
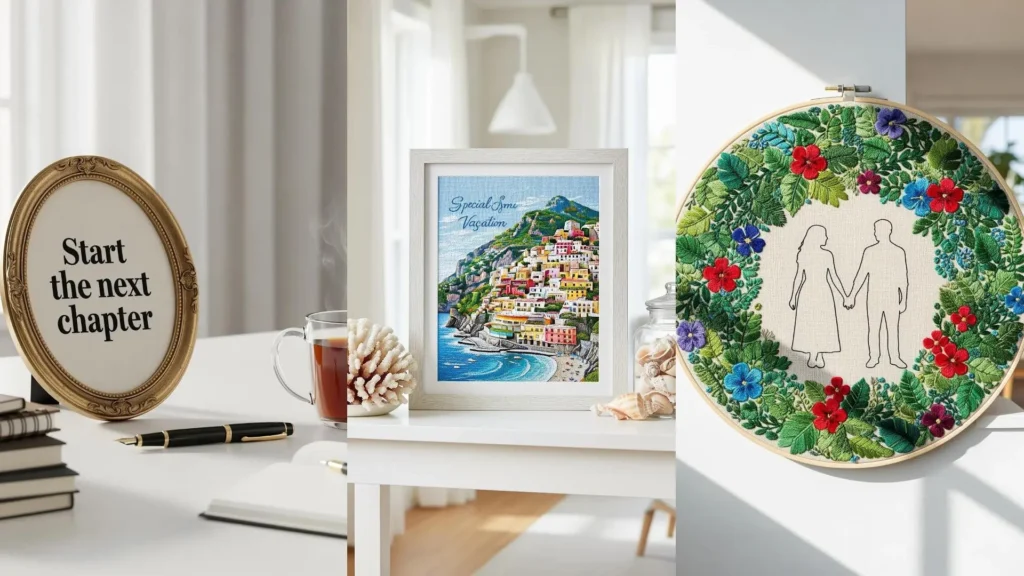
A personalized embroidered gift is more than thread on fabric—it’s a story, a memory, a feeling captured in stitches. But moving from a simple pattern to a truly polished, heartfelt piece of art can feel like a big leap.
The secret isn’t in mastering dozens of complex stitches. It’s in learning how to use a few simple techniques with intention. It’s about knowing when to use a single strand of floss for a delicate line, how to pad your satin stitch for a luxurious finish, or how to choose textures that tell a story all on their own.
Here, you’ll find ideas that move beyond the pattern. Think of this as a conversation about the small adjustments that make a monumental difference—transforming your next project into a cherished heirloom that feels as special to receive as it was for you to create.
1. Heirlooms in Thread: The Padded Monogram
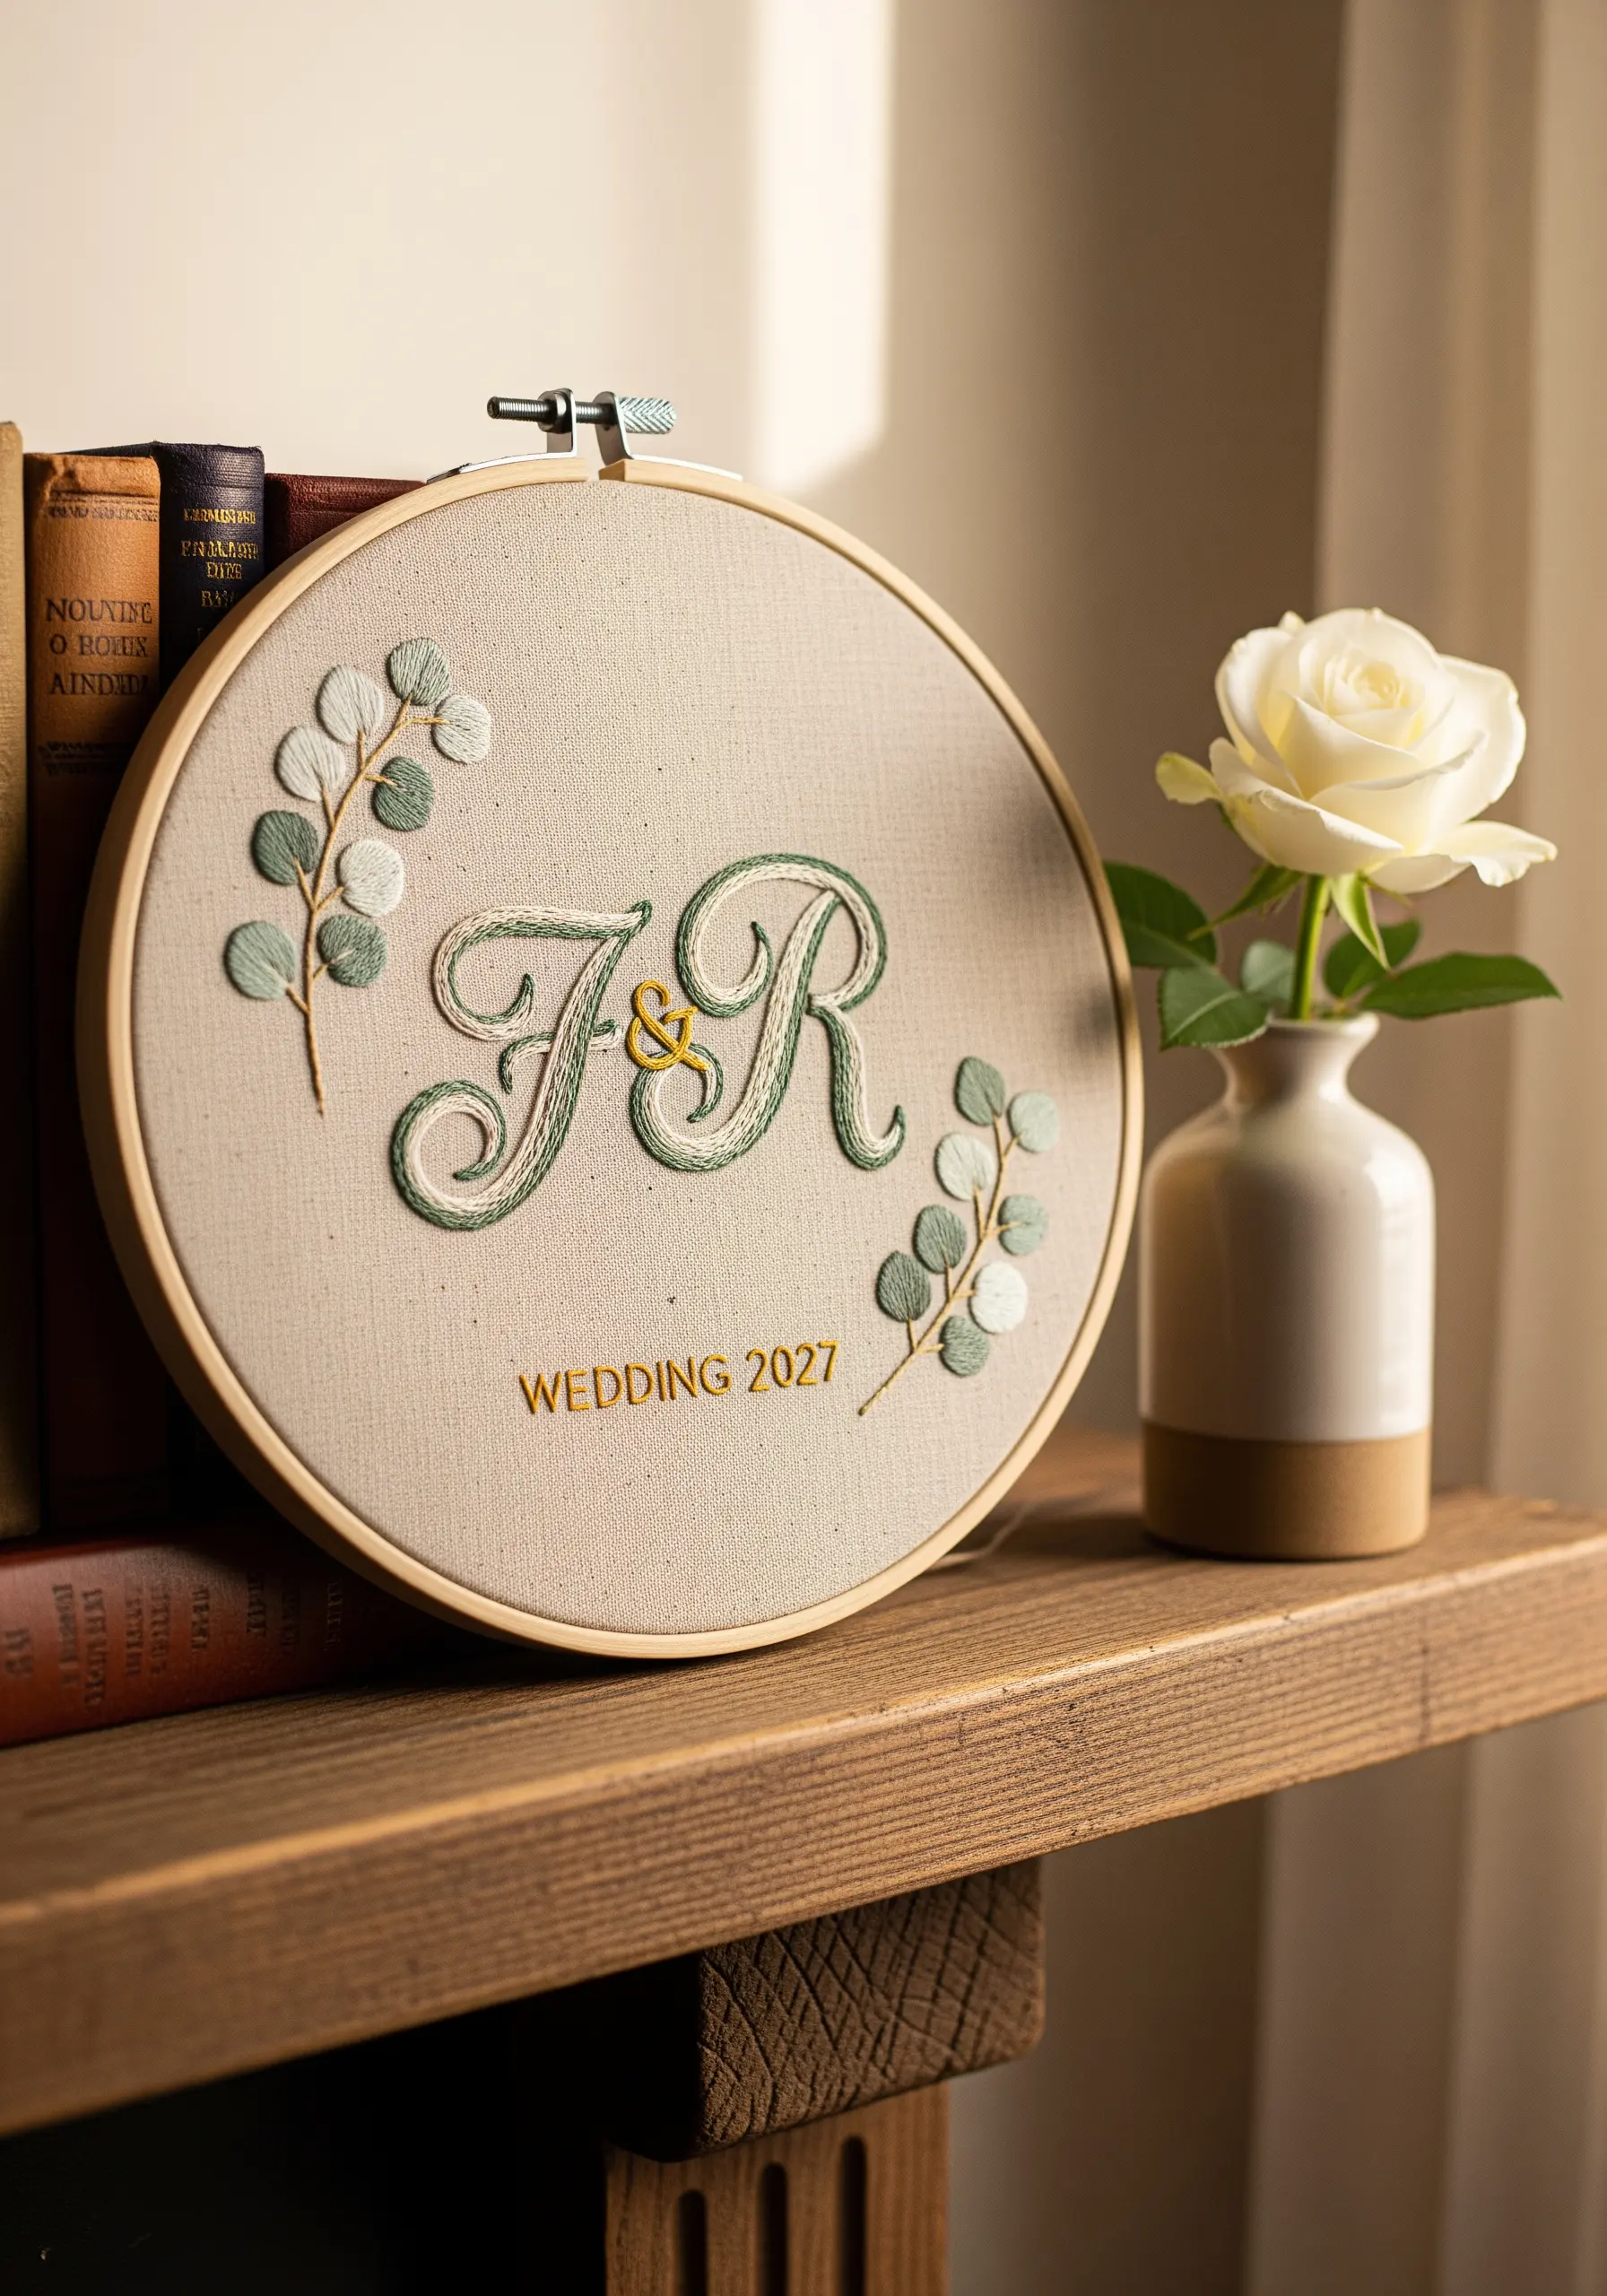
To give your letters a raised, sculptural quality, first outline them with a split stitch using two strands of floss.
Next, fill the inside of this outline with rows of straight stitches, creating a padded base.
Finally, cover this padding with a smooth satin stitch, working your stitches perpendicular to the padding underneath. This technique forces the top layer of thread to curve gently, catching the light and creating elegant dimension for a wedding or anniversary gift.
For the foliage, use padded satin stitch on the leaves to create soft, round shapes that contrast beautifully with the sharp lettering.
2. Architectural Lines: The Modern House Portrait
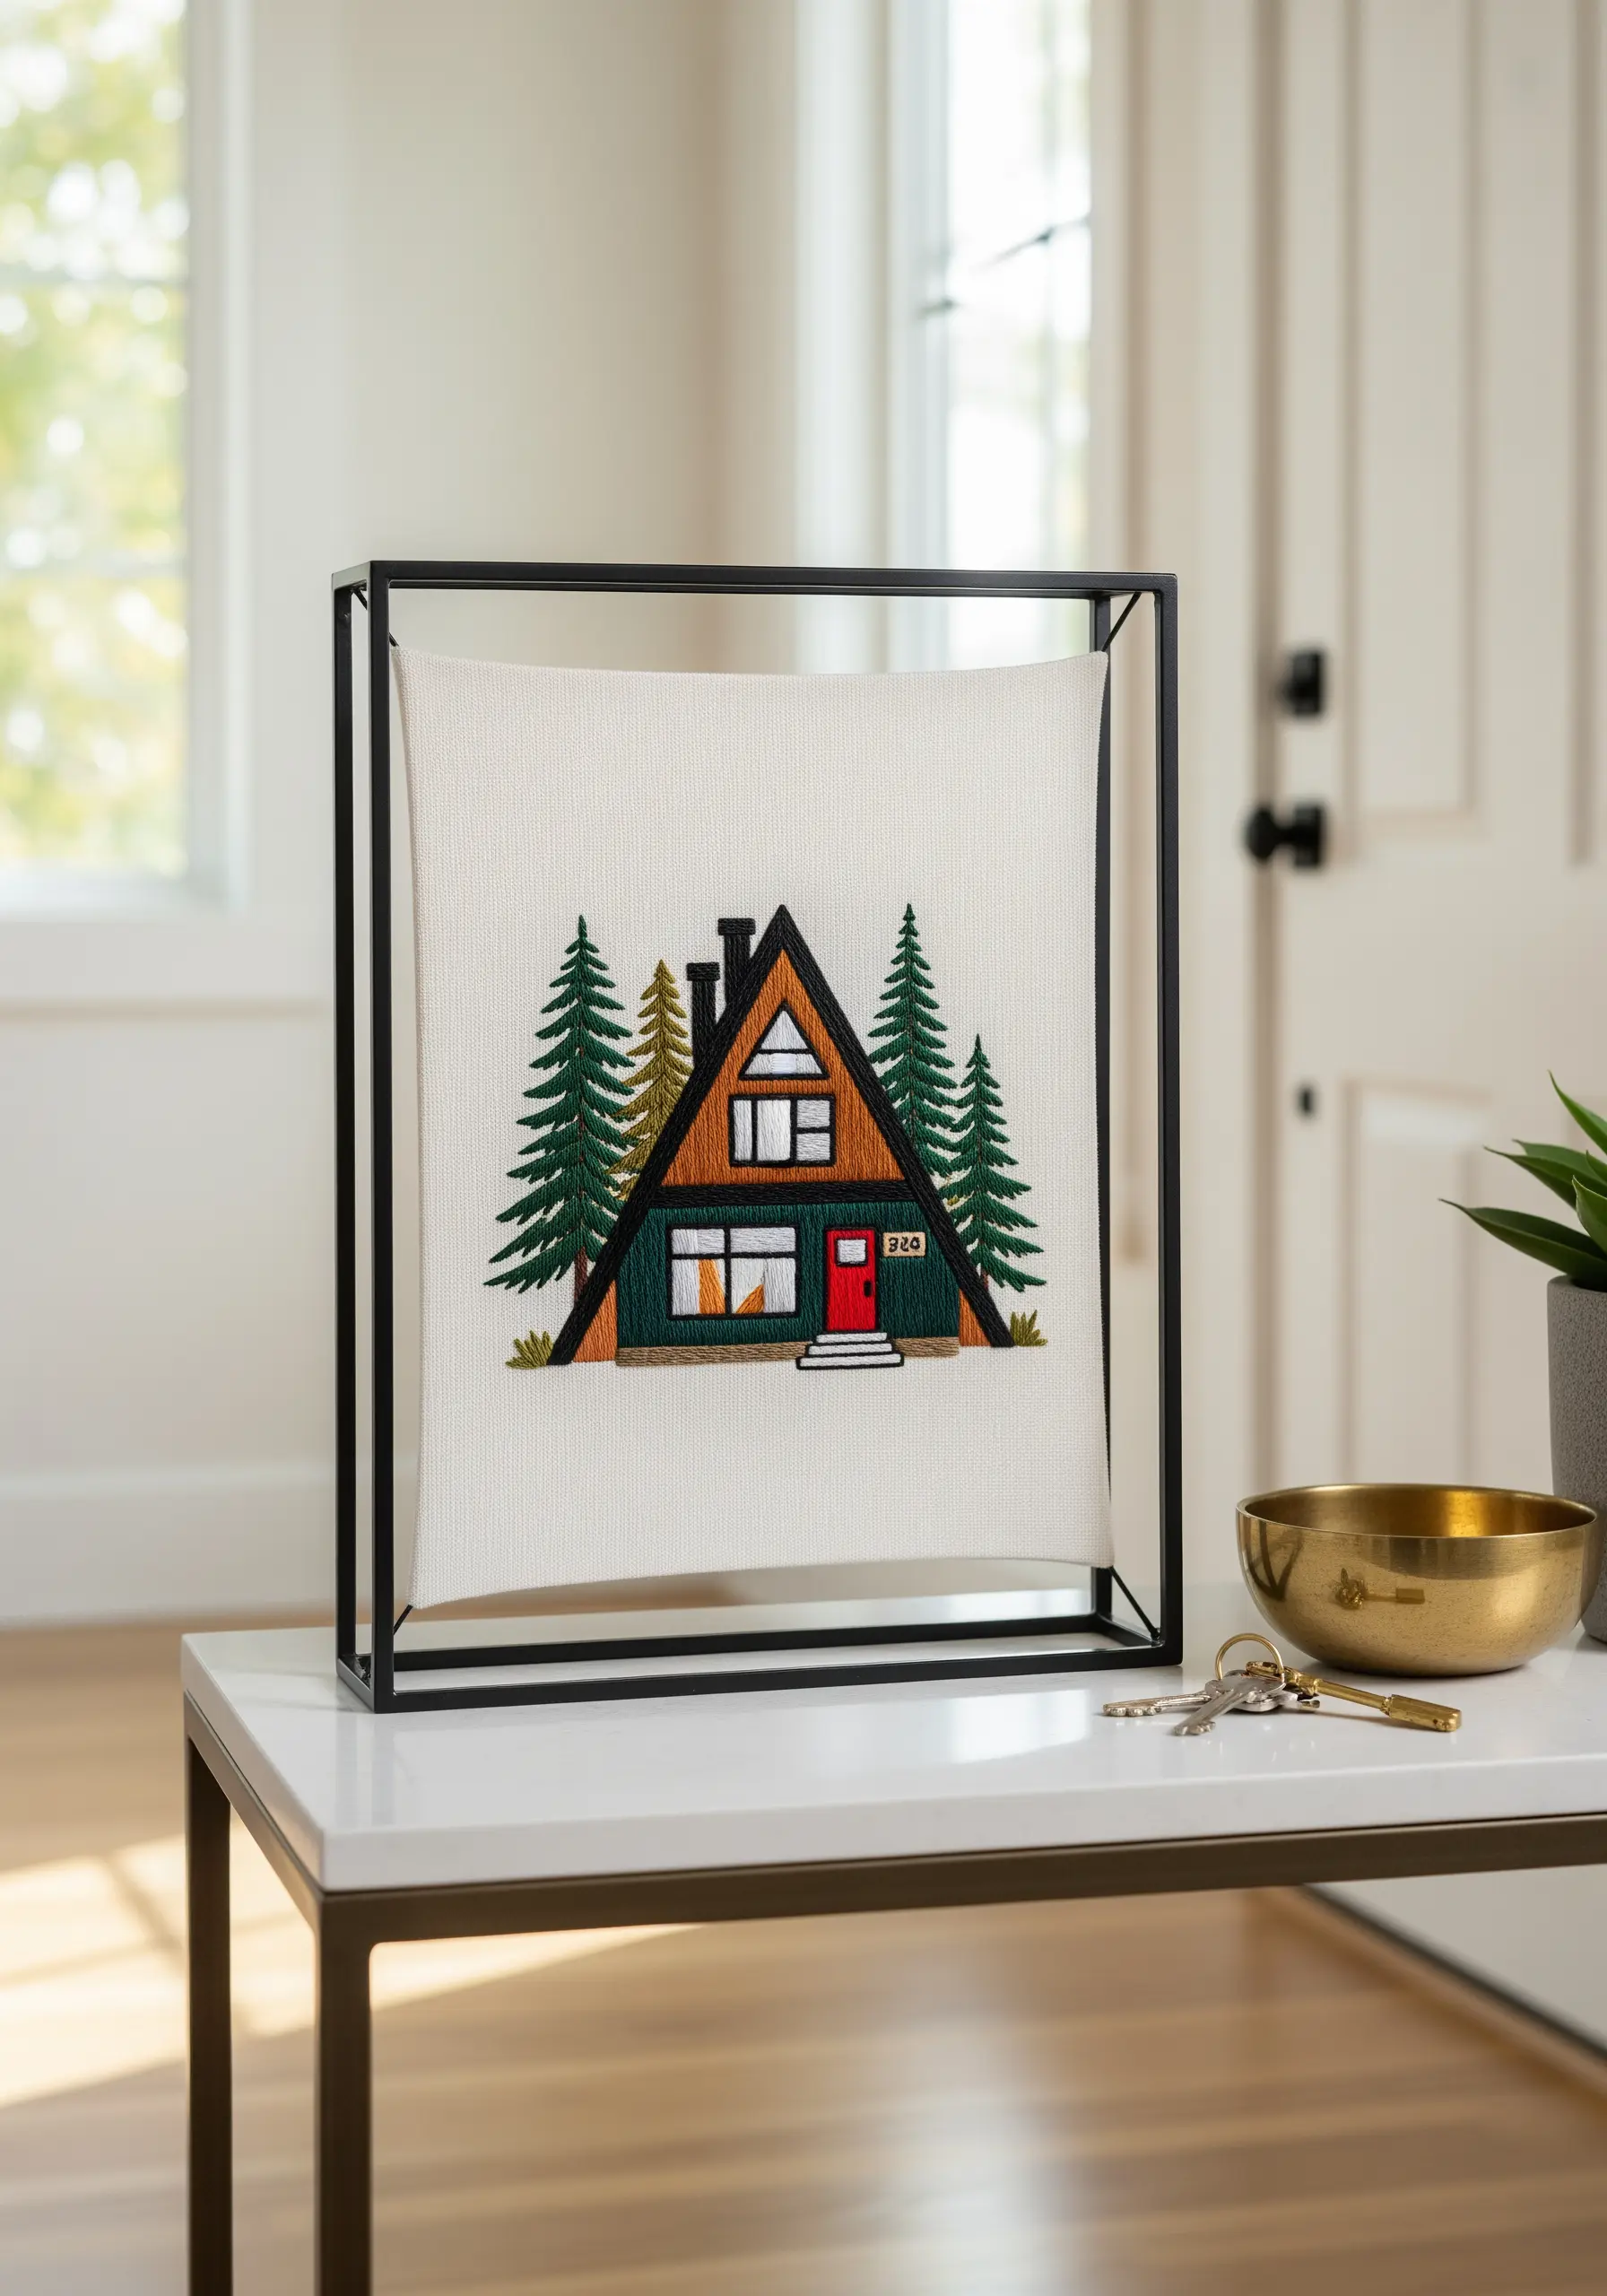
Capture the clean geometry of a home by using a floating frame, which turns your embroidery into a modern art object.
Stretch your fabric tautly between the two panes of glass or acrylic, securing it with tension rather than a traditional hoop mount.
For the embroidery itself, use single-strand backstitch for all architectural outlines to ensure crisp, graphic lines.
Fill larger areas like the roof and walls with directional satin stitch; changing the angle of your stitches helps define different surfaces and creates a subtle sense of perspective and texture.
3. Tactile Nursery Art: Combining Appliqué and Knots
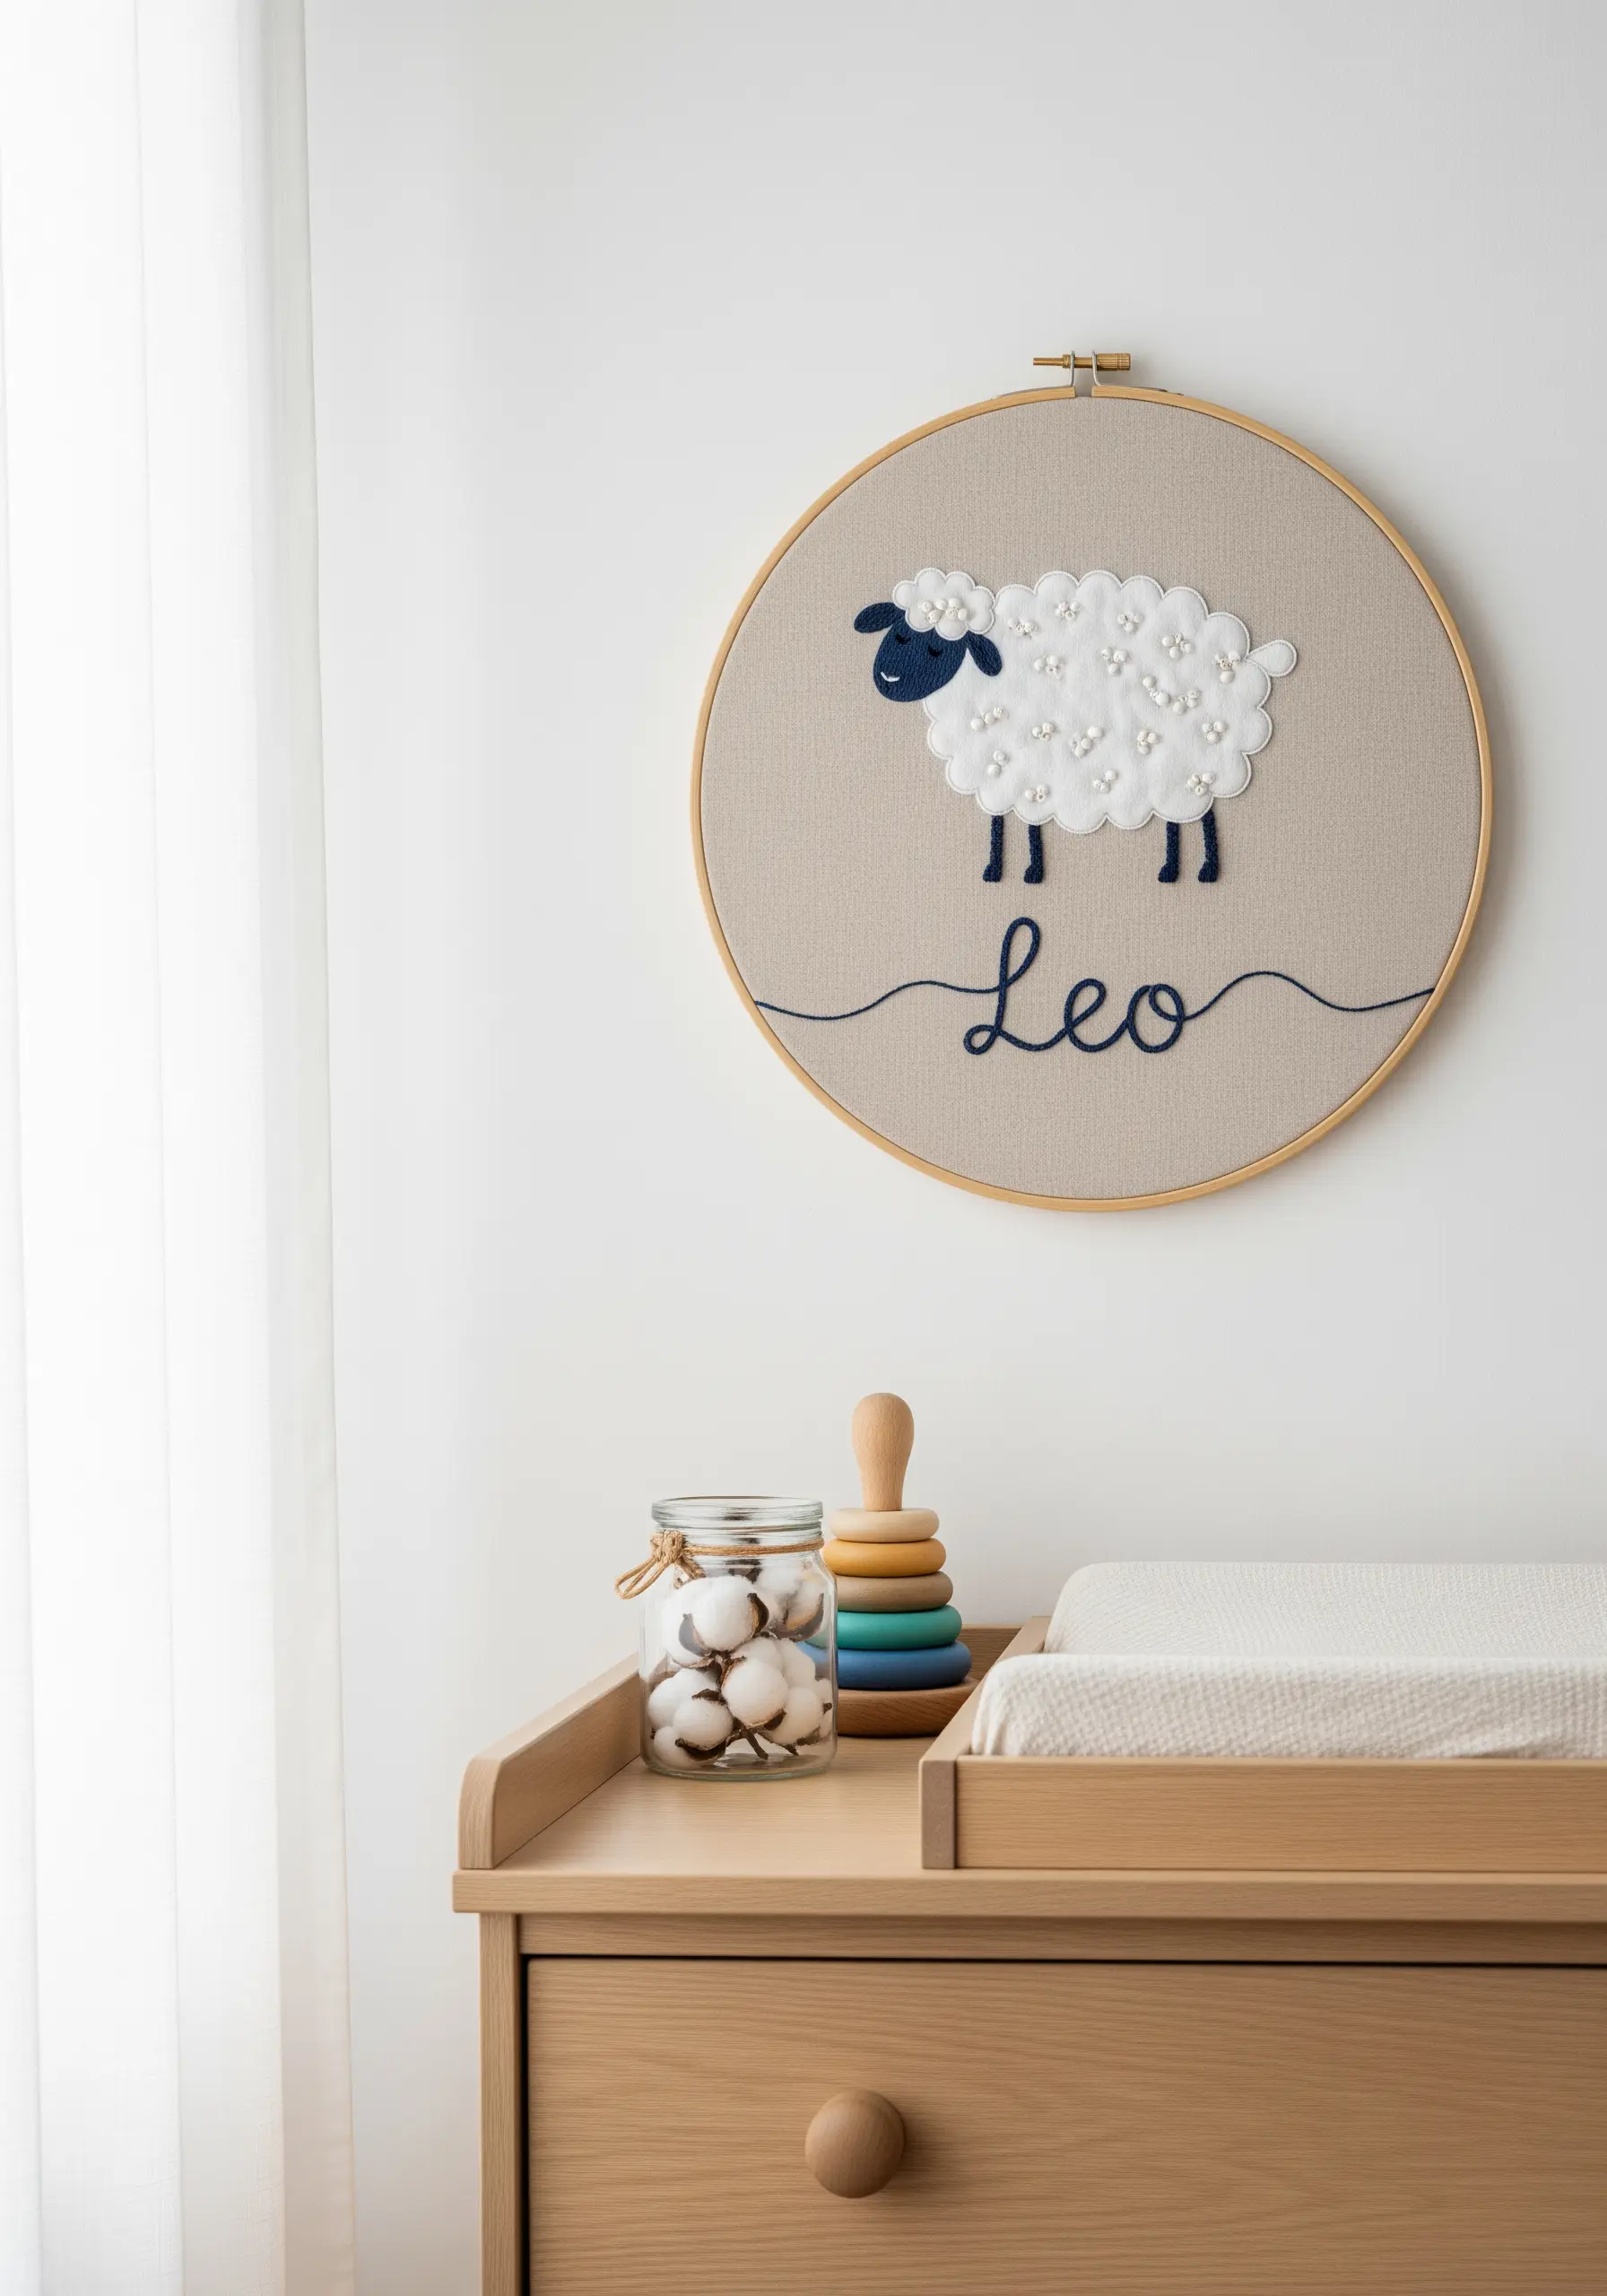
Create a wonderfully tactile piece for a nursery by combining flat appliqué with dimensional stitches.
First, cut the sheep’s body from a piece of white felt or plush fabric and secure it with a neat blanket stitch around the edge.
Then, cover the felt with densely packed French knots or colonial knots to mimic the texture of wool. Add a few seed beads for extra sparkle and sensory detail.
For the name, use a whipped backstitch in a contrasting color to create a smooth, cord-like line that is easy to read and feels polished.
4. The Art of Thread Painting: Lifelike Pet Portraits

To achieve a realistic pet portrait, treat your needle like a paintbrush and your floss like paint.
Work with a single strand of thread and use the long-and-short stitch, always following the natural direction of the fur’s growth.
Start with the eyes, nose, and mouth to anchor the expression. Then, build layers of color outward, blending shades seamlessly to create depth and highlights.
Don’t be afraid to use unexpected colors—a touch of blue in the shadows or yellow in the highlights—to add realism and vibrancy. This is the core of contemporary thread painting techniques.
5. Celestial Charting: Stitching the Night Sky

Recreate a meaningful night sky—like a birthday or anniversary—by stitching constellations onto dark navy or black linen.
Use a single strand of metallic or high-sheen white thread for the star maps, connecting the points with a simple backstitch.
Vary the size of your stars by using single French knots for smaller ones and multi-pointed star stitches for the more prominent celestial bodies.
For a subtle, galaxy-like effect, scatter tiny seed stitches in a silvery-white thread across the background fabric before you begin the main design.
6. The Family Tree: A Legacy in Leaves
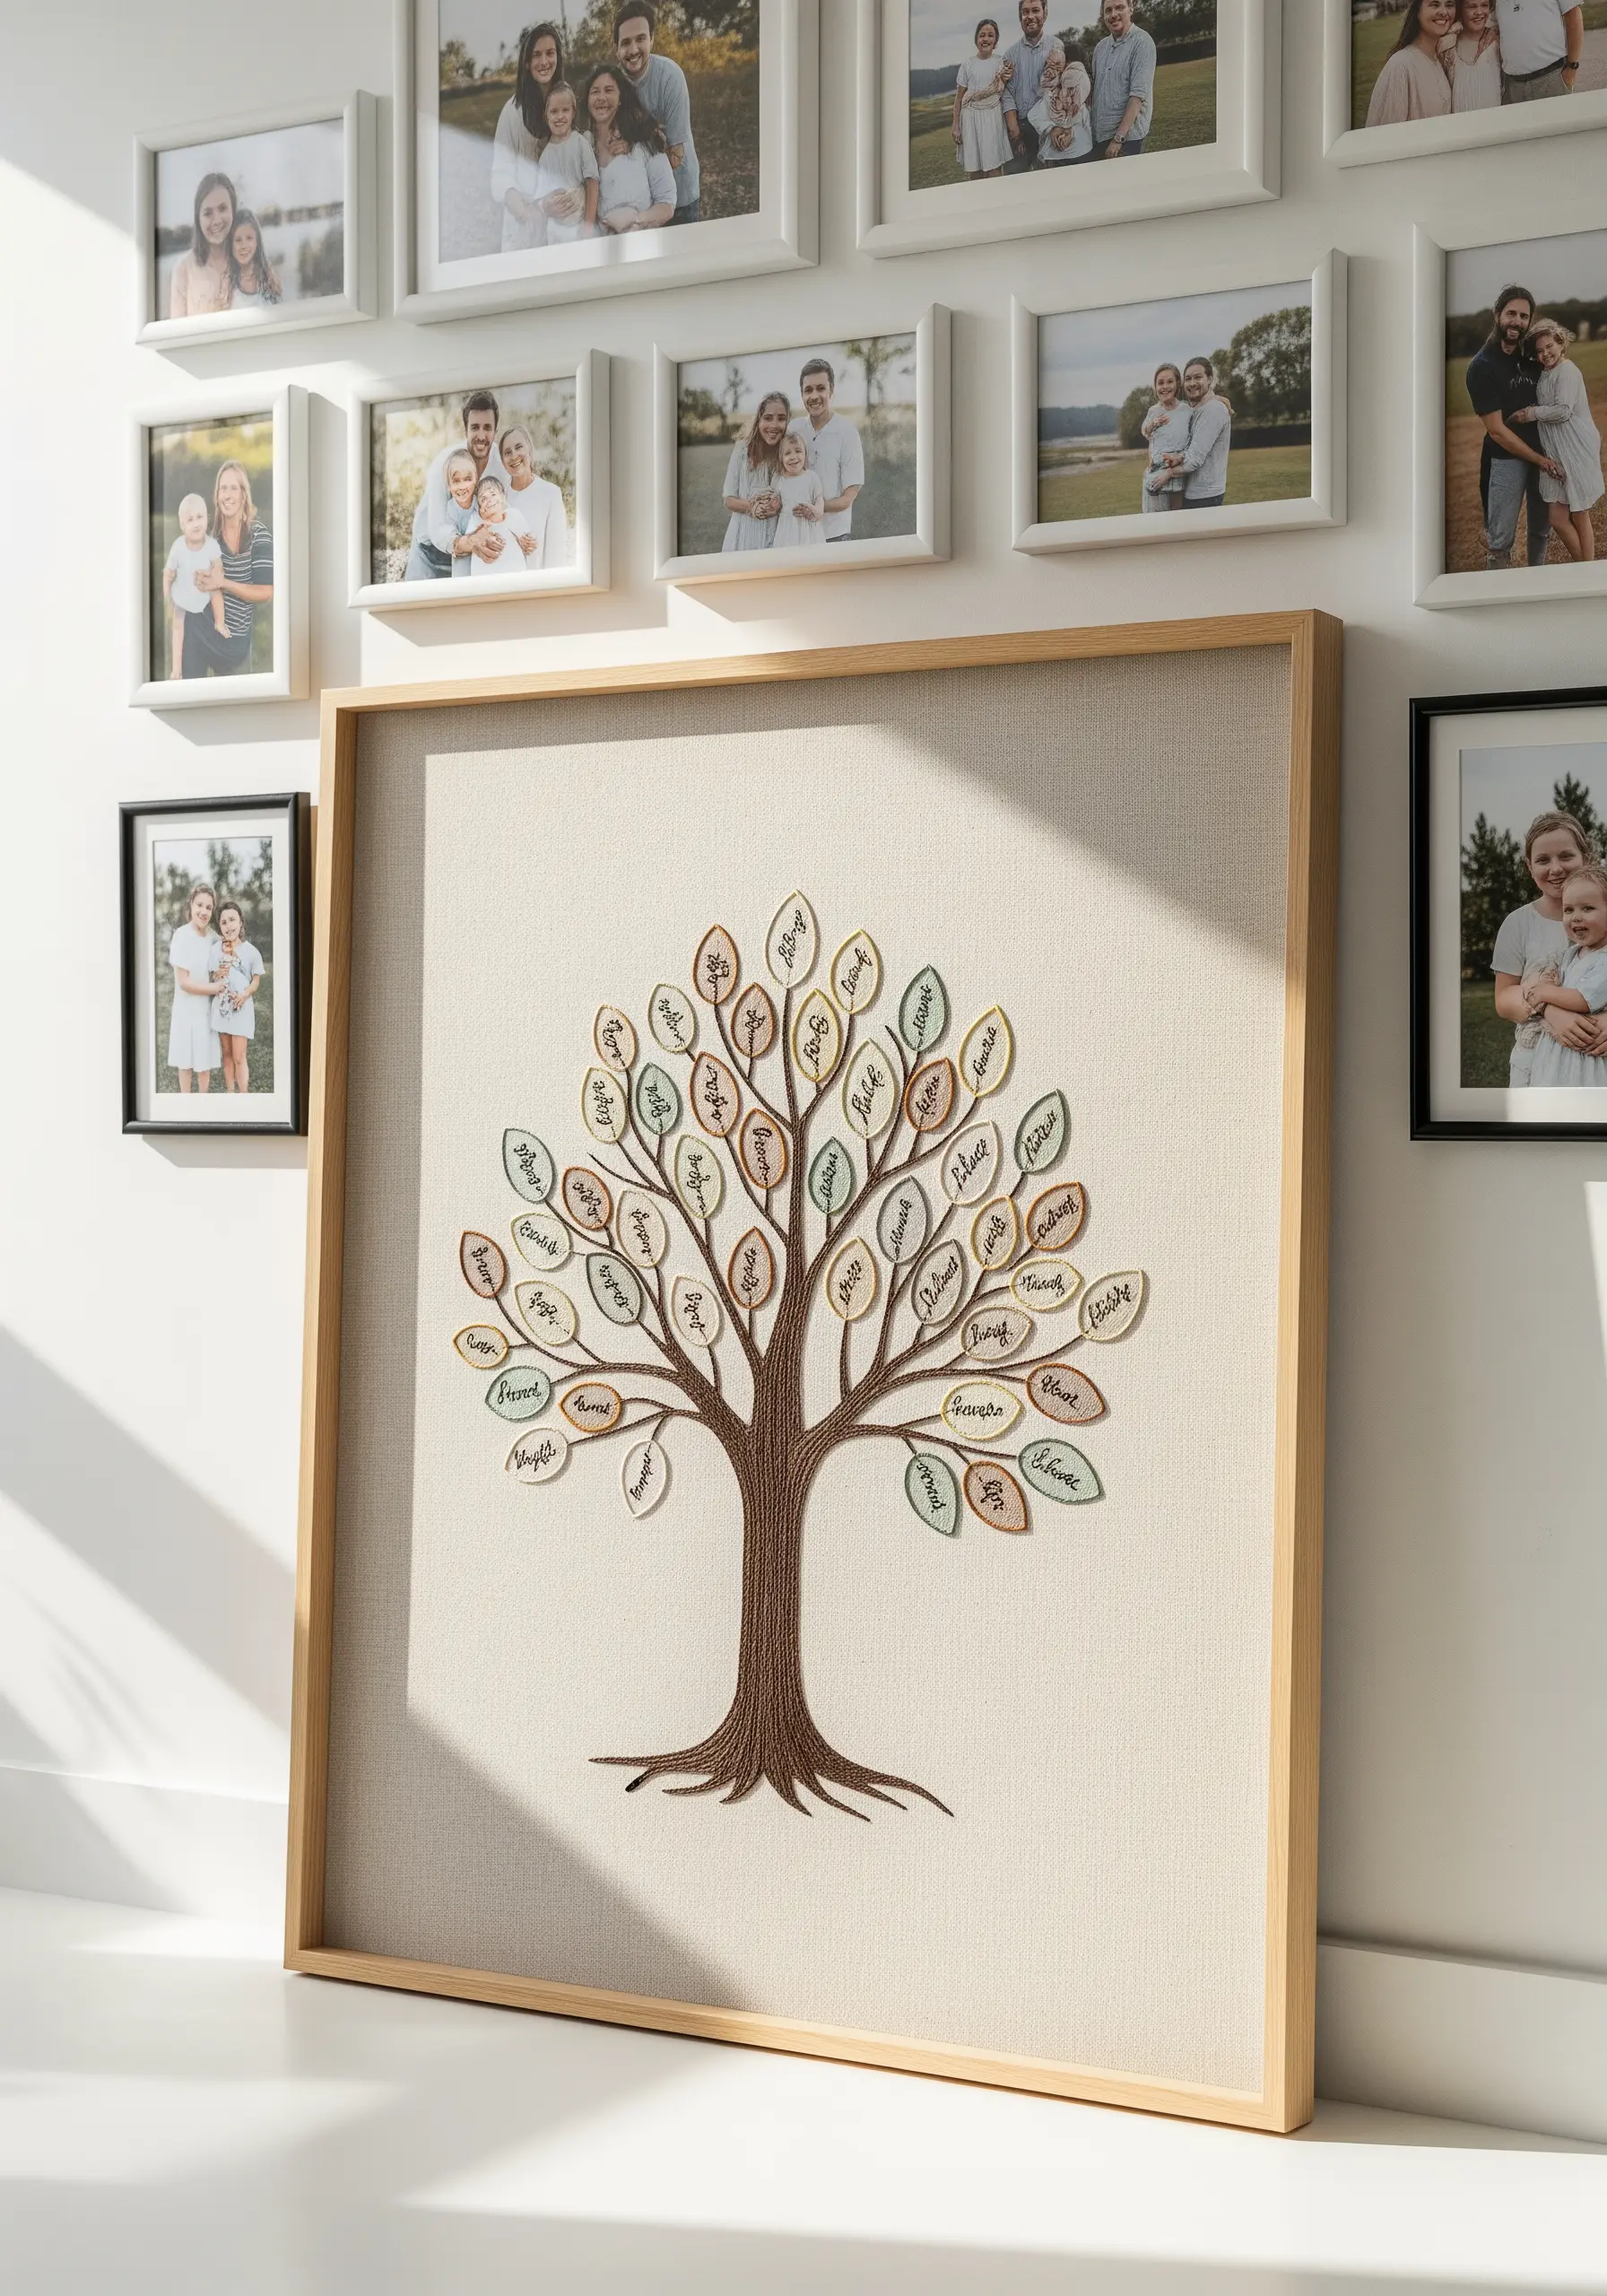
For a meaningful family tree, assign each leaf to a name and give it a unique color identity using variegated thread or by blending two different shades in your needle at once.
Use a simple fishbone stitch for the leaves; it creates a central vein and gives each one a natural, organic shape.
For the names, use a tiny backstitch with a single strand of dark brown floss to keep the lettering legible and delicate.
The trunk and branches gain their realistic, bark-like texture from stem stitch worked in varying directions, creating a sense of movement and growth.
7. Refined Typography: The Power of Negative Space
When your message is the centerpiece, clarity is everything. Choose a bold, clean font and let the negative space do the talking.
To achieve razor-sharp letters, don’t stitch the letters themselves. Instead, outline them with a fine split stitch and then fill the *entire background* around them with tiny, dense seed stitches.
This technique, known as voiding, makes the words pop with incredible precision. It works best on a high-count linen where the texture of the fill stitch adds subtle depth.
8. Floral Monograms: Mastering Composition
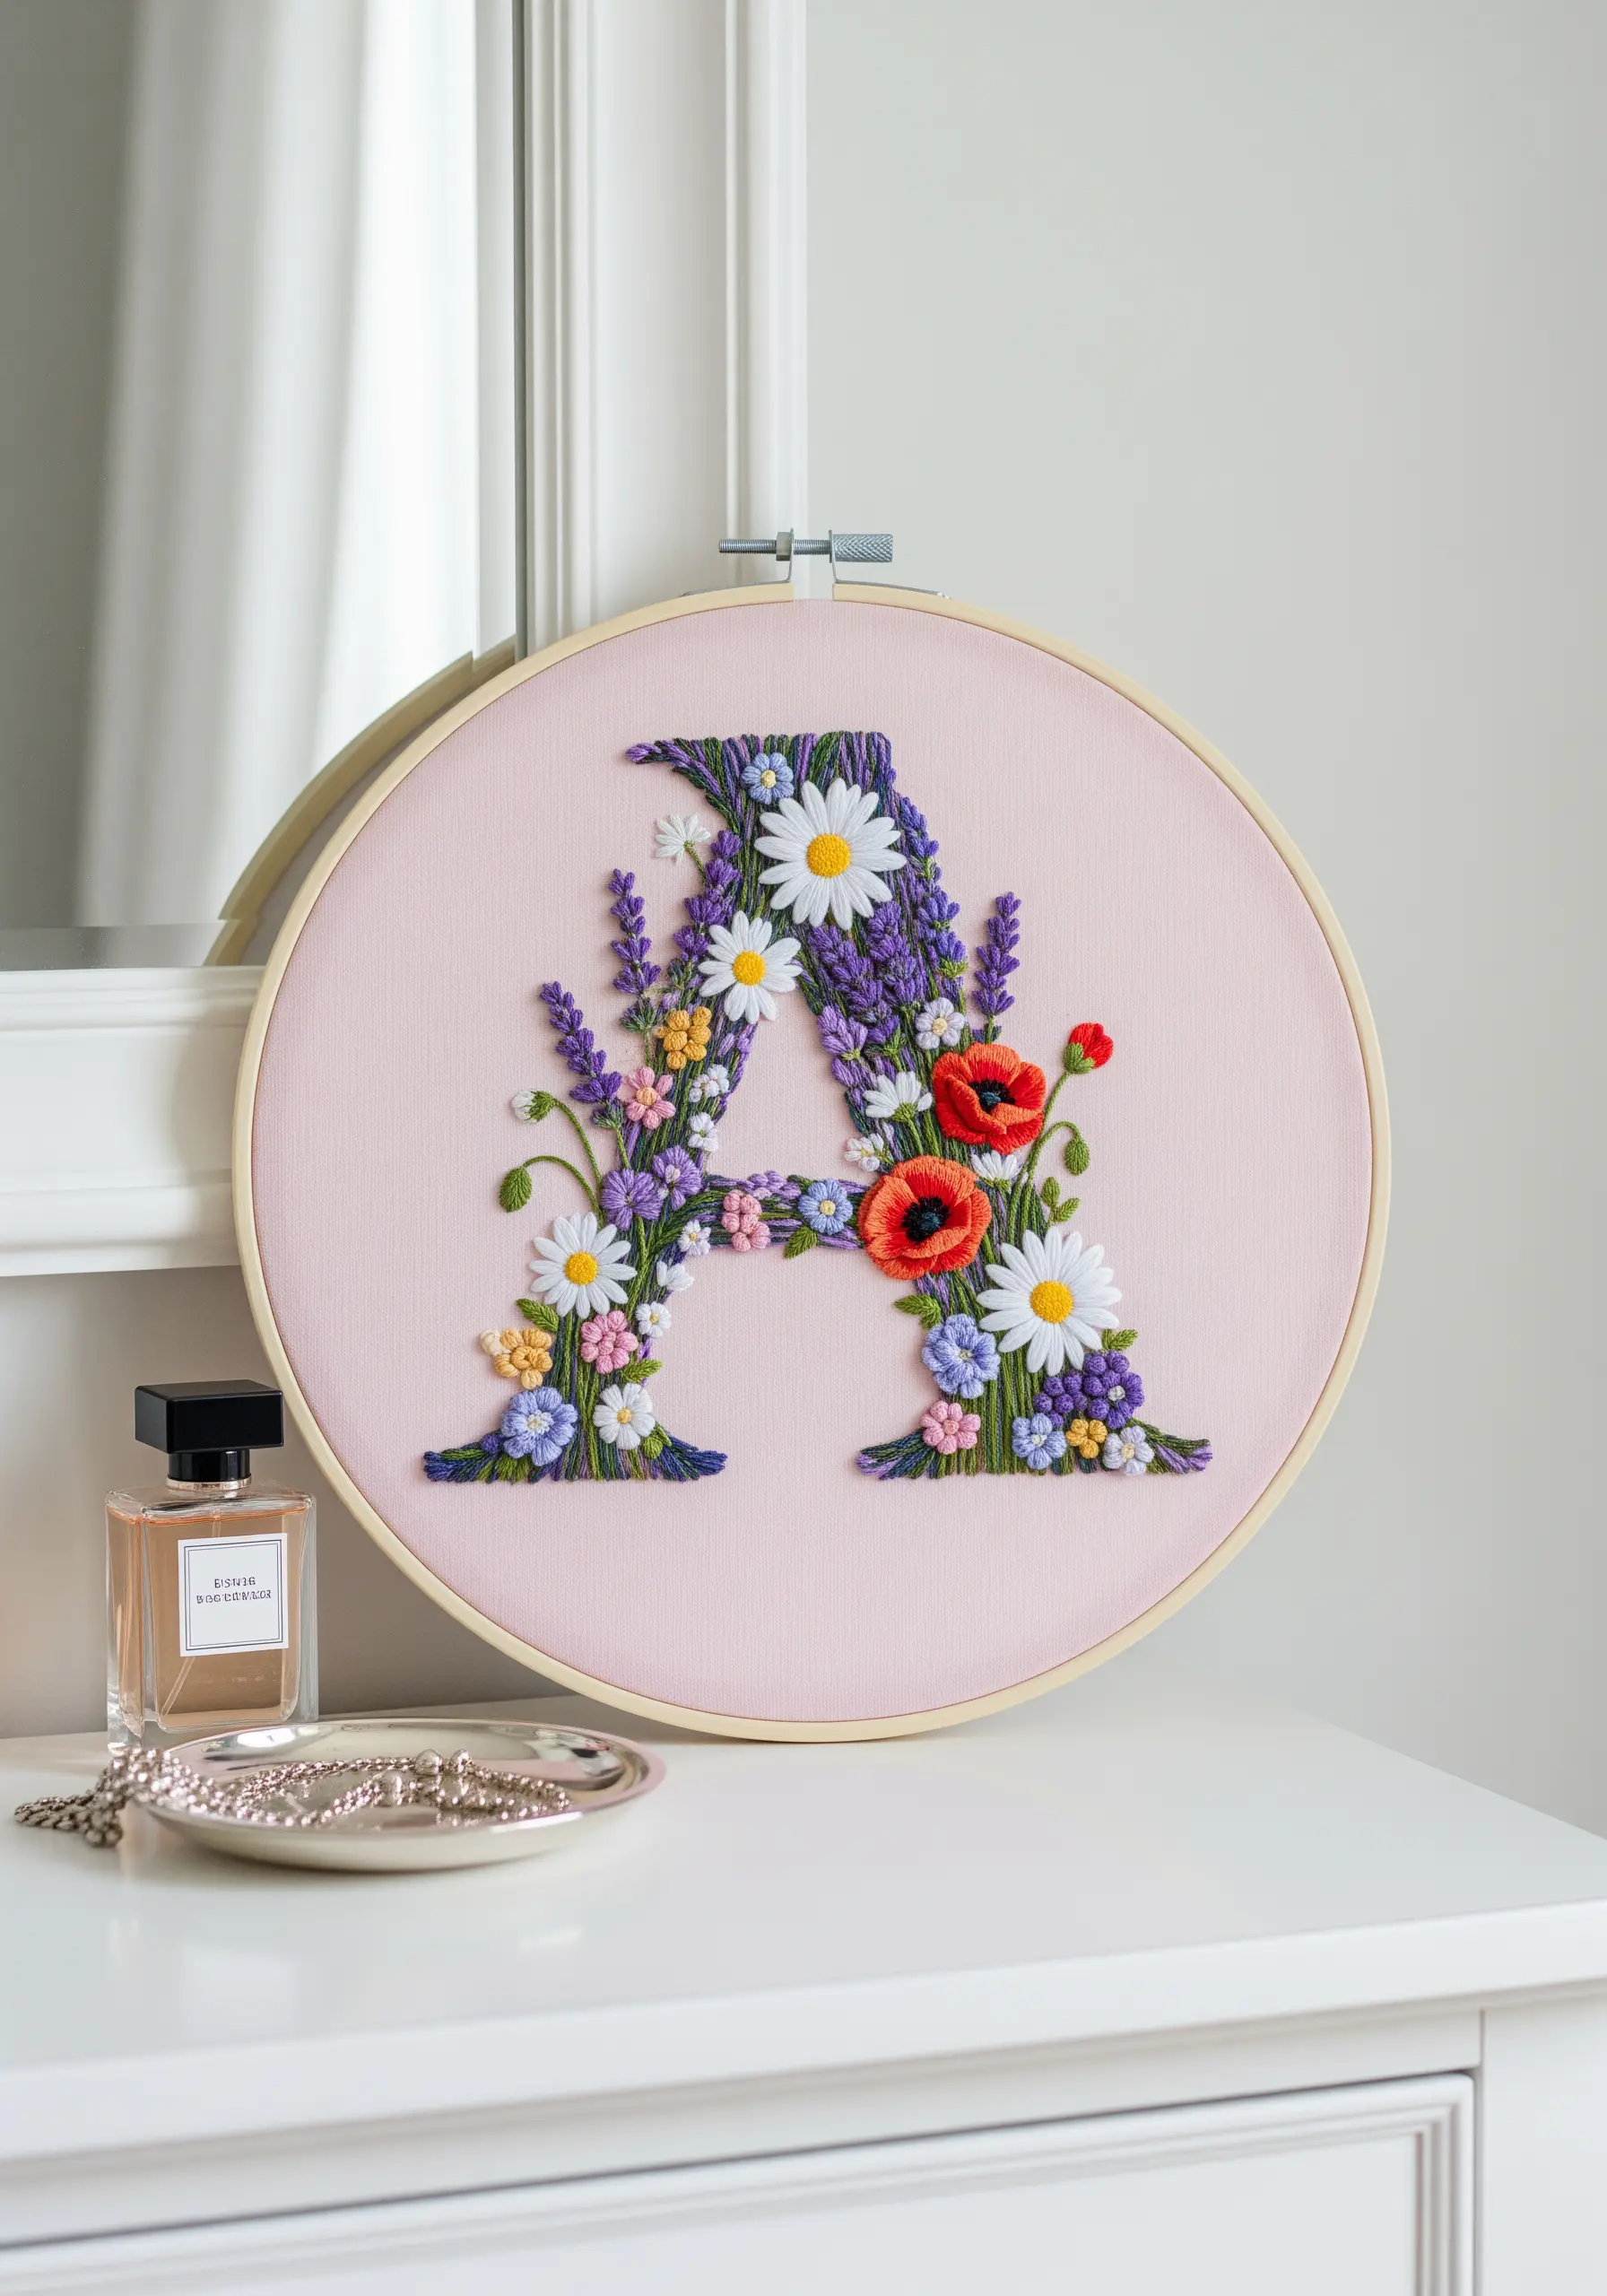
To create a lush floral initial that feels balanced, not chaotic, think in layers of texture and scale.
Start with the largest flowers—like the daisies and poppies—using satin stitch for the petals to create bold, smooth focal points.
Next, add medium-sized filler flowers and foliage, like lavender sprigs (made with lazy daisy stitches) and small leaves (fly stitch).
Finally, fill any remaining gaps with tiny French knots. This layering technique draws the eye through the design and gives the letter its full, three-dimensional shape.
9. Monochrome Landscapes: Texture as Color
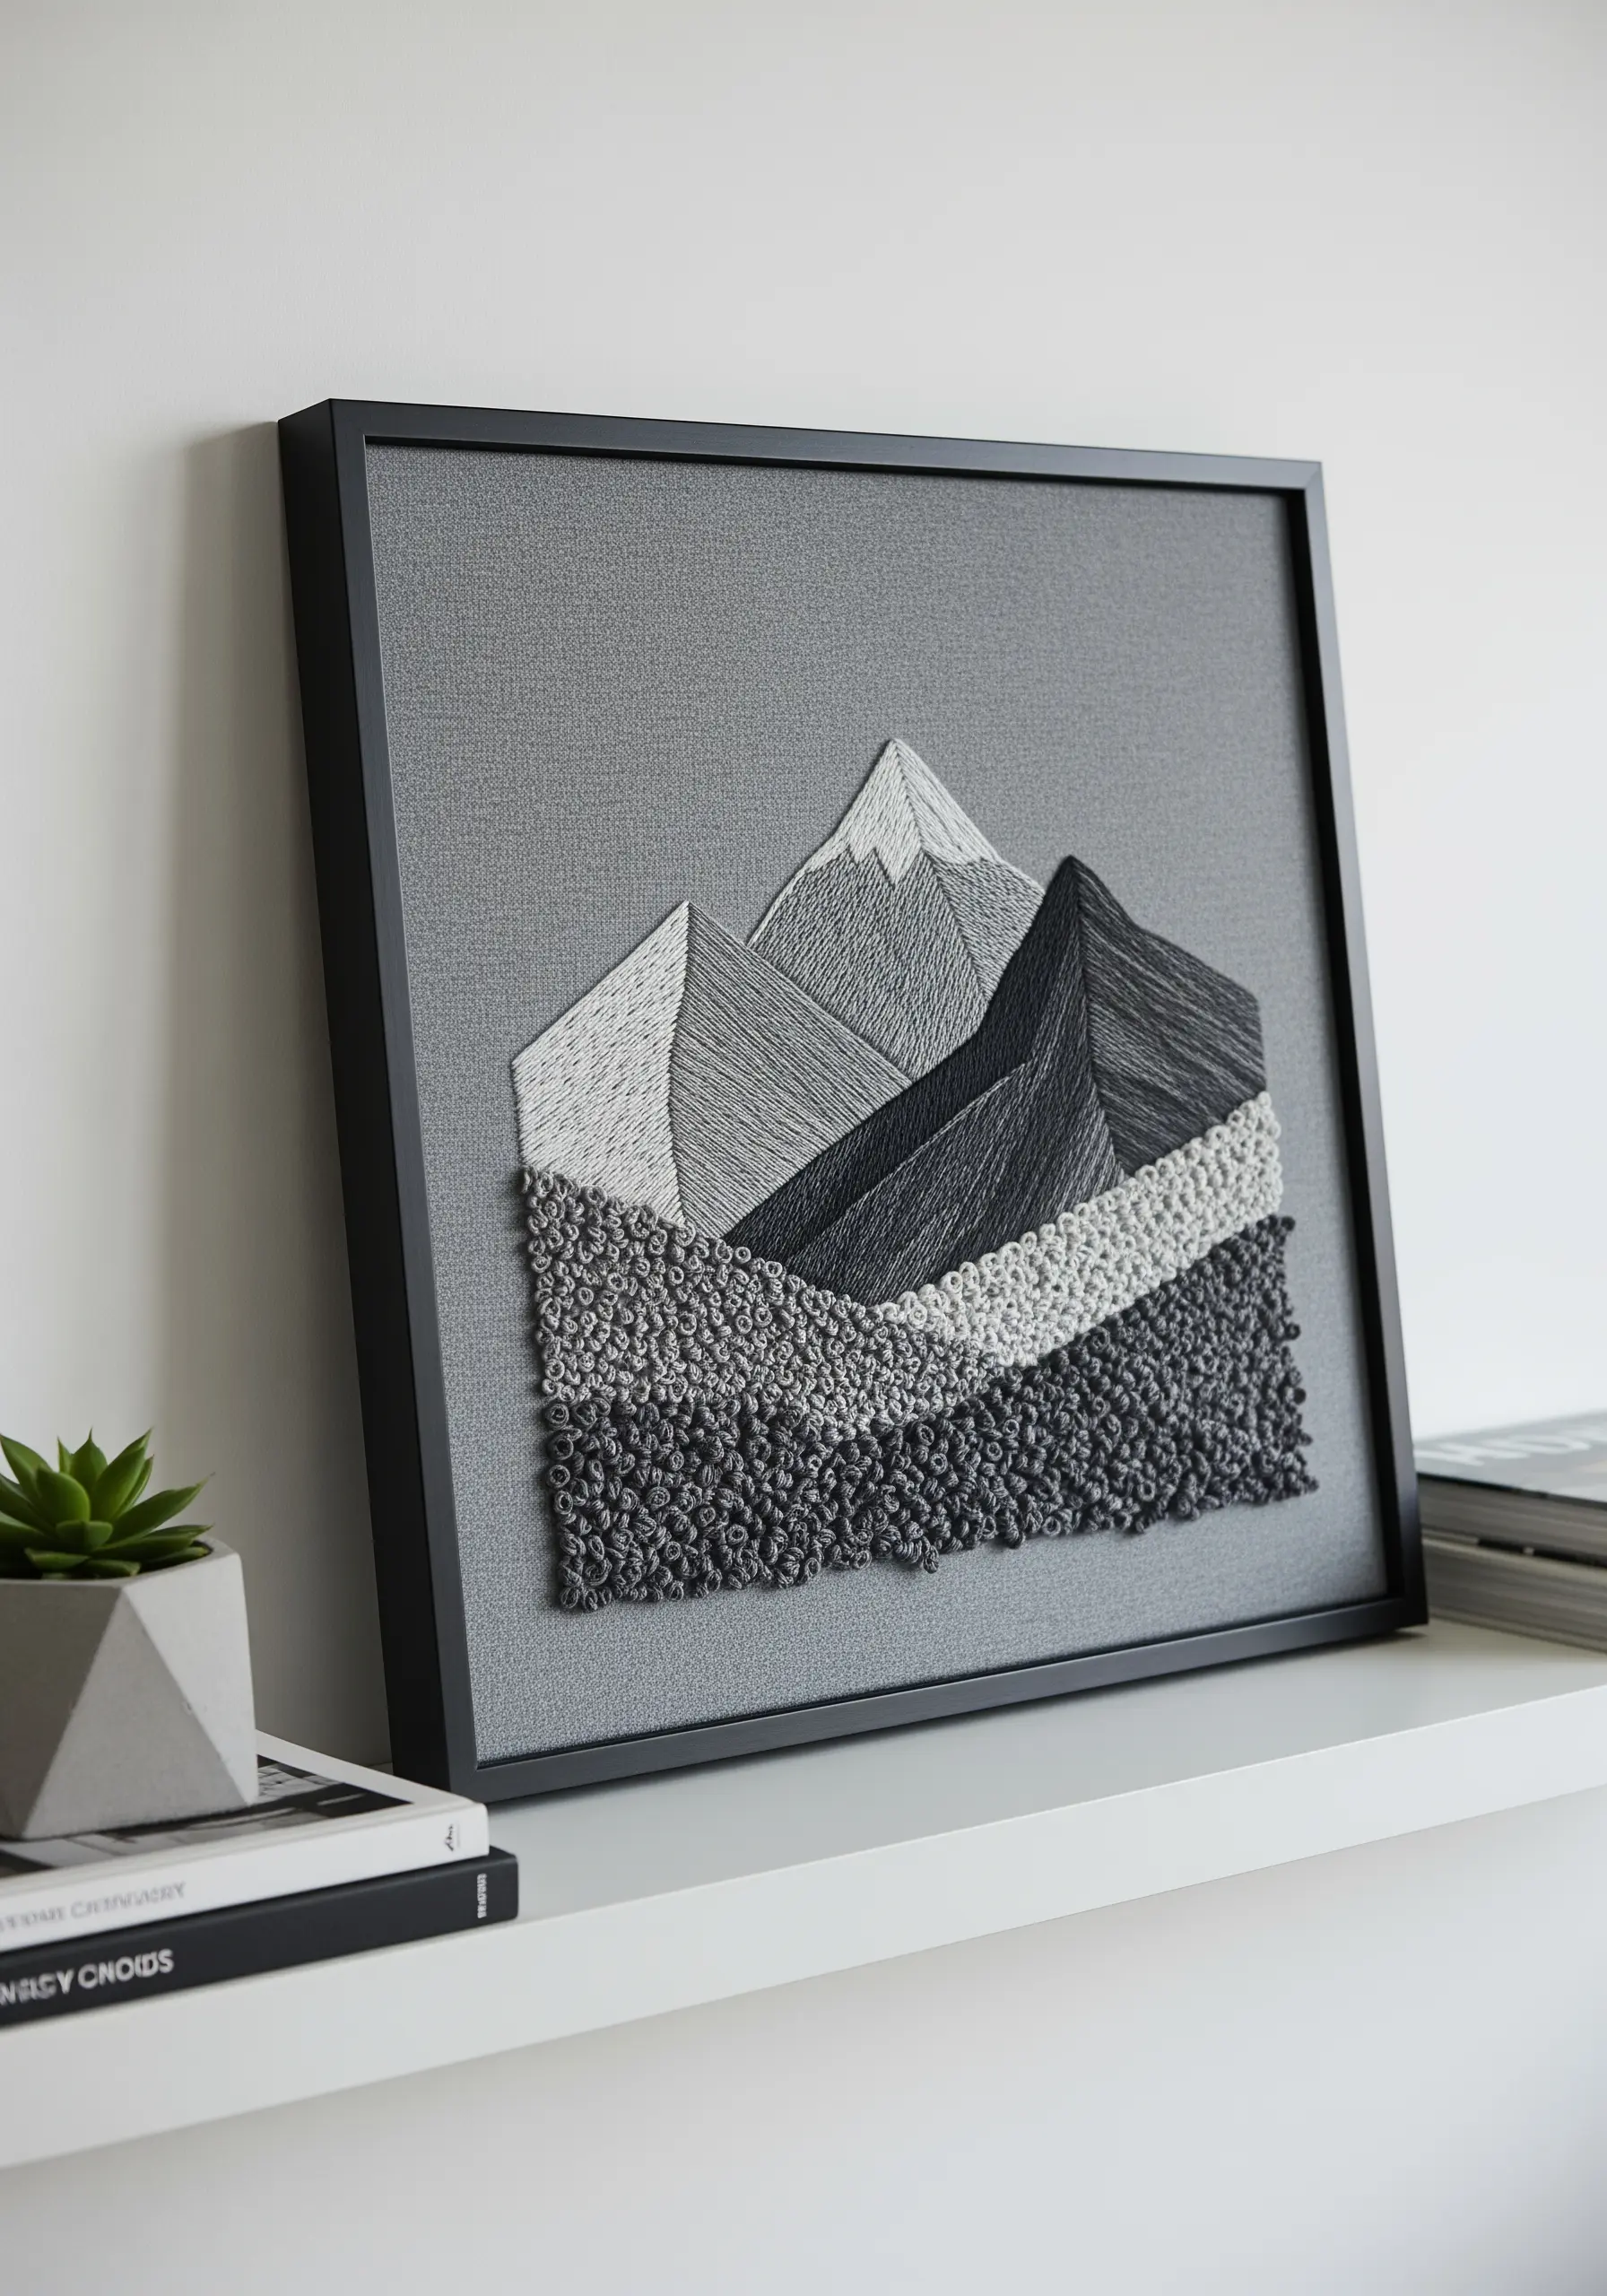
When working with a limited palette, texture becomes your primary tool for creating depth and interest.
For this mountainscape, differentiate each peak and slope by changing your stitch style. Use long, straight stitches for the smooth, distant mountains to suggest sheer rock faces.
In the foreground, create a sense of closeness and ruggedness with dense clusters of French knots and bullion loops.
This contrast in texture tricks the eye into seeing a dynamic, layered landscape, proving that monochrome black thread designs can be incredibly rich.
10. Urban Cartography: A Personalized City Map
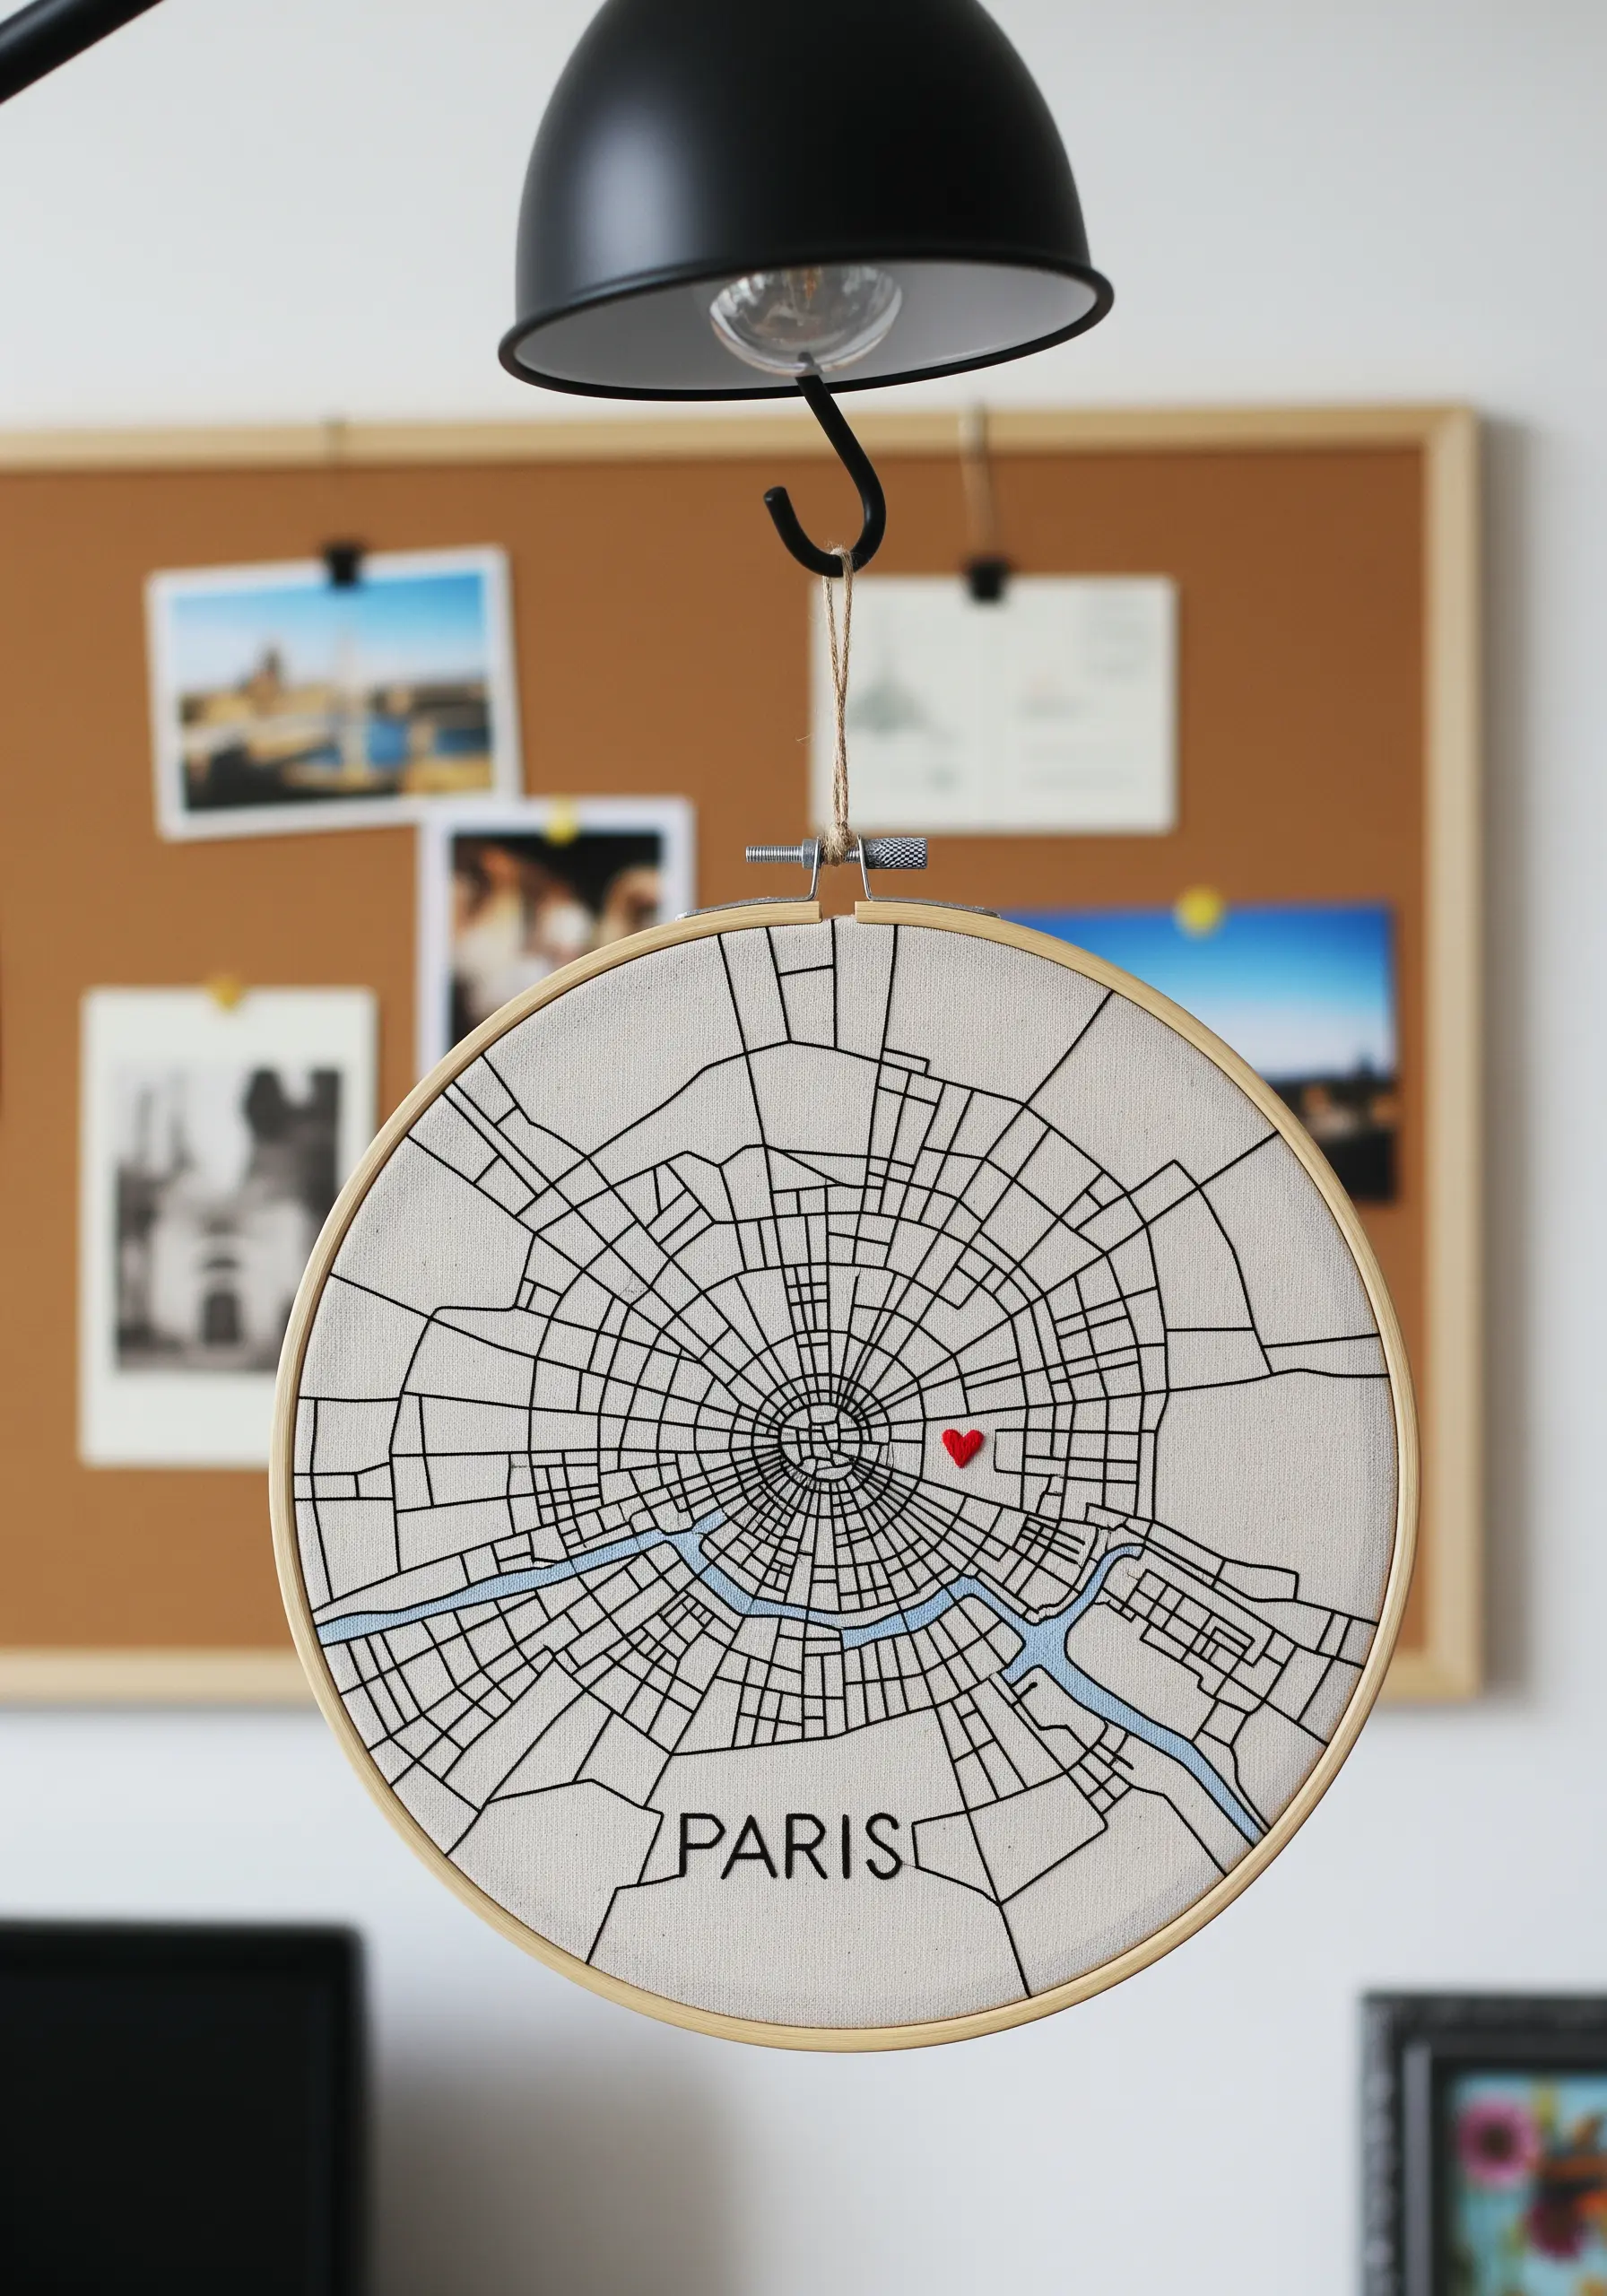
Turn a favorite city map into a minimalist piece of art by focusing on the graphic quality of its streets.
Use a water-soluble stabilizer to transfer the map design onto your fabric with perfect accuracy. This ensures all your lines are exactly where they should be.
Stitch the roads with a simple backstitch using two strands of black floss for clarity. Use a single strand of blue for rivers or coastlines to create a subtle distinction.
Mark a special location—a home, a proposal spot, a first apartment—with a single, bright red heart made of two tiny satin stitches. It becomes the emotional anchor of the piece.
11. Preserving Heritage: The Handwritten Recipe
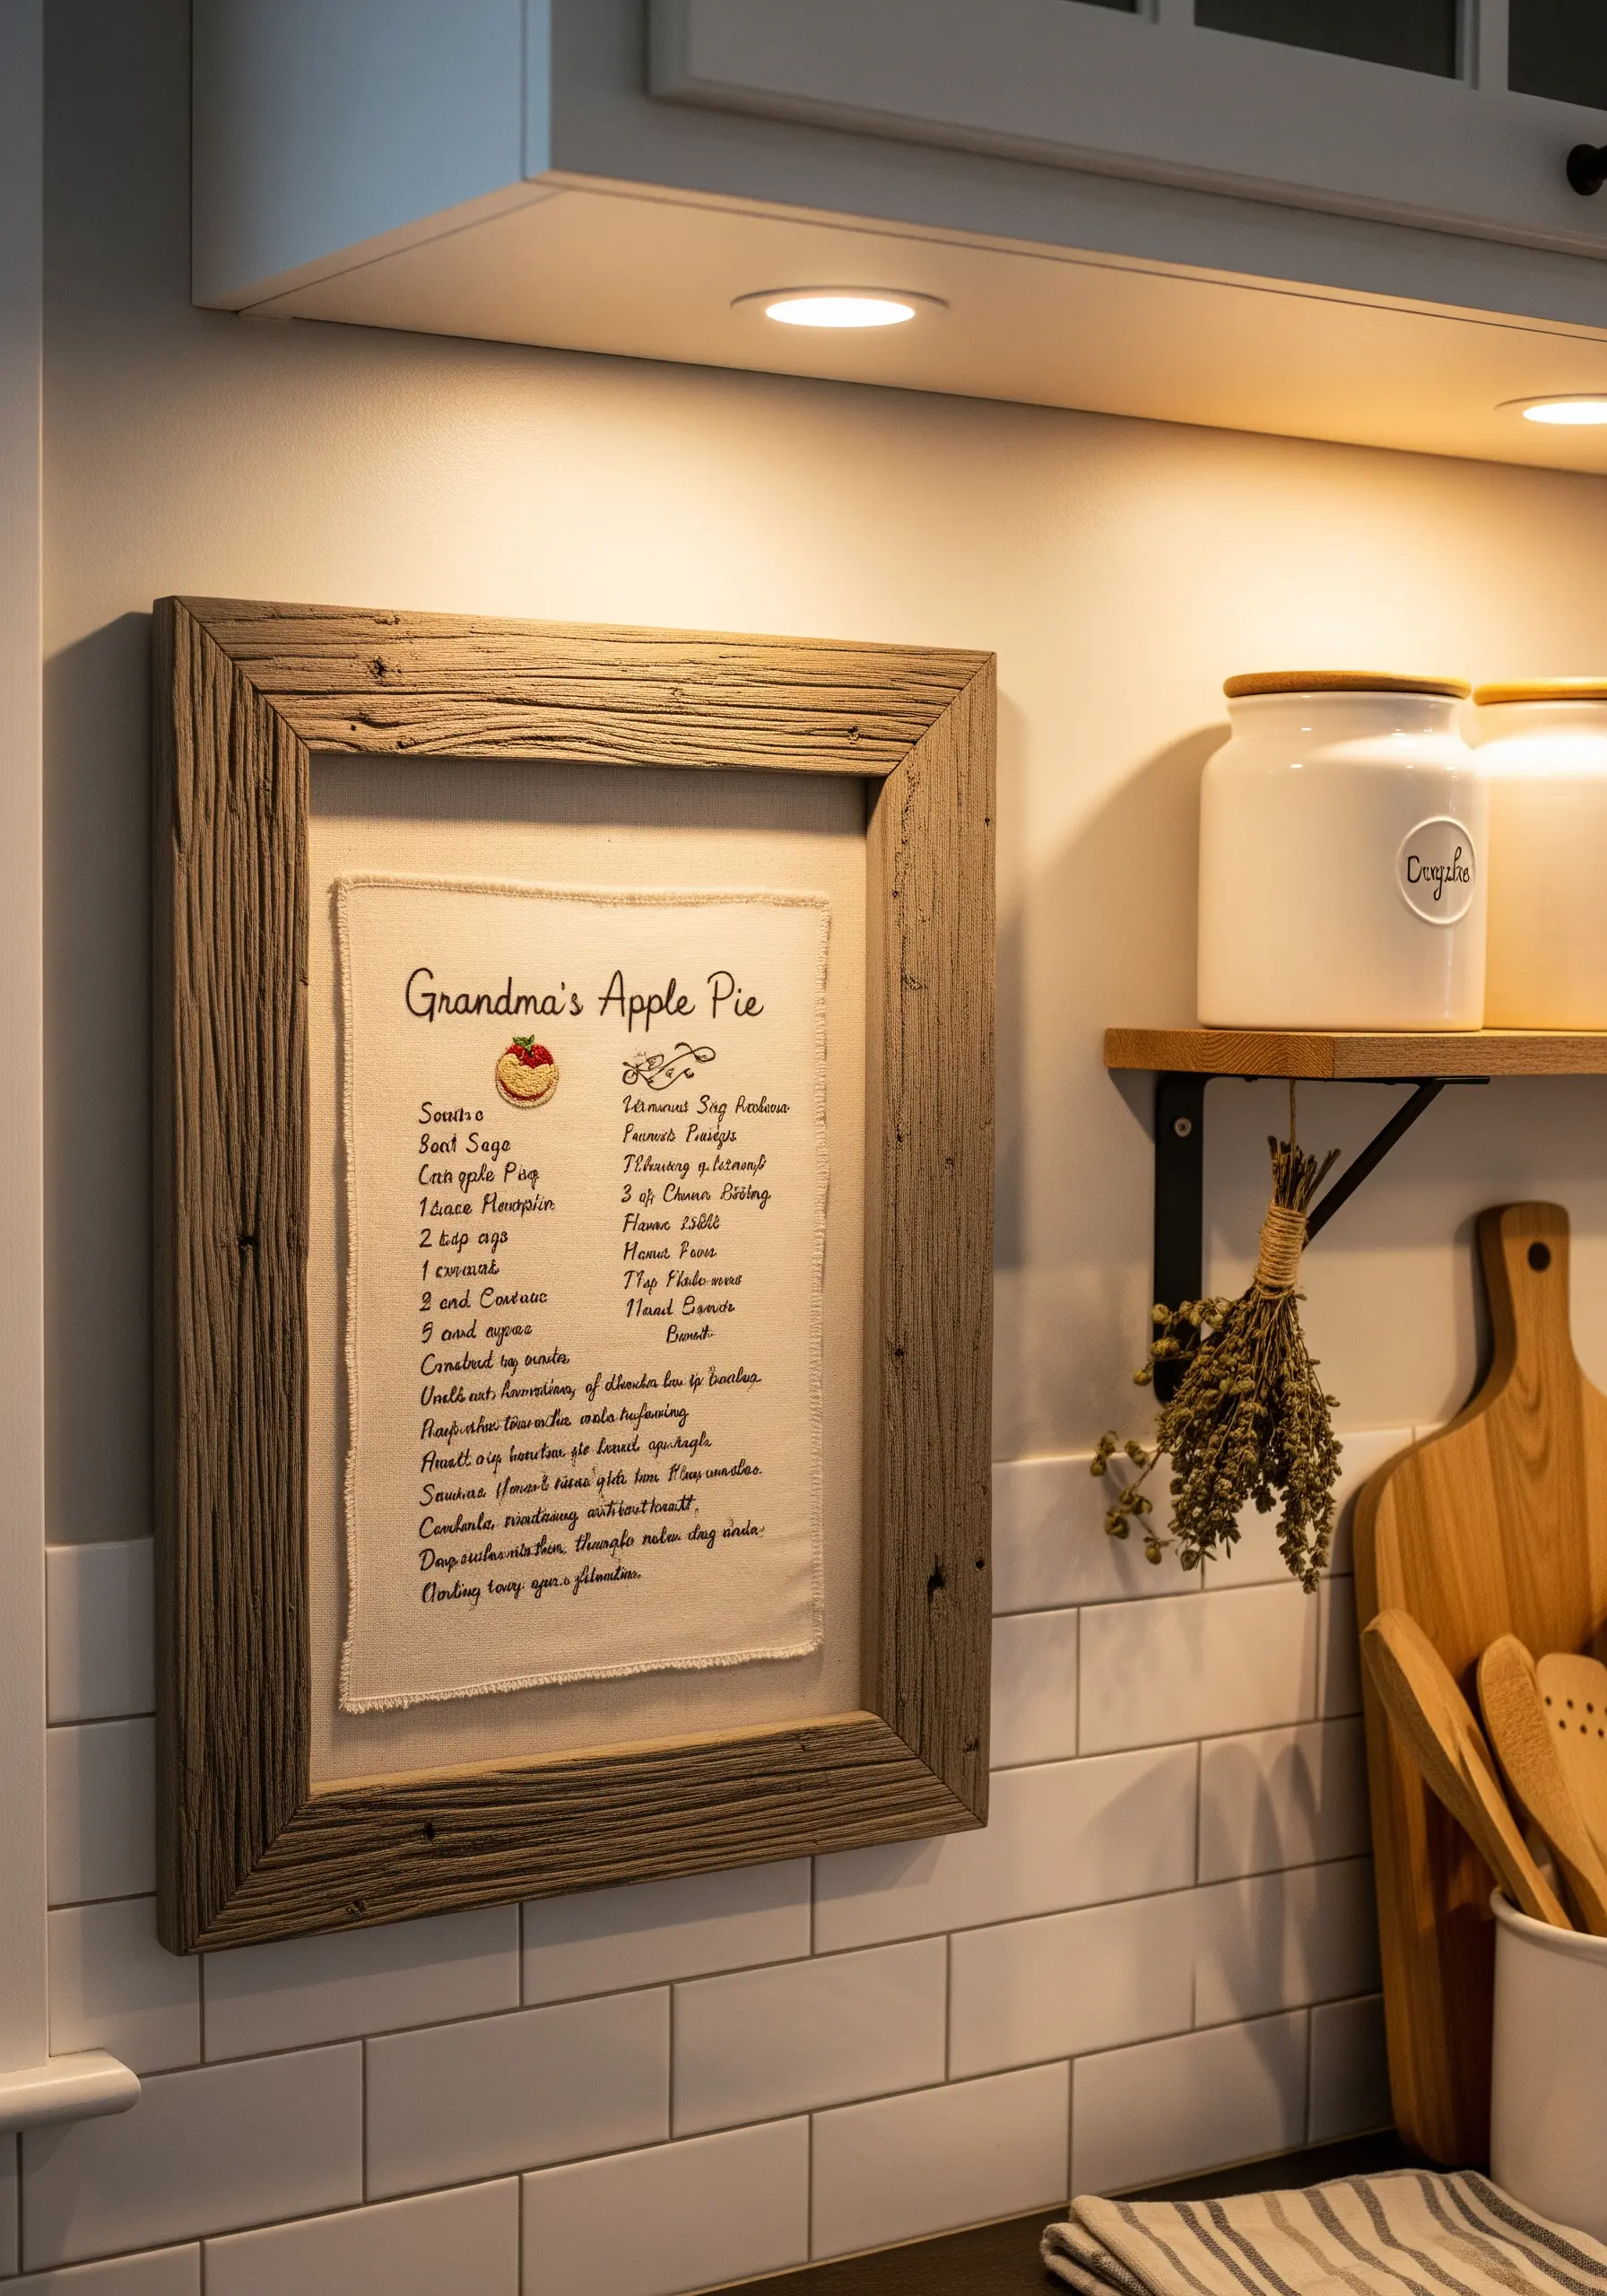
Immortalize a treasured family recipe by tracing it directly onto fabric. The key is to capture the unique character of the handwriting.
Scan the original recipe and print it onto a water-soluble stabilizer. Adhere it to your fabric—a natural linen or cotton works best for a rustic feel.
Using a single strand of floss in a dark, ink-like color, carefully stitch over the handwriting with a simple backstitch or stem stitch.
The beauty of this project lies in its imperfections—the slight quavers in a signature or the loops of a letter. Don’t try to make it perfect; aim to make it authentic.
12. Cosmic Elegance: Zodiacs with Metallic Thread
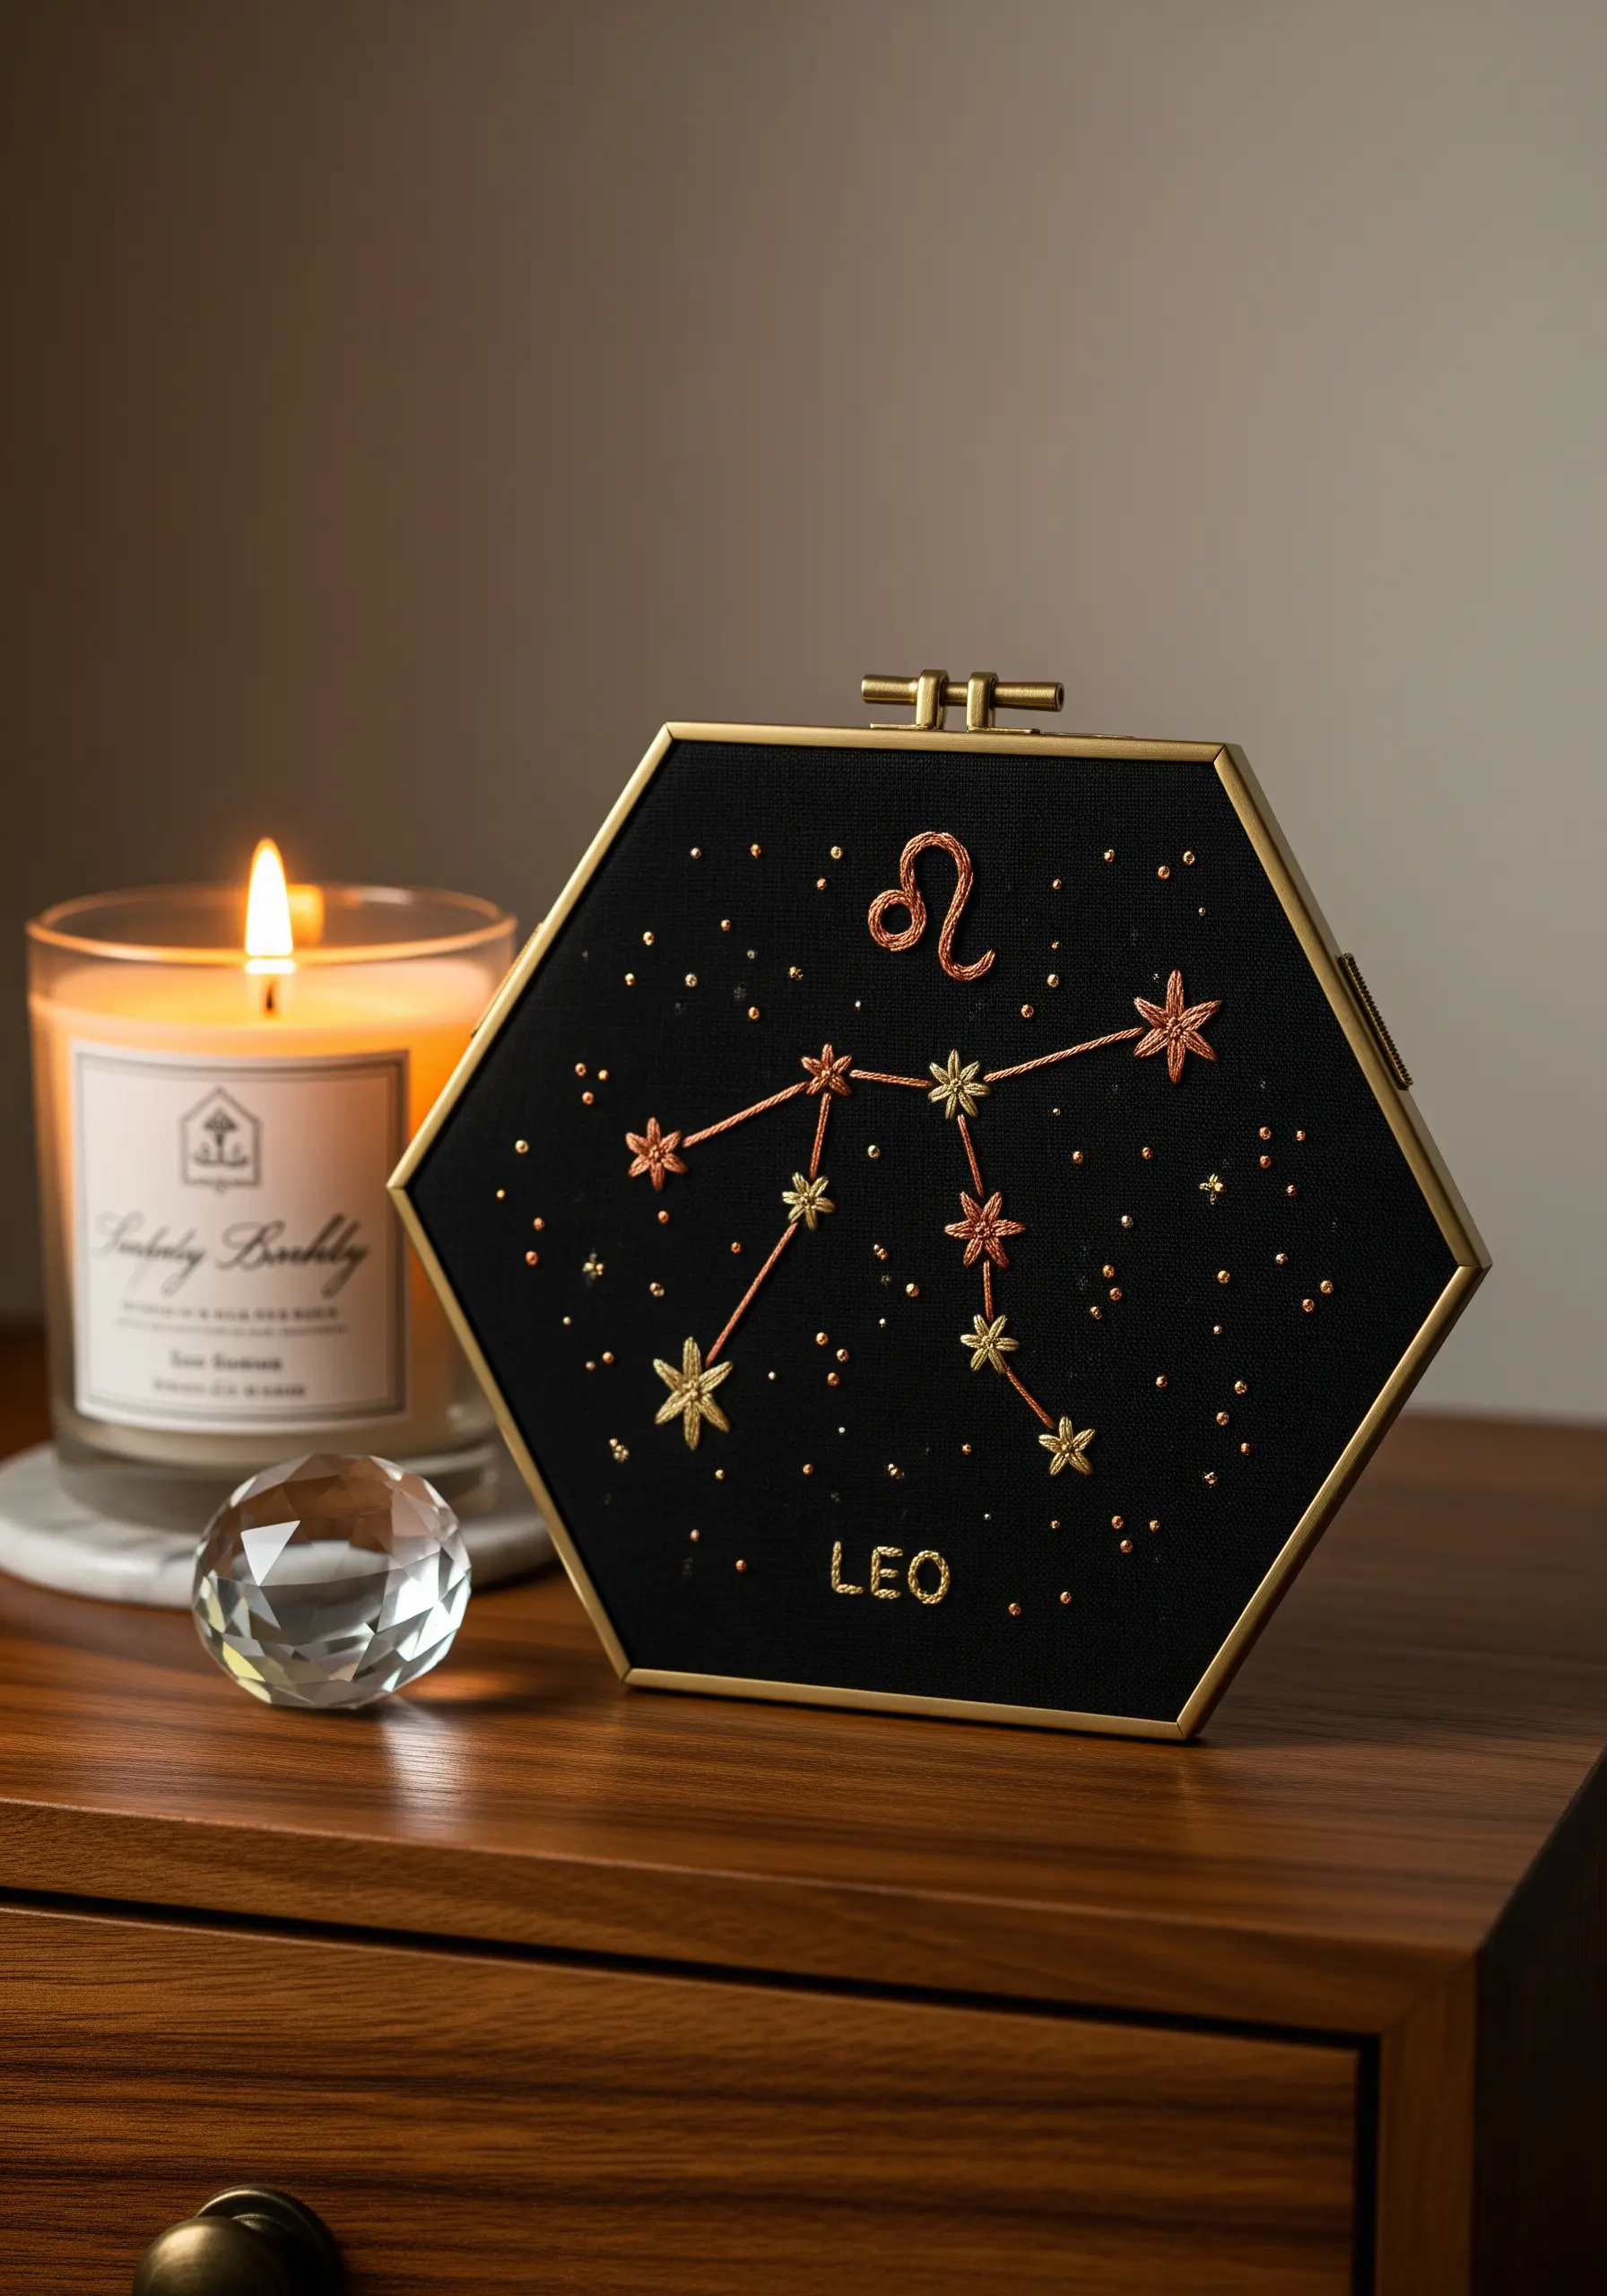
Elevate a simple zodiac chart by using metallic threads on a dark, dramatic background like black velvet or cotton sateen.
Metallic floss can be tricky to work with, so use a thread conditioner (like beeswax) and a slightly larger needle to reduce friction and prevent shredding.
Use couching to create the sharp lines of the constellation: lay down the metallic thread and tack it in place with tiny, invisible stitches of a matching regular floss.
For the stars, combine French knots with star stitches in varying sizes using gold, silver, and copper threads to create a multi-dimensional, sparkling starfield.
13. Whimsical Characters: The Perfect Satin Stitch
For cartoon-style illustrations, a flawless satin stitch is non-negotiable. It creates that smooth, solid fill that looks almost like a print.
The secret to a perfect satin stitch is preparation. First, outline your shape with a split stitch. This raised edge will guide your satin stitches and prevent them from pulling unevenly.
Keep your stitches close together but never overlapping, and maintain consistent tension. For curved shapes, angle your stitches slightly to follow the contour, ensuring a smooth turn without gaps.
A light mint or sage green fabric provides a soft, contemporary backdrop that makes bright colors pop.
14. Collegiate Pride: The University Crest
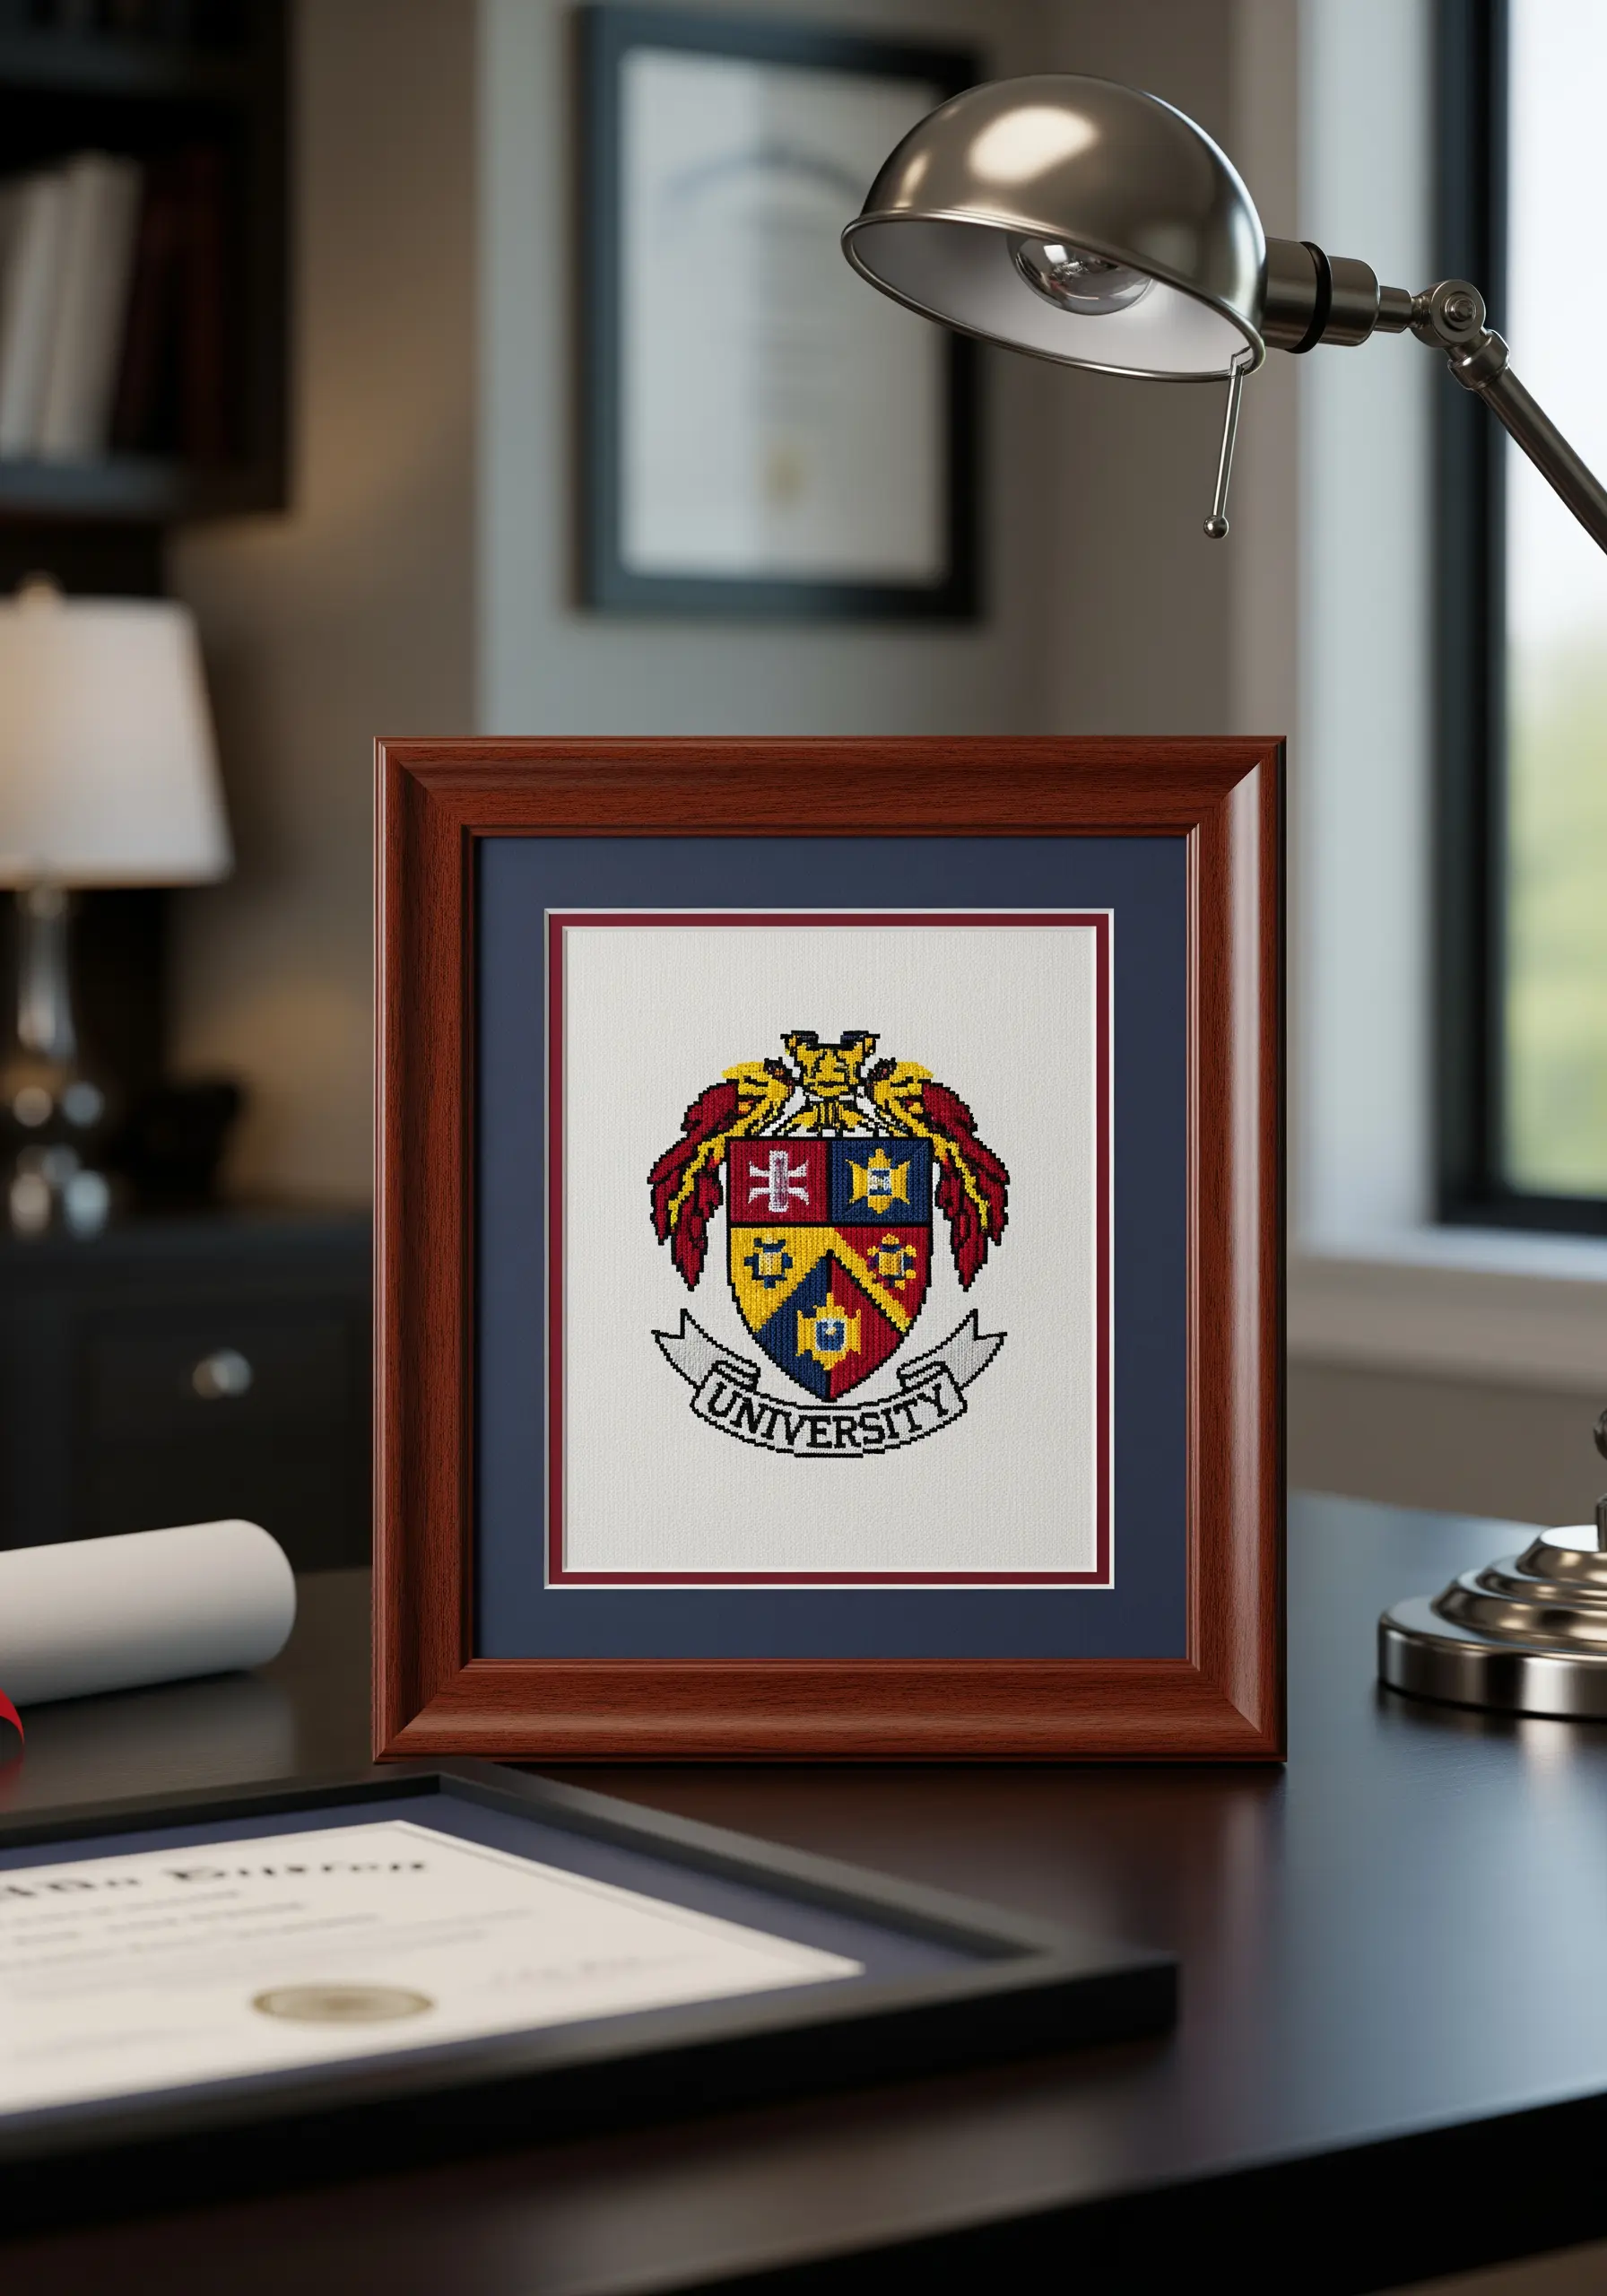
When recreating detailed emblems like a university crest, cross-stitch offers the perfect structure for precision and clarity.
Work on Aida cloth, as its grid-like weave ensures every stitch is uniform in size and placement, which is essential for heraldic designs.
Break the design down into small color blocks. Complete one color section entirely before moving to the next to minimize mistakes and keep the back of your work tidy.
To make the details extra sharp, outline the finished crest with a backstitch using a single strand of black or dark gold thread. This defines each element and makes the colors stand out.
15. Mechanical Precision: Illustrating with Thread
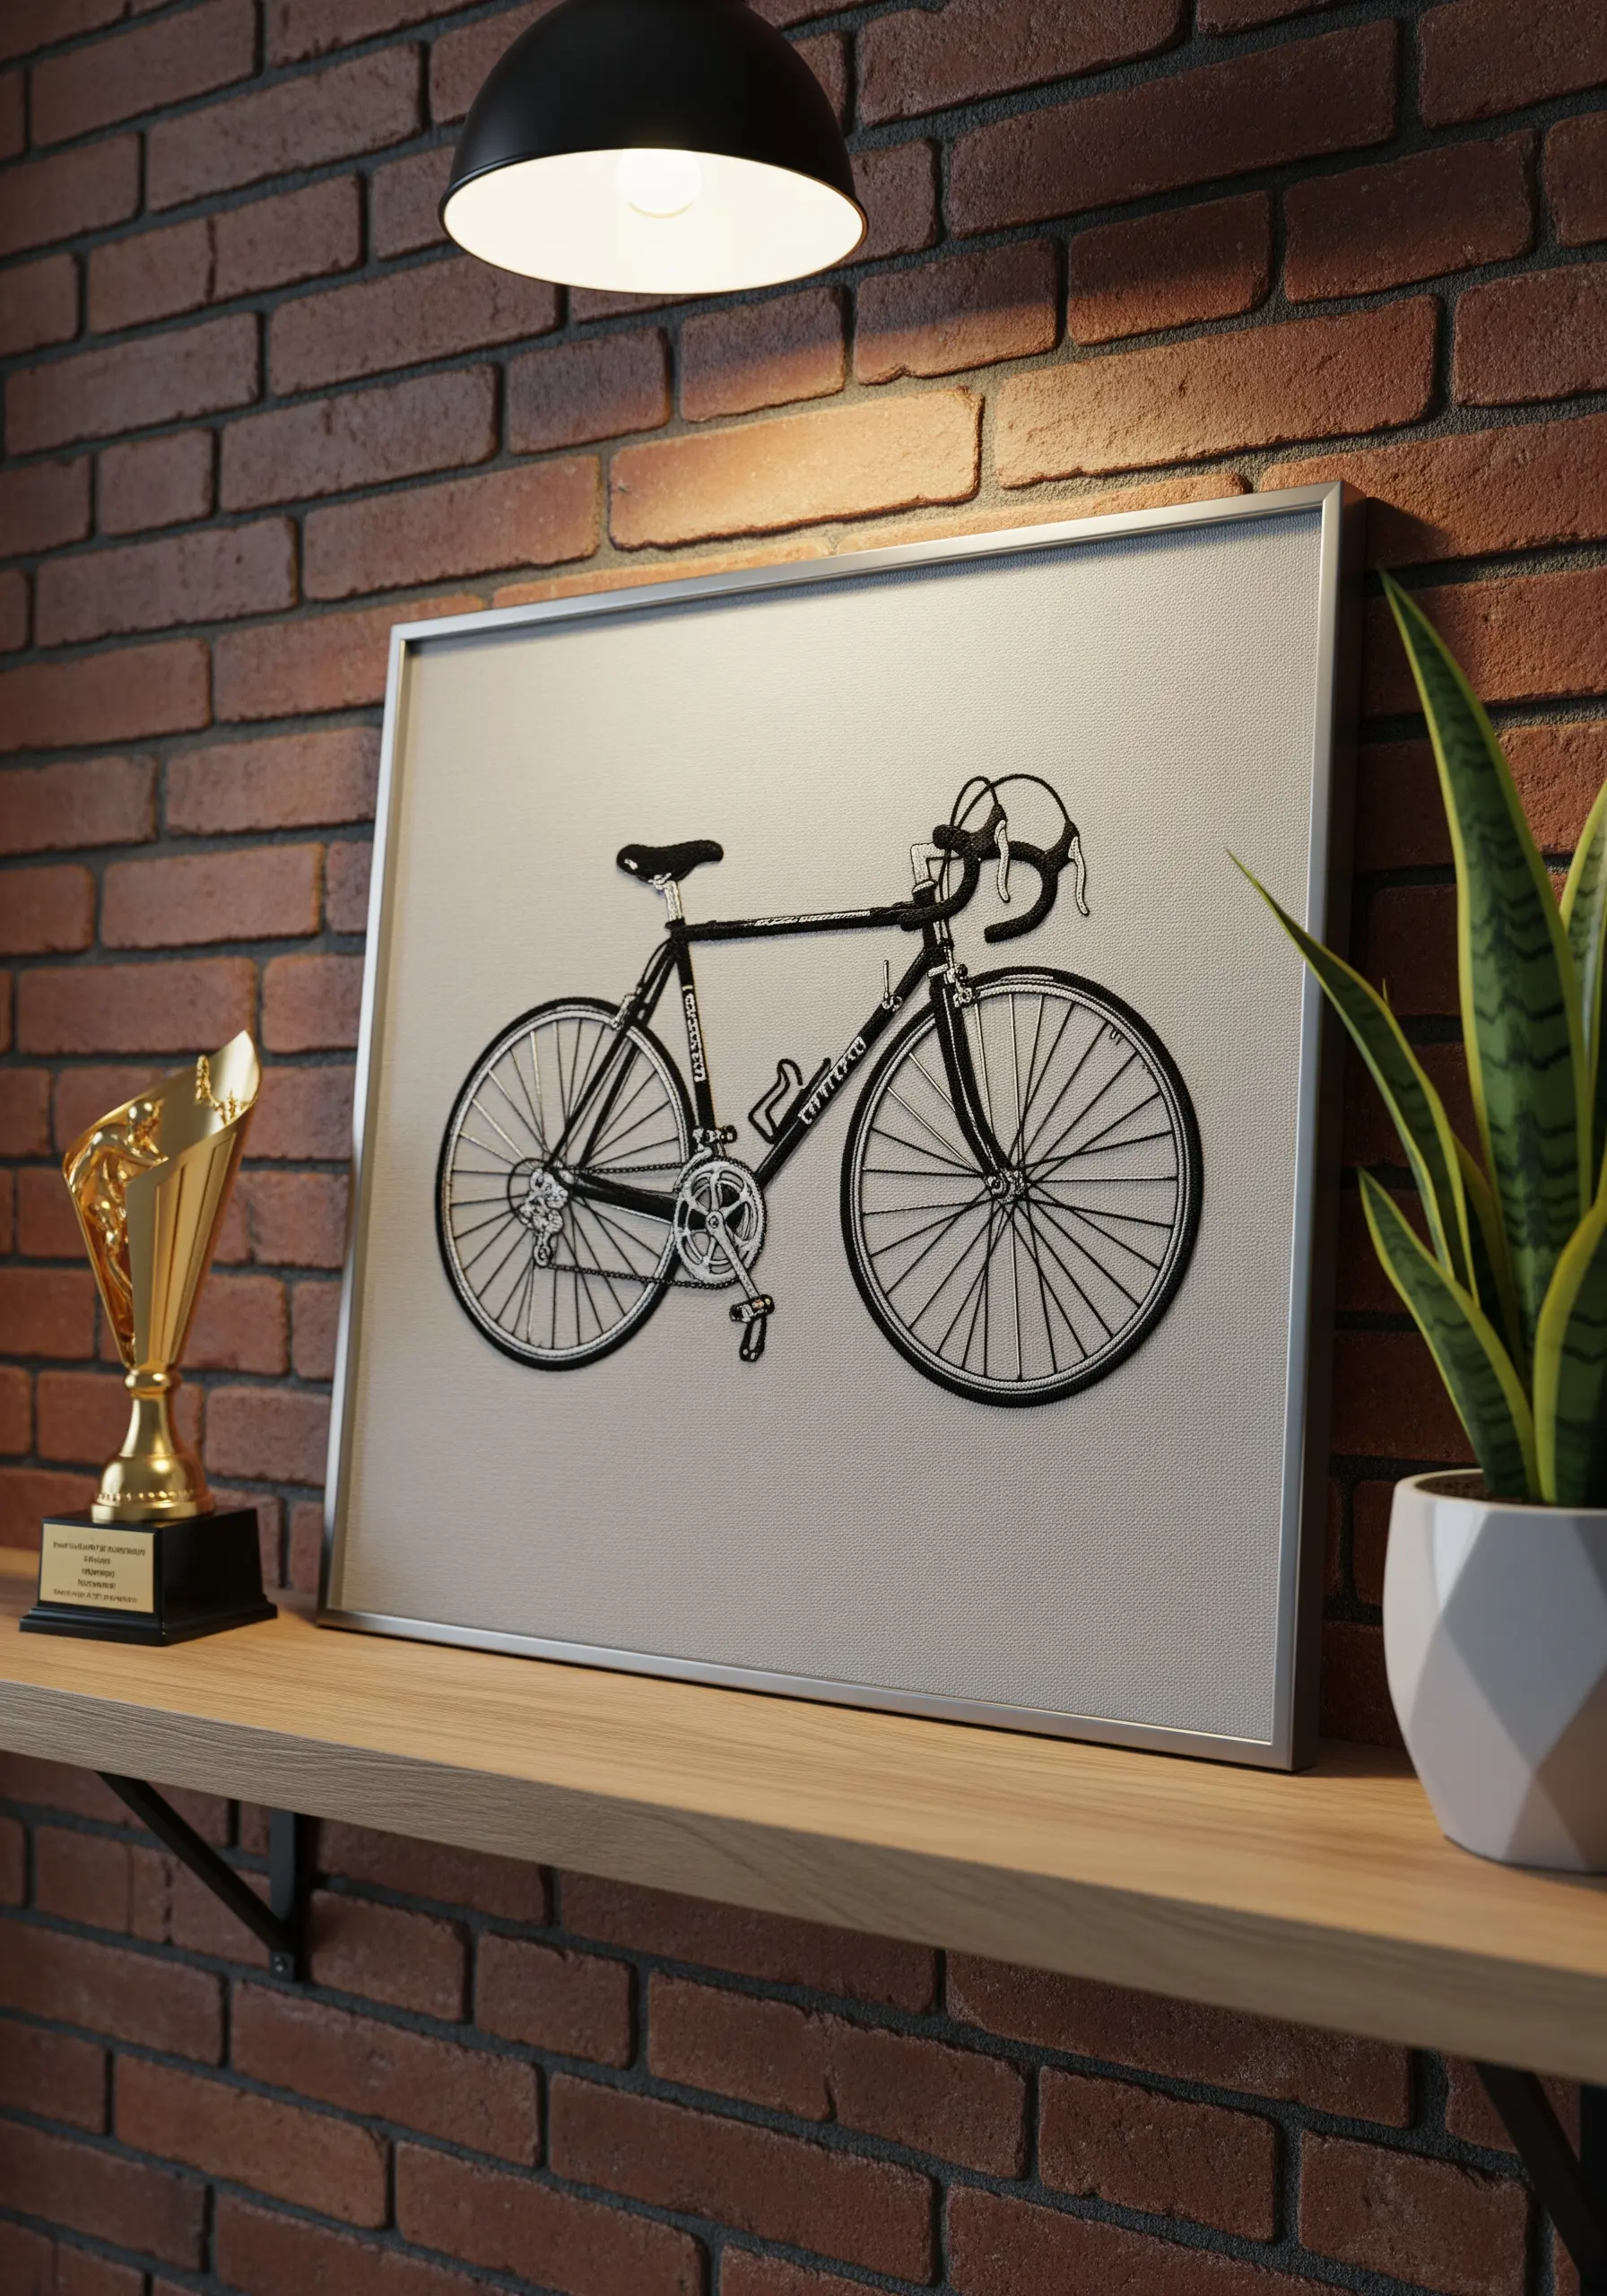
To embroider technical objects like a bicycle, focus on achieving clean, uninterrupted lines that mimic an ink drawing.
Use a whipped backstitch for the frame. First, lay down a standard backstitch, then whip it with a second thread without piercing the fabric. This creates a solid, raised line that looks like smooth metal tubing.
For the delicate spokes and chain, switch to a single strand of floss and a simple backstitch. This variation in line weight is crucial for creating a sense of mechanical realism and depth.
16. A Frame of Foliage: The Couple’s Portrait
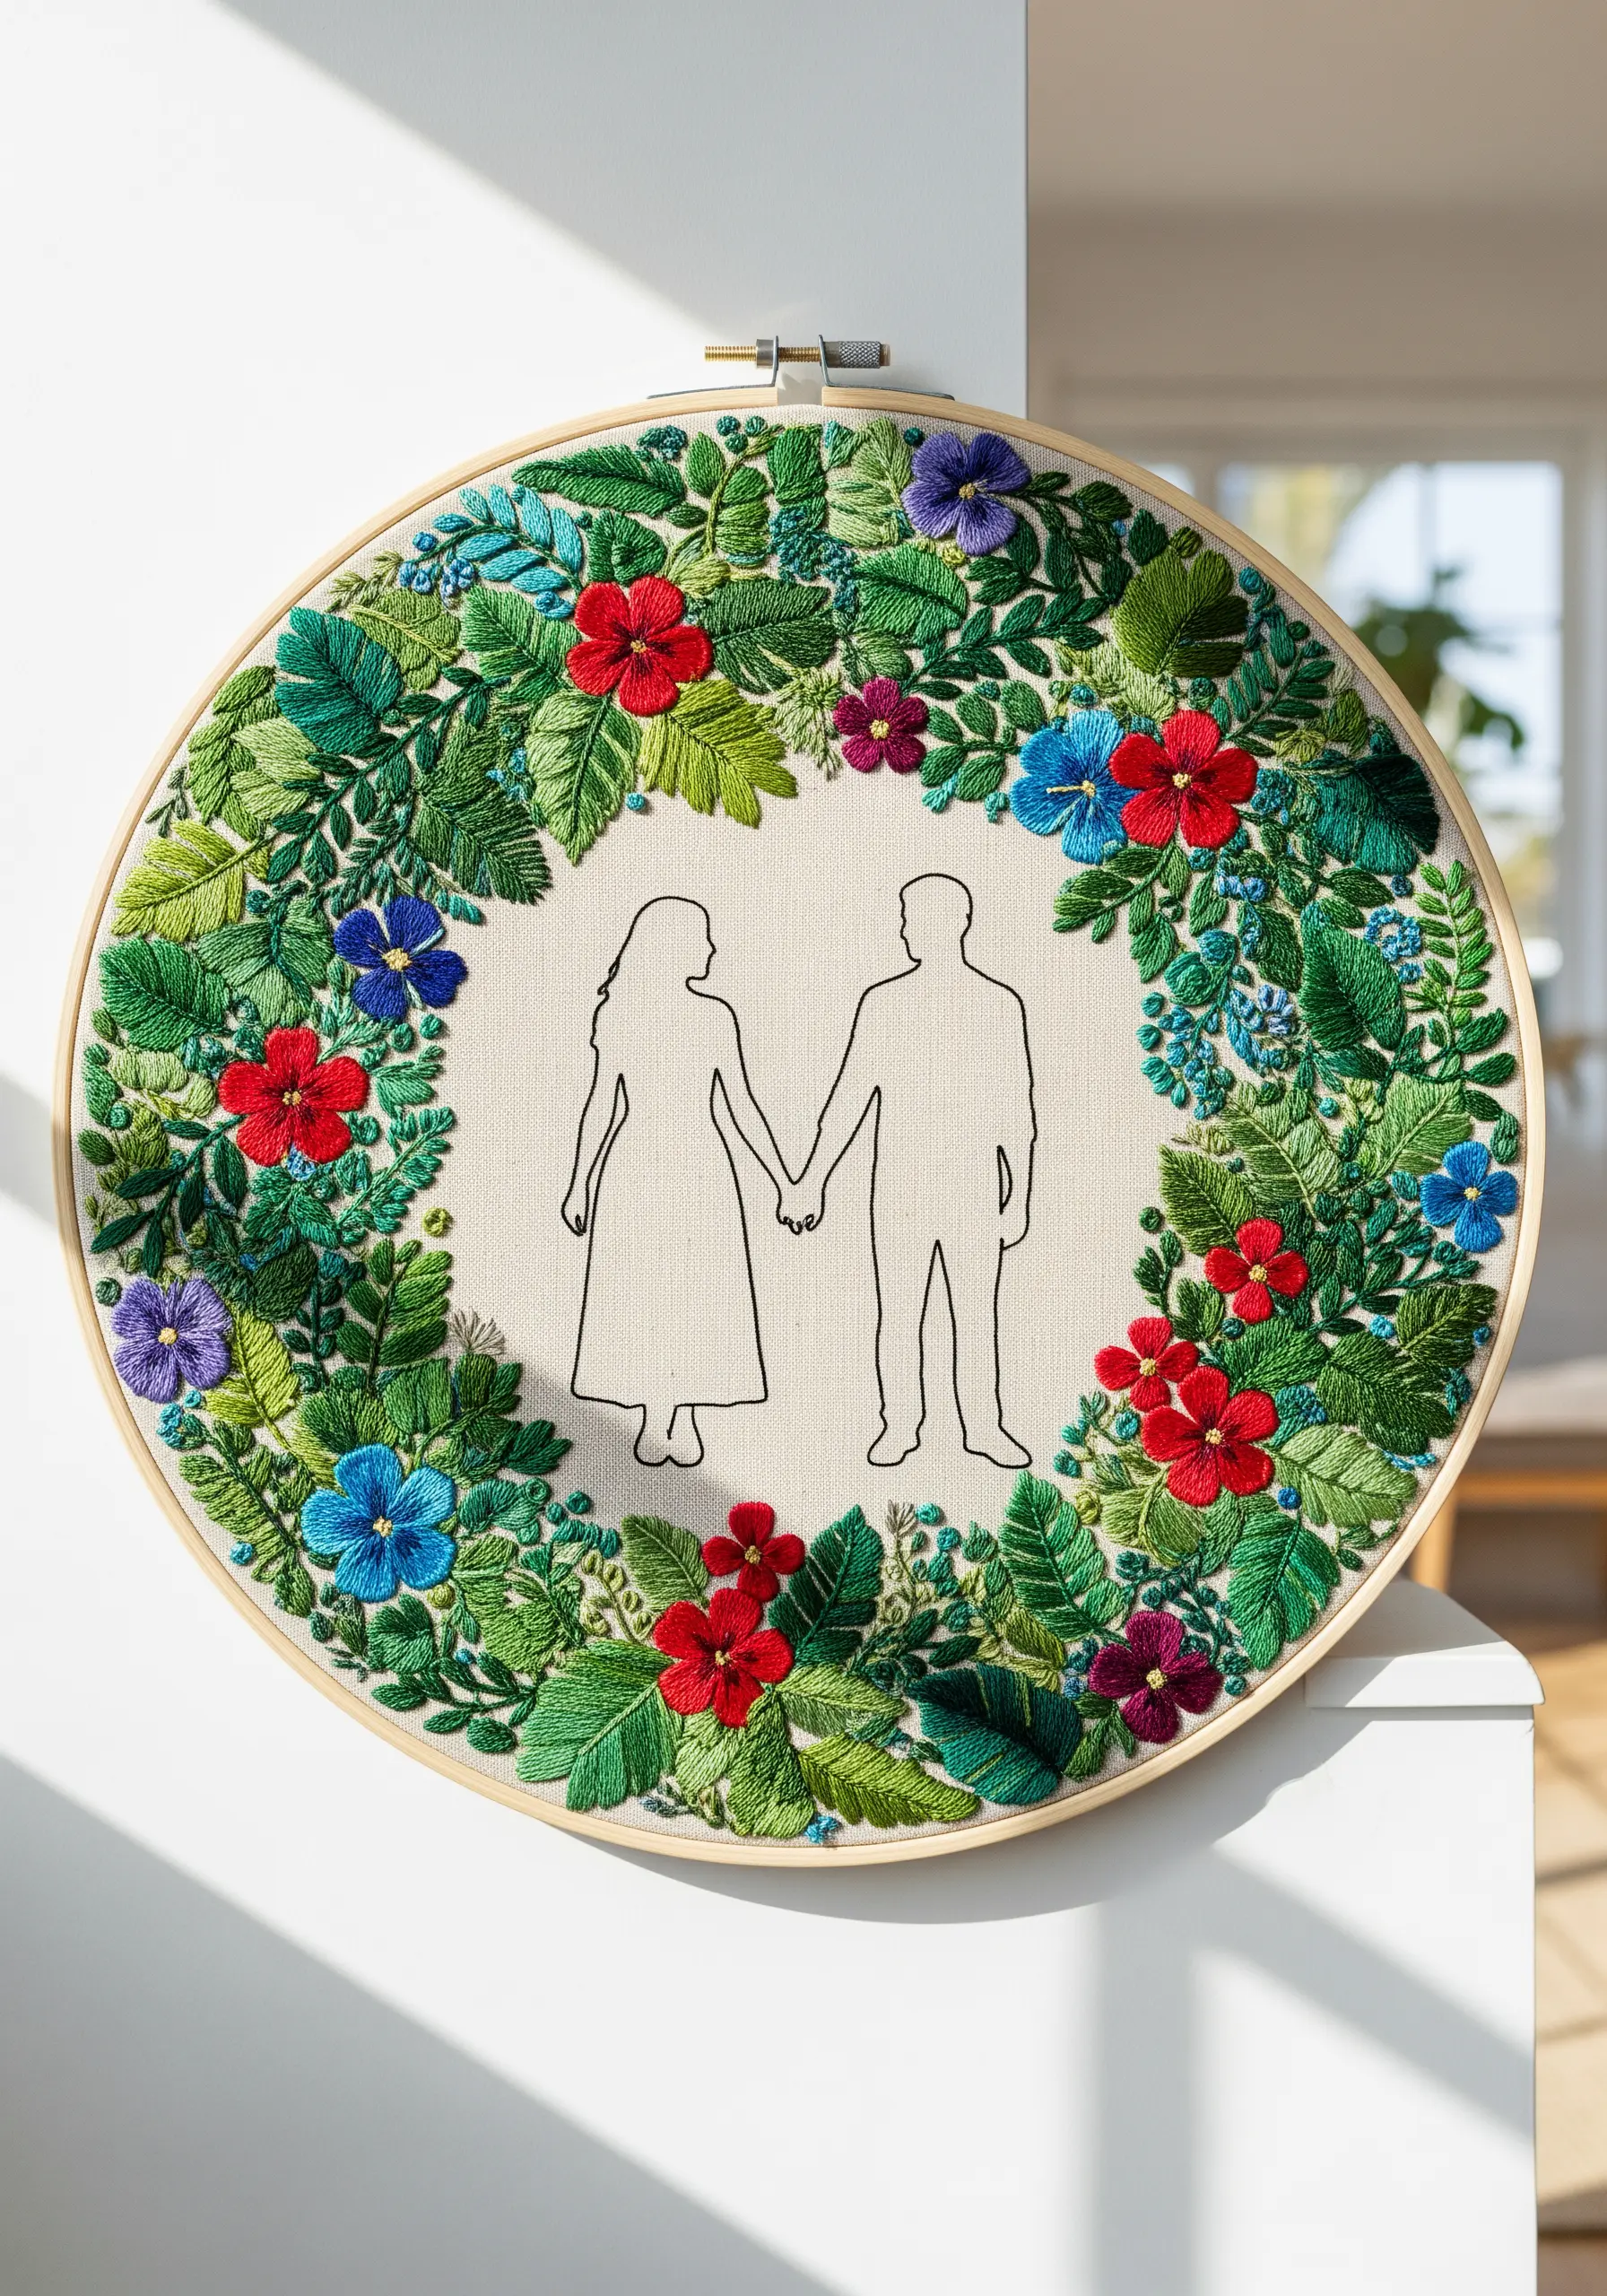
Create a stunning anniversary or wedding gift by framing a simple line-art portrait with a lush, dimensional wreath.
For the portrait itself, use a single strand of dark thread in a simple backstitch to keep the focus on the silhouette.
The wreath is where you can play with texture. Use a combination of stitches: padded satin stitch for plump flowers, lazy daisy stitches for petals, woven wheel roses for focal points, and bullion knots for buds.
Varying the greens in the leaves adds realism. Use at least three to four shades of green to create highlights and shadows throughout the foliage.
17. Landscape Impressionism: Stitching a Memory
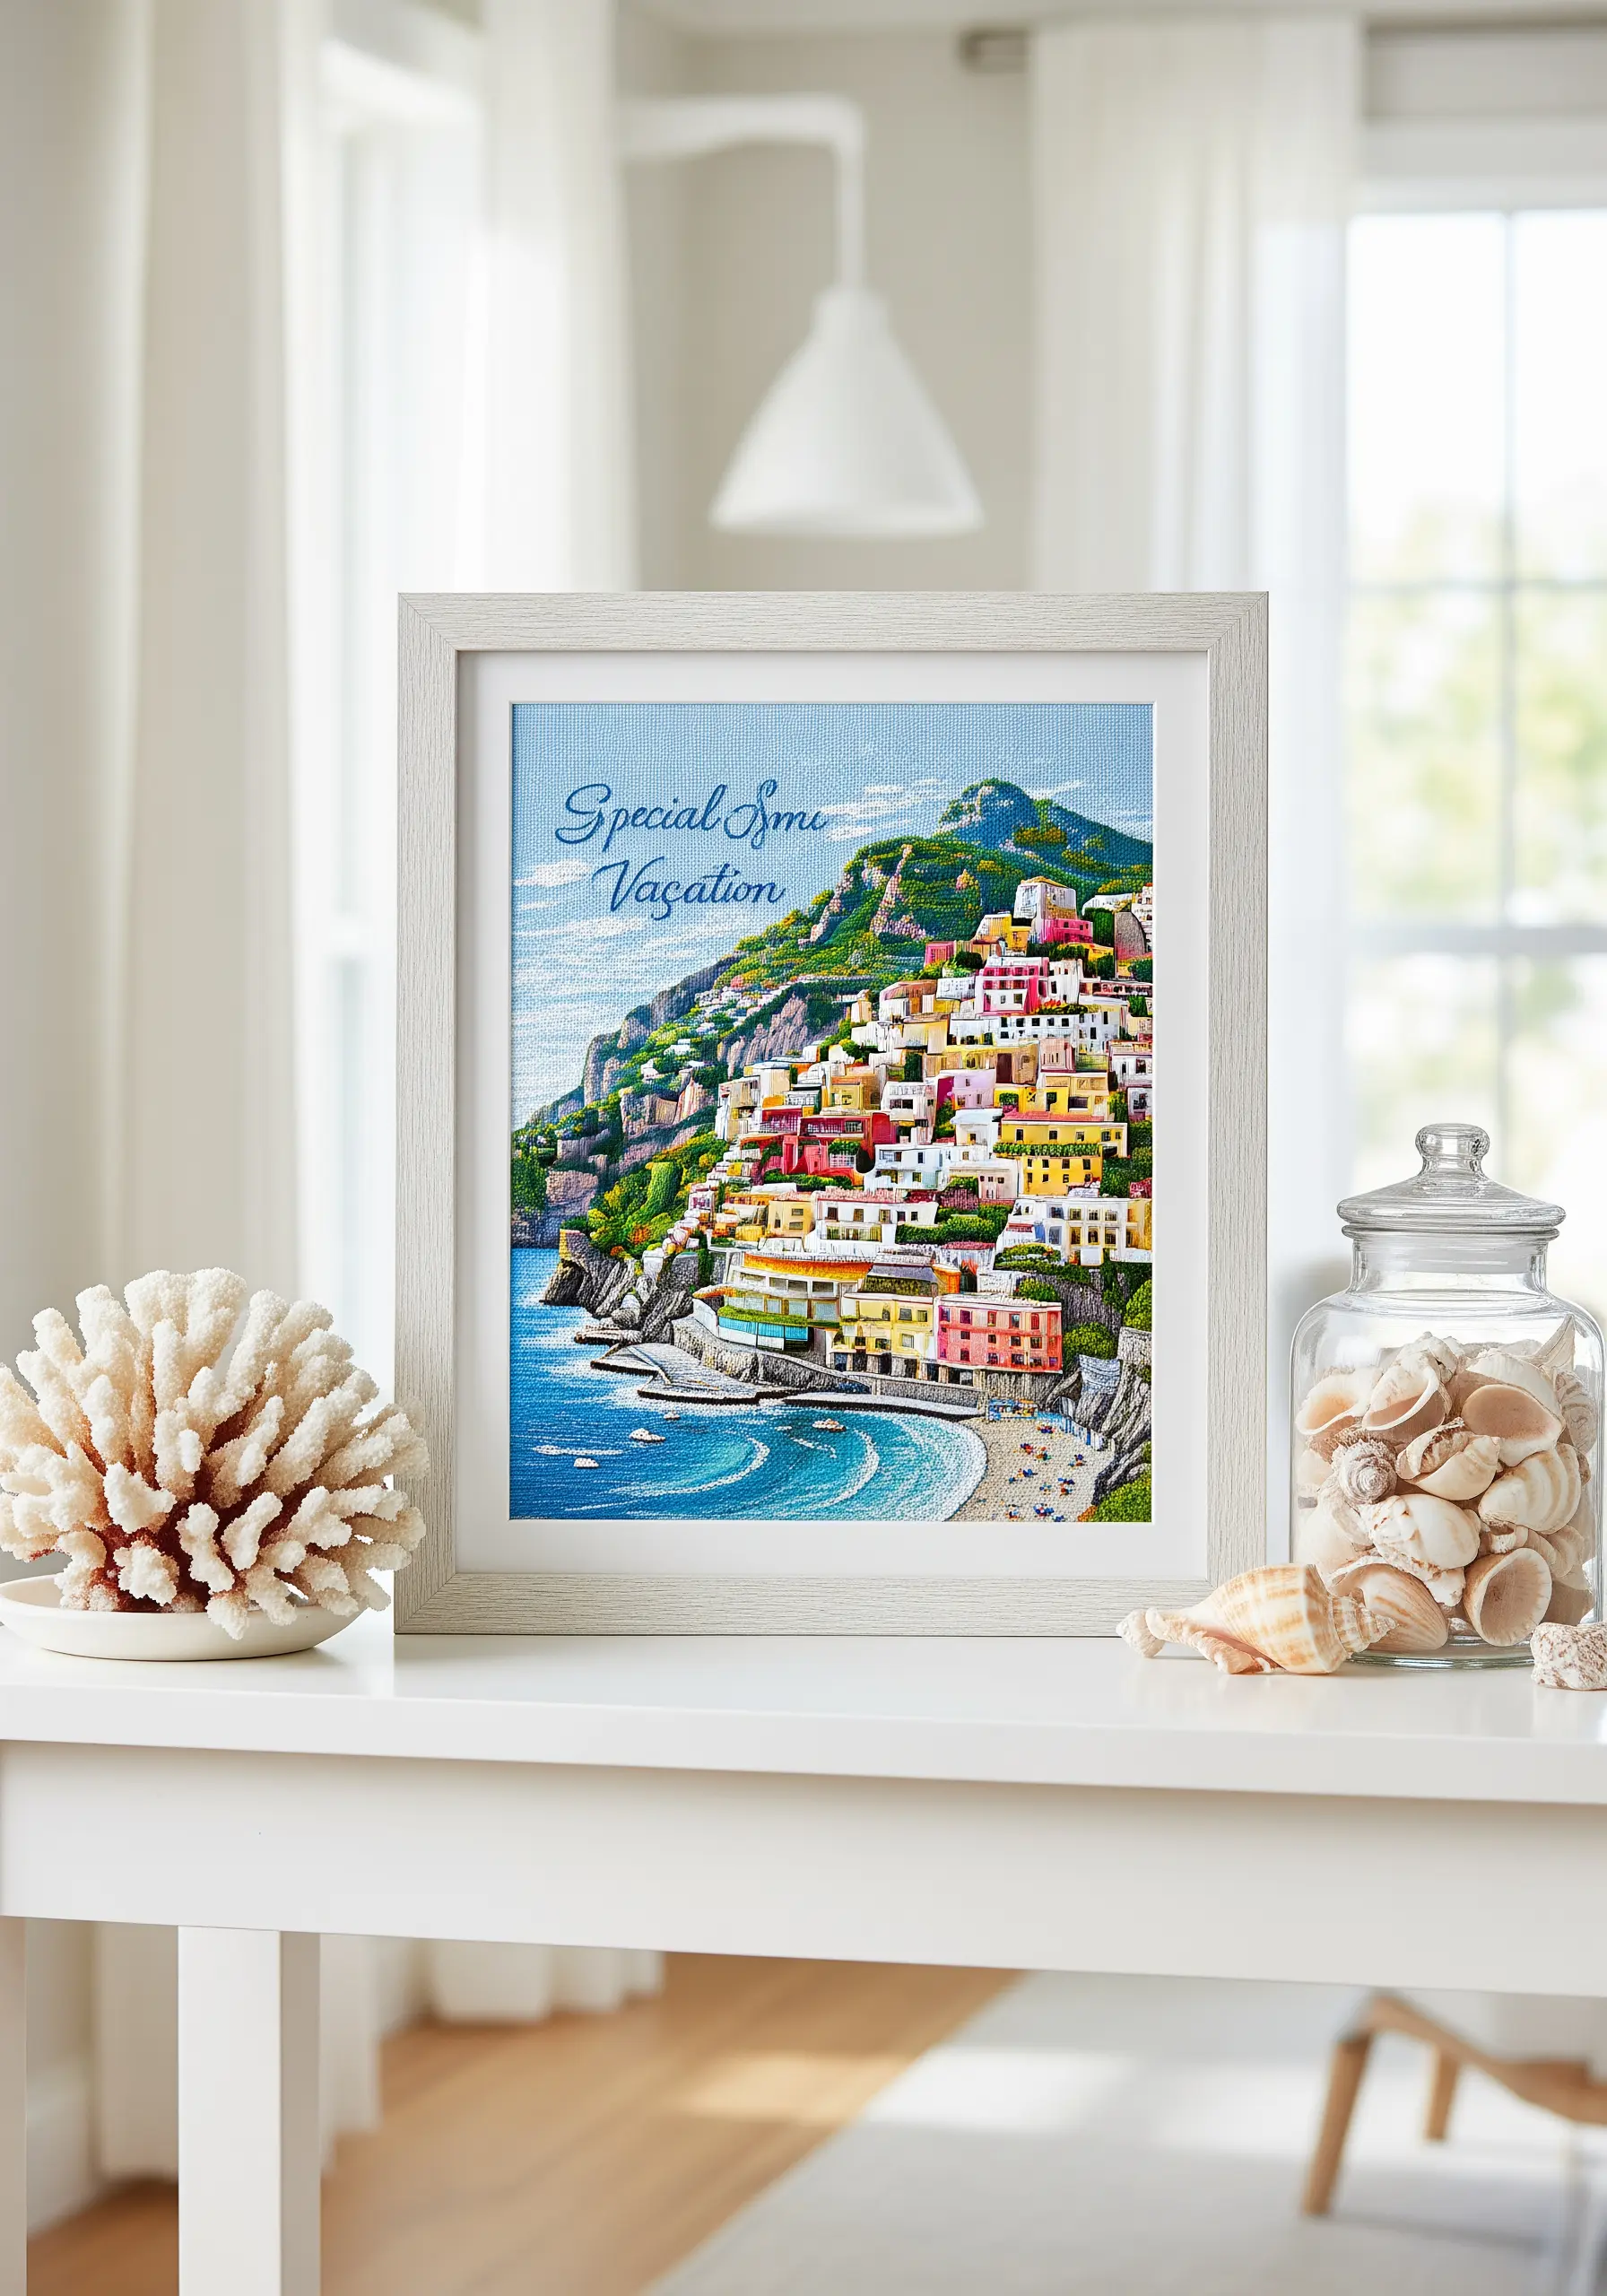
Capture the essence of a favorite vacation spot by using thread to mimic the short, distinct strokes of an impressionist painting.
Instead of smooth blending, use small, directional straight stitches and seed stitches to build up areas of color. This creates a mosaic-like texture that beautifully captures light and movement, especially in water and foliage.
Don’t be afraid to let the fabric show through in small areas; this negative space adds to the light, airy feel of the scene.
Use a slightly lighter shade for the sky at the horizon to give the landscape a realistic sense of atmospheric depth.
18. Sculptural Florals: Beyond the Hoop

For a truly show-stopping piece, combine traditional embroidery with stumpwork and dimensional fabric techniques.
The large roses are crafted from layers of fabric petals, individually wired and stitched into place to create a 3D effect. The peonies use layers of long-and-short stitch for a painted look.
Introduce unexpected textures, like the woven wheel stitches used to create the citrus slices, which adds a modern, graphic element.
Mounting the finished piece on a fabric-wrapped board and placing it in a deep shadowbox frame protects the dimensional elements and transforms it into a true work of fiber art.
19. The Sound of Stitches: Visualizing a Voice

Translate a personal audio clip—a voicemail, a baby’s first words, or an ‘I love you’—into a unique piece of art.
Use a free online tool to generate a visual waveform from your audio recording. Print this onto a water-soluble stabilizer for a perfect transfer.
To create the gradient effect, divide the waveform into three or four sections. Stitch each section with a different shade of blue, from dark to light, using vertical straight stitches or satin stitches to fill the shapes.
This creates a visual representation of sound and emotion, making it one of the most personal gifts you can stitch.
20. Pixel Perfect: The Art of Cross-Stitch
Recreate nostalgic 8-bit video game scenes with cross-stitch, the original pixel art.
Choose black Aida cloth to make the vibrant colors of the characters and objects pop with intensity, mimicking the look of a classic arcade screen.
Work block by block, color by color, to ensure a neat and organized pattern. The grid of the Aida cloth does the hard work for you, ensuring every ‘pixel’ is perfectly aligned.
This is a perfect project for gamers, creating a piece of decor that celebrates a beloved hobby with handcrafted care.
21. Literary Portraits: The Minimalist Icon
Celebrate a favorite author or literary figure with a high-contrast, graphic-style portrait.
This technique relies on transforming a photograph into a stark black-and-white image, focusing only on the most essential lines and shadows.
Use a fine-tipped, heat-erasable pen to transfer your simplified design to a neutral linen fabric.
Fill the solid areas with a dense satin stitch and use a clean backstitch for the outlines. The combination of solid fill and fine lines creates a powerful, woodcut-inspired look that feels both classic and modern.
22. The Essence of Family: A Continuous Line Portrait
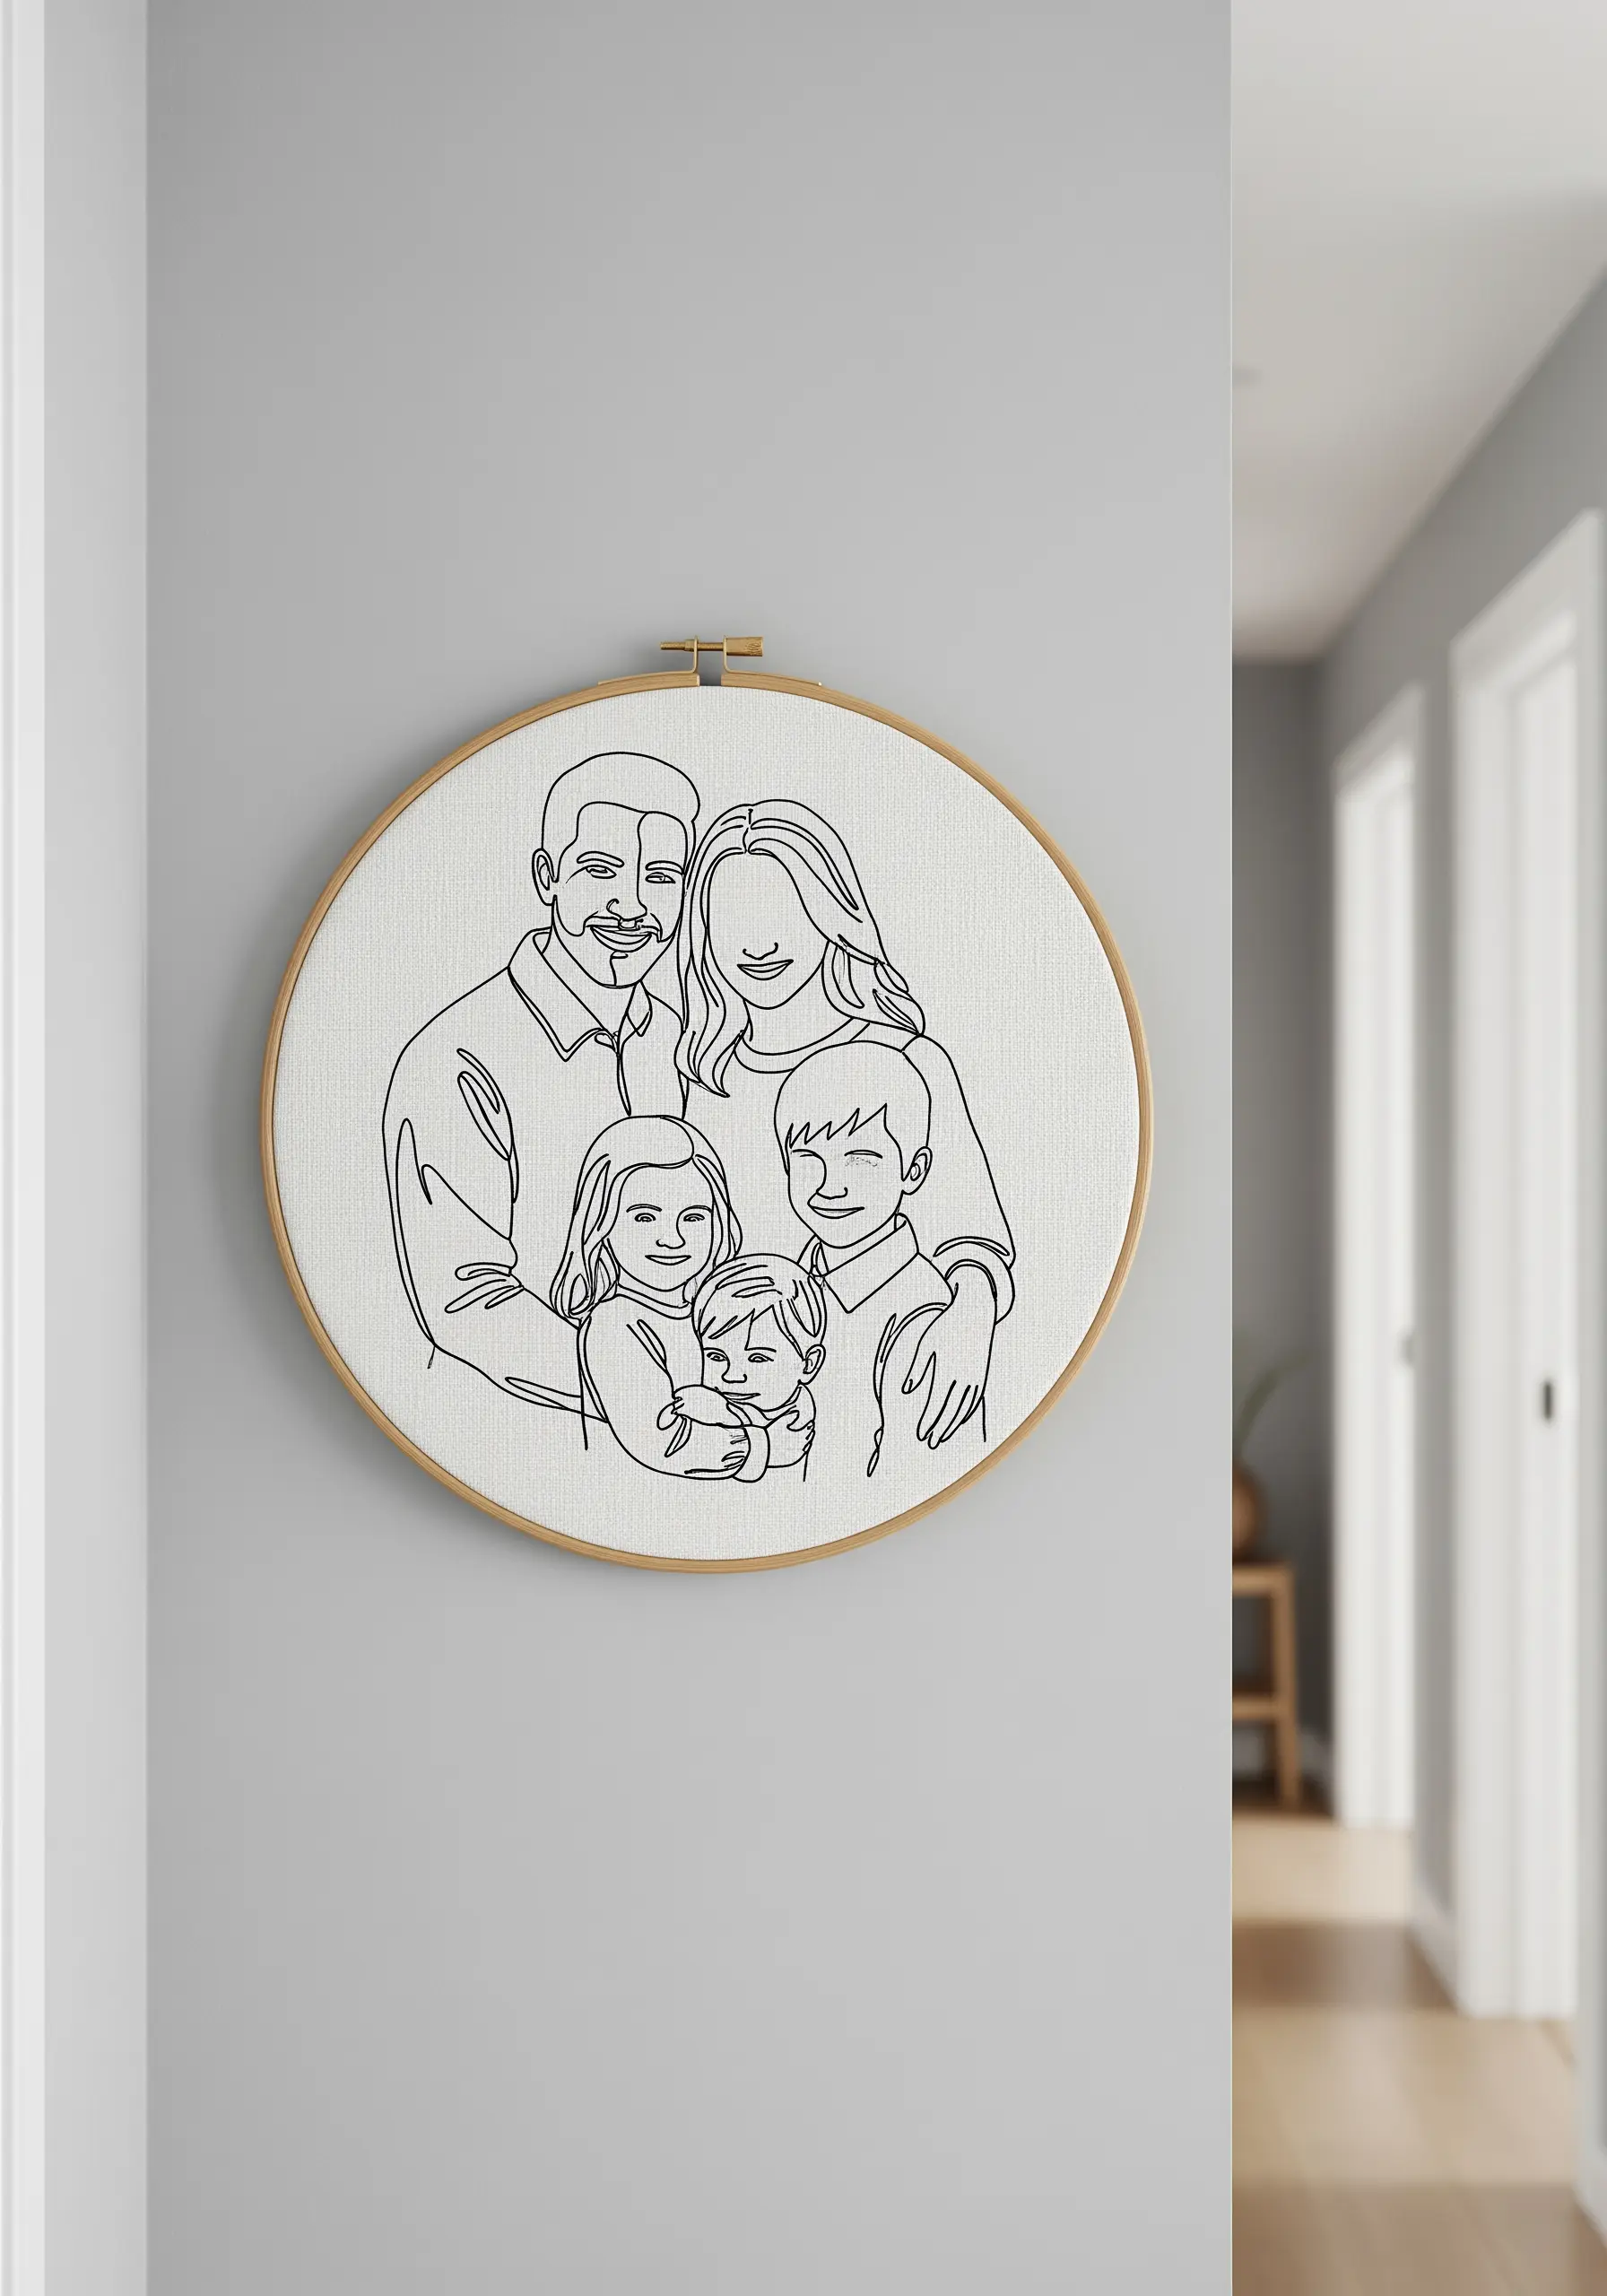
Capture the connection of family with a continuous line portrait. This modern, minimalist style feels both intimate and artistic.
Trace a favorite photo, simplifying the features into a single, flowing line. Use a lightbox and a fine-tipped erasable pen for an accurate transfer.
The best stitch for this is a whipped backstitch. It creates a smooth, unbroken line with no visible gaps between stitches, which is essential for the continuous effect.
Use just two or three strands of black floss on a clean, white cotton or linen canvas to let the elegant simplicity of the artwork shine. These minimal portrait line embroidery projects add subtle character.
23. A Garden in Grids: The Embroidered Plot

For the gardener in your life, stitch a miniature garden plan that celebrates their passion in a structured, charming way.
Create the garden beds with a clean, simple backstitch in a neutral color like taupe or ochre. This defines the structure without overpowering the plants.
Fill each plot with tiny, recognizable flora. Use French knots for lavender, lazy daisy stitches for sunflowers and daisies, and satin-stitched rectangles for tiny strawberries.
This design allows you to practice a variety of simple stitches in a small, contained space, resulting in a piece that feels intricate and detailed without being overwhelming.


