
Have you ever finished an embroidery piece and felt that something was missing? That elusive element that separates a charming craft from a piece of genuine art is often found in the smallest details—the texture of a stitch, the harmony of a color palette, or the balance of a composition.
Think of these hoop patterns not just as projects to be copied, but as invitations to refine your technique. Each one is a study in how a simple adjustment—like changing your thread count or the direction of your stitches—can completely transform the final result. They are opportunities to build your confidence and develop your unique artistic voice.
A handmade gift becomes truly meaningful when it carries the mark of your skill and intention. As you explore these ideas, focus on the ‘why’ behind each technique. You’ll soon find yourself making more deliberate, artful choices in every piece you create, turning simple hoops into stunning, heartfelt gifts.
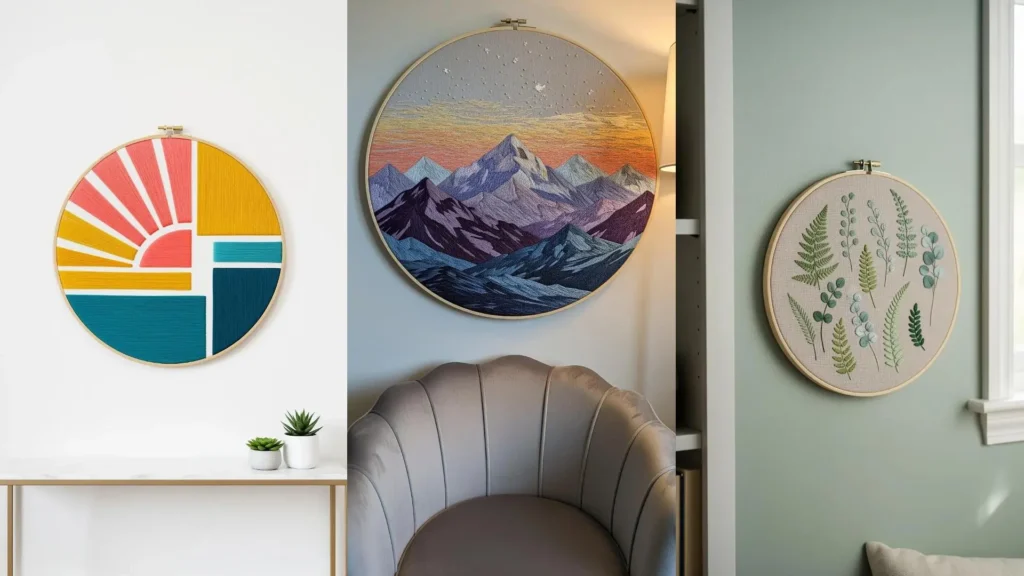
1. A Study in Botanical Textures
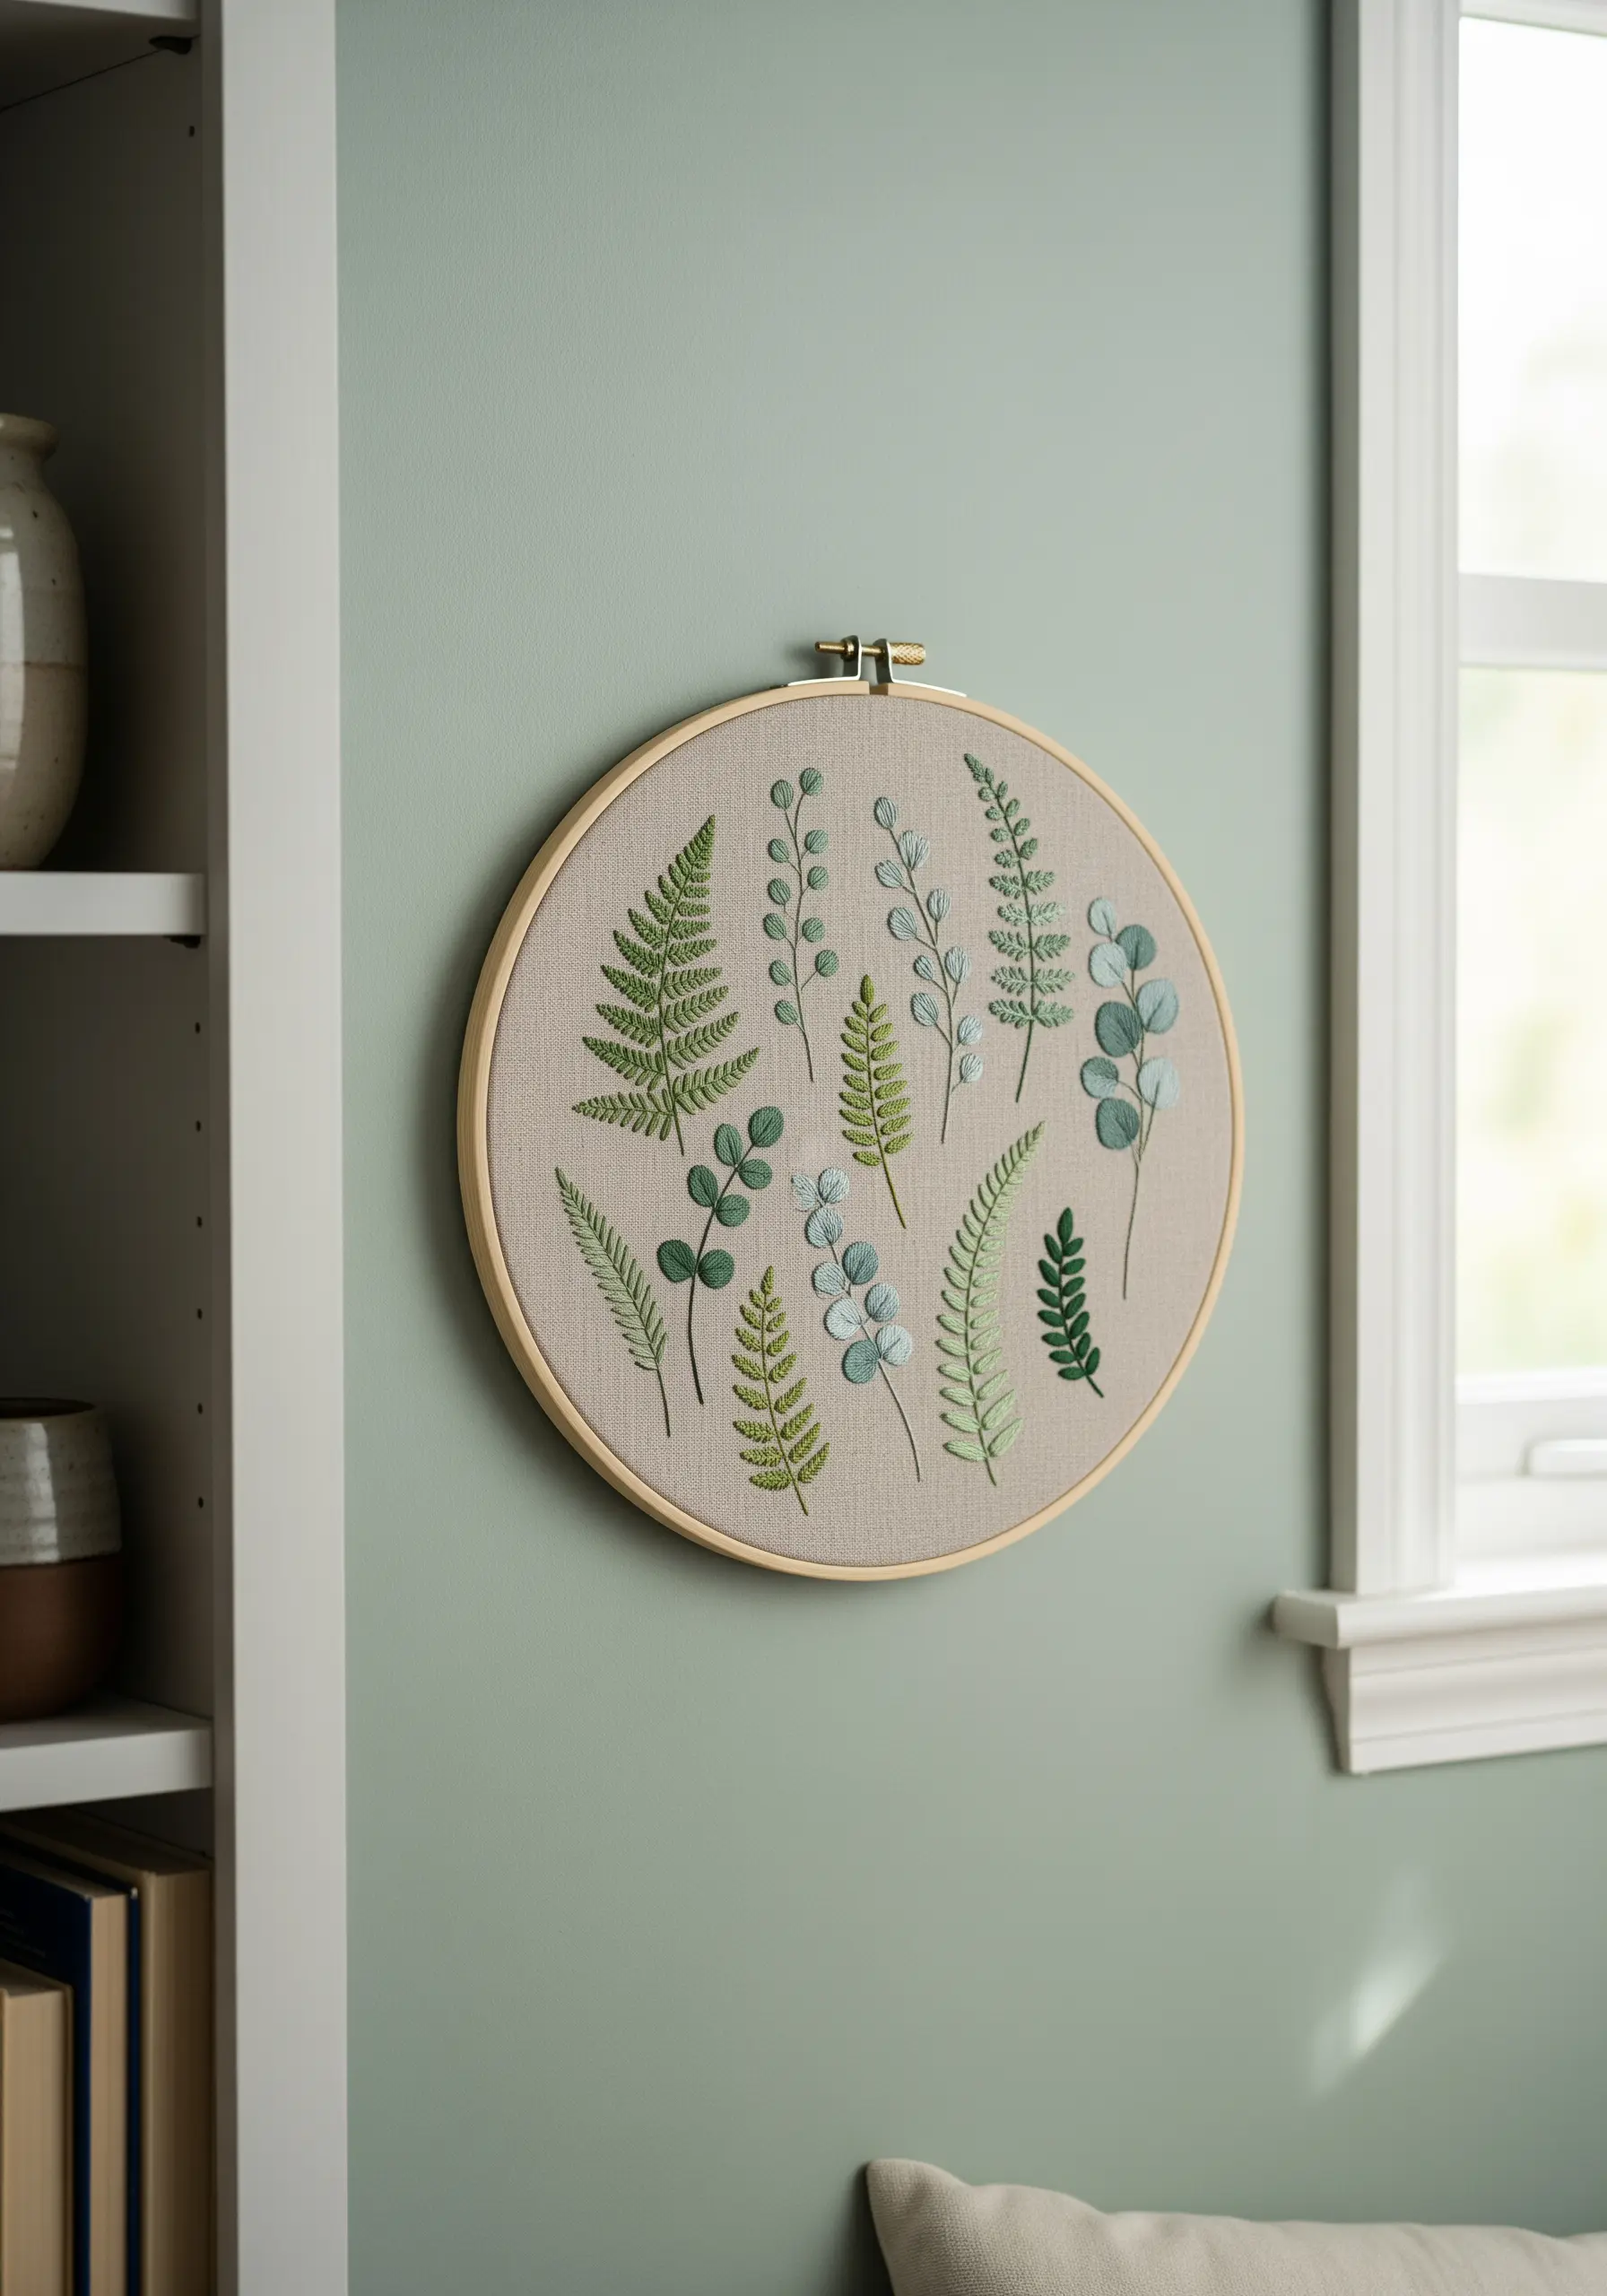
Create a dynamic yet cohesive botanical collection by varying your stitches and thread counts.
Use a fishbone stitch for the broad, veined fern leaves, a simple stem stitch for slender stalks, and detached chain stitches (lazy daisies) for delicate leaflets.
Adjust the number of floss strands you use to create visual depth—three or four strands for robust stems, and a single strand for the finest details.
This variety transforms a simple green palette into a sophisticated study of texture, and is a wonderful way to practice different fern and foliage stitch variations.
2. Celestial Radiance with Metallic Threads
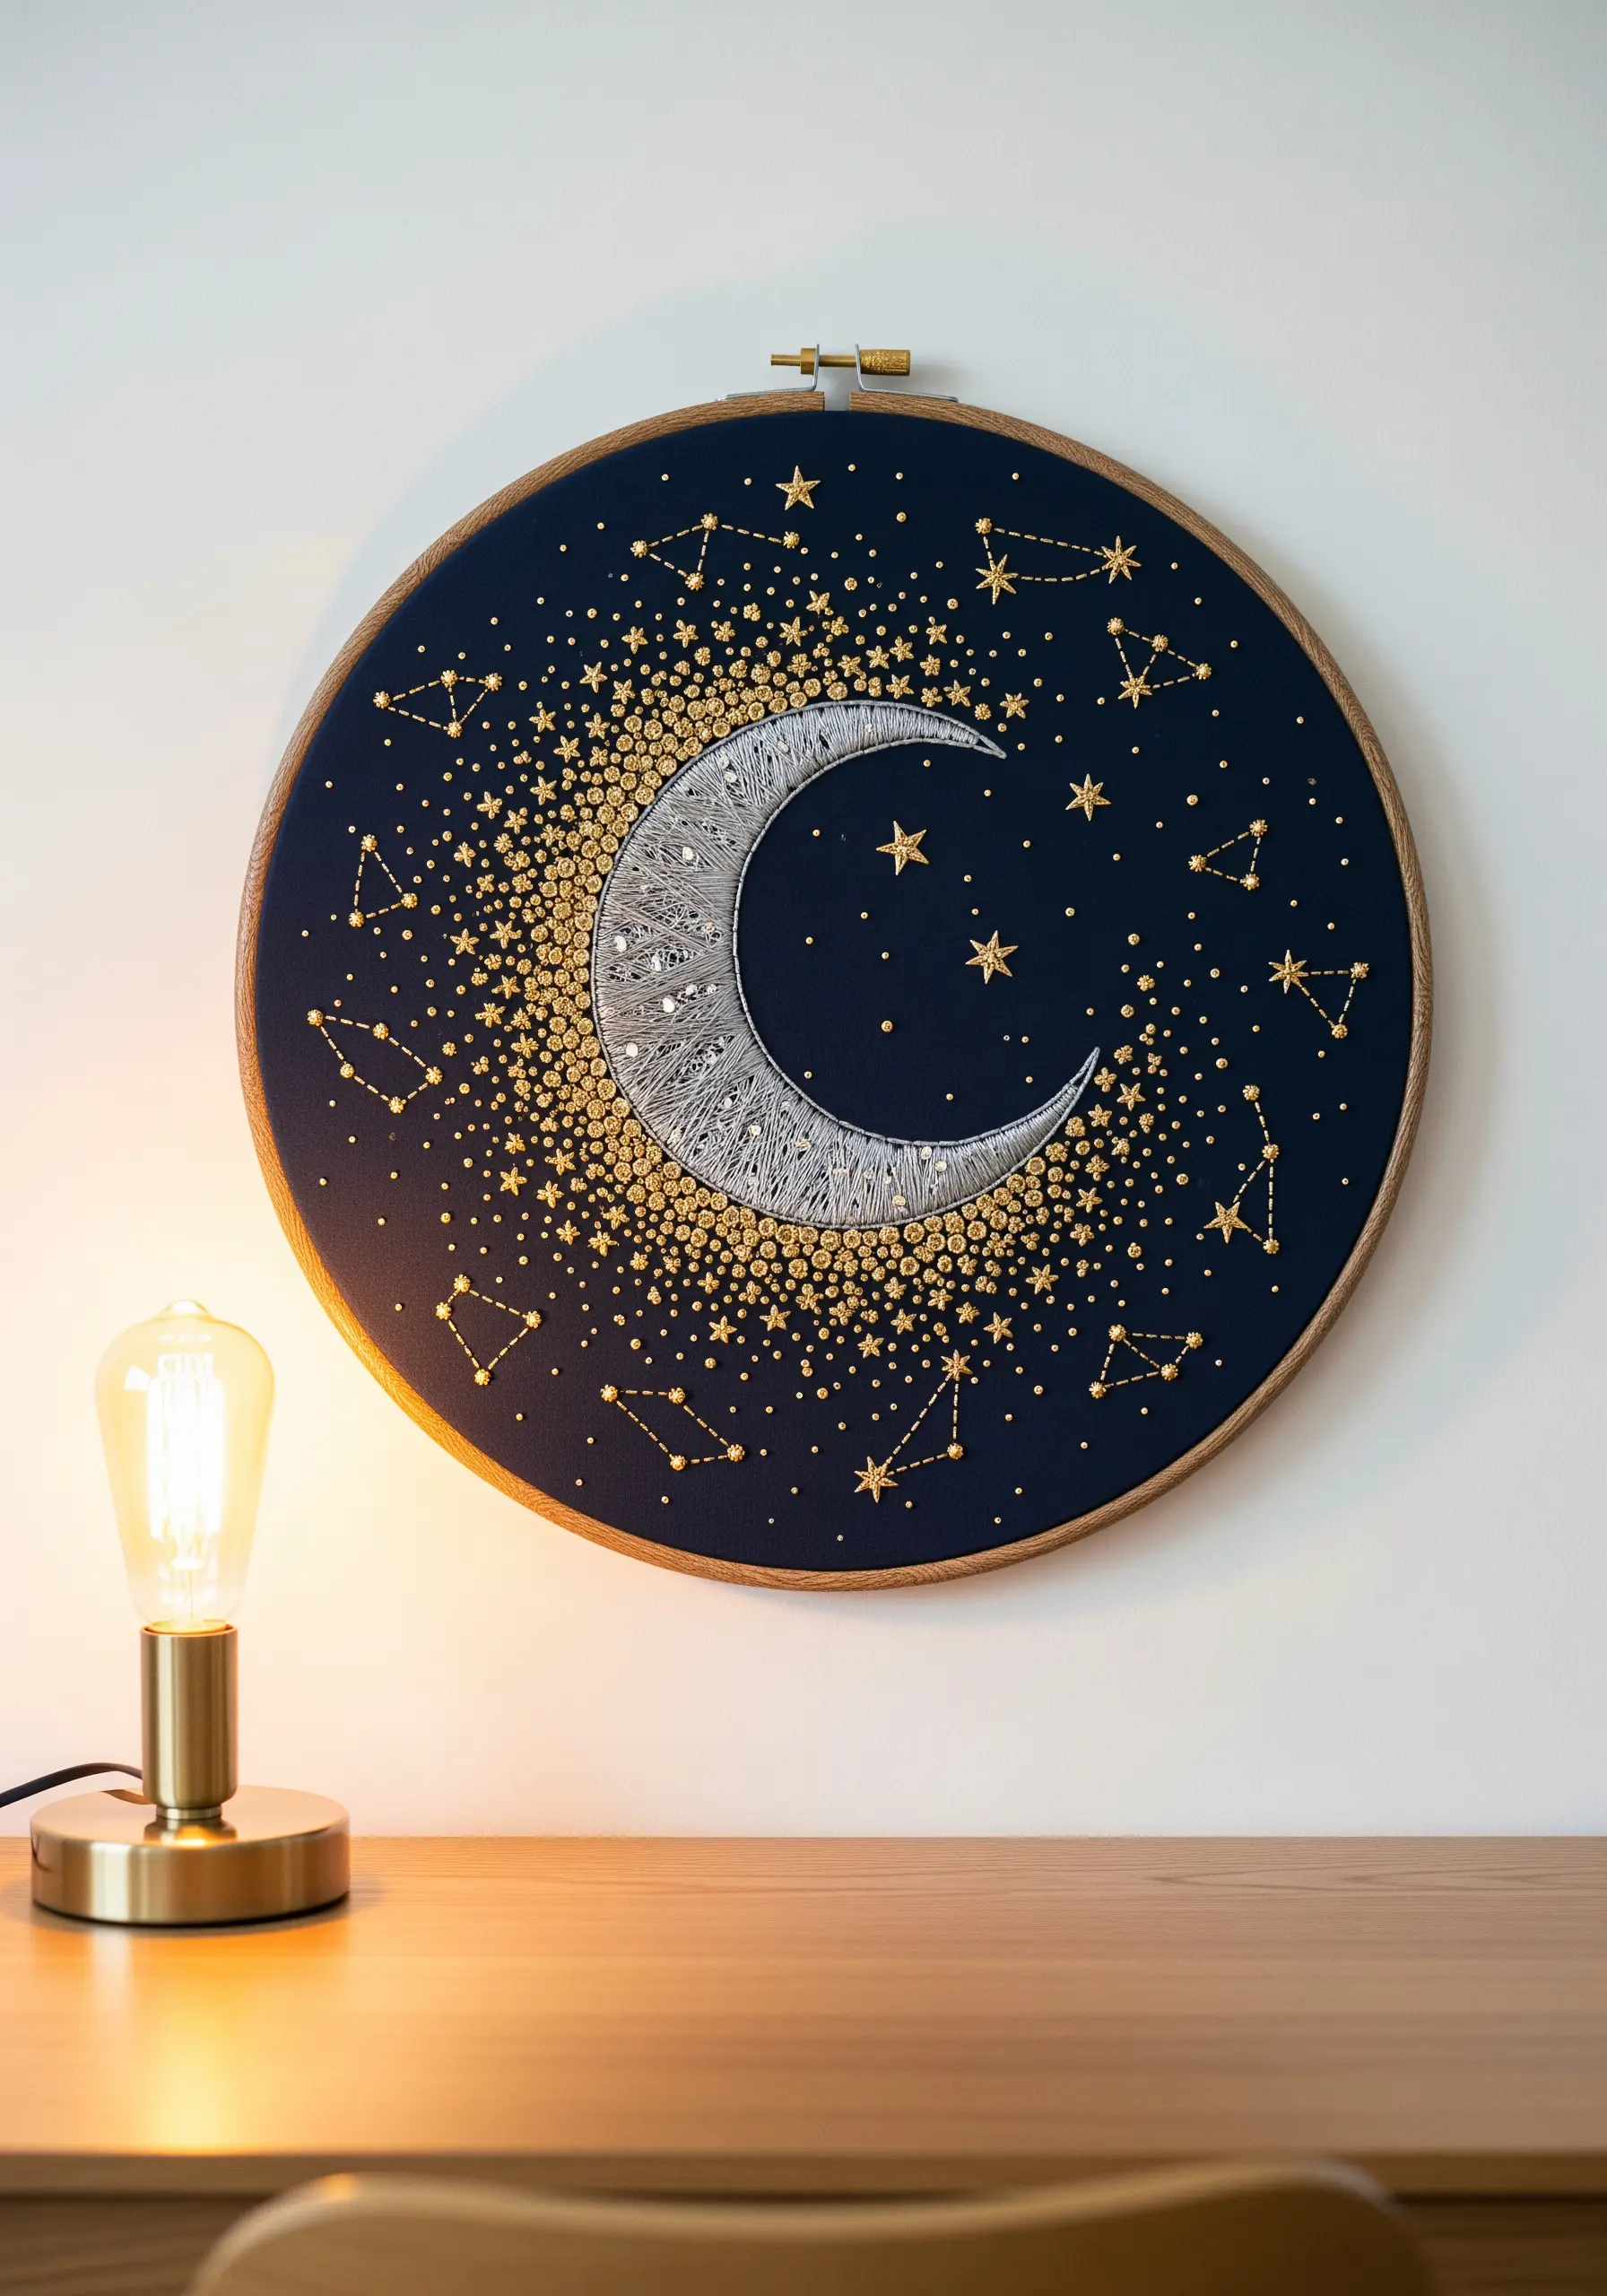
To achieve a celestial shimmer that isn’t stiff or difficult to work with, combine one strand of metallic floss with one strand of standard cotton in your needle.
Create the galactic dust effect with a dense scattering of French knots, varying their size by how many times you wrap the thread around the needle.
For the moon’s textured fill, lay down a thicker silver cord and secure it with tiny, evenly spaced stitches—a technique called couching that adds dimension and a woven quality.
The high contrast of a dark navy or black fabric makes these metallic threads pop for dramatic effect.
3. Modern Color Blocking with Thread

This design’s power comes from perfectly executed satin stitches that create bold, graphic shapes.
To ensure your color blocks have crisp, clean edges, first outline each shape with a single line of backstitch or split stitch.
This creates a firm boundary for your satin stitches to press against, preventing them from pulling or becoming uneven.
Use all six strands of cotton floss for an opaque, matte finish that emphasizes the blocky, modern composition. This is a form of abstract thread art that feels both graphic and warm.
4. Personalized Elegance with a Floral Wreath
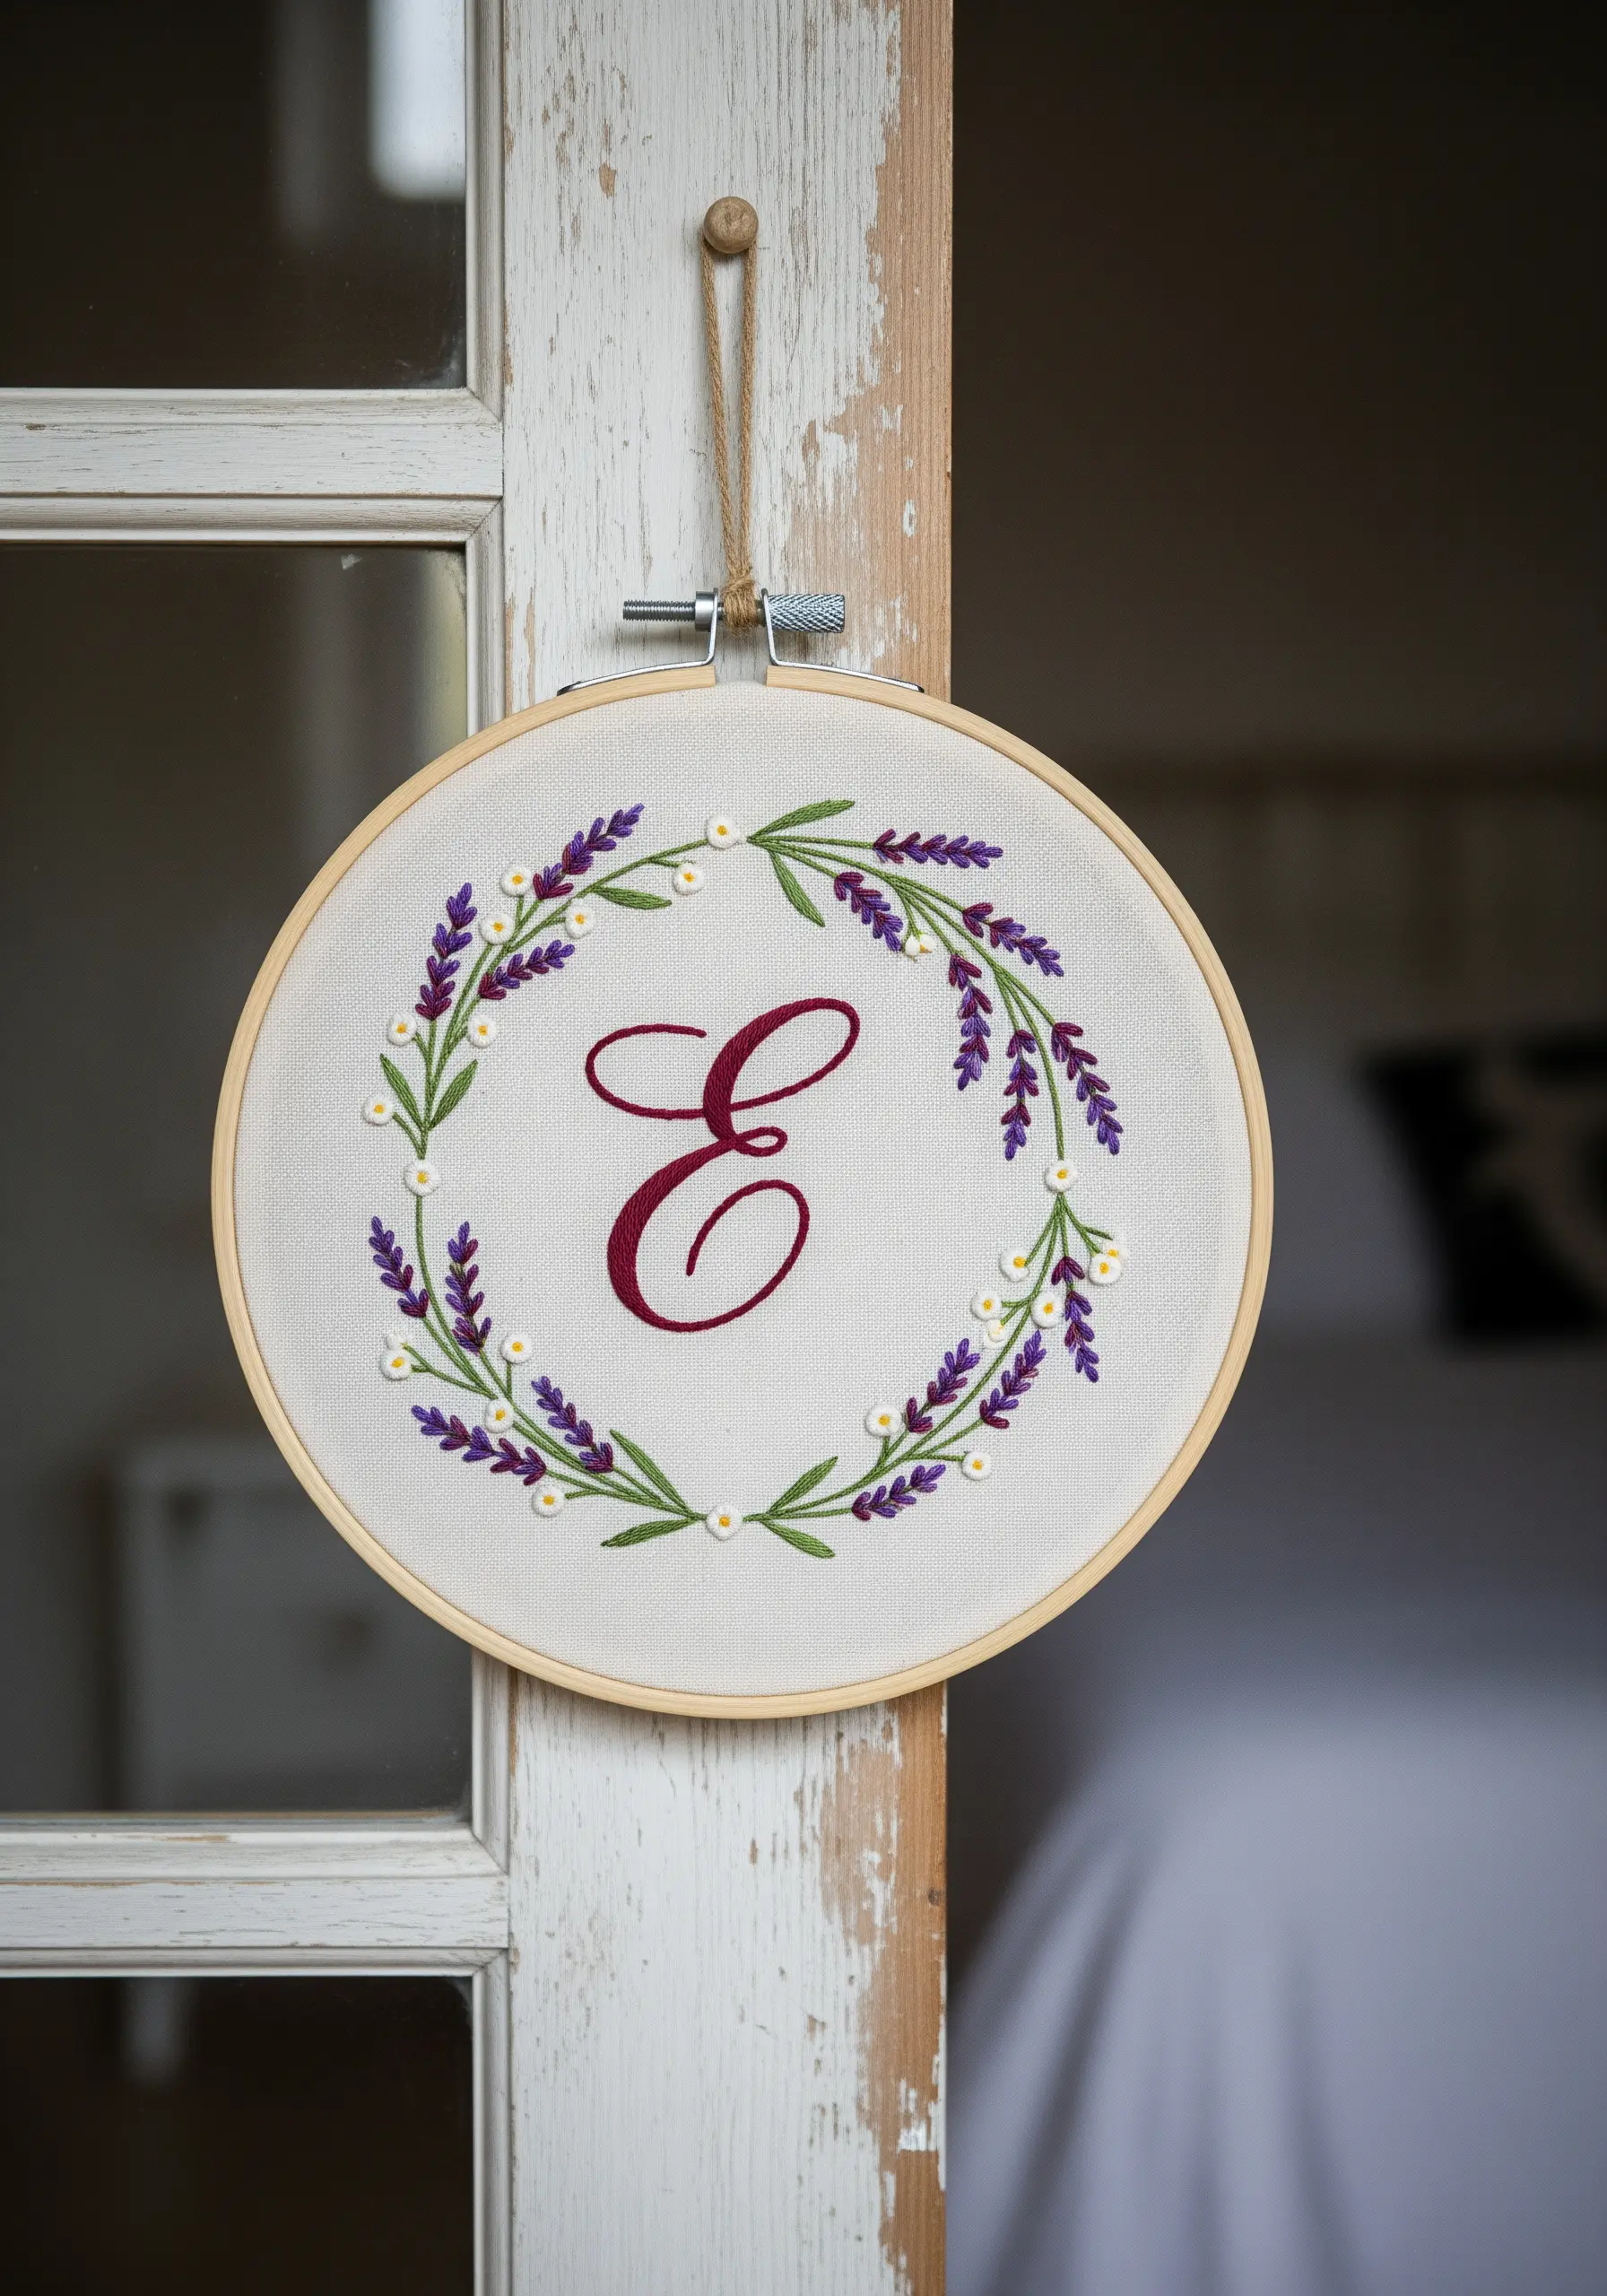
For a monogram that looks truly professional, use a padded satin stitch.
First, stitch the outline of the letter, then fill the inside with a layer of small seed stitches.
Finally, cover the entire shape with a smooth top layer of satin stitch; the padding underneath gives it a beautiful, raised dimension.
Contrast this bold initial with a delicate wreath of lazy daisy stitches for lavender blossoms and a fine stem stitch for the greenery. It’s one of the most classic botanical monogram embroidery ideas.
5. Thread Painting an Atmospheric Vista
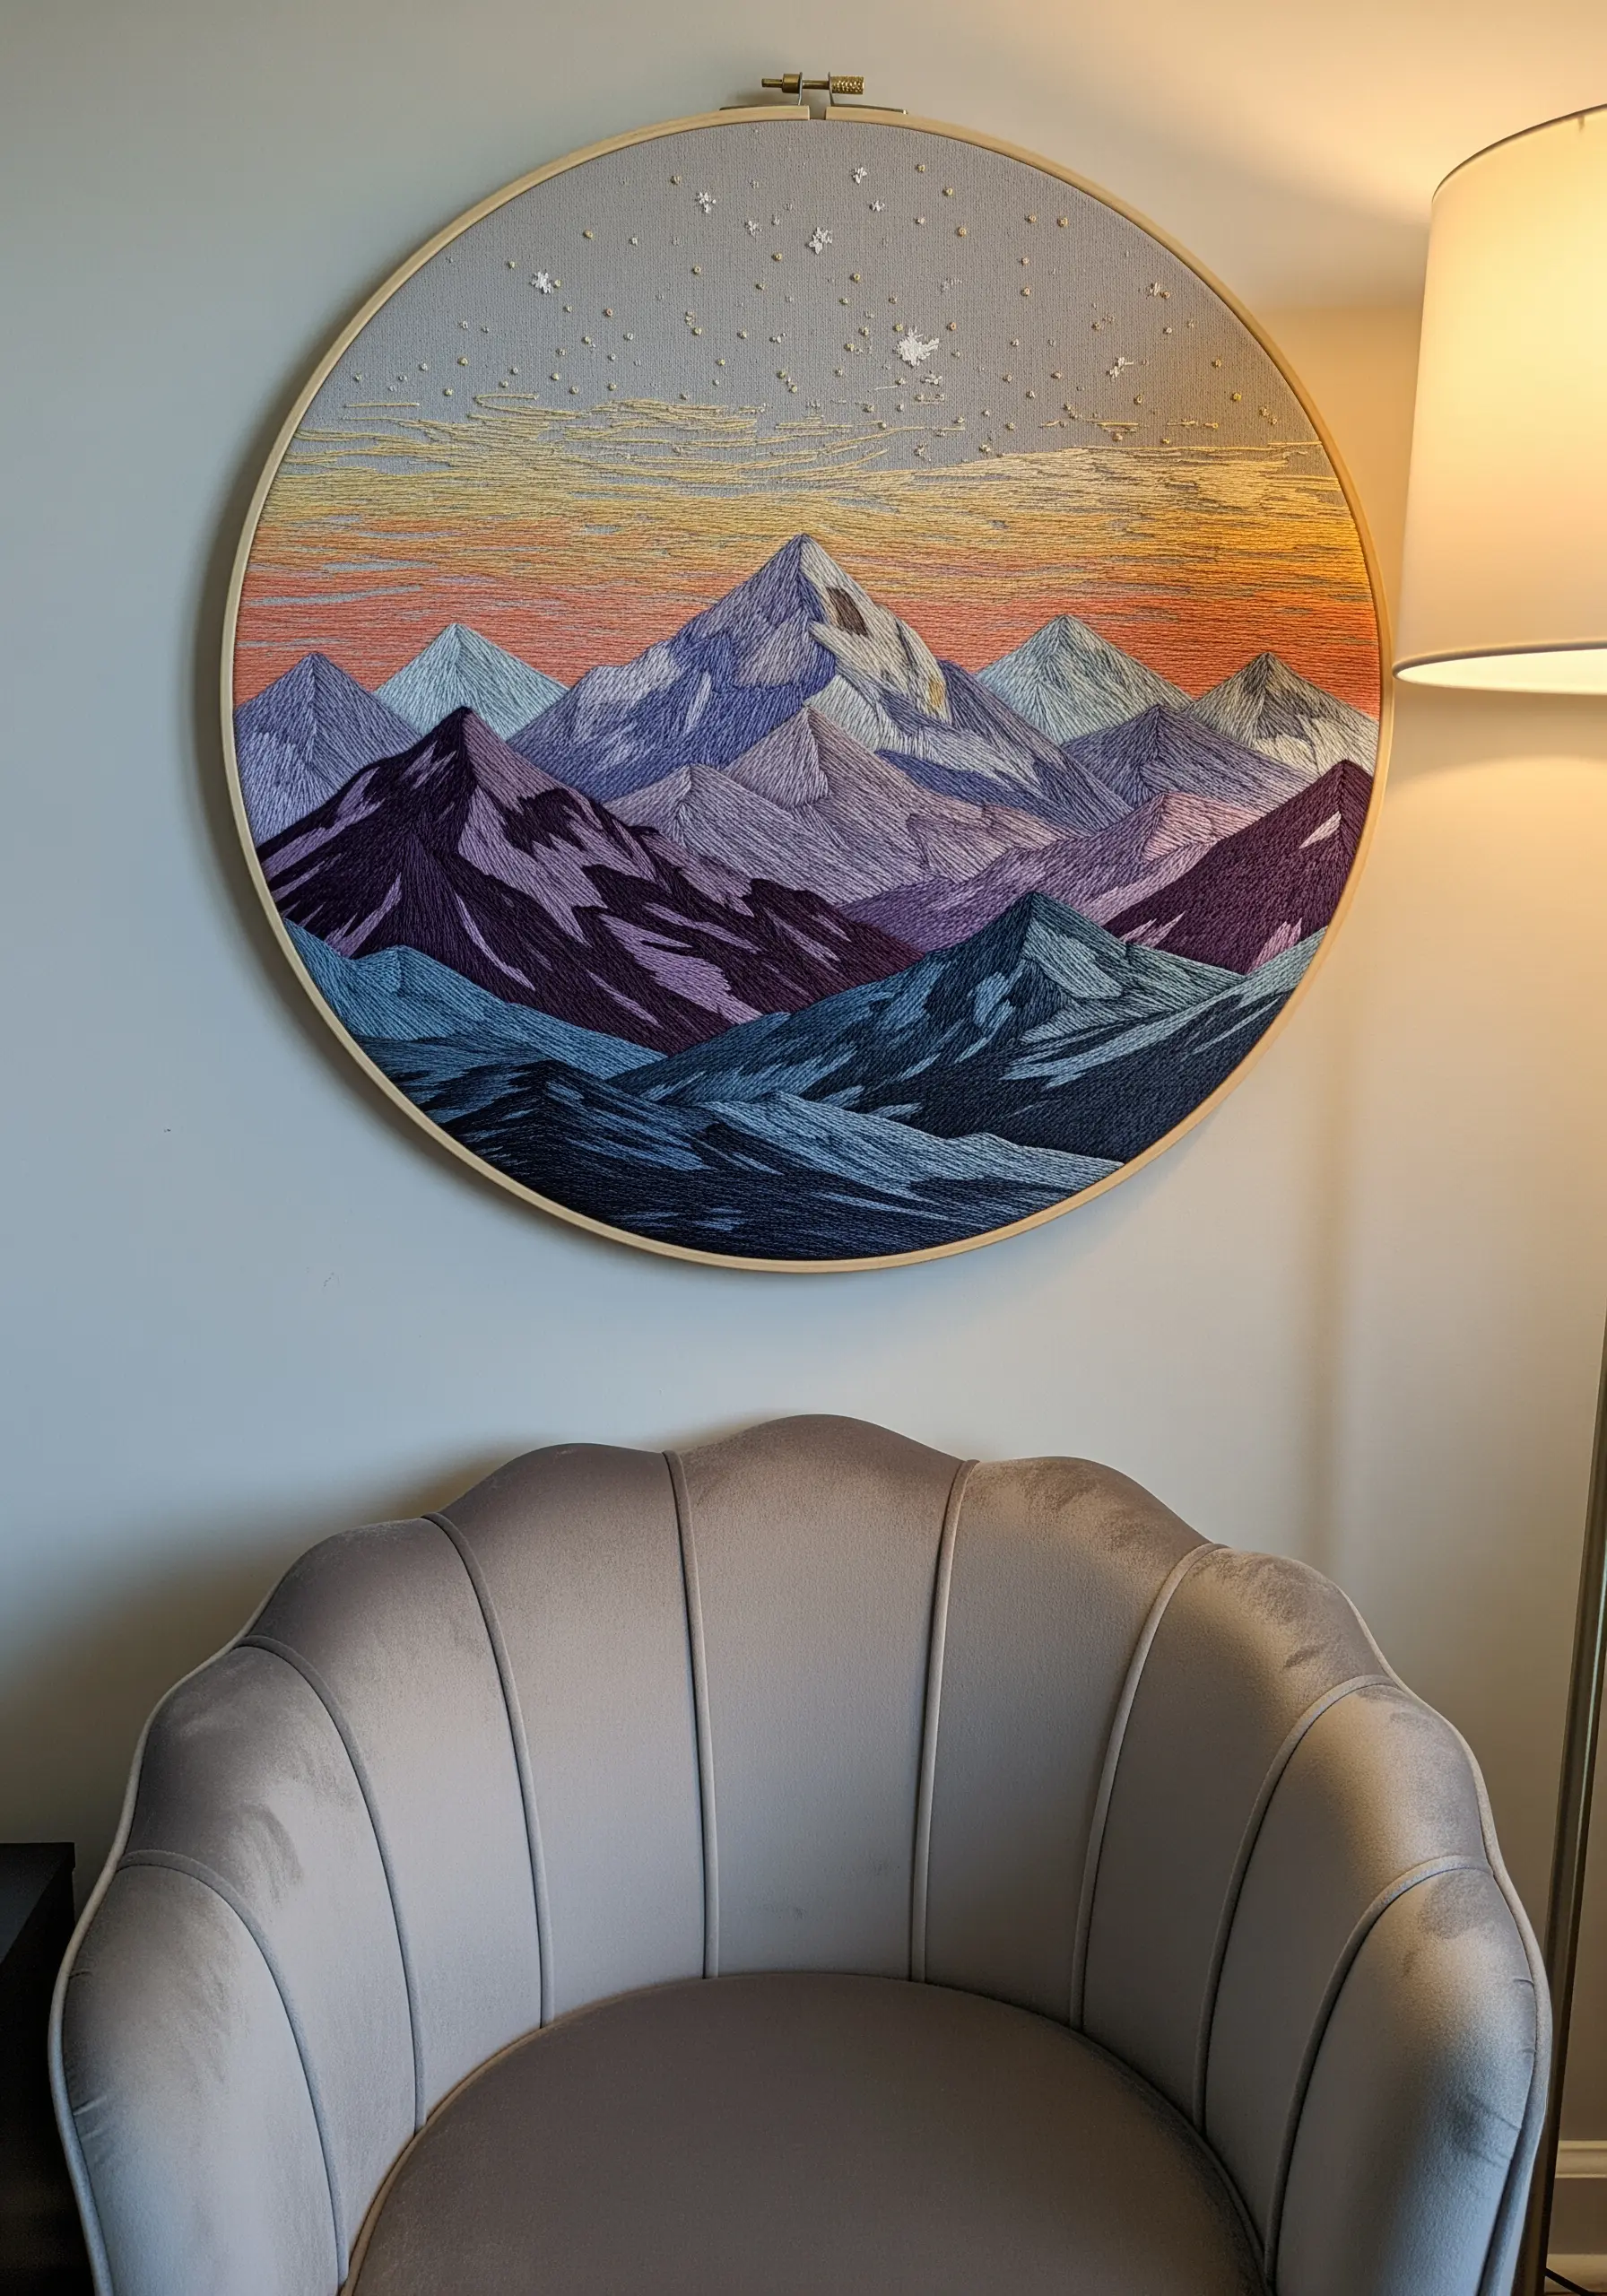
Create painterly landscapes by using the long-and-short stitch technique, often called thread painting.
The key to a smooth blend is to work with only a single strand of floss and to vary the length of your stitches, slightly overlapping each new row with the last.
Follow the natural contours of the mountains with the direction of your stitches to create a sense of form and movement.
This method allows for subtle color shifts that capture the atmospheric depth of a real landscape, making it perfect for embroidery ideas inspired by national parks.
6. Capturing Nature’s Geometry and Texture
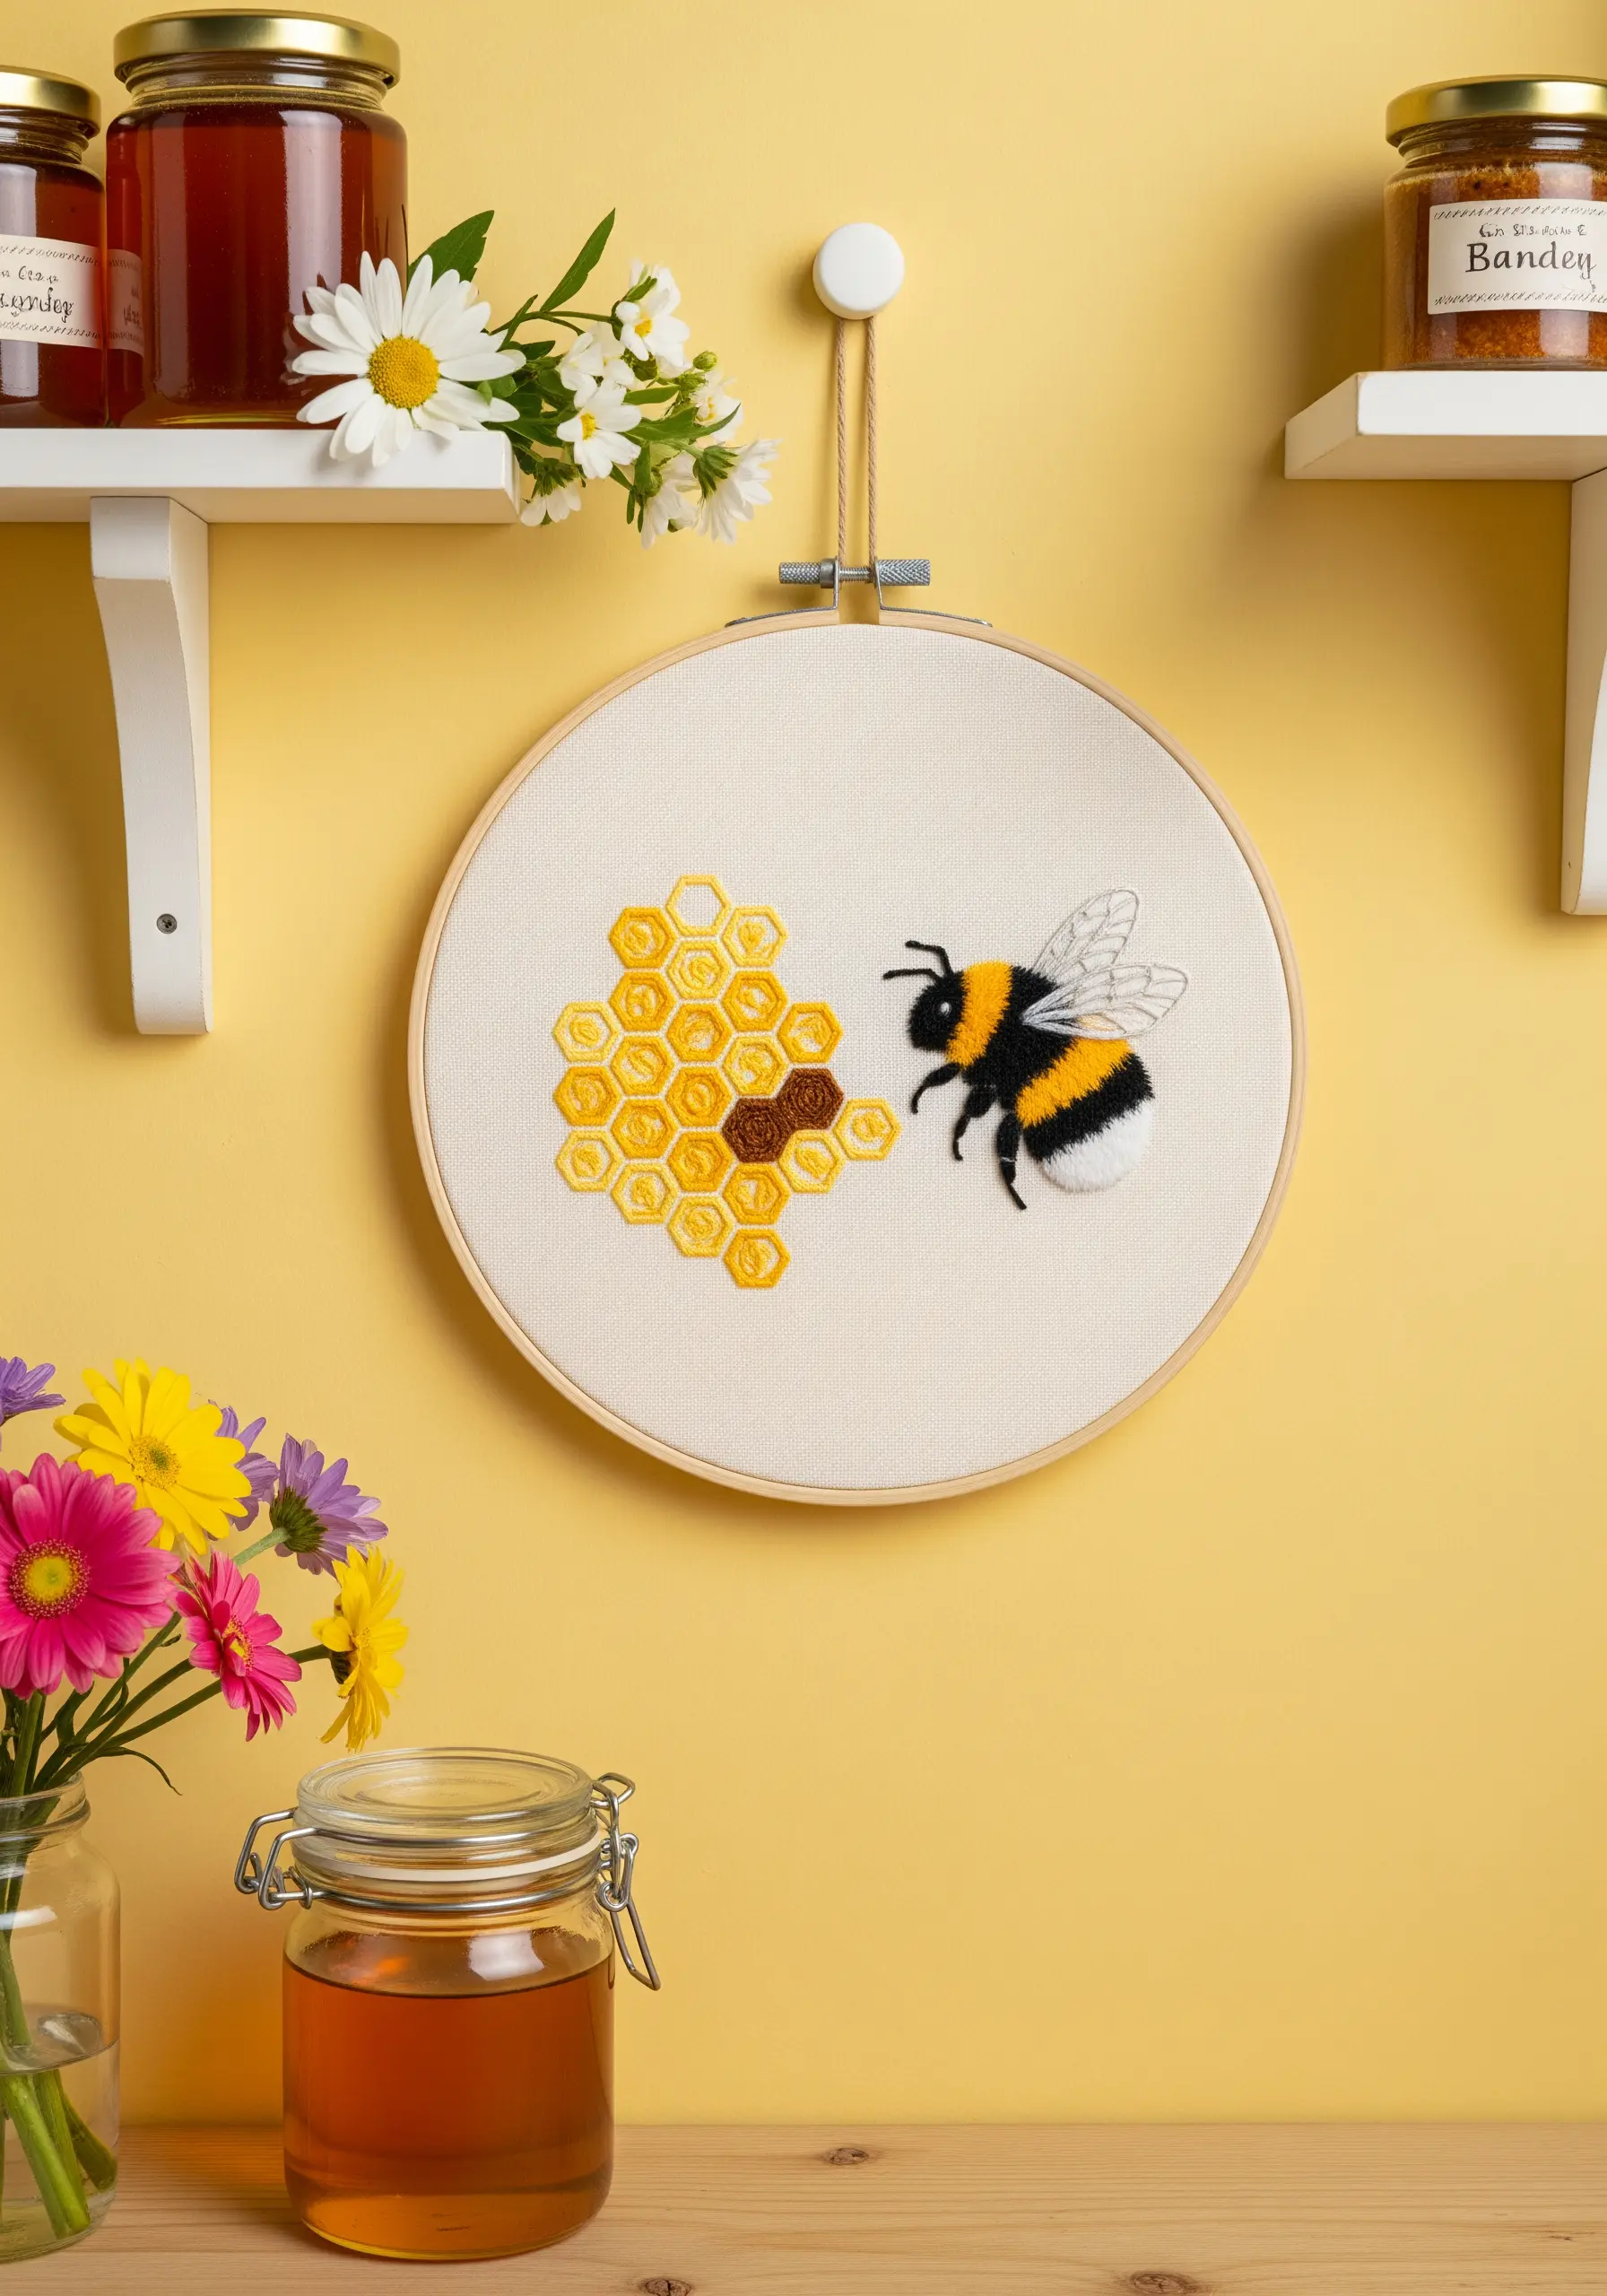
To give the bee’s body a realistic, fuzzy texture, use the turkey stitch. This technique creates thread loops that you can later snip and fluff up with your needle.
For the honeycomb, fill each cell with satin stitch, but alternate the direction of your stitches in adjacent cells.
This subtle shift will cause the cells to catch the light differently, creating the illusion of depth.
Define the geometric structure by outlining each cell with a single line of backstitch in a darker gold.
7. Sculpting Motion with Directional Stitches
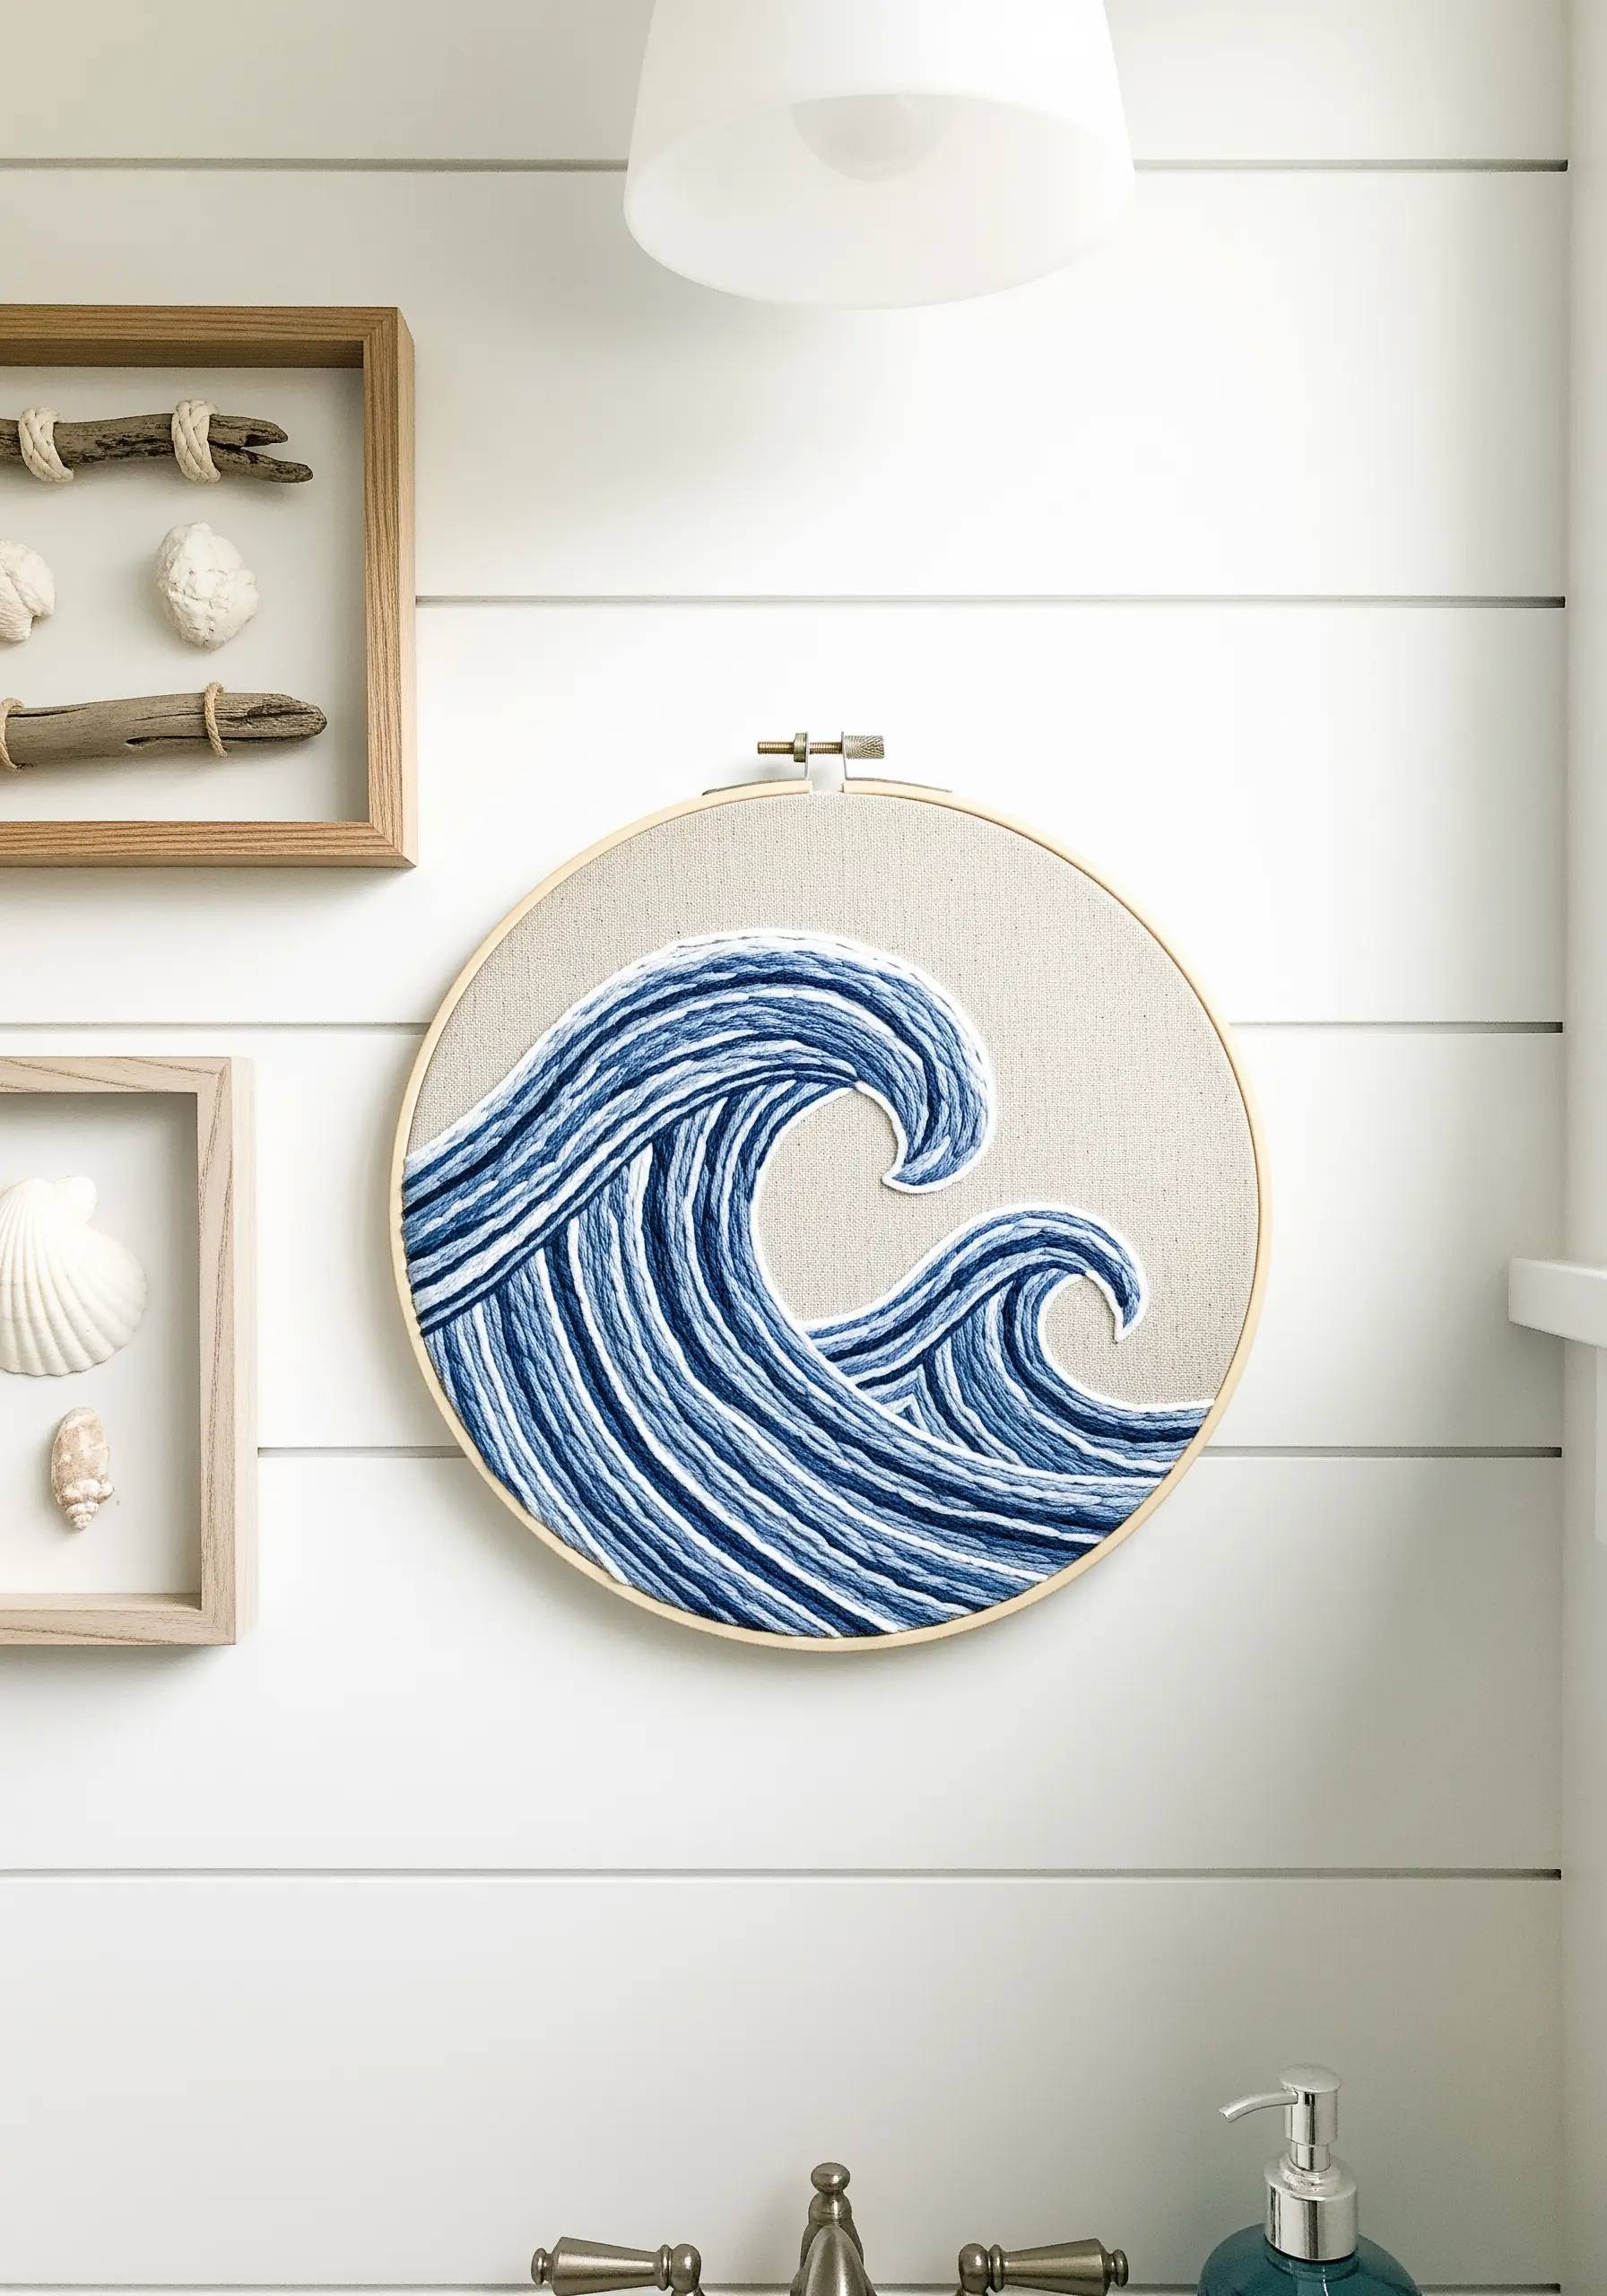
The dynamic movement in this piece is achieved by making your stitch direction follow the curve of the waves.
Instead of uniform vertical or horizontal fills, angle your needle to mimic the water’s flow.
Create depth by blending multiple shades of blue using a long-and-short stitch, and add highlights with bright white for the foam.
Using a slightly thicker thread, like a perle cotton, for the whitecaps will give them a raised texture that stands out. This is a beautiful way to create coastal-inspired embroidery scenes.
8. The Elegance of a Single, Confident Line
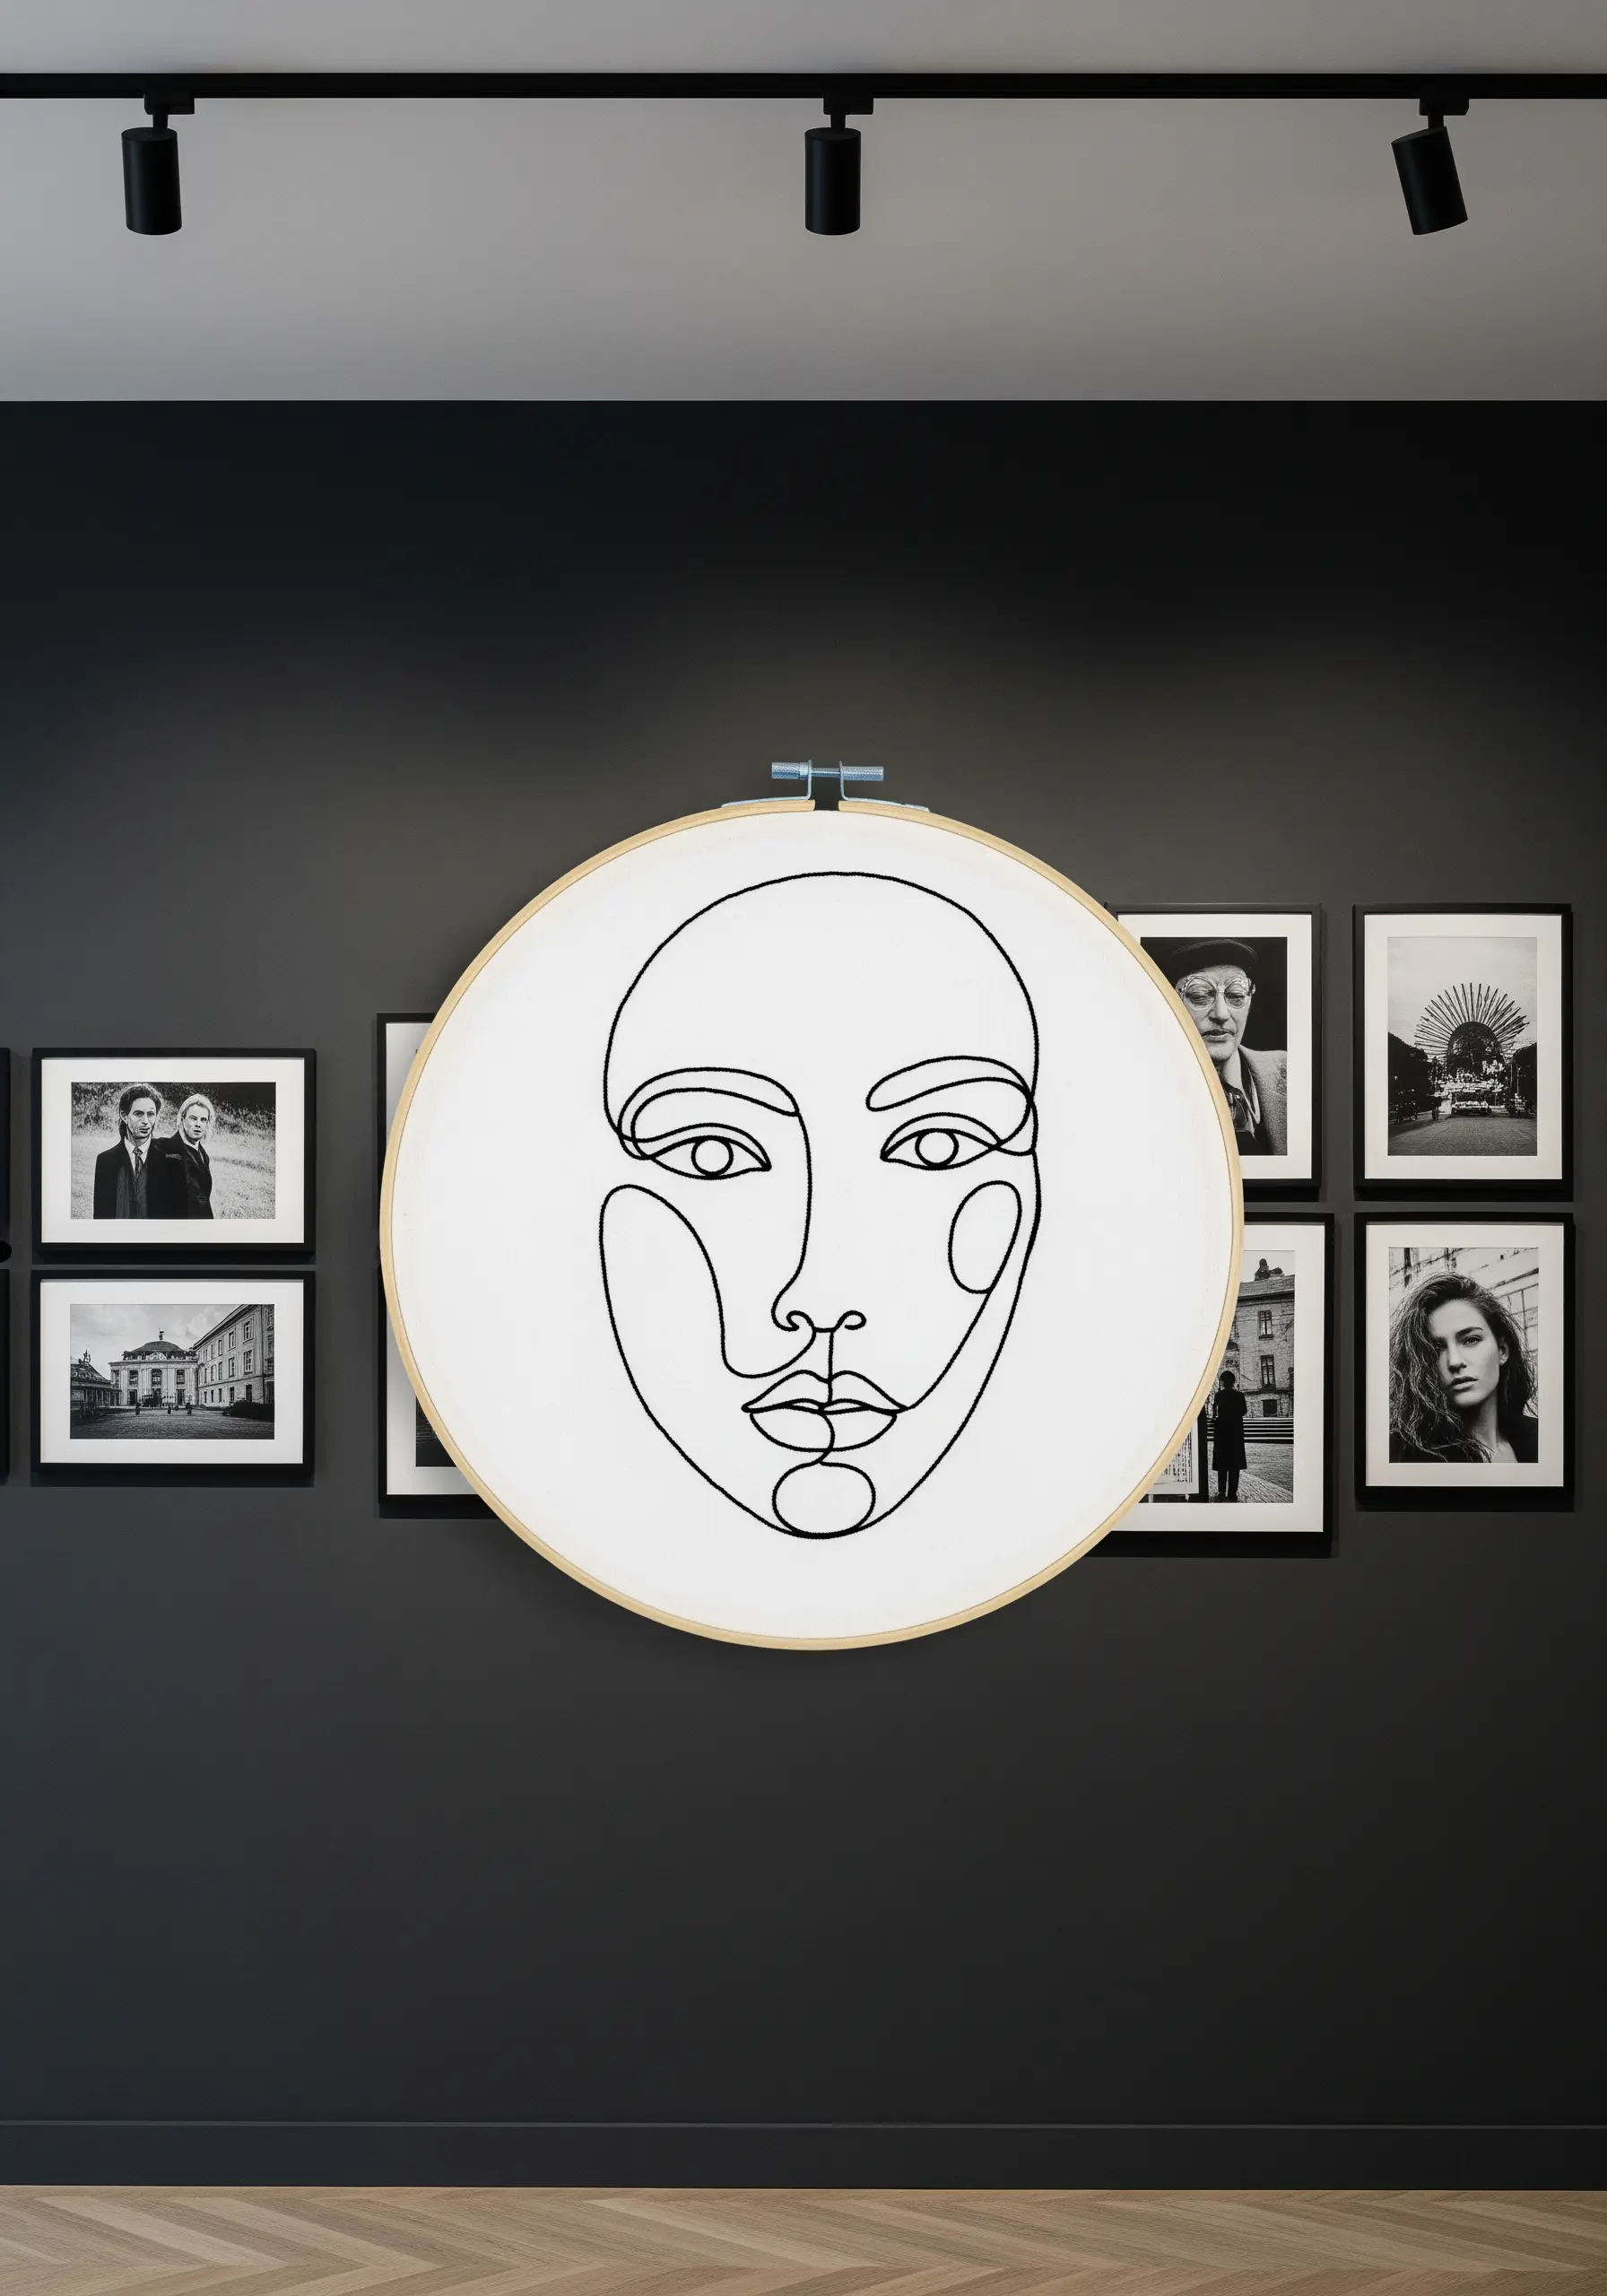
For minimalist line art to look polished, the line itself must be flawless.
Achieve a smooth, rope-like consistency by using a whipped backstitch—first, you create a standard backstitch line, then you whip a second thread around it without piercing the fabric.
This technique eliminates the segmented look of a basic backstitch, creating one continuous, fluid line.
Use three strands of floss for a line with substance, and focus on maintaining even tension. These minimalist line art embroidery patterns make a bold statement.
9. A Gallery of Garden Favorites
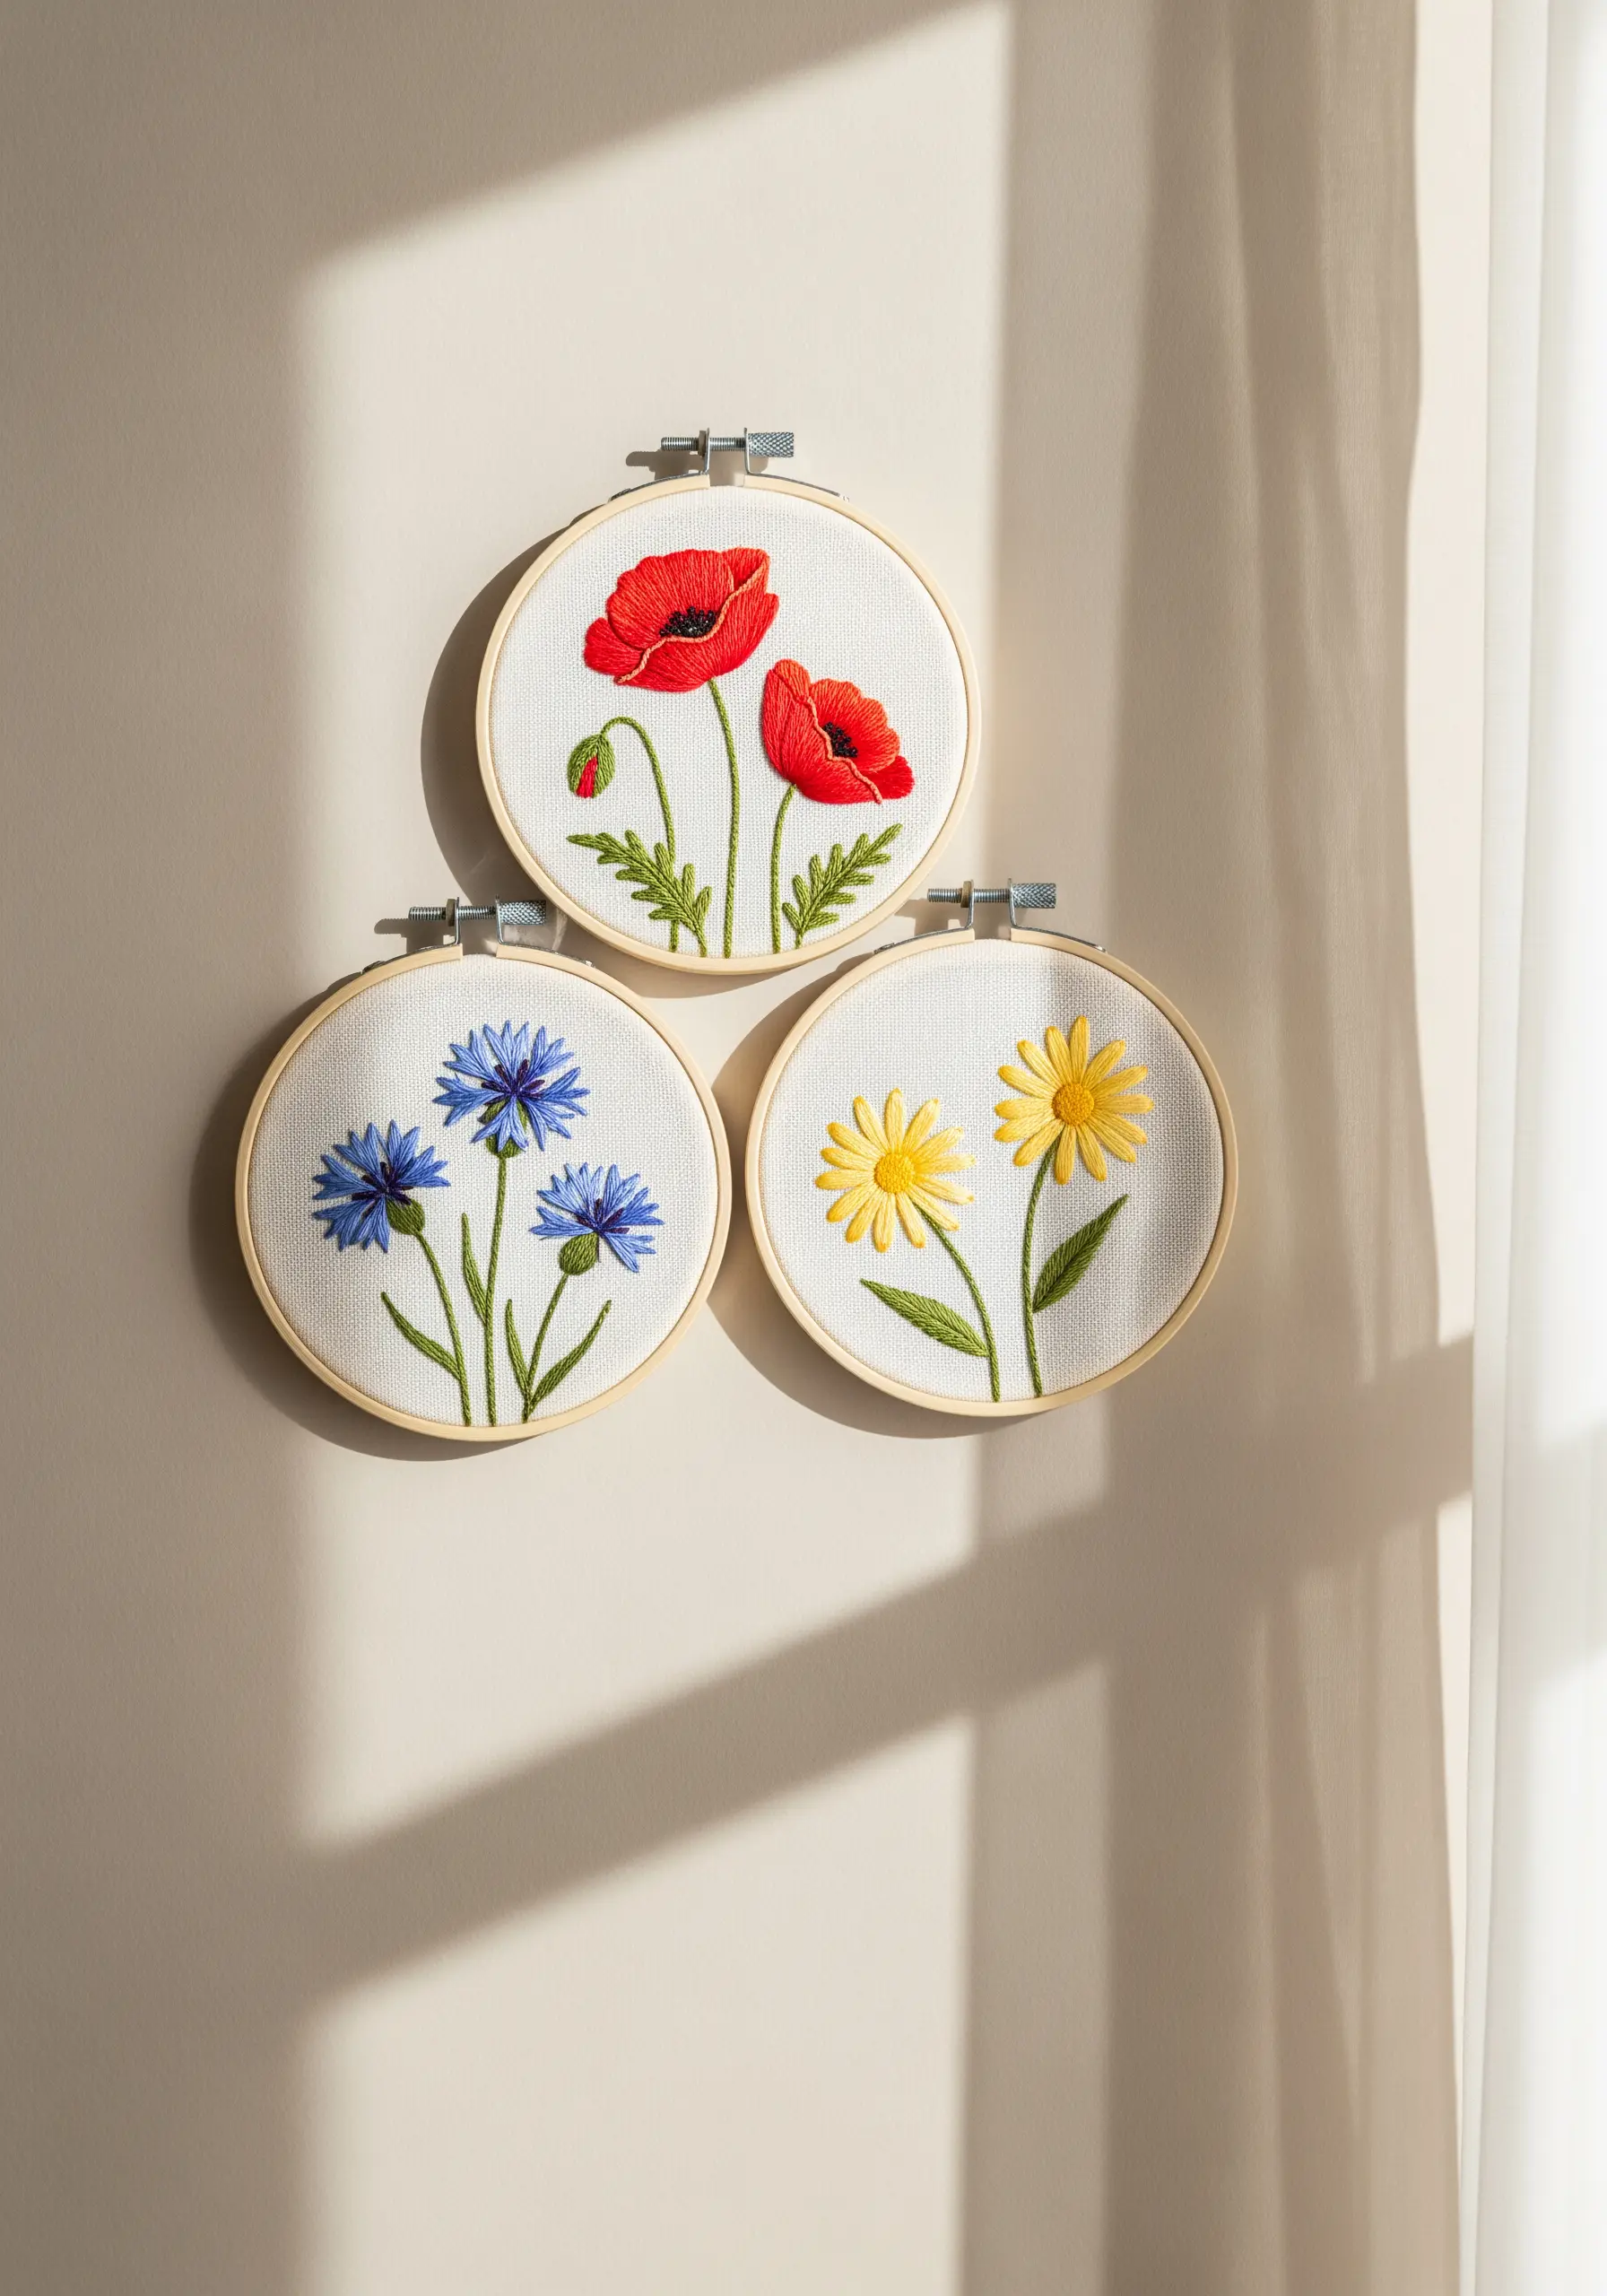
Create a stunning wall display by stitching a trio of hoops with a unified theme.
By using the same size hoop and background fabric for each piece, you establish visual harmony.
Then, explore different stitches for each flower: long-and-short stitch to blend colors on the poppy petals, clusters of straight stitches for the cornflower’s texture, and classic satin stitch for the daisy.
This grouping technique is an excellent way to experiment with new wildflower thread palettes.
10. Weaving Words with Botanical Flourishes
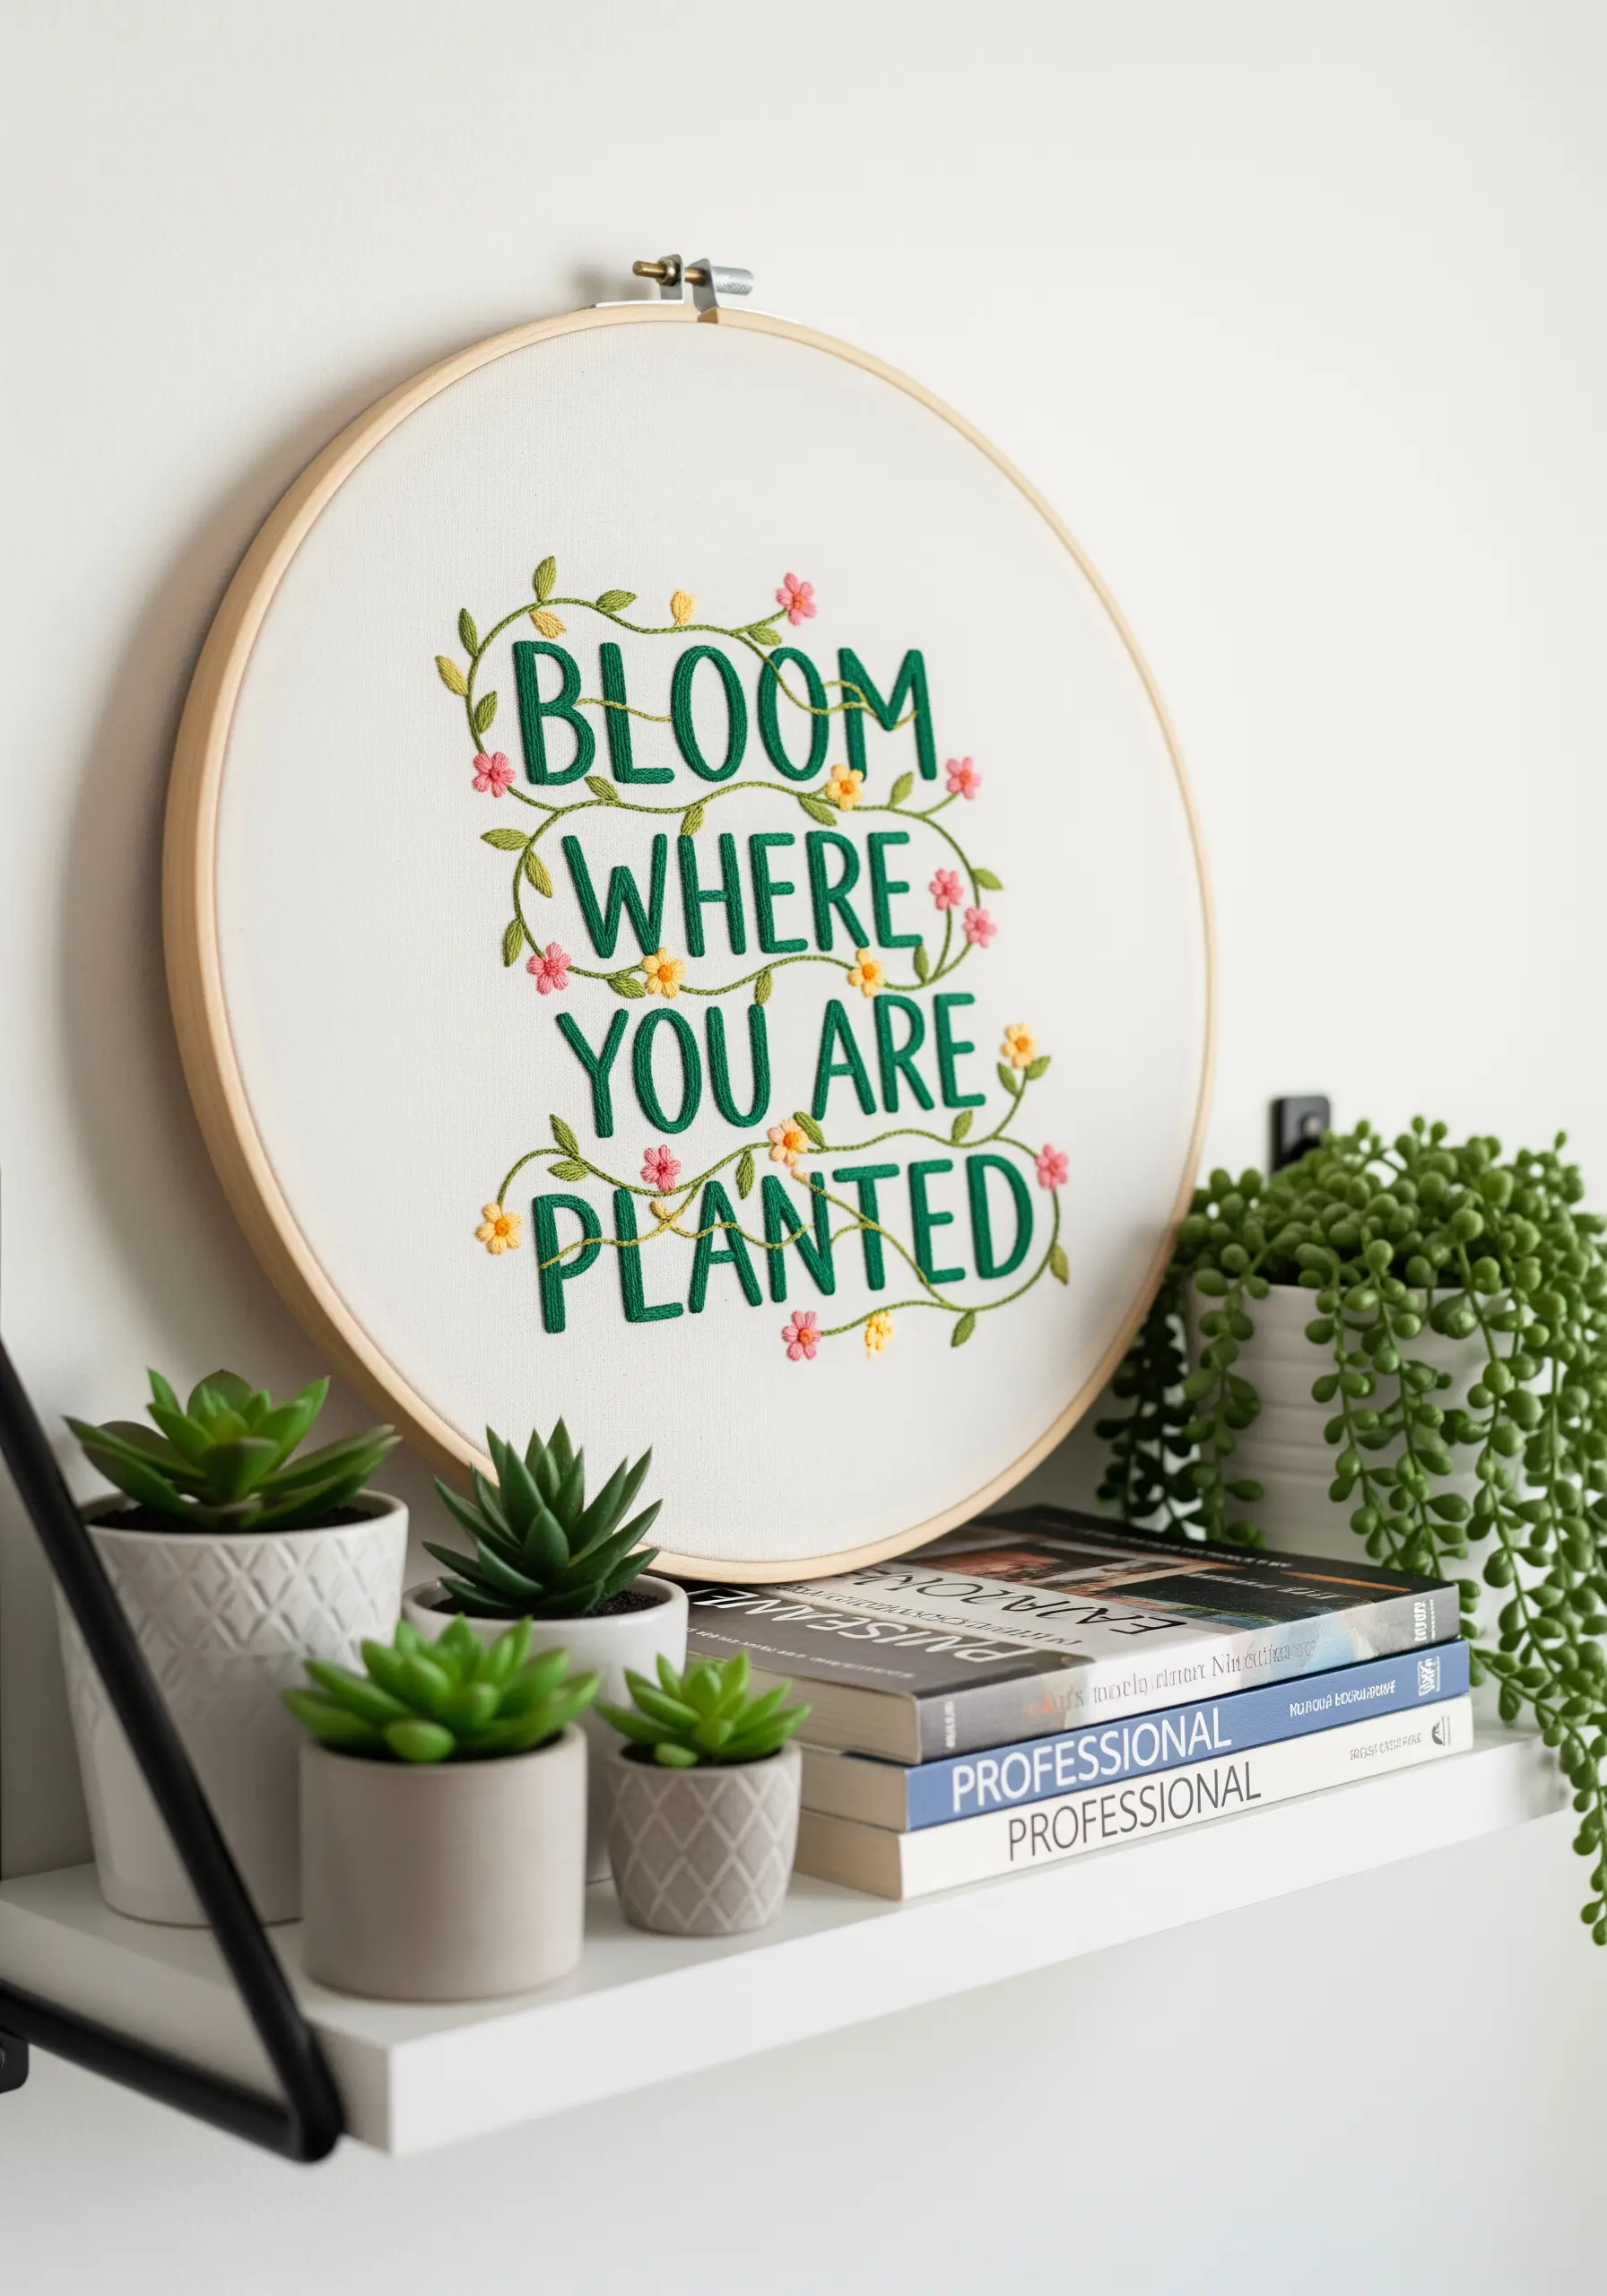
To ensure your embroidered lettering is bold and easy to read, use a padded satin stitch.
Outline your letters, fill them with a base layer of small stitches, then cover that with the final satin stitch layer for a raised effect.
Integrate the text into the design by weaving delicate vines around it using a simple stem stitch.
Add tiny French knots and lazy daisy stitches as blossoms to soften the graphic quality of the letters, creating one cohesive, beautiful piece. This makes for a lovely embroidered quote wall hanging.
11. Stitching the Night Sky with Luminescent Thread
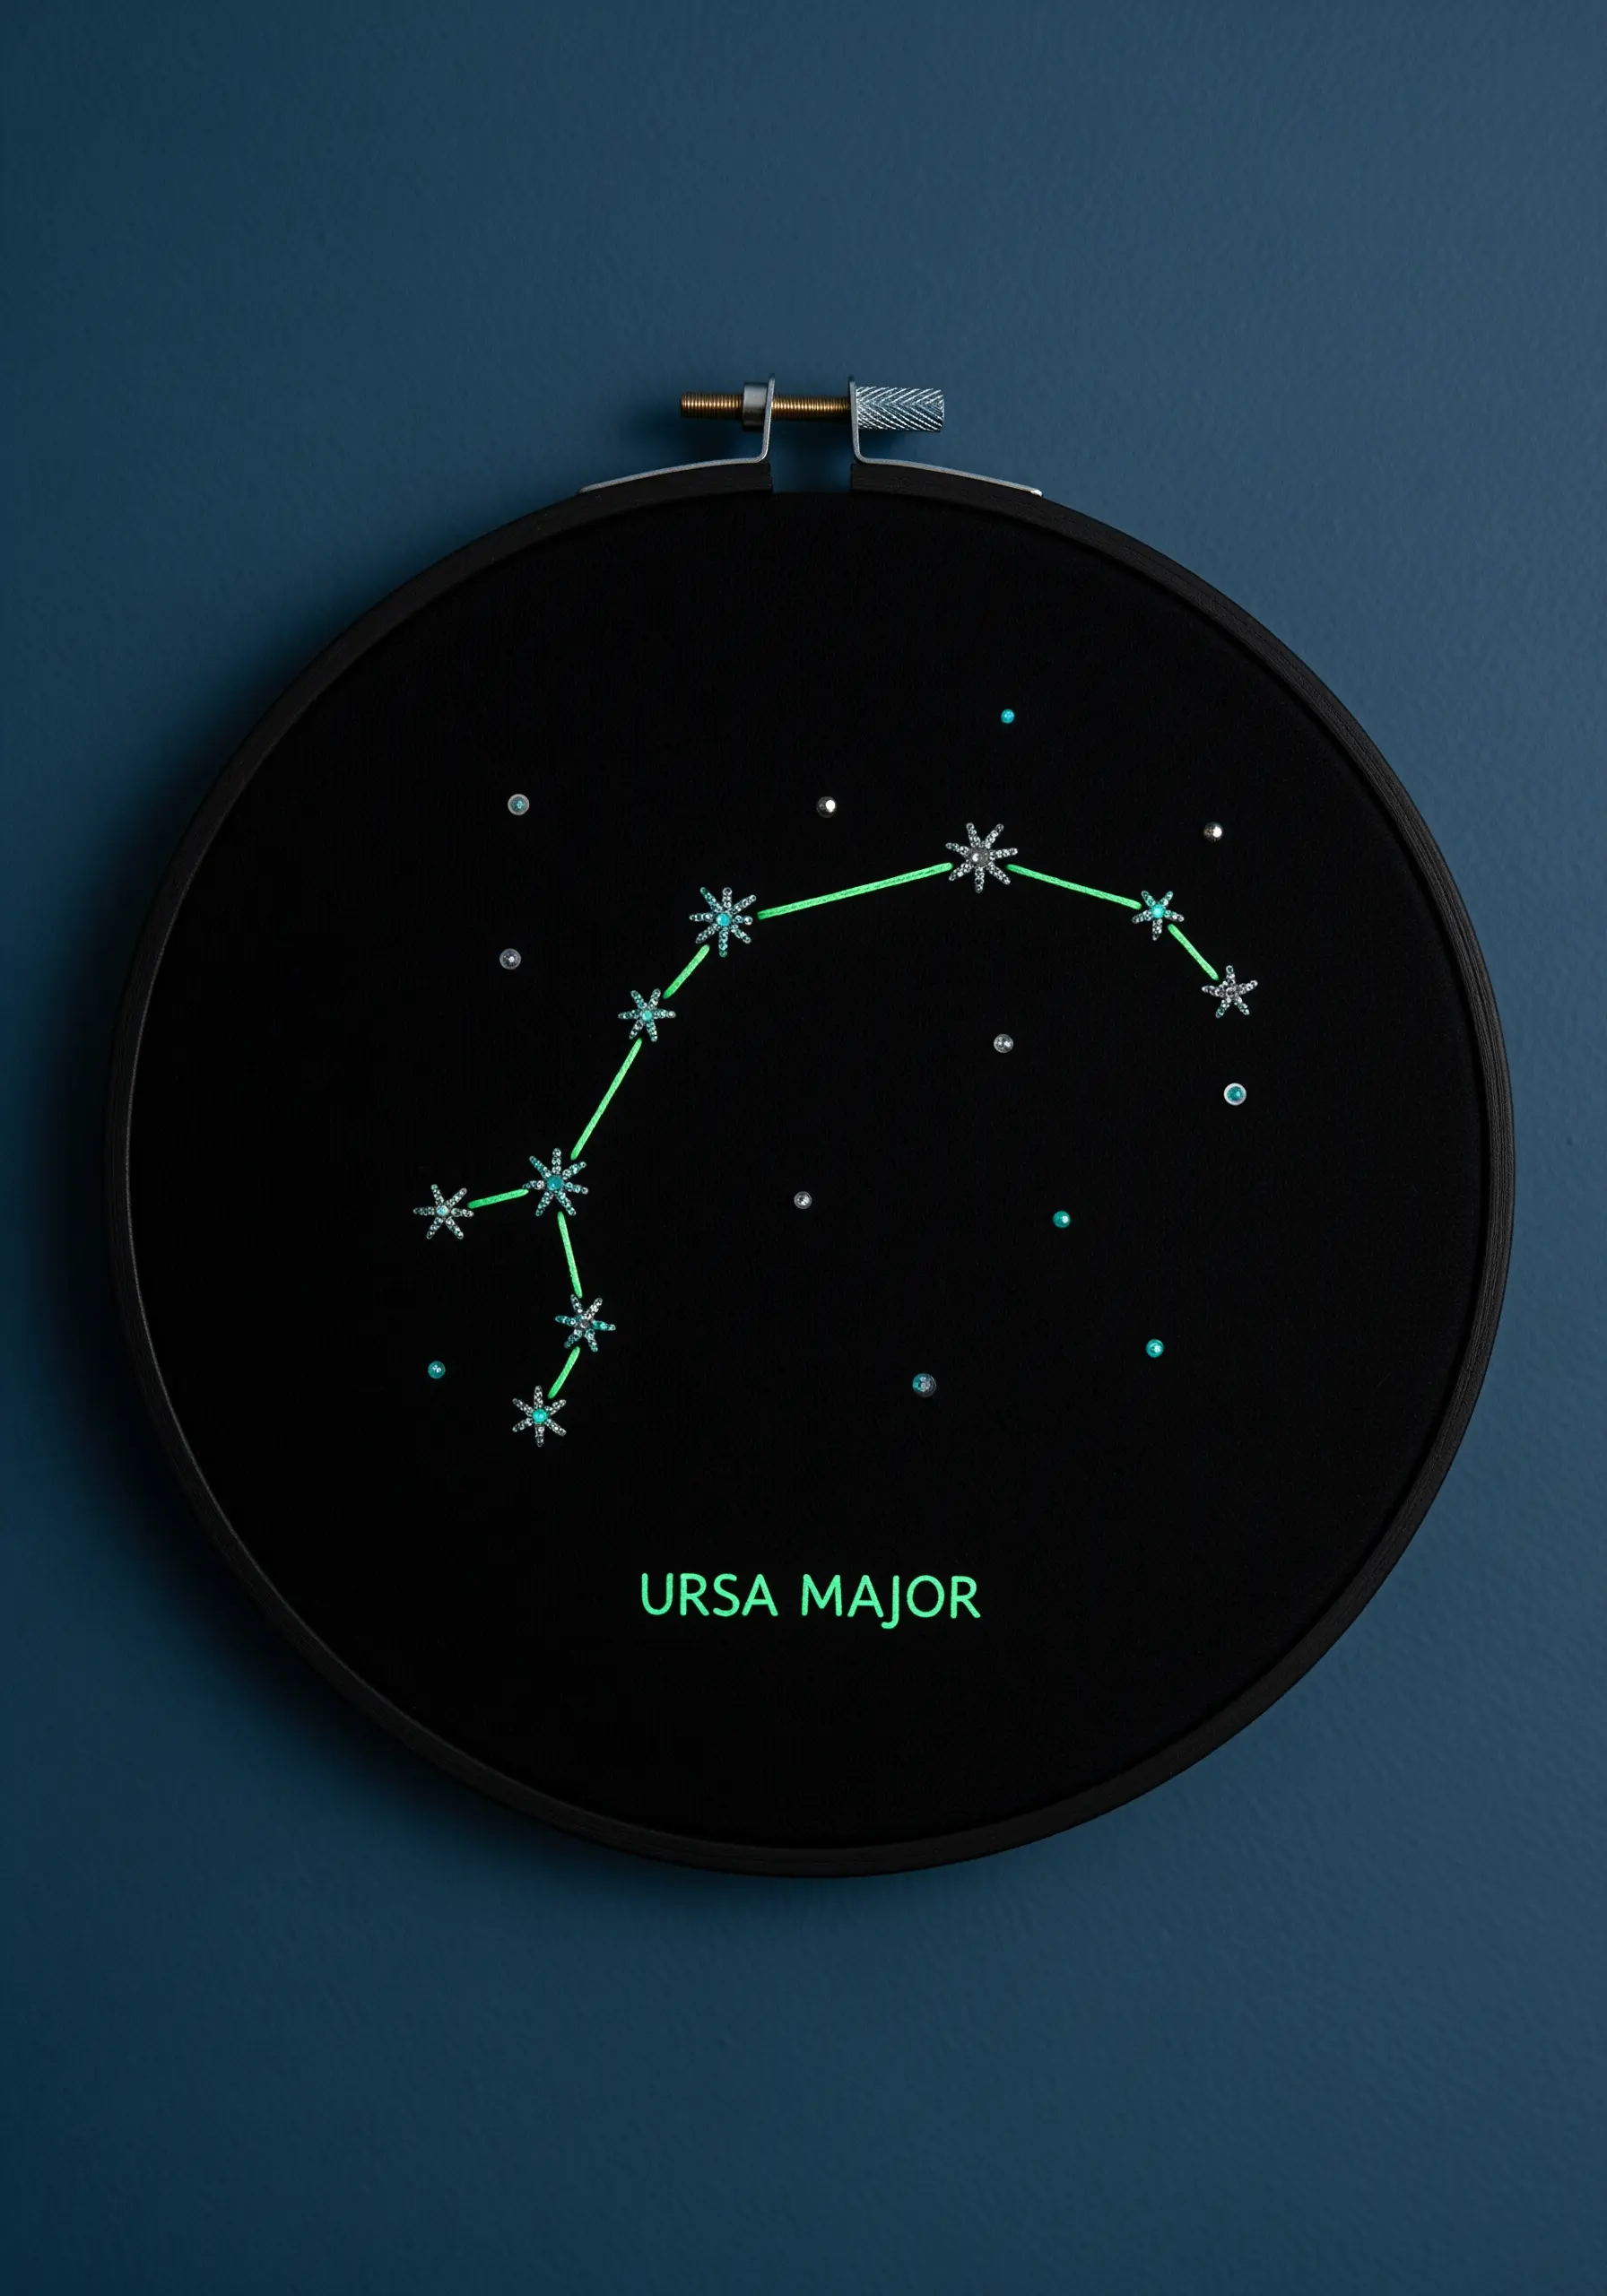
Create a design with a hidden surprise by using glow-in-the-dark embroidery floss.
This specialty thread absorbs light and then glows softly in the dark, making it perfect for celestial themes.
Use a simple backstitch for the constellation lines and small star stitches or French knots for the individual stars.
To add texture that is visible during the day, incorporate tiny silver beads or sequins that will catch the light and complement the otherworldly glow at night.
12. Capturing Character with Thread Painting
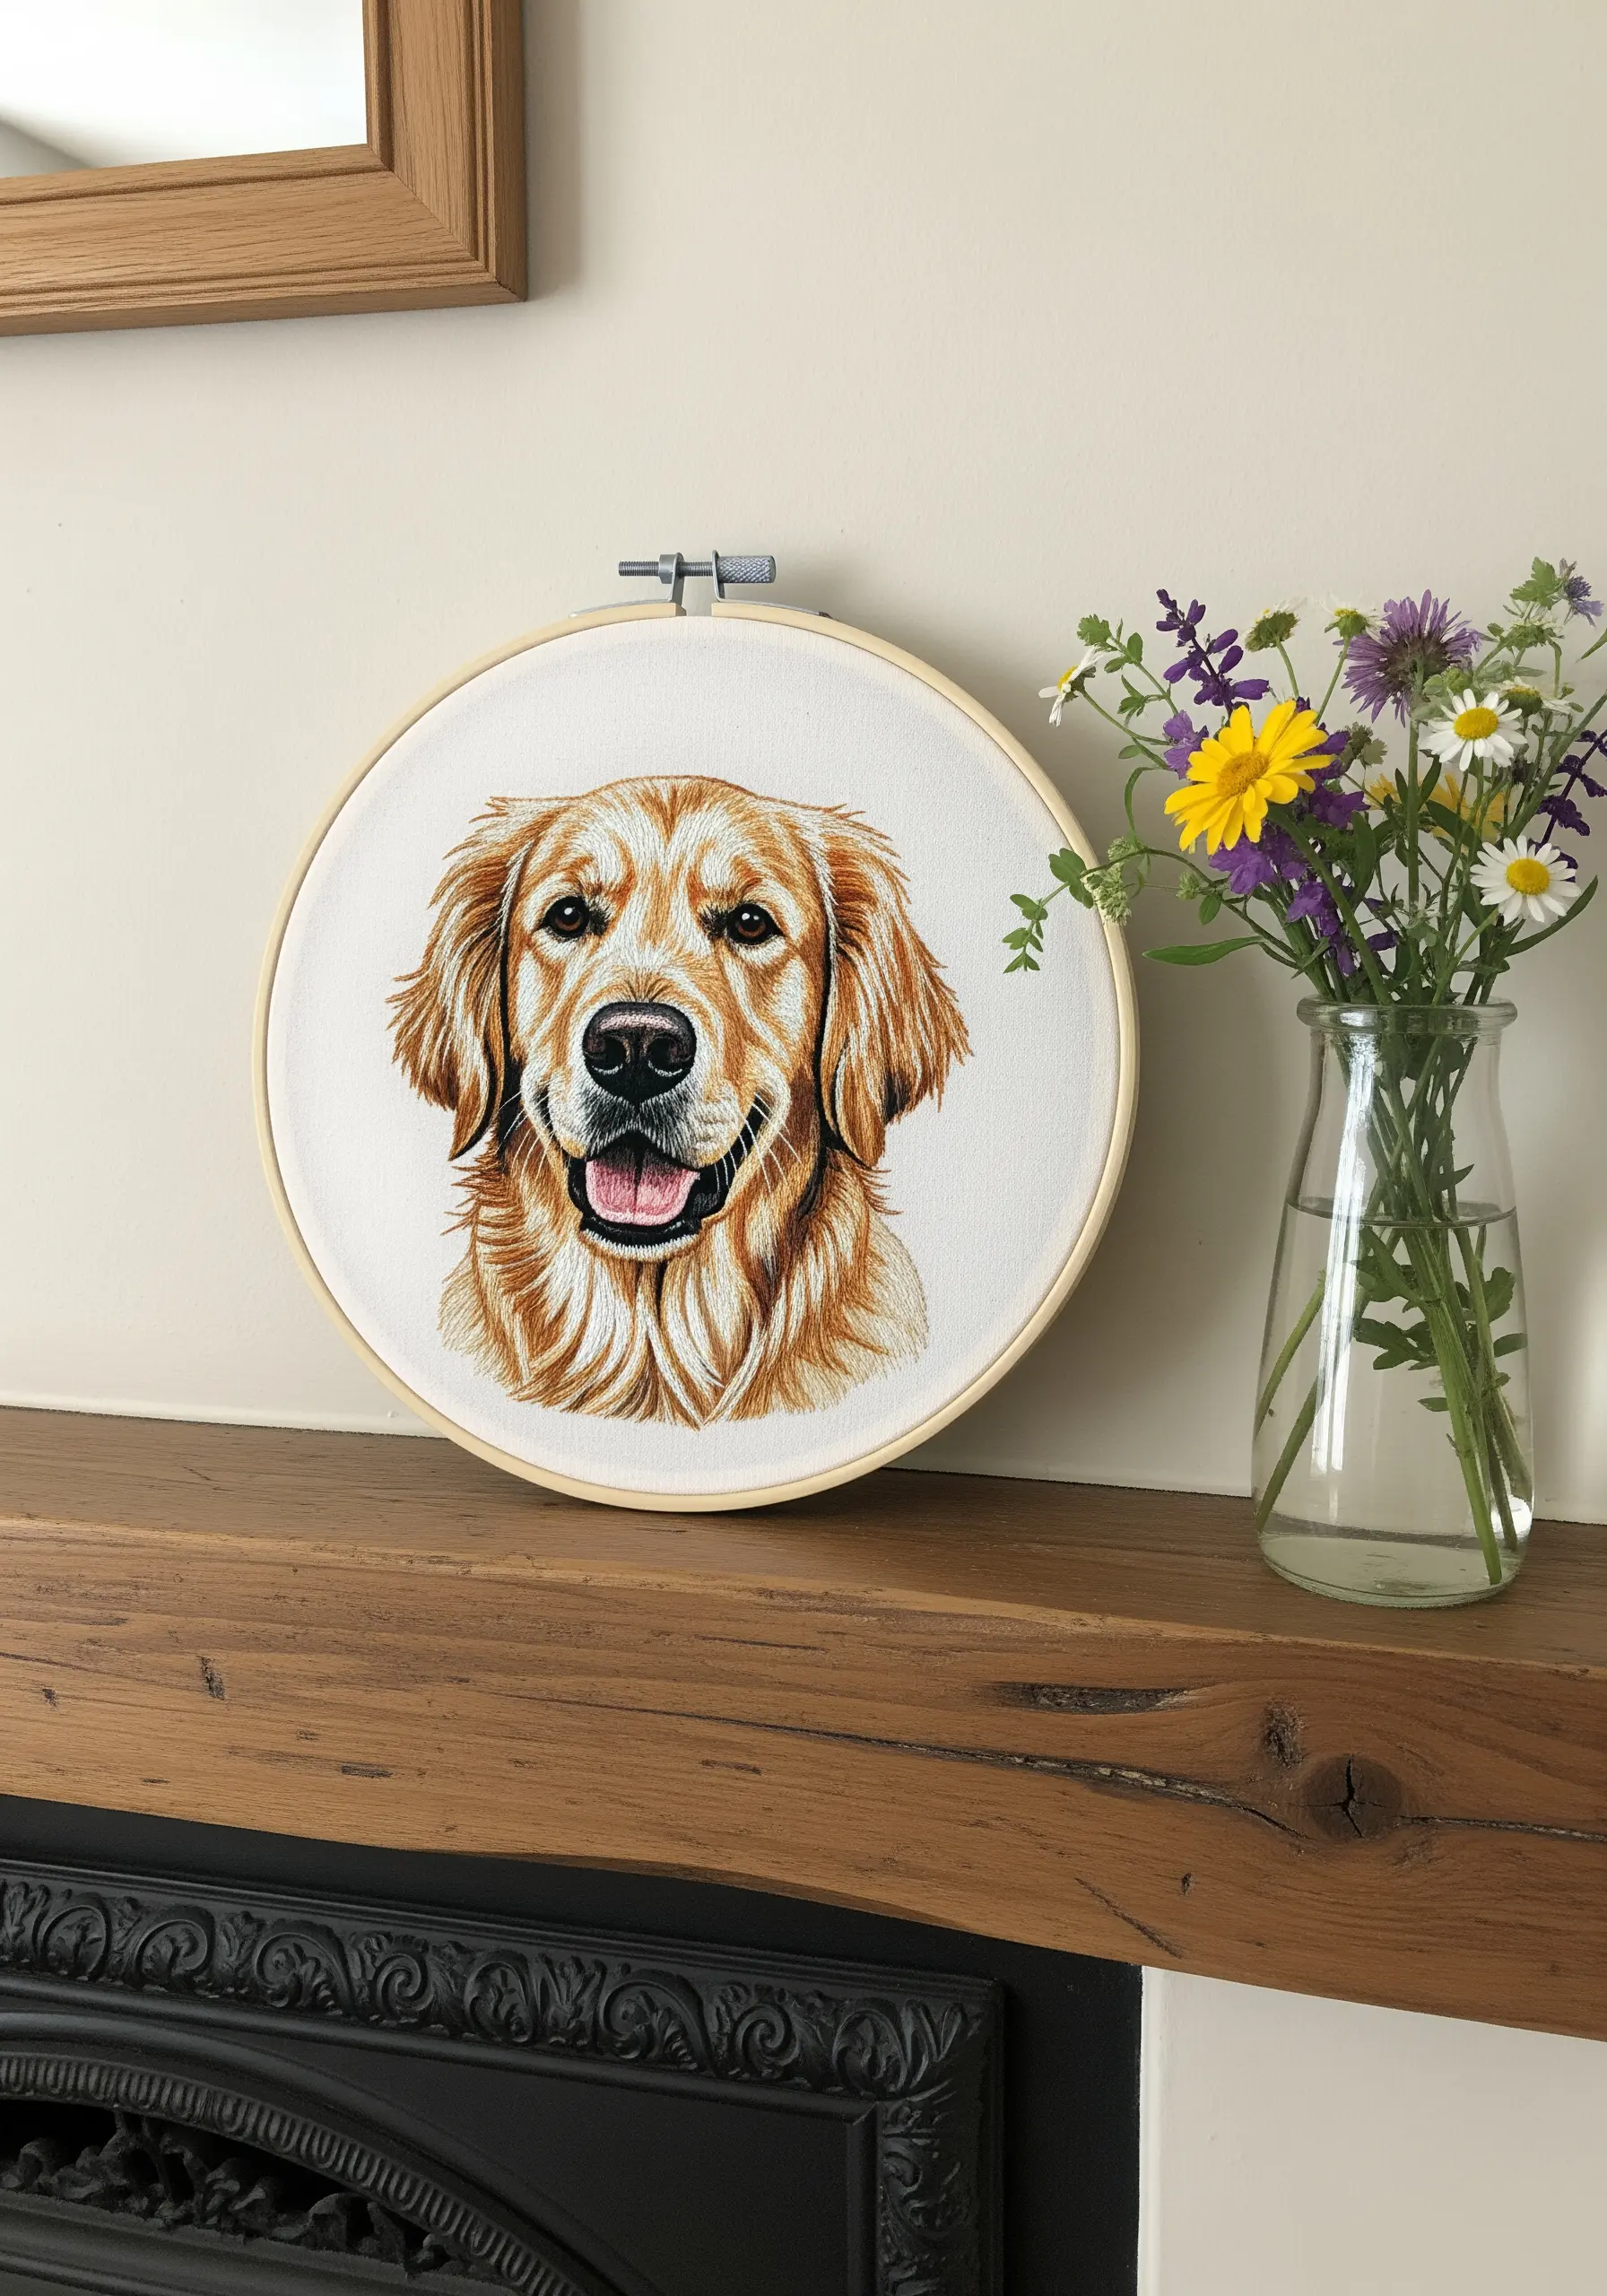
A realistic pet portrait is all about capturing the texture and direction of fur.
Using just a single strand of floss, apply long-and-short stitches that follow the natural growth pattern of the animal’s coat.
Layer your colors gradually, starting with the darker undertones and building up to the highlights.
The most crucial detail is the eyes; add a tiny white straight stitch to create a catchlight, which instantly brings the portrait to life. These make such thoughtful embroidery gifts.
13. Celebrating Autumnal Hues and Shapes
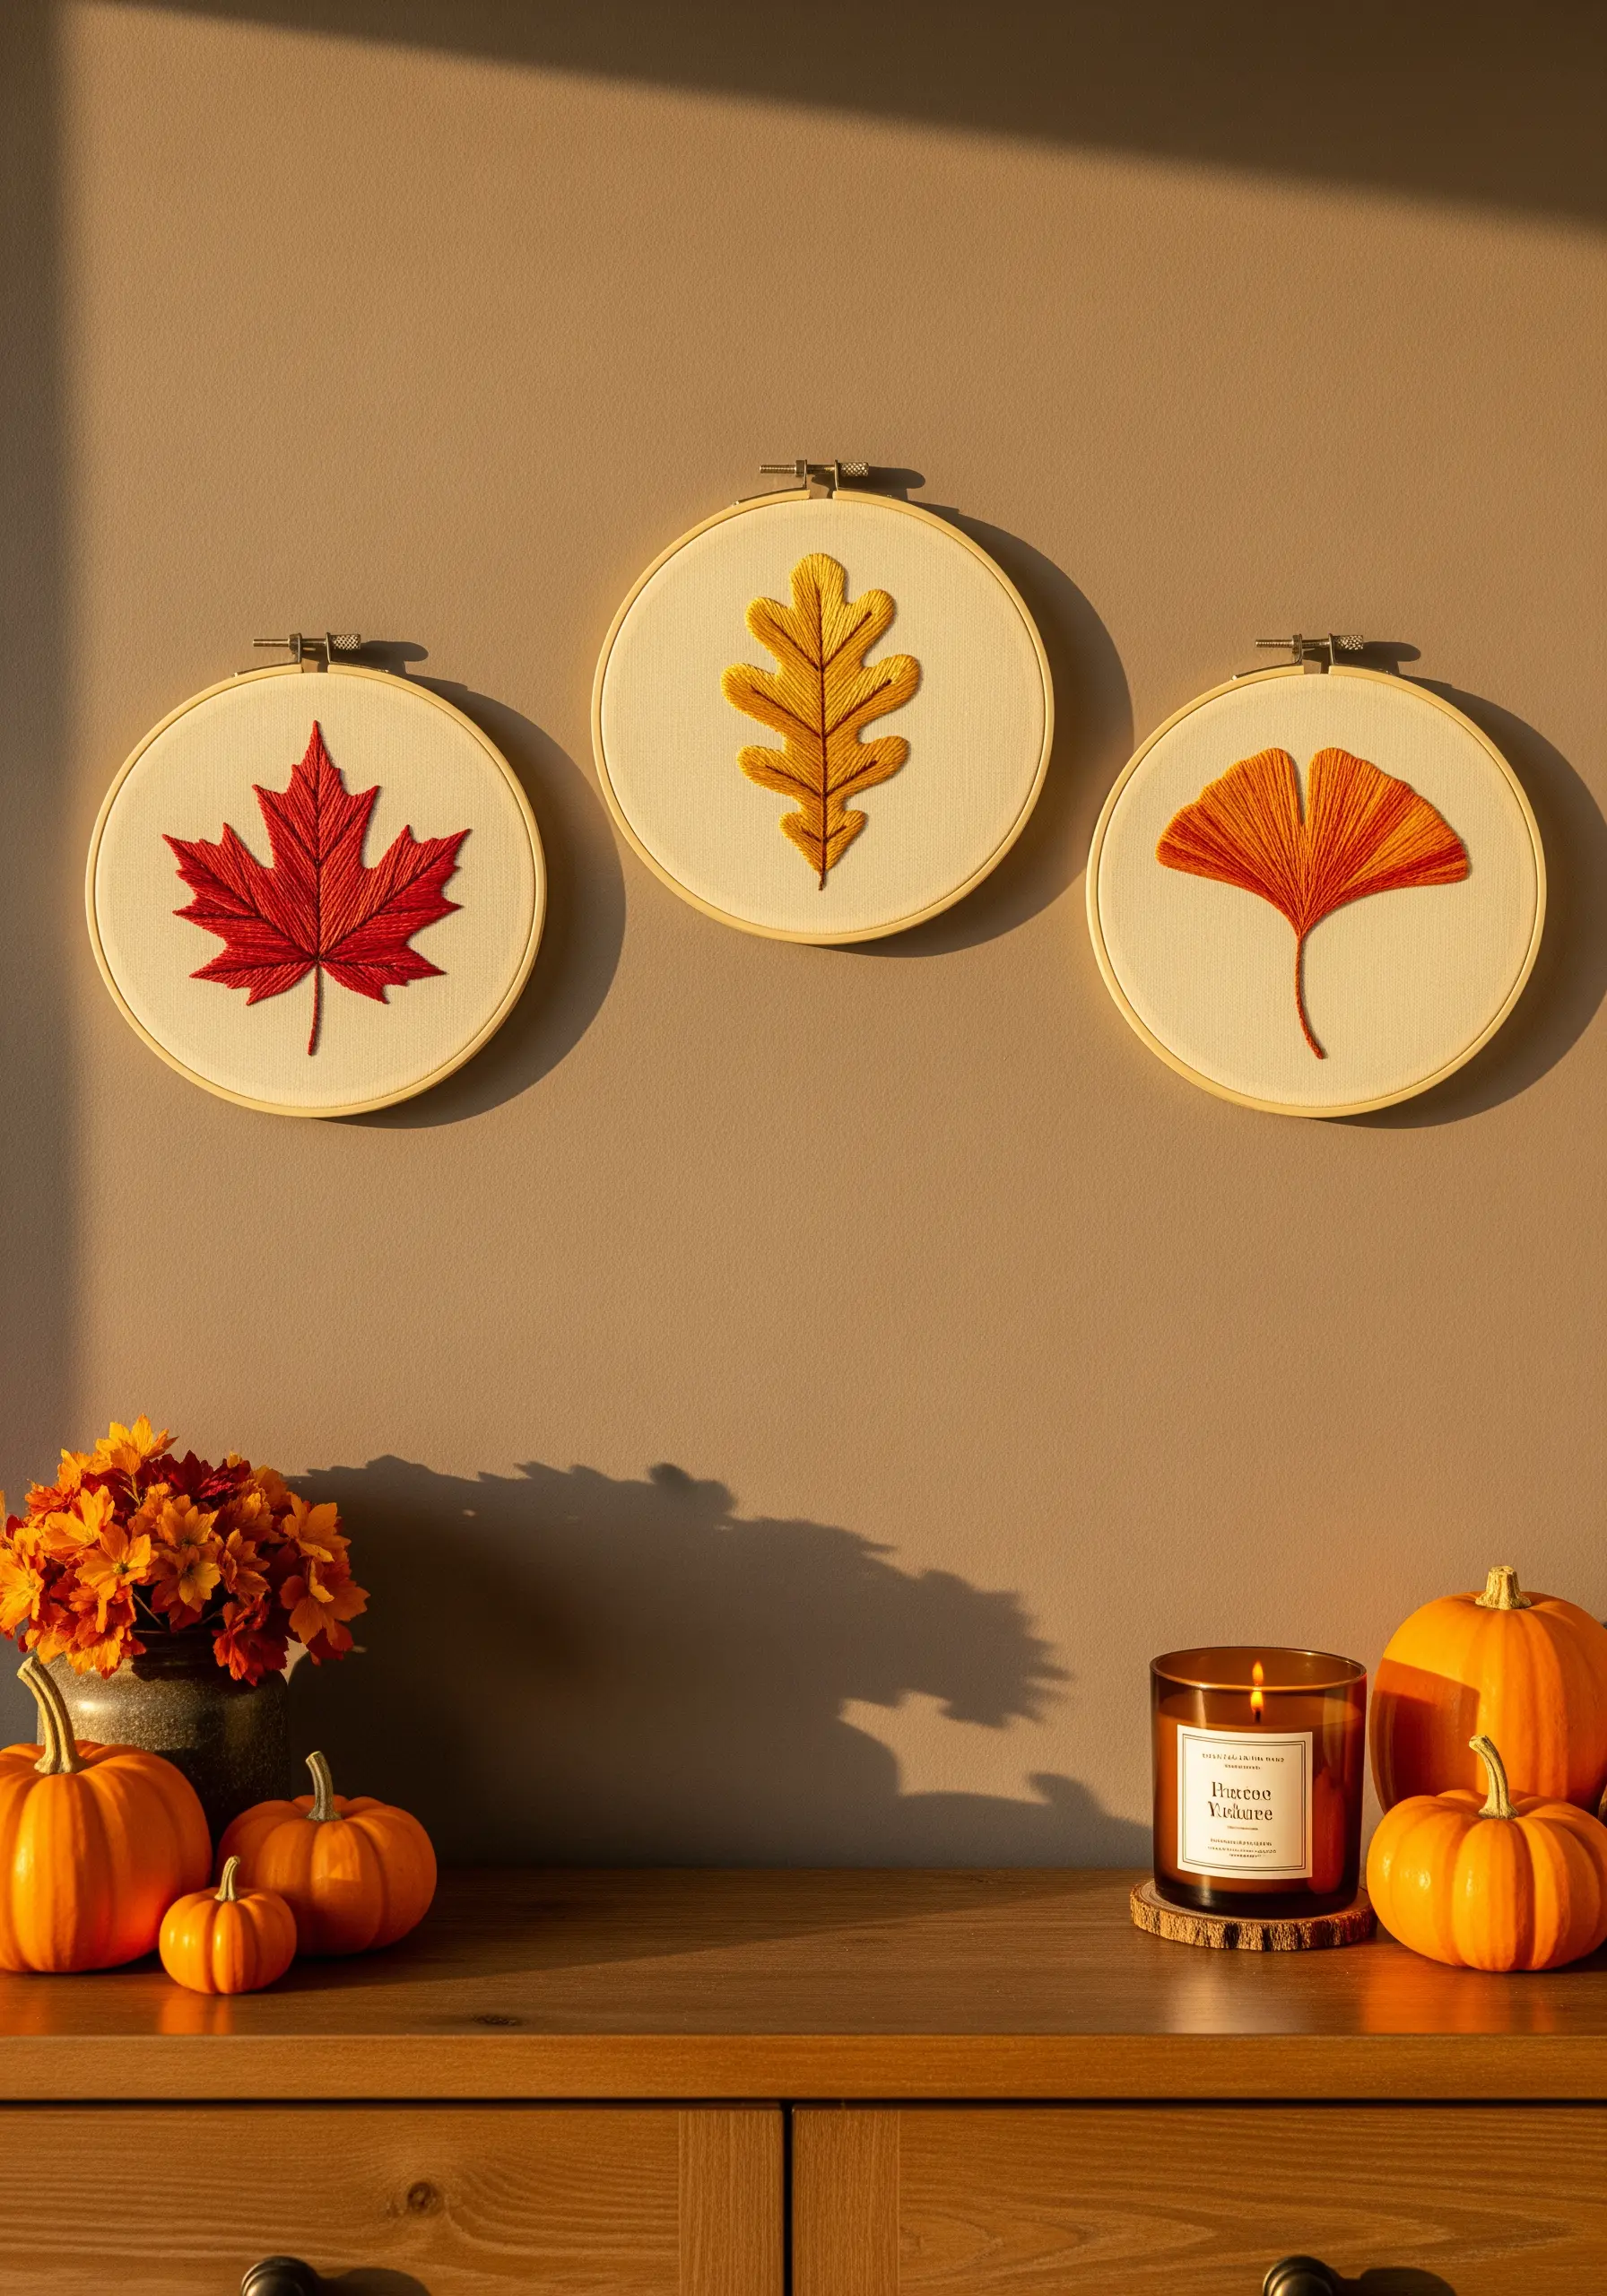
Showcase the unique structure of different leaves by assigning a specific stitch to each one.
For the maple leaf, a fishbone stitch naturally creates its prominent veins.
The oak leaf’s simpler shape is well-suited to a satin stitch fill, defined with a backstitch outline.
The ginkgo leaf’s fan shape is perfect for directional satin stitches that radiate from the stem.
Grouping these distinct textures creates a richer, more engaging seasonal display. You could even adapt these into botanical patch ideas.
14. Large-Scale Botanicals with Blended Greens
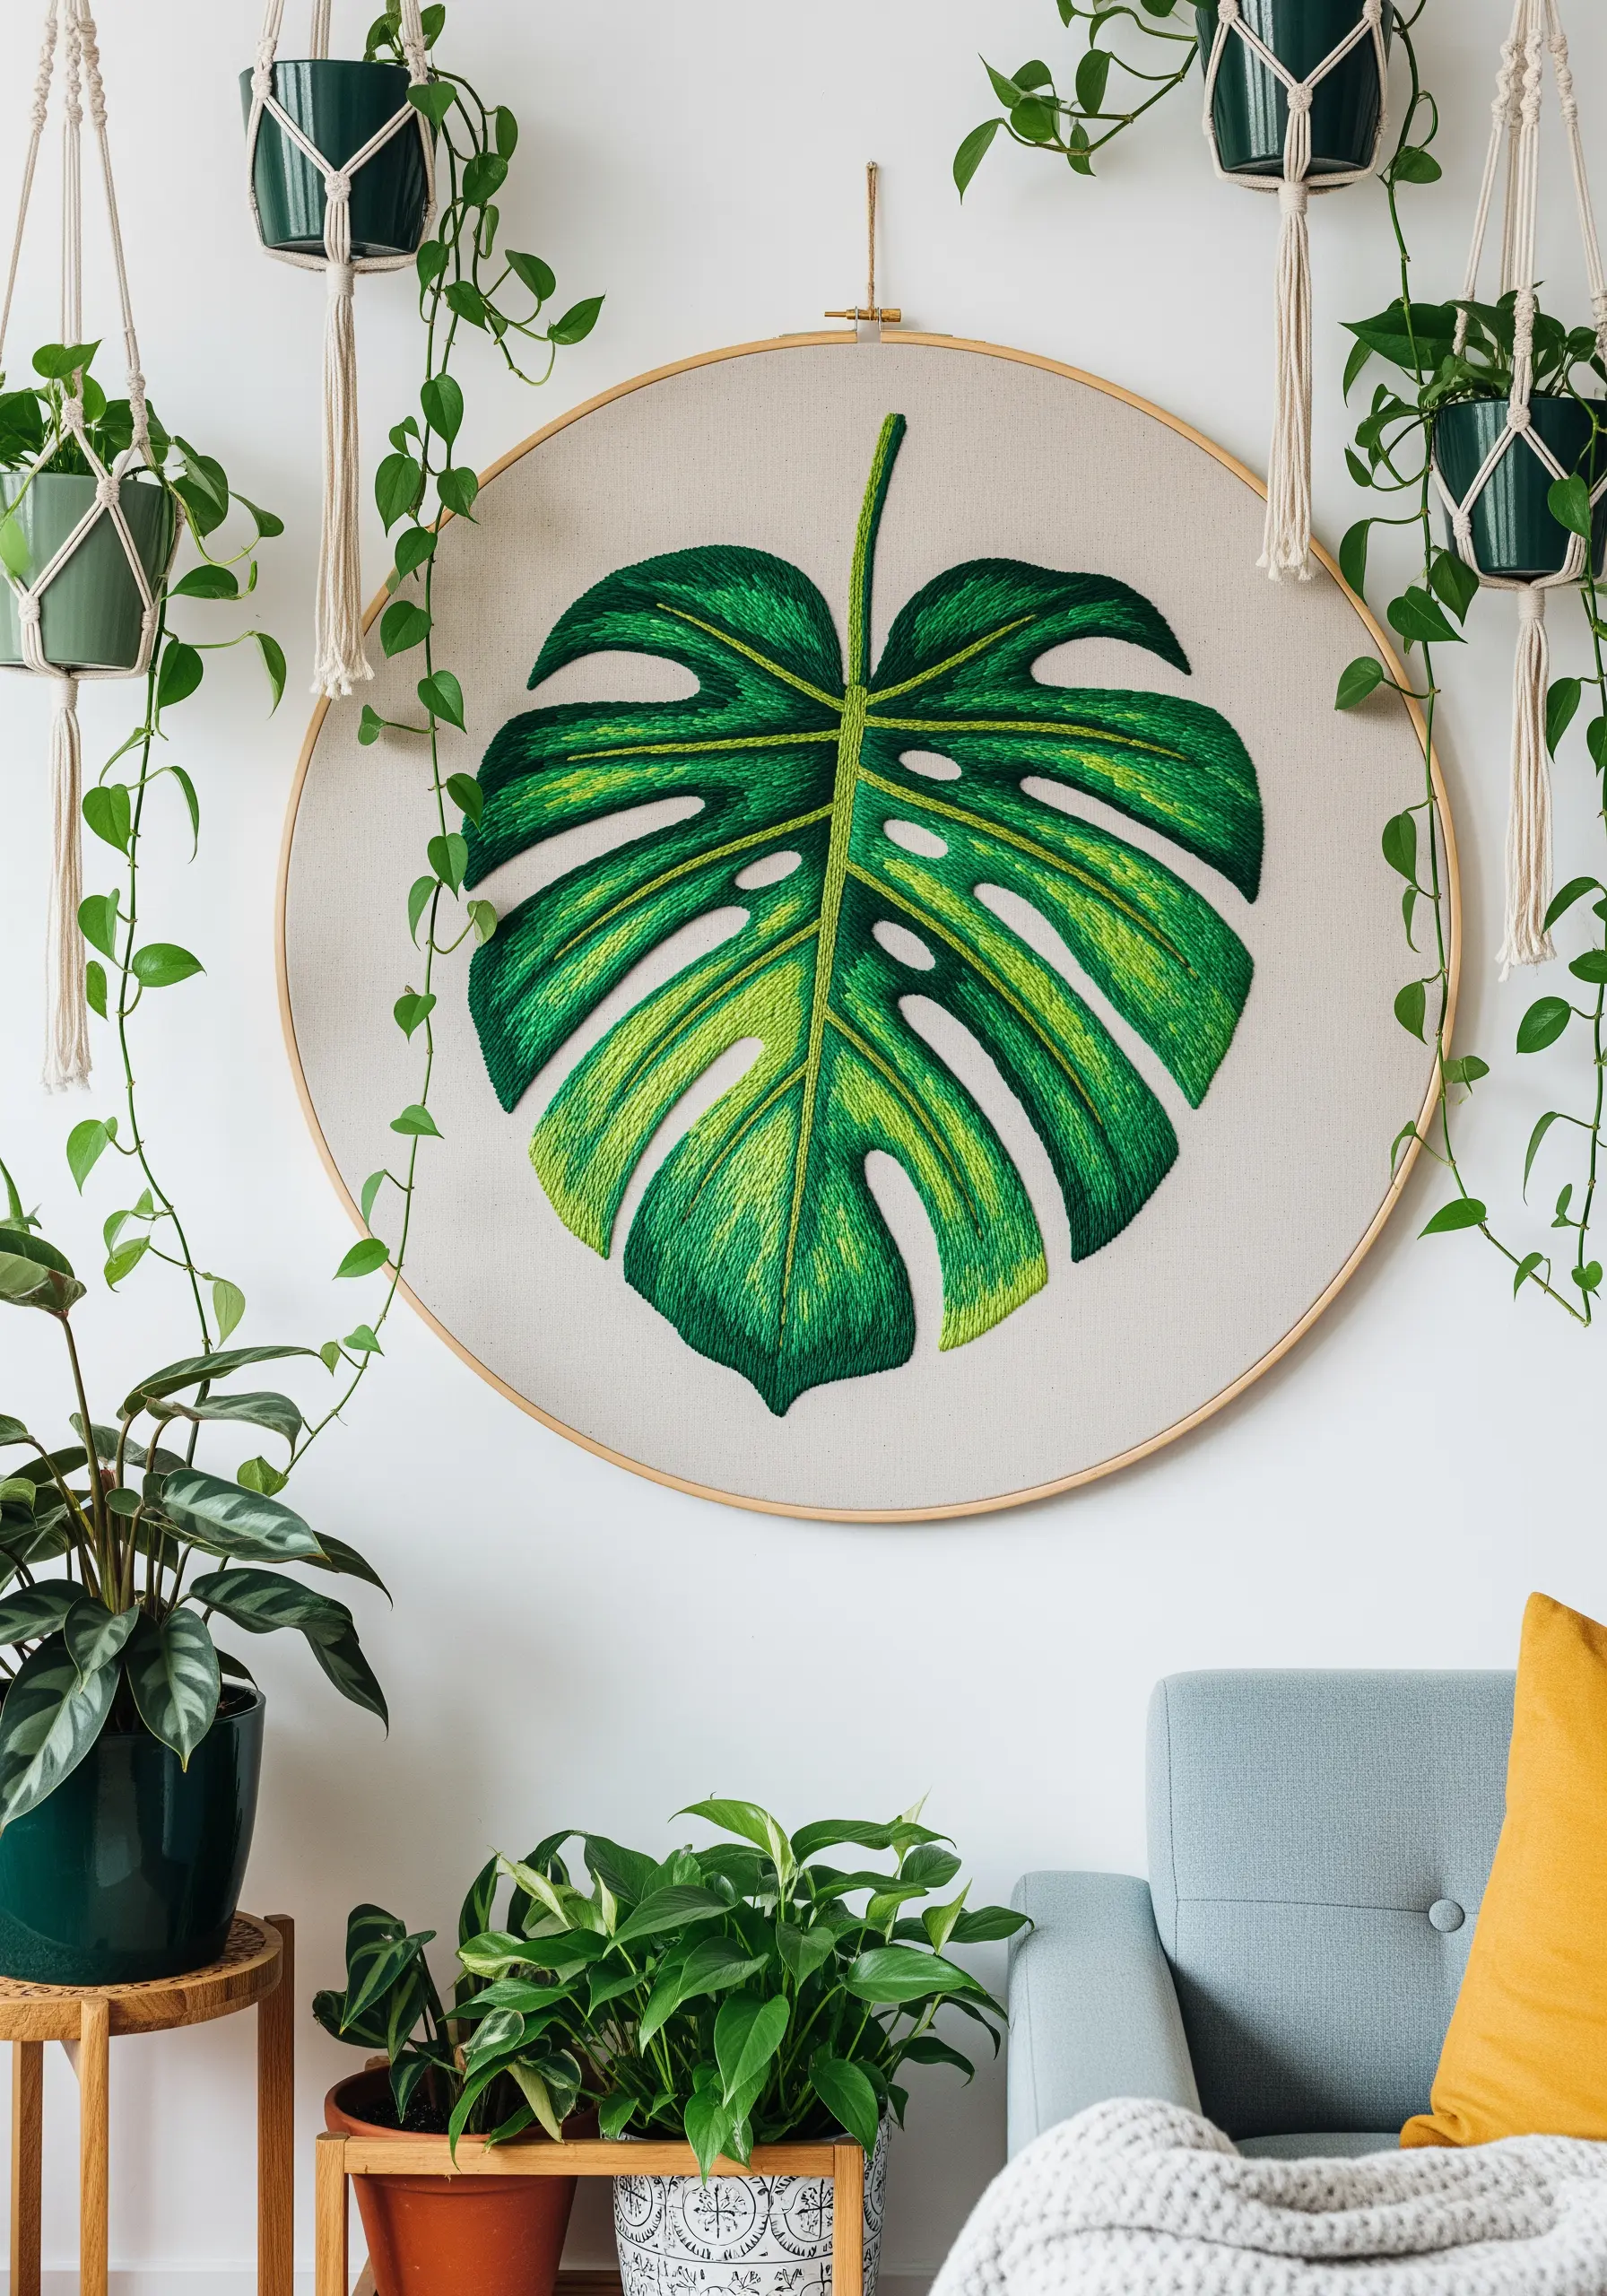
When embroidering a large motif, color blending is essential to create dimension and avoid a flat, cartoonish look.
Divide the leaf into manageable sections and use a long-and-short stitch to seamlessly blend several shades of green.
Work from a deep forest green in the shadowy areas to a bright lime green for the highlights to mimic how light hits the leaf.
This technique adds a stunning level of realism and is perfect for learning how to layer leaf stitching for three-dimensional texture.
15. A Cozy Scene for a Reading Nook
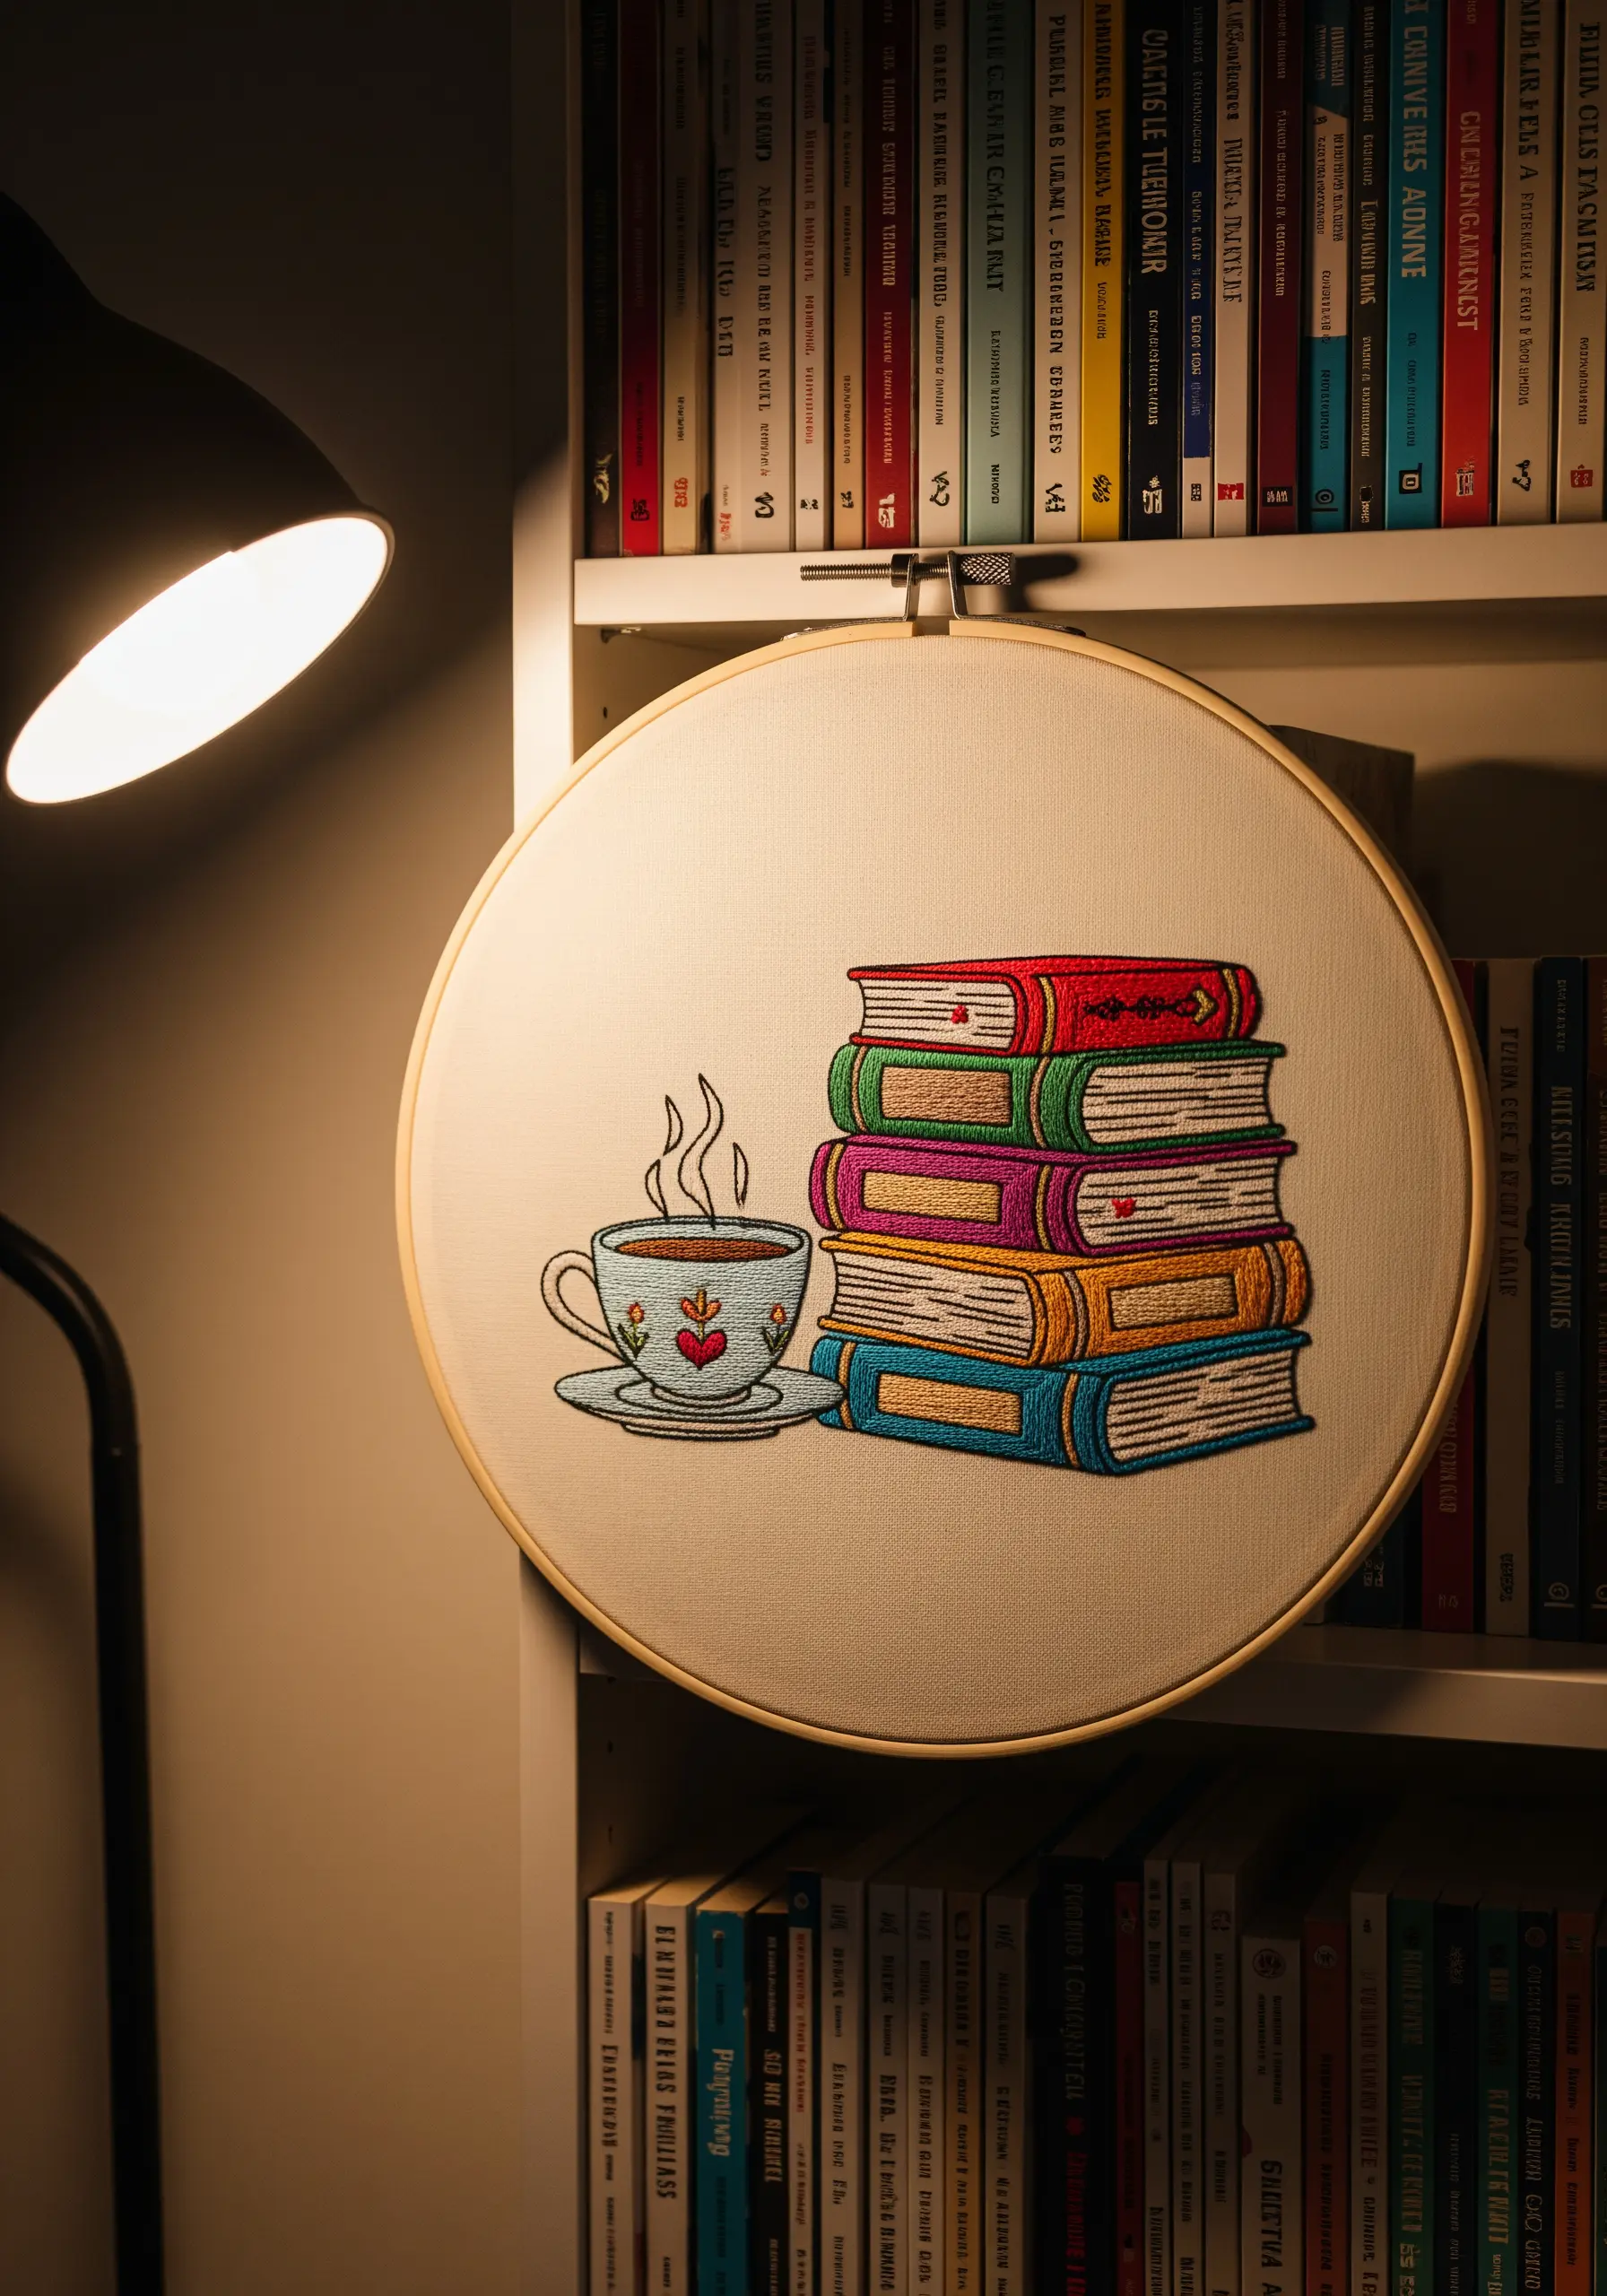
To create a clean, illustrative style, start by outlining each book with a crisp backstitch using two or three strands of black floss.
Fill the book covers with a smooth satin stitch.
For the paper pages, use an off-white thread to make a series of short, parallel vertical stitches—this gives the impression of texture without being overly detailed.
The steam from the cup can be stitched with a single strand of gray thread in a delicate, swirling stem stitch. This is one of those cute, cozy hoop art patterns that makes a perfect gift.
16. Architectural Precision in Black Thread
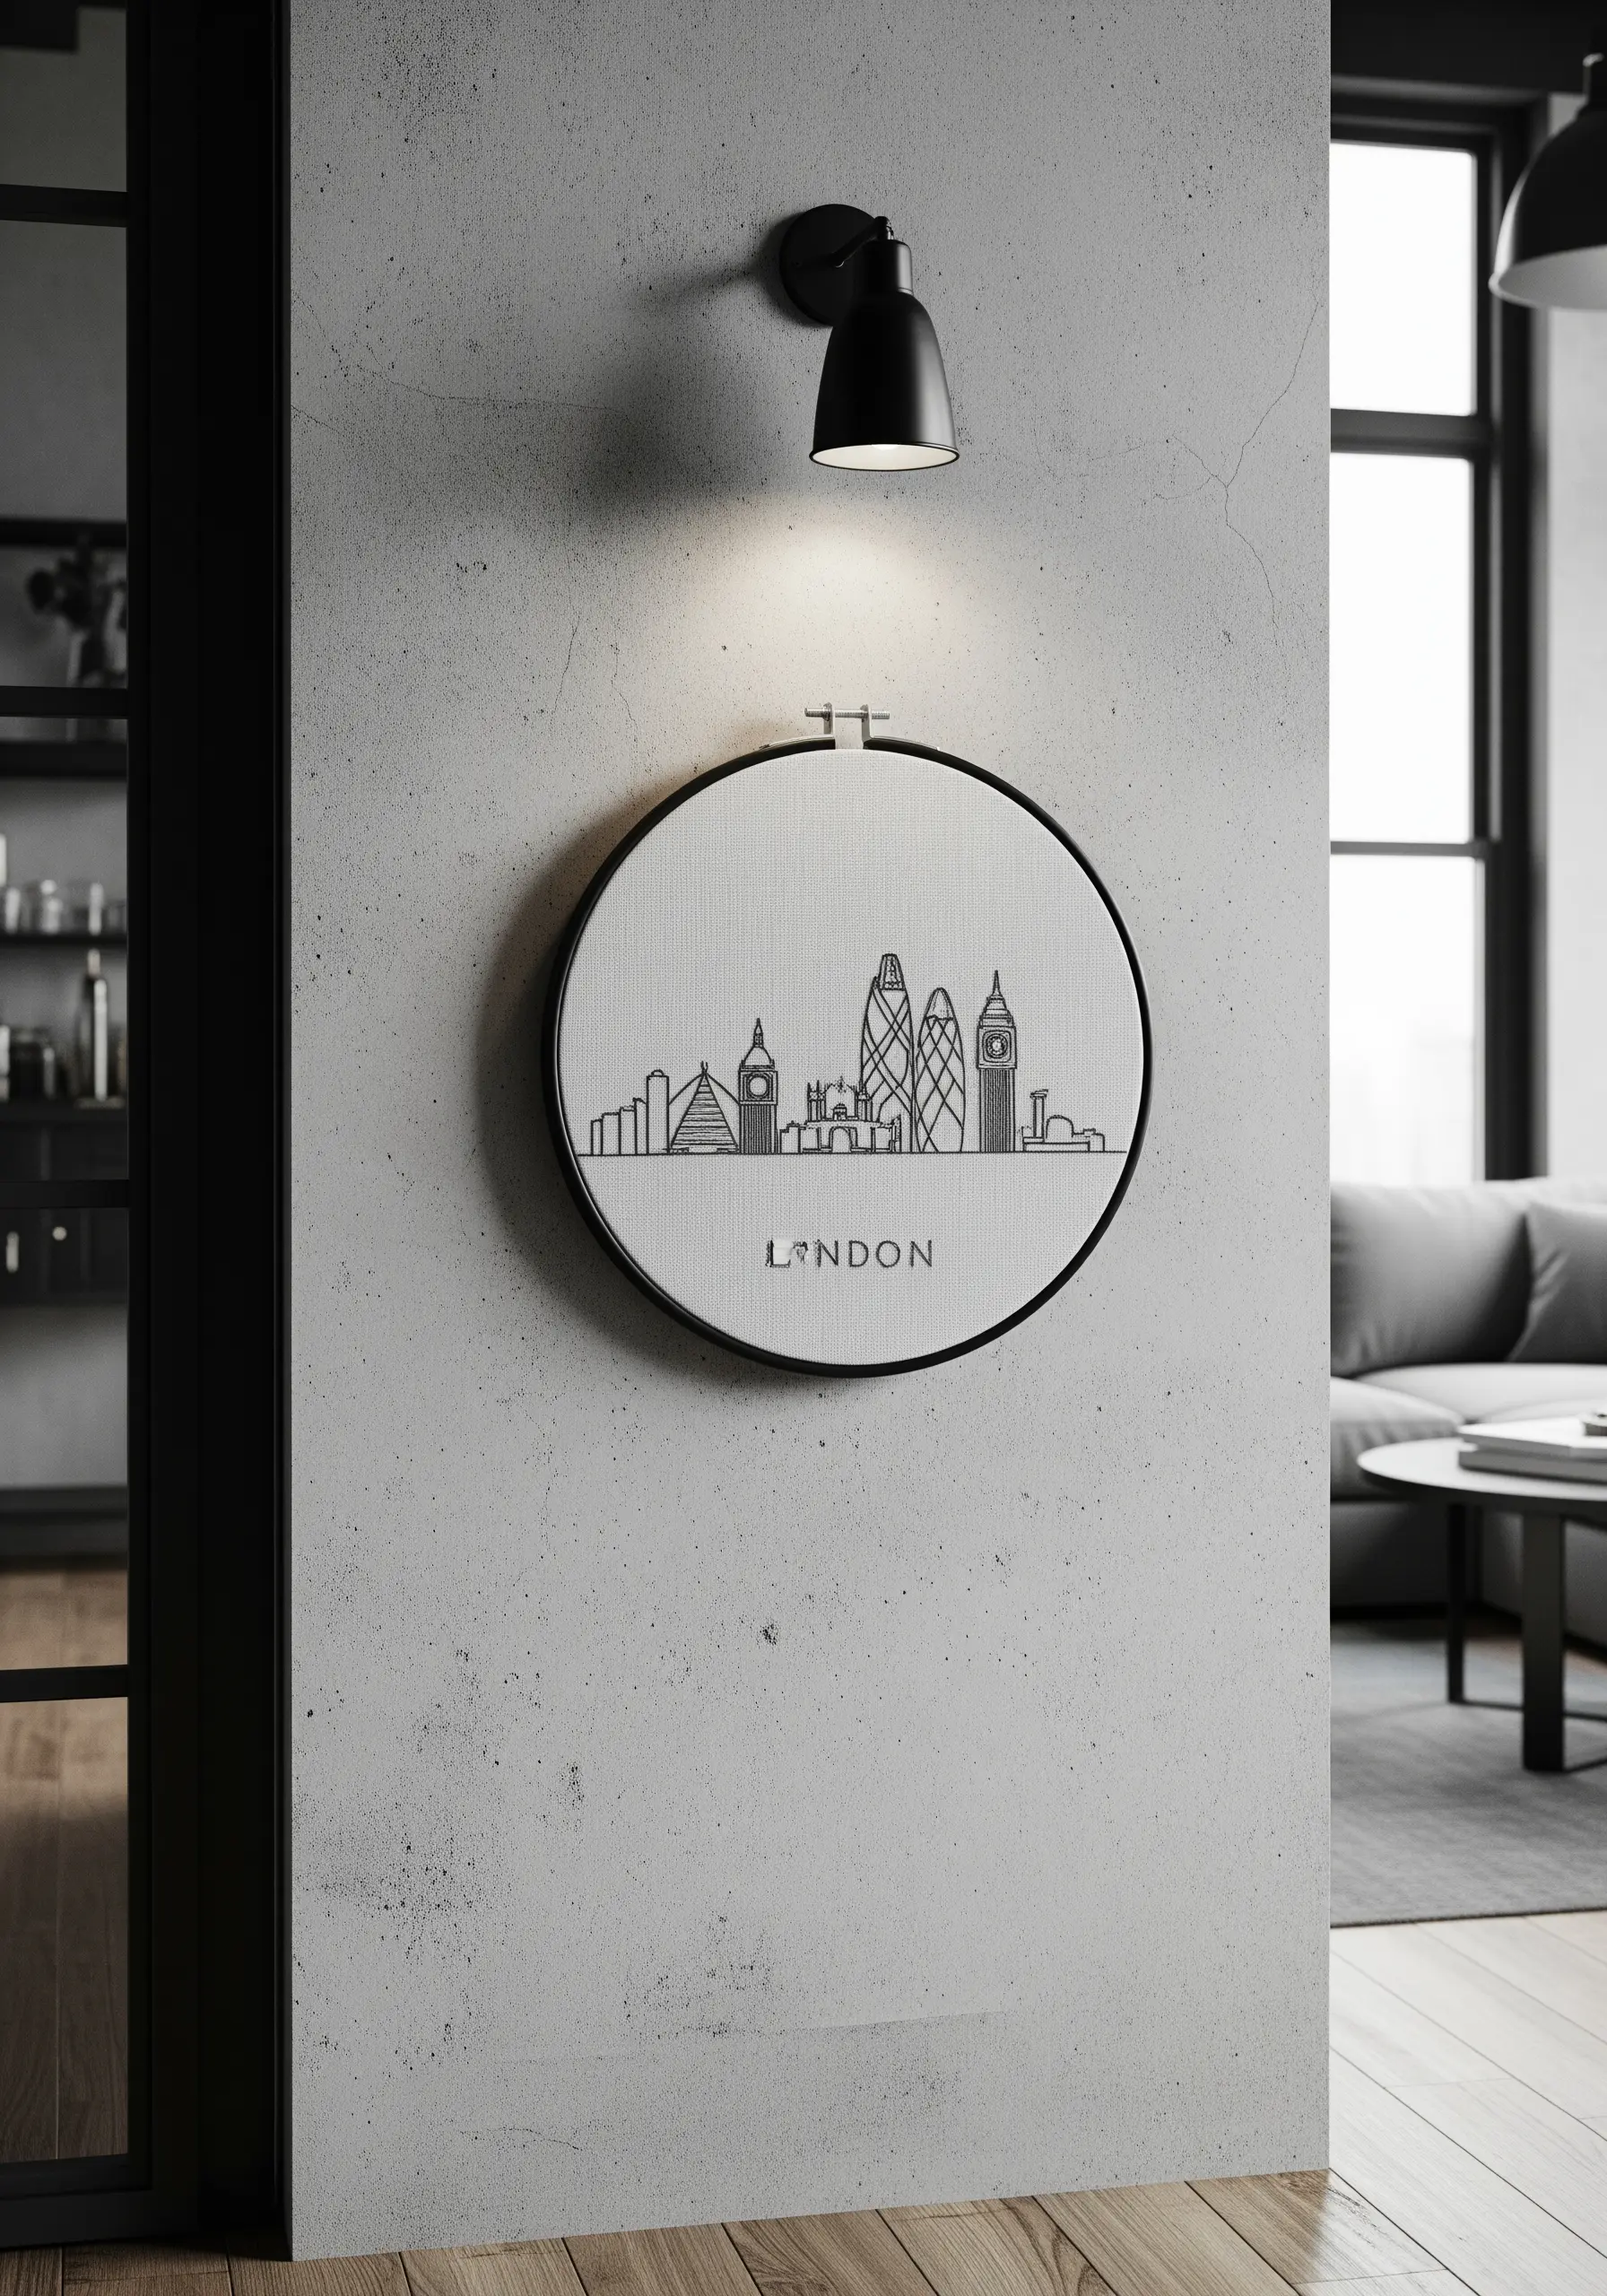
The success of a minimalist skyline design lies in its precision.
Use a simple backstitch with only two strands of floss to maintain sharp, delicate lines.
The power of this design comes from the negative space, so resist the urge to fill in the shapes.
Stretching your fabric on a high-quality, taut hoop is critical for preventing distortion of the straight lines.
Framing the piece in a black-painted hoop enhances the modern, graphic aesthetic of these monochrome black thread designs.
17. A Whimsical Woodland Vignette
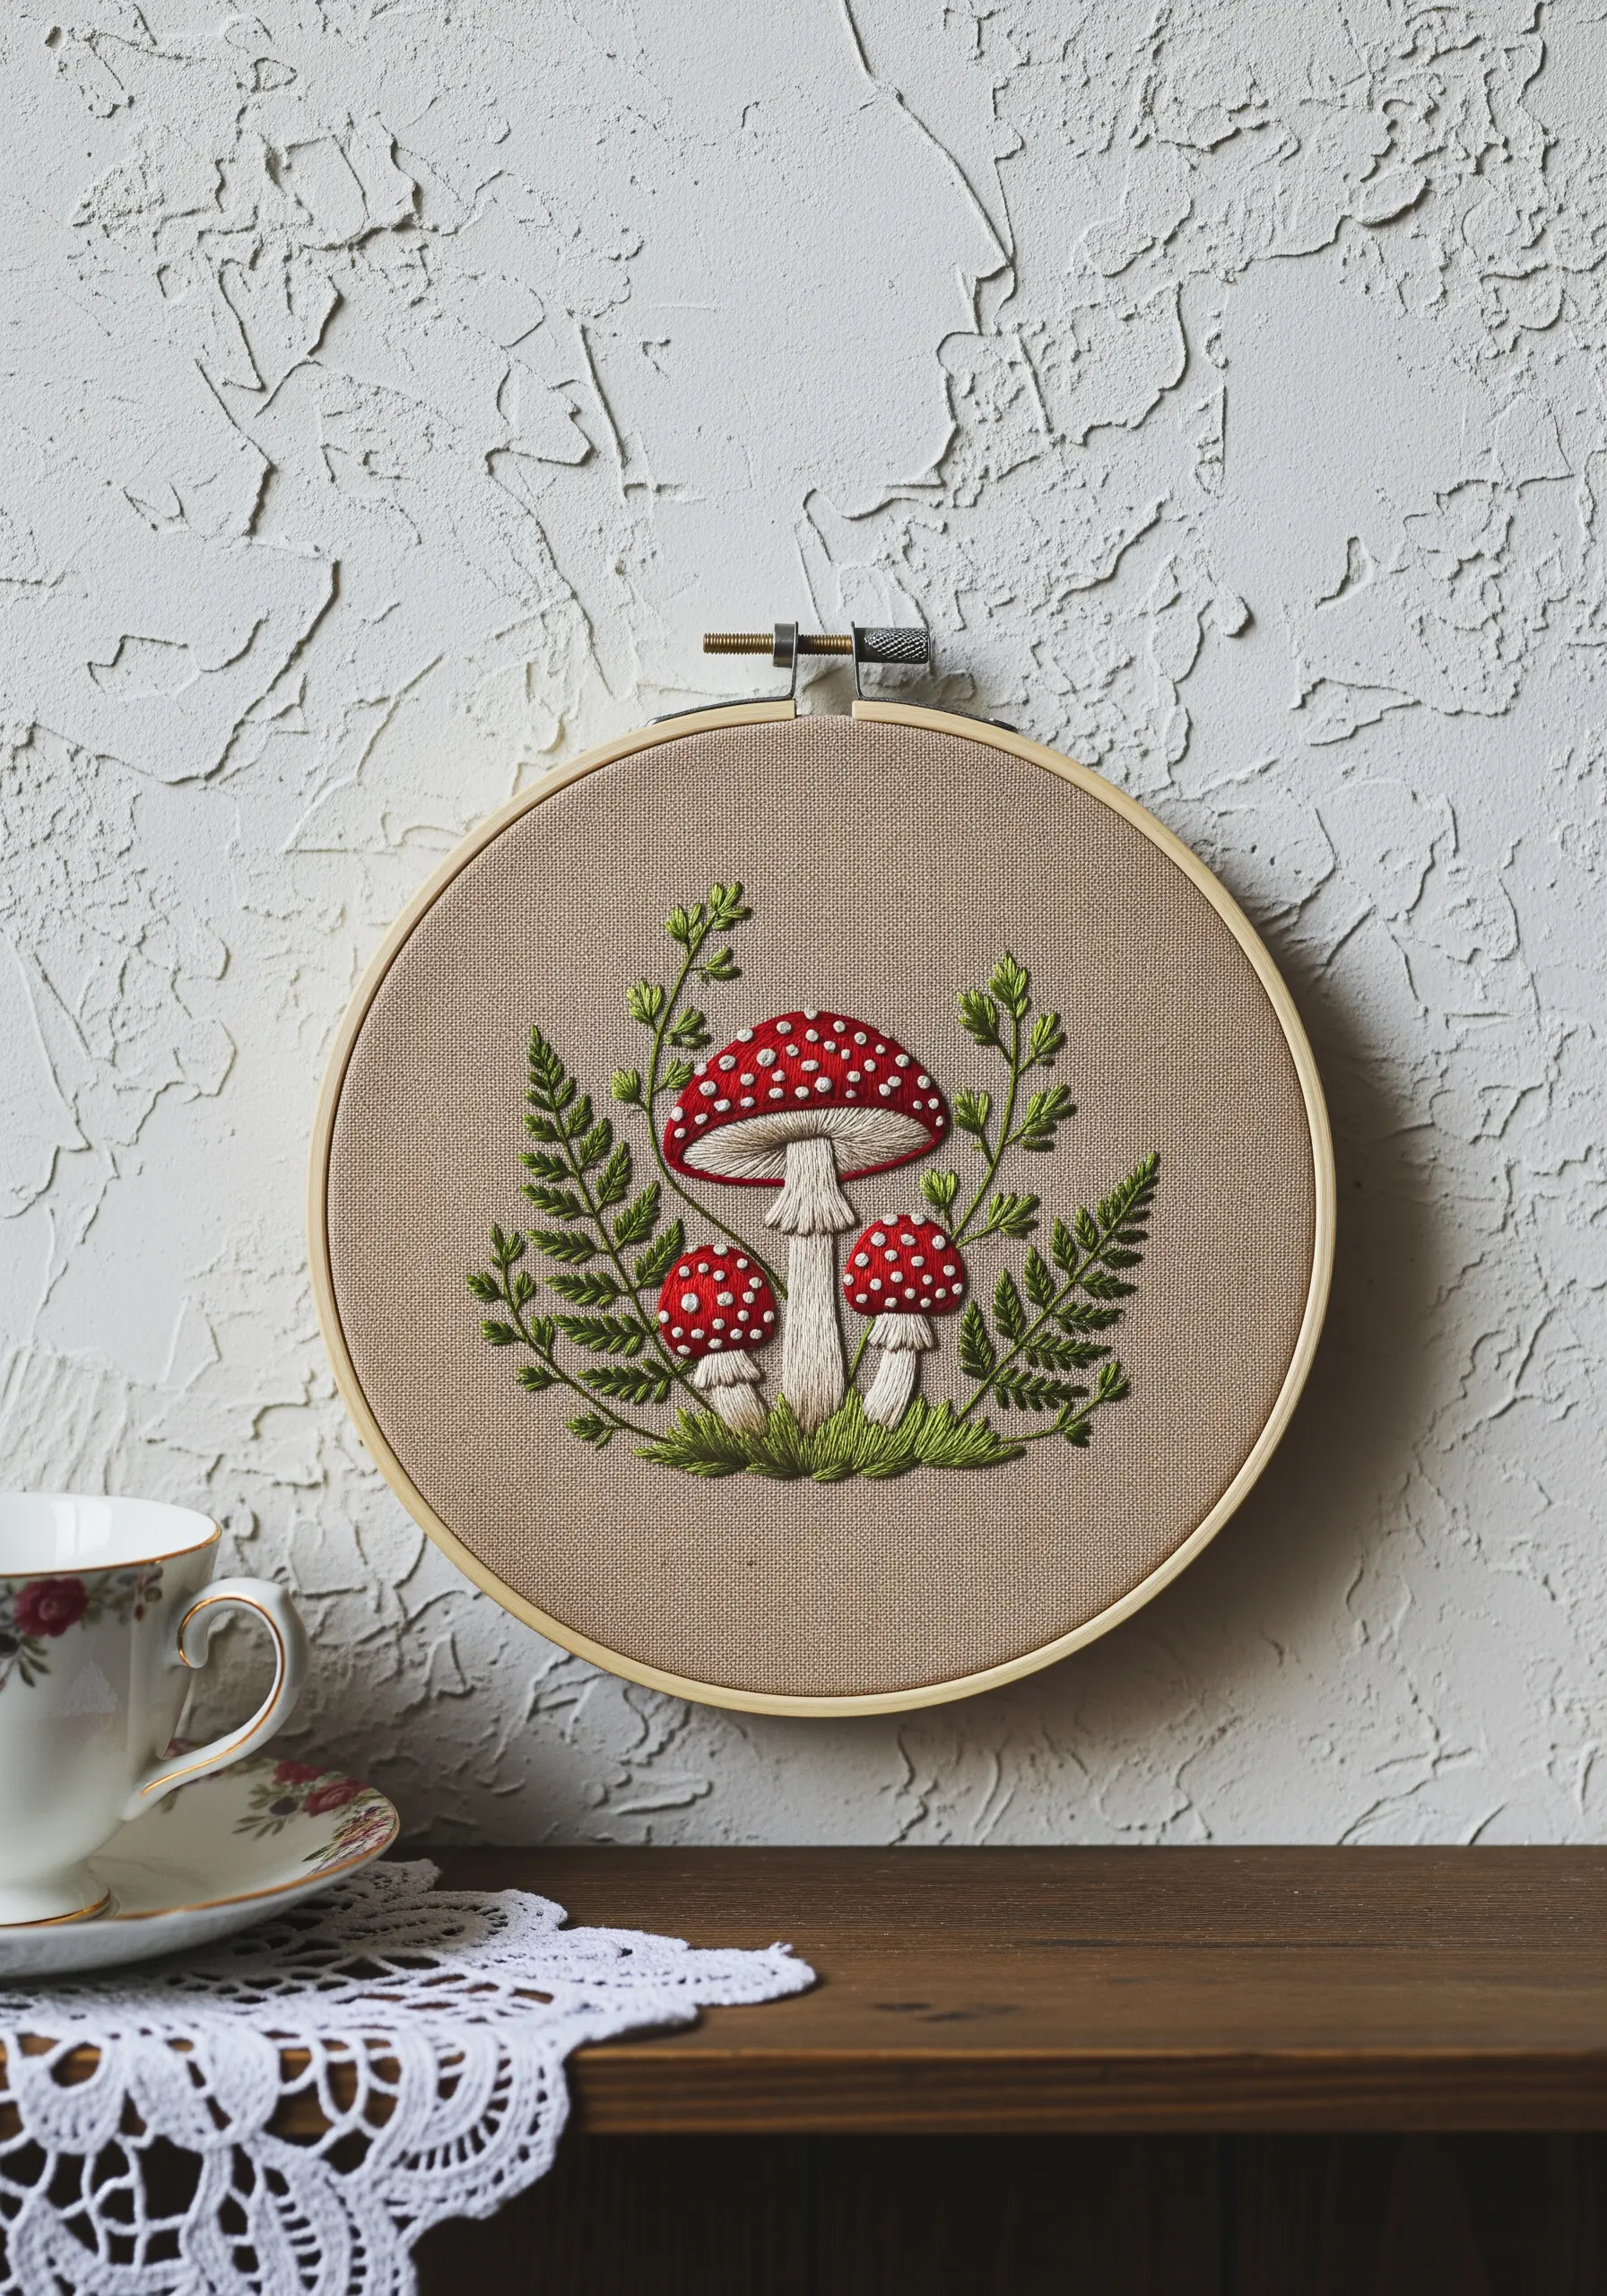
Bring these charming toadstools to life with texture.
Use a padded satin stitch for the red caps to give them a rounded, three-dimensional feel.
Once the caps are filled, add the white spots on top using French knots; their raised texture is a perfect imitation of the real thing.
Surround the mushrooms with delicate greenery using fly stitches, which create lovely, open V-shapes that look like tiny leaves or ferns.
This is a classic forest floor botanical stitch idea.
18. An Immersive Study in Color Transition
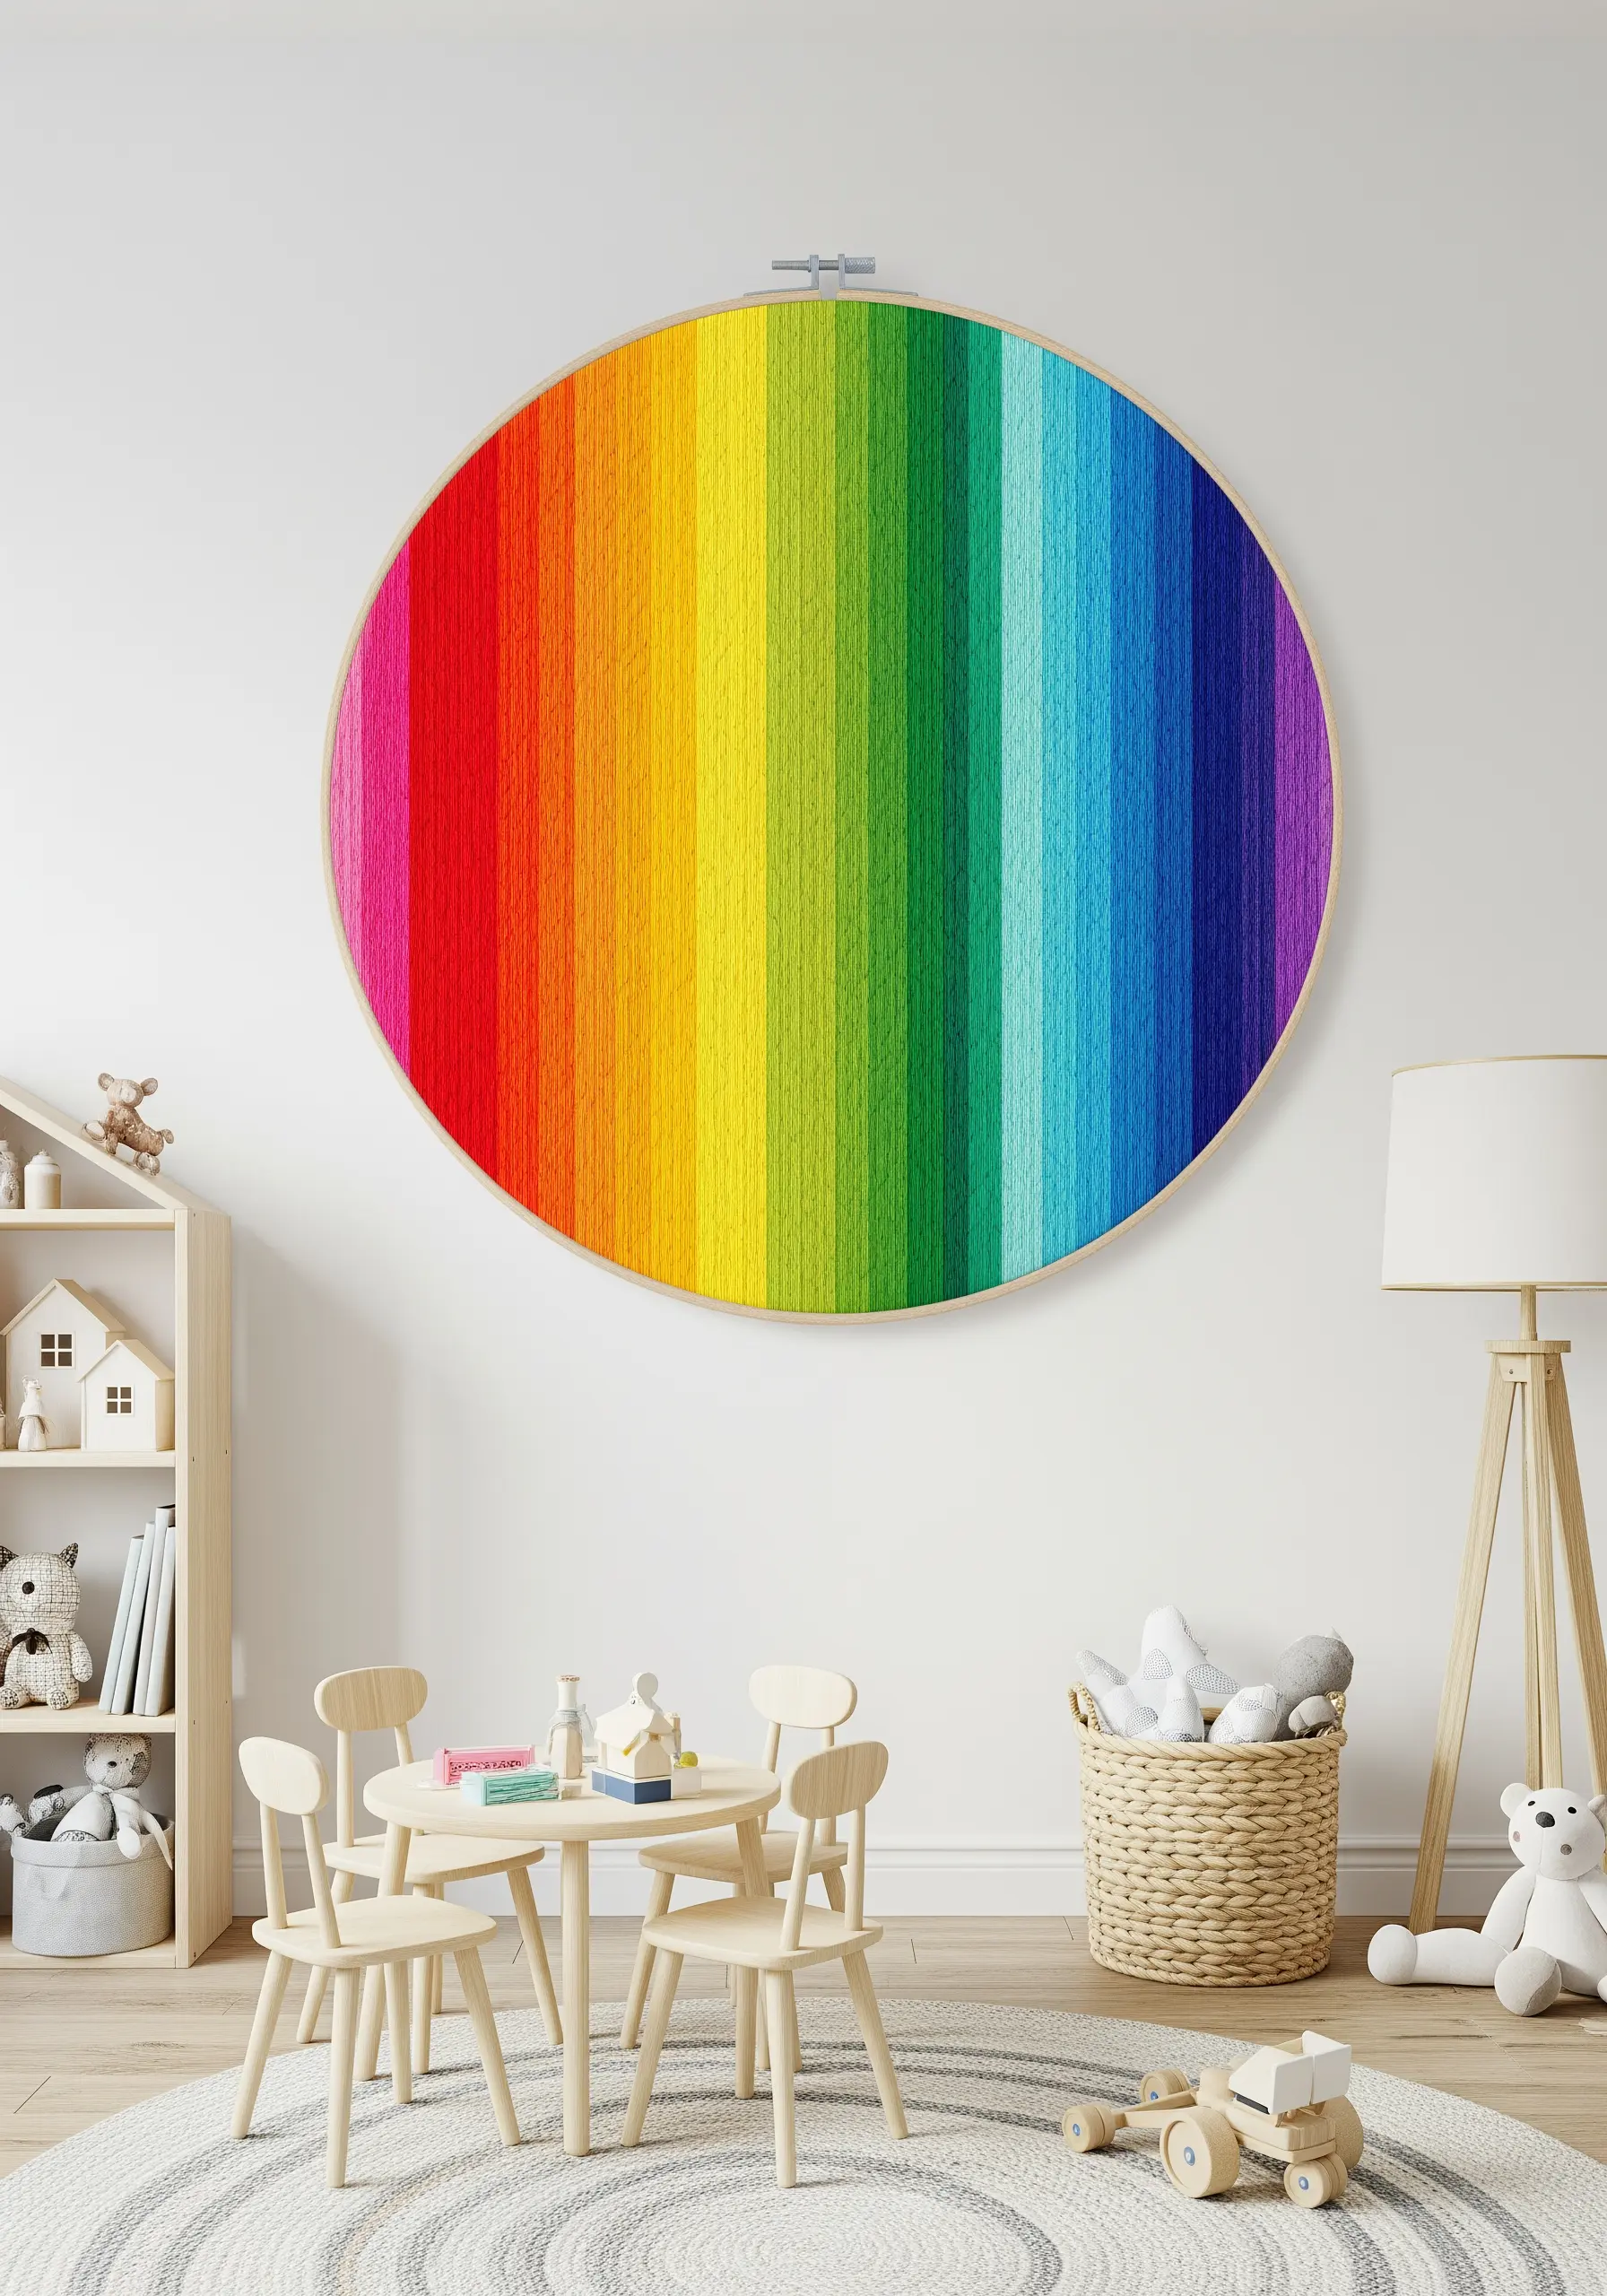
This impressive piece is made entirely of vertical satin stitches, turning the embroidery hoop into a canvas for a pure color gradient.
The key to a flawless result is ensuring every strand of floss lays perfectly flat and untwisted—a tool called a laying tool can help with this.
Carefully select your thread palette to ensure a smooth transition from one color to the next.
This meditative project is a testament to precision and patience, resulting in a piece of vibrant hoop art.
19. Mystical Goldwork for a Zodiac Sign
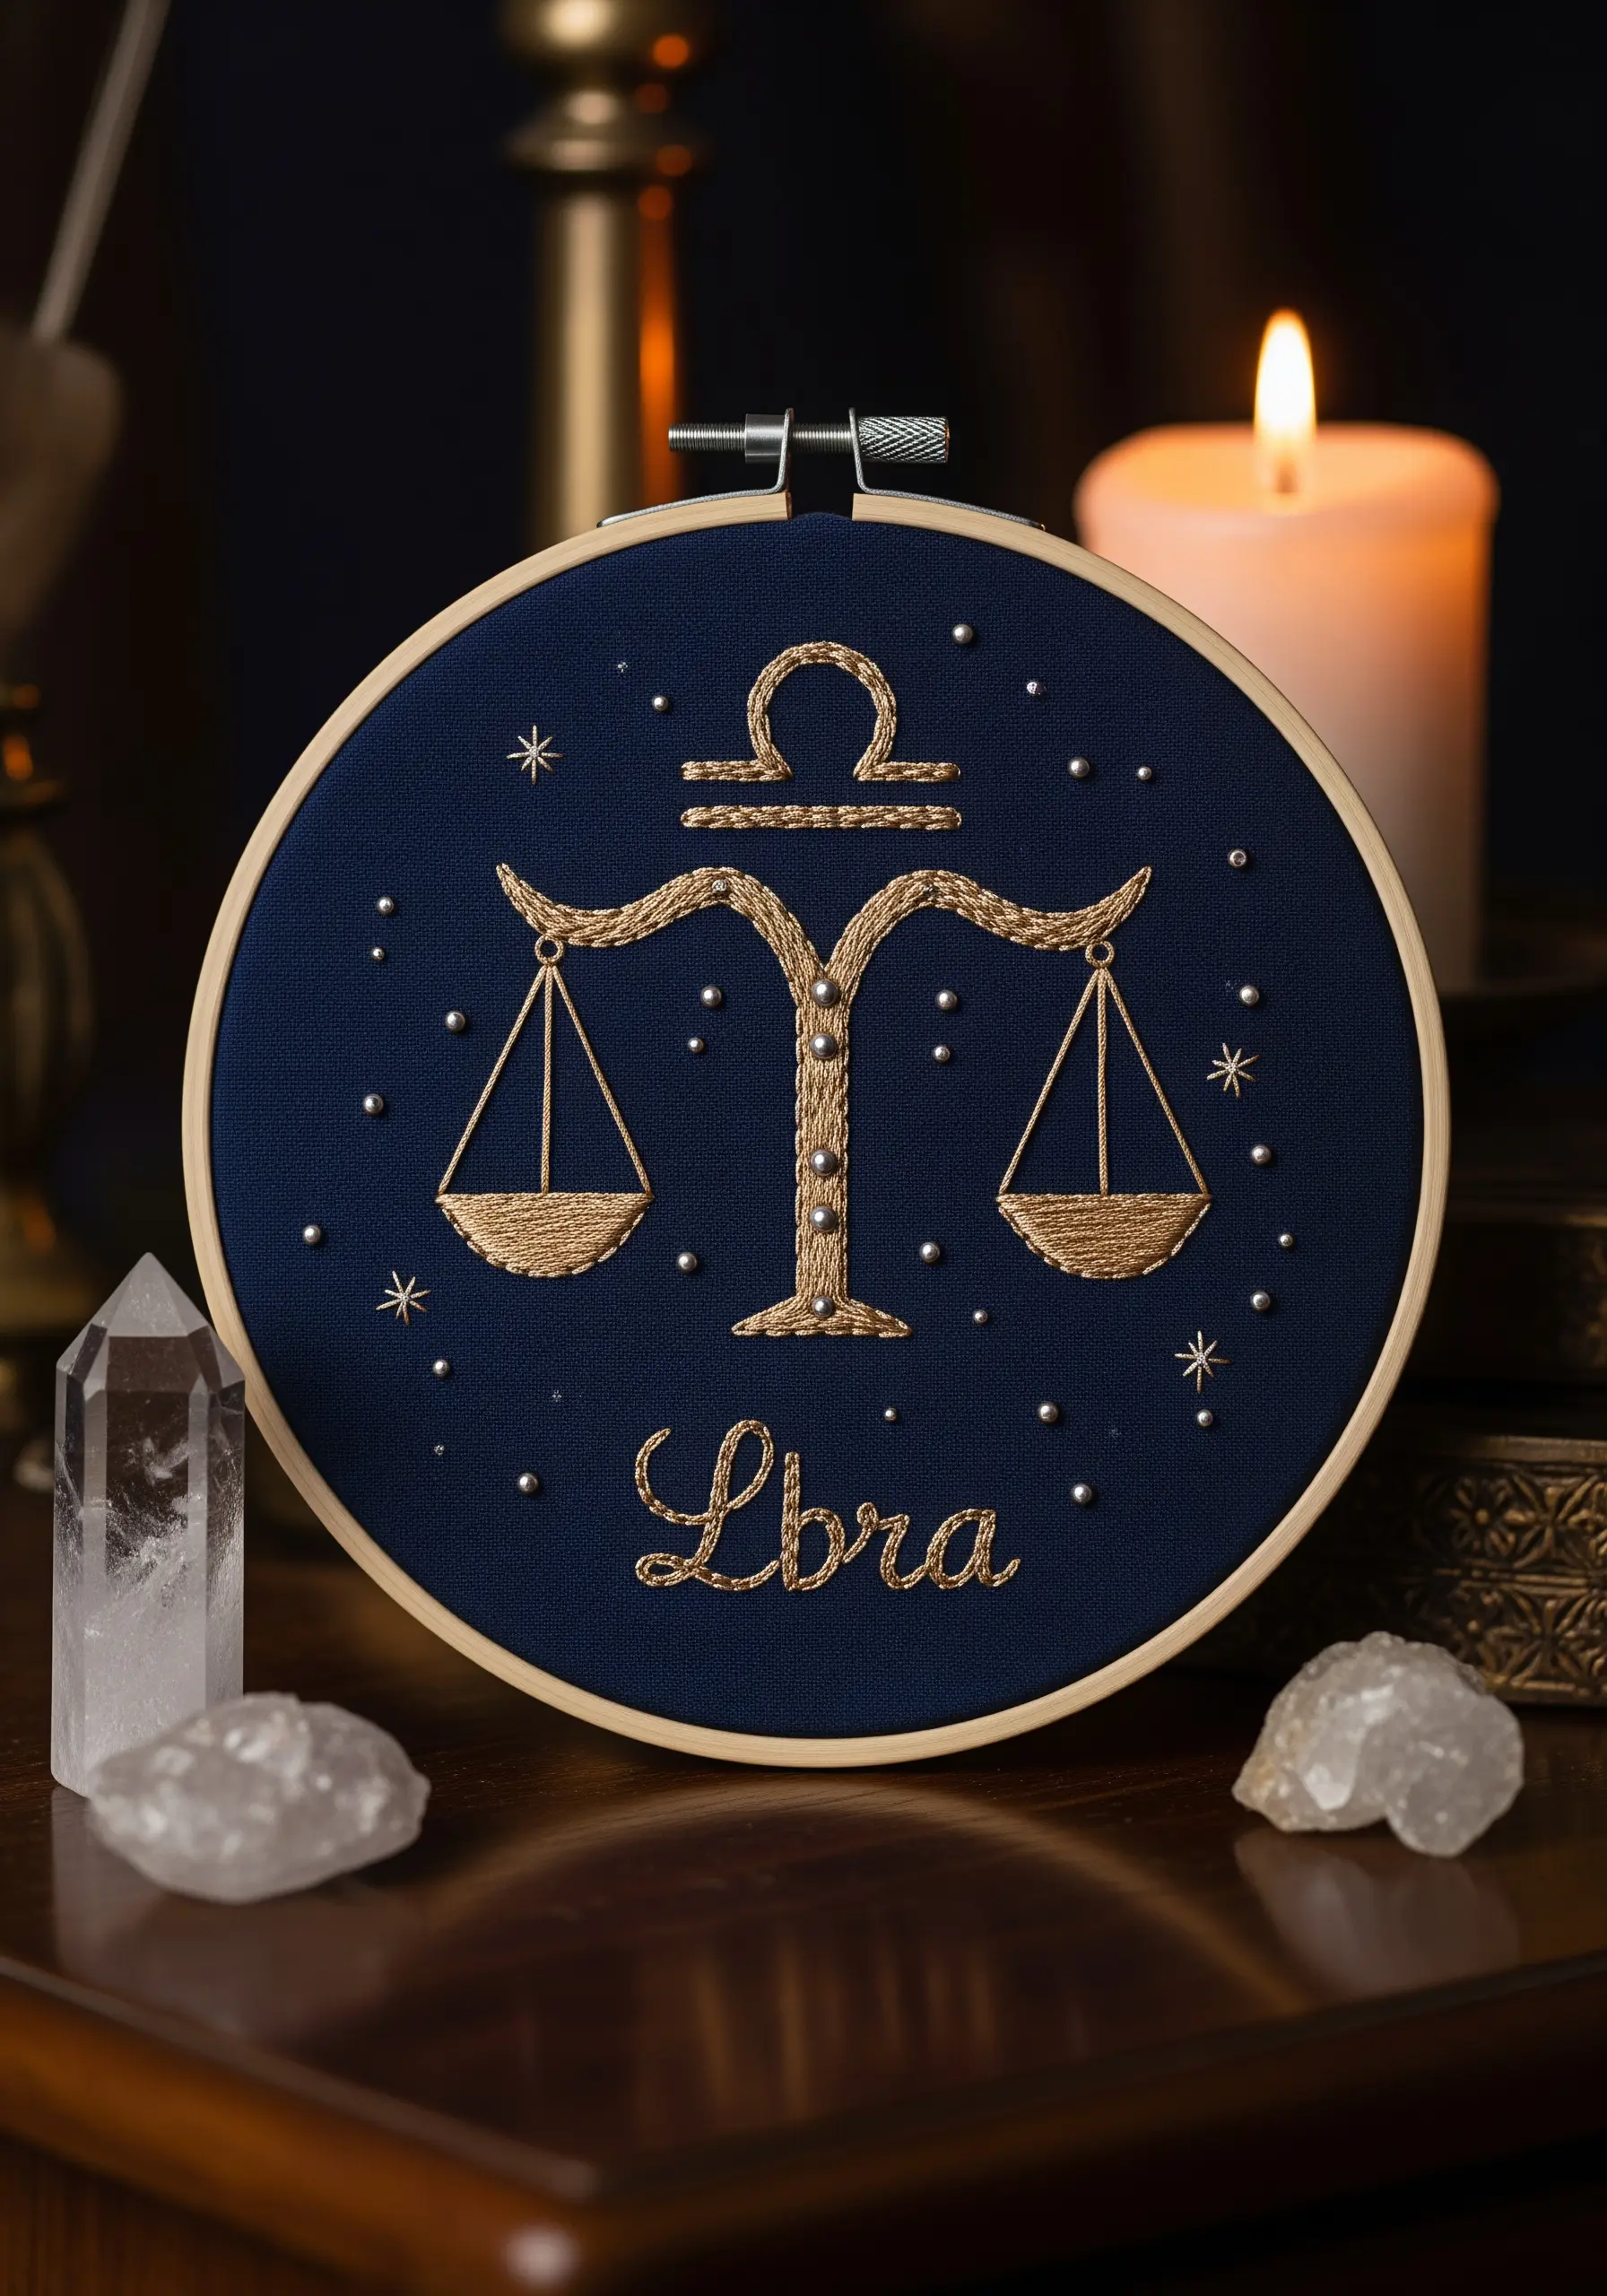
Instead of just filling your zodiac symbol with metallic satin stitches, elevate it with goldwork techniques.
Use couching for the main symbol: lay down a thicker metallic cord and tack it into place with a finer, matching thread for a raised, luxurious finish.
For the fine lettering, use a whipped backstitch with metallic floss to create a solid, smooth line.
The scattered silver beads add a final touch of celestial sparkle against the dark fabric. This is a great project for tote bag embroidery ideas featuring zodiac signs, too.
20. A Vertical Garden of Stitched Succulents
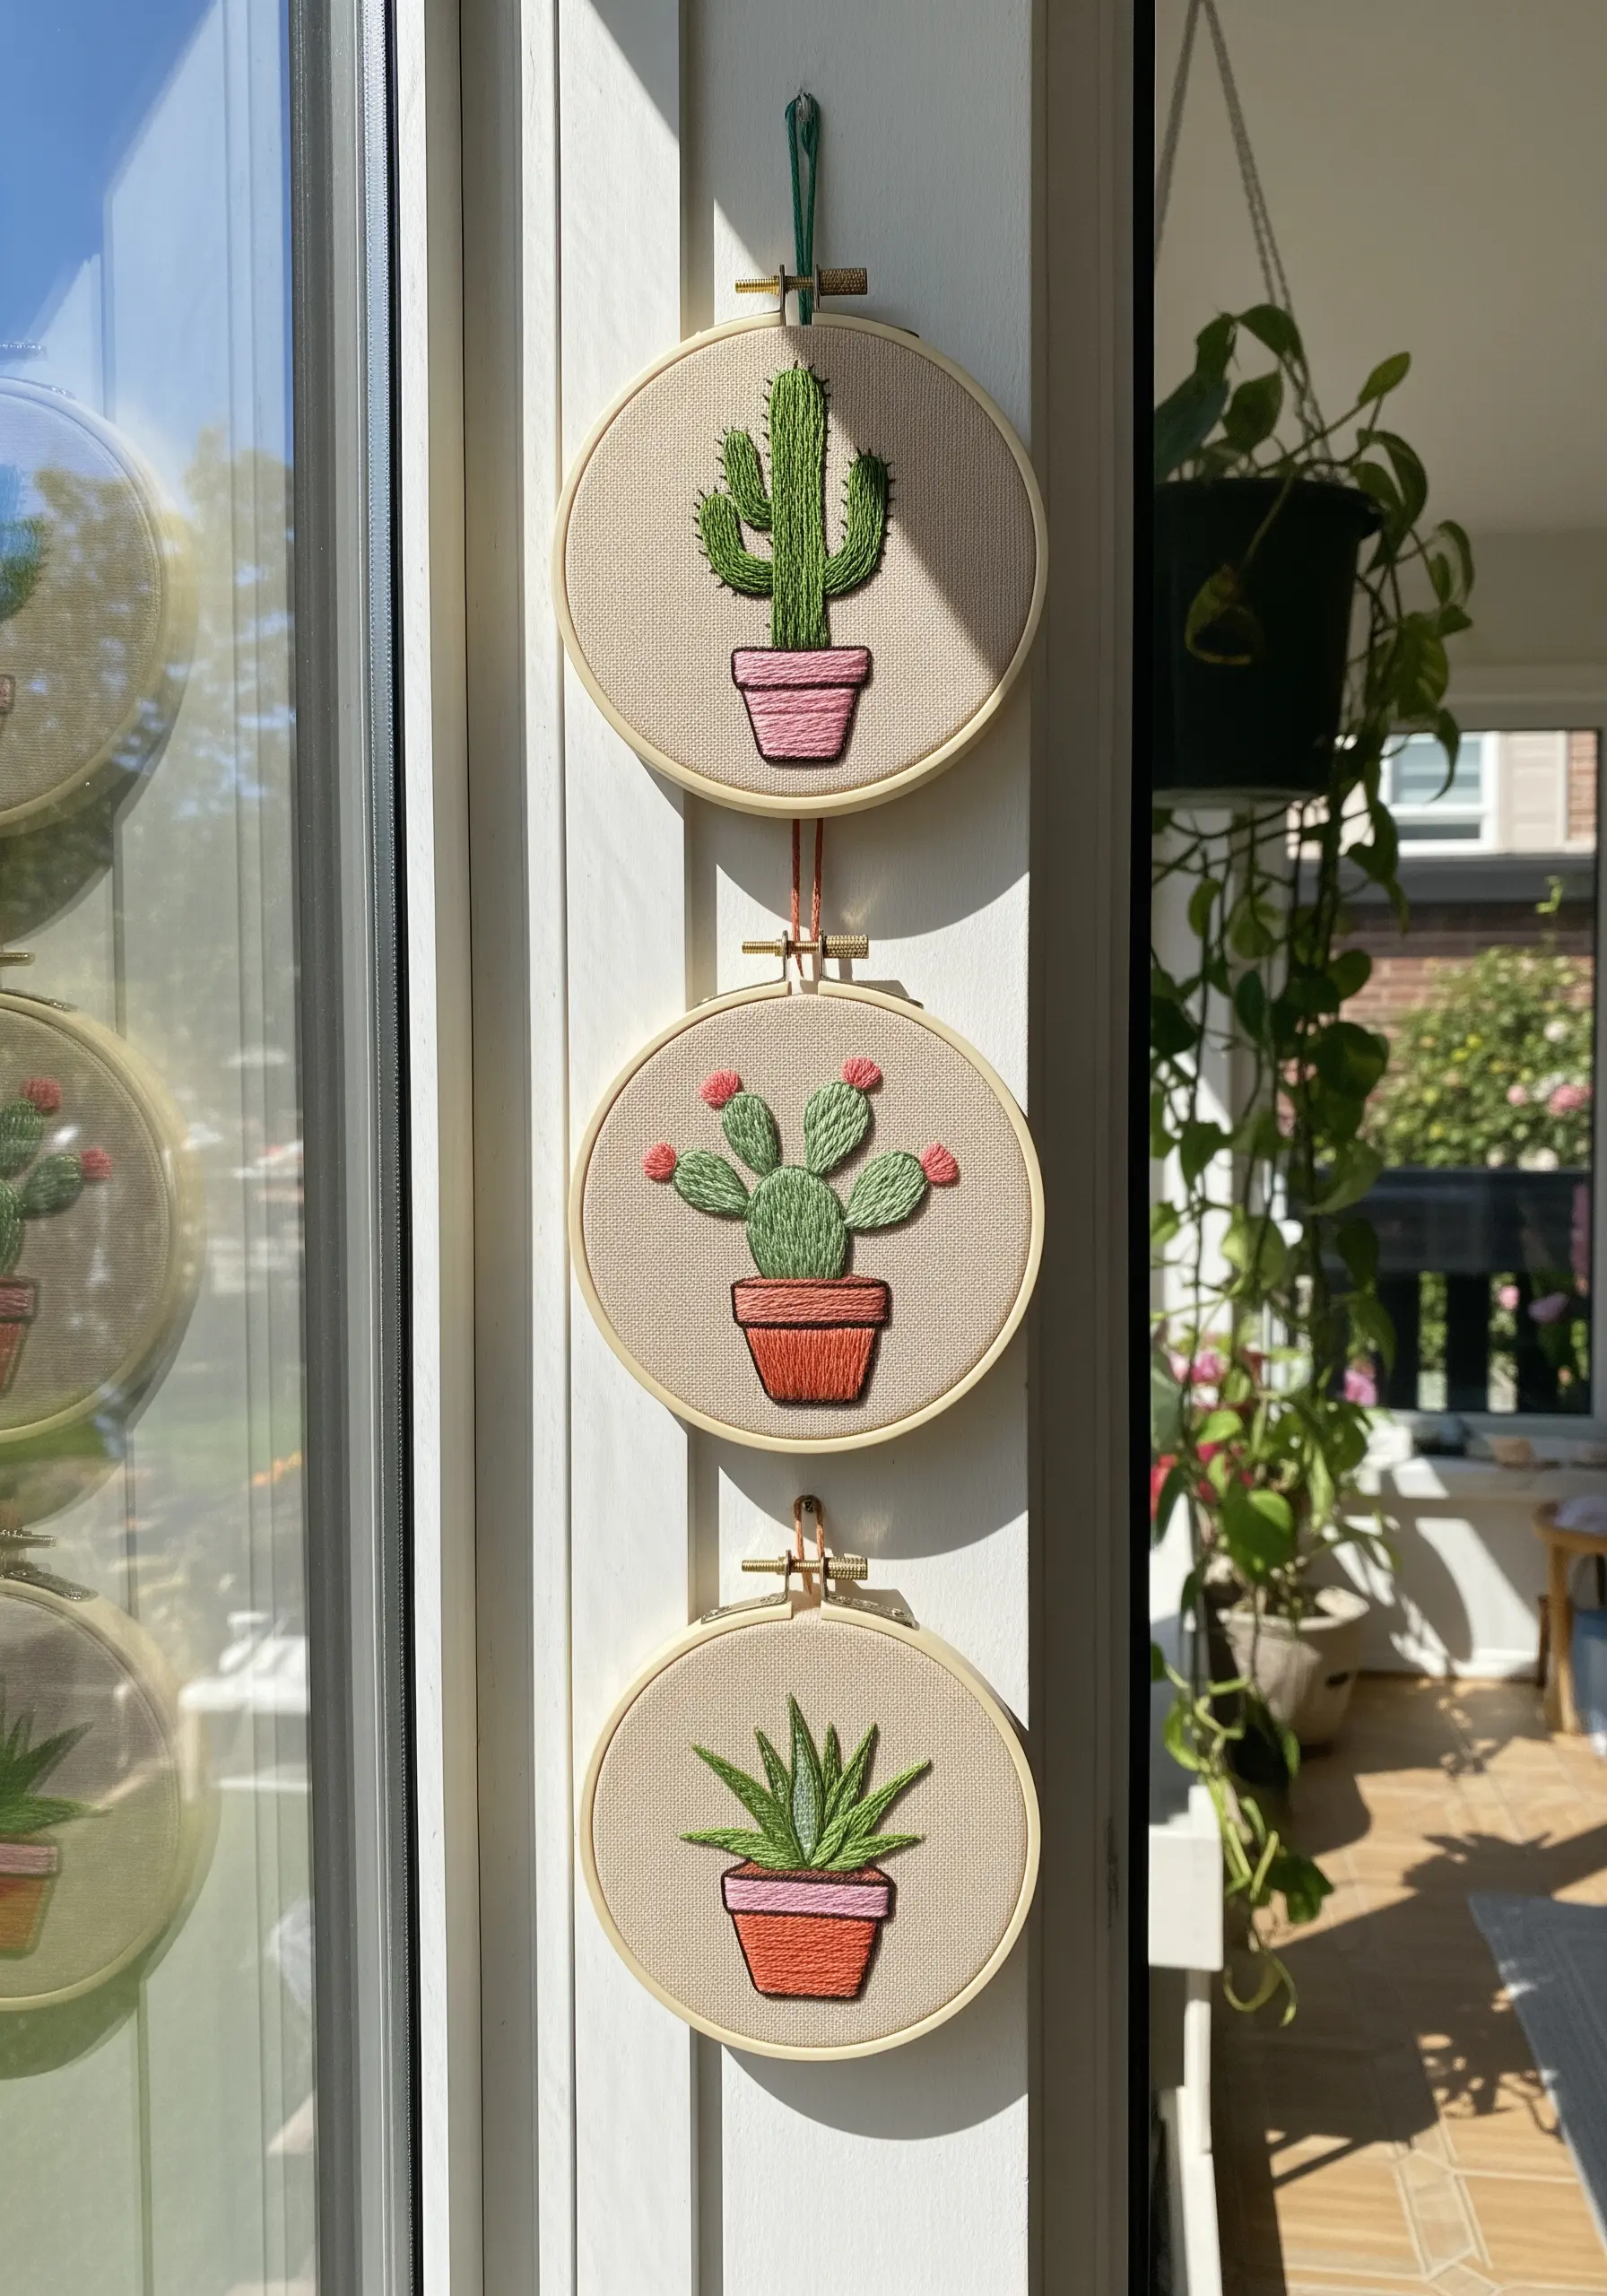
This display is a wonderful exercise in using stitch texture to define a shape.
Use long vertical satin stitches for the tall cactus, a padded satin stitch to give the barrel cactus a rounded look, and short, radiating straight stitches for the aloe.
Tiny, bright pink French knots make perfect cactus flowers.
Hanging the three hoops in a vertical line creates a chic, space-saving piece of wall art that’s perfect for a narrow column or corner. It’s a fun take on houseplant embroidery motifs.
21. A Gallery Wall of the Cosmos
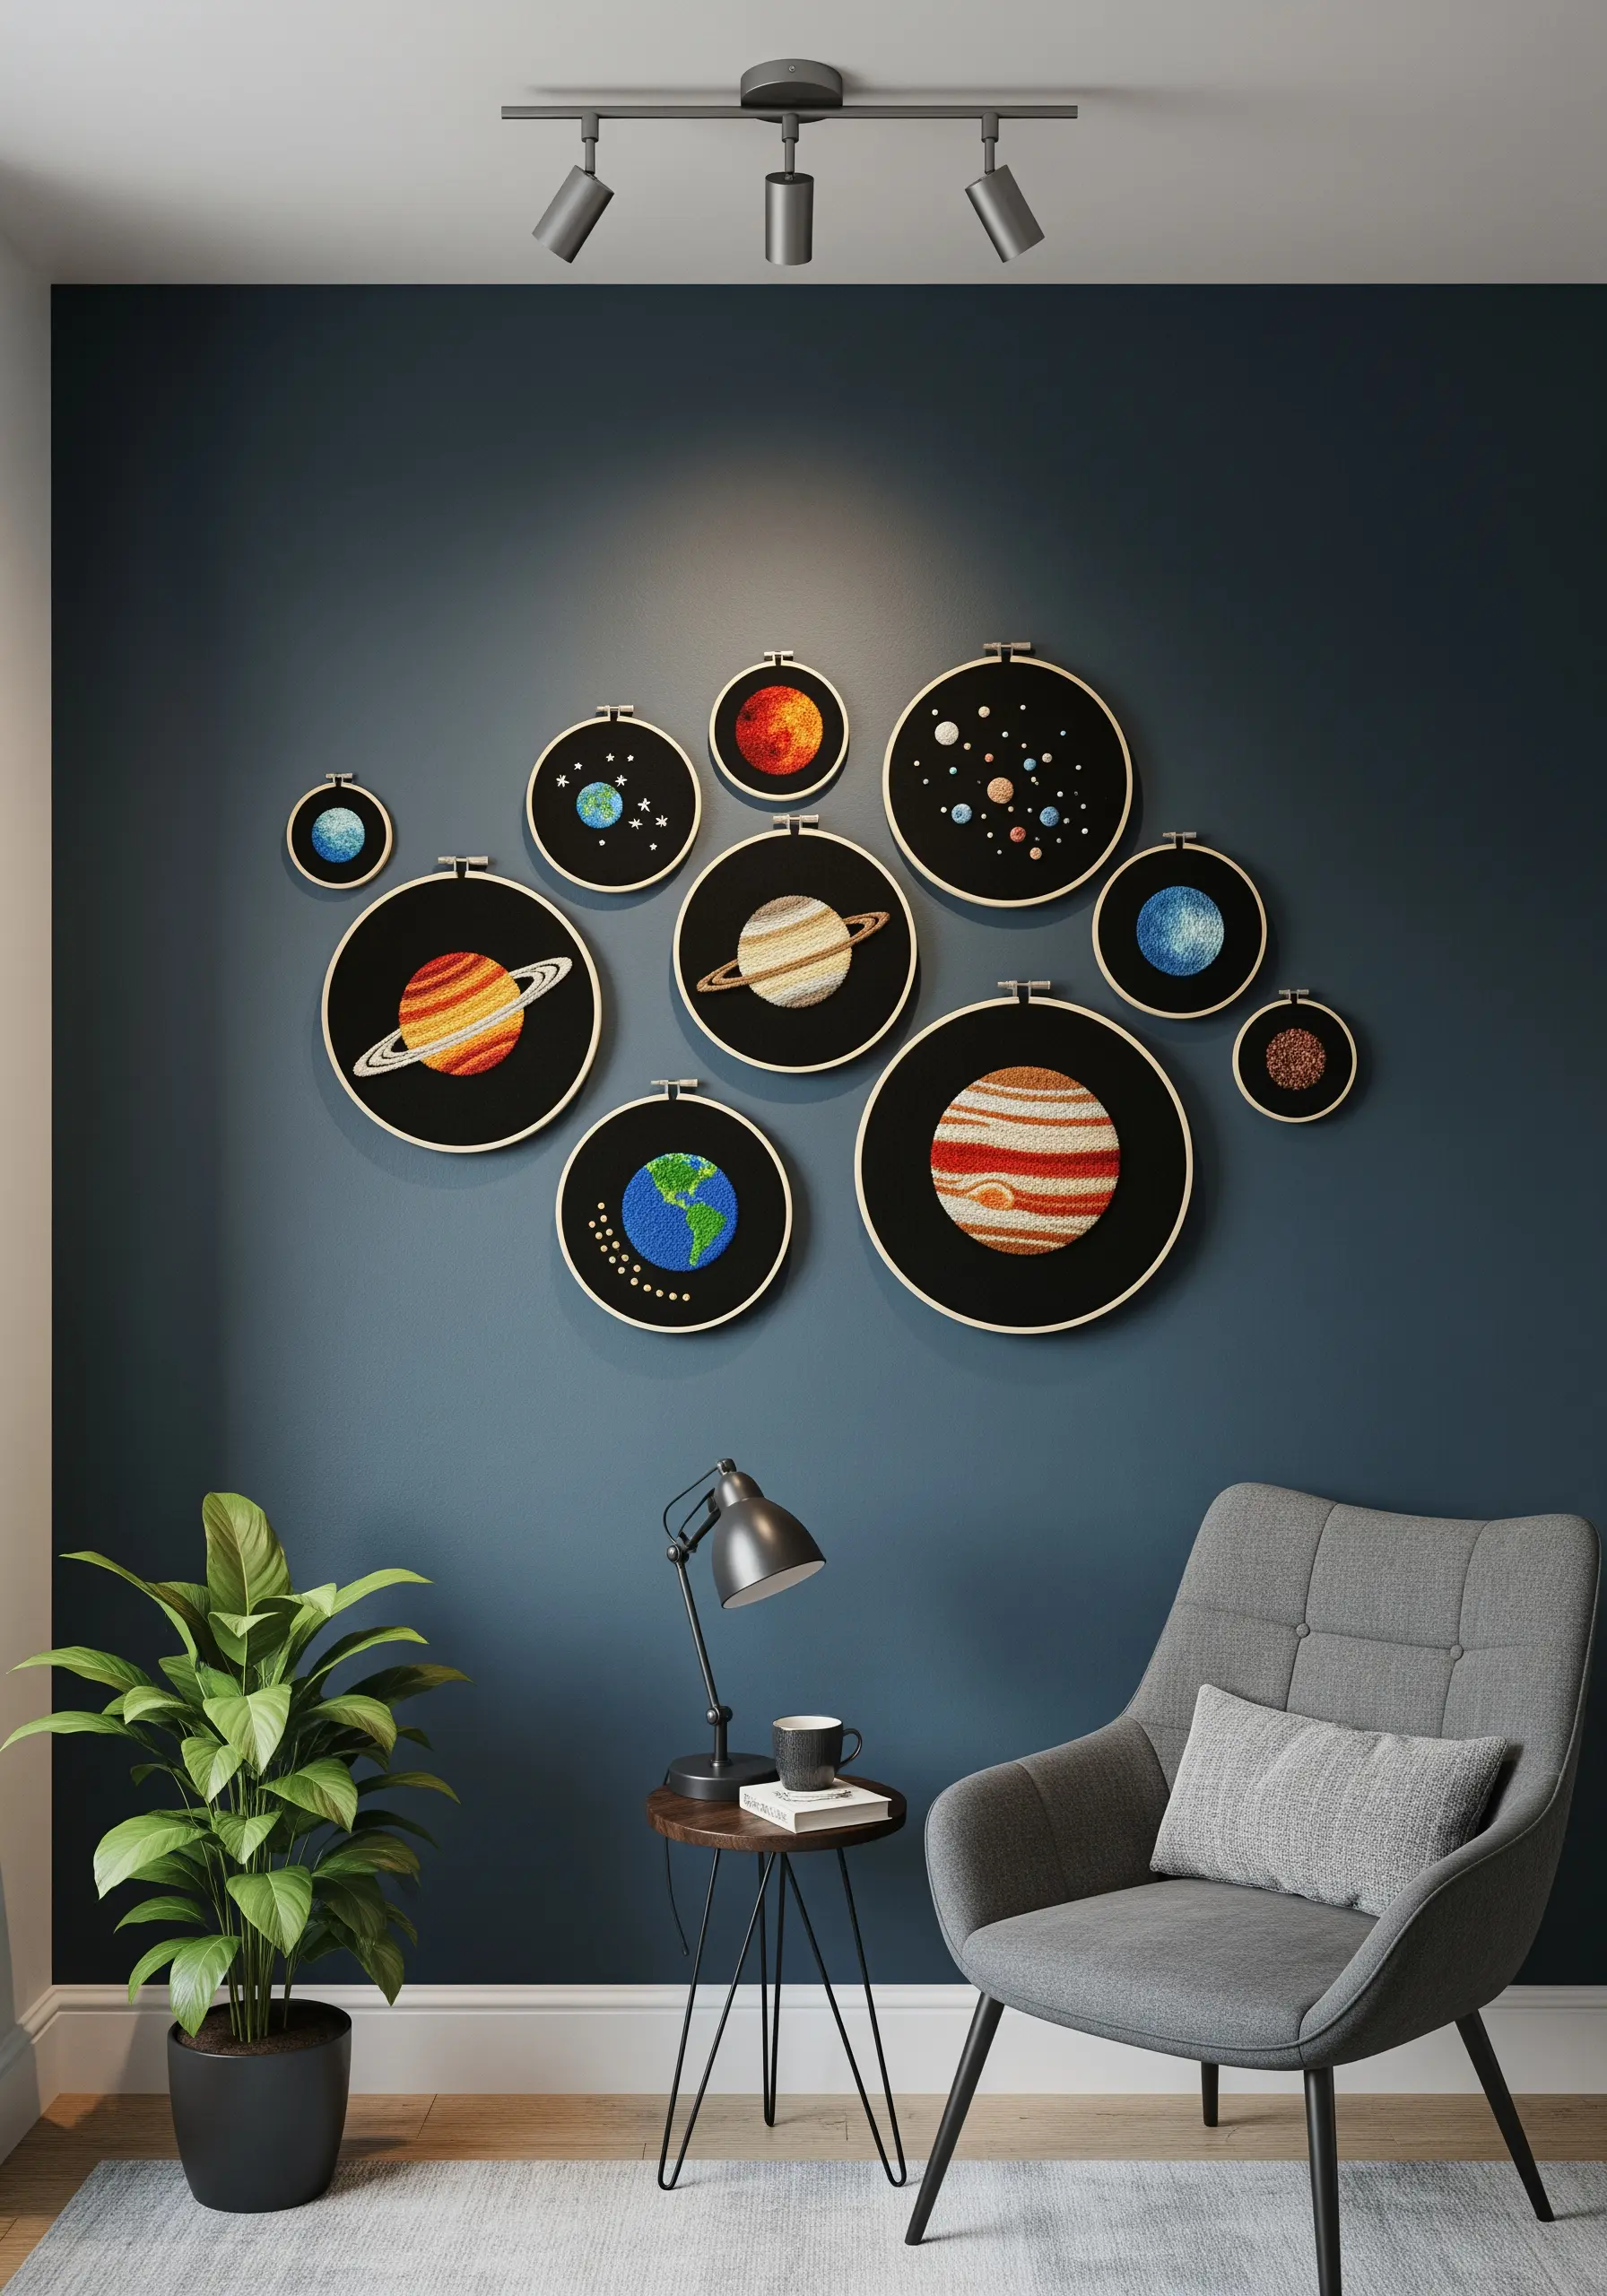
Create an entire solar system on your wall by dedicating a hoop to each planet.
This allows you to explore different stitches to represent their unique surfaces: long-and-short stitch for Jupiter’s stormy bands, French knots for Mars’ rocky texture, and smooth satin stitch for Saturn’s rings.
Using hoops of varying sizes to suggest the planets’ relative scale adds another layer of interest.
A consistent black fabric background across all hoops will unify the collection into a dramatic and cohesive display.
22. Combining Line Art with Dense Texture
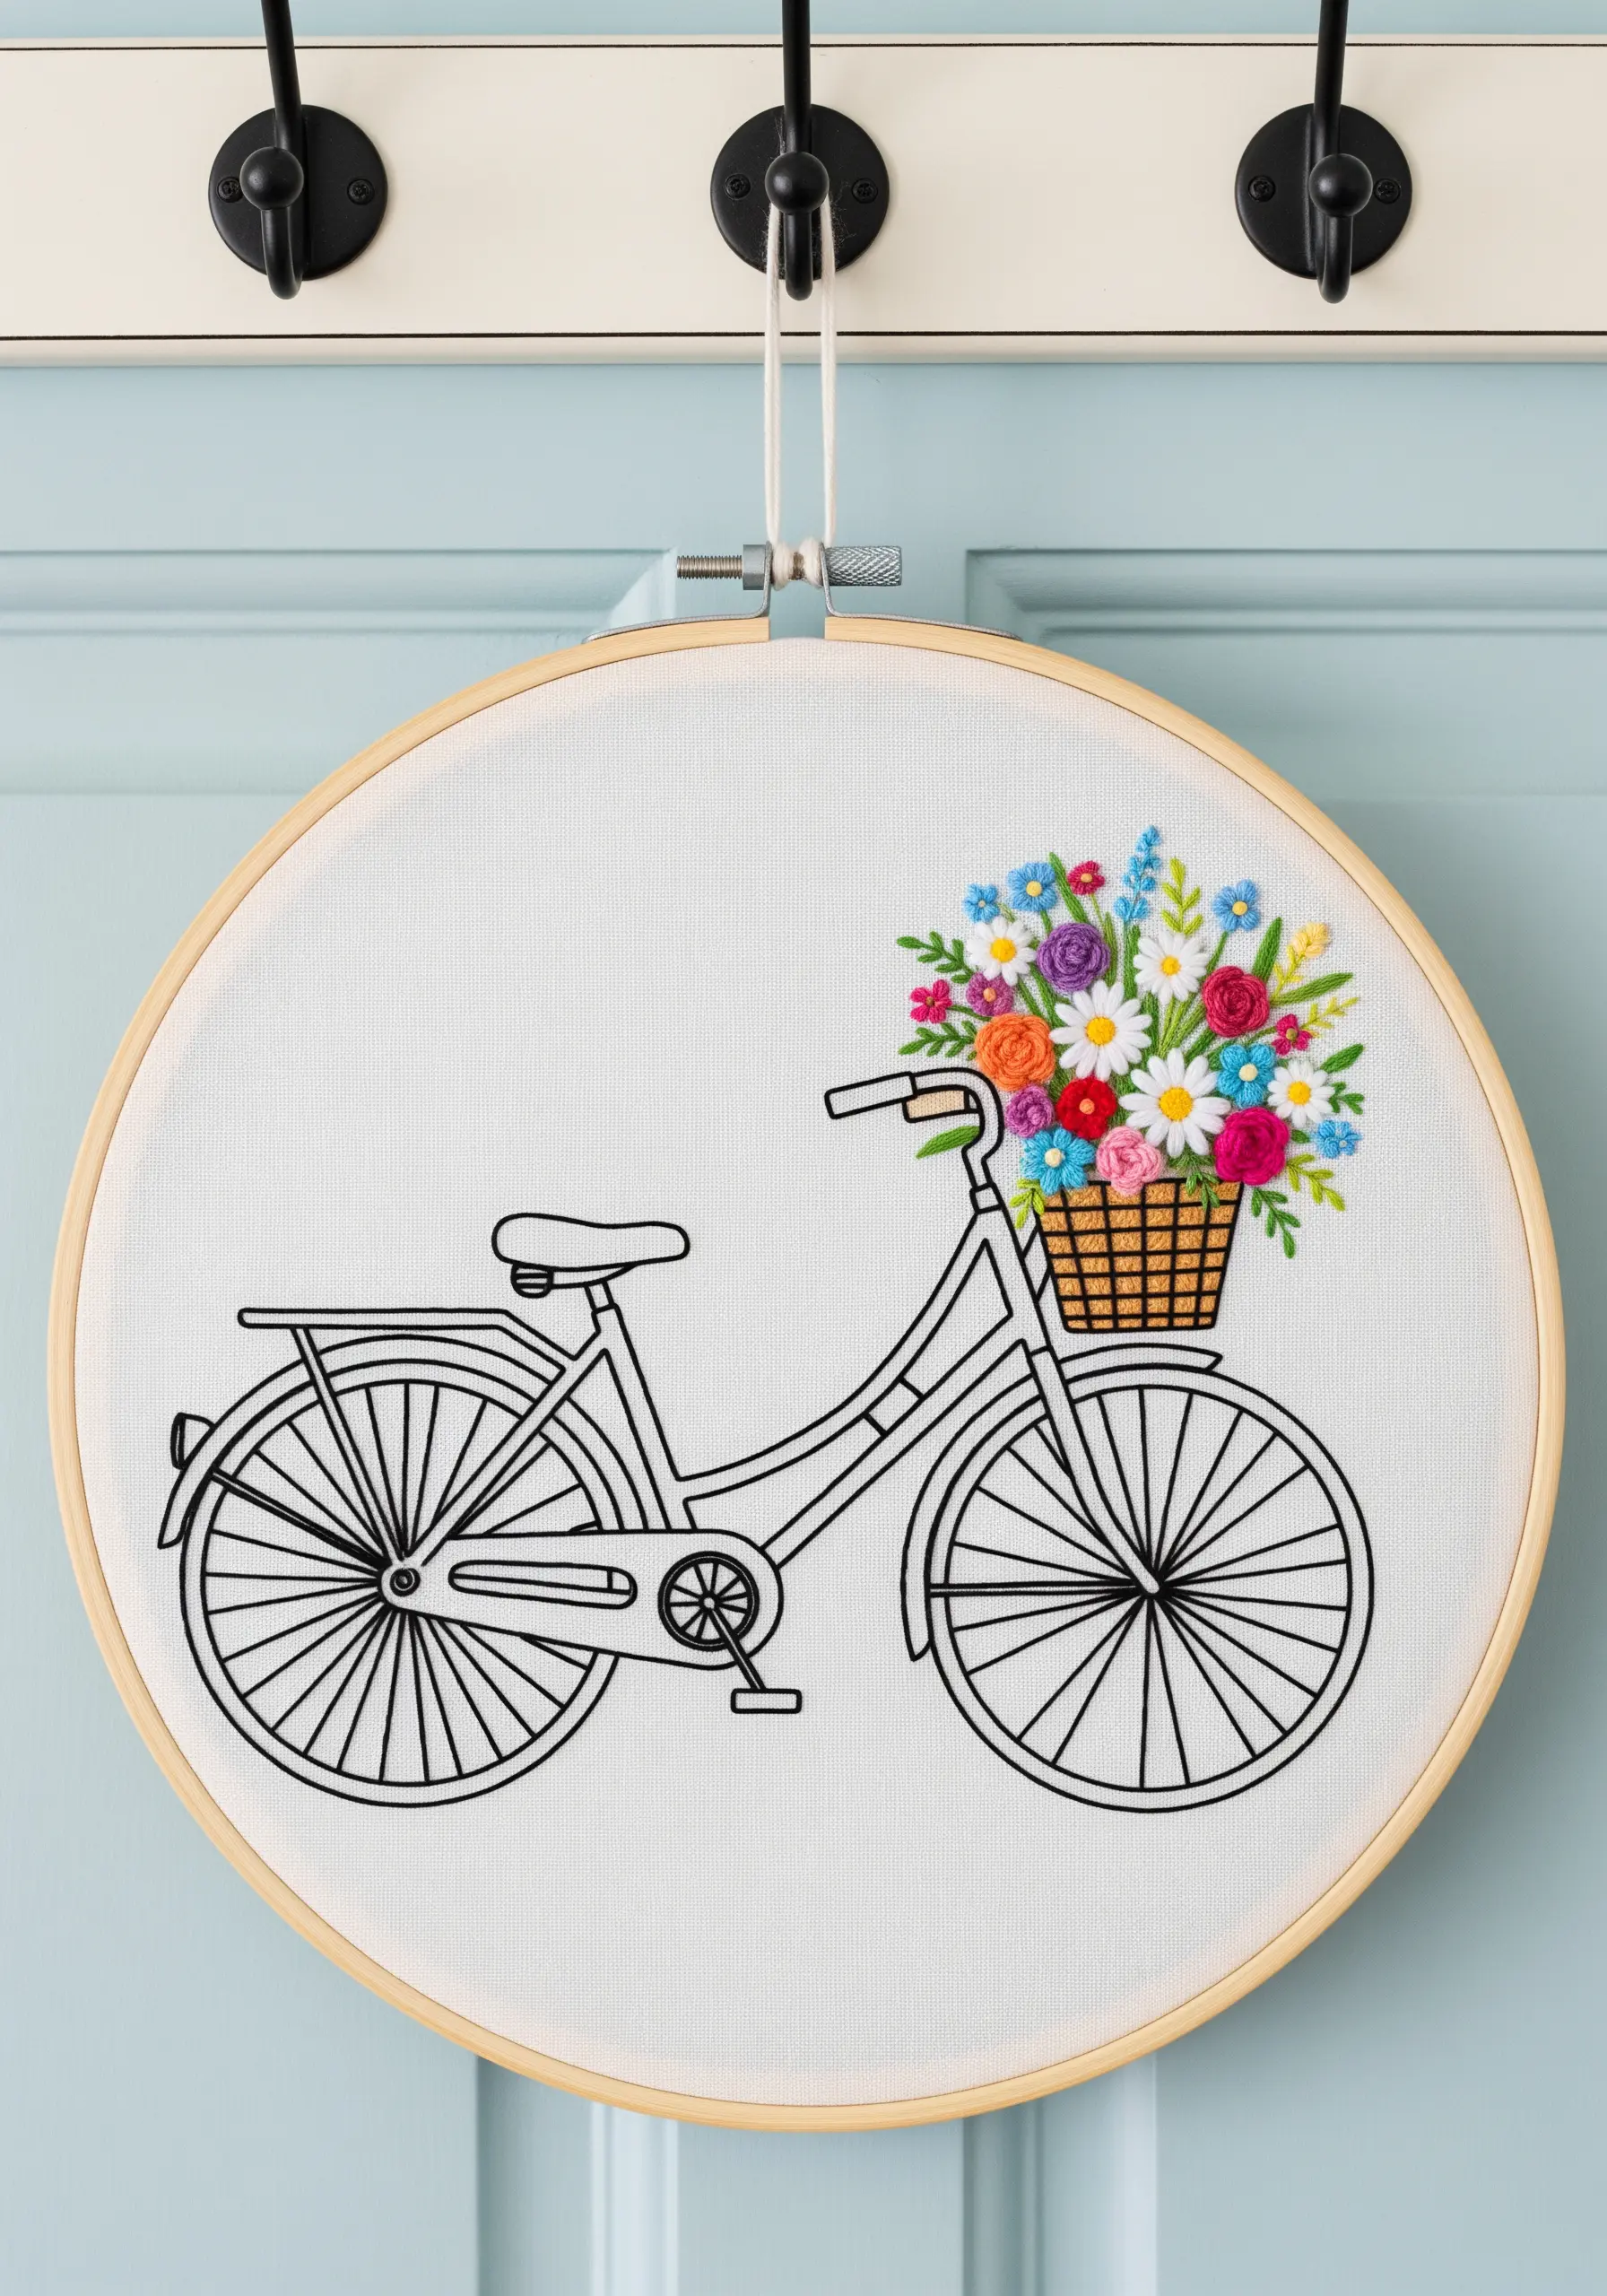
Create a stunning visual contrast by pairing clean, minimalist line art with a burst of rich texture.
Stitch the bicycle frame using a simple, two-strand backstitch for a crisp outline.
For the basket of flowers, switch to a dense mix of textured stitches: French knots, bullion knots, and lazy daisy stitches in a riot of bright colors.
This juxtaposition makes the flowers feel abundant and alive, practically overflowing from the simple drawing. It’s a great pattern to practice tiny floral motifs.
23. Meditative Stitching with Mandala Art
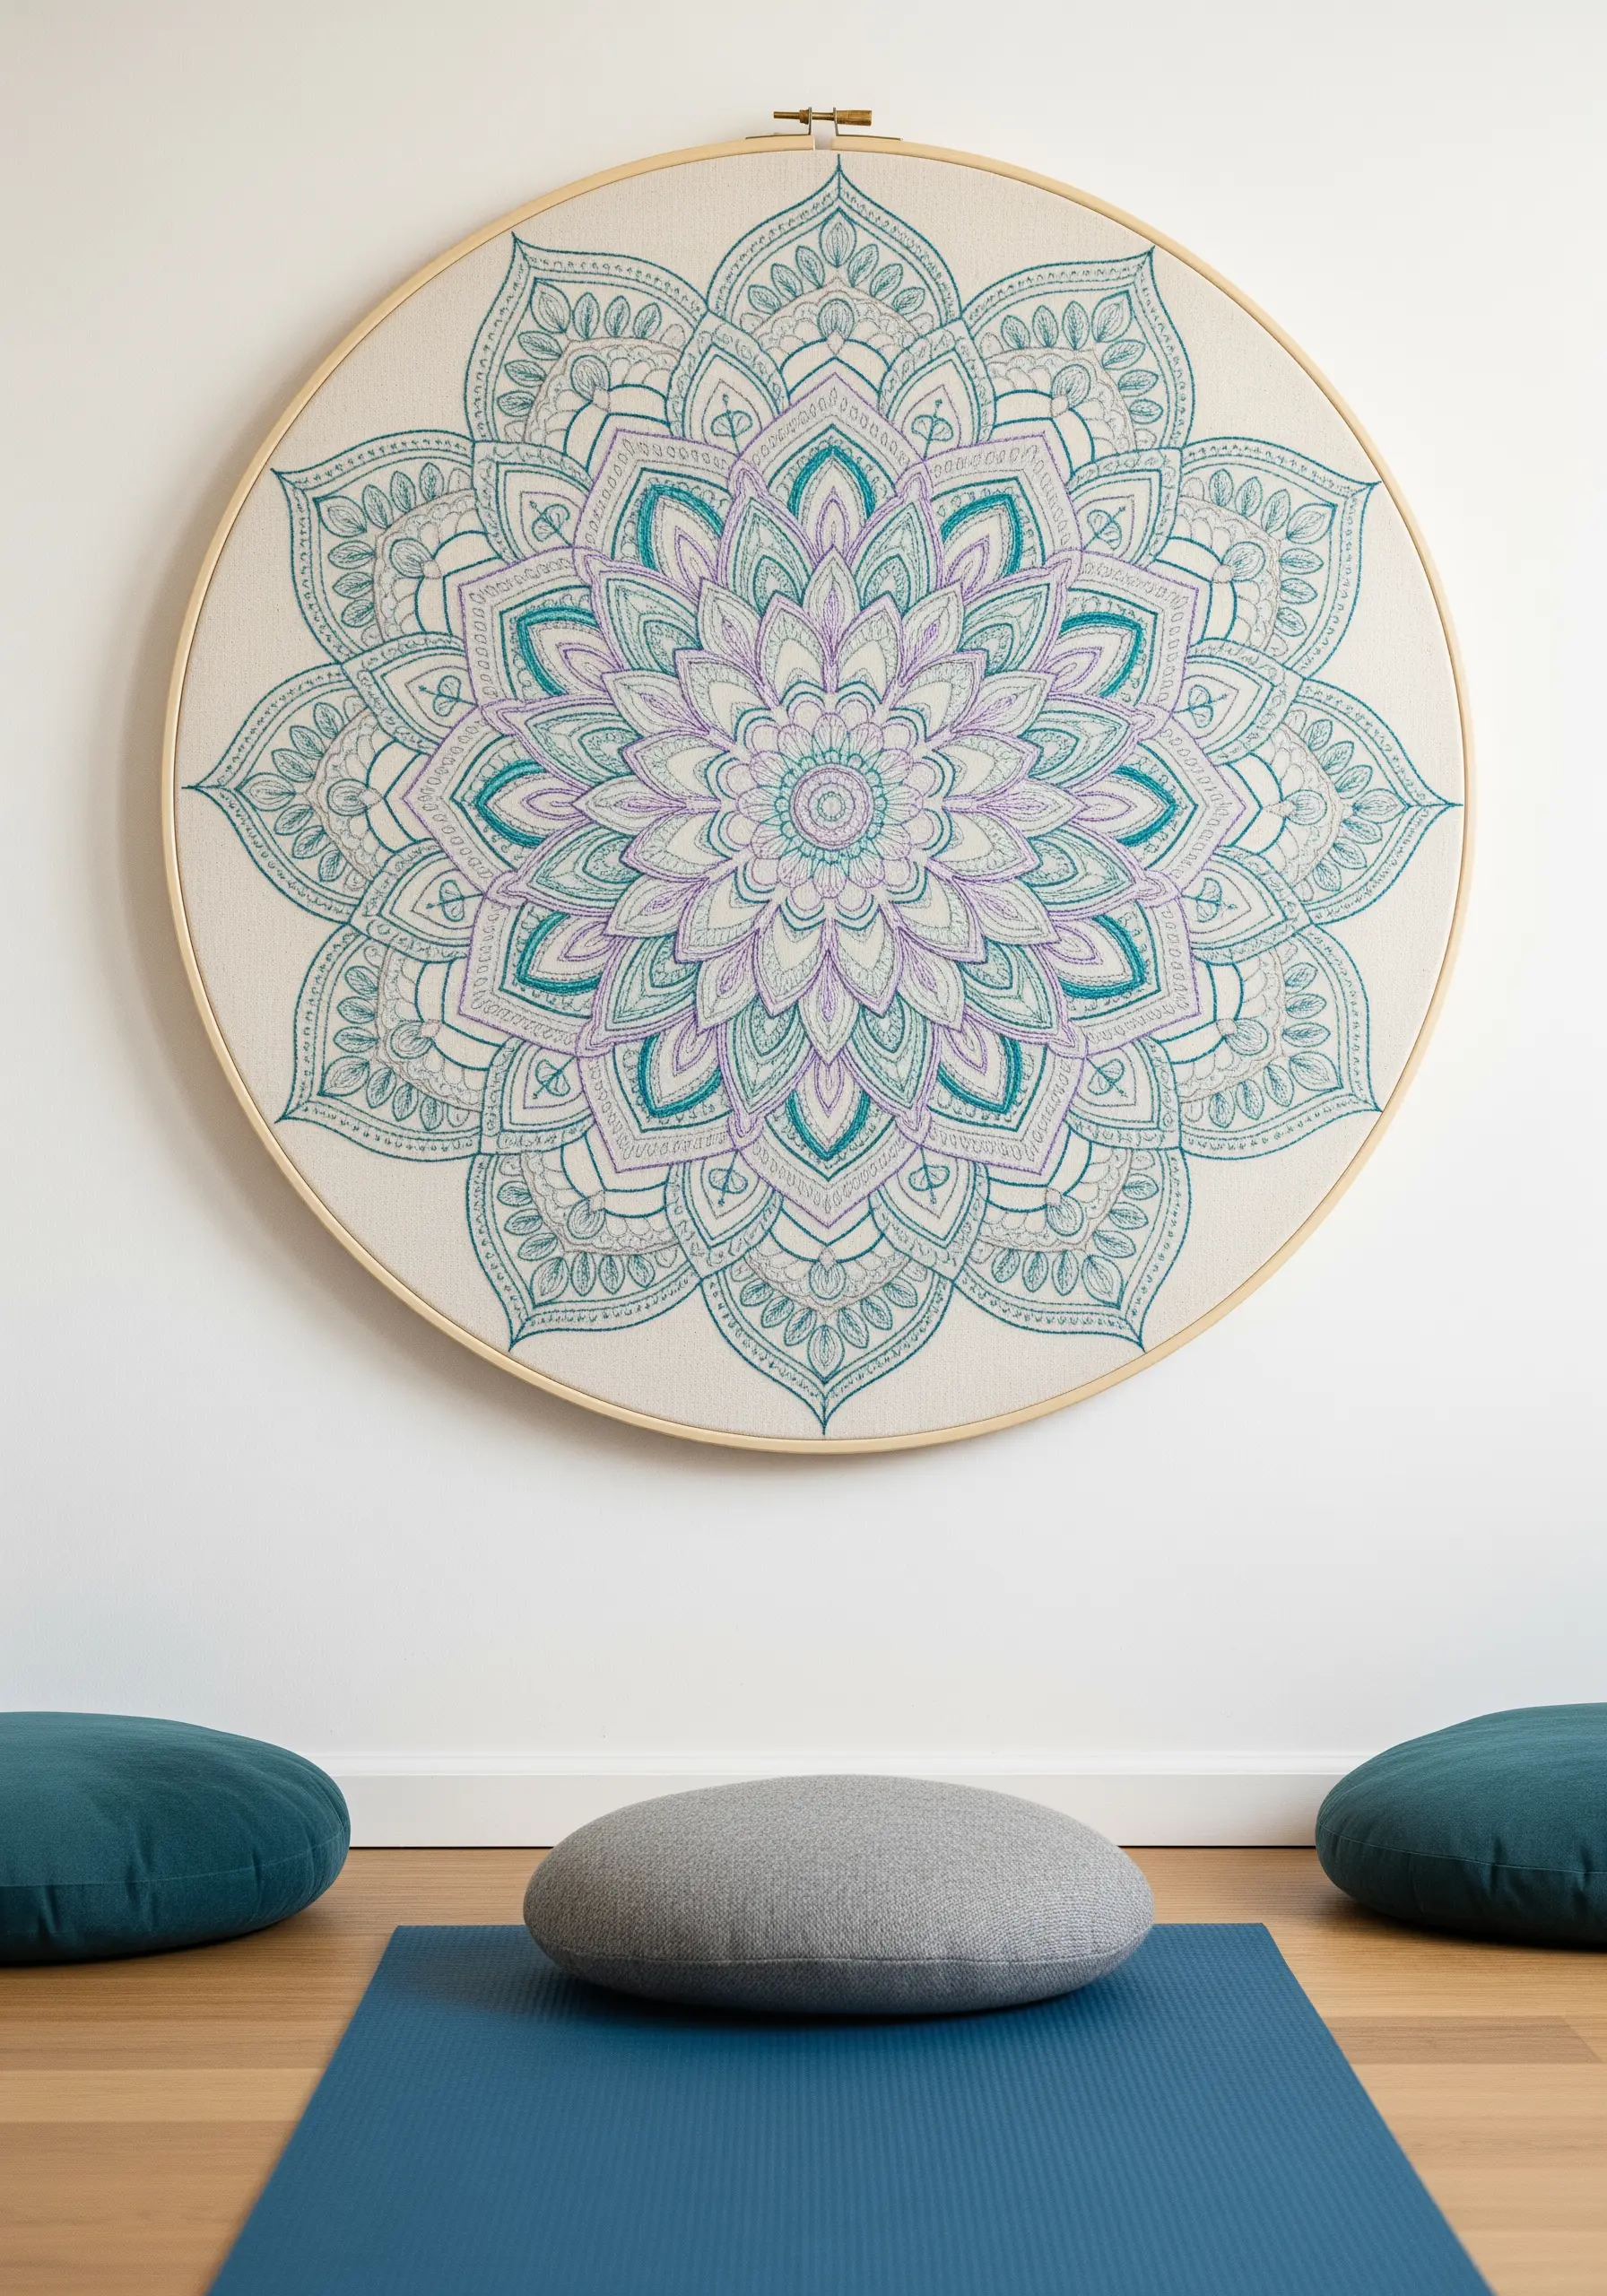
The serene beauty of a mandala lies in its perfect symmetry. Ensure your design is transferred to the fabric with precision, then work your way from the center outwards.
This method helps maintain balance and prevents fabric distortion.
Use a simple backstitch or stem stitch for the intricate linework, keeping your stitch length uniform for a clean look.
A limited, harmonious color palette often creates a more calming effect than a full spectrum, making this a perfect piece of mandala embroidery wall art.
24. Combining Embroidery with 3D Fiber Art
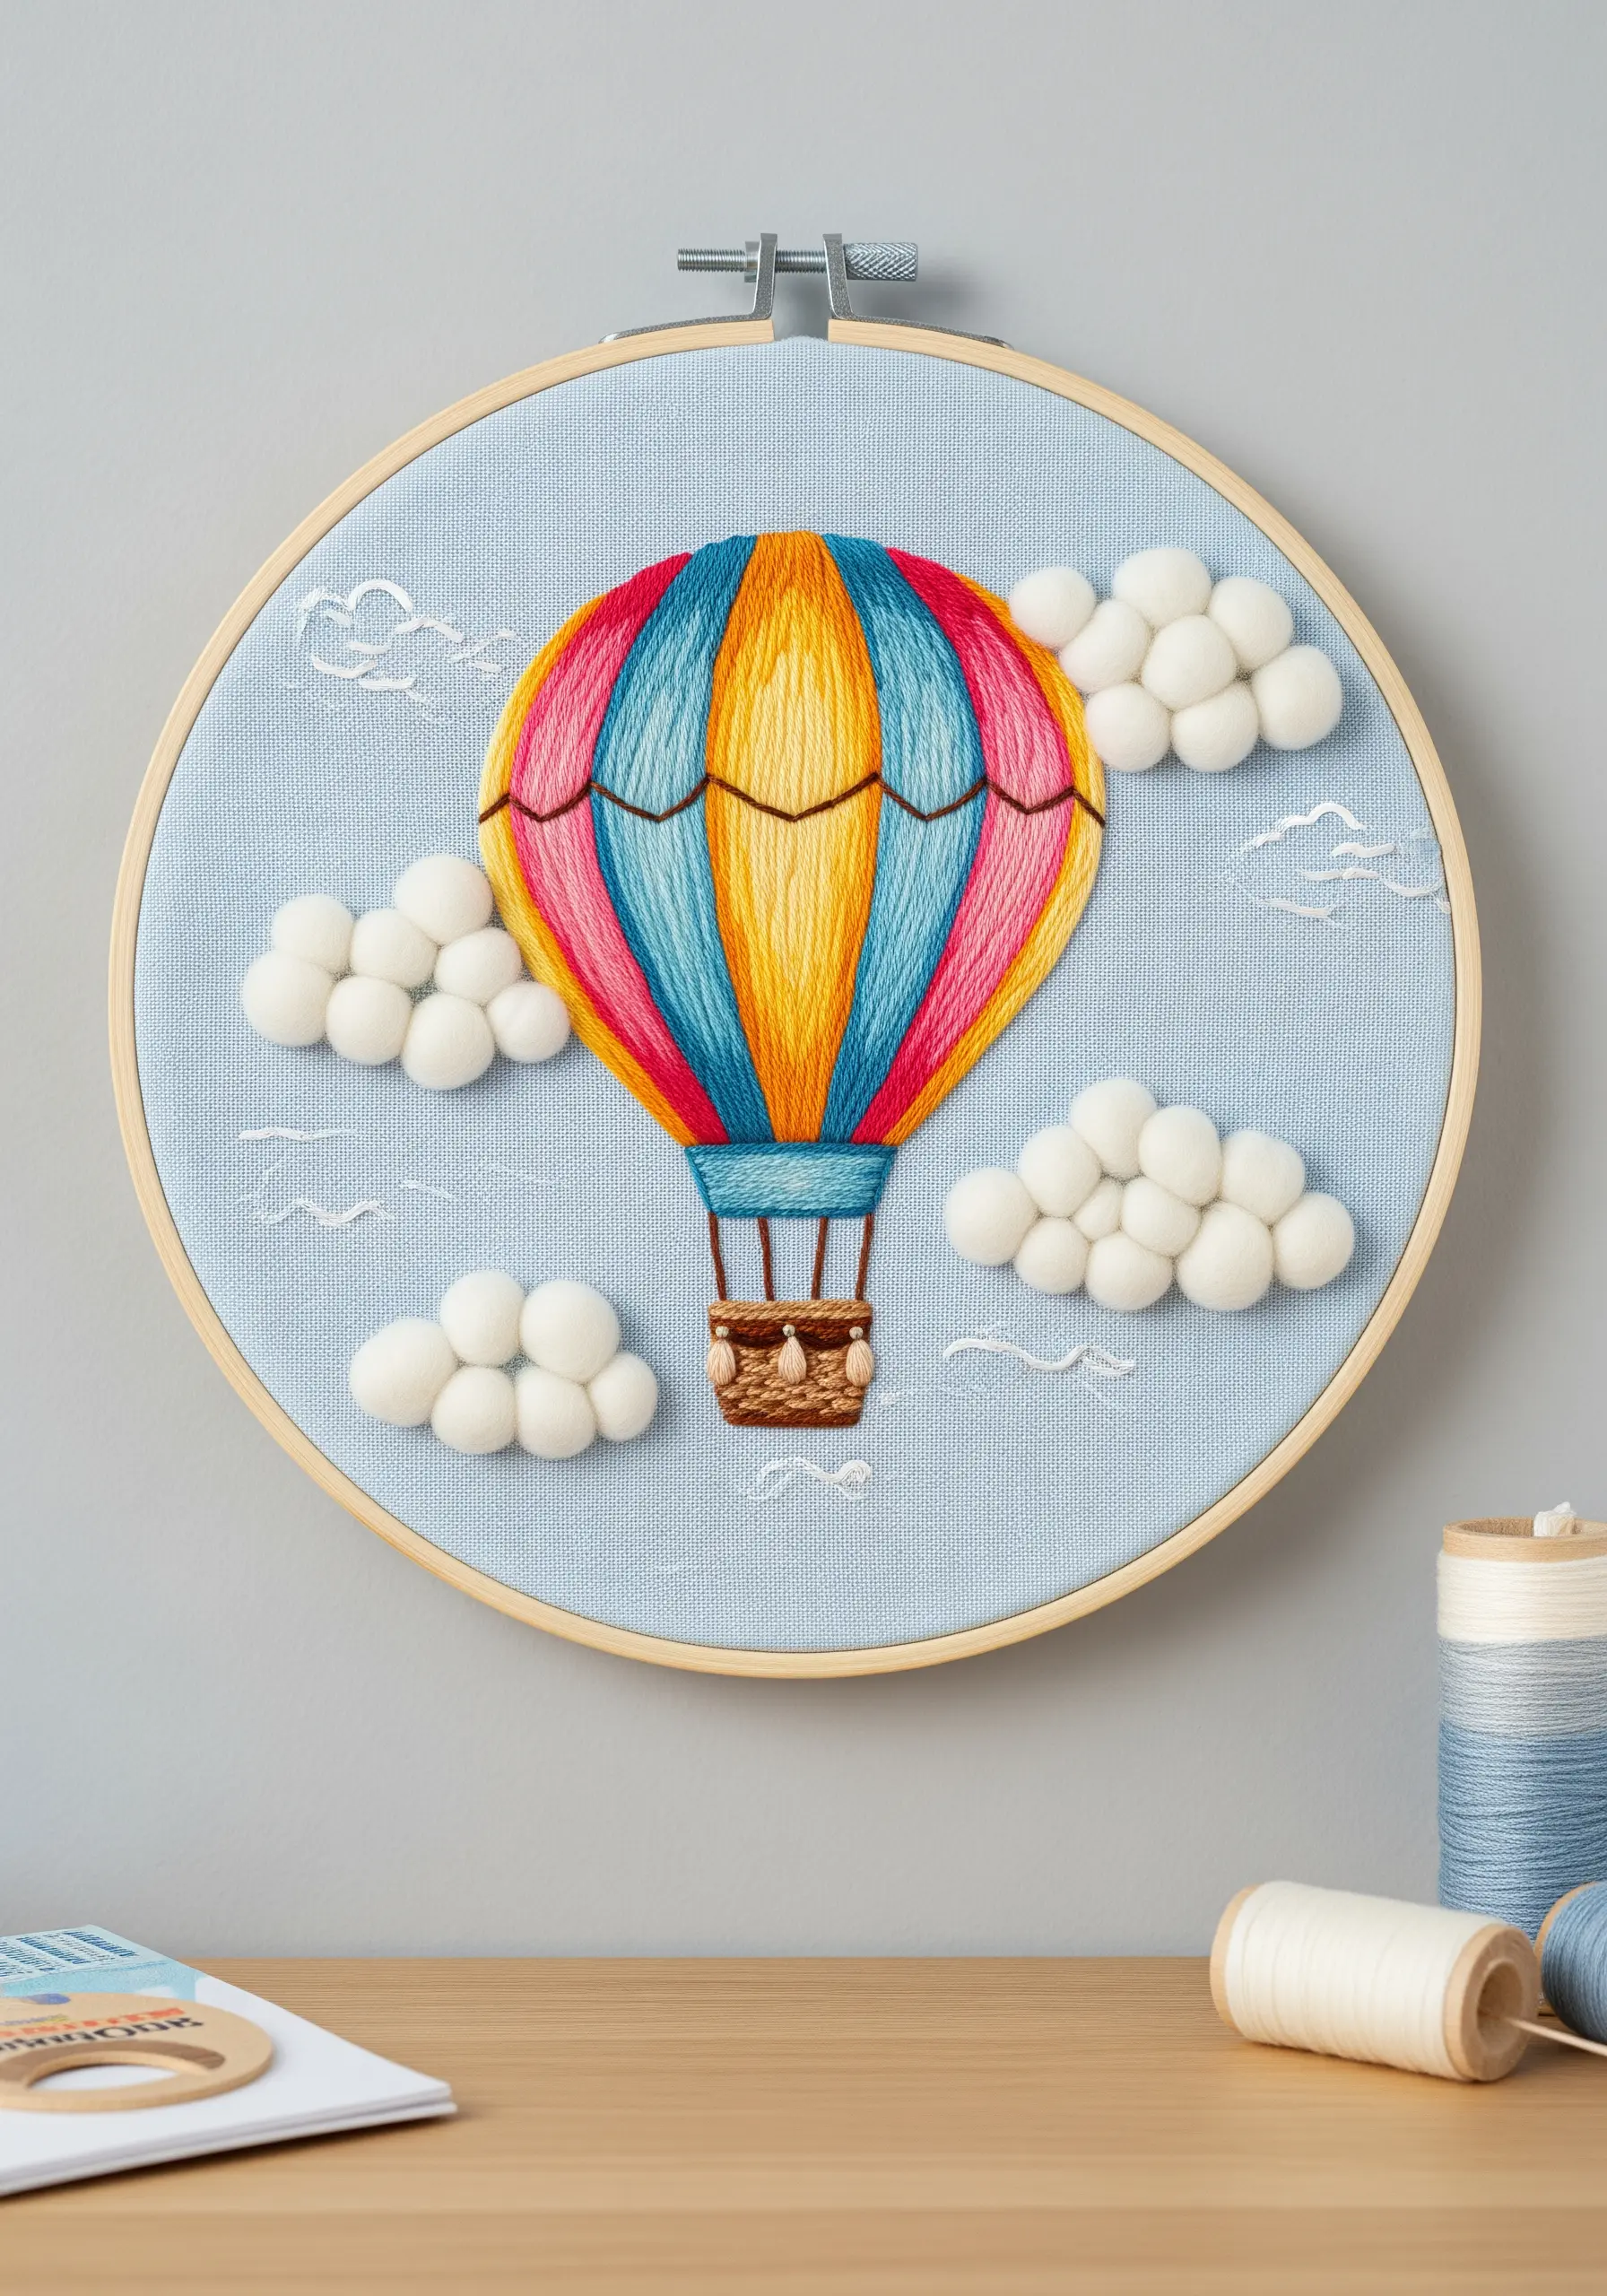
Add a playful and tactile dimension to your embroidery by incorporating other fiber elements.
The balloon itself can be filled with traditional satin stitch, while the clouds are created with soft wool roving.
You can shape the wool into cloud-like puffs and attach them using a felting needle, which tangles the fibers directly into your background fabric.
This blend of smooth thread and fluffy wool creates a delightful textural contrast. This mixed-fiber project adds wonderful depth.
25. A Cherished Recipe Stitched in Time
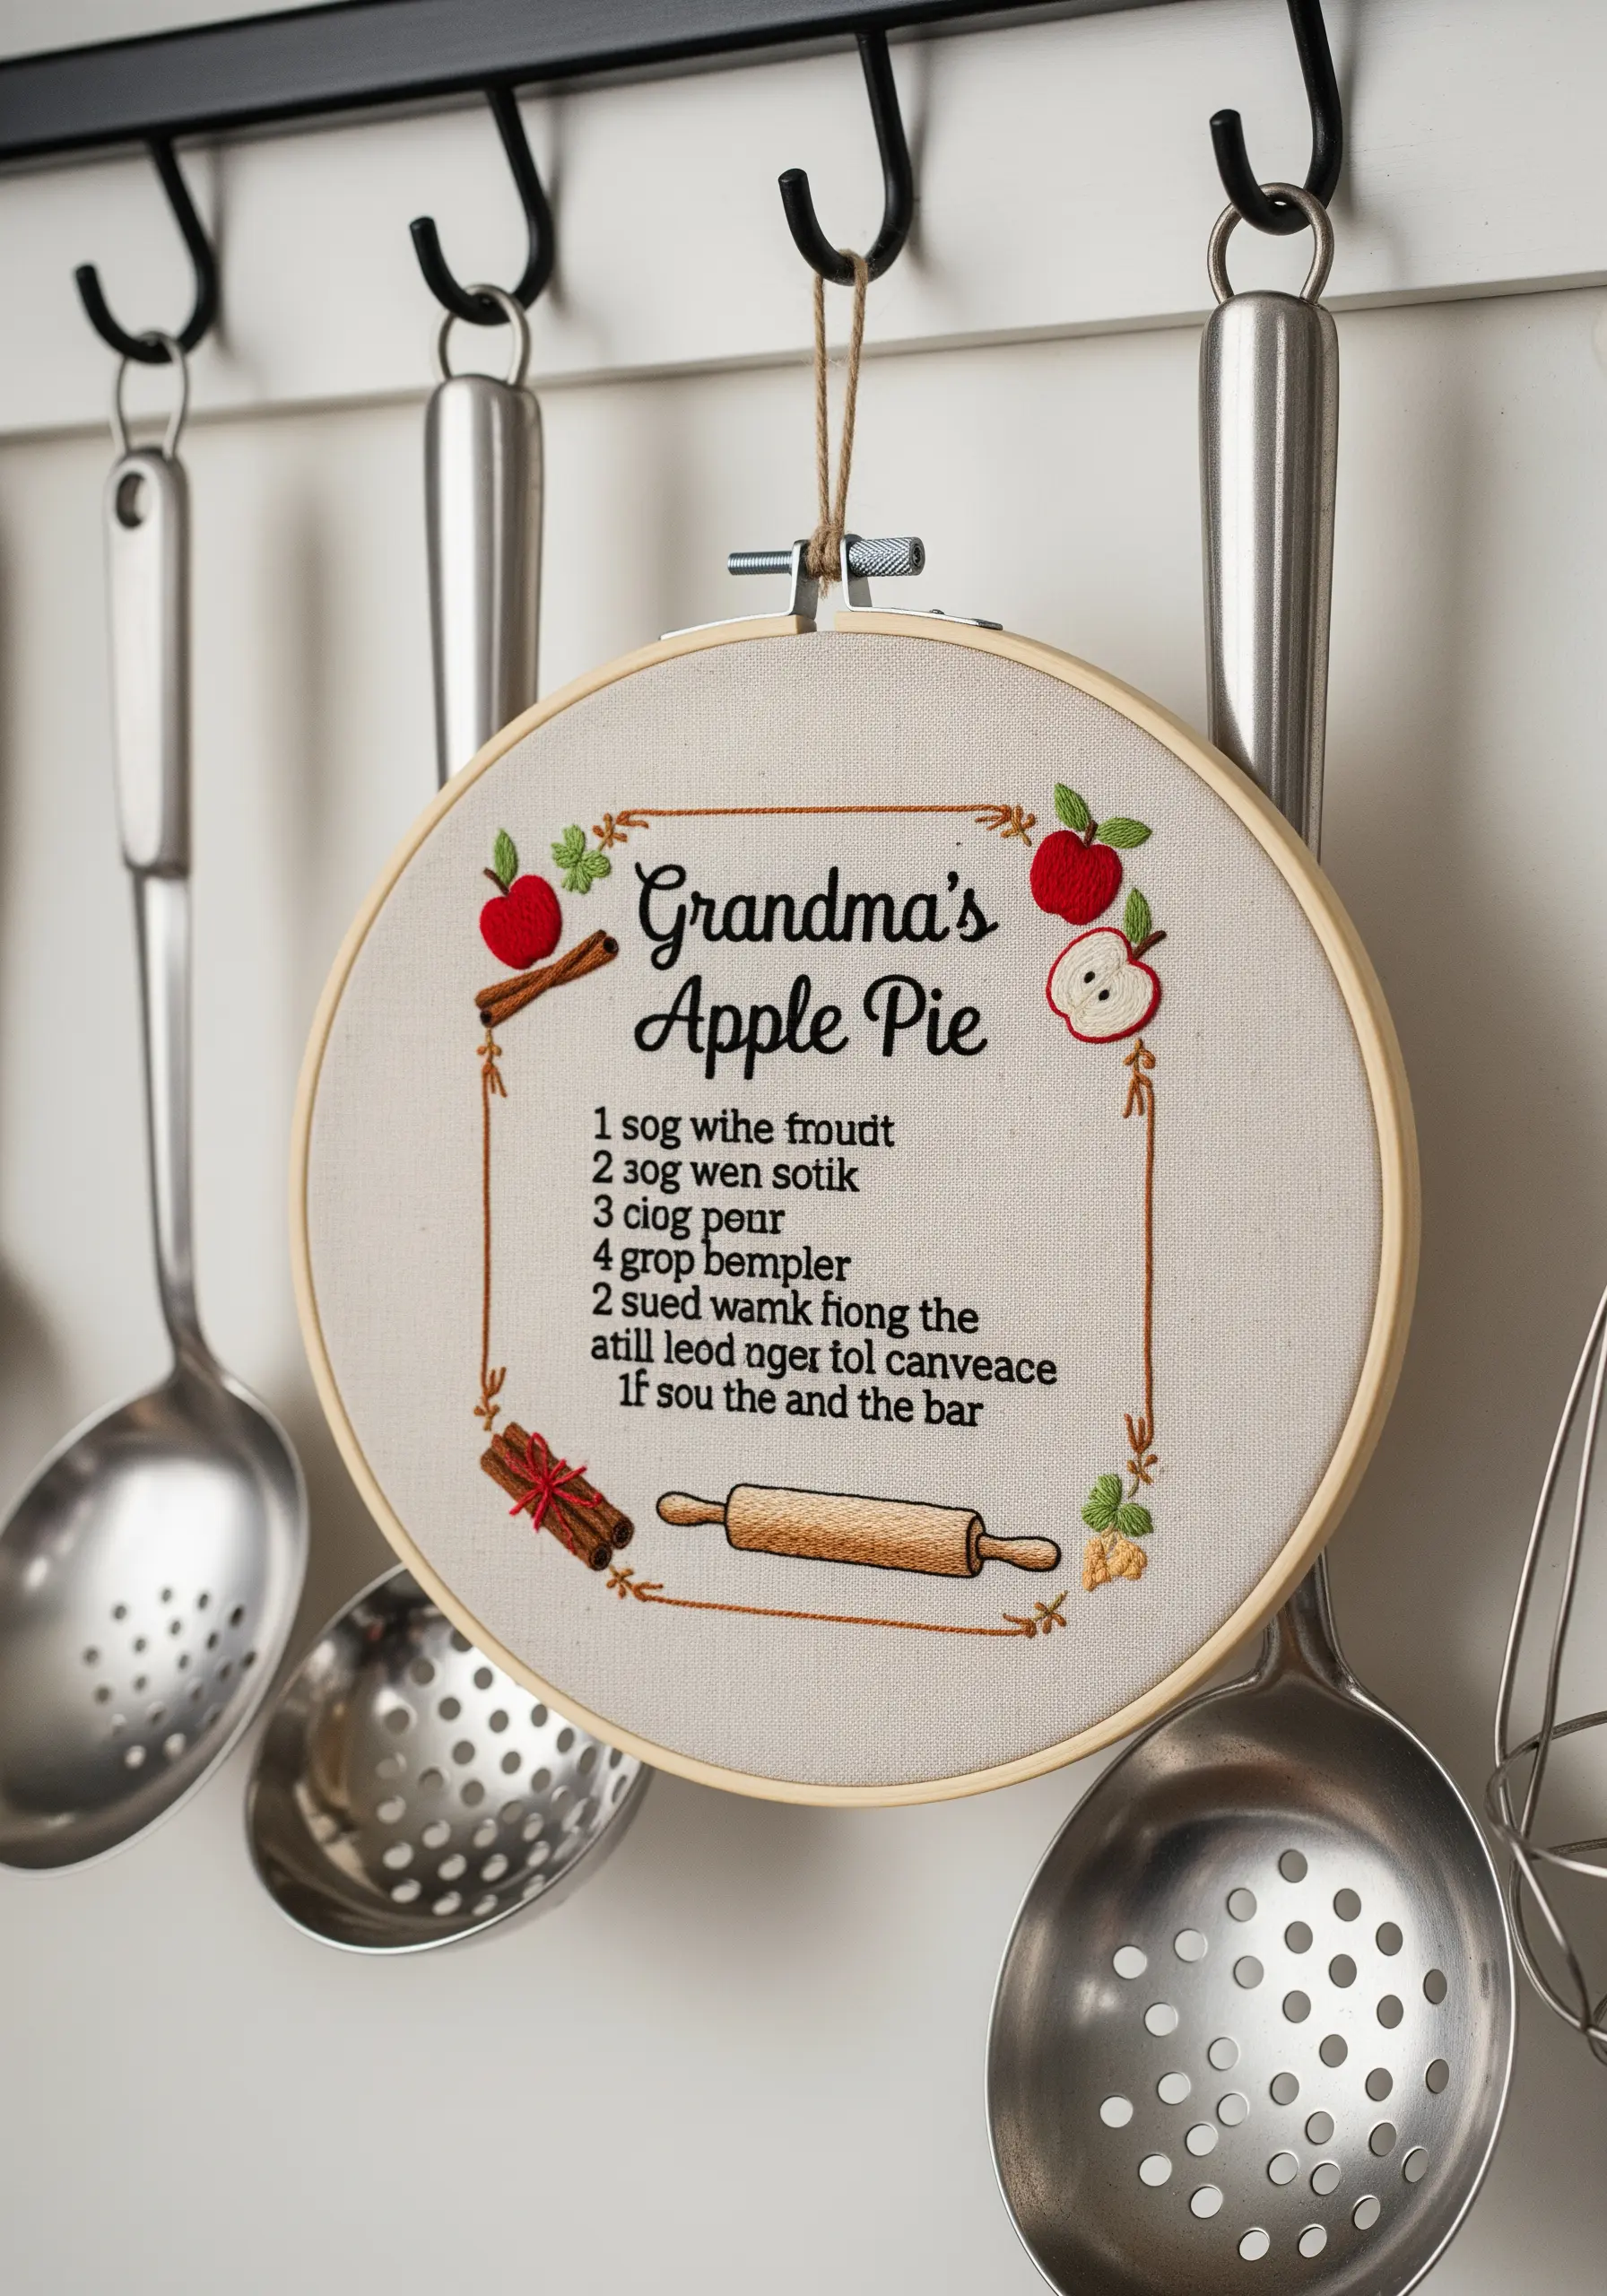
Transform a beloved family recipe into a timeless piece of kitchen art.
For a deeply personal gift, scan an original handwritten recipe card, print it on water-soluble stabilizer, and stitch directly over the handwriting.
If creating your own, use a tiny backstitch with one or two strands of floss to ensure the lettering remains crisp and legible.
Frame the text with small, relevant motifs like apples or cinnamon sticks to complete the charming, heirloom-quality piece.
26. Capturing Iridescence on Sheer Fabric
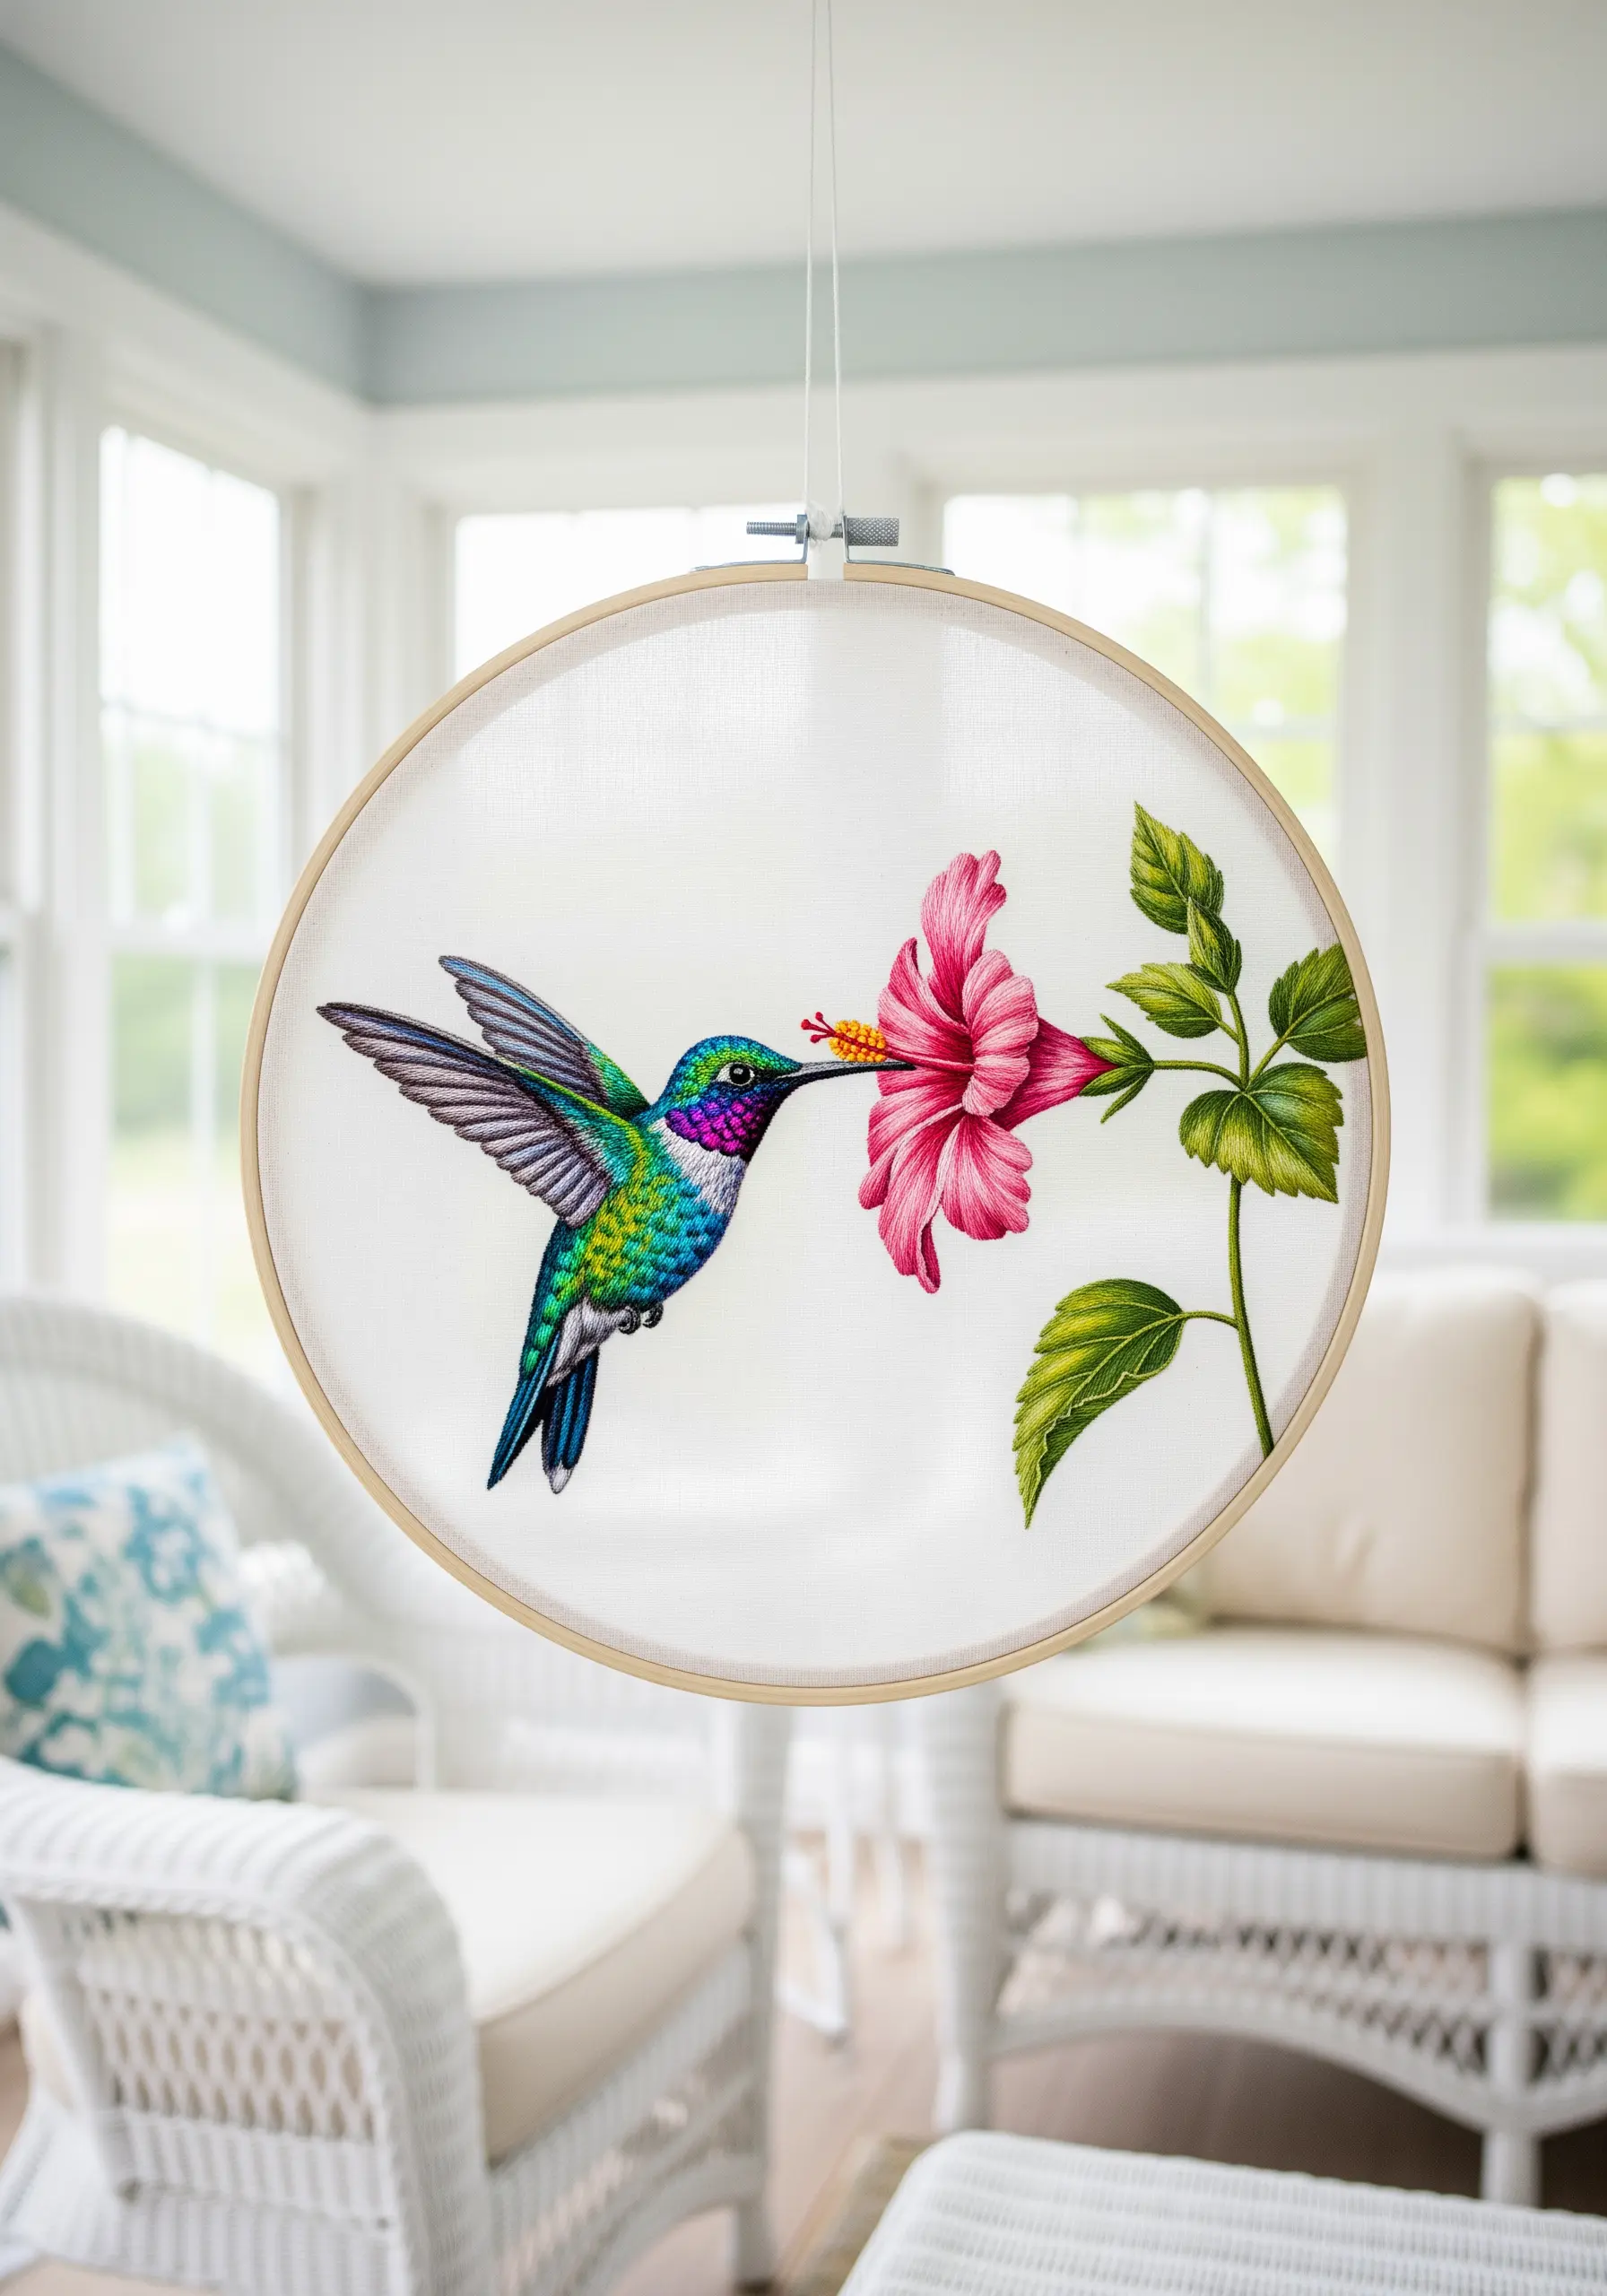
Create a breathtaking ‘floating’ illusion by stitching on sheer organza or tulle.
To mimic the iridescent sheen of the hummingbird’s feathers, use silk or satin floss; their natural luster is perfect for this.
Apply the thread painting technique with single strands to blend the vibrant colors seamlessly.
Important: Back your sheer fabric with a sheet of water-soluble stabilizer before hooping. It will provide the necessary support while you stitch and then dissolve completely in water, leaving your design suspended.
27. Layering Felt and Thread for a 3D Scene

Build a landscape with incredible depth and texture by combining felt appliqué with embroidery.
Cut your main shapes—hills, mountains, trees—from different colors of felt and arrange them in layers on your background fabric.
Secure the felt pieces with a neat blanket stitch or whipstitch around the edges.
Then, add the fine details with embroidery on top: long straight stitches for texture on the mountains, French knots for wildflowers, and a smooth satin stitch for the river. This fabric collage embroidery is both playful and effective.
28. An Abstract Composition of Texture and Form
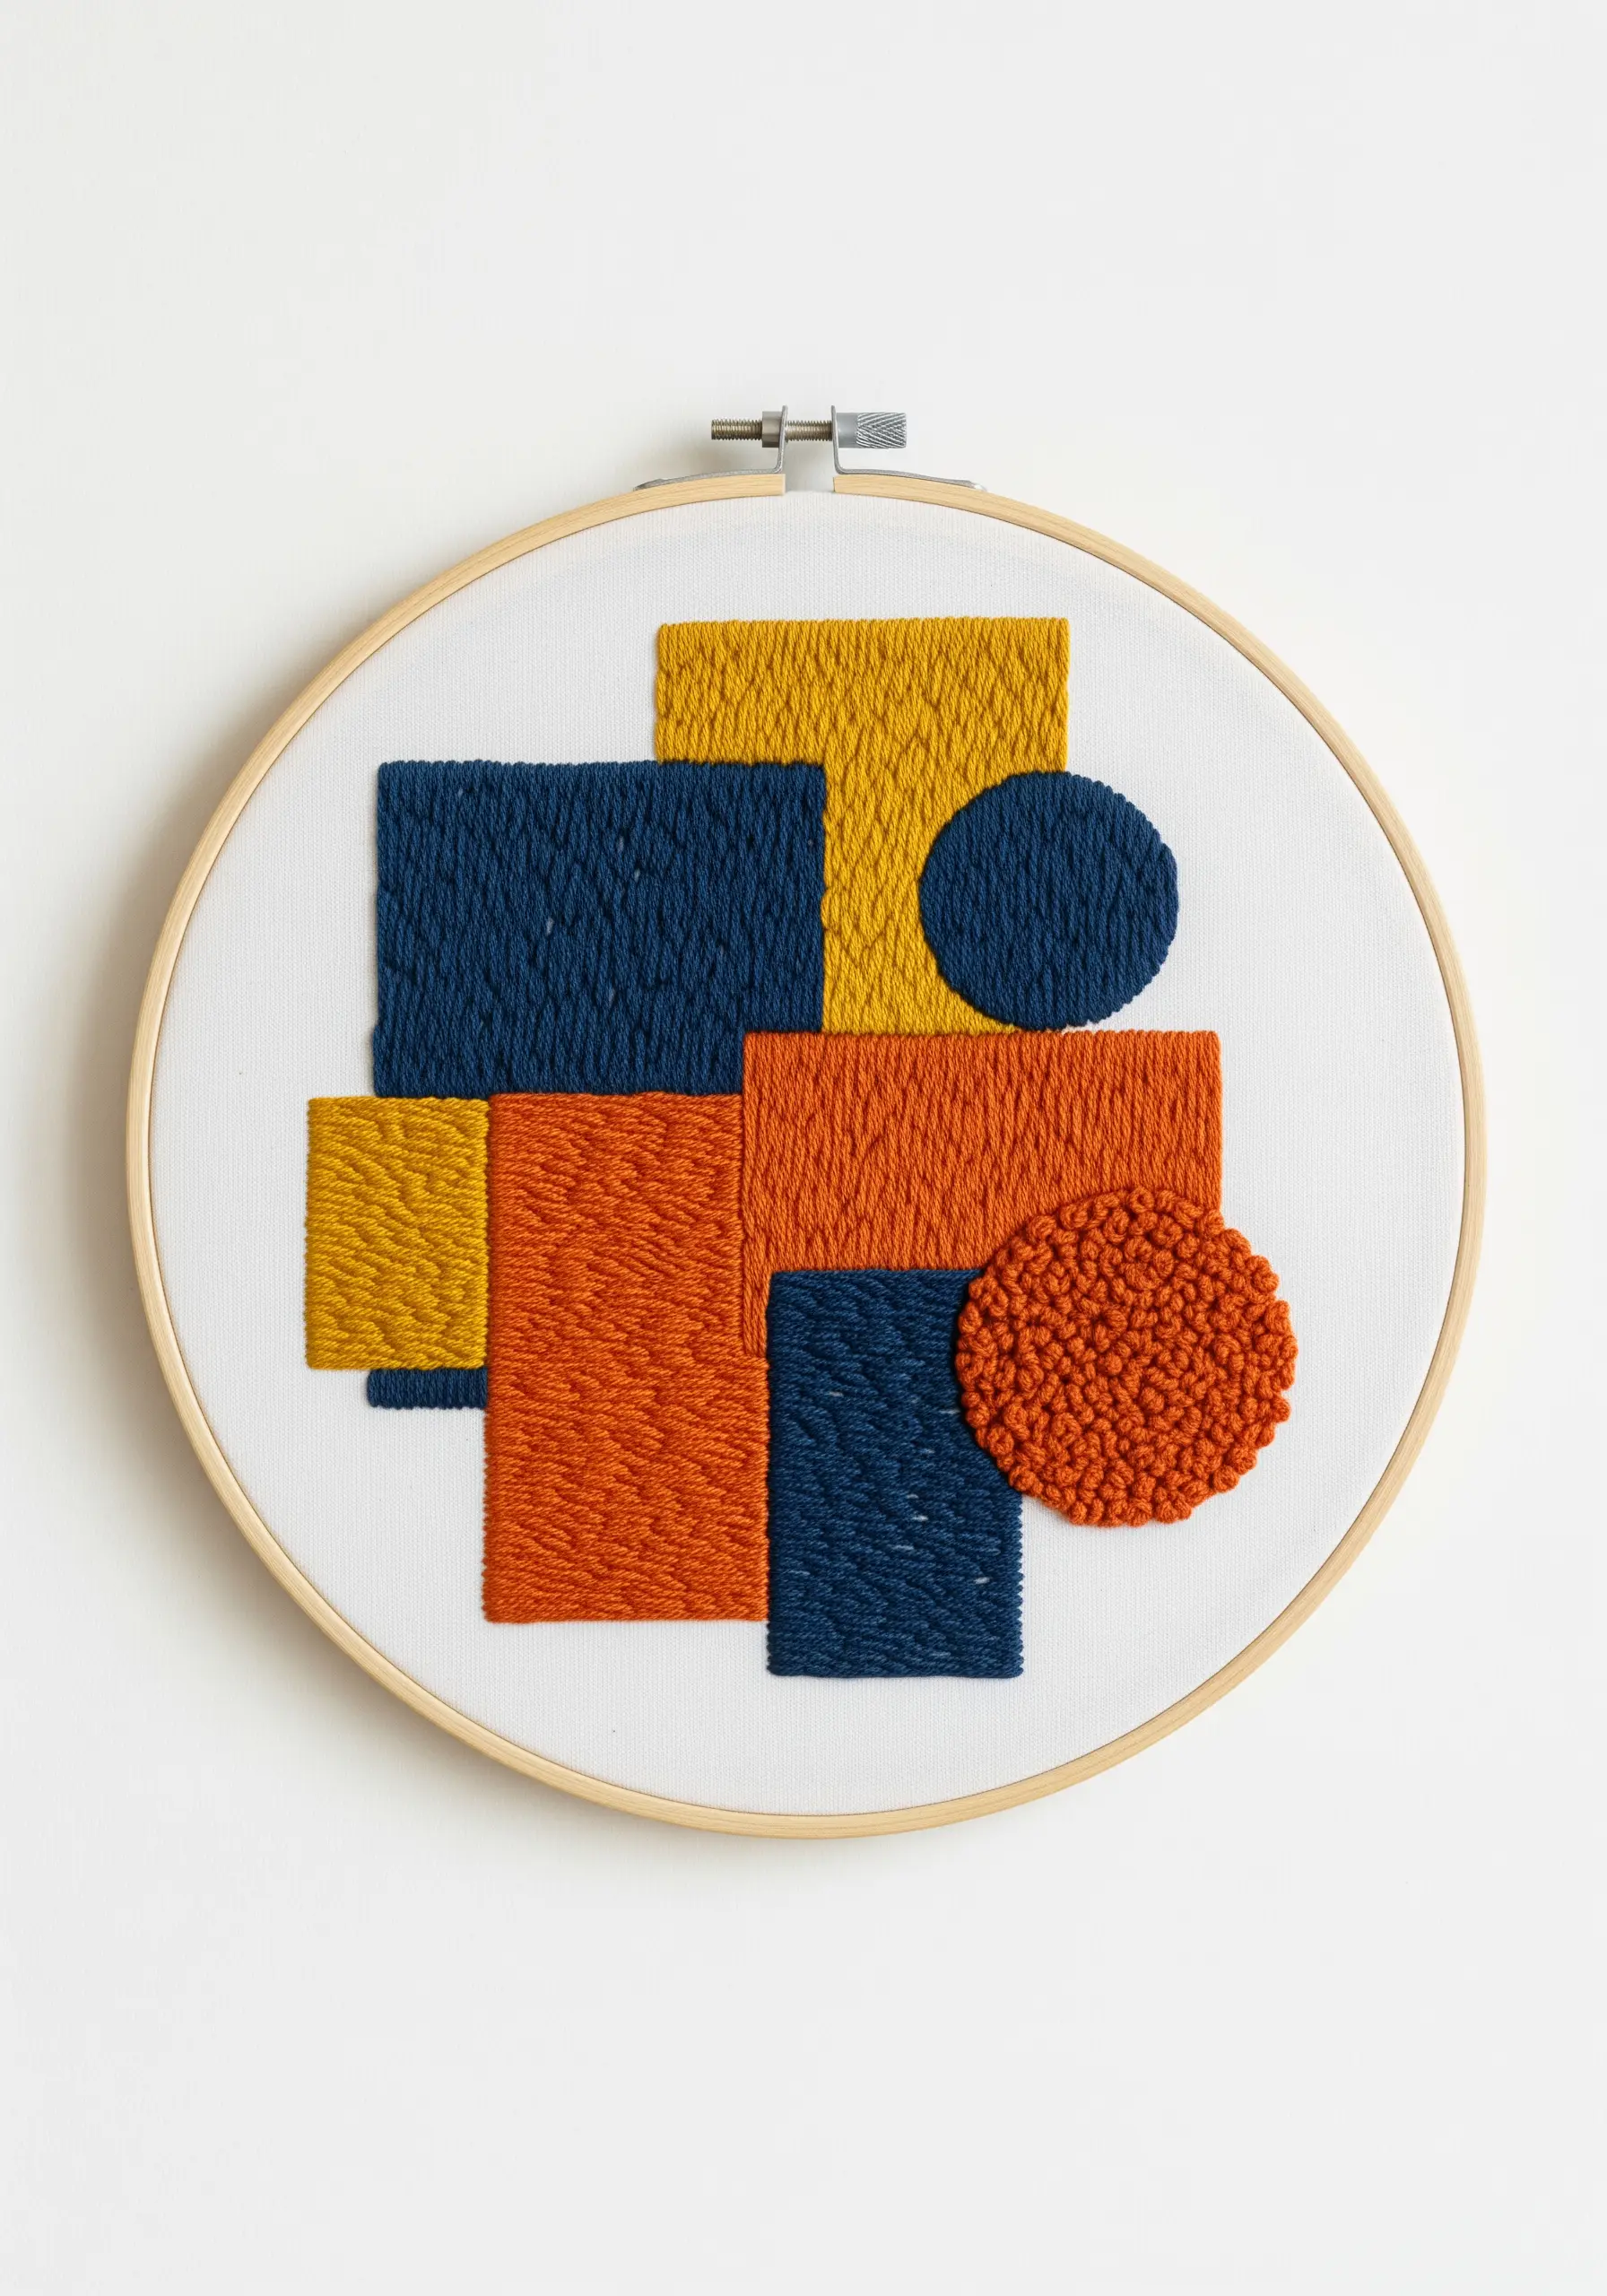
Explore the interplay of texture by filling simple geometric shapes with a variety of stitches.
Use a dense, smooth satin stitch for some blocks to create a flat, matte surface.
Then, introduce a dramatic contrast by filling an adjacent shape with a dense field of French knots, which creates a bumpy, almost chenille-like texture.
This technique turns a minimalist design into a sophisticated and tactile piece of art, showcasing how abstract embroidery stitches can create visual interest.


