
There’s a quiet magic in things that are made by hand—a warmth that perfection can never quite replicate. We often begin our creative journeys striving for flawless stitches and perfect patterns, but the true artistry often lives in the imperfections.
This is your invitation to let go of the rules. To see a slightly uneven line not as a mistake, but as a signature. To view a frayed edge not as an error, but as texture. It’s in these honest details that your work finds its unique voice and its deepest beauty.
Here, you won’t find rigid instructions. Instead, you’ll discover techniques and ideas that celebrate the maker’s hand. It’s time to create art that feels not just beautiful, but authentic, soulful, and completely, imperfectly, yours.
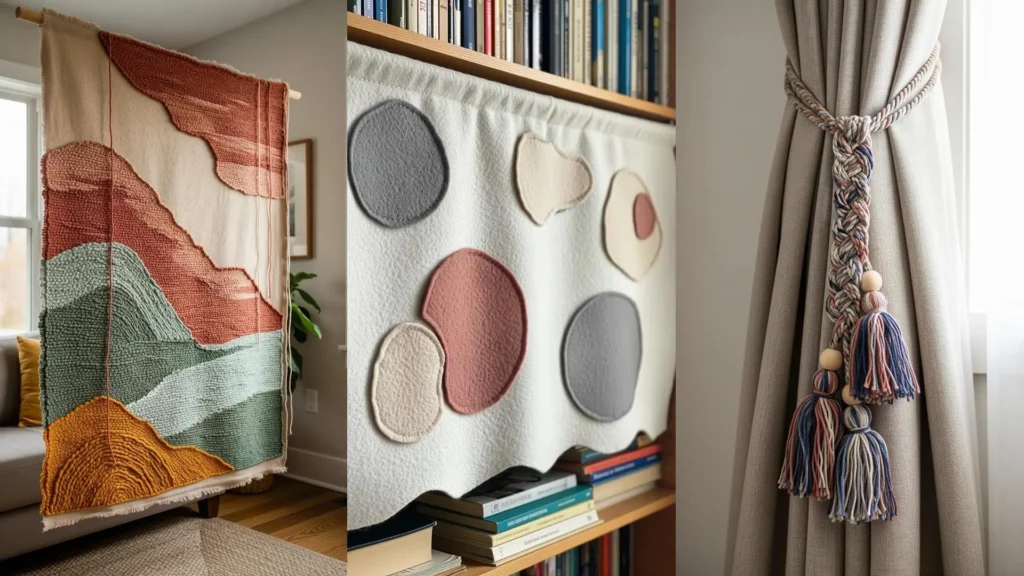
1. Build Landscapes with Punch Needle Topography

Instead of filling shapes flatly, think in layers to create painterly, topographical textures with your punch needle.
Use a thicker, chunkier wool or yarn to form your foundational shapes, allowing their organic edges to define the composition.
Vary the density and height of your loops to give each color block a distinct textural identity, mimicking the feel of rolling hills or rocky terrain.
Leave a few threads dangling along the organic divides between colors—this intentional imperfection highlights the process and adds a soft, deconstructed elegance to the finished yarn wall art.
2. Engineer Delicate 3D Botanical Studies
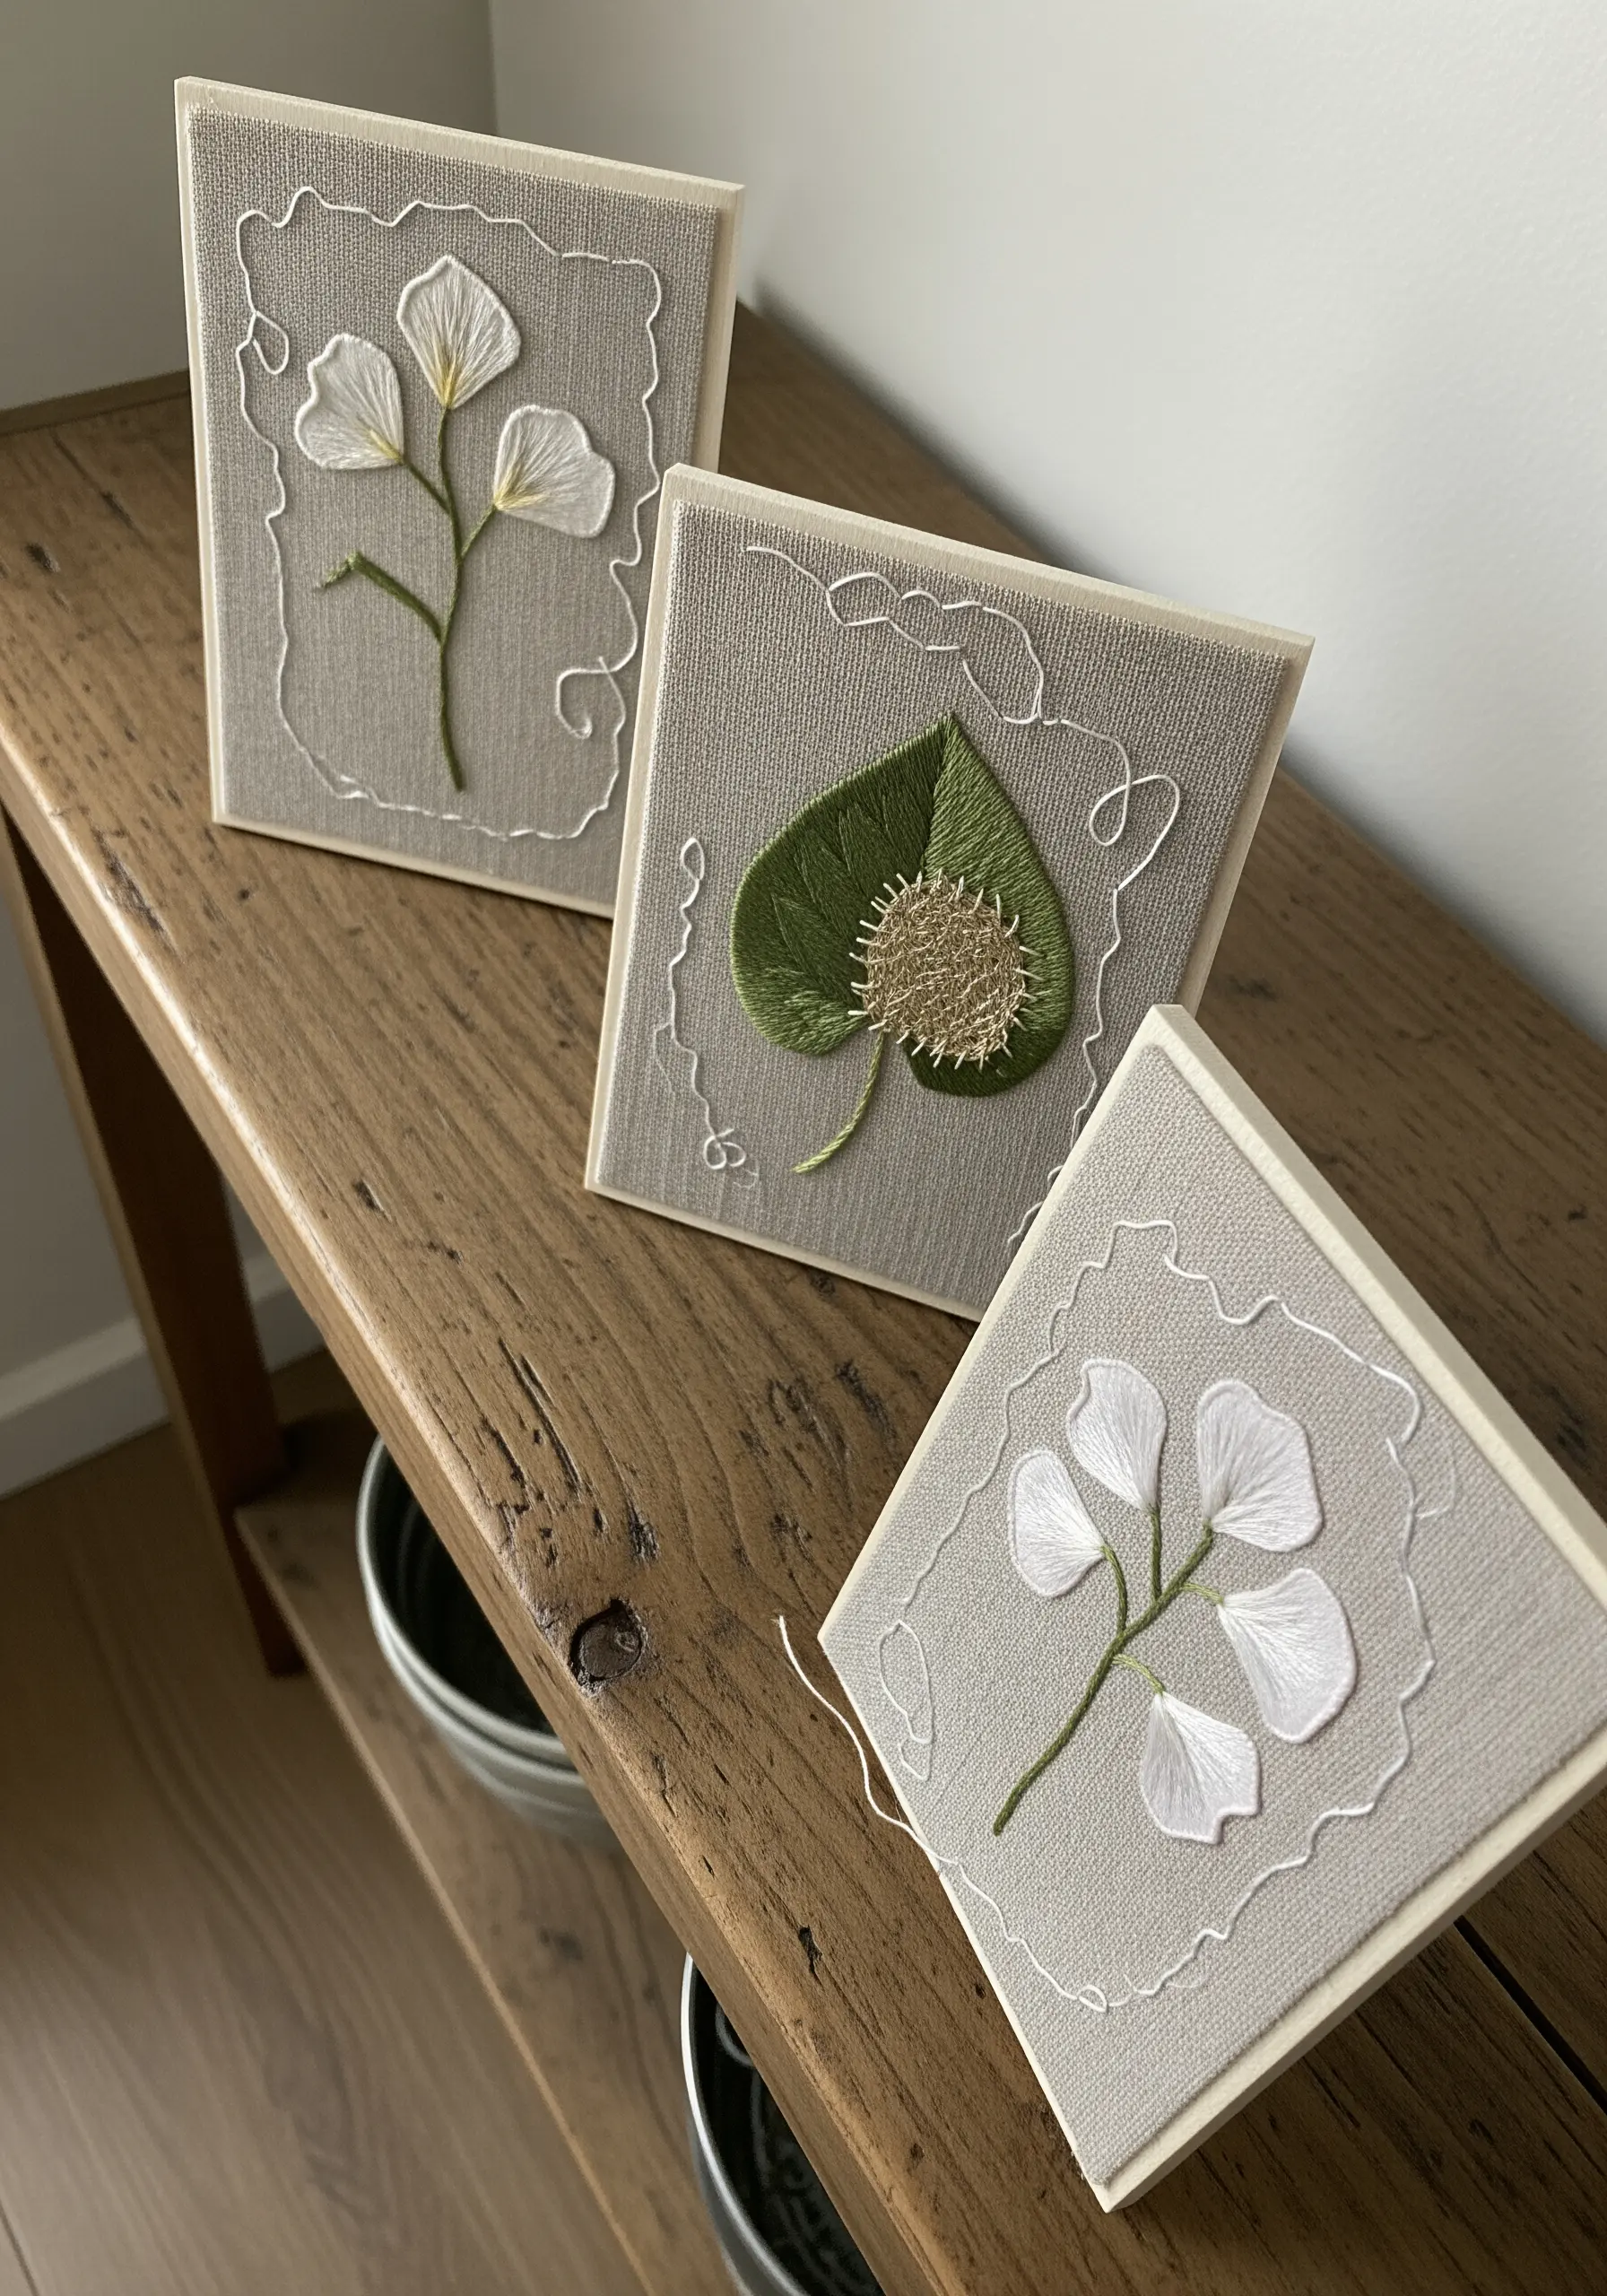
Elevate simple floral motifs by combining flat stitching with dimensional appliqué for a subtle, sculptural effect.
Cut your petal and leaf shapes from a fine, lightweight fabric like silk organza or cotton lawn—their delicate nature adds realism.
Secure each shape with just a few small anchoring stitches at the base, allowing the edges to lift away from the background fabric and create natural shadows.
Frame your composition with a whimsical, swirling border of backstitch to give the piece a soft, illustrative quality that feels both contained and alive.
3. Unify Fabric Scraps with a Deliberate Thread Grid

Transform a chaotic collection of fabric scraps into a cohesive composition with the simple power of a unifying stitch.
Arrange your fabric pieces on a canvas backing, embracing frayed edges and slight overlaps as part of the design’s character.
Choose a single, high-contrast thread color—like this bold red—to create a loose grid of long running stitches over the entire piece.
This stitched overlay acts as a visual anchor, connecting the disparate colors and patterns into an intentional work of abstract mixed media embroidery.
4. Transform Rope into a Vessel with Colorful Wraps

Move beyond the hoop and use thread to construct a functional, three-dimensional object from simple cotton rope.
Begin coiling the rope, using a sewing machine with a wide zigzag stitch or sturdy hand-stitching to secure the coils together as you build the walls of your bowl.
Use a variegated or rainbow thread to introduce effortless color that shifts as you work, creating a vibrant pattern without changing your floss.
The slight inconsistencies in stitch placement are not flaws; they are the signature of a handmade piece, adding rhythm and texture.
5. Paint with Texture Using Punch Needle Clusters
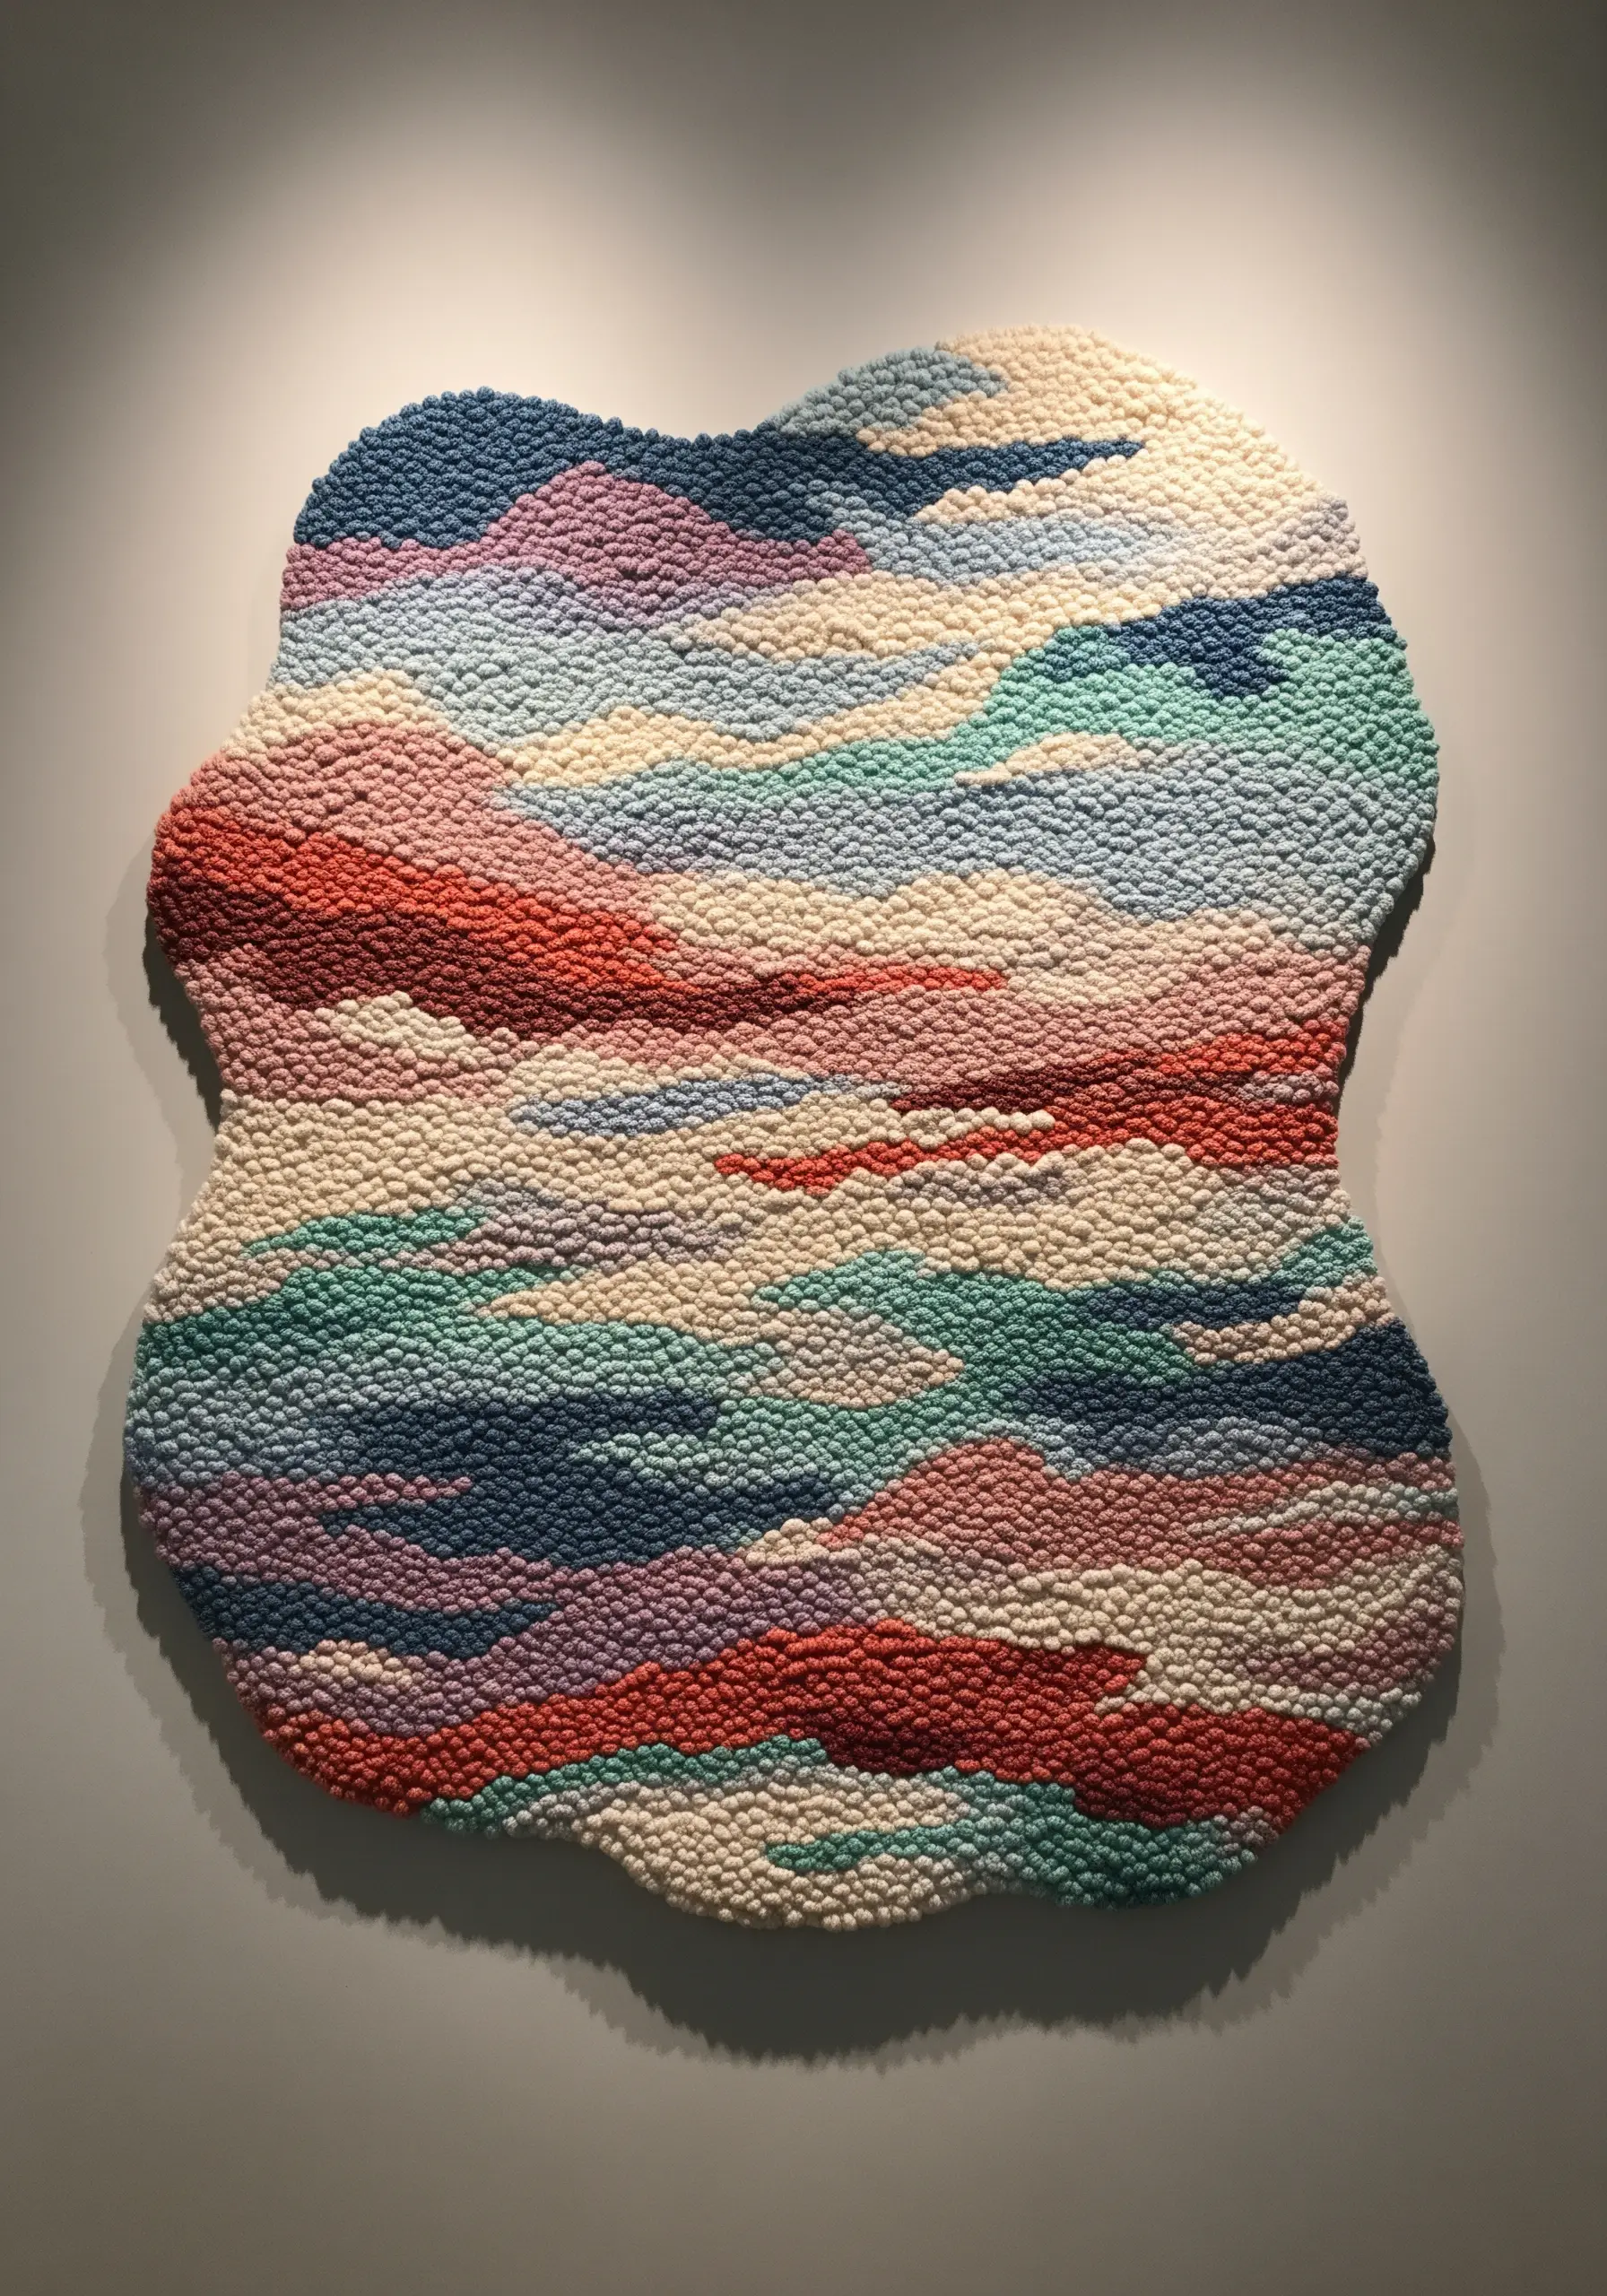
Use your punch needle not just to fill in lines, but to paint with texture, letting dense clusters of color blend and flow like impressionist brushstrokes.
Work without a drawn outline, allowing blocks of color to organically meet and merge, creating soft, undulating forms.
The incredible density of the loops—similar to French knots—becomes the main feature, turning the entire surface into a tactile landscape.
Finish your piece by cutting it out along its organic edge instead of containing it in a frame; this transforms it from a picture into a sculptural fiber art installation.
6. Stitch an Abstract Geode with Radiating Lines
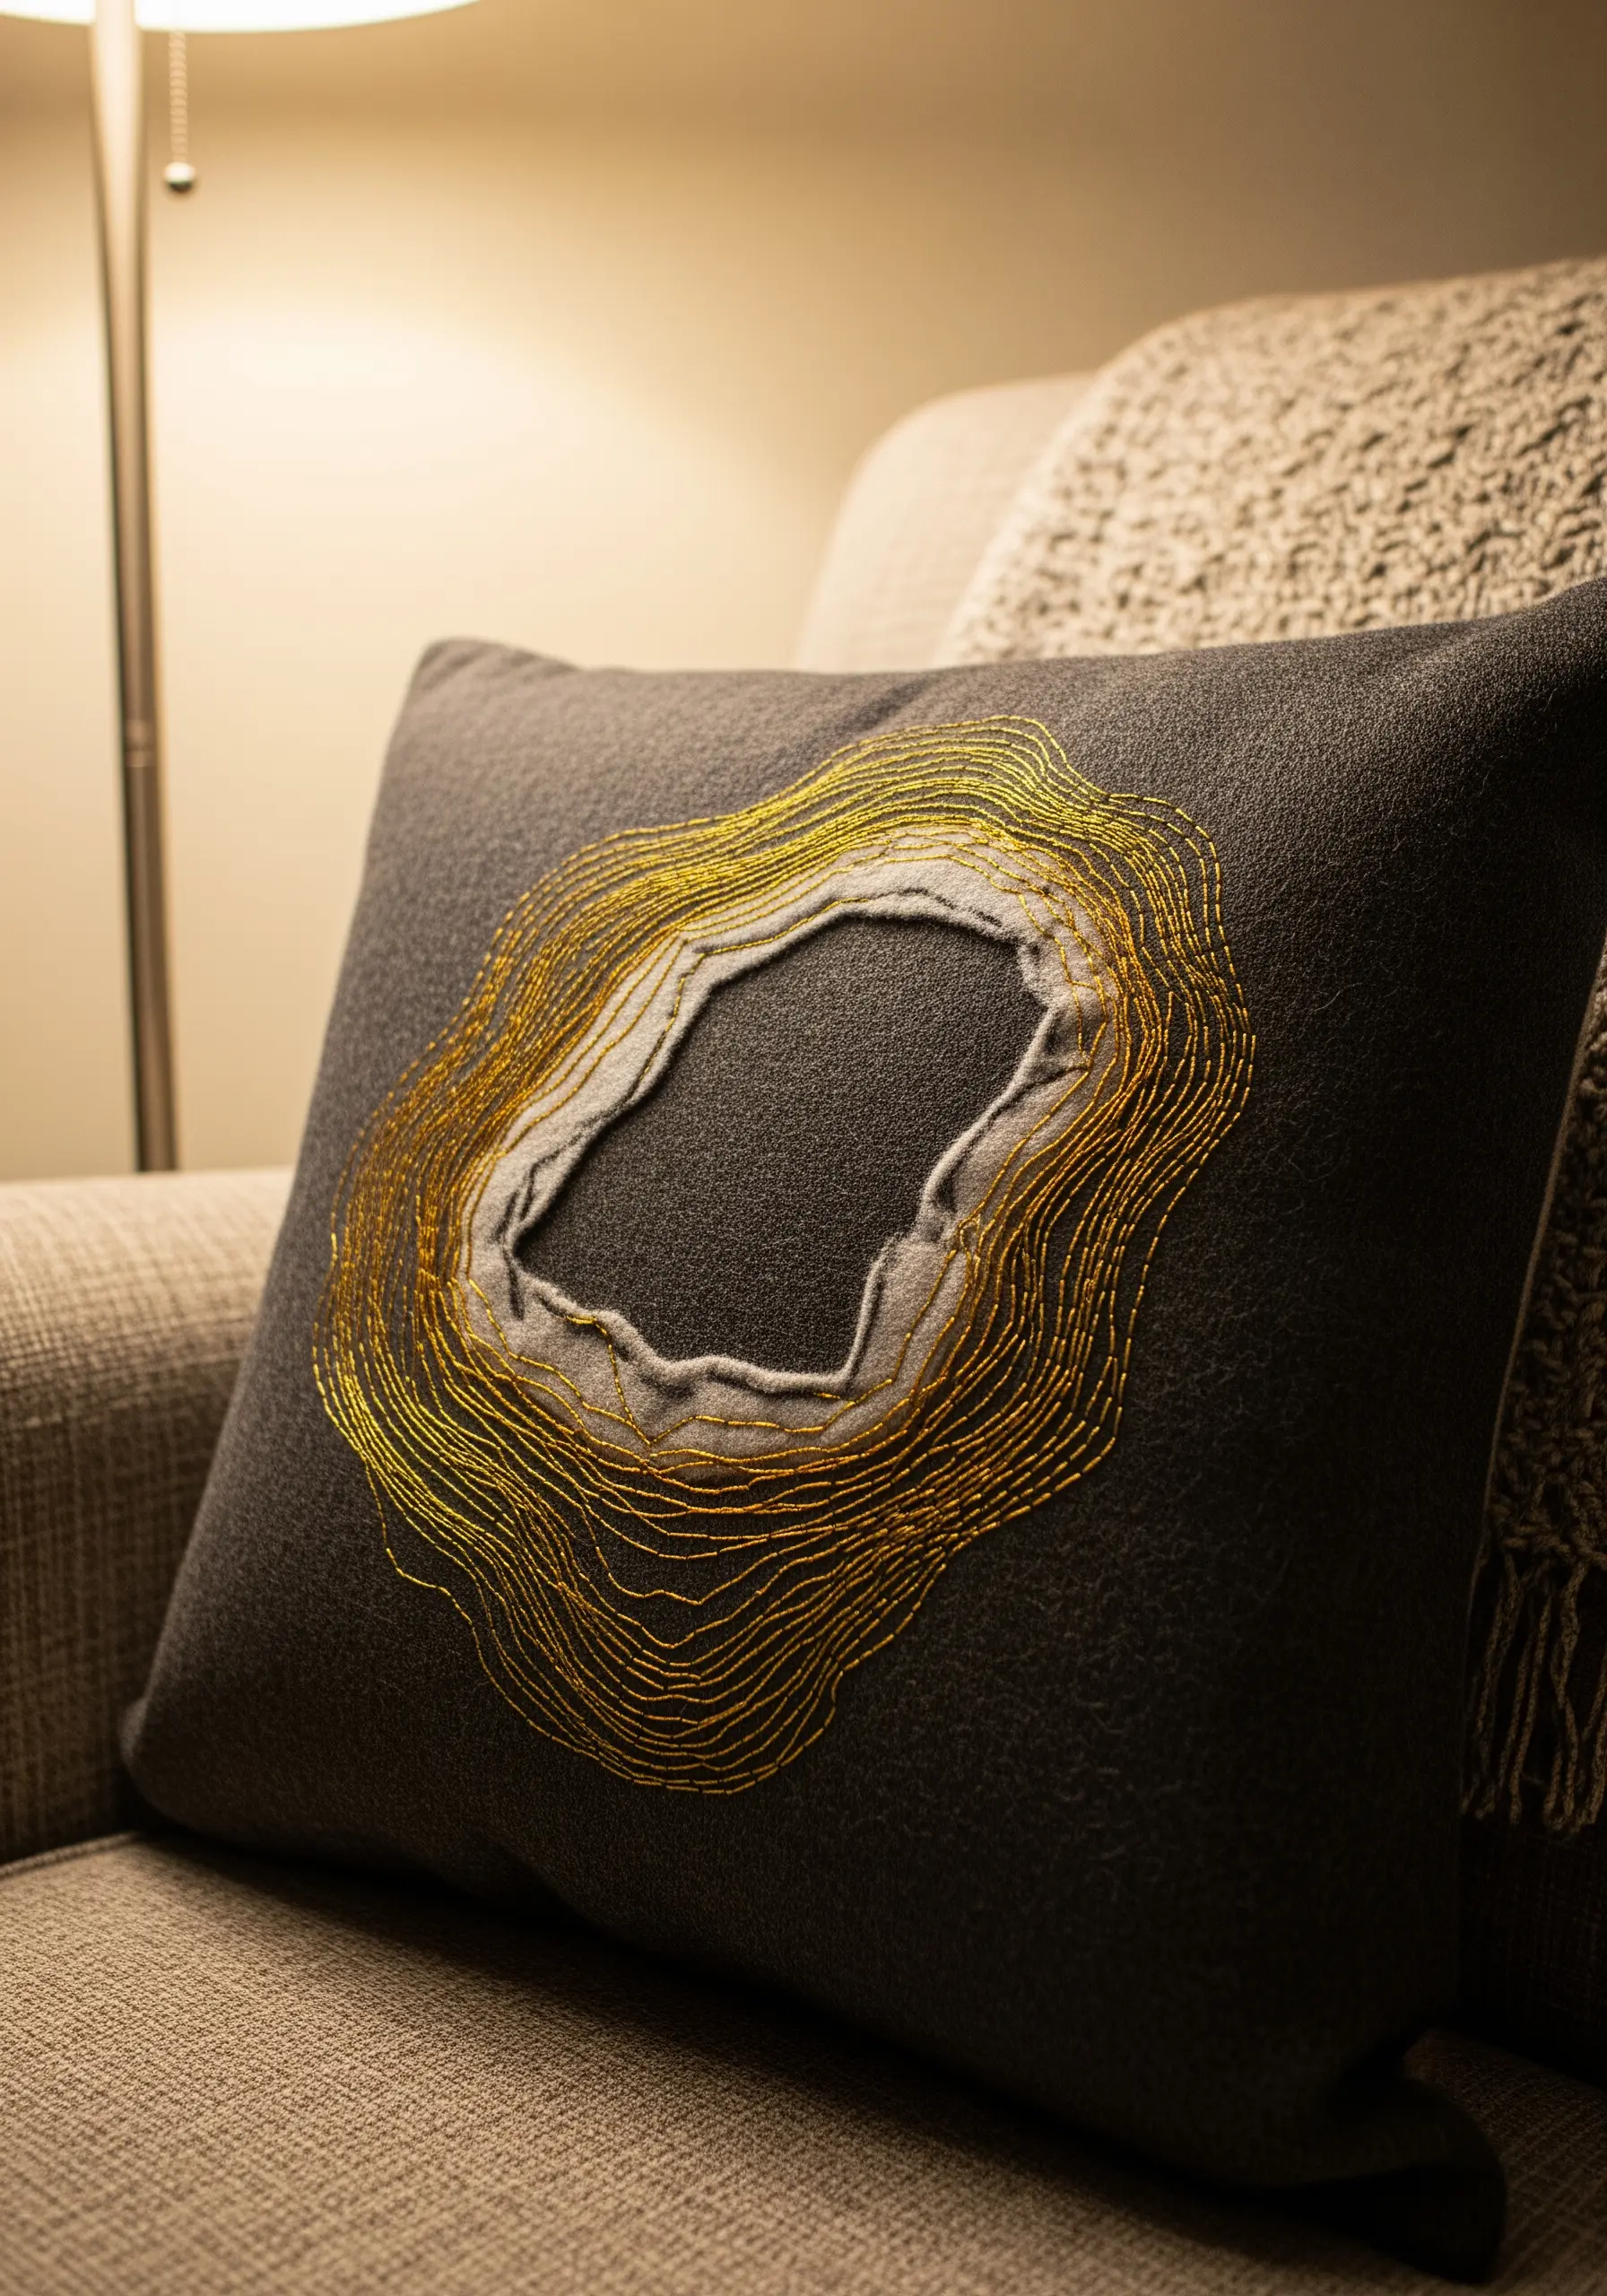
Capture the energy of a natural geode by focusing on negative space and the graphic power of radiating lines.
Create a central void by cutting away a piece of the top fabric or using appliqué to define an empty shape.
Using a mix of metallic and matte threads, stitch concentric rings of imperfect, flowing backstitches or running stitches around the central void.
The magic is in the gradient: start with lighter threads near the center and gradually shift to darker tones, mimicking the crystal growth in a real stone and creating incredible visual depth.
7. Map the Night Sky with Knots and Lines

Personalize a notebook cover or fabric surface with a celestial map that relies on the simplest stitches for its magic.
Use a clean backstitch or split stitch to draw the delicate connecting lines of your chosen constellations.
Create the stars using a mix of French knots and star stitches. Vary the size of your French knots—using one, two, or three wraps—to give the stars a sense of varying brightness and distance.
Scatter tiny, single-wrap seed knots across the background to represent distant galaxies, adding depth and a subtle sparkle to the composition.
8. Craft a Soft Sculpture Mobile with Gentle Stitches

Create a dreamy mobile where the charm lies in the softness of the materials and the simplicity of the construction.
Cut your cloud, moon, and star shapes from thick felt, which is forgiving and requires no hemming.
Use a simple whip stitch or blanket stitch around the edges to join the pieces, stuffing them lightly with poly-fil before closing.
The embroidery is minimal and expressive: a few carefully placed backstitches for sleepy eyes and a hint of blush give each character a gentle personality. This shows that a perfect stitch isn’t nearly as important as a perfect expression.
9. Sculpt Fabric with a Grid of Textural Knots

Transform a flat piece of fabric into a three-dimensional vessel using nothing more than thread and the power of tension.
Working on a sturdy fabric like canvas, create a grid of knots on the surface. Pinch a small amount of fabric, pull your thread through, and tie a secure knot.
The repetition and the consistent tension you apply with each knot are what pull the fabric inward, slowly sculpting it into a unique, organic form.
This technique, known as smocking or knotting, celebrates how stitch can fundamentally alter the structure of a textile.
10. Accentuate Shibori Dye with Rhythmic Sashiko

Combine two celebrated Japanese textile traditions to create a piece that feels both organic and intentional.
Start with a piece of fabric dyed using the shibori technique, which creates beautiful, water-like patterns.
Instead of leaving the pattern to stand alone, select one of the flowing lines or shapes created by the dye and trace it with a simple running stitch.
Using thick, high-contrast sashiko thread makes the stitch a distinct design element, adding a layer of texture and mindful rhythm to the fluid, unpredictable dye work.
11. Sketch with Thread on Three-Dimensional Pebbles
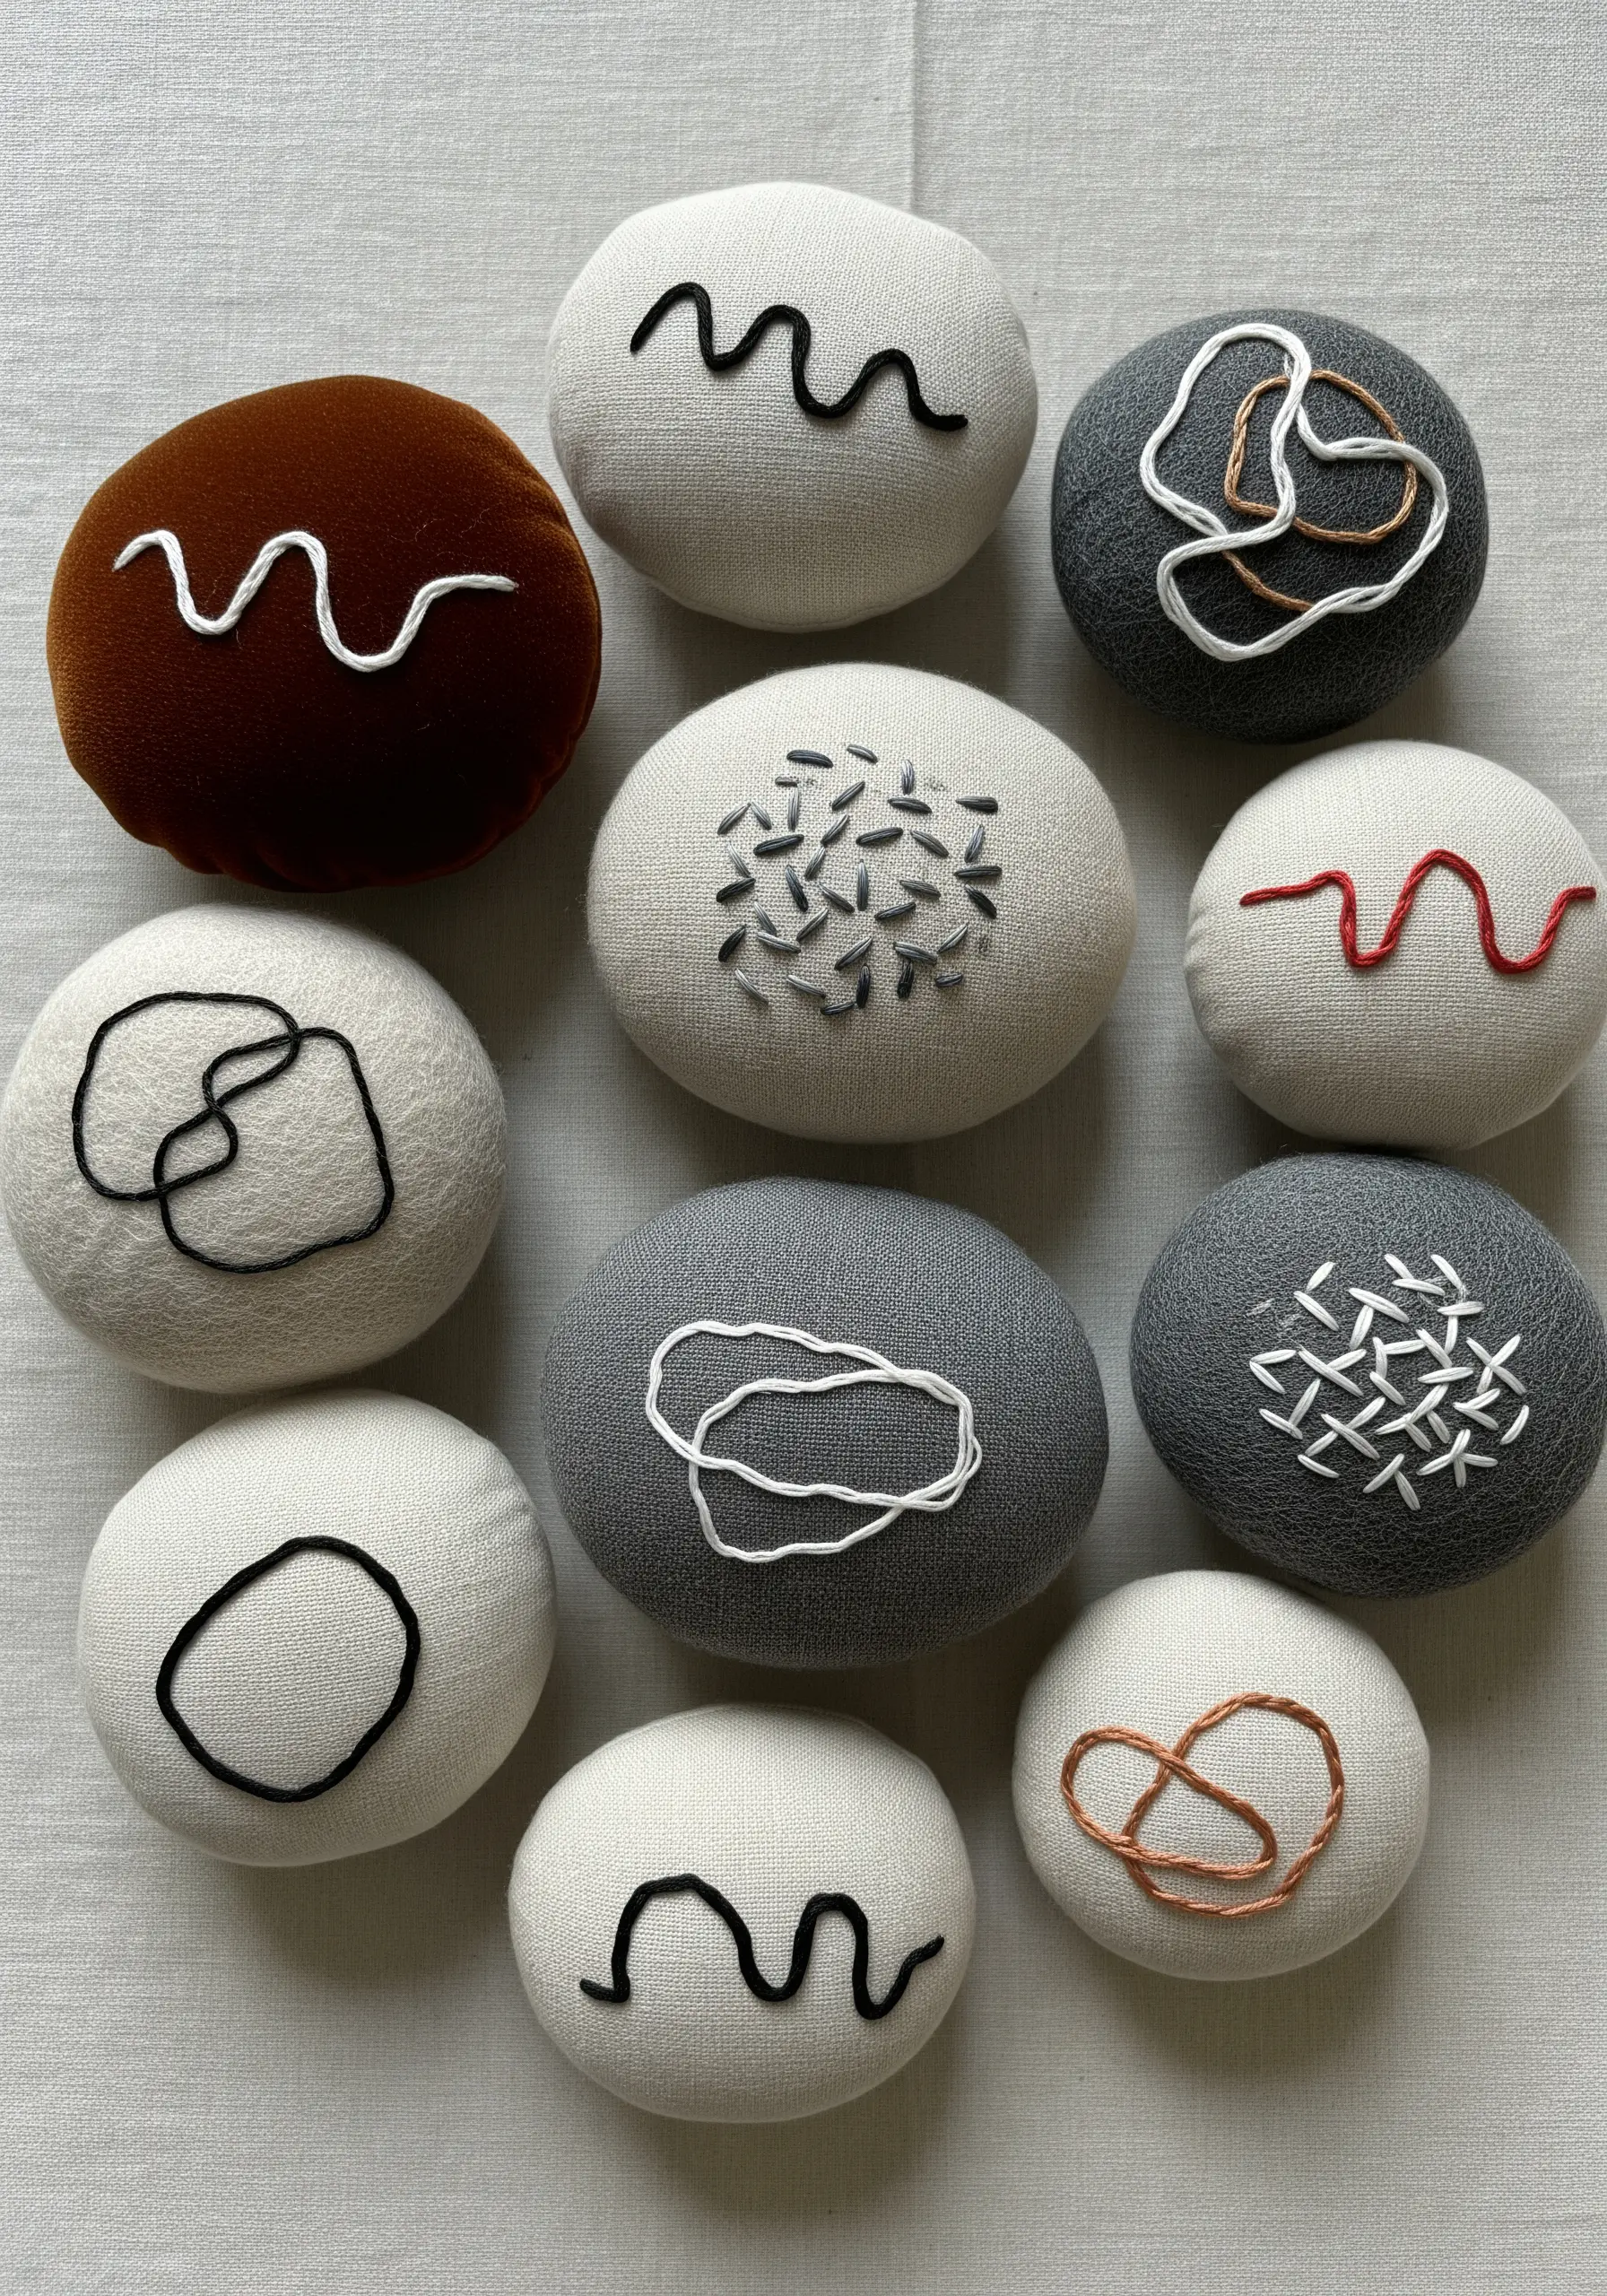
Take your embroidery off the flat plane by creating small, sculptural forms to use as your canvas.
Craft these “pebbles” by sewing and stuffing small pouches of linen, felt, or velvet in organic, rounded shapes.
Treat each pebble as a tiny sketchbook for minimalist thread drawings. Use a single, high-contrast thread to explore different marks: a simple couched line, a cluster of seed stitches, or an abstract scribble.
Grouped together, they form a tactile, compelling collection that invites touch and closer inspection, turning simple stitches into handmade objects of curiosity.
12. Create a Graphic Portrait with Bold Thread Blocking
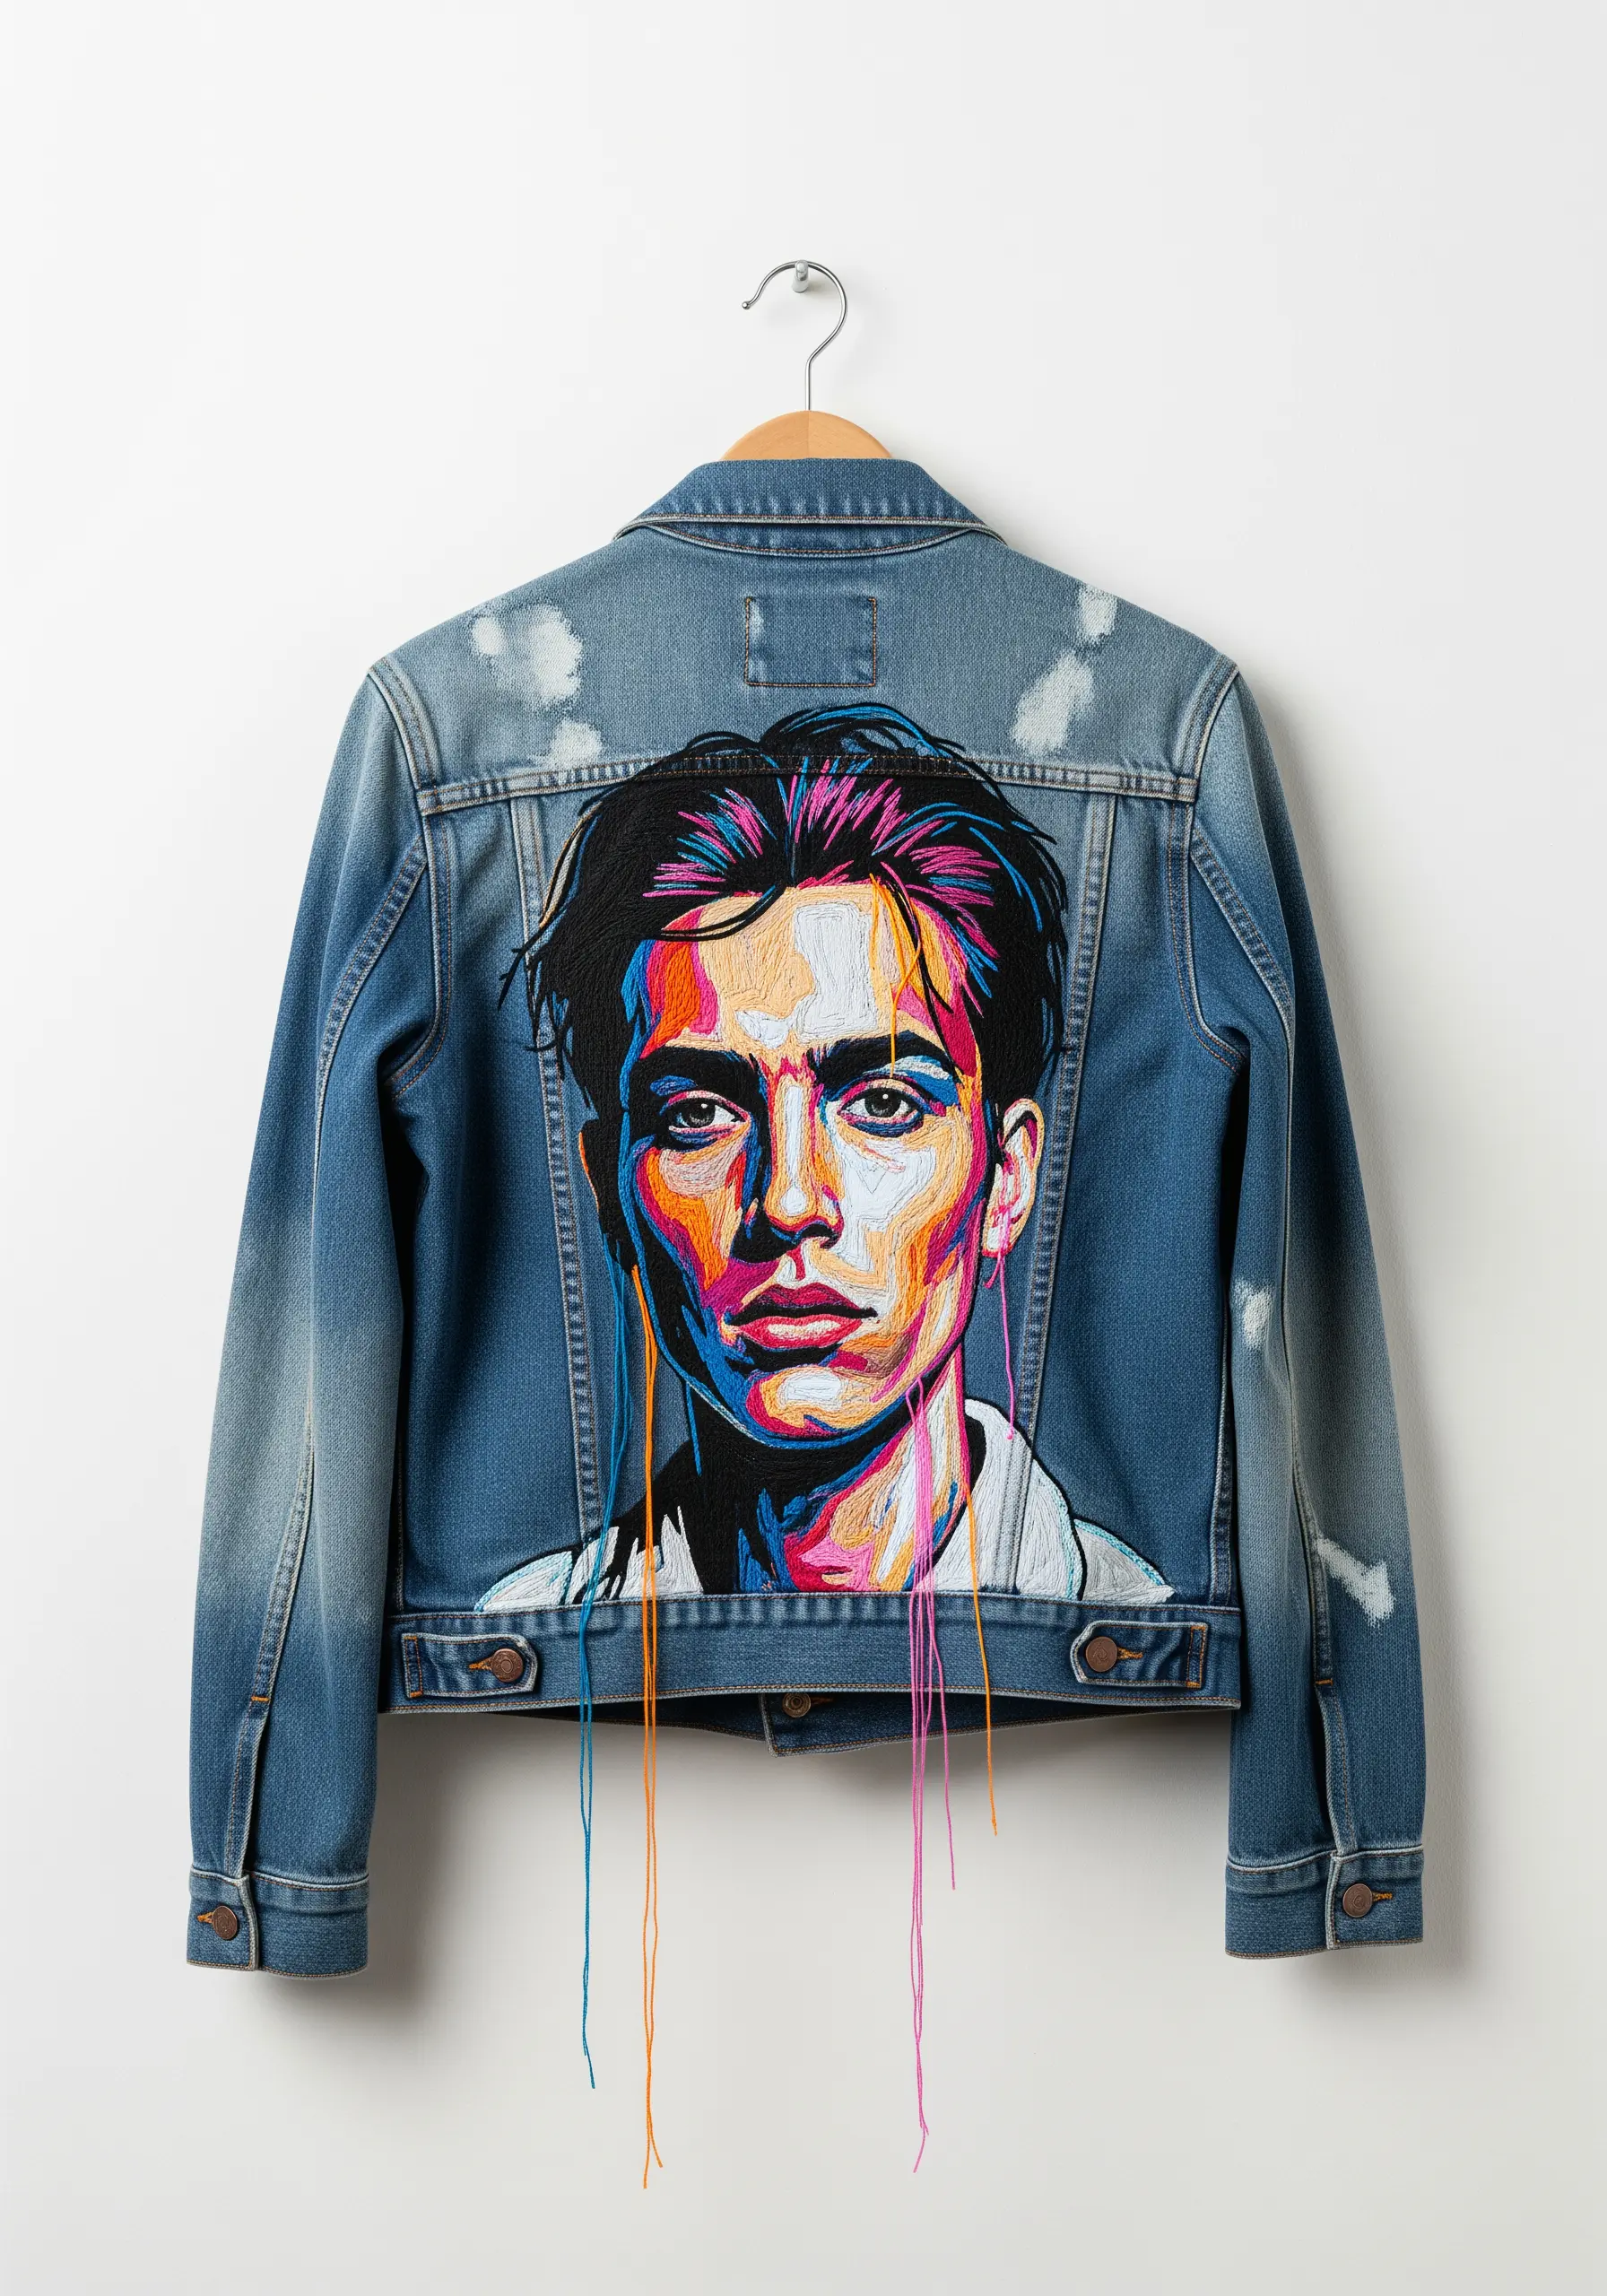
Reimagine thread painting by abandoning smooth, realistic blending in favor of a bold, graphic, pop-art style.
Break down the planes of the face into distinct shapes of light and shadow, then fill each shape with solid satin stitch using an unexpected, vibrant color palette.
The hard edges between colors create a dynamic, illustrative effect that feels more like a painting or a screen print than traditional embroidery.
Allowing threads to hang loose at the bottom of the design is a deliberate choice that adds a raw, unfinished energy, perfectly capturing the spirit of imperfection.
13. Illuminate Your Linework on a Fabric Lampshade

Use a plain fabric lampshade as a canvas to create art that transforms when the light turns on.
Choose a simple, bold design with strong outlines, as fine detail will be lost. A flowing botanical vine works perfectly.
Use a dark, thick thread and a clear outline stitch, like a stem stitch or split stitch, to ensure your design creates a strong silhouette.
When illuminated from within, the embroidered lines will glow, turning your simple stitching into a dramatic play of light and shadow that enhances the entire room.
14. Arrange Tangled Yarn Forms Across a Triptych

Create a large-scale, high-impact piece of wall art by celebrating the chaotic beauty of tangled yarn.
Instead of stitching through the fabric, apply thick piles of yarn or cord directly onto stretched canvases using a strong fabric glue or by couching them with a matching thread.
The beauty lies in the uncontrolled, organic mass of texture you create in the center of each canvas.
Arranging the work across three separate panels (a triptych) provides structure to the chaos, elevating a simple concept into a sophisticated and stunning embroidered wall hanging.
15. Draw with Thread on an Architectural Scale
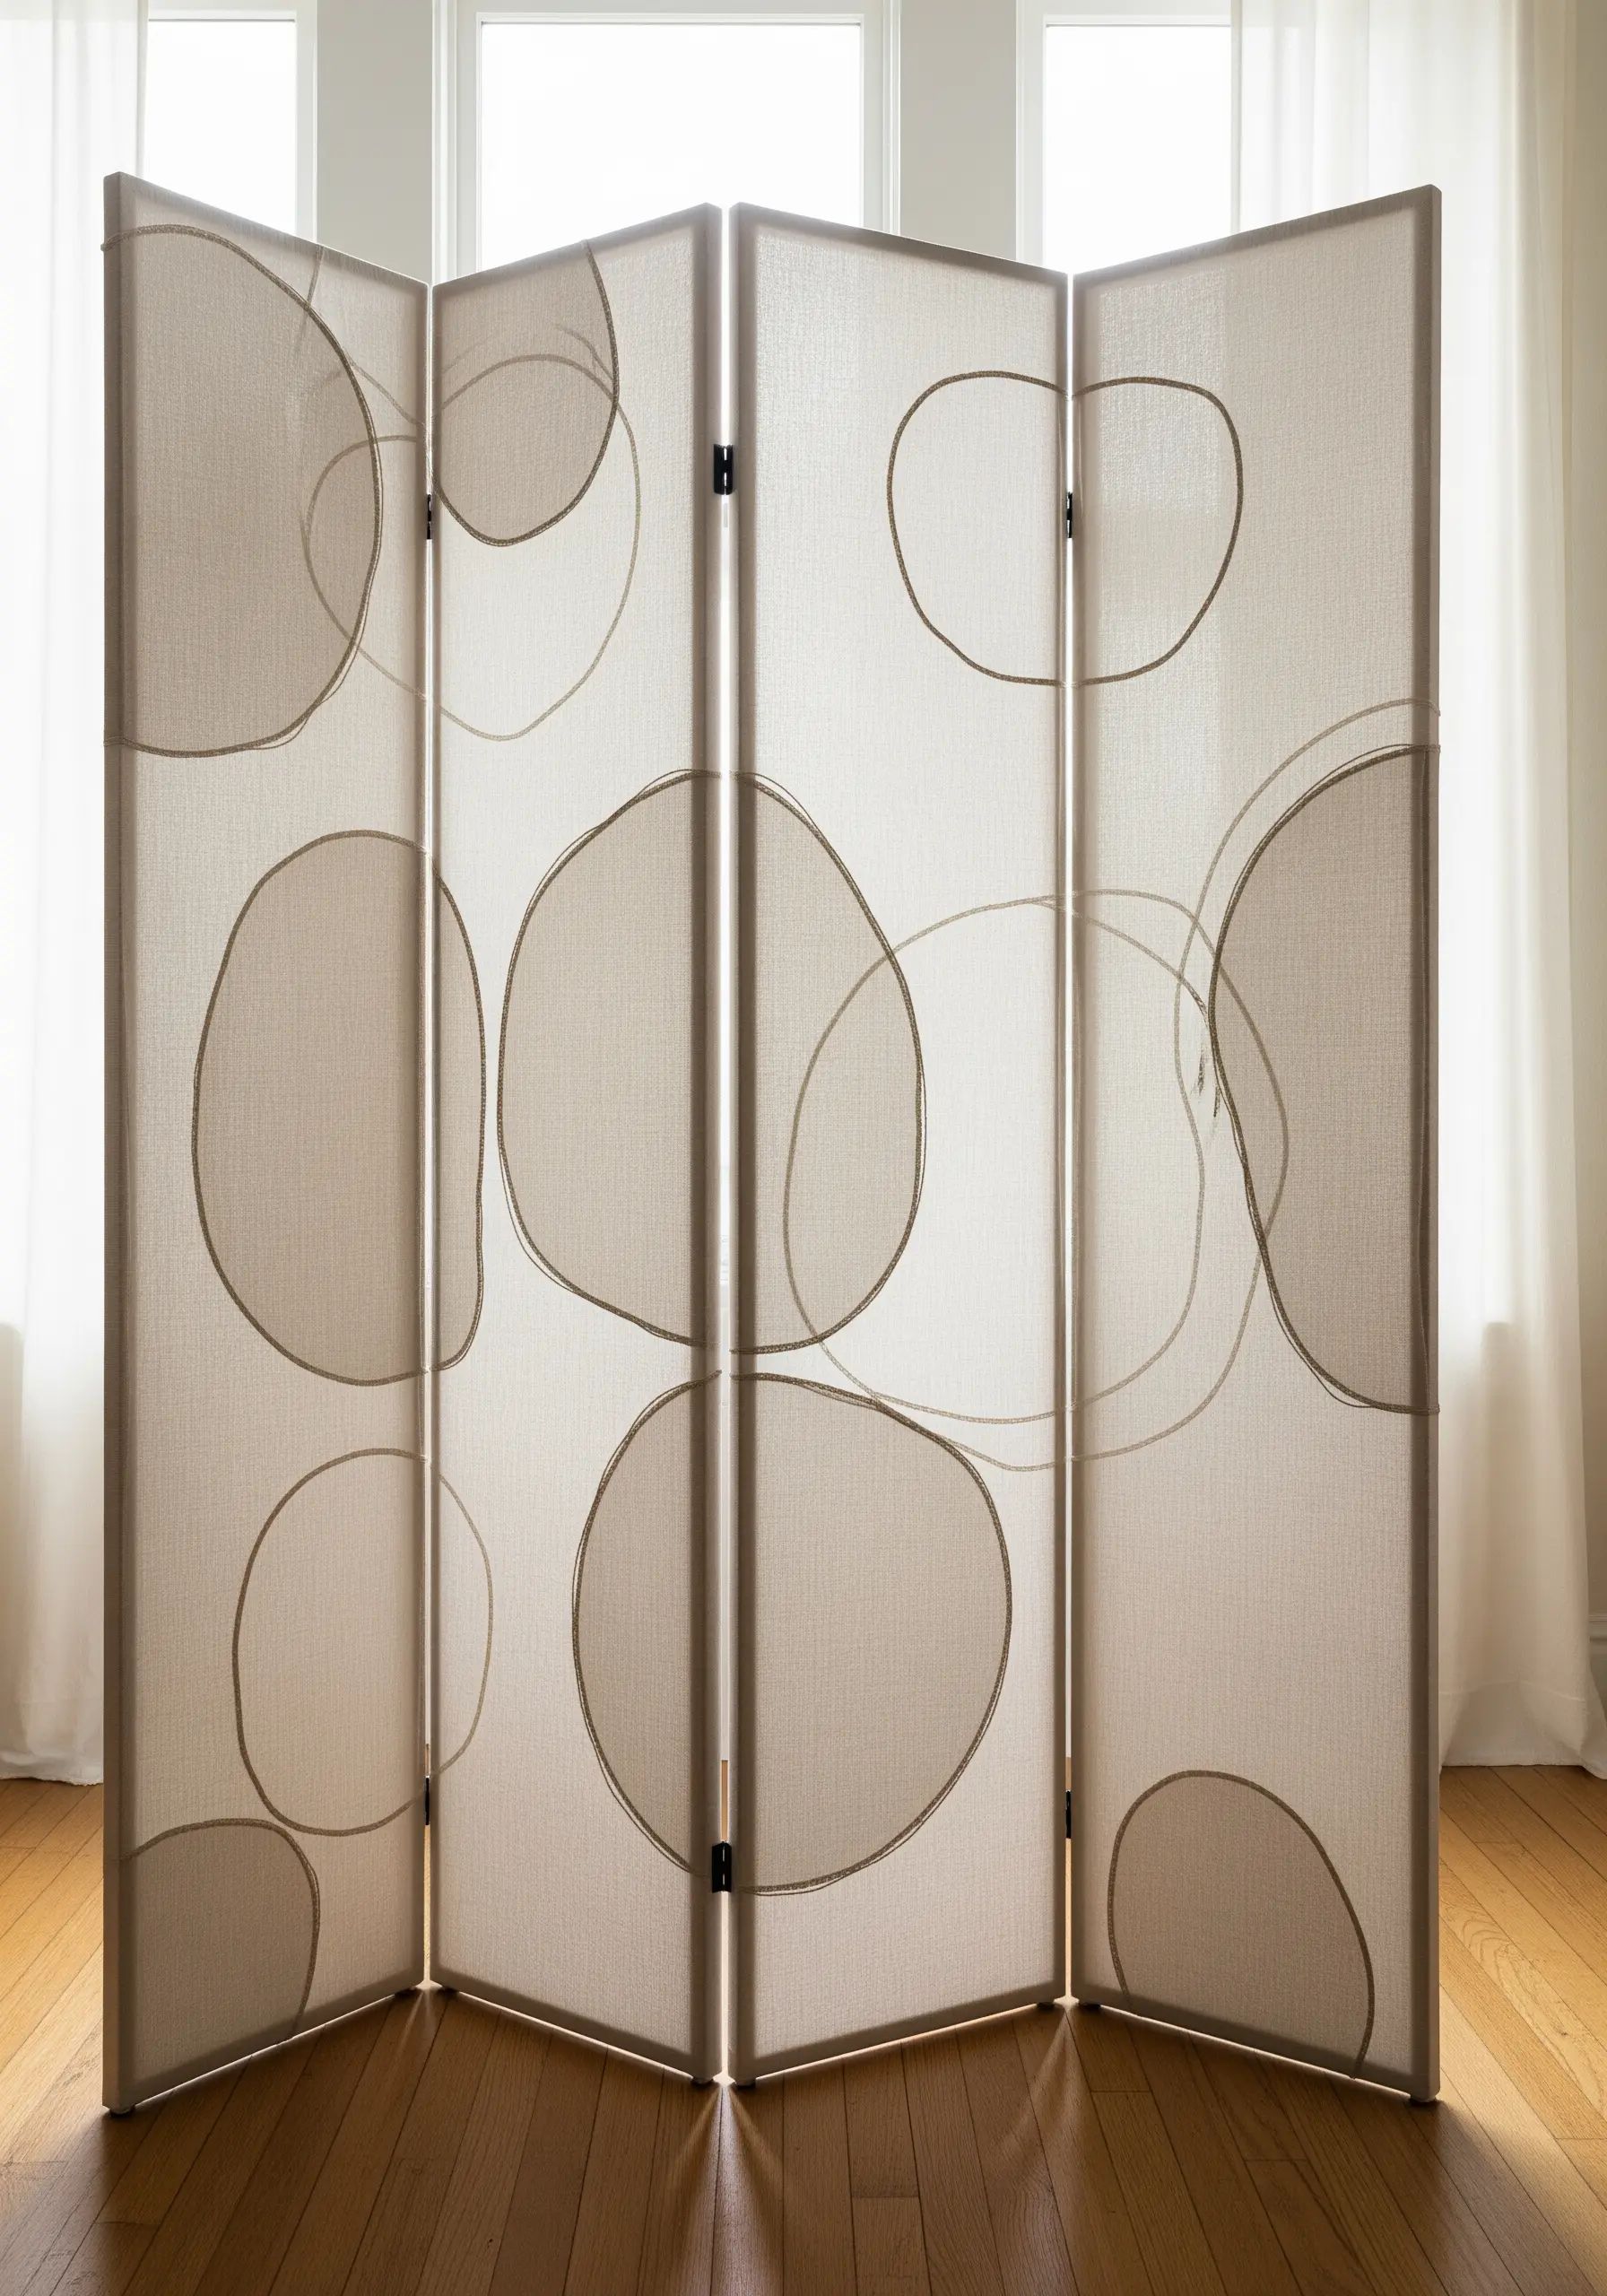
Take your line art off the page and onto a functional object, using transparency to make your stitches appear as if they are floating in mid-air.
A simple fabric room divider becomes an extraordinary canvas. The sheer panels allow light to pass through, creating an ethereal quality.
Use a thick, dark yarn and a large-eyed needle to stitch continuous, overlapping organic shapes directly onto the panels.
The simplicity of the lines combined with the grand scale creates a piece that is both a drawing and a sculpture, interacting with the light and space around it.
16. Deconstruct the Sampler for a Modern Statement

Breathe new life into the traditional cross-stitch sampler by deliberately breaking the rules of uniformity and perfection.
Treat the fabric as a journal or a sketchbook rather than a final exam. Mix different alphabets, vary the thread colors, and shift the alignment of your text.
Interrupt structured patterns with freeform marks or leave sections intentionally blank. This approach shifts the focus from a flawless finished product to an authentic record of creative exploration.
This piece celebrates the maker’s hand, where every “mistake” or change of mind becomes part of its unique story.
17. Braid and Wrap a Bohemian Curtain Tie-Back

Create a beautiful and functional piece of art for your window using simple fiber manipulation techniques.
Start by braiding several lengths of thick rope or chunky yarn to create the main structure of the tie-back.
Introduce color and texture by tightly wrapping sections with different shades of embroidery floss or thinner yarn. This adds visual interest and strengthens the braid.
Finish with generous, fluffy tassels made from the same color palette. The combination of textures—braided, wrapped, and loose—gives the piece a rich, bohemian character.
18. Reveal the Process with an Unfinished Masterpiece

Challenge the idea that art must be perfectly finished by making the creative process the subject of the work itself.
Begin a complex, large-scale piece, such as a floral mandala, on an oversized hoop.
Intentionally complete some sections in rich, full color while leaving others as simple line drawings. This contrast highlights the transformation from sketch to finished stitch.
Let your working threads hang loose. These are not mistakes to be trimmed but rather evidence of the labor and time invested, turning the piece into a story of its own creation.
19. Embrace the Philosophy of Kintsugi

While this is pottery, its principle is a powerful lesson for any artist. Kintsugi is the Japanese art of repairing broken ceramics with gold lacquer, believing that the object is more beautiful for having been broken.
Apply this philosophy to your textiles. Instead of hiding a tear, mend it with a visible, beautiful stitch in a contrasting or metallic thread.
If you make a mistake in your pattern, don’t unpick it—outline it or embellish it, turning the flaw into a feature.
This practice encourages you to honor the history of your materials and your own creative journey, finding beauty not in perfection, but in resilience and repair.
20. Tell a Story with a Memory Quilt

Create a quilt that is not just a blanket, but an archive of memories, where the imperfections are part of its soul.
Gather fabric scraps that hold meaning—pieces of old clothing, baby blankets, or curtains from a previous home. The mismatched patterns and textures are what give the quilt its life.
Don’t strive for perfect points or flawless seams. Focus on the meditative process of joining these pieces of your history together.
Hand-quilt the layers with a simple, large running stitch. The gentle, puckered texture created by hand stitching adds a layer of warmth and character that a machine cannot replicate.
21. Weave and Knot a Rustic Textile Trivet
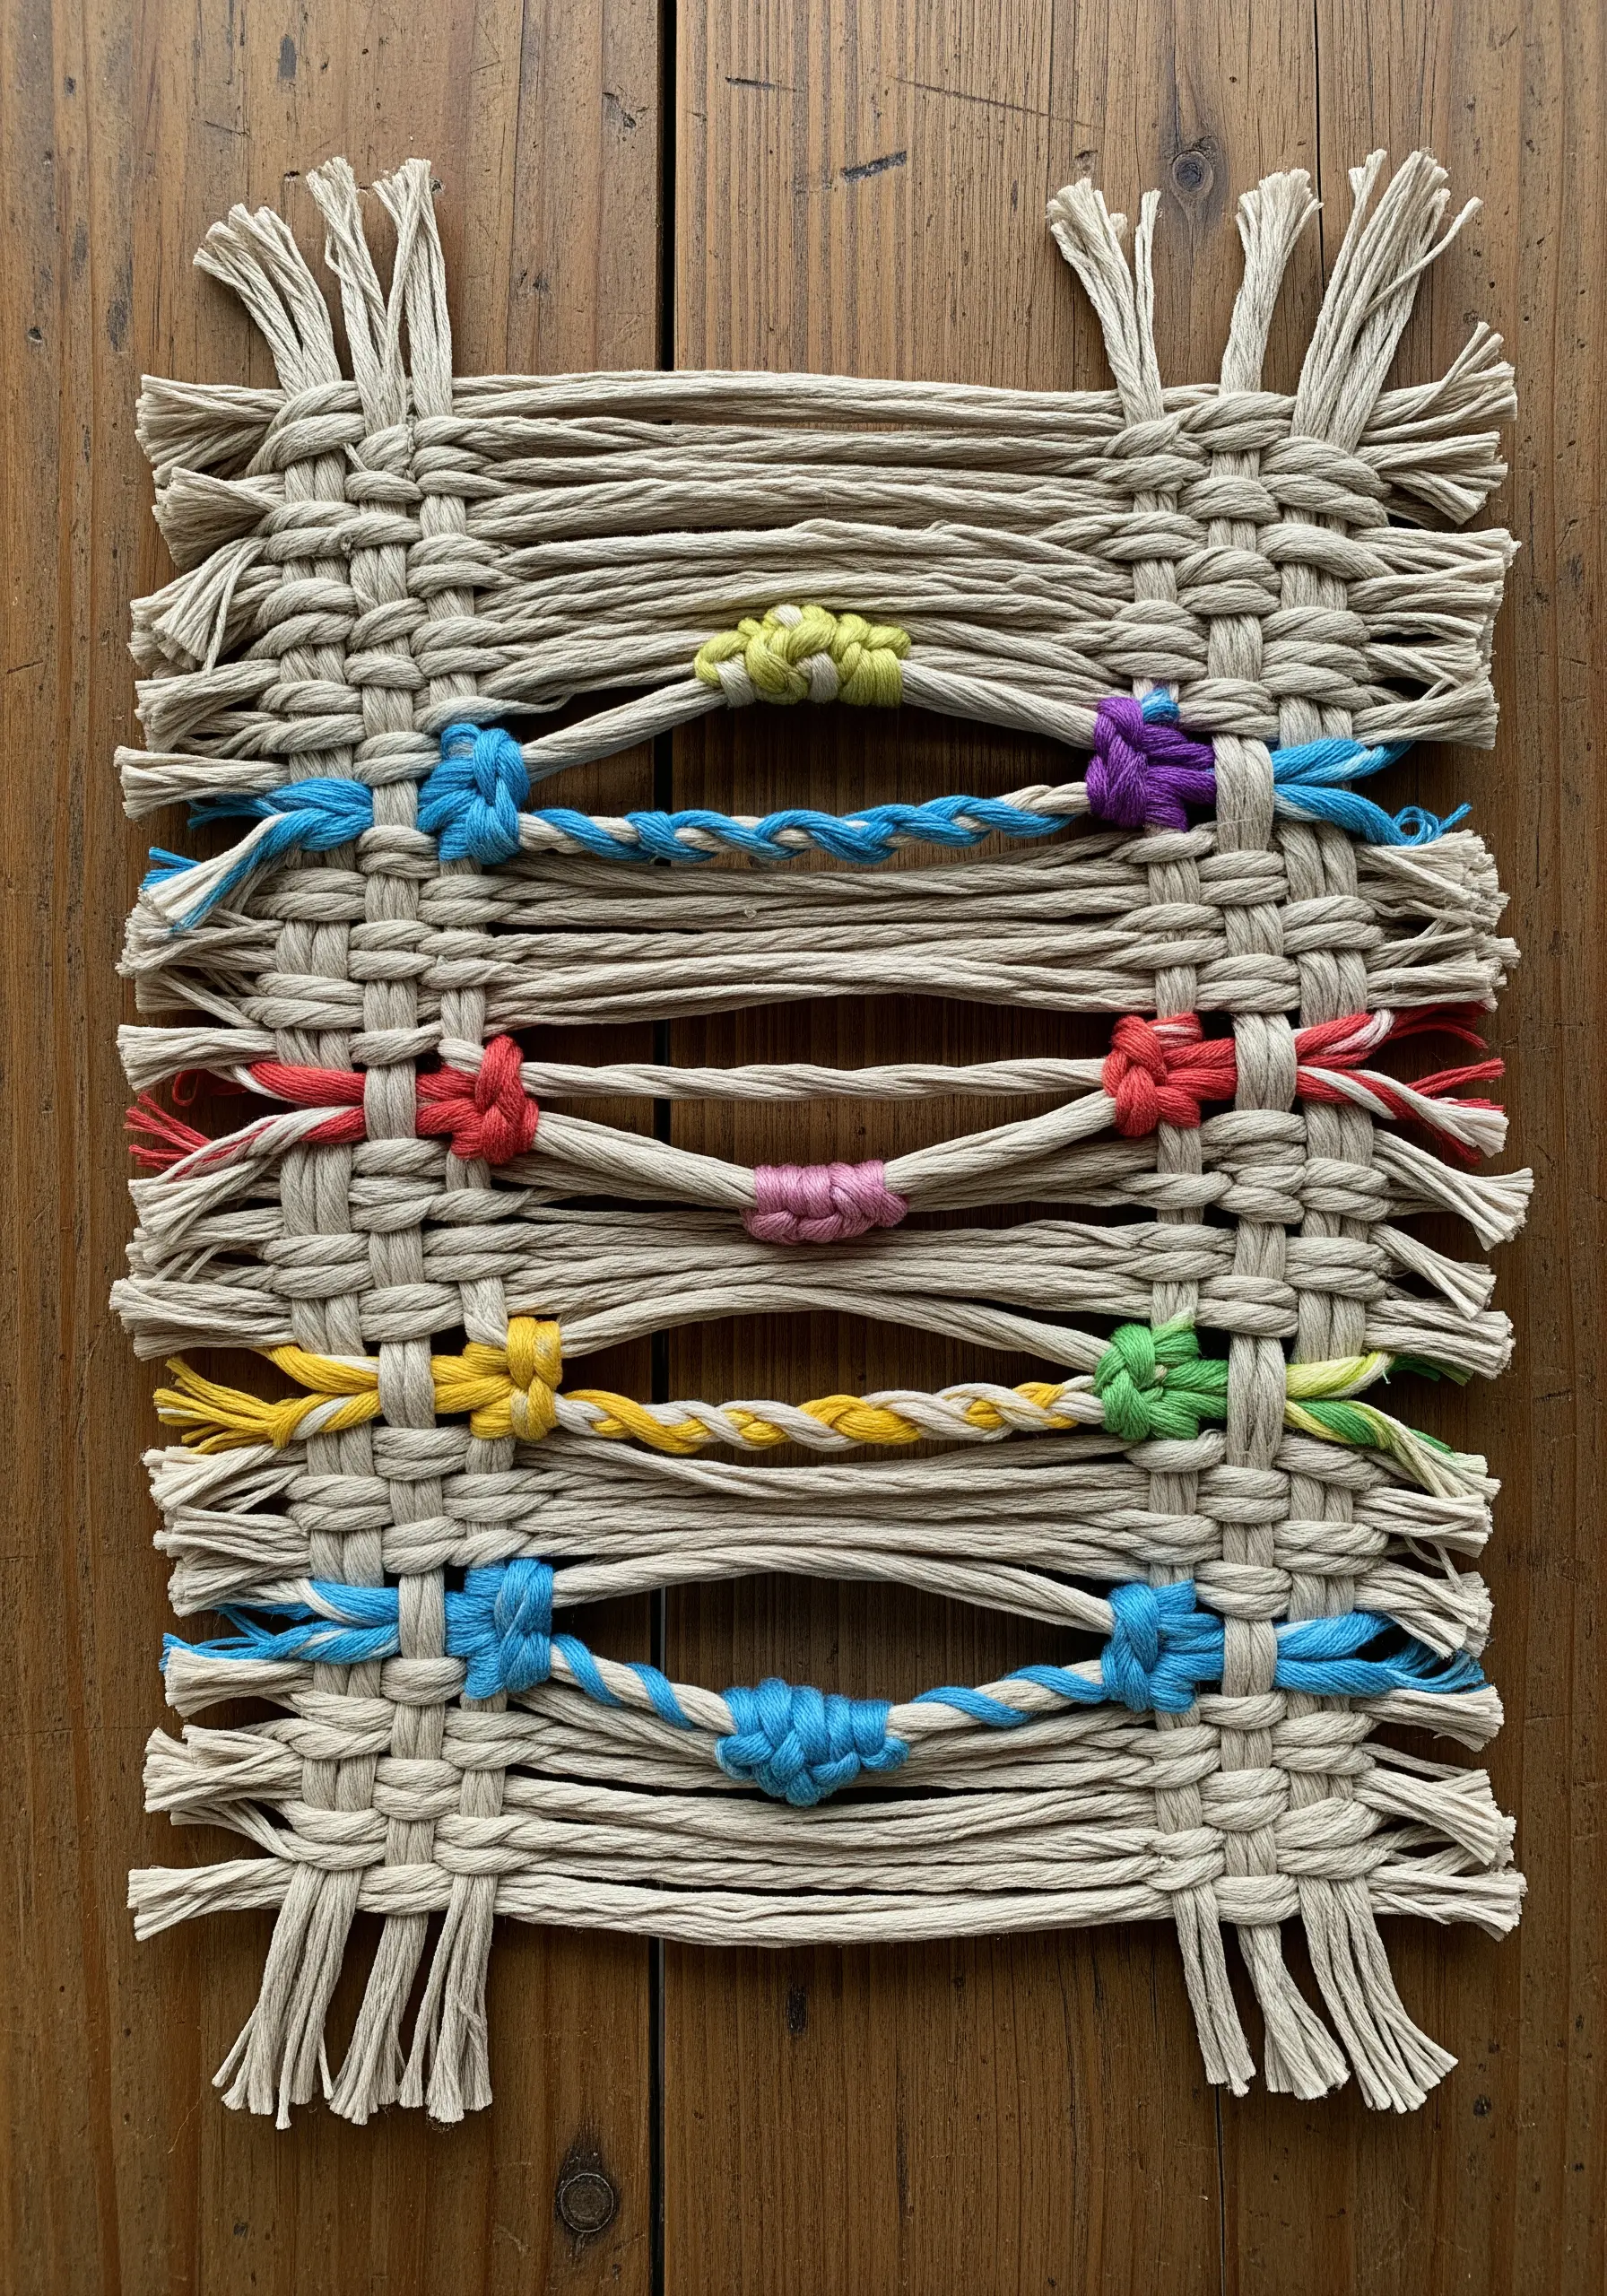
Explore the basics of weaving on a small scale, where simple knots become the main design element.
Set up a simple loom with a neutral, rustic warp thread like jute or cotton twine.
As you weave with the same material, pause periodically to tie colorful knots that pull several warp threads together.
These interruptions create deliberate gaps and textural focal points, transforming a plain weave into a playful, rhythmic pattern. The unfinished, fringed edges complete the relaxed, handmade aesthetic.
22. Compose with Soft, Layered Felt Shapes
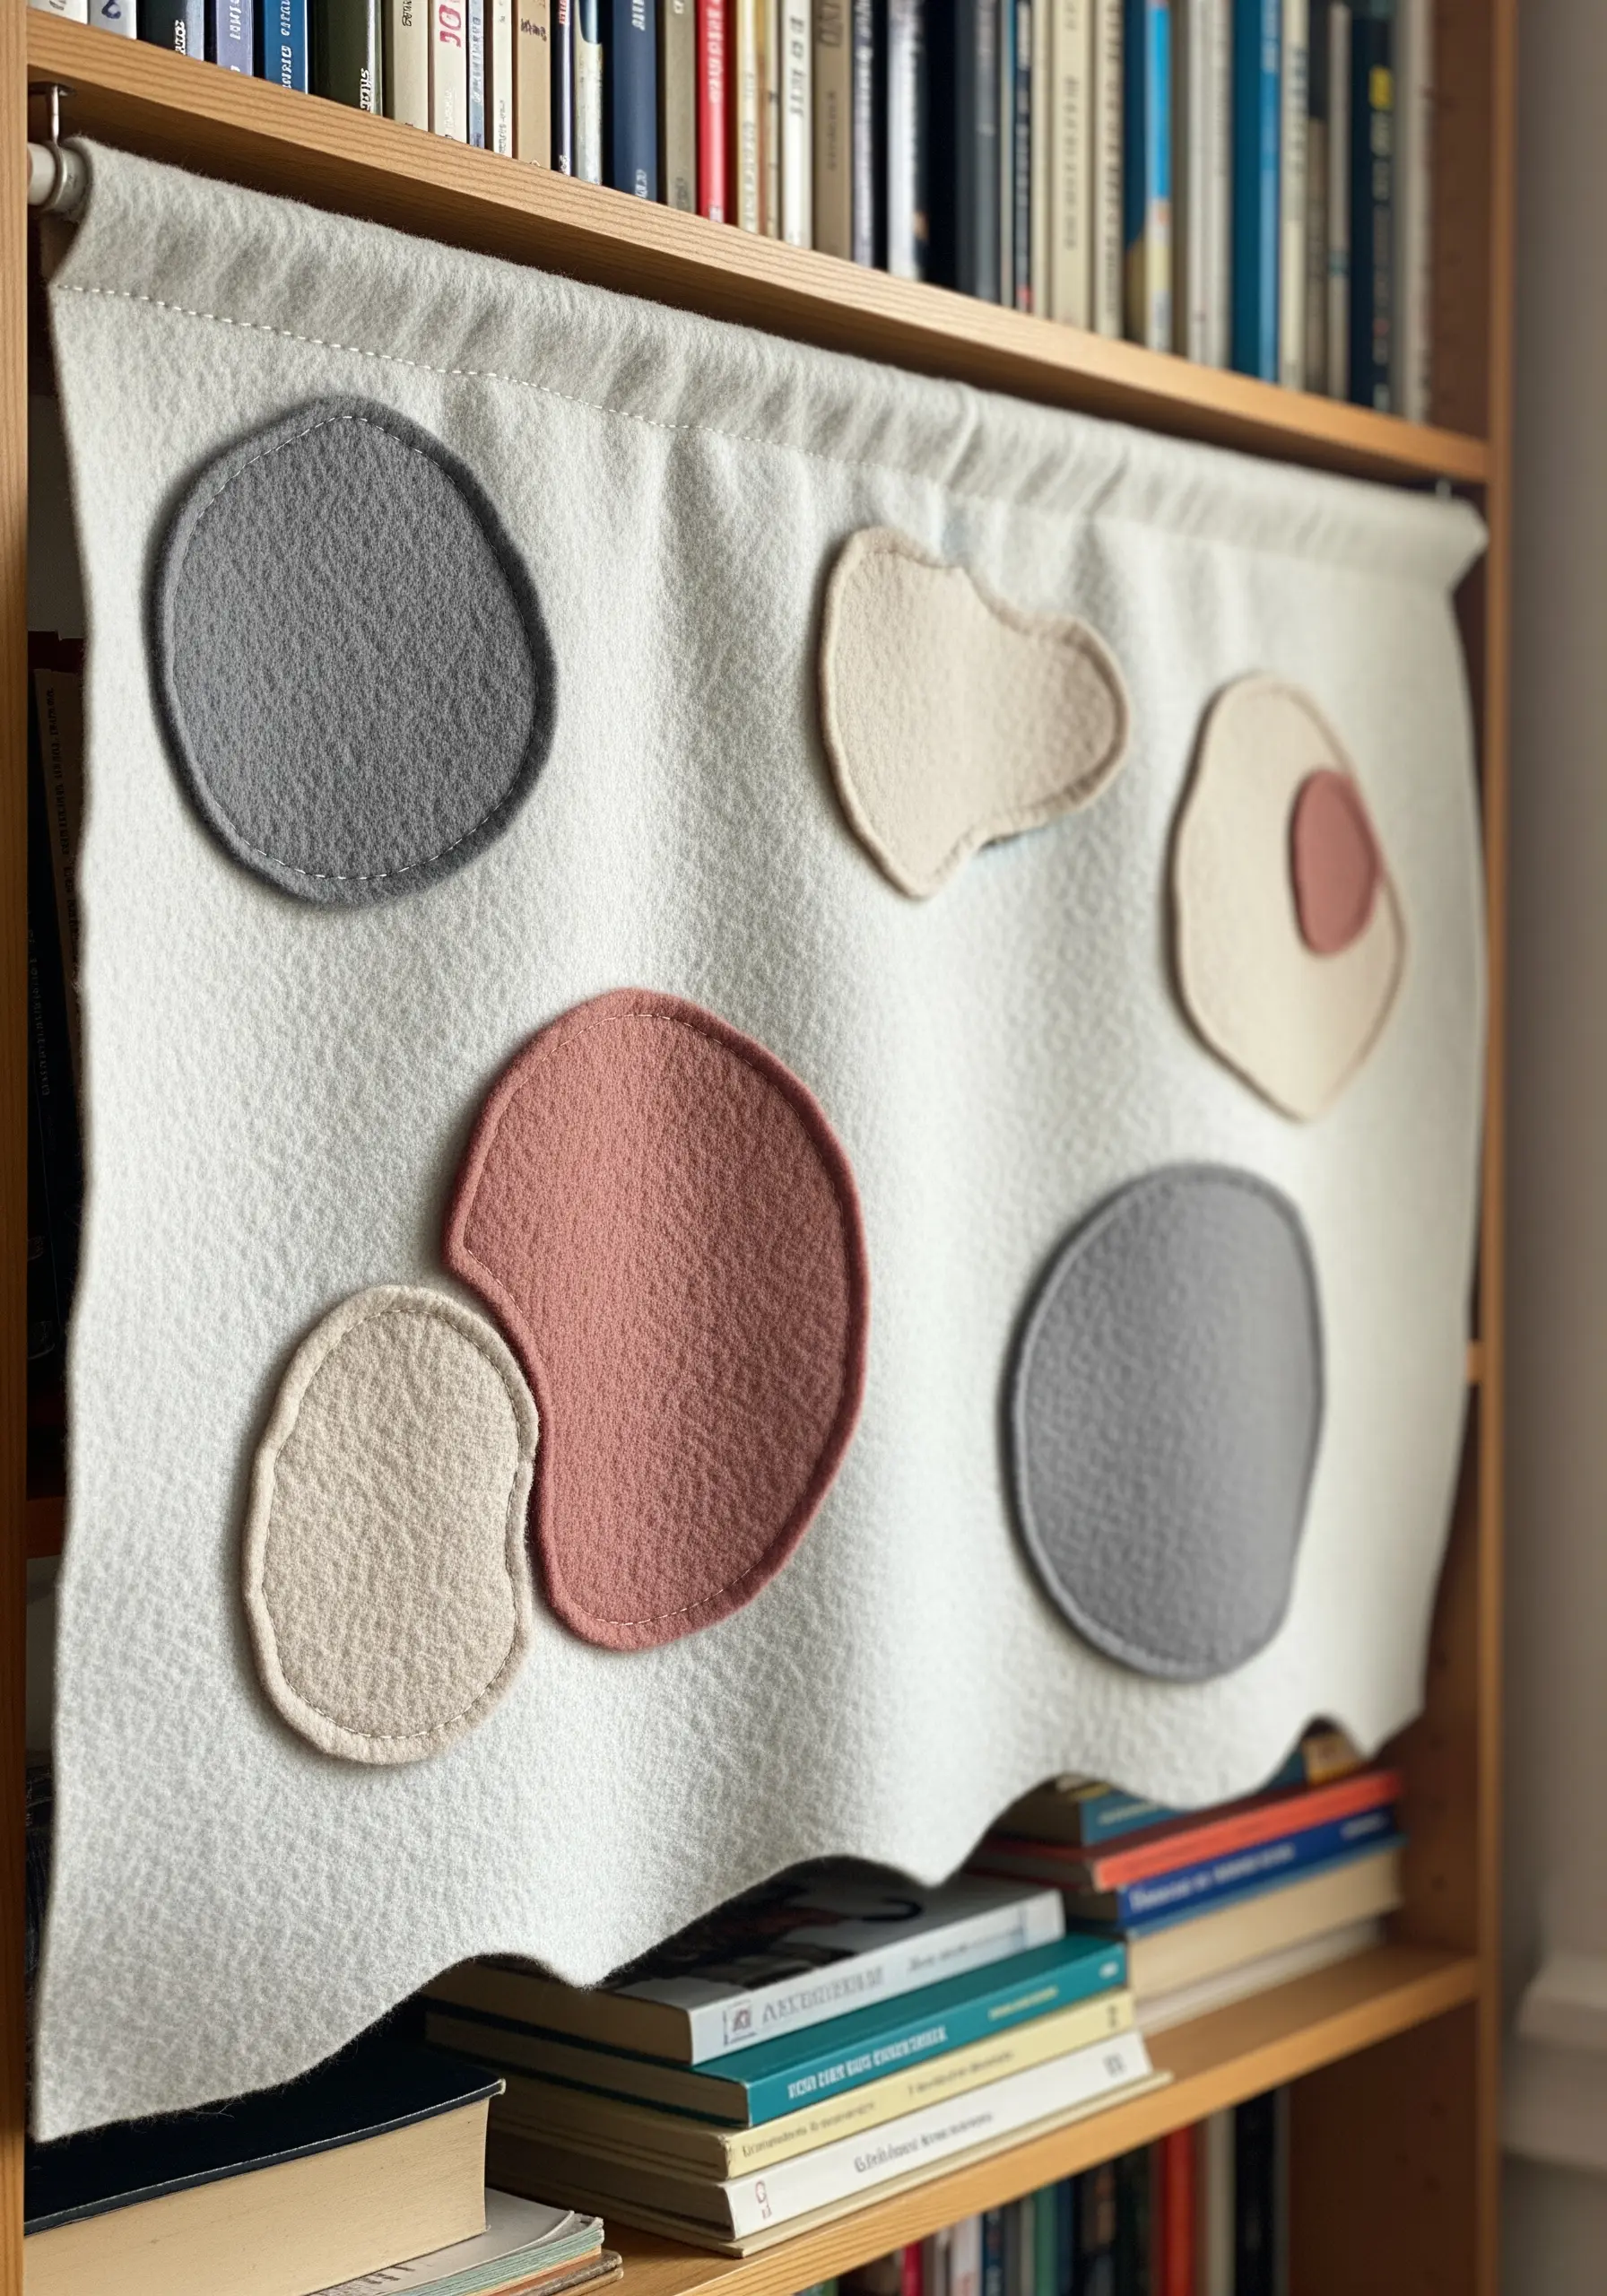
Create a calm, abstract composition that celebrates the beauty of simple shapes and soft textures.
Hand-cut organic, pebble-like forms from thick felt in a muted, earthy color palette. The slight irregularities of hand-cutting are essential to the design’s charm.
Arrange the shapes on a neutral felt background, allowing them to overlap and interact to create a sense of depth.
Attach each piece with a simple, visible running stitch in a matching thread. The stitches add a subtle textural outline that enhances the handmade quality of the work.
23. Frame Controlled Chaos for a Striking Effect

Create a powerful piece of abstract art by juxtaposing a chaotic tangle of thread with the formal structure of a traditional frame.
Mount a piece of fabric with a central cutout over a dark backing. This creates a defined window for your composition.
Using a single, continuous length of light-colored thread, fill the window with a dense, random scribble. Let the thread loop, twist, and overlap to build up a chaotic mass of lines.
Placing this raw, energetic texture within an ornate gold frame creates a fascinating dialogue between chaos and order, elevating the humble thread to fine art.
24. Weave Fabric Scraps into Your Macrame
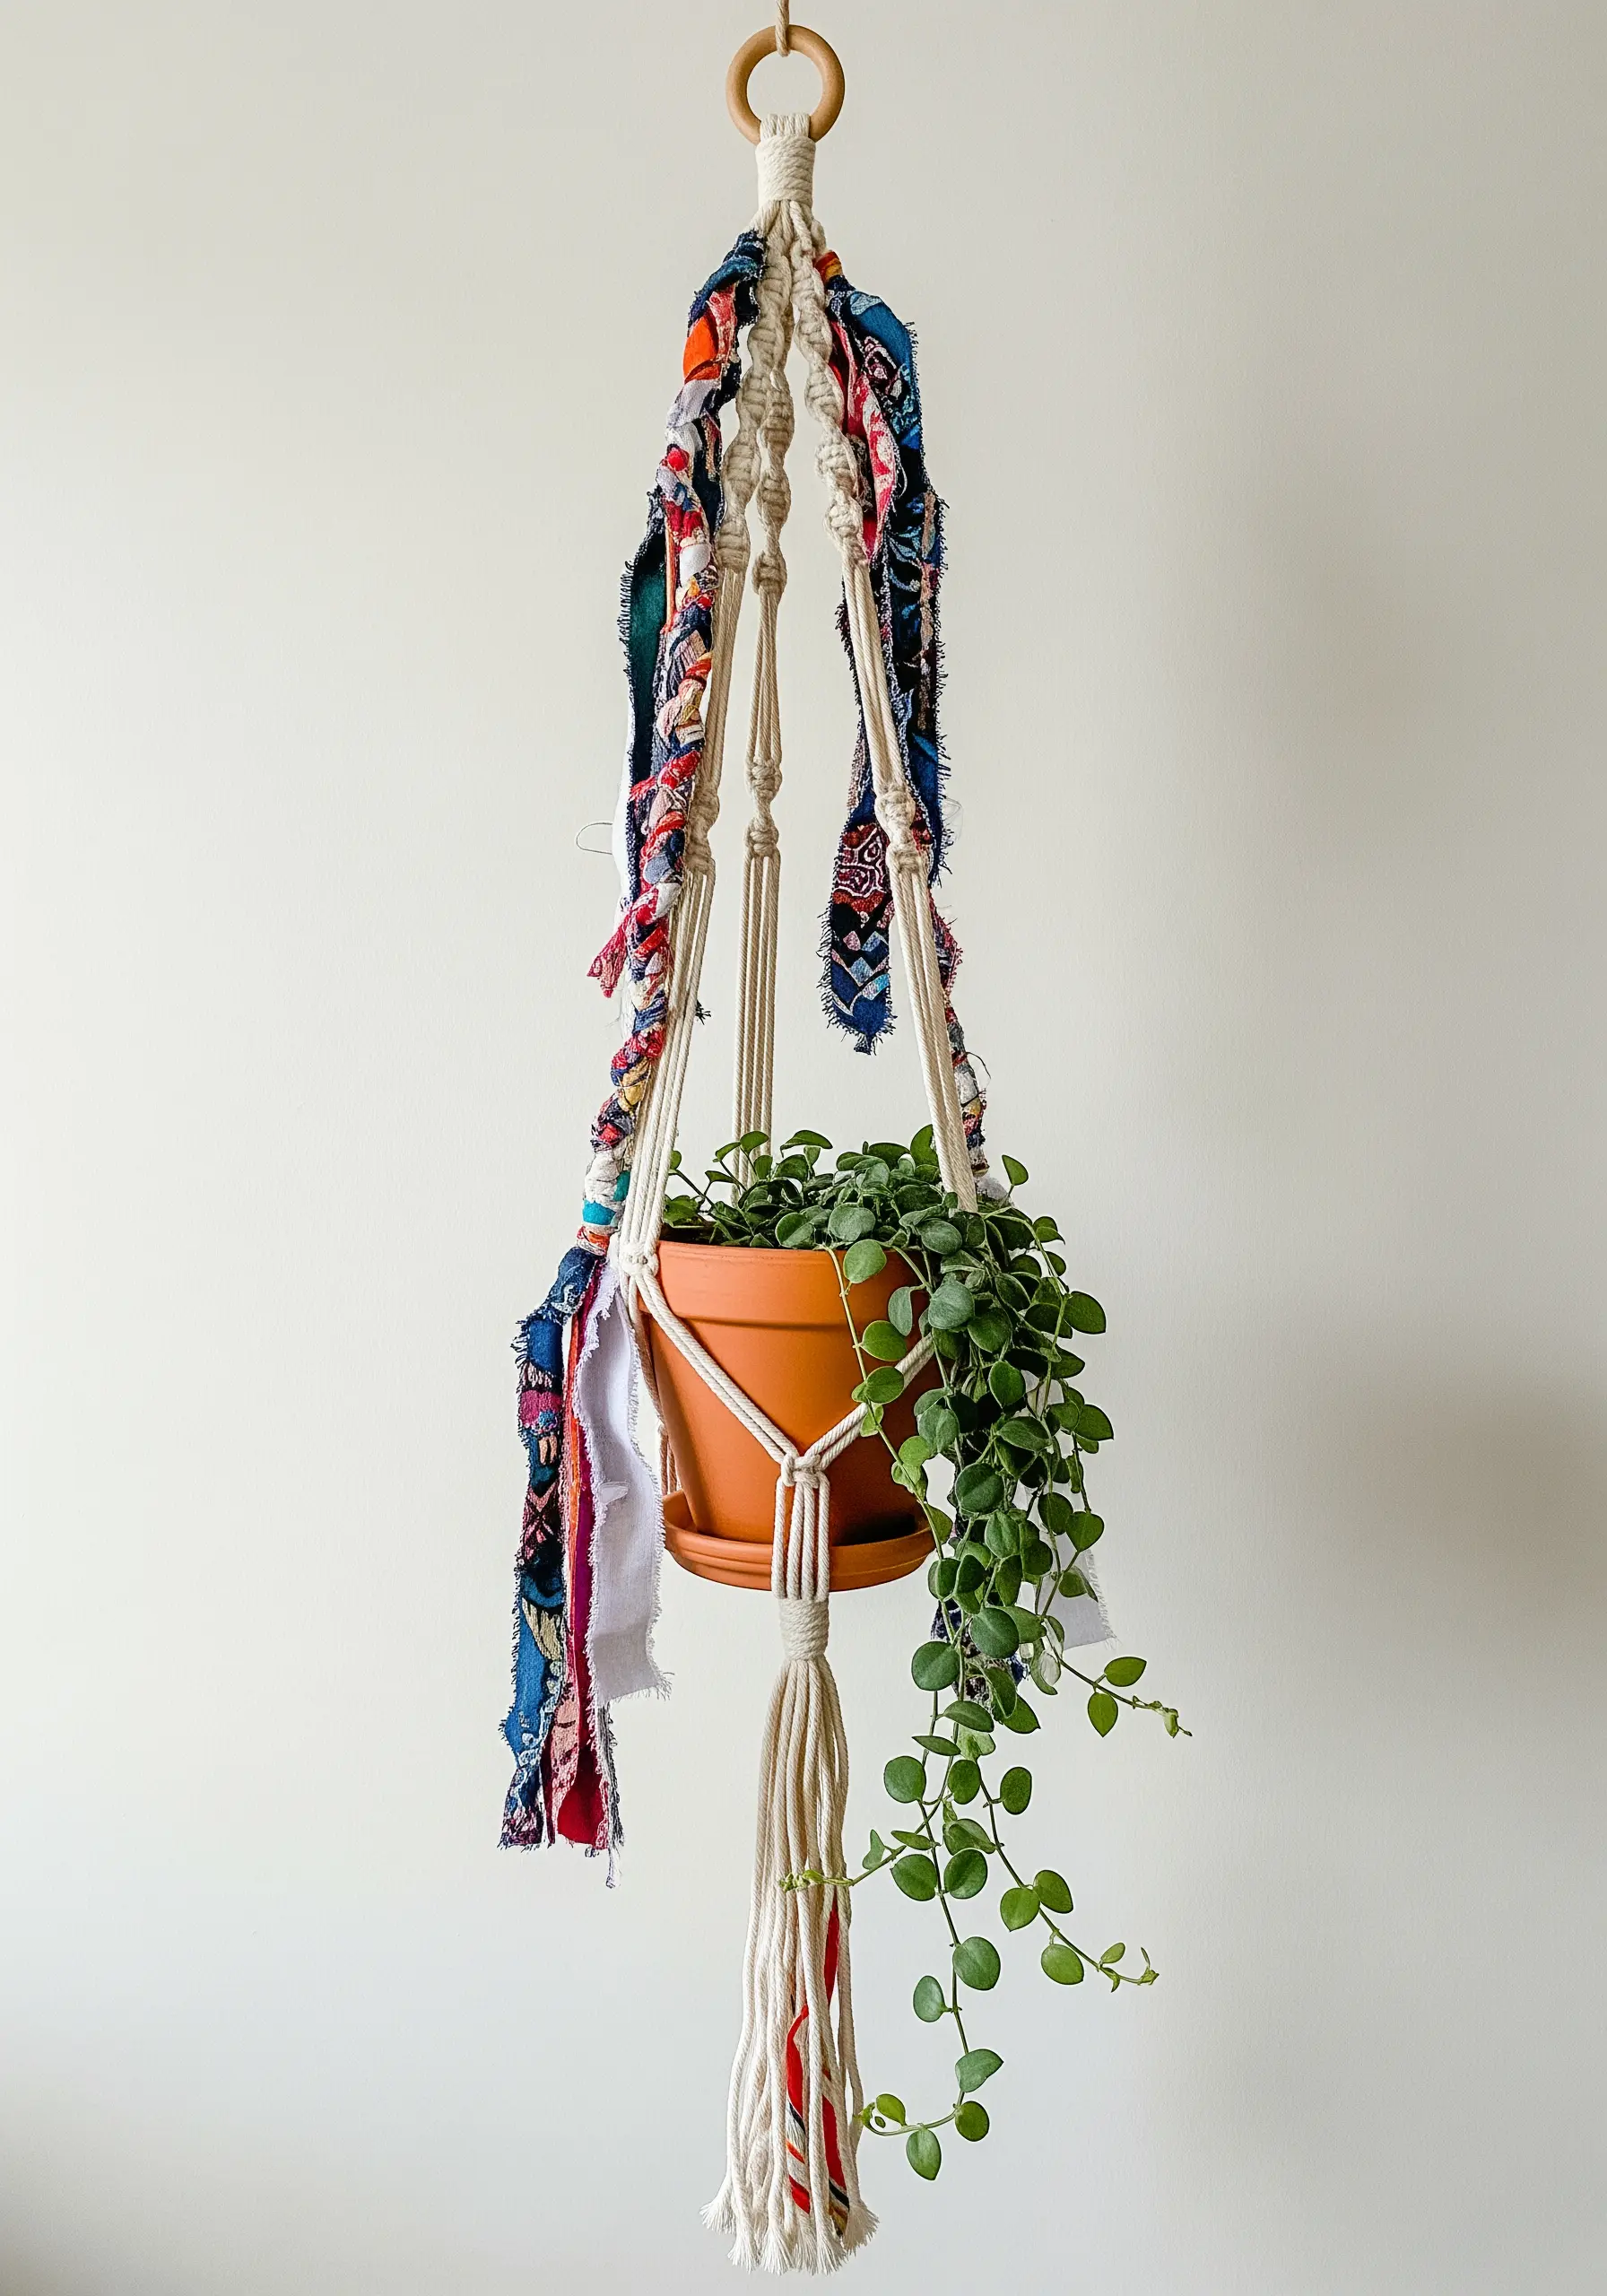
Give a classic macrame plant hanger a vibrant, bohemian upgrade by incorporating colorful fabric scraps.
As you work your standard macrame knots—like square knots or spirals—simply lay a strip of torn fabric alongside your cords and knot around it.
You can also braid or wrap the fabric strips around the cords in between knotted sections for a different textural effect.
This technique is a beautiful way to use up leftover fabric, add unexpected pops of color, and create a truly one-of-a-kind piece that reflects your personal style.
25. Outline Appliqué with an Architectural Running Stitch

Combine patchwork and appliqué, using your final stitch not just for construction, but as a primary graphic element.
Create a background from blocks of richly textured fabrics like corduroy and velvet. Appliqué a central shape in a contrasting, plain fabric on top.
Instead of hiding your stitches, use a thick, contrasting thread to sew a bold, visible running stitch around the edge of the appliqué. These stitches act like an architectural drawing, defining the form and adding a layer of deliberate, rustic detail.
26. Create Floating Line Art on Sheer Fabric
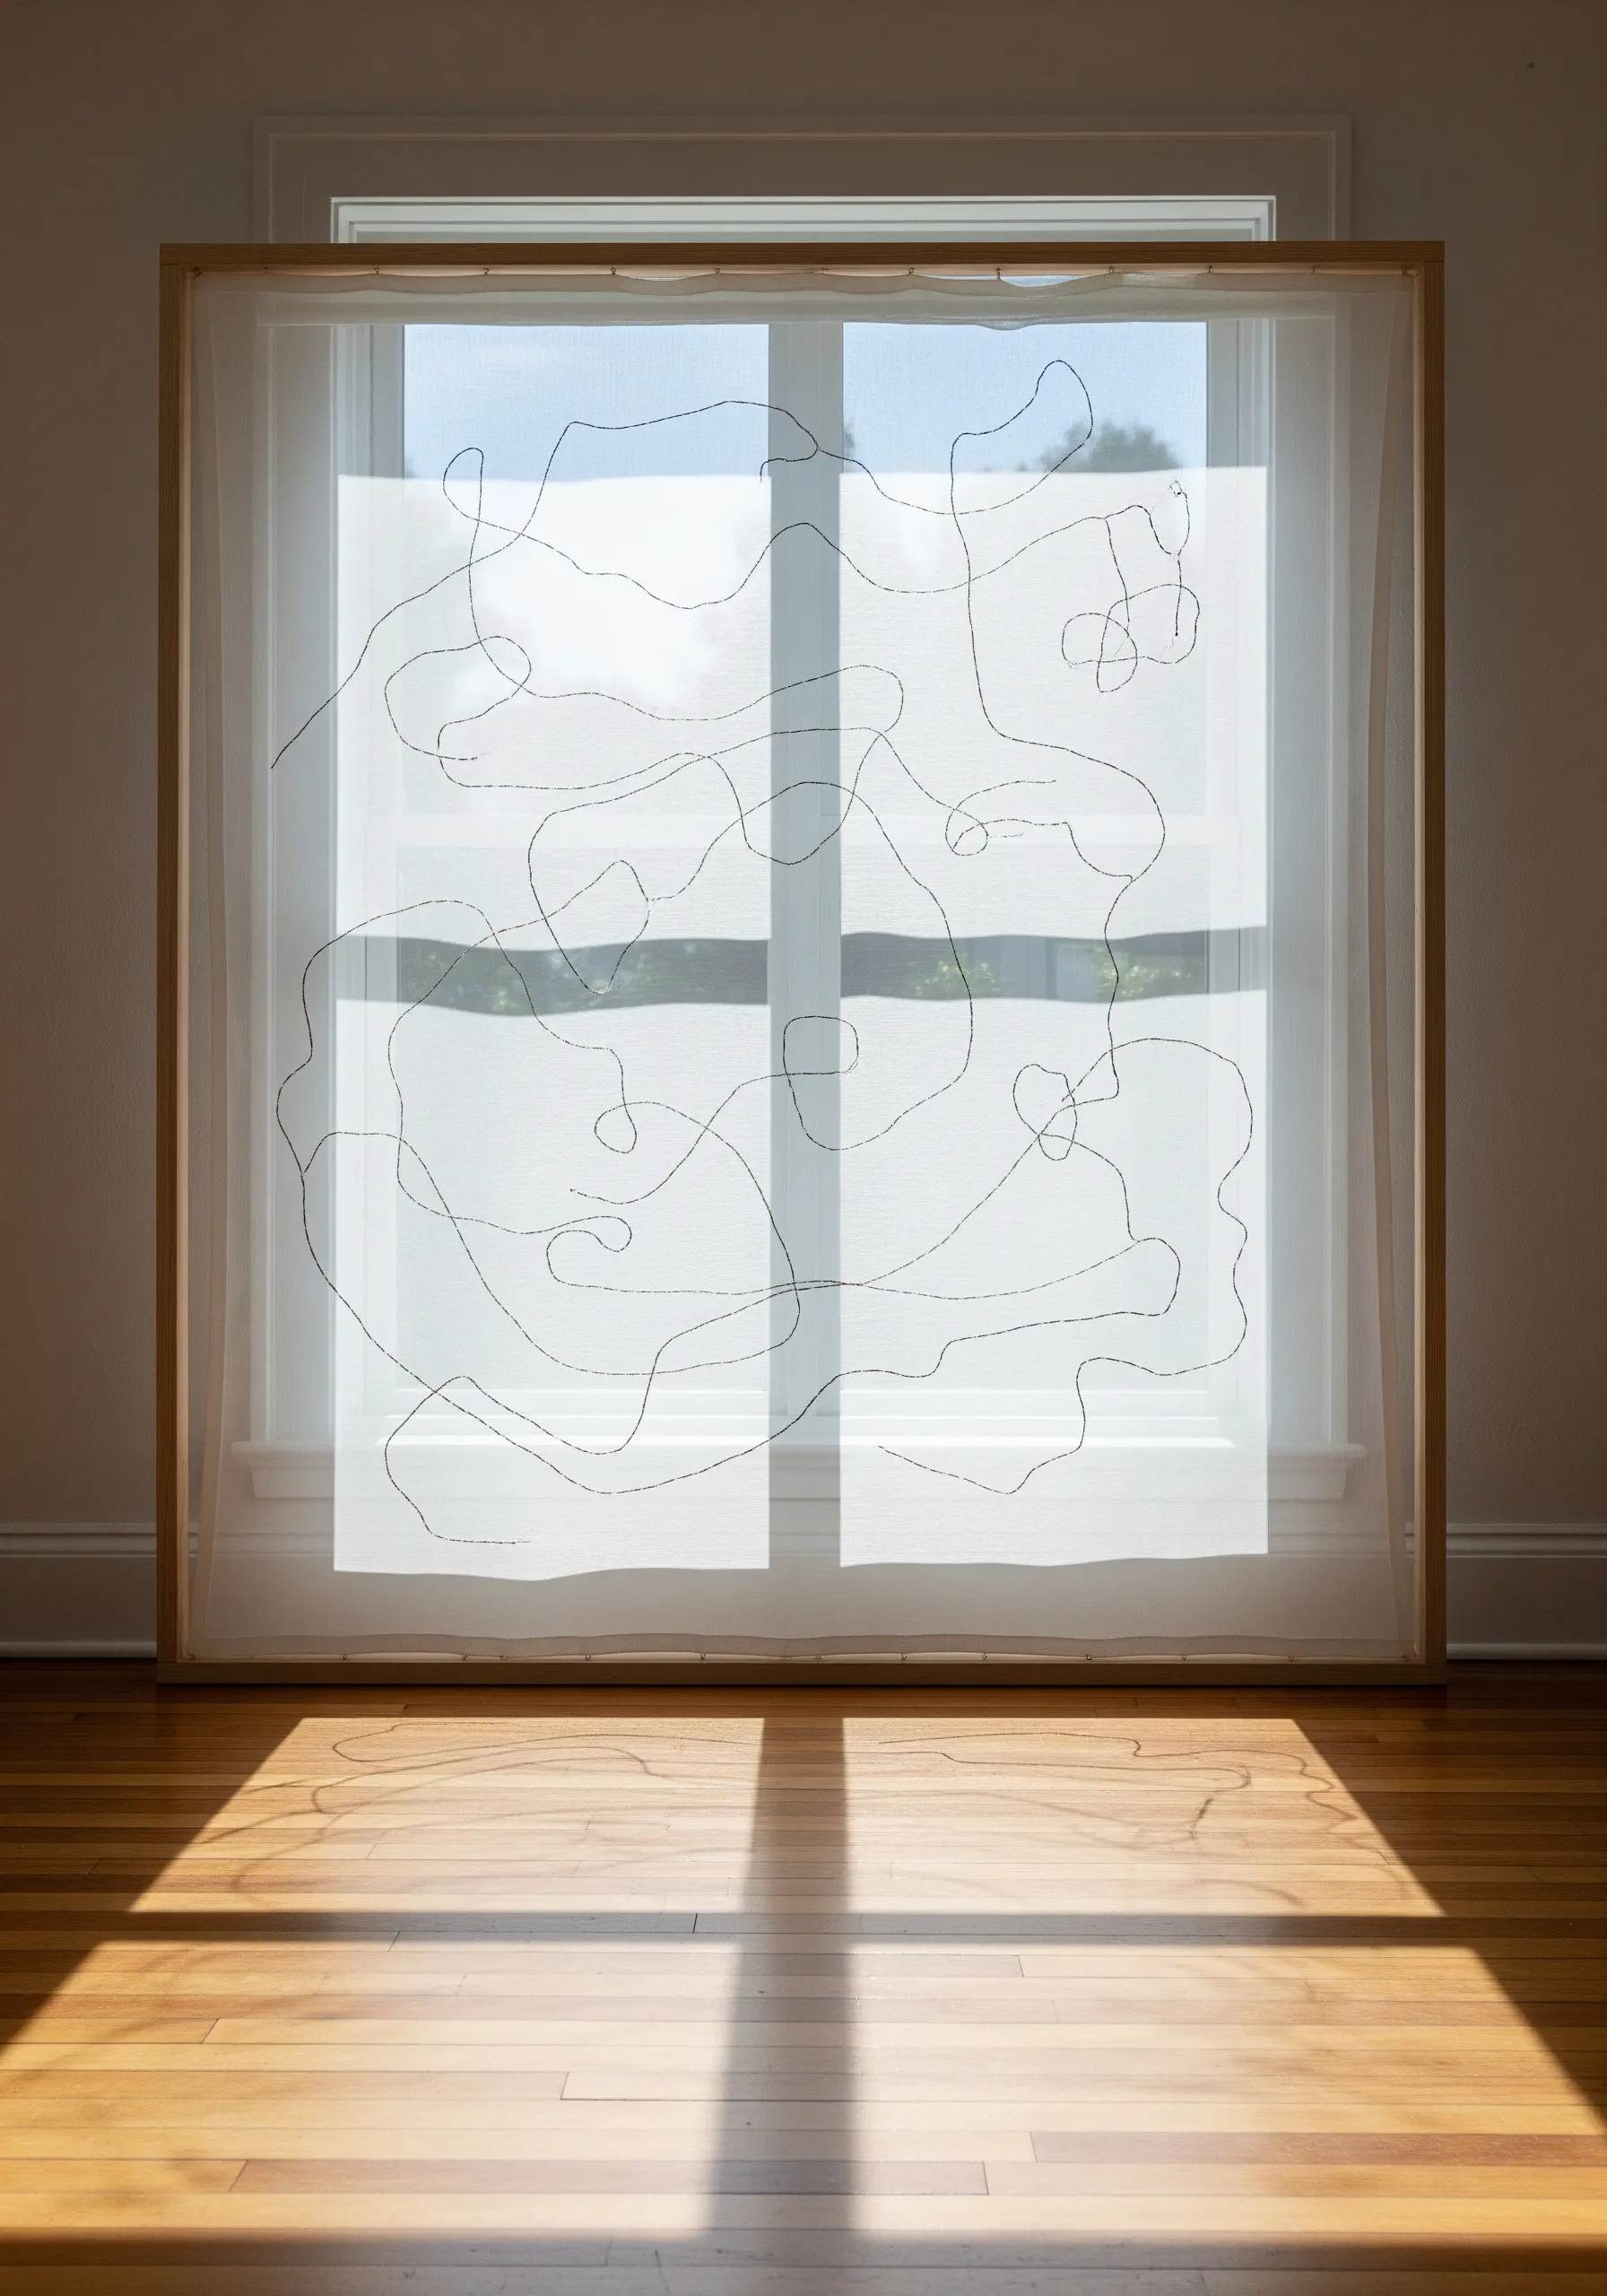
Stitch on a transparent fabric like organza or tulle to make your embroidery appear as if it’s drawn directly on the air.
Use a simple backstitch and a dark thread to create a continuous, meandering line—a kind of ‘thread drawing’ that loops and wanders across the surface without a clear beginning or end.
When framed and hung in front of a window, the piece becomes kinetic. Light passes through the fabric, casting shifting shadows of your linework onto the wall and floor, making the art a living part of your space.
27. Marry Clay and Thread for Tactile Ornaments
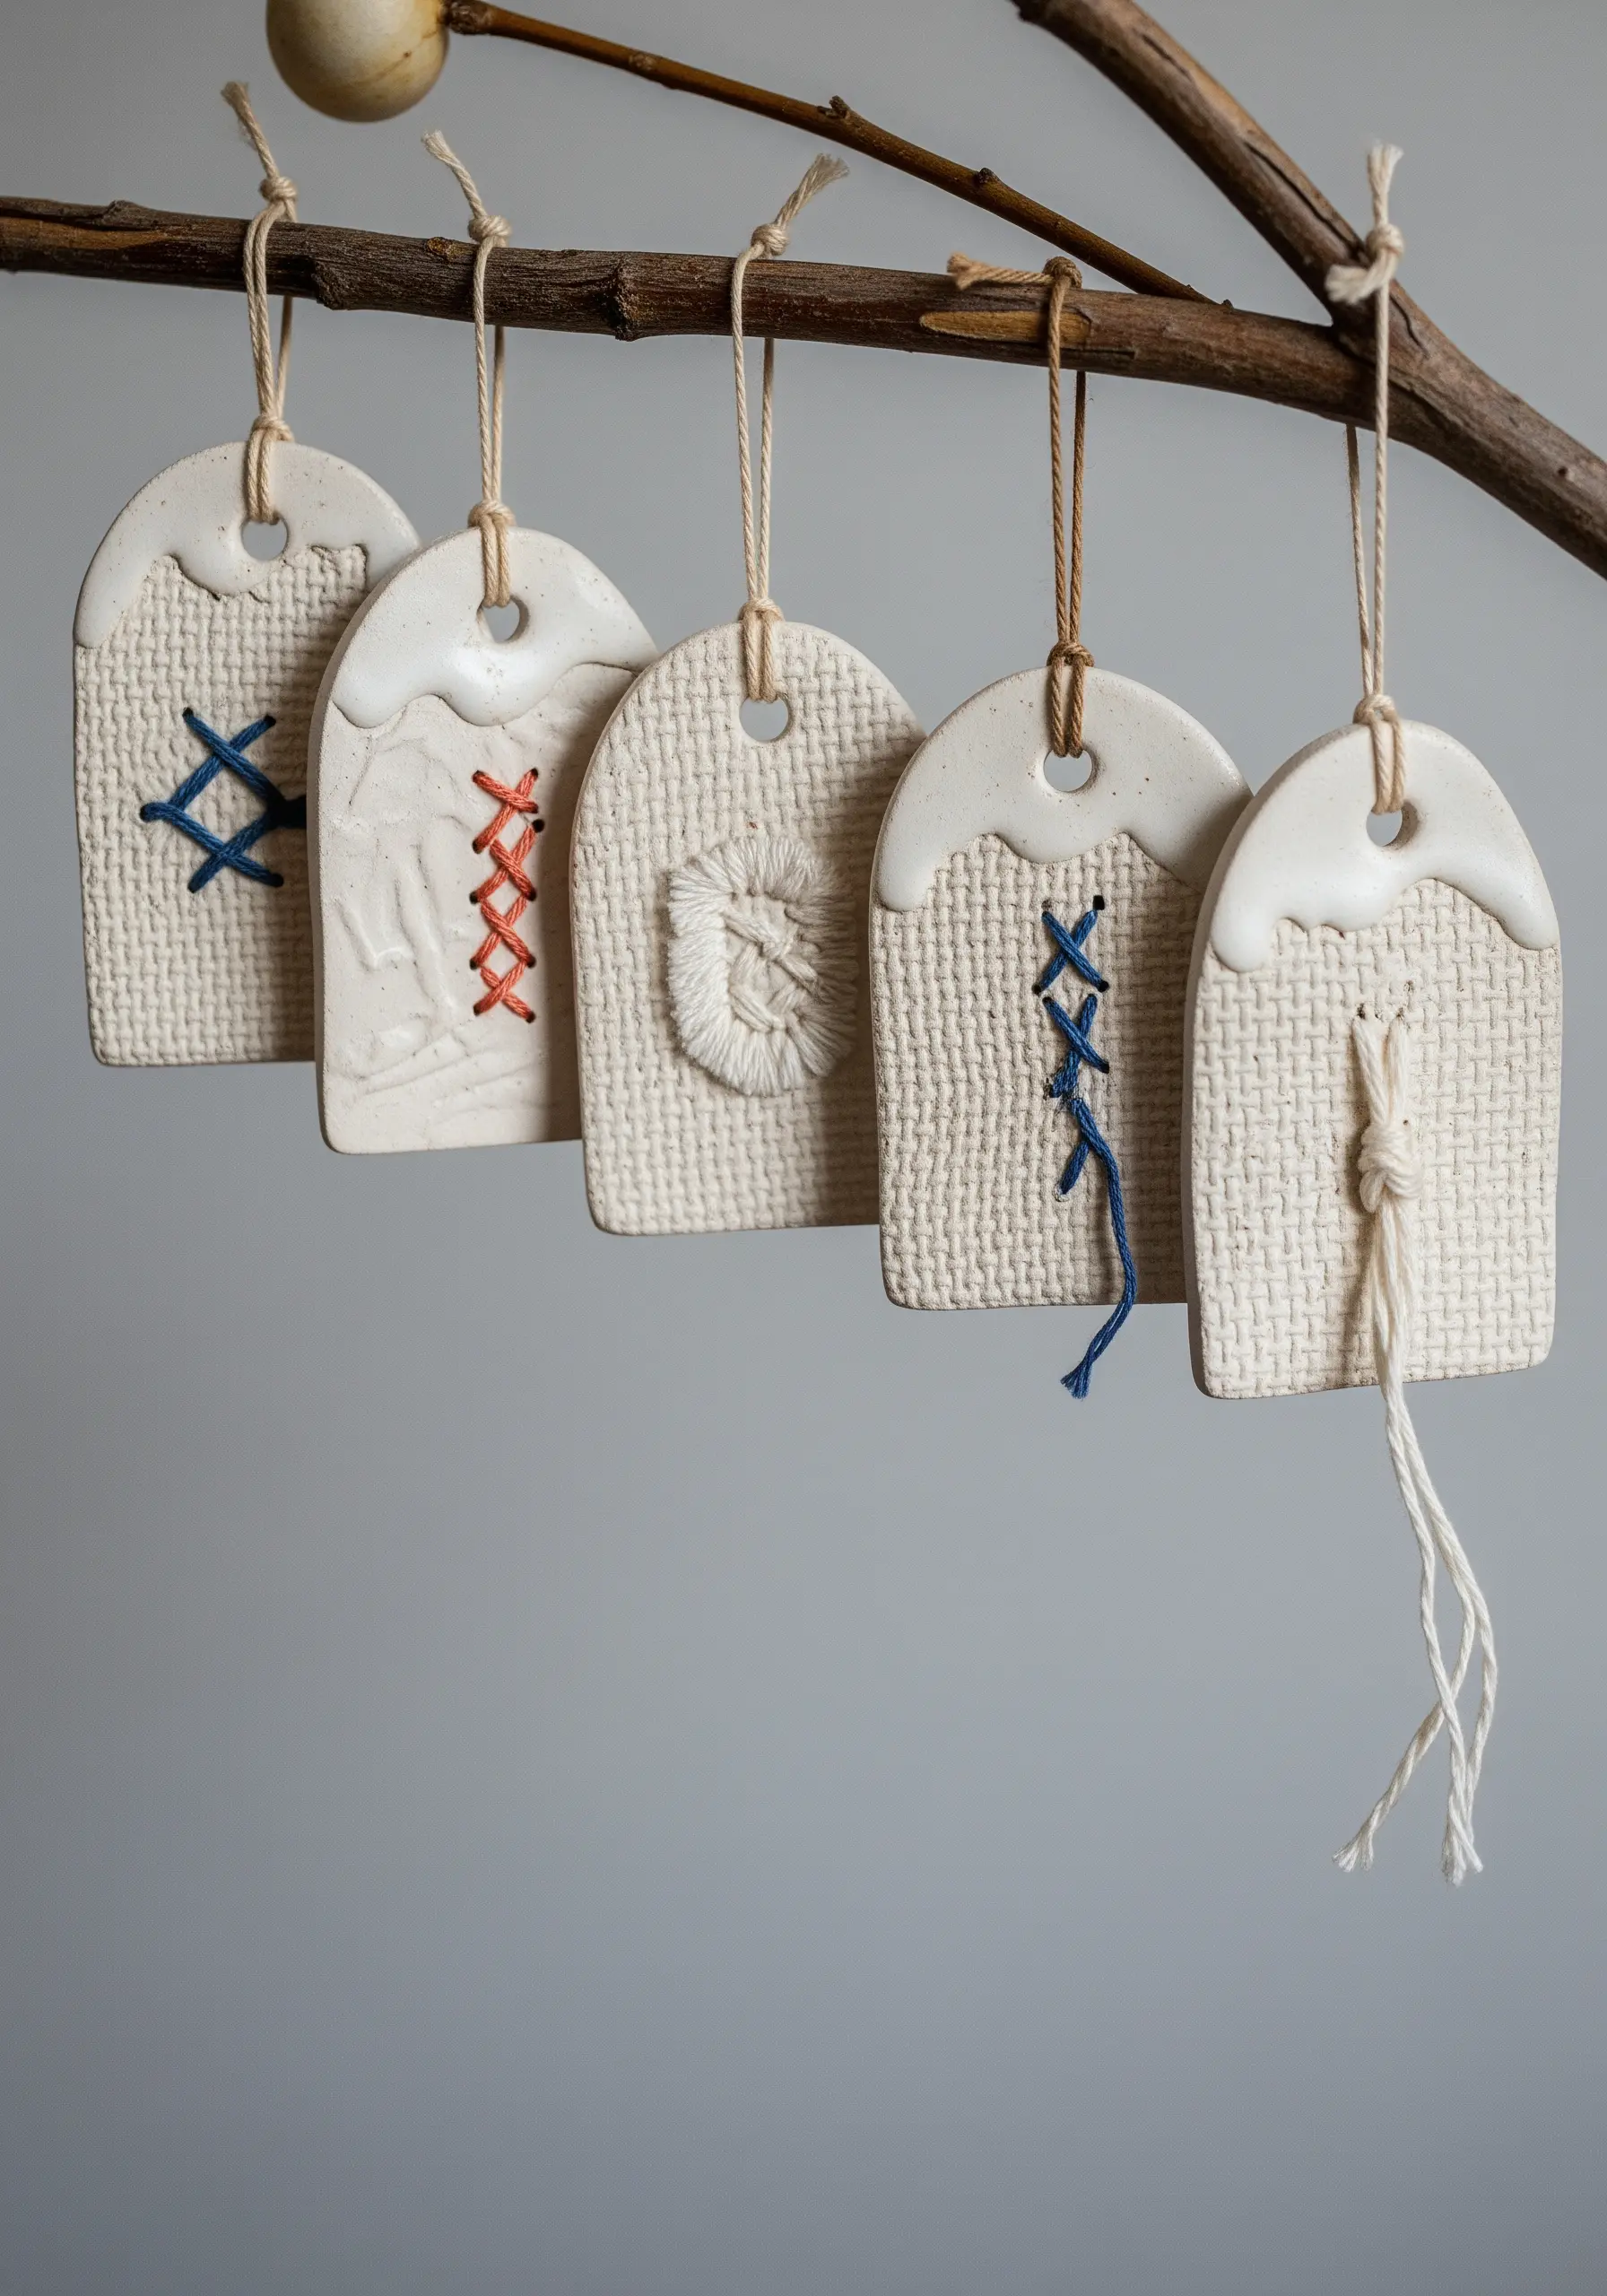
Explore the beautiful contrast between hard and soft materials by incorporating embroidery into ceramics.
Create small tags or pendants from air-dry or polymer clay. Before the clay hardens, press a piece of textured fabric (like burlap or canvas) onto the surface to create an impression.
Once hardened, use the grid of the fabric impression and pre-poked holes as a guide for simple stitches—a few cross stitches, a tied knot, or some wrapped thread.
This mixed-media project results in wonderfully tactile objects that feel both earthy and refined.
28. Personalize Tufting with Mismatched Buttons
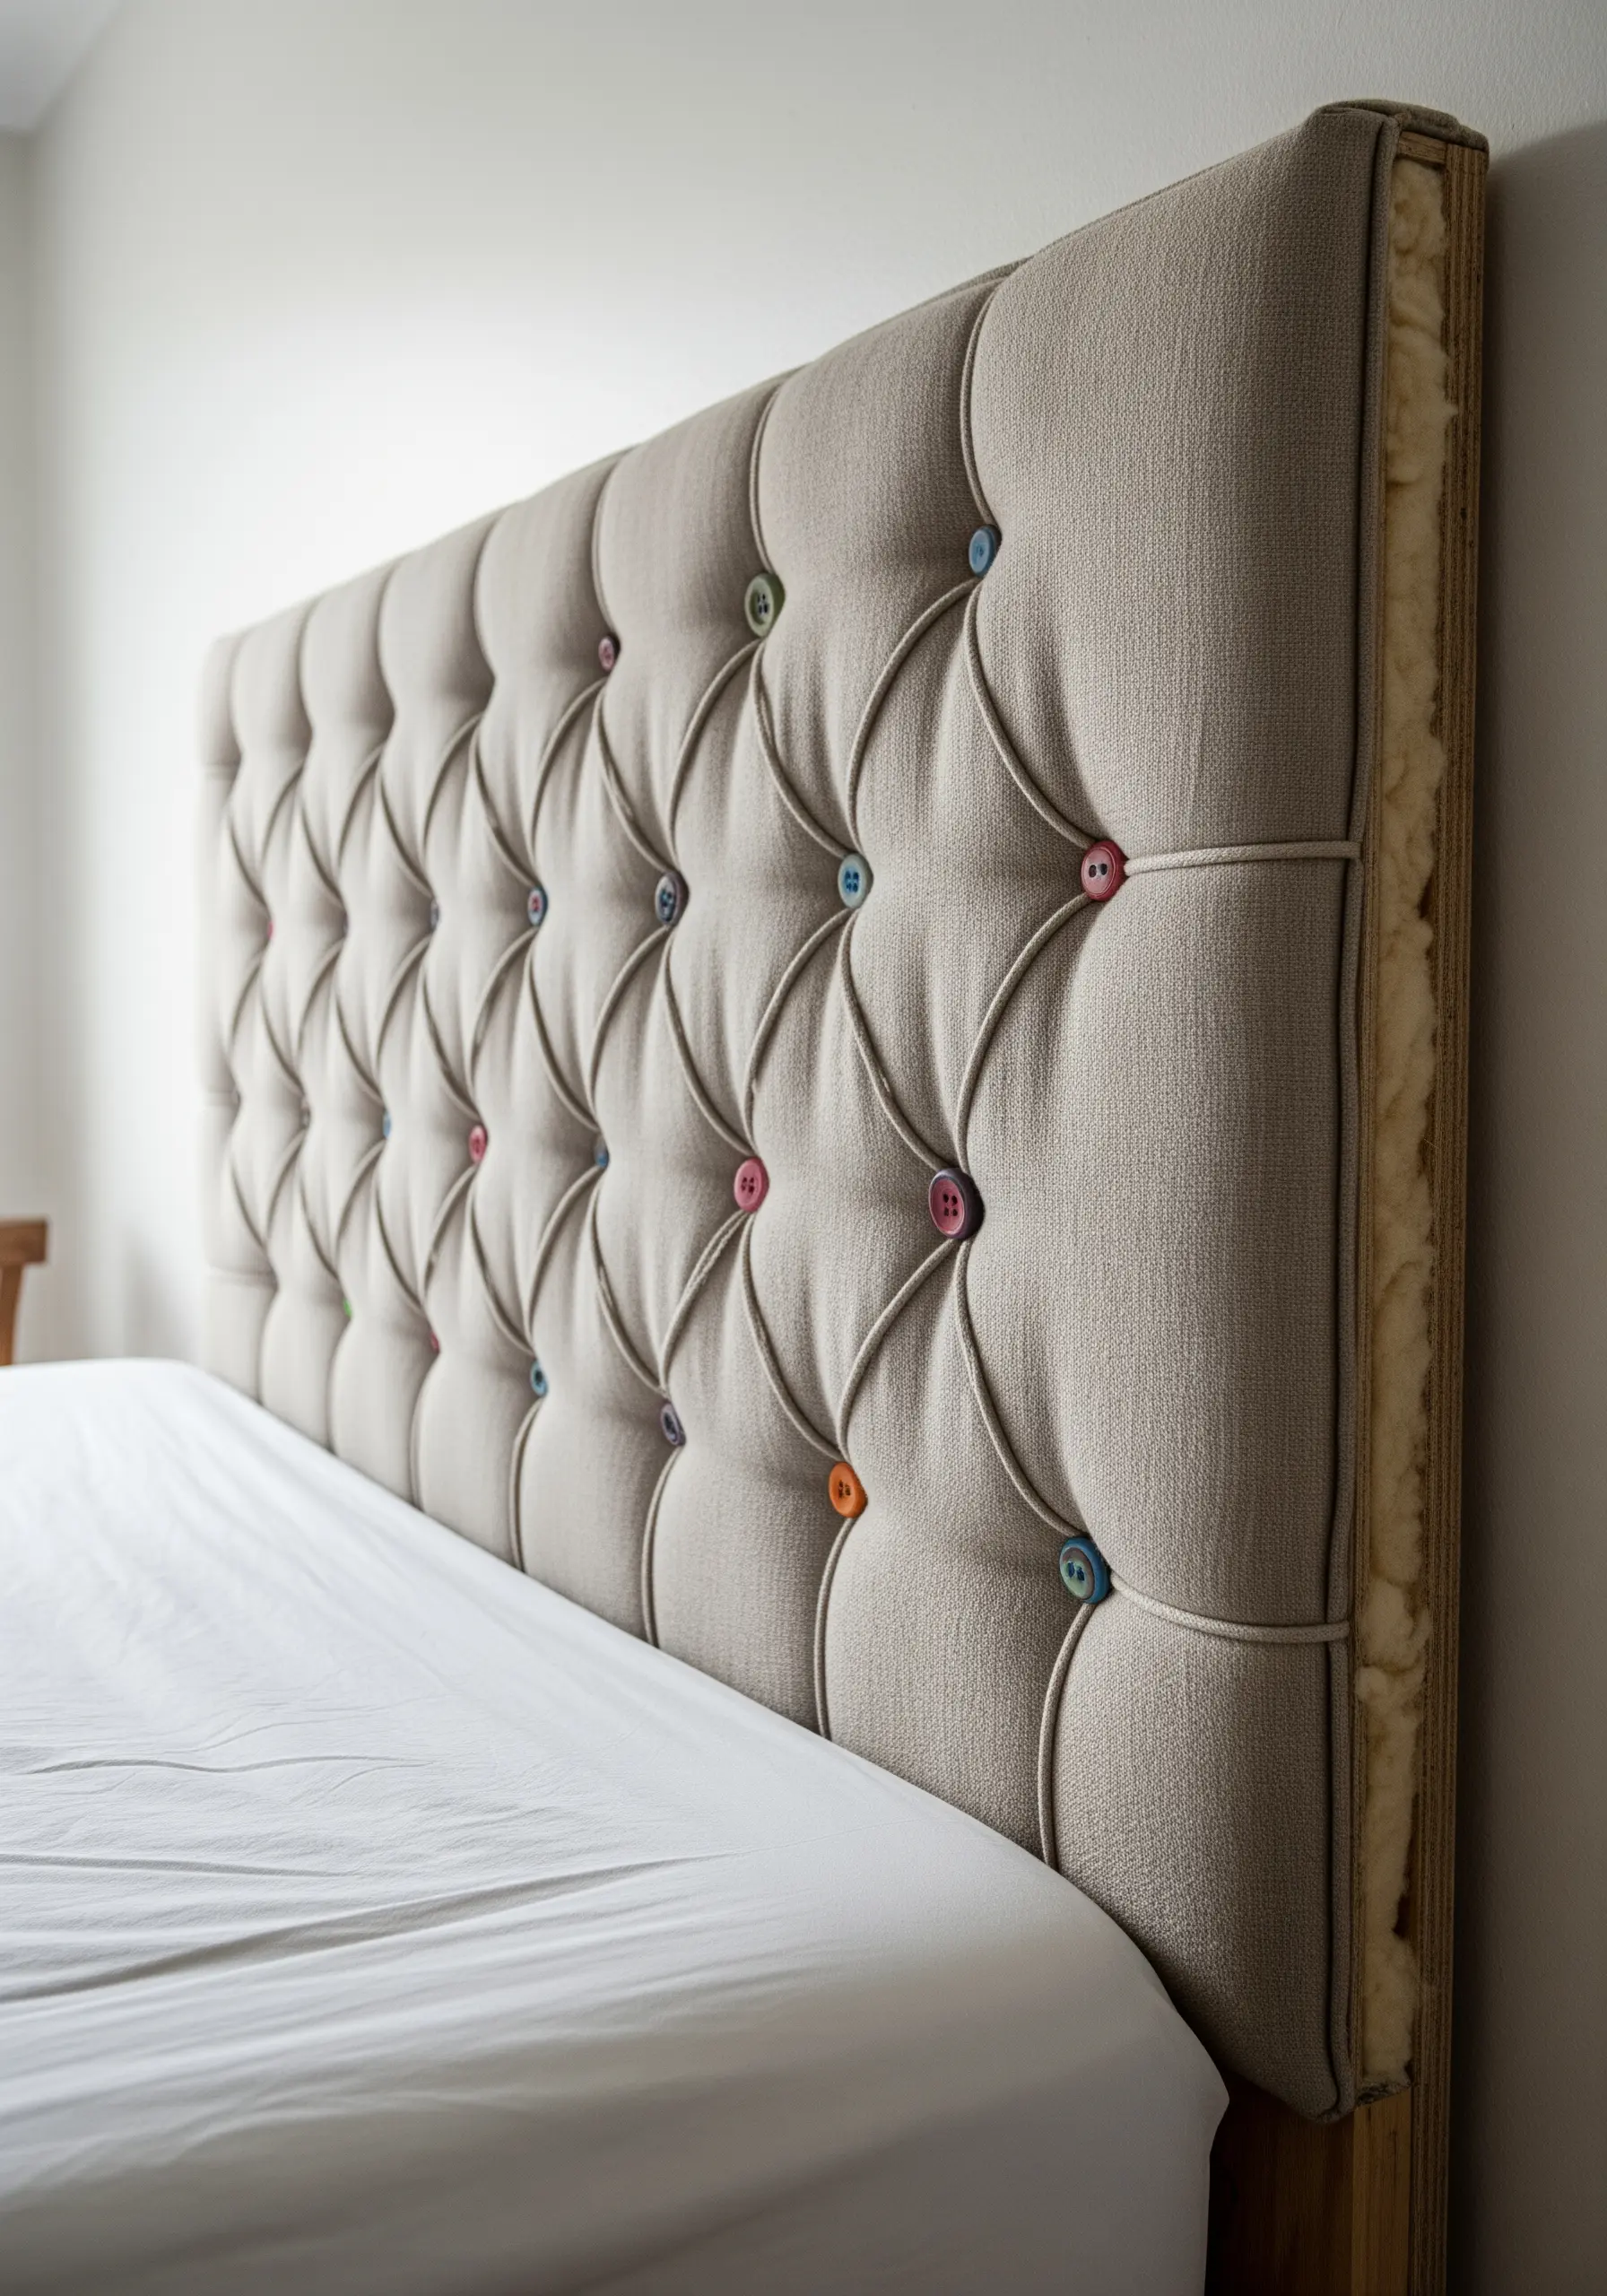
Inject a dose of playful imperfection into a classic upholstery technique with one simple, accessible change.
A traditional diamond-tufted headboard relies on uniformity for its elegant look. By deliberately breaking that rule, you can create something uniquely personal.
Instead of using standard, fabric-covered buttons, replace them with a collection of mismatched buttons in a vibrant, coordinated color palette.
This small act of rebellion transforms the headboard from a formal piece of furniture into a joyful expression of handmade character.
29. Bind a Journal with Rustic, Visible Stitches
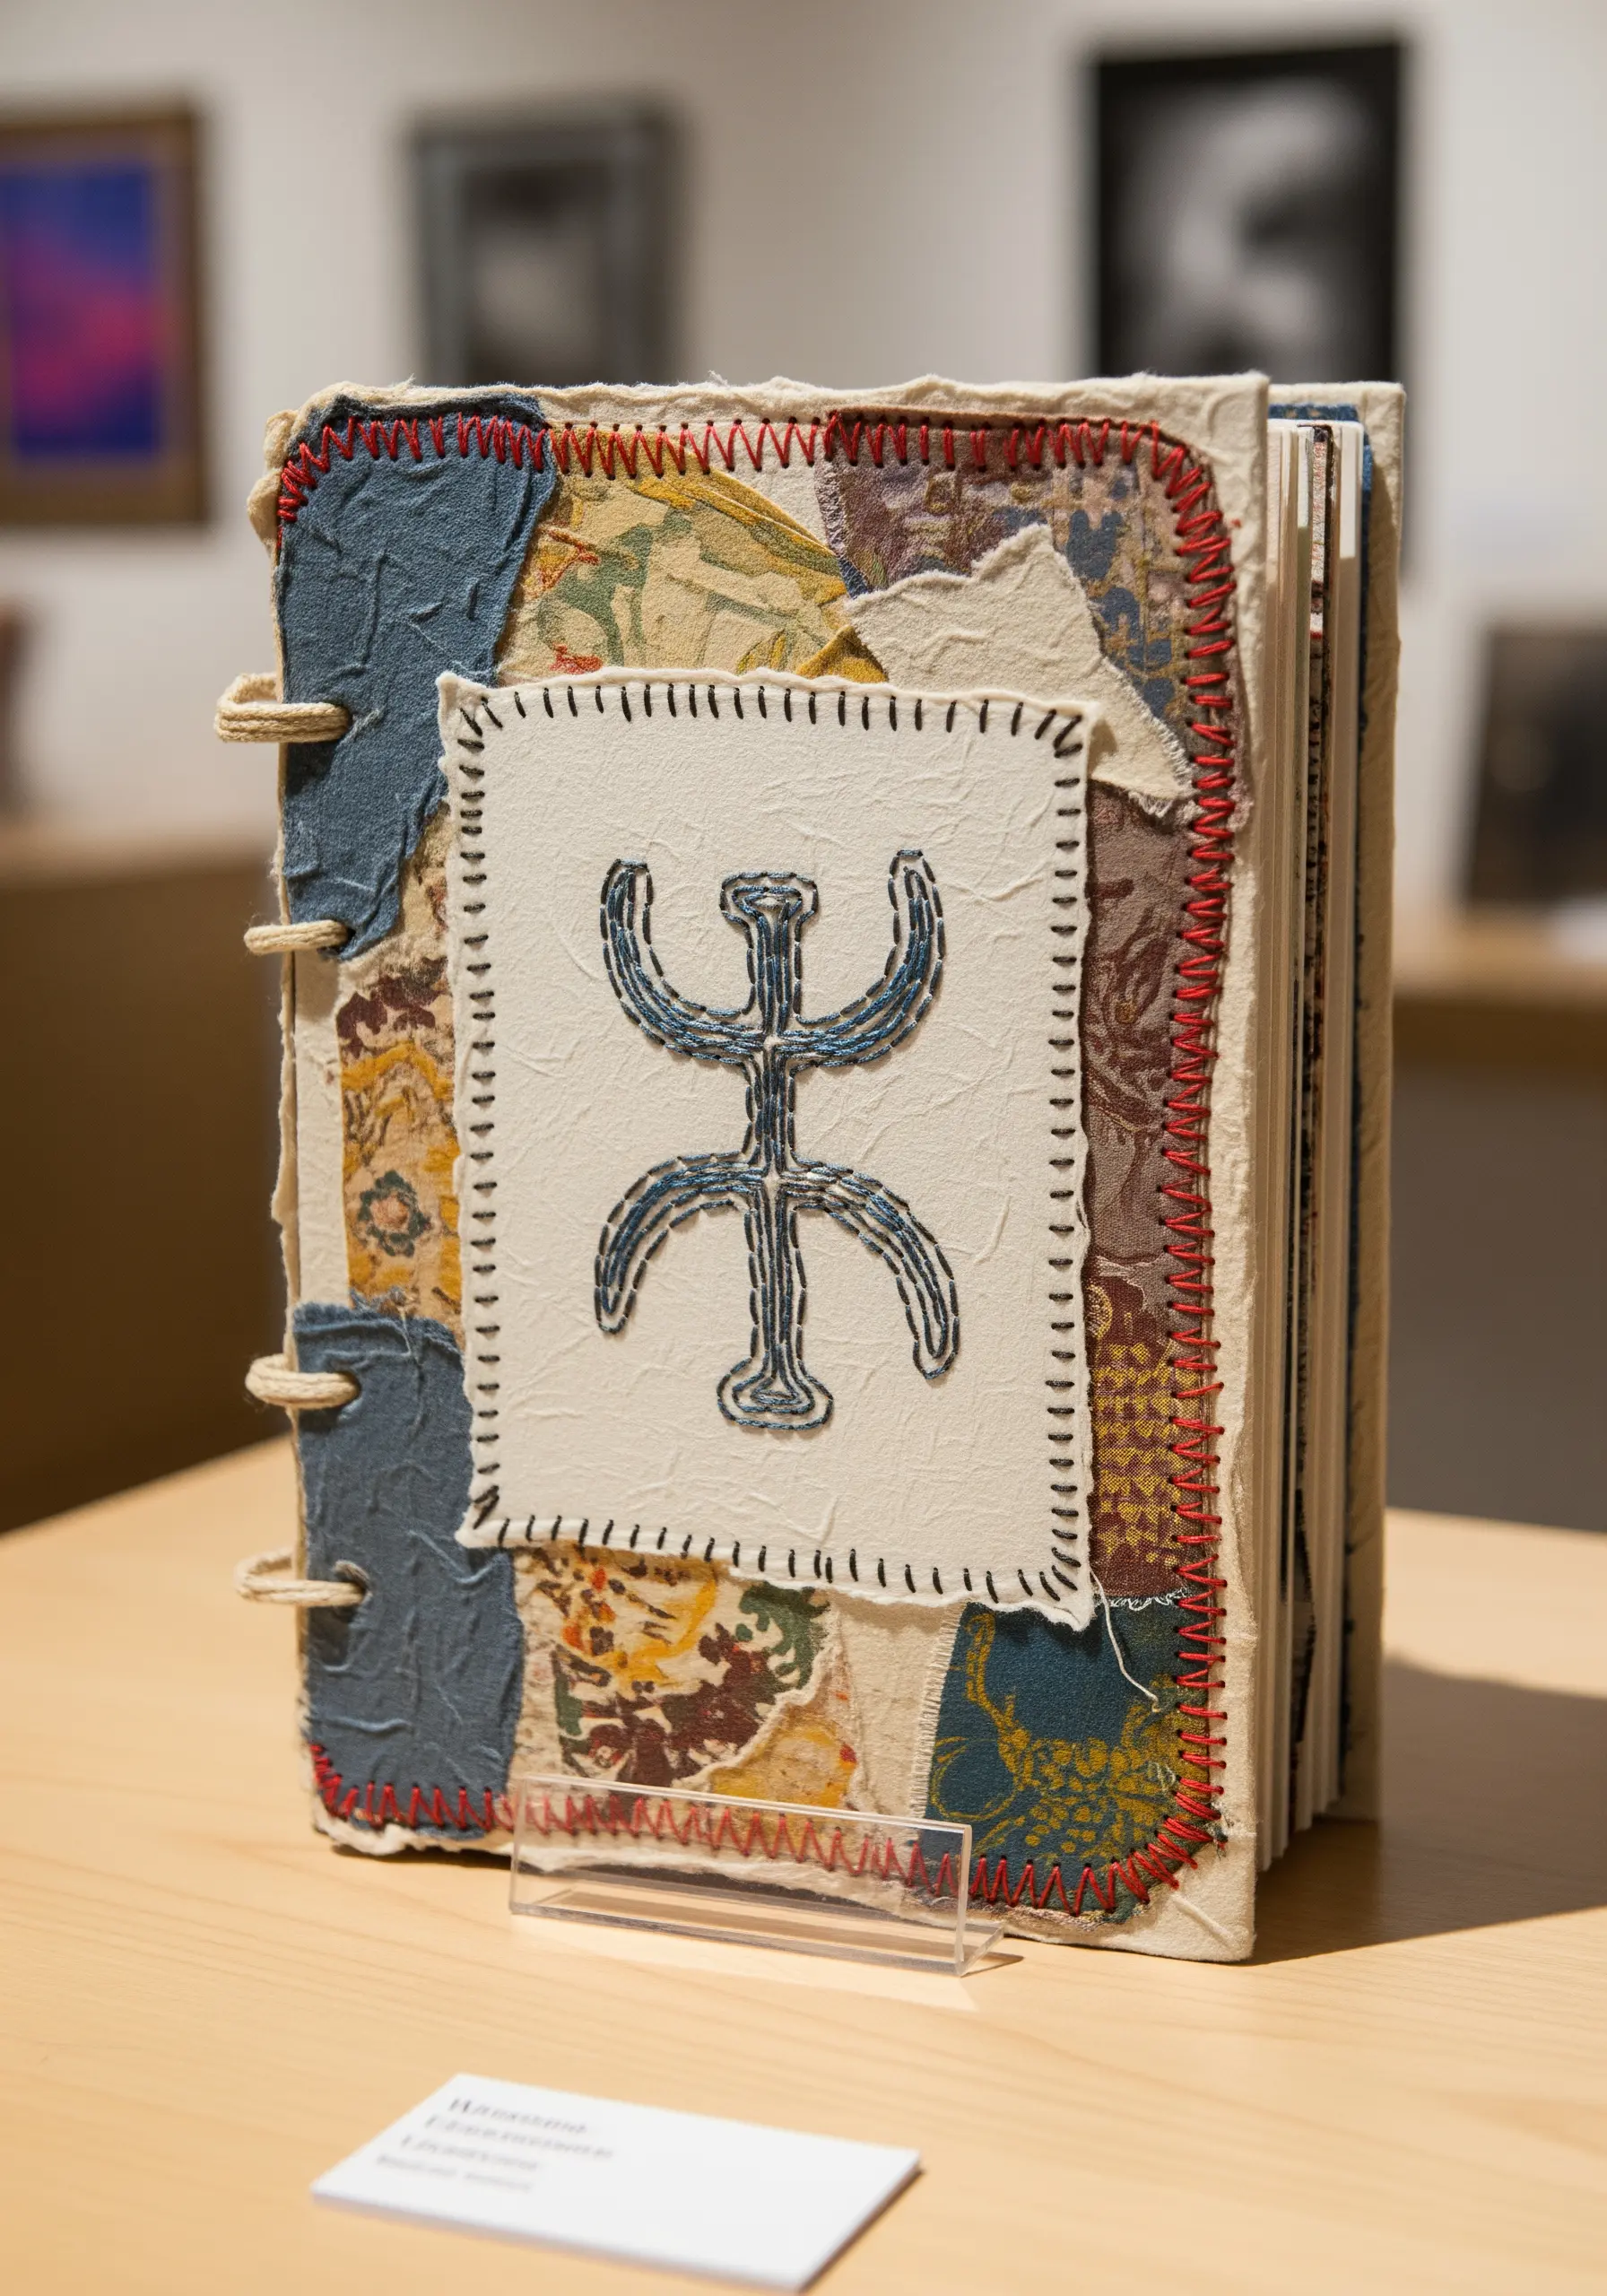
Craft a journal where the construction is not hidden but celebrated as a key part of the design aesthetic.
Create your cover by layering and collaging pieces of handmade paper and fabric scraps, embracing their raw, torn edges.
Use a thick, sturdy thread and a simple, visible binding technique like Coptic stitch to join the pages and cover. Stitch around the appliquéd elements with a large, rustic running stitch.
The honesty of the exposed spine and the ruggedness of the stitches tell a story of artistry and resourcefulness, making the journal an inspiring object before you even write a word.


