
You have the threads, the fabric, the quiet ambition. But sometimes, the gap between the art you imagine and the piece in your hands feels vast. You see flawless work and wonder how to achieve that same polish, that same intentional calm in your own stitching.
Let’s close that gap. The secret isn’t in owning more supplies or mastering impossibly complex techniques. It’s in the small, deliberate adjustments: the way you layer a stitch to create depth, the choice of a single metallic thread to catch the light, or the decision to embrace negative space.
Here, you won’t find fleeting trends. Instead, you’ll discover artistic, functional, and deeply personal ways to transform your needlework. These are not just projects; they are invitations to see your craft differently—to create tiny pieces of art that hold immense beauty and skill.
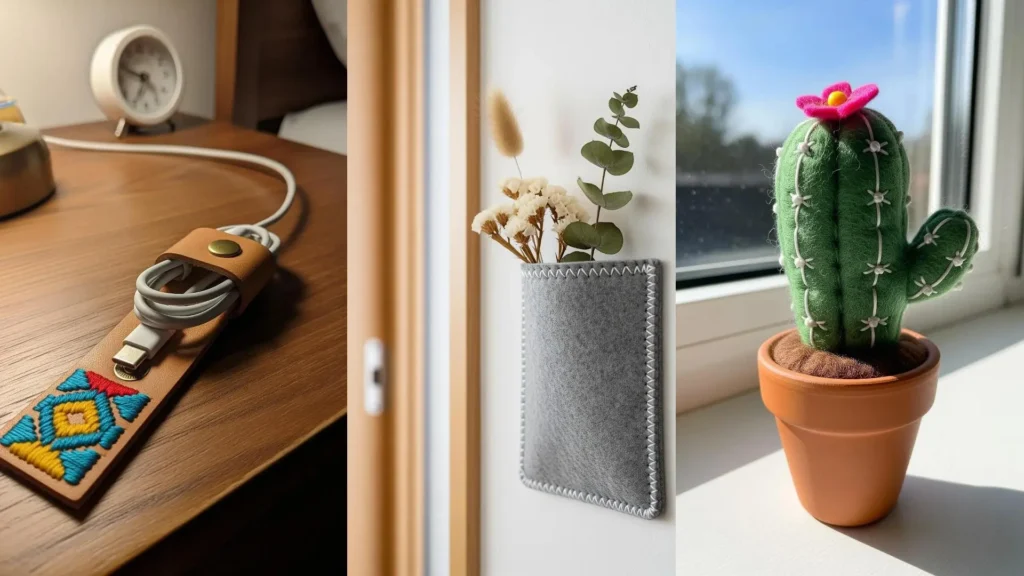
1. Geometric Threadwork on Functional Felt
When embroidering on felt, choose a sturdy, pressed wool variety to prevent stretching and distortion as you stitch.
Use a sharp needle to pierce the dense fibers cleanly, and consider a lightweight, tear-away stabilizer on the back for extra support.
This design uses simple straight stitches, but the visual complexity comes from precise color blocking and the introduction of a metallic thread.
This contrast between the matte floss and the shimmering metallic filament is what gives the geometric pattern its sophisticated, dynamic quality.
2. Sculptural Stitching for Three-Dimensional Forms
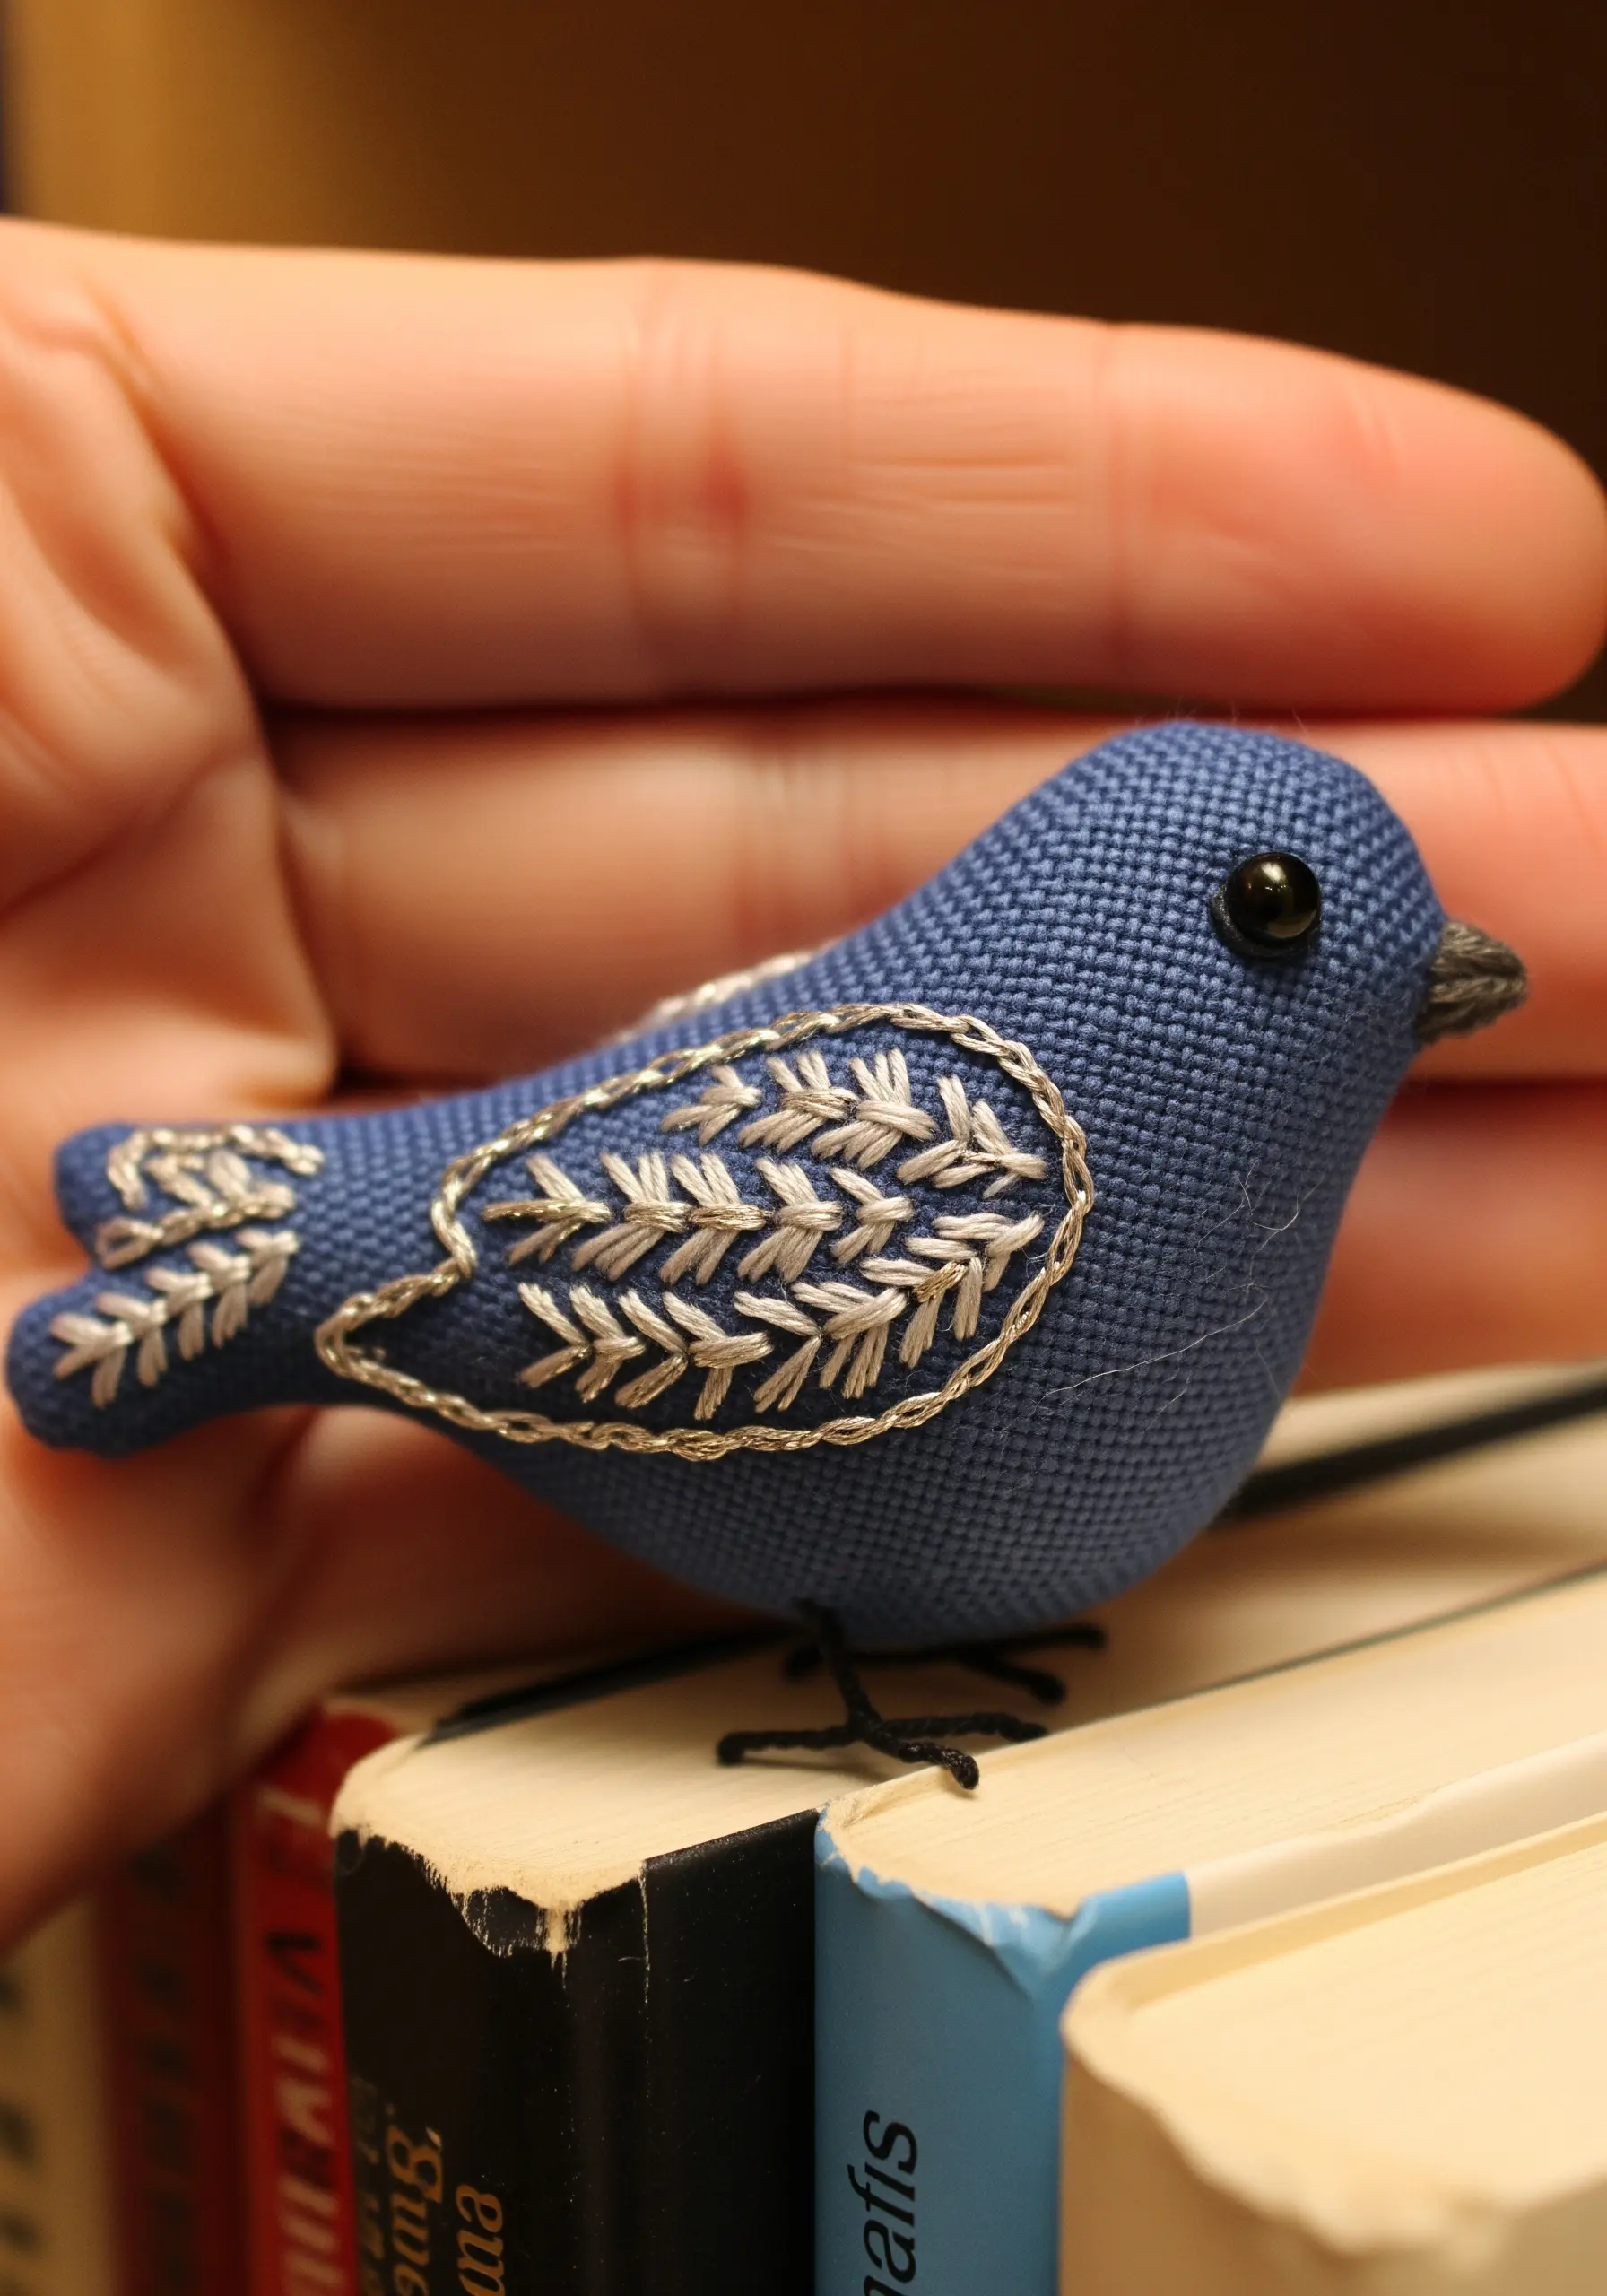
To create a 3D object like this, you begin by embroidering two flat mirror-image pieces of fabric.
For the wings, use a fishbone stitch to create a raised, feather-like texture that adds instant dimension.
Once stitched, cut out the shapes, place them right-sides together, and sew along the edge, leaving a small opening.
Turn the piece right-side out, stuff it firmly with poly-fil for a plump shape, and stitch the opening closed for a charming, tiny animal embroidery sculpture.
3. Layered Botanicals in a Miniature Hoop
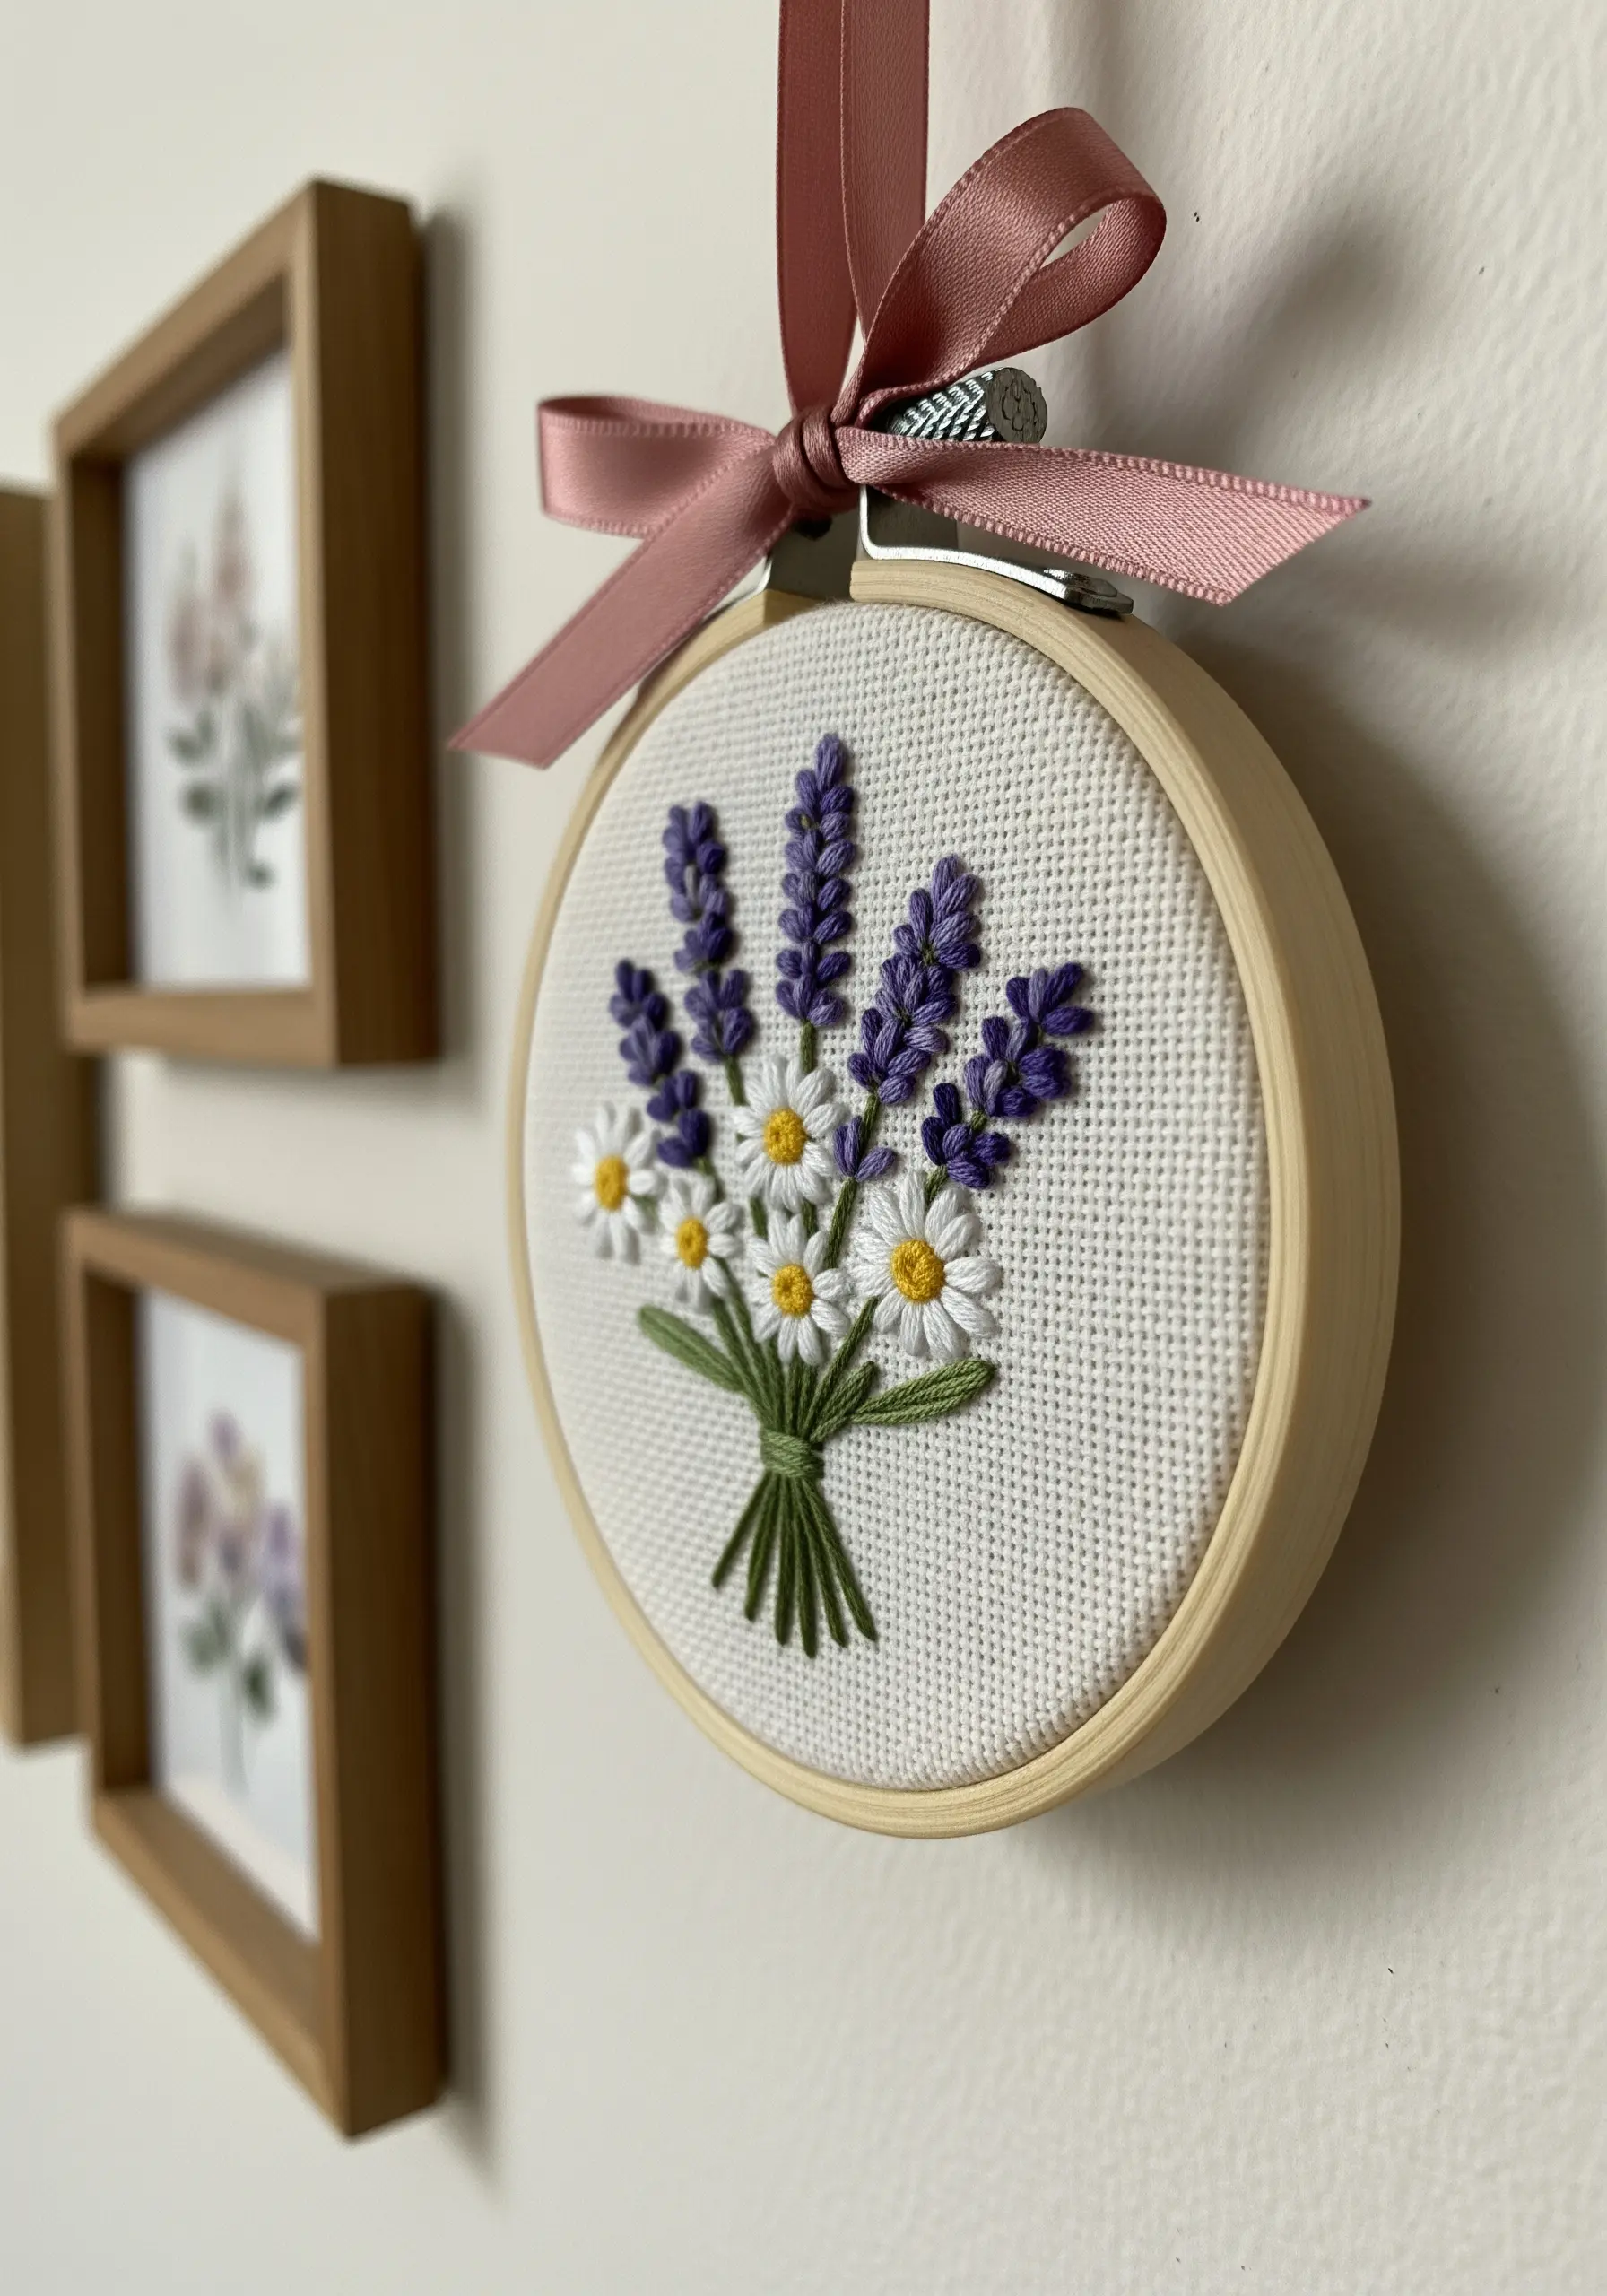
To achieve a realistic, layered bouquet, always stitch the elements in the background first.
Here, the daisy petals (detached chain stitch) and centers (French knots) are completed before any lavender is added.
Next, stitch the lavender stalks using bullion knots or raised stem stitch, allowing them to overlap the daisies naturally.
This simple layering technique creates an immediate sense of depth and makes the arrangement feel more authentic and less like a flat drawing.
4. Satin Stitch Shading on a Felt Bookmark
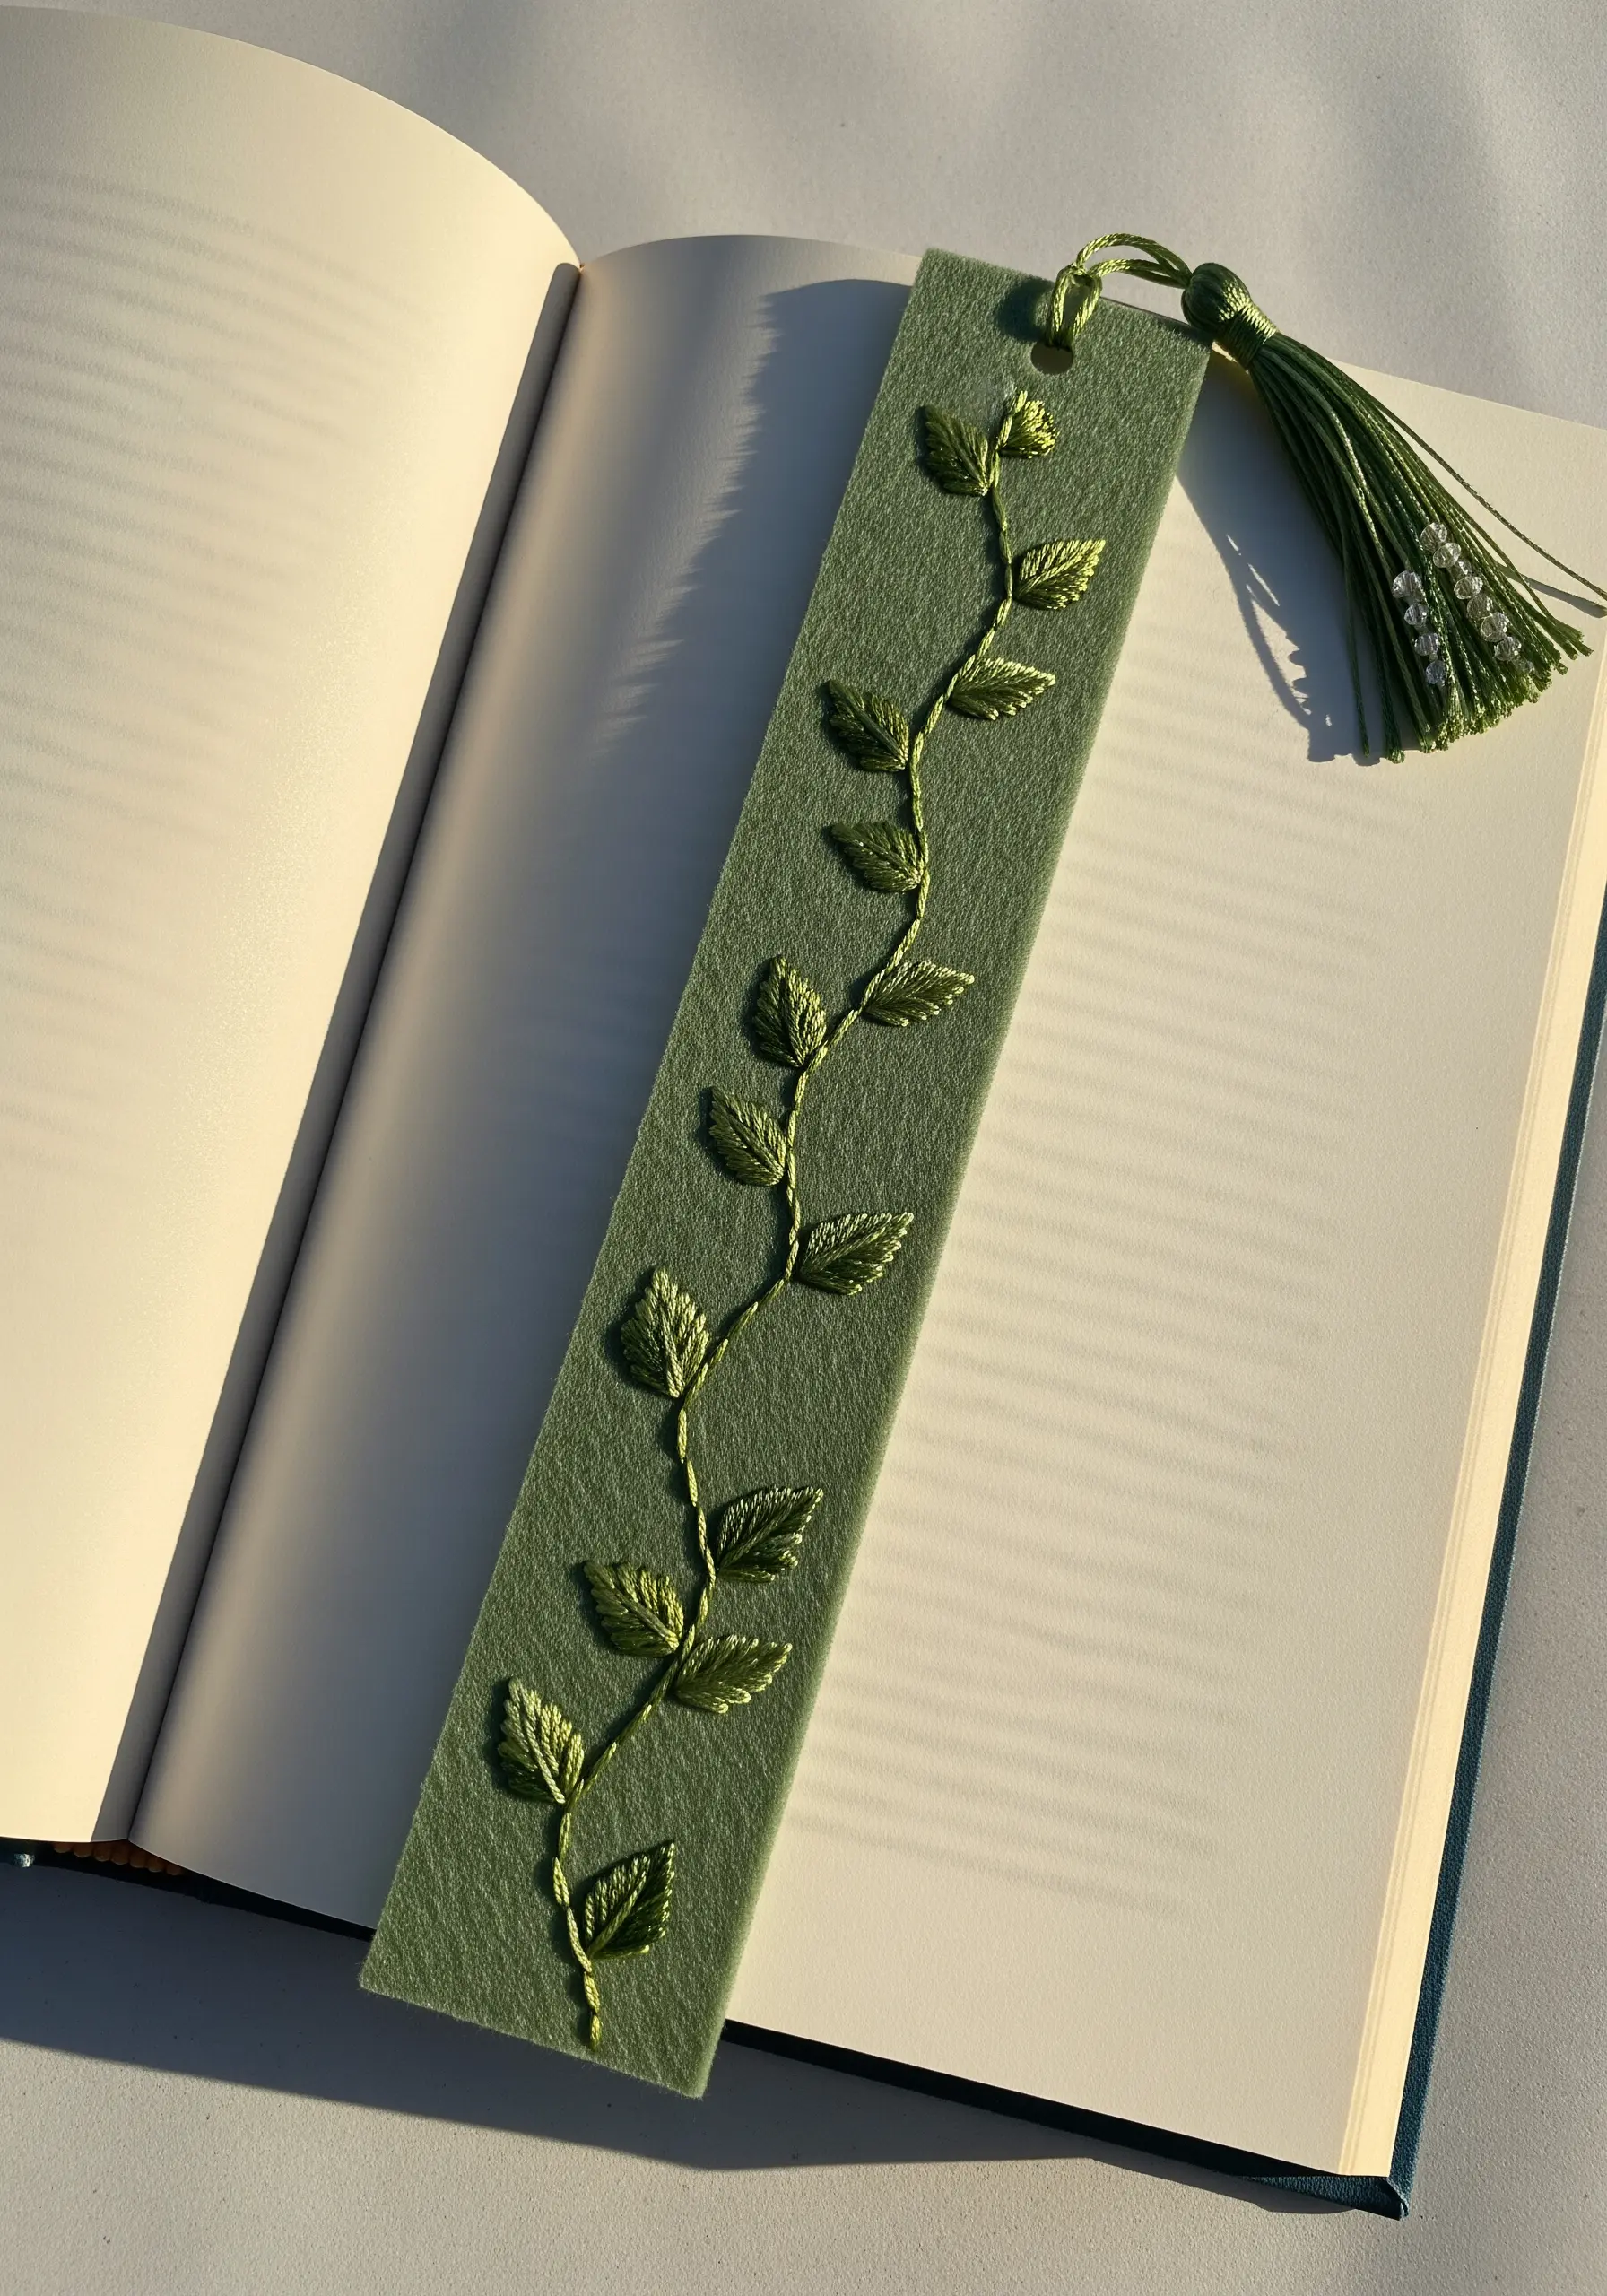
Achieving a smooth gradient on felt requires a gentle touch and the right technique.
Use long-and-short stitch instead of a traditional satin stitch to blend two shades of green on the leaves, giving them a subtle, light-catching highlight.
Work with only one or two strands of floss for maximum detail and control.
The stem is a whipped backstitch, which creates a clean, raised line that contrasts beautifully with the flat surface of the leaves.
5. Temari: The Art of Wrapped Thread Geometry
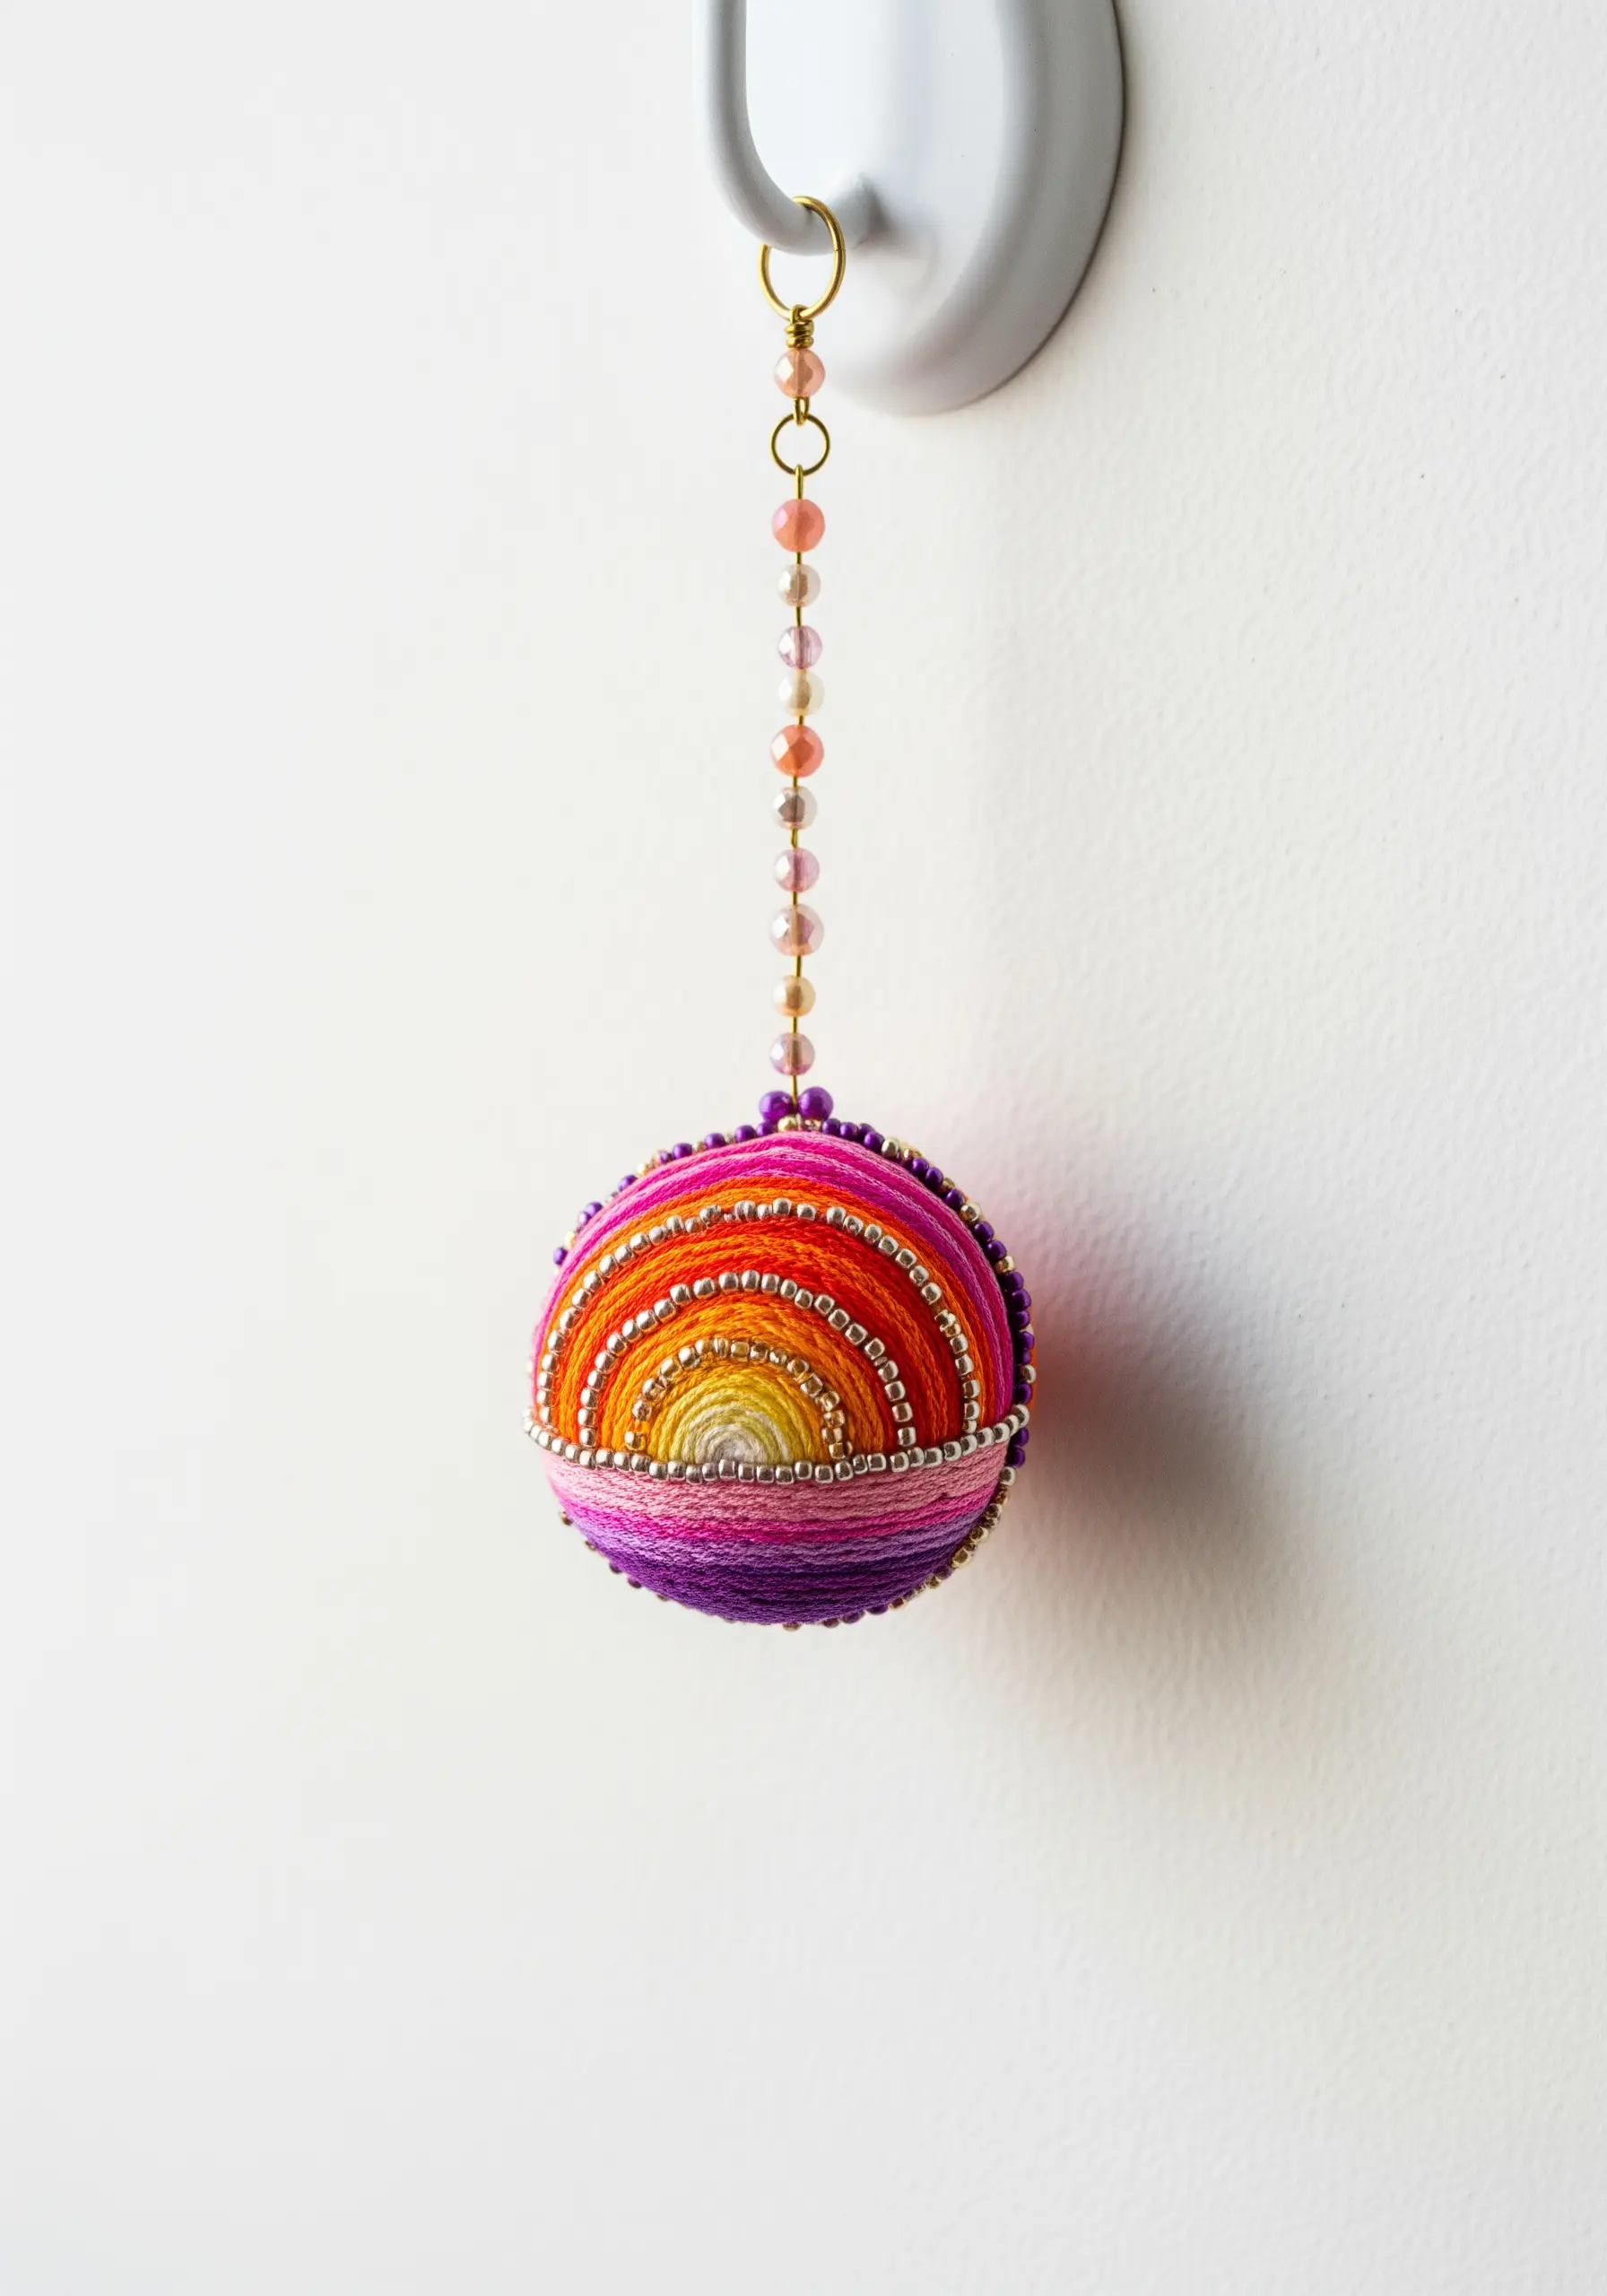
Temari is a traditional Japanese craft that uses thread to create intricate geometric patterns on a spherical base.
You begin with a core, often styrofoam or tightly wound yarn, and wrap it completely with a base layer of sewing thread.
The vibrant design is then created by systematically wrapping colorful embroidery floss around the ball, using pins as guides to mark out your geometric divisions.
The beauty comes not from stitches, but from the precision and layering of the wrapped threads.
6. Refined Lettering for Functional Textiles
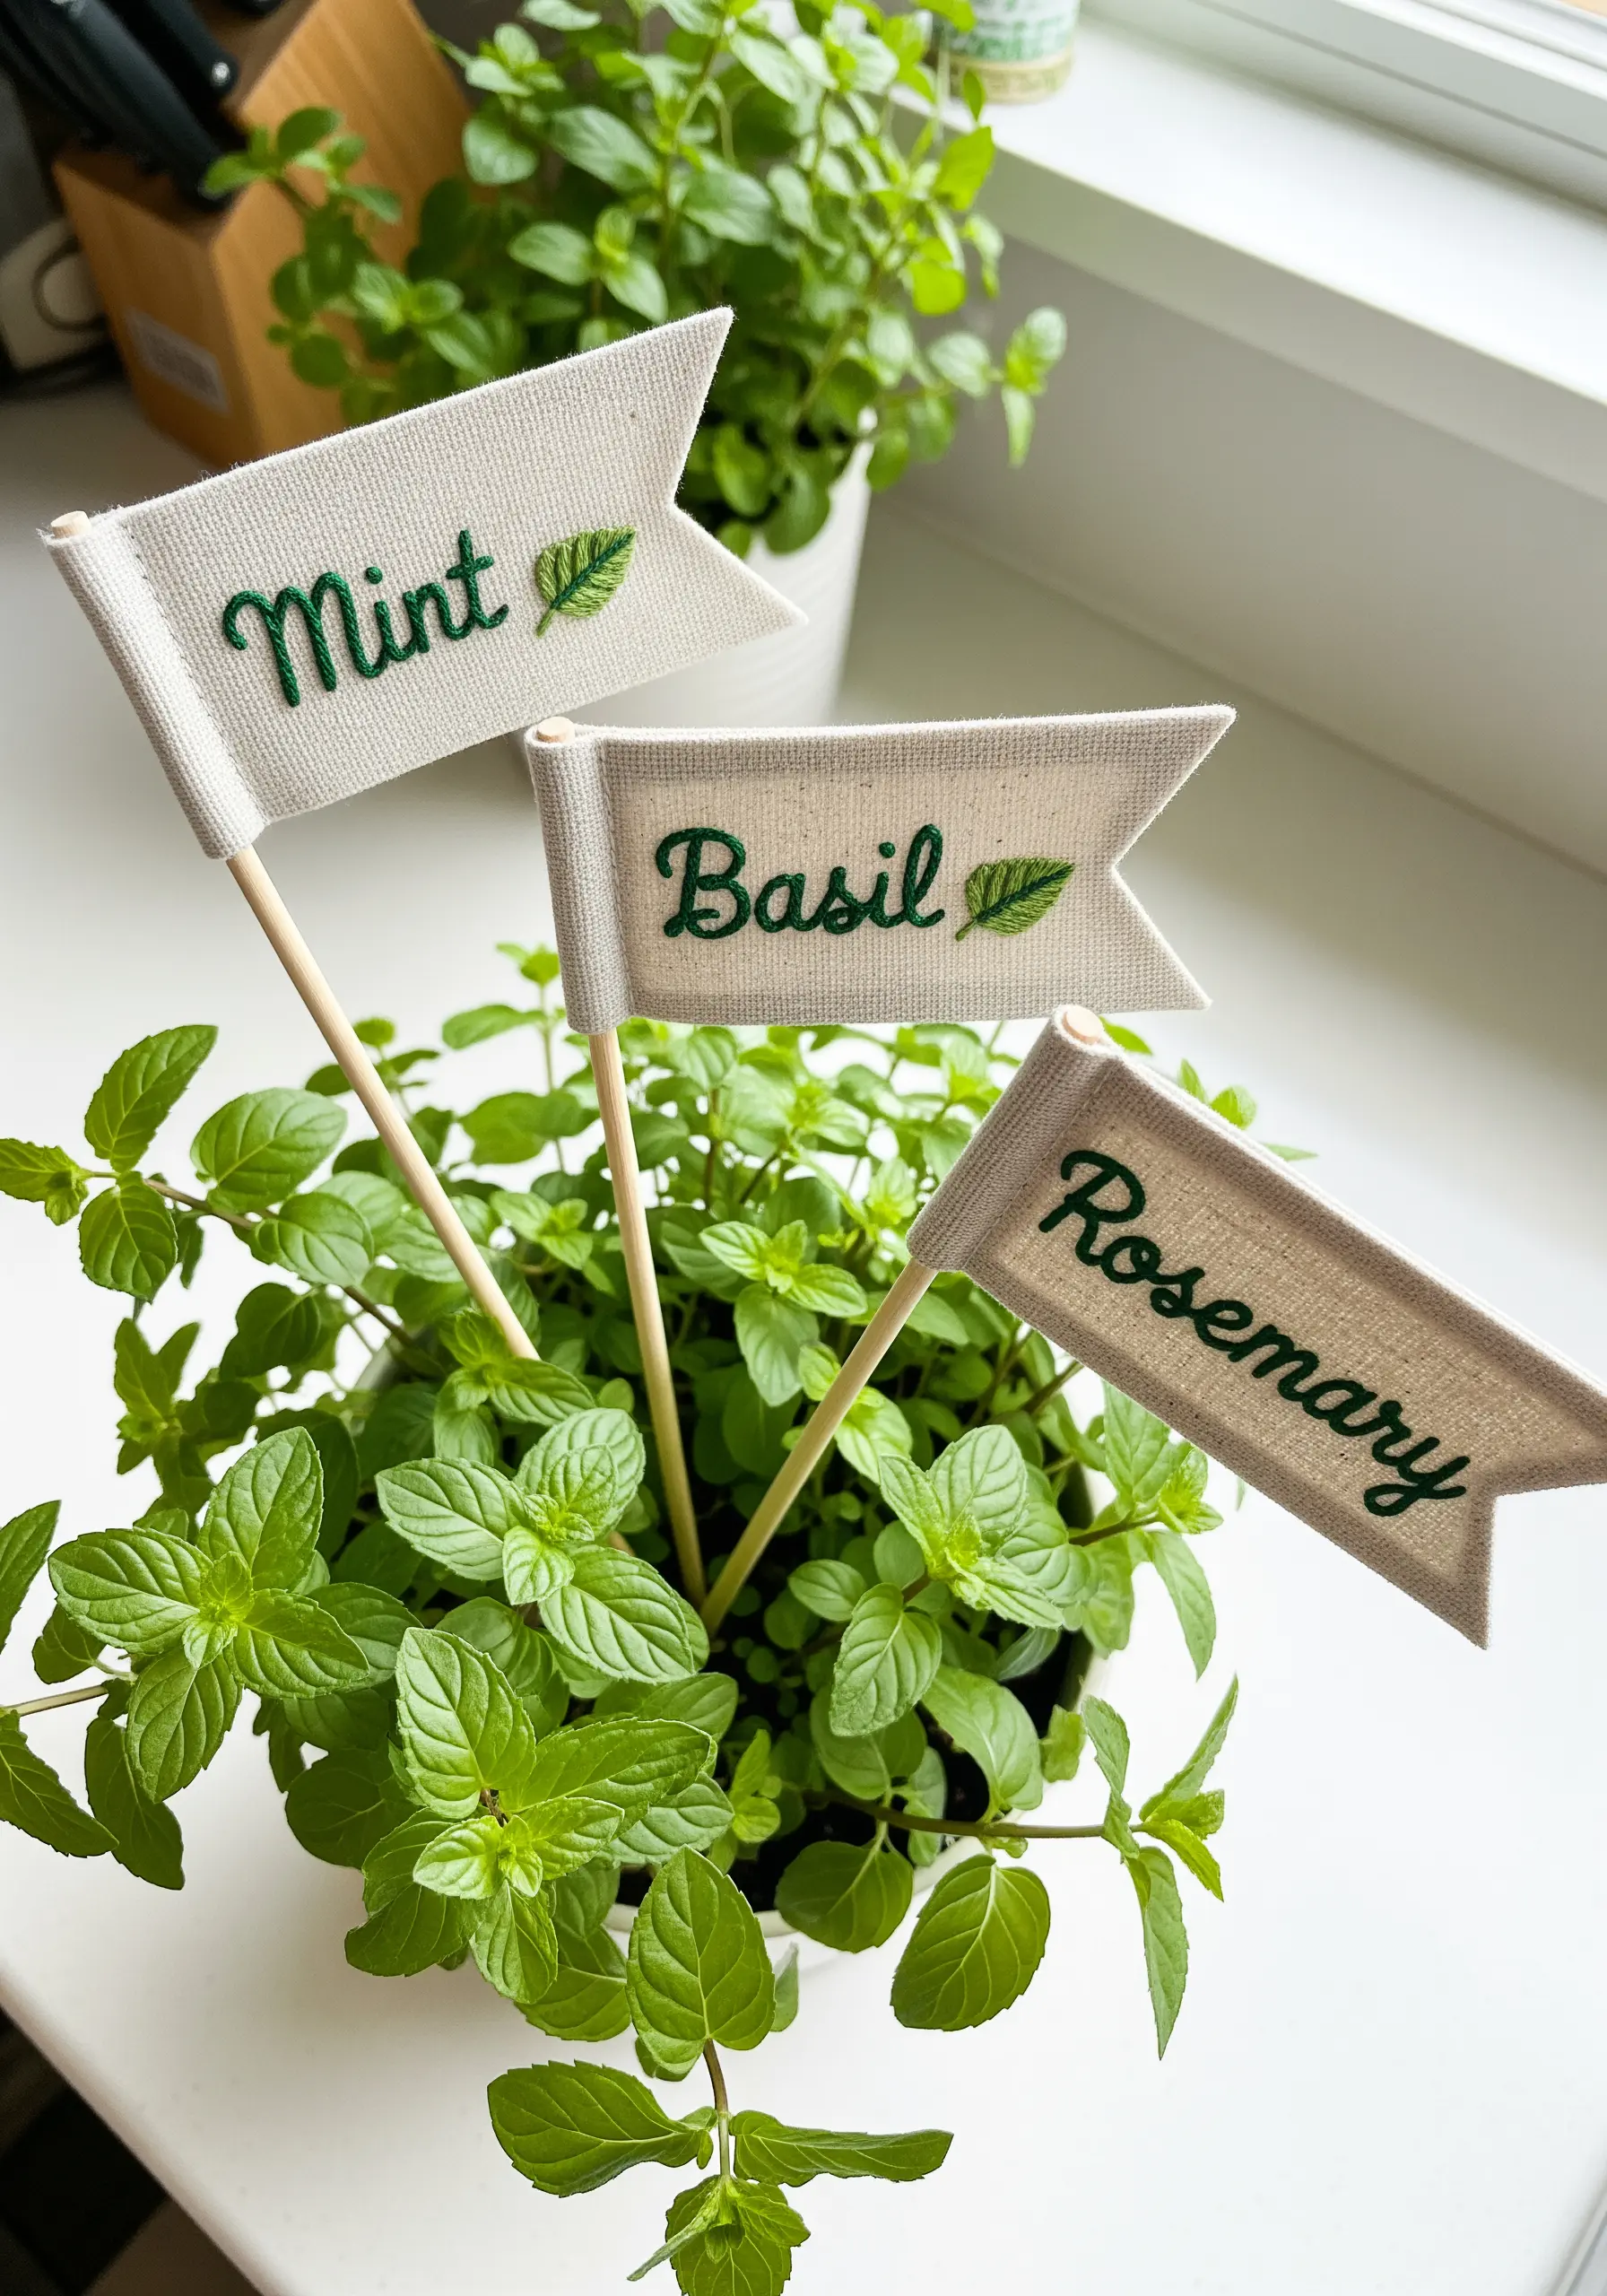
For crisp, elegant script on items like herb markers, consistency is everything.
Transfer your design using a water-soluble stabilizer to ensure every letter is perfectly formed.
Use a whipped backstitch for a smooth, raised line that mimics calligraphy, and keep your stitch length uniform, especially around curves.
Adding a tiny leaf motif using two simple detached chain stitches provides a botanical flourish that ties the piece to its purpose.
7. Integrating Embroidery into Unexpected Surfaces
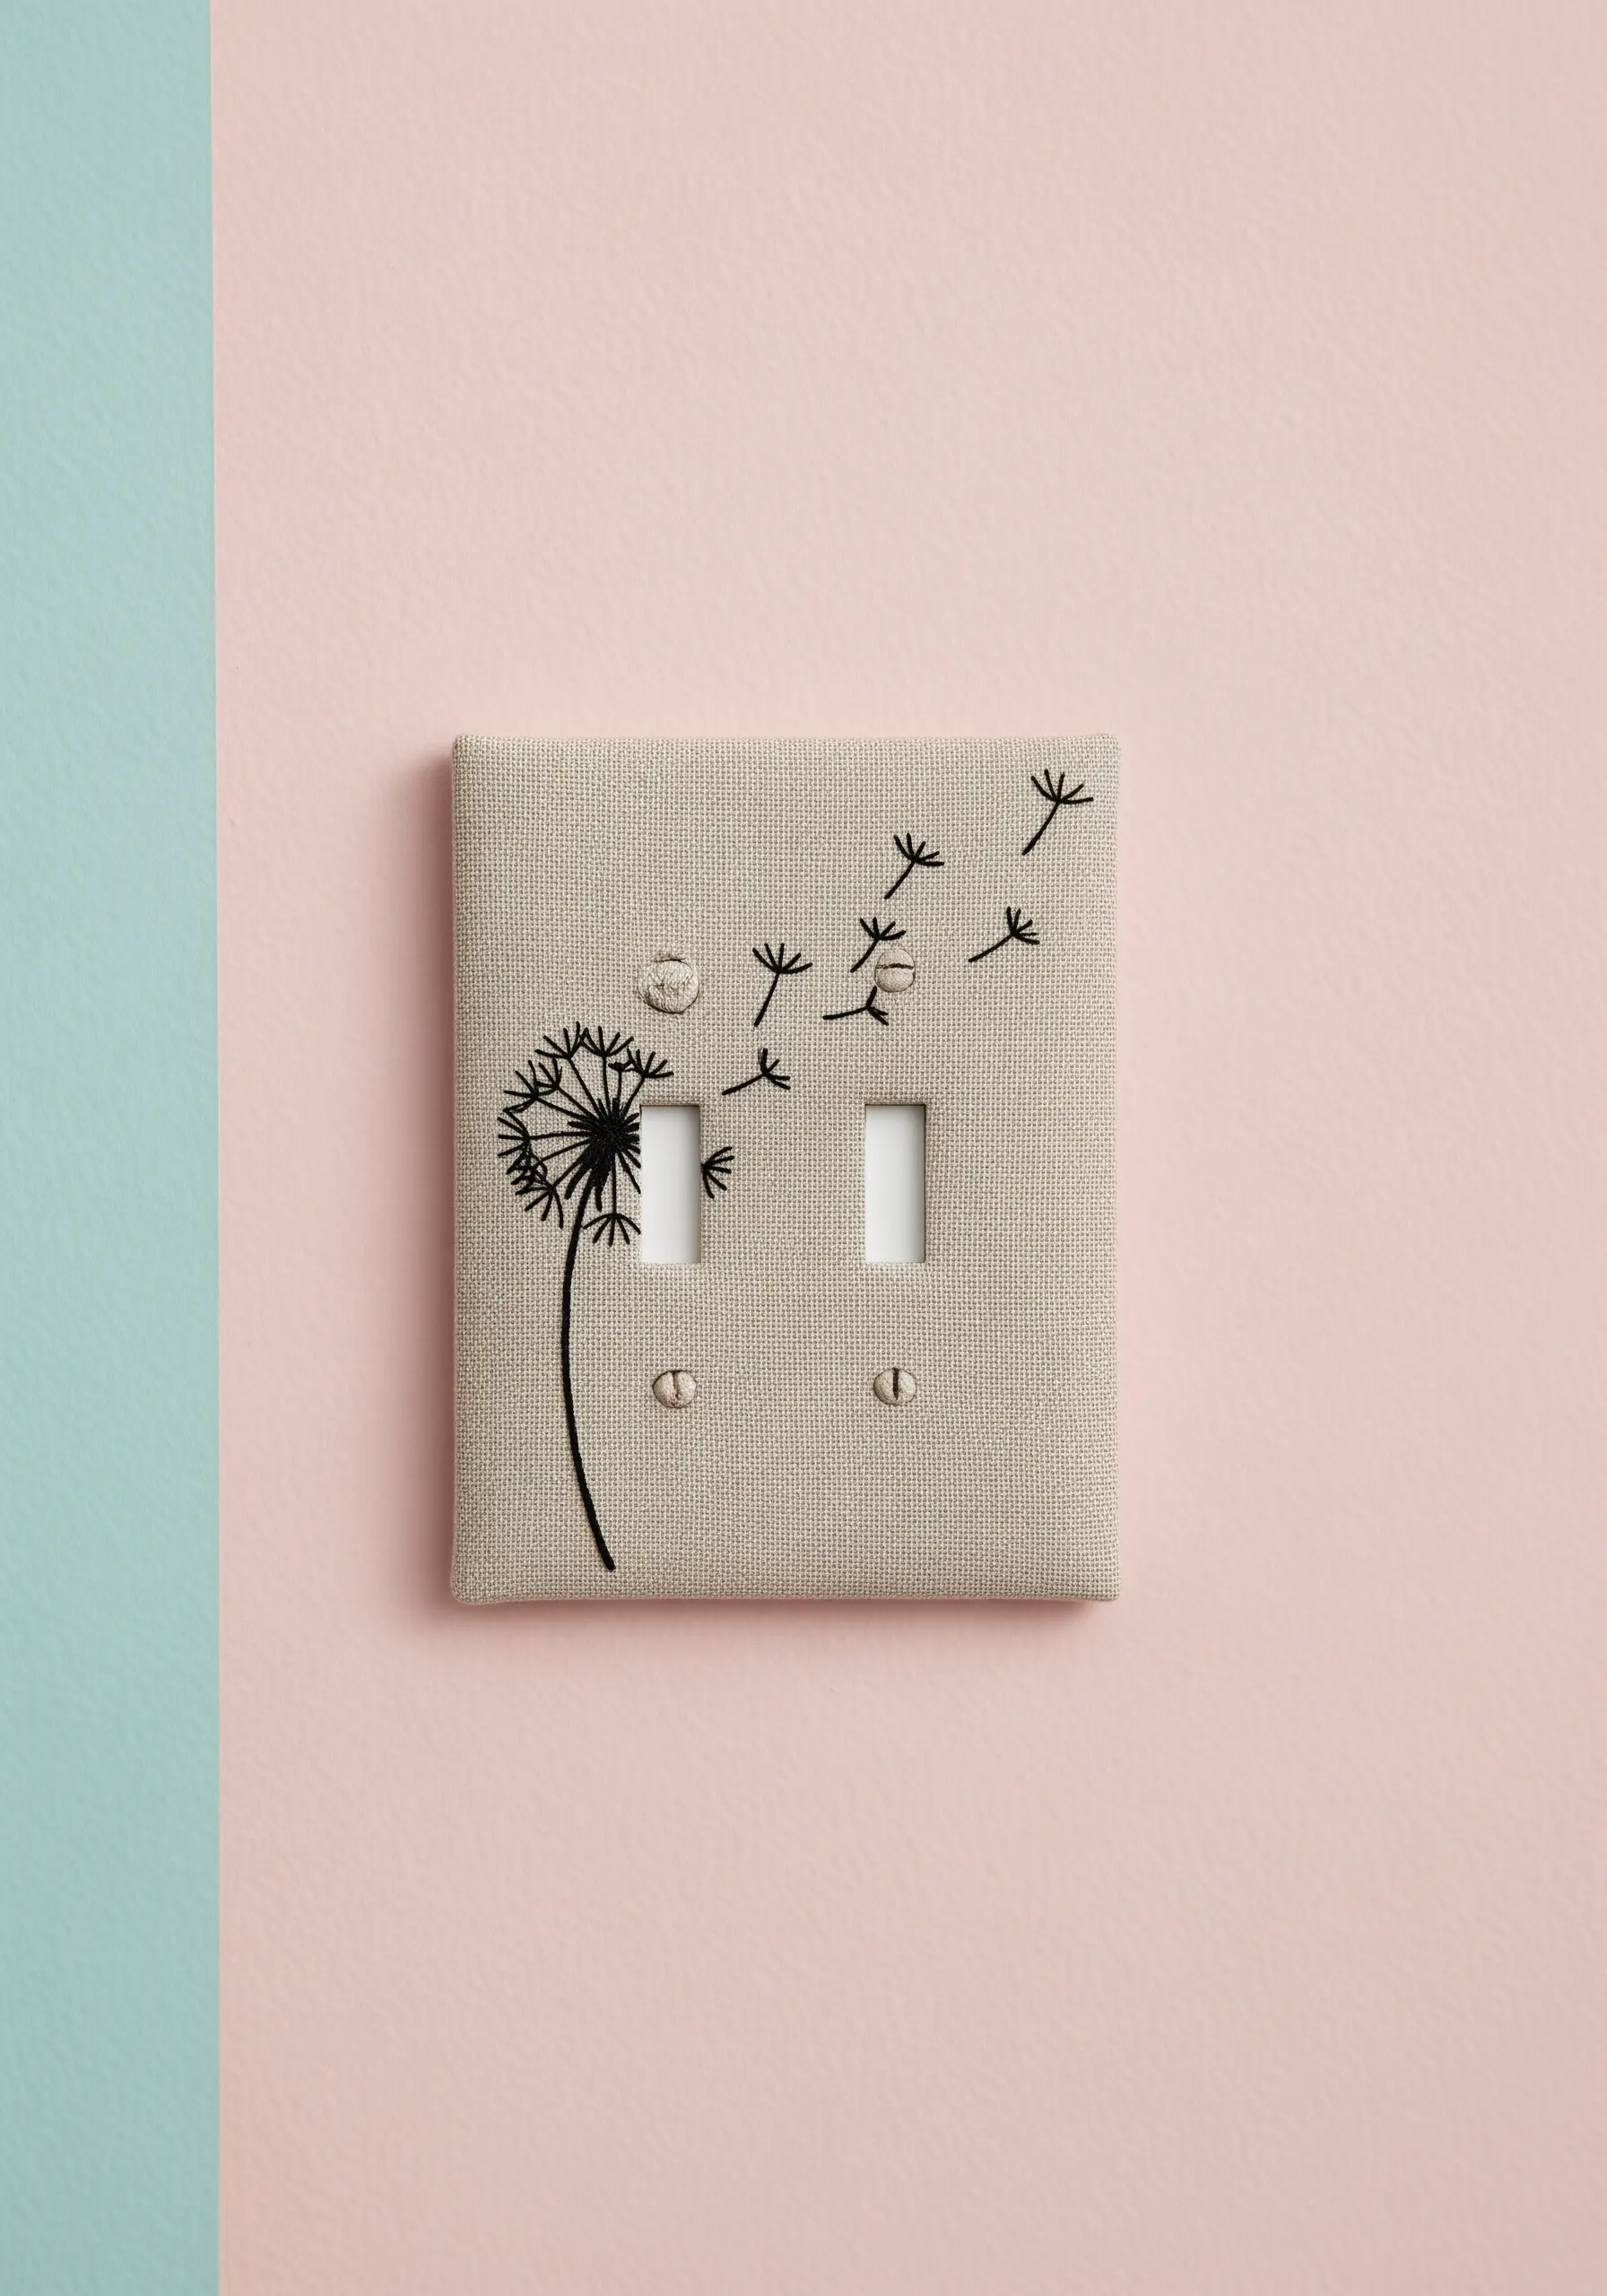
Elevate a mundane object like a light switch plate by turning it into a canvas.
First, embroider your design—a simple, graphic silhouette works best—onto a piece of sturdy linen larger than the plate.
Use a strong adhesive spray to wrap the fabric tightly around the plastic plate, carefully cutting slits for the switch and screw openings.
This technique allows you to introduce soft texture and handmade artistry into the most unexpected corners of your home.
8. Crafting Plush Sculptures with Felt and Thread
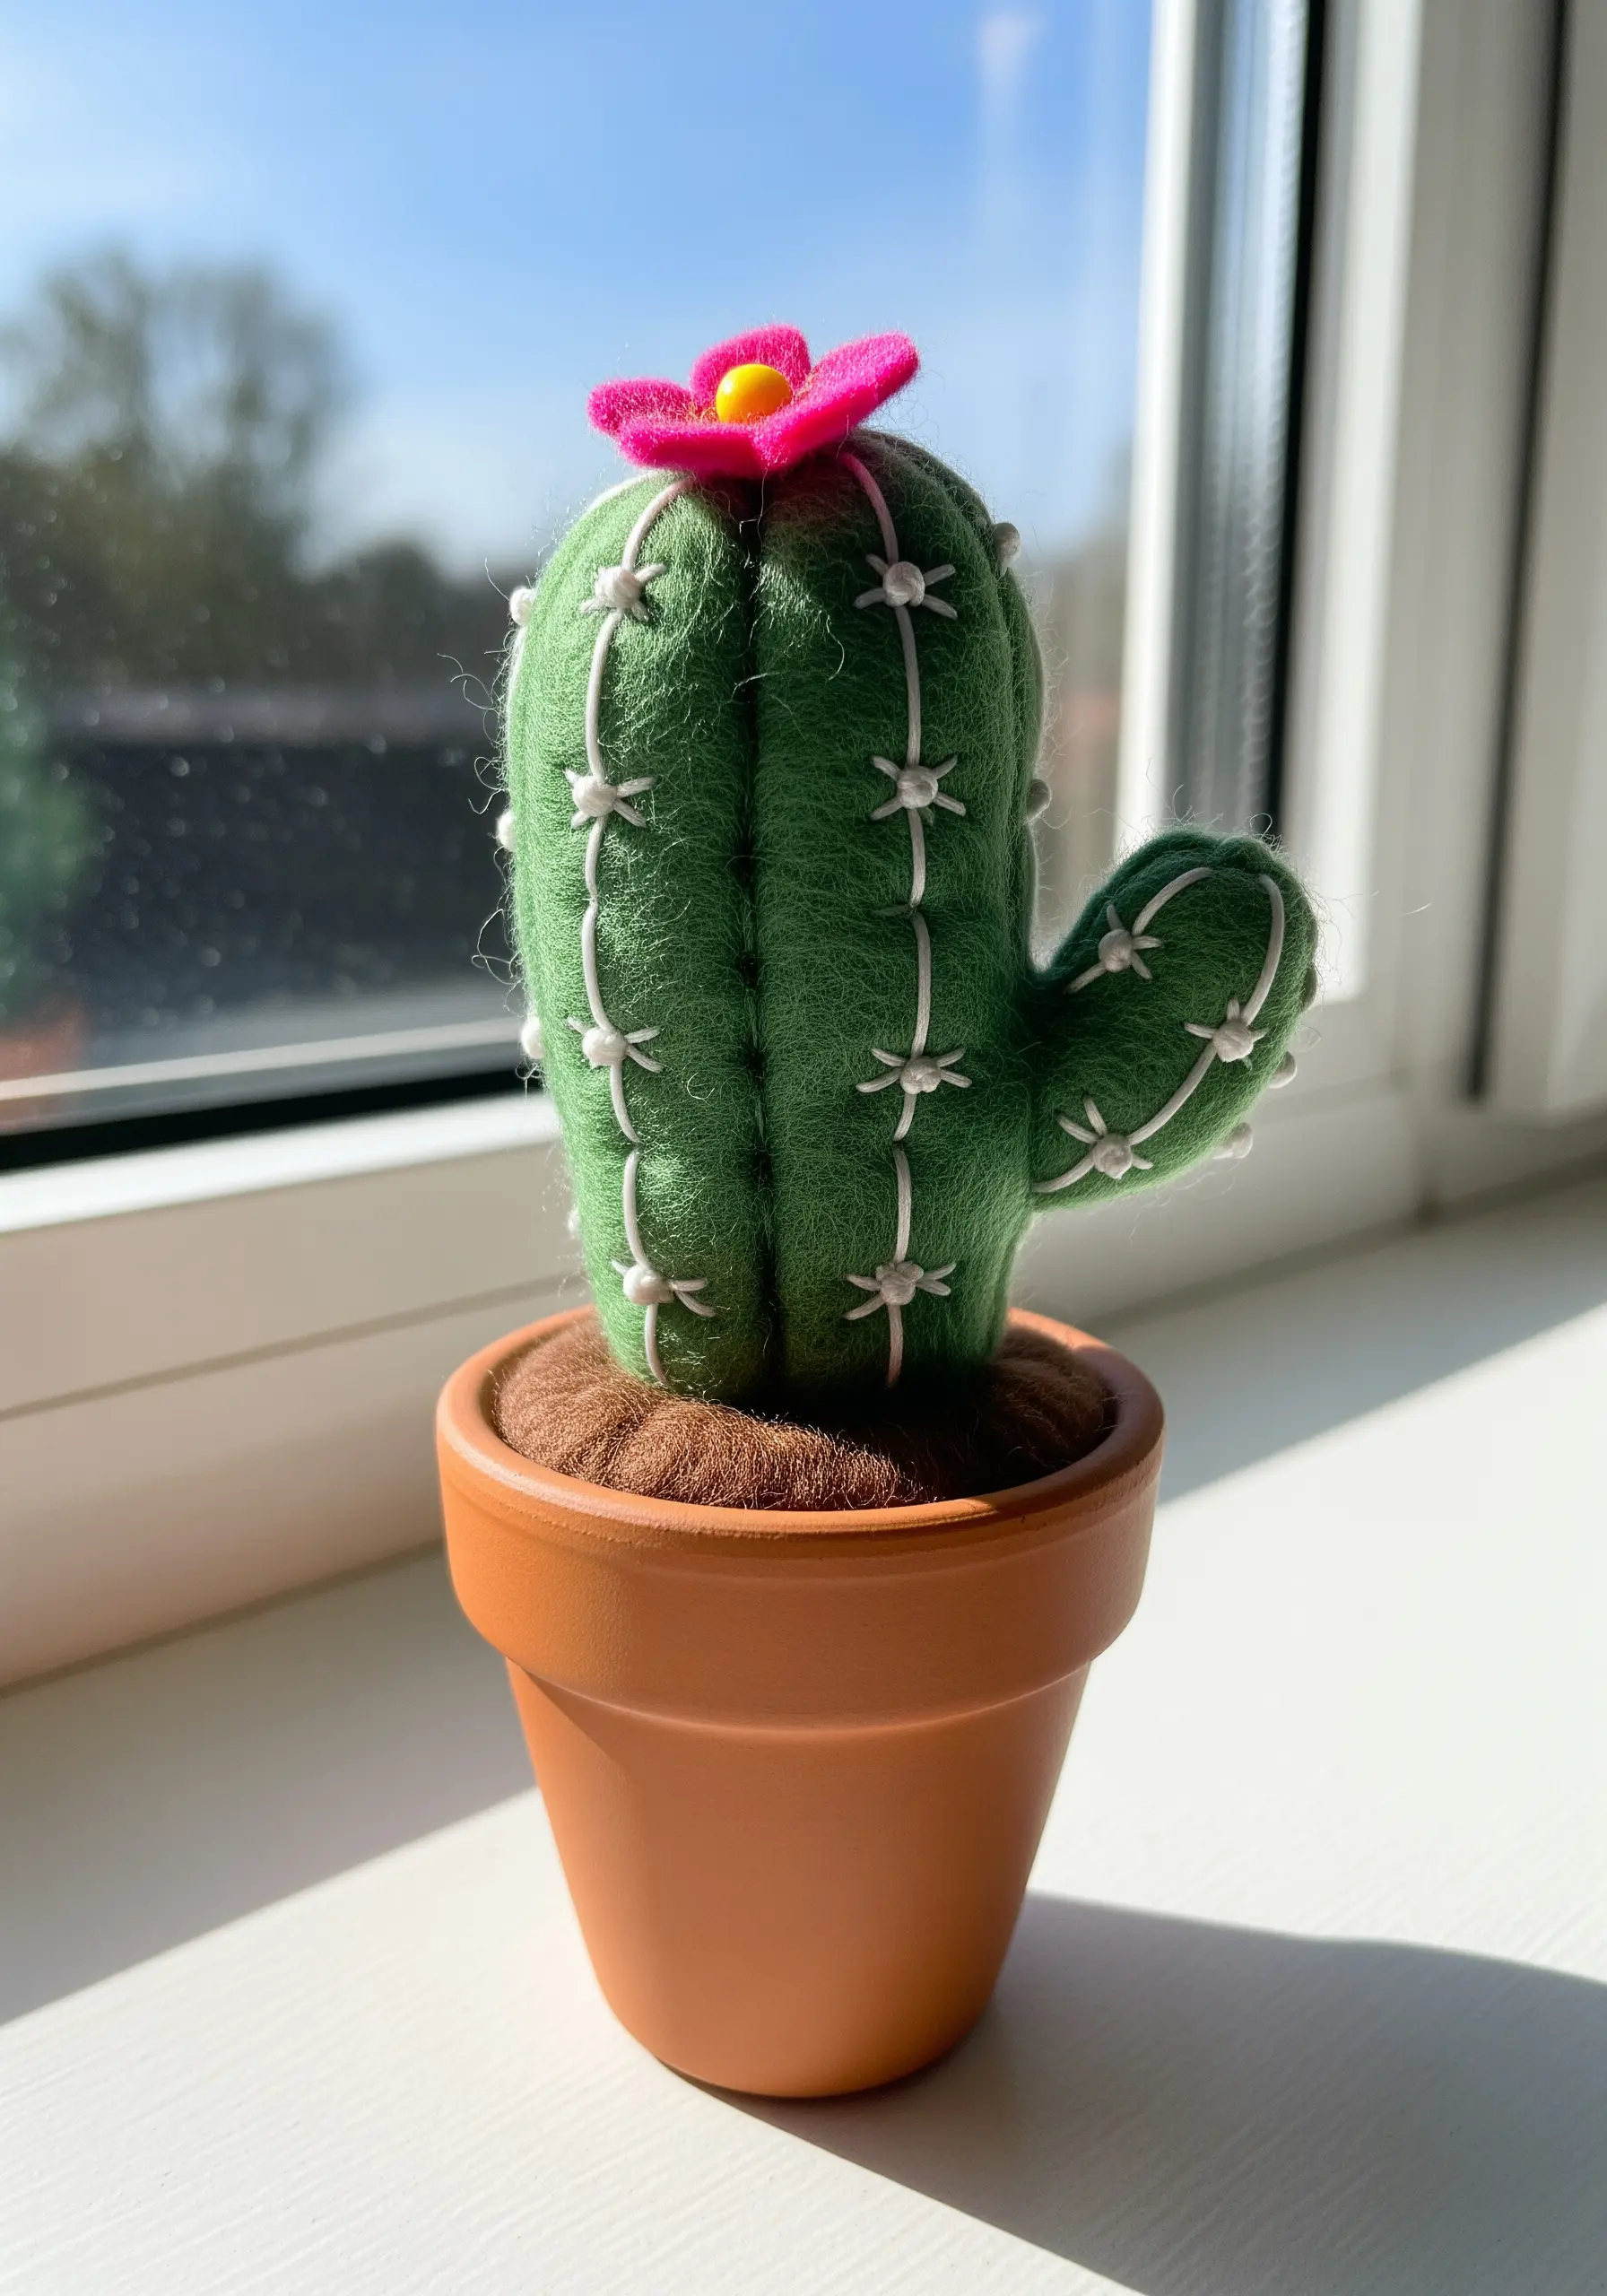
This charming cactus combines simple sewing and embroidery to create a three-dimensional object.
The body is made from two pieces of felt, sewn together and stuffed, with running stitches creating the vertical segments.
The embroidery is added last; use a thick pearl cotton and simple straight stitches to form the ‘spines,’ which stand out nicely against the soft felt.
It’s a perfect example of how embroidery can add character and detail to a simple plush form.
9. Miniature Stitched Medallions for Furniture

Upgrade plain wooden drawer pulls with a touch of bespoke embroidery.
Stitch a tiny motif on a small piece of aida cloth; the fabric’s grid ensures a neat result.
Embellish with a few seed beads for subtle sparkle and texture, then trim the cloth and affix it to the flat face of the knob with strong craft glue.
For a fully coordinated look, wrap the sides of the knob with embroidery floss that matches your stitched design.
10. Celestial Details with Metallic Threads

Working with metallic floss can be tricky, but the results are worth it.
To prevent fraying and tangling, use a thread conditioner and work with shorter lengths of thread—no more than 12 inches at a time.
Combine a fine backstitch for the constellation lines with tiny star stitches and French knots for the surrounding stars.
Using both gold and silver thread on a dark fabric creates a subtle, magical shimmer that catches the light beautifully.
11. Abstract Landscapes with Fabric Scraps
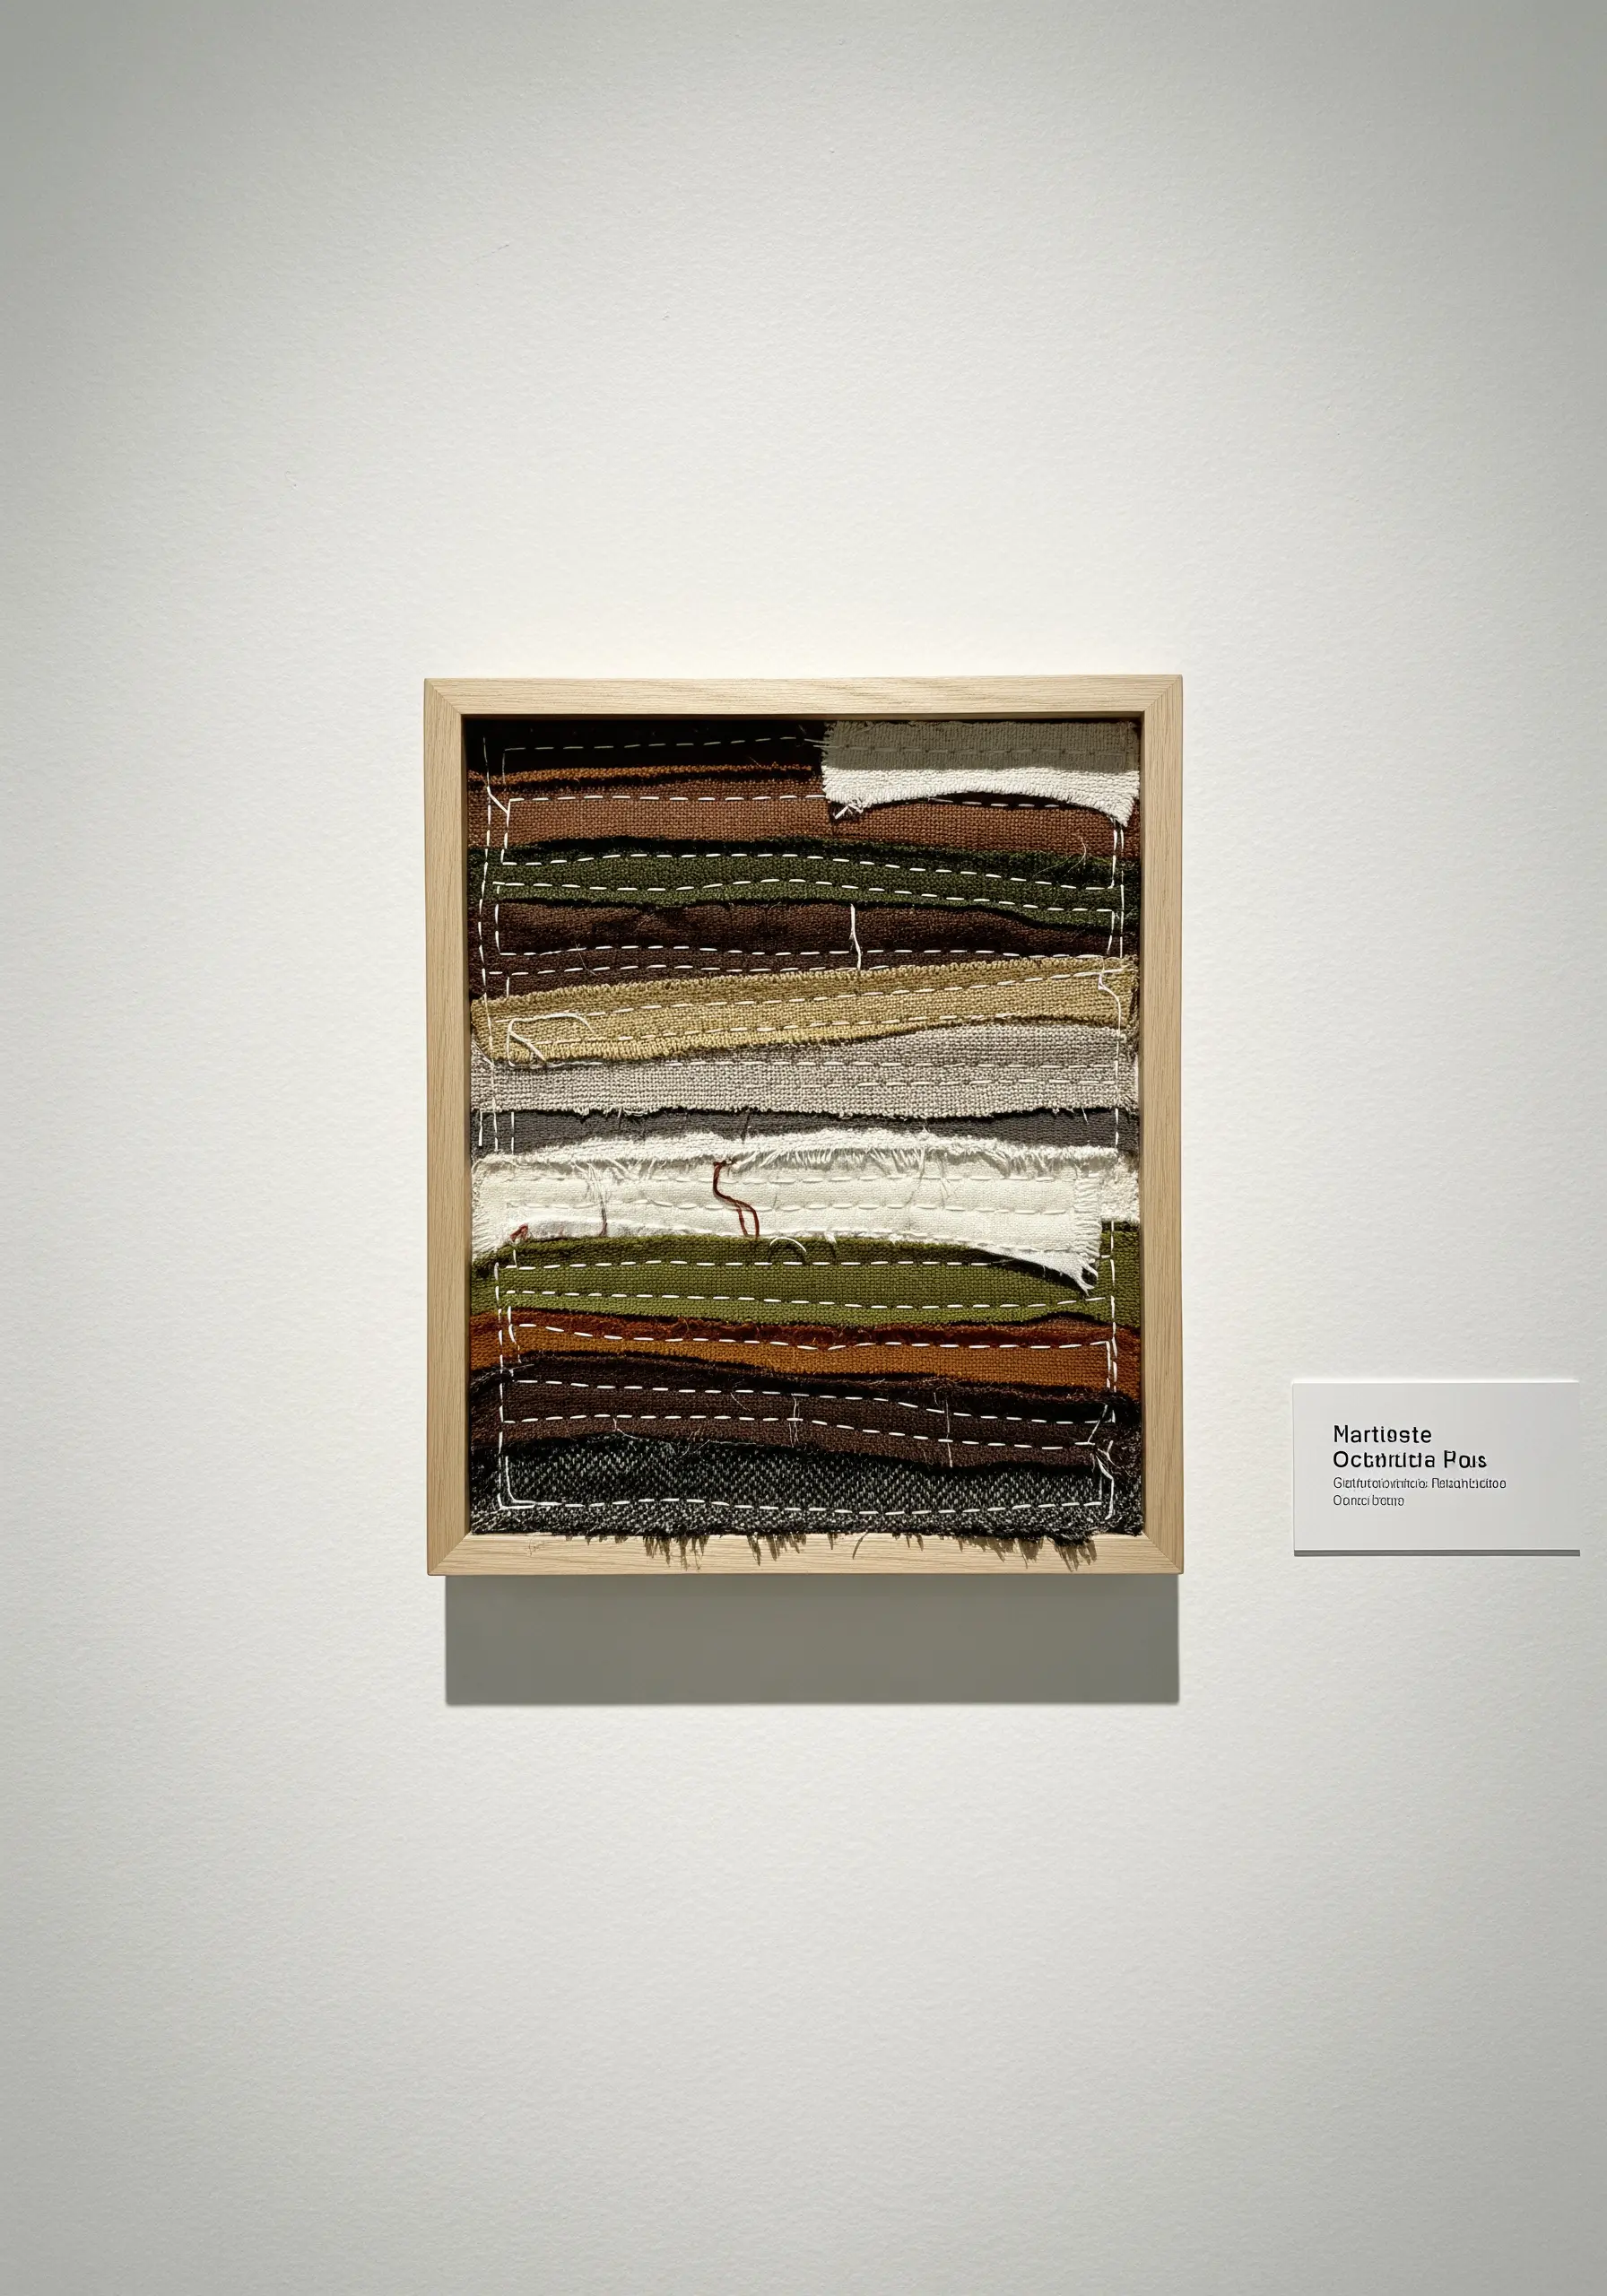
This piece is a beautiful exercise in textile collage, perfect for using up precious fabric remnants.
Arrange and layer strips of fabric in varying textures and earthy tones to evoke a stratified landscape.
Instead of glue, use a simple, visible running stitch in a contrasting thread to quilt the layers together.
The stitches become part of the design, adding a rhythmic, handcrafted texture that unifies the composition.
12. Functional Art: A Sculptural Pincushion
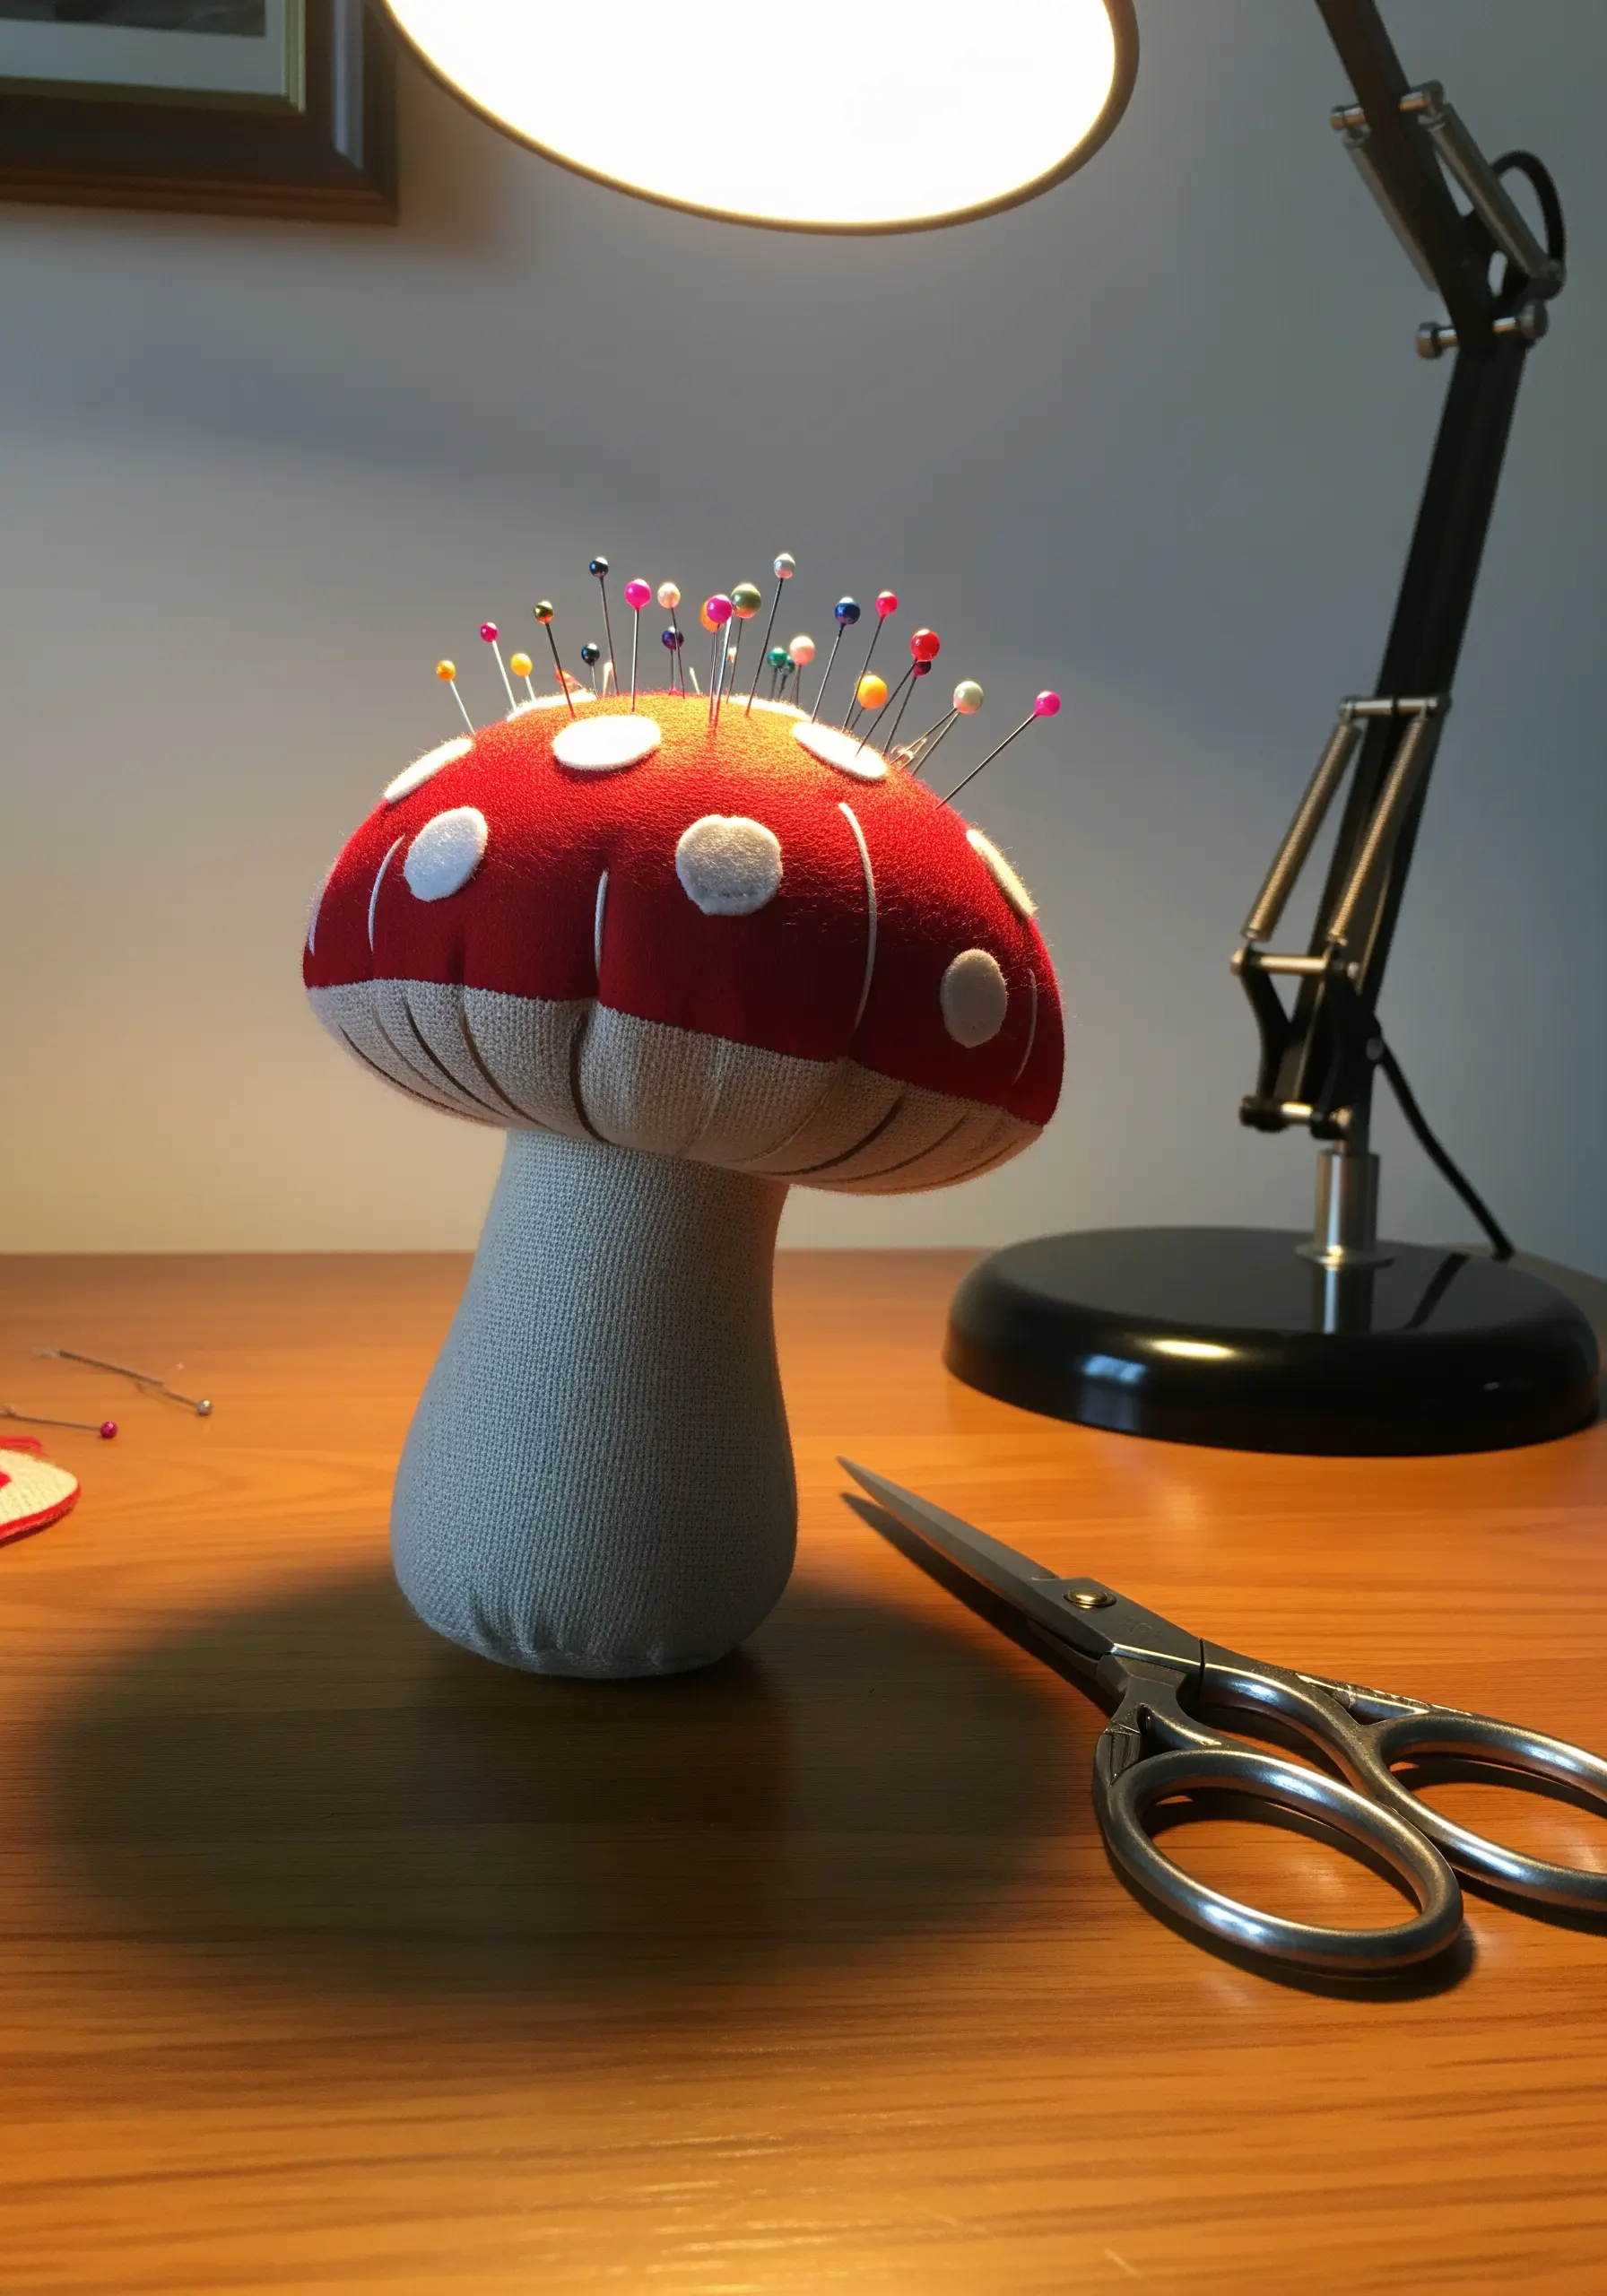
Create a useful sewing tool that’s also a delightful decorative object.
The mushroom form is constructed from sewn and stuffed fabric pieces. For the iconic white spots, you can use felt appliqué or stitch them with tight satin stitch circles.
For superior function, add a small amount of steel wool to the poly-fil stuffing—it will sharpen your pins and needles every time you use them.
13. Stumpwork: Raising Embroidery into 3D
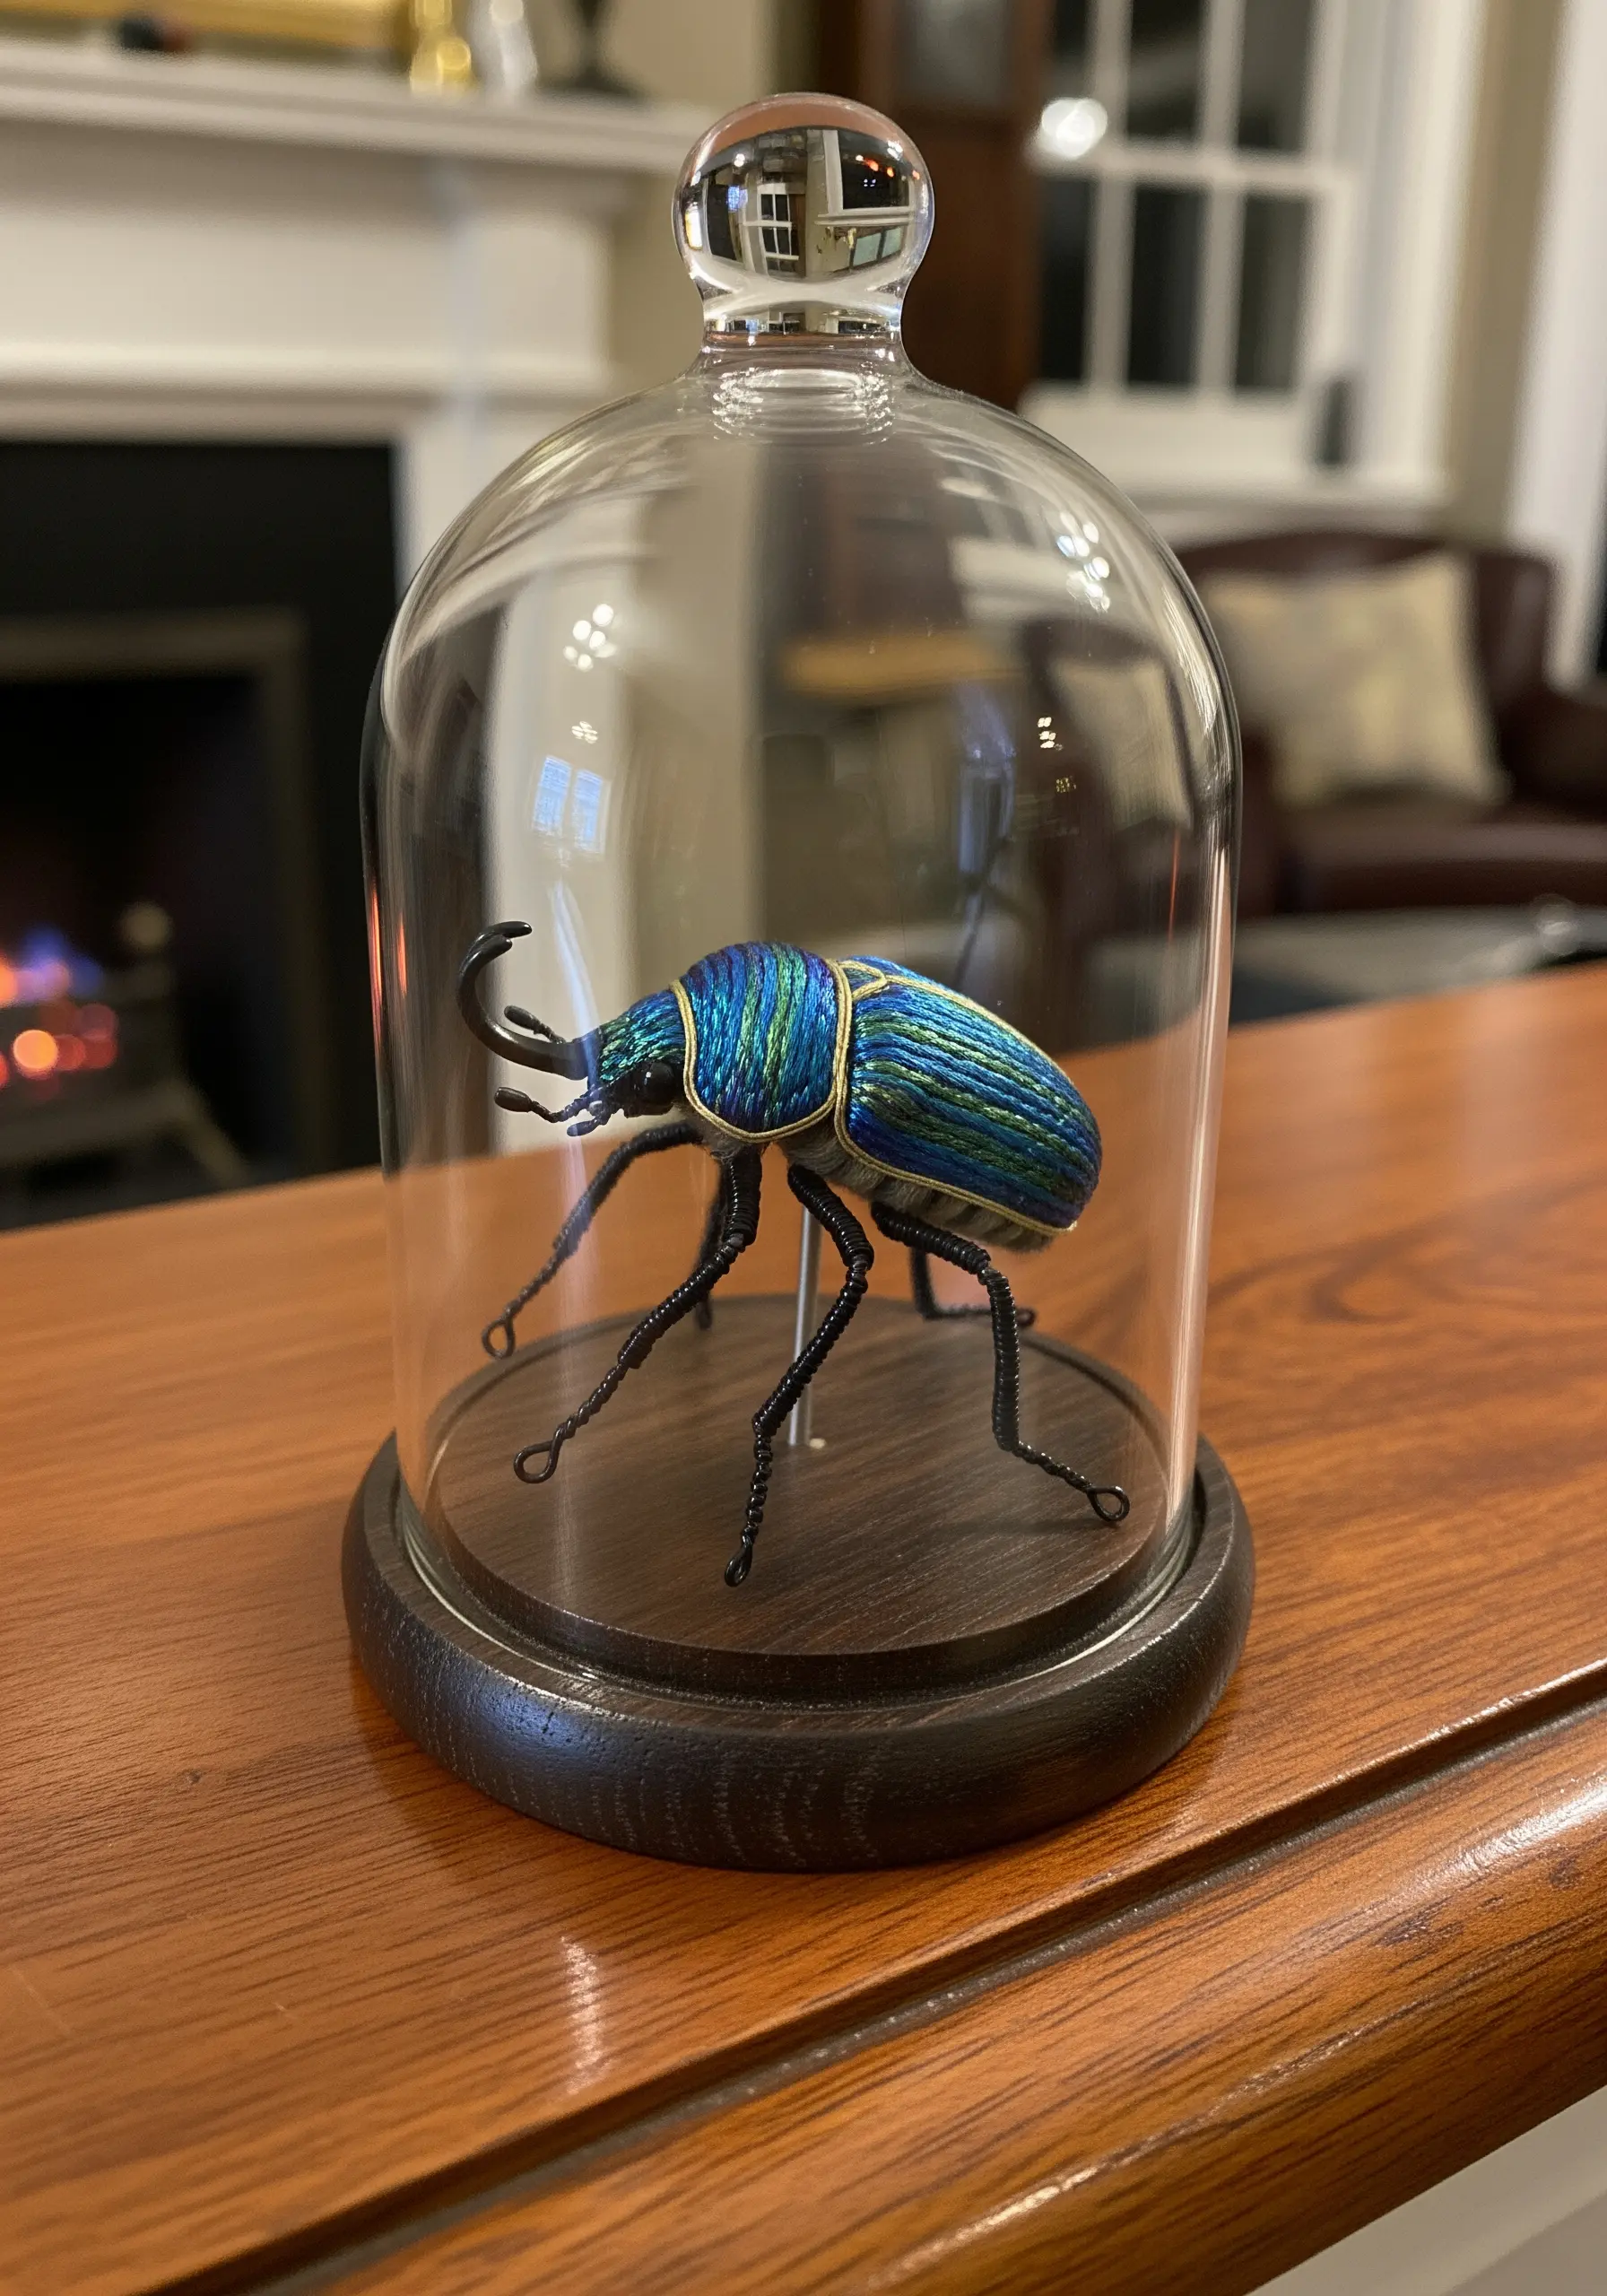
Stumpwork is a historic technique that brings embroidery off the fabric into three dimensions.
The beetle’s iridescent shell is achieved with long-and-short stitch using silk threads over padding to create a rounded form.
The legs are made from wire wrapped tightly with thread, which are then stitched onto the body.
Displaying the finished piece in a cloche protects the delicate work and elevates it to the status of a treasured specimen.
14. Crisp Monograms on Everyday Accessories

To achieve clean, professional lettering on a textured surface like canvas webbing, a stabilizer is your best friend.
Use a peel-and-stick water-soluble stabilizer to get your design placed perfectly.
First, outline the letters with a split stitch; this creates a raised edge that your satin stitch can butt up against, resulting in exceptionally sharp, defined monograms.
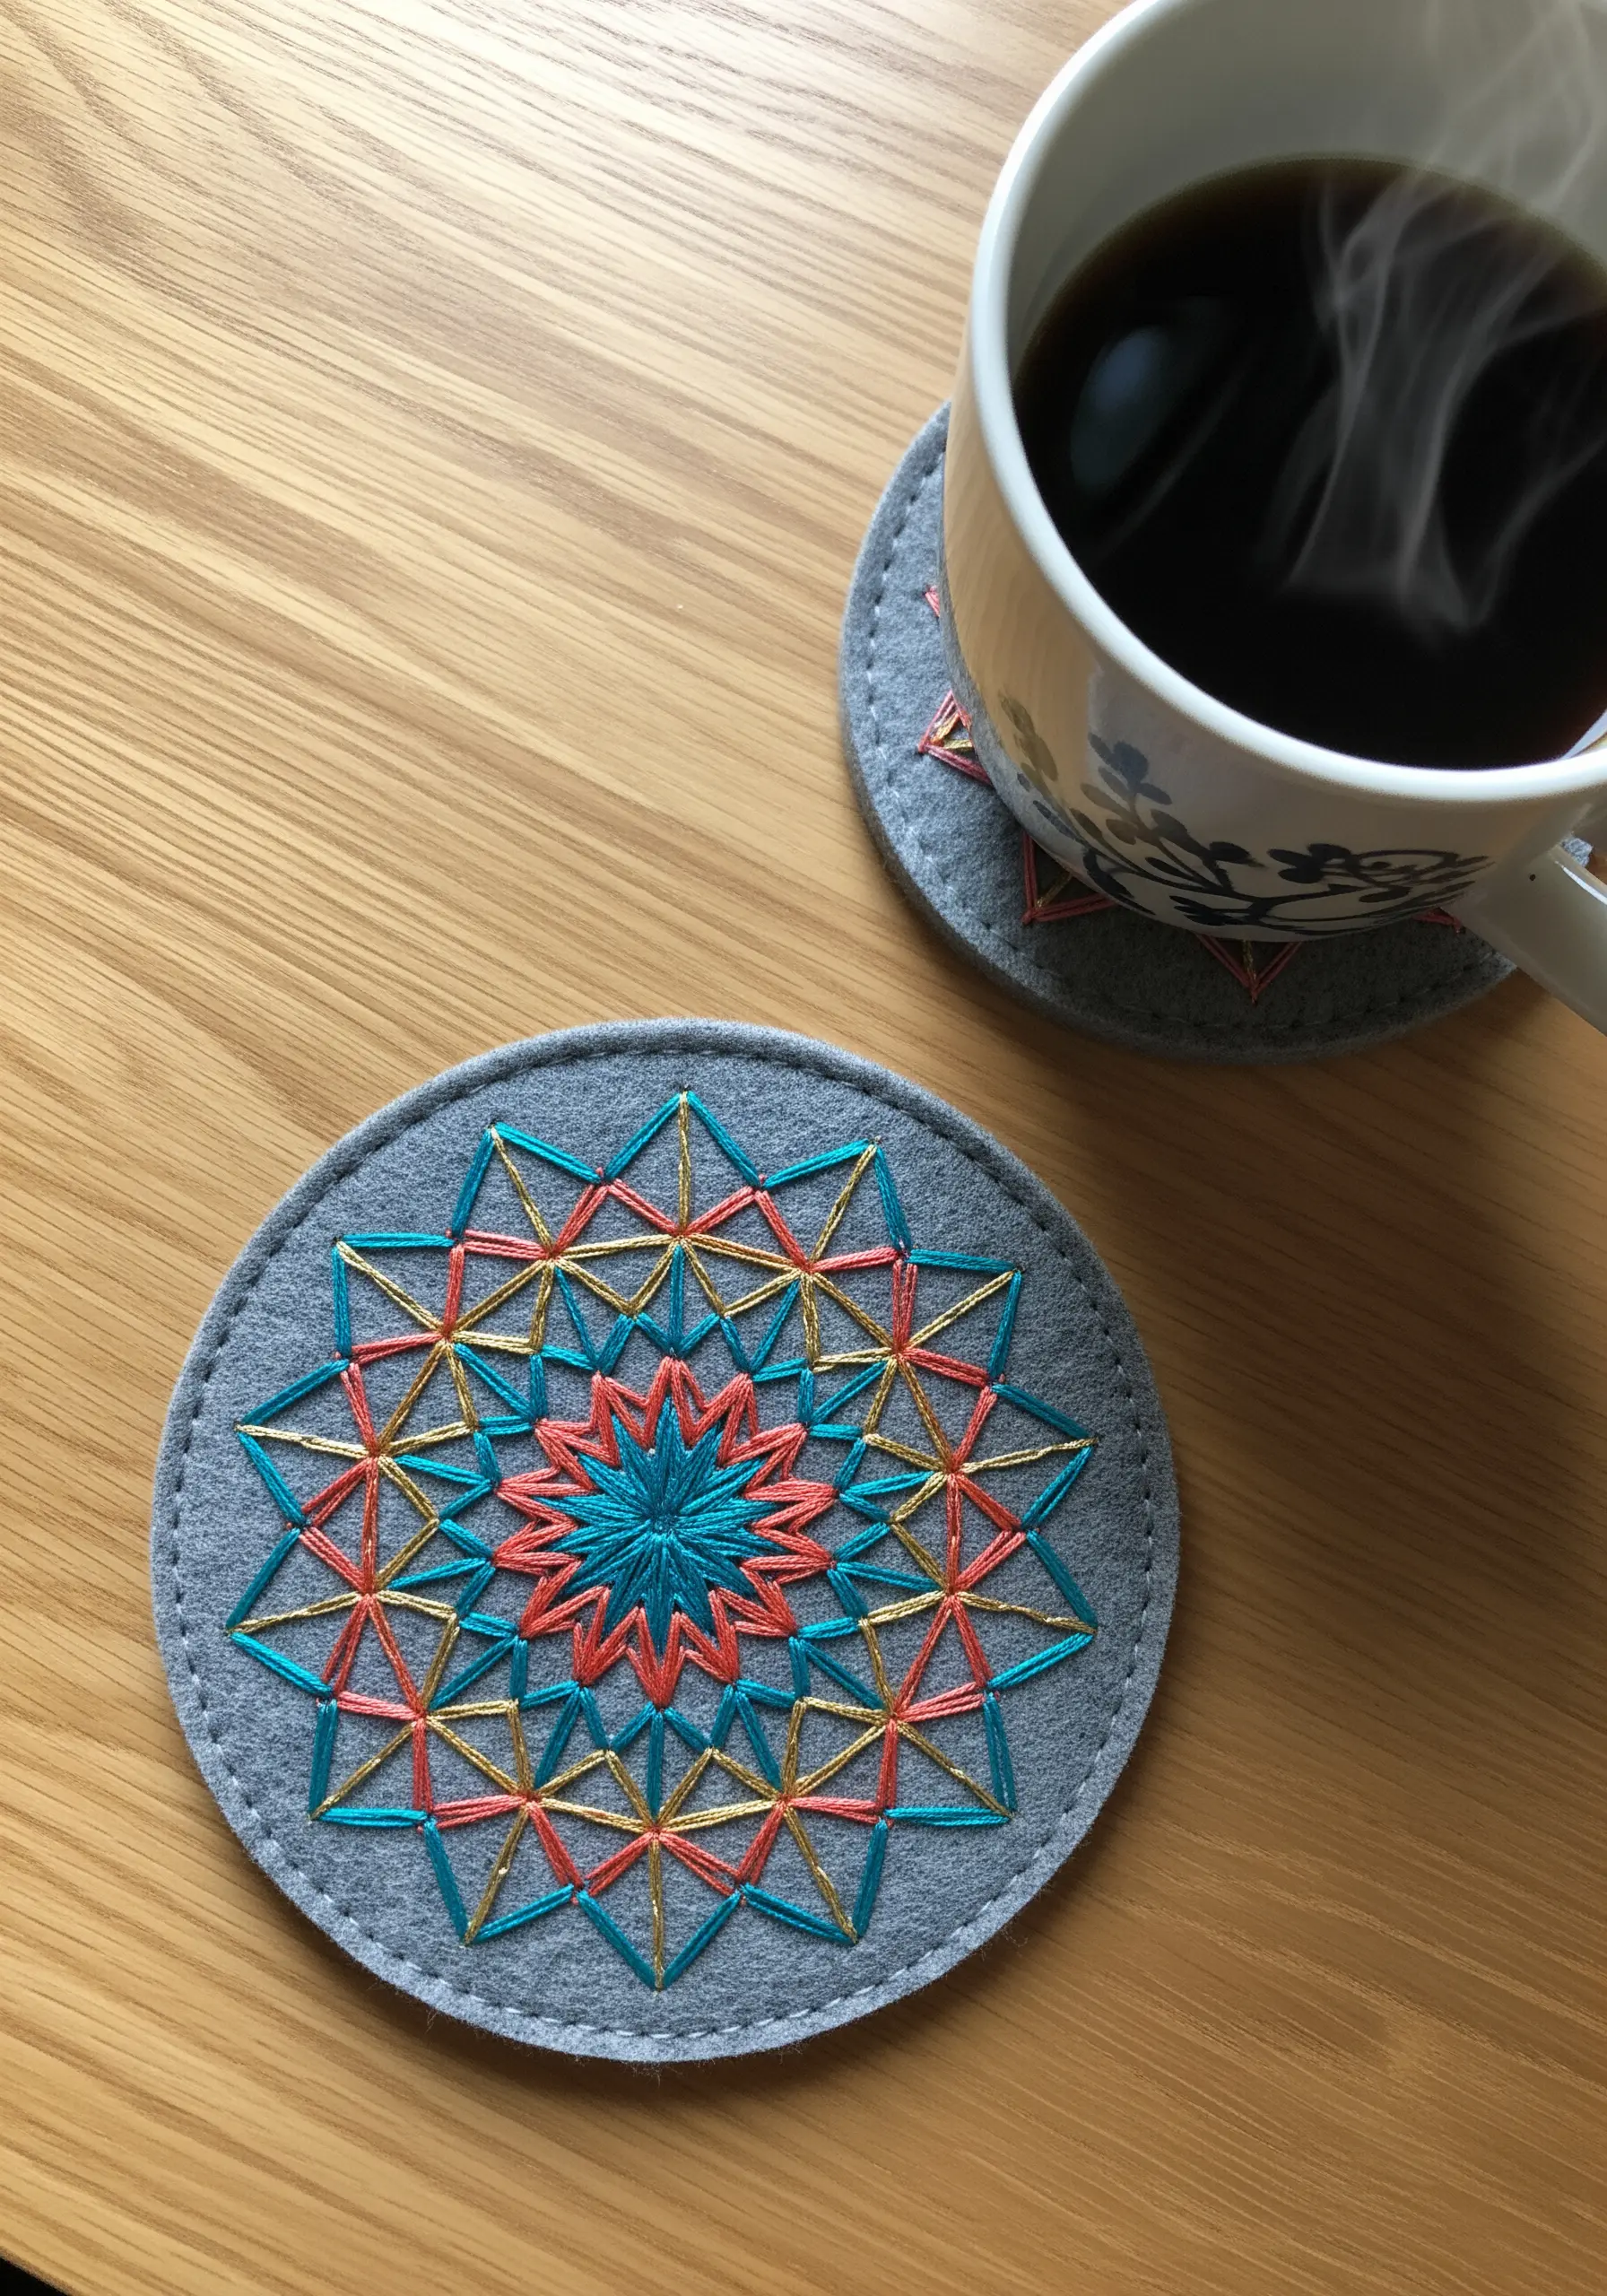
15. Miniature Quilting for Textured Coasters
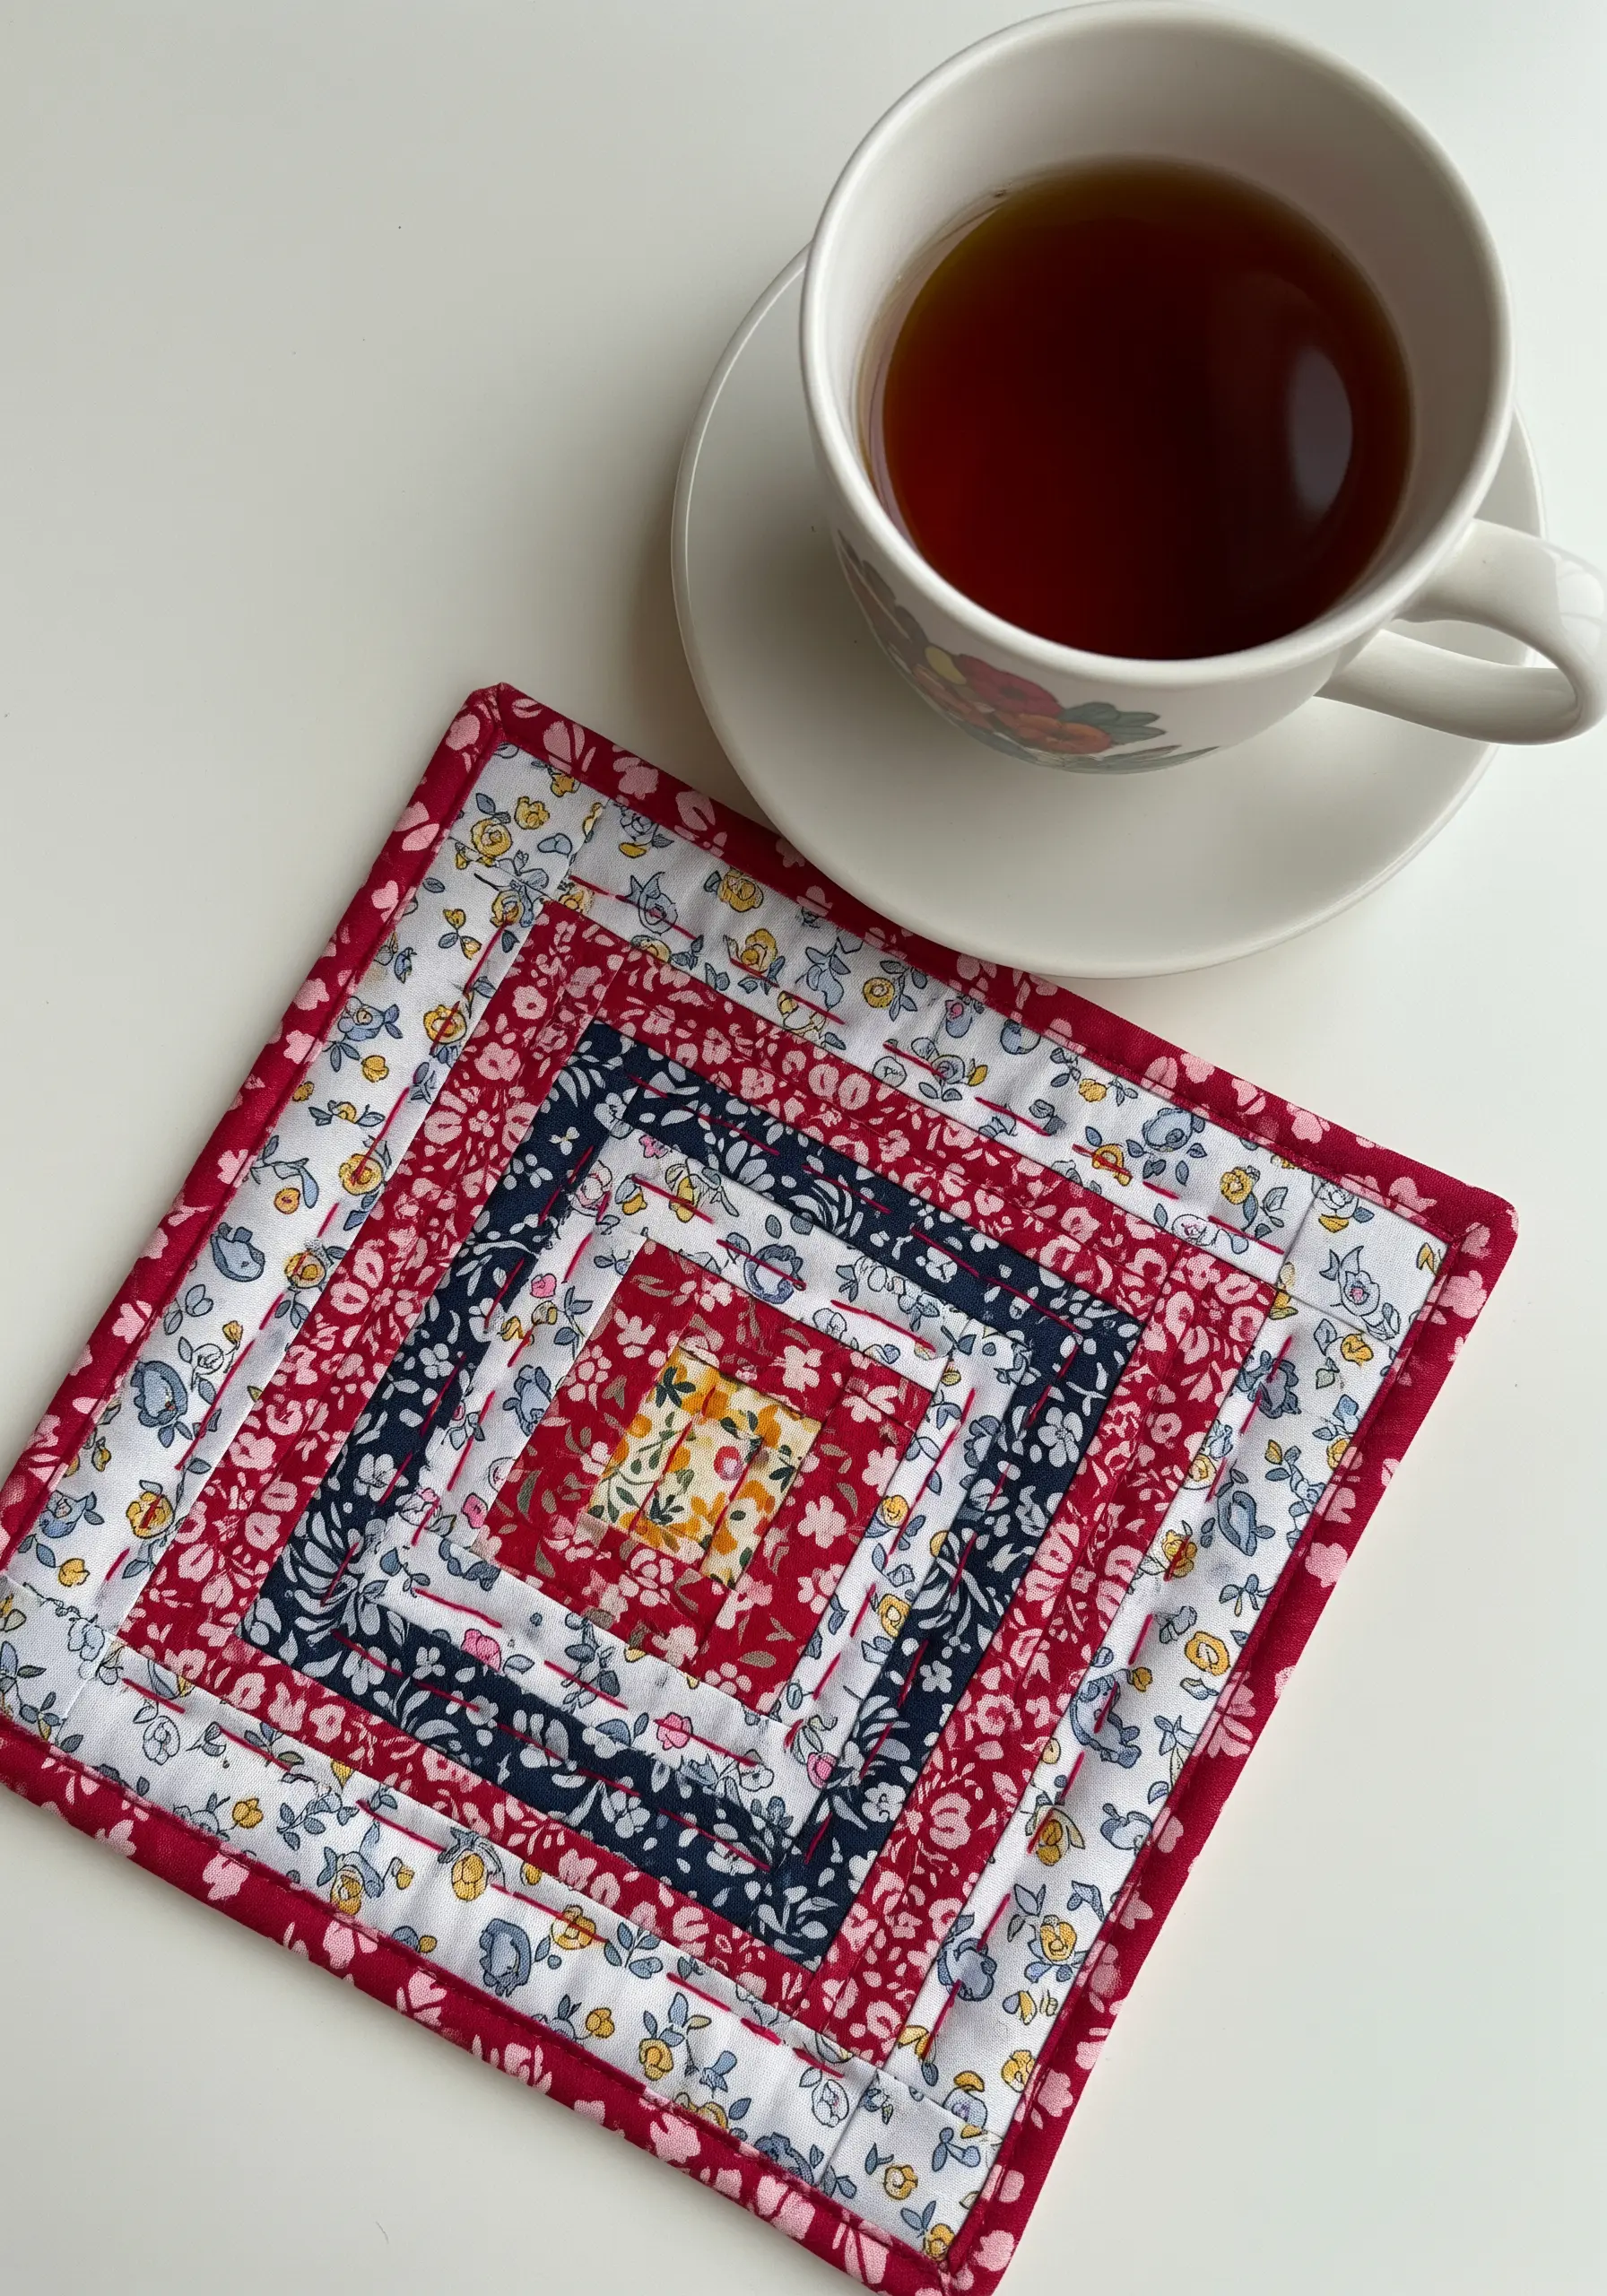
This charming piece blends quilting and hand-stitching on a small scale.
It’s a miniature log cabin quilt block, where strips of fabric are sewn around a central square.
The artistry lies in the precise cutting and piecing of the fabrics to create the spiraling pattern.
While this example is machine-sewn, you could easily assemble it by hand and add decorative running stitches for a more traditional, embroidered feel.
16. Scented Sachets with Botanical Stitching
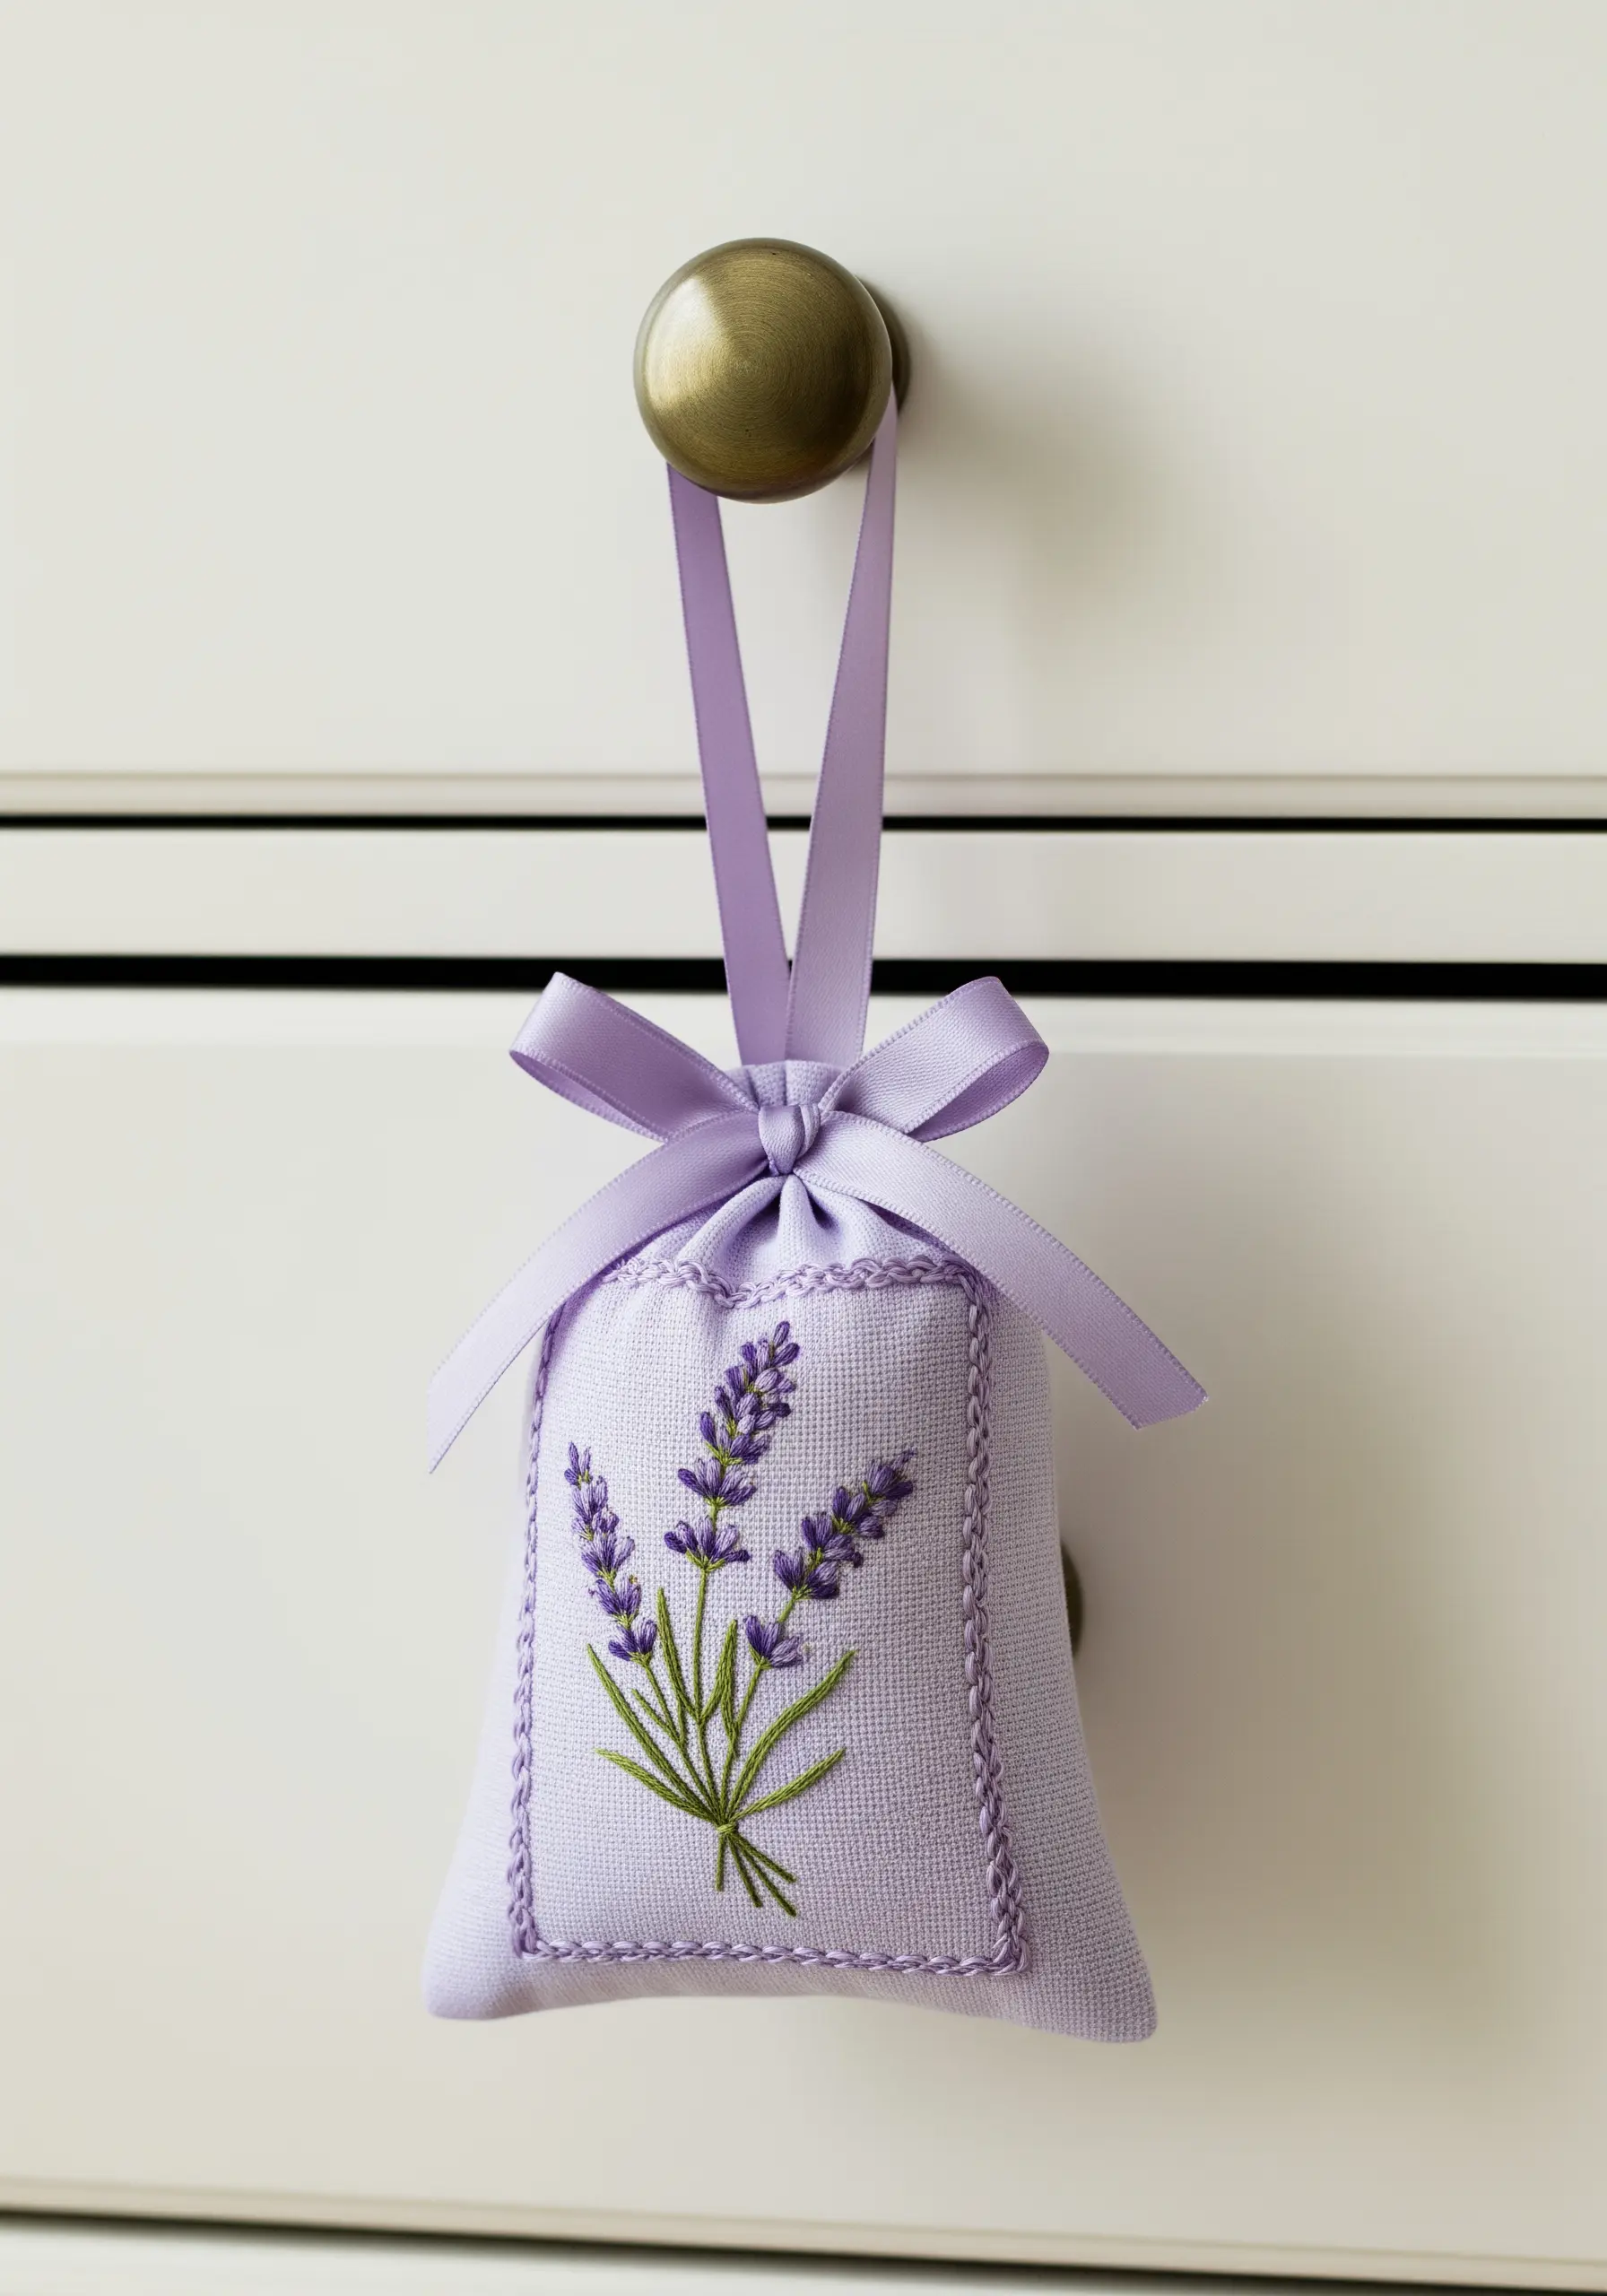
Transform a simple sachet into a treasured keepsake with thoughtful embroidery.
Choose a fine linen fabric for a delicate, heirloom feel. Before stitching your lavender sprigs, add a decorative border using a simple running stitch or chain stitch.
This small detail acts as a frame for your botanical motif, making the entire design feel more polished and intentional before you even sew the pouch together.
17. Corner Bookmarks with Layered Thread Painting
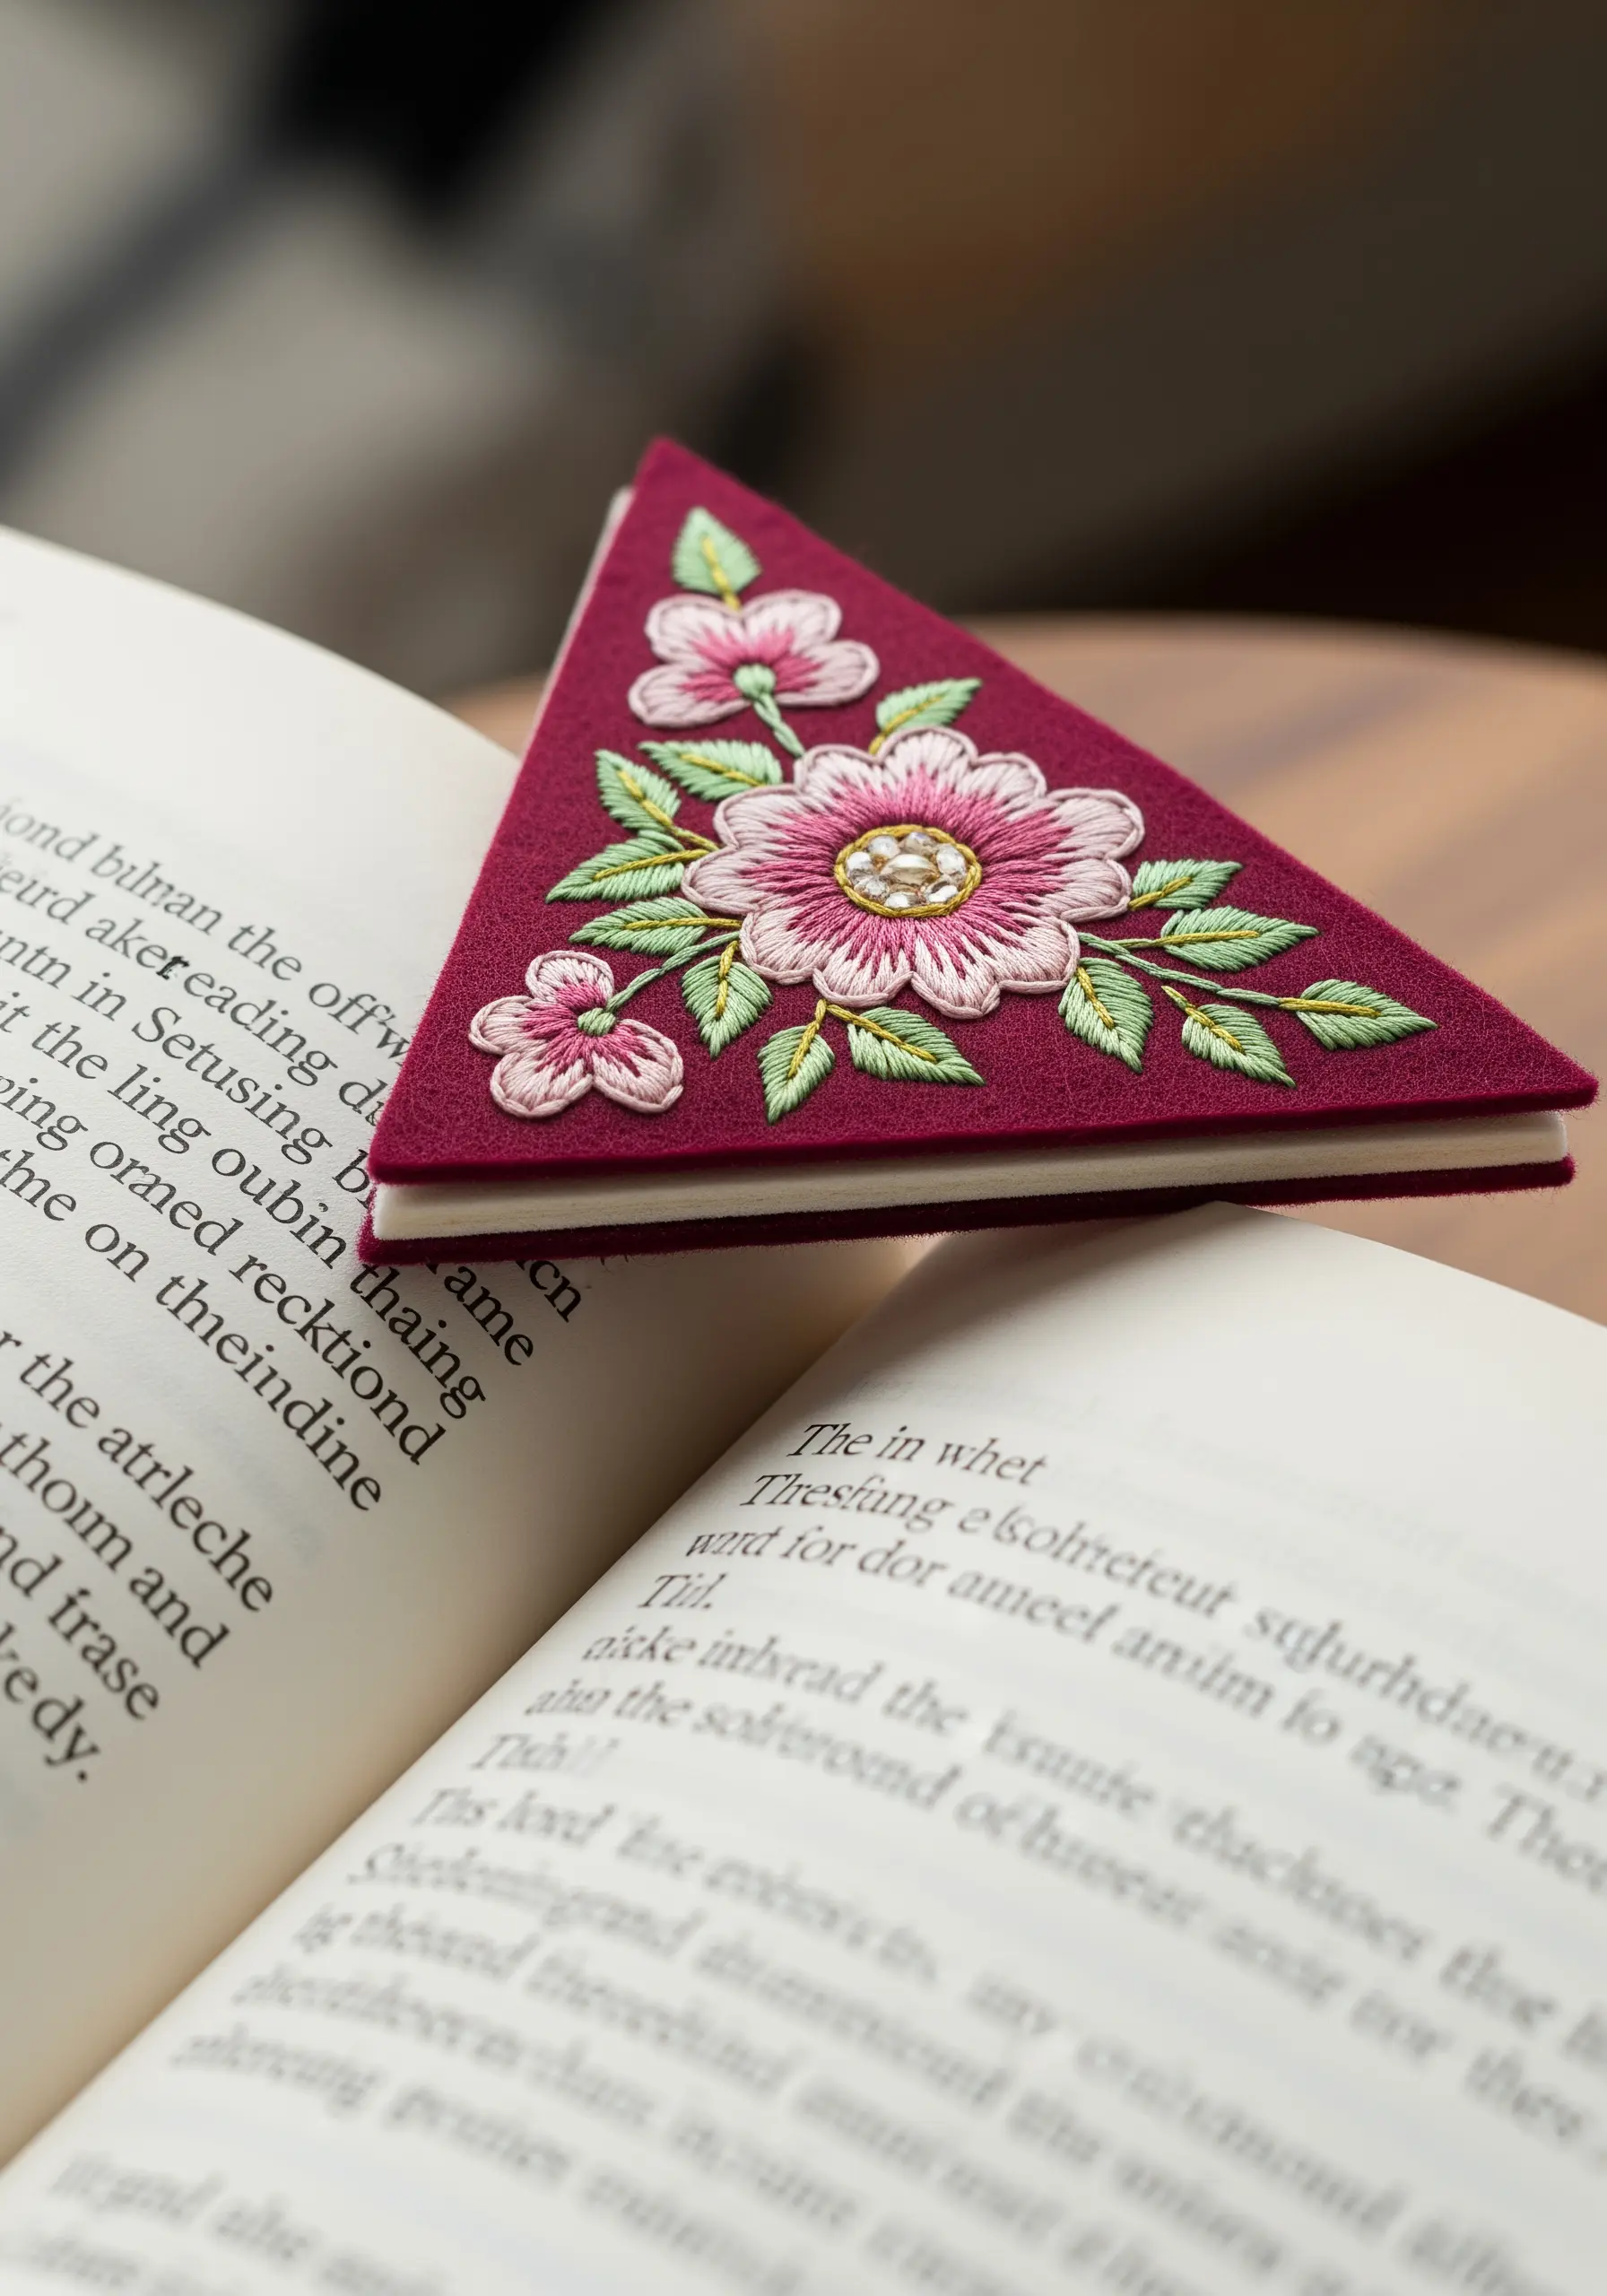
Felt is an ideal base for a functional item like a bookmark because it’s sturdy and doesn’t fray.
Use the long-and-short stitch technique to ‘paint’ the flower petals, blending shades of pink to create soft, realistic gradients.
To ensure your leaves have sharp, defined edges, outline them with a split stitch before filling them in. The result is a beautiful and durable corner bookmark that feels like a tiny piece of art.
18. Thread Painting: Capturing Portraits in Stitch

The key to realistic thread painting is to think like a painter, using a single strand of floss as your brushstroke.
Lay your stitches in the direction that the fur naturally grows, using short, overlapping stitches to blend colors seamlessly.
True realism is achieved by using a wide palette of closely related shades to build up shadows, mid-tones, and highlights, which gives the final portrait incredible depth and life.
19. Bold Typography on a Felt Pennant
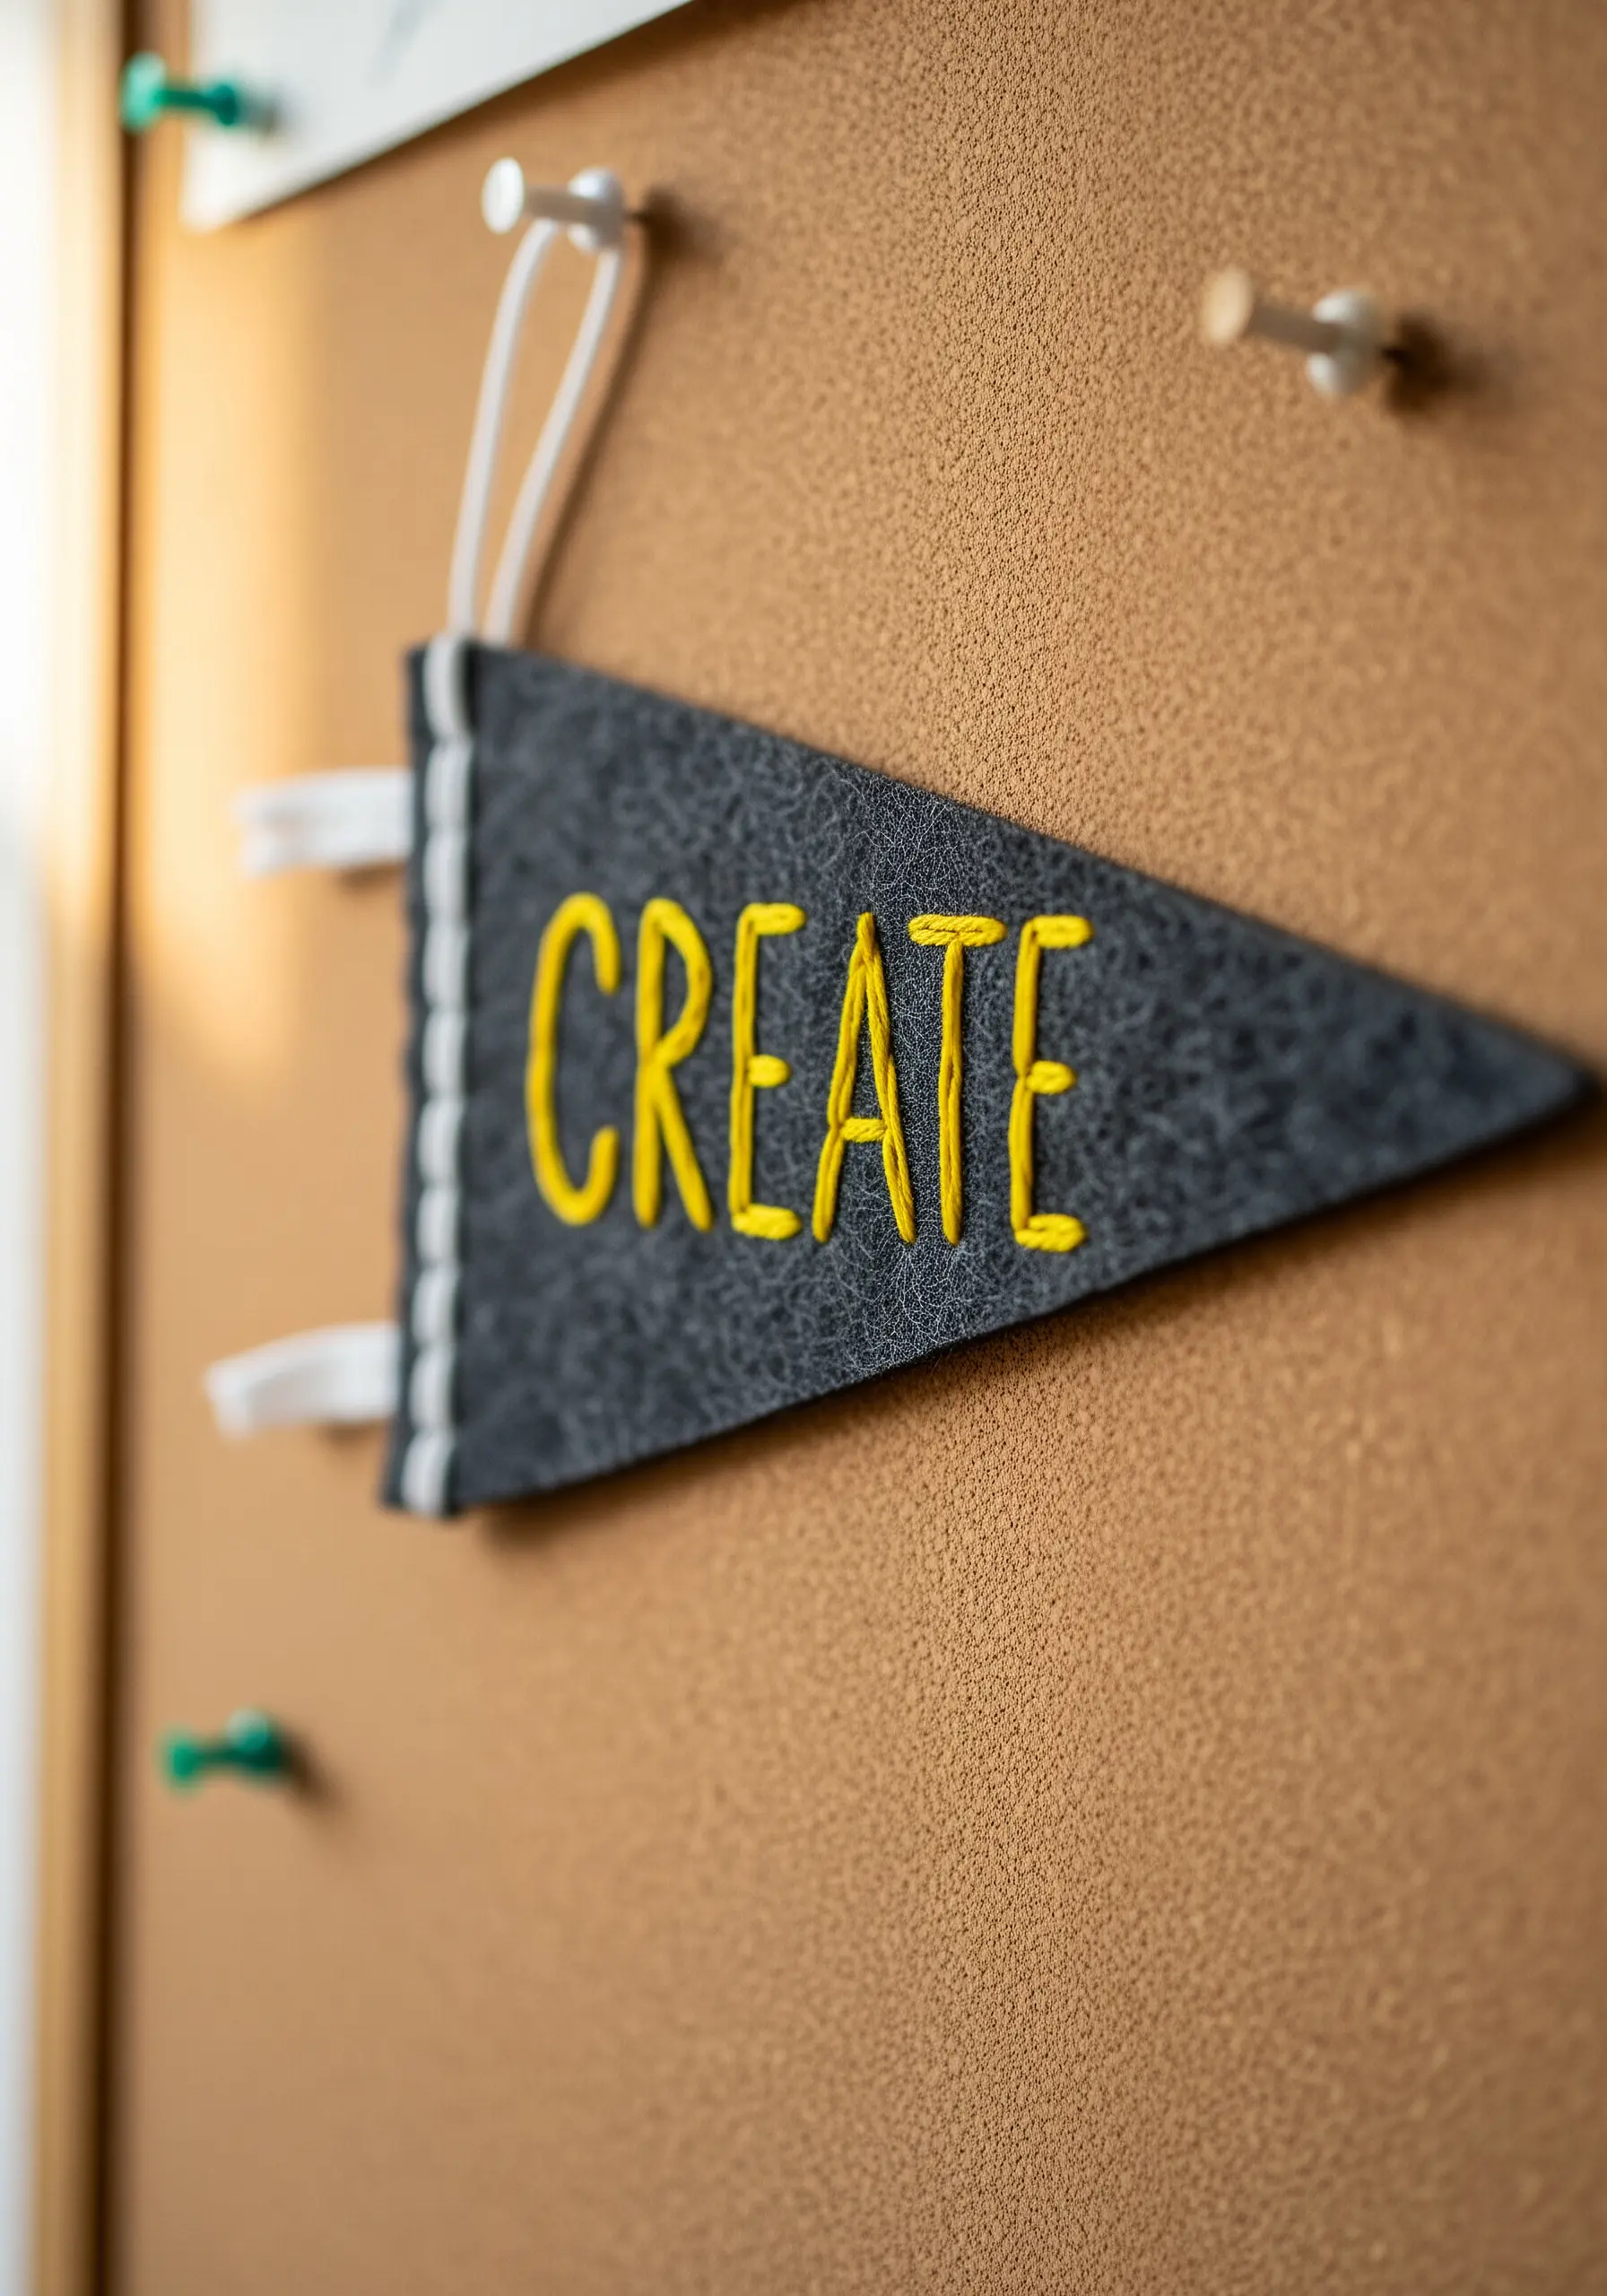
Make your message stand out by choosing stitches that add dimension and weight to your letters.
A chain stitch or a thick, whipped backstitch creates a bold line that has more presence than a simple backstitch.
Using a high-contrast color like yellow on dark grey makes the text pop, while the simple running stitch along the binding adds a subtle, thoughtful finishing touch to your inspirational wall decor.
20. Transforming Fabric Buttons into Artful Magnets
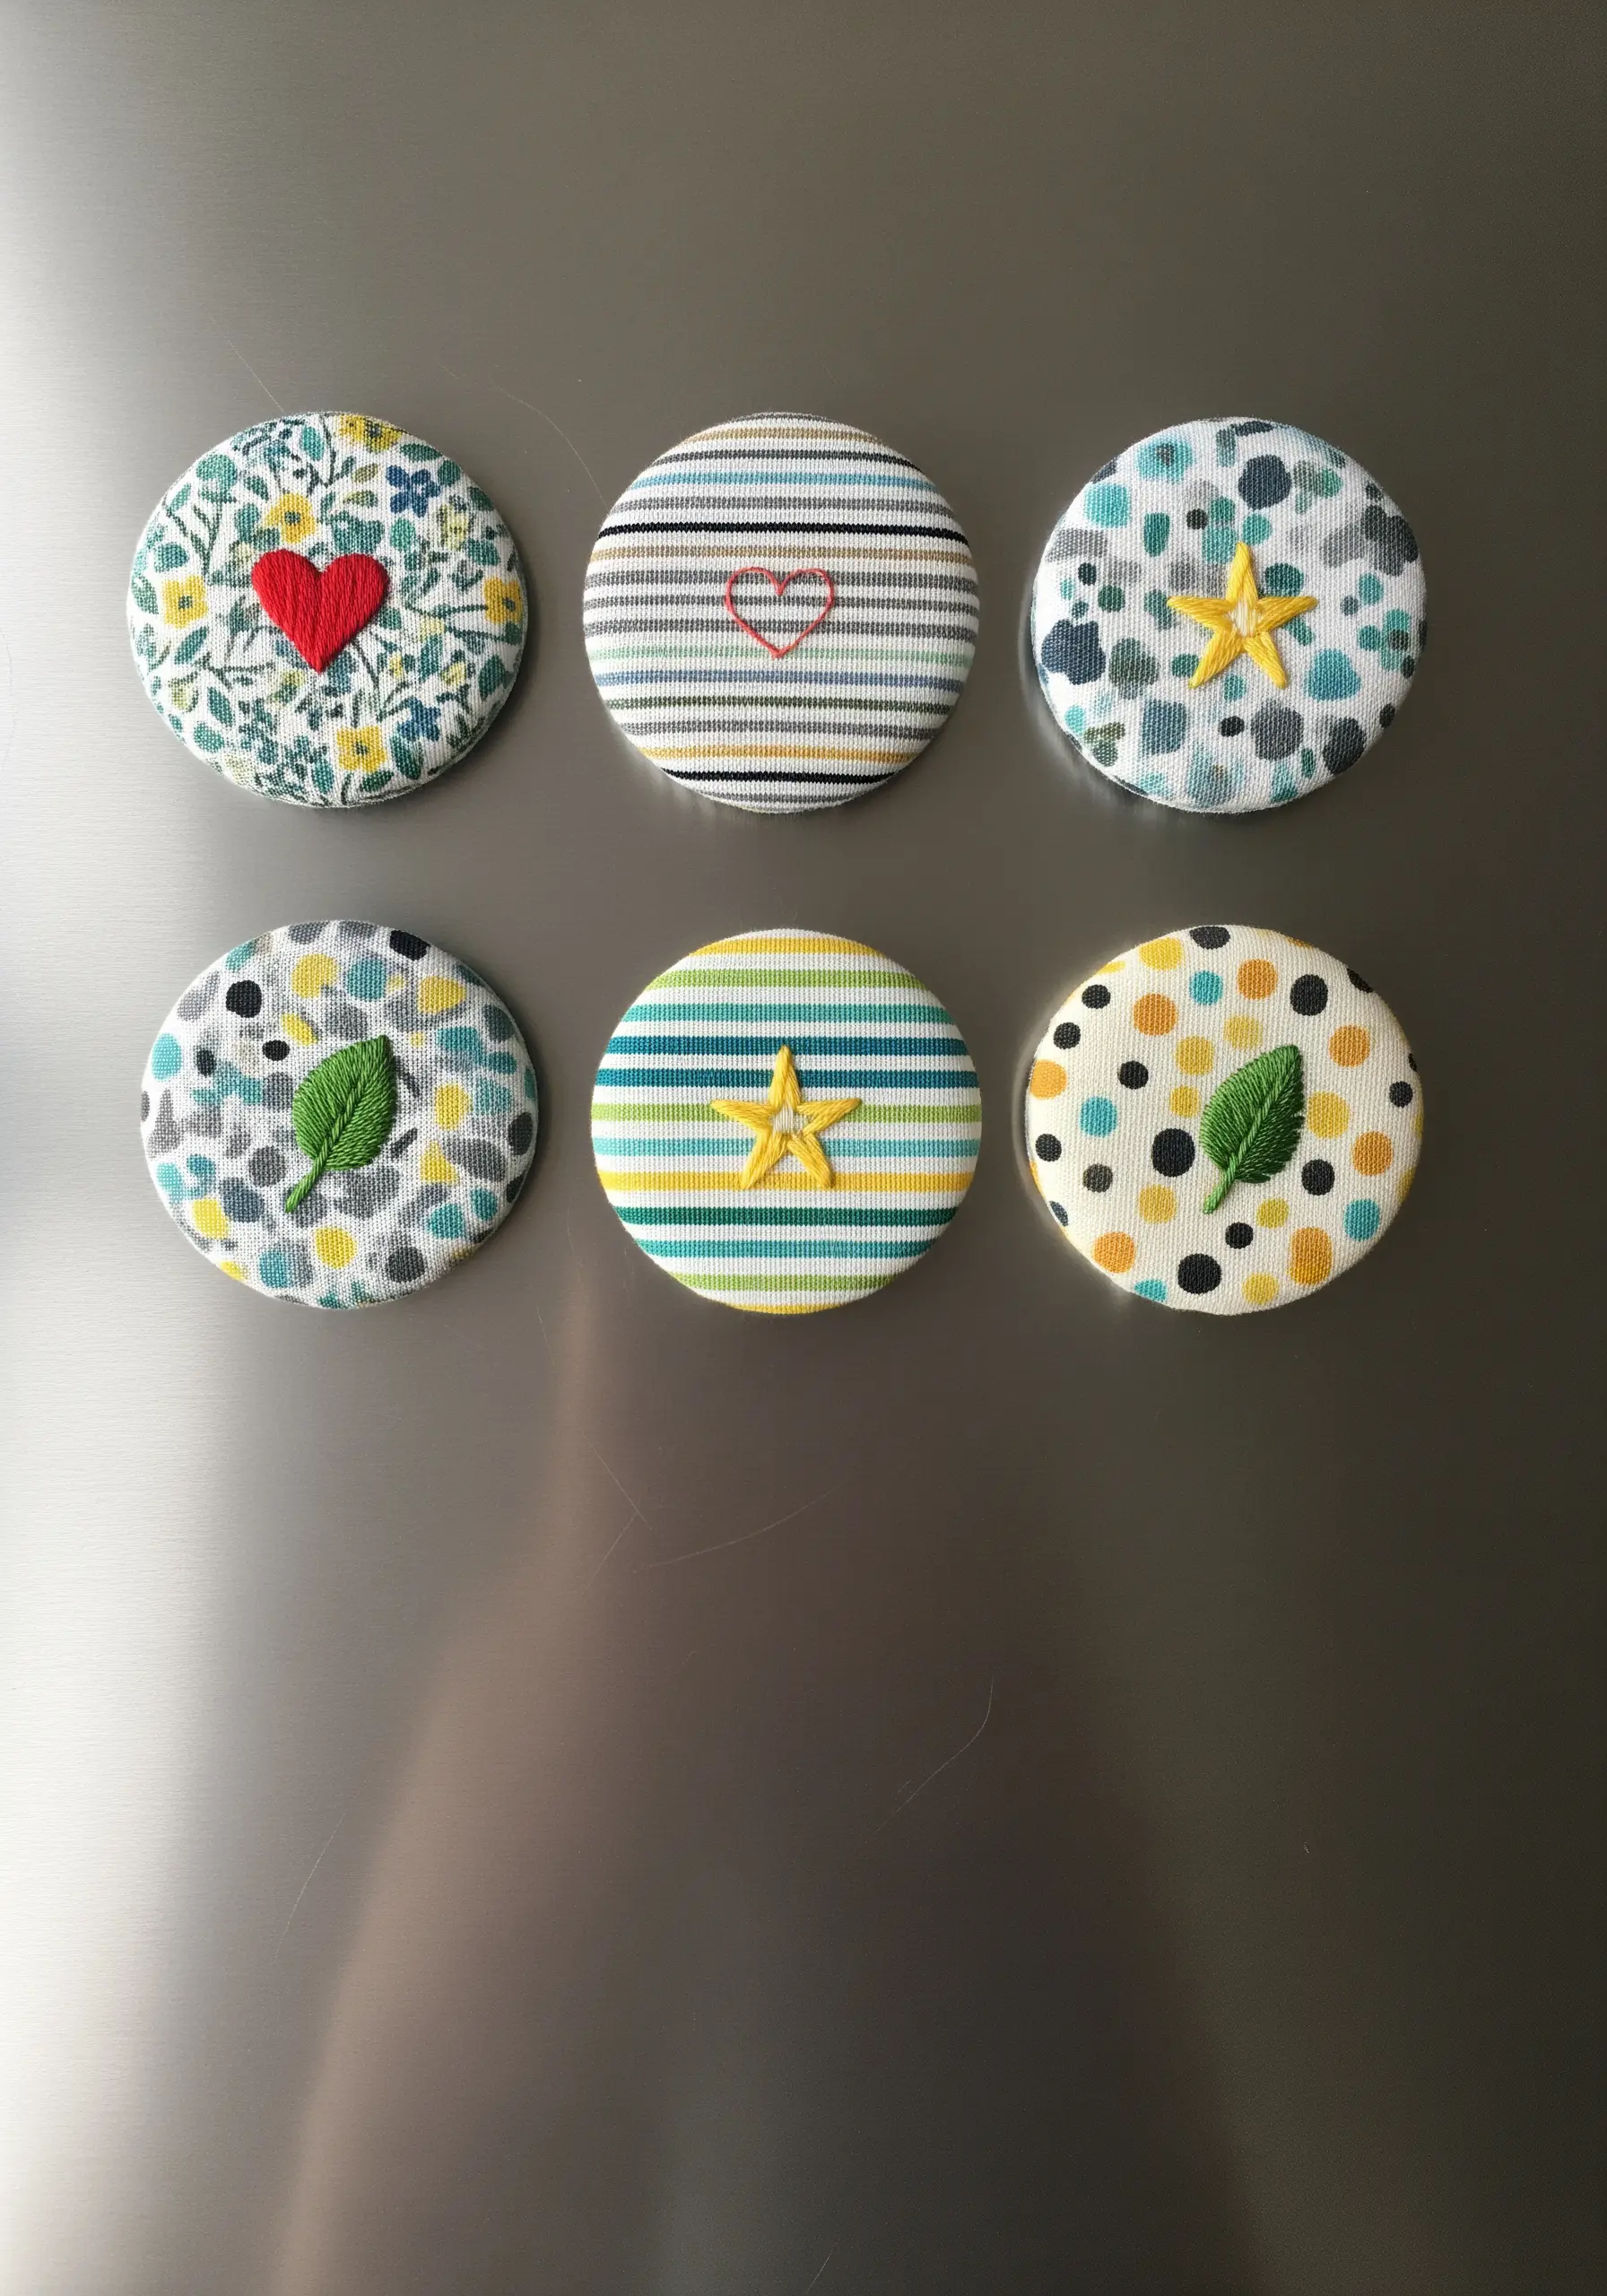
This is a wonderfully quick and satisfying project that combines patterned fabric with minimal stitching.
Use a fabric button cover kit as your base. Before assembling, add a single, simple embroidered motif to the center of your fabric circle.
Because the background fabric is busy, a simple icon like a heart or a star, stitched in a contrasting color, has the most impact.
Finish by gluing a strong, flat magnet to the back of the button.
21. Layered Felt Garland with Vein Detailing
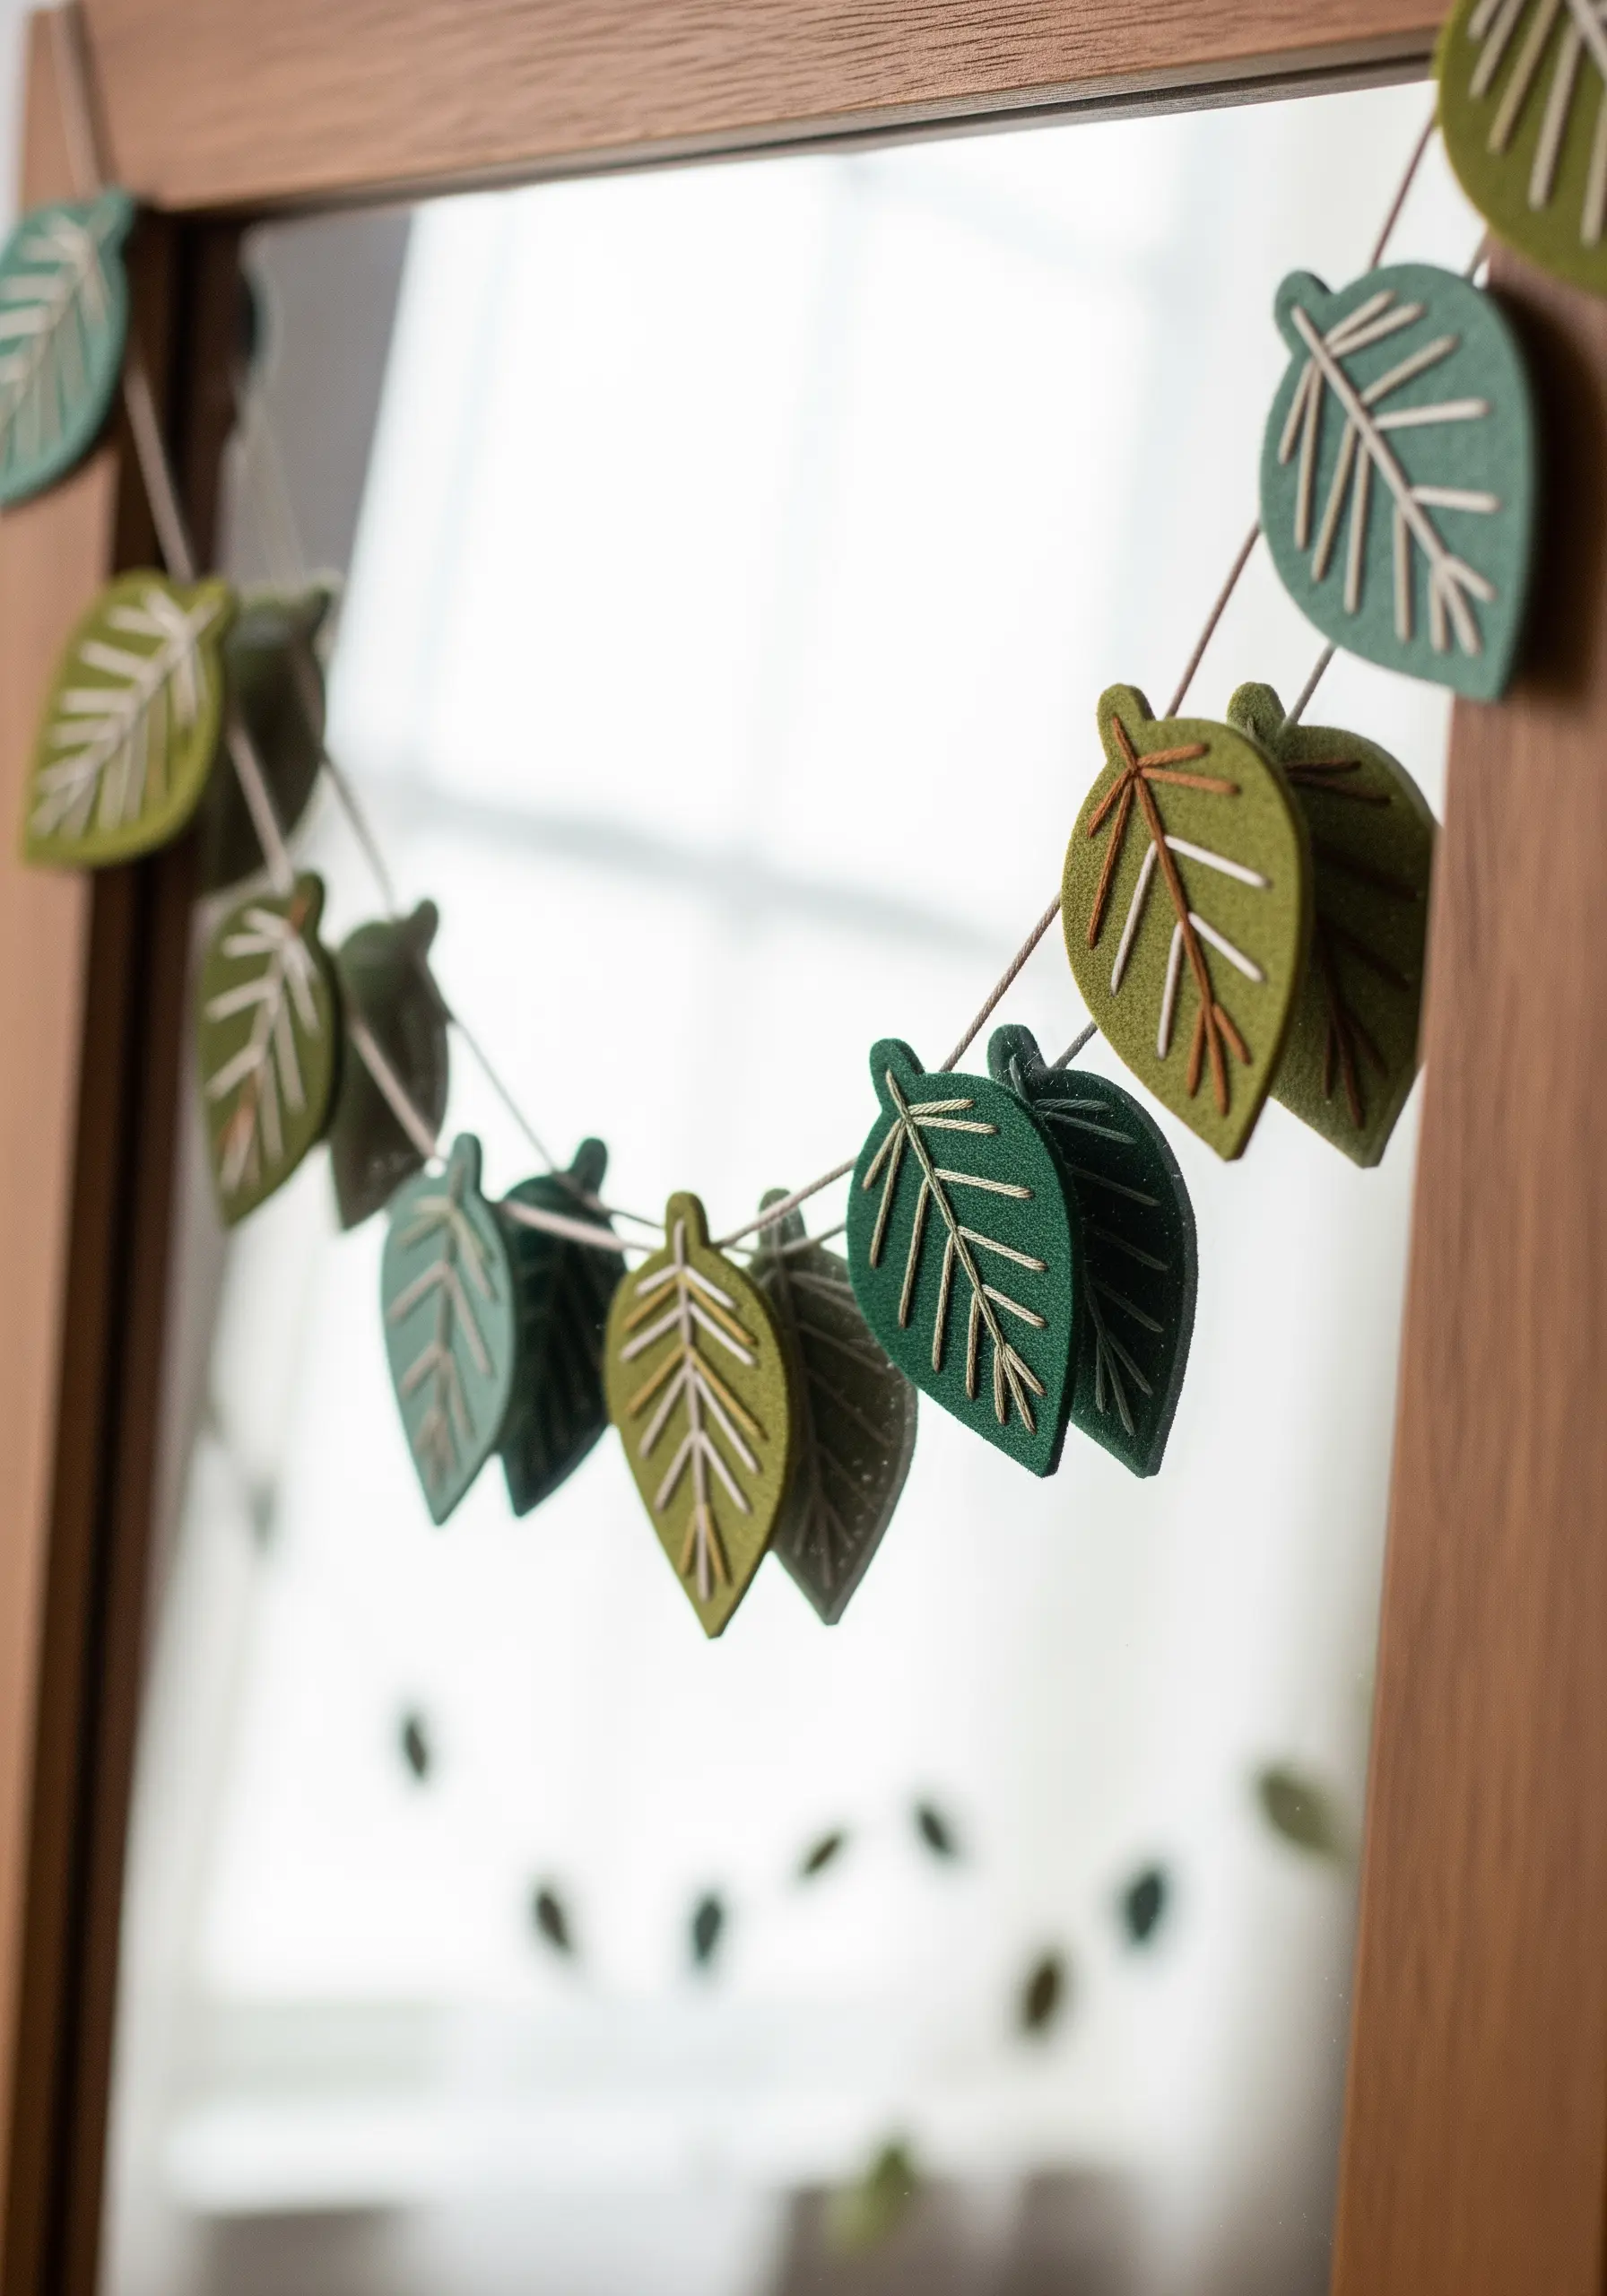
Create a lush, textural garland with a simple layering technique.
For each leaf, cut one shape from a dark green felt and a slightly smaller, identical shape from a lighter green.
Place the lighter piece on top and use a simple backstitch in a contrasting cream thread to stitch the veins.
This single step both adds realistic detail and secures the two layers together, creating depth and color variation with minimal effort.
22. Elegant Pantry Labels with Botanical Accents
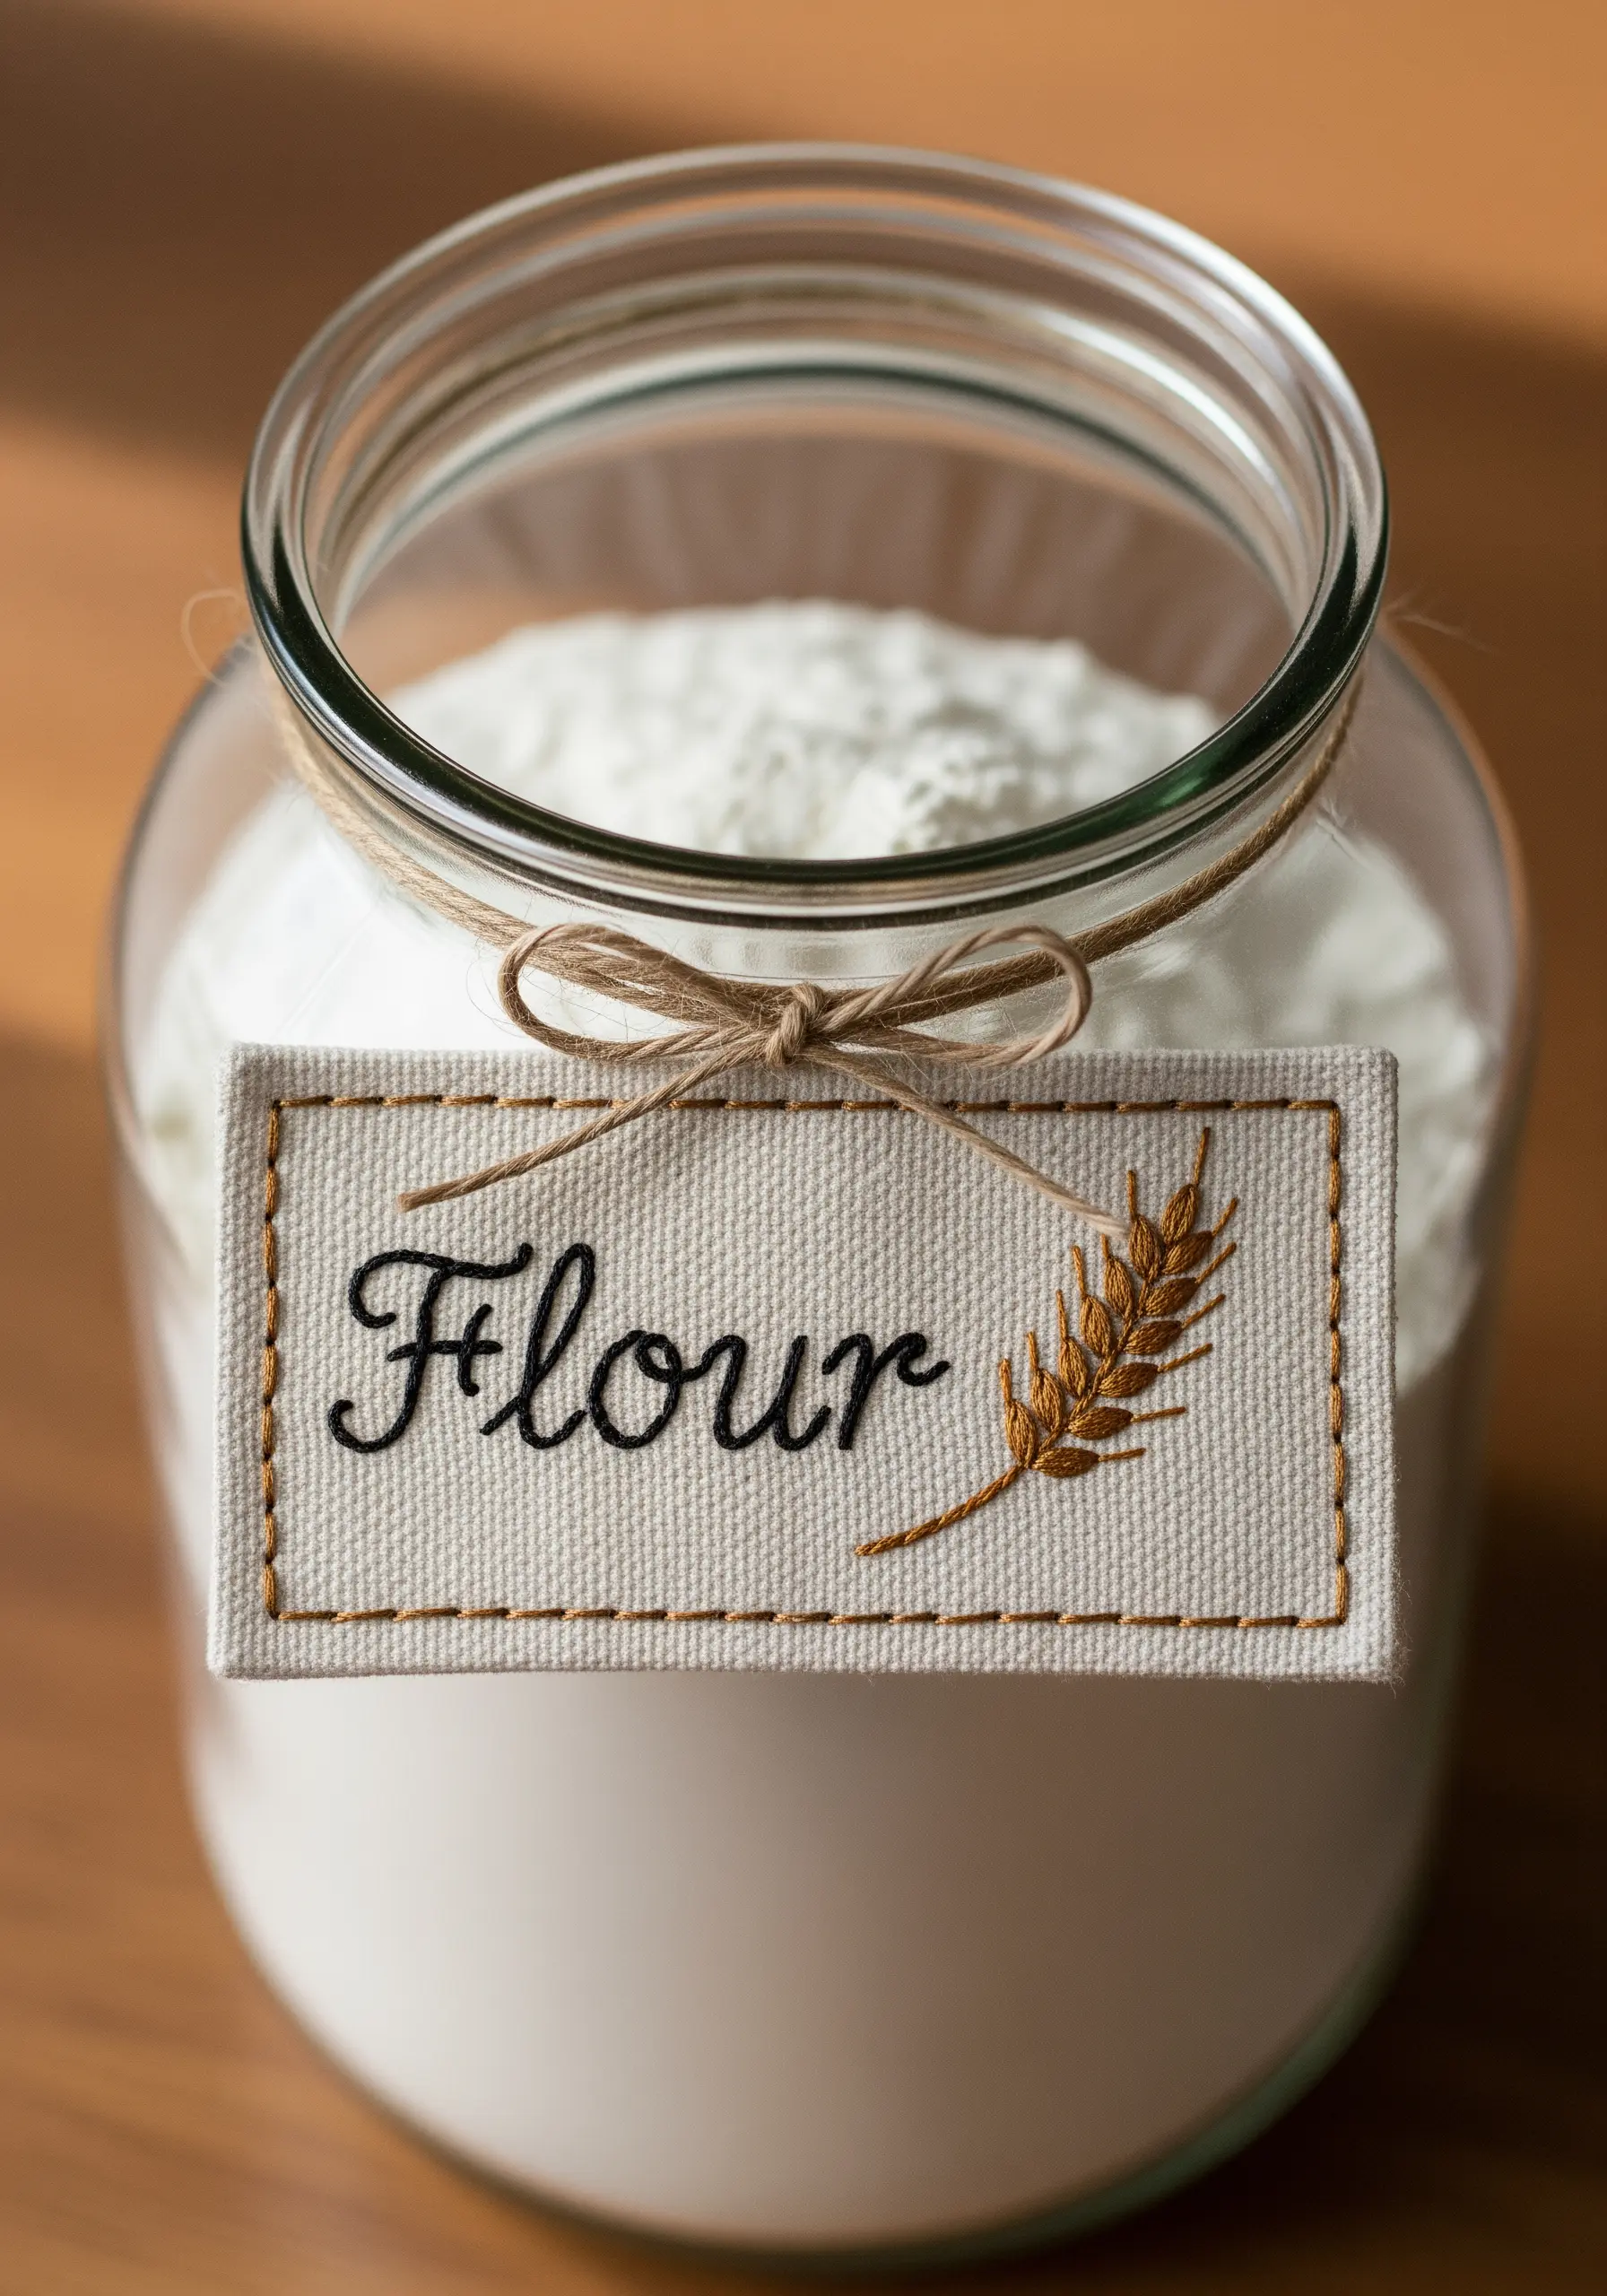
Give your pantry a bespoke, organized feel with custom embroidered labels.
Work on a piece of heavy canvas or linen for durability. A clean backstitch is perfect for the lettering, while a combination of satin stitch and stem stitch creates the dimensional wheat stalk.
To give your label a clean, patch-like finish, add a simple running stitch border before cutting it out and attaching it to your jar.
23. Ornate Scissor Fobs with Beading and Embroidery
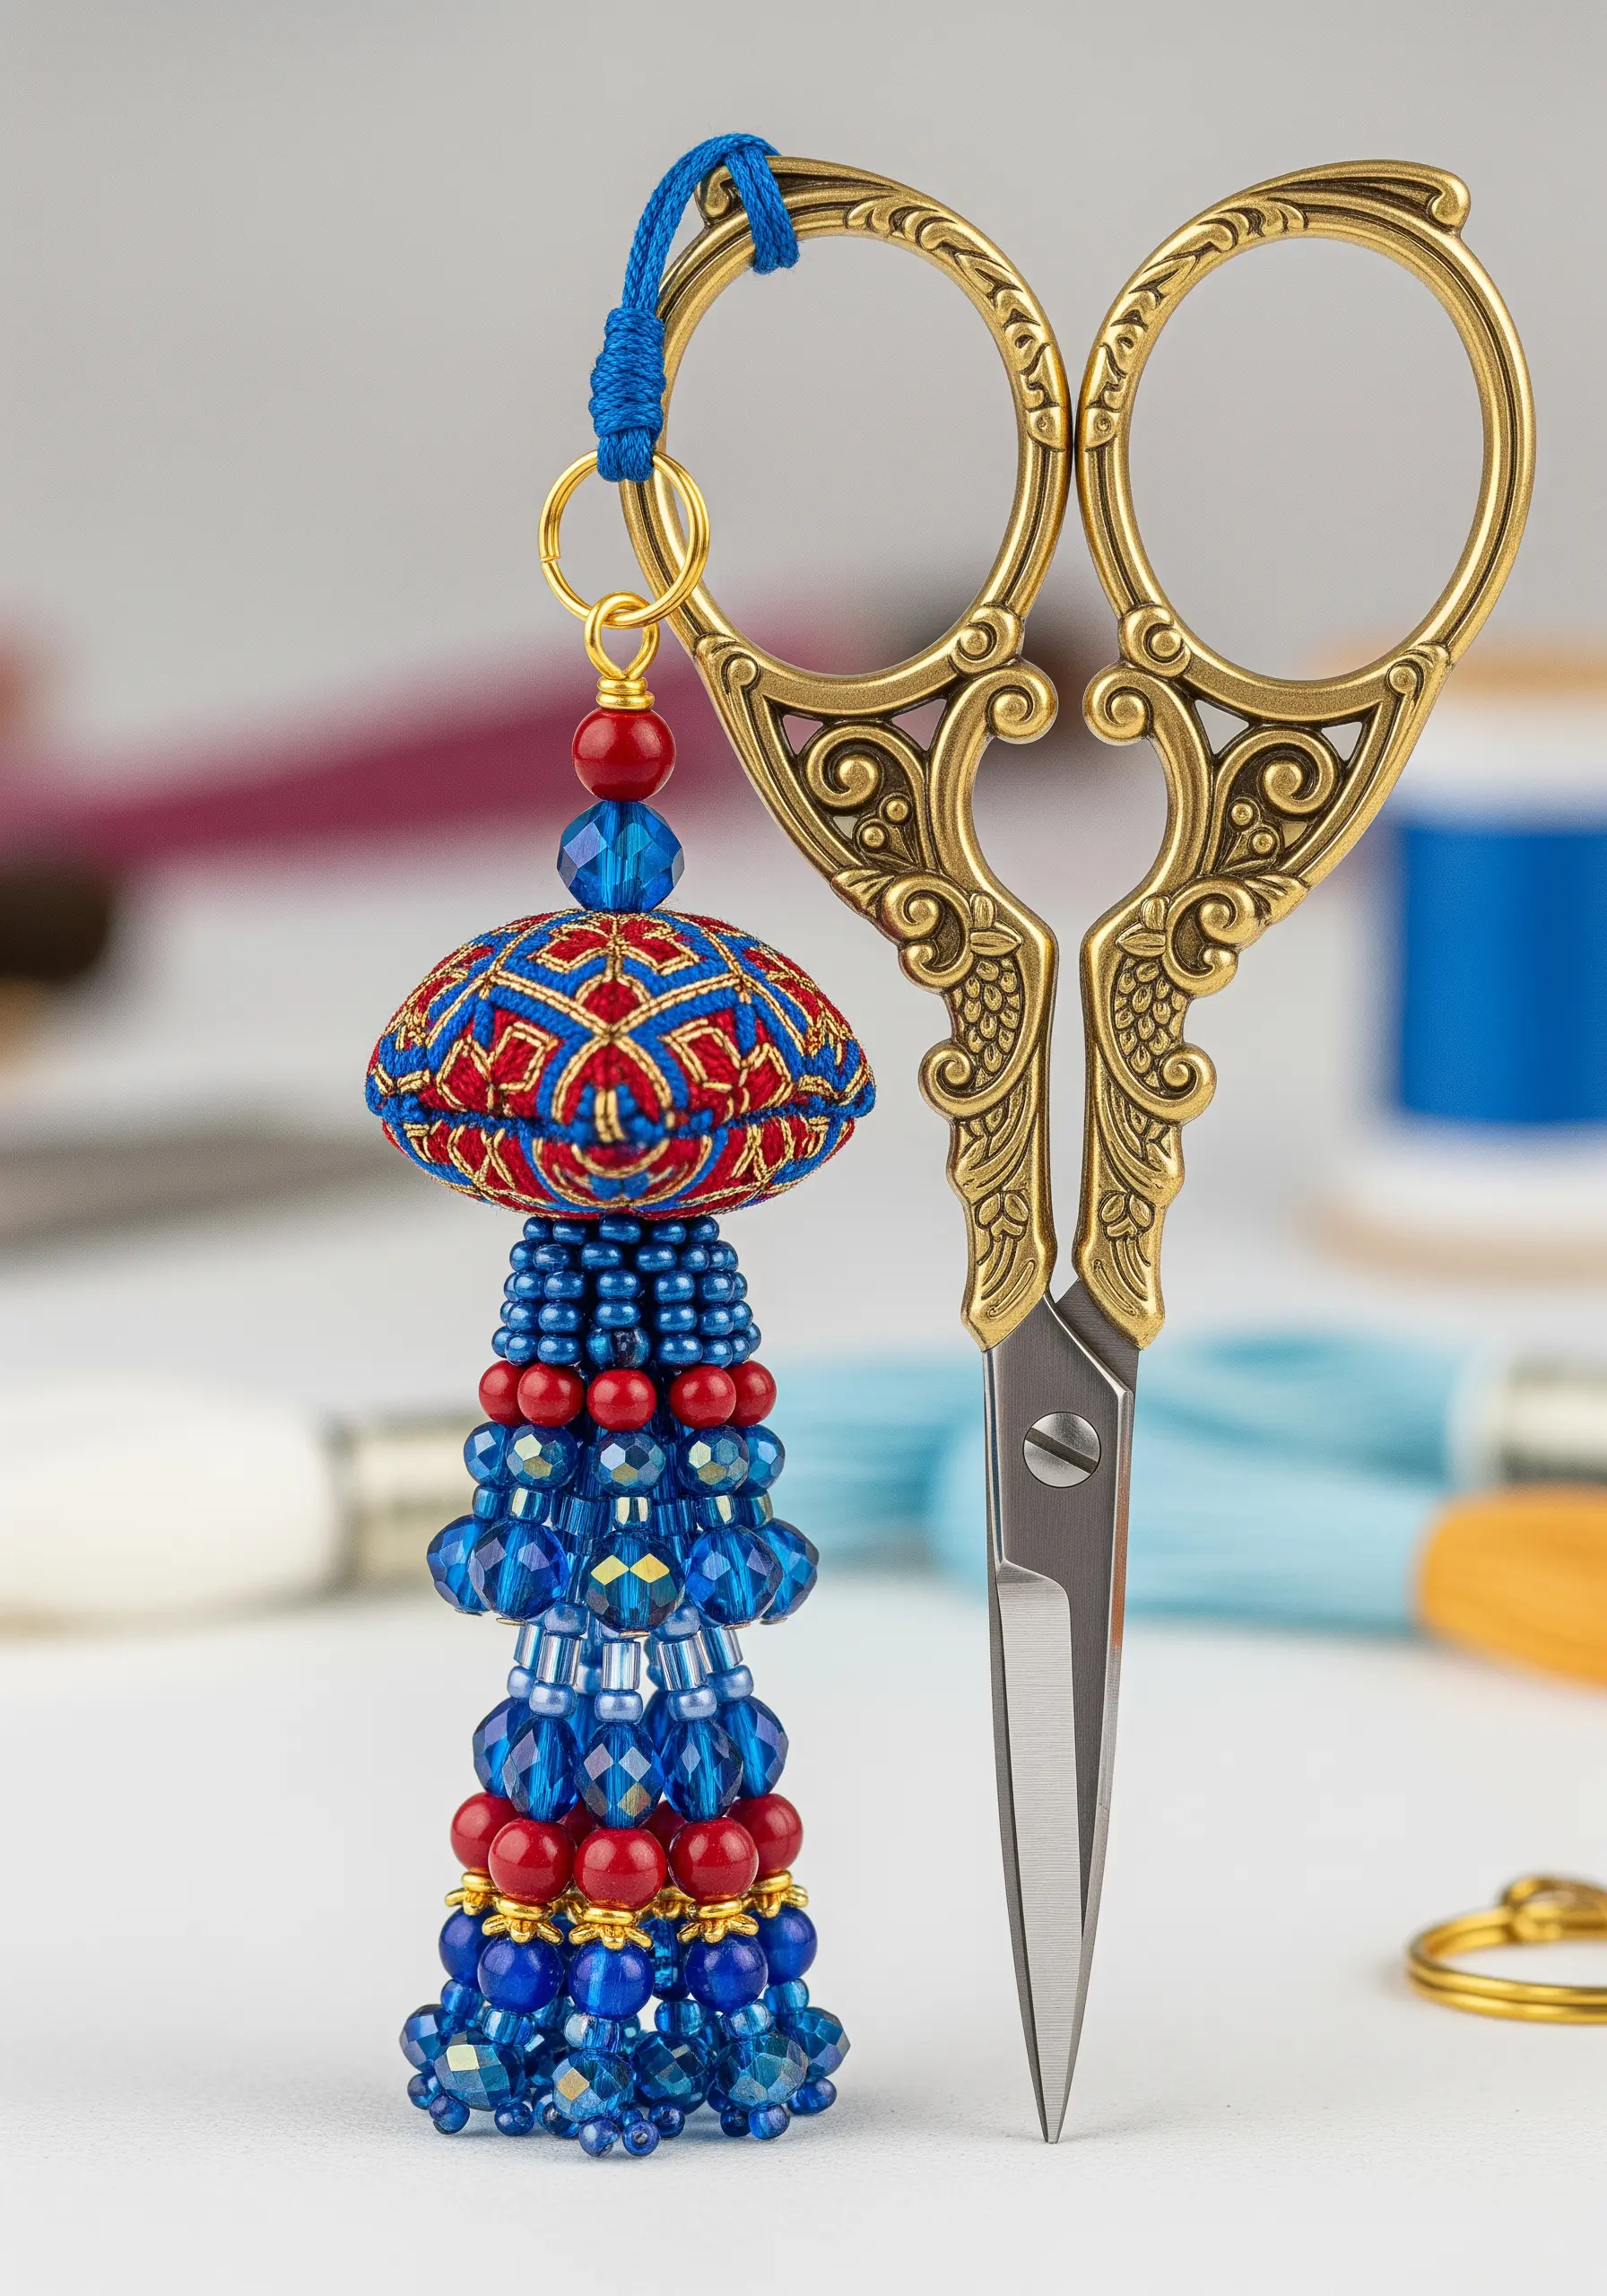
Elevate your most-used tools by creating a beautiful scissor fob that is a joy to see and hold.
This piece combines geometric embroidery on a three-dimensional, fabric-covered form with intricate beadwork.
The key to this opulent look is to stitch your embroidery pattern first, then go back and accentuate the lines and intersections with seed beads and crystals.
It transforms the fob from a simple accessory into a small piece of jewelry for your scissors.
24. Miniature Woven Textiles for Unique Decor
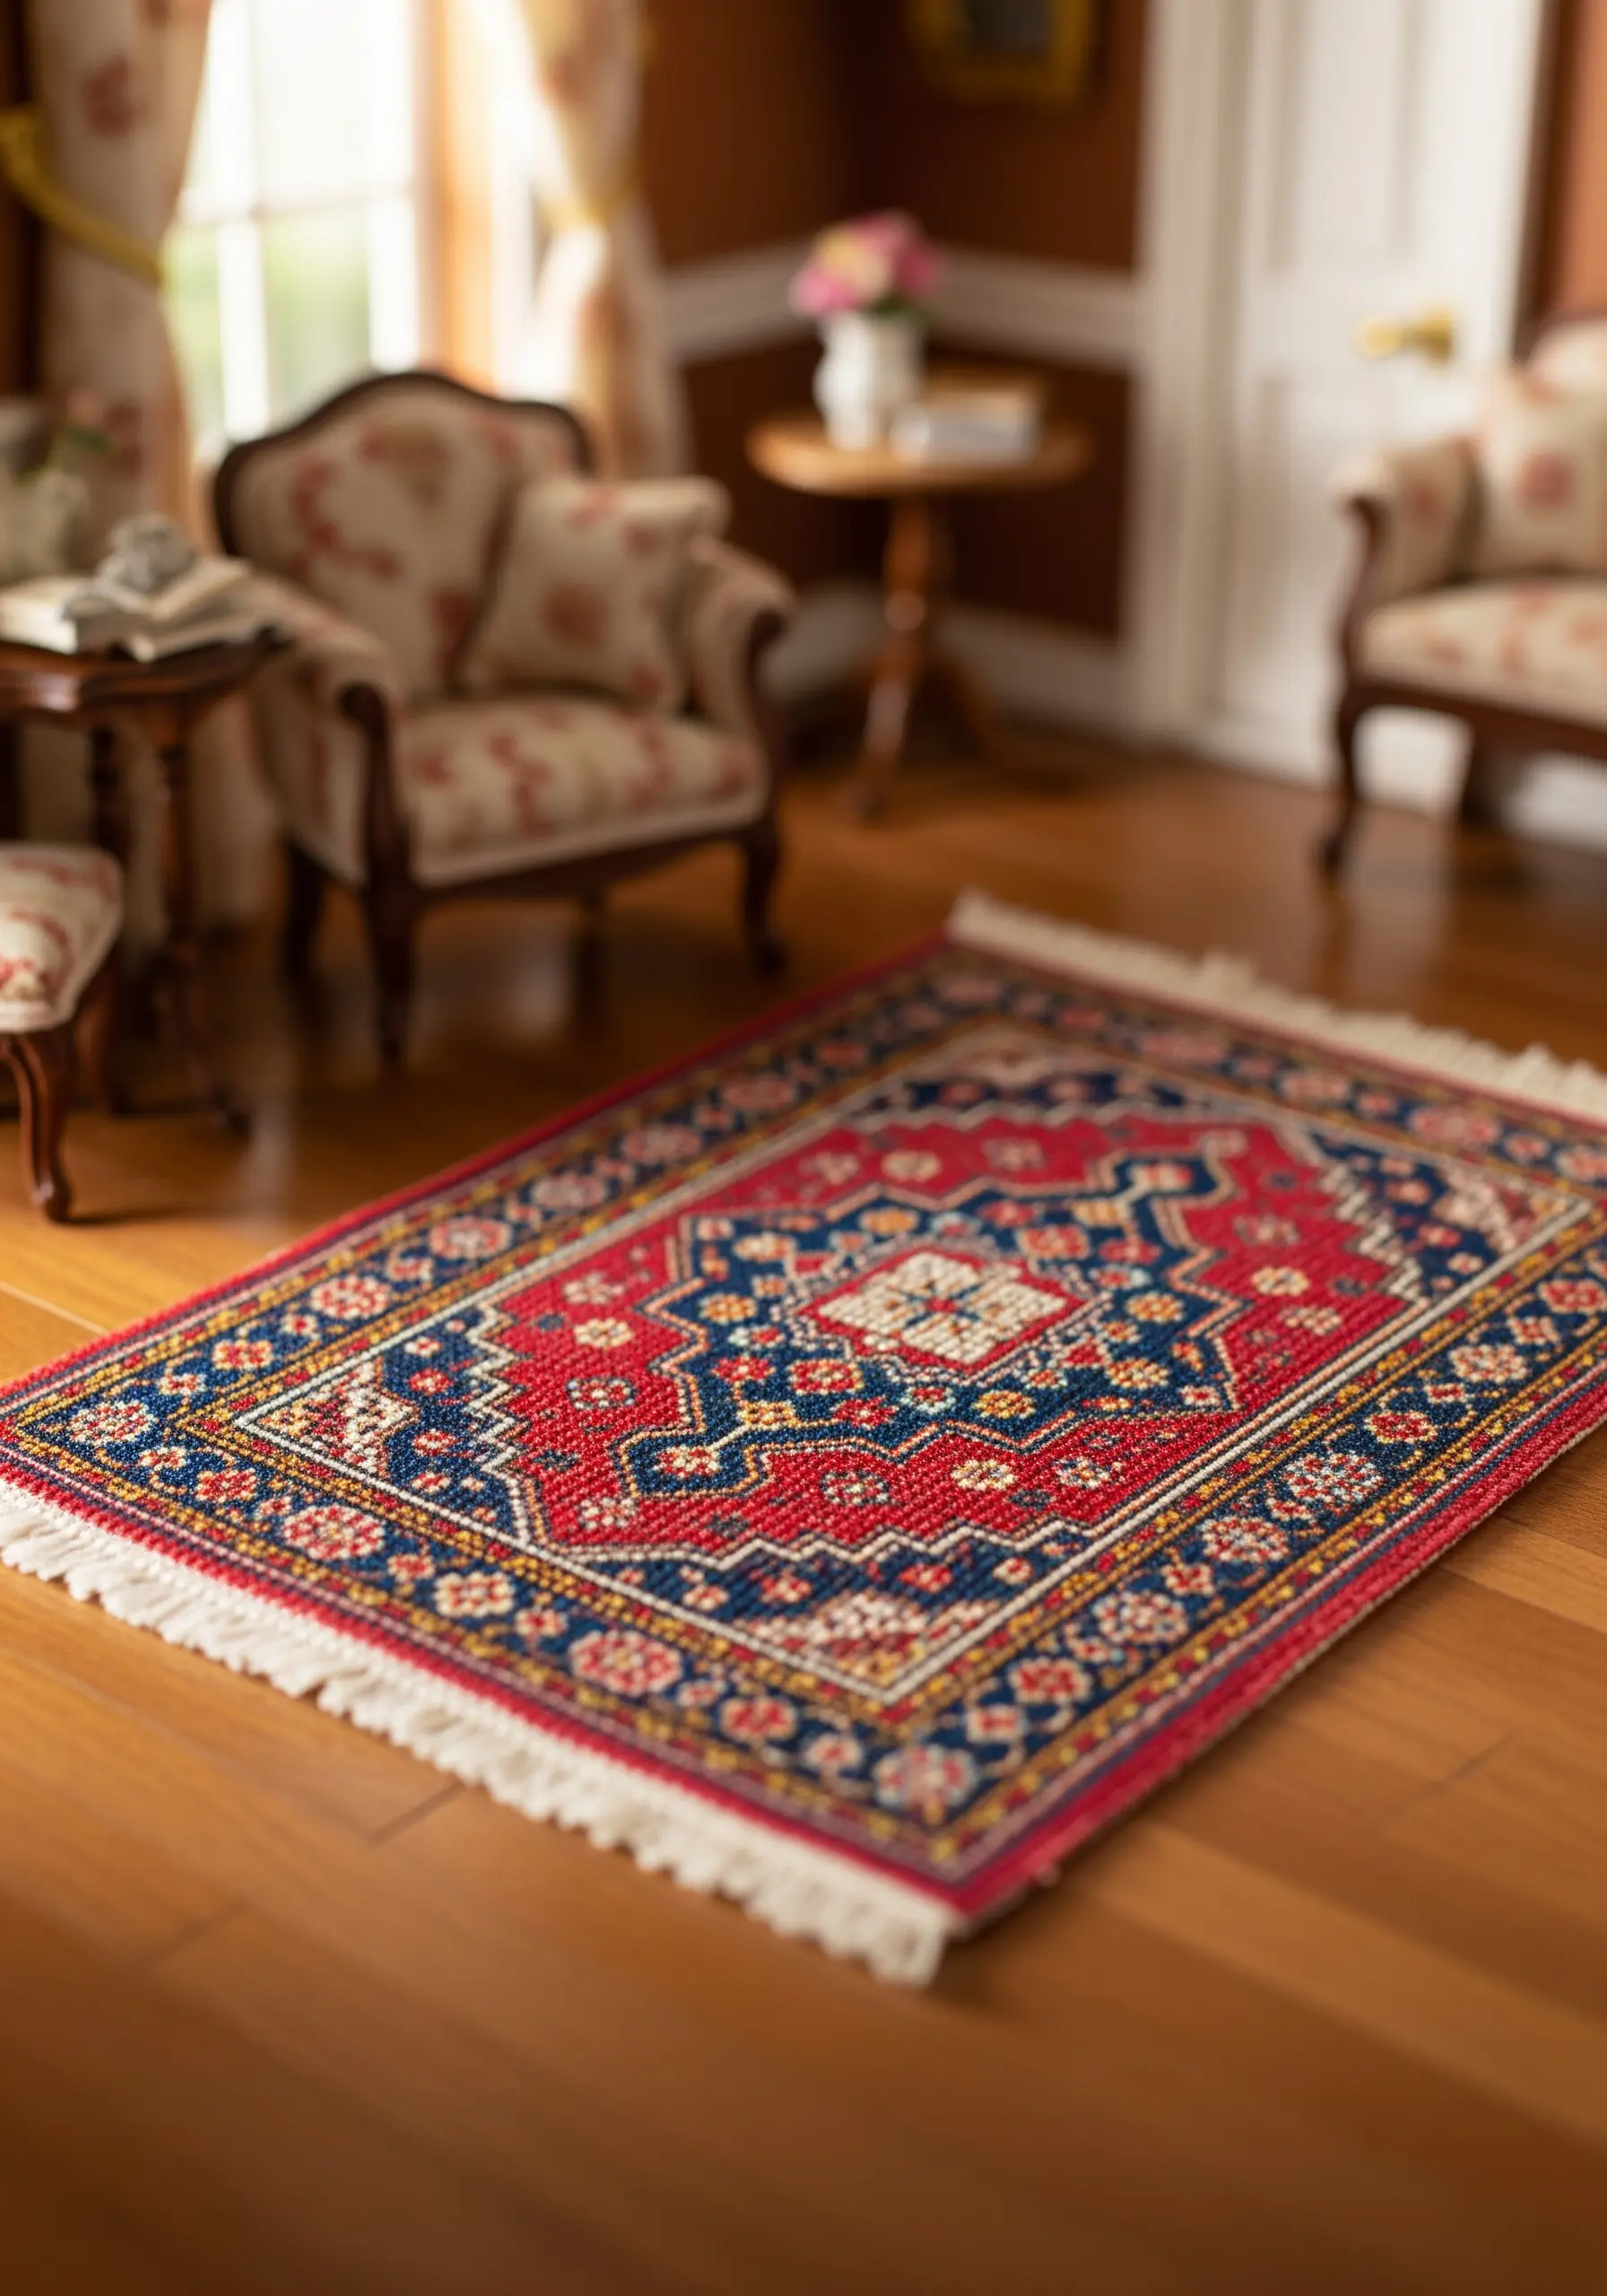
While this piece is technically a miniature weaving, you can achieve a very similar look with needlepoint techniques on canvas.
To replicate the dense, pixelated look of a traditional rug, use tent stitch or half cross stitch on a fine needlepoint canvas.
Plot out your geometric design on graph paper first. The discipline of working within a grid is what allows you to create such intricate, repeating patterns on a miniature scale.
25. Sculptural Brooches with Detached Stitches
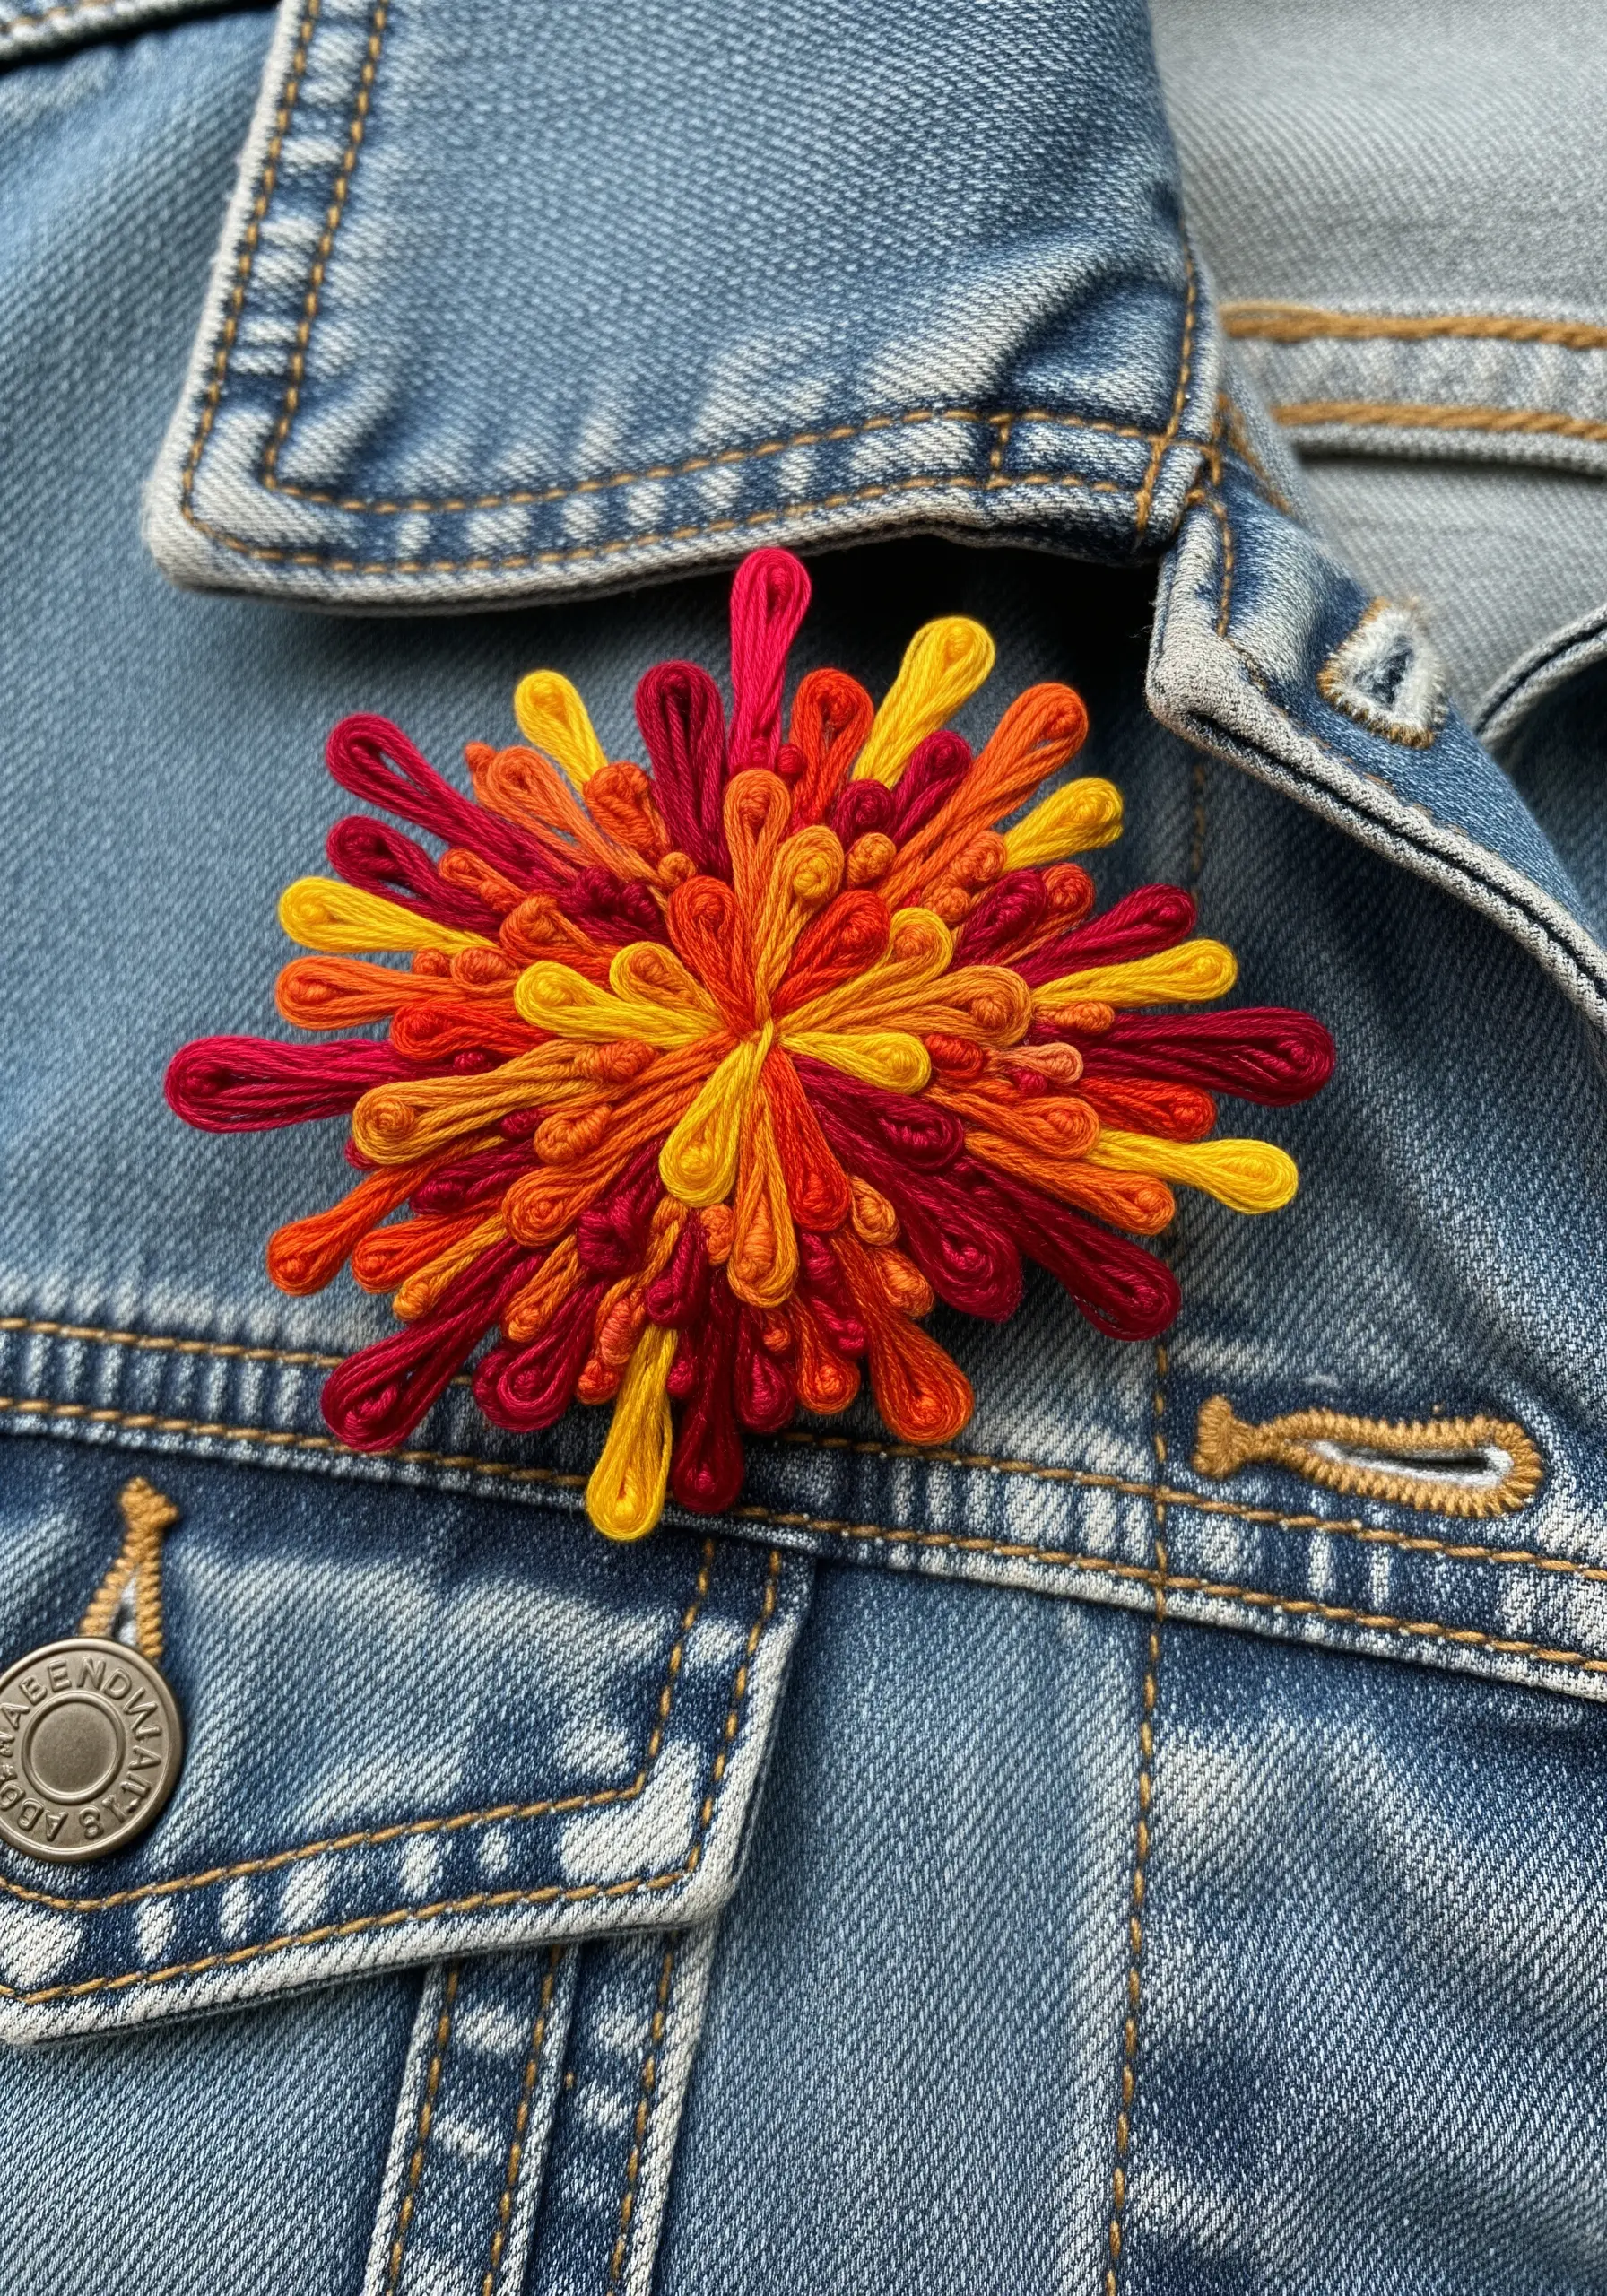
Create this vibrant, textural burst using detached stitches worked in a dense cluster.
You can use a detached chain stitch, leaving a long loop before tacking it down, or a bullion knot with many wraps.
Work the stitches in layers, varying the length, direction, and color to build up a dynamic, three-dimensional form.
It’s a fantastic way to create abstract, wearable art that has incredible movement and texture.
26. Meditative Mandalas on Soft Linen
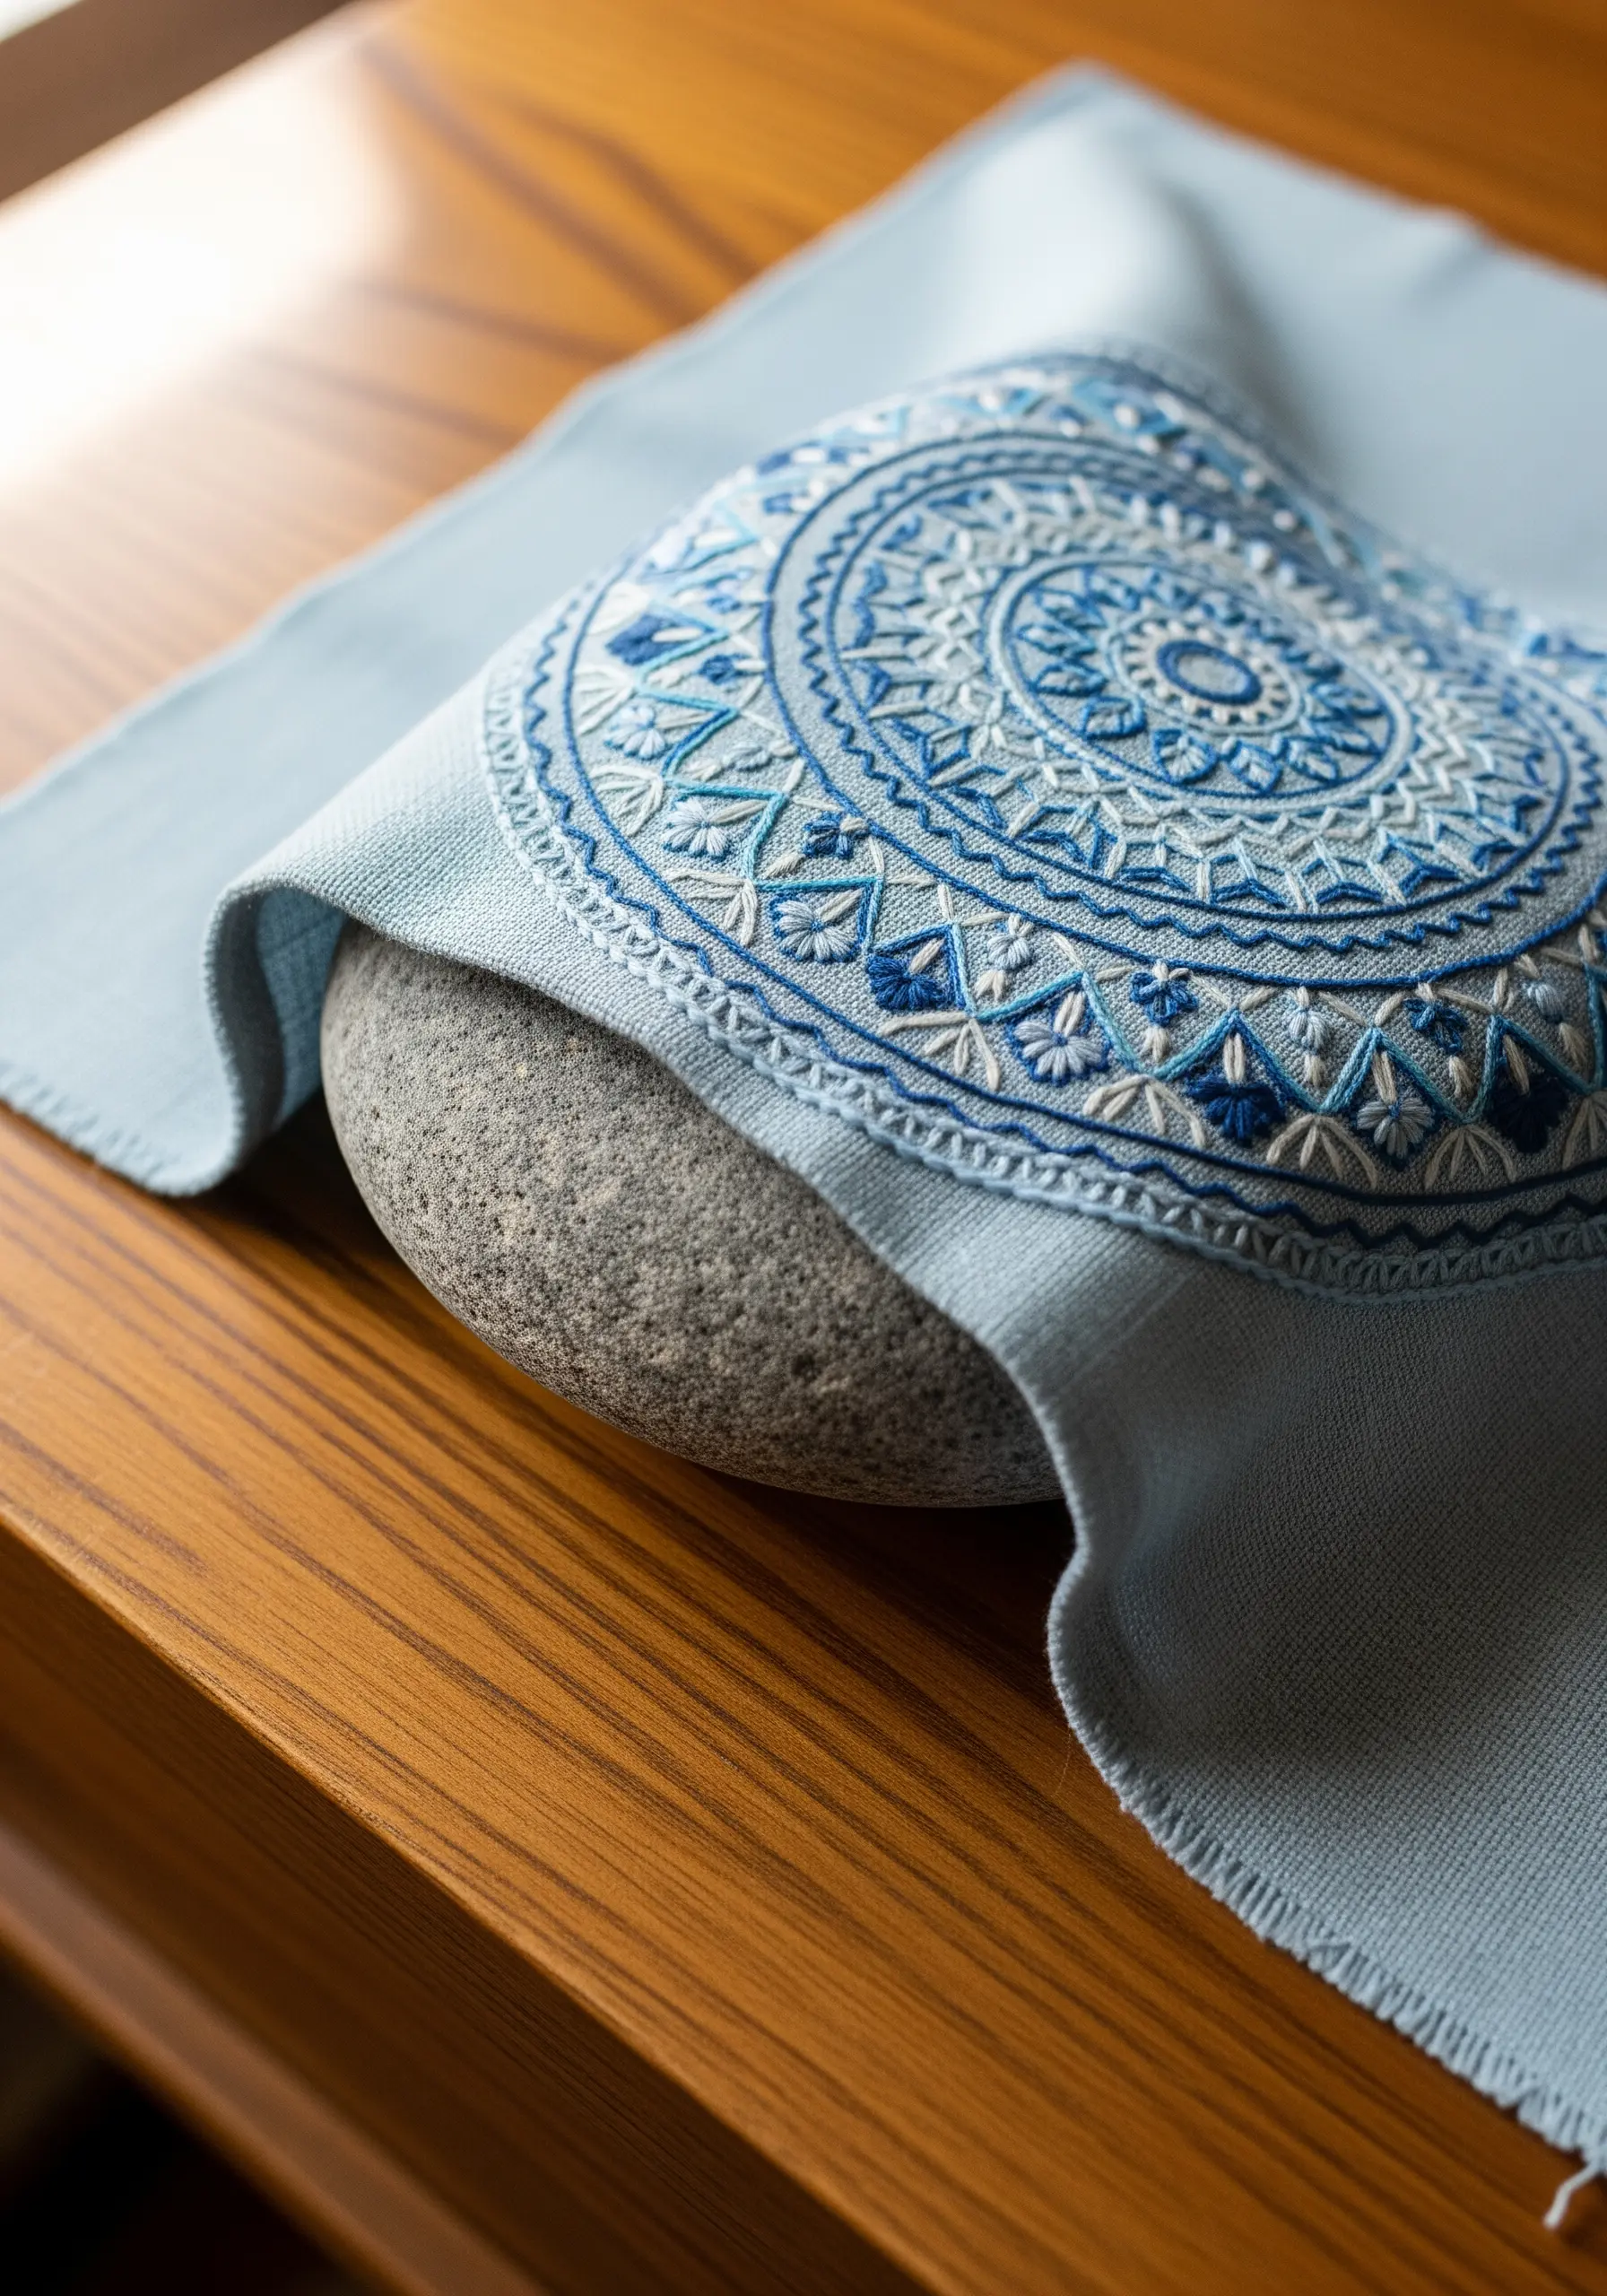
The serene beauty of a mandala lies in its symmetry and rhythm.
To ensure a perfectly balanced design, start by drawing concentric circles on your fabric with a water-soluble marker.
Vary the stitches you use in each ring to create a rich texture—alternate between smooth satin stitch, linear backstitch, and dotted French knots.
Using a monochromatic color scheme, like these shades of blue, enhances the calming, meditative quality of the piece.
27. Miniature Hoop Art as Reusable Drink Charms
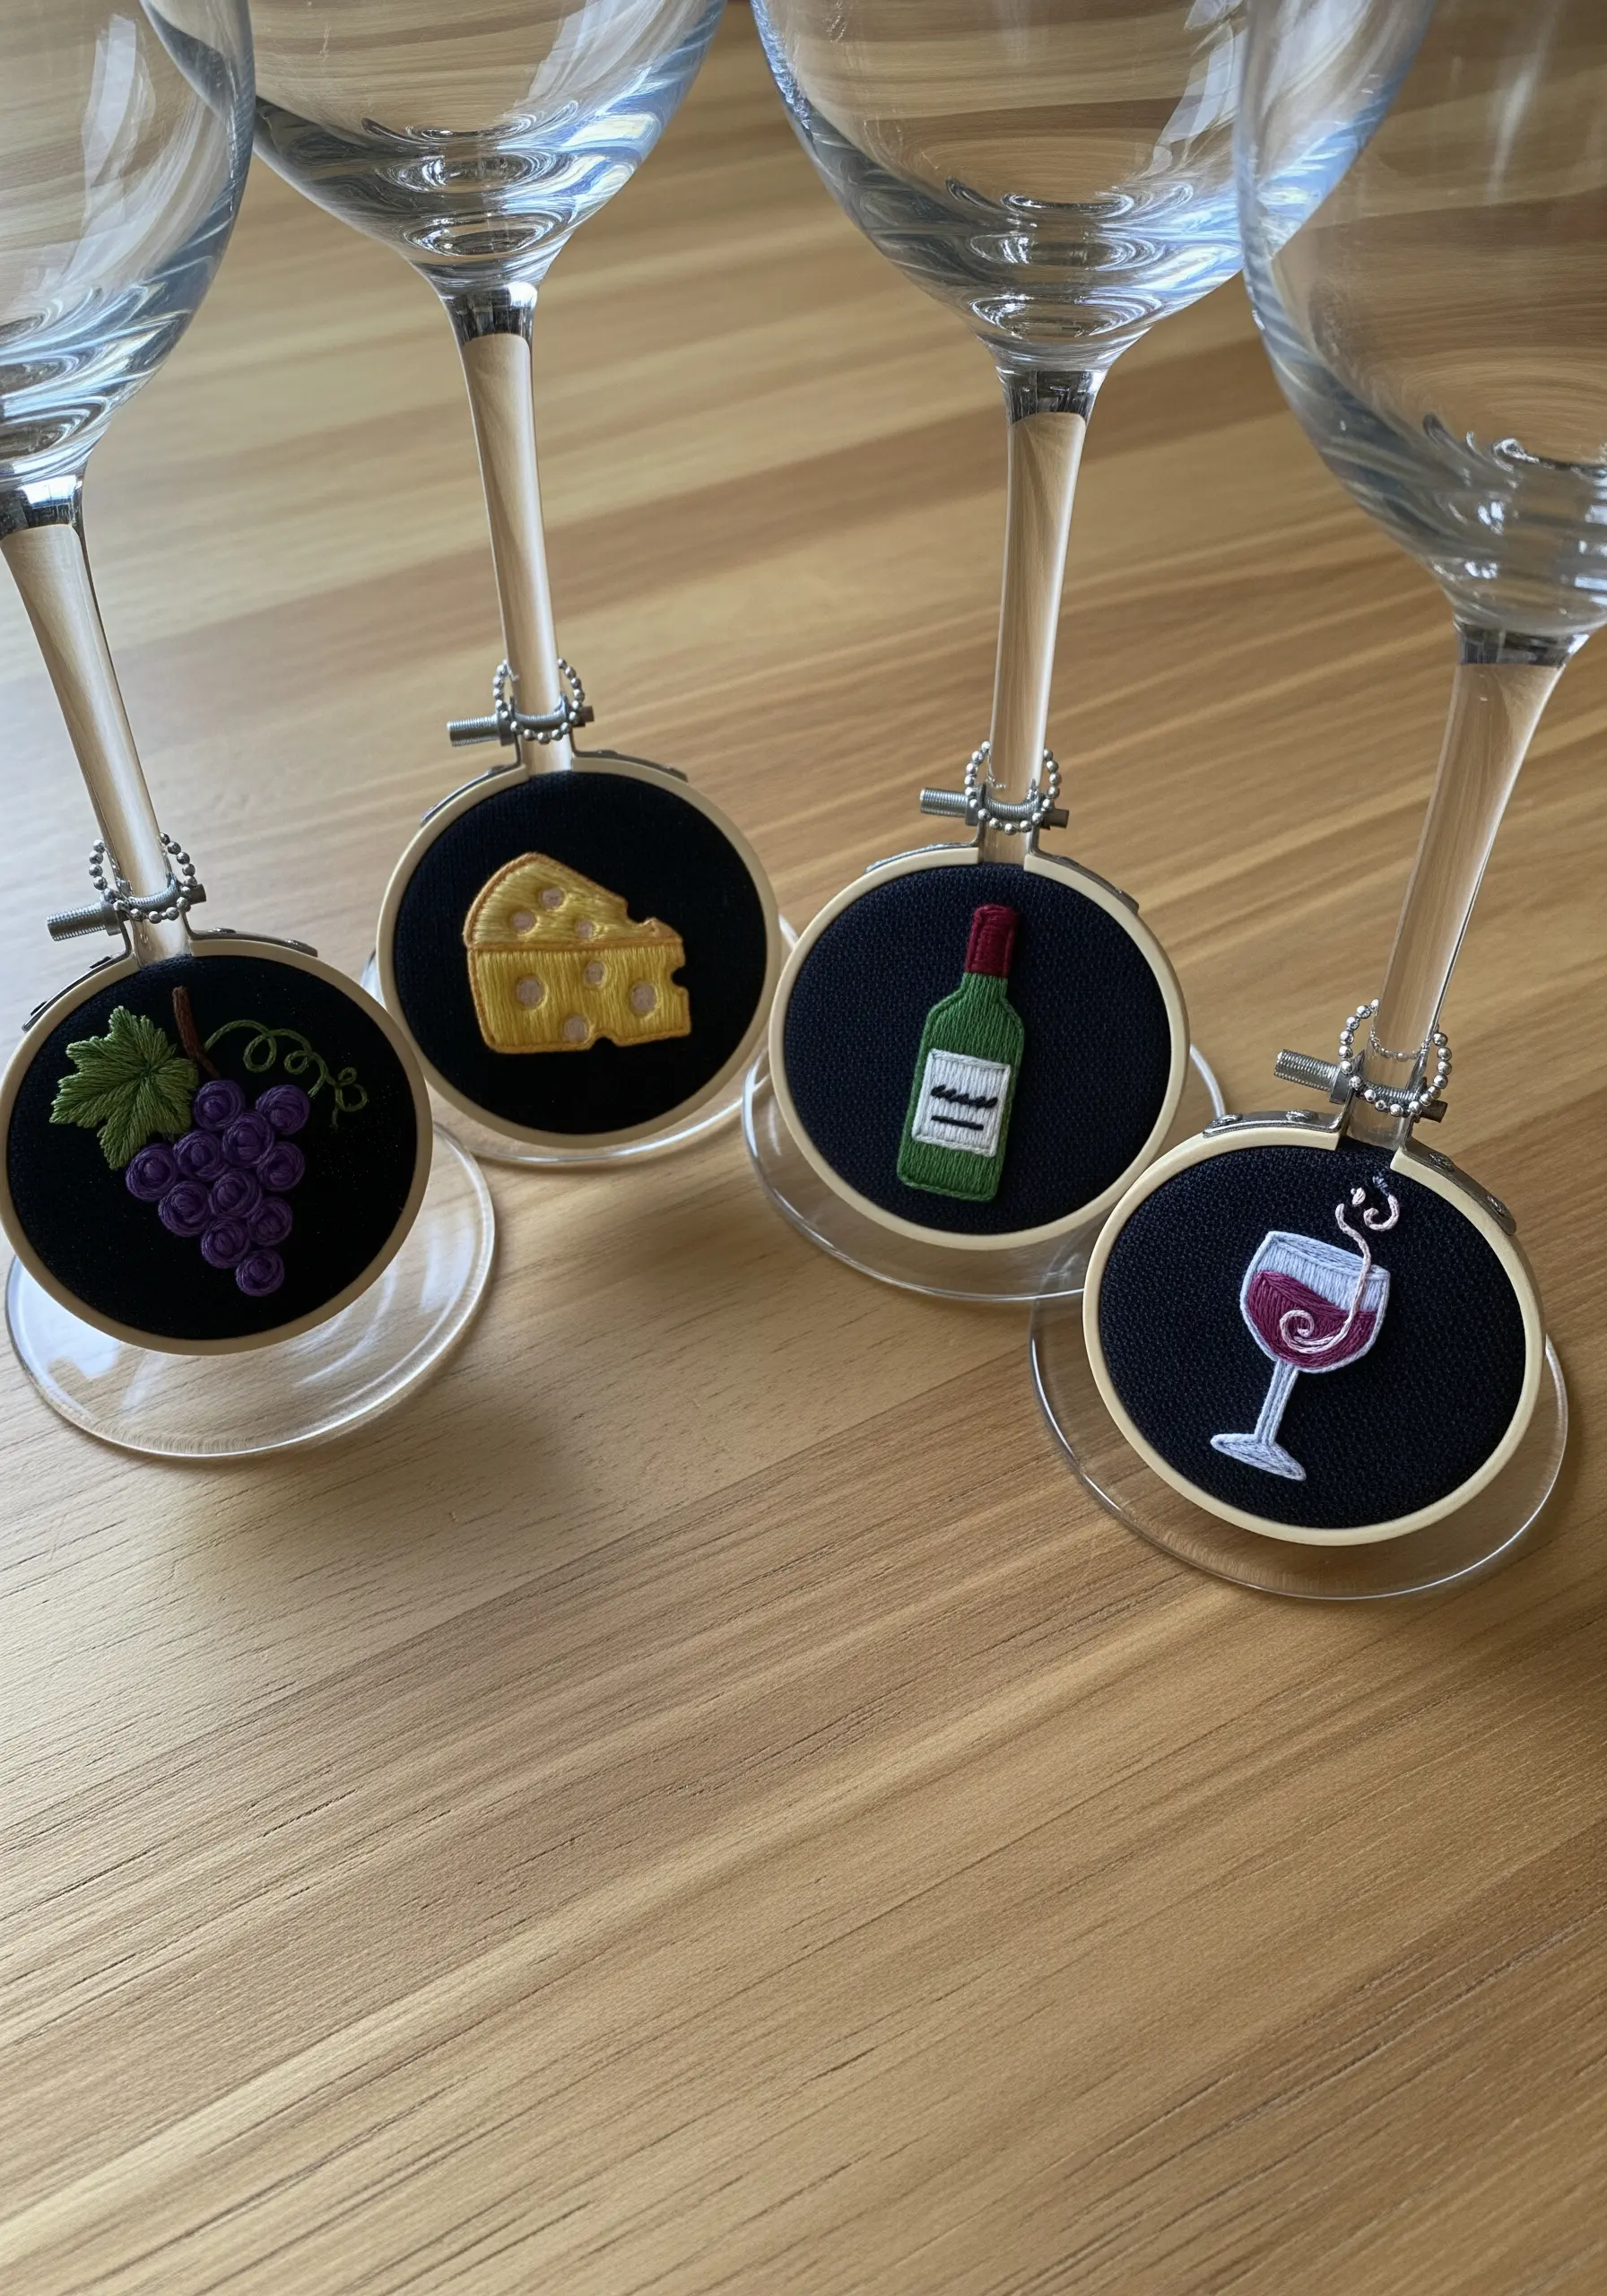
This is a clever and practical use for the tiny one-inch embroidery hoops available at craft stores.
Choose a dark, high-contrast fabric like black Aida cloth to make your colorful motifs pop.
Keep the designs simple and graphic—a wedge of cheese, a bunch of grapes—using satin stitch for fills and a simple backstitch for outlines.
Just attach a small jump ring to the hoop’s hardware to create a functional, charming drink marker.
28. Functional Felt Pocket with a Blanket Stitch Finish
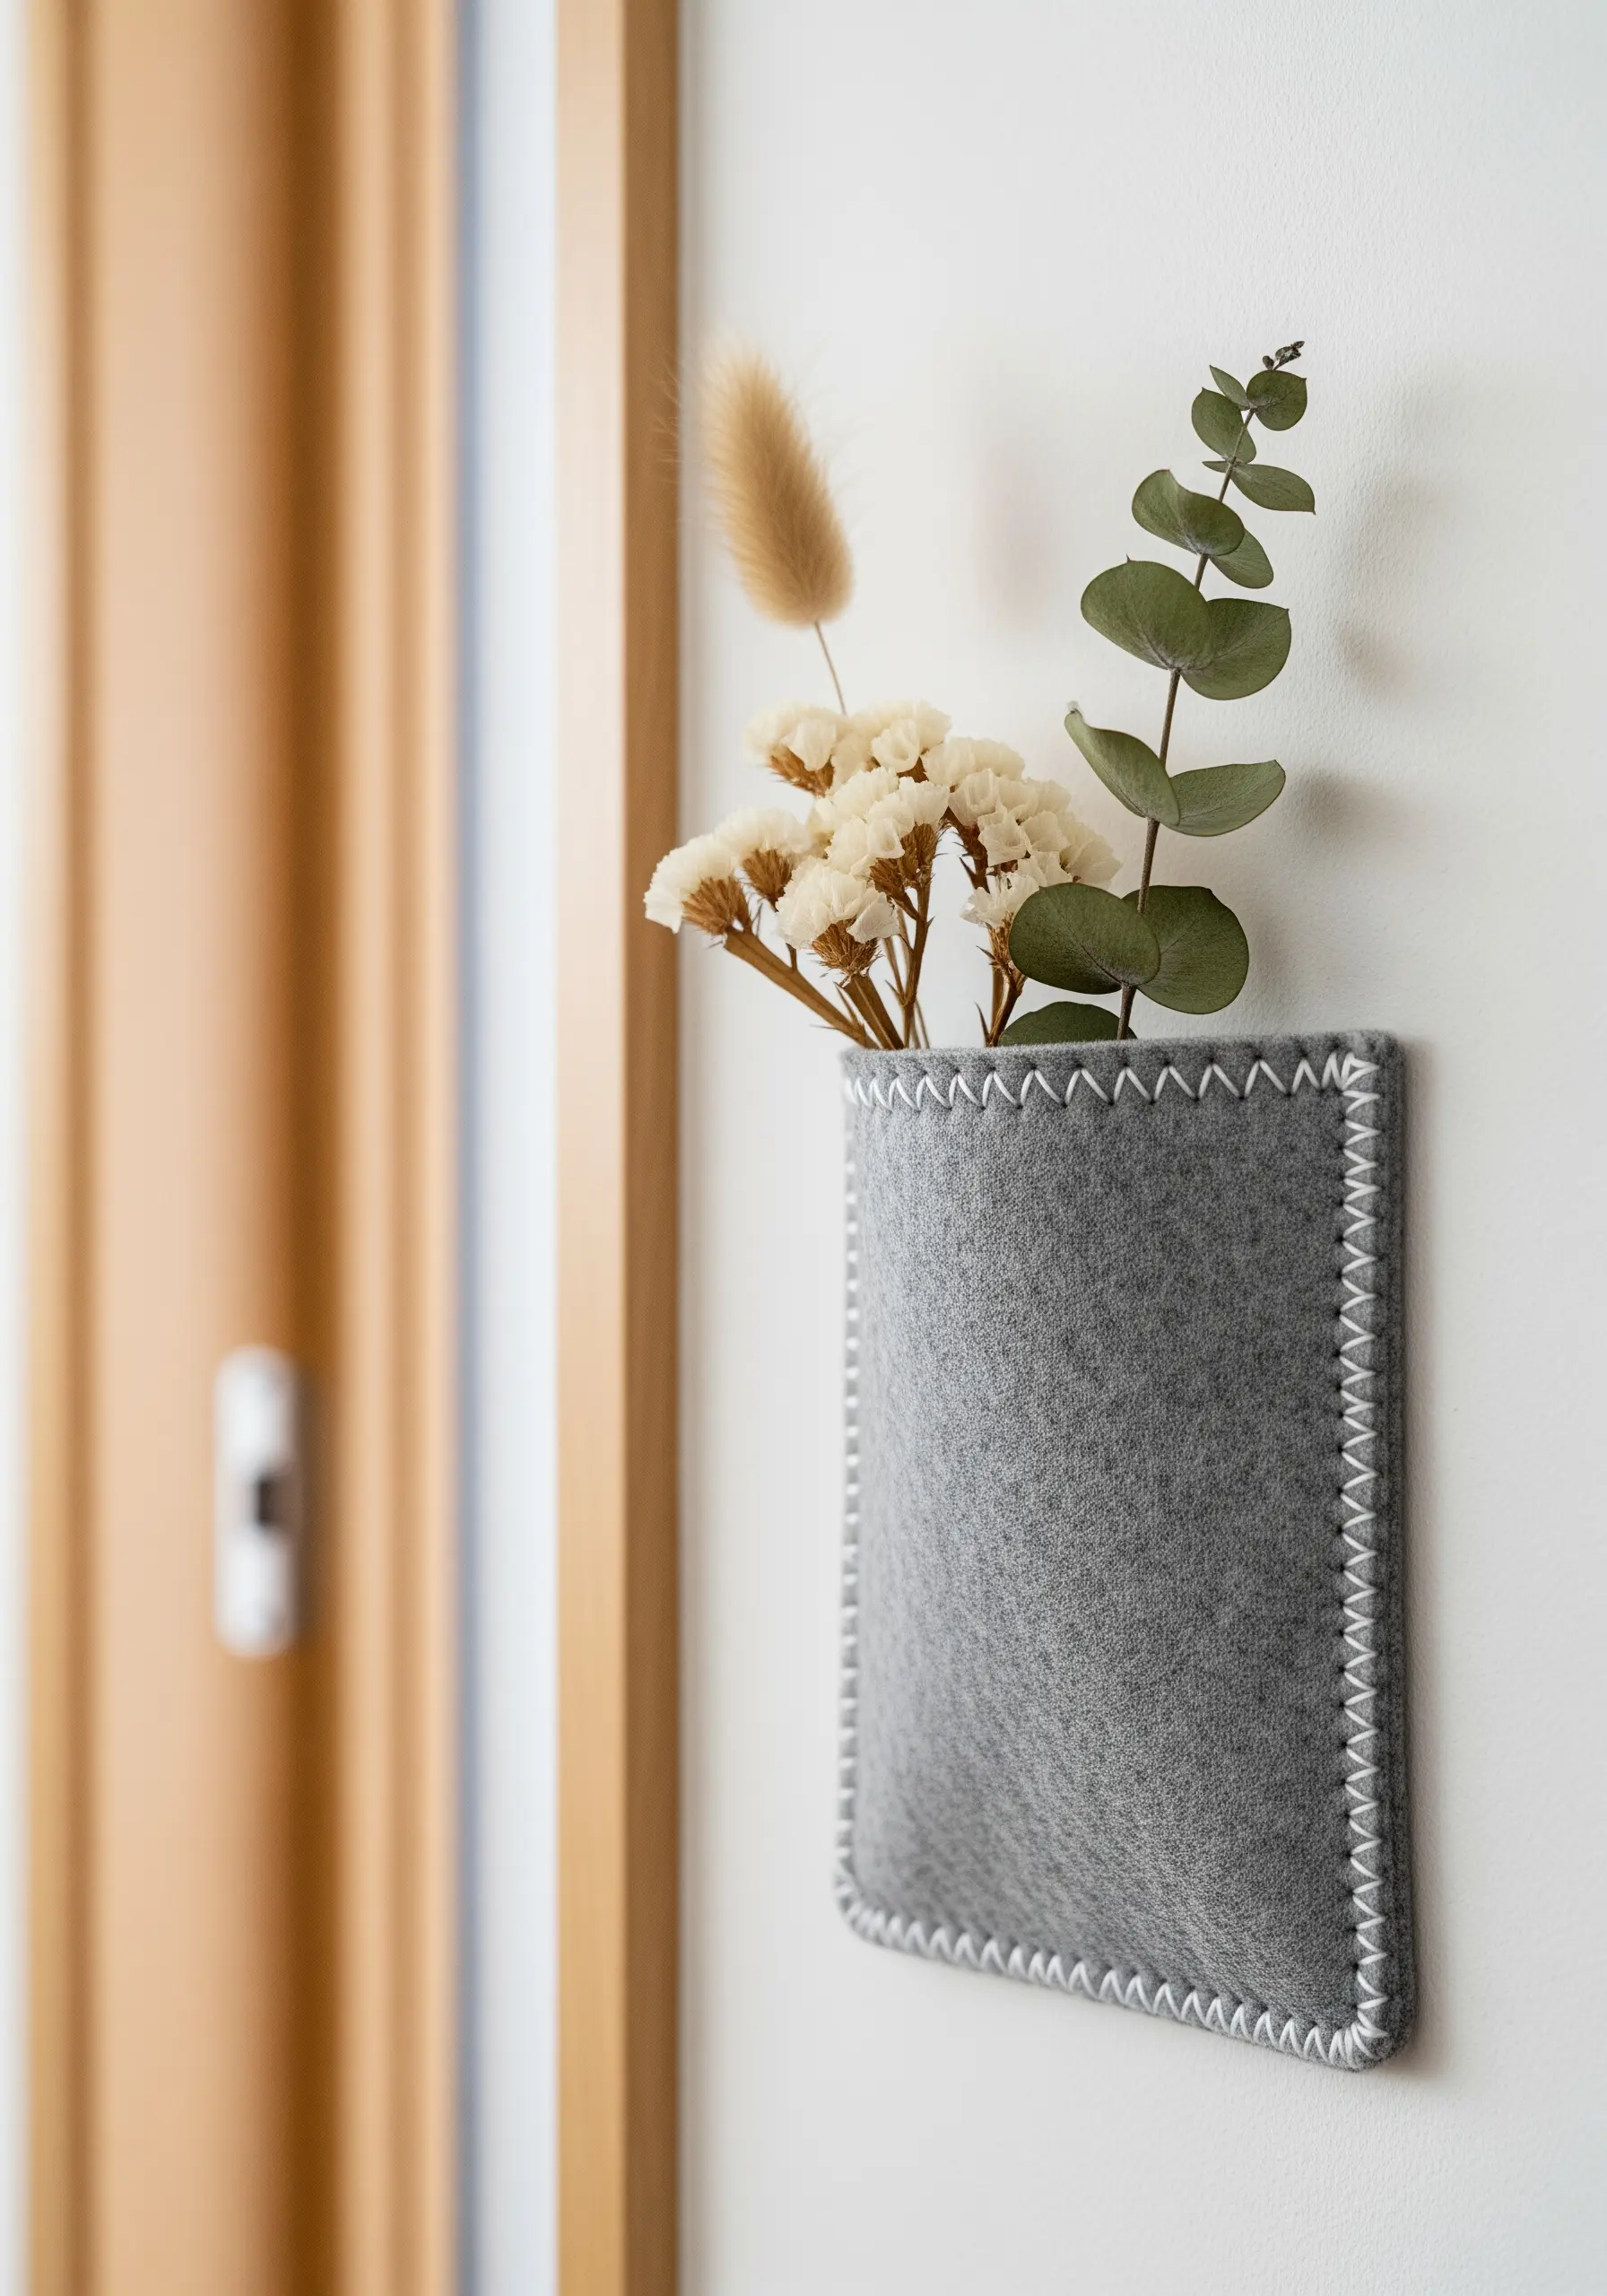
Sometimes, the most elegant design is the simplest.
This wall pocket is made from two pieces of thick craft felt, and its beauty lies in the execution of a single, perfect stitch.
Use a thick, contrasting pearl cotton thread to join the pieces with a blanket stitch.
Focus on keeping your stitch height and spacing perfectly even. The stitch is both the construction and the decoration, creating a clean, minimalist, and highly functional piece.
29. Stitching on Leather for a Modern Cord Keeper
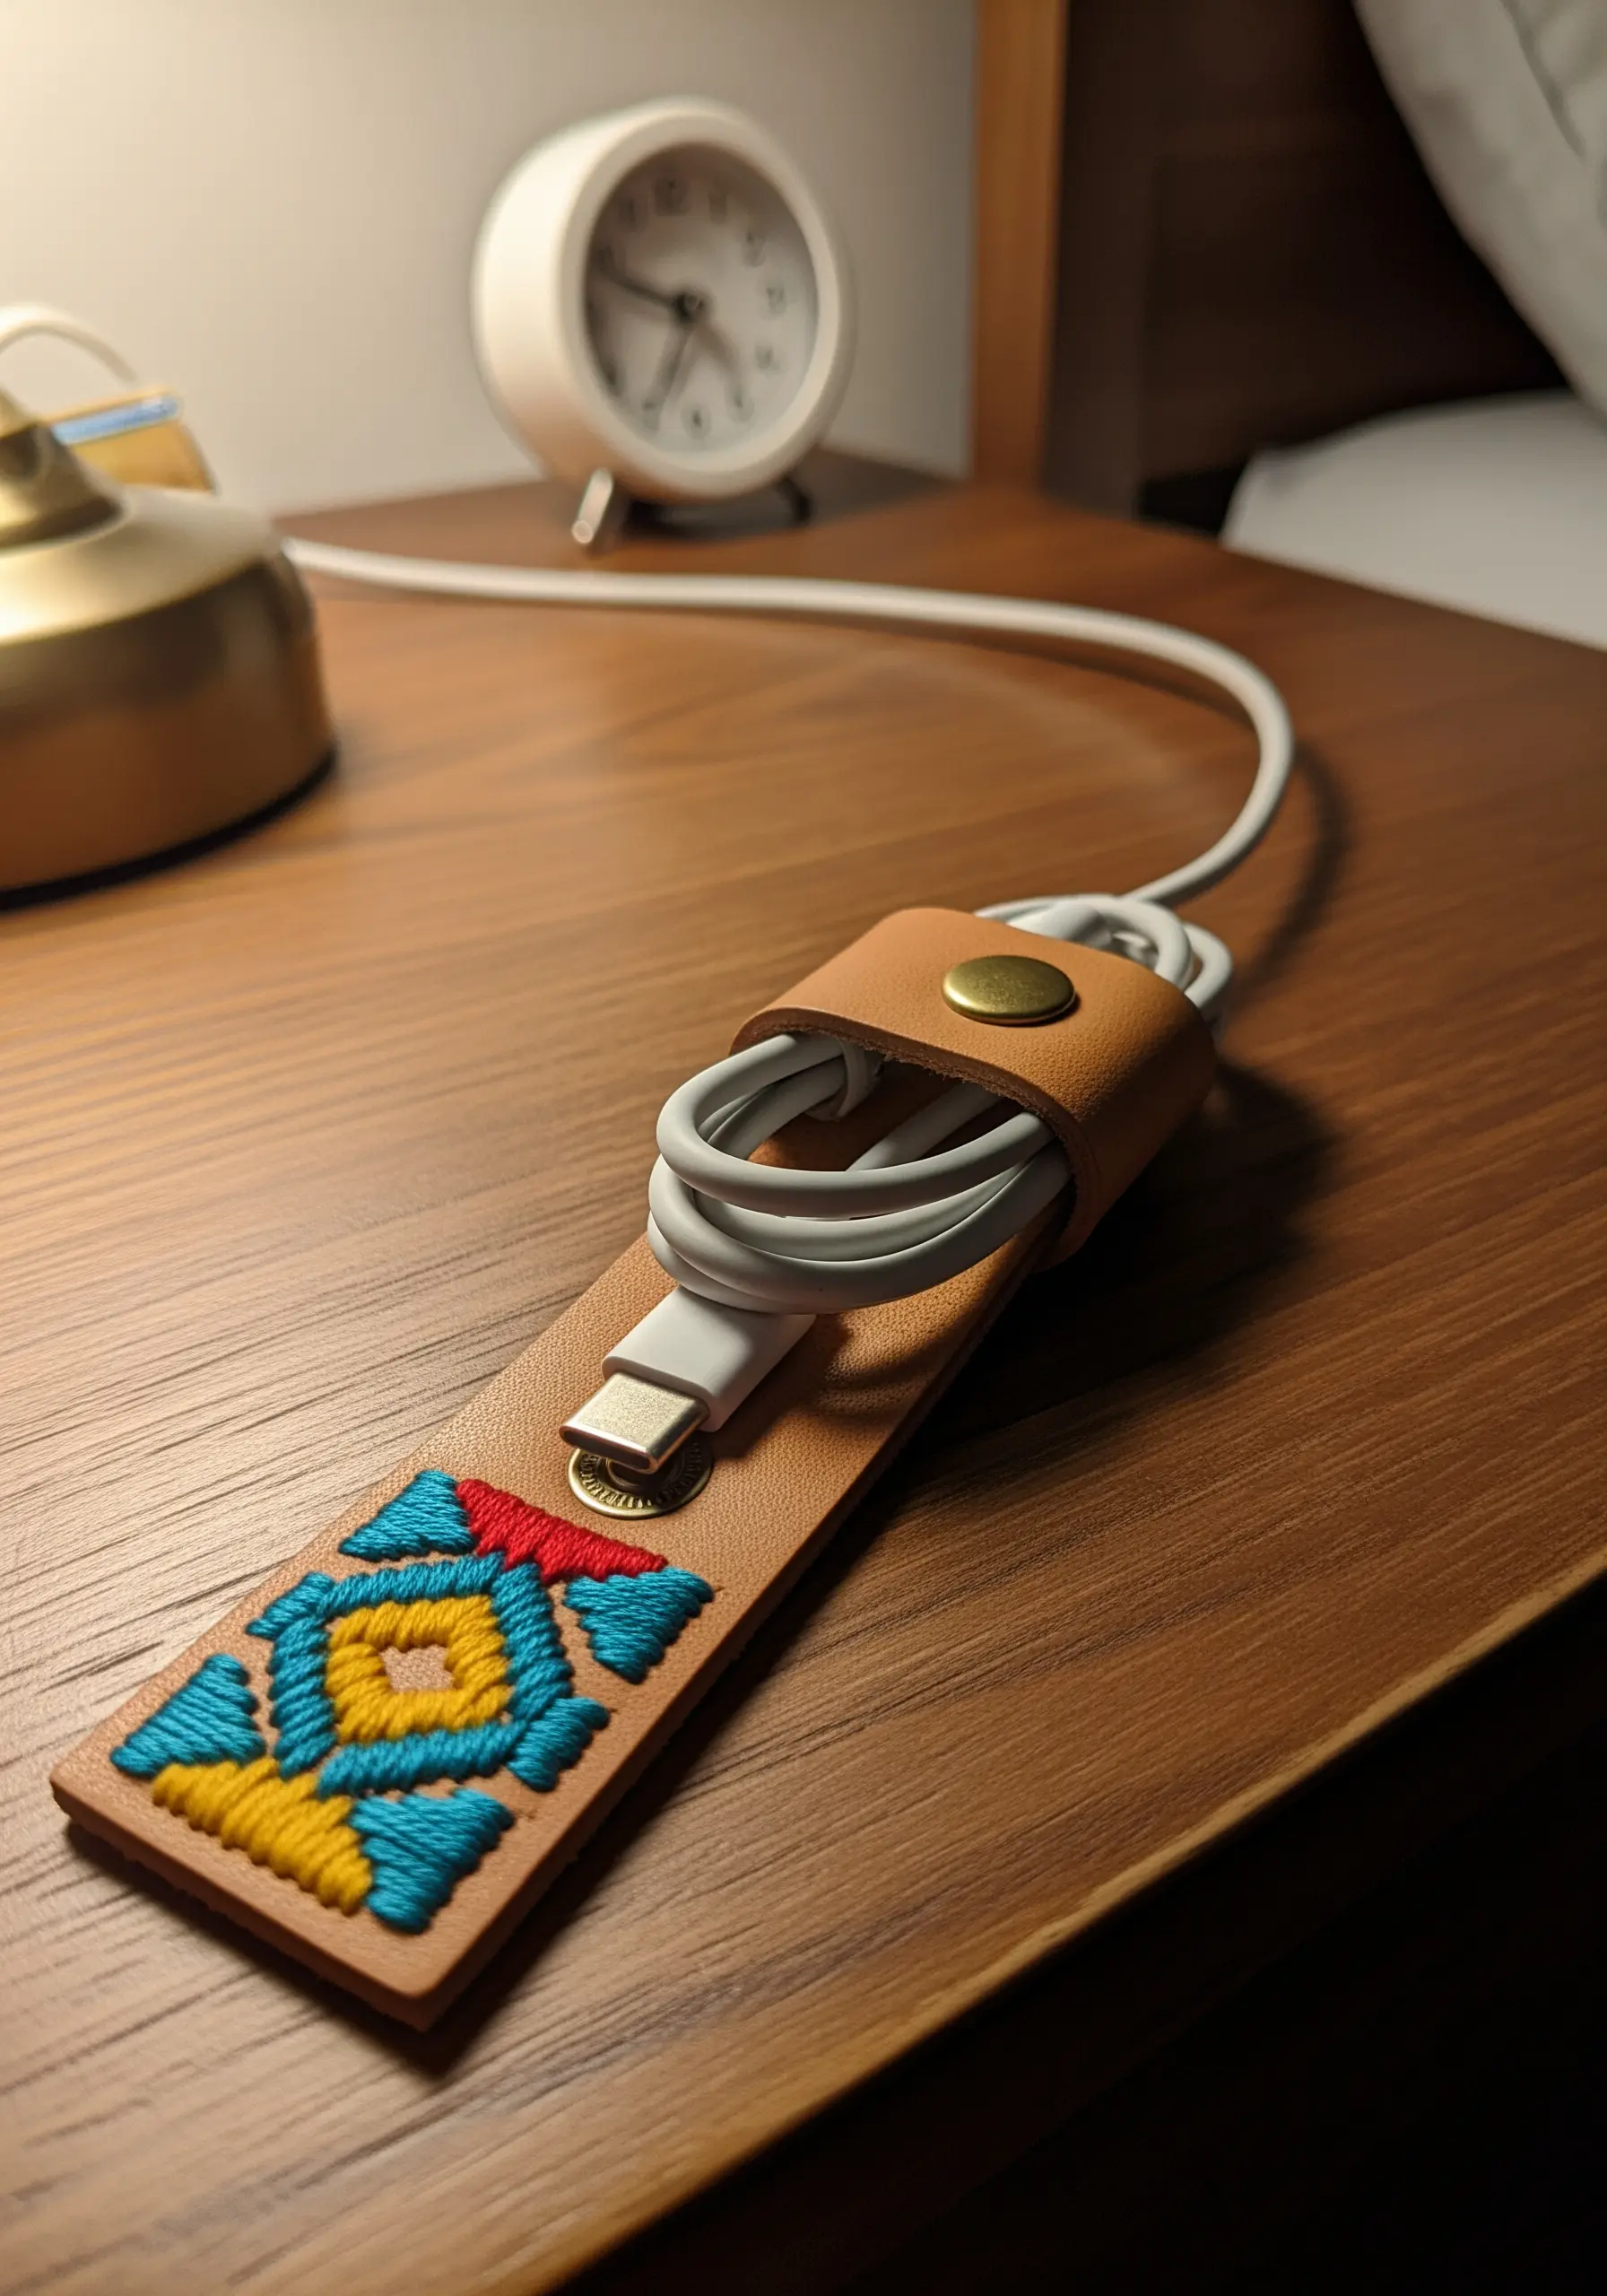
Embroidering on a non-traditional material like leather adds an unexpected, modern twist.
Because leather doesn’t heal, you must pre-punch your stitching holes with a fine awl before you begin.
Use a sturdy leather needle and a thick floss, like pearl cotton, to create bold, graphic patterns.
A simple satin stitch fill, as seen here, contrasts beautifully with the smooth surface of the leather, creating a durable and stylish accessory.
30. Hand-Stitched Details on a Miniature Art Doll
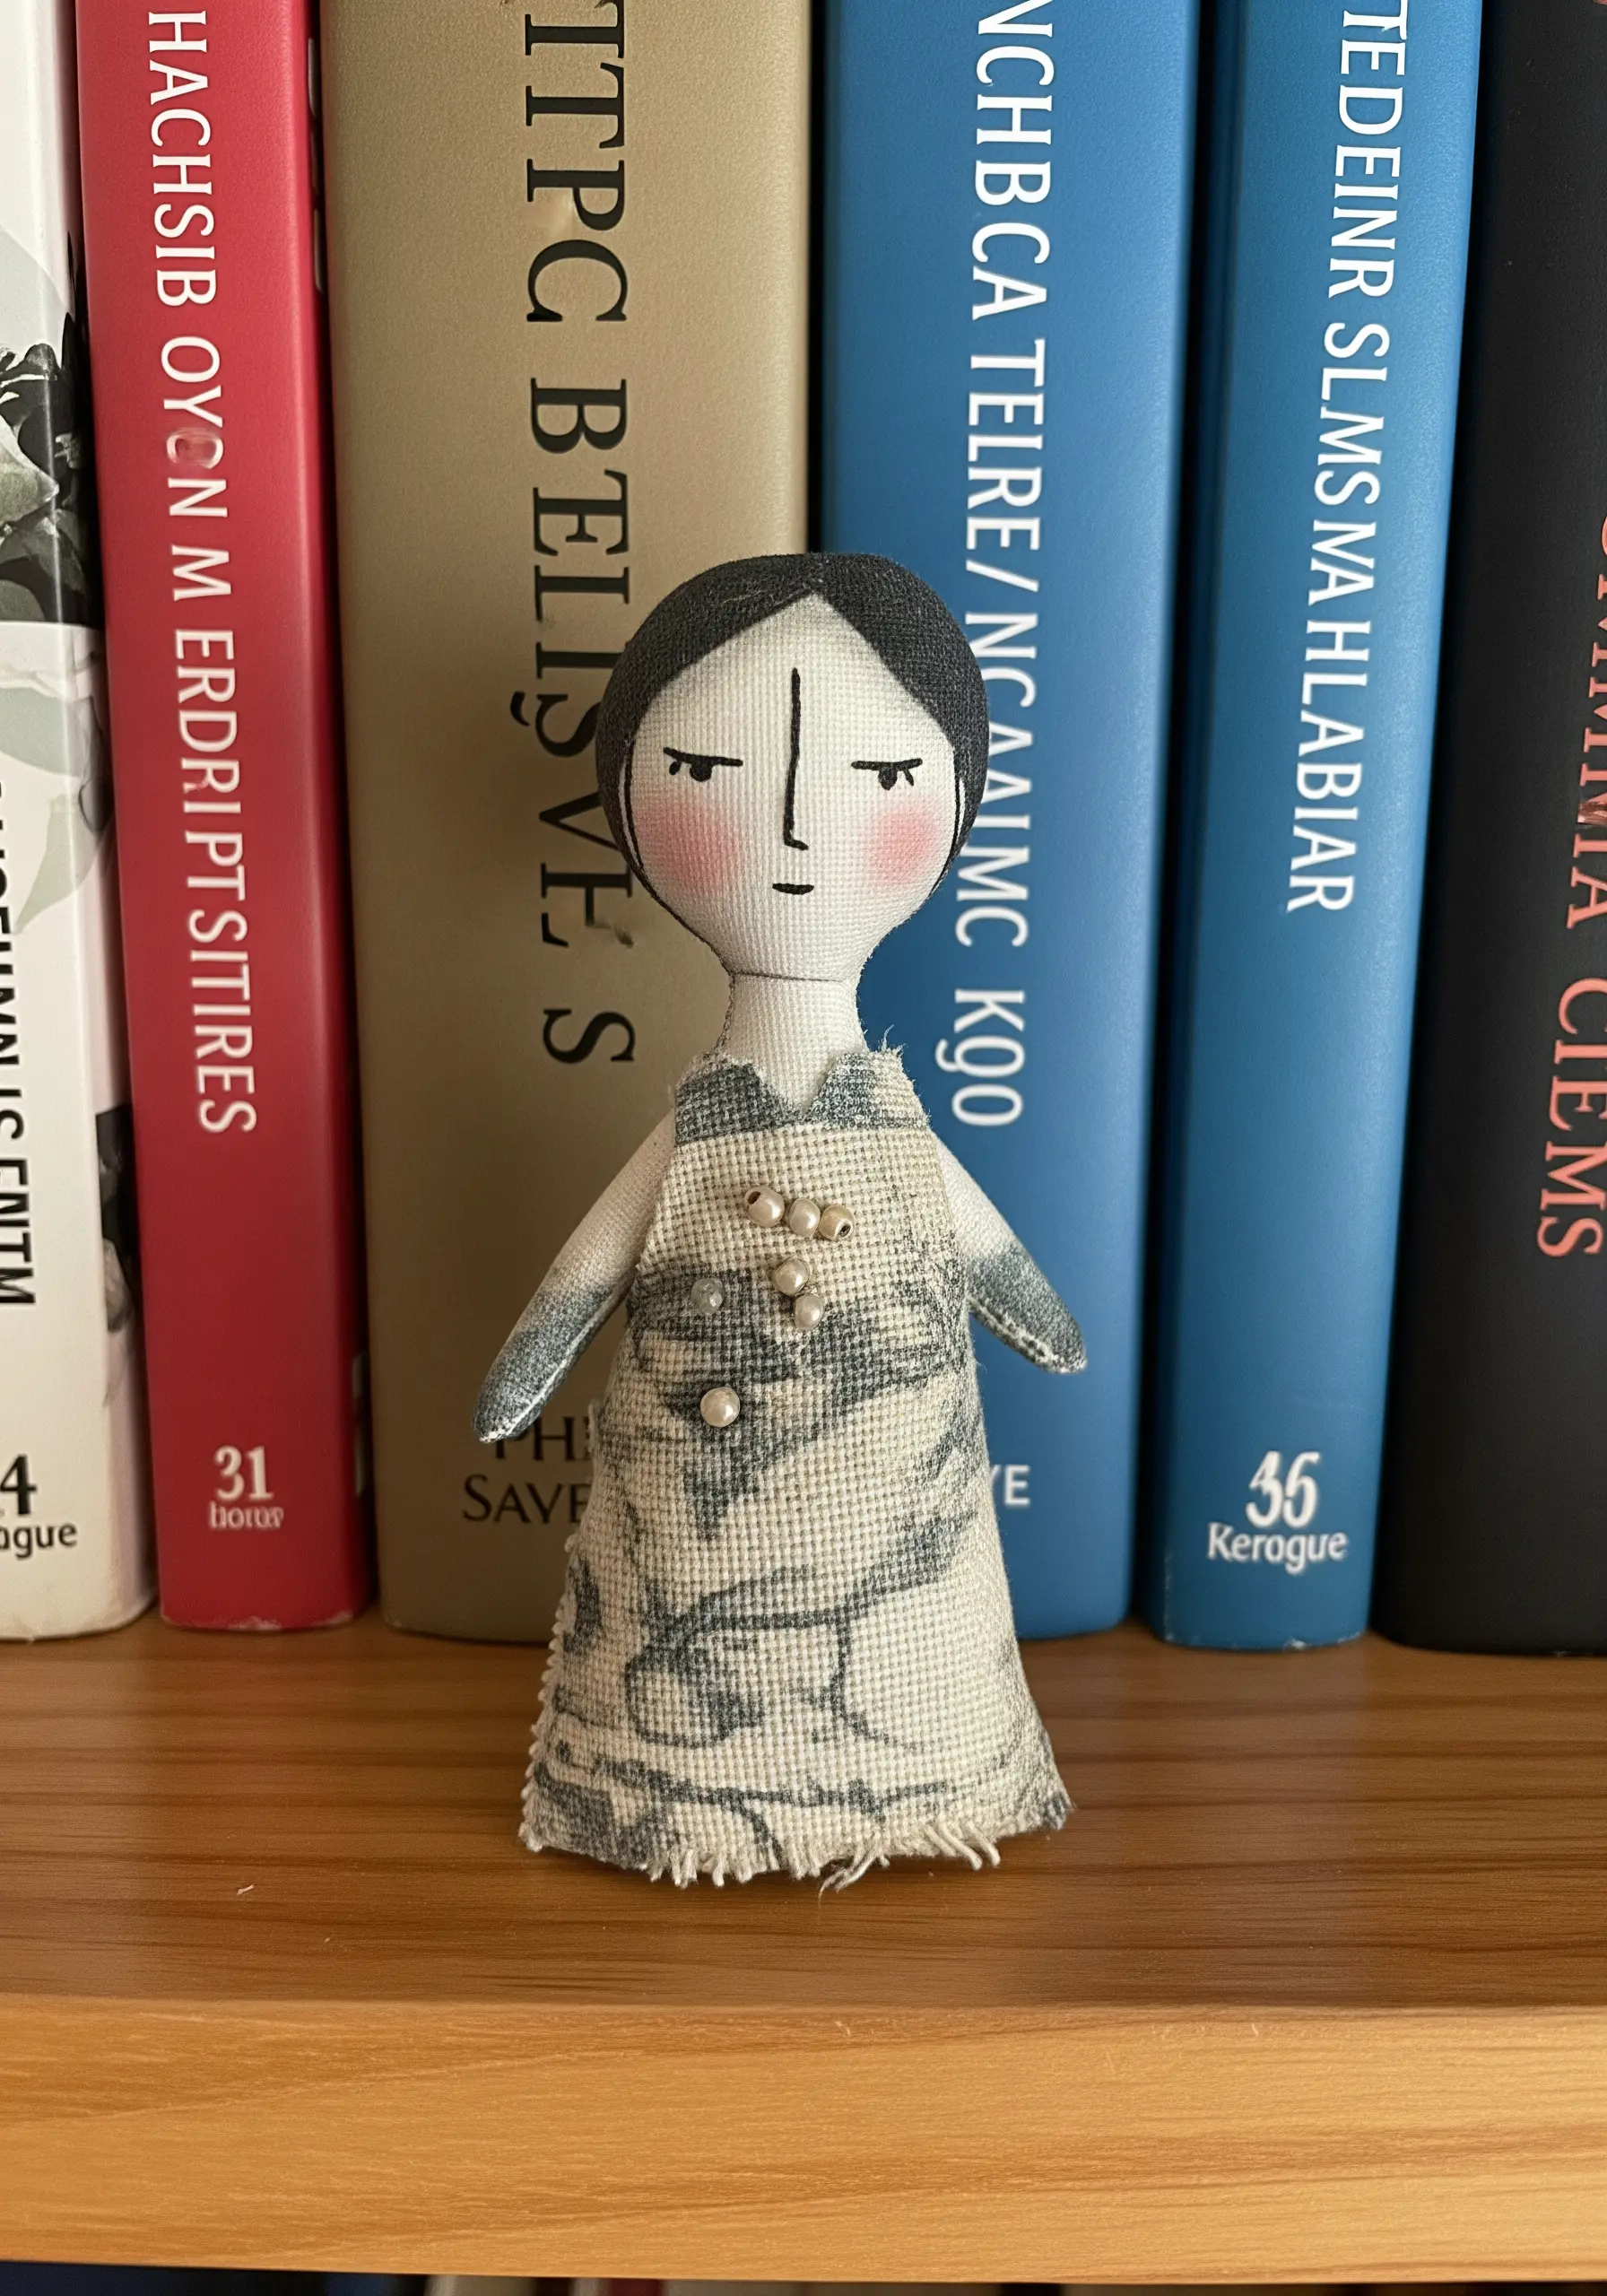
When creating a miniature art doll, subtlety is key.
Use a single strand of dark floss to stitch the facial features; the smallest stitches can convey a world of expression.
Simple straight stitches or tiny backstitches are all you need for the eyes and mouth.
The personality comes from the careful placement of these minimal details, complemented by the choice of patterned fabric for the clothing and a few seed beads for accent.
31. Minimalist Motifs for a Felt Glasses Case

Felt provides the perfect canvas for clean, graphic line art.
The natural texture of the fabric grips the thread, helping you create smooth, even lines with a simple backstitch or stem stitch.
Use two or three strands of floss to give your outlines enough weight to stand out.
The repetition of a single, simple motif elevates this functional pouch into a piece of stylish, minimalist art.
32. Creating a Cosmos with Wrapped Fiber Planets
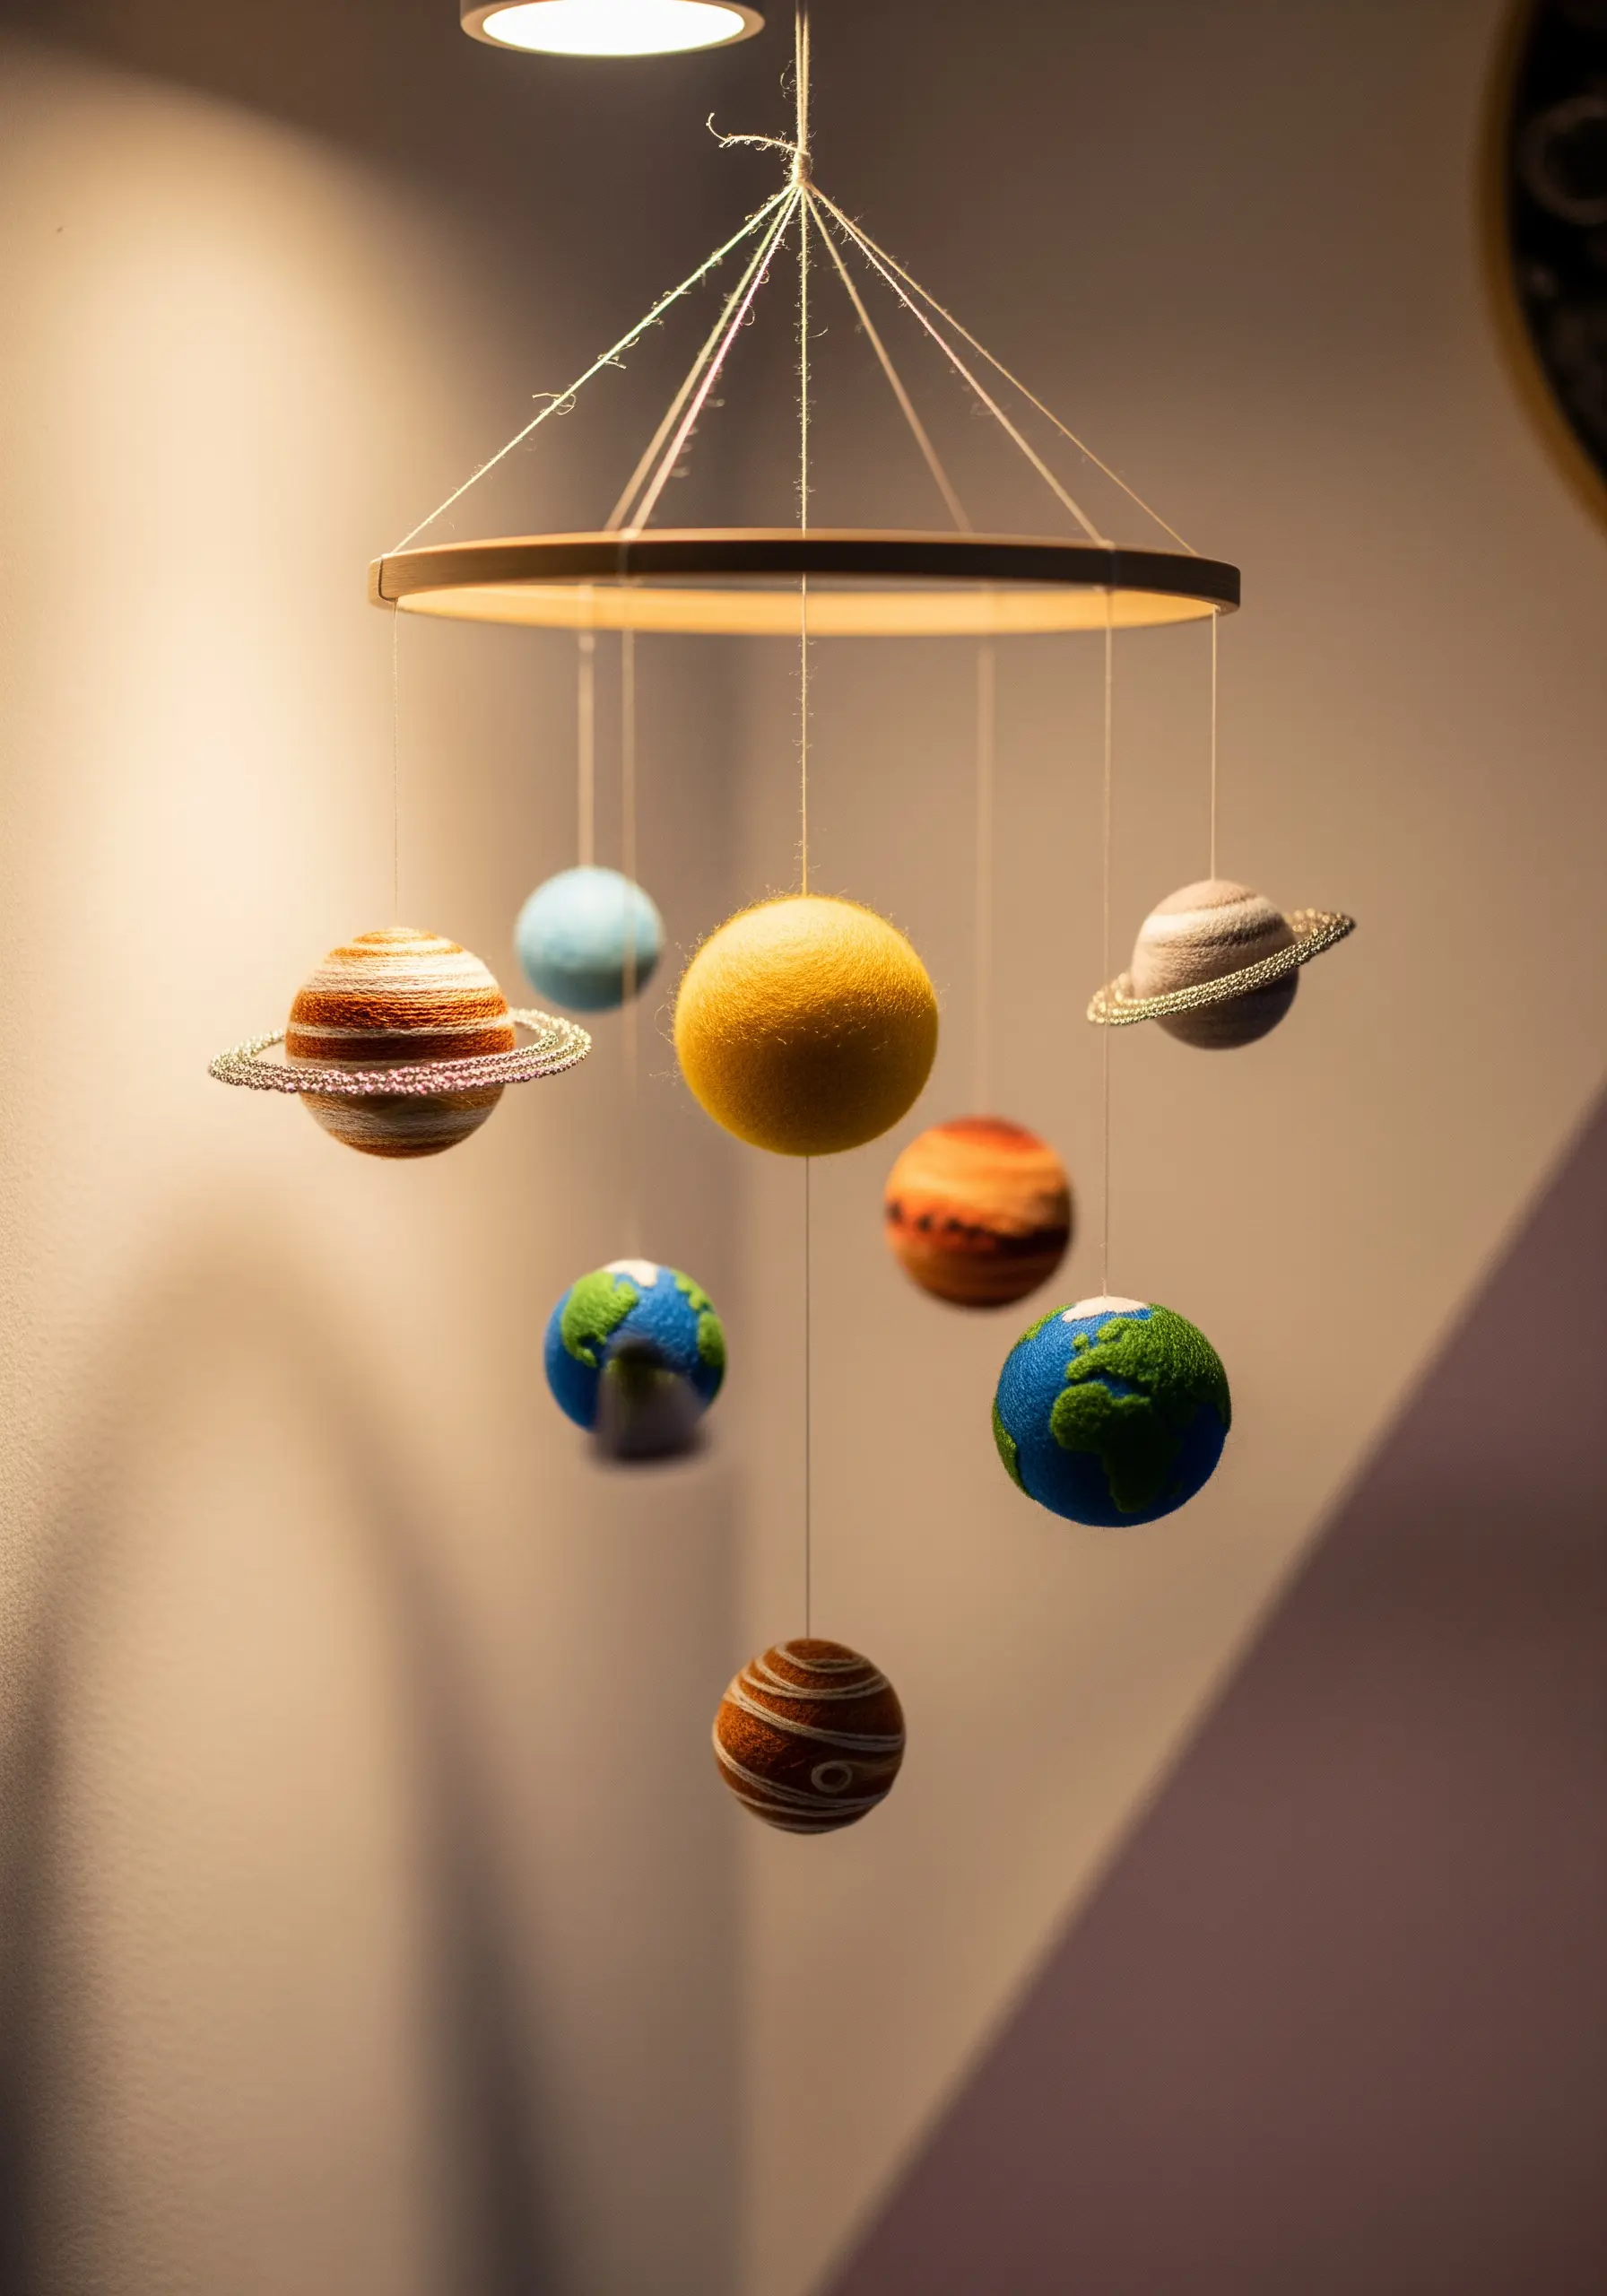
This beautiful mobile relies on fiber wrapping rather than stitching.
To create the planets, tightly wrap different colors of yarn or embroidery floss around styrofoam or felted wool balls, securing the ends with a dot of fabric glue.
For Saturn’s rings, cut a disc from stiff cardstock or felt, wrap it in a contrasting thread, and glue it in place.
It’s a simple, meditative technique that yields a stunning piece of mobile fiber art.
33. Weaving with Yarn for a Textured Wall Hanging
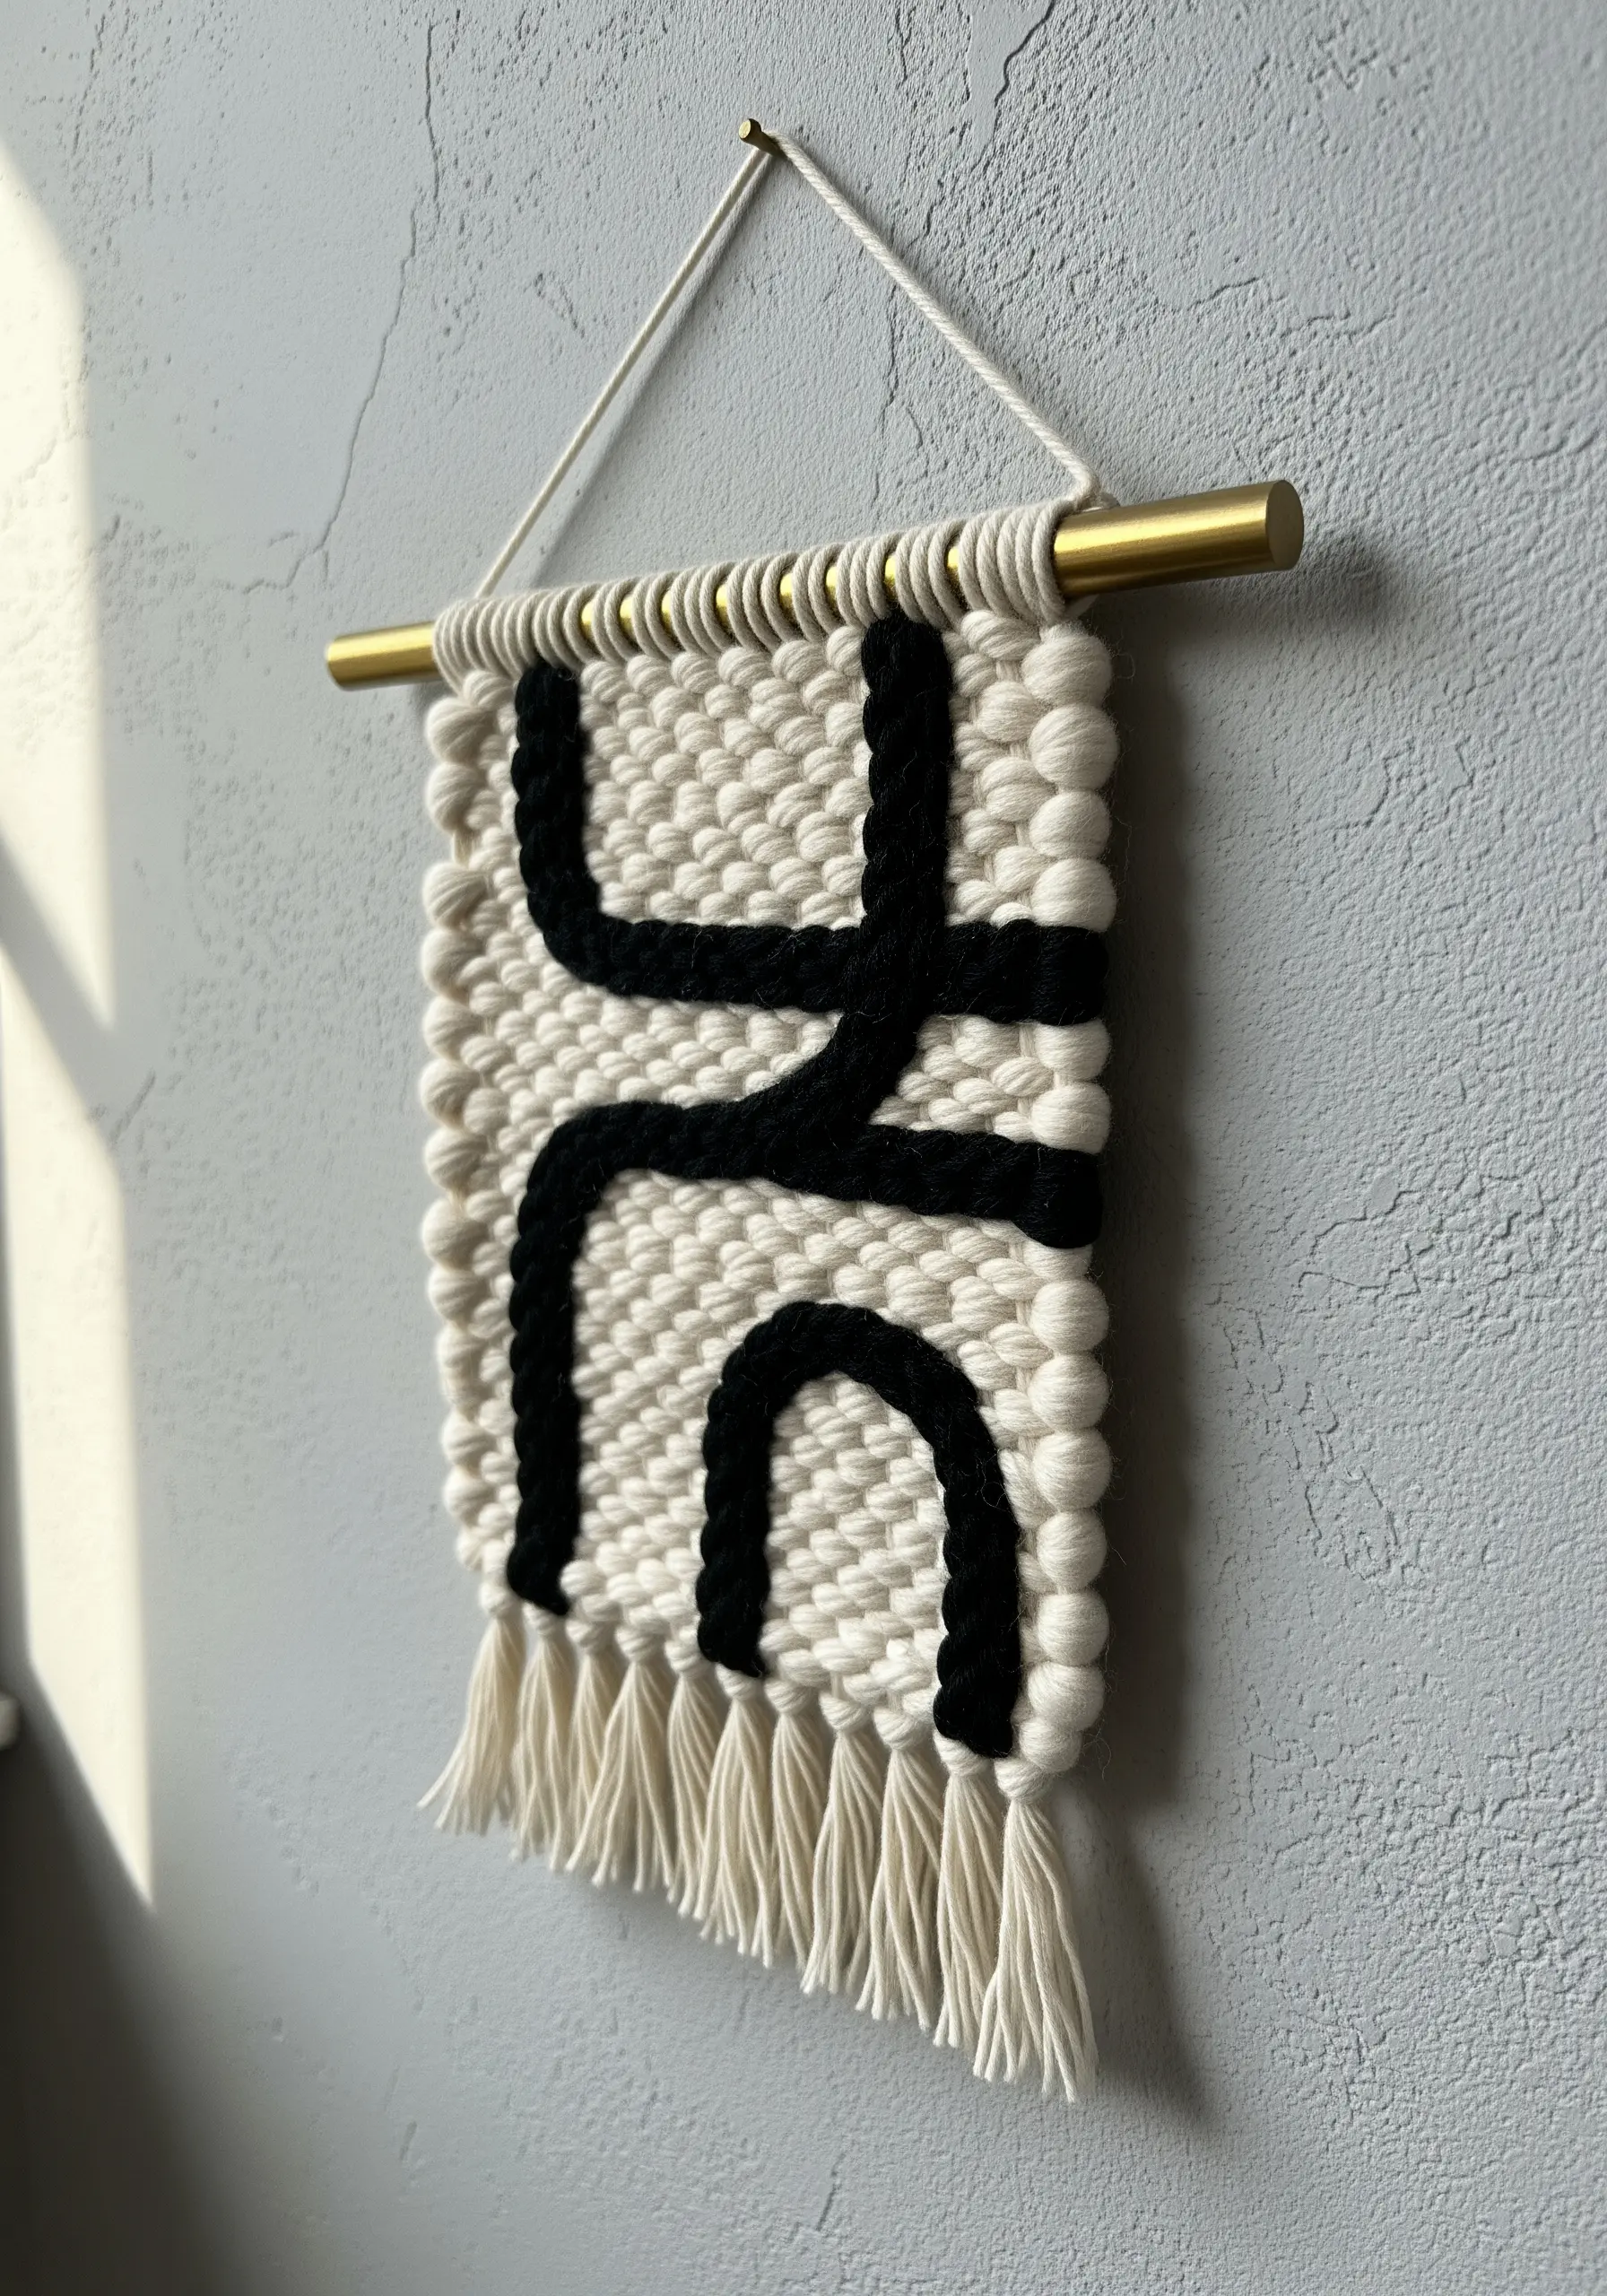
Explore the world of weaving to create deeply textured wall art.
This piece uses a simple frame loom and alternates between two basic techniques: a flat tabby weave for the background and a looped soumak weave to create the raised, puffy design.
Even with a simple two-color palette, the contrast between the flat and looped textures creates a dynamic, sculptural effect.
34. A Reusable Tea Tag with Realistic Detail
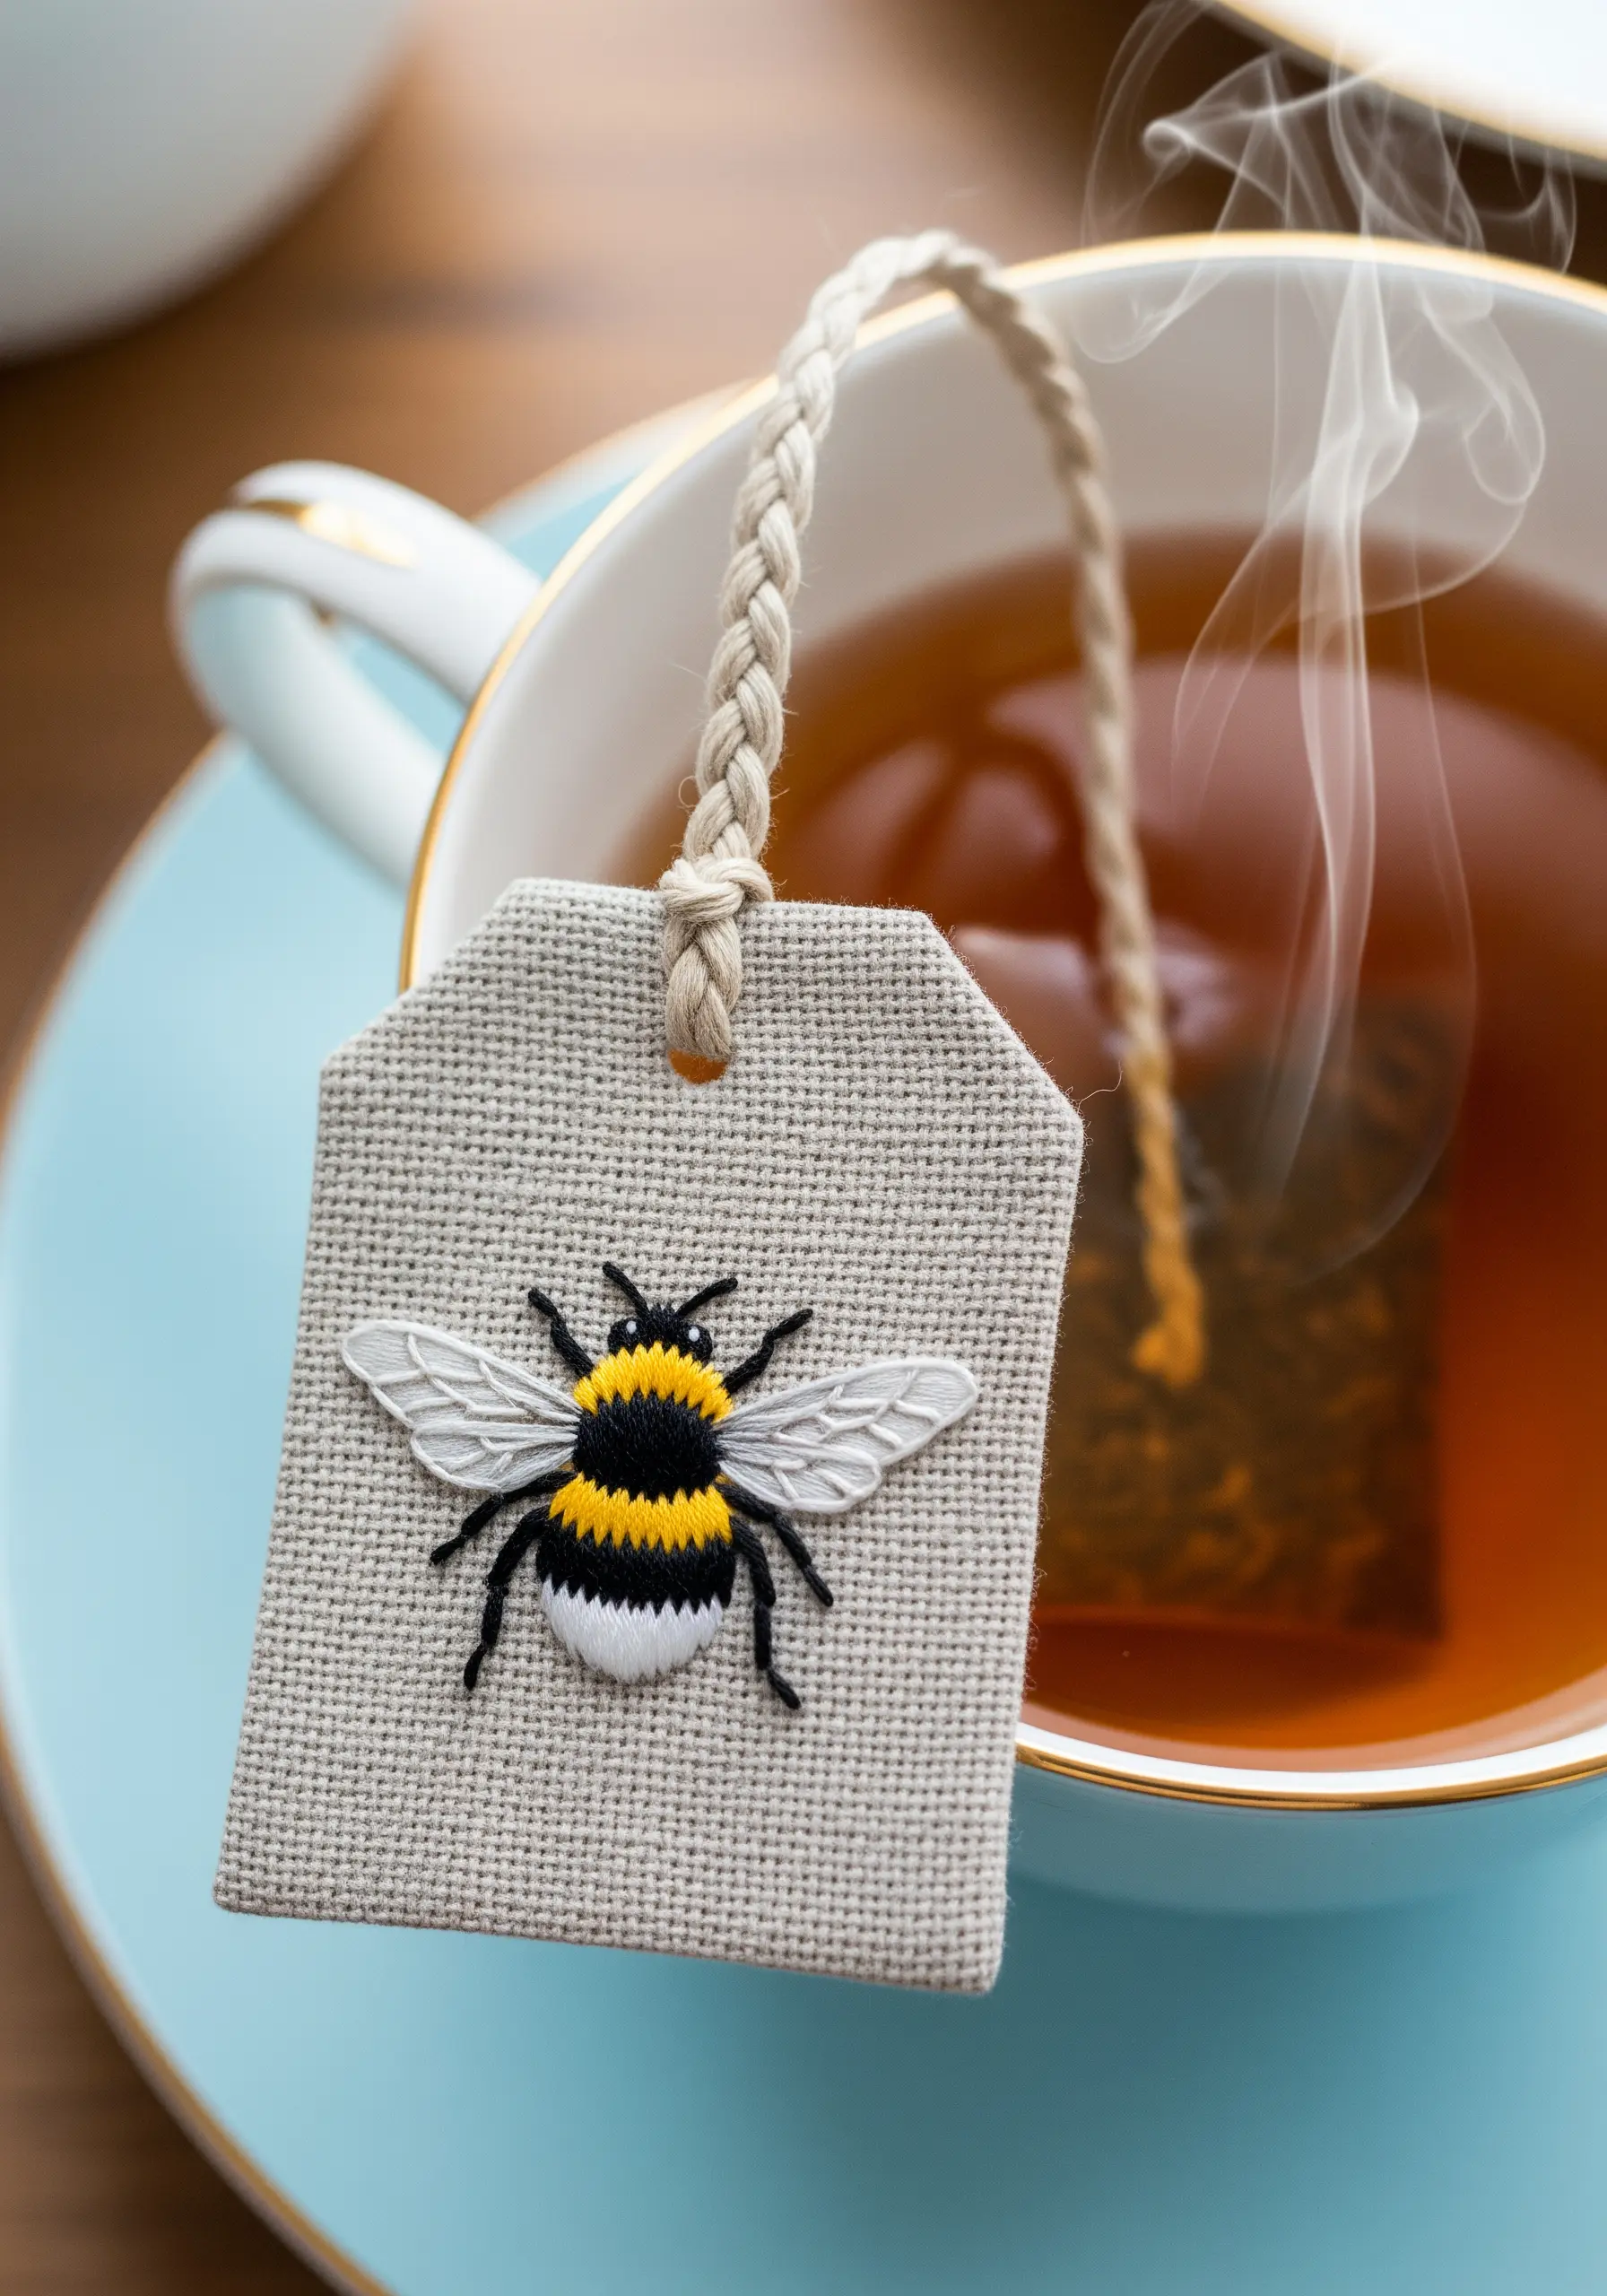
Craft a small, thoughtful object that elevates an everyday ritual.
To create the bee’s fuzzy abdomen, use satin stitches placed closely together, alternating black, yellow, and white floss.
The delicate, translucent wings are achieved with a fine backstitch outline in grey, filled with just a few straight stitches to suggest veins.
Stitched on a durable linen, this tag can be used time and time again.
35. Achieving Feathered Texture with Directional Stitching

The secret to stitching realistic feathers is to mimic nature.
Use directional long-and-short stitches, ensuring they flow outwards from the center of the face, just as real feathers would.
Layer multiple shades of off-white and tan to create subtle shadows and highlights that give the form its shape.
Finally, use tiny, scattered seed stitches and French knots to add the delicate speckling that makes the owl portrait breathtakingly lifelike.
36. Miniature Worlds: A 3D Fiber Art Diorama
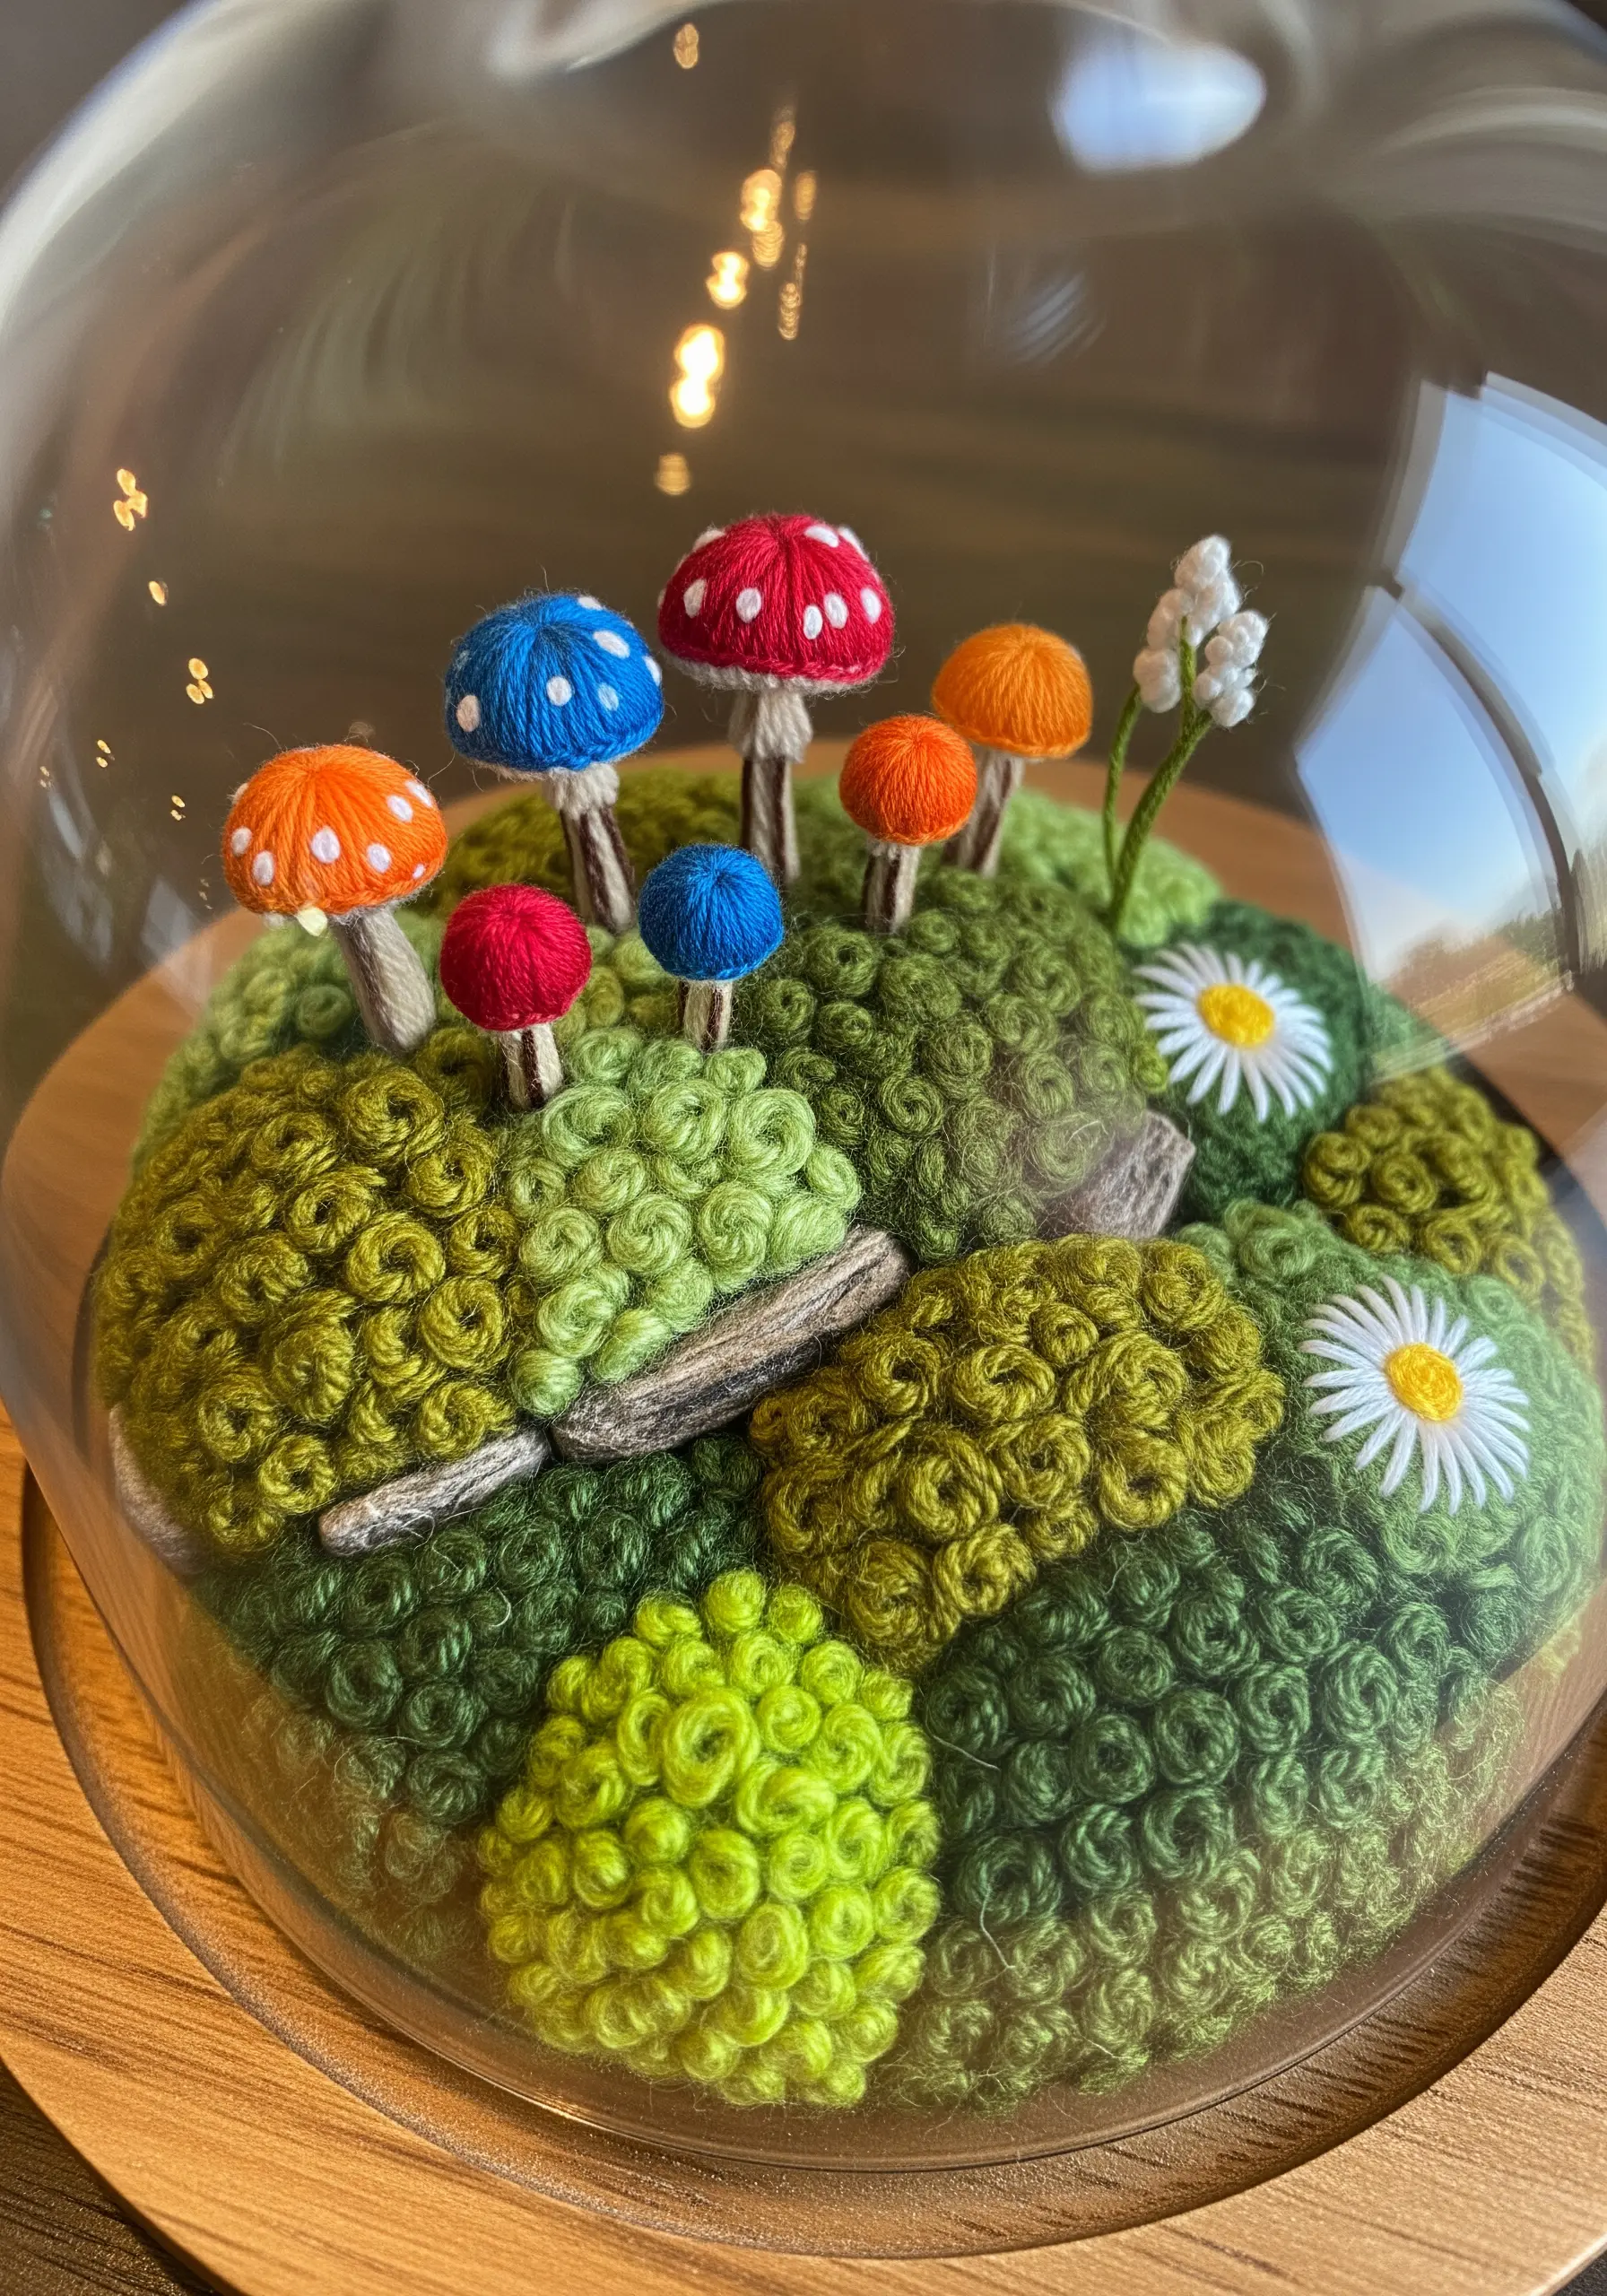
Construct a tiny, magical landscape using a variety of textural stitches.
The lush, mossy ground is created with a dense carpet of French knots and bullion knots in several shades of green.
The mushroom caps are small, stuffed fabric yo-yos stitched onto the mossy base.
It’s the combination of different 3D stitching techniques that allows you to build a miniature world that feels rich, varied, and wonderfully alive.


