
Have you ever finished a piece of embroidery and felt that it was missing… something? You followed the pattern, used the right colors, but it lacks the professional polish and artistic depth you envisioned. You’re not alone. Many stitchers feel stuck between knowing the basics and creating work that truly feels intentional and expressive.
The secret to elevating your craft isn’t about learning dozens of complex new stitches. It’s about making small, deliberate choices: using one less strand of floss for finer detail, changing the direction of your stitches to create texture, or adding a single line of metallic thread to catch the light. It’s about understanding *why* a technique works, not just how to execute it.
These gift ideas are more than just patterns; they are invitations to refine your skills. Each one holds a quiet lesson in texture, color theory, or composition. Think of them as creative exercises designed to build your confidence and help you transform thread and fabric into something not just handmade, but artfully made.
1. Render Lifelike Texture with Thread Painting
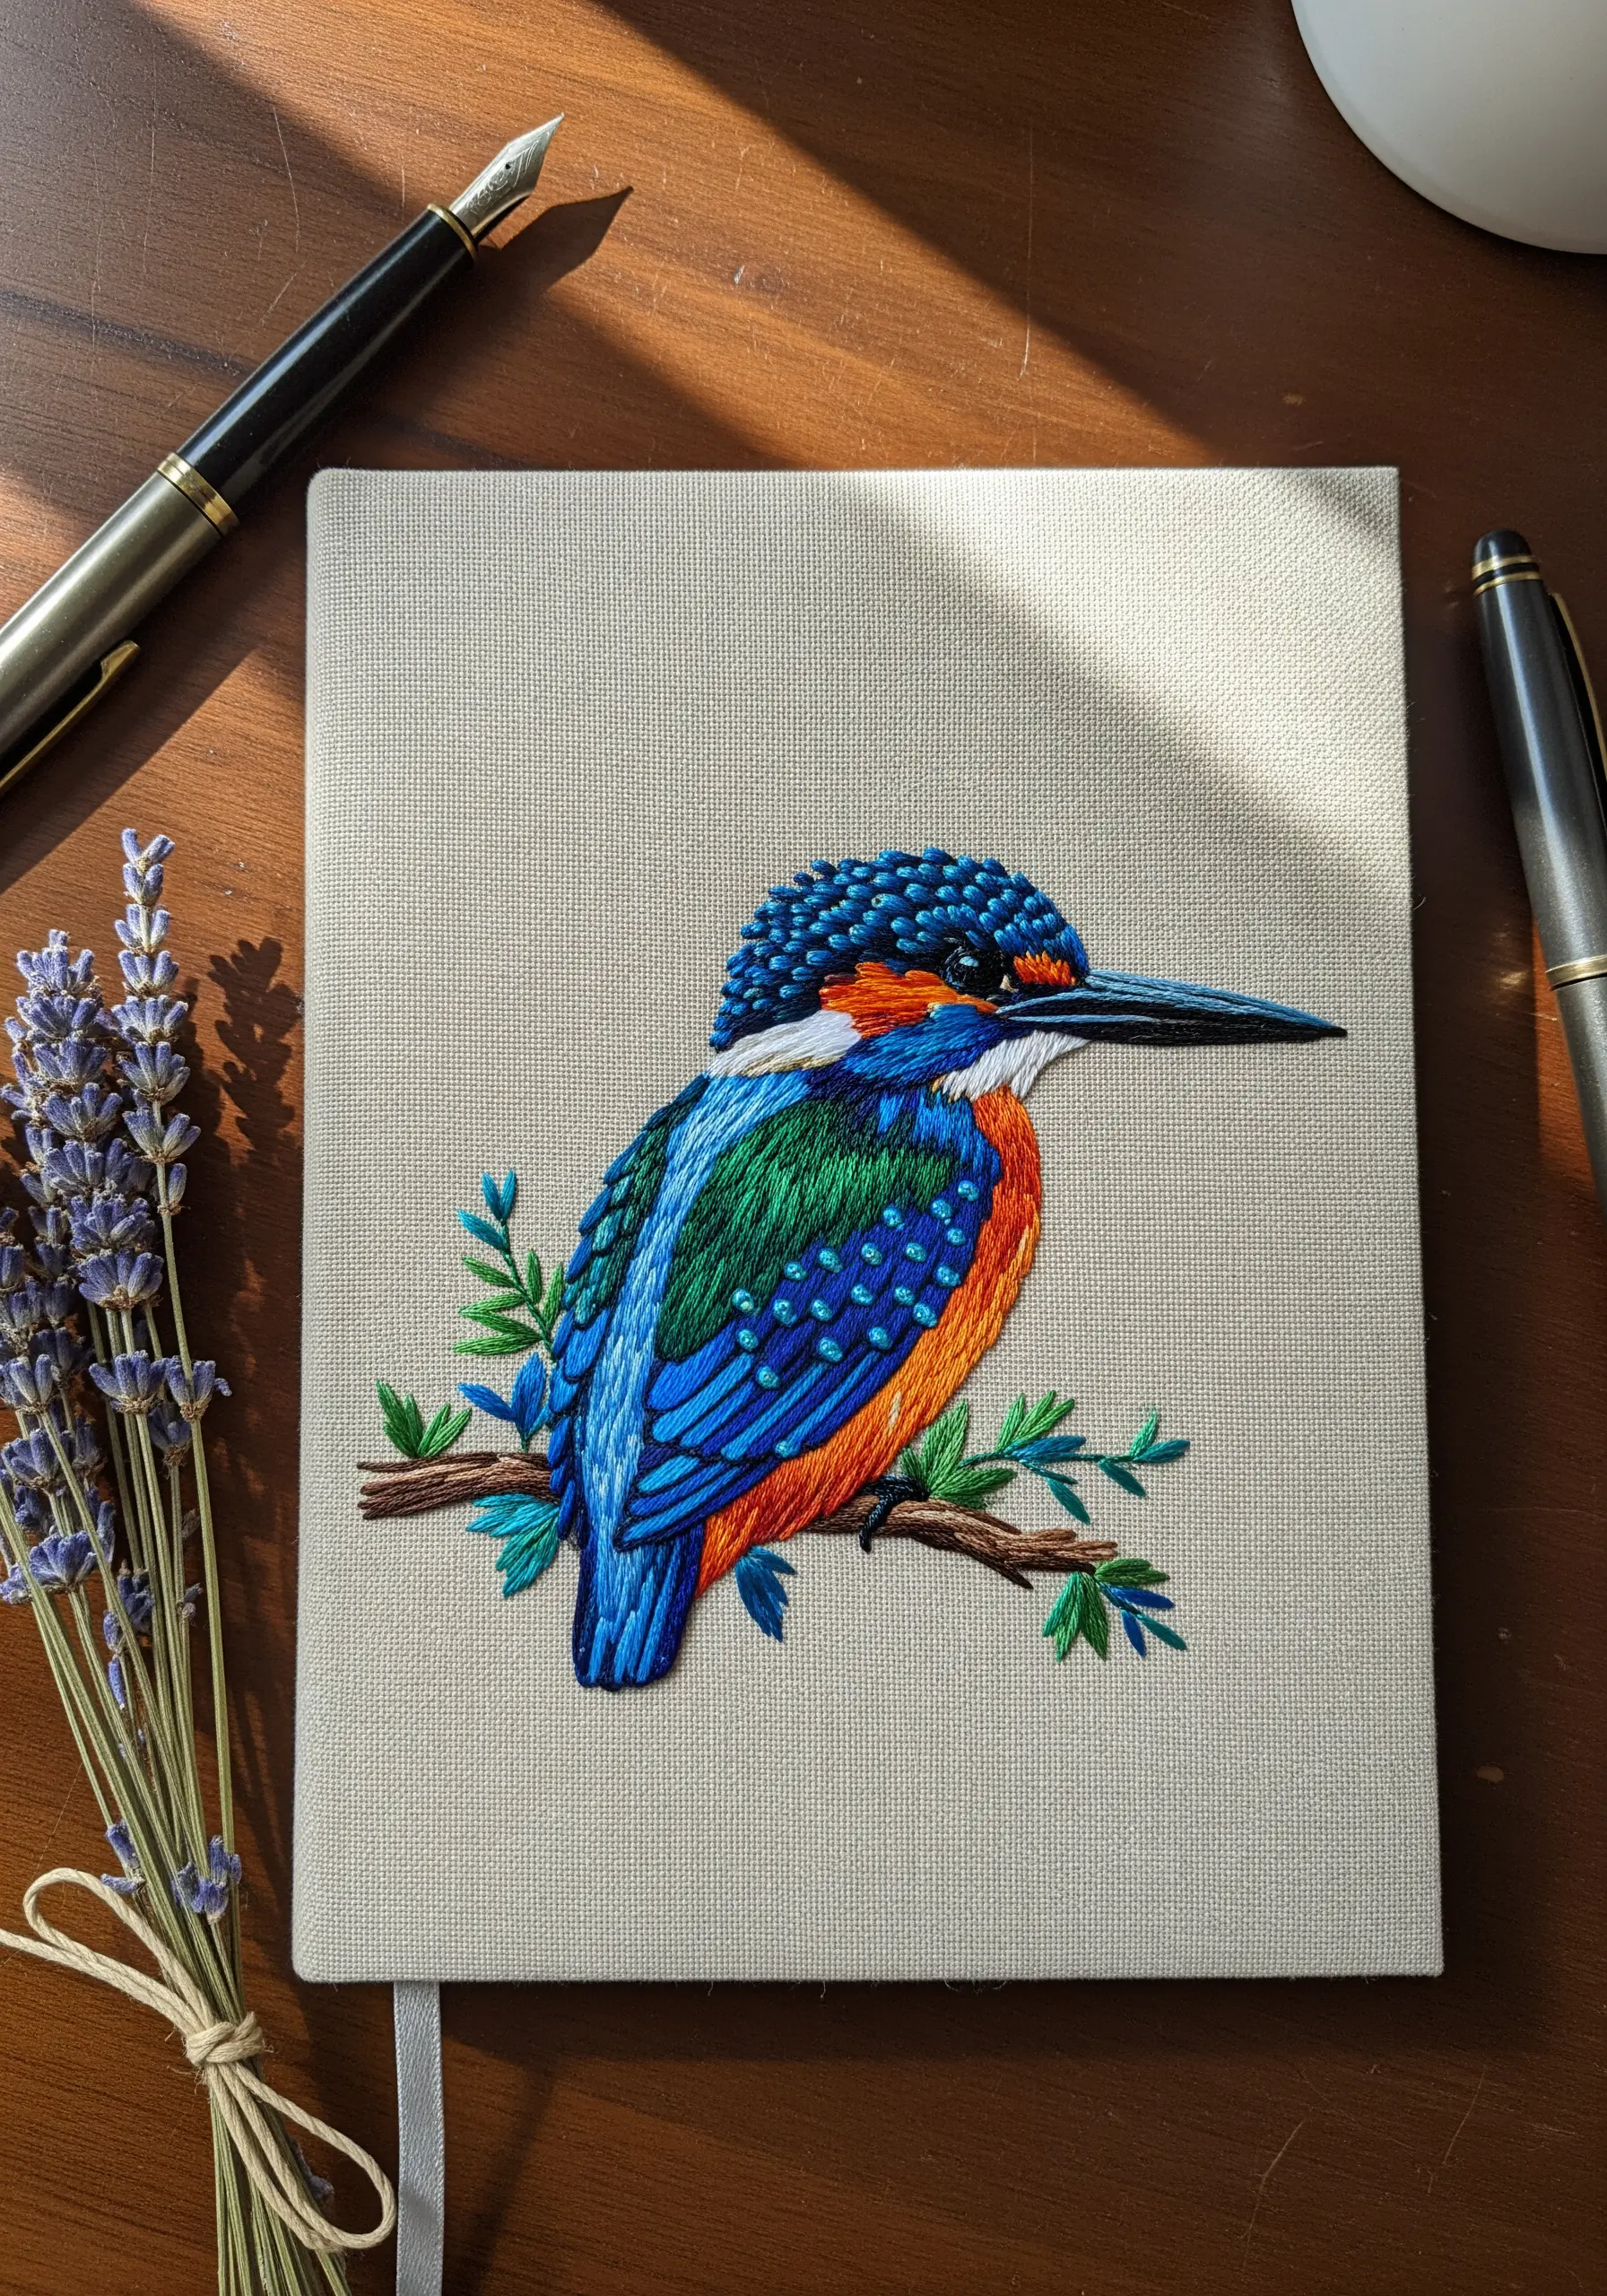
To create the vibrant, almost photographic quality of this kingfisher, you’ll rely on the thread painting technique using a single strand of floss.
Use the long-and-short stitch to seamlessly blend shades of blue, green, and orange, ensuring your stitches follow the natural direction of the feathers for realism.
For the speckled texture on the head, switch to tightly packed French knots in contrasting colors. This small detail adds a crucial layer of dimension that makes the bird come alive.
When embroidering on a journal cover, apply a fusible interfacing to the back of the fabric panel before stitching to provide stability and prevent puckering.
2. Master Symmetrical Wings and Smooth Gradients
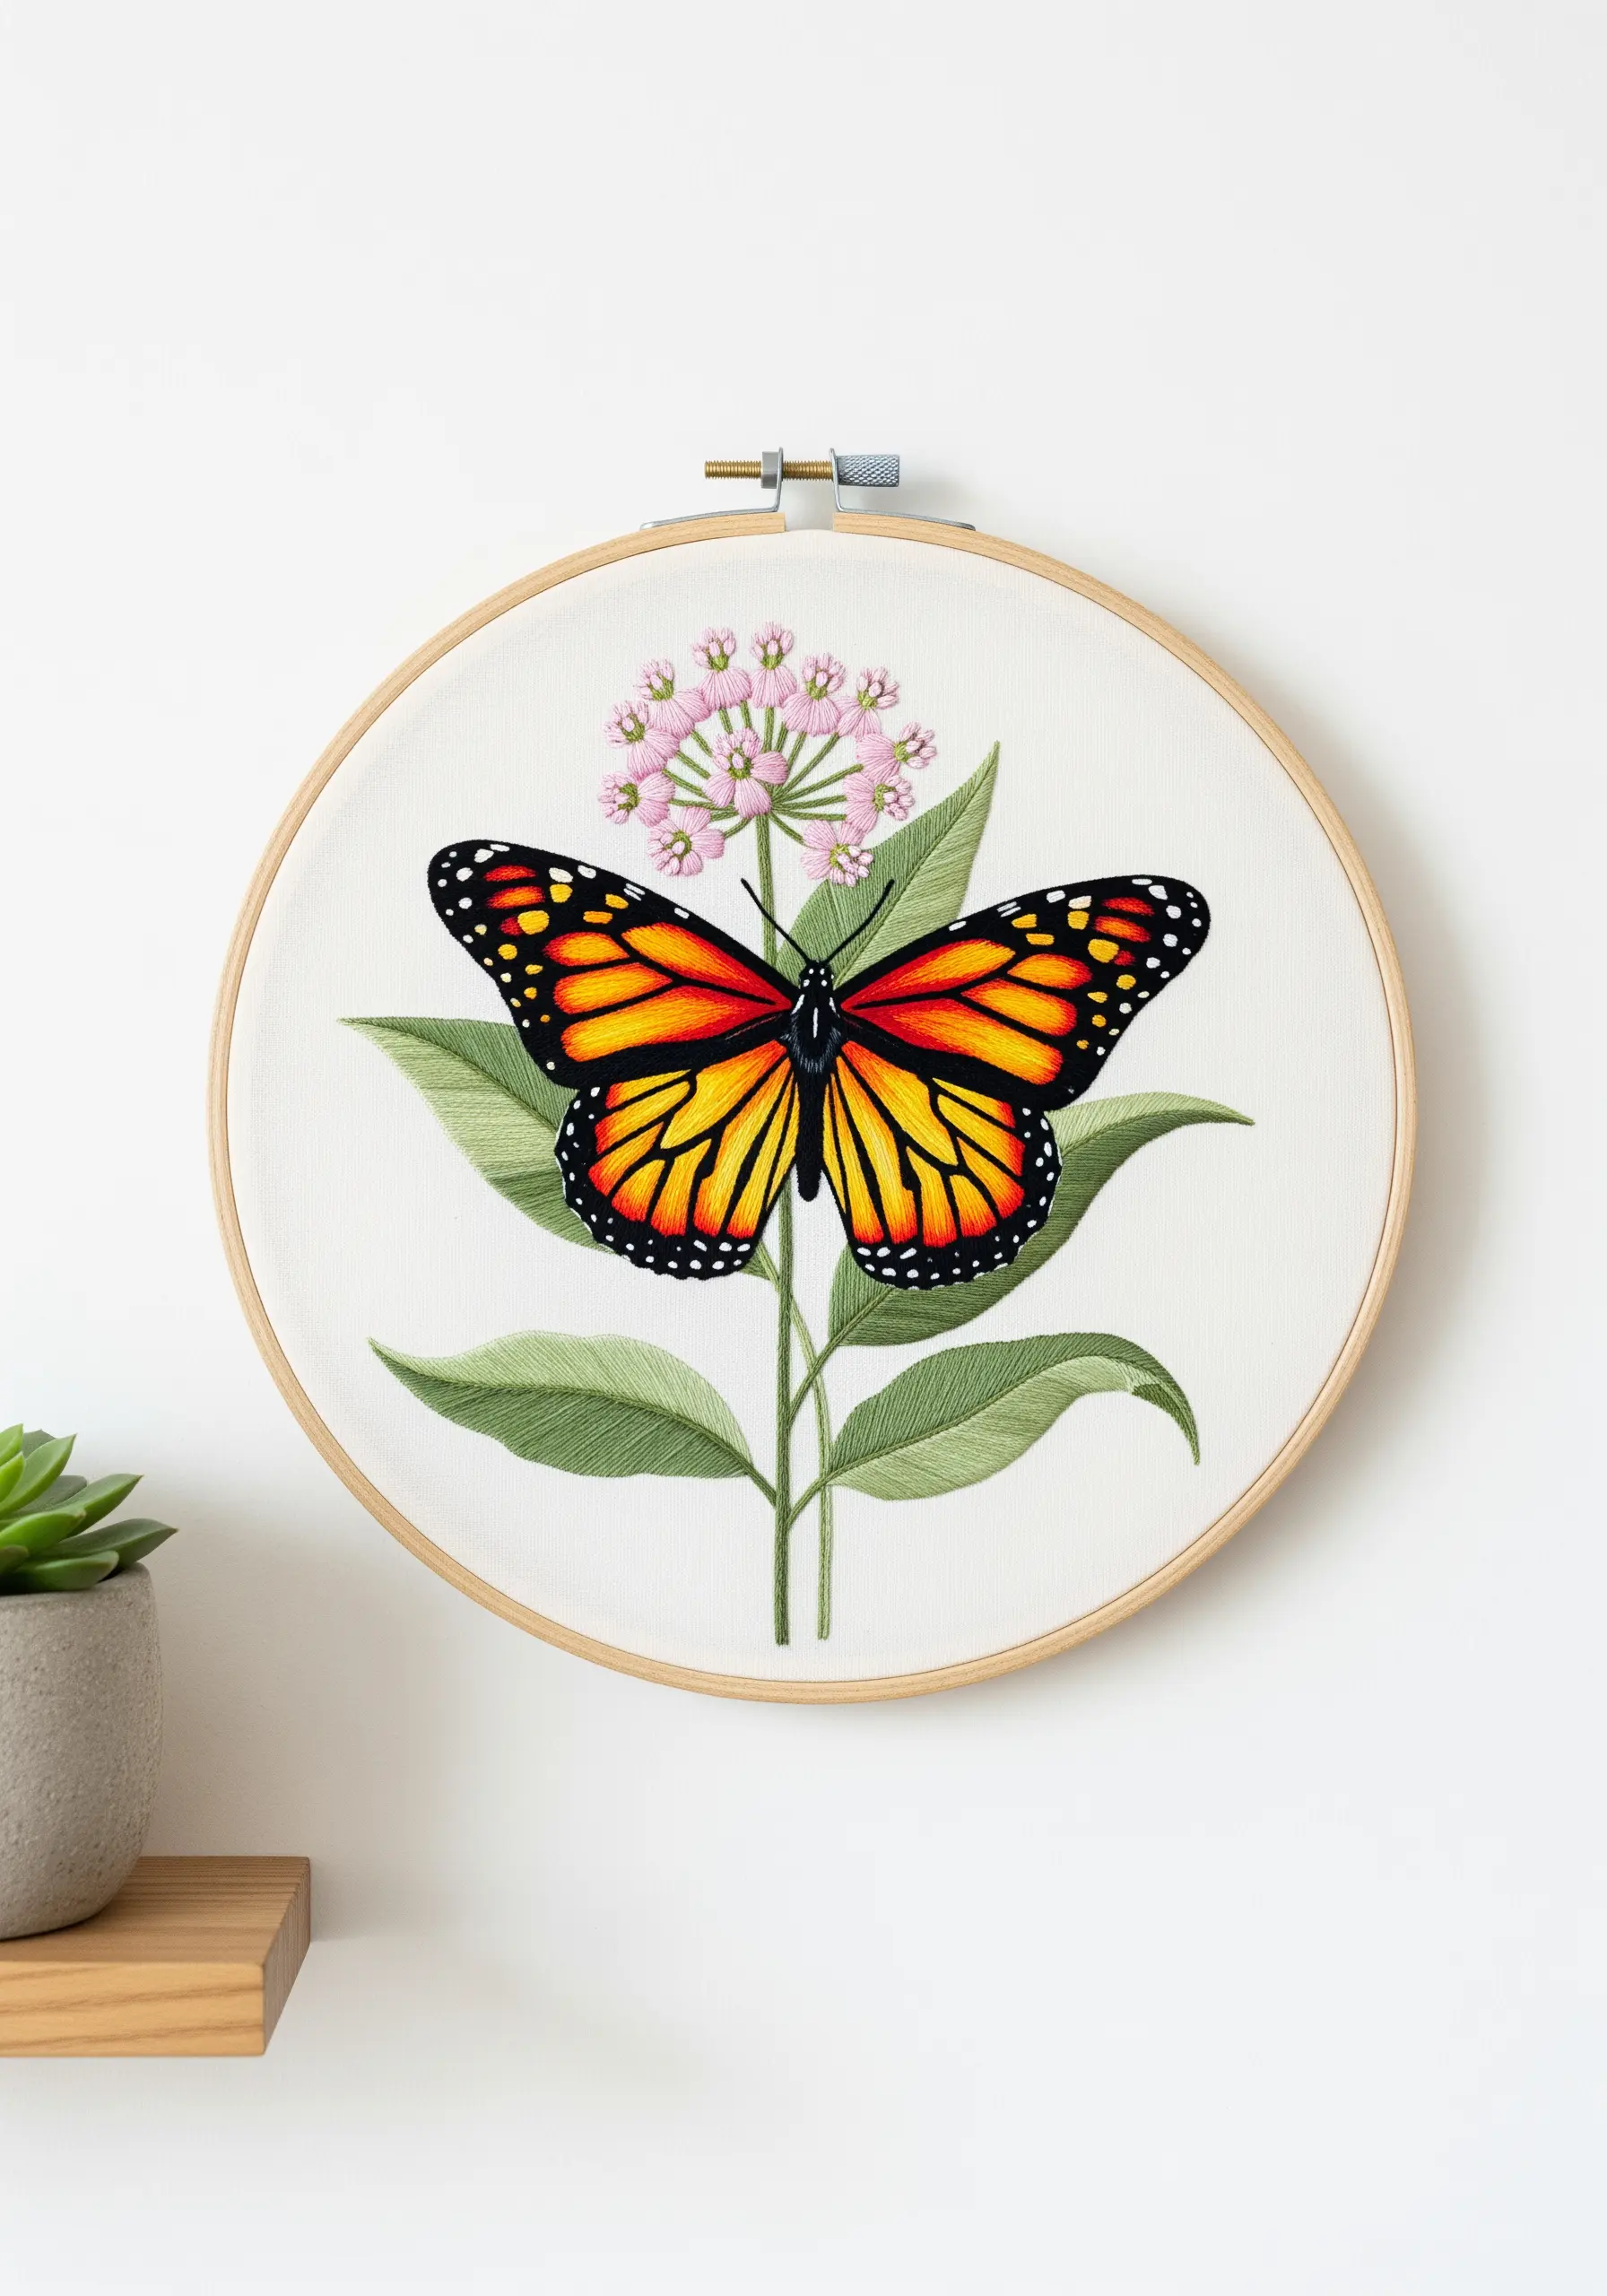
Achieving perfect symmetry in butterfly wings is simpler than it looks. Draft and perfect one side of the pattern, then trace and flip it to create an identical opposite.
For the fiery wing gradient, use a long-and-short stitch with three or four shades of orange and yellow. Work in curved rows that follow the wing’s shape to create a smooth, natural transition of color.
Define the bold black sections with a sharp split stitch outline before filling with satin stitch. This foundational outline prevents the fill stitches from looking uneven and creates a crisp, graphic edge.
3. Elevate Velvet with Celestial Textures

Stitching on velvet requires a gentle touch. Use a lightweight tear-away stabilizer and avoid pulling your stitches too tight to prevent crushing the pile.
For the intricate moon, couch a fine silver metallic thread in a lace-like pattern. Tacking it down with tiny stitches gives you control and shine without the frustration of stitching directly with metallic floss.
Create contrast and dimension by using a simple backstitch for the golden constellations and adding raised bullion knots for the scattered velvet tufts, which adds a wonderful tactile quality to the cushion.
These minimal sky moon designs look especially striking against a dark, luxurious fabric.
4. Compose a Dynamic Wildflower Meadow on Canvas
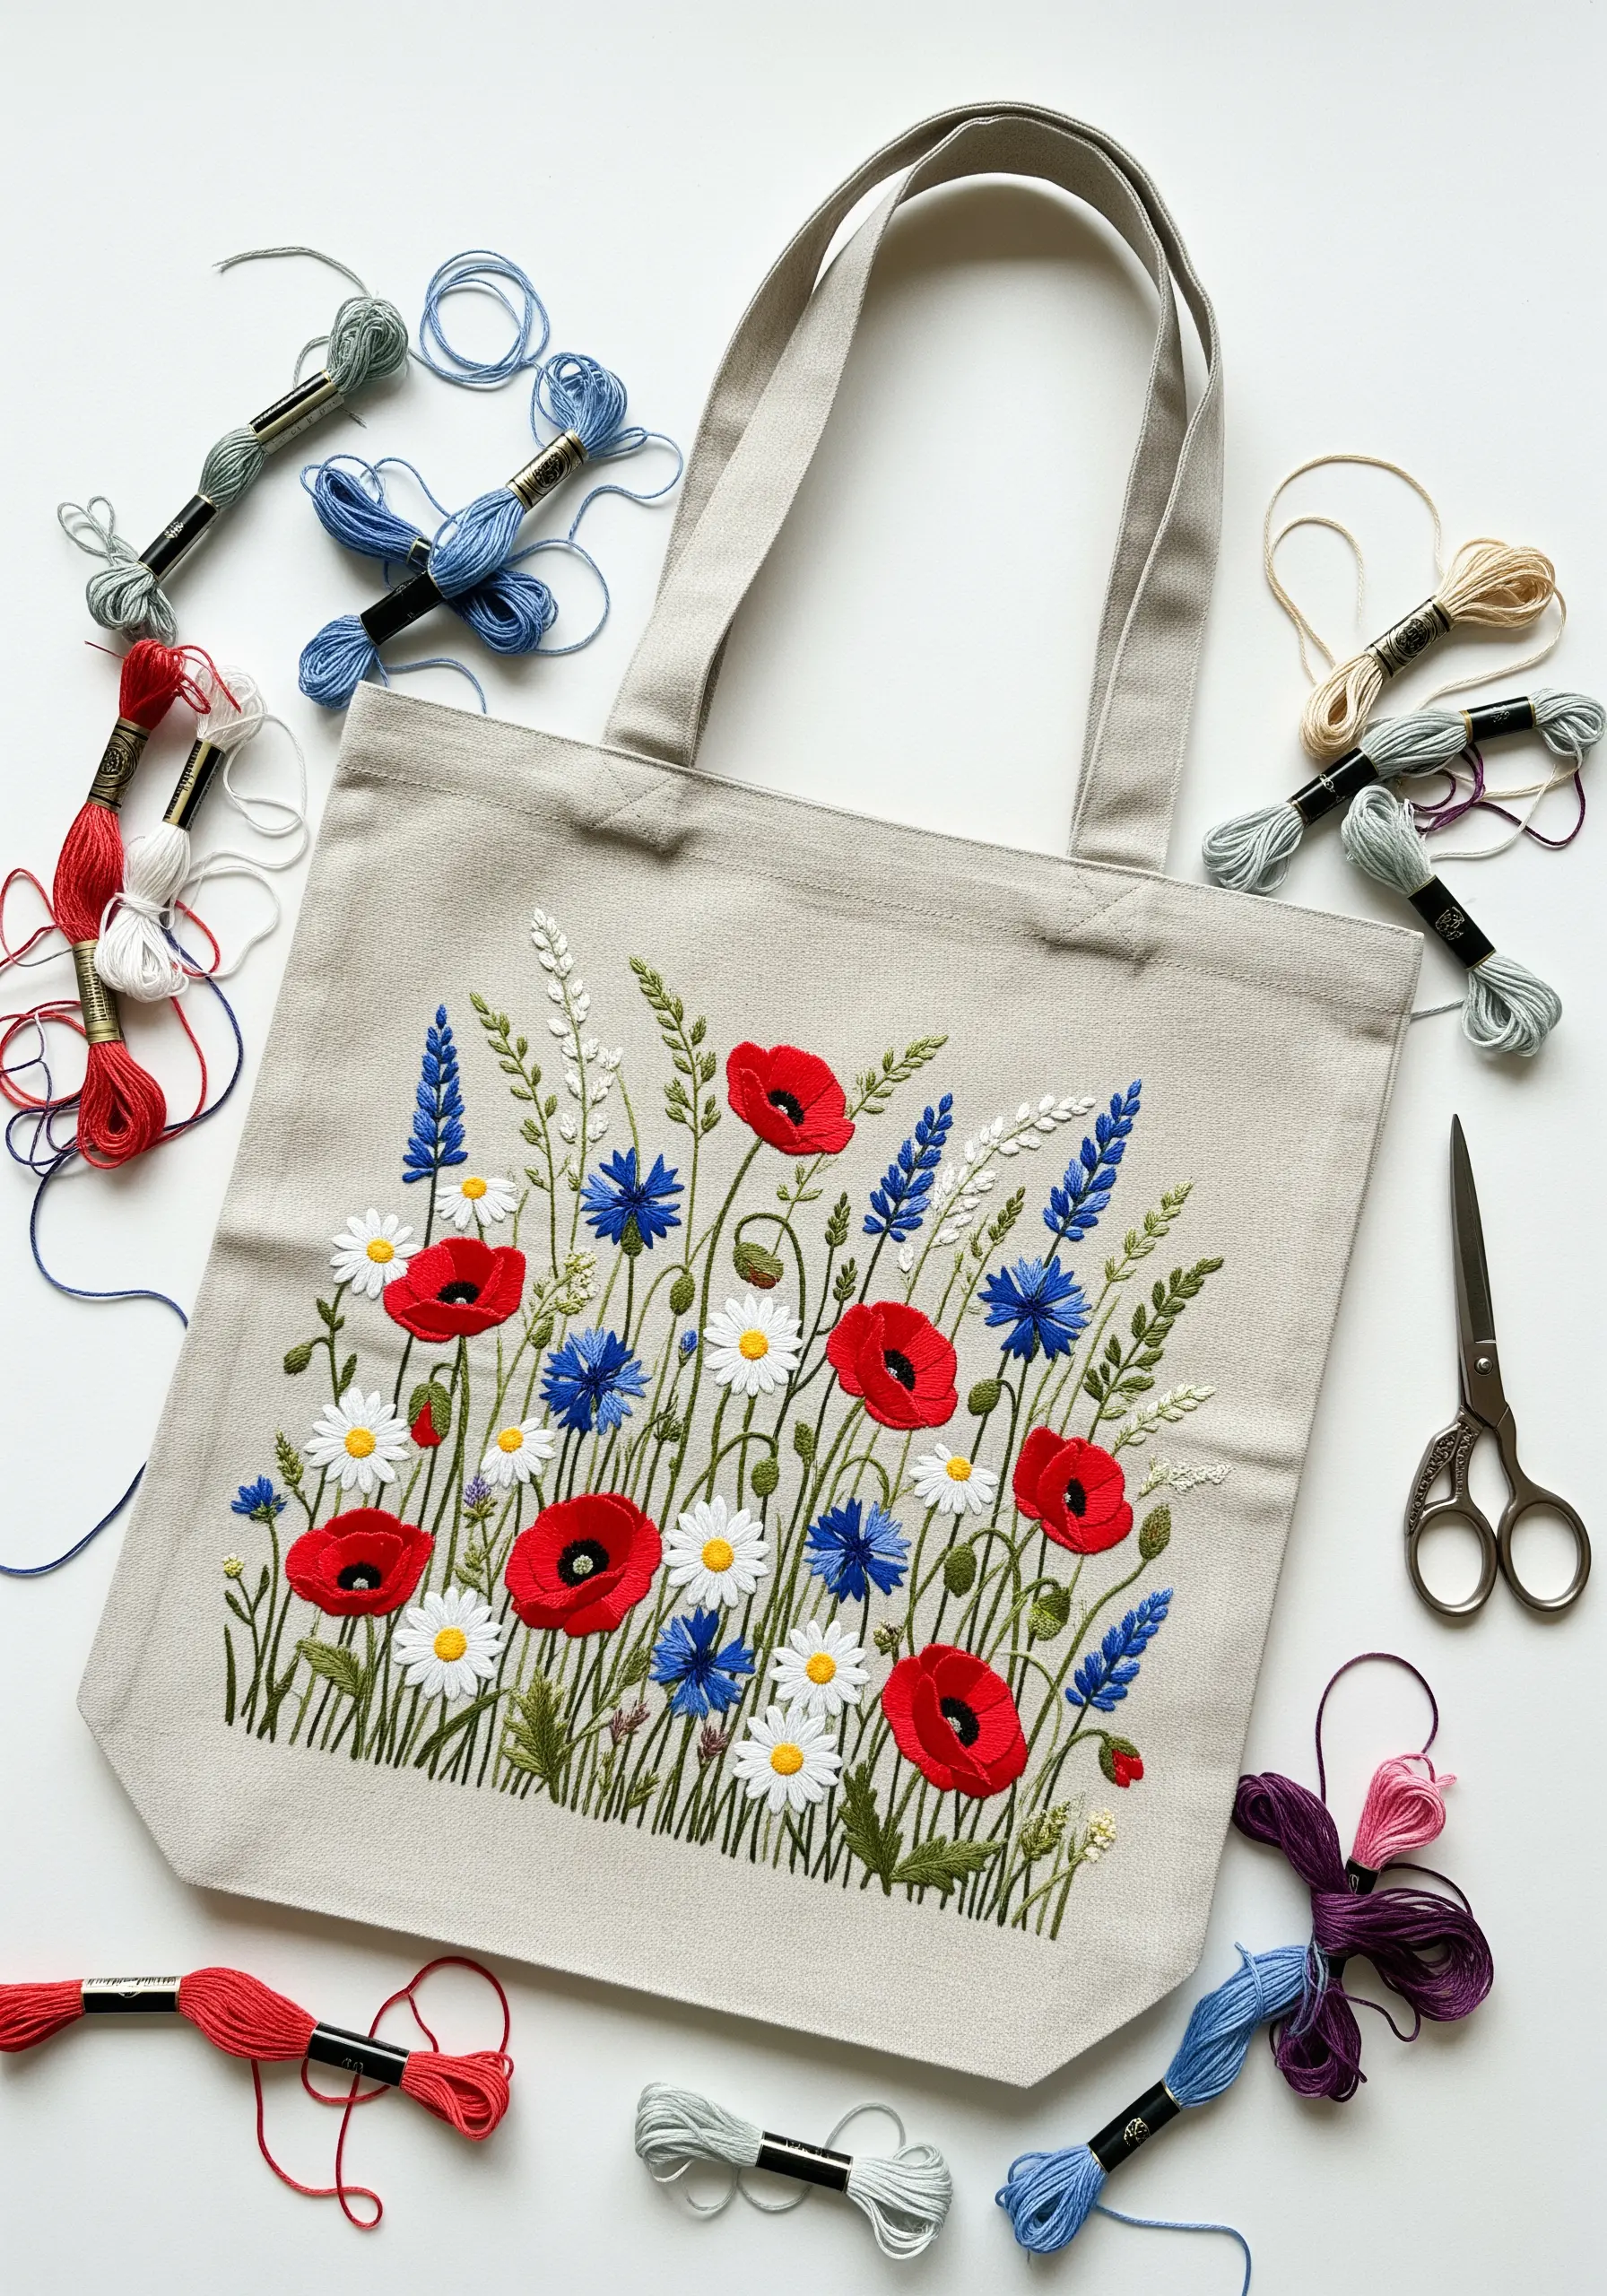
To prevent a floral arrangement from looking flat, create depth by varying the height, scale, and stitch density of each flower.
Use bold, tightly packed satin stitches for the poppy petals so they stand out as the focal point. For the daisies and cornflowers, opt for more delicate stitches like lazy daisy and straight stitches to let them recede slightly.
Fill in the gaps with French knot clusters and fly stitch greenery. This technique gives your meadow a sense of organic, layered growth rather than a simple pattern repeat, making it perfect for floral embroidery ideas to transform plain tote bags.
5. Stitch Miniature Landscapes with Gradient Skies
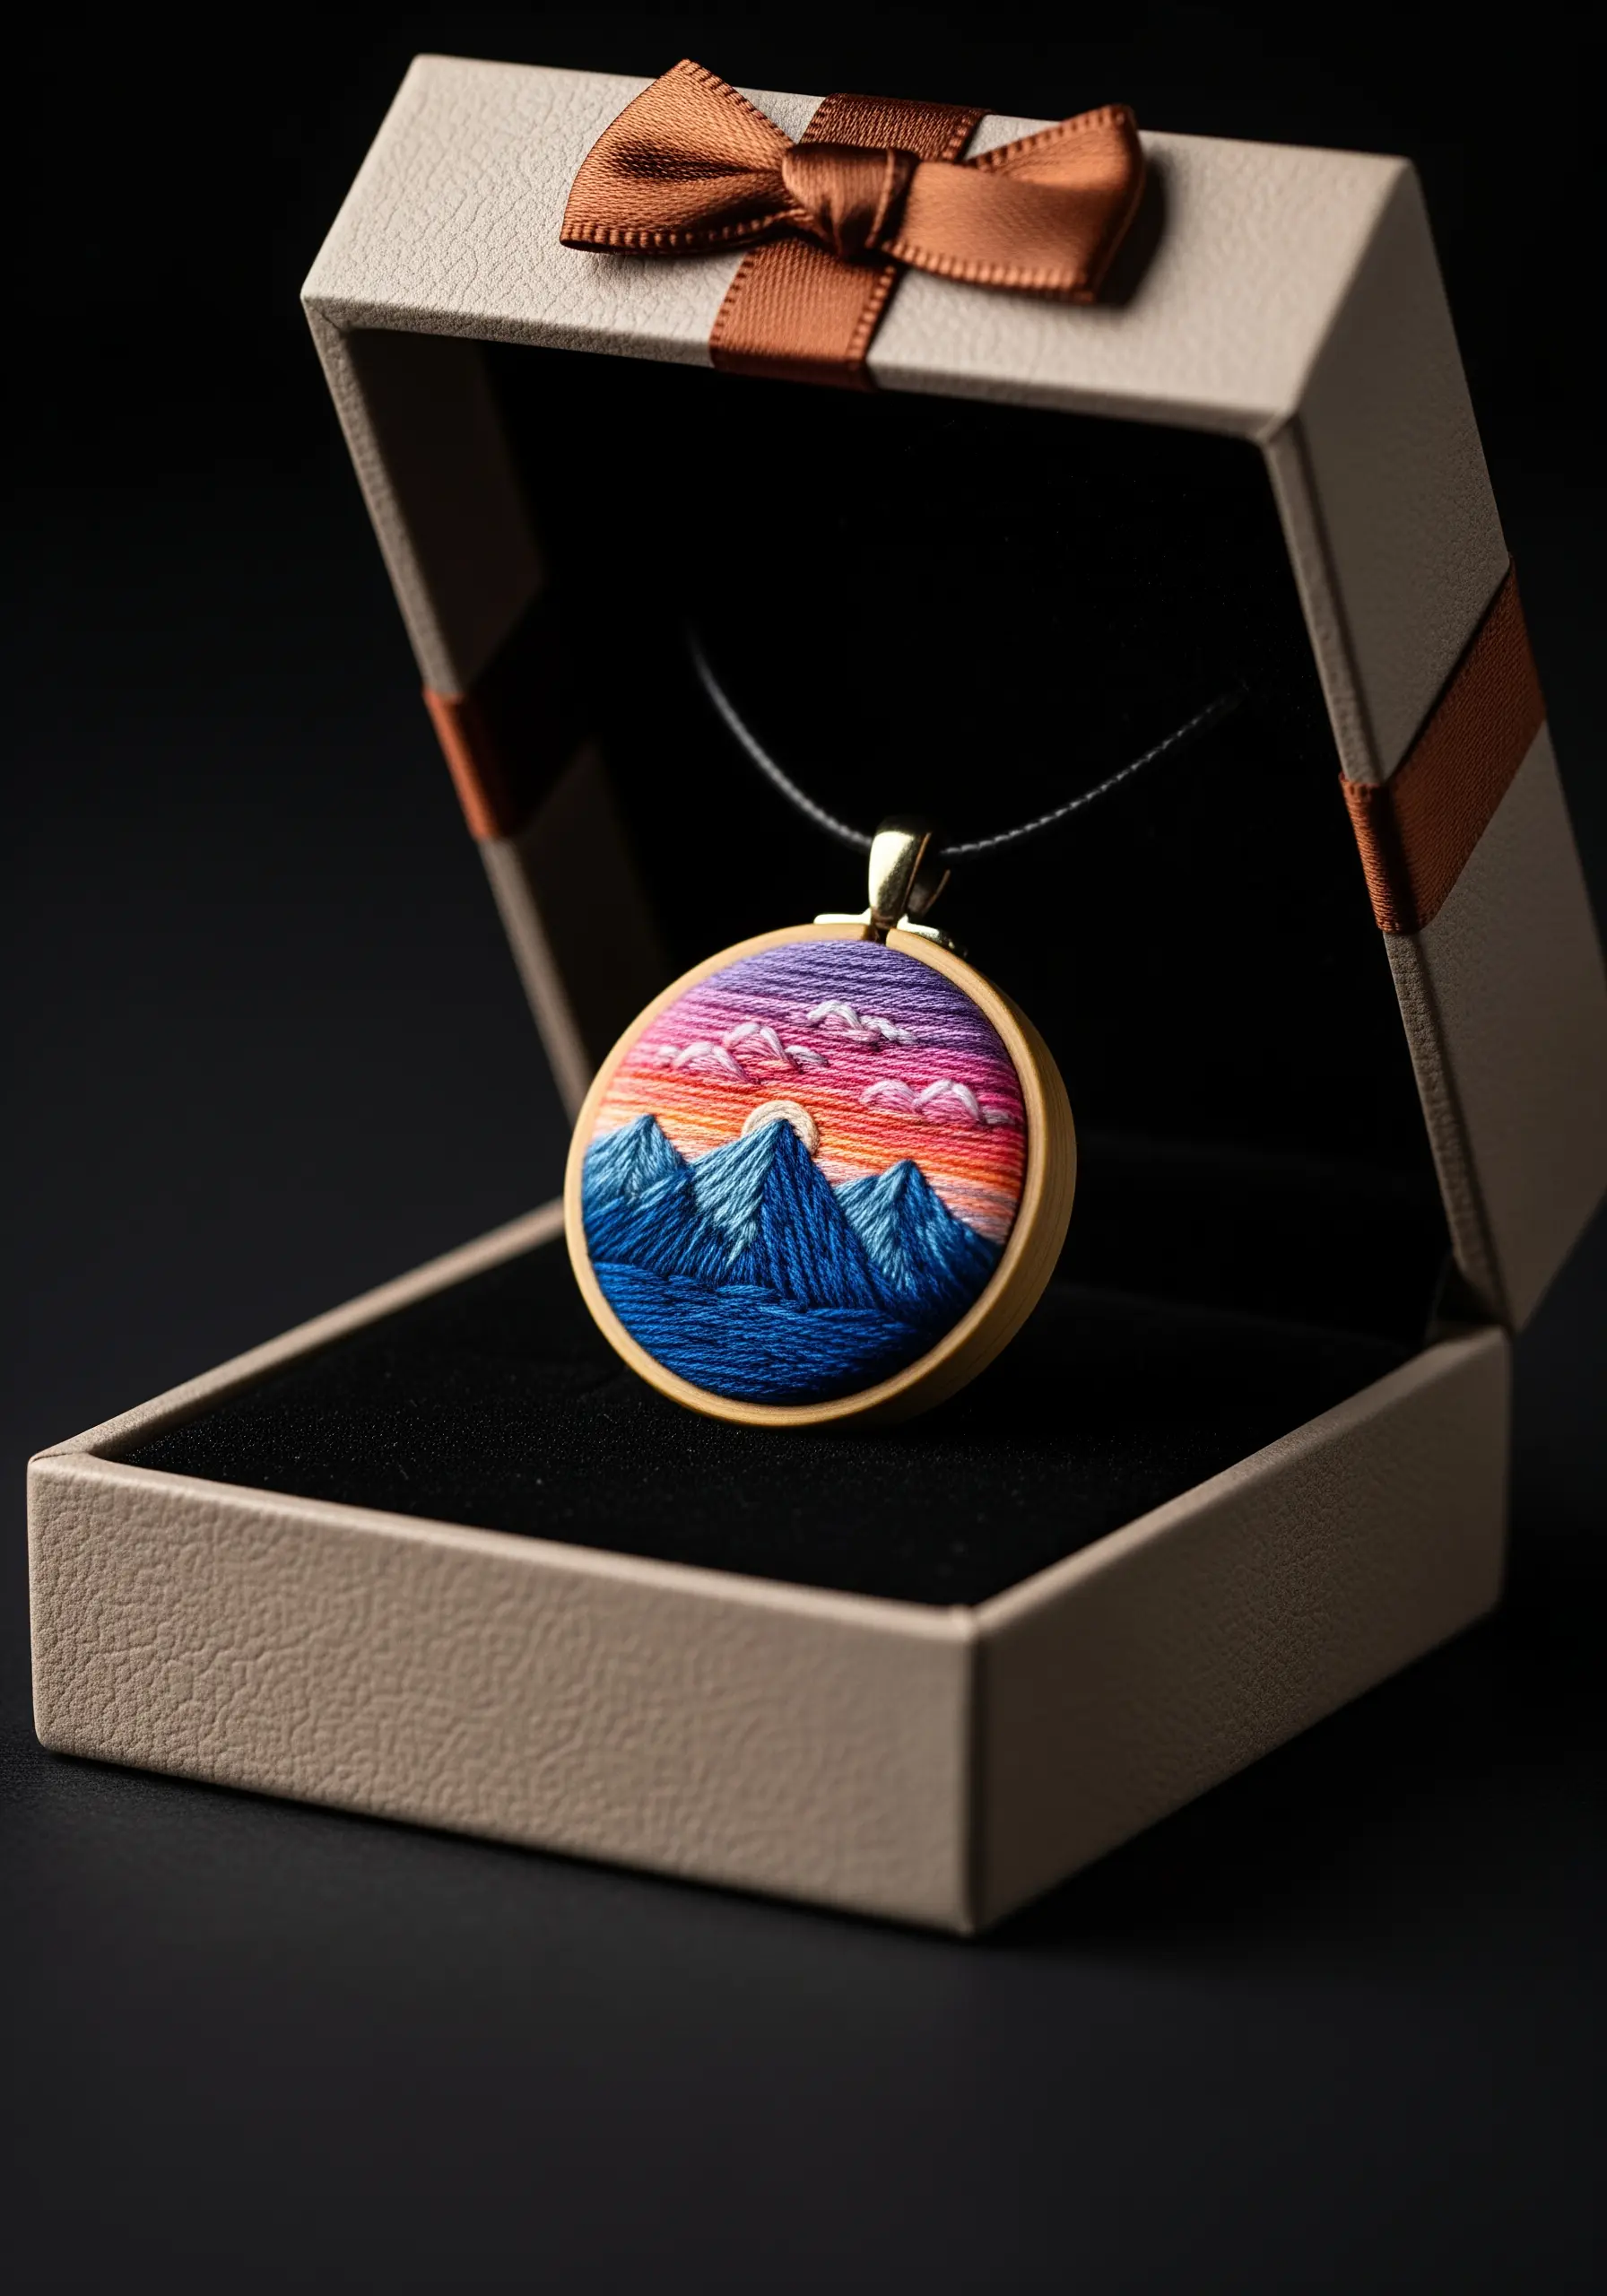
Working in a miniature hoop for a pendant demands precision. Use only a single strand of six-strand floss to achieve fine, sharp details.
Create the mountain texture with directional satin stitches, angling them to mimic the rock faces. This adds a sense of form and shadow, even at a small scale.
For the sunset sky, blend your colors using rows of split stitch instead of long-and-short stitch. This creates a smoother, less textured gradient that reads like a watercolor wash, giving the mountains the spotlight.
6. Build a Forest Floor with Dimensional Stitches
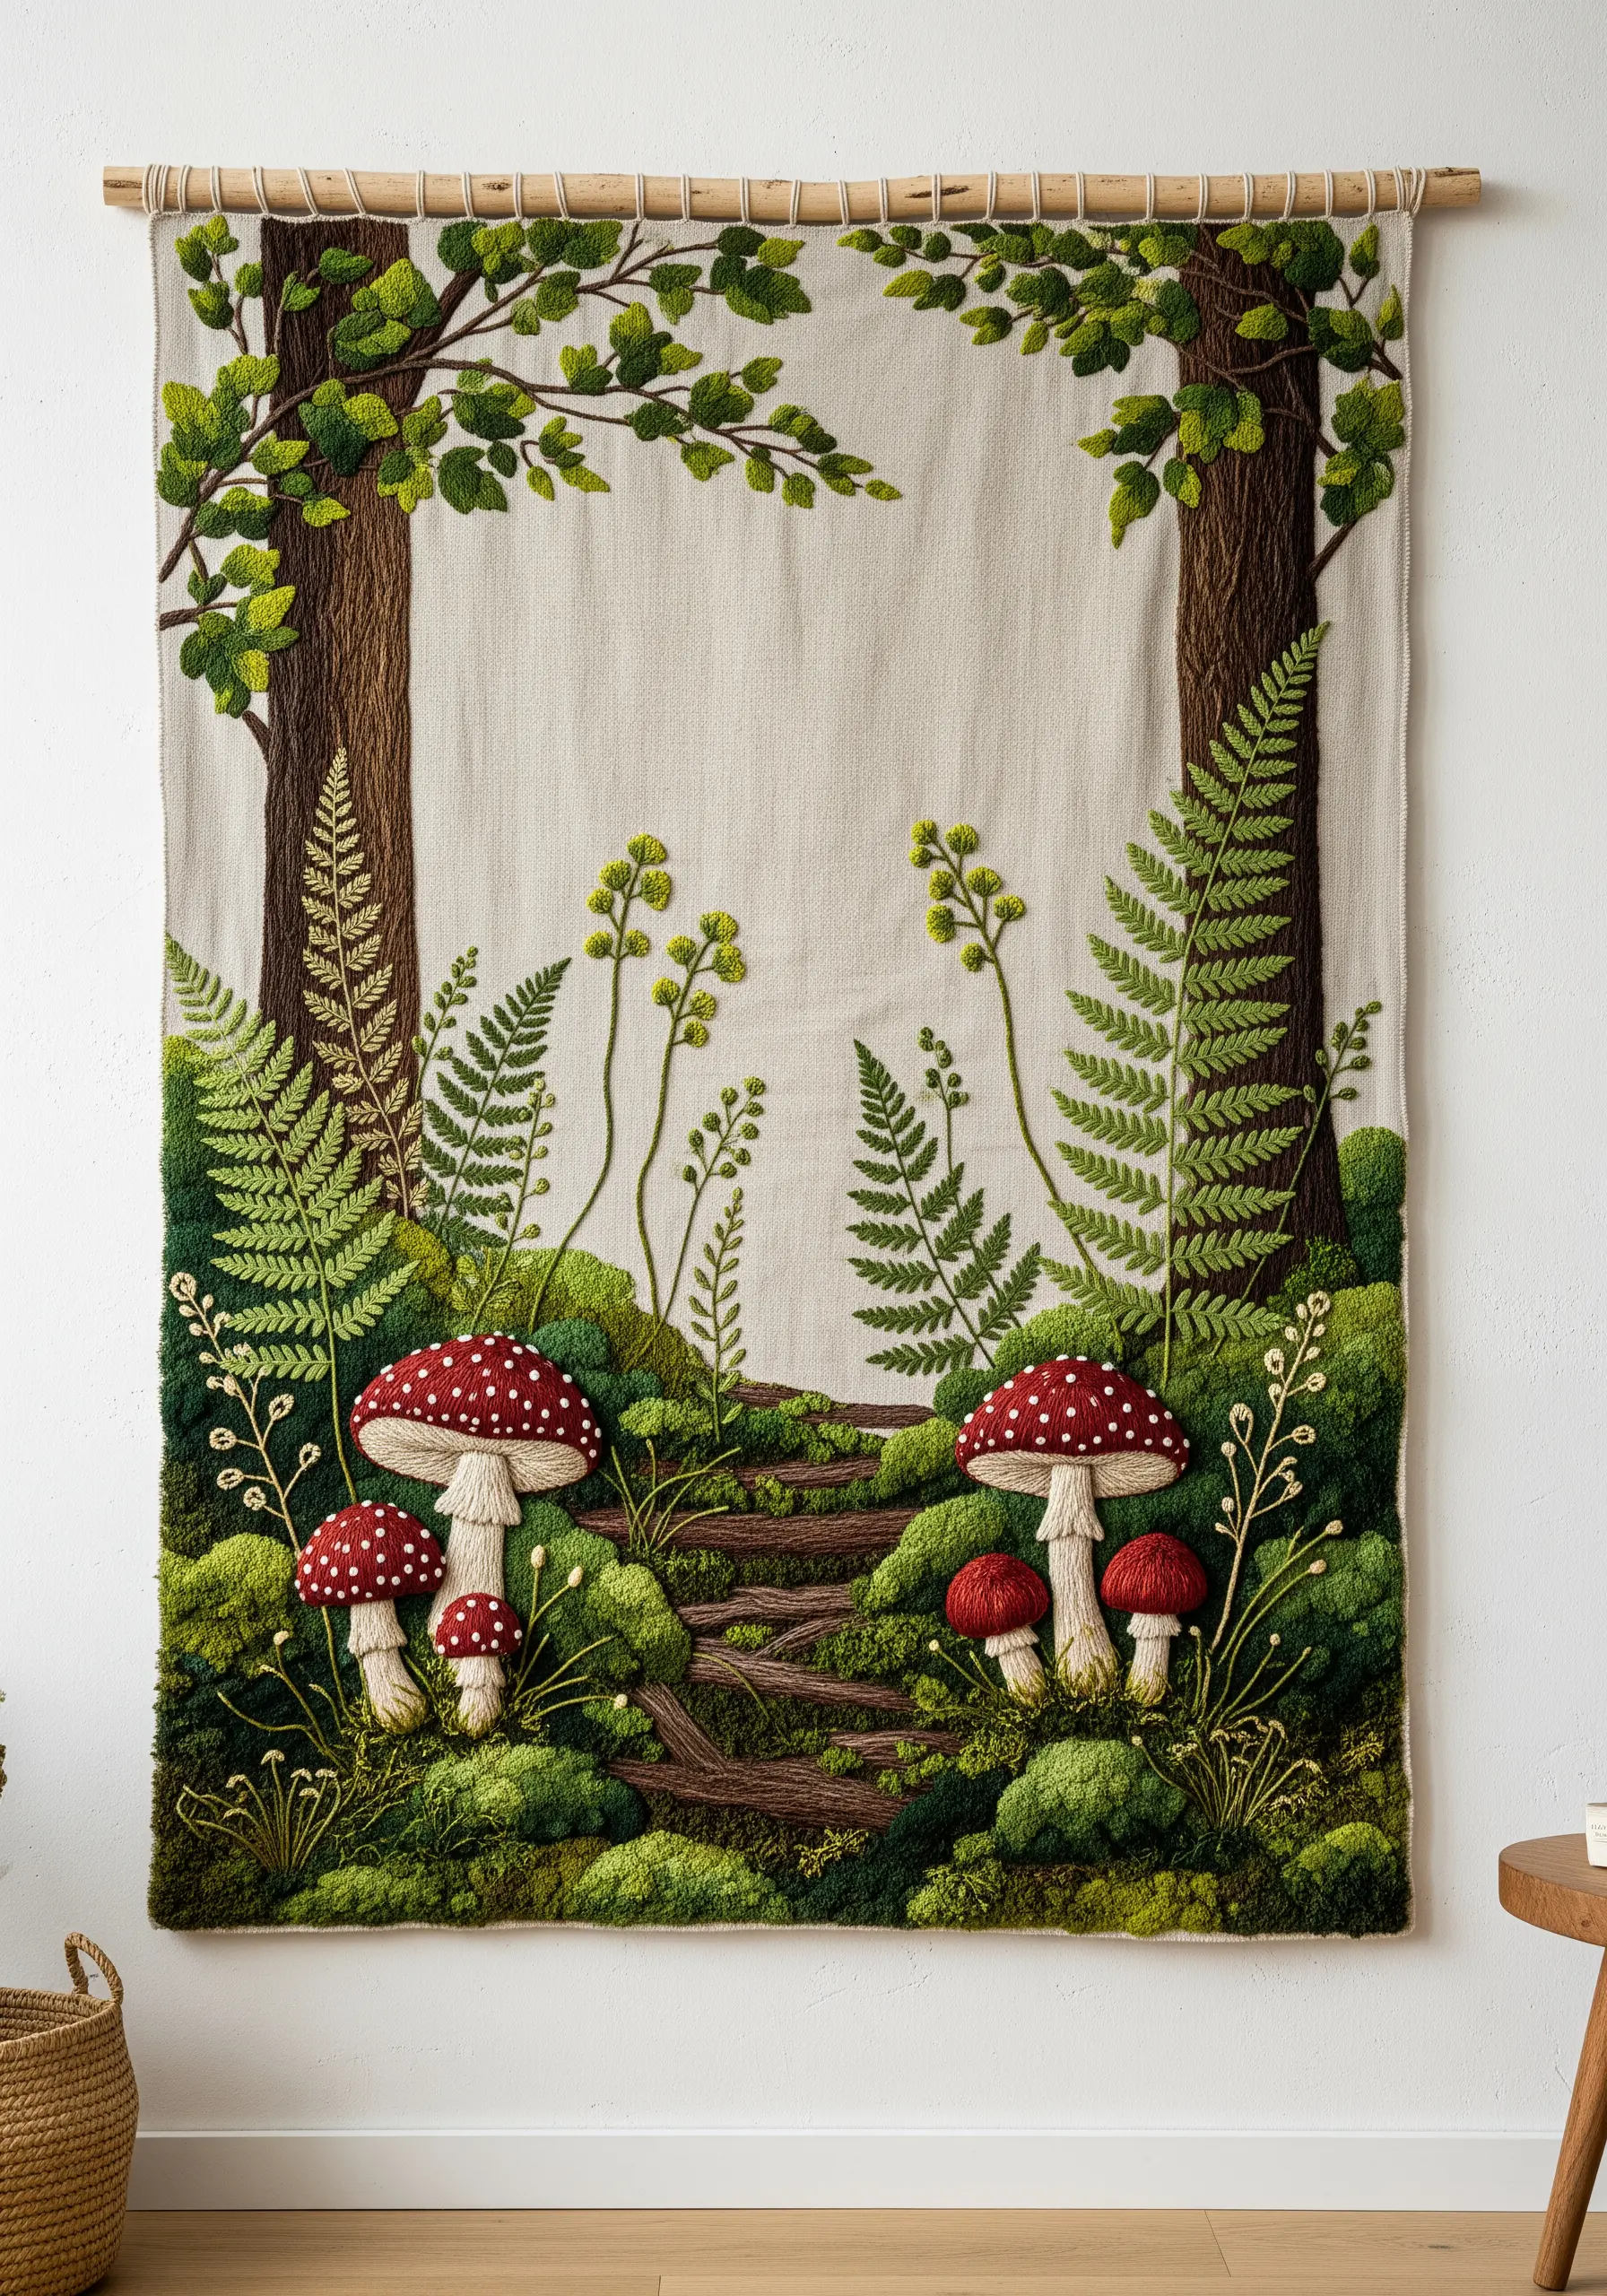
To create a truly immersive, tactile forest scene, you must think in layers of texture.
Use French knots and the Turkey work stitch (also called a Ghiordes knot) with thick wool or six-strand cotton floss to build up the plush, mossy ground. Once you complete the Turkey work, trim the loops to your desired height to create a dense pile.
For the delicate fern foliage, use the fishbone stitch. This technique creates a central vein and angled leaves in one motion, giving the fronds a natural, layered appearance that contrasts beautifully with the dense moss.
7. Tell a Story Across a Cohesive Set
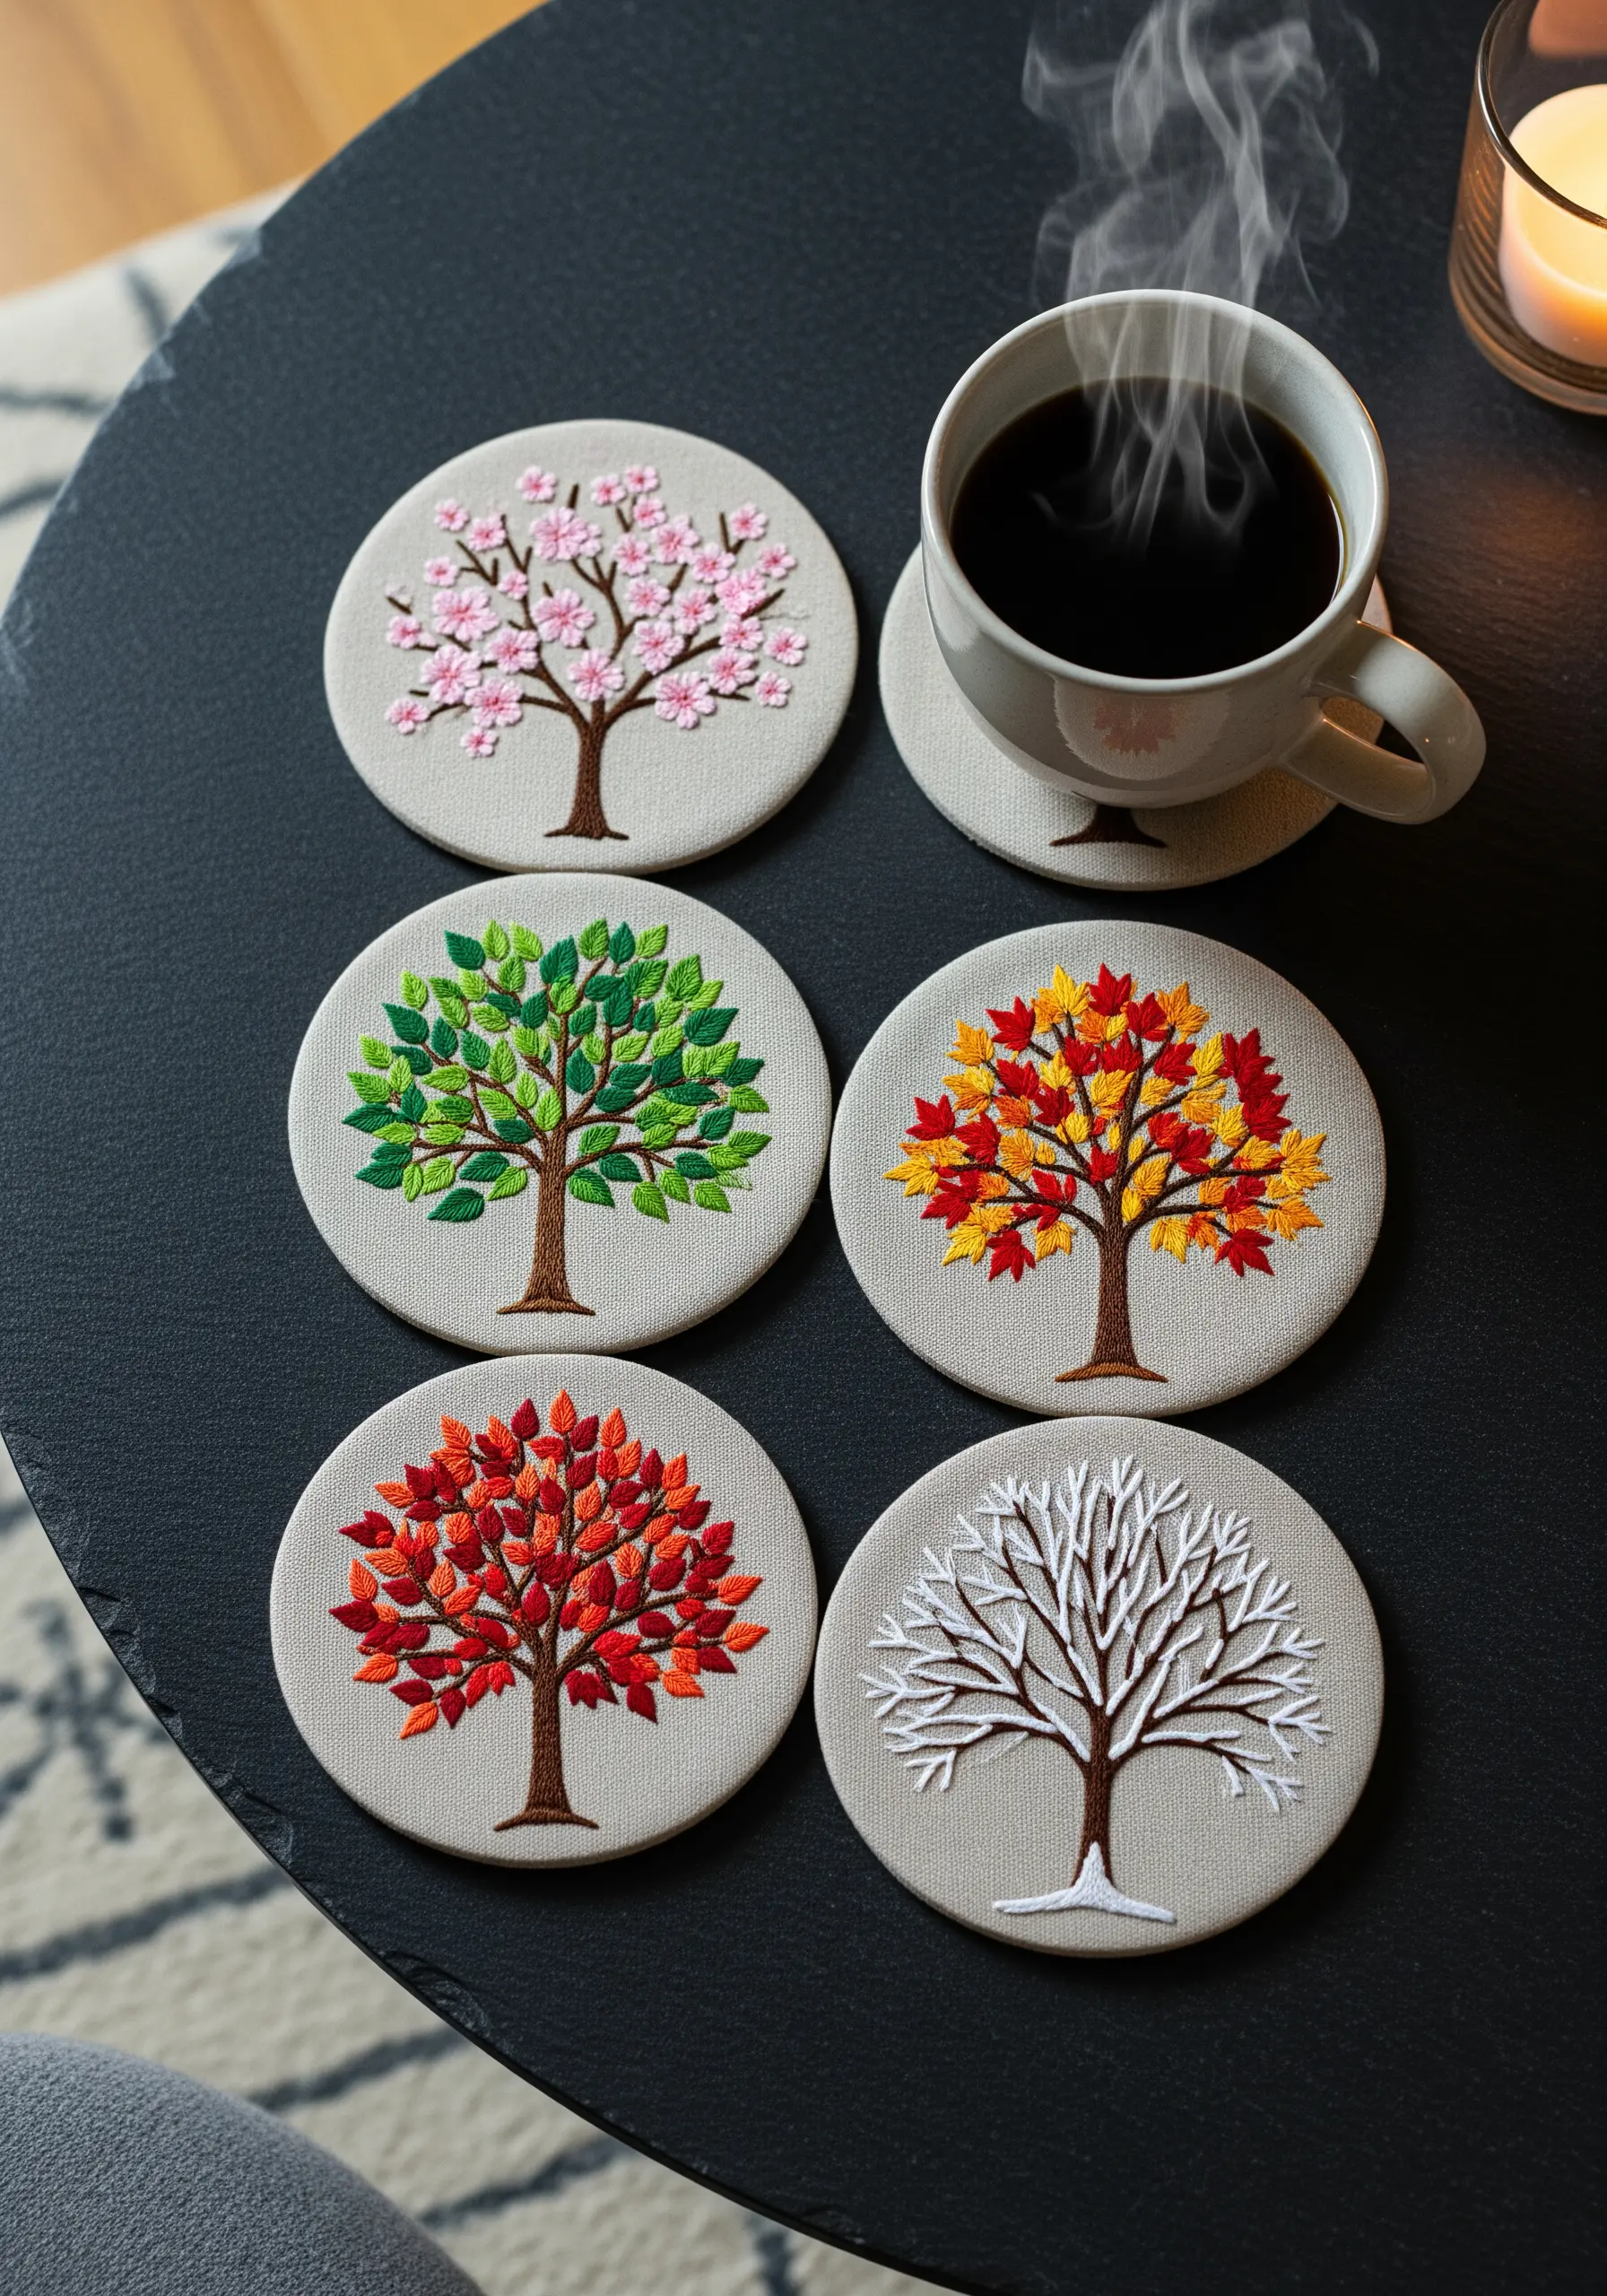
When creating a themed set, like these seasonal coasters, use a single motif as your anchor but transform it through color and stitch choice.
For spring, use clusters of French knots for delicate blossoms. In summer, fill the canopy with a lush, dense leaf stitch in varying greens.
Capture autumn’s brilliance with a blend of reds, oranges, and yellows using long-and-short stitch. Finally, strip it back to a stark, graphic backstitch or stem stitch for the bare winter branches.
This method ensures the set feels unified yet distinct, making it a thoughtful and complete gift.
8. Achieve Bold Florals on Heavy-Duty Denim
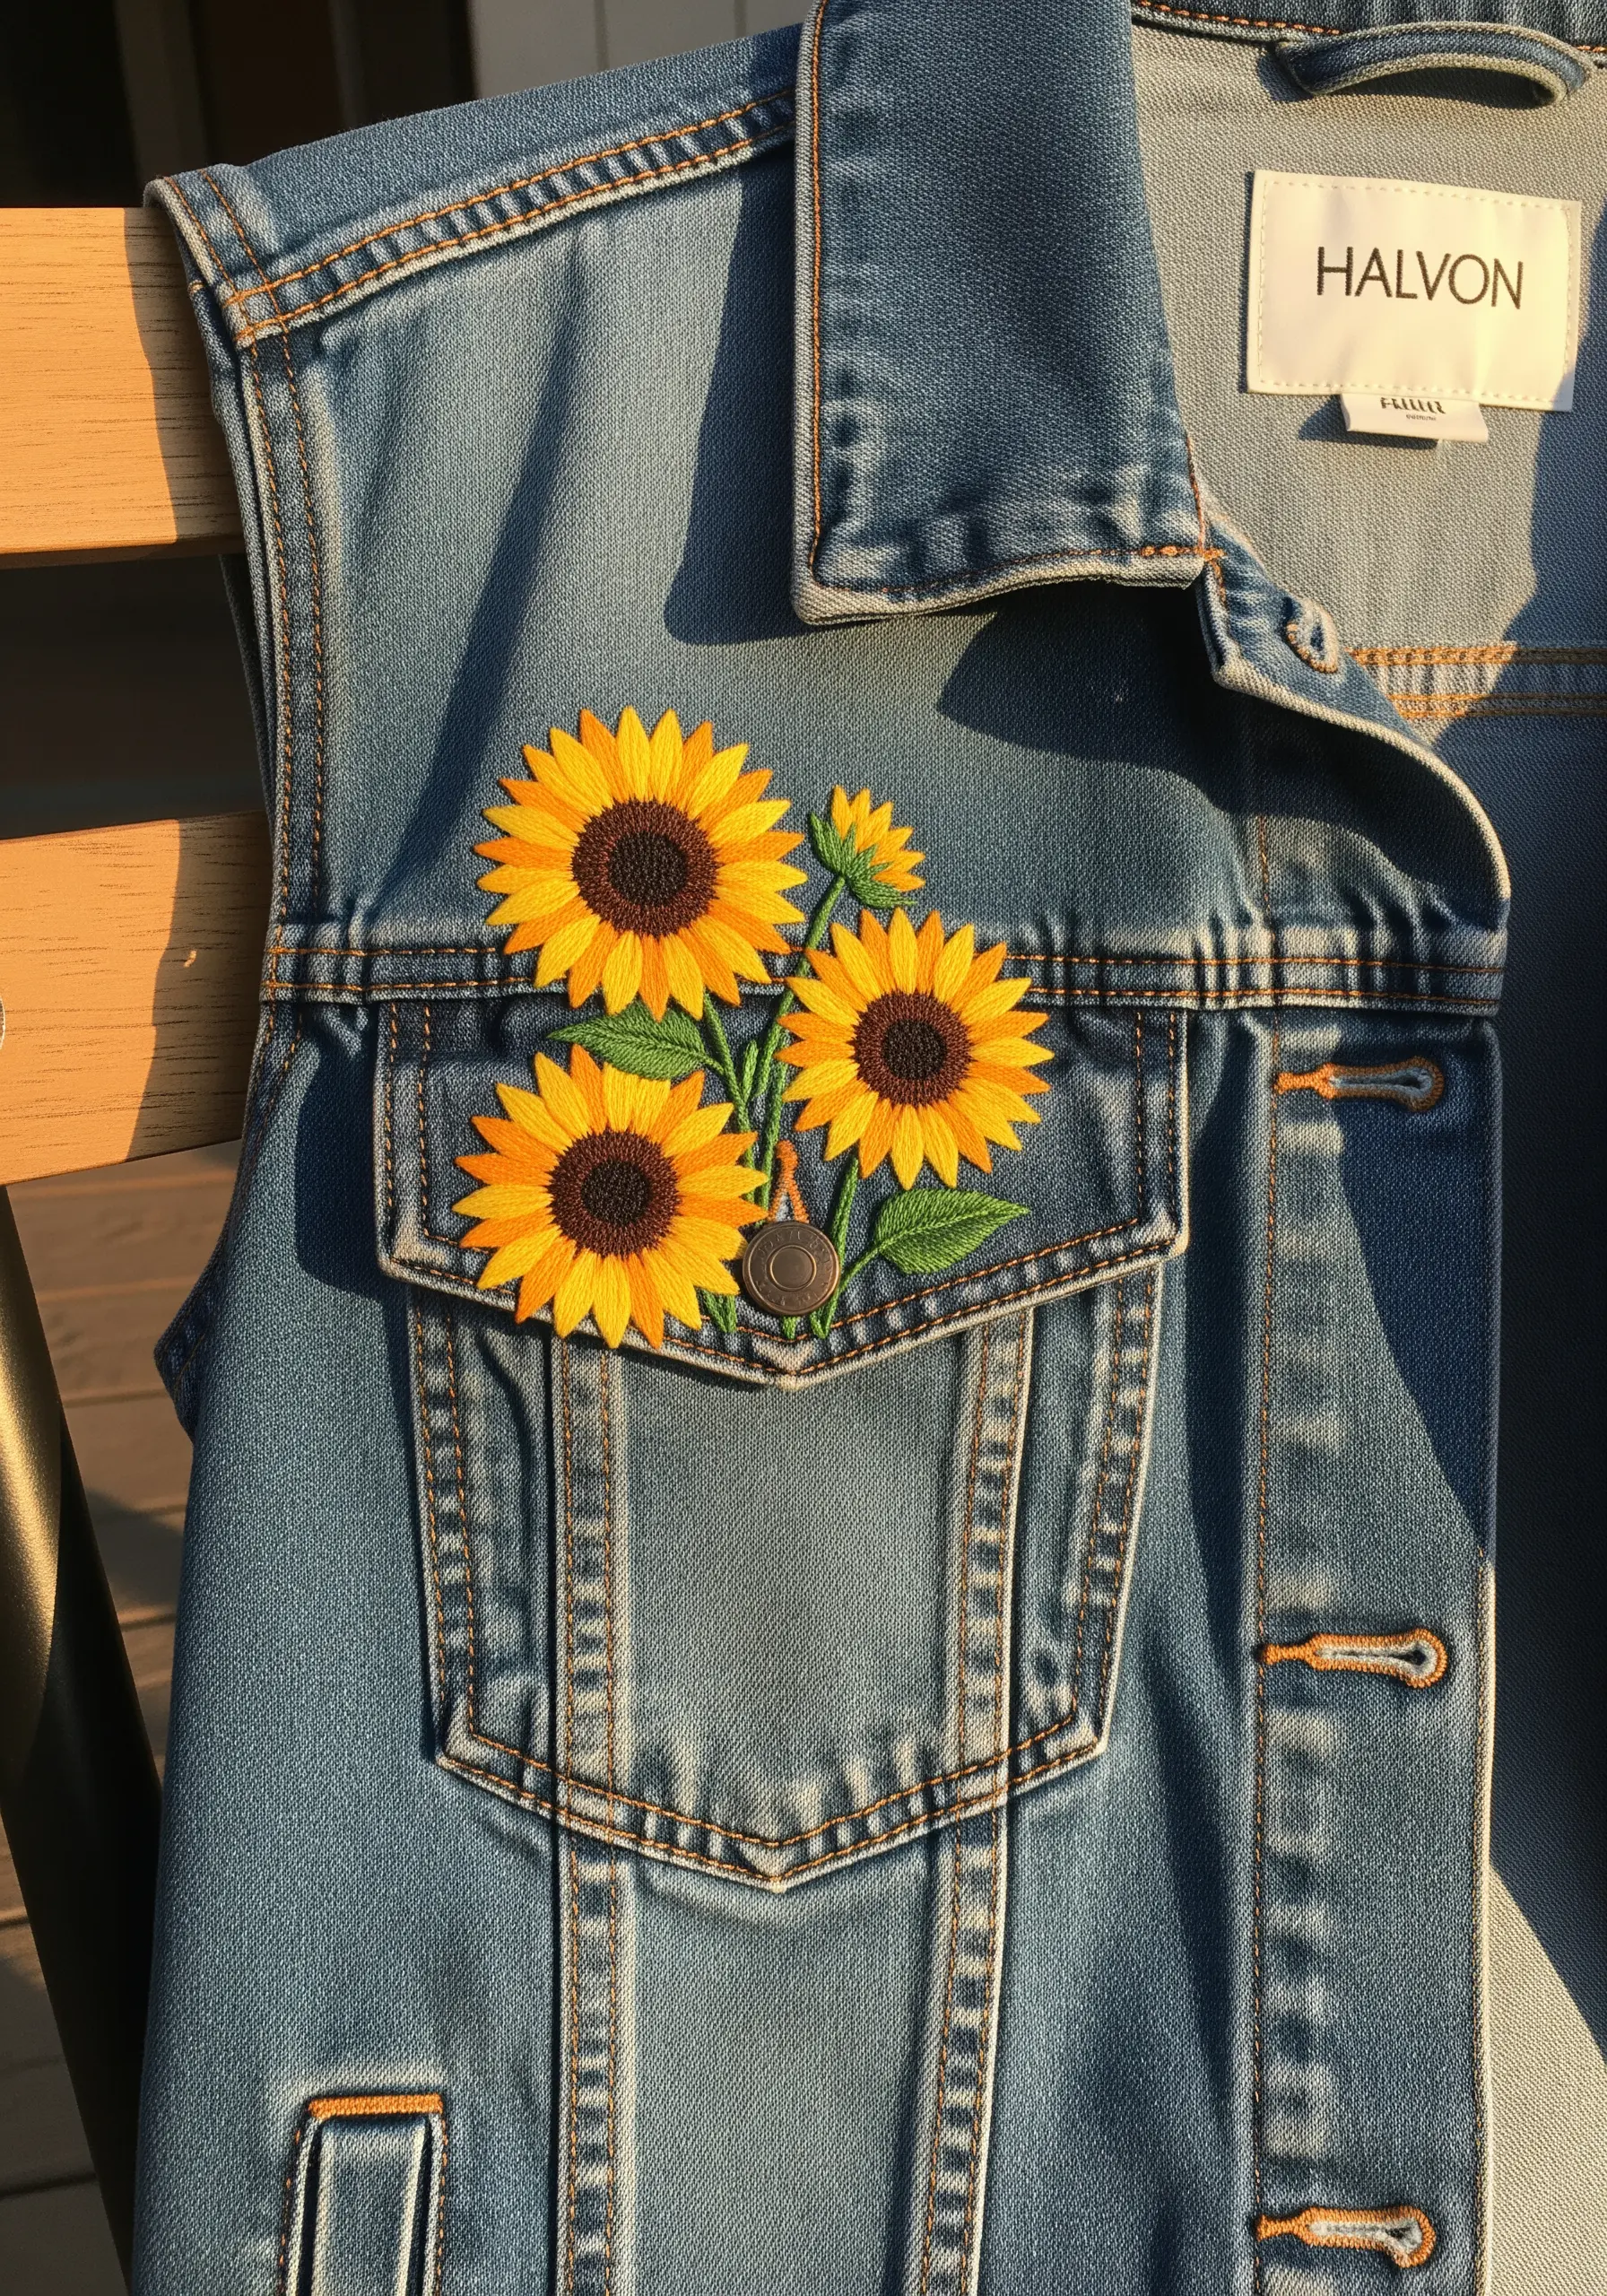
Embroidering on denim requires stabilization to prevent the fabric from puckering under the tension of dense stitches. Always use a medium-weight cut-away or iron-on stabilizer on the back.
For the sunflower petals, blend your yellows and oranges with long-and-short stitches to create a realistic, sun-kissed look.
The key to a convincing sunflower center is a dense cluster of French knots using at least two shades of brown and black. This high-texture detail provides a stunning contrast to the smooth petals and rugged denim.
9. Add Dimension with Raised Appliqué Details
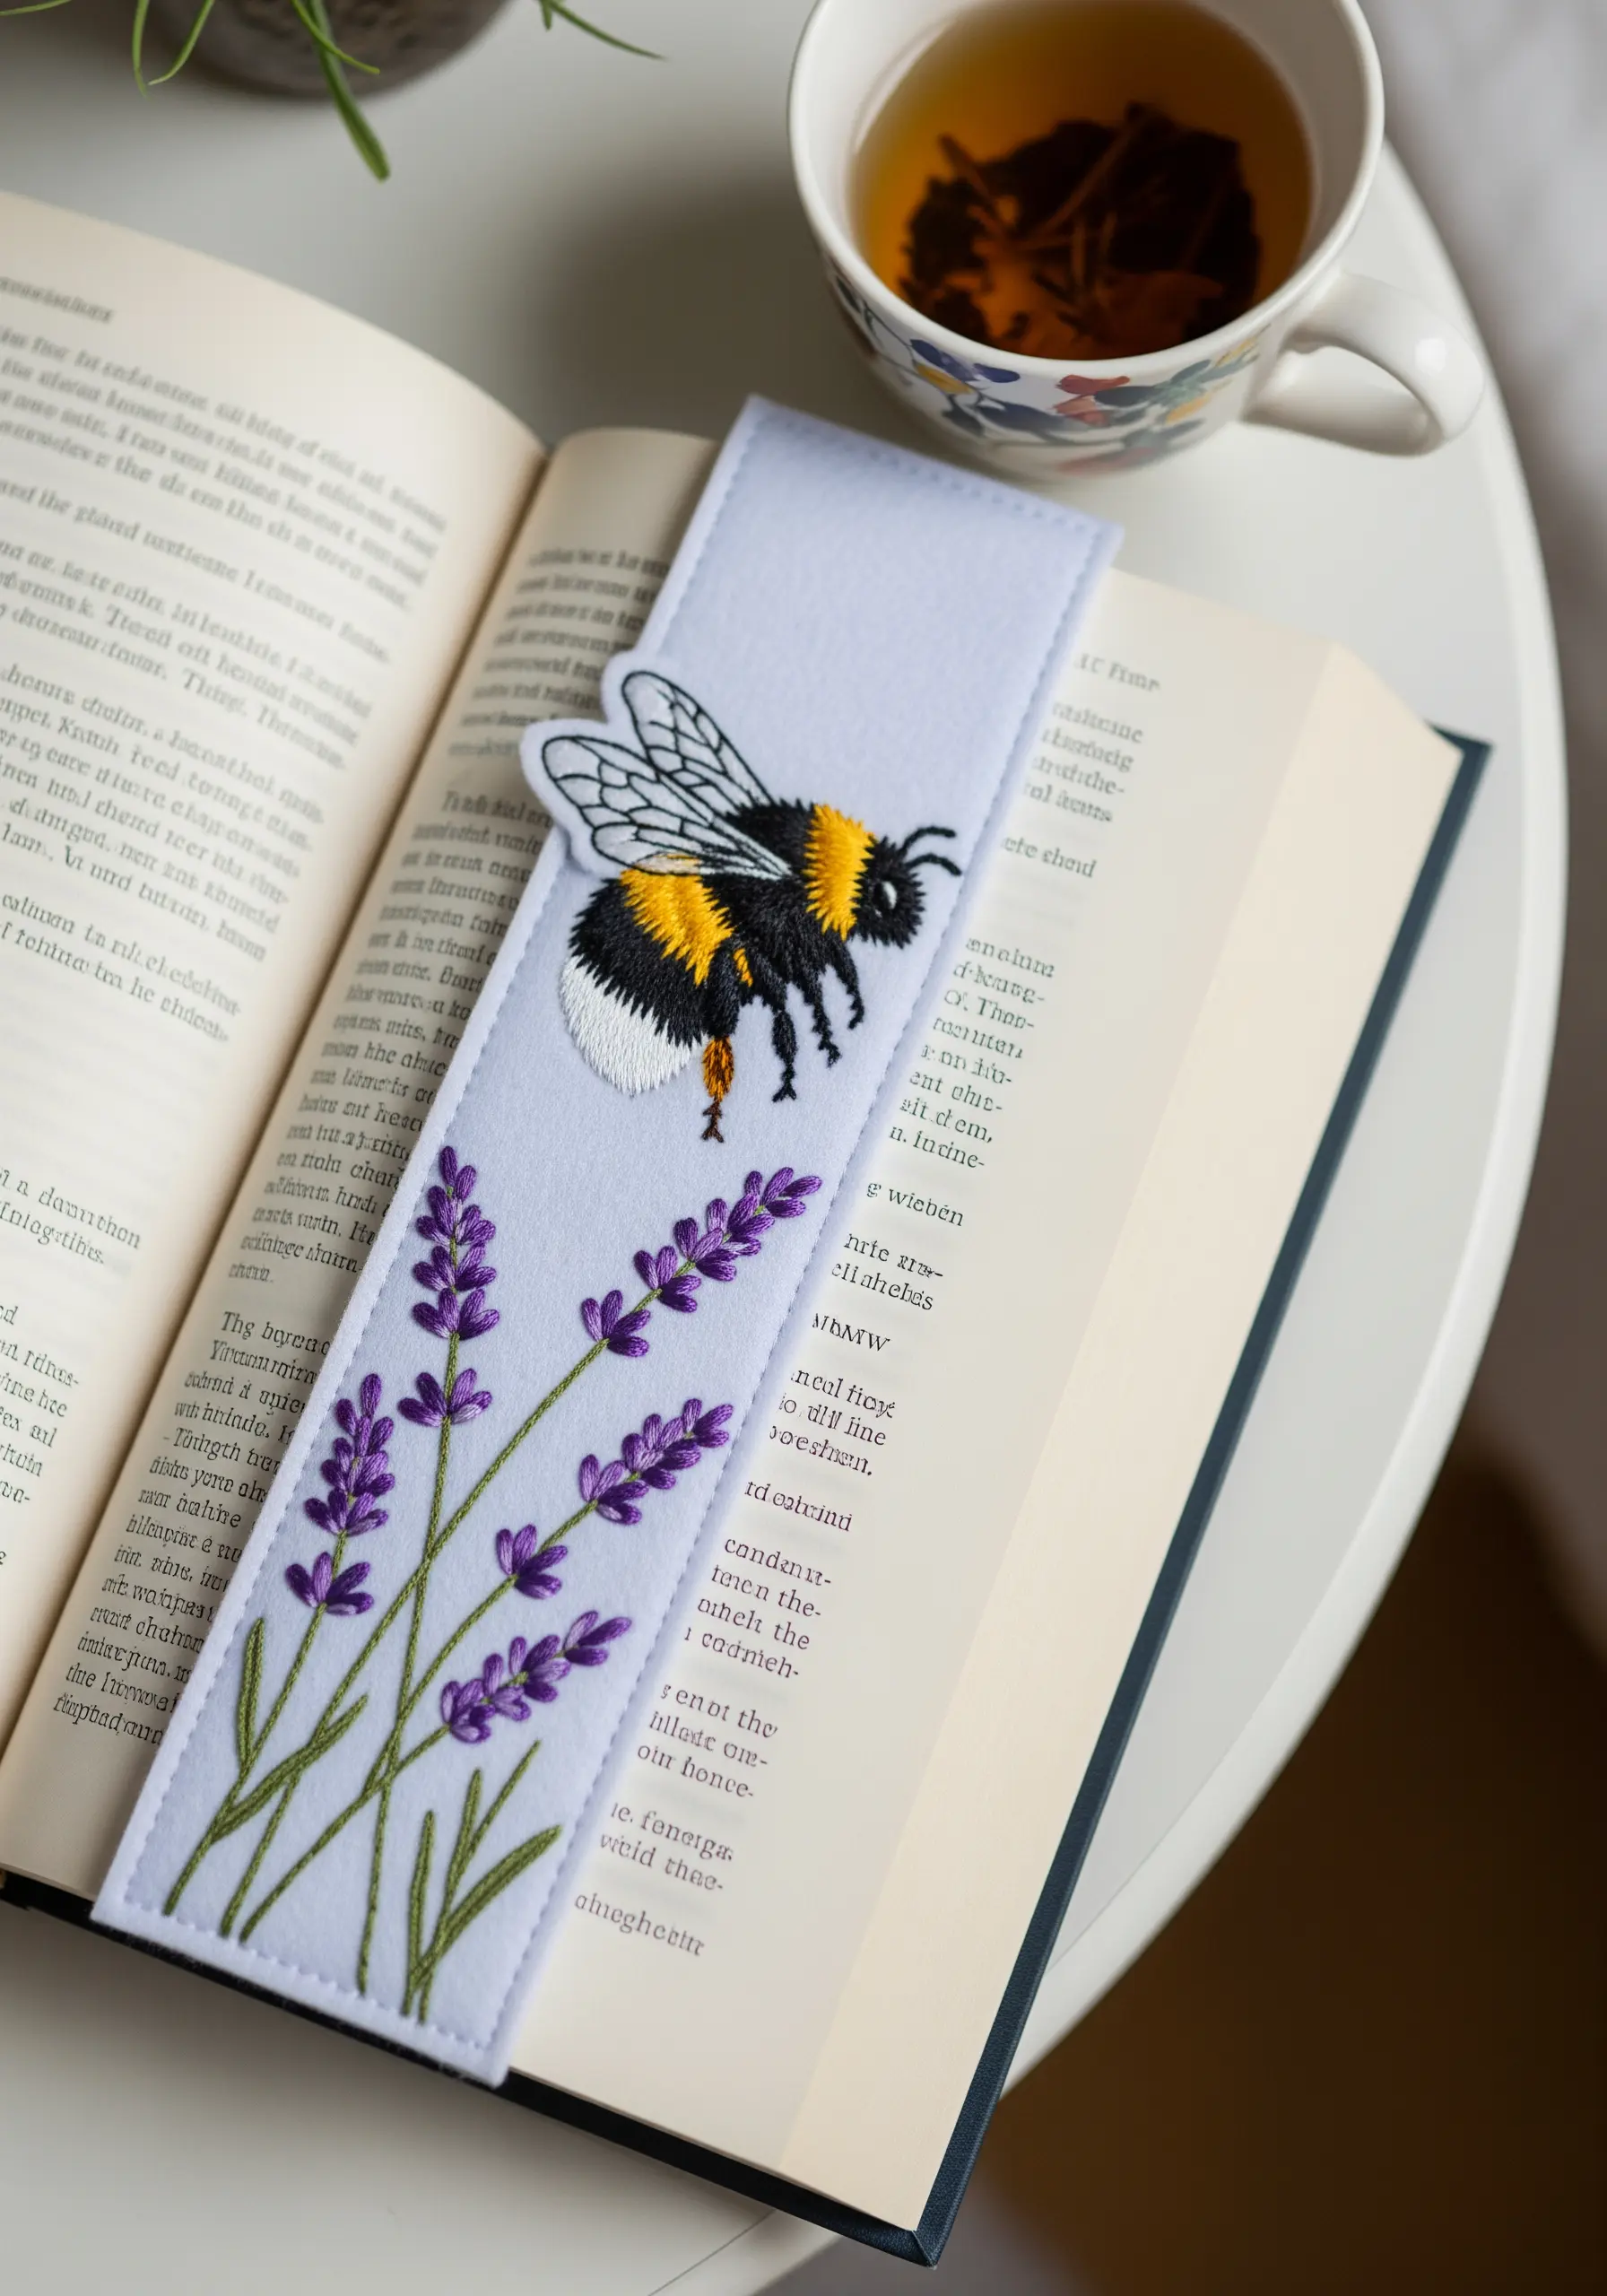
To make the bee on this bookmark truly stand out, work it as a separate appliqué element—a technique known as stumpwork.
Embroider the bee onto a piece of stiff felt or fabric, complete with satin-stitched stripes and delicate vellum wings. Carefully cut it out, leaving a tiny margin.
Secure the finished bee to the bookmark with a few small, discreet stitches. This raises it from the surface, creating a dynamic 3D effect that contrasts beautifully with the flat lavender stems.
10. Craft a Bejeweled Brooch with Metallic Outlines

For wearable art like this hummingbird brooch, a clean outline is essential. Use a single strand of gold metallic thread and couch it along the edges—this gives you a perfect, shimmering line without the struggle of pulling metallic floss through fabric.
Fill the sections with jewel-toned satin stitches, keeping them smooth and tight.
Elevate the piece by adding a few strategically placed seed beads or tiny sequins to the head and wings. This finishing touch catches the light and gives the piece a precious, jewelry-like quality.
11. Create a Sculptural Scene on Felt
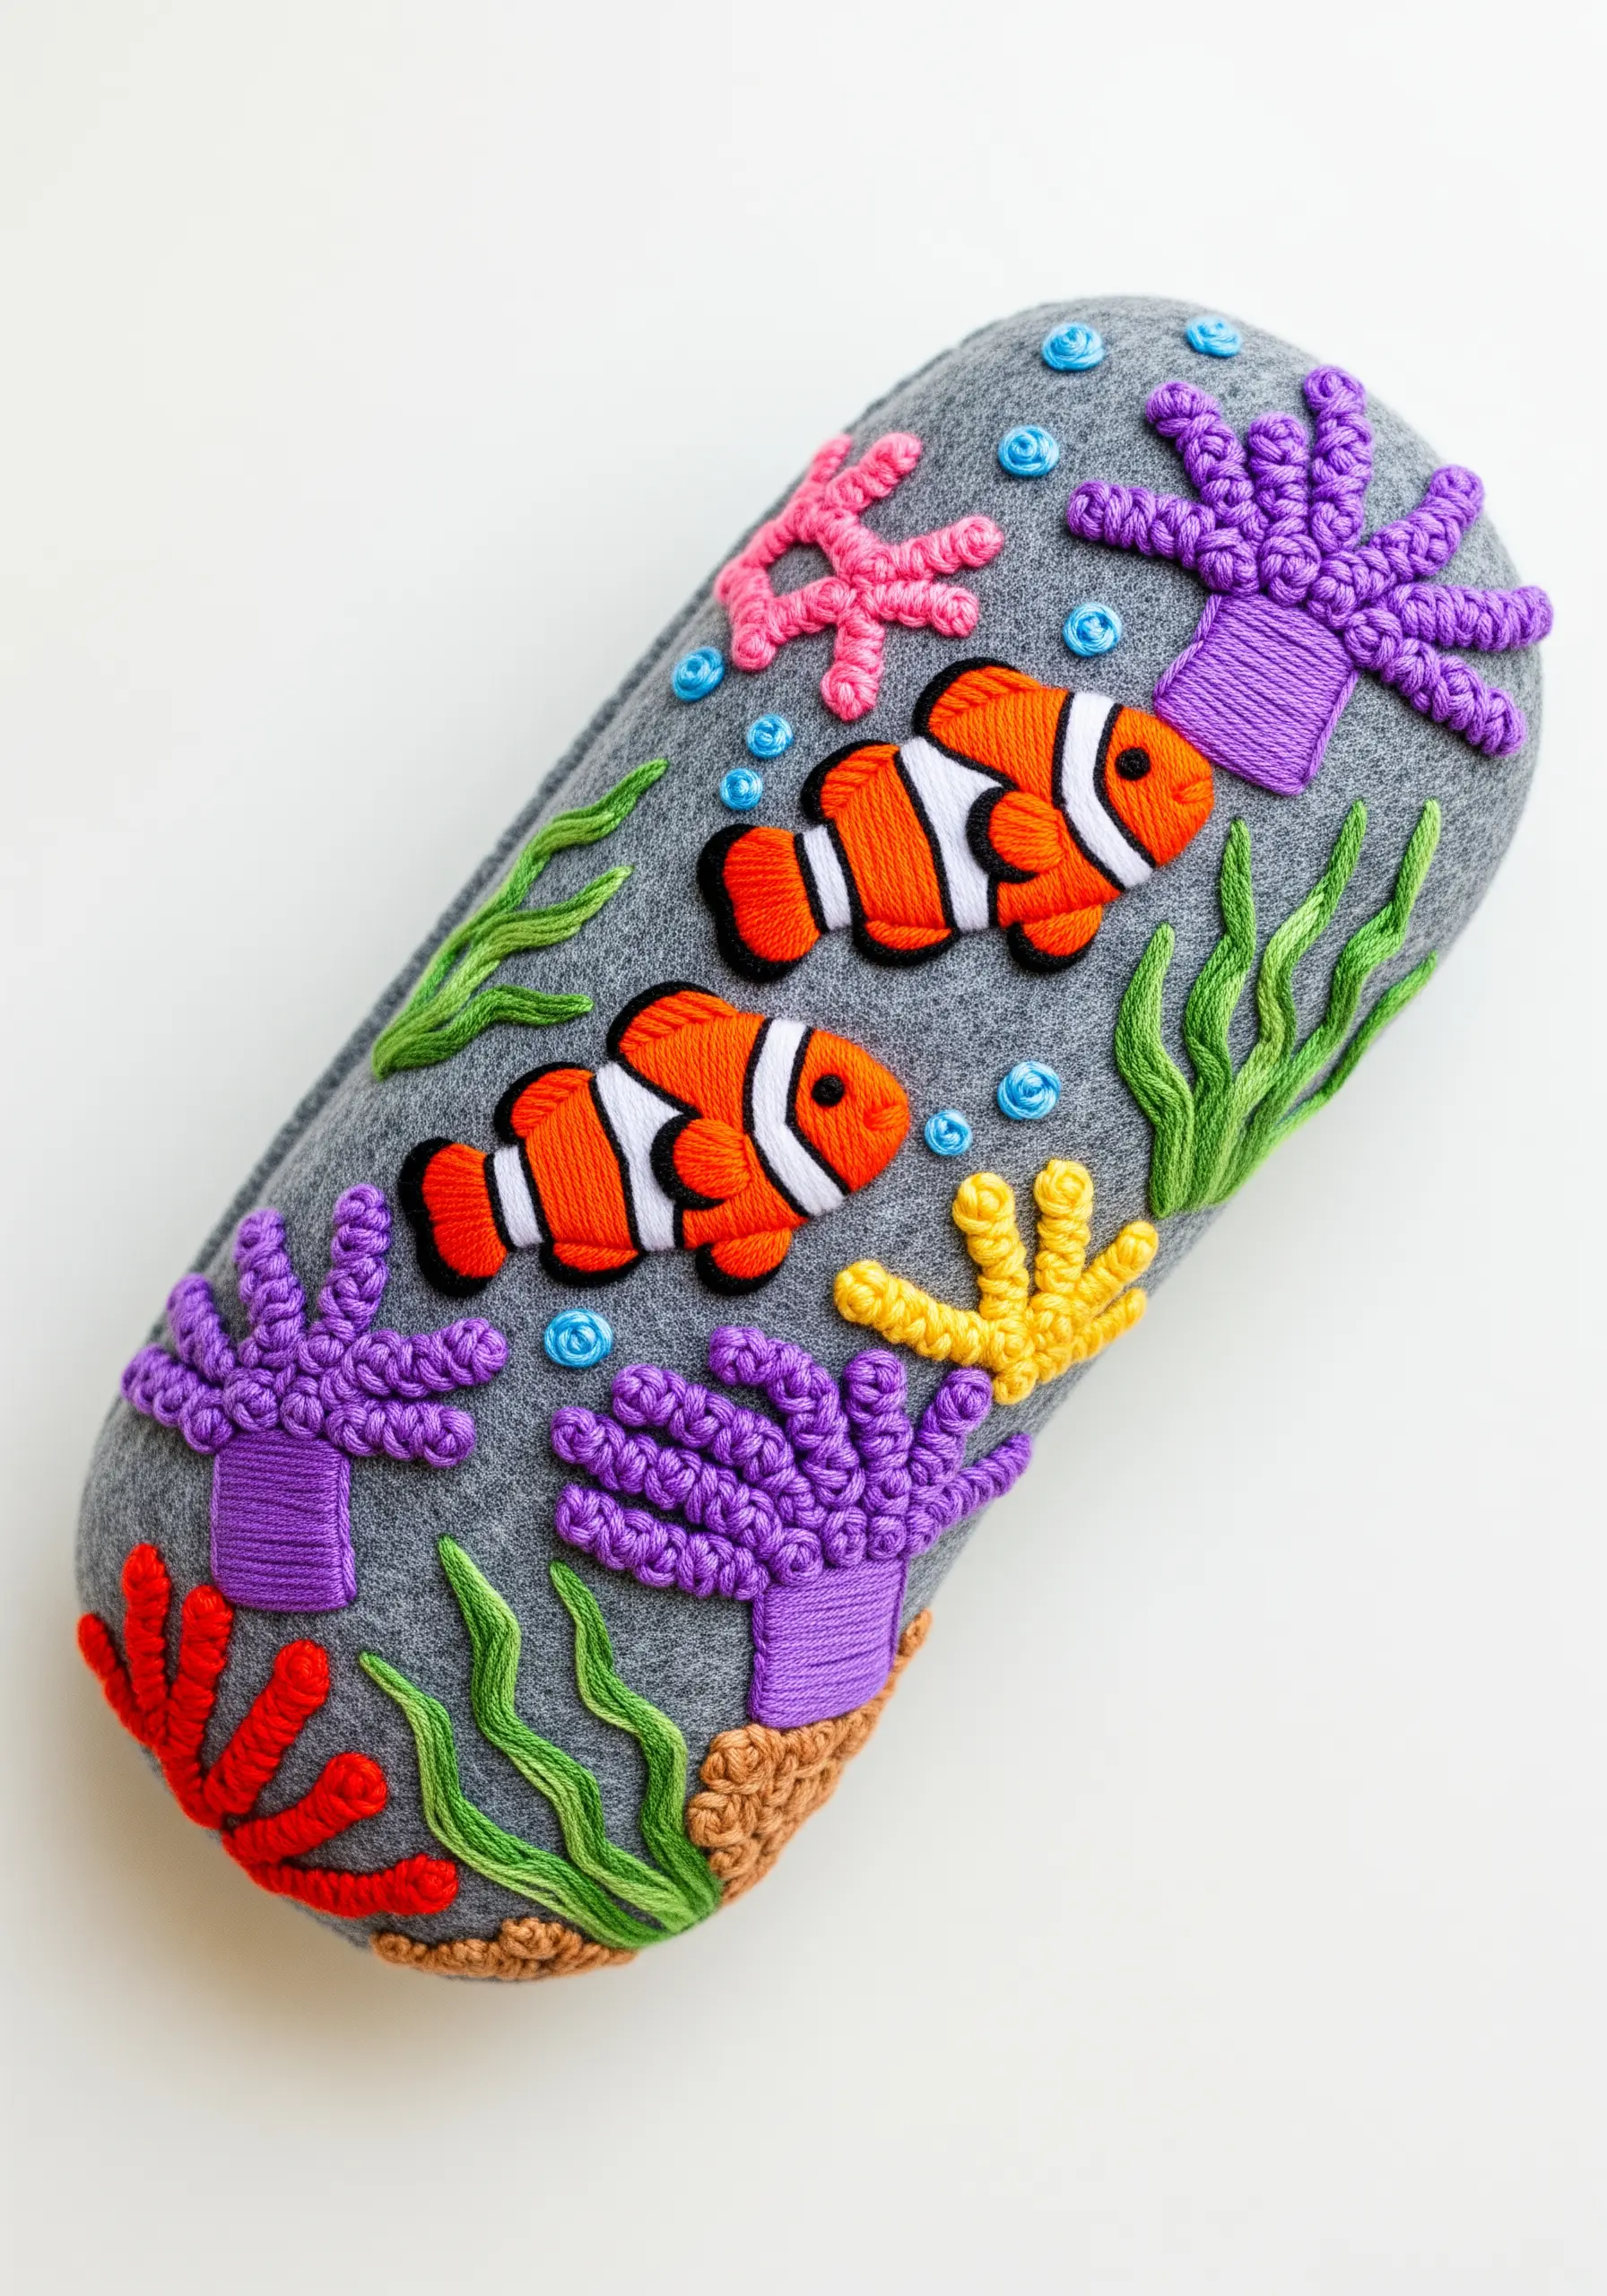
Felt is an ideal base for dimensional embroidery because it is stable and doesn’t fray. This allows you to build up stitches without needing a stabilizer.
For the vibrant coral and anemones, use a combination of stacked French knots, bullion knots, and dense Turkey work loops. These stitches create an incredibly rich, touchable surface.
To make the clownfish appear rounded, use padded satin stitch. Place a few foundation stitches in the center of the shape before covering them with your final satin stitches, creating a raised, plump effect.
12. Stitch Elegant, Durable Lines for Kitchen Linens
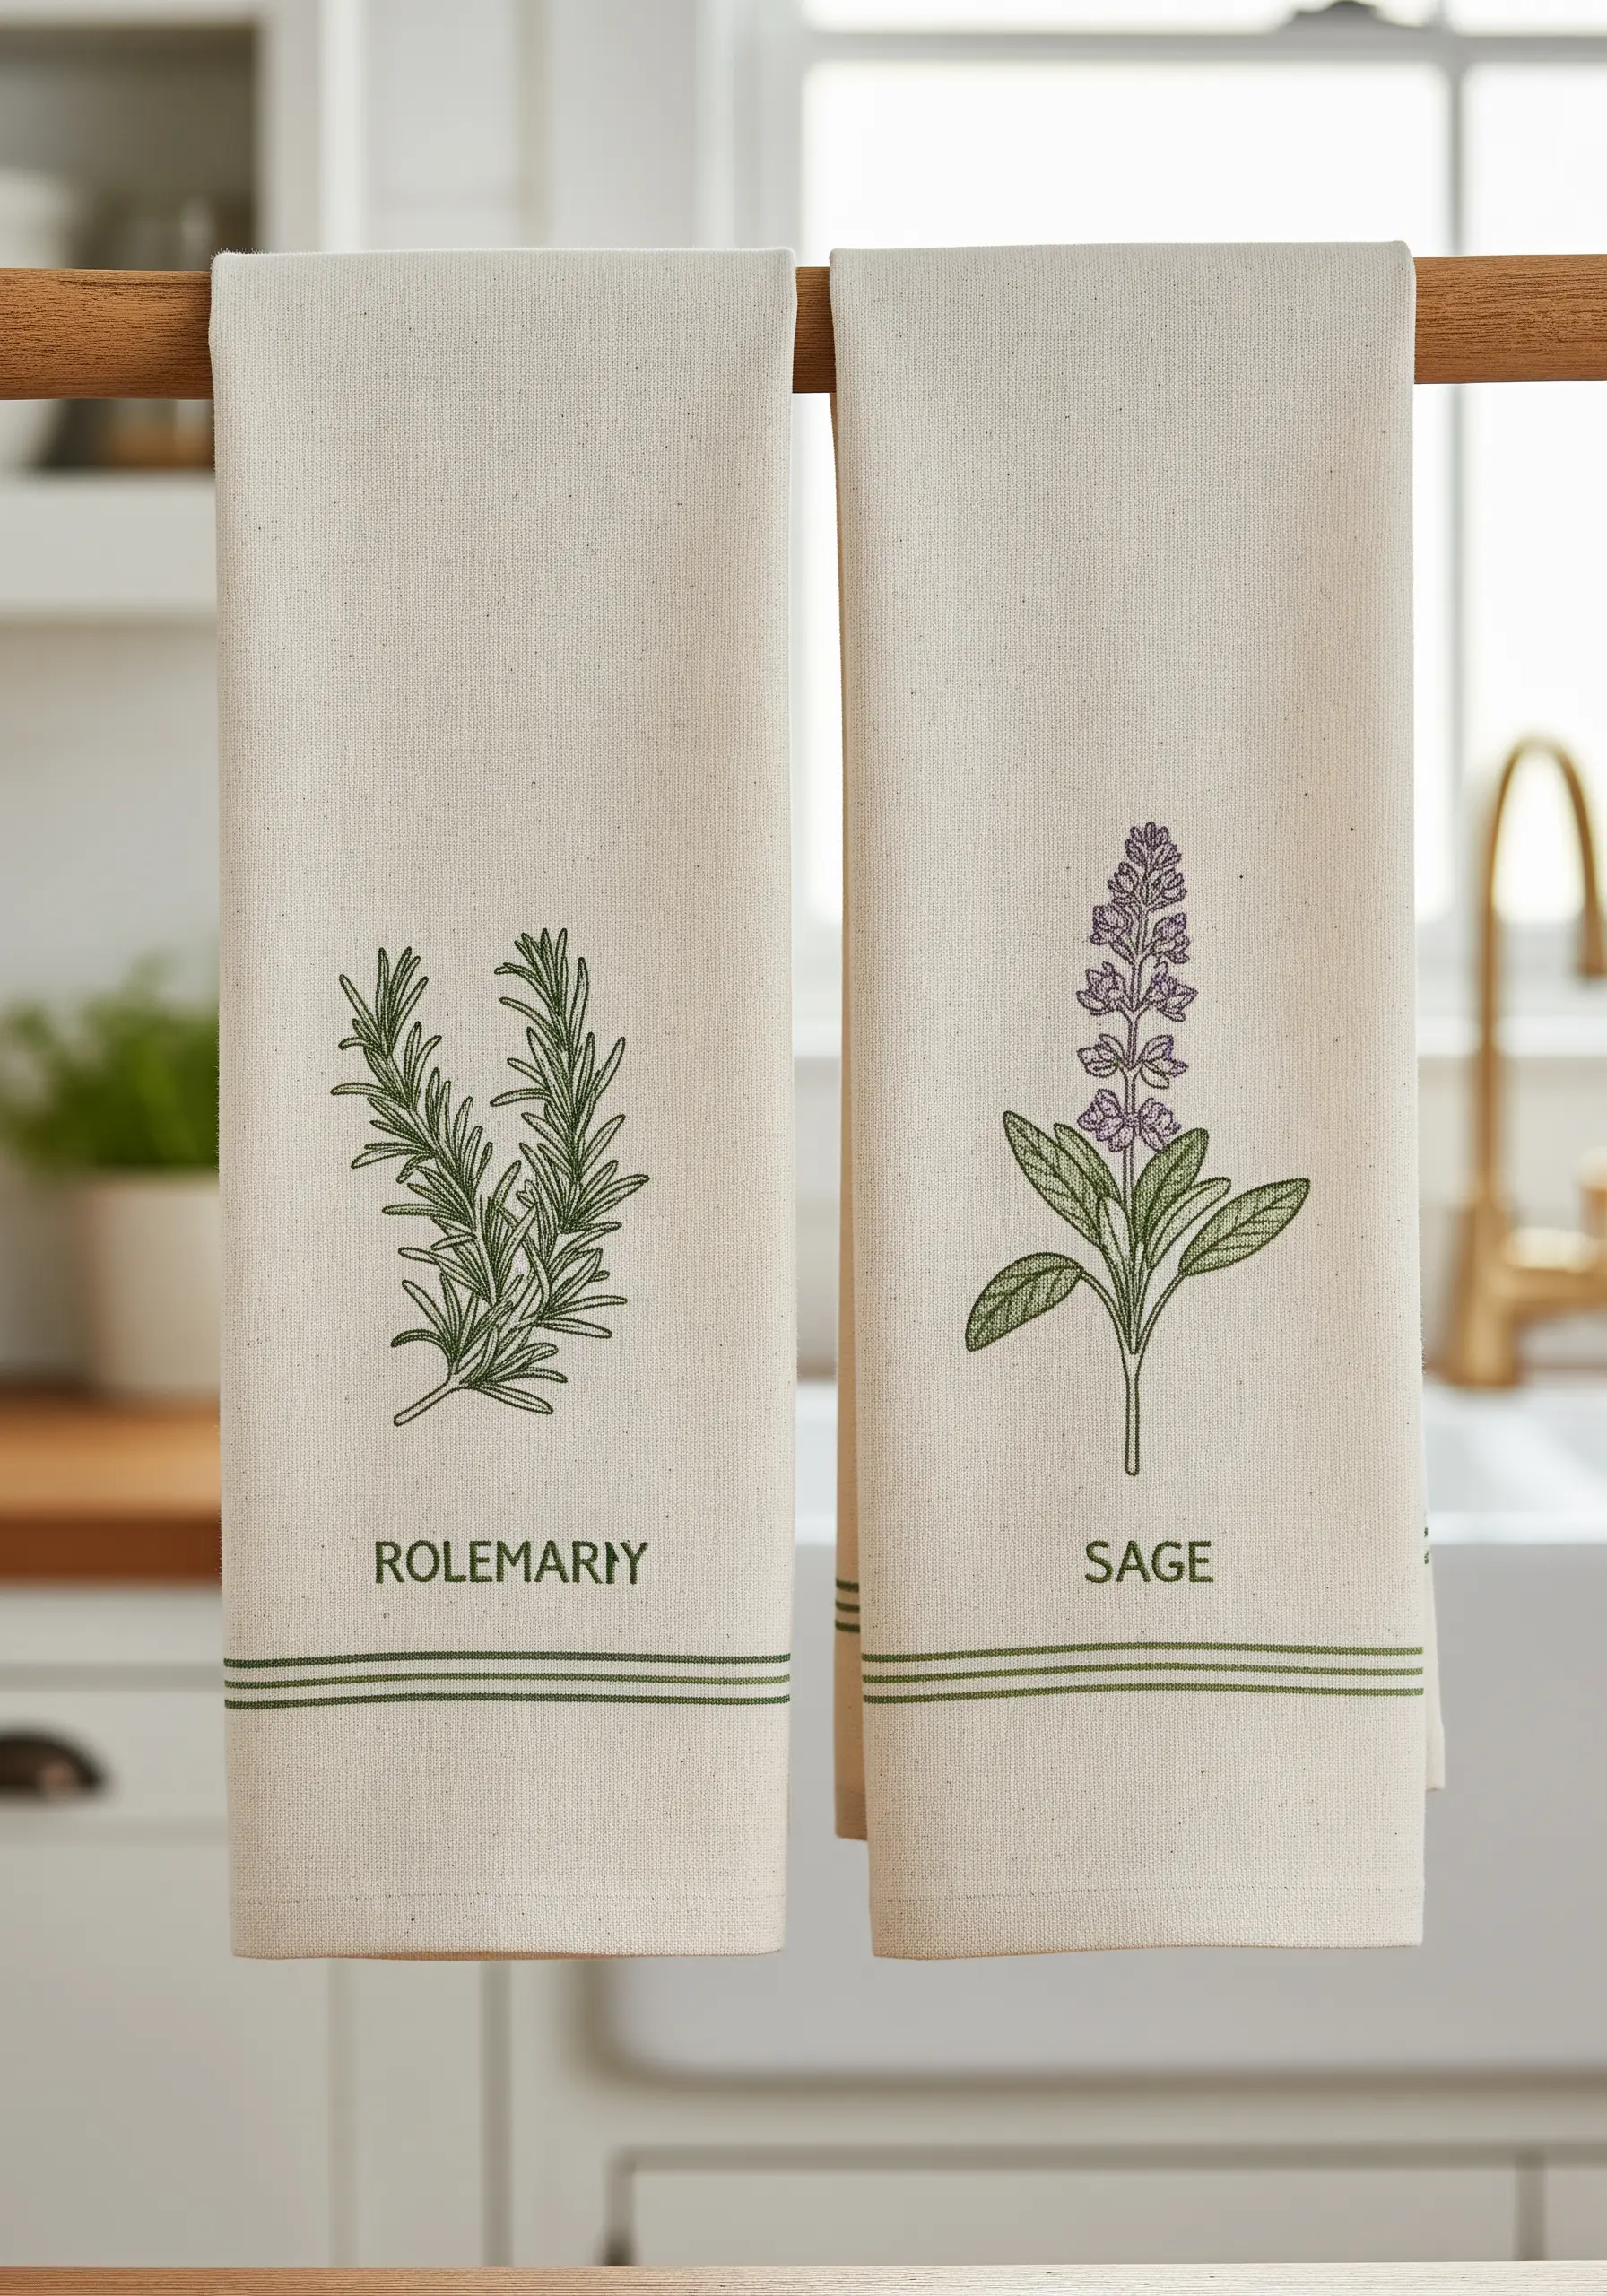
When embroidering functional items like kitchen towels, durability is as important as beauty. Choose stitches that can withstand frequent washing.
A whipped backstitch or a clean stem stitch creates a solid, raised line that is both elegant and robust. Use two or three strands of high-quality cotton floss for a delicate but clear design.
This minimalist approach ensures your simple embroidery accents remain beautiful and intact, transforming an everyday item into a cherished piece of decor.
13. Design an Abstract Cosmic Spiral
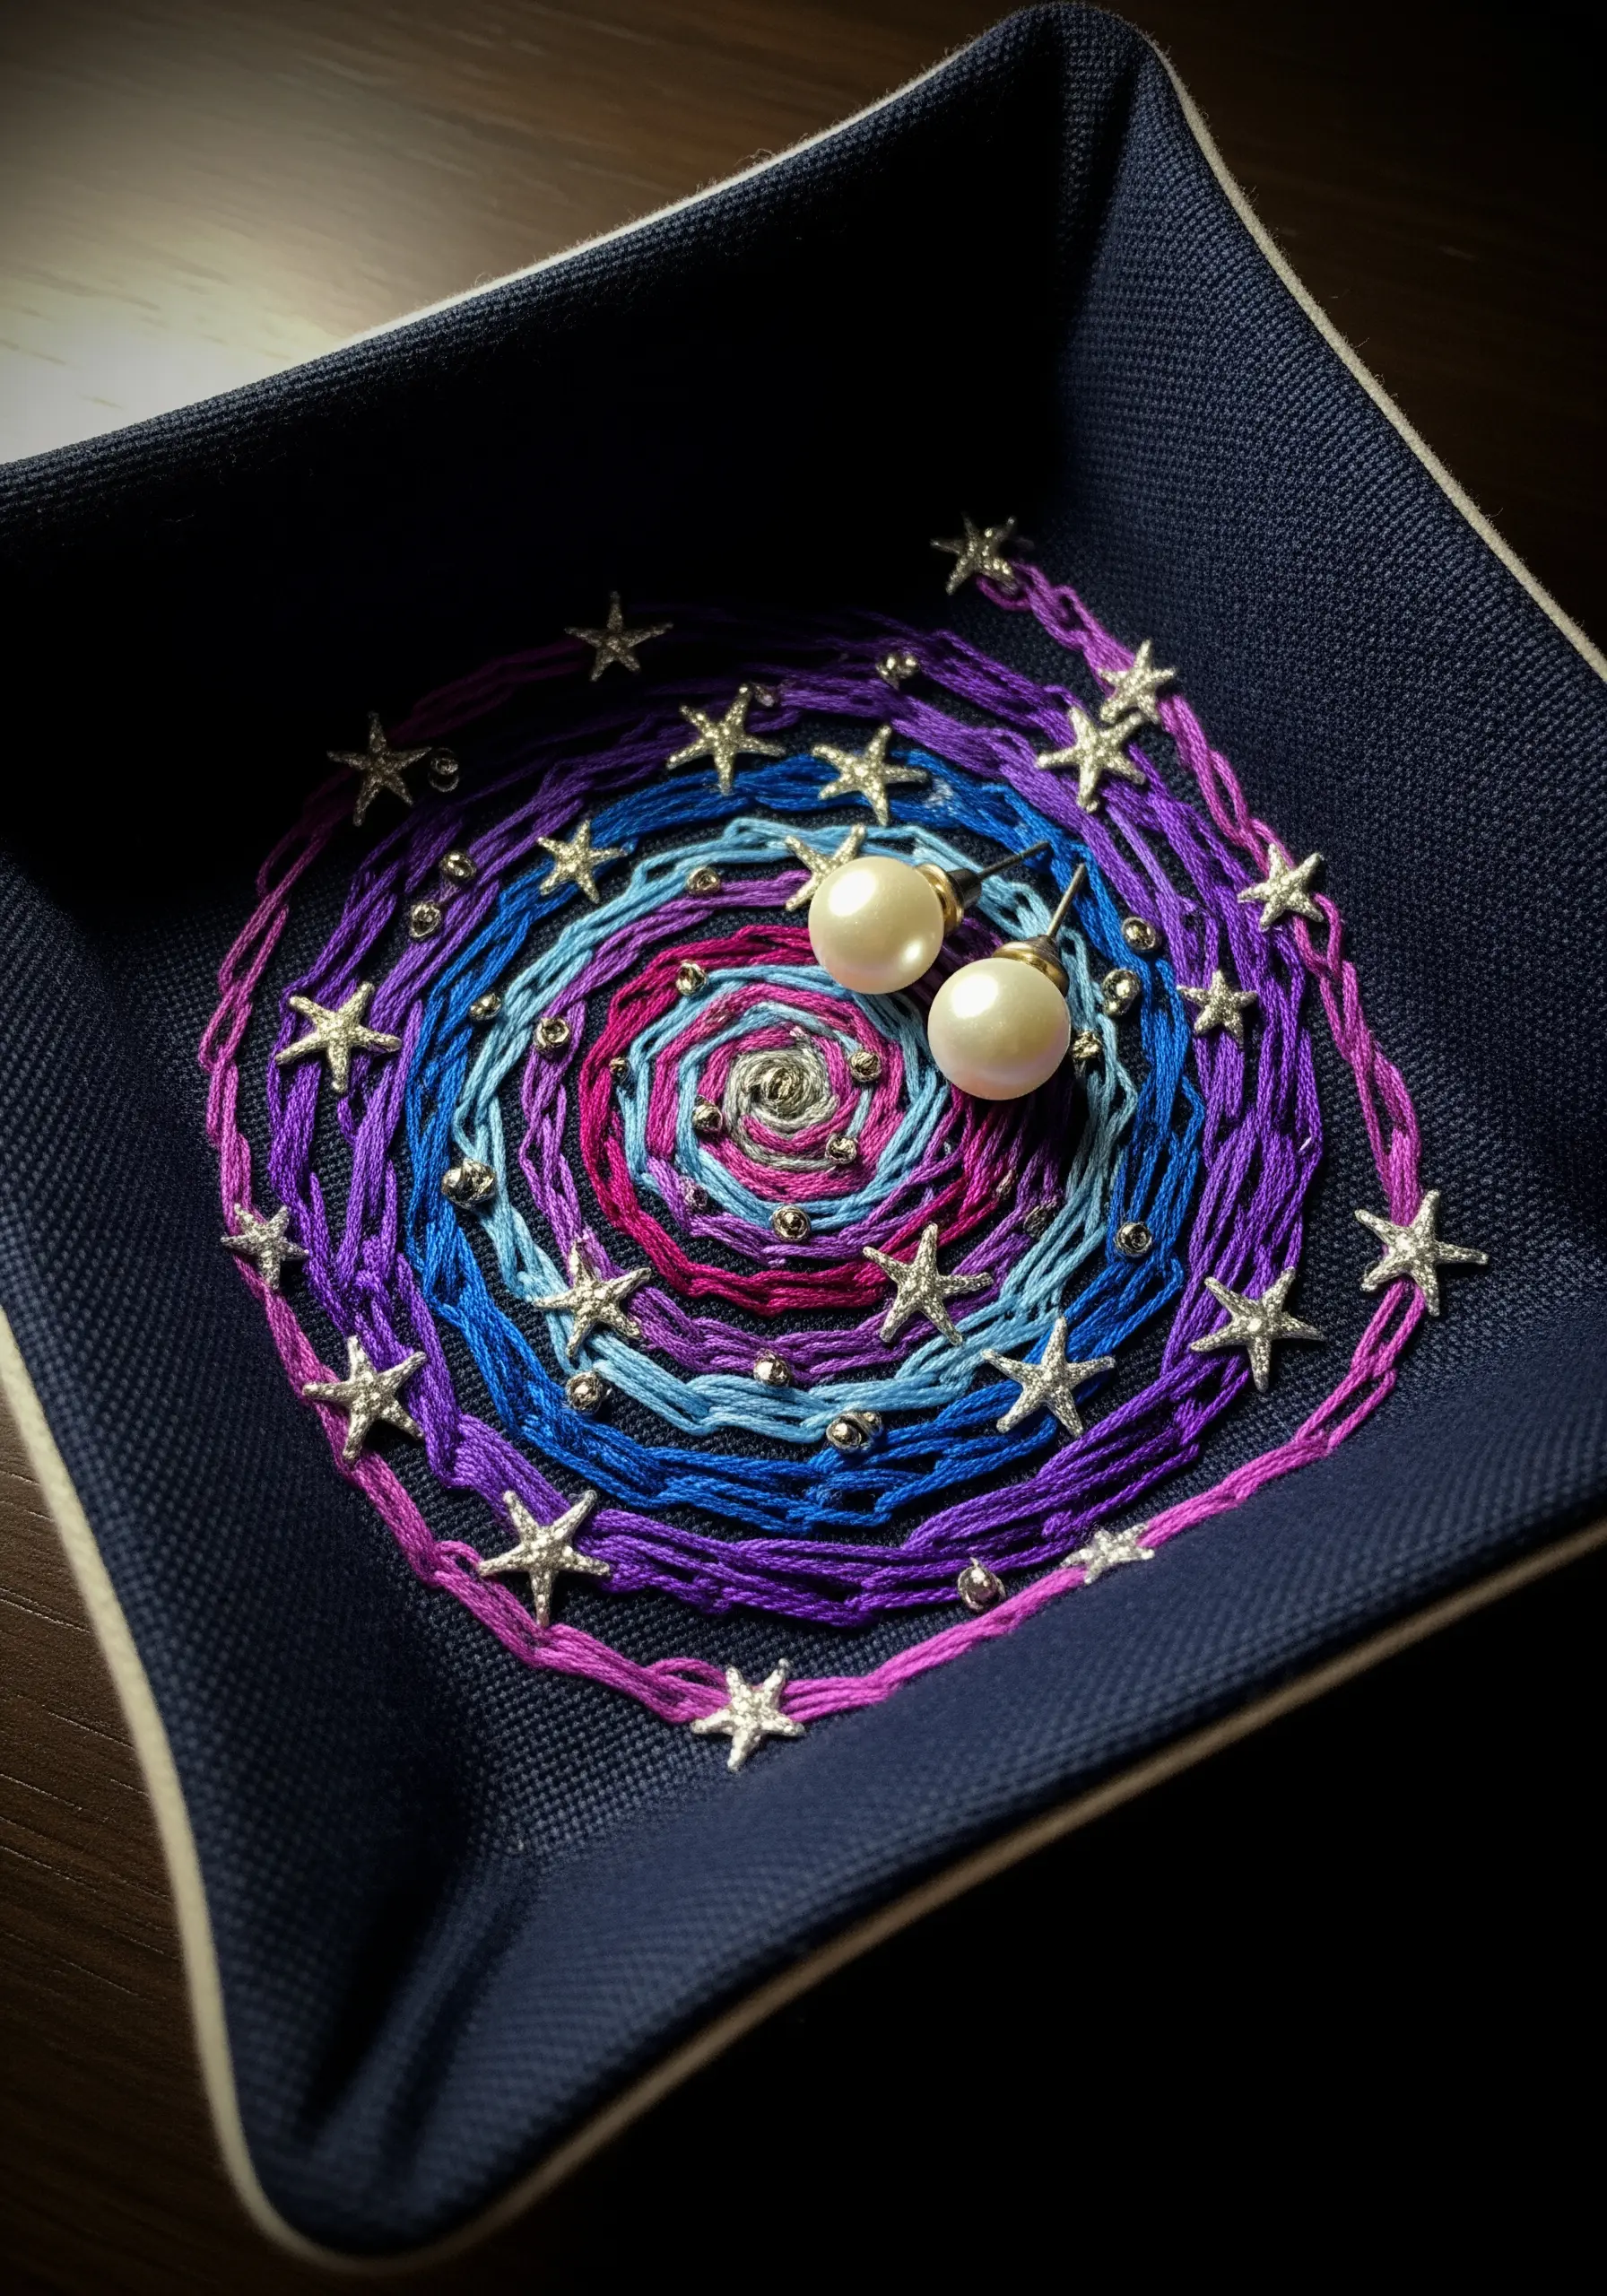
For a perfect, fluid spiral, don’t try to stitch it directly. Instead, lay down bundles of variegated floss (3-4 strands at a time) and couch them into place with a separate, thinner thread.
This technique gives you complete control over the curves and allows the color transitions in the floss to create a natural, galactic effect.
Once the spiral is complete, scatter tiny star-shaped charms or silver seed beads throughout the design. This introduces a different texture and a hint of sparkle, completing the celestial illusion.
14. Embellish 3D Objects with Graceful Stitches
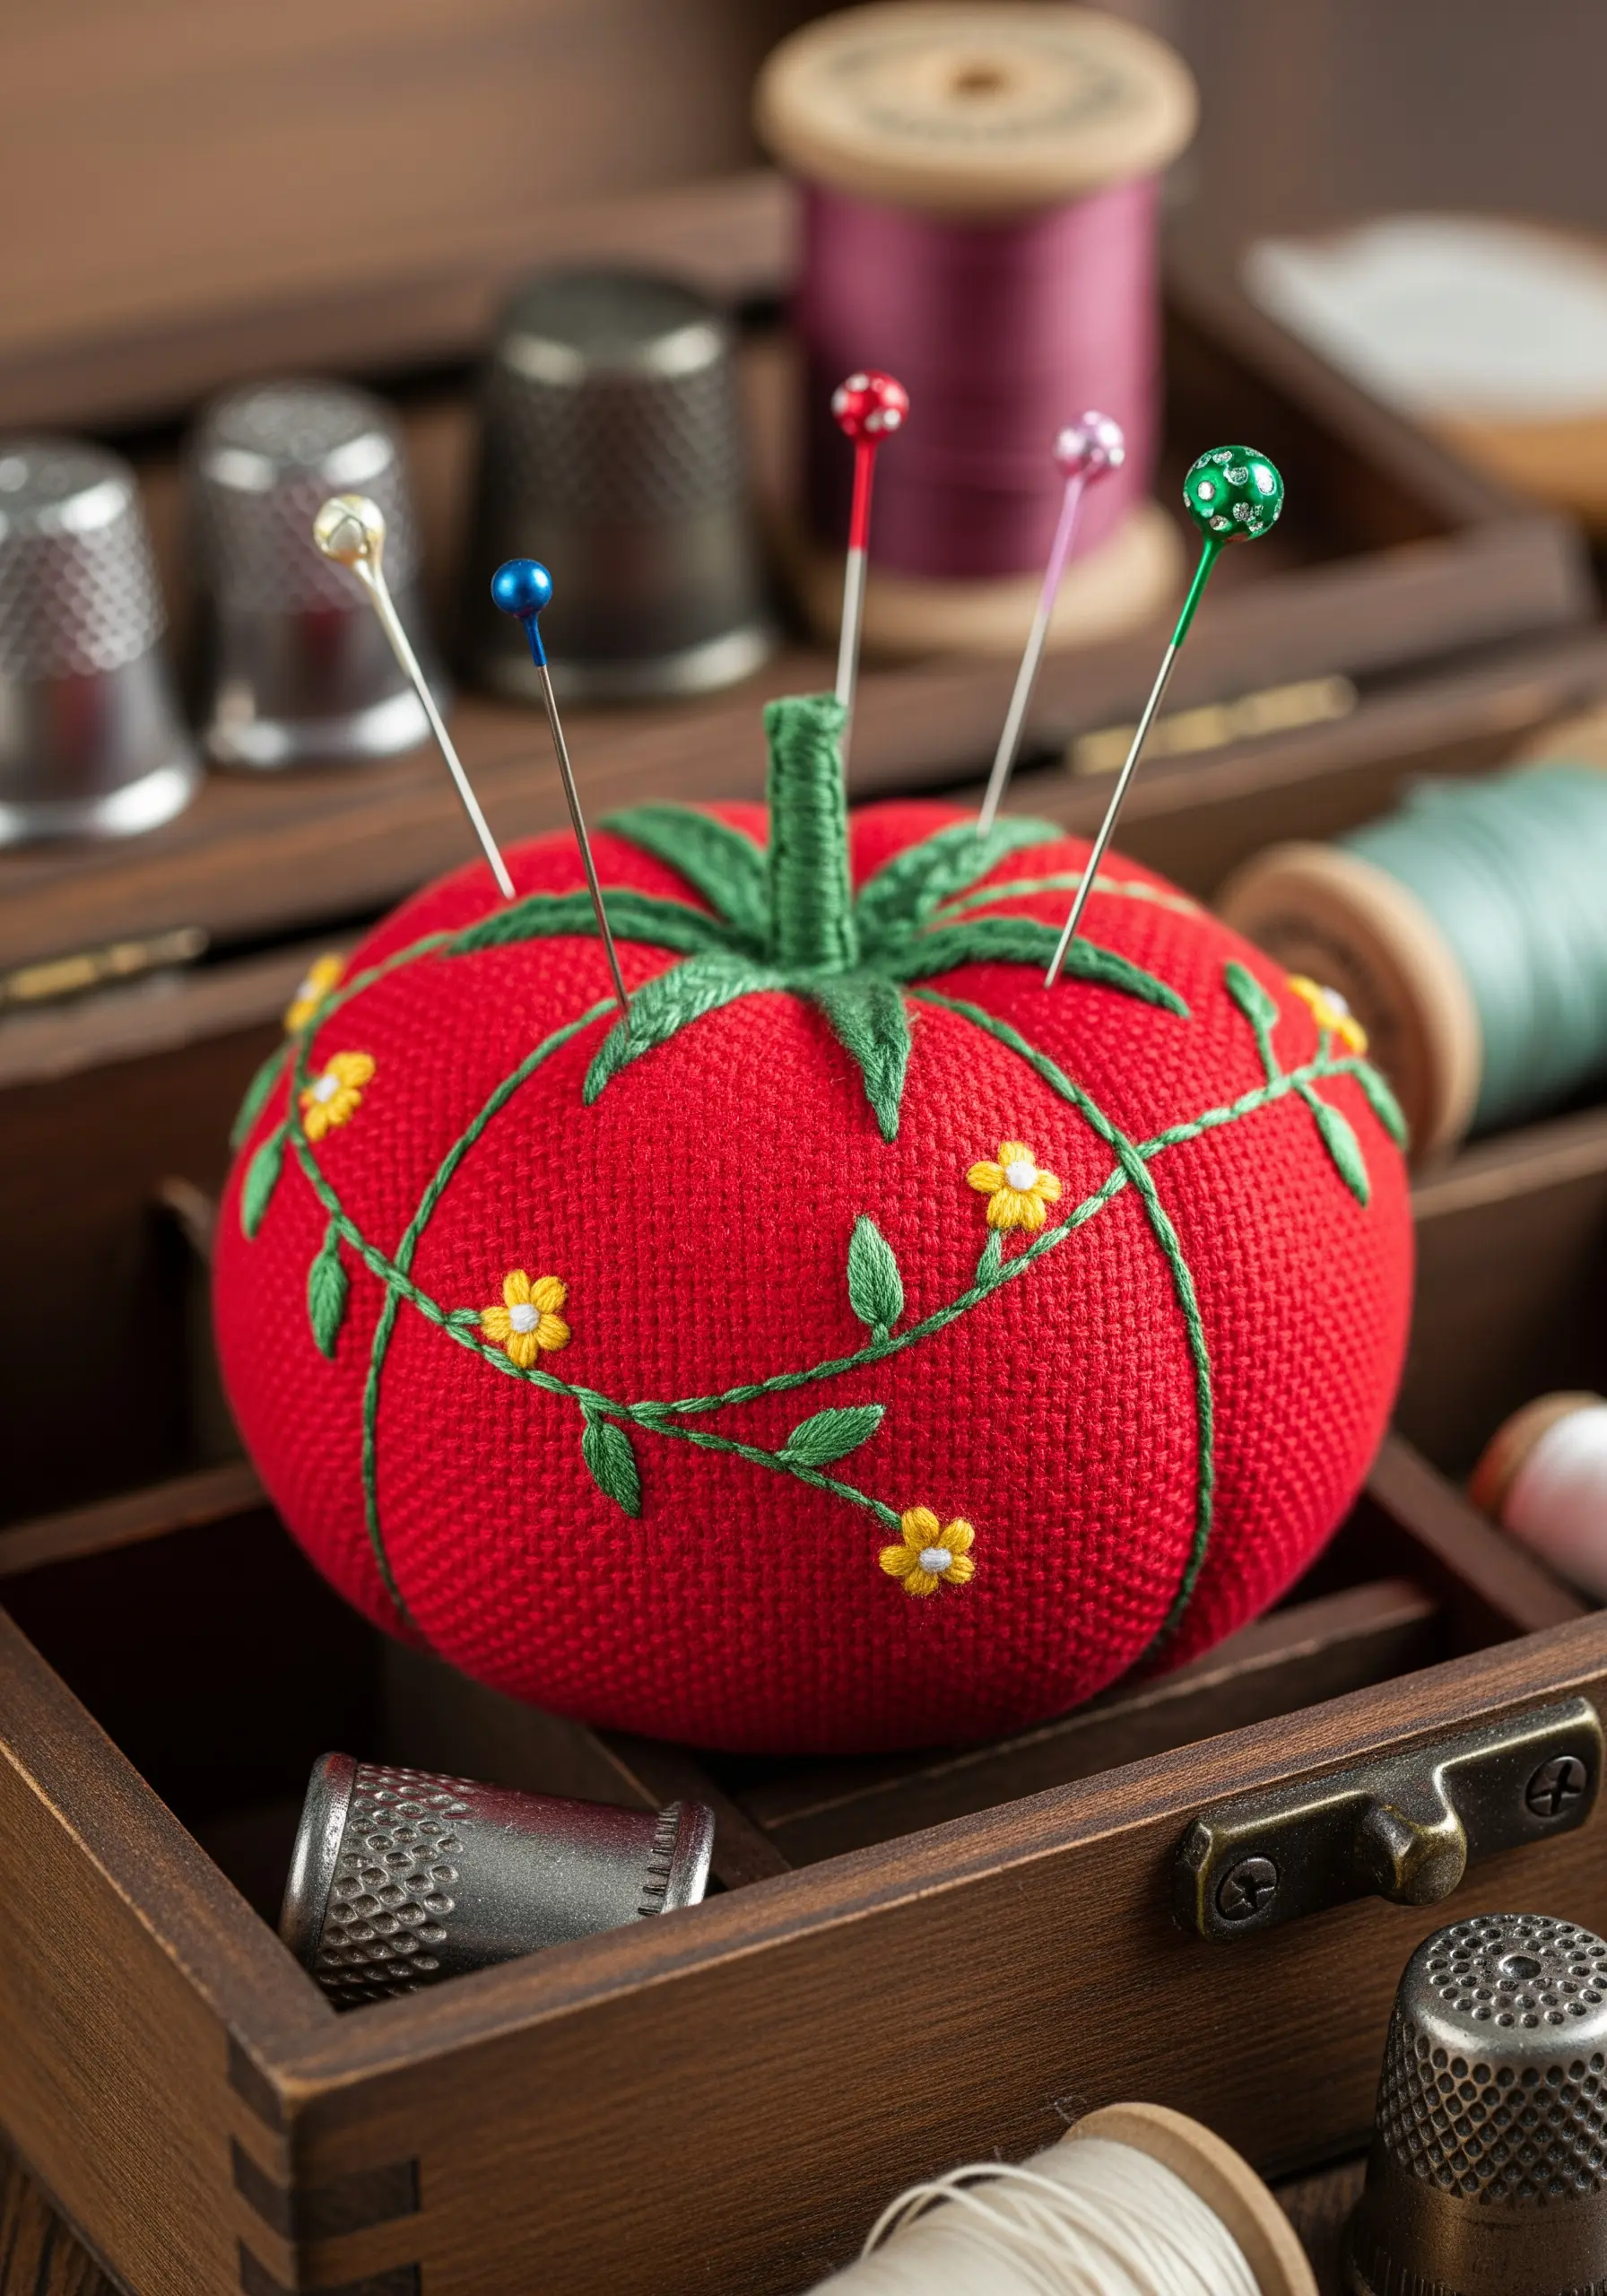
When you can’t use a hoop on a 3D object like a pincushion, choose stitches that are easy to control and follow curves naturally.
The feather stitch is perfect for creating the meandering vine, as it creates a beautiful, organic line with a simple rhythm.
Add small detached chain (lazy daisy) stitches for leaves and single French knots for blossoms. These stitches require minimal tension and can be placed precisely, making them ideal for adding decorative flair to unconventional surfaces.
15. Embroider on Paper for a Keepsake Touch
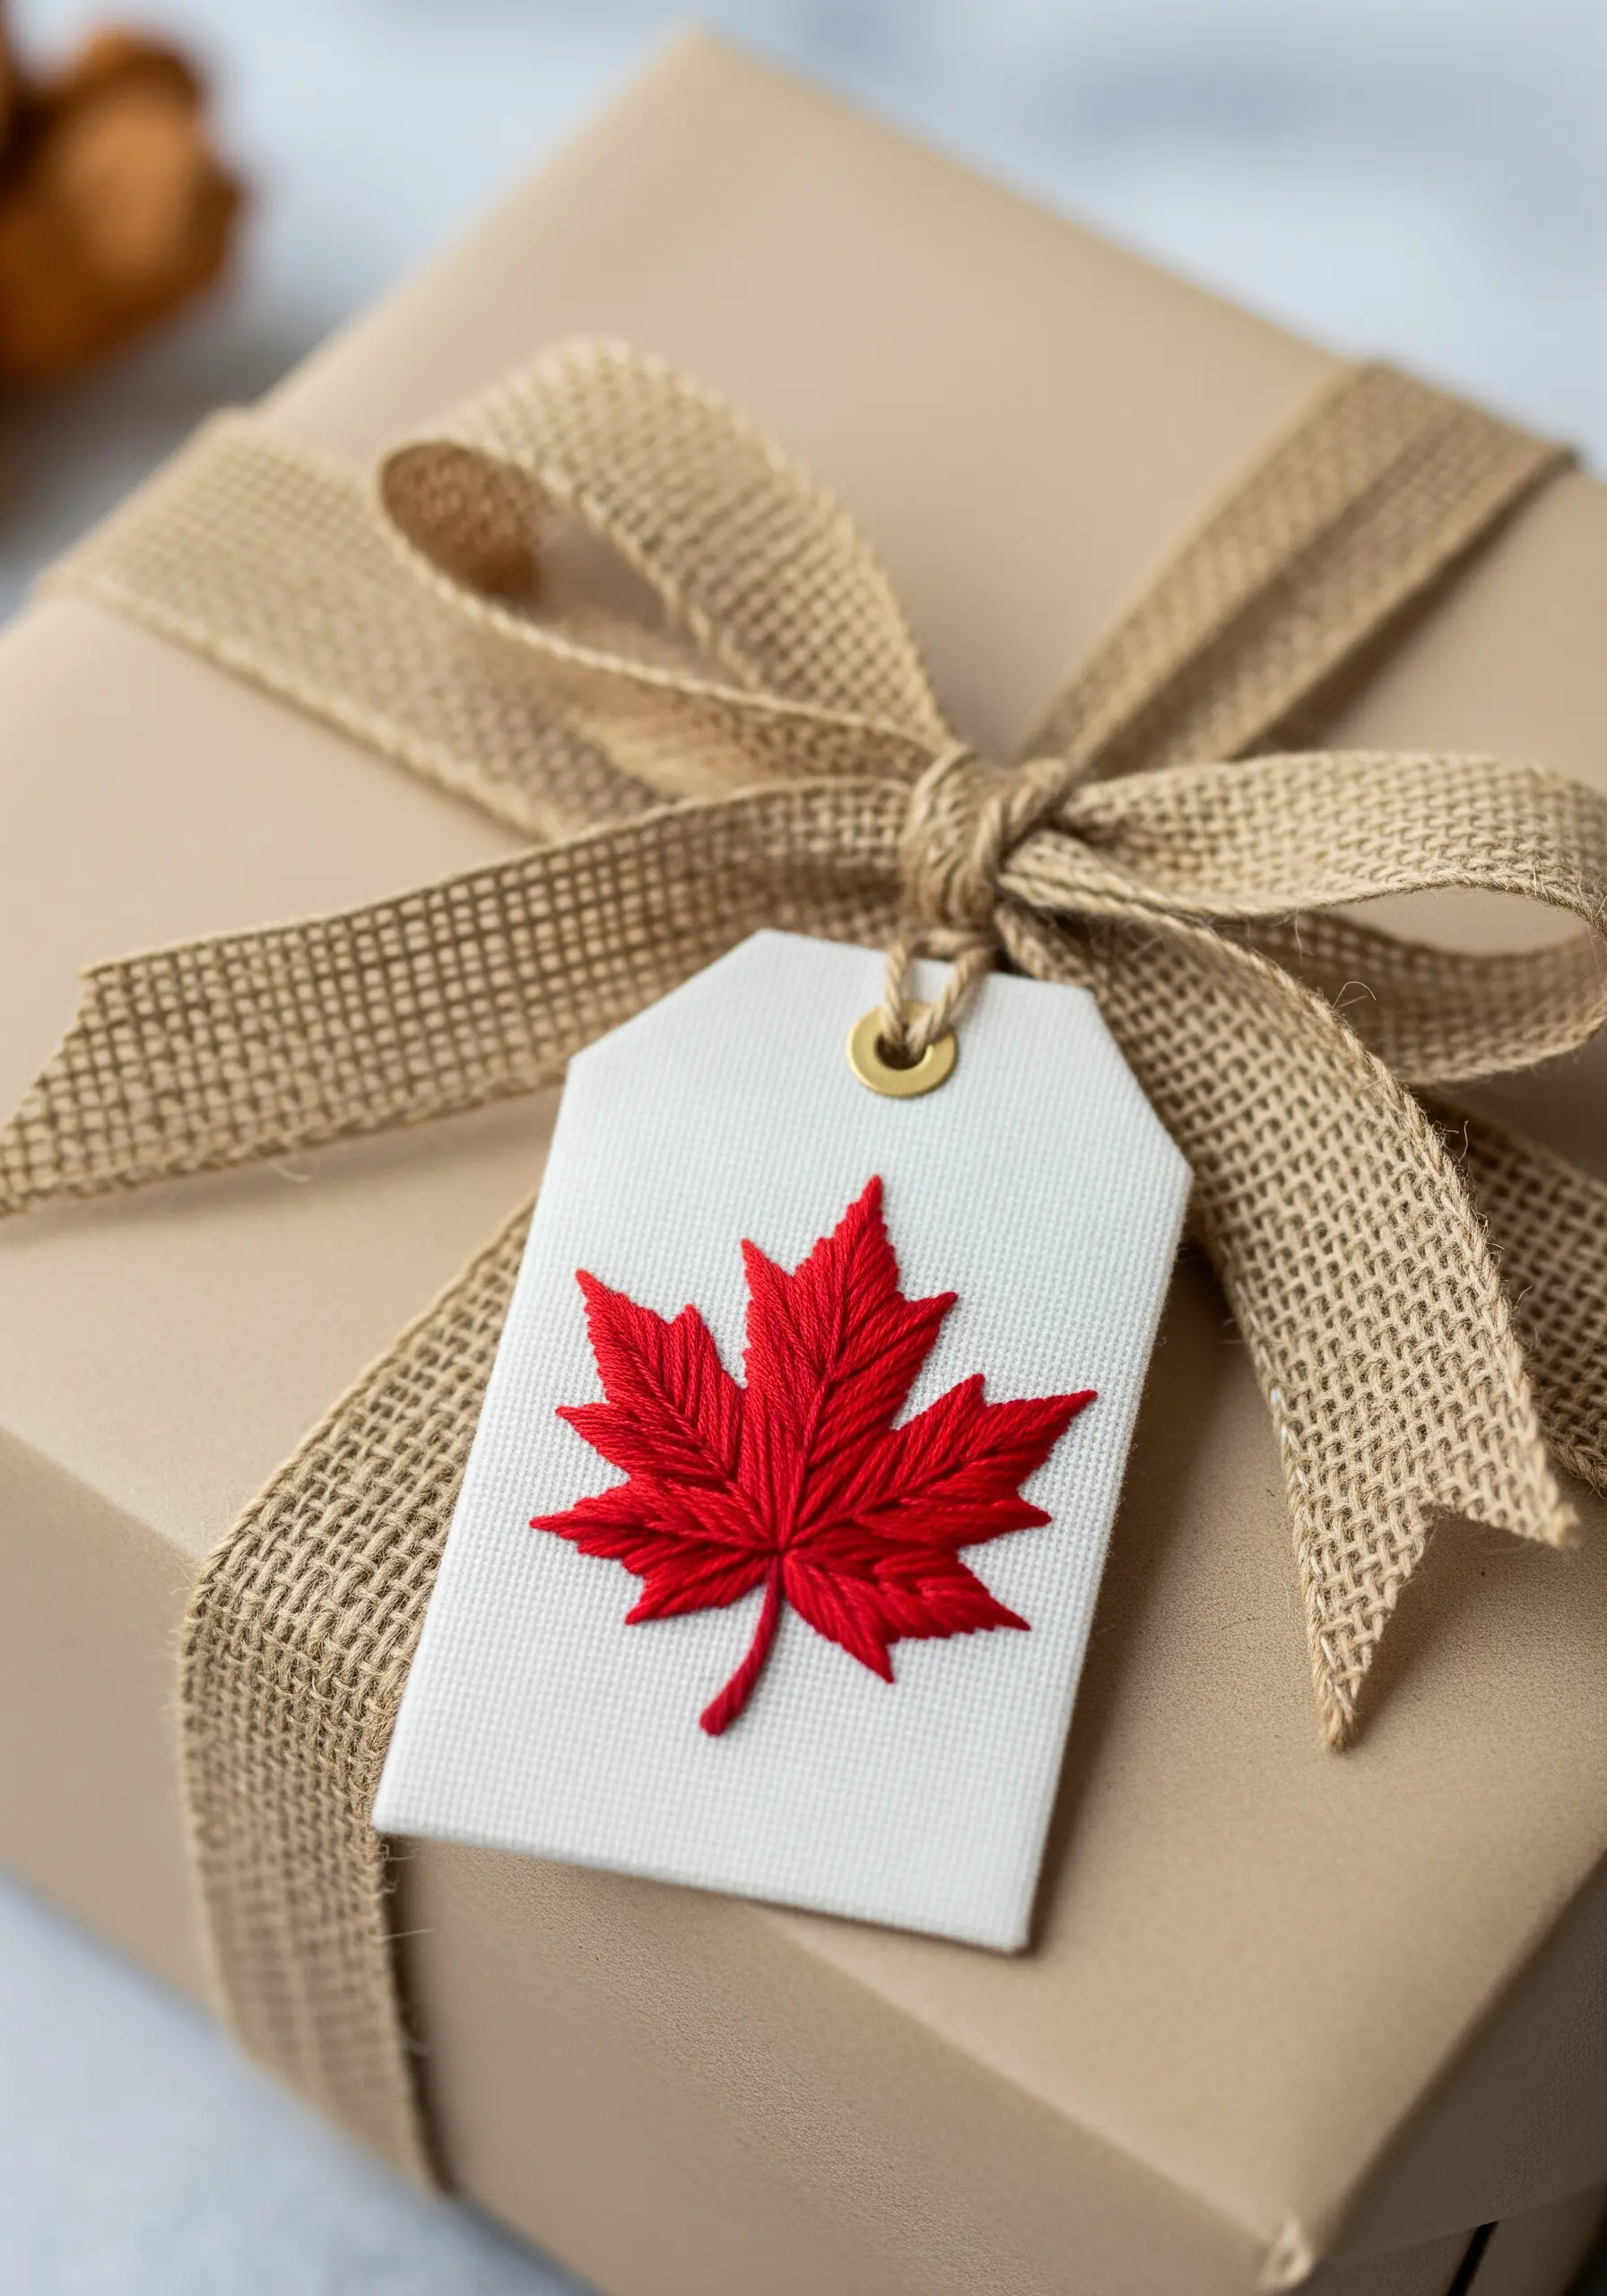
Stitching on cardstock or heavy paper creates a uniquely beautiful effect for gift tags or art prints, but it requires a specific technique to avoid tearing.
First, lightly draw your design, then use a pin or your embroidery needle to pre-pierce holes along the lines before you begin stitching. This ensures the thread passes through cleanly.
Use a fishbone stitch to fill the leaf, as it creates the central vein and angled sides simultaneously. Pull your thread taut, but not tight, to keep the paper flat. This small effort transforms a simple tag into a memorable keepsake.
16. Master Intricate Motifs on Unconventional Items
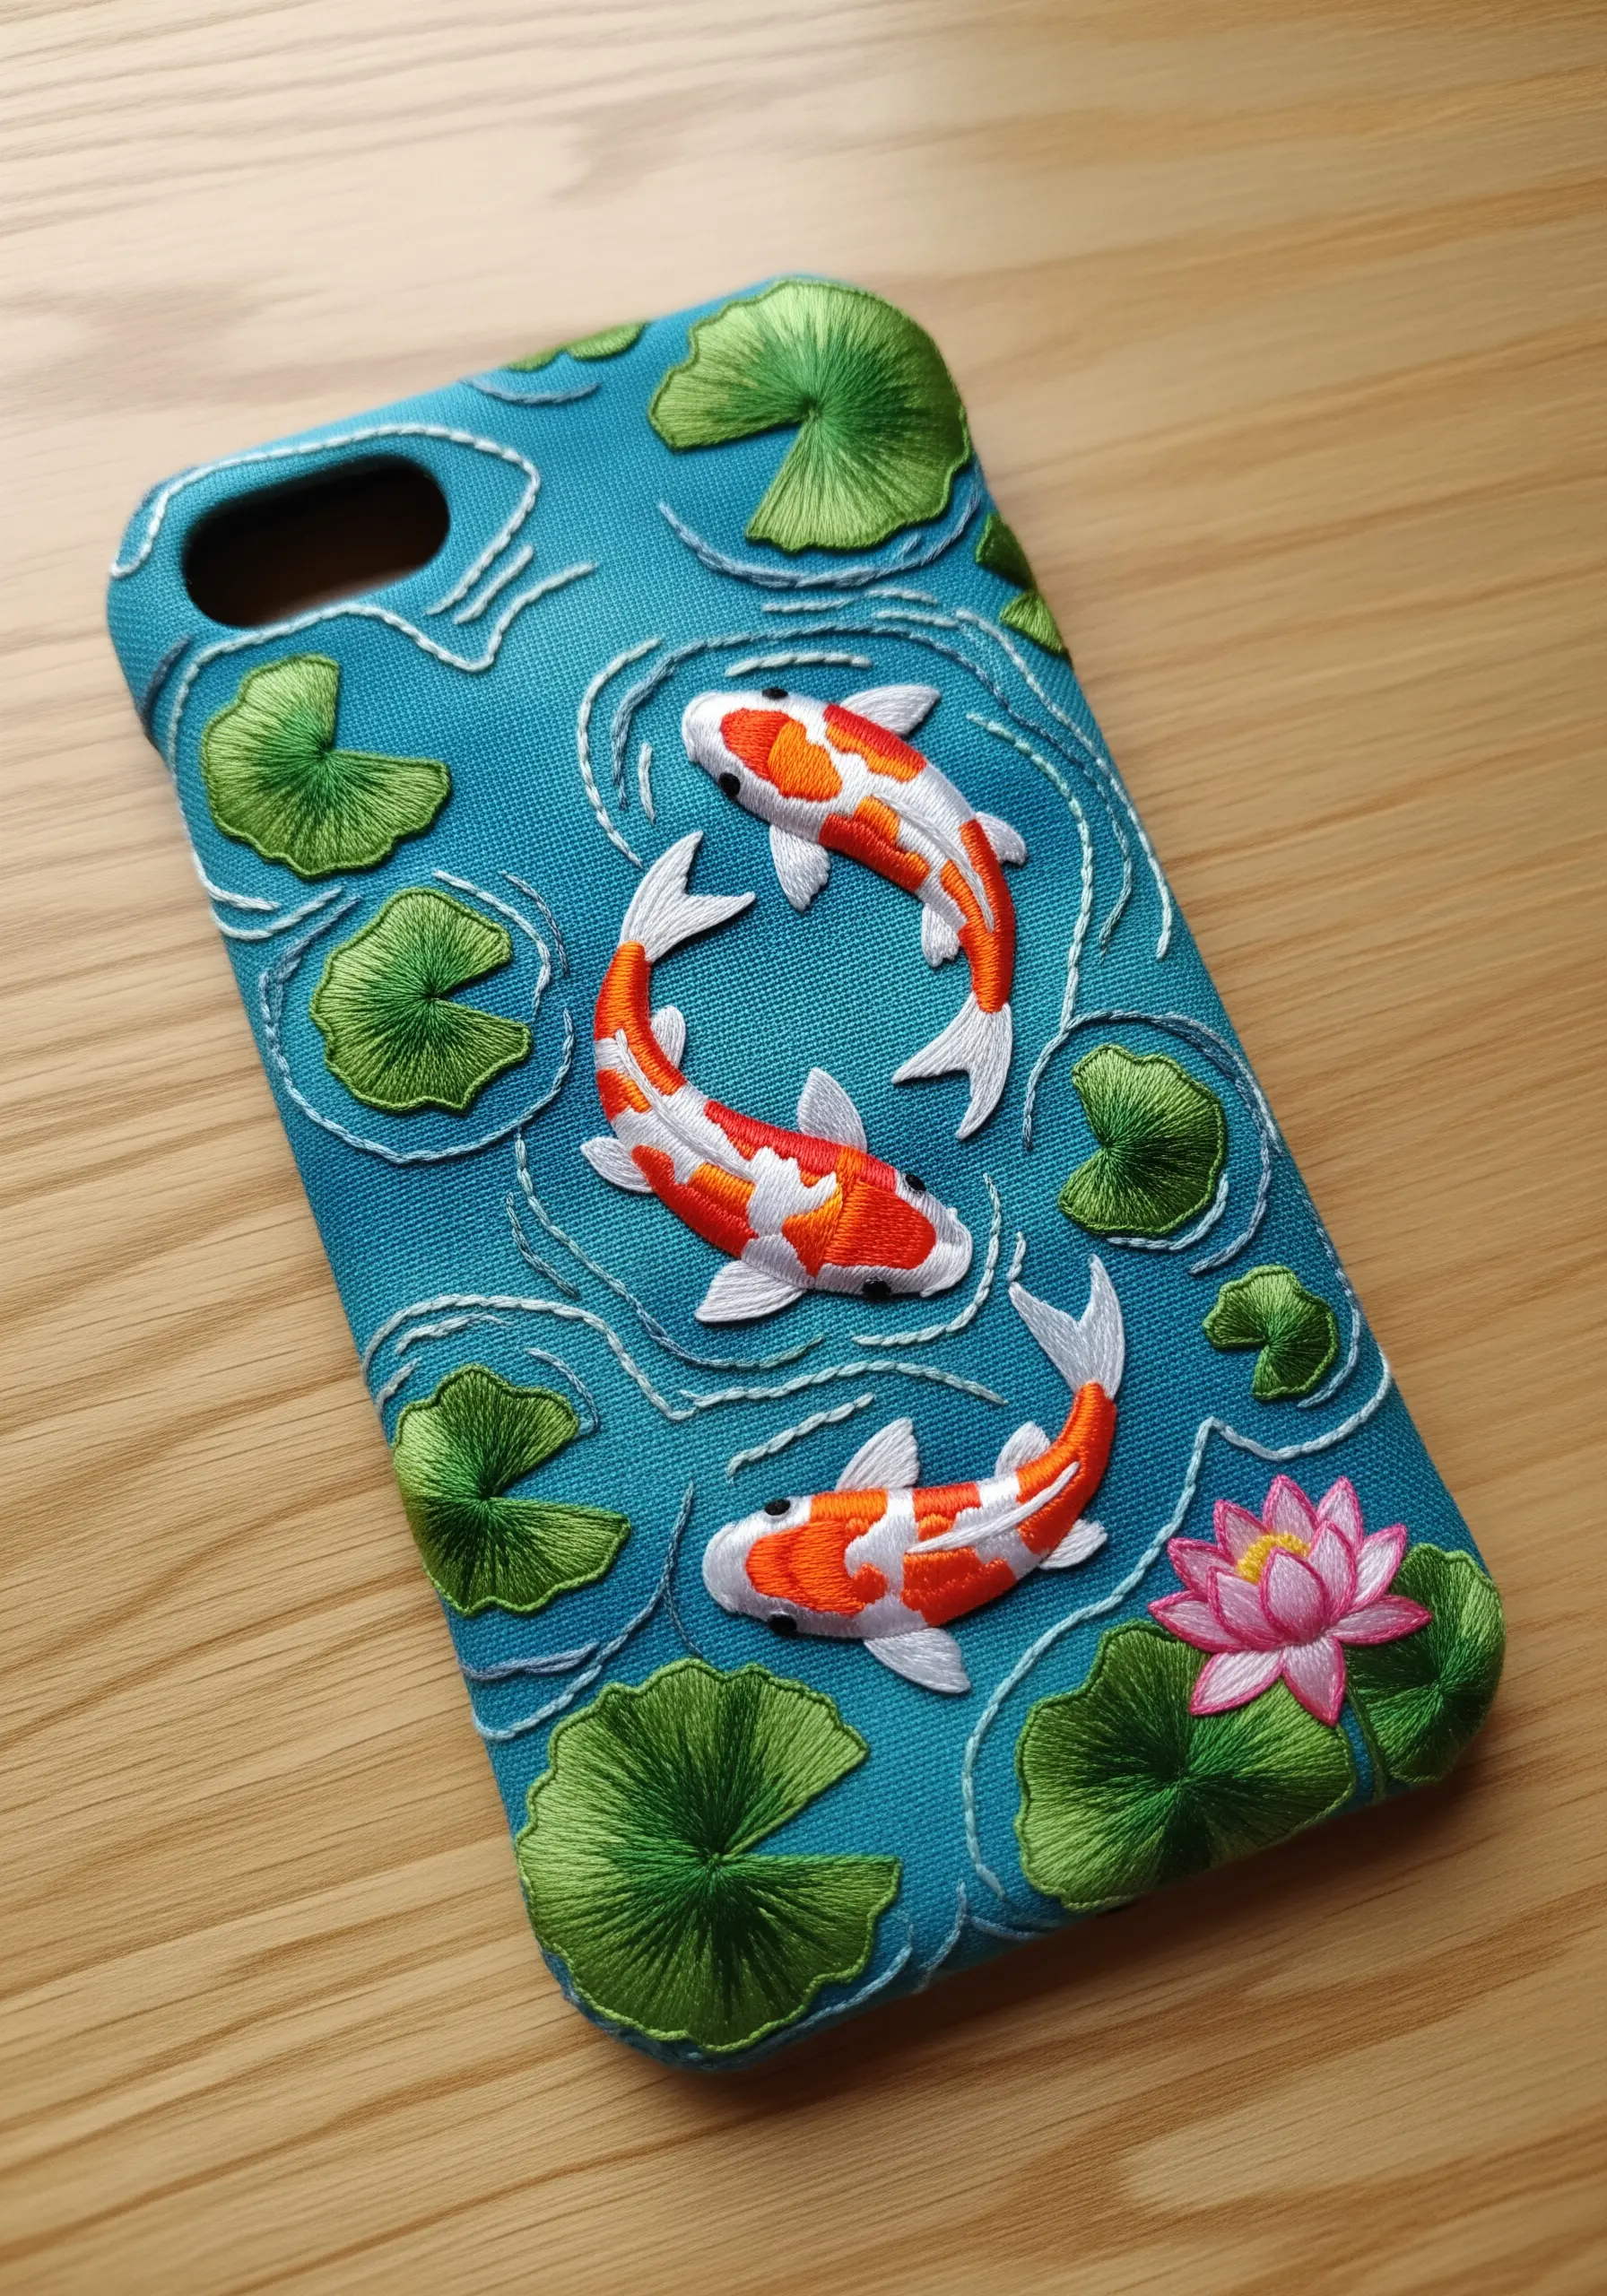
To embroider a phone case, you need a fabric-covered version or a soft silicone case that a sharp, strong needle can consistently pierce.
Create the illusion of movement in the water with simple, concentric rings of backstitch using a light blue or white thread. This subtle detail brings the entire scene to life.
For the koi and lily pads, use long-and-short stitch to blend colors smoothly. Even on a small, slightly curved surface, this technique provides the control needed for detailed, painterly effects.
17. Create an Interactive Heirloom Calendar
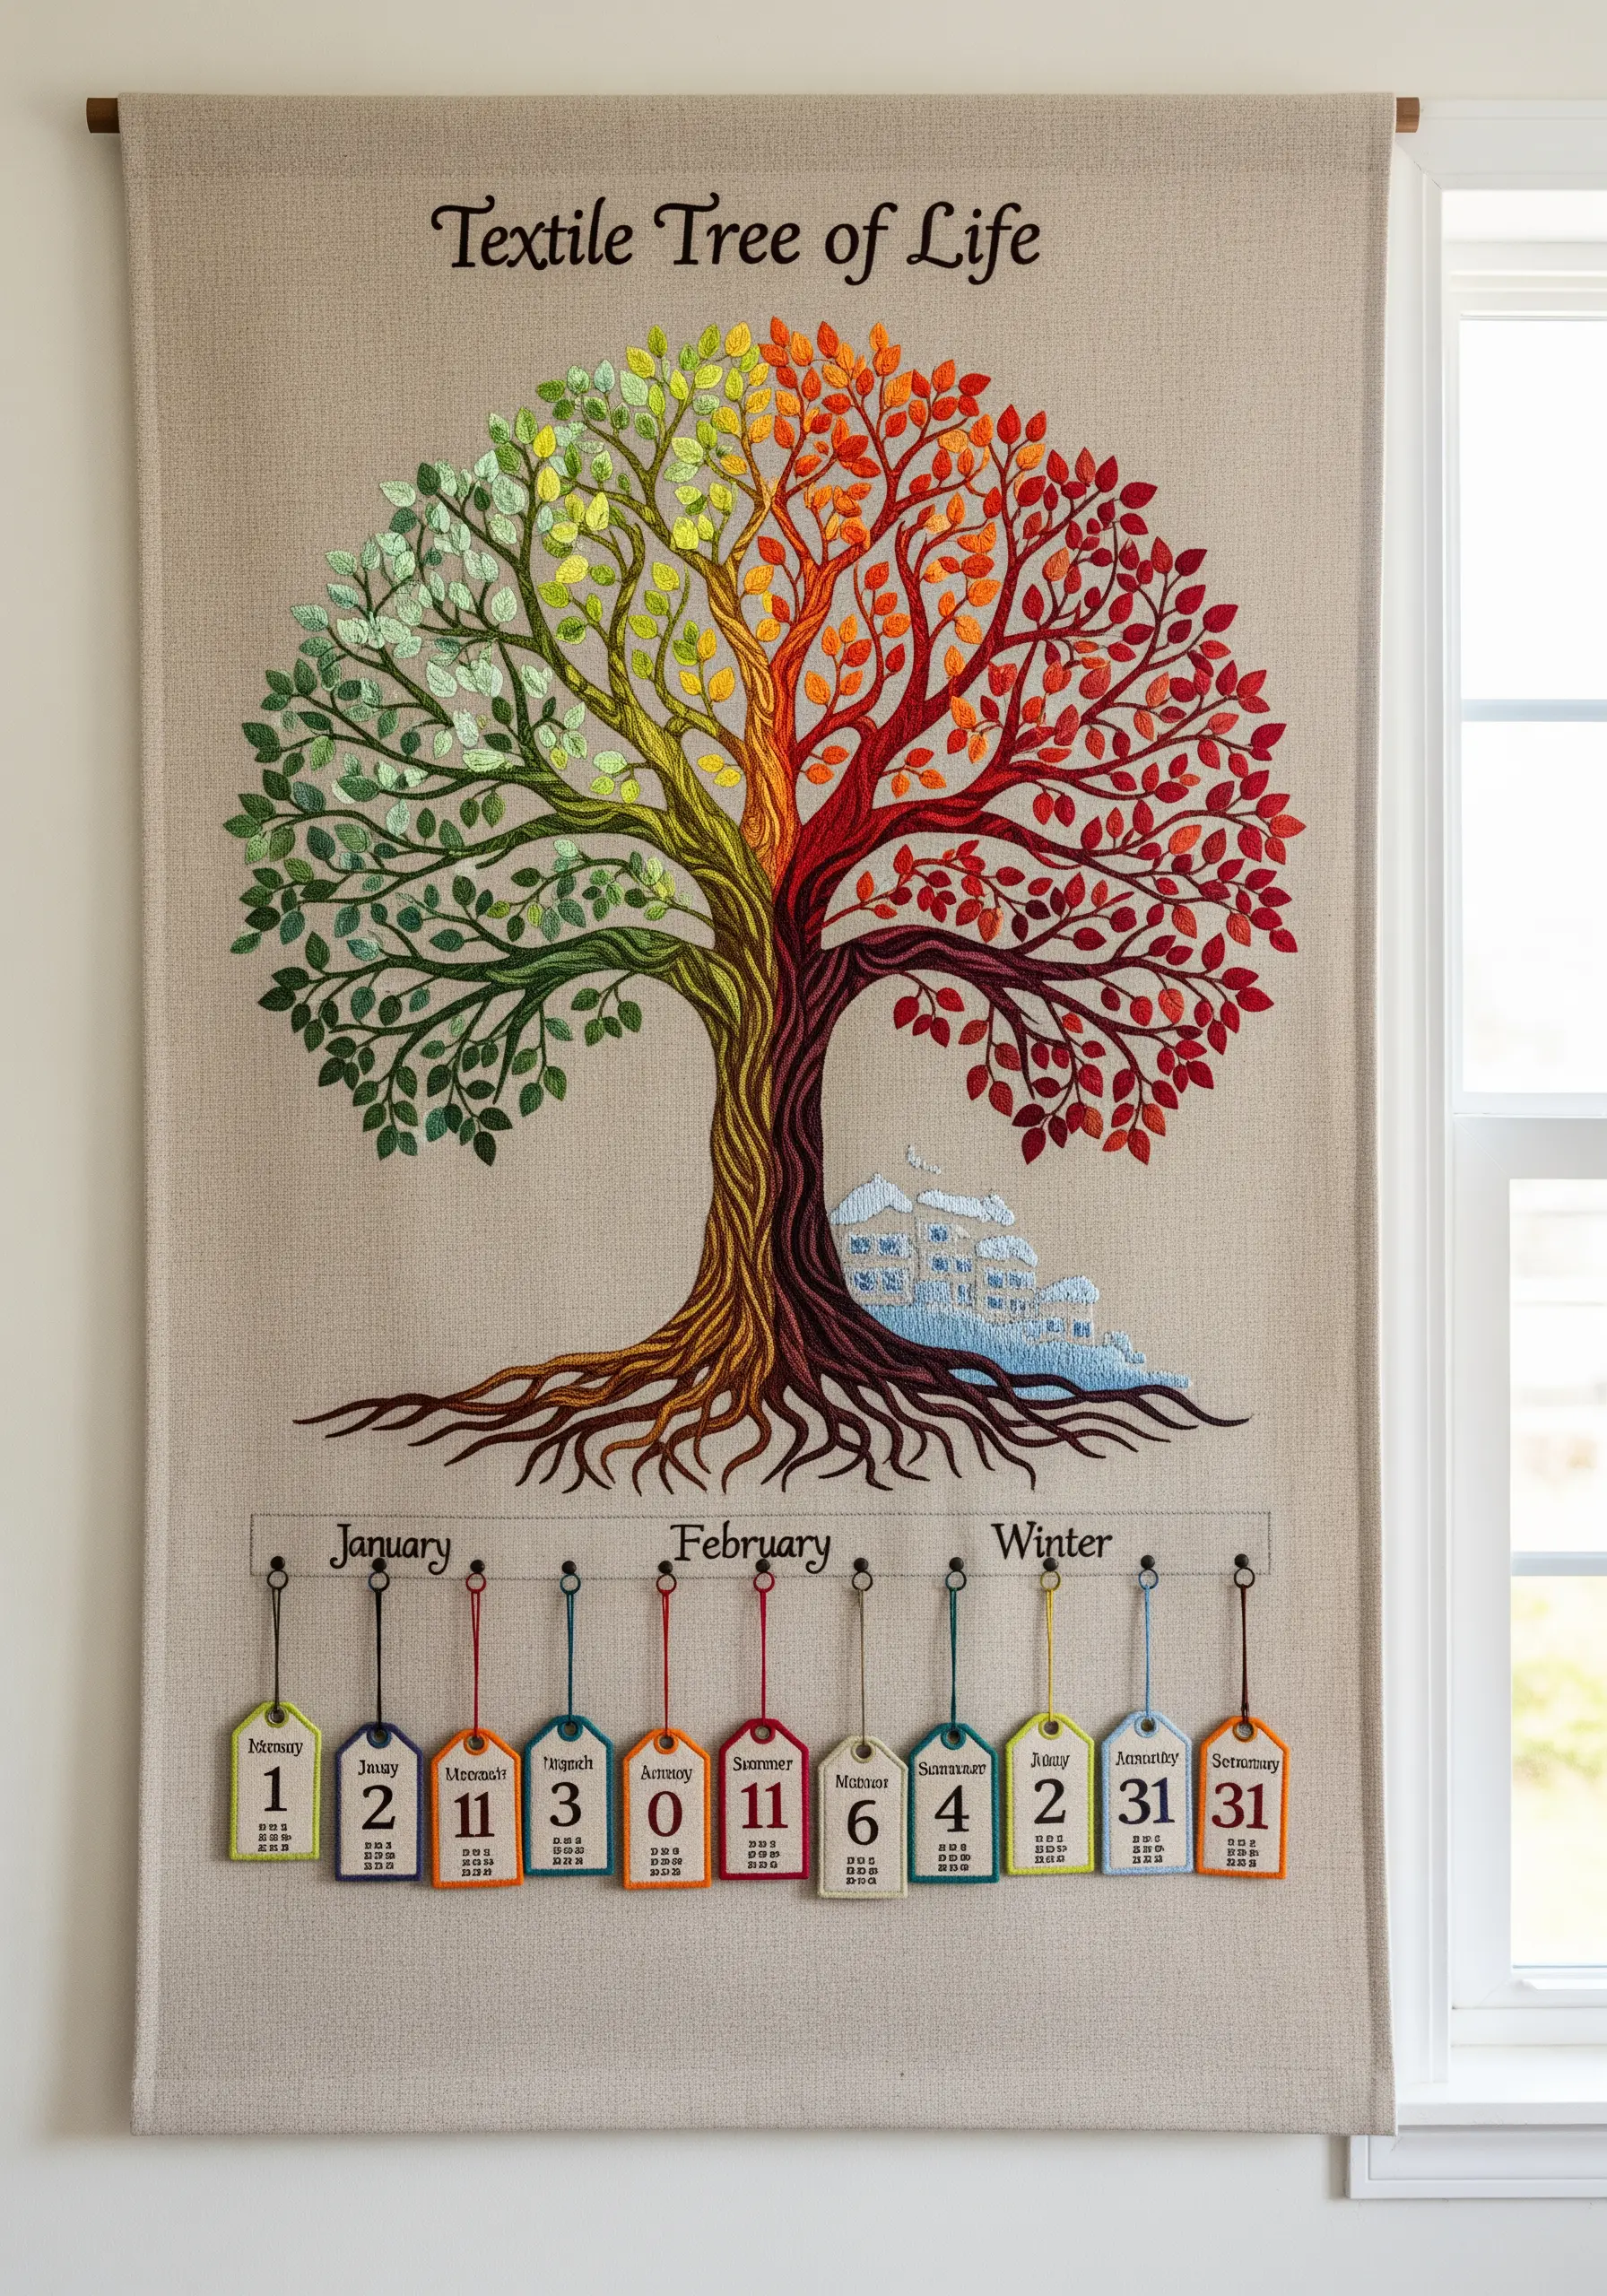
A large-scale project like this ‘Tree of Life’ feels more achievable when you treat each element as a mini-project.
For the trunk, use vertical long-and-short stitches with several shades of brown to mimic the texture of bark. This directional stitching adds realism and dimension.
To represent the seasons, block out four sections and fill the leaves with color gradients—from spring green to fiery autumn red. The individually stitched, detachable tags not only add function but turn the piece into an interactive family heirloom.
18. Craft a Flawless, Professional-Grade Patch
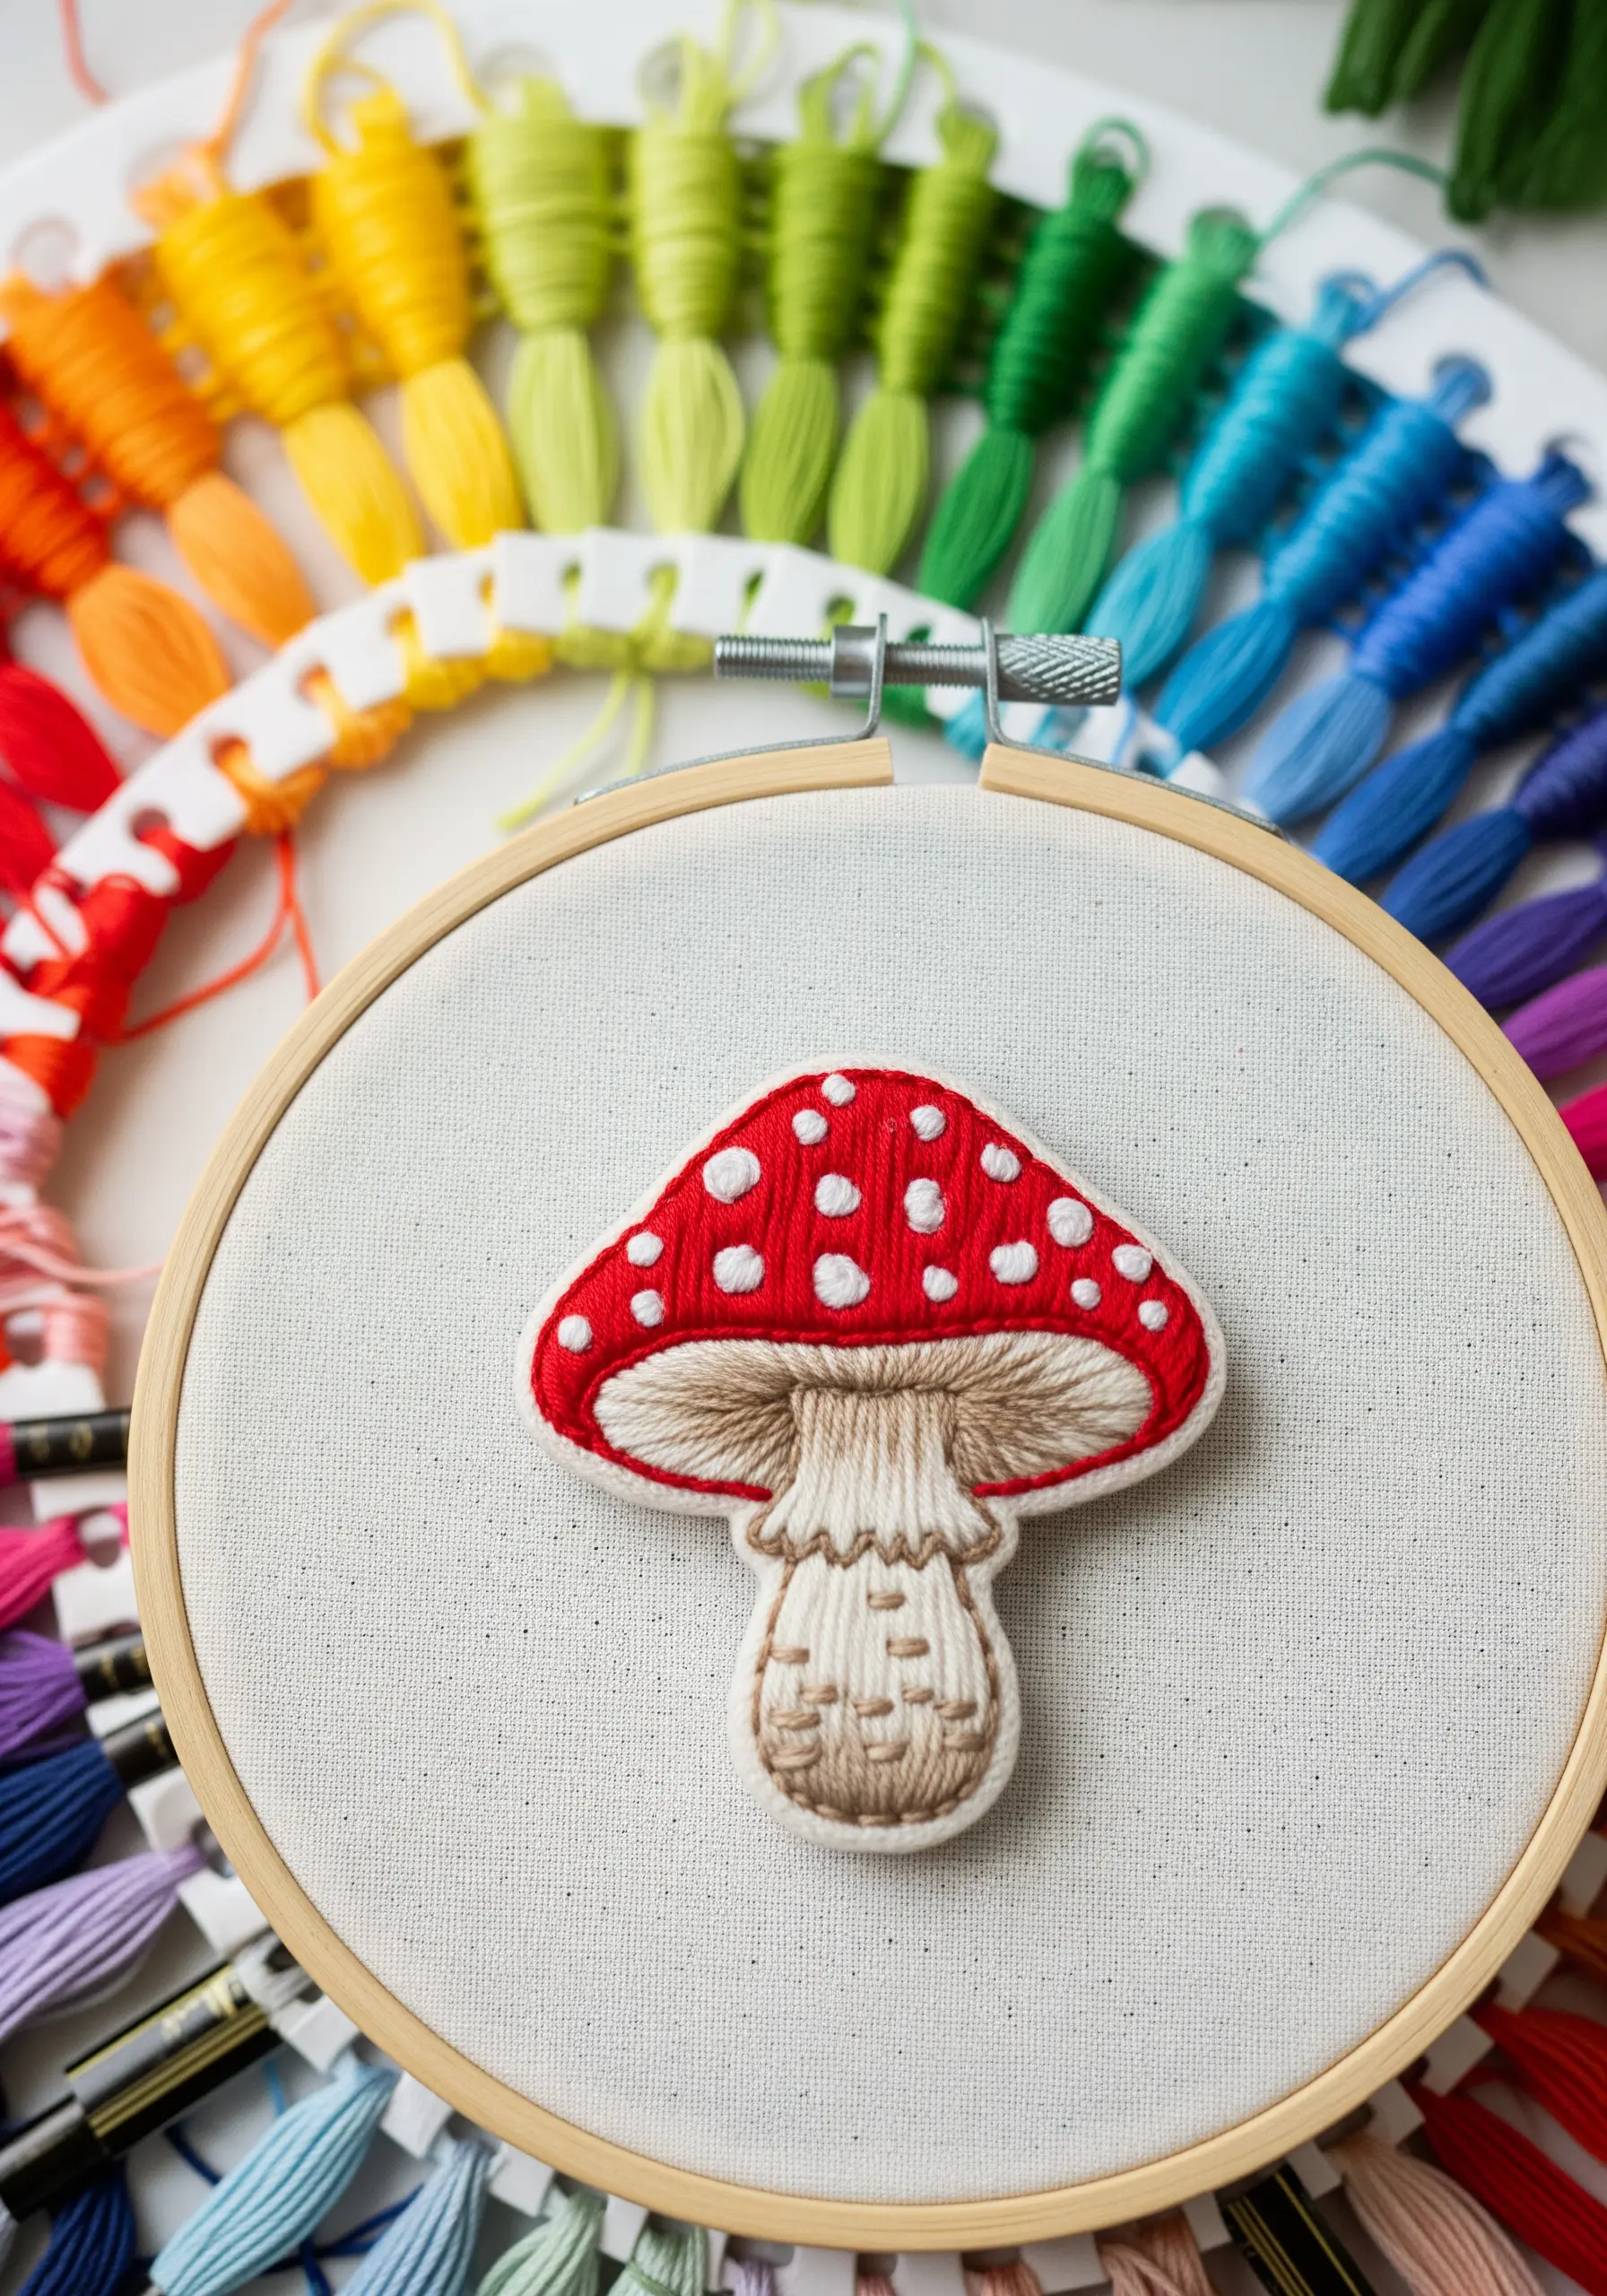
The secret to a clean, sturdy appliqué patch is the border. Before you cut out your design, outline the entire shape with a tight, dense satin stitch.
This border should be about 2-3mm wide and worked with 3-4 strands of floss to give it structure. It cleanly encases the raw edges of your fabric (felt is an excellent choice), preventing any fraying and giving it a polished, store-bought look.
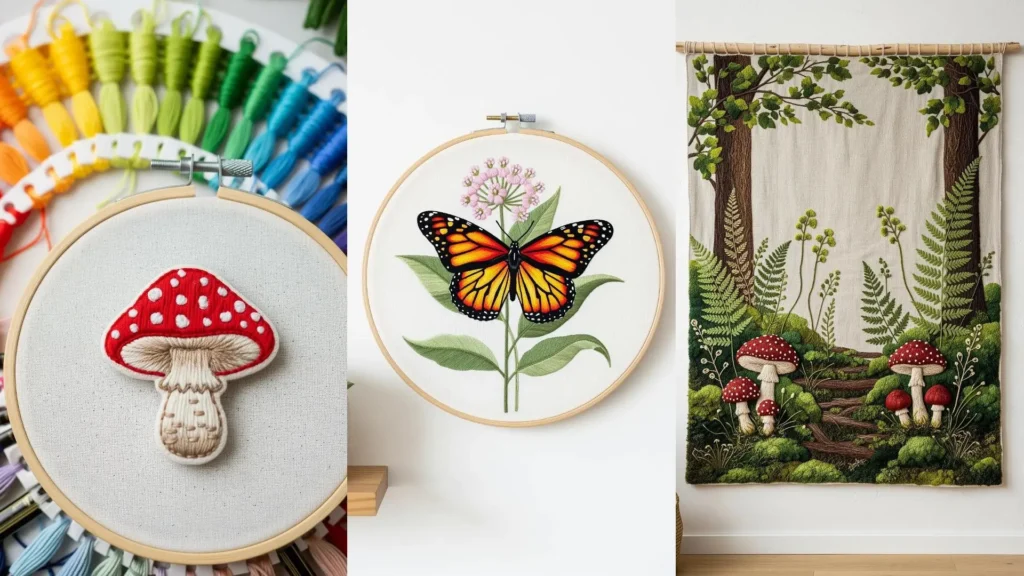
Once finished, you can apply an iron-on adhesive sheet to the back for easy application to jackets, bags, or hats, like in these realistic mushroom forest floor embroidery projects.


