

You have the threads, the fabric, and the desire to create something beautiful. But sometimes, the finished piece doesn’t quite match the vision in your head. It’s not about learning dozens of complicated new stitches; it’s about making small, intentional choices that elevate your work from handmade to artful.
Think of your needle as a pencil and your thread as ink. How can you make your lines cleaner, your colors more harmonious, your textures more expressive? The answer lies in understanding why a certain thread works on a specific fabric, or how a simple shift in stitch direction can create the illusion of light.
Here, you’ll find practical techniques that offer immediate, visible results. We’ll move beyond just following a pattern and start making the thoughtful, artistic decisions that will give your embroidery a polished, confident, and deeply personal signature.
1. Add Celestial Drama with Metallics on Velvet
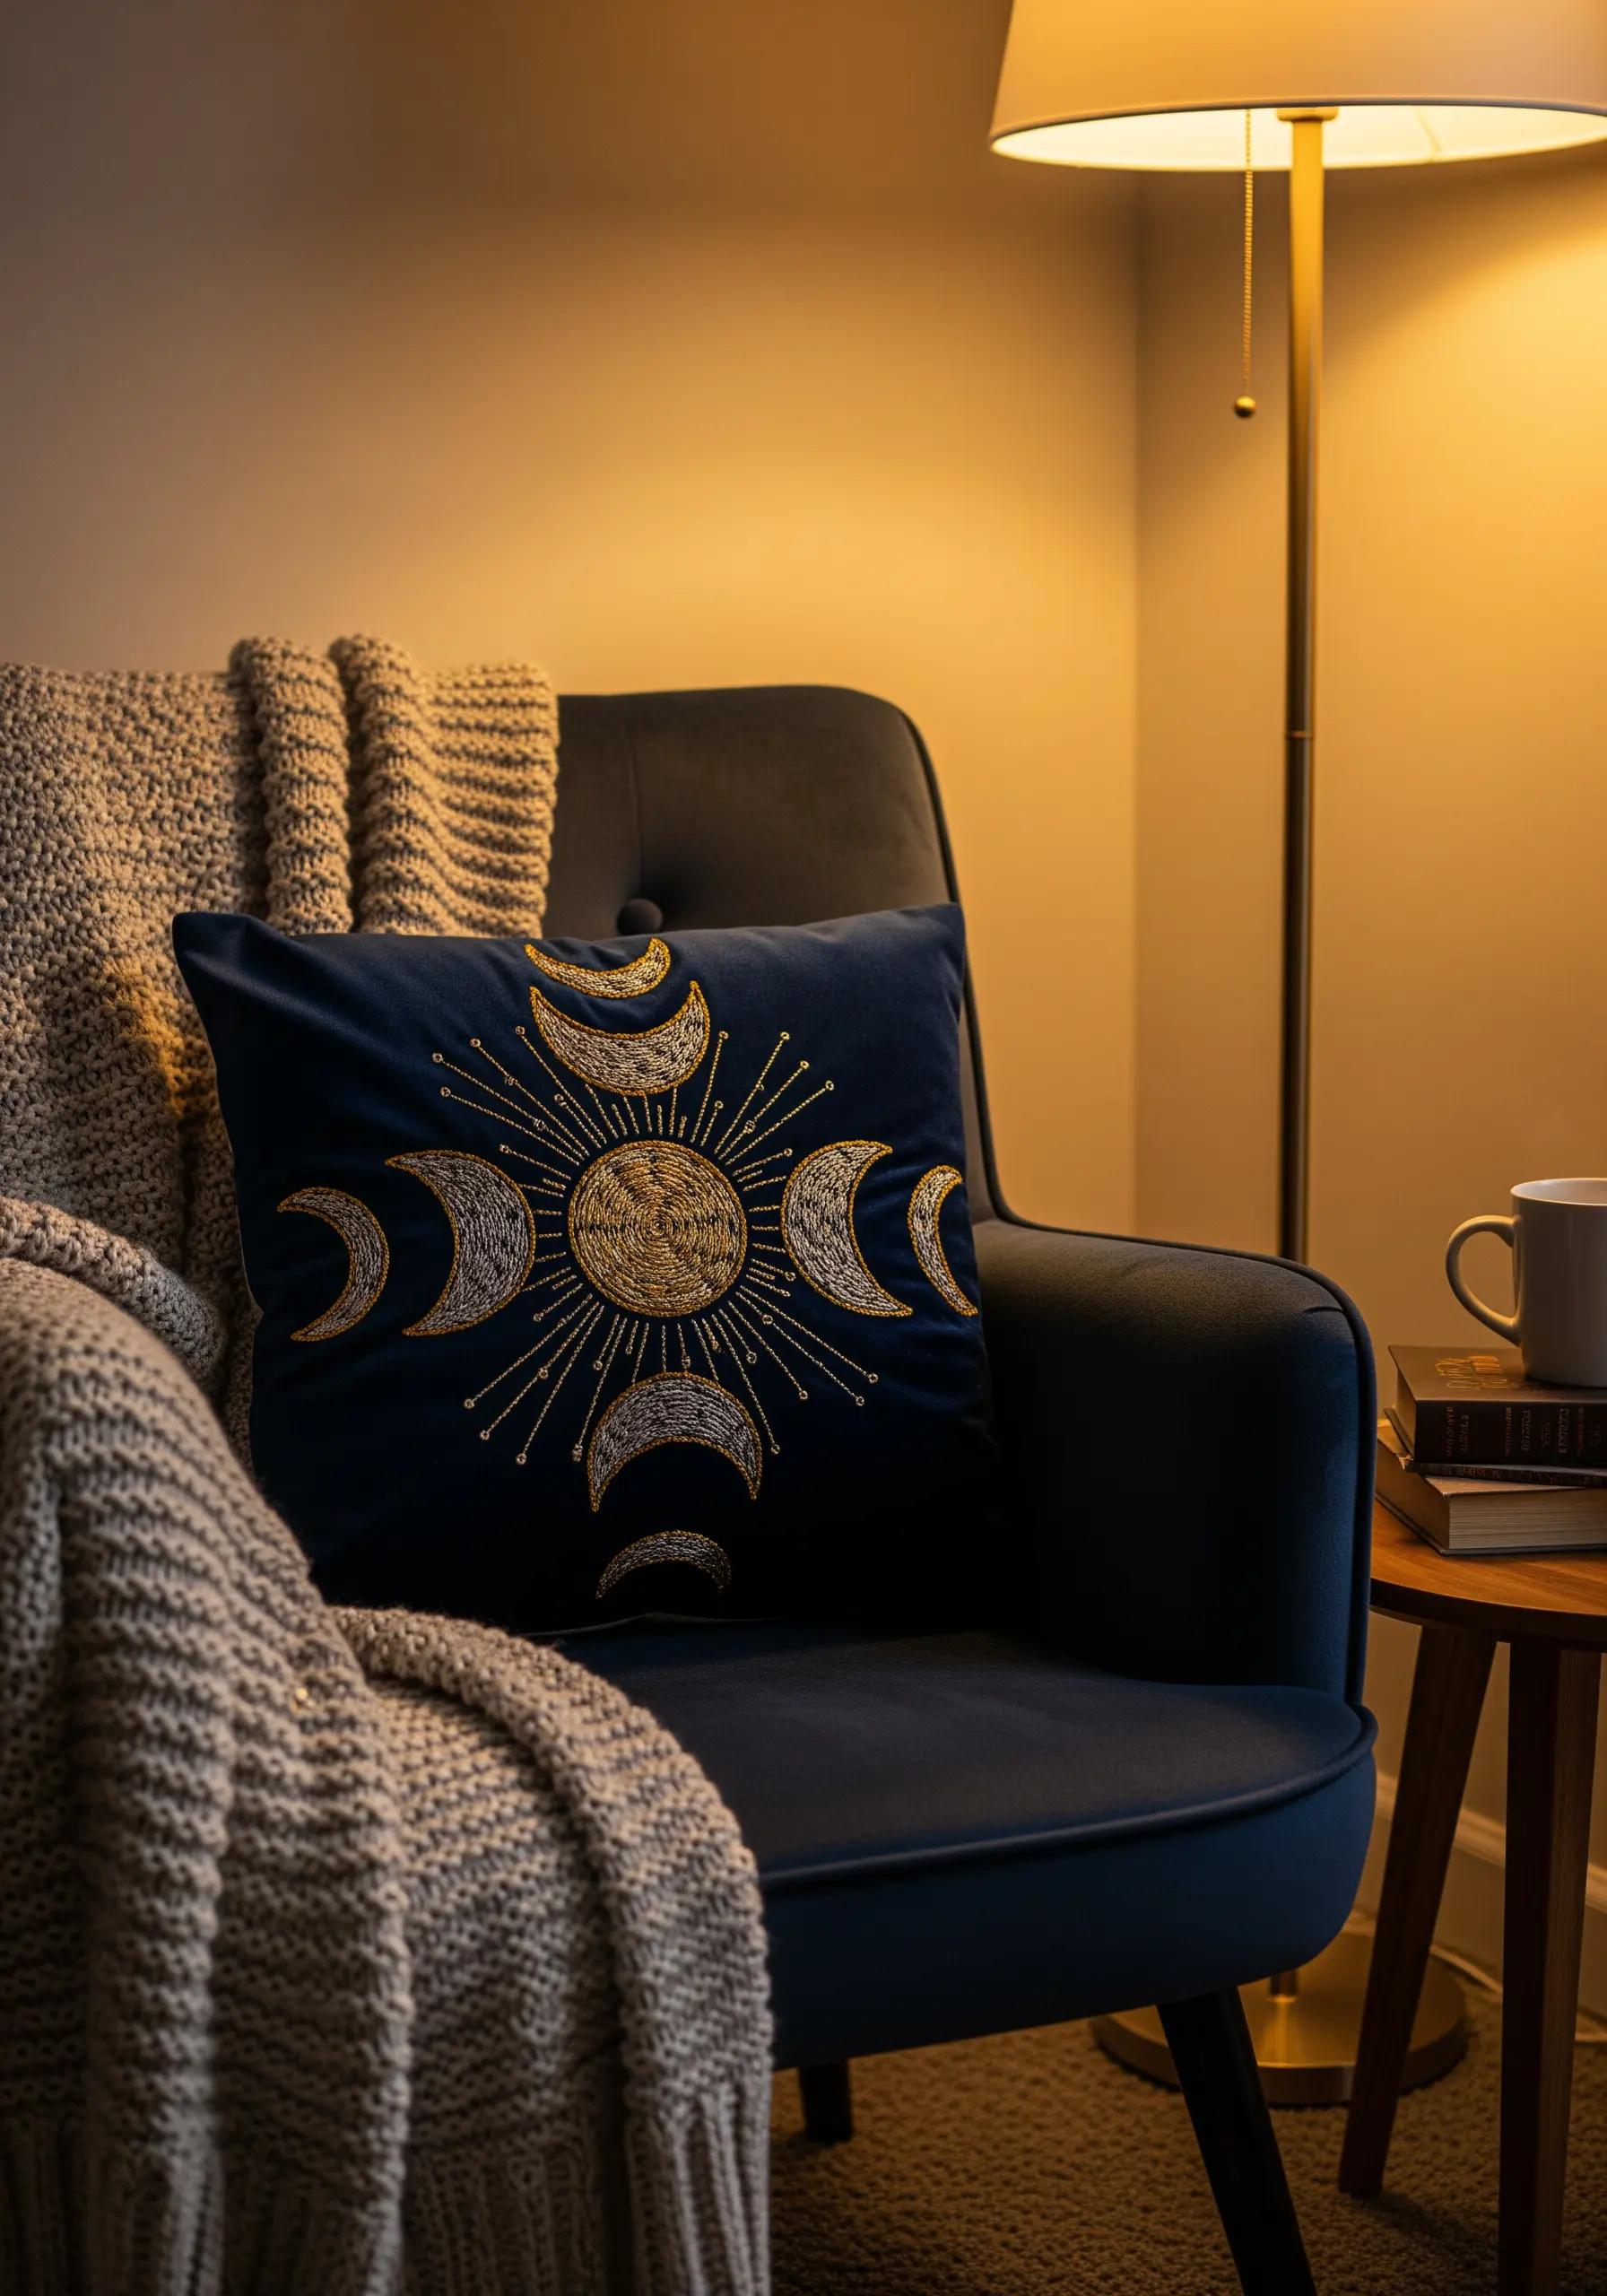
Transform a simple cushion cover by choosing a fabric with inherent luxury, like deep navy velvet.
Use a high-sheen gold metallic thread to create a dramatic contrast that catches the light.
To prevent metallic thread from snagging or breaking, use a shorter length of thread than you normally would and consider a thread conditioner like beeswax.
Outline your sun and moon motifs with couching—laying the metallic thread on the surface and tacking it down with a finer, matching cotton thread—for perfectly smooth, shimmering lines that don’t distort the plush fabric.
Fill the larger shapes with a dense seed stitch to create a texture that glitters rather than shines, adding depth to your celestial design.
This technique turns a functional item into one of those calm, cozy handmade crafts that anchor a reading nook.
2. Create an Organic Flow with Scattered Botanicals

To make a table runner feel effortlessly chic, scatter small, delicate floral motifs instead of stitching a rigid, repeating border.
Work with a limited, soft color palette—perhaps four or five muted shades—to ensure the overall design feels cohesive and gentle, not chaotic.
Vary the stitch direction and density of each flower to mimic the randomness of a wildflower meadow.
Use simple stitches like lazy daisy for petals, French knots for flower centers, and a fine stem stitch for the stalks, letting the composition do the expressive work.
This approach elevates simple linen into one of those hand-stitched table runner embroidery designs that look elegant and bespoke.
3. Blend Macrame and Weaving for a Statement Wall Hanging
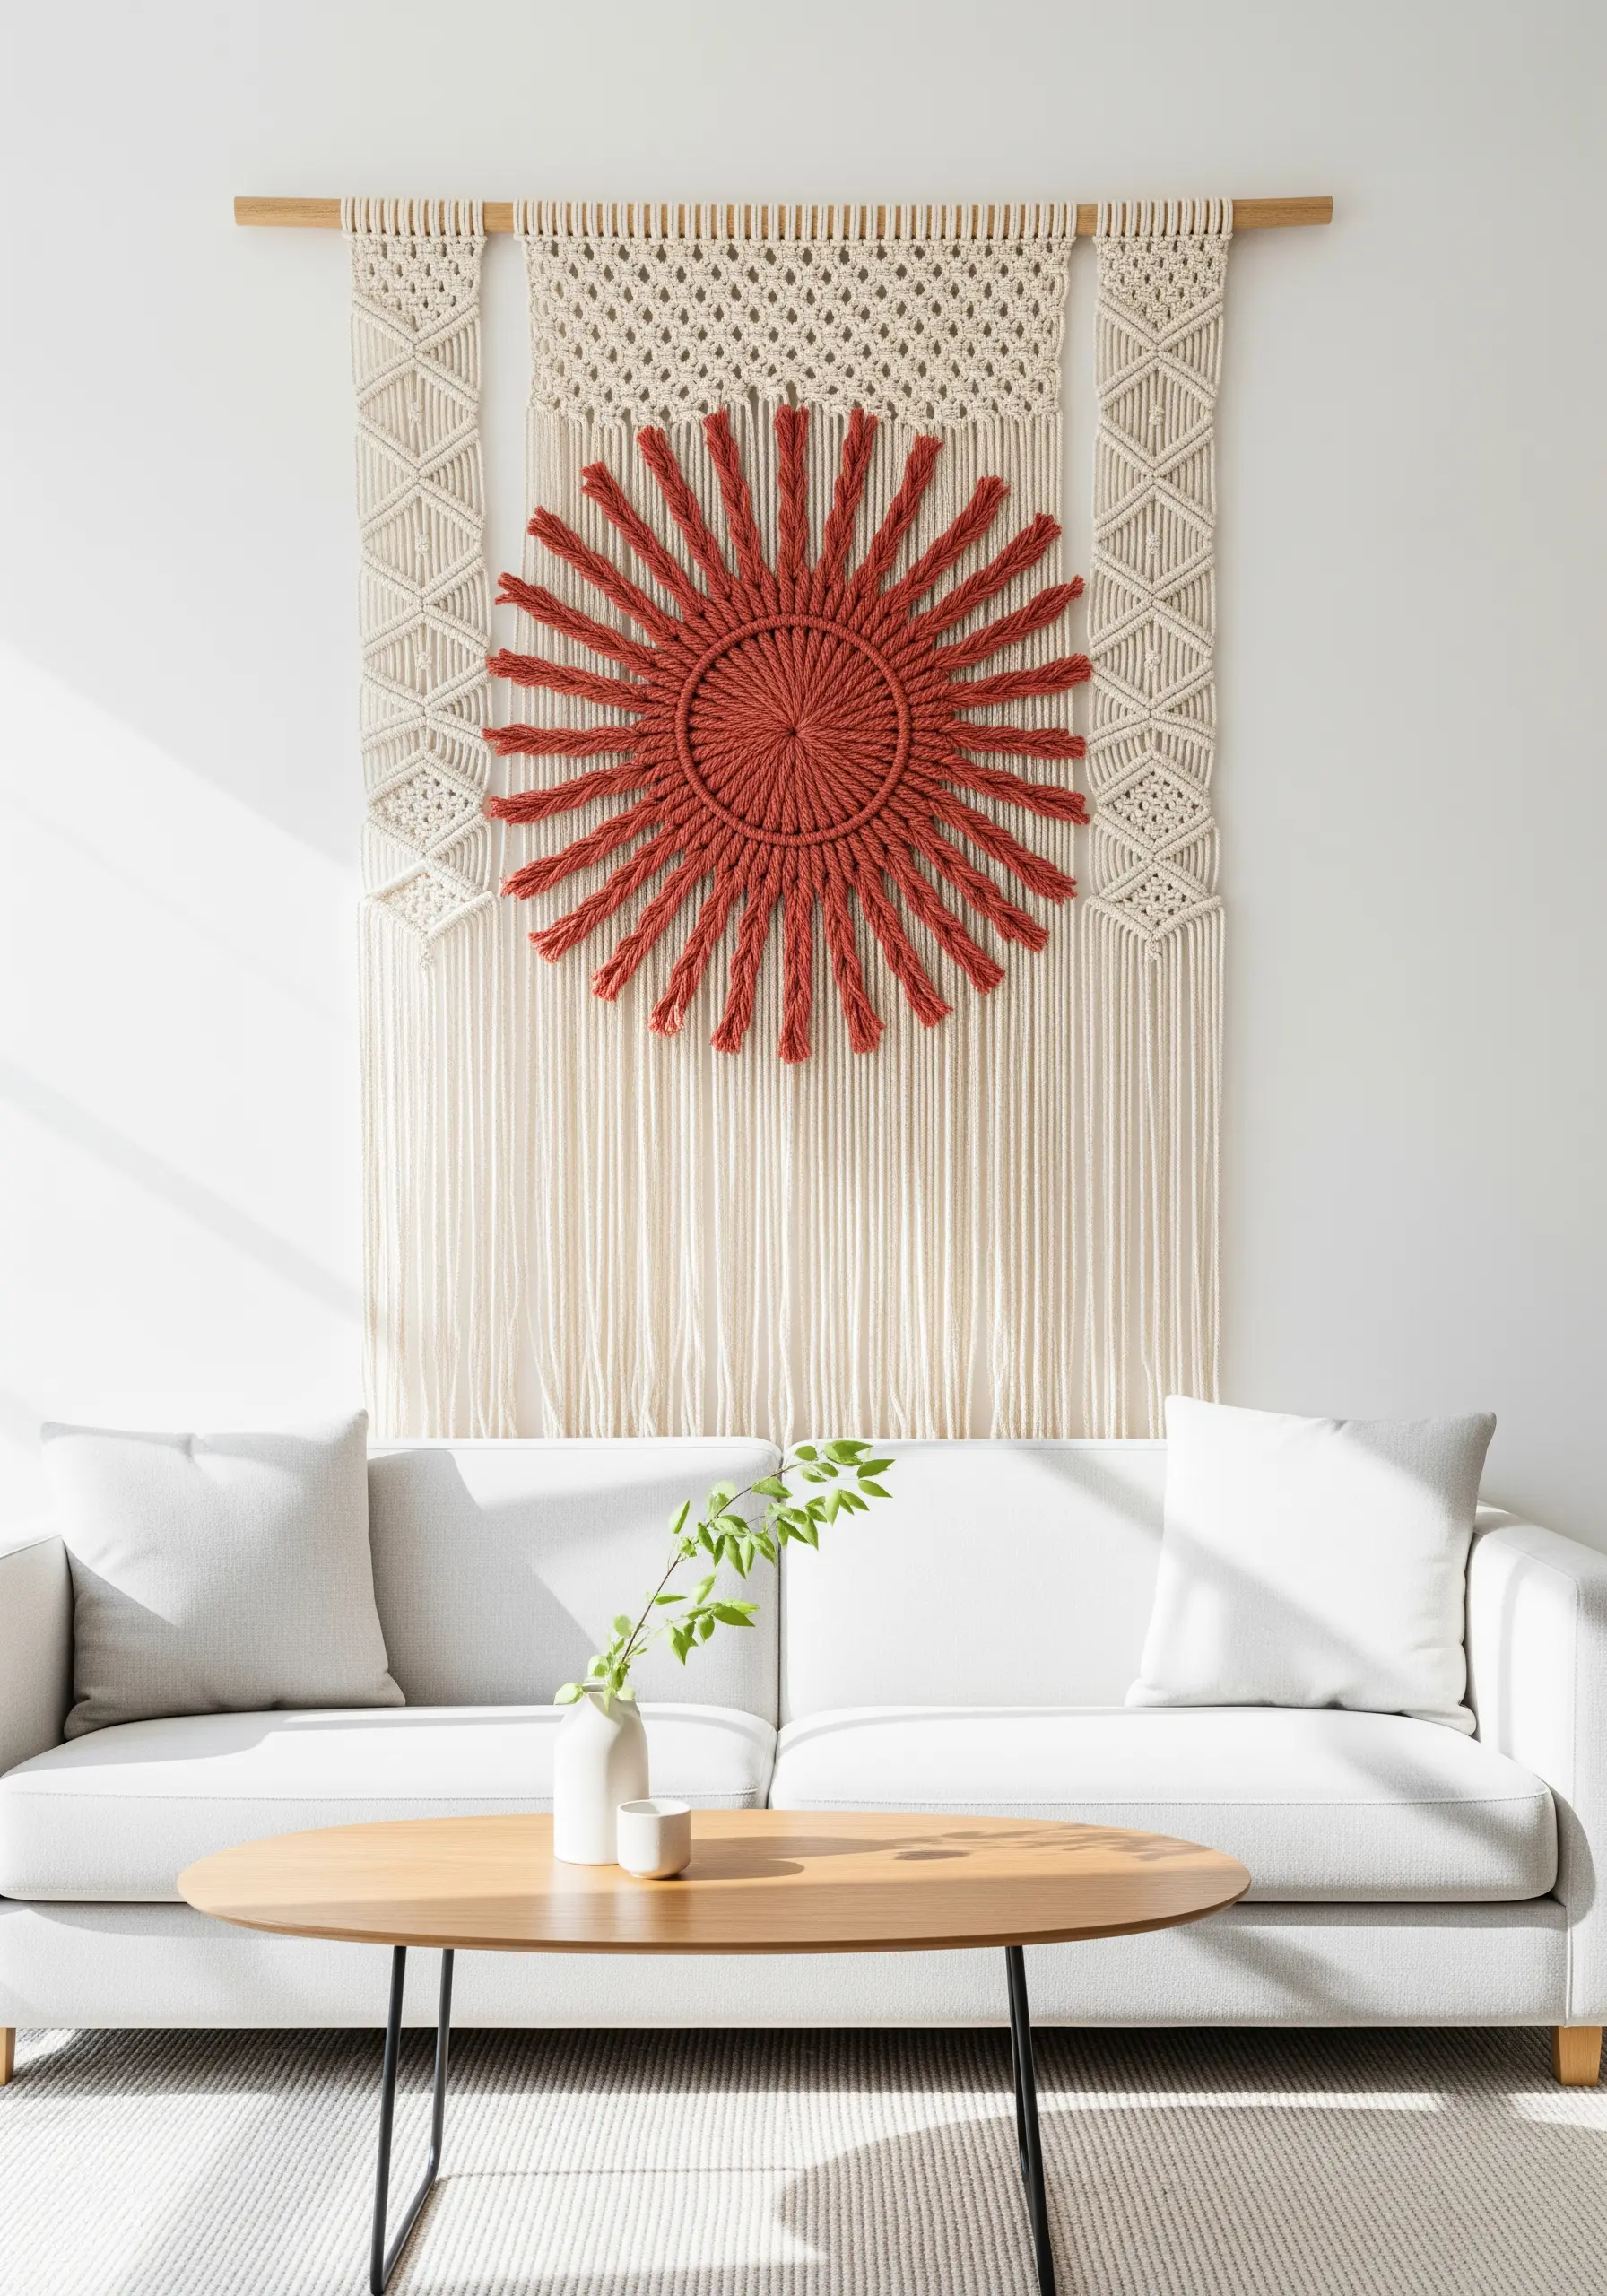
Go beyond the hoop by creating a large-scale focal point that combines different fiber art techniques.
Use macrame knots like square knots and double half-hitches to build a structured, geometric frame at the top of your piece.
For the central sunburst motif, switch to a circular weaving technique around a sturdy metal or wooden ring, wrapping it tightly with a bold, contrasting color of yarn.
Let the long, straight fringe hang freely to create a sense of movement and length, which draws the eye downward and makes ceilings feel higher.
This is one of those DIY yarn wall art pieces that introduces commanding texture and warmth into a minimalist space.
4. Stitch Clean, Graphic Herbs for a Modern Kitchen
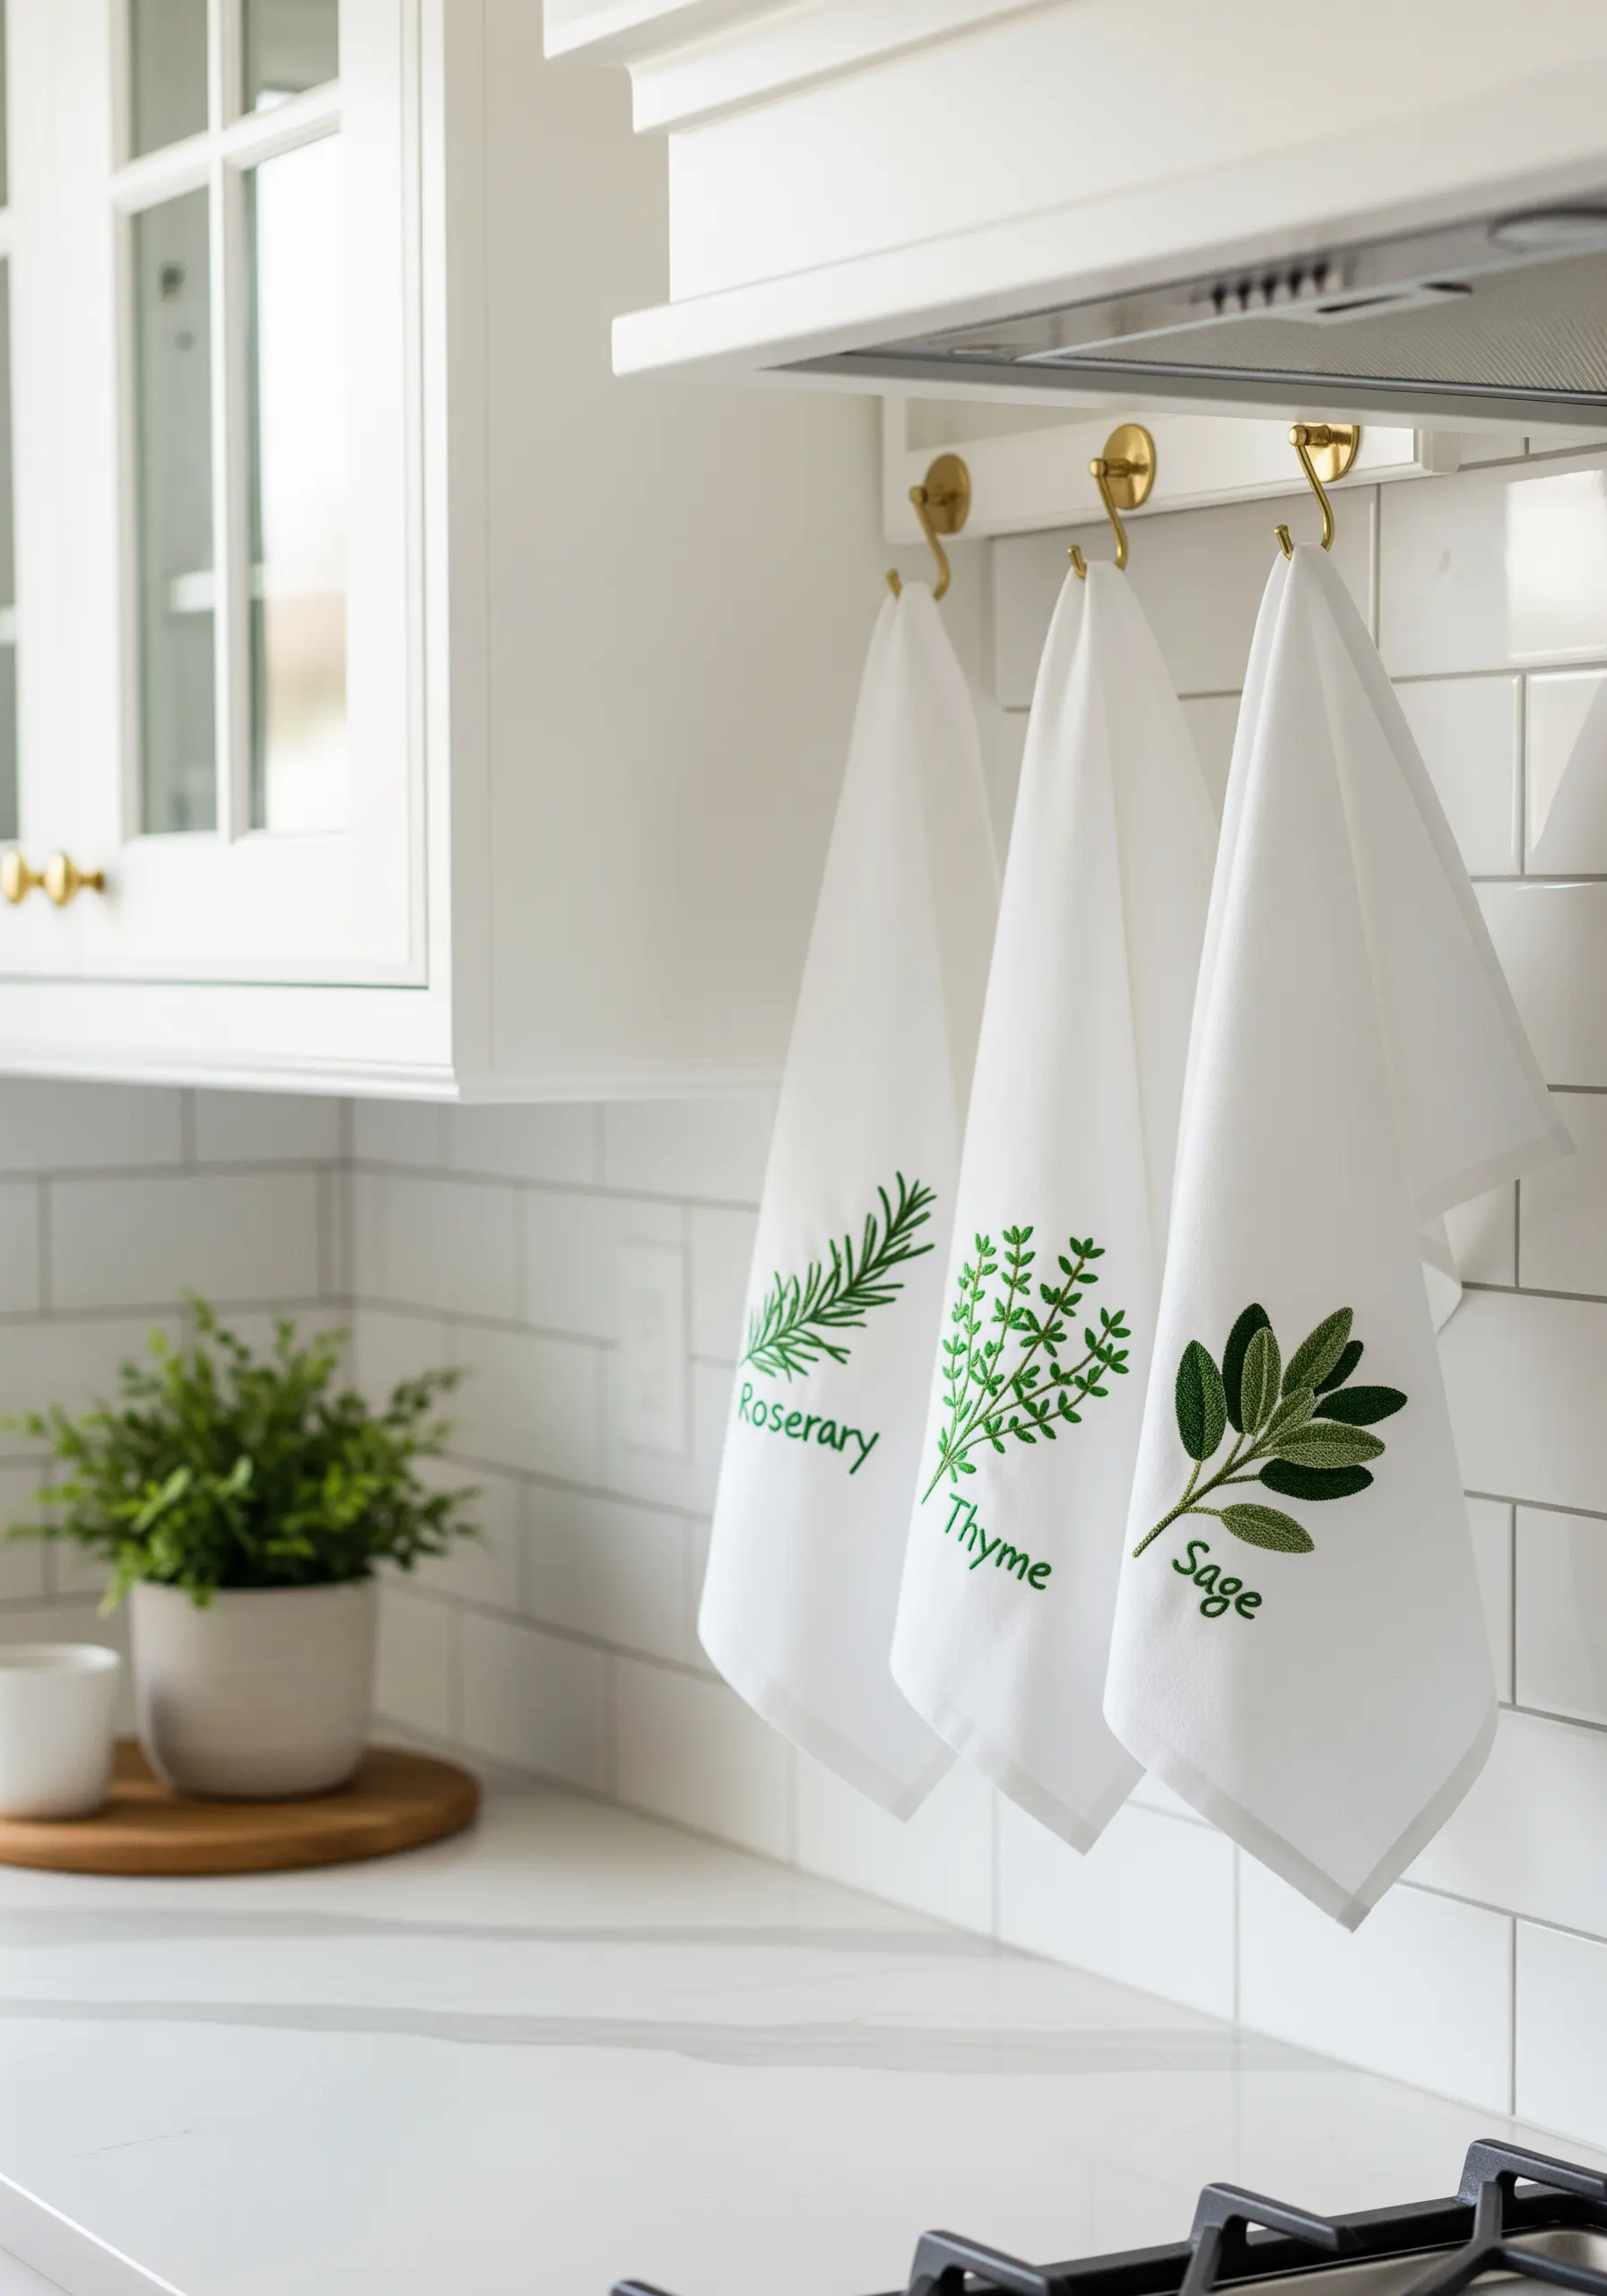
Elevate plain kitchen towels with crisp, identifiable herb motifs that feel both fresh and functional.
Choose a single, vibrant green for each herb and pair it with a clean, modern font for the labels to maintain a cohesive, graphic aesthetic.
Use a dense satin stitch for the leaves, ensuring your stitches lie close together for a smooth, solid fill. To achieve sharp leaf points, angle your final stitches carefully.
For the delicate stems and lettering, a precise backstitch or stem stitch using two strands of floss will provide clarity without adding bulk.
This project is a perfect way to practice creating simple line art fruit & food motifs that are both stylish and recognizable.
5. Use Felt as a Forgiving Canvas for Bold Mandalas
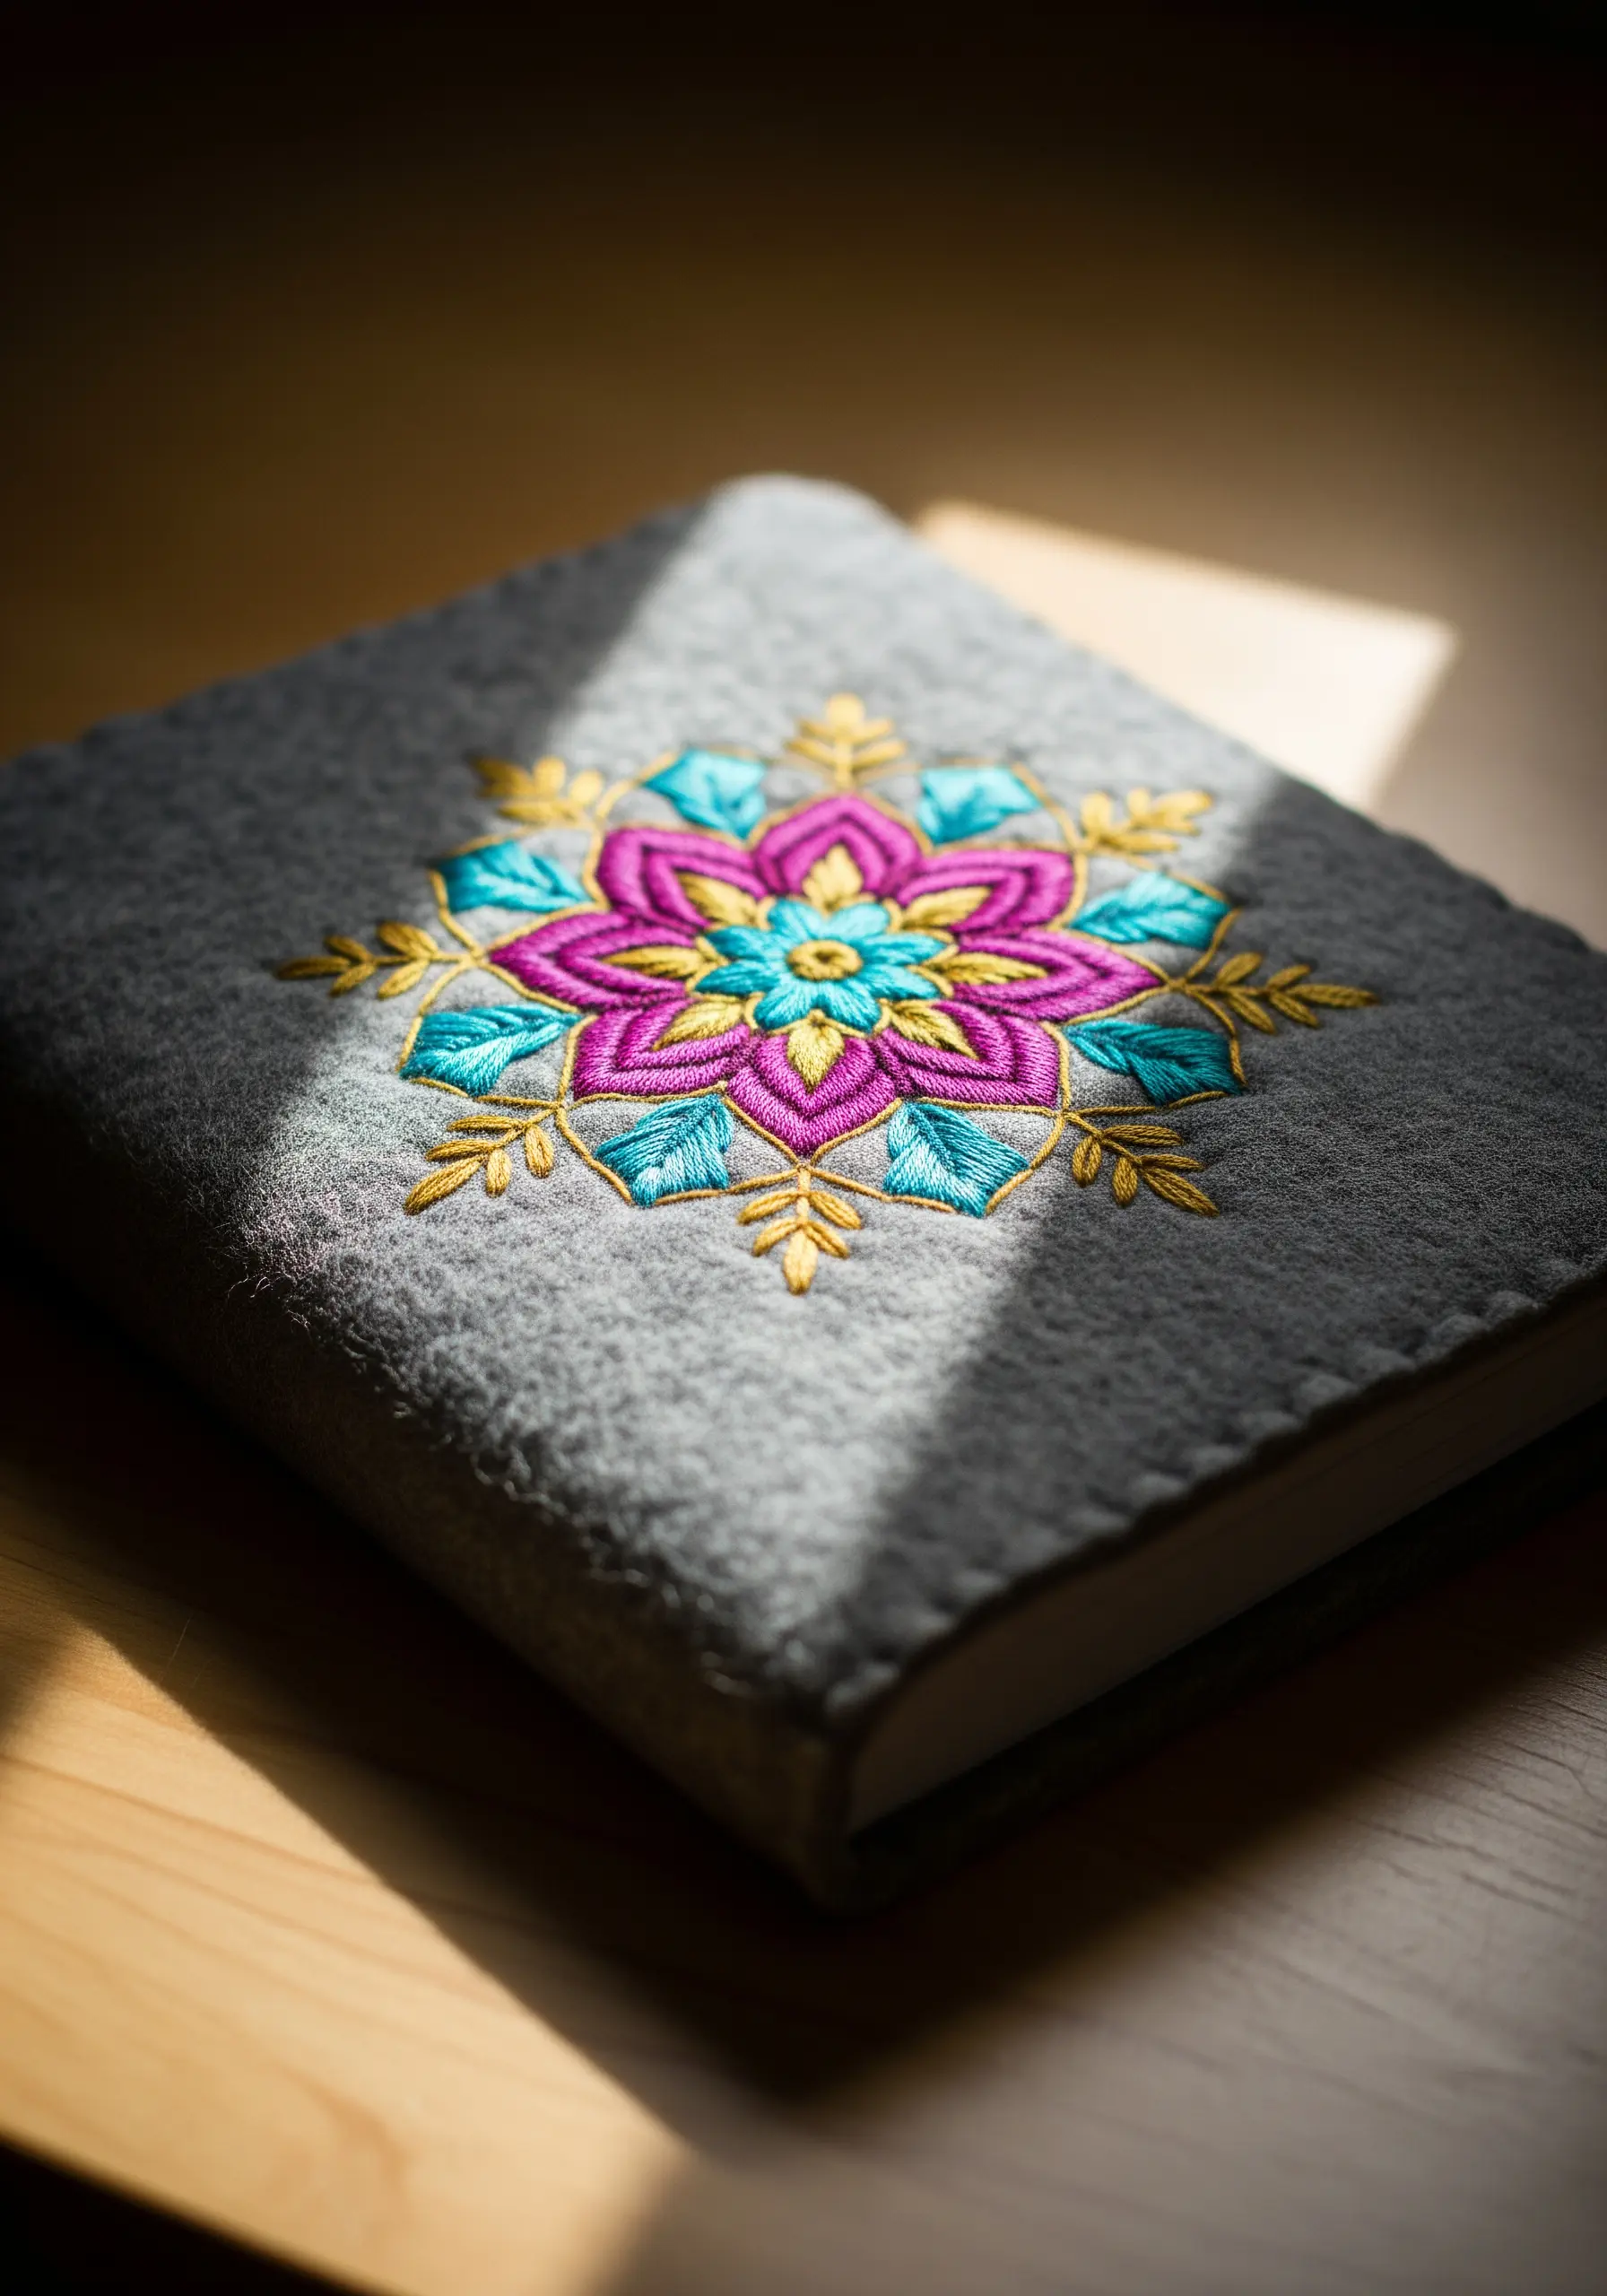
Embroidering on felt is perfect for projects that require clean edges without hemming, like this vibrant book cover.
The dense, non-woven texture of felt grips the thread, making it easier to achieve smooth satin stitches without the fabric puckering.
Choose a high-contrast color palette to make the geometric shapes of the mandala pop. The felt’s matte finish will make your silk or cotton threads appear even richer.
To ensure your mandala is perfectly symmetrical, transfer your design using a water-soluble stabilizer that you can rinse away after stitching is complete.
This tactile project transforms a simple journal into one of those DIY cozy embroidery bookmarks or covers that make reading feel special.
6. Weave Chunky Yarn for a Quick Textural Update
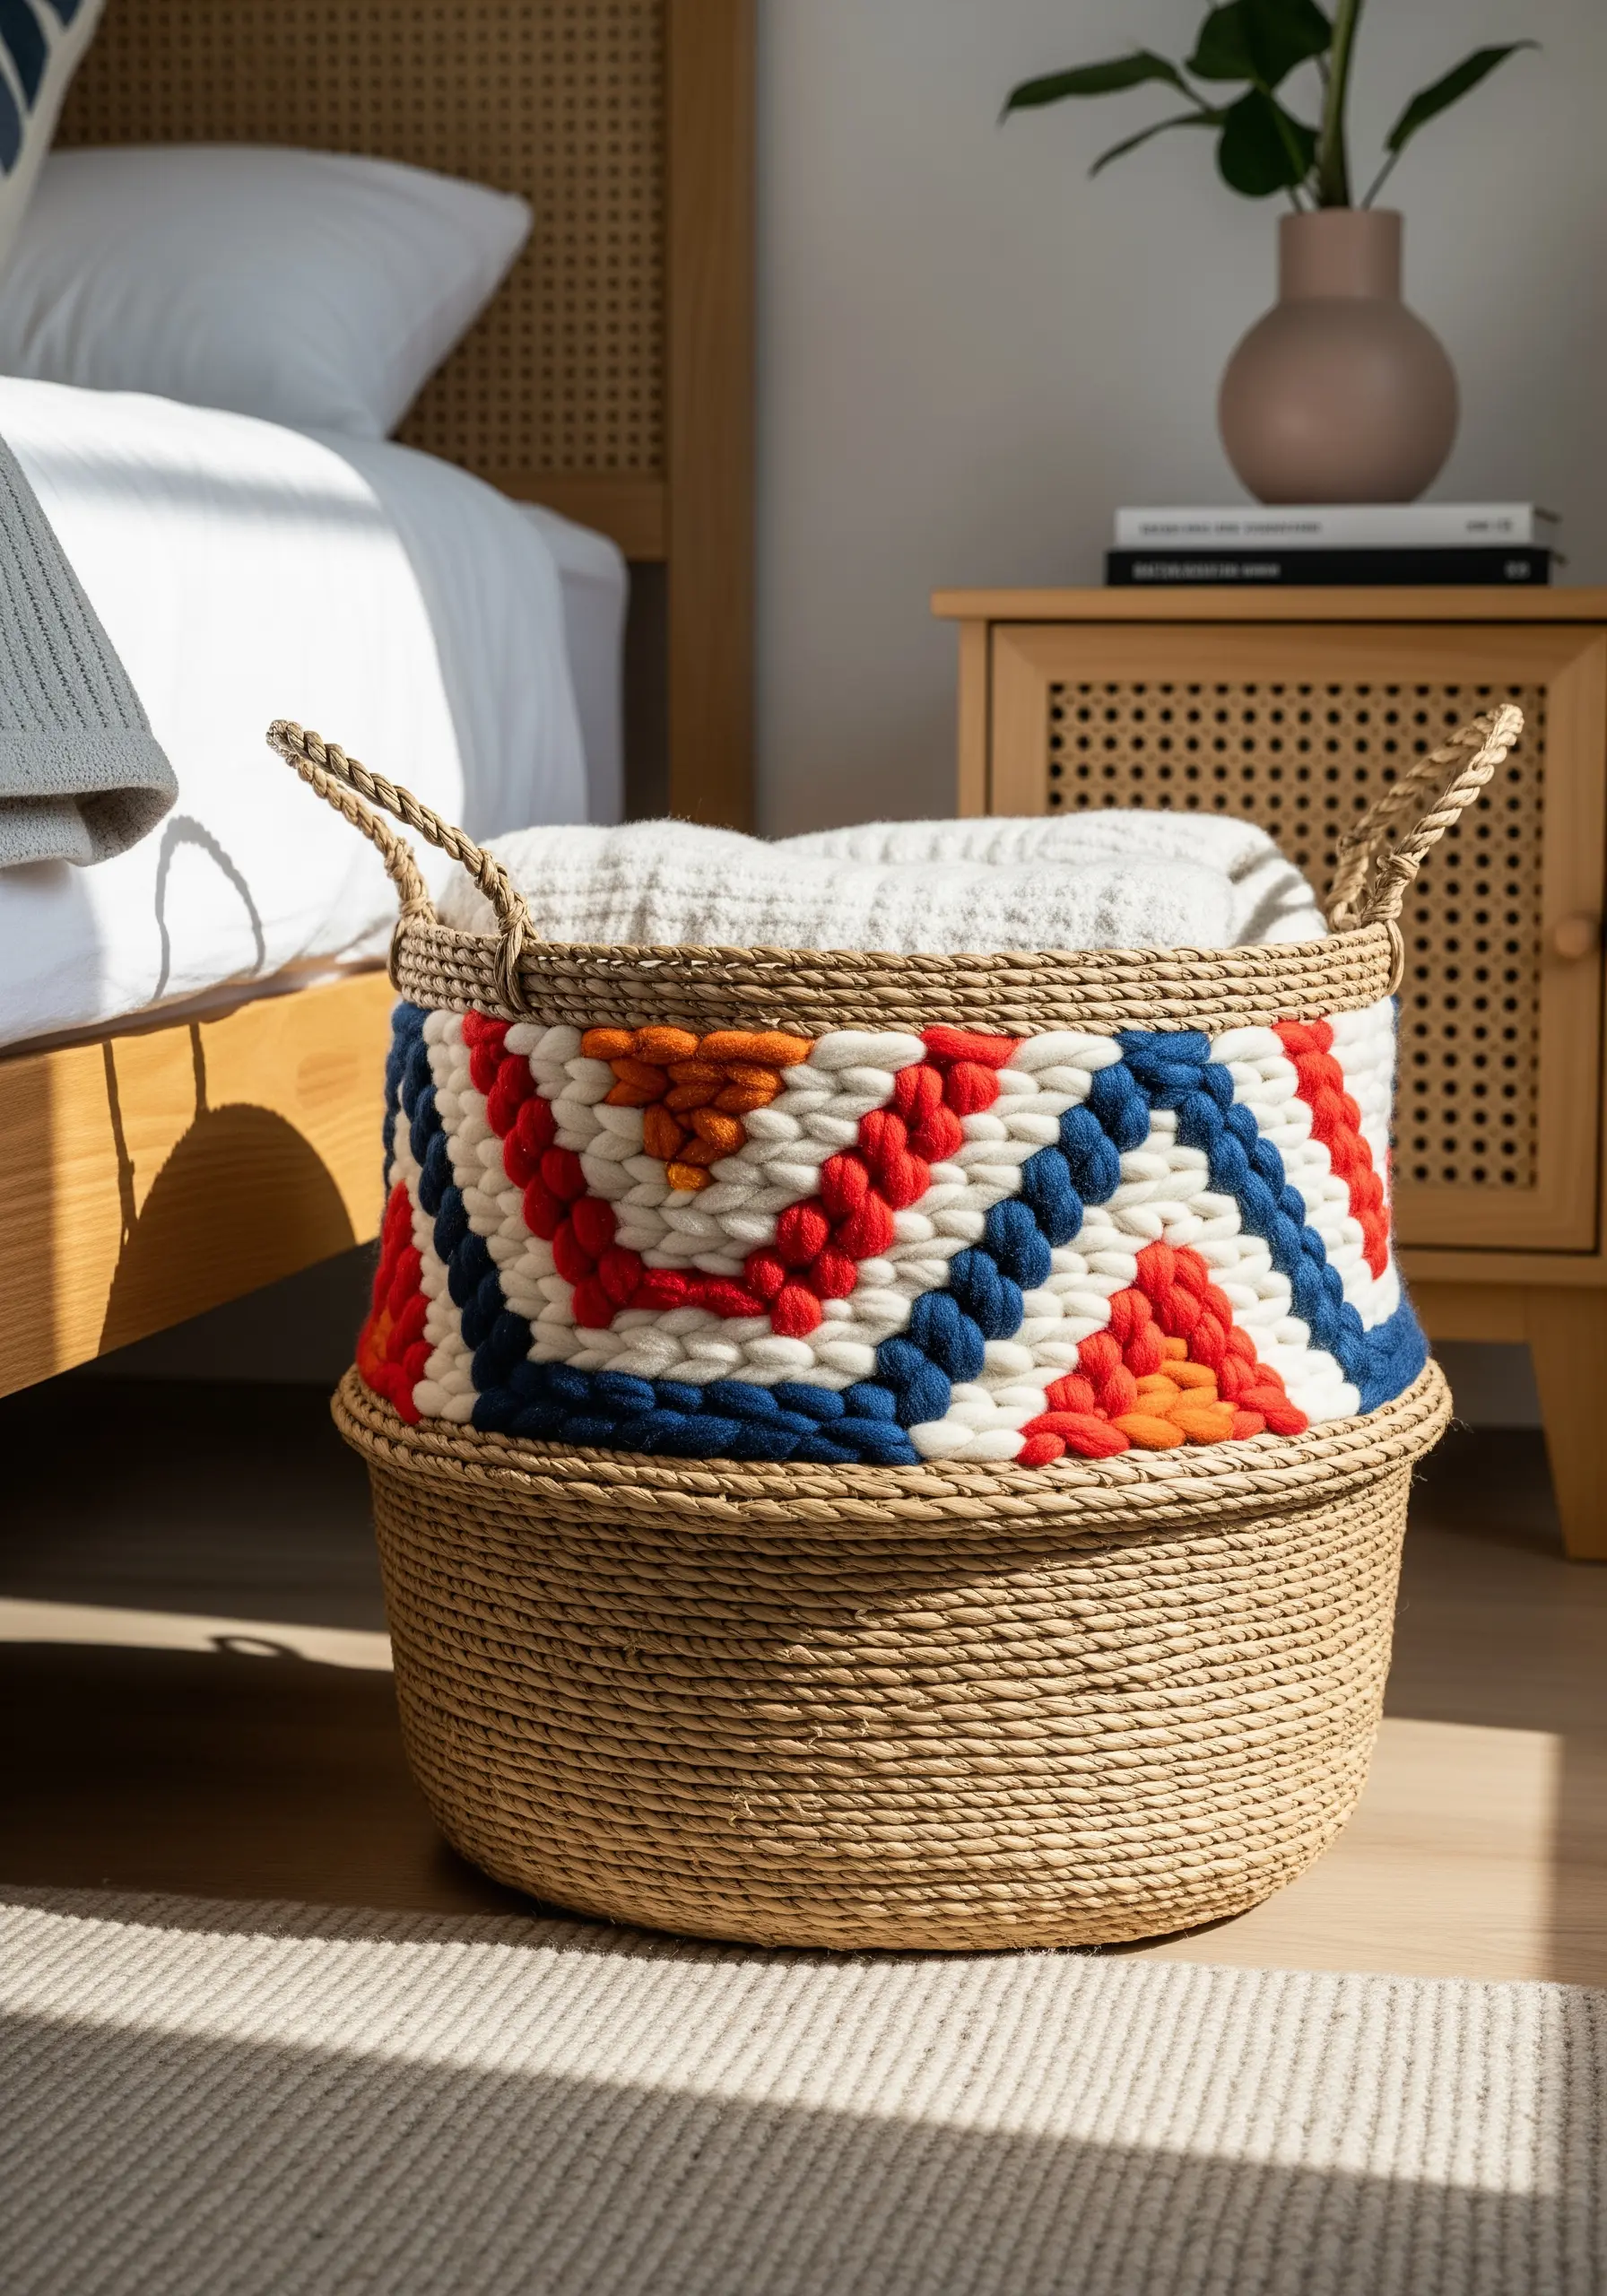
Instantly add a pop of color and texture to a woven basket using chunky yarn or roving.
You don’t need a special frame; the basket itself acts as your loom. Use a large tapestry needle to weave your thick fibers in and out of the basket’s existing structure.
Create bold, geometric patterns like chevrons or diamonds by changing the color and direction of your weaving.
This technique is incredibly fast and forgiving, and it’s one of the most effective mixed fiber embroidery ideas for adding a handmade touch to store-bought items.
Secure the ends of the yarn on the inside of the basket with a few simple knots to ensure your design stays put.
7. Design a Minimalist and Functional Key Holder
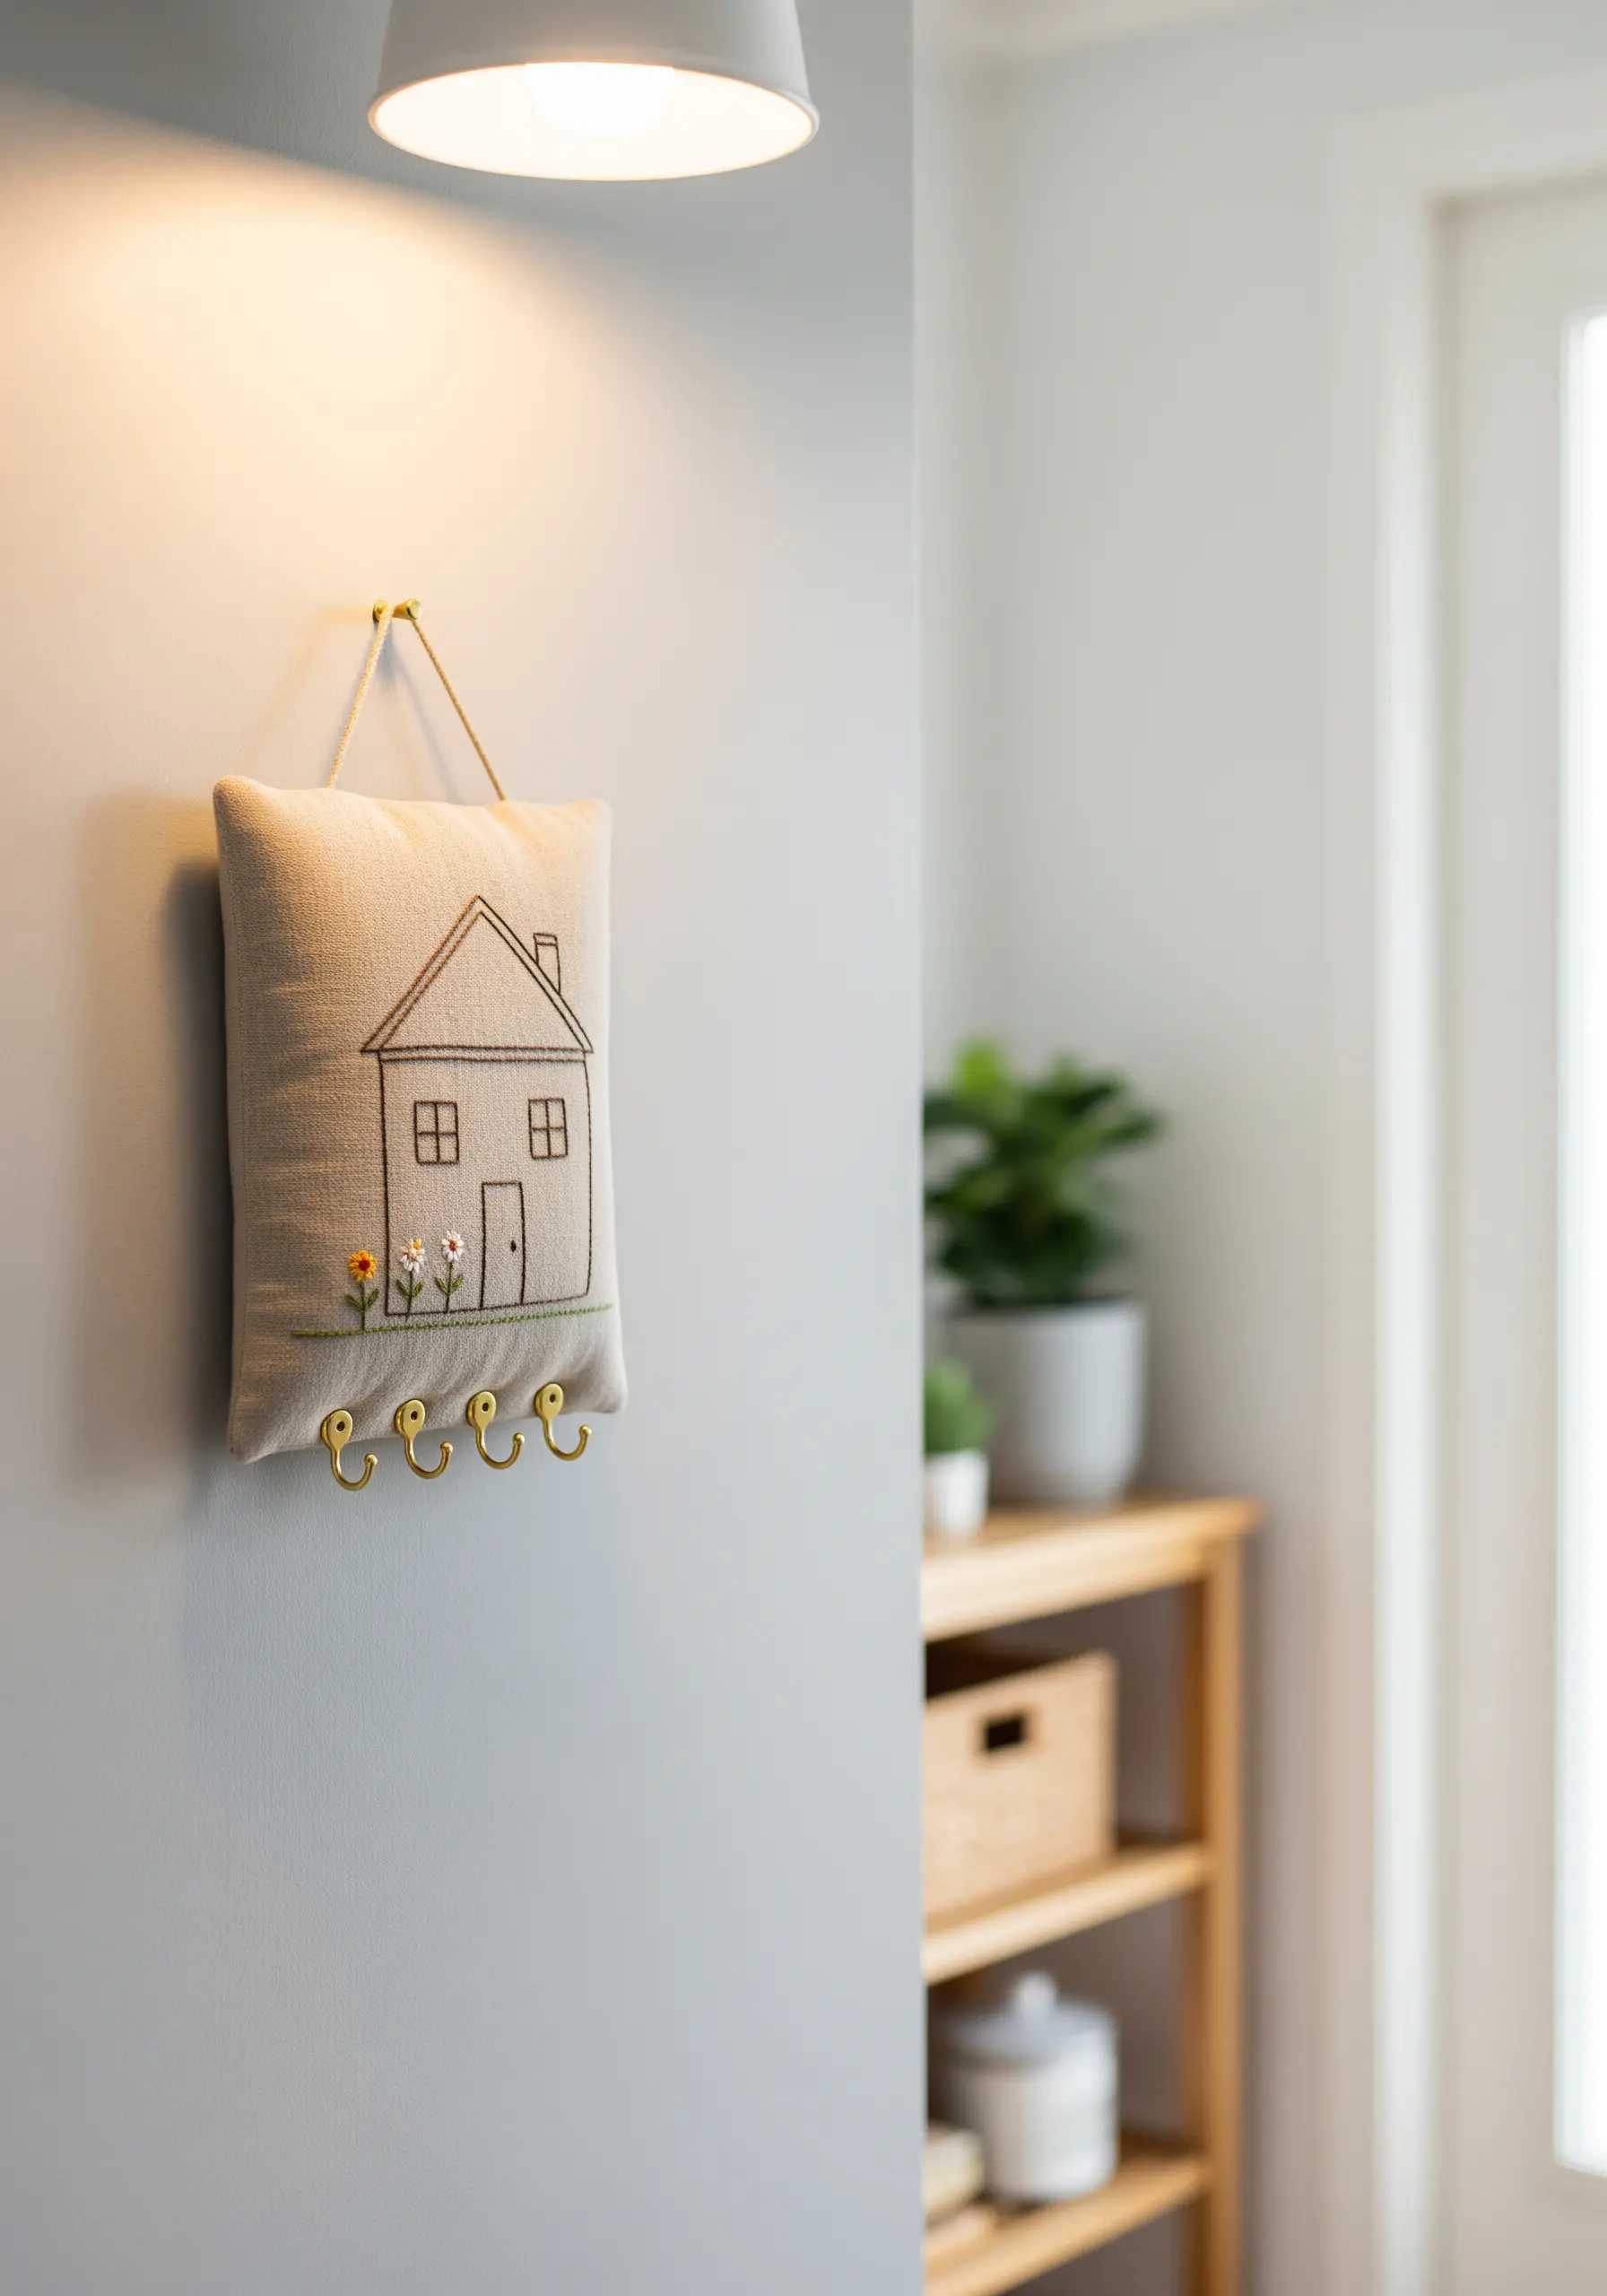
Turn a simple embroidered piece into a practical object for your entryway.
Stitch a simple line-art house design onto a sturdy fabric like linen or canvas. Use a basic backstitch with three strands of floss for a clean, graphic look.
Create a small, padded pillow and firmly attach a row of brass hooks to the bottom edge before sewing it closed.
Add a simple loop of twine or ribbon at the top for hanging. The combination of soft textile and hard metal adds a pleasing material contrast.
These are the kinds of minimal embroidery accents that bring both charm and organization to your home.
8. Embrace Mindful Repetition with Sashiko Patchwork
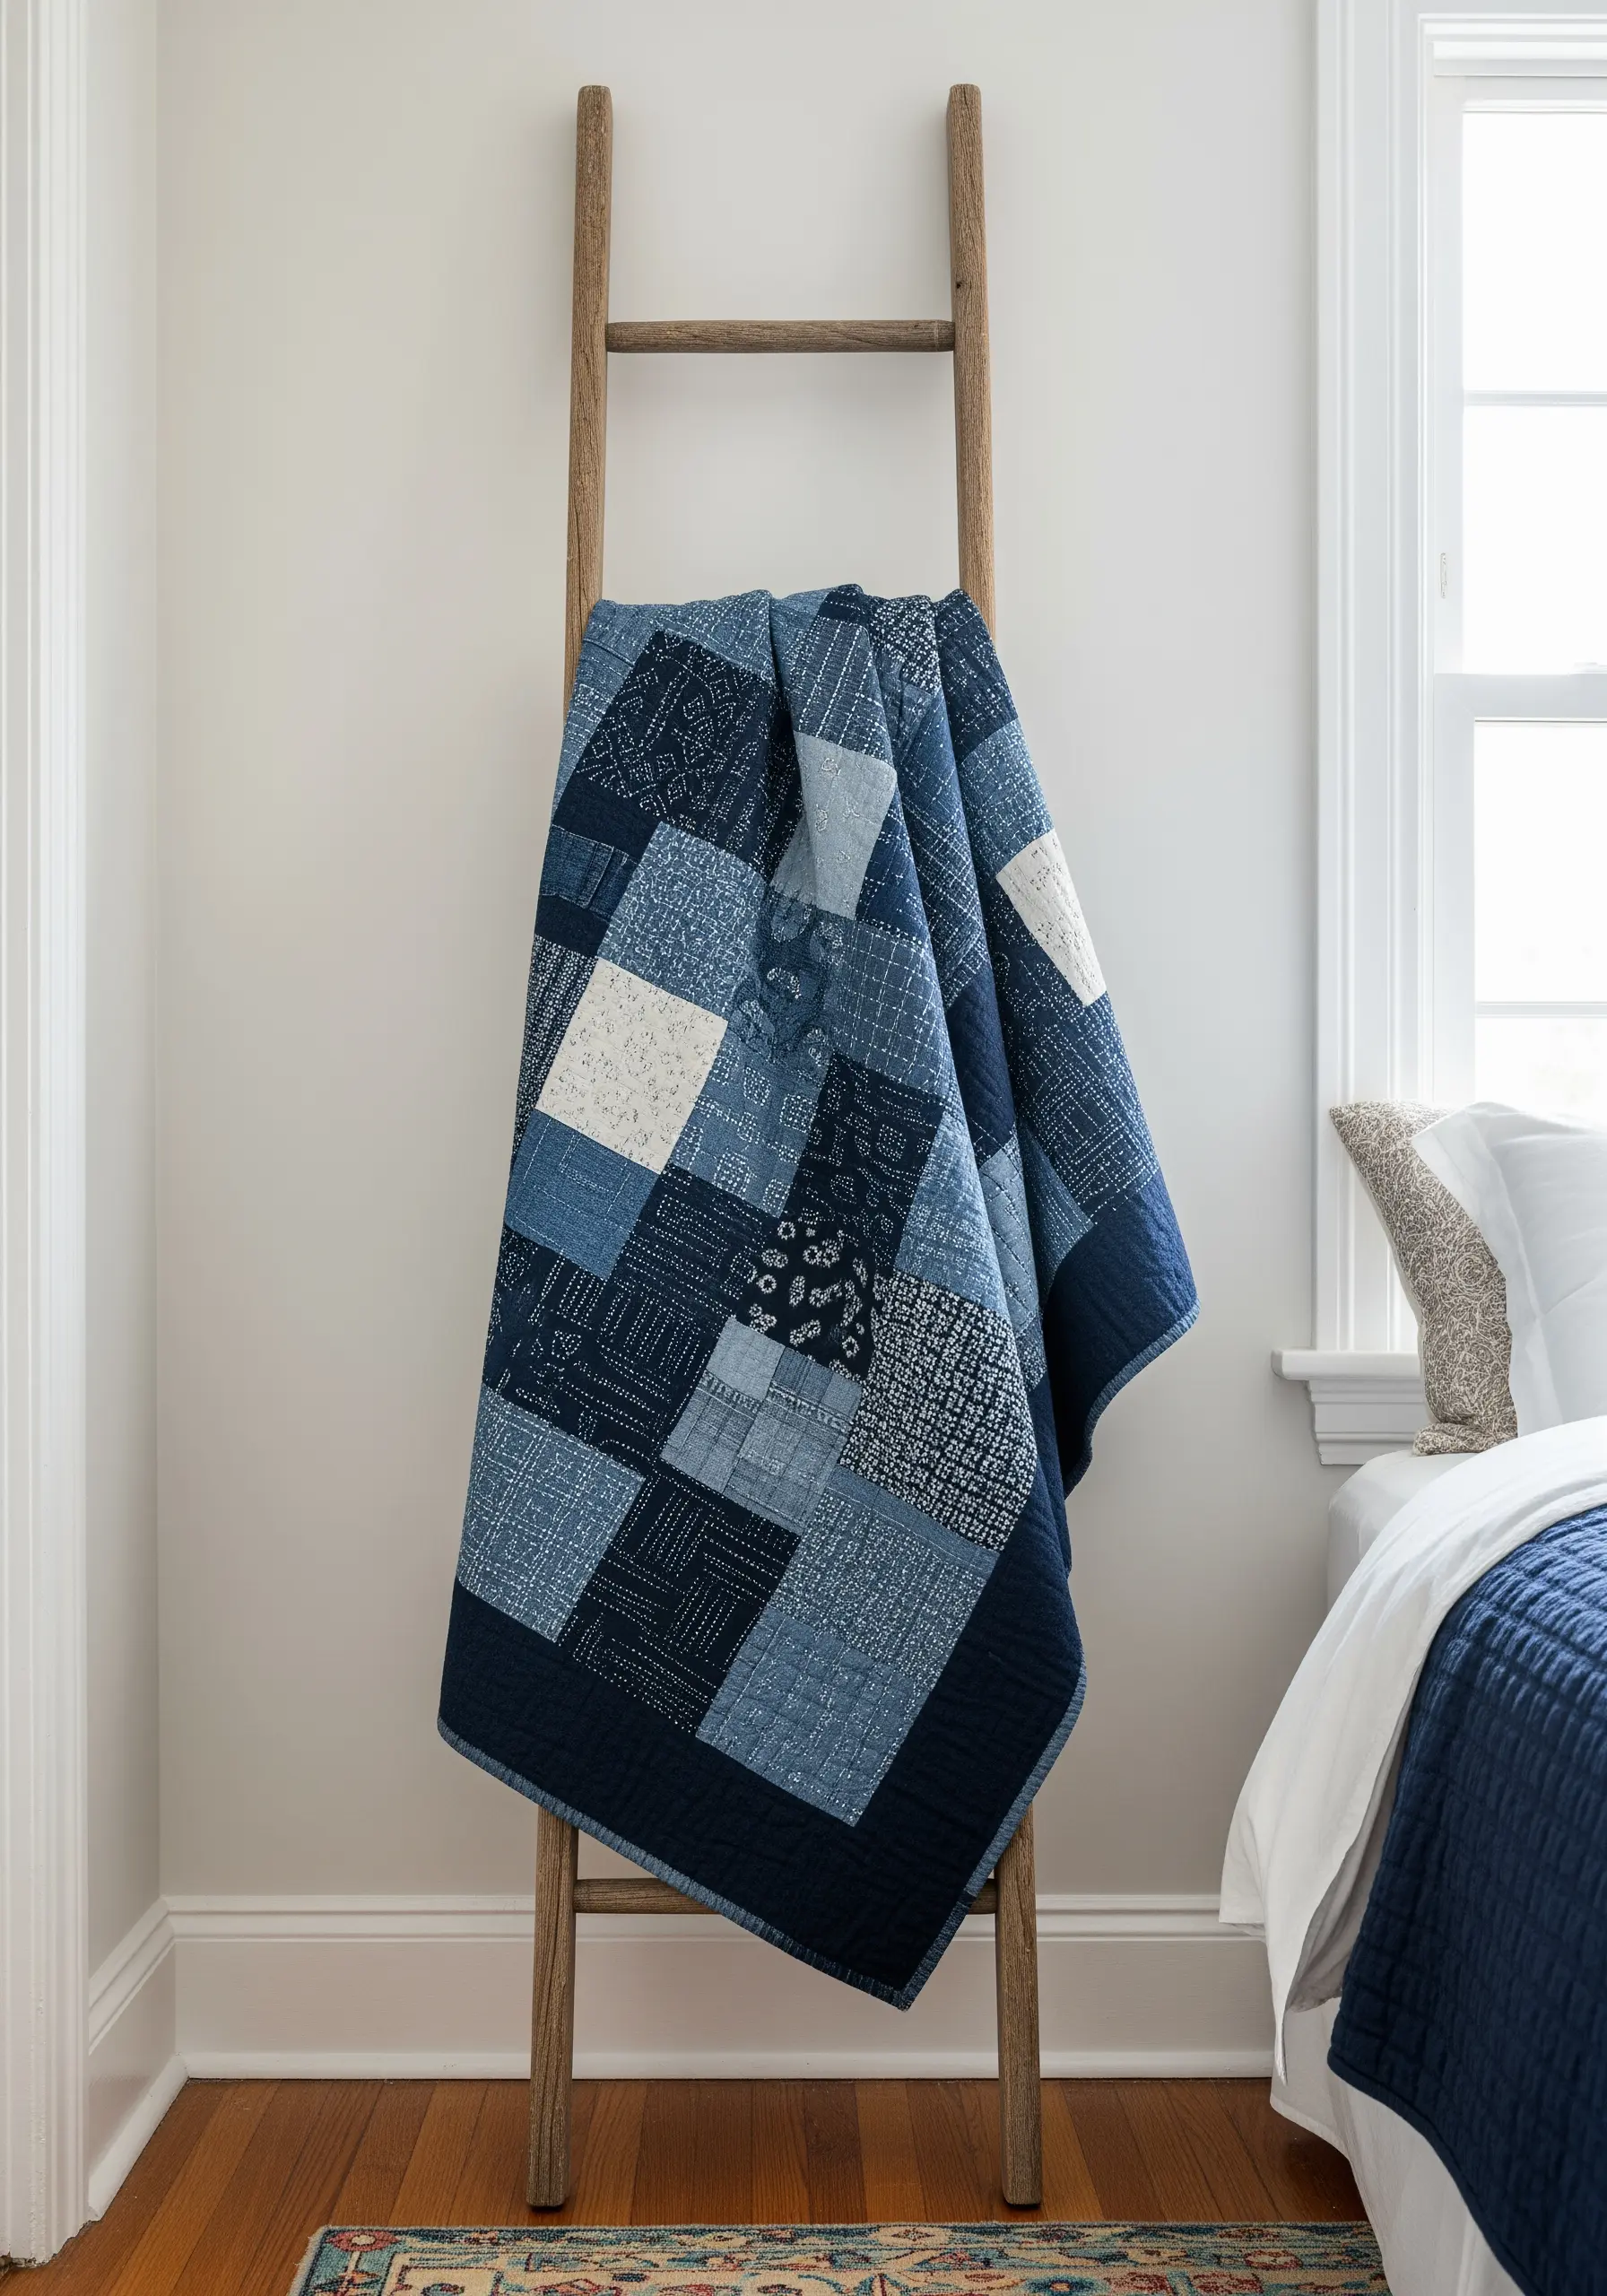
Explore the art of Sashiko, a traditional Japanese embroidery style that uses a simple running stitch to create stunning geometric patterns.
Combine different squares of indigo-dyed fabric, each featuring a unique Sashiko pattern, to create a visually rich patchwork quilt.
Use authentic Sashiko thread, which is tightly twisted and matte, and a long Sashiko needle to help you load multiple stitches at once for a rhythmic, meditative process.
The key to beautiful Sashiko is consistent stitch length and leaving a tiny bit of slack on the back of the fabric at the corners to prevent puckering.
The result is a piece of monochrome embroidery wall art or a functional quilt that embodies tranquility and craftsmanship.
9. Craft a Tactile Planter Cover with Punch Needle
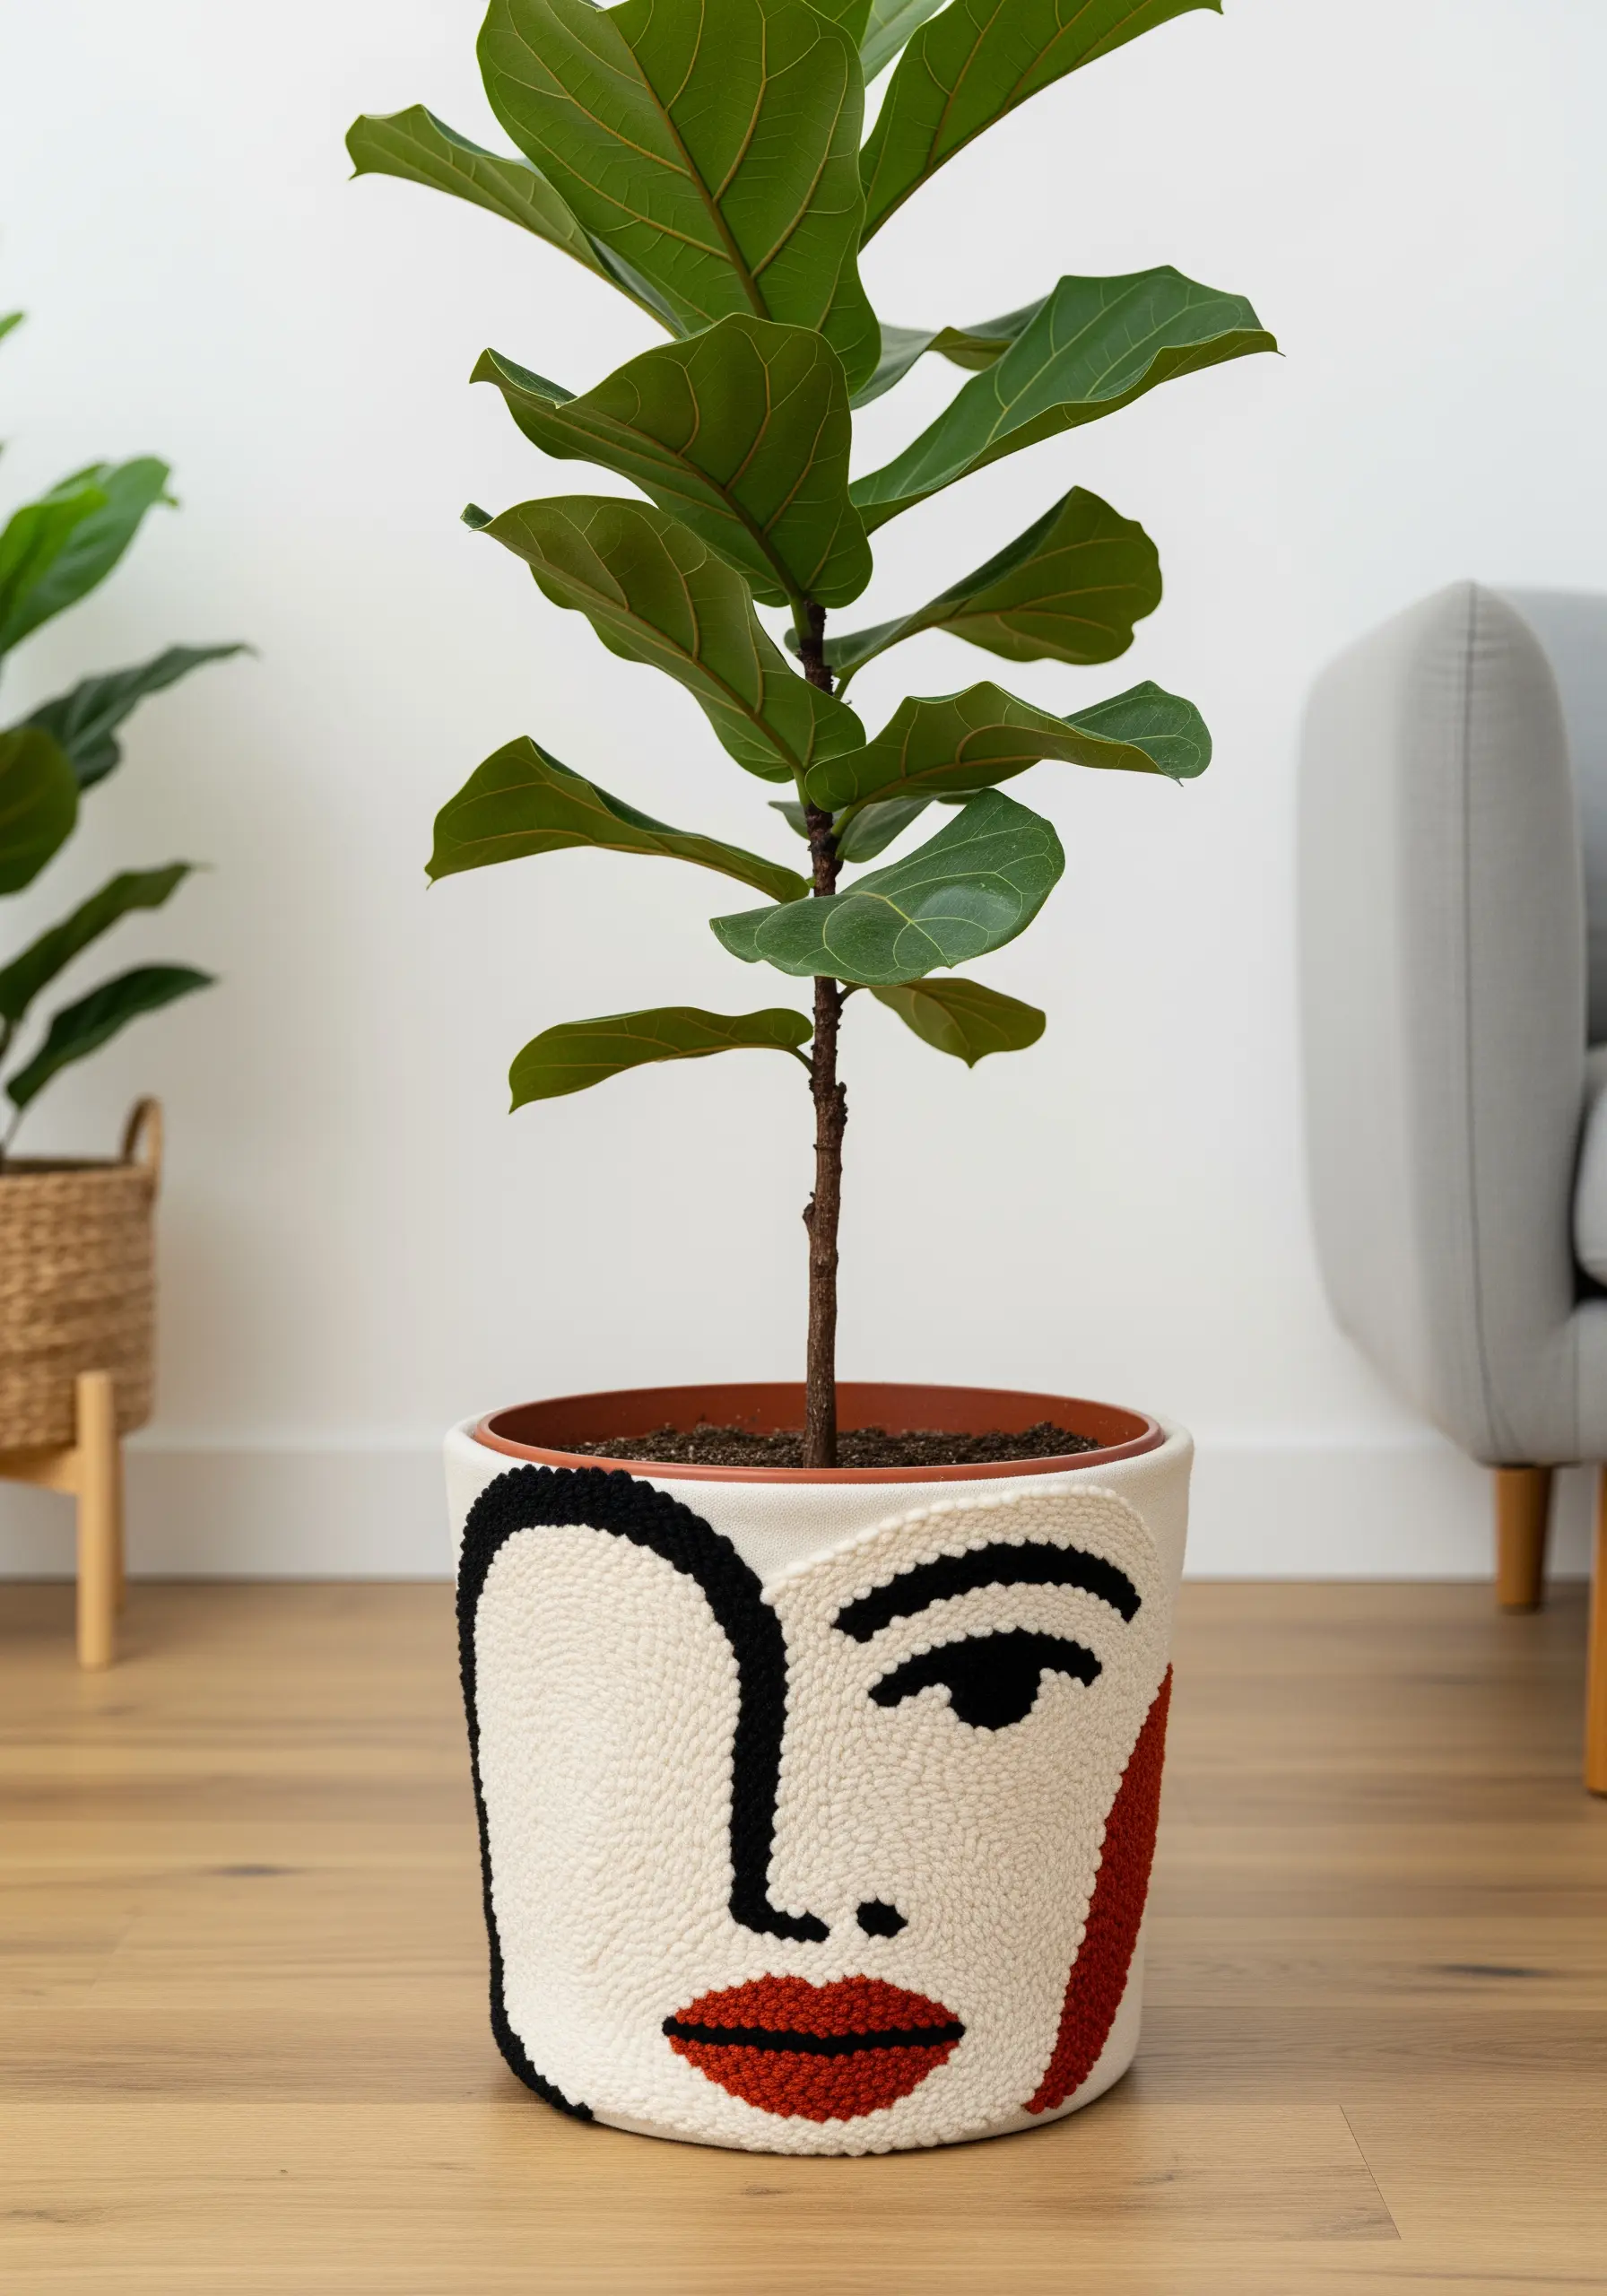
Use punch needle to create a cozy, textured sleeve for a standard planter pot, instantly elevating a simple houseplant.
Working with punch needle on monk’s cloth allows you to create dense, plush loops that give your design a soft, sculpted appearance.
Create a bold, abstract face or pattern, and use a strong outline in a contrasting color, like black, to define the shapes and make the design legible.
Once your piece is complete, seam the flat panel into a cylinder that can be slipped over a pot, adding an instant layer of artistry.
This is a perfect way to showcase your favorite houseplant embroidery motifs in a three-dimensional and highly tactile form.
10. Stitch Graphic Coasters with High-Contrast Thread
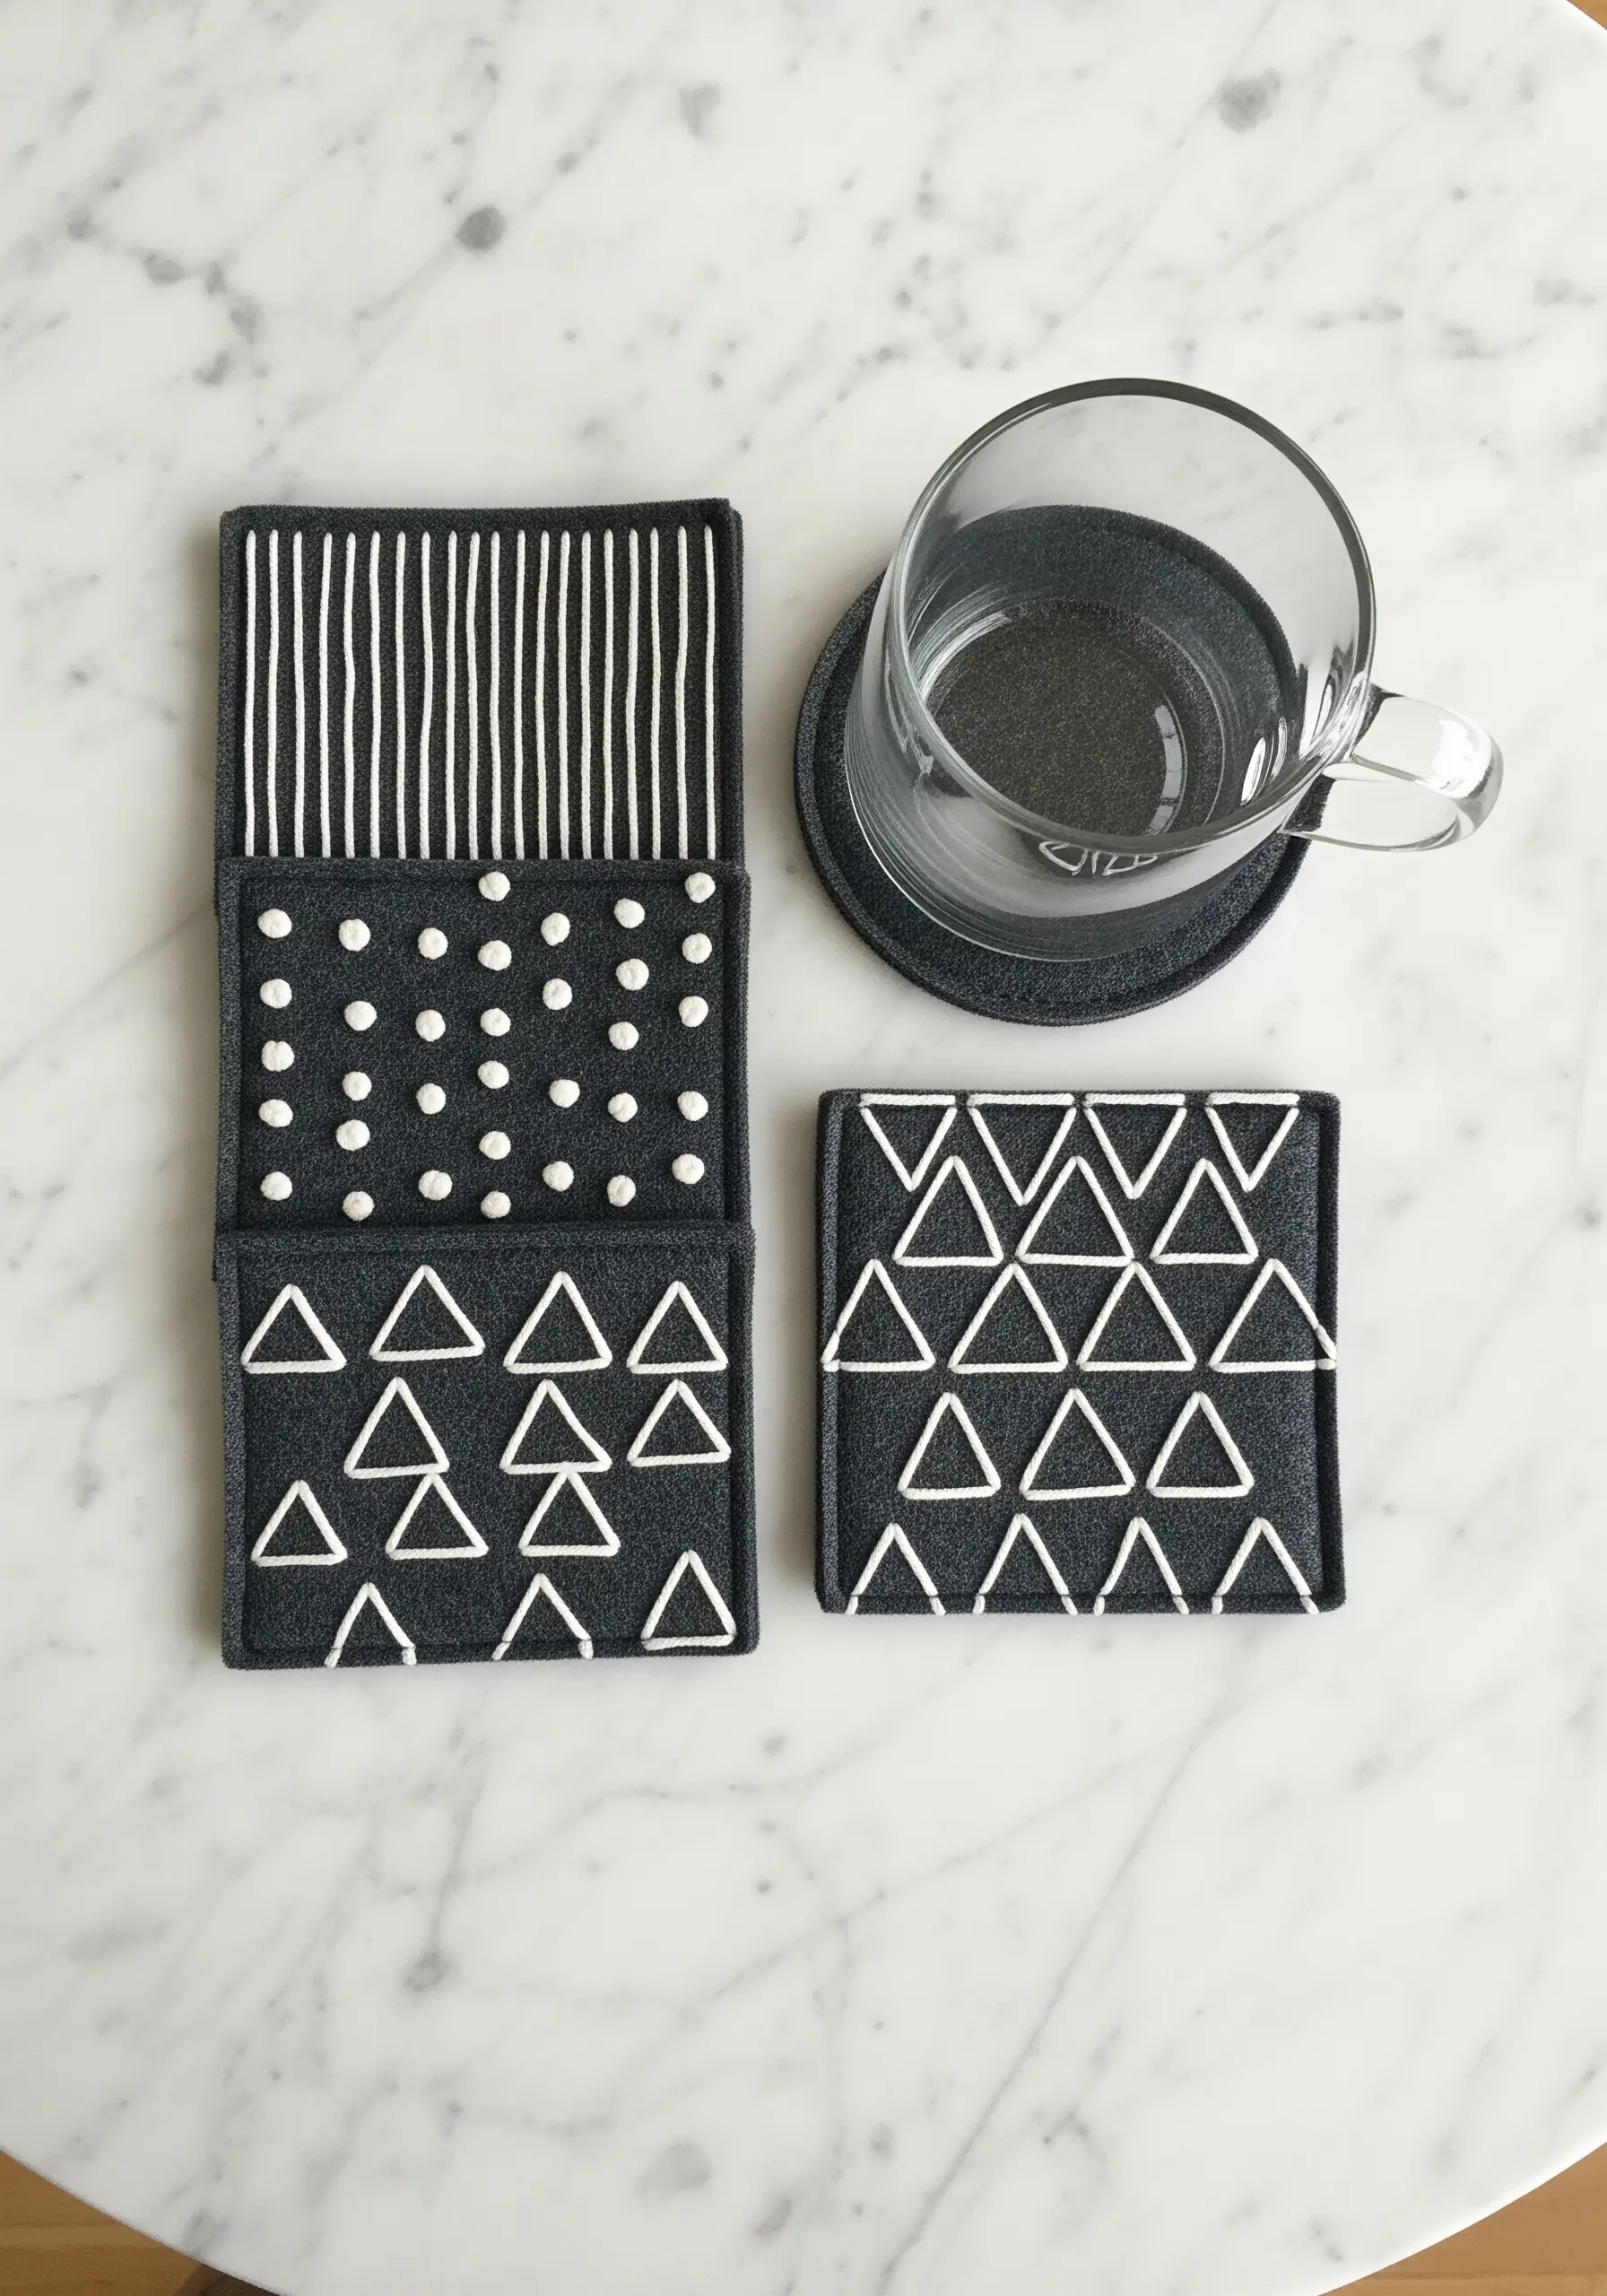
Turn simple felt squares into a set of modern, geometric coasters with just a needle and thread.
Choose a thick, high-contrast thread, like white pearl cotton on charcoal felt, to make your stitched lines bold and intentional.
Use a simple backstitch or running stitch to create clean lines, dots, and triangles. The beauty of this project lies in its simplicity and precision.
Mark your pattern lightly with a chalk pencil before you begin to ensure your geometric shapes are uniform and evenly spaced.
These coasters are a great example of modern geometric thread art that is both functional and stylishly minimalist.
11. Organize Your Life with Elegant Embroidered Labels
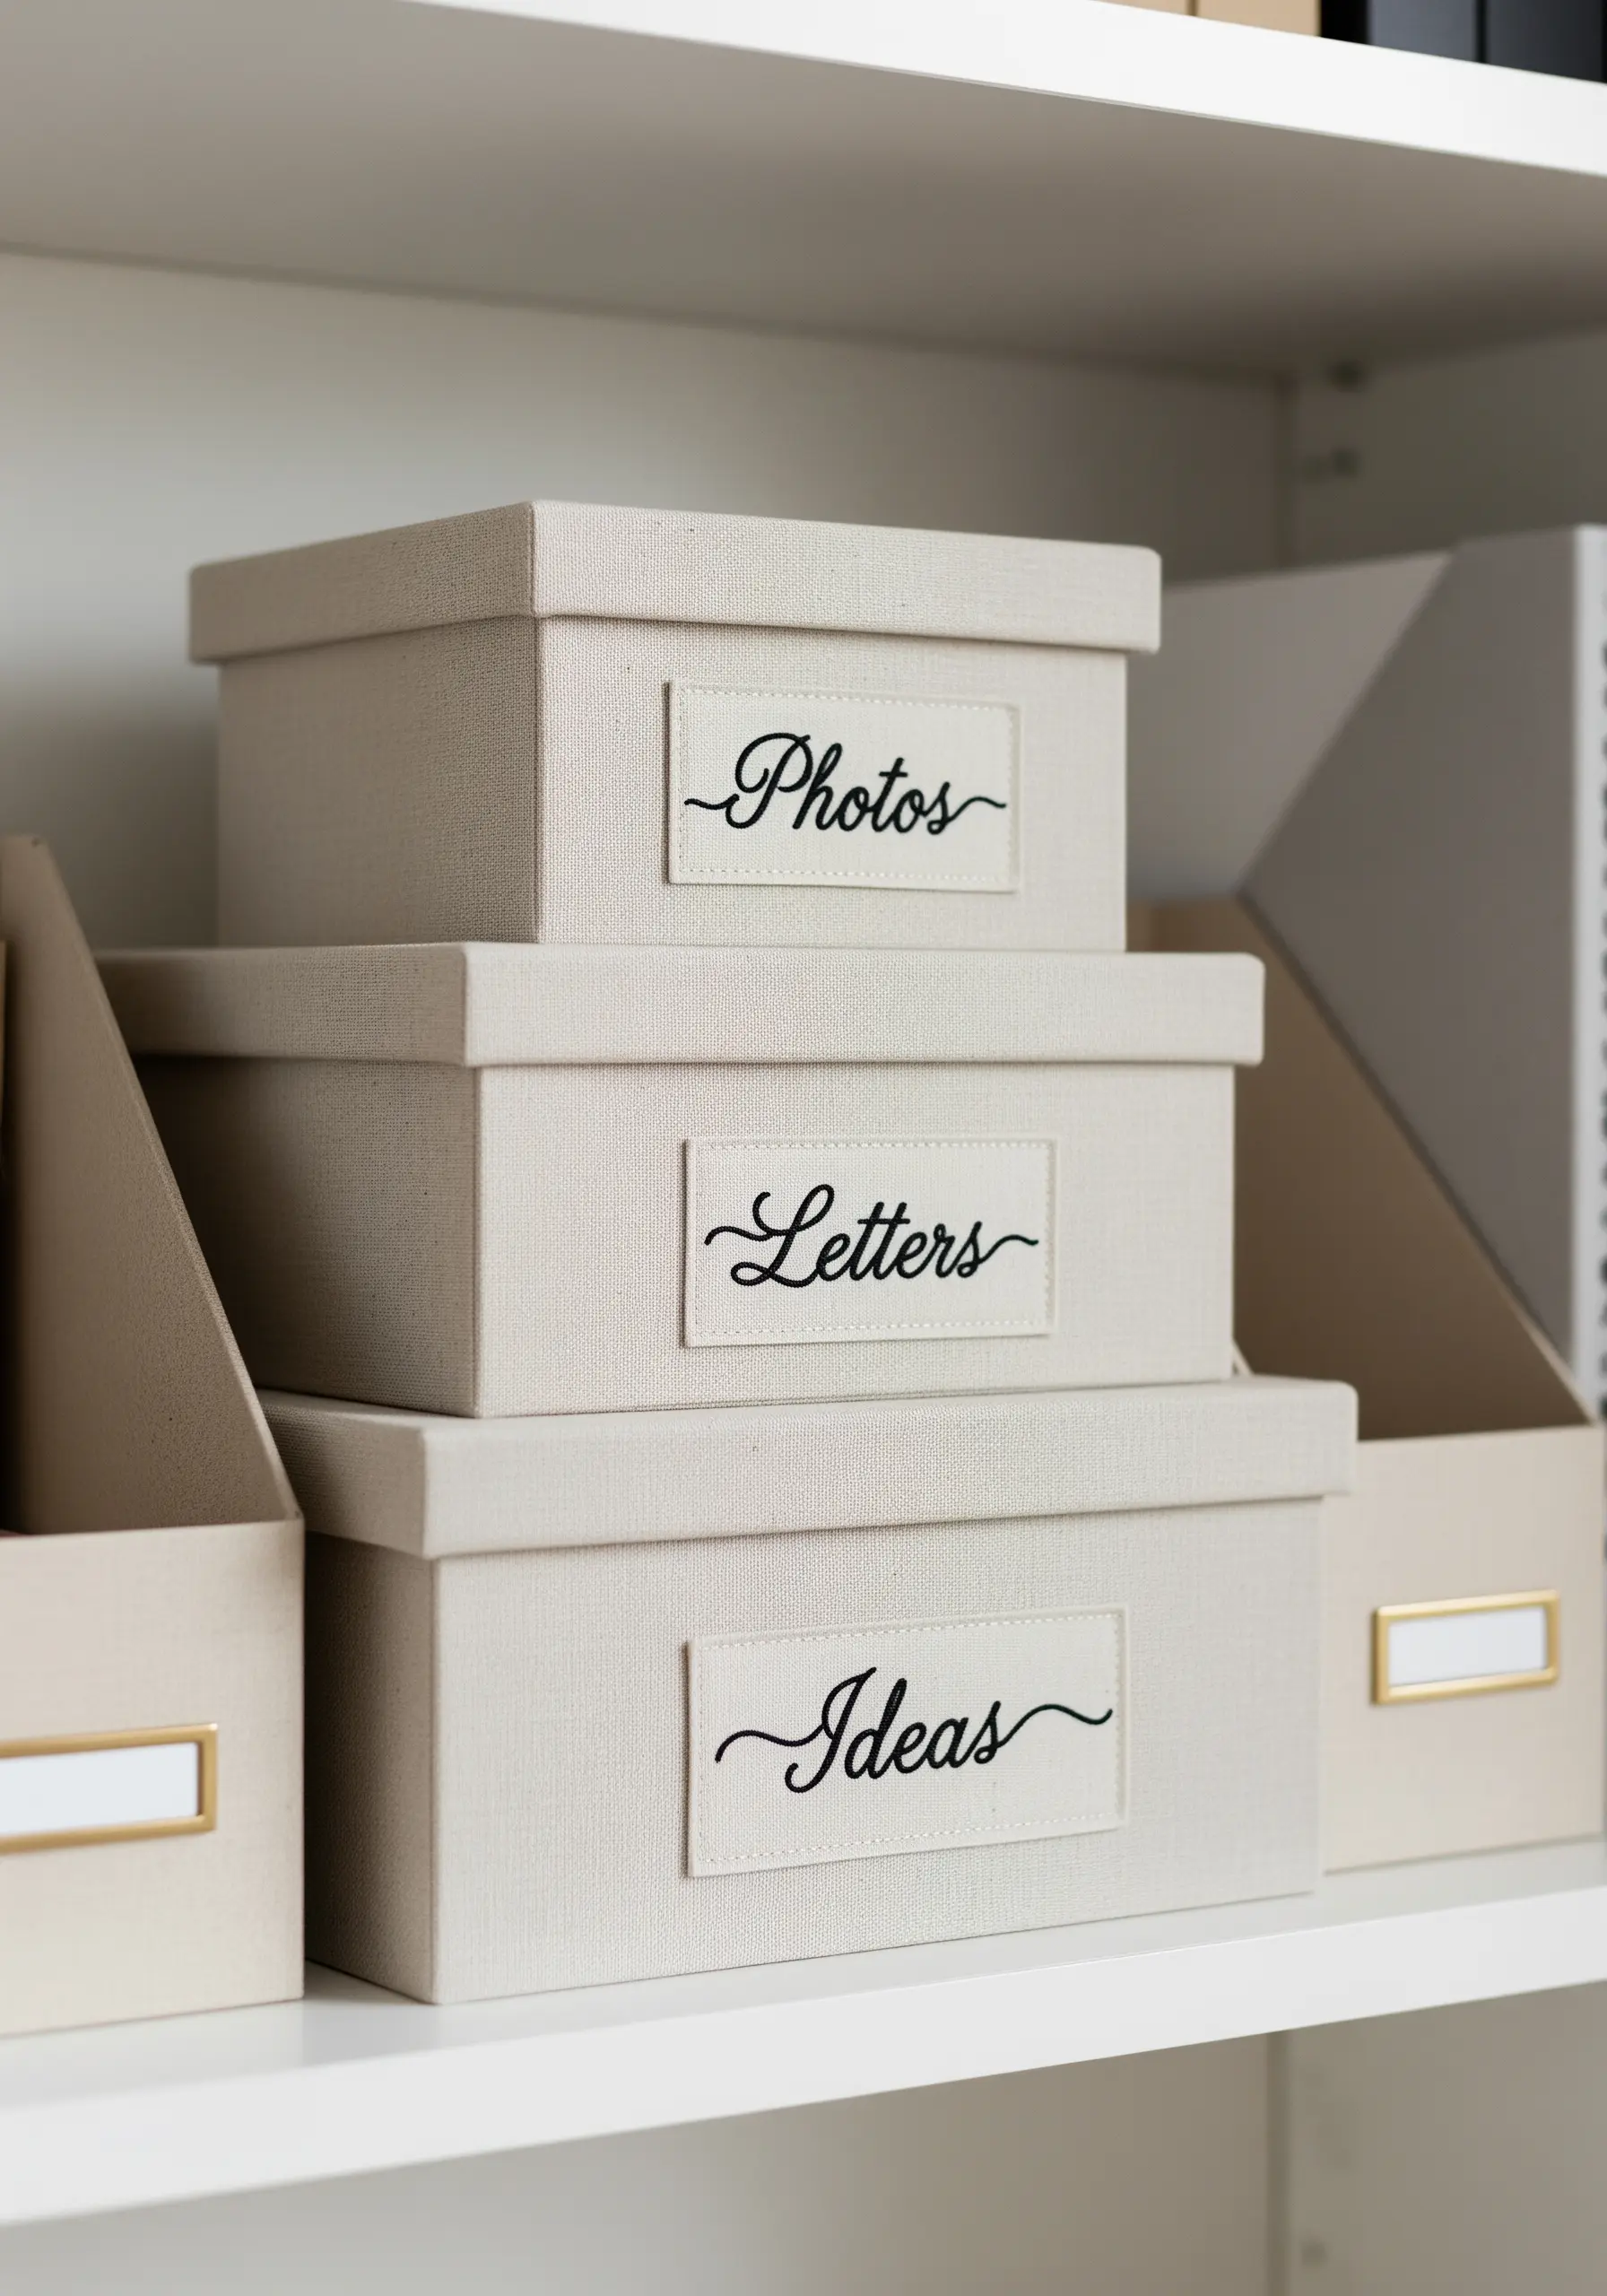
Add a sophisticated, handmade touch to your storage solutions with custom embroidered labels.
Stitch your words onto small rectangles of linen or canvas using a contrasting thread color for maximum readability.
A whipped backstitch is an excellent choice for script, as it creates a smooth, raised line that mimics elegant calligraphy.
Fray the edges of the fabric rectangle slightly before attaching it to your boxes with fabric glue for a soft, rustic finish.
This is a beautiful way to practice tiny lettering embroidery ideas and bring a sense of bespoke order to your shelves.
12. Create Depth and Realism with Padded Satin Stitch
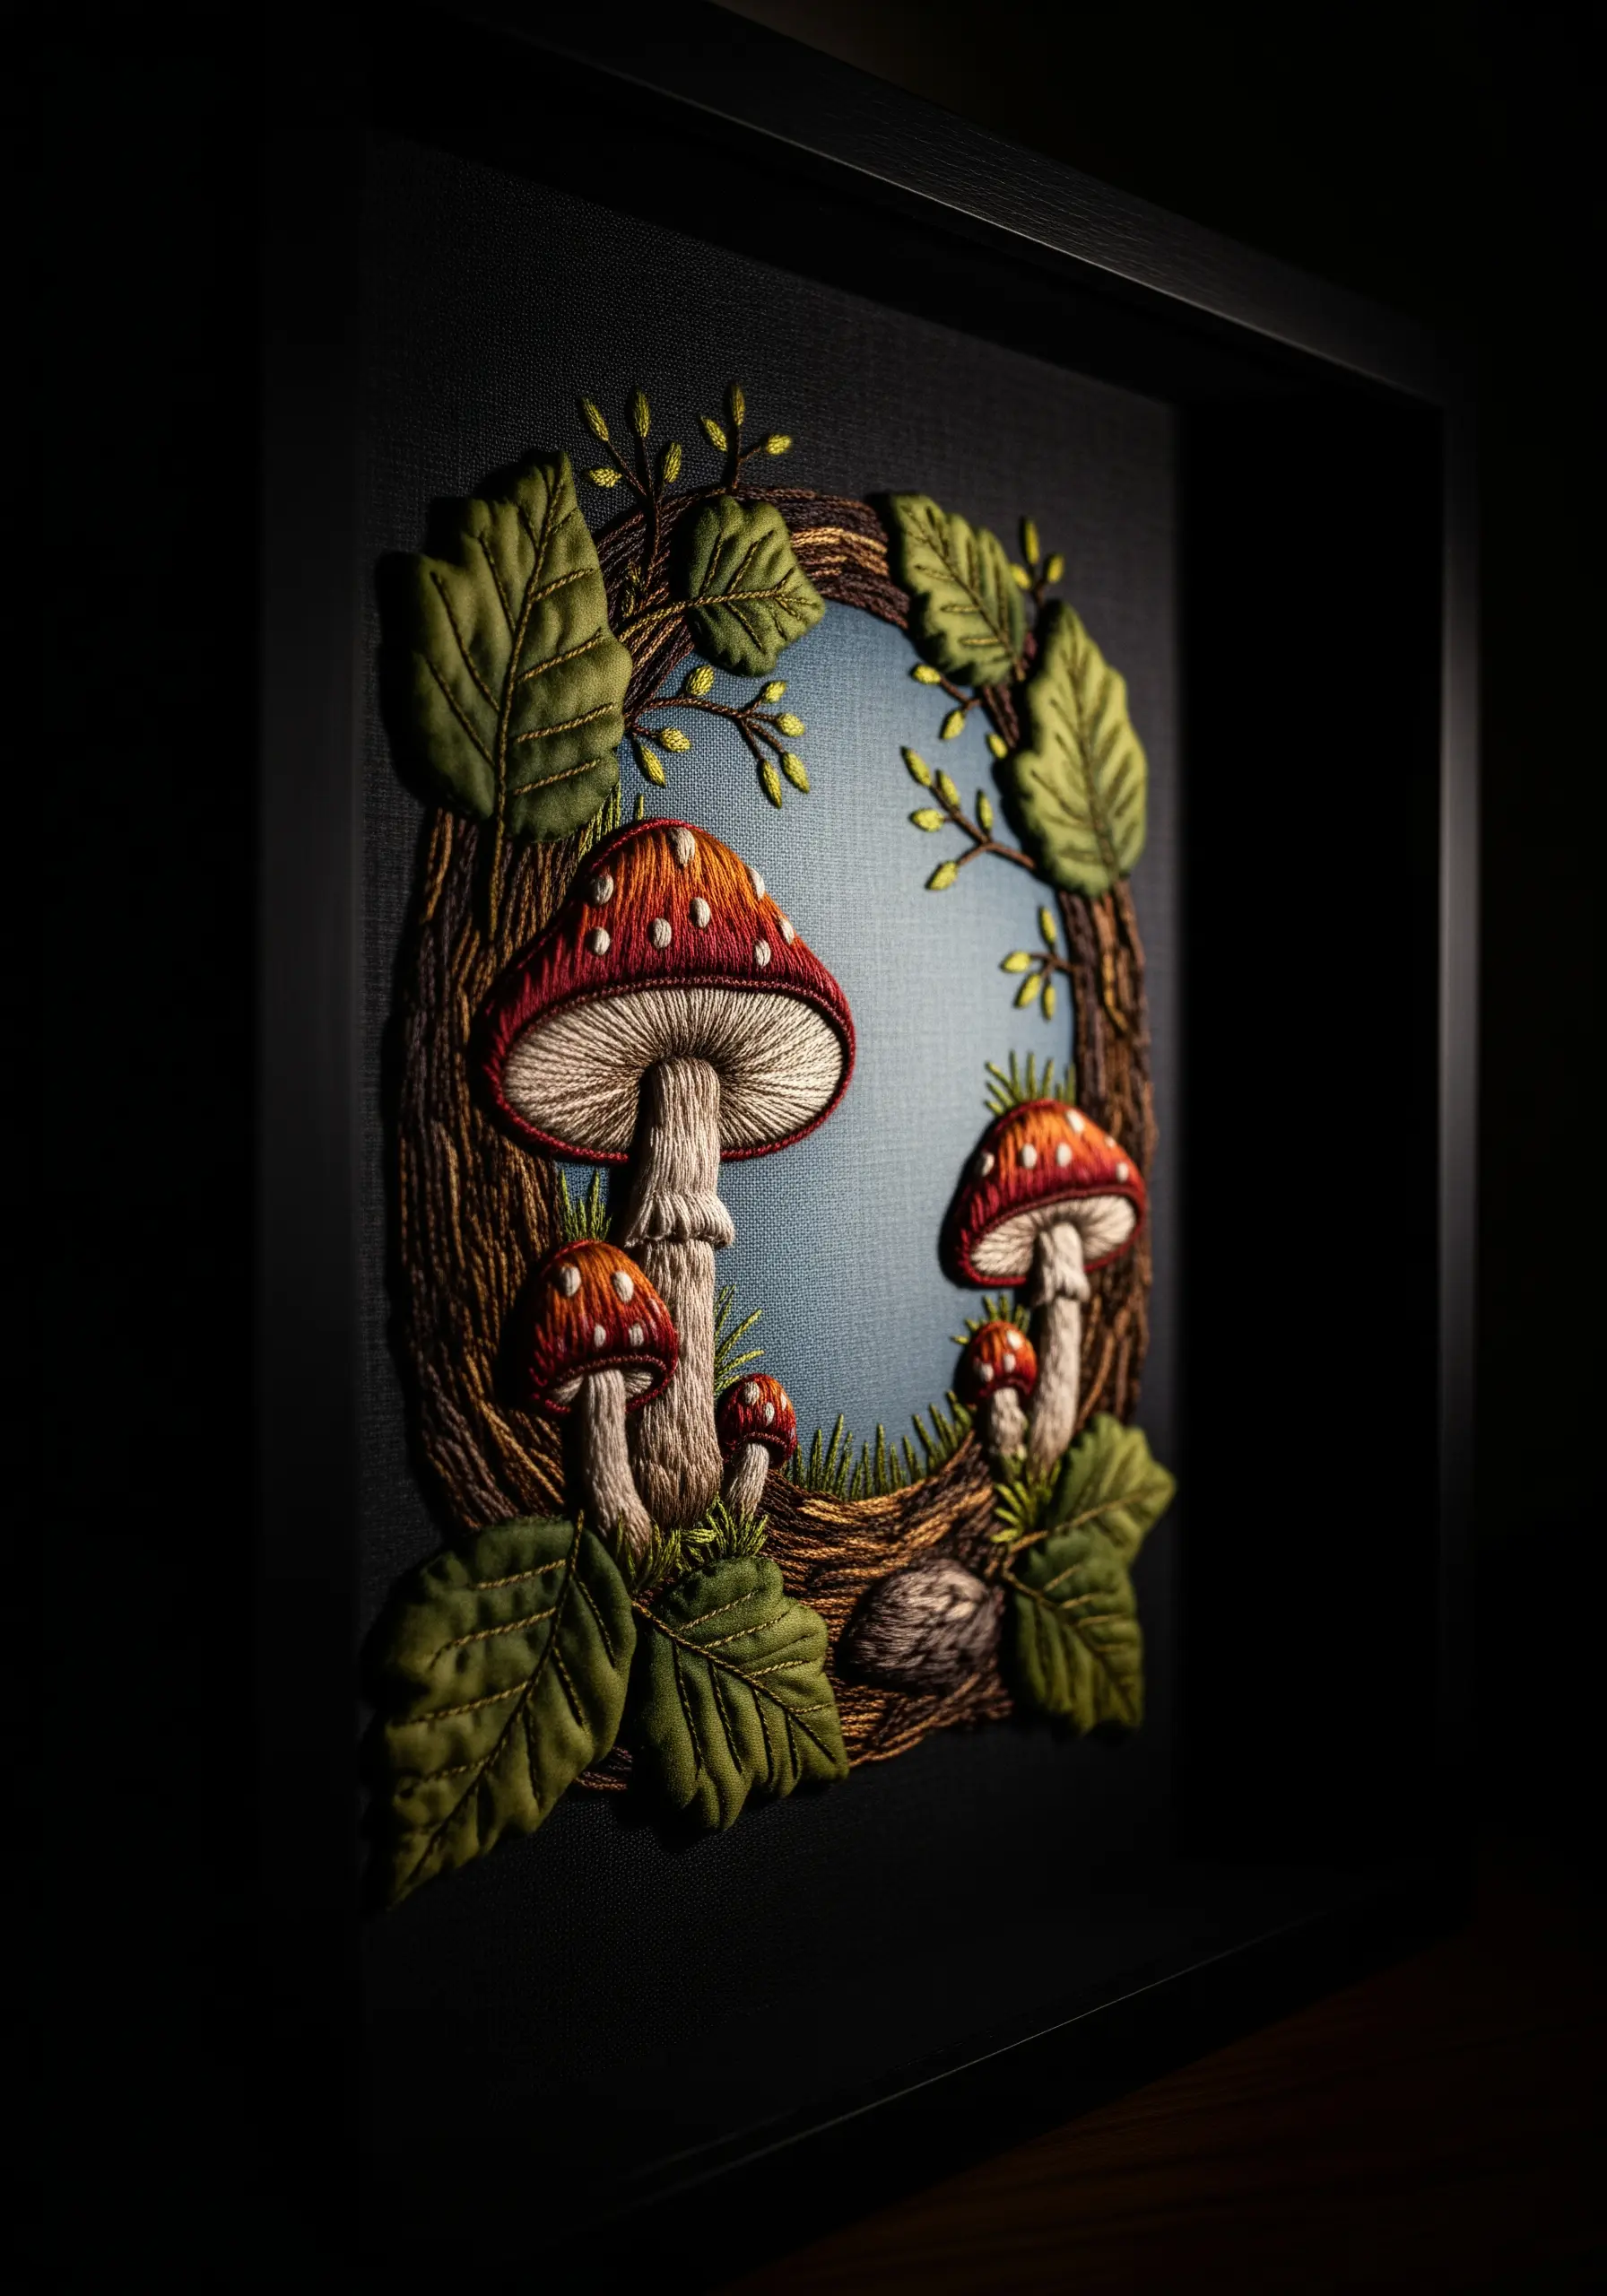
To make elements of your embroidery literally stand off the fabric, use a technique called padded satin stitch.
First, create a foundation of small, underlying stitches (called underlay) within the shape you want to raise, like the cap of a mushroom.
Then, work your final satin stitches over this padding, perpendicular to the underlay stitches. This creates a smooth, raised, and three-dimensional effect.
Combine this with thread painting techniques—using different shades of thread to blend colors—to achieve a stunningly realistic result.
This method is similar to the principles behind realistic feather embroidery techniques, where dimension is key to lifelike results.
13. Curate a Cohesive Botanical Gallery Wall
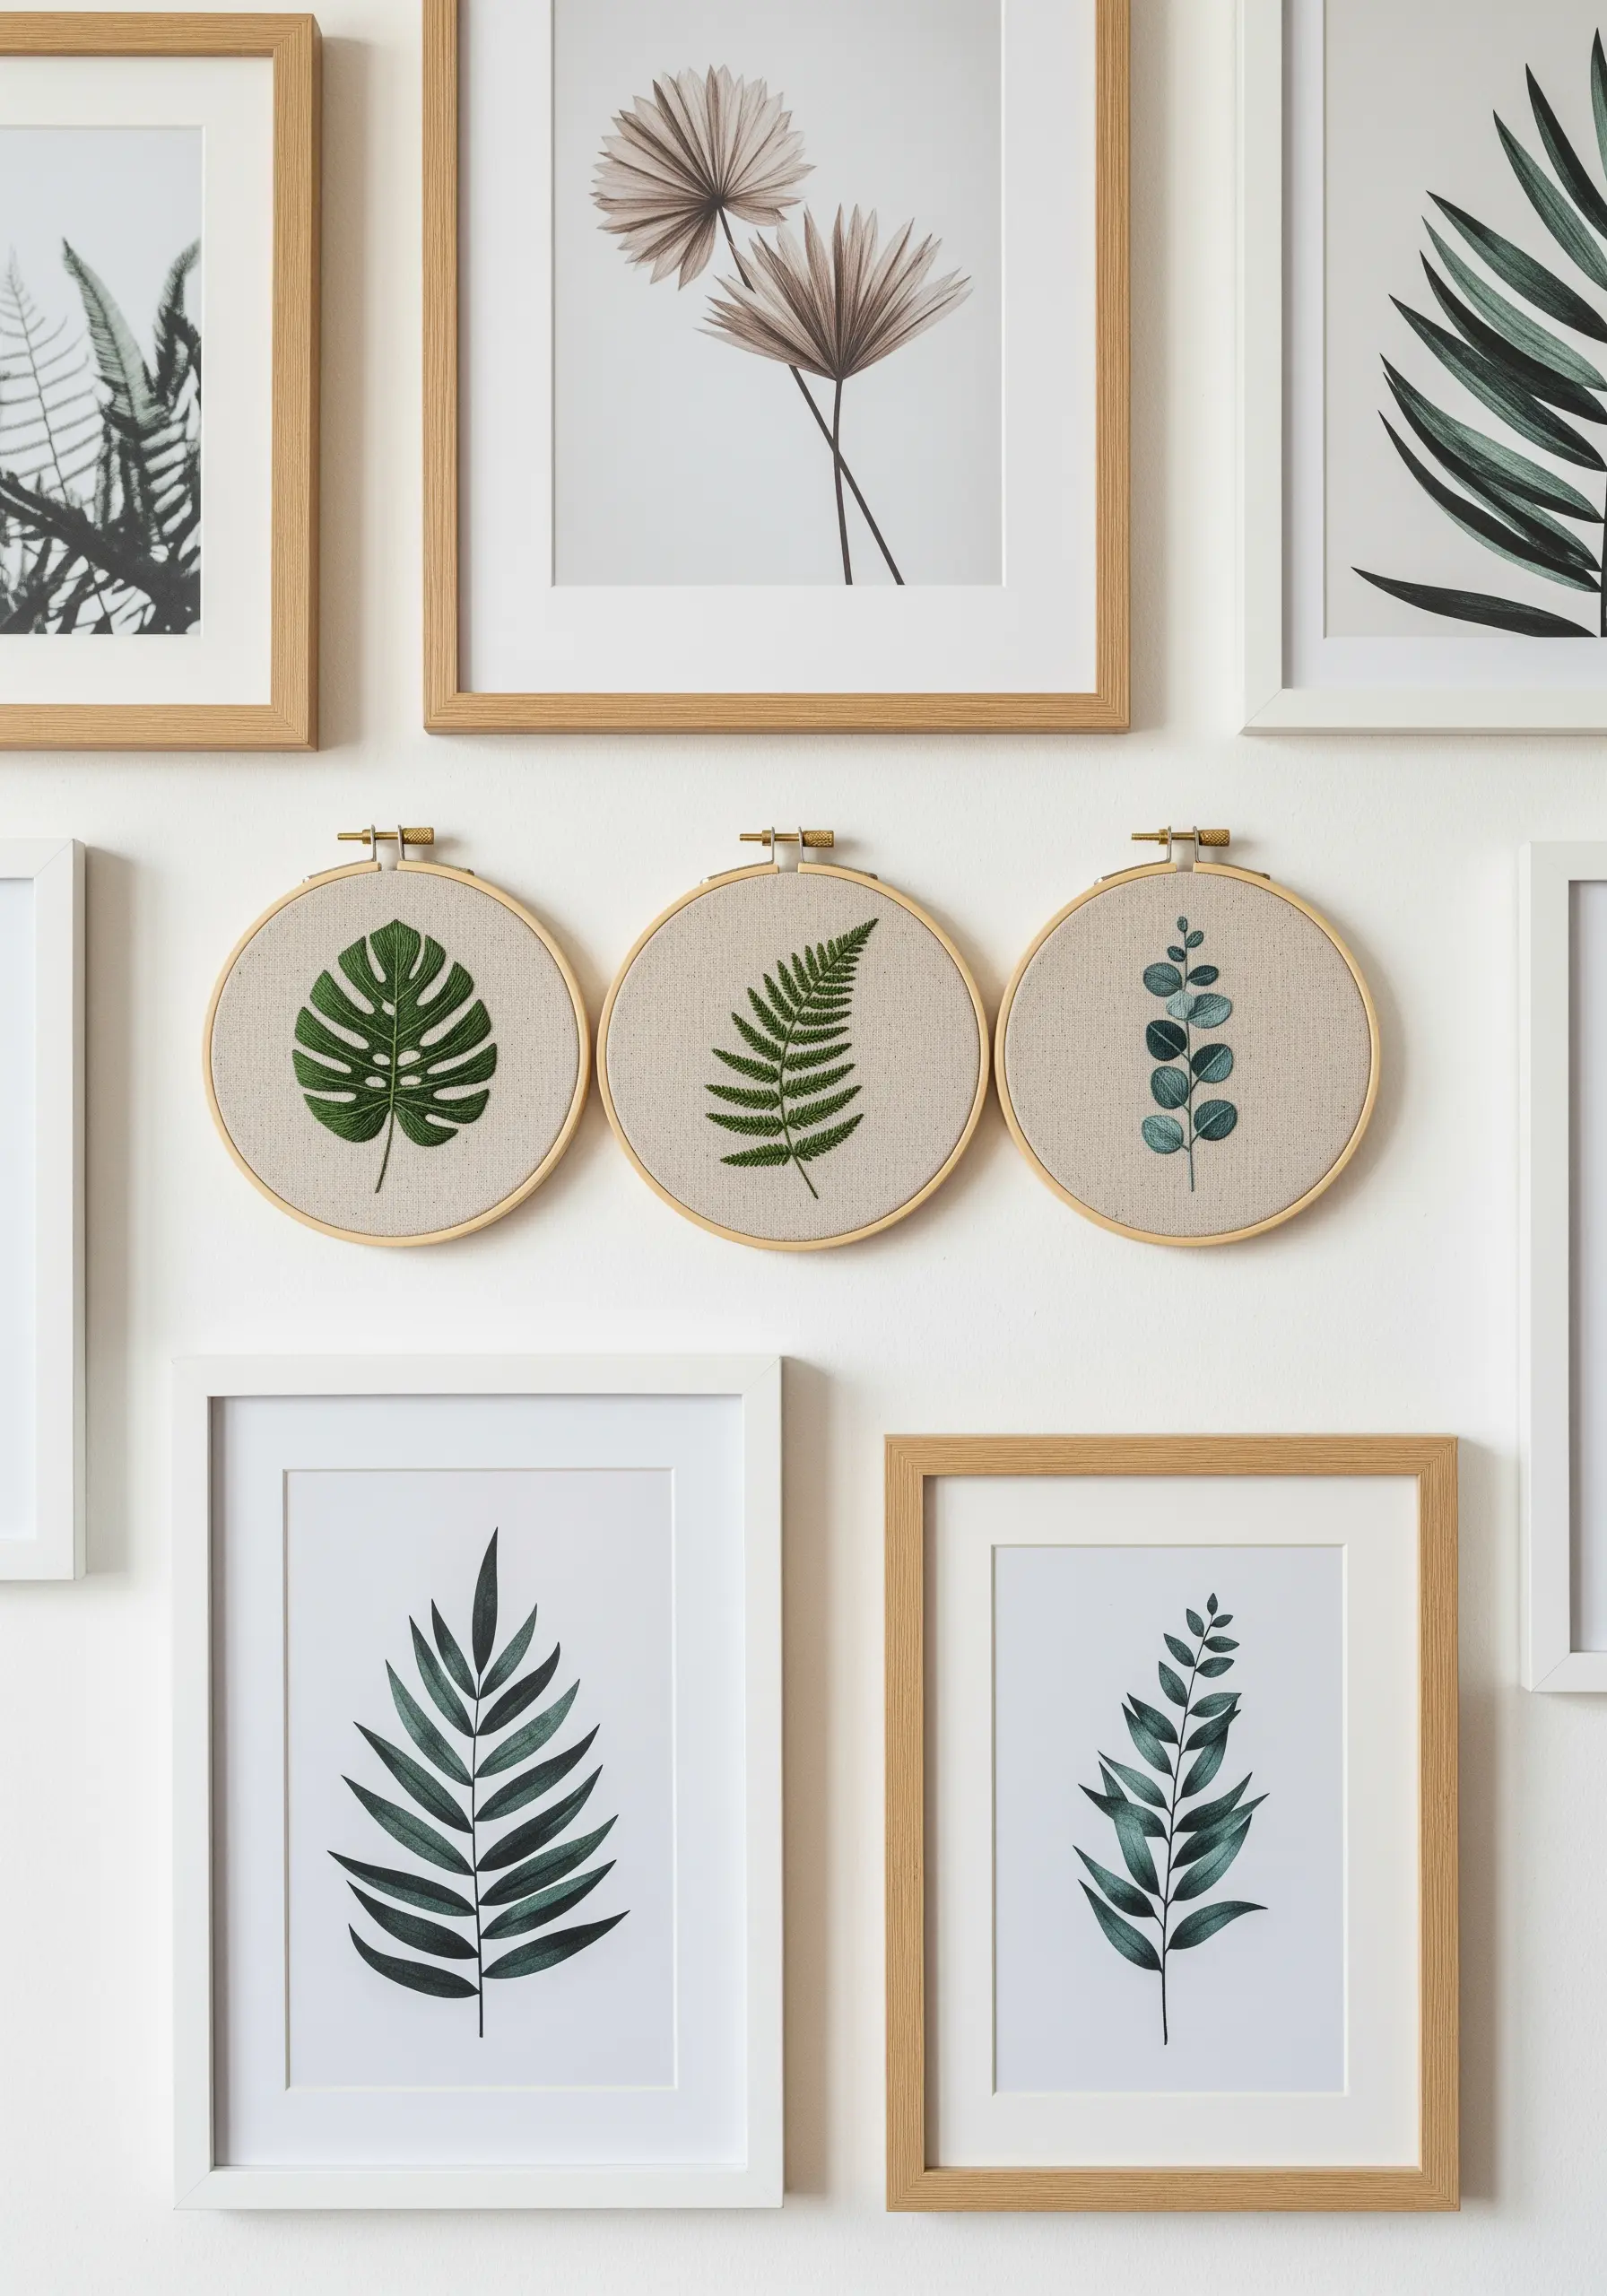
Create a sophisticated display by grouping several embroidery hoops together as a single art piece.
To ensure the collection feels intentional, use the same background fabric—a neutral linen or cotton works beautifully—for every hoop.
Choose a single theme, like different types of foliage, and stitch one specimen per hoop. This creates both variety and unity.
By limiting your color palette to shades of green and maintaining a similar level of detail across each piece, you design a collection, not just a set of individual embroideries.
This approach is central to creating inspiring hoop art projects that integrate seamlessly with other framed art.
14. Embroider on a Lampshade for a Luminous Effect
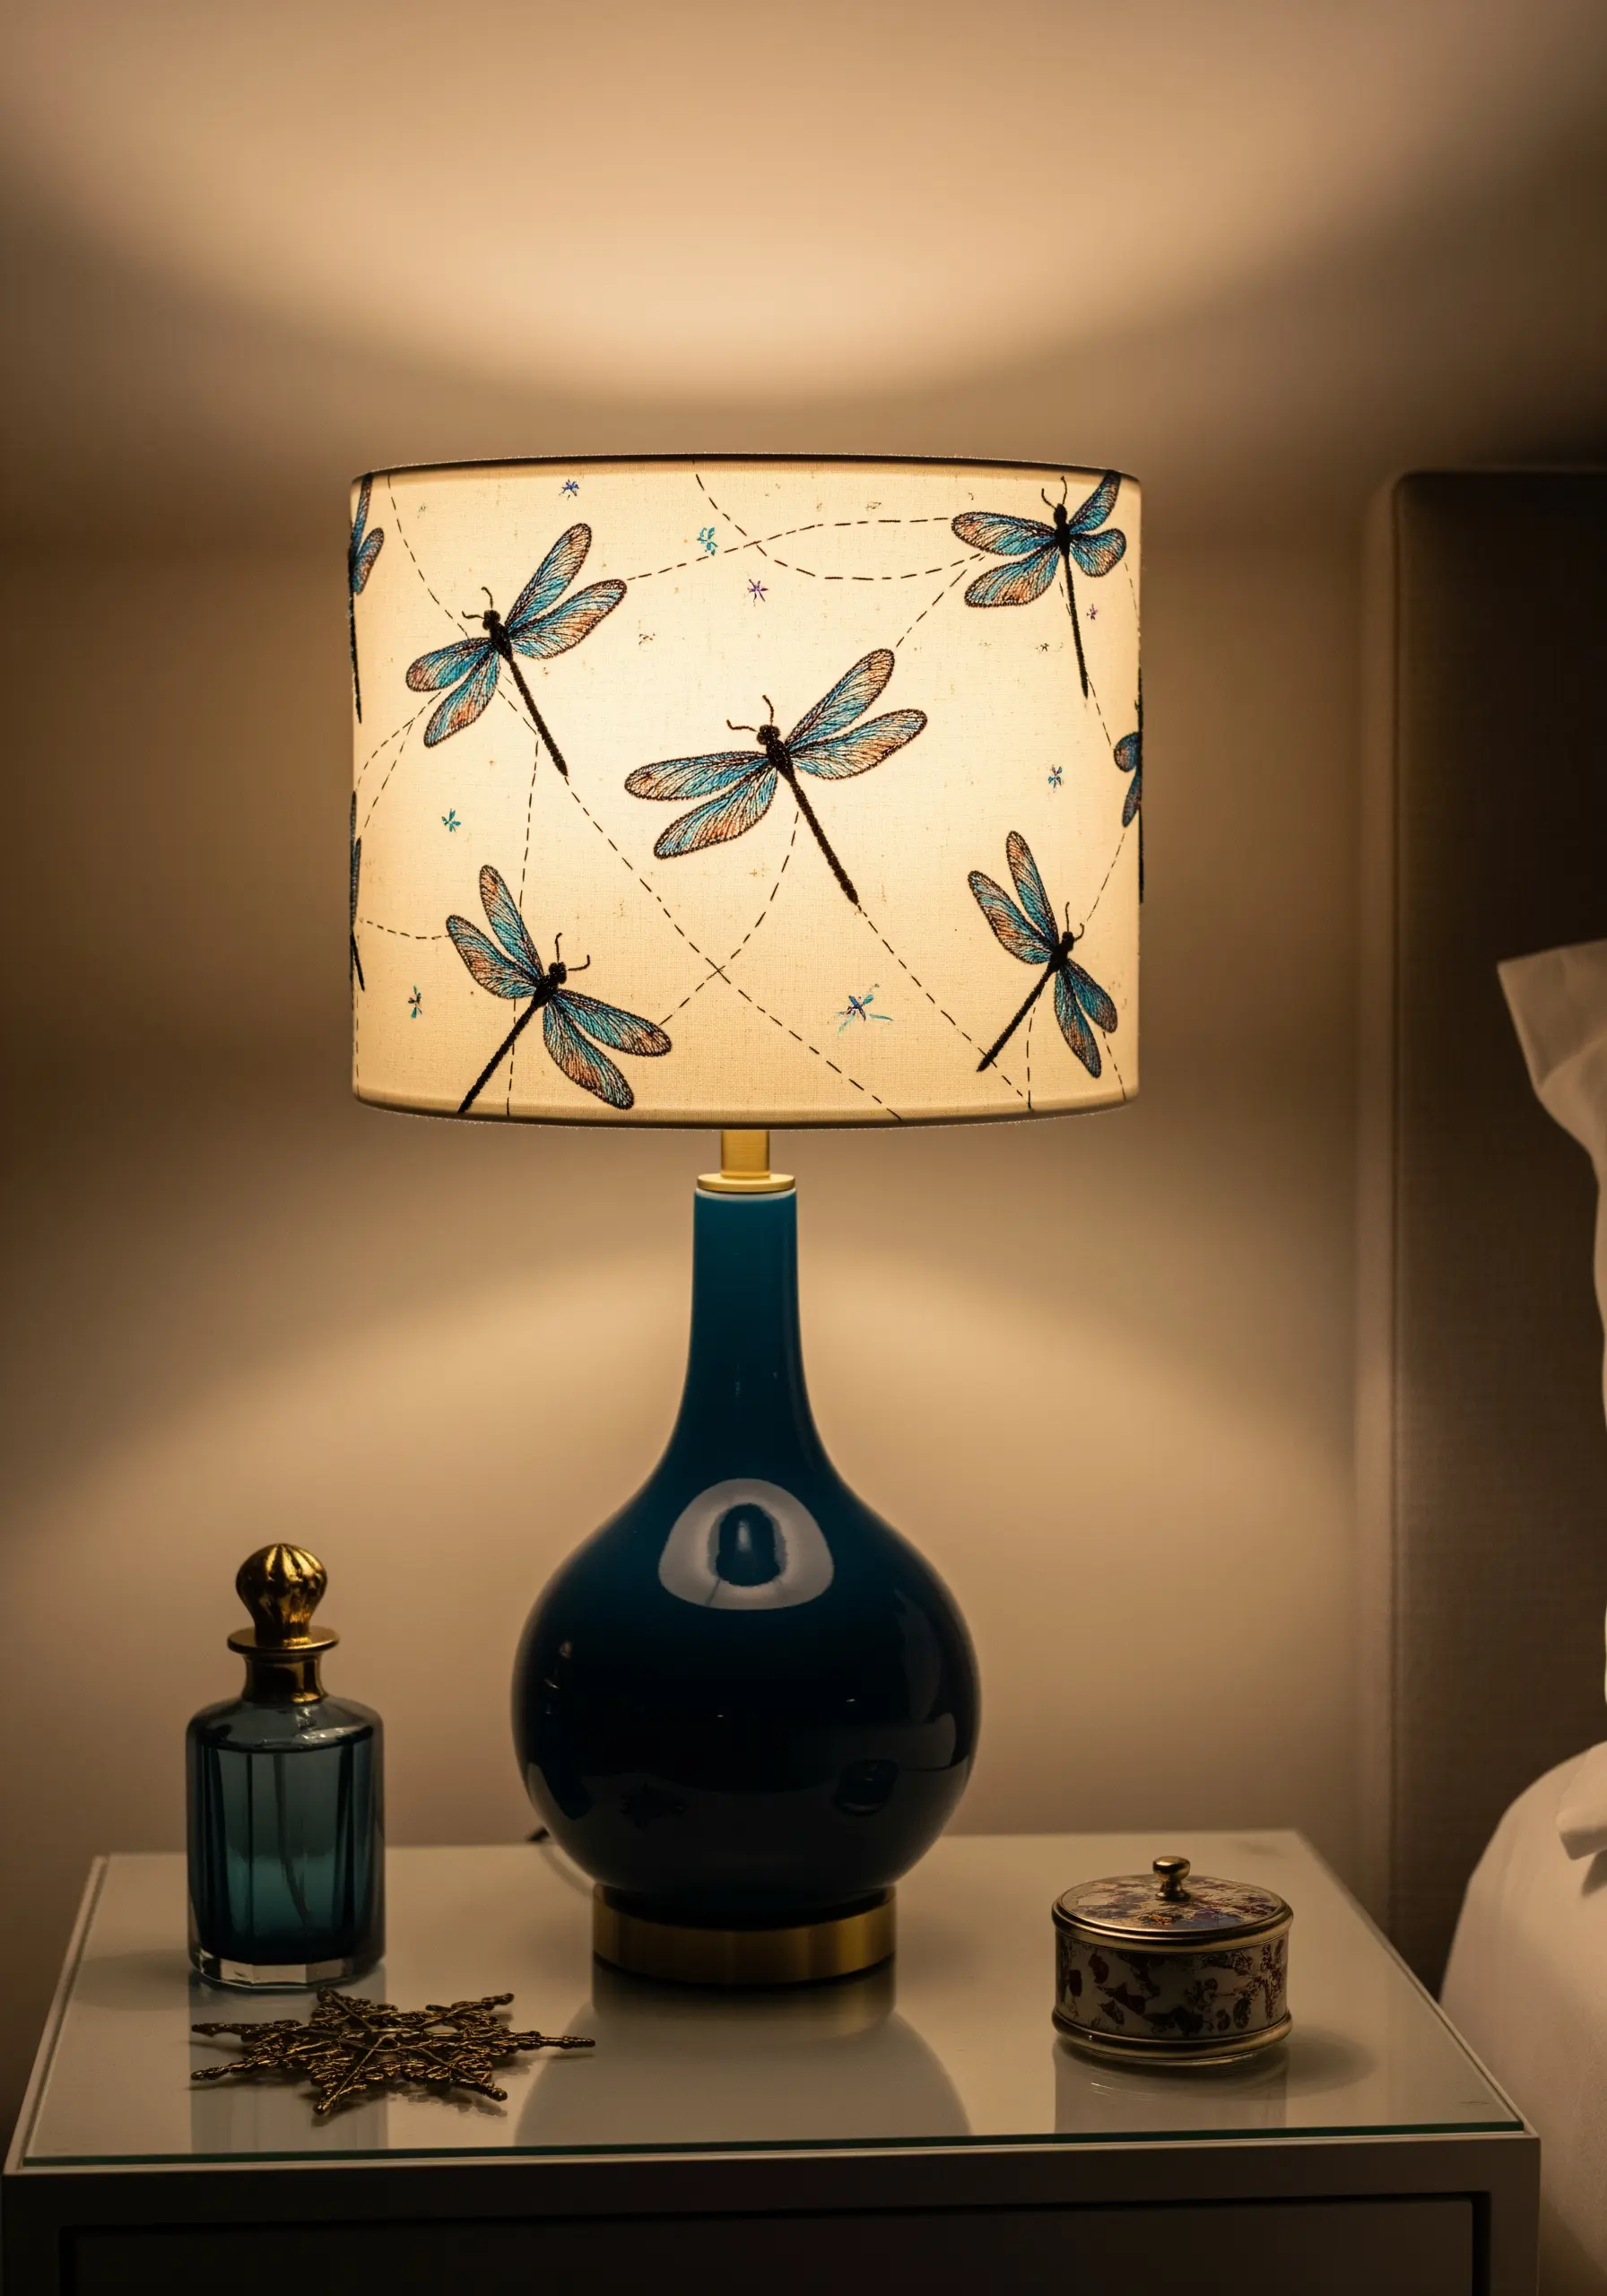
Take your embroidery off the wall and onto functional home decor, like a plain lampshade.
Choose a simple, open design like dragonflies, as dense stitching will block the light.
Use a lightweight thread and airy fill stitches, such as seed stitch or fishbone stitch, for the wings to allow light to filter through, creating a beautiful stained-glass effect when the lamp is on.
To work on the rigid, curved surface, you’ll need to stitch without a hoop, using a sharp needle and a thimble to guide your stitches carefully through the stiff material.
This is one of those unexpected embroidery techniques that completely transforms an everyday object.
15. Construct a Serene Nursery Mobile with Felt and Floss
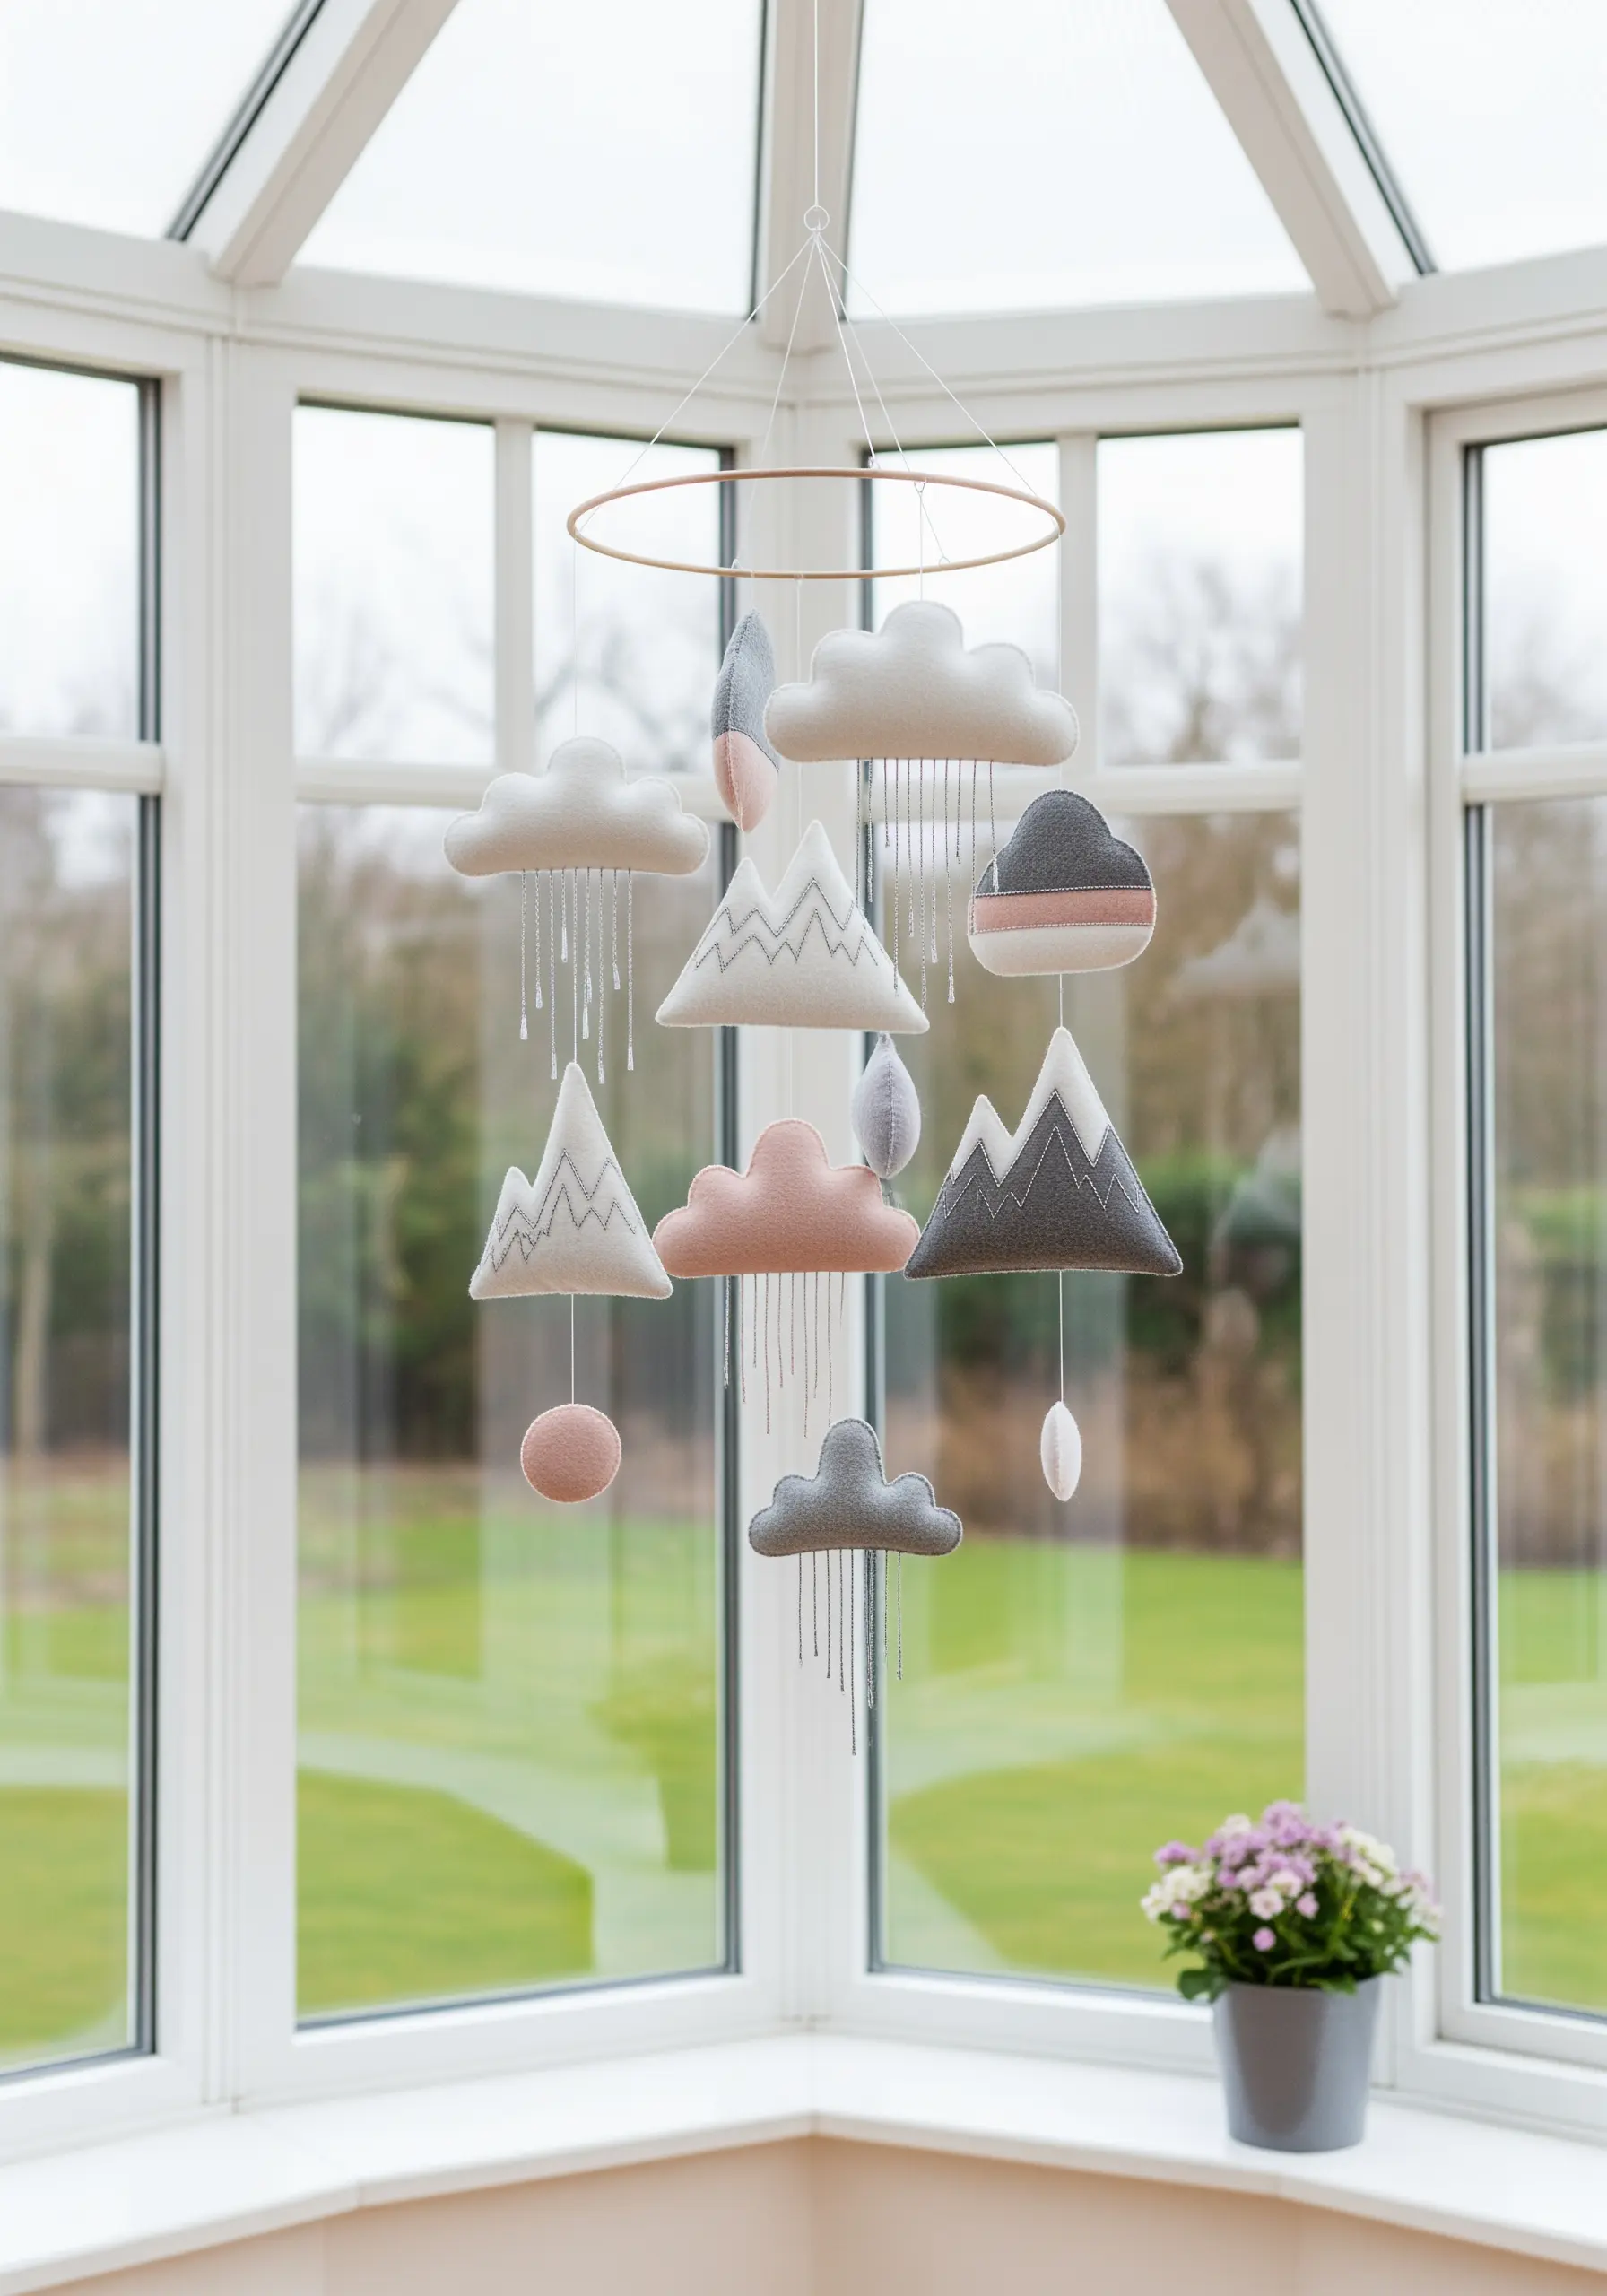
Combine simple sewing and embroidery to create a gentle, handmade mobile for a nursery.
Cut your cloud and mountain shapes from soft felt in a calming, neutral color palette.
Use a contrasting blanket stitch around the edges of each shape not only to join the front and back pieces but also to add a charming decorative border.
Add simple embroidered details—like backstitched peaks on the mountains—before stuffing the shapes lightly with poly-fil for a soft, 3D effect.
This project is a perfect example of how you can create handmade objects you can craft with kids (or for them) that feel personal and treasured.
16. Master Bold Lettering with a Padded Satin Stitch
To make your embroidered letters look exceptionally clean, bold, and professional, give them a raised, 3D profile.
First, outline each letter with a split stitch. This creates a firm ridge that will act as a guide for your fill stitches.
Then, fill the inside of the outlined letter with a layer of horizontal seed stitches or straight stitches to create padding.
Finally, cover the entire letter with a smooth, vertical satin stitch. The underlying layers will raise the final stitches, giving your text a satisfying, embossed quality.
This technique is perfect for inspirational quote embroidery hoops where you want the words to have a strong visual impact.
17. Stitch Delicate Florals on Luxurious Velvet
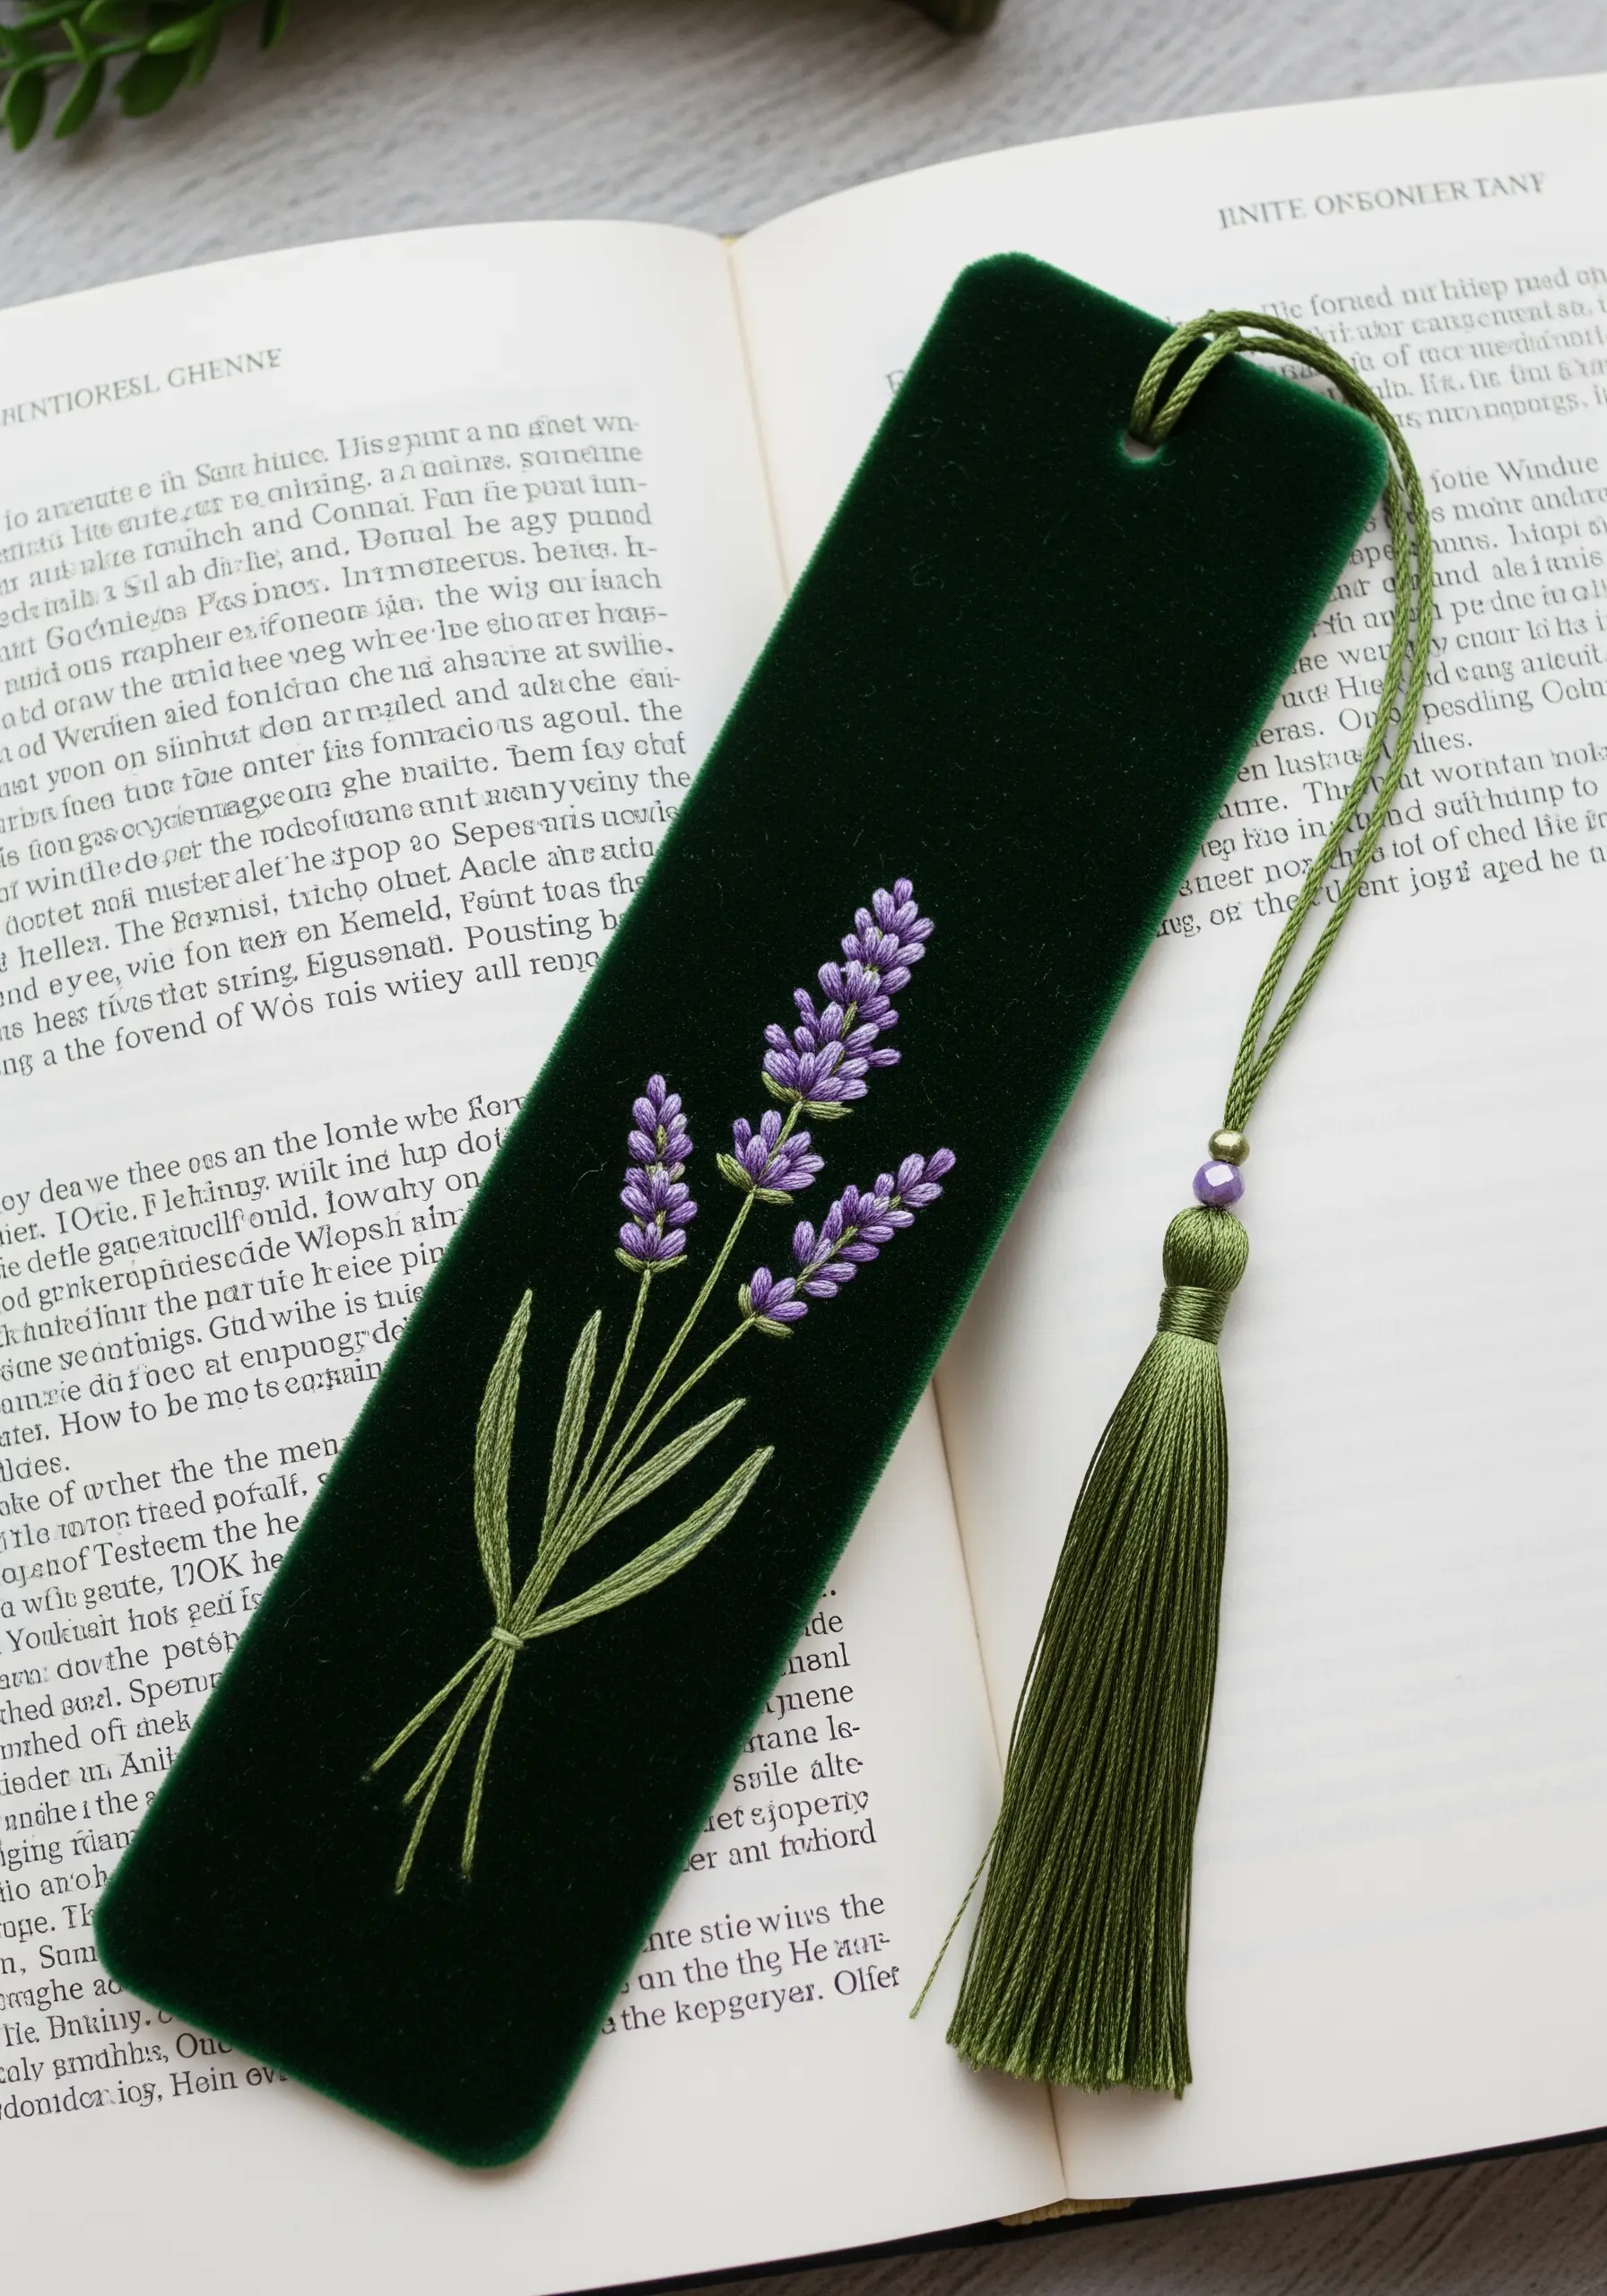
The deep, light-absorbing pile of velvet provides a stunning backdrop for delicate botanical embroidery.
To prevent your stitches from sinking into the fabric, always use a layer of tear-away stabilizer on the back.
Choose a design with fine lines, like lavender sprigs, and use a sharp needle that can pierce the dense fabric without snagging.
Simple stitches like stem stitch for the stalks and lazy daisy stitch for the lavender buds will stand out beautifully against the rich texture of the velvet.
Explore these delicate lavender stitch ideas to create a bookmark or sachet that feels incredibly luxurious to the touch.
18. Create Whimsical Decor with Textile Sculptures
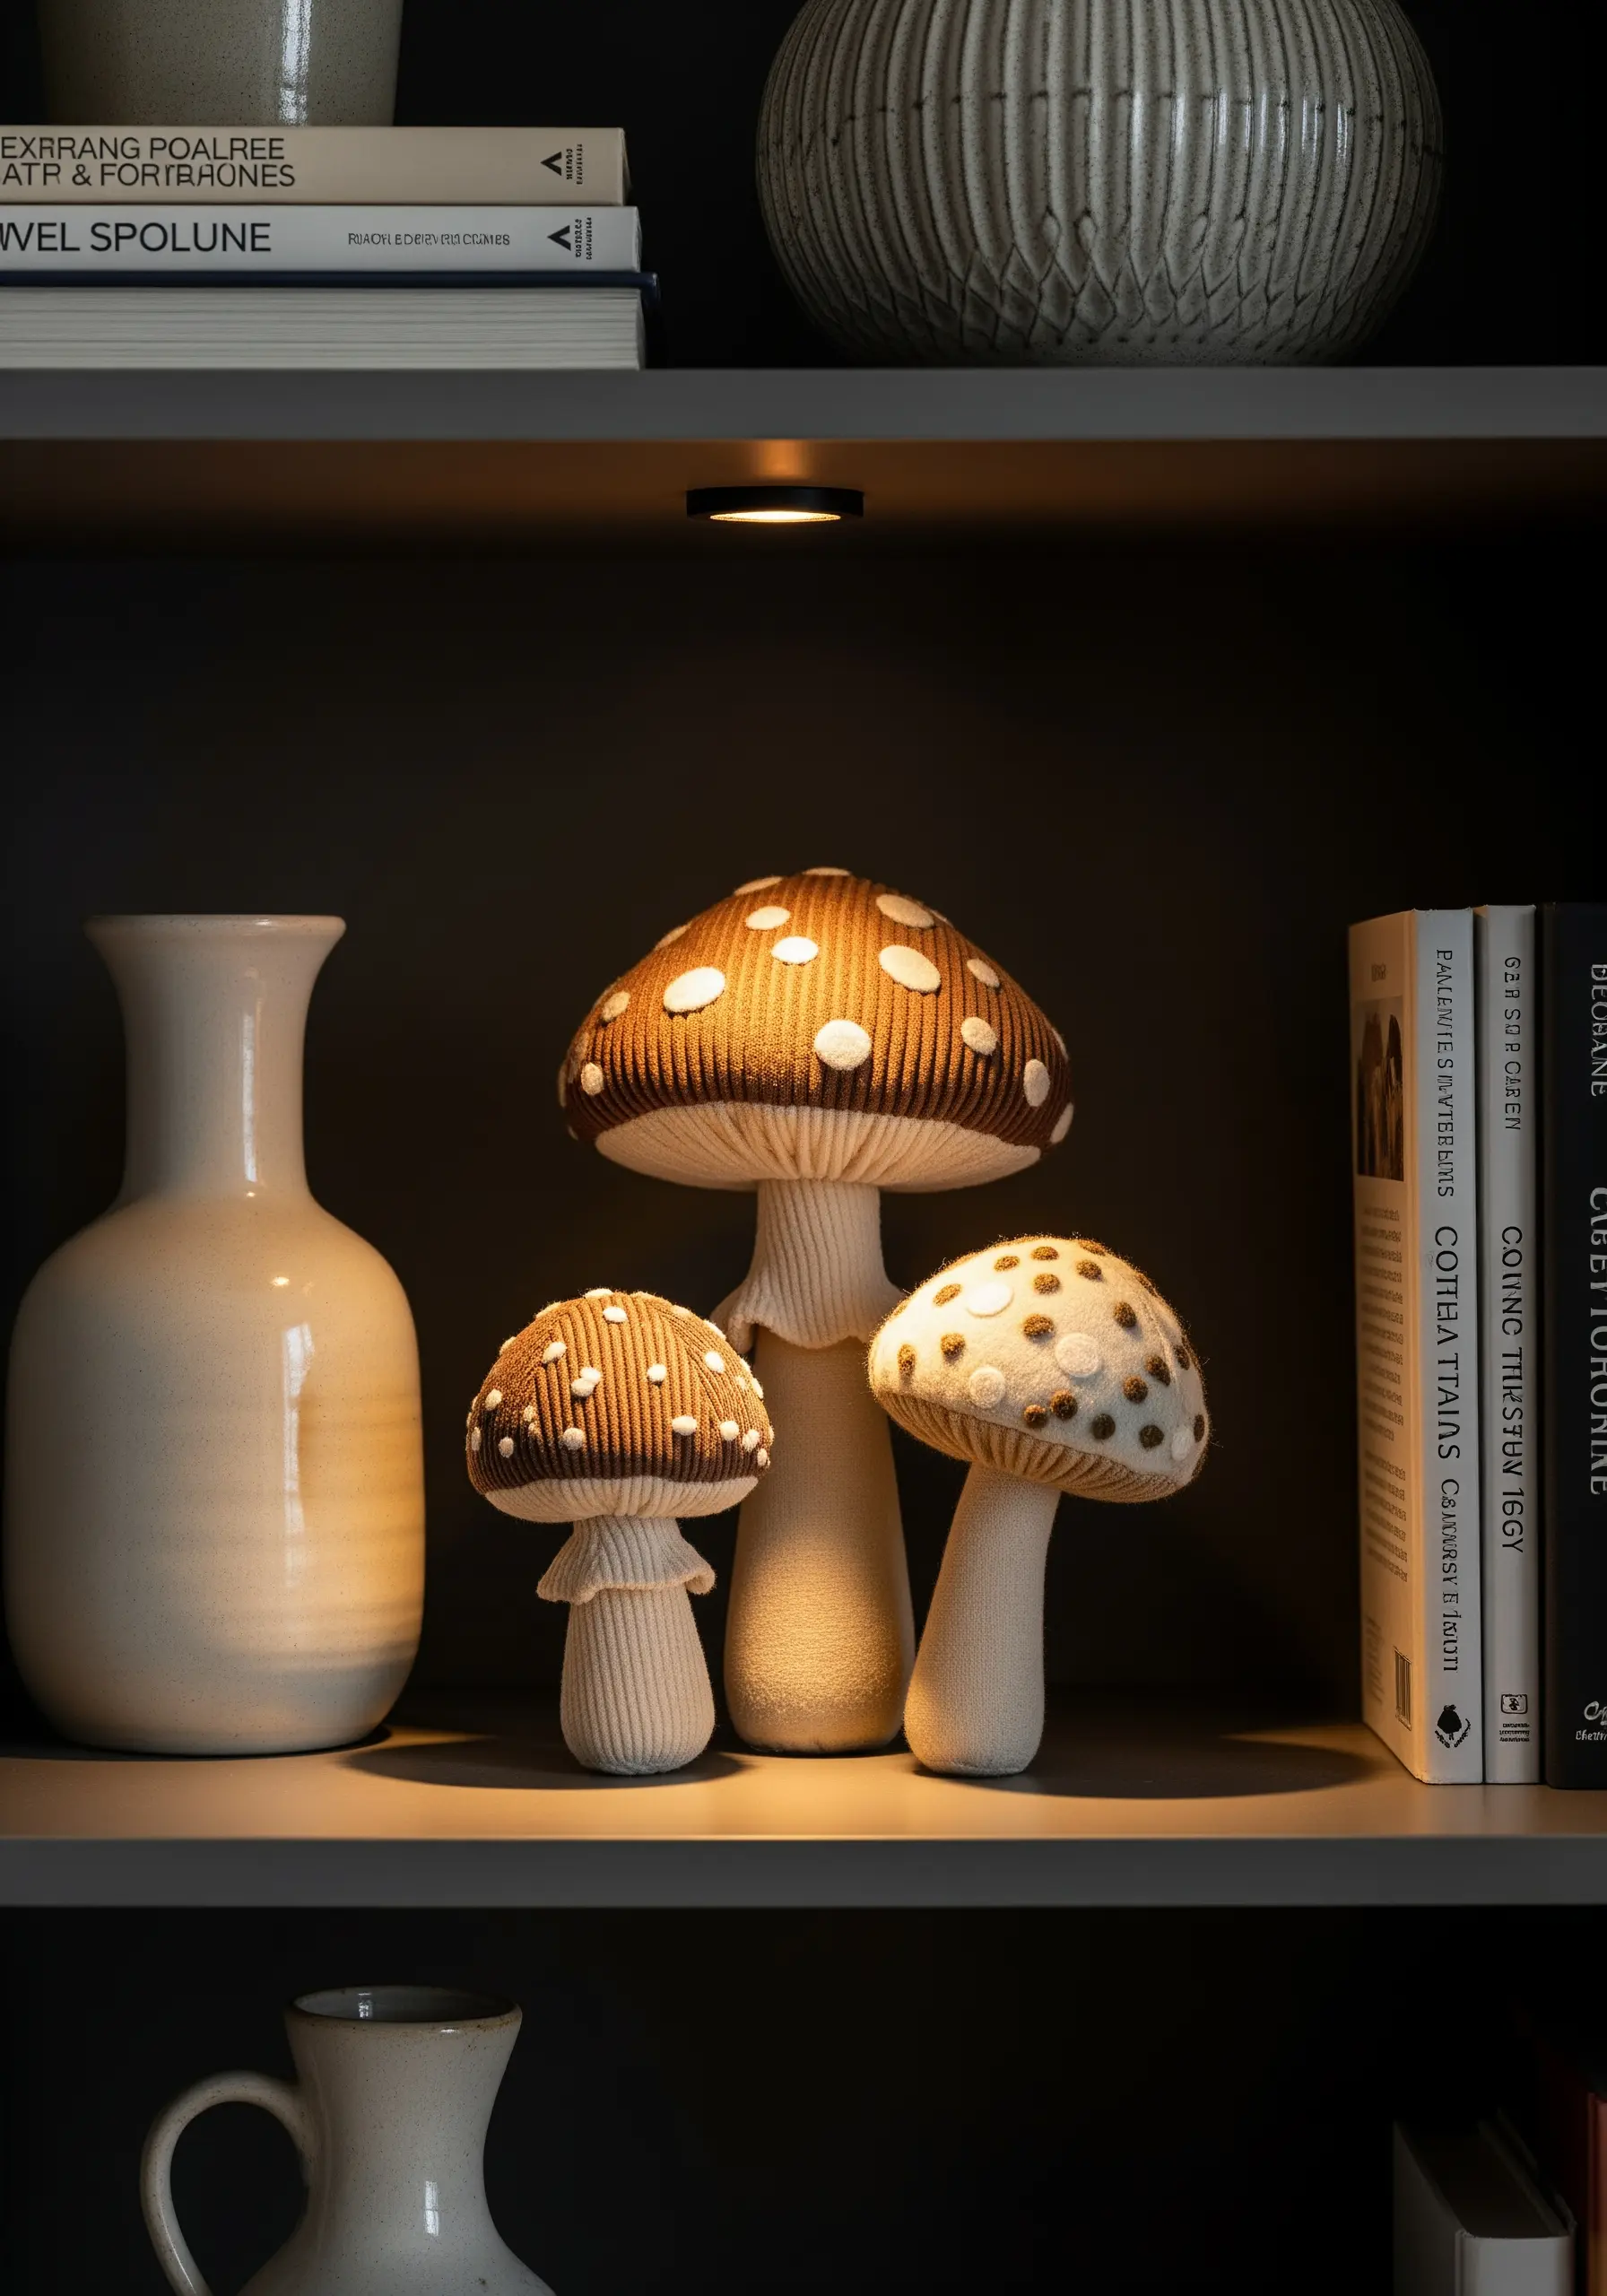
Move beyond two-dimensional art by crafting small, three-dimensional objects from fabric.
Construct mushroom shapes using different textured fabrics, like corduroy for the cap and a smooth cotton for the stem, to create tactile interest.
Use simple hand-stitching techniques to assemble the pieces and add details, such as straight stitches to mimic the gills under the cap or French knots for spots.
Group different sizes together on a shelf or mantelpiece to create a whimsical, forest-floor vignette.
This approach is perfect for lovers of dried flower style embroidery ideas who want to bring a similar rustic, natural charm into their space.
19. Elevate functional Items with Mixed-Media Details
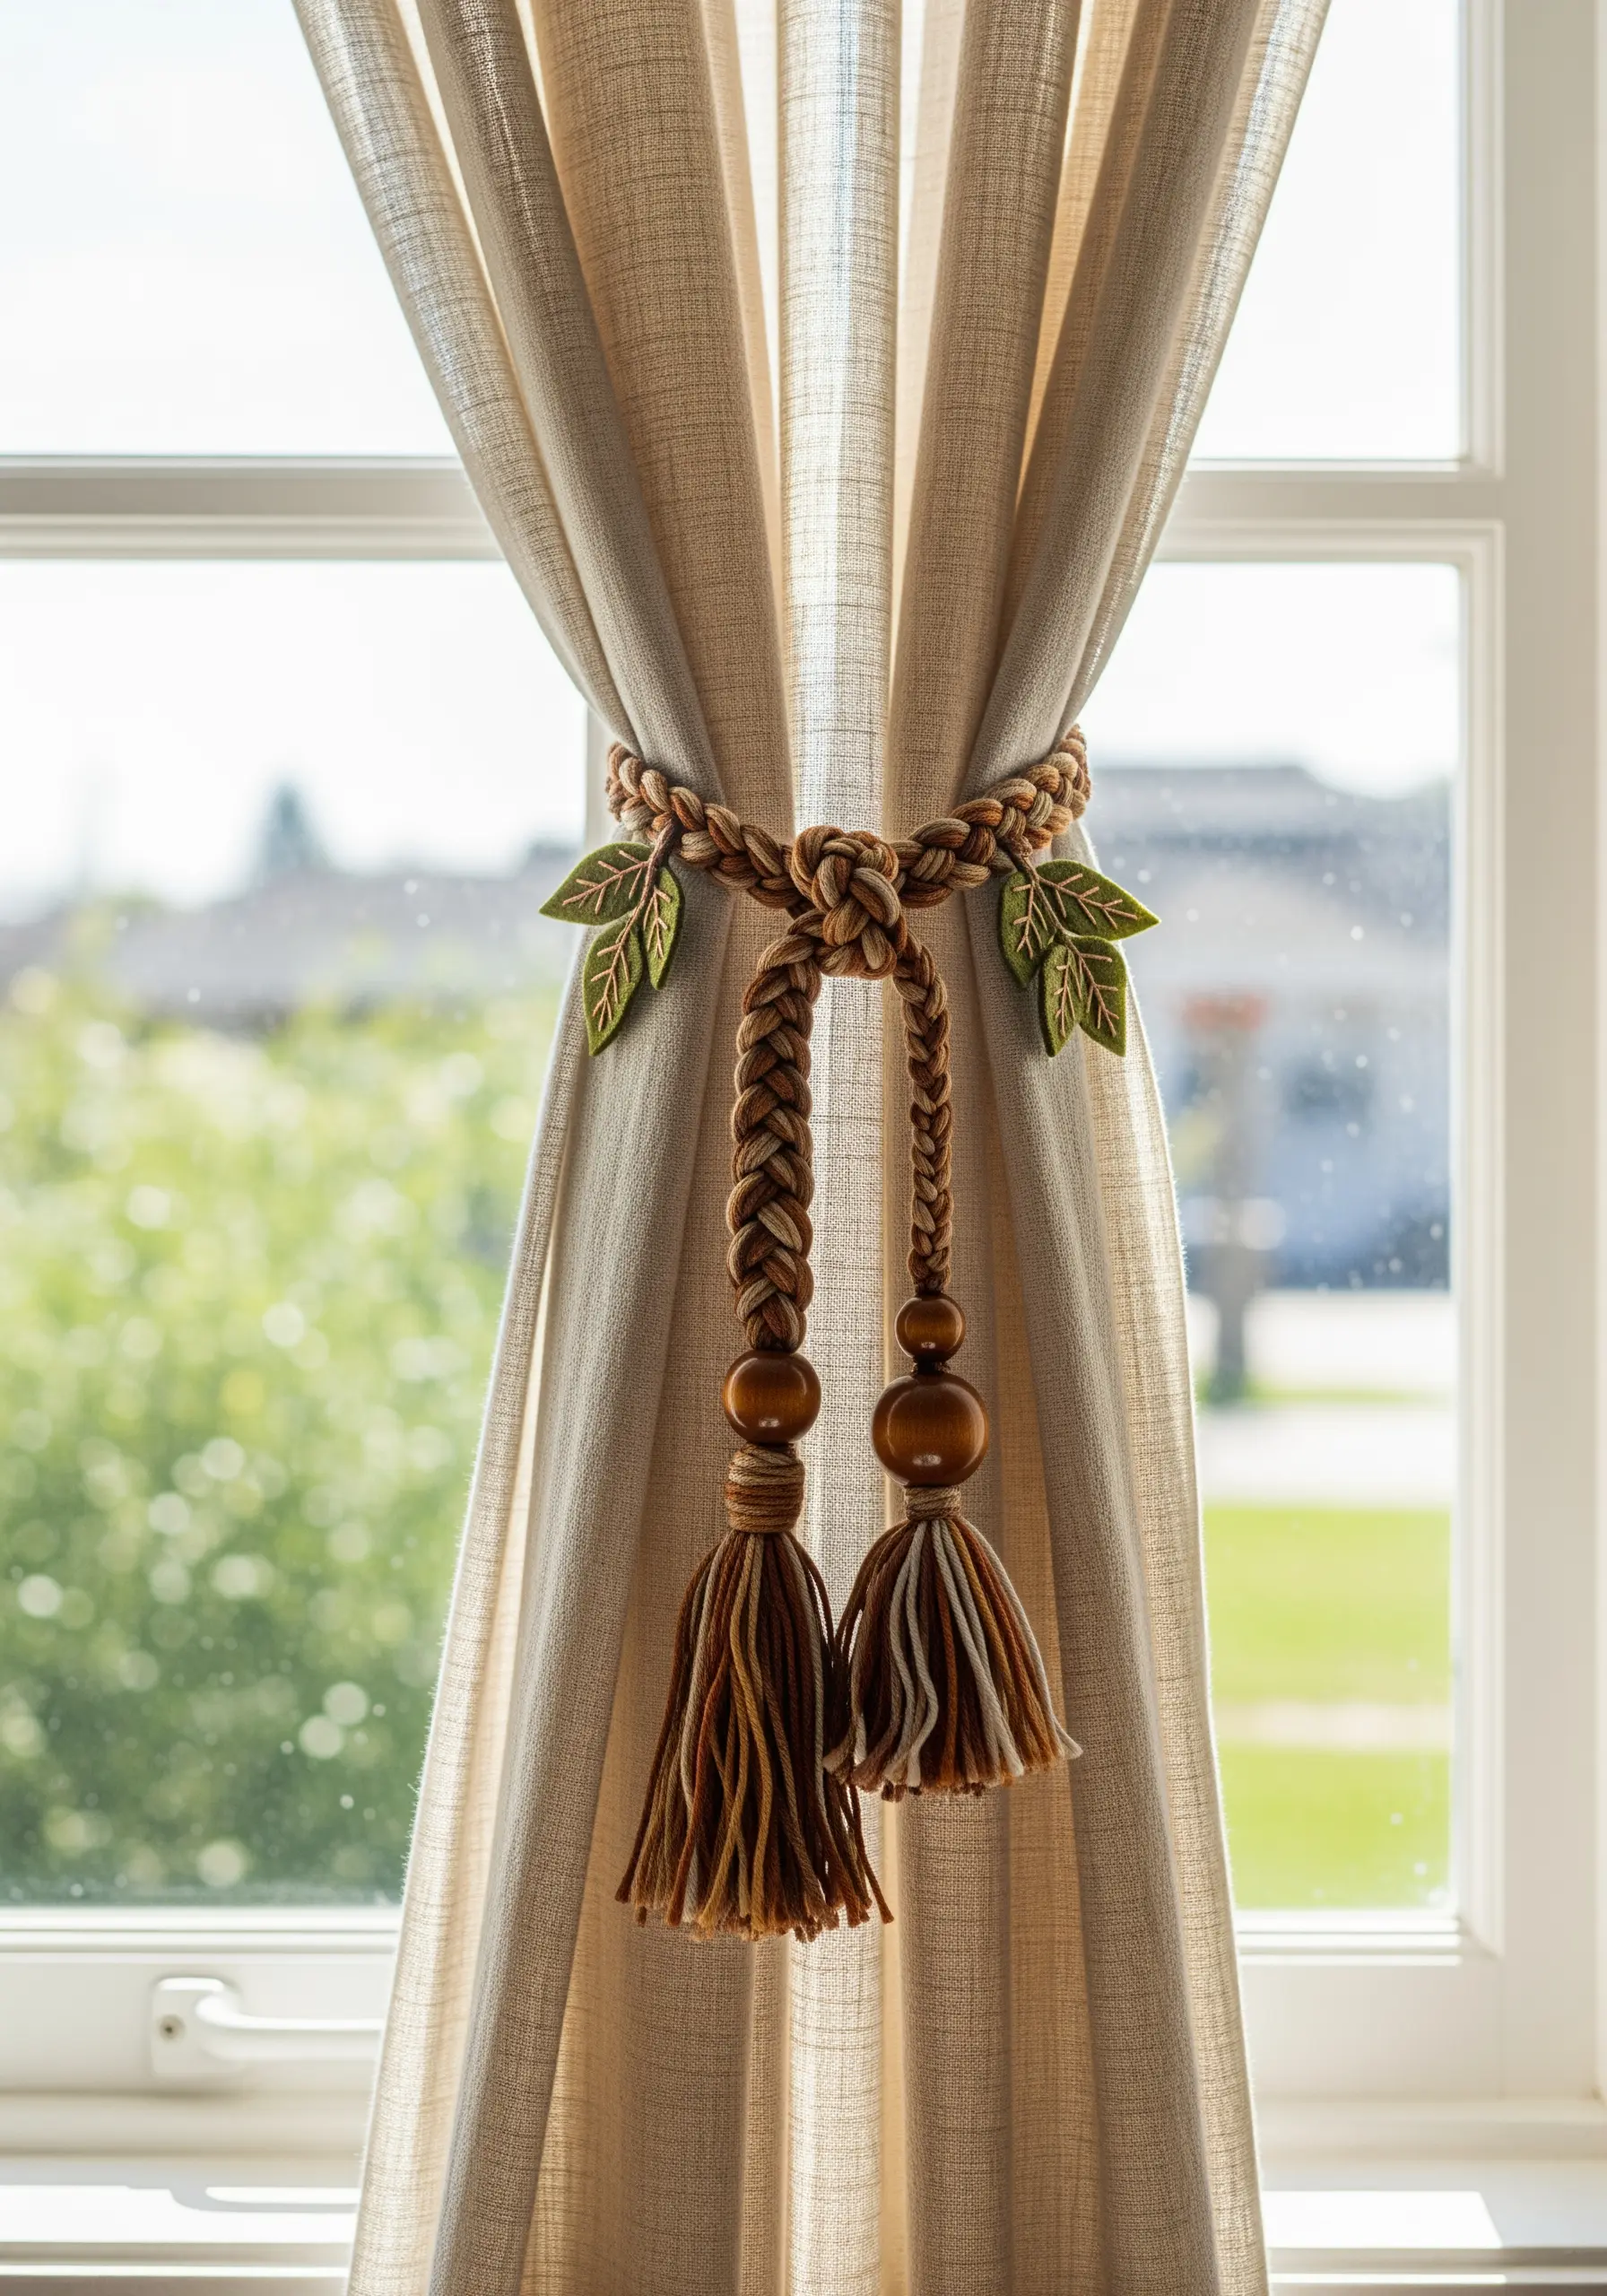
Combine different fiber crafts to create unique and beautiful home accessories, like these curtain tie-backs.
Braid thick yarn or macrame cord to create the main tie, incorporating wooden beads for a natural, bohemian touch.
Embroider leaf motifs separately onto a sturdy base fabric like felt or double-layered cotton. Use a satin stitch or fishbone stitch for a solid, textured fill.
Carefully cut out the embroidered leaves and securely stitch them to the braided cord, concealing your attachment points on the back.
This showcases one of the many clever ways to combine fabric and thread to produce a polished, multi-layered piece.
20. Achieve Painterly Realism with Thread Painting
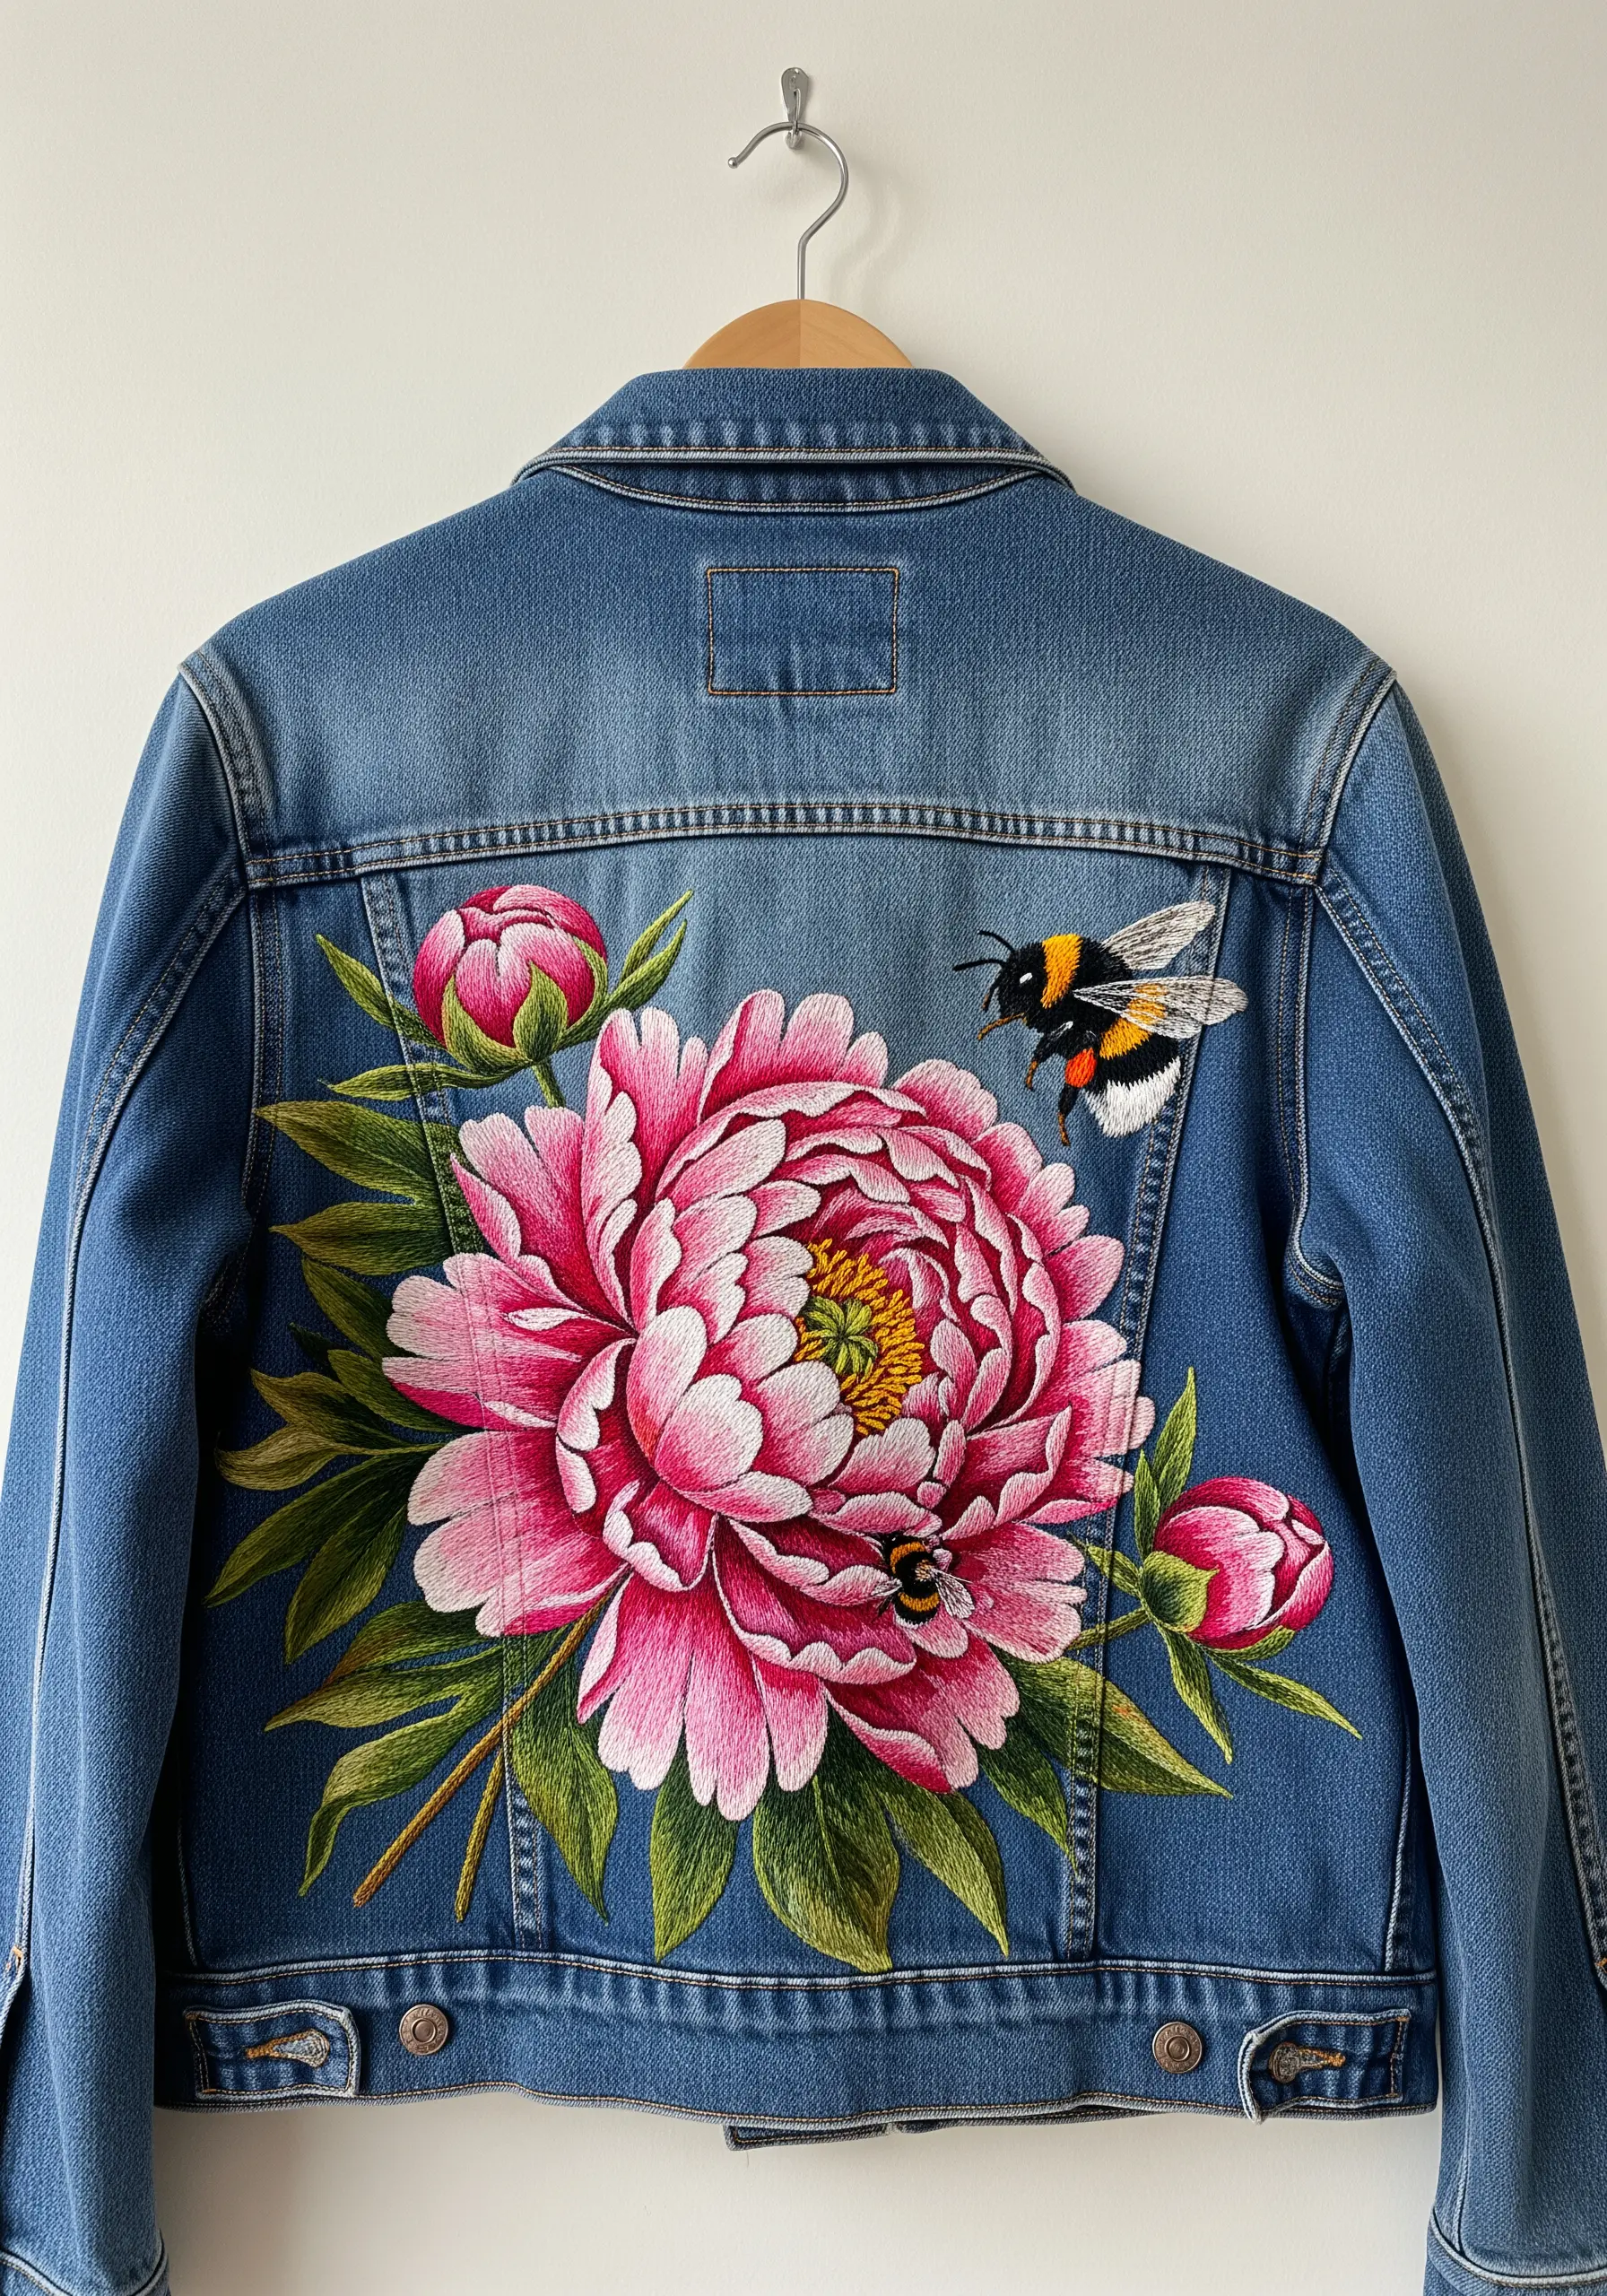
Transform a plain denim jacket with a large-scale, realistic floral motif using the long-and-short stitch technique.
This stitch allows you to blend multiple shades of a color seamlessly, creating the soft gradients you see in a real peony petal.
Always work on denim with a heavy-duty stabilizer on the back to prevent the fabric from stretching and distorting under the weight of dense stitching.
Map out your color zones first, moving from dark to light to create a sense of depth and dimension. This turns your thread into paint.
This is the perfect project for showcasing vintage-inspired denim jacket embroidery motifs with breathtaking detail and artistry.
21. Add Subtle Sophistication with a Tone-on-Tone Monogram
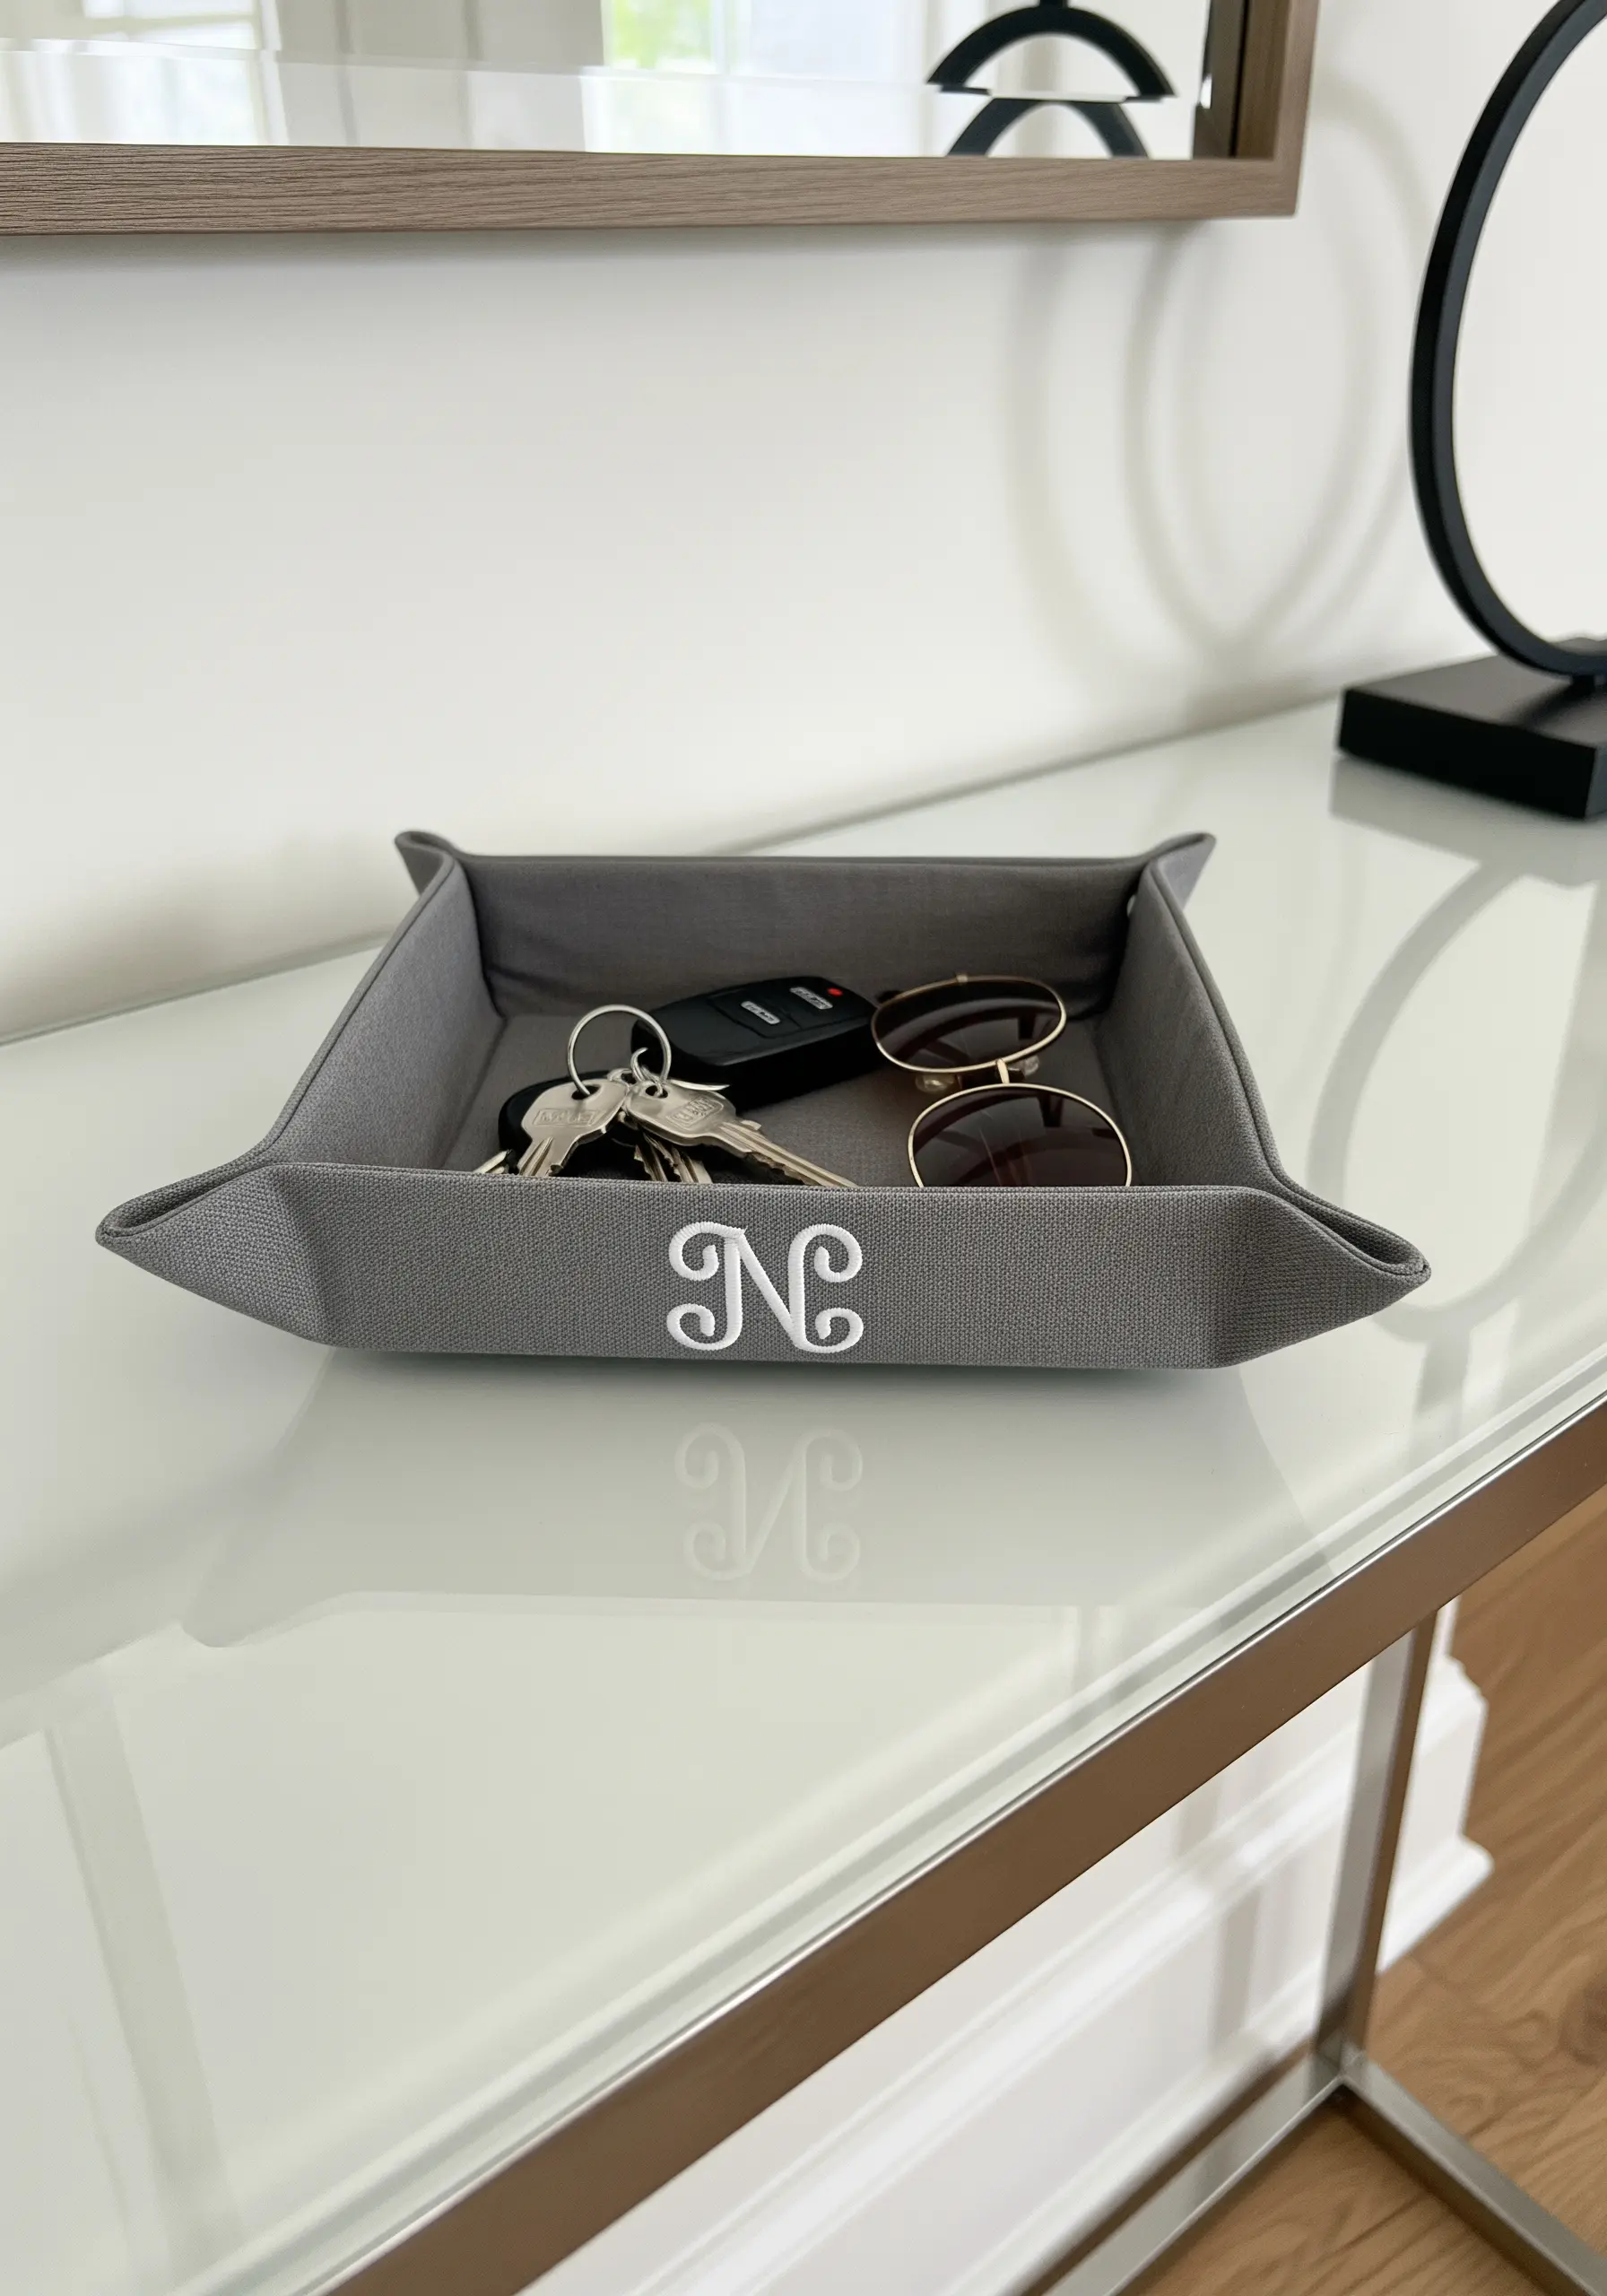
For an accent that feels personal yet understated, embroider a monogram using thread that is only a few shades different from your base fabric.
This tone-on-tone technique creates a subtle, textural effect that reads as high-end and intentional.
Choose a thick, decorative font and use a padded satin stitch to give the monogram a raised, embossed quality that catches the light.
This approach works beautifully on functional items like an entryway valet tray, adding a touch of custom elegance without being loud.
It’s one of the most effective minimal monogram styles for achieving a refined, designer look.
22. Frame Functional Spaces with a Delicate Stitched Border
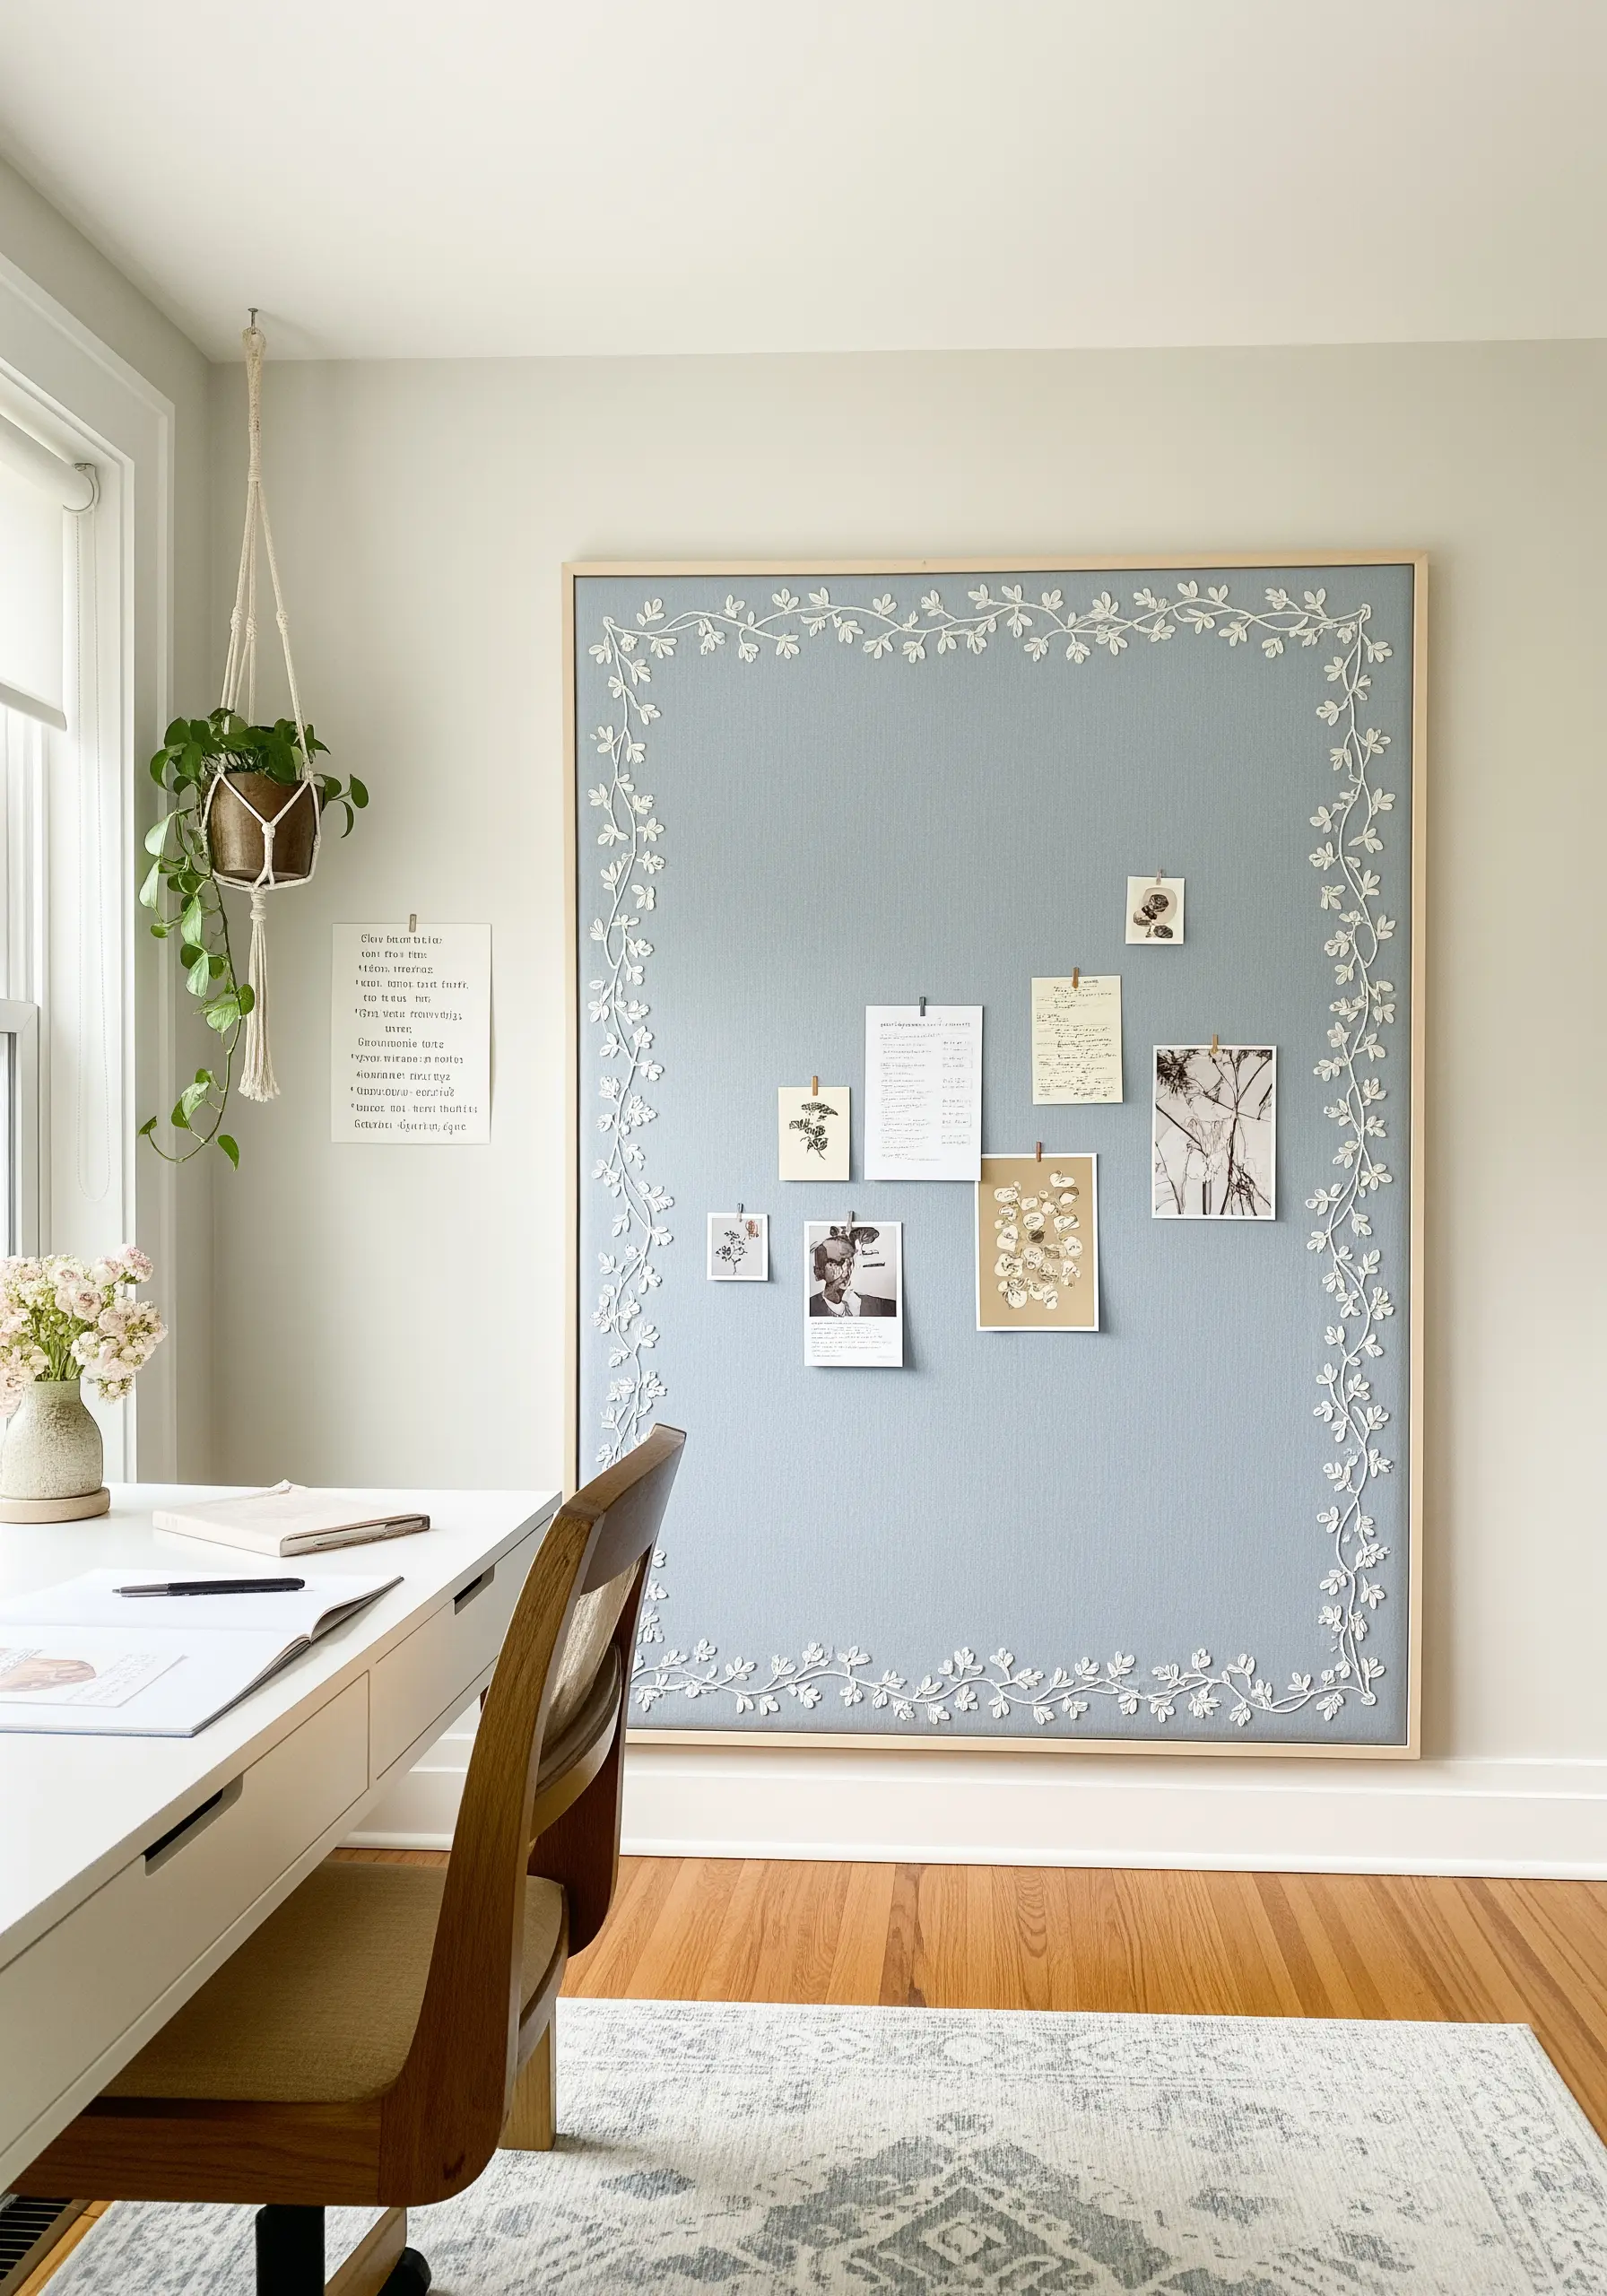
Turn a simple pinboard into a piece of wall art by adding an embroidered border directly onto the fabric surface.
Use a simple, repeating botanical motif, like a leafy vine, to create a graceful frame around the functional area.
A chain stitch or feather stitch is perfect for this, as it works up quickly and creates a beautiful, organic line.
Choose a white or cream thread on a colored linen background for a classic, high-contrast look that feels both fresh and timeless.
This project is a wonderful way to apply botanical border designs to something beyond table linens, creating art that is also useful.
23. Create Sculptural Lines with Couching and Chunky Fibers
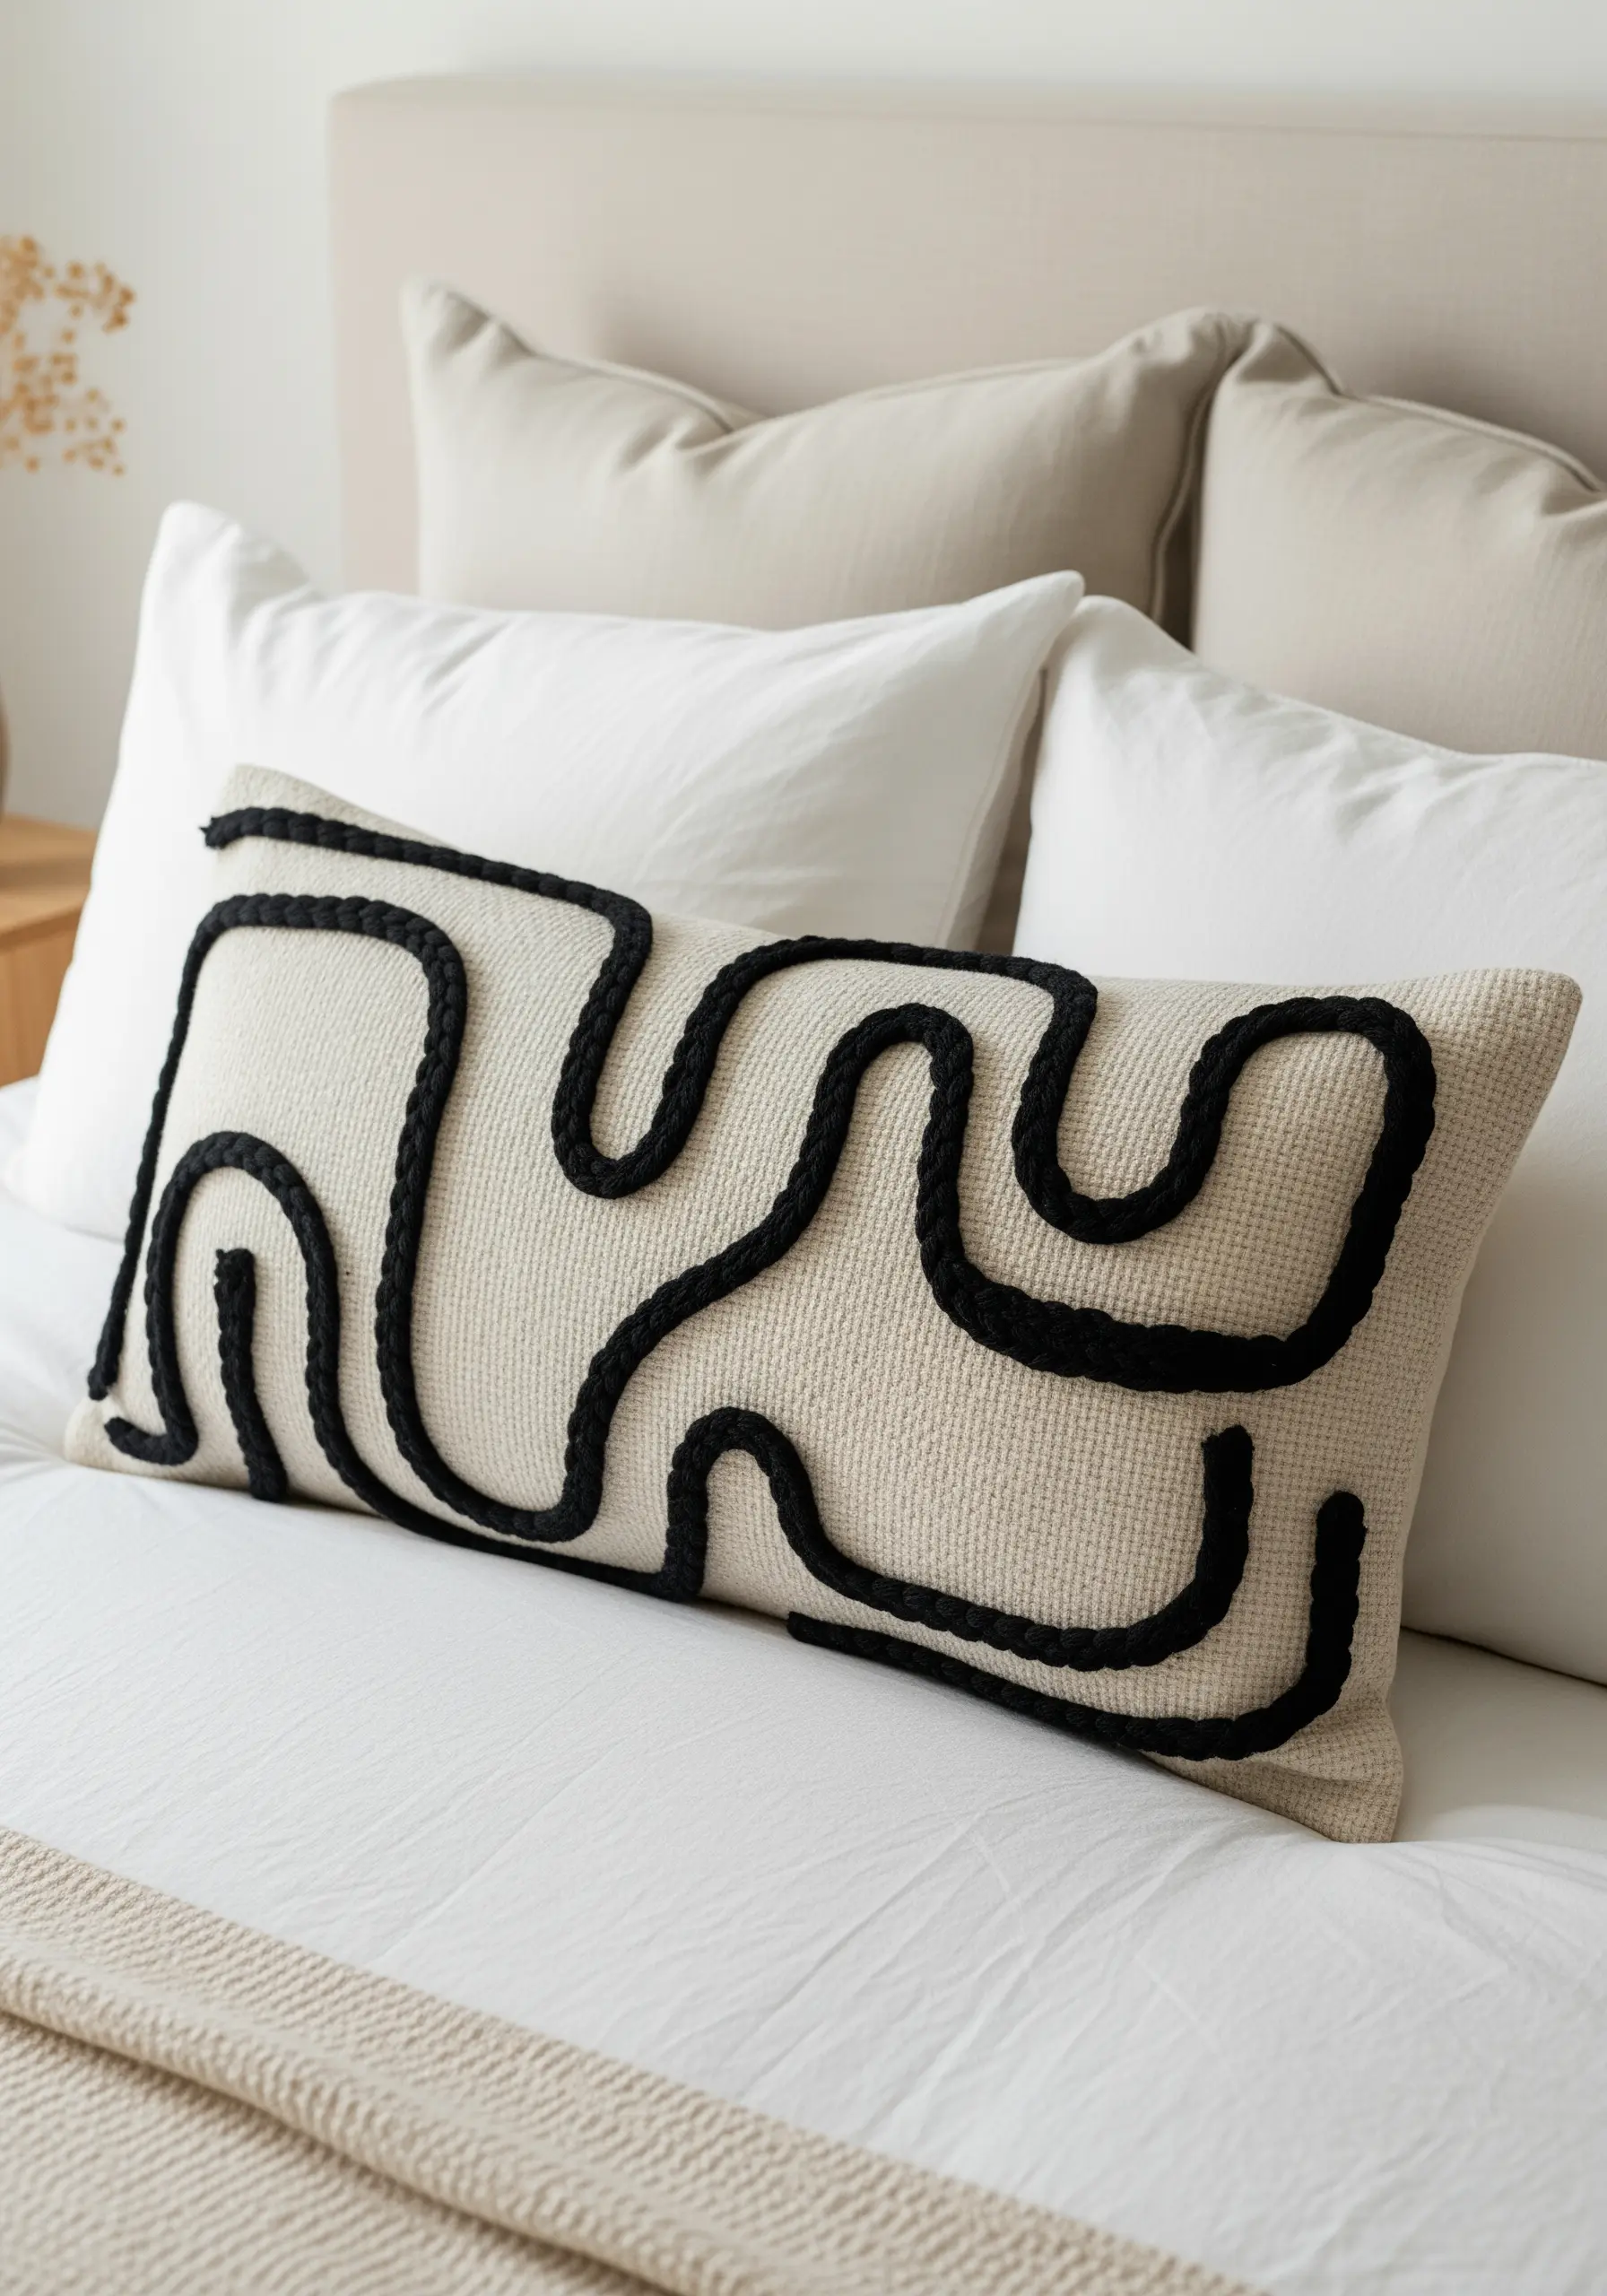
For a bold, graphic, and highly textural effect, use the couching technique with thick yarn or braided cord.
Lay your chunky fiber on the surface of your pillow cover in a continuous, abstract line, pinning it in place as you go.
Then, using a regular sewing needle and a matching, thinner thread, make small, discreet tacking stitches over the yarn to secure it permanently to the fabric.
This method allows you to create dramatic, raised lines that would be impossible with traditional stitching, adding a sculptural quality to your textile art.
It is one of the best abstract thread embroidery ideas for making a modern, high-impact statement.


