
You have the threads, the fabric, and the desire to create something truly special. But sometimes, your finished pieces don’t quite capture the magic you envisioned. They feel… handmade, but not quite *art*. Let’s change that, not by learning a hundred new stitches, but by rethinking how you use the ones you already know.
This is where your work transforms. We’ll move beyond simply filling in shapes and begin to build dimension, texture, and light into your embroidery. Imagine creating objects that feel alive, scenes you can almost step into, and textures that invite a closer look. It’s about making intentional choices—the right thread for a shadow, the perfect stitch for a shimmer—that elevate your craft into an expressive art form.
Consider this a quiet conversation about possibility. Together, we will explore simple shifts in technique that offer profound results, turning your functional items and decorative hoops into whimsical objects that tell a story. You have the skill; now, let’s give it a voice.
1. Build a Dimensional Diorama with Thread

Transform a simple hoop into a layered, storybook scene by combining traditional stitches with sculptural techniques.
Use dense French knots and turkey work to create a mossy, touchable forest floor that invites the eye inward.
For the trees and canopy, wrap heavyweight thread or yarn around wire to form branches, then attach them to the background fabric to build depth.
This method allows you to play with light and shadow, creating a foreground and background that make the scene feel immersive, not flat.
Integrate tiny LED lights behind a semi-sheer background fabric to cast a magical glow, turning your embroidery into a miniature, illuminated world.
2. Weave a Cosmic Dreamscape on Velvet
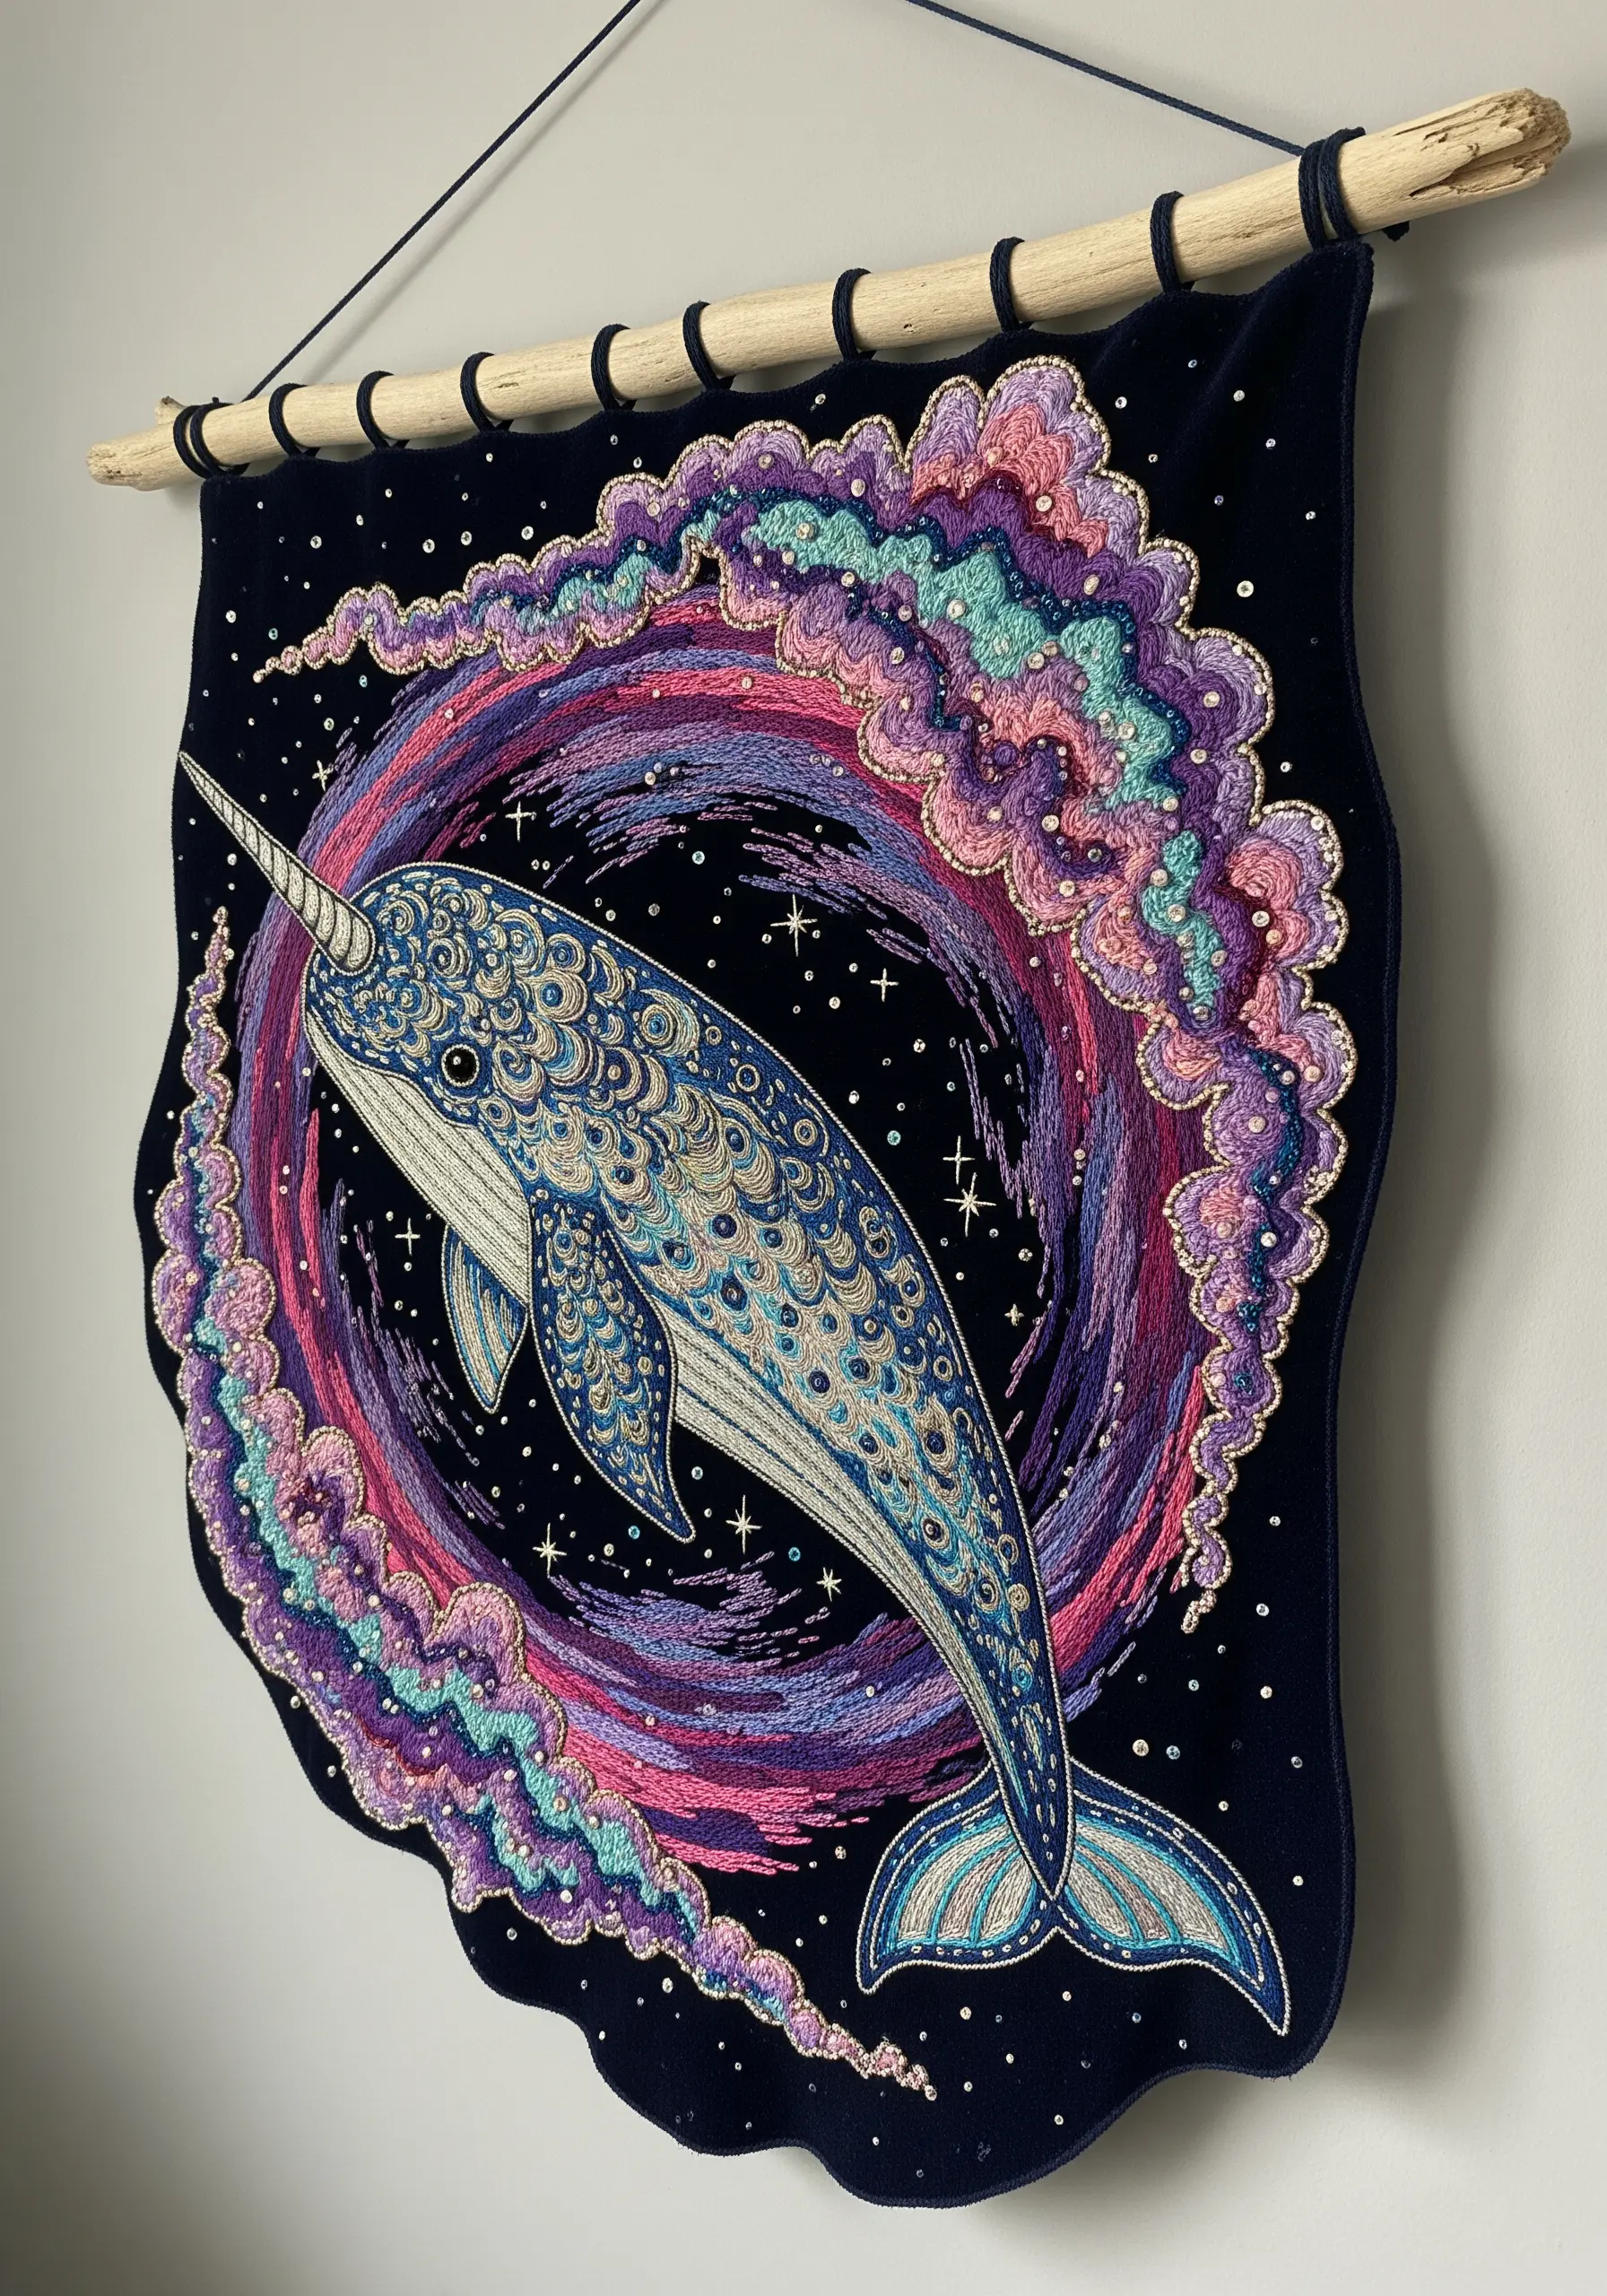
Choose a dark, plush velvet as your canvas to give your threads an unparalleled richness and depth.
The fabric’s pile catches the light, making metallic and silk threads shimmer intensely, perfect for celestial scenes.
Create swirling galaxies not with satin stitch, but with clusters of French knots in varying sizes and colors, which gives a dynamic, nebular texture.
Incorporate sequins and small beads sporadically to mimic distant stars; they provide a subtle sparkle that thread alone cannot replicate.
Finish the piece with an irregular, flowing edge instead of a perfect circle or square to enhance the organic, untamed feel of a cosmic event.
3. Craft a Storybook Tea Cozy with Appliqué
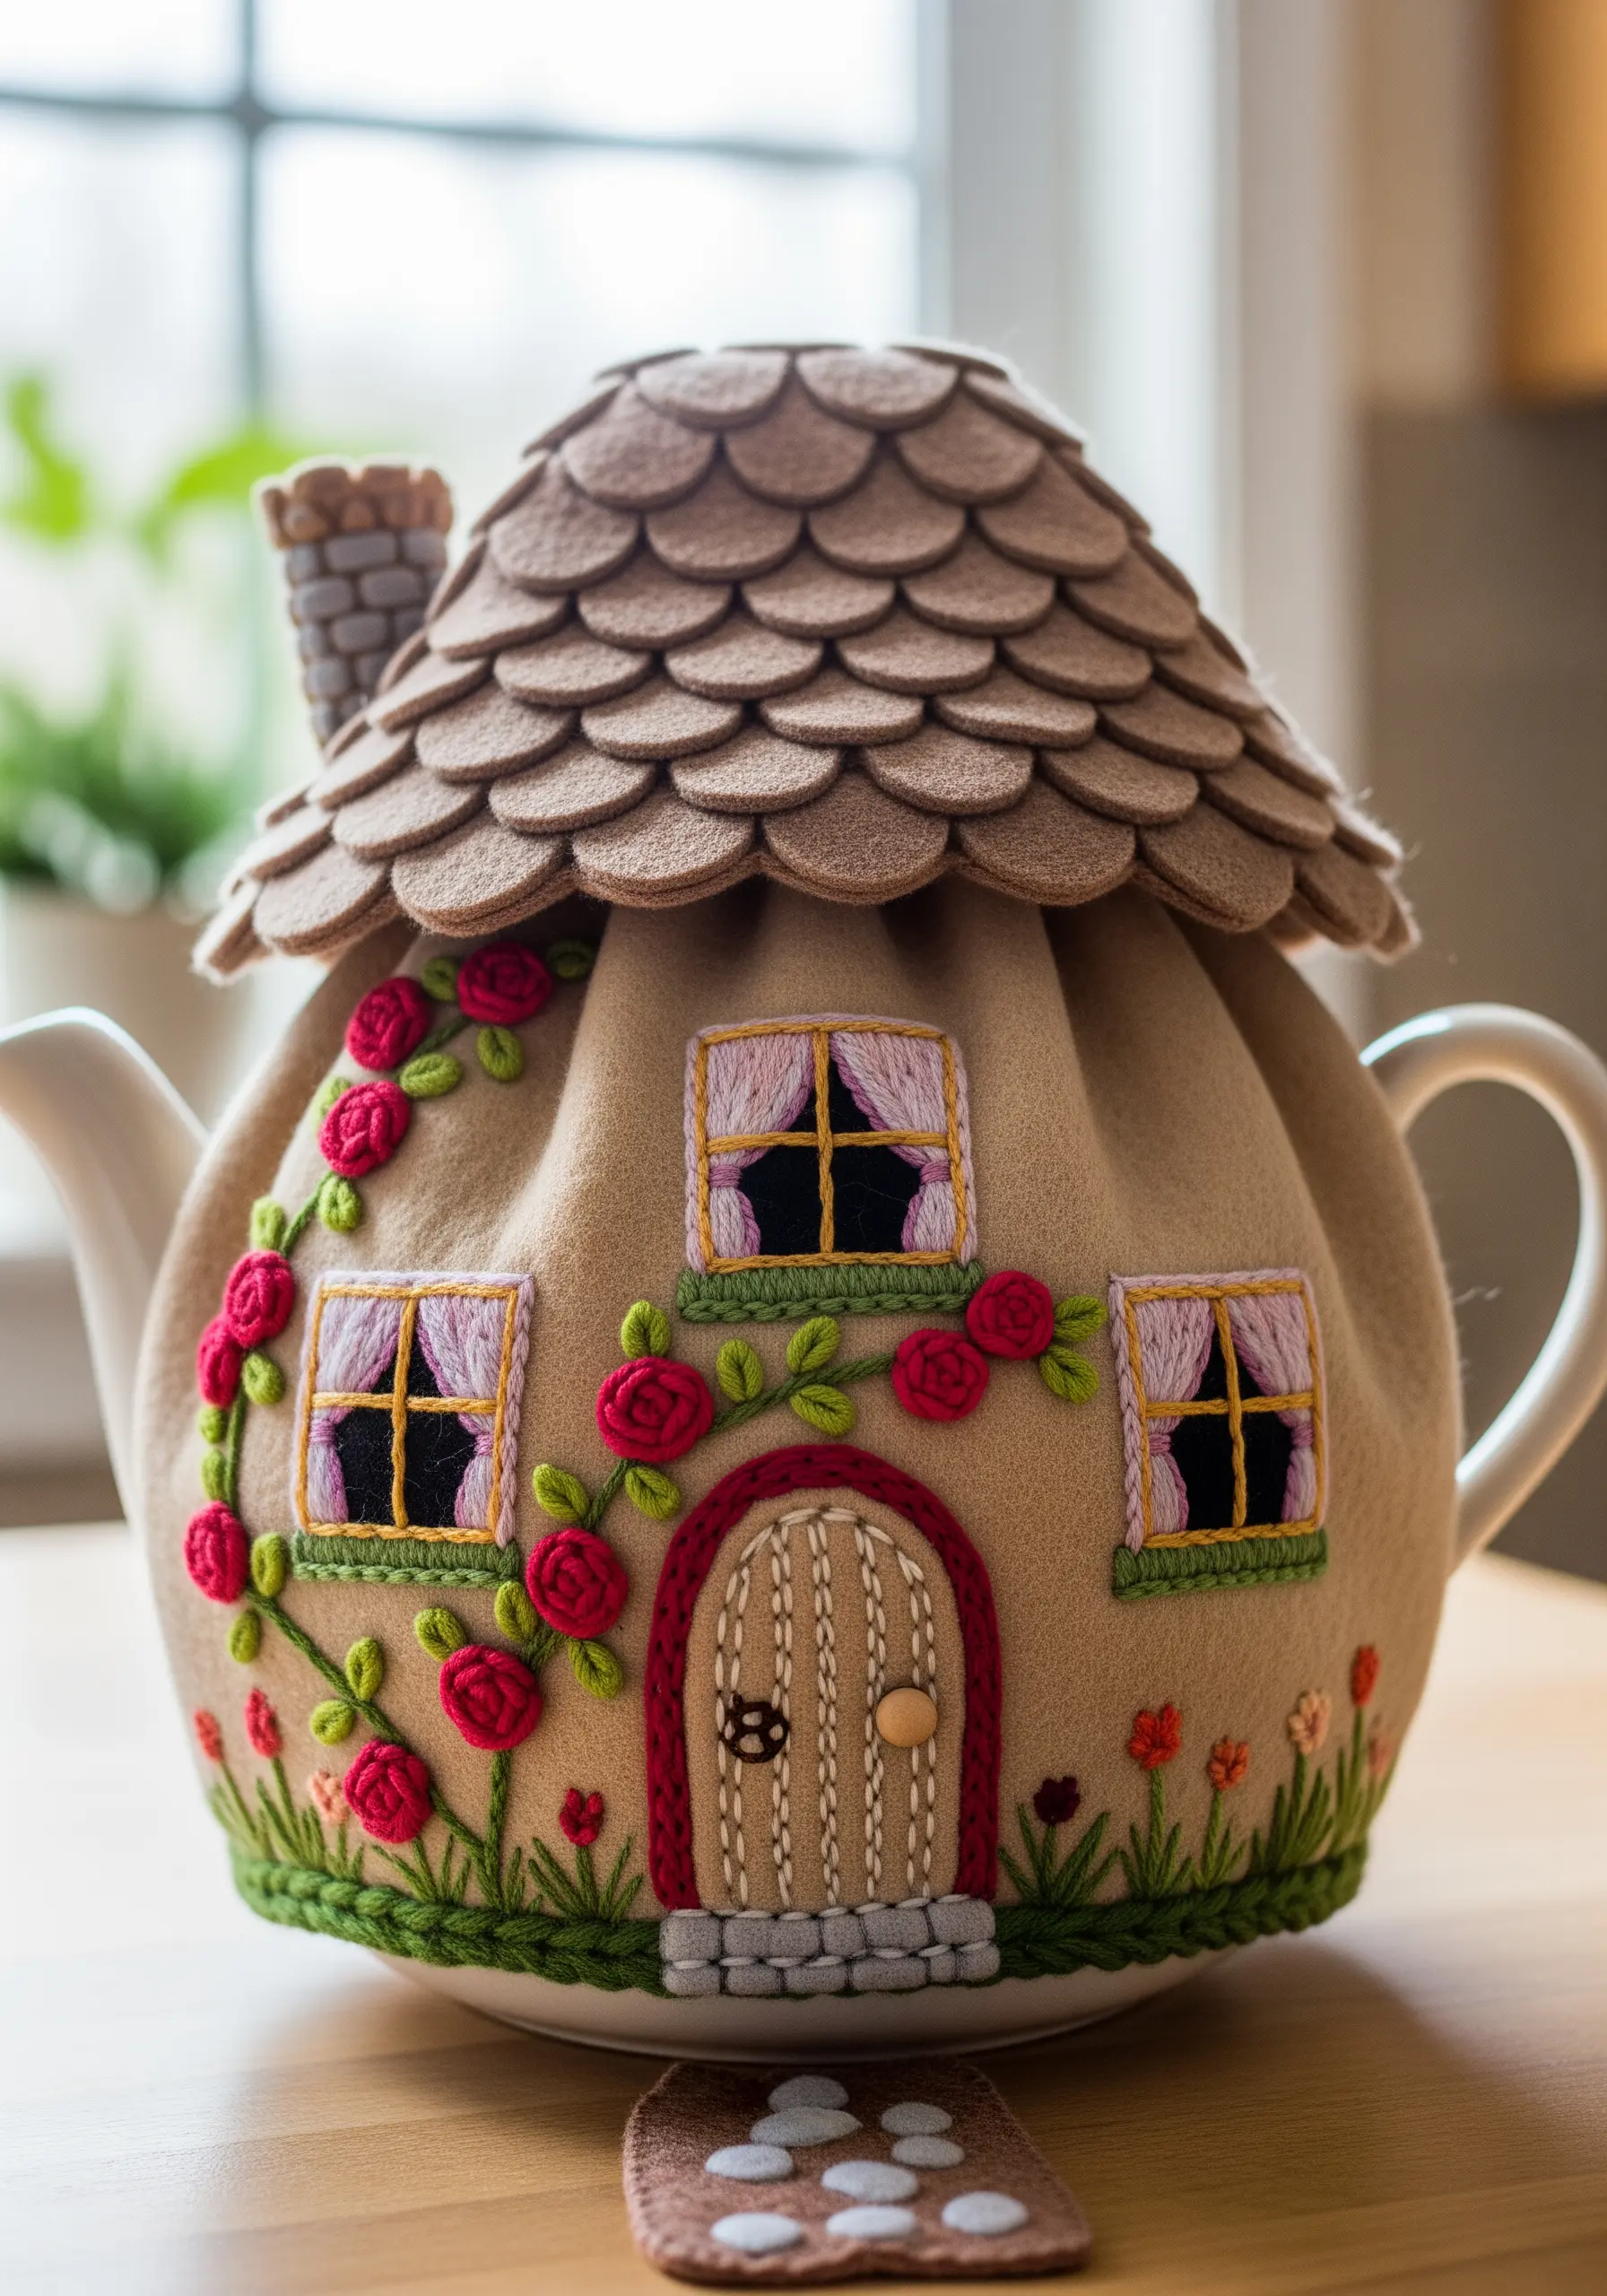
Elevate a simple tea cozy by combining felt appliqué with targeted, decorative embroidery.
Cut felt shapes for the walls, roof, and door, then stitch them onto a linen base for a clean, graphic foundation.
Focus your detailed embroidery on the elements that bring charm: use bullion knots for plush, dimensional roses and a woven wheel stitch for a textured doorknob.
This selective stitching adds intricacy where it matters most, preventing the design from looking overworked while drawing attention to the whimsical details.
For the roof tiles, layer individual felt scallops and secure them with a single stitch at the top, allowing the bottom edges to lift slightly for a realistic, 3D effect.
4. Stitch the Stars with Metallic Thread
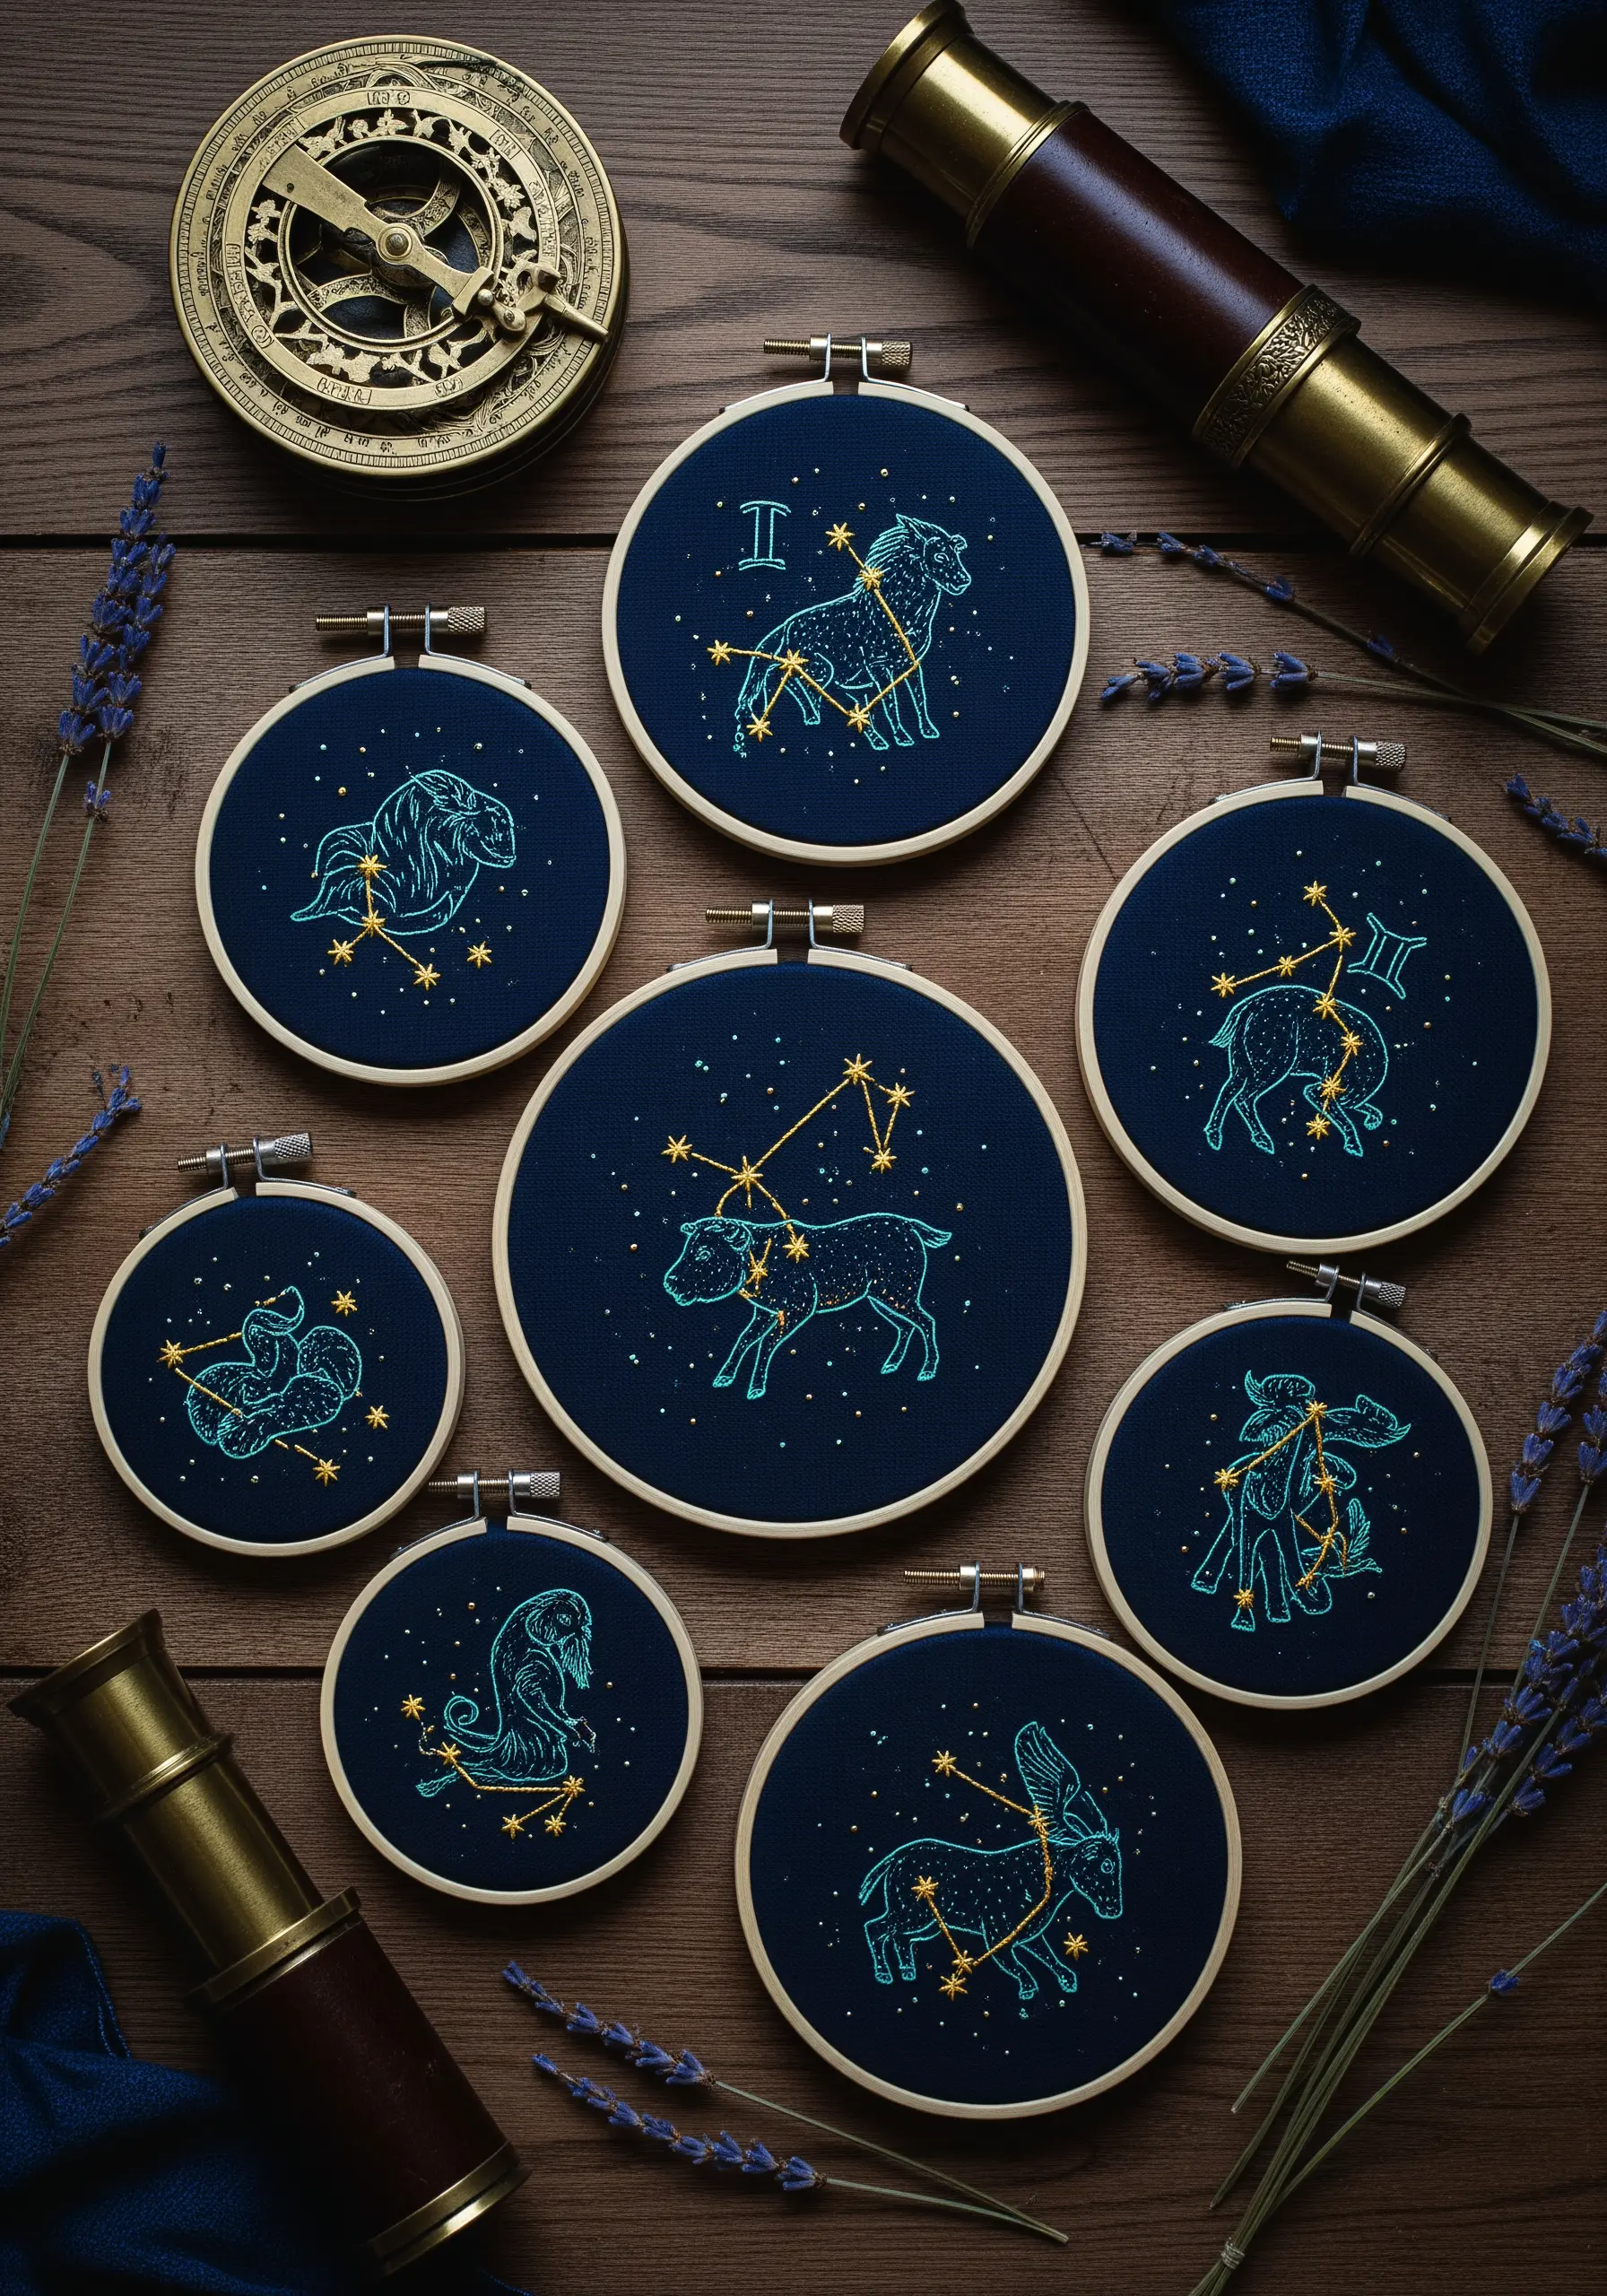
Create high-impact celestial art by pairing dark navy cotton with a fine metallic or glow-in-the-dark thread.
To prevent metallic thread from tangling, use shorter lengths and a thread conditioner like beeswax; this small step ensures your stitches lay smooth and bright.
Instead of a simple backstitch for constellations, use a whipped backstitch. This technique creates a solid, raised line that looks more deliberate and reflective.
Plot out your stars with tiny seed stitches or single French knots before connecting them, giving each star a distinct, shimmering presence.
Group multiple hoops together to create a stunning gallery wall of the zodiac, turning a simple motif into a cohesive art installation.
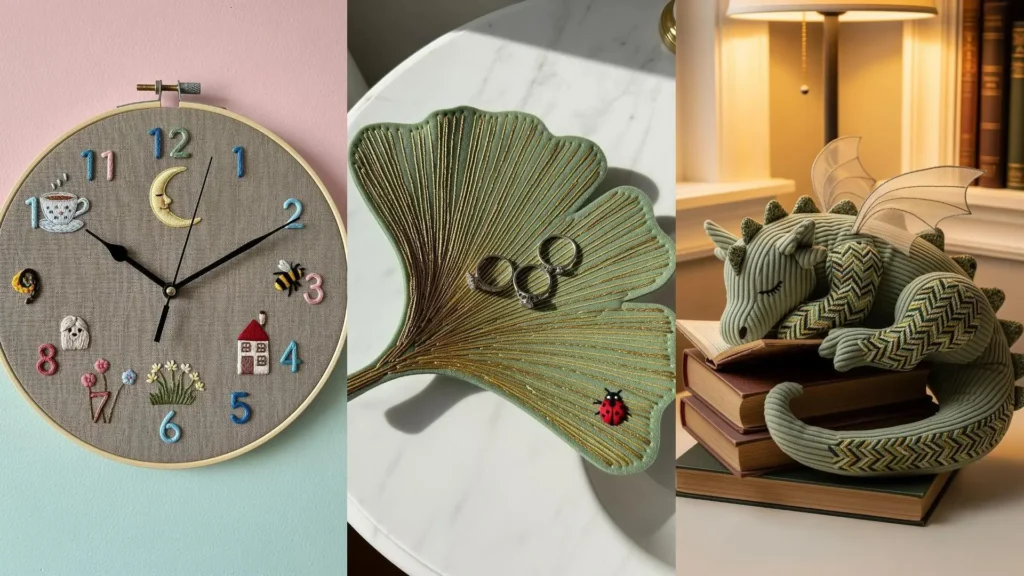
5. Construct a Plush Companion with Textile Harmony
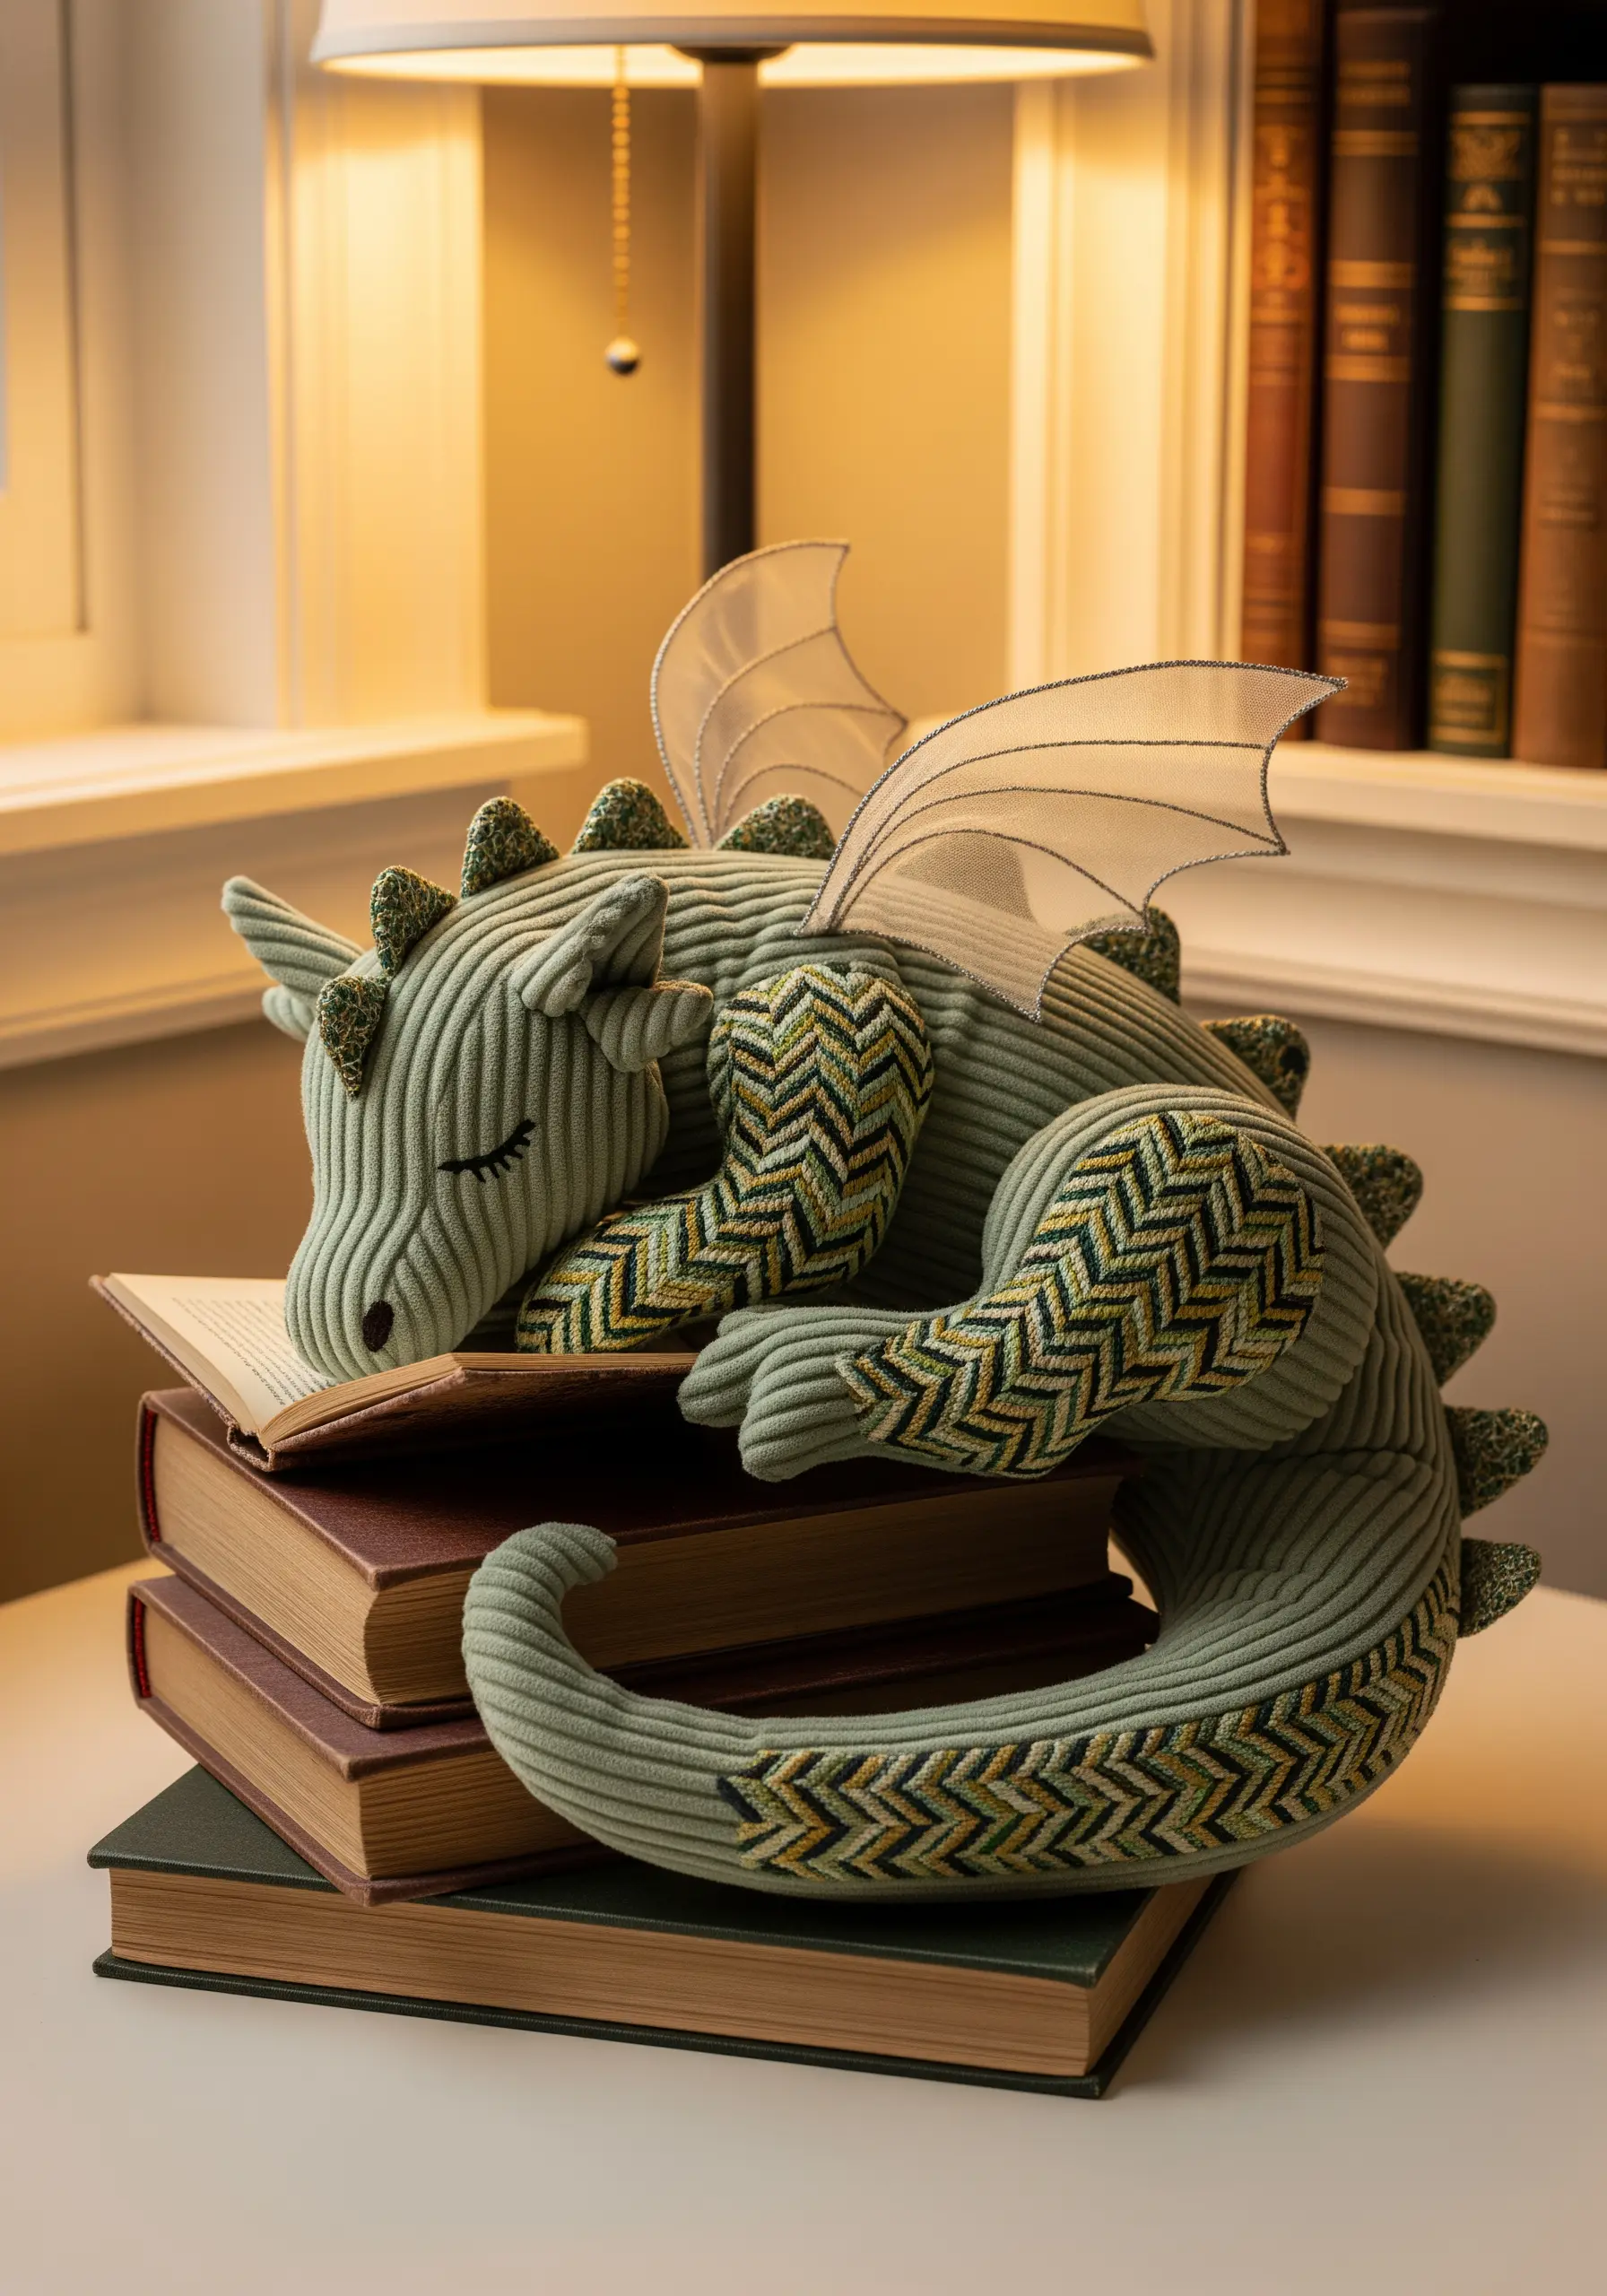
Design a soft sculpture by focusing on the interplay of fabric textures rather than complex embroidery.
Choose two to three complementary fabrics, like a soft corduroy for the main body and a patterned jacquard for accents on the wings and spines.
The texture of the fabric does the heavy lifting, creating visual interest and a tactile quality that invites touch.
Keep the embroidered details minimal and impactful—a few simple backstitches to define the eyes and nostrils are all you need to give it personality.
Use sheer organza for the wings, stitched with a simple outline to suggest veins; its transparency adds a delicate, ethereal contrast to the plush body.
6. Embroider a Lampshade That Tells a Tale
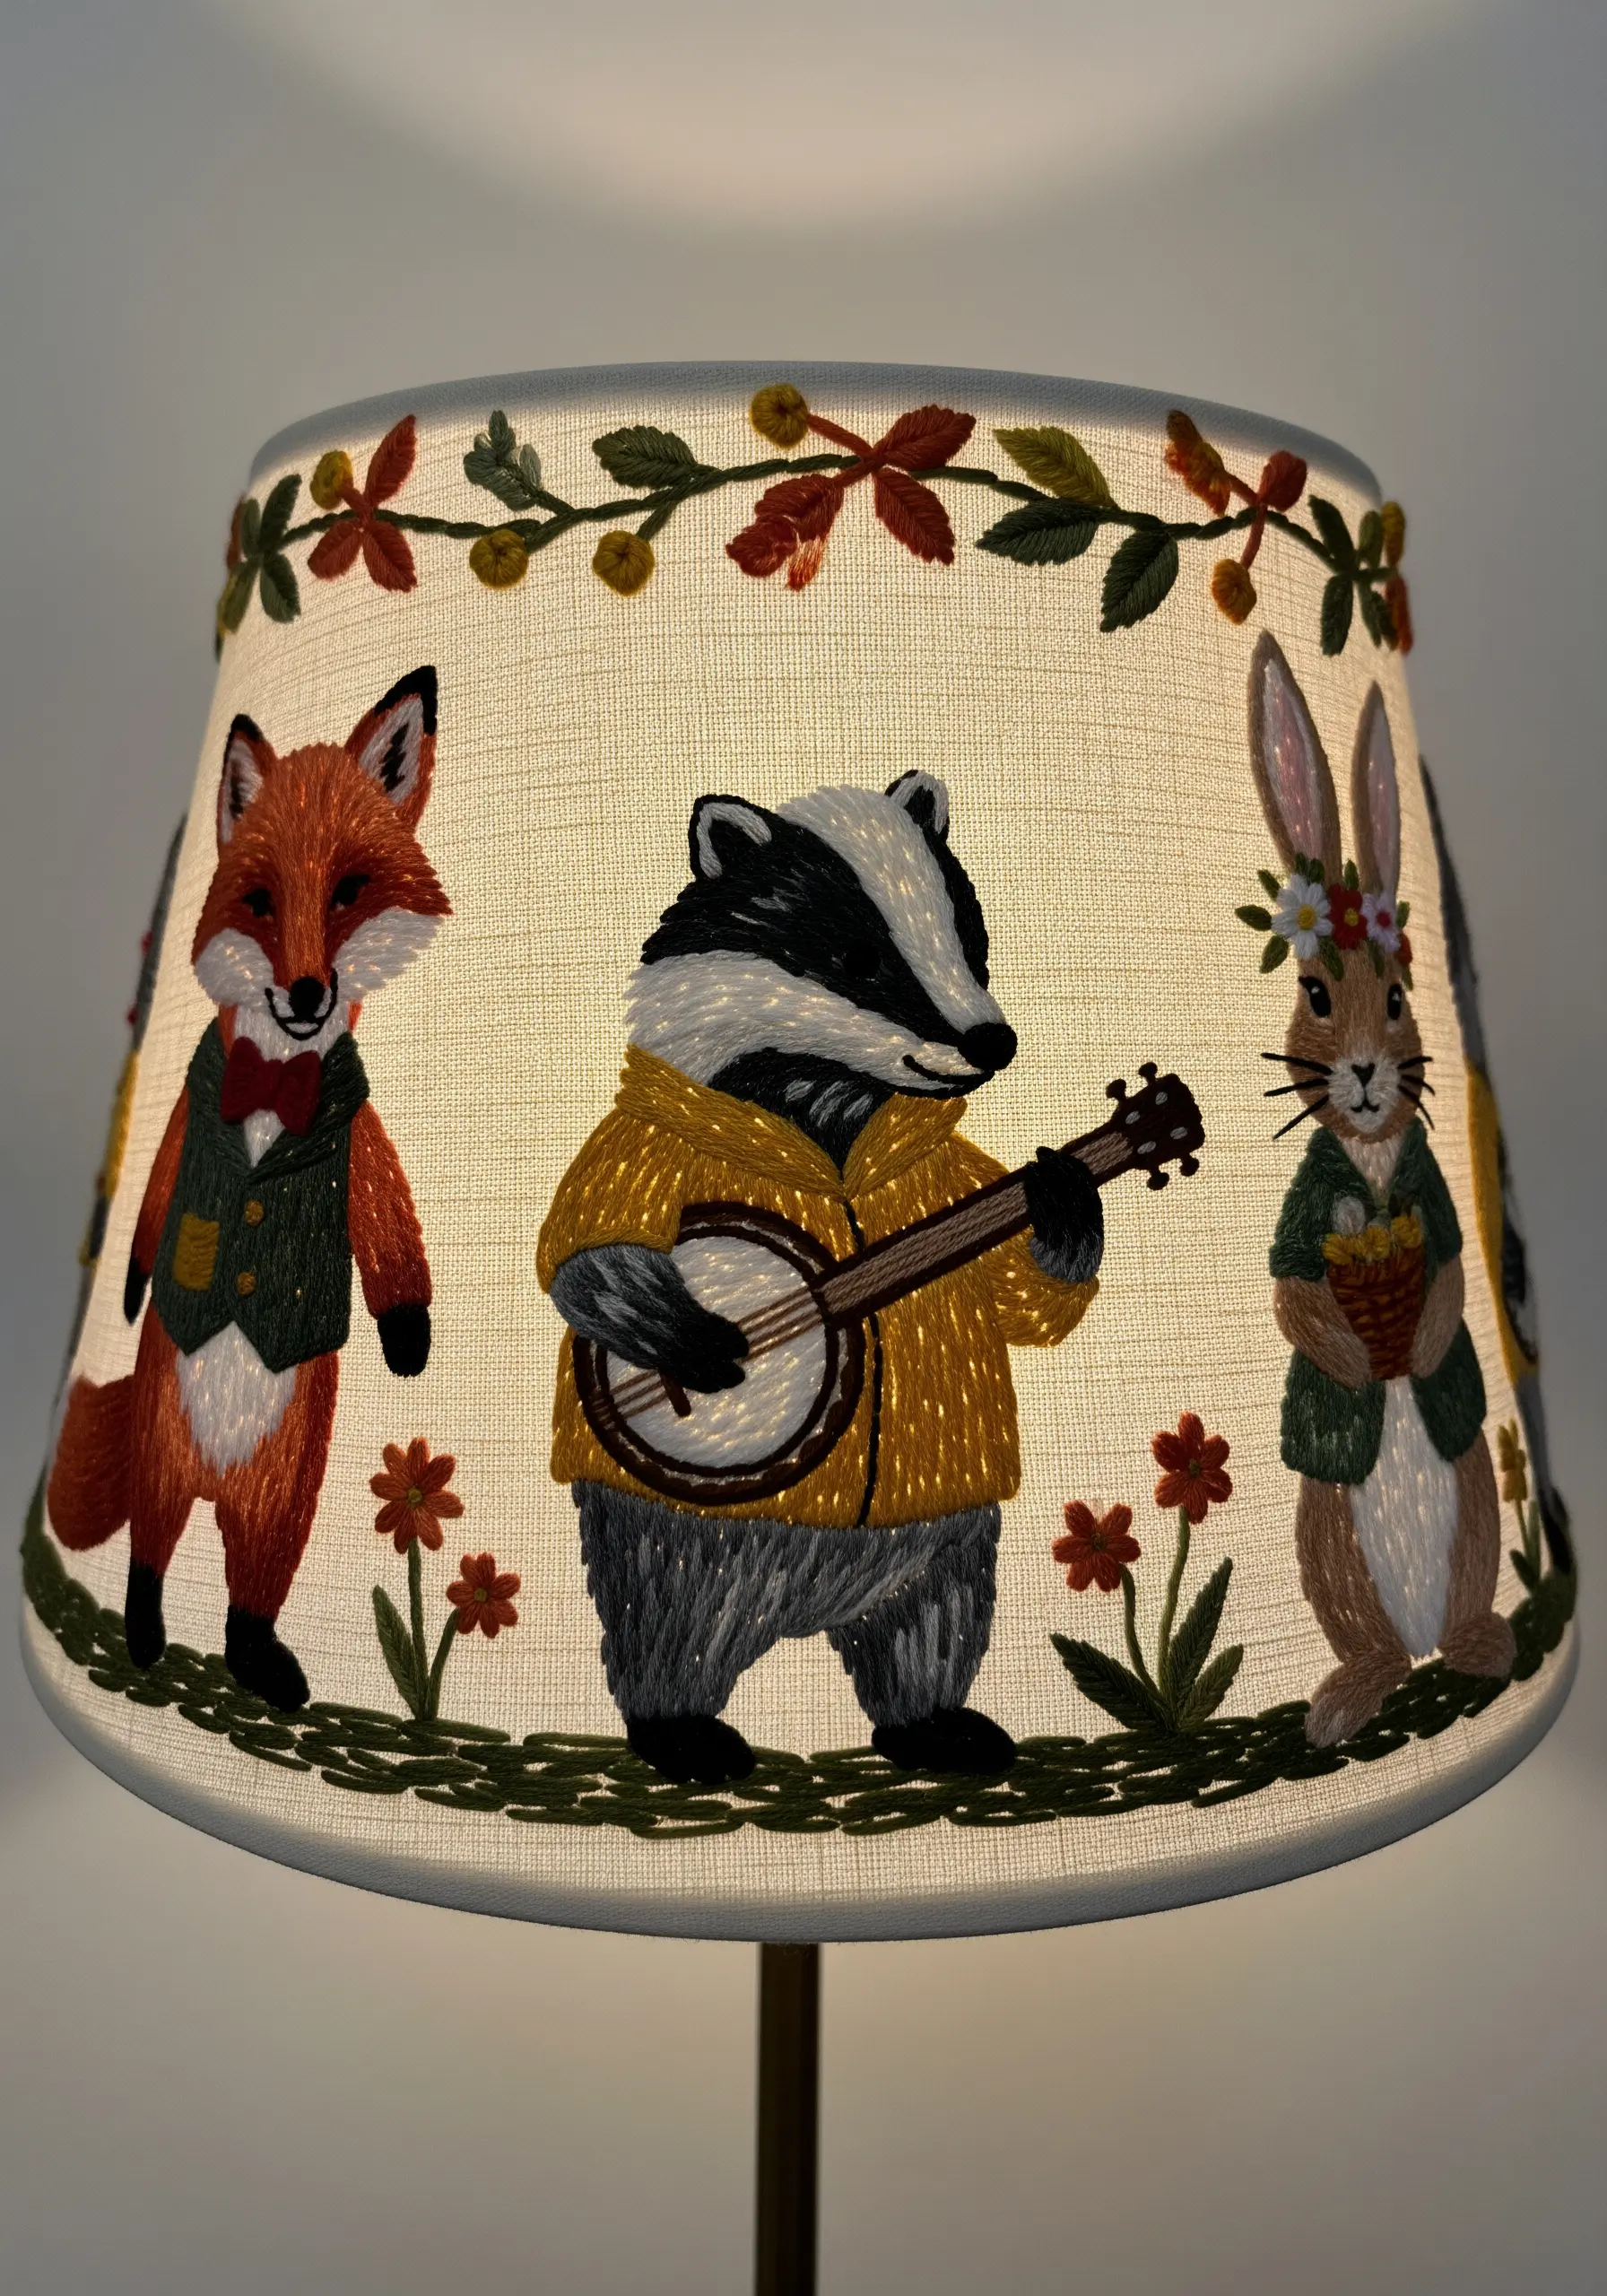
Transform a plain lampshade into a narrative piece by using thread painting to illustrate charming characters.
Choose a fabric lampshade with a smooth, even weave that can support dense stitching without puckering. A light-colored linen or cotton is ideal.
Use long and short stitch to create a smooth, painterly effect for the animals’ fur and clothing, blending shades to add dimension.
Remember that the design will be illuminated from within. Use this to your advantage by choosing vibrant thread colors that will glow warmly when the lamp is on.
Before stitching, trace your design lightly with a water-soluble pen, ensuring the scale and placement are balanced all the way around the shade for a continuous story.
7. Assemble a Delicate Hot Air Balloon Mobile

Construct a sophisticated nursery mobile by focusing on form, subtle texture, and a harmonious color palette.
Create the balloon shapes from panels of high-quality linen in soft, complementary pastels.
Instead of dense embroidery, add elegance with delicate, tone-on-tone stitches—like small fly stitches or backstitched swirls—that suggest pattern without overwhelming the form.
This minimalist approach ensures the final piece feels calming and airy, perfect for a serene environment.
Attach tiny woven baskets with fine thread to complete the whimsical illusion, turning a simple sewing project into a floating piece of art.
8. Sculpt an Underwater World with Stumpwork
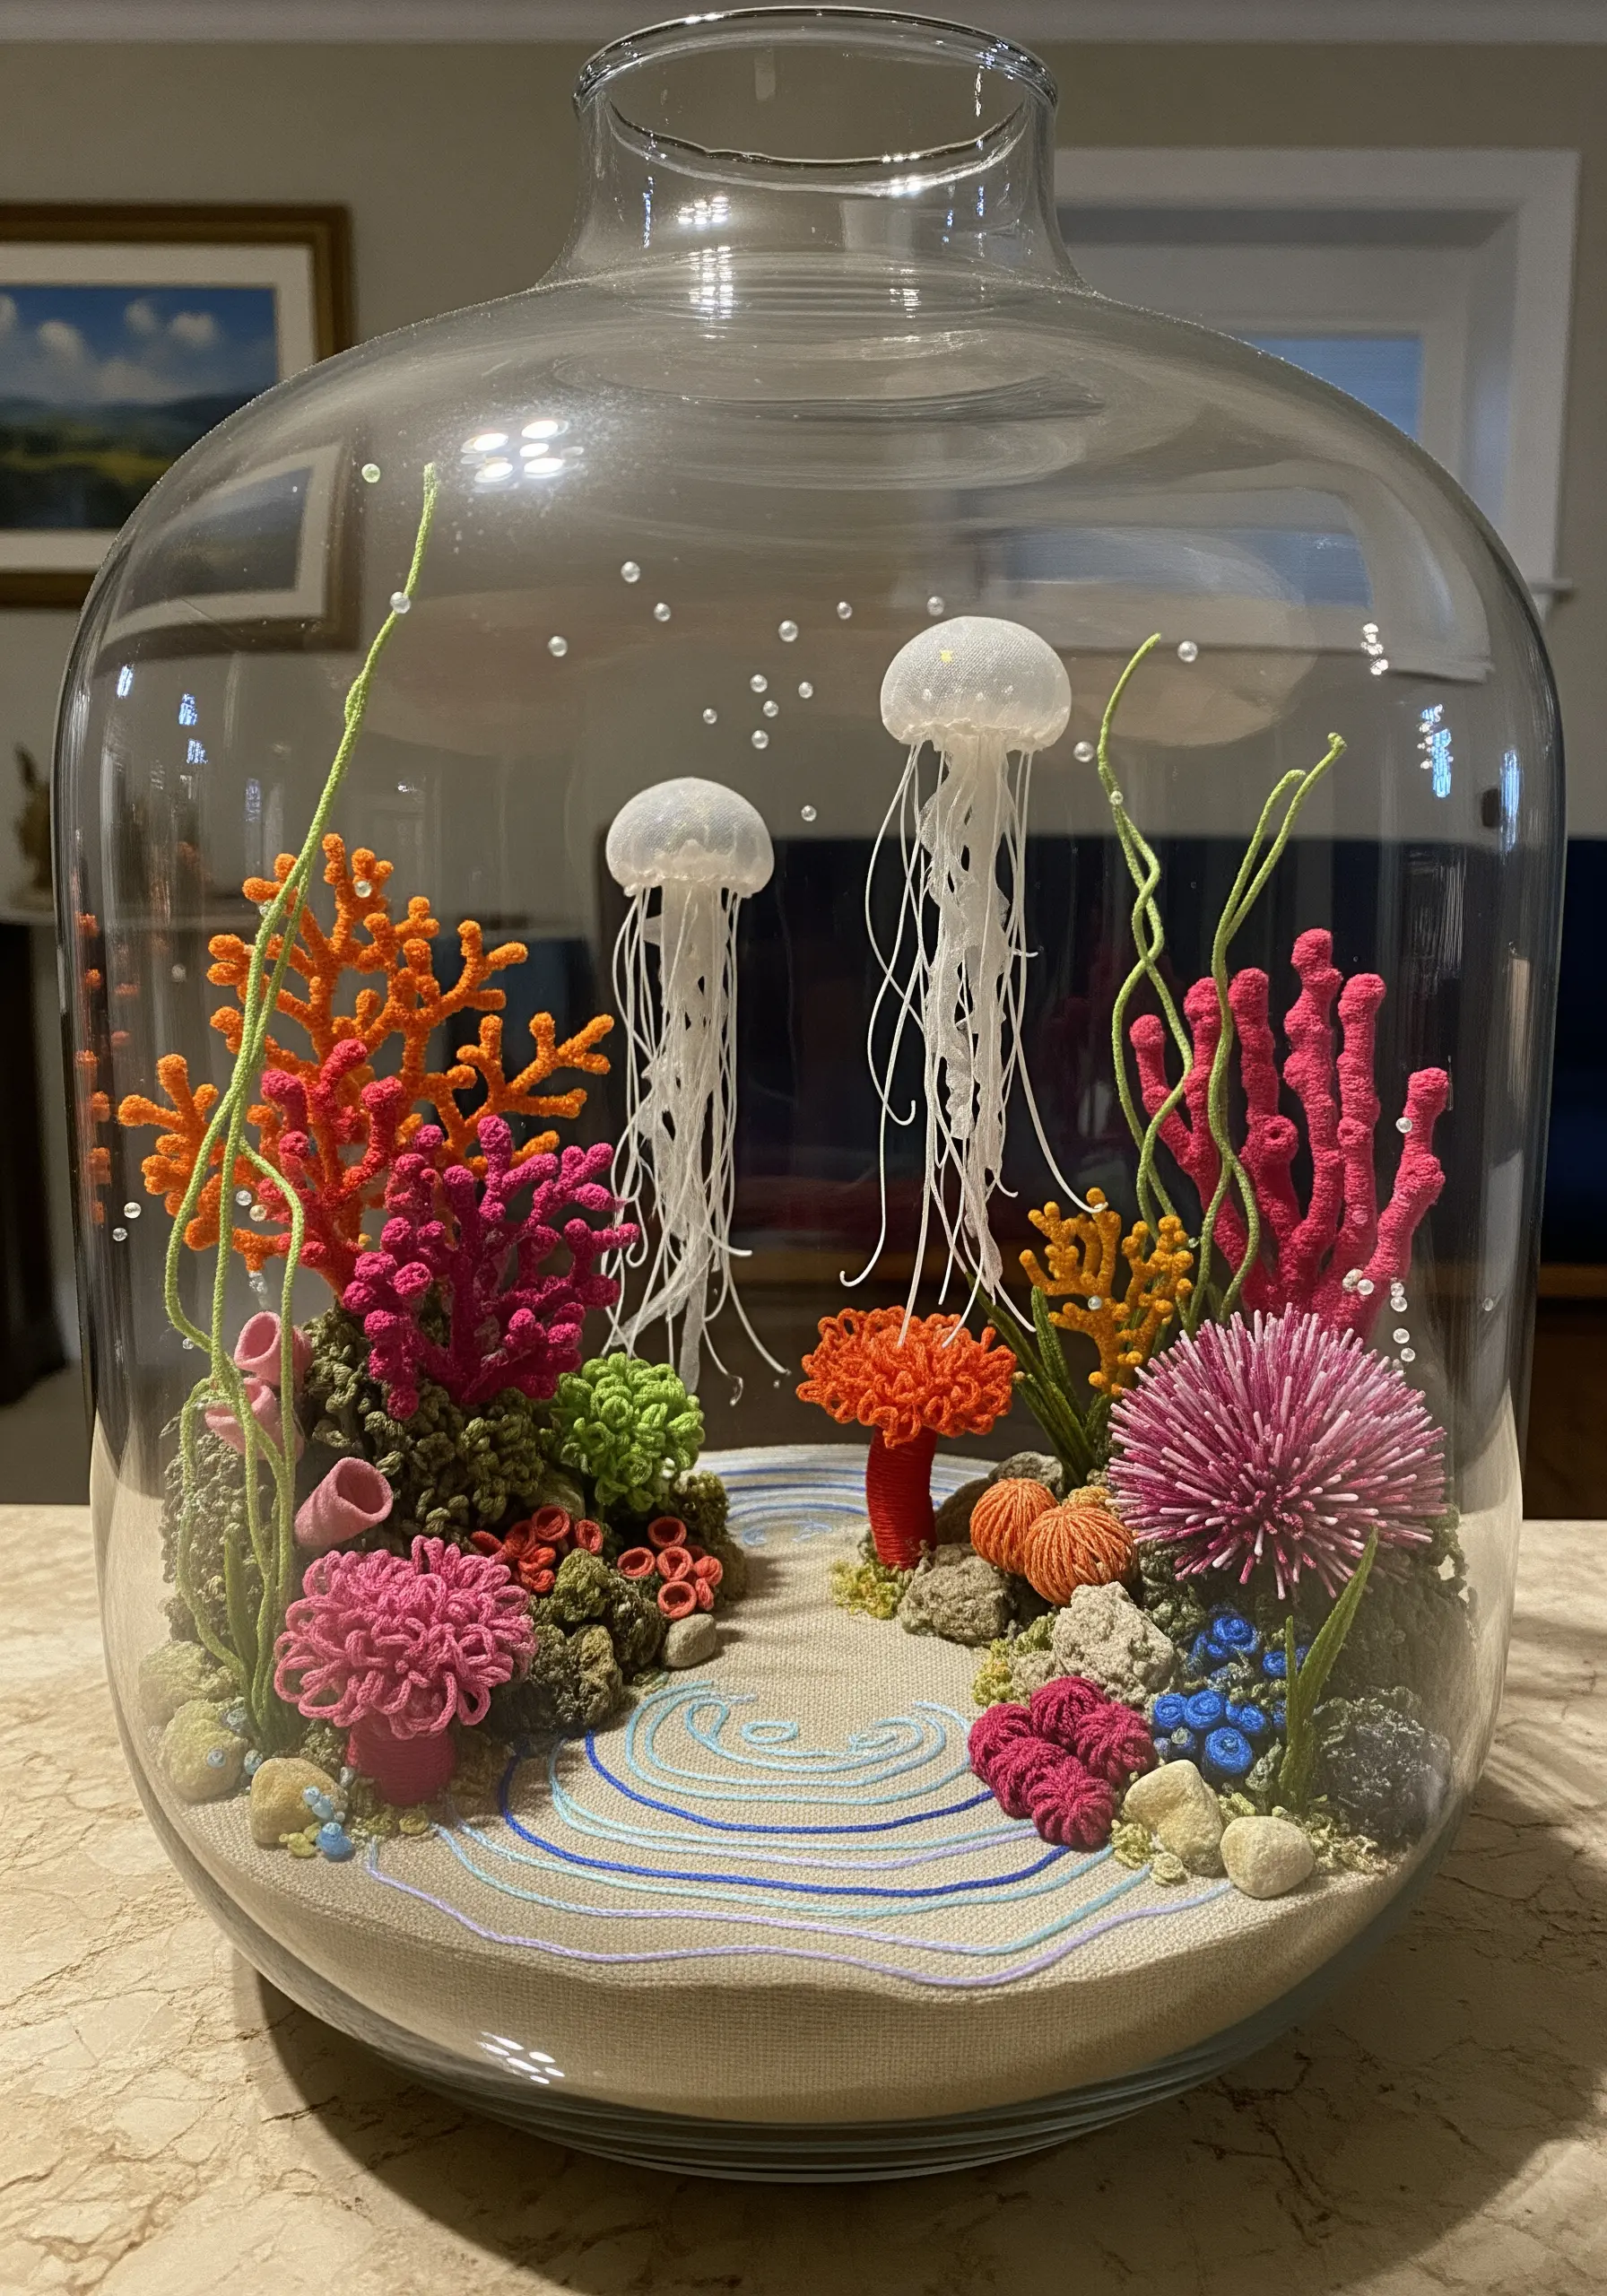
Move your embroidery off the fabric and into the third dimension by creating a sculptural coral reef scene.
Use stumpwork techniques, stitching coral and anemone shapes onto a separate piece of fabric with a wire outline. Cut them out and shape them before attaching them to your main scene.
Create intricate textures with a variety of stitches: use bullion knots for sea worms, cast-on stitches for anemone tentacles, and dense French knots for mossy rocks.
For the ethereal jellyfish, use sheer organza and let the threads hang loose to mimic delicate tentacles floating in the water.
Displaying the final piece in a glass cloche or jar enhances the diorama effect, turning your stitch work into a self-contained, magical ecosystem.
9. Create Graphic Impact with Illustrative Outlines
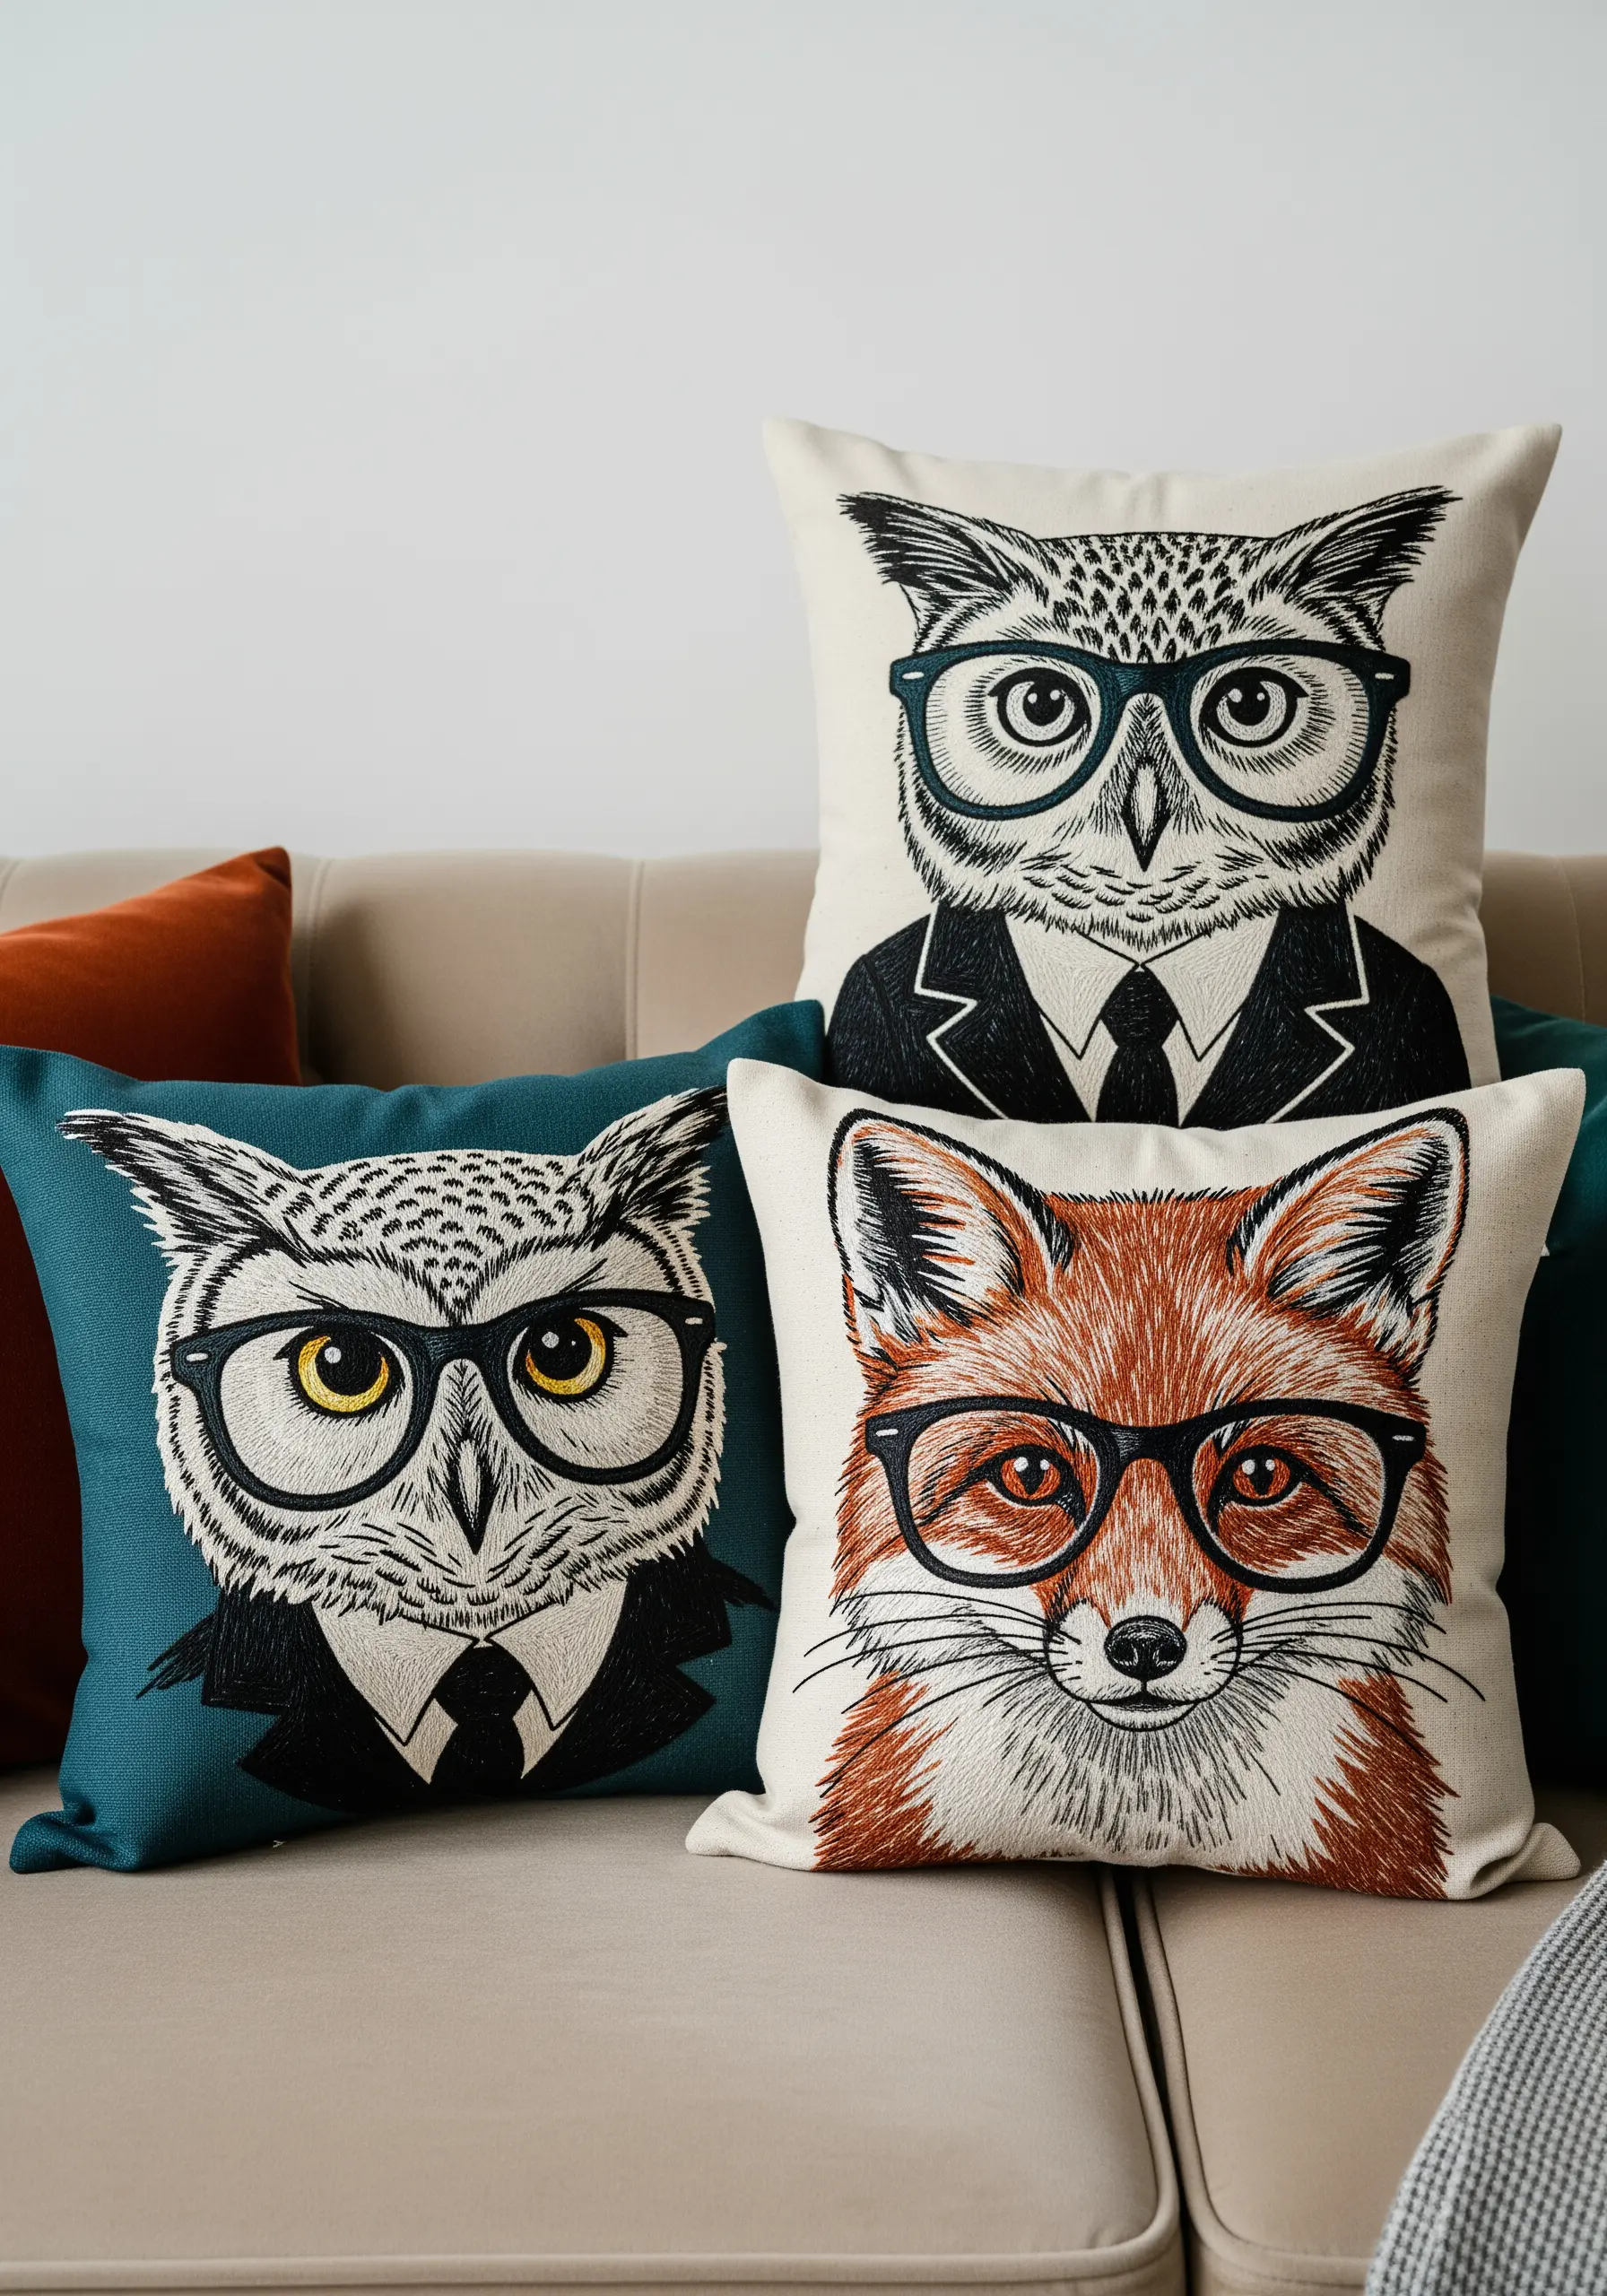
Achieve a bold, modern look on cushions by treating your embroidery like a pen-and-ink illustration.
Stick to a high-contrast palette, such as black thread on a light linen or cream thread on a dark teal fabric.
Use a single, consistent stitch—like a backstitch or stem stitch—to create clean, confident lines that define the entire design.
Incorporate hatching and cross-hatching to create shading and texture, just as you would in a drawing. This technique adds depth and sophistication without introducing more colors.
This illustrative style works exceptionally well for quirky, anthropomorphic animals, giving them a storybook charm that is both whimsical and chic.
10. Define Form with Elegant Couching
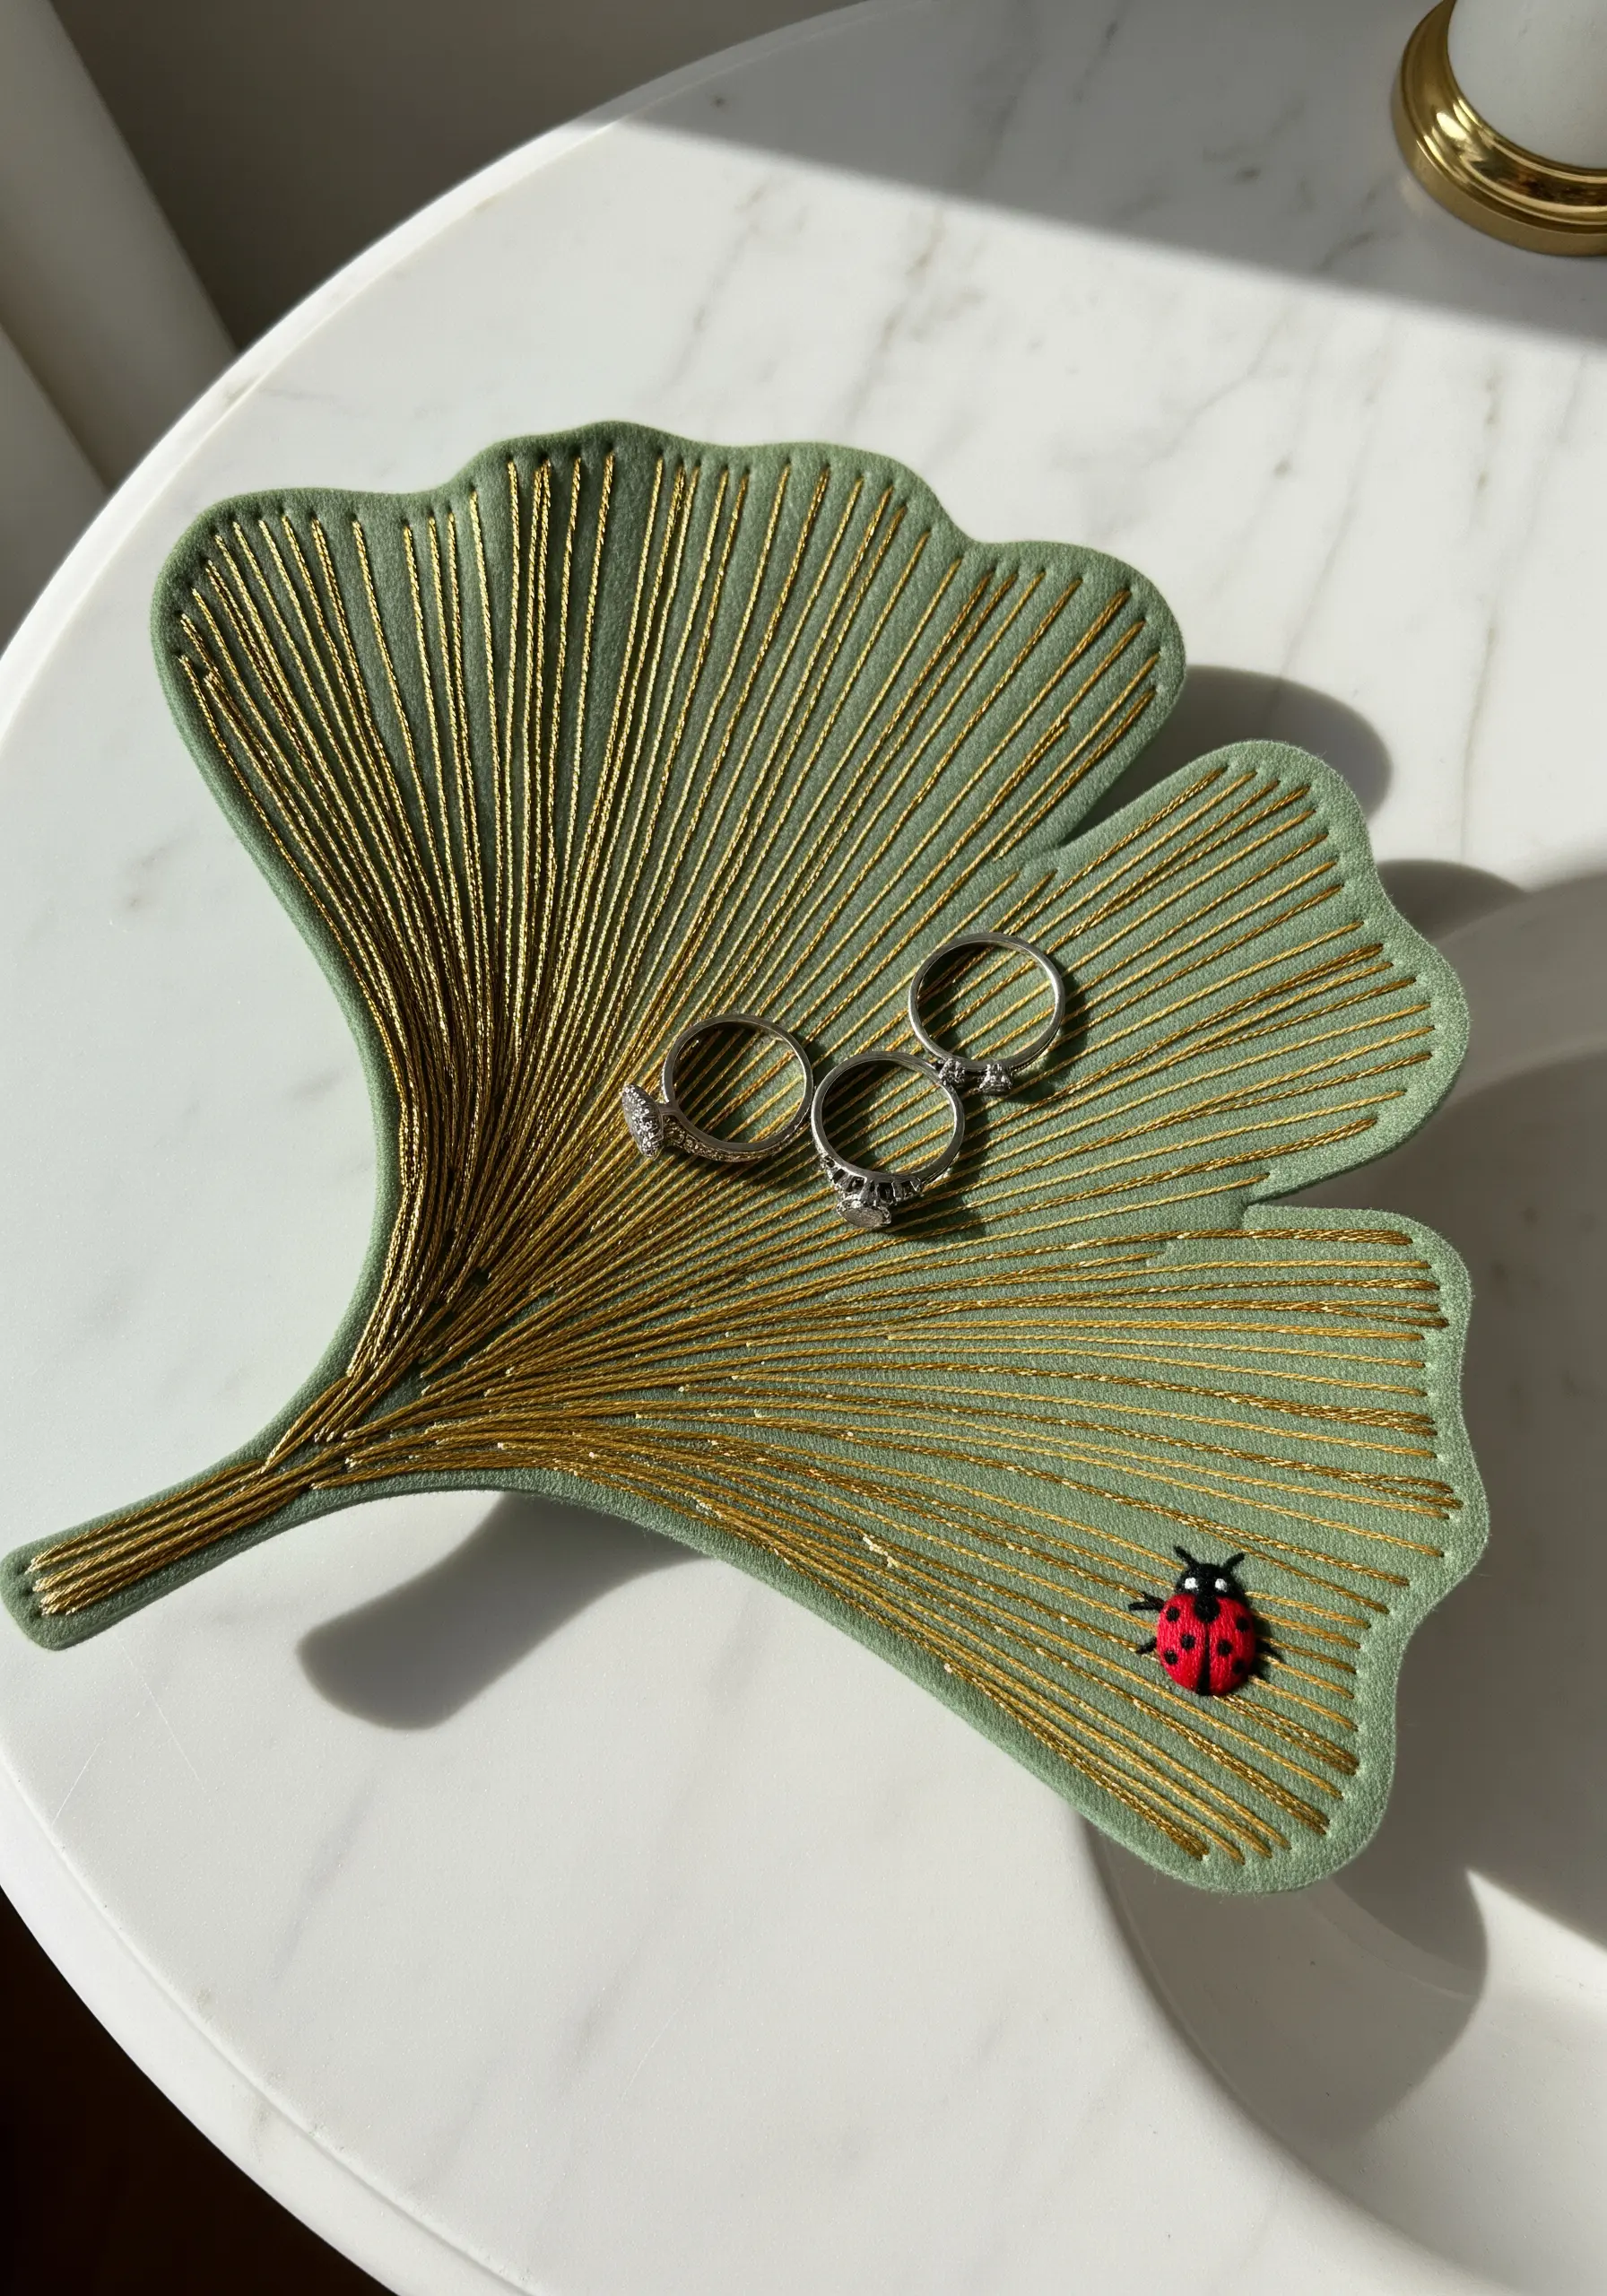
Create a sophisticated trinket dish by using couching to add clean, metallic lines that emphasize its organic shape.
Couching, the technique of laying a thread on the surface and tacking it down with smaller stitches, is perfect for thick or metallic threads that are difficult to pull through fabric.
Arrange your metallic thread in parallel lines to accentuate the veins of the ginkgo leaf, using a fine, matching thread for the tacking stitches so they become nearly invisible.
This creates a stunning texture that is both visual and tactile, turning a simple fabric shape into a functional piece of art.
Add a single, whimsical element, like a tiny ladybug made of satin stitch, to provide a pop of color and a focal point.
11. Engineer a Freestanding Embroidered Bookmark
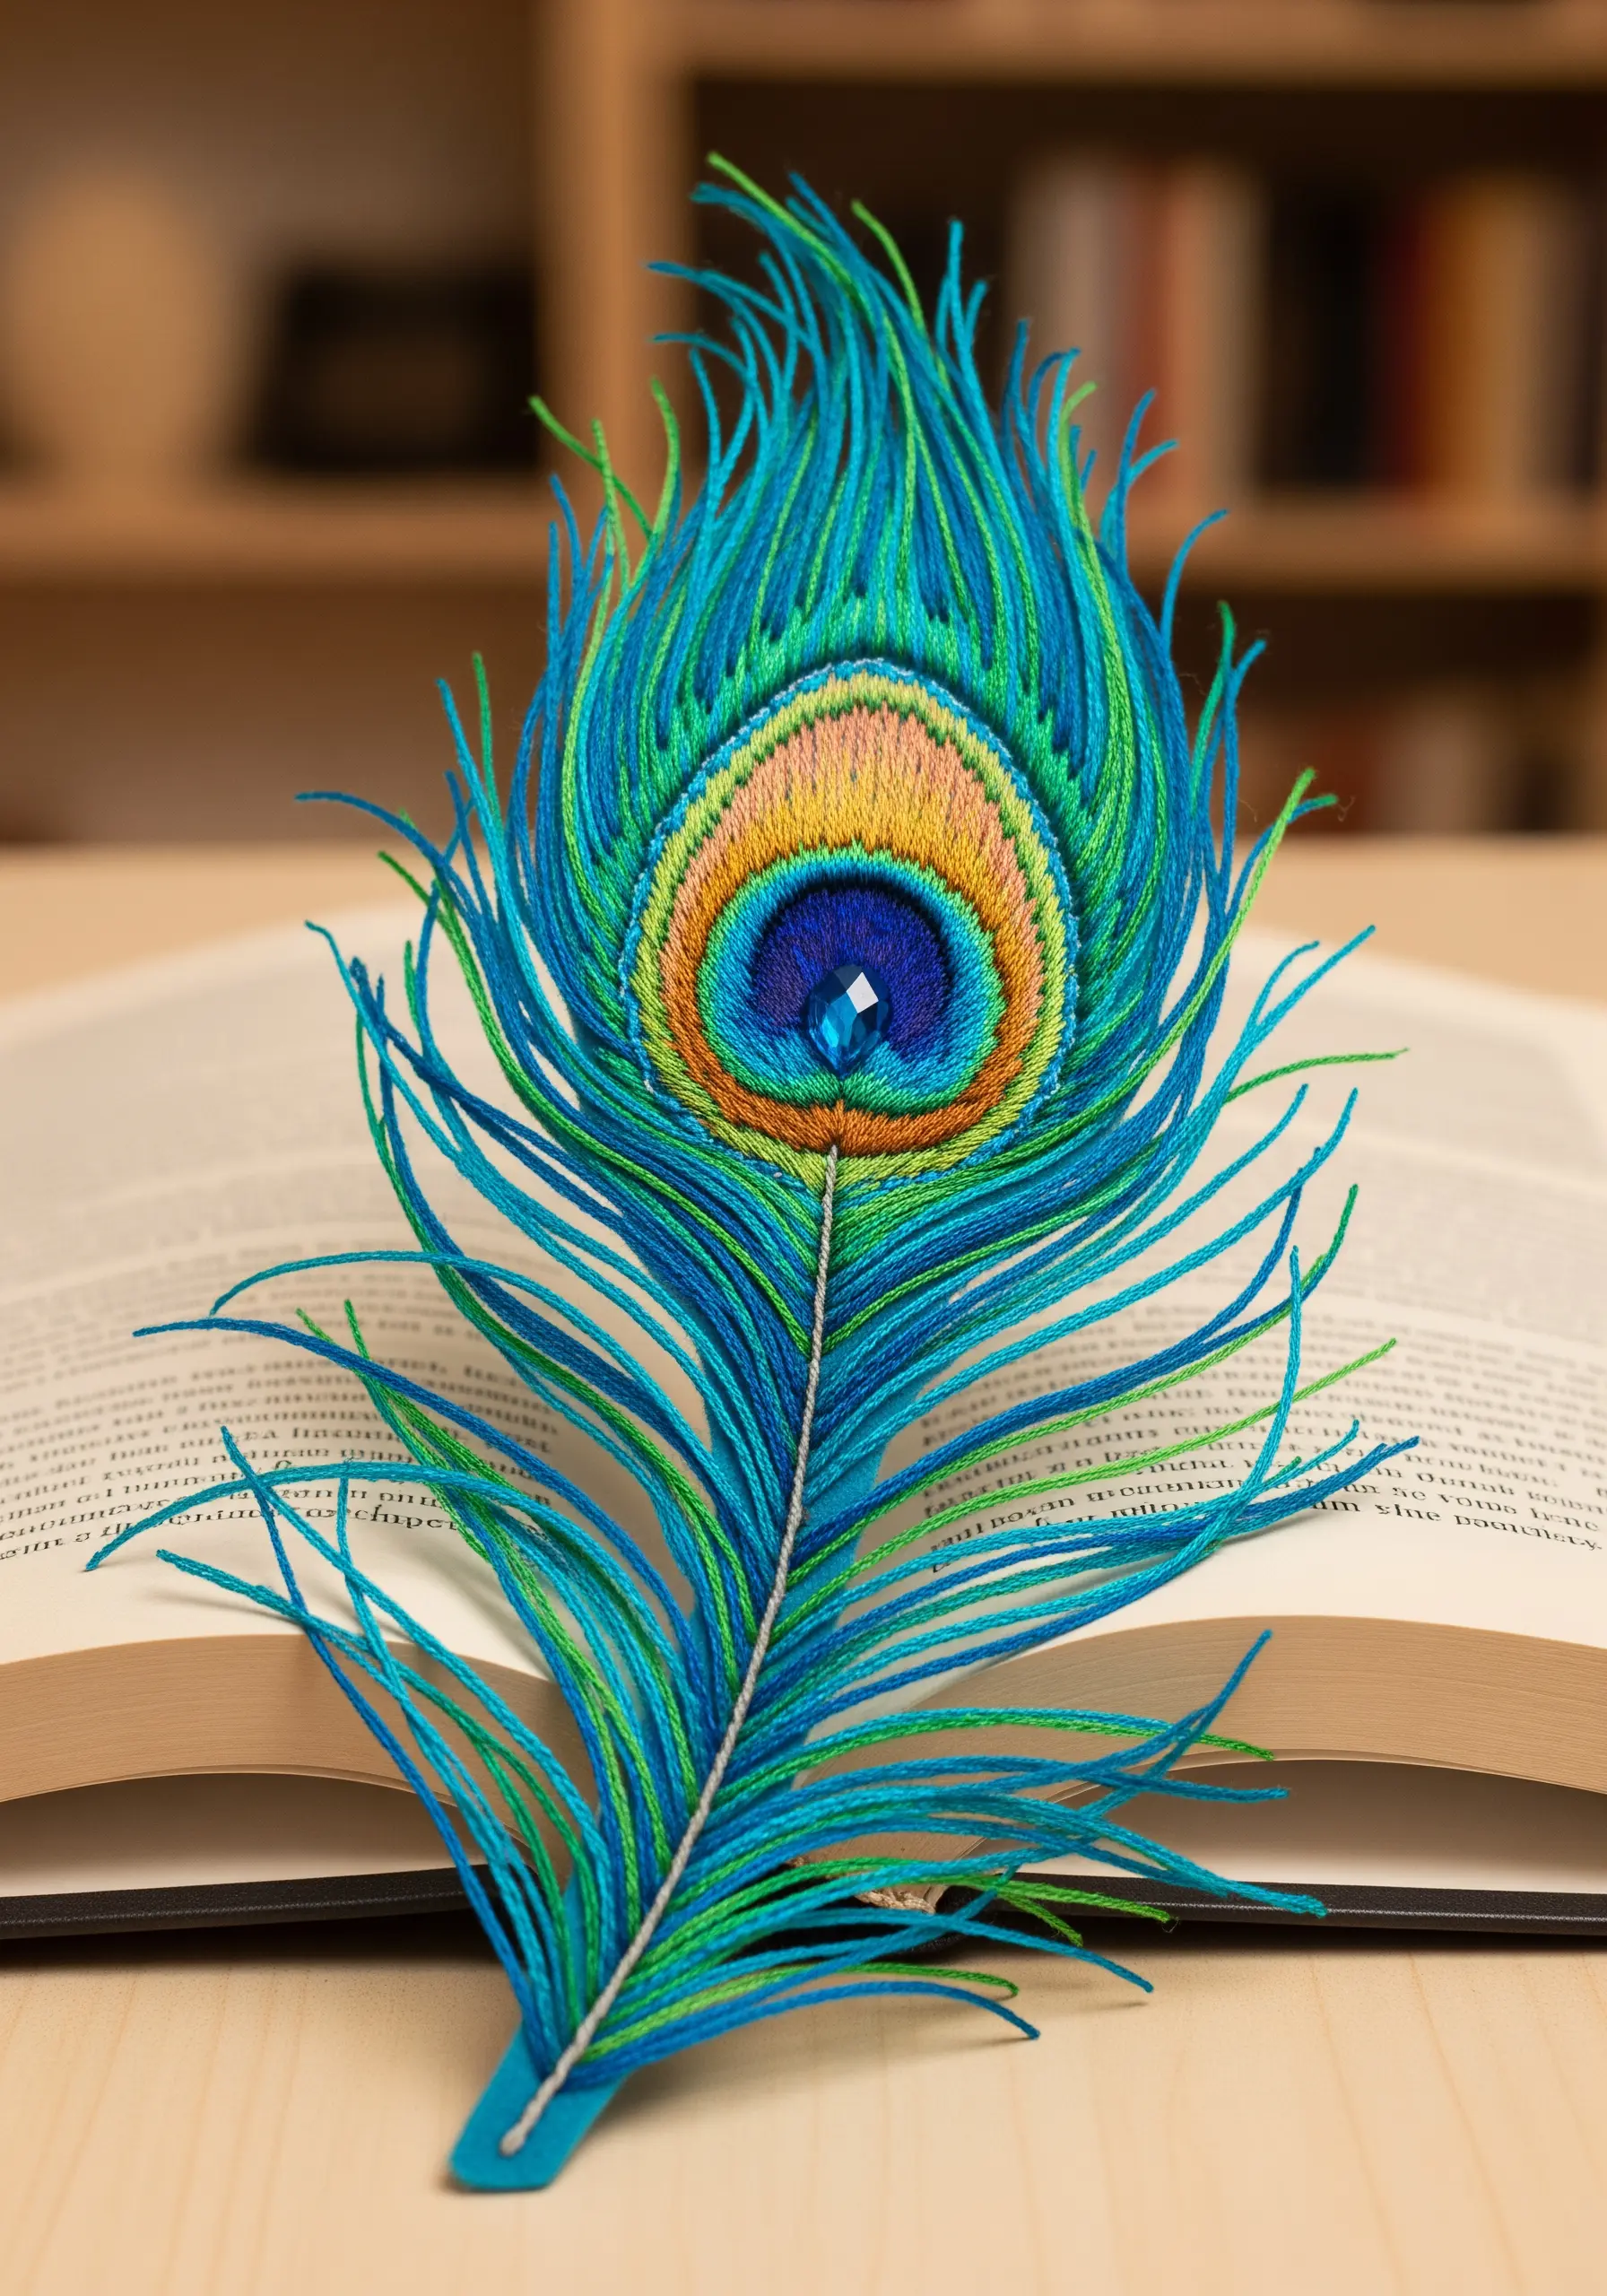
Create a bookmark that is an art object in itself by stitching a design that can be cut out from the fabric.
Use a water-soluble stabilizer as your base. Stitch your design densely onto it, ensuring all elements are connected so the piece holds together after the stabilizer is dissolved.
For the feather’s barbs, use a detached chain stitch or long, loose straight stitches extending from the central shaft to create a wispy, realistic edge.
Employ thread painting with multiple shades of blue and green to capture the iridescent quality of a peacock feather.
A single, well-placed bead or crystal at the center adds a touch of light and luxury, elevating it from a simple bookmark to a treasured keepsake.
12. Adorn Your Curtains with Botanical Sculptures
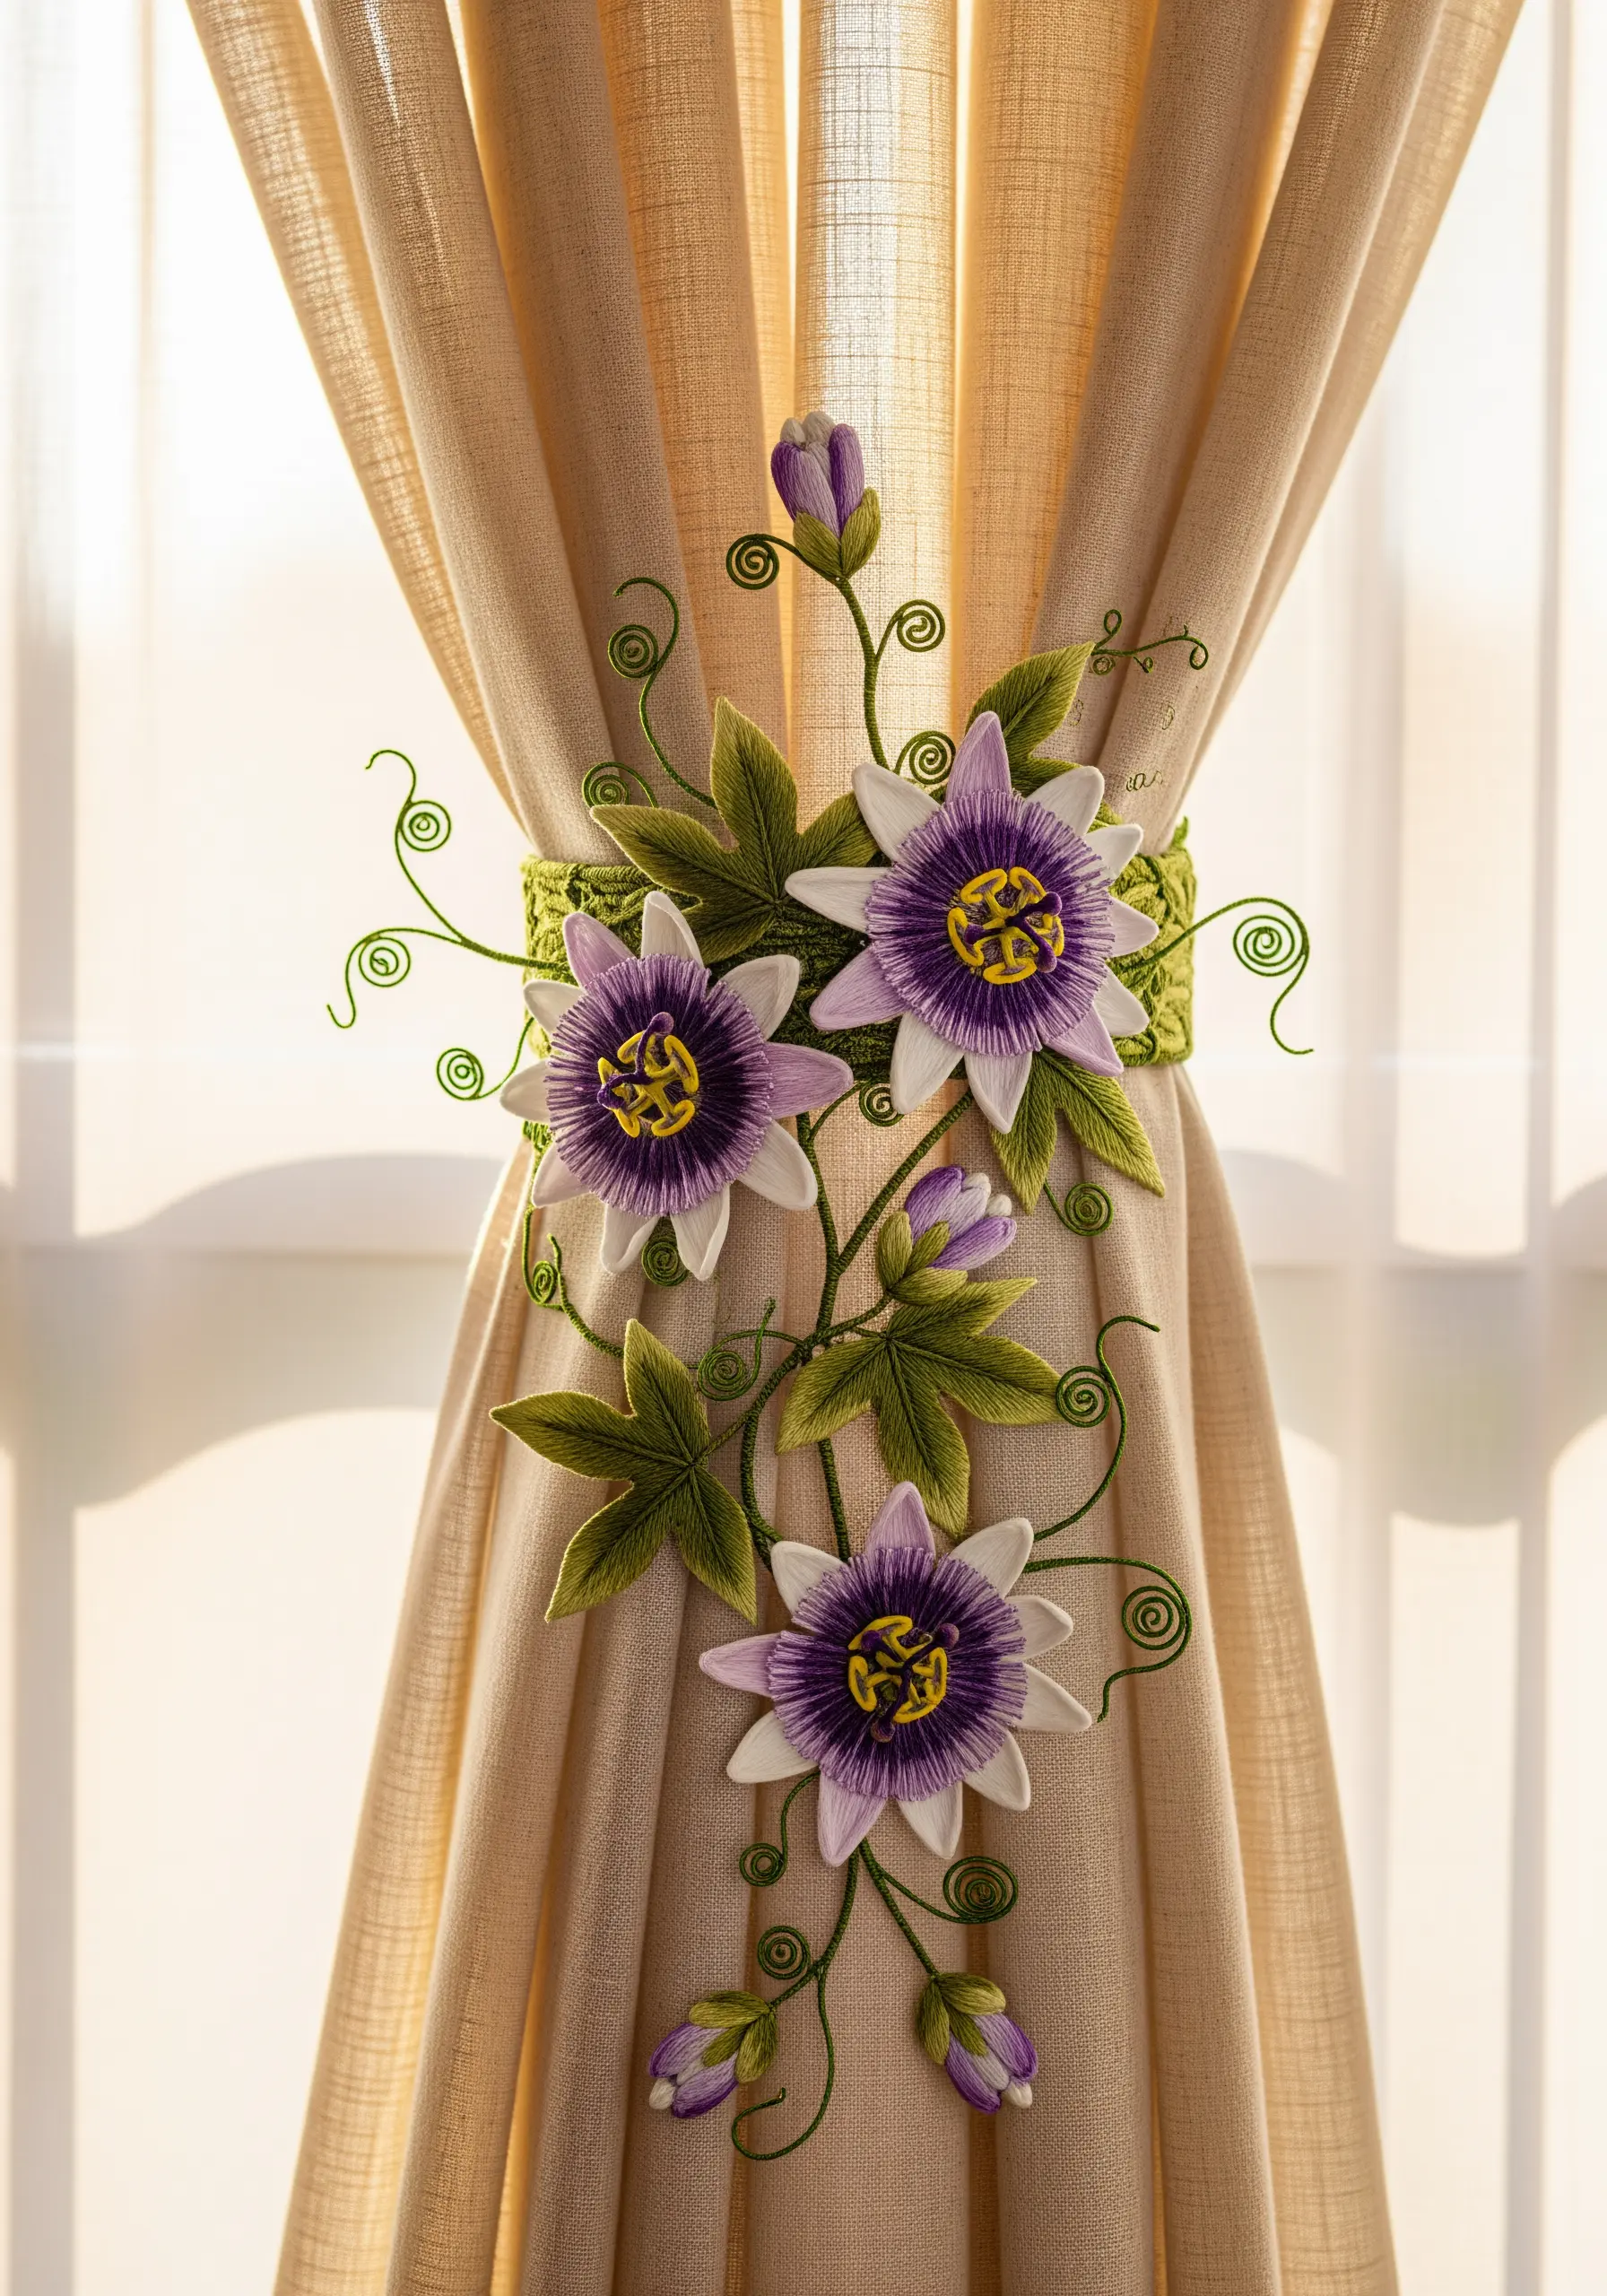
Craft a functional curtain tie-back that doubles as a statement piece of floral art using stumpwork techniques.
Create individual petals and leaves on wire-edged fabric. This allows you to bend and shape each element realistically after it’s stitched.
Use long-and-short stitch to achieve soft, natural color gradients on the passion flower petals, blending purples, whites, and yellows seamlessly.
For the spiraling tendrils, tightly wrap green thread around a wire, which you can then curl into a perfect, springy shape.
Assembling these raised, sculptural embroidery effects onto a simple band creates a lush, botanical composition that brings your window treatments to life.
13. Personalize Time with a Hoop Clock

Turn a standard embroidery hoop into a functional and deeply personal clock.
Instead of numbers, stitch small, meaningful motifs that represent different hours of the day for you—a coffee cup, a favorite flower, or a crescent moon.
Use padded satin stitch to give the motifs a slightly raised, 3D quality that makes them stand out against the fabric background.
Choose a tightly woven fabric like linen or cotton canvas in a neutral color to ensure the clock hands are clearly visible and the embroidered icons pop.
You can purchase a simple clock mechanism from any craft store. Just make a small hole in the center of your fabric to install it, instantly transforming your stitchery into a whimsical timepiece.
14. Curate a Collection of Thread-Painted Moths

Create the illusion of a vintage entomology collection by using meticulous thread painting to capture the beauty of moths.
Work with a single strand of embroidery floss to achieve the finest detail and the smoothest color blending on the wings.
Study real moth species to inform your color palettes and patterns, which will give your work a stunning level of realism.
Stitch each moth as a separate appliqué on felt or another sturdy fabric, then cut it out and mount it onto a background of vintage-style paper or calligraphy.
Displaying them in a shadow box with entomology pins enhances the illusion of a scientific specimen collection, blending art with natural history.
15. Craft a Dreamy Felt and Fabric Garland
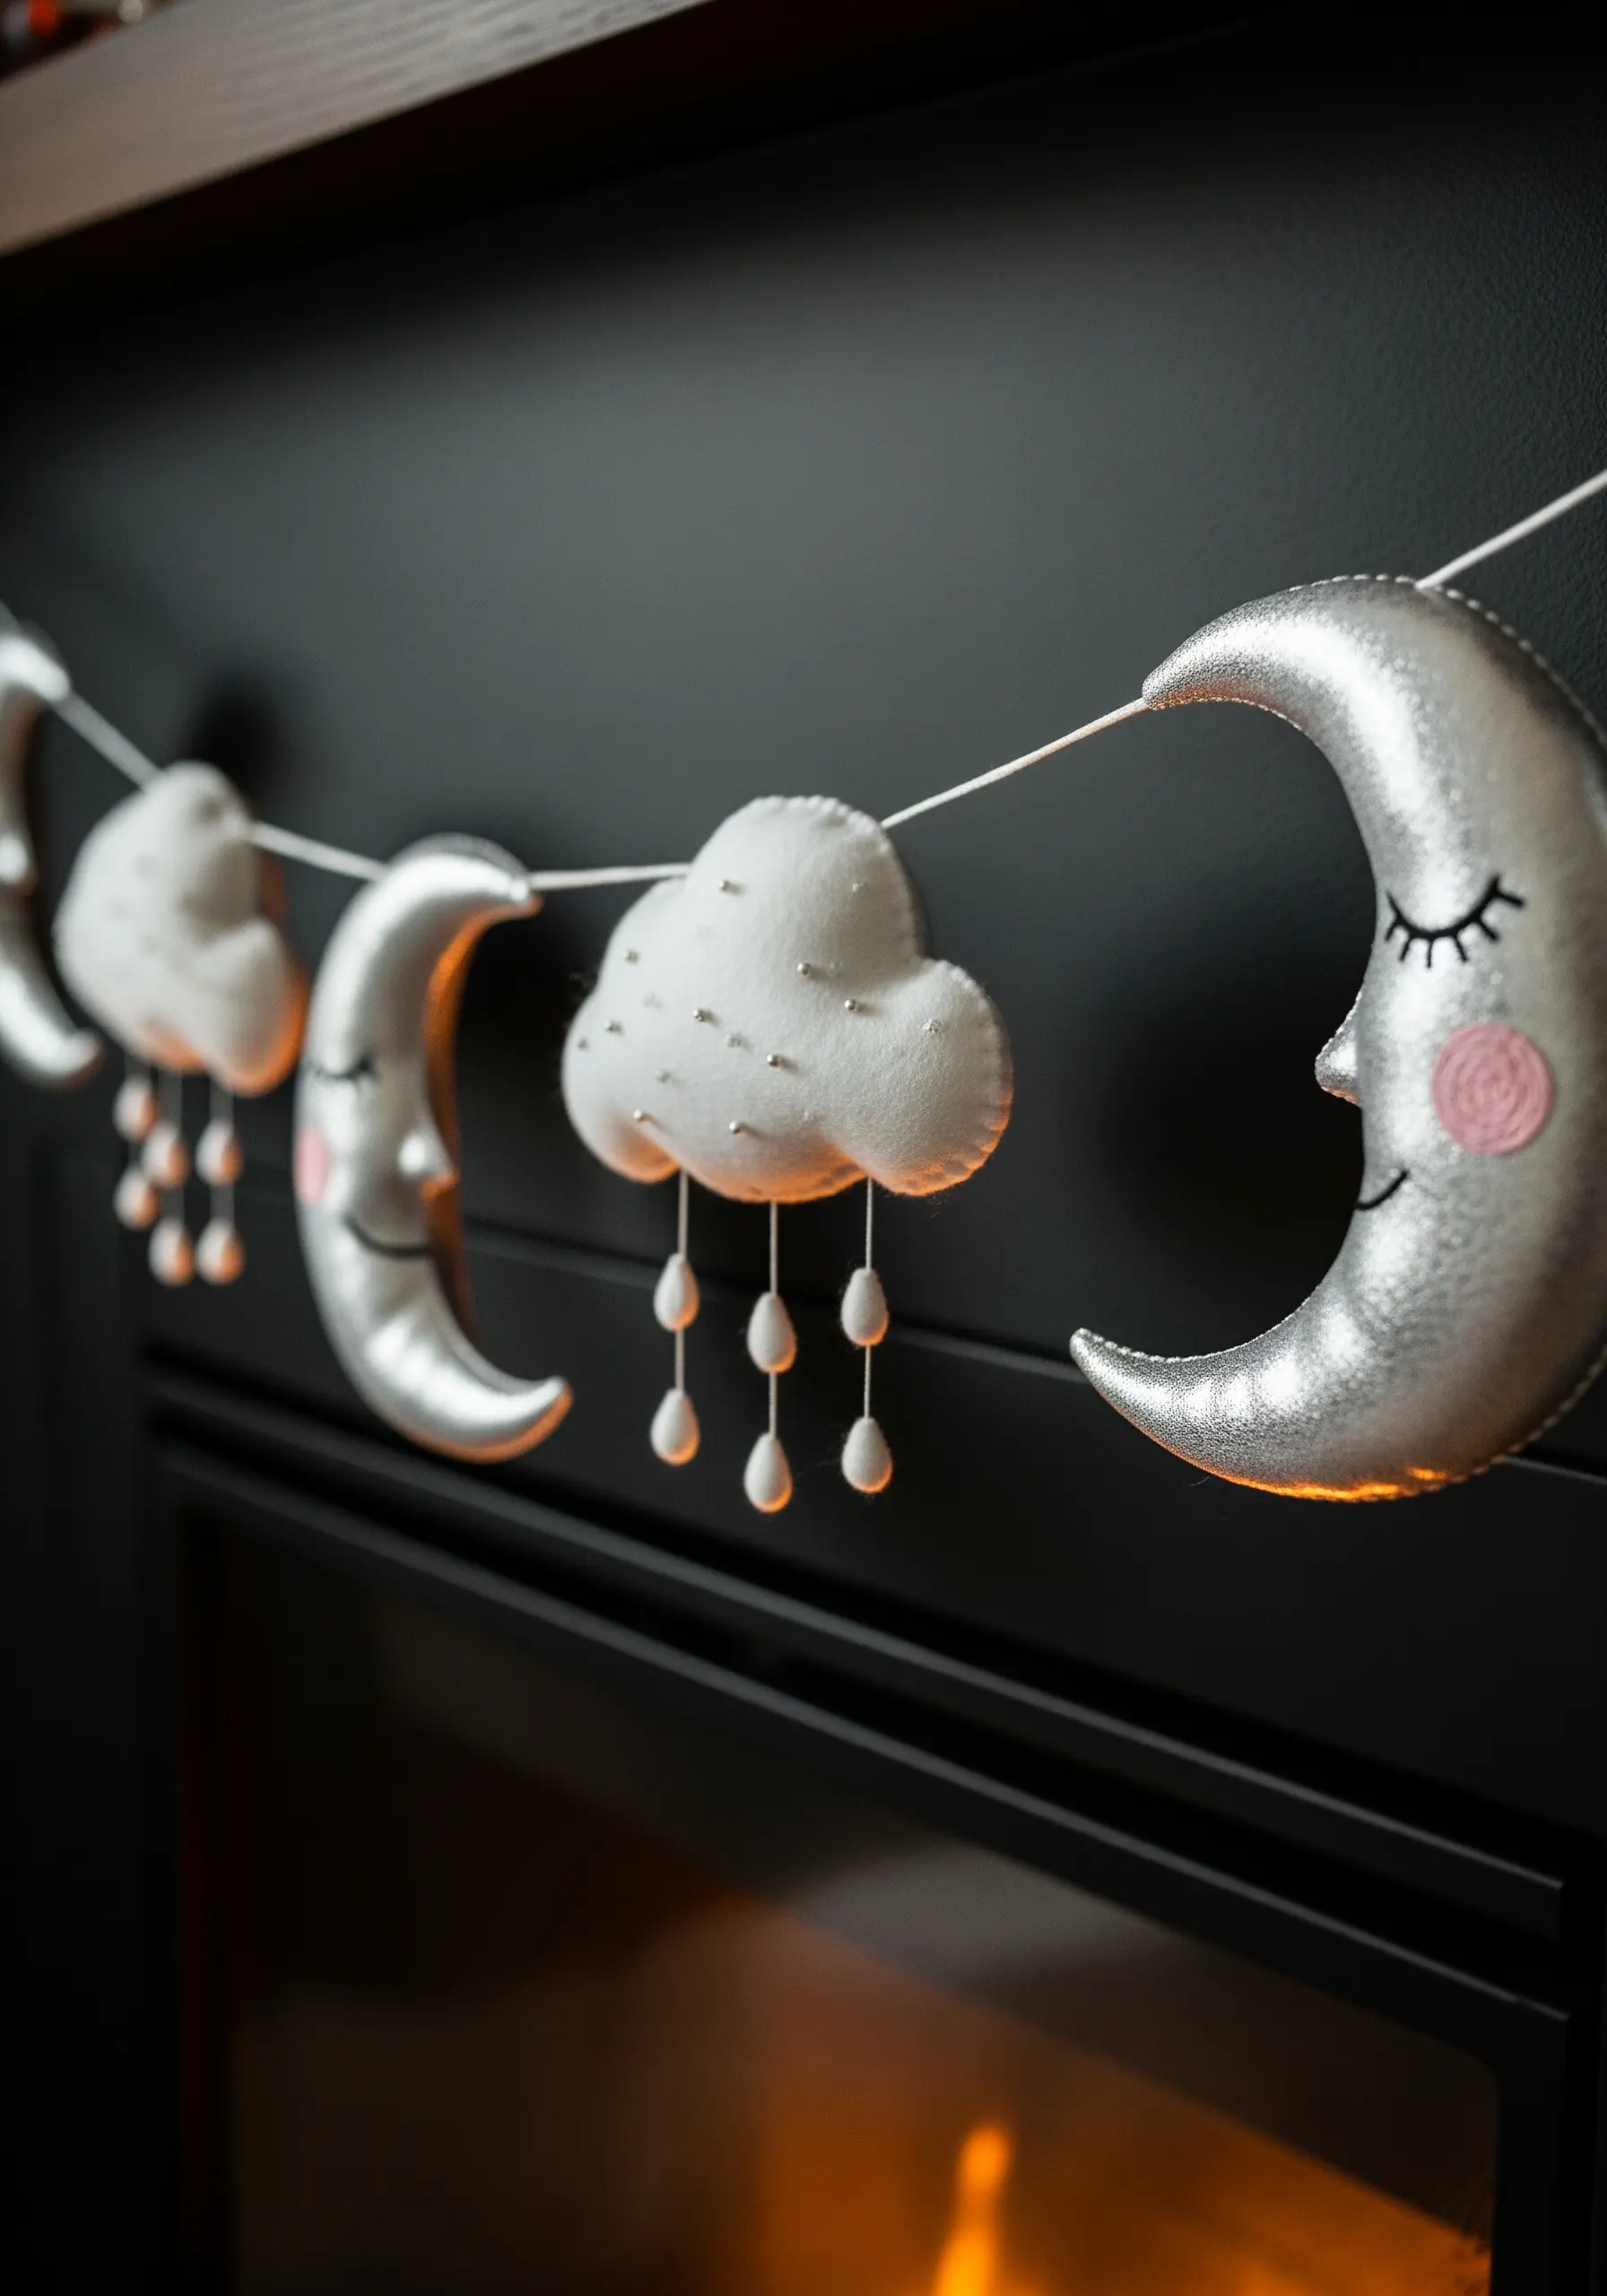
Create a soothing garland for a nursery or quiet corner by combining soft felt with shimmering fabric.
Use a metallic faux leather or a similar shiny fabric for the moons to provide a gentle, light-reflecting contrast to the matte, plush felt clouds.
Keep the stitching minimal and clean. A simple running stitch around the edges is all you need to assemble the shapes, giving it a charming, handmade feel.
Add delicate details with small beads or French knots—like raindrops falling from the clouds or subtle rosy cheeks on the moons.
This project is perfect for using up fabric scraps and requires no complex patterns, making it a quick and satisfying way to add a touch of whimsy to a room.
16. Enliven Your Table with Bold Floral Borders
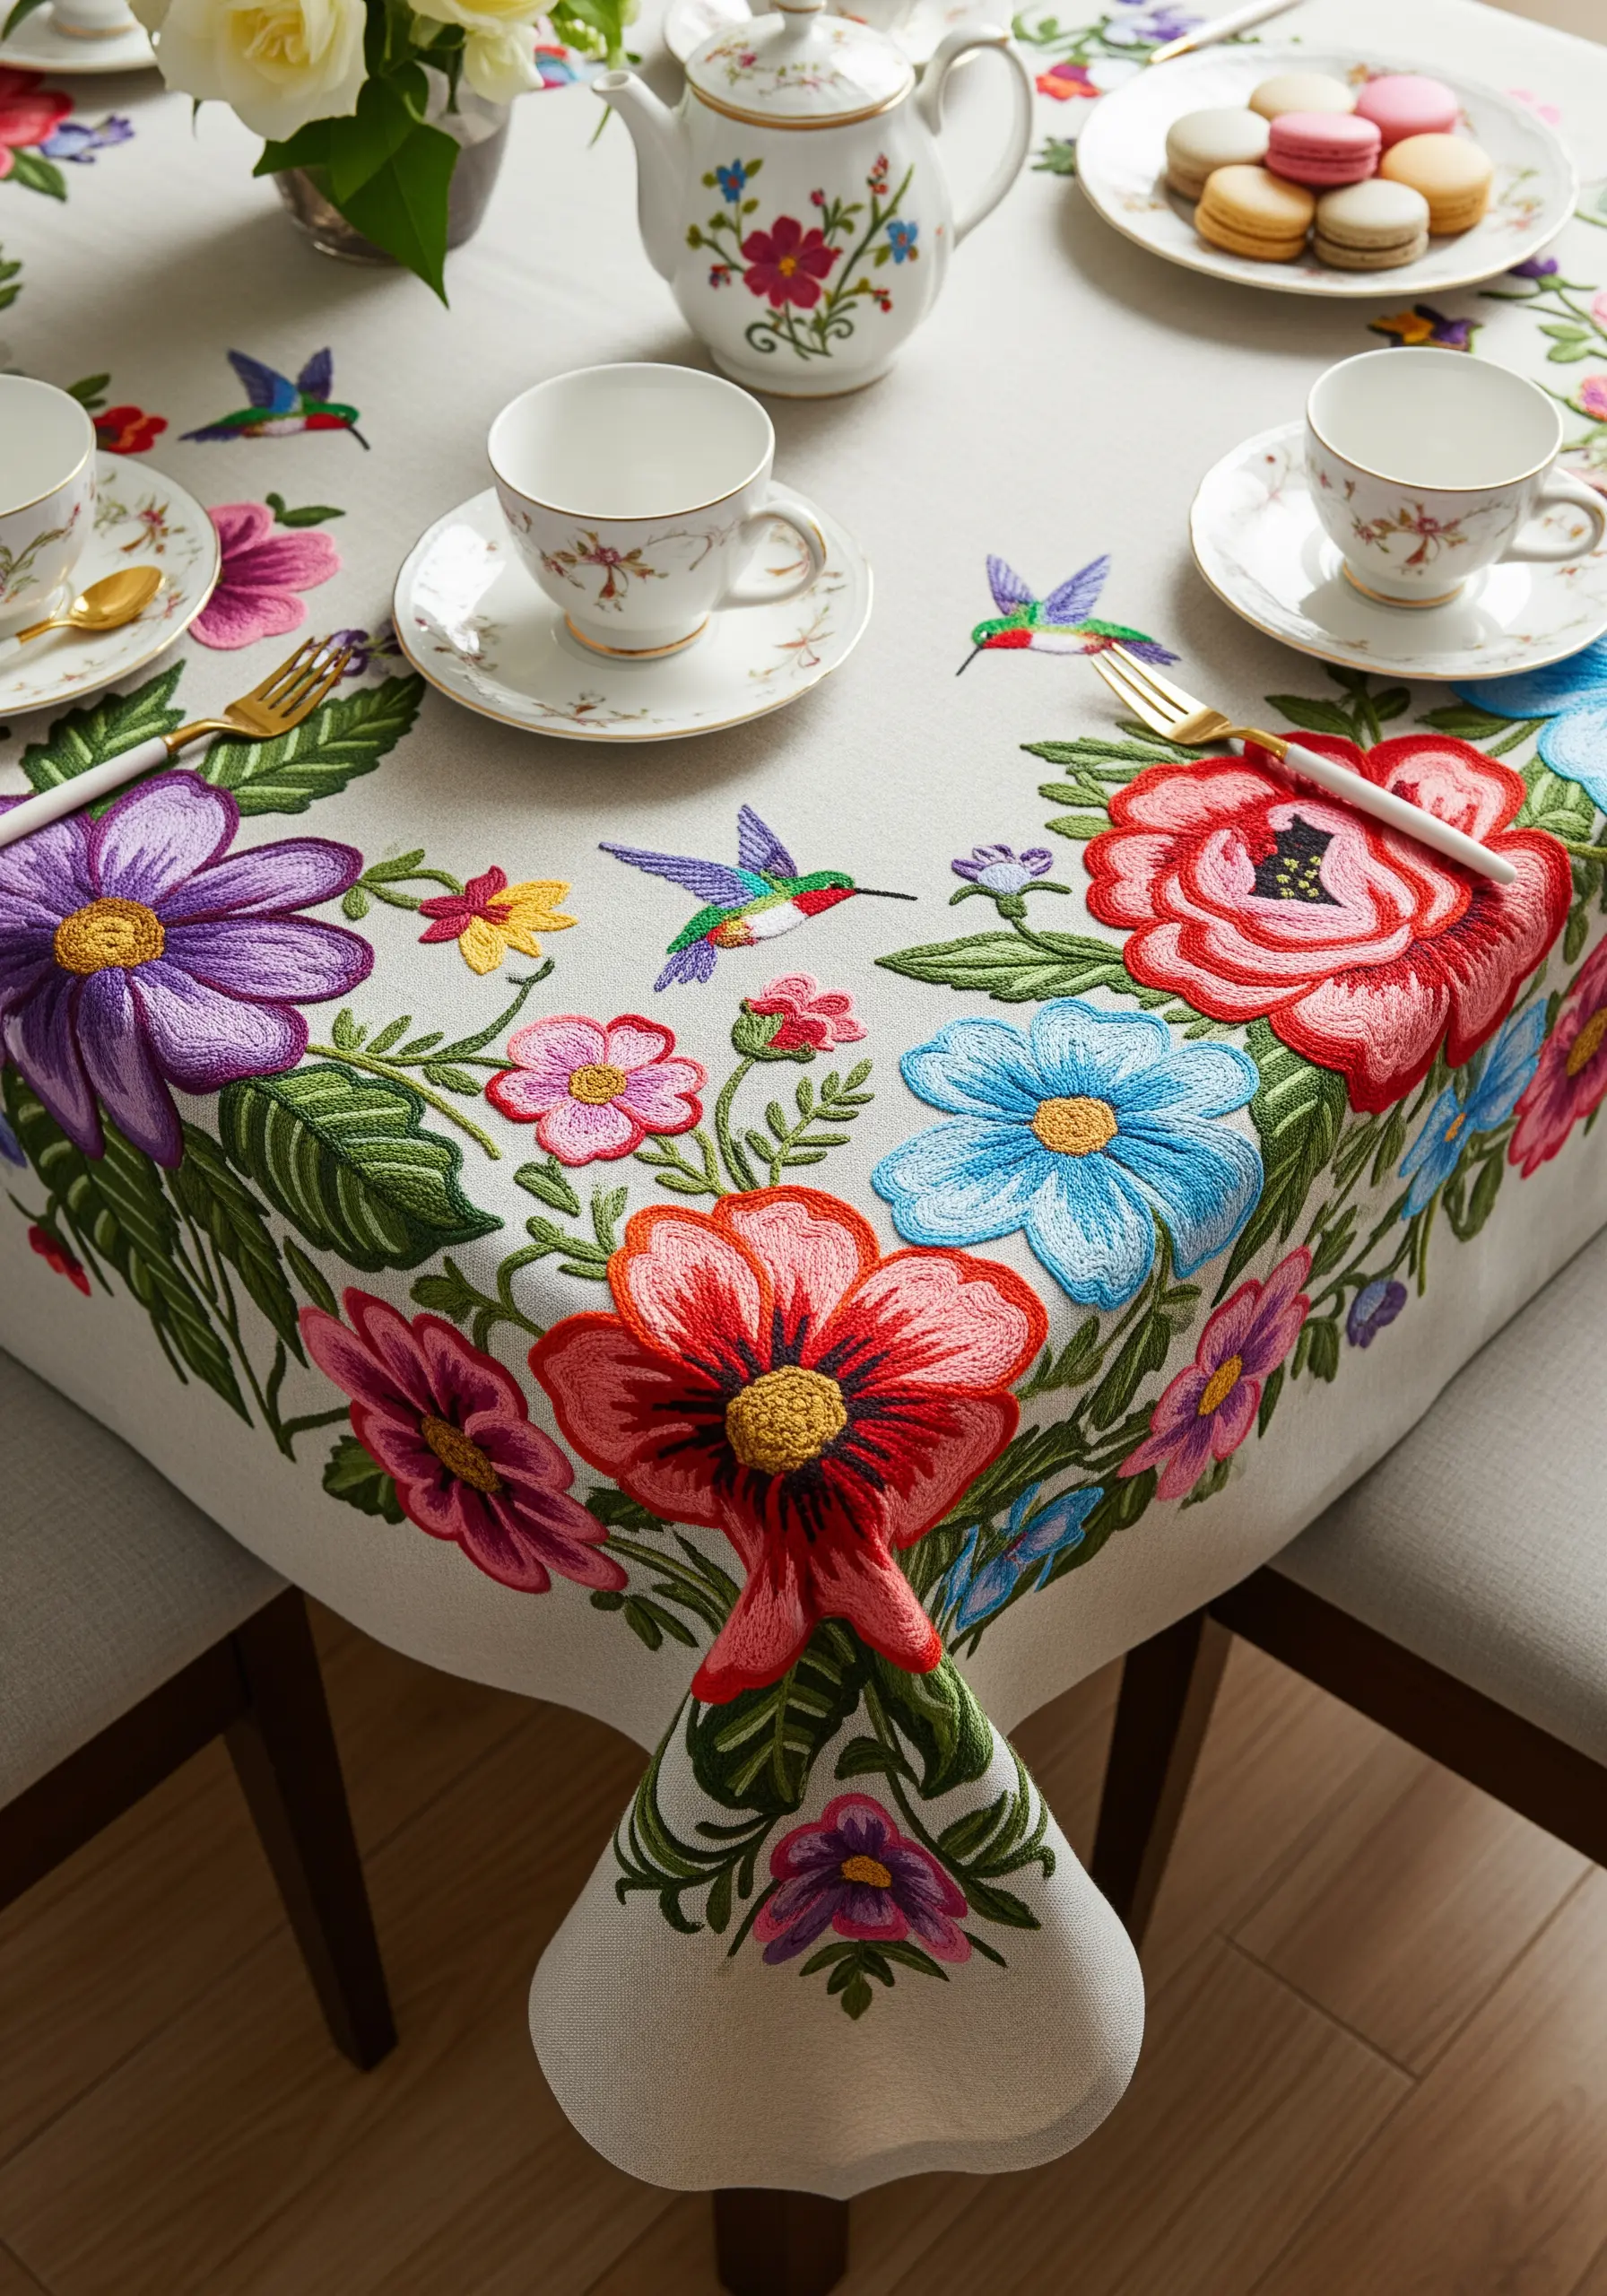
Transform a plain tablecloth into a vibrant masterpiece with a large-scale, repeating floral pattern.
Use a bold satin stitch for the flower petals, but outline them first with a split stitch. This creates a raised, defined edge that makes your satin stitch look incredibly neat and professional.
Don’t be afraid of a riot of color. A confident, maximalist palette gives the piece energy and a celebratory feel.
Vary the types of flowers and leaves to keep the design engaging, and add small, dynamic elements like hummingbirds to create a sense of movement.
This is a long-term project, so choose a high-quality linen that will withstand use and washing, becoming a treasured heirloom for family gatherings.
17. Build a Landscape with Cross-Stitch and Appliqué

Create a charming, graphic landscape on a storage basket by combining the texture of cross-stitch with the clean shapes of appliqué.
Use Aida cloth or evenweave fabric for the rolling hills, filling them with solid blocks of cross-stitch. The gridded texture provides a lovely, pixelated contrast to the other elements.
For the clouds and other simple shapes, use felt appliqué secured with a neat blanket stitch around the edges.
The lollipop trees are made with a woven wheel stitch, which creates a dense, circular pattern that is both fun and textural.
This mixed-technique approach adds layers of visual interest, turning a simple storage item into a delightful, story-filled object.
18. Create Tactile Spines with Turkey Work

Give your embroidered creature a wonderfully tactile and realistic texture by mastering the turkey work stitch.
Turkey work creates dense loops on the surface of the fabric. You can leave them as loops for a soft feel or snip them for a brush-like, spiky texture perfect for a hedgehog’s spines or an animal’s fur.
Stitch the loops closely together for a full, dense coat. After snipping, you can trim and shape them just like you would with a haircut to create contours and dimension.
Use a blend of neutral-colored threads—browns, creams, and grays—to give the spines a natural, varied look.
This technique turns a simple stuffed animal or doorstop into an irresistible, interactive piece of art.
19. Carve out Shapes with Negative Space and Seed Stitch
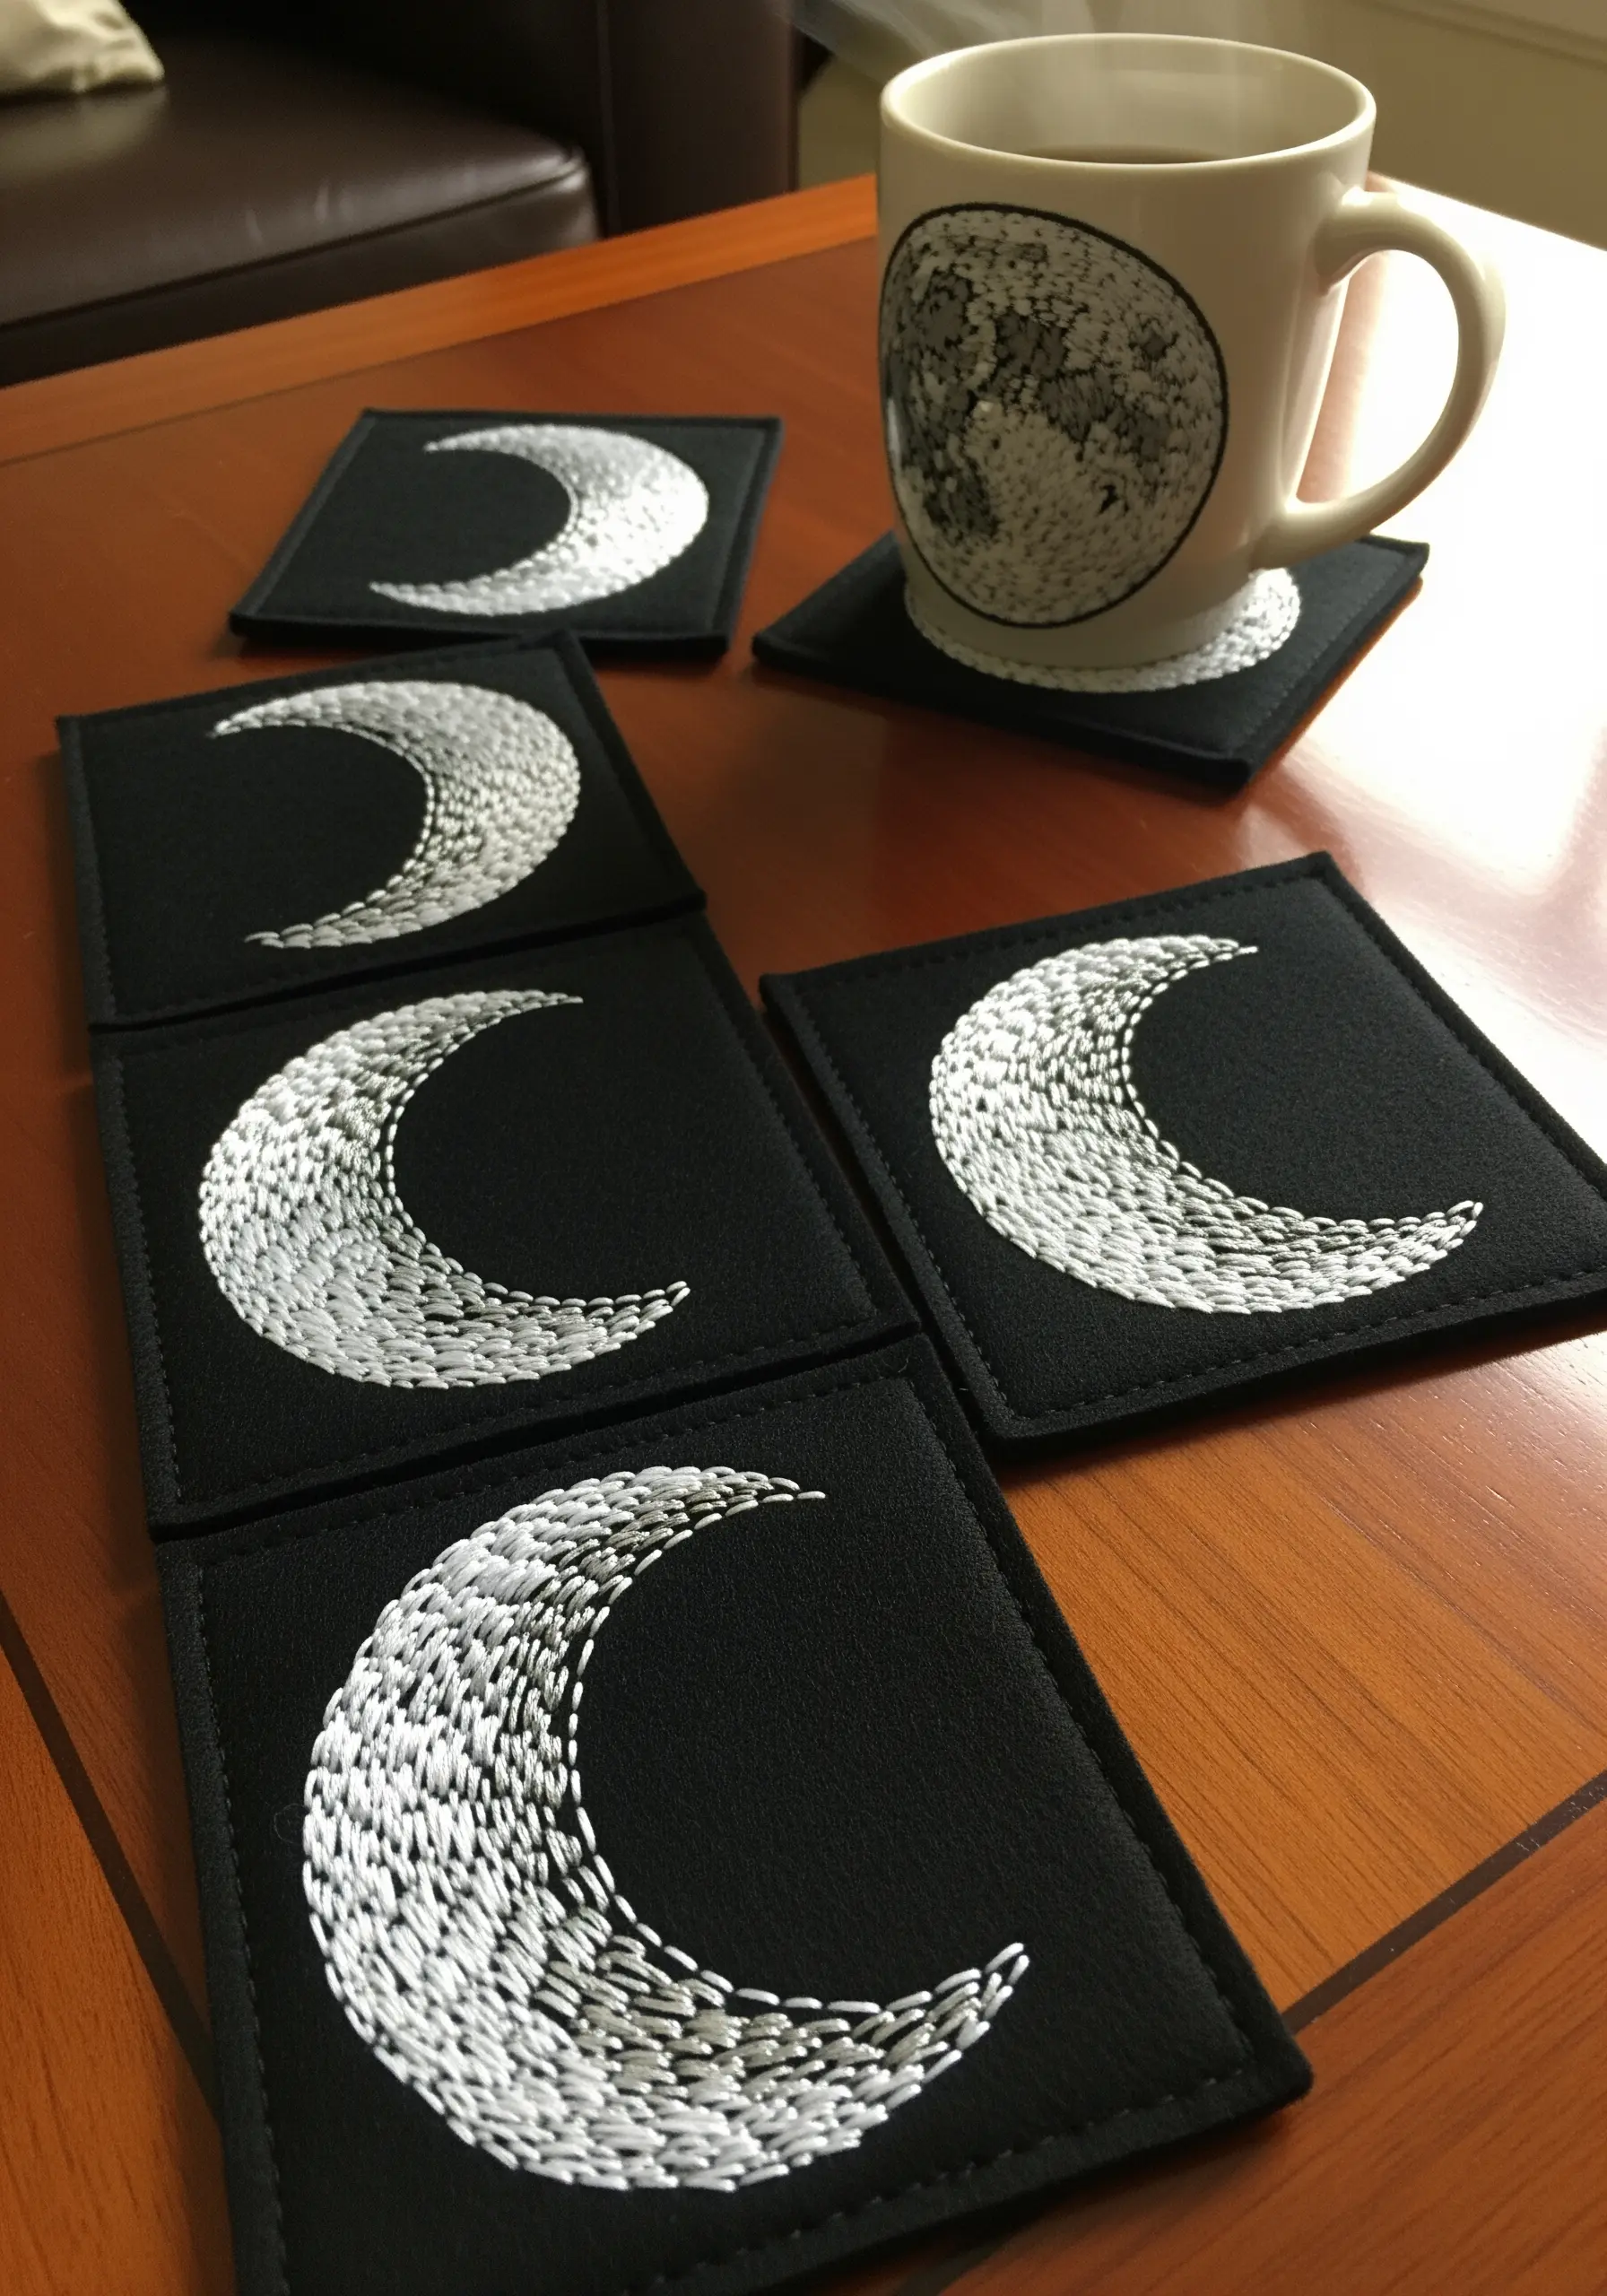
Create a powerful graphic image, like these moon coasters, by focusing on the texture of your fill stitch and the drama of negative space.
Instead of a smooth satin stitch, fill the crescent shape with a dense field of tiny seed stitches (or rice stitches).
Vary the direction and placement of these small stitches to mimic the craters and texture of the moon’s surface, creating a sense of organic randomness.
By stitching the moon in white or silver on a stark black fabric, the un-stitched area becomes just as important as the stitched one, creating a dramatic, high-contrast design.
This technique is incredibly effective for silhouettes and graphic motifs, proving that texture can be more expressive than a dozen colors.
20. Combine Utility and Whimsy with Appliqué
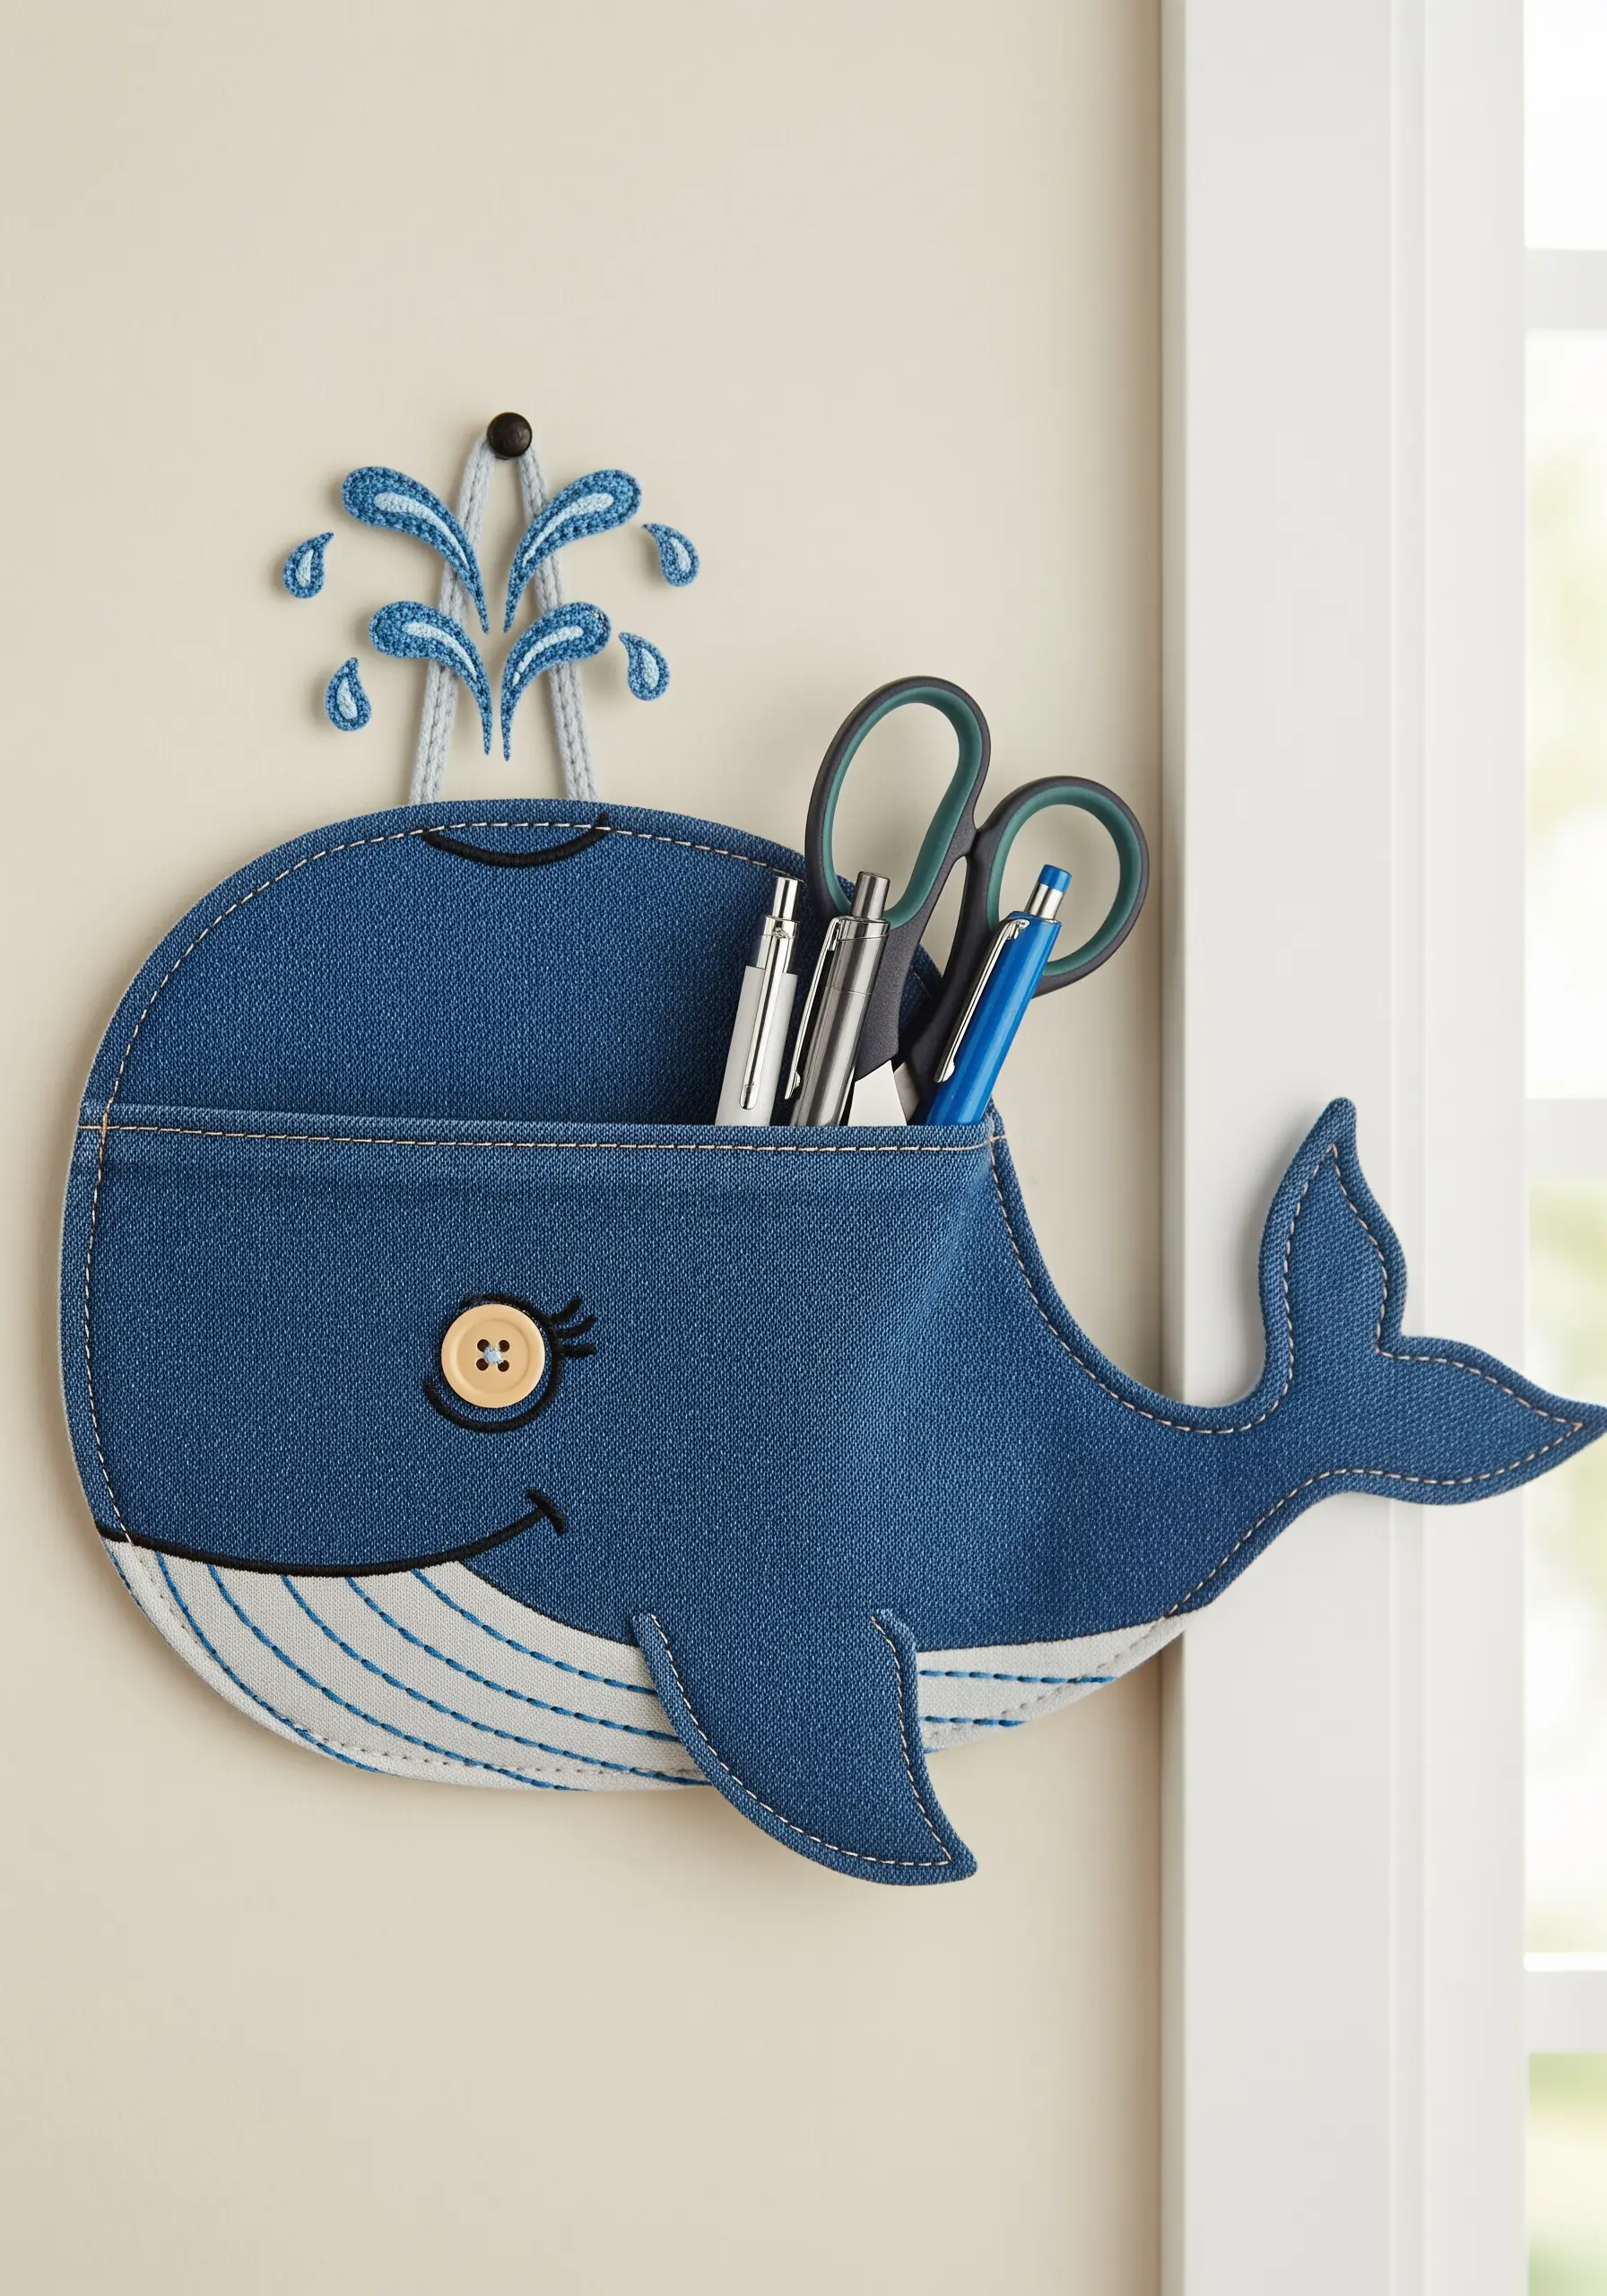
Craft a functional wall organizer that is also a delightful piece of decor by using simple appliqué and minimal stitching.
Cut the main whale shape from a sturdy fabric like denim or canvas. Create the pocket from a slightly different shade to add subtle dimension.
Use machine stitching with a contrasting thread for the outlines and details. It’s fast, durable, and gives the piece a clean, polished look.
A single, charming detail, like a button for the eye, adds a touch of personality and handmade charm without requiring complex embroidery skills.
Incorporate a playful accent, like a water spout made from glittery fabric or ric-rac trim, to complete the whimsical story.
21. Upgrade Your Furniture with Embroidered Knobs
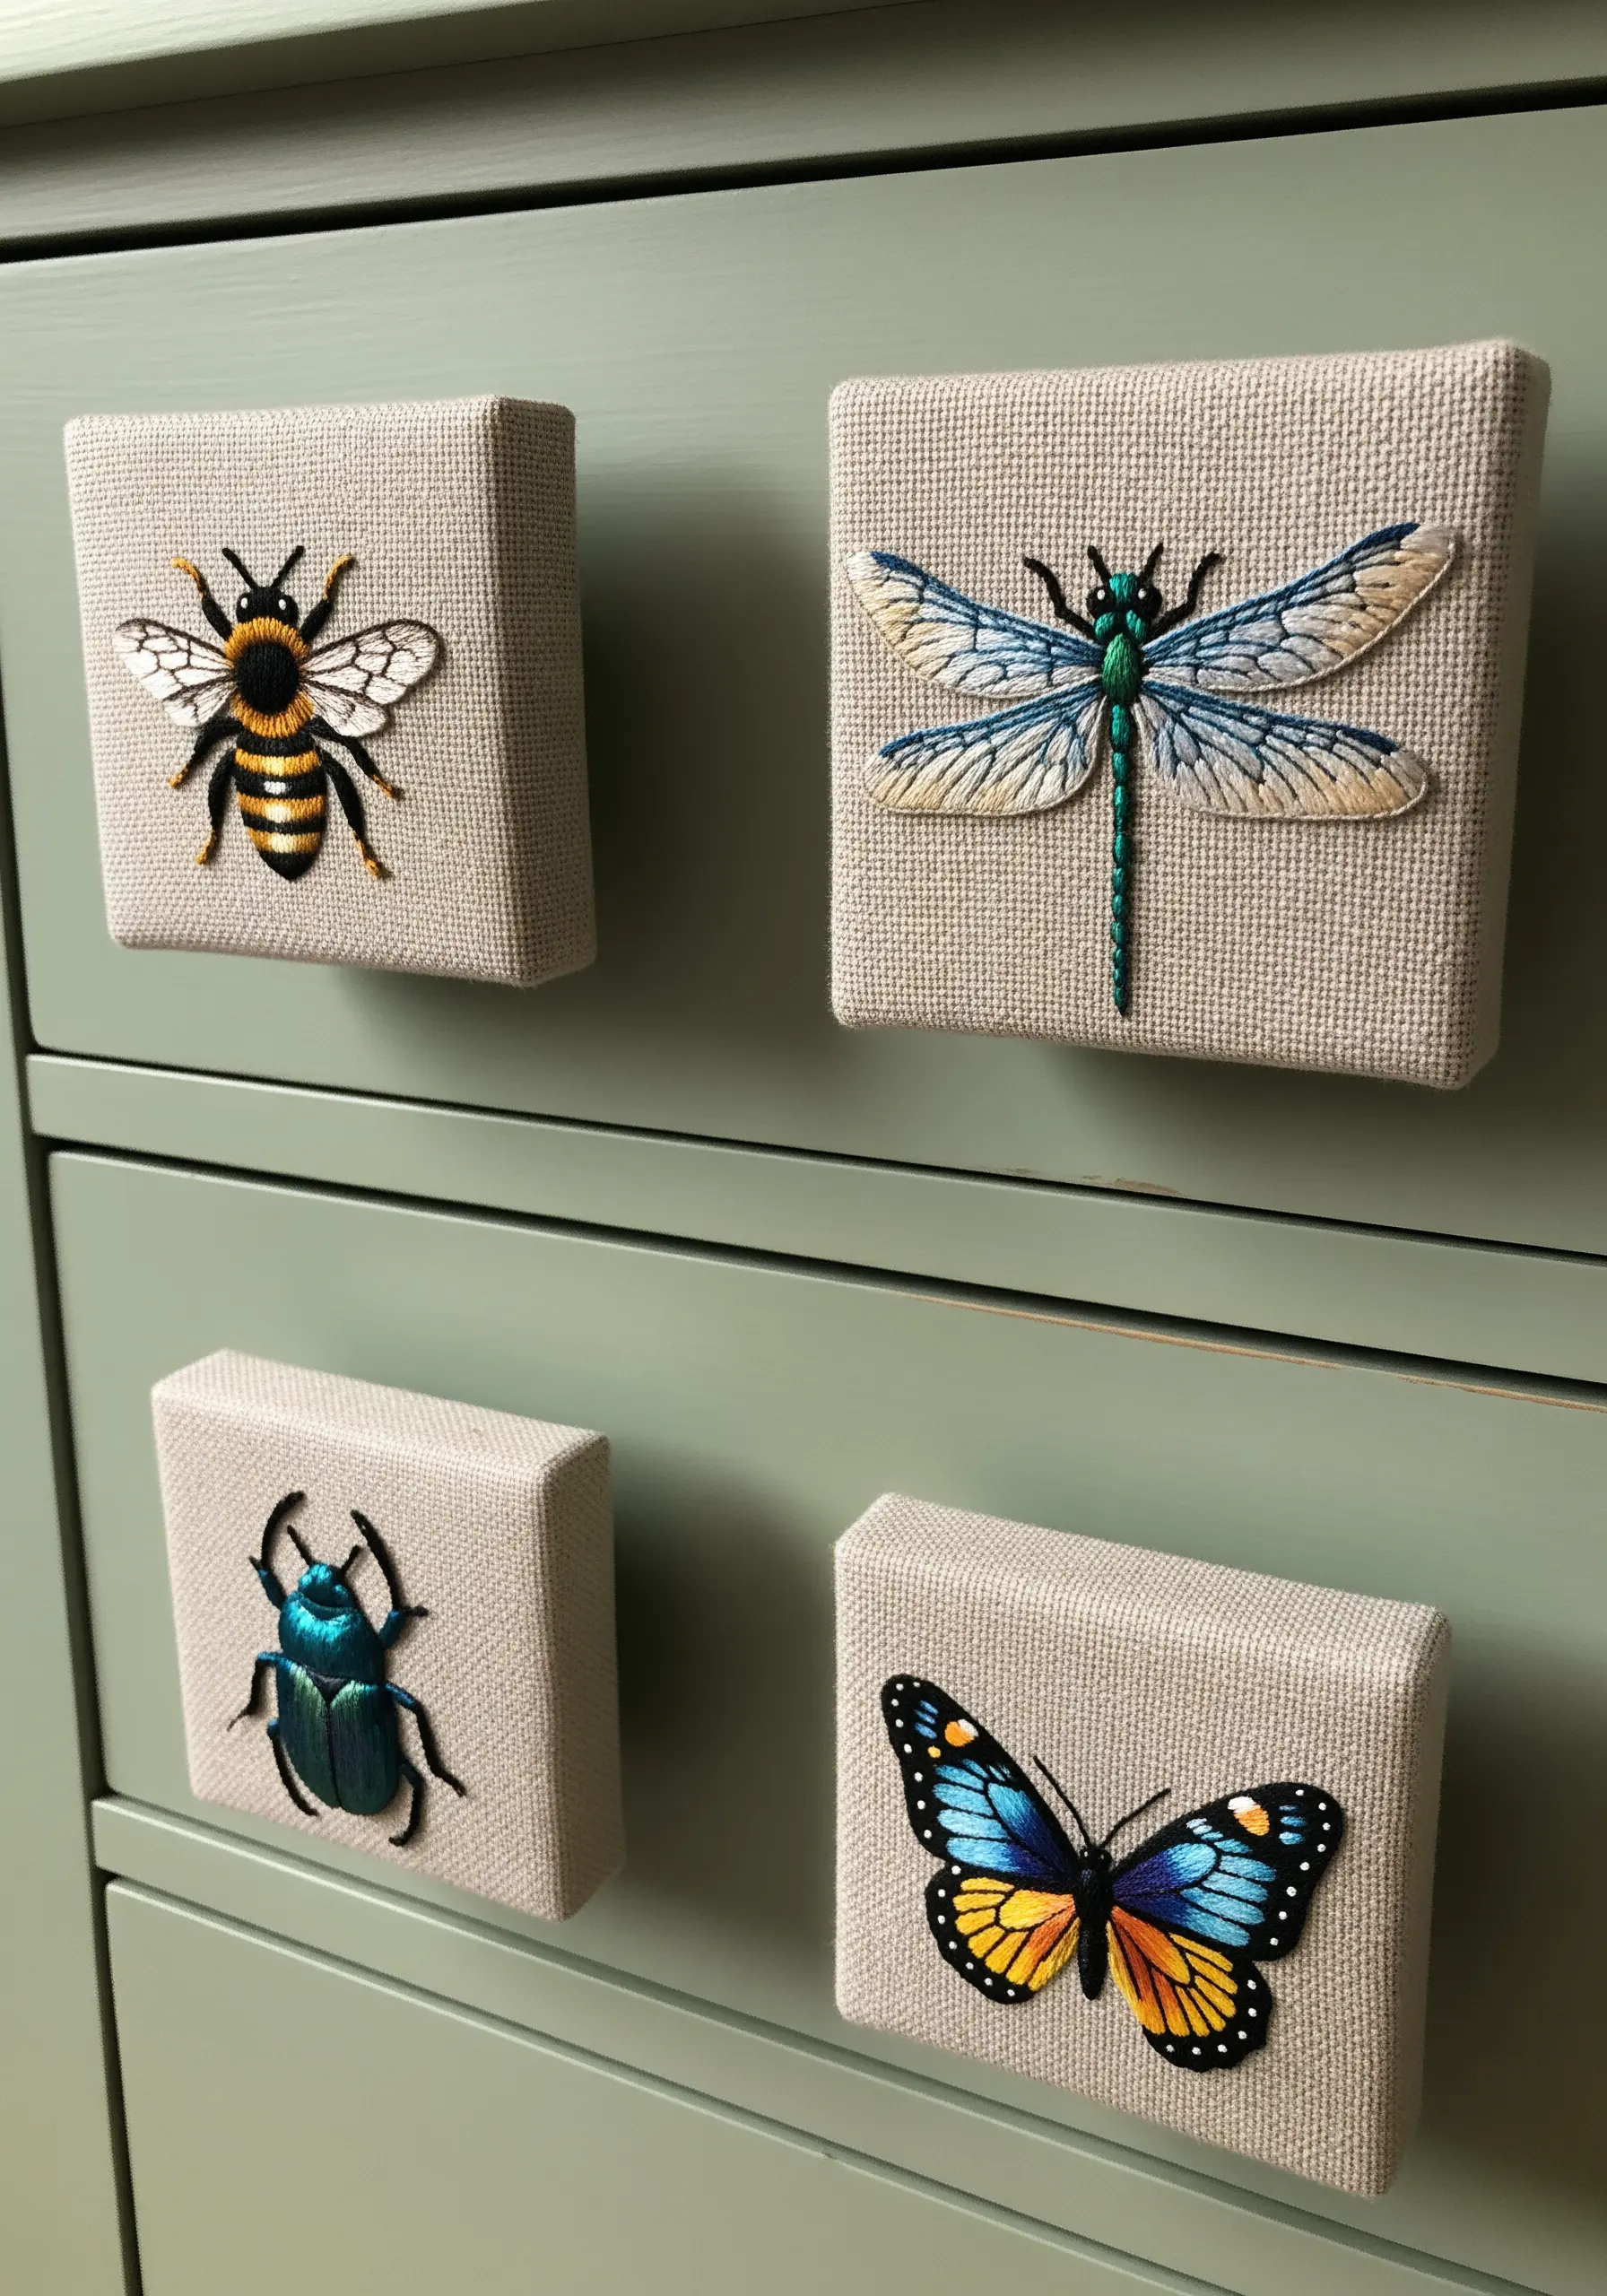
Add a bespoke, artistic touch to any piece of furniture by creating your own embroidered drawer pulls.
Start with small, blank wooden blocks or canvas squares. Stretch a piece of neutral, tightly woven linen over the top and secure it at the back.
Embroider small, detailed motifs—like insects or botanicals—using just a few strands of thread for maximum precision.
Focus on thread painting techniques to create realistic shading and detail, even on a tiny scale. This elevates the knobs from simple crafts to miniature works of art.
Attach the finished embroidered blocks to standard hardware bases to create unique, high-end pulls that instantly personalize a dresser or cabinet.
22. Sculpt a Pincushion Garden with Dimensional Stitches

Create a pincushion that’s too beautiful to hide in a drawer by sculpting succulents with advanced dimensional stitches.
Use a woven wheel stitch (or spider web rose stitch) for the central rosette succulents, pulling the threads tightly to create a dense, layered effect.
For the spiky, upright leaves, use a detached buttonhole stitch over a foundation of straight stitches to build up a firm, 3D shape.
The ‘soil’ is a dense bed of French knots in dark brown, which not only looks realistic but also helps hold the pins securely.
This project transforms a purely functional tool into a decorative object that celebrates your love for both stitching and botanicals.
23. Integrate Embroidery into Your Home’s Architecture
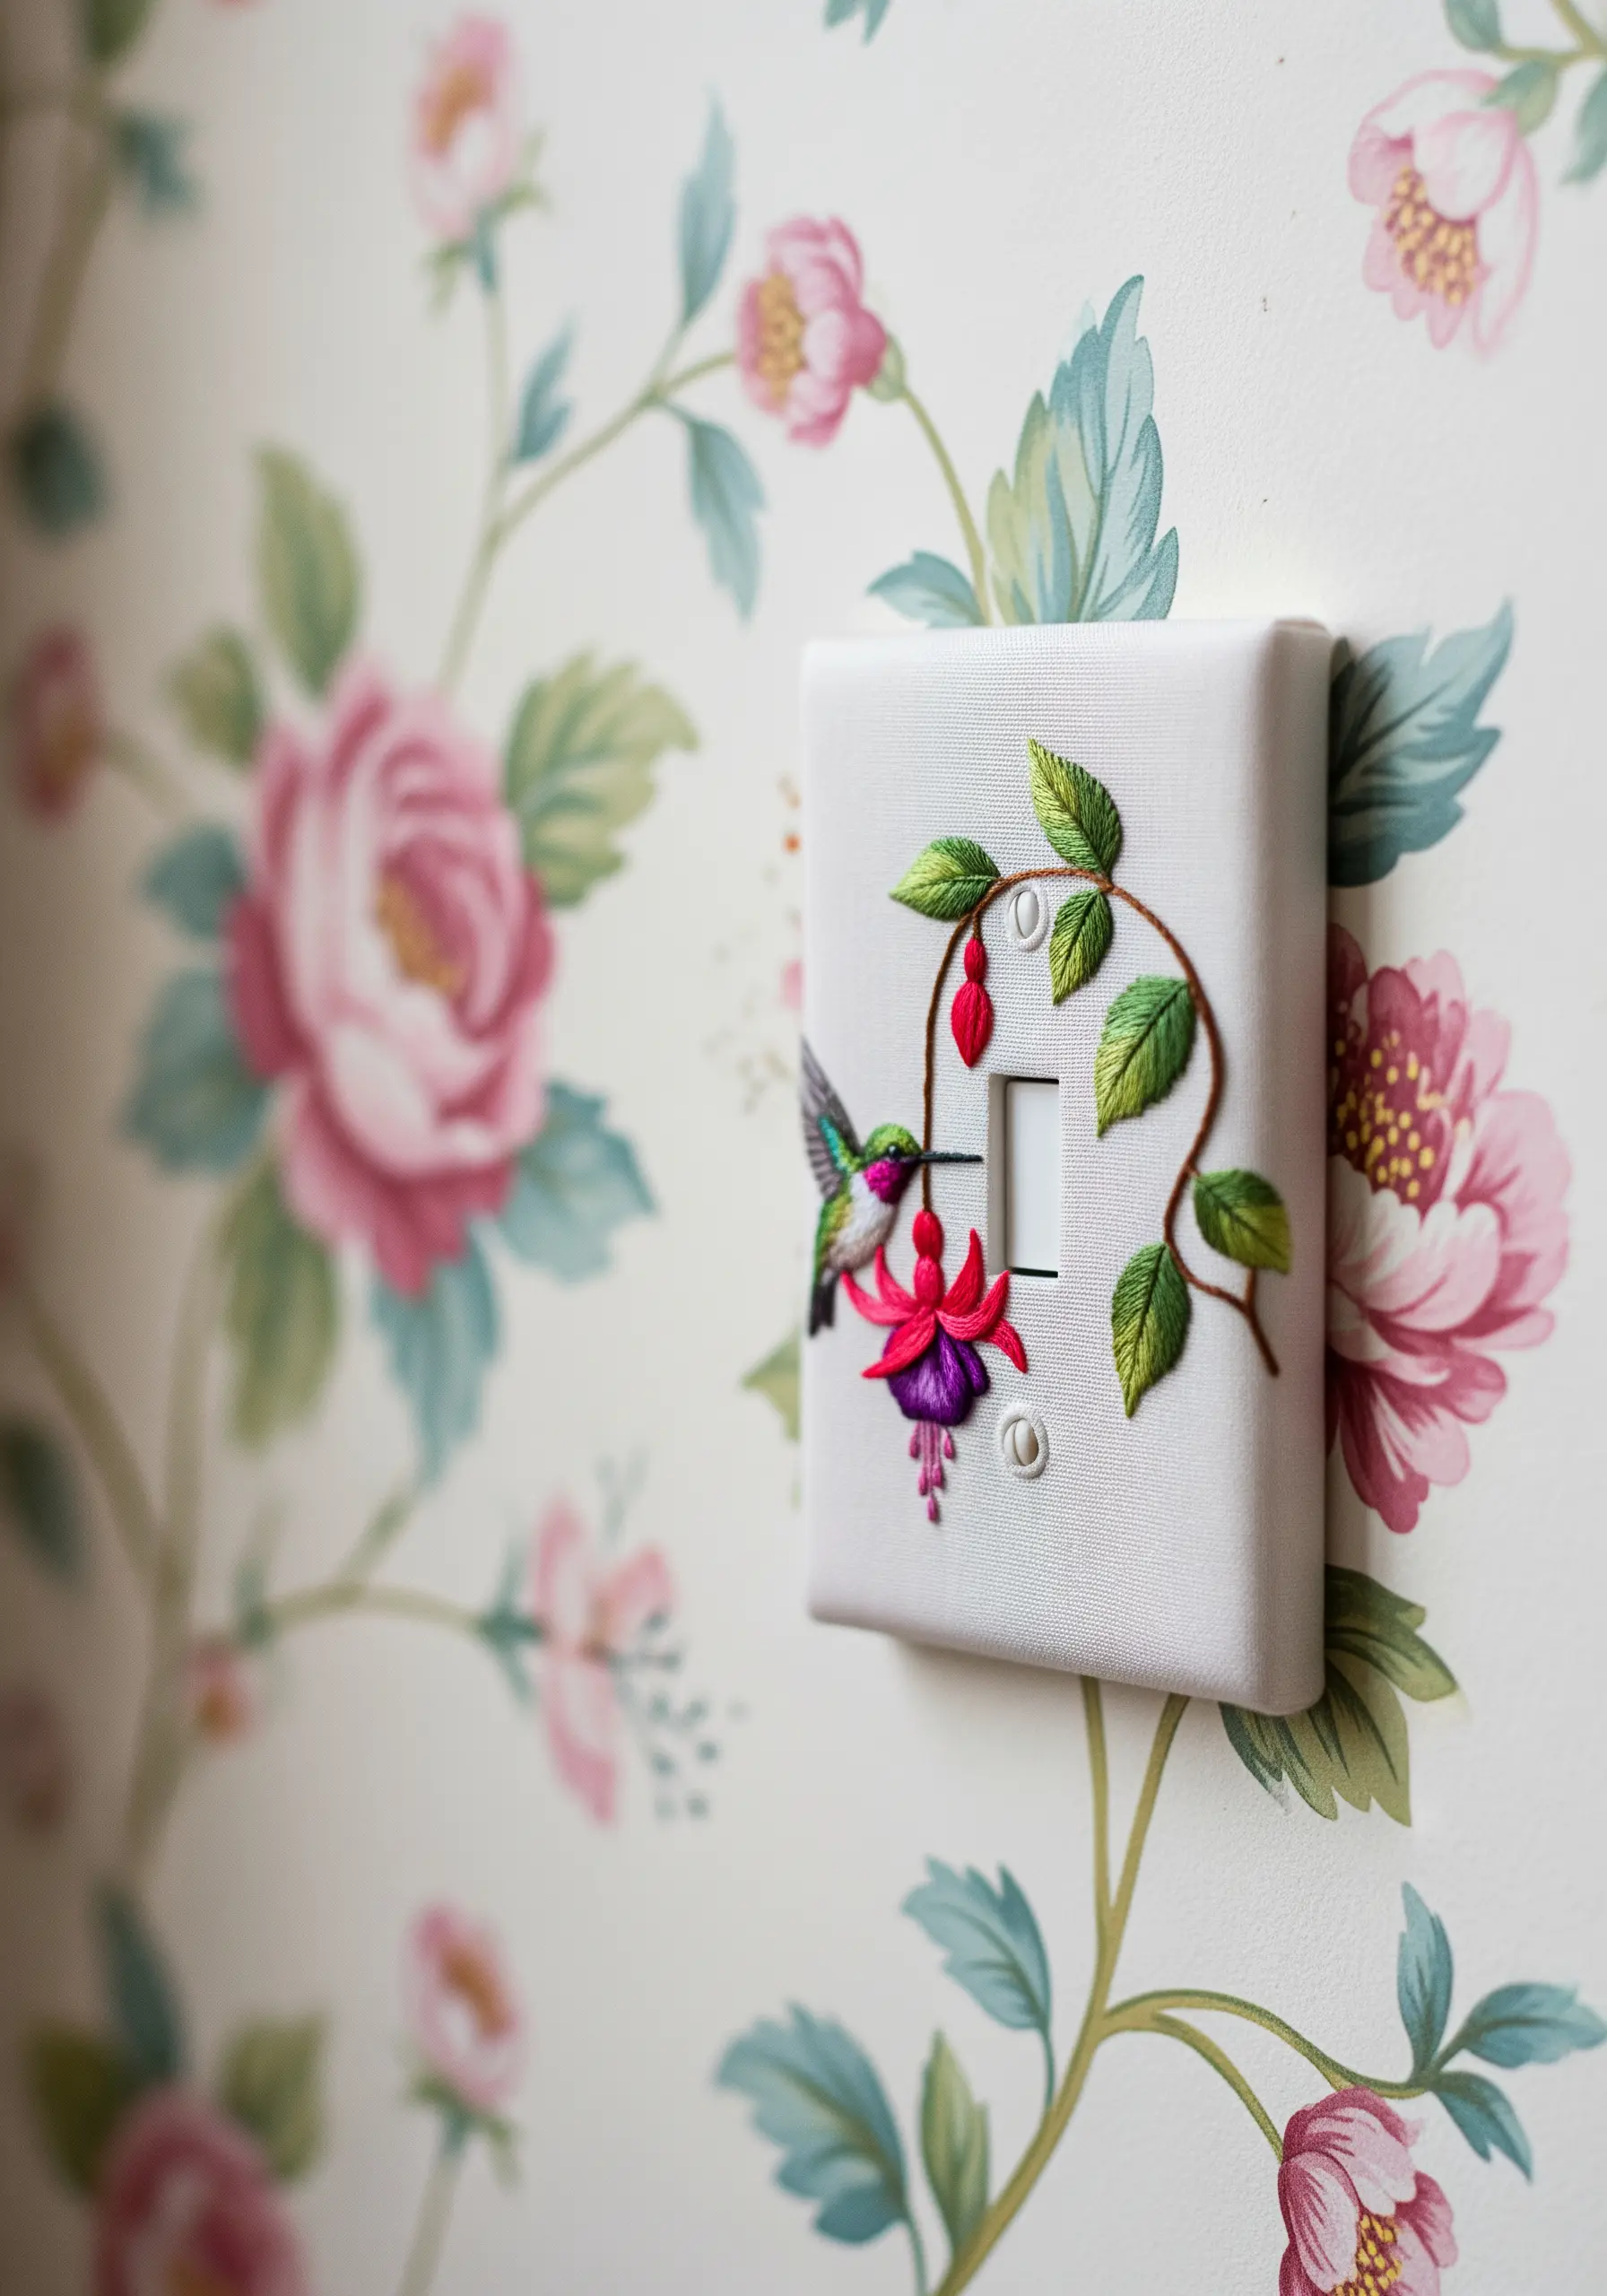
Make your embroidery a seamless part of your decor by creating a custom cover for a light switch or outlet.
Embroider your design onto a piece of fabric larger than the switch plate. A simple floral vine or a delicate hummingbird works beautifully.
Remove the plate from the wall, then wrap your embroidered fabric tightly around it, securing it at the back with strong craft glue. Cut out holes for the switch and screws with a craft knife.
This technique allows your art to blend perfectly with its surroundings, especially when designed to complement the wallpaper, as seen here.
It’s a subtle but powerful way to add a touch of handmade elegance to the most unexpected corners of your home.
24. Capture Personality with a Thread-Painted Portrait
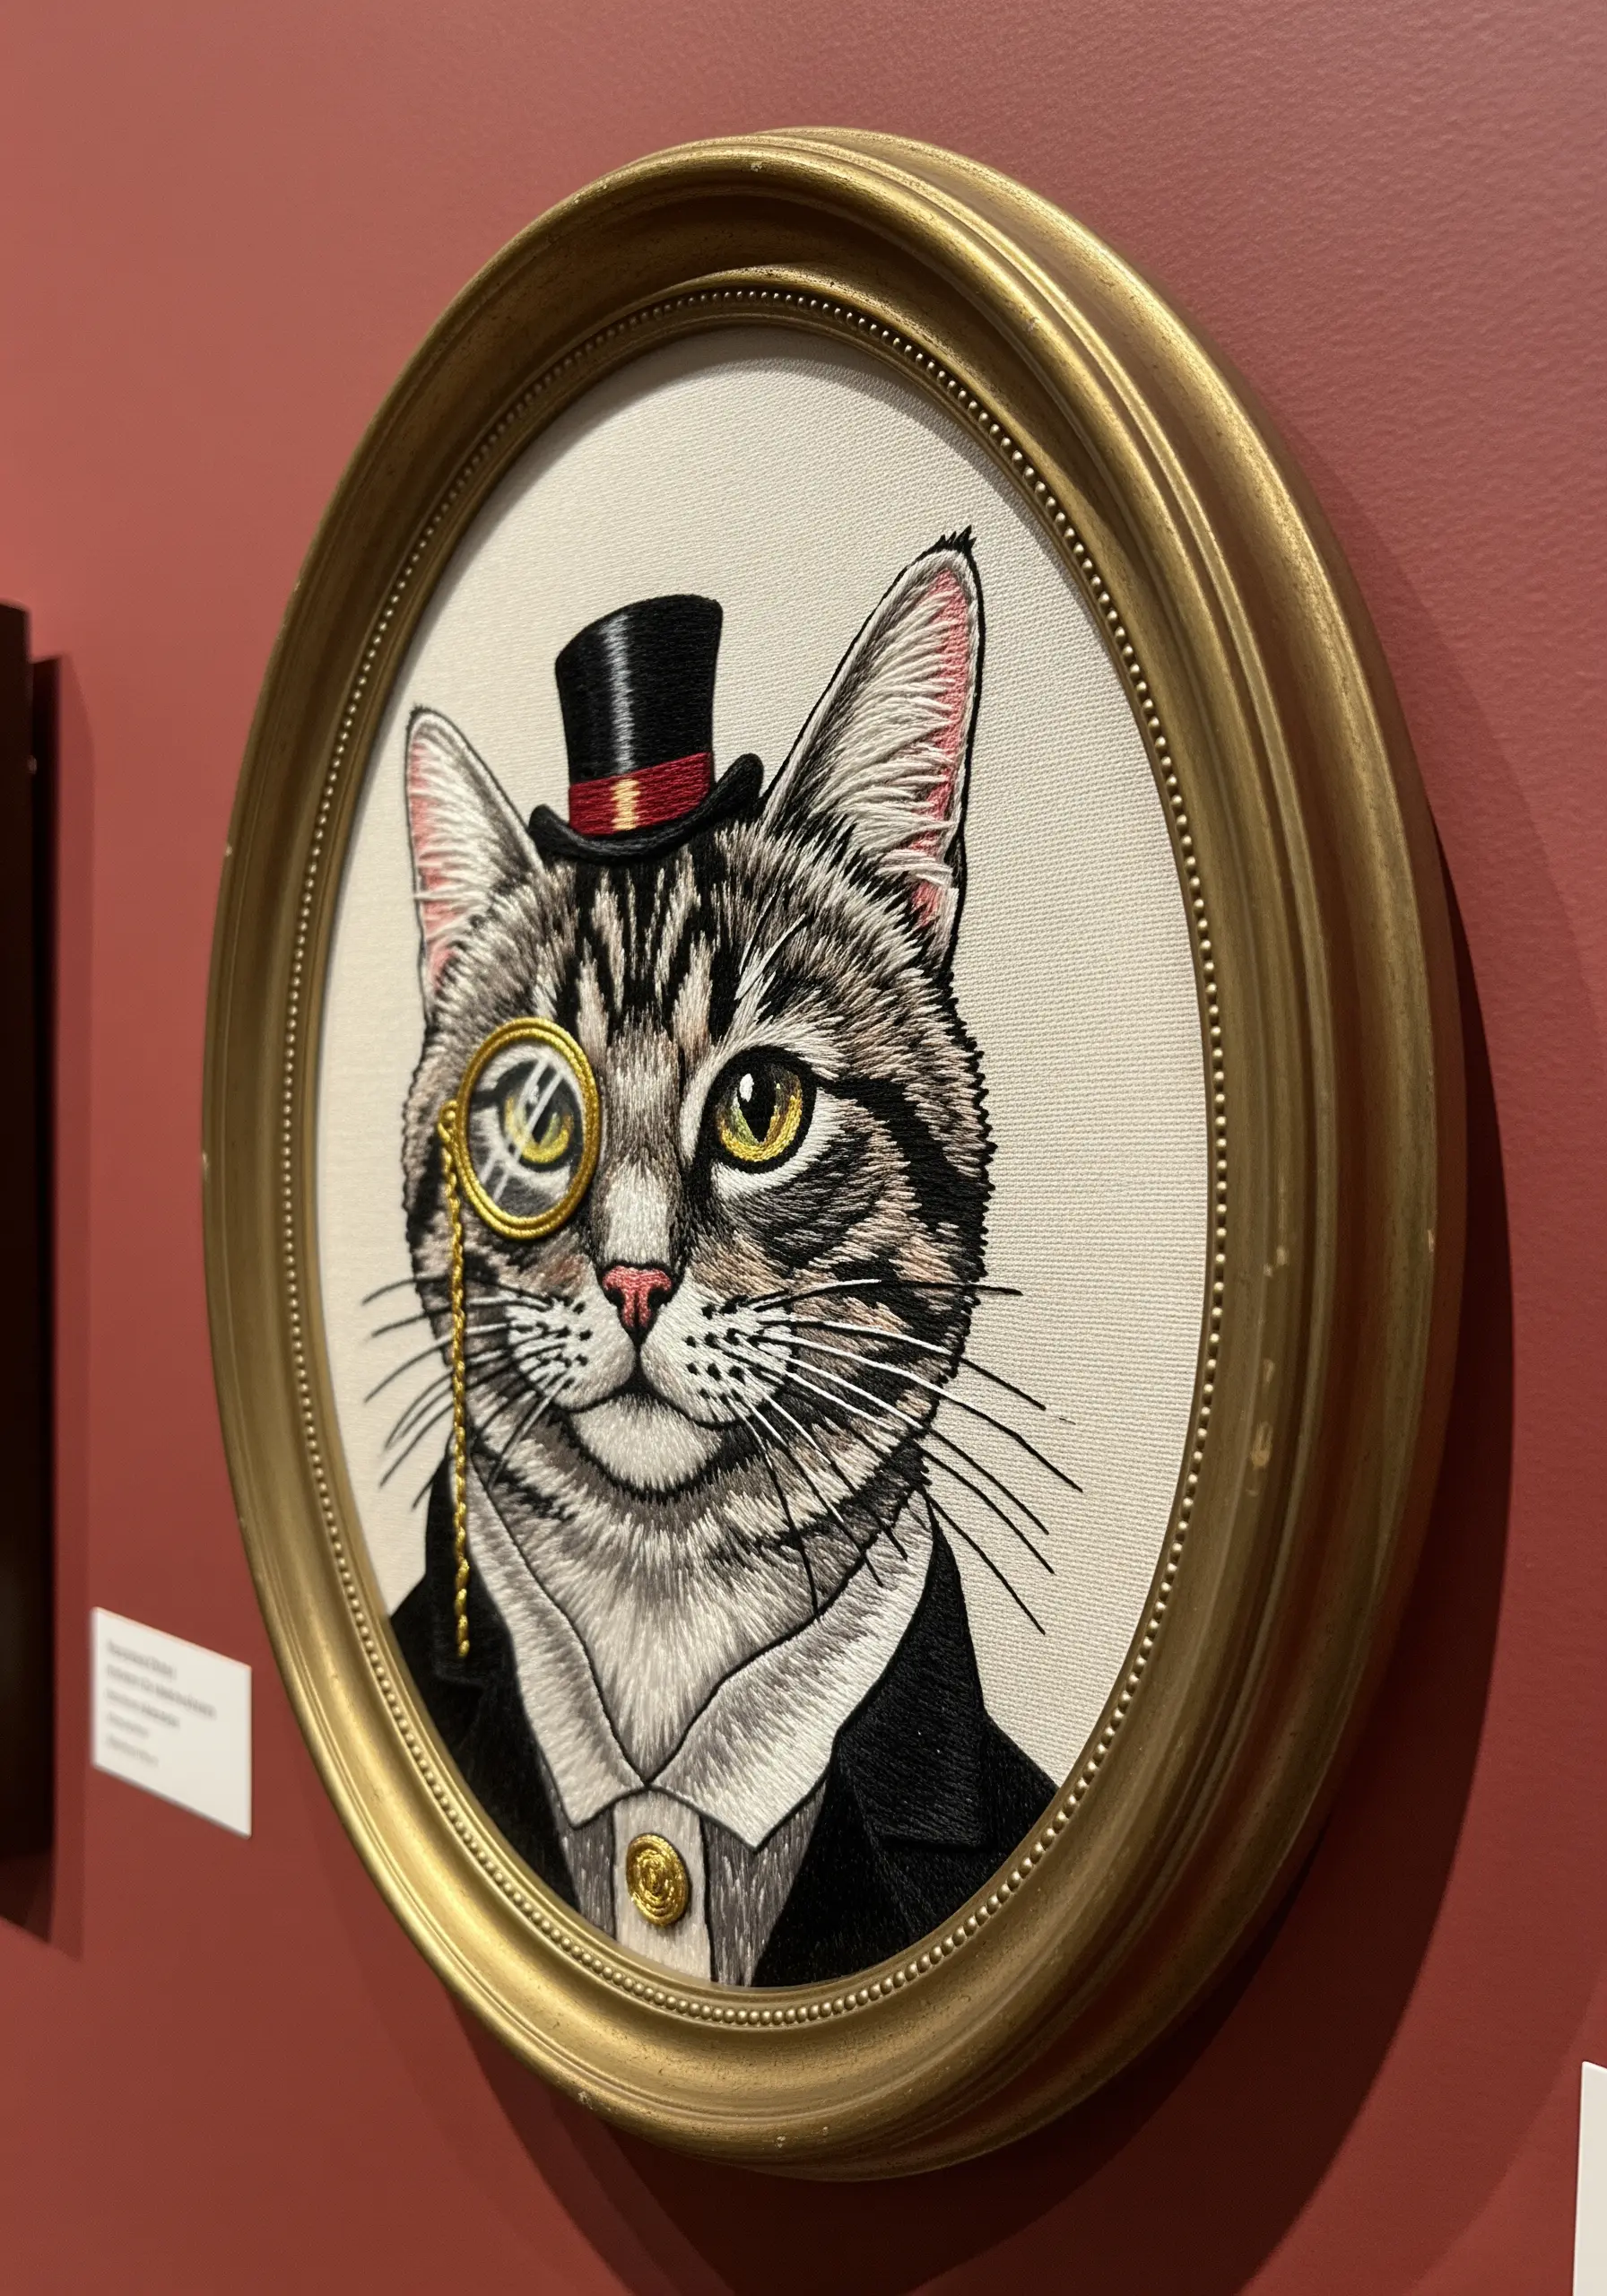
Elevate your embroidery to fine art by creating a detailed pet portrait that captures not just likeness, but personality.
The key is meticulous thread painting. Use a single strand of floss and directional stitches that follow the natural growth of the fur.
Work from a clear photograph, paying close attention to the way light hits the fur and reflects in the eyes. Use dozens of shades to create realistic depth and highlights.
For the whiskers, use a single, long stitch with a stiff, fine thread, or even a strand of horsehair, laid on top of the fur for a crisp, realistic effect.
Adding whimsical accessories like a top hat and monocle transforms a beautiful portrait into a charming, character-filled masterpiece.


