

You have the threads, the fabric, and the desire to create something beautiful. But perhaps you feel a gap between the vision in your mind and the piece in your hoop. It’s a quiet frustration many of us feel—the sense that your work could be more refined, more intentional.
The secret isn’t in mastering hundreds of complex stitches. Instead, it lies in learning to see your needle and thread as artistic tools. It’s about understanding how the direction of a single stitch can create light and shadow, how choosing a slightly thicker thread can add powerful dimension, or how leaving a little space can say more than filling it ever could.
These small pieces are more than just projects; they are invitations to experiment. They are designed for tiny spaces, not just in your home, but in your schedule. Here, you will find the techniques to transform your stitching from a simple craft into a thoughtful practice, one stitch at a time.
1. Render Realistic Texture with Directional Stitching
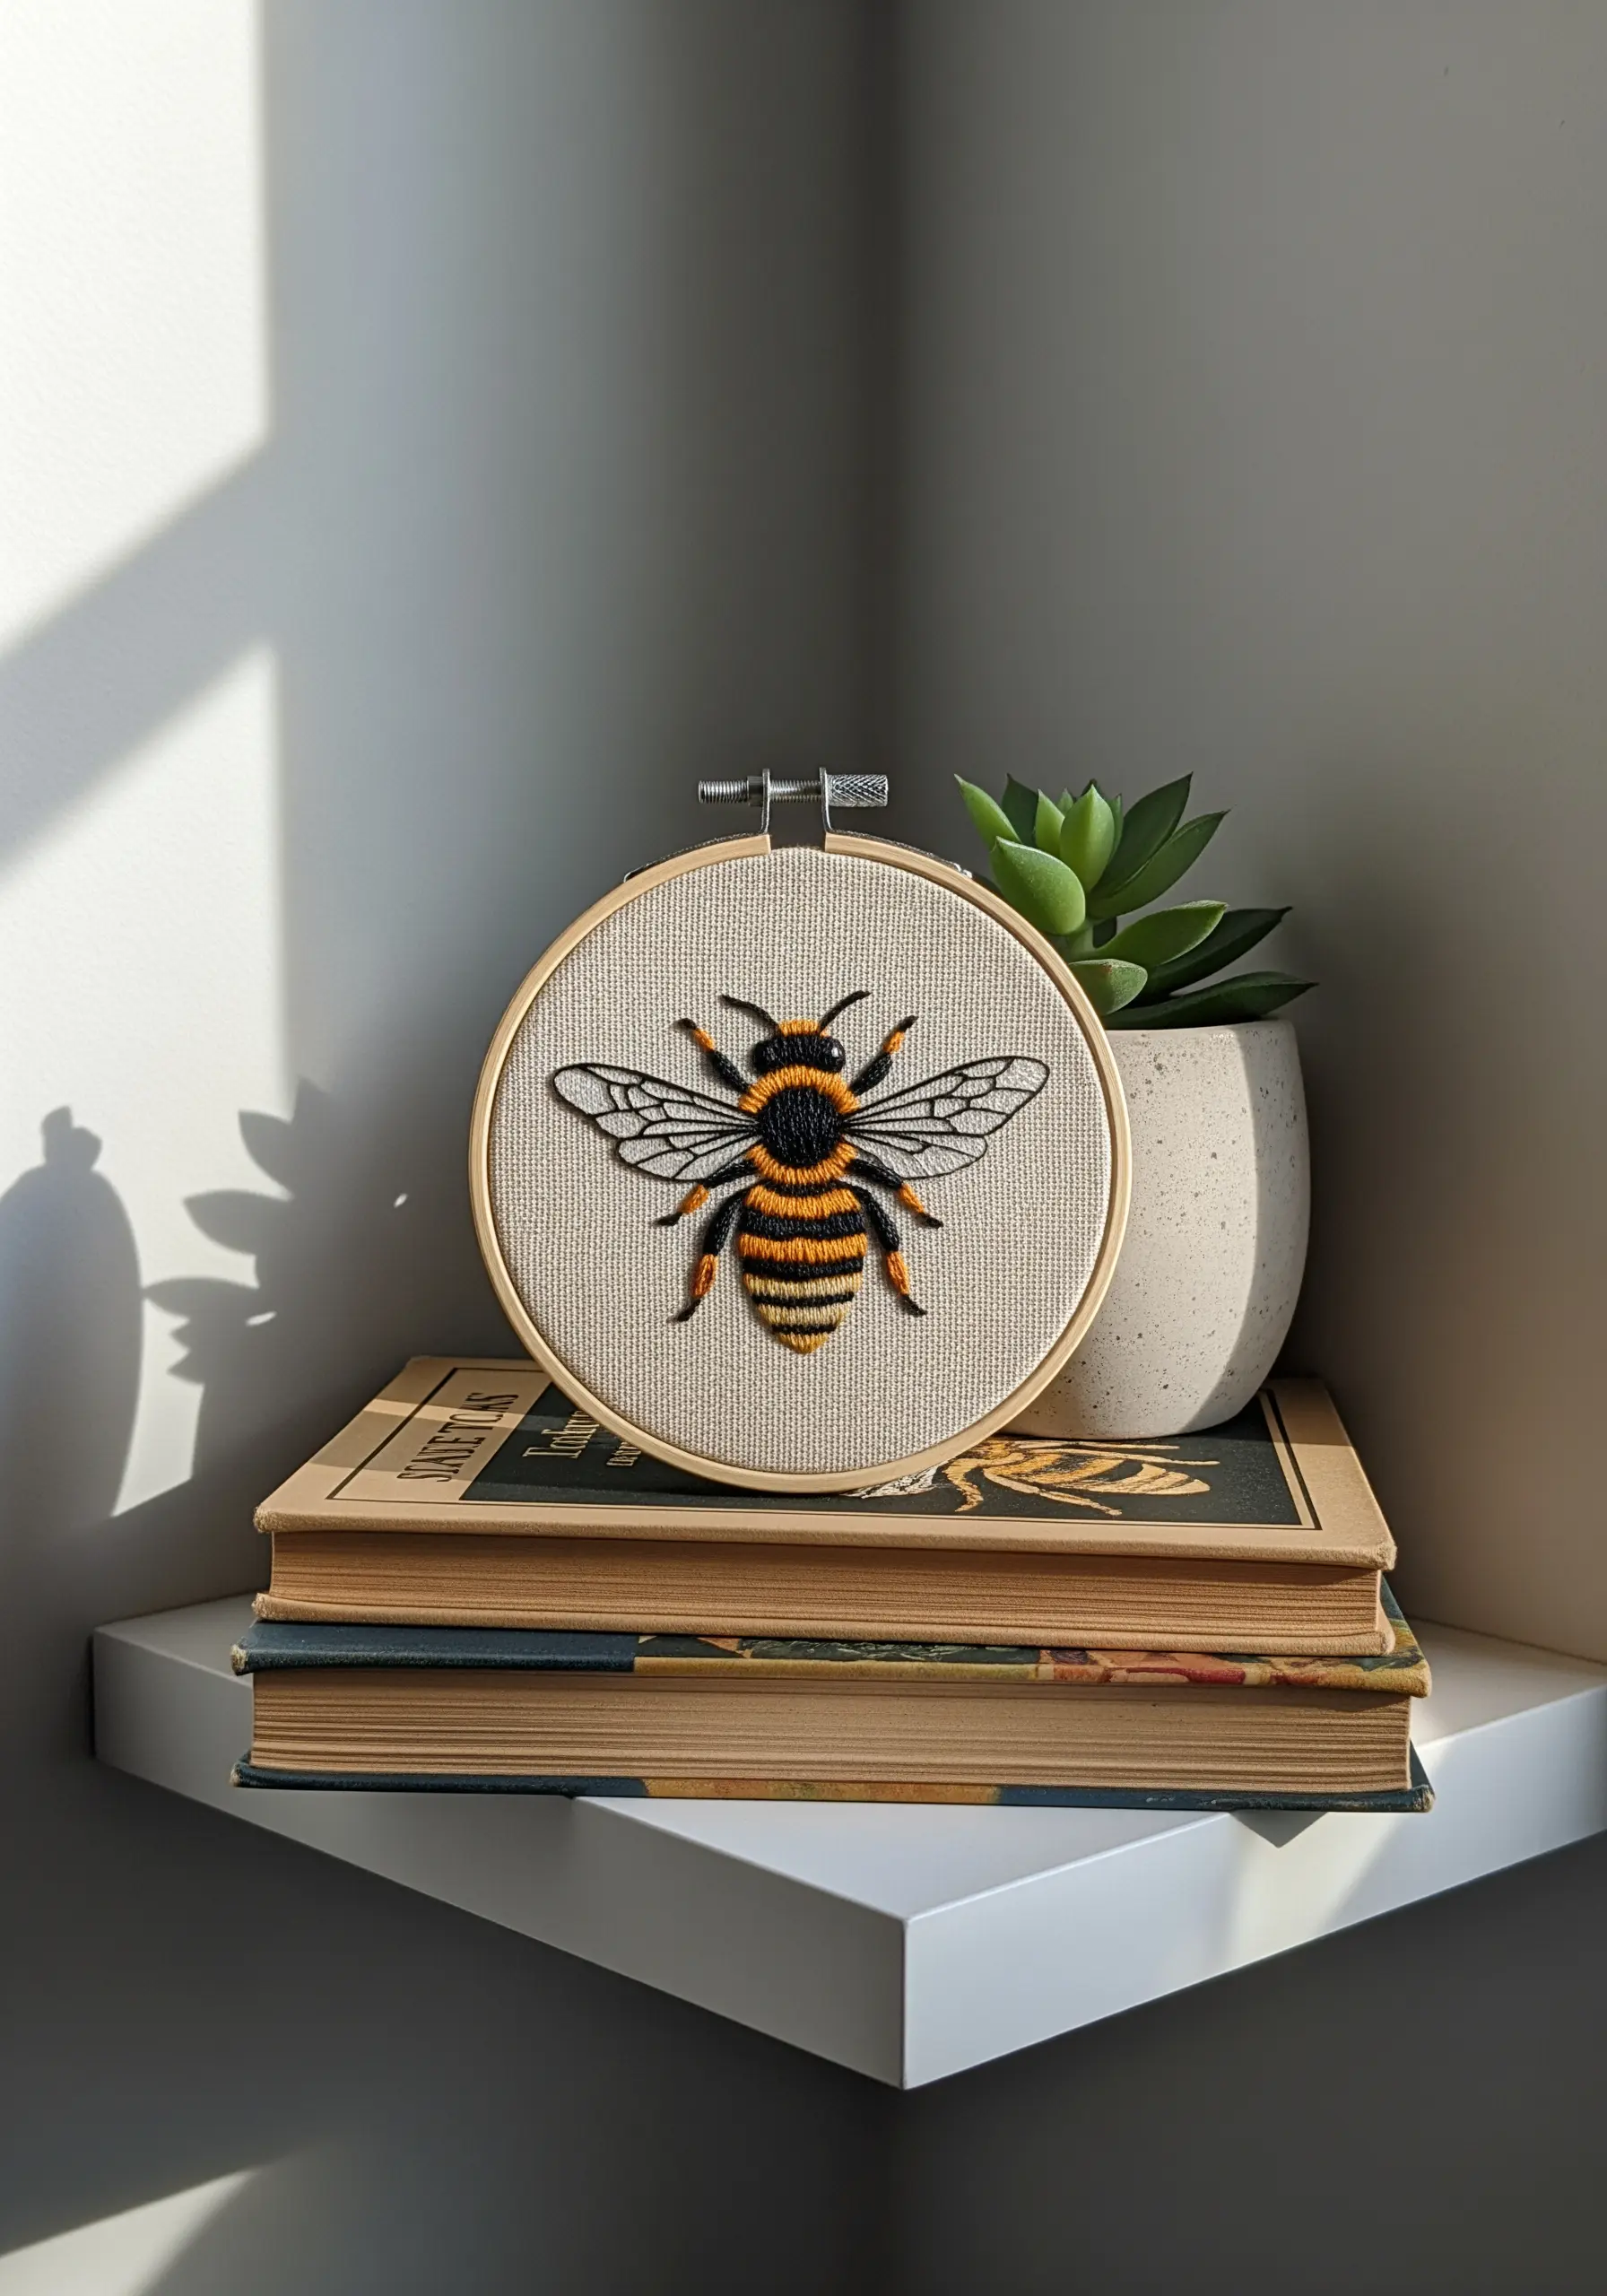
To create a bee that feels alive, focus on contrasting textures.
Use a long-and-short stitch for the fuzzy thorax, blending shades of yellow and amber to mimic natural fluff.
For the delicate, transparent wings, switch to a single strand of grey or off-white thread.
Use a fine split stitch for the veins, leaving most of the wing area open to suggest translucency.
This contrast between the dense, soft body and the light, graphic wings is what creates a convincing, three-dimensional effect and is perfect for nature texture embroidery projects that feel amazingly real.
2. Compose with Intention on Narrow Surfaces
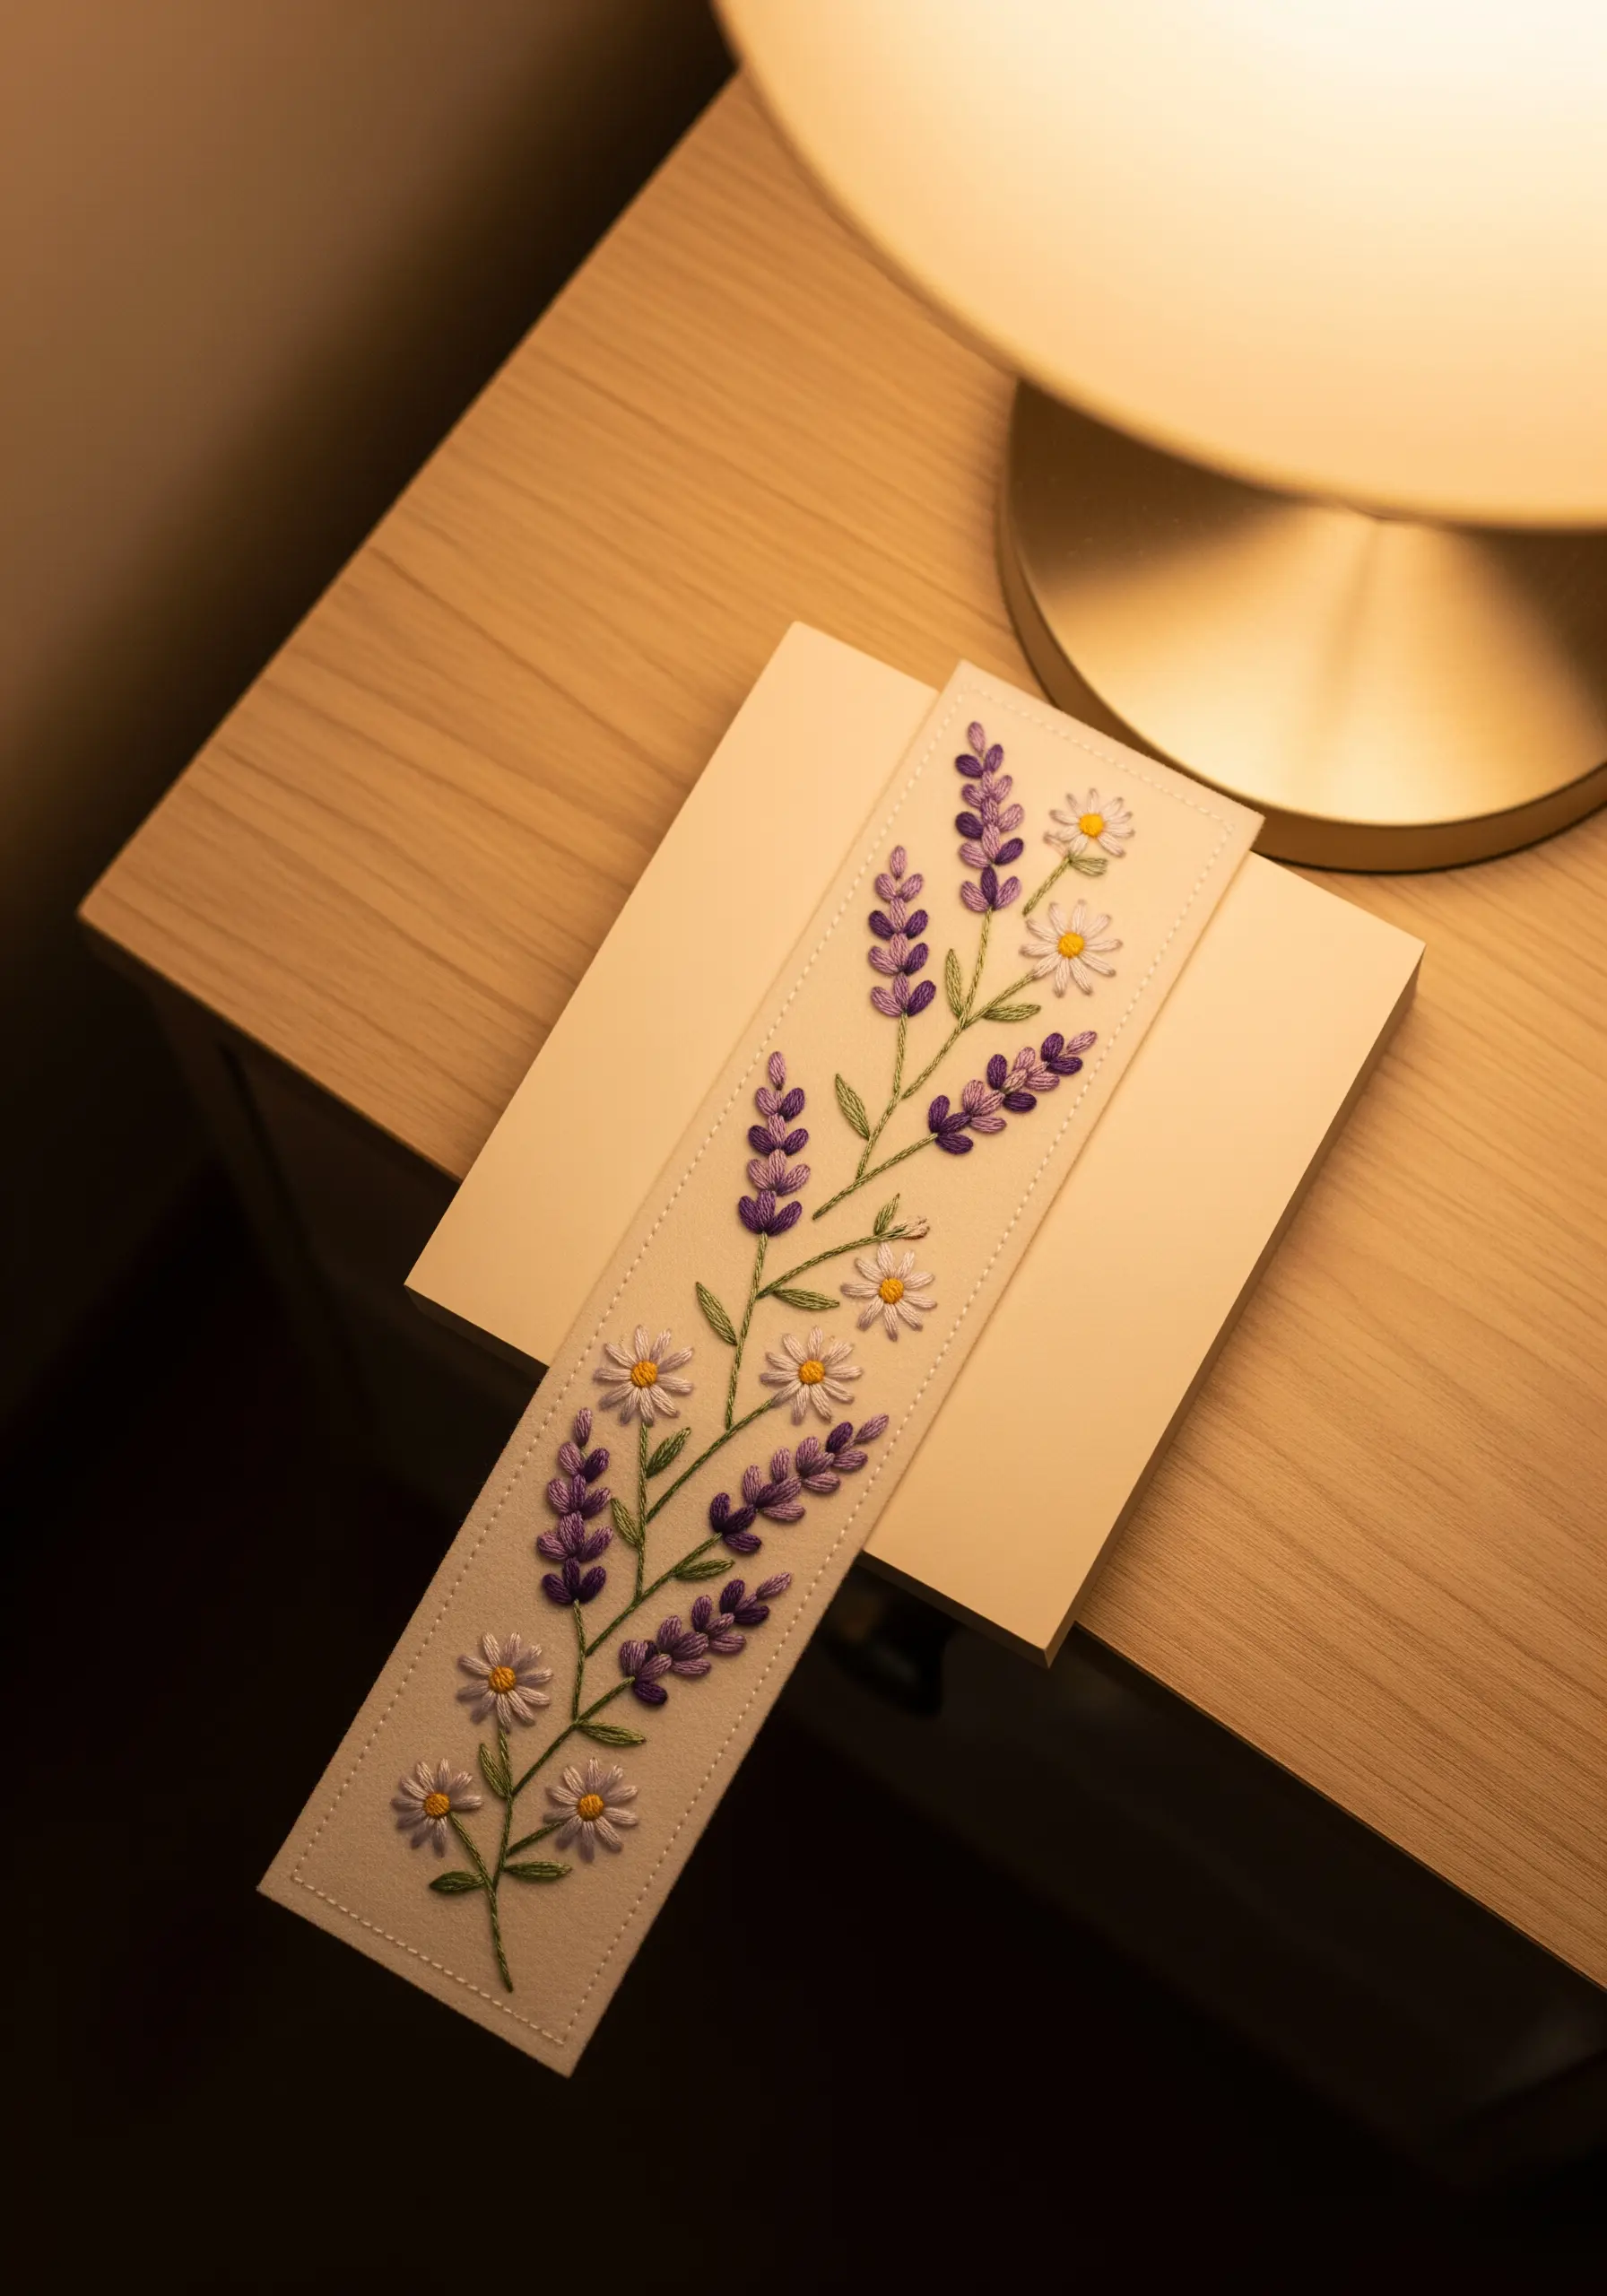
When embroidering a bookmark, treat the narrow space like a vertical canvas.
Create a gentle S-curve with the main stem to guide the eye naturally down the length of the design.
Balance larger floral elements, like the lavender sprigs stitched with satin stitch, by interspersing smaller, simpler daisies made with detached chain stitches.
This technique prevents visual clutter and creates an elegant rhythm, turning a simple object into one of those adorable mini stitch ideas that make perfect gifts.
3. Sculpt Landscapes with Directional Satin Stitch
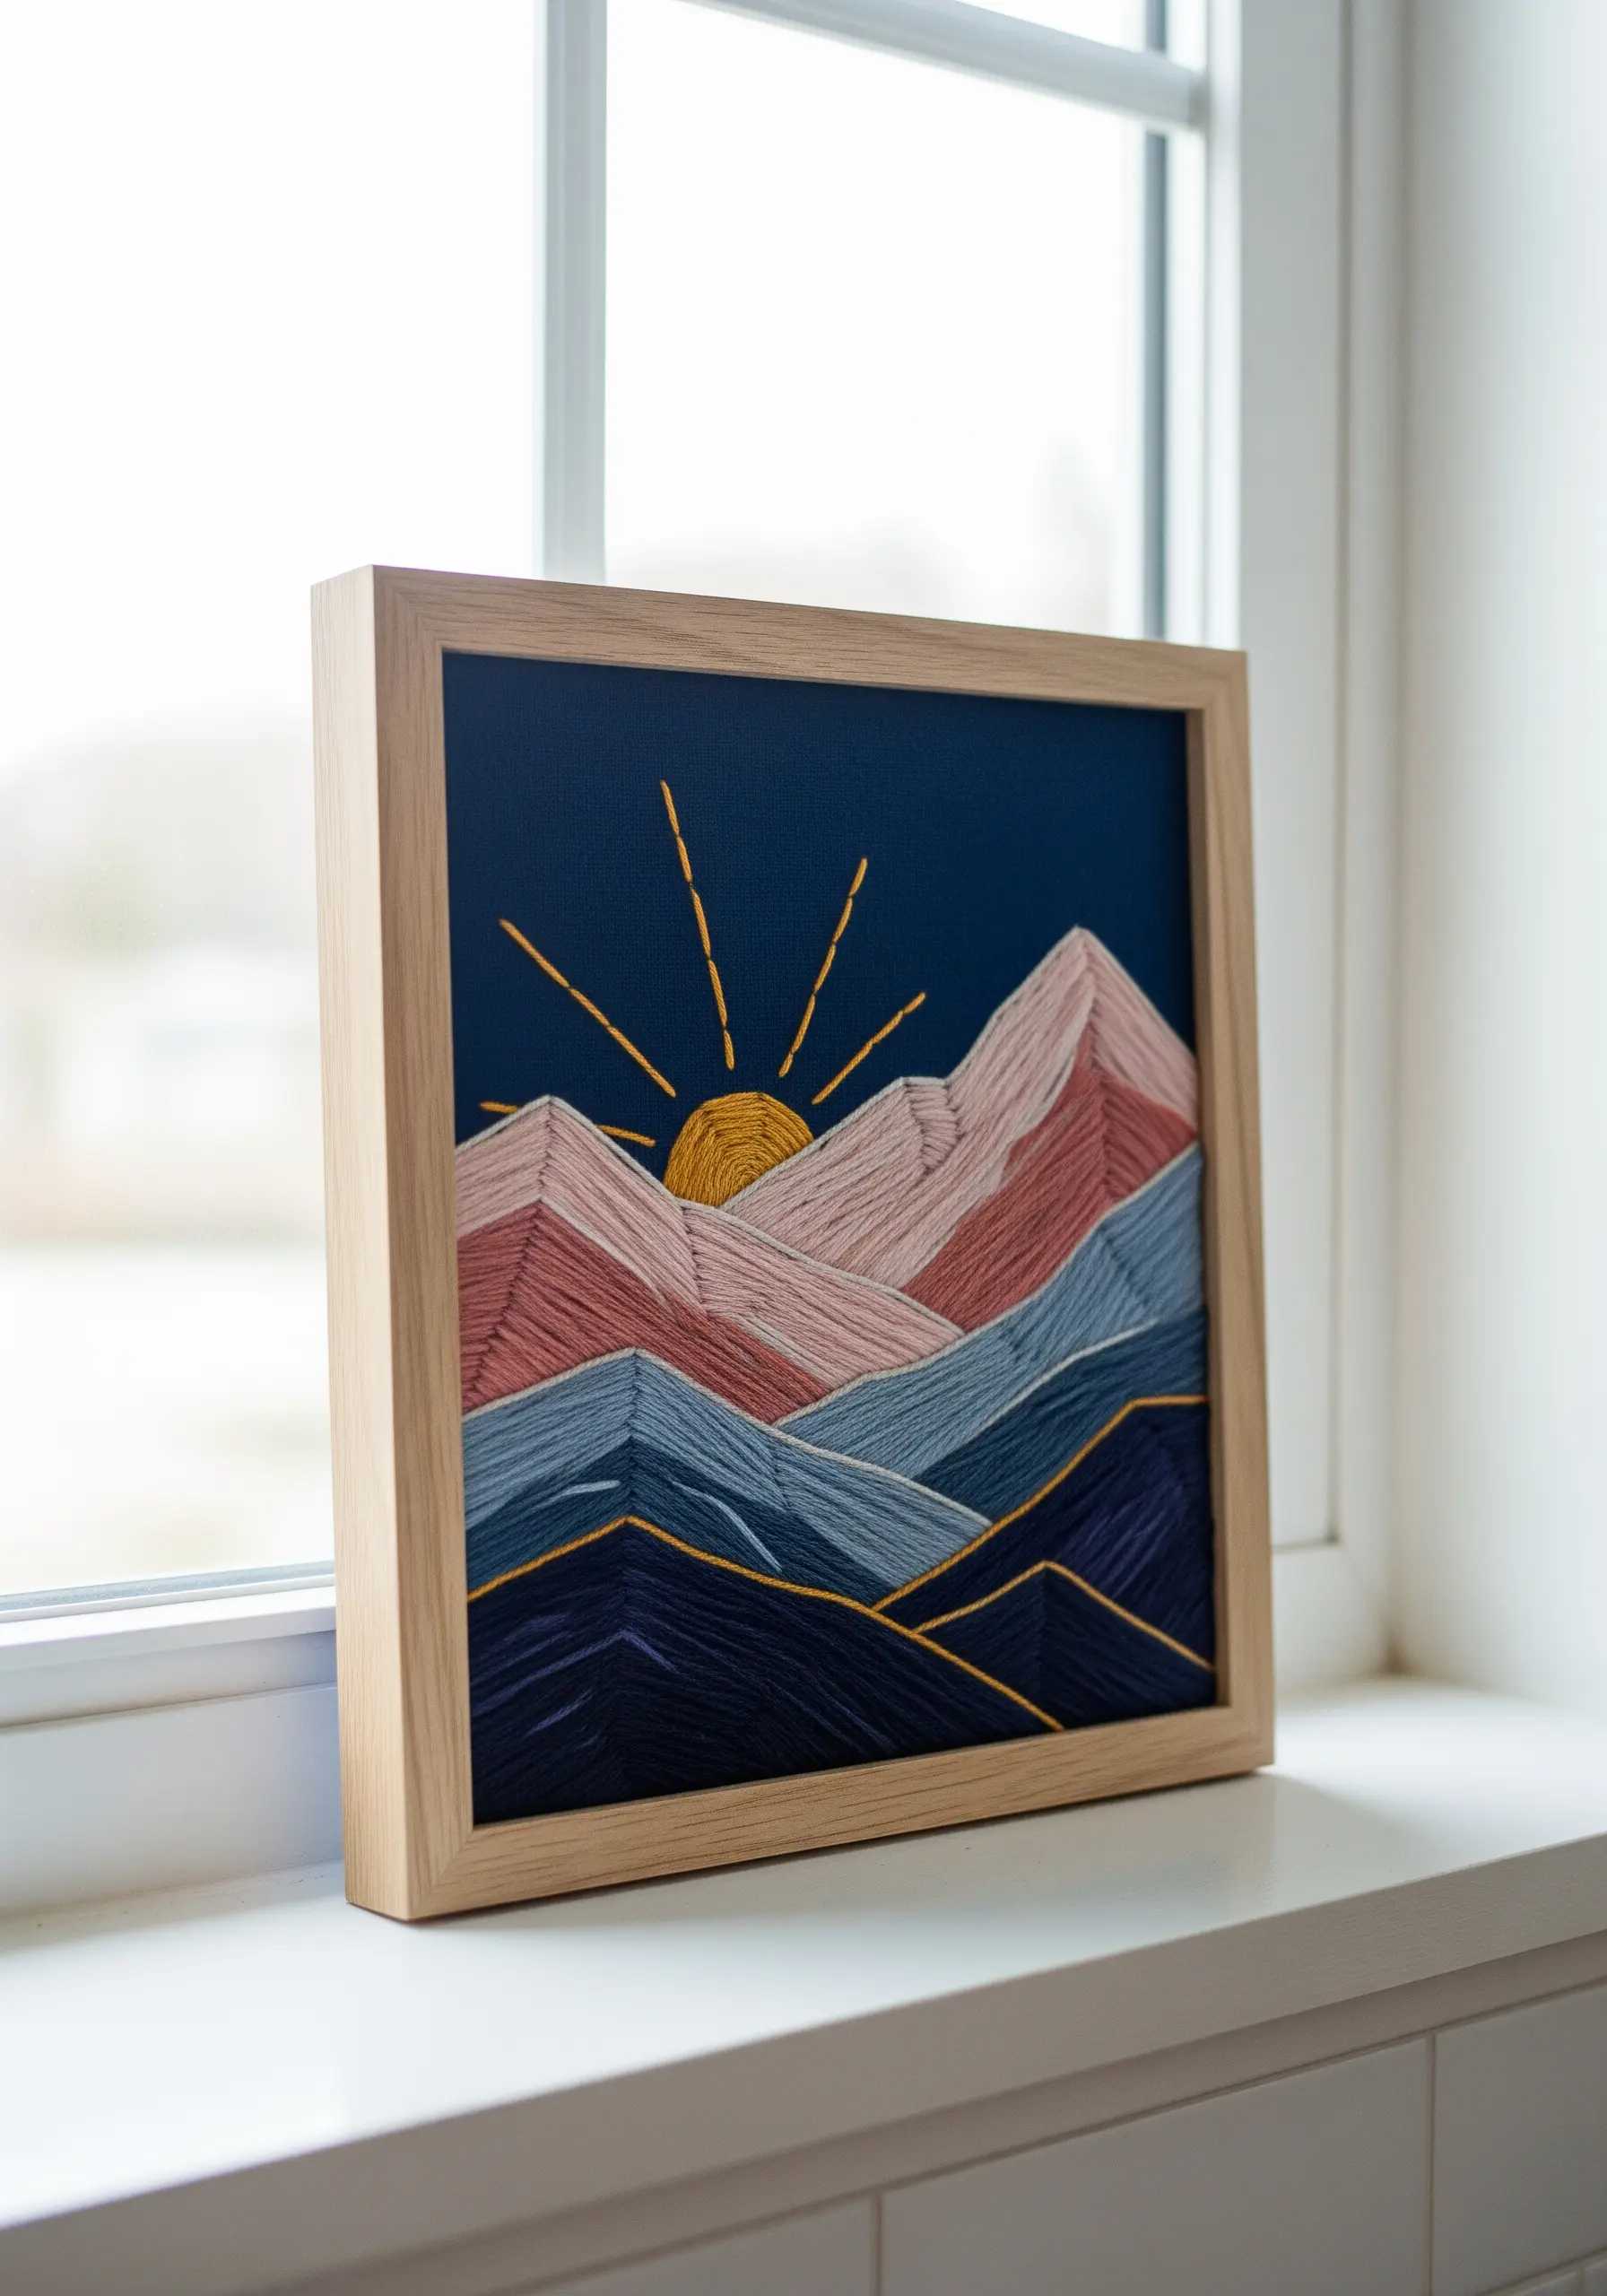
To give your landscapes depth and structure, use the direction of your satin stitches to define planes.
For each mountain section, angle your stitches consistently to create the illusion of a solid, angled face reflecting light.
When one section meets another, change the stitch direction abruptly to create a sharp, graphic edge.
A single strand of metallic gold thread, couched along the ridges, adds a crisp, modern outline that elevates the entire piece beyond simple color-blocking, much like you’d see in artistic string art landscape scenes.
4. Master the Dense Floral Fill Technique
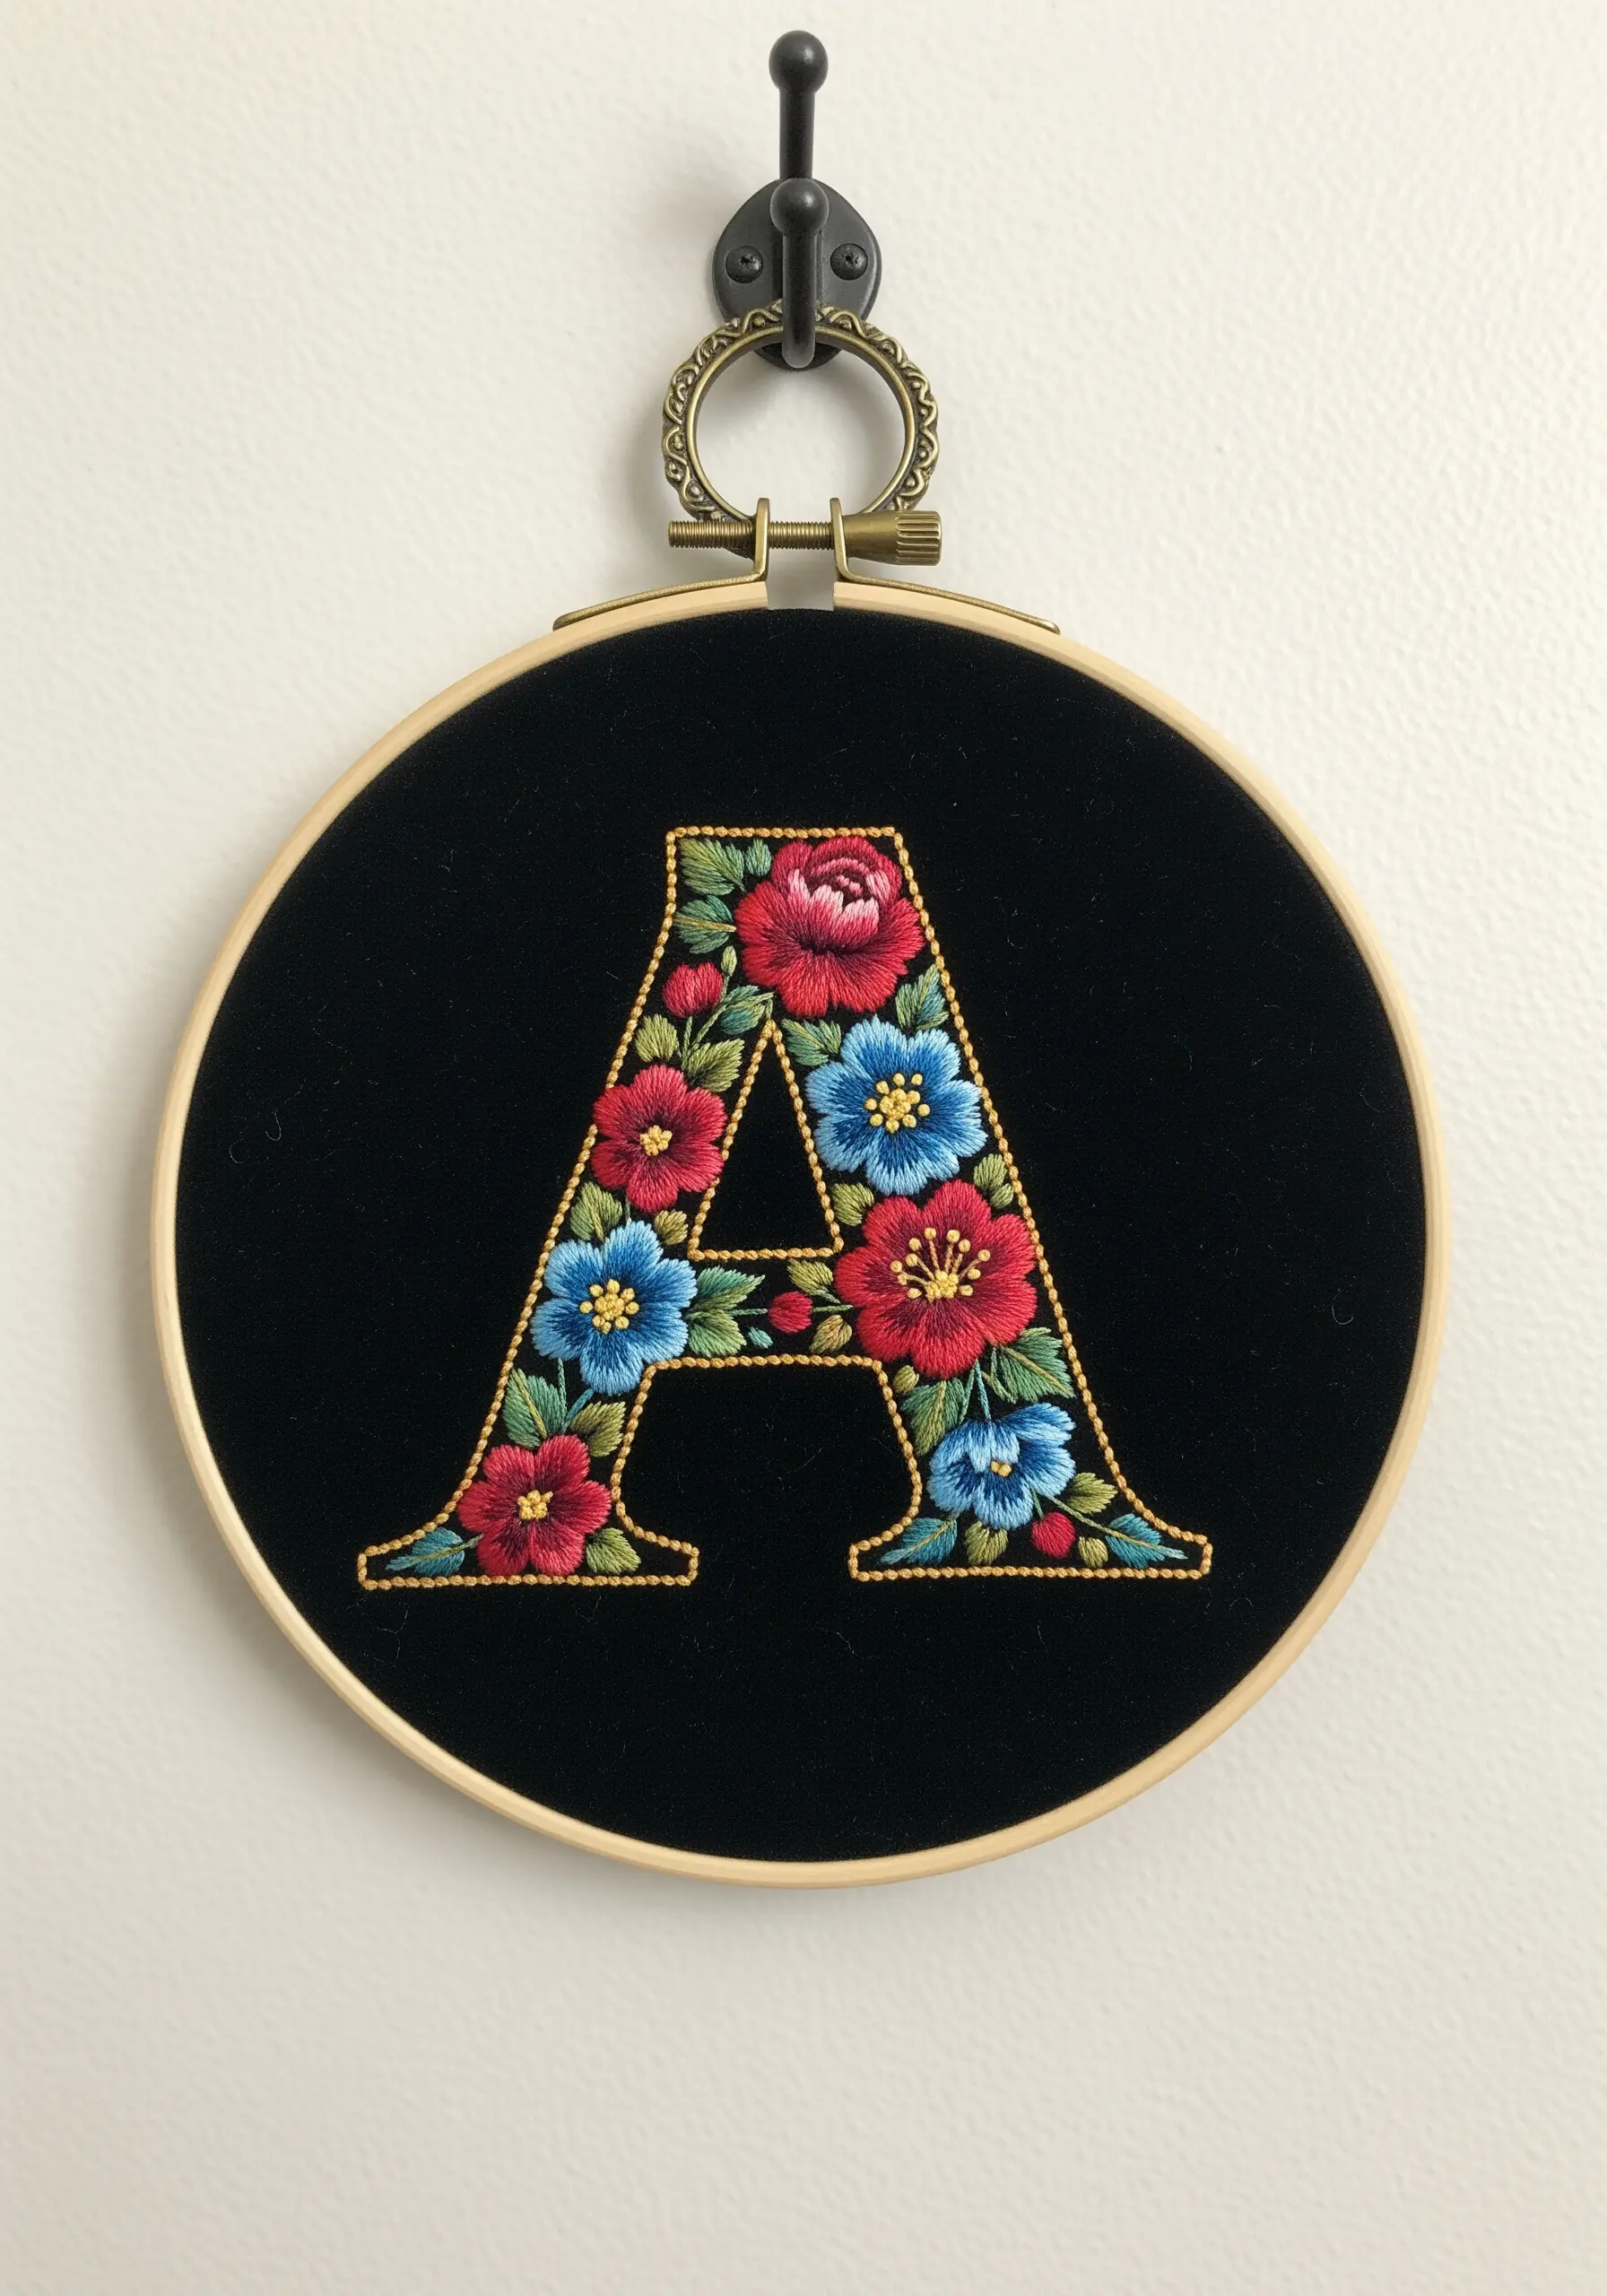
Turn a simple letter into a lush botanical tapestry by focusing on stitch density and variety.
Work on a dark, high-contrast fabric like black velvet to make your colors vibrate.
Pack your floral motifs—like wagon wheel roses, satin-stitched leaves, and French knot centers—tightly together, overlapping them slightly to eliminate any gaps.
Outline the final shape with a neat row of couched metallic thread or a precise backstitch to give it a clean, defined edge and a professional finish, perfect for personalized name monogram wall embroidery gifts.
5. Embrace Graphic Lines on Utilitarian Objects
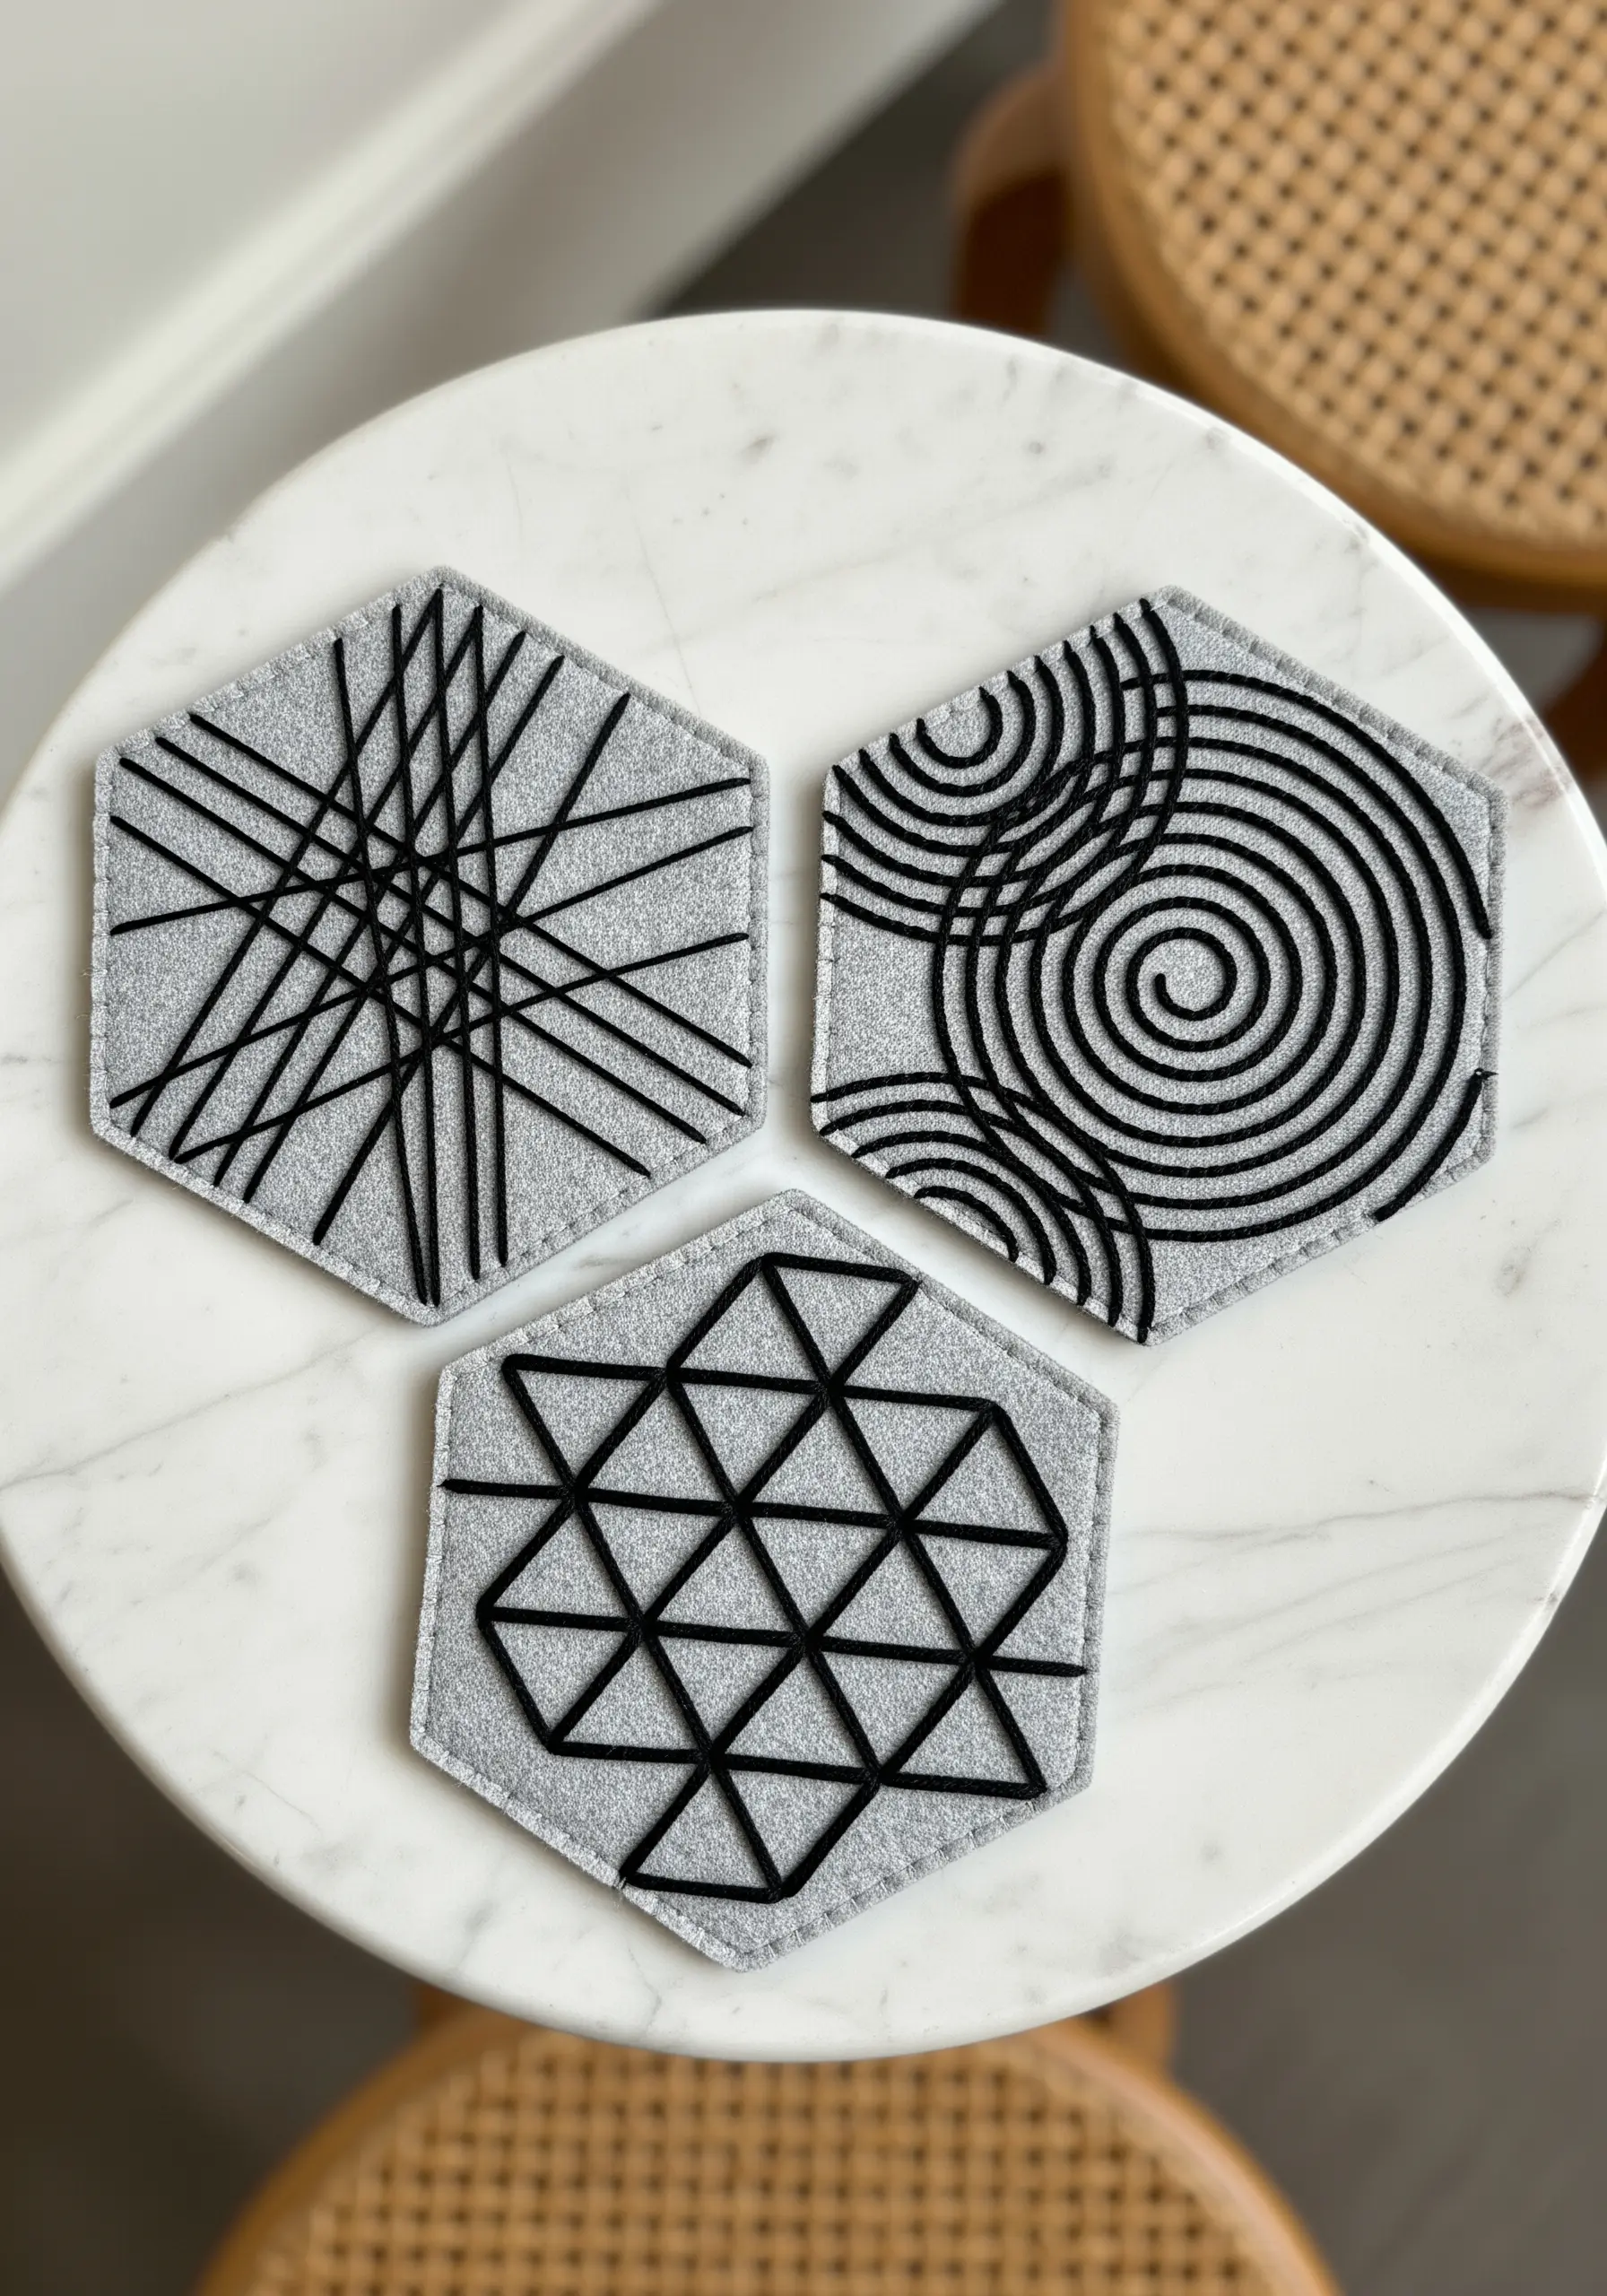
Transform everyday items like felt coasters with bold, geometric embroidery.
Choose a non-stretchy, stable material like thick felt, which requires no hoop and won’t pucker.
Use a thicker thread, such as #5 pearl cotton, and a simple backstitch to create clean, graphic lines that stand out.
The key here is precision: mark your pattern carefully with a disappearing ink pen to ensure your lines are perfectly straight and your angles are sharp, creating modern geometric thread art ideas with a minimalist feel.
6. Add Artful Detail to Functional Tools
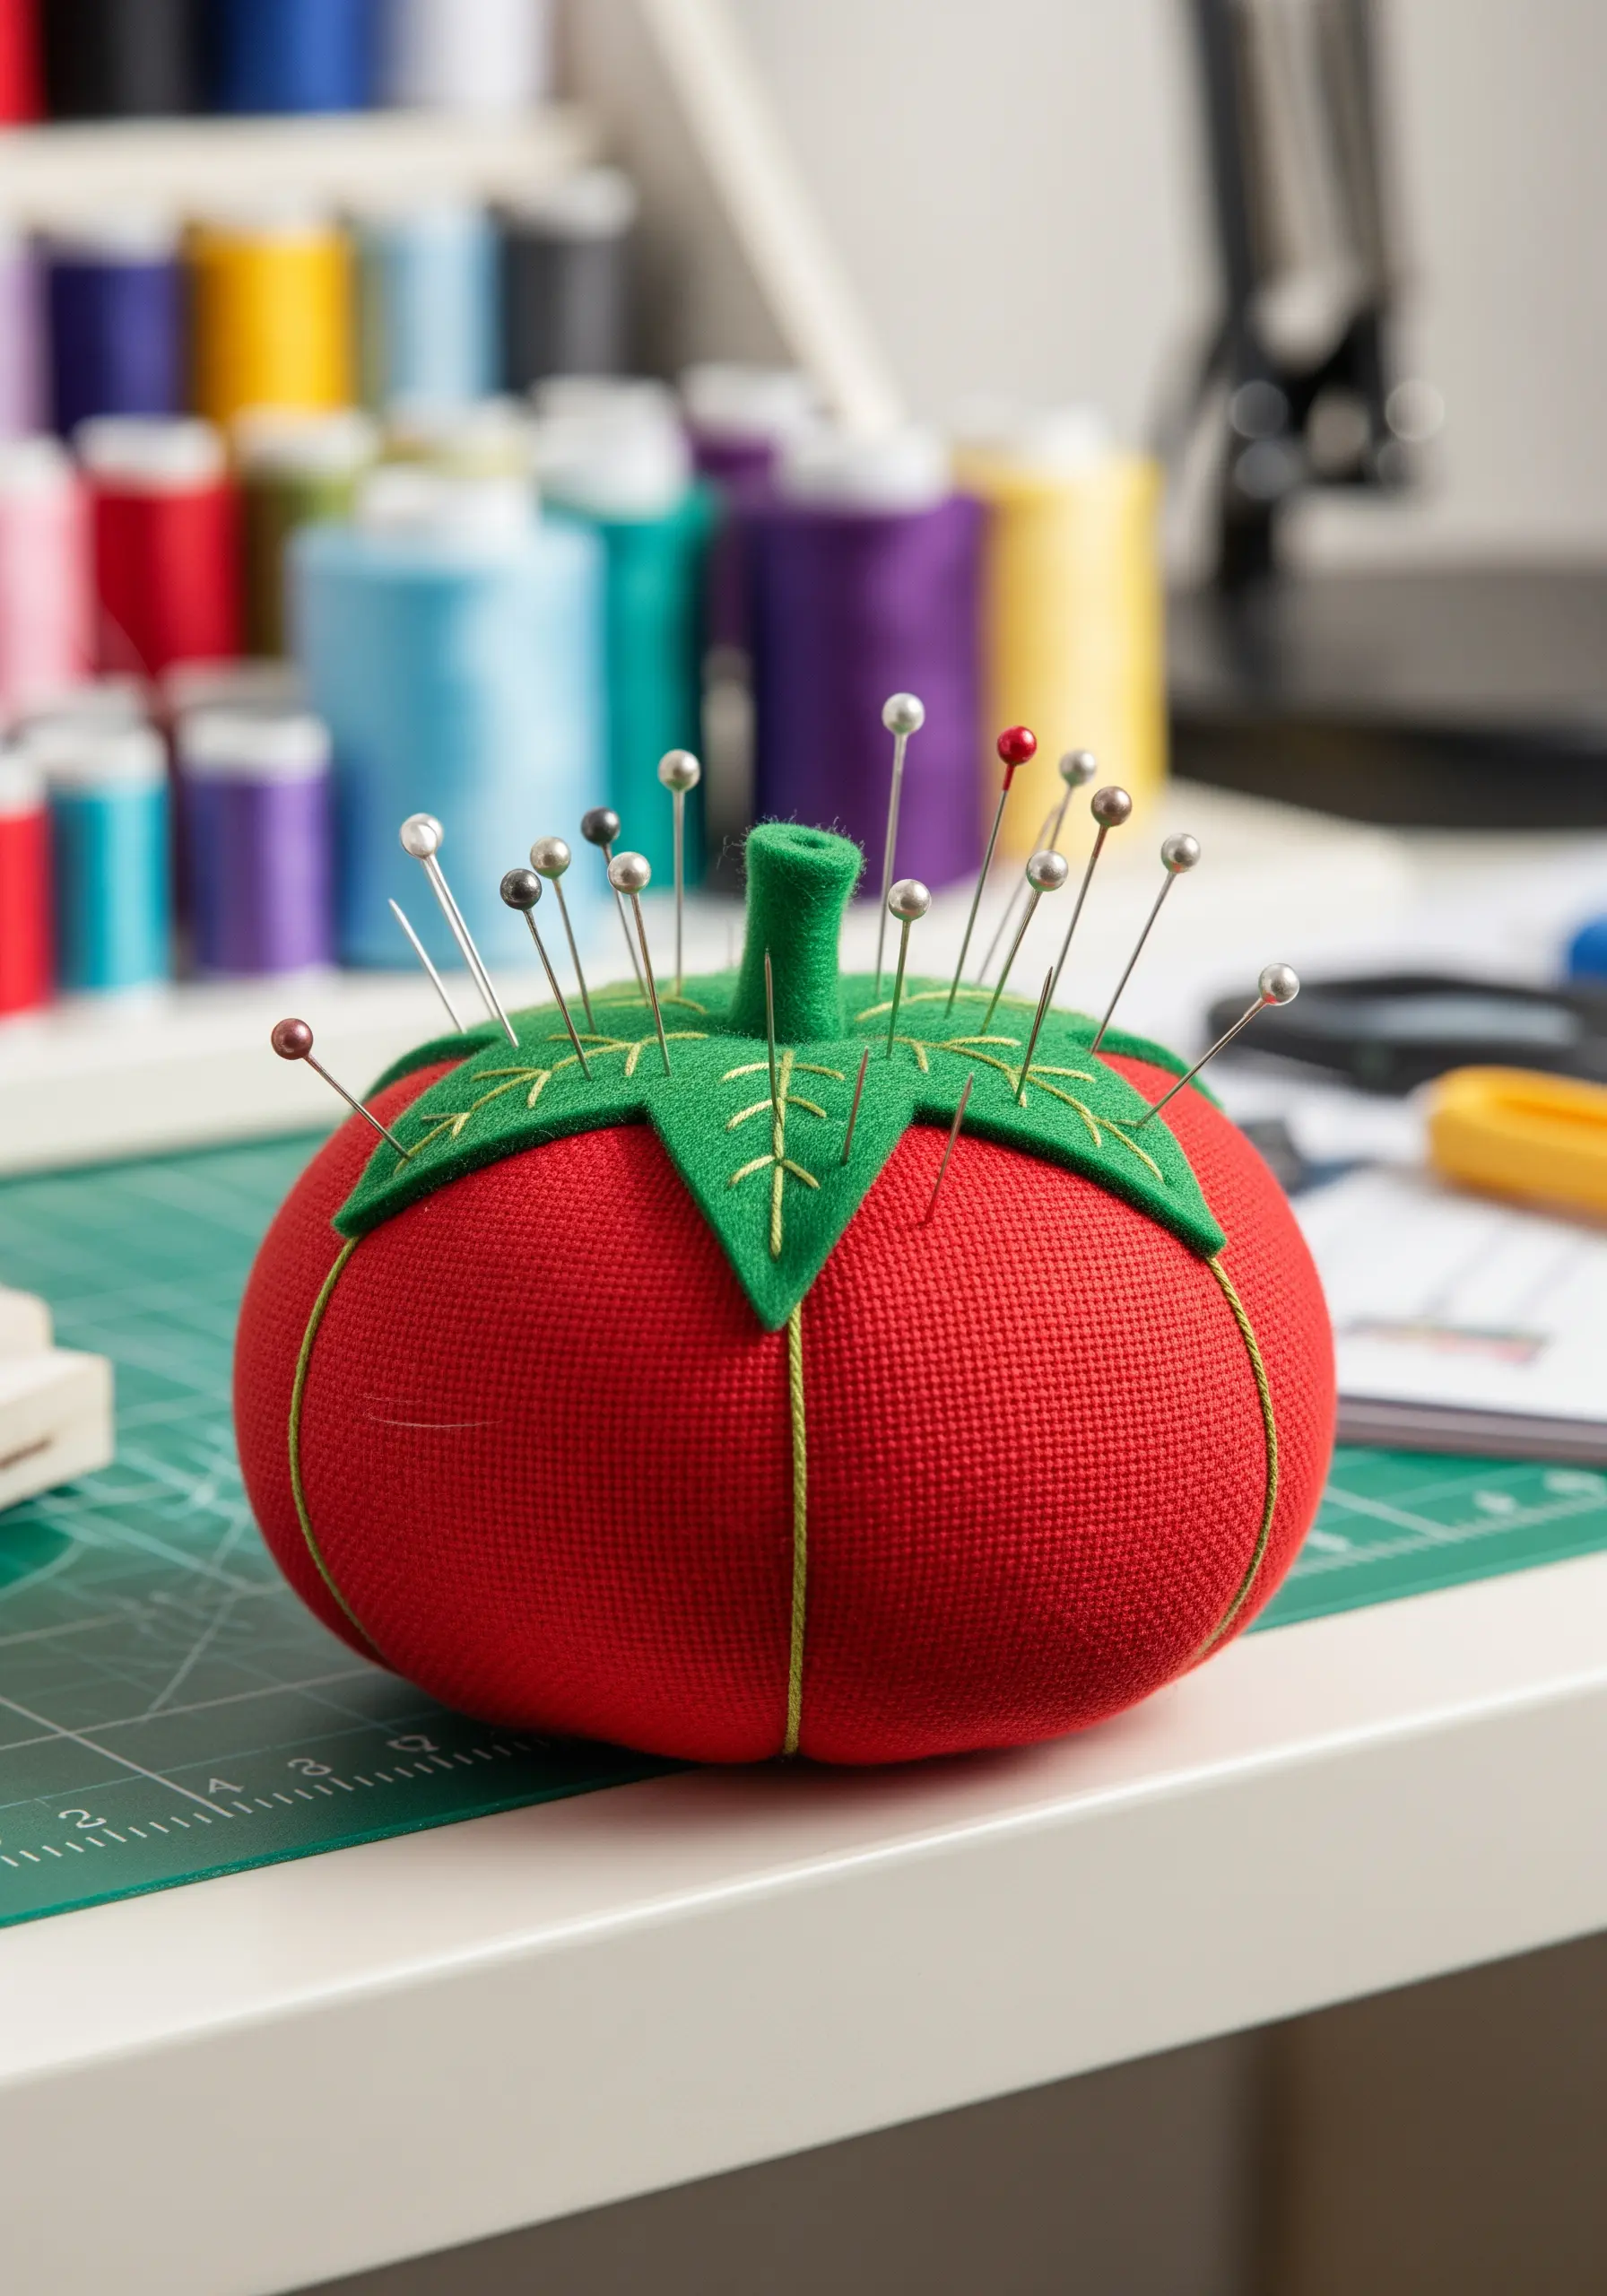
Elevate your sewing tools by turning a simple pincushion into a small work of art.
Use a durable, tightly woven fabric that can withstand constant use.
For the decorative leaf veins, a simple chain stitch adds texture and definition without creating too much bulk.
The beauty is in the finishing: ensure the segments of the tomato are pulled taut with a strong thread from top to bottom to create those classic indentations. This is one of those DIY fabric crafts that double as unique handmade gifts for any fellow crafter.
7. Isolate Your Motif with an Appliqué Patch
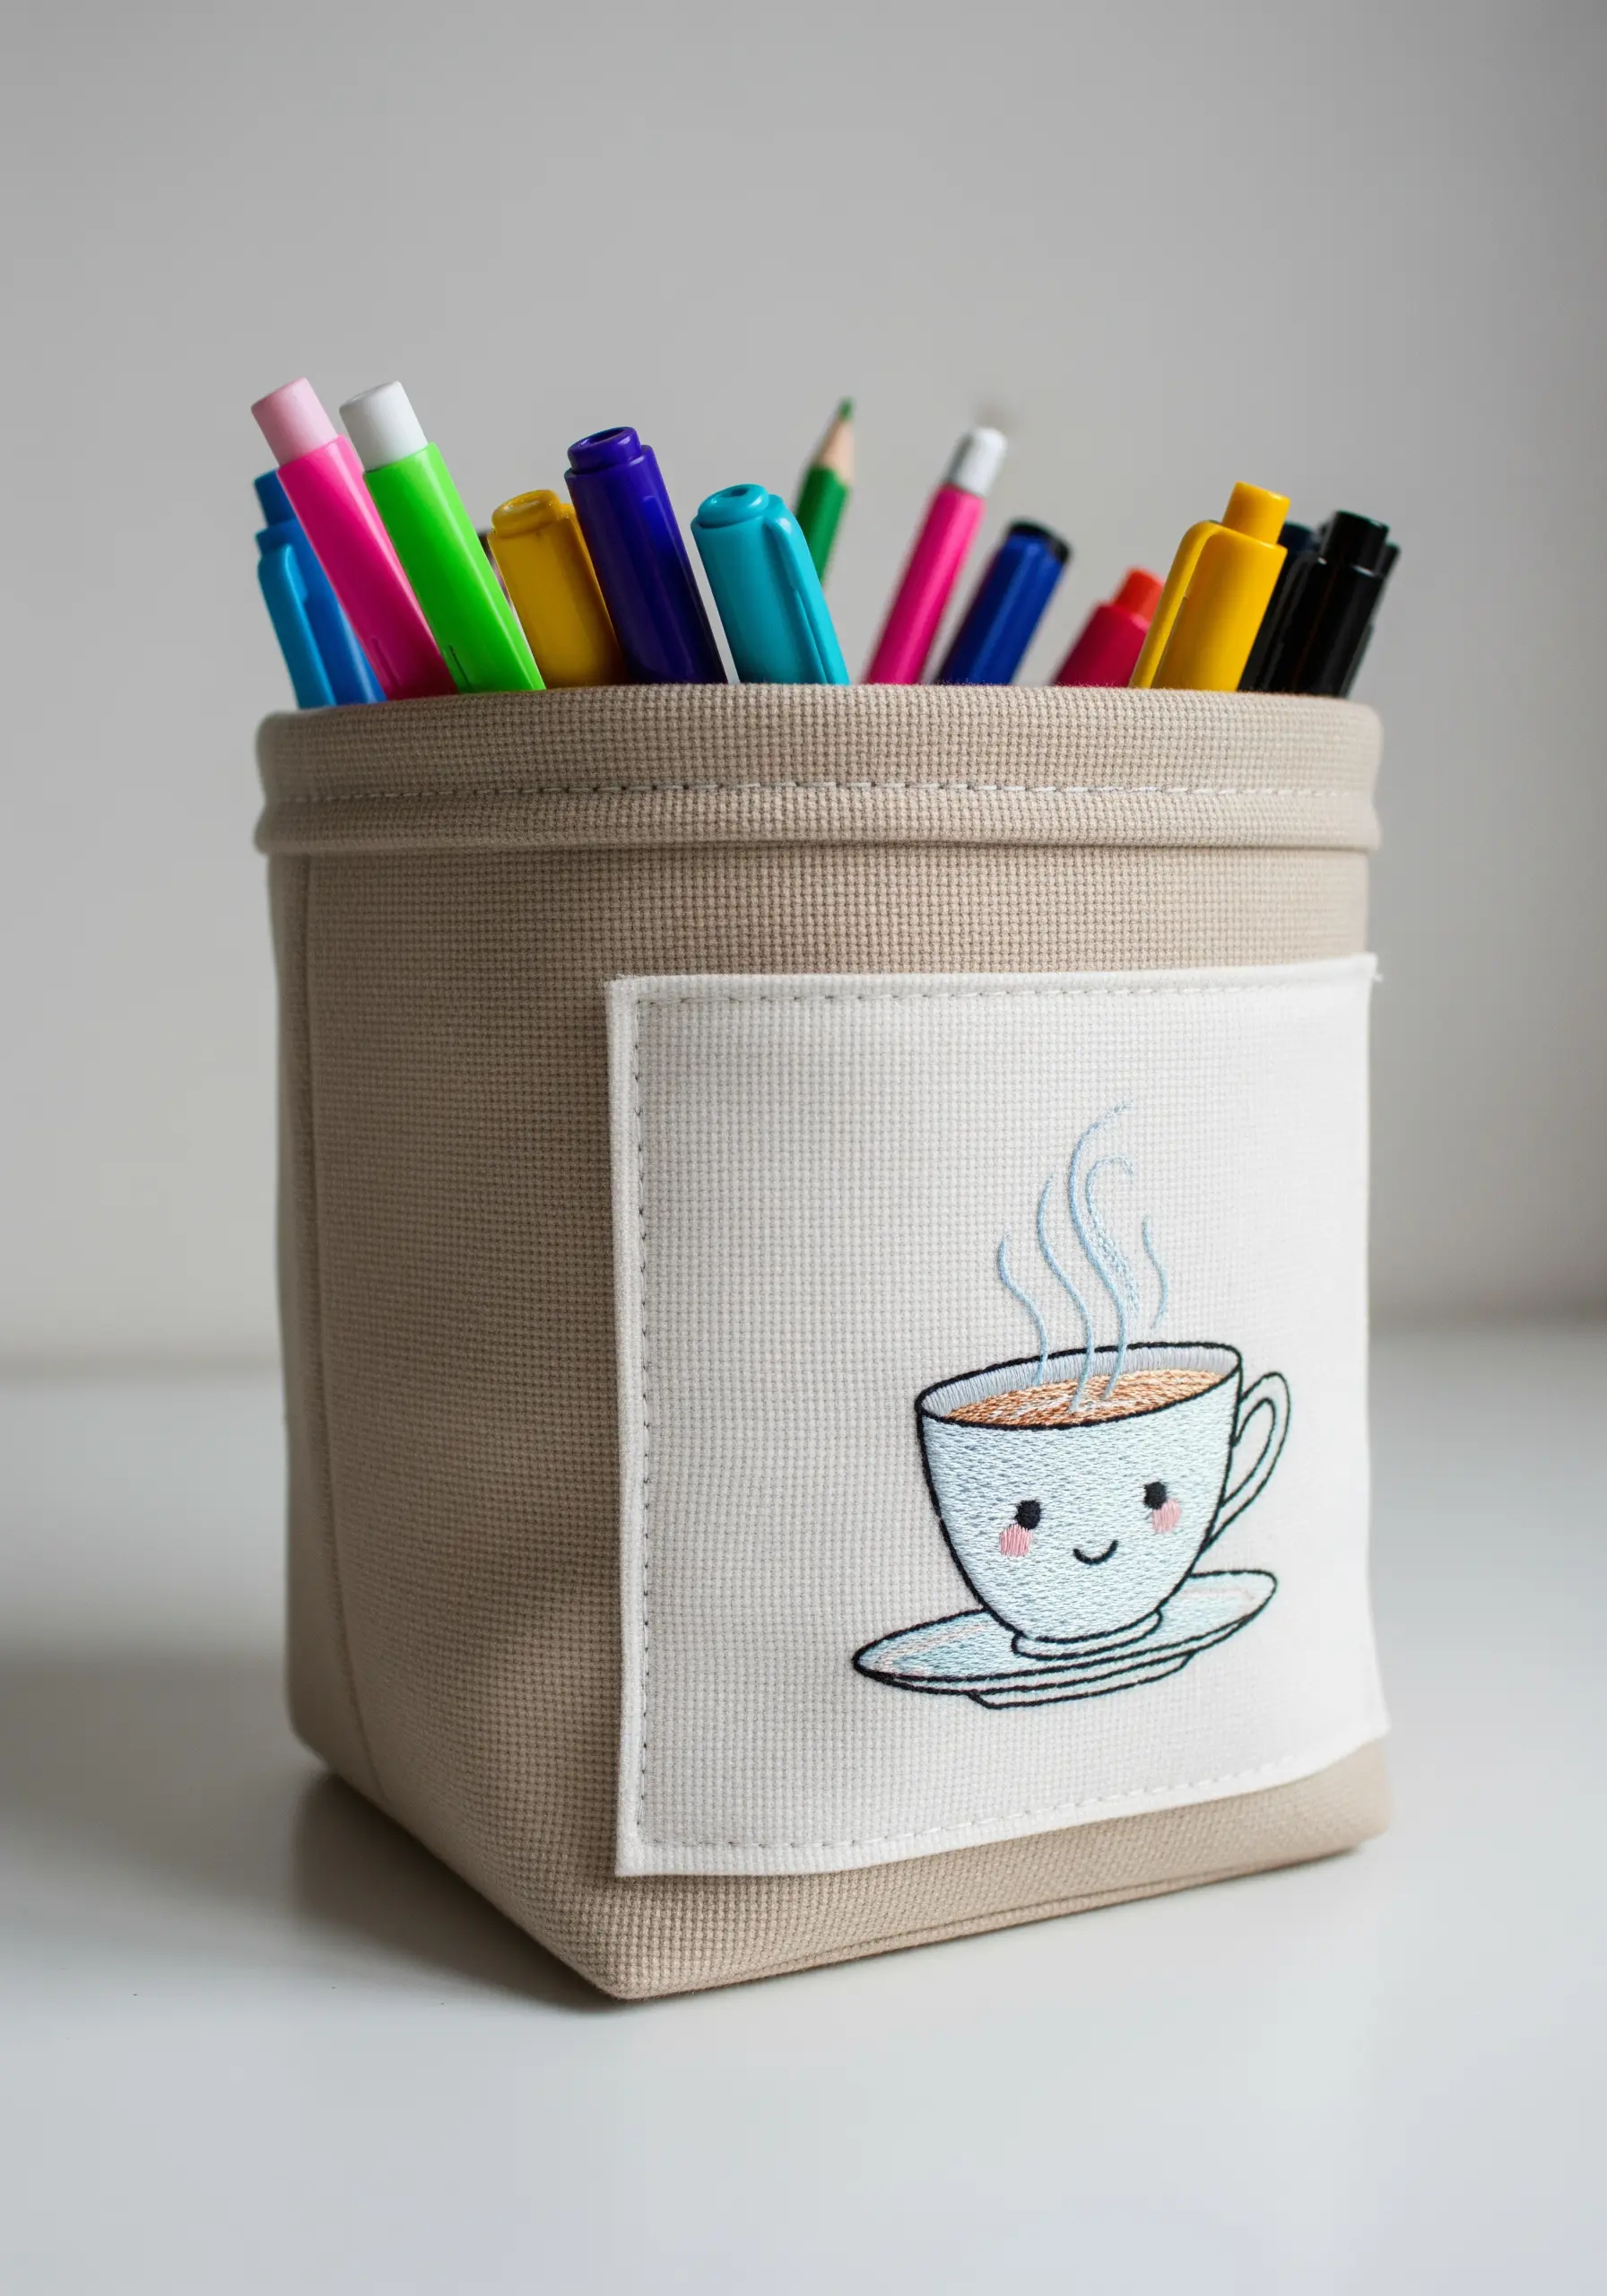
When embroidering on a pre-made 3D object like a fabric bin, stitch your design on a separate piece of fabric first.
This allows you to work comfortably in a hoop, ensuring your stitches are flat, even, and tight.
Once complete, trim the patch, fold the raw edges under, and appliqué it onto the final object with a neat running stitch or whipstitch.
This method gives you complete control and a much cleaner result than trying to maneuver a bulky item under your needle, offering one of many subtle embroidery touches that make your desk look Pinterest-ready.
8. Achieve Realism with Thread Painting
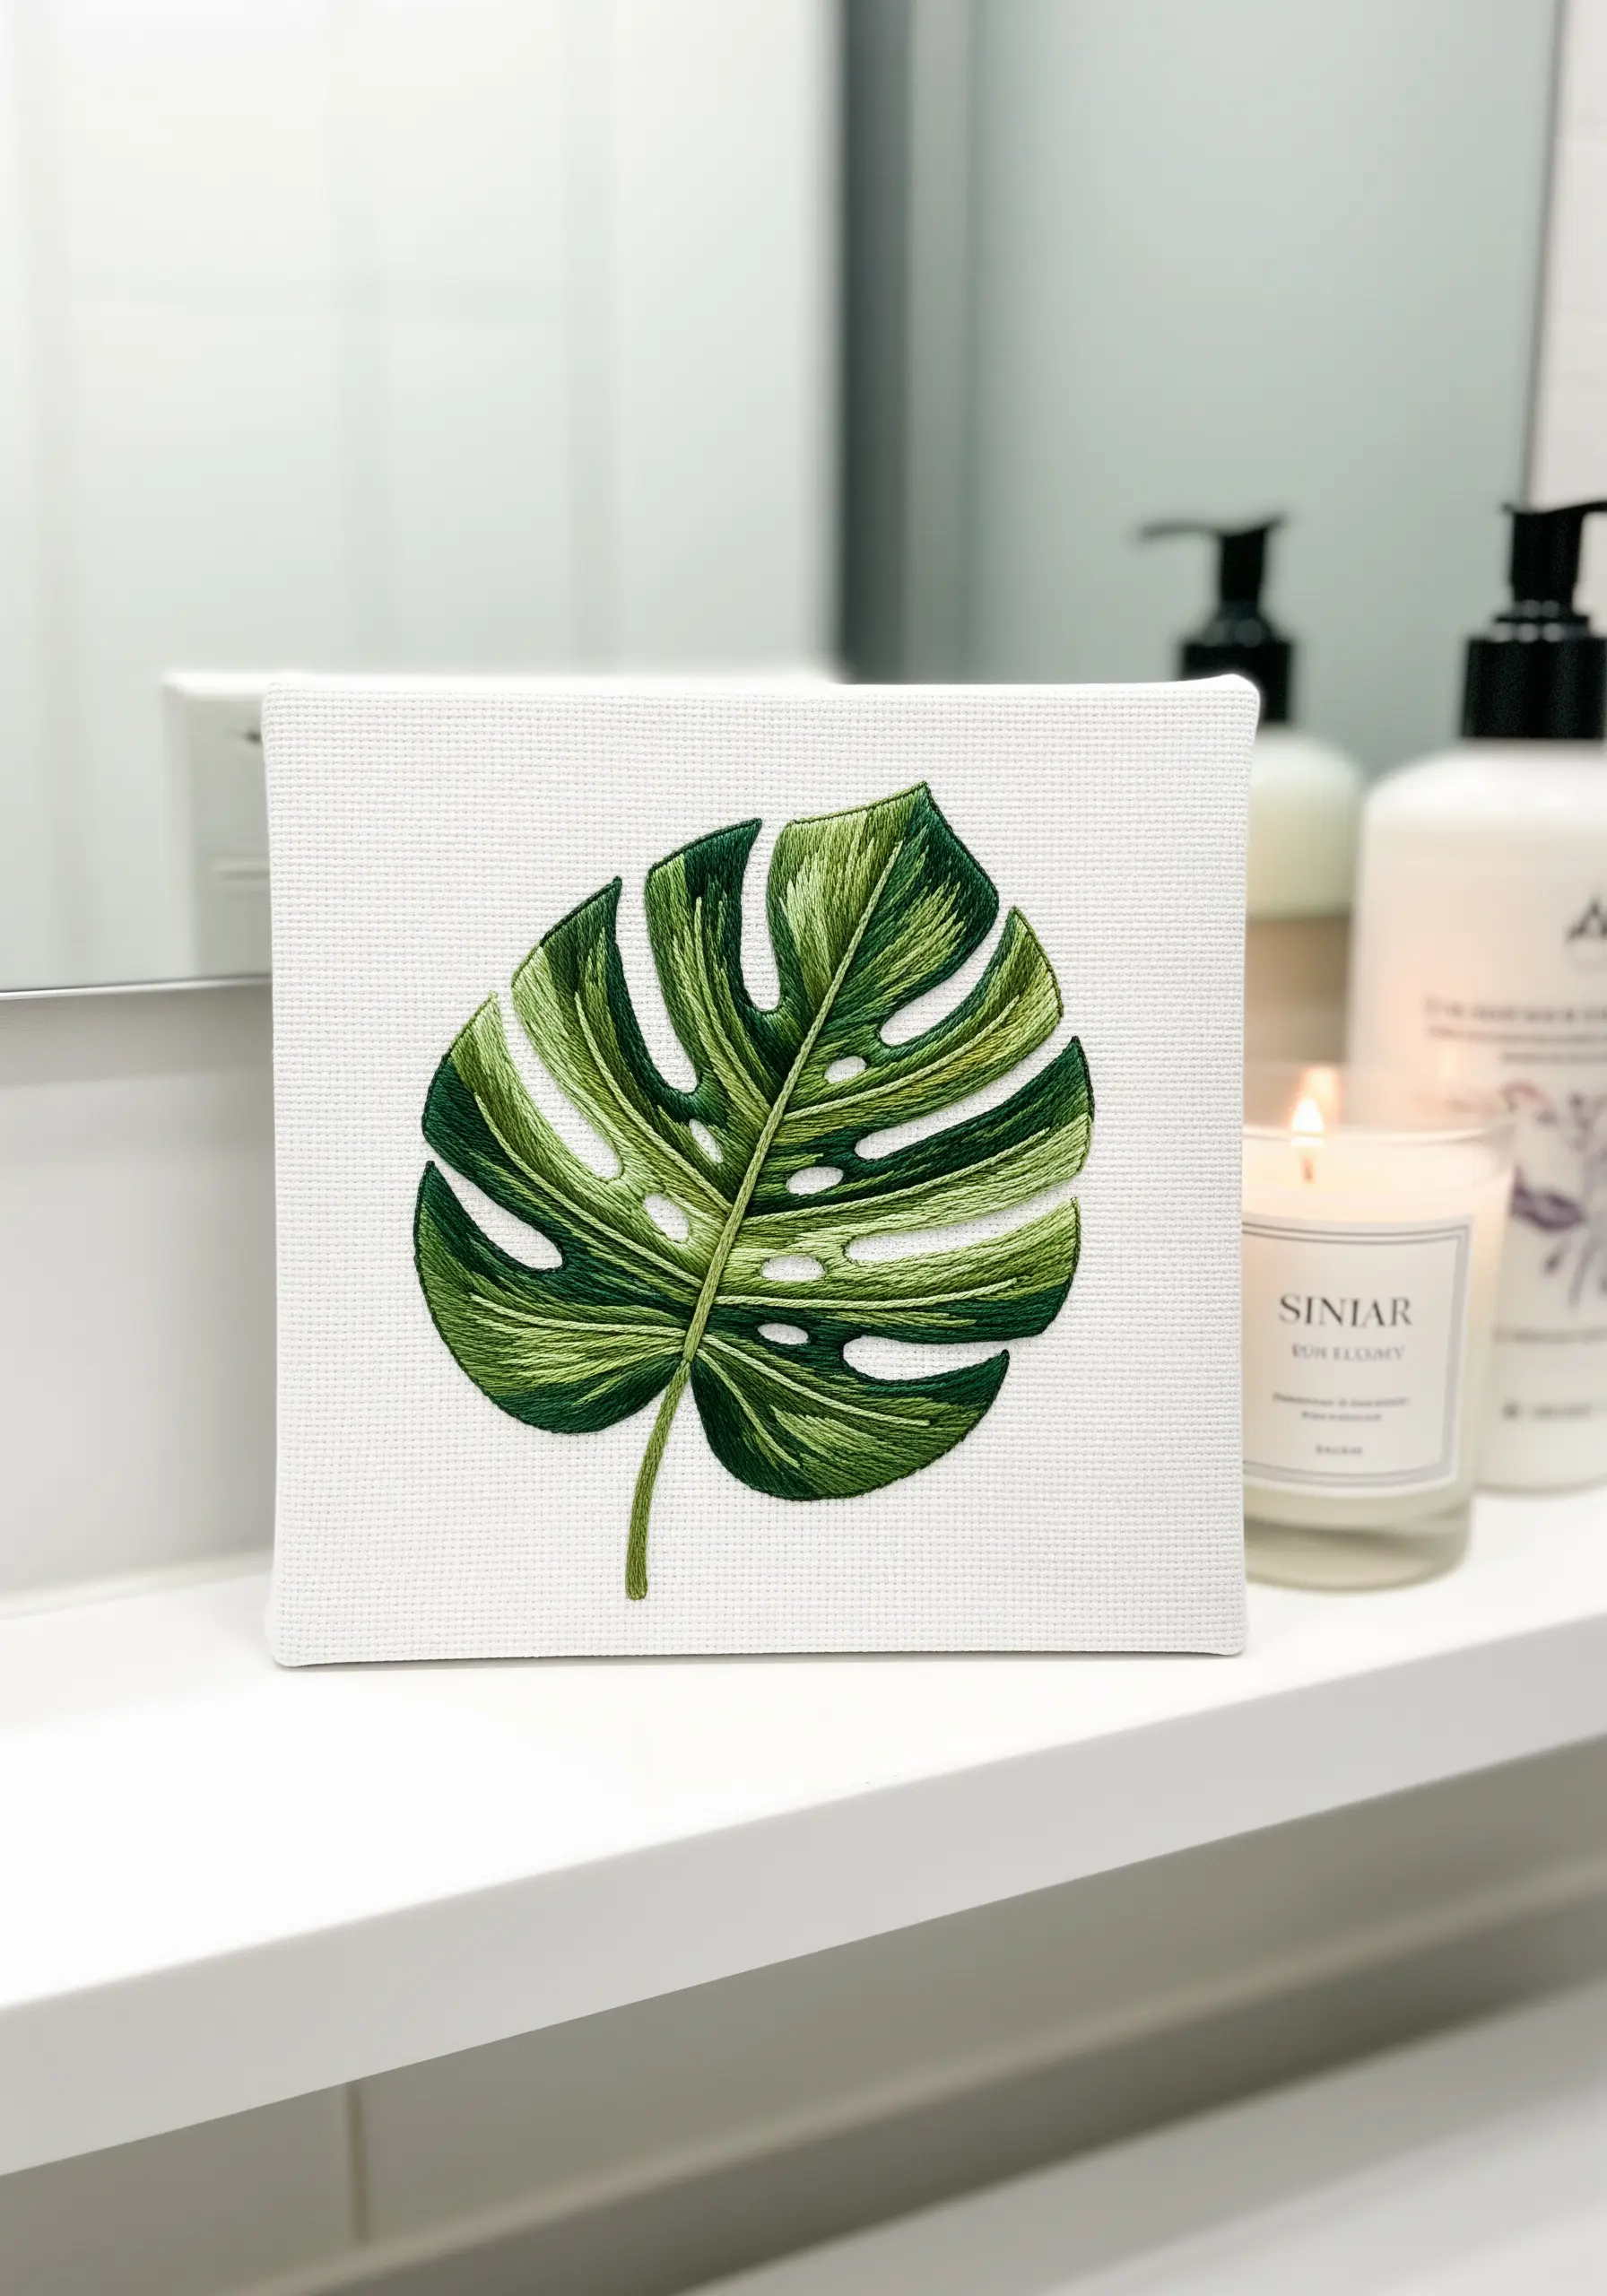
To capture the lifelike variegation of a monstera leaf, you need to think like a painter.
Use the long-and-short stitch as your brushstroke, working with at least four or five shades of green.
Lay your stitches to follow the natural direction of the leaf’s growth and veins.
Blend the colors gradually by overlapping your rows of stitches, ensuring there are no hard lines between shades.
This technique creates a soft, realistic gradient, adding depth and dimension to all of your fern & foliage stitch variations.
9. Create a Dreamy Finish with Mixed Media
Introduce a soft, ethereal quality to your work by combining embroidery with other materials.
To get that soft, blended look in the clouds, lightly color the fabric first with watercolor paints or inktense pencils, then add sparse, scattered seed stitches on top.
When working with metallic thread for stars, couch it with a fine, matching-color thread instead of pulling it through the fabric repeatedly—this preserves its shine and prevents fraying.
This blend of textures is key to achieving those watercolor-style leaf embroidery blends for soft dreamy botanical effects.
10. Build Dimension with Textured Knot Stitches
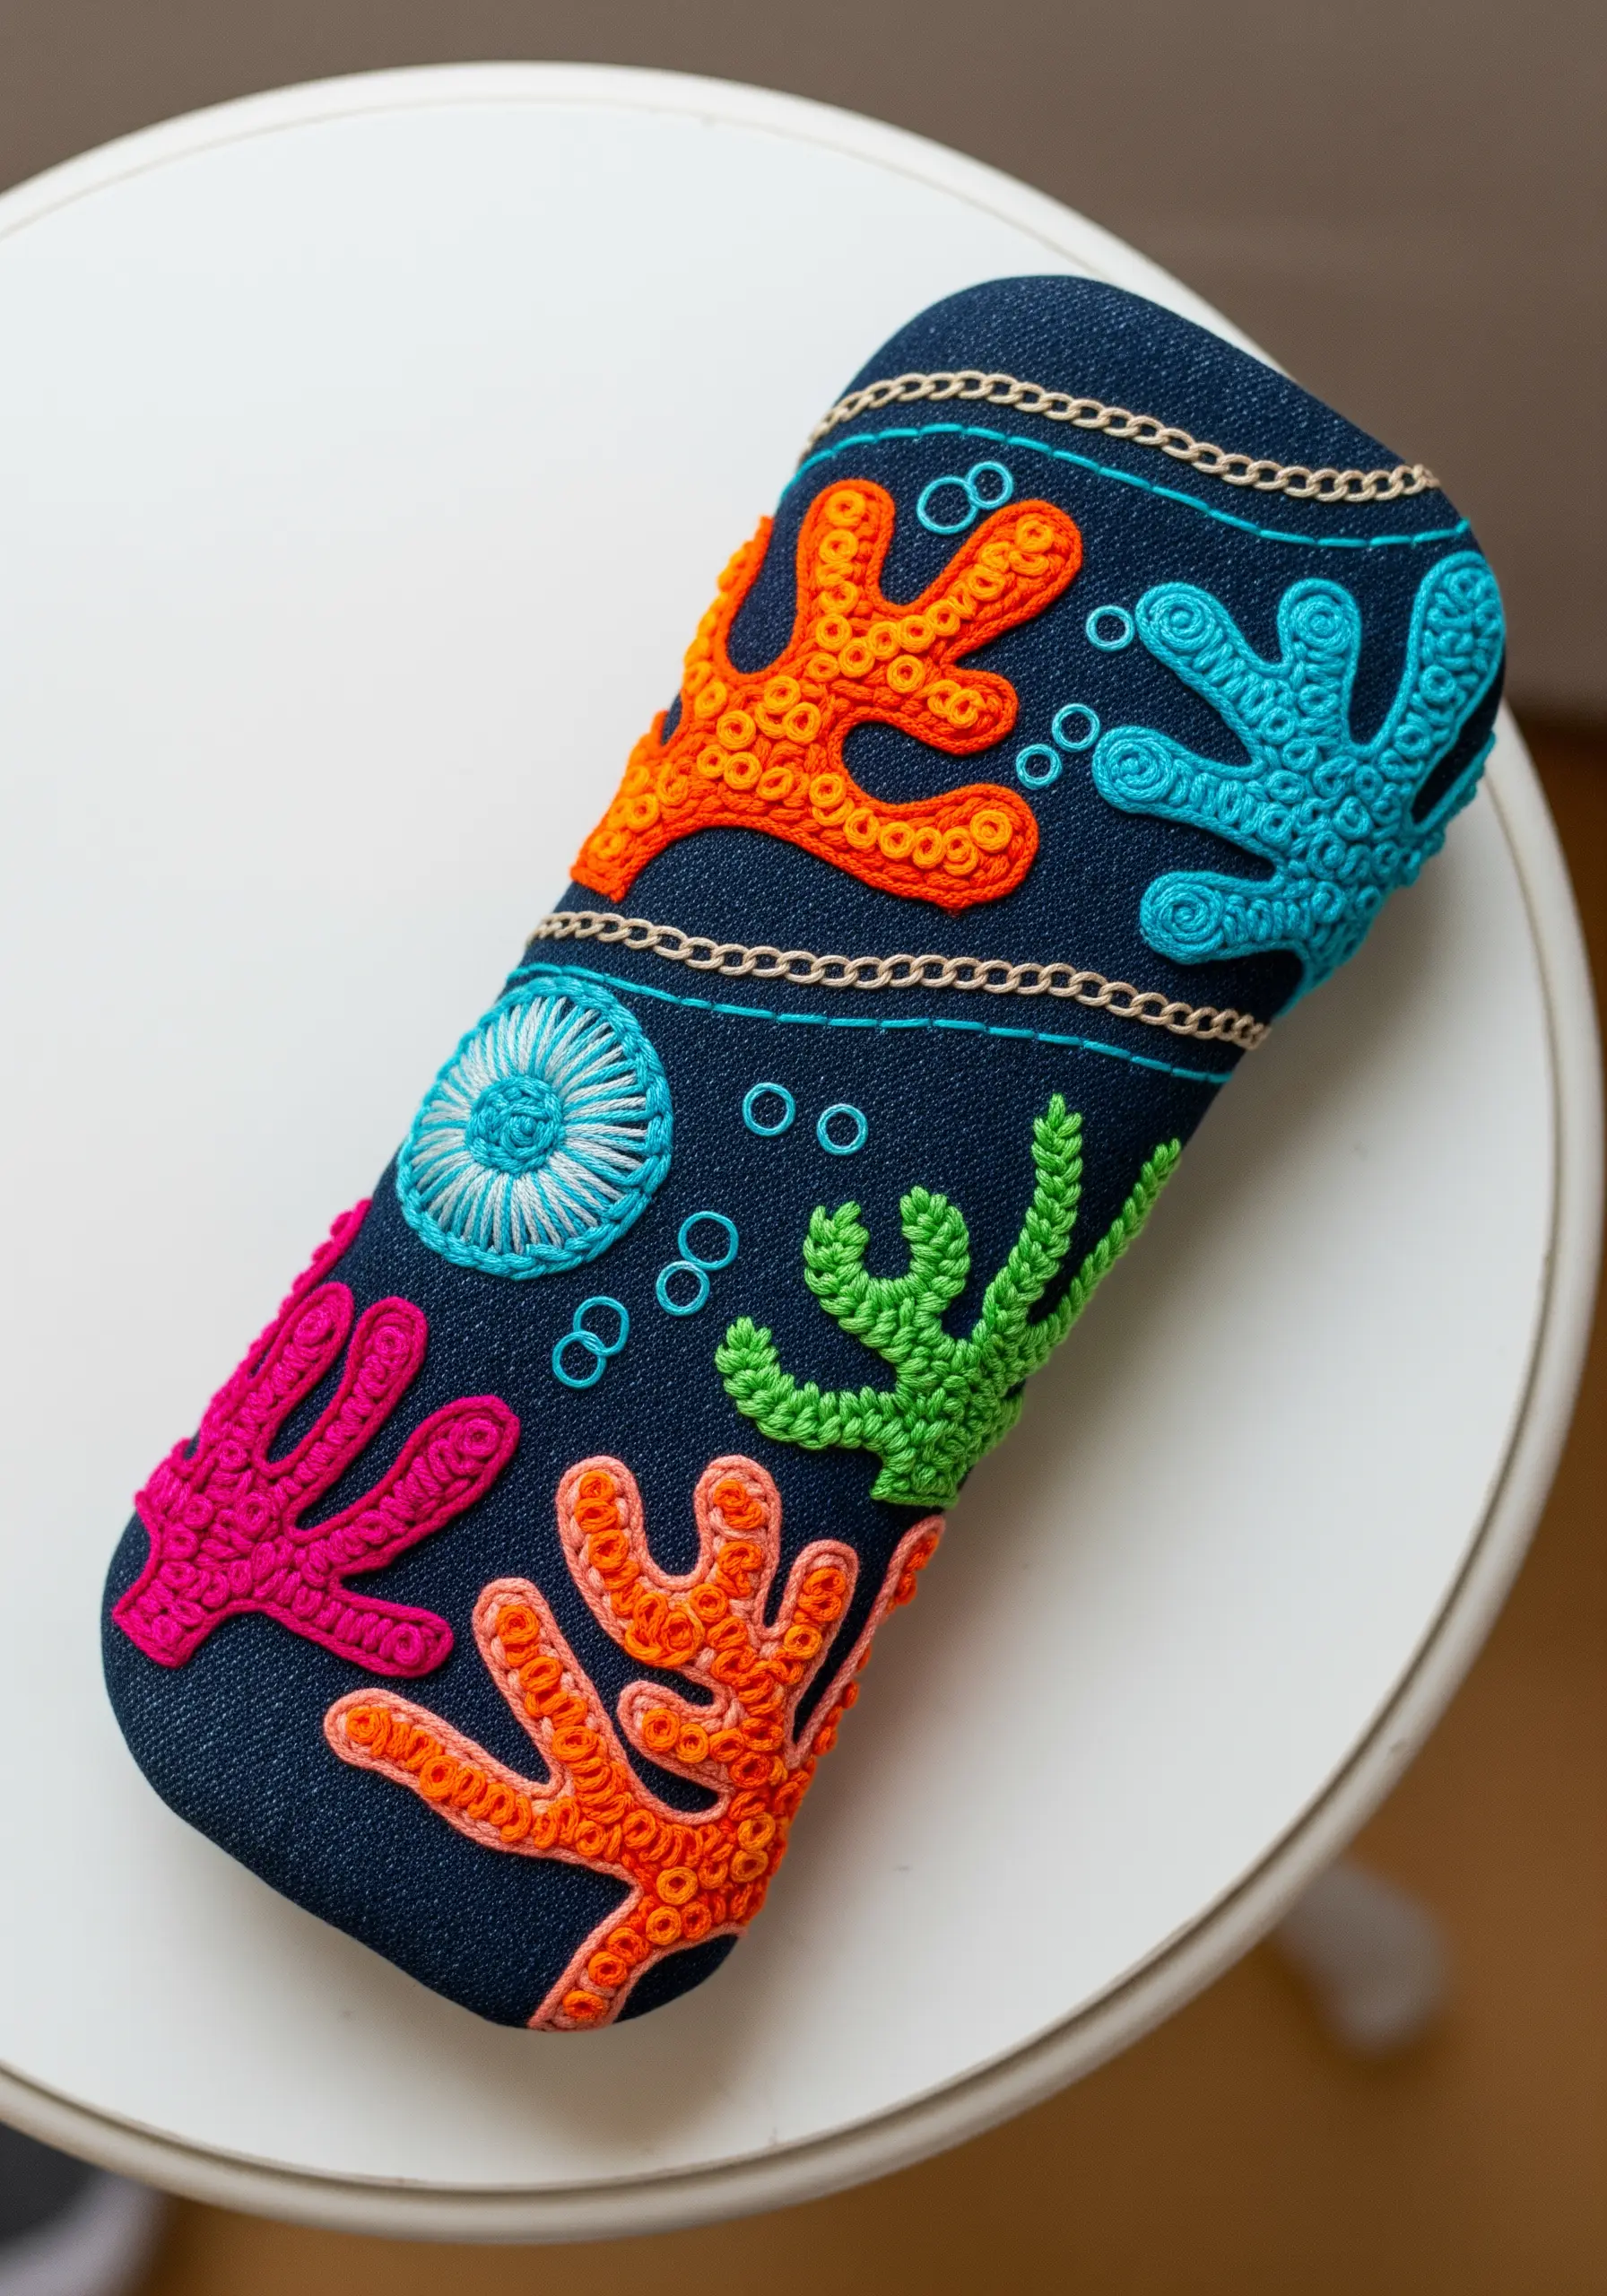
For motifs that need to pop, use stitches that create physical texture and dimension.
Fill the coral shapes with densely packed French knots or, for a more elongated shape, bullion knots.
Vary the number of wraps on your bullion knots to create organic, irregular shapes that mimic real coral growth.
The high-contrast between the raised, bumpy textures and the smooth denim fabric makes the design incredibly tactile and visually striking, perfect for any ocean-inspired hoop embroidery ideas.
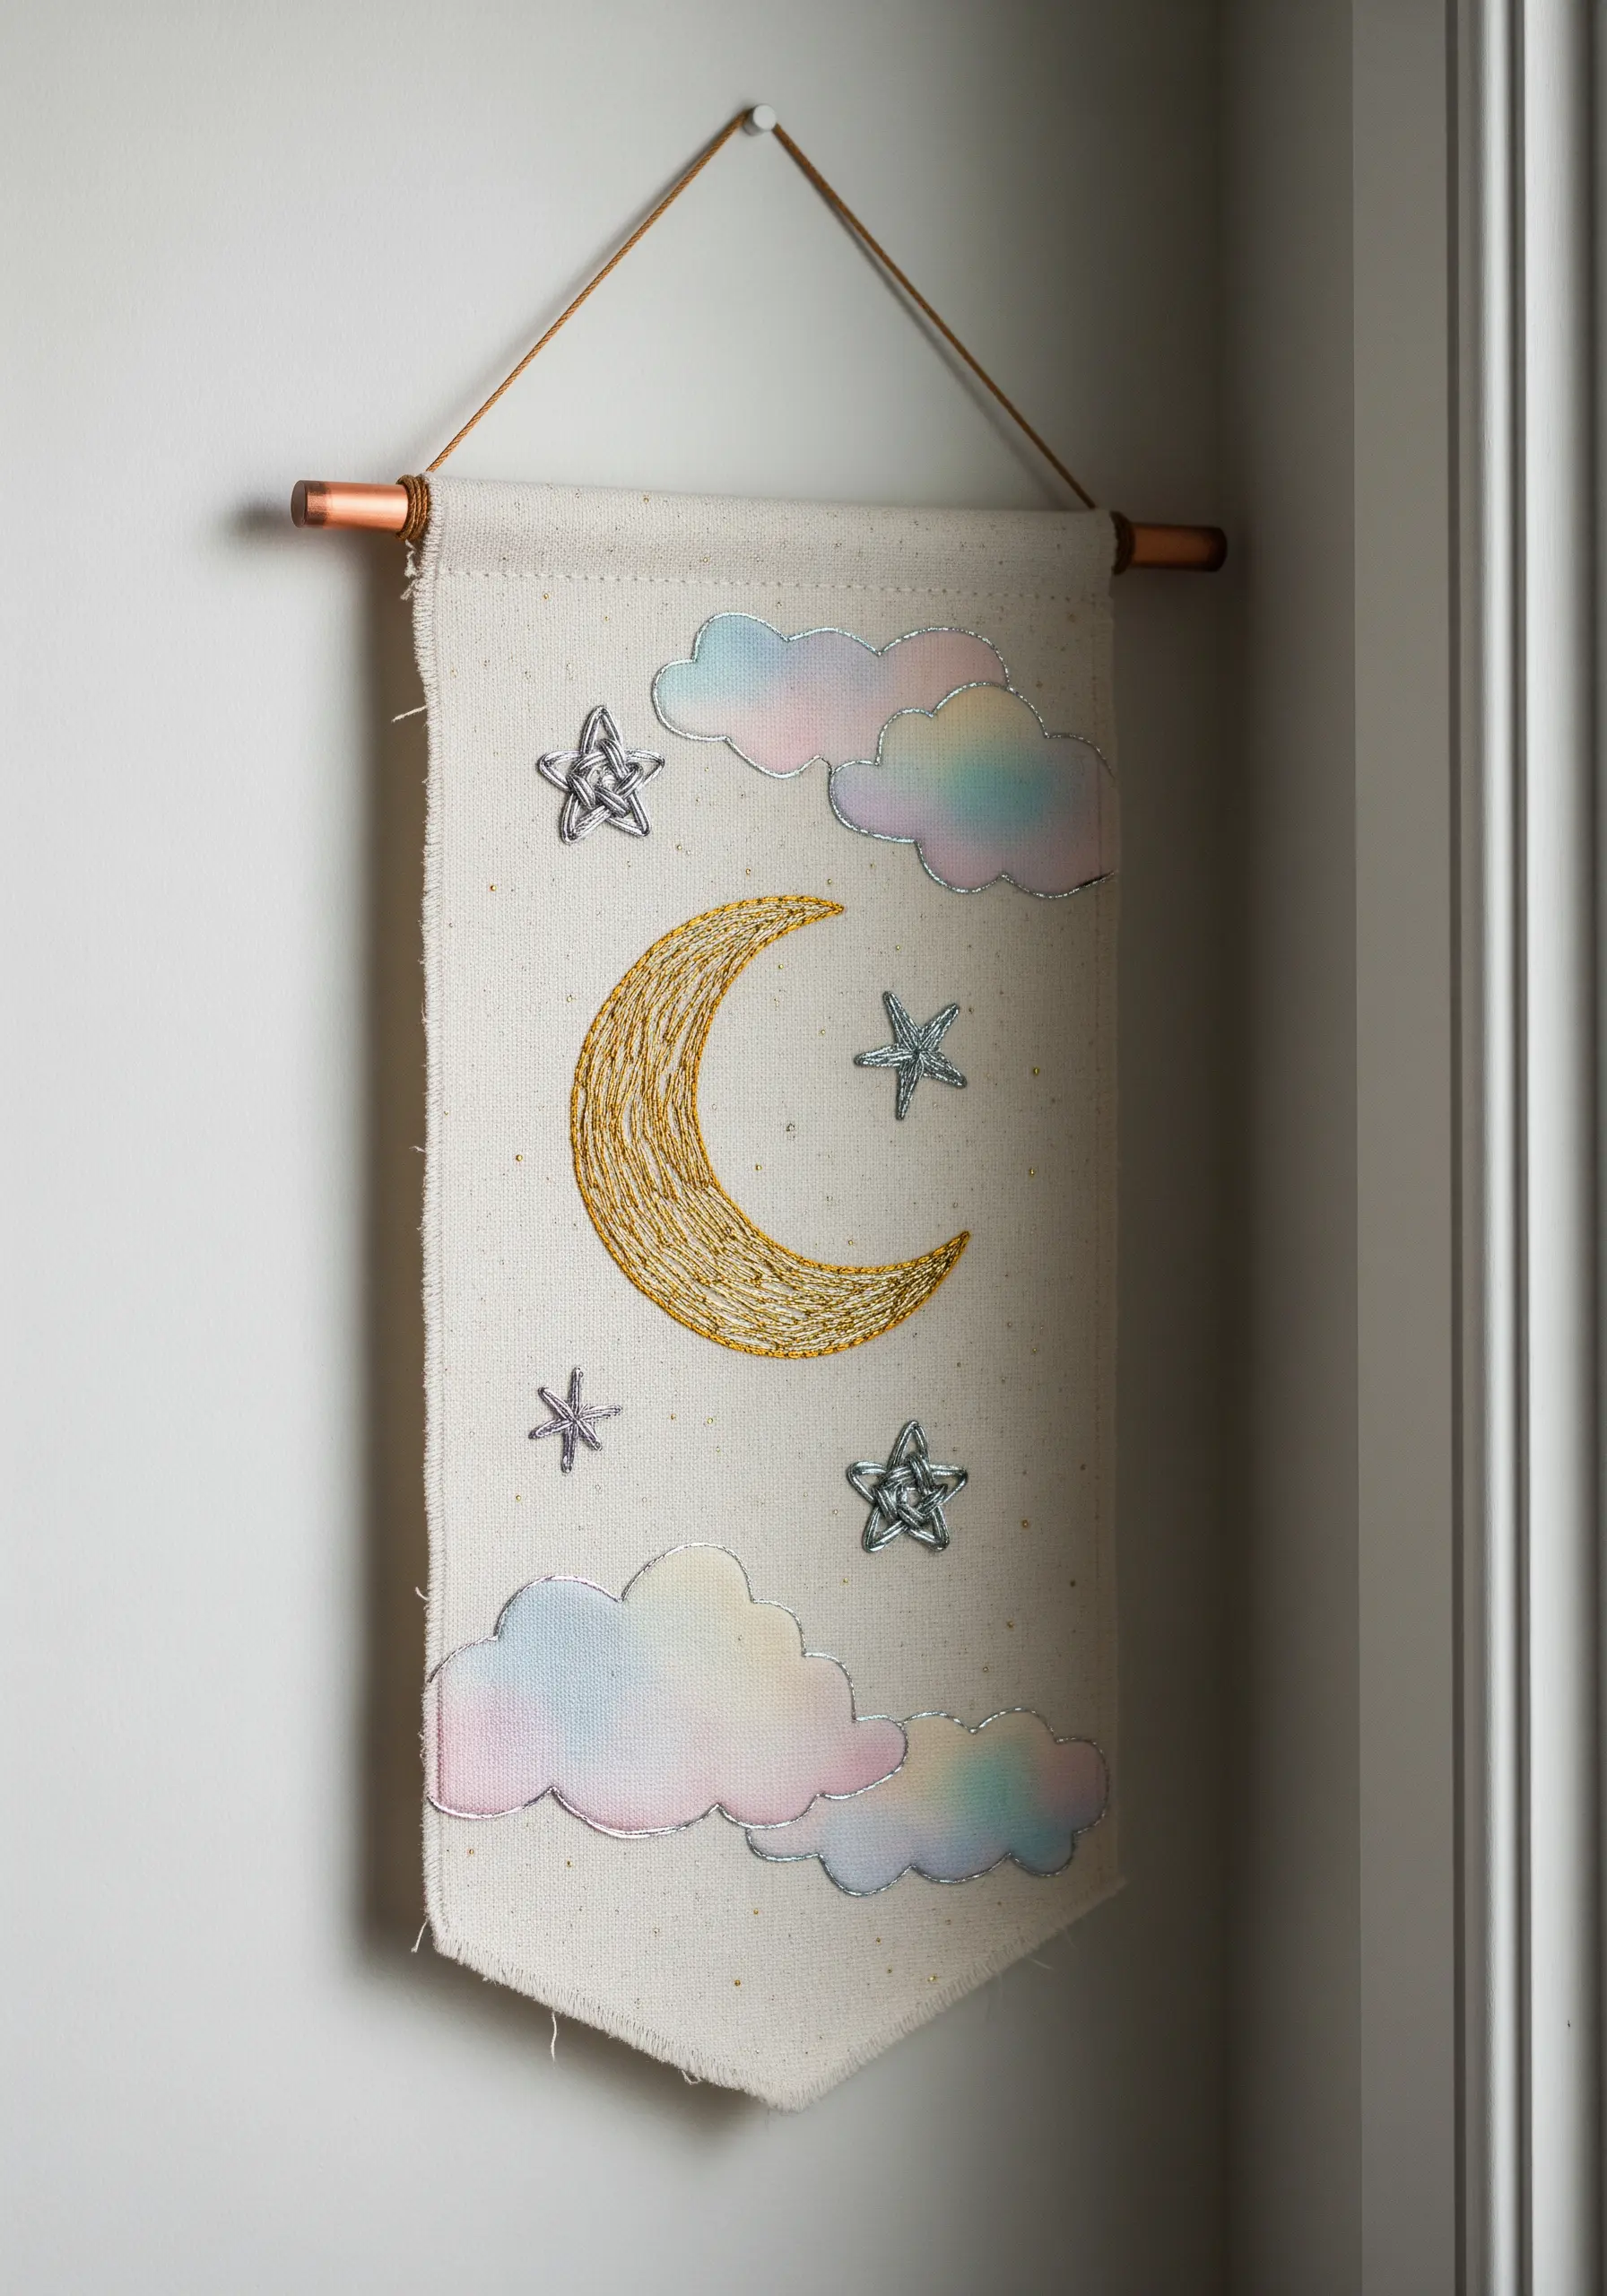
11. Curate a Narrative with Vertical Display
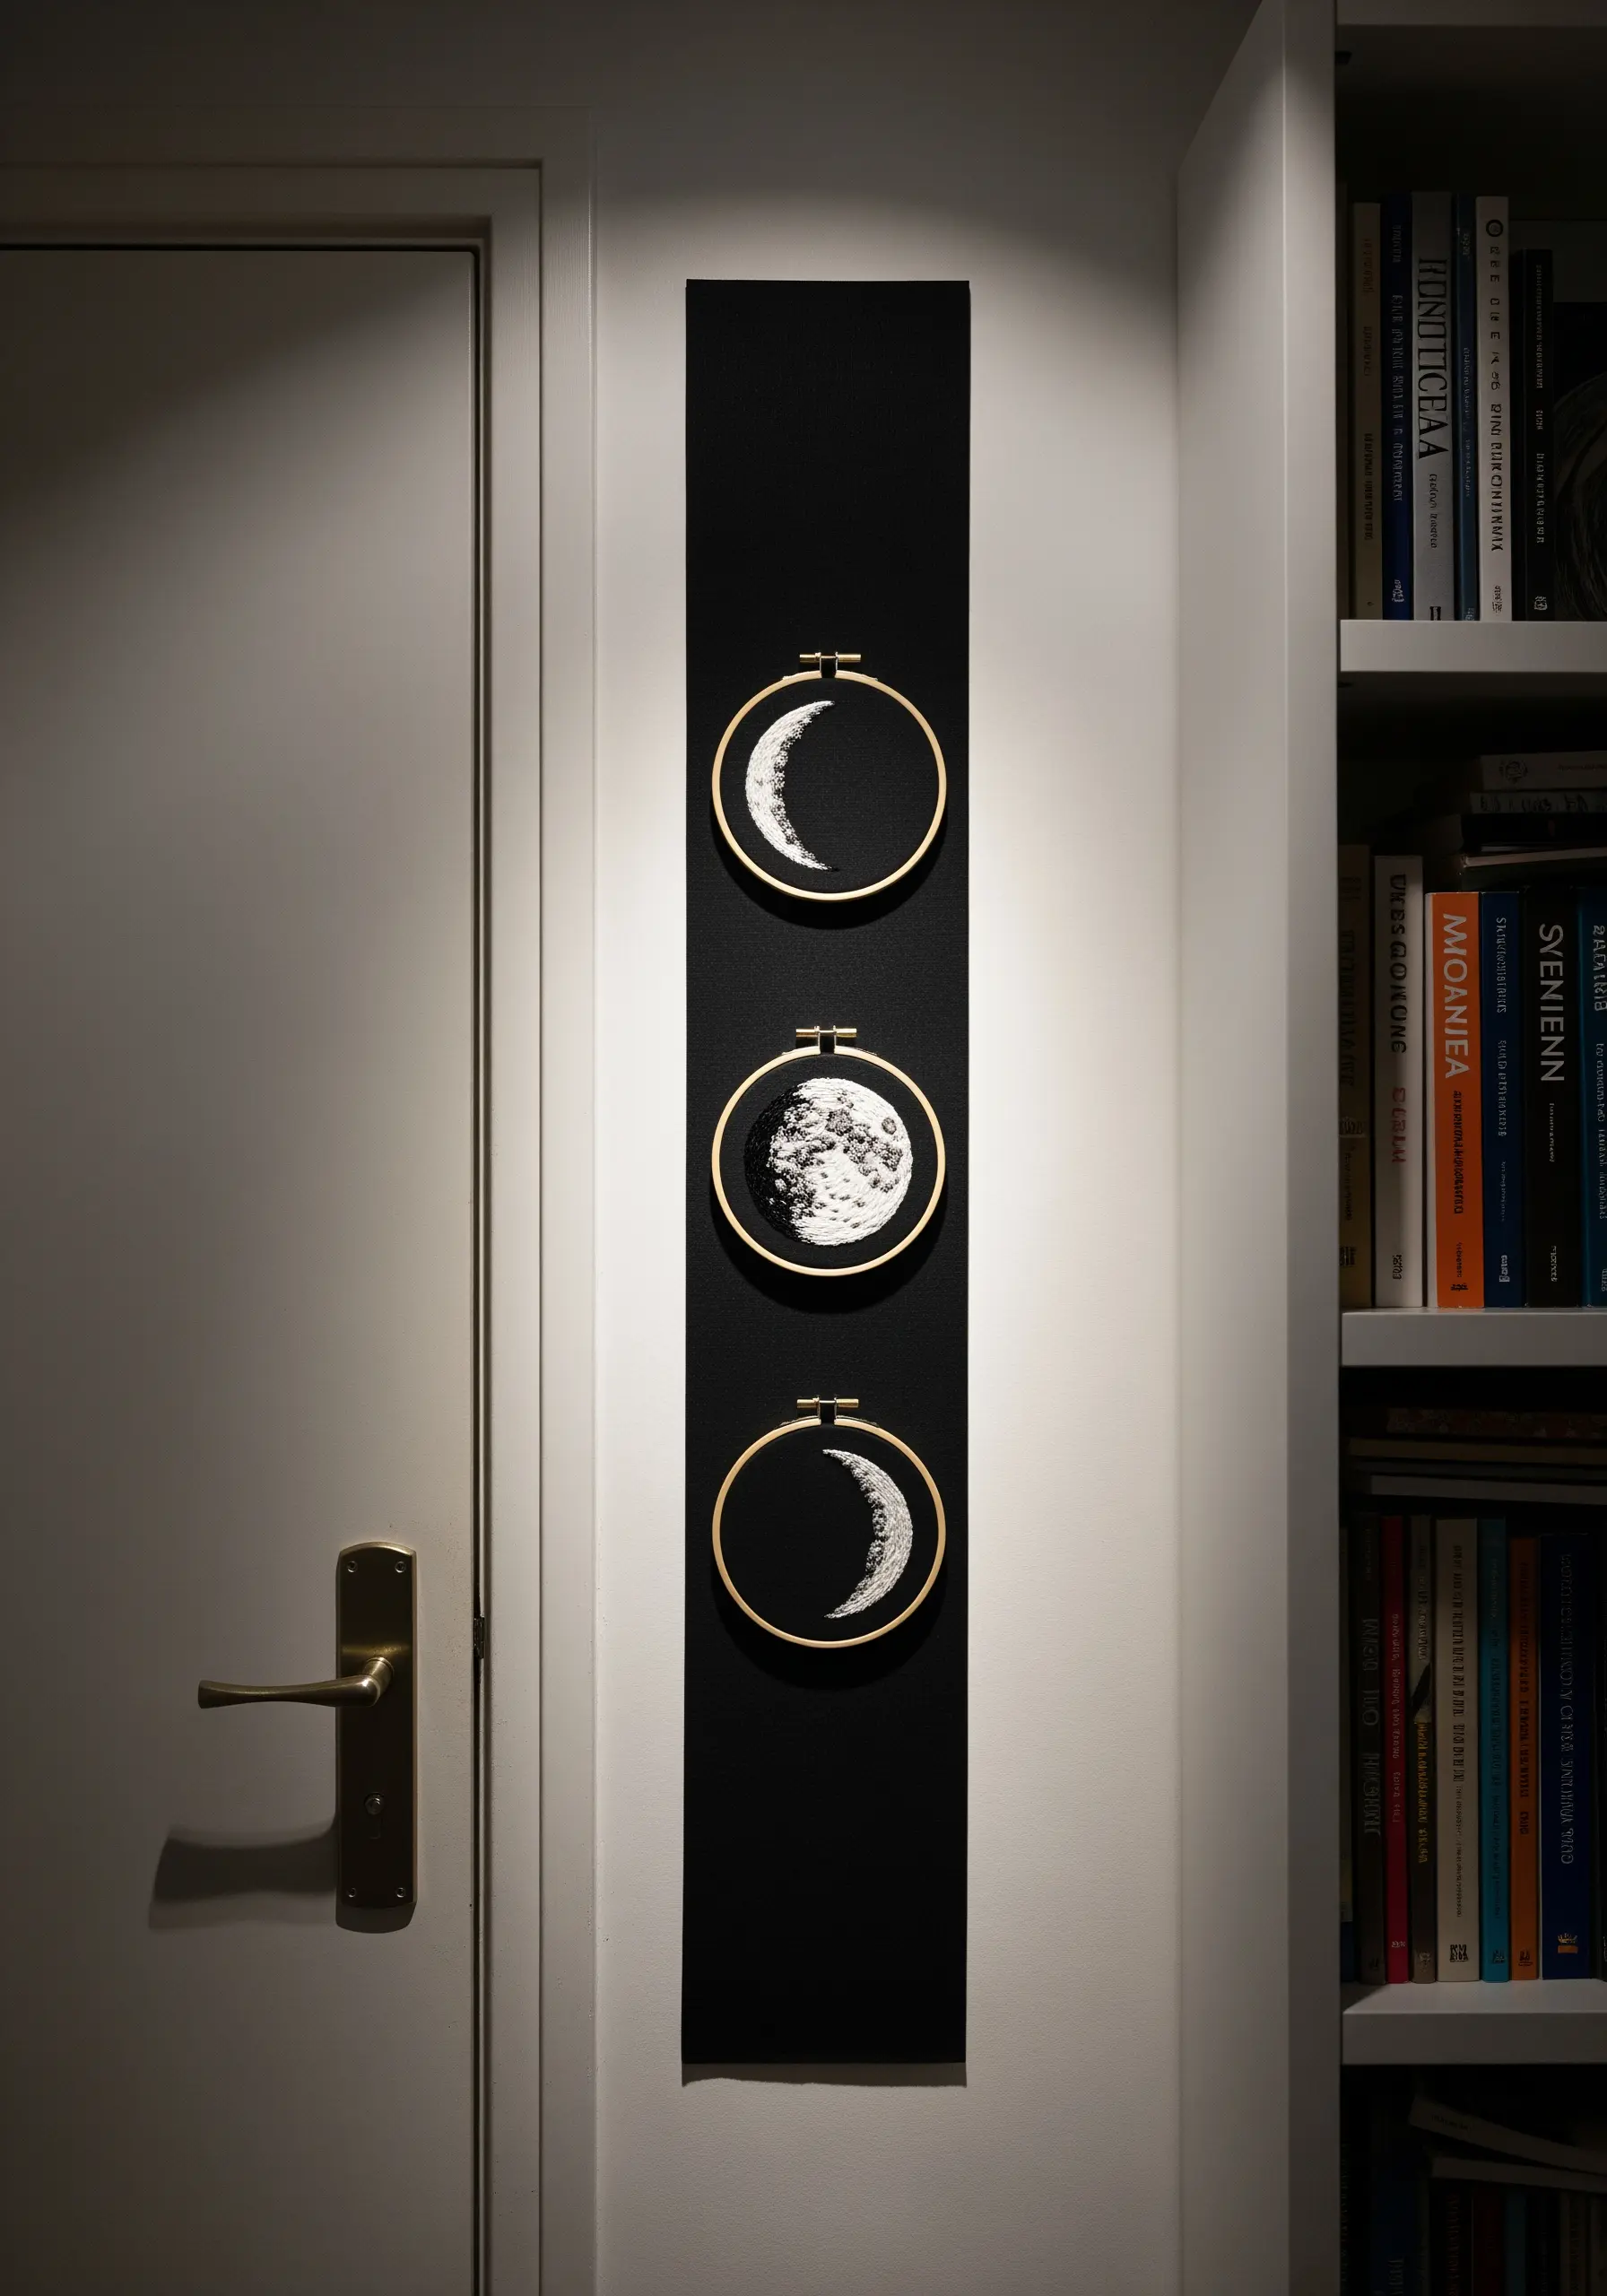
For a narrow wall, a vertical series of small hoops tells a story and draws the eye upward, creating an illusion of height.
Choose a simple, recurring theme like the phases of the moon to create visual cohesion.
Work on dark fabric to make the white and silver threads stand out dramatically.
Create the cratered texture with a dense collection of French knots and seed stitches in varying sizes. It’s a perfect way to display minimal sky & moon designs with maximum impact.
12. Fill Abstract Shapes with Flawless Satin Stitch
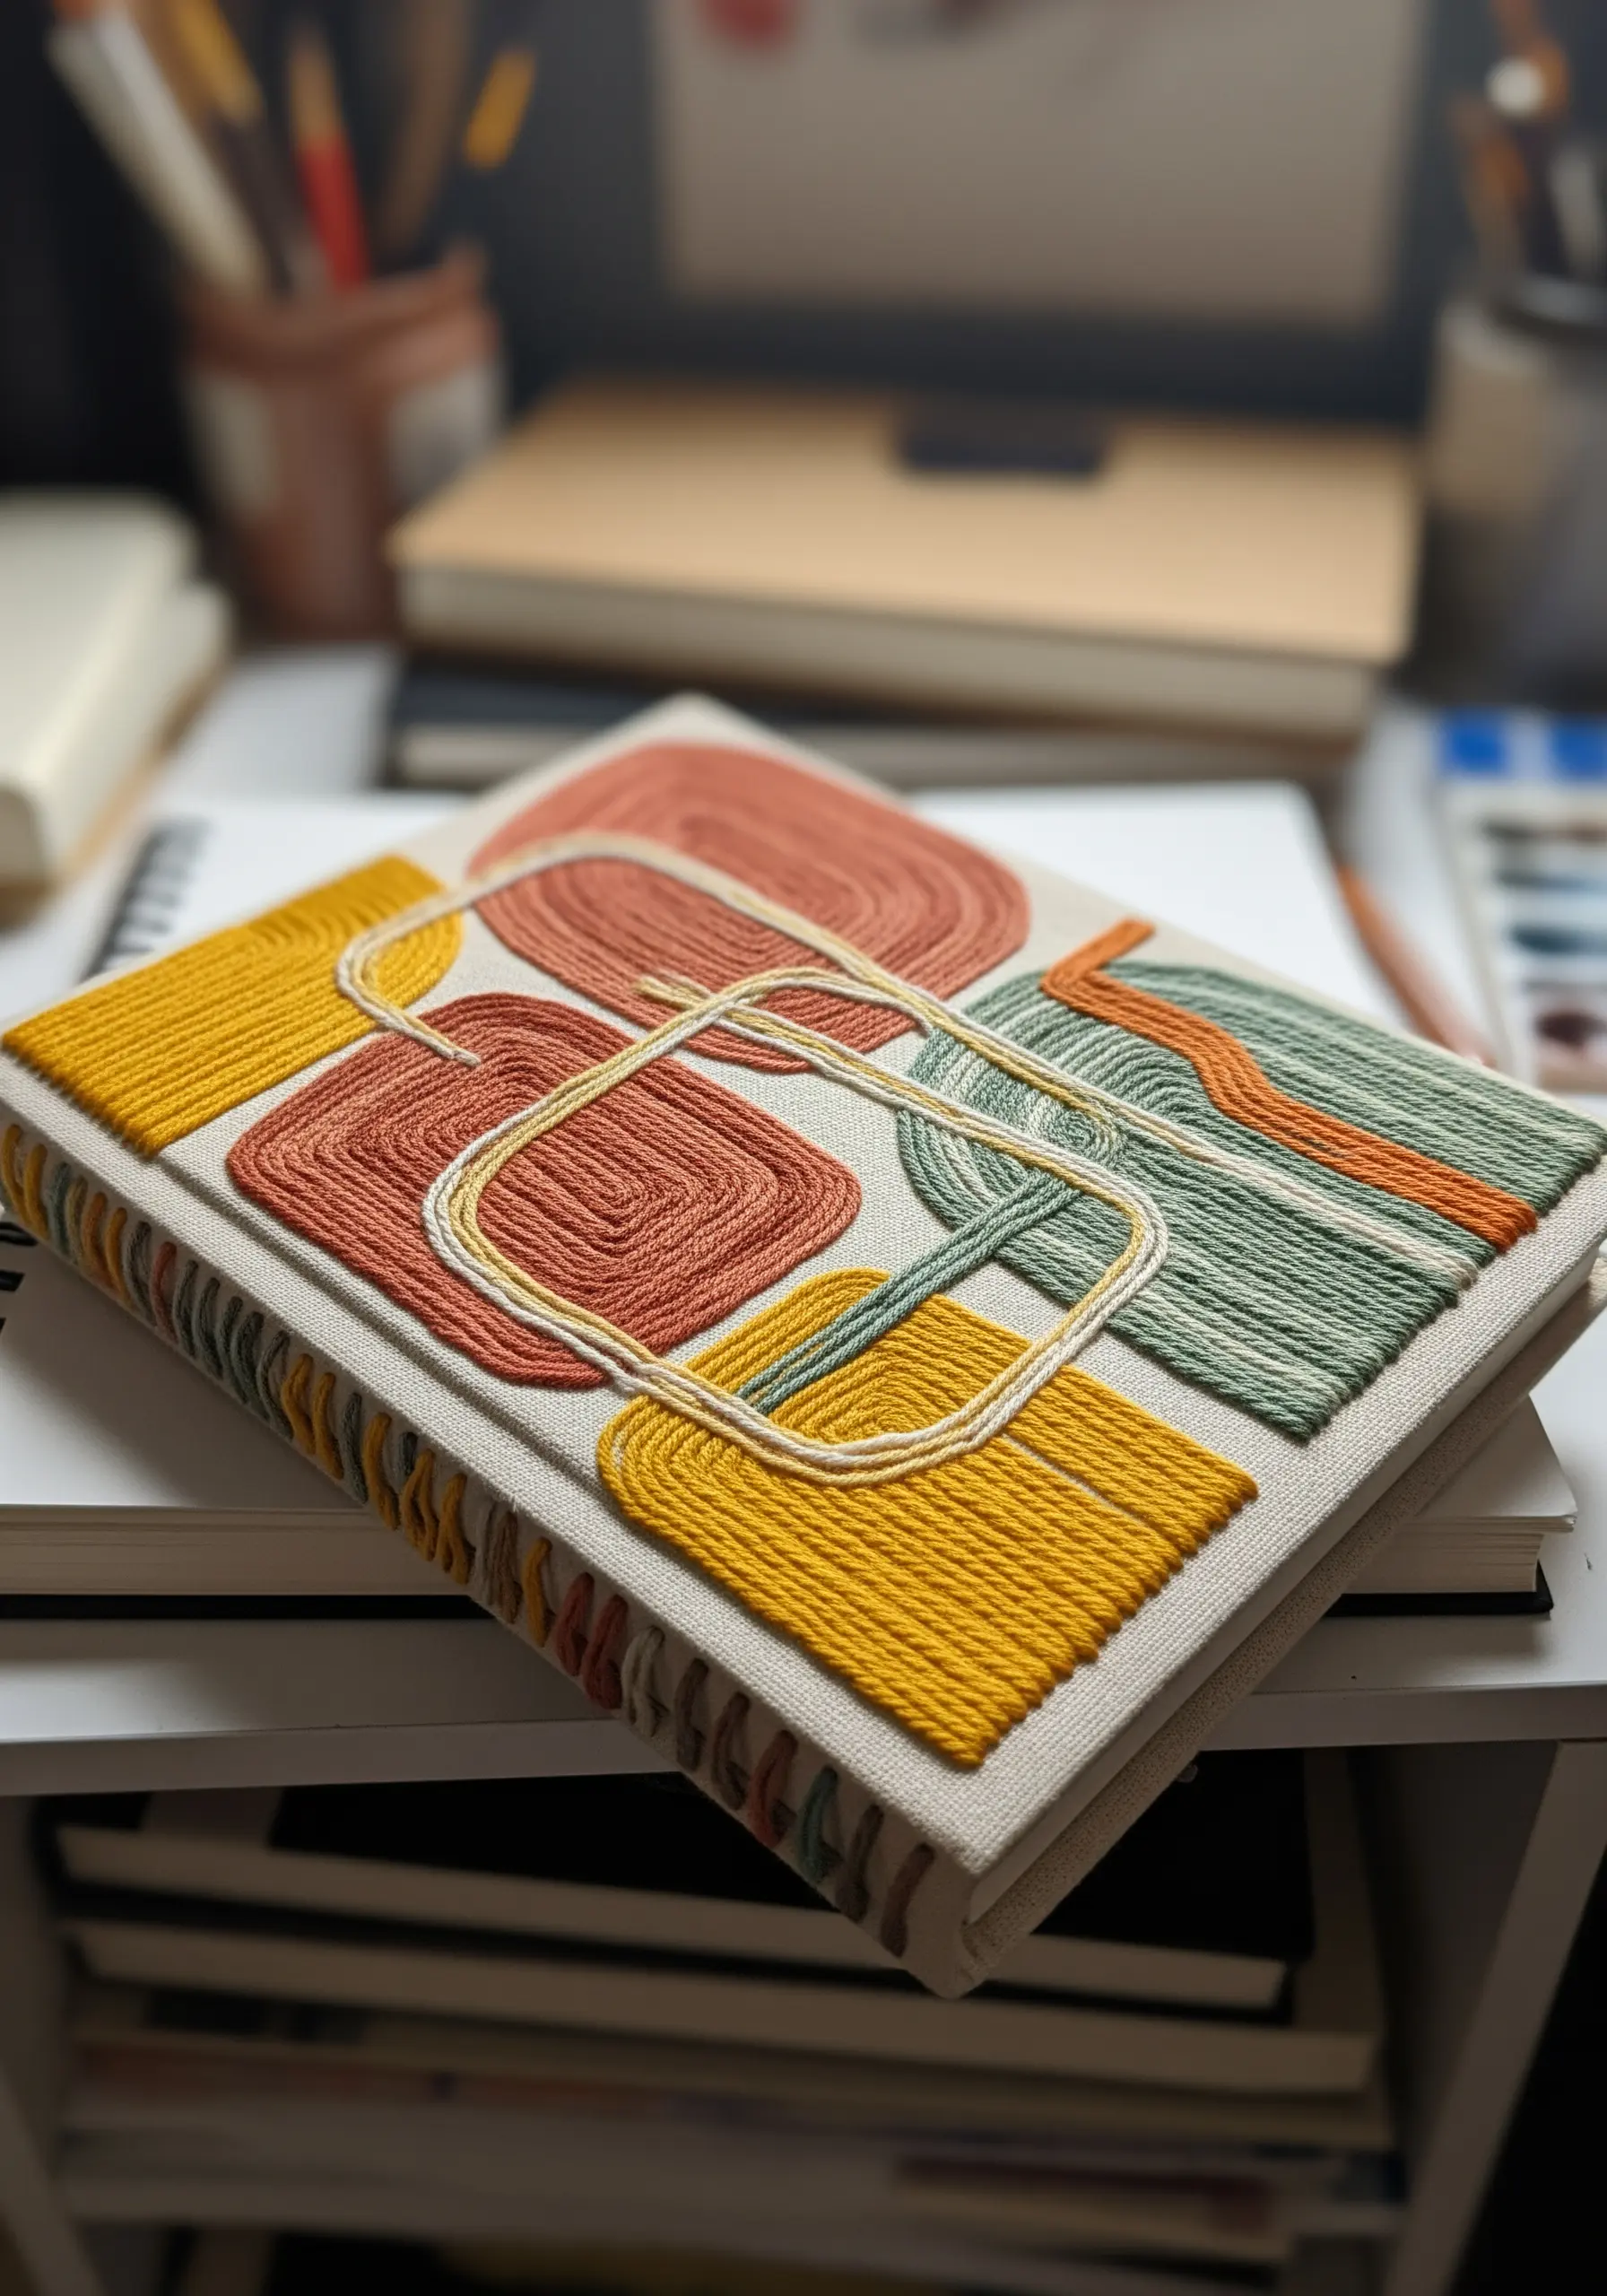
Covering a surface with abstract satin-stitched blocks creates a bold, woven effect.
To keep your stitches perfectly flat and parallel, work with fewer strands of floss—even a single strand can provide beautiful coverage without adding bulk.
For crisp edges on curved shapes, outline the shape first with a split stitch. This raised edge will act as a guide, allowing you to tuck the end of each satin stitch neatly beneath it for a clean finish.
This precision transforms simple blocks of color into something that feels almost painted, ideal for abstract color blend stitch ideas.
13. Frame a Motif for a Polished Finish
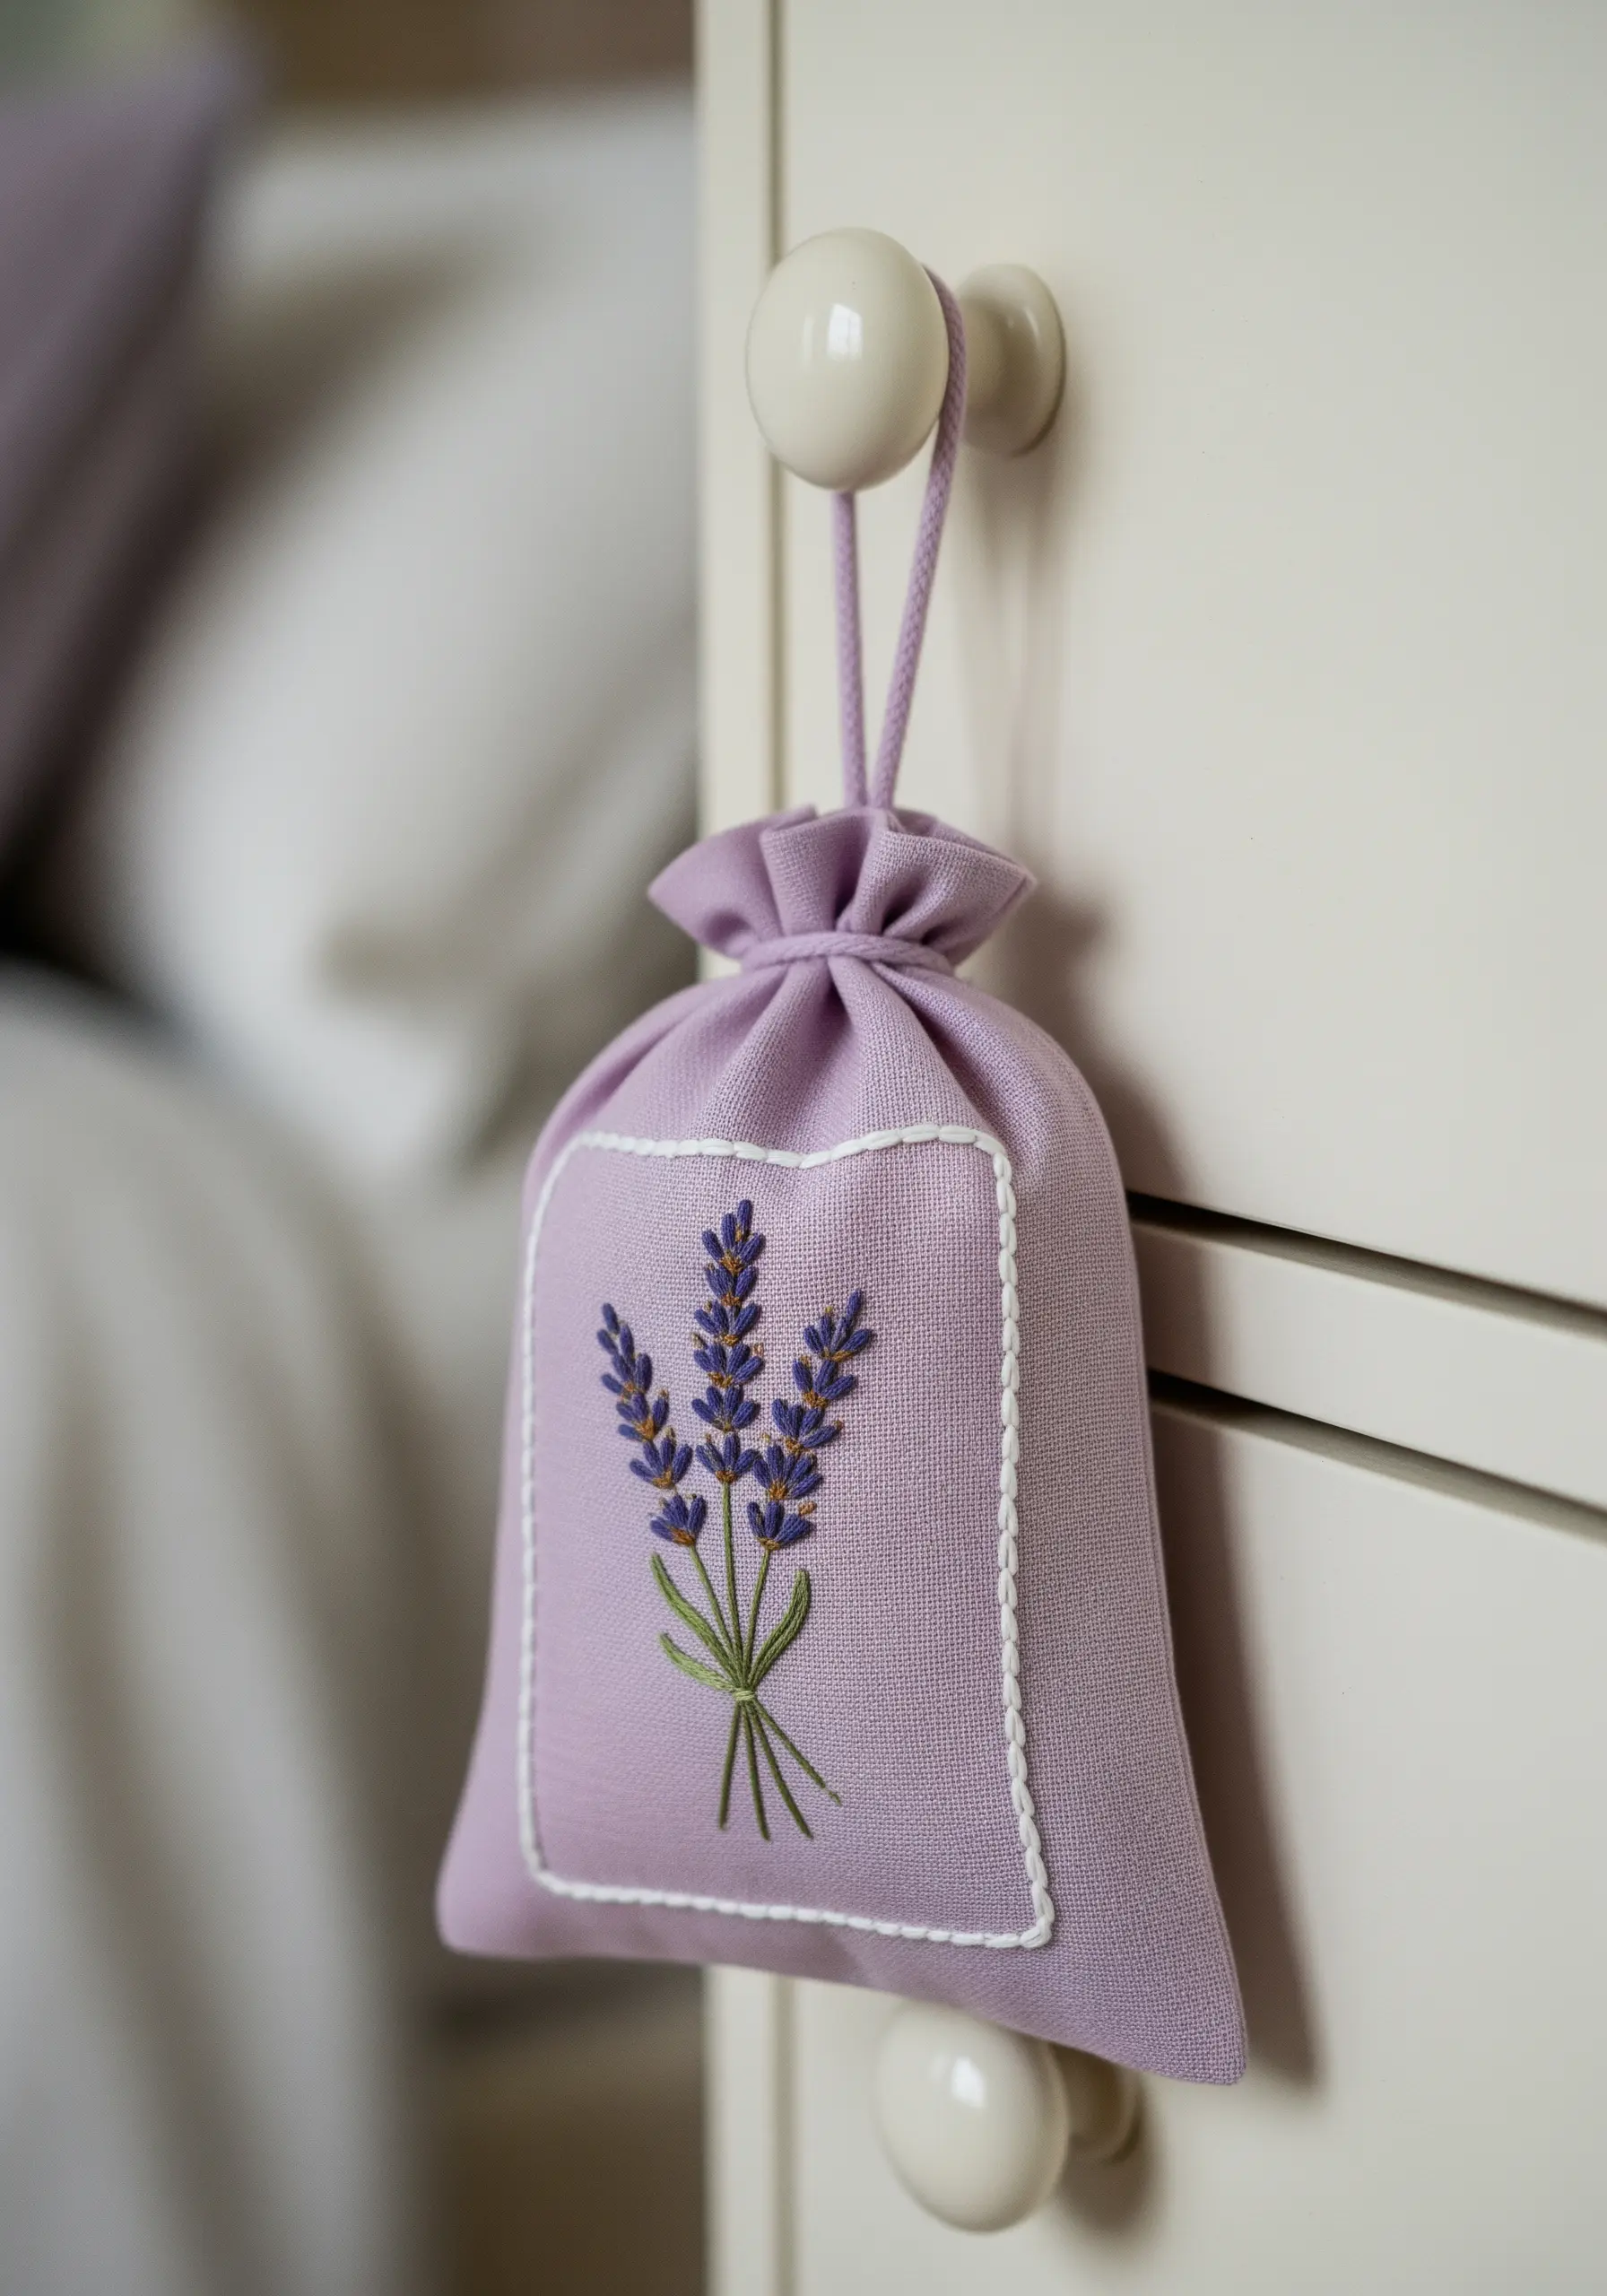
Elevate a simple lavender sprig on a sachet by turning it into a contained composition.
Stitch your central design first, then frame it with a simple running stitch or backstitch border a short distance away.
This patch-like effect gives the embroidery a focal point and a clean, intentional look.
Using a contrasting thread for the border, like white on lavender fabric, makes the design pop and adds a touch of classic elegance to your delicate lavender stitch ideas.
14. Transform Hoop Art with Creative Framing
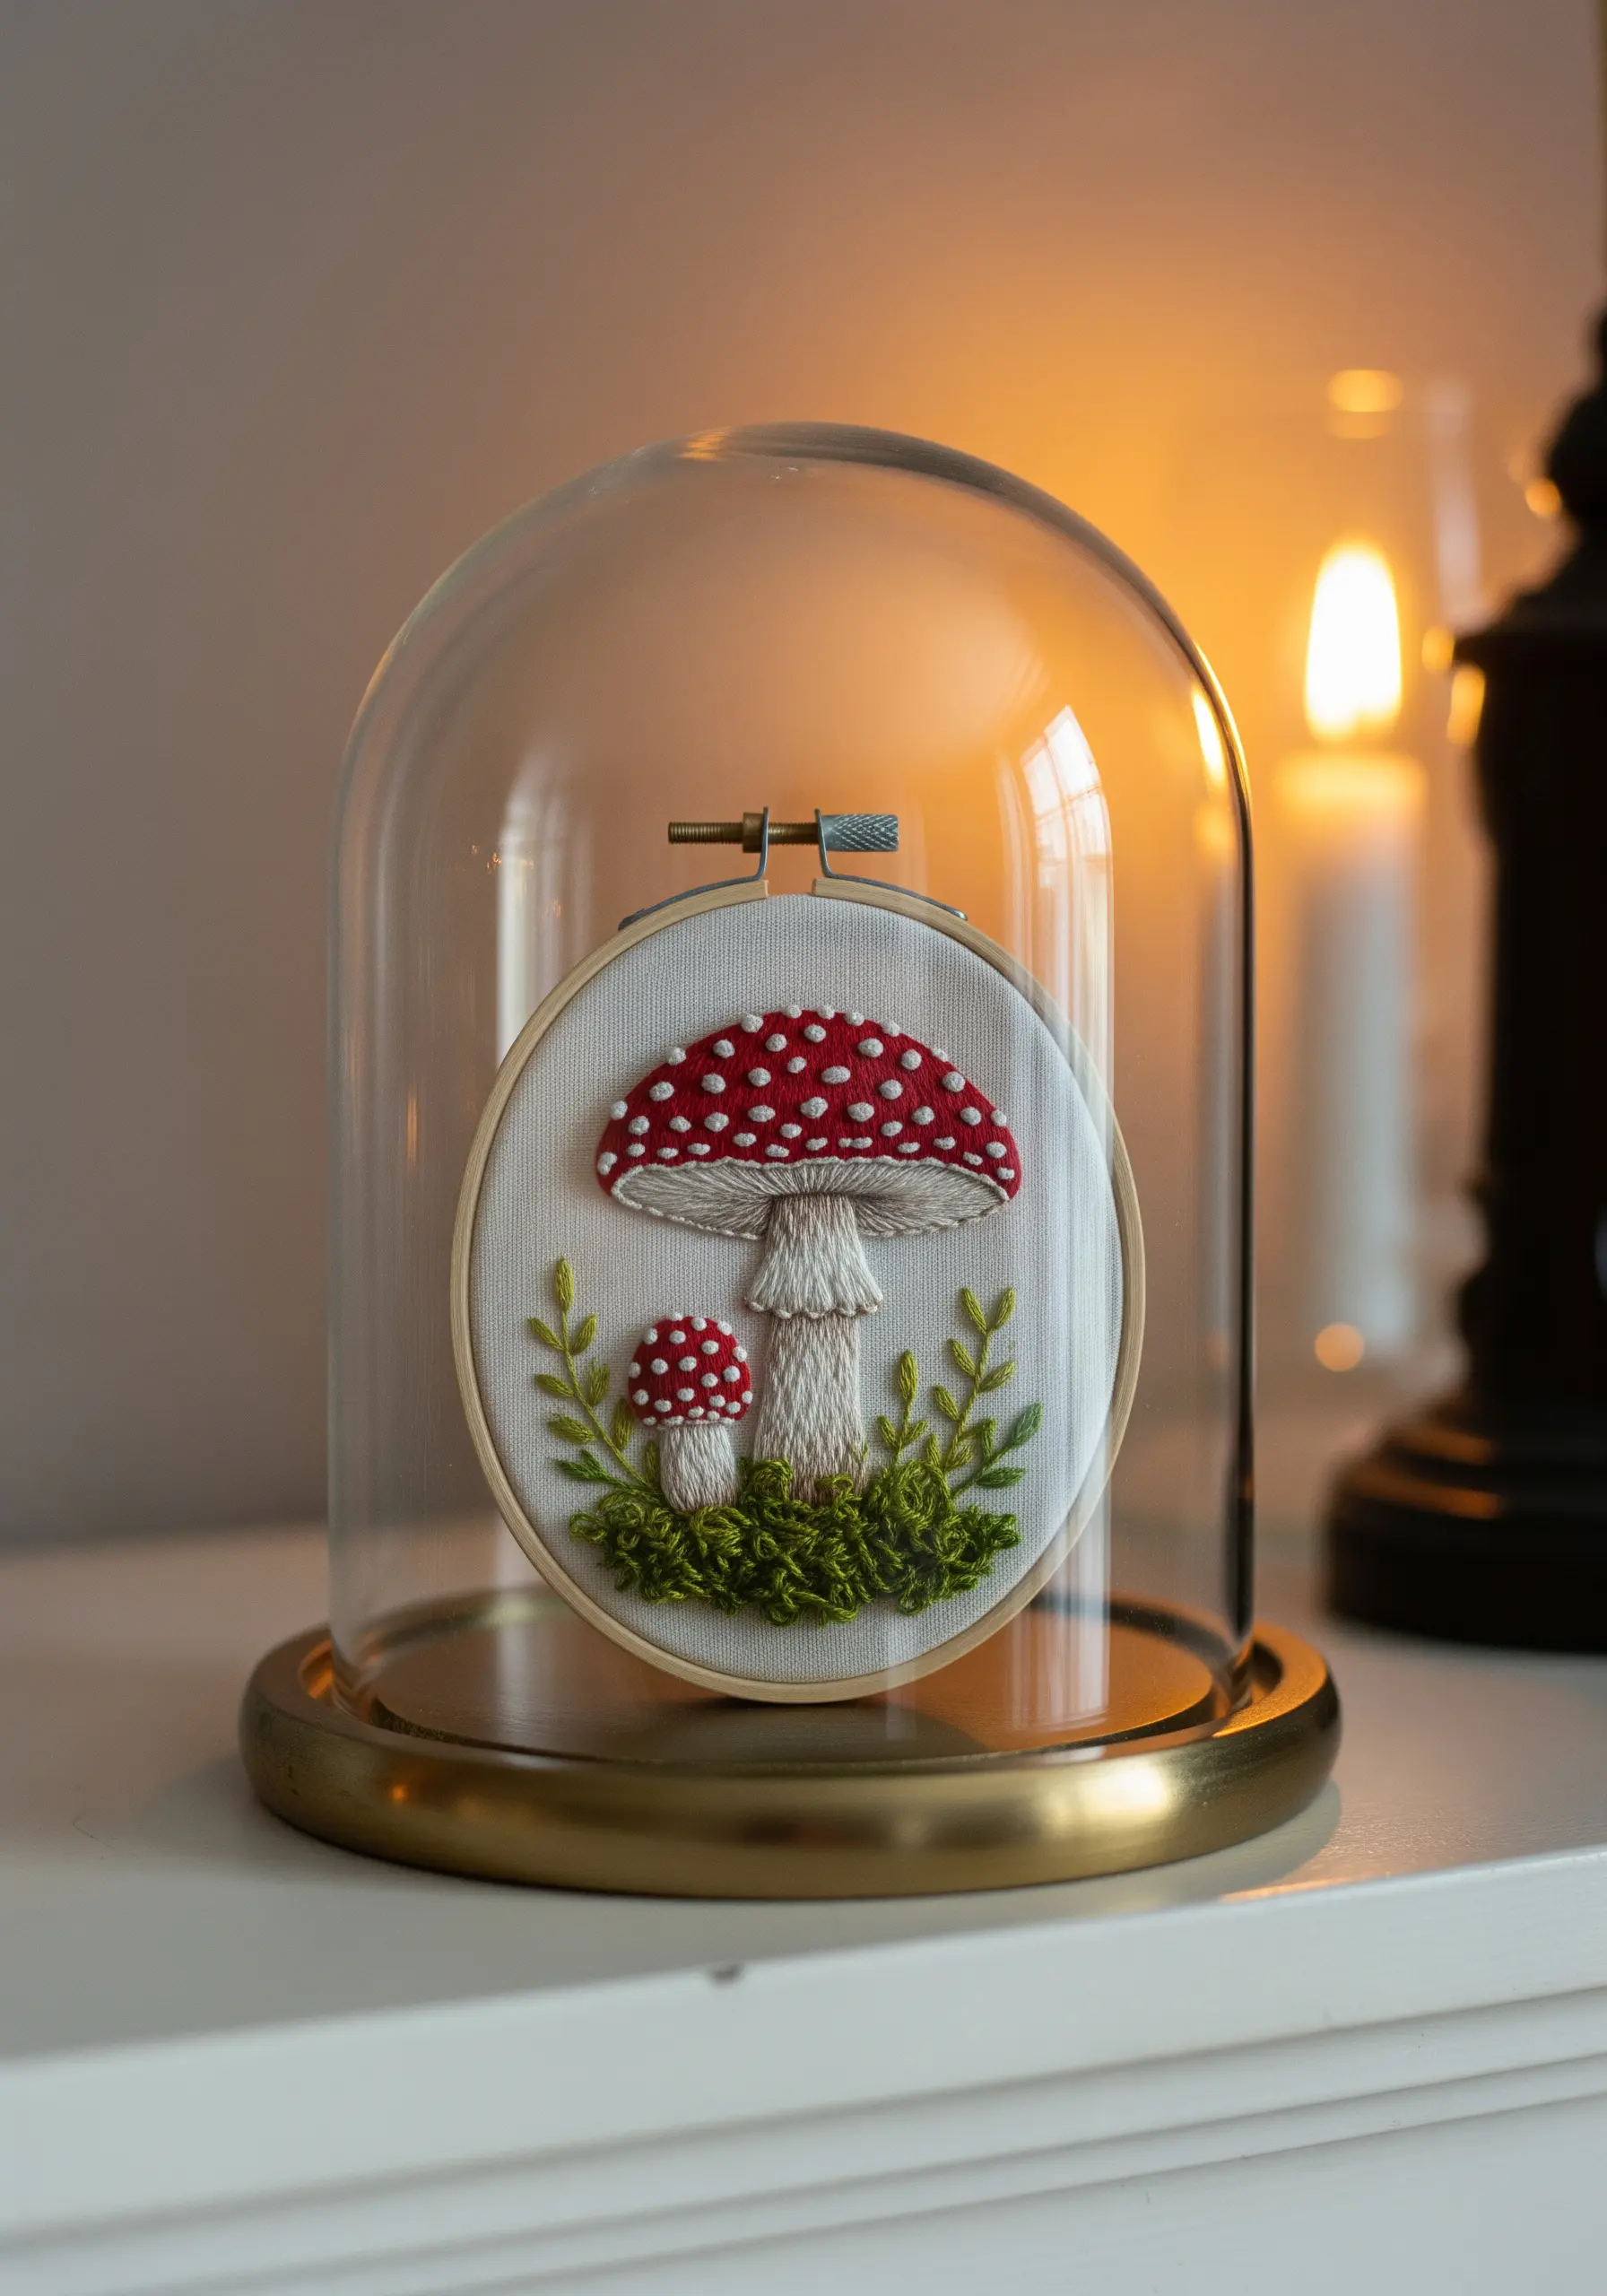
Take your embroidery off the wall and turn it into a sculptural object by displaying it under a glass cloche.
This simple act of containment elevates the piece, protecting it and presenting it as a precious specimen.
For the subject itself, build up layers of texture: use turkey work for the mossy ground, padded satin stitch for the mushroom stem, and French knots for the spots on the cap.
A cloche makes even simple framed embroidery patterns that look like they belong in a gallery feel like curated artifacts.
15. Find Unconventional Canvases for Your Stitches
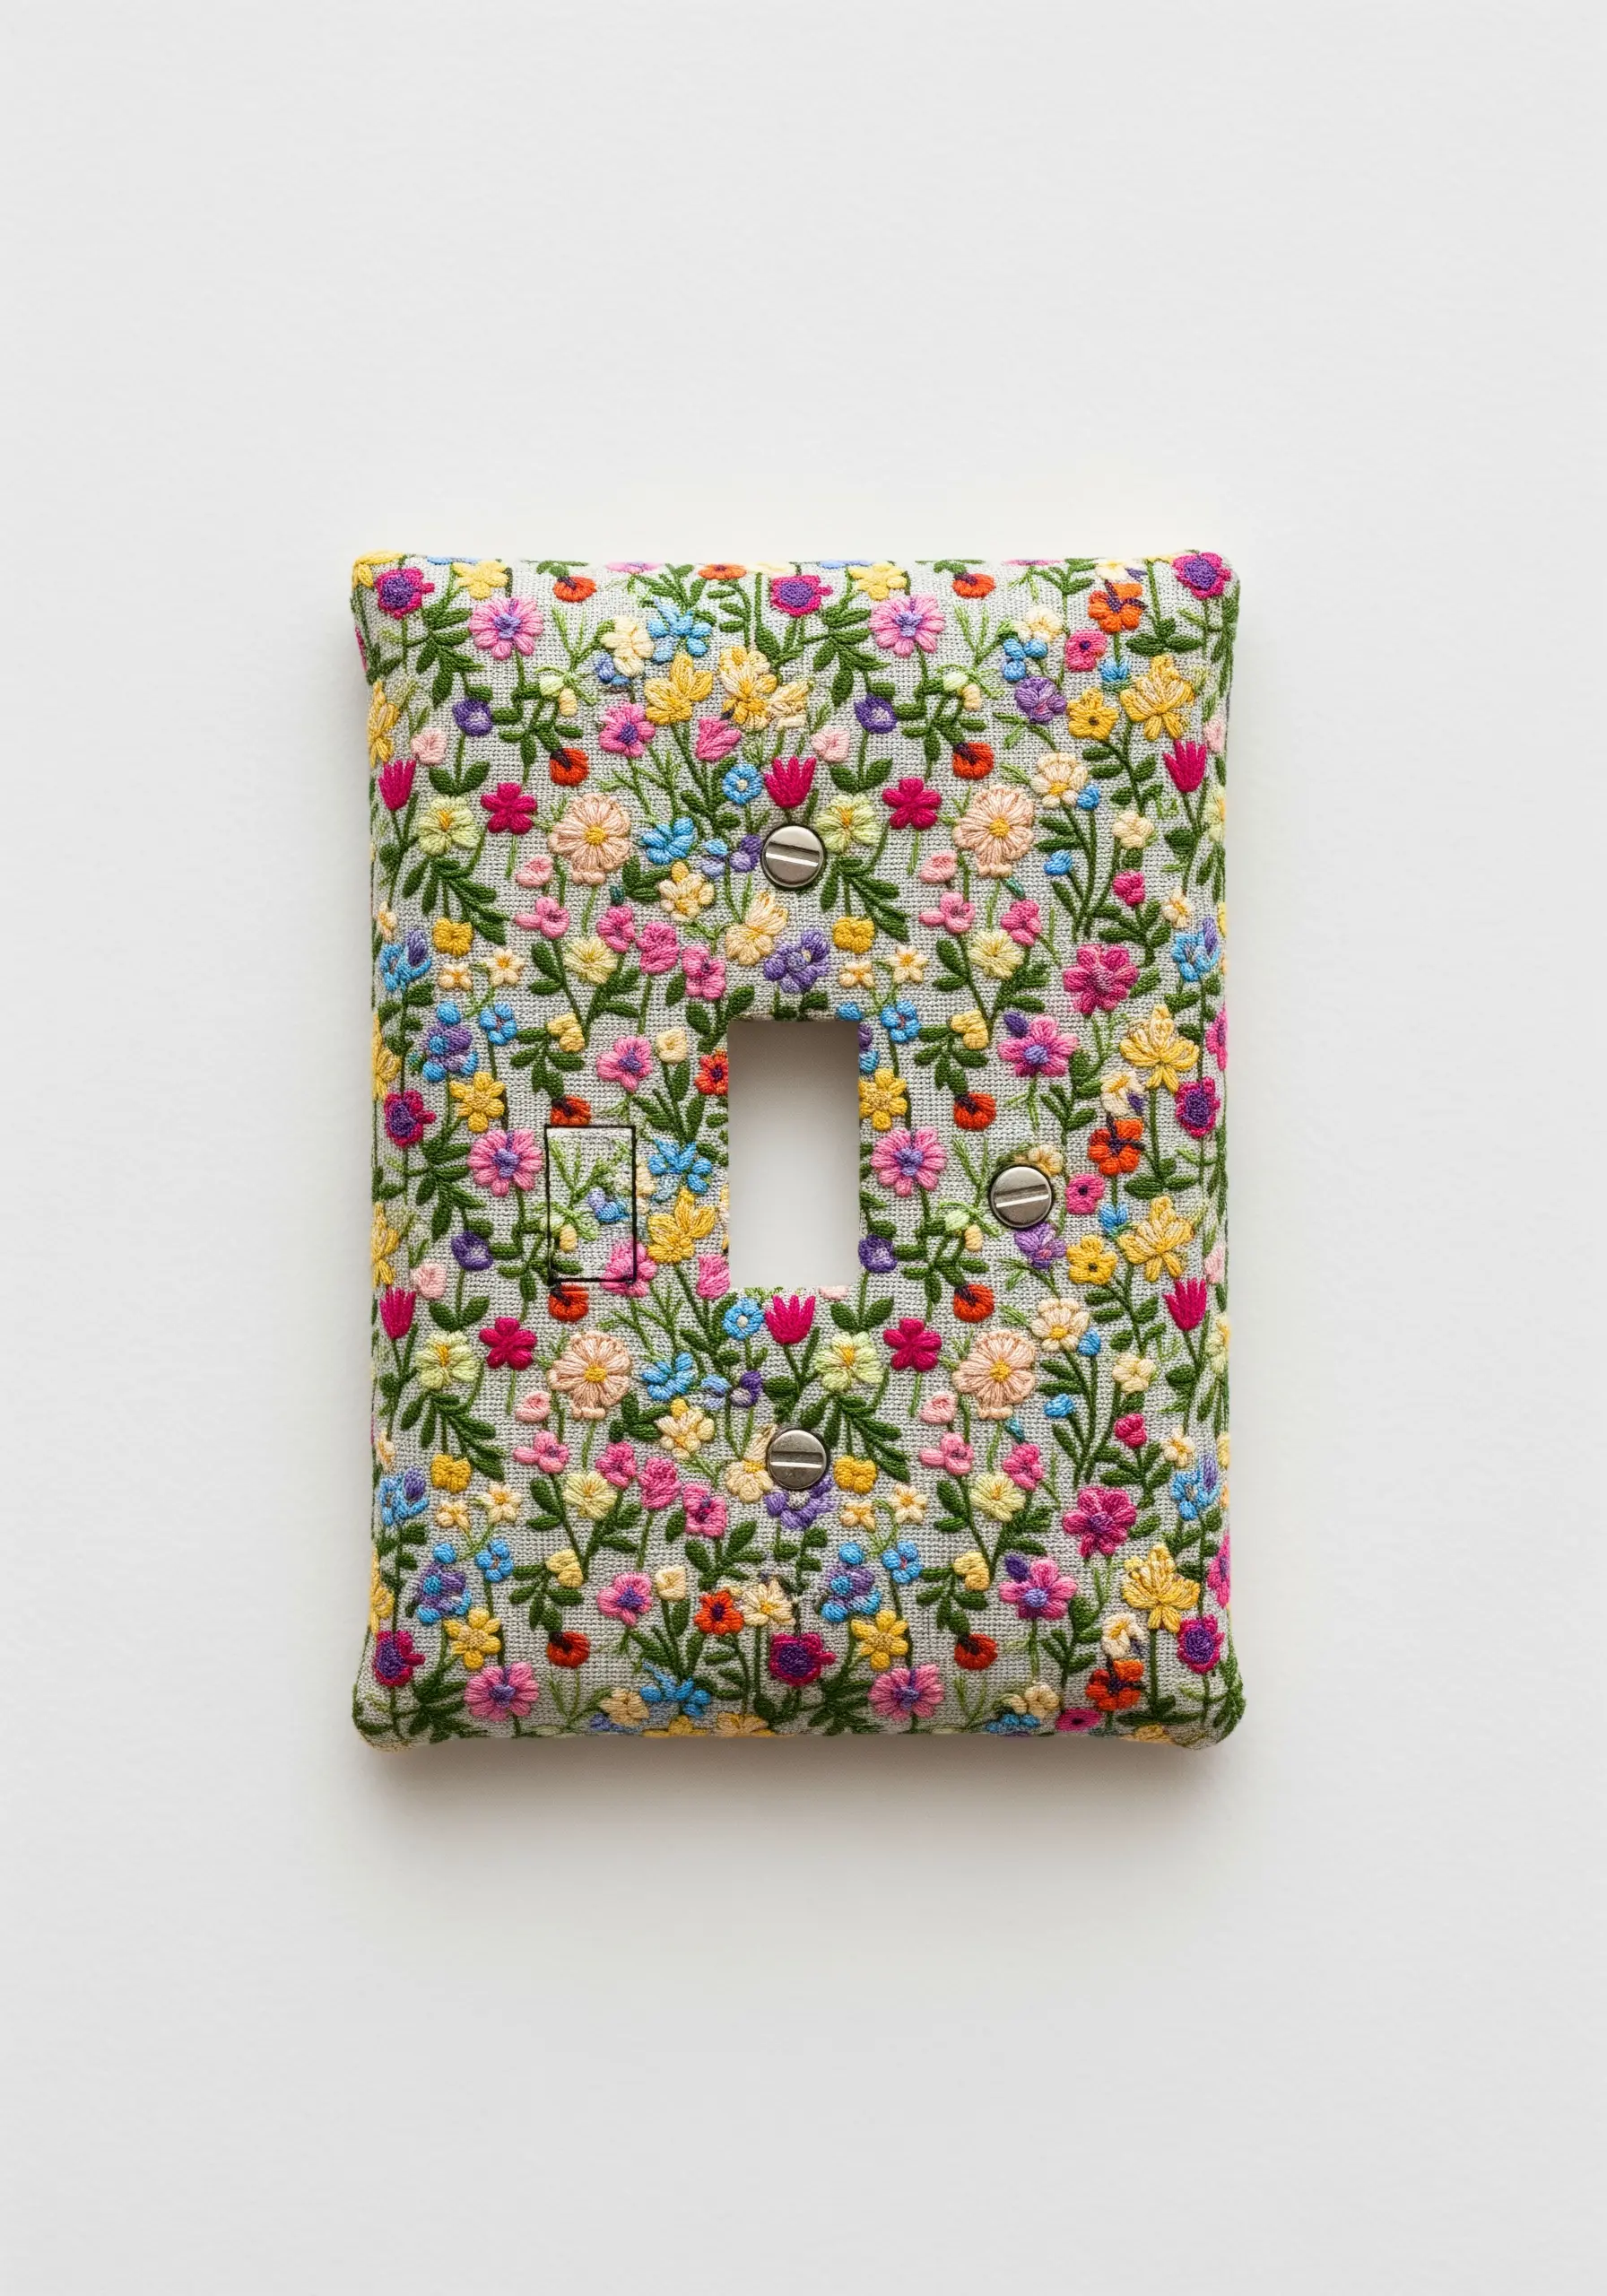
Think beyond the hoop and apply your embroidery to unexpected surfaces like a light switch cover.
Create a dense, all-over floral pattern—a technique known as ‘millefleur’—on a piece of fabric slightly larger than the switch plate.
Use a variety of simple stitches like lazy daisies, French knots, and straight stitches in a riot of color.
Once finished, carefully wrap the fabric around a standard plastic plate, securing it tightly at the back with glue. It’s one of the most unexpected fabric crafts that will make your home pop.
16. Master Stitching on Challenging Materials
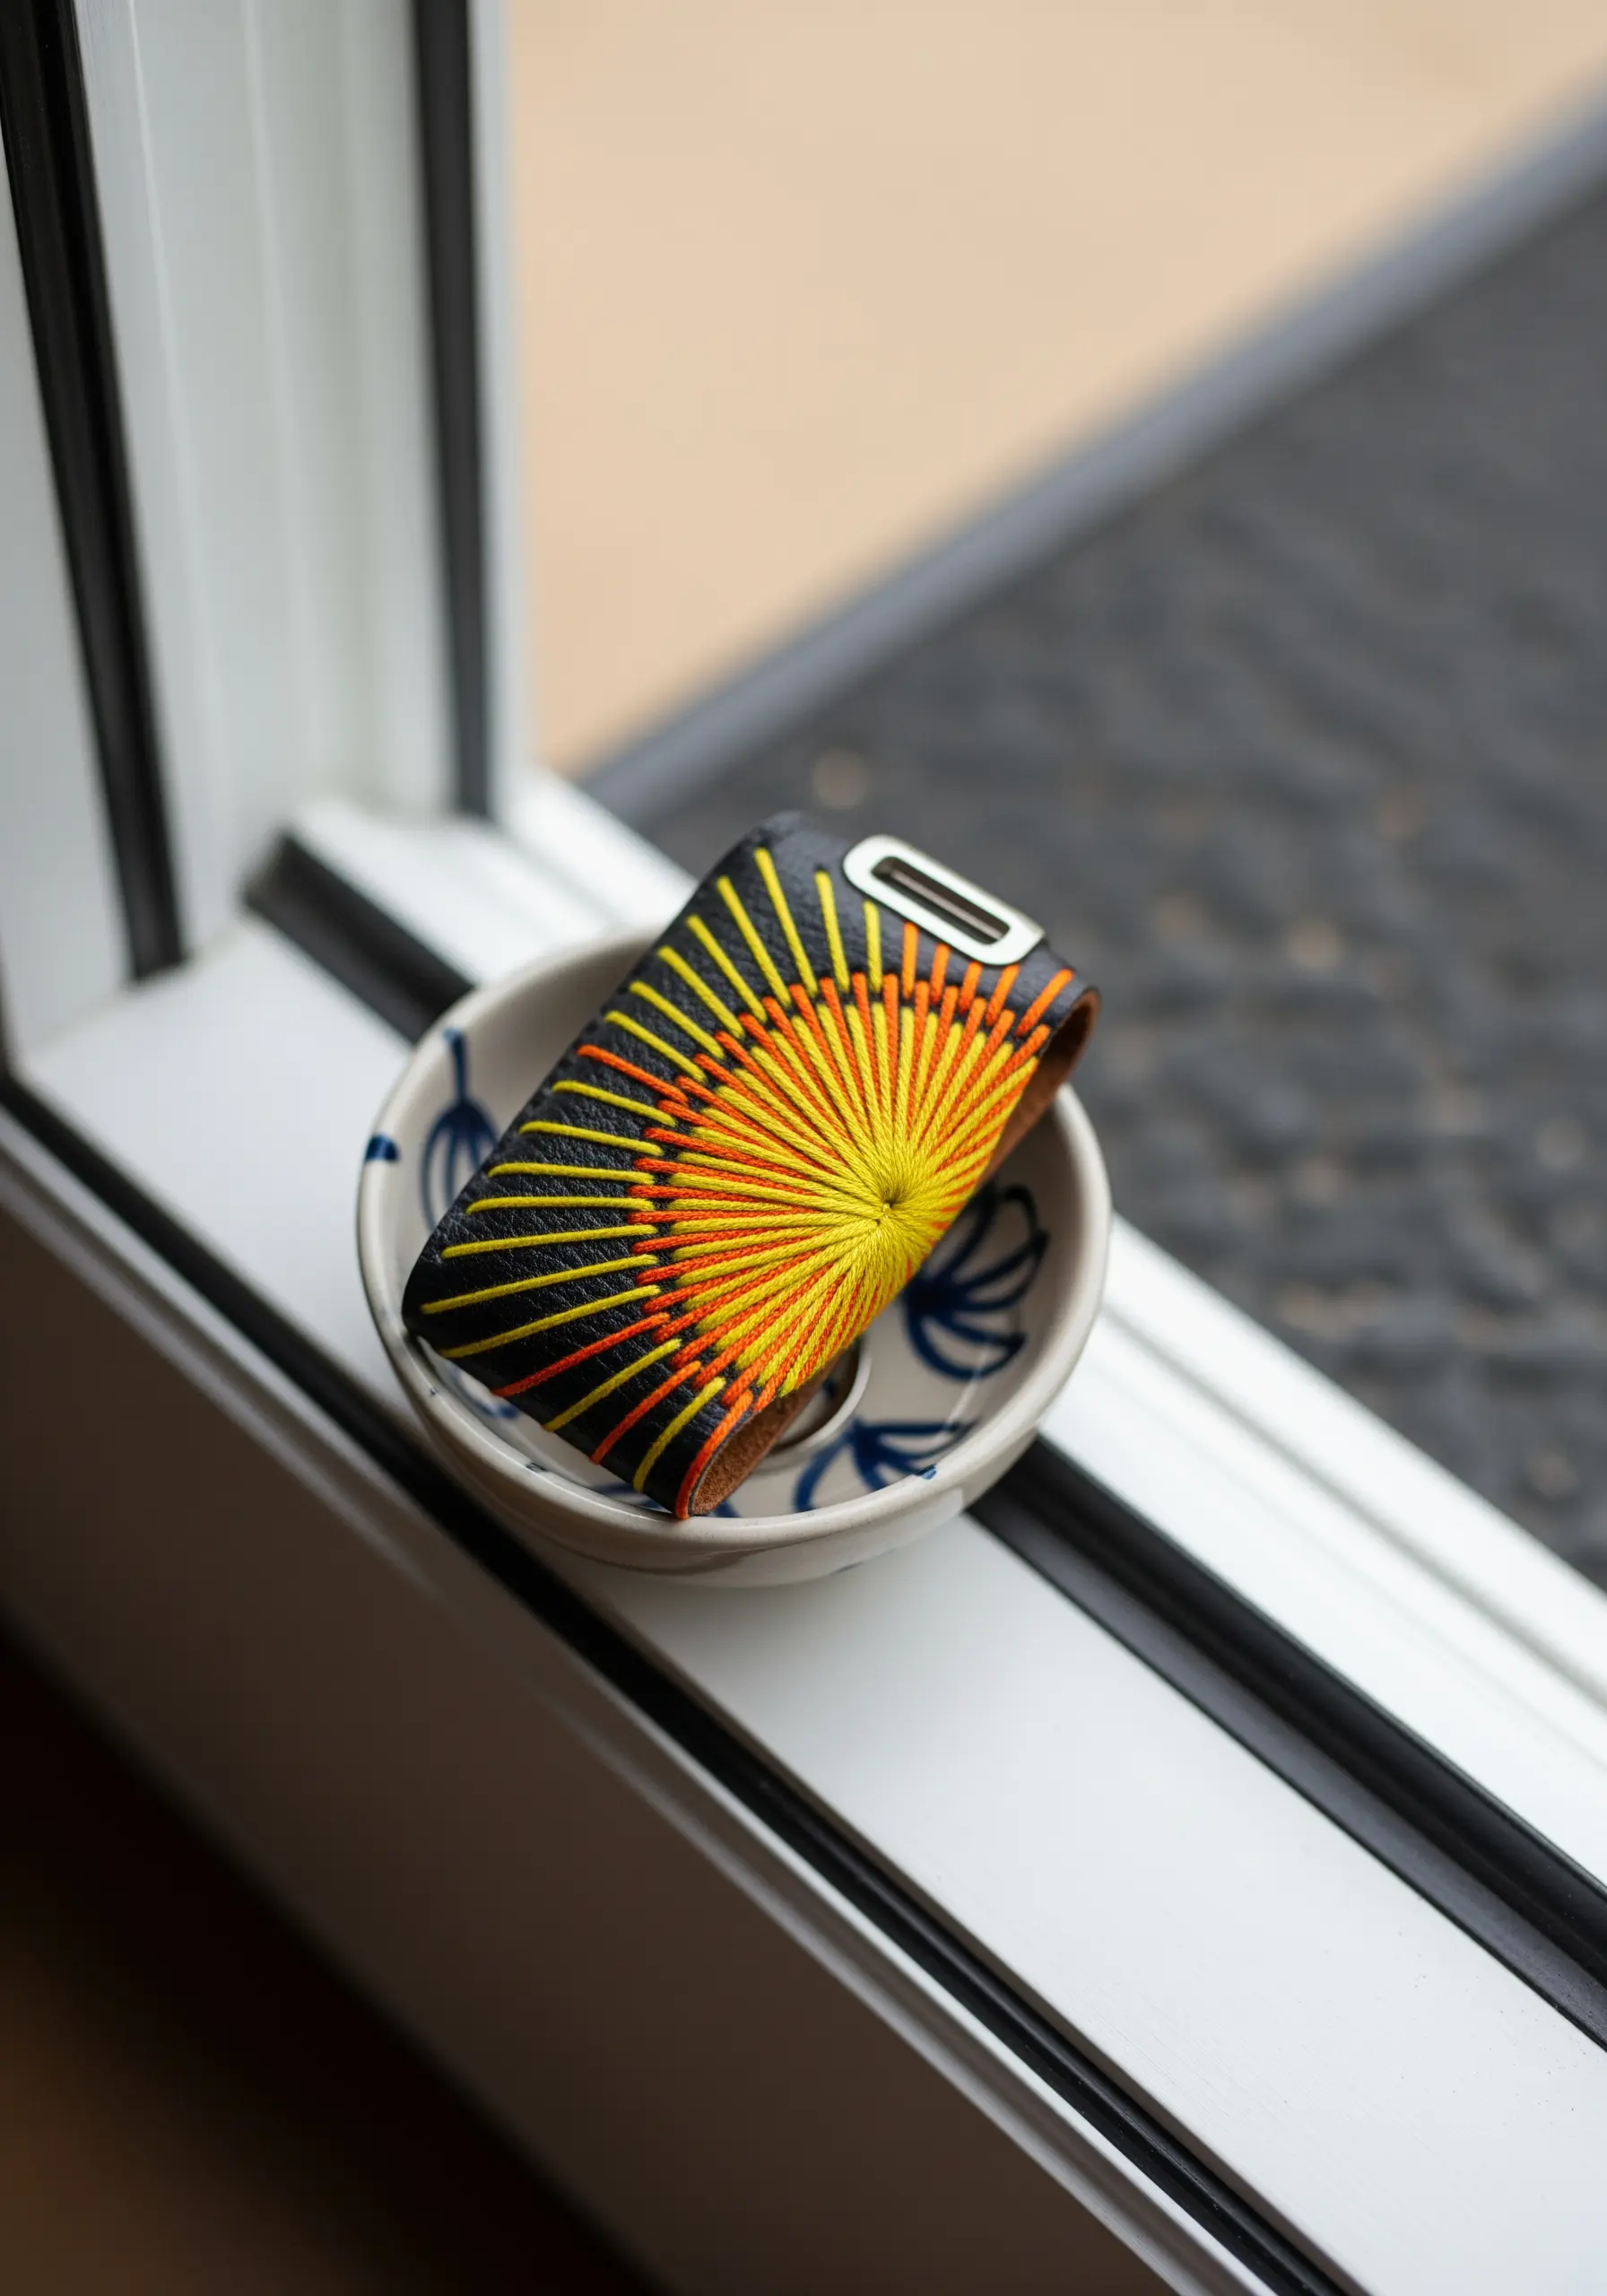
When embroidering on leather or faux leather, your process must be precise, as every puncture is permanent.
Plan your design and mark it carefully. Use a sharp, strong leather needle and a thimble to protect your fingers.
For a radiating sunburst pattern, a simple straight stitch is highly effective. Anchor your thread securely on the back and pull each stitch taut but not so tight that it puckers the material.
These tiny stitching ideas that add a pop of color to accessories make a huge statement.
17. Explore 3D Embroidery for Lifelike Results
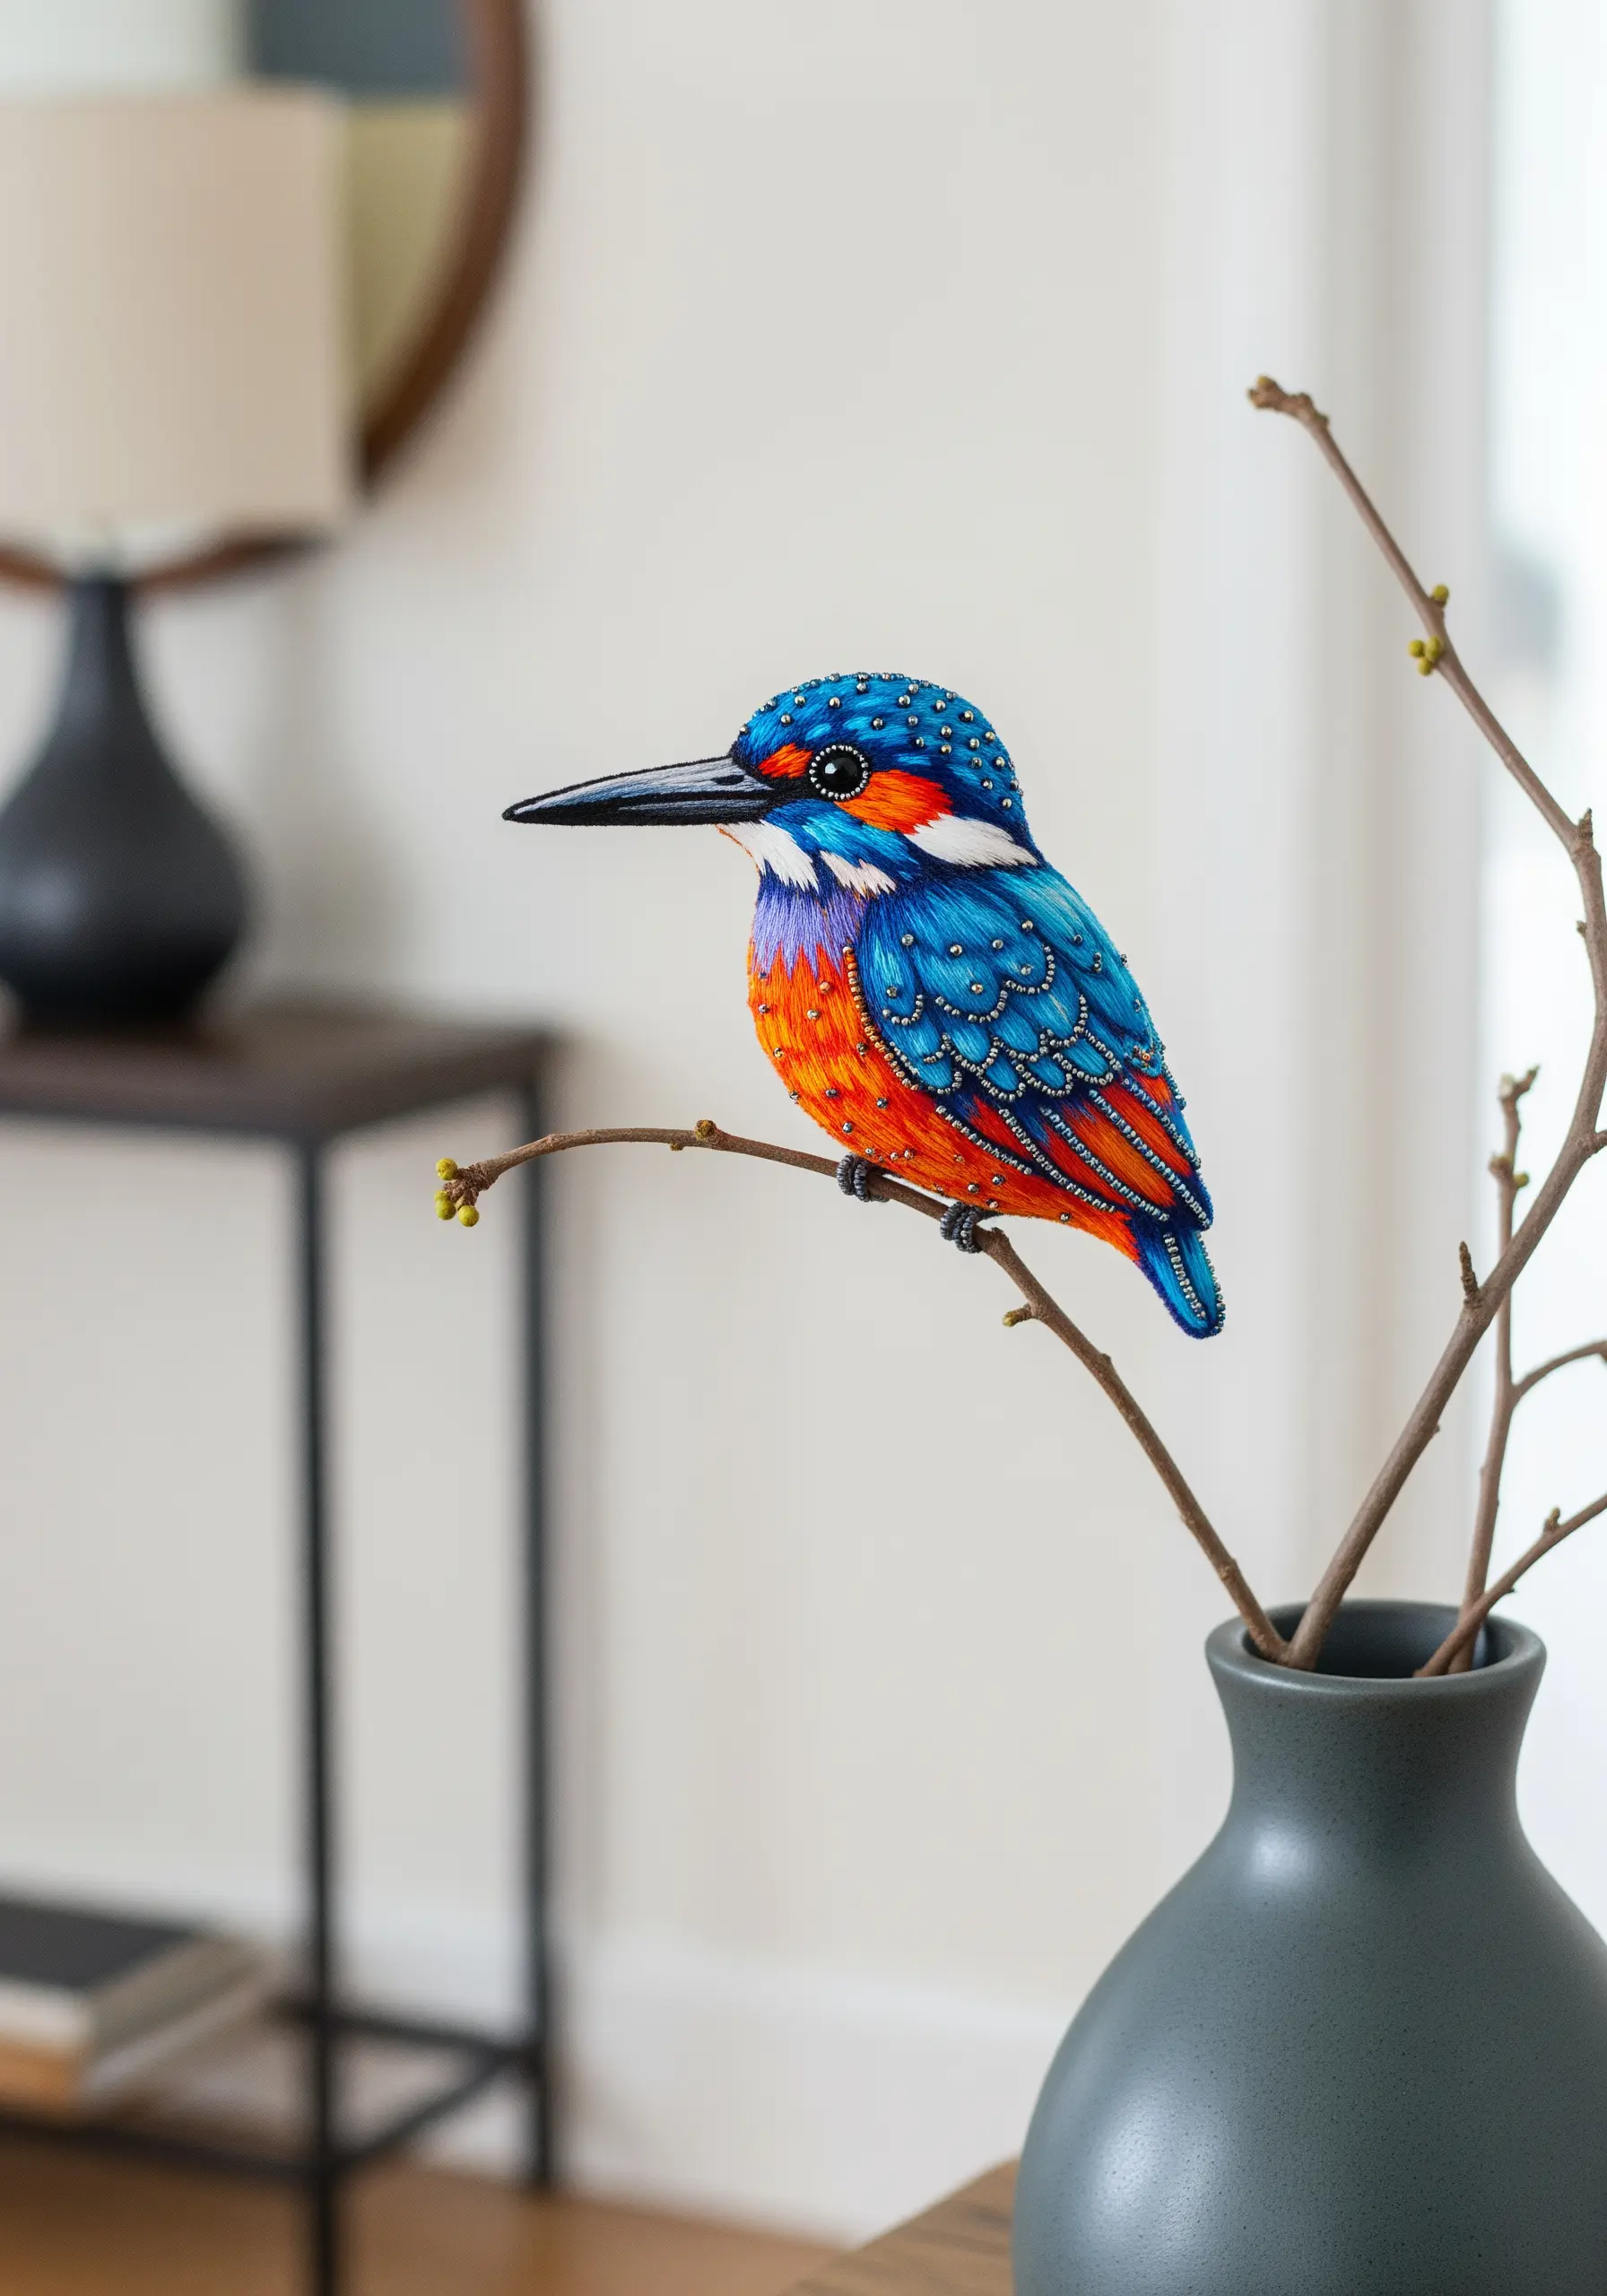
Bring your subjects into the third dimension using stumpwork techniques.
For this kingfisher, the body is embroidered flat, while the top wing is stitched separately over a wire frame.
Once complete, the wired wing is cut out and attached to the body, allowing you to bend it into a realistic, raised position.
Adding tiny beads for the shimmering blue feathers enhances the realism and catches the light beautifully, making bird & butterfly embroidery patterns that make fabric come alive.
18. Design a Cohesive Triptych for a Modern Look
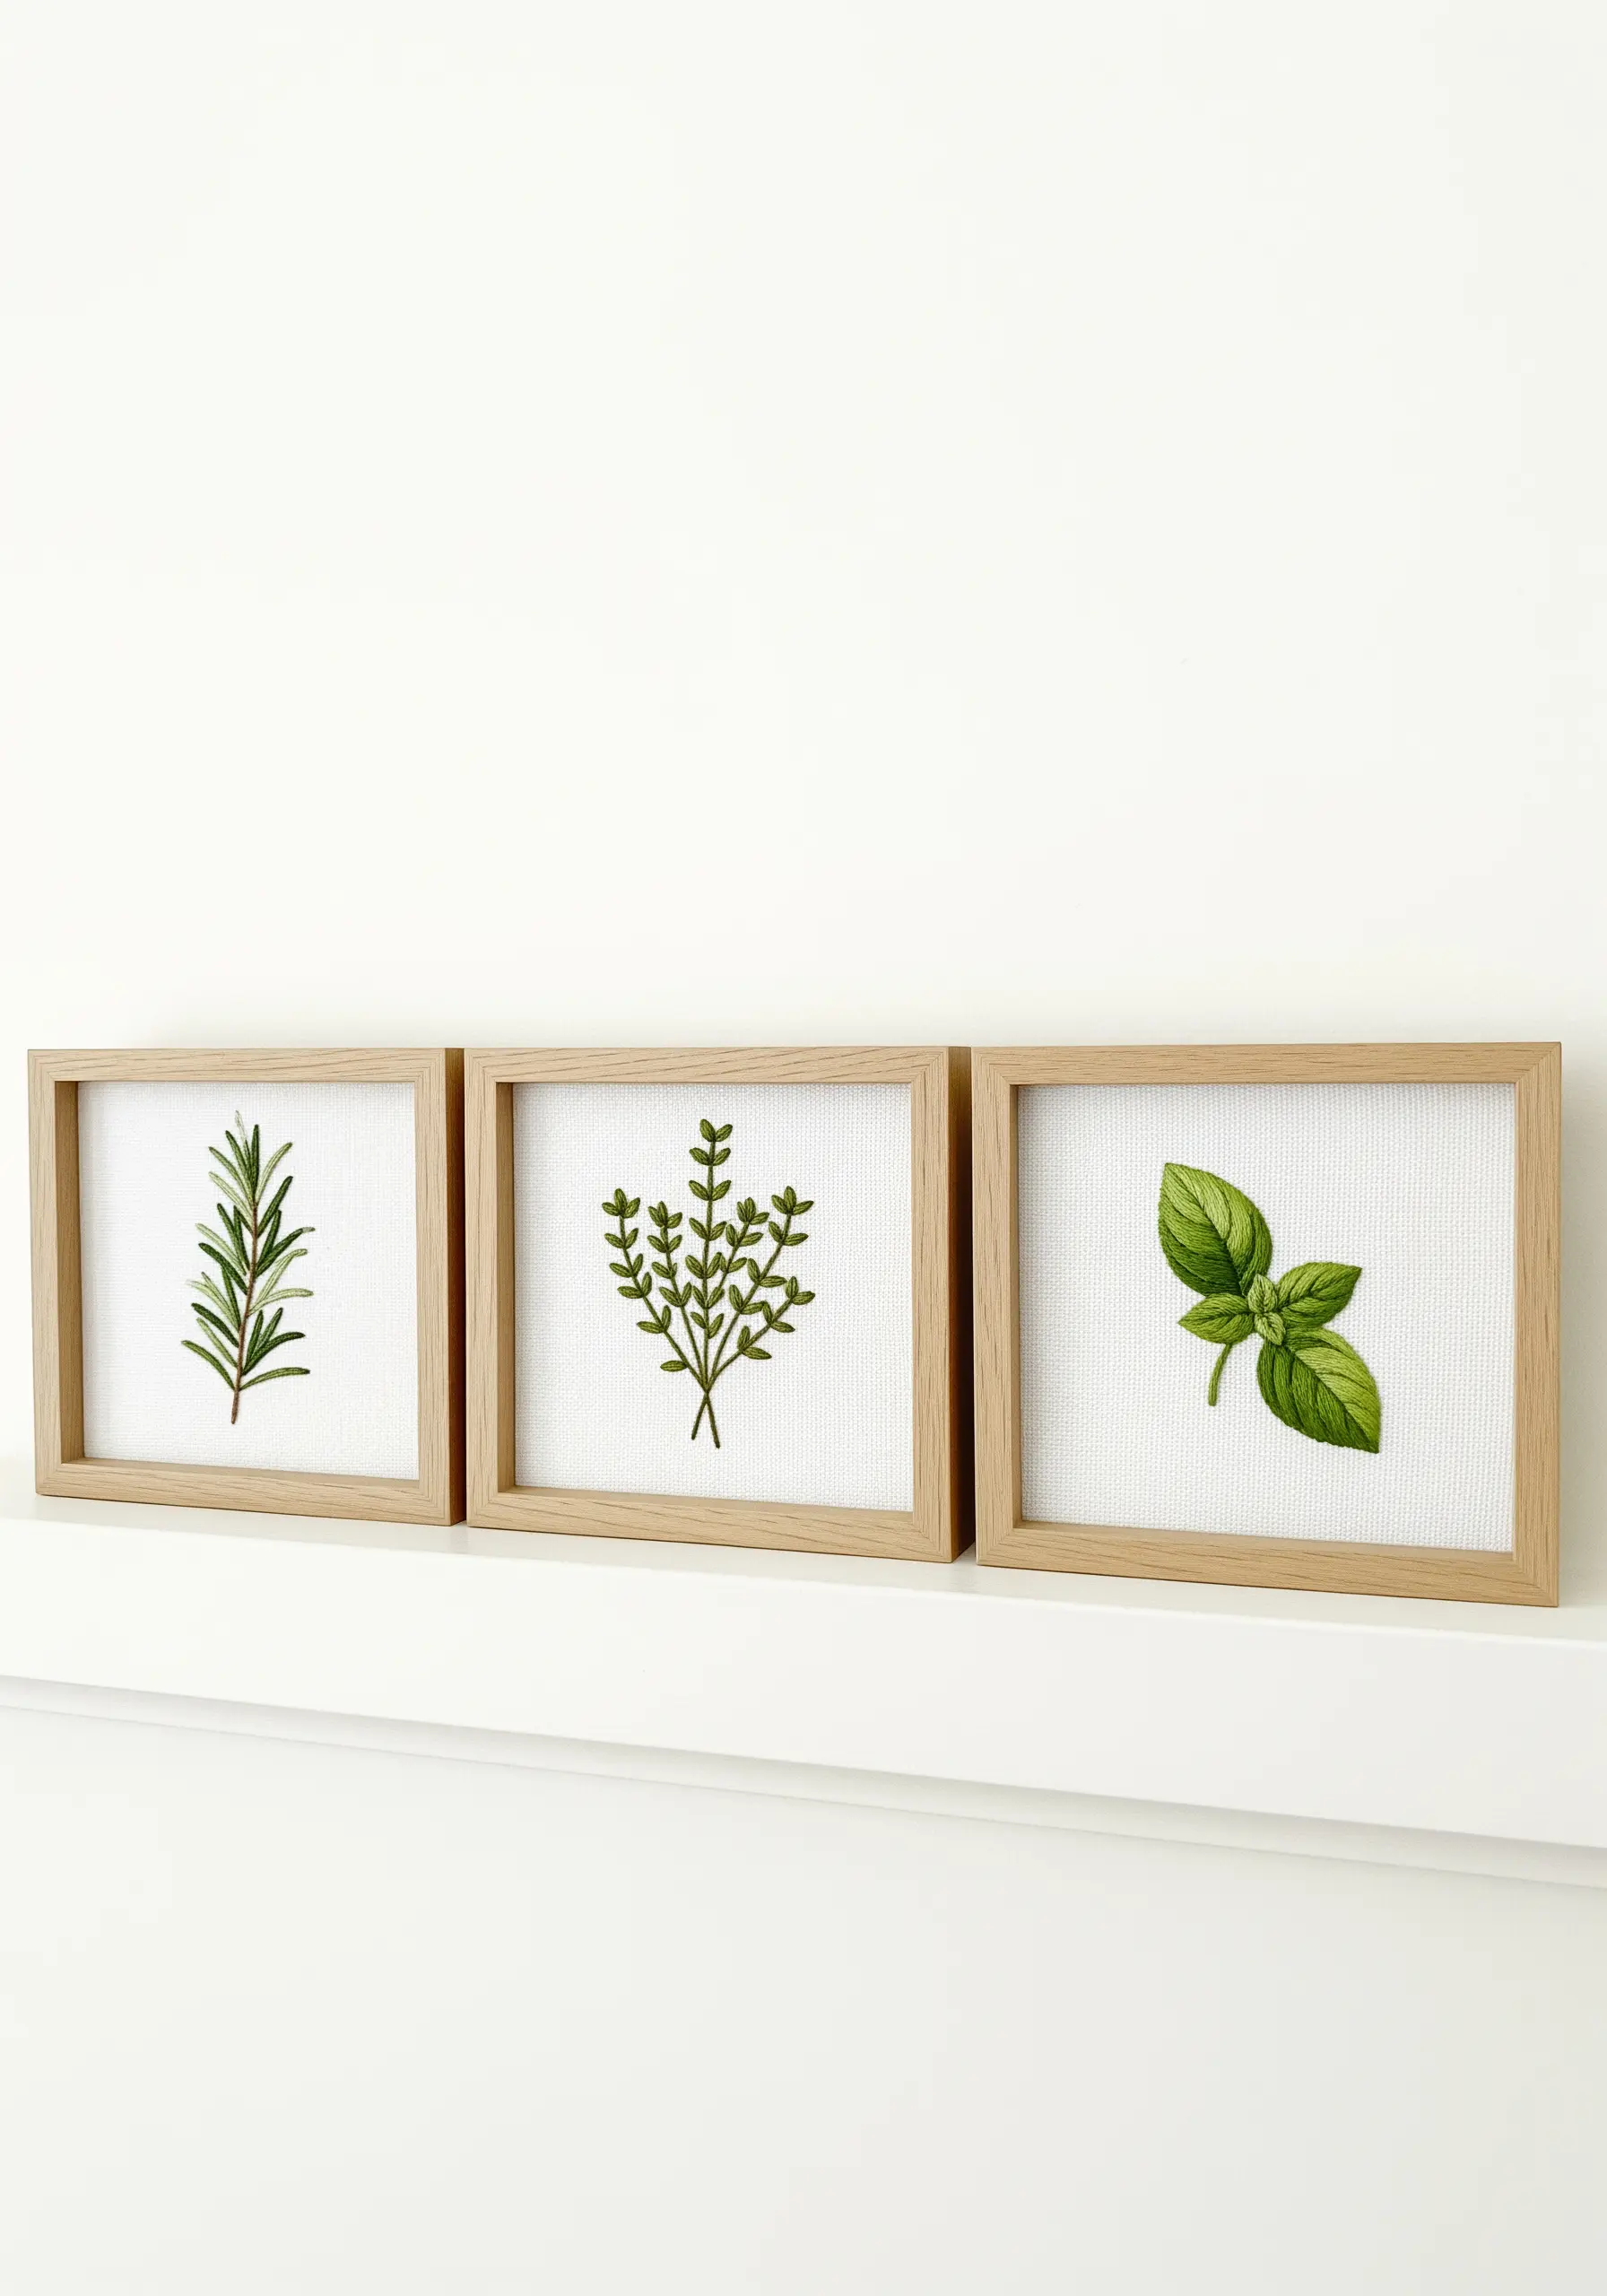
To create a polished, gallery-style display, stitch a series of related motifs and frame them identically.
Choose a simple theme, like culinary herbs, and keep the compositions minimal to let the fine details shine.
Use the same neutral background fabric and simple, matching wooden frames for all pieces to create visual unity.
This coordinated approach turns several small pieces into a single, impactful statement, making it easy to create a minimal DIY embroidery piece perfect for a gallery wall.
19. Add Dynamic Movement to Graphic Designs
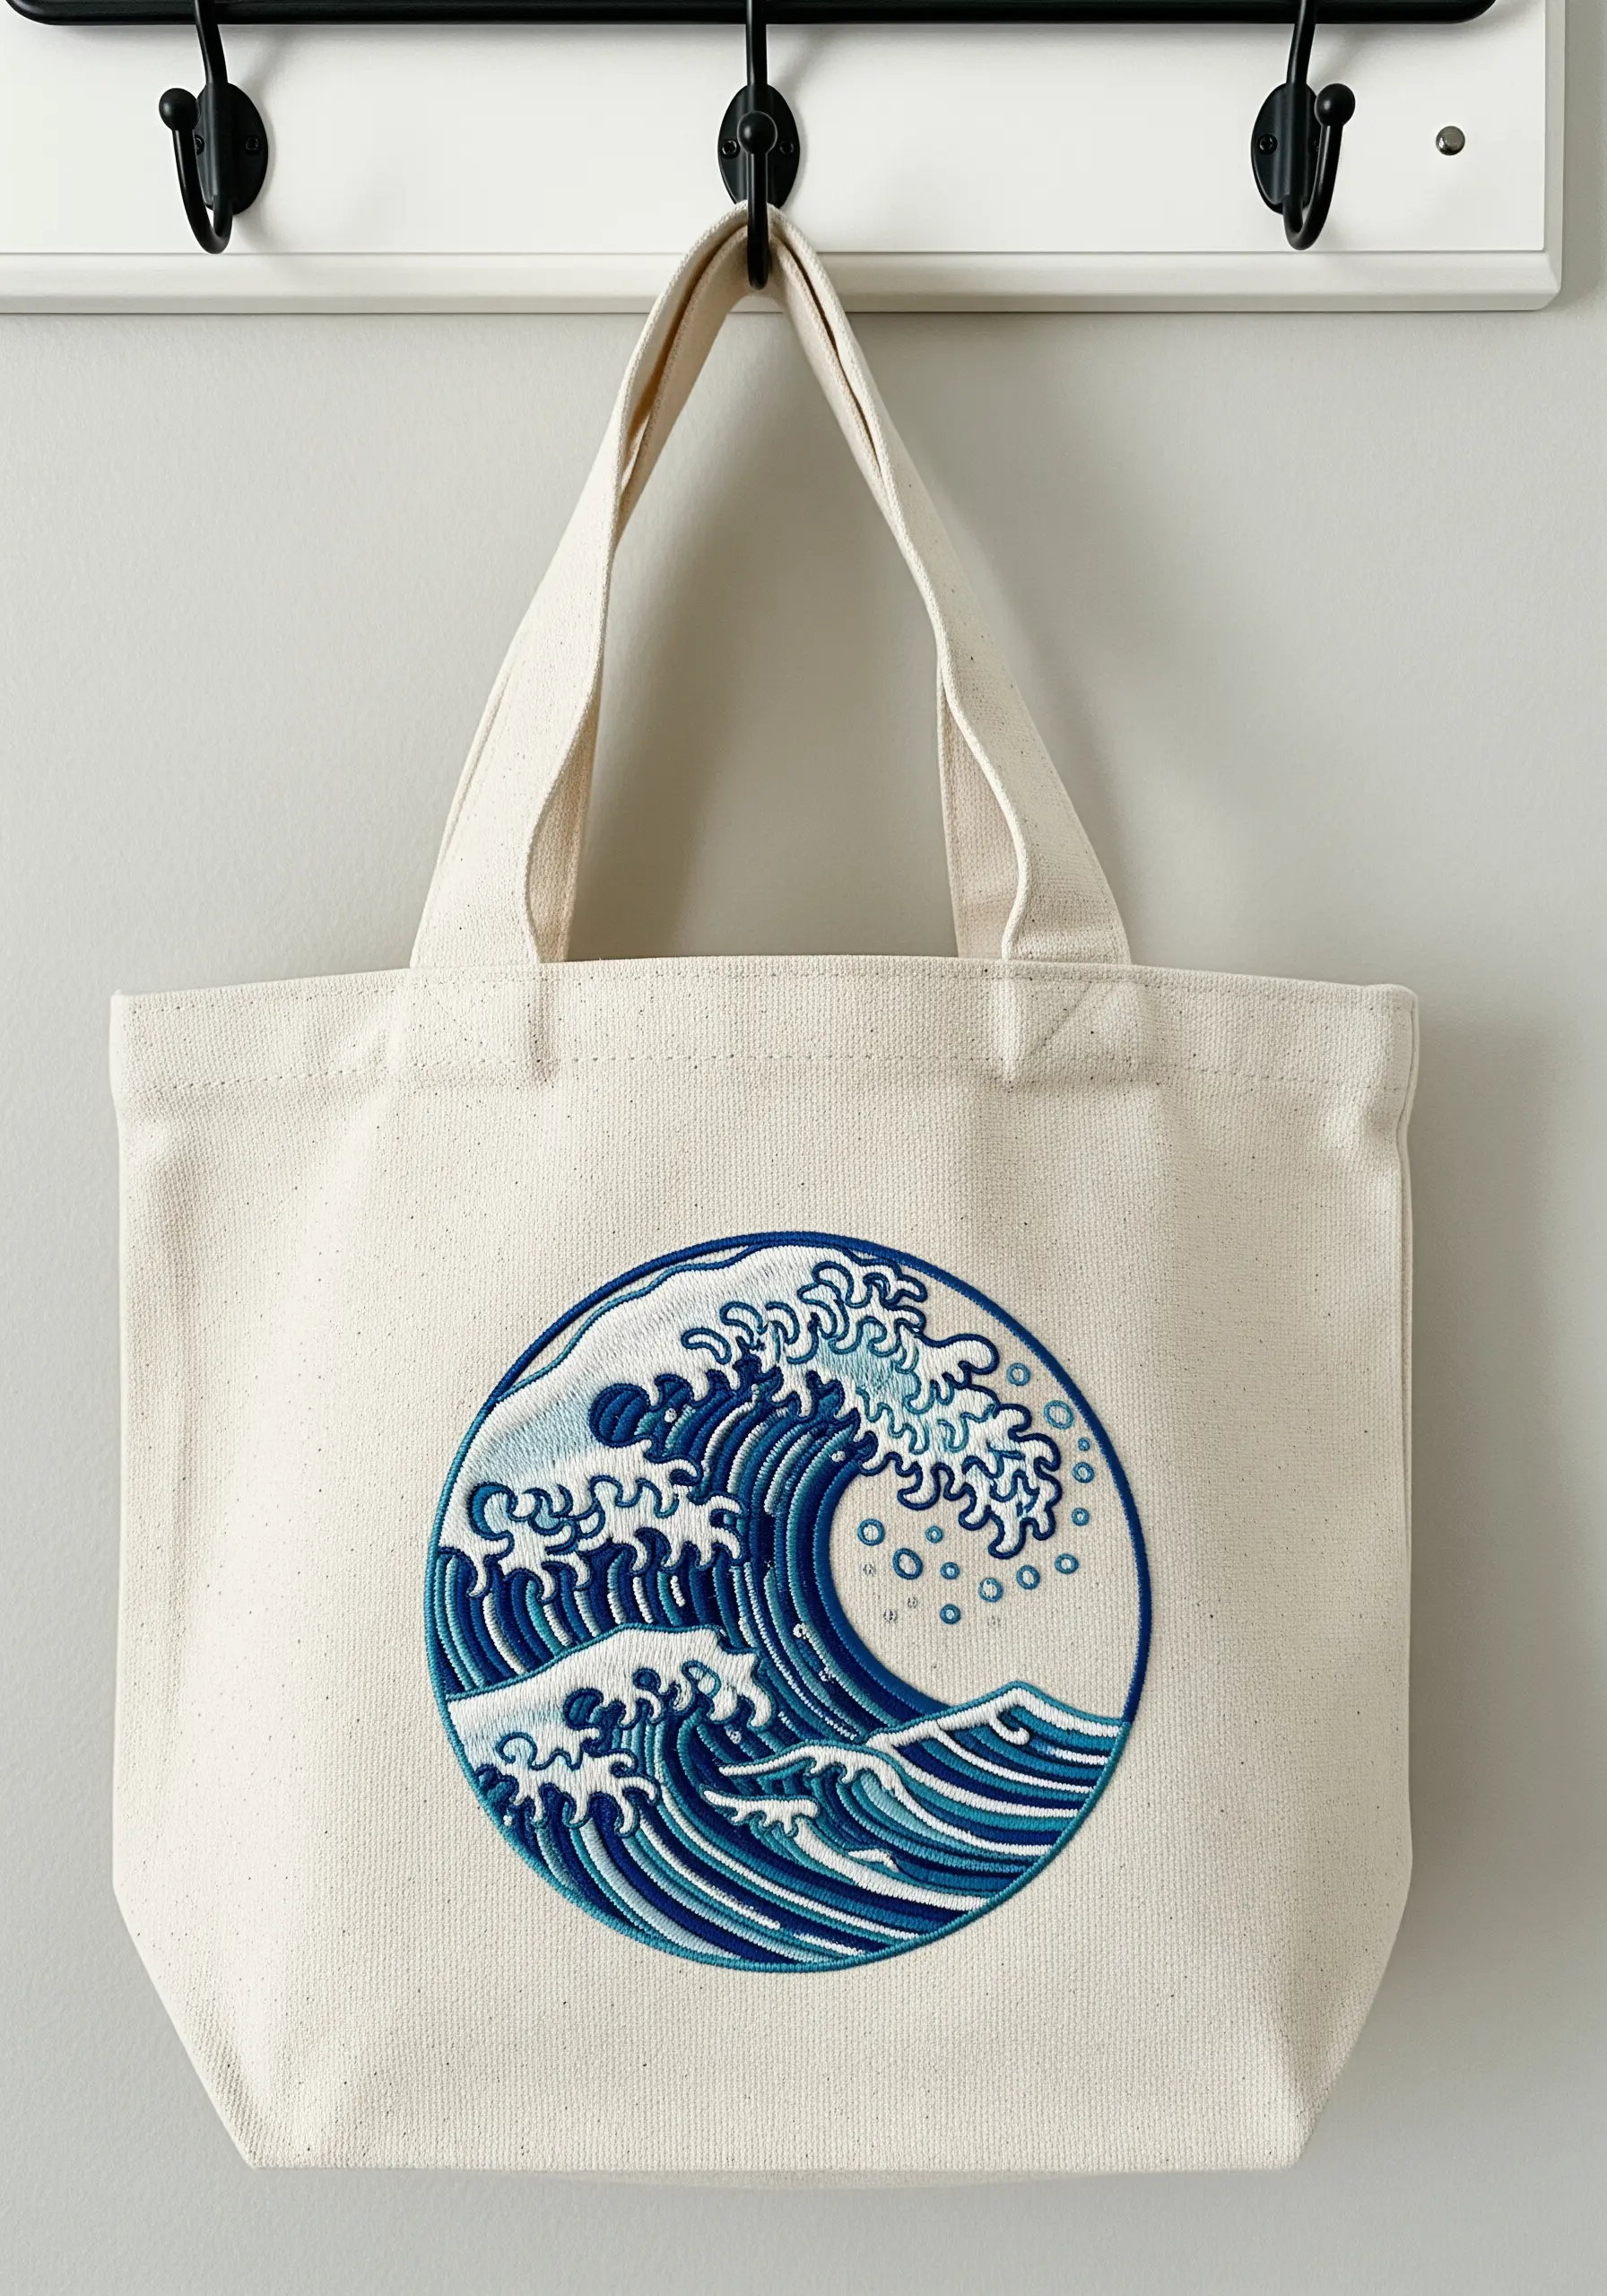
To prevent puckering when stitching a large, dense design on a tote bag, always use a cut-away stabilizer on the back of the fabric.
Capture the energy of Hokusai’s Great Wave by using a variety of stitches.
Use directional satin stitch for the solid blocks of water, outline the curves with a whipped backstitch for definition, and scatter French knots to represent sea spray.
This mix of textures is what creates the illusion of churning movement, and works well for all kinds of tote bag embroidery ideas.


