
You have the threads, the fabric, and the desire to create something beautiful. But sometimes, you might find yourself wondering how to move from simply stitching a pattern to creating a piece that feels truly finished, polished, and intentional. How do you make your work sing?
The answer isn’t about mastering hundreds of complex stitches or investing in expensive tools. It’s about small, deliberate choices—the kind that transform a simple line into a statement, or a flat shape into something with life and texture. It’s about understanding why one technique works better than another for the effect you want to achieve.
Here, you will find projects that are not just quick, but smart. Each one is built around a specific technique or an idea designed to elevate your work. Whether it’s adding dimension with padding, mixing materials for modern contrast, or choosing the perfect stitch for crisp lettering, these small adjustments will make a visible difference. You’re ready to create decor that feels not just handmade, but artfully made.
1. Master the Minimalist Landscape with Bold Outlines
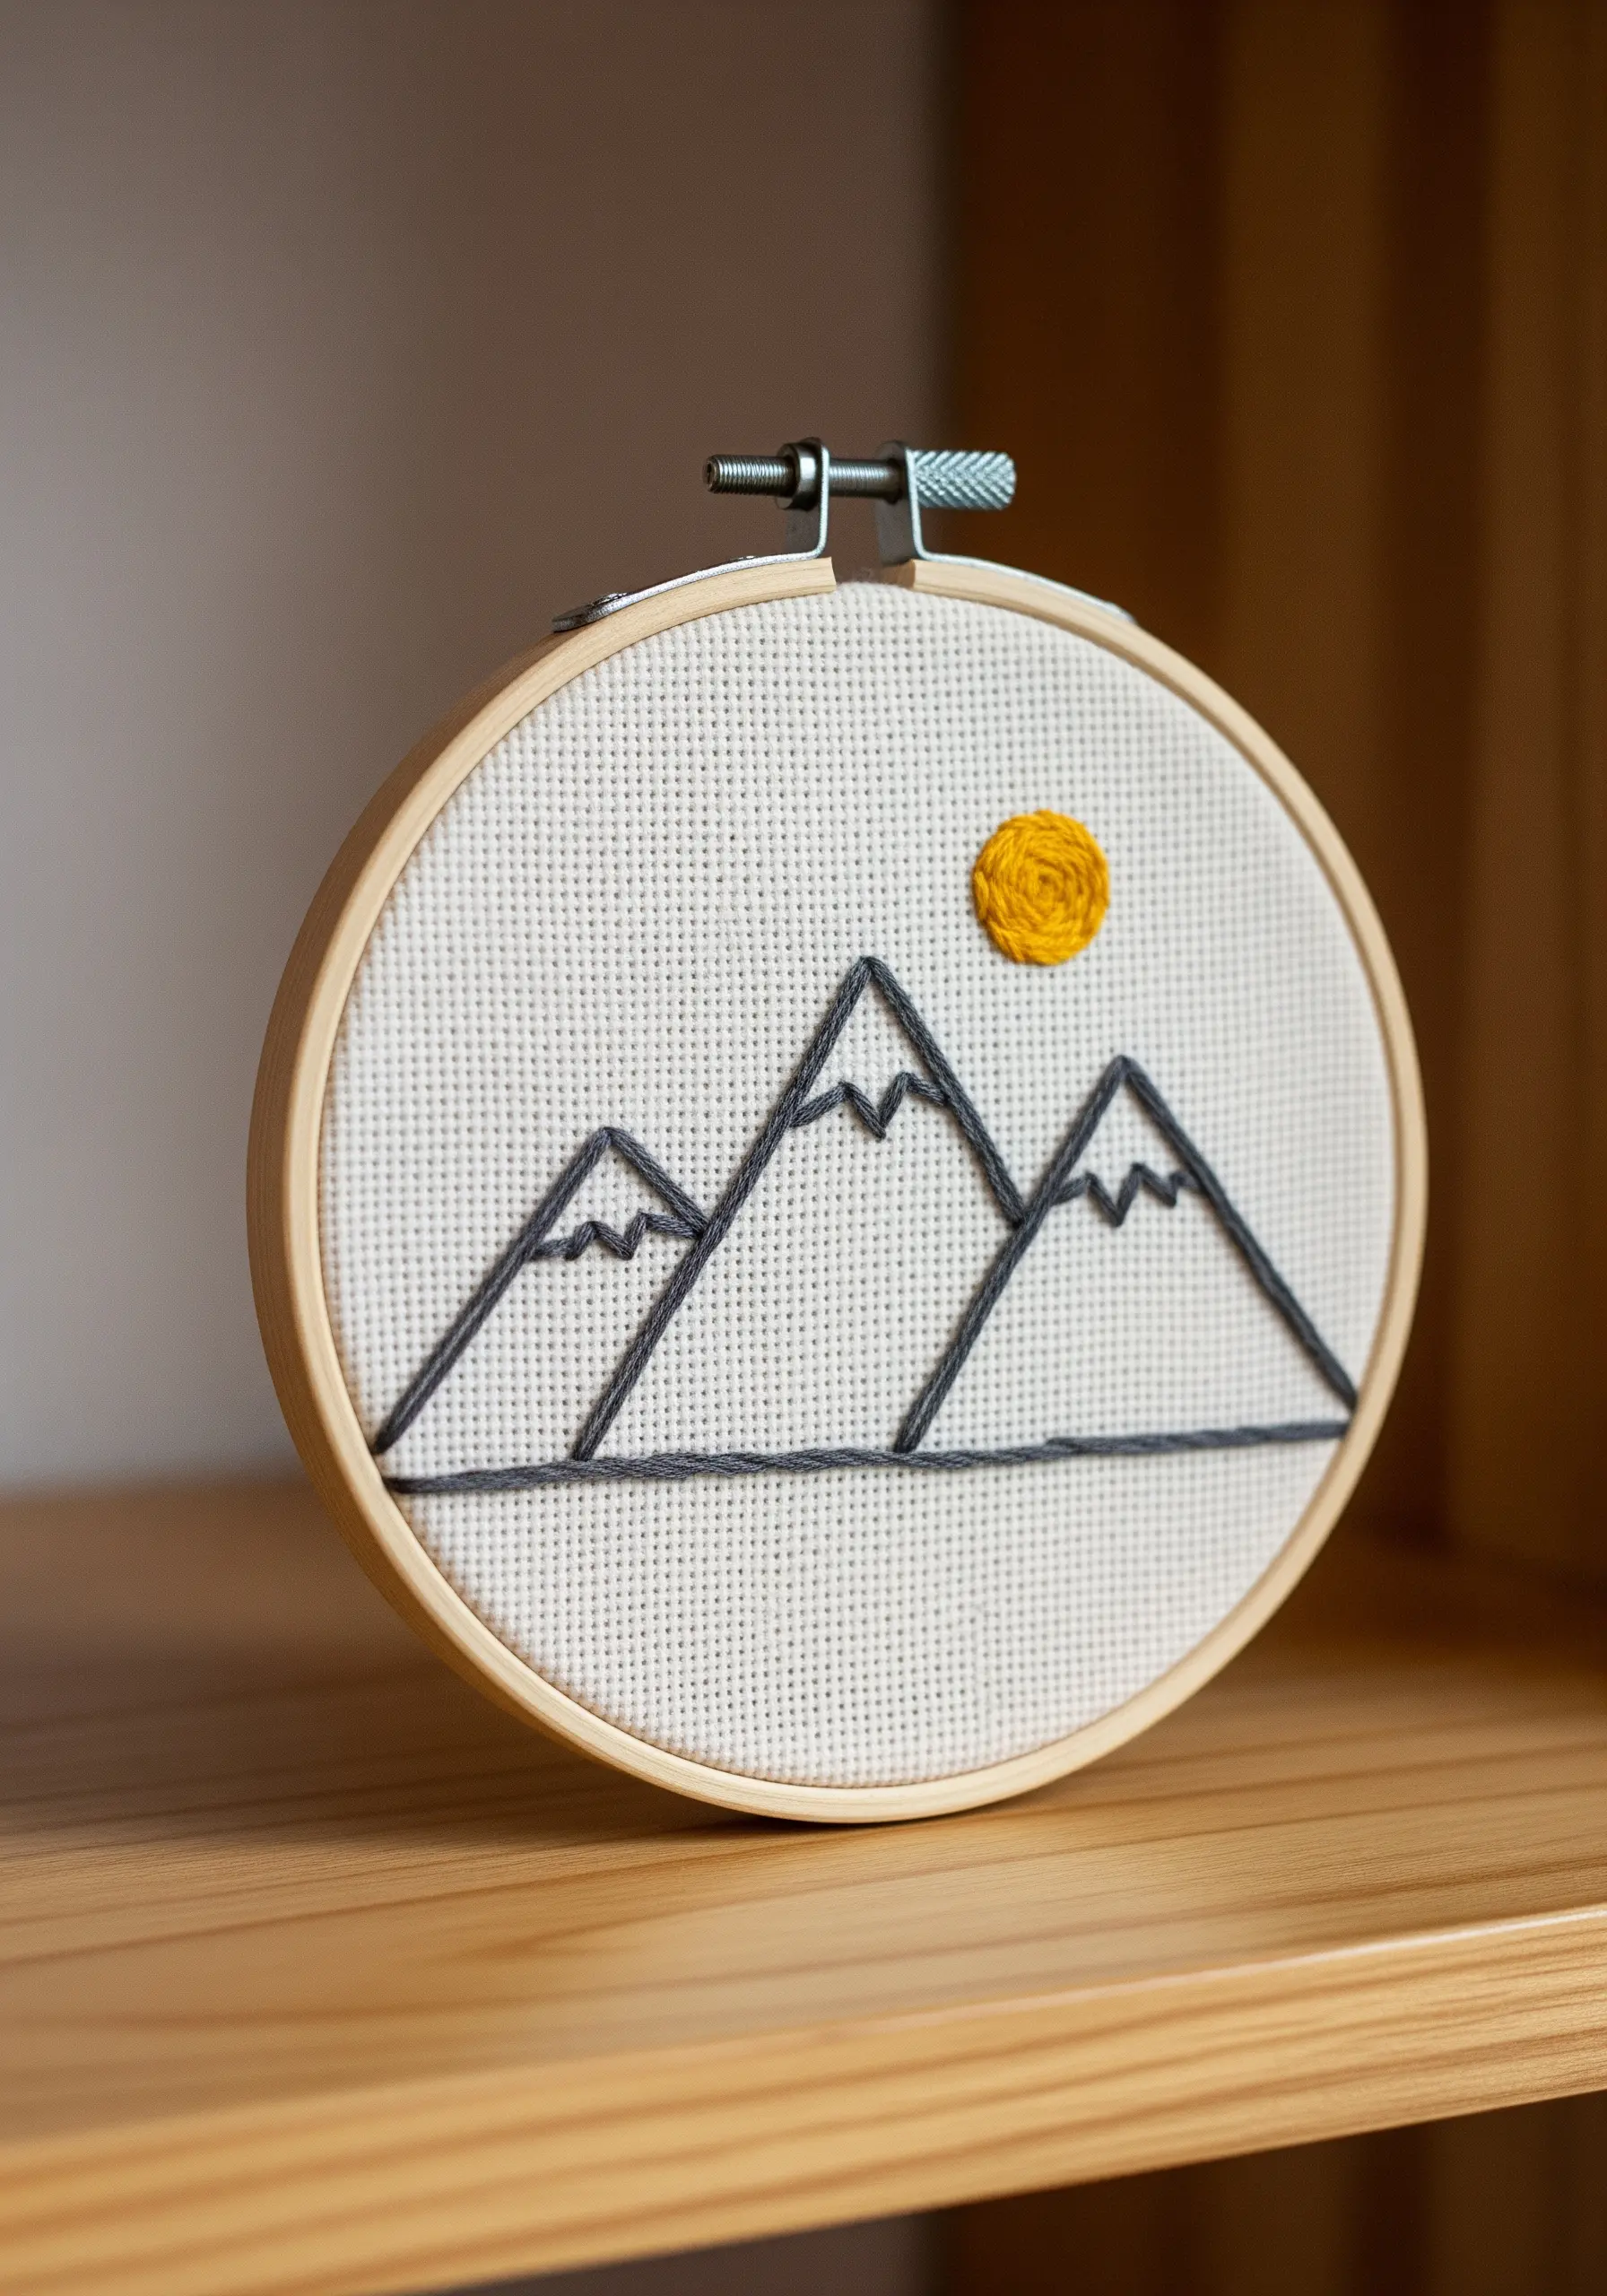
Focus on the power of a single stitch to create a clean, graphic line that stands out against Aida cloth.
Use a whipped backstitch or a heavy chain stitch for the mountains, keeping your tension consistent to avoid puckering.
For the sun, a woven wheel stitch offers dense, sculptural texture that contrasts beautifully with the flat lines of the mountains.
This deliberate contrast in texture is what gives minimalist embroidery its professional impact.
2. Create Tactile Dimension with Raised Embroidery
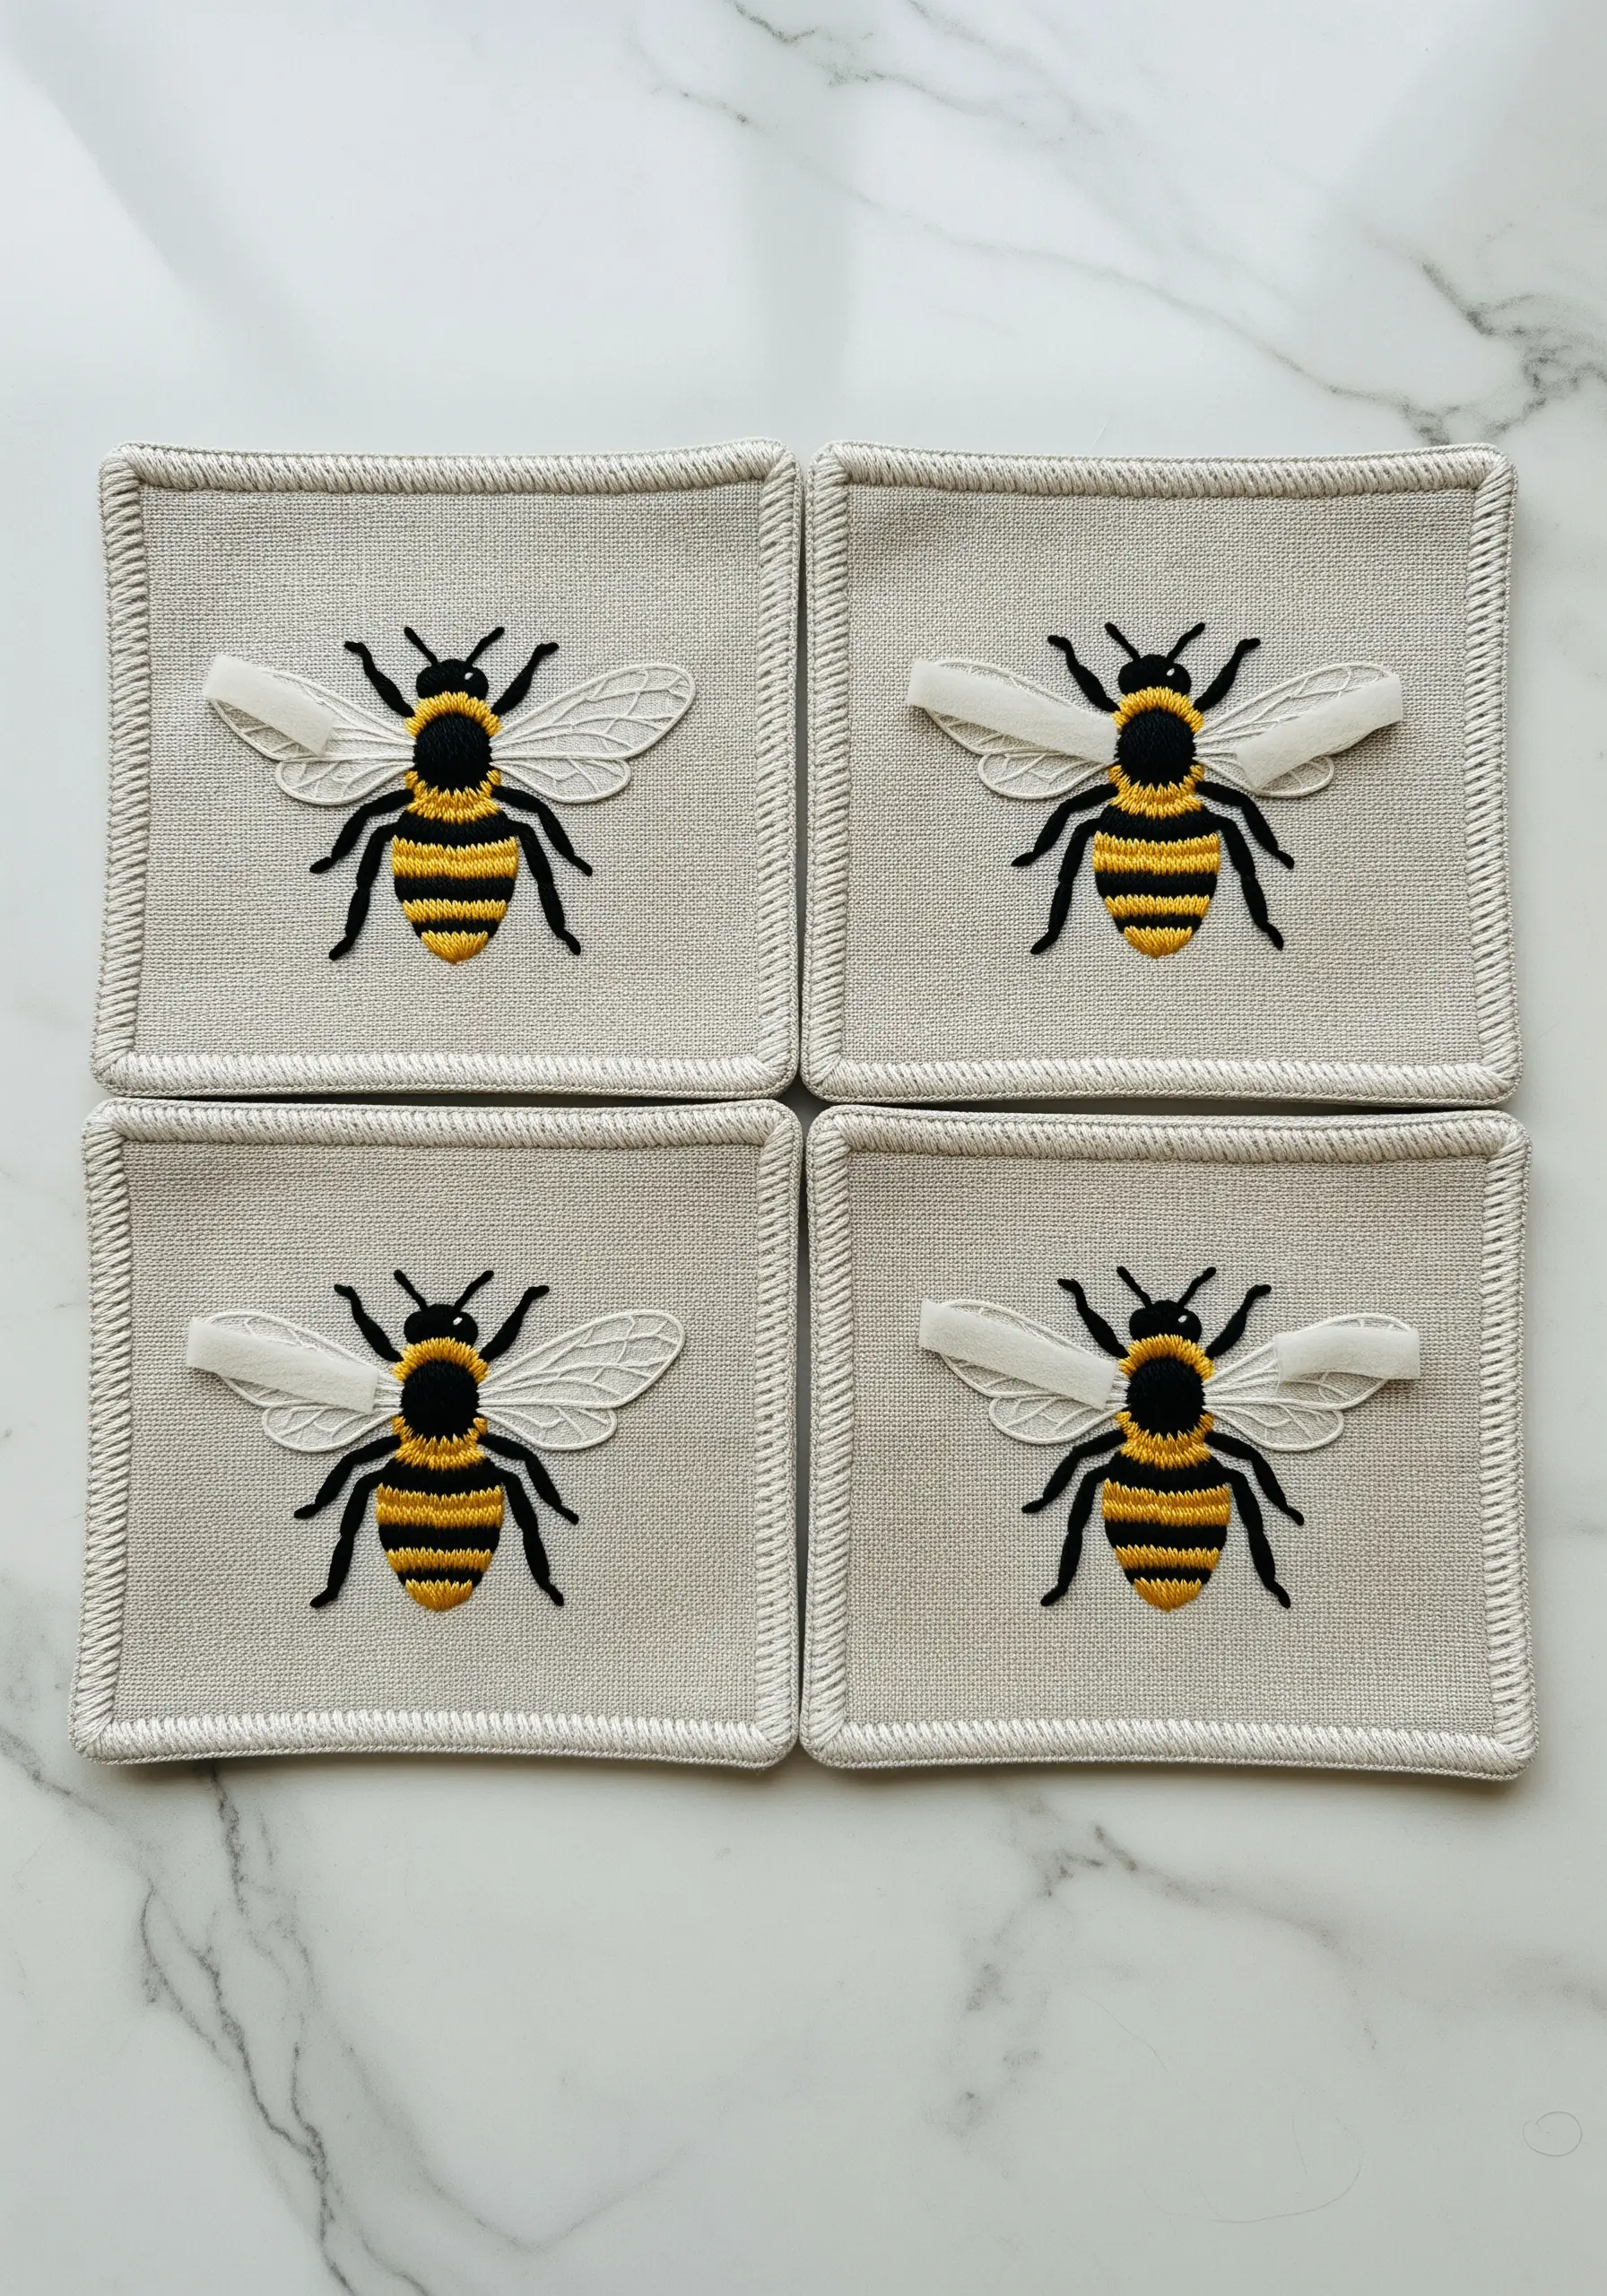
Elevate a simple motif by incorporating stumpwork techniques for the wings.
Create detached wings on a separate piece of sheer fabric like organza, outlining them with wire and filling with buttonhole stitches.
Attach them to the main design, allowing them to lift off the surface for a realistic 3D effect.
For the bee’s body, use a padded satin stitch over a few foundation stitches to create a rounded, plump feel.
This textural layering turns functional coasters into miniature art pieces.
3. Weave Delicate Details into a Functional Keepsake
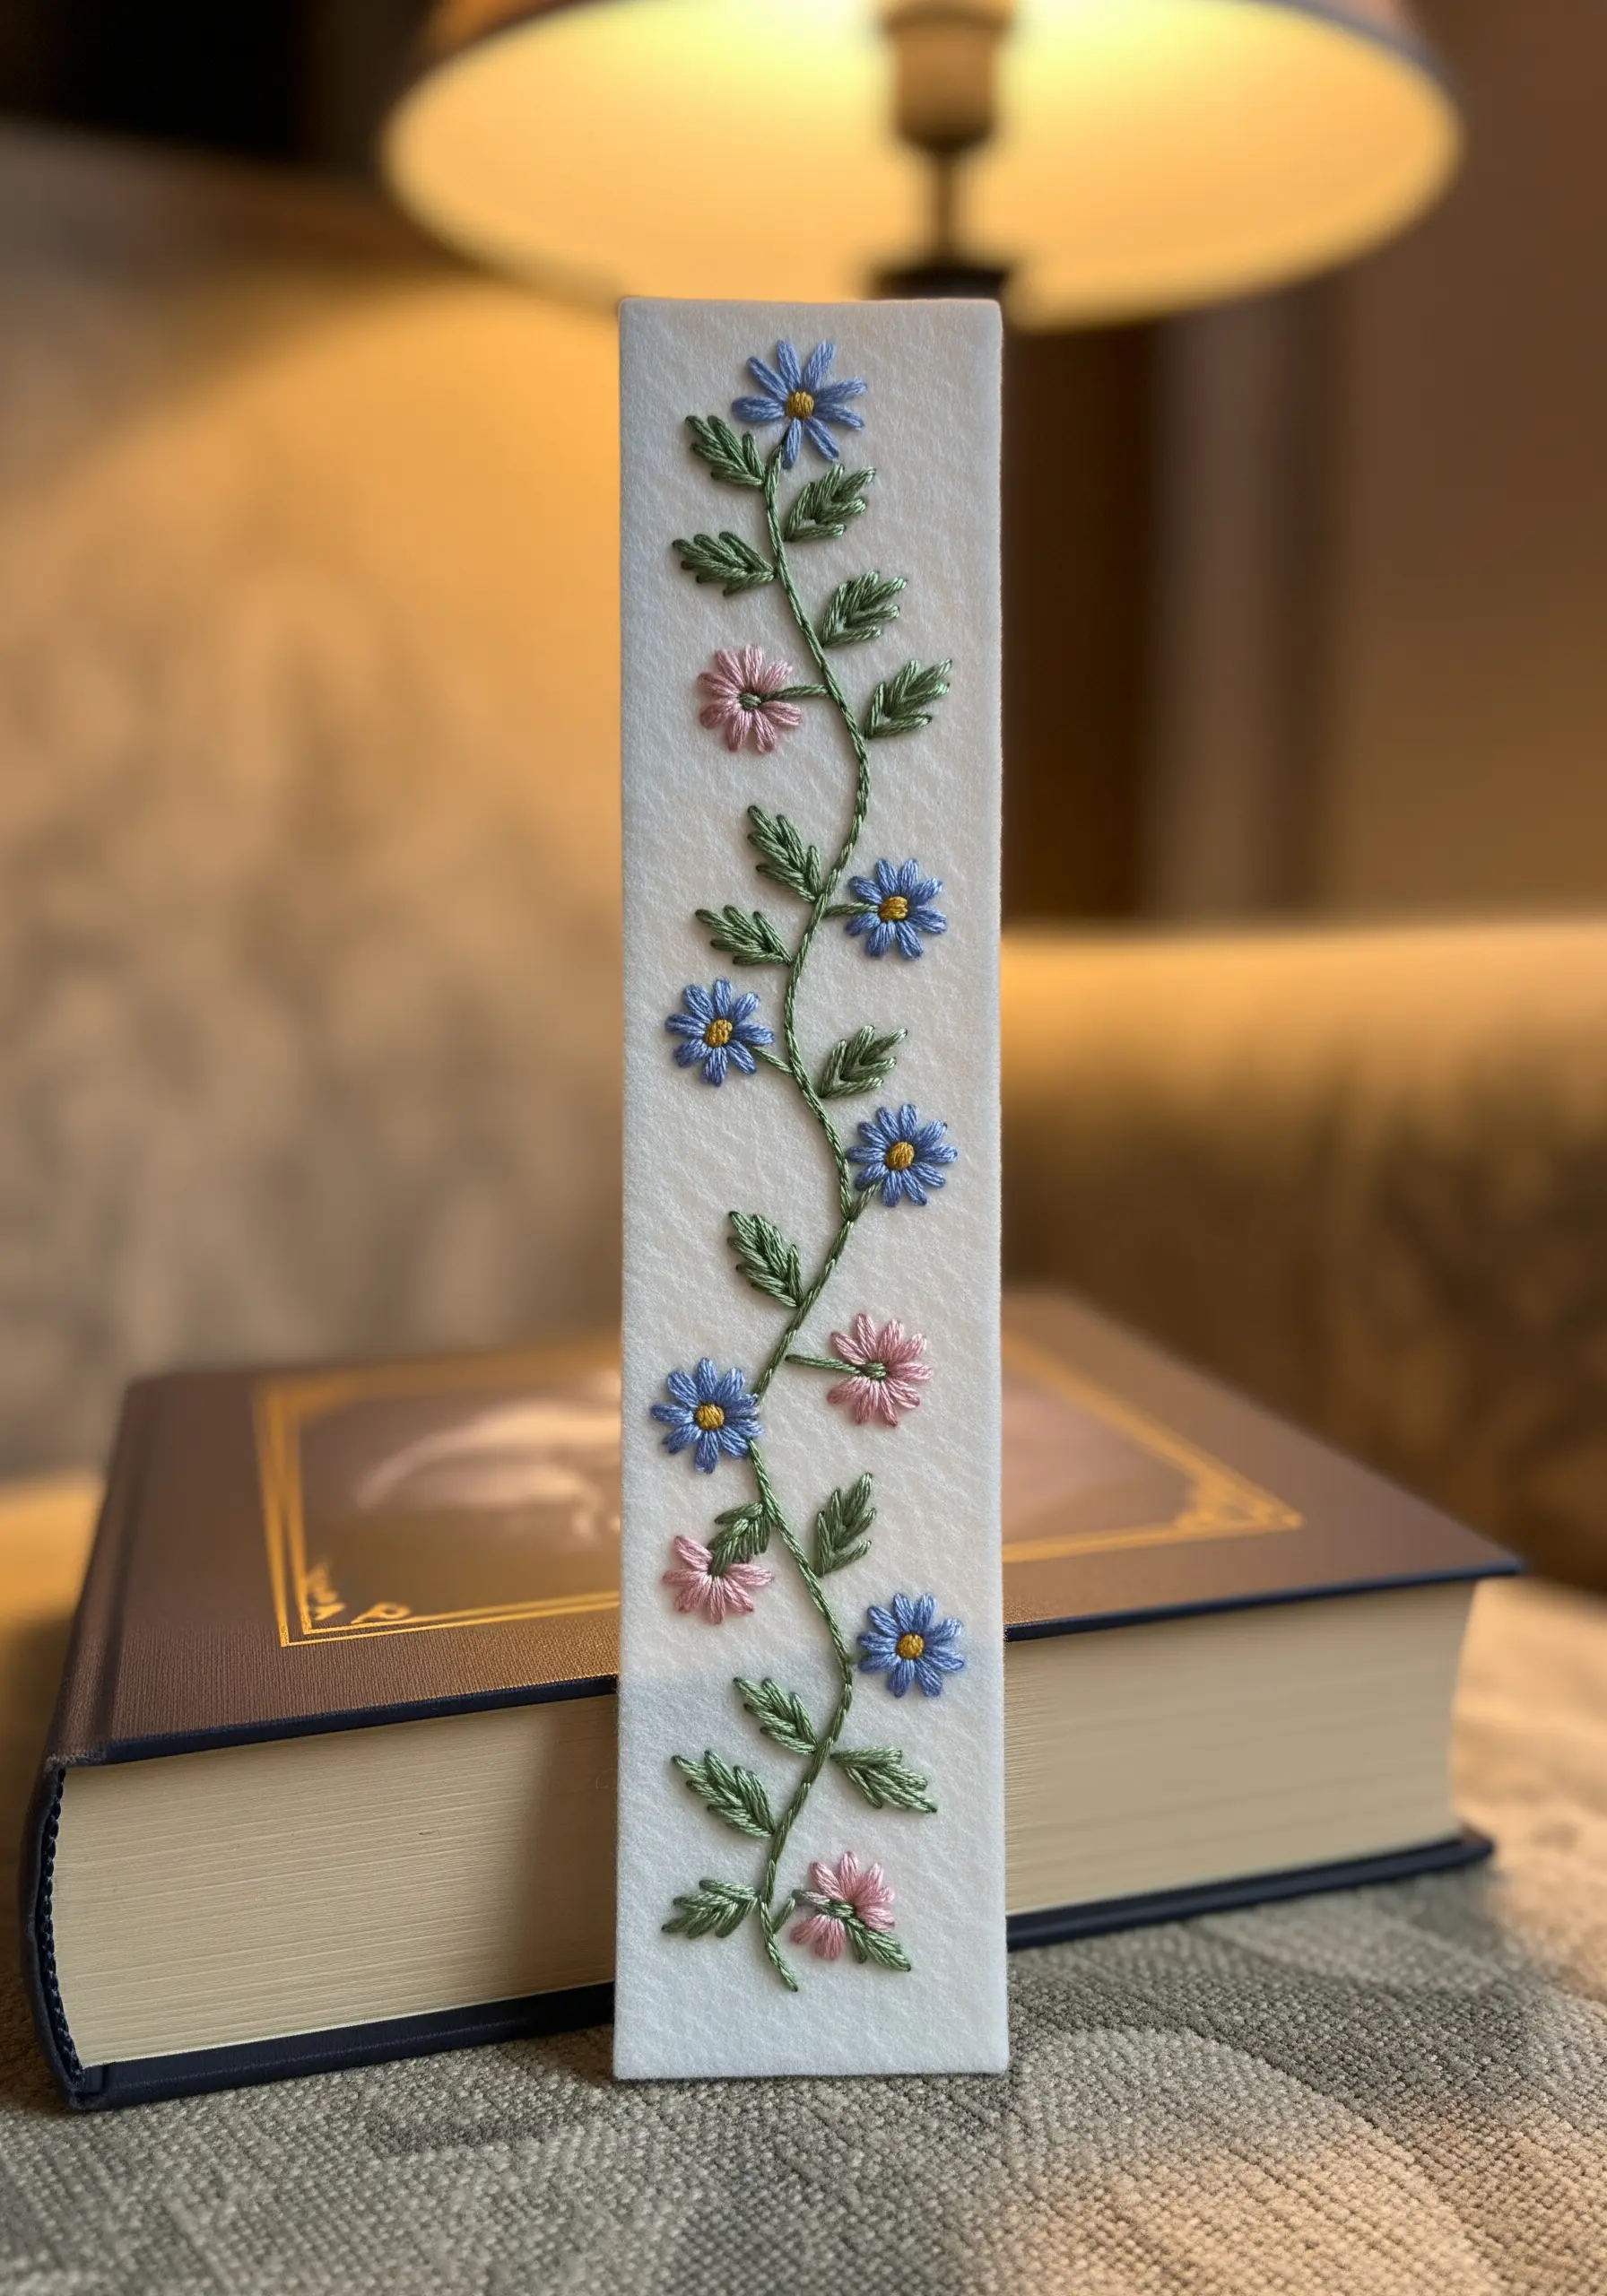
Create a durable and beautiful bookmark on a strip of felt or heavy-duty stabilizer, which prevents stretching.
Use lazy daisy stitches for the petals, securing each one with a tiny anchoring stitch for longevity against wear and tear.
For the stem, a whipped backstitch creates a smooth, rope-like line that won’t snag on pages.
Varying the shades of green in the leaves with just one or two strands of floss adds realism without cluttering the small space.
This is one of those DIY cozy embroidery bookmarks that feels truly special.
4. Explore Bold Color Blocking with Yarn Couching
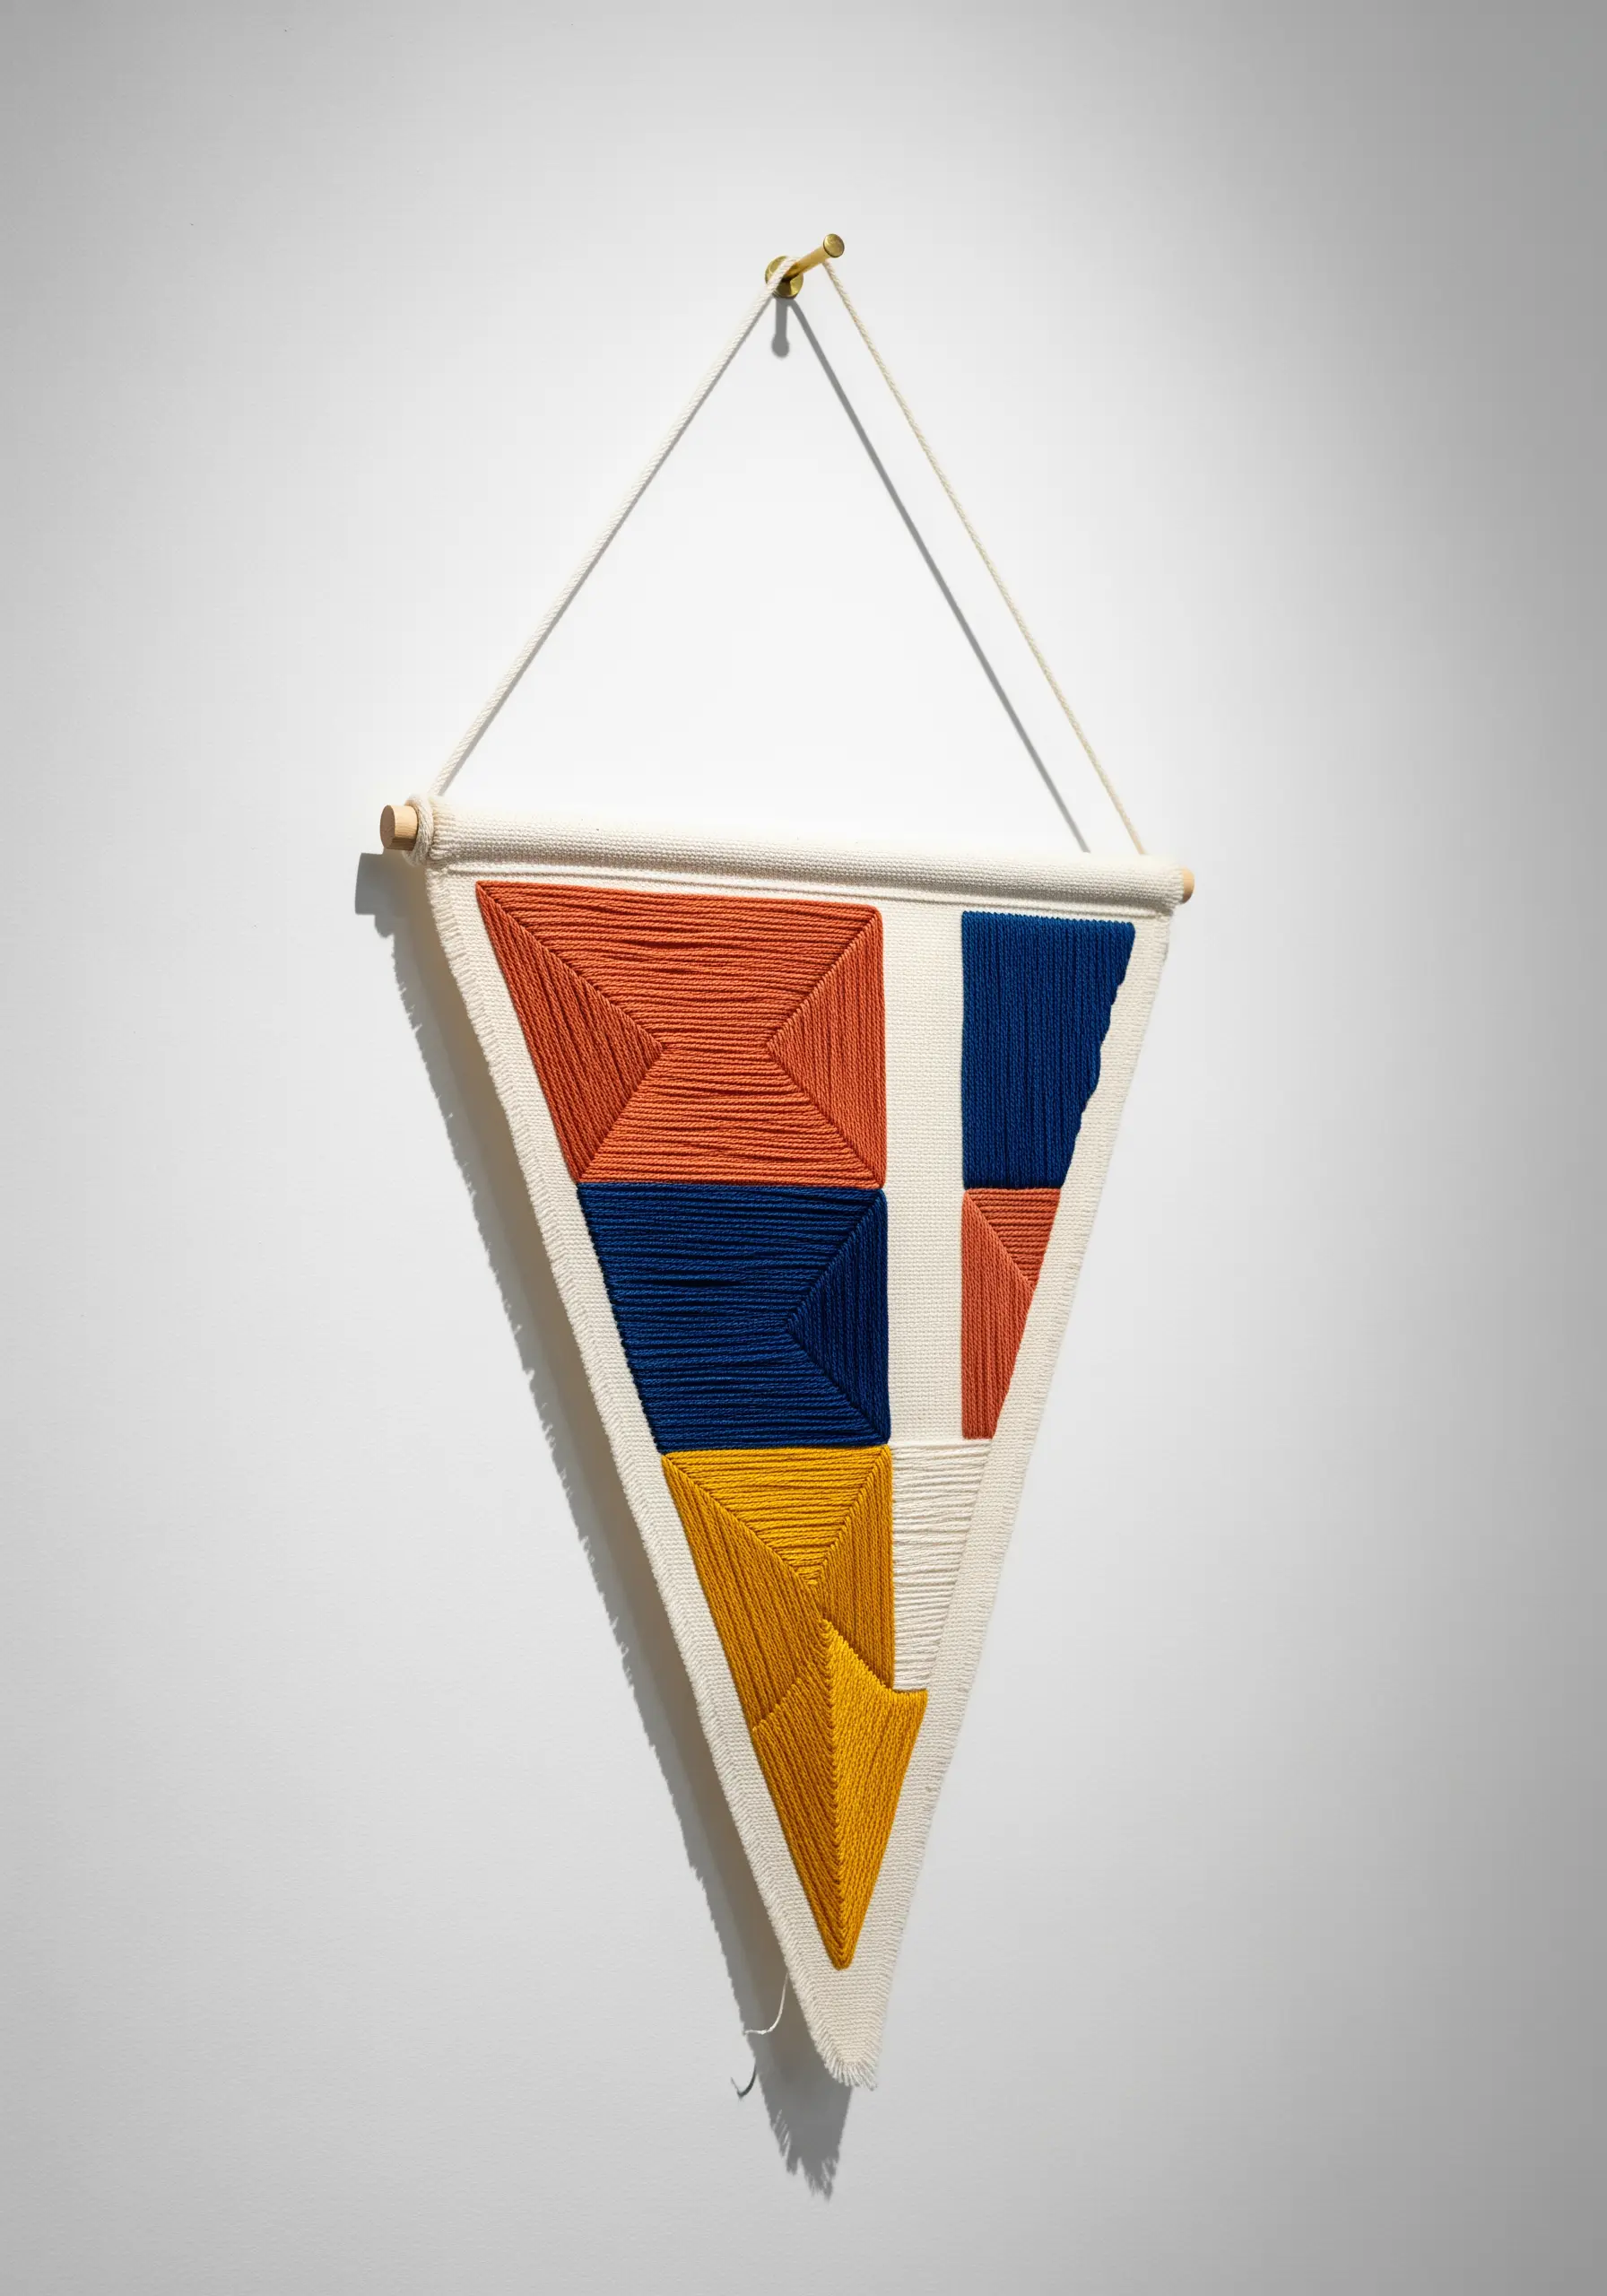
Instead of traditional embroidery floss, use thicker yarn to cover large areas quickly and create dramatic texture.
Lay the yarn in your desired shape and use a thinner, matching embroidery thread to couch it down with small, evenly spaced stitches.
This technique allows you to create crisp geometric blocks of color with a satisfyingly tactile surface.
This method is perfect for large-scale DIY wall art embroidery projects that demand visual impact.
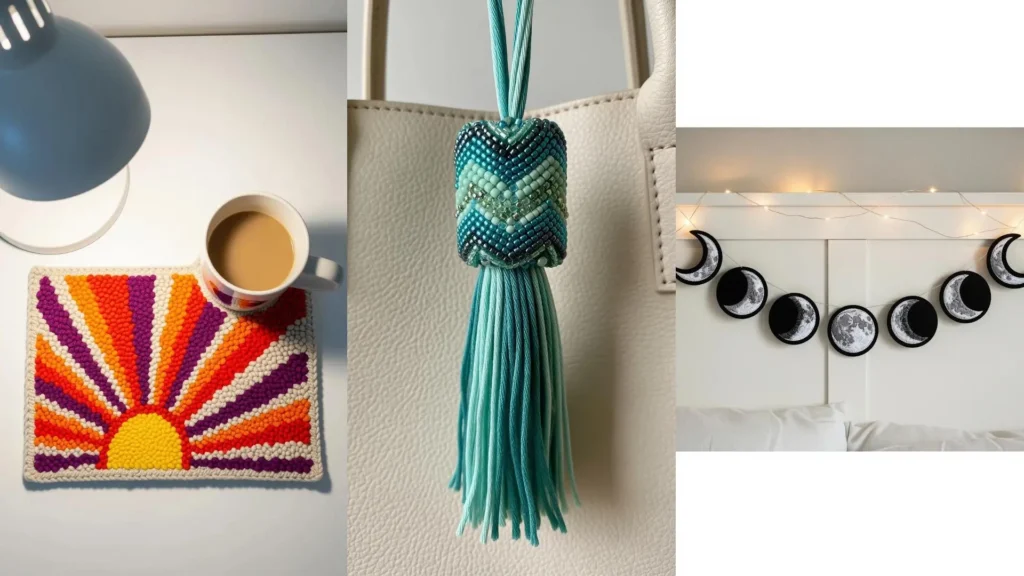
5. Use Metallic Thread for a Touch of Lunar Magic
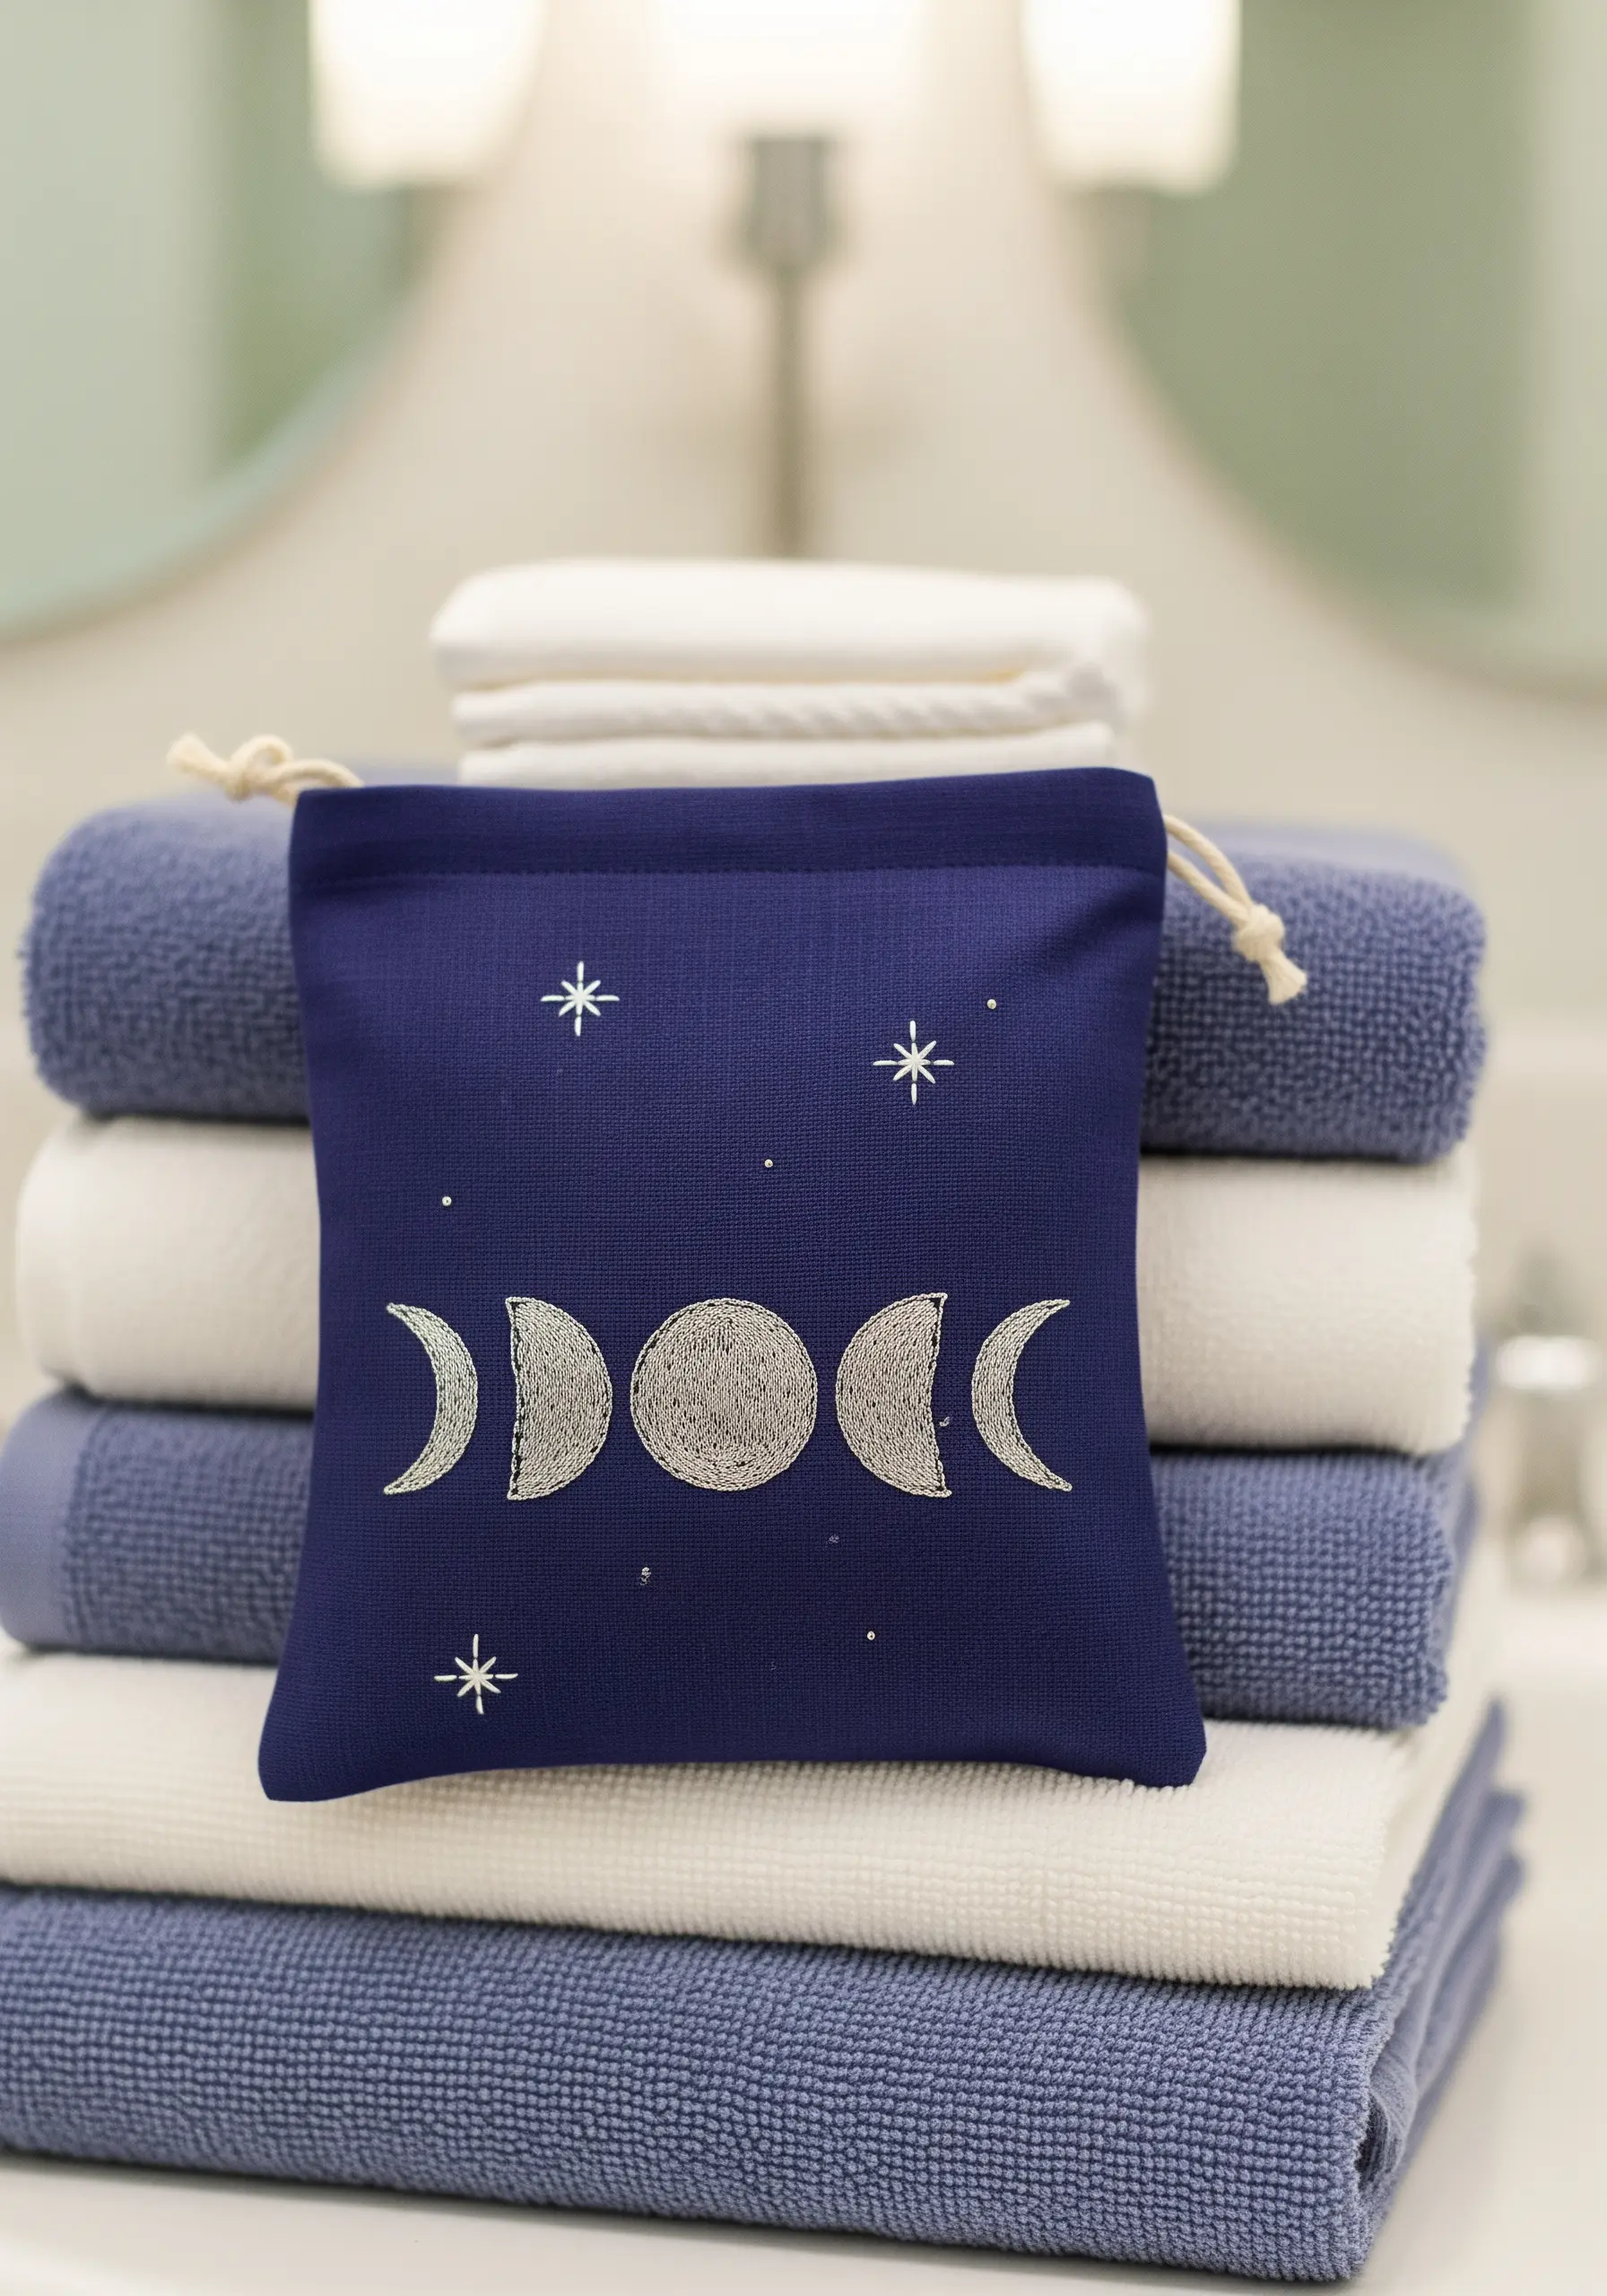
To make your celestial motifs glow, choose a high-quality metallic thread and a needle with a larger eye to prevent shredding.
For the cratered texture of the full moon, use a dense pattern of French knots or seed stitches in varying sizes and shades of silver.
Contrast this with smooth satin stitch for the crescent moons to create visual interest.
Work slowly and use a thread conditioner like beeswax to tame the metallic floss, ensuring your stitches lay flat and luminous against the dark fabric.
6. Add Charm with Miniature Padded Satin Stitch
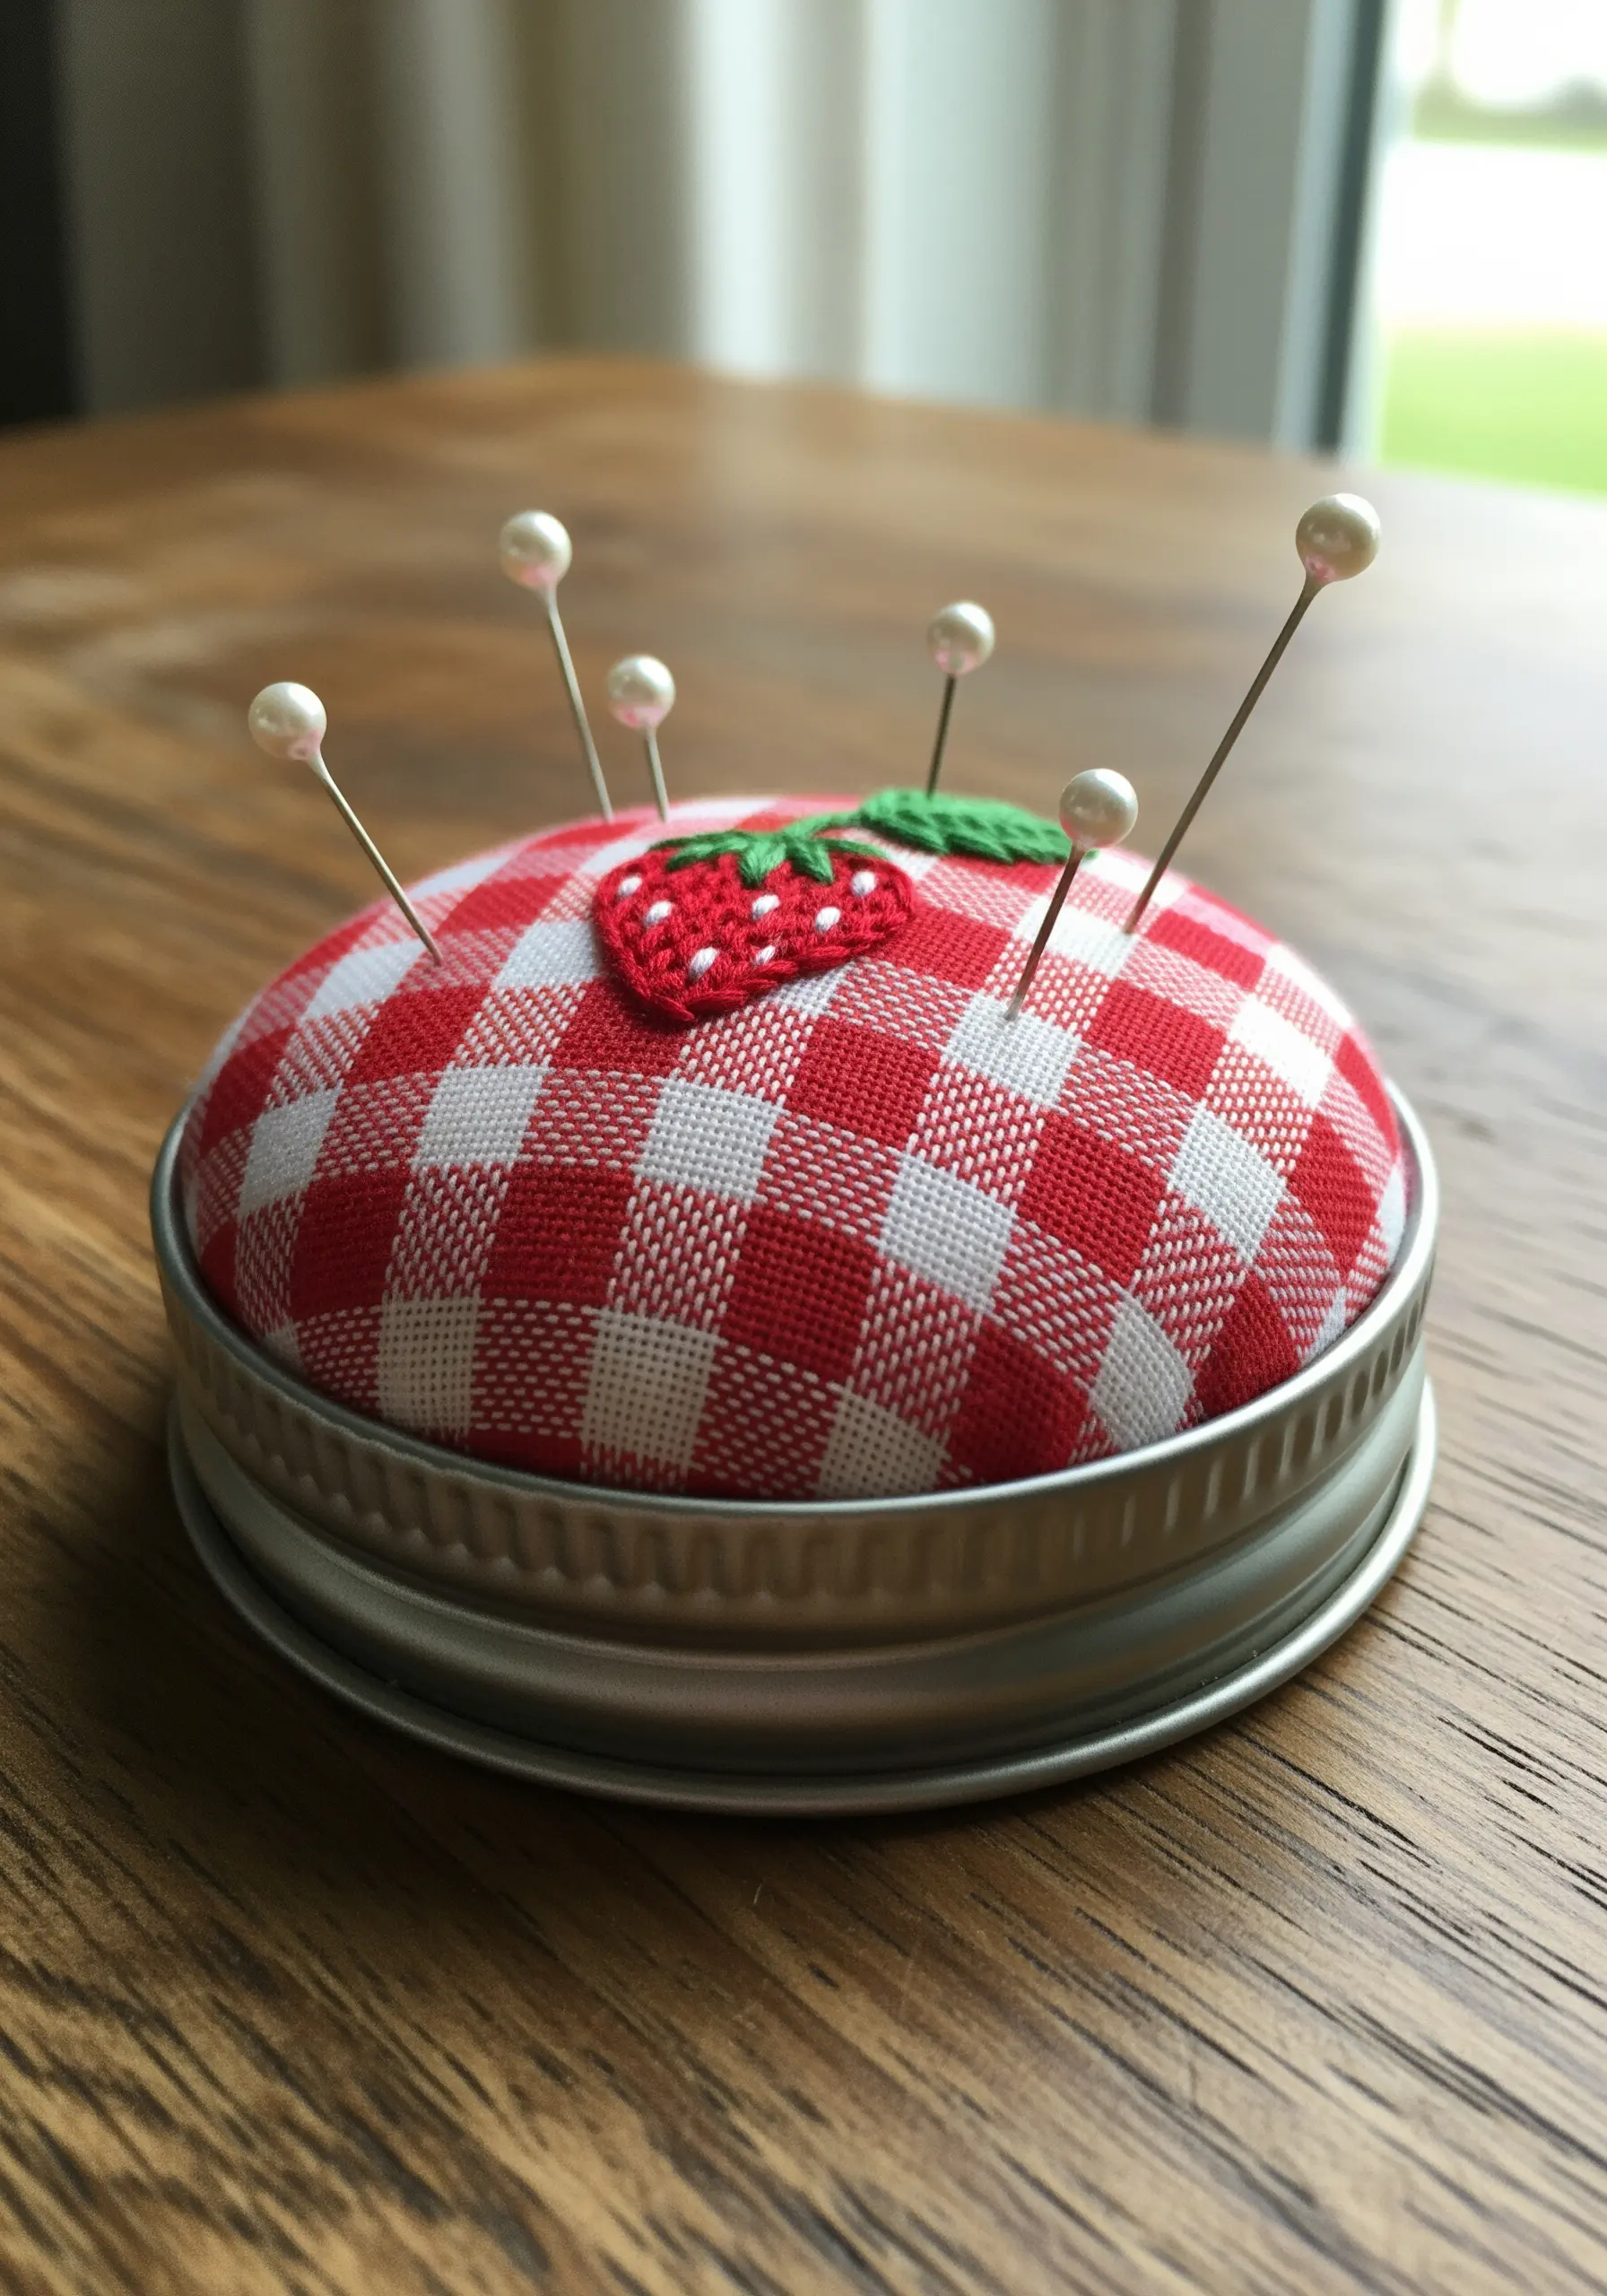
Transform a simple pincushion into a delightful object by adding a tiny, dimensional motif.
For the strawberry, lay down a few straight stitches as padding before covering them with a smooth satin stitch.
This small step creates a raised, 3D effect that makes the fruit pop against the flat fabric.
Use single-strand French knots for the seeds to maintain a delicate scale appropriate for the miniature design.
7. Achieve Elegant Lettering on Textured Fabric
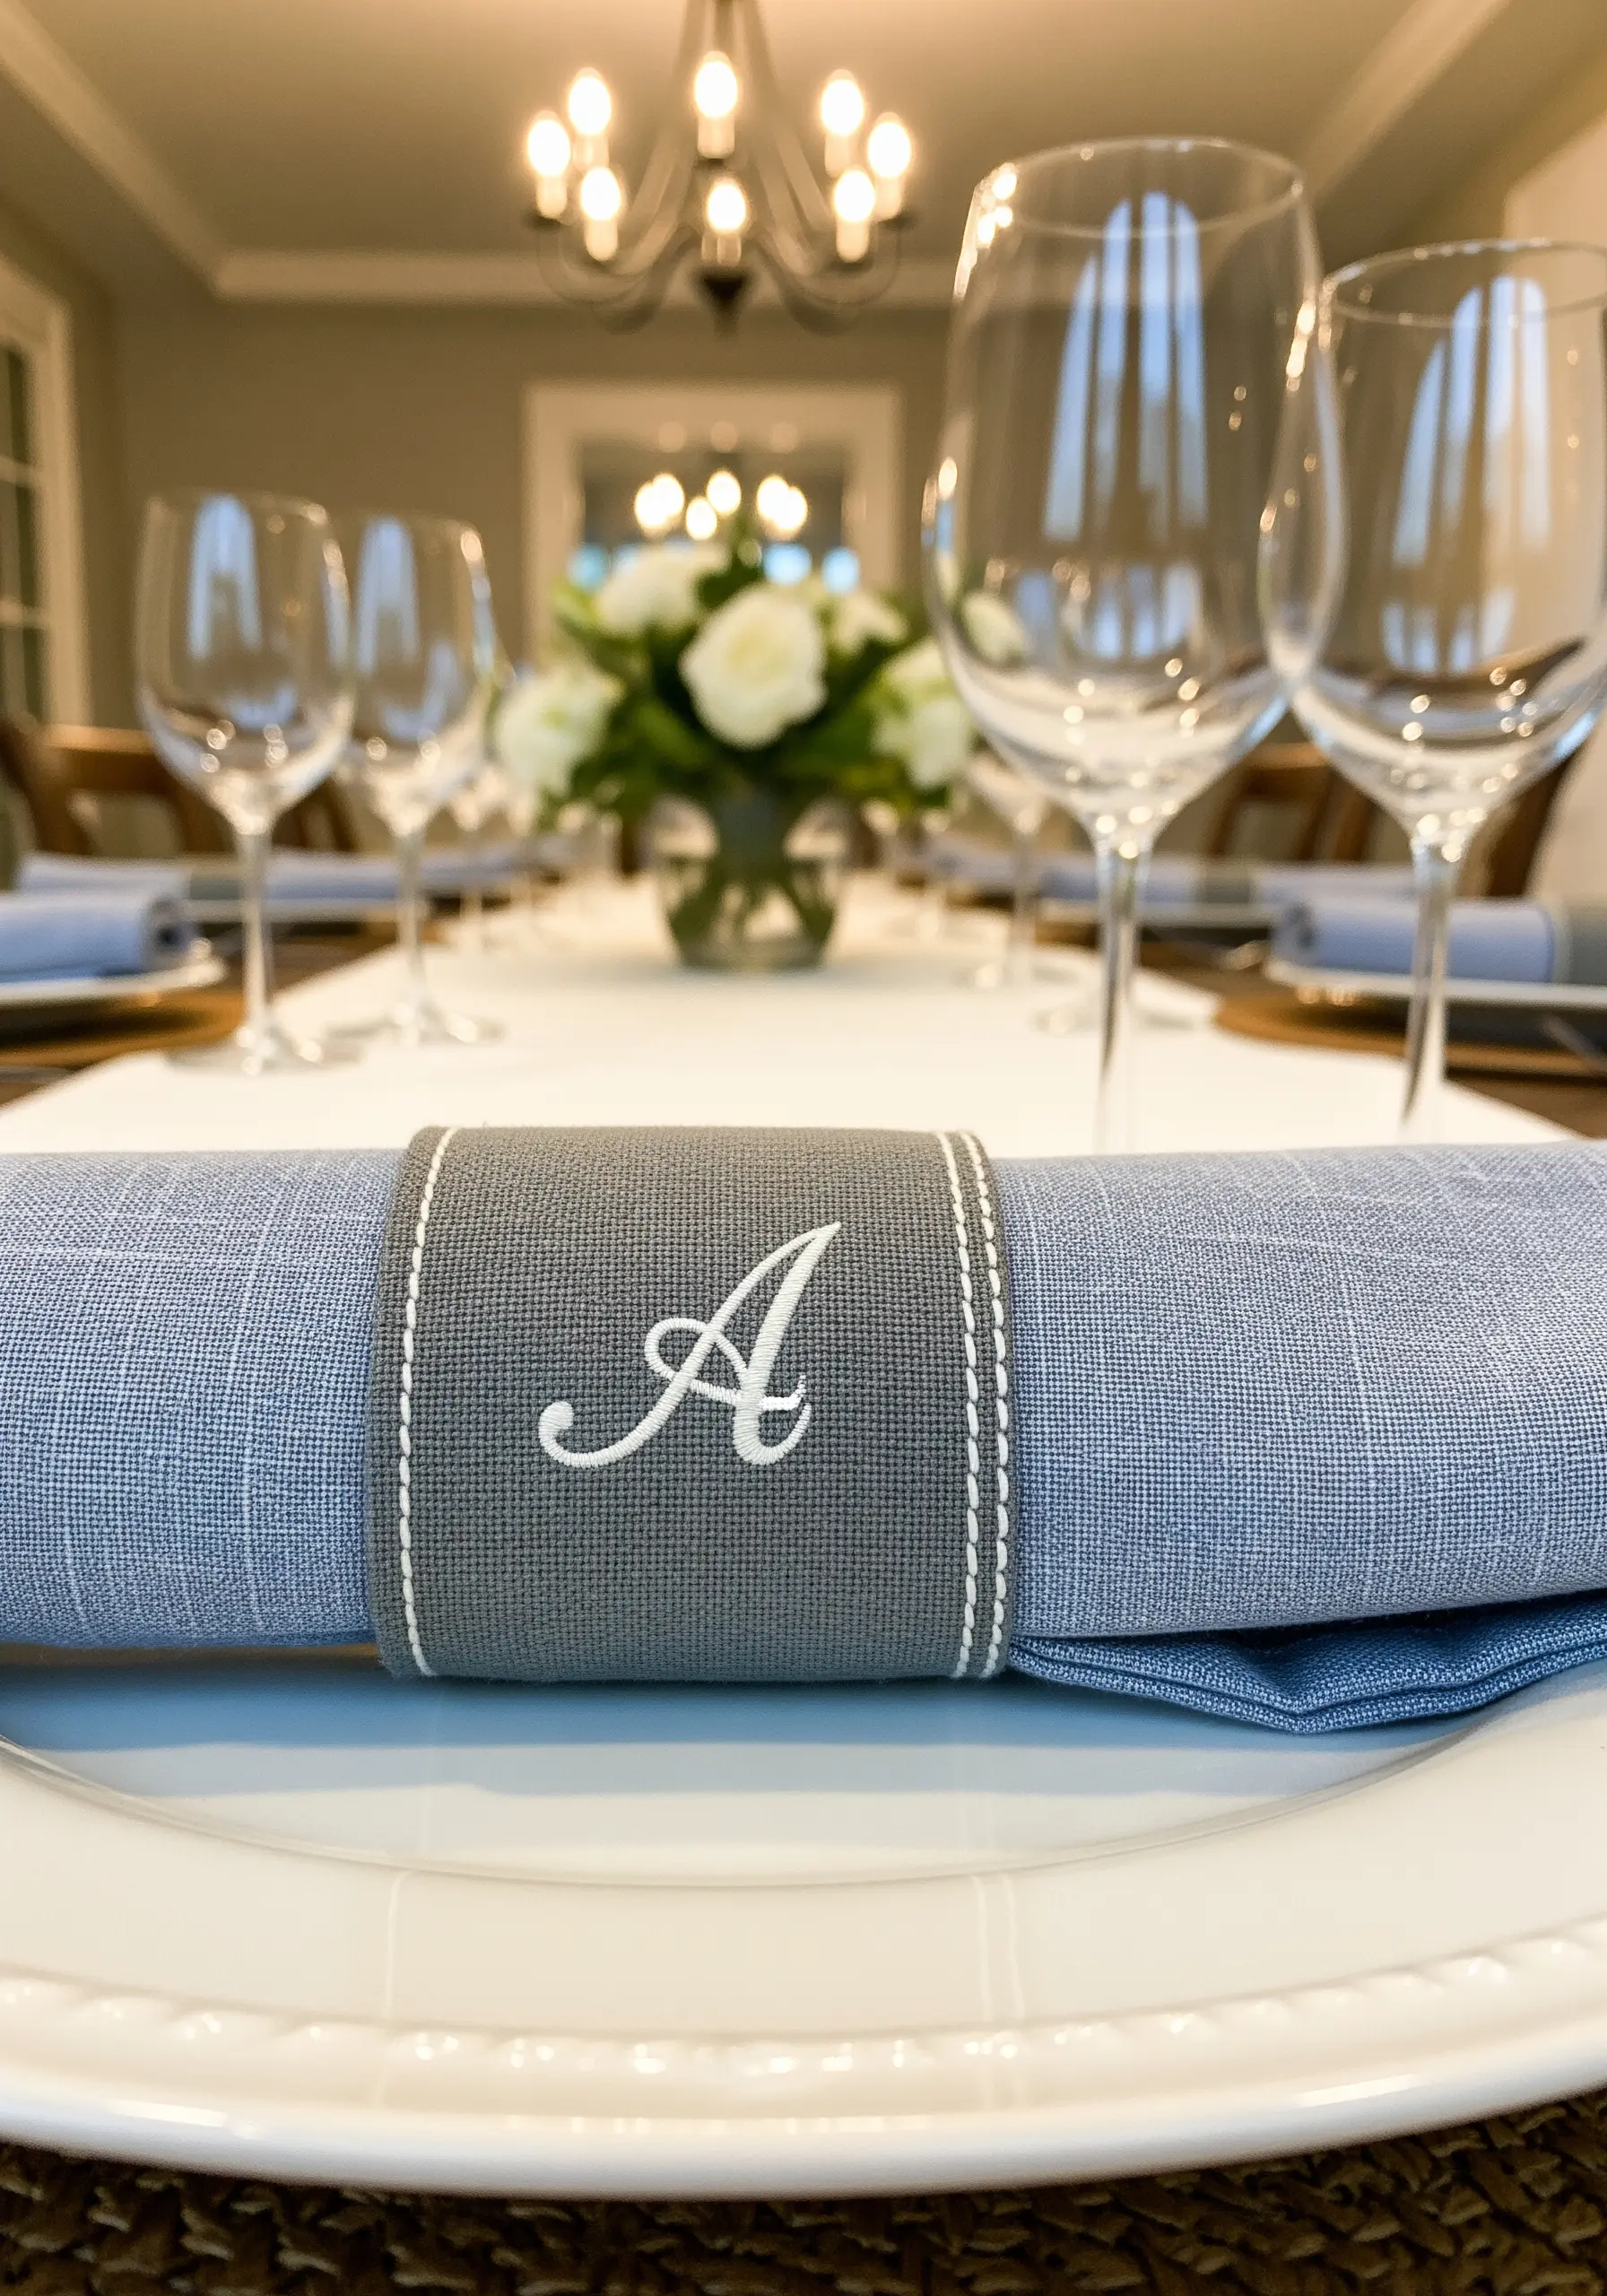
When embroidering monograms on a textured material like Aida cloth, precision is key for a high-end look.
Use a fine, sharp needle and just two strands of floss for a delicate script that doesn’t overpower the piece.
To ensure your curves are smooth, use a split stitch or a whipped backstitch; this reinforces the line and prevents it from sinking into the weave of the fabric.
These minimal monogram styles elevate any table setting.
8. Combine Felt Appliqué and Embroidery for 3D Forms
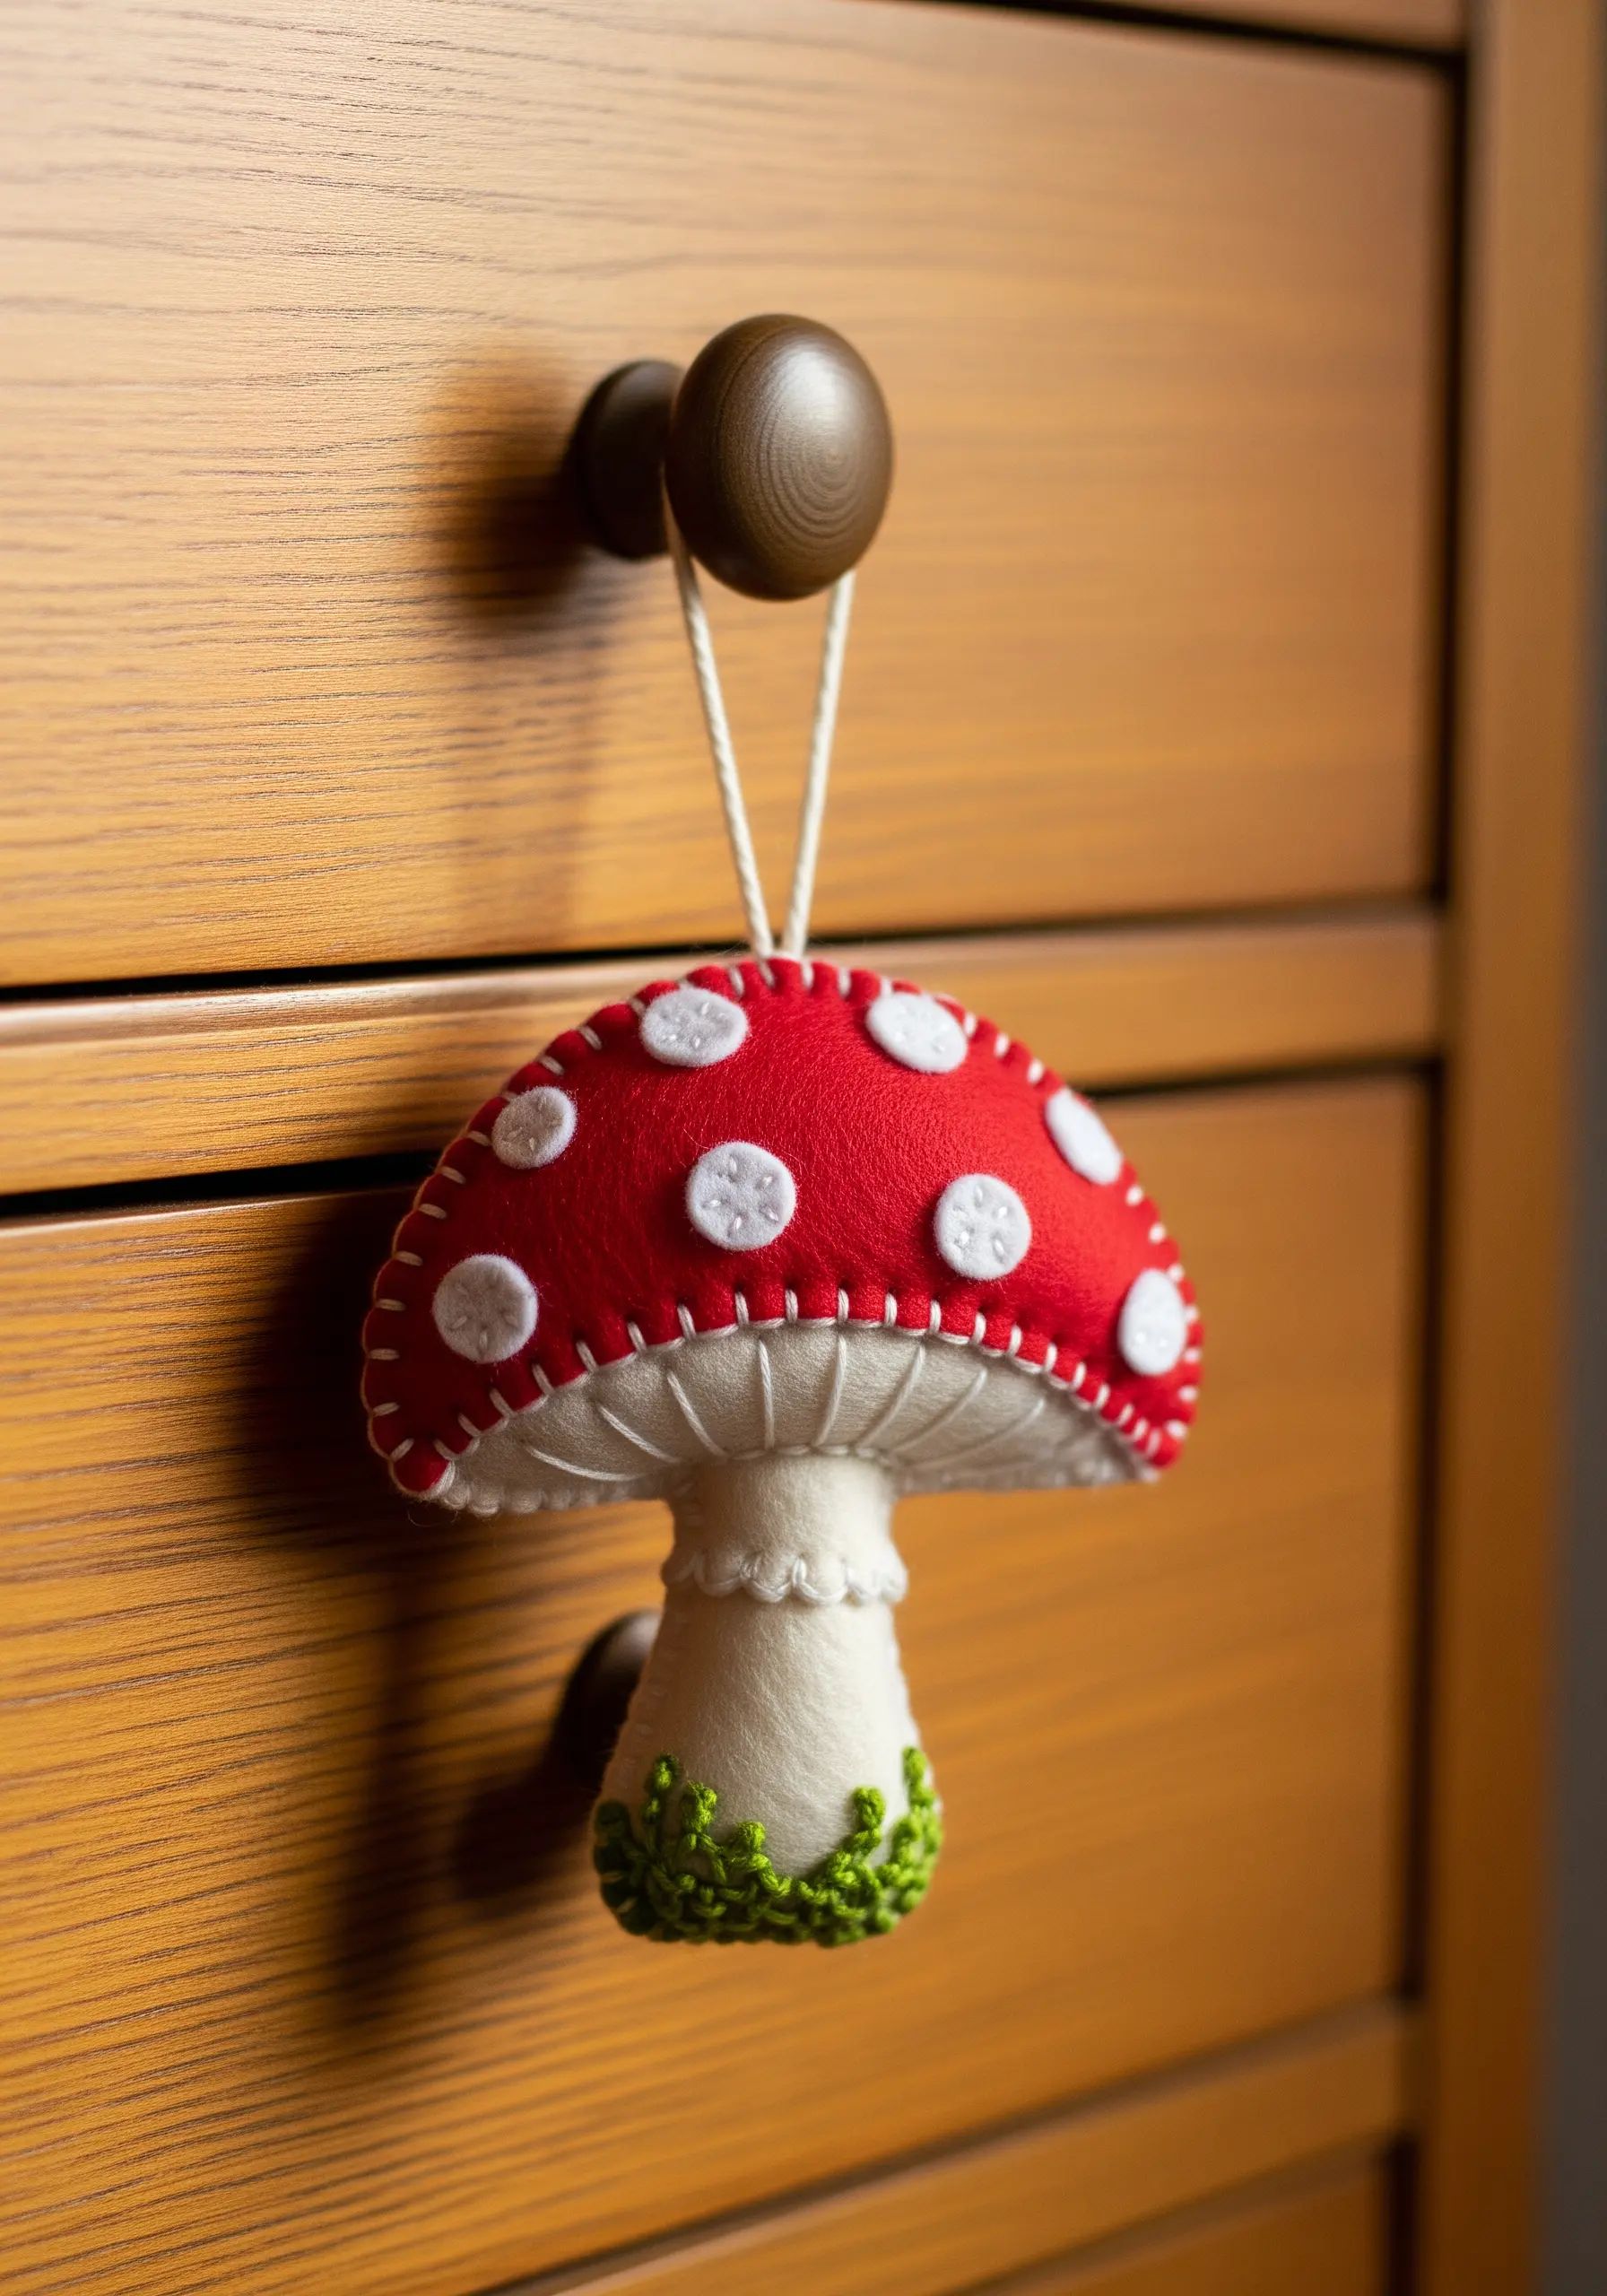
Create charming, tactile ornaments by building them in layers for a sculptural effect.
Cut your main shapes from felt and use a simple blanket stitch around the edges for a clean, handcrafted finish that also secures the seams.
Add details like the mushroom spots using small felt circles attached with a single central stitch.
For the grassy base, a cluster of French knots in variegated green yarn adds lush texture that grounds the piece.
9. Create Plush Texture with Punch Needle Loops
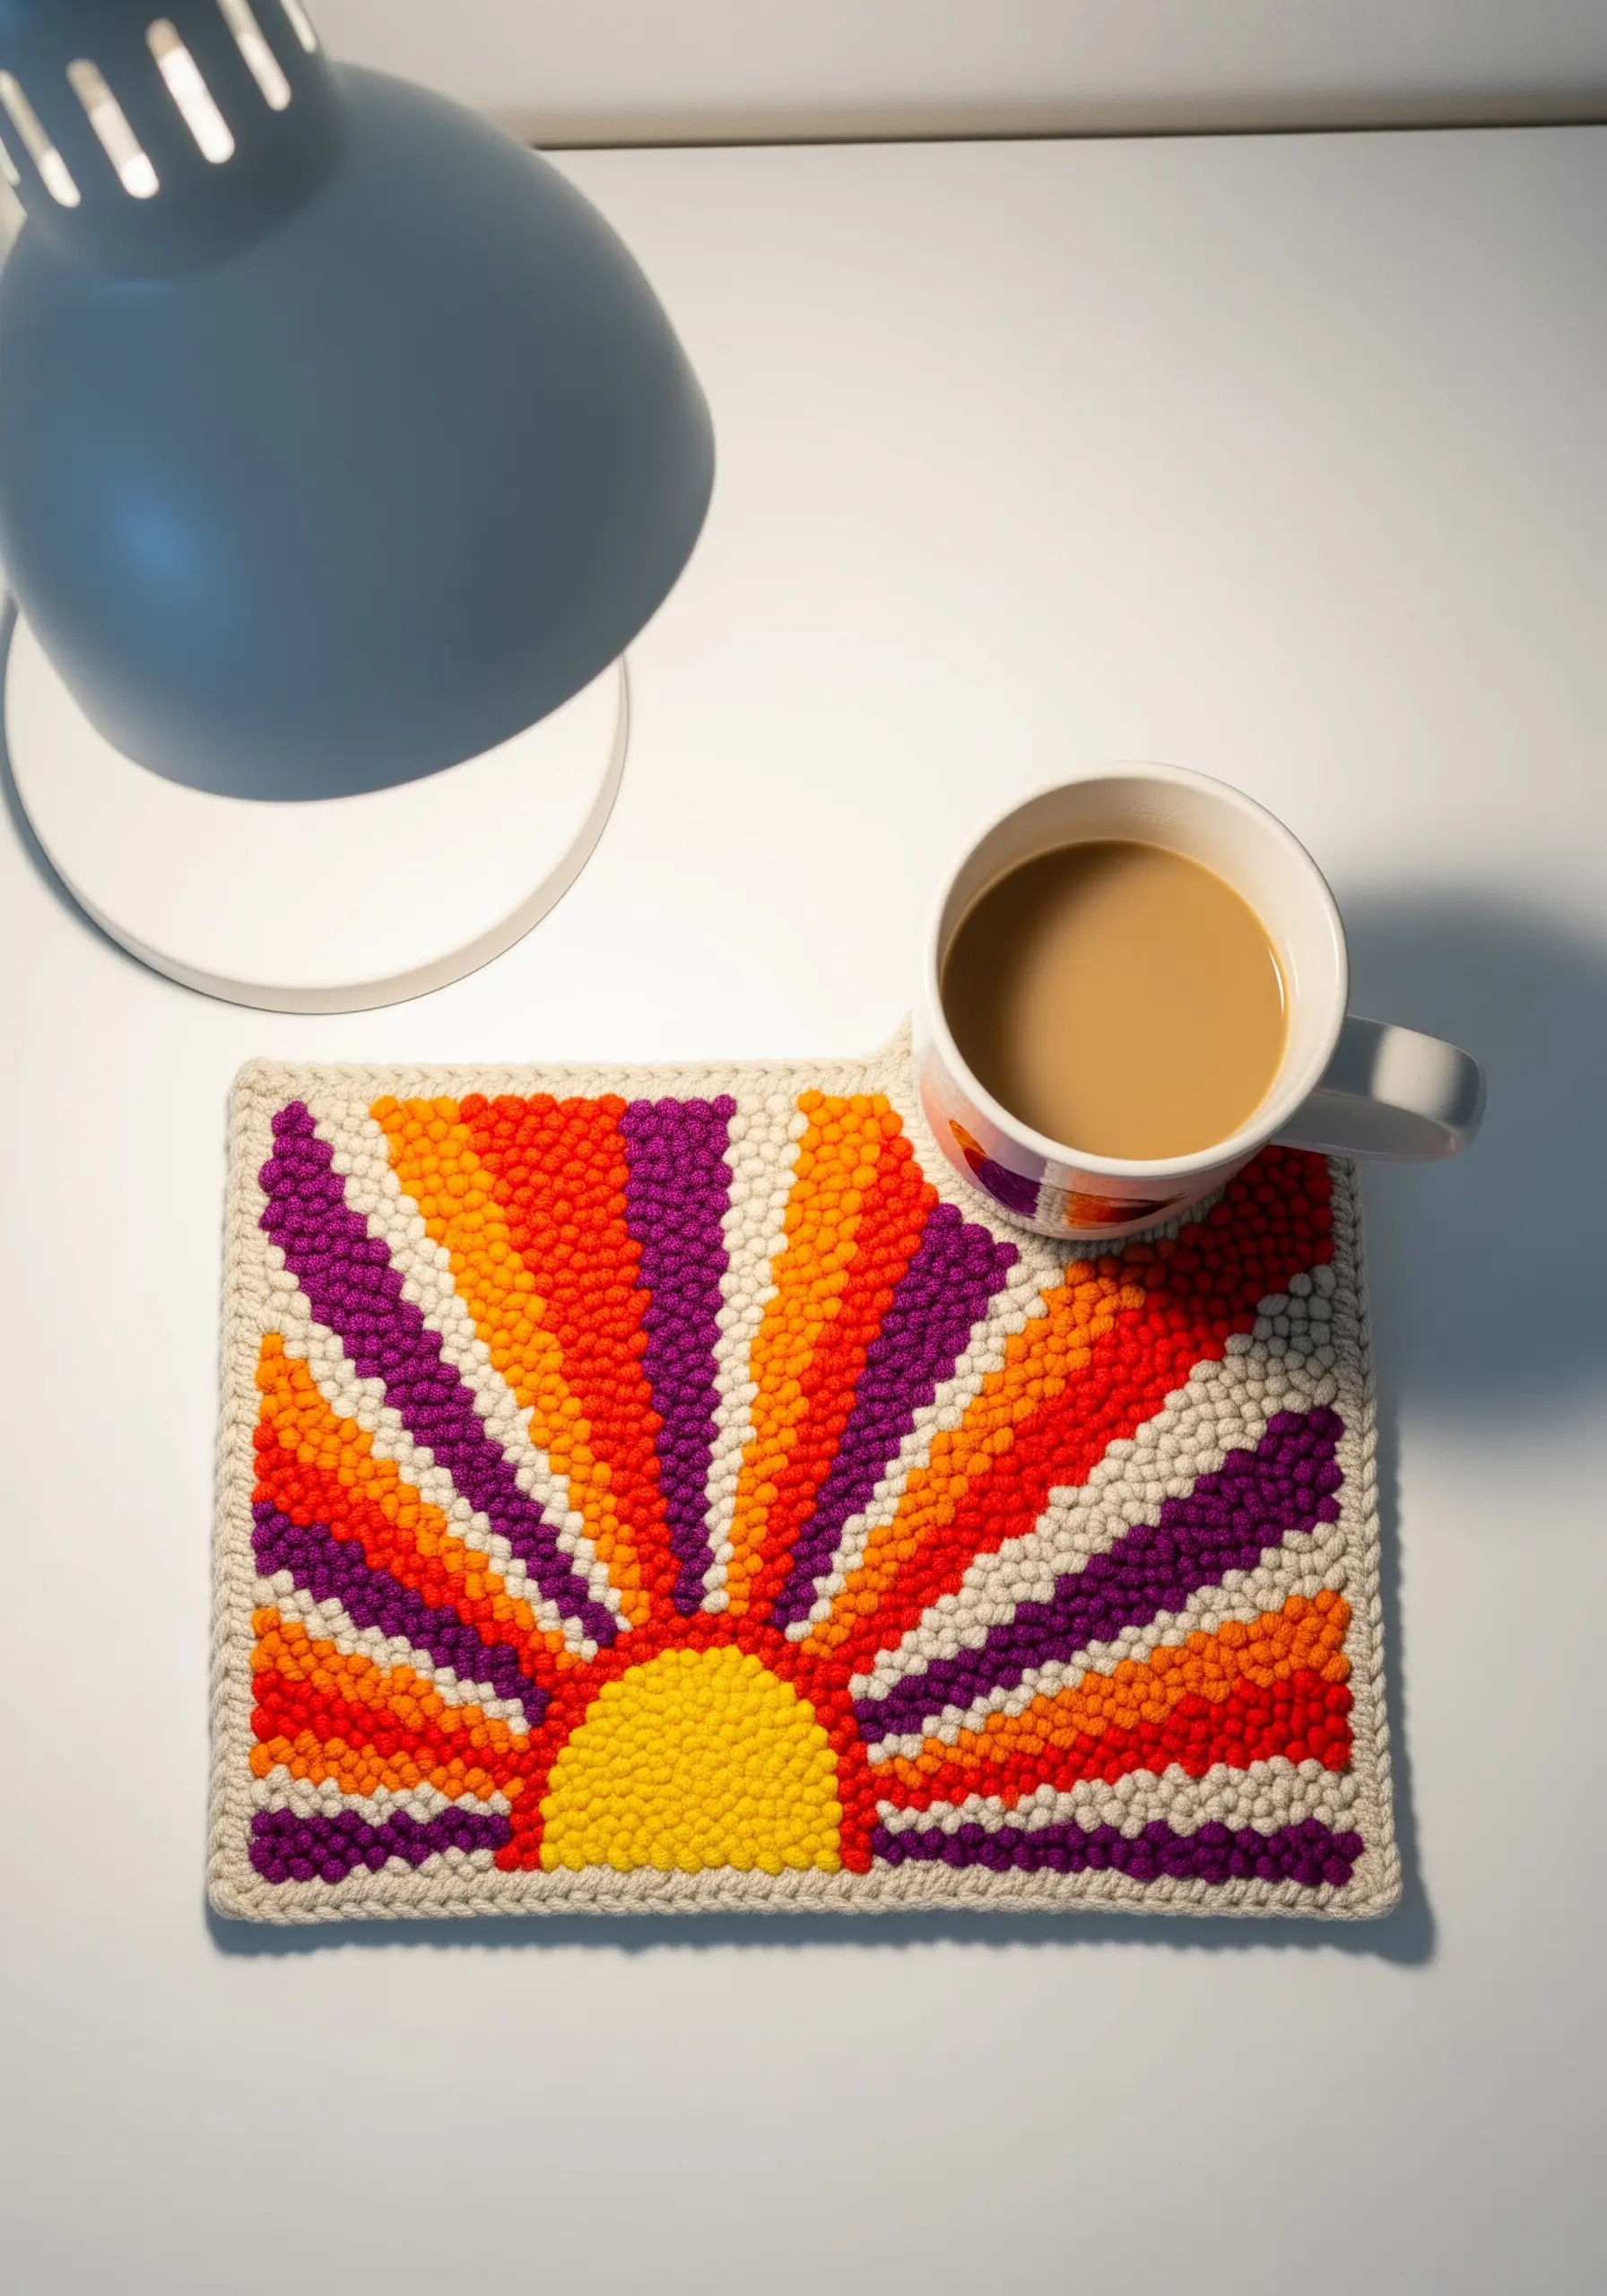
For a quick and satisfying project, explore the world of punch needle embroidery.
The technique creates dense loops of yarn, perfect for functional items like coasters or mug rugs that require durability and absorbency.
To achieve crisp lines between colors, work your outline stitches first before filling in the sections.
A consistent loop height creates a clean, uniform look that highlights the bold graphic design.
10. Integrate Unconventional Materials for Modern Texture
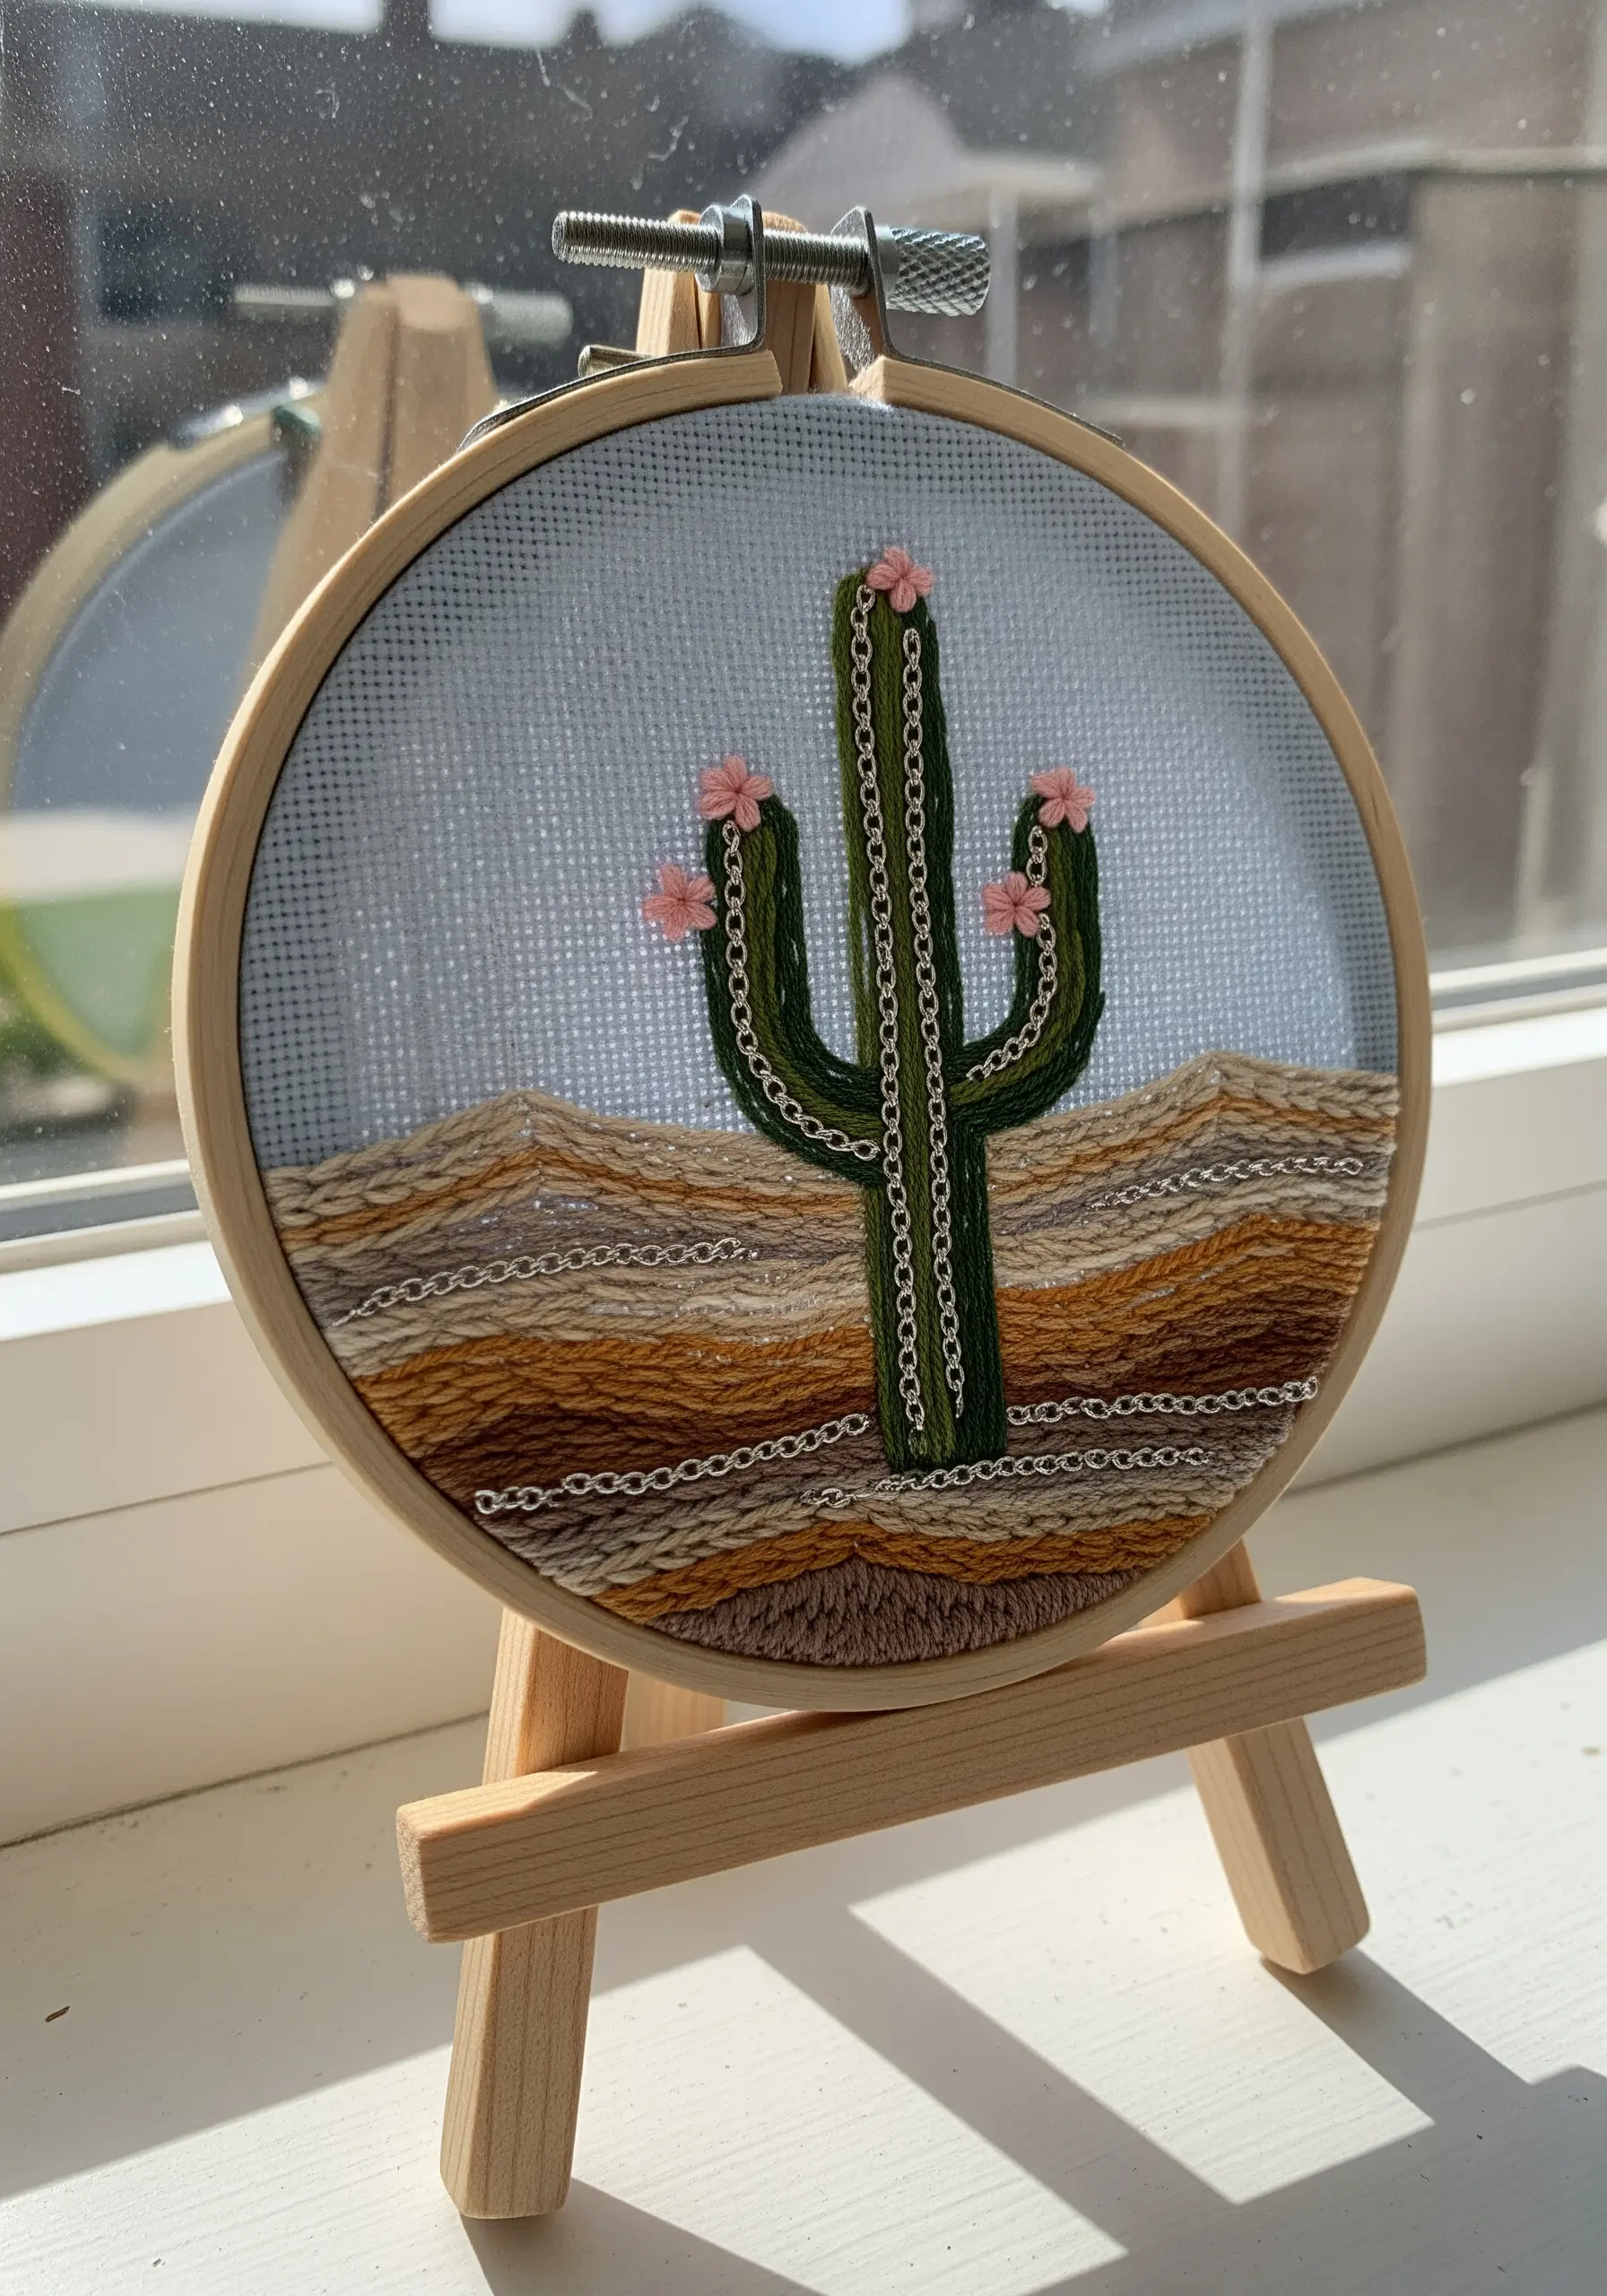
Add an unexpected element to your embroidery by incorporating materials like fine jewelry chain.
Couch the chain onto the fabric using a matching, single strand of floss, treating it just like a thick thread.
This adds a subtle metallic glint and a hard, smooth texture that contrasts beautifully with the soft floss of the cactus and desert sands.
It’s a modern twist that elevates the piece from purely textile art to mixed-media contemporary embroidery.
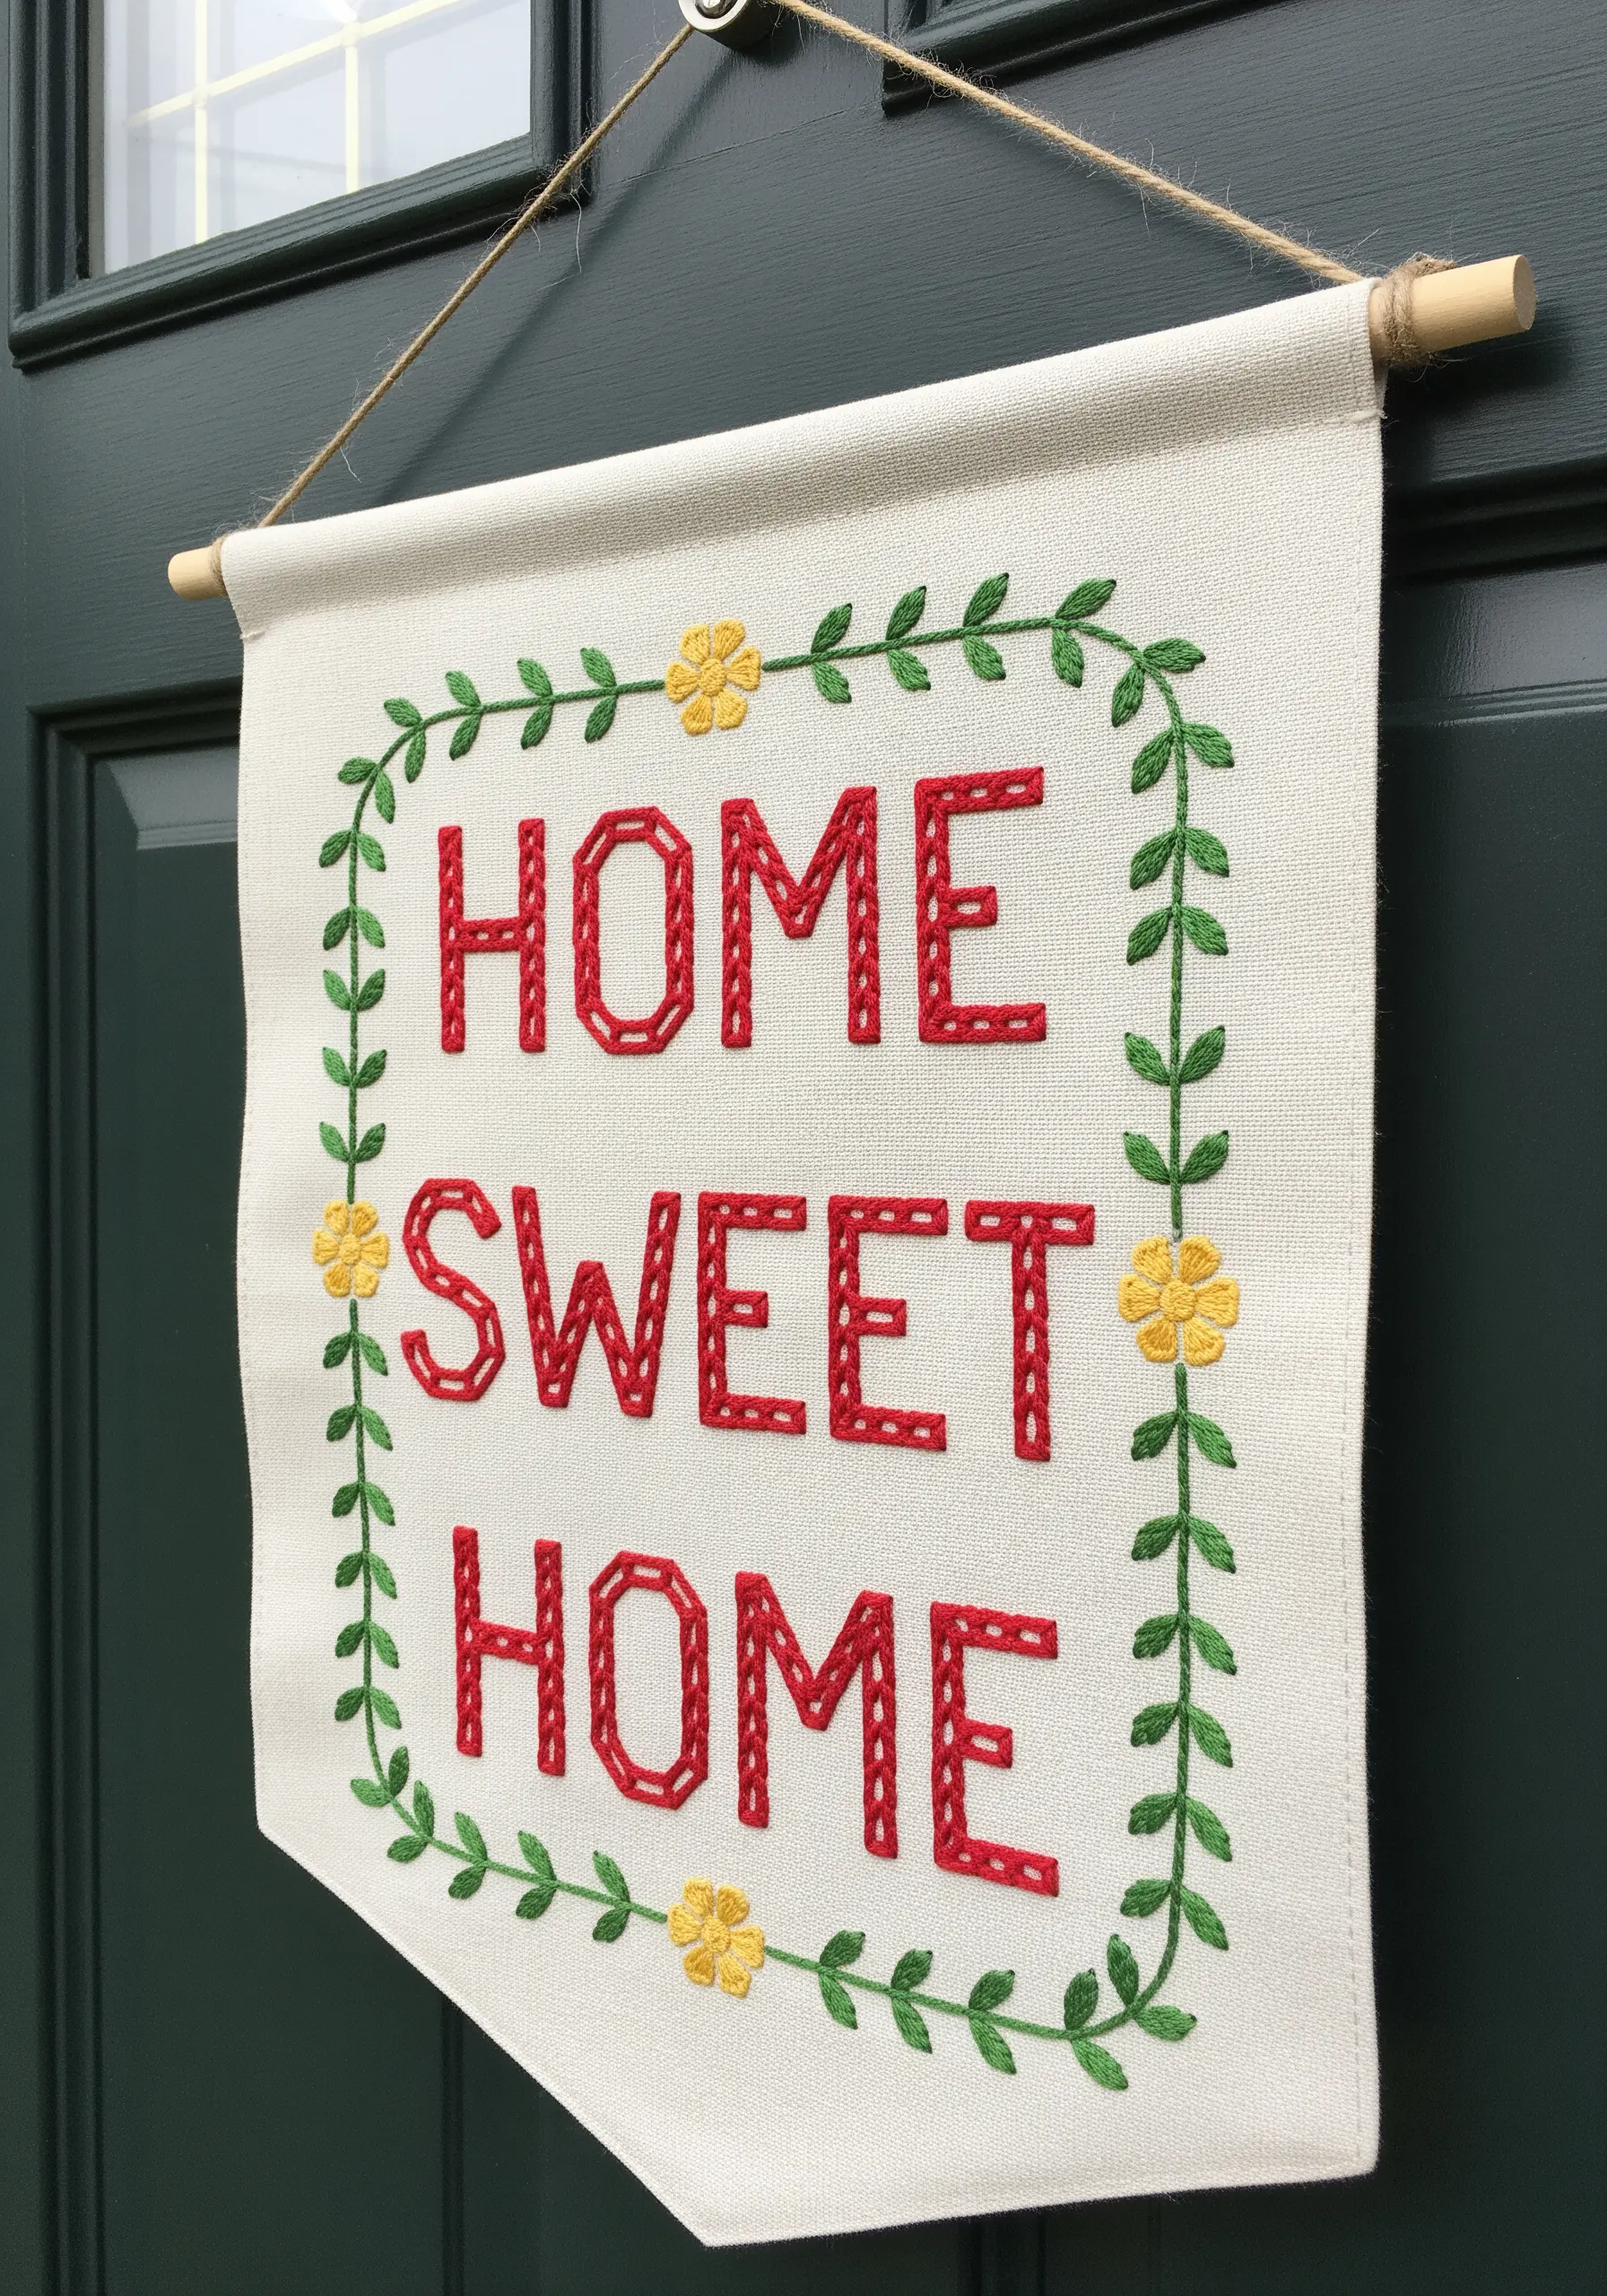
11. Stitch Crisp Lettering for Functional Garden Décor
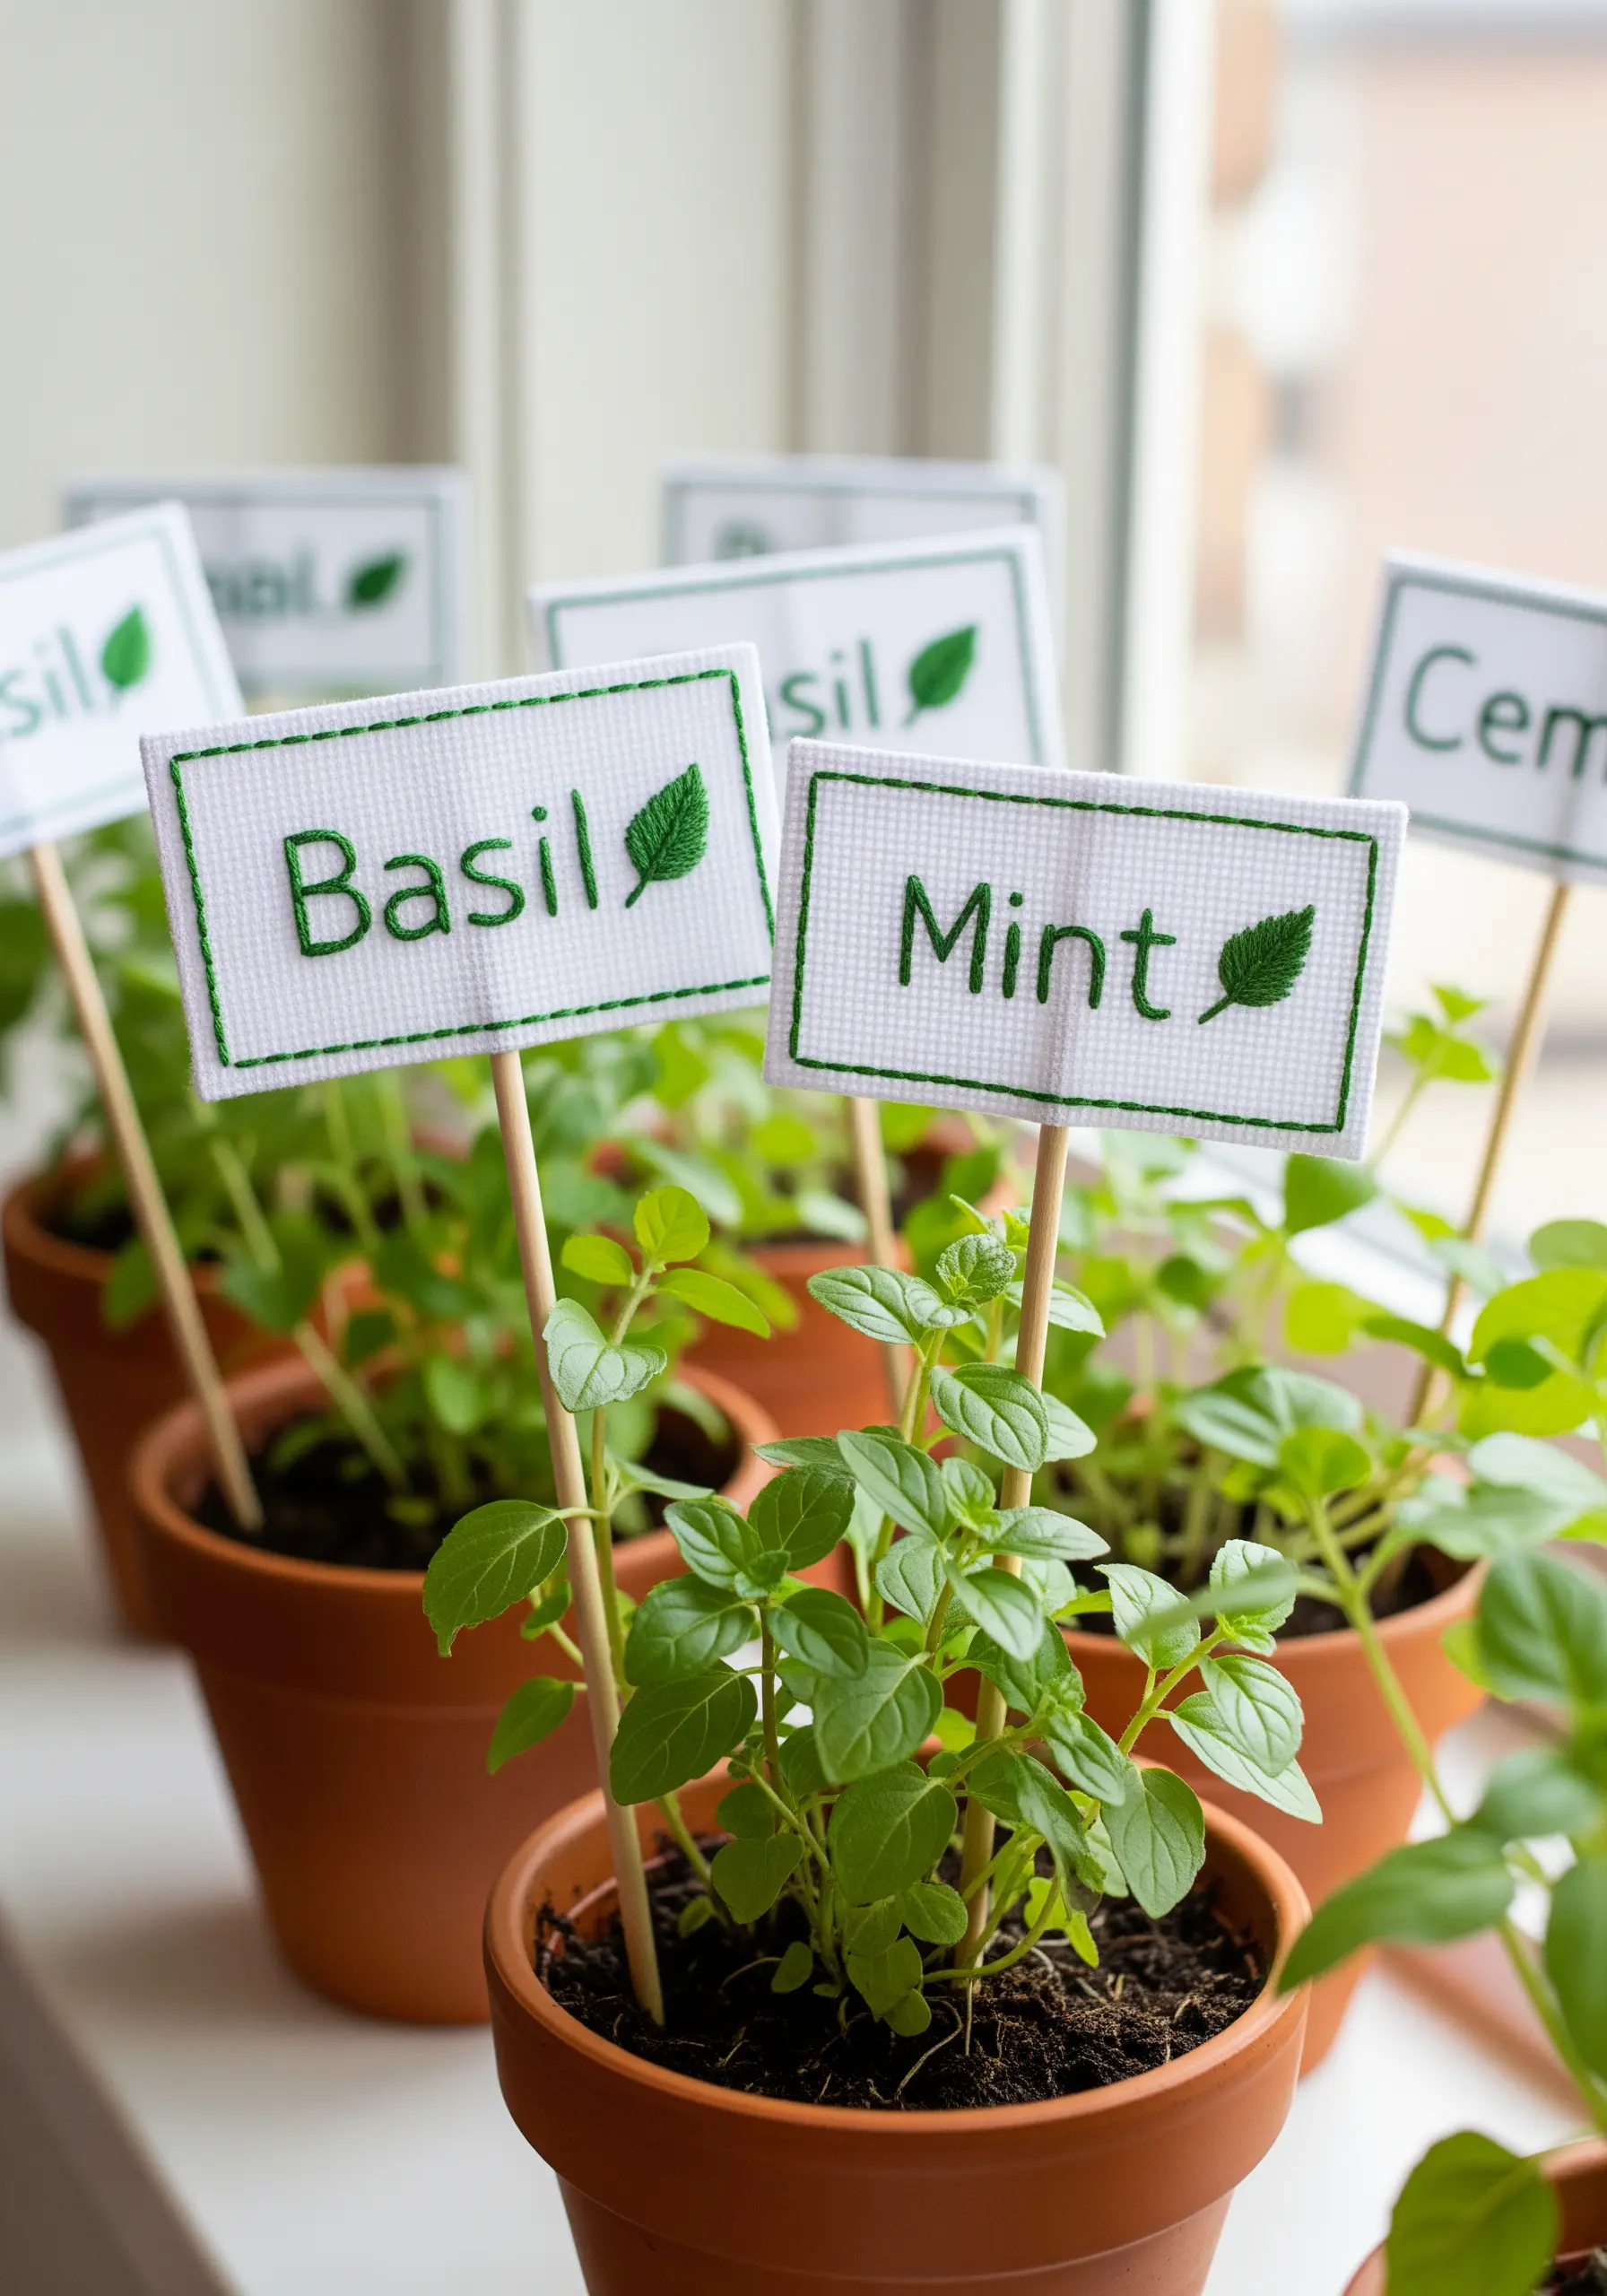
Make your garden markers both beautiful and legible by using a simple backstitch for the lettering.
Use three strands of floss to ensure the words are bold enough to be read easily from a distance.
Stitching on Aida cloth or even-weave linen provides a natural grid that helps keep your letters uniform and evenly spaced.
A simple running stitch border adds a polished finish, turning a practical item into a piece of charming garden art.
12. Use Beadwork to Mimic Natural Textures
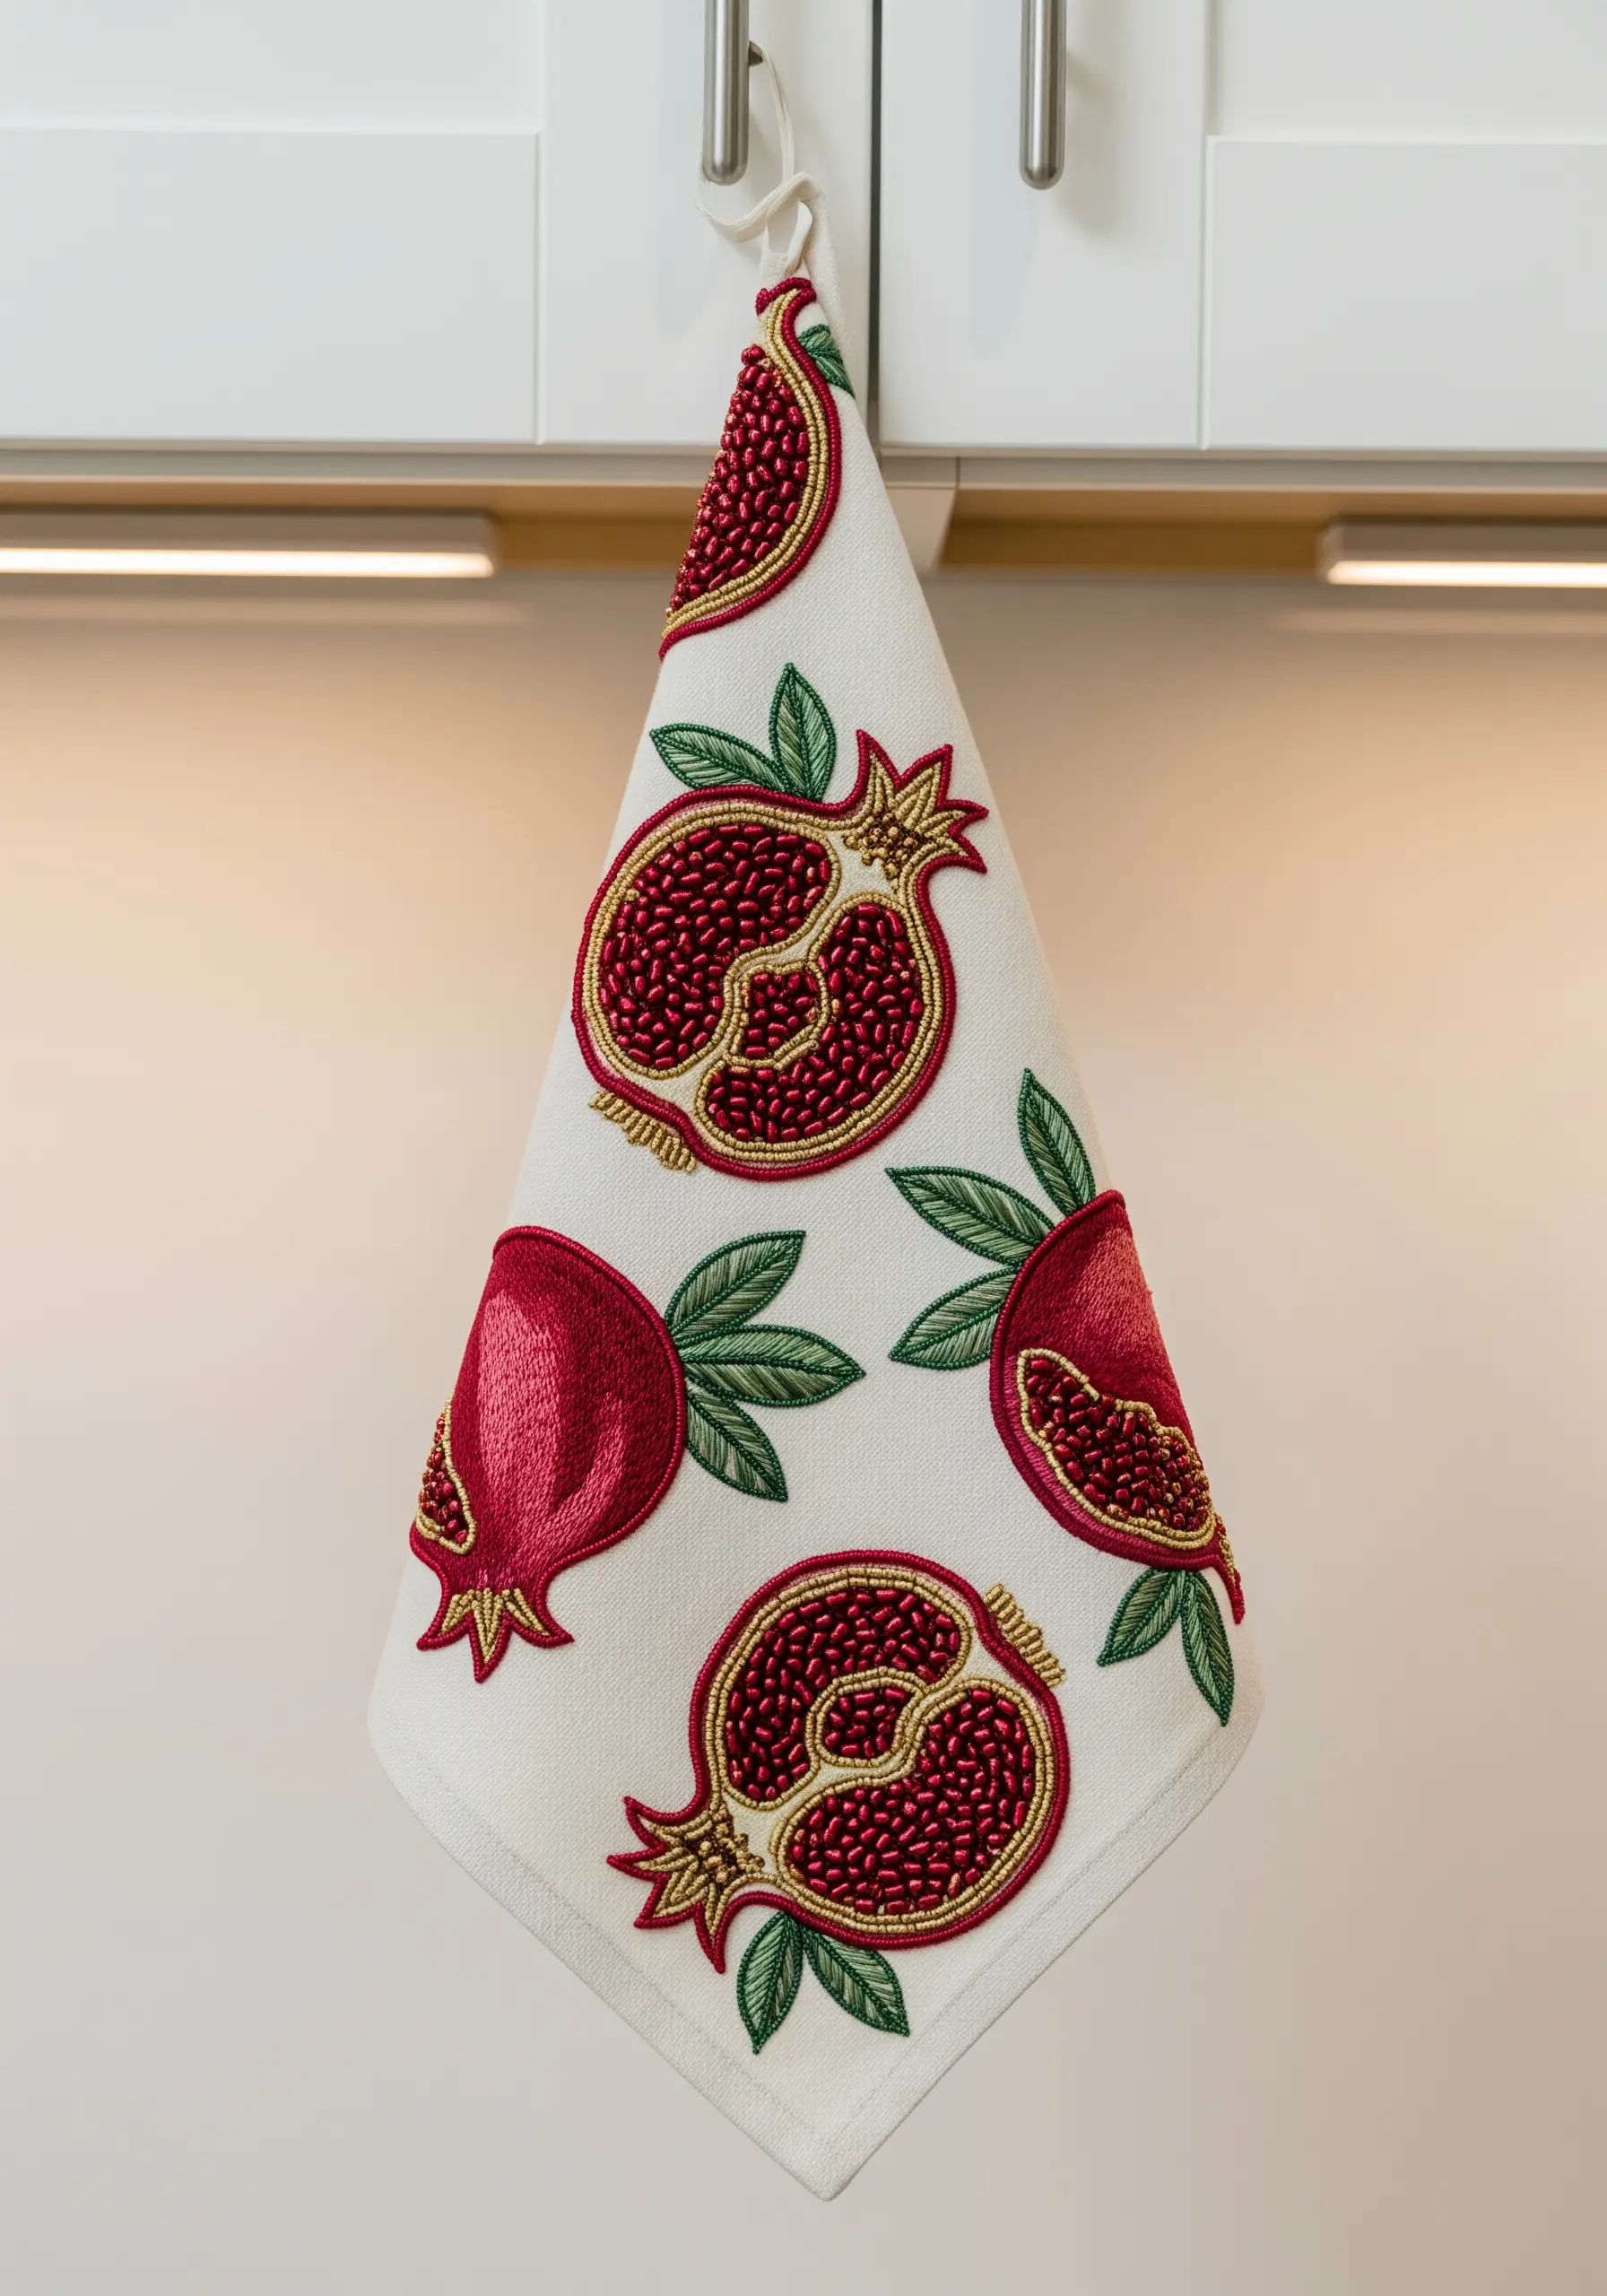
To capture the jewel-like quality of pomegranate seeds, fill the sections with tiny red seed beads instead of French knots.
Secure each bead with a small stitch using a matching thread, which will become invisible against the dense beading.
Outline the fruit segments with a contrasting gold thread using a chain stitch to create a defined, almost illustrative look.
This blend of thread and beadwork adds a luxurious texture and shimmer, transforming a simple kitchen towel.
13. Incorporate Roving for Sculptural Softness
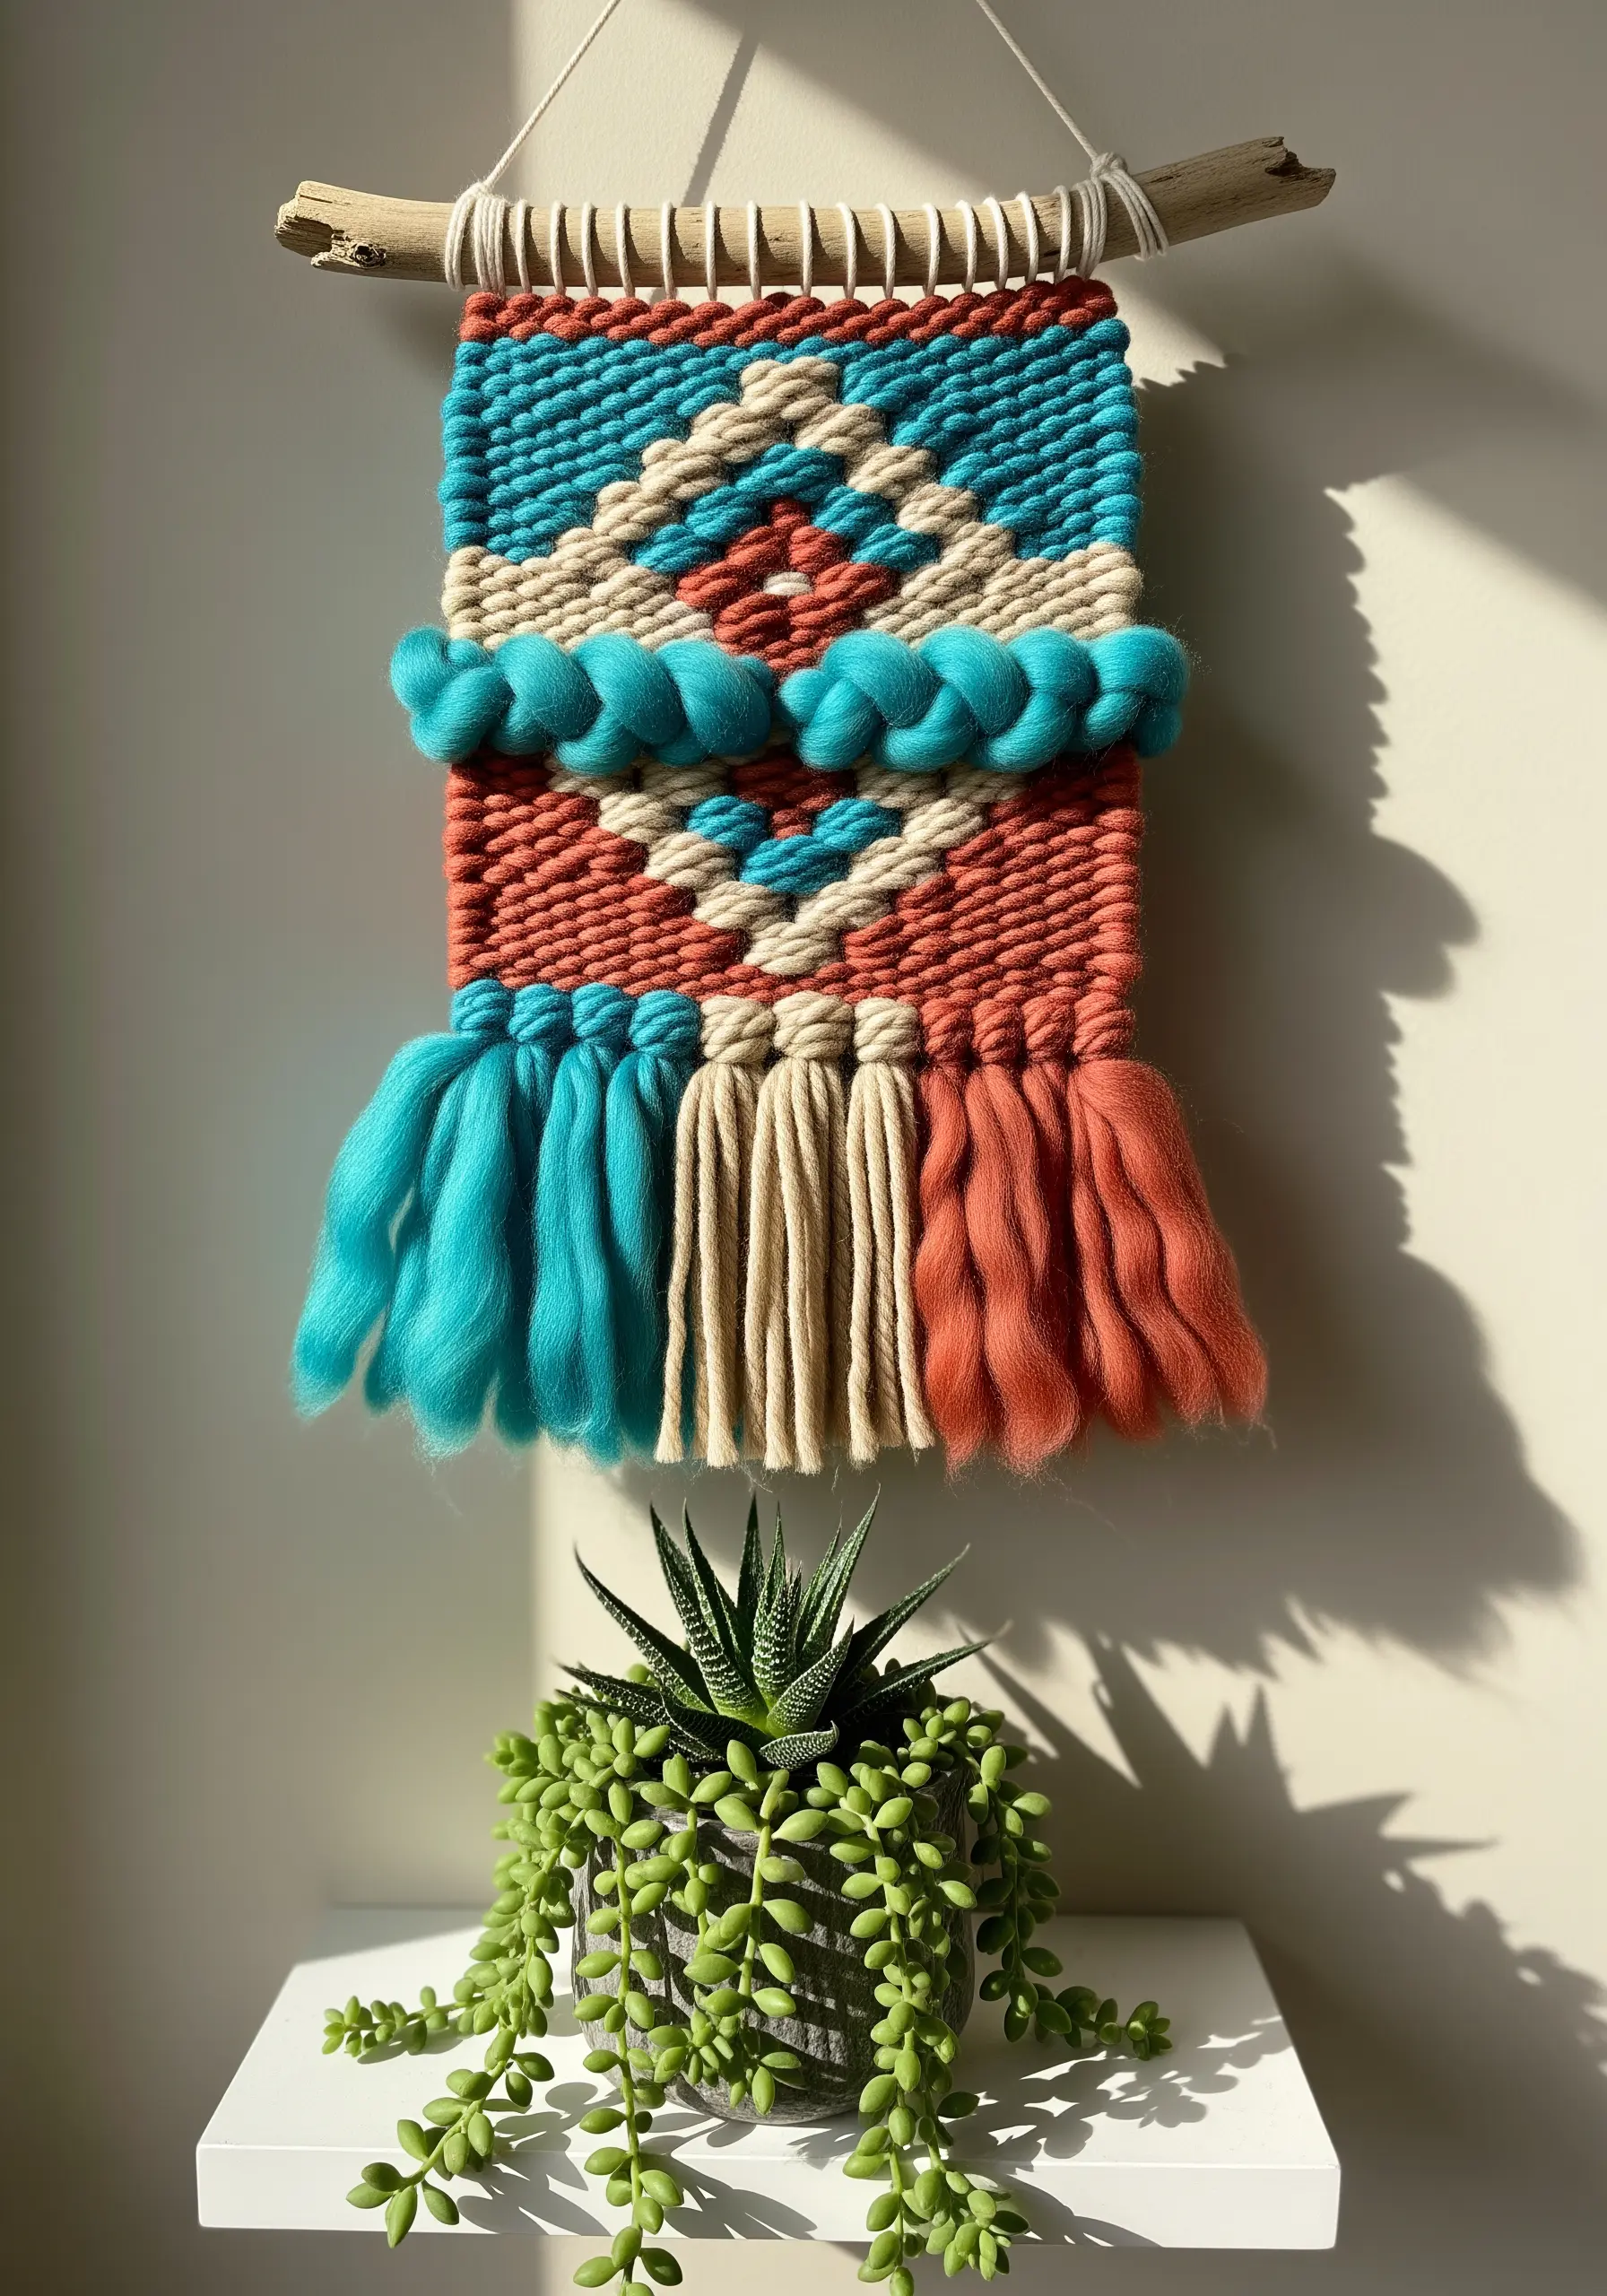
Move beyond thread and yarn by weaving with chunky wool roving for unparalleled softness and volume.
Its unspun nature creates incredibly soft, cloud-like textures that add sculptural dimension to your wall hangings.
You can weave it in a simple tabby (over-under) pattern or create dramatic loops and braids for more complex texture.
These mixed-fiber wall hangings bring a warm, tactile quality to any space.
14. Embrace Visible Mending with Sashiko Stitching
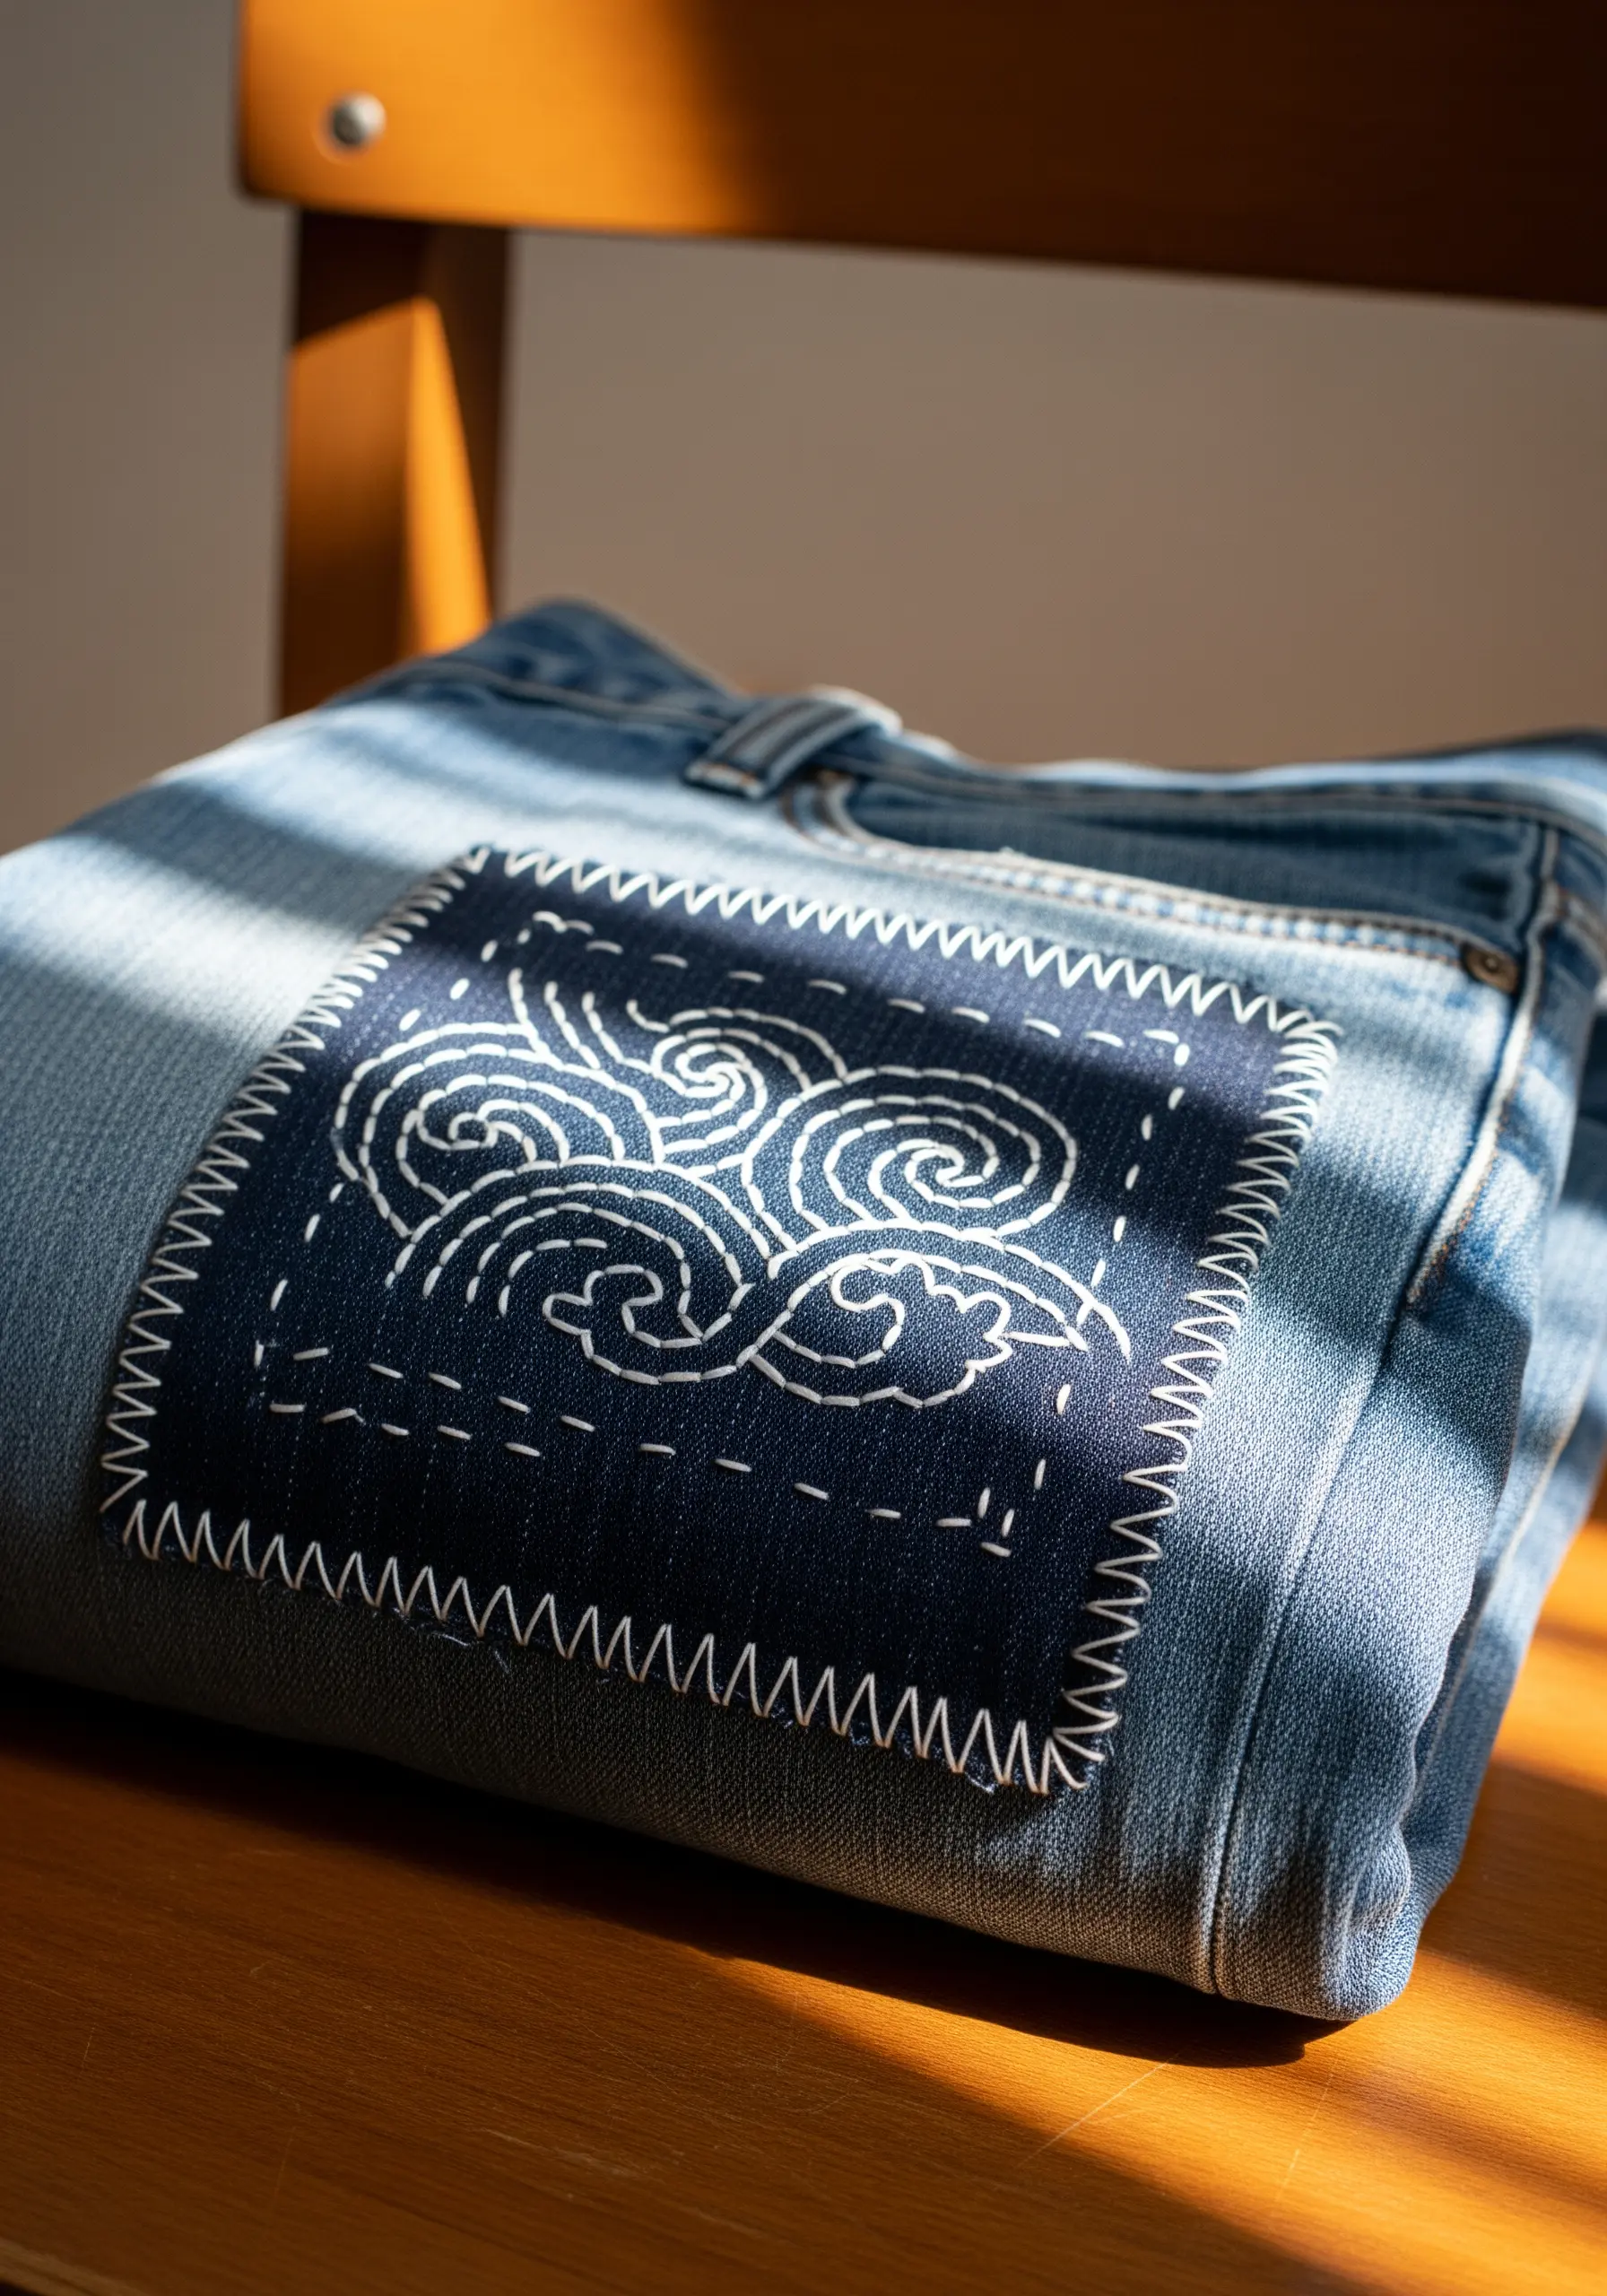
Turn a repair into a design statement using the principles of Sashiko, a traditional Japanese mending technique.
Use a simple running stitch with a thick, contrasting thread (like sashiko thread or pearl cotton) to create geometric or flowing patterns.
The key to the aesthetic is the even spacing of your stitches, which creates a rhythmic, meditative quality.
This not only reinforces the fabric but also adds a personal, artful touch to your clothing.
15. Create Graphic Impact with Raised Line Art
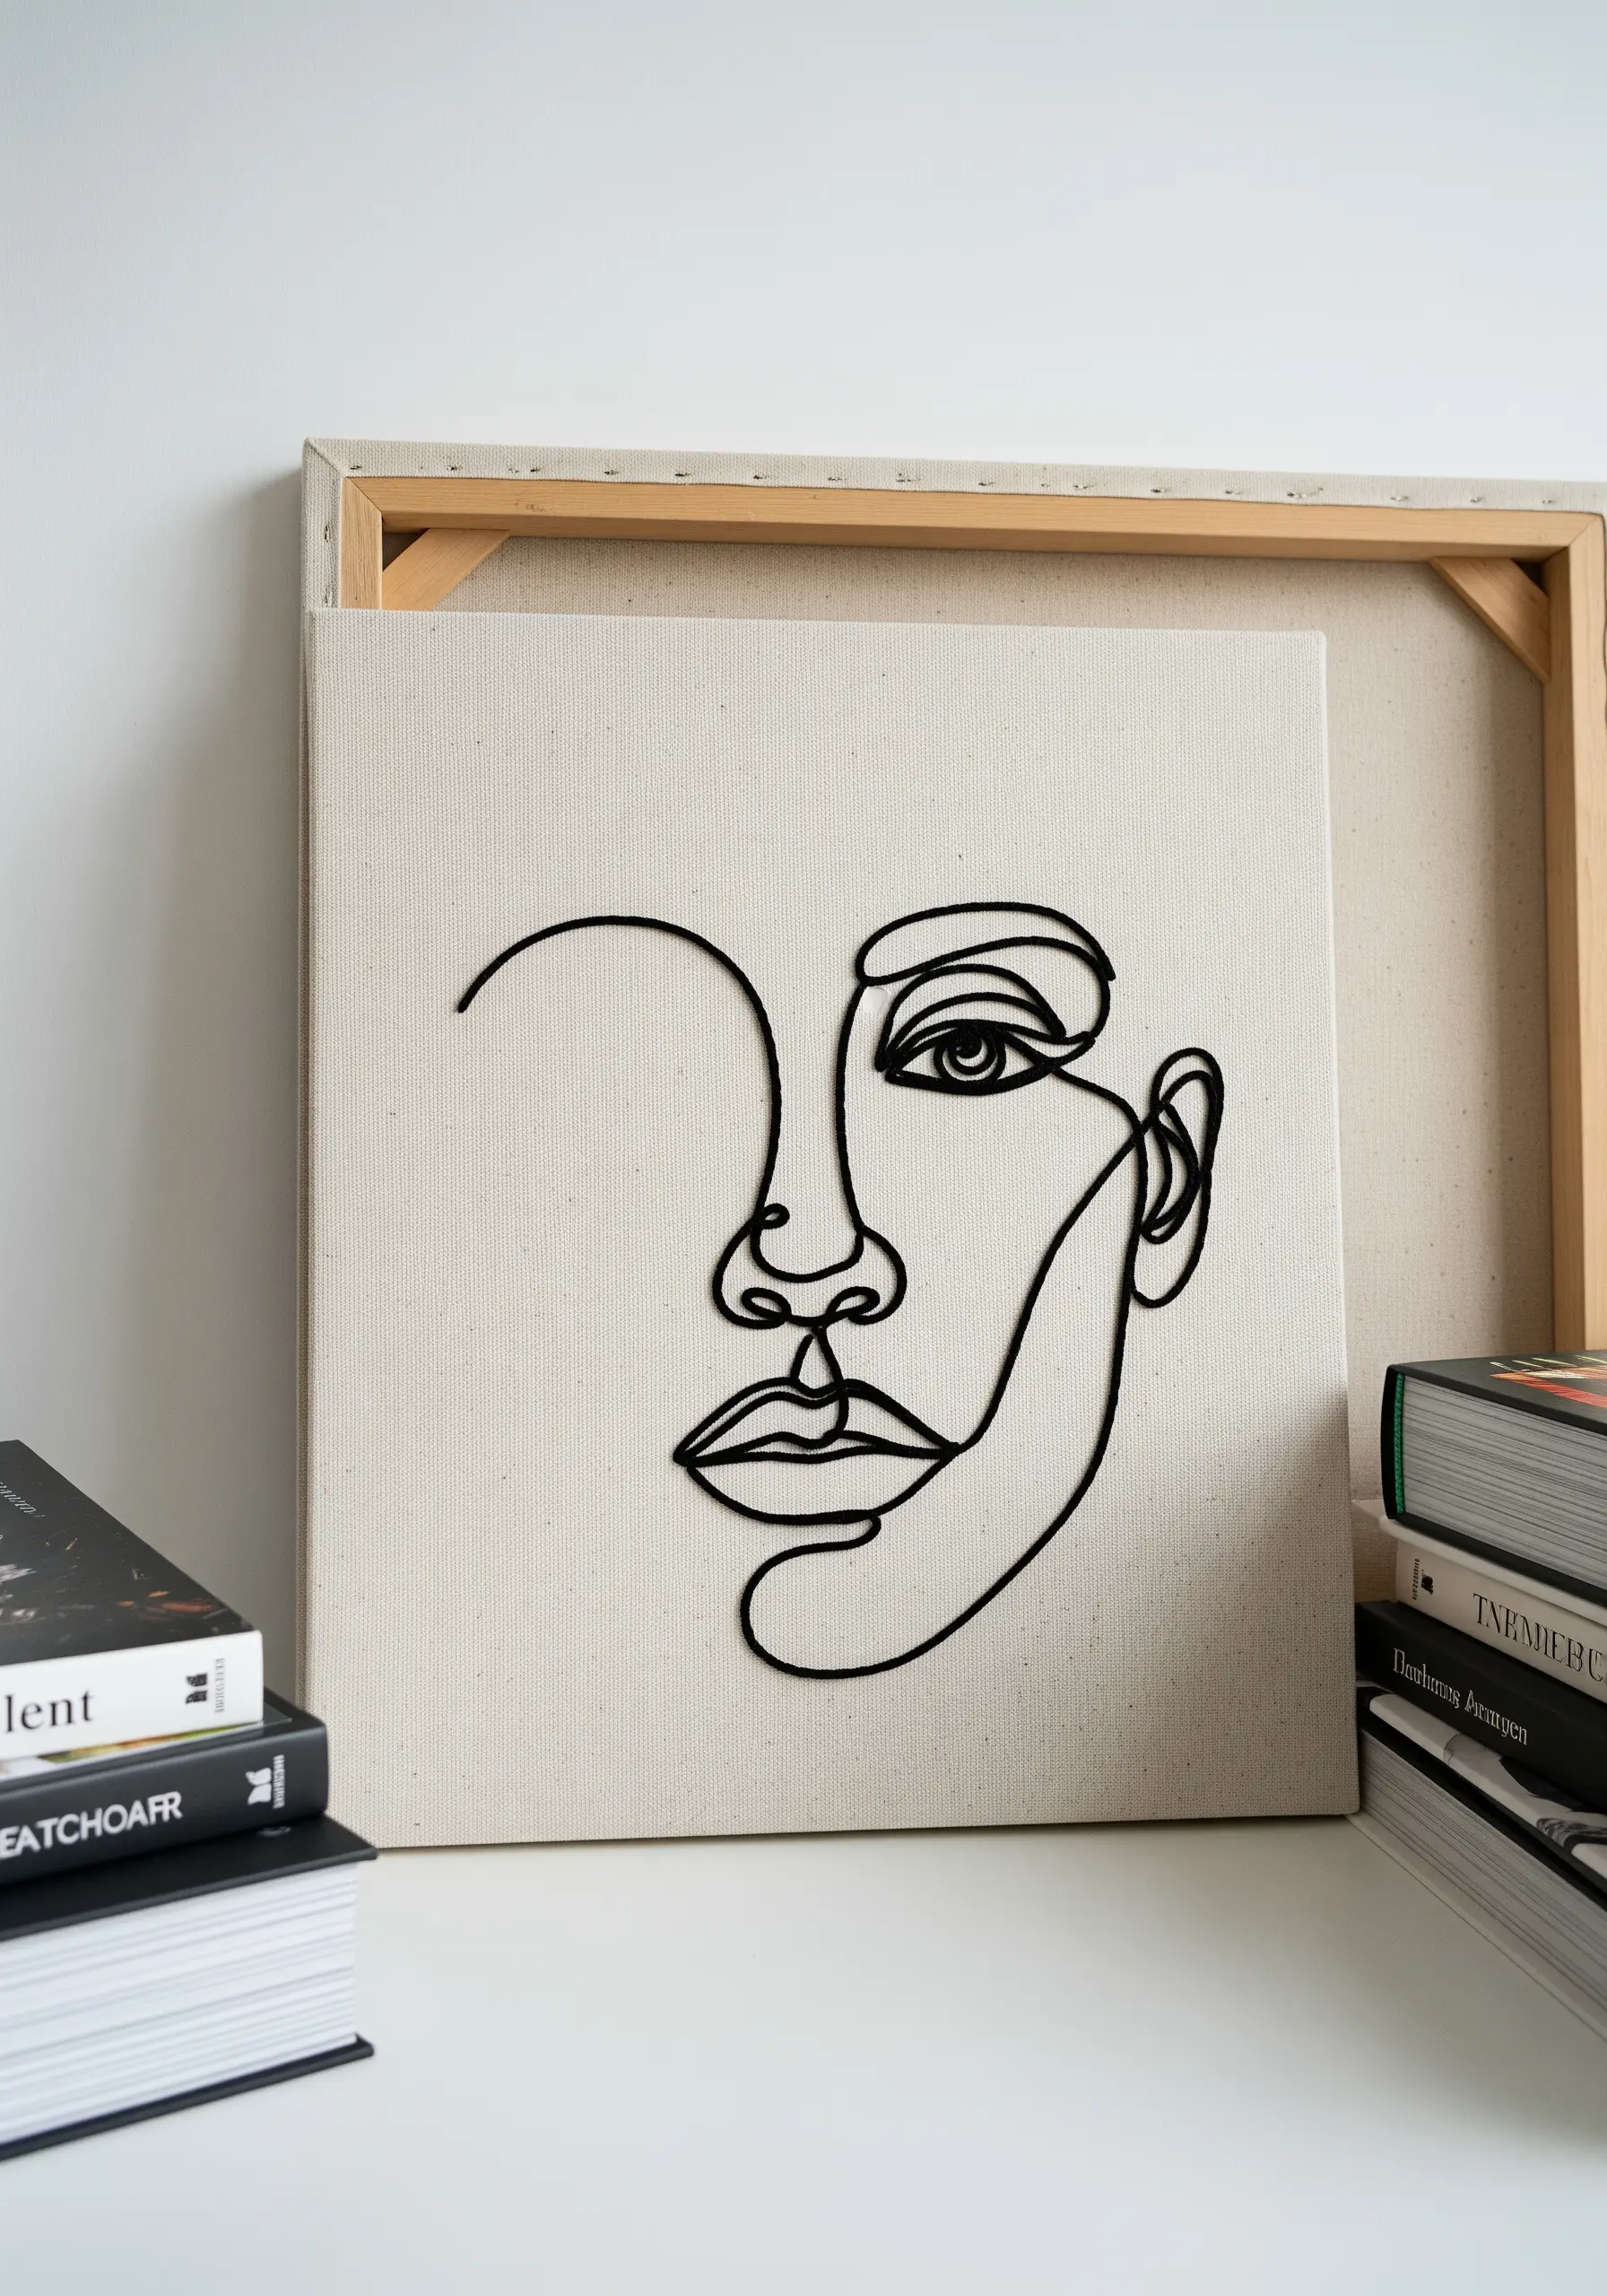
For a bold, minimalist statement, use a thick cord or yarn and couch it onto a stretched canvas.
This technique mimics the look of single-line drawings but with a satisfying three-dimensional quality.
Trace your design lightly in pencil, then lay the cord along the line, securing it with a thinner, matching thread every quarter-inch.
The result is a clean, sculptural piece that bridges the gap between drawing and fiber art, like these abstract face line embroidery designs.
16. Weave Beads and Thread for a Luxe Accessory
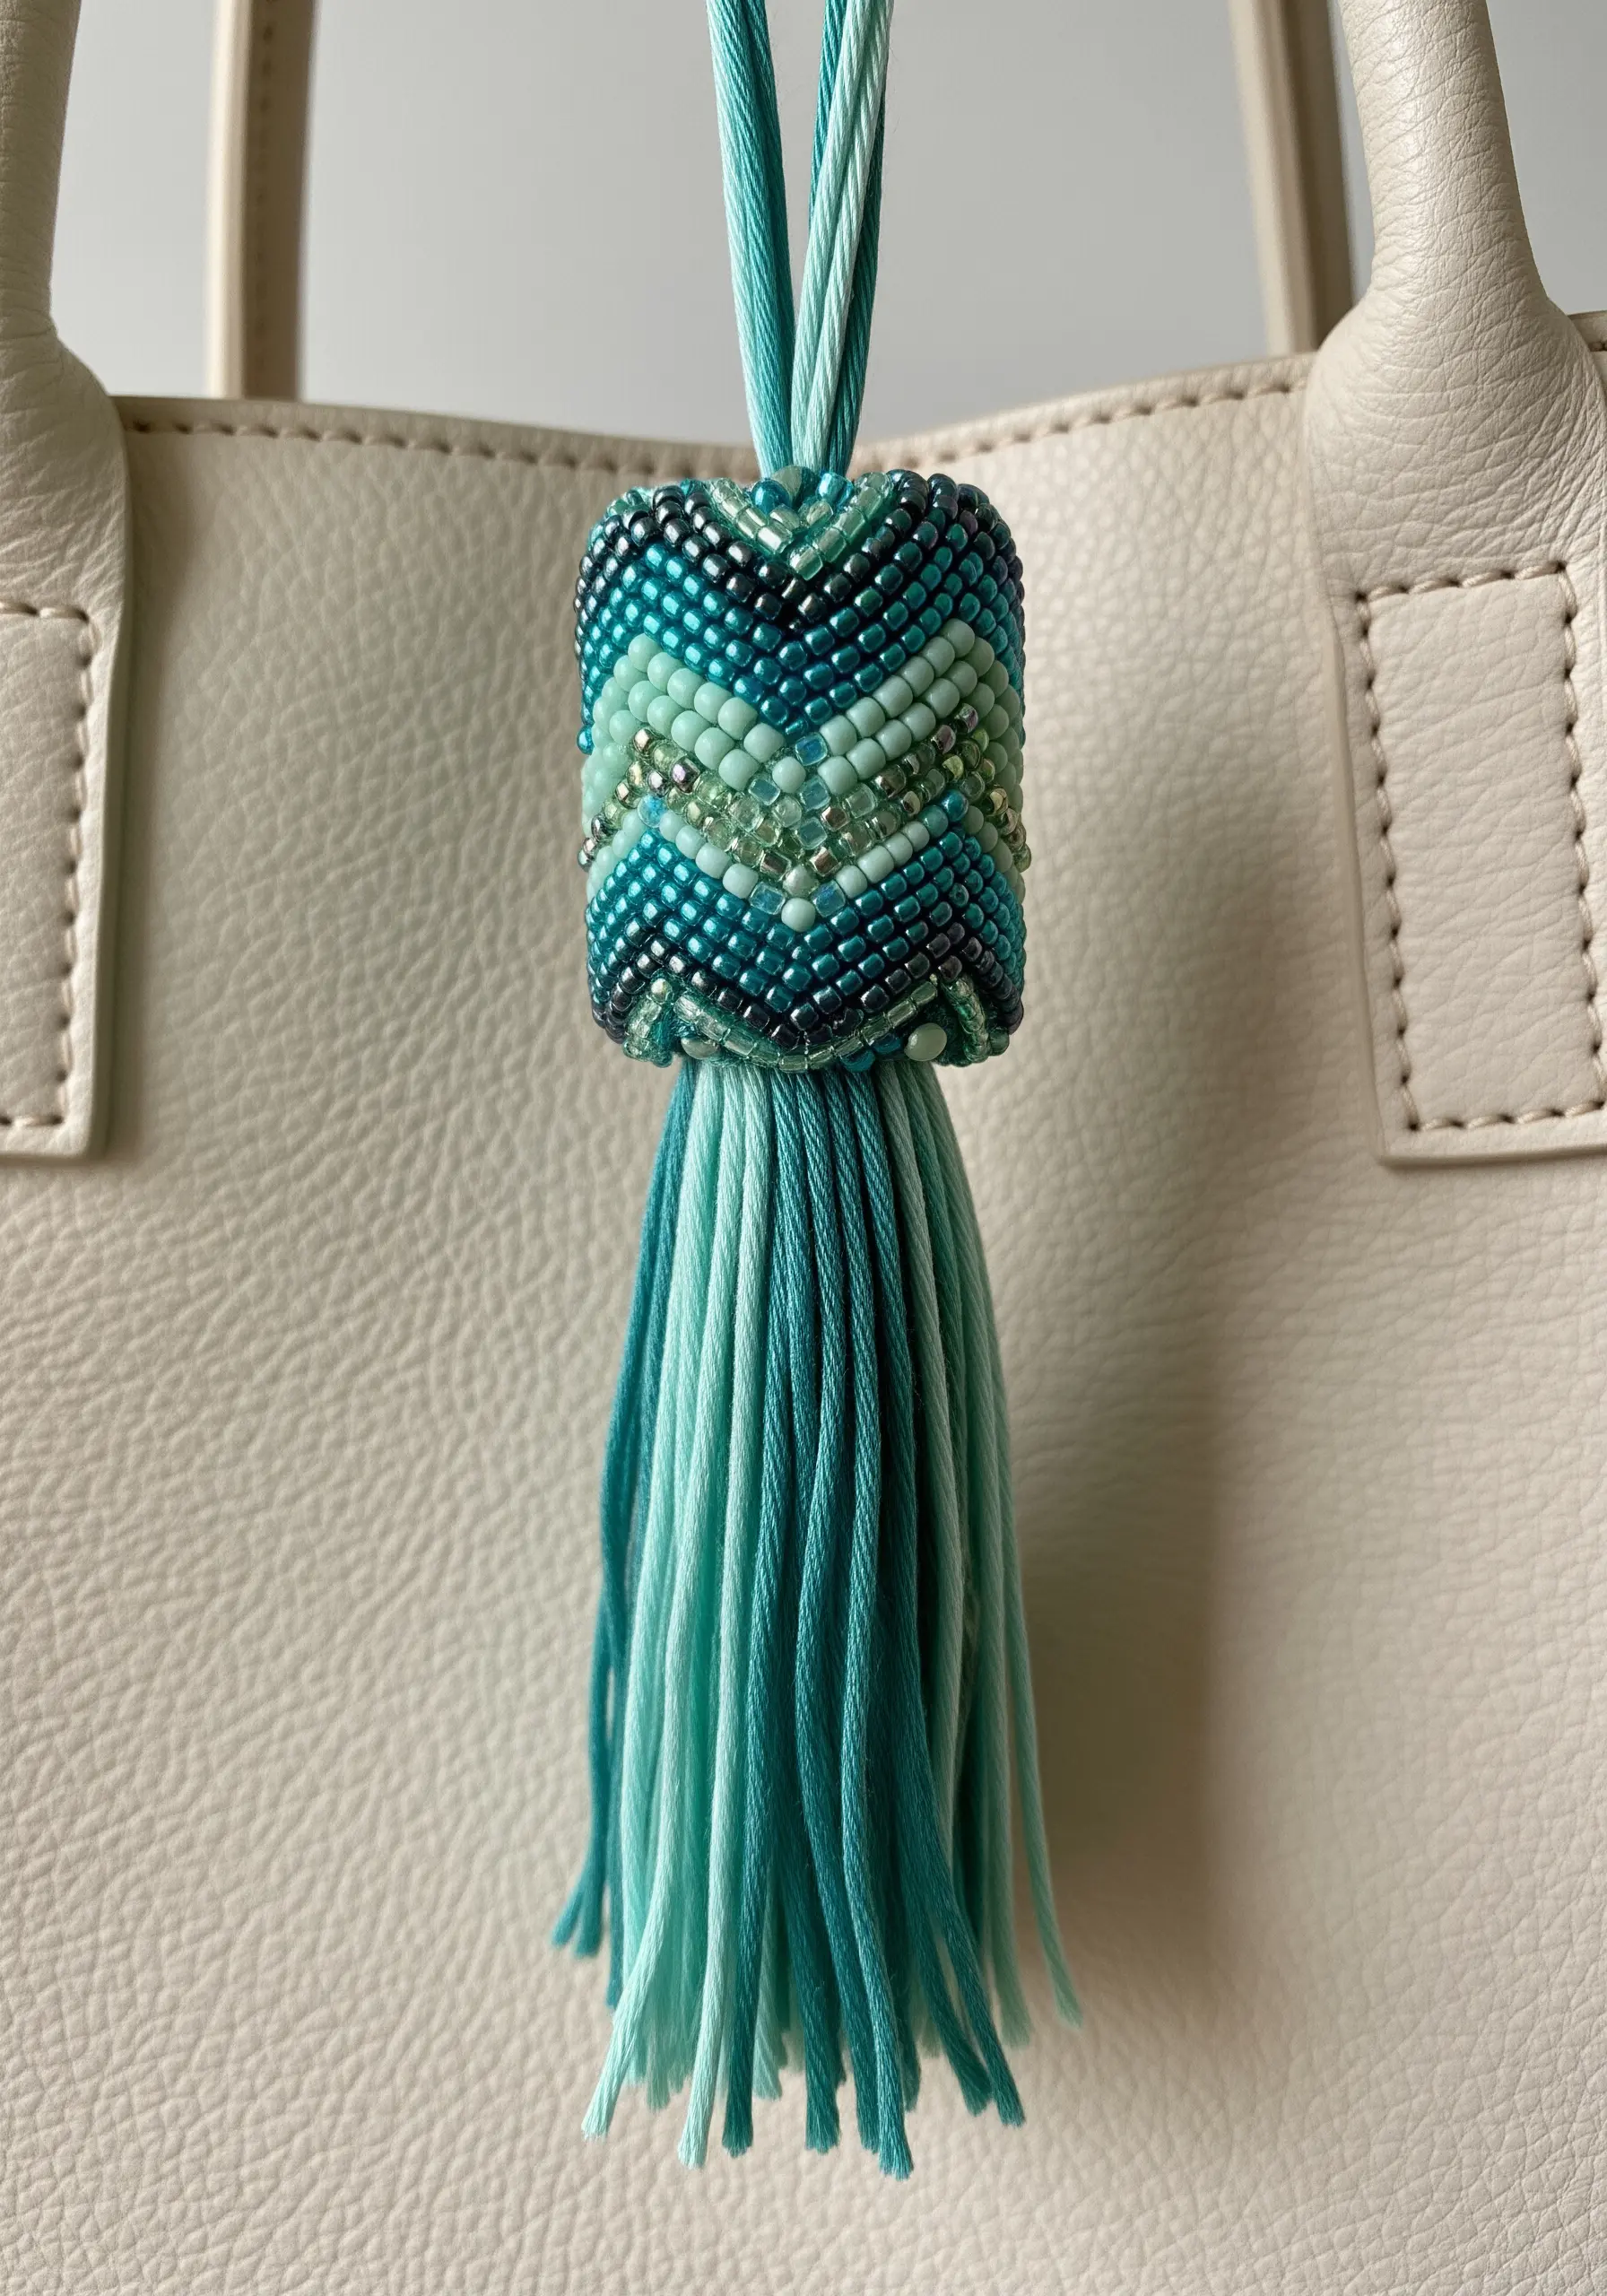
Combine beading and embroidery techniques to create a sophisticated bag charm or tassel.
Use a peyote or brick stitch to weave seed beads into a cylindrical form around a core of embroidery floss.
Finish the piece with a lush tassel made from the same floss colors to create a cohesive design.
The interplay between the structured, shimmering beads and the soft, flowing tassel creates a beautiful textural contrast.
17. Turn an Everyday Object into a Tiny Tapestry
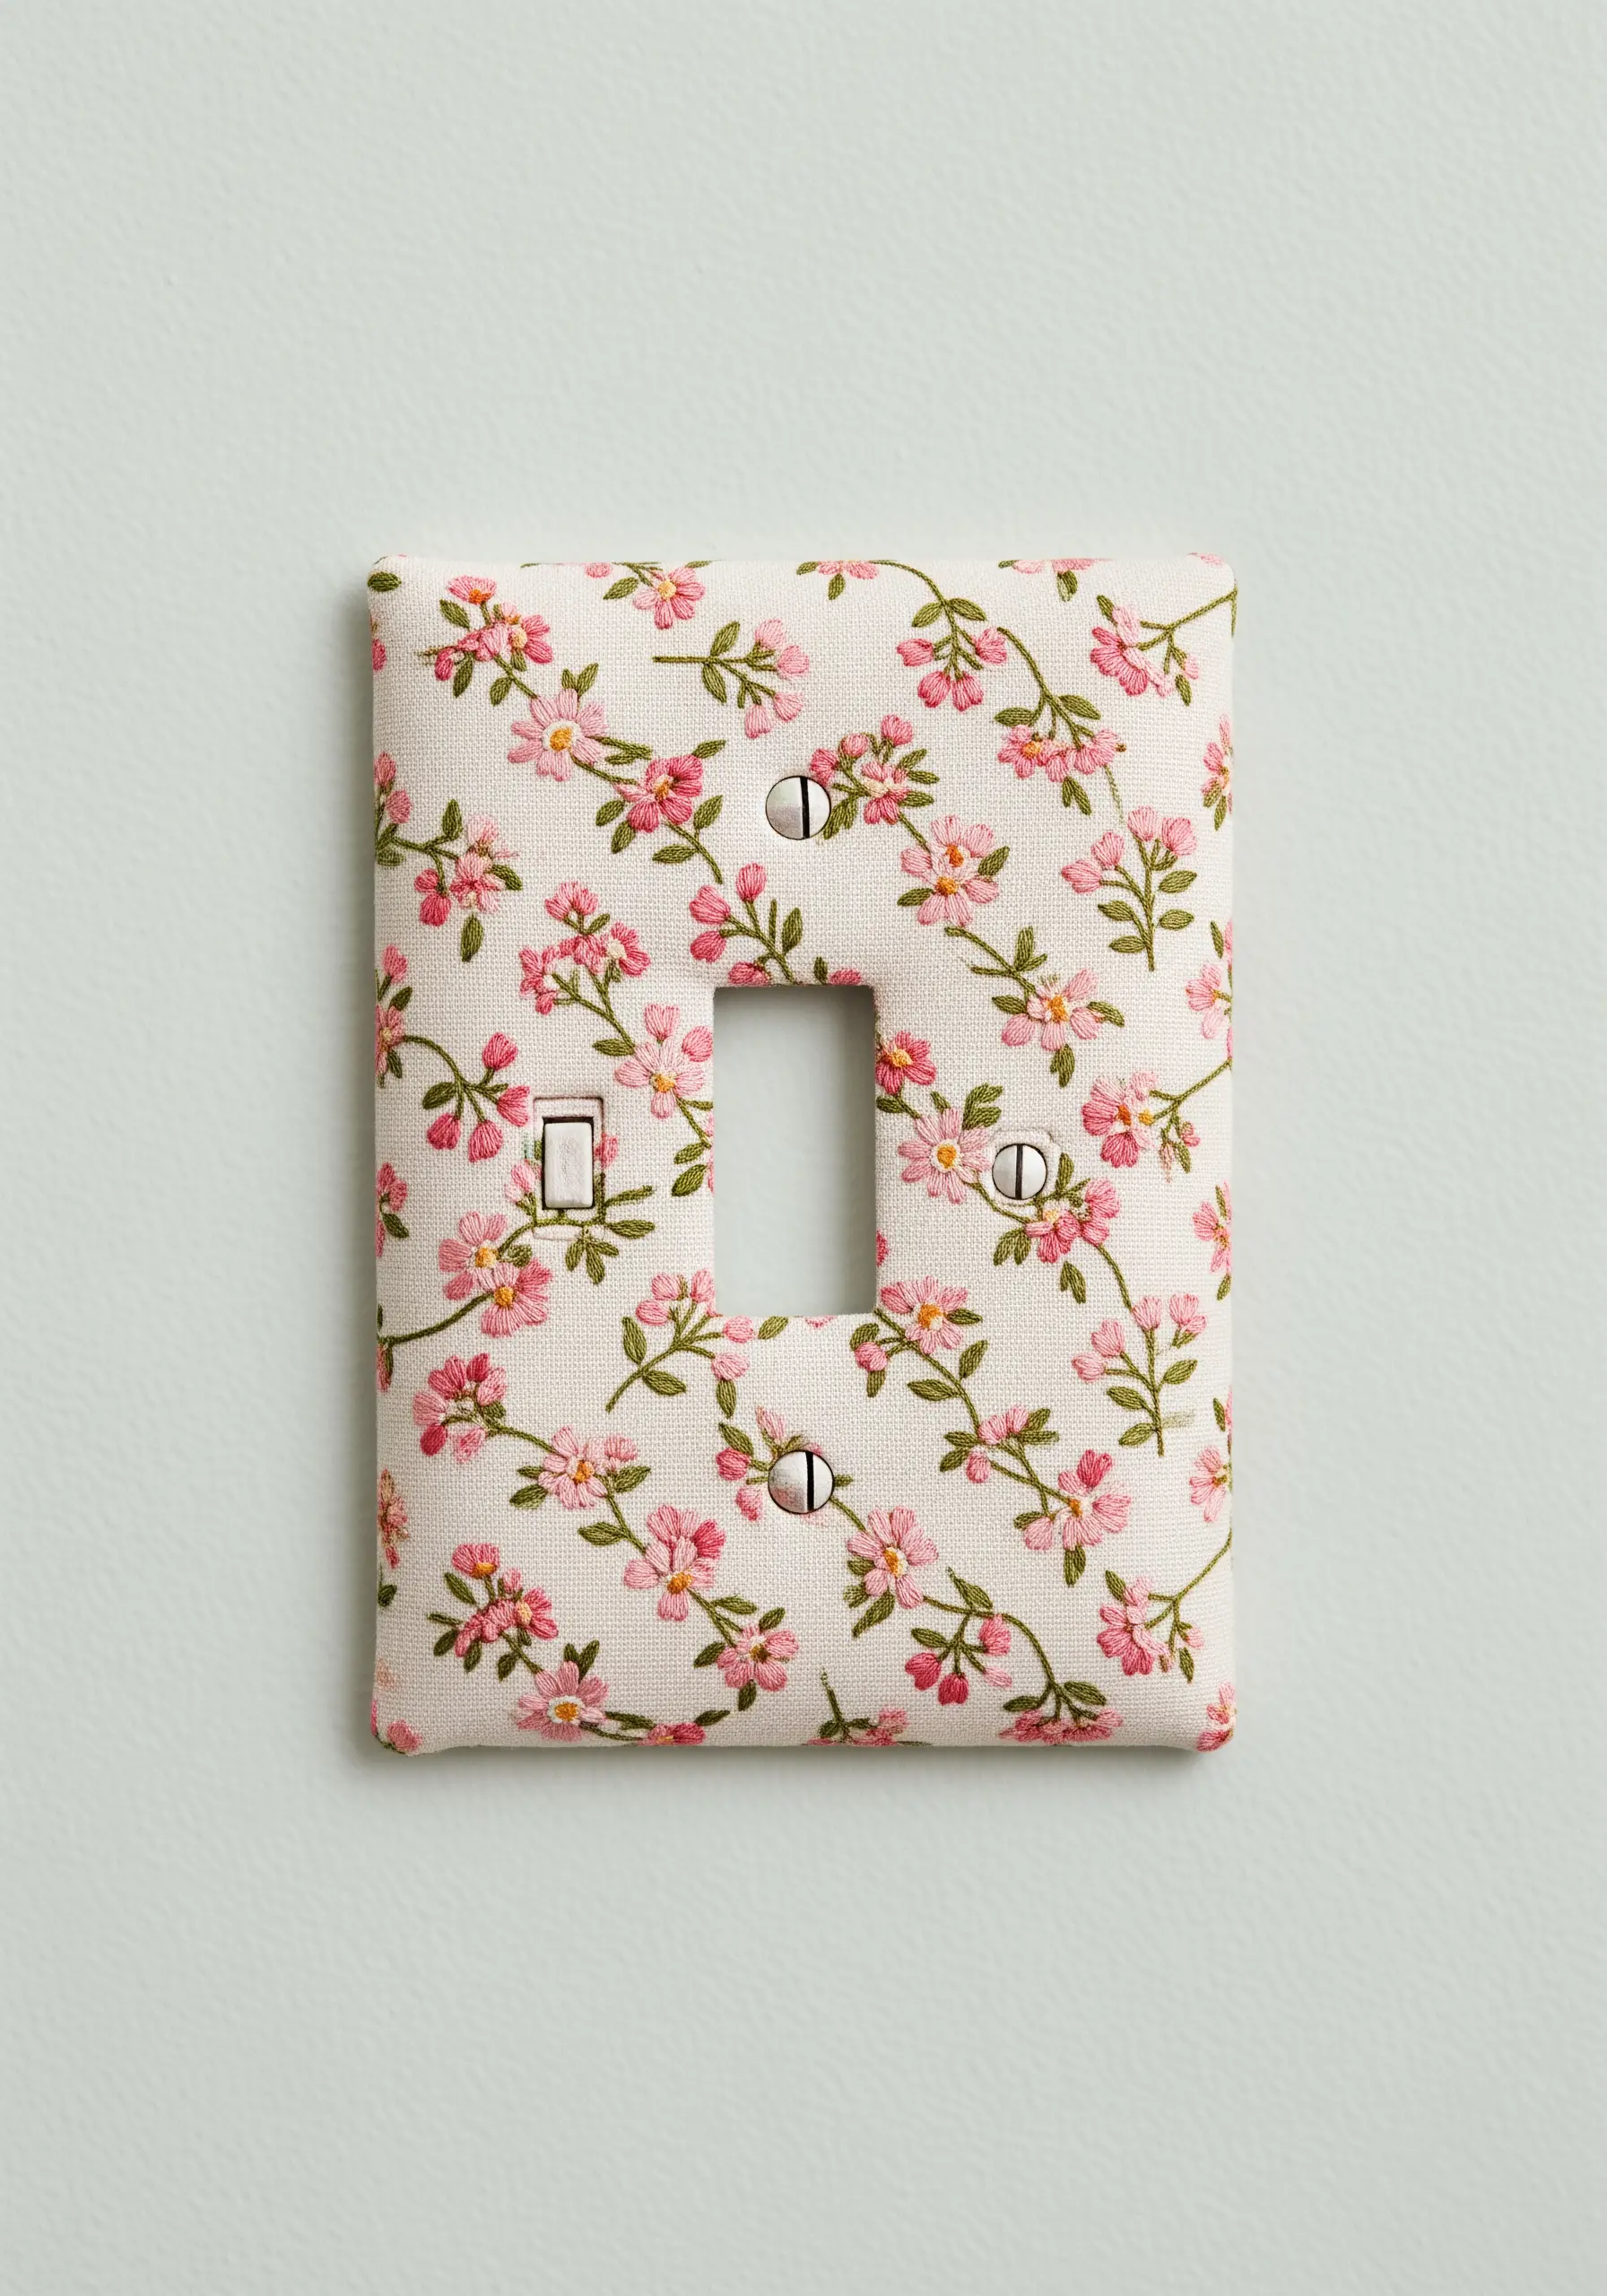
Elevate a mundane household detail by wrapping a standard light switch plate in beautifully embroidered fabric.
Choose a fabric with a small, dense pattern that won’t be lost in the compact format.
Use a strong adhesive spray to secure the fabric, carefully trimming the openings and folding the edges neatly around the back.
This simple project adds an unexpected and charming layer of texture and personality to your walls.
18. Build a 3D Garden with Layered Felt
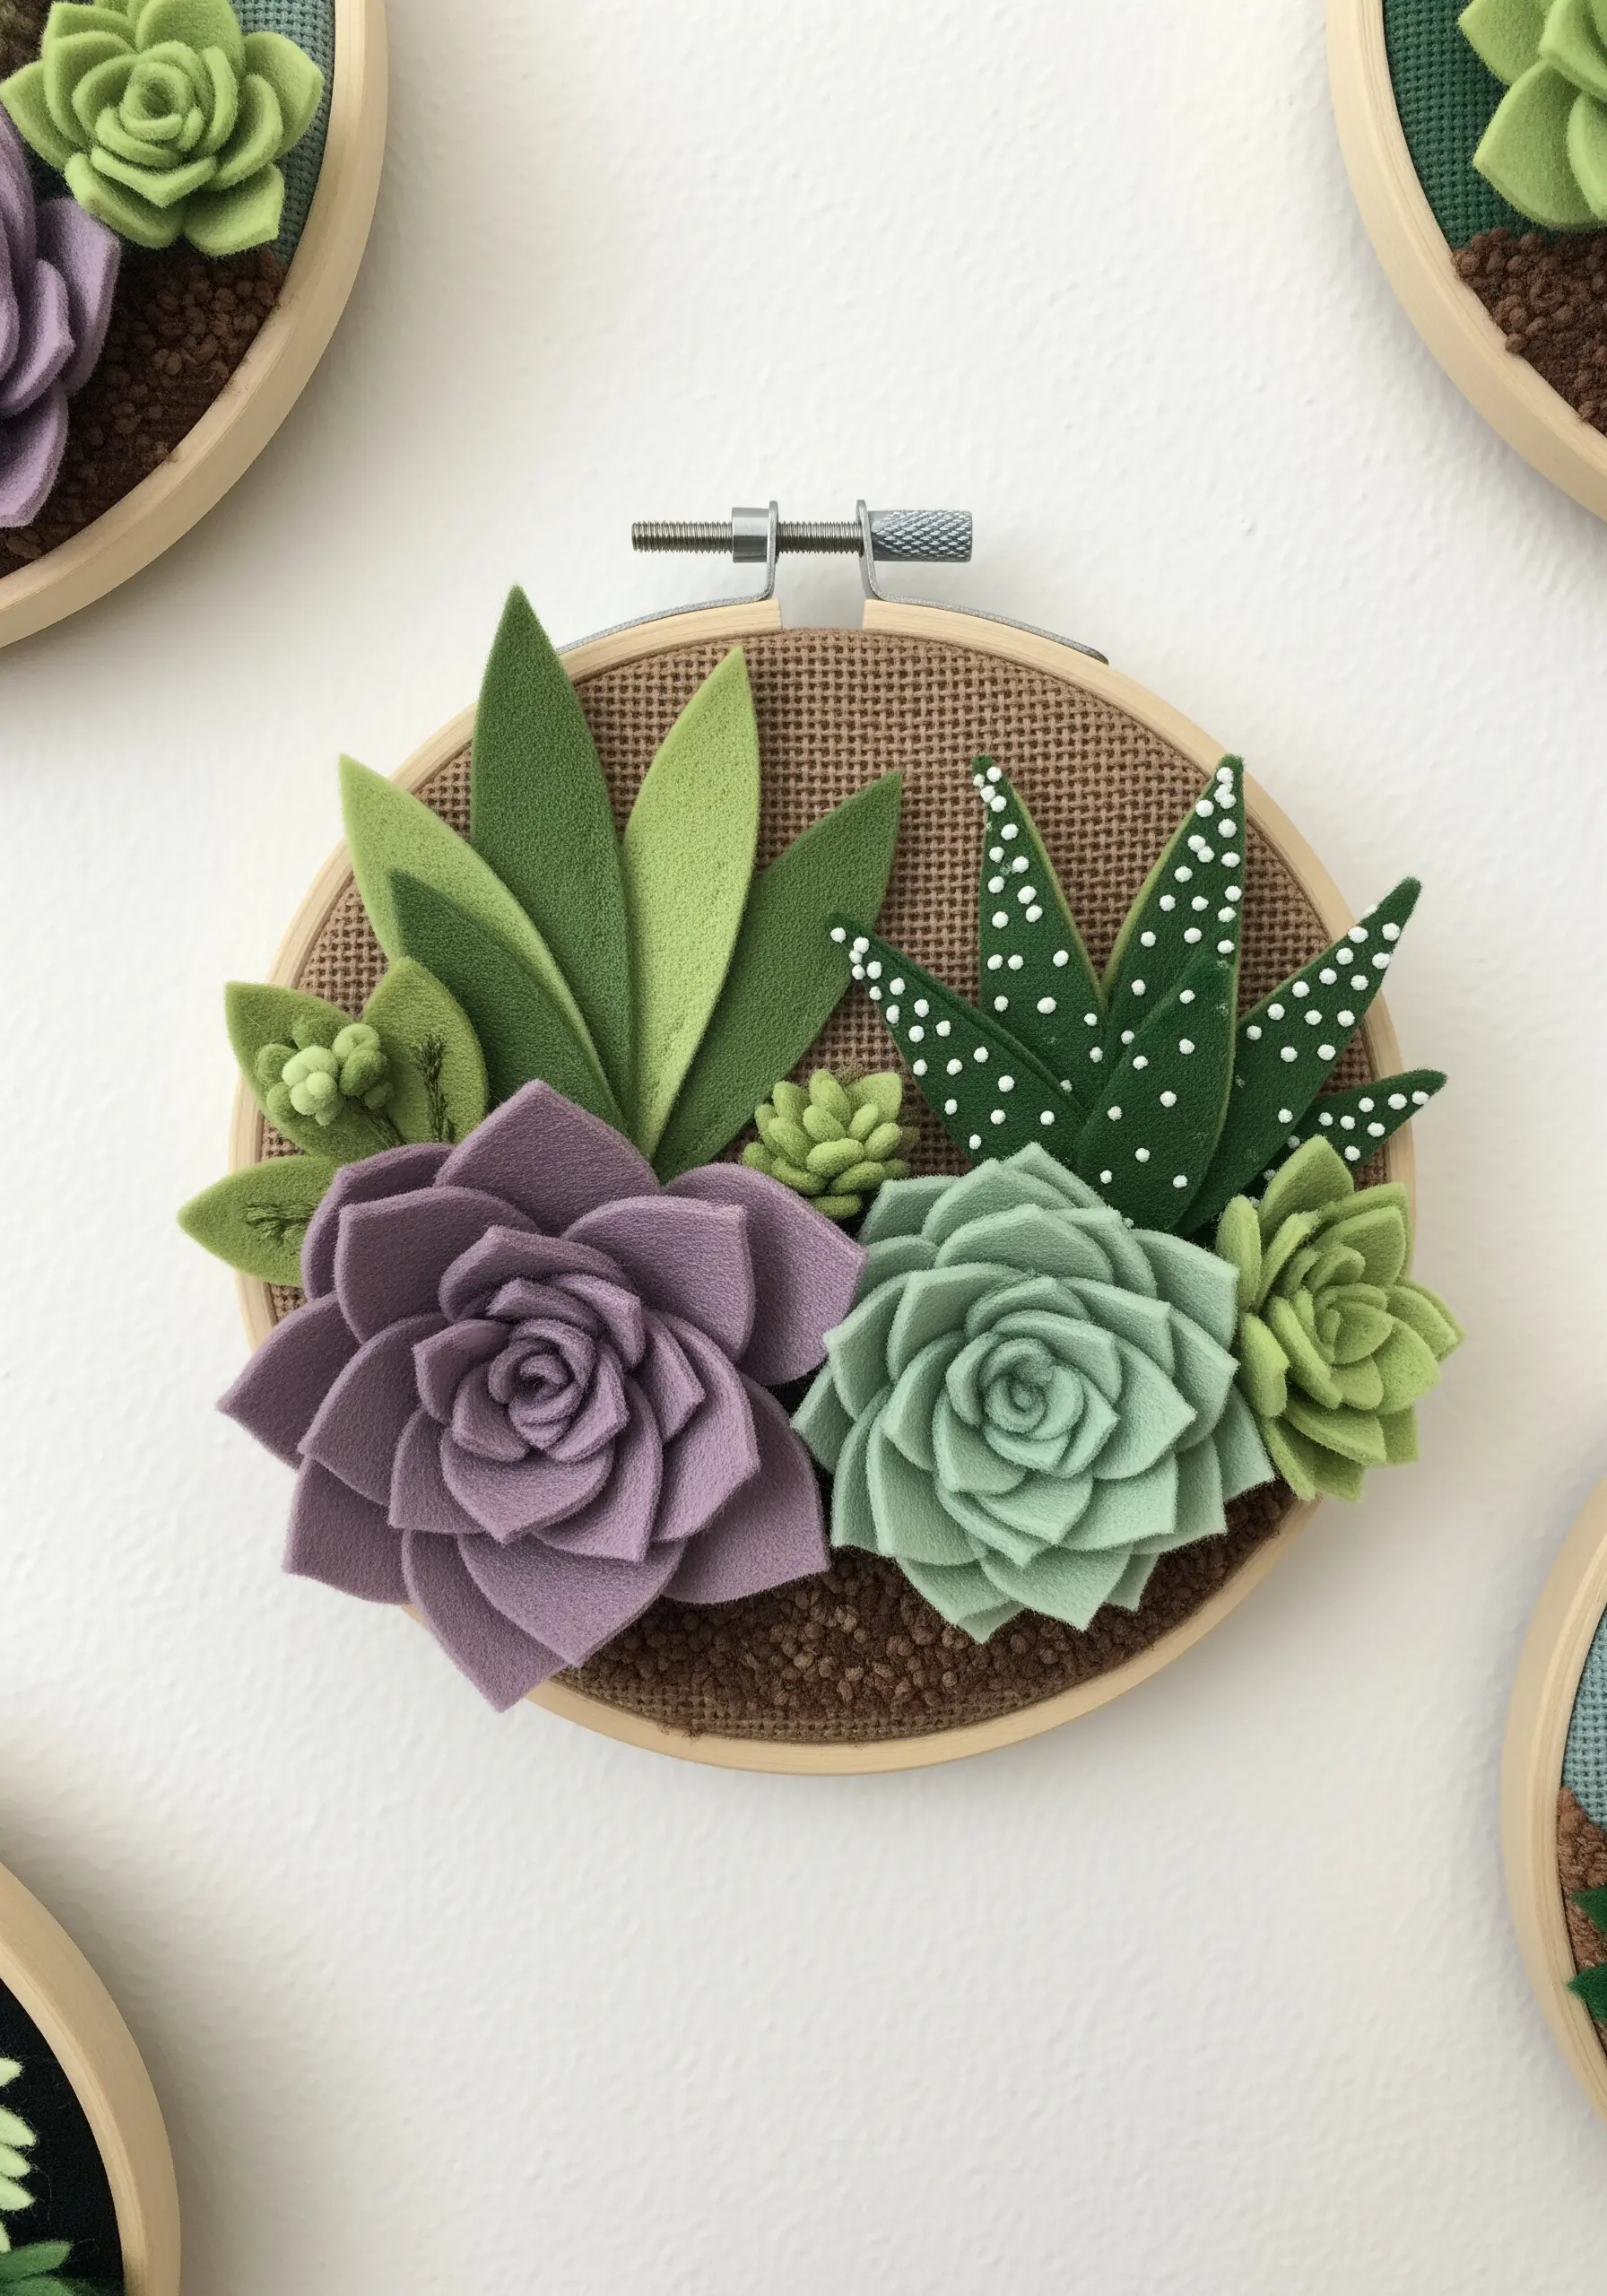
Create a low-maintenance succulent garden that bursts with texture and dimension.
Cut petal and leaf shapes from various shades of green and purple felt.
Layer and roll them to form realistic rosettes and spiky aloes, securing the bases with hot glue or a few stitches.
For added detail, use white fabric paint to dot the leaves, mimicking natural succulent markings.
Arranging them in a hoop over a burlap base gives the project a rustic, finished look.
19. Create a Themed Garland with Appliqué Patches
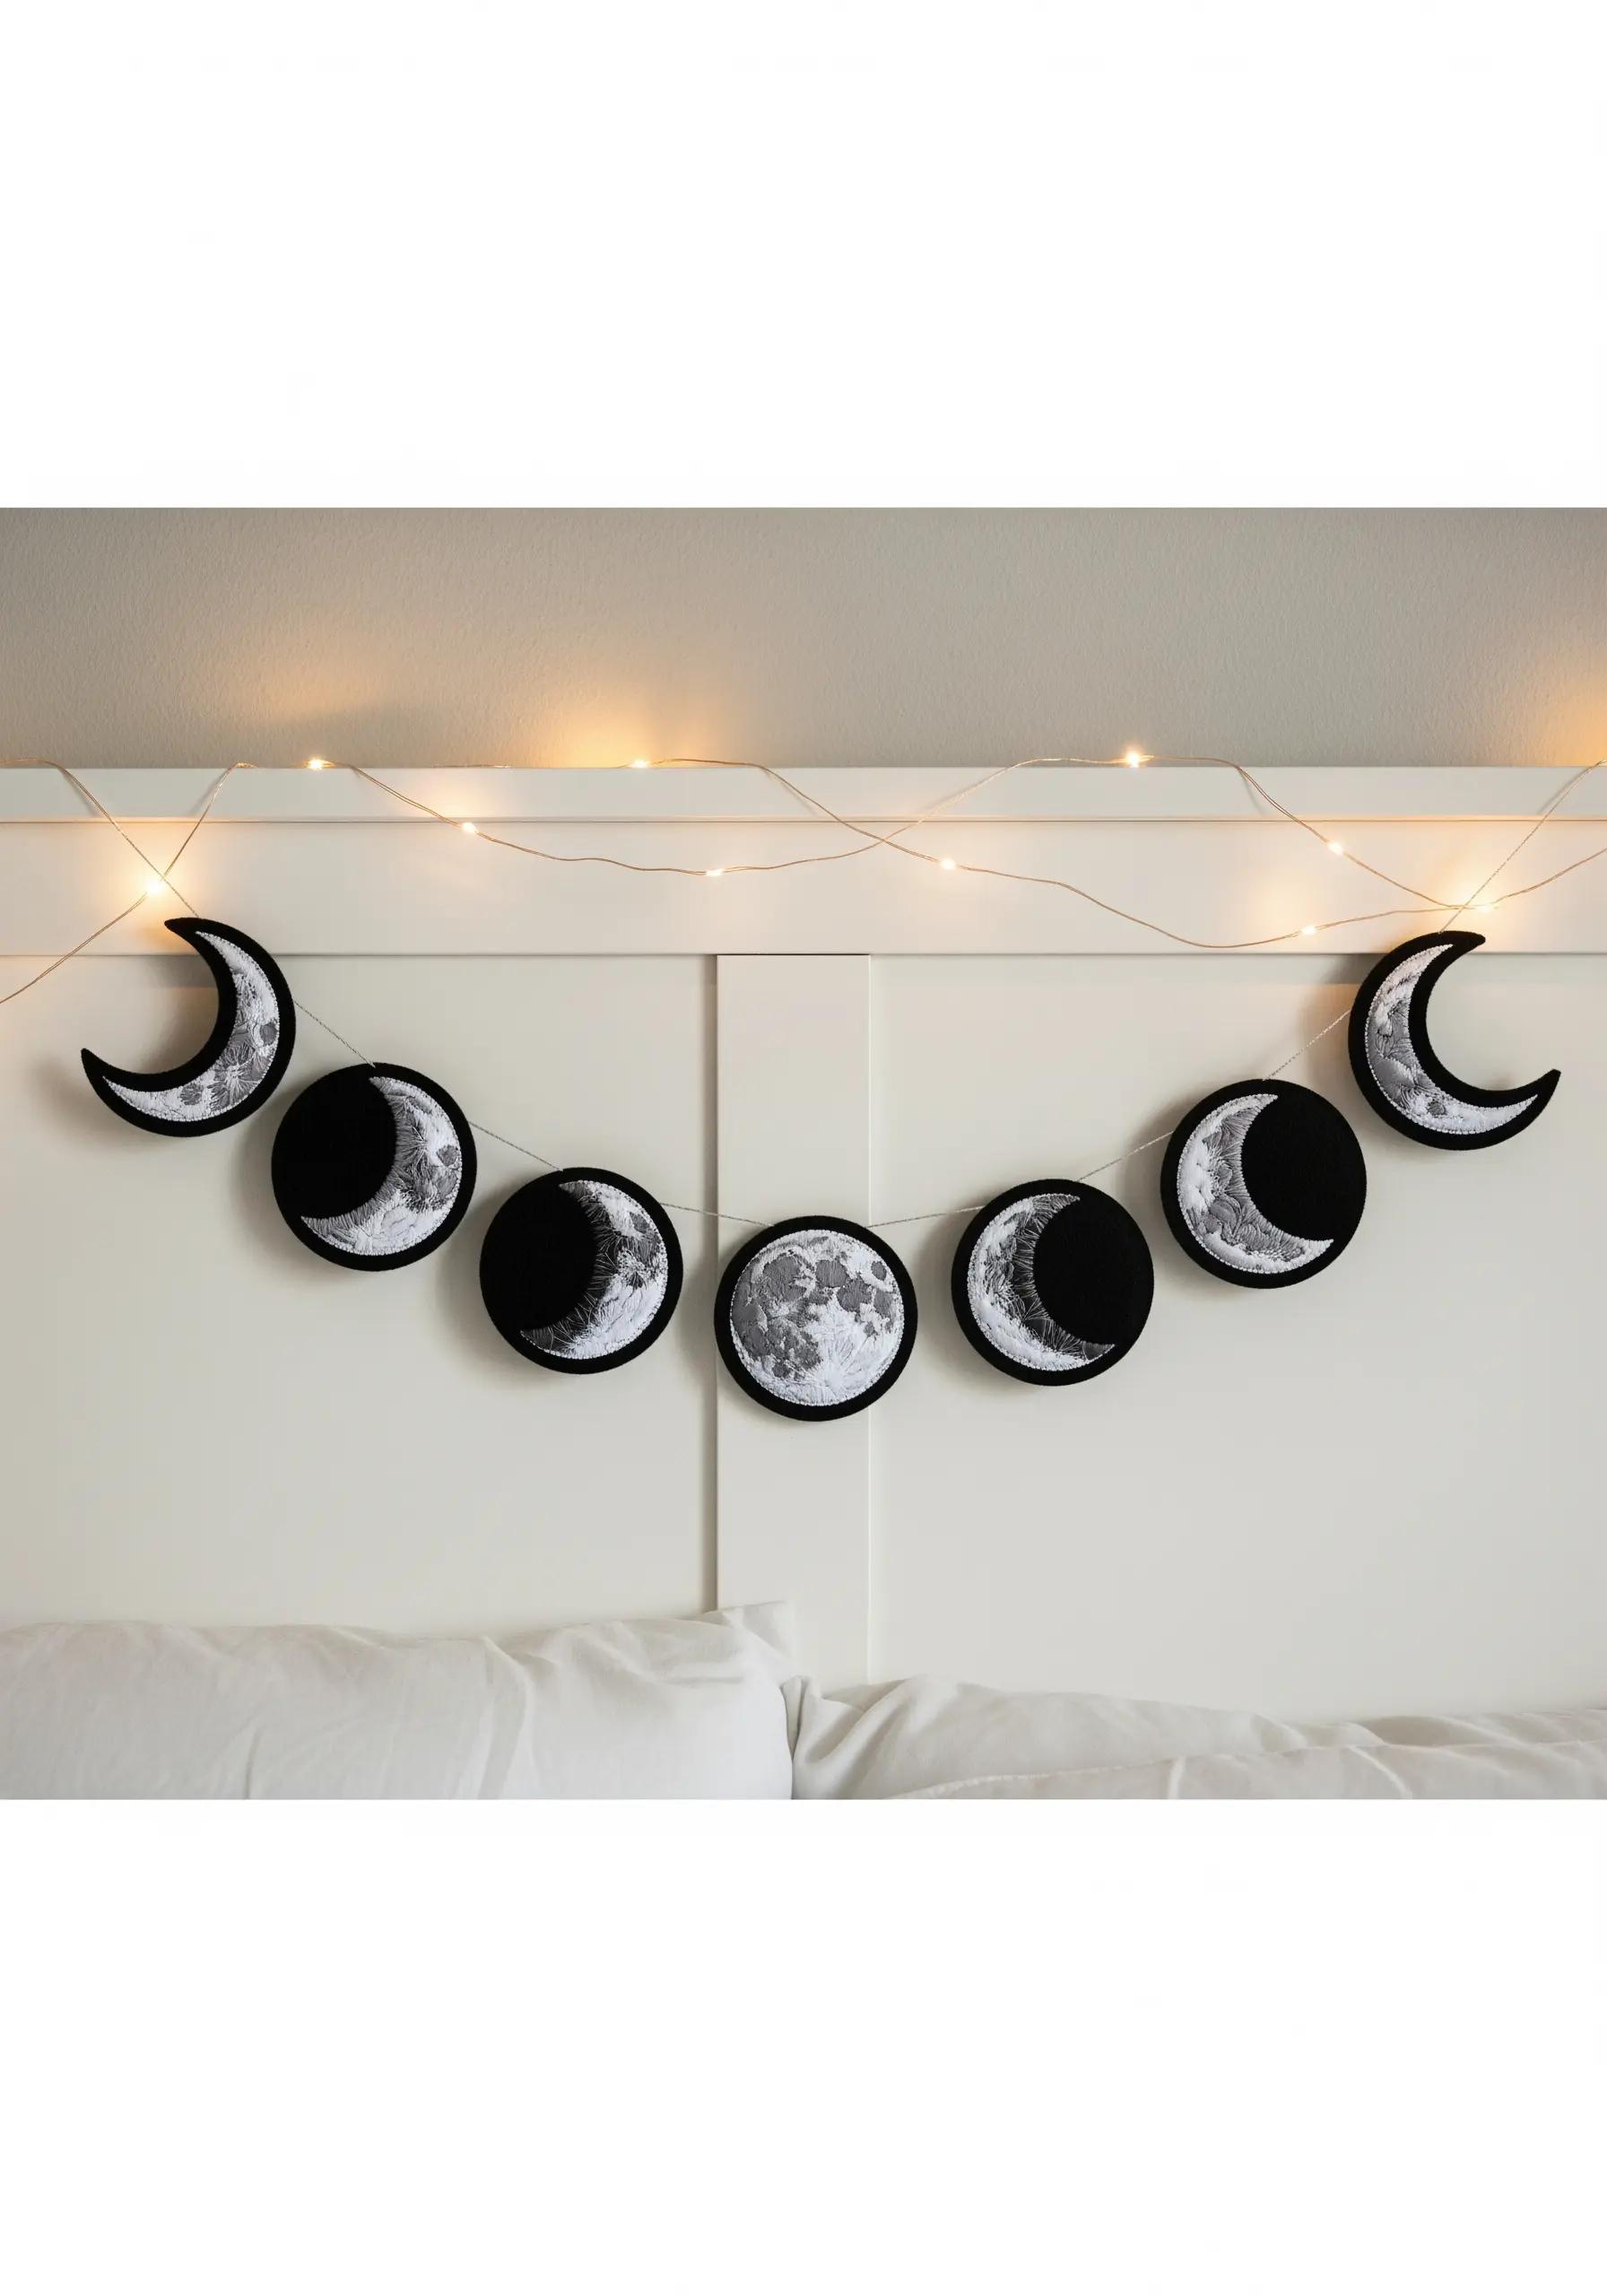
Design a cohesive wall hanging by creating a series of related embroidered patches.
For the moon phases, use a dense satin stitch or a chaotic long-and-short stitch to fill the shapes, creating a convincing crater-like texture.
After stitching, carefully cut each shape out, leaving a small black felt border for definition.
String them together with a simple cord to create a dramatic garland that tells a celestial story.
20. Paint with Beads for Vibrant, Textured Scenes
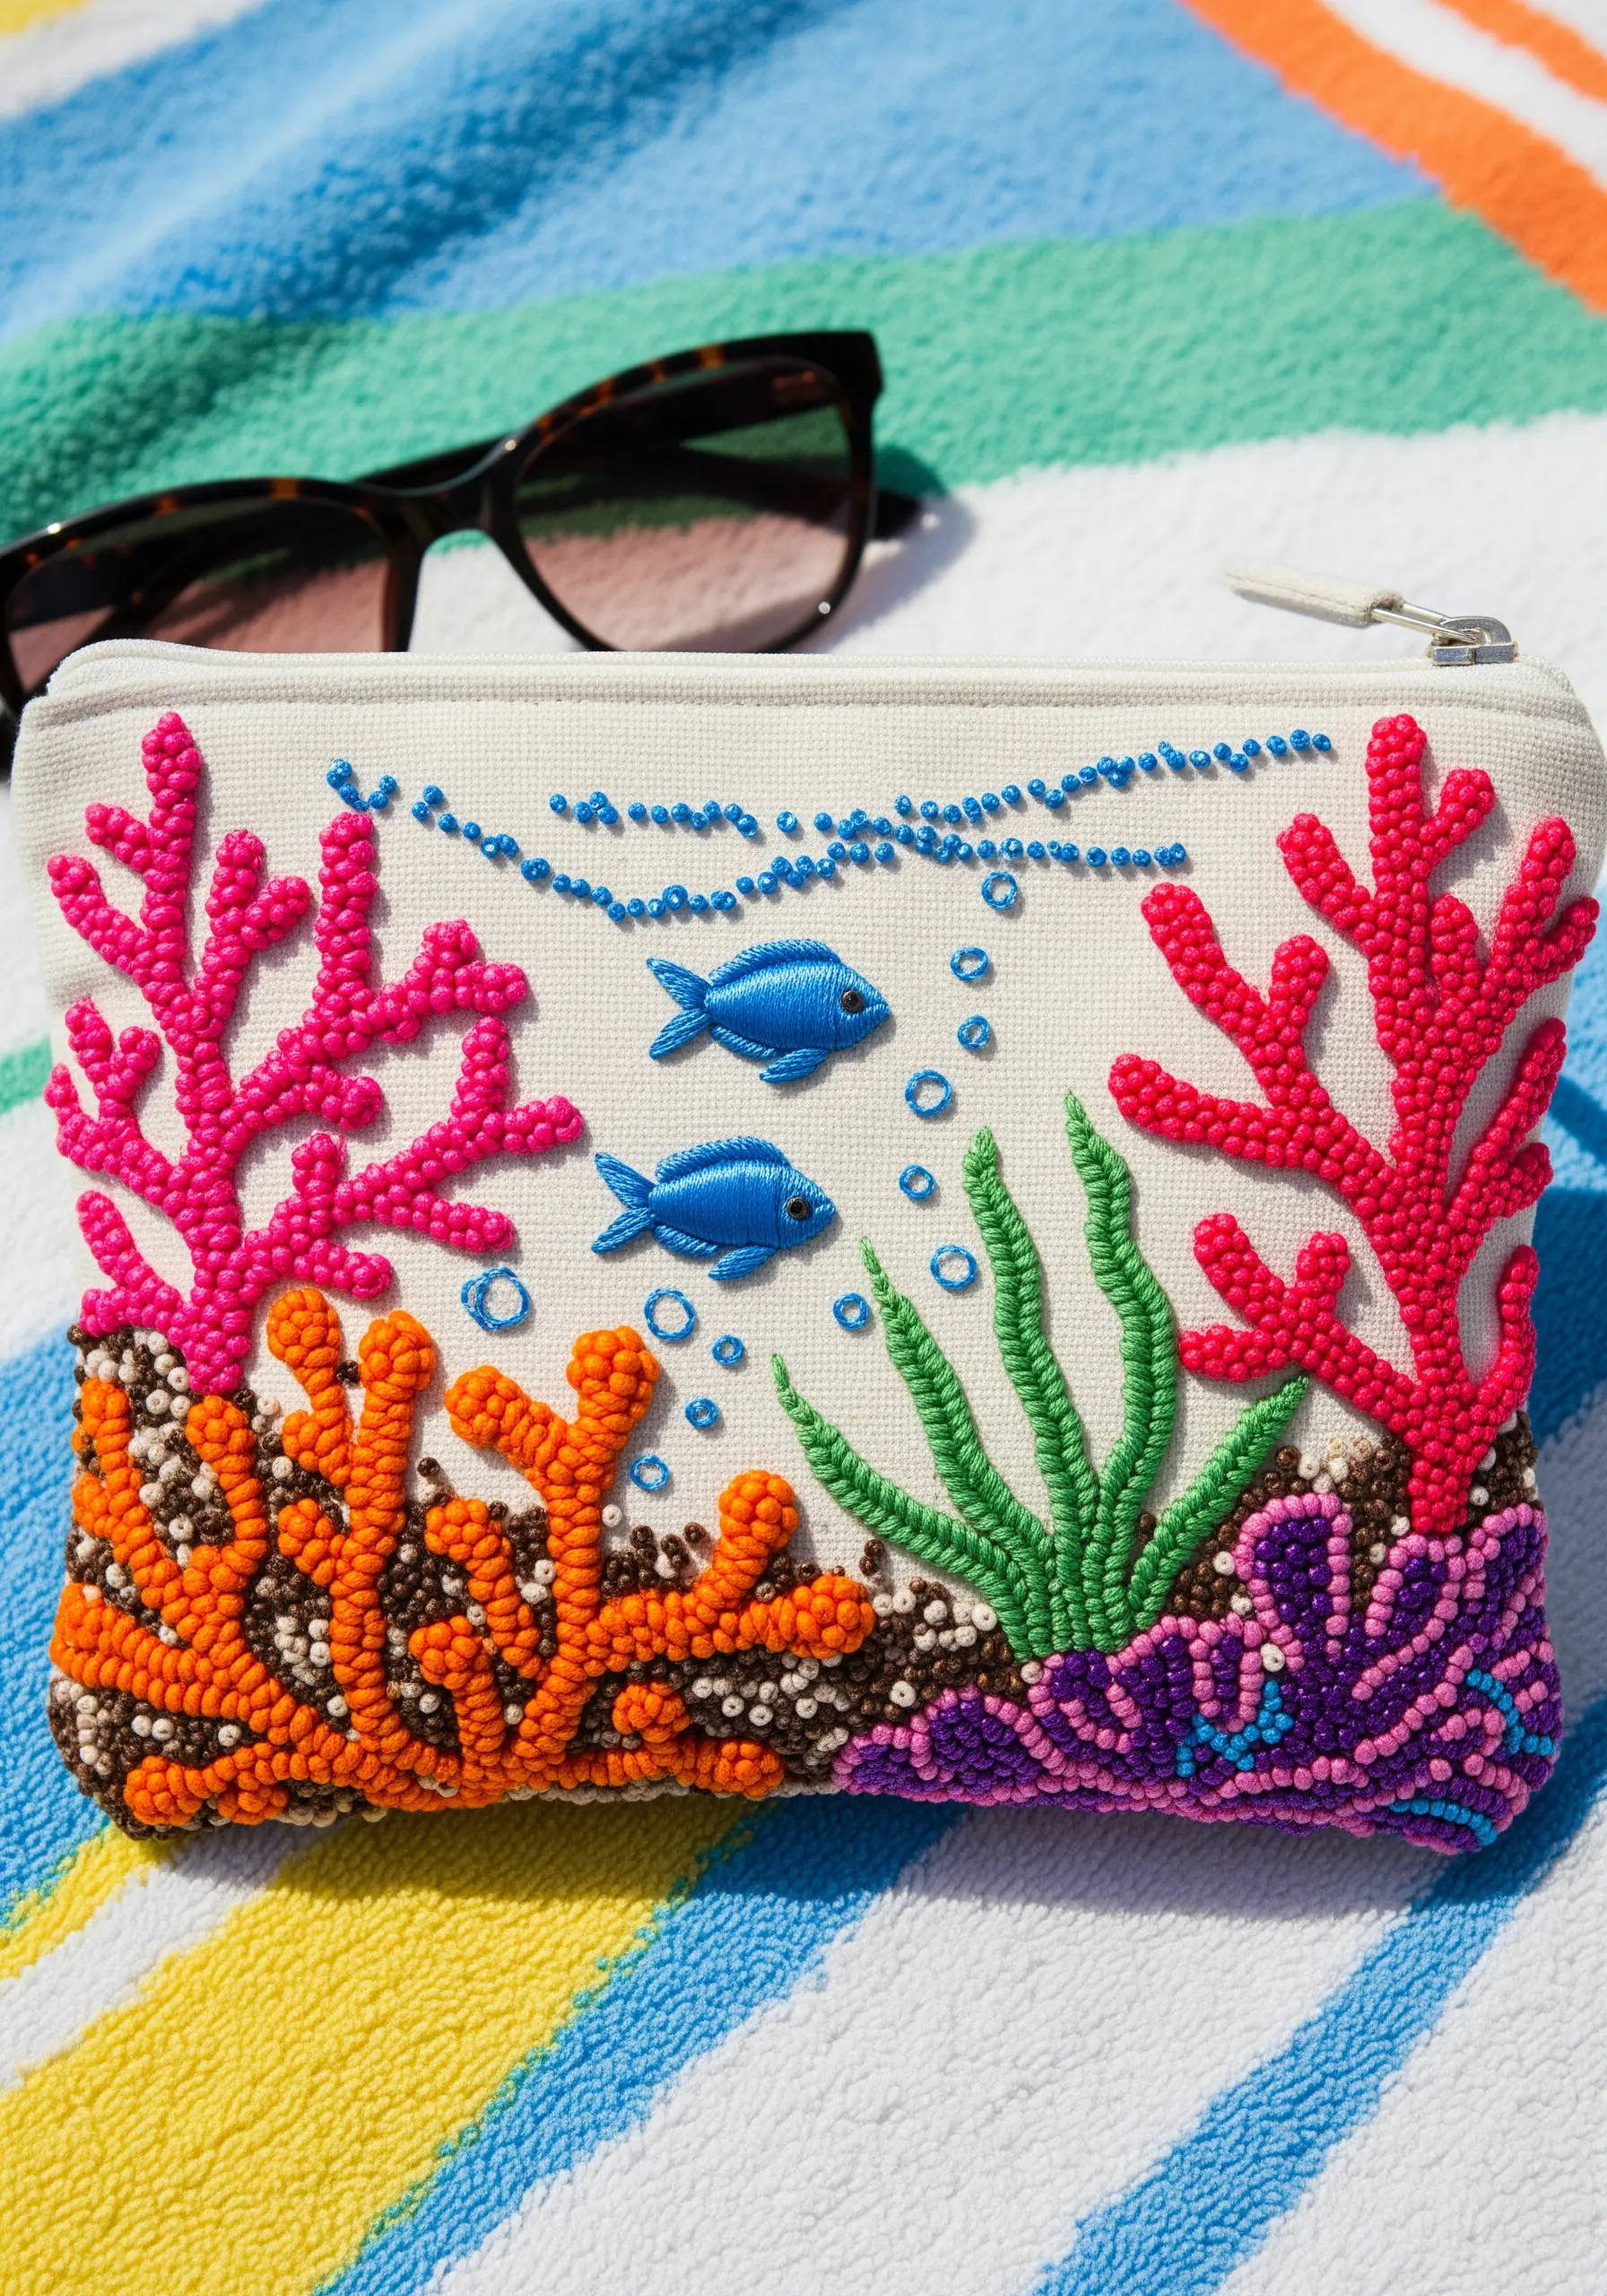
Use seed beads like pixels to create a colorful, tactile underwater world on a simple canvas pouch.
Instead of floss, fill your shapes with dense clusters of beads, using the couching method for lines and single stitches for scattered fills.
Grouping different bead finishes—matte, shiny, and translucent—adds depth and mimics the way light filters through water.
This technique is perfect for creating vibrant coastal, ocean-inspired scenes.
21. Use Brick Stitch for Bold, Graphic Lettering
For lettering that needs to be bold and clear, a brick stitch fill is a perfect choice.
This stitch creates a woven, textured effect that stands out, especially when using a high-contrast color against a neutral background.
Outline your letters first with a split stitch to create a sharp, defined edge, then fill them in with horizontal brick stitches.
This technique provides excellent coverage and a satisfyingly uniform texture for a clean, graphic look.
22. Design a Cohesive Series with a Shared Palette
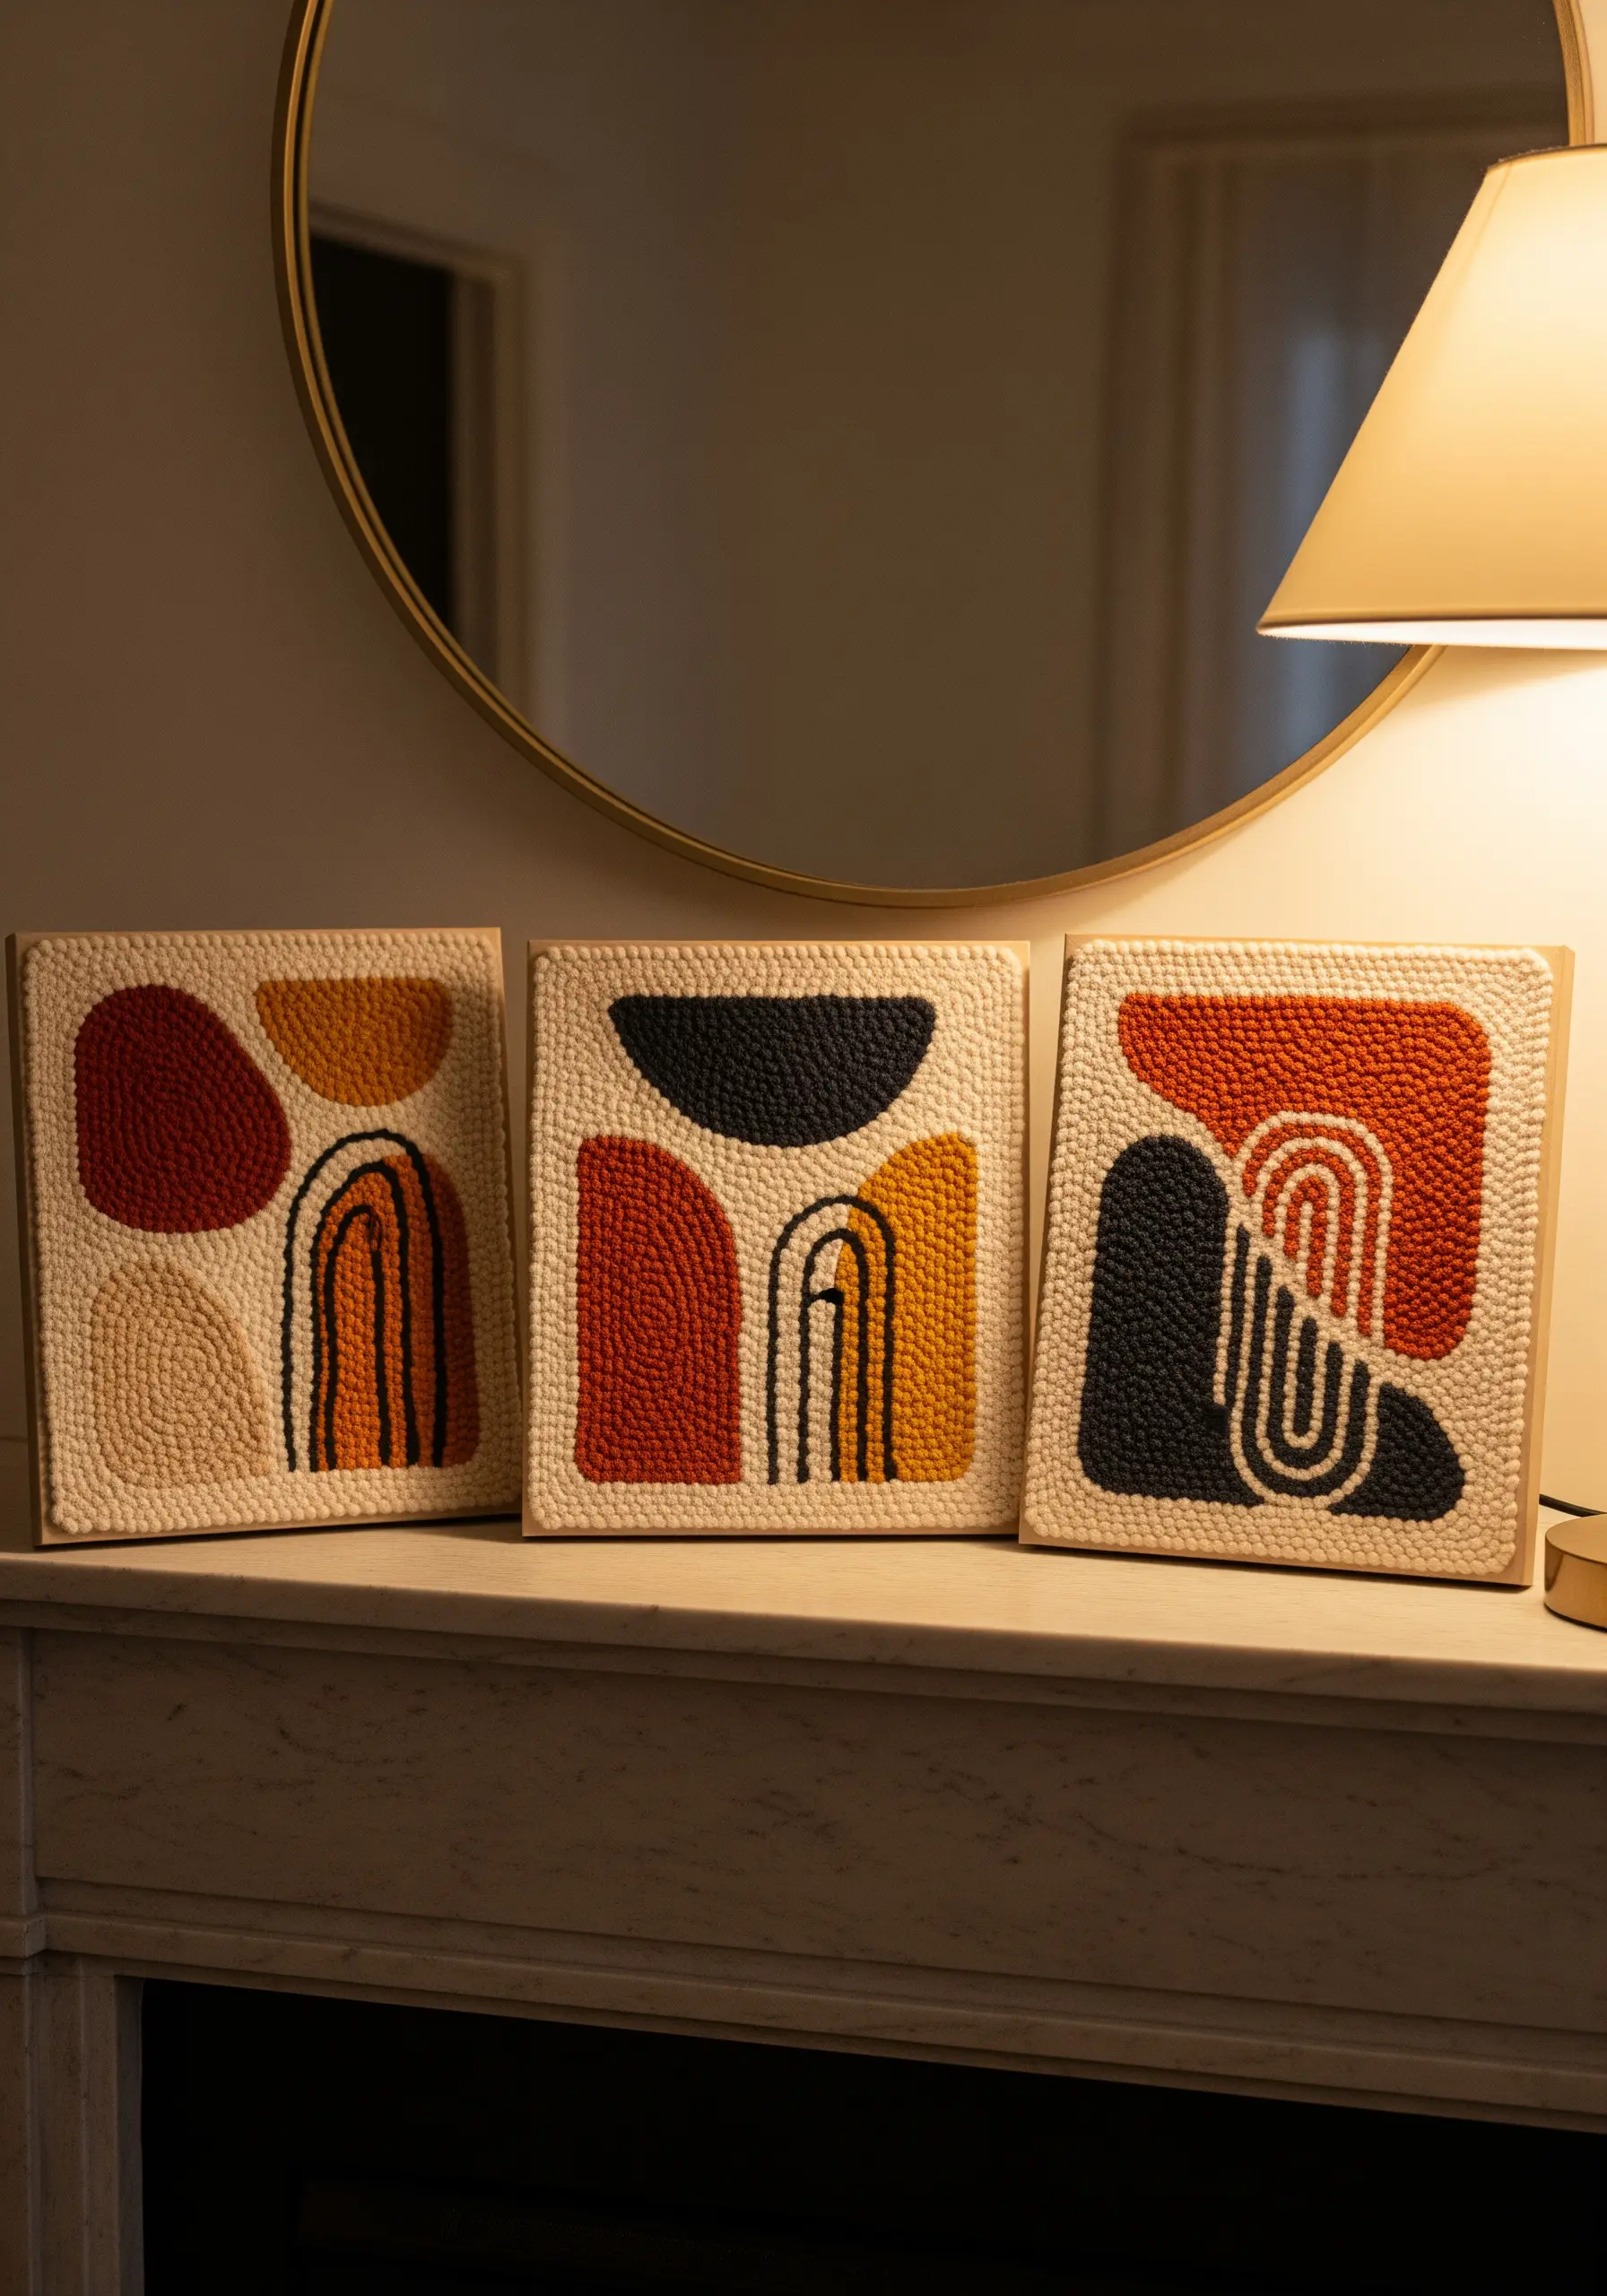
Create a sophisticated art installation by making a triptych of punch needle pieces.
Use a consistent color palette and a family of abstract shapes across three separate canvases.
This repetition of color and form ties the individual works together into a single, harmonious statement.
Displaying them together creates a larger impact than a single piece, making it feel like a curated collection of abstract embroidery patterns.
23. Master Realism with Thread Painting
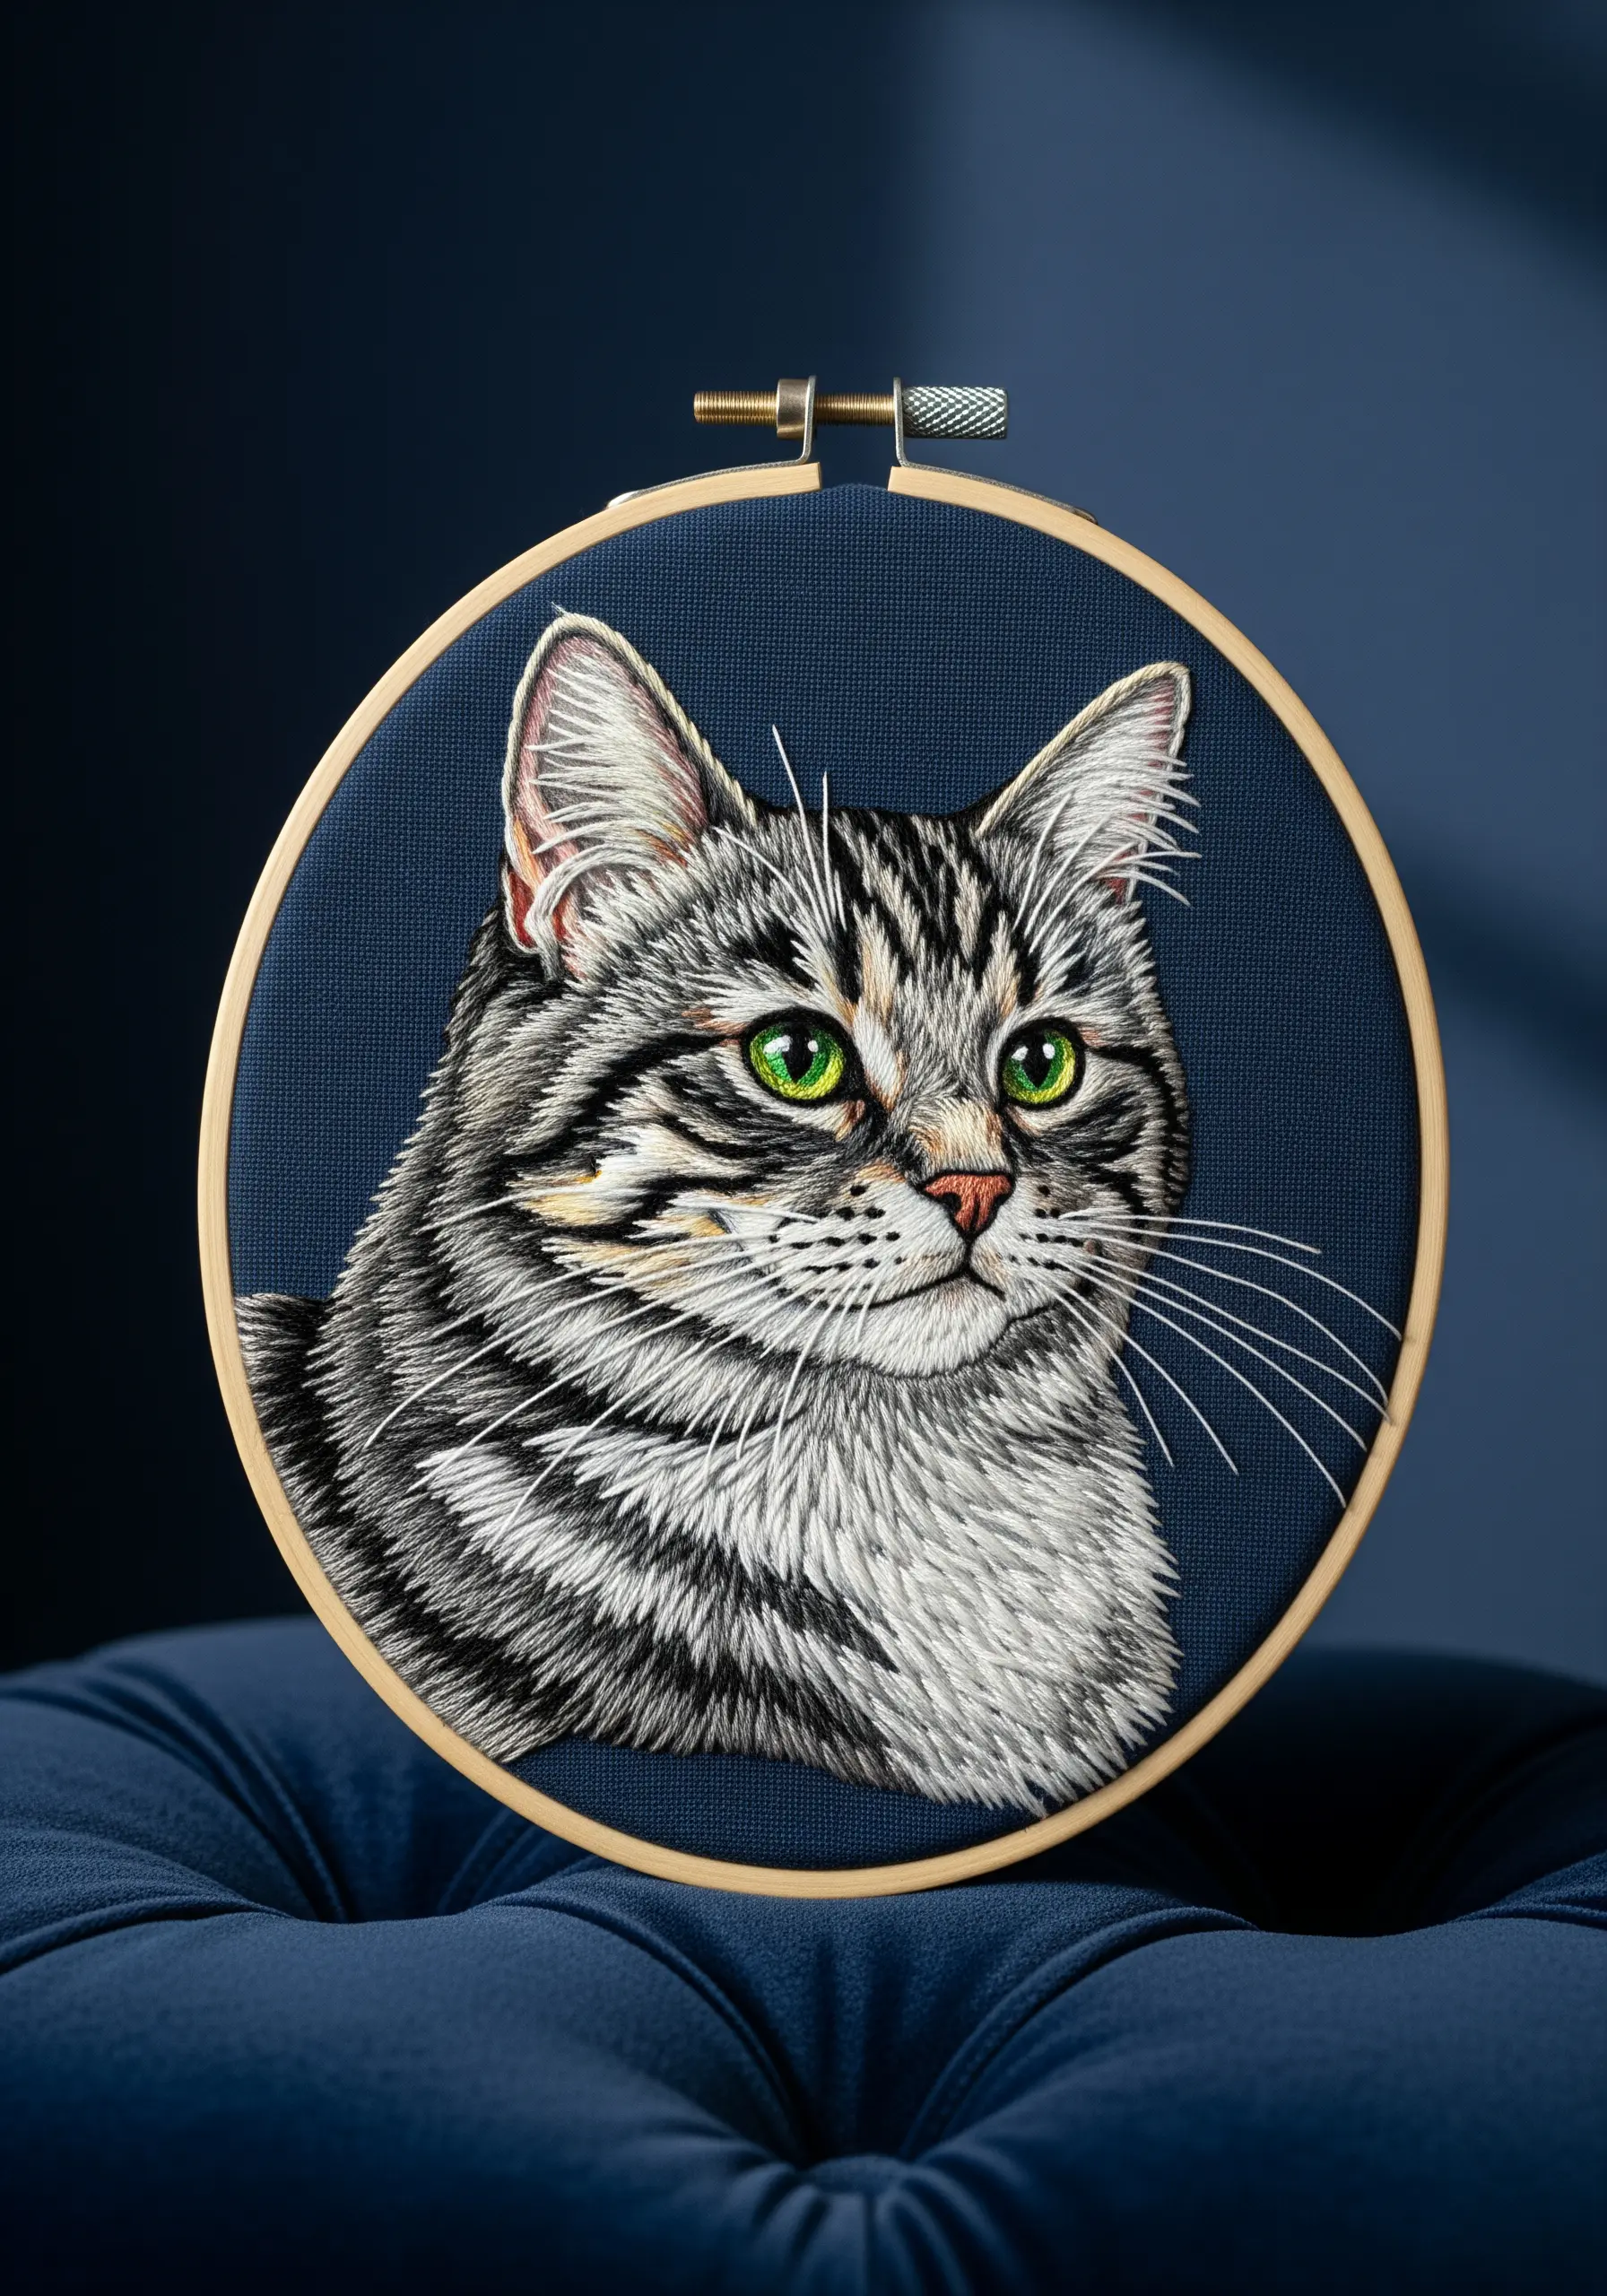
Capture the likeness of a beloved pet using the long-and-short stitch technique, also known as thread painting.
The key is to blend multiple shades of floss within a single small area to mimic the subtle variations in fur color and depth.
Use single strands of thread for the finest details, like whiskers and the bright reflection in the eyes.
Always stitch in the direction of fur growth to create a convincing, realistic texture that brings the portrait to life.
24. Customize Apparel Instantly with Embroidered Patches
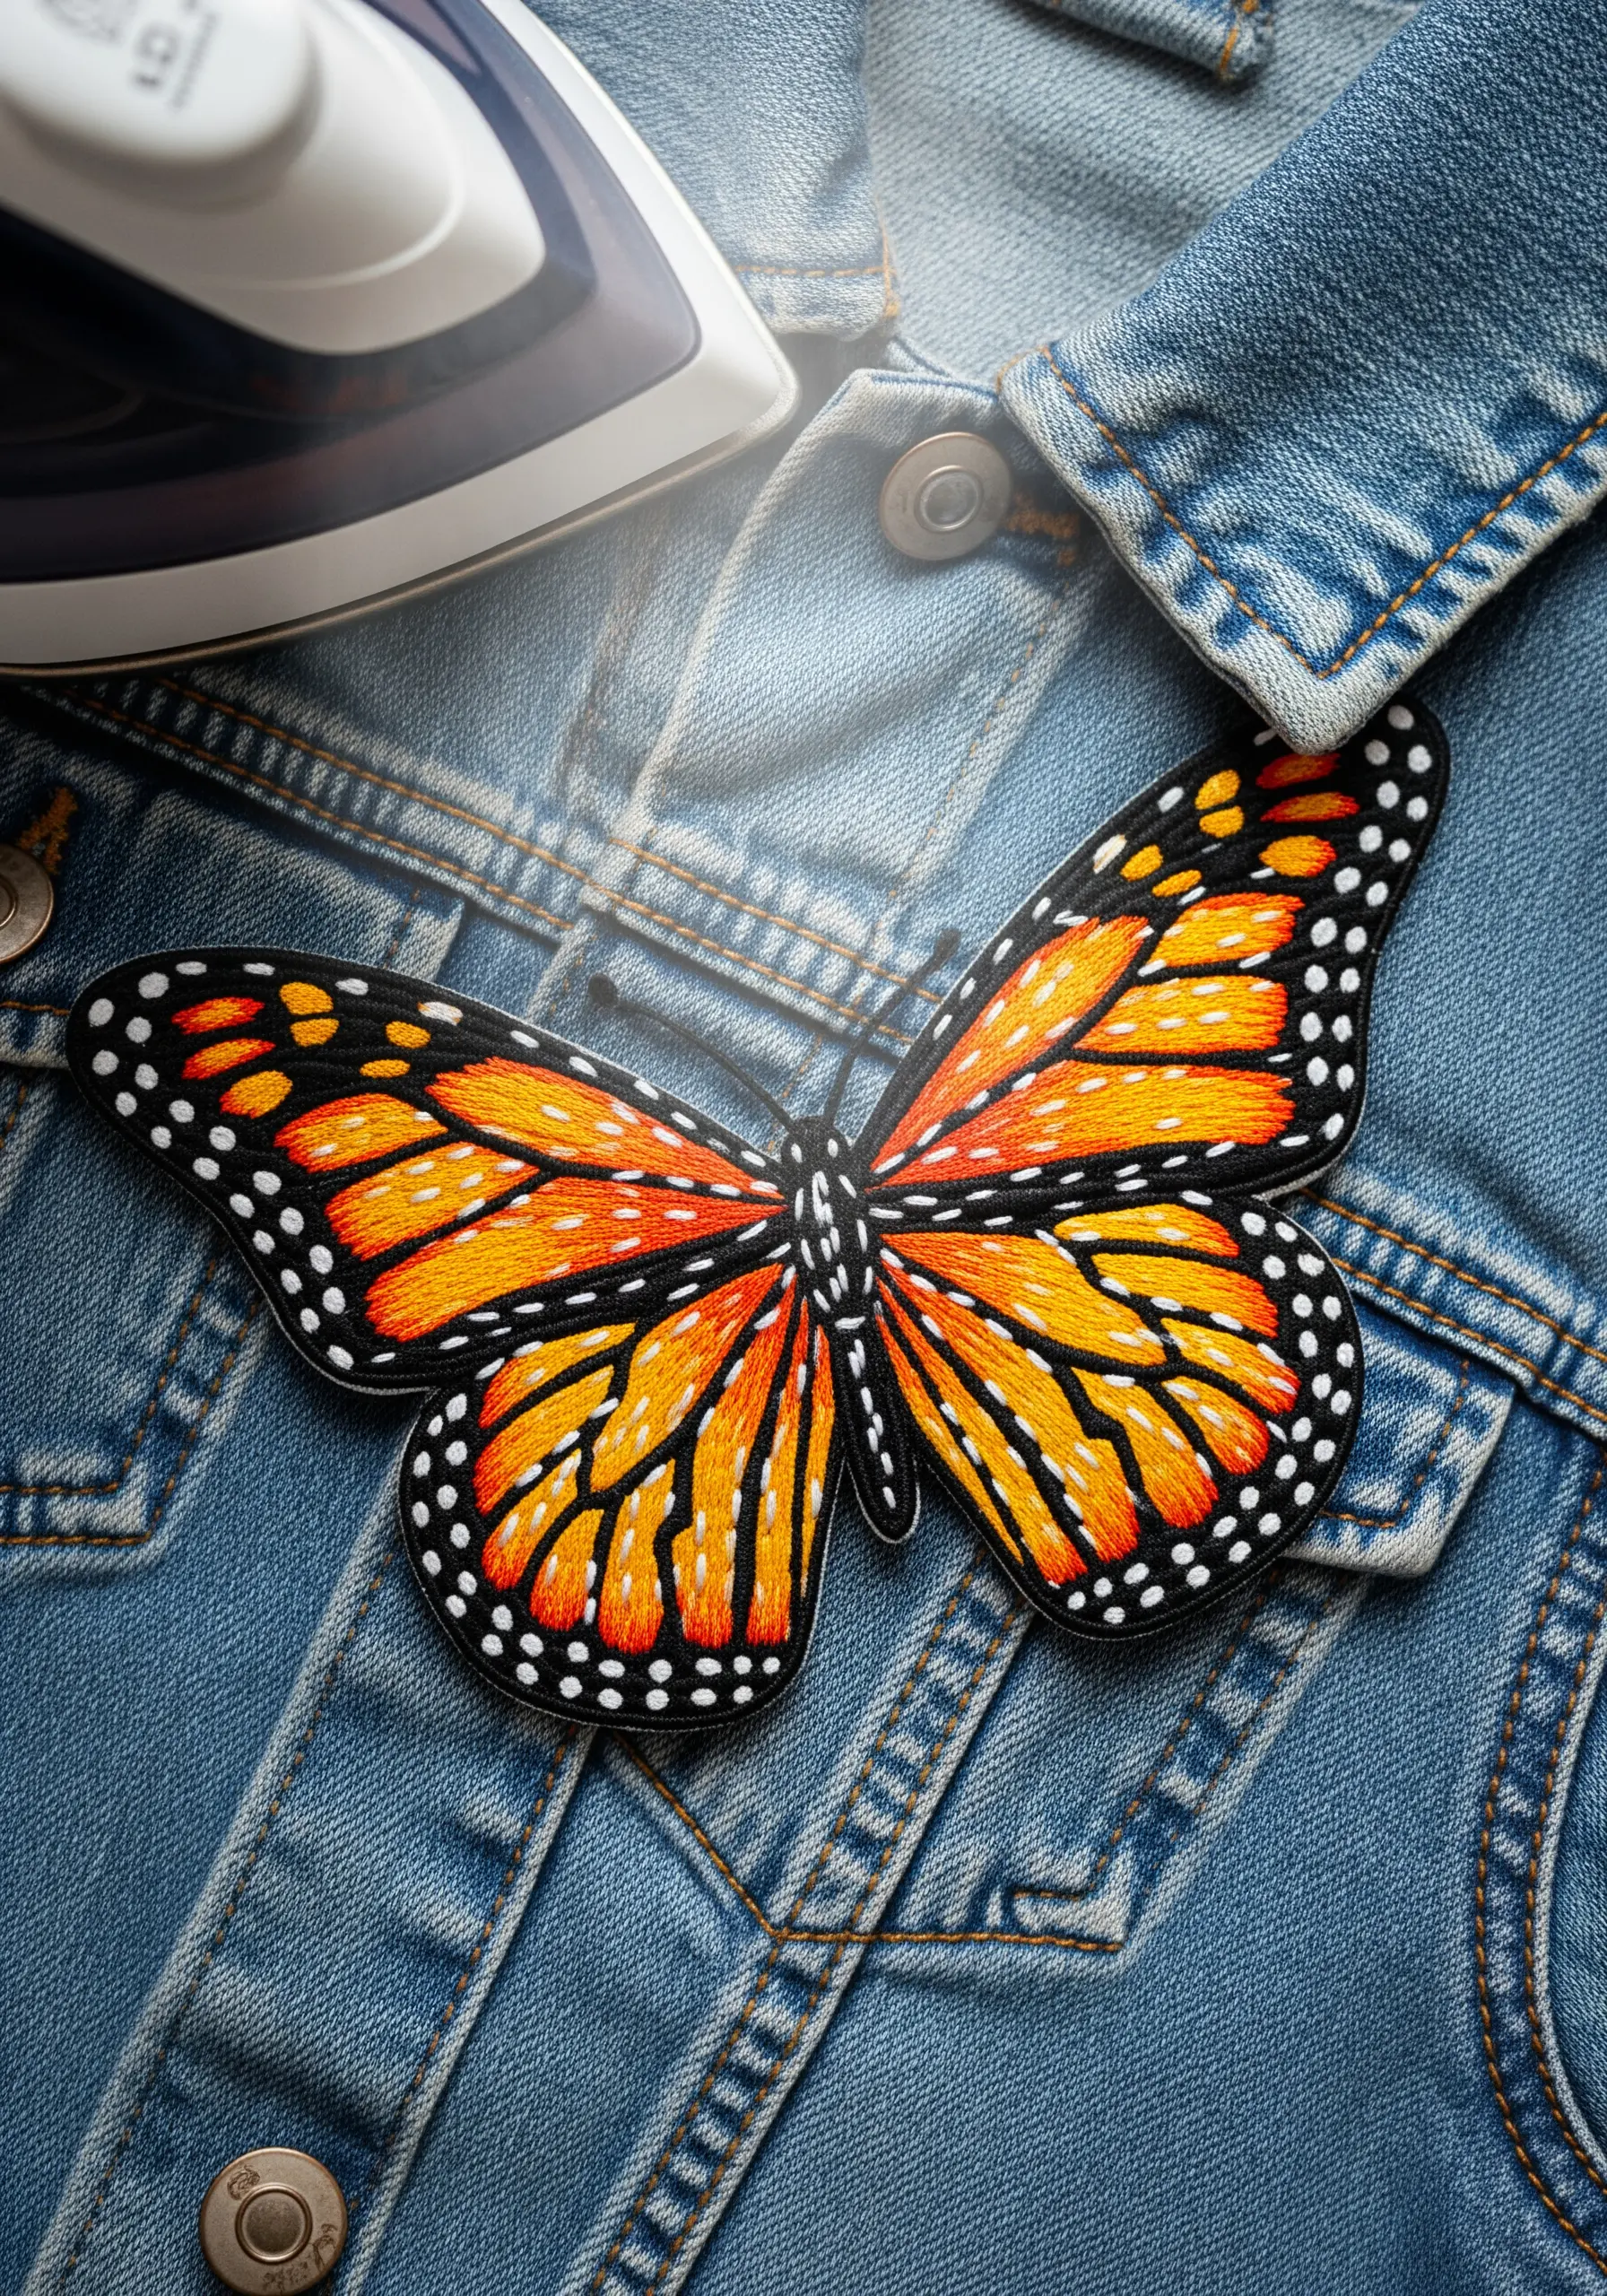
An embroidered patch is the fastest way to add a detailed, personal touch to a denim jacket or backpack.
For a professional look, choose a patch with a ‘merrowed’ or satin-stitched border, which seals the edges and prevents fraying.
When applying with an iron, use a press cloth (a simple piece of cotton fabric) between the iron and the patch.
This protects the delicate threads from direct heat, ensuring the colors stay vibrant and don’t melt.
25. Layer Beads and Sequins for Opulent Texture
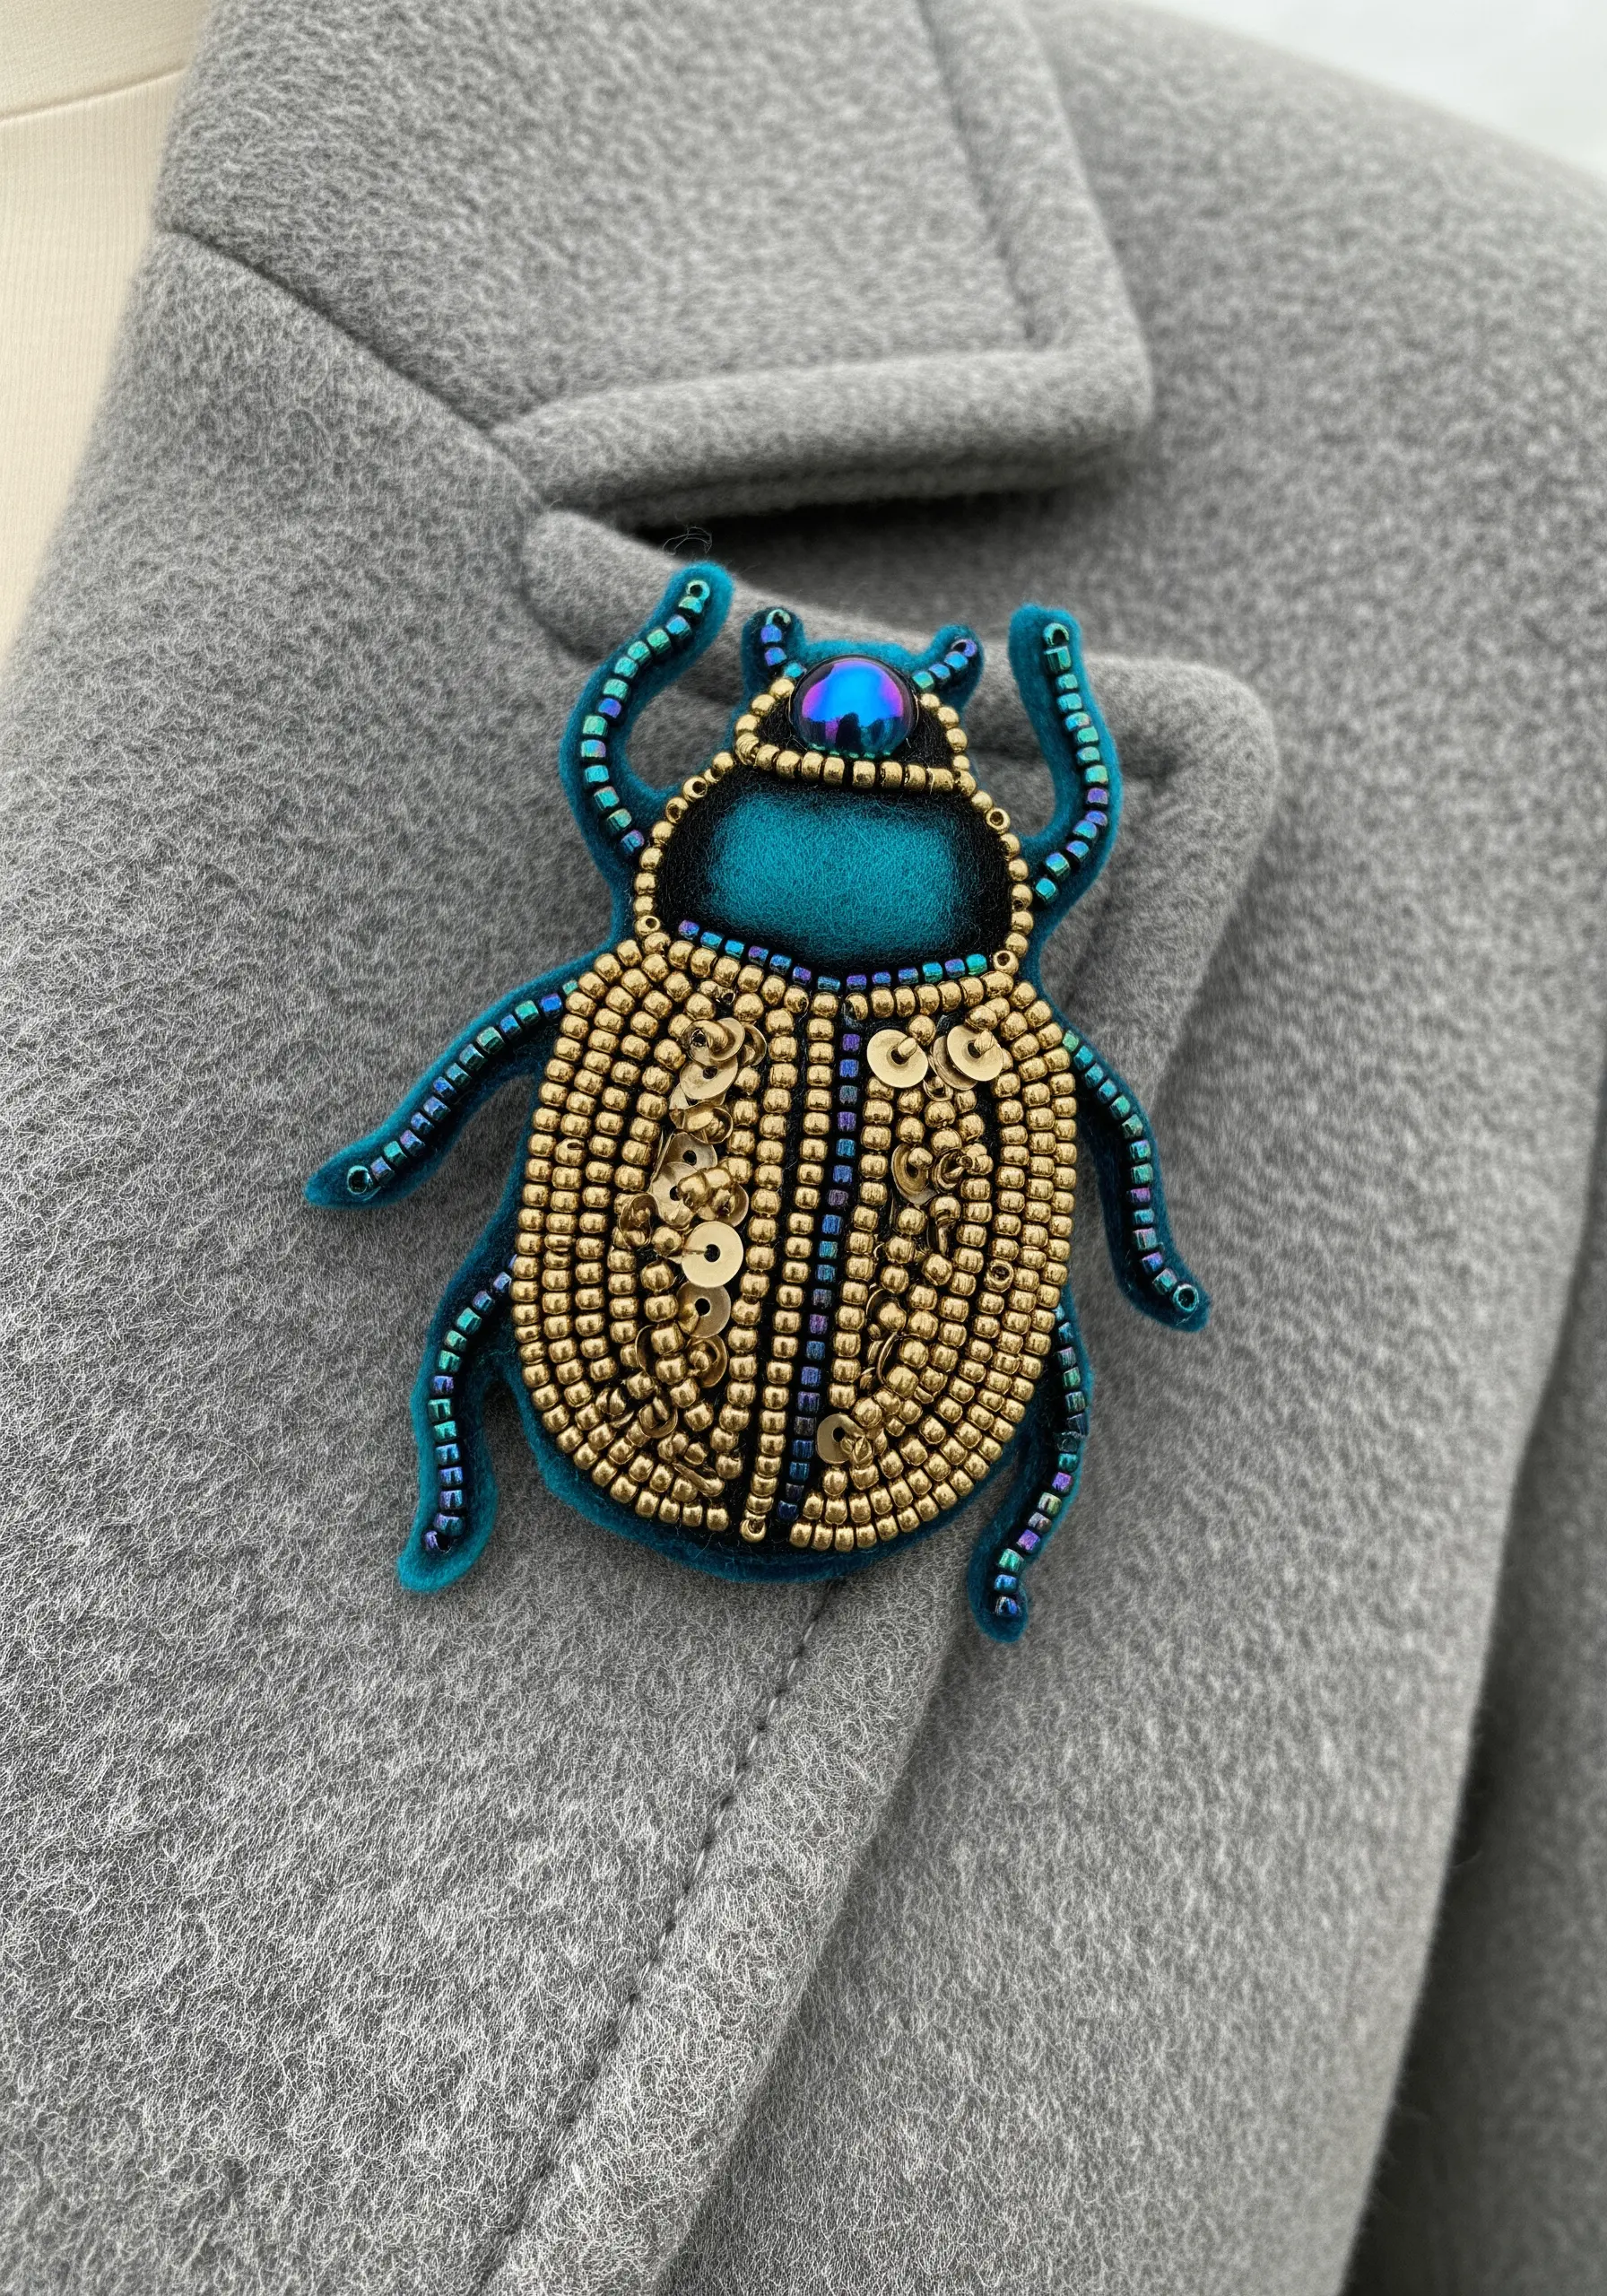
Build a luxurious, dimensional brooch by layering different embellishments on a felt base.
Use rows of seed beads for the main body to create a solid, textured surface that follows the contours of the shape.
Add flat sequins for broad areas of shimmer, and use larger, uniquely shaped beads or cabochons as focal points.
The combination of textures—granular beads, flat sequins, and smooth stones—creates a rich, tactile piece of wearable art.
26. Achieve Smooth Cursive with a Padded Stem Stitch
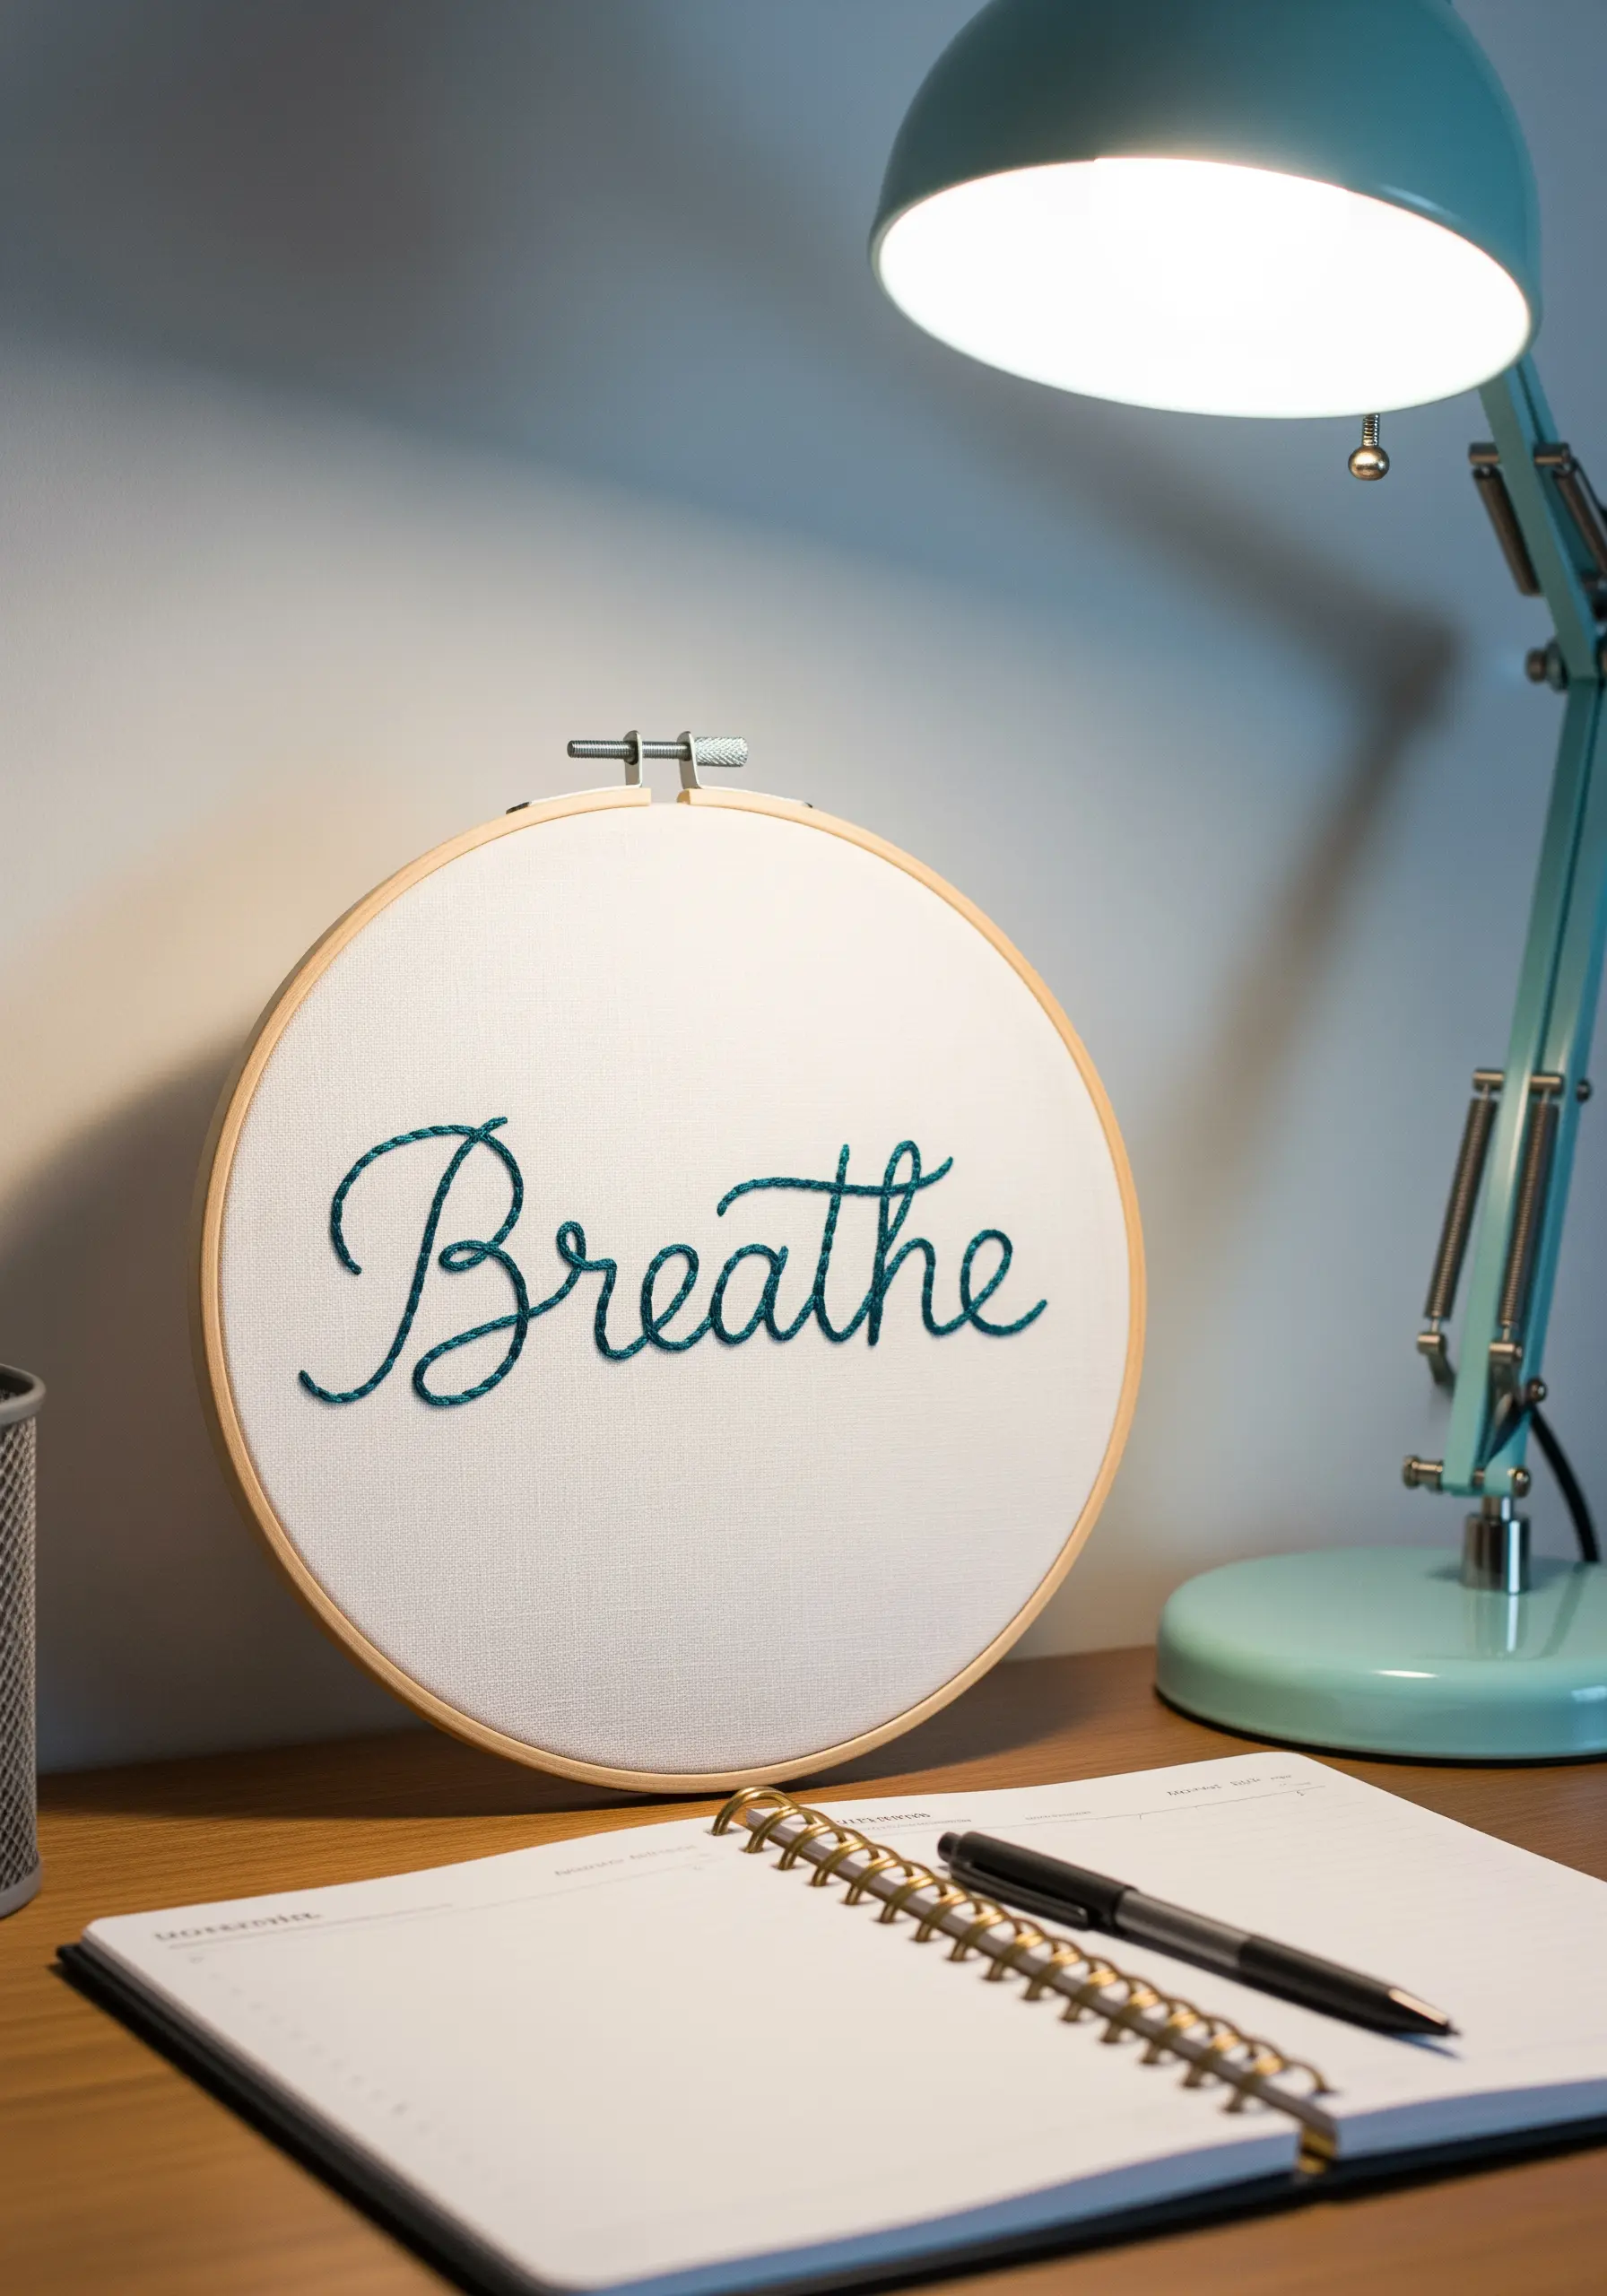
To give your embroidered words a raised, cord-like appearance, use a padded stem stitch.
First, create a foundation of simple straight stitches along the shape of the letters.
Then, work your stem stitch directly over this padding, which lifts the final stitches off the fabric.
This simple extra step gives your script more dimension and presence. Use at least four strands of floss for a noticeably rounded and elegant line.
27. Add a Personal Touch to Scented Sachets
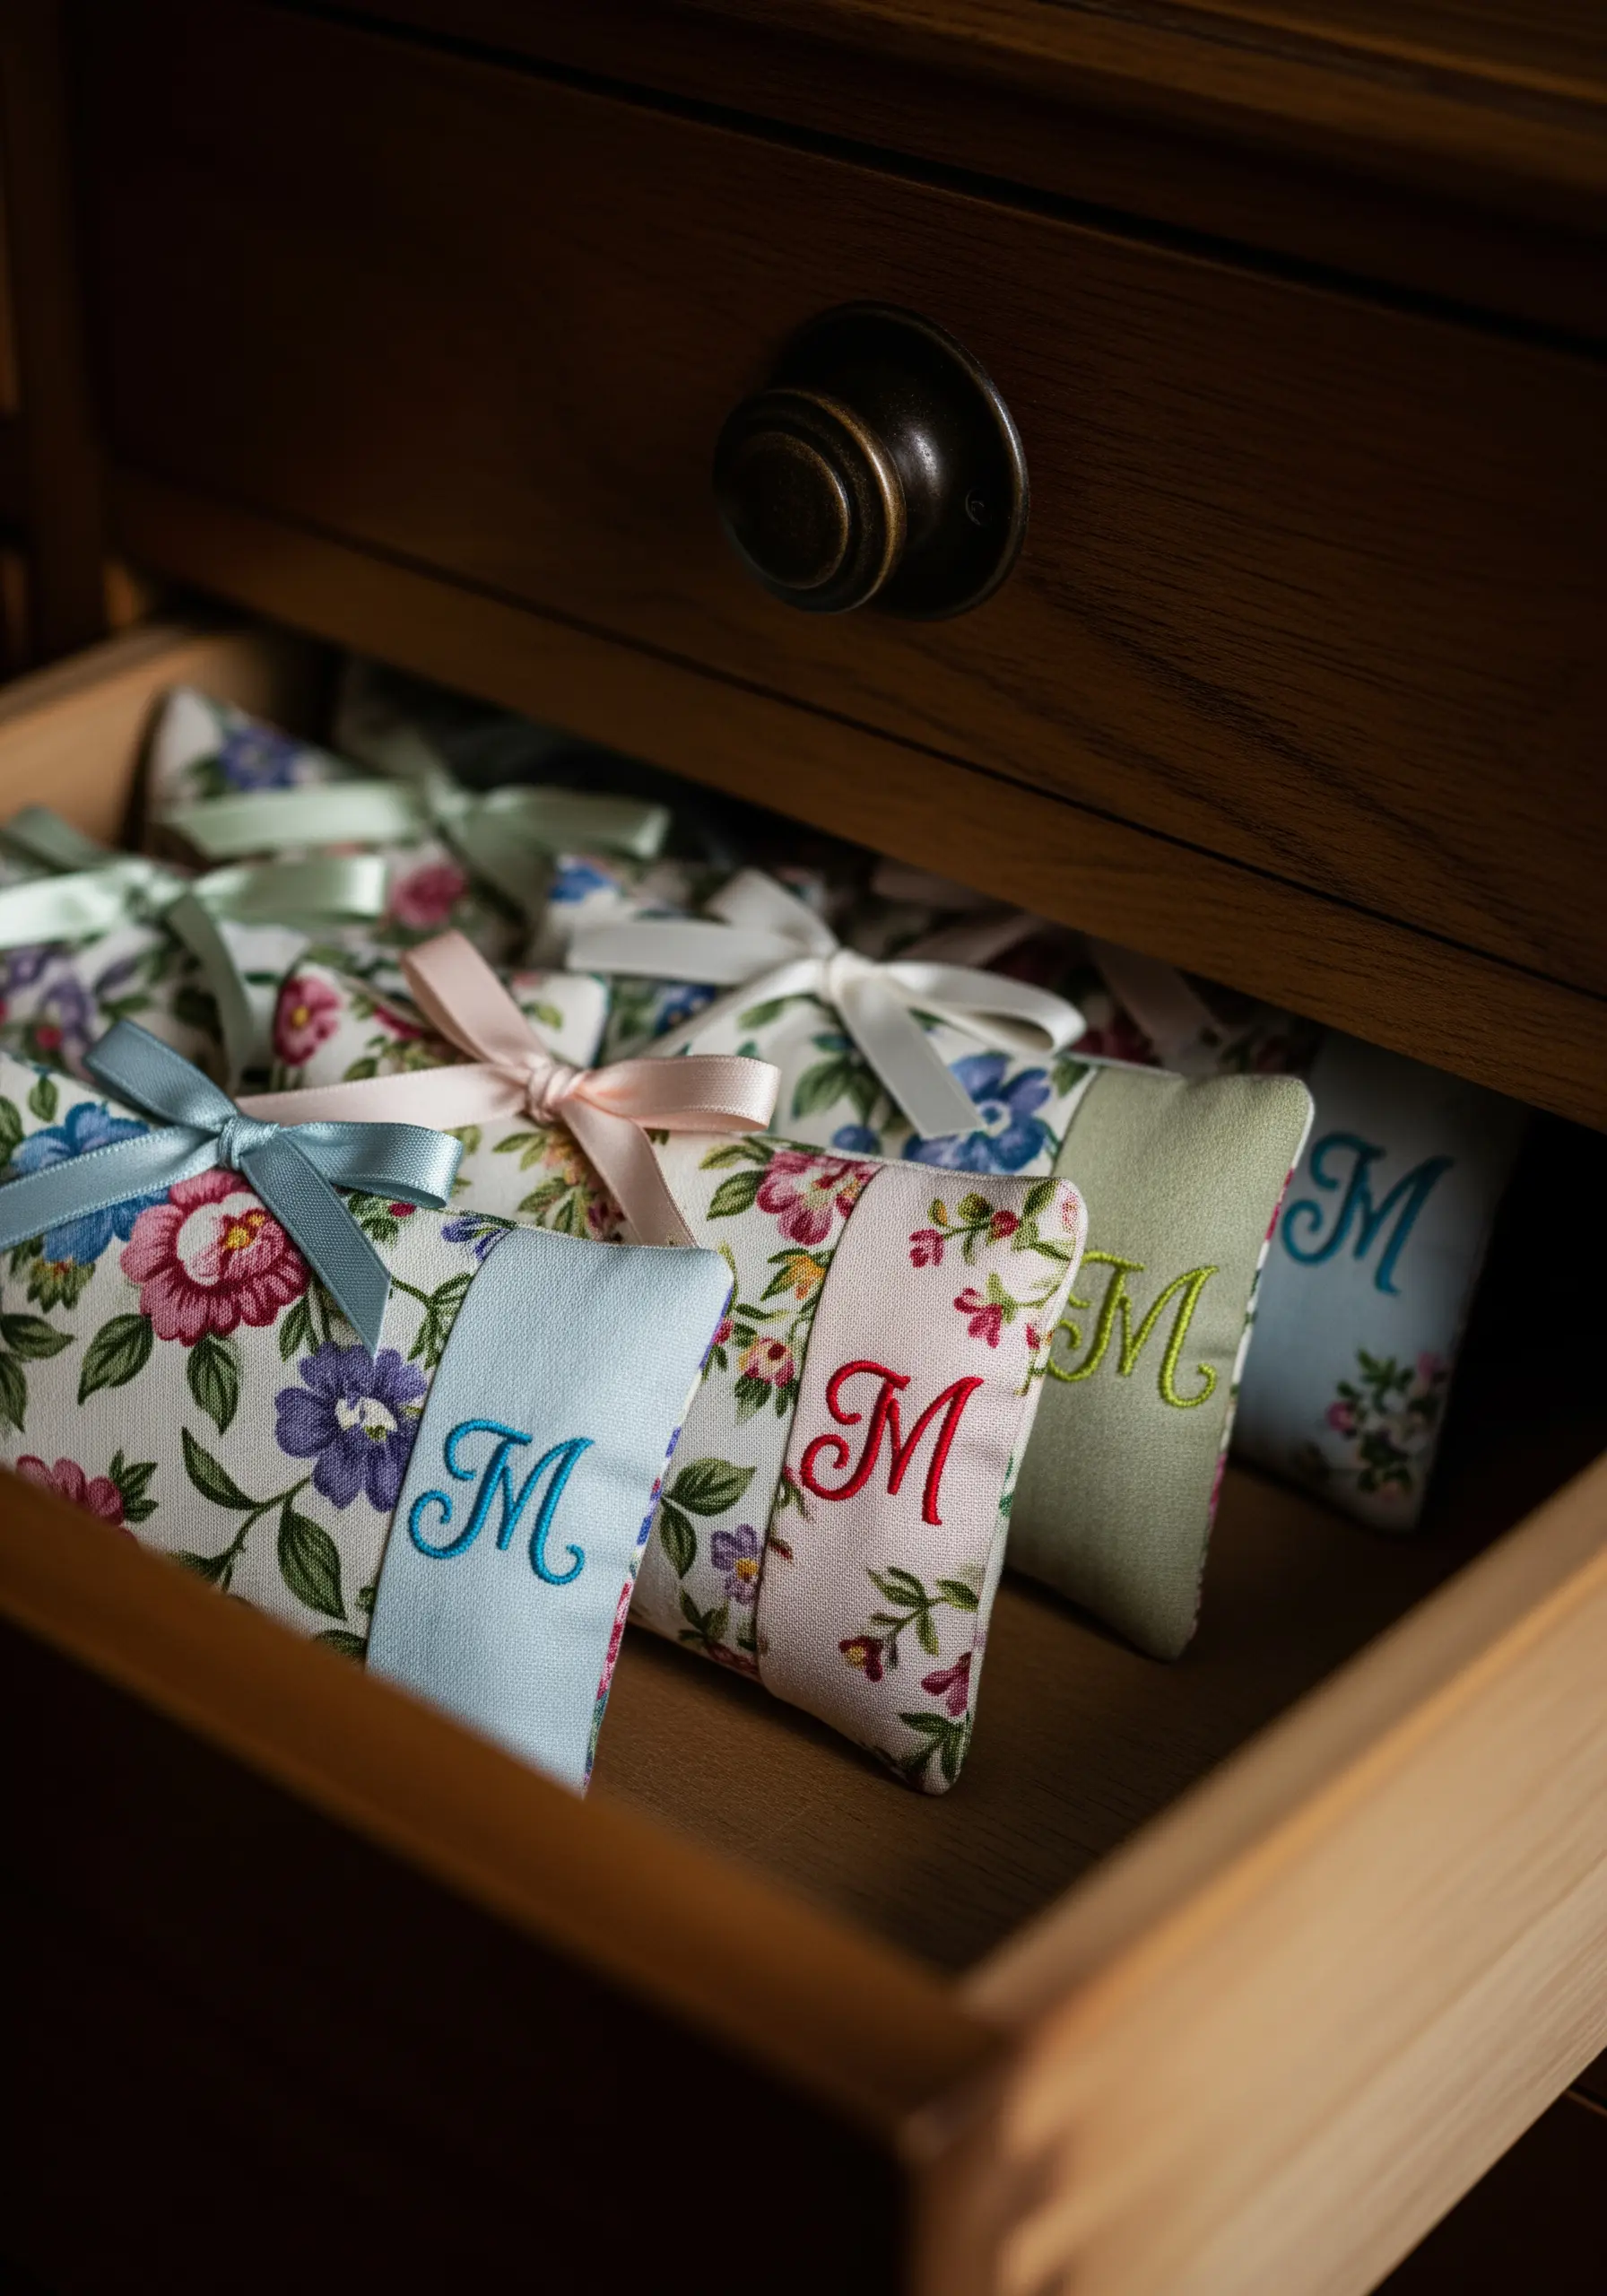
Elevate simple lavender sachets with an elegant, machine-embroidered monogram for a bespoke feel.
The precision of machine embroidery allows for intricate, flawless script that provides a beautiful contrast to soft floral or linen fabrics.
Choose a thread color that coordinates with the fabric print for a harmonious look, or a contrasting color for a bold statement.
These make for thoughtful, handmade embroidery gifts that are both beautiful and functional.
28. Explore Knotting for Structural Textile Art
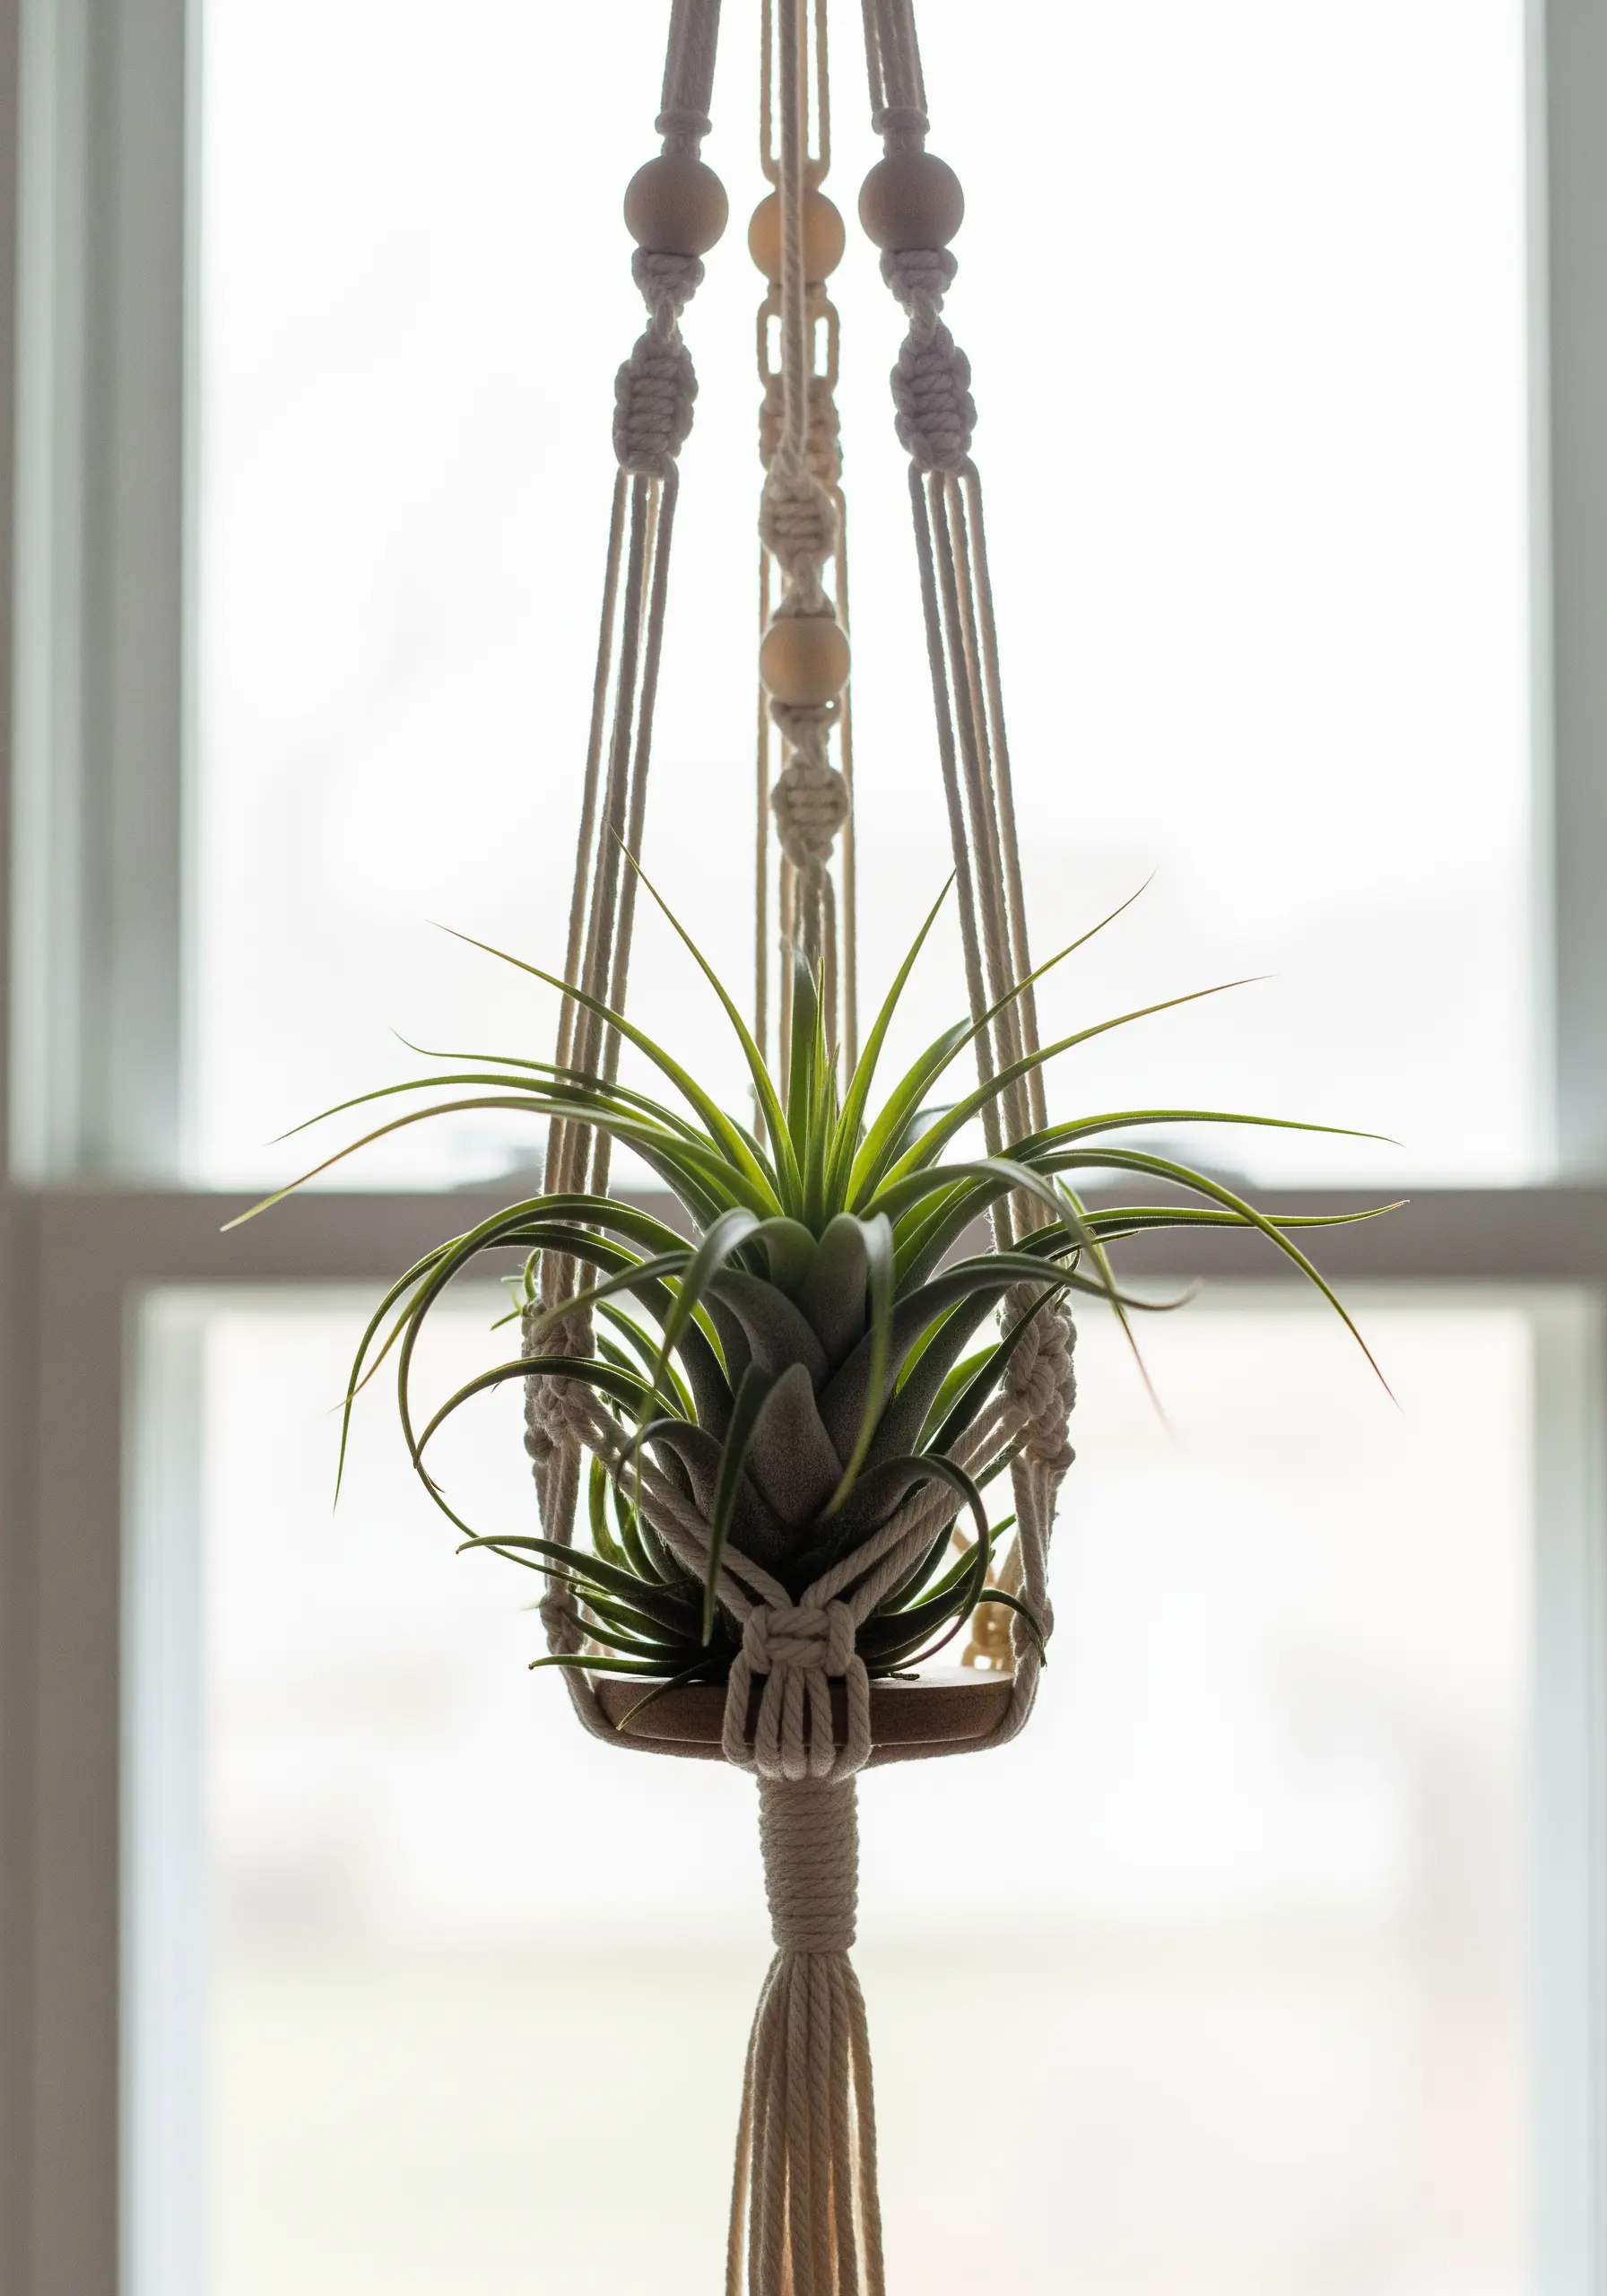
Take a break from the needle and explore macrame, the art of decorative knotting.
A simple plant hanger can be created using just a few basic knots: the lark’s head to attach the cords, the square knot to form the body, and a wrapping knot to finish the base.
The beauty of macrame lies in the rhythm and structure of the knots themselves, creating a functional piece of decor from simple rope.
This project is a perfect entry point into three-dimensional fiber art.


