

Before you pick up your next project, I want you to pause and think about the small details that transform a simple craft into a piece of personal art.
It’s rarely about learning a hundred complex stitches. More often, it’s about understanding how to use one or two stitches with intention—how to adjust your thread weight for emphasis, how to create texture that invites touch, or how to choose a color palette that brings a sense of calm to your space.
These ideas are your guide to making those subtle, powerful choices. Let’s move beyond just following patterns and start making thoughtful decisions that will elevate every piece you create, turning your small corner of the world into a true reflection of you.
1. Paint a Landscape with Thread and Texture

Create atmospheric depth in your landscape hoops by varying your stitch direction and density.
Use single-strand long-and-short stitches for the sky to create a soft, blended sunset effect, keeping the lines horizontal to suggest calmness.
For the water, switch to two strands and a slightly more varied backstitch to mimic movement and reflection.
In the foreground, use French knots and detached chain stitches (lazy daisies) for wildflowers, varying the height and color to build a sense of natural, untamed growth.
This contrast in texture is what separates a flat image from an immersive piece of embroidery that captures nature’s textures.
2. Elevate Your Space with Macrame Knots

Transform a simple cord into a structured, elegant plant hanger by mastering knot consistency.
Focus on maintaining even tension for every square knot and half hitch; this ensures your design hangs straight and looks professionally crafted.
Incorporate sections of spiral knots (half square knots repeated in one direction) to introduce a dynamic, twisting element that contrasts with the flatter sections.
Leaving a generous, neatly trimmed tassel at the bottom provides a satisfying visual anchor to the entire piece.
3. Craft a Geometric Quilted Moment
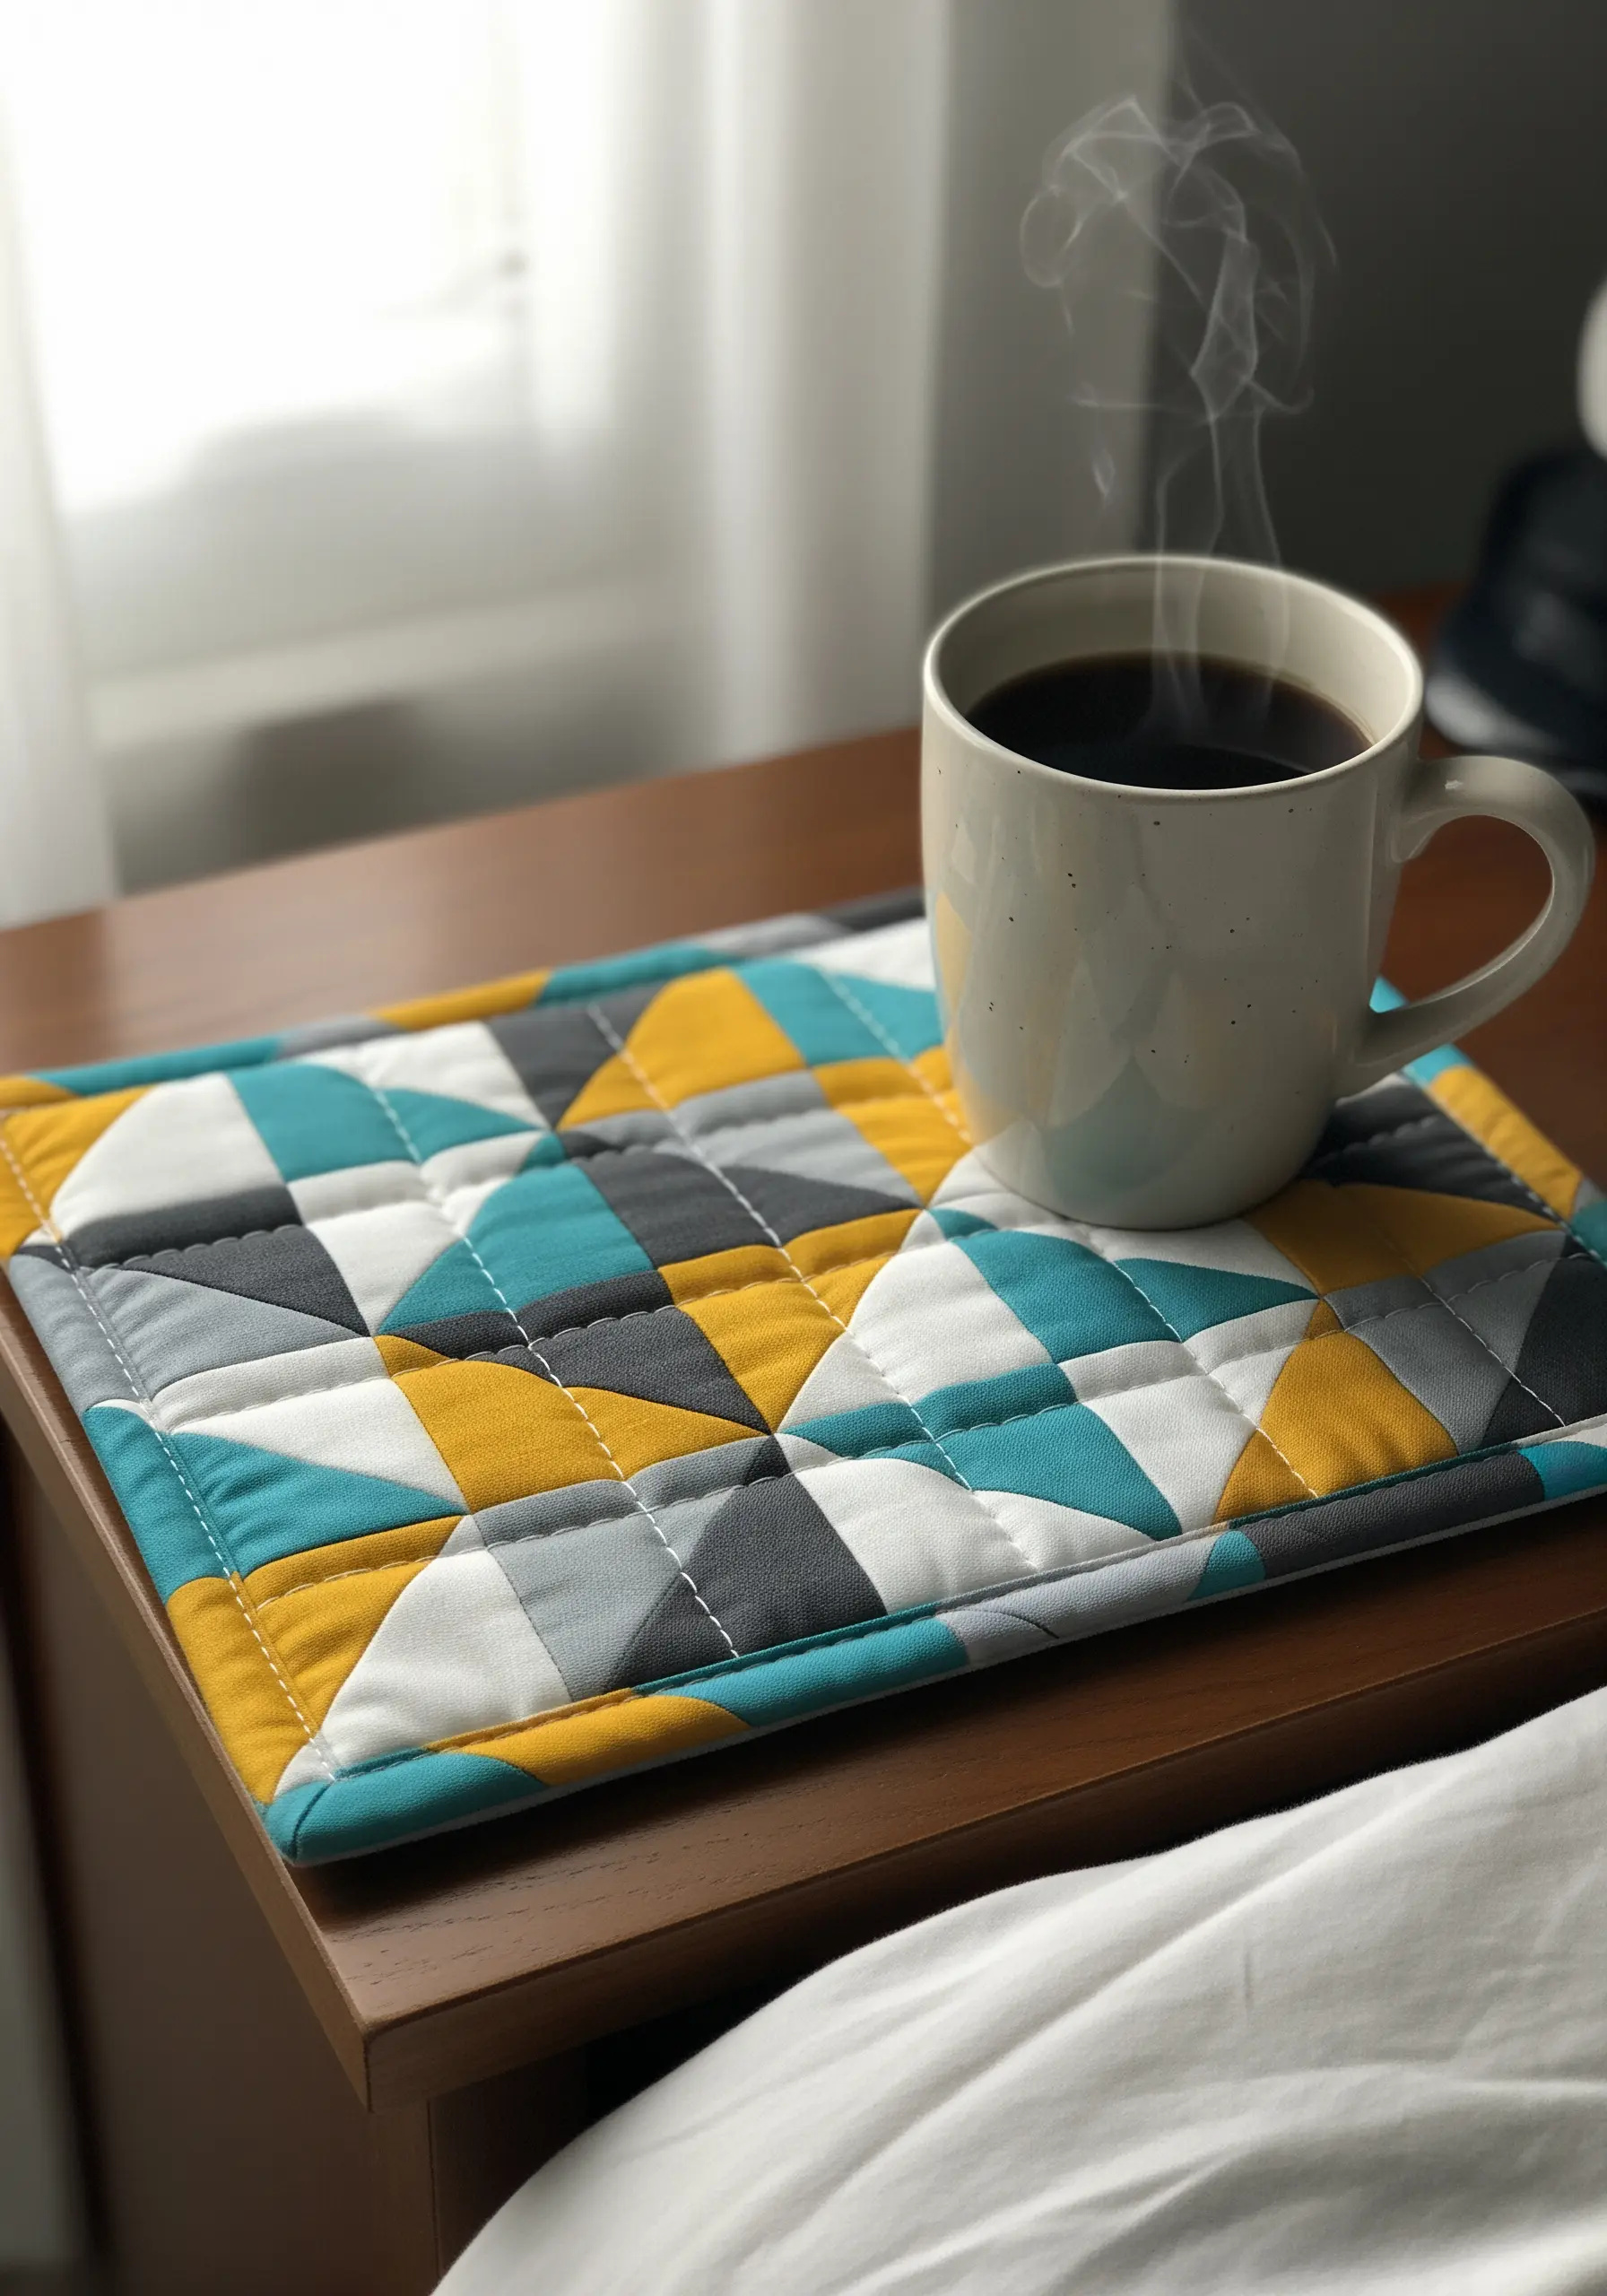
Create a modern, functional art piece like a mug rug by focusing on precision quilting.
After piecing your geometric top, use straight-line quilting with a walking foot to add texture that complements the angles.
Stitch ‘in the ditch’ (along the seam lines) to define the shapes, then add parallel lines across the larger blocks for extra dimension.
A contrasting thread color for your quilting lines will turn the stitches themselves into a key design element, highlighting the clean geometry.
4. Define Abstract Shapes with Punch Needle
Punch needle art gains its professional finish from consistent loop height and clean outlines.
To create those satisfyingly dense, plush areas, ensure your punch needle is set to a consistent depth and that you push it all the way down with every stitch.
For the crisp borders between colors, use a single row of a contrasting neutral (like white or cream) to define each abstract shape.
This outlining technique makes the colors pop and gives the freeform design an intentional, polished structure.
5. Sew a Bespoke Fabric Planter Cover

Give a standard nursery pot a custom, decorative finish with a structured fabric cover.
Choose a mid-weight canvas or cotton duck fabric, as it has enough body to hold its shape without collapsing.
To ensure the cover is sturdy and stands upright, iron a layer of fusible fleece or heavy interfacing to the wrong side of your main fabric before sewing.
This small step adds structure and gives your finished piece a much more substantial, high-quality feel.
6. Create a Bold Felt Wall Pennant

Make your message pop by focusing on clean appliqué and thoughtful embellishments.
Before cutting your letters from felt, iron a sheet of heat-activated stabilizer to the back; this prevents stretching and allows for razor-sharp edges.
Stitch around the perimeter of the pennant with a simple running stitch in a contrasting color for a handmade, graphic border.
Finish with multicolored yarn tassels that pick up accent colors from your room, tying the piece into your overall decor scheme.
7. Weave a Modern Chevron Bookmark
This intricate pattern is simpler than it looks and relies entirely on knotting consistency.
This technique, known as friendship bracelet weaving, uses a series of simple forward and backward knots to create the chevron shape.
The key to a flat, even weave is to pull each knot with the same amount of tension, sliding it snugly up to the previous row.
Choosing a palette of three to four complementary colors creates a rhythmic, visually pleasing pattern without overwhelming the small scale of the bookmark.
8. Stitch a Calming Lavender Sachet

Elevate a simple sachet by adding dimensional embroidery that hints at the fragrance inside.
For the lavender blossoms, use a padded satin stitch: first create a small satin-stitched underlayer, then stitch over it in the opposite direction for a raised, plump effect.
Use a fine stem stitch for the stems, tapering them near the base to create a natural-looking bouquet.
These delicate lavender stitch ideas on a natural linen fabric create a timeless piece that feels both rustic and refined.
9. Sew a Cheerful Fabric Bunting

The secret to a perfect, playful bunting lies in sharp points and a curated fabric selection.
To get crisp, professional-looking triangle points, trim the seam allowance close to the stitching at the tip before turning it right-side out.
Gently push out the point with a dull, pointed tool like a chopstick or a point turner, then press firmly with an iron.
Create a cohesive look by choosing fabrics from the same collection or with a shared color palette—like pastels with hints of gingham and florals.
10. Craft a Vibrant Decorative Tassel

Make a statement door hanger or drawer pull by focusing on density and a polished finish.
Create an ultra-plush tassel by wrapping thick yarn or multiple strands of thinner yarn around a piece of cardboard a generous number of times—more is always better for a luxe look.
Secure the neck of the tassel by wrapping it tightly and neatly with a contrasting thread, like a metallic gold cord.
Tuck the ends of the wrapping cord securely underneath the coil for a seamless, professional finish.
11. Hand-Stitch a Leather Cord Keeper

Add a touch of handcrafted luxury to your tech accessories with a simple leather project.
Use a thick, waxed thread for stitching; the wax helps the thread glide through the leather and adds durability, while the thickness provides a beautiful visual contrast.
Before stitching, use a wing divider or a ruler to mark your stitch placement evenly along the edge.
This preparation ensures your saddle stitch or whip stitch looks uniform and intentional, elevating the final piece from simple to sophisticated.
12. Craft a Celestial Felt Ornament

Combine simple stitches with sequins and beads to create a rich, textured celestial piece.
Use a blanket stitch around the edge of the felt moon; this stitch not only secures the two pieces together but also creates a decorative, clean border.
Instead of just stitching stars, incorporate tiny silver sequins and seed beads, securing them with a single stitch through the center.
This mix of matte thread and shimmering embellishments creates celestial micro-embroidery that catches the light beautifully.
13. Design a Modern Quilted Wall Hanging

Turn simple fabric blocks into a piece of abstract art through the power of dense, straight-line quilting.
The texture comes from stitching parallel lines very close together—about 1/4 inch apart—across each color block.
Varying the direction of the quilting lines (horizontal, vertical) for different blocks adds another layer of subtle, graphic interest.
This technique, known as matchstick quilting, adds incredible texture and a modern, architectural feel to the soft fabric.
14. Embroider a Functional Valet Tray

Personalize a practical object by stitching your design before construction.
Embroider your floral wreath onto a single flat piece of heavy linen or canvas. This is far easier than trying to stitch inside a pre-made object.
Use woven wheel stitches for the flowers to create a raised, dimensional effect that stands out against the flat fabric.
Once the embroidery is complete, you can then stitch the corners to form the tray, turning your hoop art into one of your easy small embroidery patterns for your everyday essentials.
15. Wrap a Frame in an Ombré Crochet

Upgrade a simple photo frame with the soft texture of crochet.
Use an ombré or gradient yarn to achieve the smooth color transition without having to change threads constantly.
Work a series of tight single crochet stitches around the frame, ensuring your tension is consistent to avoid gaps or bunching.
This simple technique completely transforms the object, adding softness, color, and a handmade touch that draws the eye.
16. Create Shibori-Dyed Textiles

Achieve striking, geometric tie-dye patterns using the Japanese art of Shibori.
Instead of randomly scrunching the fabric, fold it precisely into squares or triangles (the Itajime technique) or wrap it around a pole (Arashi).
The key to crisp white lines is binding your folded fabric very tightly with string or rubber bands before submerging it in the indigo dye.
This controlled approach to dyeing results in beautiful, repeating patterns that feel intentional and artistic.
17. Design a Bold Appliqué Cushion
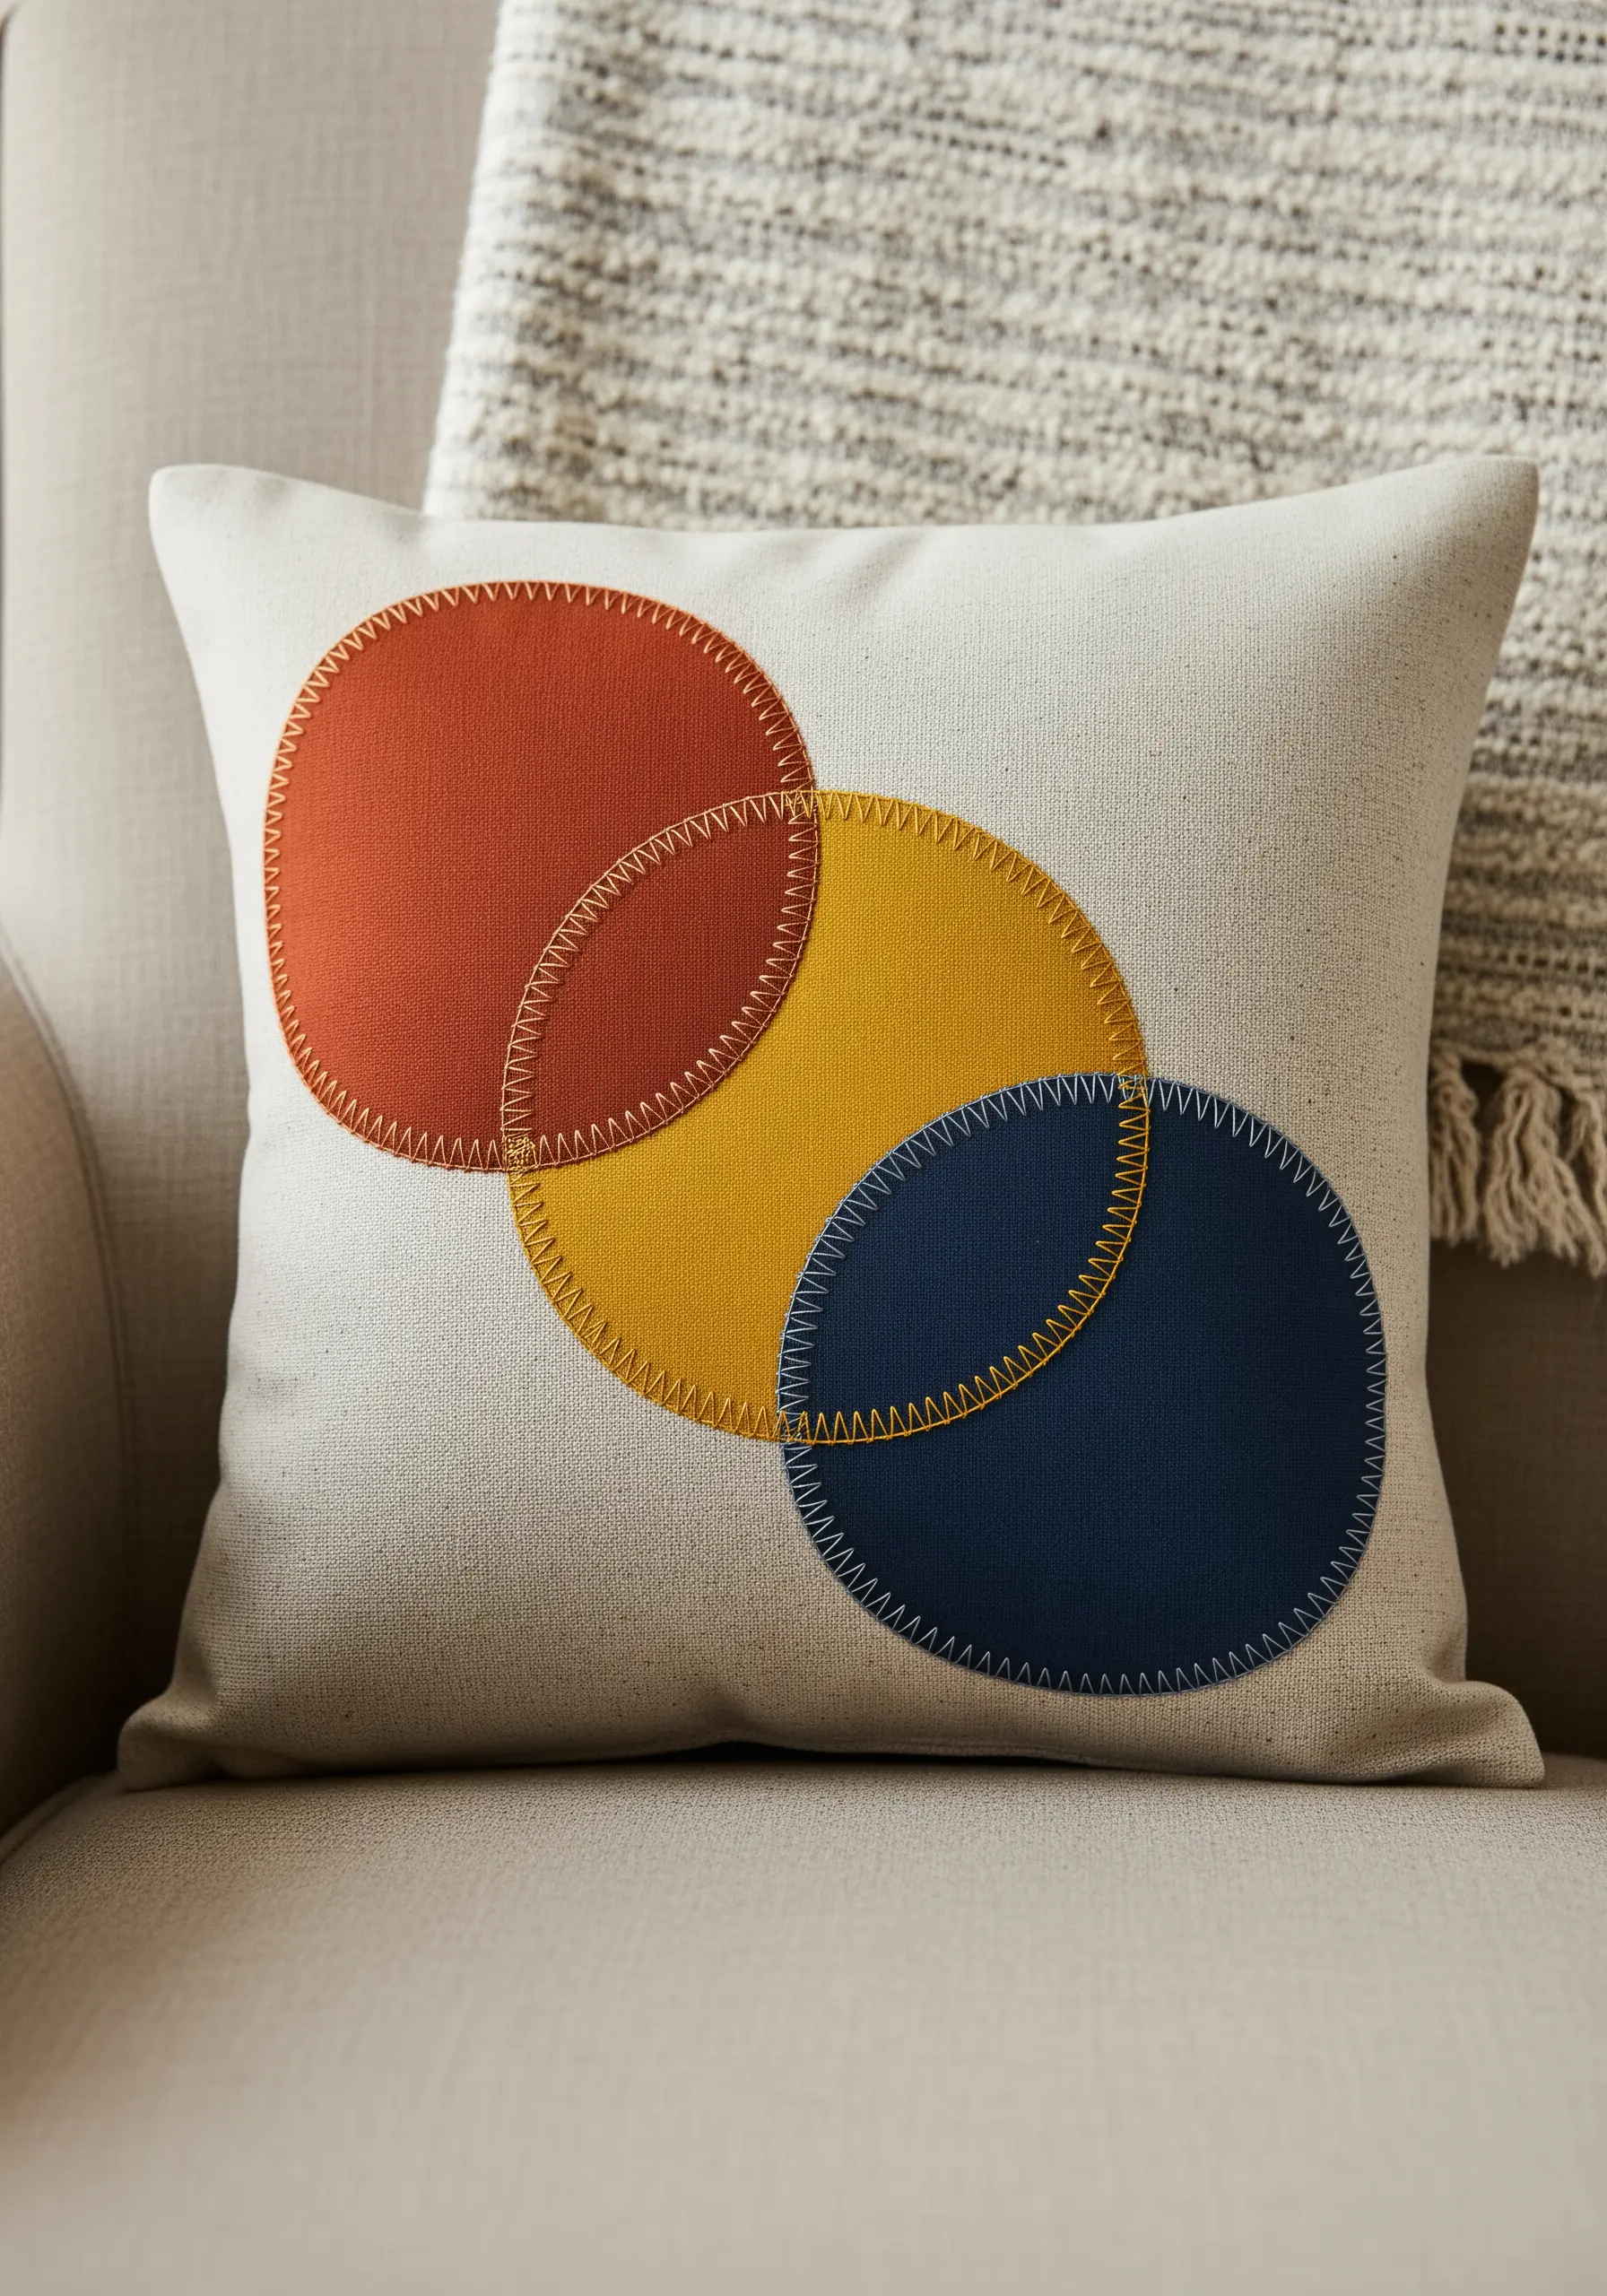
Create a graphic, modern pillow using layered appliqué and a decorative finishing stitch.
Cut simple circles from felt or non-fraying cotton canvas in a cohesive color palette. Use a temporary spray adhesive to hold them in place before sewing.
Instead of a plain straight stitch, use a contrasting blanket stitch or a wide zigzag stitch around the edges of each circle.
This not only secures the appliqué but also turns the stitching into a prominent, textural design element that unites the overlapping shapes.
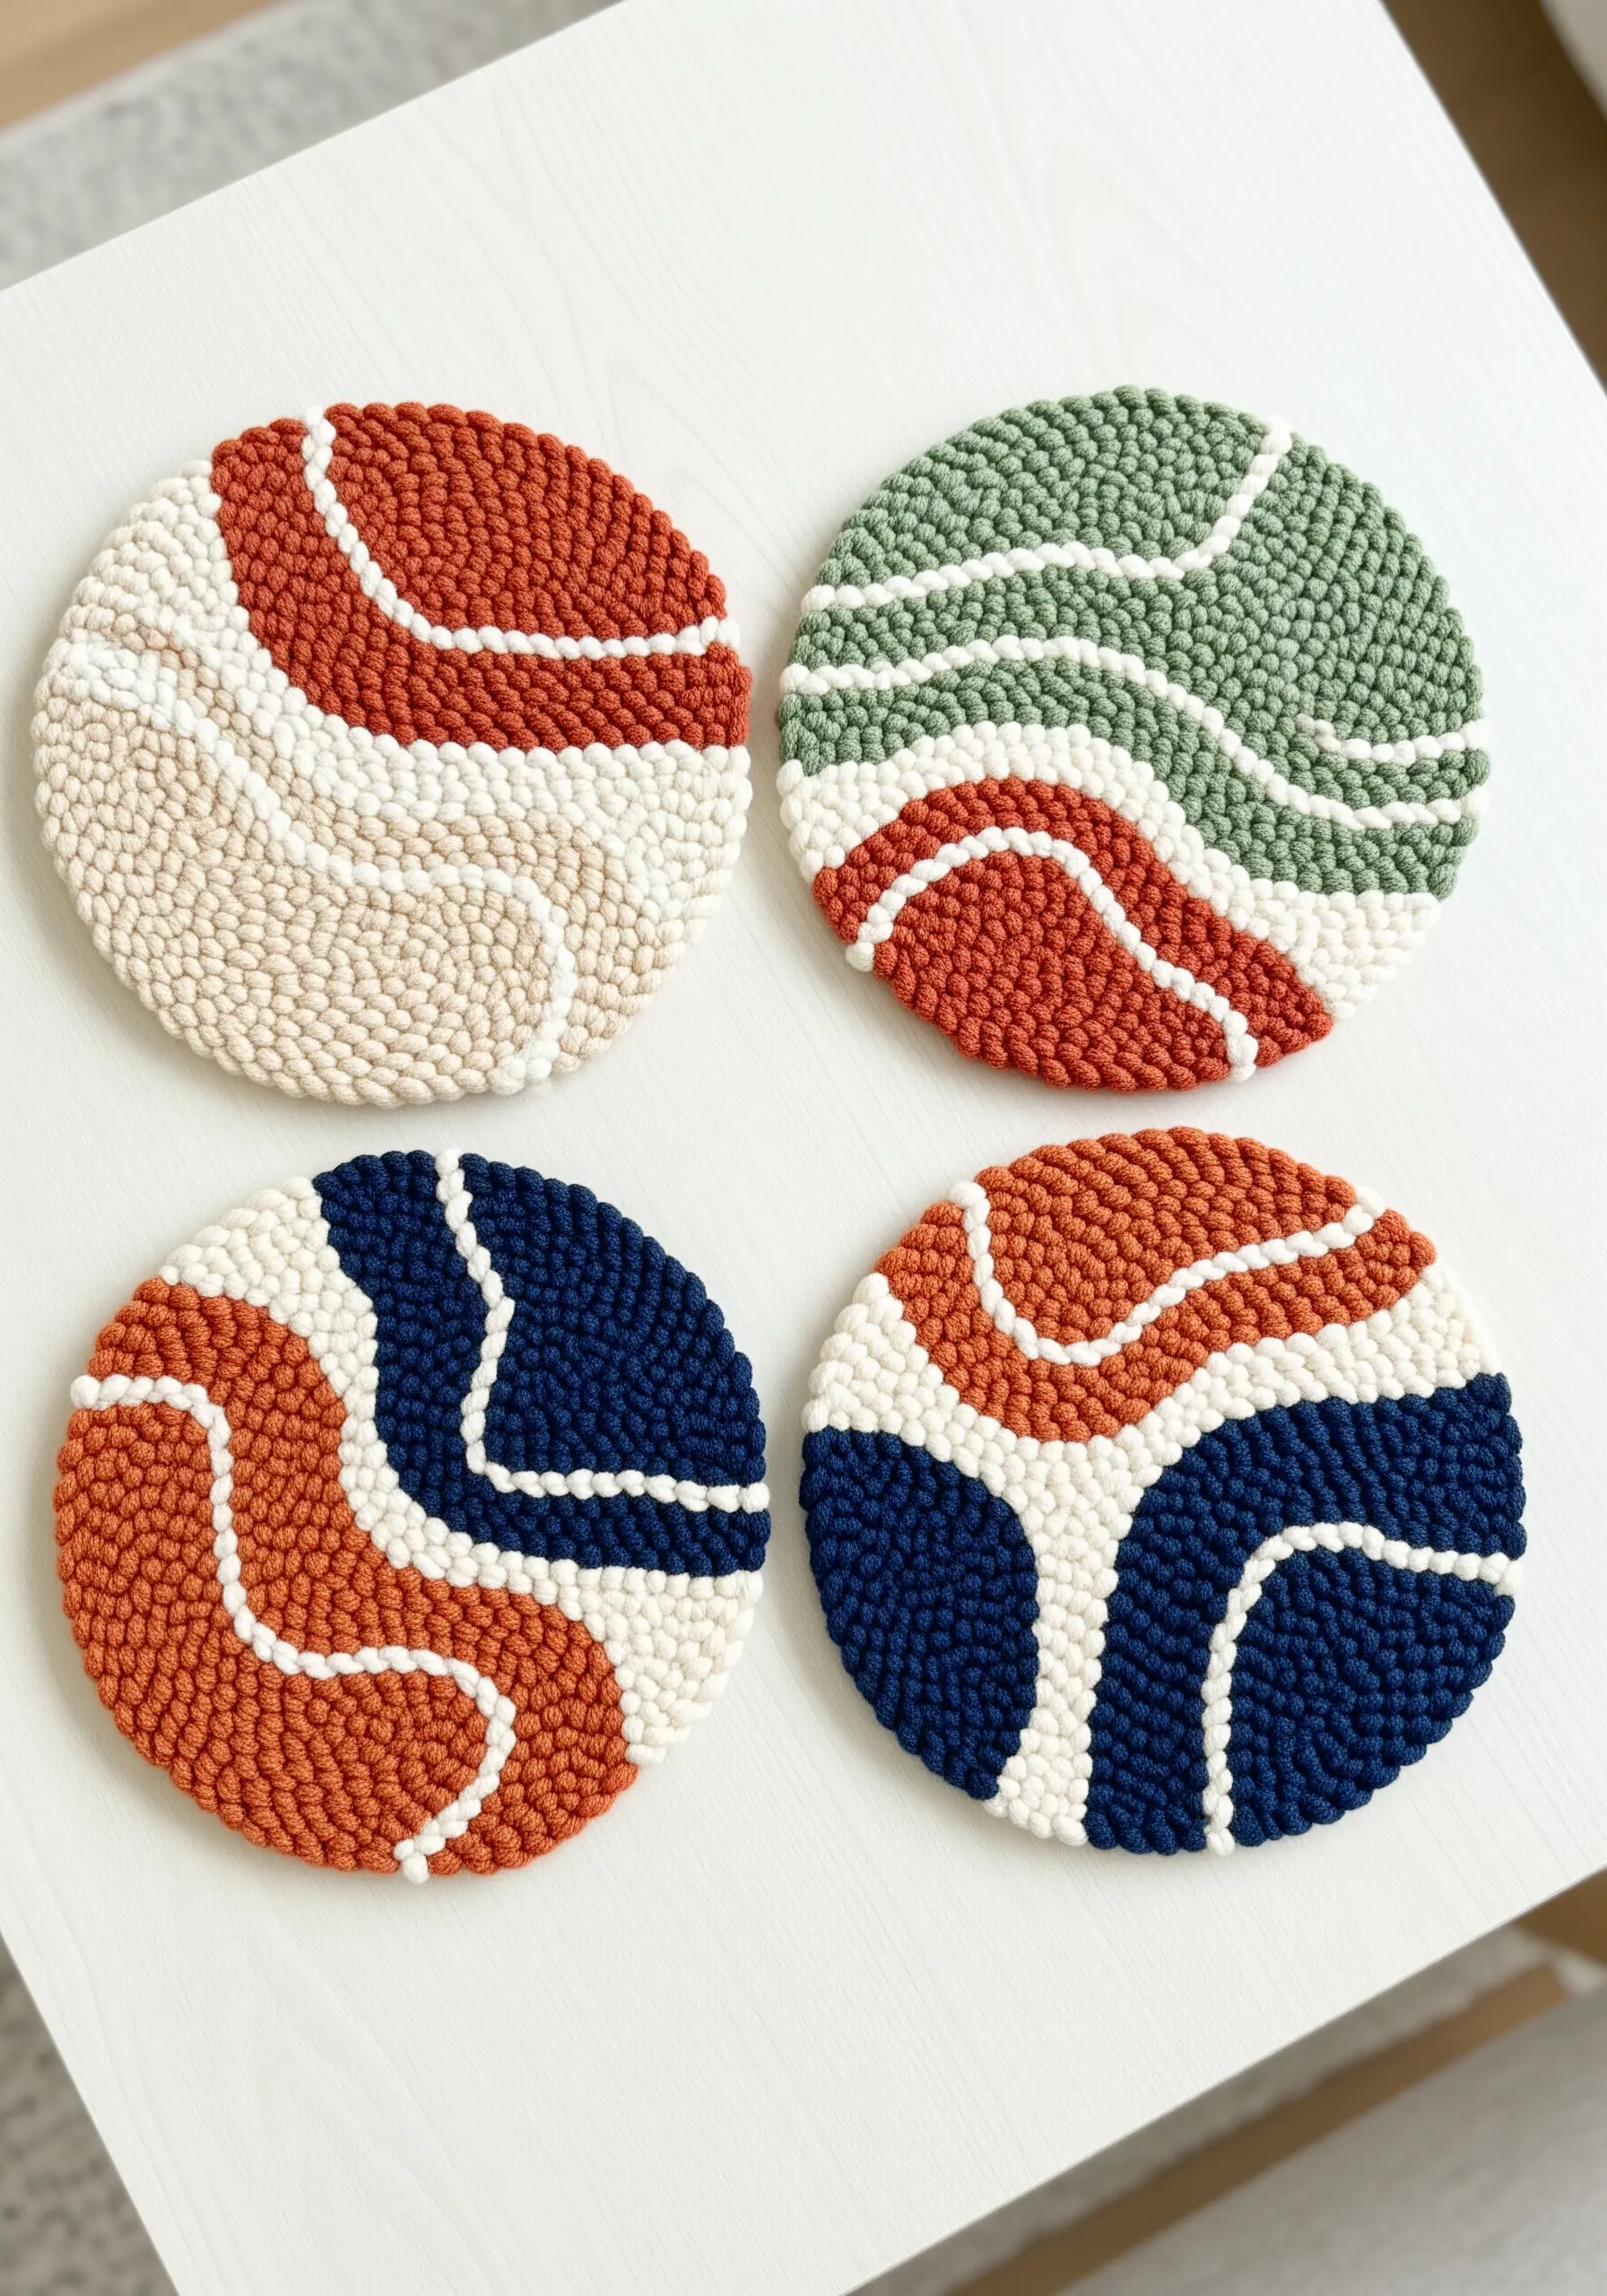
18. Weave a Fringed Macrame Coaster
Craft a bohemian-inspired coaster by coiling rope and adding a soft, fringed edge.
Start with a tight spiral of cotton rope, stitching it together by hand or with a sewing machine’s zigzag stitch.
To introduce the grey accent, simply wrap the main rope with colored embroidery floss or thin yarn for several rotations before continuing to coil.
The fringe is made from lark’s head knots. Attach dozens of small cords to the outer ring, then unravel and comb them out to create a soft, fluffy border.
19. Stitch an Inspirational Wall Banner

Give embroidered text a polished, three-dimensional look using a padded satin stitch.
First, outline your letters with a simple backstitch or split stitch. Then, fill the shape with satin stitches worked over that outline.
This underlying layer of thread lifts the satin stitch, making the lettering pop from the fabric and appear much bolder.
Frame your inspirational quote with simple leaf motifs using a lazy daisy stitch for a balanced and elegant composition.
20. Assemble a Colorful Felt Ball Trivet

Create a playful and practical kitchen accessory by focusing on a strong, invisible construction.
Use a heavy-duty upholstery thread and a long needle to string the felt balls together, passing through the center of each one.
Work in a spiral pattern from the center outwards, making sure to pull the thread taut after adding each ball to ensure a tight, flat structure.
Pass the thread through each ball multiple times where it connects to its neighbors to build a durable piece that won’t lose its shape.
21. Sculpt a Realistic Felt Succulent Garden
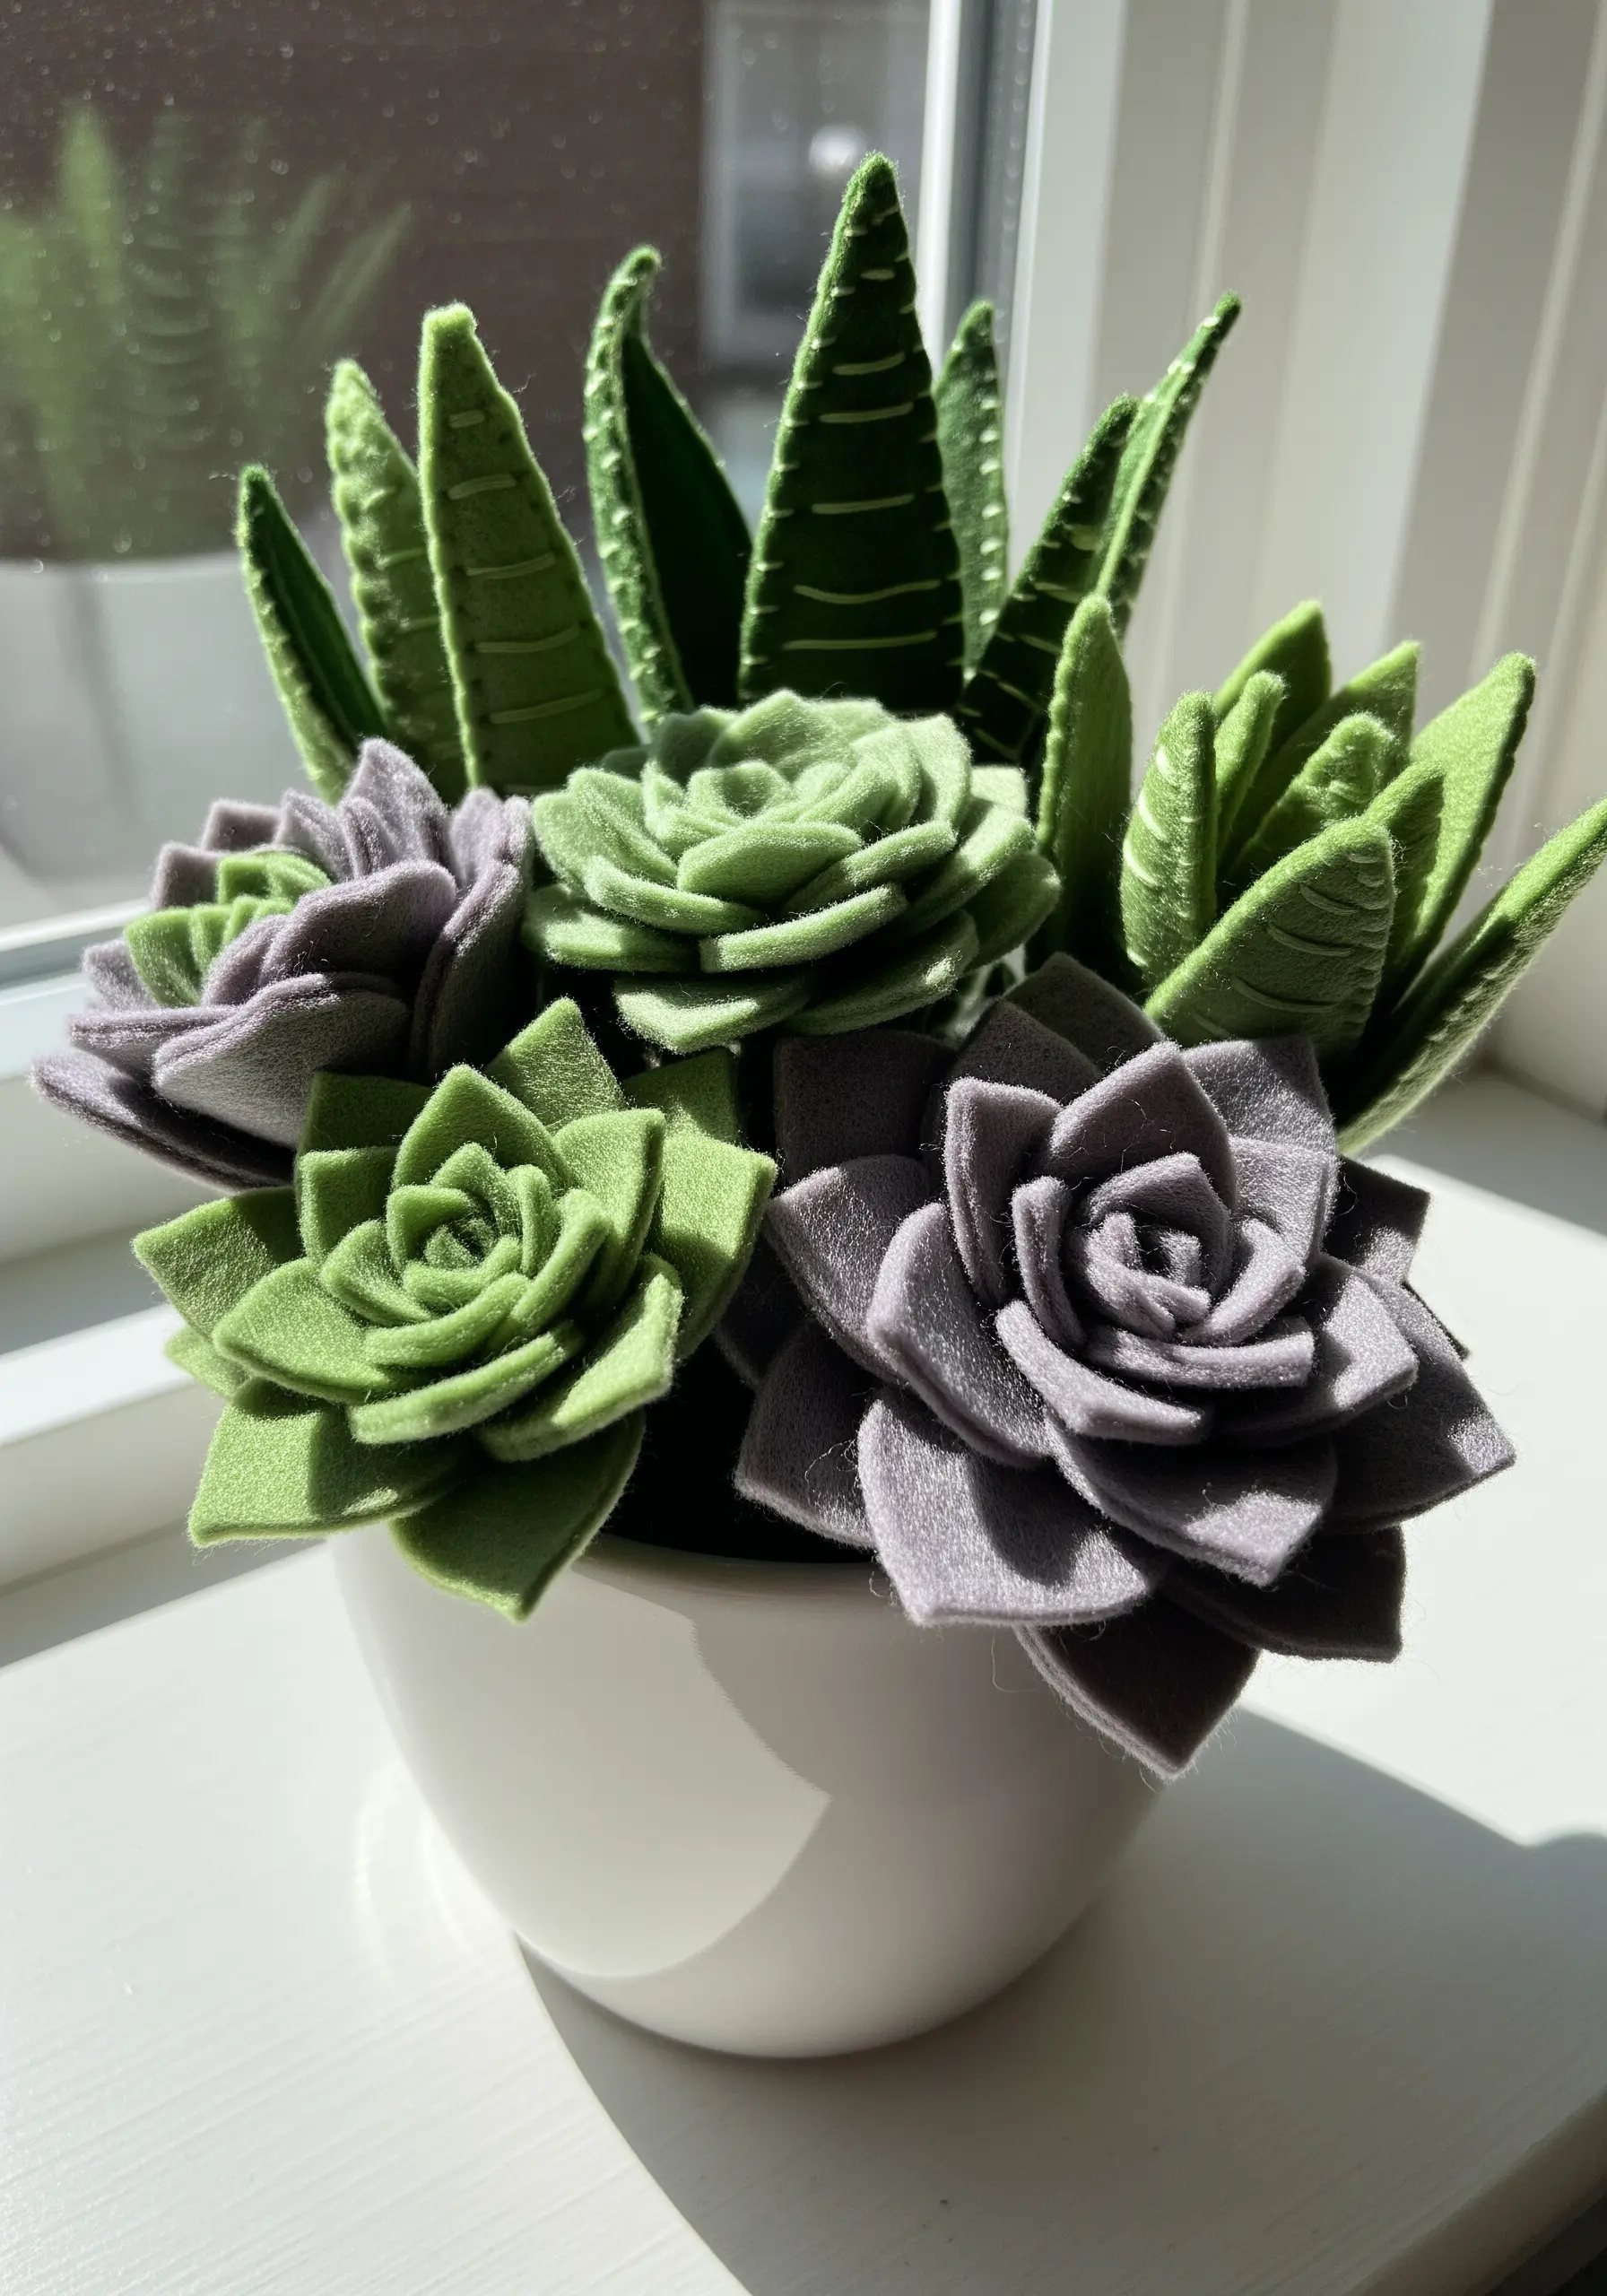
The key to realistic felt flowers is layering and subtle shaping.
Cut individual petals or leaves in varying sizes. For a touch of realism, add details like stripes or edges with a permanent fabric marker before assembling.
Start with the smallest petals in the center, gluing them in a tight spiral around a central point. Gradually add larger petals around the outside, overlapping them naturally.
Gently curve and shape the outer leaves with your fingers to mimic the organic form of a real succulent.
22. Cover a Box with Decorative Fabric

Achieve a seamless, professional finish on a fabric-covered box by mastering the corners.
Apply a thin, even layer of fabric-safe adhesive like Mod Podge to the box surface to prevent lumps.
For neat corners, use the ‘mitered corner’ technique: fold the fabric as if you were wrapping a gift, creating a clean 45-degree angle fold.
Press all edges and folds firmly with a bone folder to create crisp lines and ensure the fabric adheres perfectly to the box’s structure.
23. Weave a Landscape with Textural Yarn
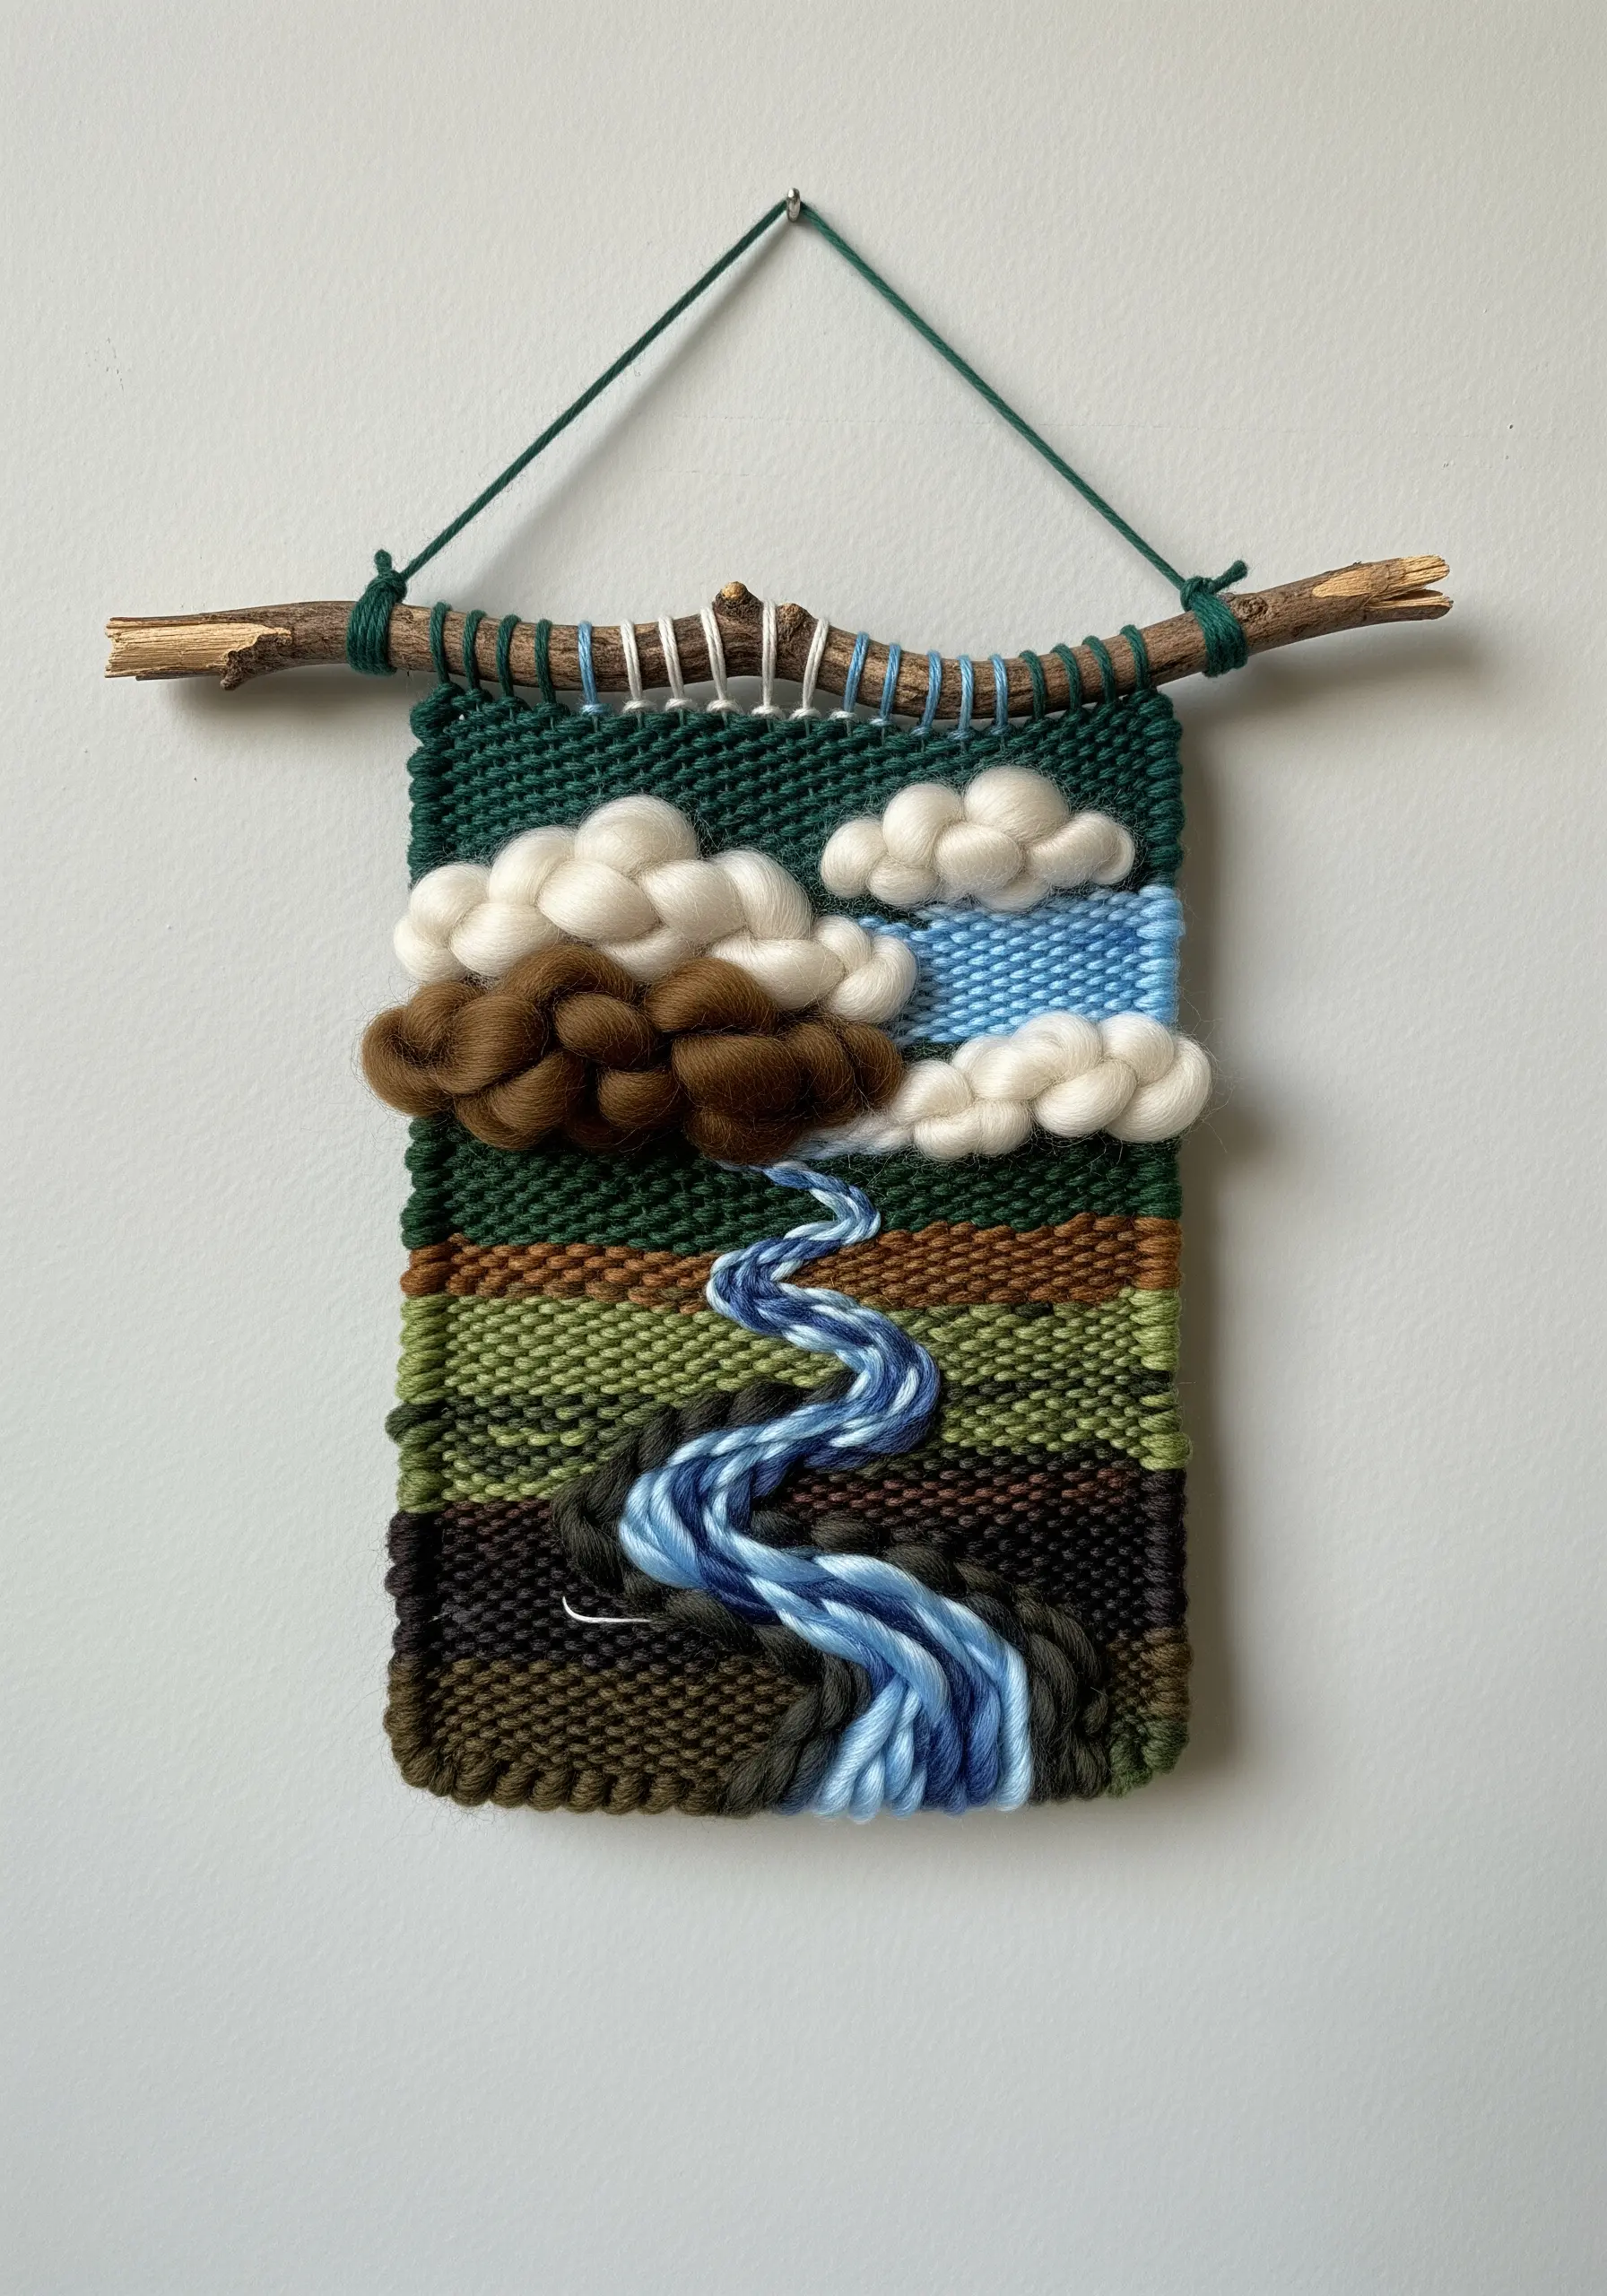
Go beyond flat weaving by incorporating different yarn types and techniques to build a tactile scene.
Use chunky, unspun wool roving and a soumak weave to create the puffy, three-dimensional clouds that stand out from the background.
For the river, ply two different shades of blue yarn together to create a variegated thread that mimics the movement and depth of water.
This intentional variation in texture transforms a simple woven panel into a small-scale fiber art installation.
24. Add a Classic Monogram to Towels
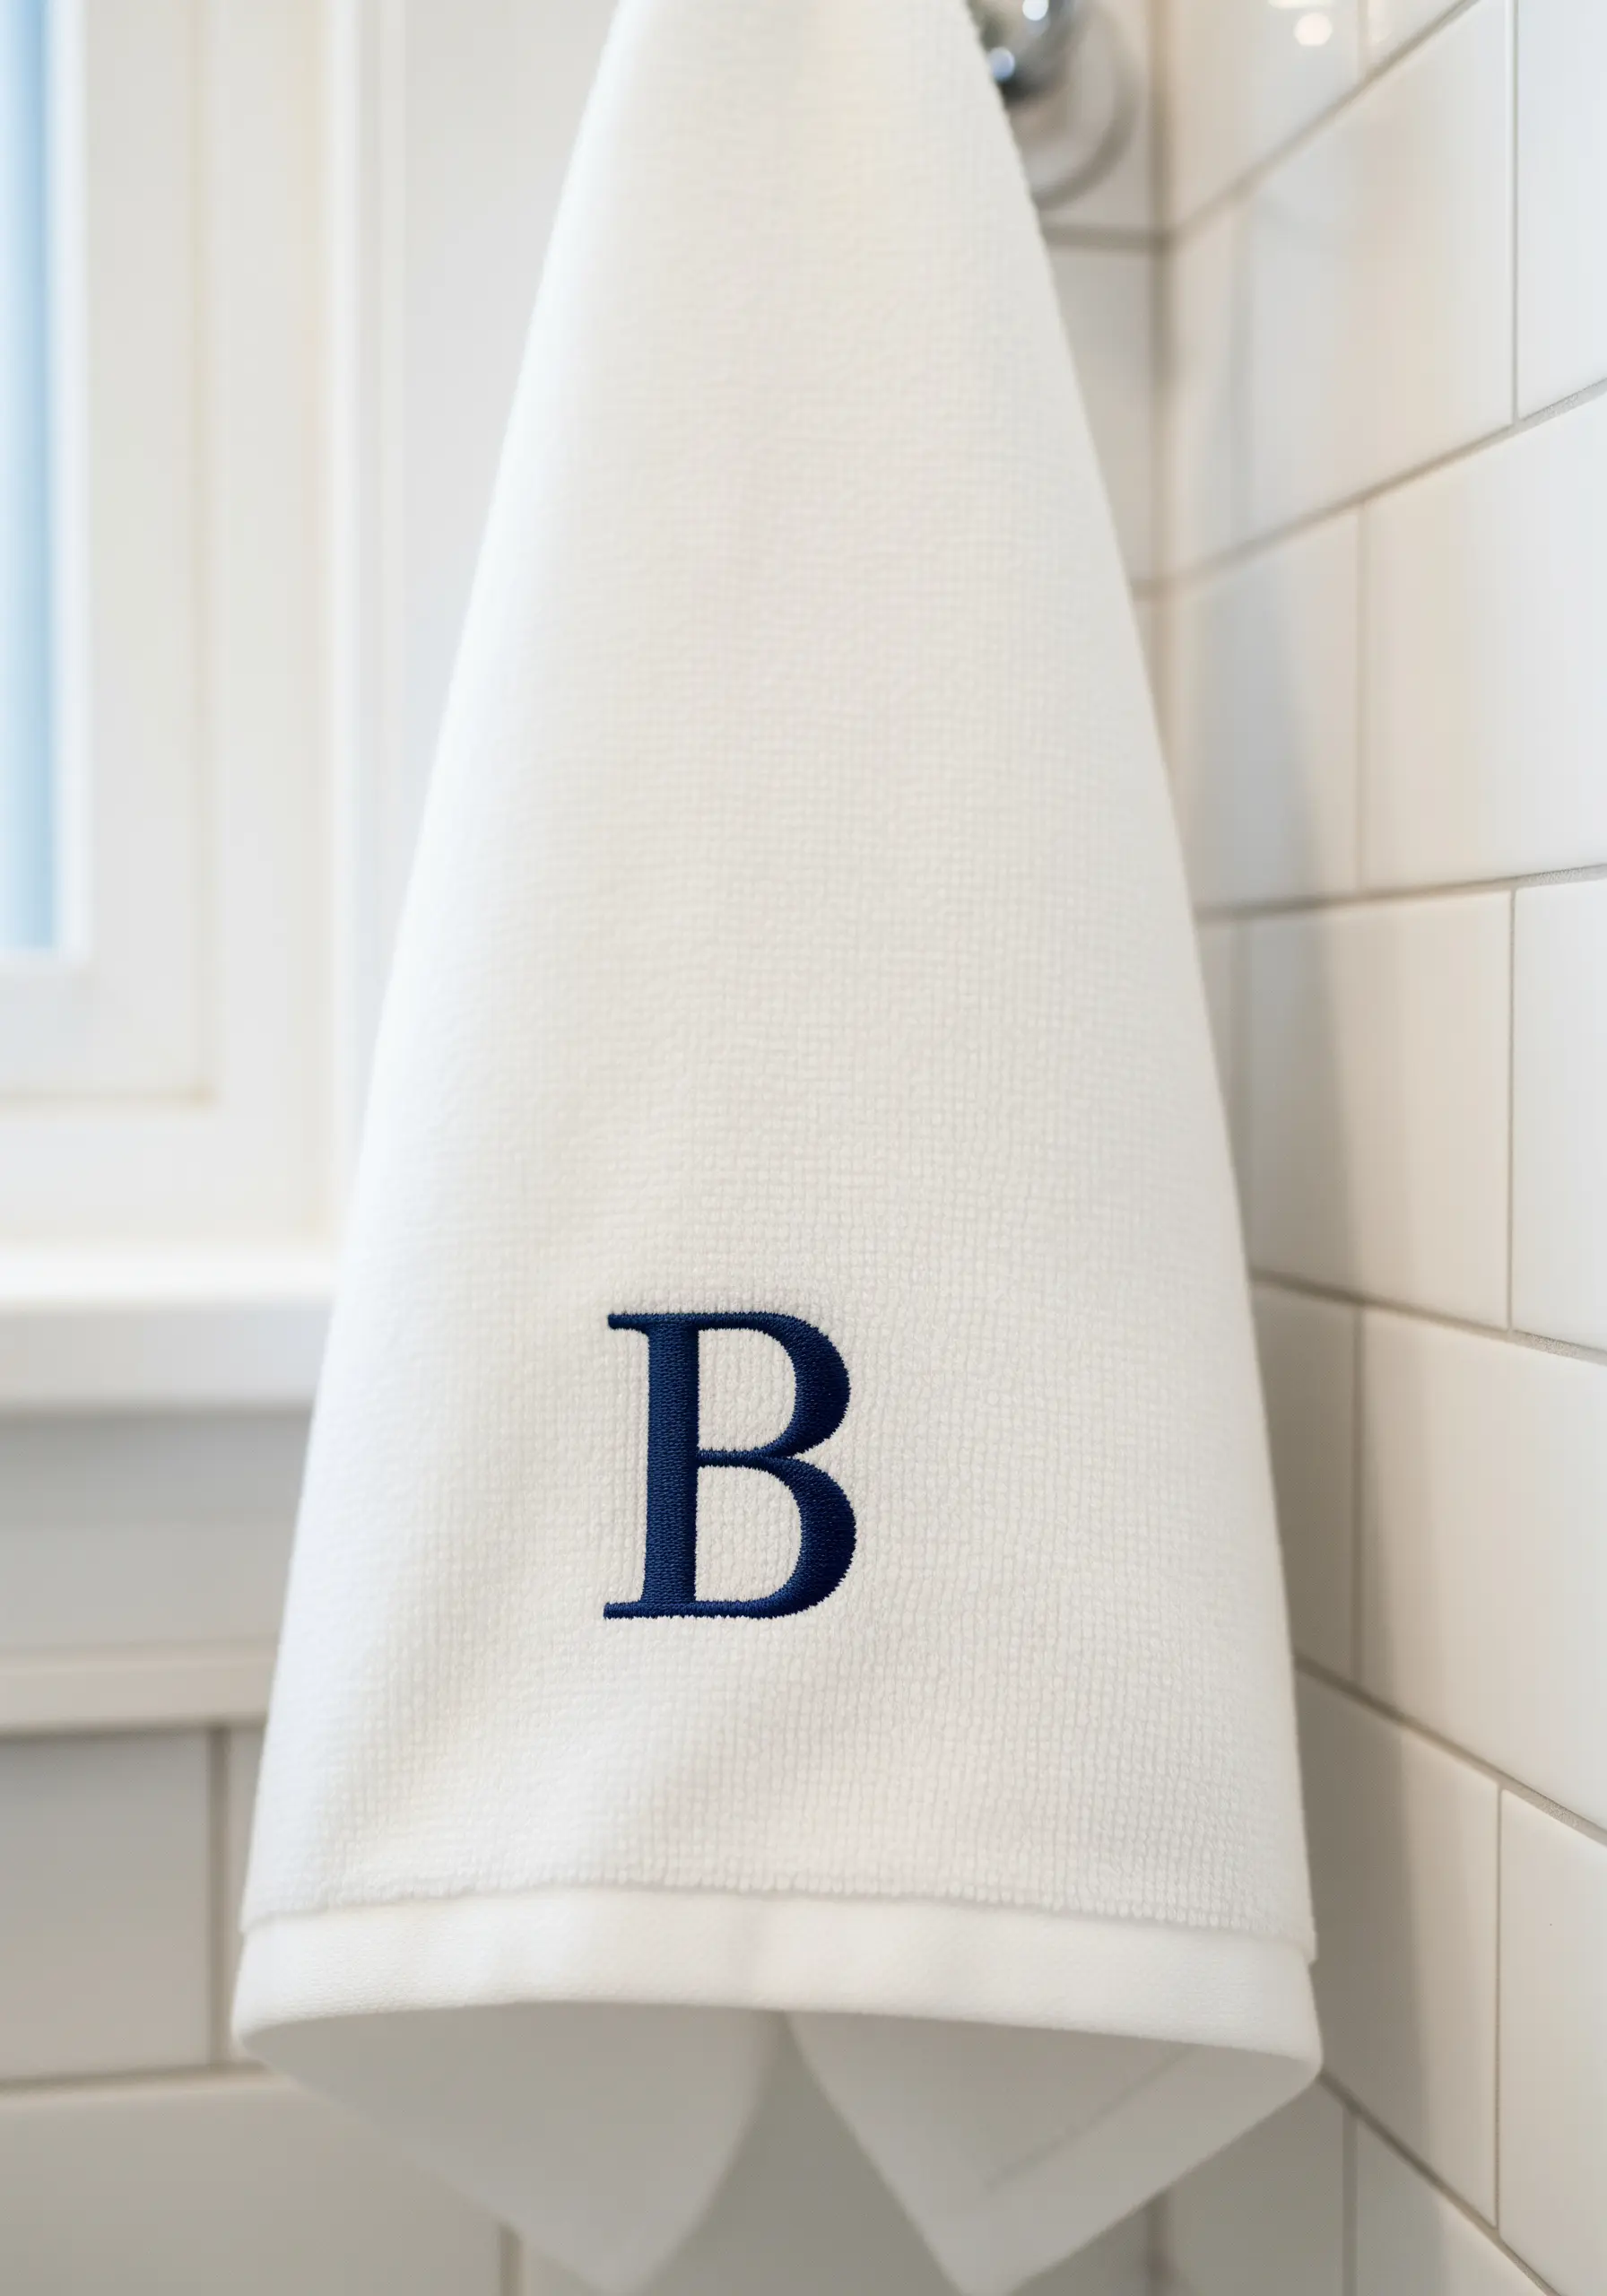
Embroidering on high-pile fabric like terry cloth requires one crucial step for clean results: using a stabilizer.
Place a layer of water-soluble or tear-away stabilizer on top of the towel before hooping; this prevents your stitches from sinking into the loops and disappearing.
Use a dense satin stitch to create a bold, solid letter that sits proudly on the surface of the fabric.
This technique ensures your minimal monogram looks crisp and professional, not lost in the texture.
25. Construct a Vibrant Ojo de Dios
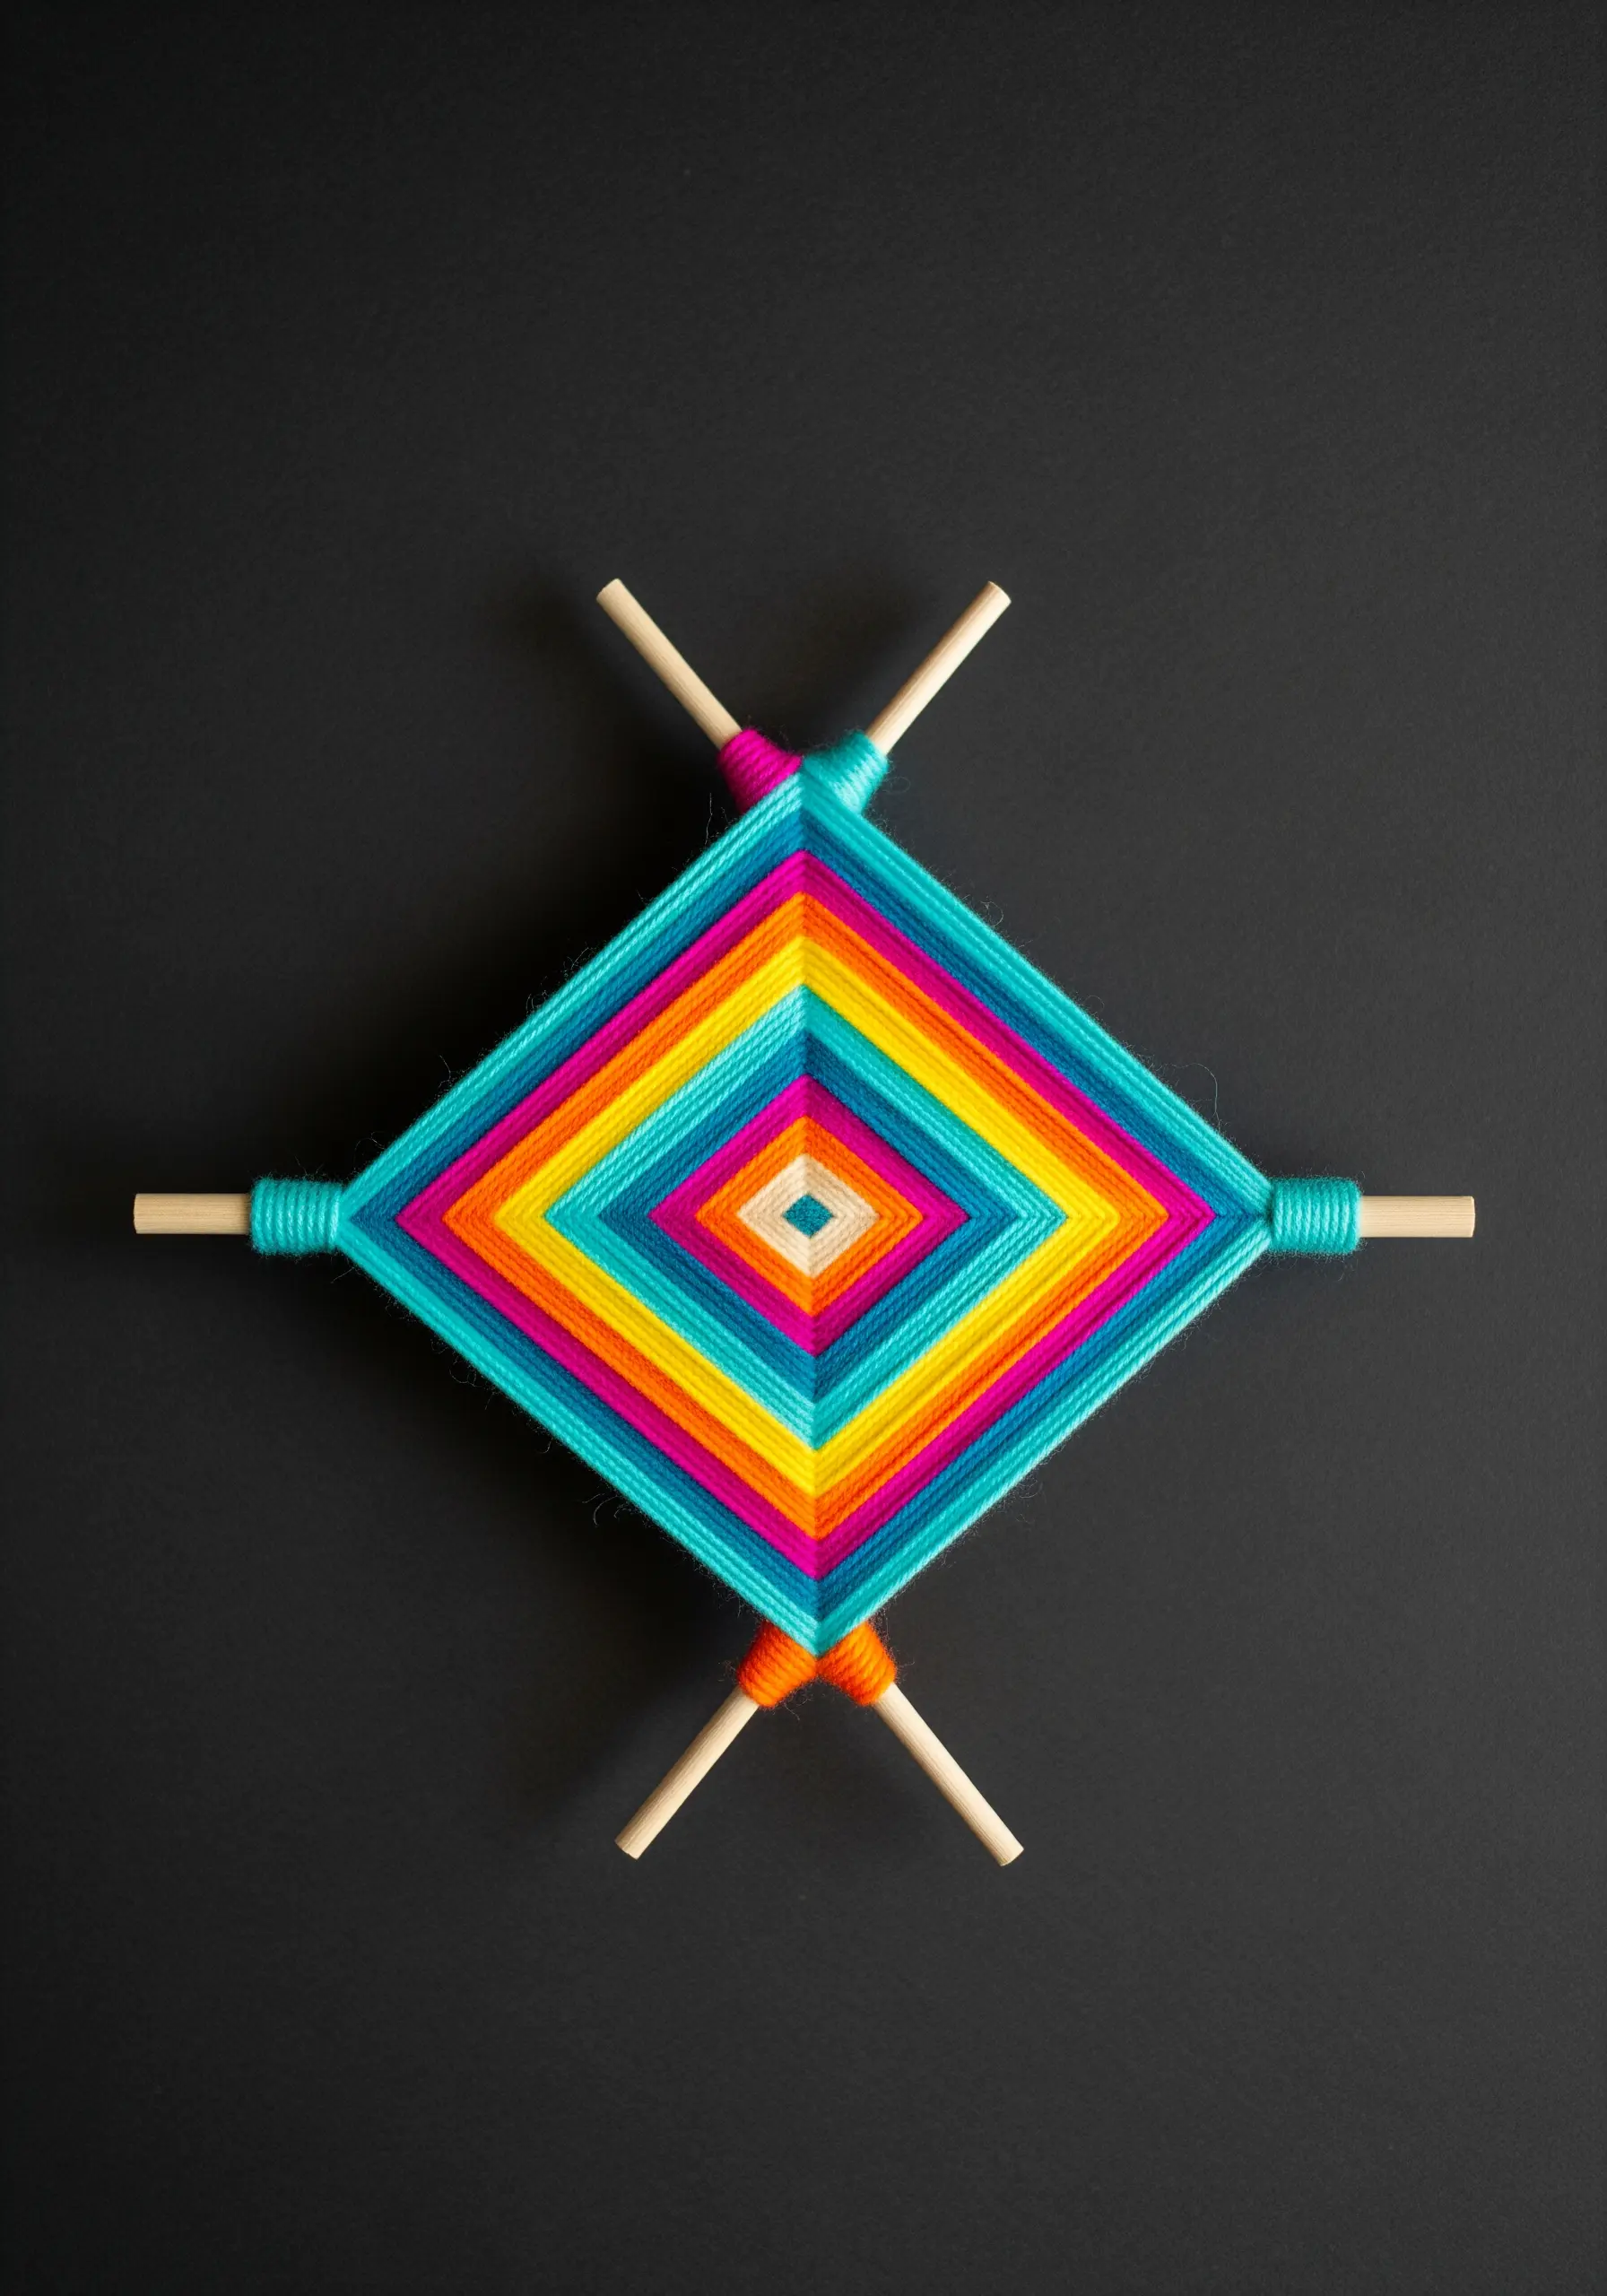
This traditional craft, known as a God’s Eye, turns yarn wrapping into a mesmerizing geometric art form.
The entire design is created by wrapping yarn around a cross-frame of dowels, with no knots required except at the beginning and end.
The key to the sharp, diamond pattern is consistent tension and always wrapping in the same sequence (e.g., over one dowel and around, then on to the next).
Change colors frequently to create the vibrant, concentric squares that give this piece its powerful graphic impact.
26. Create Luxe Art with Bead Embroidery
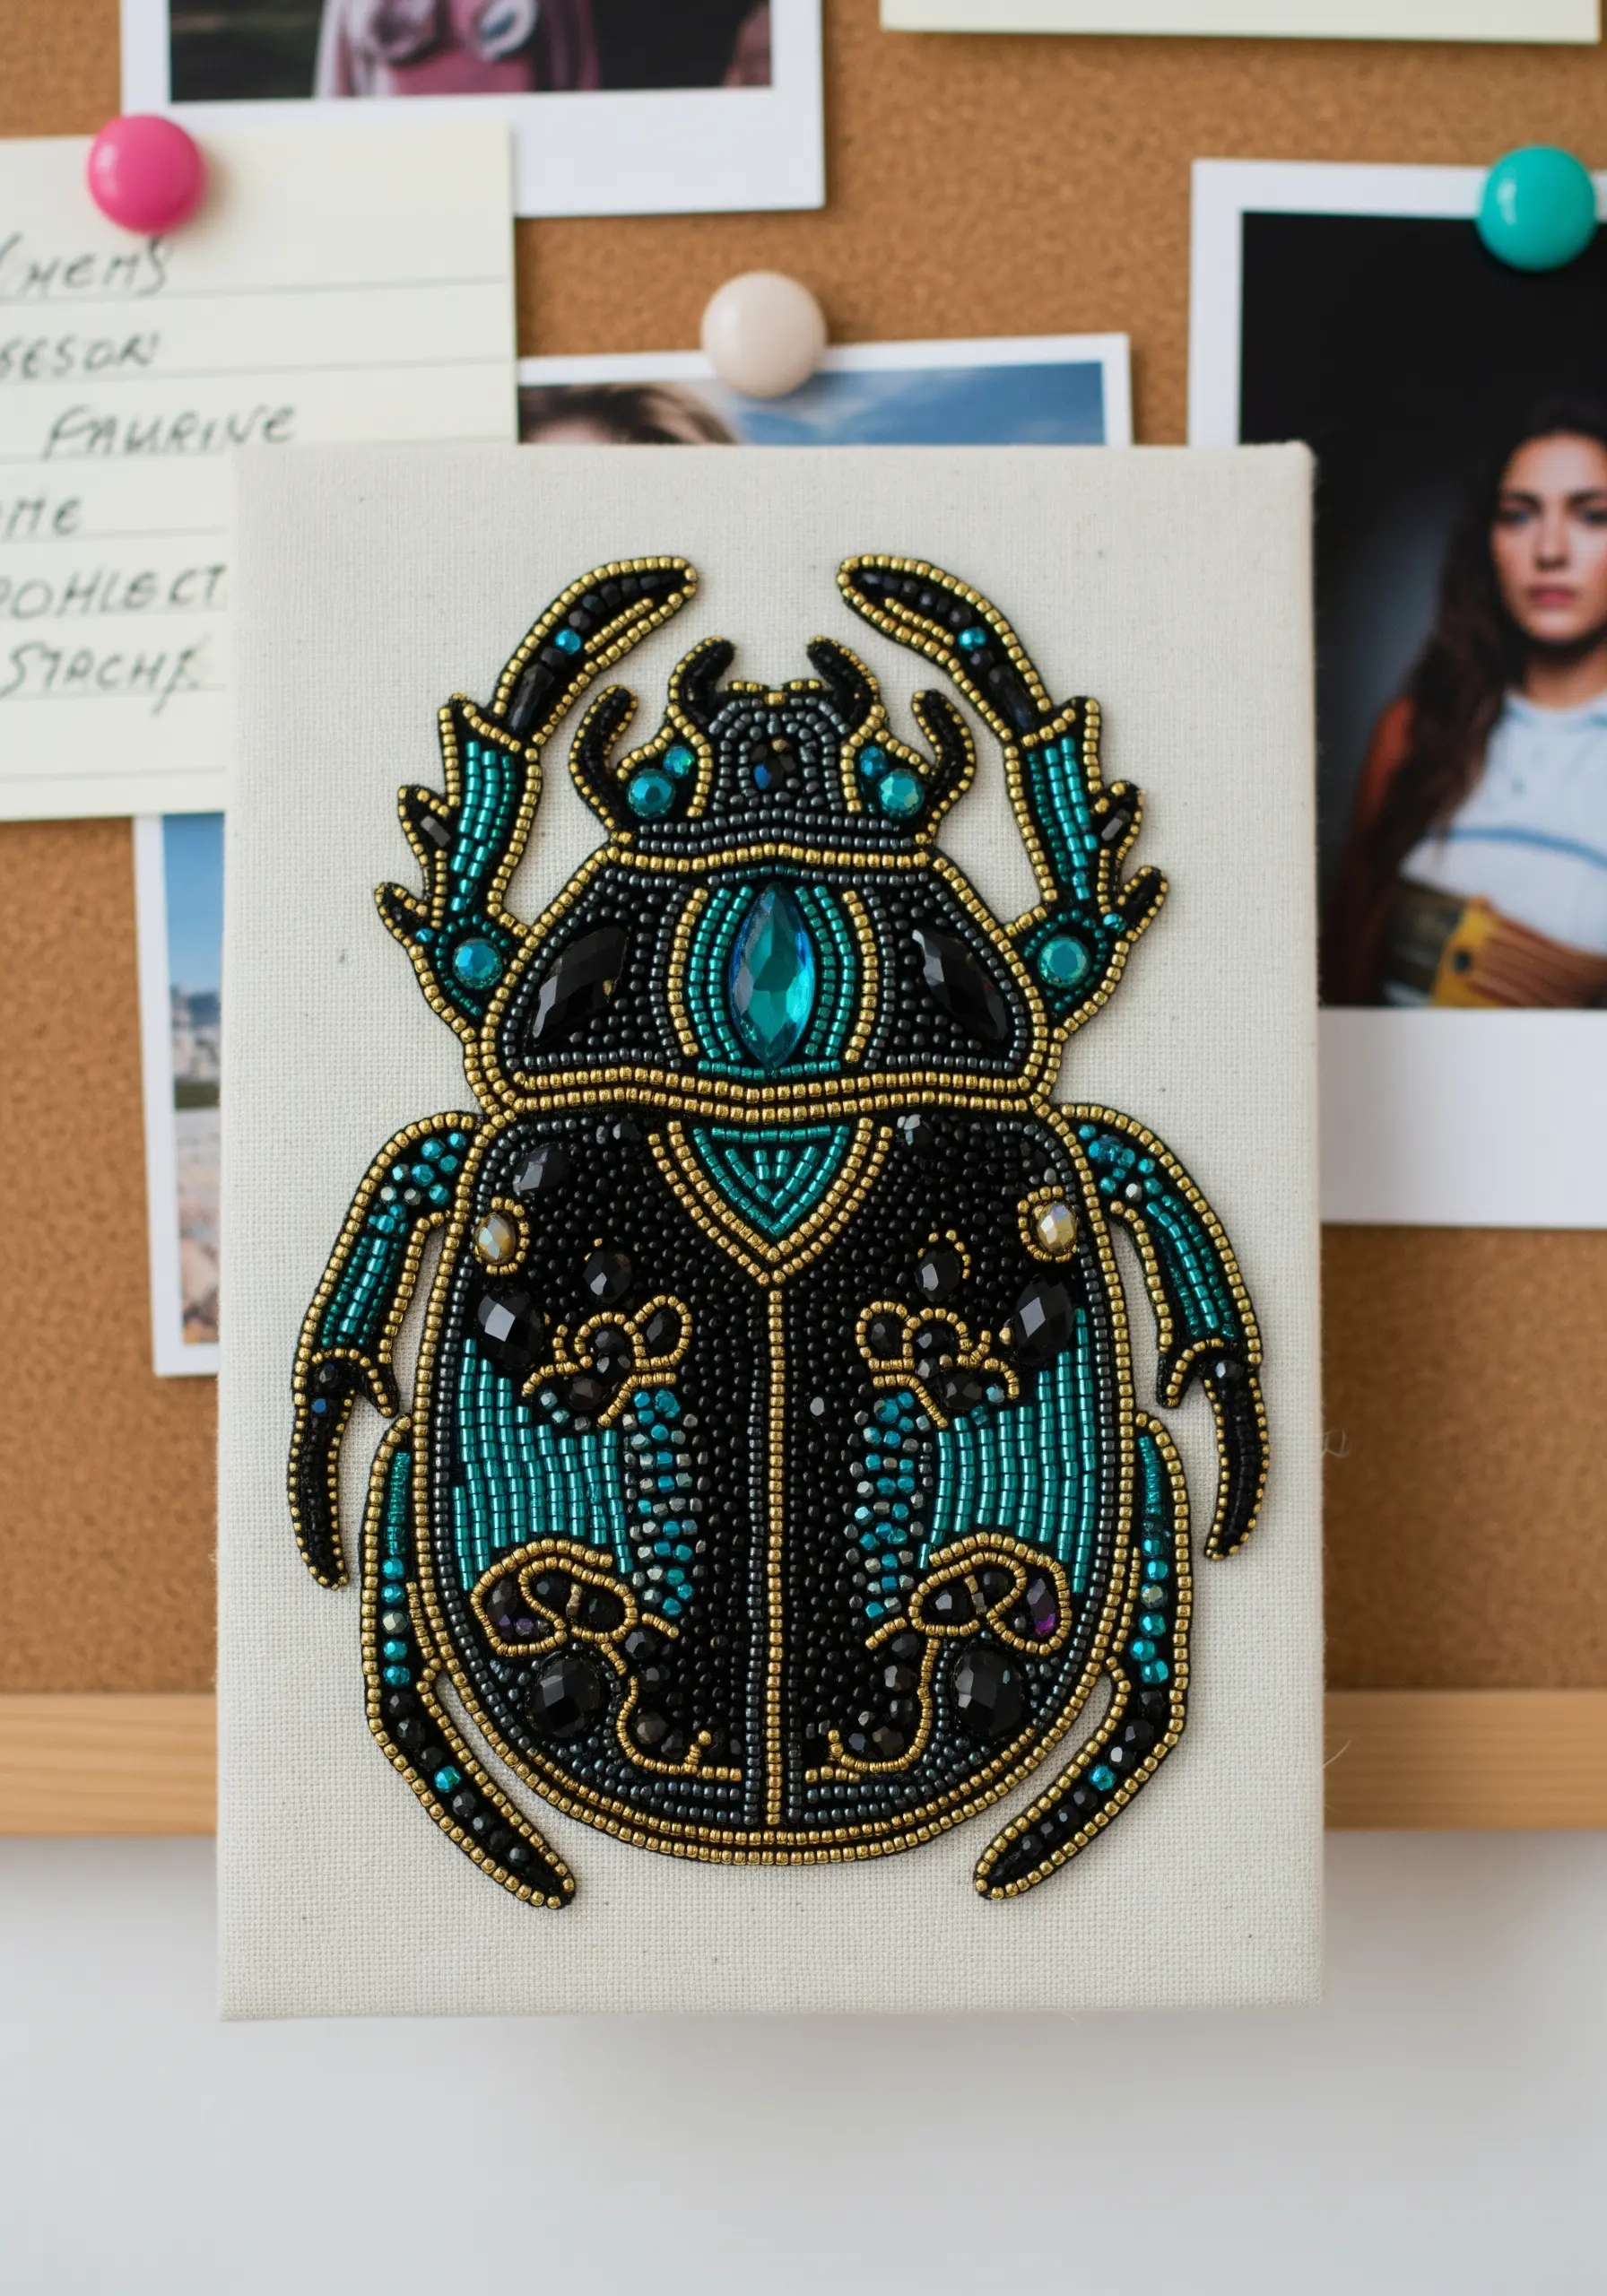
Elevate your textile art by ‘painting’ with beads for unparalleled texture and shine.
Work in small sections. First, couch a thread along the outline of a shape to create a defined border. This gives your beadwork a clean edge.
To fill areas, use a backstitch method: string three or four beads onto your needle, lay them down, and make a small stitch back between the last two beads to secure them.
This technique offers more control than just sewing on one bead at a time and results in smooth, shimmering surfaces.
27. Frame a Mirror with Macrame Knots
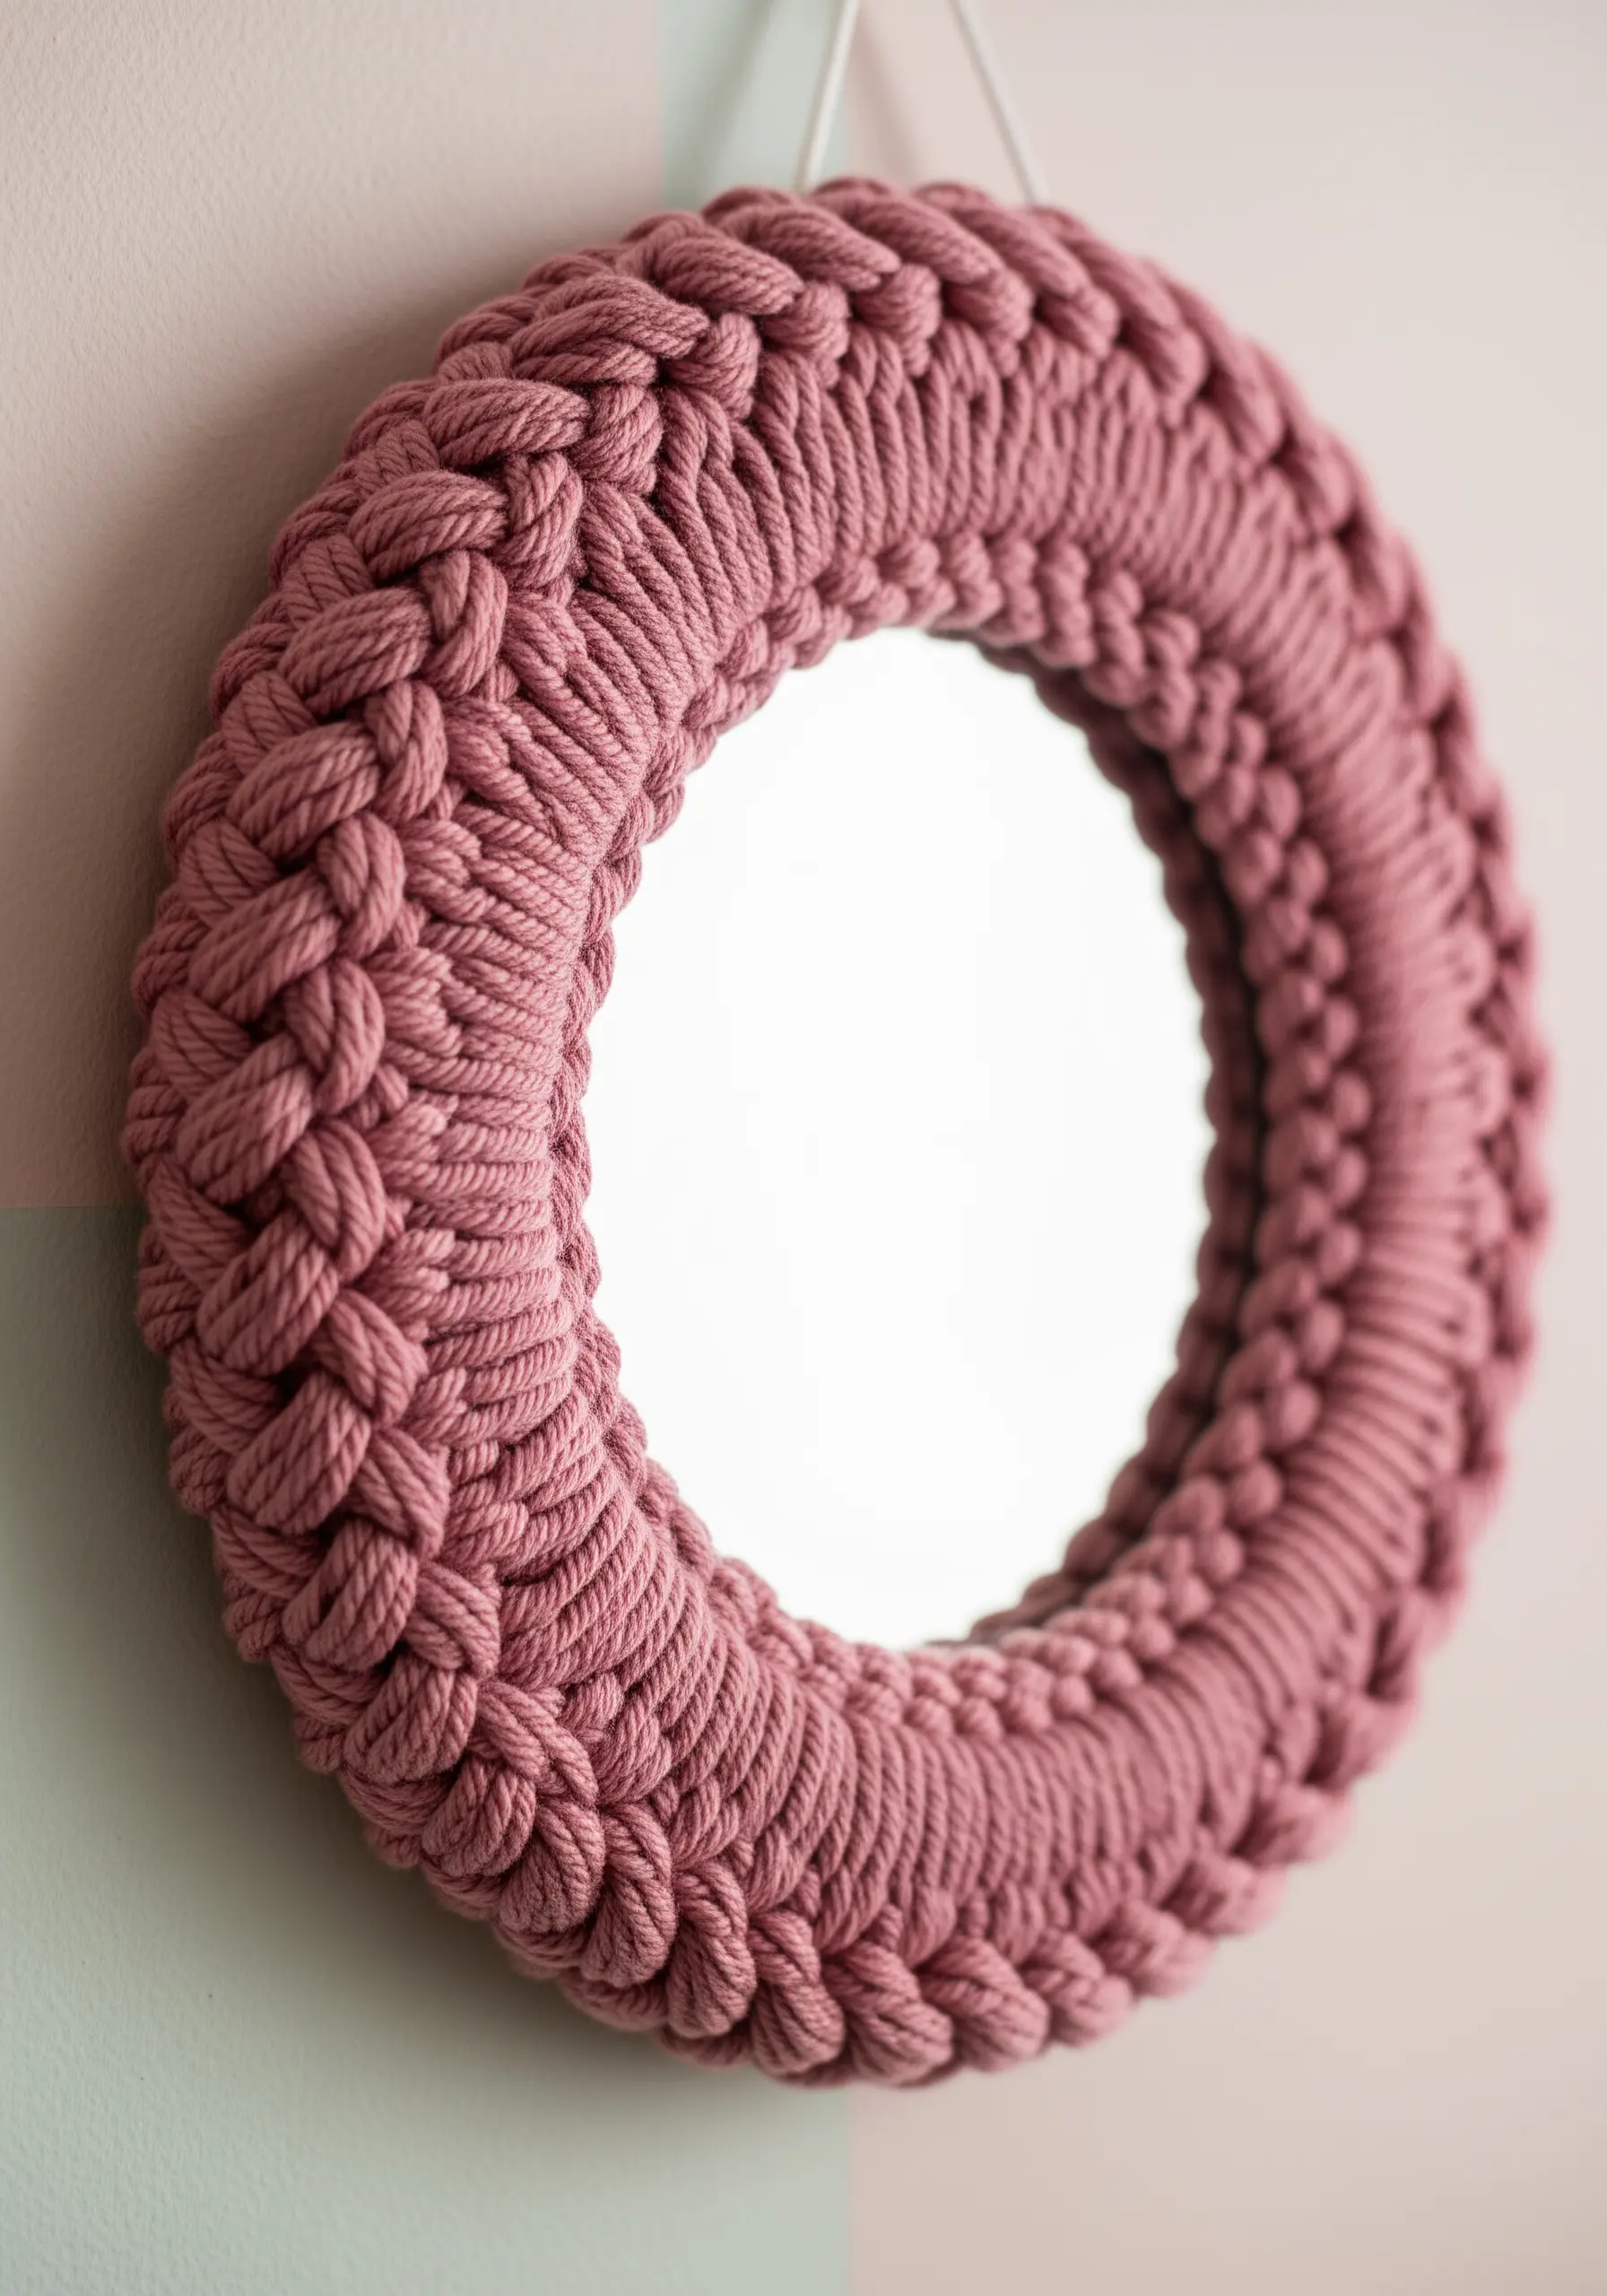
Transform a basic mirror into a textural, bohemian statement piece with thick cotton cord.
Use a series of repeating knots, like square knots or a half hitch spiral, worked tightly around the base of the mirror frame.
The key is to push the knots together as you work, ensuring there are no gaps and the frame is completely covered.
The thick, braided texture adds softness and dimension, turning a functional object into a piece of tactile wall decor.
28. Sew a Reversible Fabric Storage Bin

A well-made fabric bin gets its structure and professional finish from one simple material: interfacing.
Iron a layer of medium-weight fusible interfacing to the wrong side of both your outer fabric and your lining fabric before you begin sewing.
This gives the bin enough stiffness to stand up on its own and prevents it from looking floppy or homemade.
The reversible design, with a contrasting lining, adds a pop of pattern and personality when you fold down the top edge.
29. Stitch a Delicate Corner Bookmark

Create a charming and useful gift by embroidering on felt.
Felt is an ideal fabric for this project as it doesn’t fray, allowing you to leave the edges raw or finish them with a simple, decorative stitch like a blanket stitch.
Use a woven wheel stitch for the flower’s center to give it a raised, three-dimensional quality that contrasts with the flatter satin-stitched petals.
The simple triangular construction slips neatly over the corner of a page, making it both beautiful and practical.
30. Decorate with a Cross-Stitch Light Switch Plate

Take your cross-stitch off the wall and integrate it into your home’s functional details.
Use a perforated plastic or vinyl cross-stitch canvas, which can be easily cut to the exact size of your switch plate cover without fraying.
Stitch your design, then carefully cut out the opening for the switch using a craft knife.
Attach the finished piece to the plate with a strong double-sided adhesive for a surprising and personalized touch of handmade decor.
31. Craft a Modern Leather and Thread Tassel

Combine different materials to create a tassel with modern, sophisticated texture.
Use a strip of soft, metallic faux leather for the fringe, which provides a sleek contrast to the soft thread.
The key to a high-end look is the wrapping. Use a smooth, slightly glossy cord or floss and wrap the neck of the tassel with perfect, tight coils.
Tucking the wrapping cord’s tail completely out of sight is the final step that separates a good tassel from a great one.


