
The desire to create something beautiful for your own walls is a powerful one. But often, the gap between the vision in your mind and the piece in your hands can feel discouraging. You might find yourself wondering why your stitches don’t look as clean, or your colors as vibrant, as you had hoped.
The secret isn’t about buying more supplies or learning dozens of impossibly complex stitches. It’s about refining your approach. It’s in understanding how the direction of a single stitch can mimic light, how a change in thread texture can create depth, or how leaving a little space around your motif can make it breathe.
Here, we’ll move past the basics and into the small, intentional adjustments that make the biggest difference. You’ll learn not just what to stitch, but why a certain technique works. Think of this as a quiet conversation about elevating your craft, one thoughtful stitch at a time, until your walls reflect the artistry you’ve always known you had.
1. Master Directional Satin Stitch for Botanical Realism
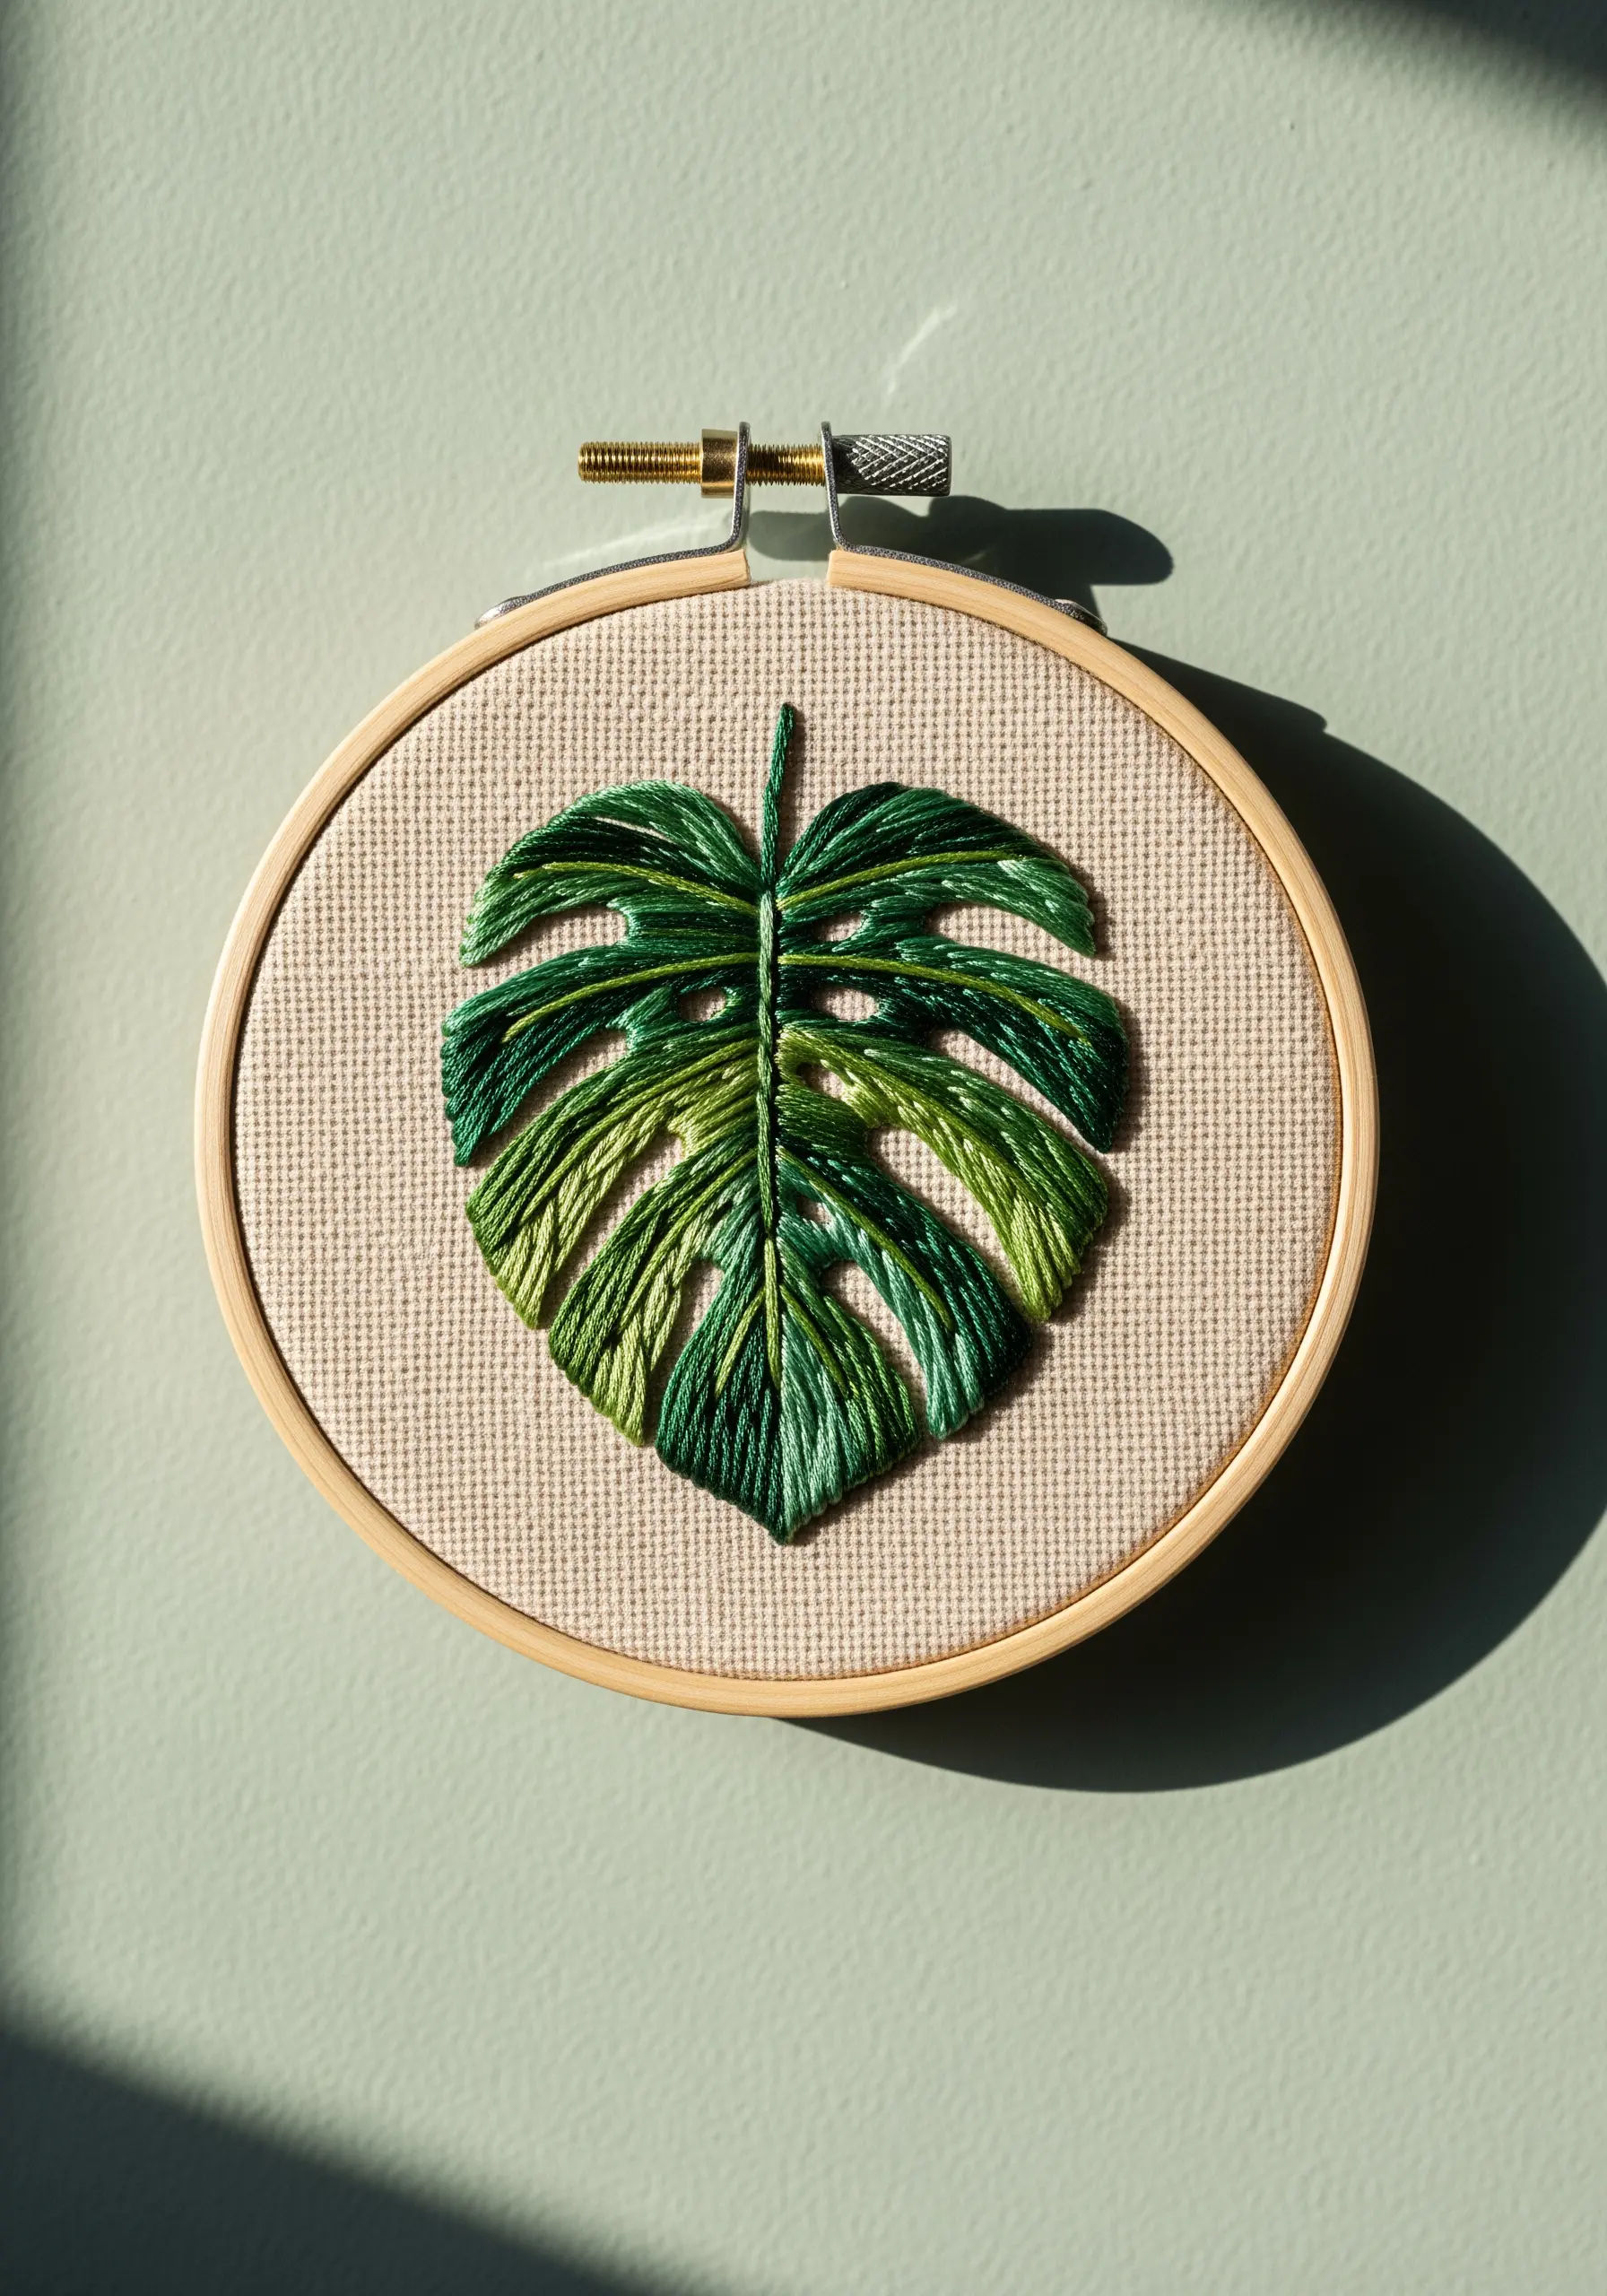
To prevent your satin stitches from looking flat, think like a painter and use thread direction to create form and light.
Divide the leaf into sections based on its natural veins and angles.
Stitch each section with the satin stitches angled slightly differently, following the way a real leaf would catch the light.
This technique creates subtle facets that add dimension, making your botanicals look far more dynamic without changing the stitch itself.
Use at least three shades of green—light, medium, and dark—to define these sections and enhance the illusion of depth.
2. Explore Punch Needle for Graphic, Textured Shapes

If you want bold texture without intricate stitches, punch needle is your answer.
This technique creates rows of dense, plush loops with a satisfying speed, ideal for filling large color blocks.
Use a thicker yarn, like worsted or aran weight, to achieve that deep, tactile finish.
To keep your shapes crisp, outline them first before filling them in, ensuring your punch needle stays just inside the lines.
The contrast between the high-texture shapes and the flat, negative space of the monk’s cloth is what gives this style its modern, graphic appeal.
3. Weave a Miniature Landscape with Mixed-Fiber Textures
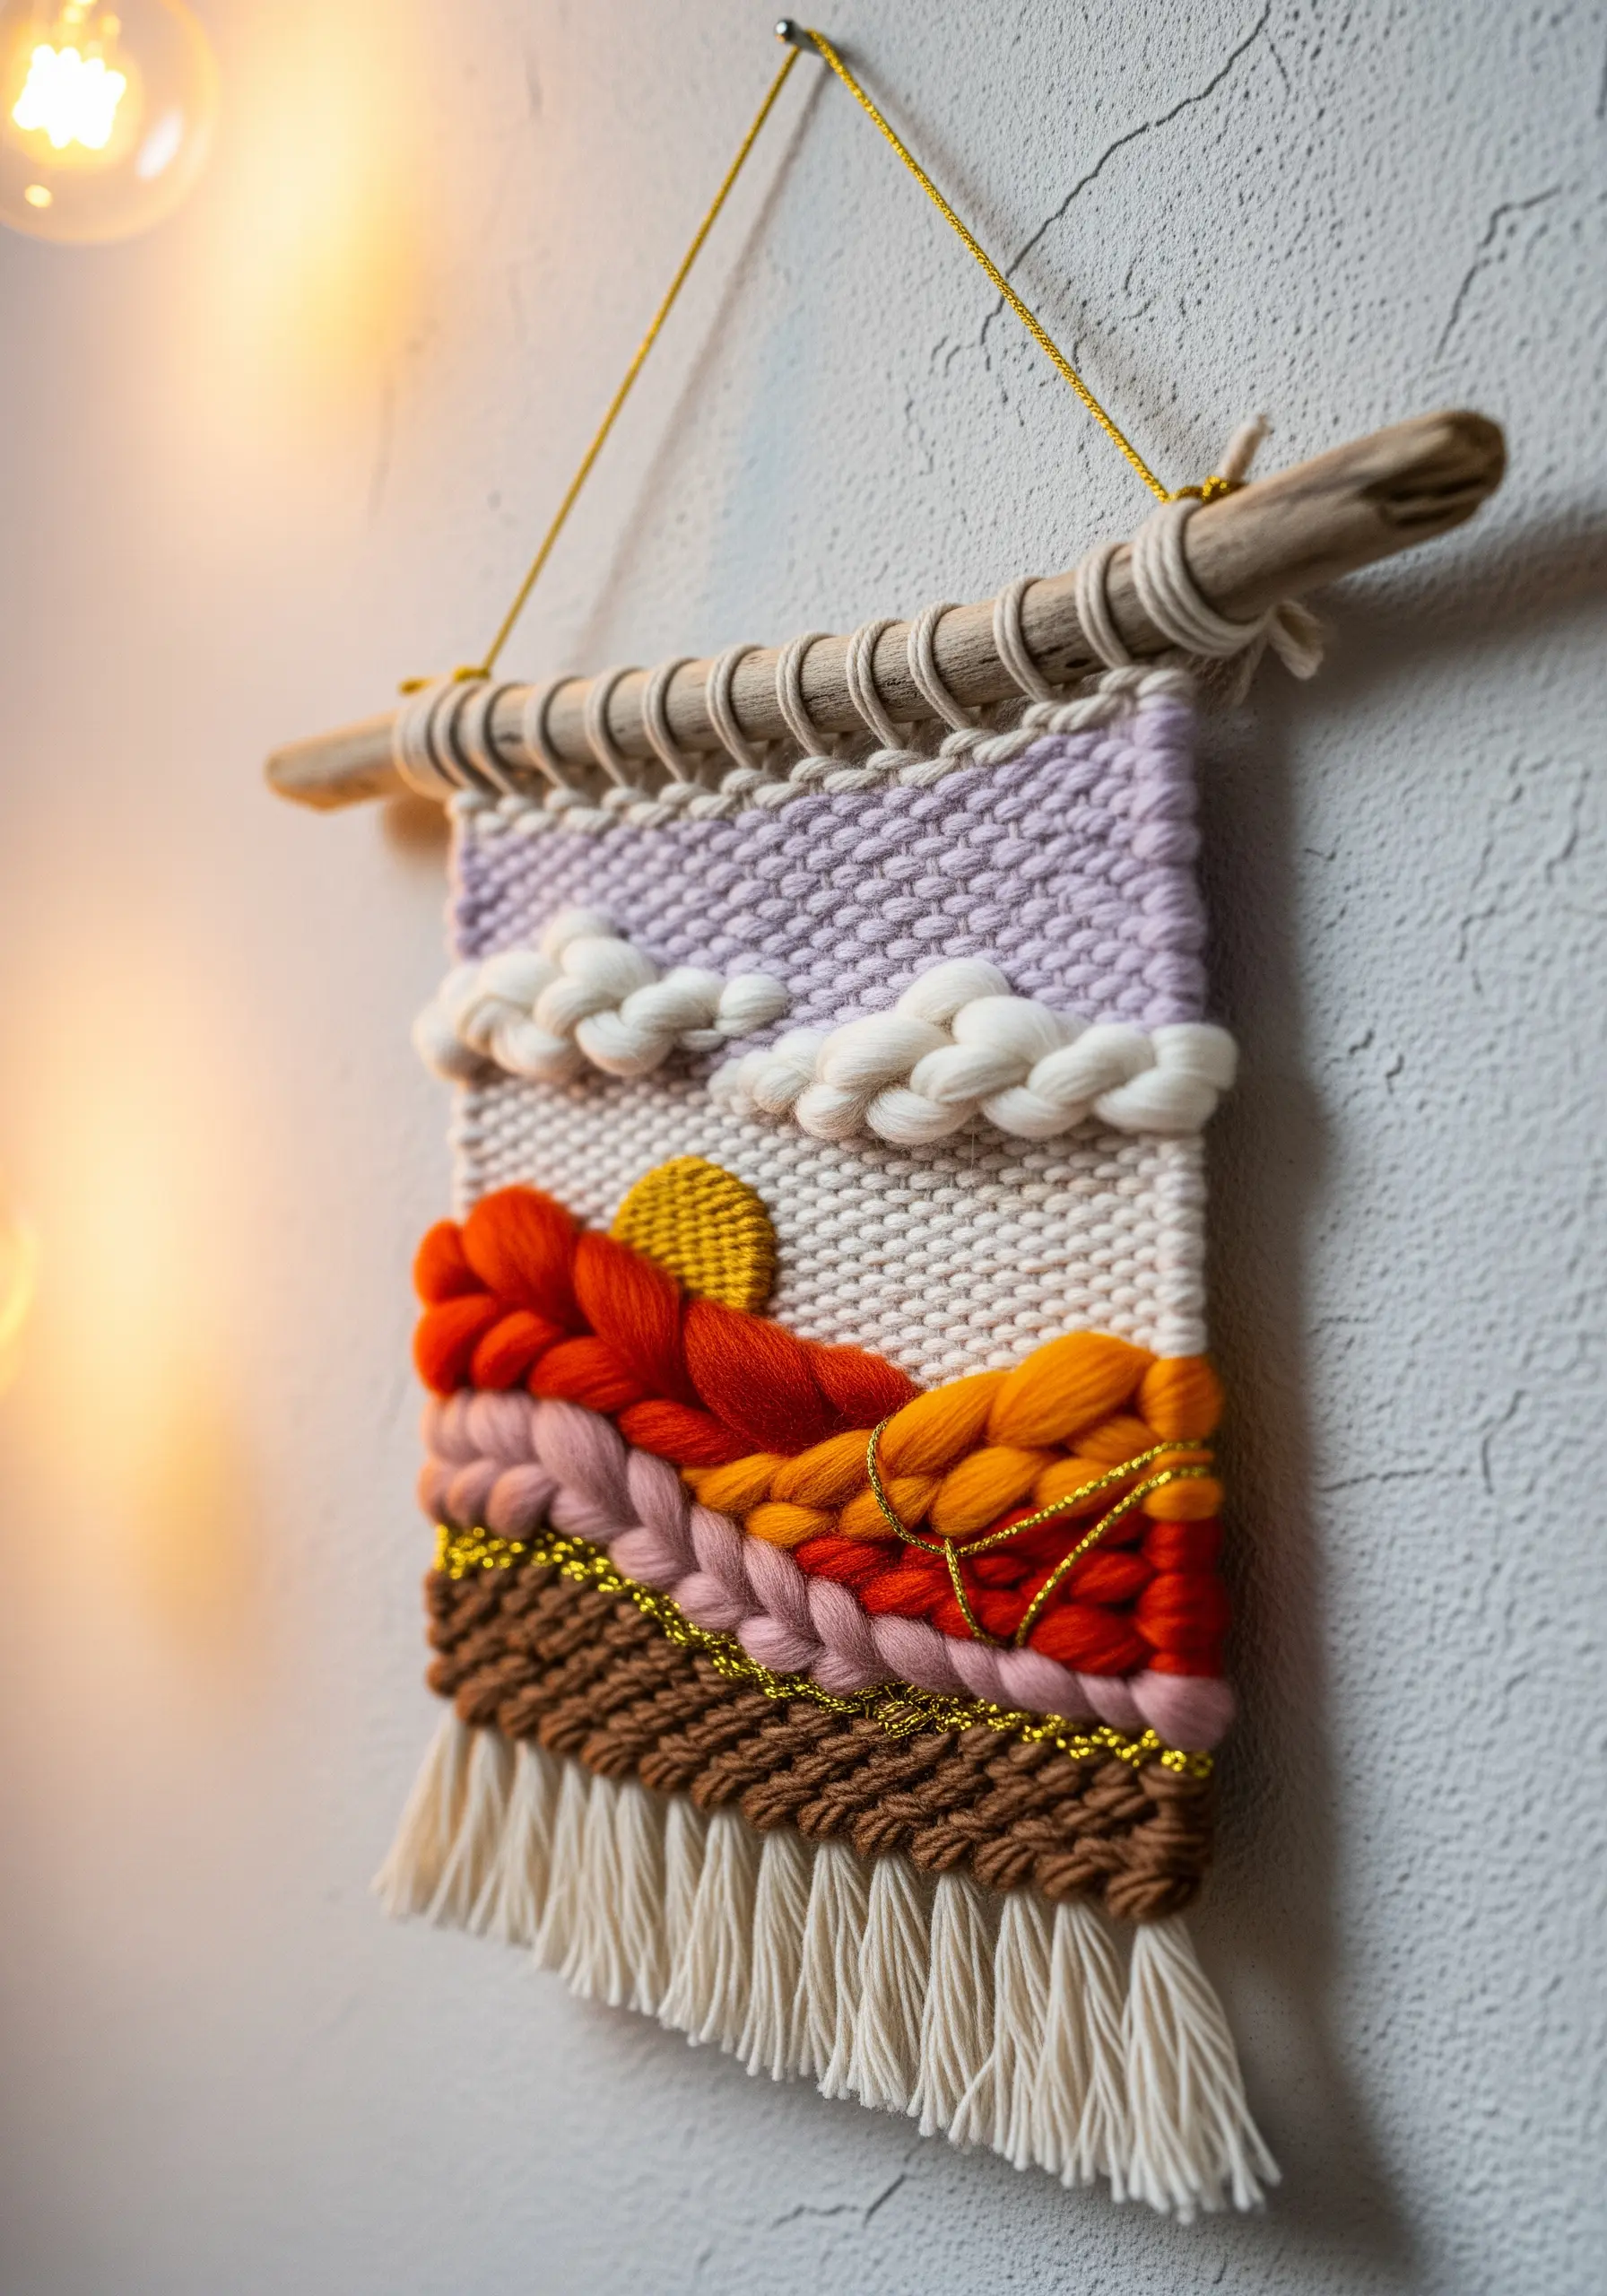
Combine different yarn weights and textures on a small loom to create a landscape with palpable depth.
Use chunky wool roving to create fluffy, cloud-like effects with just a few passes.
Contrast this with thinner, tightly woven yarns for the sky and mountains to create visual distance.
Incorporate a metallic thread—even just a single line—to catch the light and add an unexpected touch of refinement.
Finishing with a simple fringe and hanging it from a piece of driftwood completes the organic, handmade feel.
4. Combine Felt Appliqué and Stitching for a Clean, Graphic Look
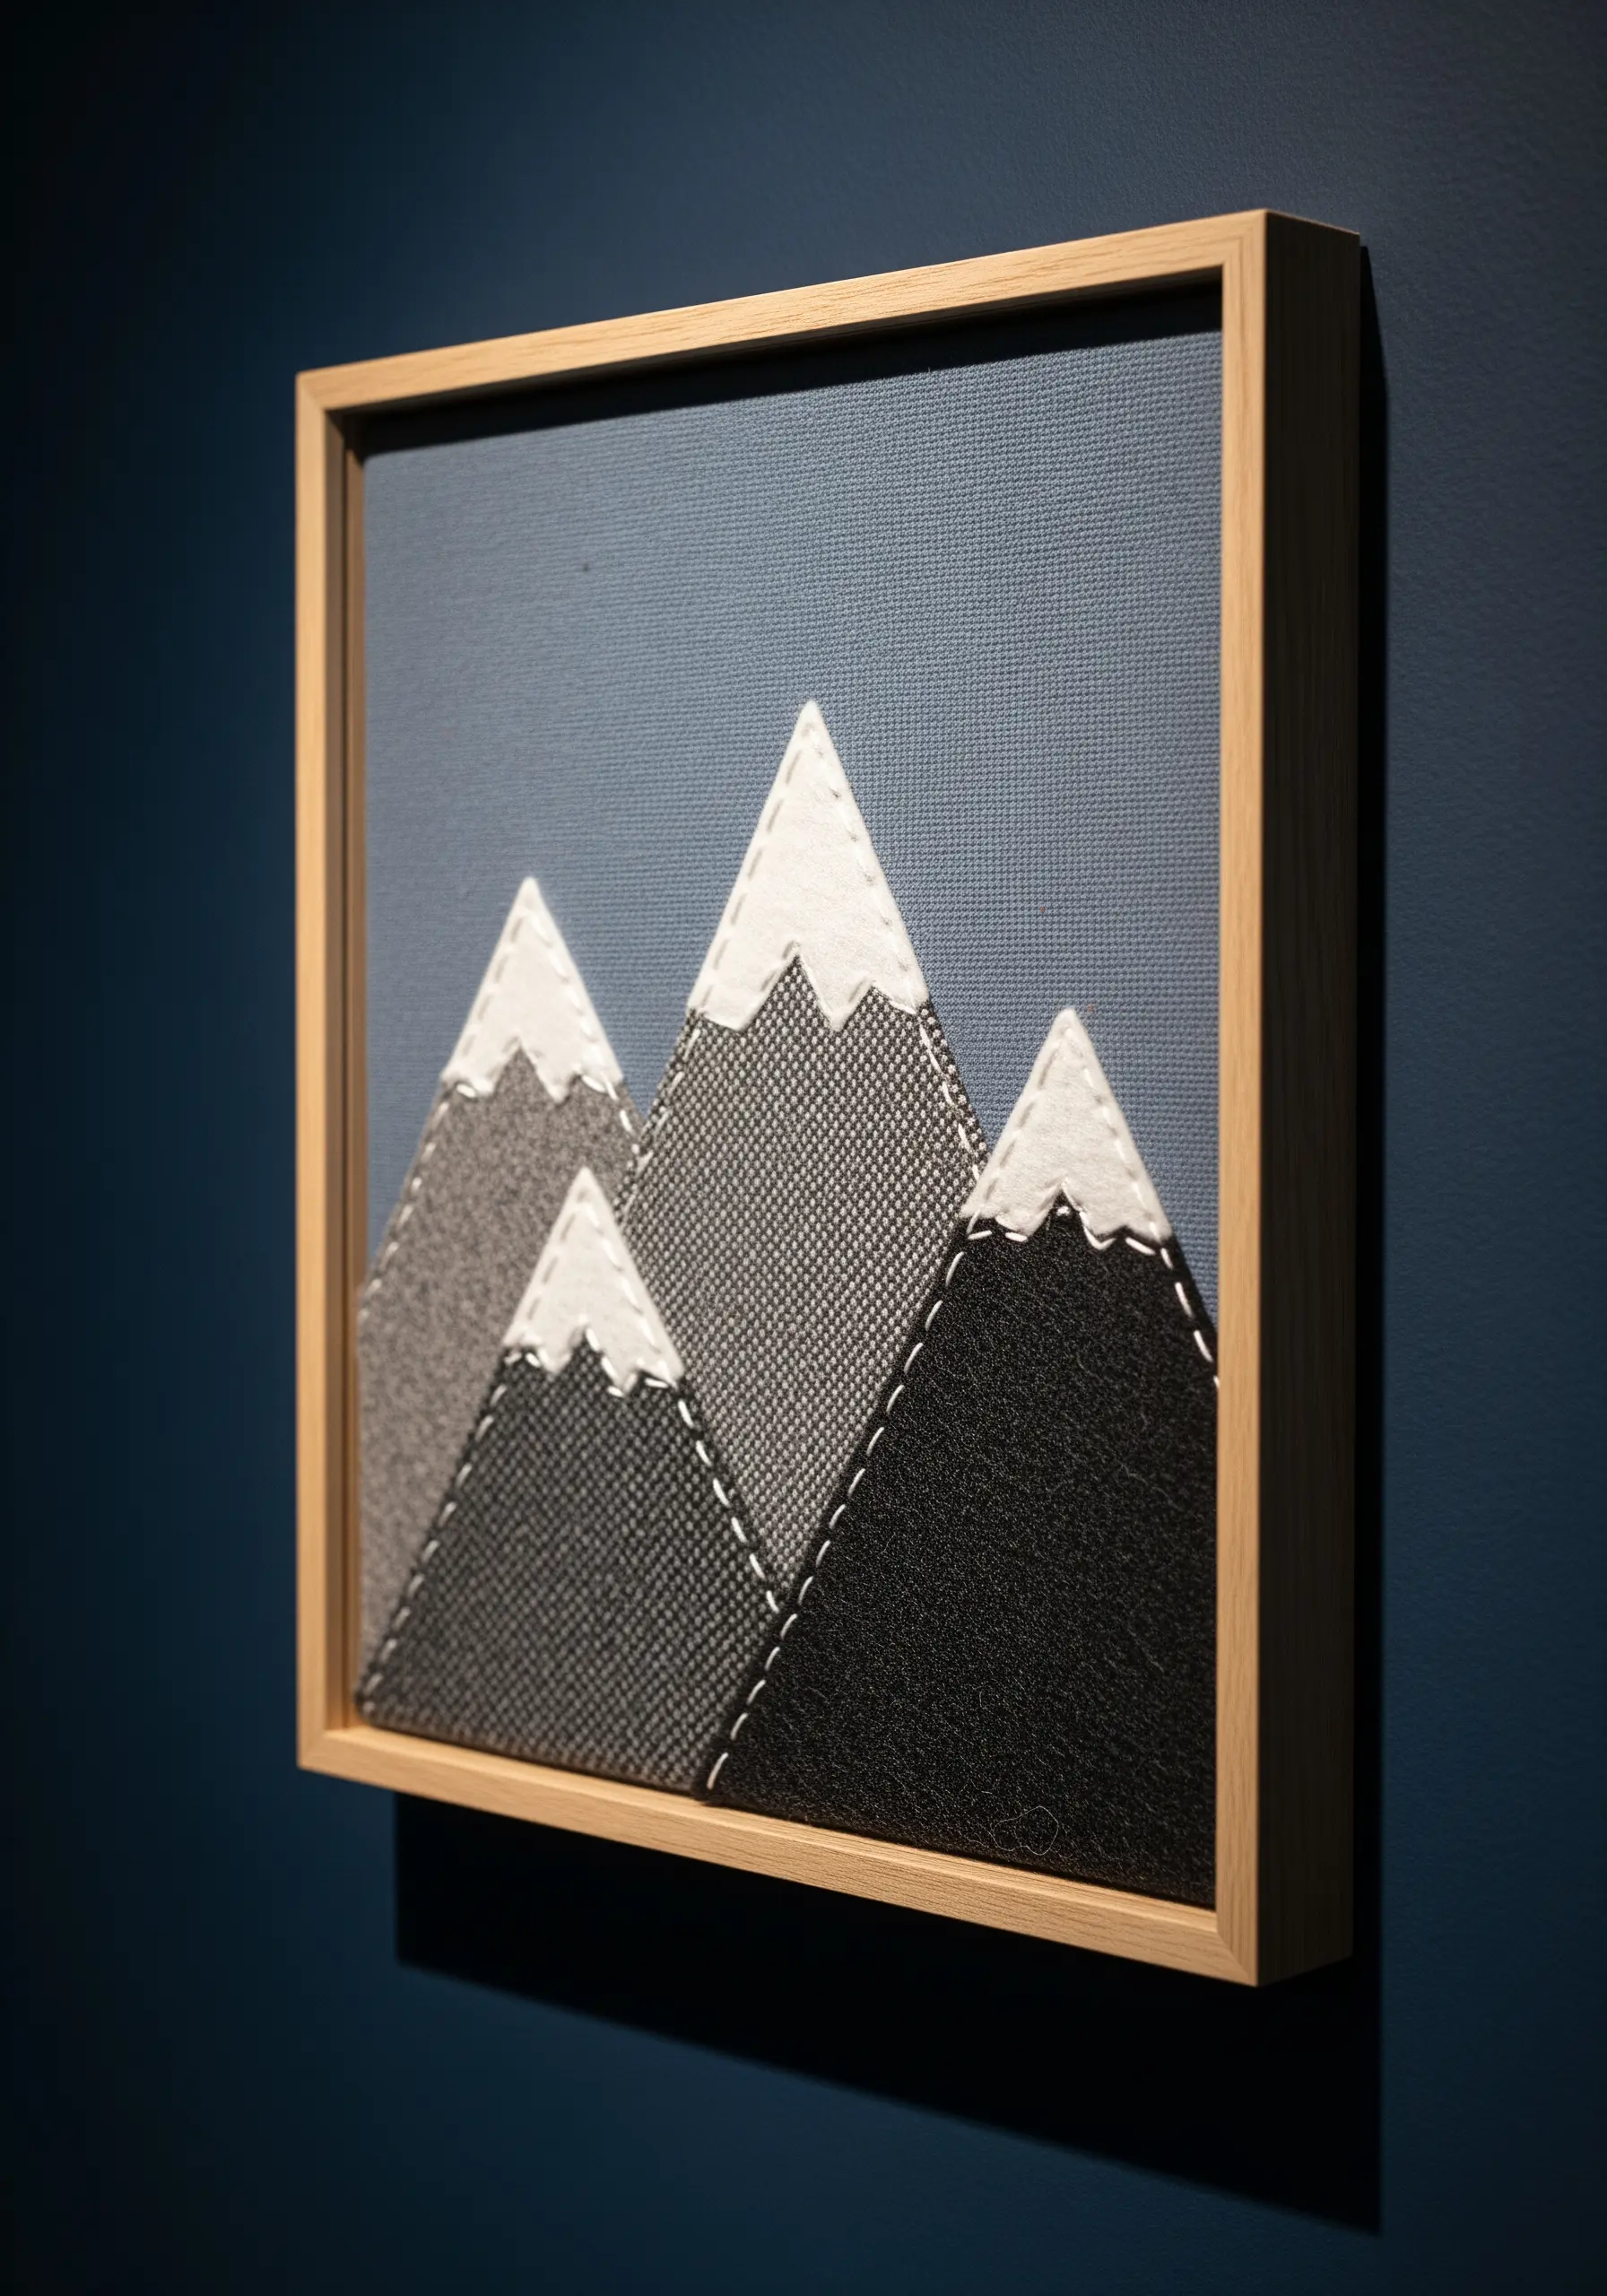
Create a sharp, modern mountain scene by layering precisely cut pieces of felt or textured fabric.
Choose fabrics with different weaves or sheens—like a sturdy wool felt next to a subtle tweed—to give each mountain its own character.
Instead of hiding your stitches, use a contrasting thread and a simple running stitch to add a deliberate, illustrative detail.
This technique turns the construction into a design element, celebrating its handmade origins while maintaining a crisp, minimalist aesthetic.
Mounting the finished piece in a shadow box frame enhances the sense of depth between the layers.
5. Use Thread Painting to Capture Celestial Detail
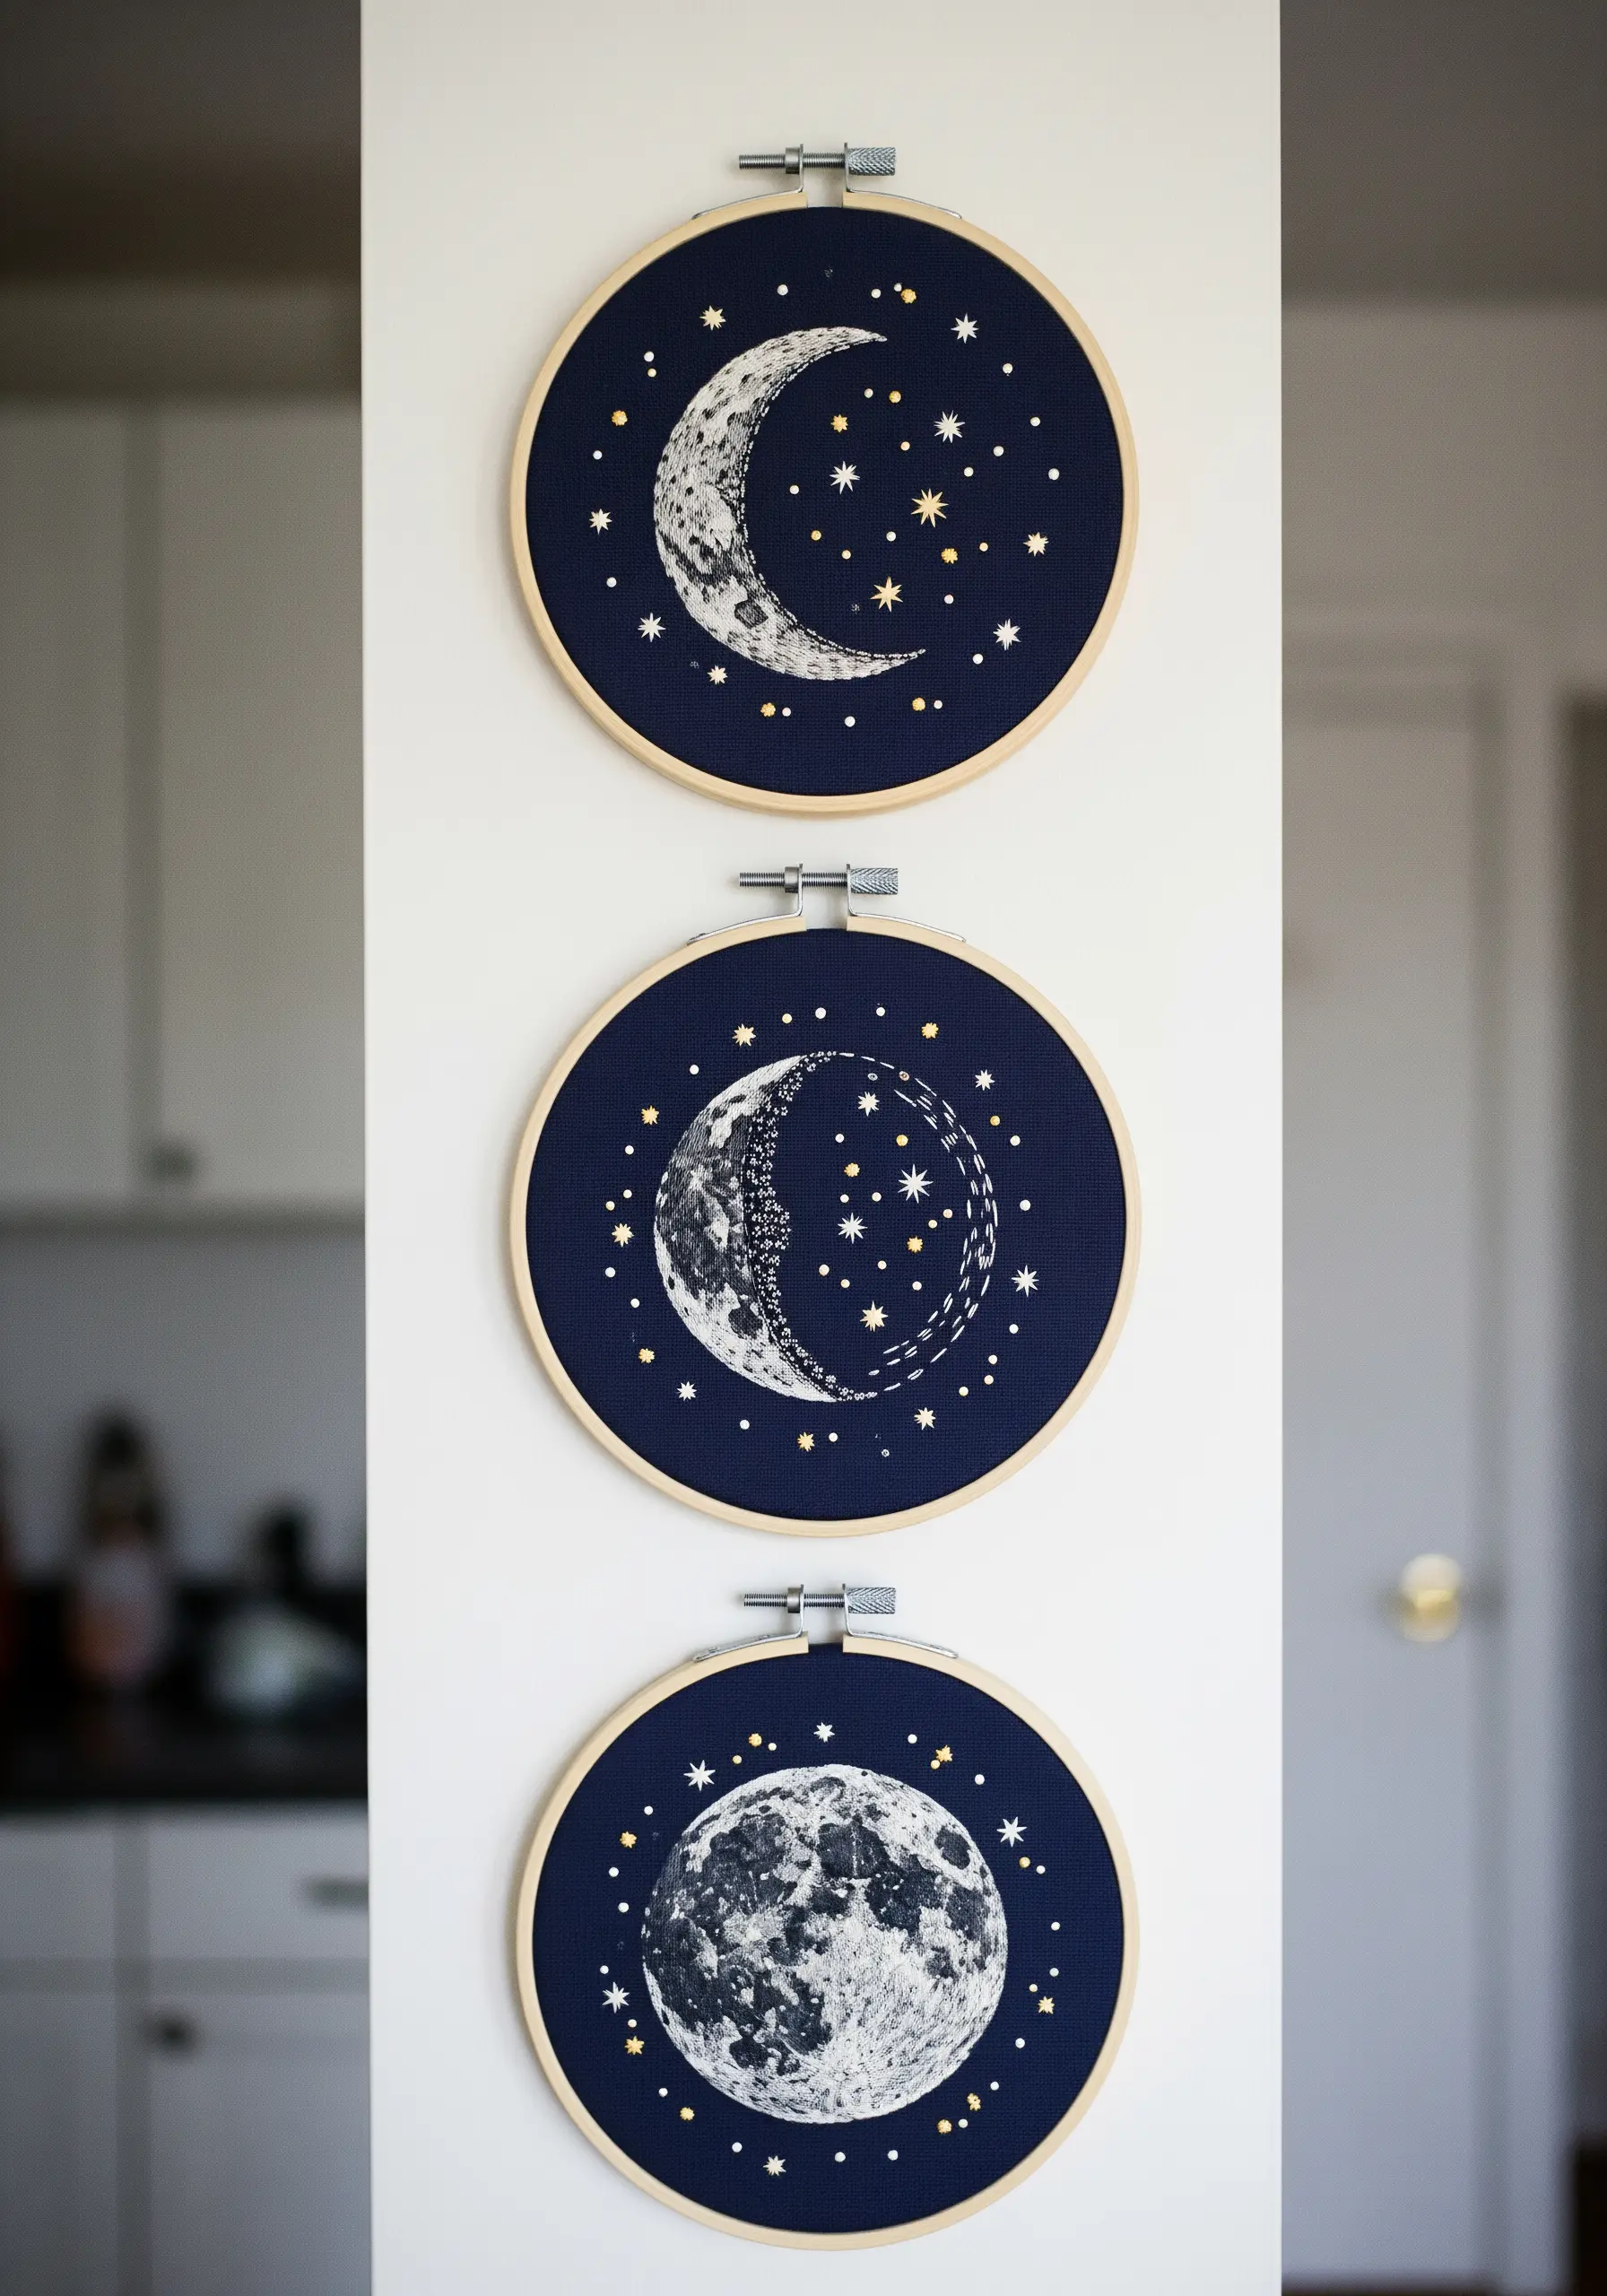
To embroider a realistic moon, move beyond basic stitches and embrace thread painting on a dark fabric background.
Work with a single strand of floss in shades of white, light grey, and silver to build up texture, using short, scattered stitches to mimic craters and shadows.
The key is to layer your colors subtly, blending them together to create a soft, luminous gradient.
For the surrounding stars, use tiny French knots or straight stitches with metallic thread for a delicate sparkle that doesn’t overwhelm the main subject.
Arranging three hoops in a series creates a powerful narrative piece for a narrow wall.
6. Add Dimension with Beads and Blended Threads
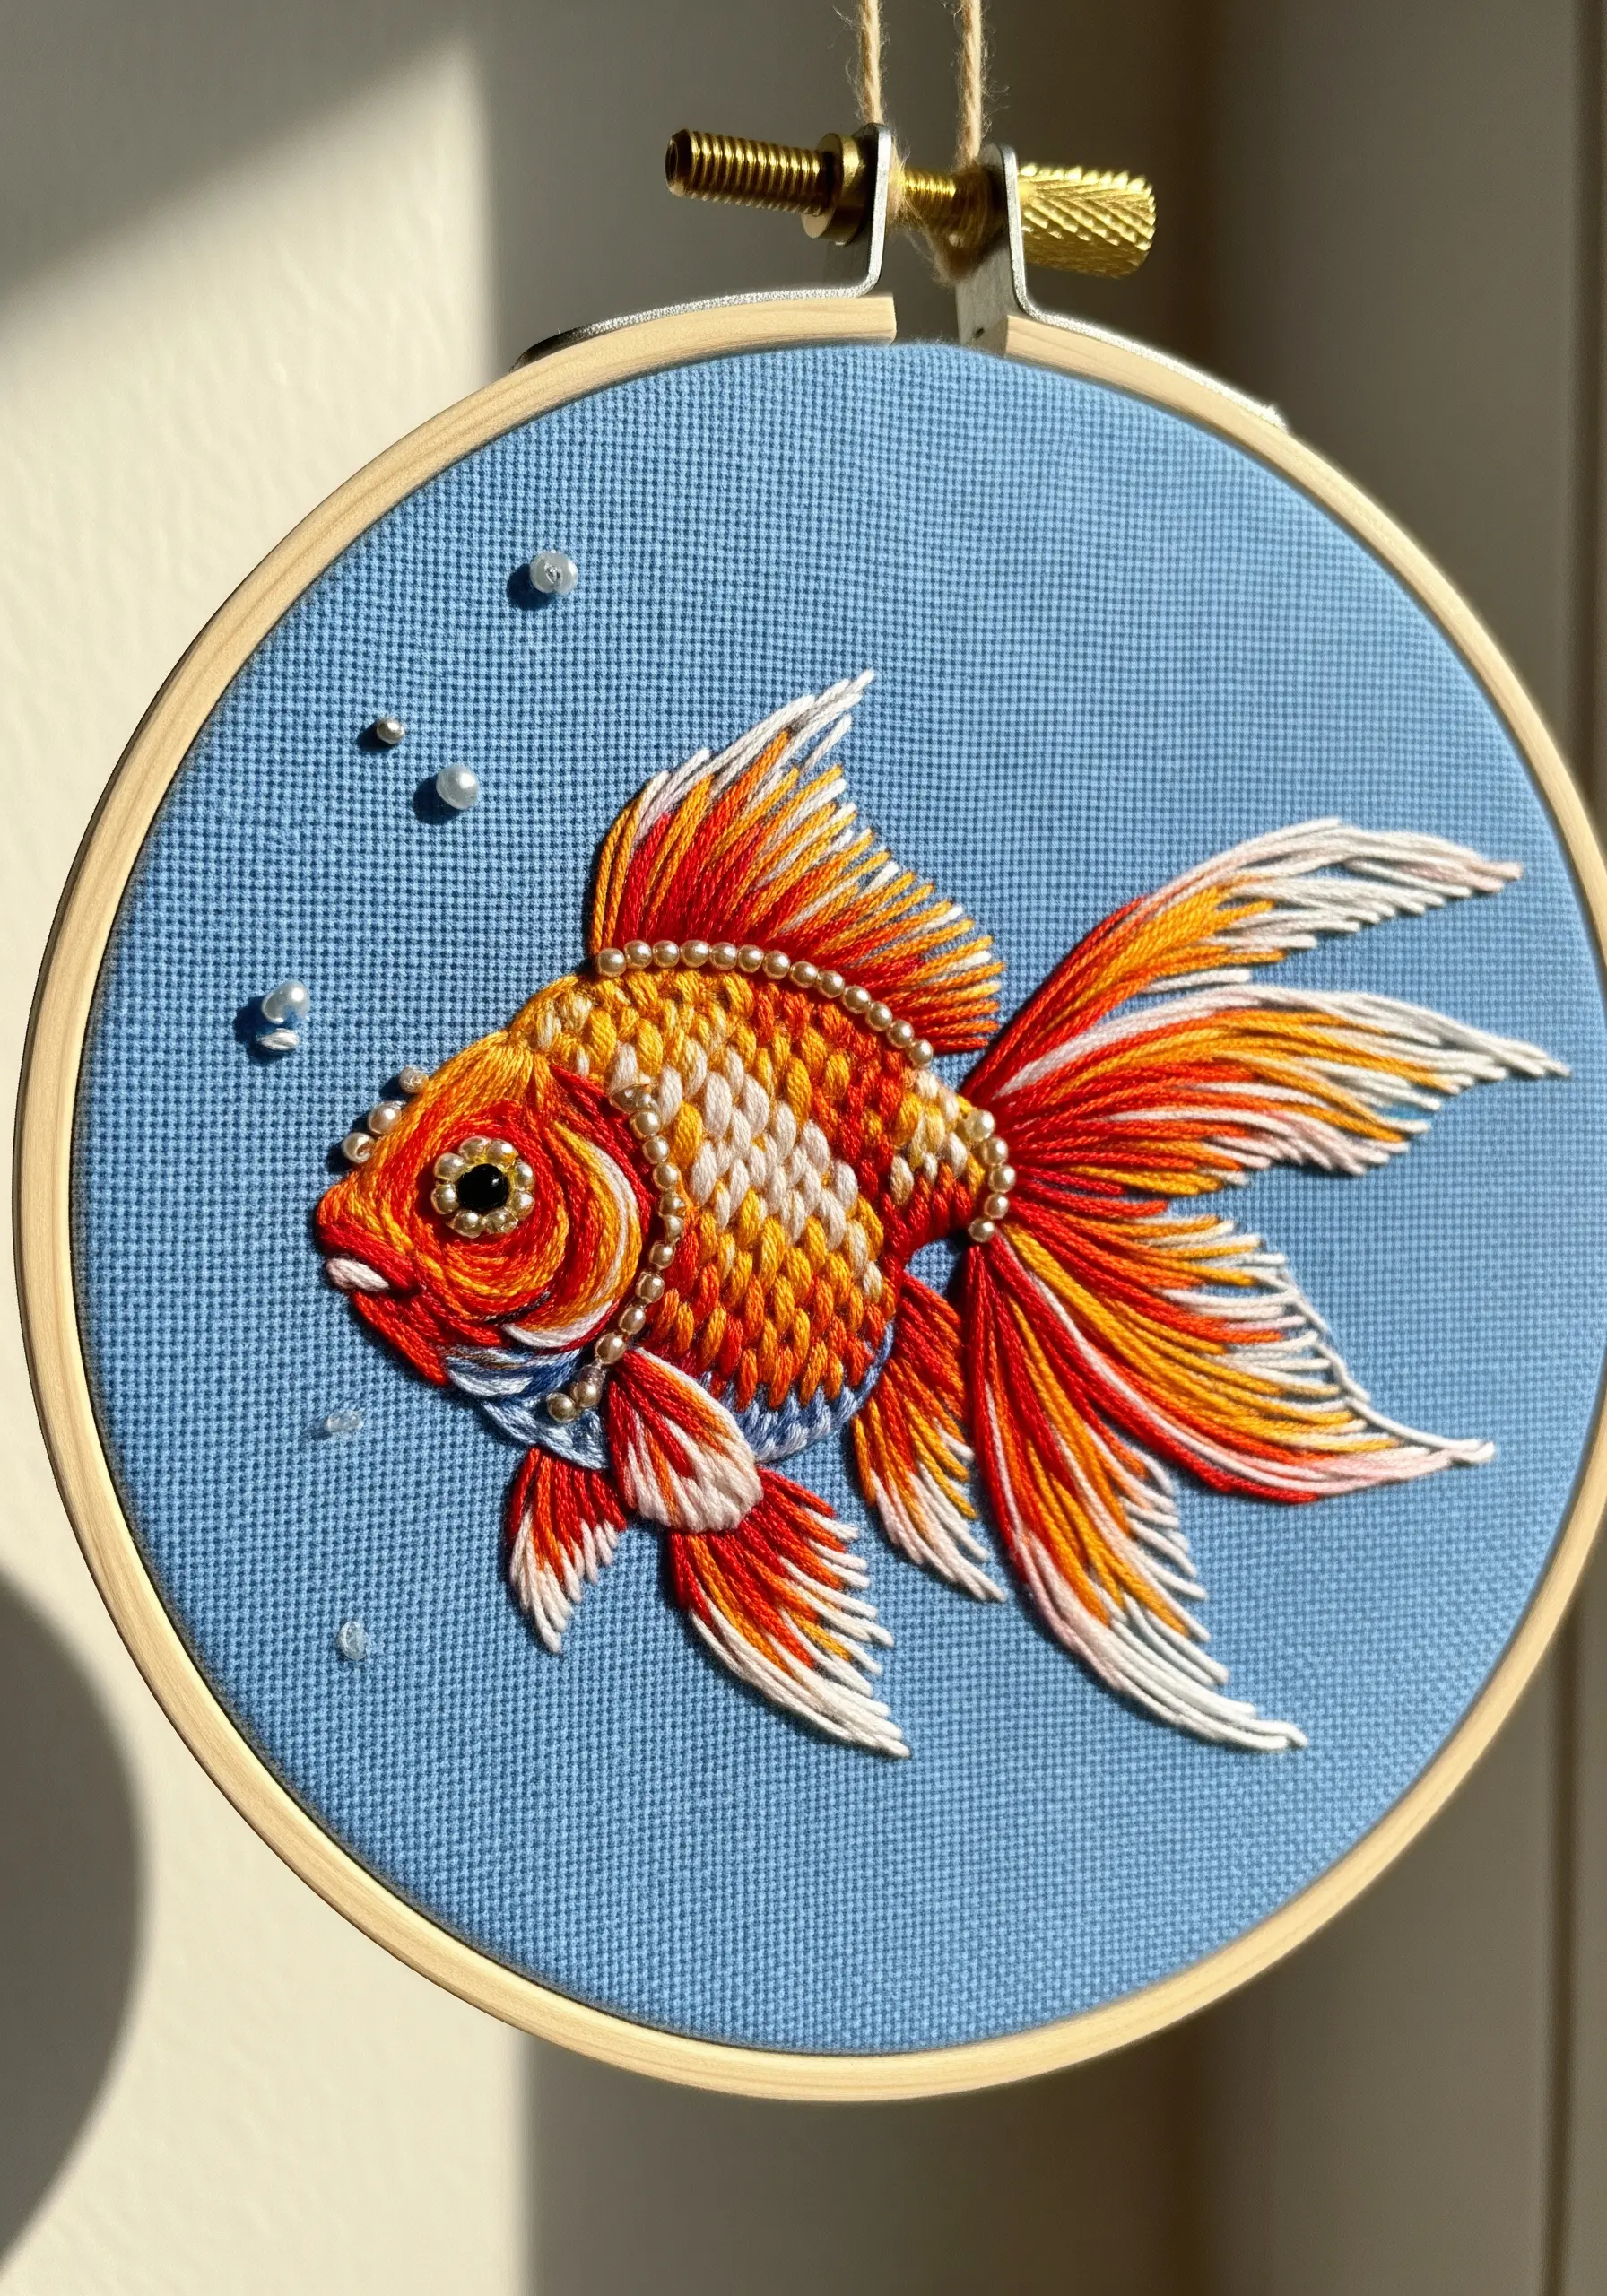
Elevate your thread painting by incorporating tiny seed beads for texture and light reflection.
Use a long-and-short stitch to seamlessly blend the oranges, reds, and yellows in the fish’s fins, creating the illusion of movement.
For the scales, alternate between satin stitch and strategically placed rows of pearlescent beads to mimic a natural shimmer.
A single black bead makes for a perfect, lifelike eye, while a few clear beads scattered as bubbles add to the underwater narrative.
This mix of matte thread and reflective beads creates a dynamic finish that changes with the light.
7. Create Art Deco Glamour with Precision Beading
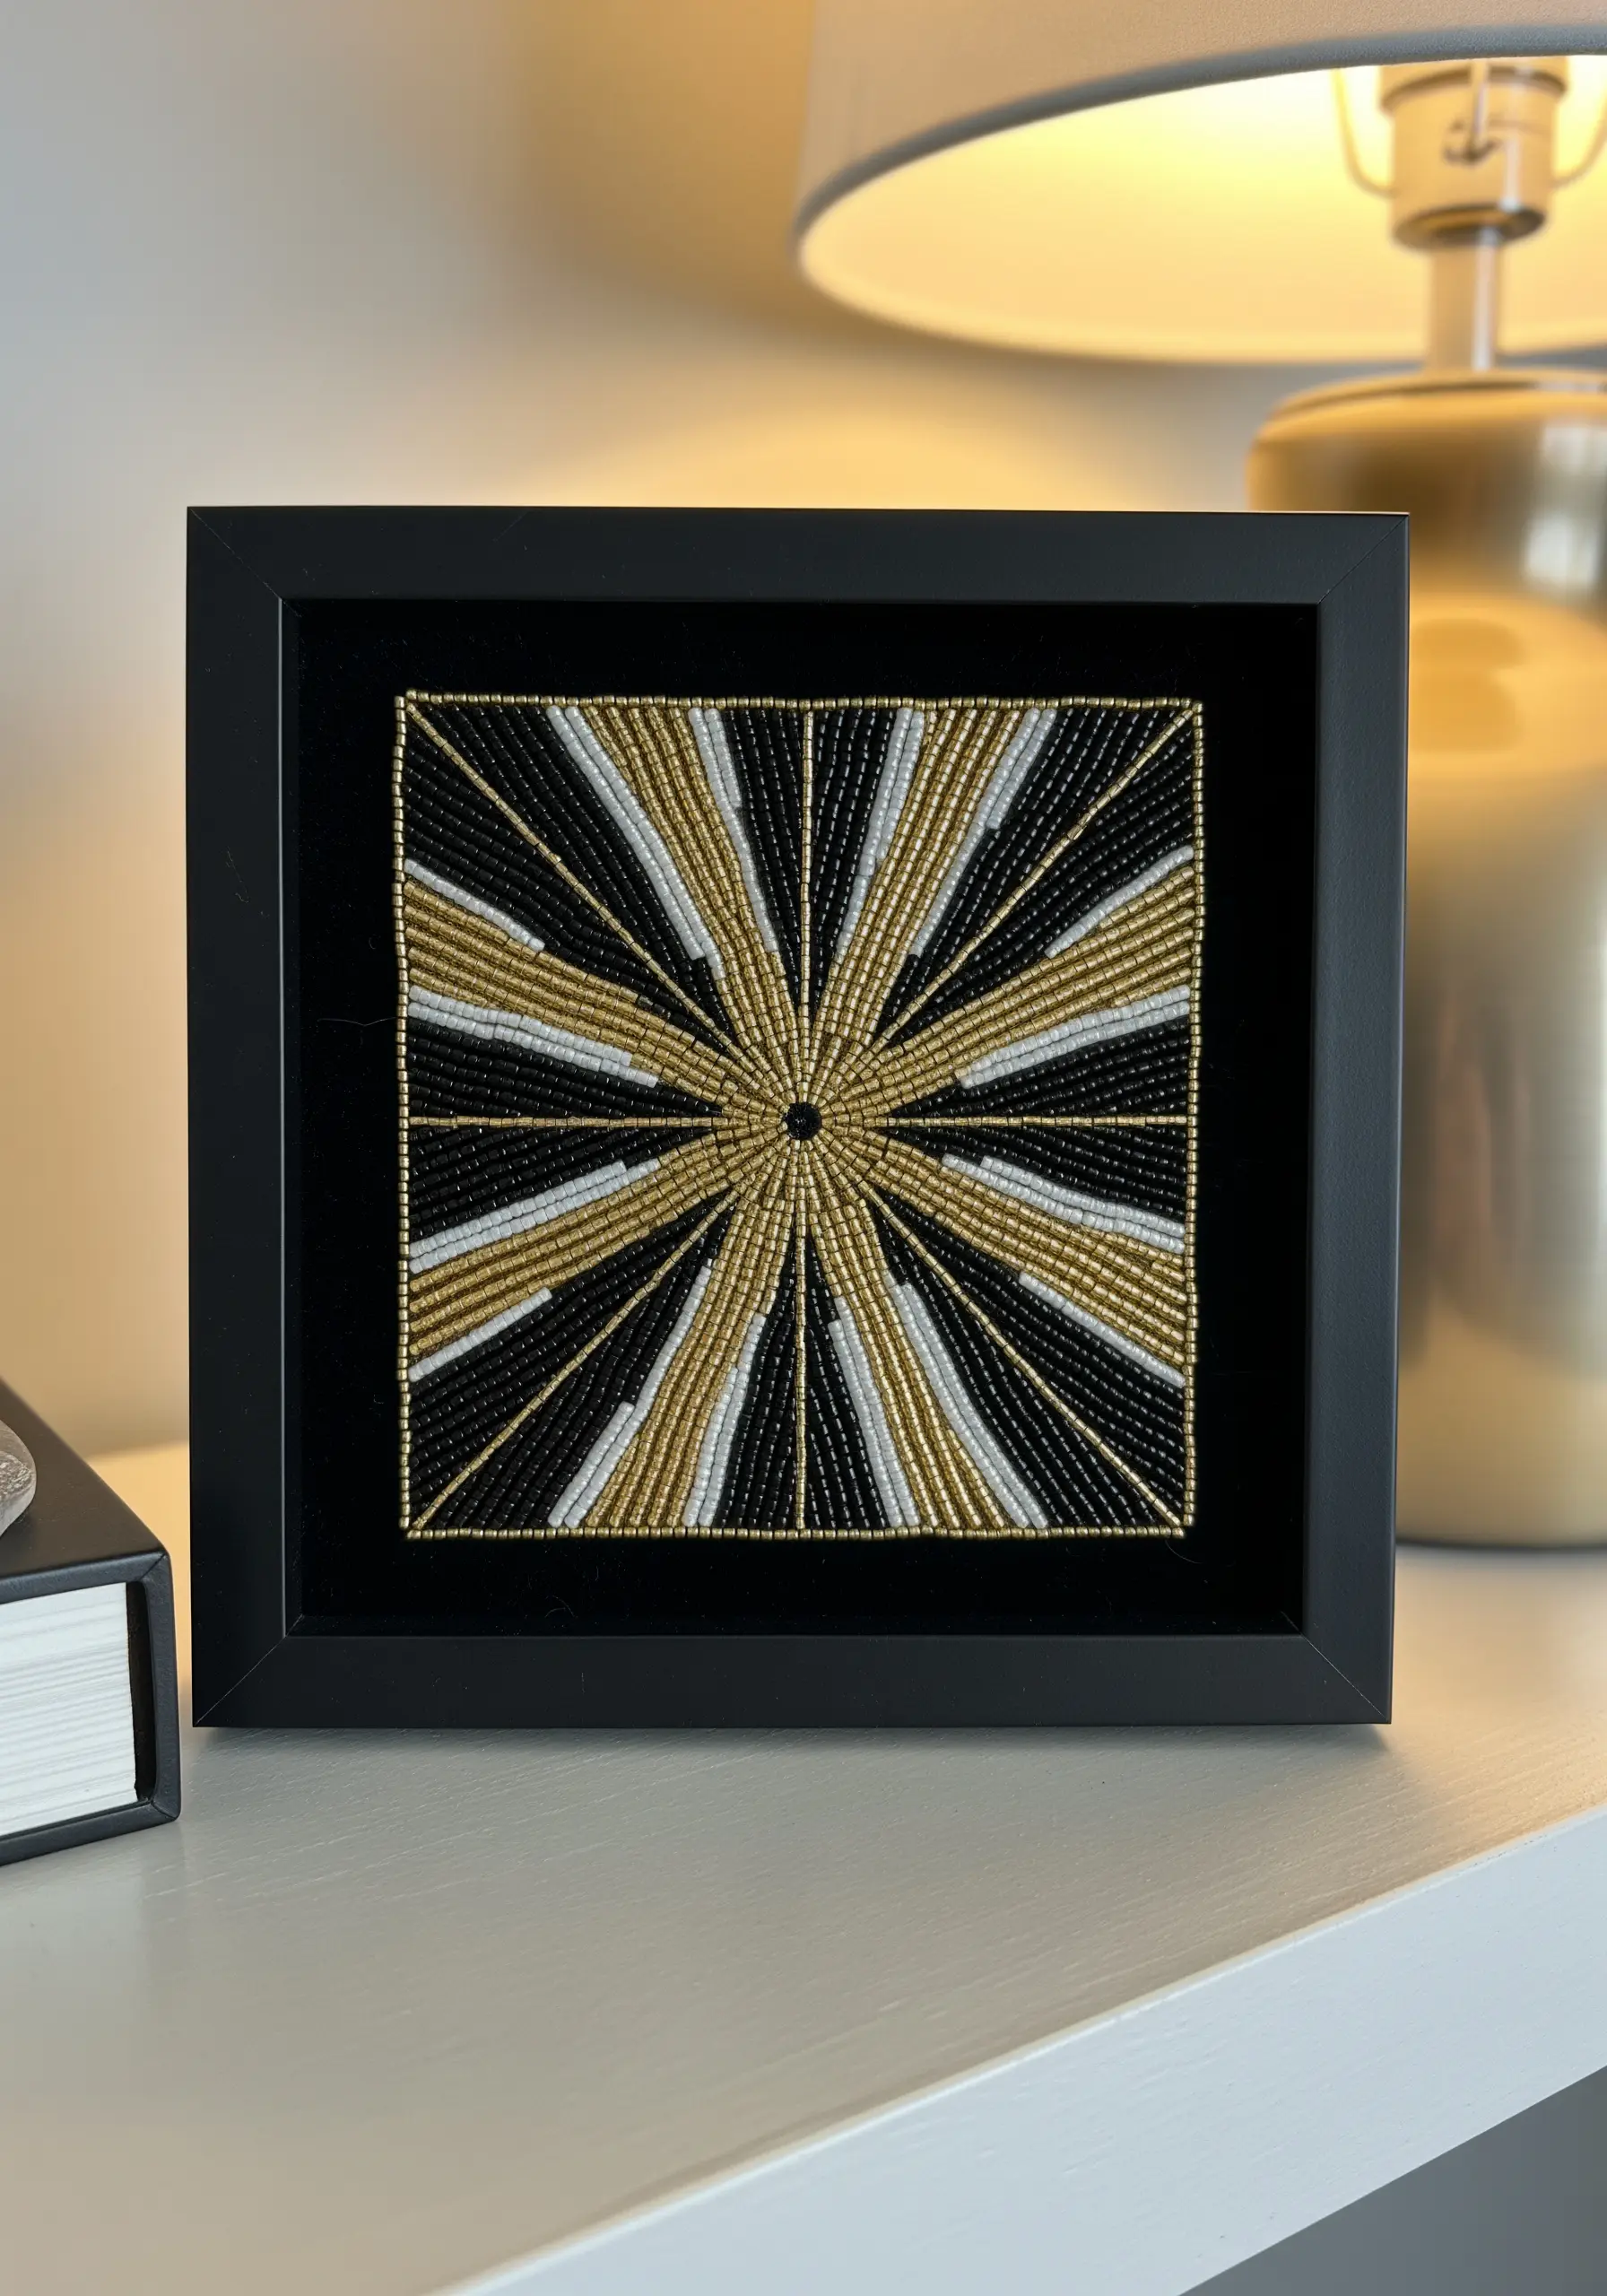
For a sophisticated, high-impact piece, work entirely with beads on a luxe fabric like black velvet.
Draw a precise geometric pattern, like a sunburst, onto your fabric first.
Using a beading needle and matching thread, stitch down lines of seed beads, one or two at a time, keeping them tight and perfectly straight.
Alternate between matte, metallic, and pearlescent beads in a controlled palette—like gold, black, and cream—to create a composition that feels both opulent and controlled.
The texture of the velvet absorbs light, making the metallic beads appear even more radiant.
8. Refine Your Lettering with Whipped Backstitch
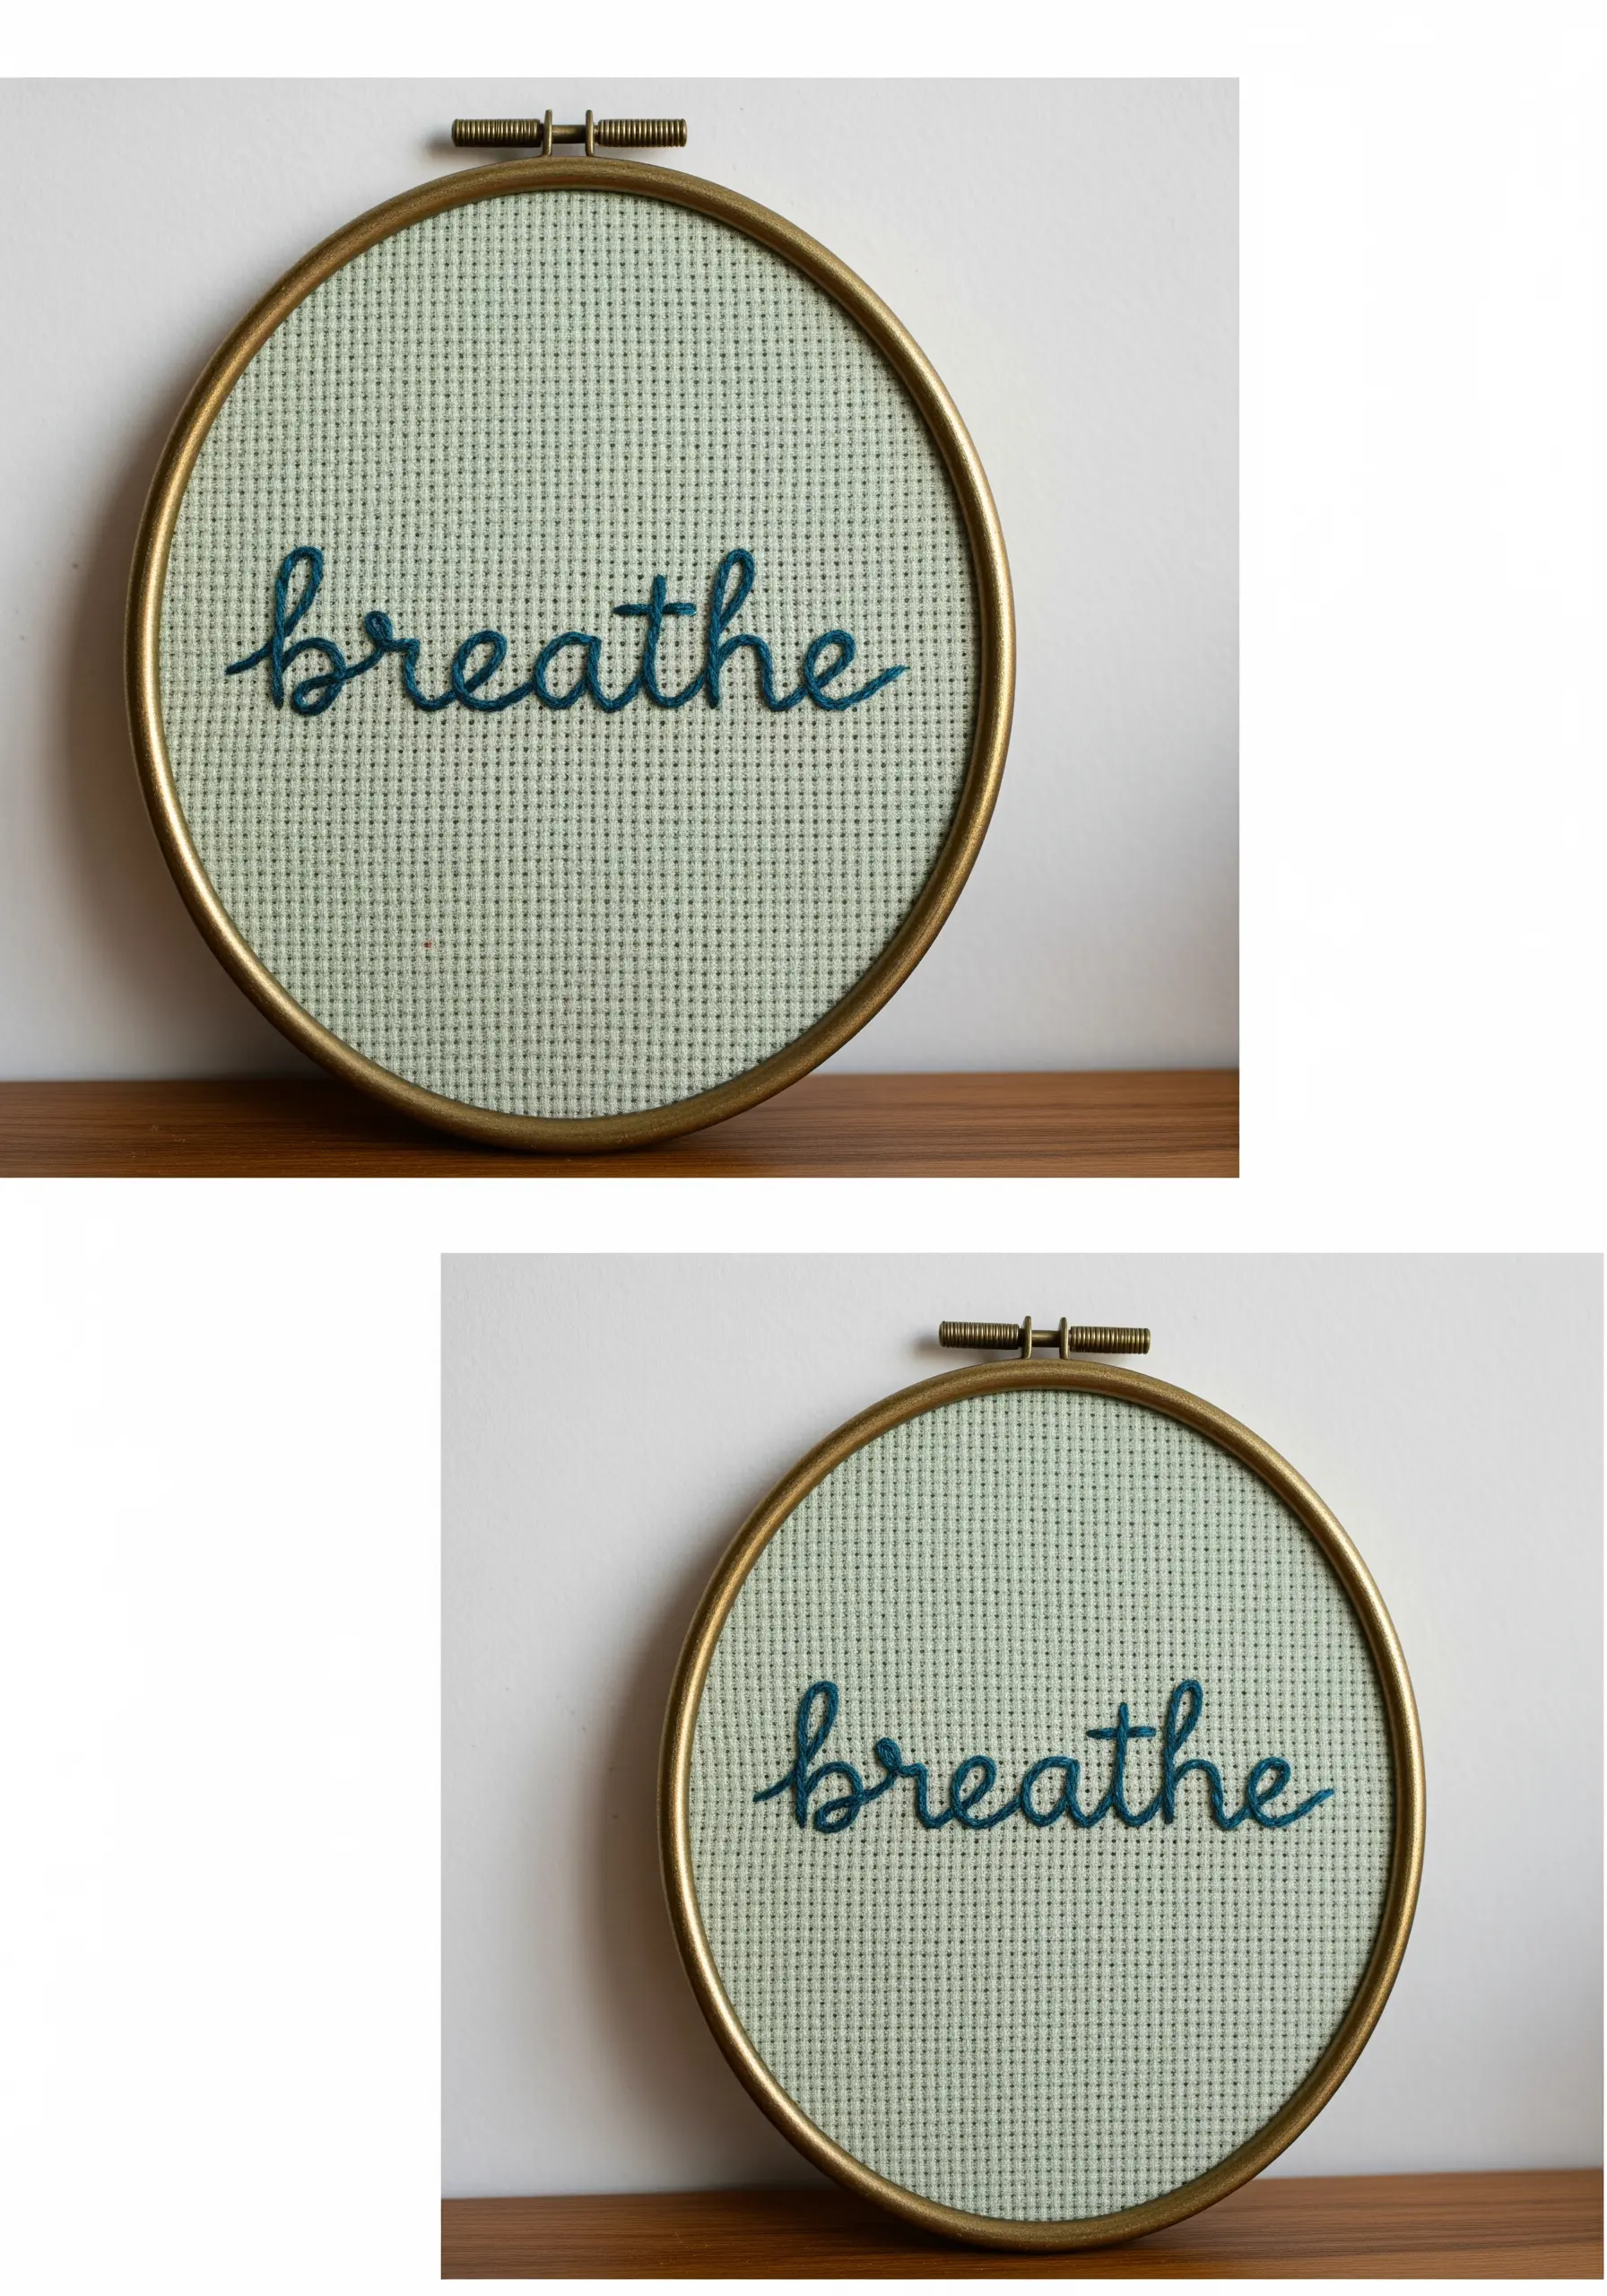
If your backstitched letters look disjointed, elevate them with a whipping technique for a smooth, cord-like finish.
First, complete your word using a standard backstitch, focusing on keeping the stitch length consistent.
Then, using a second strand of the same thread (or a contrasting one for effect), slide your needle under each backstitch without piercing the fabric.
This wraps the initial stitches, concealing the gaps and creating a single, flowing line that looks incredibly professional.
It’s a simple second step that transforms basic lettering into elegant script.
9. Introduce 3D Elements for a Playful, Tactile Effect
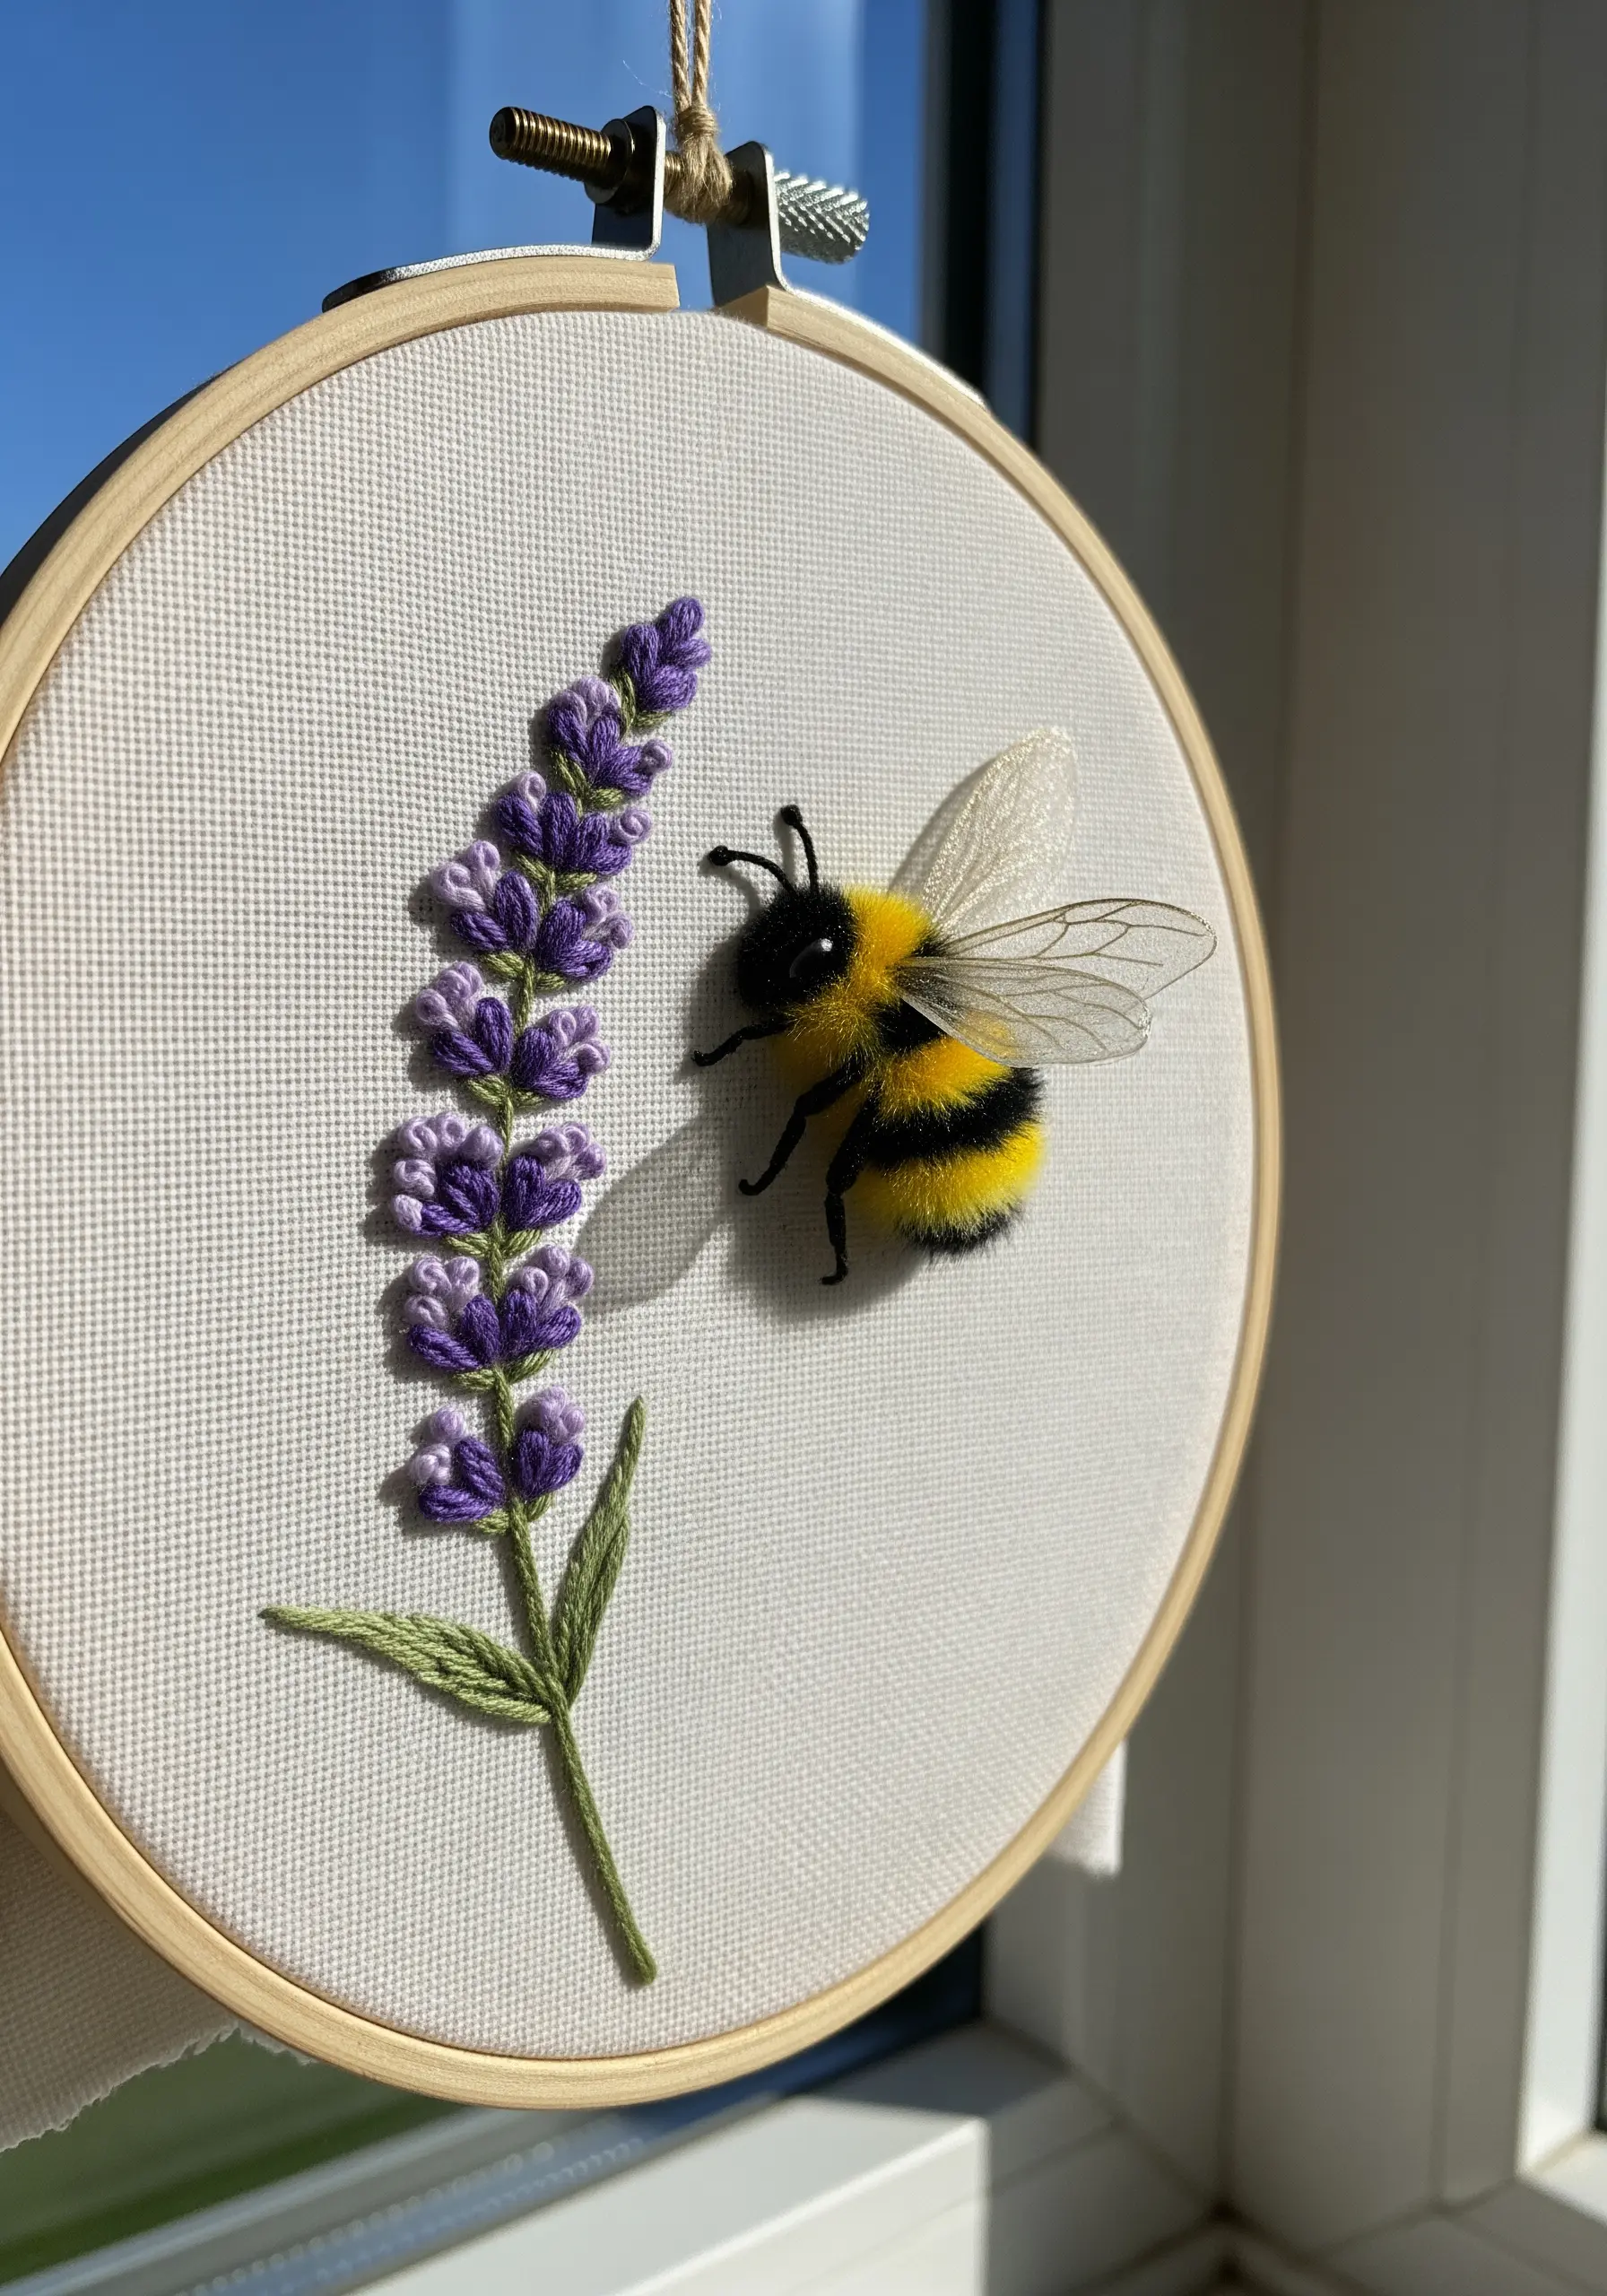
Combine traditional embroidery with three-dimensional craft techniques to make your art literally pop off the fabric.
Stitch the lavender using satin stitch and French knots for a classic embroidered look.
For the bee, create a body from fluffy yarn or a pom-pom and attach it securely to the fabric.
Use sheer organza or fine wire mesh for the wings, stitching them on so they remain free-standing.
This combination of embroidery and mixed-media creates a delightful, interactive piece that invites a closer look.
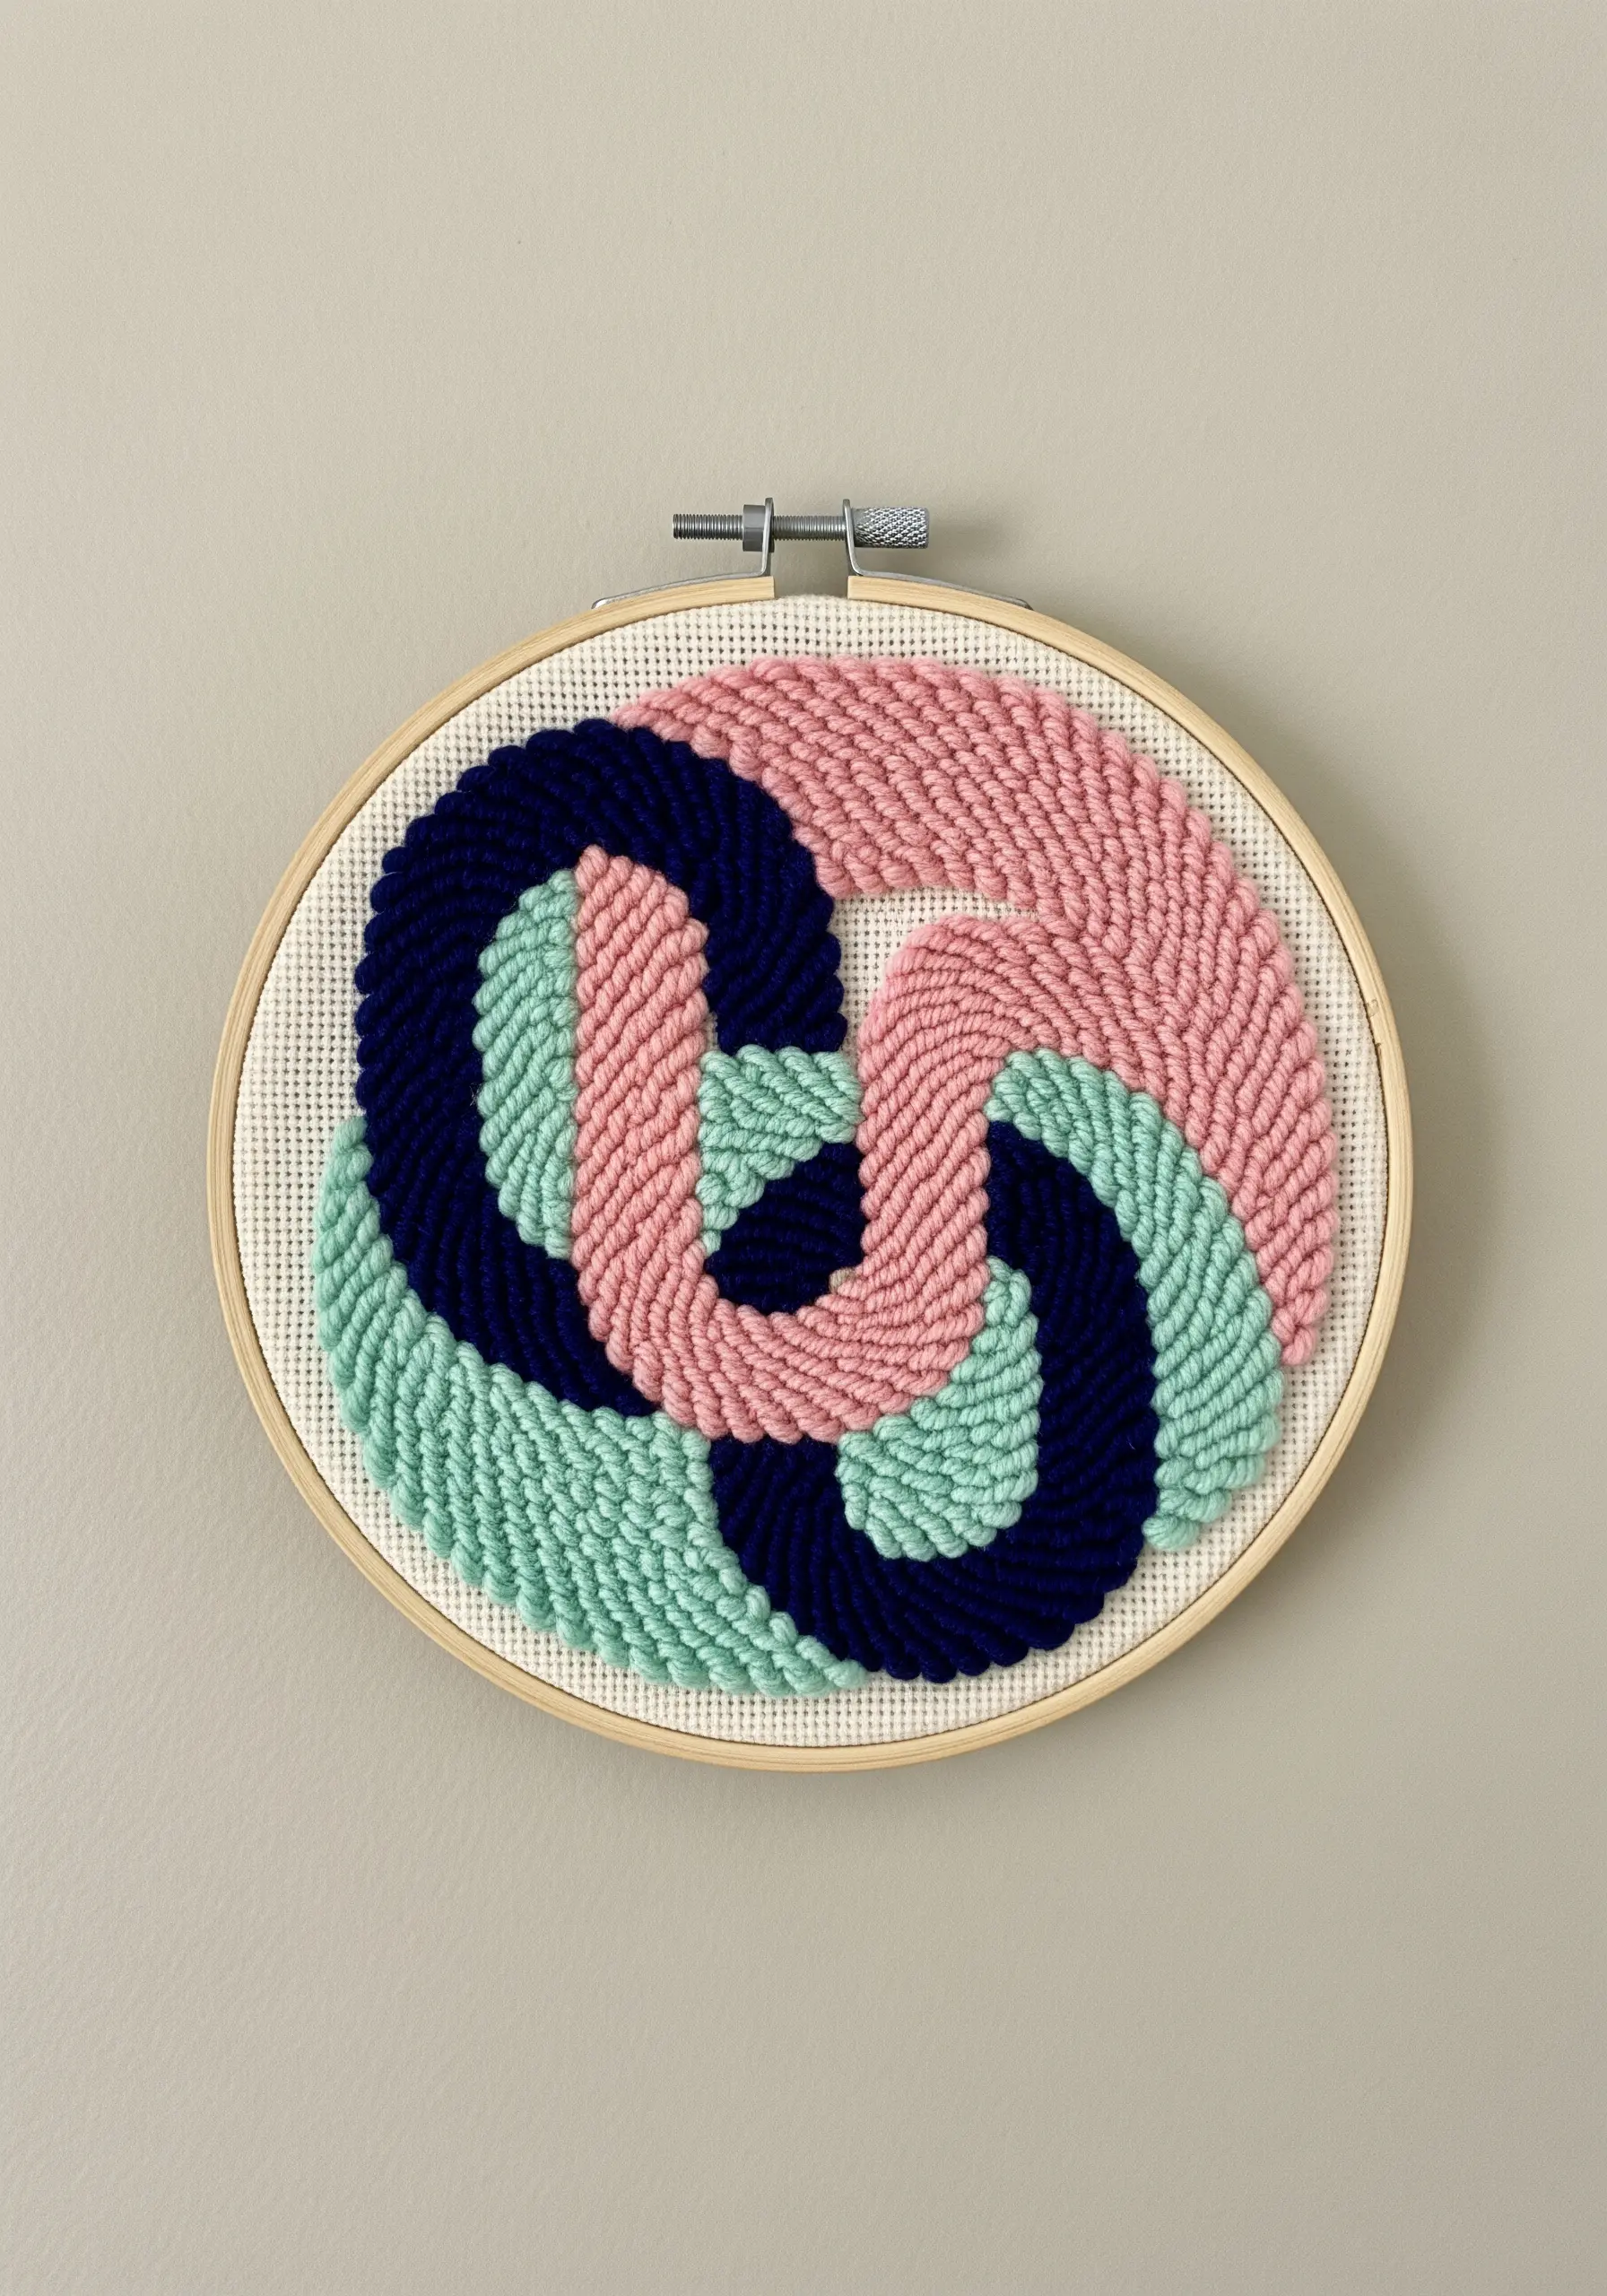
10. Embrace Abstract Weaving with Unconventional Materials
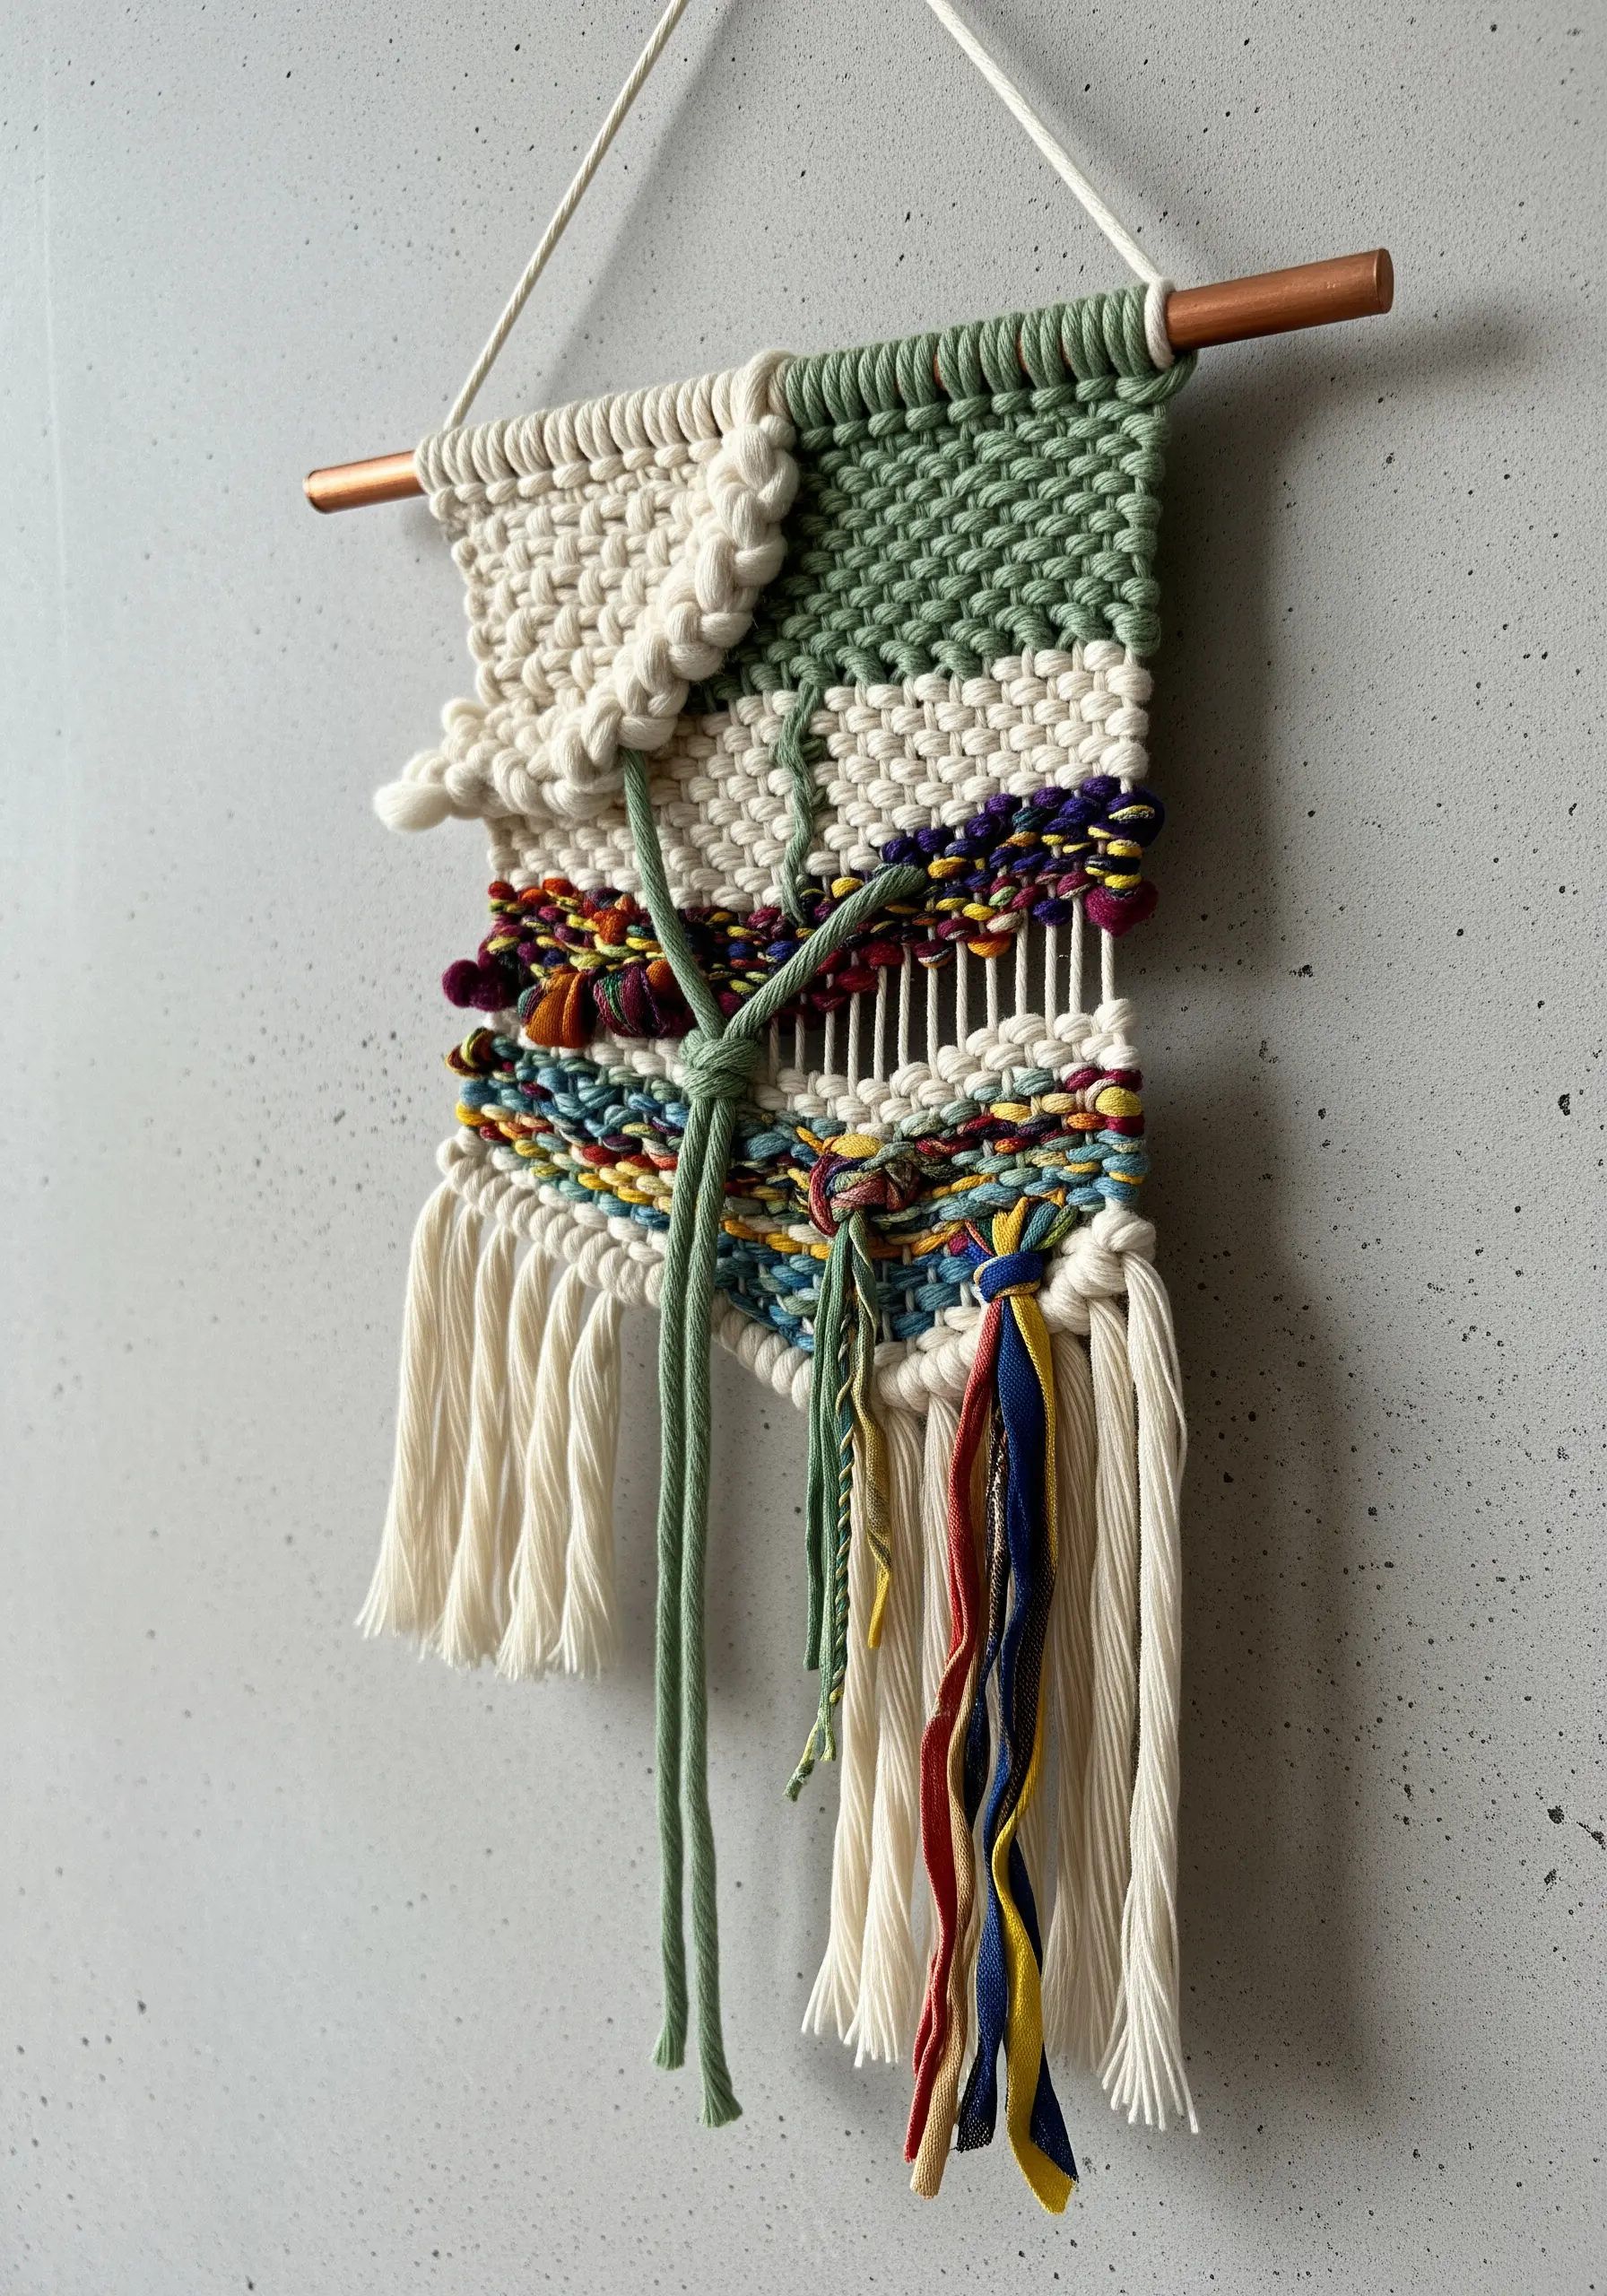
Move beyond straight lines and experiment with freeform weaving on a small lap loom.
Incorporate scraps of fabric, ribbons, and varying thicknesses of yarn to create unpredictable blocks of color and texture.
Allow some threads to hang loose or tie them in knots directly on the warp to add sculptural interest.
This intuitive process is less about precision and more about creative expression, turning leftover materials into mesmerizing wall art.
It’s a perfect way to use up your fiber stash and create something truly one-of-a-kind.
11. Master the Bold Statement of a Single Line
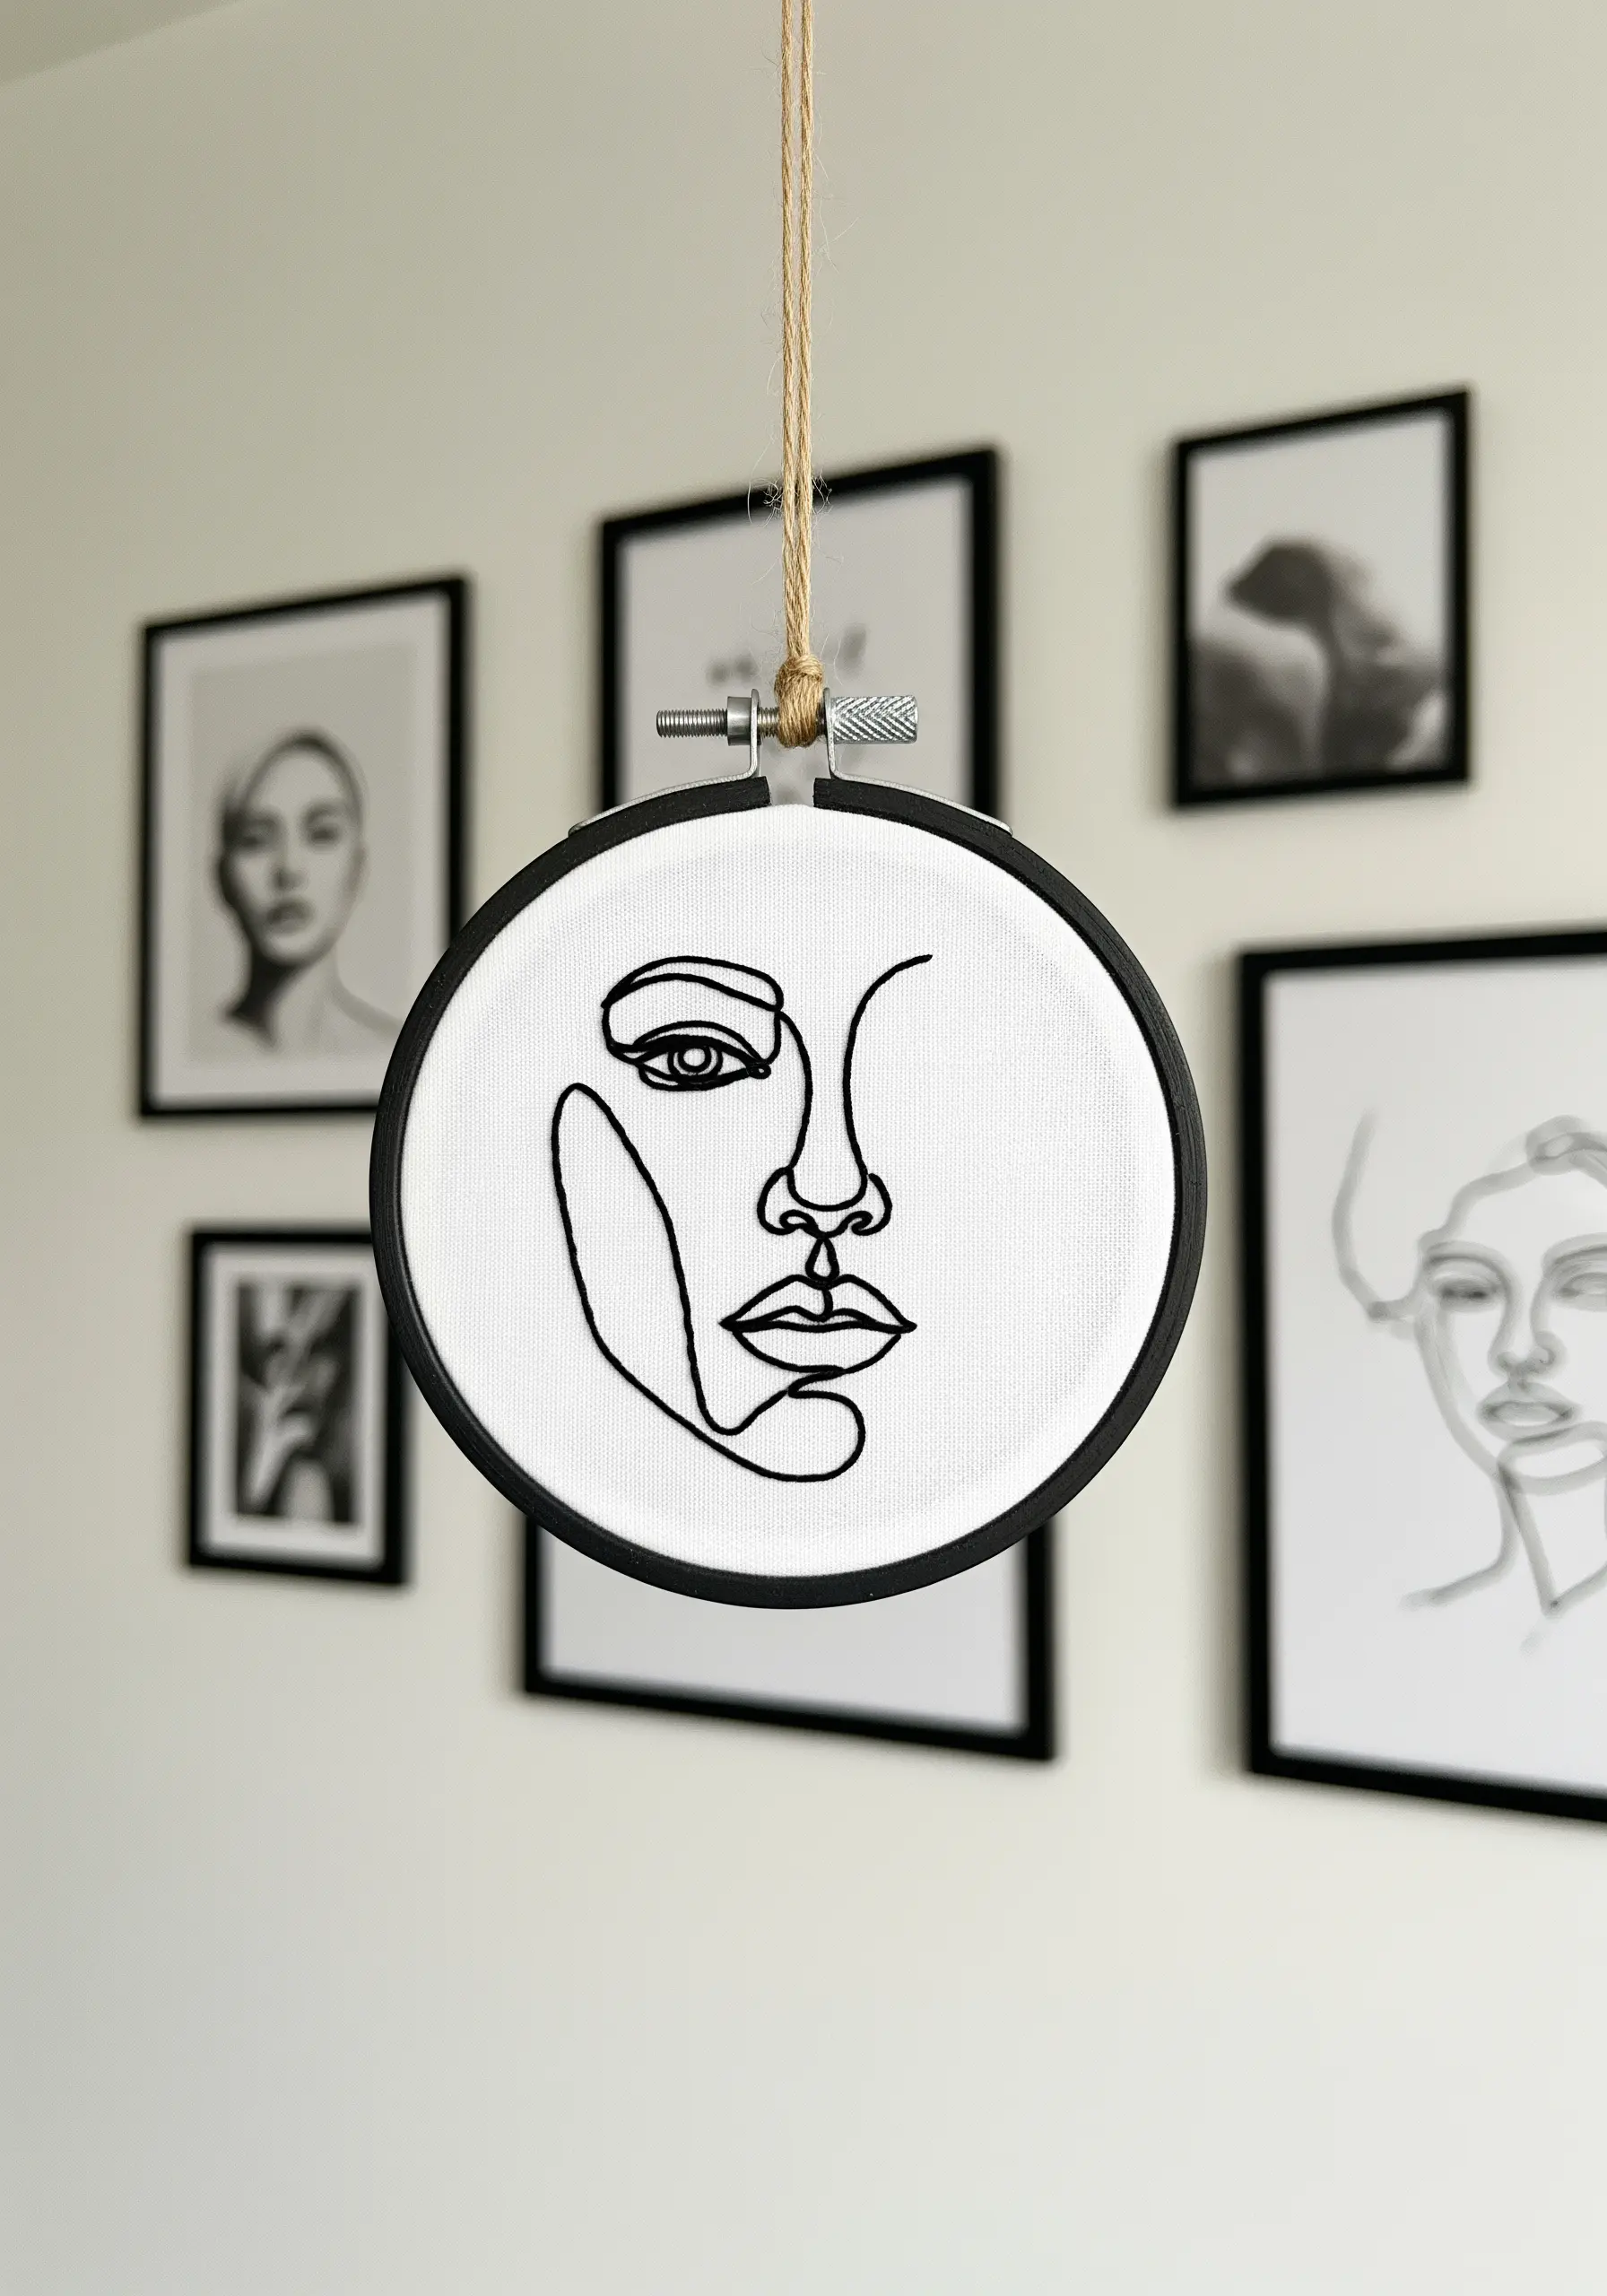
For a piece that is both minimal and powerful, focus on the quality of a single, continuous line.
Choose a thick, dark thread, like a pearl cotton or all six strands of embroidery floss, to give your line weight and presence against a plain white background.
Use a stem stitch or a whipped backstitch to ensure the line is perfectly smooth and unbroken, especially around curves.
The key to this style is flawless execution—a tight, even stitch makes all the difference.
These abstract face line embroidery designs offer a modern, gallery-inspired look for your wall.
12. Create a Landscape with Fabric Collage and Accent Stitches
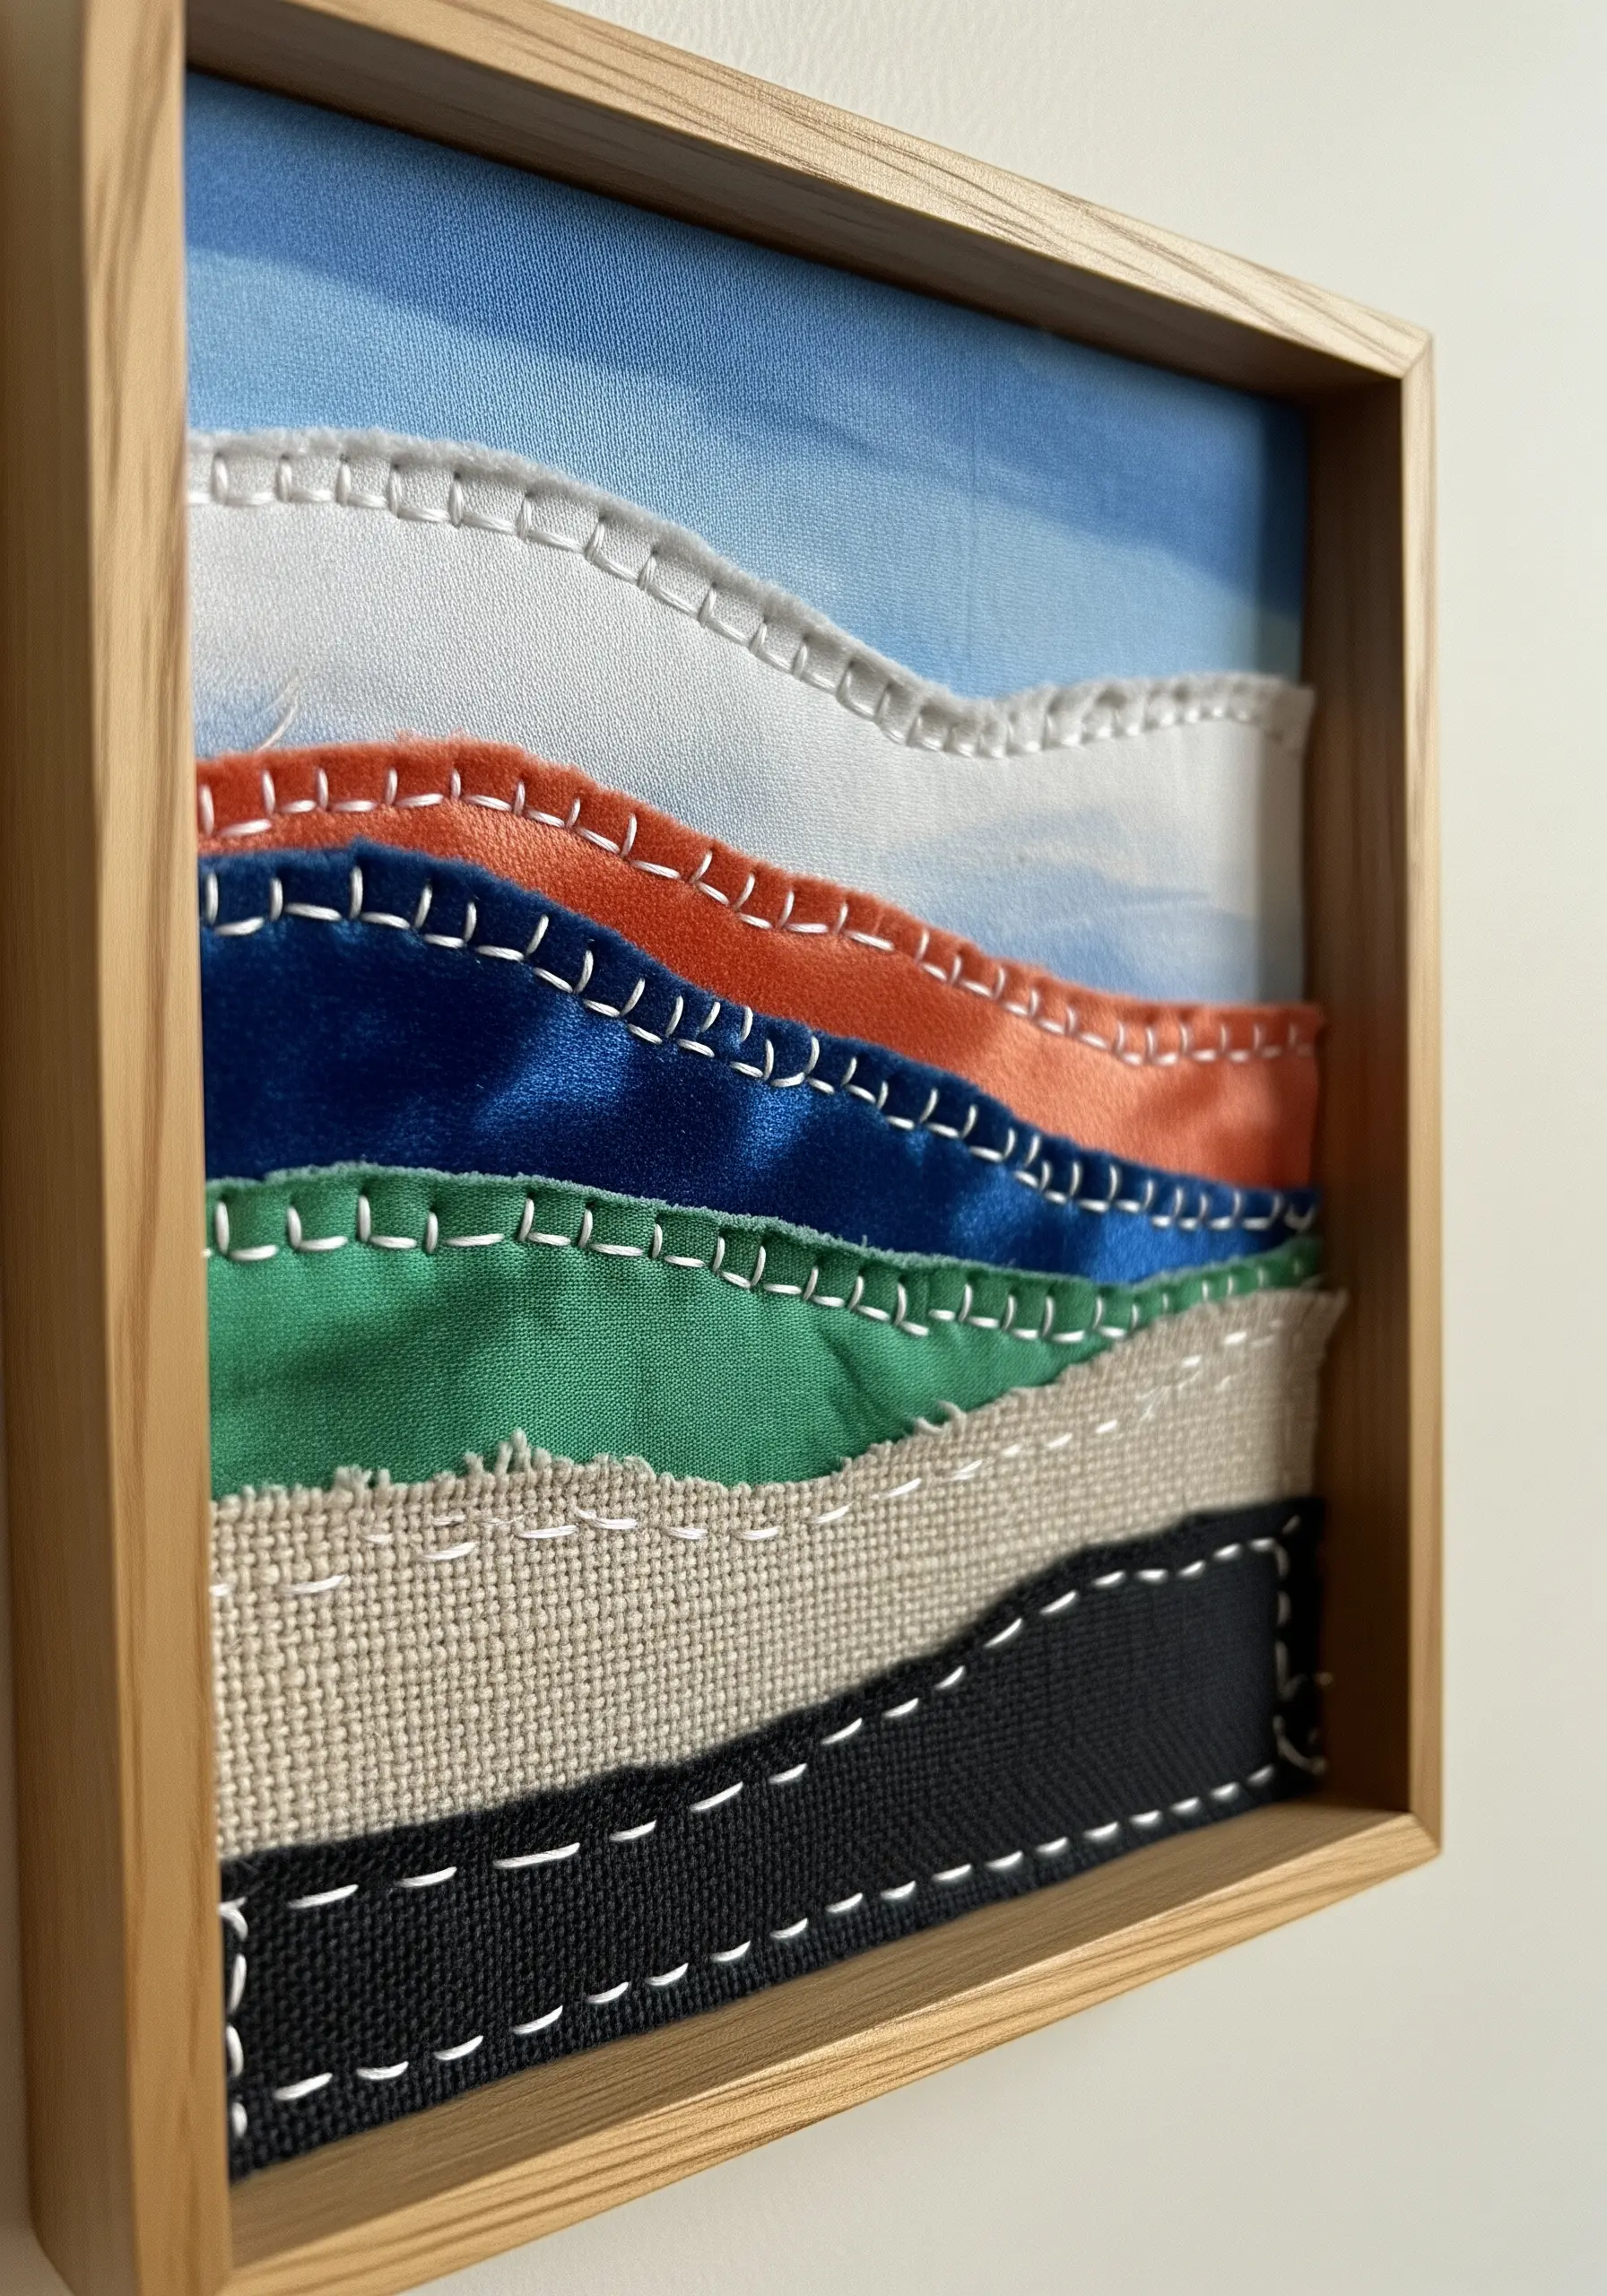
Build a richly textured scene by layering scraps of fabric with different sheens, weights, and weaves.
Don’t worry about perfect edges; a raw, slightly frayed edge adds organic character.
Arrange the fabric pieces to represent hills, water, or sky, then use a simple running stitch or blanket stitch in a contrasting color to secure them.
The stitch acts as both a functional element and a graphic detail, outlining the shapes and adding a touch of handmade charm.
This is a fantastic way to create fabric collage embroidery artworks that tell a story with texture.
13. Achieve a Painterly Effect with Spiral Stitching
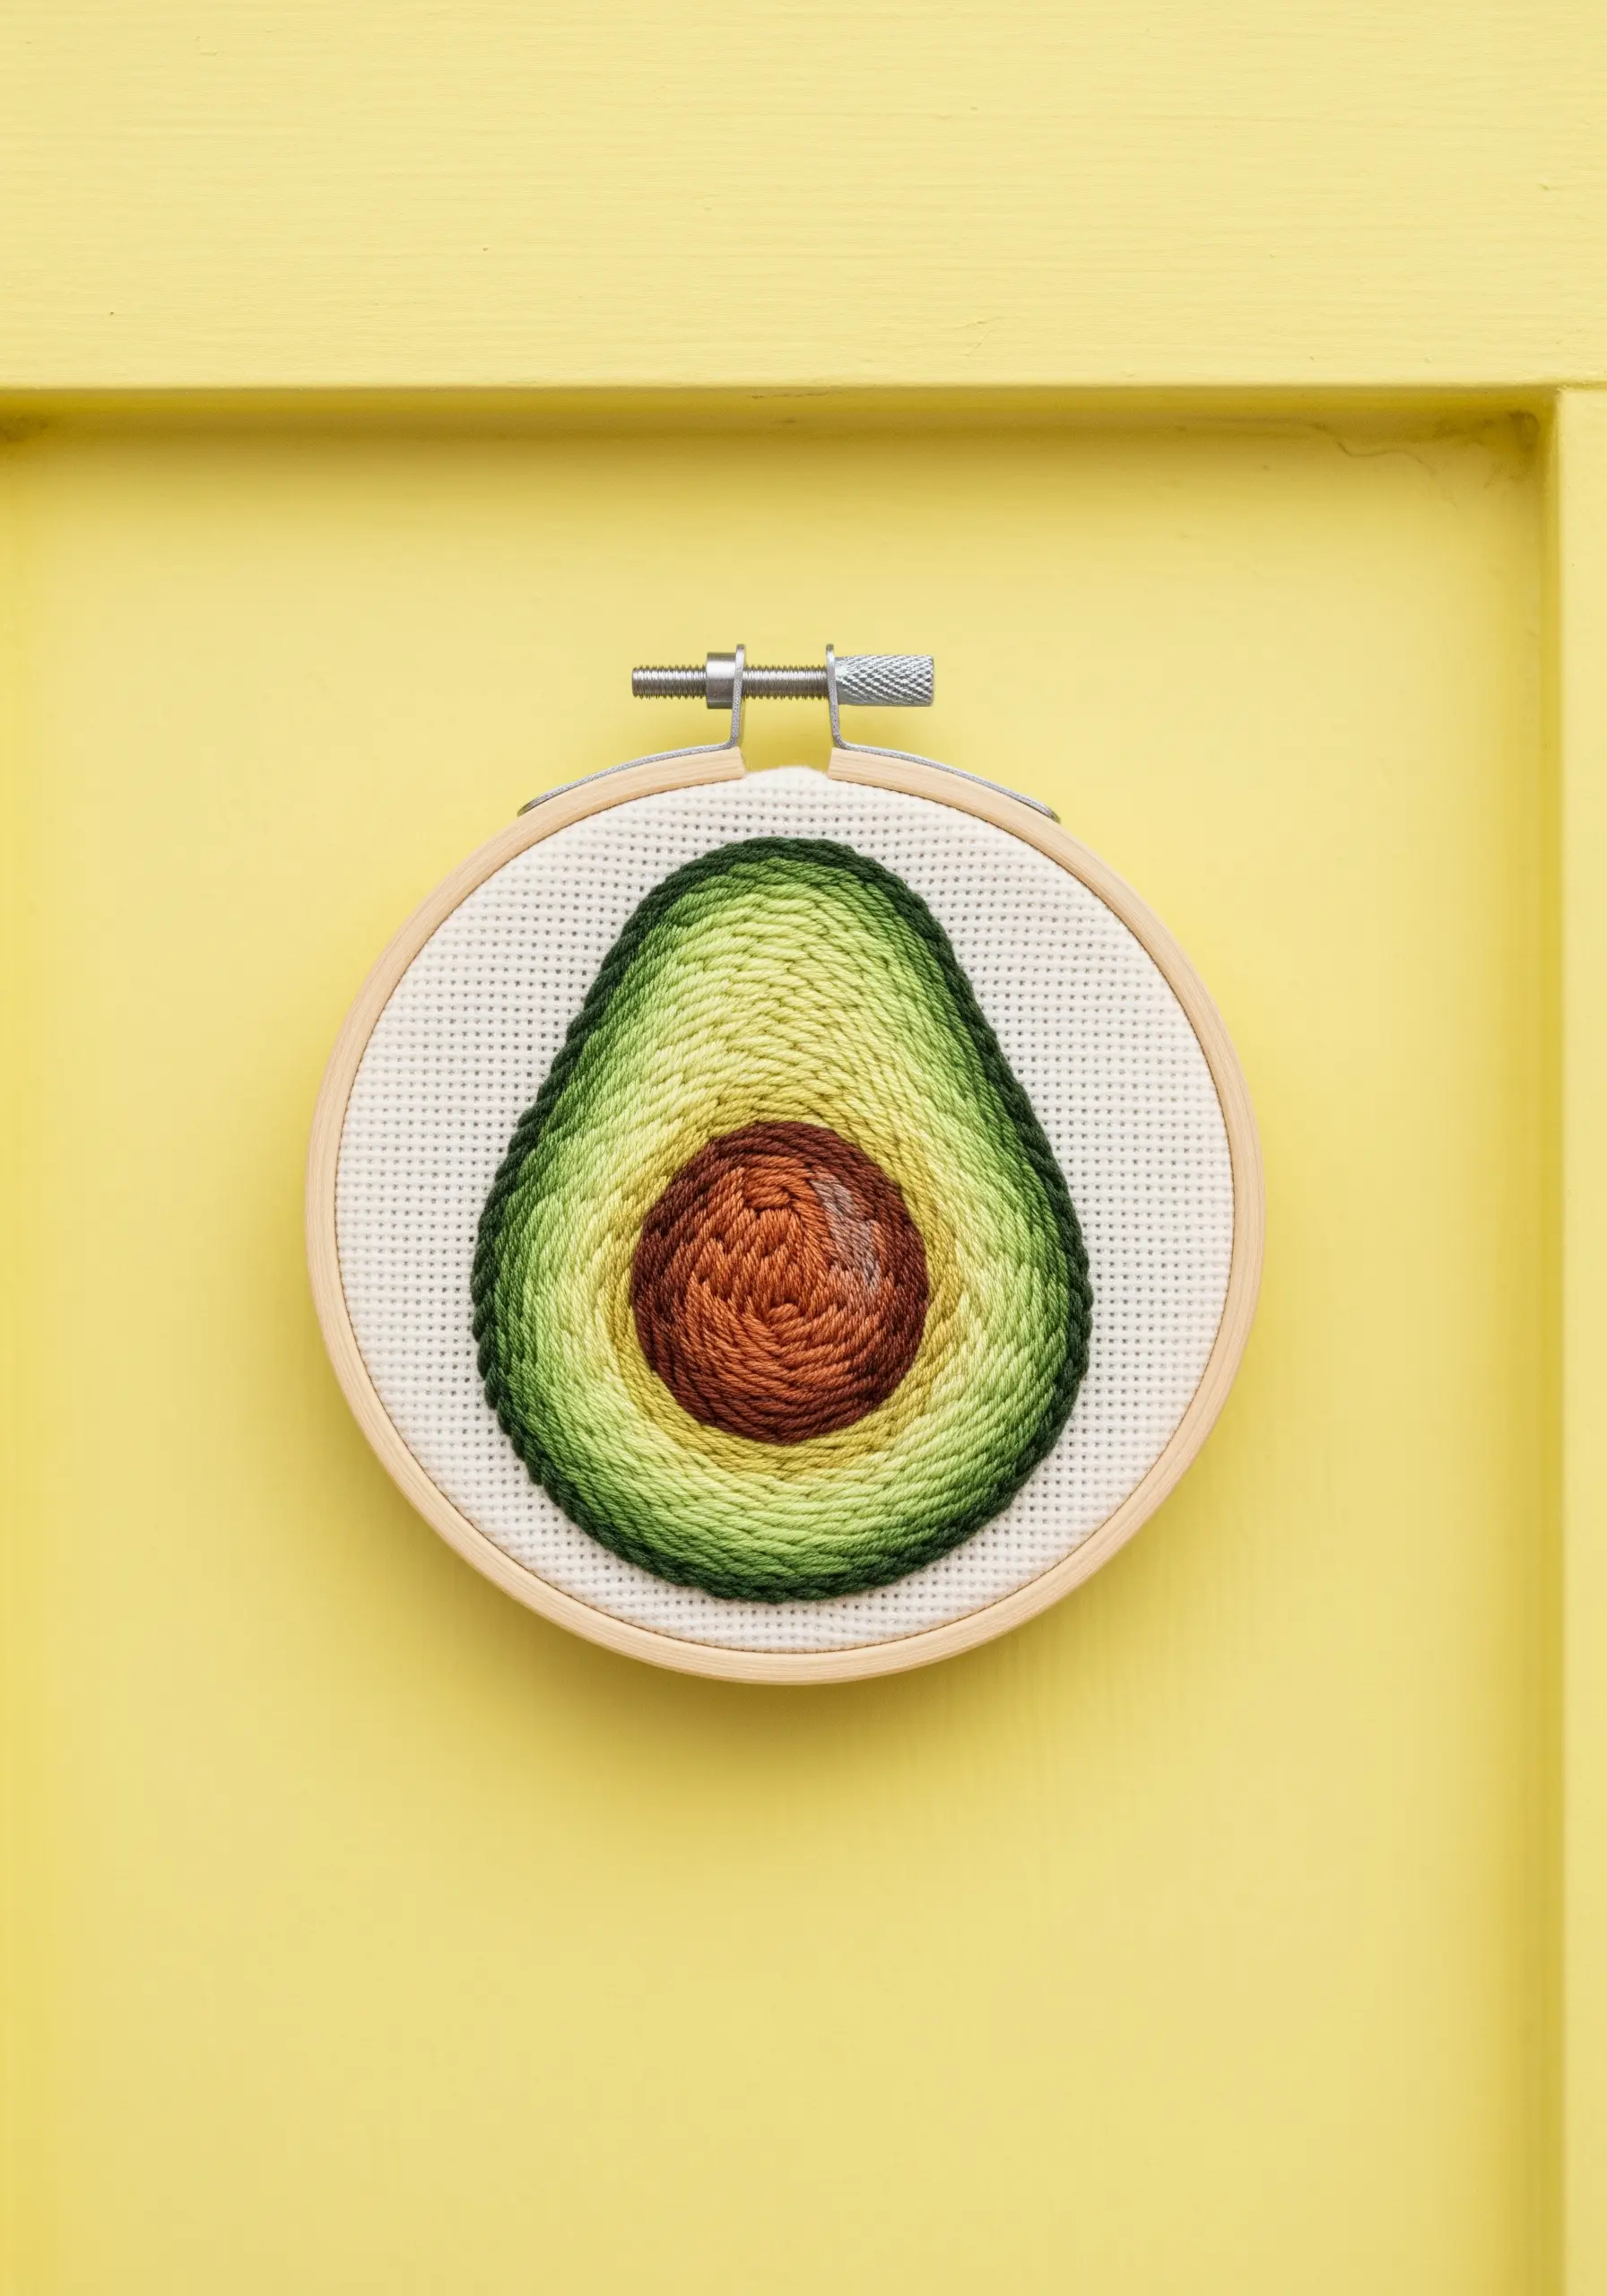
To create the soft, blended look of an avocado, fill the shape with stitches that follow its contours.
Start at the center of the pit and work your way out in a spiral using a simple backstitch or split stitch.
Change your thread color gradually from dark brown to lighter rust, then from dark green to pale yellow-green for the flesh.
This spiraling technique naturally blends the colors and mimics the texture of the real fruit, resulting in a piece that feels almost painted.
It’s an excellent method for any round or oval object.
14. Build a Diorama with Layered Felt and Embroidery

Create a stunning sense of depth by building a scene in layers within a shadow box frame.
Cut foreground, mid-ground, and background elements from different colored felt.
Add embroidered details to each layer before assembling—like silver thread for a metallic moon or tiny stitches for texture on the trees.
Use small foam spacers (hidden between the layers) to physically separate them, creating real shadows and a captivating 3D effect.
This turns a simple landscape into an immersive, miniature world.
15. Explore Interlocking Shapes with Punch Needle
Punch needle is perfect for creating abstract geometric designs with a satisfying, tactile finish.
To create clean, interlocking shapes, work on one color section at a time, outlining it carefully before filling it in.
When you move to the adjacent color, punch your needle directly against the loops of the first color to create a crisp, seamless join.
The uniform height and density of the loops create a design that feels cohesive and intentional, perfect for abstract patterns.
This is a fast and meditative way to produce bold, modern wall art.
16. Make Delicate Florals Pop on a Dark Background
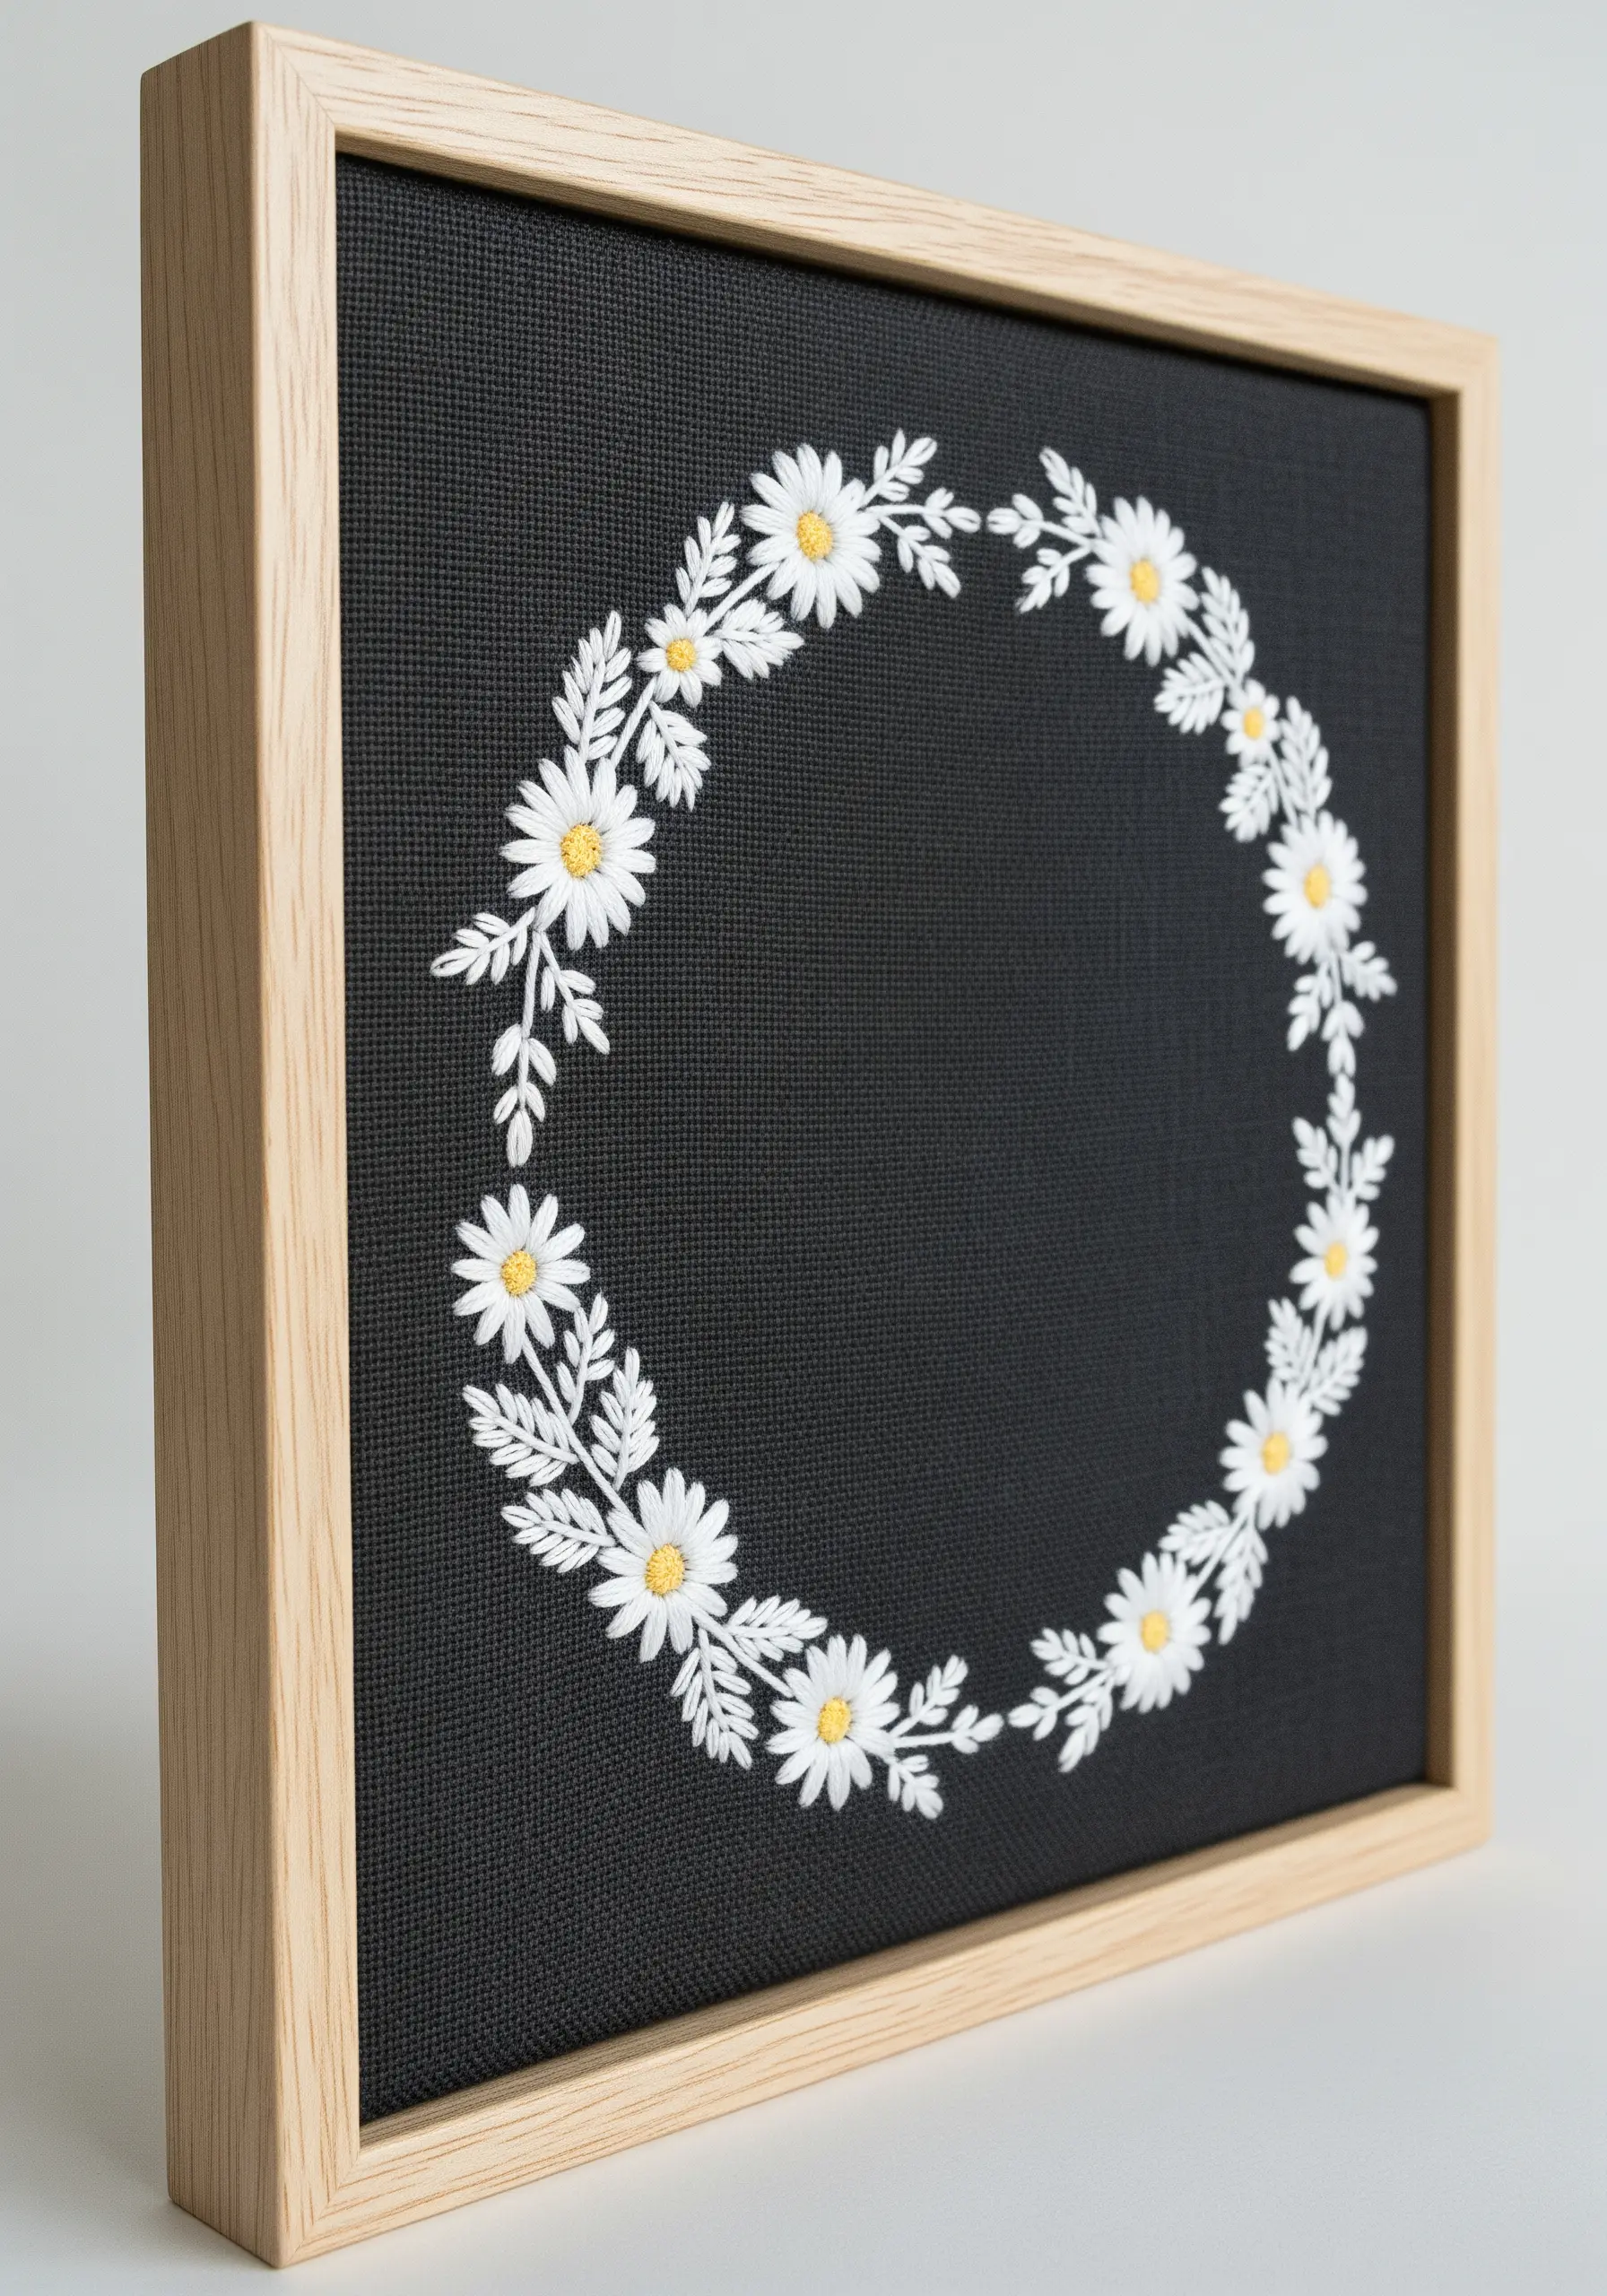
Stitching with white and light-colored thread on black or navy fabric creates a dramatic contrast that instantly elevates your work.
For delicate petals like daisies, use a detached chain stitch (or lazy daisy stitch) to create perfect teardrop shapes.
Use just two or three strands of floss to keep the work from looking bulky, ensuring the fine details remain crisp.
A cluster of yellow French knots in the center adds the perfect touch of color and texture.
This high-contrast approach makes even simple tiny floral motifs feel sophisticated and striking.
17. Capture Realistic Detail with Thread Painting
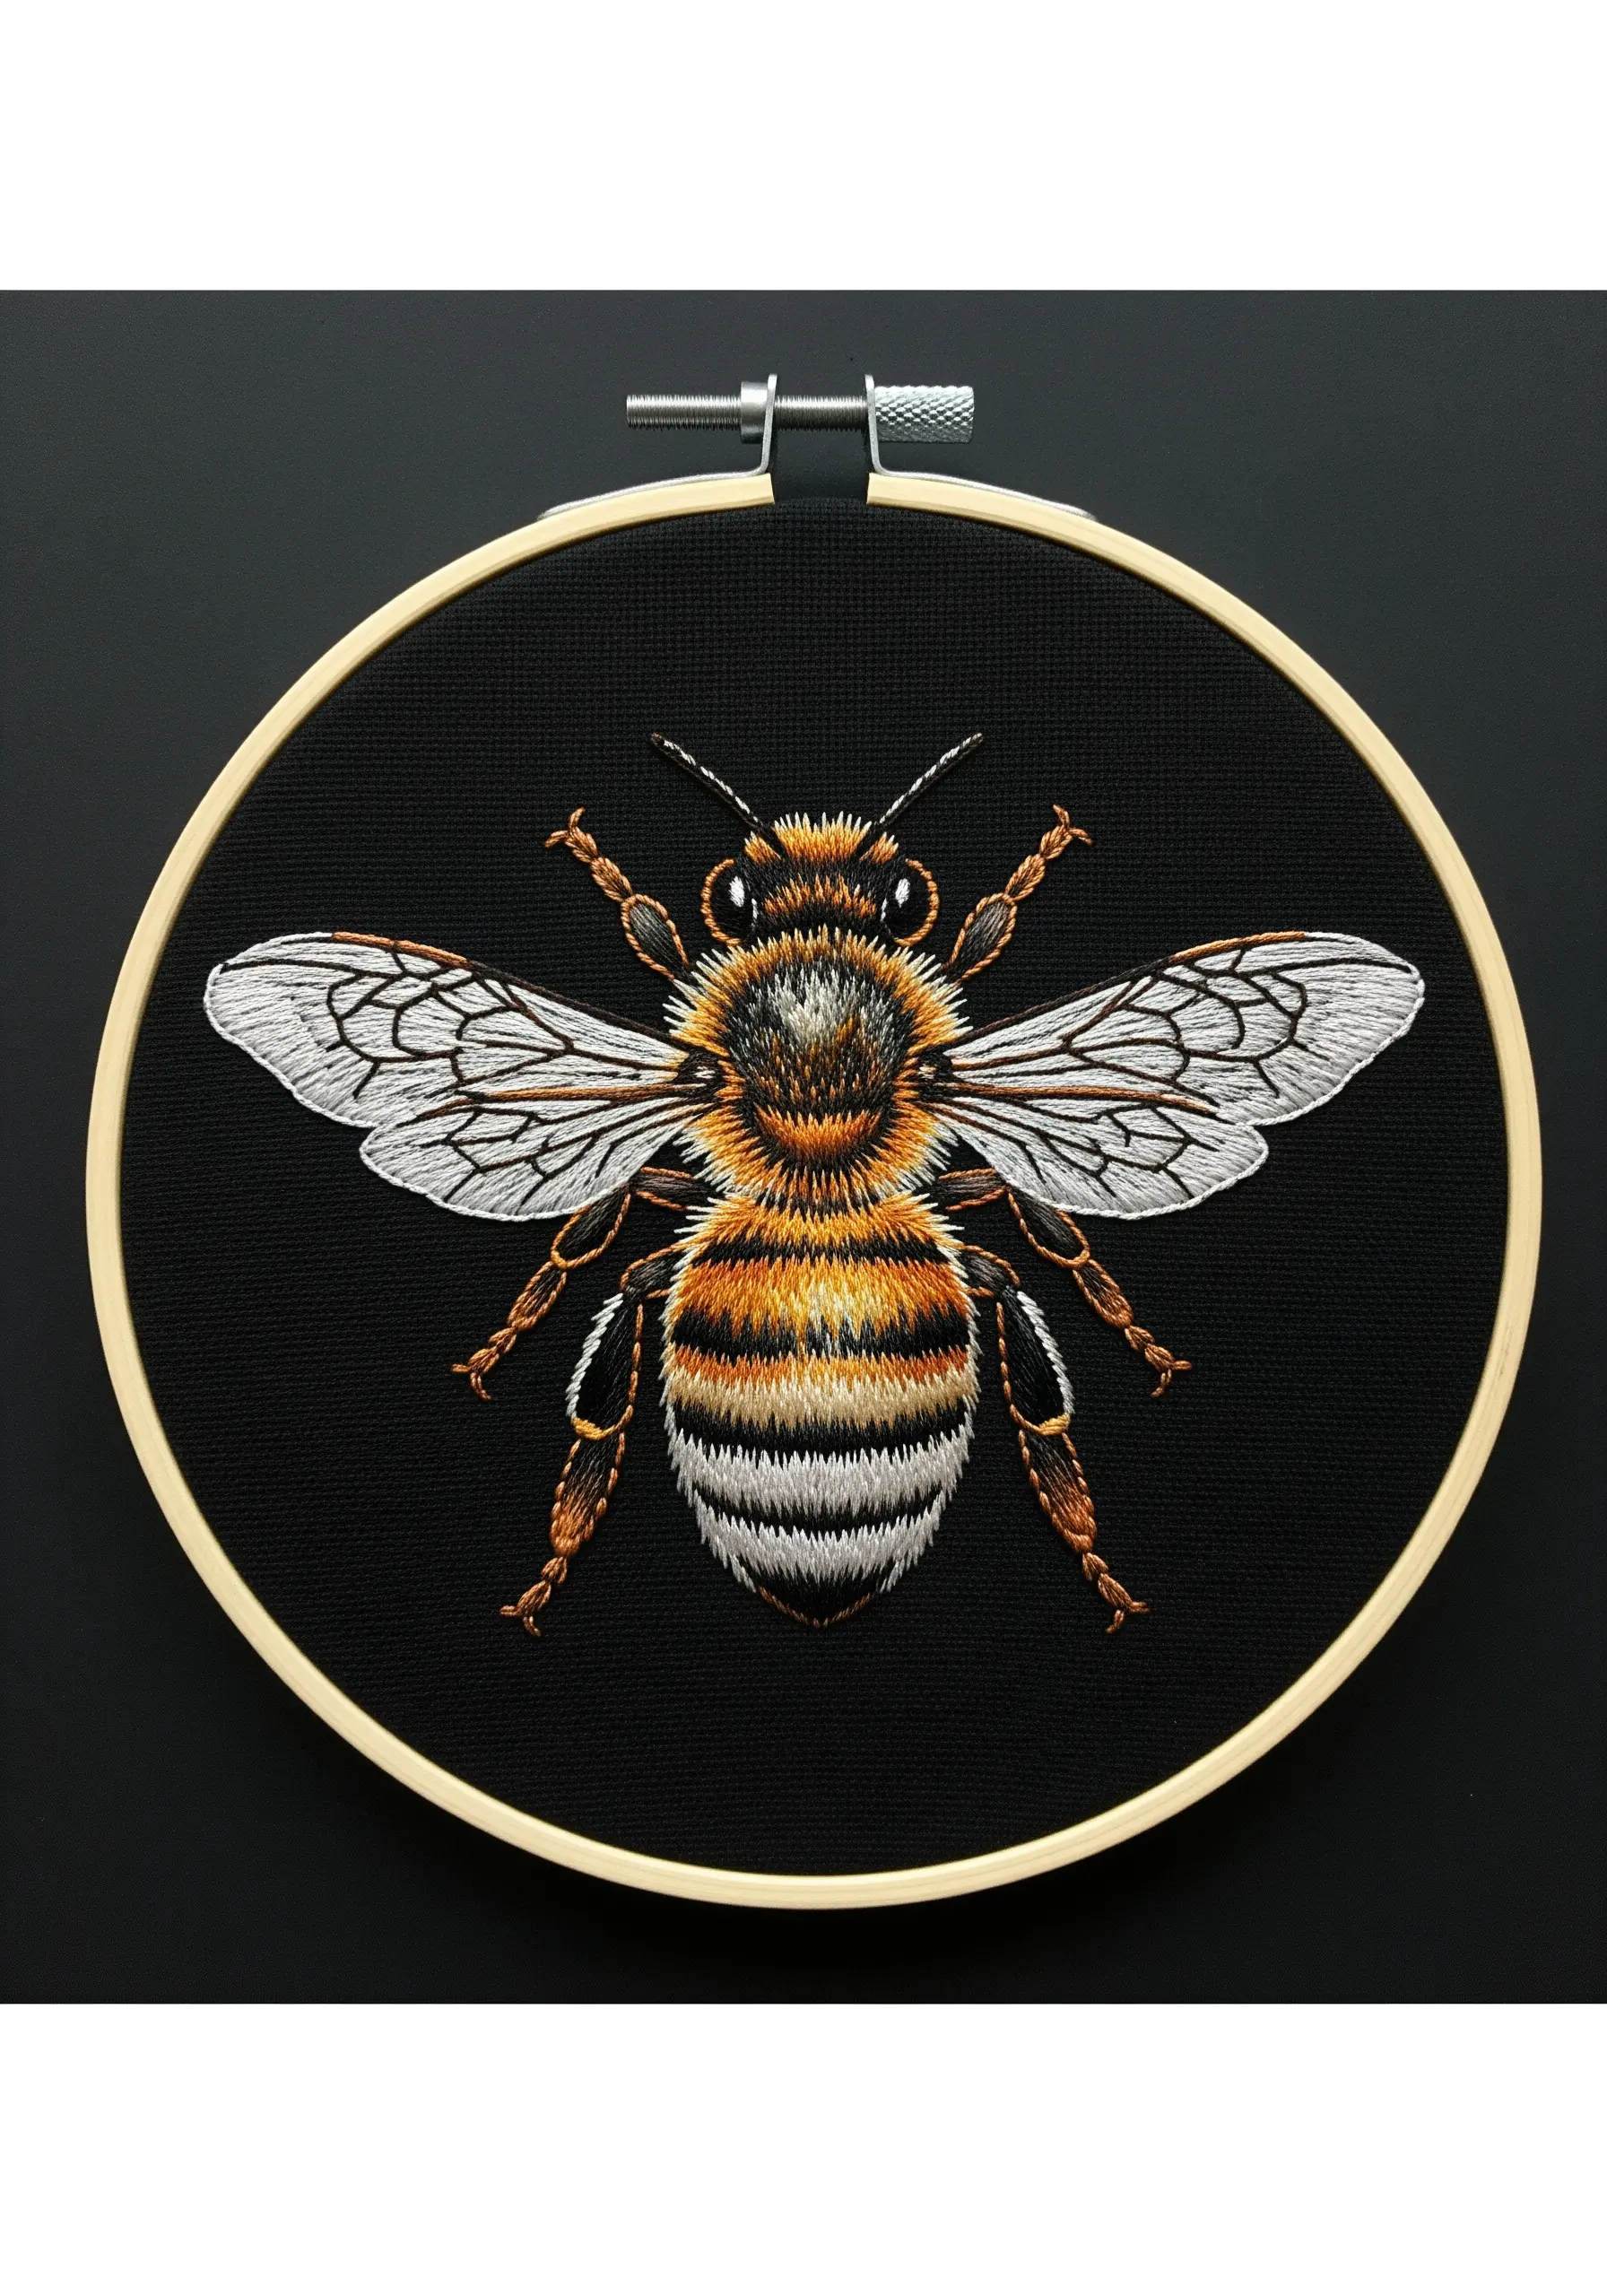
To achieve a photorealistic effect, think of your needle as a paintbrush and your floss as paint.
Work with a single strand of thread to allow for the finest detail and the smoothest color blending.
Use long-and-short stitch to build up layers of color, carefully studying a reference photo to place highlights and shadows accurately.
For the fuzzy texture of a bee’s body, use shorter, denser stitches. For the transparent wings, use sparse, long stitches in grey and white.
Patience is key, but the result is a breathtaking piece of art that showcases the potential of thread.
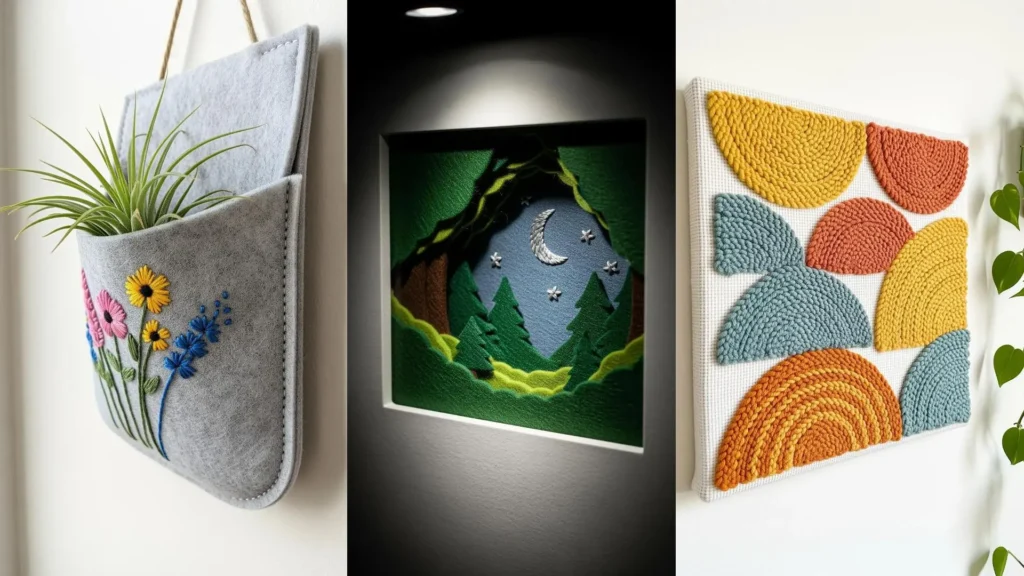
18. Add Functional Beauty by Embroidering on Felt
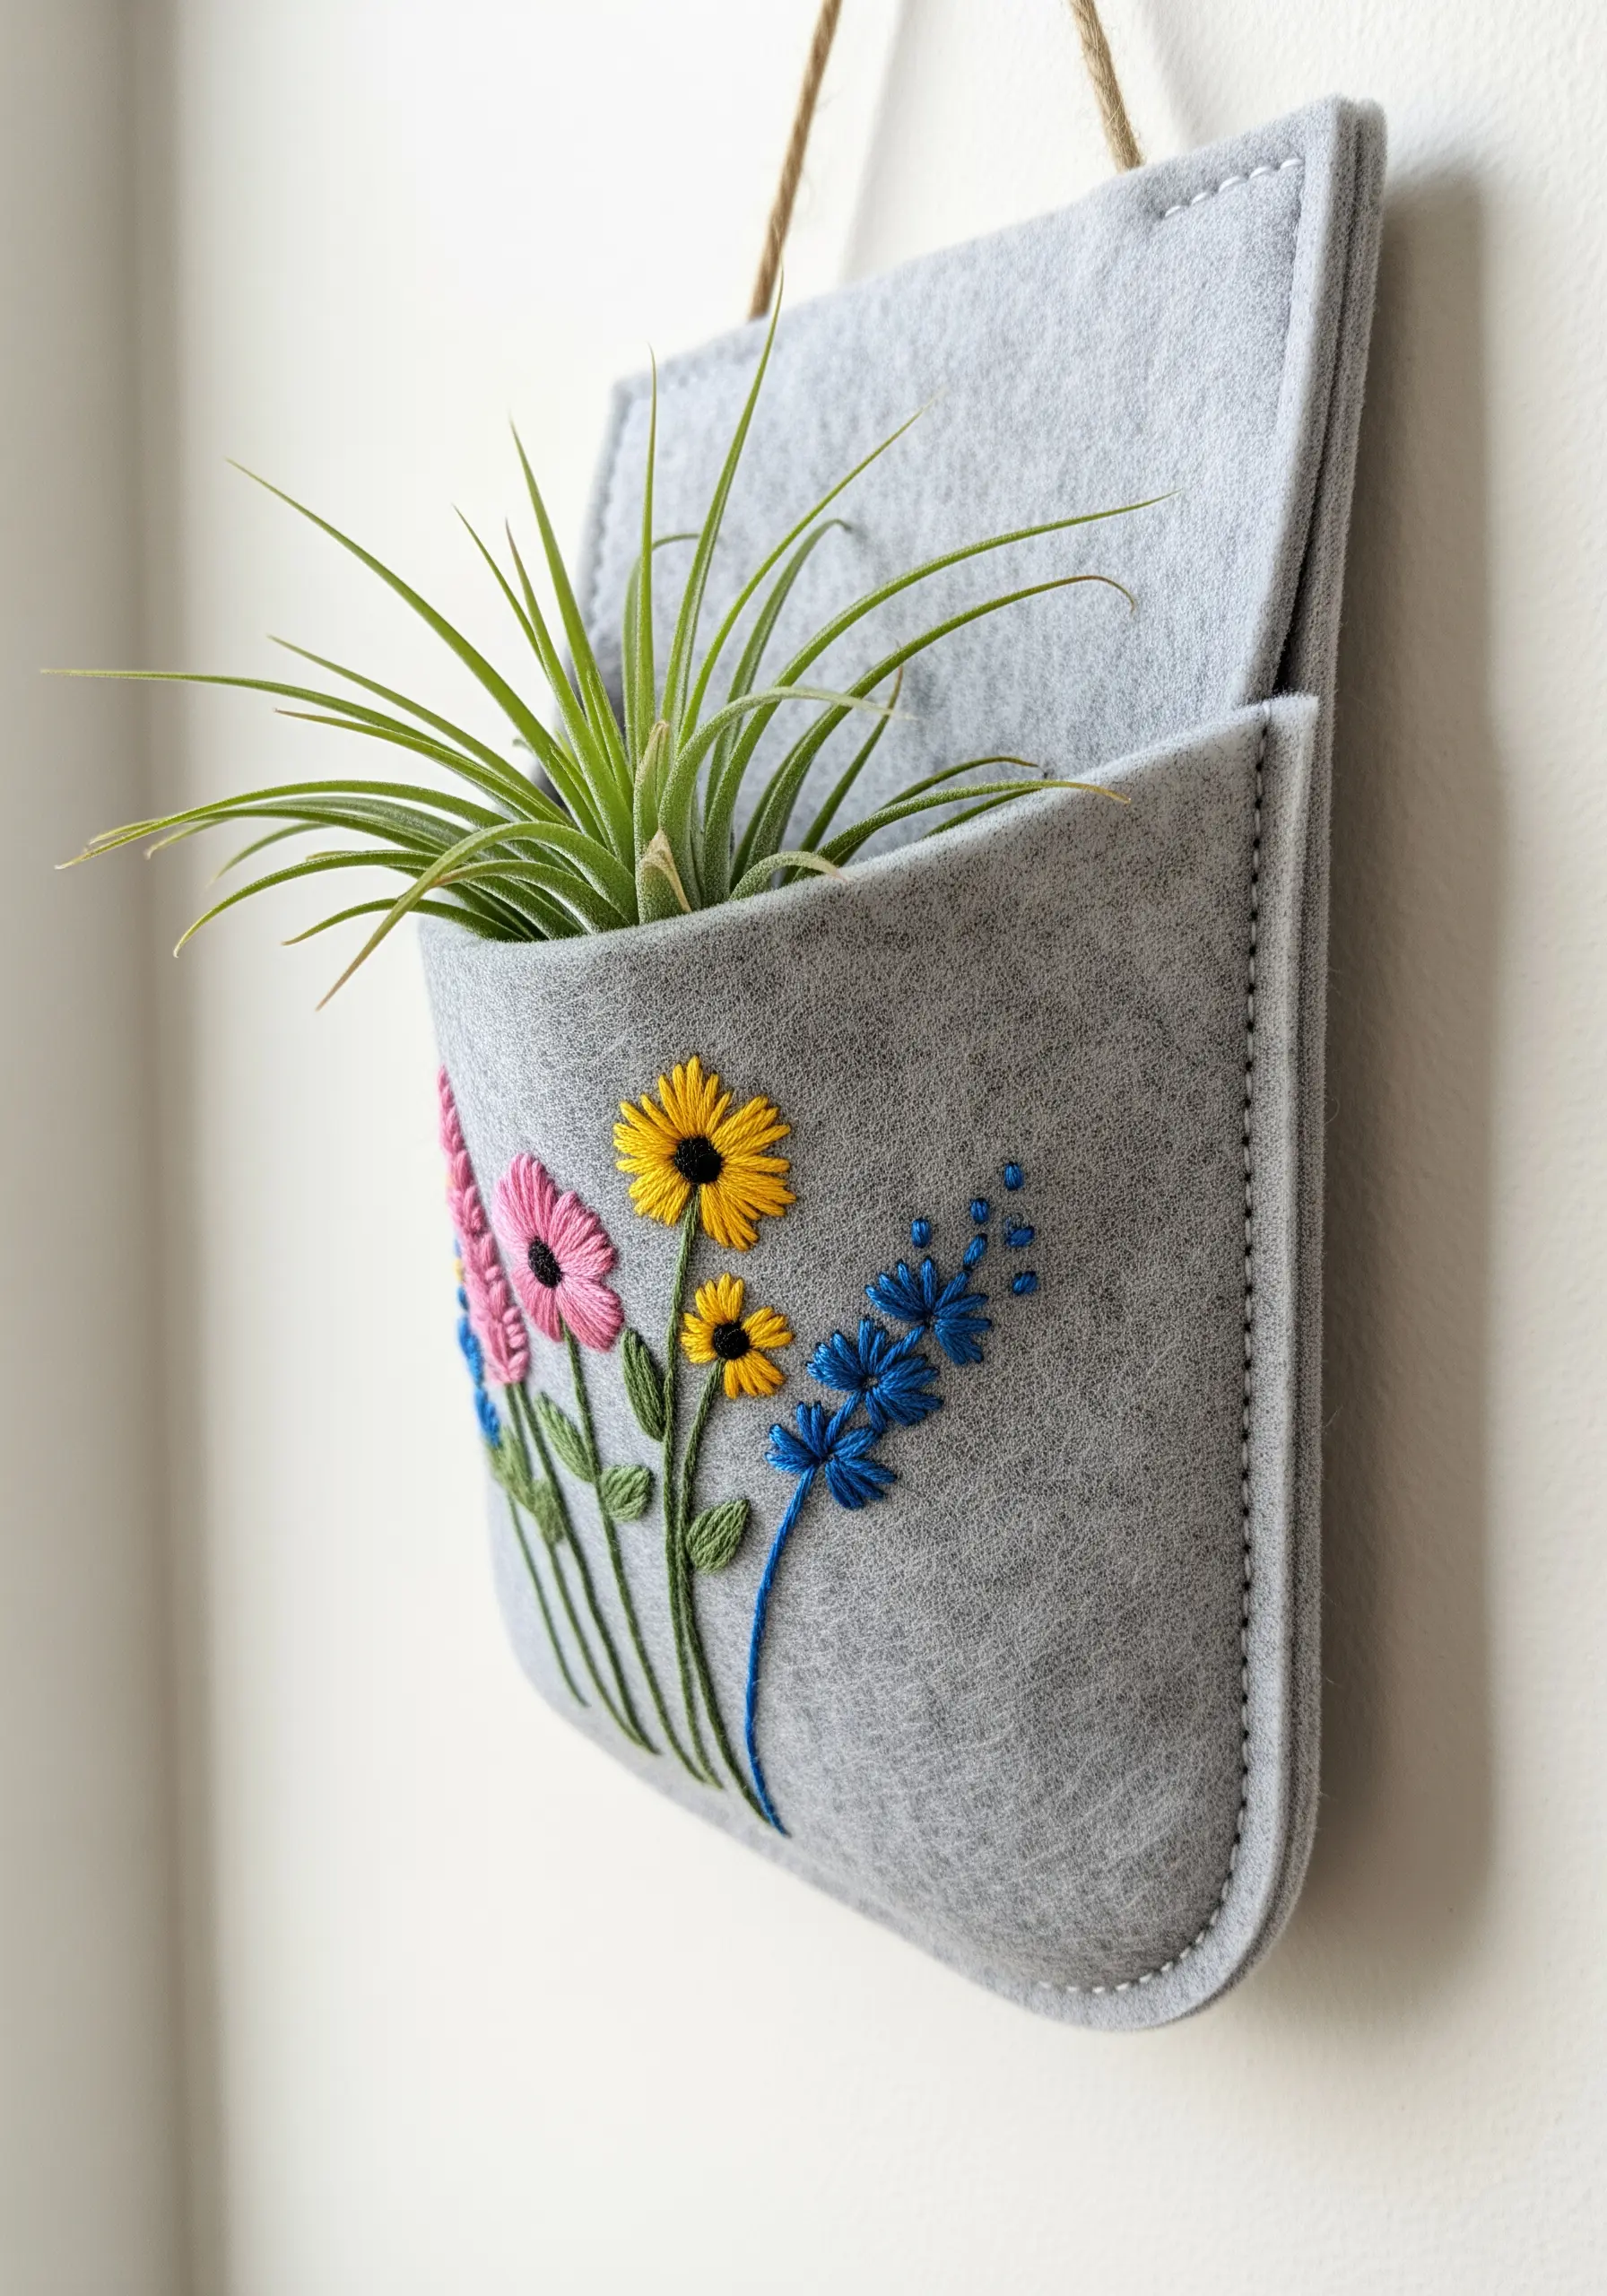
Take your embroidery off the hoop and onto functional objects like this felt wall pocket.
Felt provides a stable, non-fraying base that is very forgiving for beginner stitchers.
Use basic stitches like satin stitch, stem stitch, and French knots to create a vibrant floral design.
The thickness of the felt gives your stitches a slightly raised, dimensional quality.
Finish the pocket with a simple running stitch along the edges to create a piece that is both beautiful and useful for holding small items like air plants or mail.
19. Create Sculptural Art by Wrapping Canvas
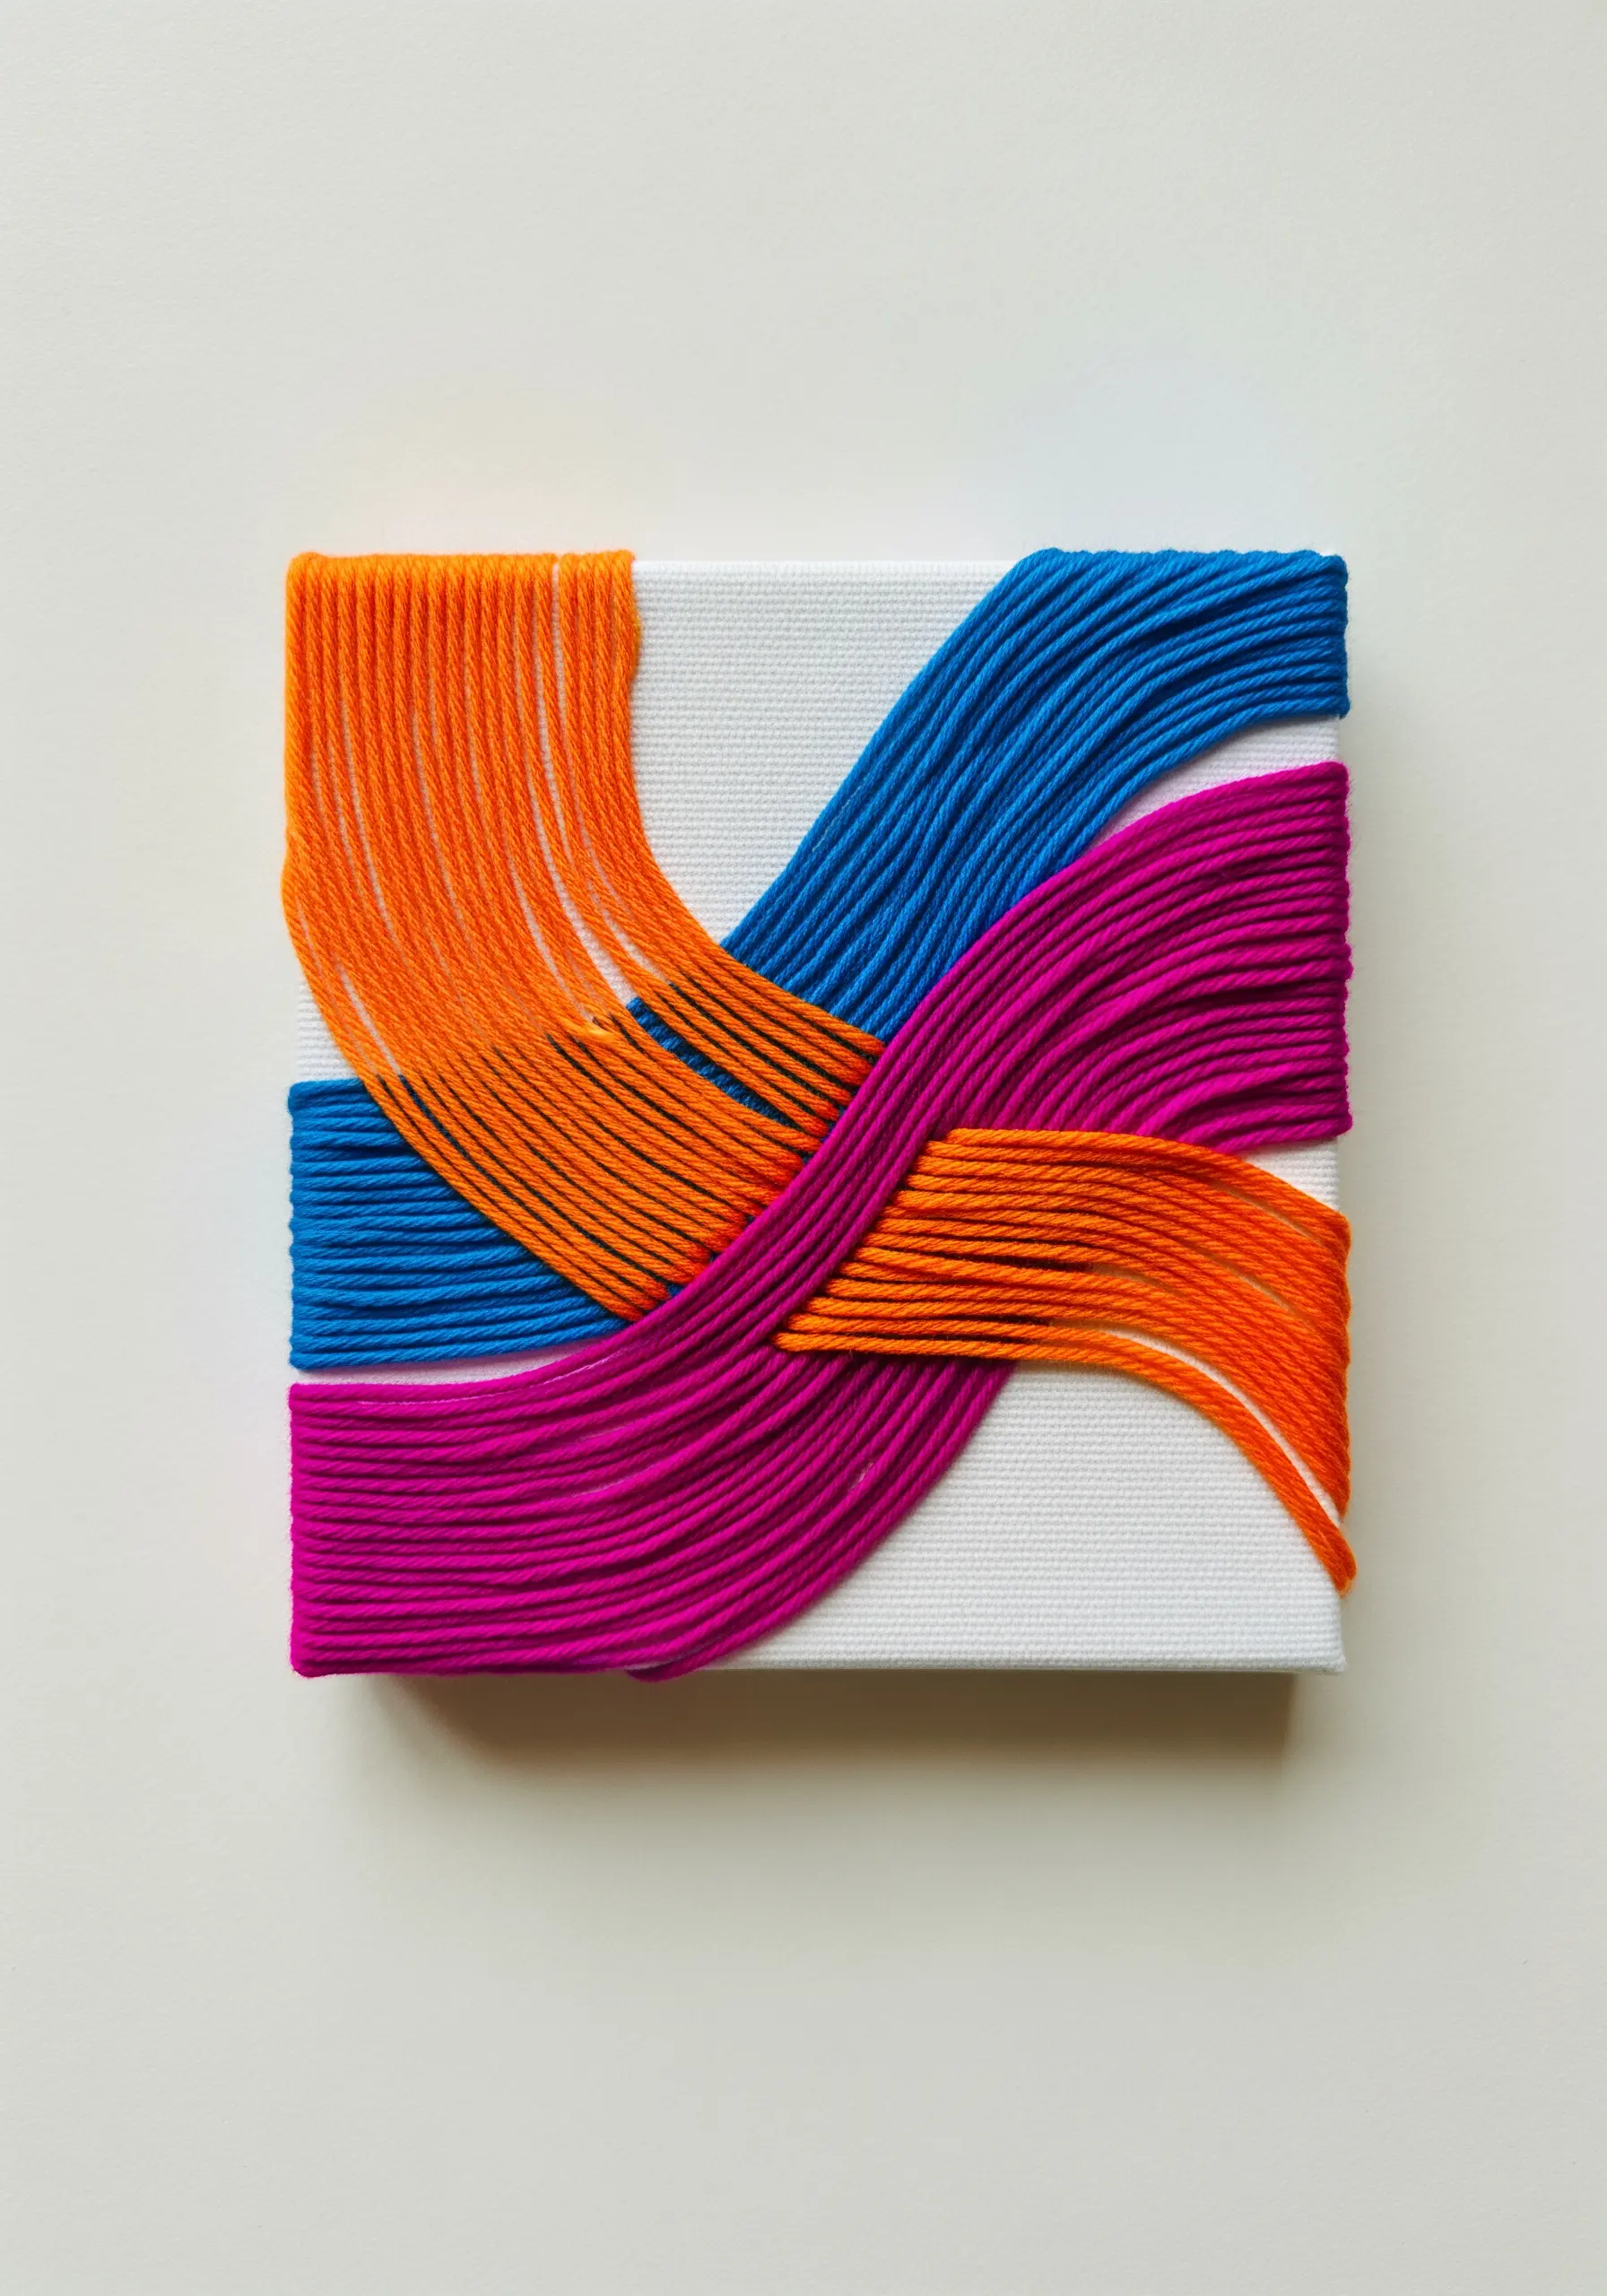
For a bold, graphic statement, use yarn or thick thread to wrap a small stretched canvas.
This technique requires no needle, only careful tension and placement.
Plan your design by lightly sketching overlapping shapes onto the canvas.
Wrap the yarn tightly around the canvas and stretcher bars, securing the ends on the back with tape or a staple gun.
The overlapping sections create a layered, almost sculptural effect with intense color blocking, perfect for abstract yarn wall art.
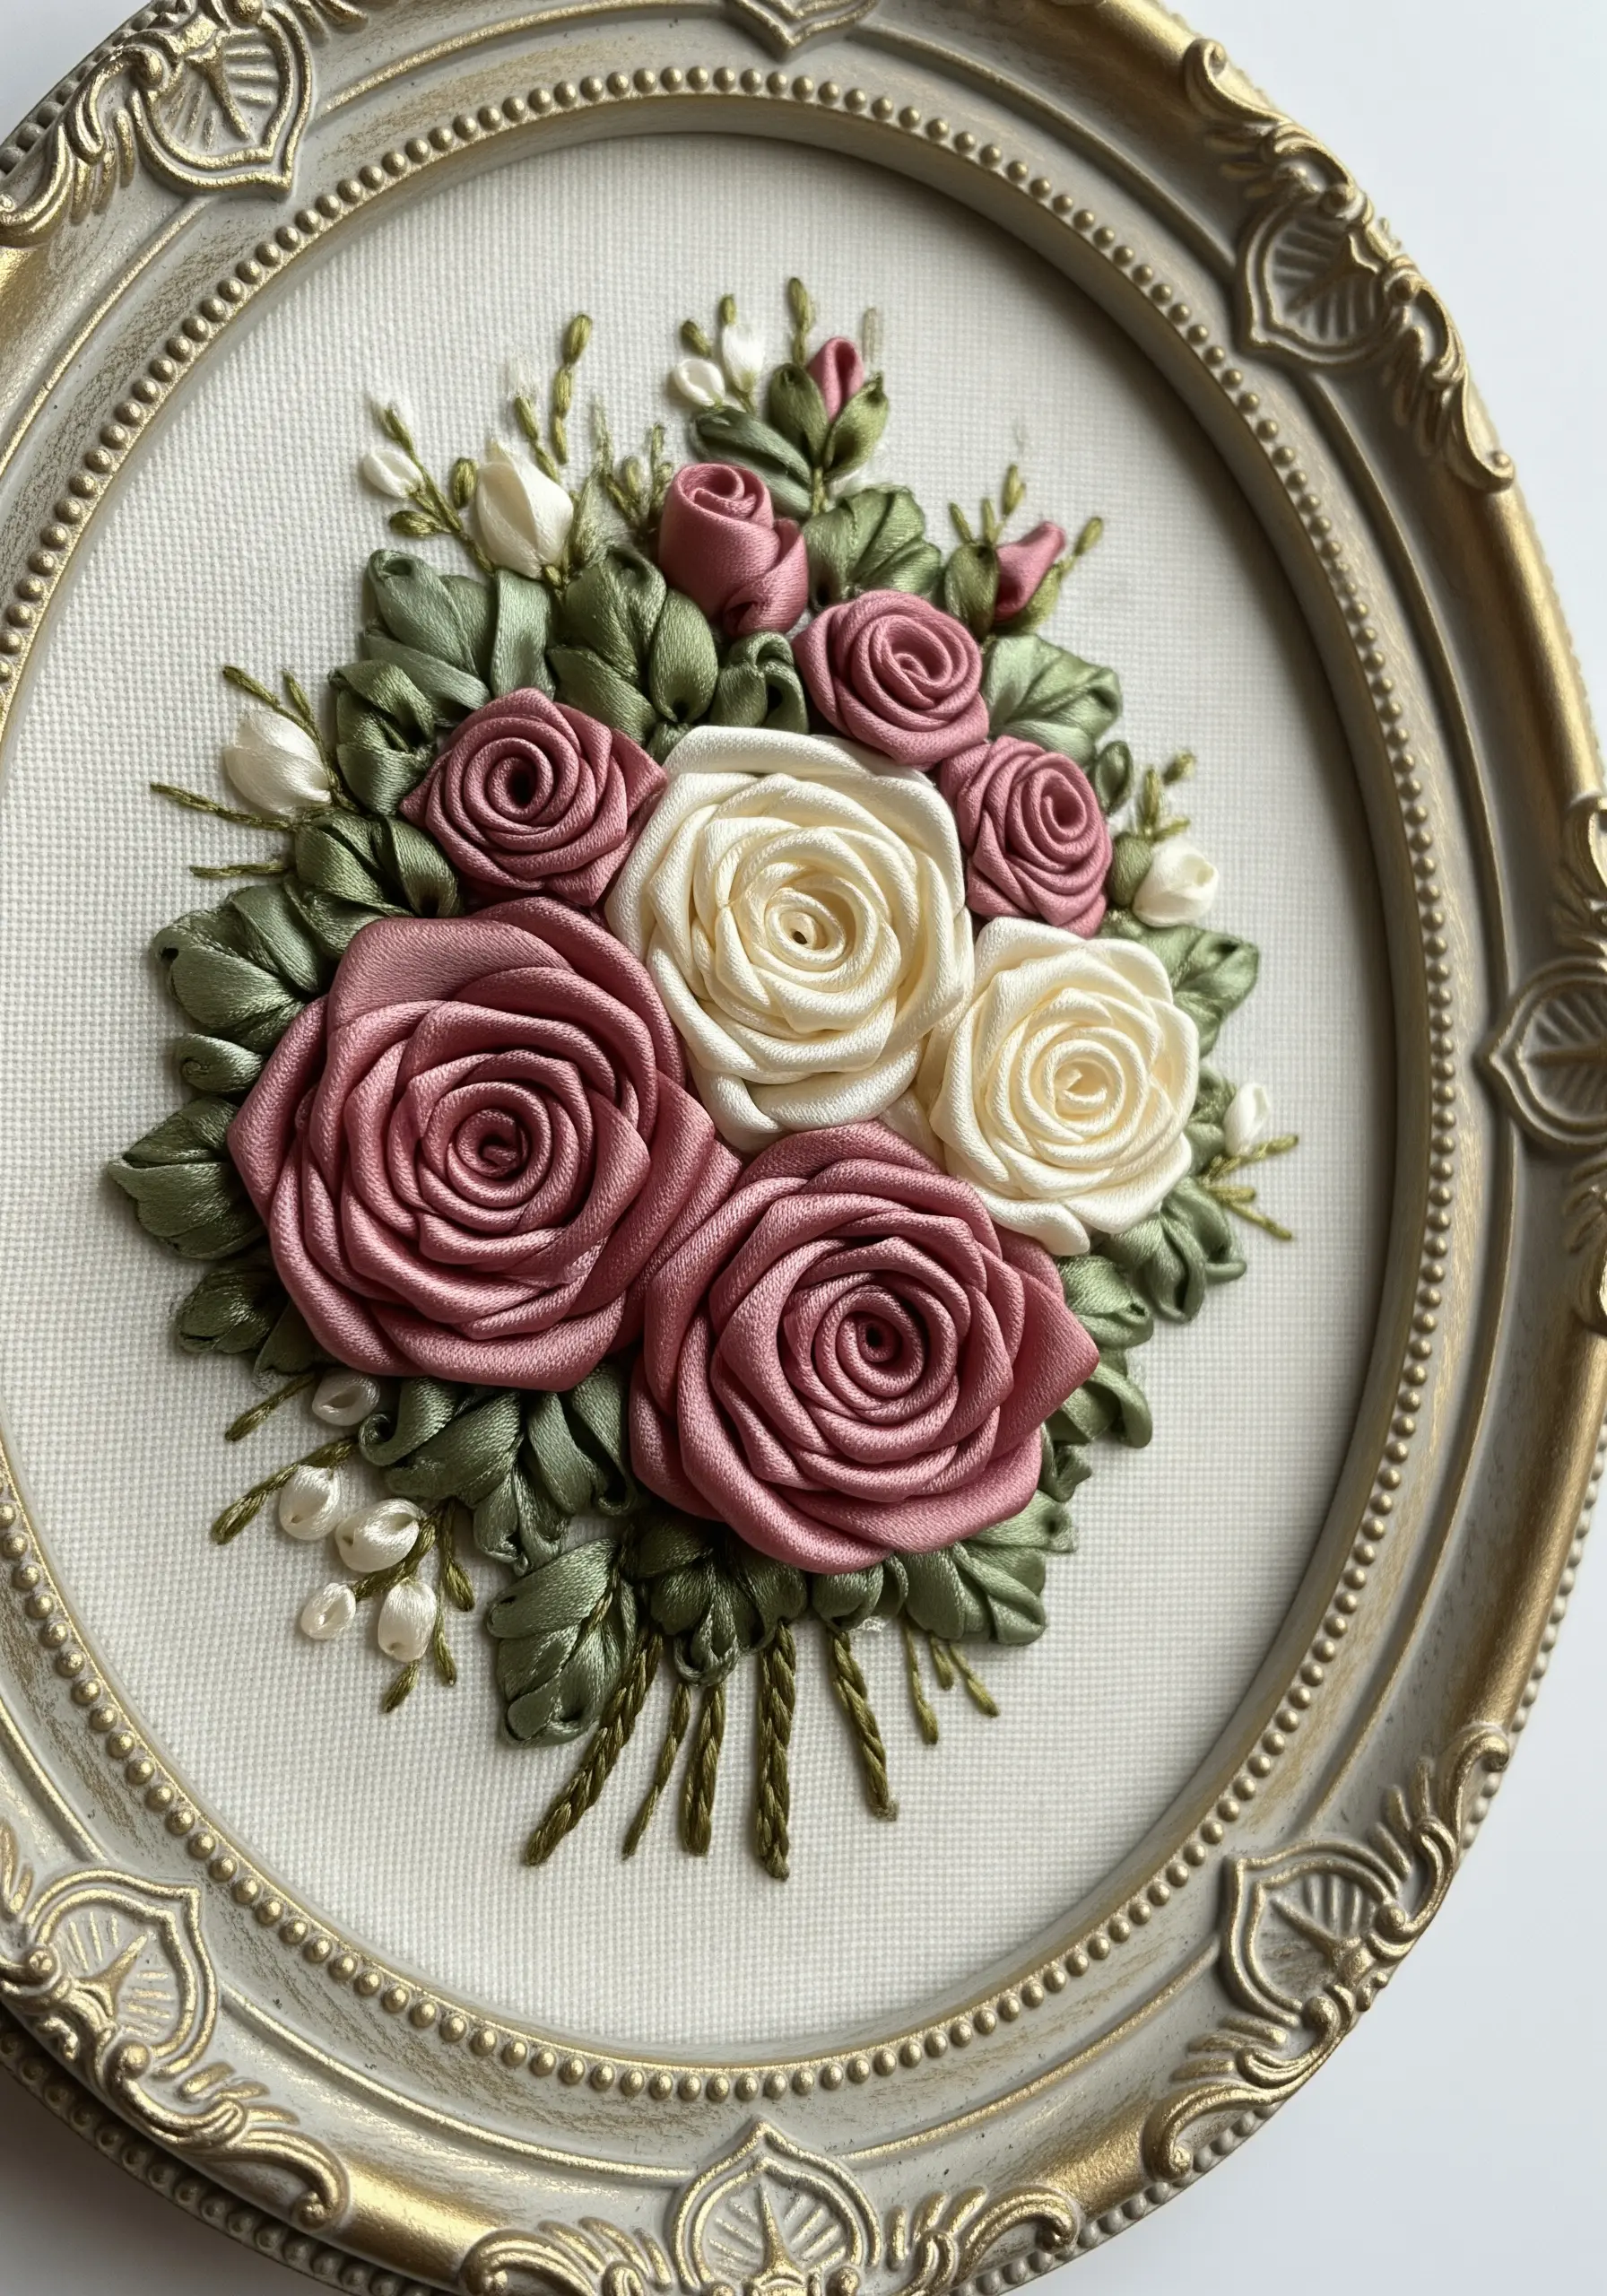
20. Build Lush Peony Petals with Layered Stitches
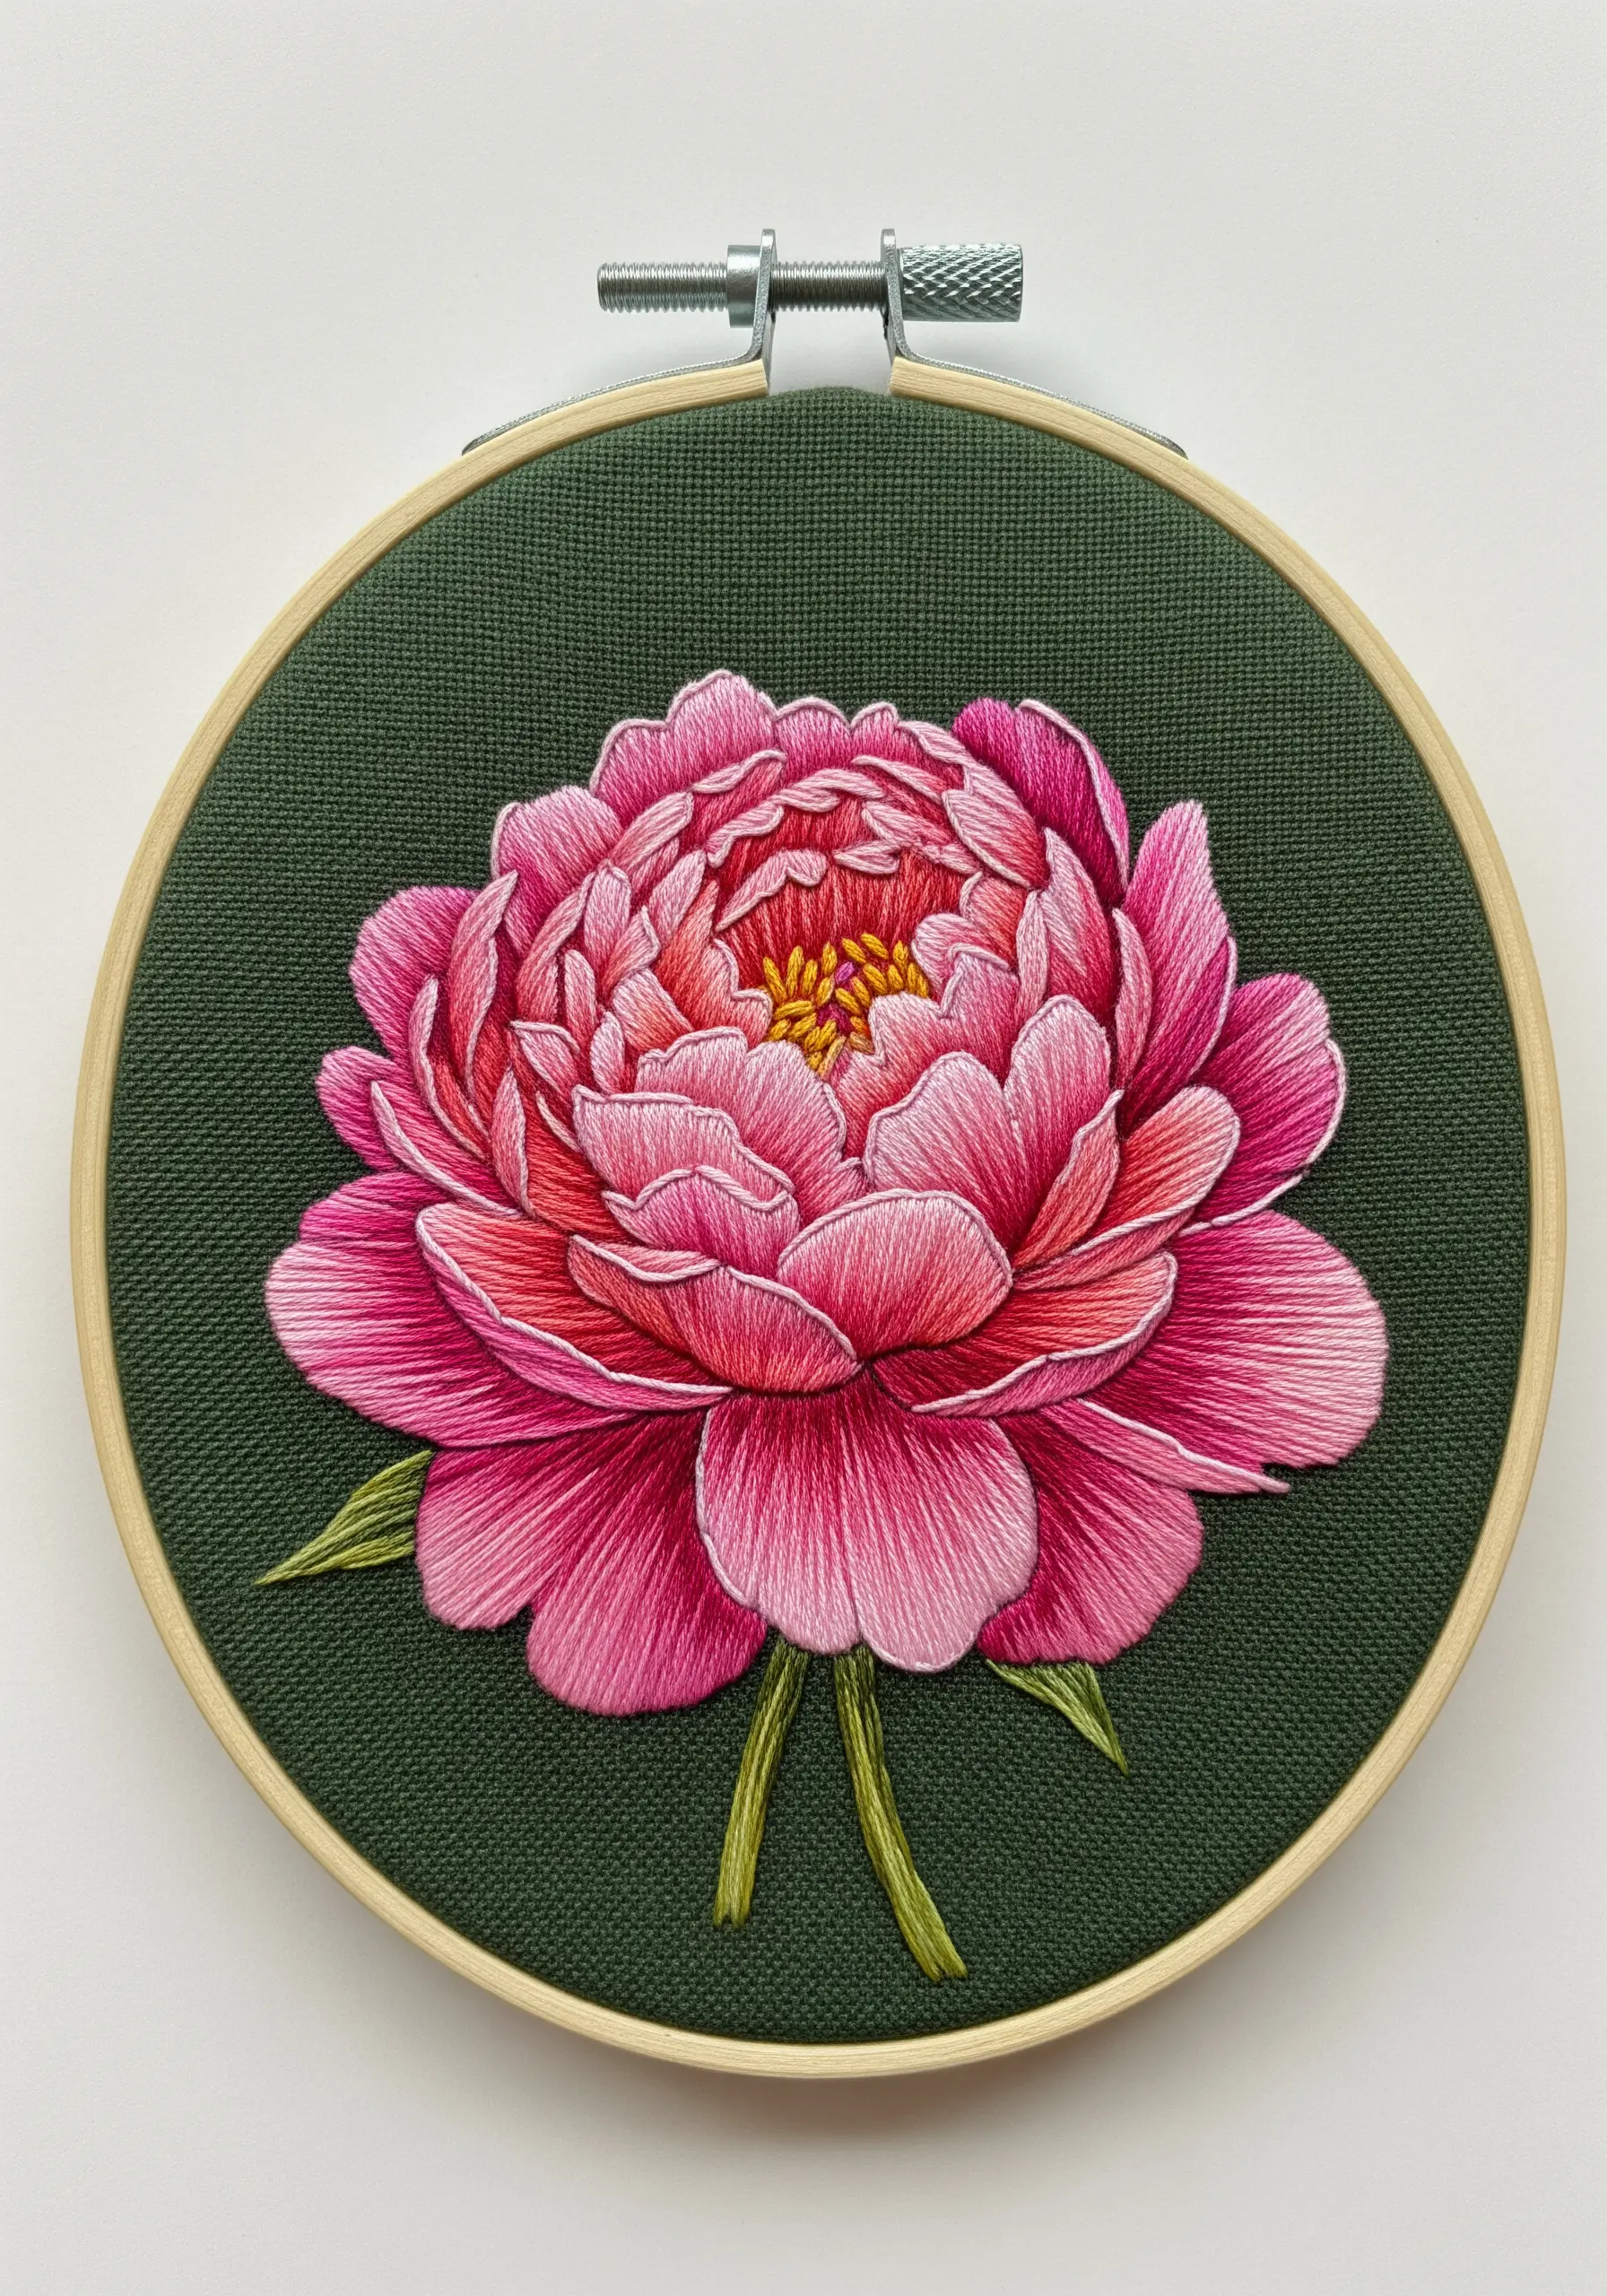
To create the full, dense look of a peony, you need to build the petals in layers from back to front.
Start with the outermost petals, using long-and-short stitch to blend shades of pink from dark to light.
Once the back layer is complete, begin stitching the next layer of petals directly on top, overlapping them slightly.
This layering technique, combined with directional stitching that follows the curve of each petal, creates incredible depth and realism.
Using a dark background fabric makes the vibrant pinks even more dramatic, a key principle in peony embroidery ideas.
21. Experiment with Geometric String Art in a Hoop
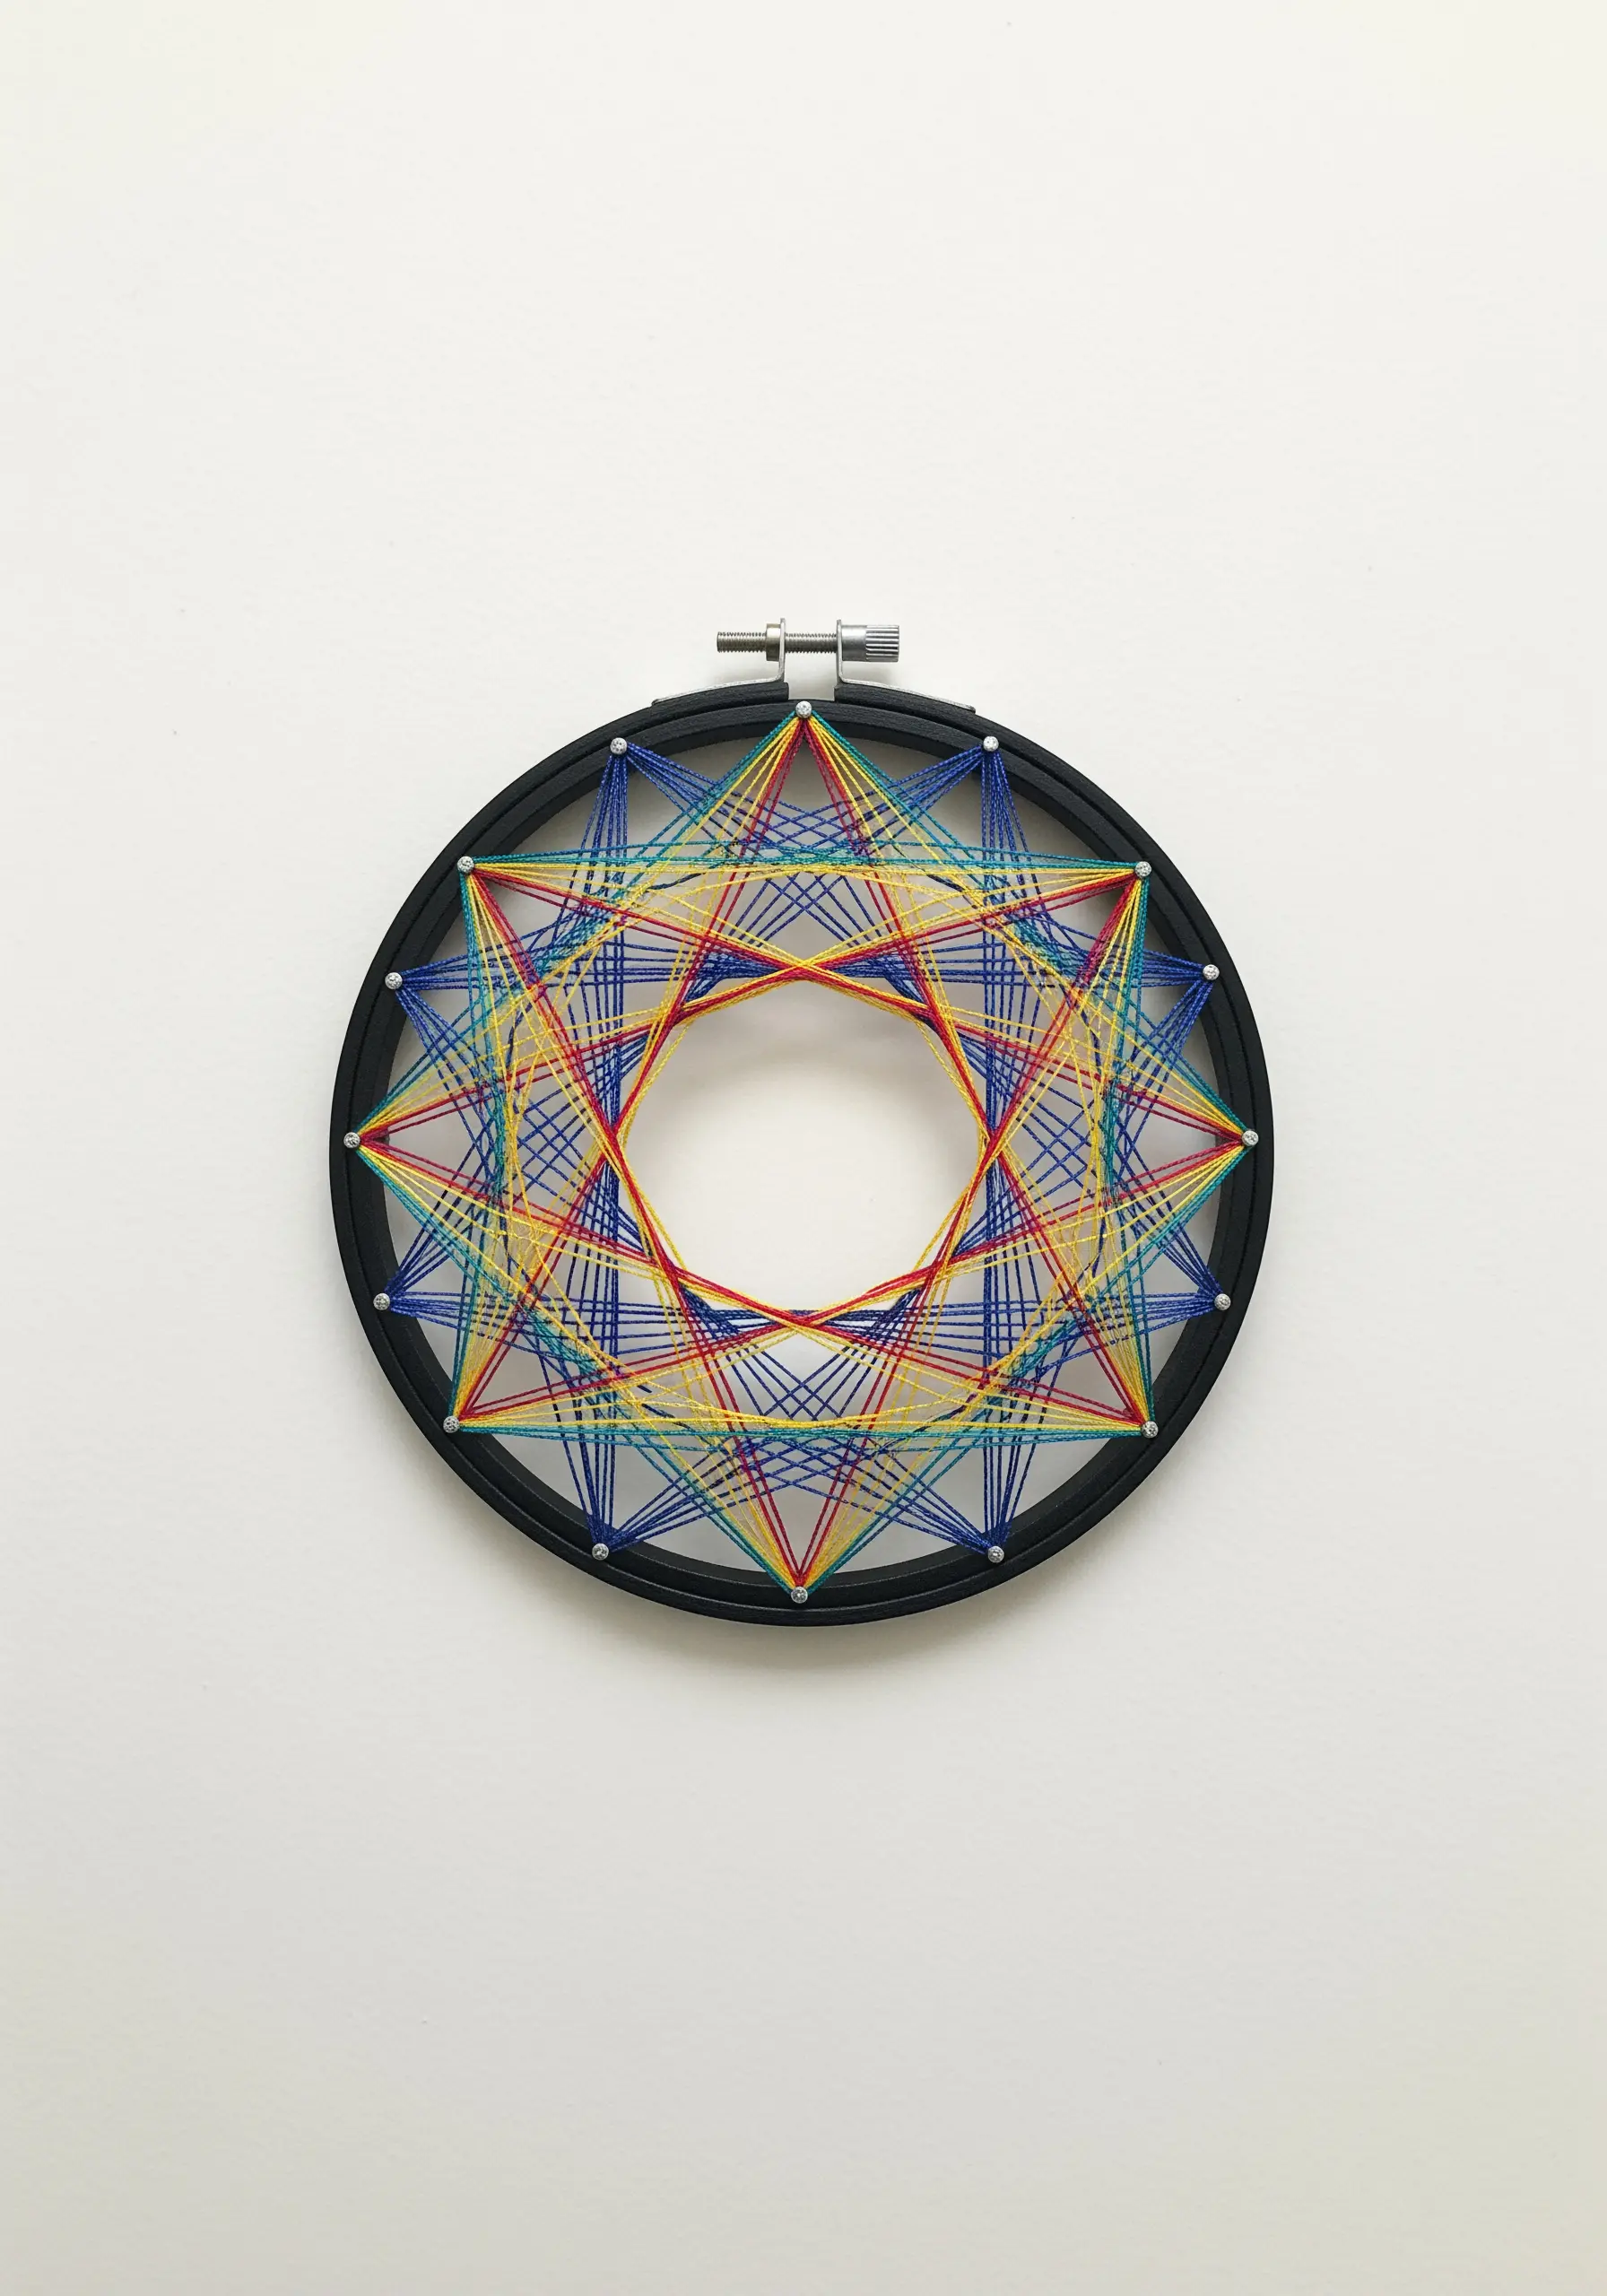
You can create mesmerizing geometric patterns without ever piercing the fabric—by transforming your hoop into a loom.
Instead of fabric, use only the hoop itself, or stretch a piece of sturdy cardstock with holes punched around the perimeter.
Wrap your thread from one side of the hoop to the other in a repeating mathematical pattern to build up intricate, star-like shapes.
Using primary-colored threads against a black hoop creates a vibrant, graphic effect reminiscent of classic string art.
This is a great way to explore the intersection of craft and mathematics.
22. Sculpt Three-Dimensional Florals with Ribbon Embroidery
For flowers that literally stand off the fabric, switch from floss to silk or satin ribbon.
Use a large-eyed needle to pull the ribbon through the fabric, twisting and folding it to create realistic rose petals.
The ‘folded ribbon rose’ is a classic technique where you manipulate the ribbon on the surface to create a convincing bloom.
Combine these with simple straight stitches and French knots using narrower ribbon for leaves and buds.
The high sheen and dimensionality of ribbon embroidery create a luxurious, vintage-inspired look that is impossible to achieve with thread alone.
23. Paint a Seascape with Textured Knots and Stitches
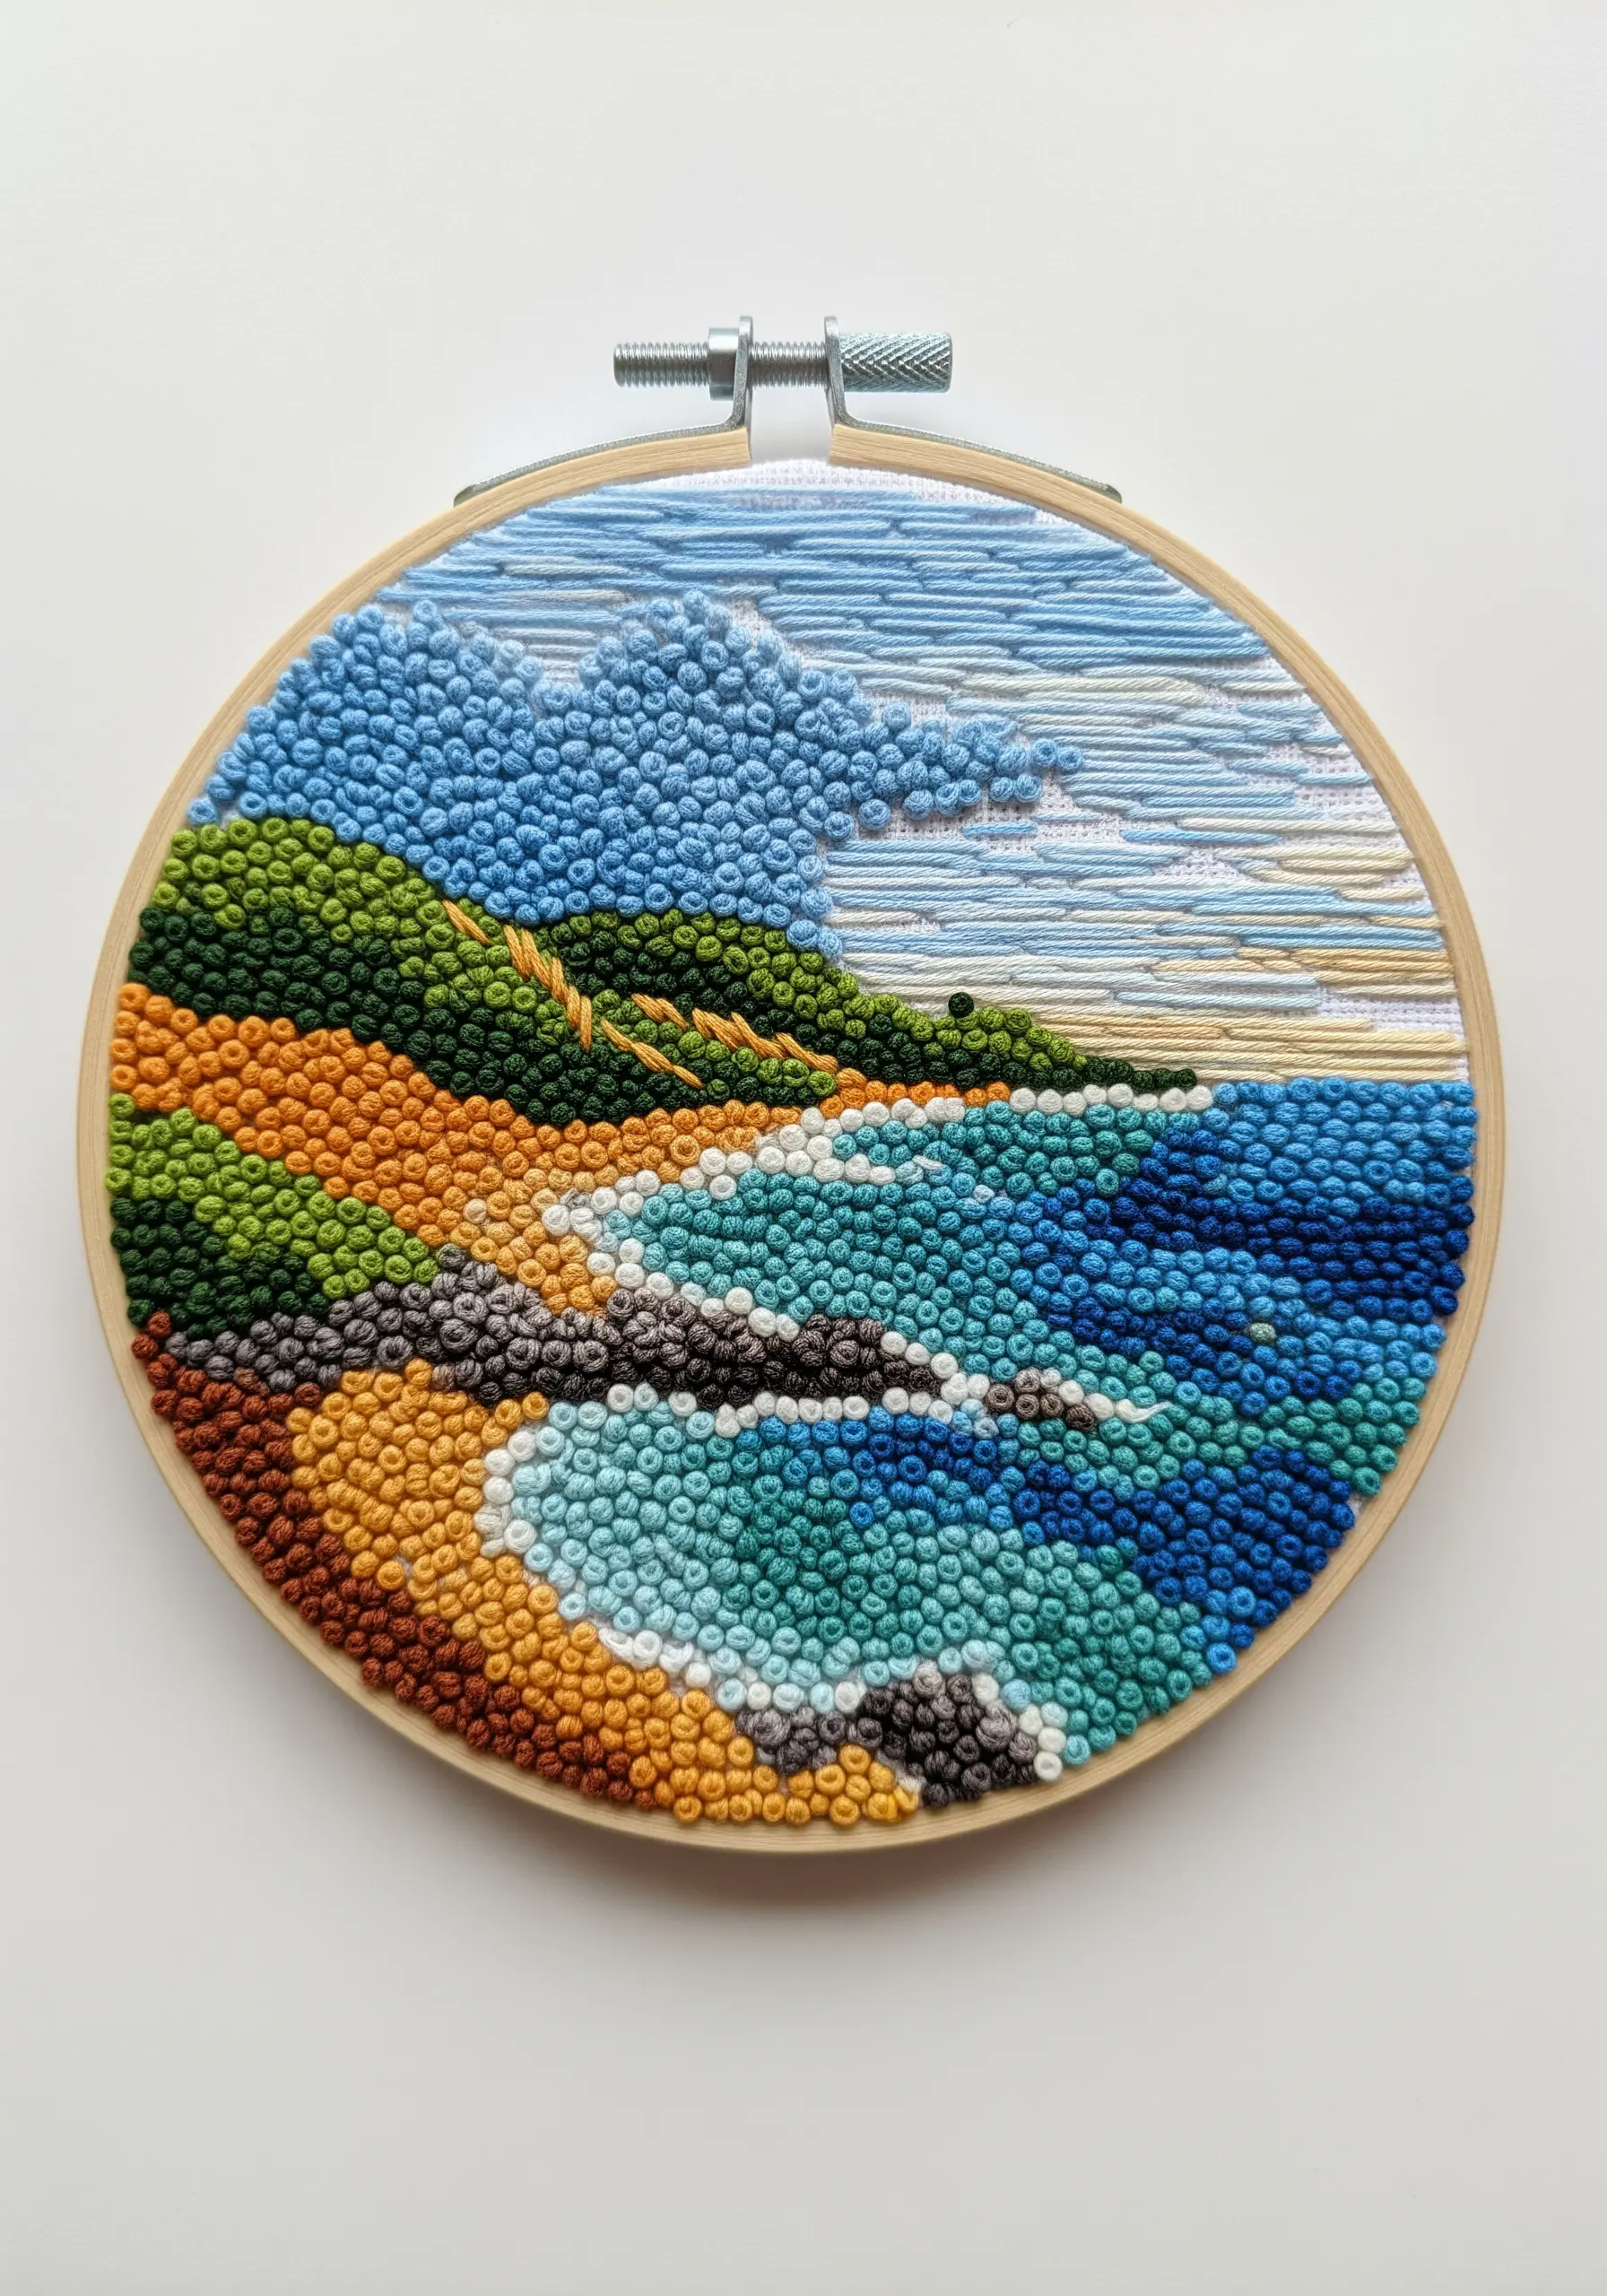
Capture the varied textures of a coastline by assigning a different stitch to each element of the landscape.
Use thousands of tightly packed French knots in shades of blue, green, and brown to create the pebbly, frothy texture of the shore and waves.
In contrast, fill the sky with smooth, horizontal satin stitches to convey a sense of calm and distance.
This deliberate use of stitch variation is a powerful way to capture nature’s textures, turning your hoop into a tactile map.
24. Explore Optical Illusions with Blackwork Embroidery
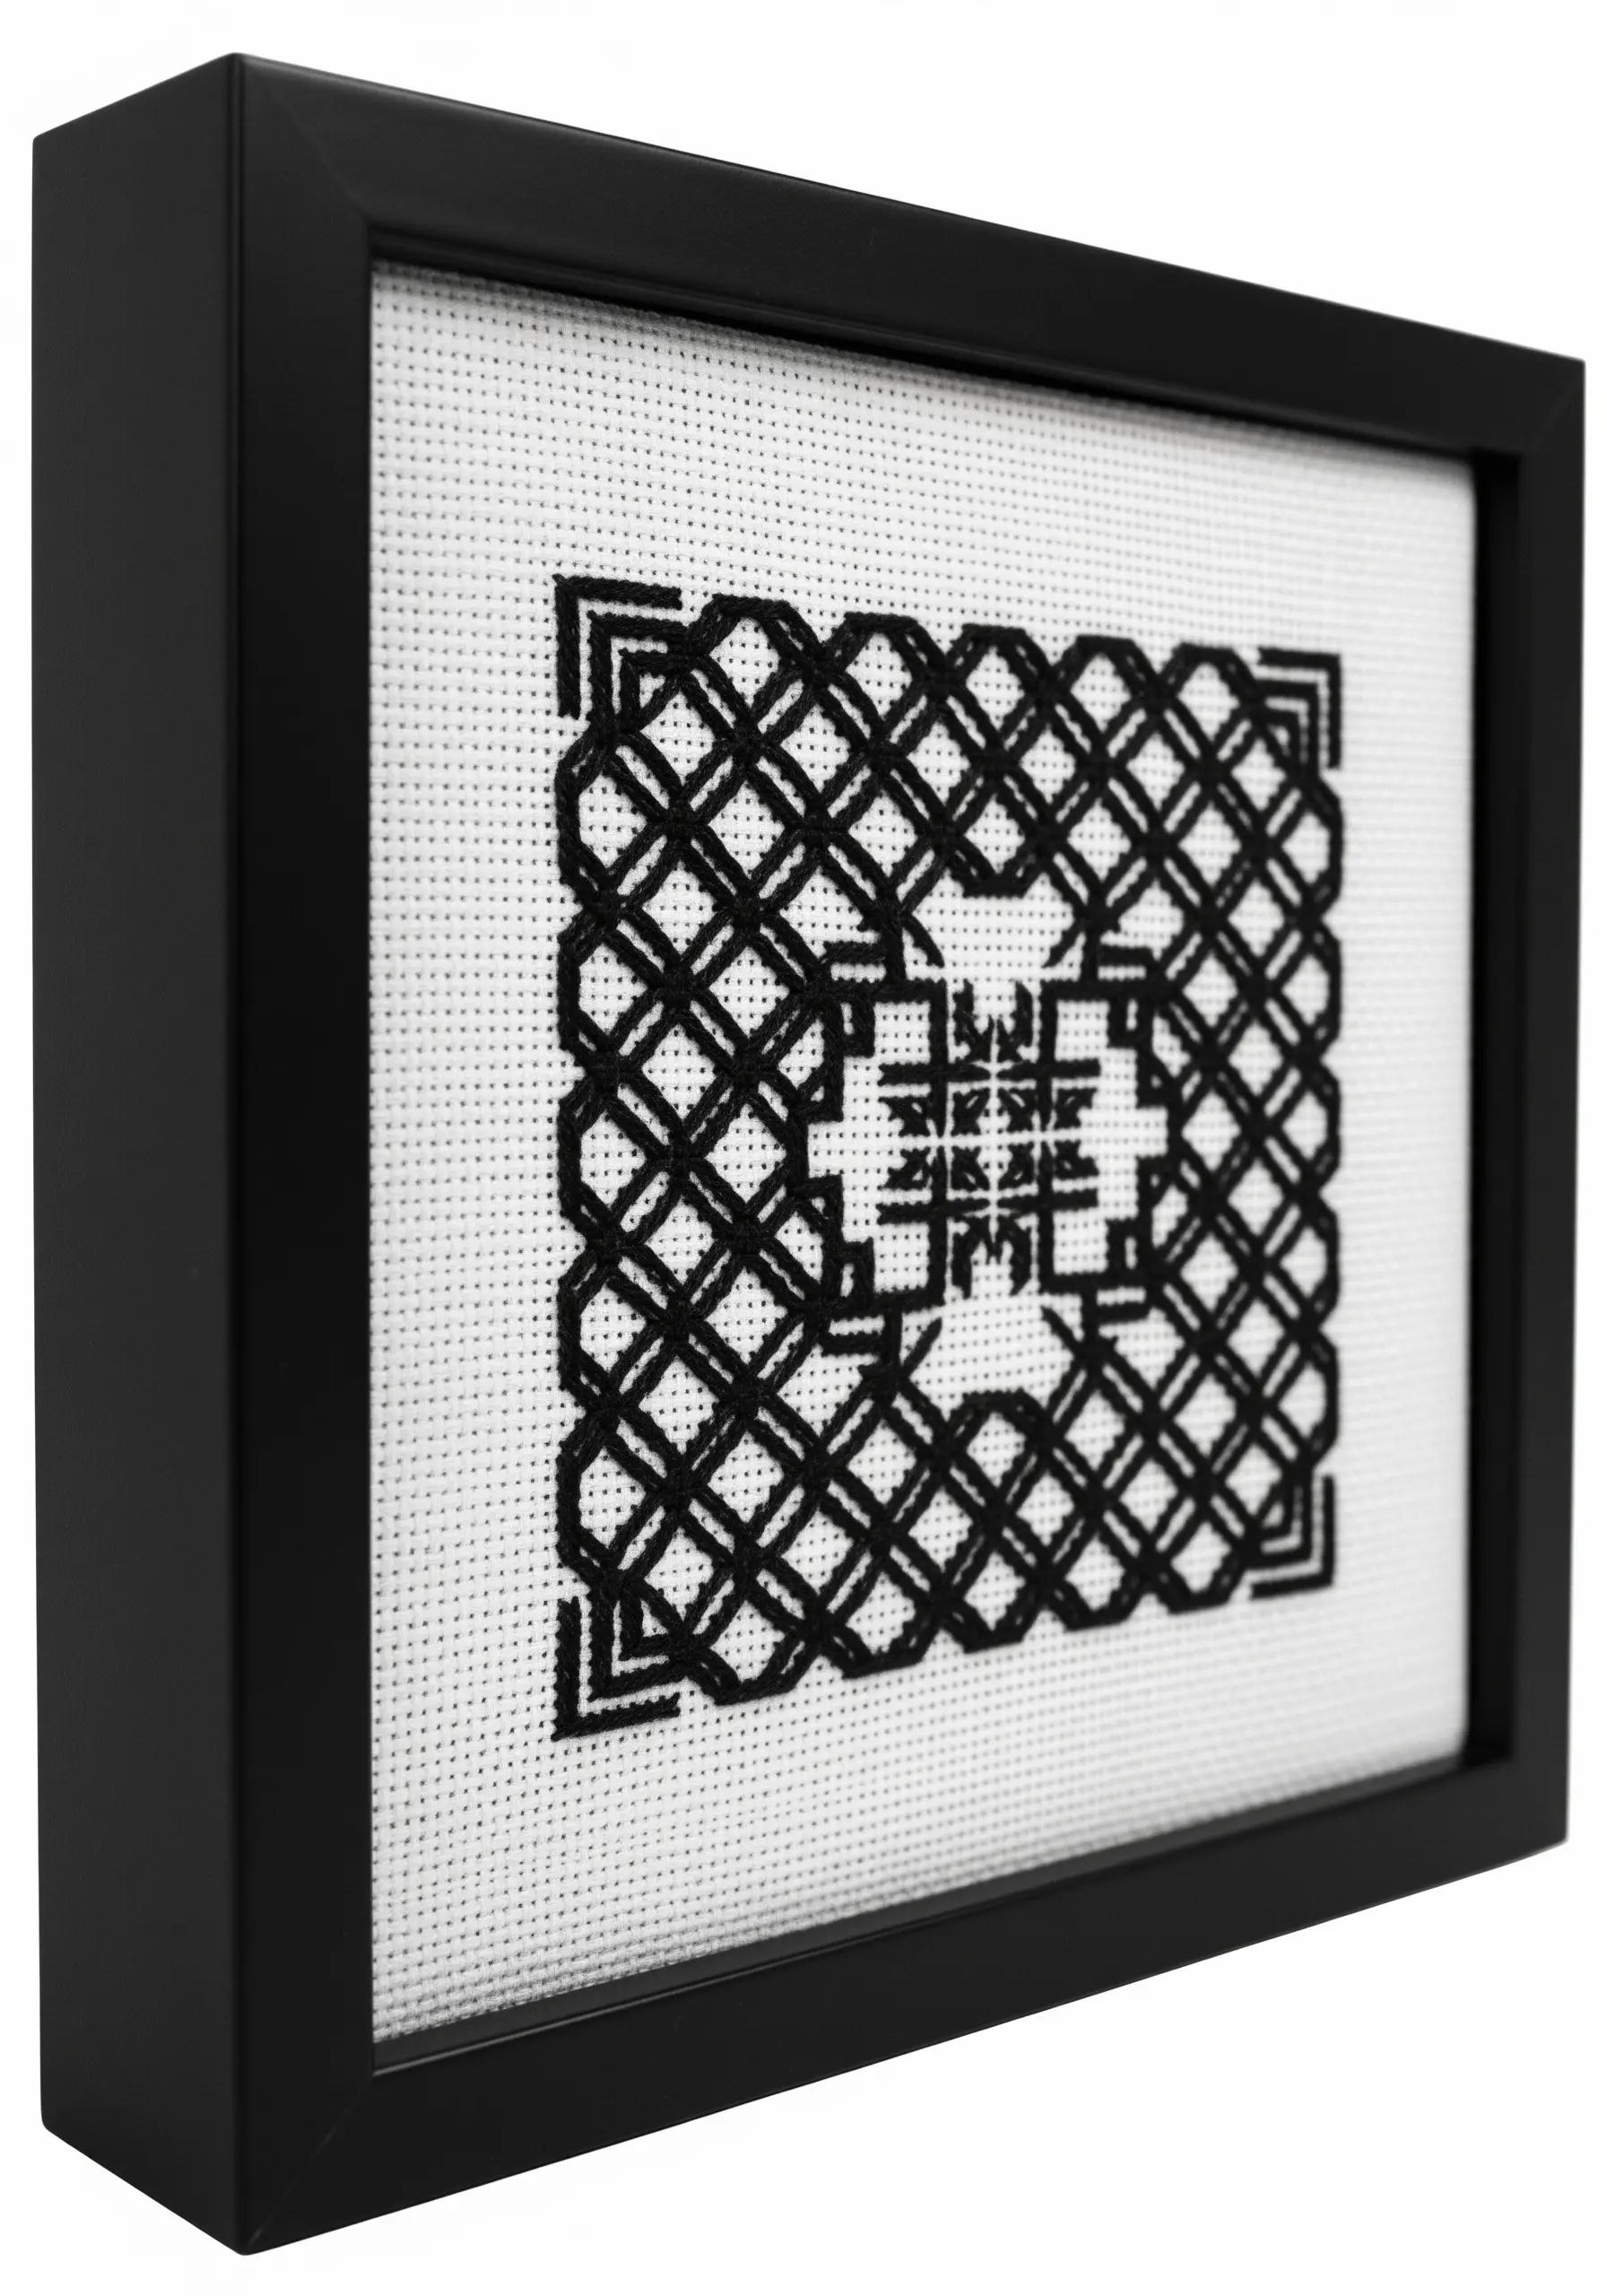
Blackwork is a traditional technique that uses repeating geometric patterns to create intricate, lace-like designs.
Traditionally done in black thread on white fabric, it relies on the precision of counted stitches on an even-weave fabric like Aida.
You can create complex, almost 3D effects by varying the density of the patterns.
Lighter, more open patterns recede, while denser, darker patterns come forward, creating an optical illusion within the grid.
Framing a finished piece in a simple black frame enhances its sharp, graphic quality.
25. Create Whimsical Dimension with Padded Appliqué
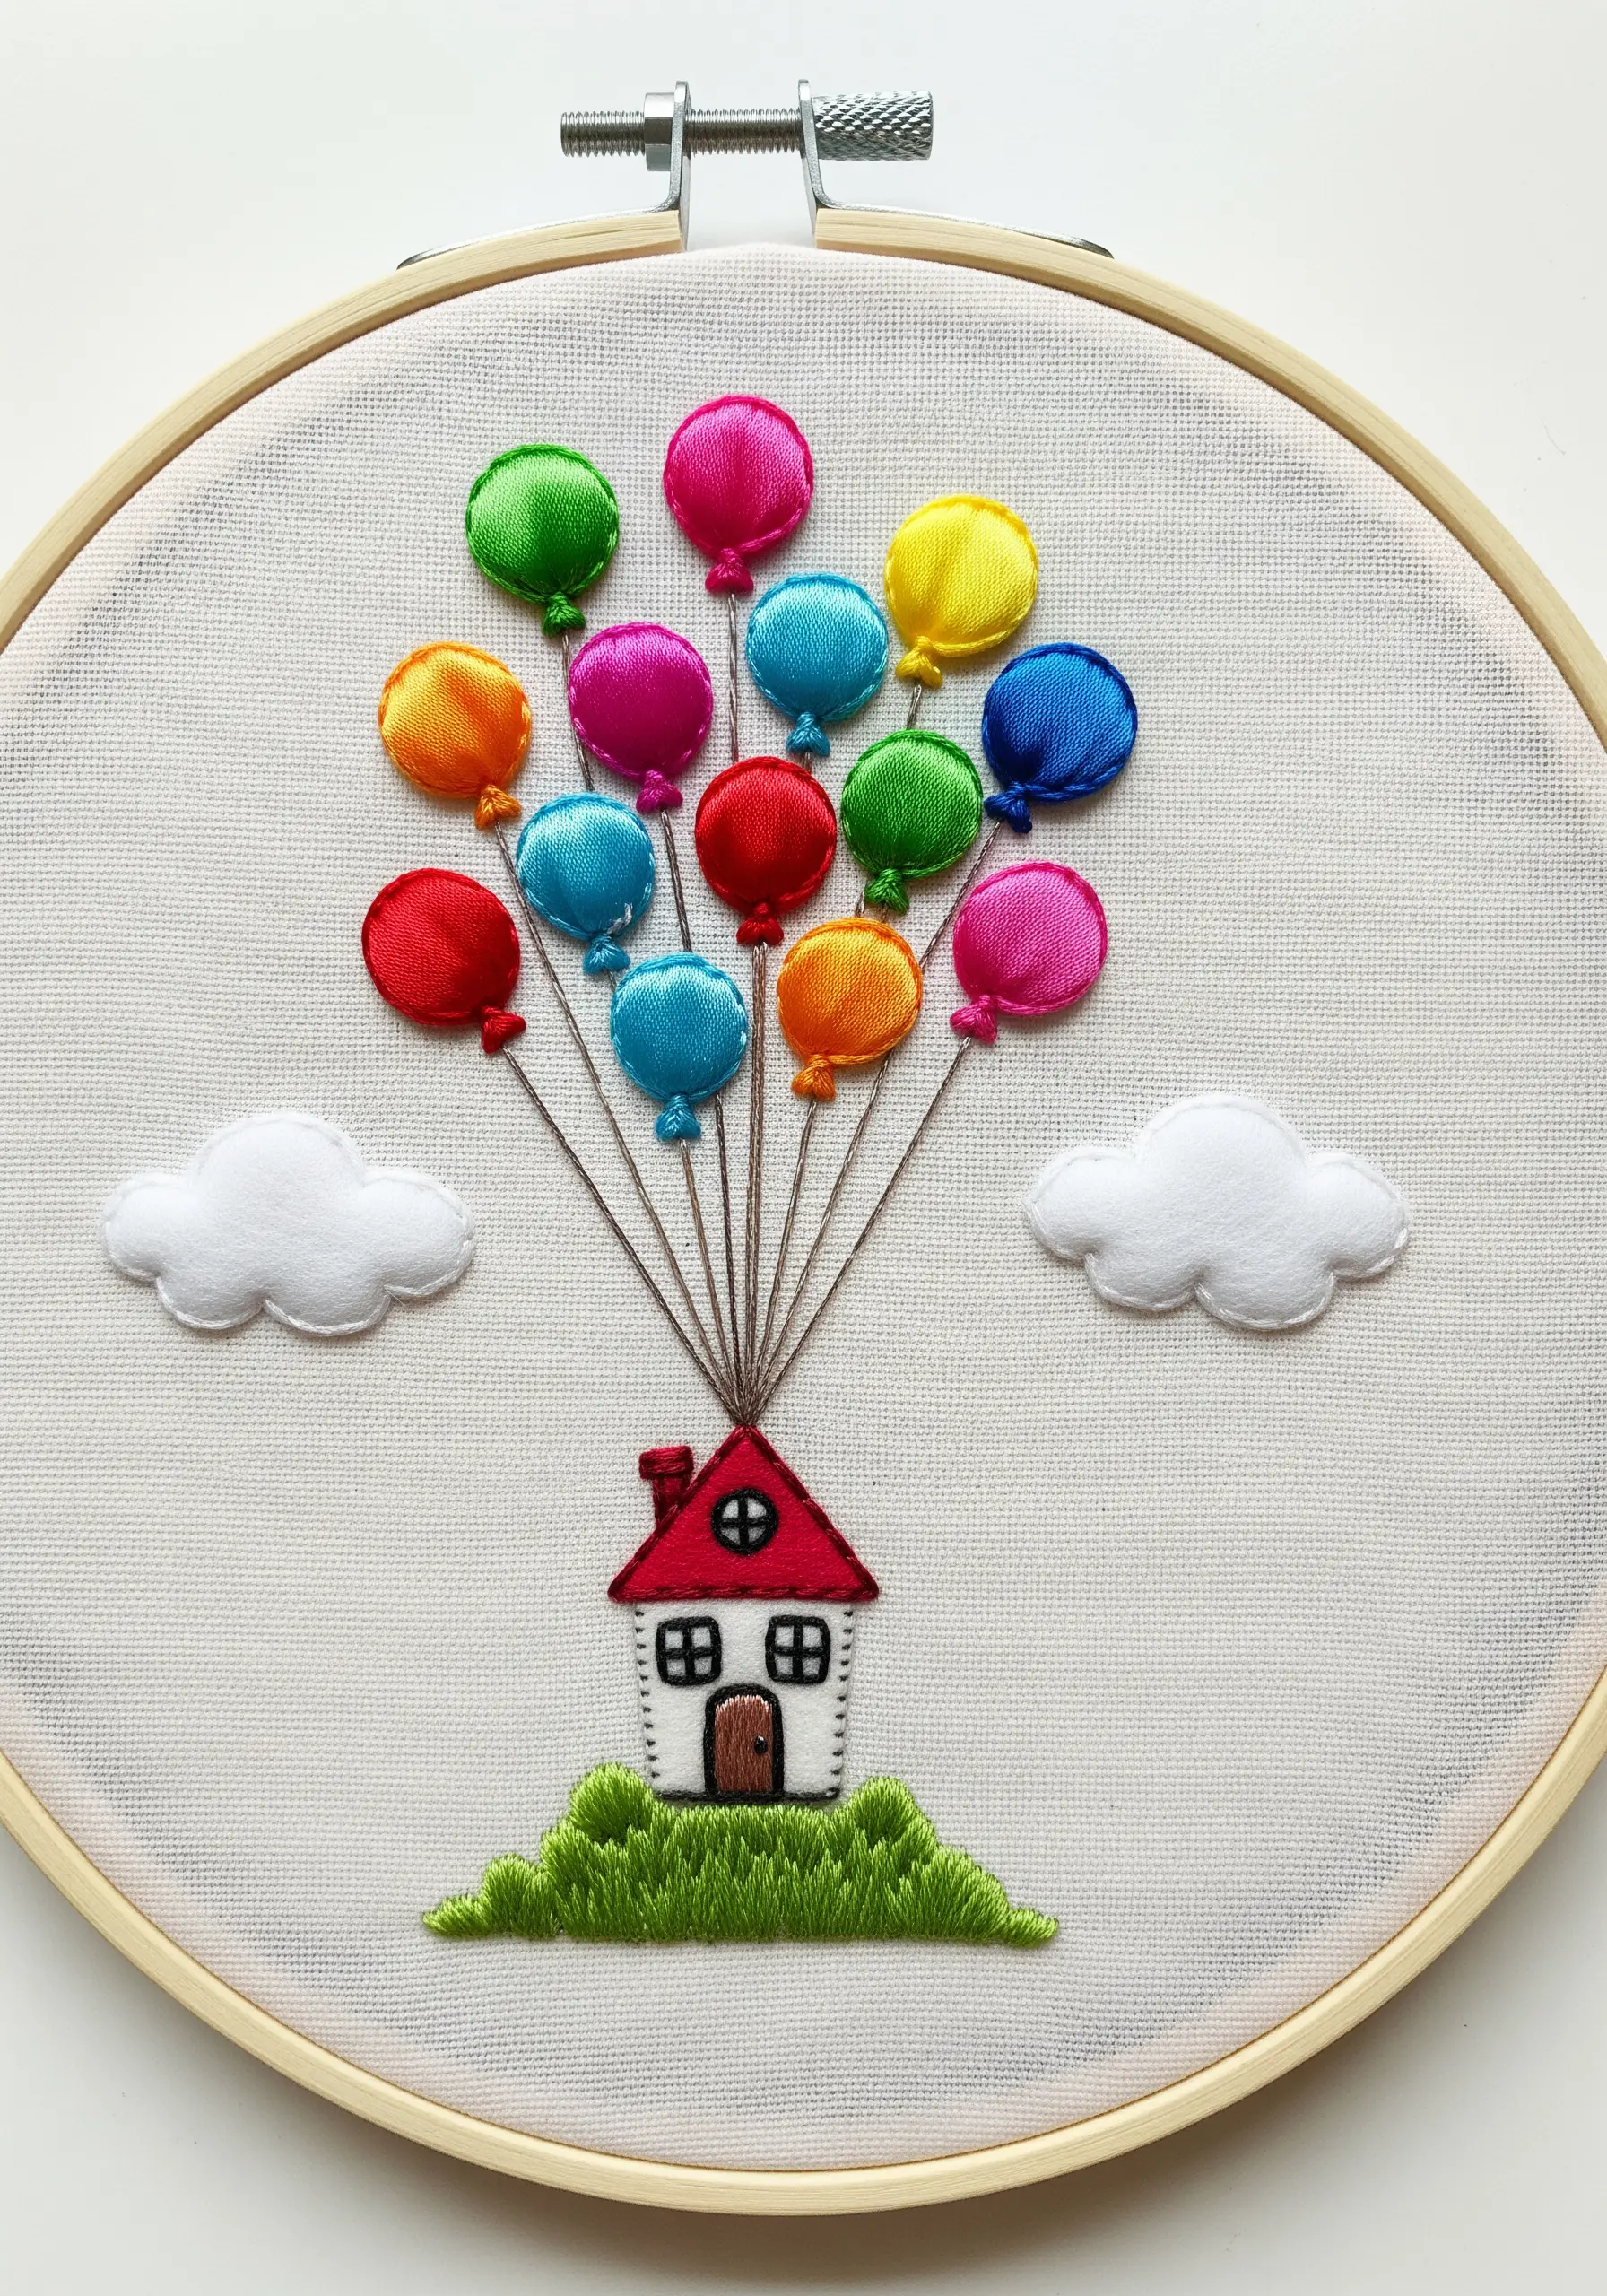
To make elements of your design stand out, use padded or ‘trapunto’ appliqué.
For the balloons, cut each shape from satin fabric, which has a natural sheen.
Lightly stuff them with a tiny bit of cotton batting before stitching them onto your main fabric with a neat whip stitch.
This simple step gives them a soft, puffy, 3D quality that adds a playful and charming touch to the entire piece.
Use a simple backstitch for the house and French knots for the bushes to keep the focus on the floating balloons.
26. Stitch Realistic Pet Portraits with Grayscale Thread Painting
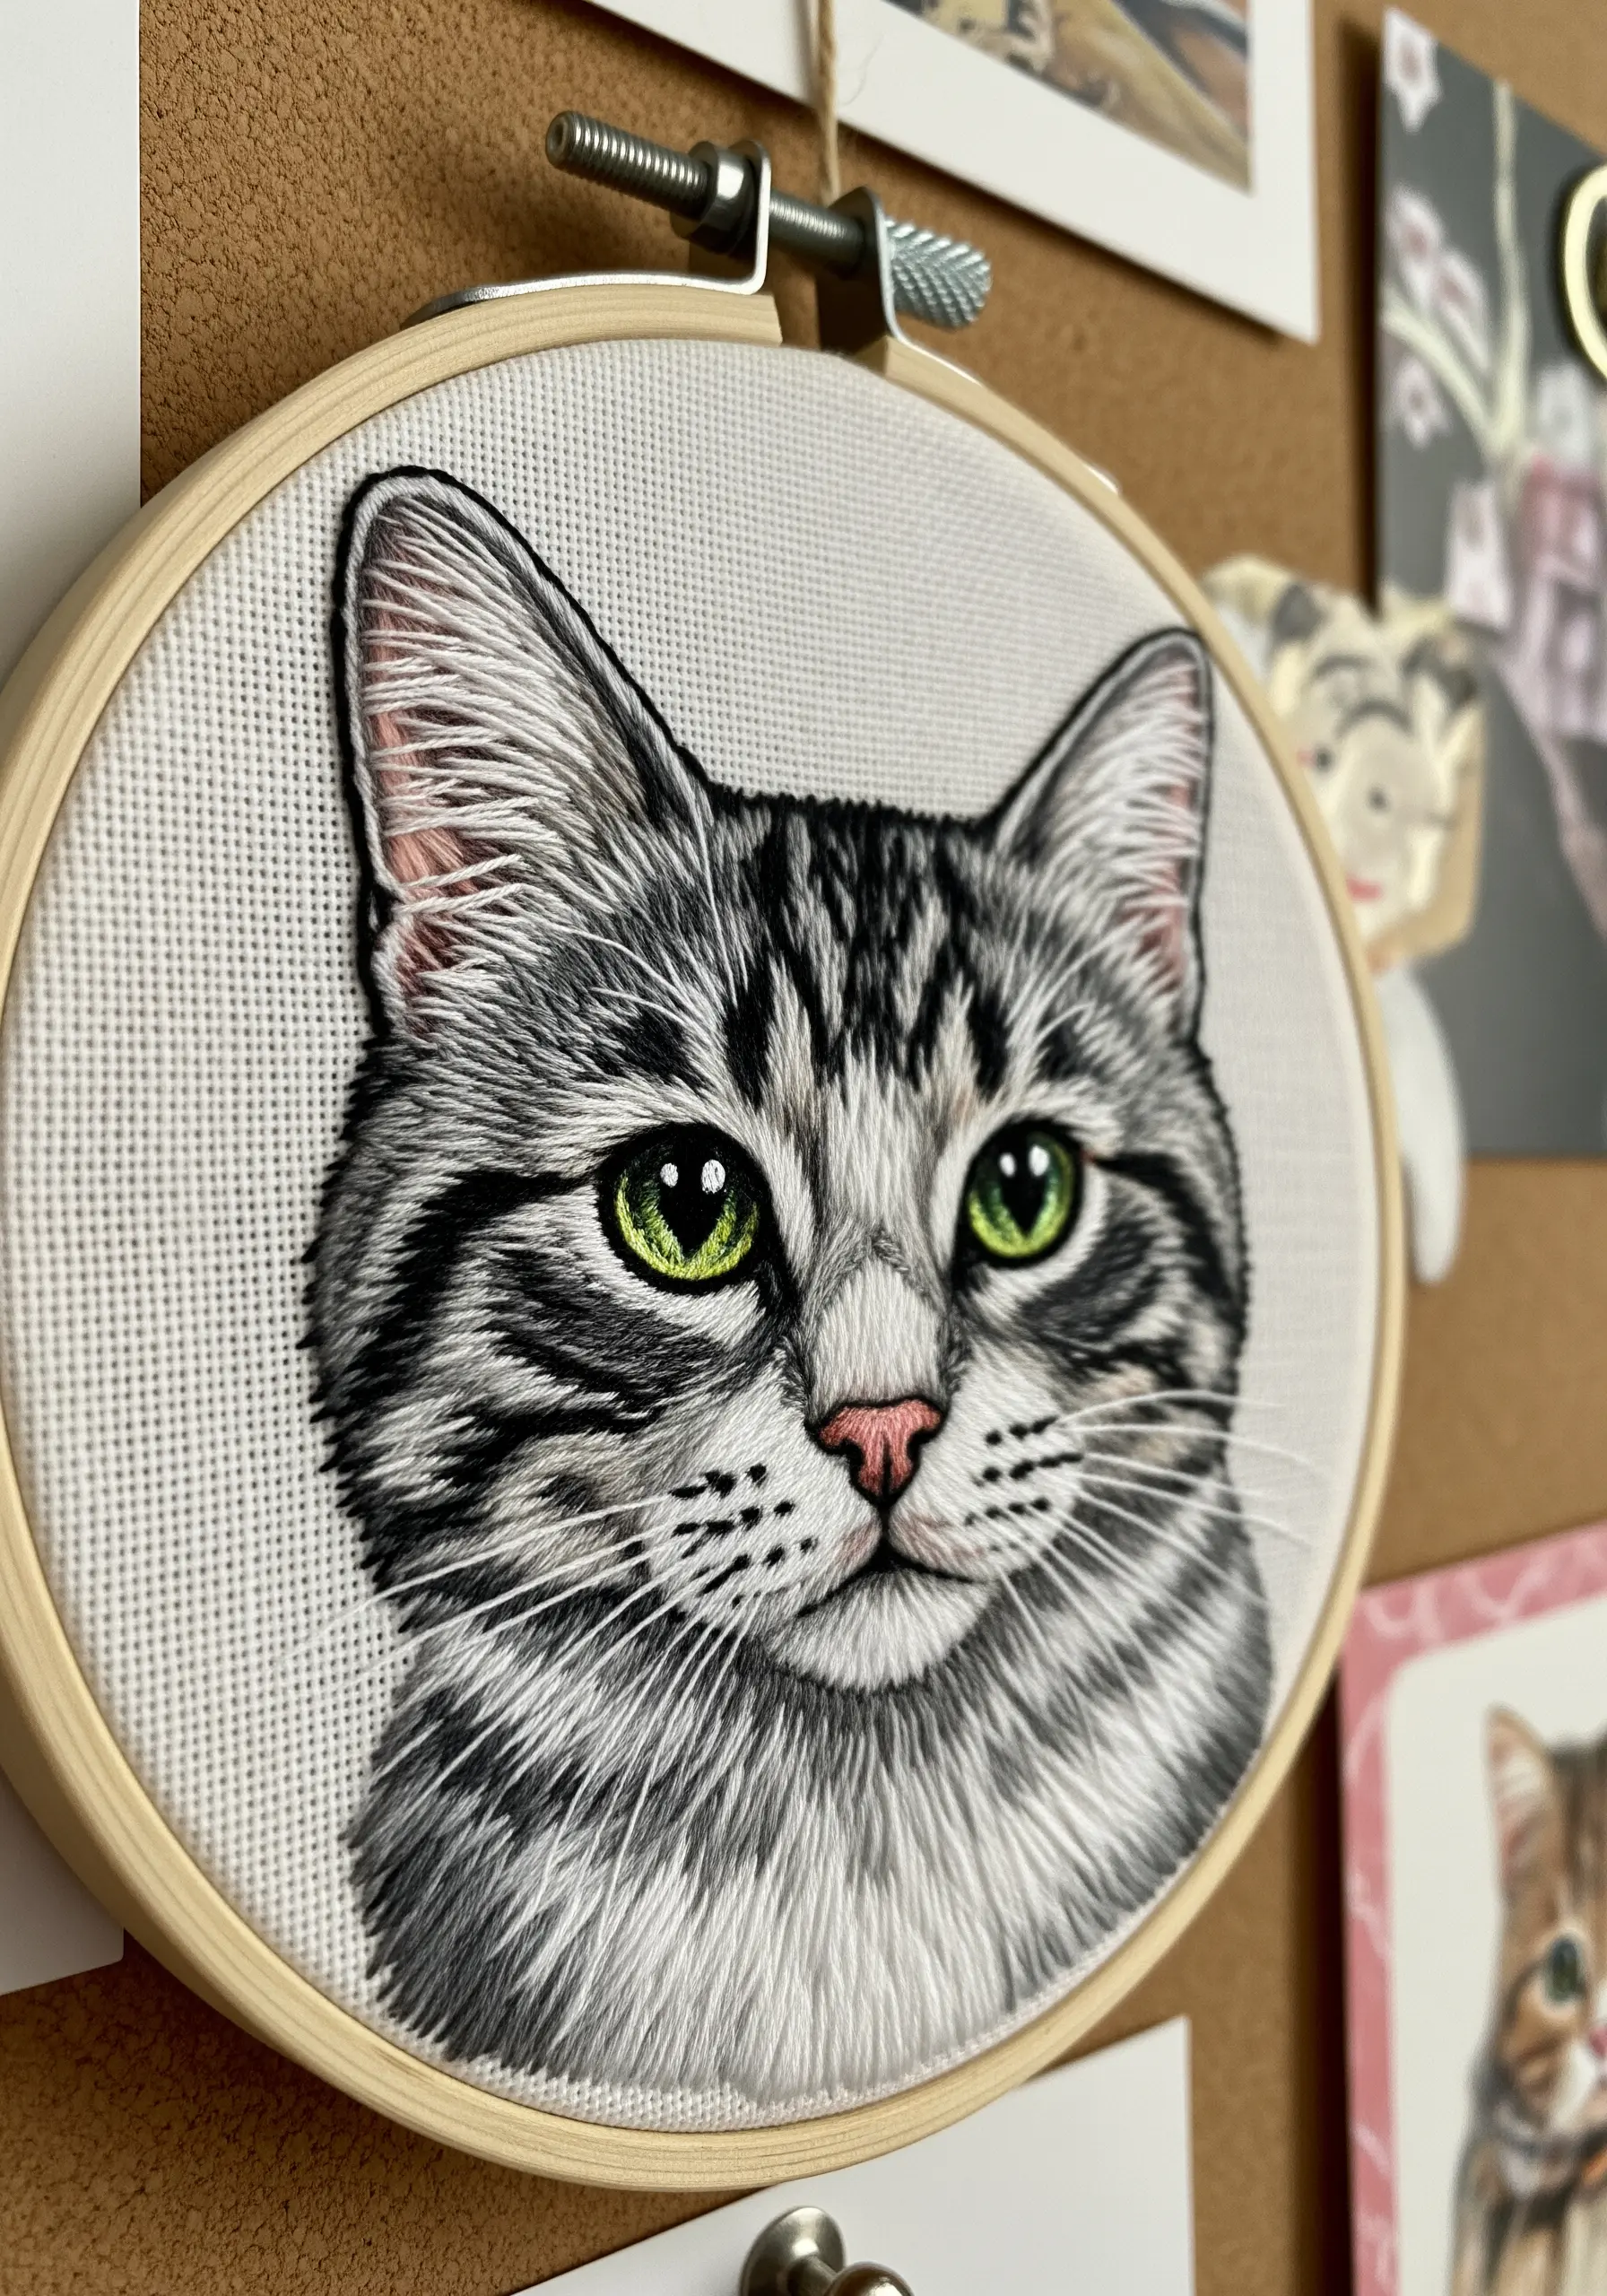
To capture the likeness of a pet, the key is mastering light, shadow, and fur direction.
Working in grayscale—with shades of black, grey, and white—forces you to focus on form rather than color.
Use single-strand floss and follow the natural direction of the fur growth with your long-and-short stitches.
Layering shades carefully will create the contours of the face and the softness of the fur.
A tiny pop of color, like for the eyes or nose, can bring the entire portrait to life against the monochrome background.
27. Convey an Urban Vibe with Minimalist Outlines
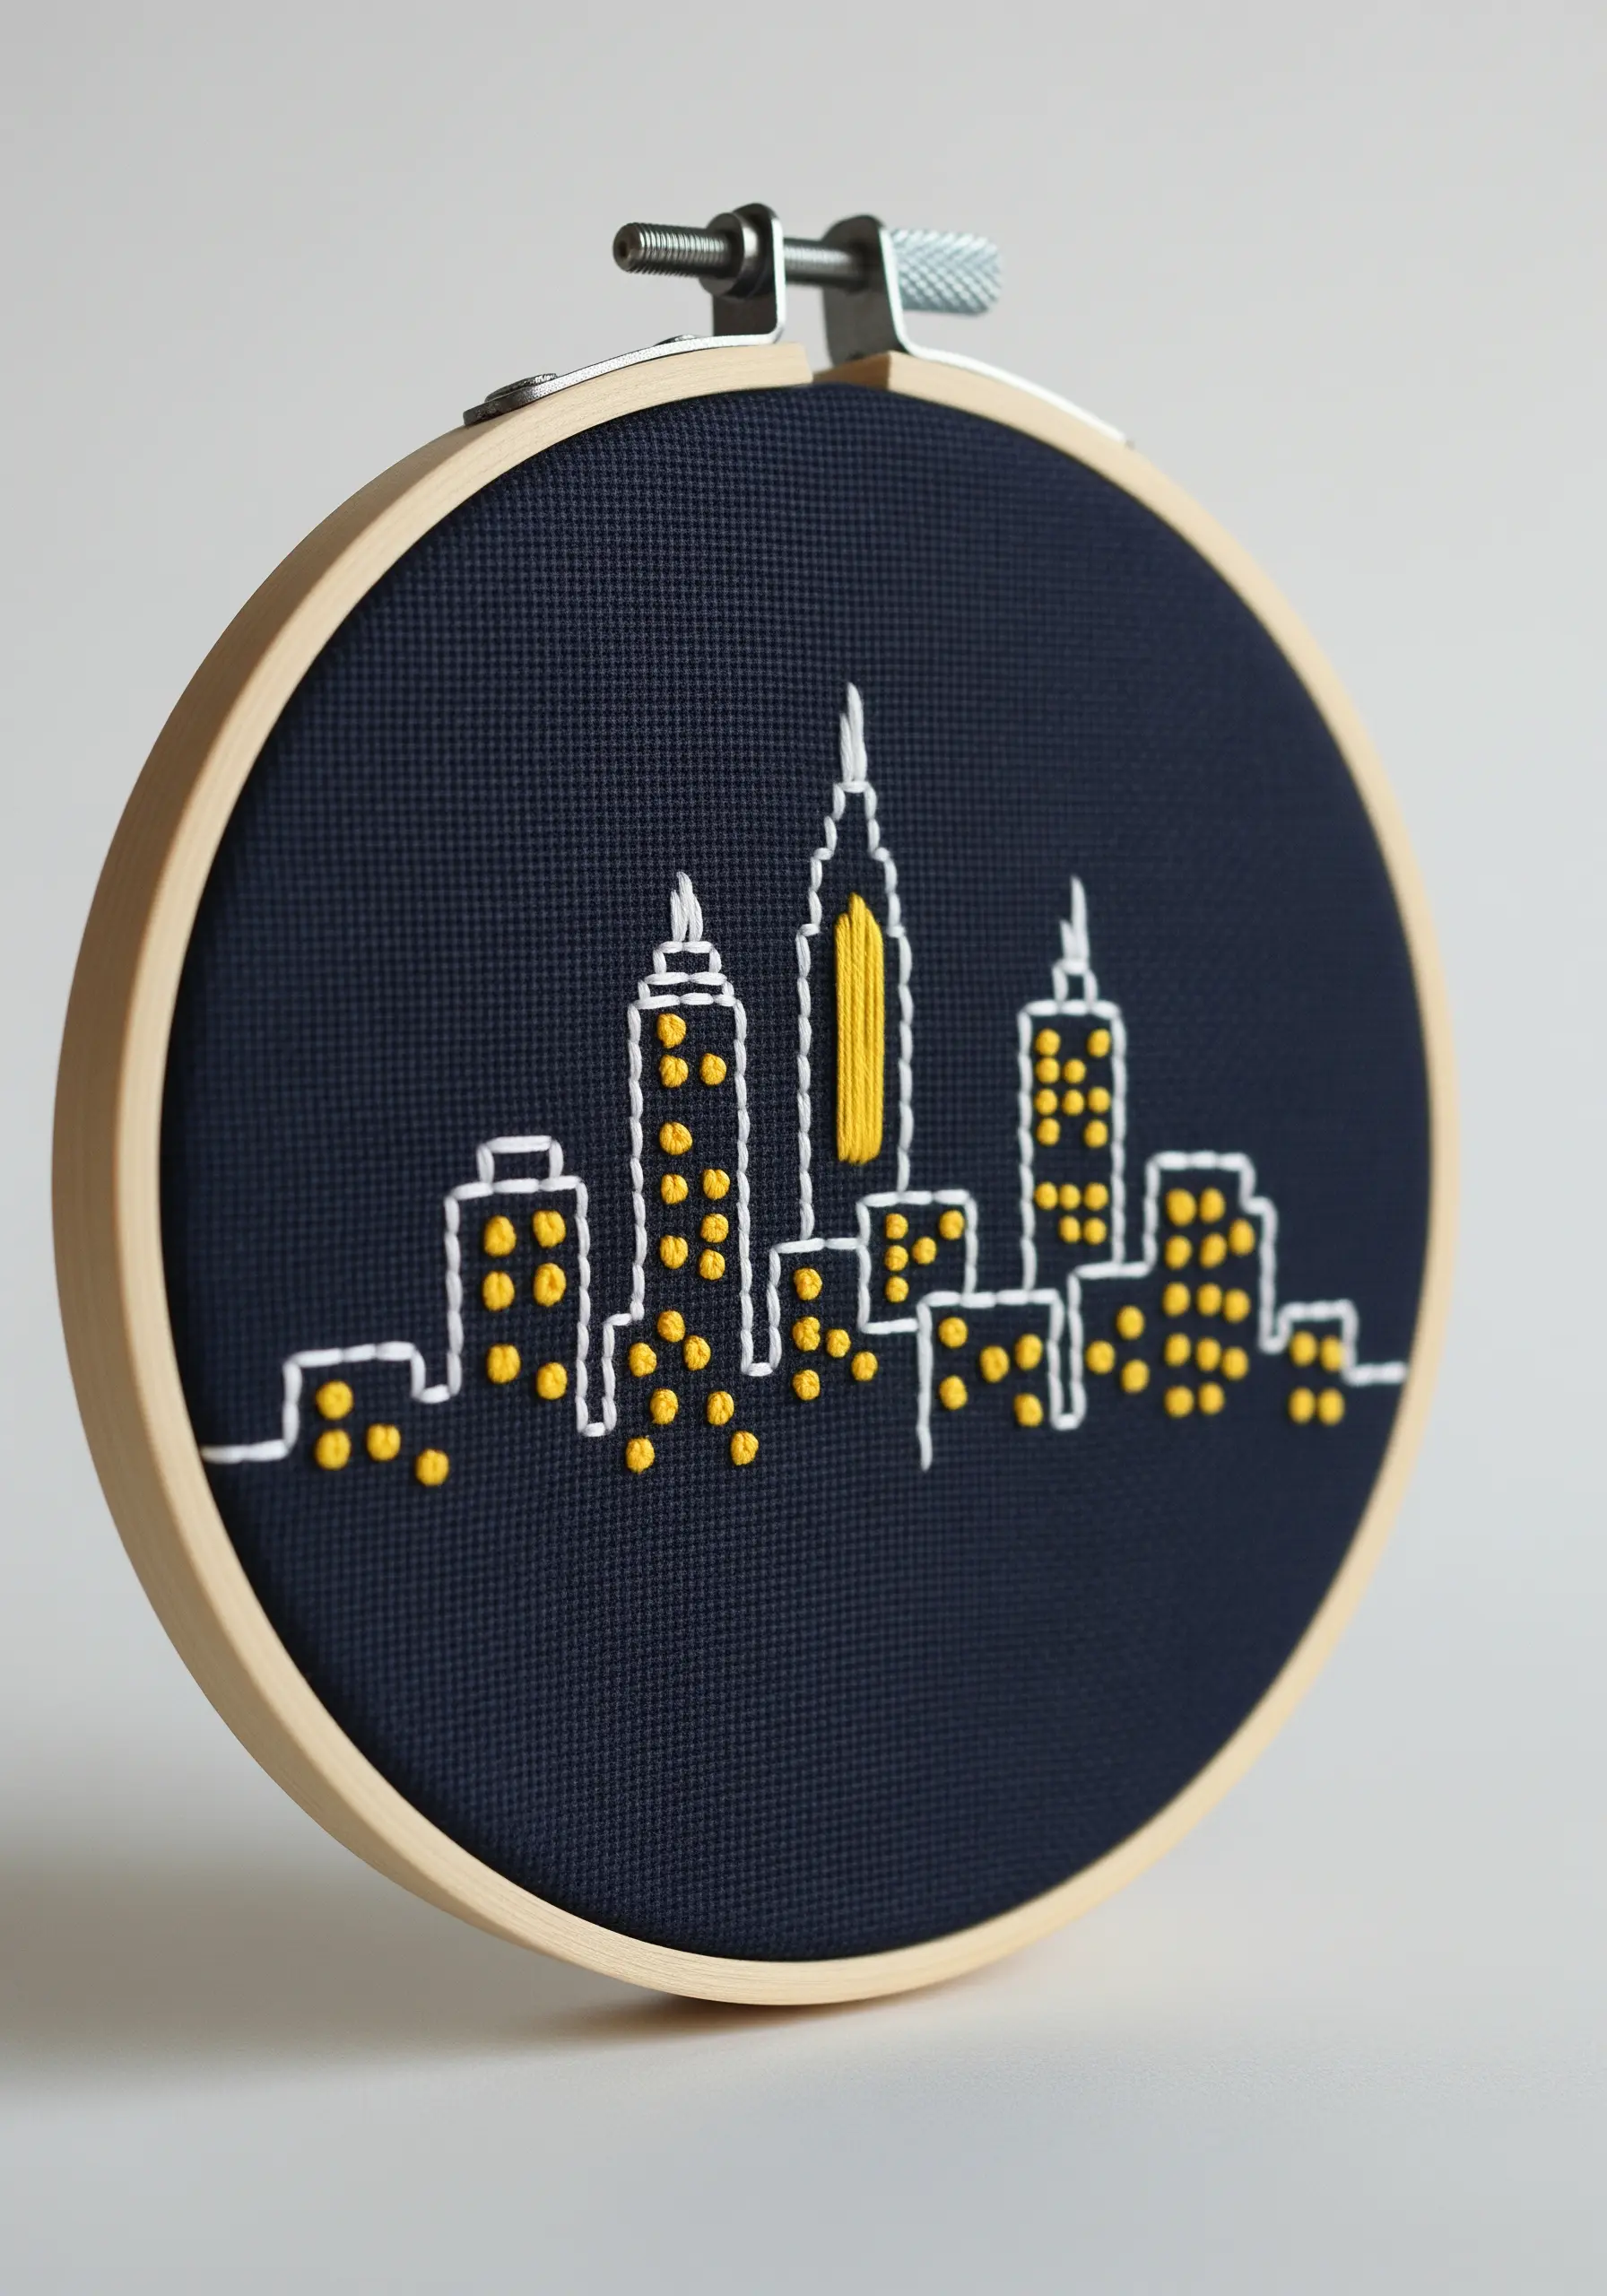
You don’t need intricate detail to evoke a city skyline; a simple, clean outline can be just as effective.
Use a bright white or yellow backstitch against a dark navy fabric to suggest glowing lights against a night sky.
For the windows, use single, short satin stitches or French knots in a contrasting bright color.
The power of this design lies in its simplicity and use of negative space.
This is one of the easiest tiny embroidery ideas that turn blank walls into minimal art with maximum impact.
28. Design Playful Scenes with Felt and Blanket Stitch
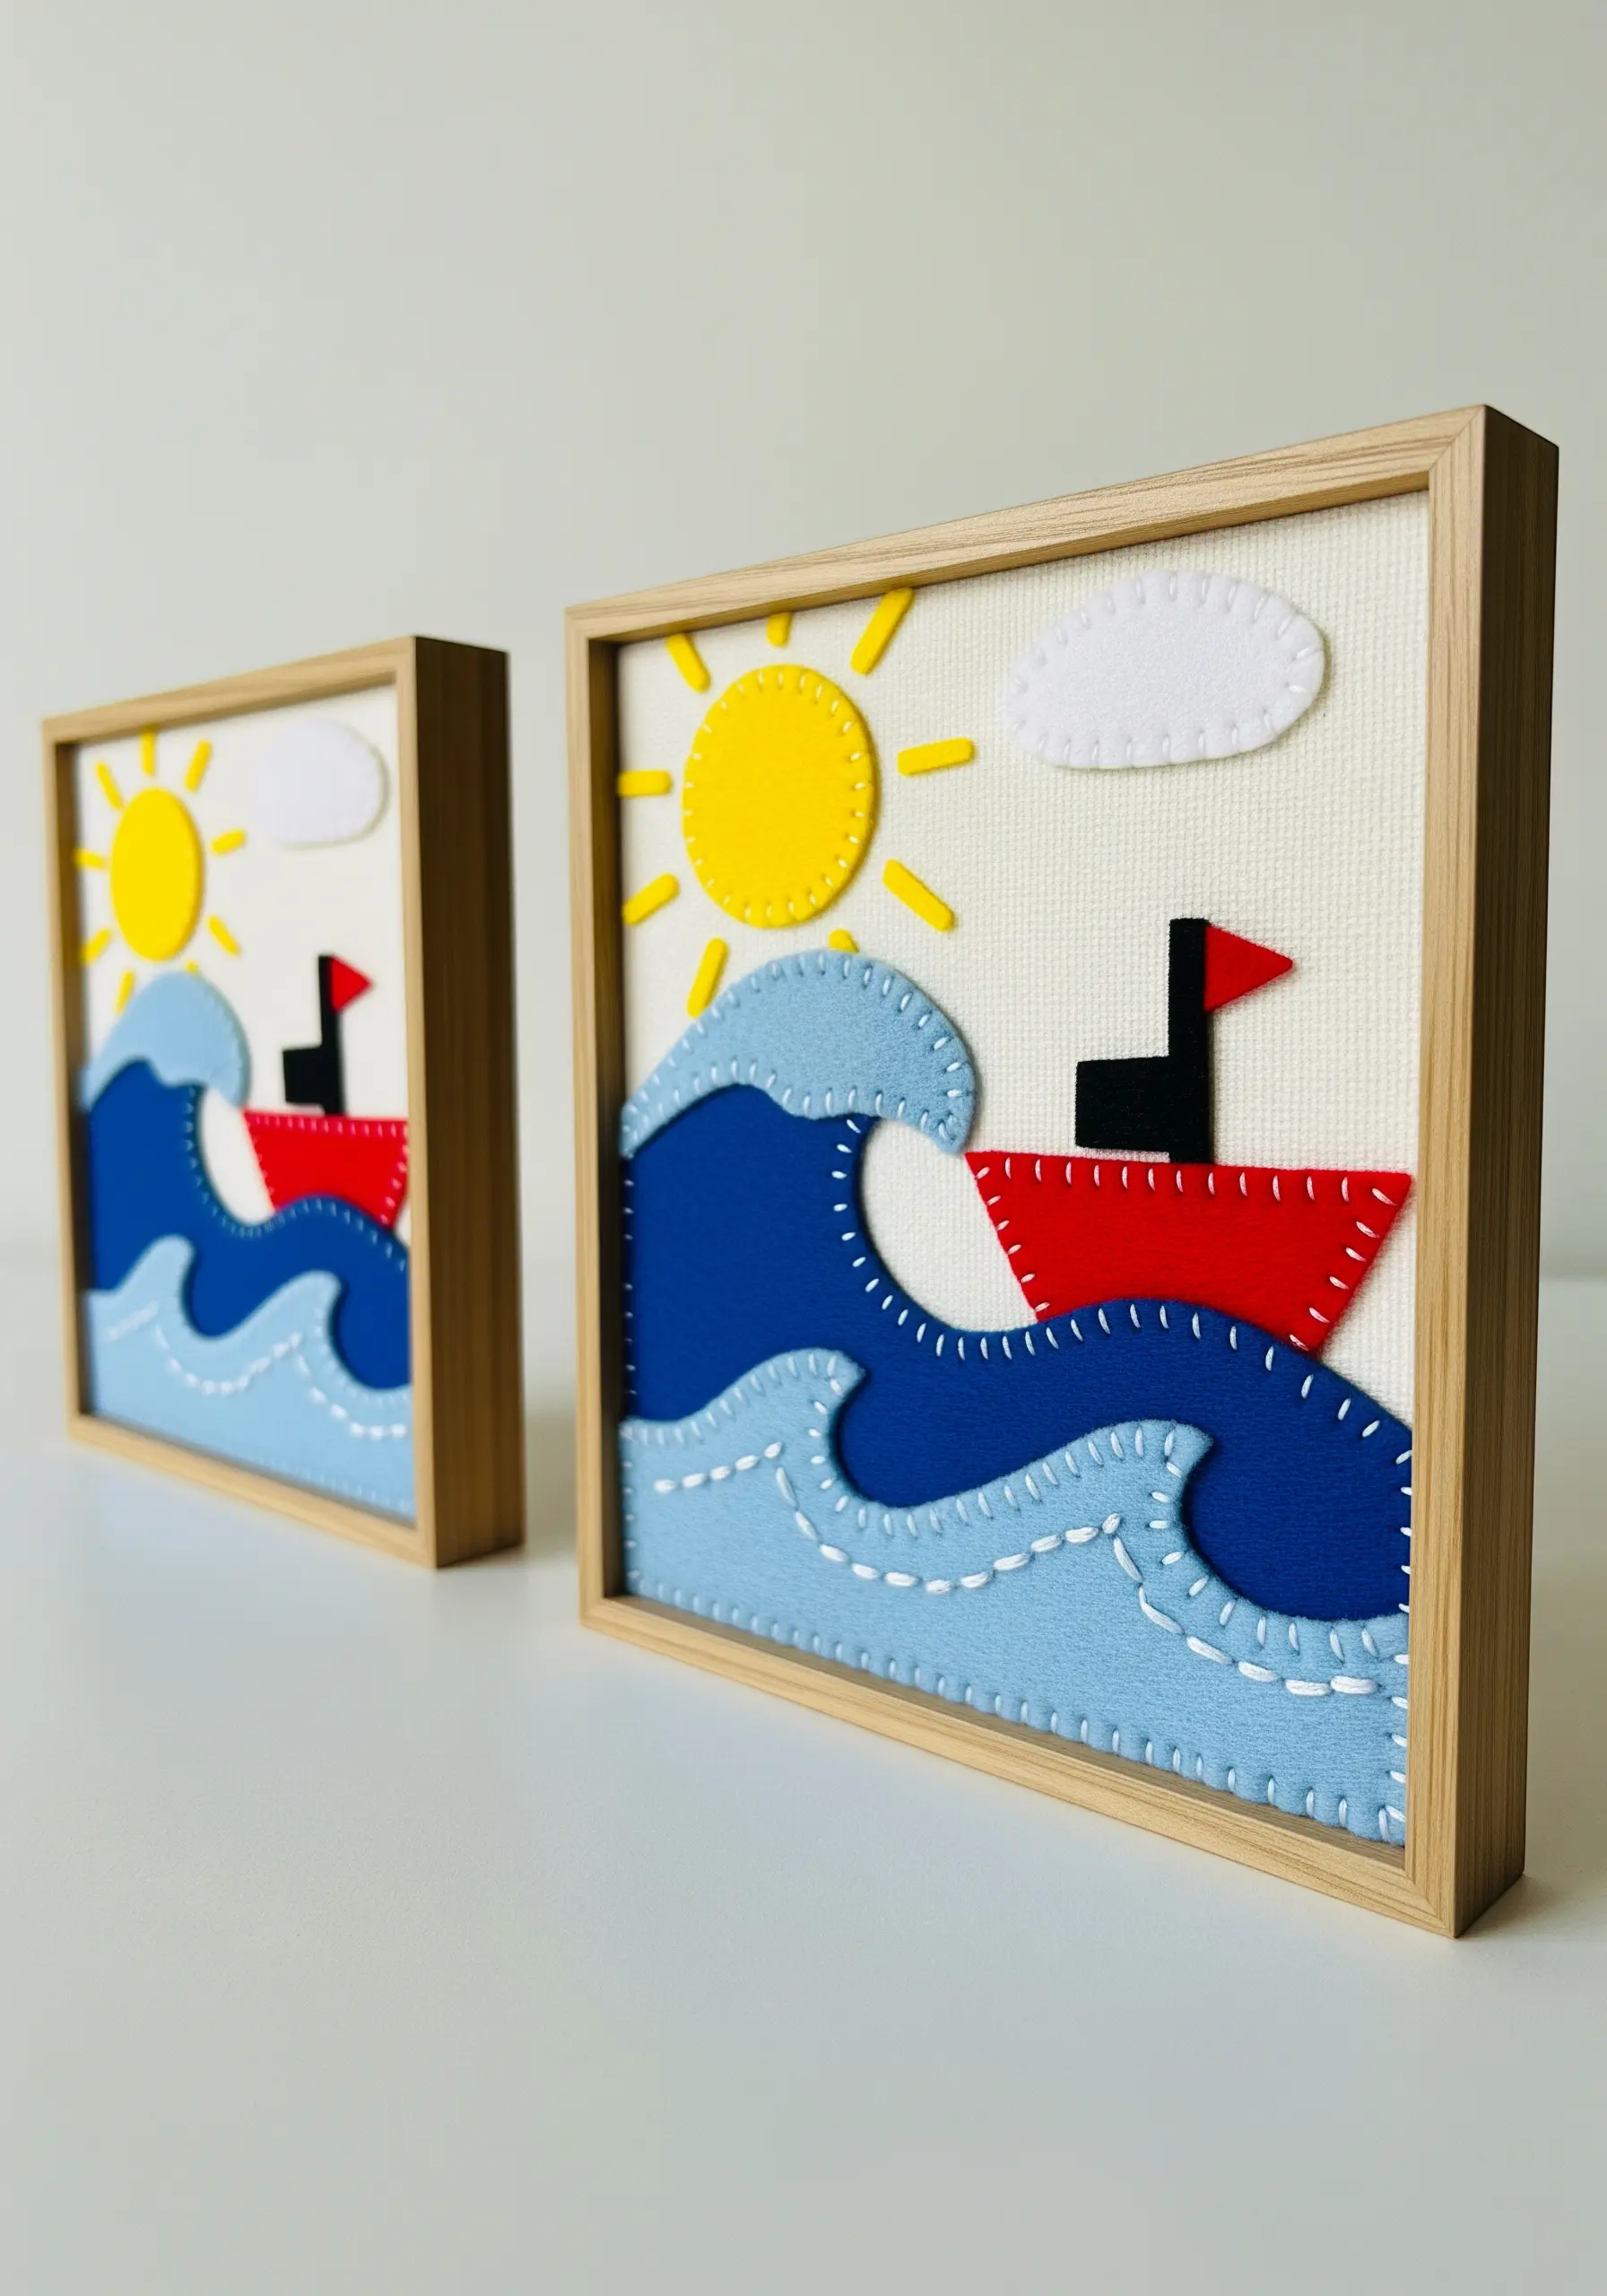
Create charming, storybook-style art by combining simple felt shapes with a decorative blanket stitch.
Cut your sun, waves, and boat from brightly colored craft felt.
Layer them on a neutral fabric background and use a contrasting white floss to stitch them down with a visible blanket stitch around the edges.
This stitch not only secures the pieces but also adds a playful, cartoon-like outline that defines each shape.
It’s an accessible technique perfect for nursery decor or adding a touch of whimsy to a room.
29. Create a Minimalist Duo with Opposing Motifs
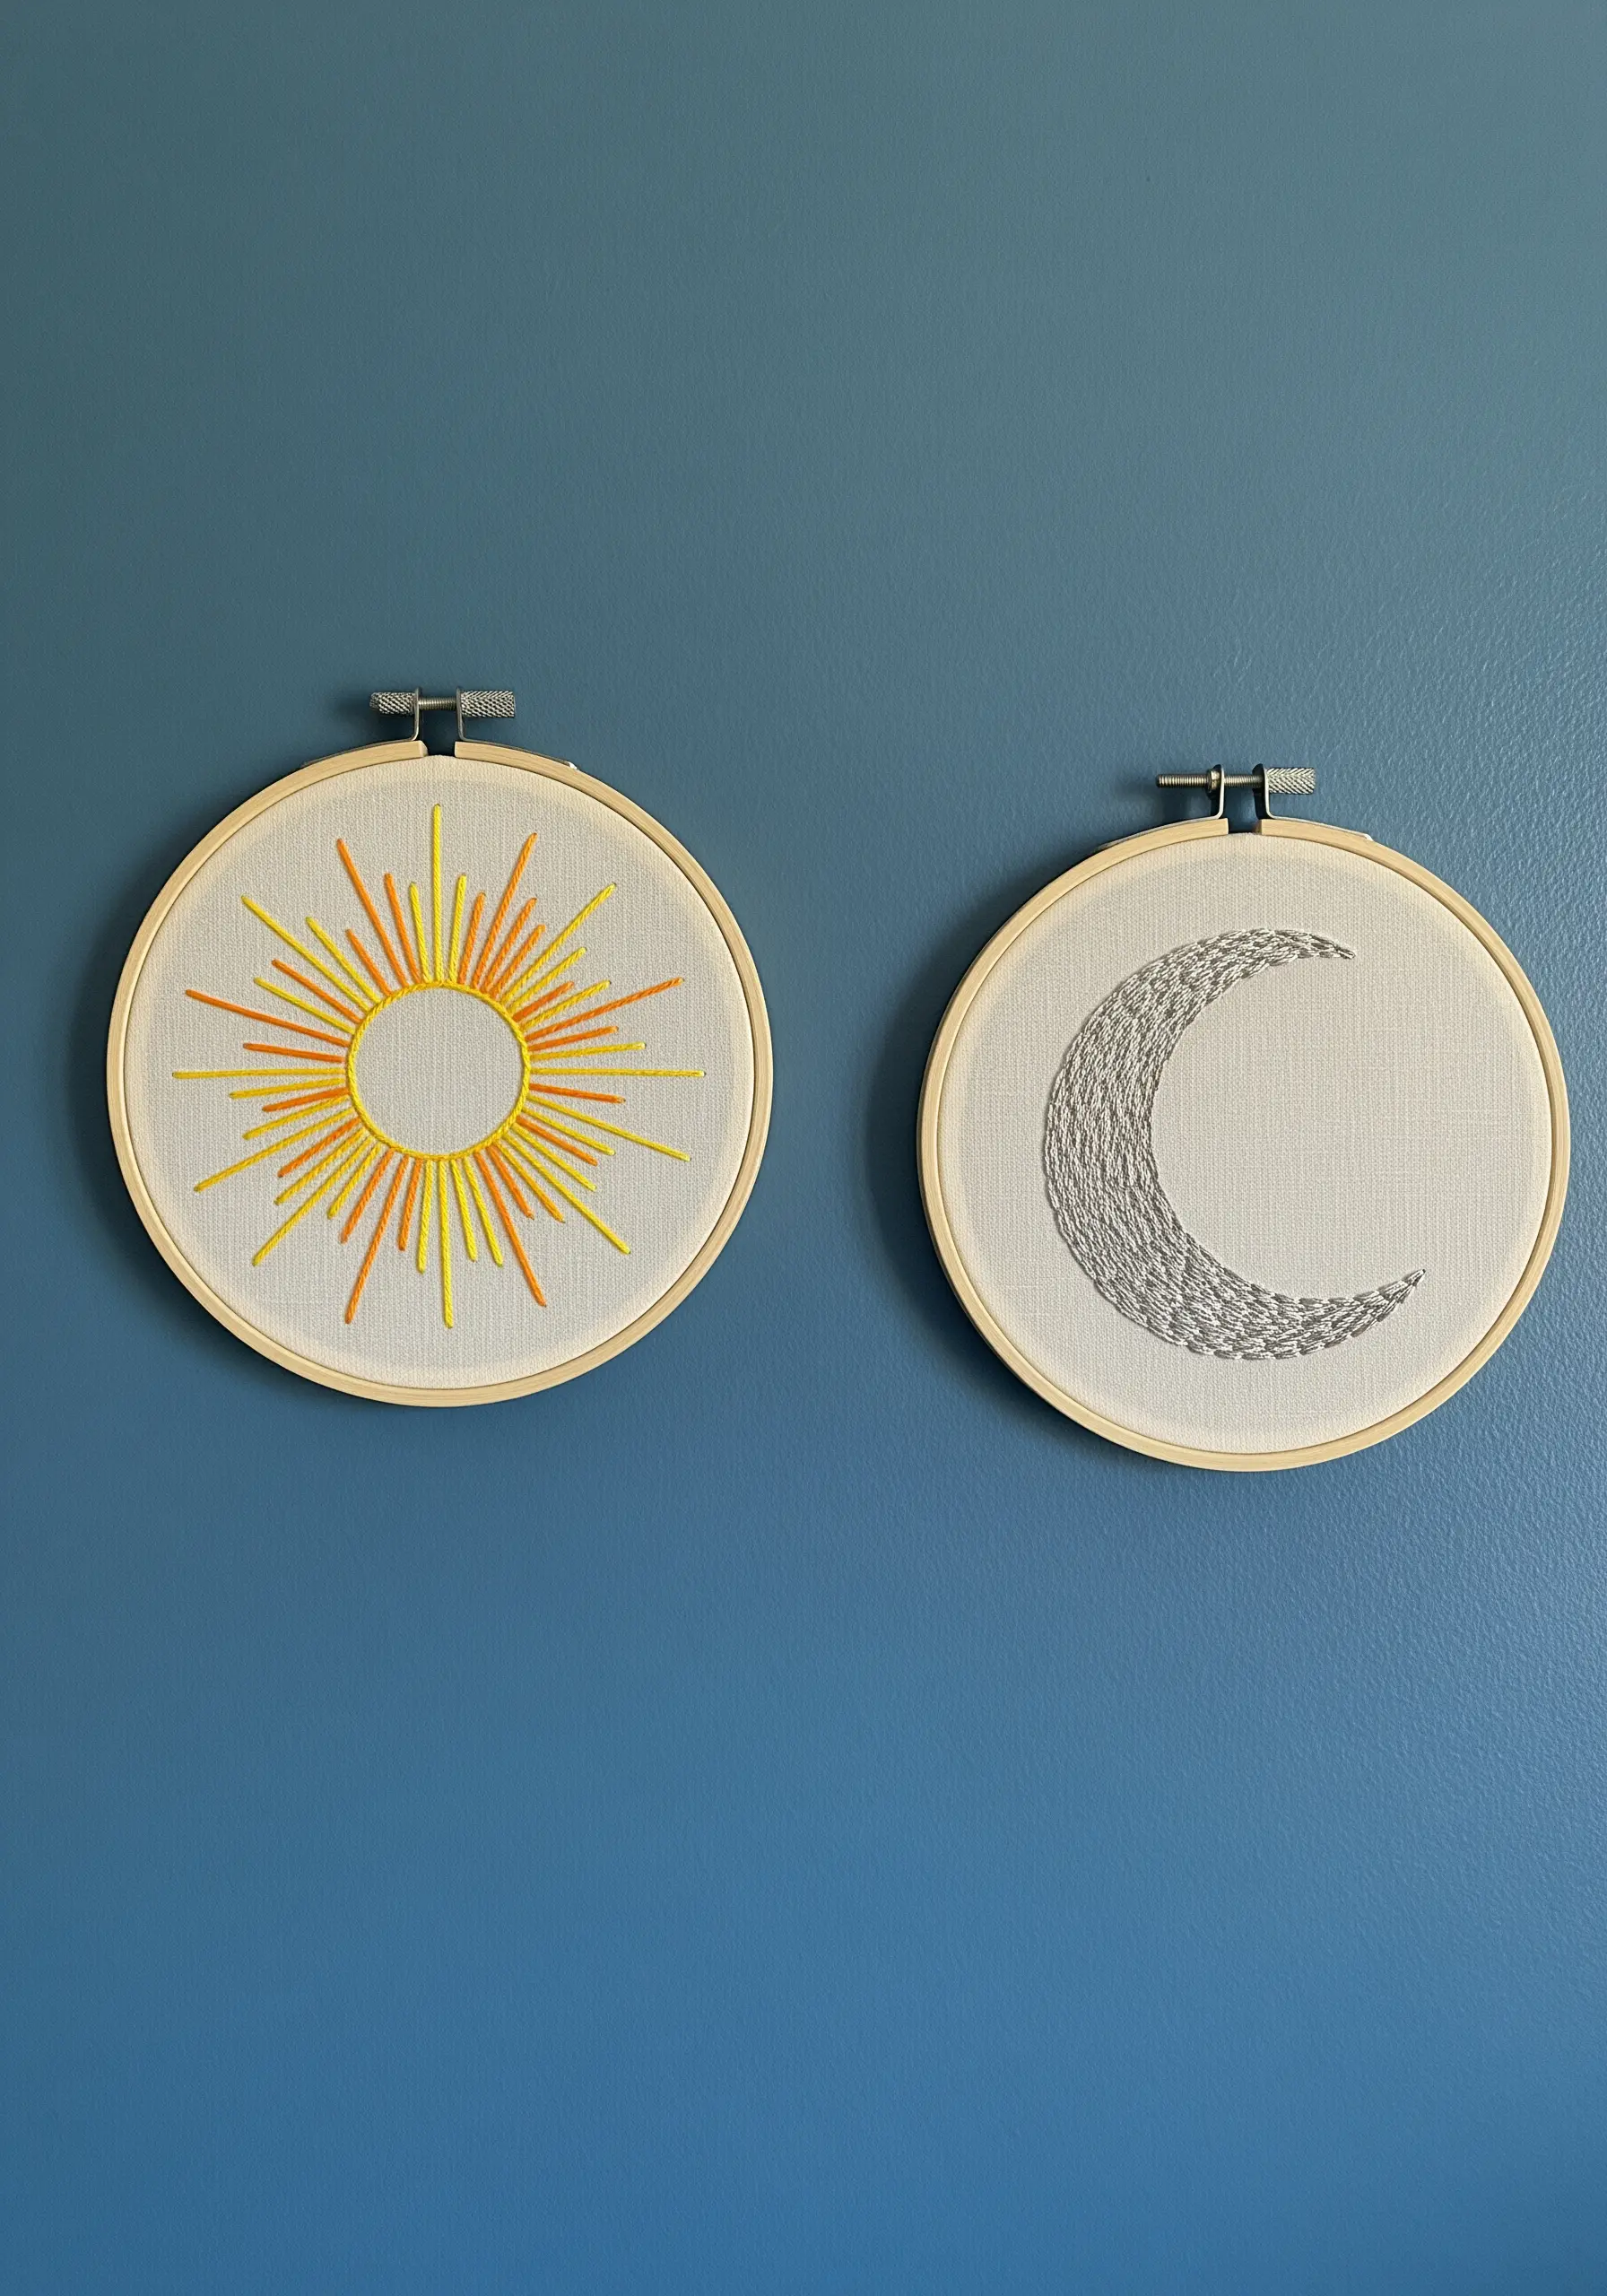
Tell a simple story by pairing two hoops with complementary or opposing designs.
Stitch a sun and a moon, each on its own hoop, using simple but distinct techniques.
For the sun, use radiating straight stitches in shades of yellow and orange to convey energy.
For the moon, use a textured fill stitch, like seed stitch or even small French knots in a single grey tone, to give it a quiet, cratered surface.
Hanging them together creates a balanced, harmonious display that feels more impactful than a single piece.
30. Map the Stars with Glow-in-the-Dark Thread
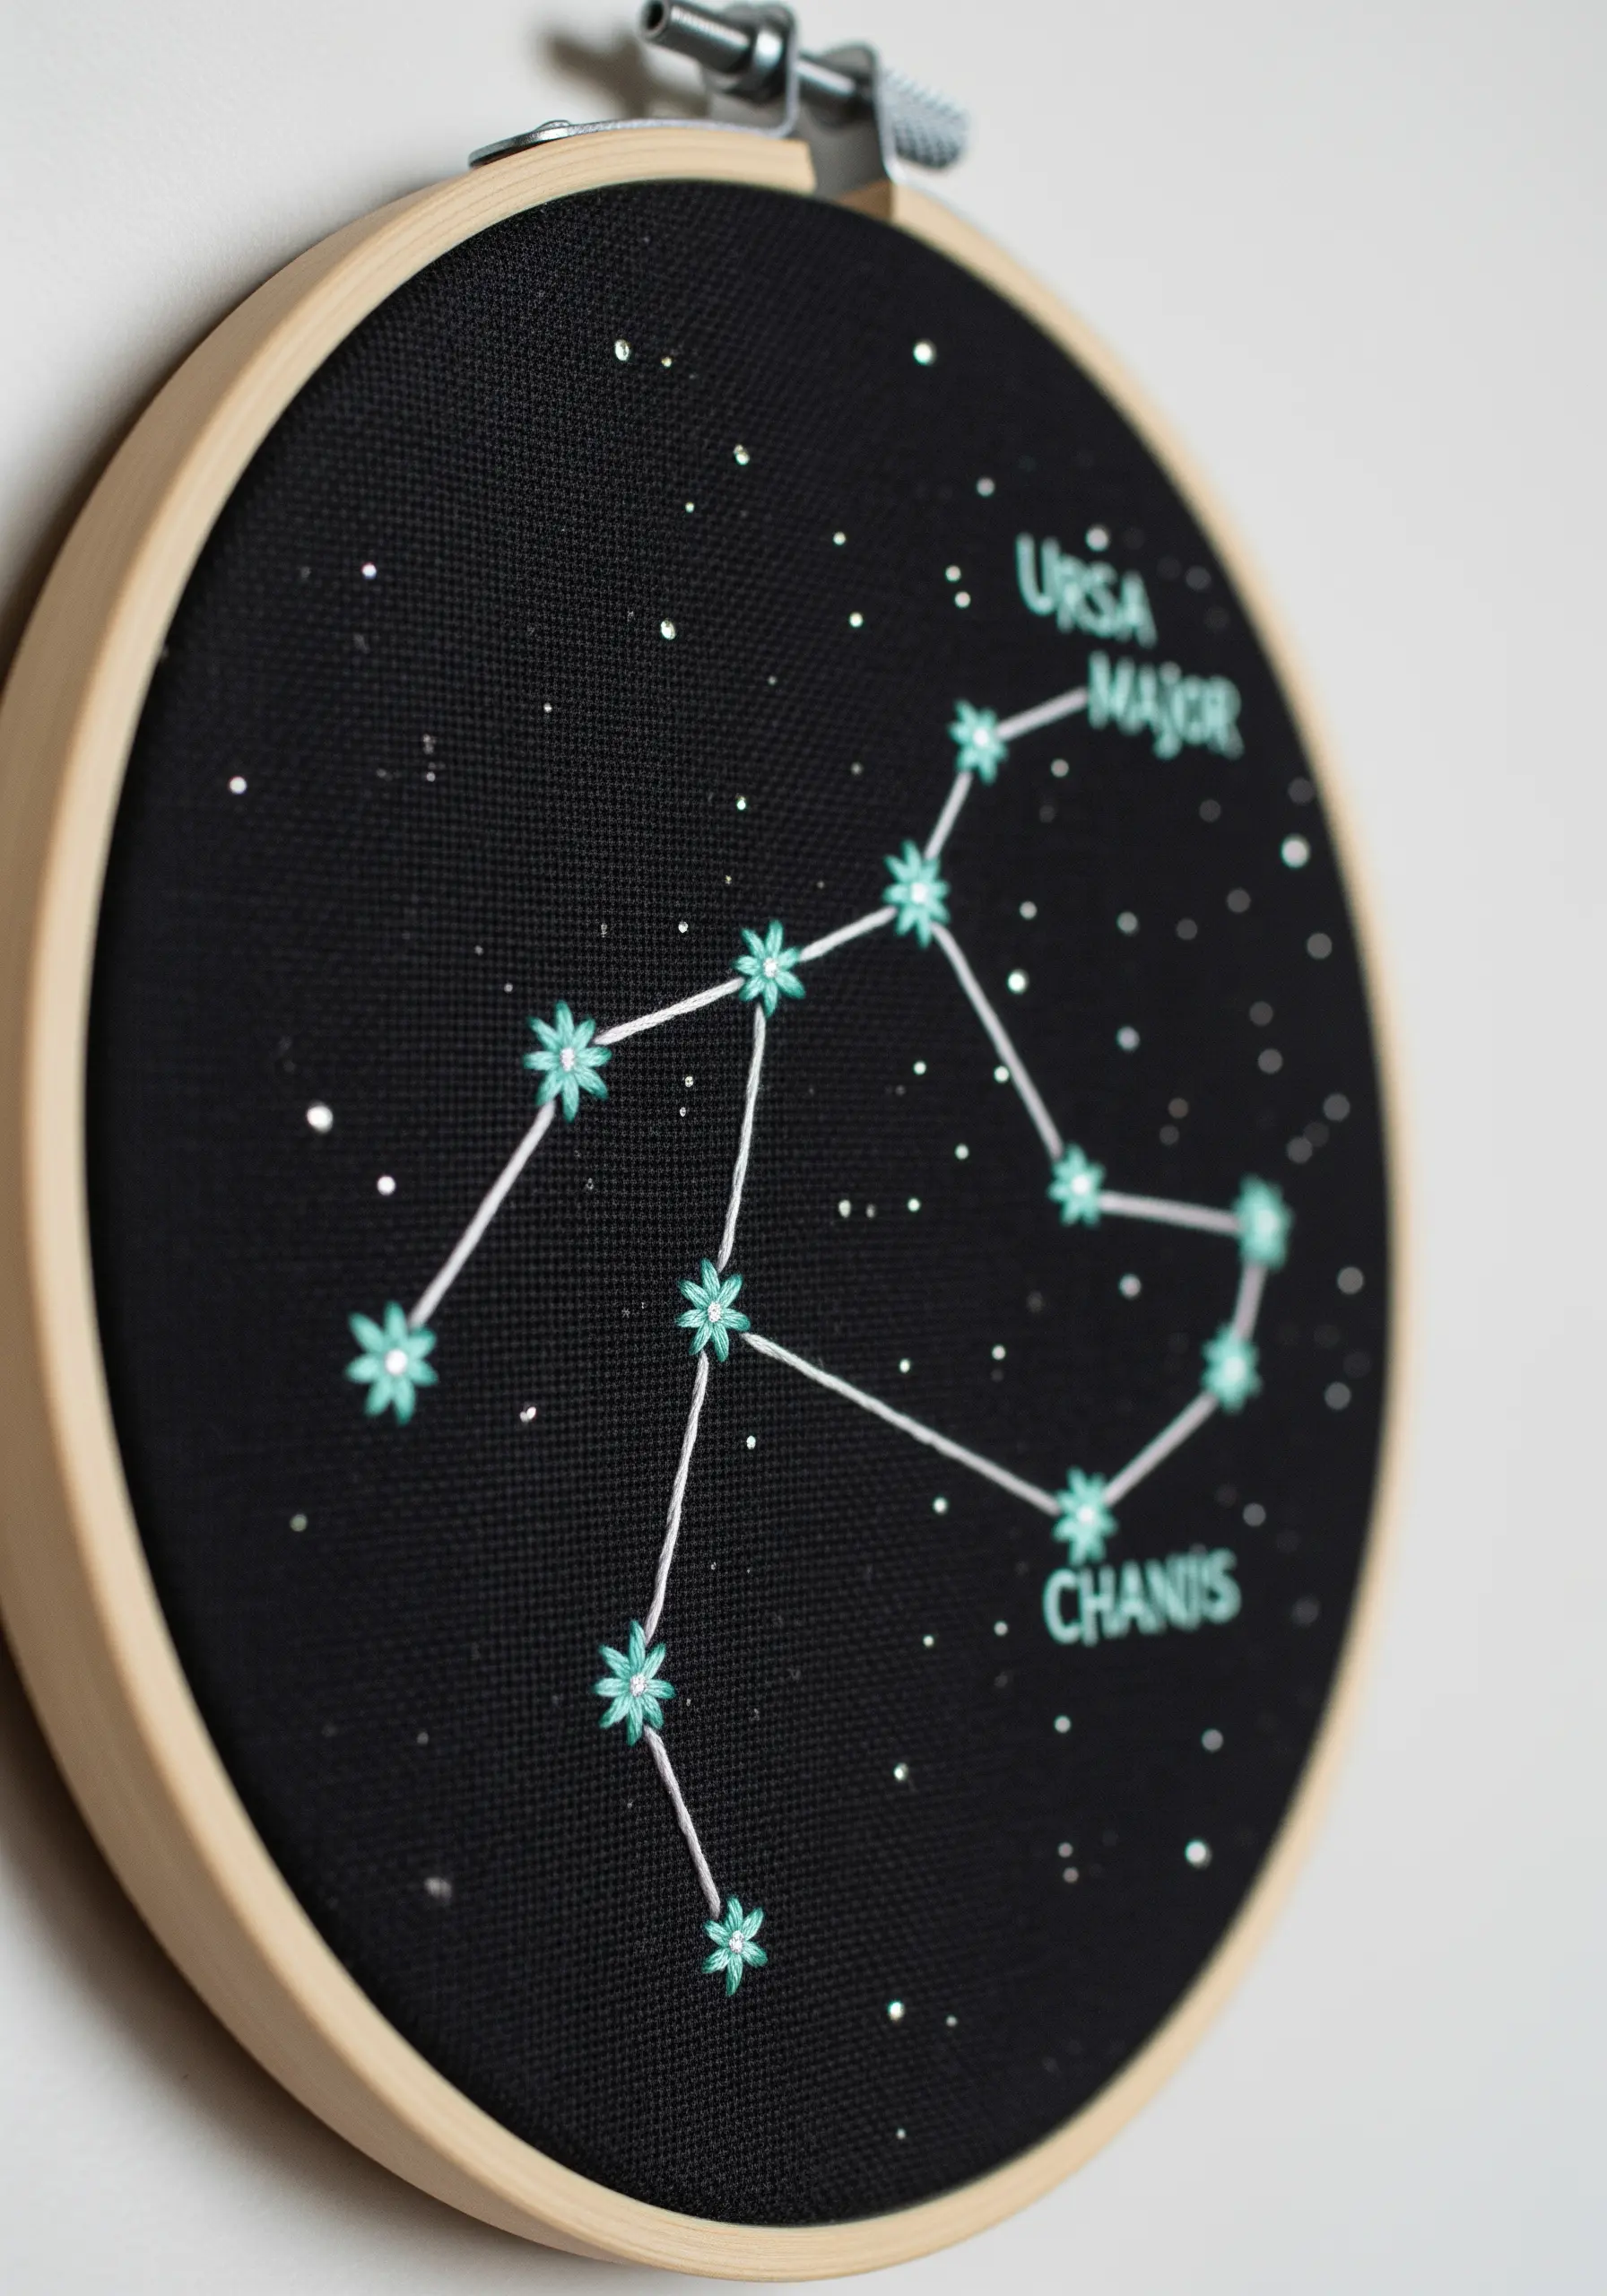
Add a secret, magical element to your celestial embroidery by using glow-in-the-dark thread.
Stitch your constellation on dark fabric using a simple backstitch for the connecting lines and star stitches or French knots for the stars.
During the day, it’s a lovely piece of astronomical art. At night, it transforms.
To enhance the effect, you can also add a sprinkle of glitter fabric paint for a permanent starry background.
This is a wonderful way to create tiny night sky embroidery designs with a surprising twist.
31. Combine Macrame and Embroidery for a Boho-Chic Finish
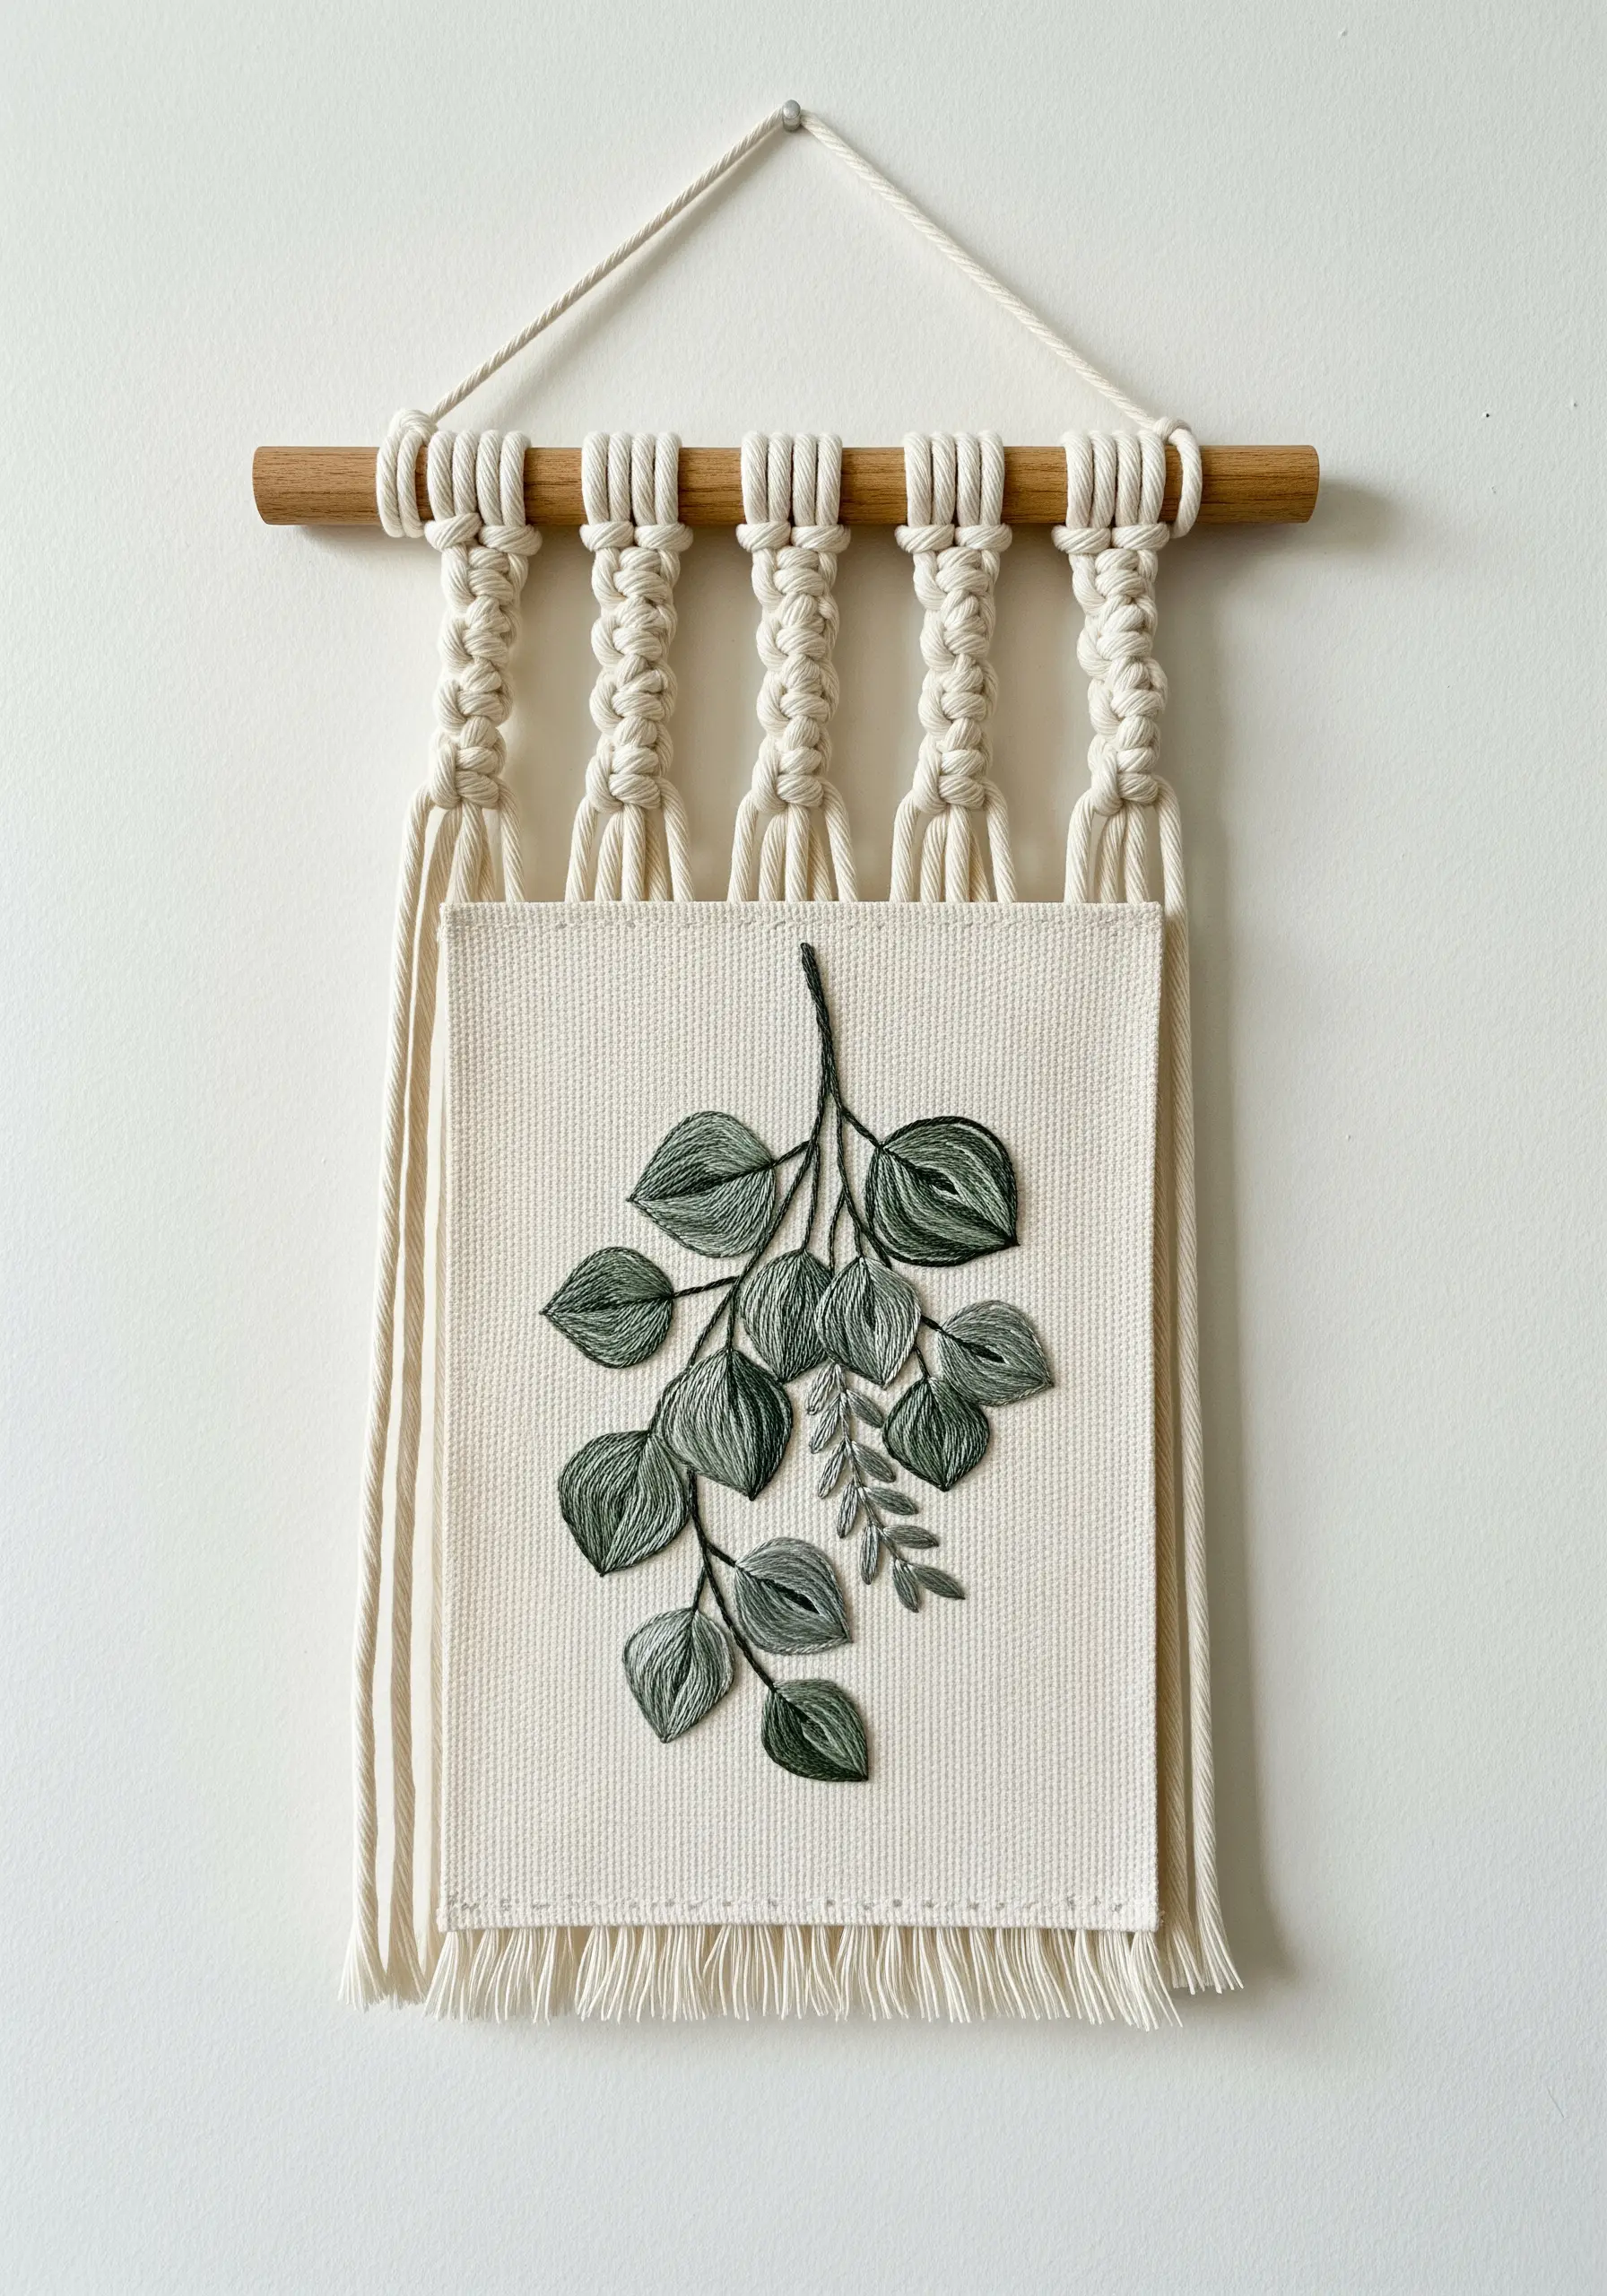
Frame your botanical embroidery with the textural beauty of macrame for a modern, bohemian wall hanging.
Complete your embroidered piece on a rectangular piece of canvas, leaving ample space at the top and bottom.
Attach the top of the canvas to a wooden dowel, then use macrame knots like the square knot and half-hitch to create a decorative hanger.
A simple fringe at the bottom of the canvas, created by pulling away weft threads, ties the two crafts together beautifully.
This project elevates a simple hoop into a more substantial piece of embroidered textile wall hangings.
32. Create a Glossy Finish with Directional Thread Painting
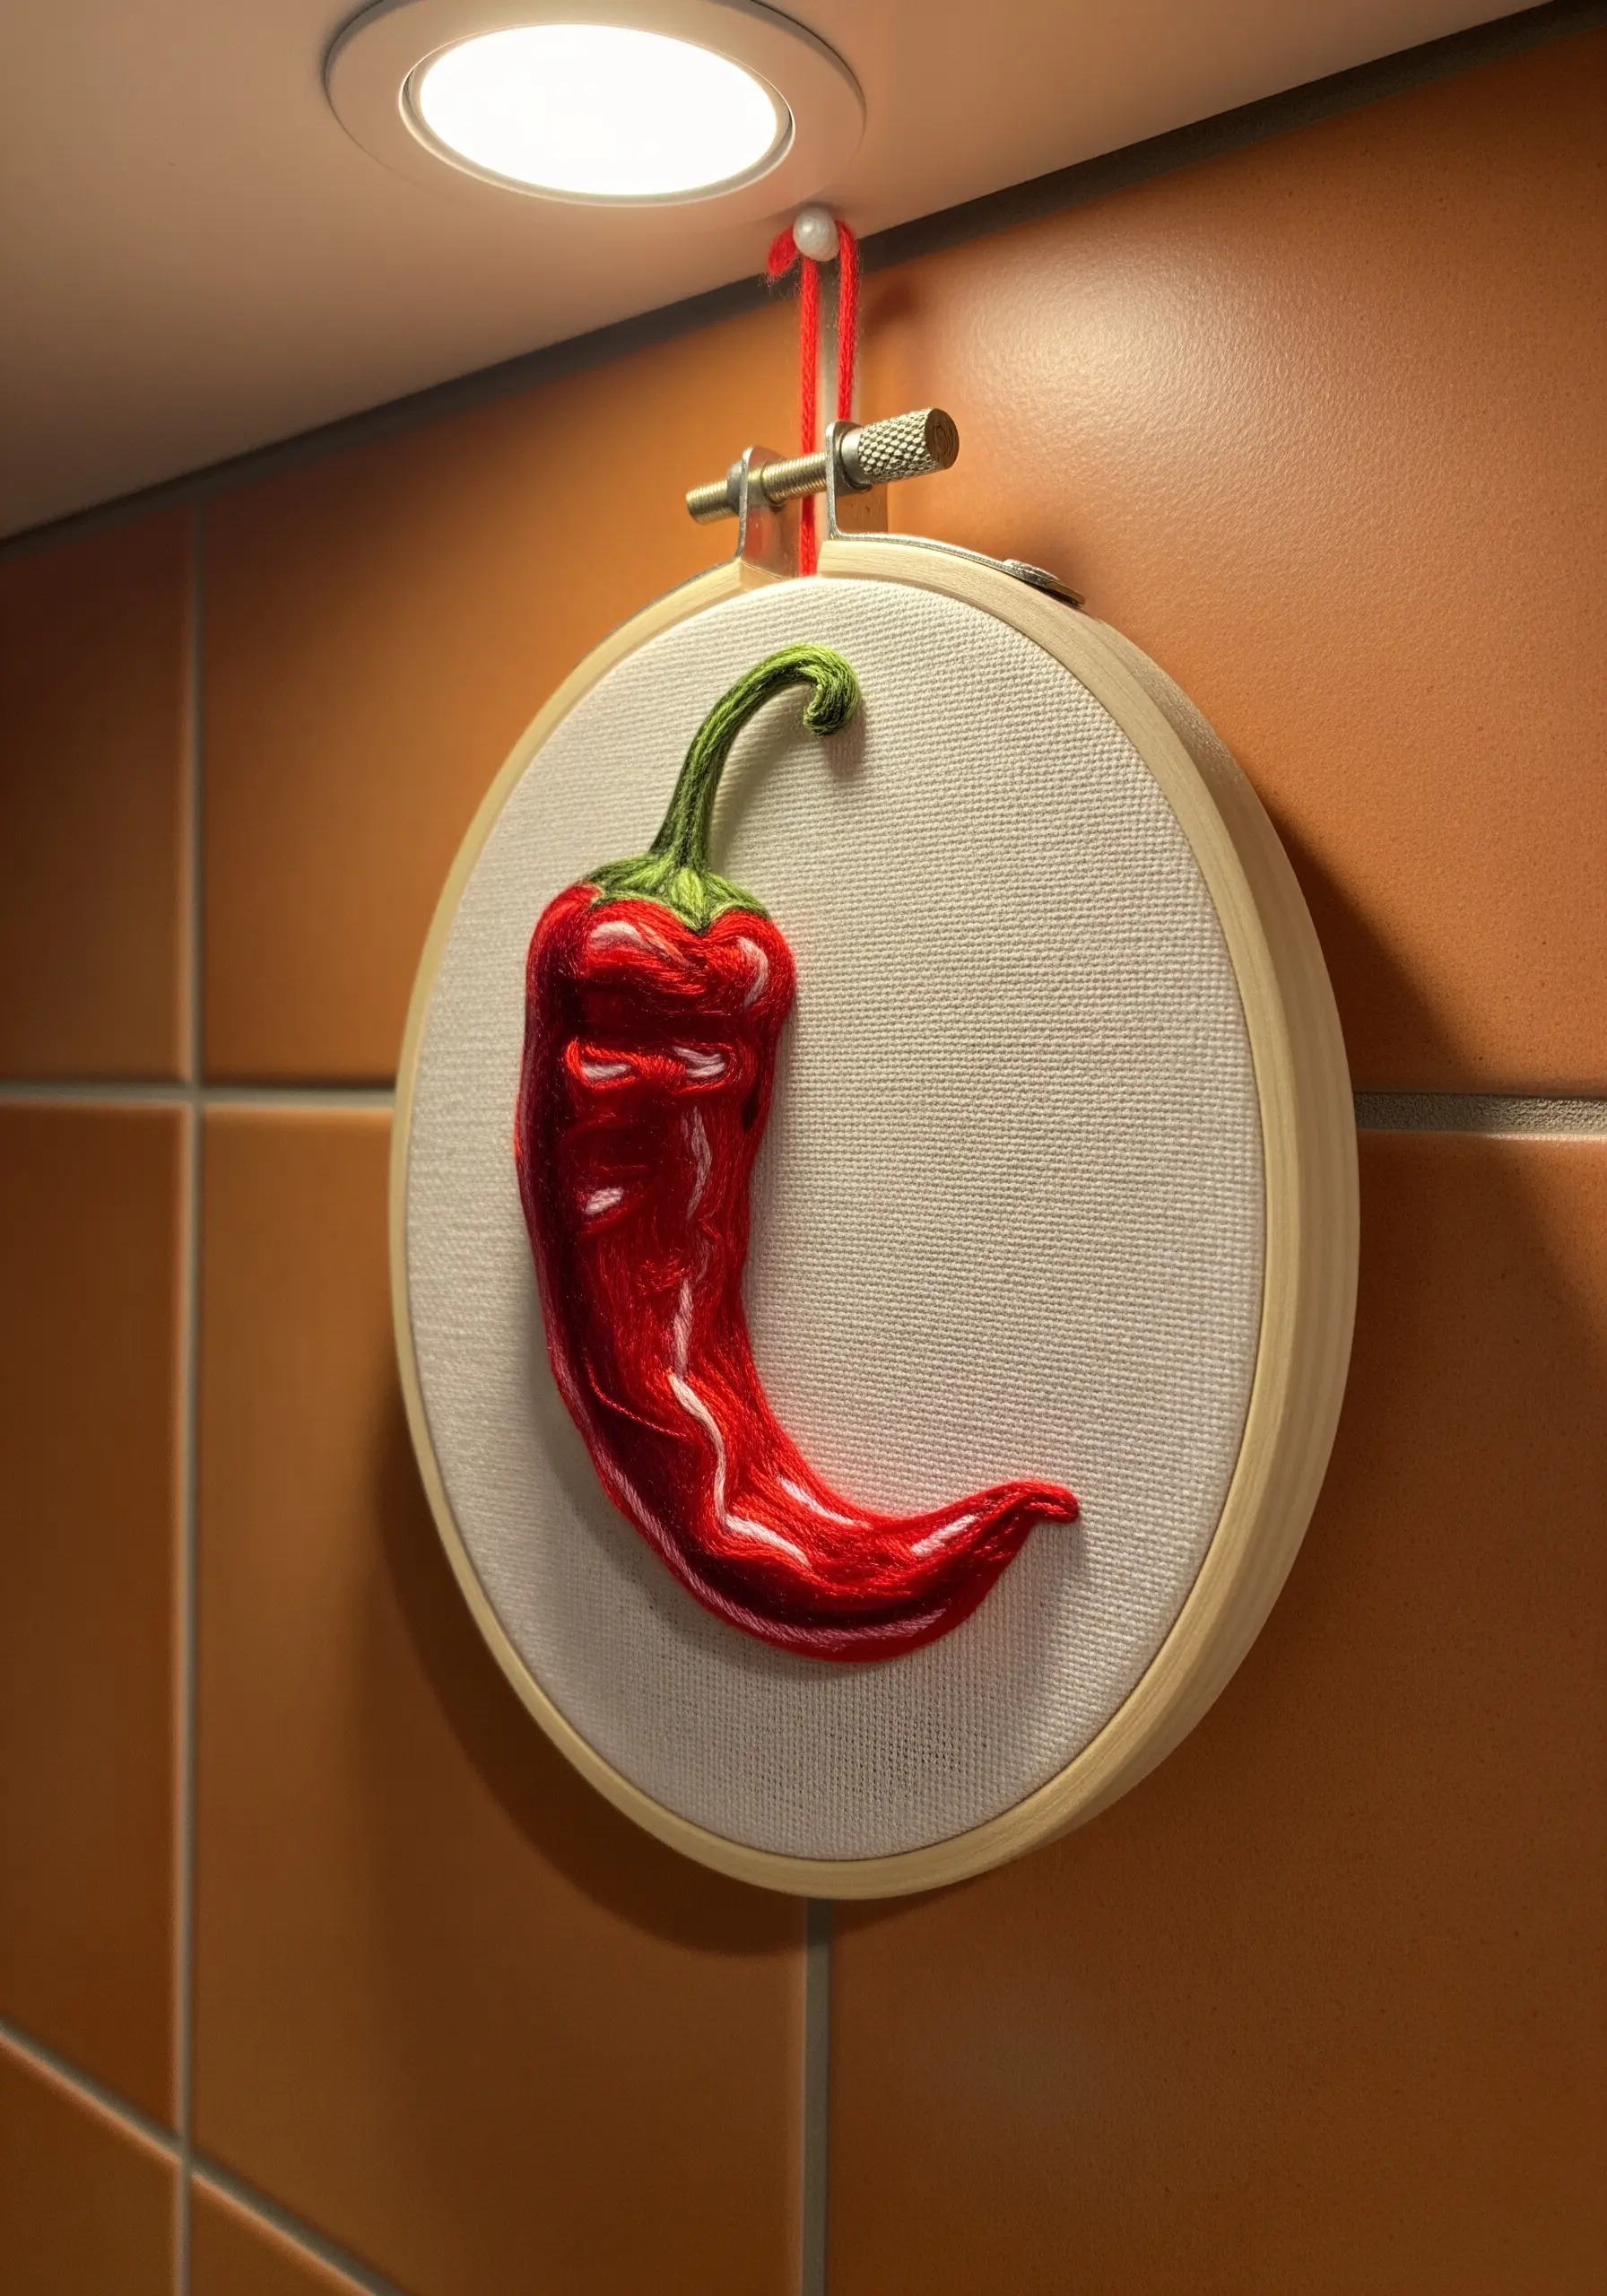
To mimic the slick, reflective surface of a chili pepper, the direction of your stitches is everything.
Use a long-and-short stitch, but keep the stitches long and angled to follow the pepper’s curves.
Incorporate several shades of red, including a very dark red for shadows and a near-white for the brightest highlight.
Placing a single, sharp line of white thread along the main curve creates a powerful illusion of a glossy reflection.
This technique turns a simple subject into a stunningly realistic study of light and form.
33. Define Shapes with a Couching Outline
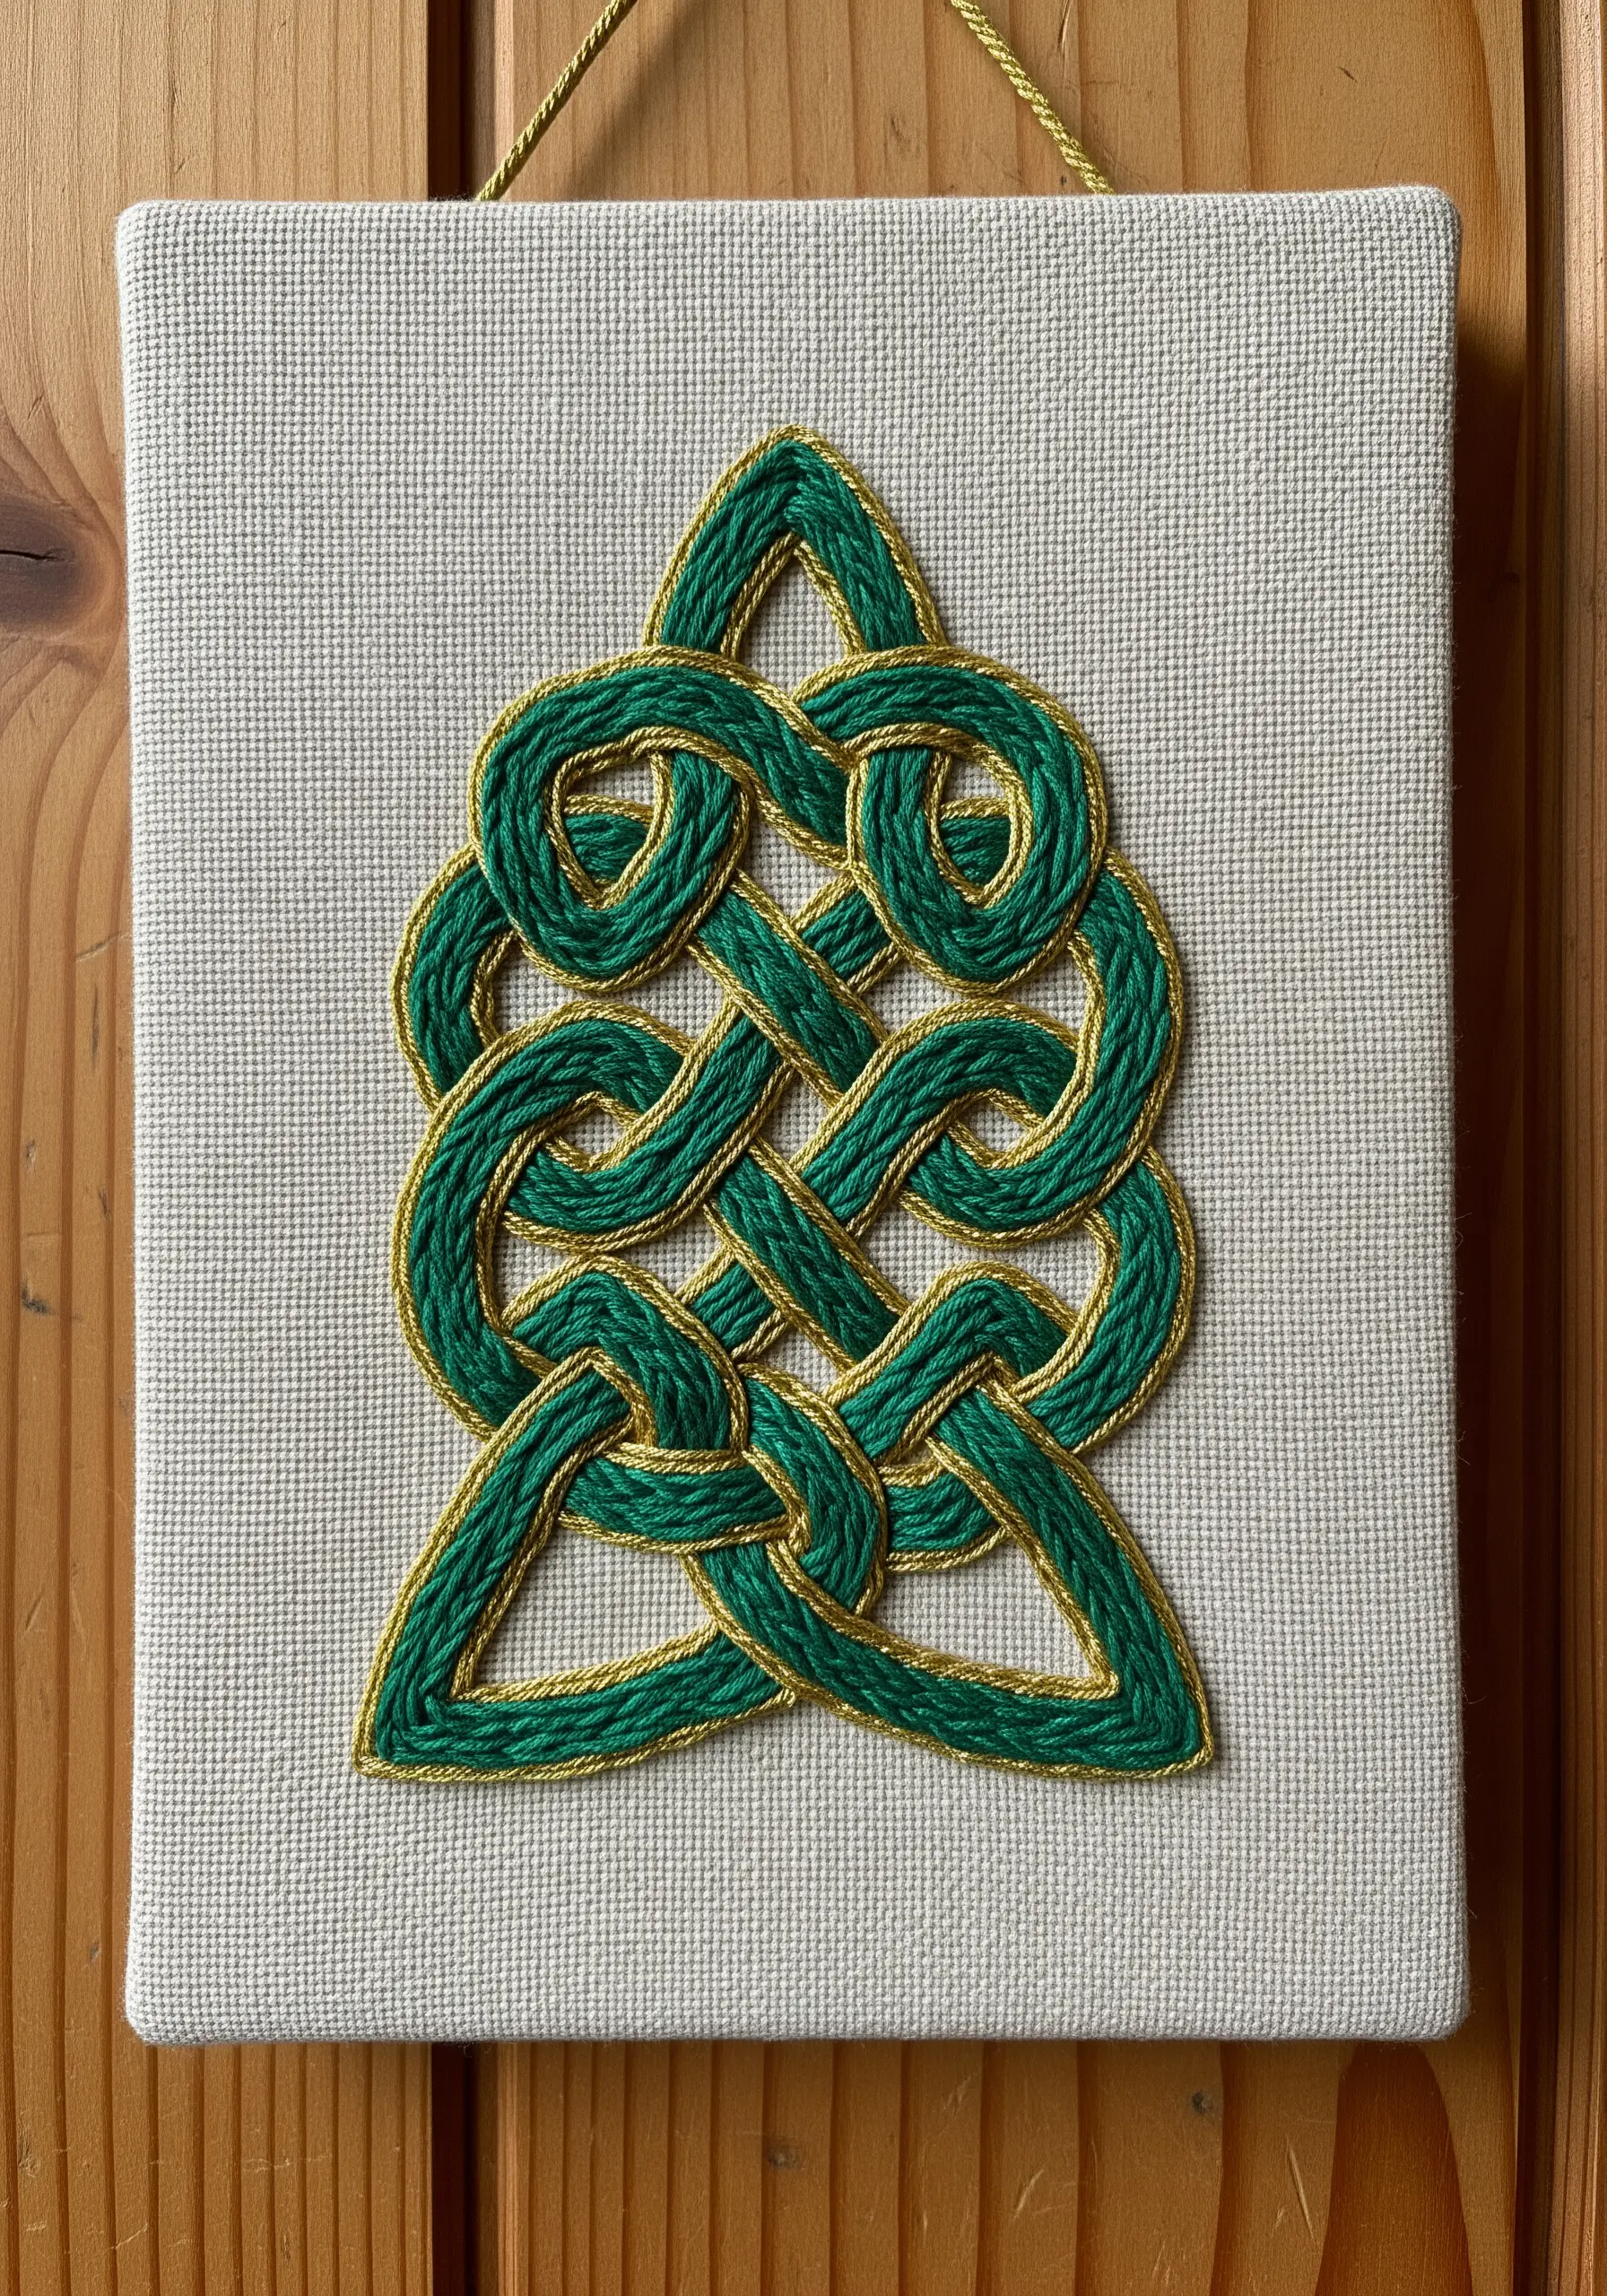
For a bold, graphic outline that stands out, use the couching technique.
Lay down a thick cord or multiple strands of embroidery floss along your design line.
Then, using a second, thinner thread (often in a contrasting color), come up from the back of the fabric and make small, perpendicular stitches over the cord to tack it down.
Here, a gold metallic thread is used to couch a thick green cord, creating a luxurious, defined edge for the Celtic knot design.
This method is perfect for adding clean, strong lines to any piece.
34. Build a Miniature Garden with 3D Stitches
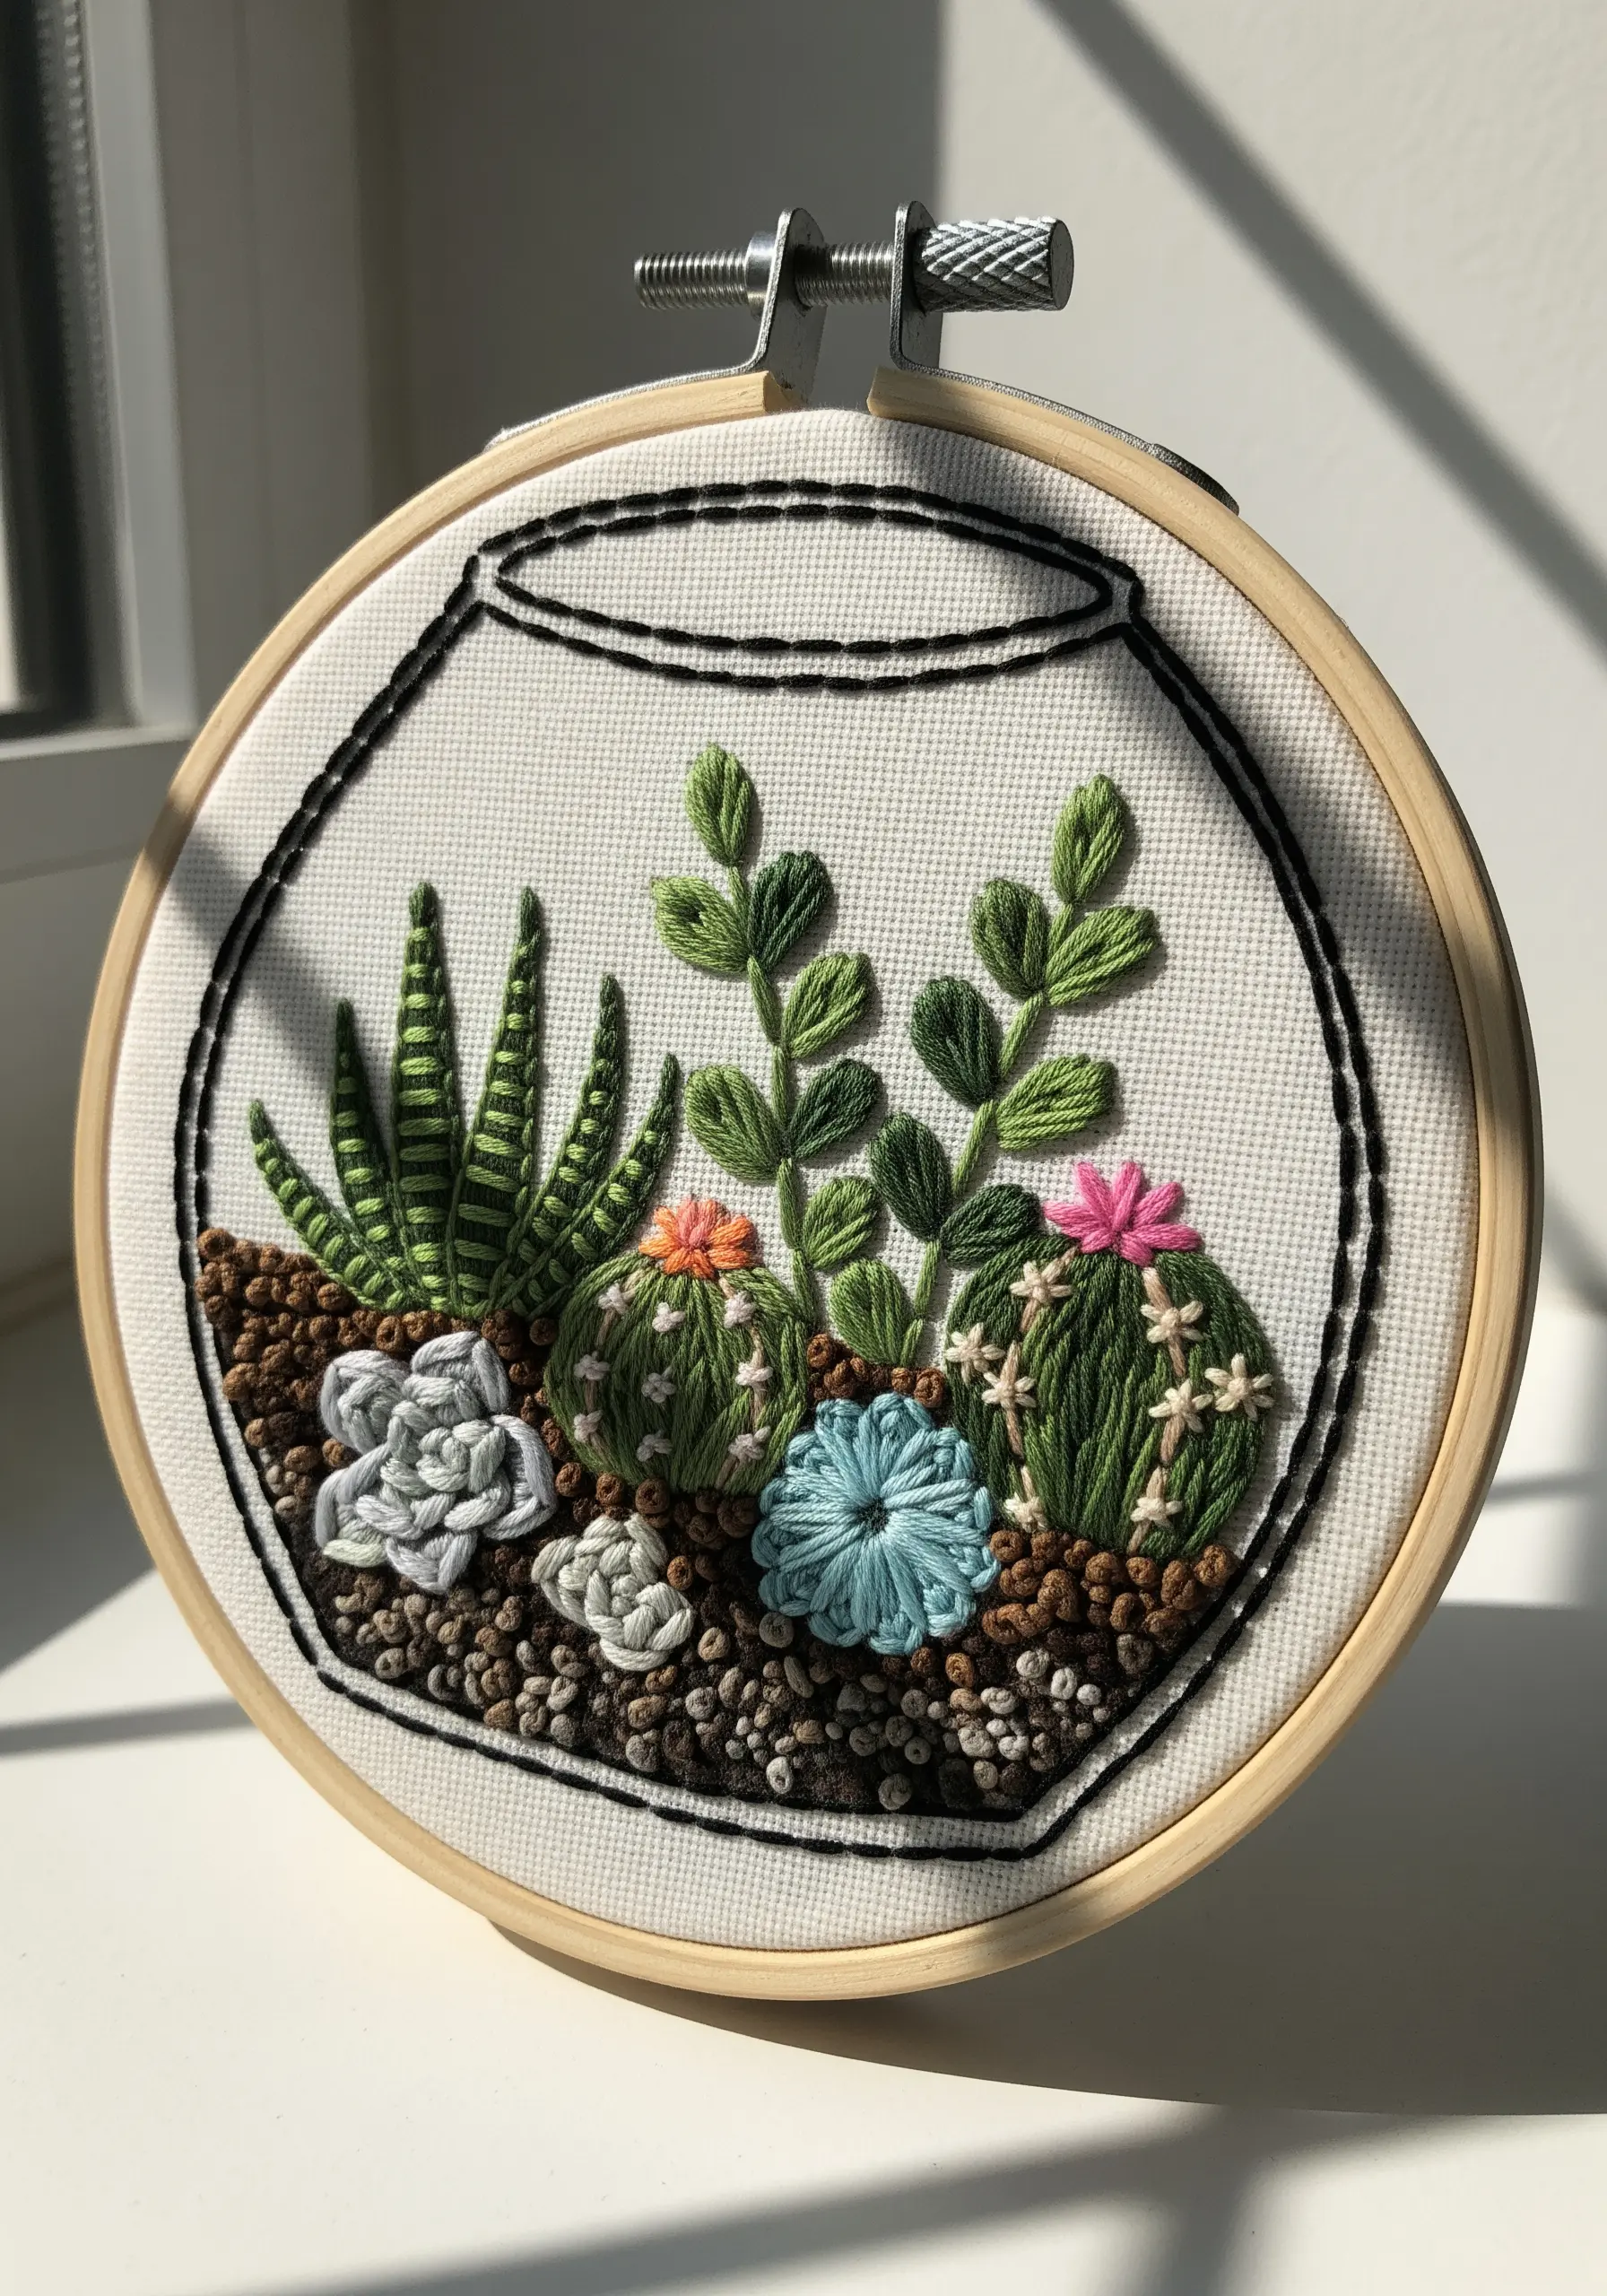
Create a charming terrarium that never needs watering by using a variety of dimensional stitches.
Use woven wheel stitches (or spider web roses) for the succulent rosettes, which create a beautiful, layered petal effect.
Employ bullion knots for small, spiky cacti and detached chain stitches for leaves.
Tightly packed French knots in shades of brown and grey make for a convincing gravel base.
Combining these contemporary texture techniques in a small space results in a delightful, tactile garden under glass.


