

When you look at nature, what do you really see? It’s easy to focus on the shapes—the outline of a leaf, the curve of a petal. But the true story is in the texture. It’s the rough skin of bark, the velvety surface of moss, the cool smoothness of a river stone.
This is where your embroidery can transform. By shifting your focus from simply filling in shapes to recreating these tactile sensations, you move from crafting a picture to telling a sensory story. Your stitches can become the grain in wood, the frost on a window, or the delicate veins of a leaf.
Here, you’ll find ways to translate the textures of the natural world into thread. You don’t need complex patterns, just a new way of seeing—and a few techniques that will give your work depth, realism, and a quiet confidence that feels truly alive.
1. Recreate Birch Bark with Layered Fabric
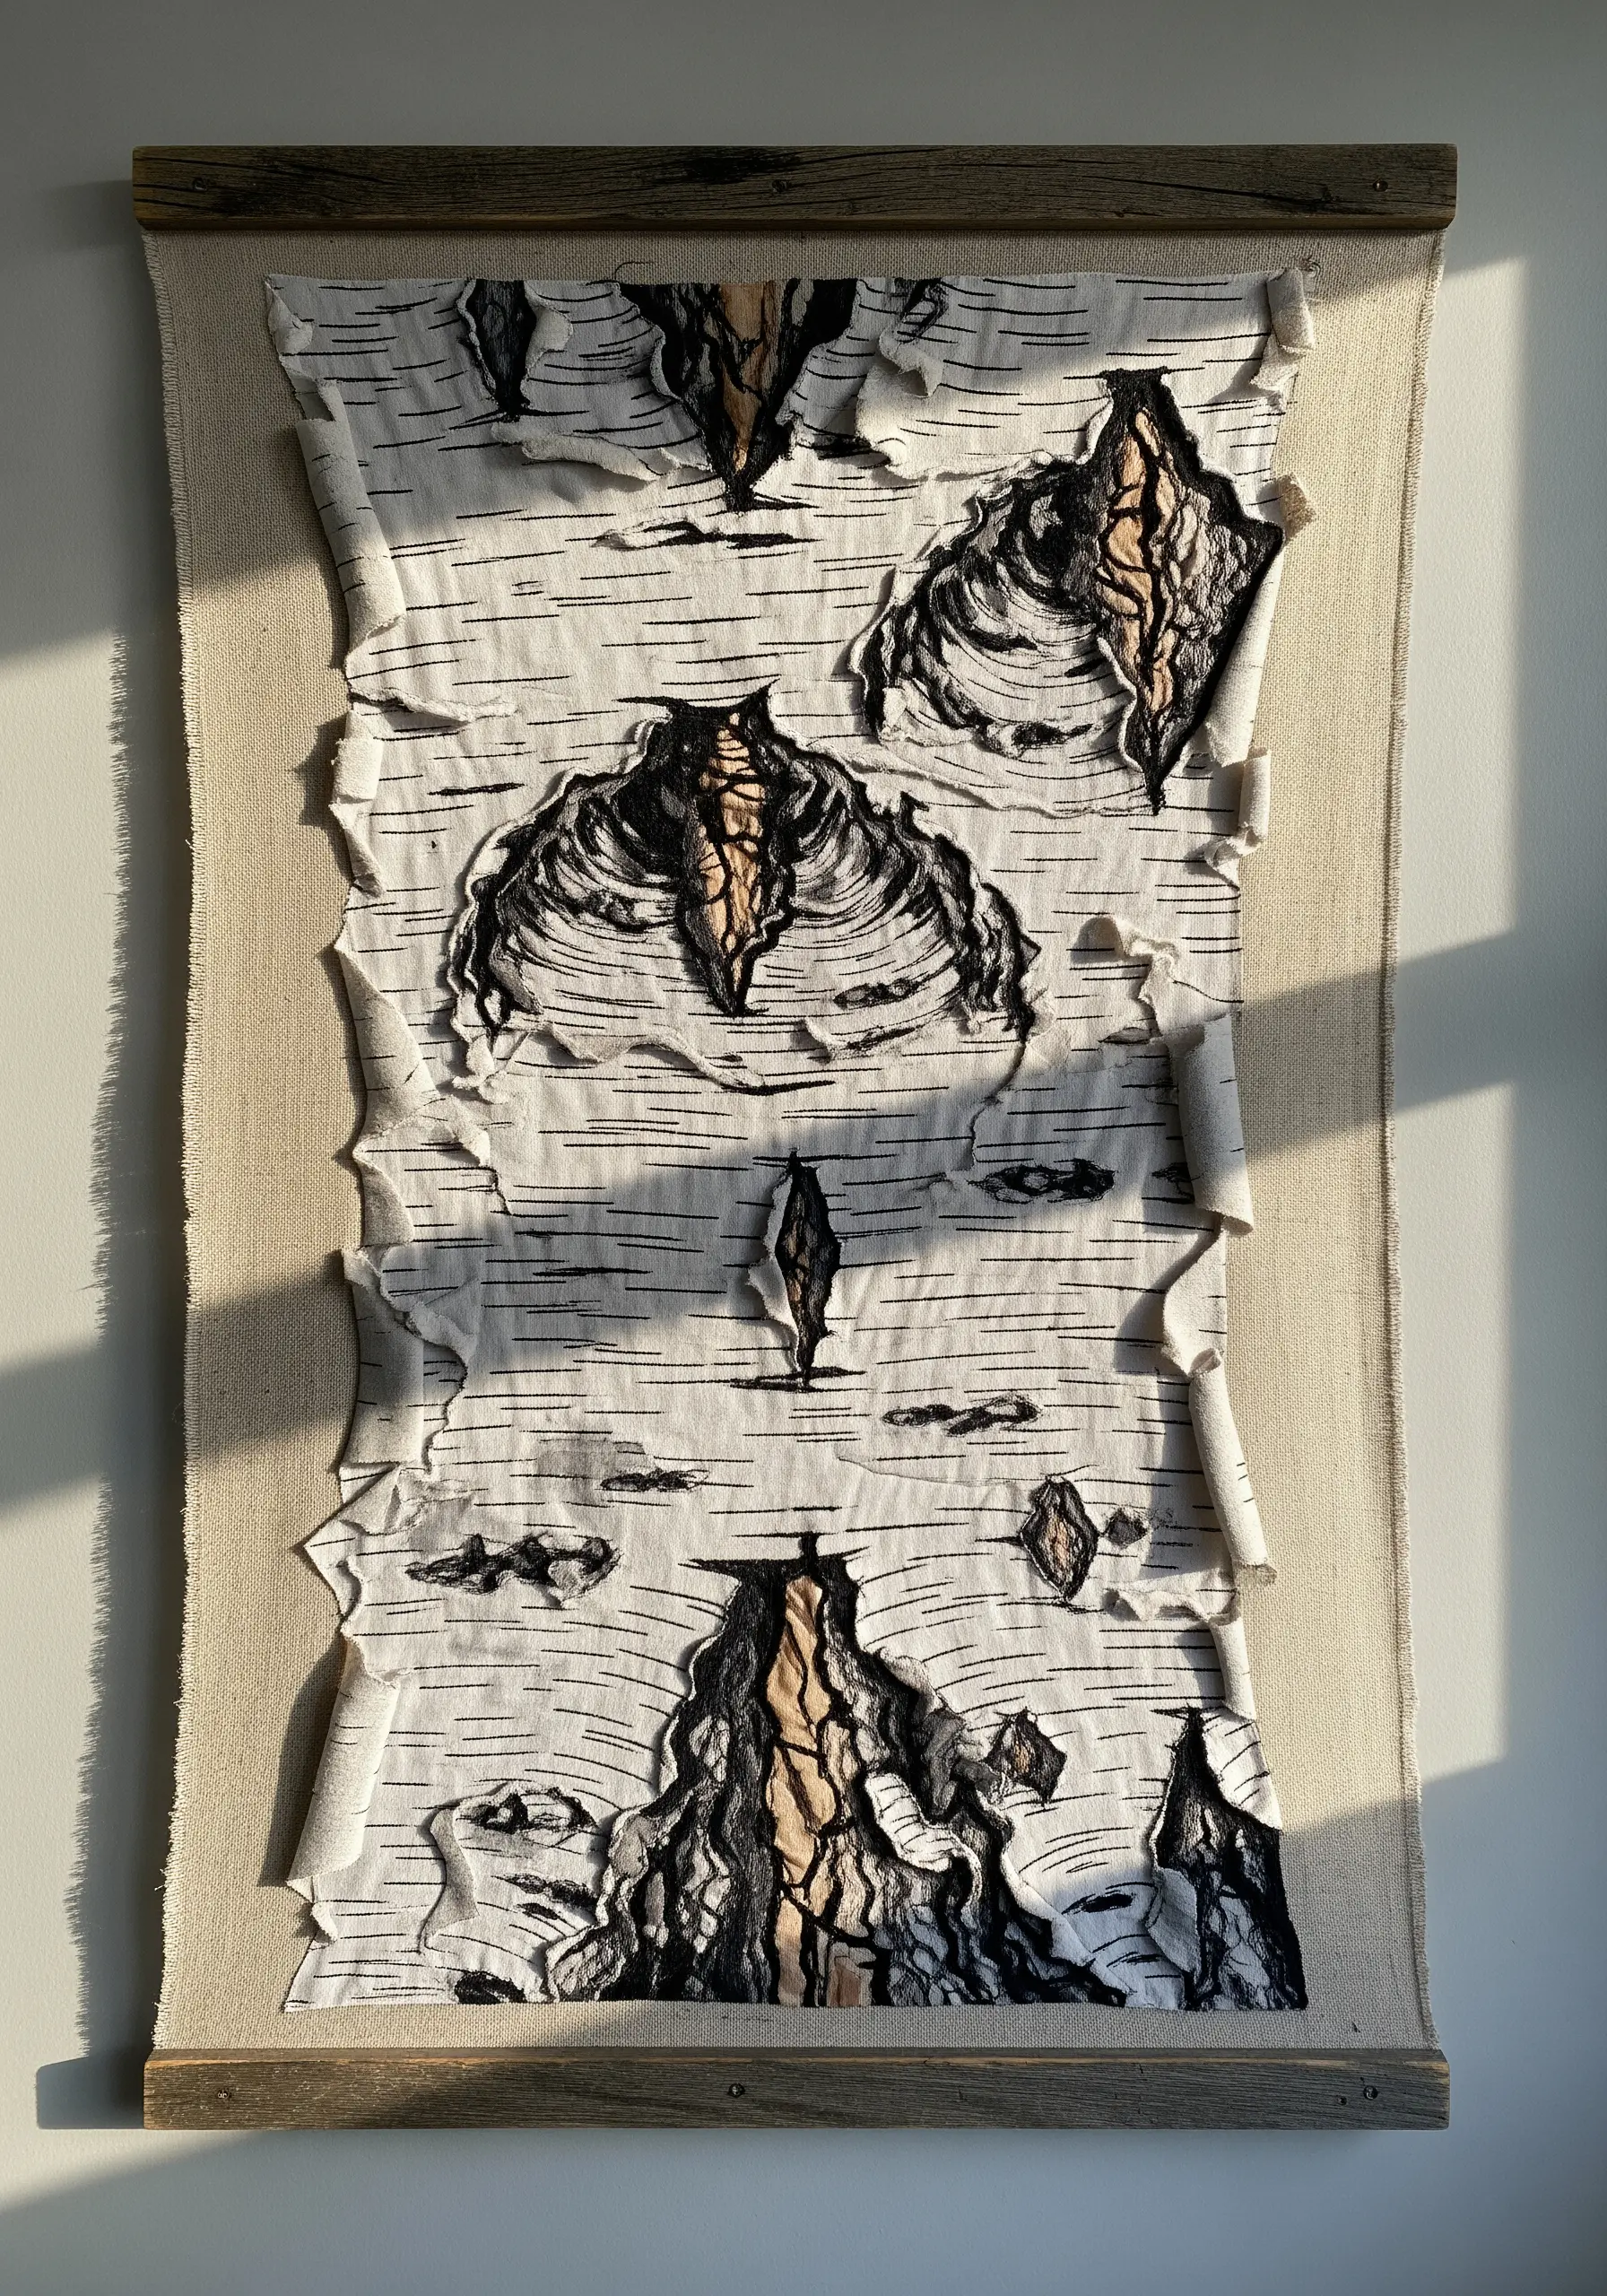
Begin with two layers of fabric: a dark, textured brown for the base and an off-white linen or cotton for the top layer.
Stitch horizontal, slightly irregular lines in black thread across the white fabric to mimic the markings on birch bark.
Carefully snip and peel back sections of the top layer, rolling the edges and securing them with tiny stitches to reveal the dark fabric underneath.
Fill the exposed areas with dense free-motion stitching or varied straight stitches to create the illusion of inner wood grain.
This technique turns a flat surface into a sculptural piece, inviting touch and adding incredible depth to your textile art.
2. Embody Mossy Growth with Dimensional Knots

To capture the dense, clustered feel of moss, abandon flat stitches in favor of highly dimensional knots.
Use thicker threads like wool or tapestry yarn to create chunky French knots or bullion knots, varying their size and tightness for an organic look.
Combine several shades of green, chartreuse, and ochre, clustering them in tight groups to replicate the way moss grows in colonies.
For lichen details, switch to a finer, silvery-grey thread and work tiny, tight colonial knots or add small seed beads.
This method builds a rich, touchable surface that moves beyond visual representation into a truly textural experience.
3. Stitch Smooth River Stones with Coiled Texture

Create the serene, smooth texture of river stones by coiling and wrapping threads.
Start by outlining your pebble shapes, then fill them by couching a thick yarn or cord in a spiral pattern, using a finer matching thread to tack it down.
For a more integrated look, wrap a central cord with different shades of floss before you coil it, creating subtle color variations within each stone.
Introduce a single, contrasting line of stem stitch across a few stones to suggest a crack or a mineral vein, adding a touch of realism.
This approach transforms simple shapes into weighty, tangible forms, perfect for cushions or tactile hoop art.
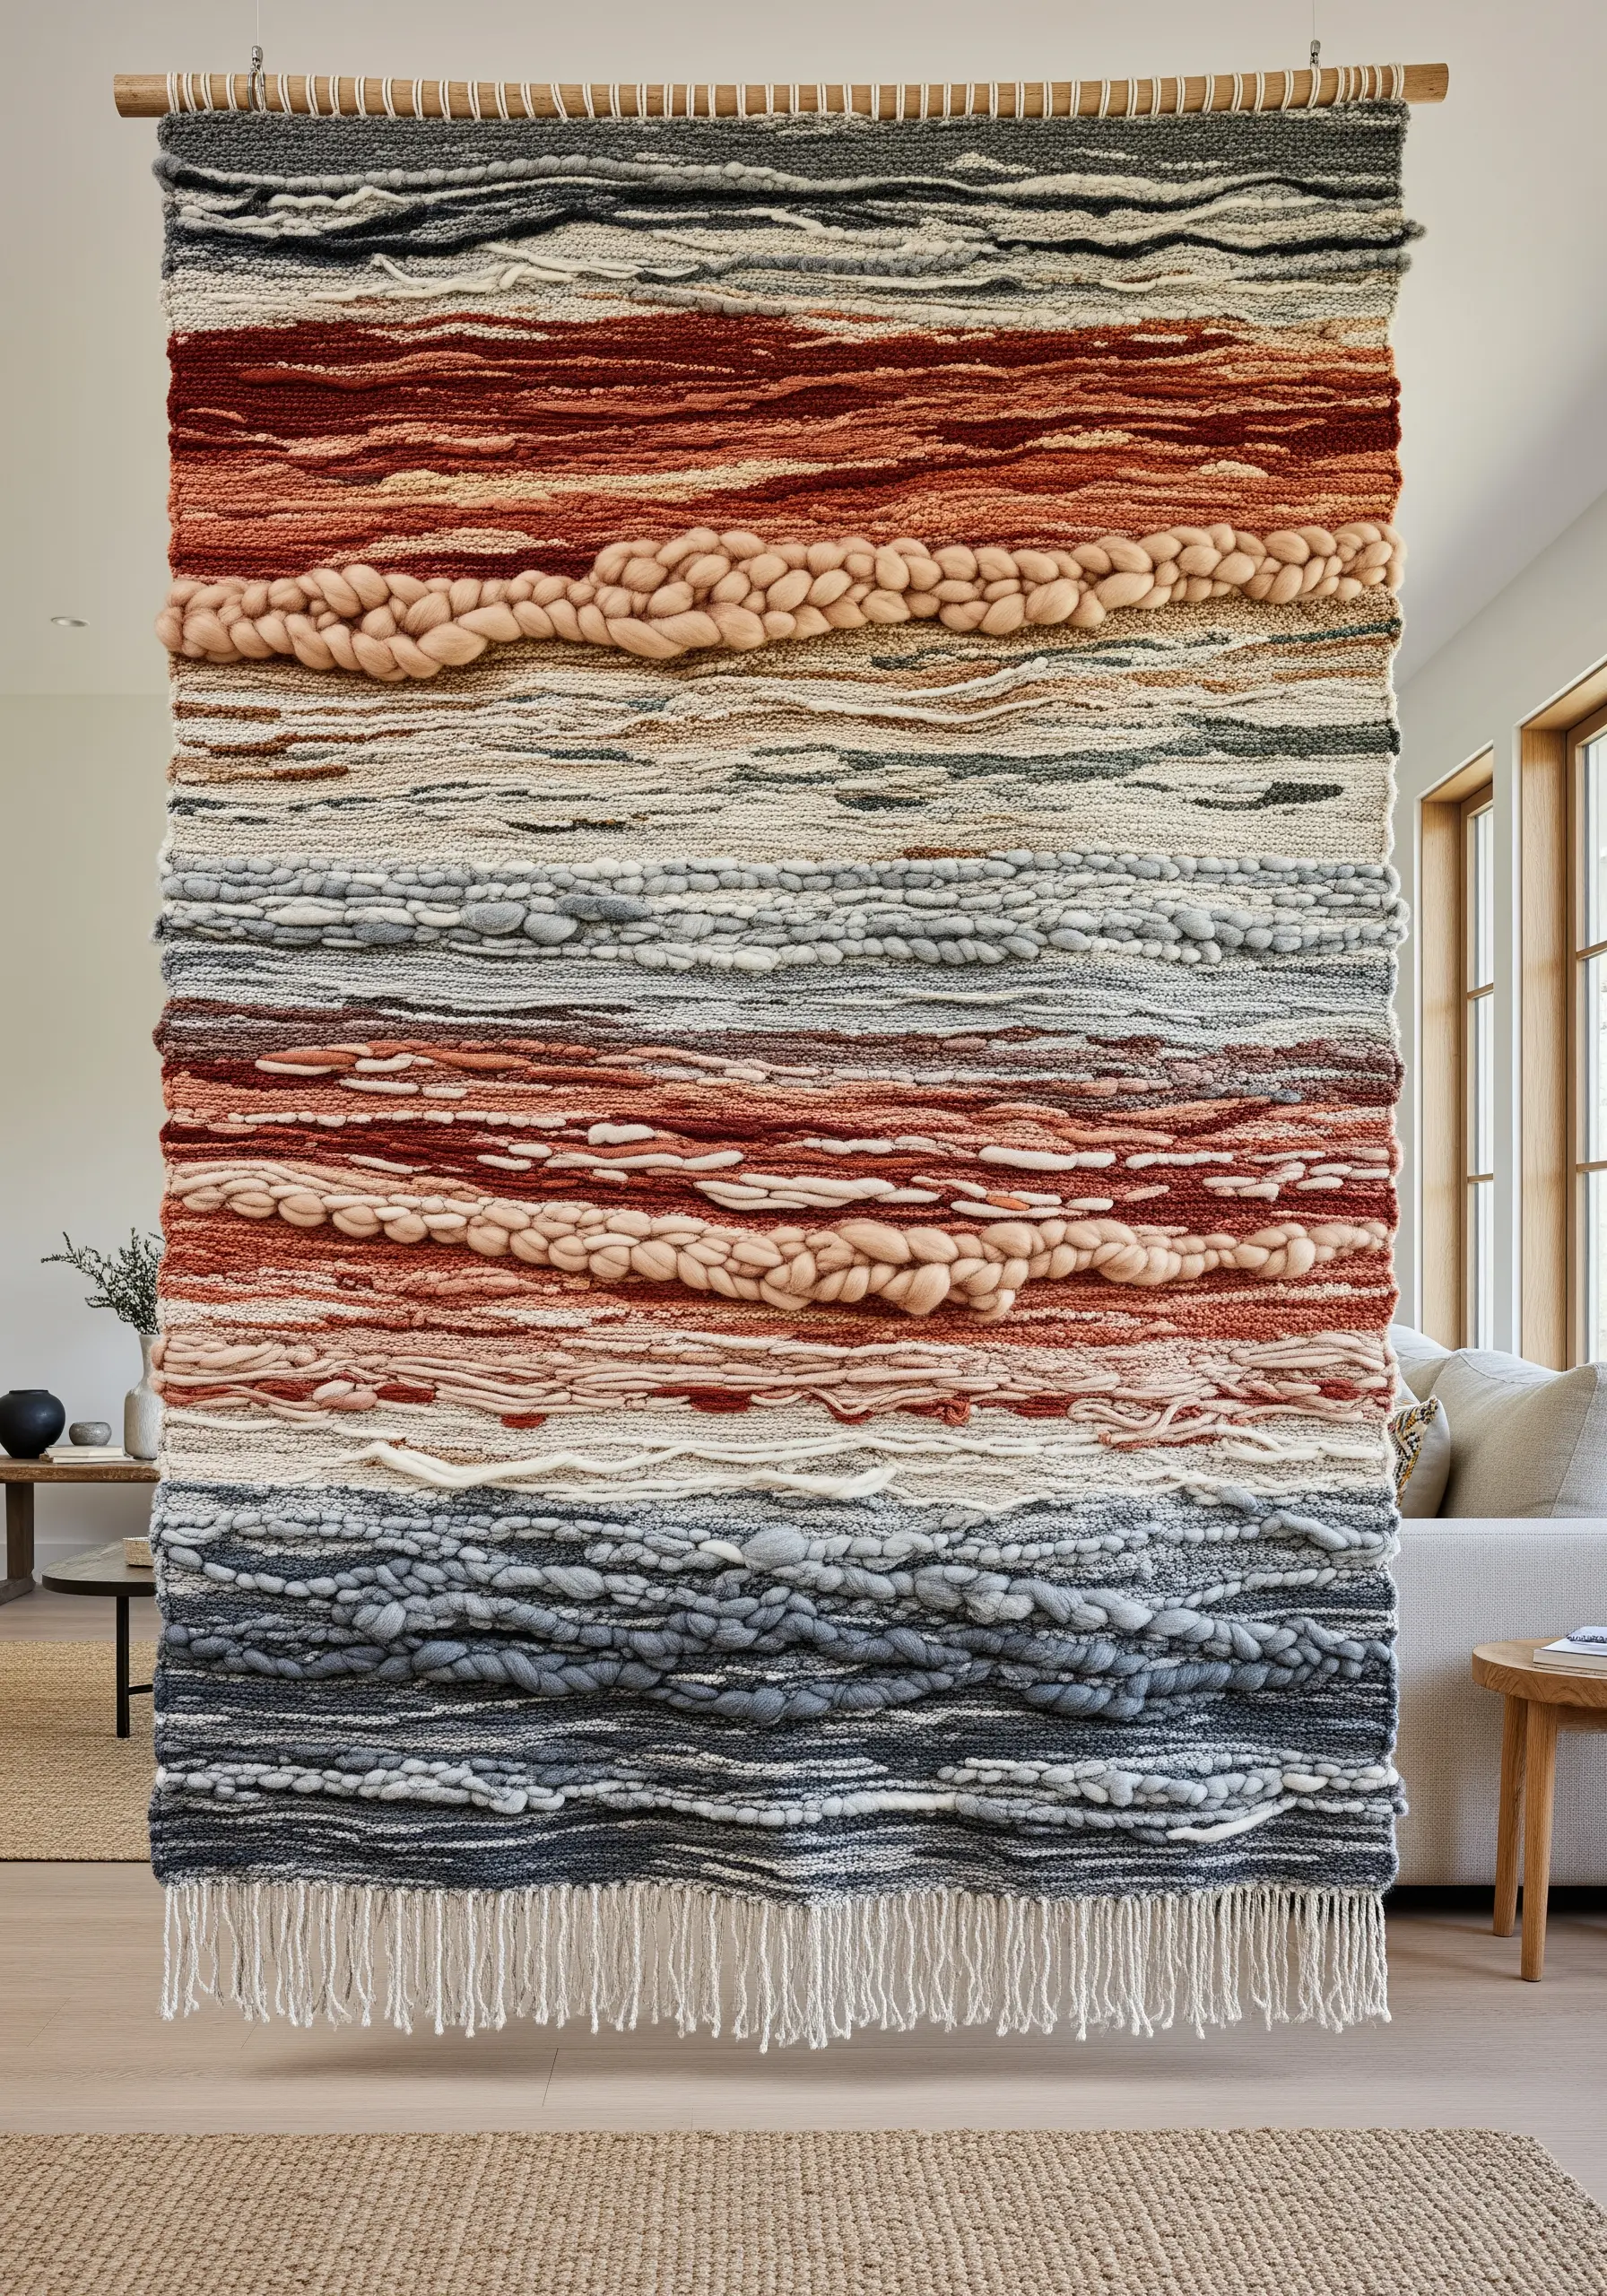
4. Weave a Seascape with Wool Roving and Lace
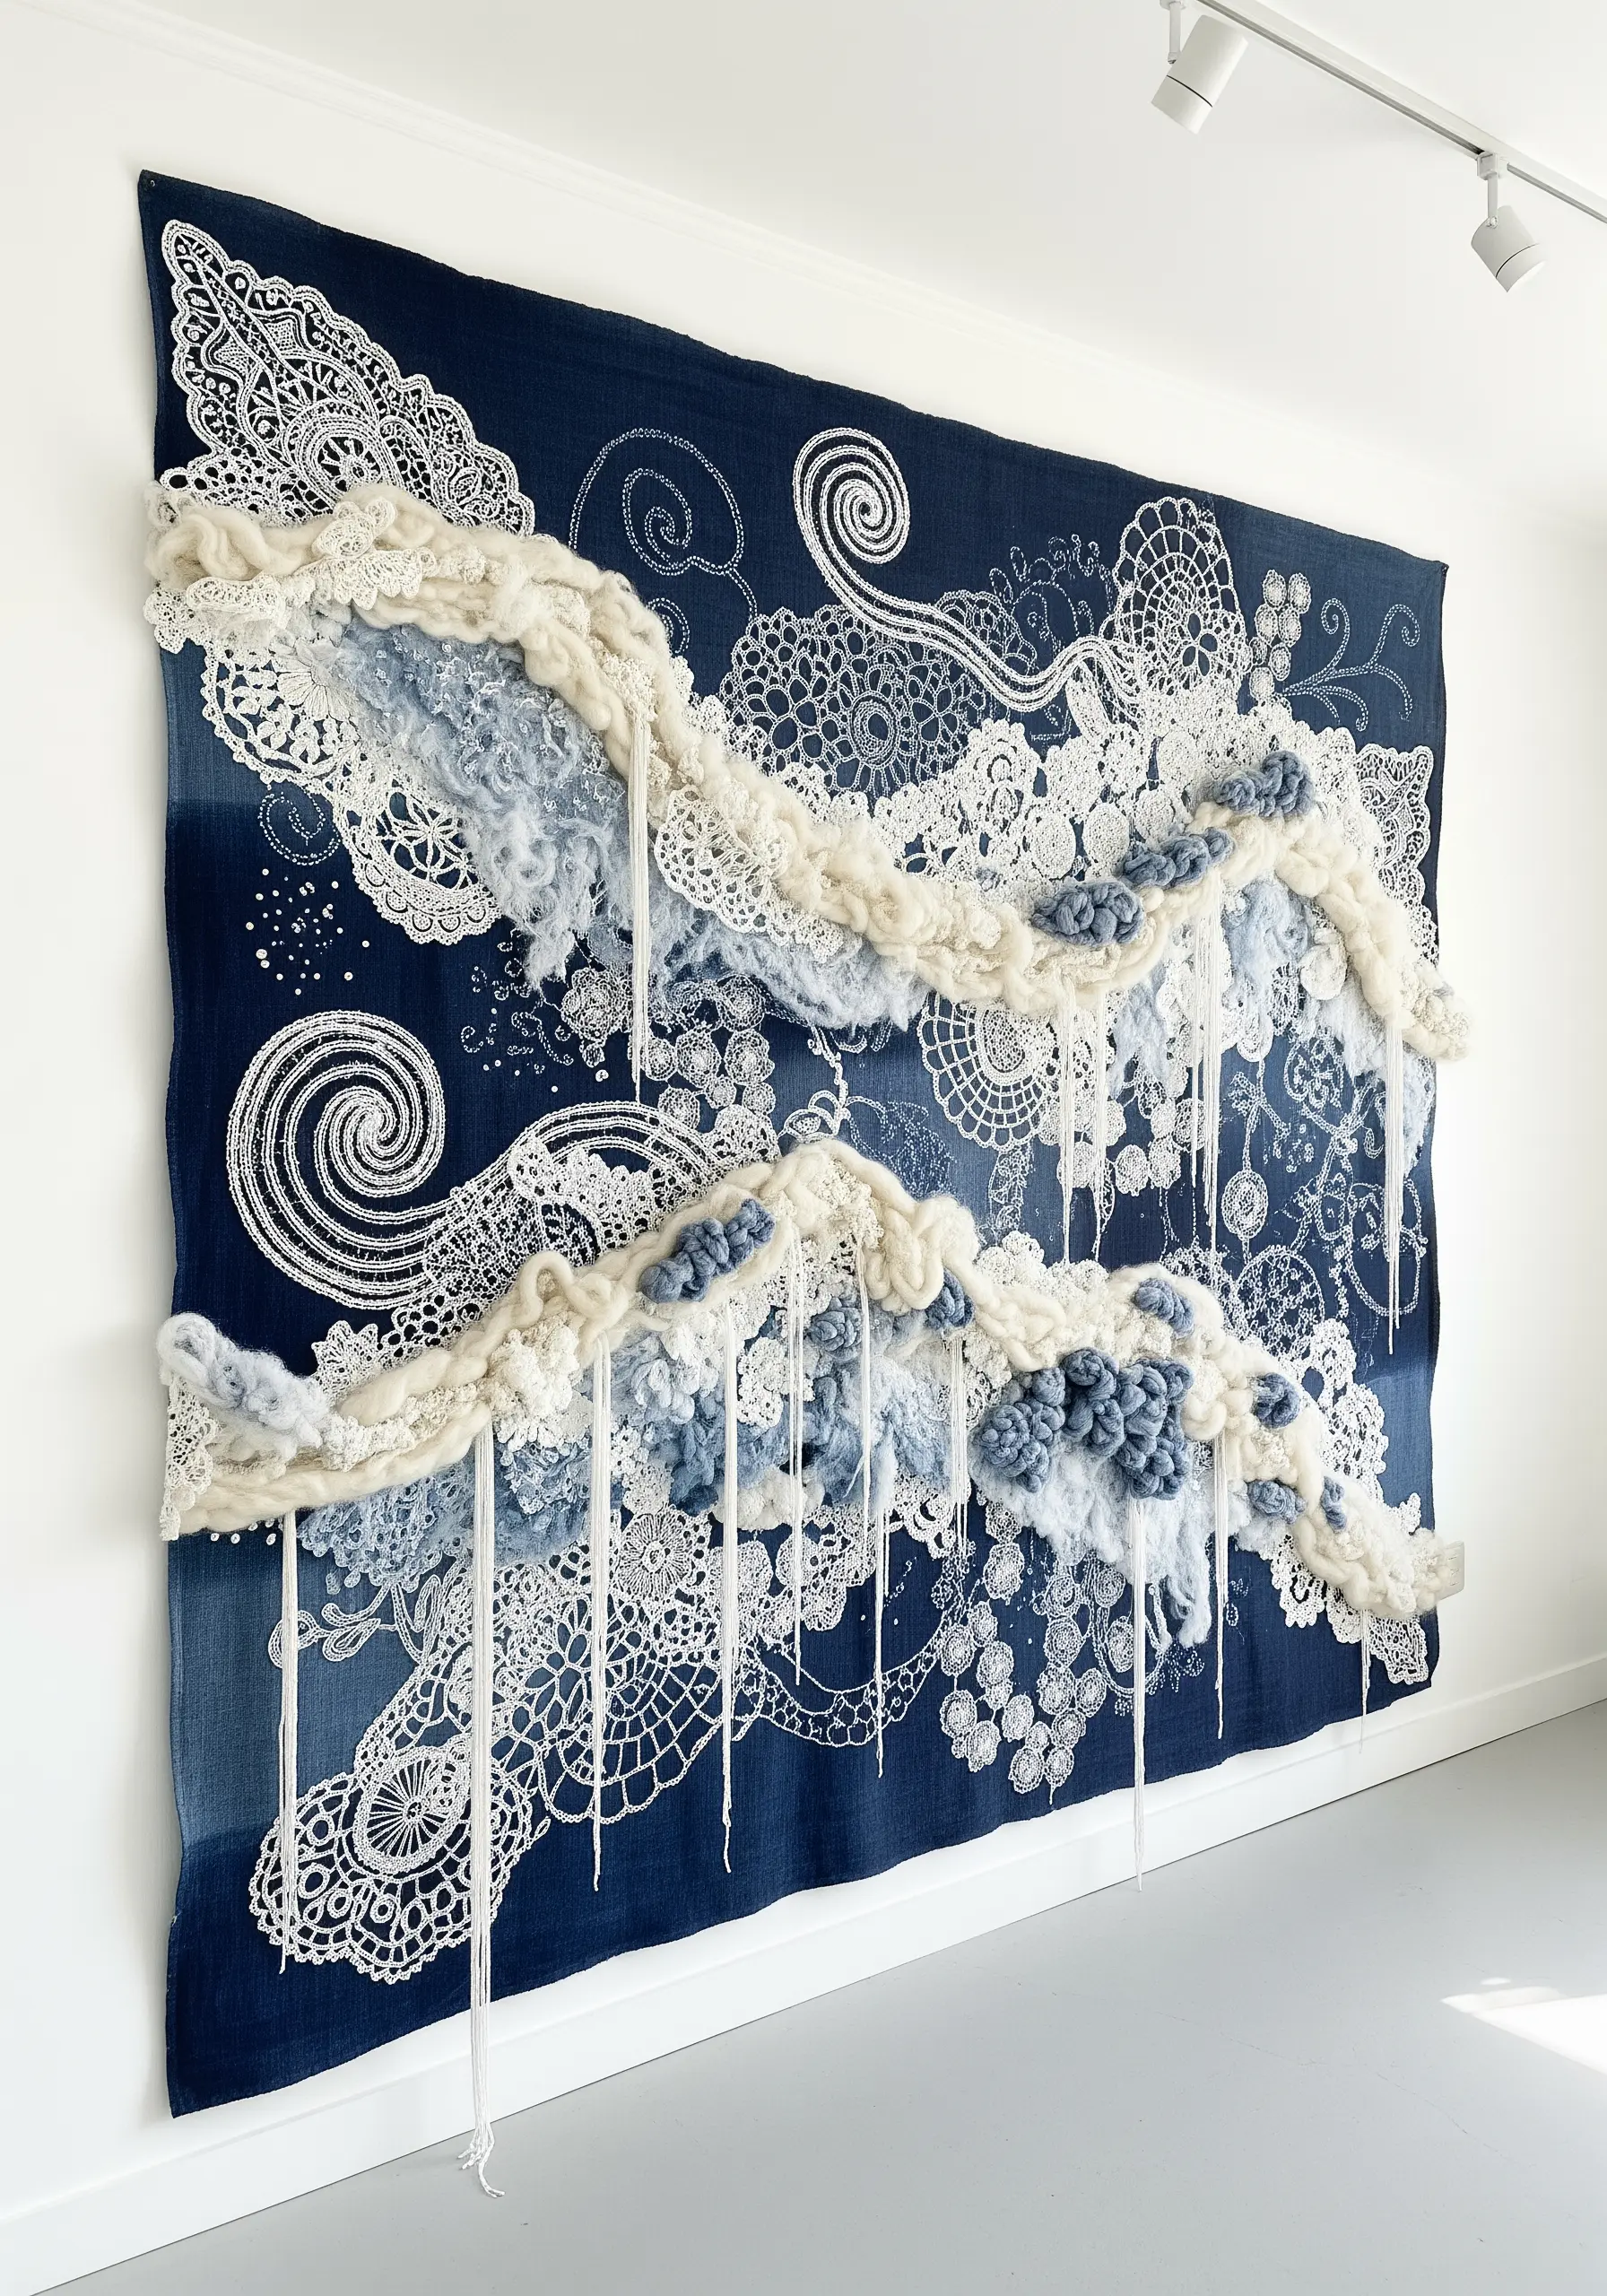
For large-scale embroidery tapestries that evoke the power of the sea, combine contrasting textures like delicate lace and raw wool roving.
Appliqué sections of vintage lace doilies onto a sturdy background fabric, like denim or canvas, to represent seafoam.
Then, couch thick, unspun wool roving in flowing lines over the lace, allowing it to rise and fall to create waves with dramatic volume.
Add fine details with silver seed beads or simple running stitches to mimic sparkling light on water, unifying the bold textures with subtle highlights.
5. Sculpt Mushroom Gills with Padded Stitches
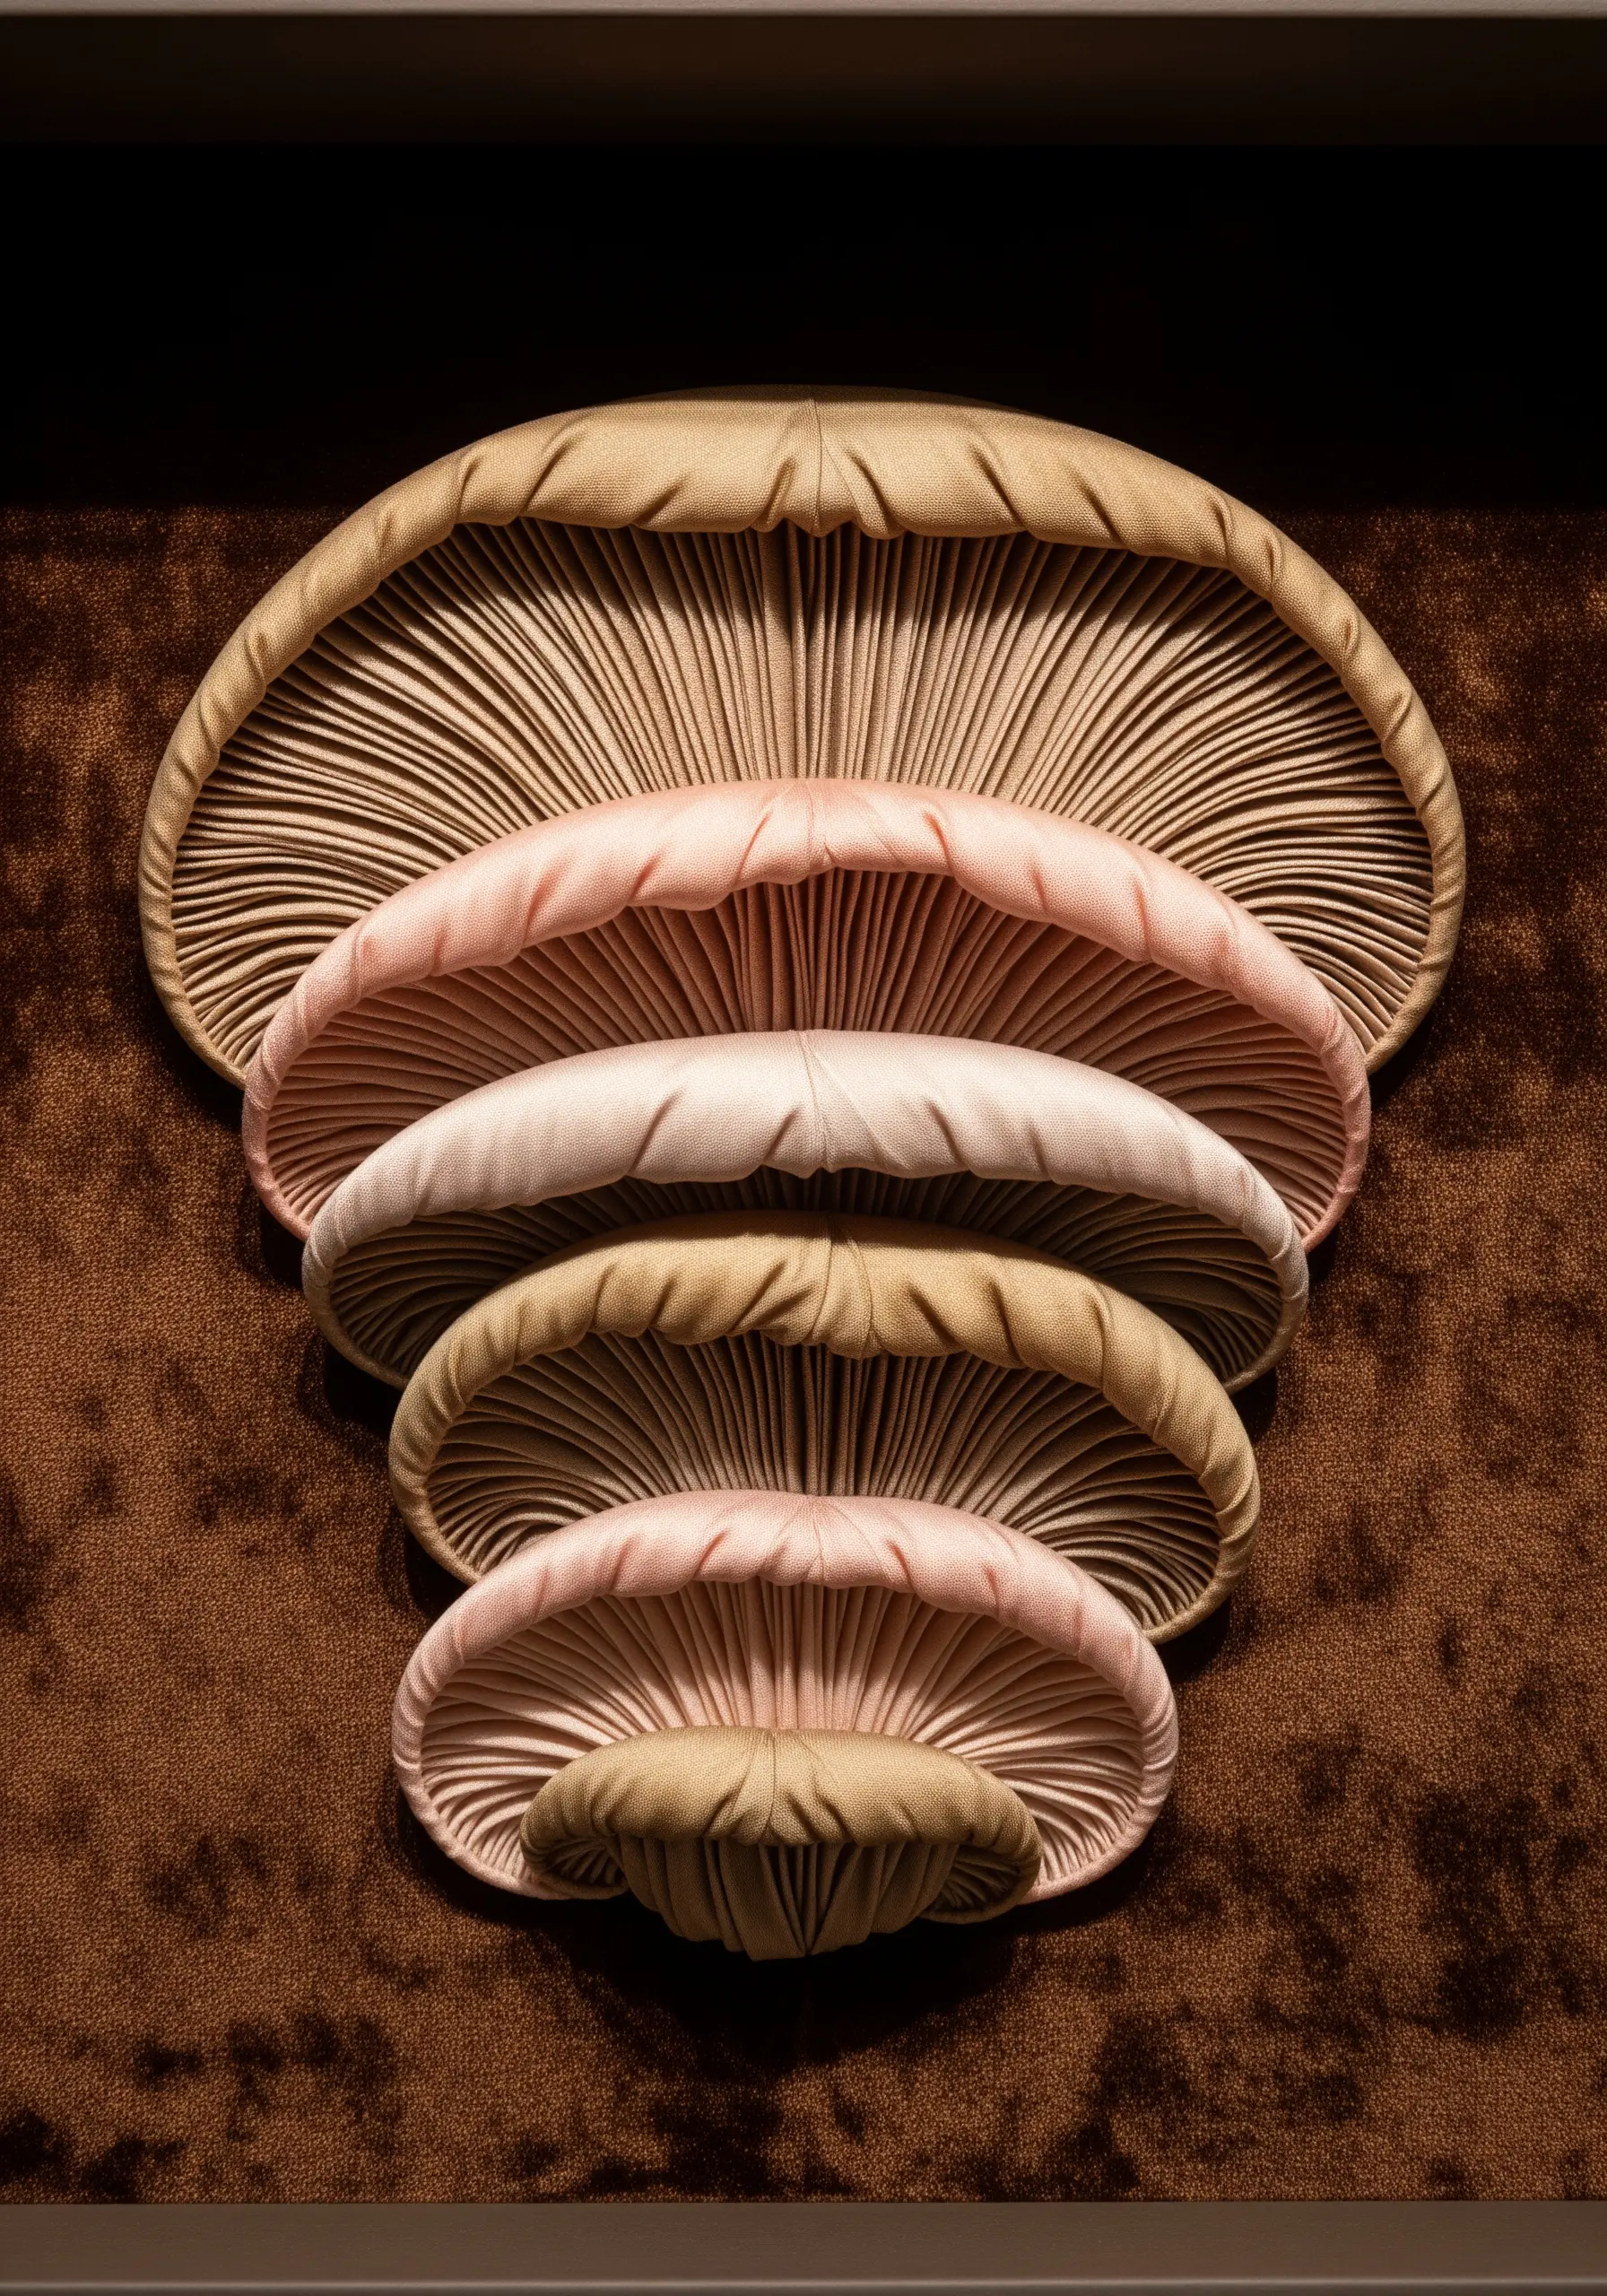
Move beyond flat illustration by giving your mushroom designs three-dimensional form through sculptural techniques.
Use a soft, pliable fabric like cotton jersey or silk charmeuse, which gathers beautifully to create the delicate texture of gills.
Create the gill effect with dense, radiating straight stitches, pulling them slightly to create channels and ridges.
For extra volume, use trapunto padding: create a small pocket, lightly stuff it with batting, and then stitch it closed from behind before adding the gill details.
This turns a simple motif into a realistic mushroom sculpture that feels soft and organic.
6. Contrast Thick and Thin Lines for Root Systems

To depict the complex texture of roots or veins, play with dramatic variations in thread weight.
Create the main, thick roots by braiding multiple strands of heavy yarn together and then couching the braid onto your fabric.
For the finer, secondary rootlets, switch to a single strand of embroidery floss in a lighter, complementary color.
Use a wandering stem stitch or backstitch, allowing the lines to cross over and under each other to build a sense of tangled depth.
This contrast in scale is what gives the composition its energy and realism, making the texture feel alive.
7. Capture Frost’s Delicacy on Sheer Fabric
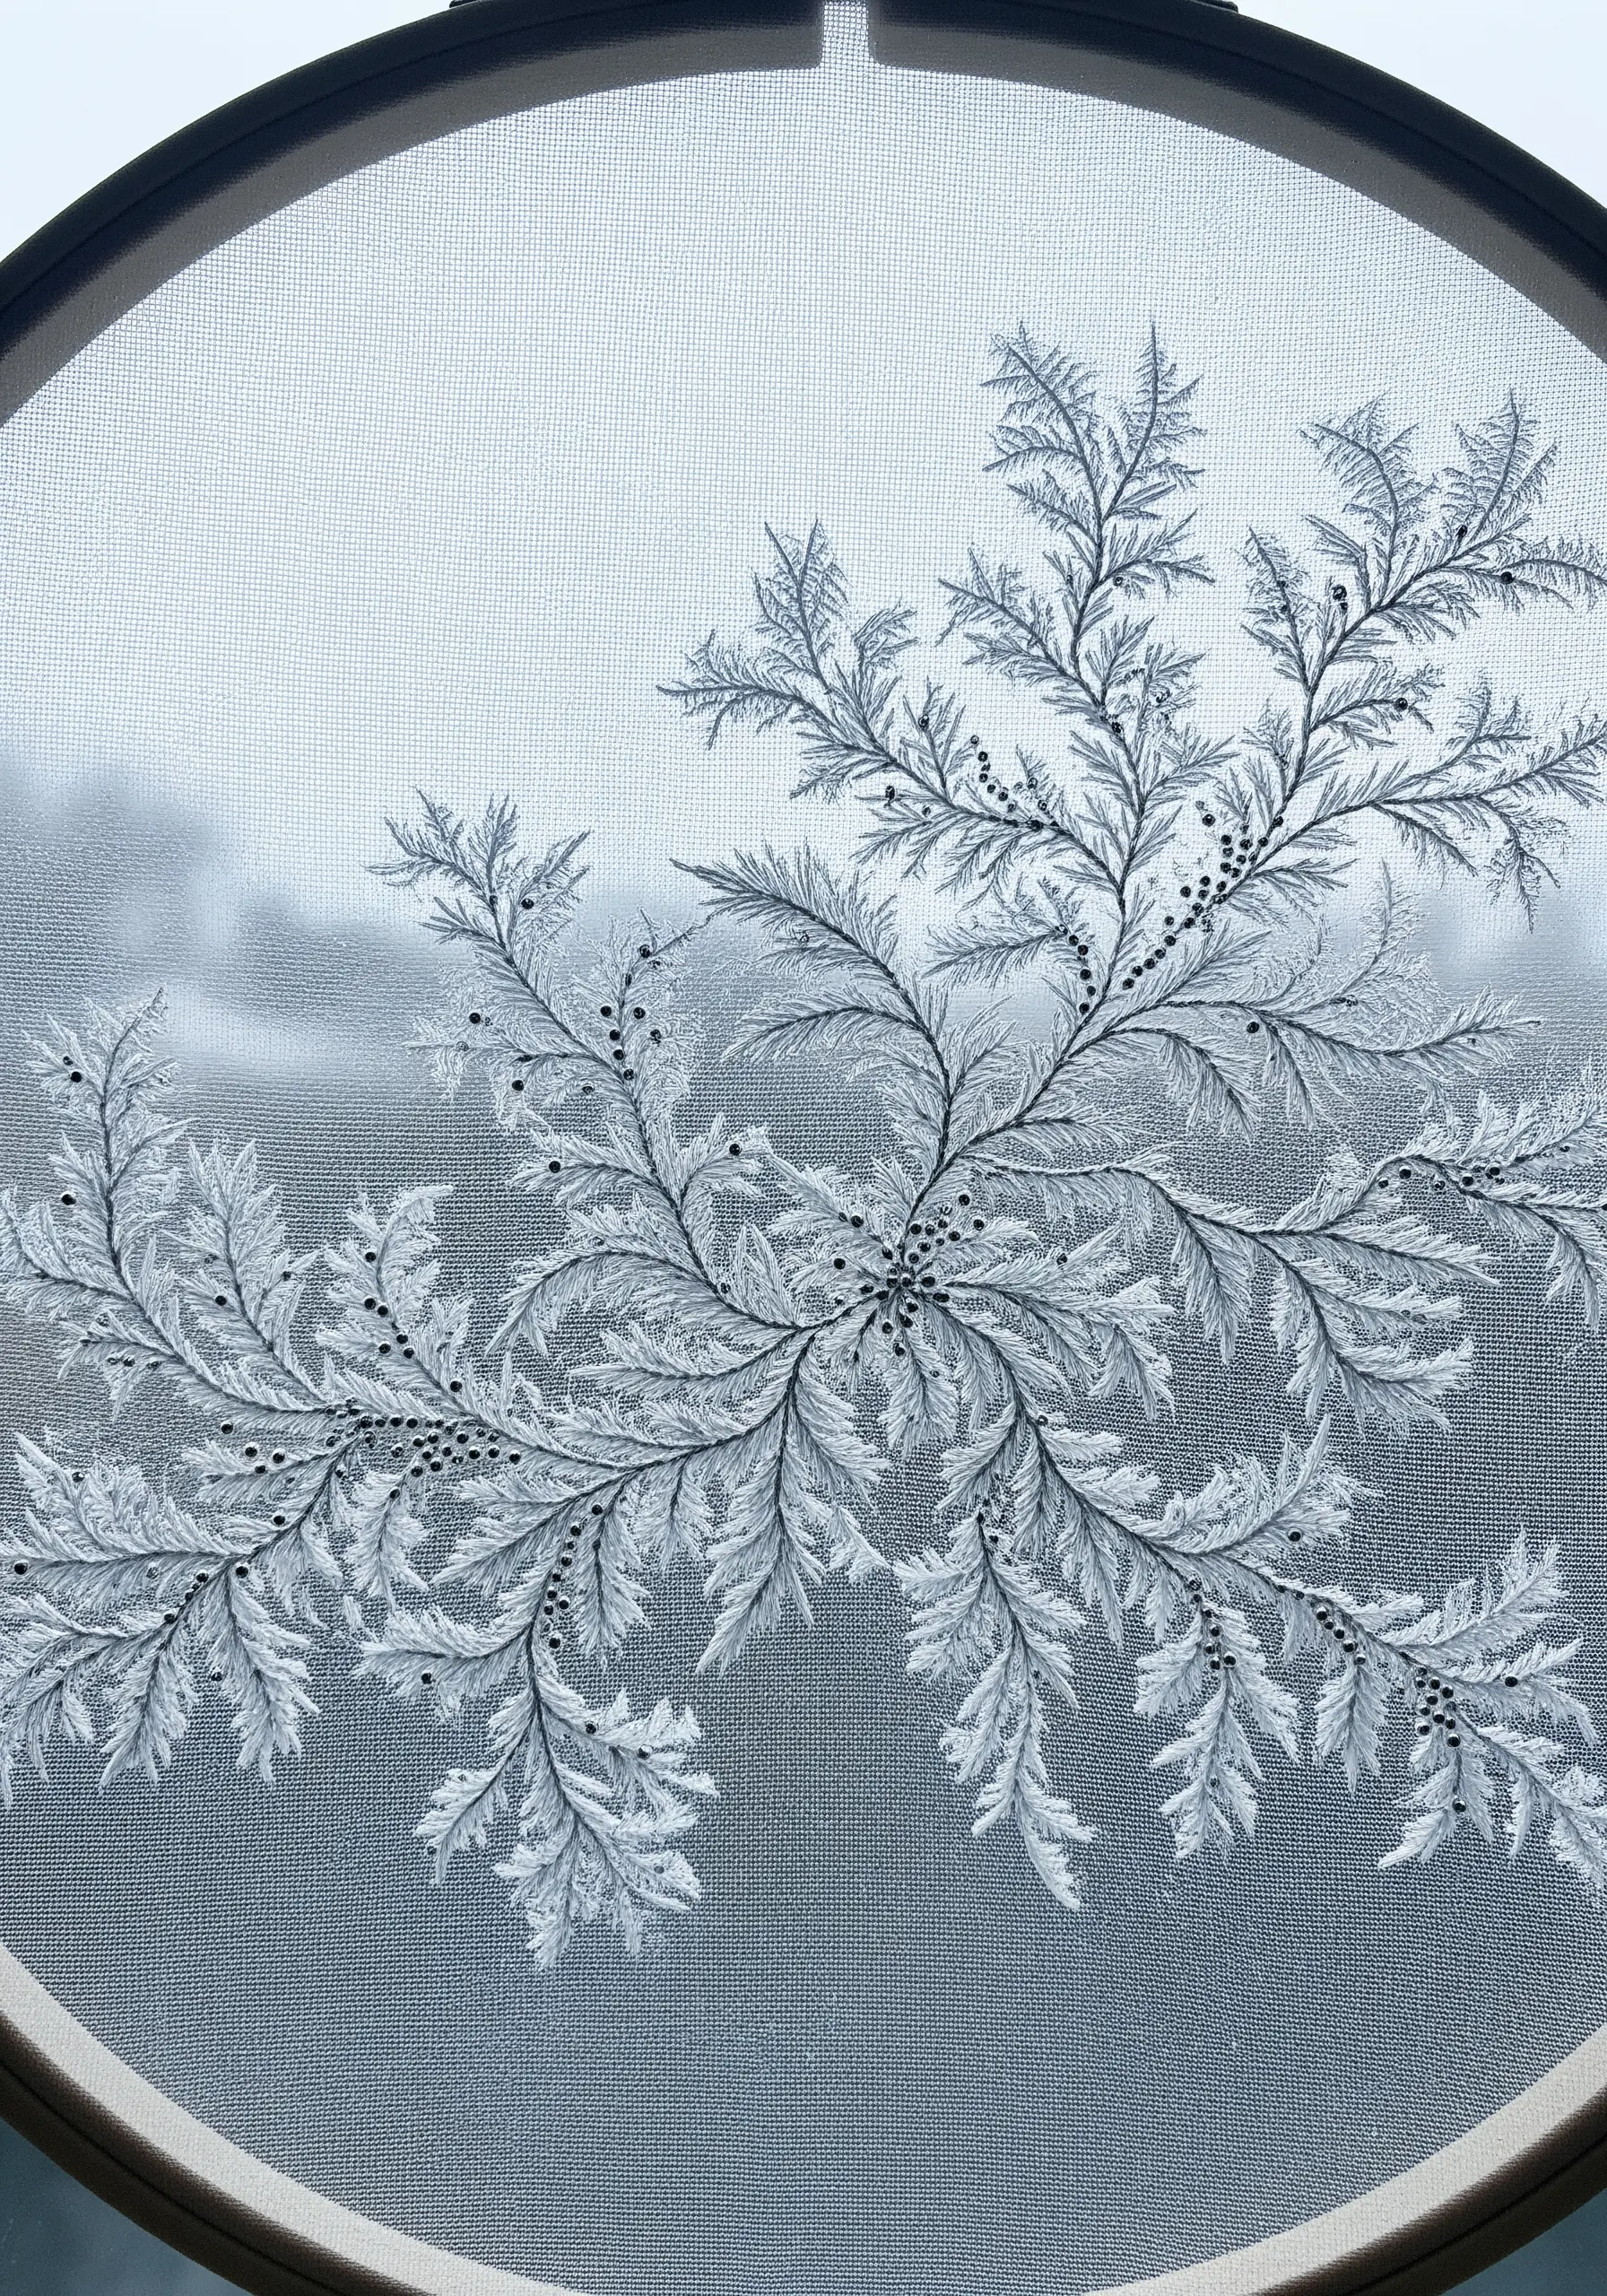
Stitching on a transparent fabric like organza or tulle allows you to create designs that feel weightless, like frost on a windowpane.
Use a single strand of white, light gray, or metallic silver thread to maintain a delicate, crystalline appearance.
Build the frost patterns with radiating fly stitches or fern stitches, which naturally mimic the feathery shapes of ice crystals.
For a hint of frozen dew, scatter tiny silver-lined seed beads or clear microbeads at the tips of the branches.
The transparency of the background fabric is key—it makes your stitches appear to float in mid-air.
8. Sculpt Minimalist Dunes with Quilting Techniques

You can create soft, rolling landscapes without a single decorative stitch by using textural quilting methods.
Layer a top fabric, batting, and a backing fabric, then stitch your wave-like dune patterns through all three layers.
Use a simple running stitch or backstitch, focusing on creating smooth, flowing curves.
The magic happens after stitching: the fabric naturally puckers along your stitch lines, creating subtle, elegant contours that mimic wind-swept sand.
This minimalist approach makes texture the star, perfect for statement-size wall art in a modern space.
9. Render Geodes with Thread Painting and Beads
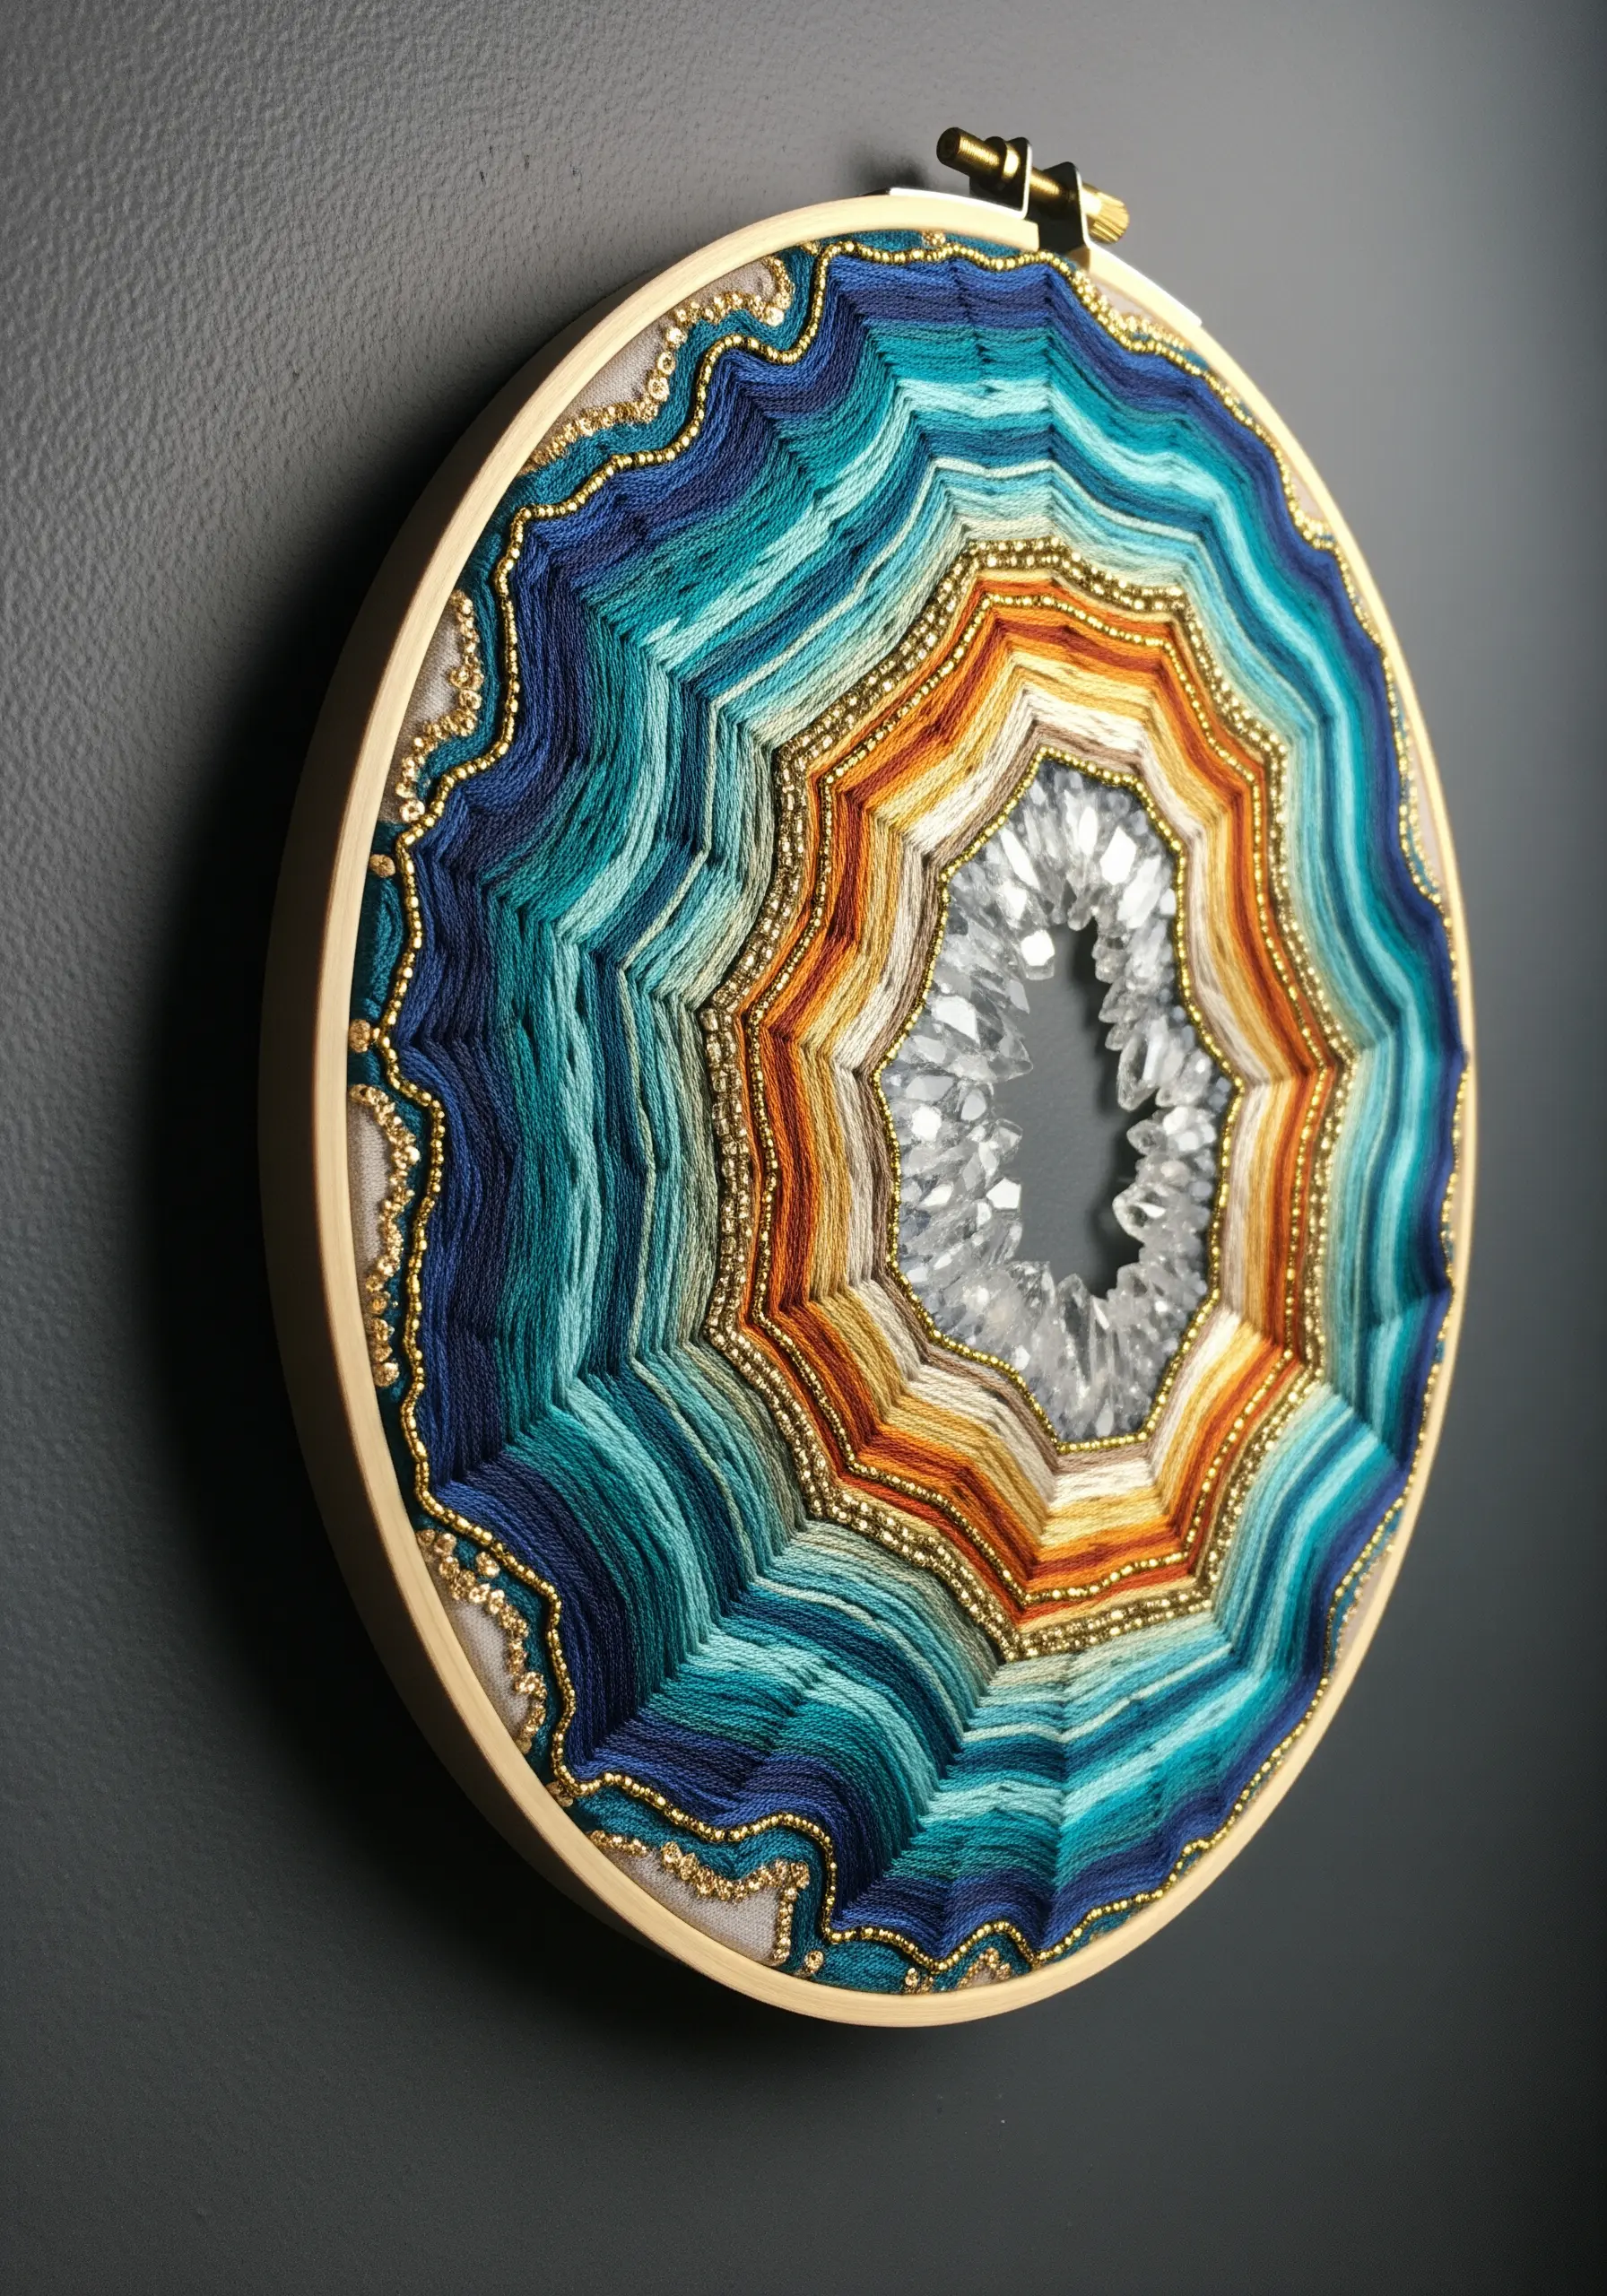
Mimic the layered, crystalline structure of a geode by combining smooth gradients with sharp, sparkling textures.
Use long-and-short stitch to create concentric rings of color, blending each shade carefully to achieve a soft, natural gradient.
Define the boundary between color bands with a precise line of couched metallic thread or gold seed beads to add a crisp, mineral edge.
For the raw crystal center, stitch down genuine crystal shards or densely clustered clear beads, creating a focal point of intense sparkle and texture.
This project is a perfect opportunity to create mixed-media contemporary embroidery designs that feel both organic and glamorous.
10. Emulate Wood Grain with Directional Stitches

To create the illusion of polished wood, the direction of your stitches is just as important as the colors you choose.
Work entirely in long-and-short stitch or a dense split stitch, ensuring every single stitch follows the organic, flowing lines of the wood grain.
Use a wide palette of closely related neutral tones—browns, tans, grays, and creams—to build realistic depth and variation.
A single, darker circle of satin stitch becomes a knot, disrupting the flow just enough to feel natural.
This meticulous technique results in stunning framed embroidery artworks that capture tiny details beautifully and look like paintings from a distance.
11. Convey Decaying Bark with Foil and Appliqué
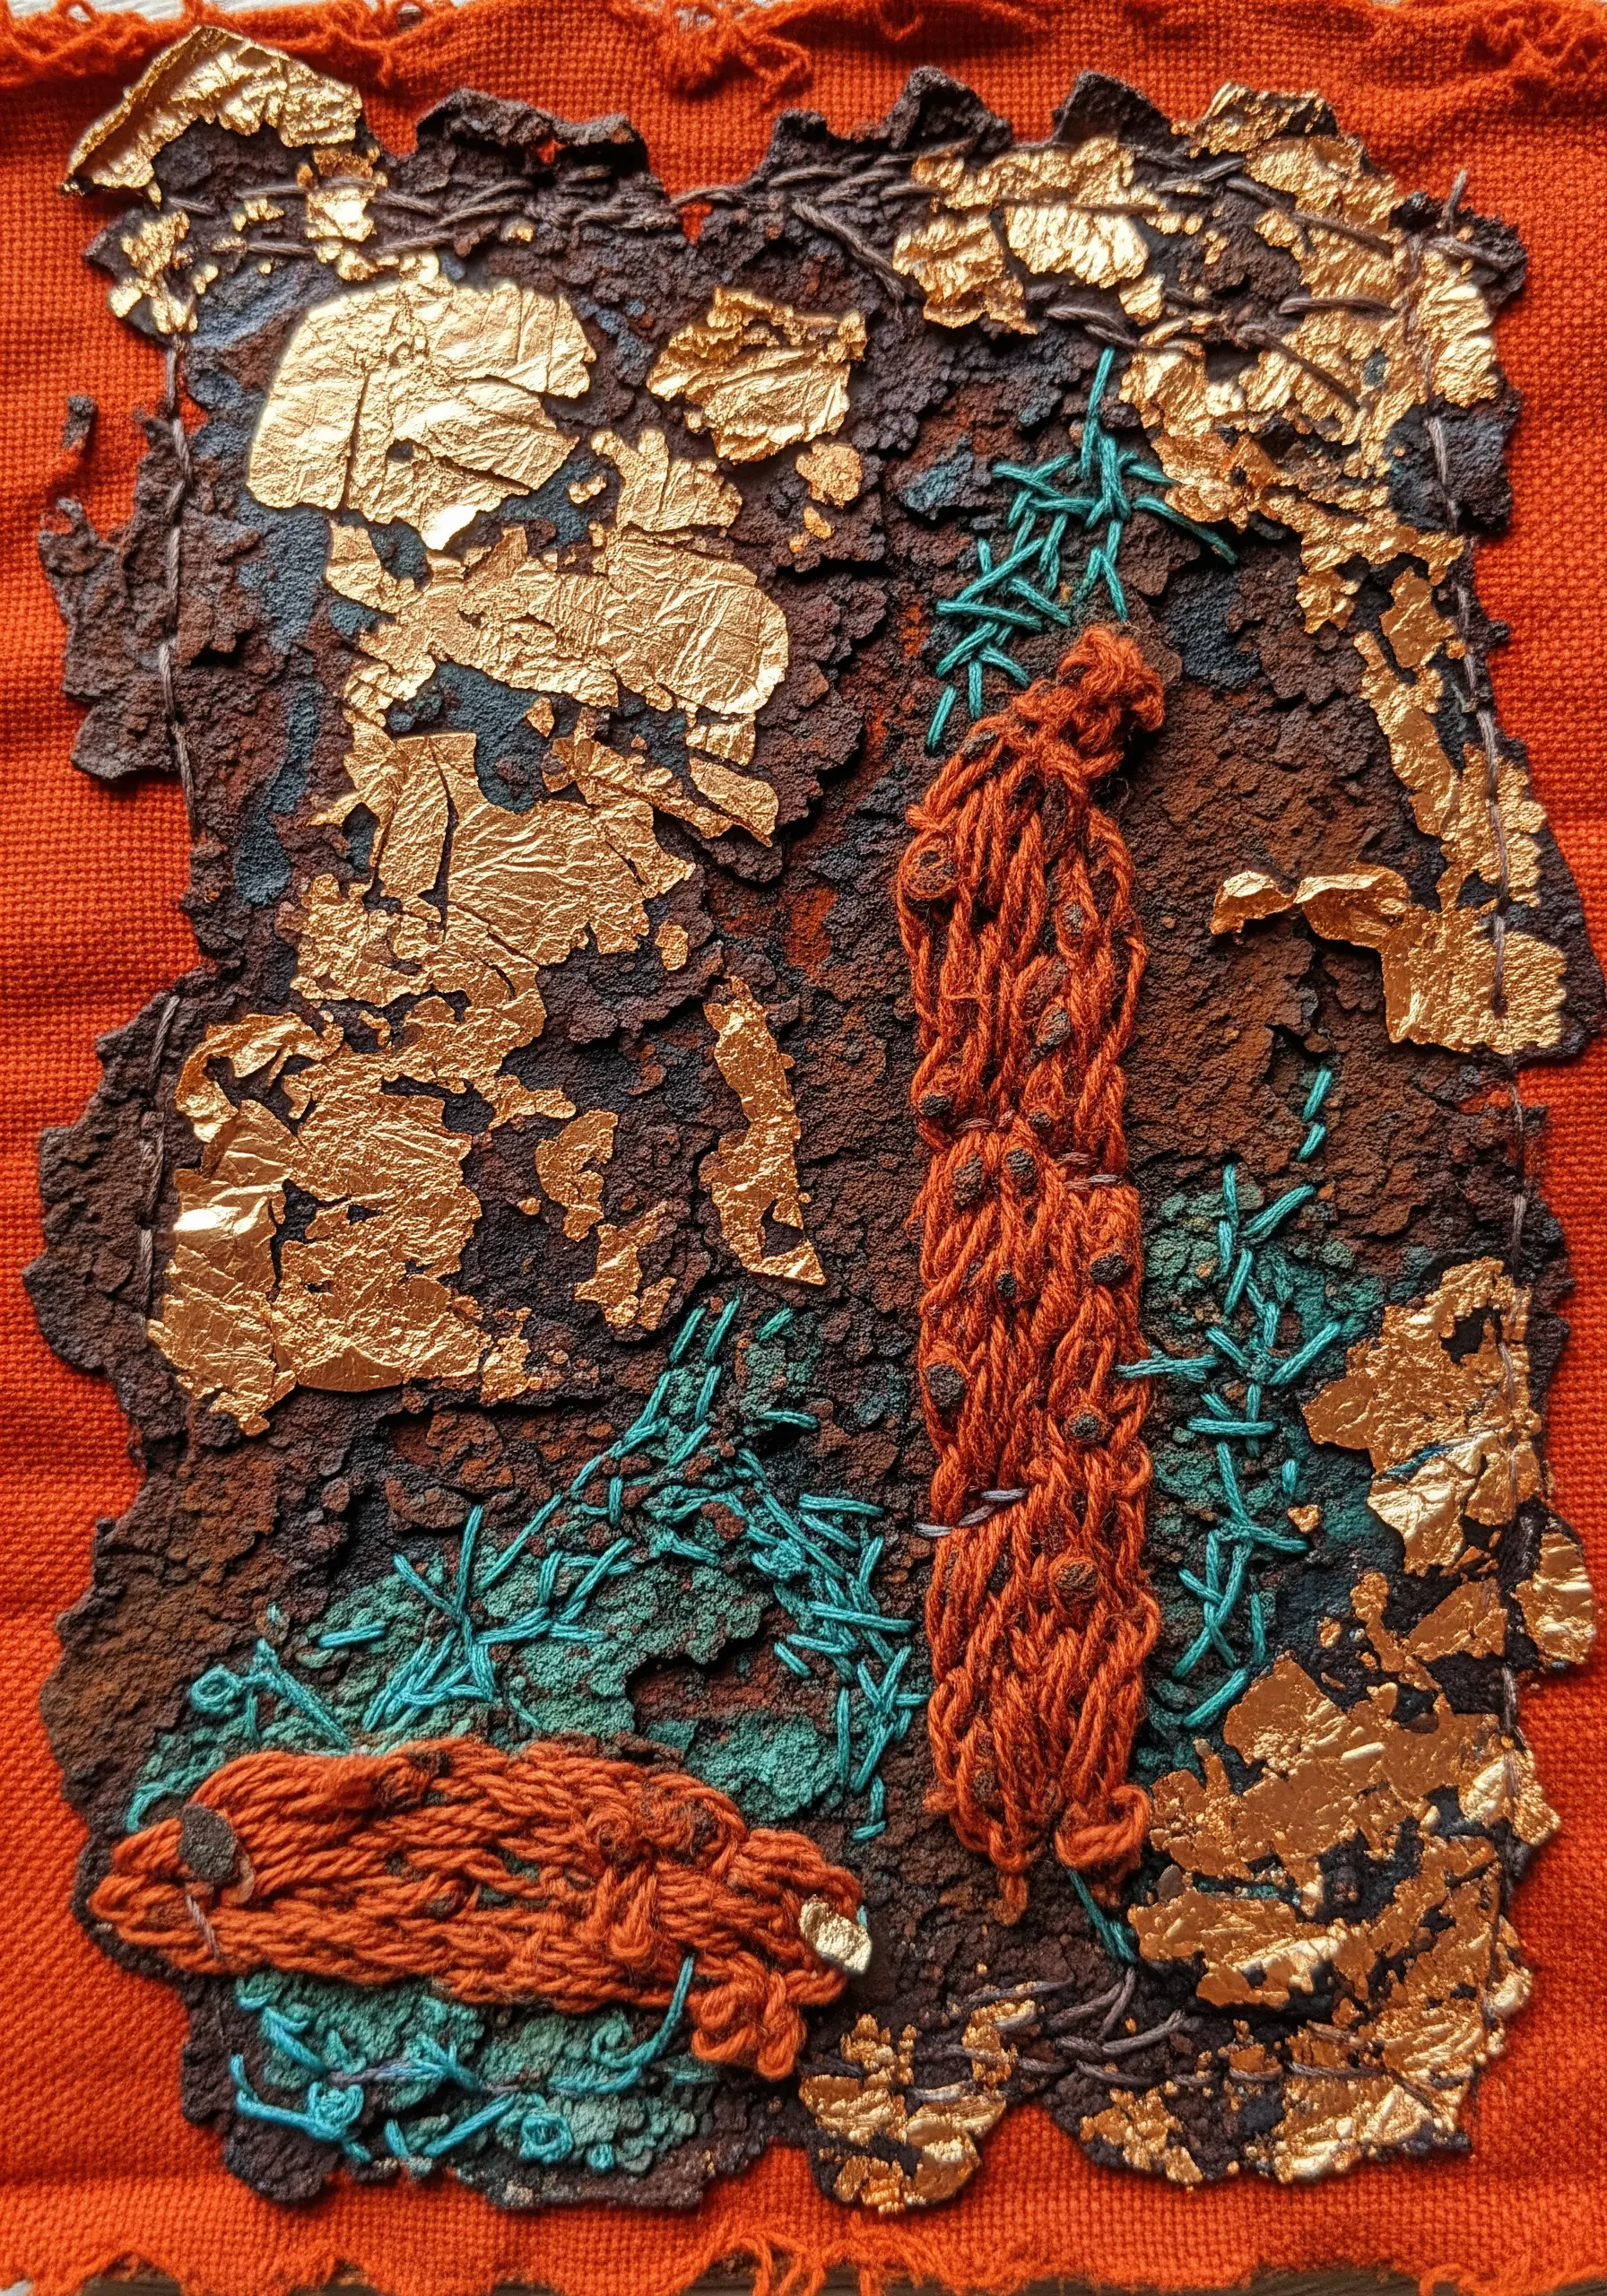
Capture the beautifully imperfect texture of decaying bark by combining distressed fabric, raised stitches, and metallic accents.
Start by appliquéing a piece of rough, textured fabric—like cork or distressed faux leather—onto your base.
Apply gold or copper foil leaf over parts of the appliqué, rubbing some away to create a flaky, peeling effect.
Add clusters of dimensional stitches, like woven bars or thick French knots, to represent moss or fungi growth, anchoring the different media together.
This technique is about embracing imperfection and layering unconventional materials to tell a story of growth and decay.
12. Build a Coral Reef with a Sampler of Stitches

A coral reef is the perfect subject for exploring a dictionary of textural stitches in one vibrant piece.
Use clusters of French knots and colonial knots for bumpy coral textures, varying the thread count and colors for diversity.
Create branching coral forms with raised stem stitch bands or cast-on stitches, which stand up from the fabric surface.
Incorporate woven picot stitches or detached buttonhole stitches to form fan-like shapes, and scatter pearls and sea glass beads for extra dimension.
This approach turns your hoop into a playground of texture, where each stitch contributes to a lively underwater ecosystem.
13. Construct Insect Wings with Beads on Tulle

To capture the iridescent, fragile texture of insect wings, work with beads and sequins on a transparent base fabric like tulle.
First, outline the wing’s structure with a fine backstitch or by couching a thin metallic wire for stability.
Fill the cells of the wing with a mix of bugle beads, seed beads, and tiny sequins, choosing iridescent finishes that catch the light.
The transparency of the tulle is crucial; it allows the wing to look delicate and almost weightless, as if it could take flight.
This technique elevates beading into a form of precise, architectural embellishment.
14. Define Feathers with Precise Color Blending

The key to soft, realistic animal & insect embroidery patterns lies in mastering the long-and-short stitch for seamless color transitions.
Work in small sections, creating each feather or row of feathers individually so they appear to overlap naturally.
Use a single strand of floss for the finest detail, and blend at least three shades per feather to create highlights and shadows.
Always ensure your stitches follow the direction of feather growth, curving gently to create a sense of movement and softness.
The final result is a texture that looks incredibly soft and lifelike, transforming a simple cushion into a piece of art.
15. Layer Stitches for a 3D Pinecone Effect
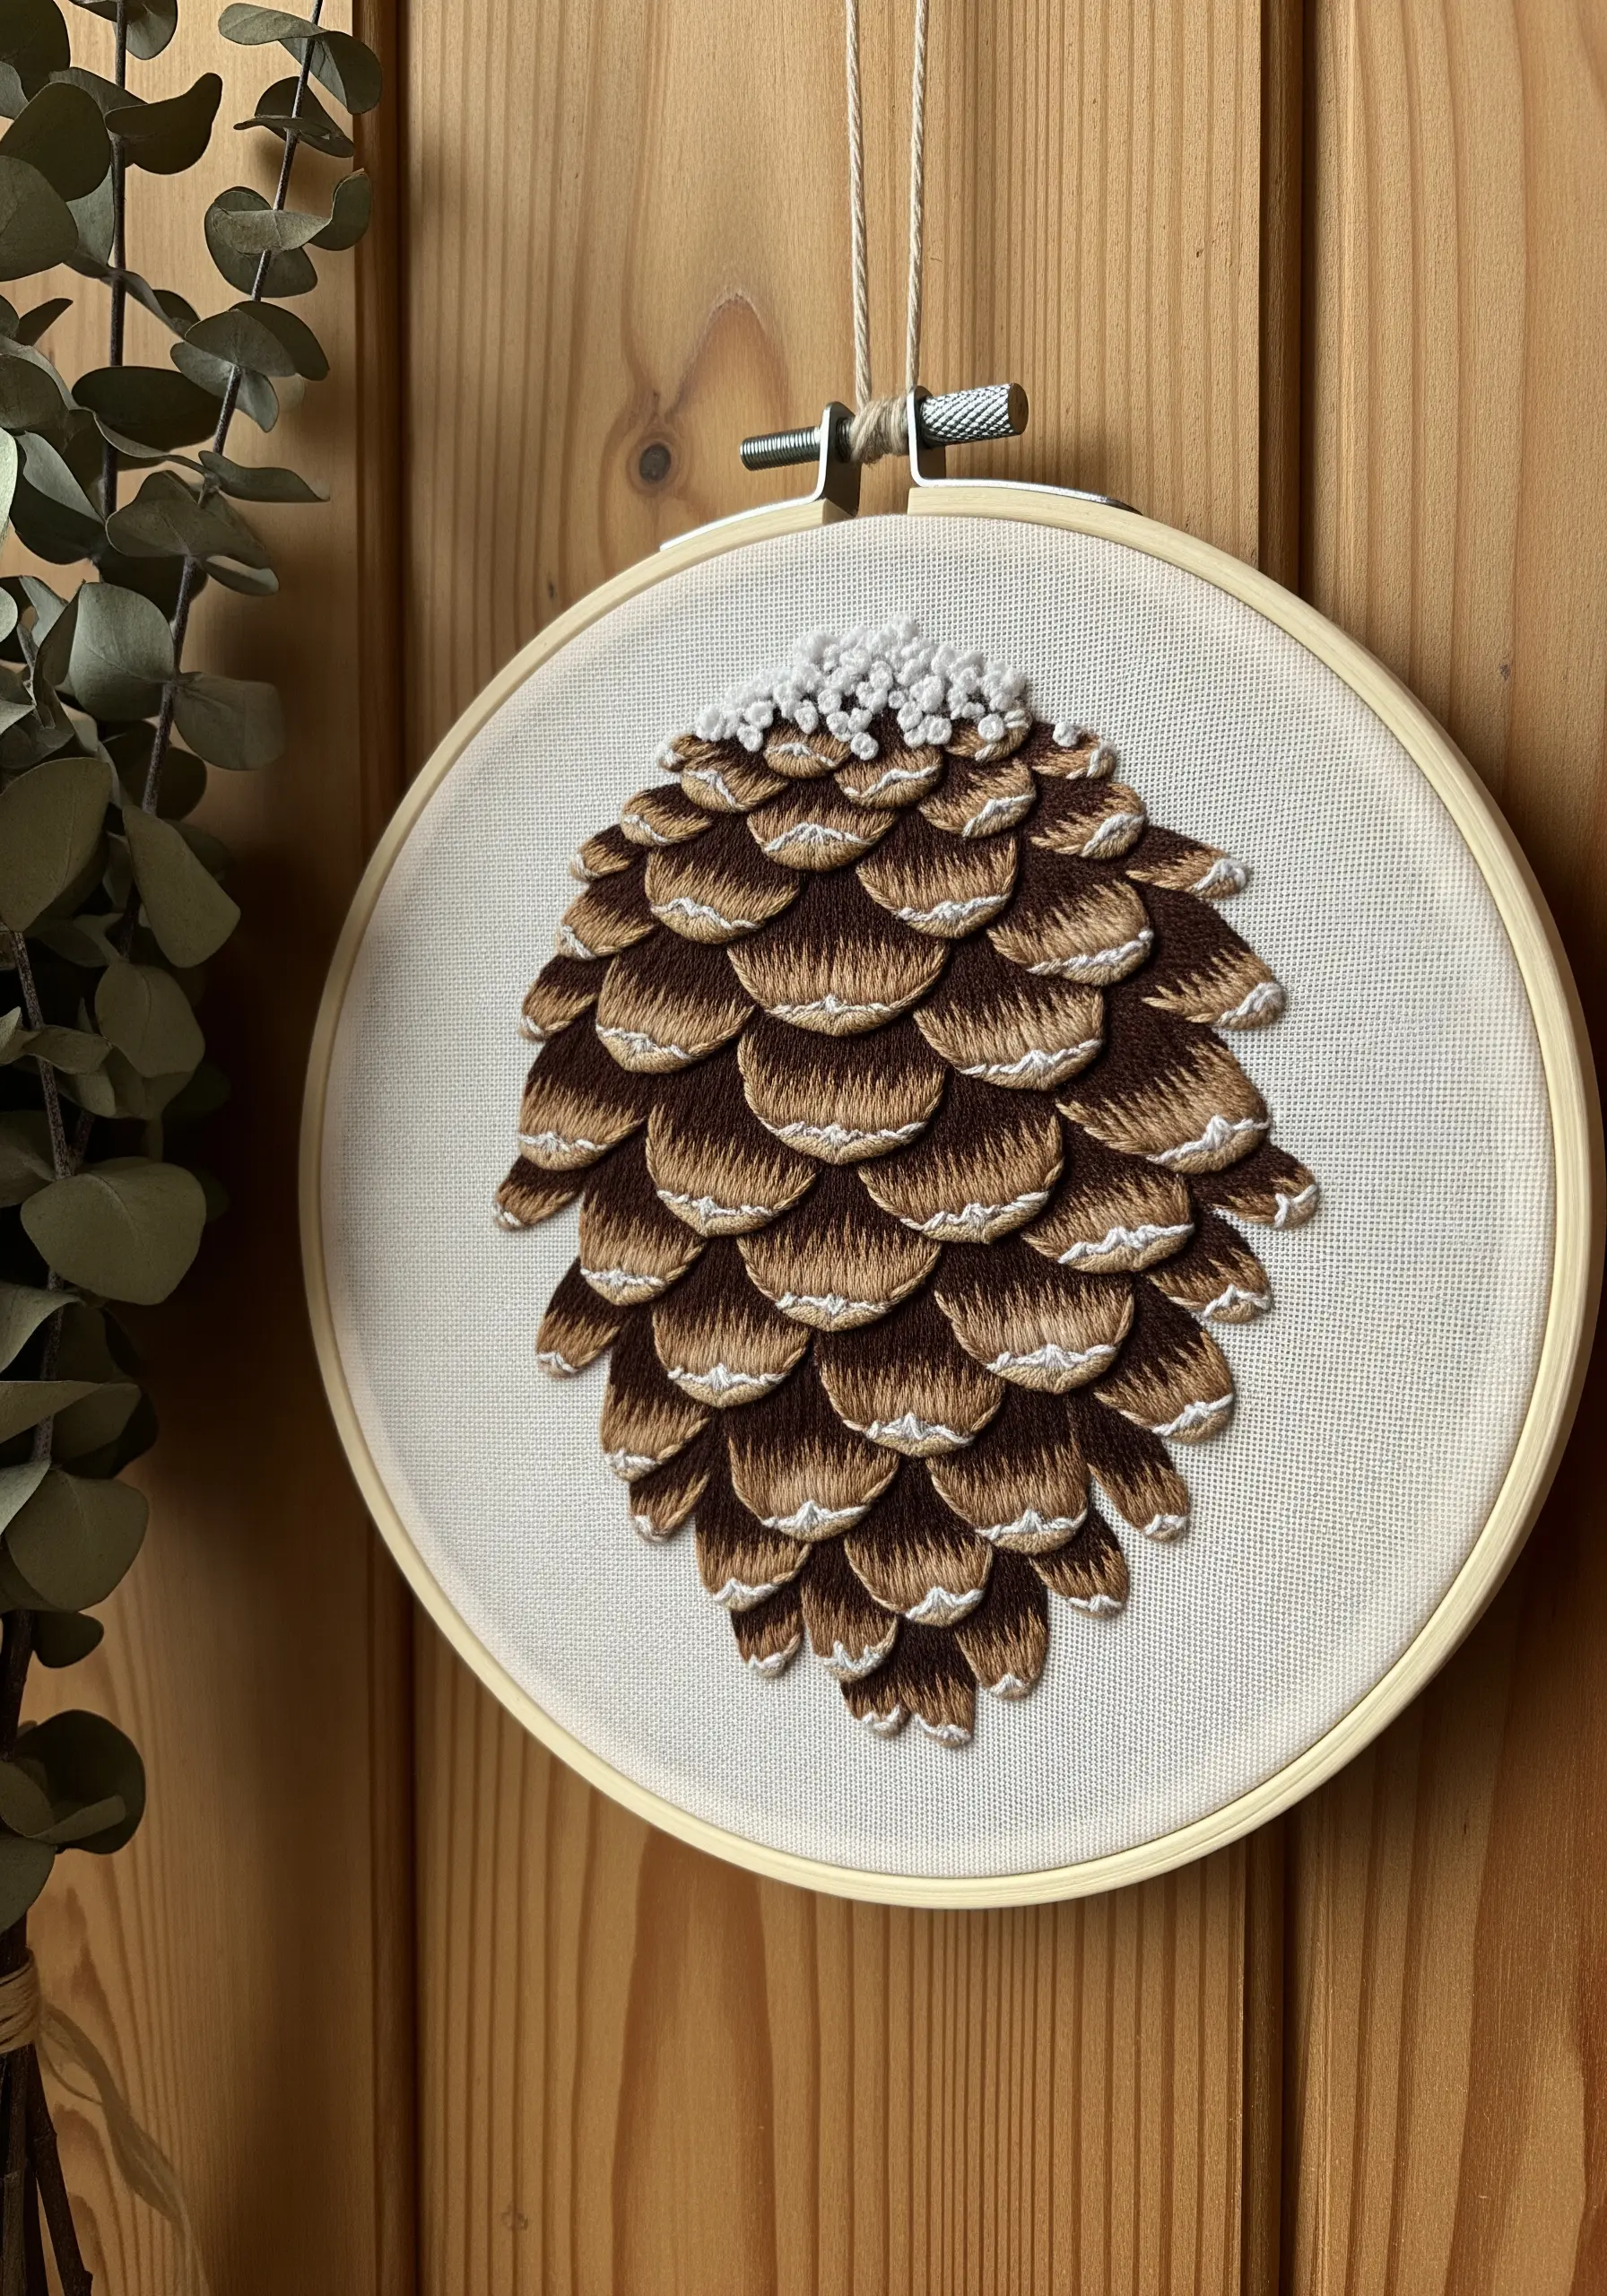
Create the overlapping texture of pinecone scales by working in methodical, layered rows.
Start stitching at the bottom of the pinecone and work your way up to ensure the scales overlap correctly.
Use a padded satin stitch or a fishbone stitch for each individual scale, giving it a slight puffiness and dimension.
Outline the top edge of each scale with a lighter color using a single backstitch; this defines the shape and adds a frosted, highlighted look.
Top the pinecone with a cluster of white French knots to represent a touch of snow or resin, completing the woodland feel.
16. Weave a Sunflower Center with Lattice Work

Elevate a simple sunflower design by creating a realistic, woven seed head in the center.
First, fill the center circle with a base of dark brown satin stitch.
Next, lay down a grid of long straight stitches in a lighter brown, spacing them evenly across the circle.
Finally, use an even lighter thread (like off-white) to weave over and under this grid, creating a diamond-patterned lattice that mimics the intricate arrangement of sunflower seeds.
This technique adds a layer of complexity and texture that draws the eye and makes the entire design more dynamic.
17. Meditate on Texture with Minimalist Tree Rings

You can create a powerful statement piece with just one simple stitch: the running stitch.
On a large piece of fabric, use a single, continuous line of running stitch that spirals outwards from a central point.
The texture comes not from complexity, but from the slight, rhythmic unevenness of hand stitching and the gentle puckering of the fabric.
Choose a thread color that offers a subtle contrast to your fabric for a calm, serene effect.
This large-scale, minimalist embroidery project transforms a simple line into a meditative exploration of growth and time.
18. Sculpt Volcanic Rock with Fabric Manipulation

To capture the porous, rugged texture of volcanic rock, you need to move beyond thread and manipulate the fabric itself.
Use a thick, non-woven material like felt as your base, which can be shaped without fraying.
Create craters by gathering and stitching the felt into puckered, hollow forms, securing them with thread from behind.
Embellish the surface with clusters of black French knots and sew on chunky, matte black beads to represent crystalline inclusions.
This highly sculptural method results in a dramatic, tactile piece that feels ancient and powerful.
19. Build Crystalline Forms with Beads and Thread
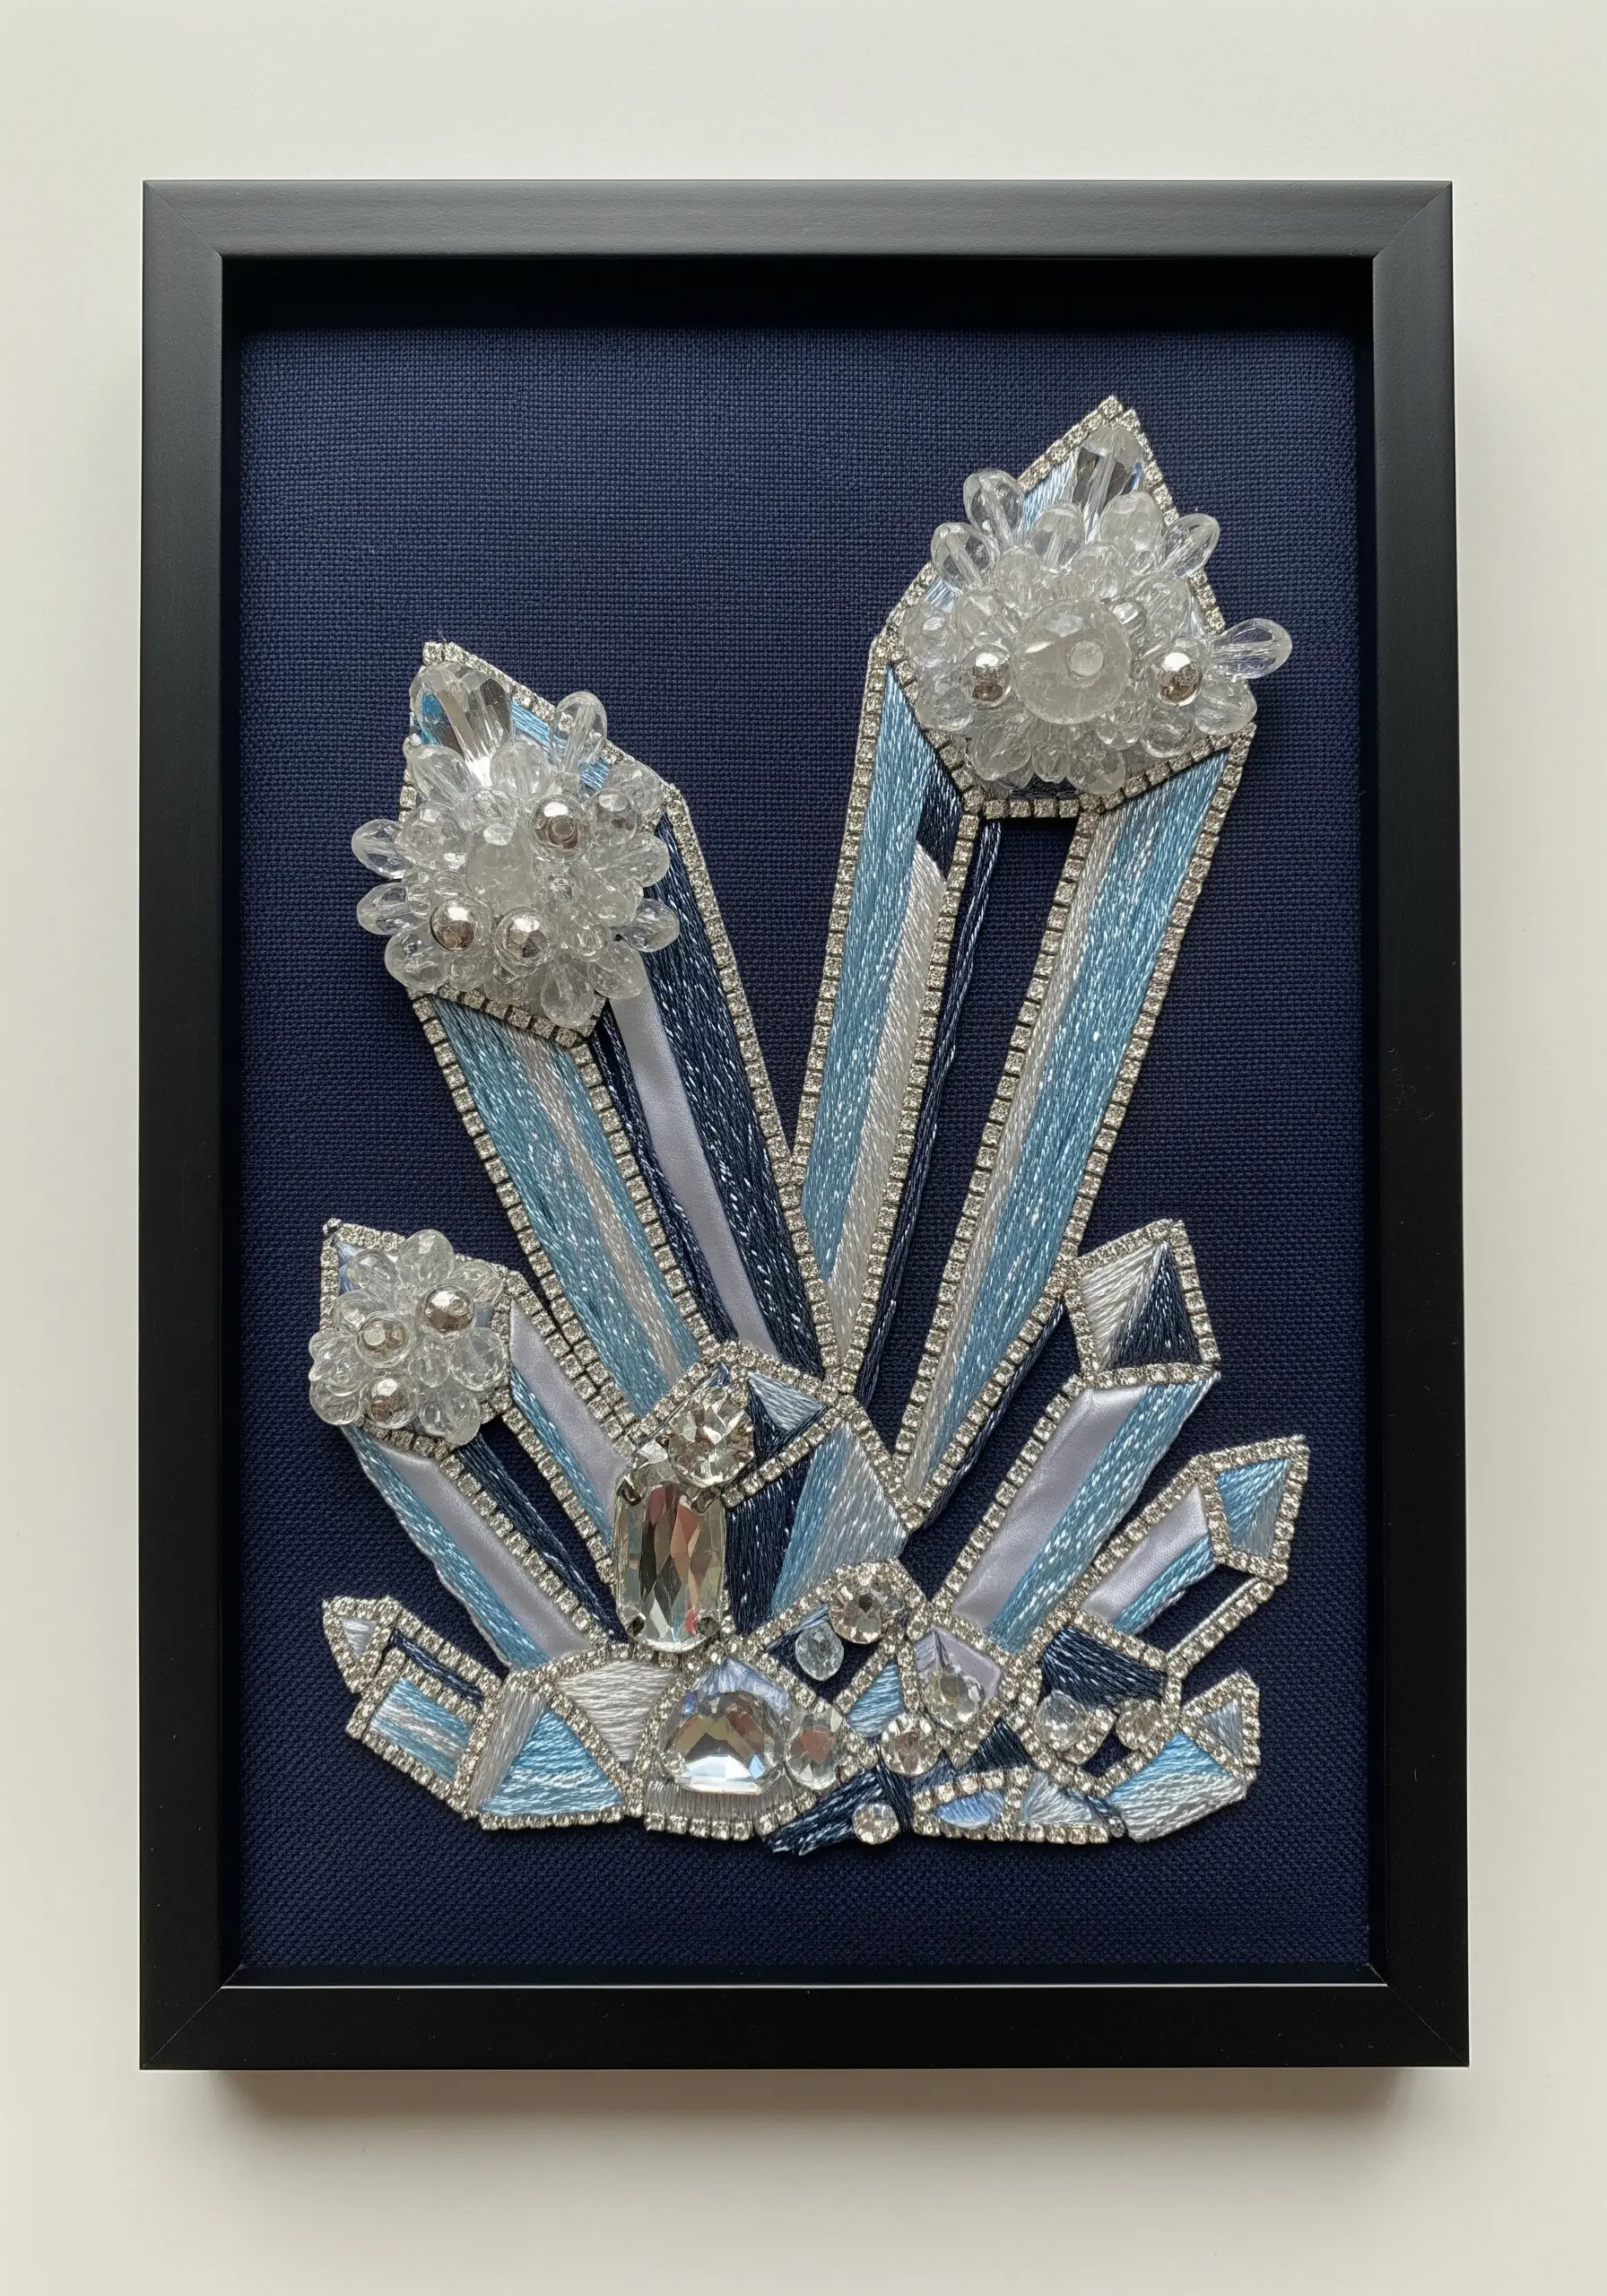
Translate the sharp geometry of crystal formations into a sparkling mixed-media piece.
Start by outlining the crystal shapes with a crisp border of silver-lined seed beads or couched metallic cord.
Fill the larger facets with smooth satin stitch, making sure your stitches are parallel and tight to create a reflective, silky surface.
For the crystal tips, create dense clusters of clear and silver beads, stacking them to build up a three-dimensional, light-catching point.
The combination of smooth thread and faceted beads is what gives this design its authentic crystalline feel.
20. Define a Leaf Skeleton with Negative Space
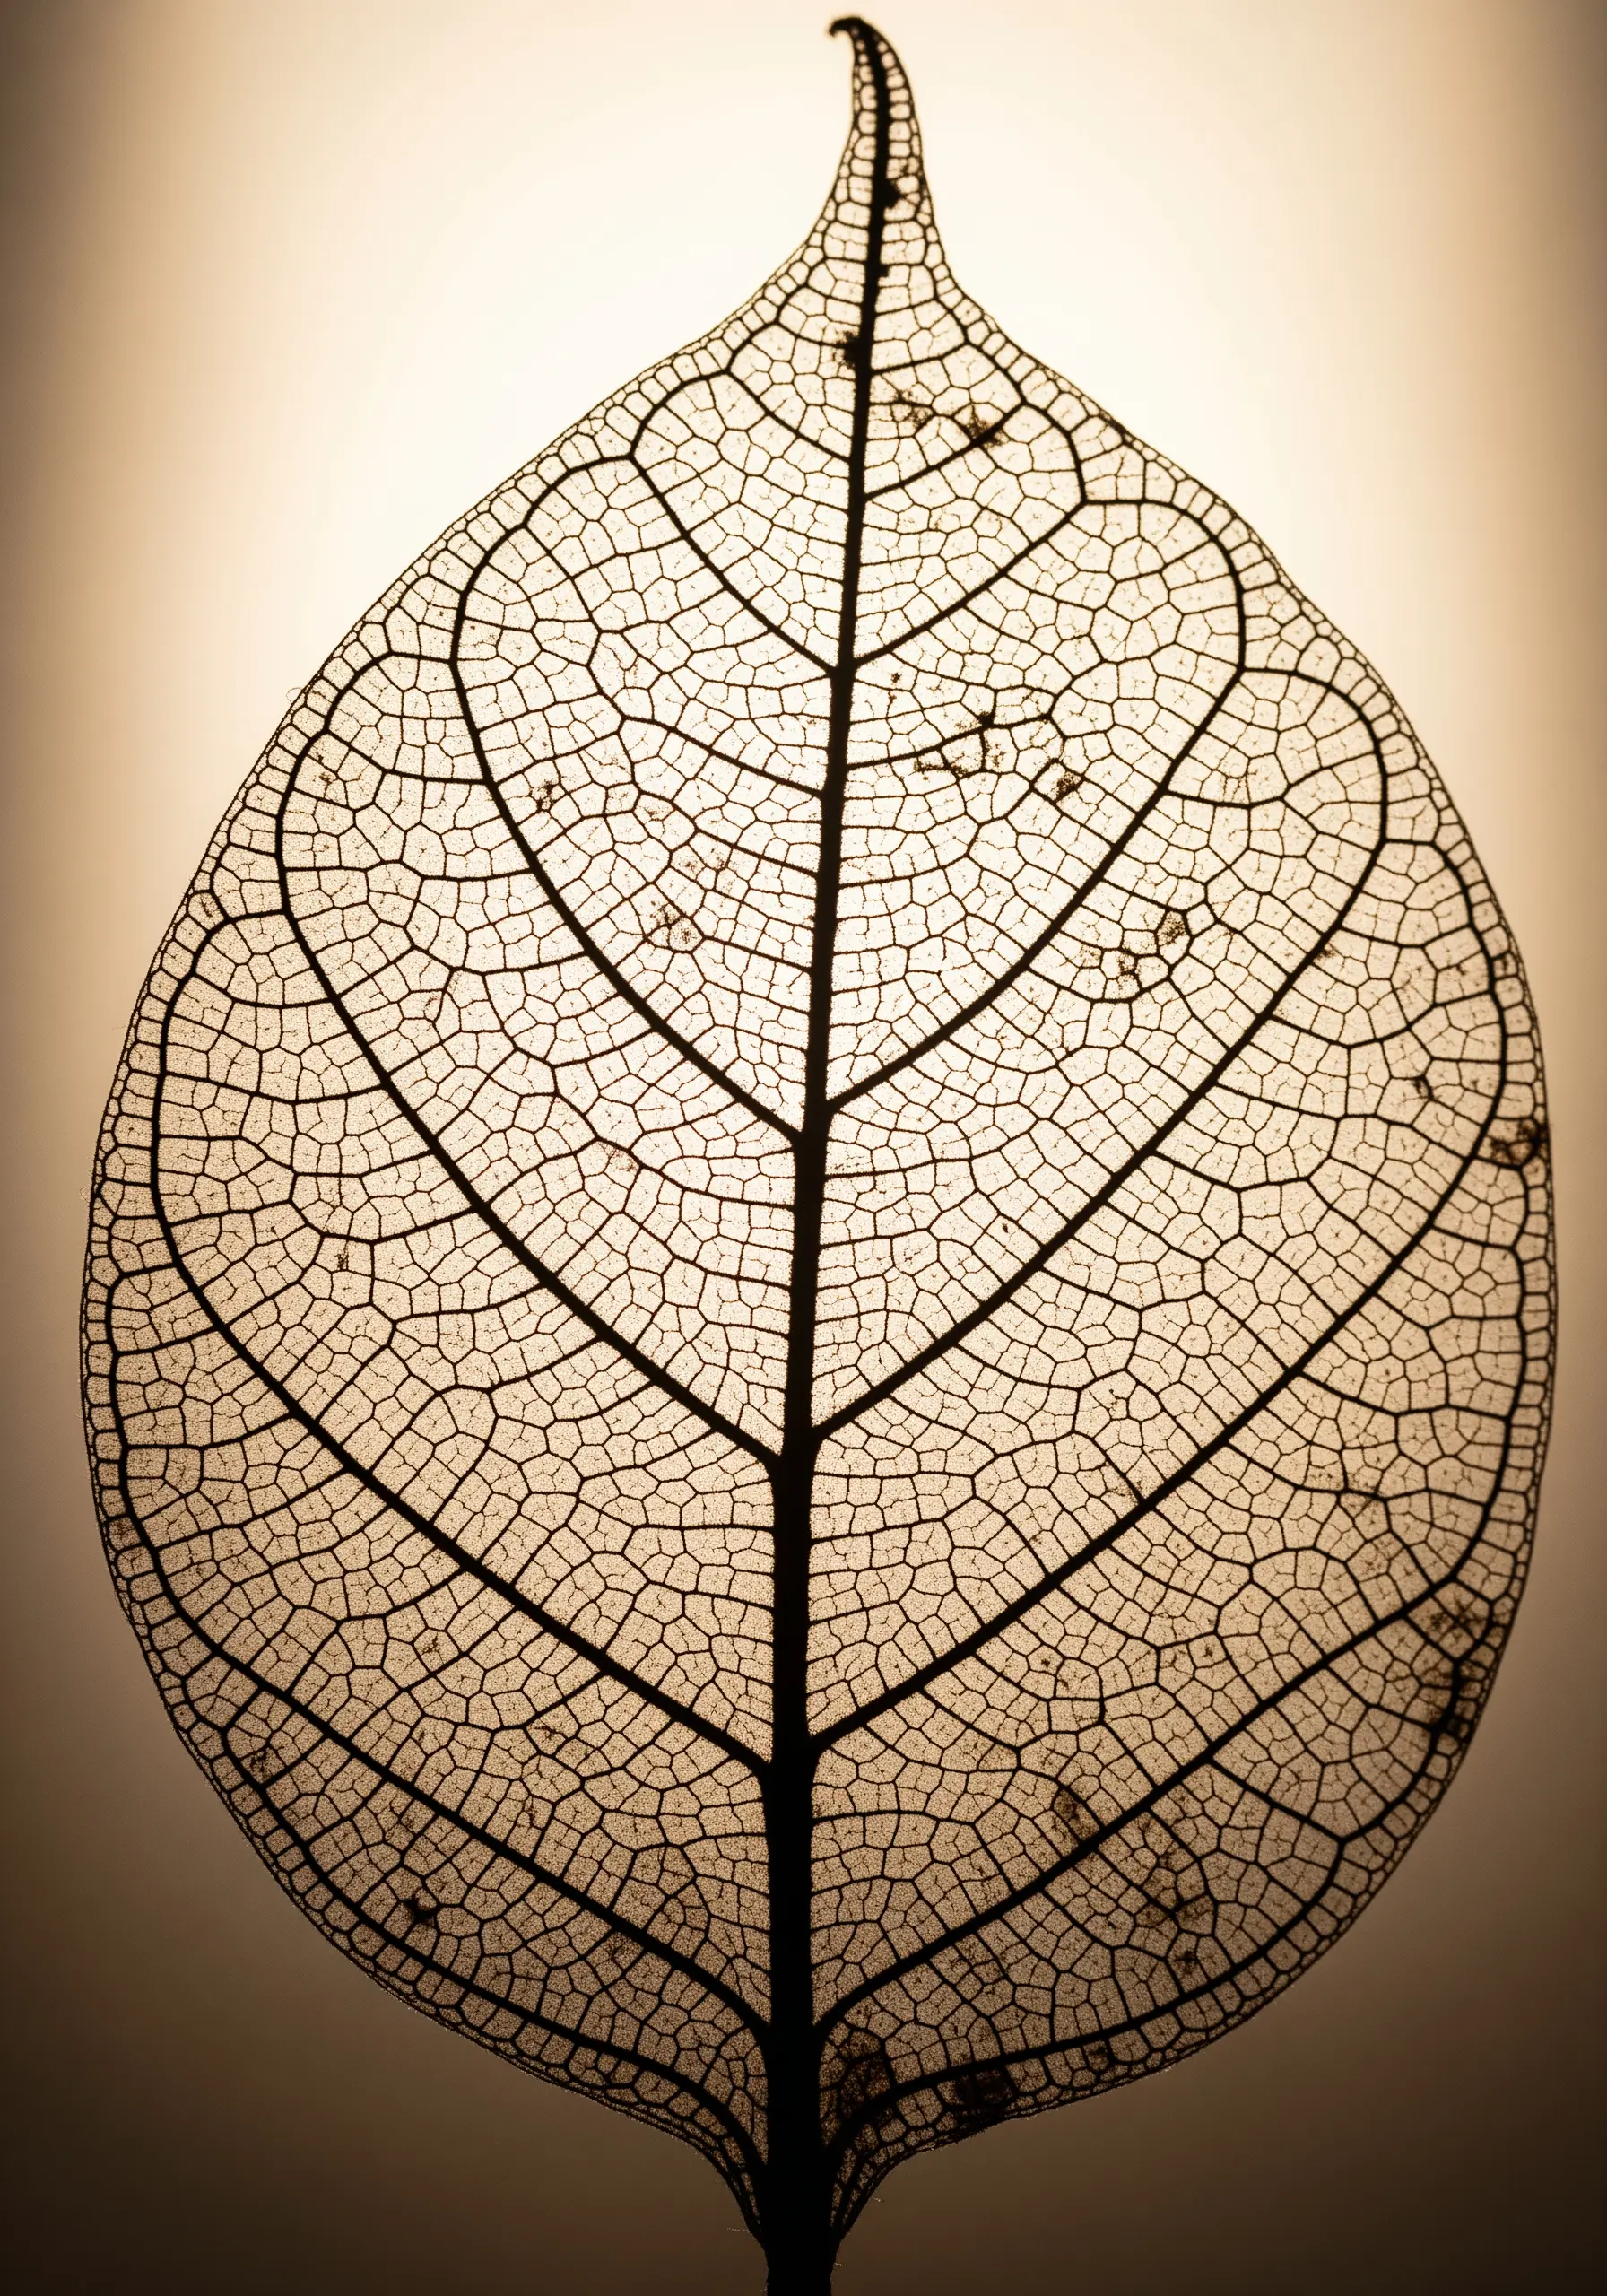
The beauty of a skeleton leaf lies in what’s missing, so your primary tool here is negative space.
To achieve this with hand embroidery, work on a sheer fabric like fine tulle or organza, which will become nearly invisible once hung.
Use a whipped backstitch or a fine stem stitch with a single strand of thread to trace the delicate network of veins.
Don’t be afraid to leave large areas of the fabric completely empty; this transparency is what creates the incredibly fragile, lace-like effect.
This is one of those rare leaf patterns that is more about the space between stitches than the stitches themselves.
21. Mimic Reptile Skin with Overlapping Sequins
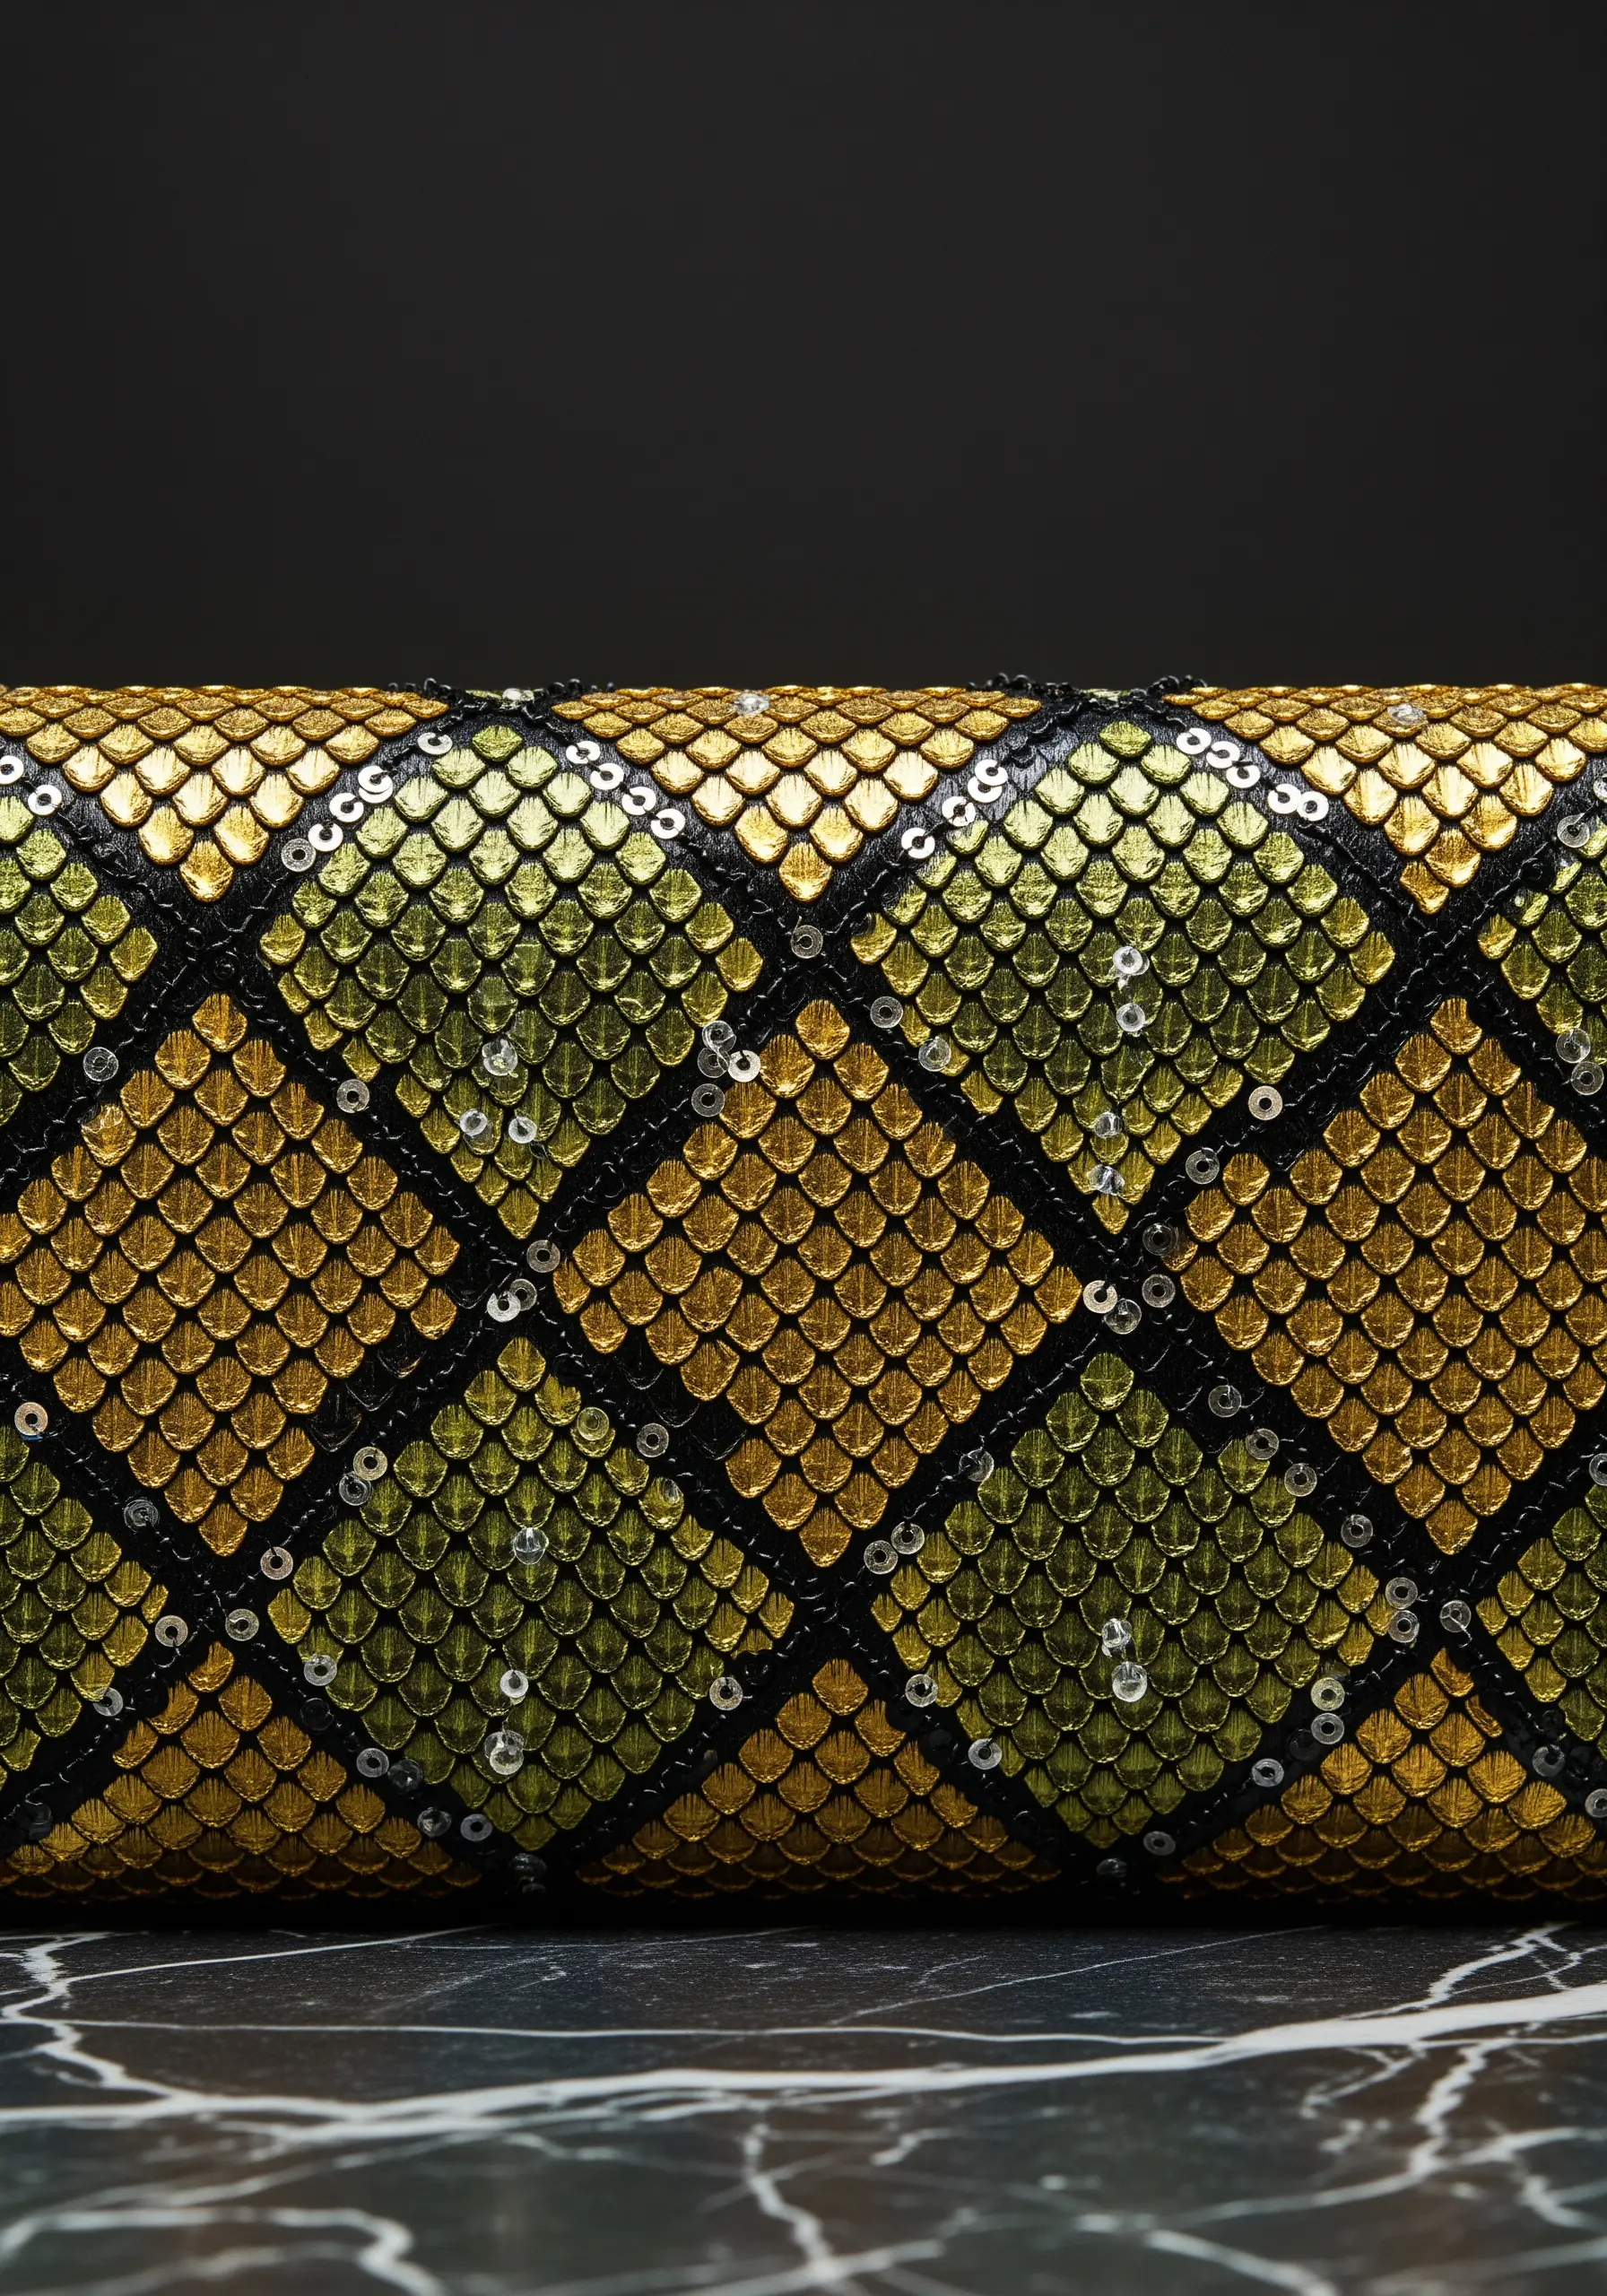
Create the shimmering, textured effect of reptile scales by strategically layering sequins.
Begin at the bottom of your design area and work upwards in rows, just as you would with layered stitches.
Secure each sequin with a single stitch or a tiny seed bead, overlapping the next row of sequins to cover the stitches of the row below.
Create a diamond pattern by alternating the placement and color of the sequins, which adds depth and realism to the design.
This technique produces a flexible, light-catching fabric that is perfect for accessories or statement embellishments.
22. Weave a Web with Beads for Dewdrops

Capture the ethereal moment of a dew-covered spiderweb by combining fine thread with tiny, clear beads.
First, create the radial spokes of the web with long straight stitches, ensuring they are pulled taut but don’t pucker the fabric.
Weave the spiral threads by couching a fine metallic or silk thread across the spokes, securing it at each intersection.
Finally, use a beading needle to add tiny, clear seed beads along the spiral threads, mimicking the precise placement of water droplets.
Stitching on a dark background makes the silvery thread and sparkling beads pop, enhancing the delicate illusion.
23. Create an Amethyst Geode with Raw Stones
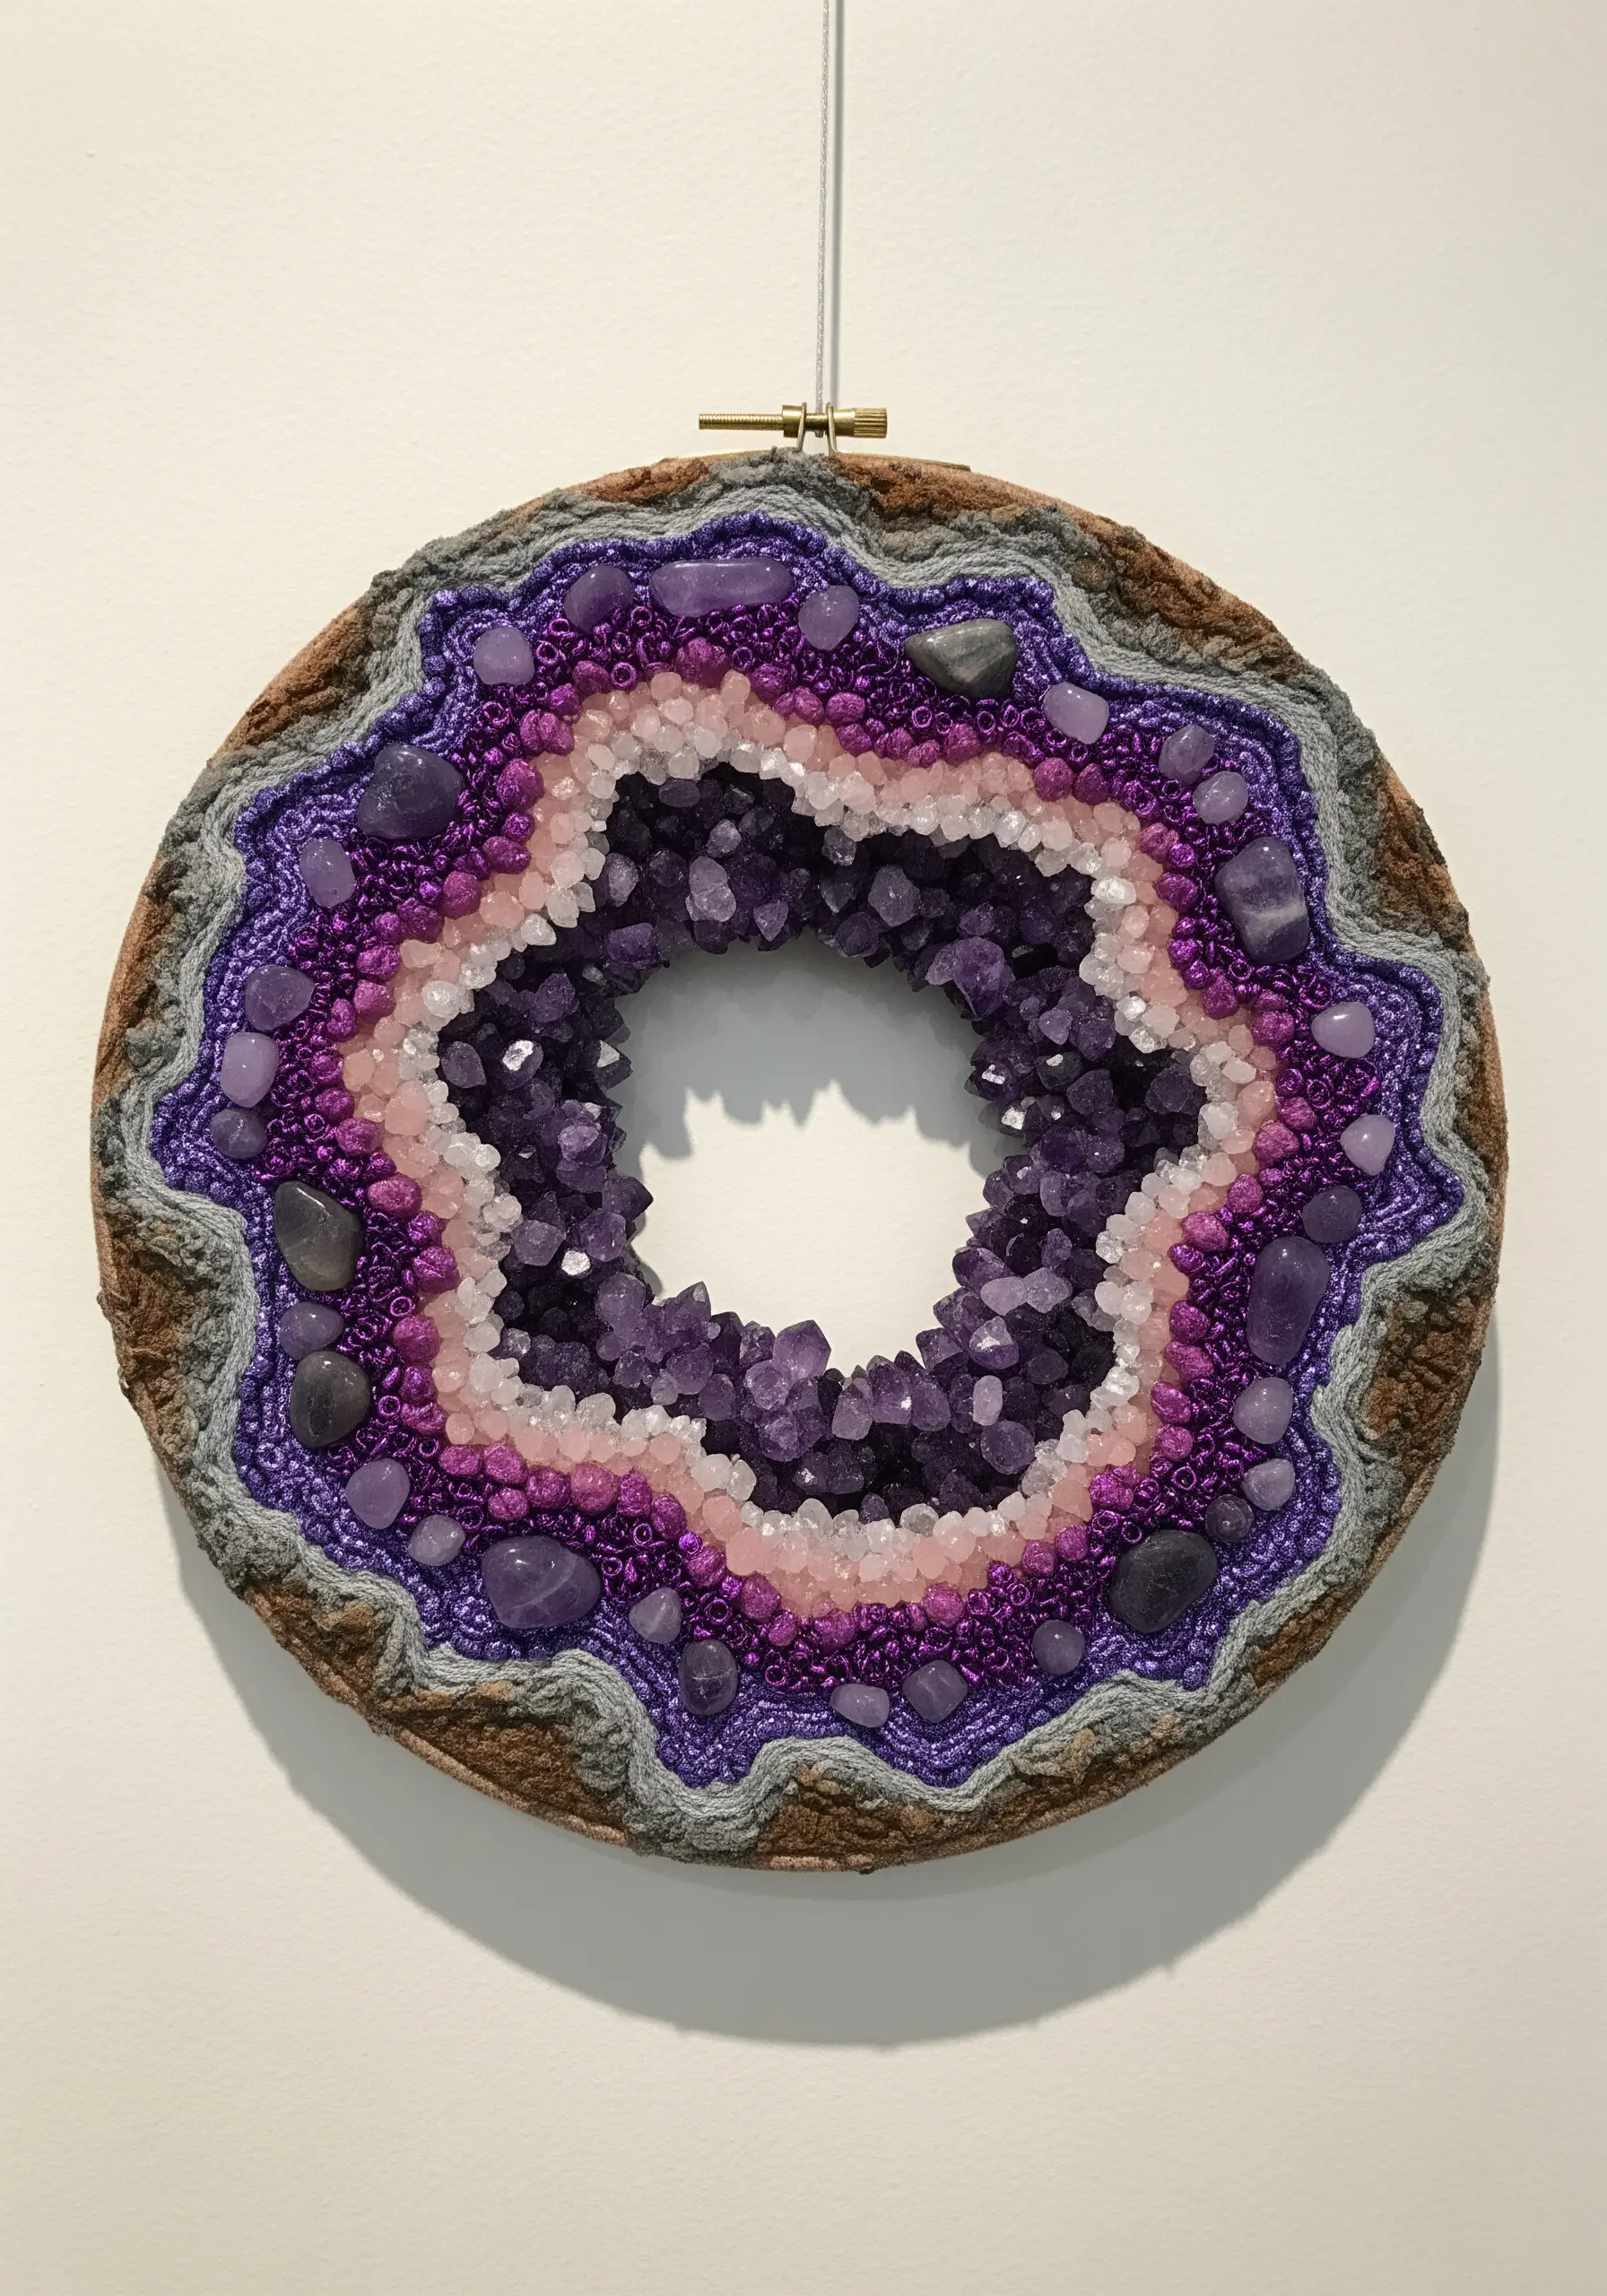
Build on the geode concept by incorporating real gemstones and a wider variety of textures for a richer finish.
Instead of just beads, stitch down genuine amethyst chips and polished rose quartz pebbles in the center for an authentic, weighty feel.
Surround the stone center with rings of French knots or bullion stitches worked in wool yarn to add a soft, matte contrast to the sparkling stones.
Use couched, textured yarn for the outermost layer to represent the rough, earthy exterior of the geode.
This multi-textured approach makes your artwork a true sensory experience.
24. Compose a Pebble Beach with Woven Wheels
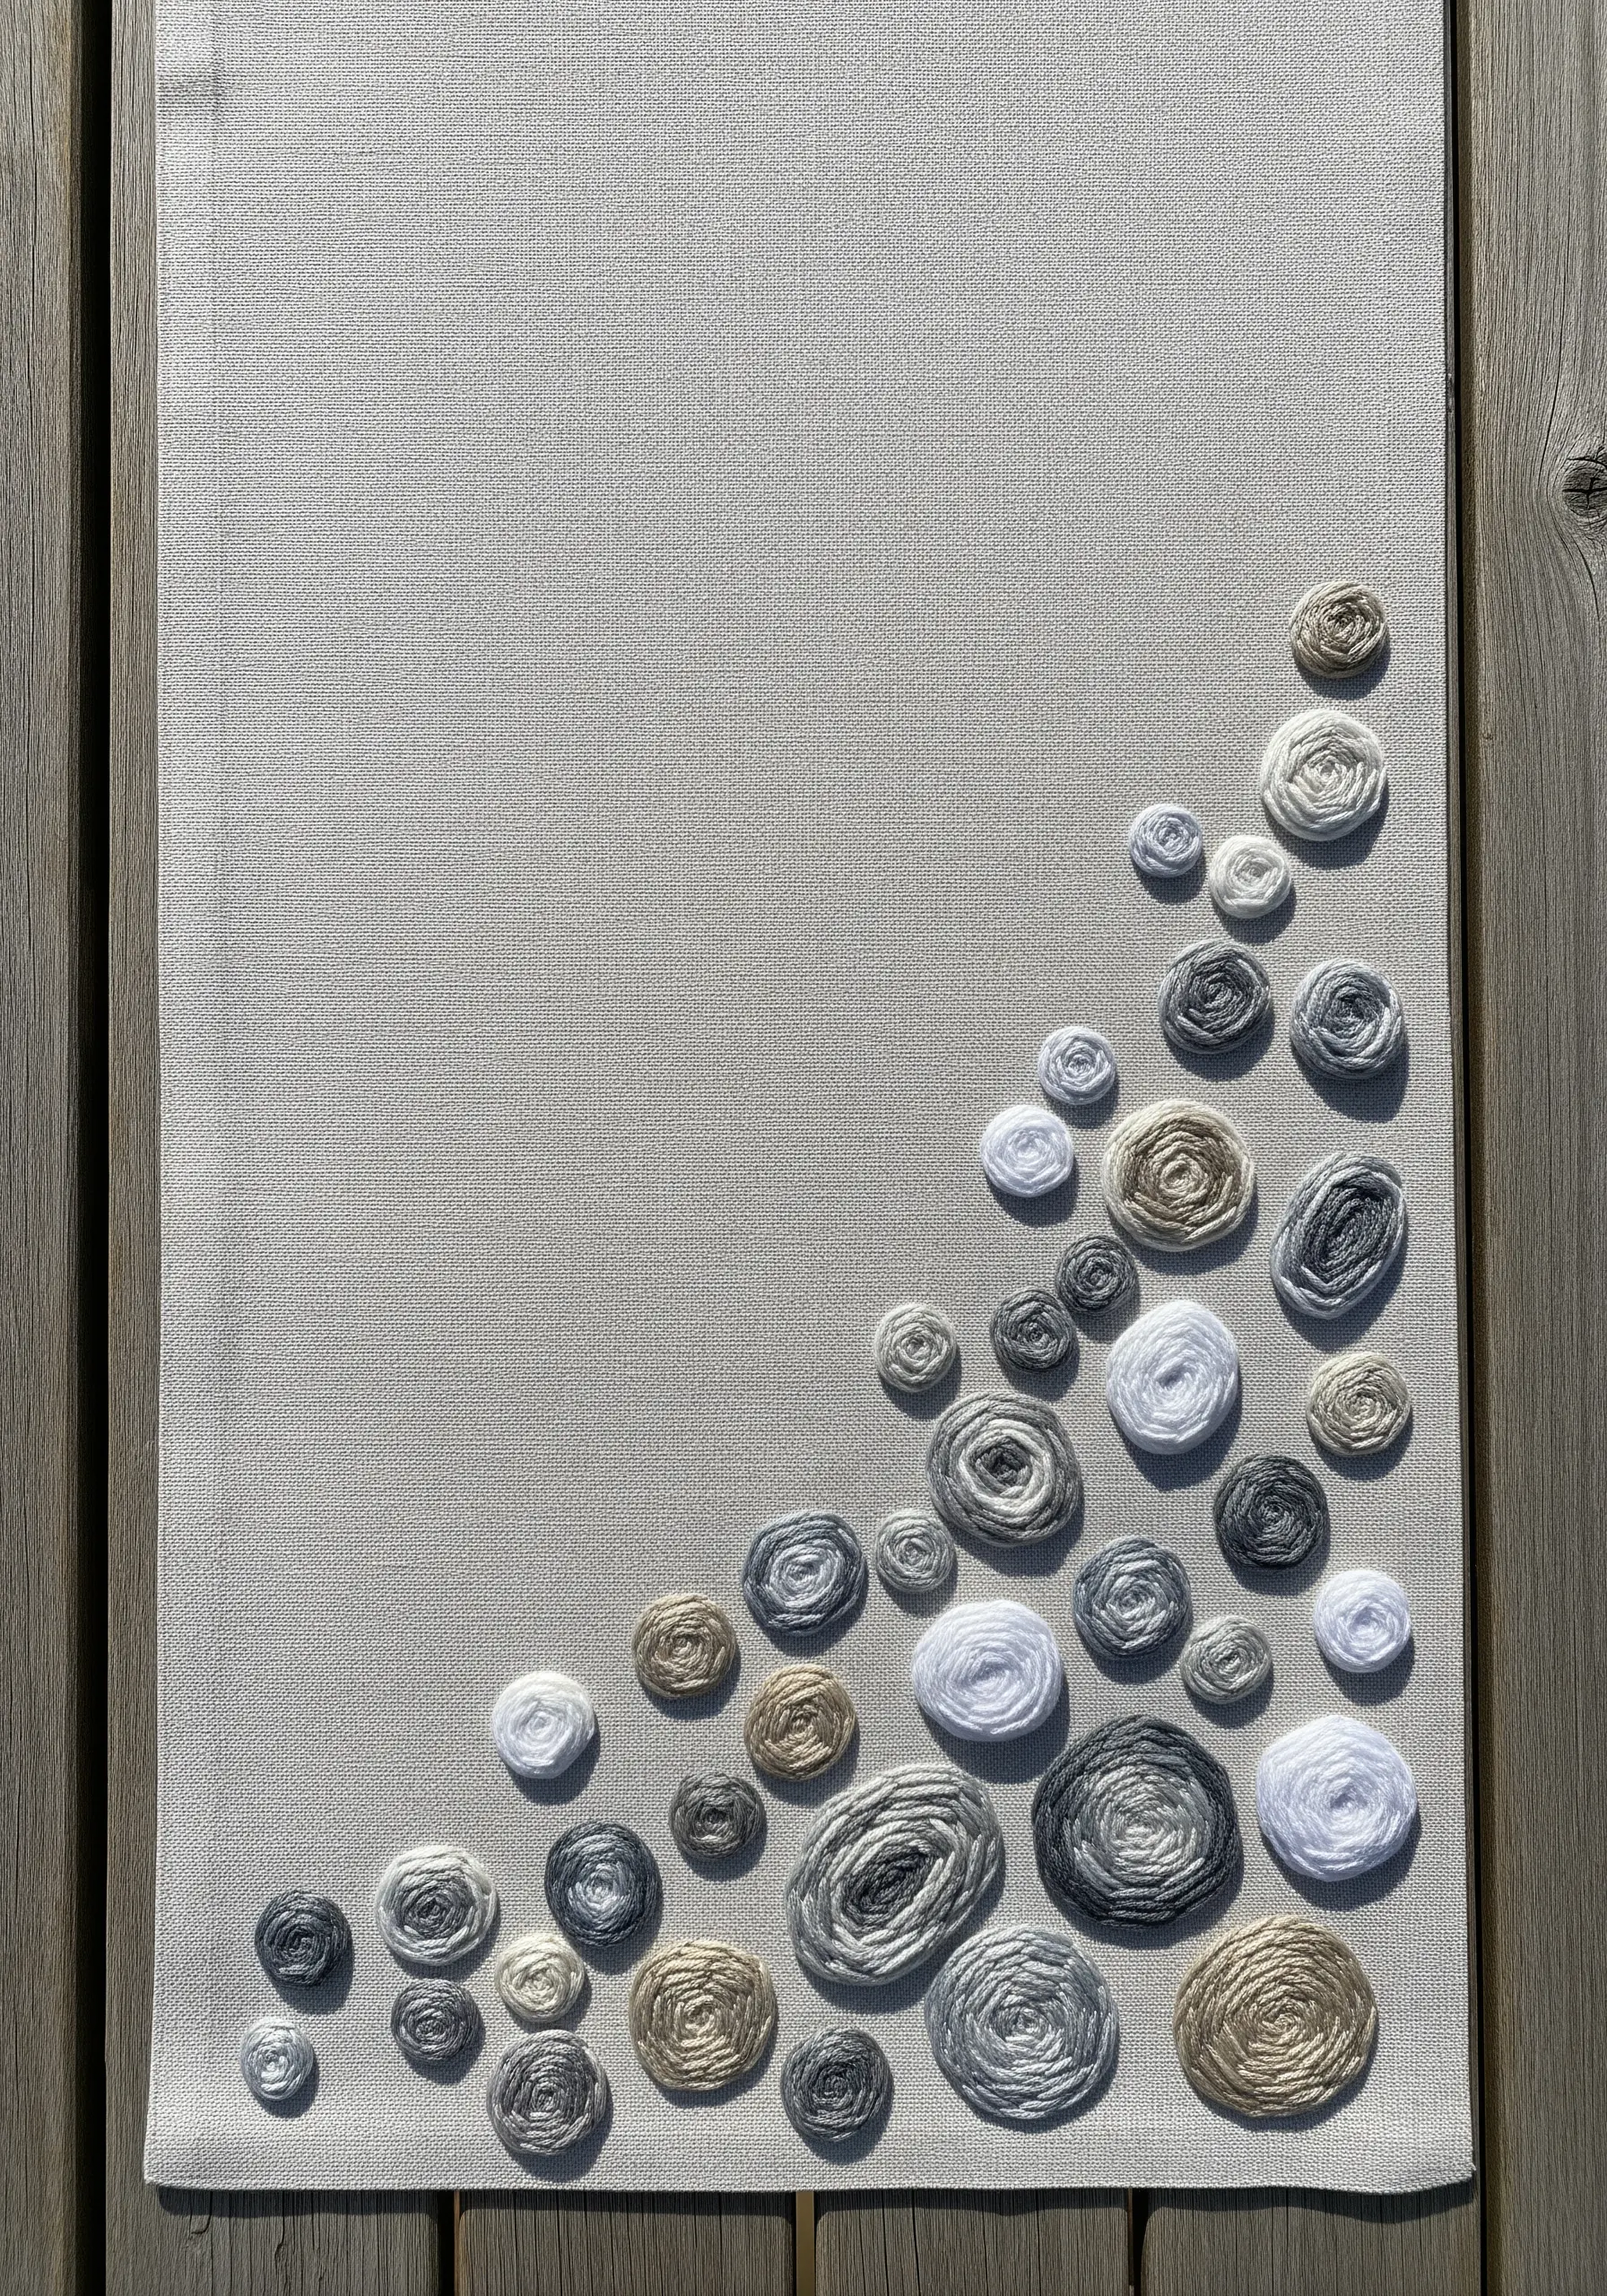
The woven wheel stitch, or spider web rose, is perfect for creating clusters of round, textured shapes like pebbles or barnacles.
Vary the size of your stitches by changing the number and length of the straight-stitch spokes you build your wheel upon.
Use variegated thread or switch colors midway through weaving a wheel to give each ‘pebble’ a unique, multi-toned appearance.
Overlap the wheels slightly and cluster them in an organic, asymmetrical arrangement to create the feeling of a natural shoreline.
These simple abstract designs are incredibly effective for adding texture to home textiles.
25. Achieve a Woven Look with Chunky Couching
You can emulate the rich texture of a woven wall hanging using embroidery techniques on a single piece of fabric.
Lay down thick, chunky wool roving or multiple strands of yarn in horizontal bands of color.
Use a thinner, strong thread to couch these fibers down, either with invisible tacking stitches or with a decorative stitch like a cross stitch or chevron stitch.
Incorporate sections of tightly packed French knots or long bullion stitches to mimic different weaving patterns like soumak or rya knots.
This method gives you the visual impact of weaving without needing a loom.
26. Define Ice Crystals with Metallic Thread
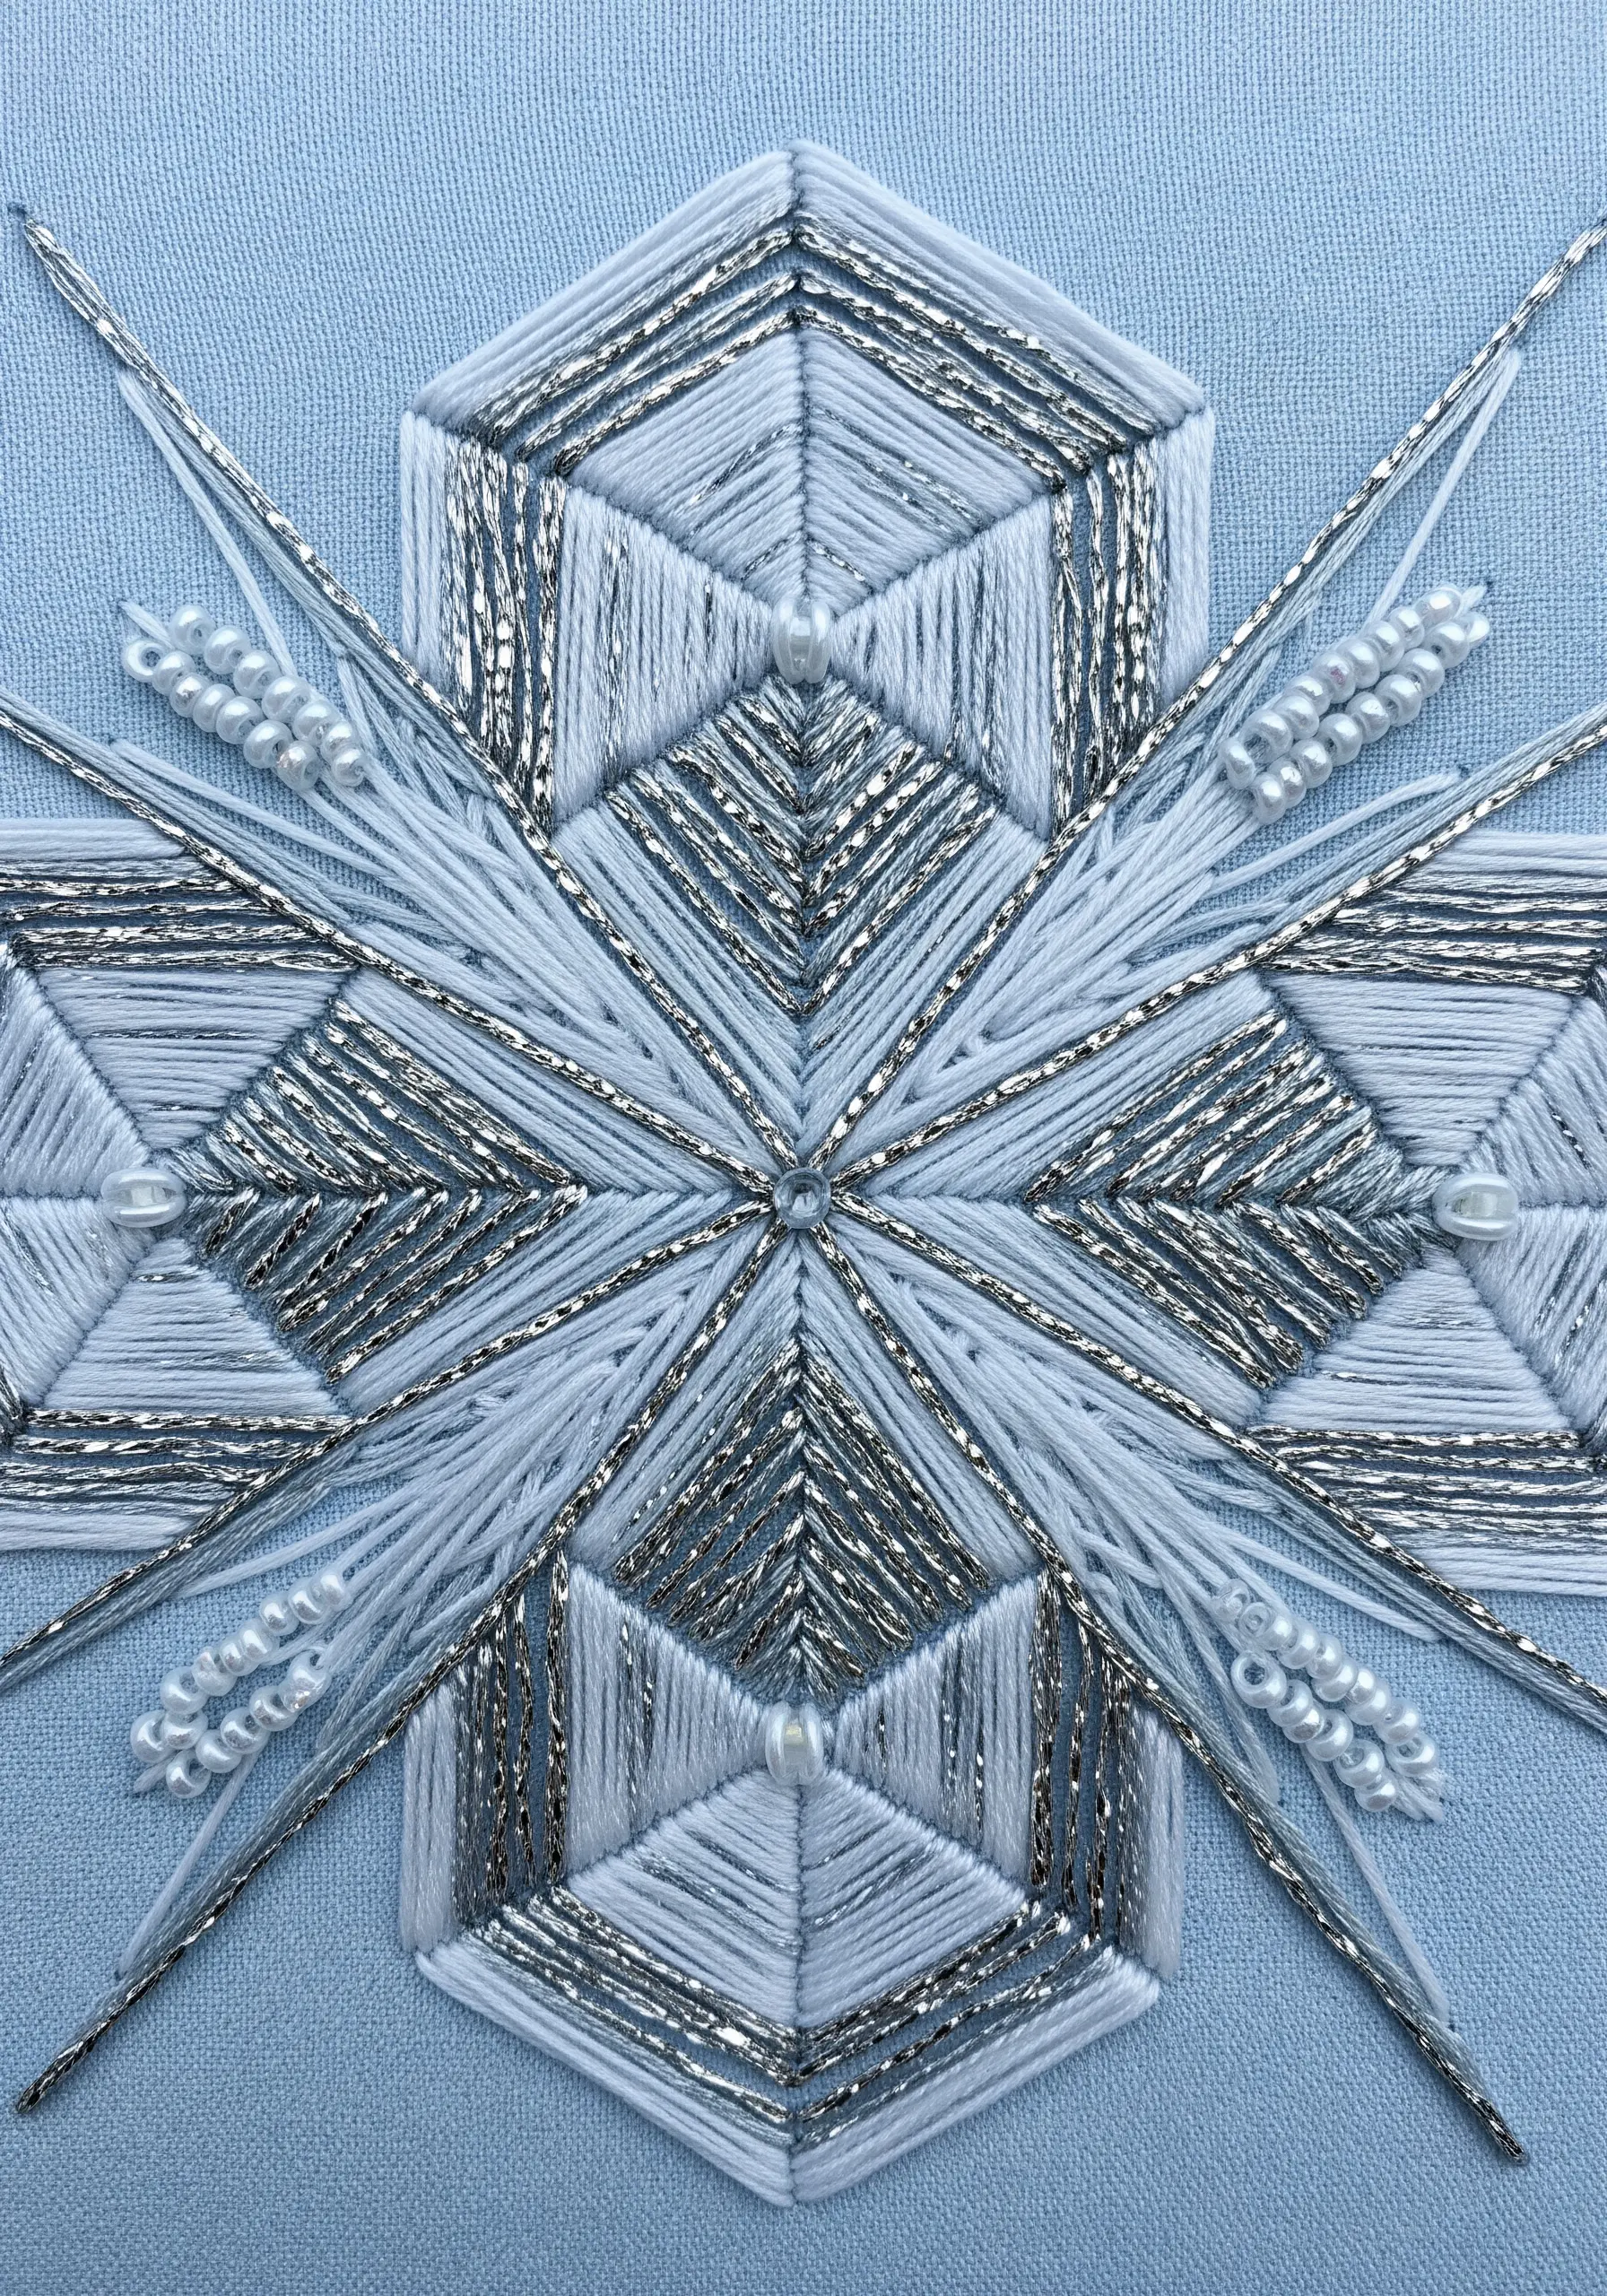
Give a geometric snowflake pattern an authentic frosty sparkle by incorporating metallic threads and precise satin stitches.
To keep your lines sharp, use a water-soluble marker to draw your geometric design directly onto the fabric before you begin.
Alternate between sections of smooth, white satin stitch and areas filled with laid work using a silver metallic thread.
The contrast between the matte floss and the shimmering metallic thread creates a dynamic, light-catching effect.
Add tiny seed pearls or white beads at the intersections of your lines to complete the intricate, crystalline look.
27. Sculpt Cracked Earth with Raised Appliqué
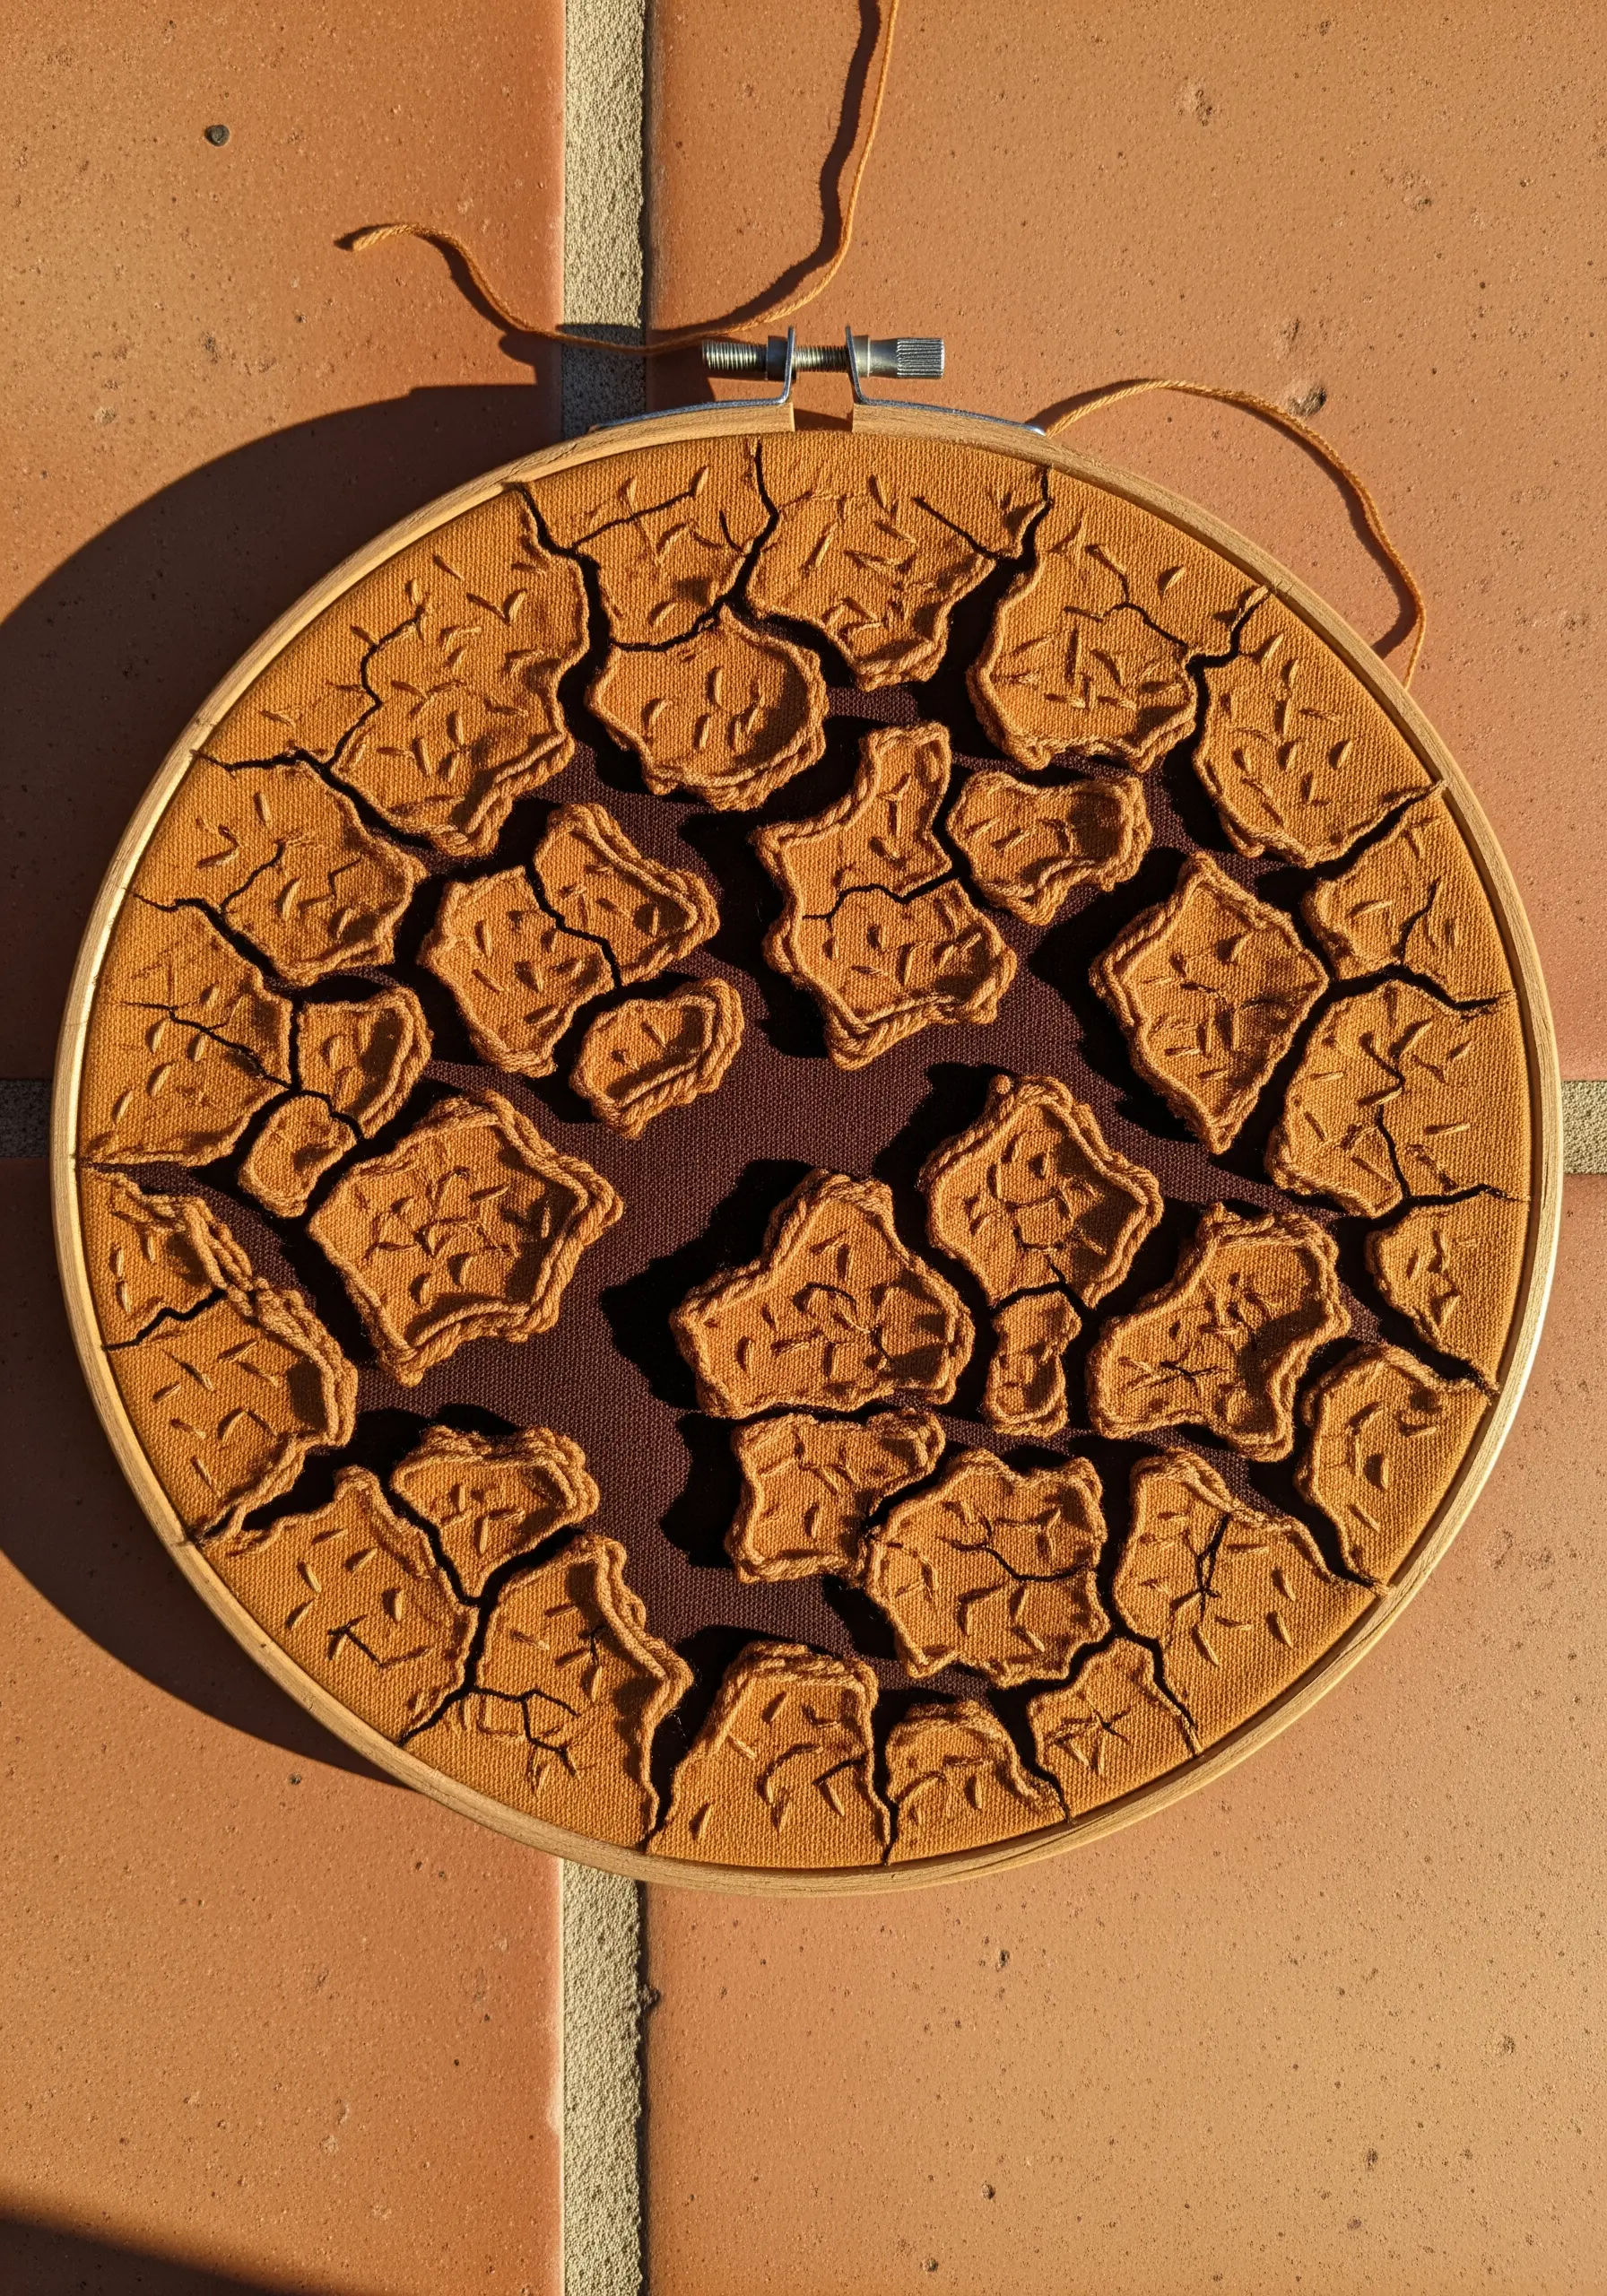
To create the texture of parched, cracked earth, you need to build dimension up from the surface.
Cut your ‘cracked earth’ shapes from a piece of fabric and work your stitches on them separately.
Fill these shapes with a dense seed stitch or short straight stitches to give them a rough, earthy texture.
Lightly pad the back of each shape with a small piece of felt or batting before appliquéing it onto your darker background fabric.
Finally, connect the raised shapes with stitched ‘cracks’ using a dark brown backstitch, which makes the raised sections pop.
28. Build a Barnacle Colony with Stumpwork

Capture the unique, clustered texture of barnacles using stumpwork or padded embroidery techniques.
Create each individual barnacle by making a small, cone-like shape with padded satin stitch over a felt or cardstock base.
Alternatively, for a softer look, create small fabric buds, stuff them lightly, and then stitch them onto the background.
Vary the size and orientation of the barnacles, clustering them tightly together in some areas and scattering them in others for a natural feel.
Use a darker thread to stitch the opening of each barnacle, adding the final touch of realism.
29. Create Floating Dandelion Seeds
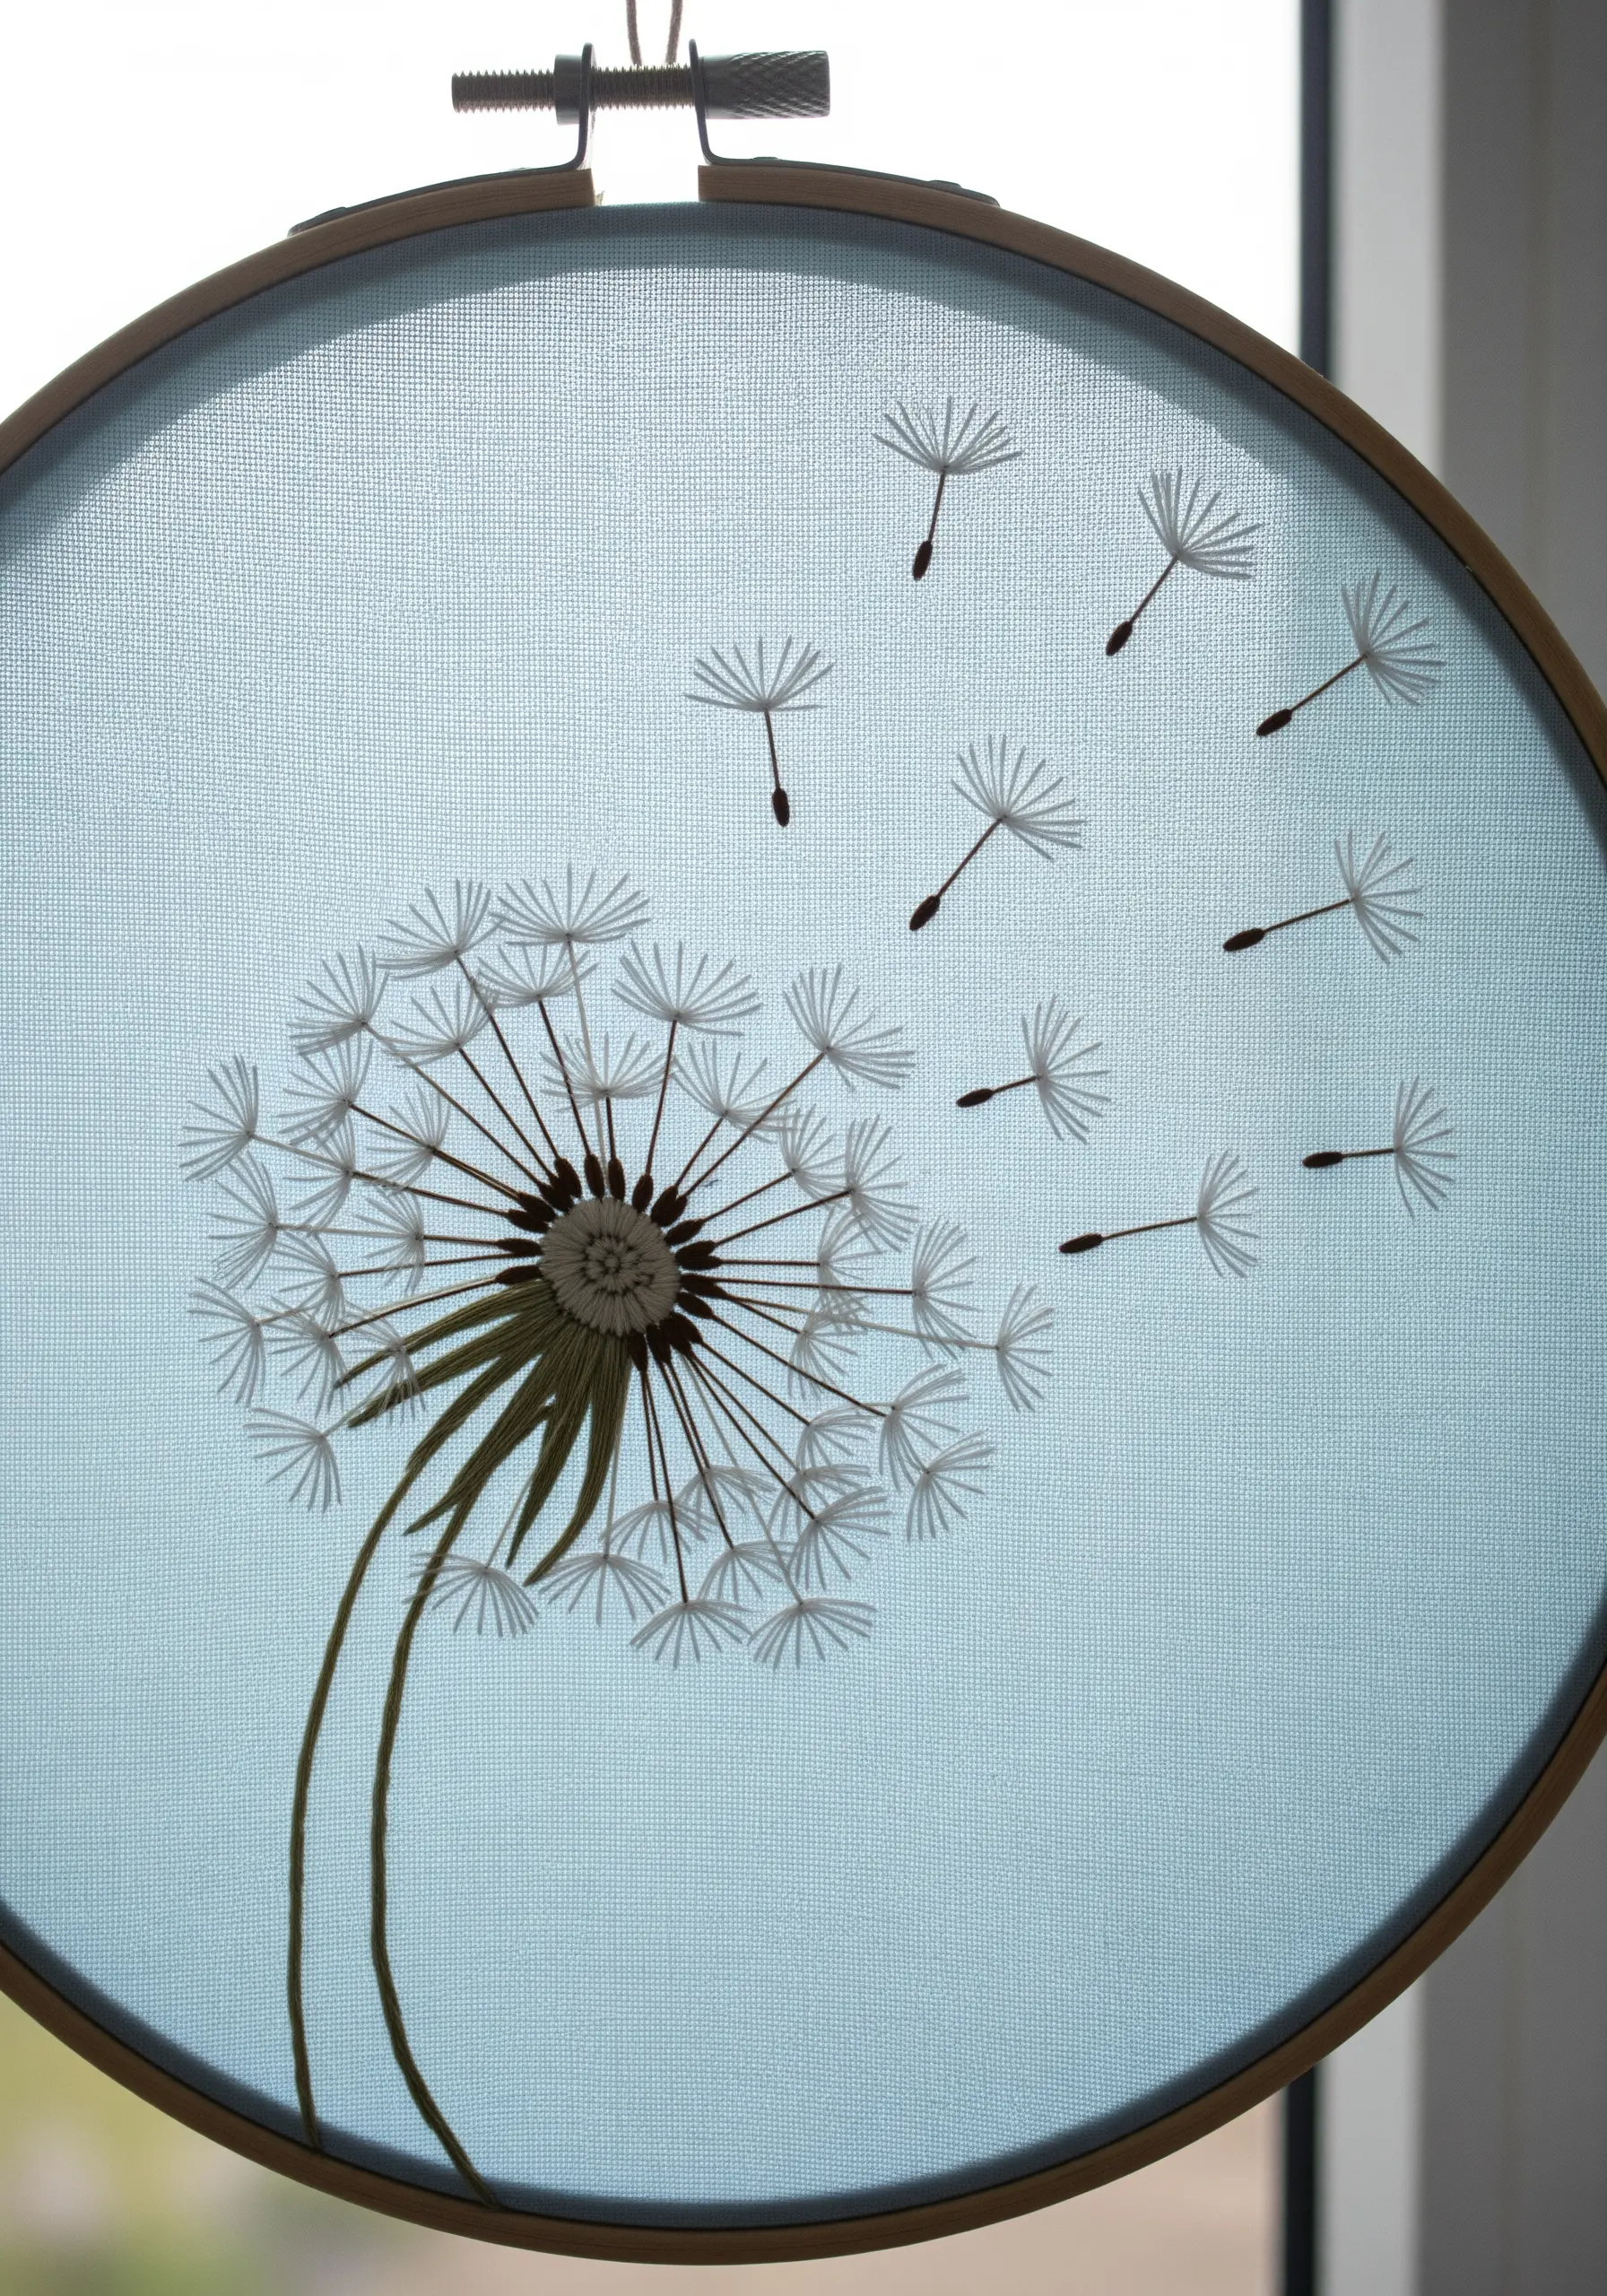
The key to stitching a dandelion that feels like it could blow away is creating a sense of lightness and movement.
Work on a light, airy fabric like linen or even a sheer fabric to enhance the feeling of weightlessness.
For each seed pappus (the parachute), use a series of detached chain stitches or fly stitches arranged in a circle, all worked with a single strand of white floss.
Connect the pappus to the center with long, delicate straight stitches in a darker color for the seed and stem.
Stitch a few seeds drifting away from the main flower head to create a narrative of movement and wind.
30. Layer Mineral Strata with Mixed Media
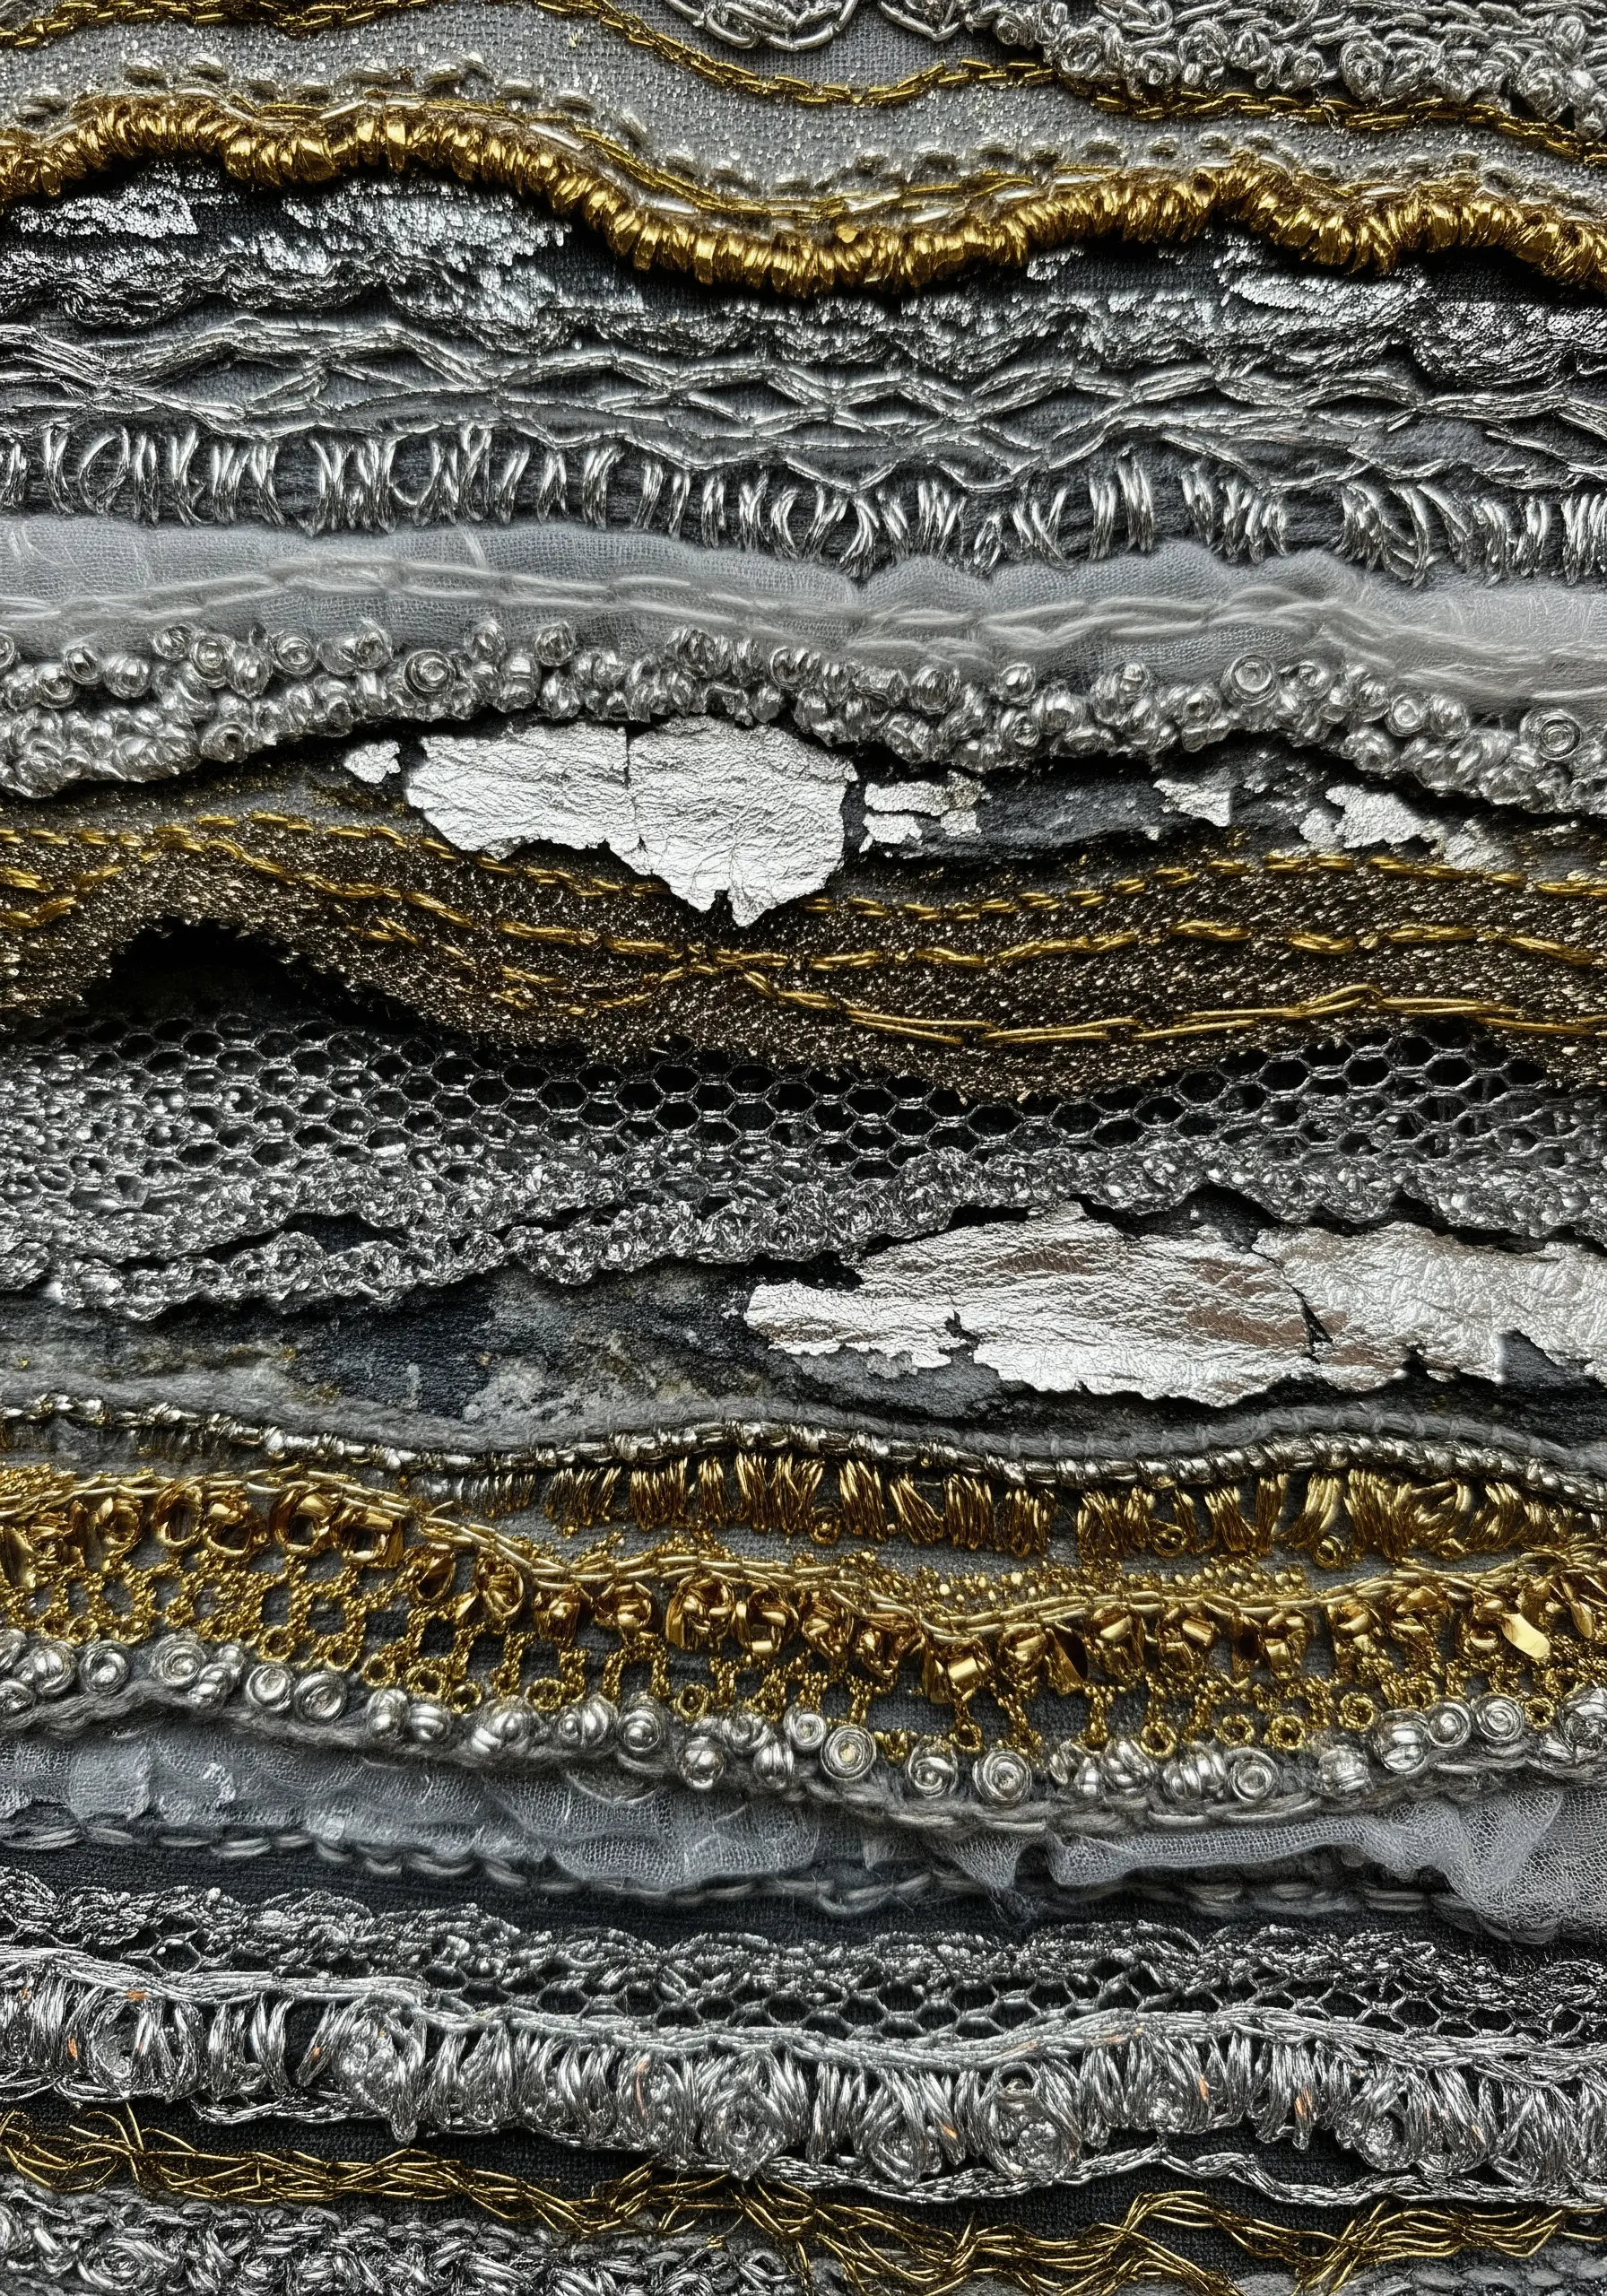
Evoke the rich, layered texture of rock strata by creating a collage of different materials and threads.
Arrange horizontal strips of various fabrics—like metallic lace, raw silk, and fine mesh—onto your background fabric.
Secure these layers with different linear stitches, such as couching thick metallic cords, running lines of chain stitch, or adding rows of French knots.
Incorporate fragments of silver or gold leaf between the layers to represent shimmering mineral deposits.
This is one of the best abstract mixed-media embroidery ideas for using up scraps and creating something truly unique.
31. Fan Stitches to Form a Ginkgo Leaf
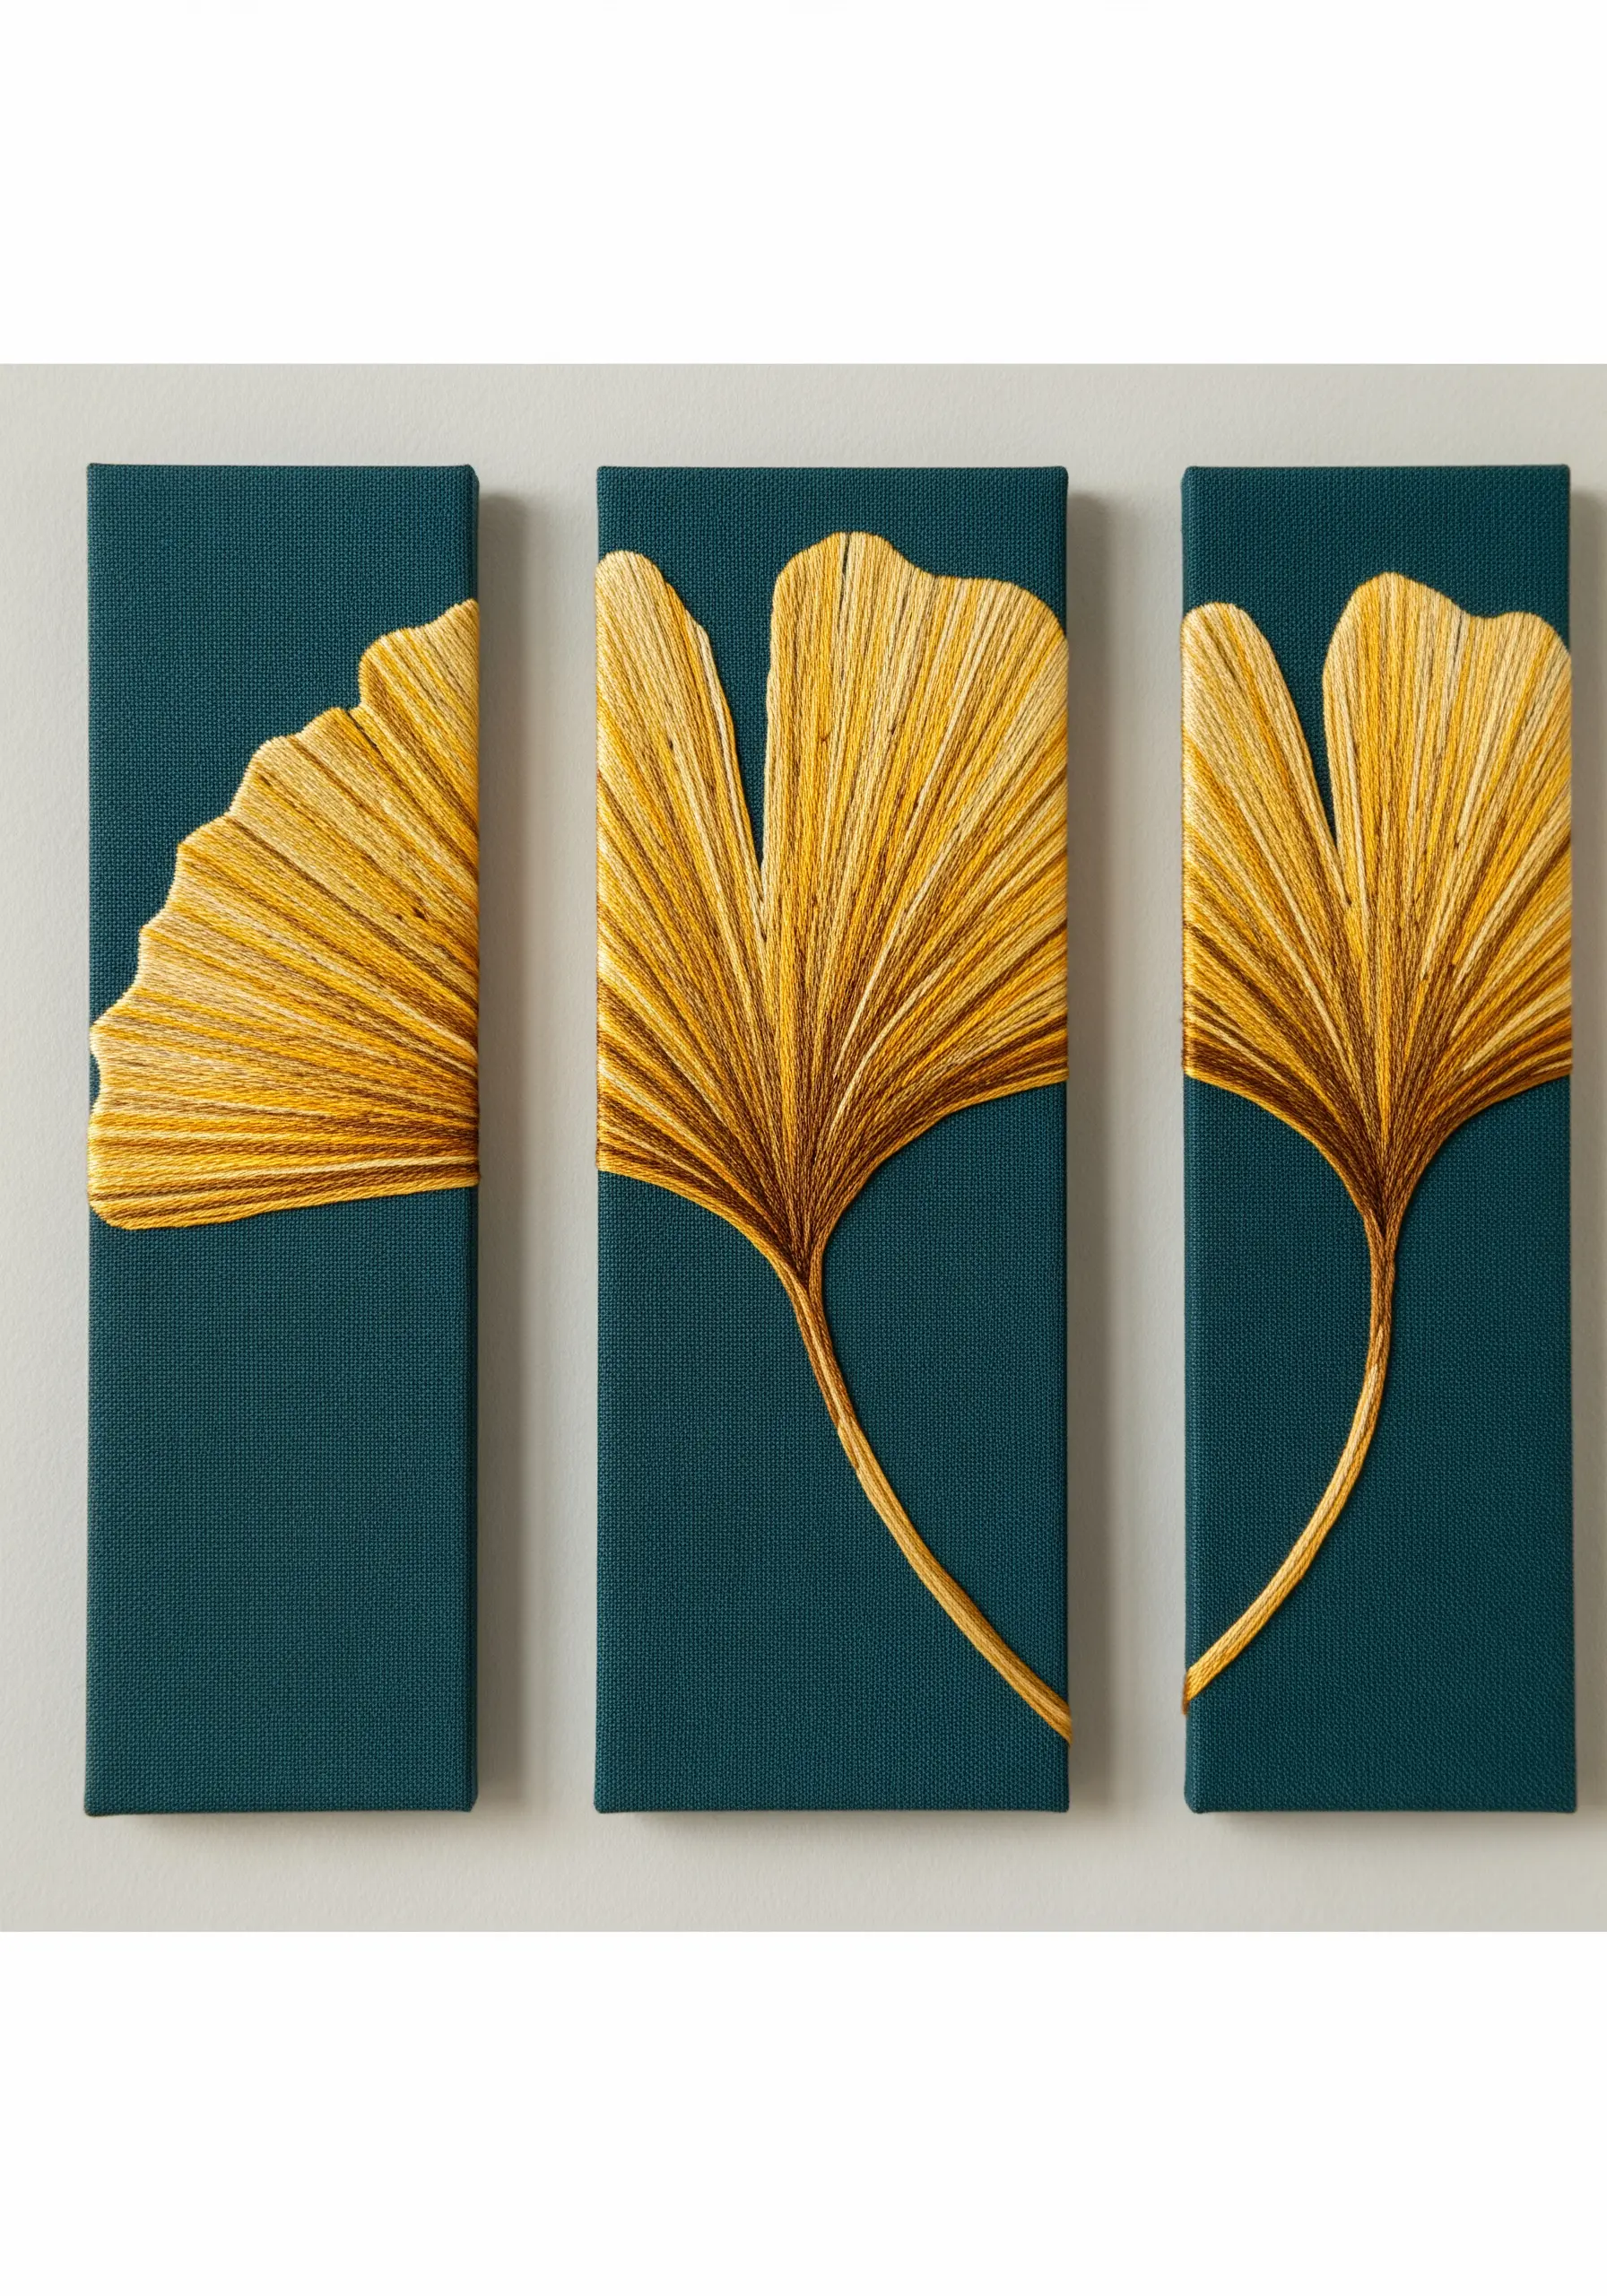
The elegant, fan-like shape of a ginkgo leaf is perfectly suited to a radiating satin stitch.
To achieve this, all of your stitches must start from a single point at the base of the leaf and fan outwards towards the curved edge.
Use two or three closely related shades of gold and yellow, blending them with long-and-short stitches to create a subtle, sun-kissed gradient.
Create a clean, defined stem using a whipped backstitch or by couching a thicker cord, which provides a raised edge against the flat stitches of the leaf.
Displaying them as a triptych of minimalist embroidery wall pieces transforms a simple motif into a sophisticated art installation.


