

You can capture more than just a picture of a landscape; you can translate the very feel of it into thread. Think of the rough texture of bark, the soft density of moss, or the smooth contours of a river stone. This is where embroidery moves beyond image-making and becomes a tactile language.
Each project here is an invitation to look closer—not just at the world outside, but at the potential within your own hands. We will explore how to build dimension, layer stitches for depth, and choose threads that don’t just add color, but also character and weight.
Let’s move beyond simple outlines and fills. It’s time to create work that feels as rich and complex as the nature that inspires it. You have all the skill you need; this is about refining your eye and your technique to create something truly resonant.
1. Render Earth Strata with Yarn Couching
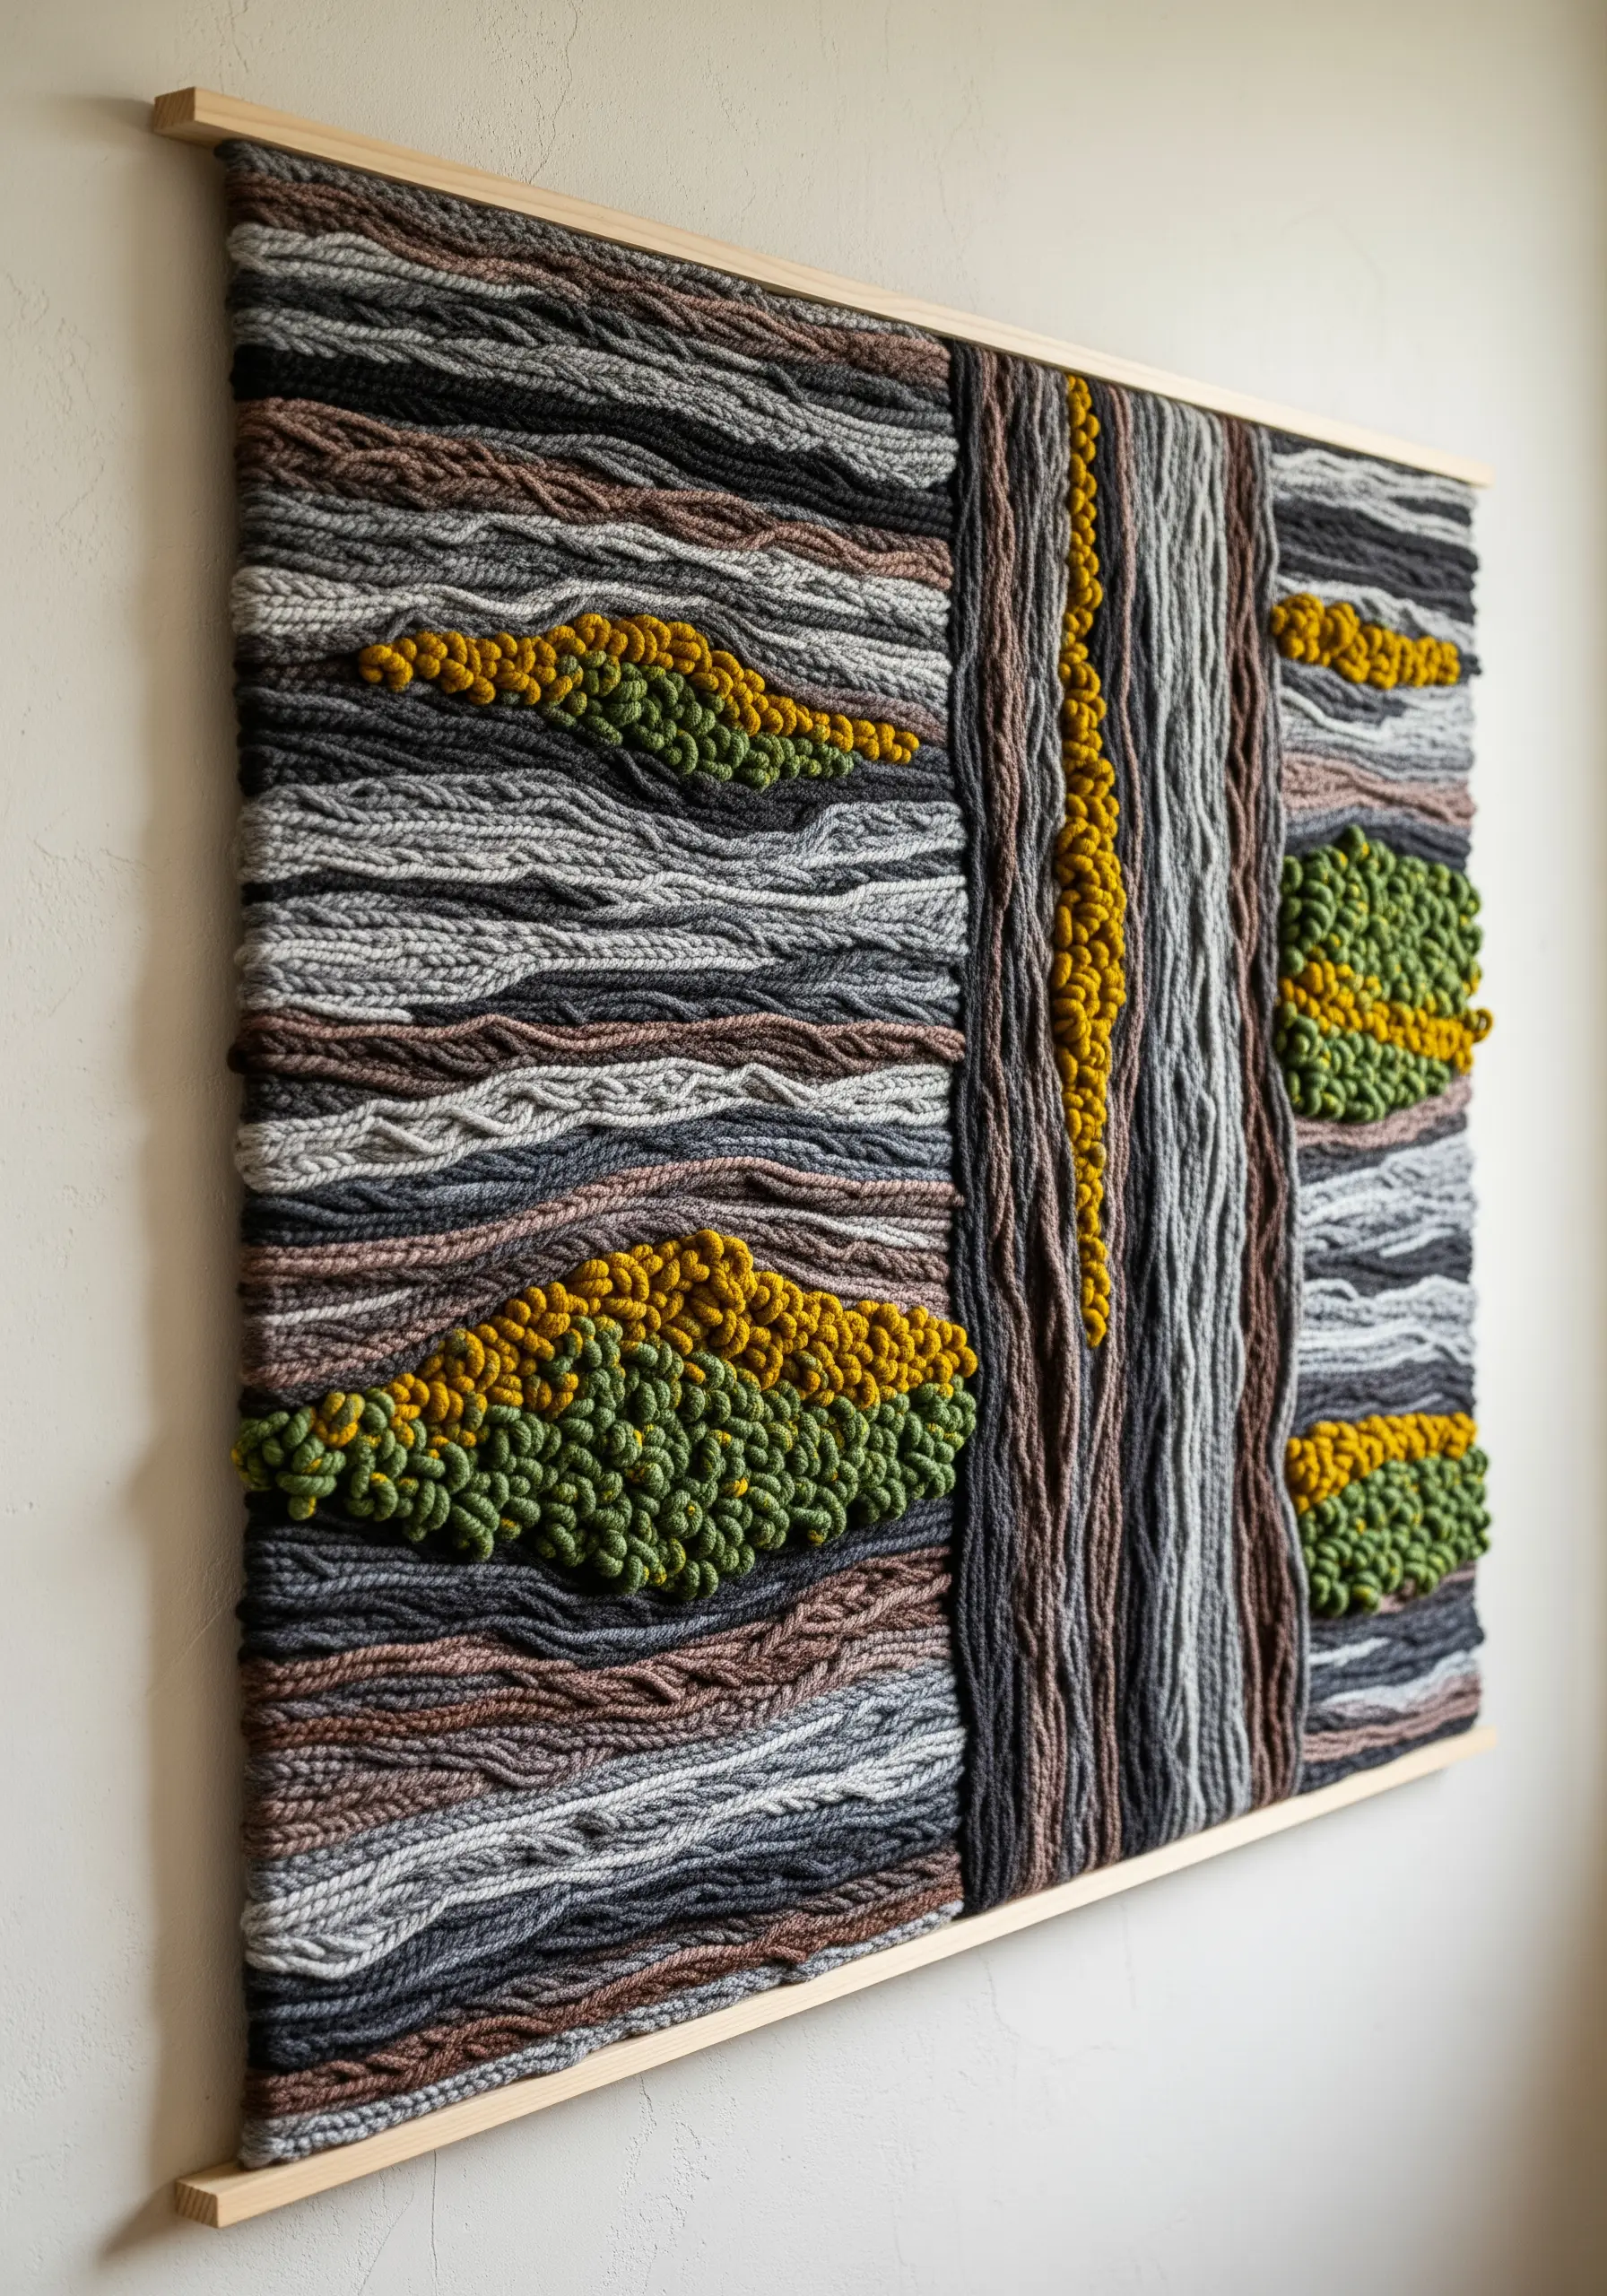
Create geological layers by couching thick, textural yarns onto a heavy canvas backing.
Instead of filling large areas with floss, lay down chunky wool or roving yarn and secure it with a thinner, contrasting thread using small, evenly spaced tacking stitches.
Vary the yarn weights and textures—from smooth merino to bumpy slub yarn—to mimic the organic composition of rock and soil.
For the moss-like pods, fill circular areas with dense French knots in variegated greens and ochre, creating raised islands of texture that contrast with the linear flow of the couched yarn.
This technique allows you to build a large-scale yarn wall art piece with speed and dramatic tactile effect.
2. Sculpt River Stones with Felt Appliqué
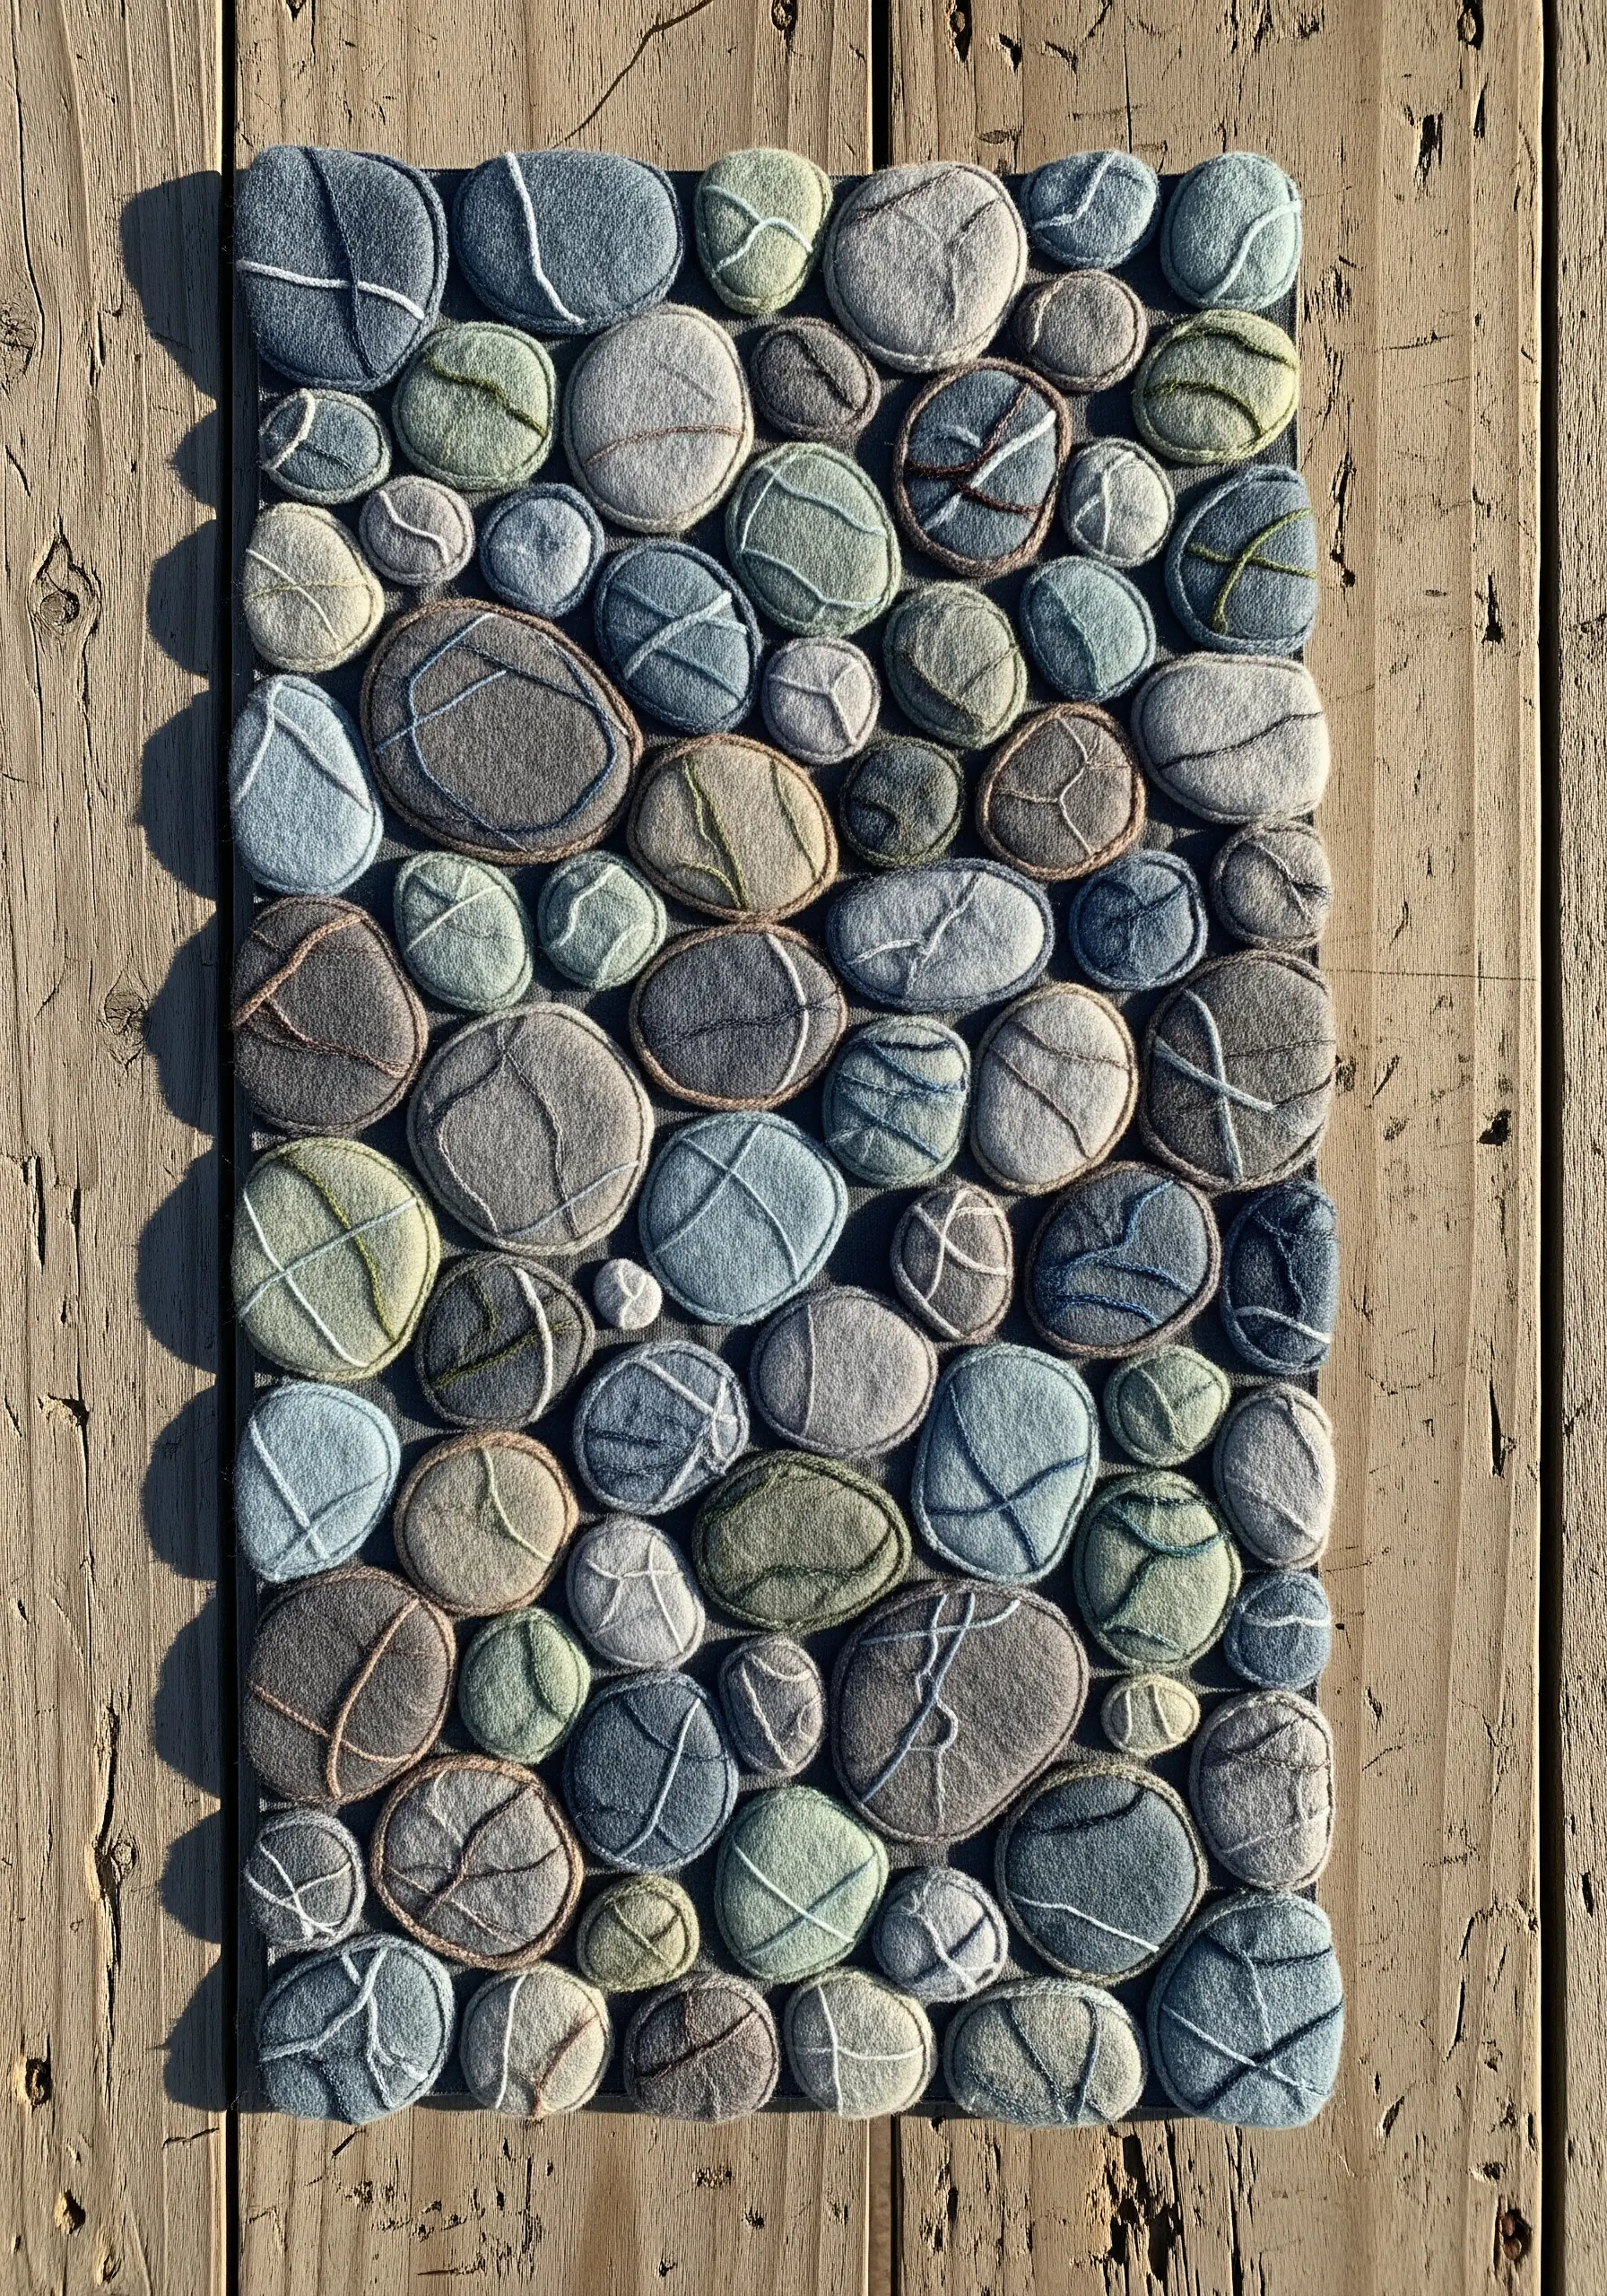
To capture the smooth, weighted feel of river stones, start with a foundation of felt appliqué.
Cut organic pebble shapes from wool felt in muted blues, greys, and greens, then arrange and secure them onto your base fabric with a tiny whipstitch around the edge.
Pad some of the felt shapes with a layer of batting underneath to create subtle, three-dimensional contours.
The final touch is adding the delicate cracks and veins with a single strand of a darker contrasting thread, using a simple backstitch or split stitch.
This combination of soft appliqué and sharp line work creates a composition that is both visually gentle and structurally defined.
3. Cultivate Mossy Landscapes with Dimensional Knots
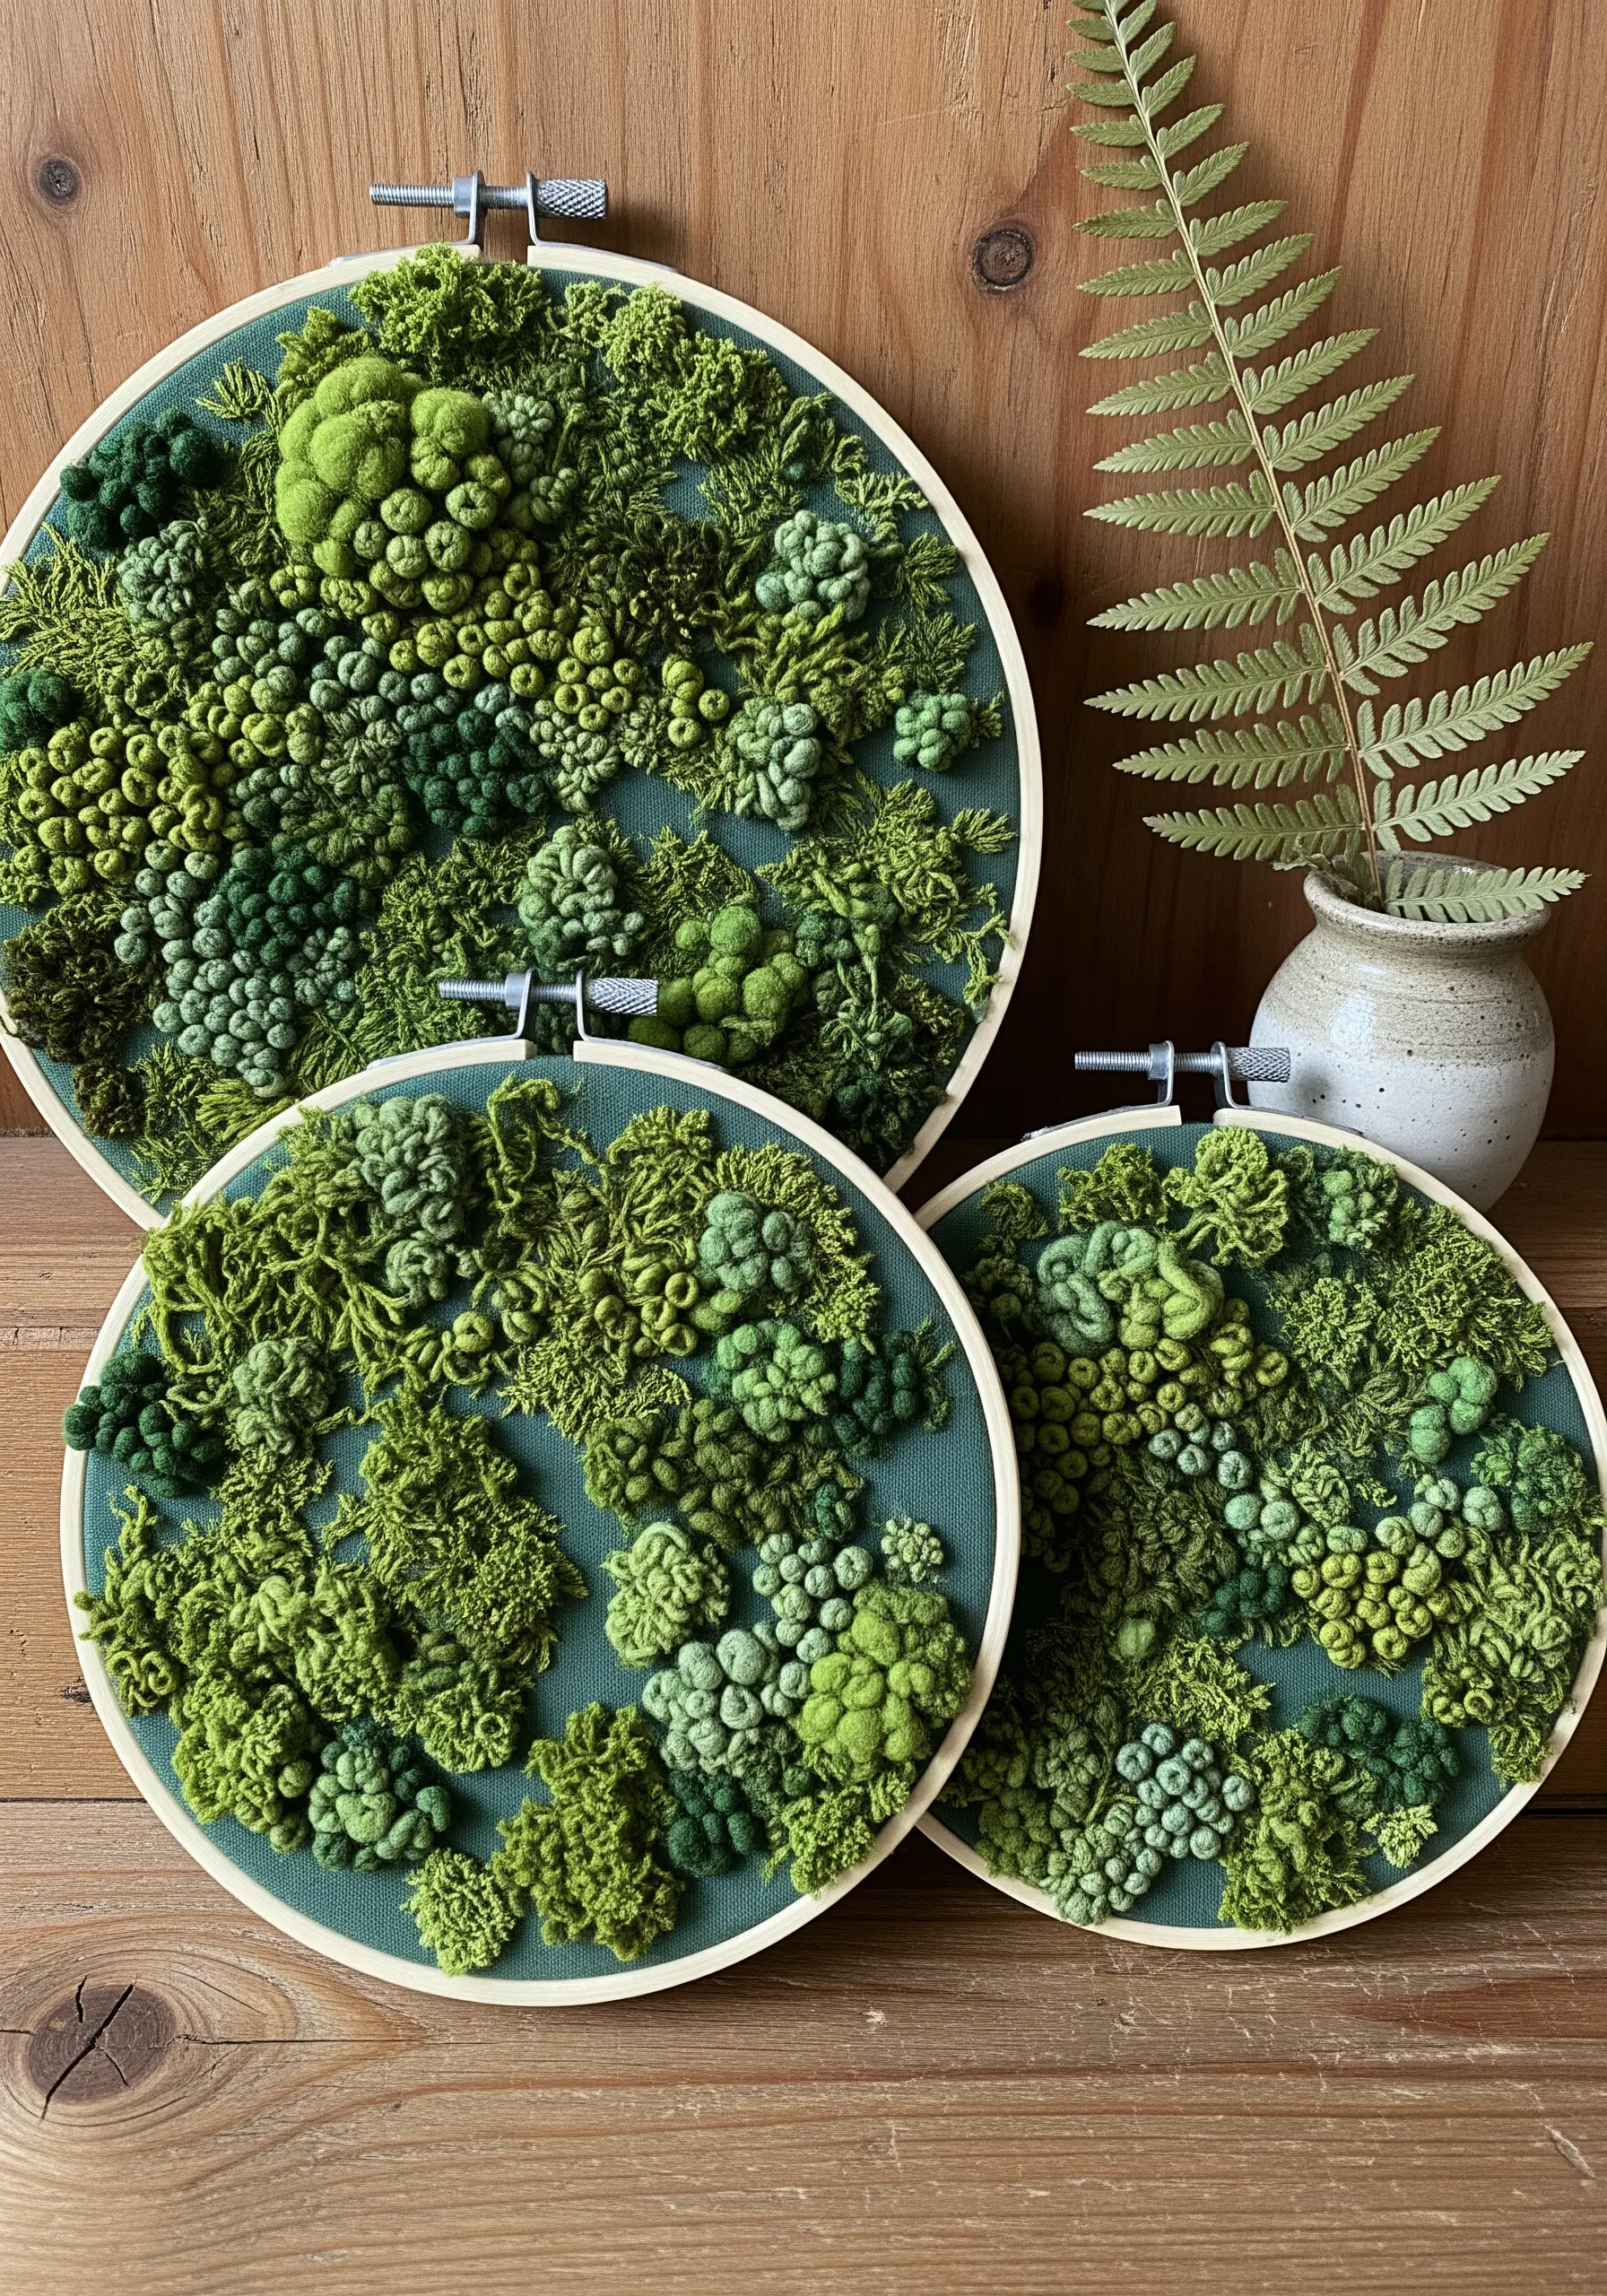
Recreate the dense, velvety texture of moss by clustering knots of varying sizes and tensions.
Use French knots for tight, small buds and Colonial knots for rounder, more robust mounds. For a shaggier texture, incorporate bullion knots worked closely together.
The key to a realistic finish is using several shades of green floss simultaneously, from deep forest to bright chartreuse, and varying the number of strands you use for each knot (from two to six).
Work in organic patches rather than rows, allowing the clusters to overlap and build on each other to create an undulating, high-texture surface that invites touch.
4. Illustrate a Leaf Skeleton with Precision Stitching
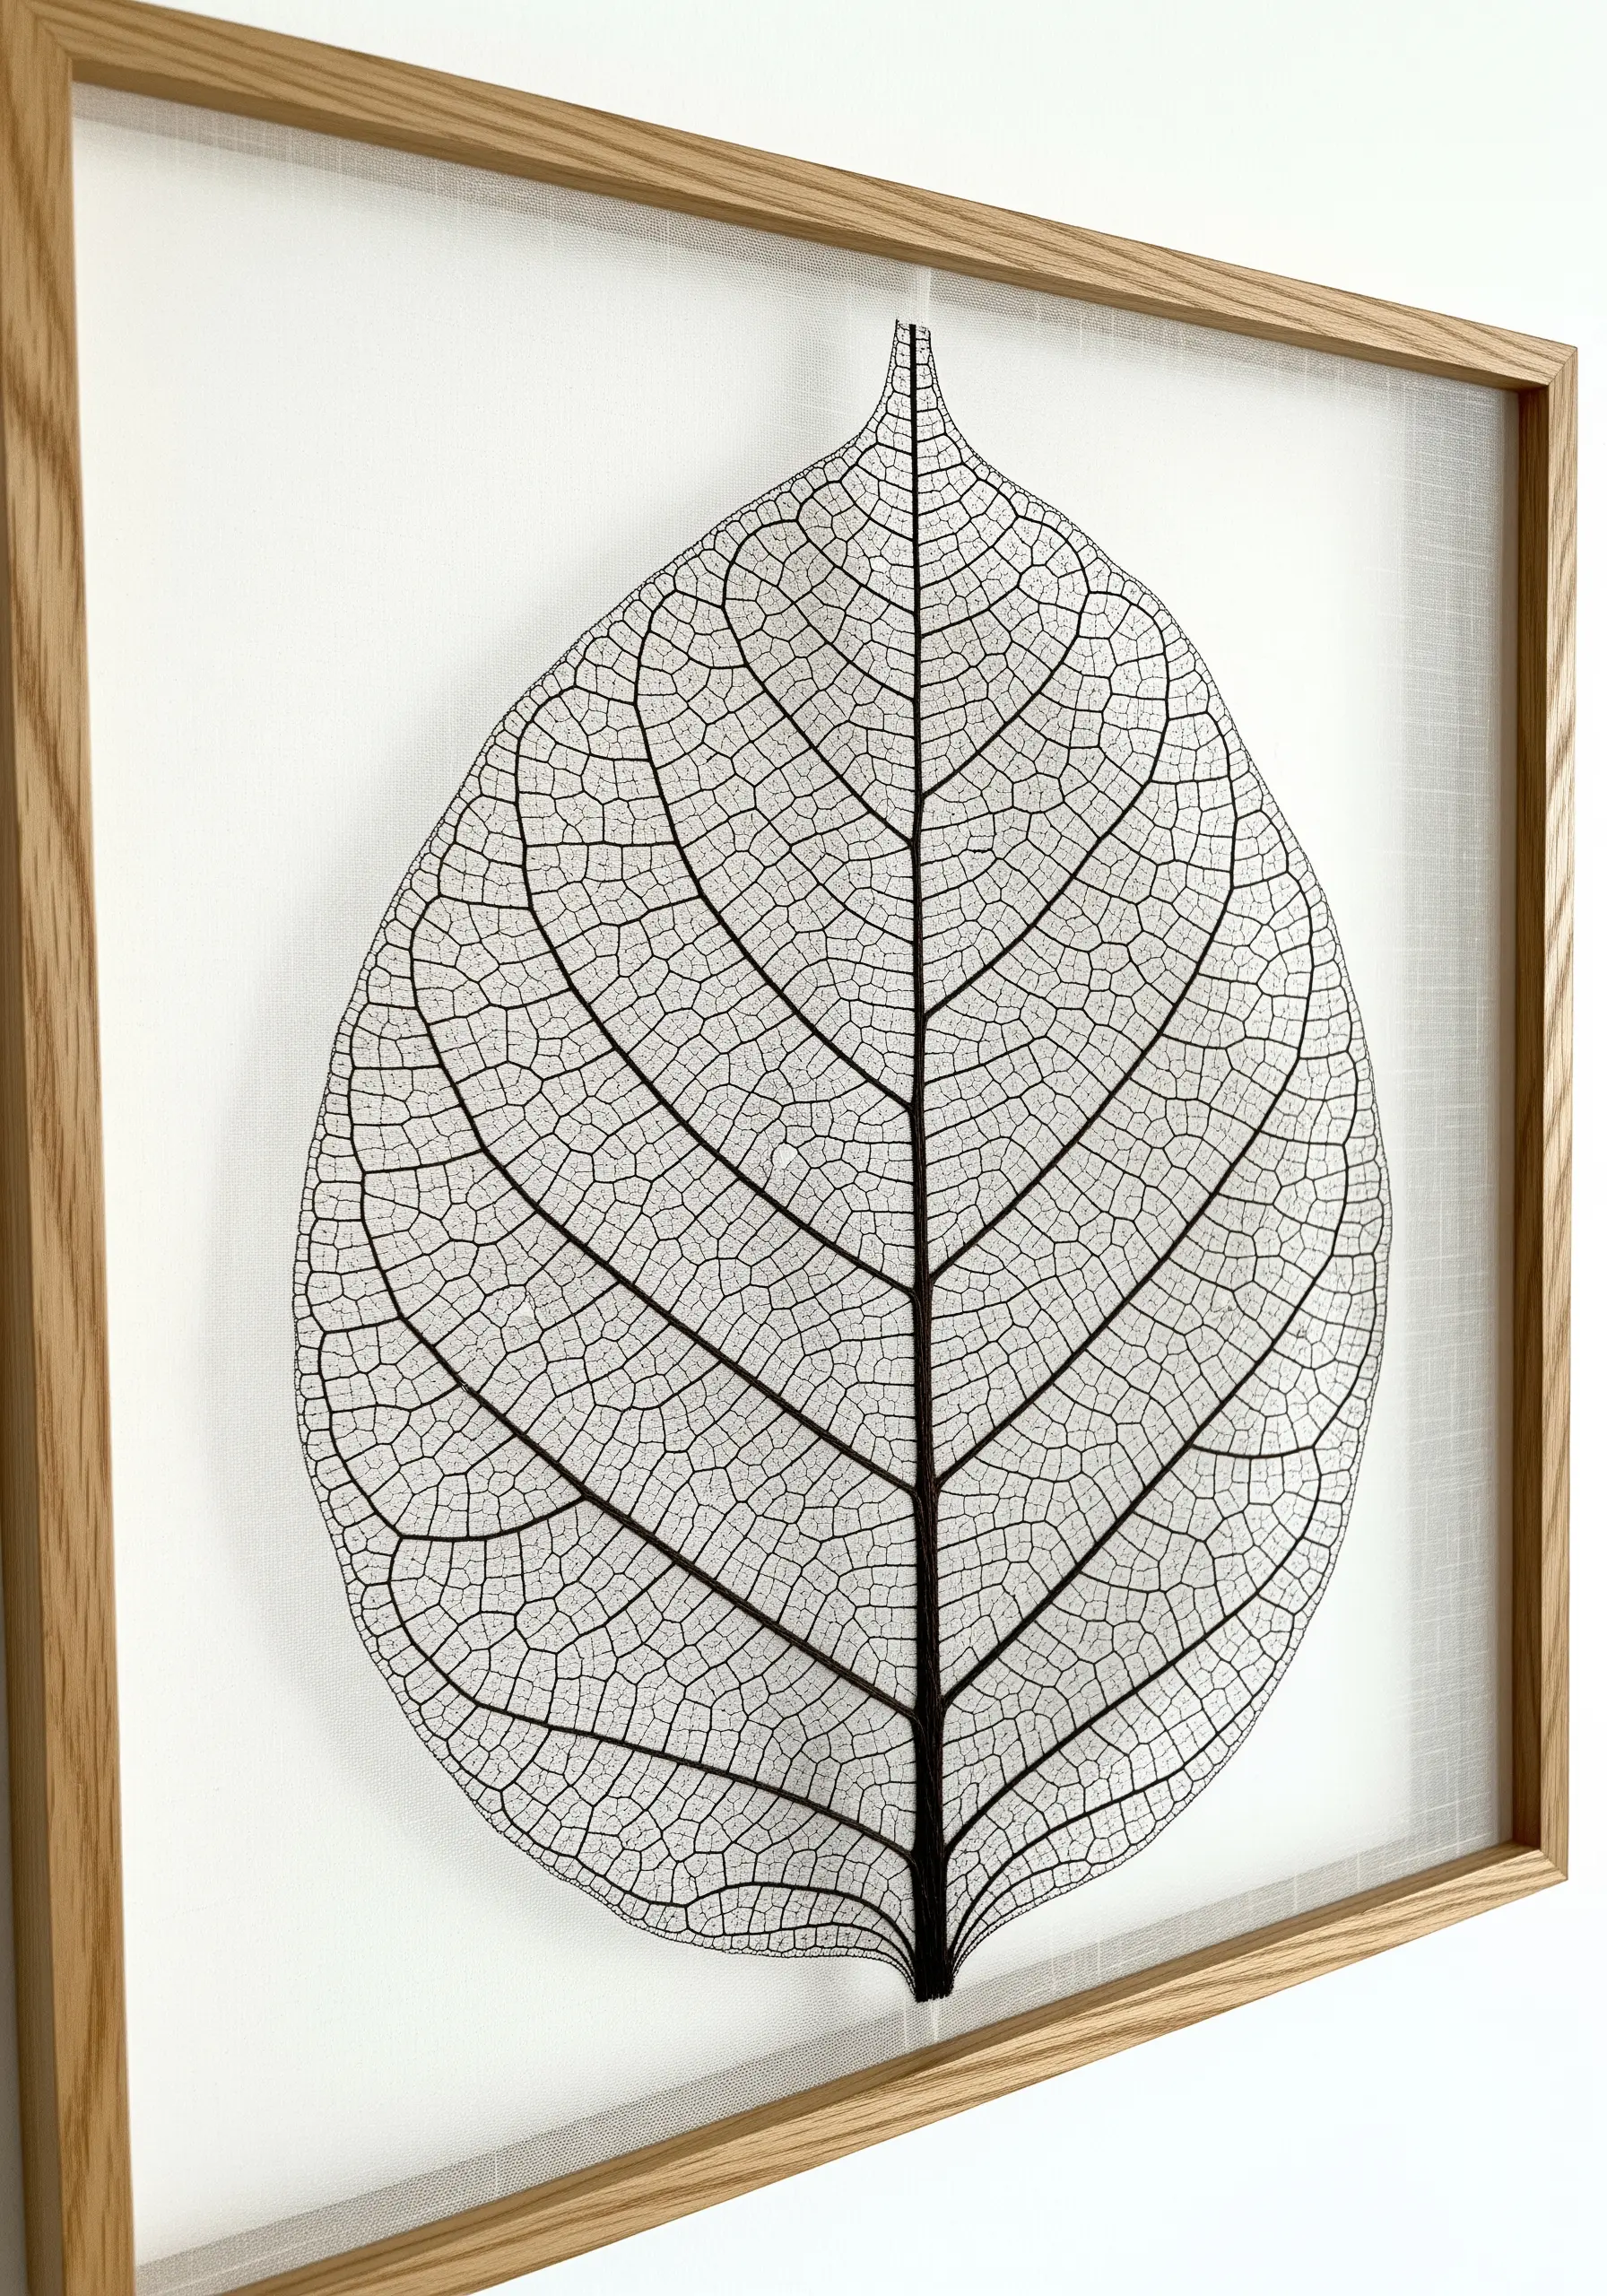
Capture the fragile architecture of a skeleton leaf by focusing on clean, precise linework.
Stretch a crisp, even-weave linen or cotton taut in your hoop. Use a single strand of black or dark grey six-strand floss and a fine, sharp needle.
Trace the main veins with a slightly thicker stitch, like a two-strand backstitch, to give them prominence.
For the intricate cellular network, switch to a single strand and use a delicate backstitch or stem stitch, keeping your stitch length incredibly small and consistent.
This project is an exercise in meditative patience, where the negative space of the fabric is just as important as the lines you create, resulting in elegant botanical line art.
5. Construct Fungi with Stumpwork Techniques
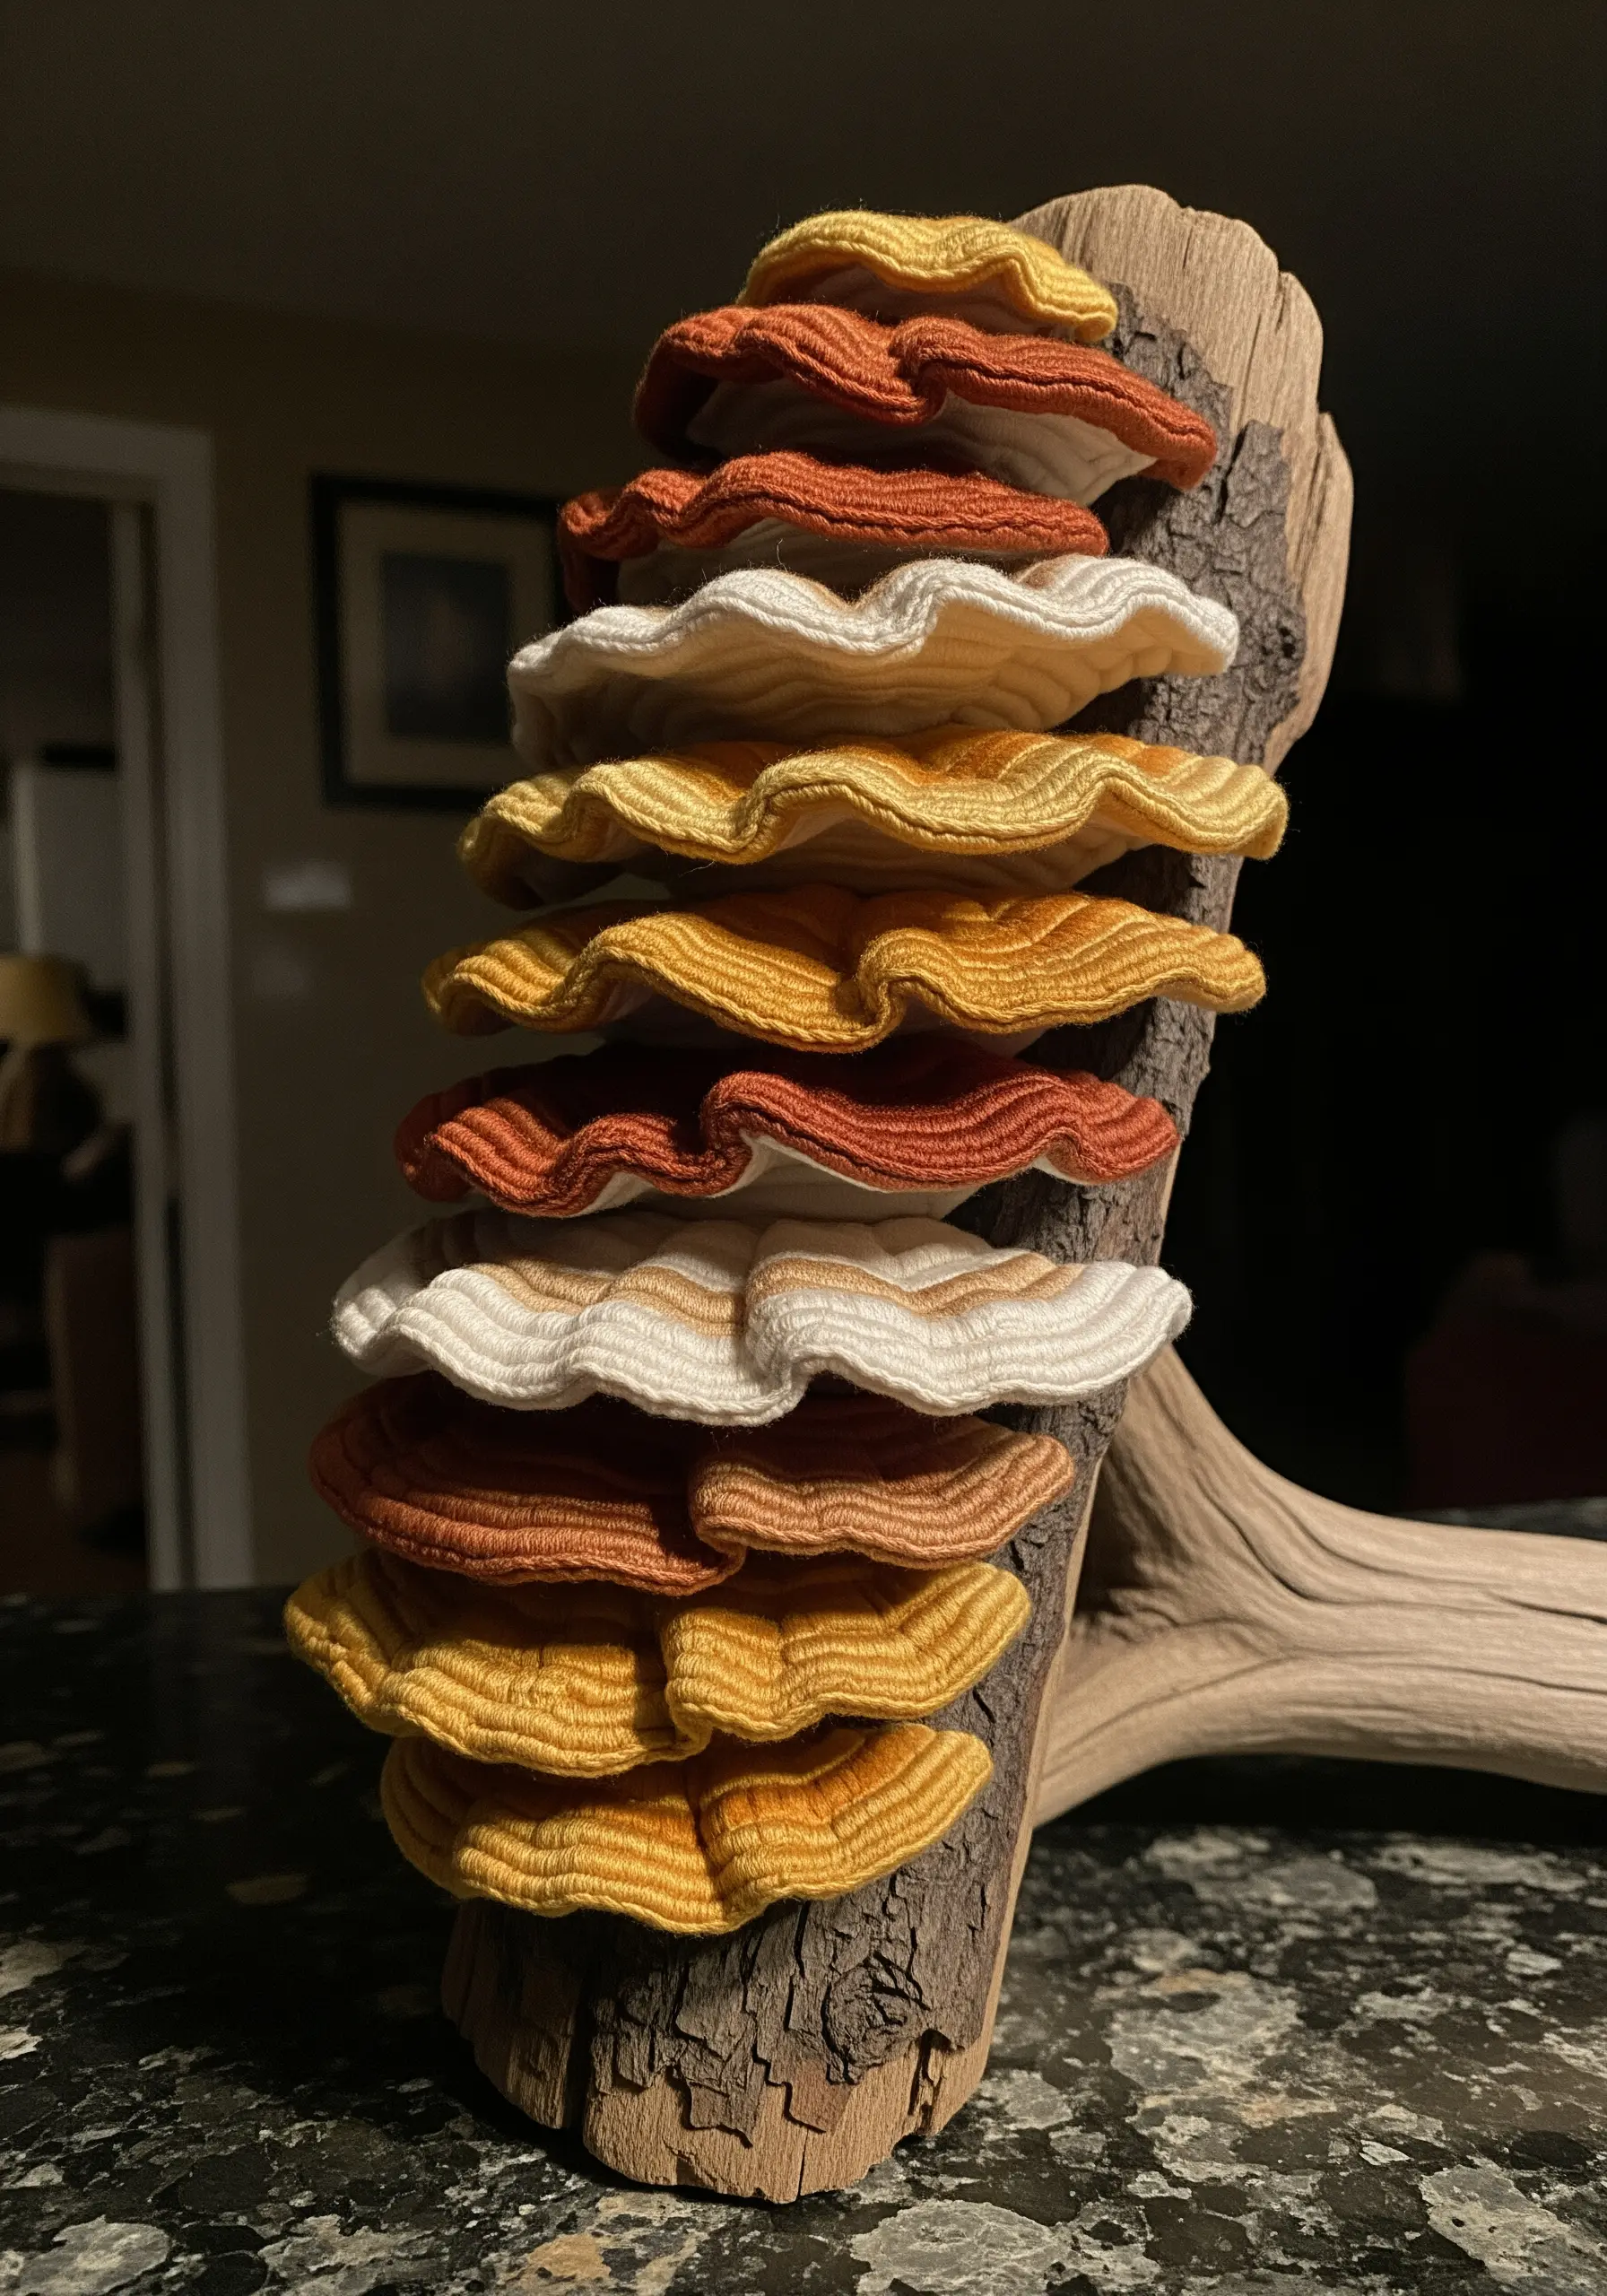
Build dimensional shelf fungi using stumpwork, a technique that raises embroidery off the fabric surface.
Create each fungus shape by stitching over a felt padding or a wired slip. For the wire method, bend a fine wire into the fan shape of the mushroom, then cover it with buttonhole stitches.
Fill the shape with directional long-and-short stitches using variegated oranges, yellows, and browns to mimic the natural growth rings.
Once complete, cut the shape out, leaving a small tab of fabric at the base to attach it to a piece of driftwood or your main embroidery, allowing the fungi to project realistically.
6. Plant a Wildflower Meadow on a Pillow
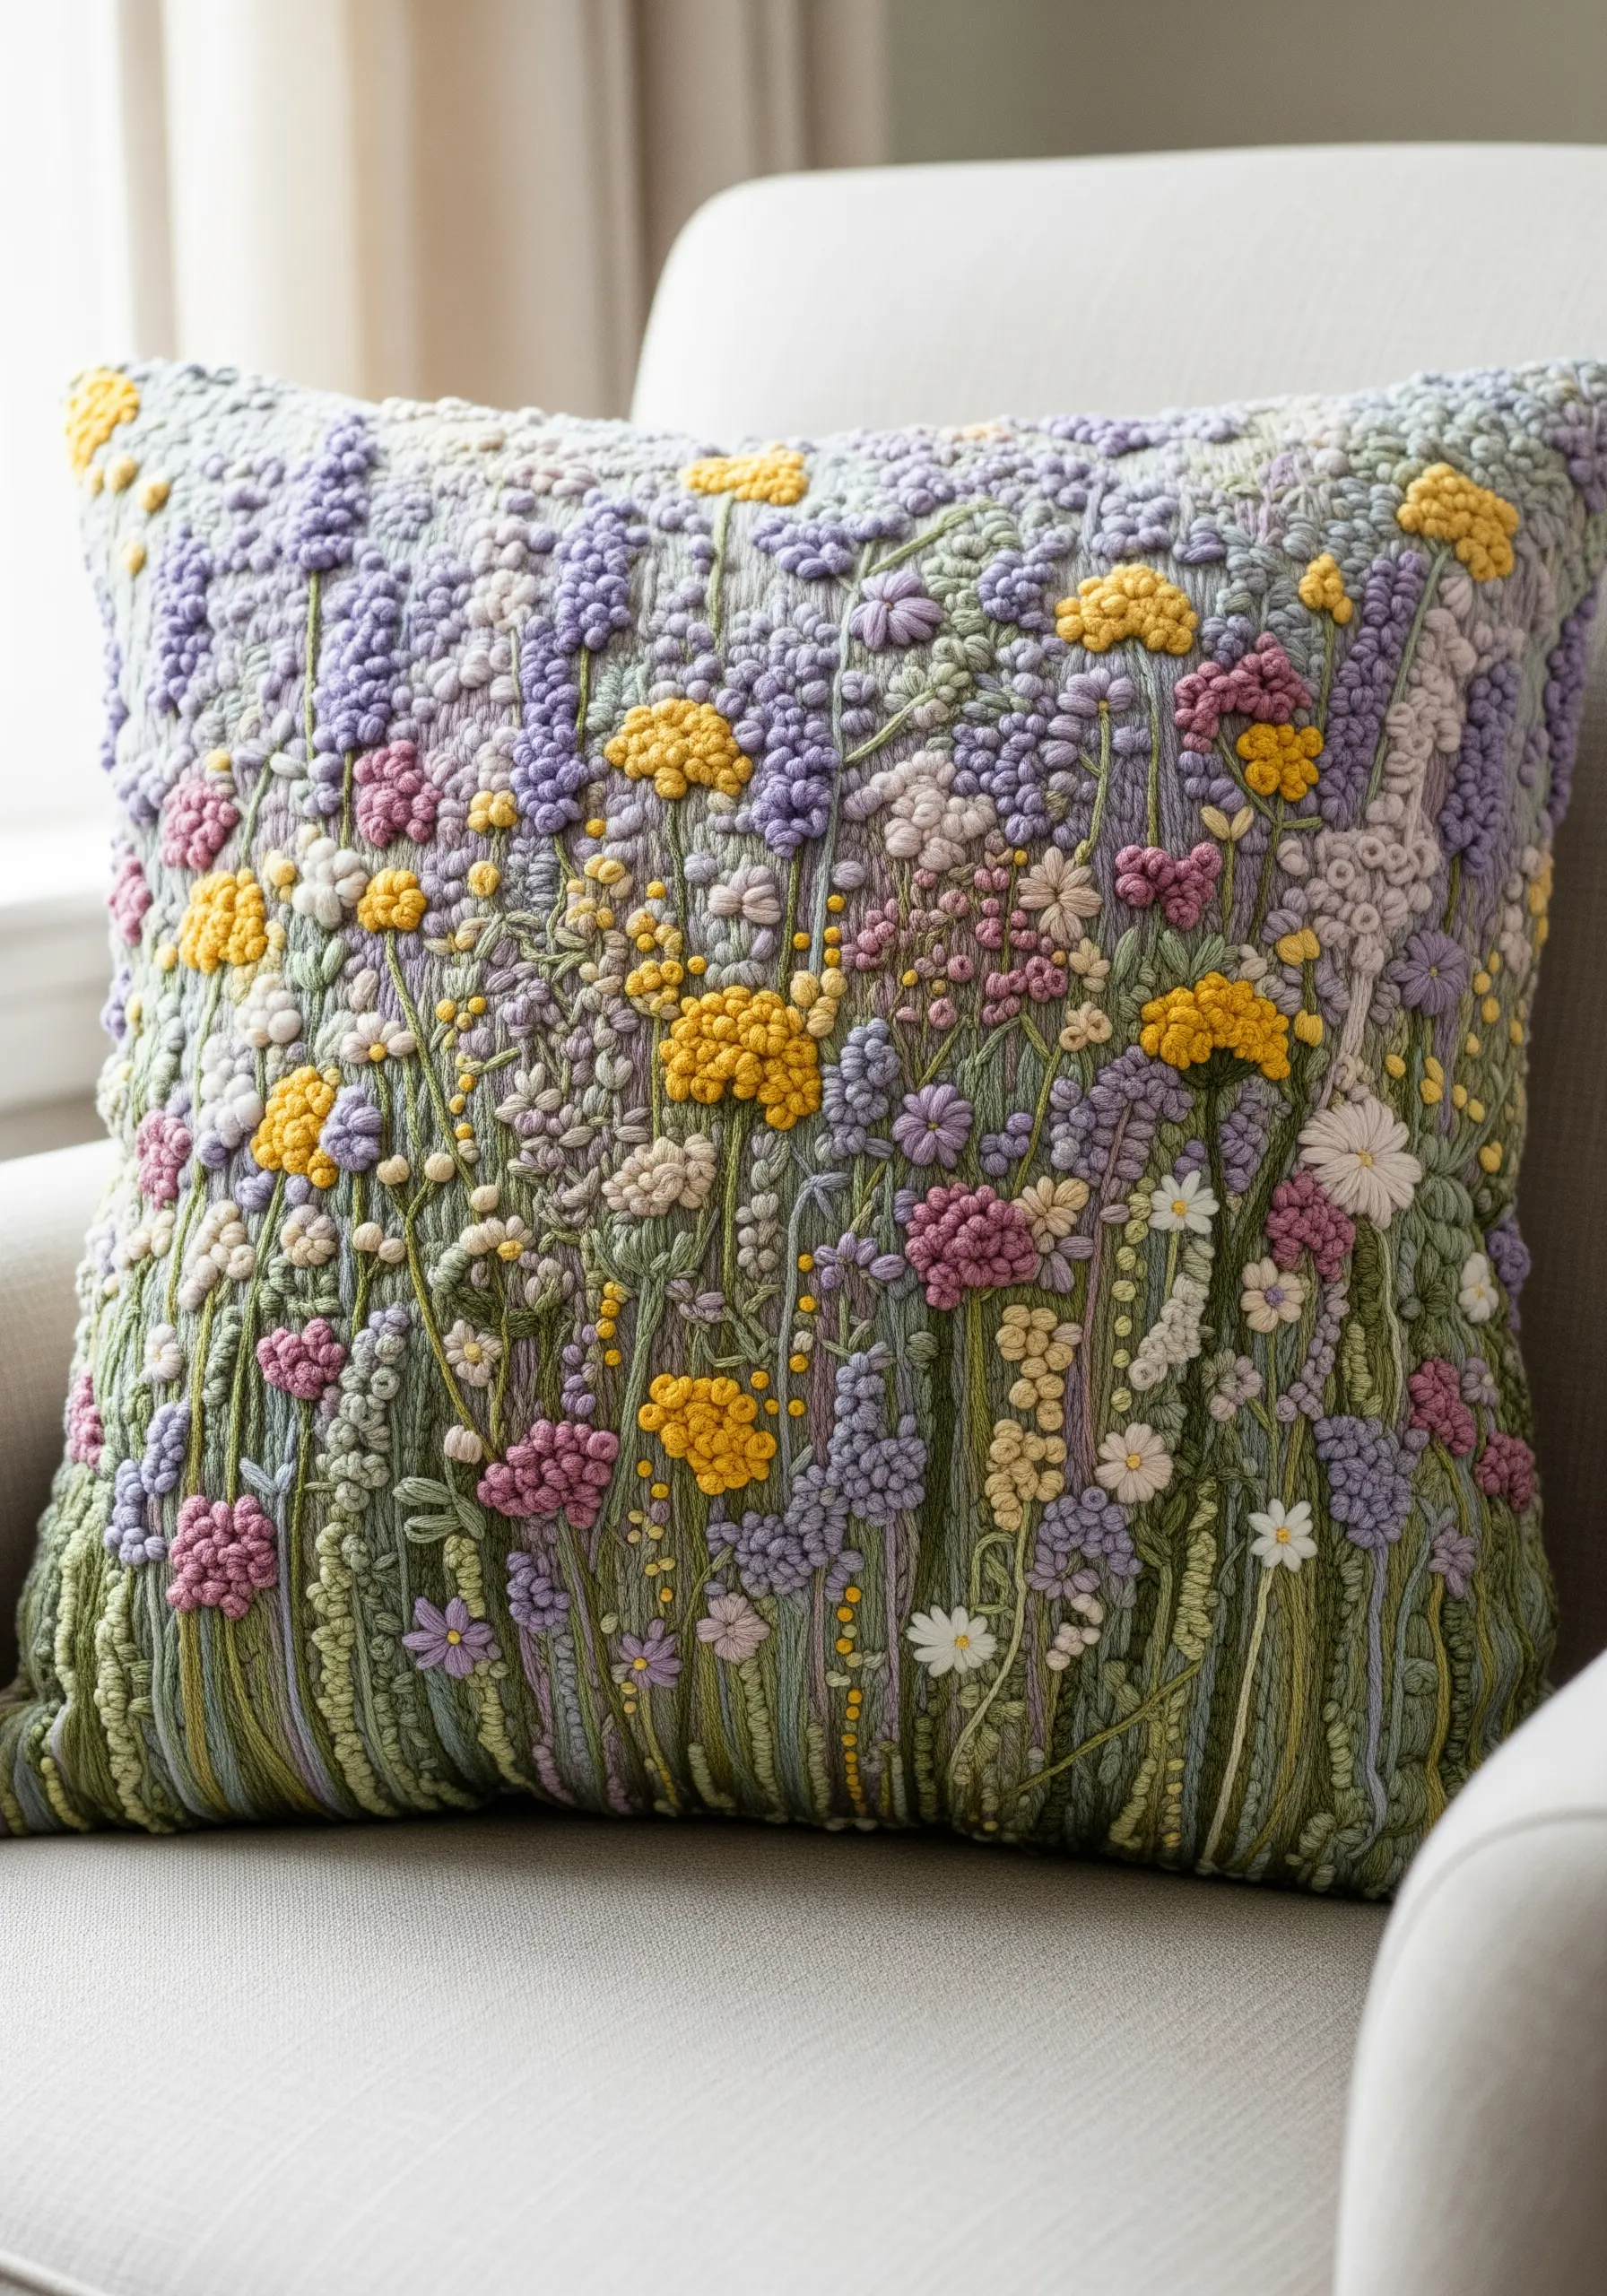
To stitch a dense meadow that feels lush and vibrant, you must layer a variety of stitches and thread weights.
Create a foundation of vertical straight stitches and stem stitches in various greens for the grasses. Then, build upon that with French knots for flower heads, detached chain stitches (lazy daisies) for petals, and bullion knots for elongated buds.
Cluster the stitches tightly and allow them to overlap. This density is what creates the impression of a field teeming with life.
Incorporate thicker threads like perle cotton for prominent flowers and single strands of floss for delicate background elements. It’s a perfect technique for embroidery pillow ideas that transform a room.
7. Replicate a Forest Floor with Layered Straight Stitches
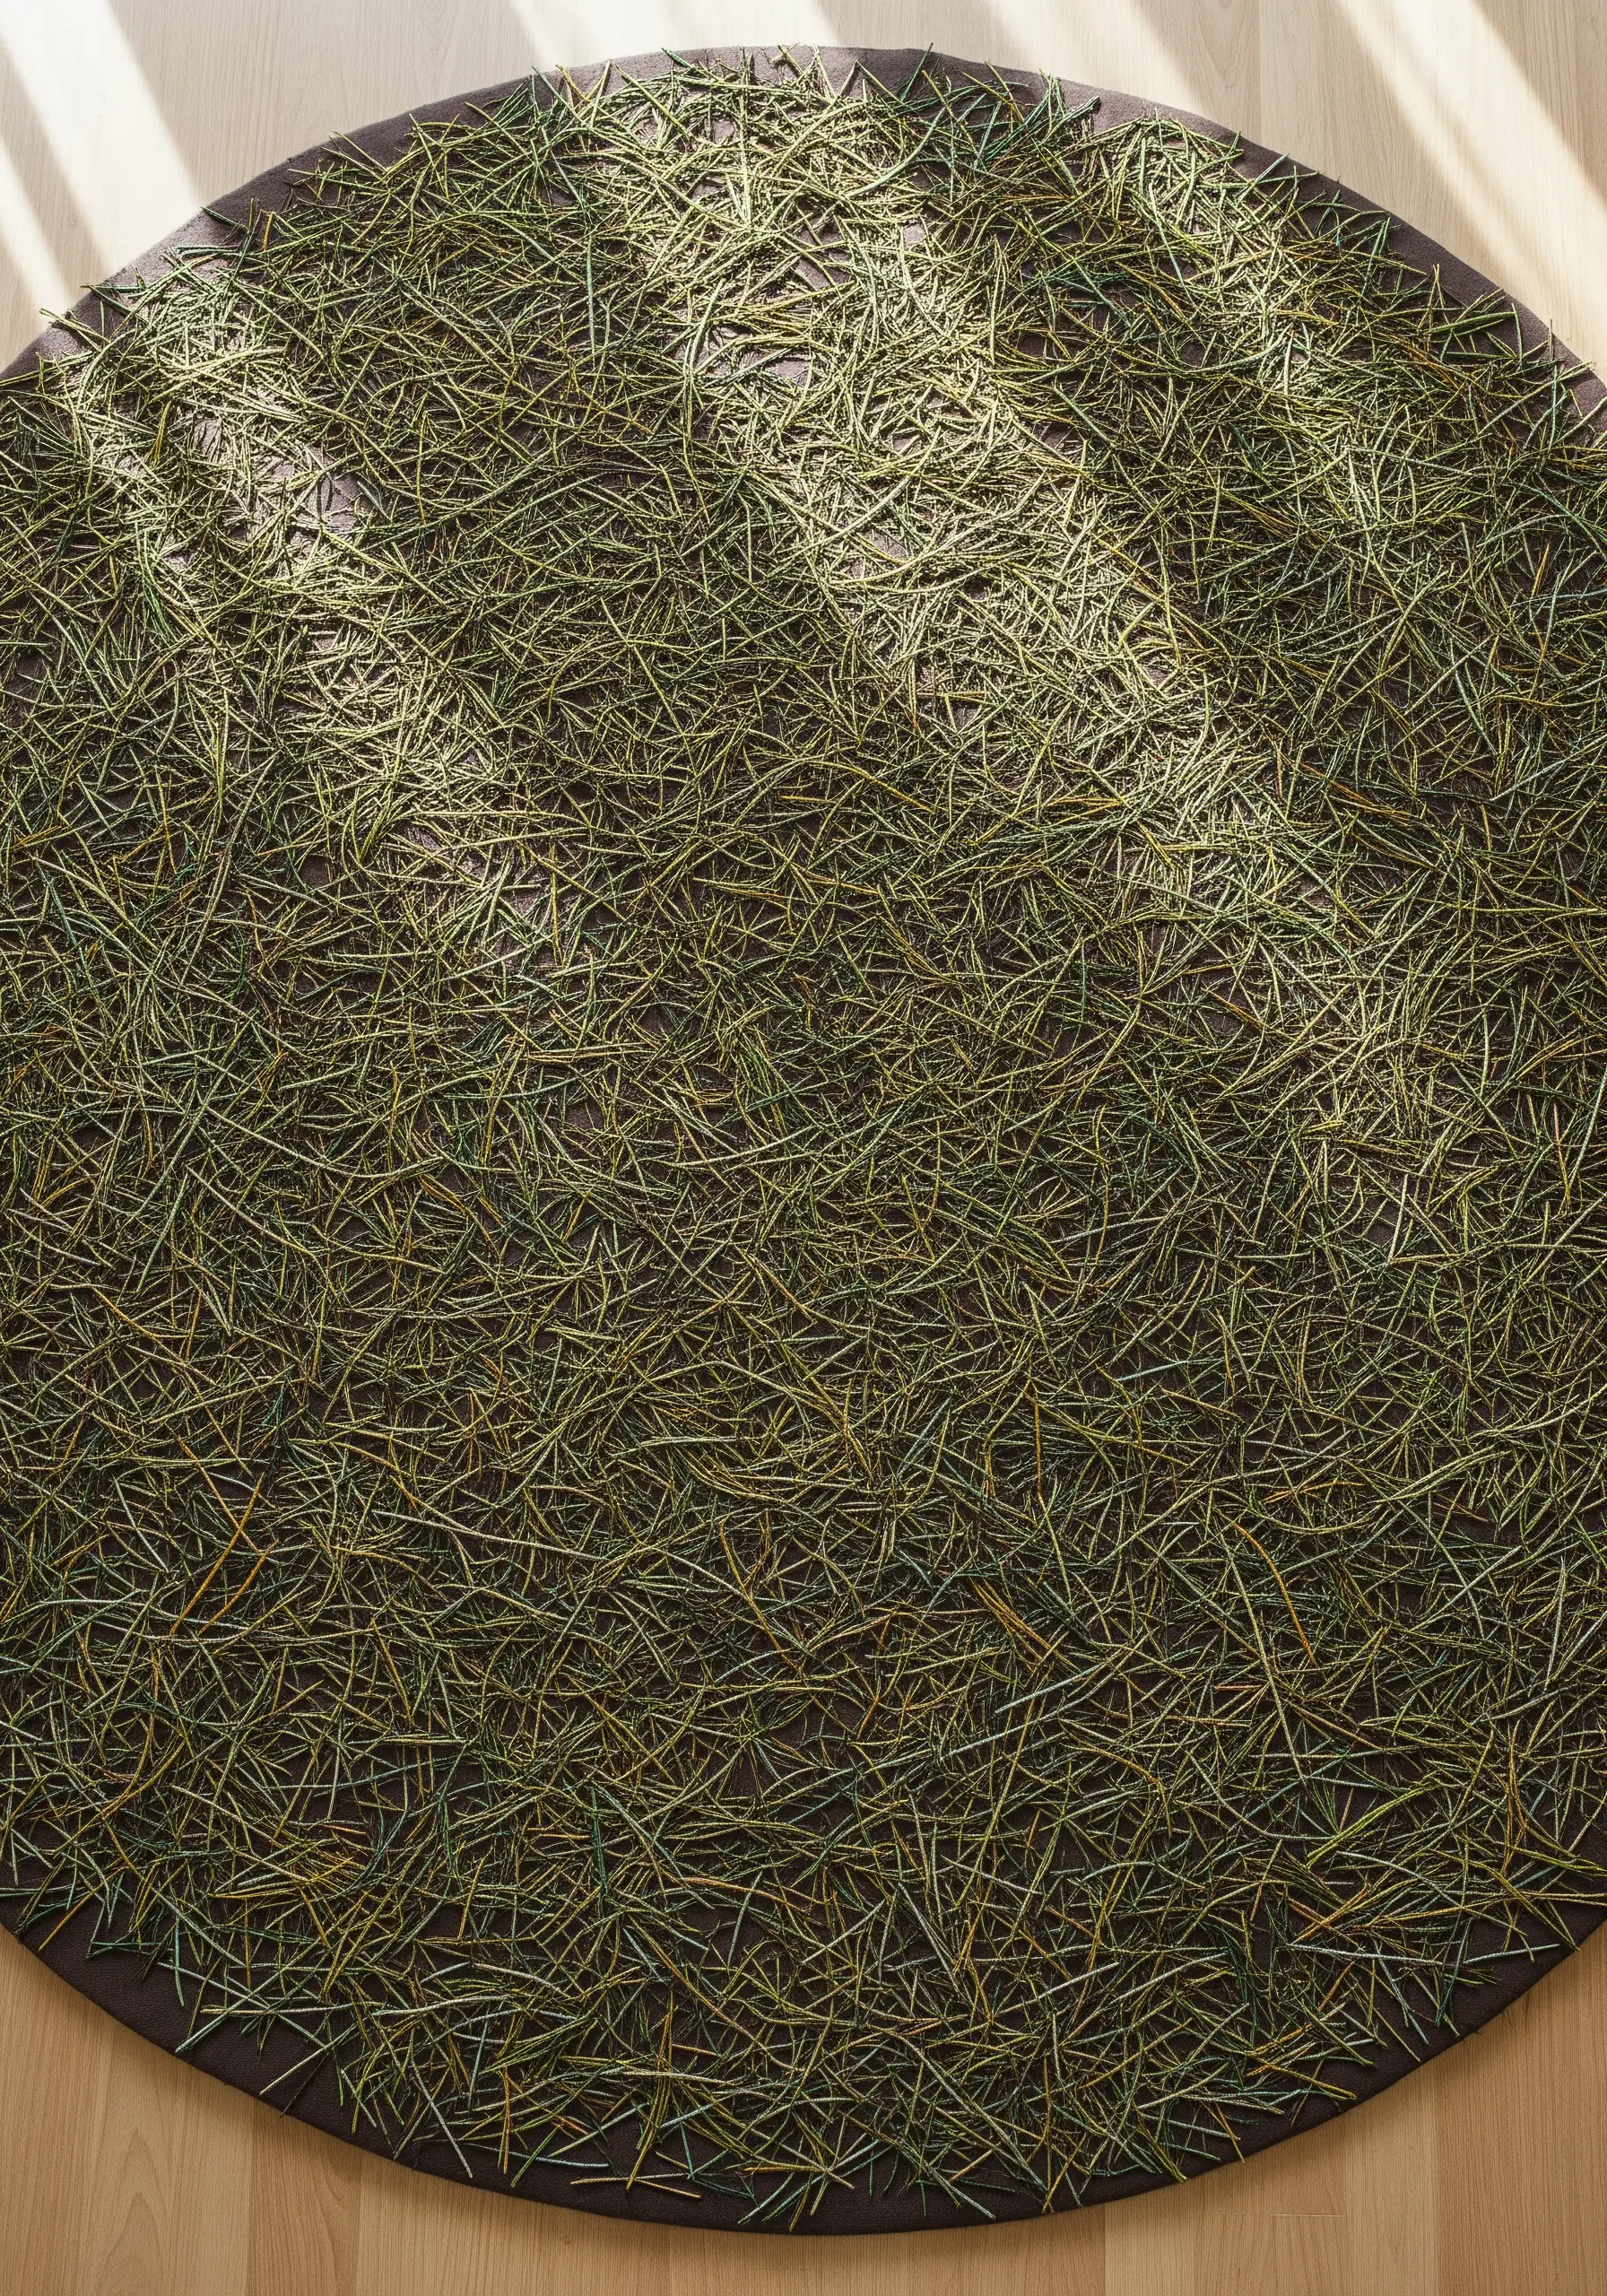
Capture the chaotic texture of fallen pine needles with thousands of meticulously placed straight stitches.
Work on a dark, earthy fabric to create depth. Use a mix of threads in shades of olive, brown, and ochre to mimic the decaying needles on the forest floor.
Vary the length and direction of your stitches, layering them over one another to build up a dense, thatch-like texture. There should be no discernible pattern; the goal is controlled randomness.
Introducing a few stitches in a single strand of metallic copper or gold thread can suggest the way sunlight catches on the debris, adding a subtle, dynamic element to the piece.
8. Weave a Freestanding Bird’s Nest

Construct a delicate, three-dimensional nest using a water-soluble stabilizer as your mold.
Draw a circle on the stabilizer and hoop it securely. Begin layering threads—jute, raffia, linen, and scraps of embroidery floss—in a random, crisscrossing pattern over the circle.
Using a sewing machine with a darning foot (or by hand), stitch freely over the layered threads to lock them together. The more you stitch, the sturdier the final piece will be.
Once satisfied, unhoop the project, trim the excess stabilizer, and rinse it in warm water. As the stabilizer dissolves, the threads will hold their shape. Gently form it into a bowl as it dries.
9. Define a Feather with Directional Satin Stitch
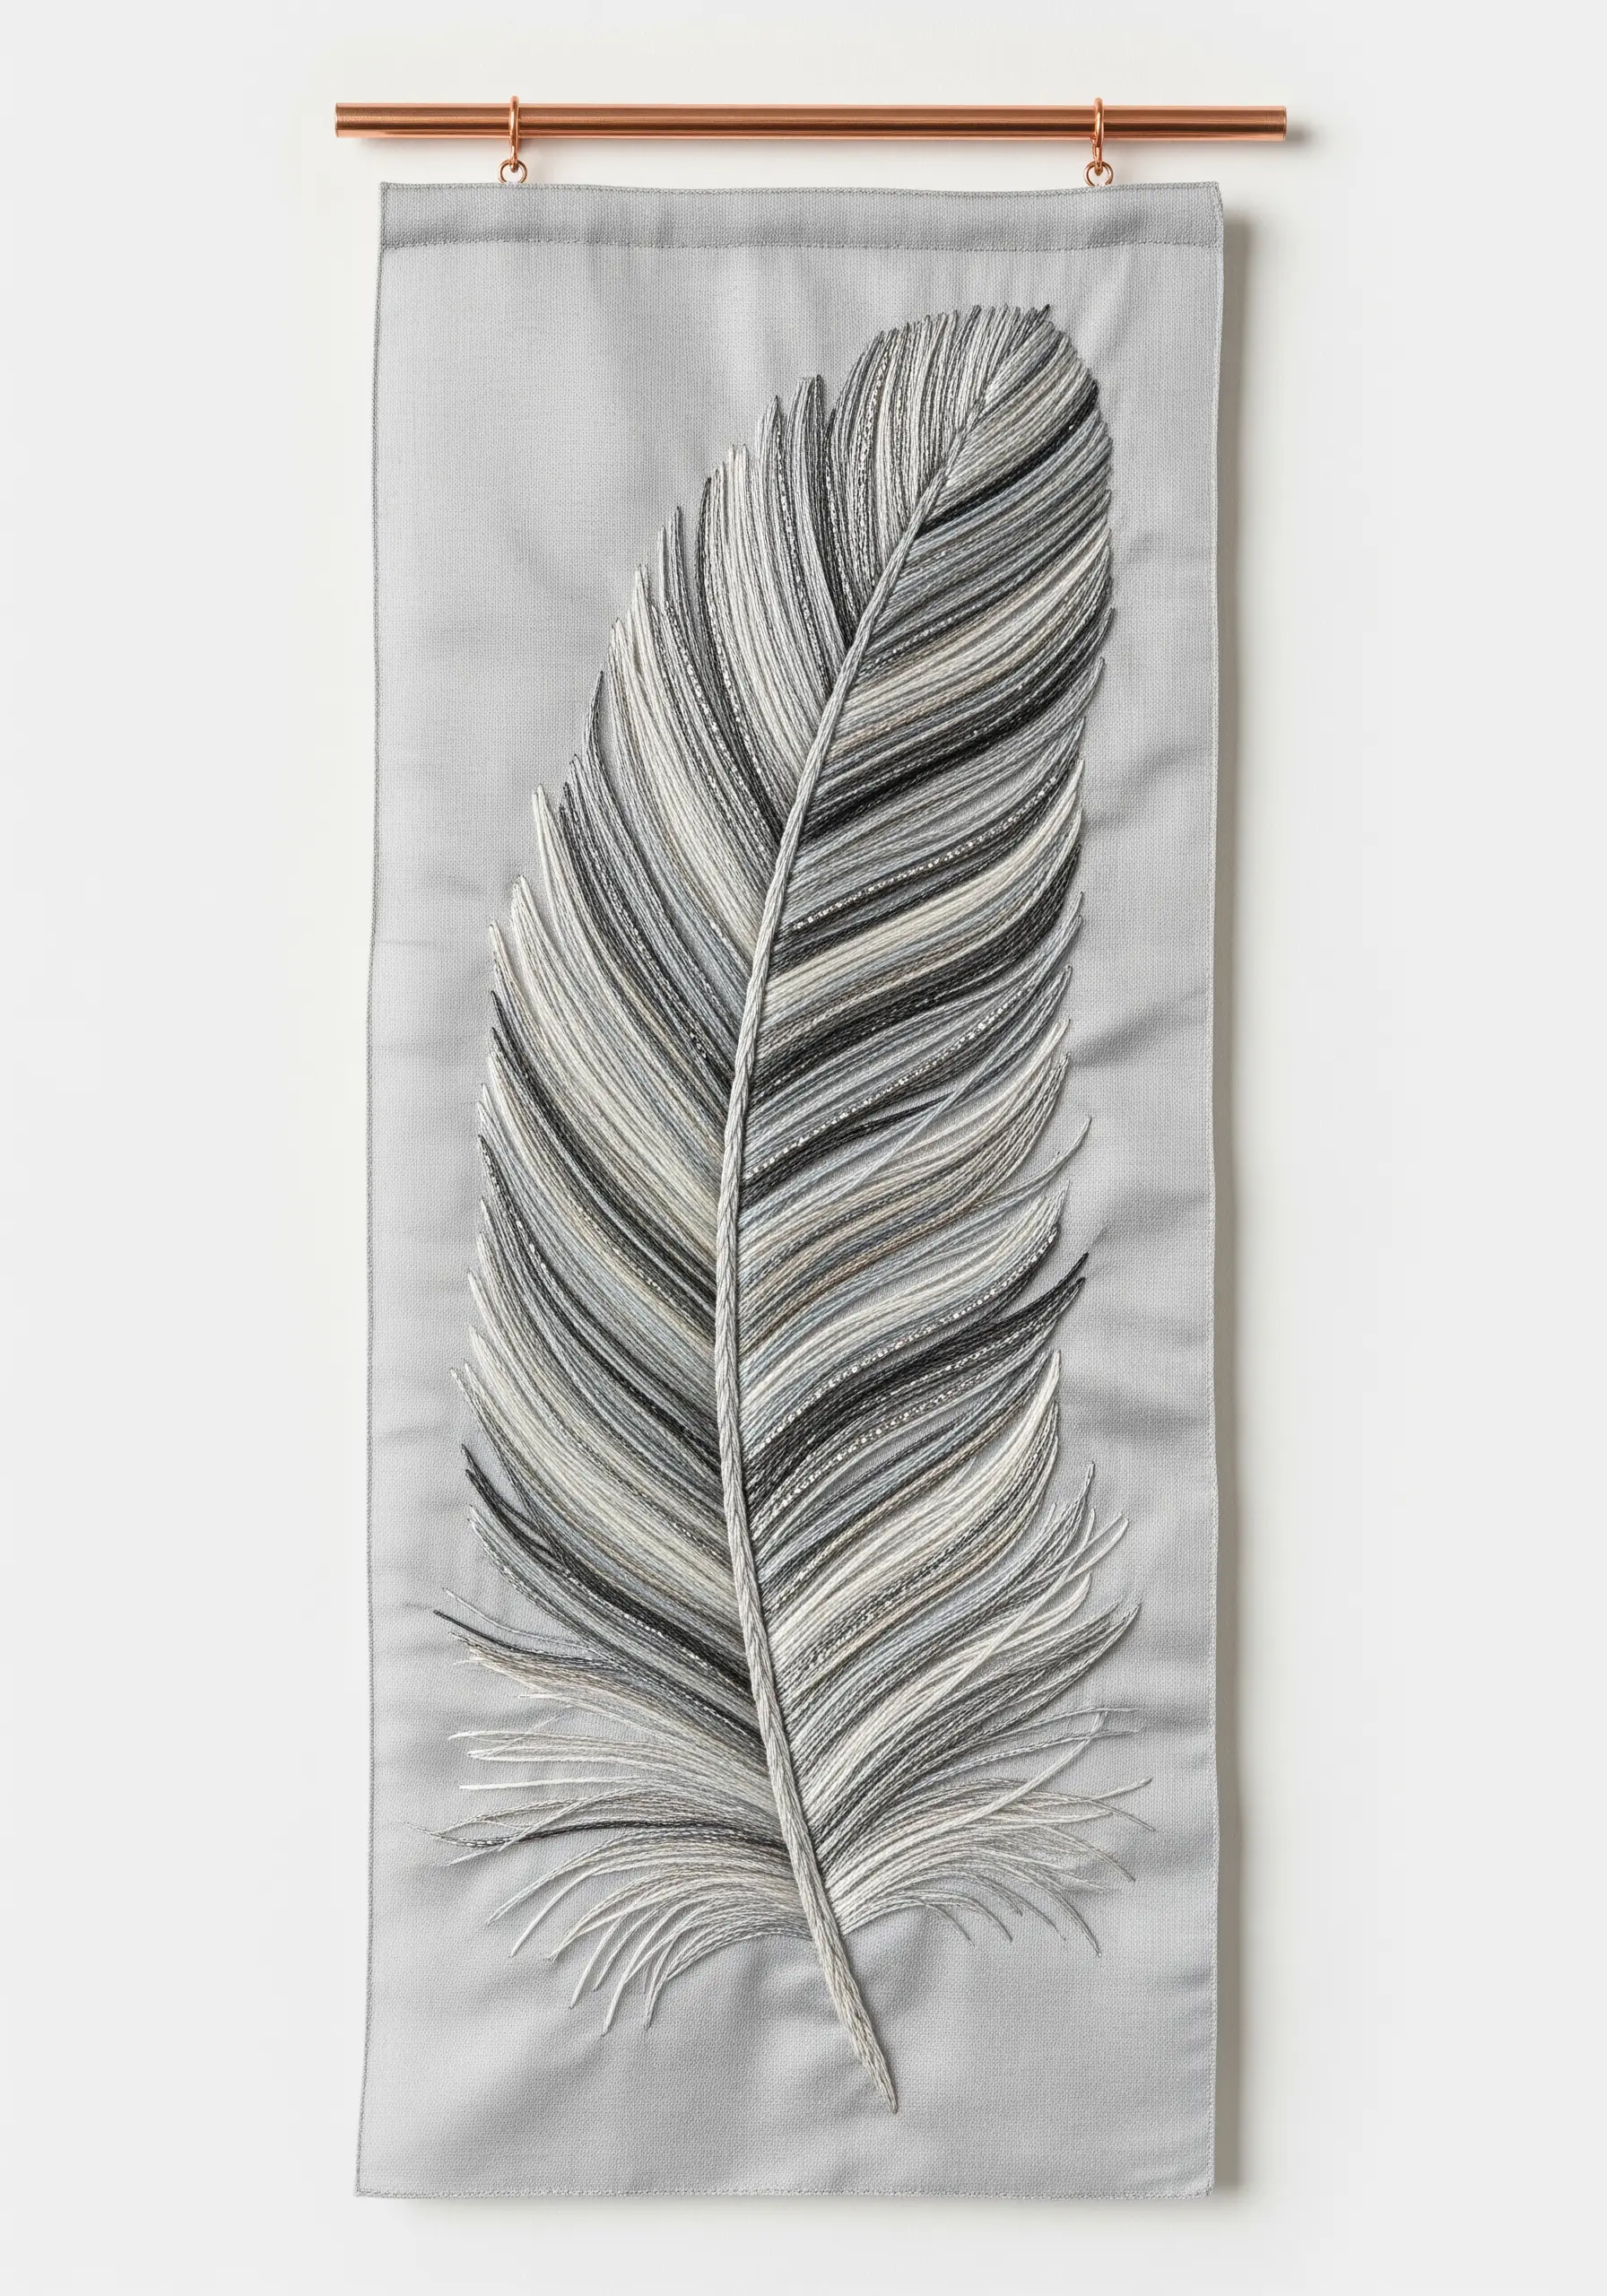
The key to an elegant, realistic feather is perfectly executed directional stitching and subtle color blending.
Use long-and-short stitch to fill the barbs of the feather, angling your stitches diagonally away from the central shaft. This creates a natural sense of movement and light.
Blend shades of grey, white, and black by slightly overlapping the rows of stitching. The transition between colors should be seamless, not blocky.
For the shaft, use a raised stem stitch or couch a piece of thicker cord to give it a defined, dimensional spine that grounds the delicate softness of the barbs.
10. Capture an Abstract Seascape with Linear Stitches
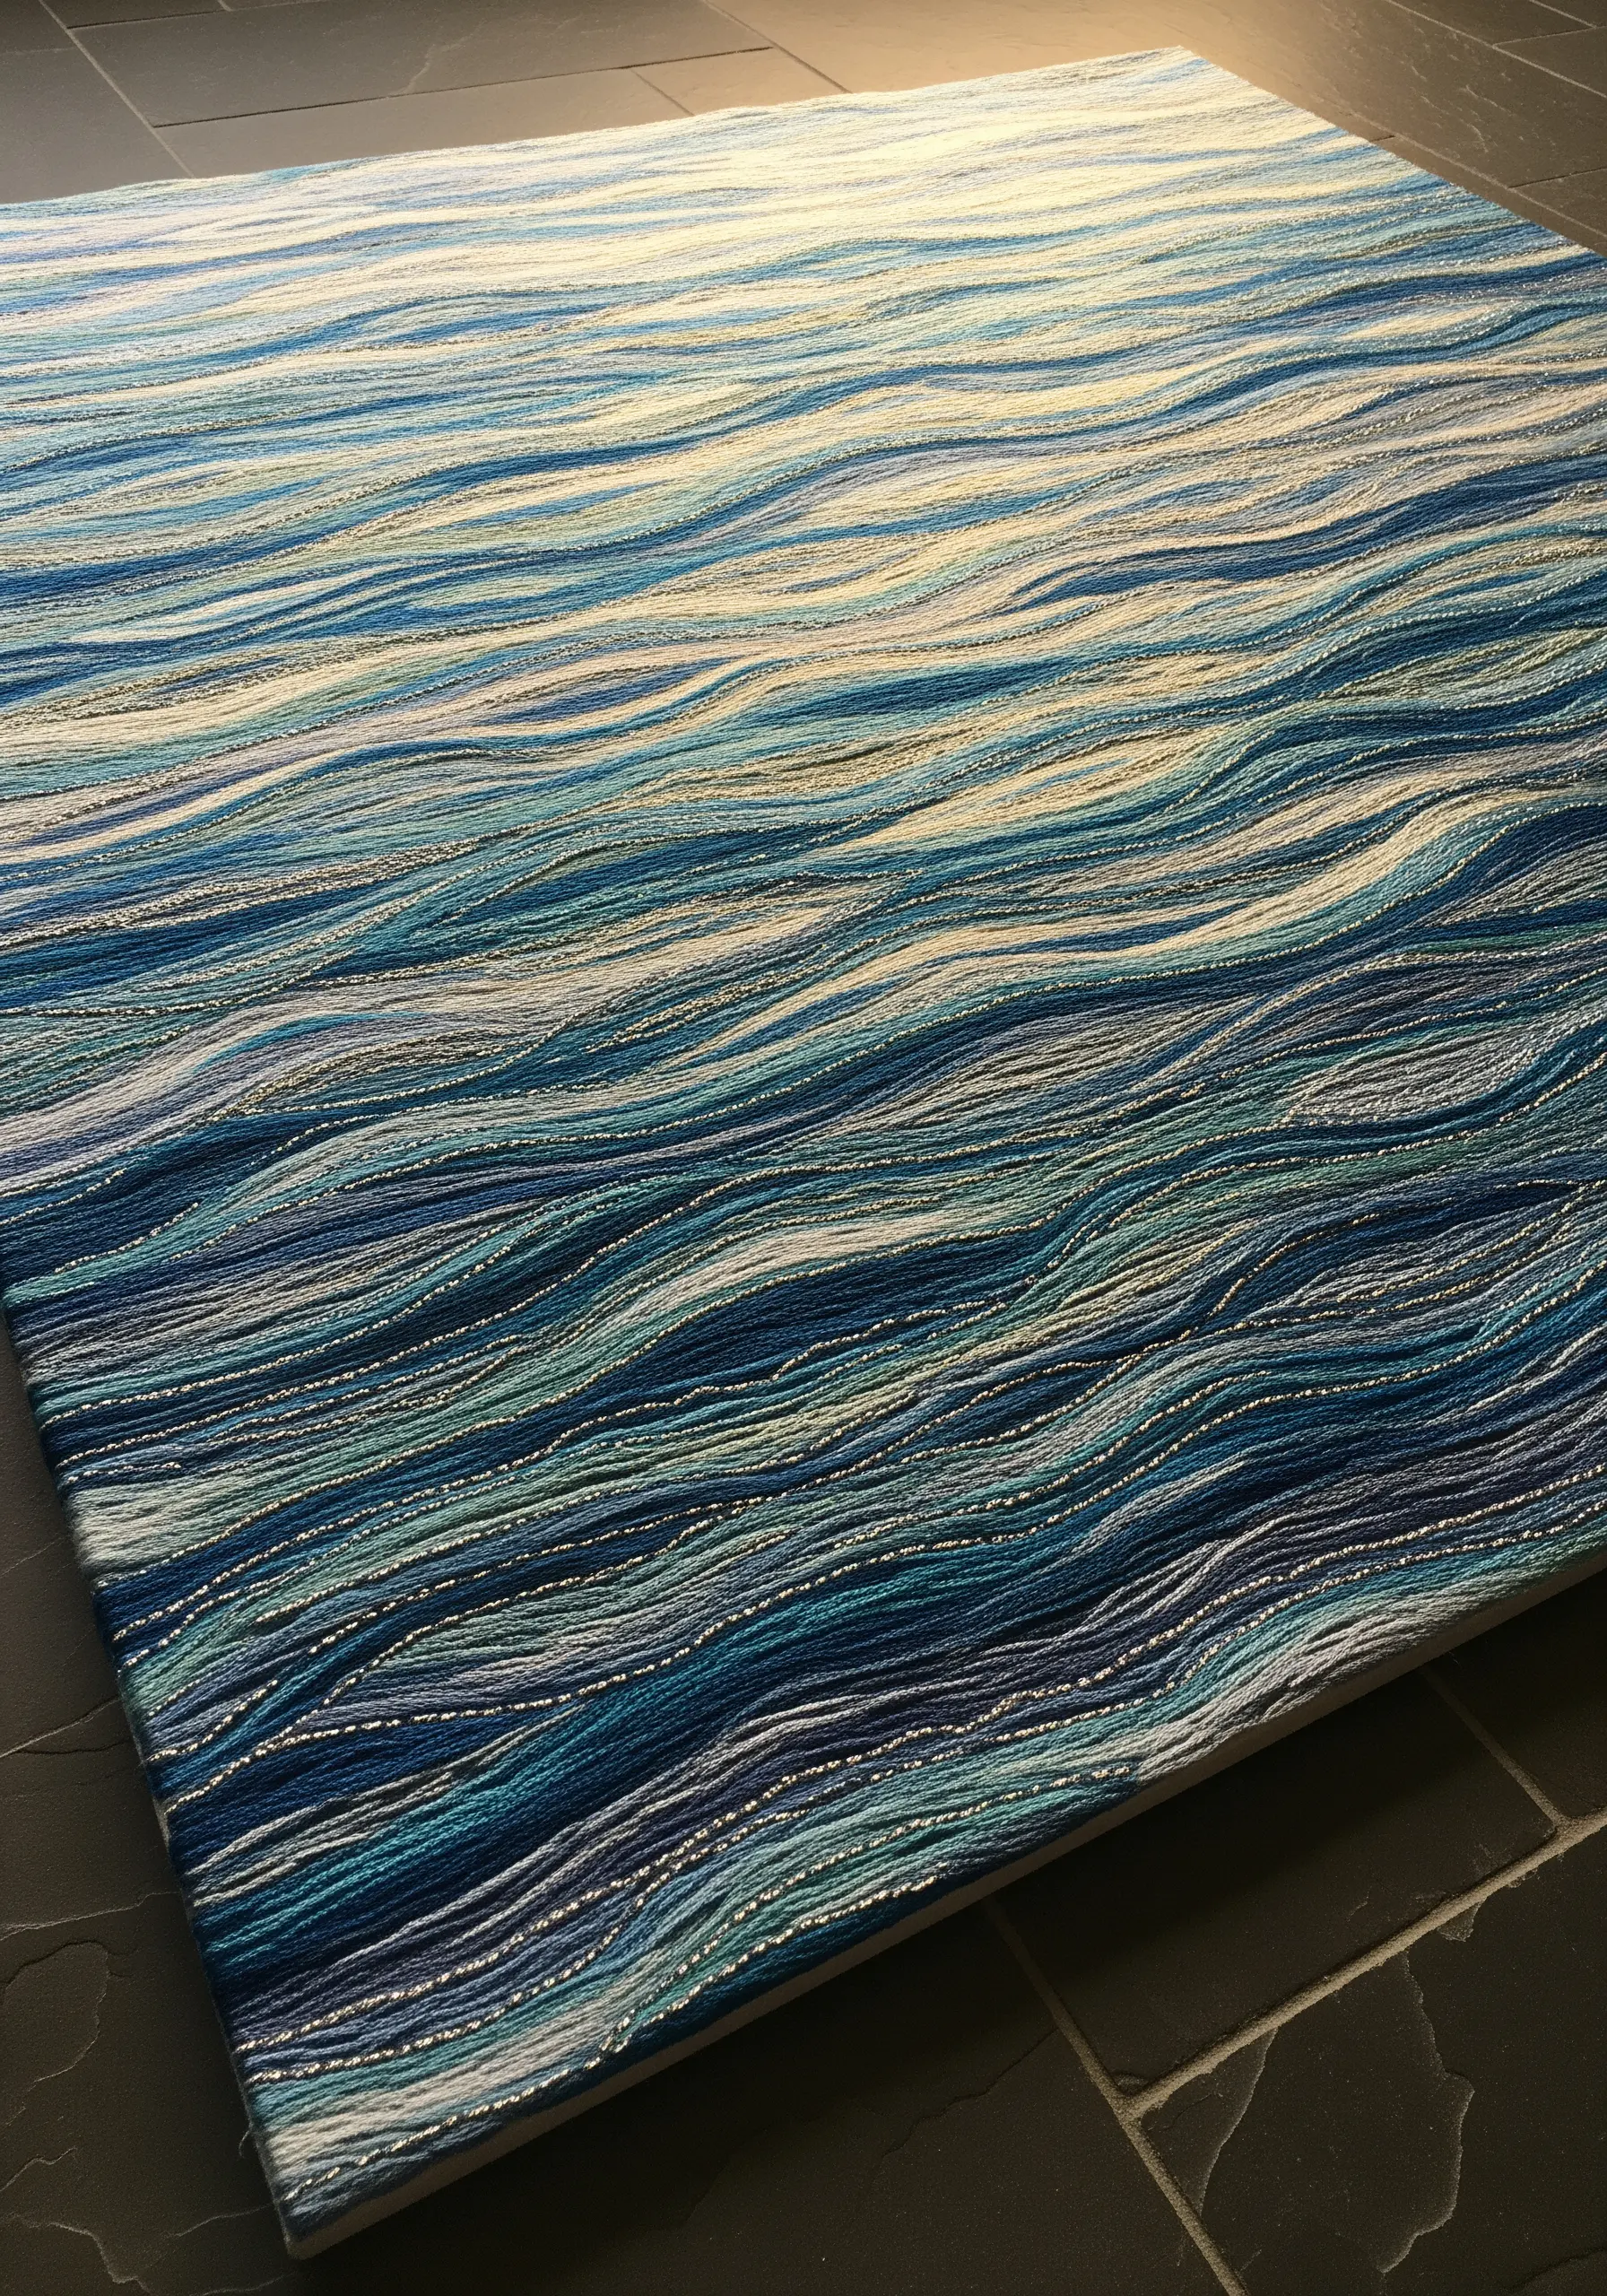
Evoke the movement of water by layering horizontal lines of simple stitches in a carefully chosen color palette.
Stretch your canvas and fill it with wavy rows of backstitch, split stitch, or stem stitch. Allow the lines to be imperfect and slightly undulating, just like the surface of the ocean.
Use a wide range of blues, teals, greys, and whites to create depth. Incorporate a few strands of metallic or silk thread to represent the glint of sunlight on the waves.
The magic is in the density. By packing the lines tightly in some areas and leaving more space in others, you create a visual rhythm that mimics the ebb and flow of water.
11. Mimic Cracked Earth with Negative Space
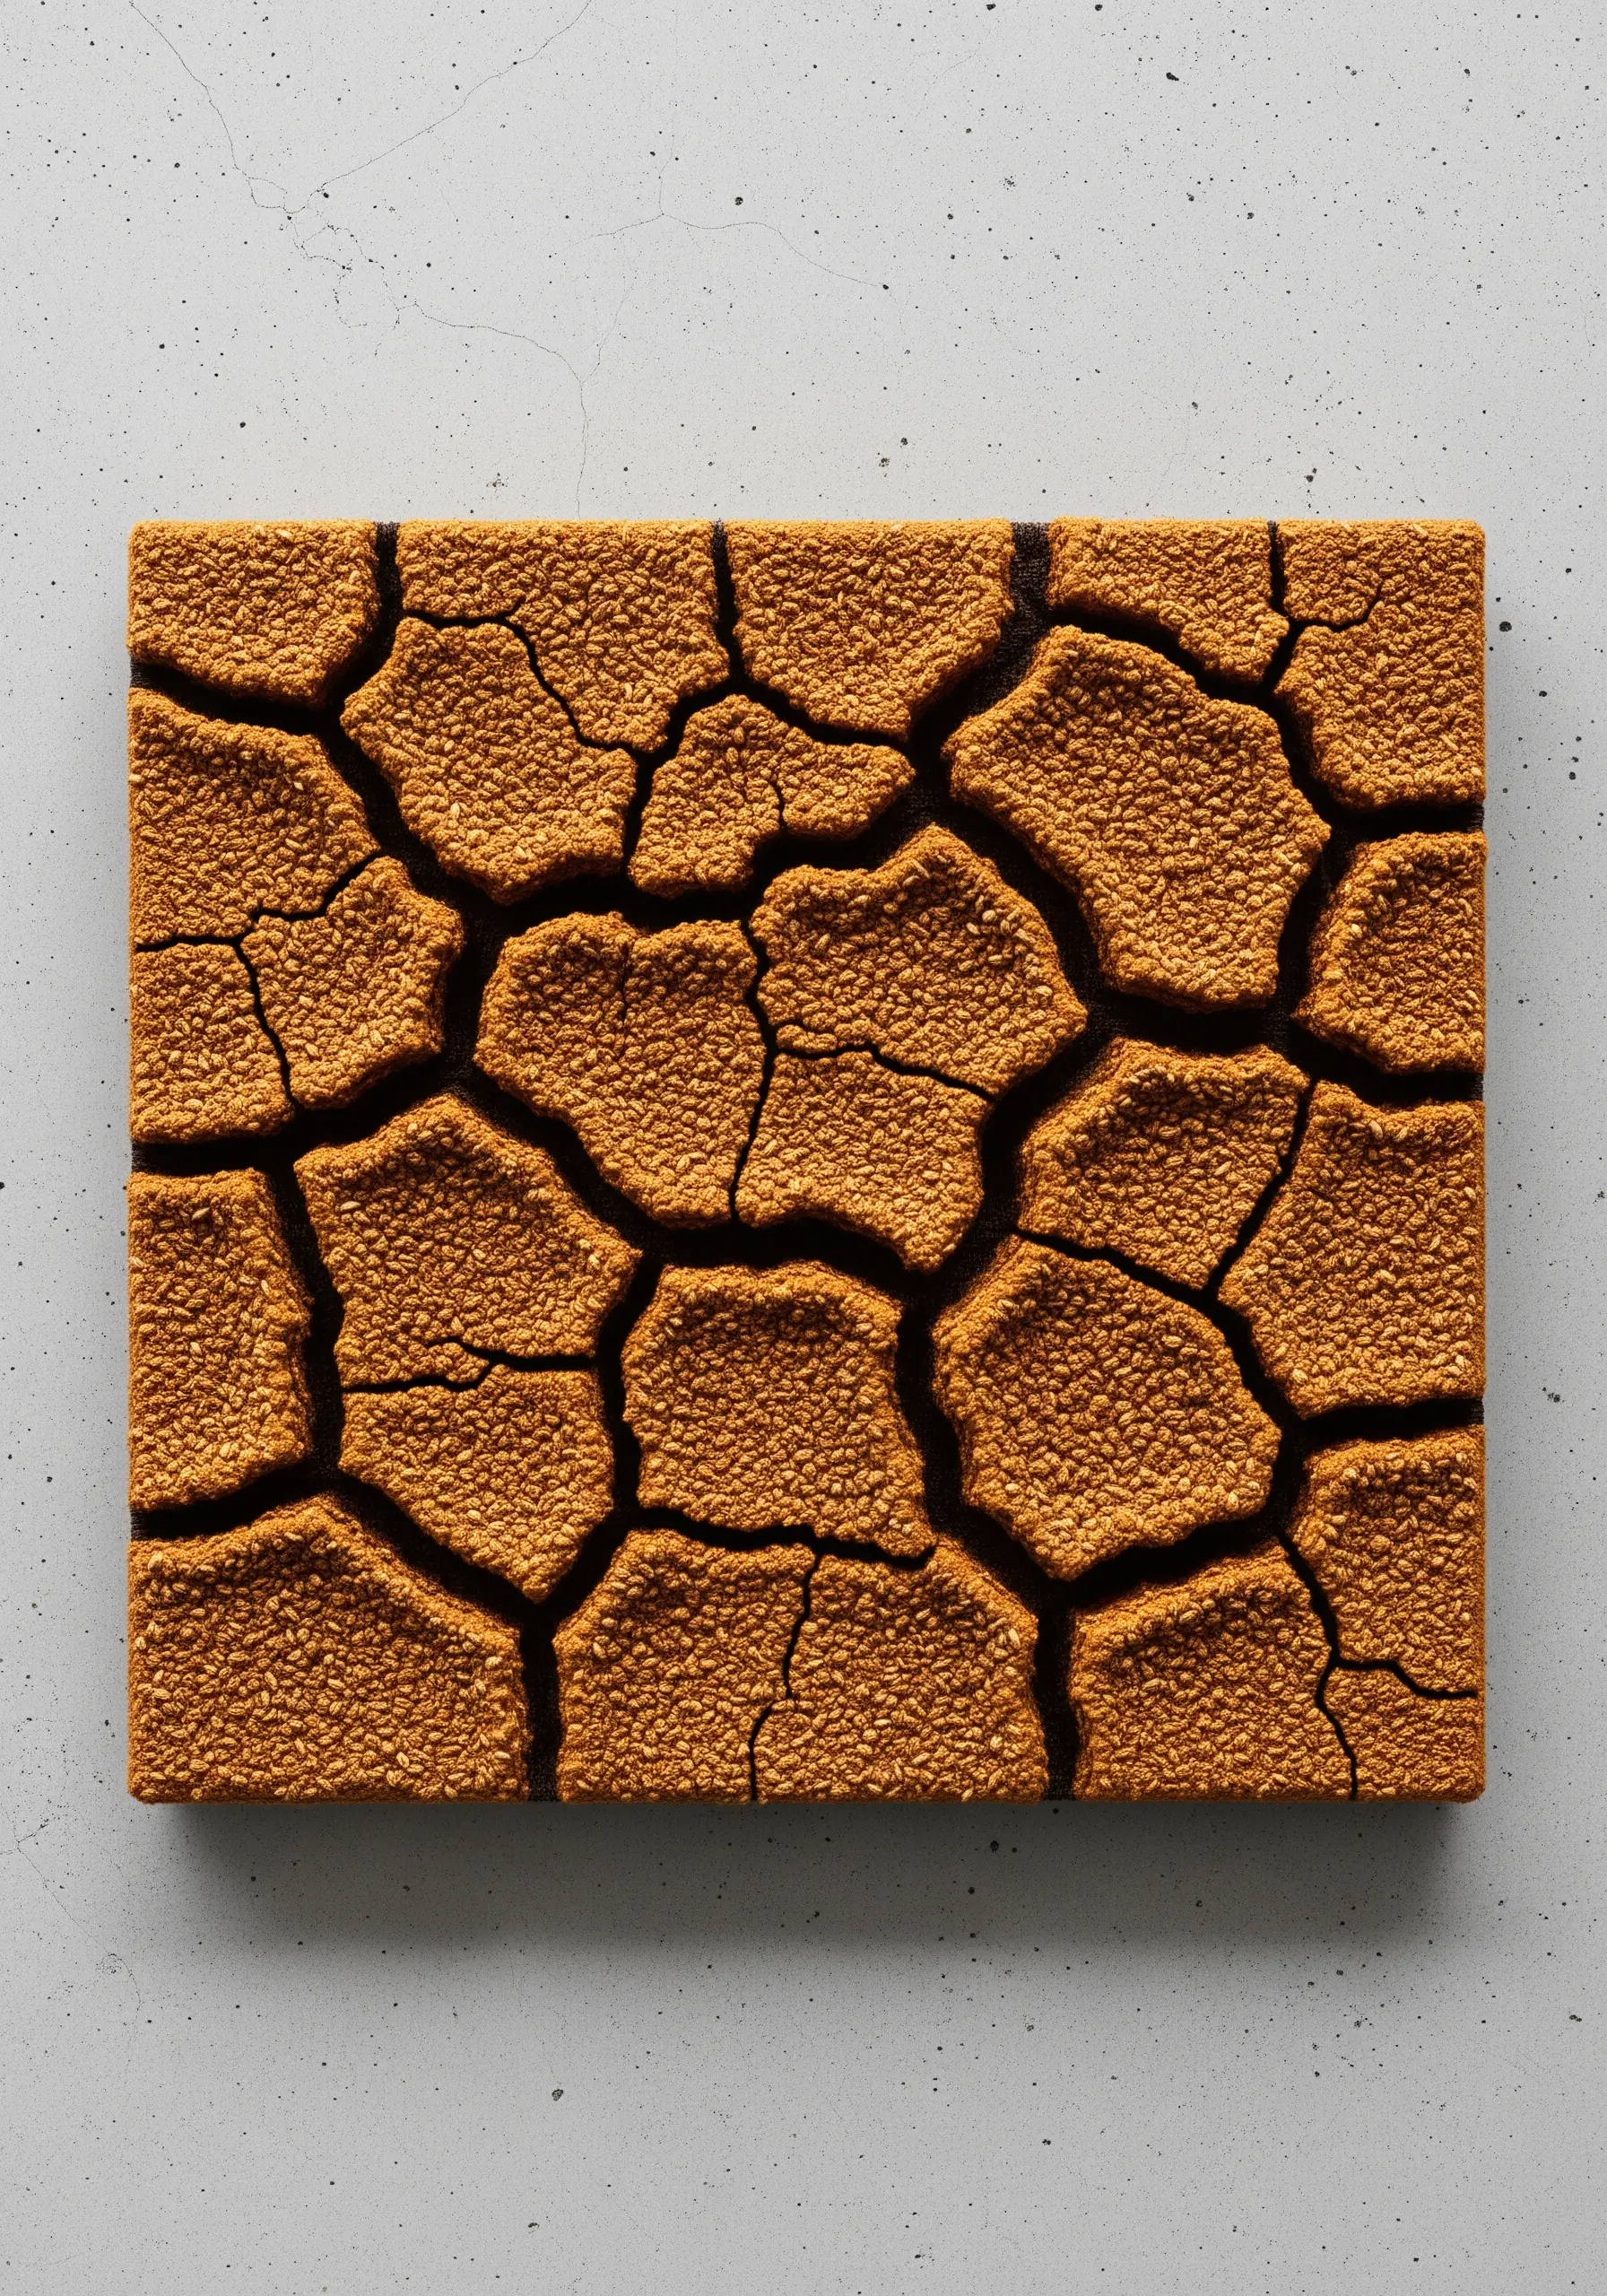
The texture of parched earth is created not just by the raised surfaces, but by the deep cracks between them.
To achieve this, densely fill organic shapes with French knots or seed stitch using a sandy, ochre-colored thread. This creates the raised, granular texture of the dry soil.
The key is to leave clear channels of unstitched fabric between these textured shapes. This negative space becomes the cracks.
You can enhance the effect by outlining the inside edge of each textured shape with a single line of backstitch in a darker brown, which creates a sharp shadow and emphasizes the depth of the fissures.
12. Stitch a Dew-Kissed Spiderweb
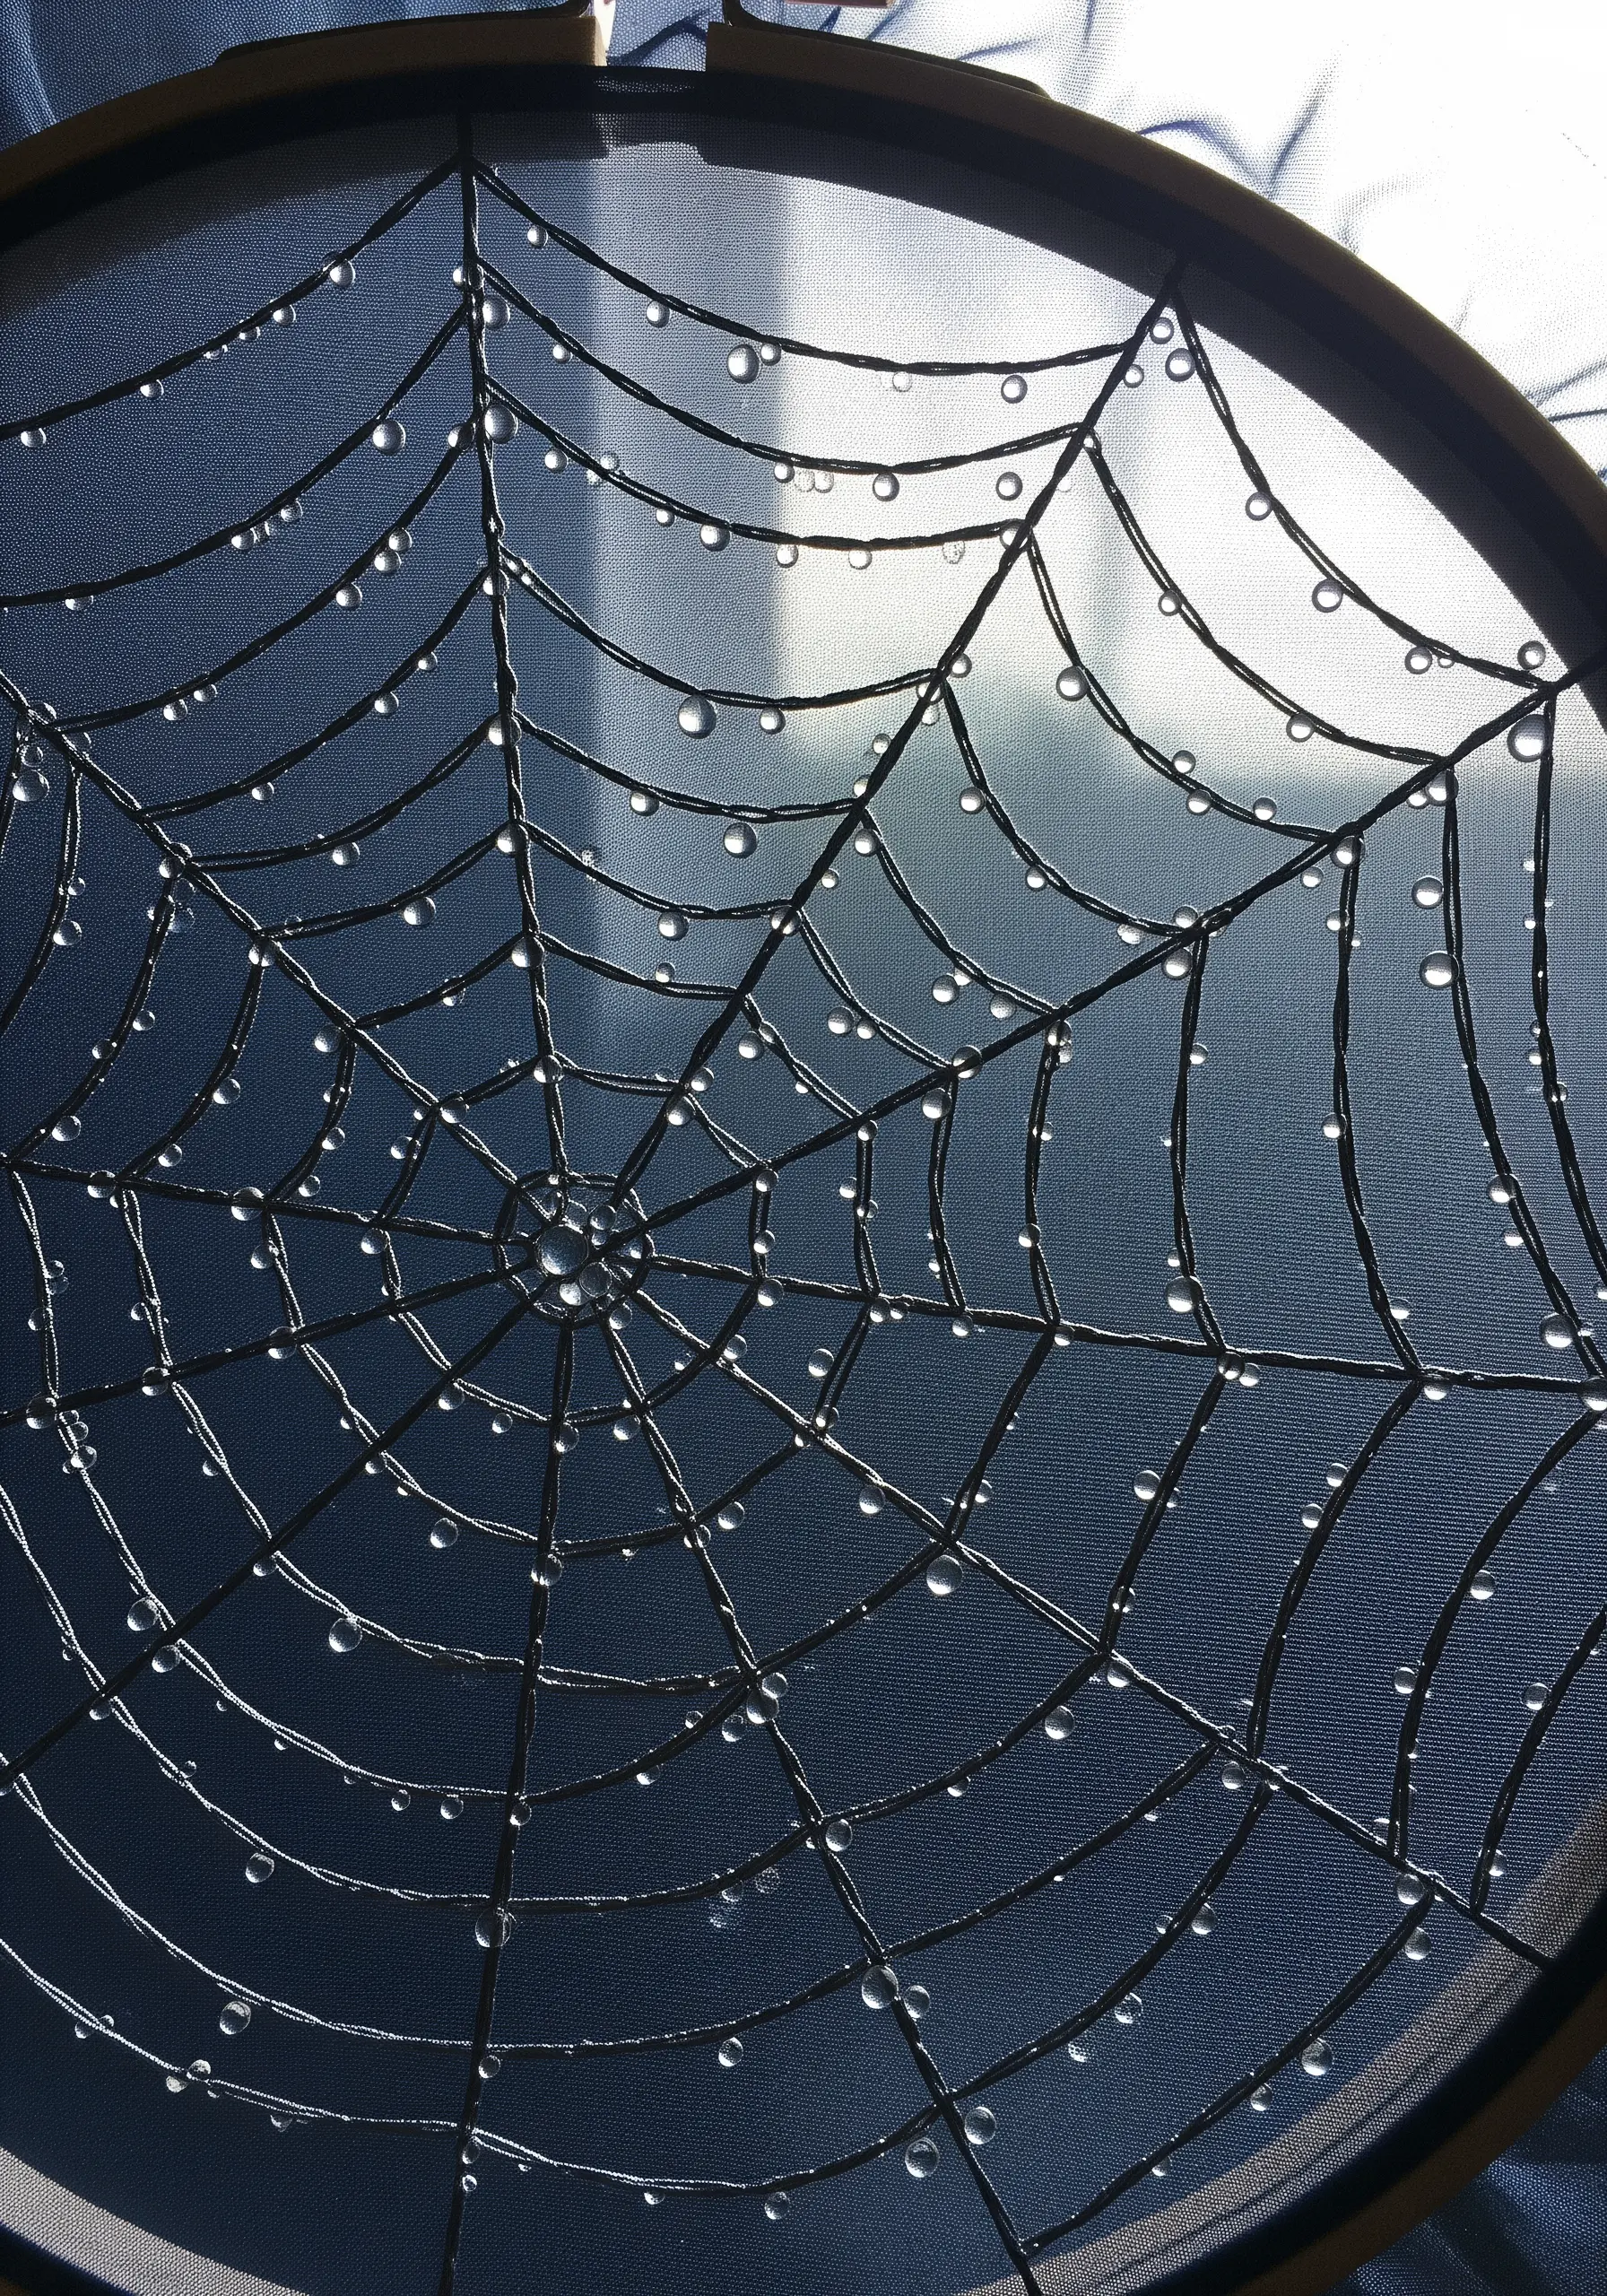
Embroidering on sheer fabric like tulle or organza is the perfect way to capture the ethereal quality of a spiderweb.
Use a fine metallic or silk thread in silver or white to make the web shimmer. Stitch the radial lines first with straight stitches, then weave the spiral using a couching stitch or by wrapping the thread around the spokes.
To create the dewdrops, use tiny clear seed beads or glass beads, securing each one with a small stitch. Alternatively, make very small, tight French knots with a high-gloss white rayon or silk floss.
The transparency of the fabric makes the web appear to float, creating a truly magical effect when it catches the light.
13. Sculpt Seashells with Padded Satin Stitch
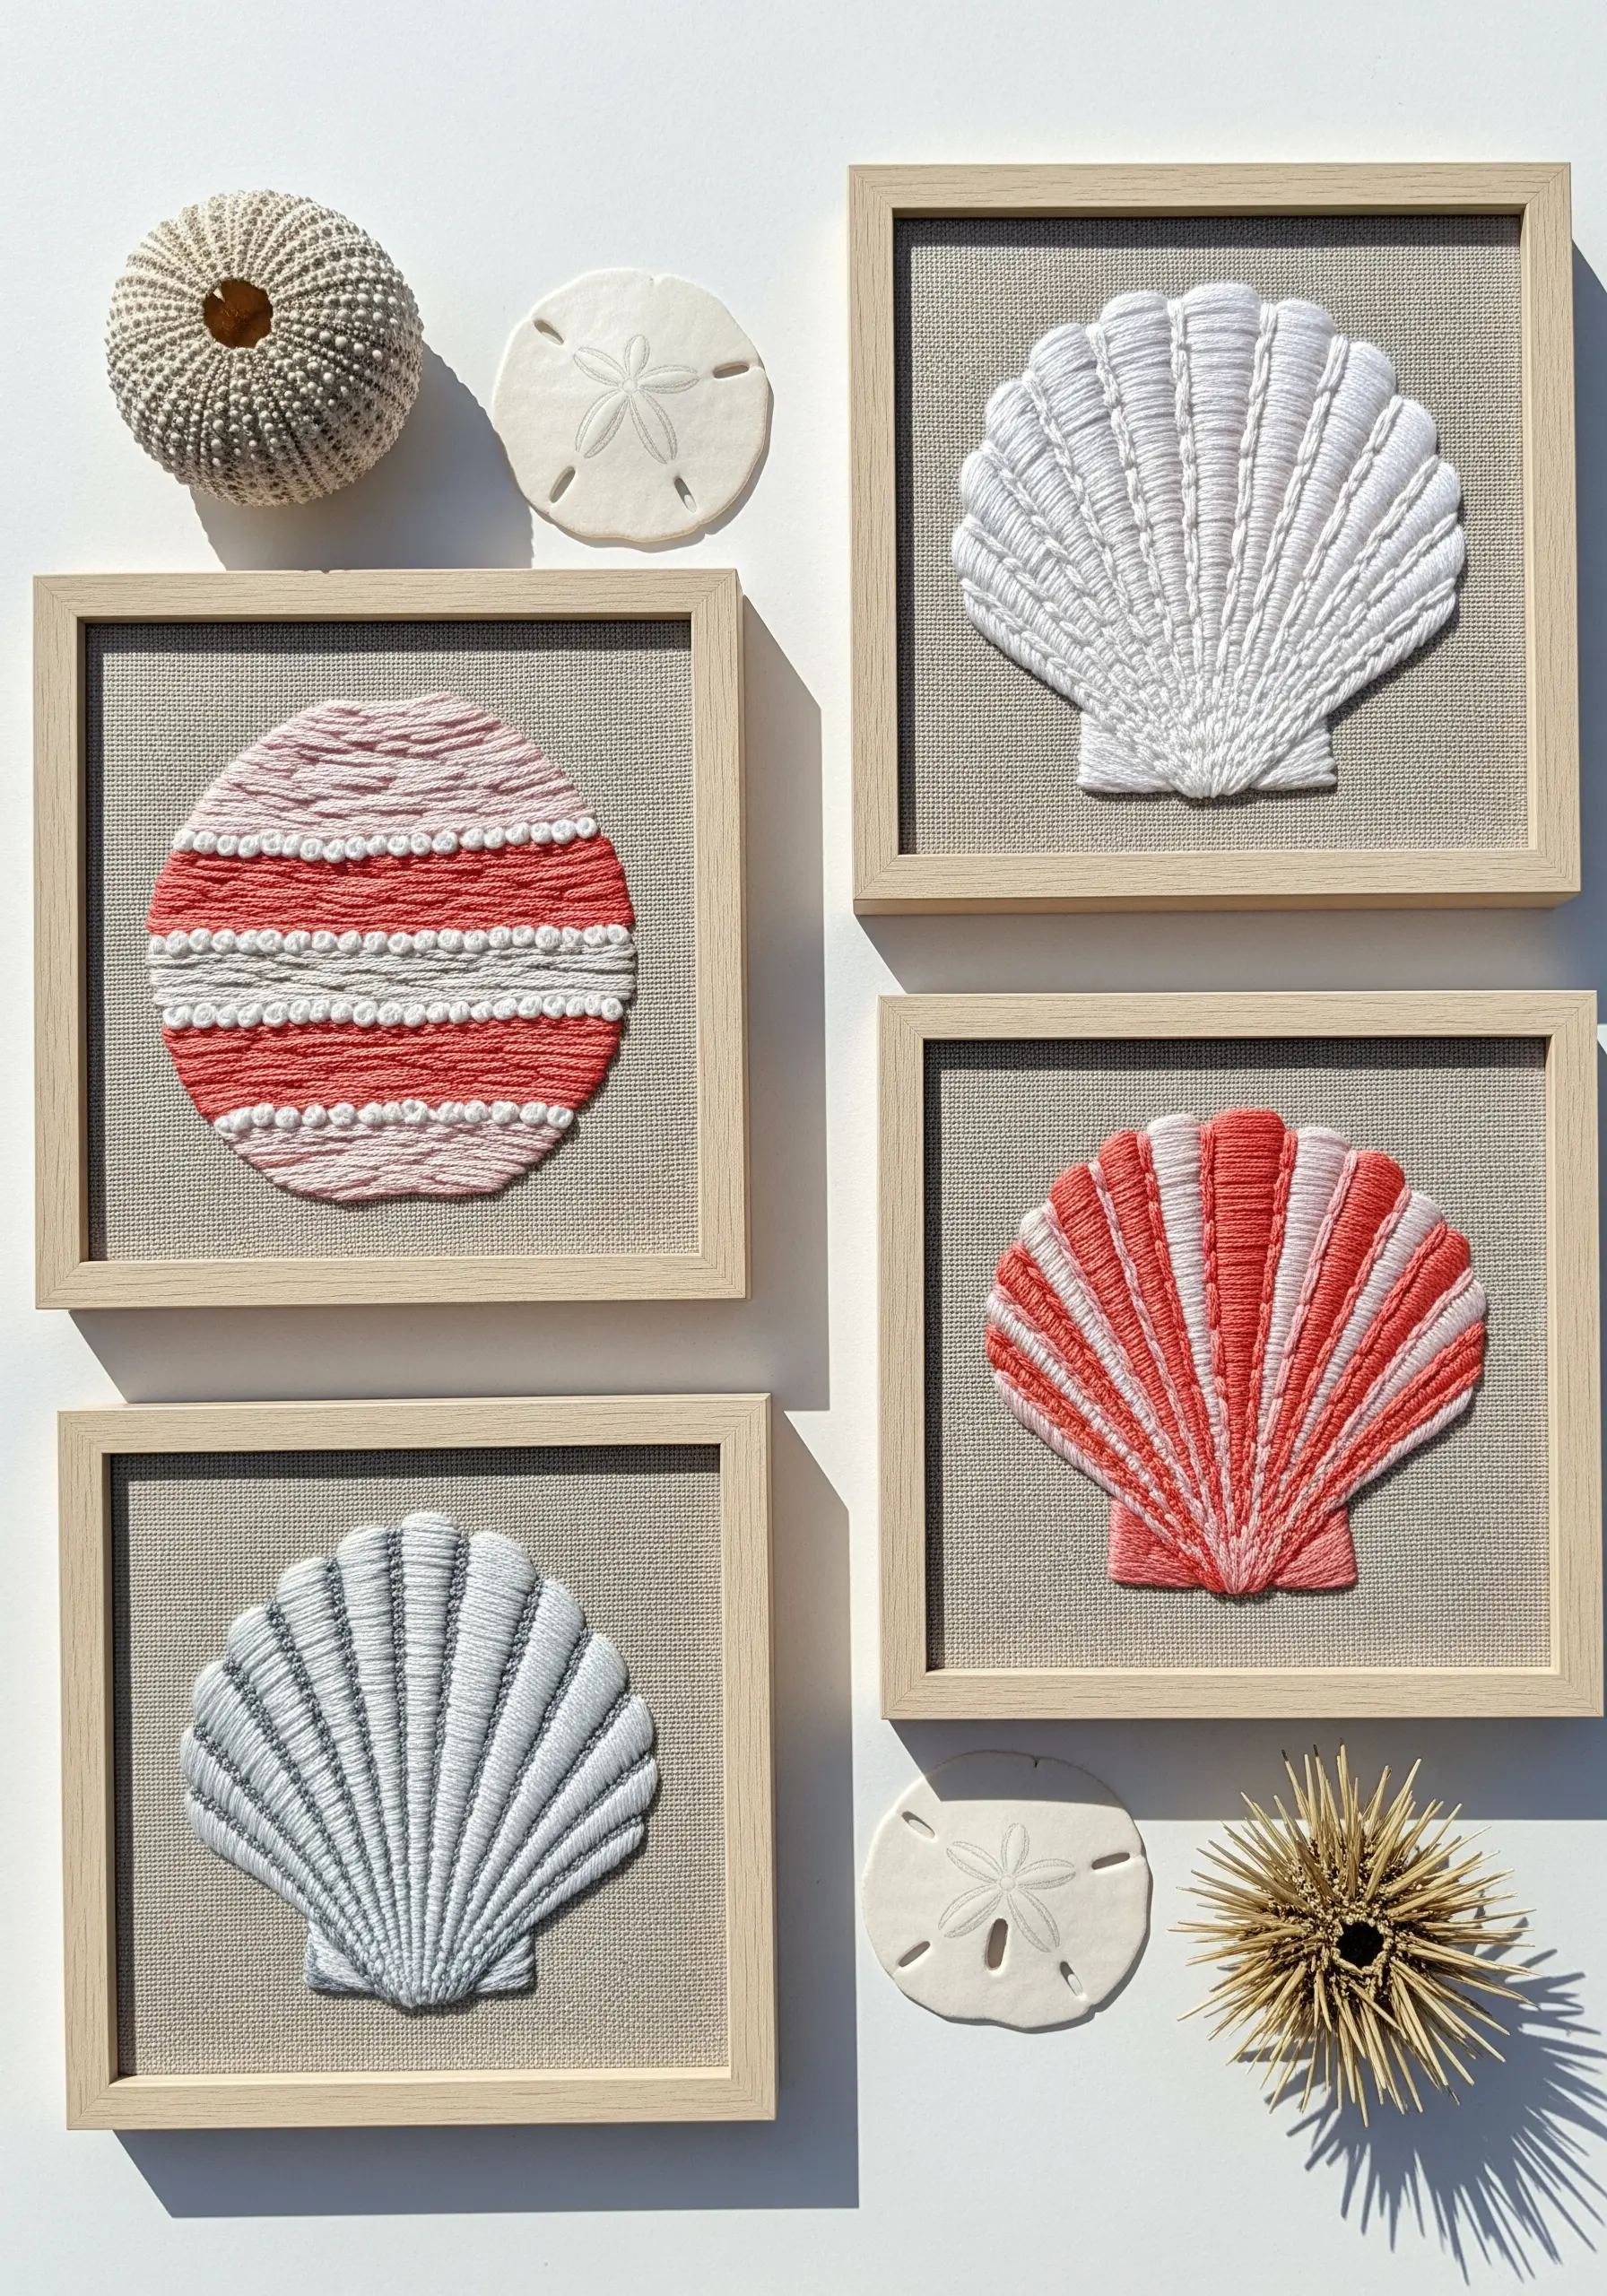
Give your embroidered seashells a realistic, three-dimensional form using padded satin stitch.
First, lay down a foundation of small, straight stitches within the area you plan to cover. This padding physically raises the surface of the fabric.
Next, work your satin stitches over the padding at a perpendicular angle. For a seashell, stitch from the outer edge toward the center, following the direction of the shell’s natural ridges.
Using a thread with a slight sheen, like perle cotton or silk, will enhance the play of light and shadow on the raised surface, making your shells look beautifully sculpted. It’s a perfect technique for creating stunning framed embroidery pieces.
14. Create a Pebble Texture with Dense Knots
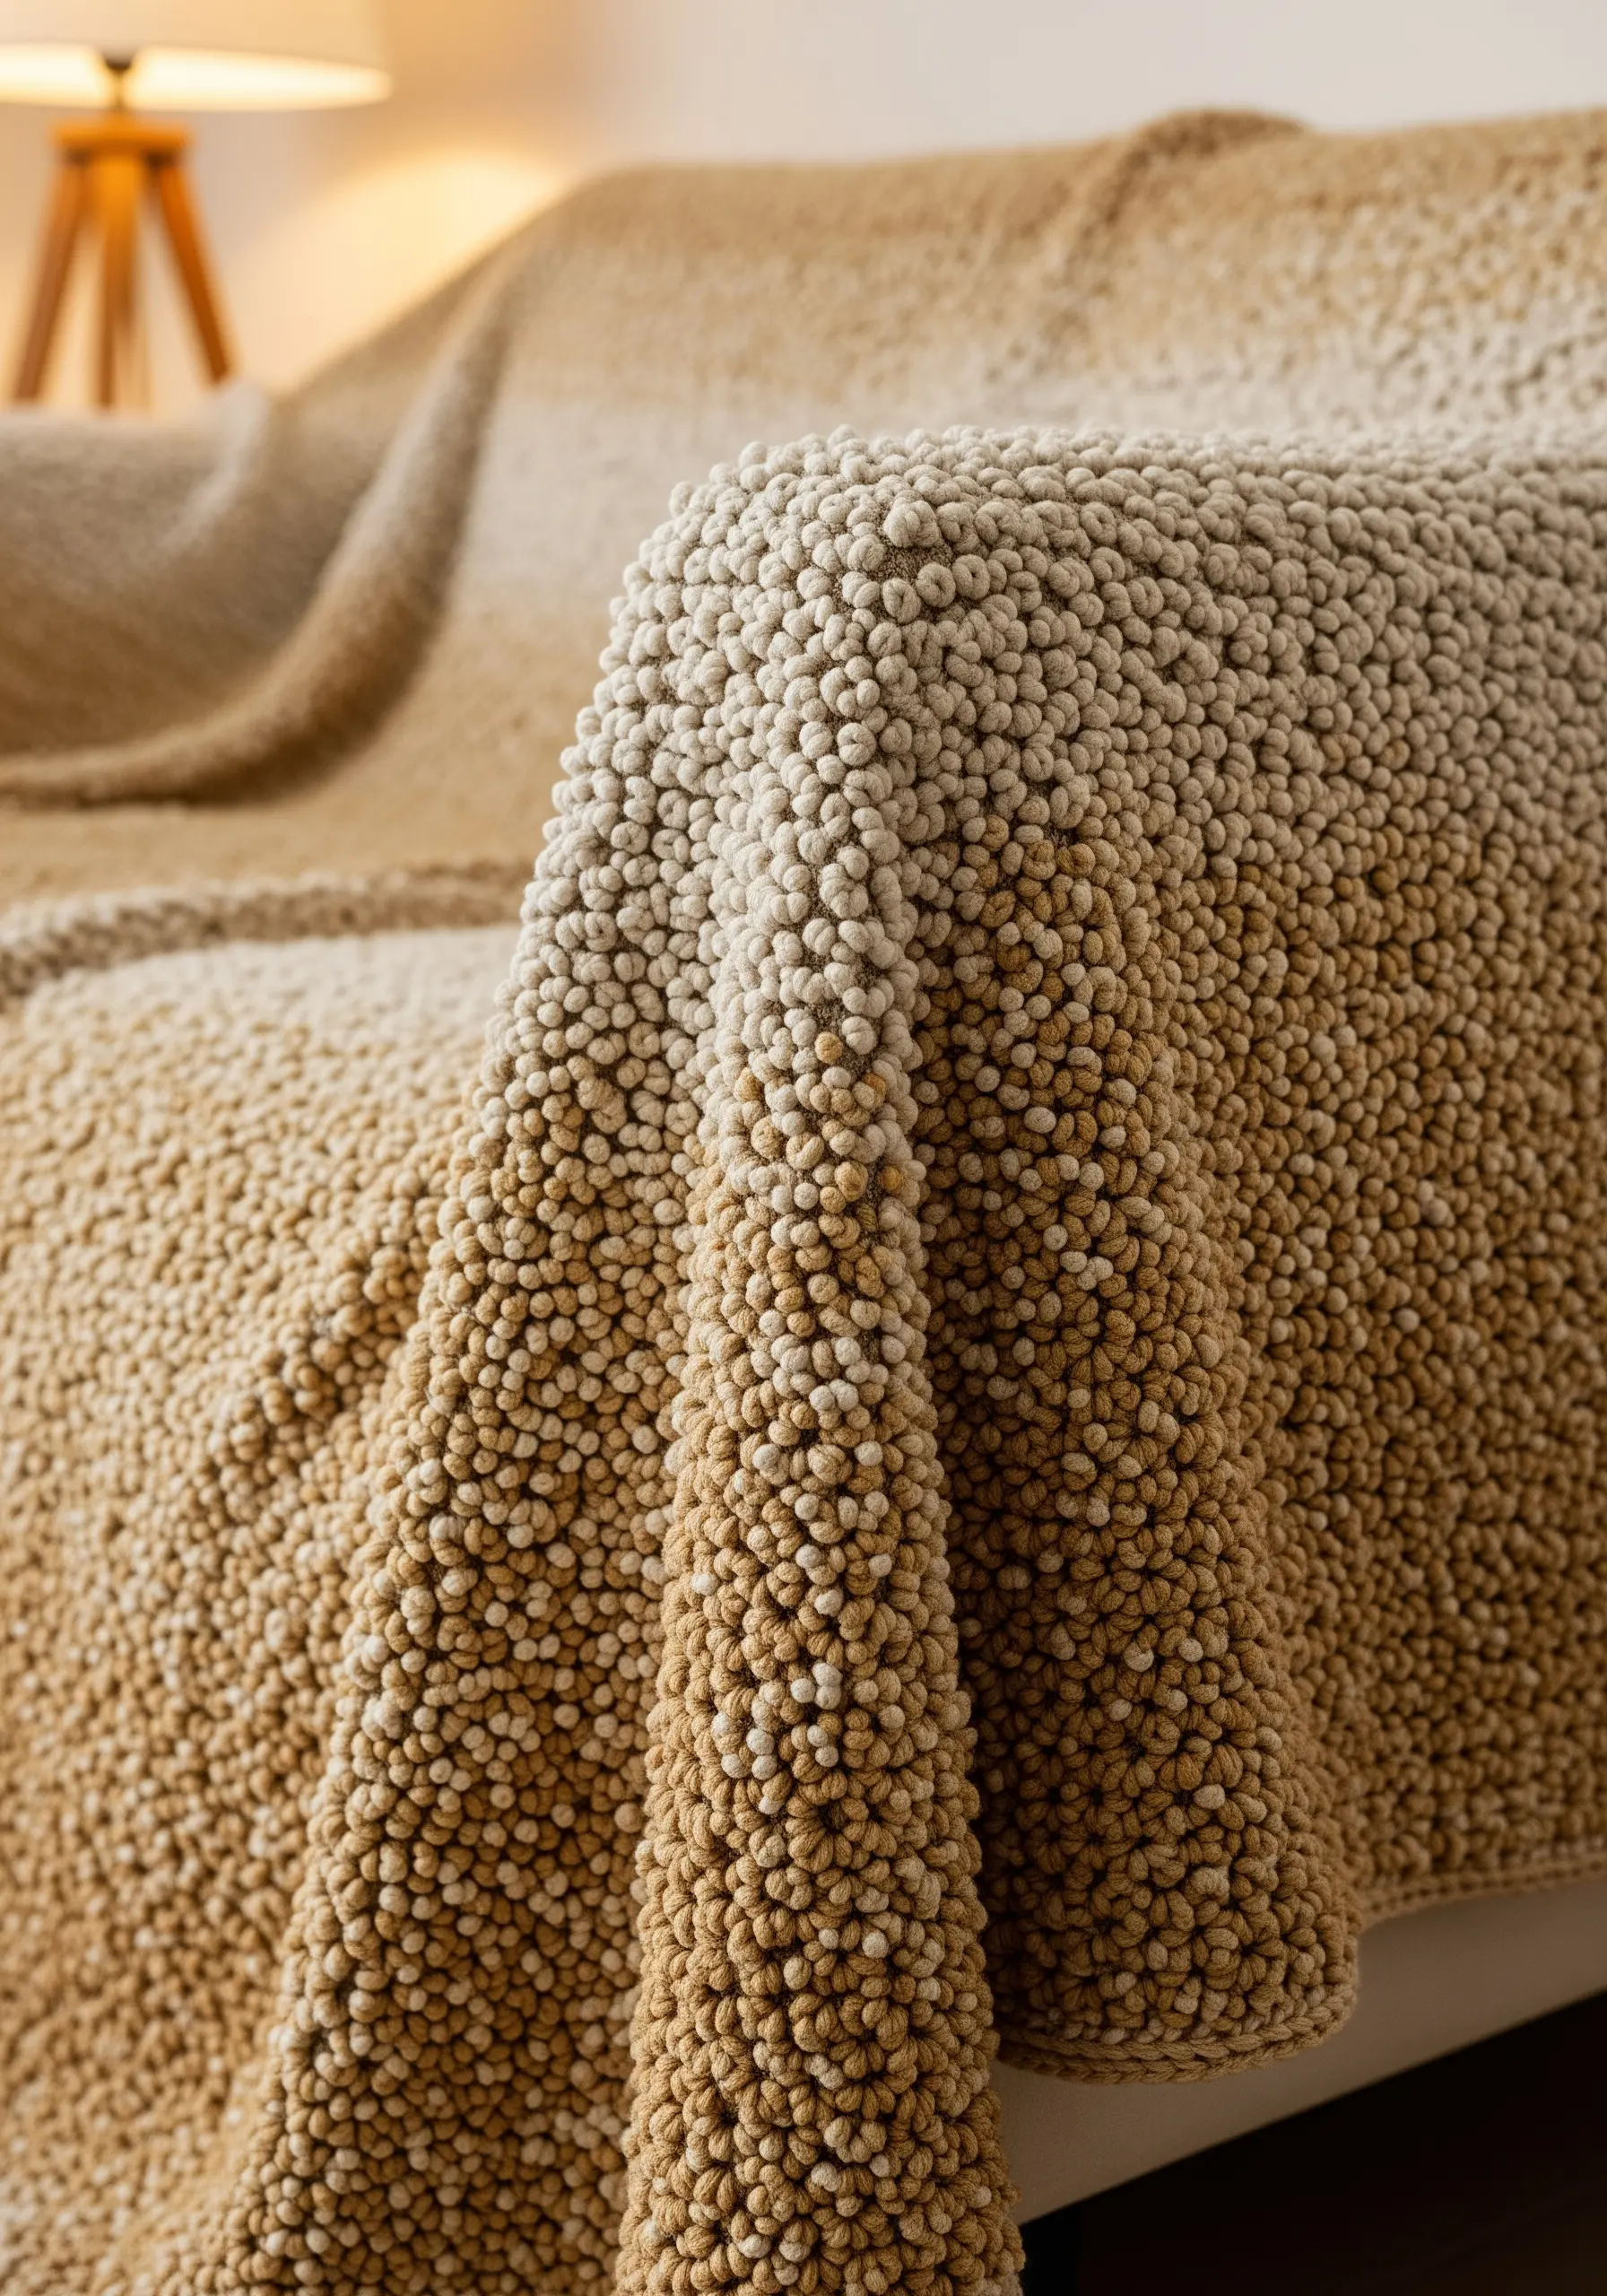
For a project that is pure texture, cover a surface with thousands of colonial knots worked in a thick, soft yarn.
This technique is perfect for large, tactile pieces like embroidered throws and blankets or rugs. Choose a sturdy backing fabric like monk’s cloth or heavy canvas.
The colonial knot is often sturdier and more uniform than a French knot, making it ideal for this kind of high-density work. Pack the knots tightly together so no background fabric shows through.
Create a subtle gradient effect by gradually shifting from one color of yarn to another, blending them together for a soft, natural transition reminiscent of sand or pebbles.
15. Embroider Frost on Sheer Curtains

Capture the delicate patterns of frost by stitching onto a sheer fabric like linen or voilè.
Use a temporary stabilizer on the back to prevent puckering while you stitch. Choose a fine, lightweight thread palette: white, silver, and pale icy blue.
Use open, airy stitches to mimic the crystal formations. Feather stitch, fly stitch, and detached chain stitches are perfect for creating the branching, fern-like patterns of frost.
Scatter tiny seed stitches or French knots to represent ice crystals. When the stabilizer is removed, the design will float beautifully on the transparent fabric, interacting with the light.
16. Replicate Mushroom Gills with Thread Painting
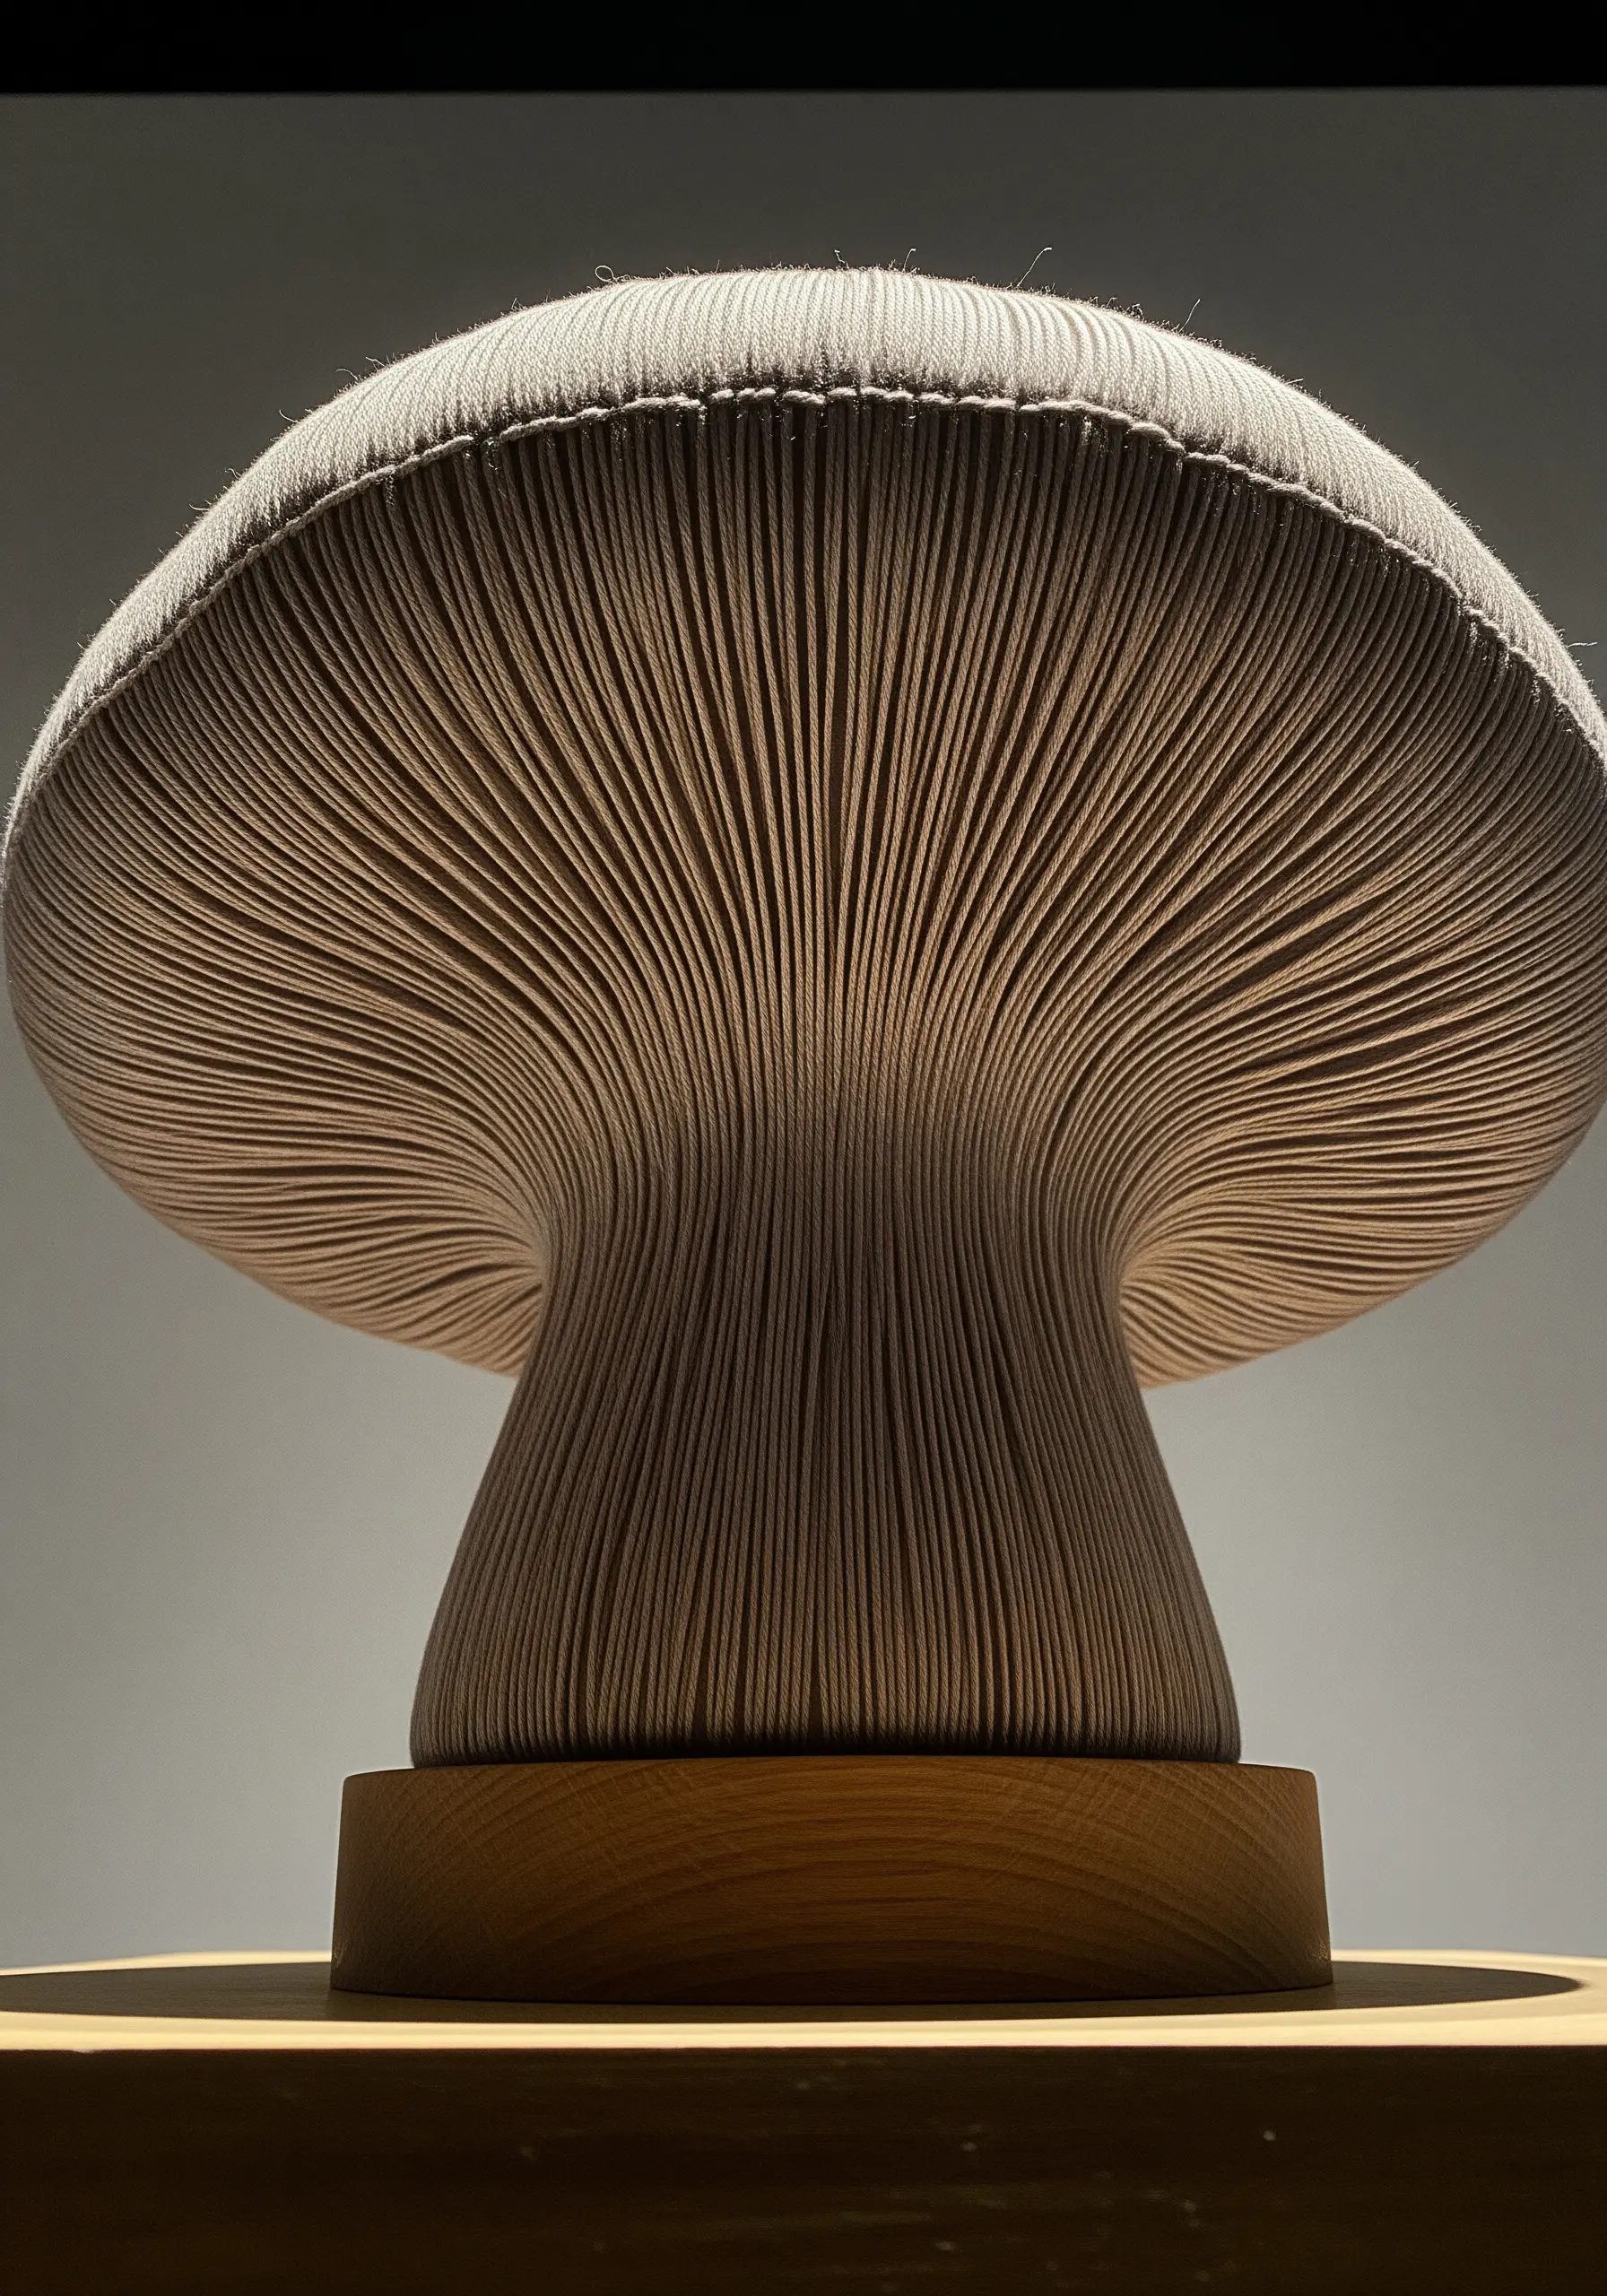
This advanced project uses thread to create the illusion of tightly packed mushroom gills, a technique that is part embroidery, part sculpture.
The form itself is constructed from fabric shaped over a base, but the gill texture is all thread work. Use a single strand of floss and a very long straight stitch, or satin stitch, pulled taut over the curved surface.
The key is absolute precision and tension. Each stitch must lie perfectly parallel to the last, creating a dense, ribbed texture that catches the light and creates deep shadows.
This isn’t about creating a picture of a mushroom; it’s about building a textile object that embodies its essential form and texture.
17. Build a Forest Floor Collage
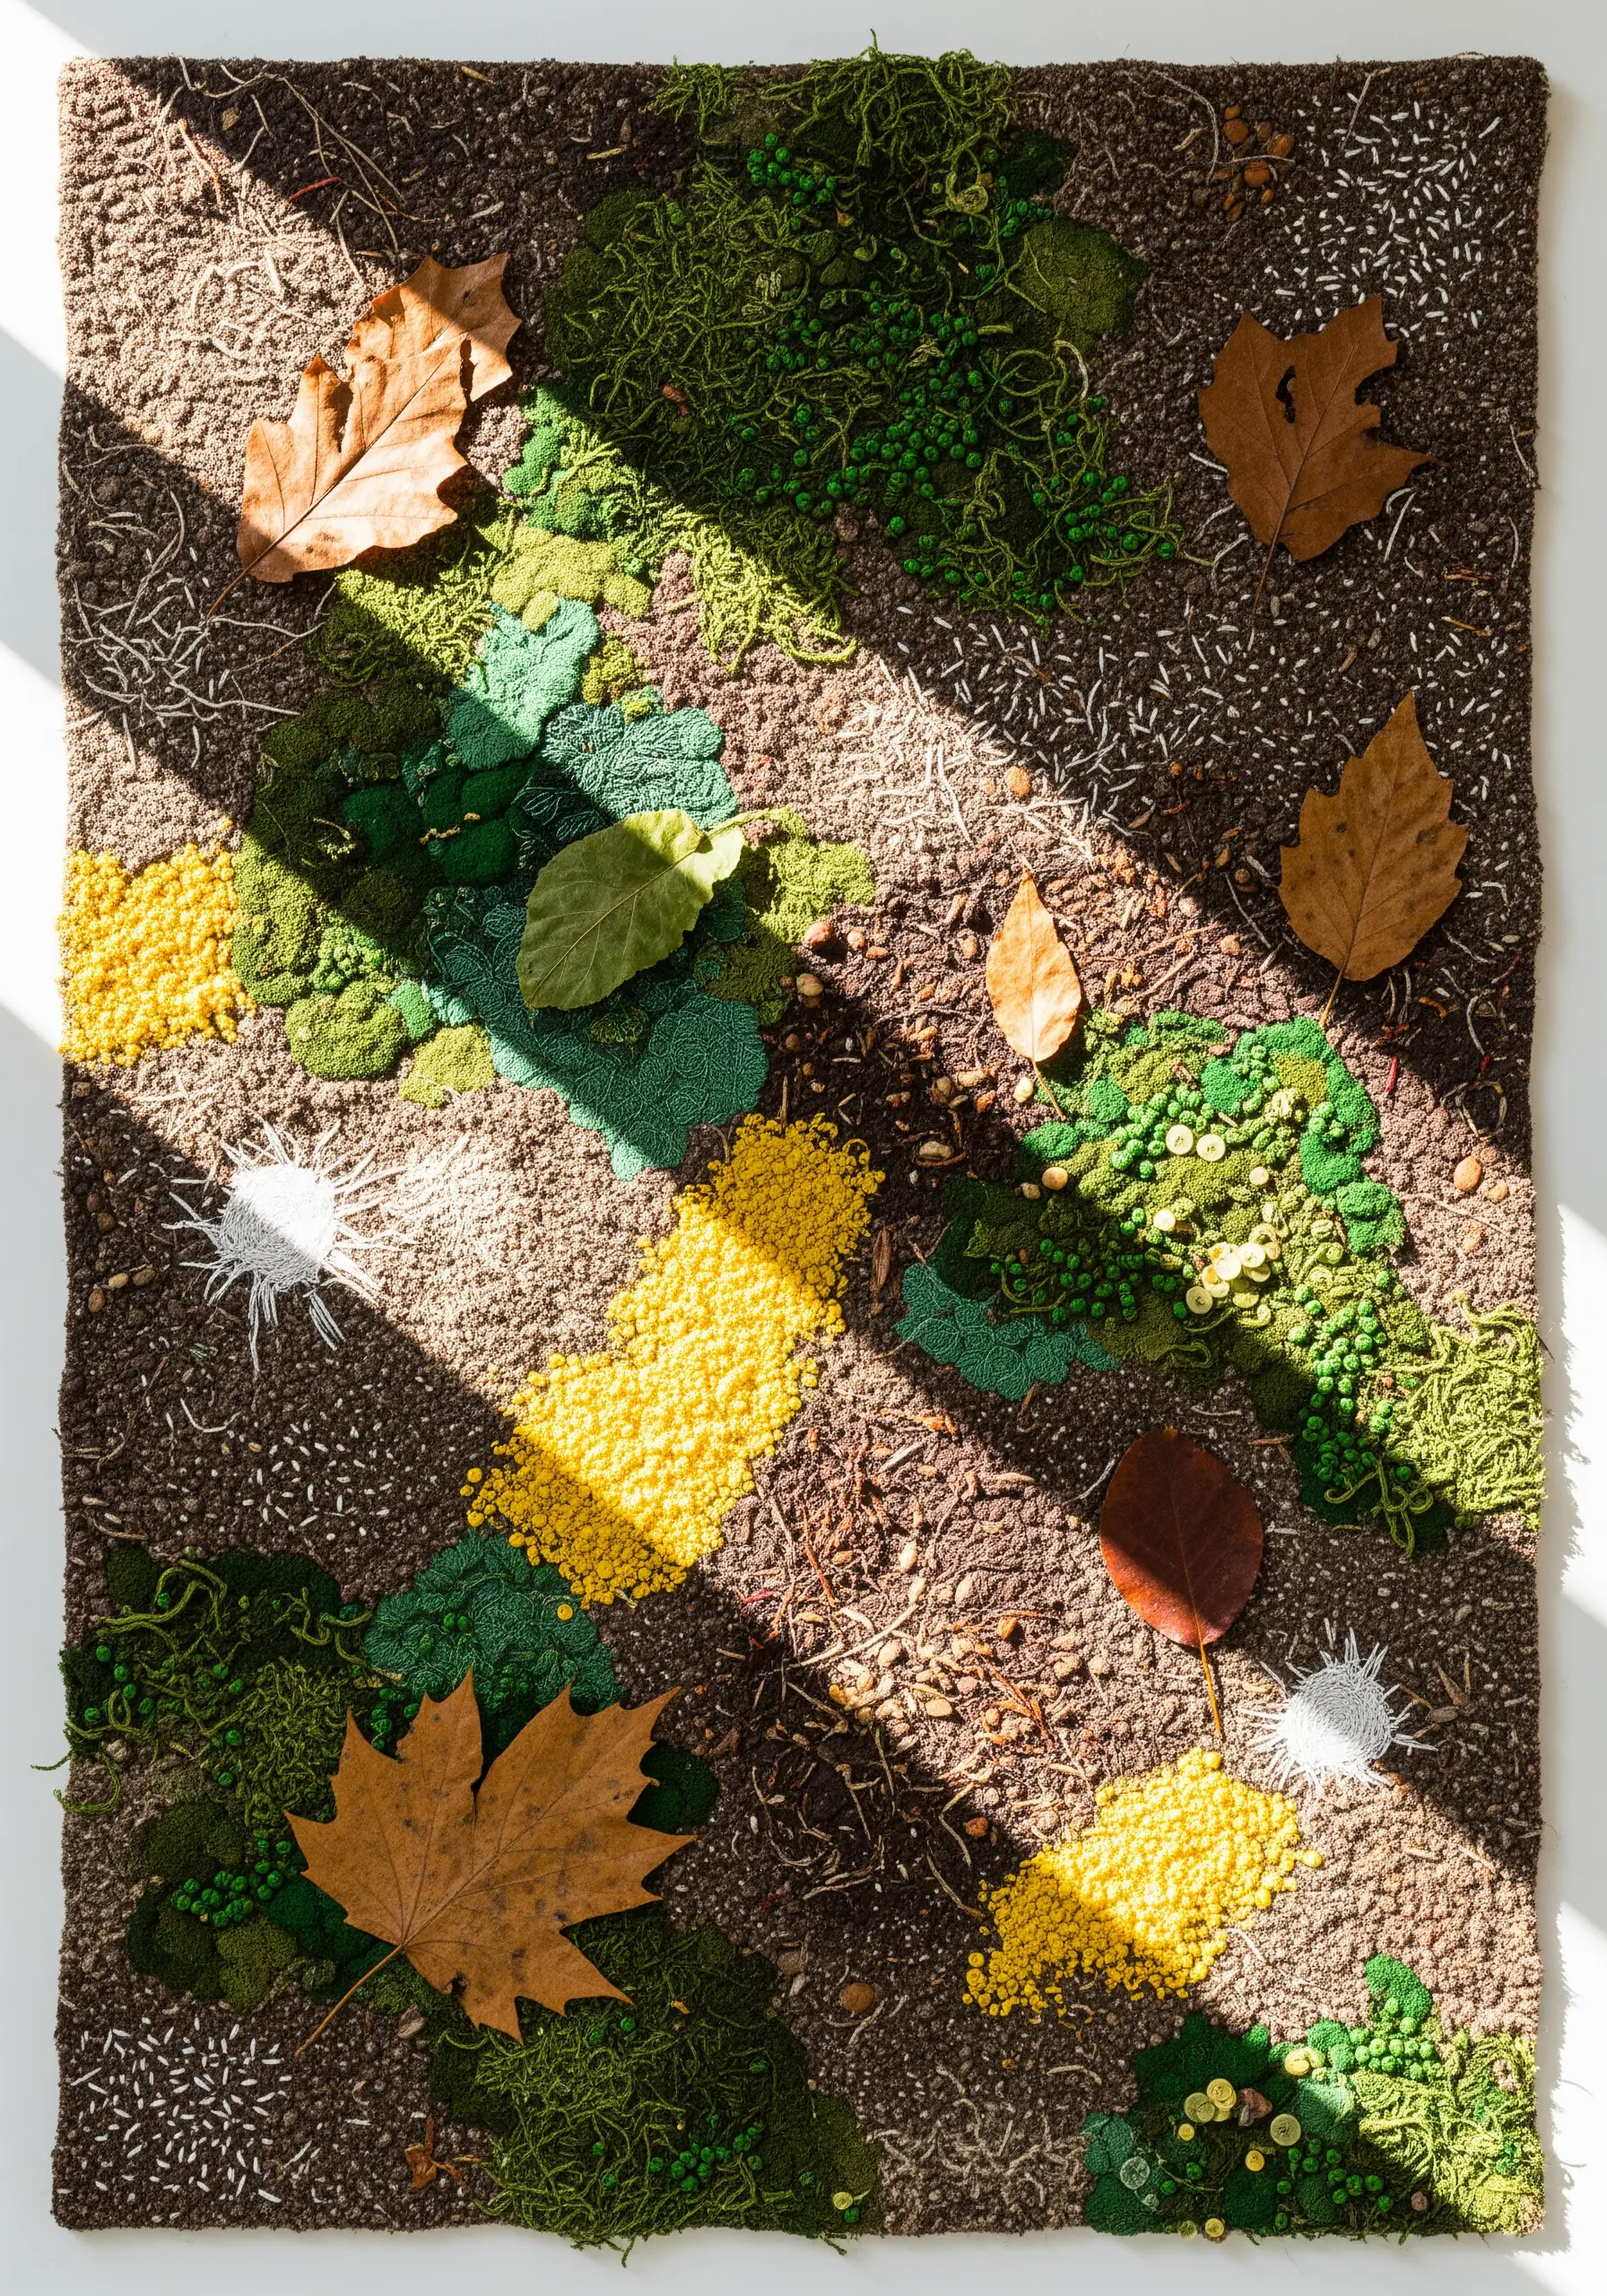
Create a rich, multi-sensory piece by combining different embroidery stitches with appliqué and found objects.
Start with a base fabric and create patches of texture: French knots for moss, turkey work for grassy tufts, and seed stitch for bare earth.
Then, layer on top of this. Appliqué small pieces of felt or hand-dyed fabric to represent lichen. You can even incorporate real, preserved leaves, securing them with tiny, almost invisible stitches.
This method of high-texture fabric collage embroidery results in a piece that is not just seen but experienced, telling the story of a specific place and time.
18. Adorn a Pillow with Appliquéd Pebbles
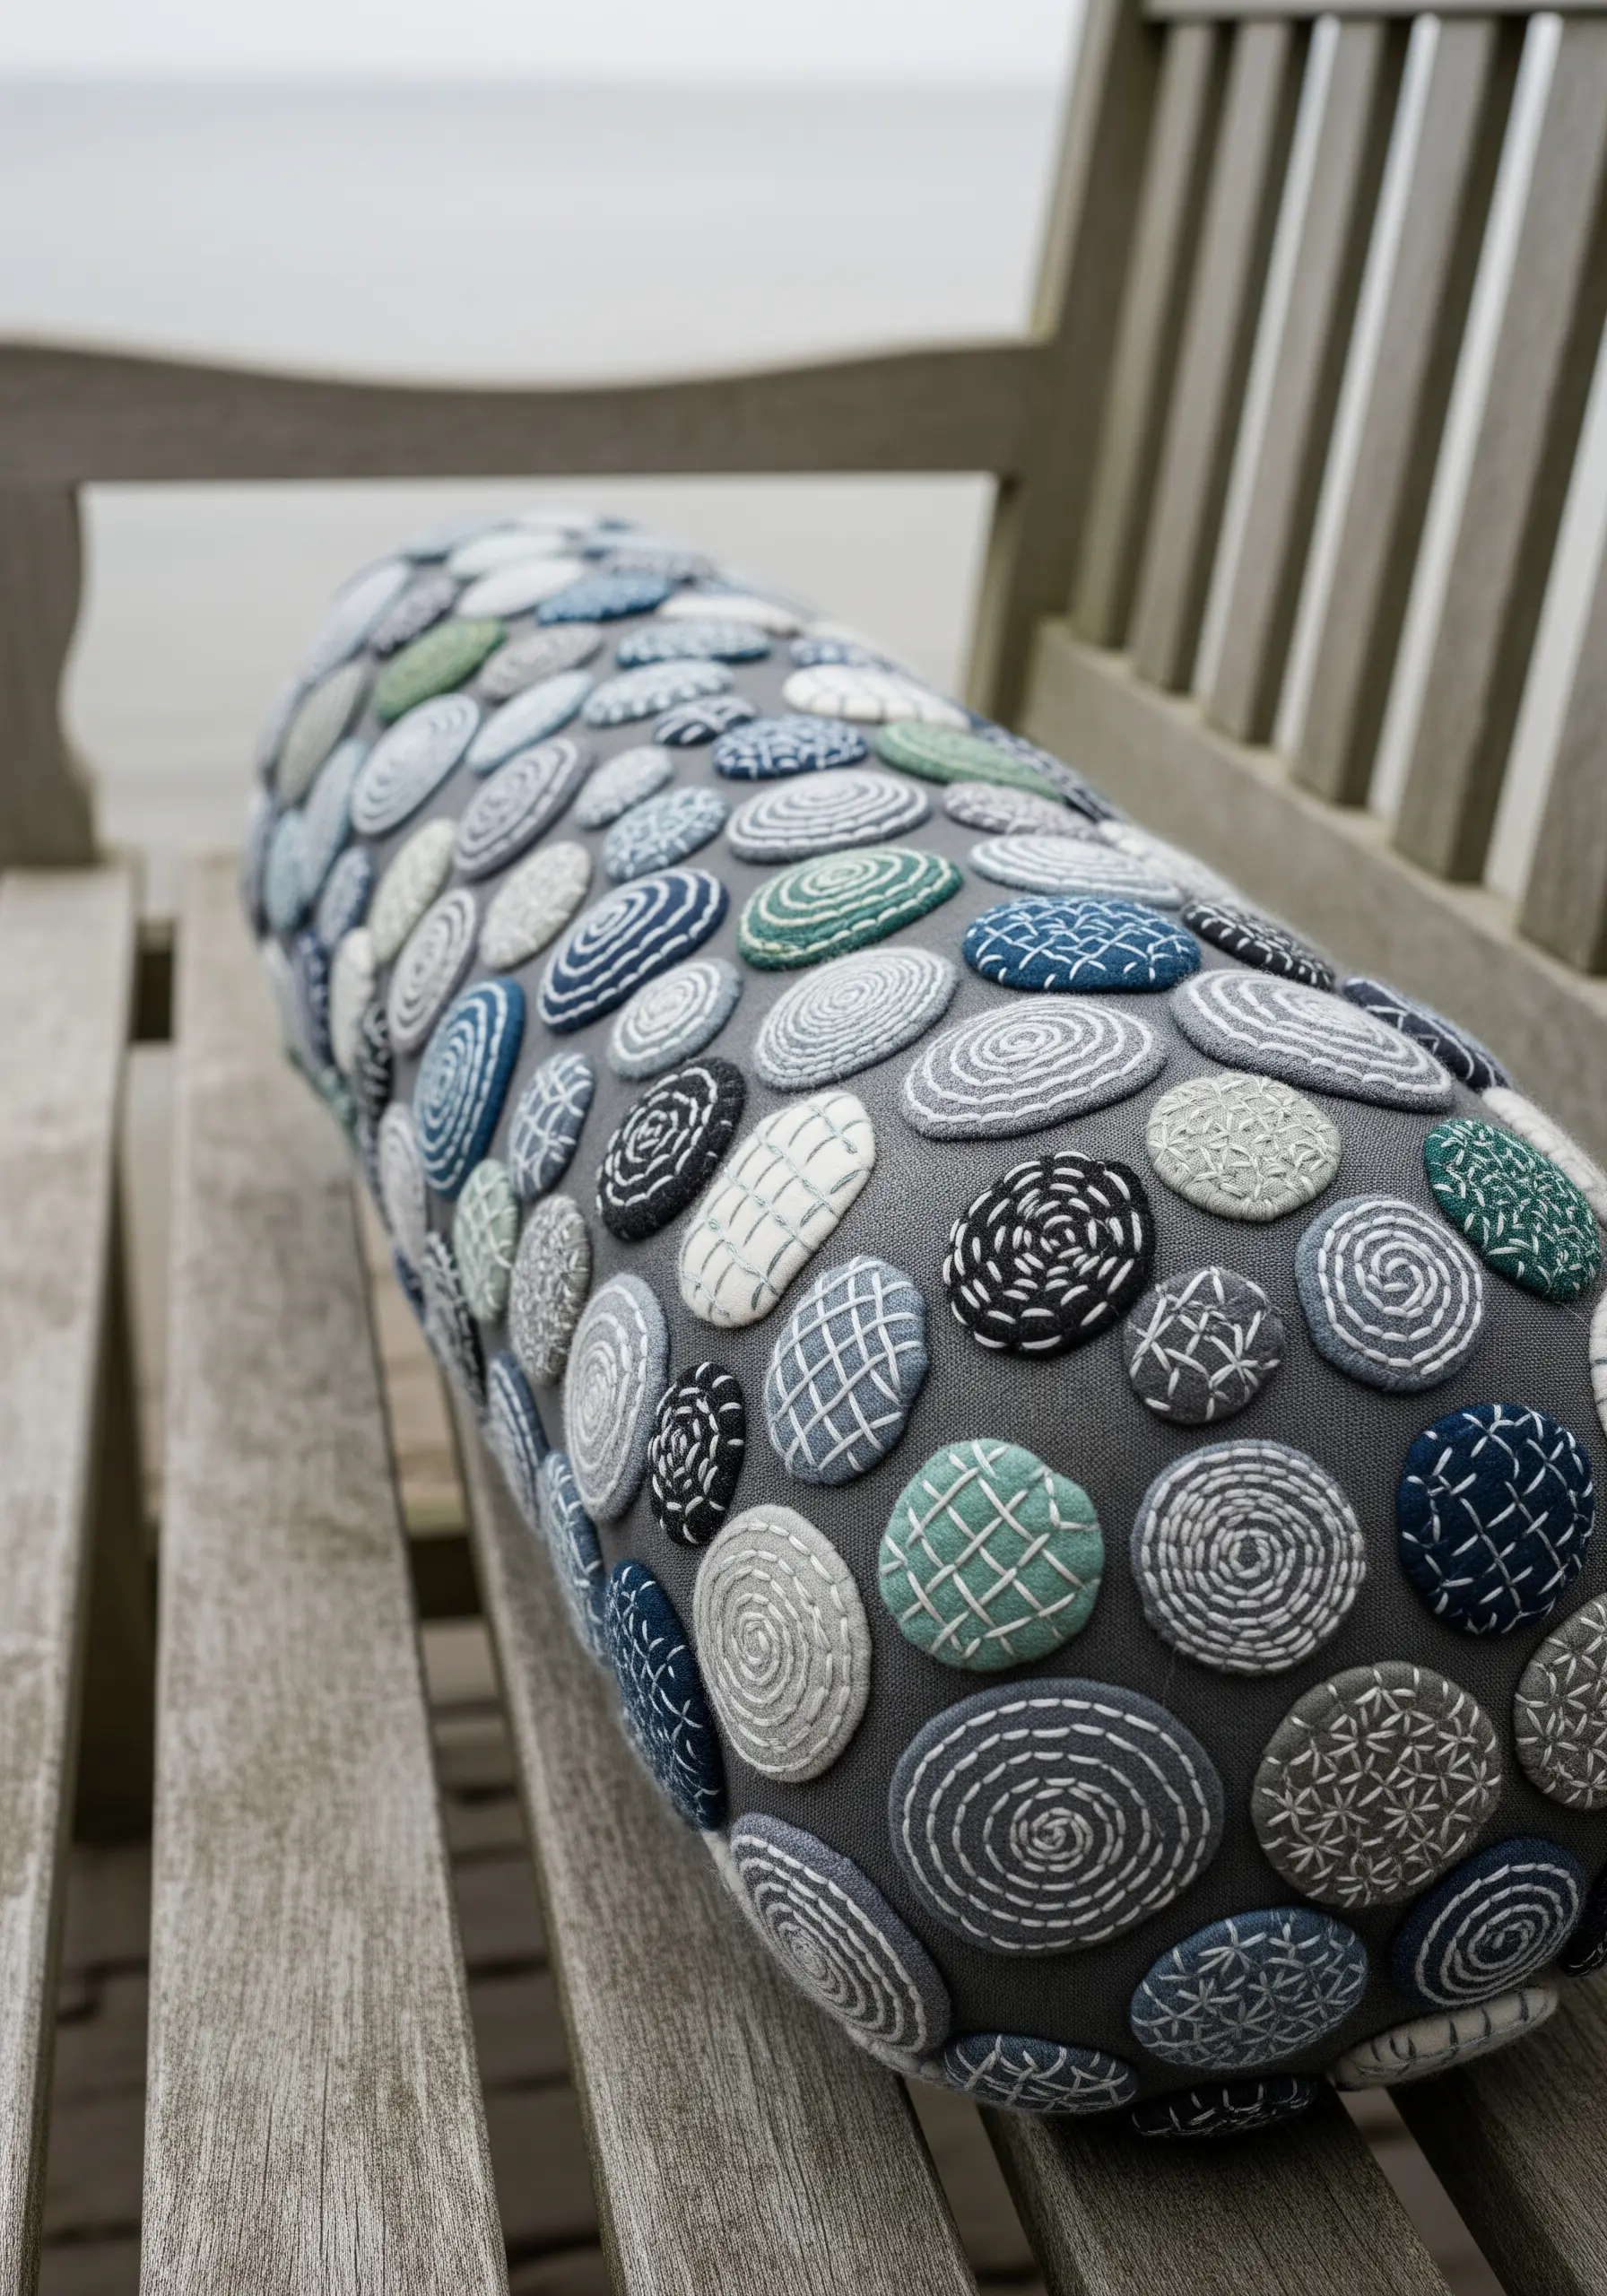
Transform a simple pillow with a collection of individually stitched and appliquéd fabric pebbles.
Cut ovals and circles from wool or felt in a cohesive, nature-inspired color palette. Before attaching them to the pillow, embellish each shape with a unique embroidered pattern.
Use simple stitches like running stitch, seed stitch, cross stitch, or backstitch to create spirals, grids, and contour lines. This turns each pebble into a small, self-contained piece of art.
Arrange the finished pebbles on your pillow cover, overlapping them slightly for a natural, piled-up look, and secure them with a neat whipstitch around the edge. The result is a highly tactile and visually engaging design.


