

You’ve mastered the basic stitches, and now you’re ready to create embroidery that feels truly intentional—bold, polished, and full of personality. This is where you move beyond simply filling in shapes and begin to use thread to tell a visual story, capturing the vibrant energy of pop art.
Think of each motif not just as a picture, but as an exercise in texture, color, and composition. We’ll explore how to make colors pop on dark fabric, how to create 3D effects with simple stitch variations, and how to use outlines to give your work that clean, graphic finish that defines the pop-art style.
Forget generic patterns. These ideas are designed to sharpen your technical skills and your artistic eye. You’ll learn to make deliberate choices about thread, fabric, and stitch direction, transforming everyday icons into expressive works of art that are unmistakably yours.
1. Add Tactile Depth with Woven Wheel Gumballs
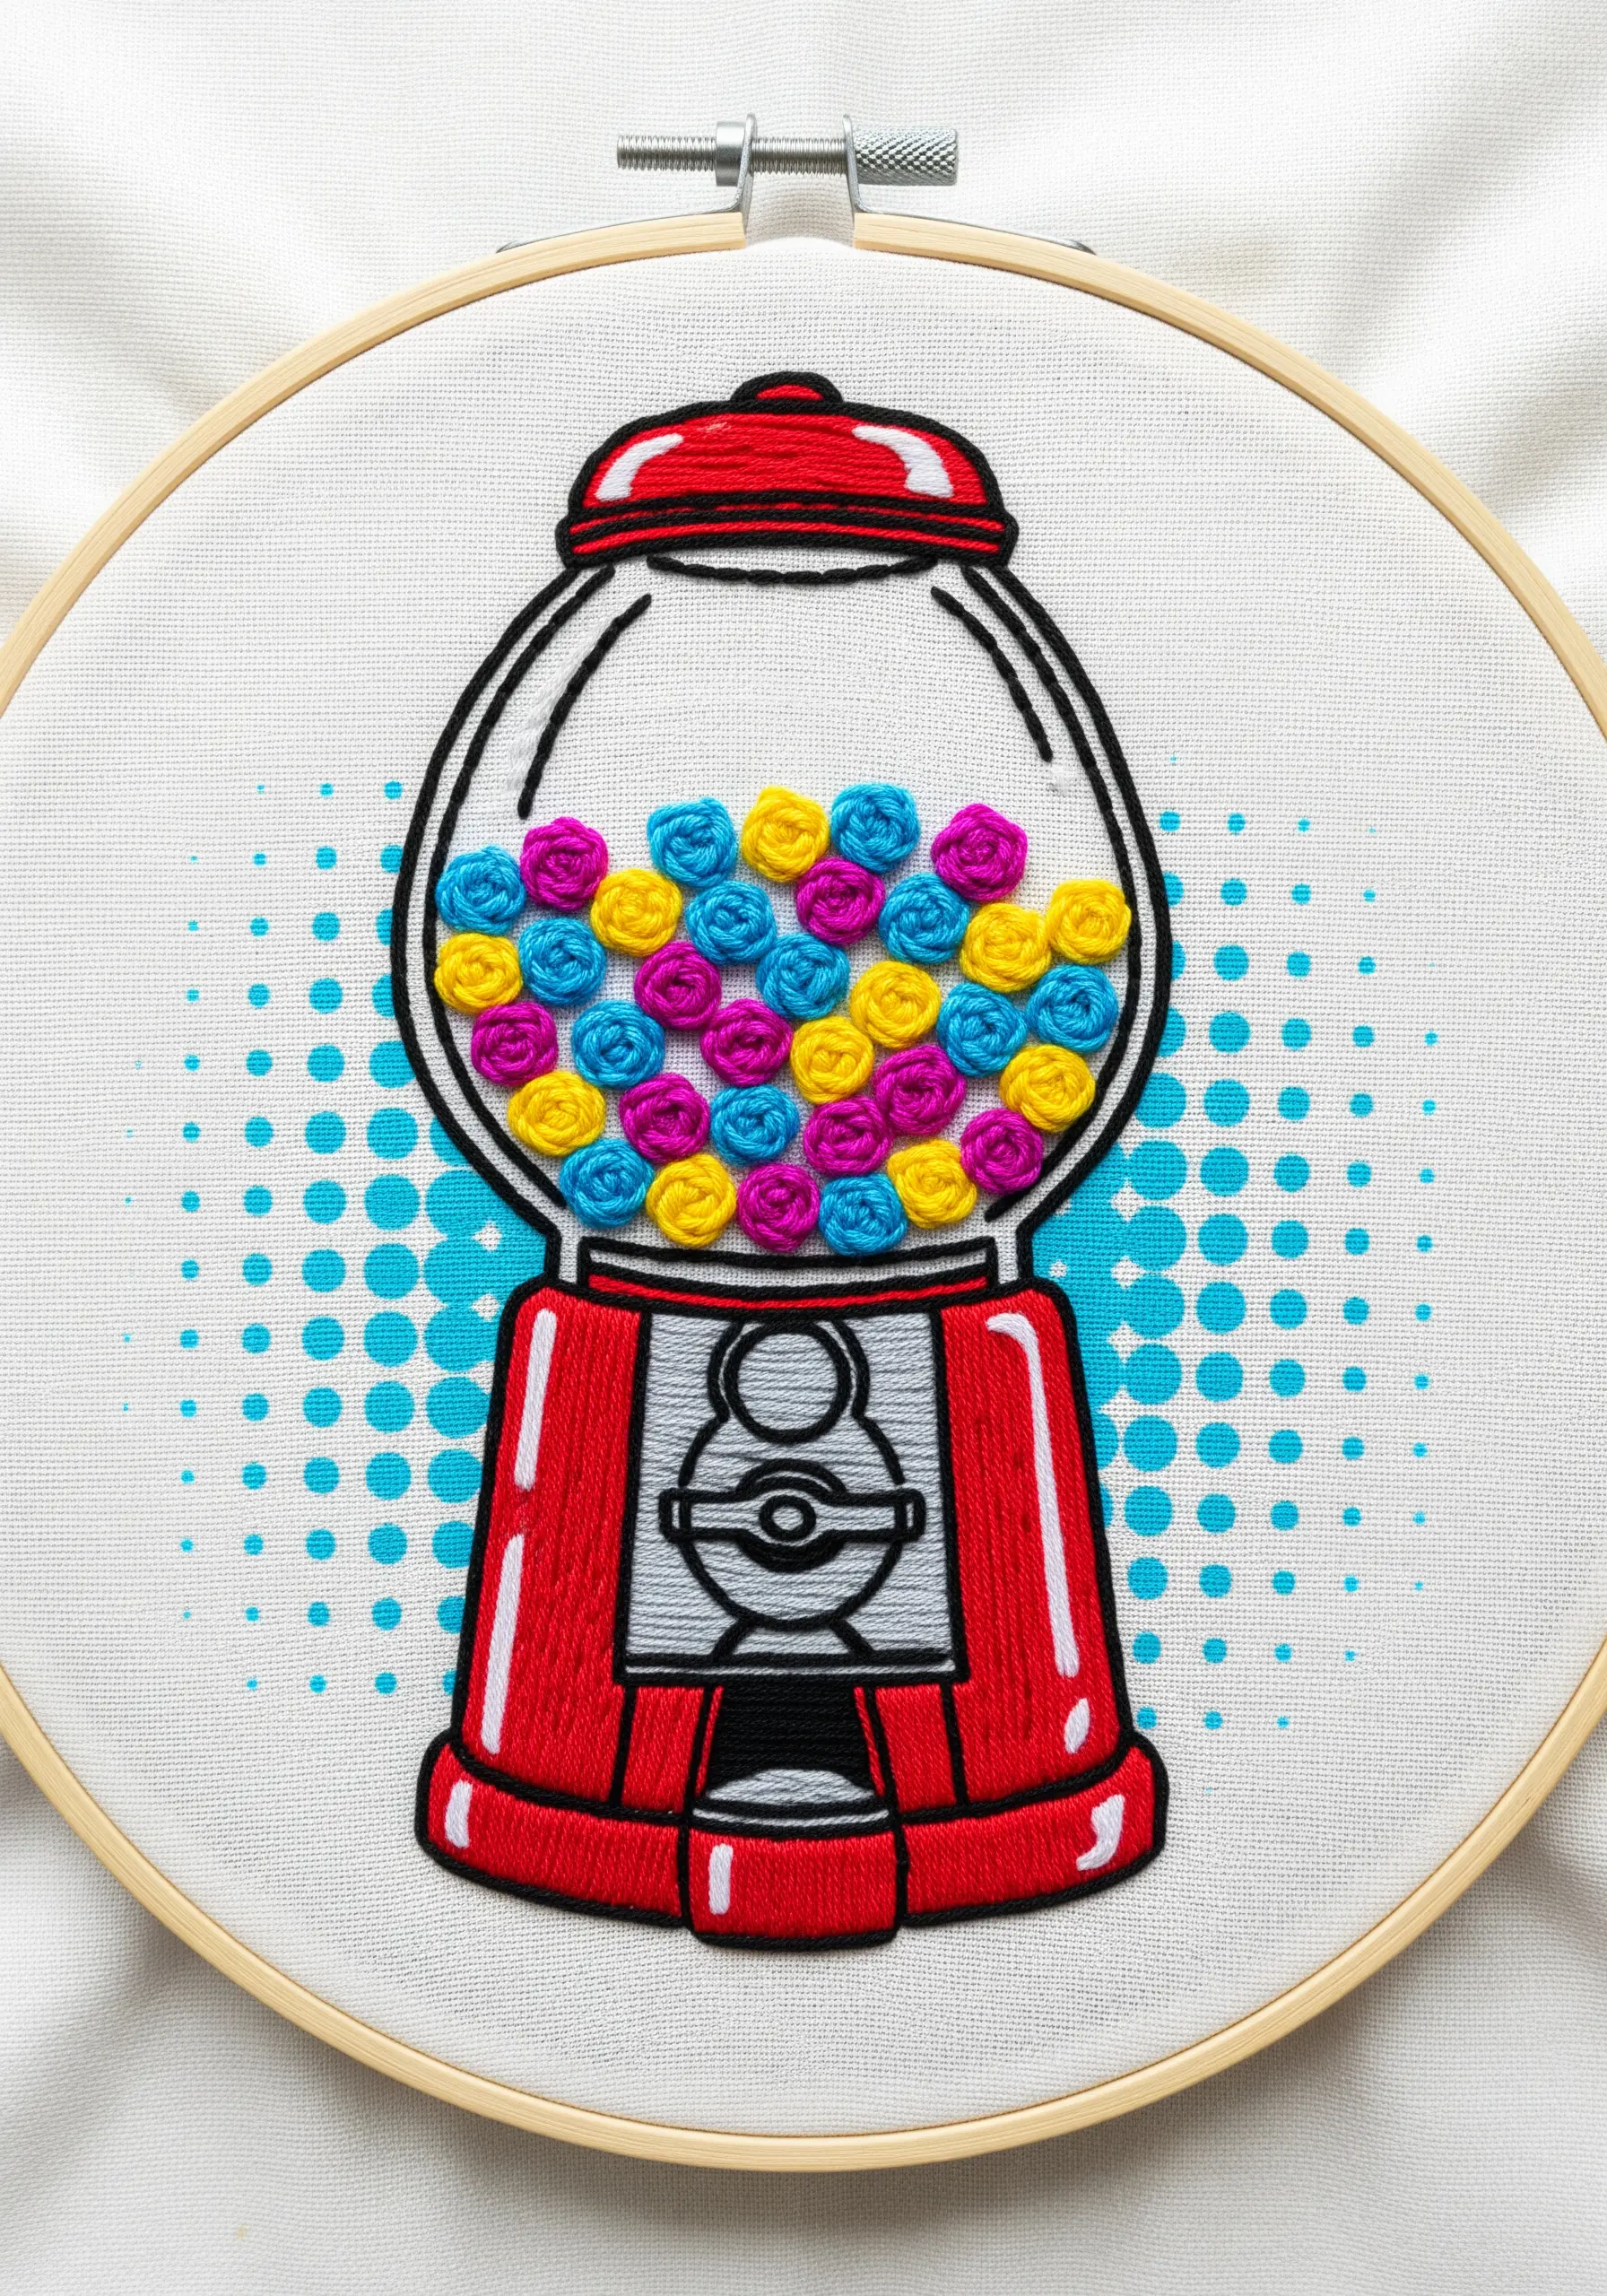
Create a striking contrast between flat and dimensional textures to make your subject pop.
Use a tight, clean satin stitch for the gumball machine’s body, ensuring your stitches lie flat and parallel for a glossy, metallic finish.
For the gumballs, use the woven wheel stitch (or spider web rose stitch) with six-strand floss to create raised, round forms that invite touch.
This textural difference is what elevates the piece from a simple illustration to a dynamic artwork.
A background of simple French knots or seed stitches mimics comic-book halftone dots, reinforcing the pop-art aesthetic without overpowering the main motif.
2. Imply Motion with Directional Stitching
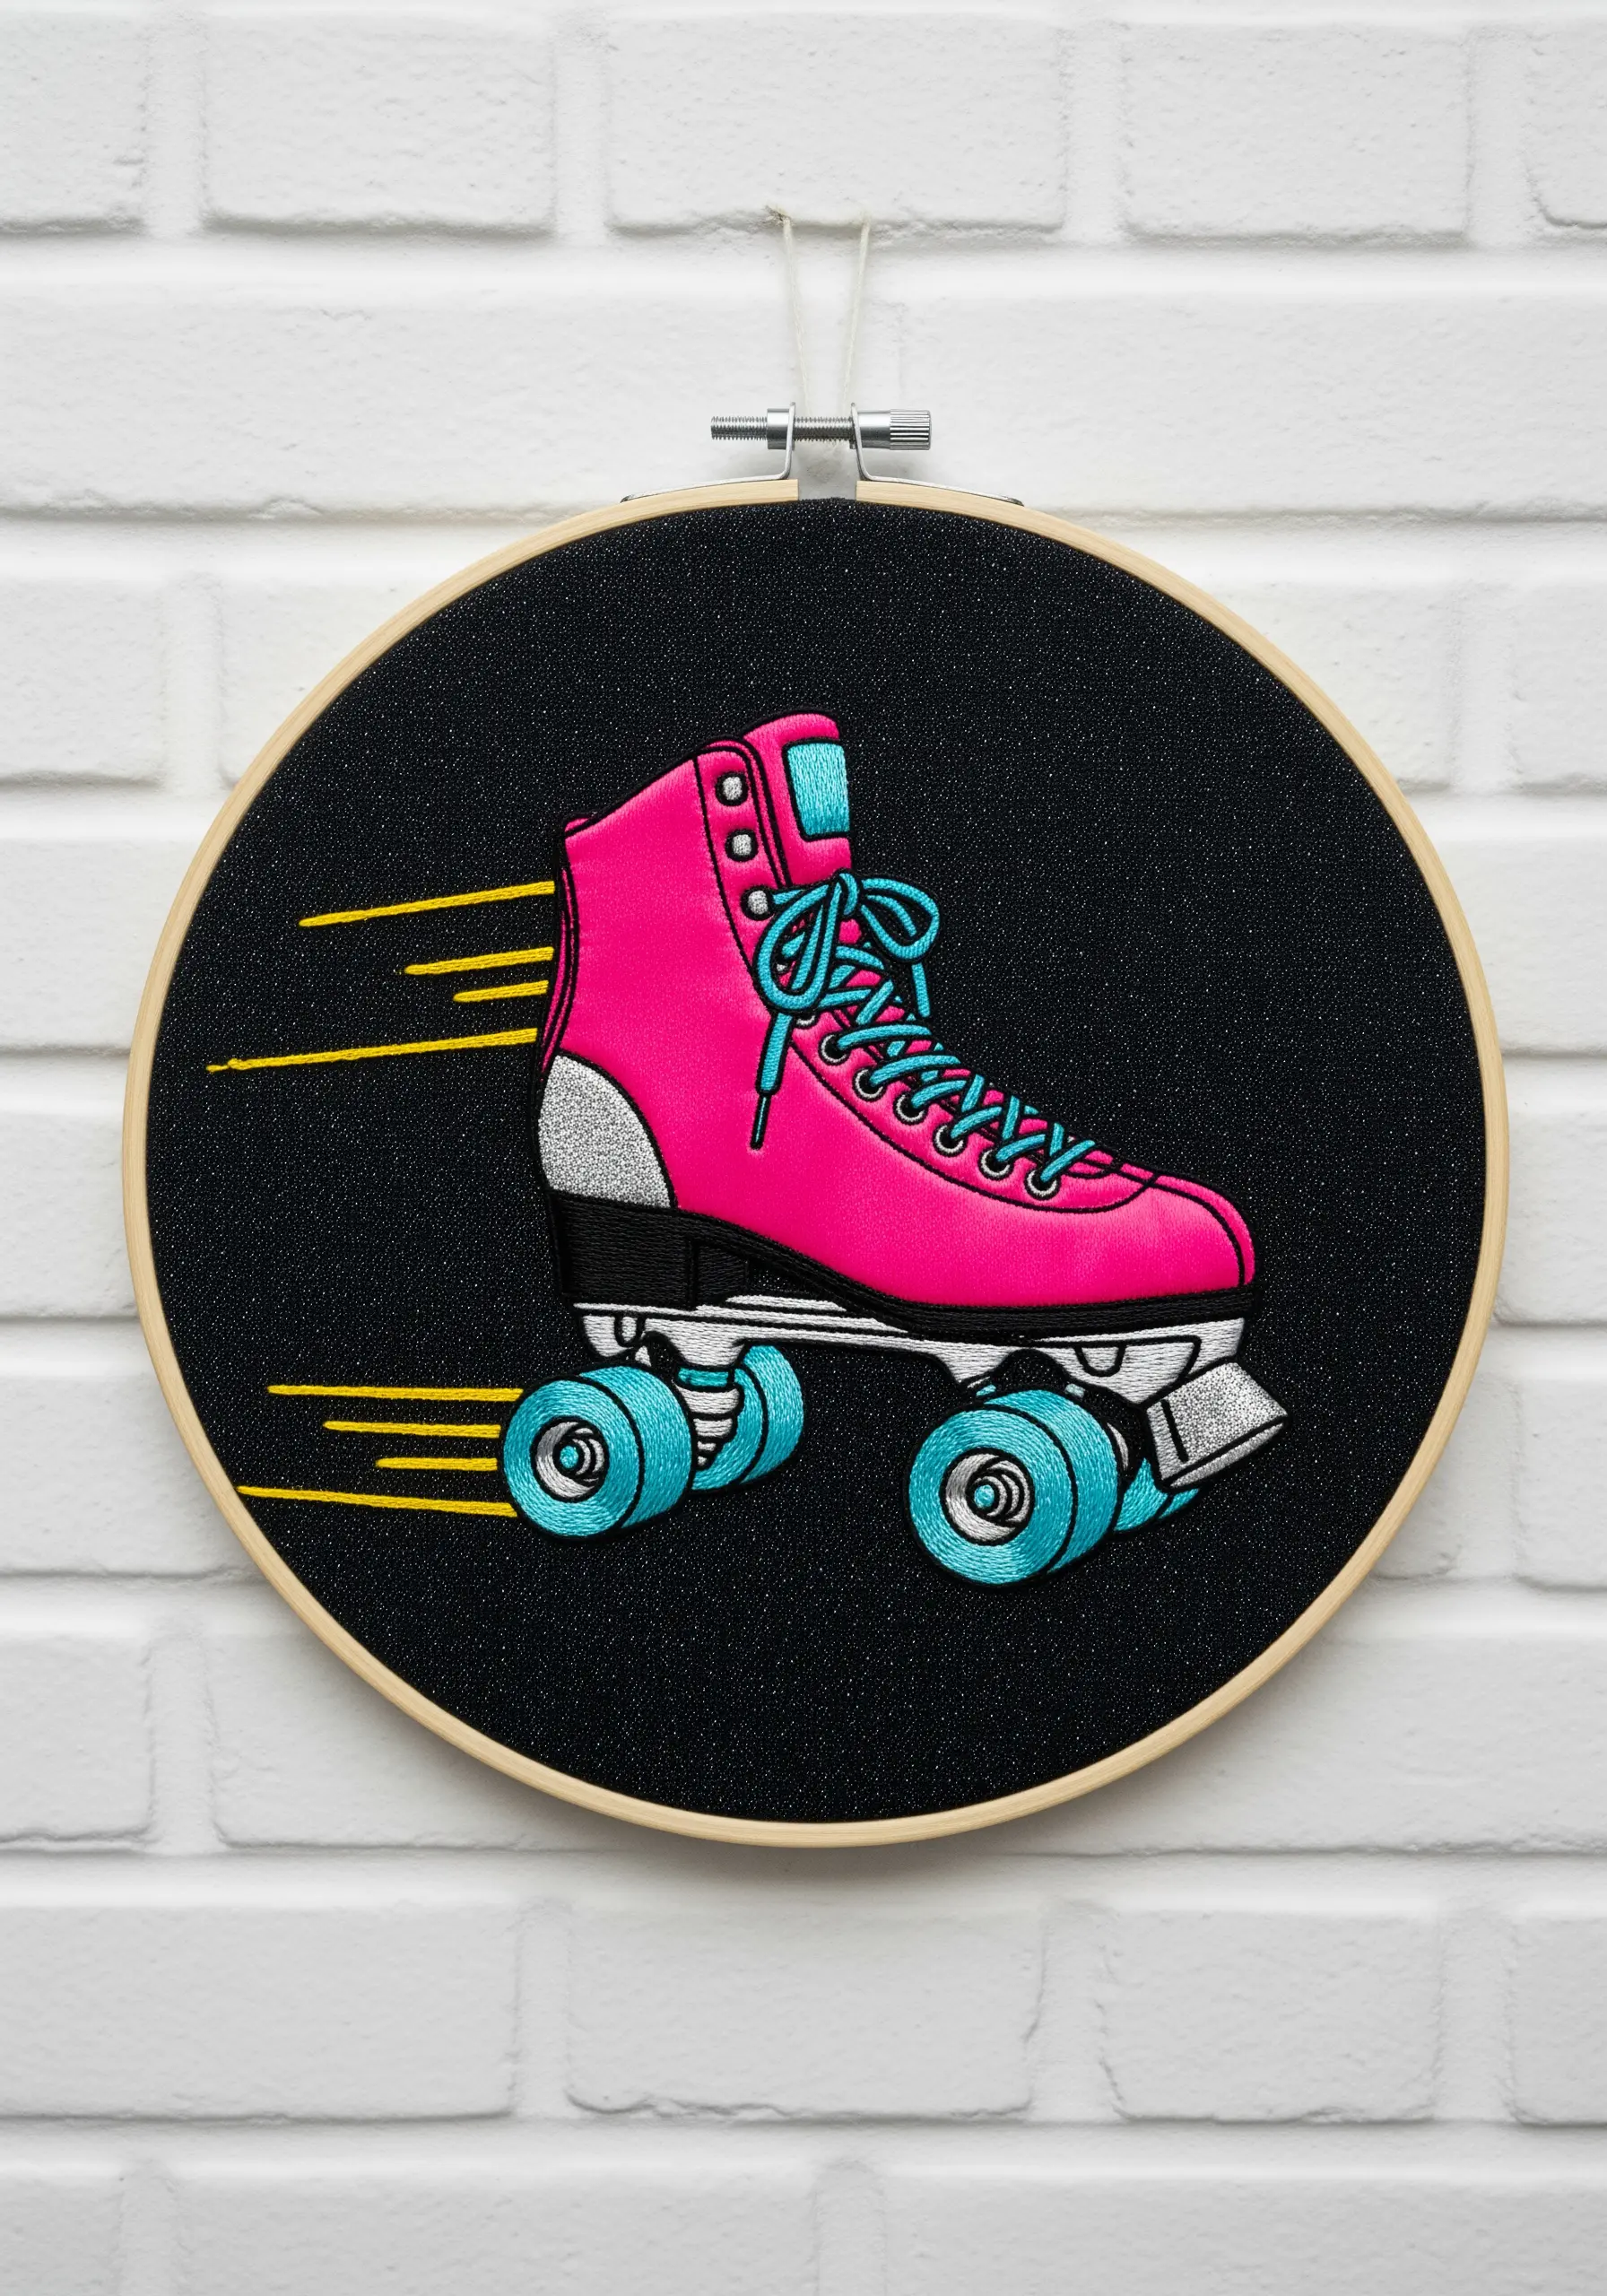
Use the direction of your satin stitches to define form and create a sense of speed.
On the body of the roller skate, angle your stitches to follow the curves of the boot, which helps create highlights and shadows, giving it a three-dimensional feel even with flat color.
Choose a dark, high-contrast fabric like black cotton drill to make vibrant pinks and blues appear even more saturated and electric.
A few simple, long straight stitches in a contrasting color are all you need to create convincing motion lines, proving that less is often more when conveying movement.
This technique turns a static image into a dynamic DIY wall art embroidery project.
3. Recreate Digital Texture with a Basket Weave Stitch
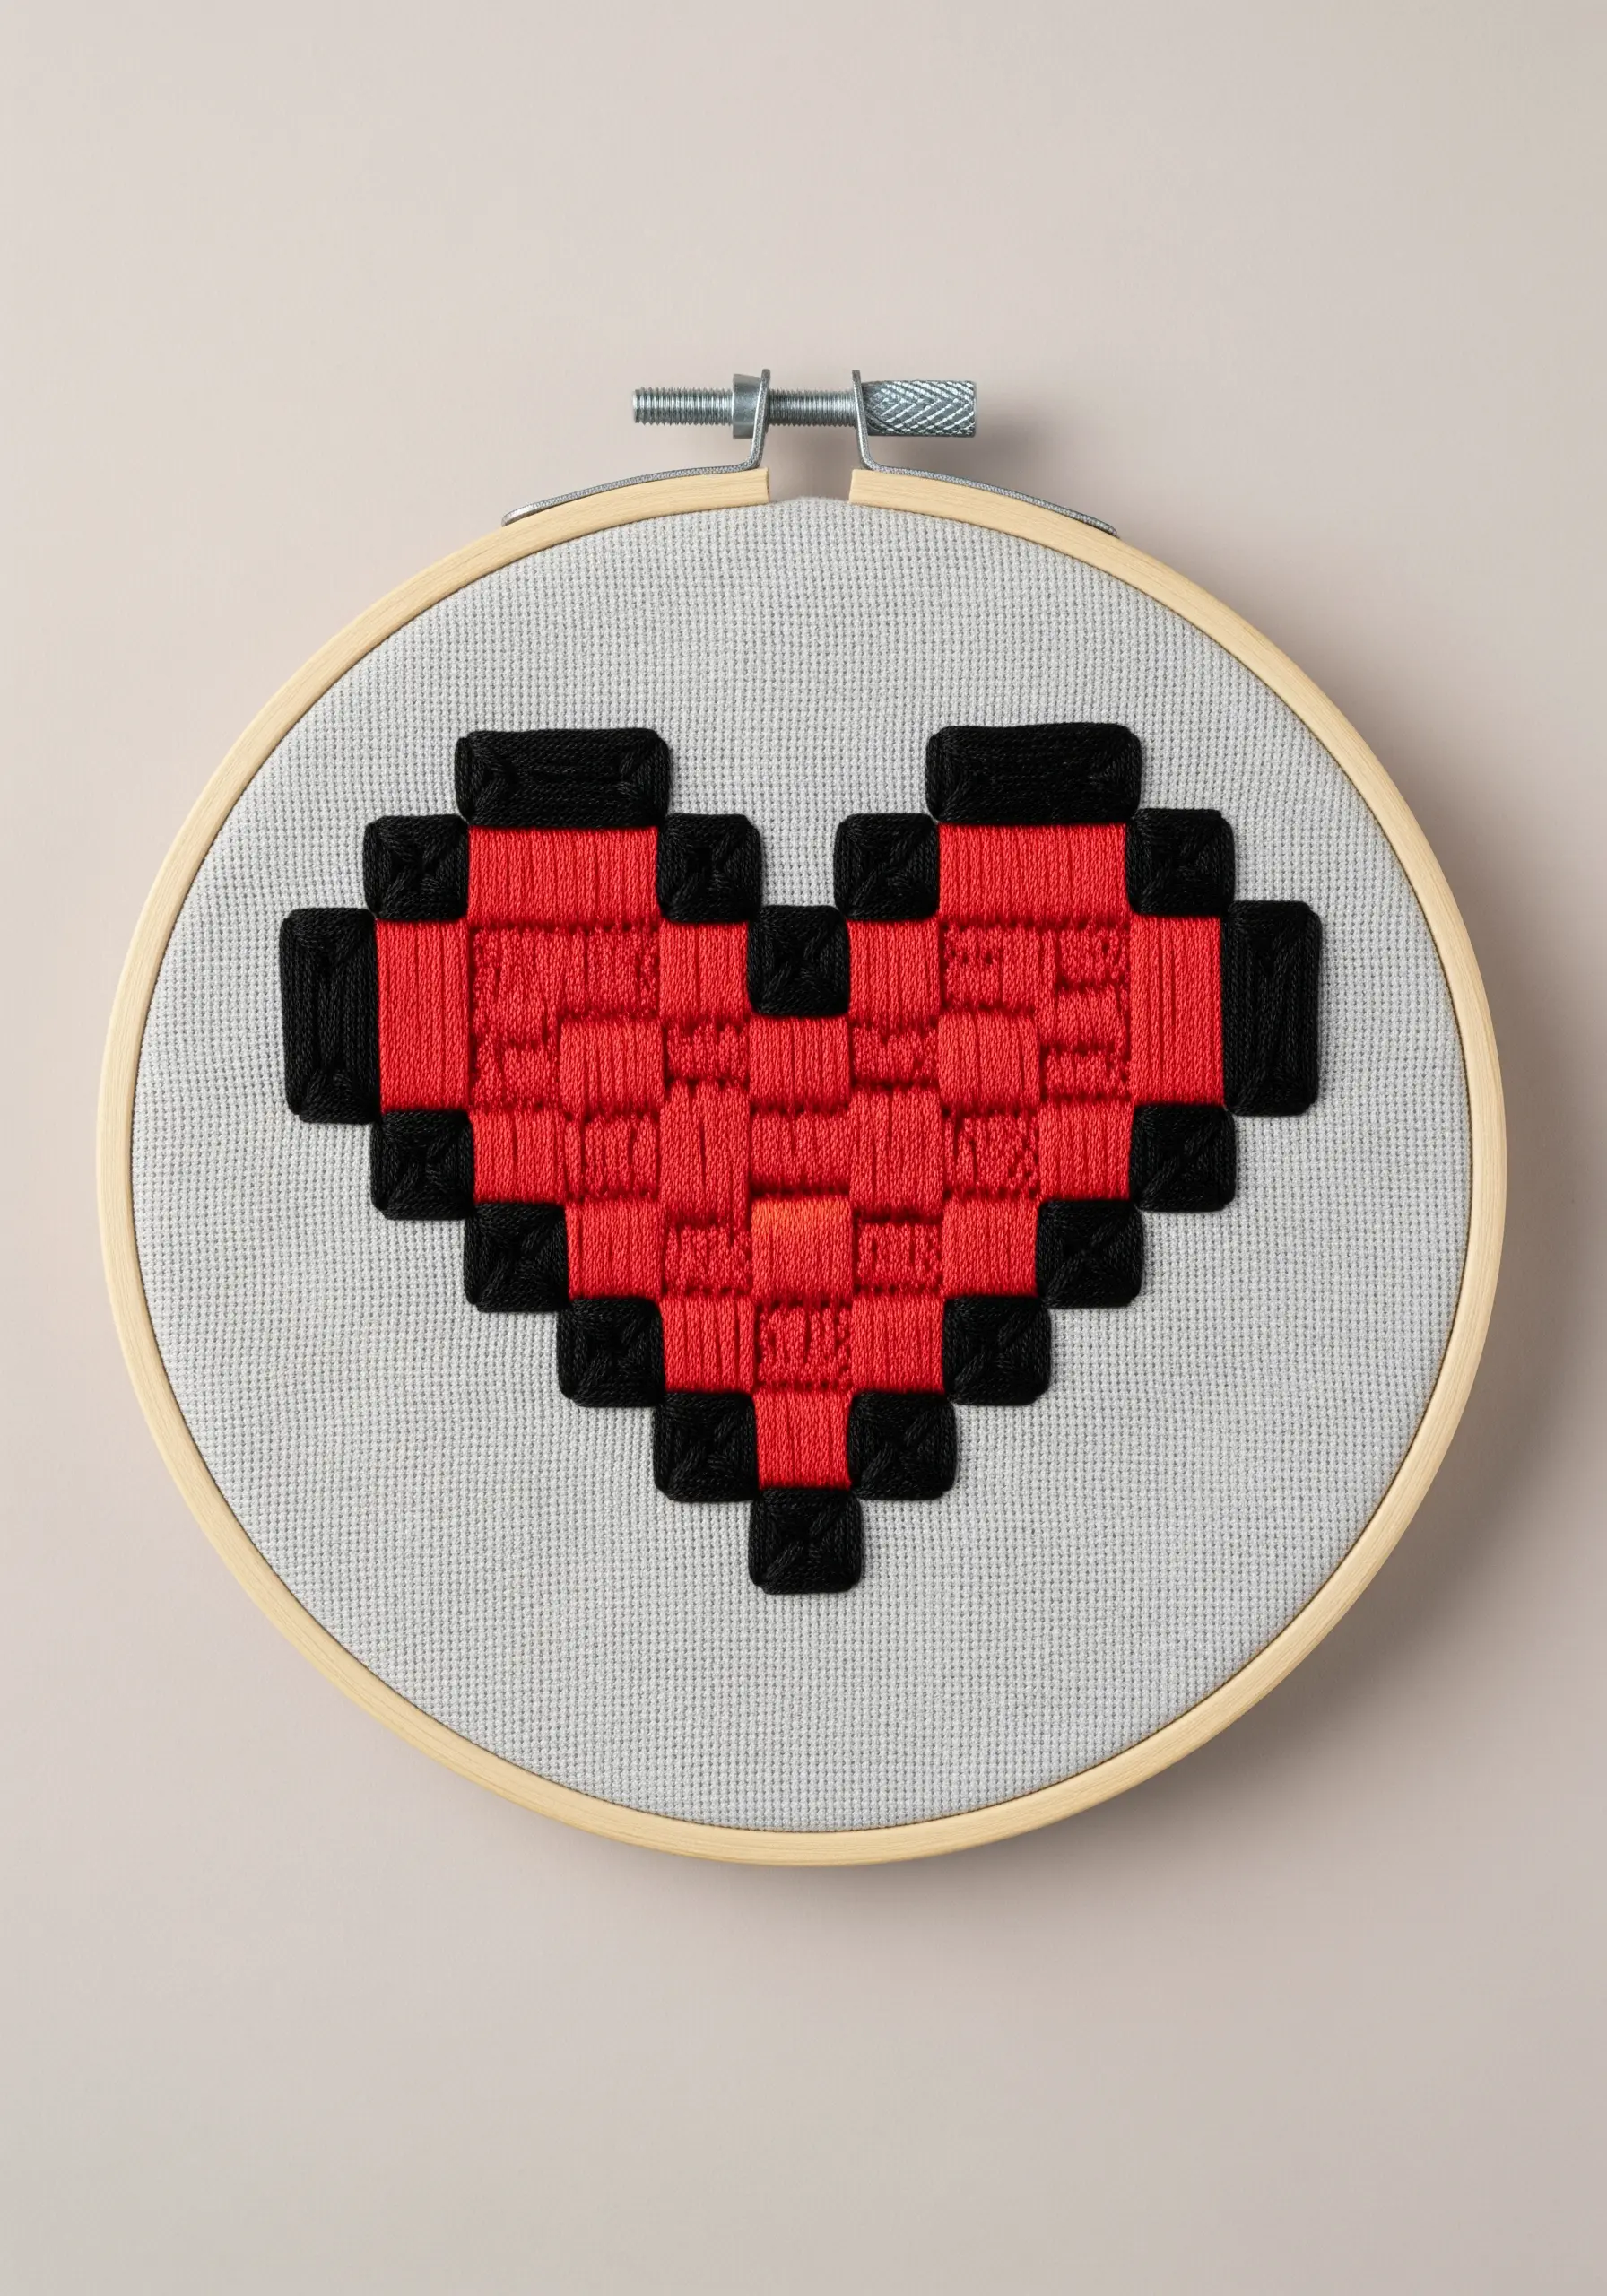
To achieve a clean, 8-bit pixelated effect, move beyond cross-stitch and try a basket weave or laid-work stitch.
First, lay down a series of parallel horizontal stitches across the entire shape, then weave your vertical stitches over and under them to create a perfect grid.
The key to a polished look is uniform tension and spacing; use an evenweave fabric like Aida or linen to help guide your needle.
This method provides full, flat coverage that looks incredibly neat and intentional, perfectly capturing the retro video game aesthetic.
4. Master Graphic Impact with Color Blocking
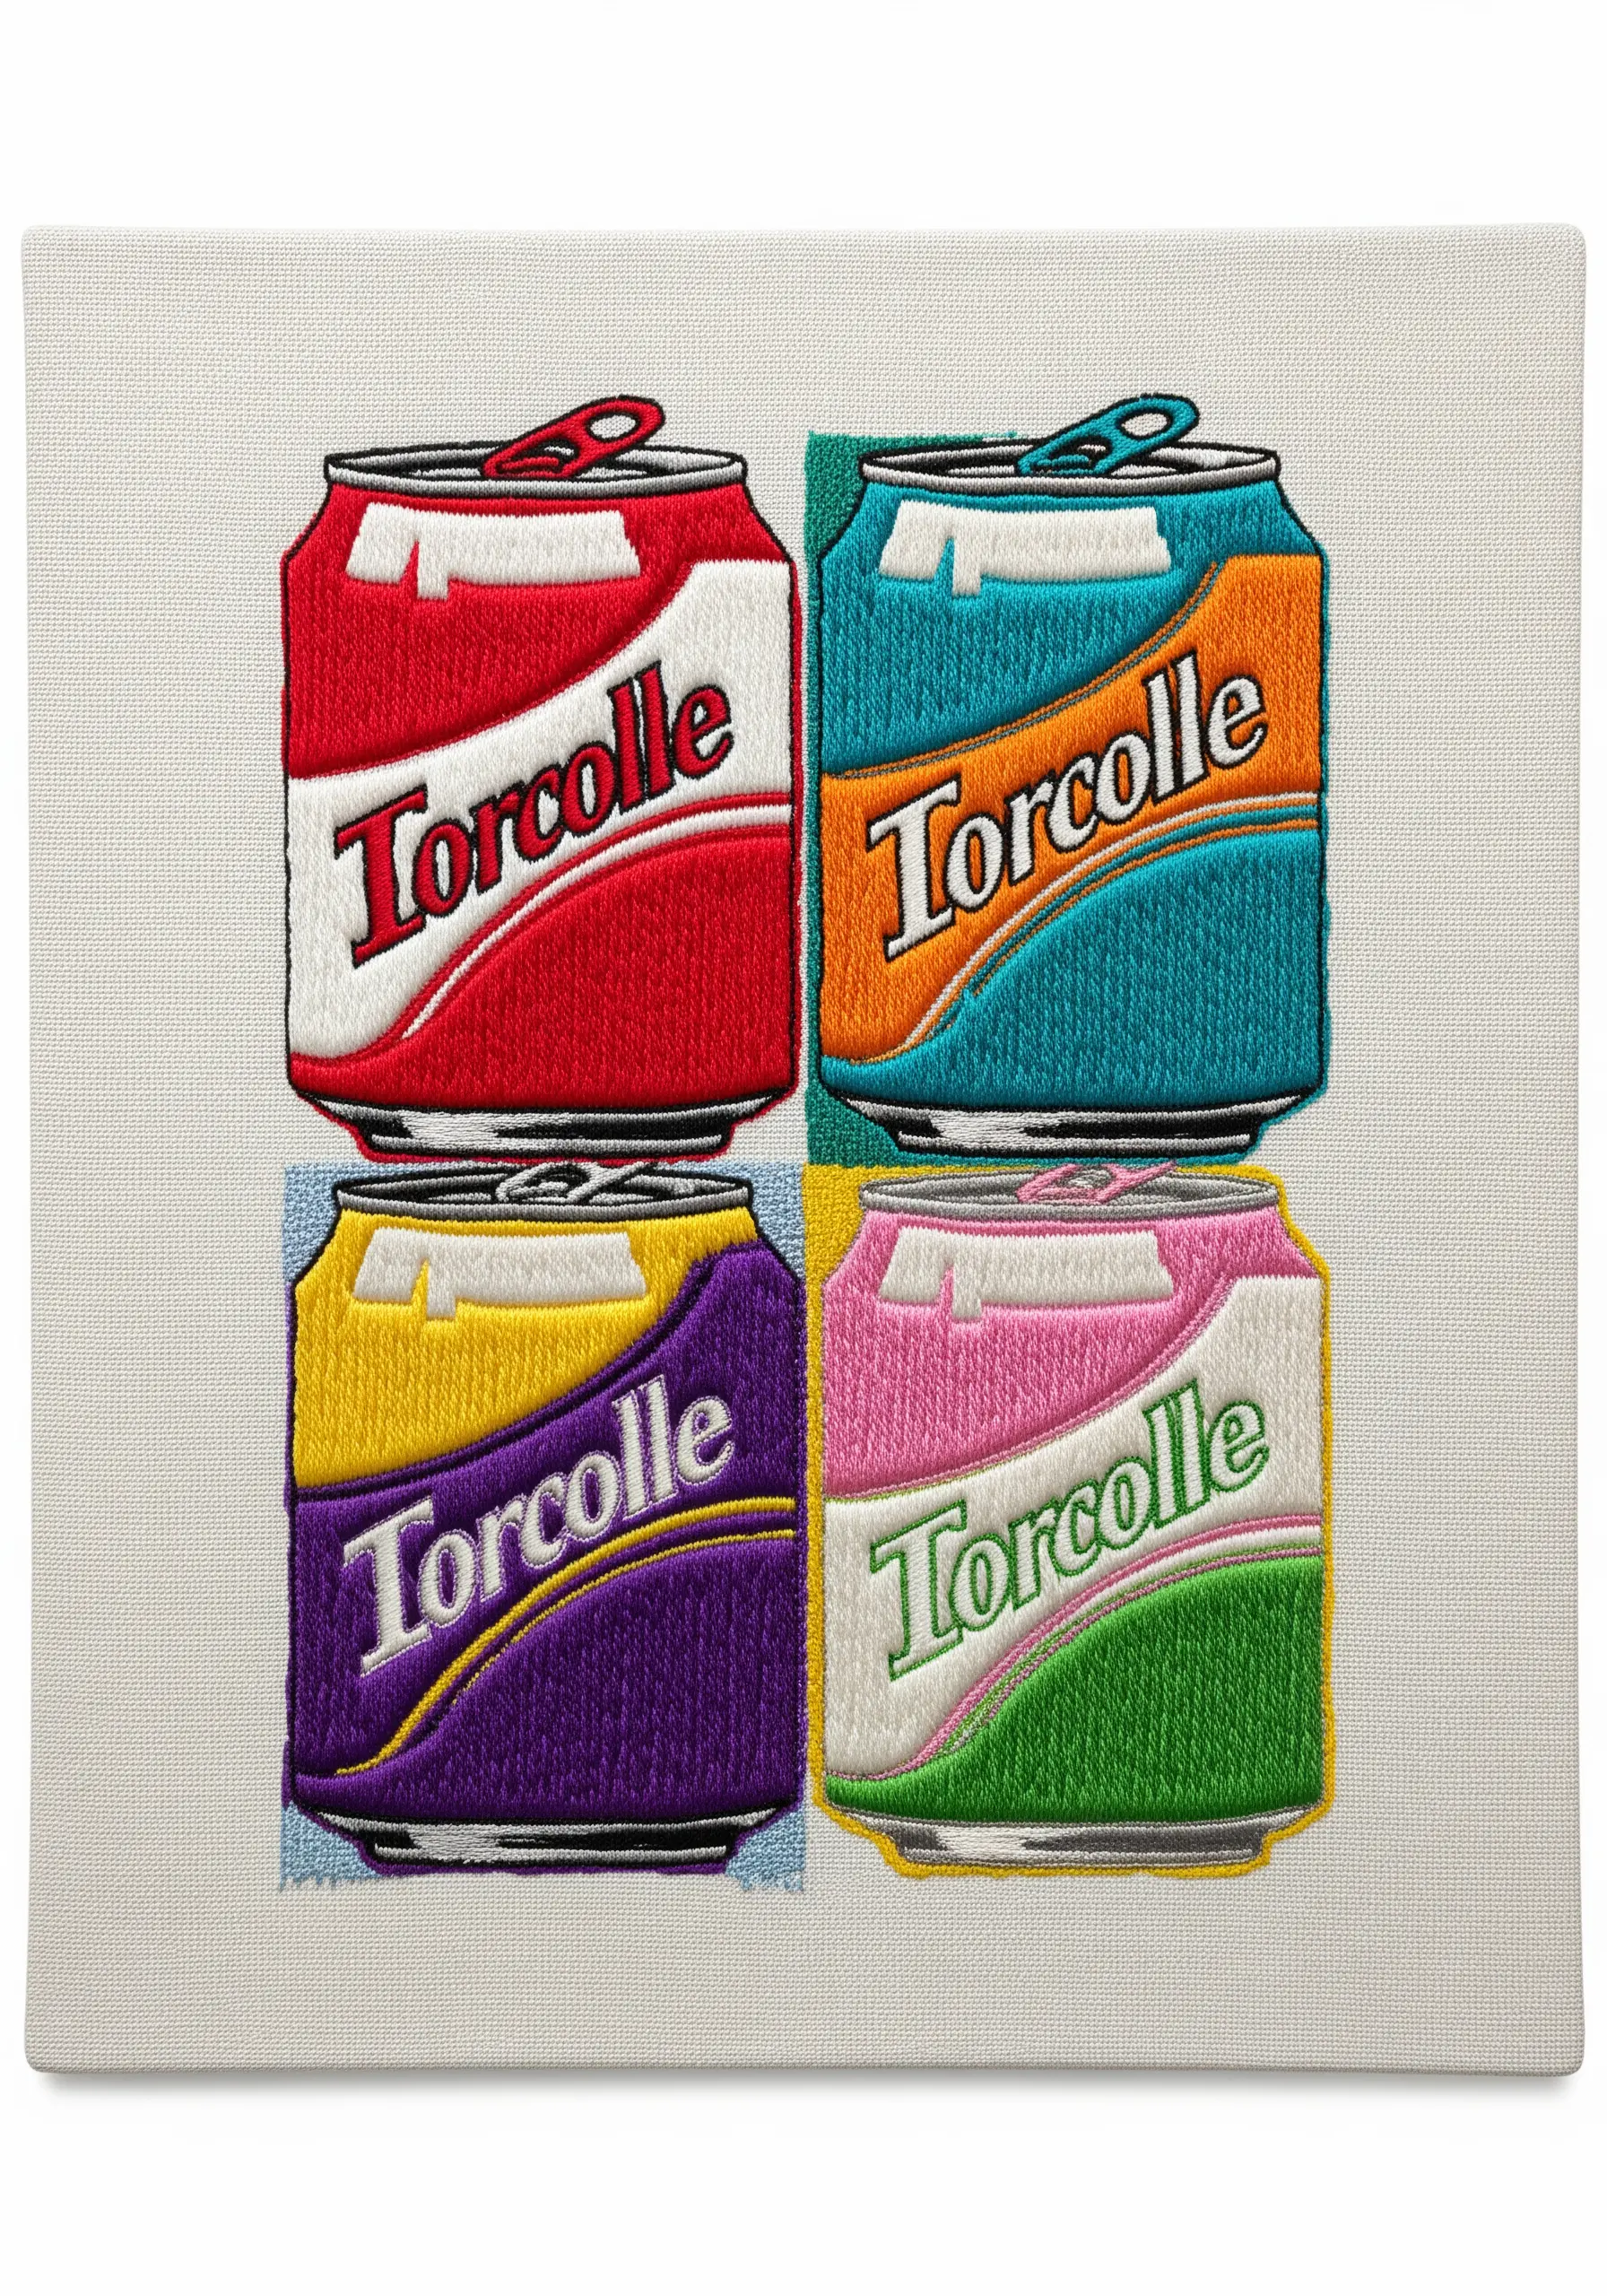
Channel Andy Warhol by using repetition and a bold, limited palette to turn a simple object into a statement piece.
For ultra-sharp edges between colors, first outline each section with a single line of split stitch before filling with satin stitch.
This simple preparation step creates a raised ‘dam’ that keeps your fill stitches contained, resulting in a crisp, professional finish.
By varying the color combinations in each quadrant, you create a rhythm and energy that is central to the pop-art movement, turning thread into a modern thread art statement.
5. Create Illusion with Sheer Appliqué Layers
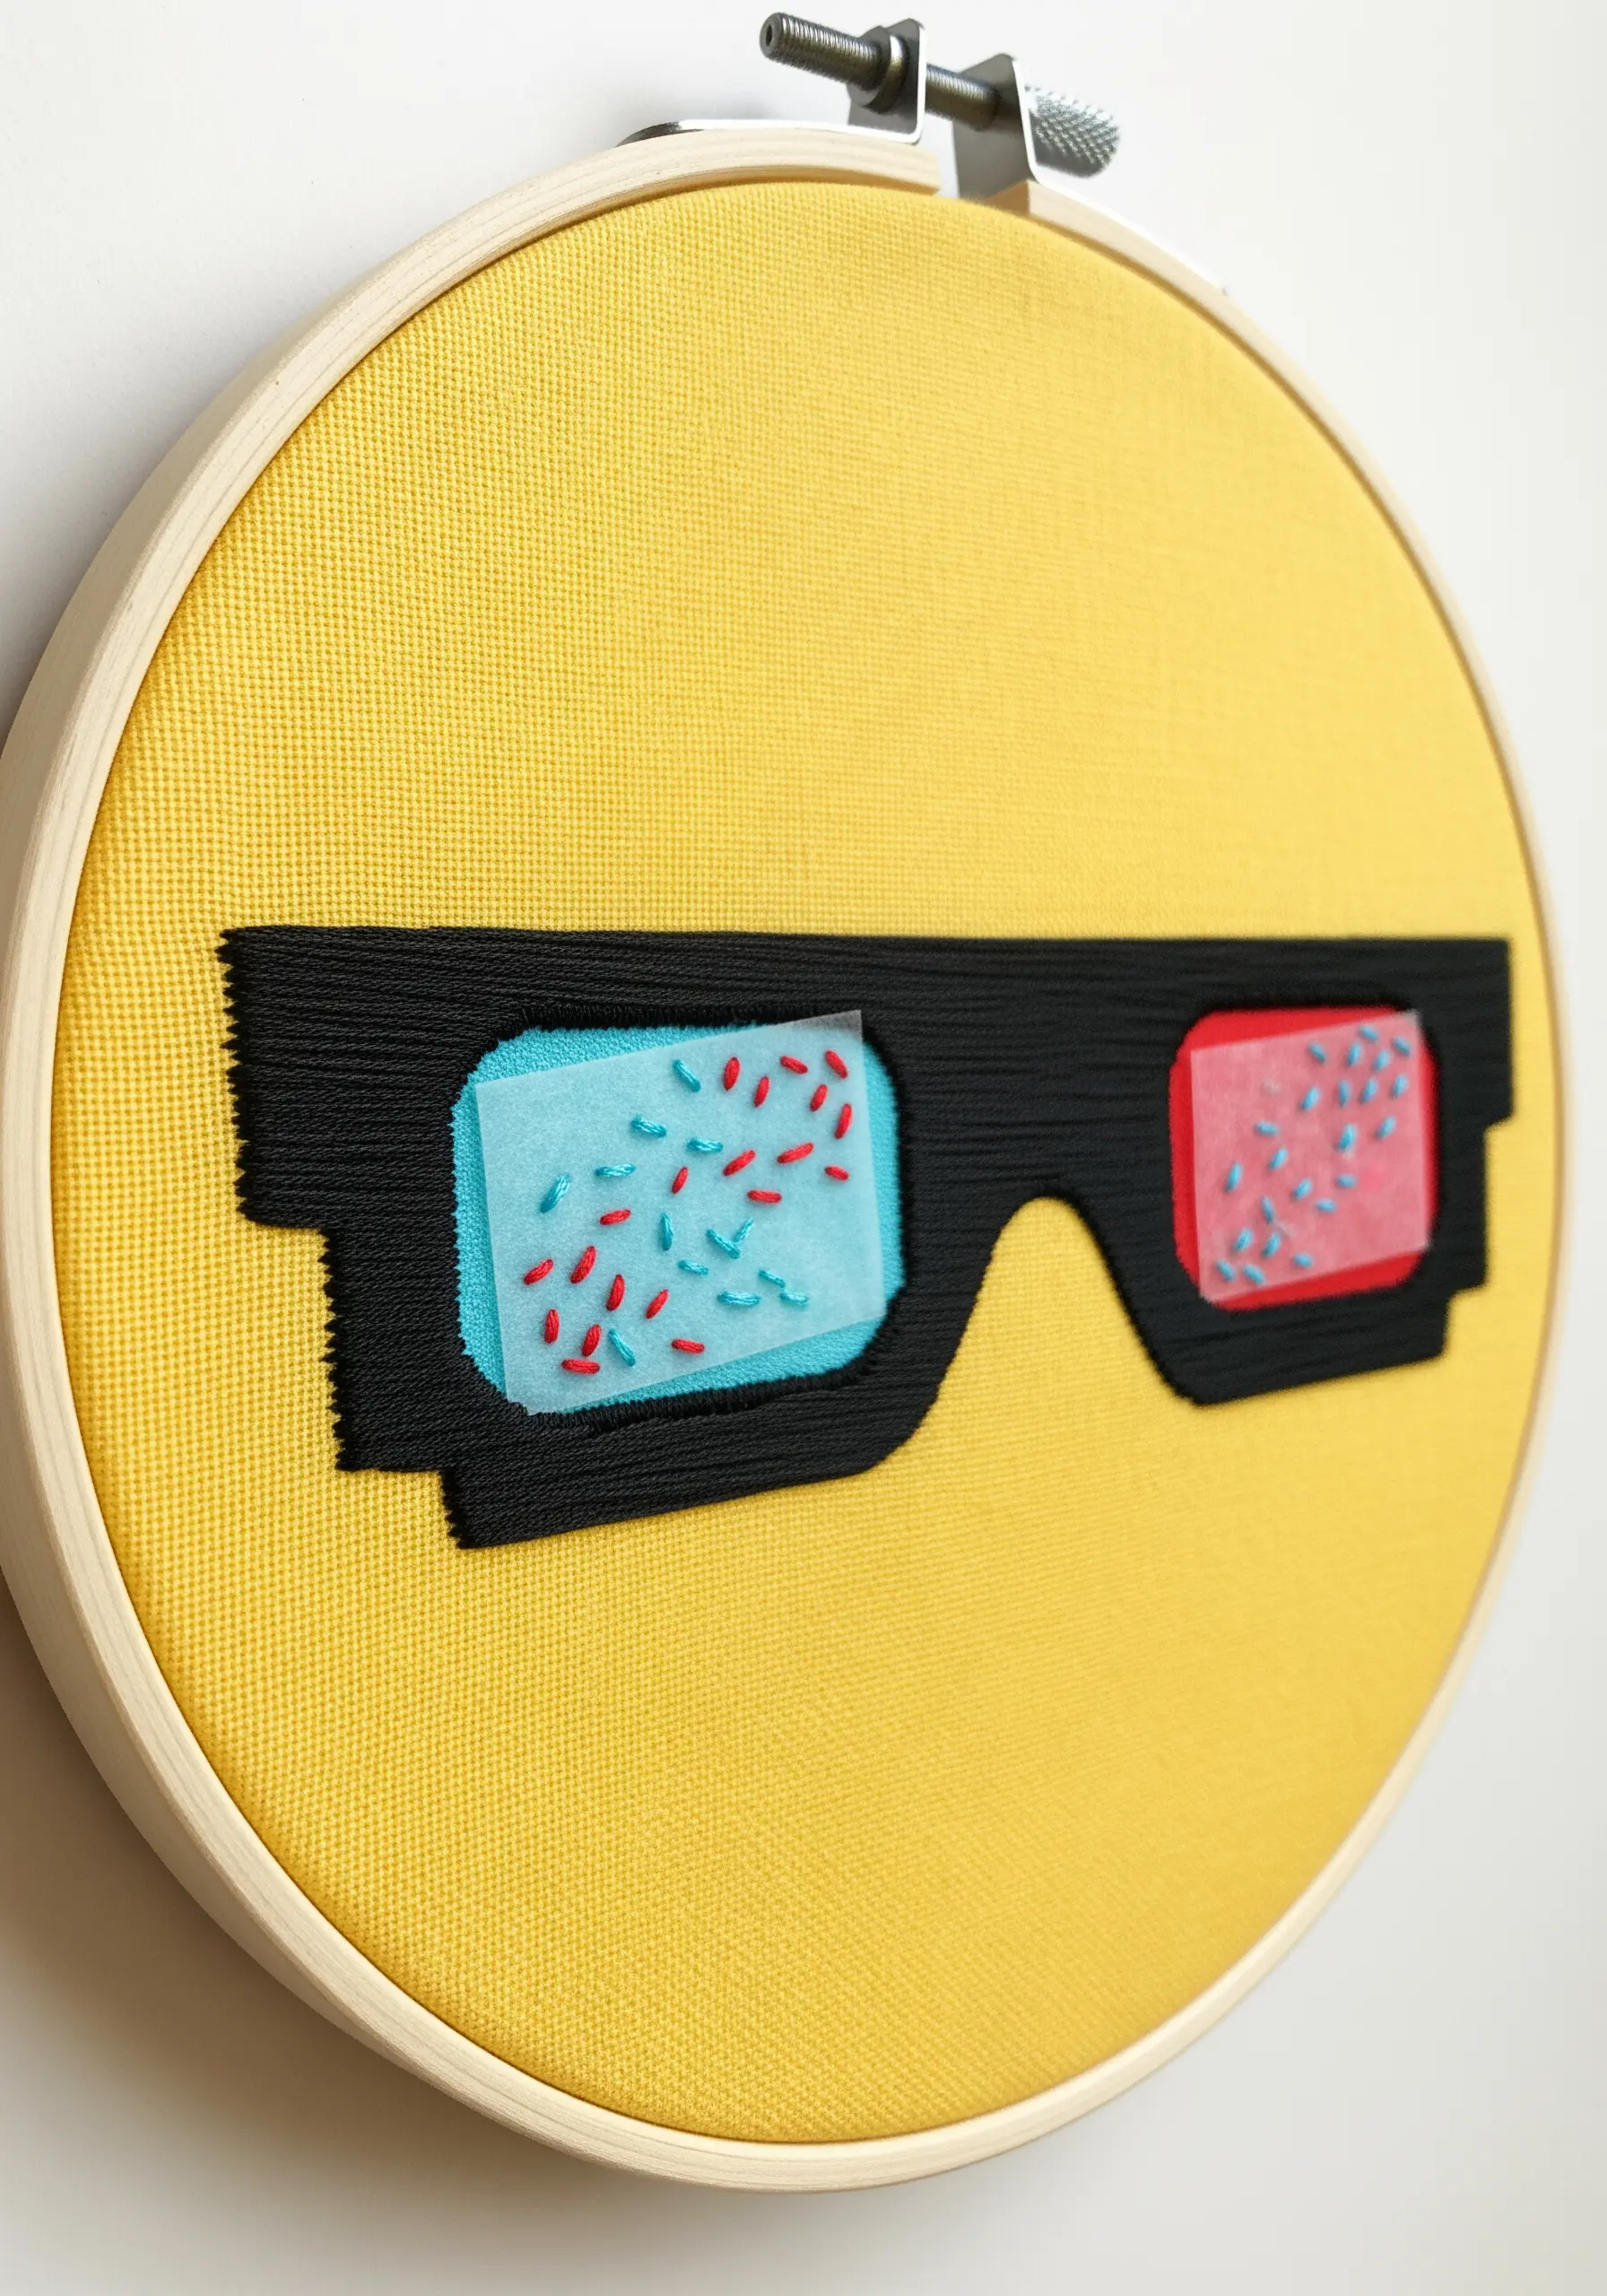
Incorporate mixed-media elements to add unexpected depth and texture to your work.
For the lenses of these 3D glasses, appliqué small pieces of colored organza or tulle onto your base fabric using a fine, matching thread and tiny running stitches around the edge.
Then, scatter tiny seed stitches across the sheer fabric to add detail without compromising its transparency.
The contrast between the delicate, see-through lenses and the dense, opaque satin stitch of the frames creates a compelling visual effect that thread alone cannot achieve.
This is one of those eye-catching embroidered mixed-media projects that truly stands out.
6. Stitch Soundwaves with Graphic Outlines

Translate abstract concepts like sound into visual form using dynamic stitch choices.
For the vinyl record, use a circular satin stitch for the grooves, working from the center out to create a realistic sheen.
The soundwave is brought to life with a jagged backstitch or stem stitch, using a metallic silver thread to catch the light and add a modern, electric feel.
Stitching on a brightly colored, unconventional fabric like this magenta pink instantly frames the piece in a pop-art context, making the neutral colors of the record stand out.
7. Elevate Apparel with Bold, Graphic Patches
Transform a simple denim jacket by treating its back panel as a canvas for a large, statement motif.
To ensure your design is durable enough for wear, use a stabilizer behind the fabric to prevent puckering, especially with dense satin stitches.
Define every element with a thick, black outline in satin stitch or chain stitch. This comic-book-style outlining is essential for making the design readable and impactful from a distance.
These are the kinds of aesthetic embroidery ideas to turn your old clothes into art.
8. Simplify Form for Iconic Character Art
Capture the essence of a beloved character by focusing on clean lines and flat, saturated color.
A bold, black outline using a stem or split stitch provides the perfect graphic container for your fill stitches.
When filling the shape with satin stitch, use a single strand of floss for smaller details like the eye, and two or three strands for the larger body area to ensure smooth coverage without bulk.
Tiny details, like the bubbles made from a simple detached chain stitch (lazy daisy) with a French knot inside, add a touch of personality and context.
9. Mix Lettering and Texture for a Retro Feel
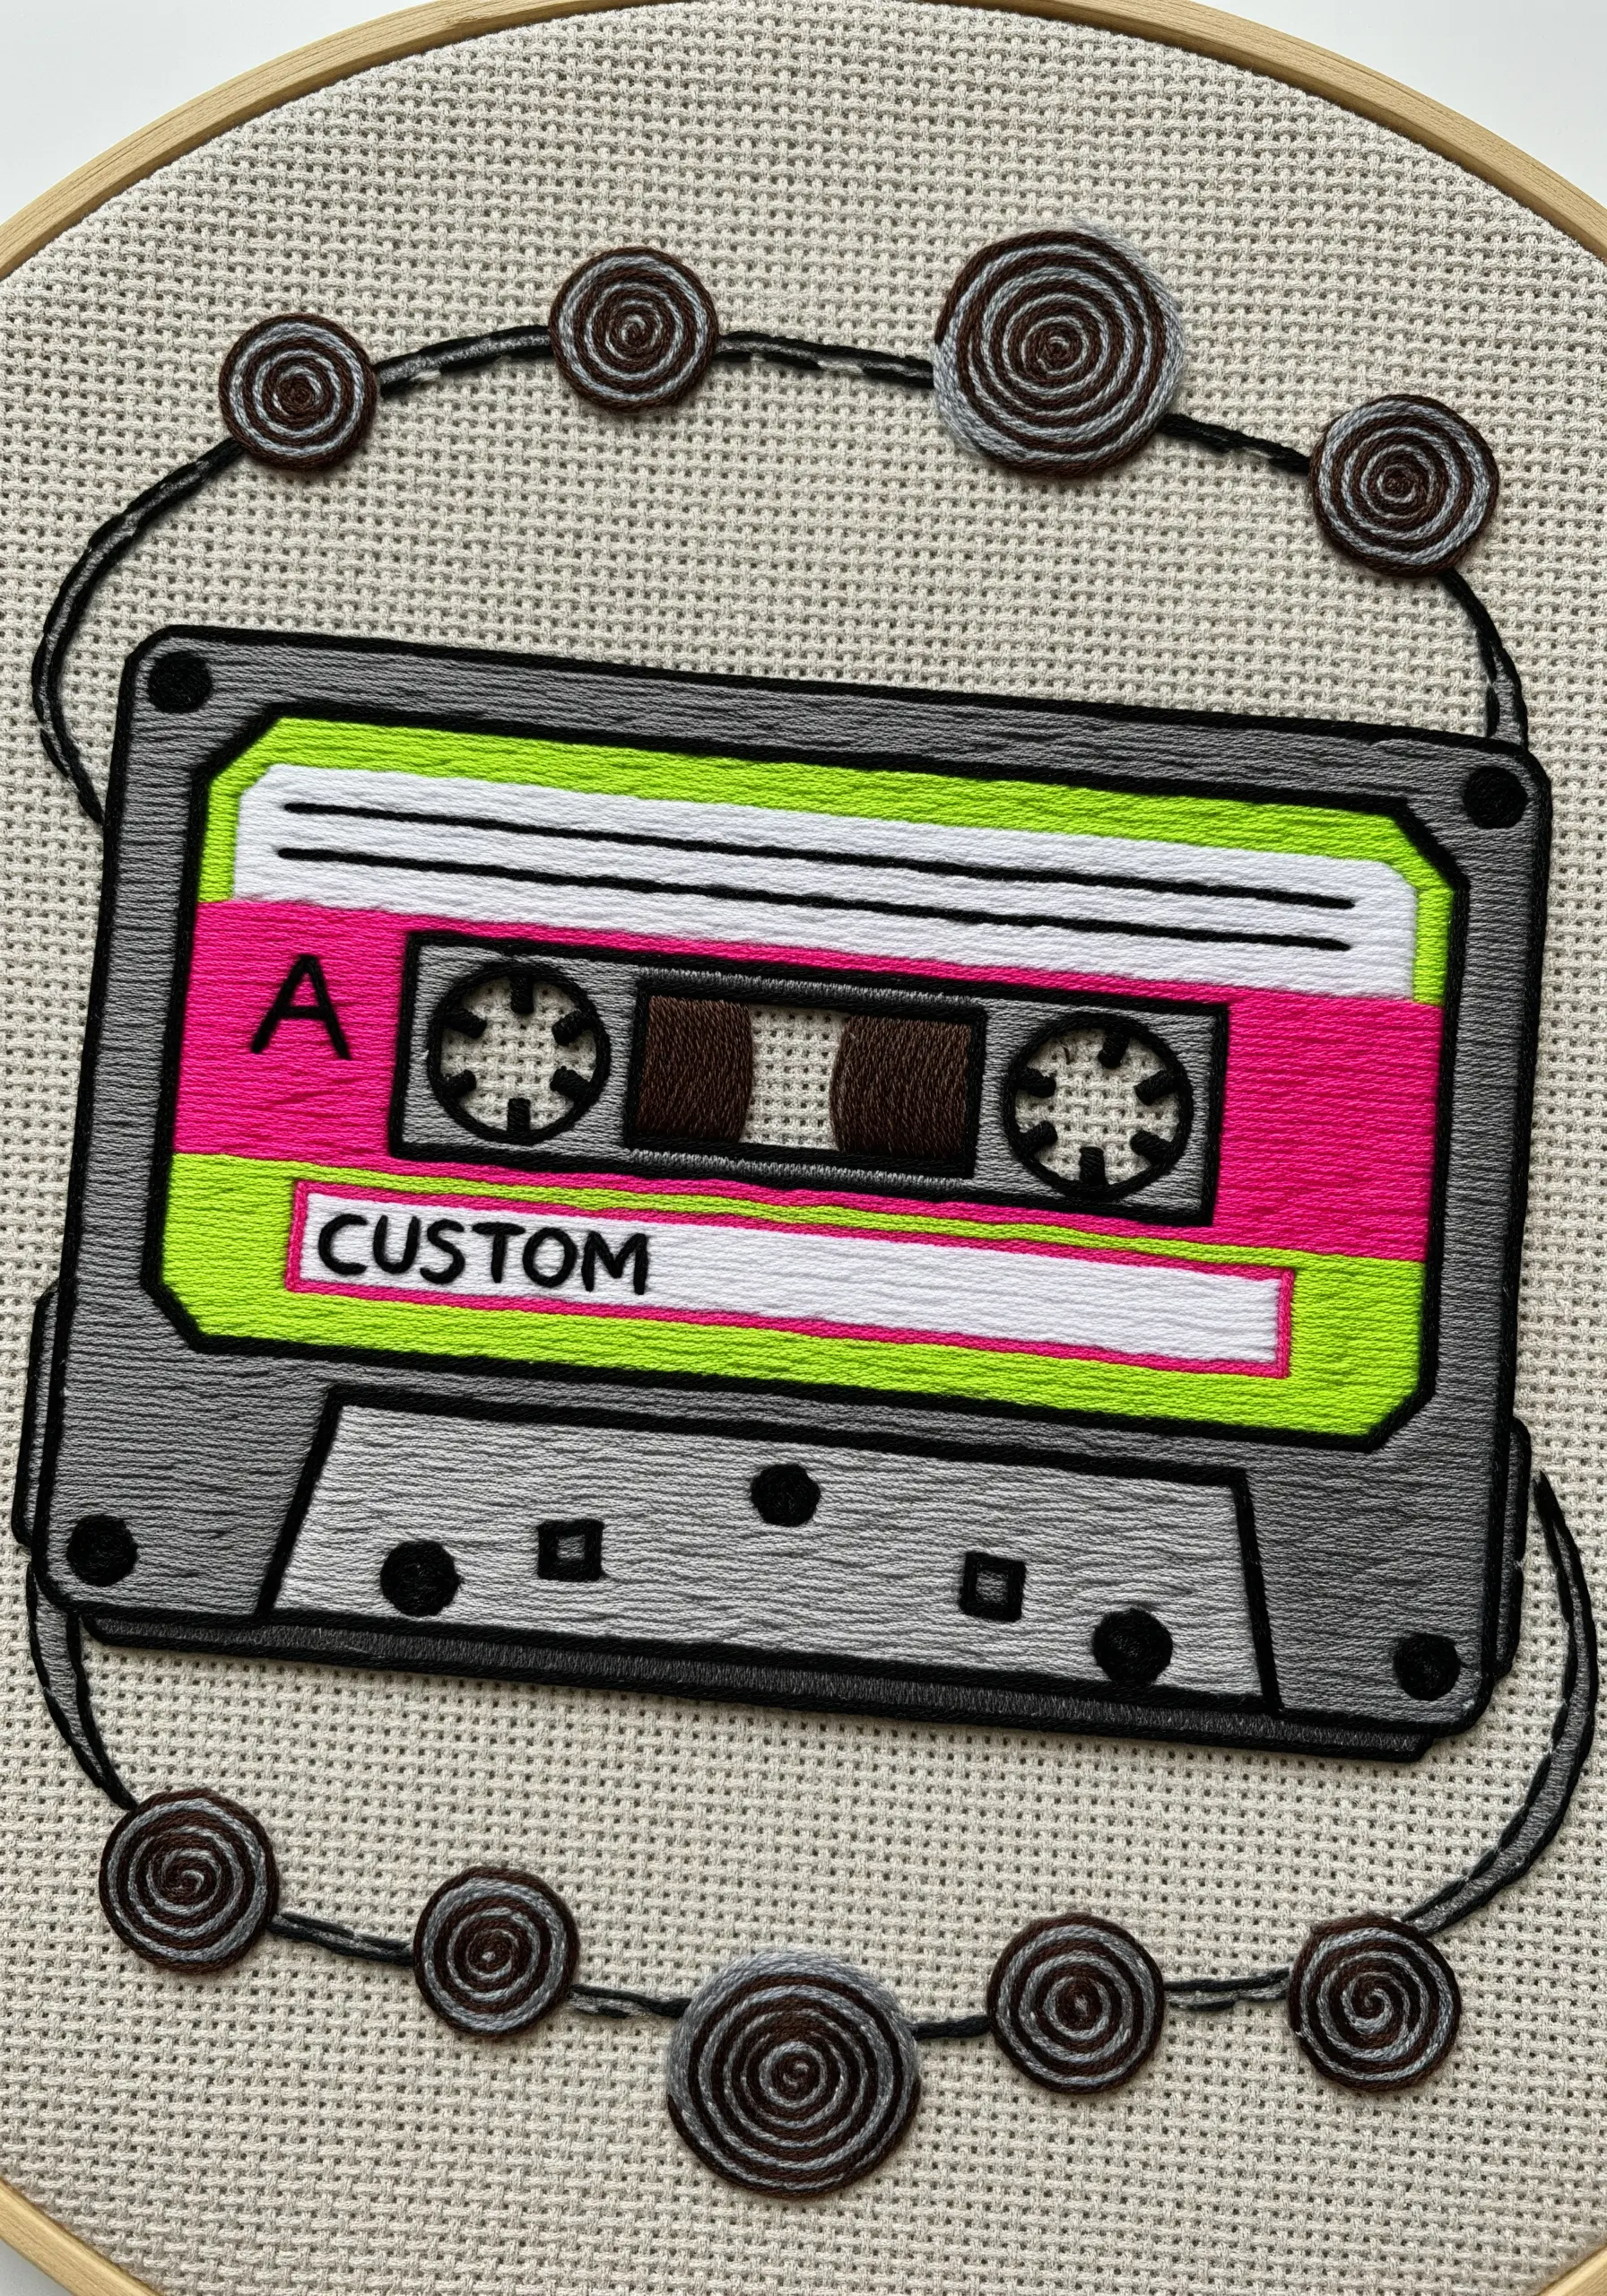
Combine different stitches and textures to replicate the look of a vintage cassette tape.
Use a fine backstitch or single-strand satin stitch for the custom lettering to keep it crisp and legible.
For the magnetic tape seen through the windows, try a satin stitch with a brown or bronze metallic thread to mimic its subtle shimmer.
The messy, unspooled tape can be rendered with a whipped backstitch or a couched thicker yarn, giving it a distinct, coiled texture that contrasts with the flat body of the cassette.
10. Capture Detail with Precise Micro-Stitching

When rendering iconic tech, precision is everything. Use a single strand of floss for all outlines and small details like button labels.
To create the subtle shading and highlights on the controller body, use two closely related shades of grey—a light grey for the main fill and a slightly darker grey for shadowed areas.
The key is to blend them with long-and-short stitches for a smooth gradient rather than a hard line.
This attention to detail transforms a simple shape into a realistic and nostalgic piece of art, perfect for stunning framed embroidery pieces.
11. Create Comic Book Bursts with Radiating Stitches

Evoke the high-energy of comic book art by combining bold lettering, graphic shapes, and dynamic textures.
Fill the ‘POW!’ letters with a vertical satin stitch for a solid, impactful look, and outline them in a contrasting color to make them stand out.
Use a pattern of French knots or small straight stitches for the halftone background effect inside the speech bubble.
The outer explosion is defined by a combination of chain stitch for the bumpy outline and sharp, radiating straight stitches for the spikes, creating a powerful sense of action.
12. Use Color Banding for a Playful Finish

Create visual interest within a simple shape by using clean bands of color.
To achieve the neat, striped effect on the watermelon rind, outline each color section with a backstitch first.
Then, fill each band with satin stitch, using the outline as a guide to keep your edges perfectly straight and defined.
For the seeds, use a satin stitch in the shape of a teardrop rather than a French knot. This gives them a flatter, more graphic appearance that aligns with the overall pop-art style.
This technique is perfect for creating minimal fruit & plant motifs that look polished and intentional.
13. Swirl Color for a Psychedelic Lava Lamp
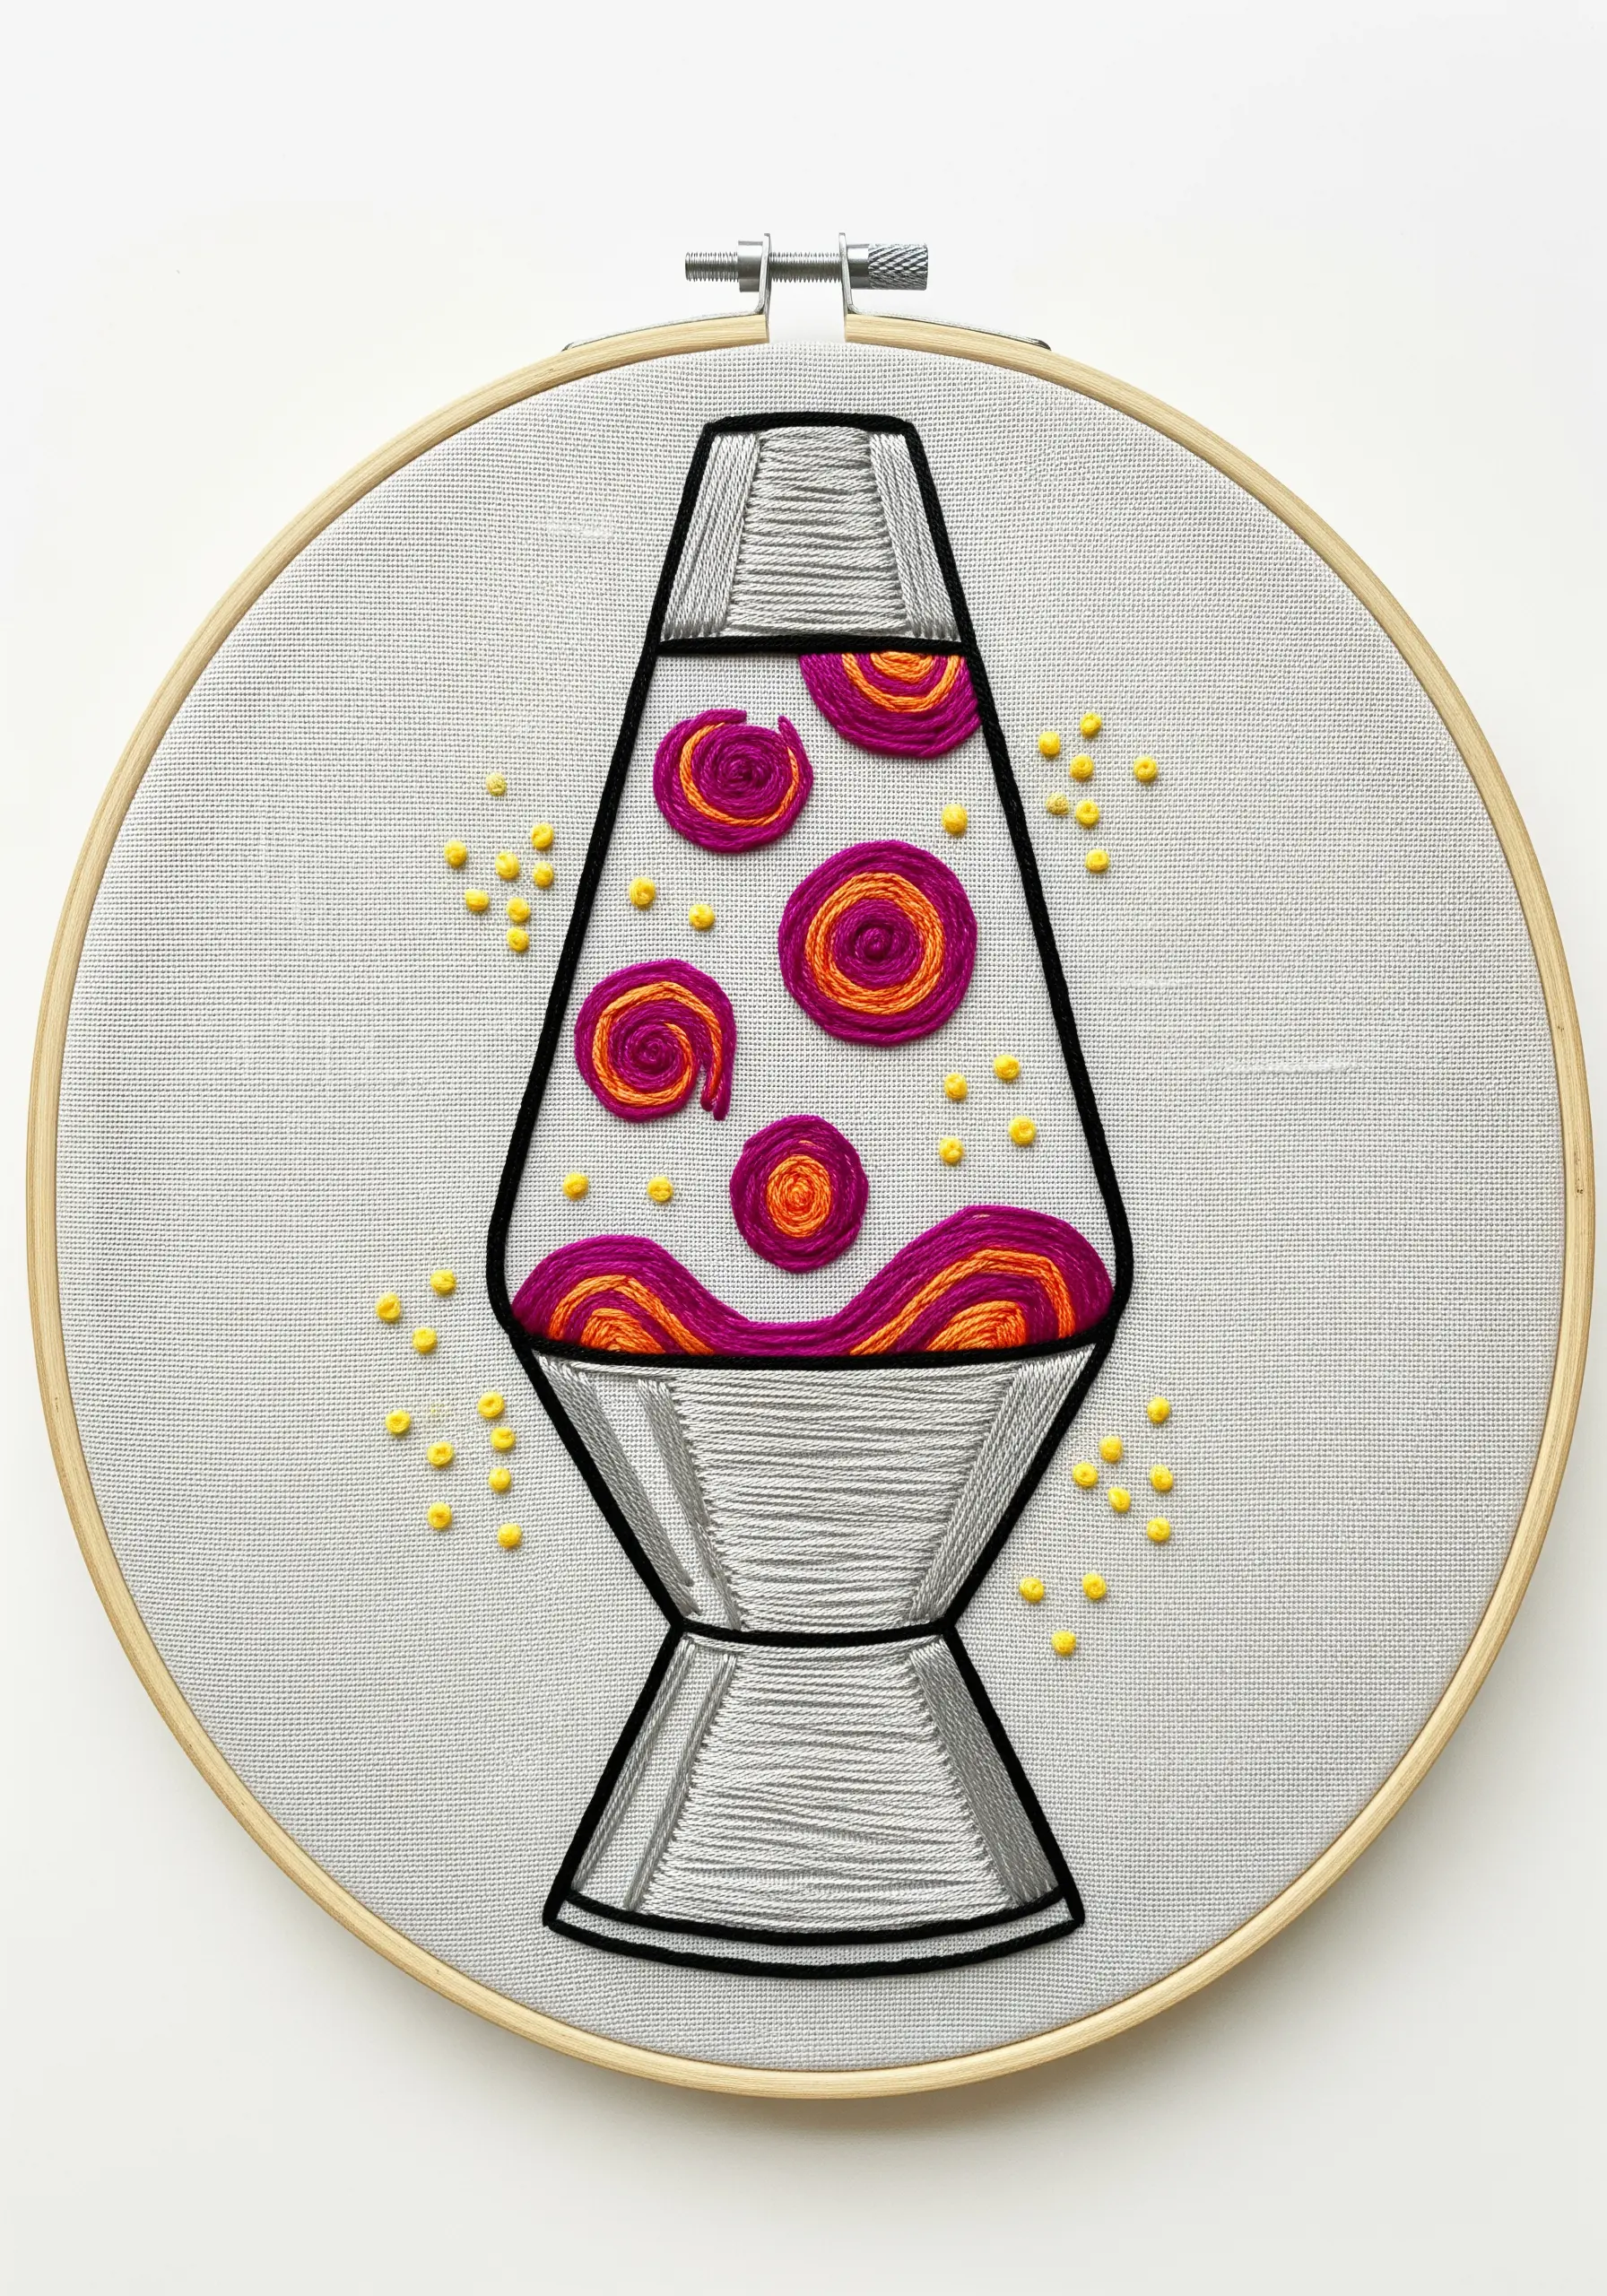
Capture the fluid, groovy motion of a lava lamp by blending colors within your stitches.
For the lava blobs, use a variegated thread or two different colors of floss in your needle at the same time.
Stitch them in a spiral pattern, using a backstitch or stem stitch to create swirling, organic shapes that feel like they’re moving.
A sparse scattering of yellow French knots around the lamp adds a ‘bubbly’ texture and fills the negative space without cluttering the design.
14. Stitch Reflections for a Polished Sheen
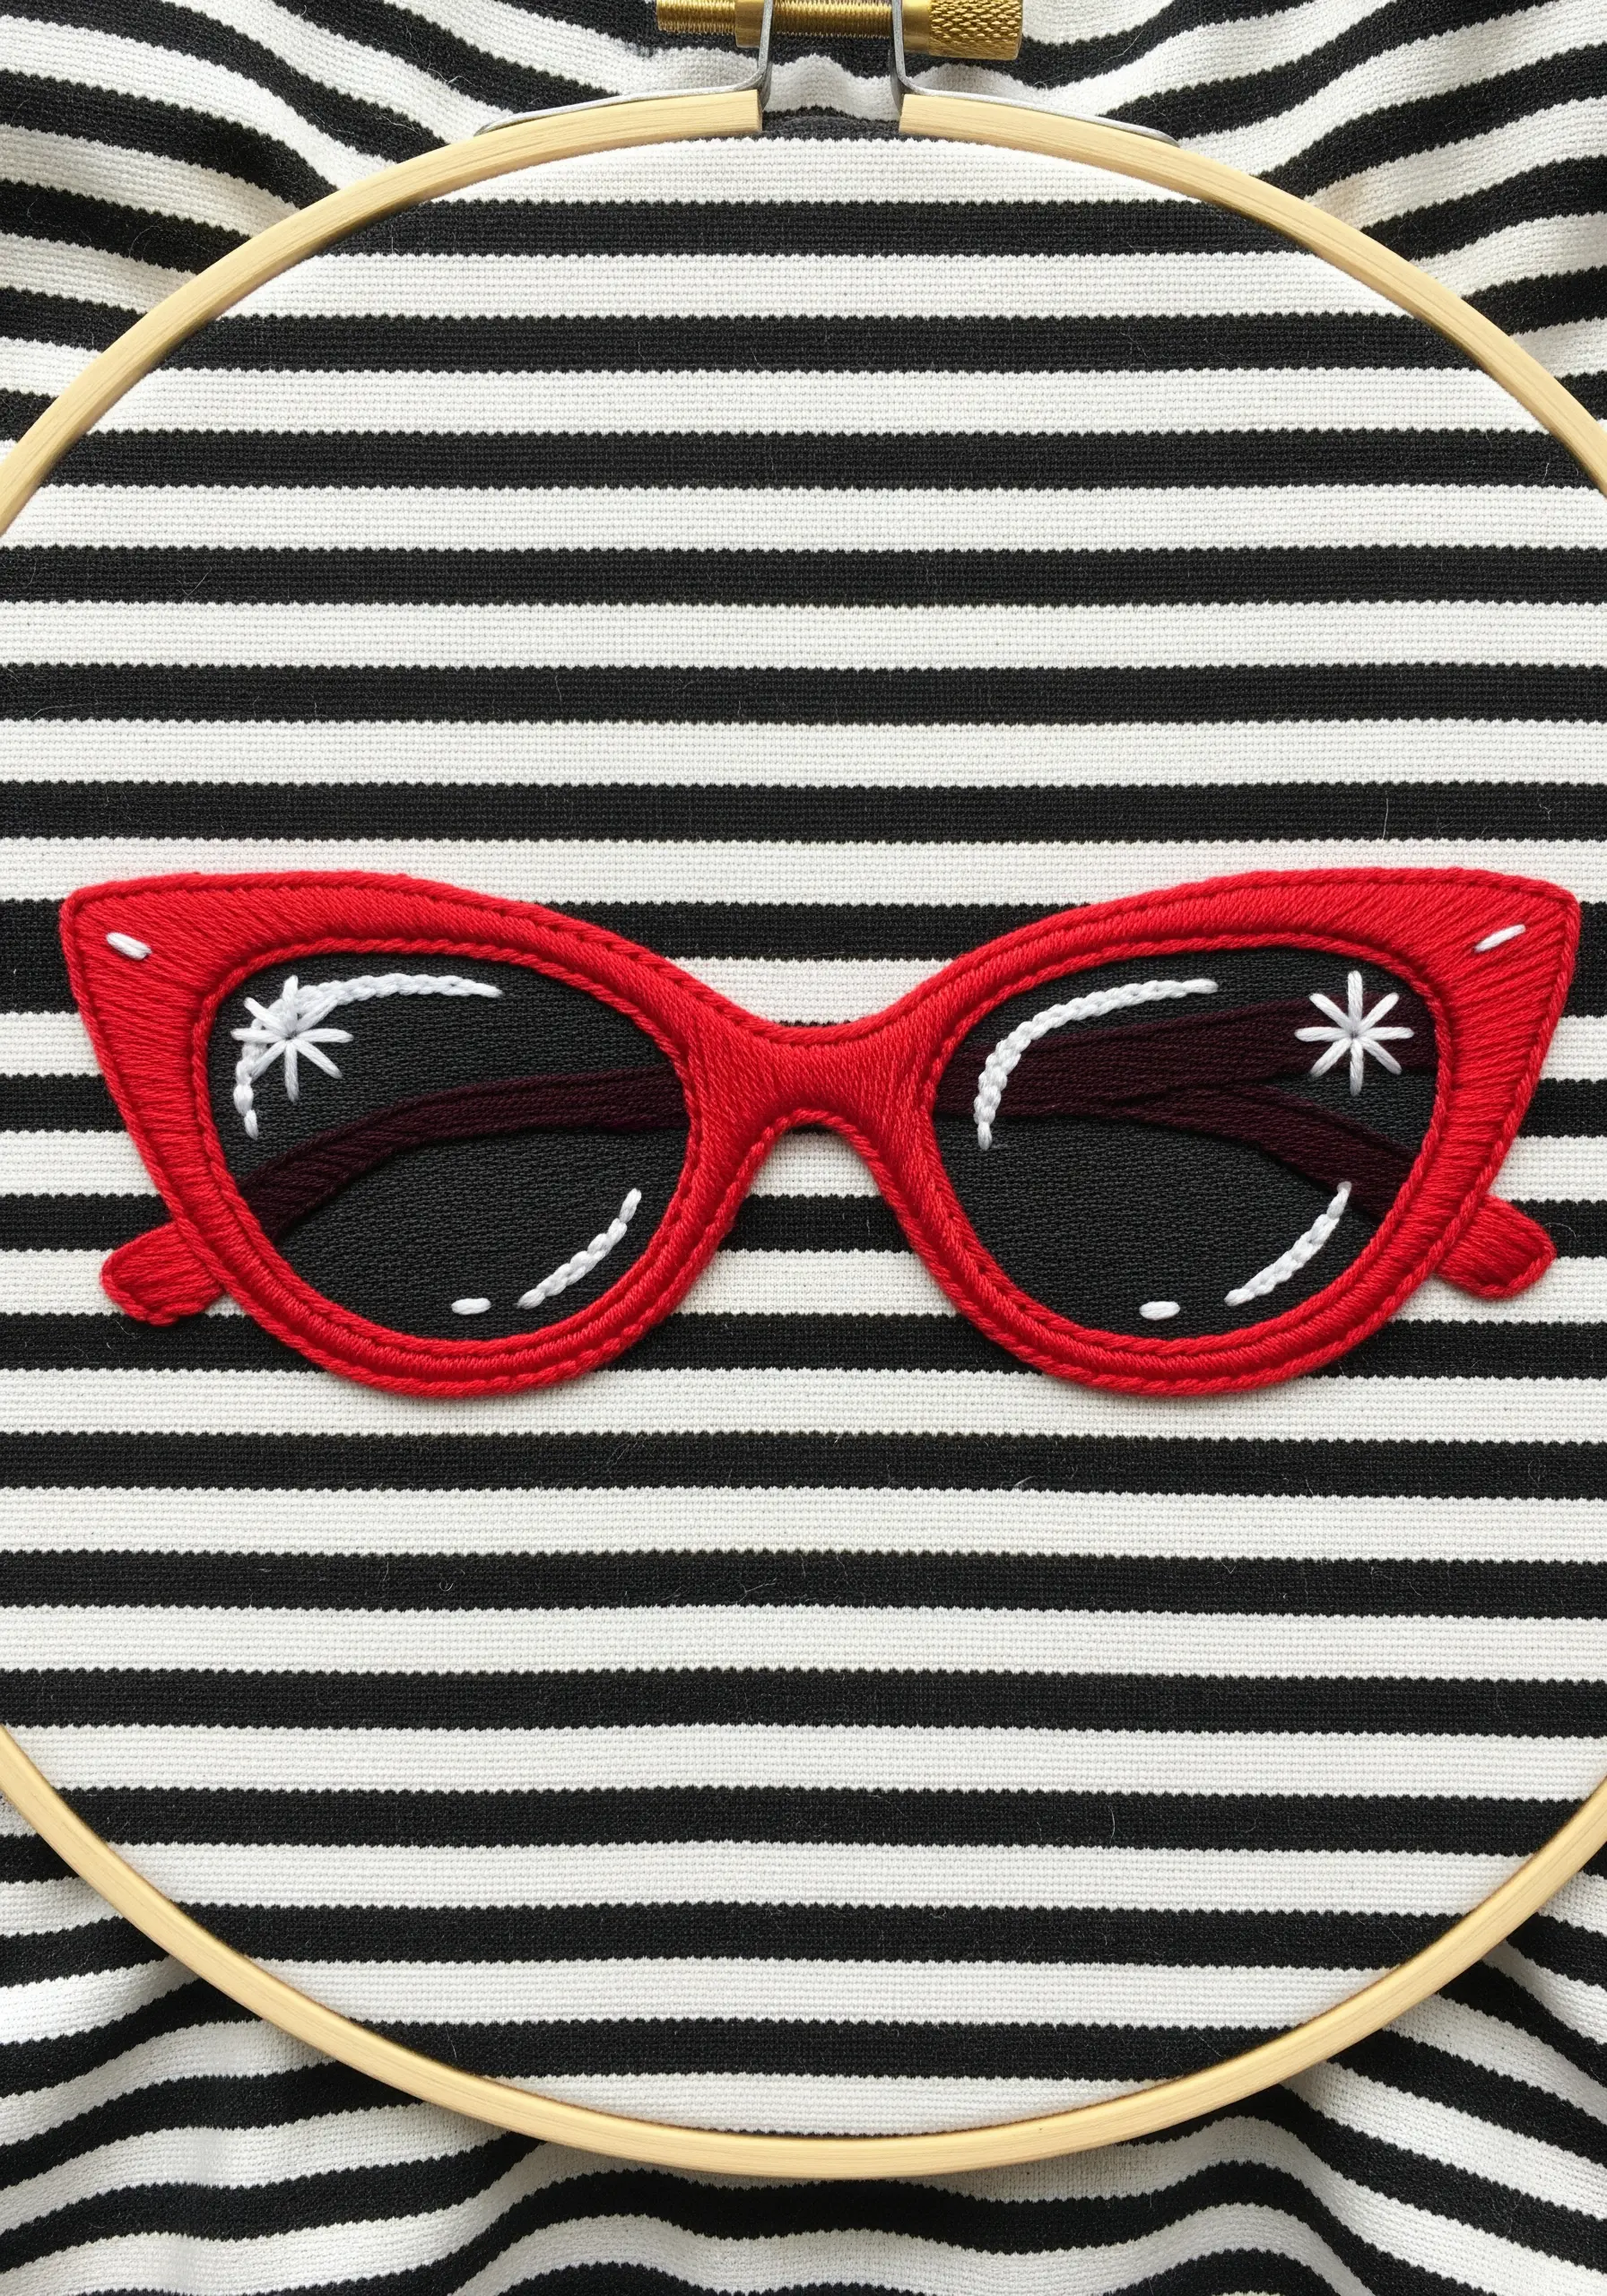
Suggest a glossy surface on objects like sunglasses by adding strategically placed highlights.
Fill the lenses with a dense, black satin stitch, ensuring all stitches run in the same direction for a smooth, uniform surface.
Then, use a single strand of white or light grey floss to add small, sharp details: a few straight stitches for a star-like sparkle and a curved line of stem stitch to represent a larger reflection.
These tiny additions are what trick the eye into seeing a shiny, reflective surface, adding a layer of realism to your graphic design.
15. Combine Cross-Stitch and Backstitch for Tech Details
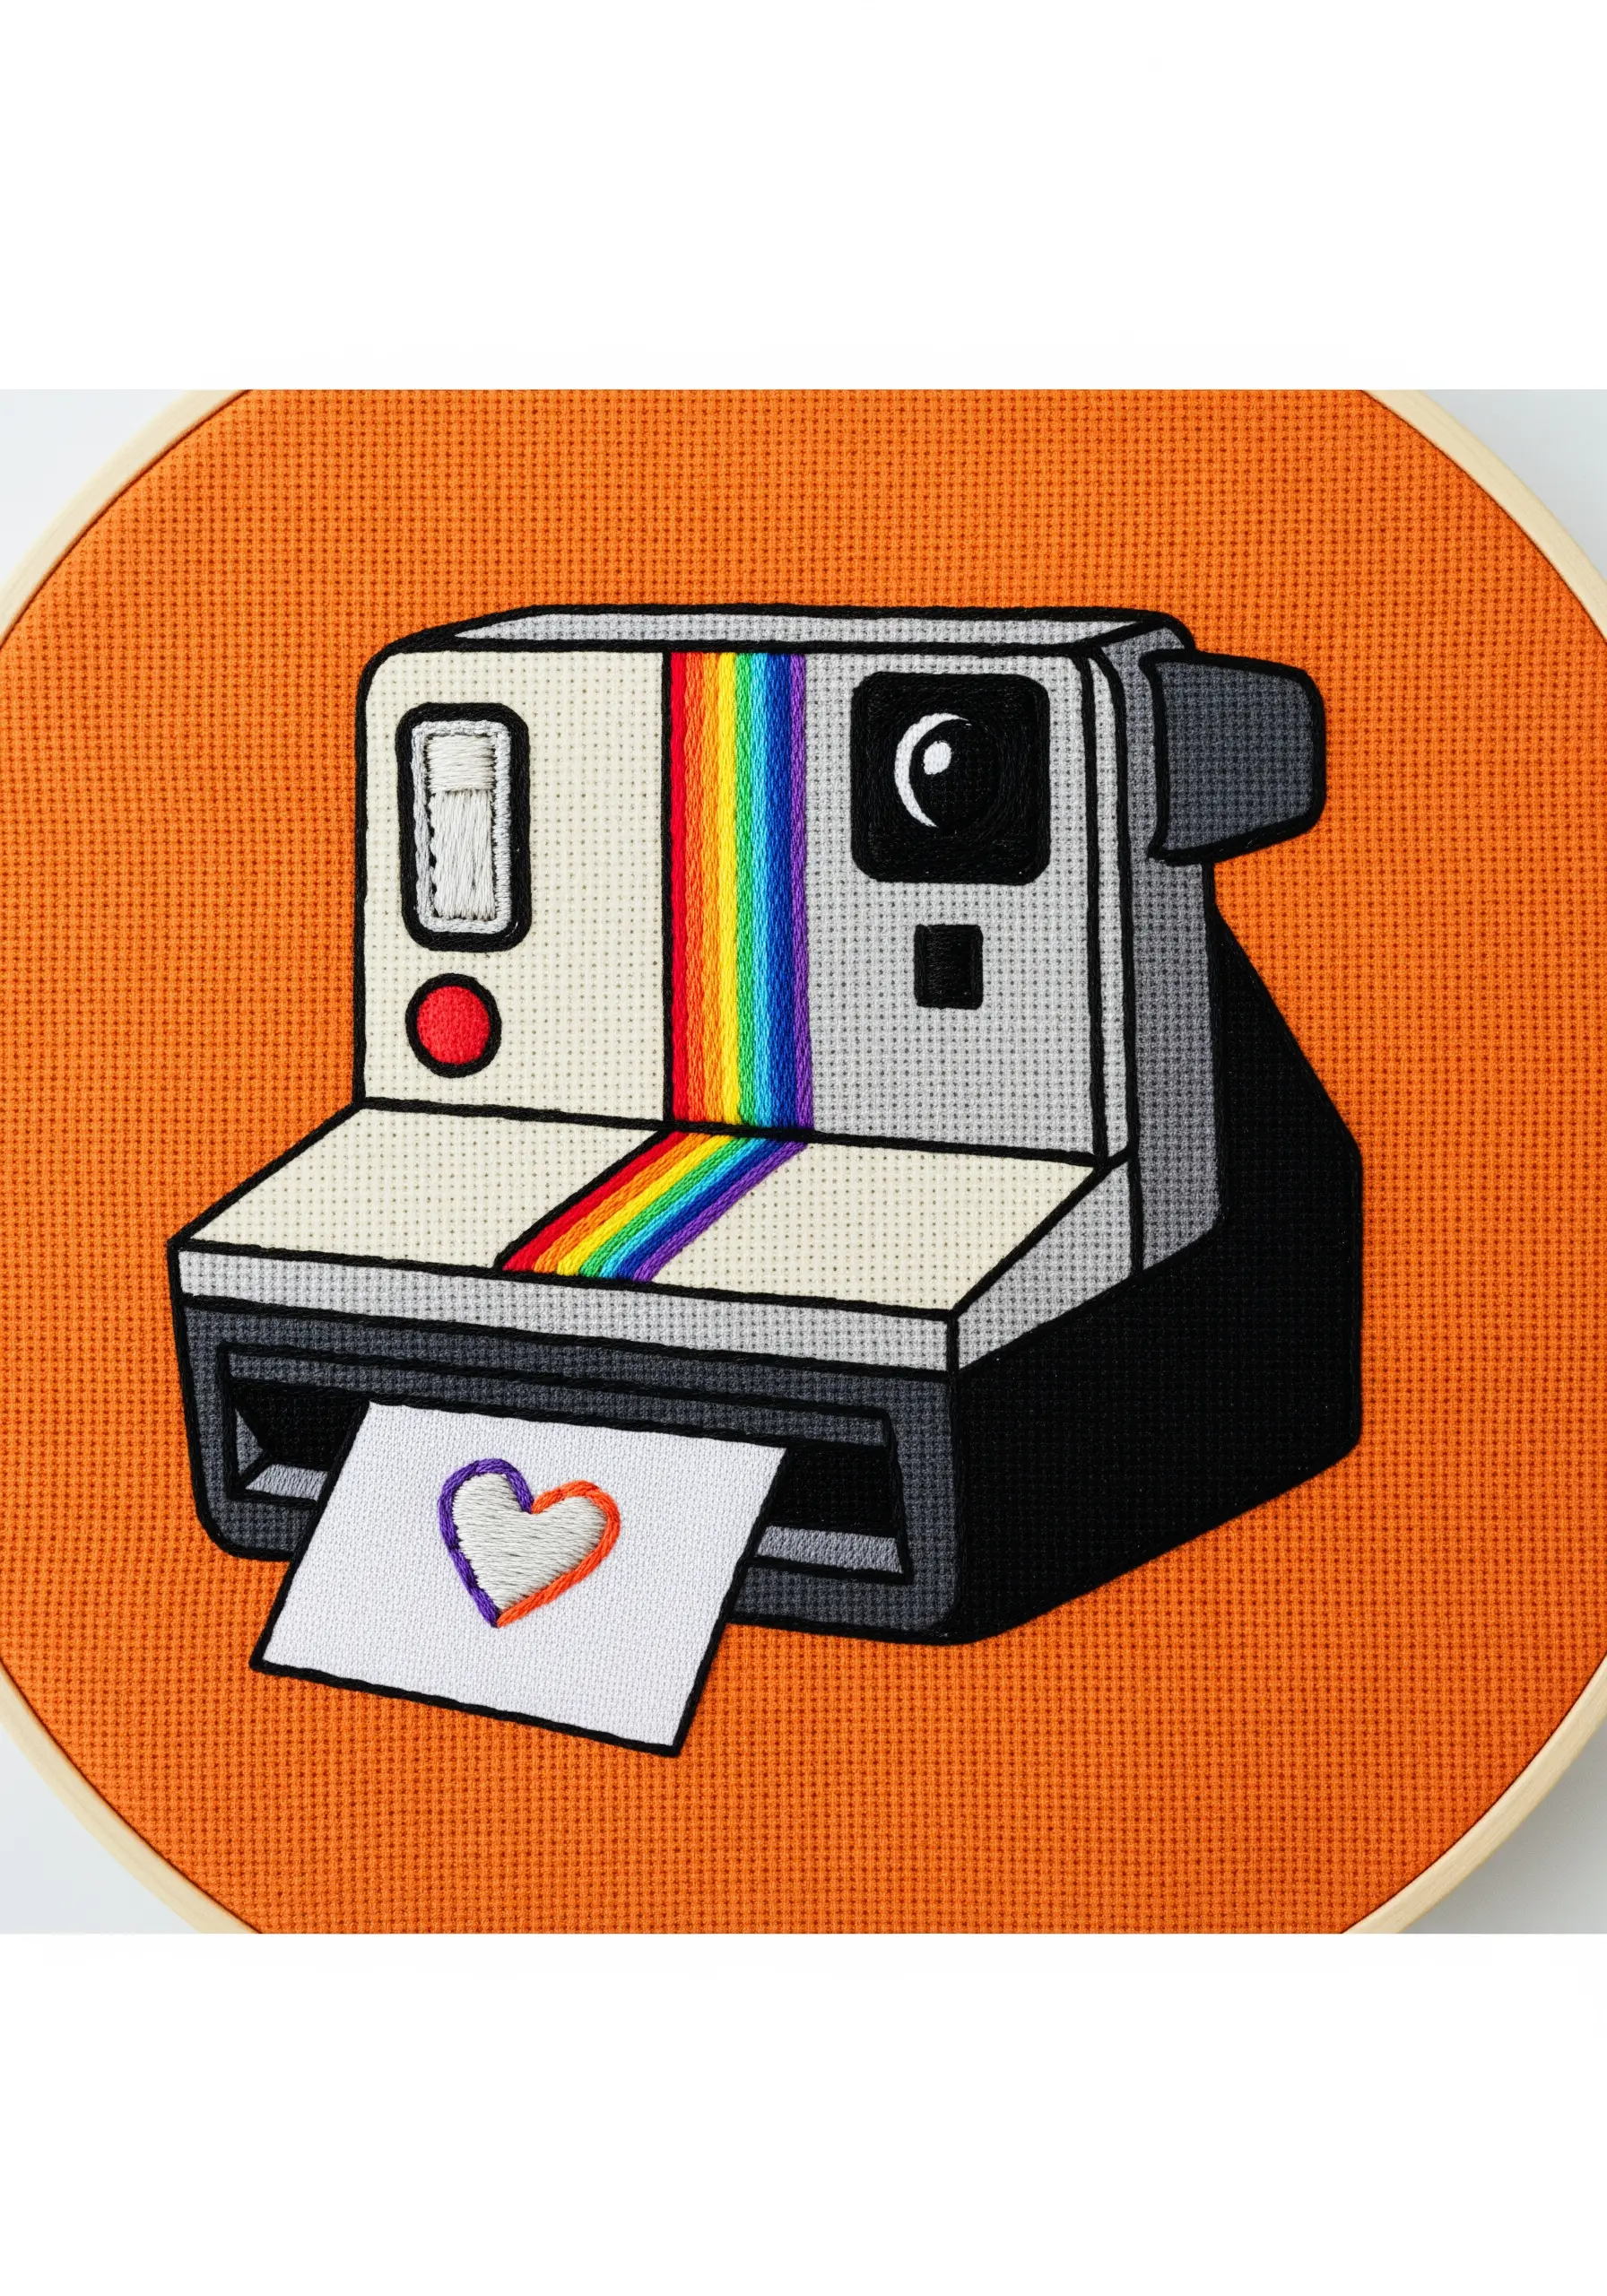
Leverage the strengths of different stitches to render complex objects with both texture and fine lines.
Use cross-stitch on an evenweave fabric for the main body of the camera, creating a slightly pixelated, textured surface that is perfect for retro tech.
Switch to a fine backstitch with a single strand of black floss for all the outlines, shadows, and tiny mechanical details.
This combination allows you to achieve both the blocky form of the object and the crisp, delicate lines needed for realism, making it one of those tiny embroidery designs inspired by everyday life that really shines.
16. Add Dimension with a Padded Chain Stitch
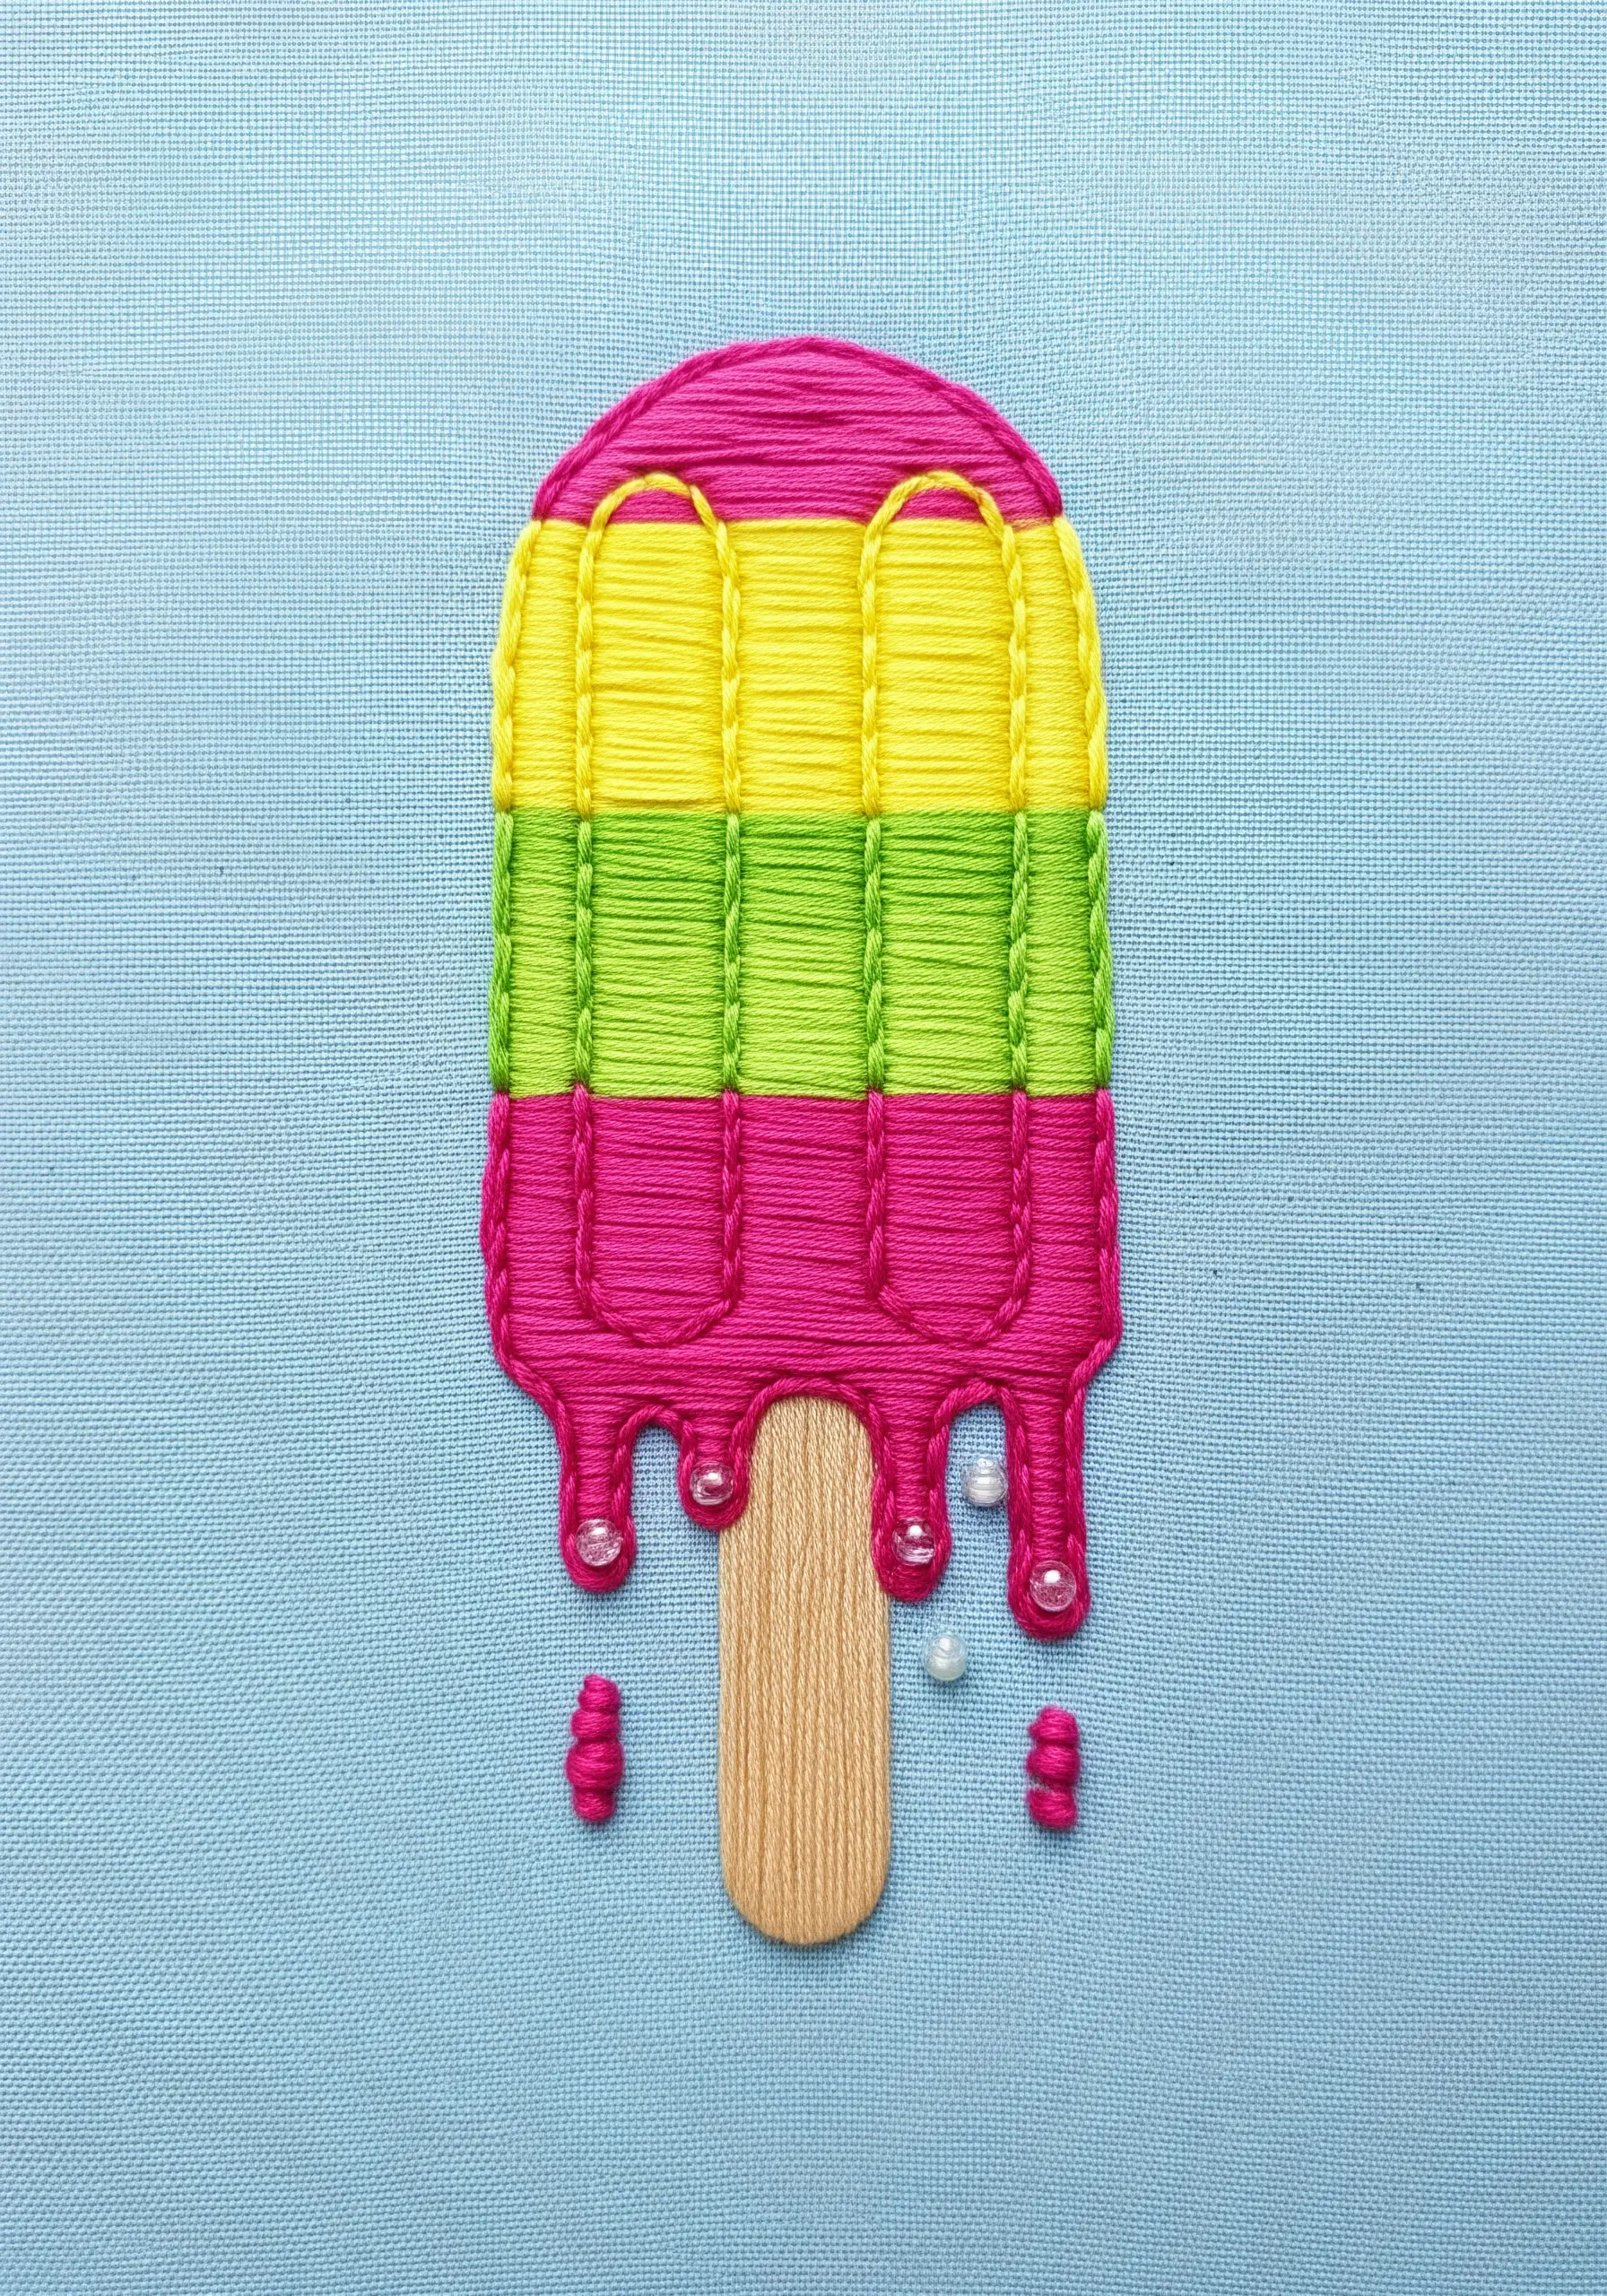
Give your fill stitches a raised, 3D effect by using a padded chain stitch.
Outline each color block of the popsicle first with a standard backstitch.
Then, fill the area with rows of chain stitch, working them closely together so no fabric shows through.
The looped structure of the chain stitch naturally creates a thicker, more textured surface than satin stitch, making the object look plump and rounded.
Adding a few small beads for ‘drips’ introduces another texture and enhances the melting effect.
17. Achieve Photorealism with Thread Painting
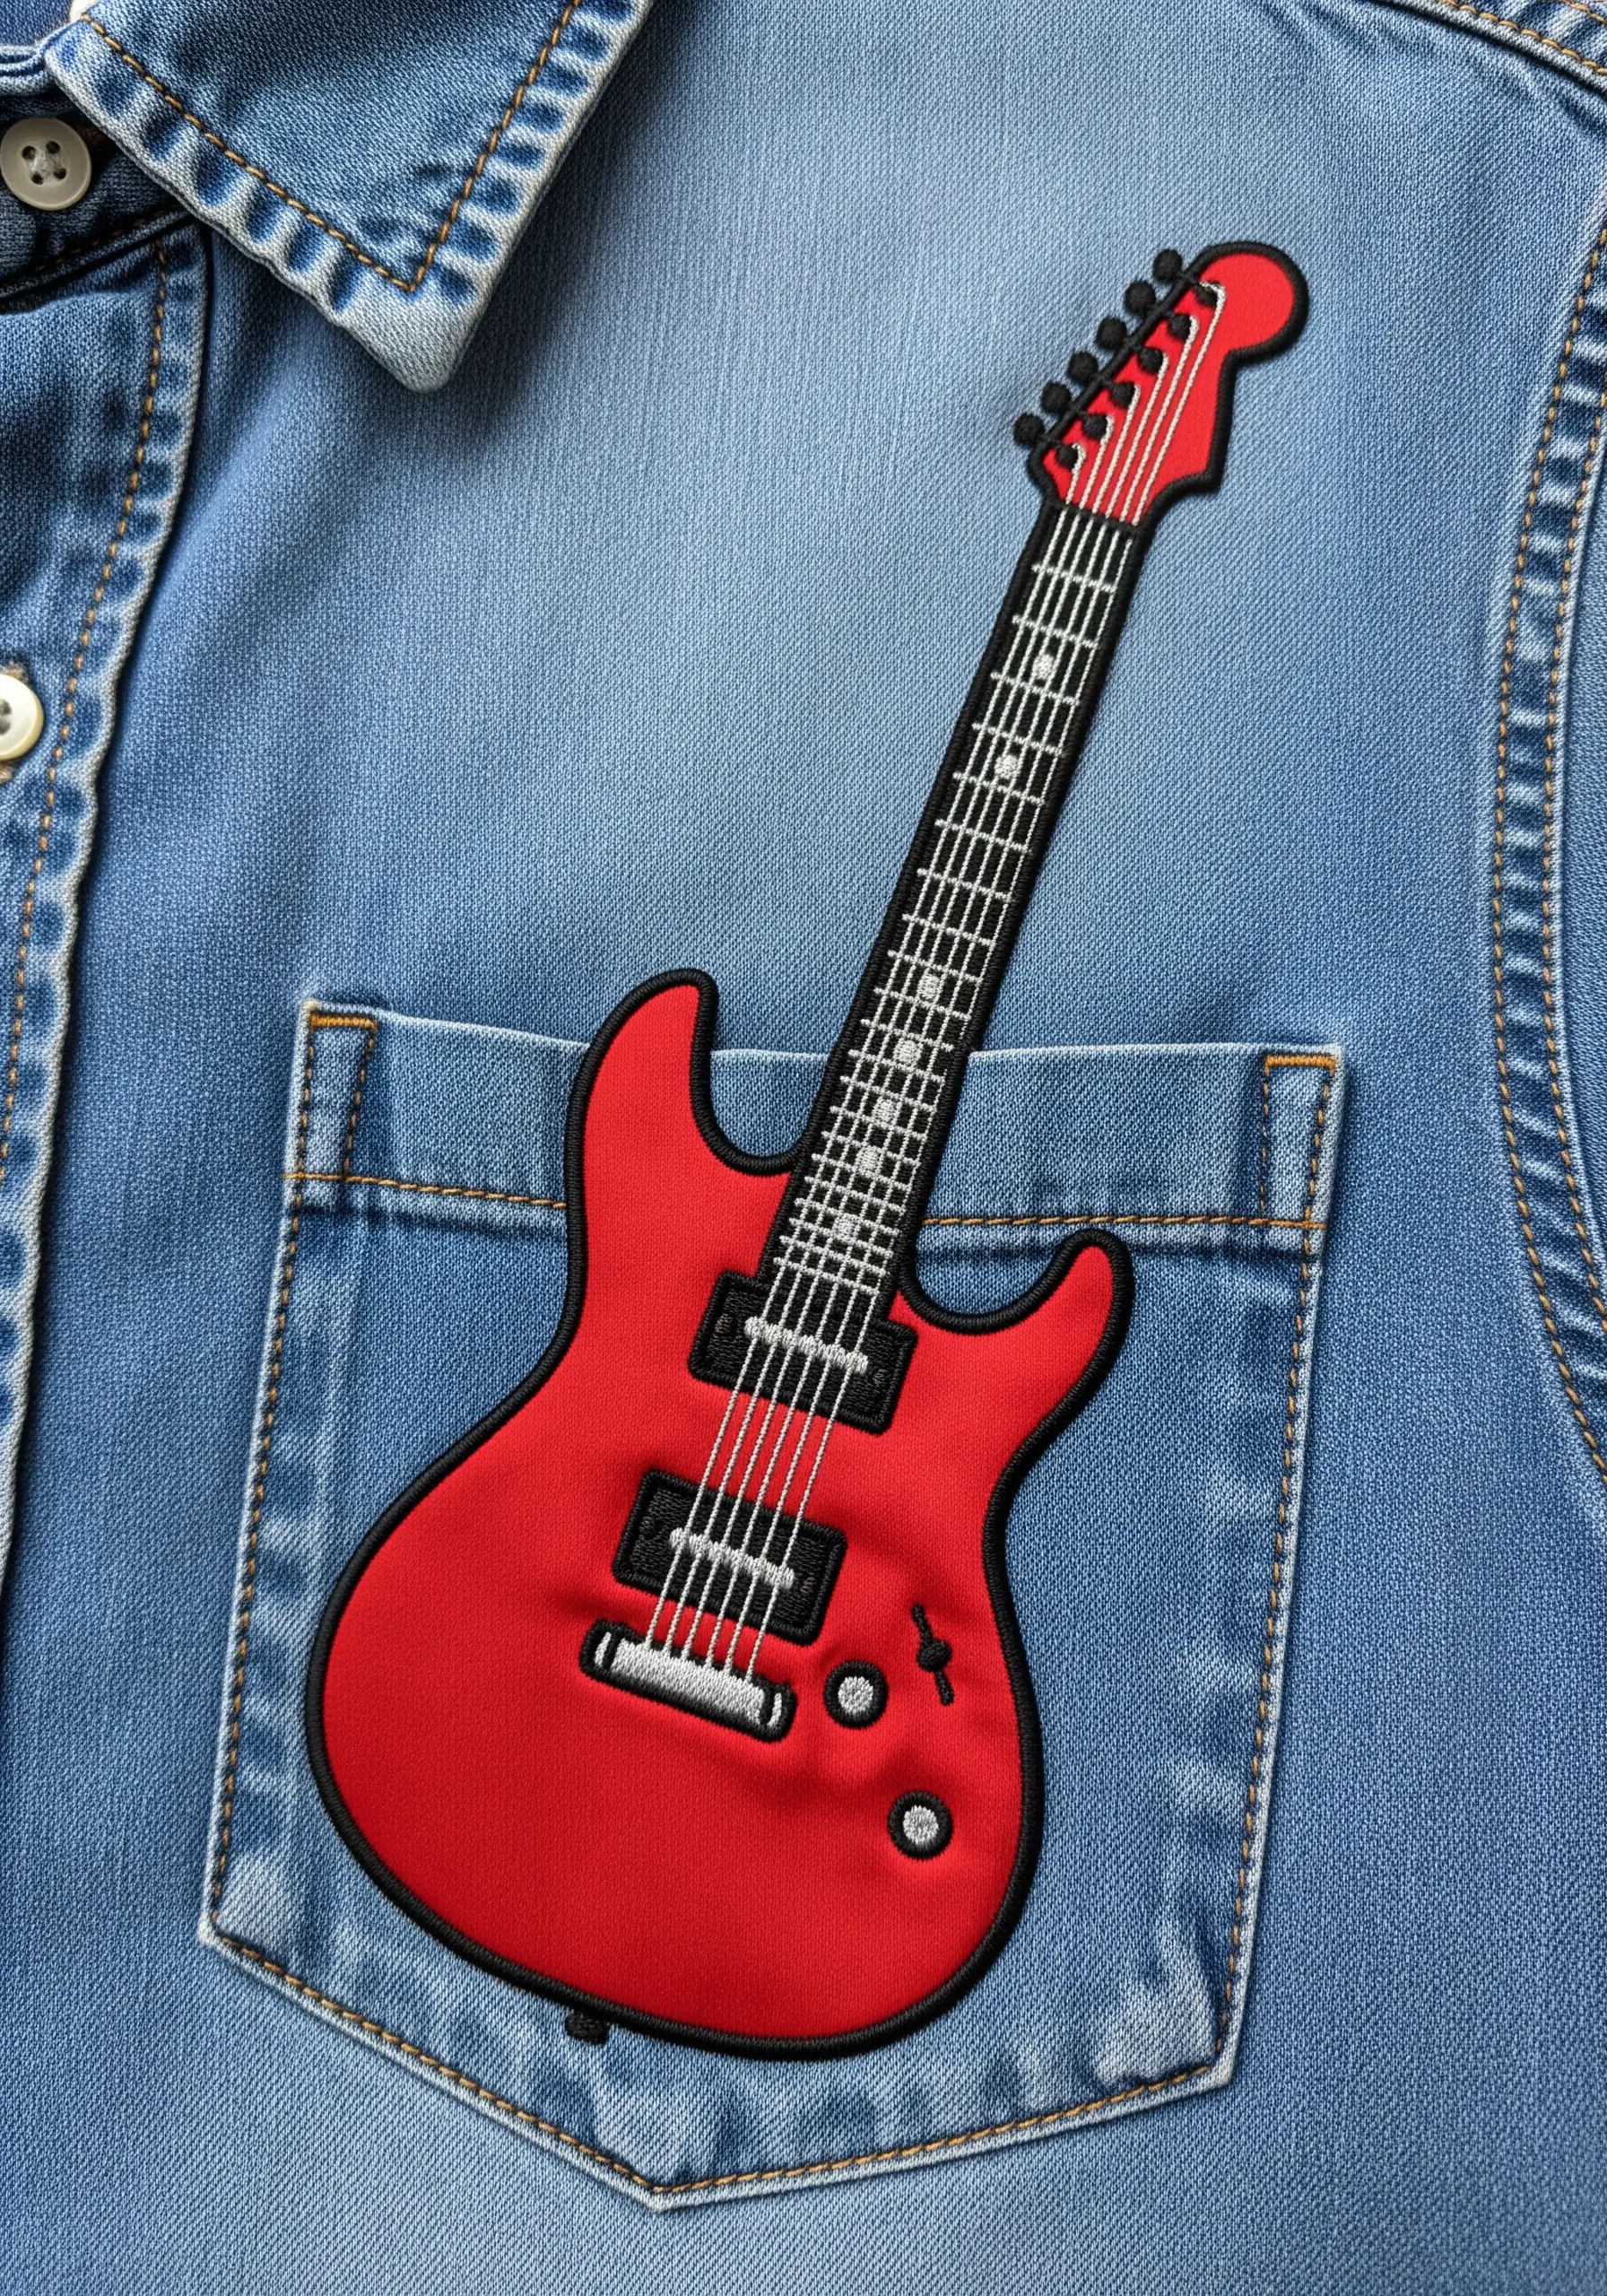
For complex objects like this electric guitar, use long-and-short stitch to create smooth gradients and highlights.
The body of the guitar is filled with at least two shades of red, carefully blended to create a realistic, glossy shine.
Use a single strand of silver or grey floss for the metallic hardware and frets, laying tiny satin stitches to mimic the look of polished metal.
A thick black satin stitch outline provides a clean, sticker-like finish, making the design pop against the denim fabric of the shirt pocket.
18. Create Depth on 3D Objects with Curved Satin Stitch
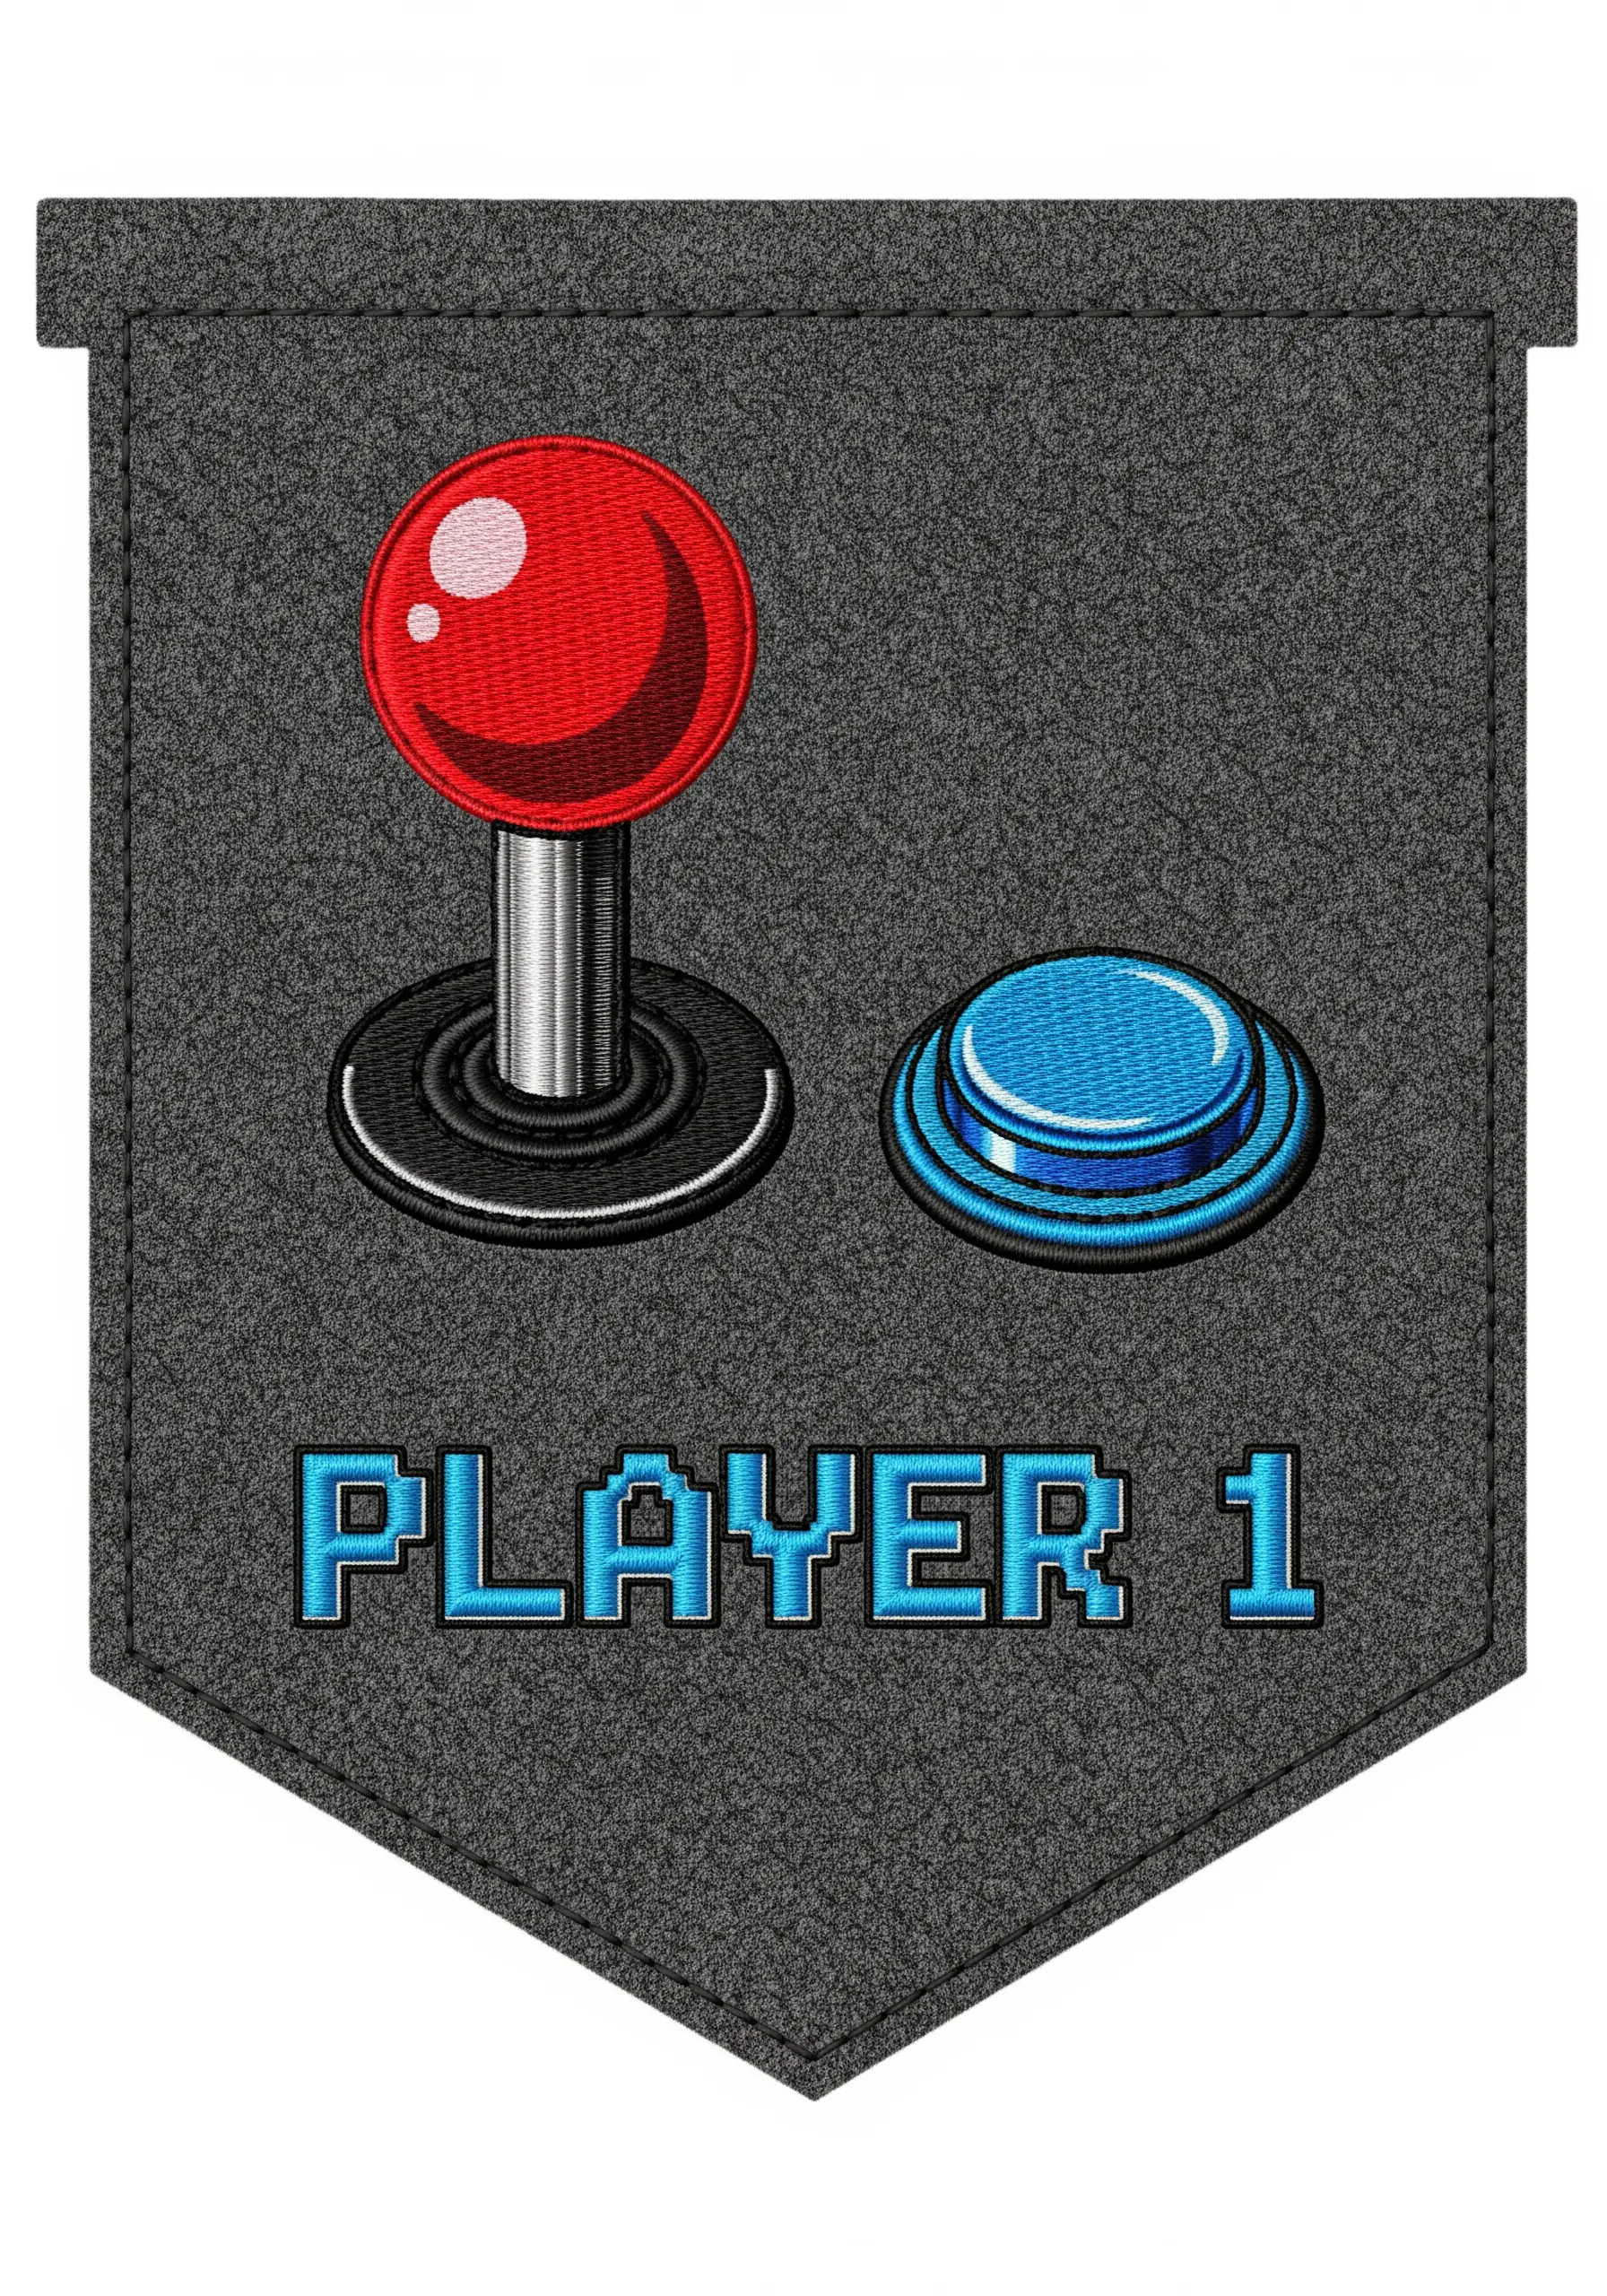
To make a spherical object like a joystick knob look round, your satin stitches must follow its curve.
Imagine lines wrapping around a ball and angle your stitches accordingly, making them shorter at the edges and longer in the middle.
Add a highlight with a few curved stitches of a lighter color (or even white) to complete the illusion of a three-dimensional, shiny surface.
This thoughtful use of stitch direction is a fundamental skill for moving from flat, cartoonish fills to more realistic and dynamic forms.
19. Mimic Metallic Shine with Strategic Color Placement

You don’t always need metallic thread to suggest a metallic surface; clever use of color can achieve the same effect.
For the gold lipstick tube, use three shades of gold/yellow floss: a dark shade for the base, a mid-tone for the main body, and a light yellow or cream for the highlights.
Place the colors in distinct vertical bands using satin stitch. The sharp contrast between the dark and light tones tricks the eye into seeing a reflective, cylindrical object.
This is a classic illustration technique that translates beautifully to embroidery and adds a touch of glamour to small handmade projects.
20. Sculpt with Thread for Hyperrealistic Texture

To create the swirled look of soft-serve ice cream, use a directional long-and-short stitch that follows the flow of the swirl.
Use two or three shades of blue floss in your needle at once to create a natural, variegated color effect.
As you stitch, deliberately let some stitches overlap and twist to build up a thick, sculpted texture that looks almost edible.
The sprinkles, made of tiny, randomly placed straight stitches in bright colors, provide the perfect finishing touch and add to the playful realism of the piece.
21. Create a Coiled Cord with Whipped Stem Stitch
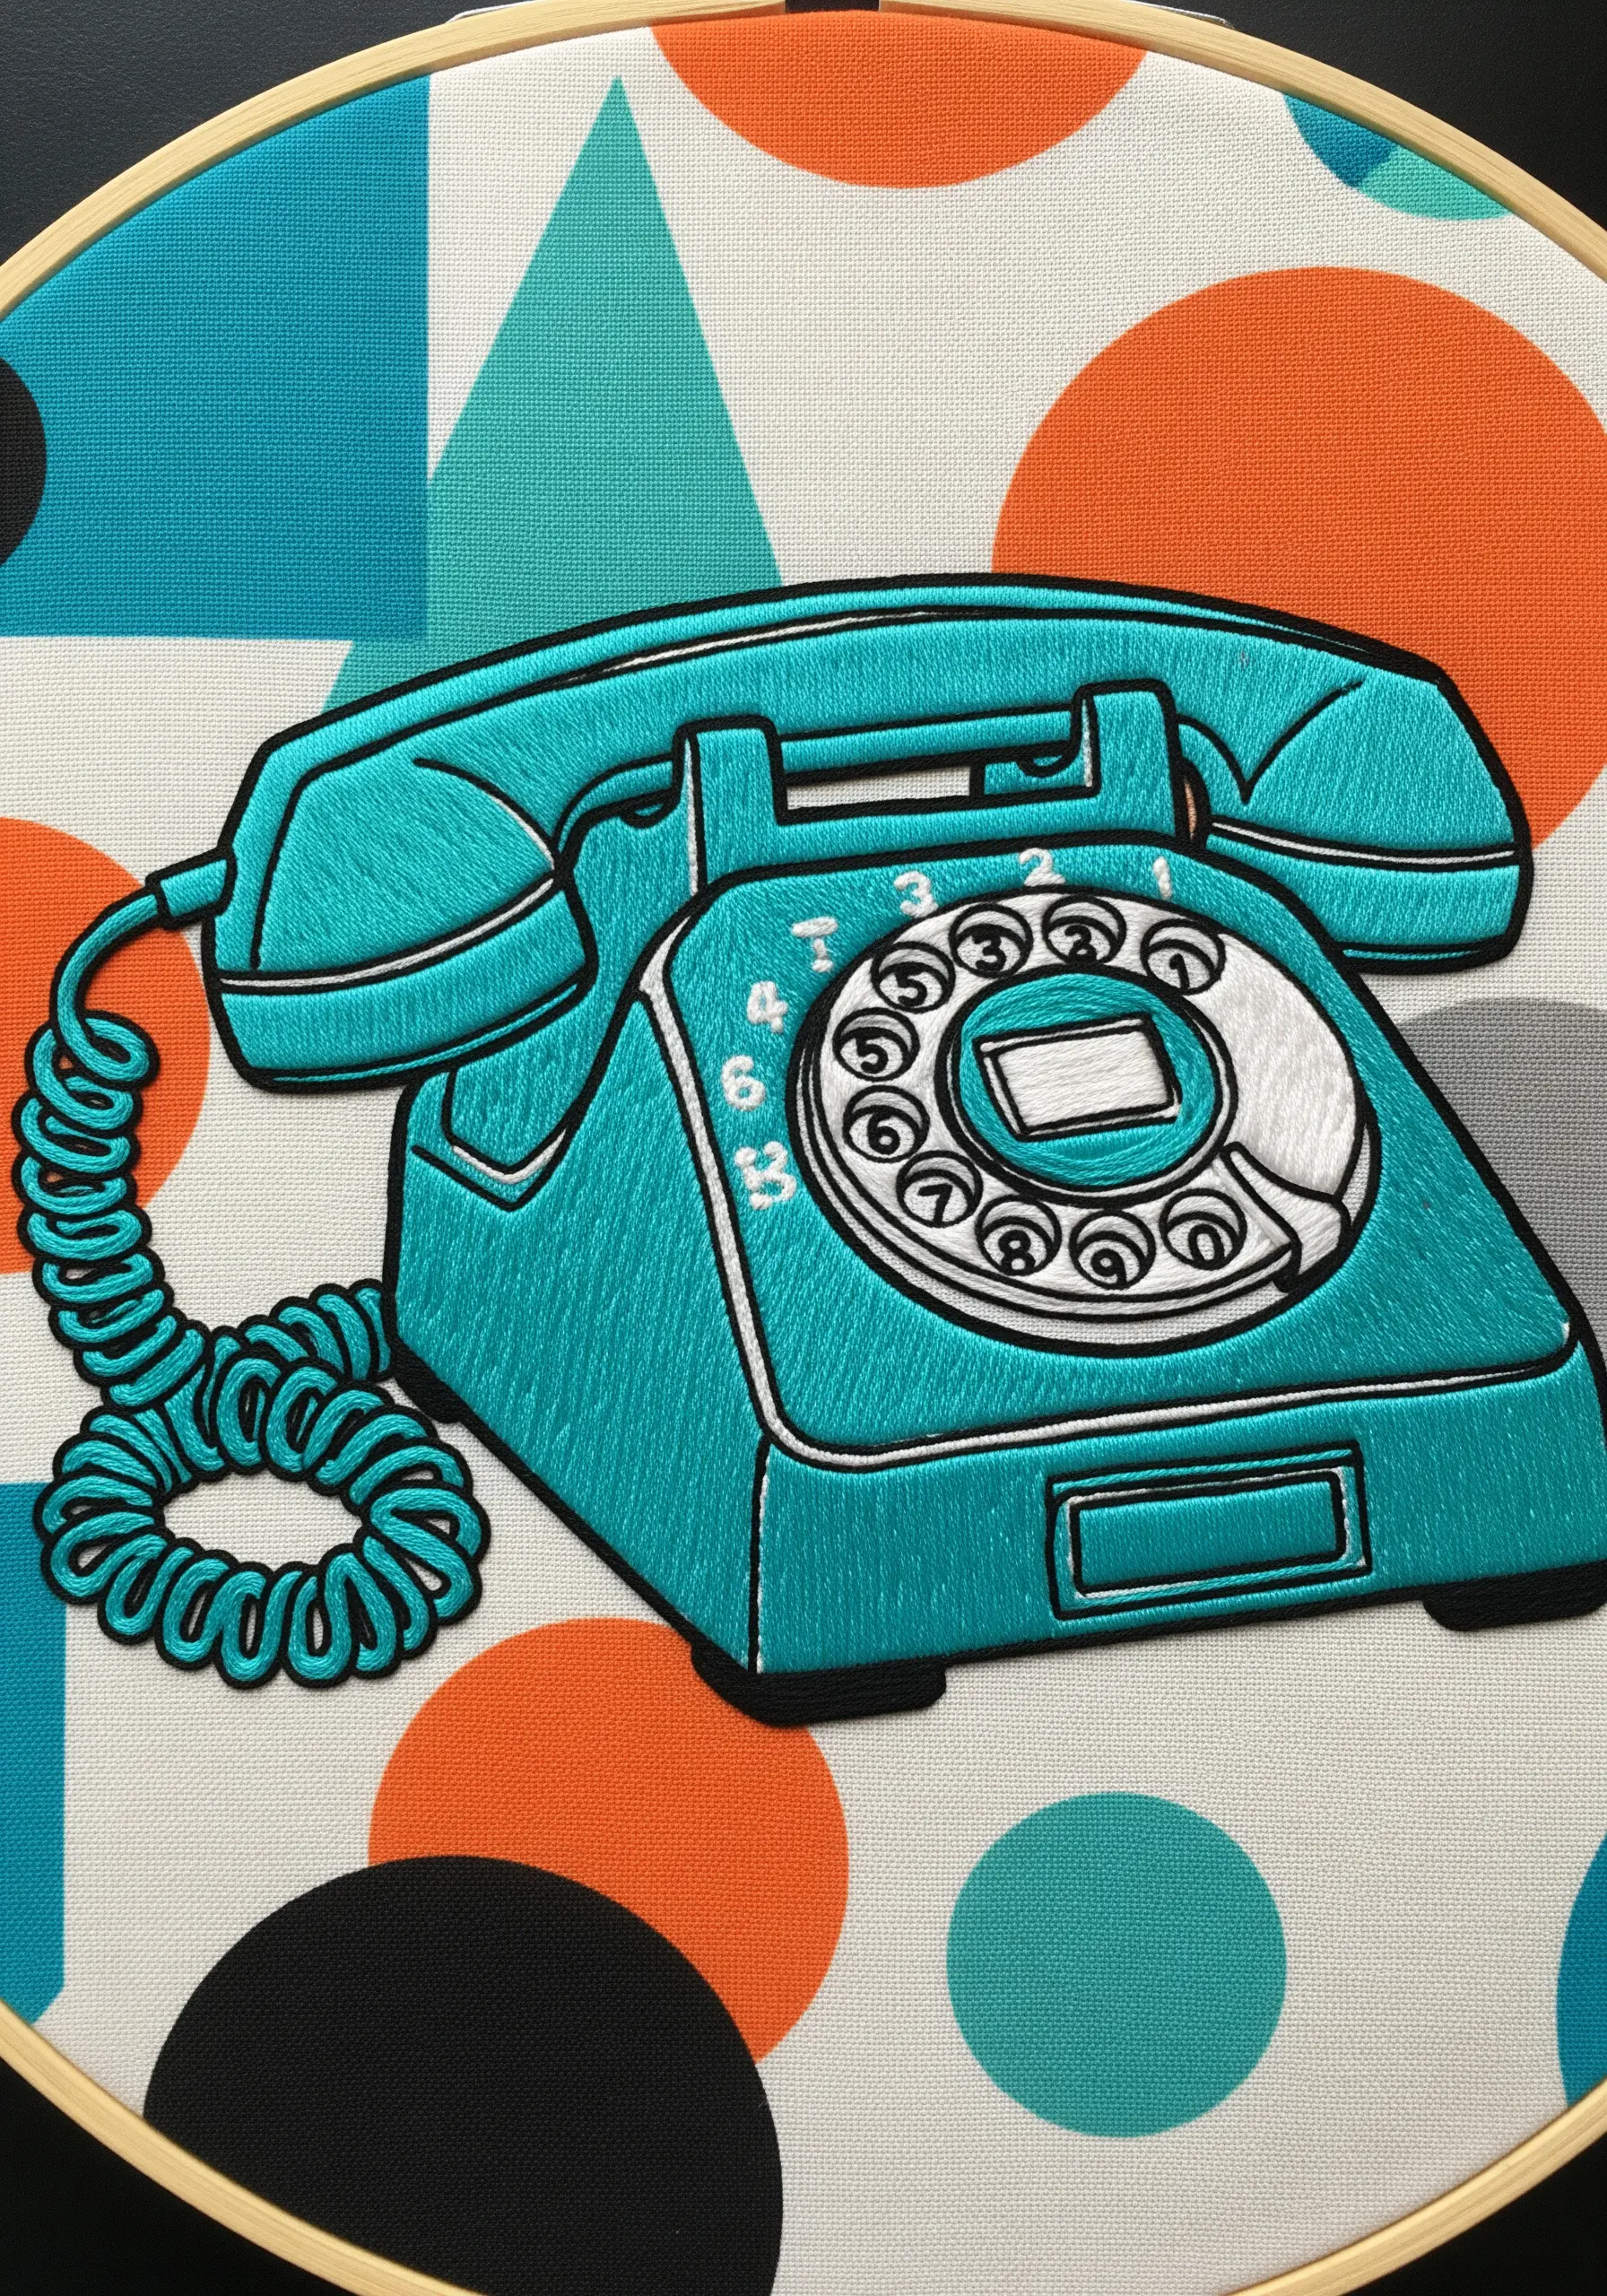
Replicate the texture of a retro telephone cord with a simple but highly effective stitch combination.
First, lay down a foundation of stem stitches in a looping, coiled pattern.
Then, take a second thread (either the same color or a slightly different shade for depth) and whip it around each stem stitch without piercing the fabric.
This process builds up a rounded, cord-like line that has a much more realistic, three-dimensional quality than a simple backstitch, making your vintage-inspired embroidery motifs look authentic.
22. Scale Up Motifs for High-Impact Accessories
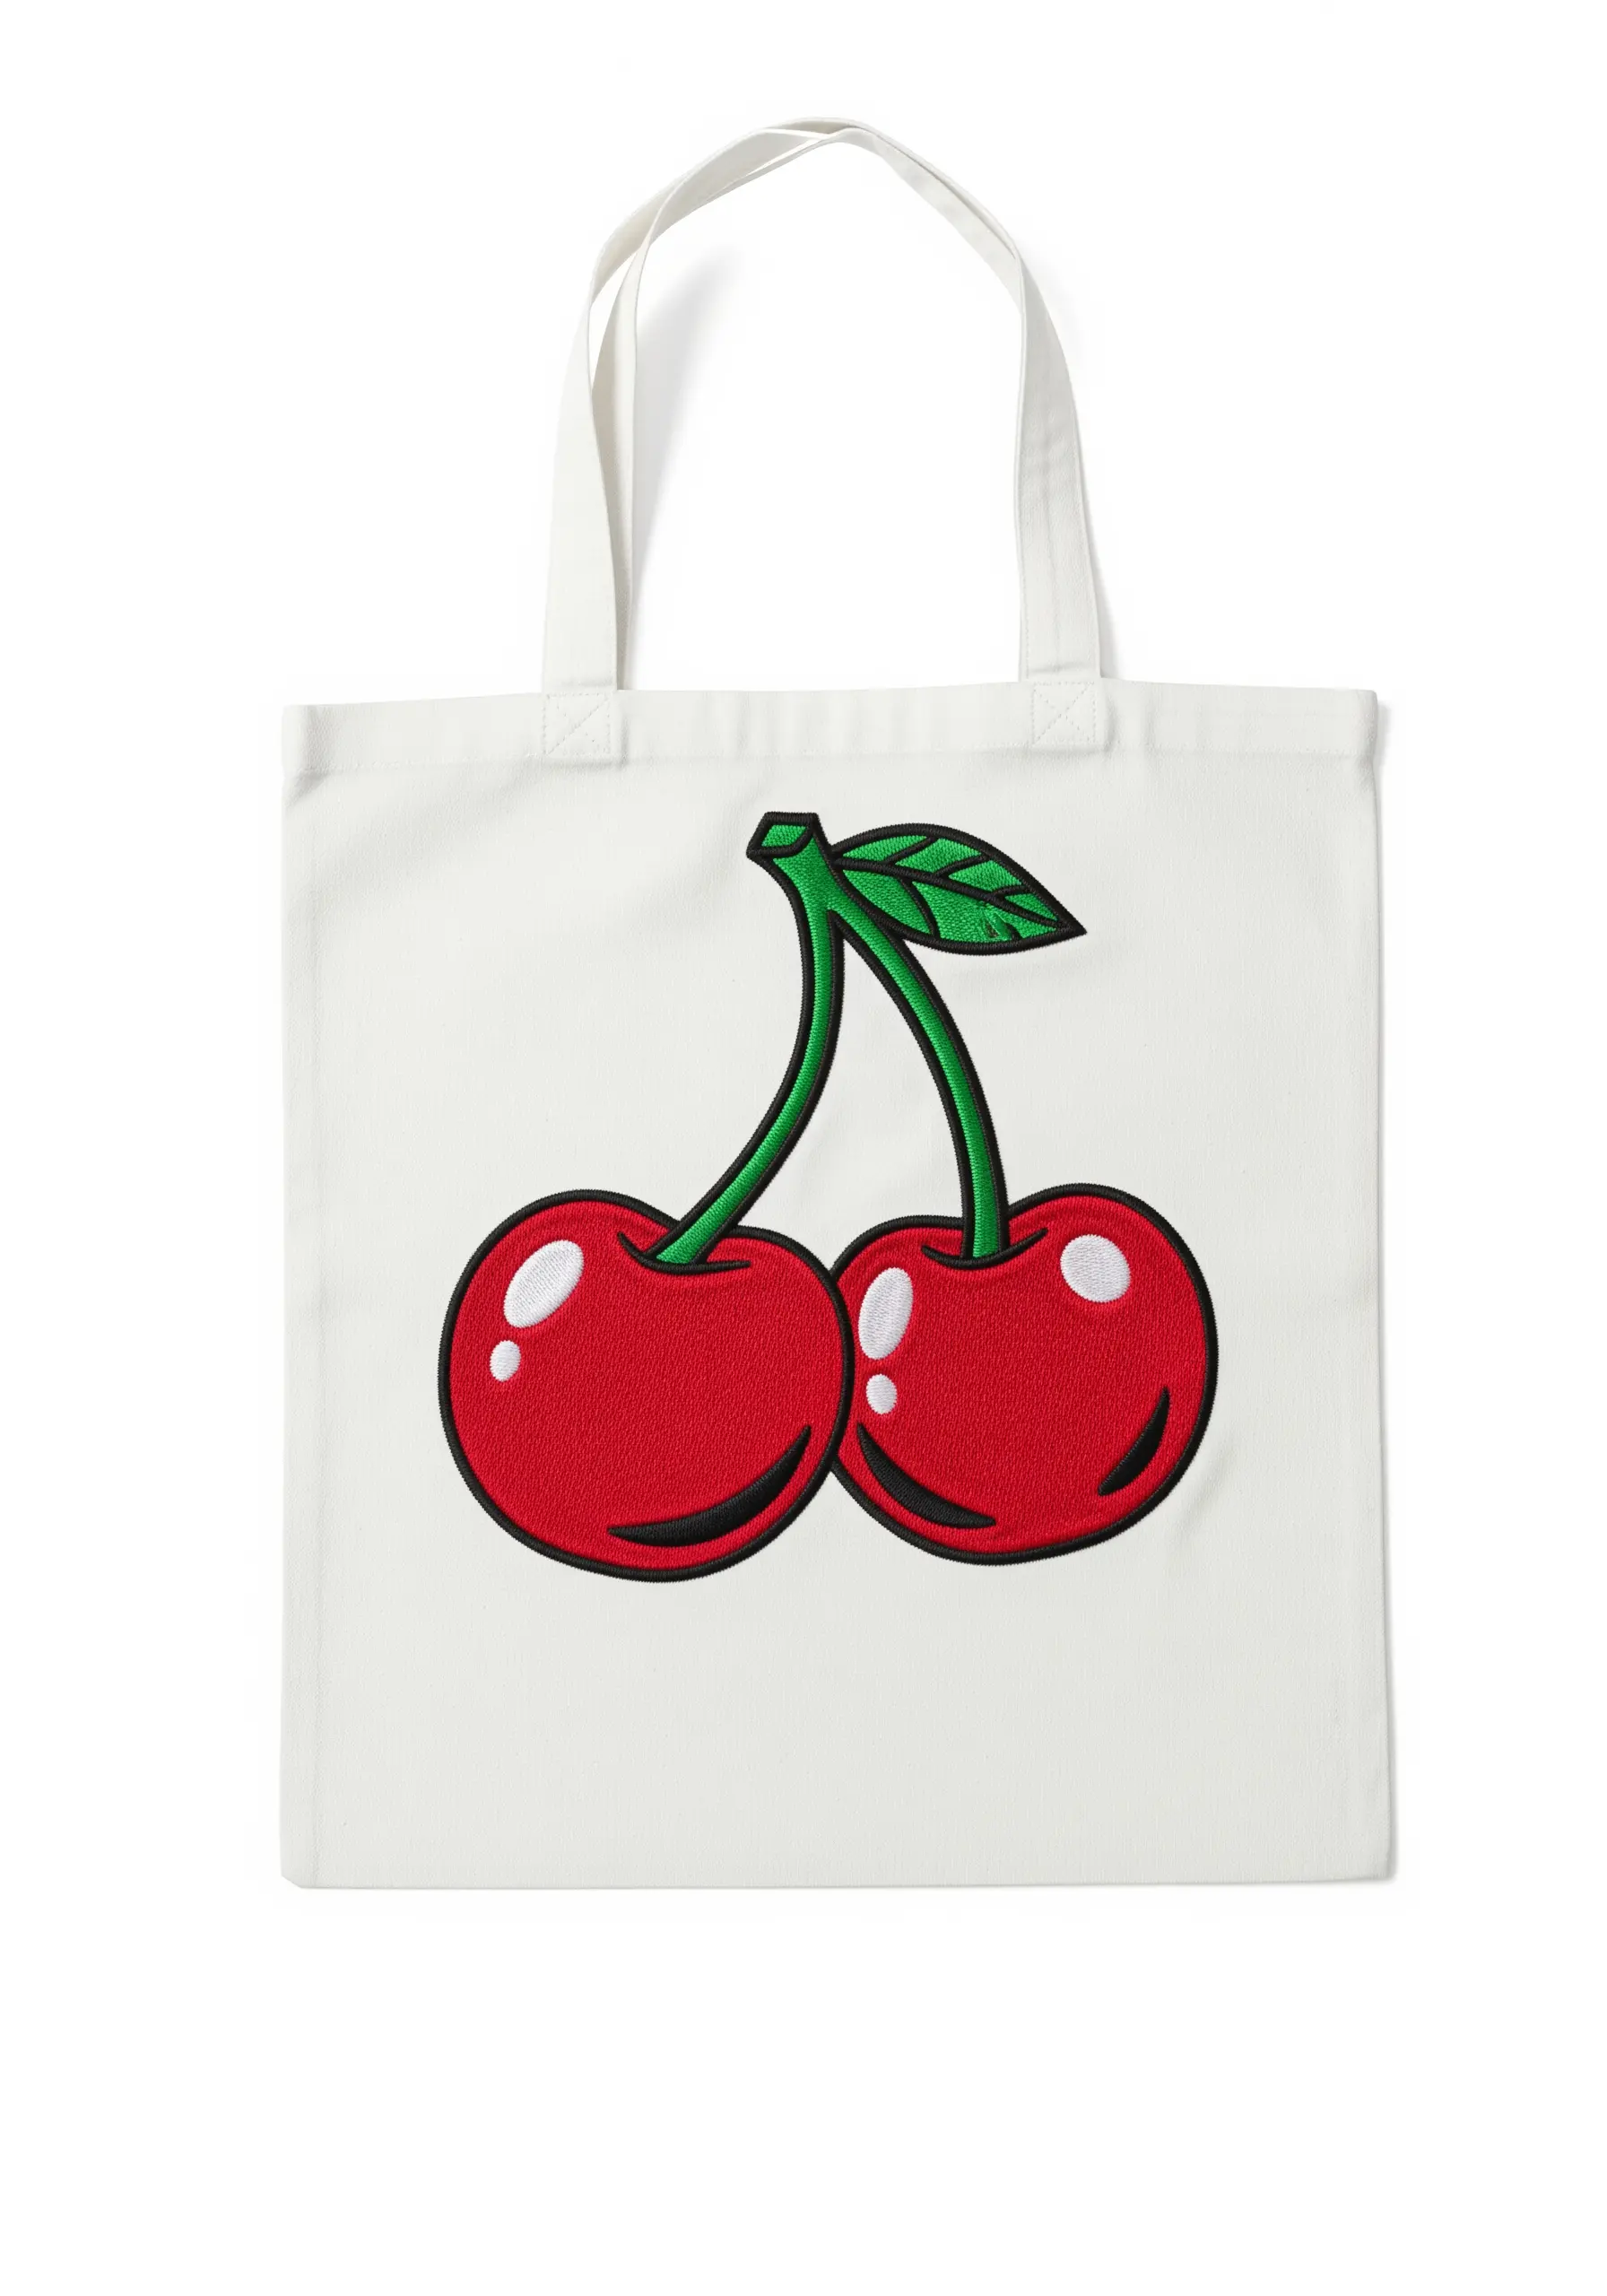
Don’t be afraid to let a single, simple motif take center stage on a larger item like a tote bag.
When scaling up a design, increase your thread count to ensure good coverage. Use all six strands of floss for the fill and a three or four-strand stem stitch for the outlines to maintain bold, graphic lines.
For the glossy highlights, use a crisp white satin stitch. Placing them consistently on the same side of each cherry creates a believable light source and adds to the professional, polished look.
This approach is perfect for transforming plain tote bags into statement pieces.
23. Use Negative Space in Line Art Designs

Suggest a shape without filling it in completely by using clever line art and negative space.
The outline of the lightbulb is created with a simple, open backstitch, allowing the white fabric to become part of the design itself.
This minimalist approach draws the eye to the central element—the exclamation point—which is filled with a dense, contrasting red satin stitch for maximum impact.
This technique is perfect for creating minimalist embroidery DIYs that feel modern and conceptually interesting.
24. Add Energy with Radiating Accent Stitches

Amplify the impact of a central motif by adding small, energetic accent lines.
After filling the lightning bolt with a dense satin stitch and outlining it with a contrasting border, use a single strand of white or black thread to add radiating straight stitches around it.
Vary the length and angle of these ‘spark’ lines to create a sense of dynamic, crackling energy.
This simple addition transforms a static symbol into a scene filled with action and movement, giving it that classic pop-art flair.


