

Your travel memories deserve more than a faded photograph or a simple souvenir. They deserve to be woven into the very fabric of your life—a detail on a jacket cuff, a line on a tote bag, a secret symbol on a pocket. This is where embroidery transforms from a craft into a language.
Forget complicated patterns and dozen-color palettes. The most impactful designs are often the most personal and restrained. A single line can represent a journey, a pop of color can mark a beloved place, and a simple texture can evoke the memory of a landscape. It’s about choosing the right stitch, the right thread, and the right placement to tell your story with intention and elegance.
Let’s explore how to turn everyday items into meaningful keepsakes. You’ll learn not just what to stitch, but how to stitch it with a modern, artistic sensibility. Your needle and thread are tools for memory-keeping, ready to create something beautiful, personal, and lasting.
1. Render Mountain Ranges with a Textured Whipped Stitch
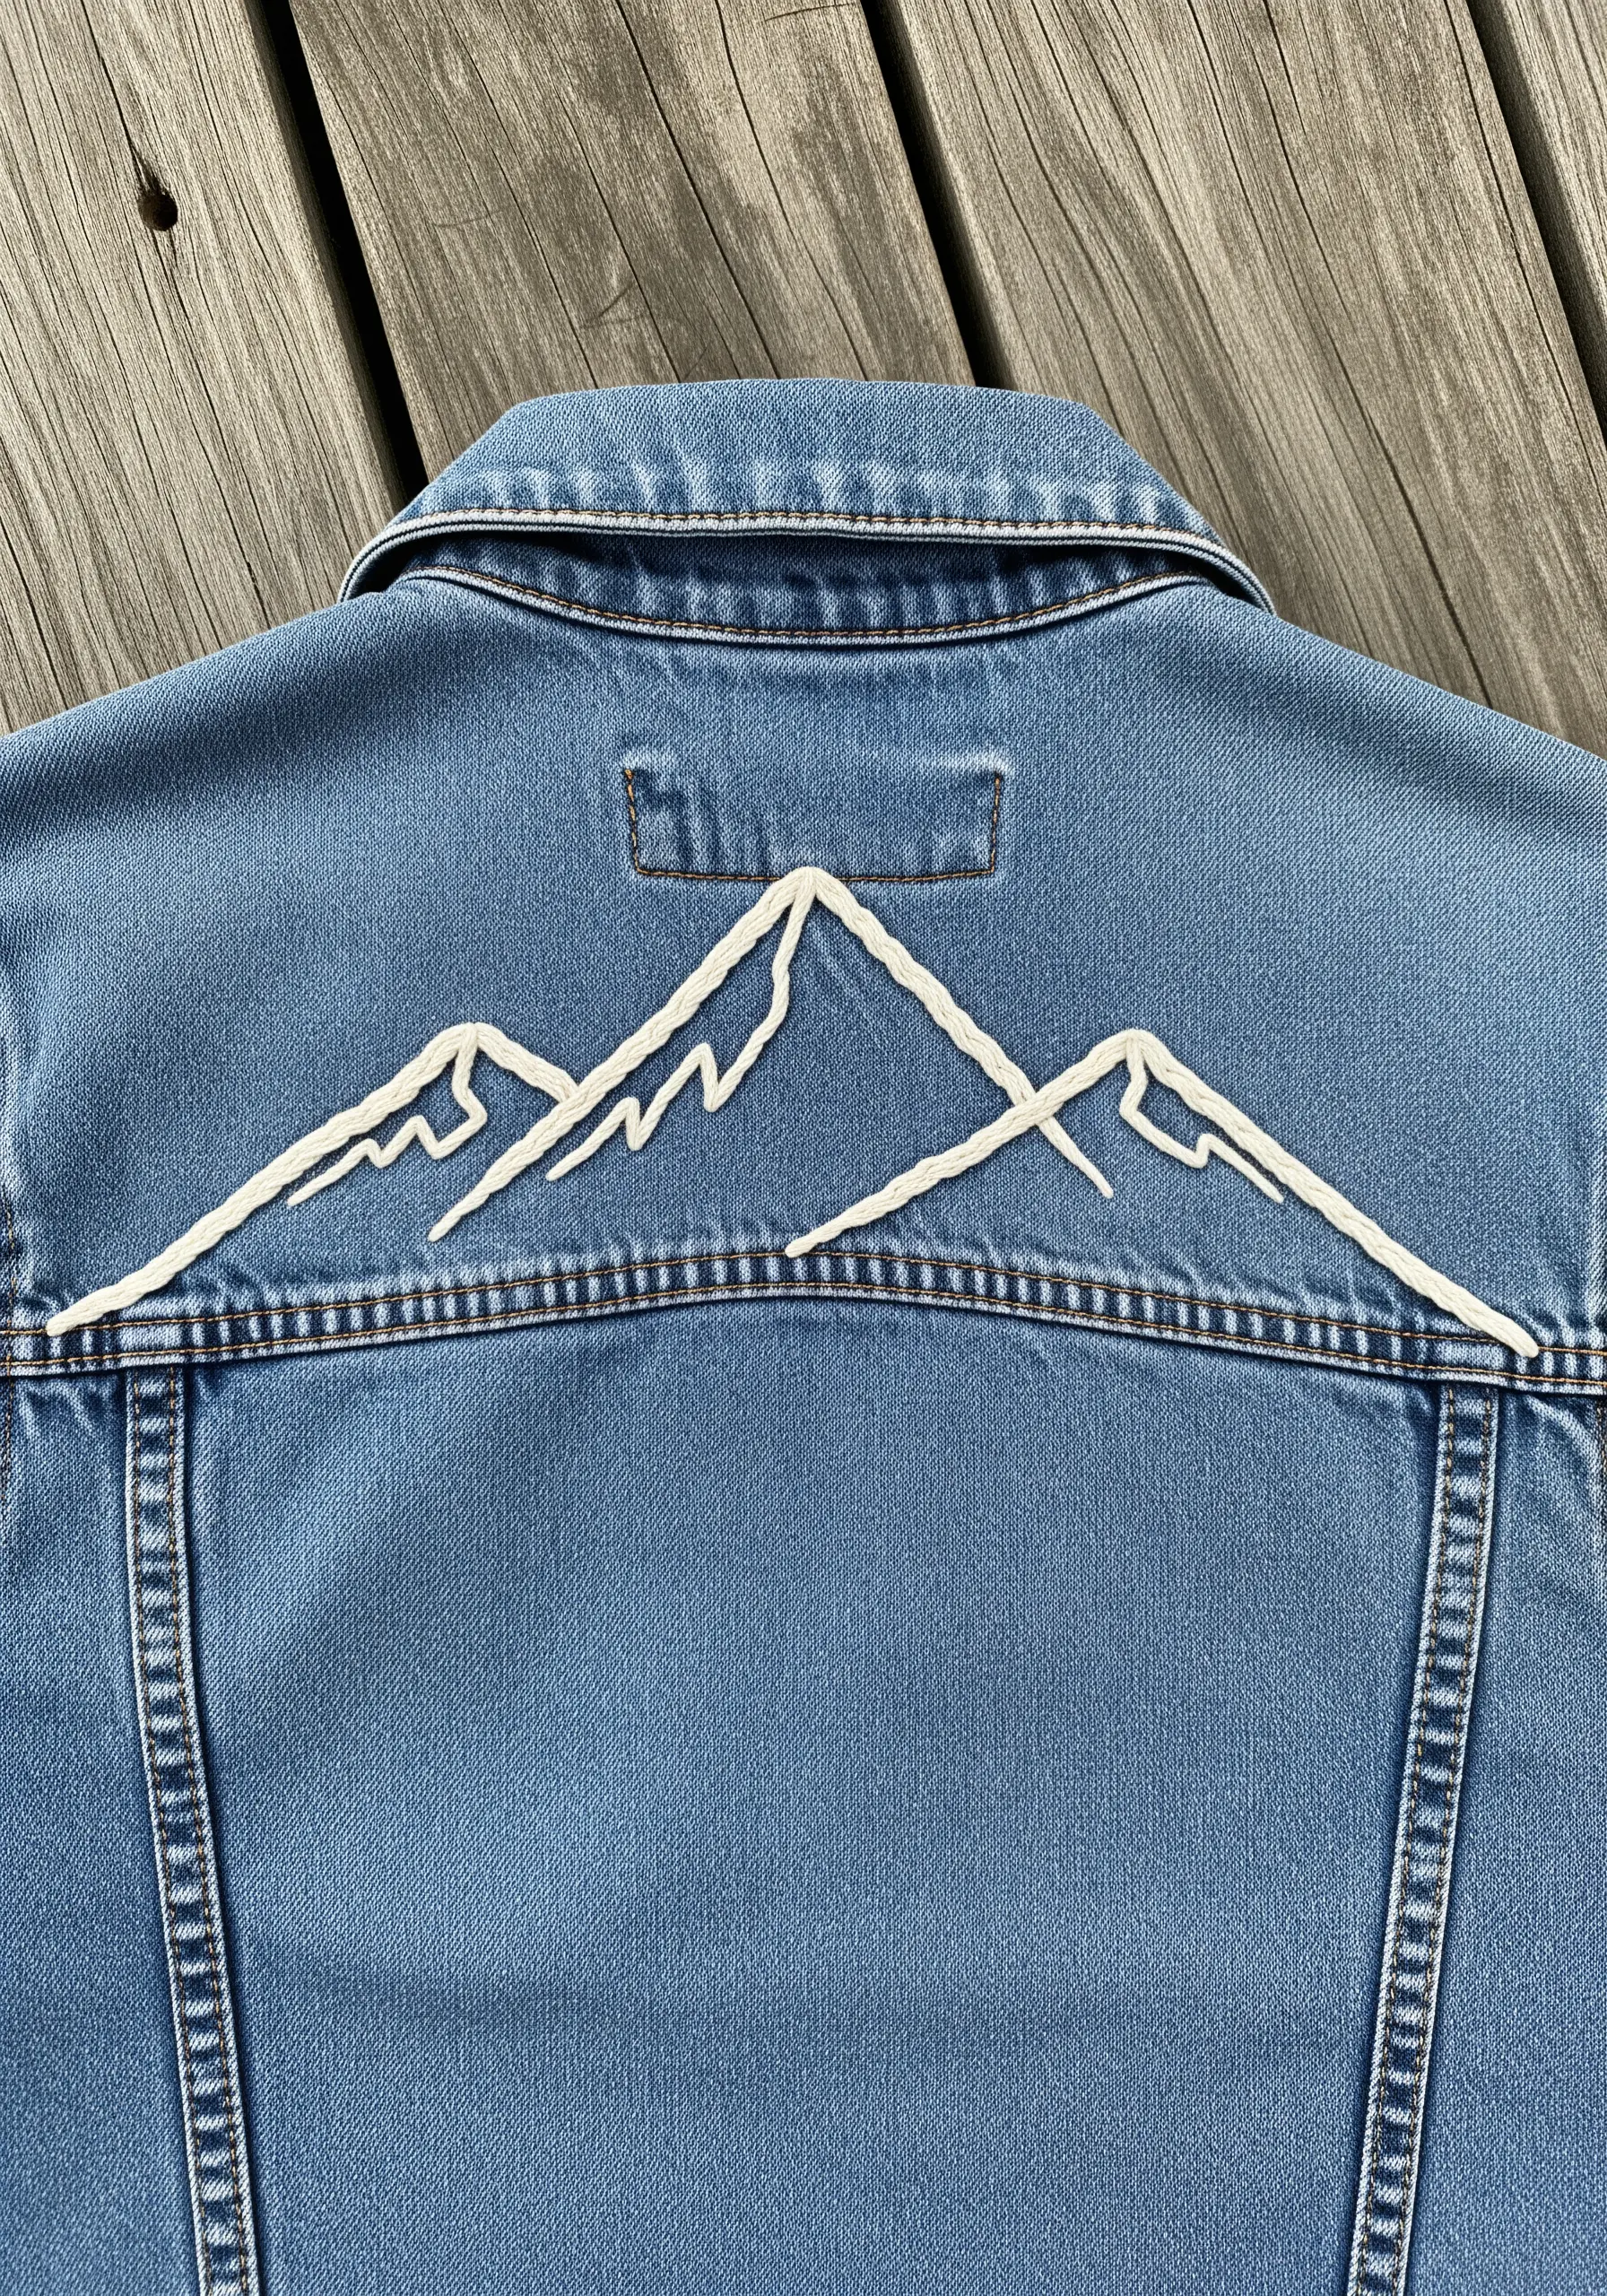
To give a simple mountain outline a bold, rope-like texture on heavy fabric like denim, use a whipped backstitch.
First, create your outline using a standard backstitch.
Then, take a new, thicker thread (or double your current one) and weave it under each backstitch without piercing the fabric.
This technique elevates a basic line into a tactile, three-dimensional element that stands out against the rugged texture of a vintage-inspired denim jacket.
2. Isolate a Memory with a Single Point of Color
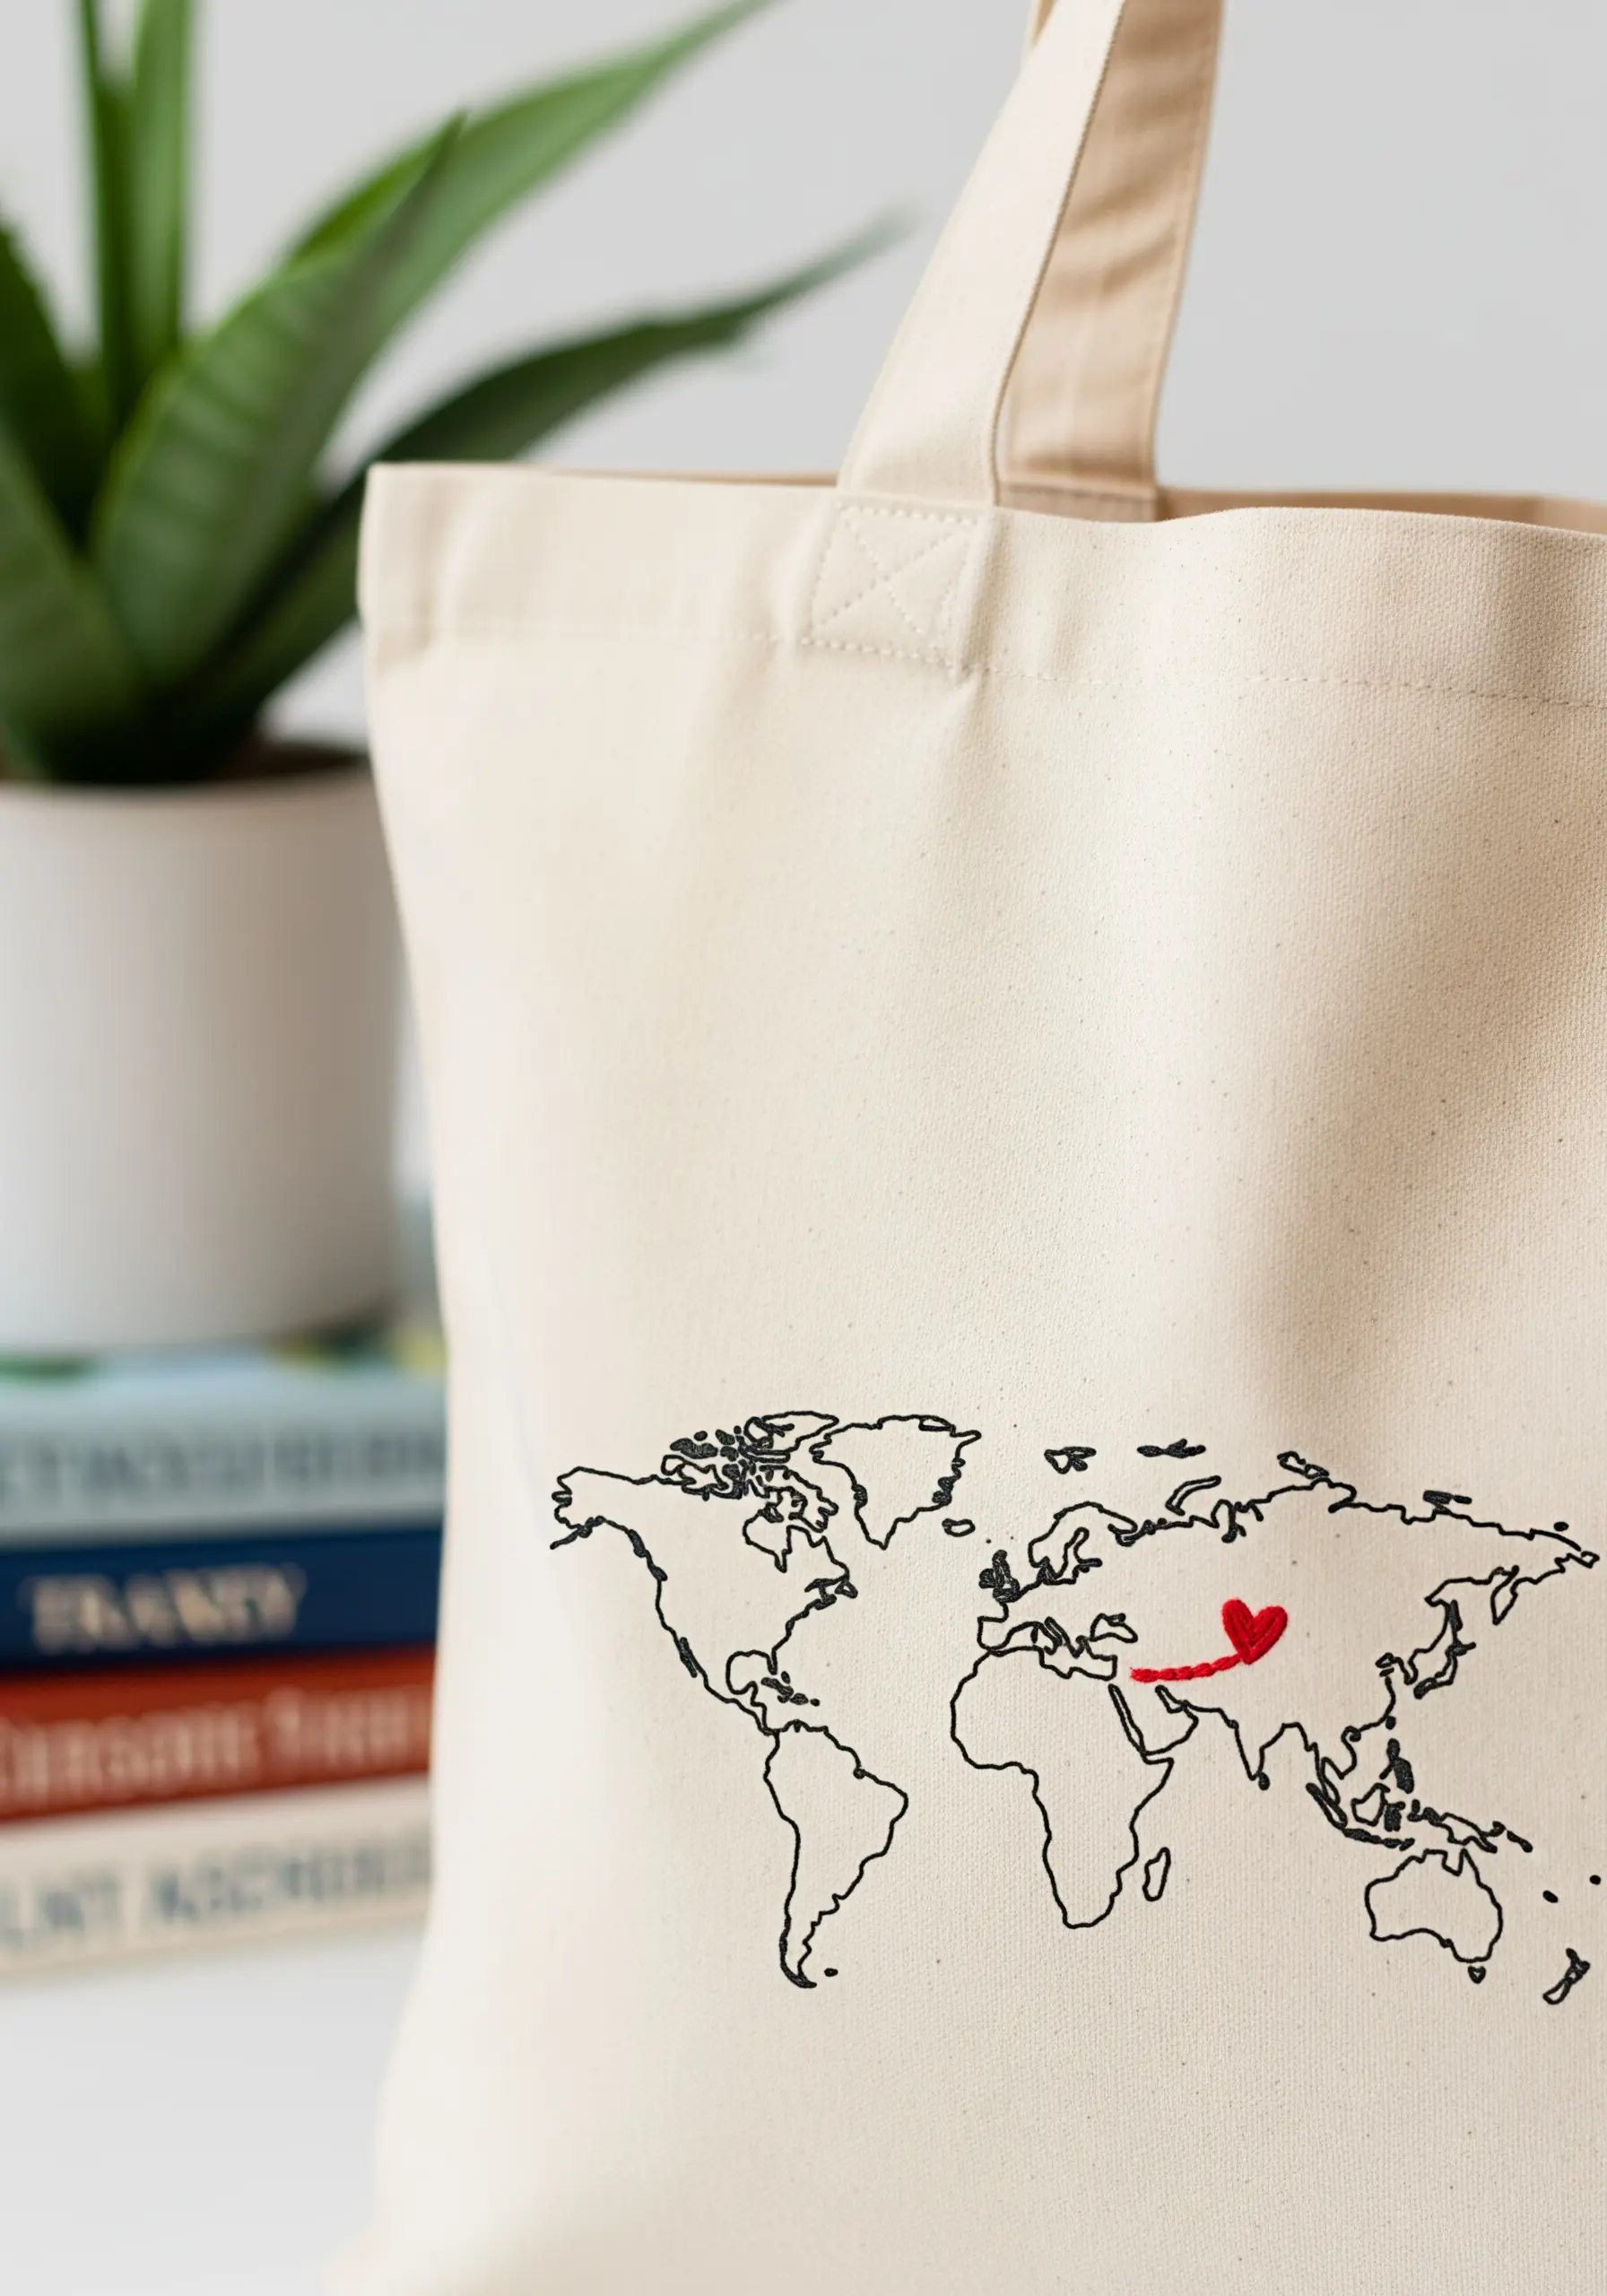
For a world map design, use a fine, single-strand backstitch to keep the continents delicate and precise.
The power of this design comes from restraint; stitch the entire map in a neutral color like black or grey.
Then, choose one meaningful location and mark it with a tiny, vibrant satin-stitched heart or a single French knot.
This focal point draws the eye immediately, turning a generic graphic into a personal story of origin, destination, or love.
3. Create a Sense of Motion with a Dashed Line
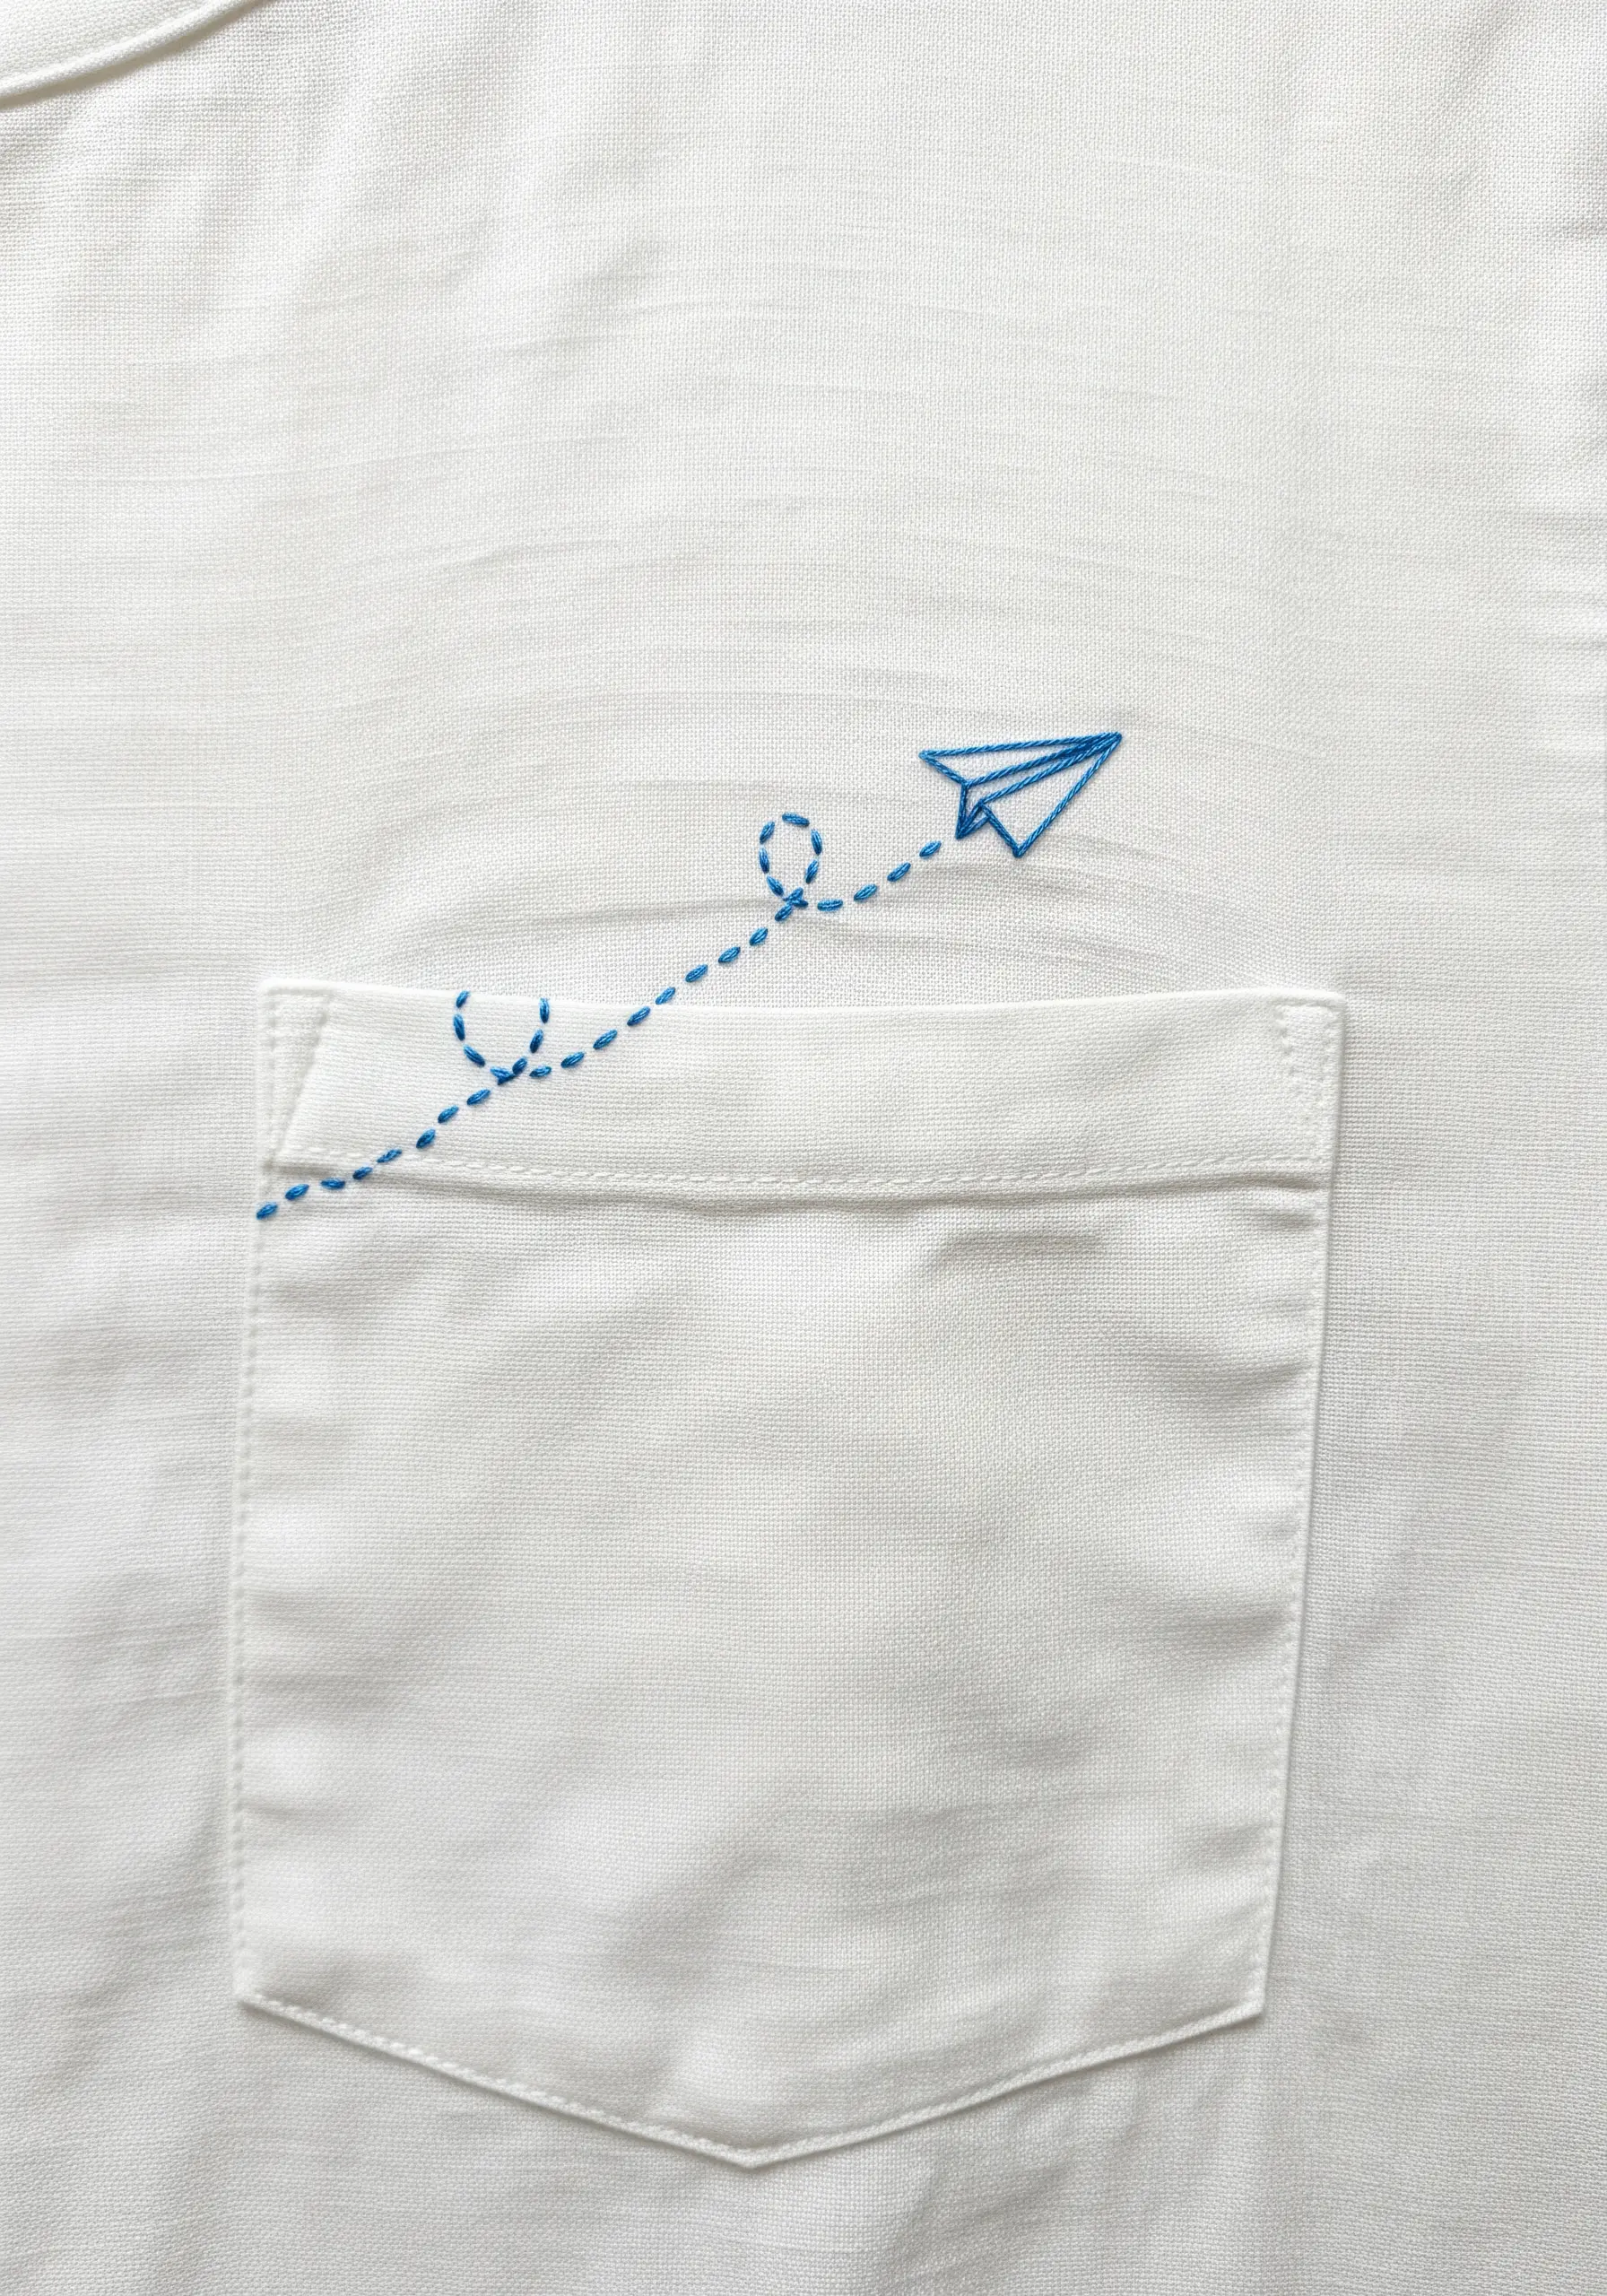
To make a motif like a paper airplane feel dynamic, stitch its trail with a simple running stitch.
Instead of a solid line, use spaced-out stitches to create a dashed path—this implies movement and lightness.
For the loops, ensure your stitches follow the curve smoothly; a smaller stitch length will help you define the shape without creating sharp angles.
This technique is perfect for adding a touch of playful narrative to a shirt pocket or sleeve cuff.
4. Achieve Sharp Points on a Compass Rose
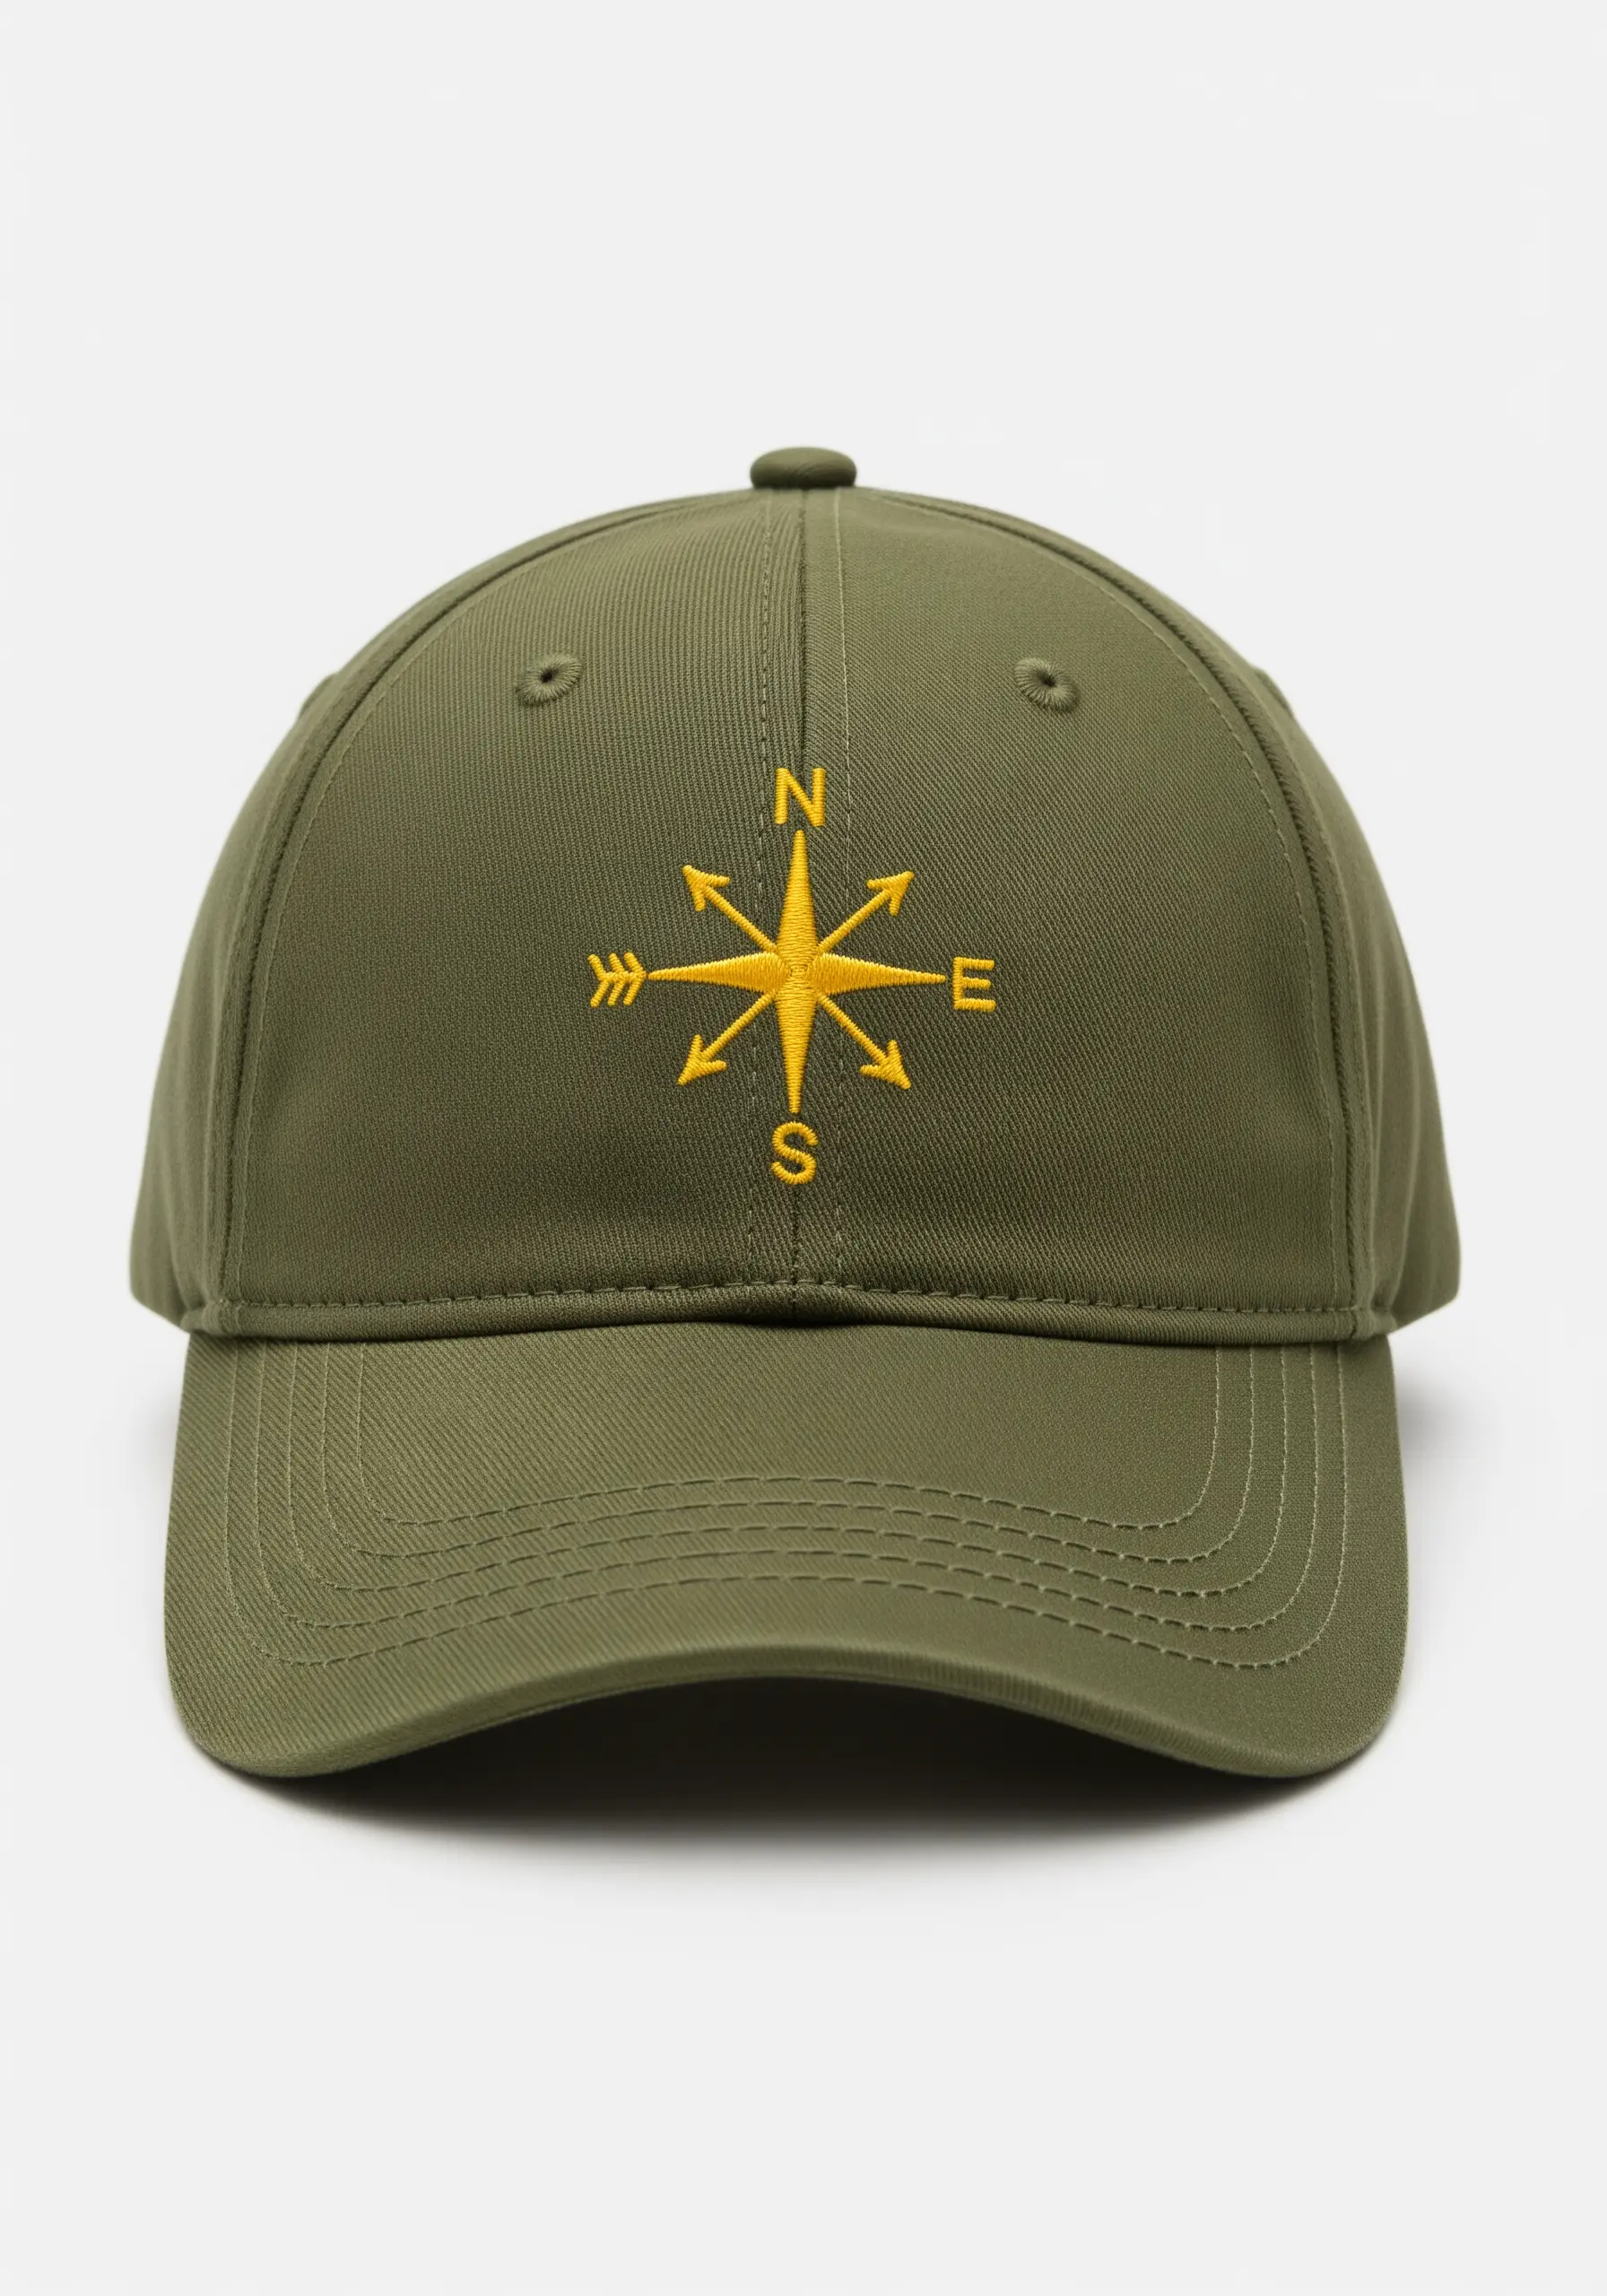
When stitching sharp motifs like a compass, precision is everything.
Use a split stitch for the outlines to create a sharp, unwavering edge.
For the fill, lay your satin stitches diagonally and ensure they all angle in the same direction.
To create the crisp points, end each satin stitch precisely in the corner, pulling the thread taut before starting the next one.
This discipline prevents rounded edges and gives the design a clean, graphic quality.
5. Use Directional Stitches for Natural Texture
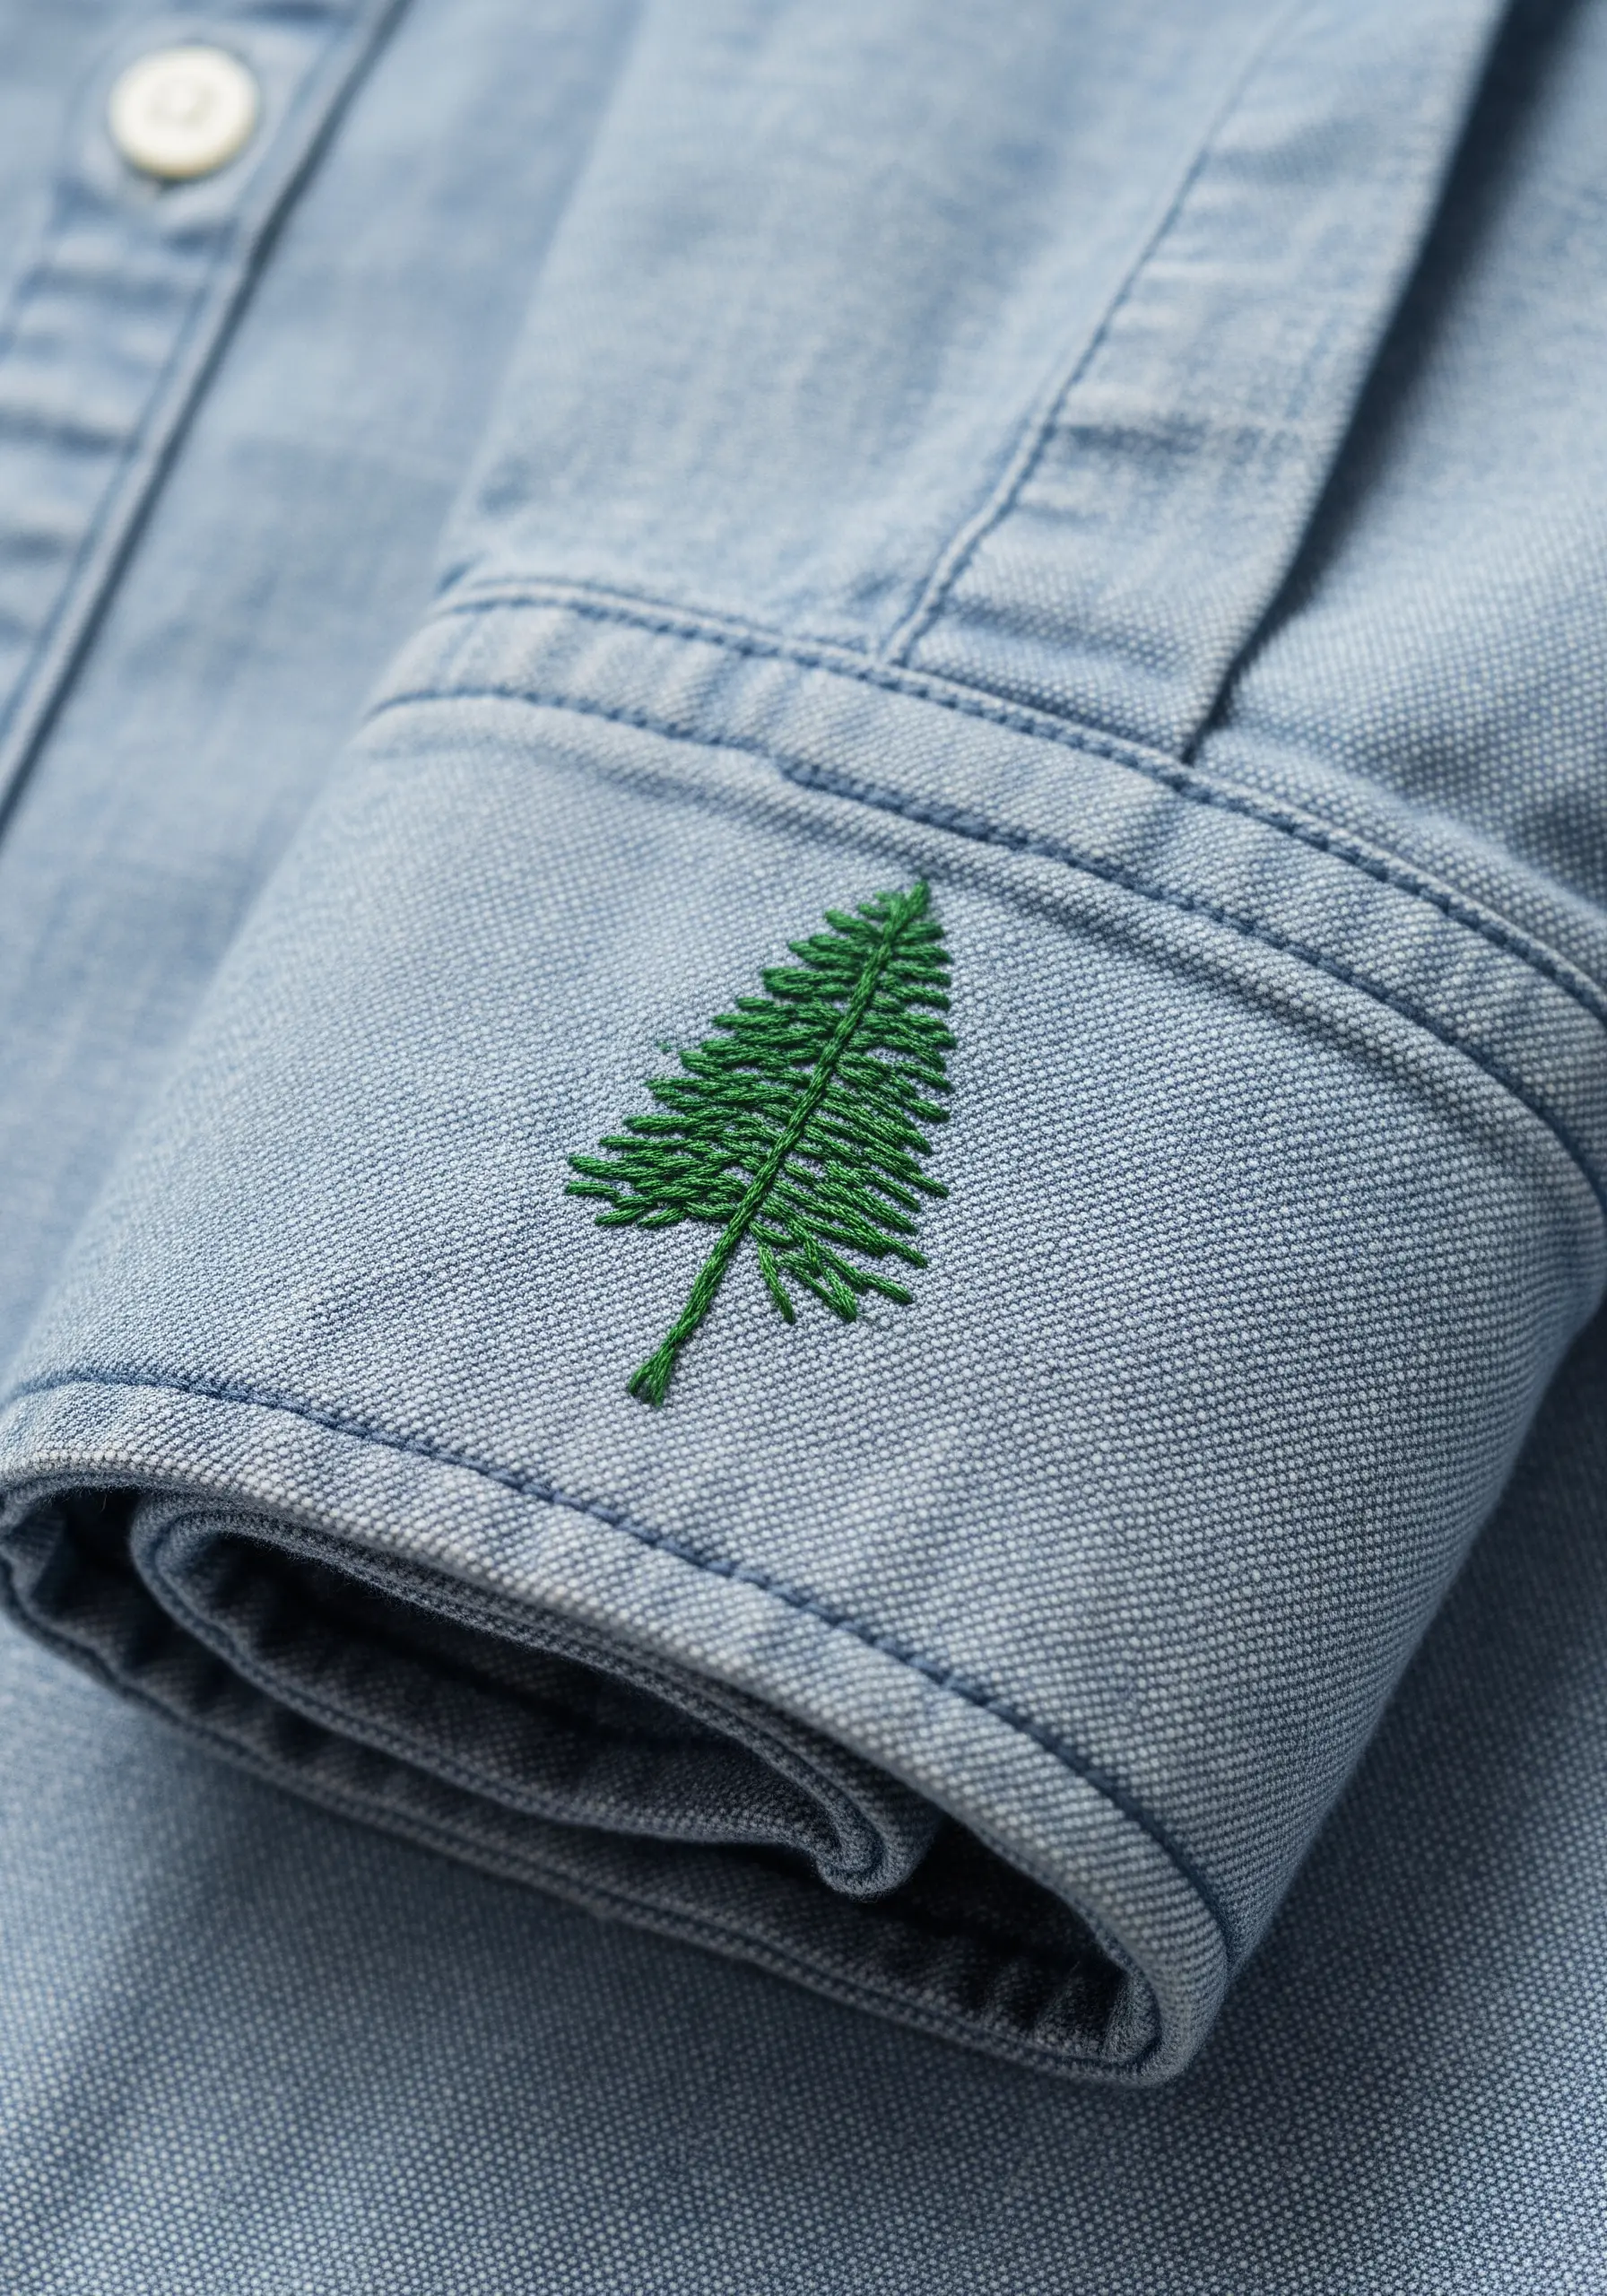
To give a simple pine tree motif lifelike texture, don’t just fill it in randomly.
Use a long-and-short stitch, angling your stitches outward from the central trunk, just as pine needles grow.
For the trunk, use a contrasting vertical satin stitch or a single line of stem stitch.
This directional approach transforms a flat shape into something with organic dimension, making it a perfect accent for a cuff or collar.
6. Master Clean Lettering for a Modern Look
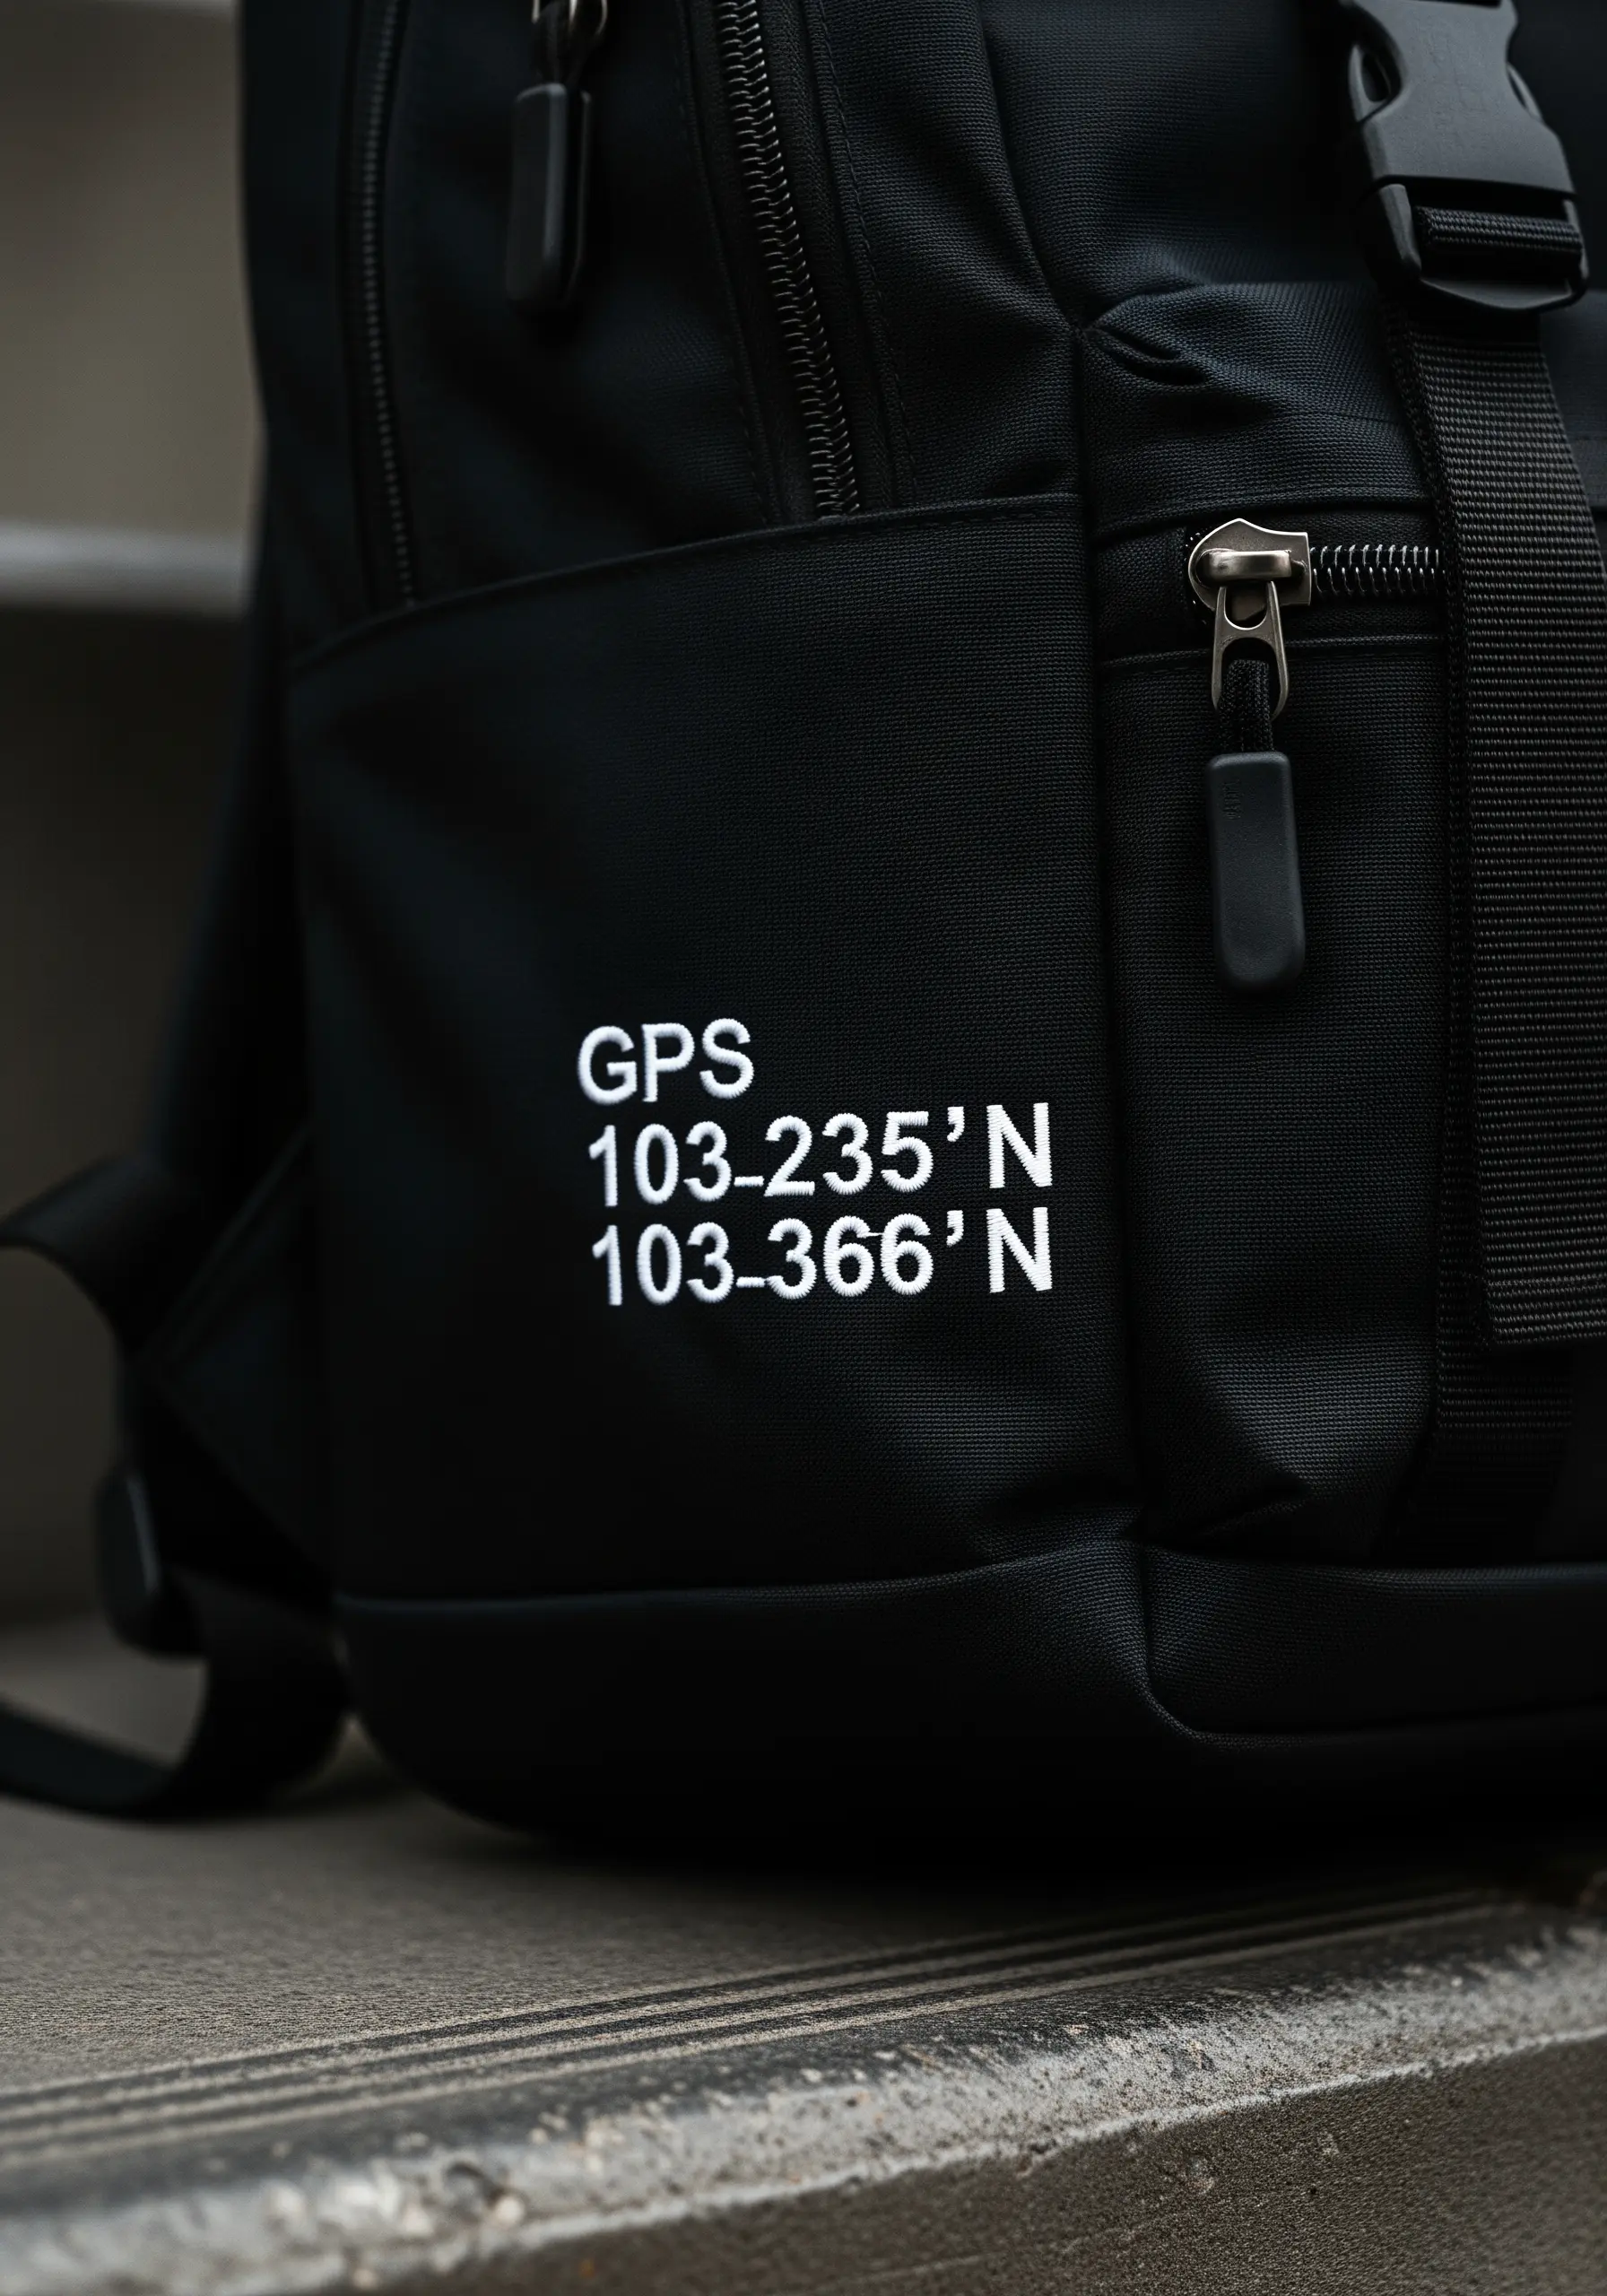
To embroider crisp, sans-serif text like GPS coordinates, treat each letter as a tiny architectural drawing.
Use a single strand of floss and a tiny backstitch or split stitch for ultimate control.
Stitch each part of the letter (the vertical stem, the horizontal arm) as a separate, straight line.
This method prevents the rounded, soft look of cursive and ensures your text is readable and modern, ideal for personalizing technical gear like a backpack.
For perfectly straight lines, you can draw a guideline with a water-soluble pen first.
7. Layer Colors to Build Dynamic Wave Forms
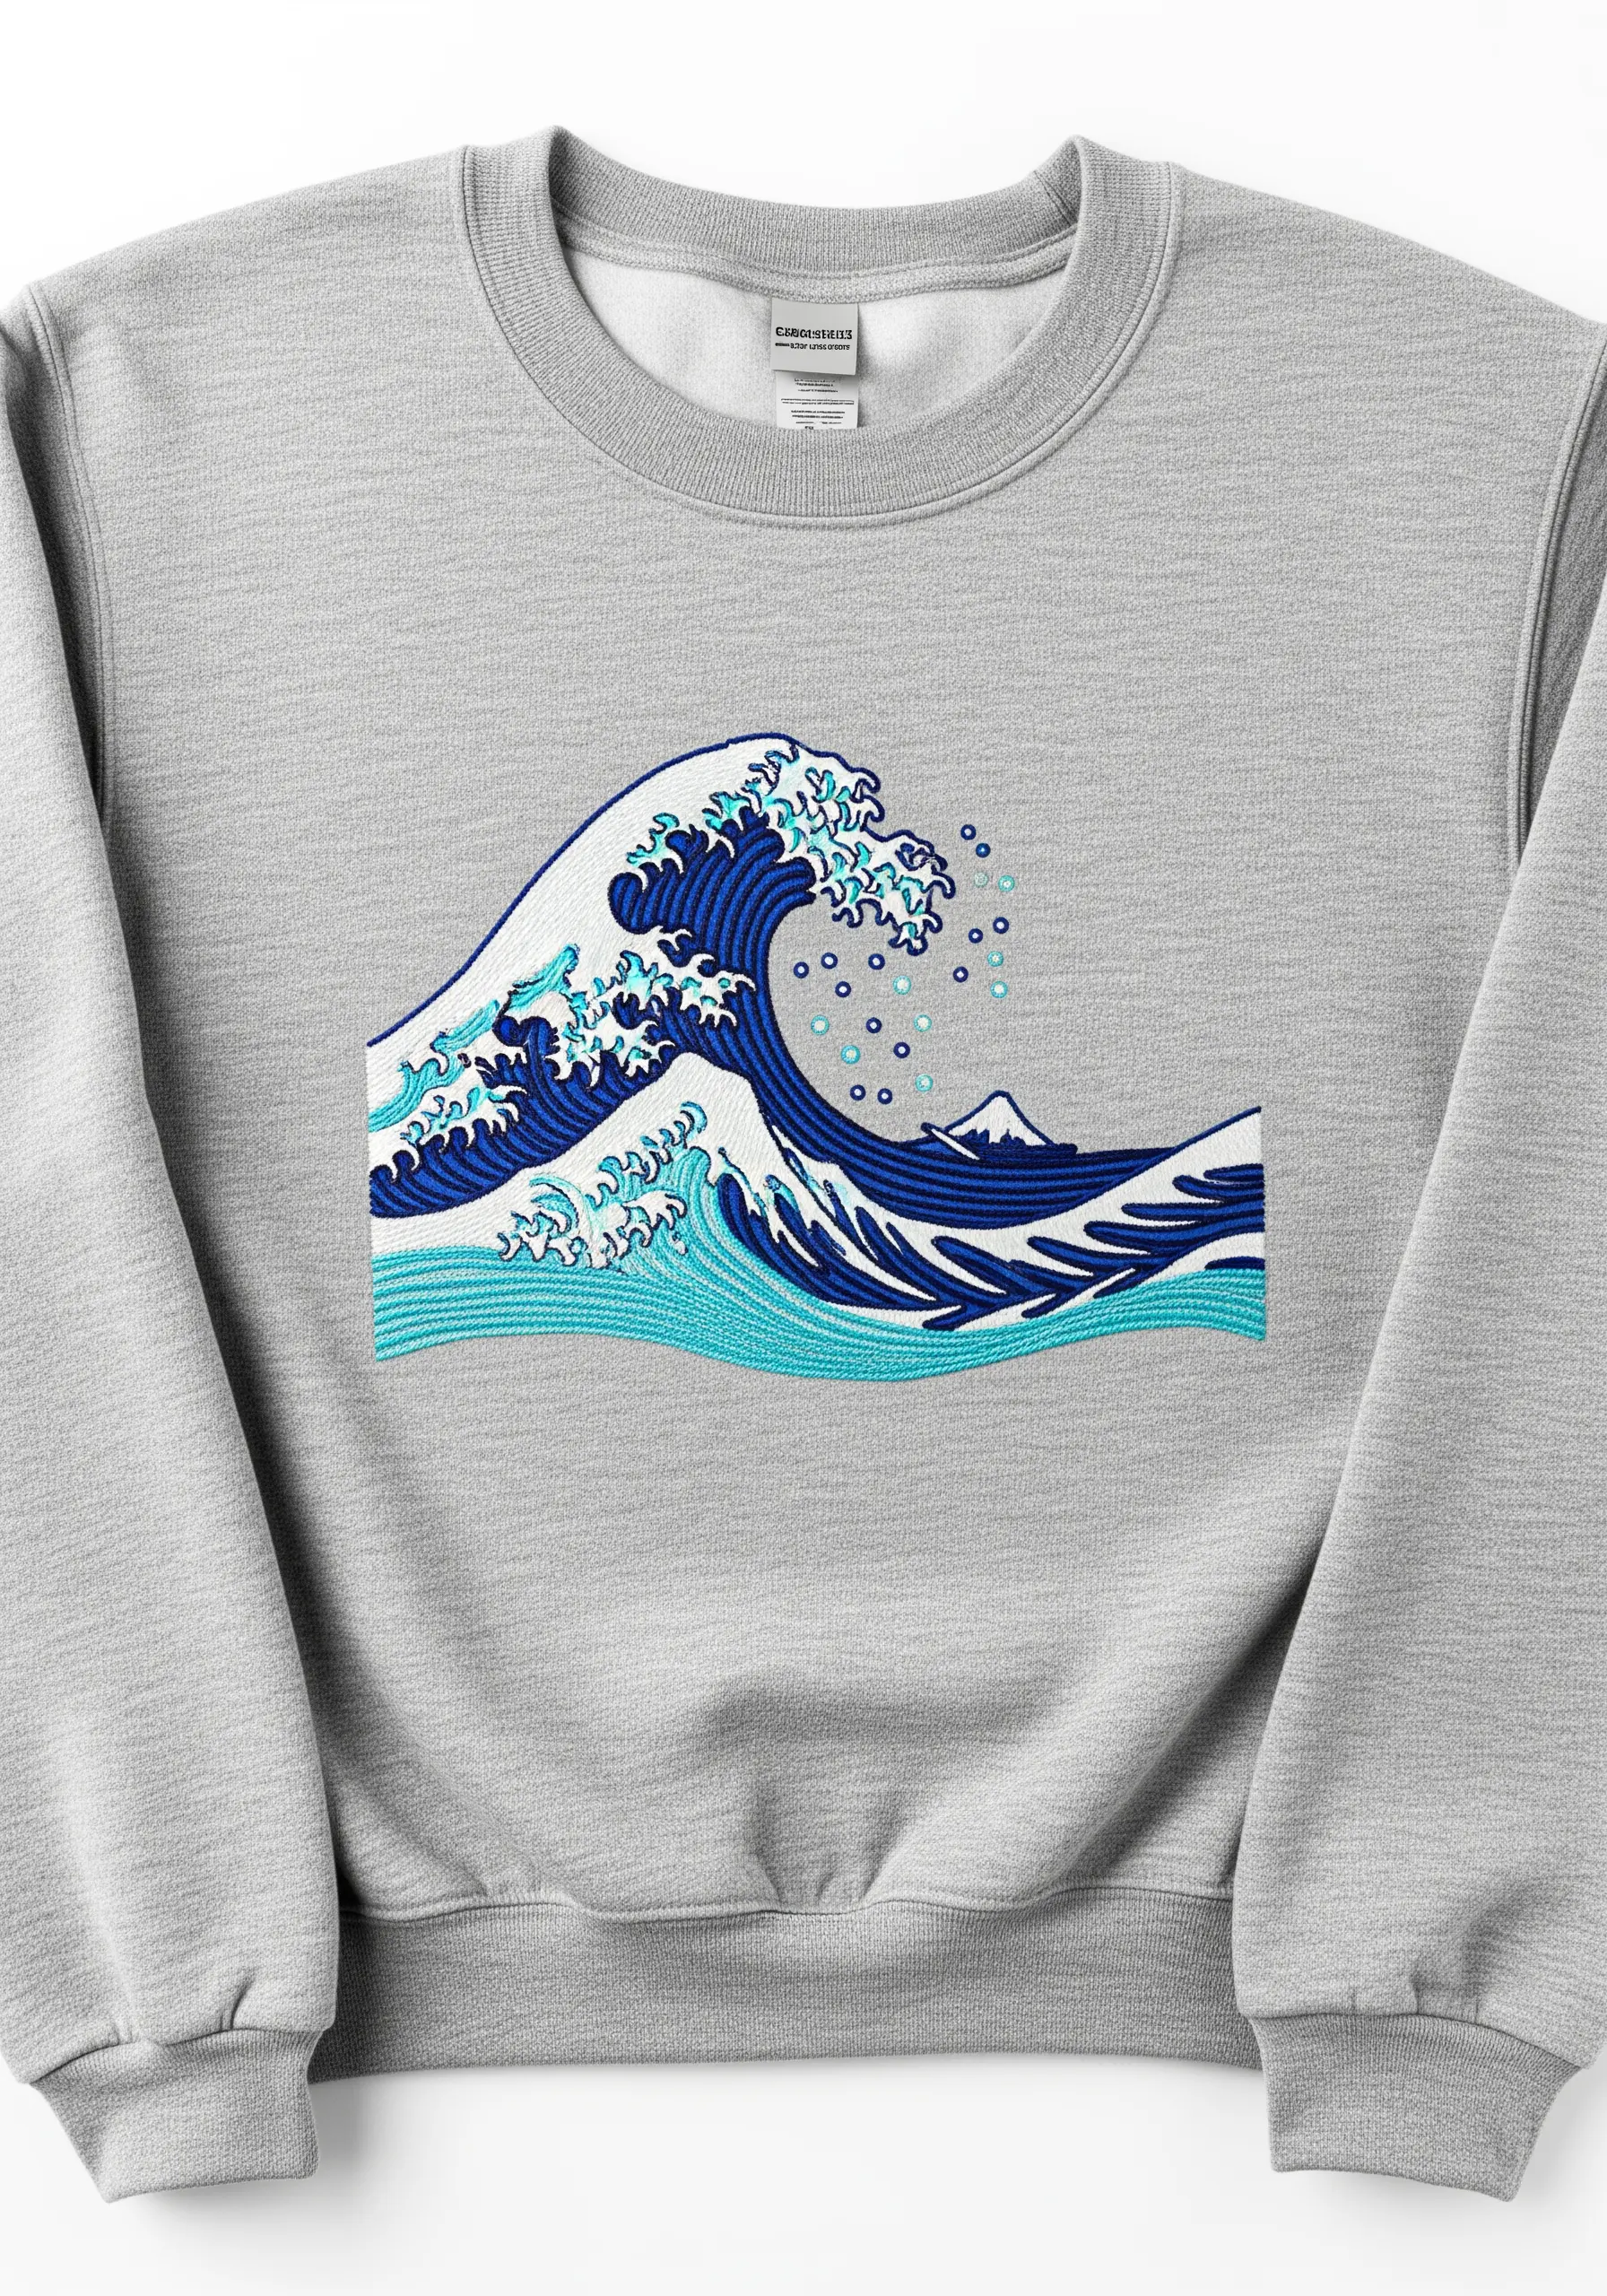
Recreating iconic art like ‘The Great Wave’ requires strategic layering, not just filling shapes with color.
Begin with the lightest colors as your base layer, using directional satin stitches that follow the water’s flow.
Next, add the darker shades on top, allowing the base colors to peek through to create depth.
Finally, use French knots or tiny straight stitches in white to suggest sea foam.
This approach gives the design a painterly quality and a sense of powerful movement.
8. Combine Satin Stitch and Metallic Thread for Celestial Accents
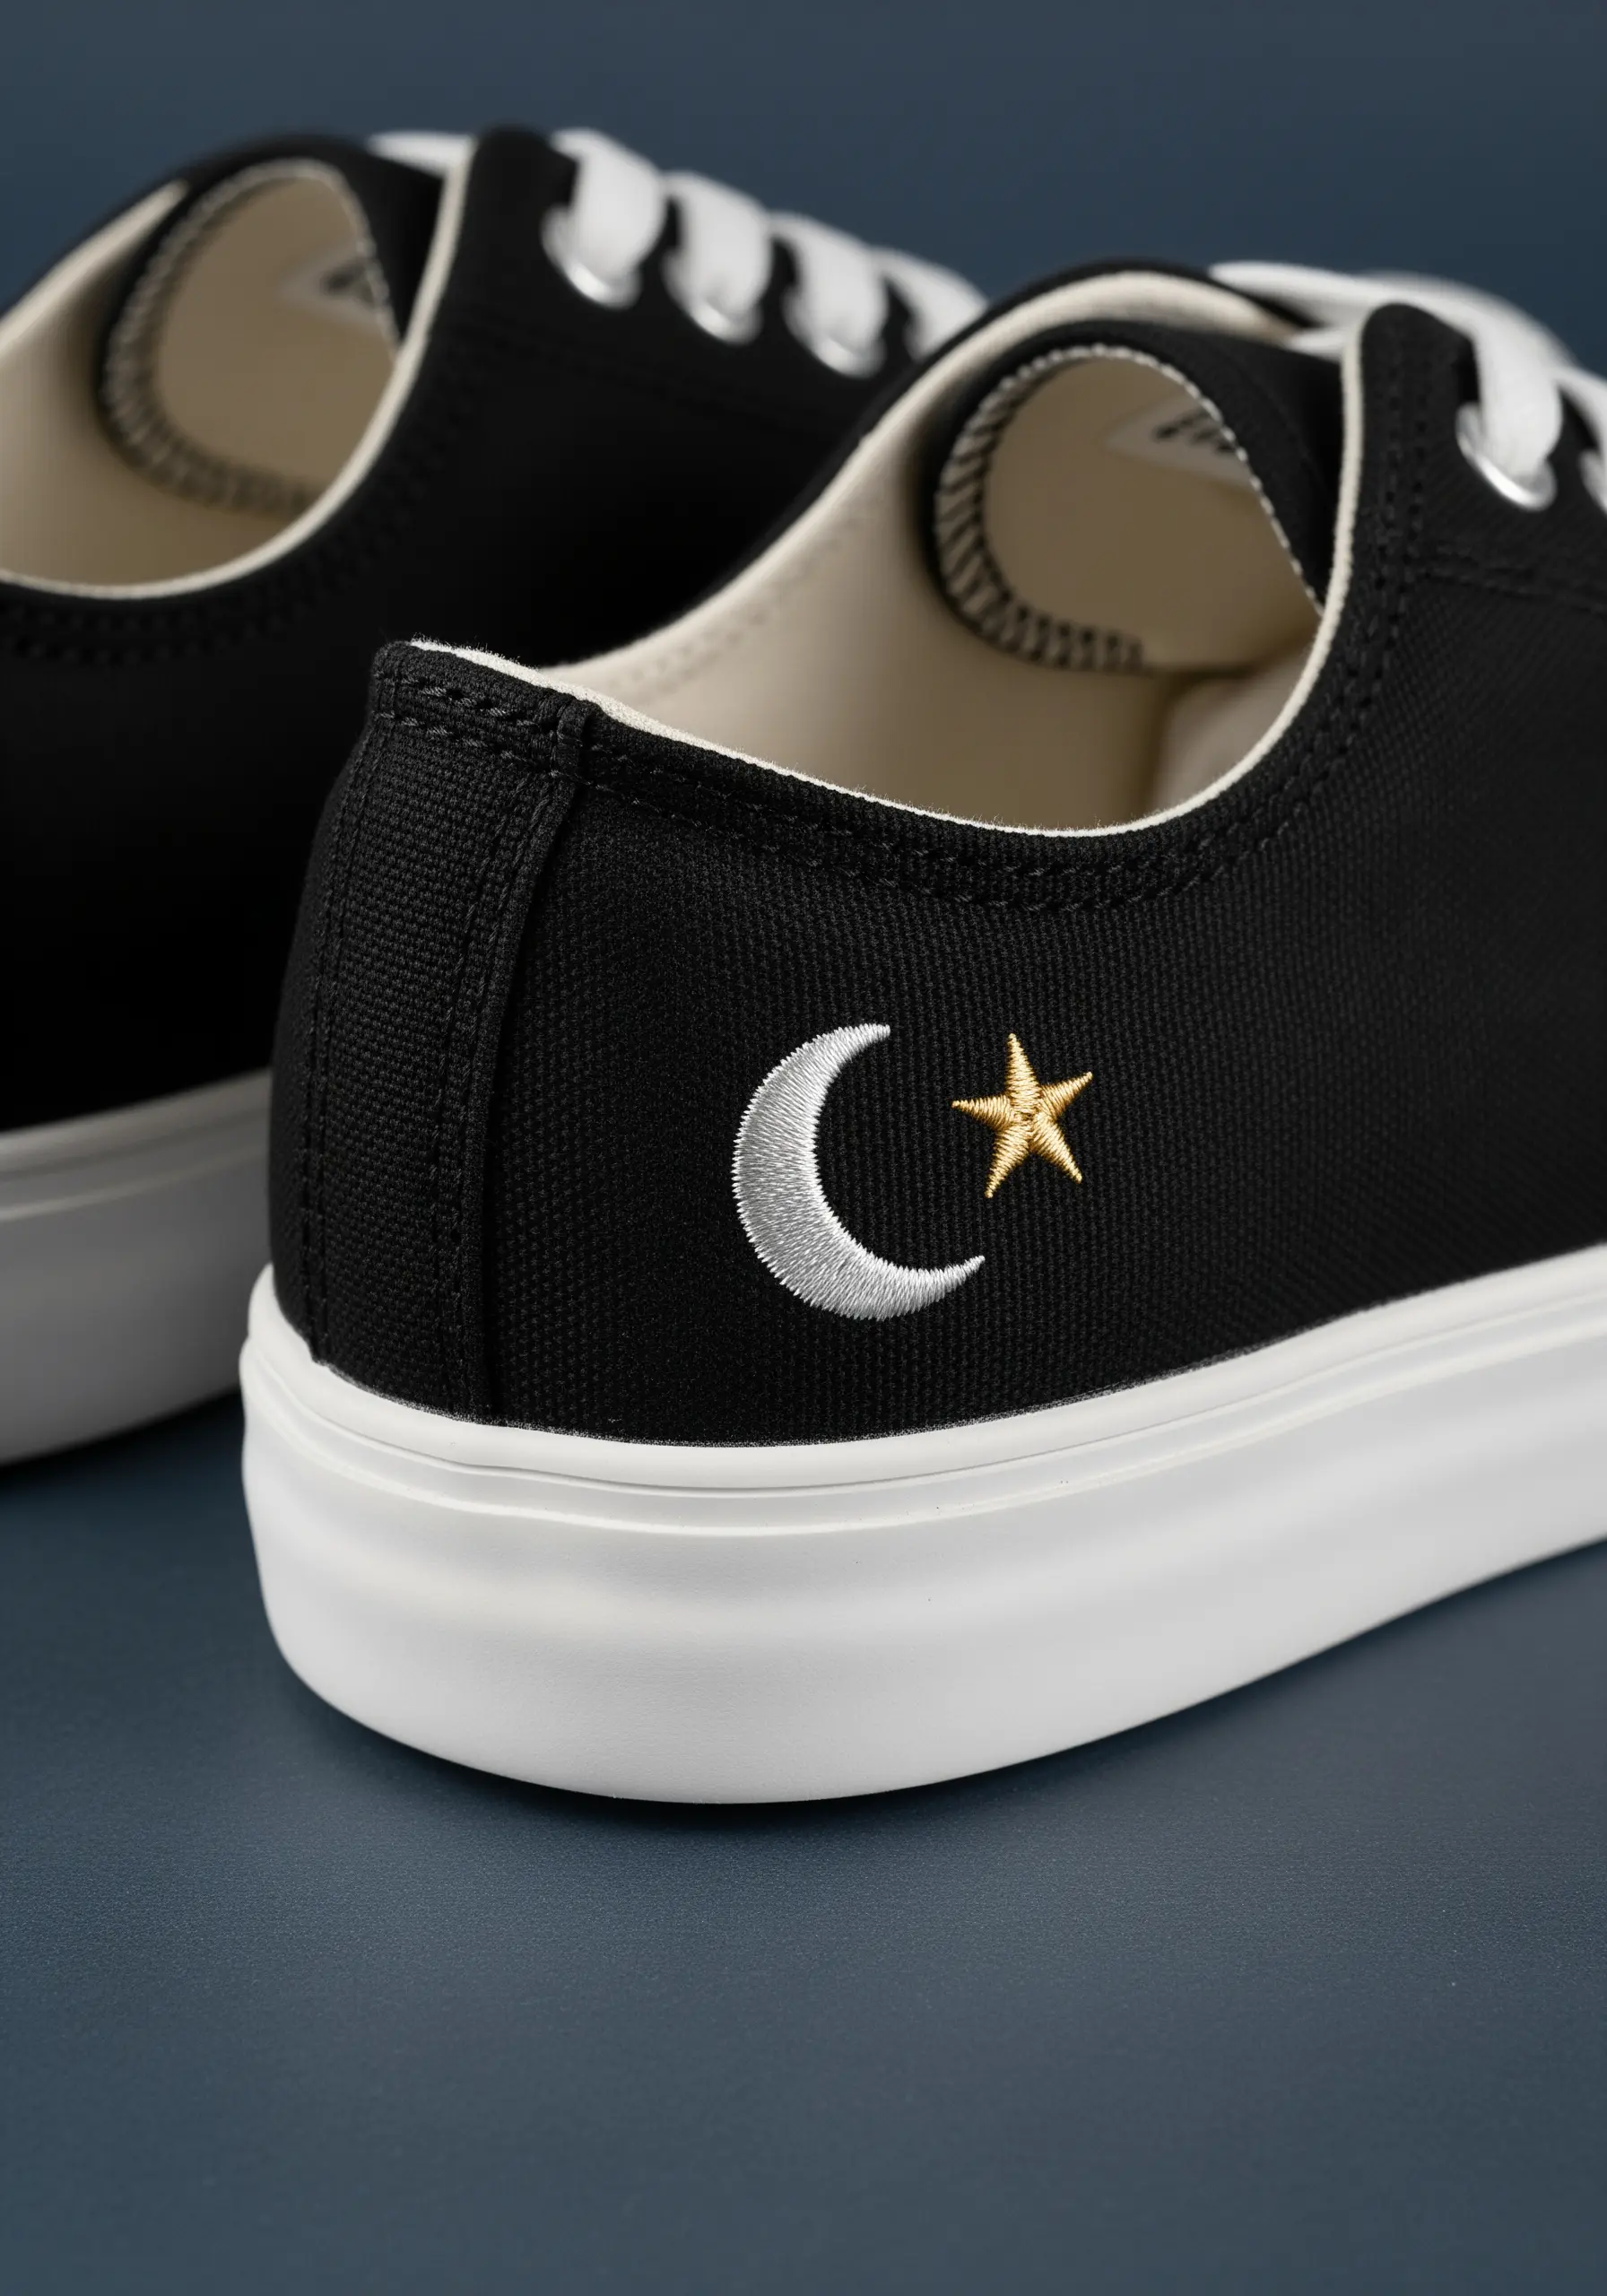
To create a celestial motif that feels both soft and sharp, combine two different textures.
Use a classic satin stitch with standard cotton floss for the crescent moon; the smooth, dense fill will give it a soft glow.
For the star, switch to a single strand of gold metallic thread and use four simple straight stitches that cross in the center.
This contrast between the matte moon and the sparkling star adds visual interest and a touch of magic, perfect for the heel of a canvas sneaker.
9. Use a Minimal Outline on Textured Fabric

When embroidering on a textured, ribbed knit like a beanie, a dense fill stitch can get lost or warp the fabric.
Instead, opt for a clean, simple outline using a backstitch or stem stitch.
Choose a thread color that contrasts sharply with the beanie to ensure the design remains visible.
This minimalist embroidery approach respects the fabric’s texture while adding a personal, graphic touch that celebrates wanderlust.
10. Add Personality with Tiny Floral Details
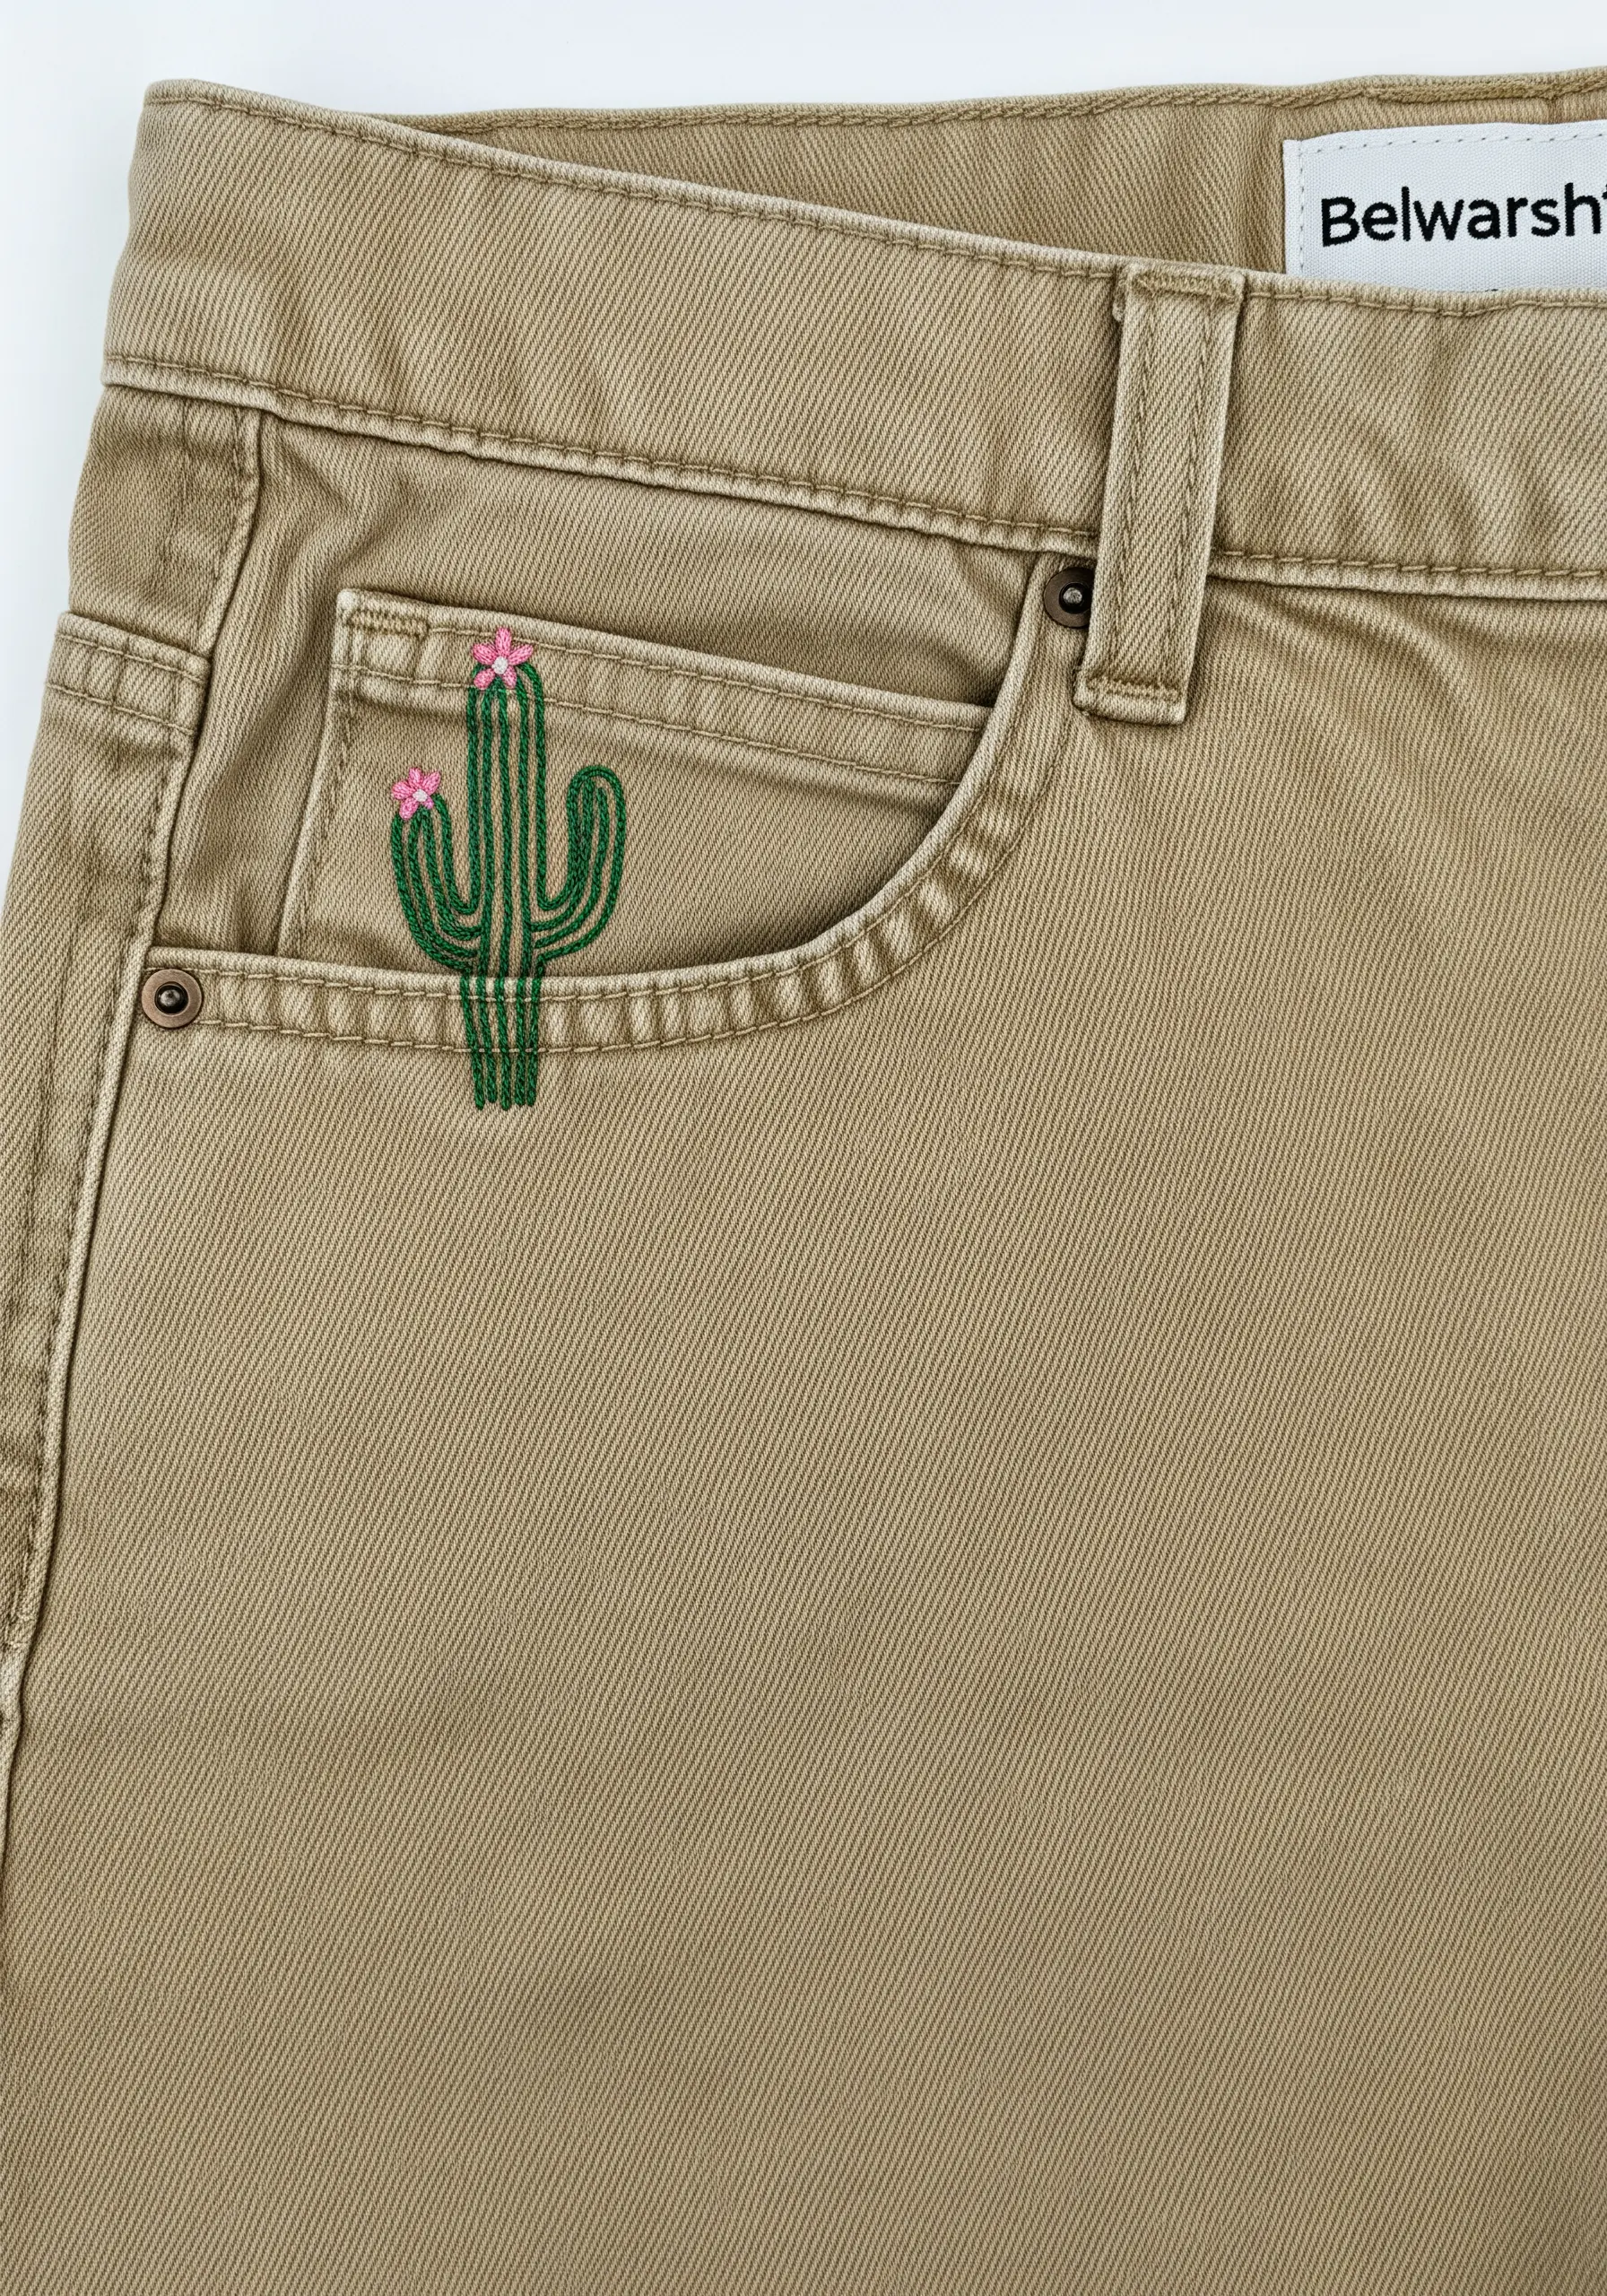
Elevate a simple cactus motif by adding tiny, unexpected floral accents.
Stitch the body of the cactus in a classic satin stitch using a natural green.
Then, use a contrasting color like bright pink to add two or three lazy daisy stitches at the top to represent flowers.
These tiny floral embroidery ideas add a surprising pop of color and personality, transforming a standard design into something special.
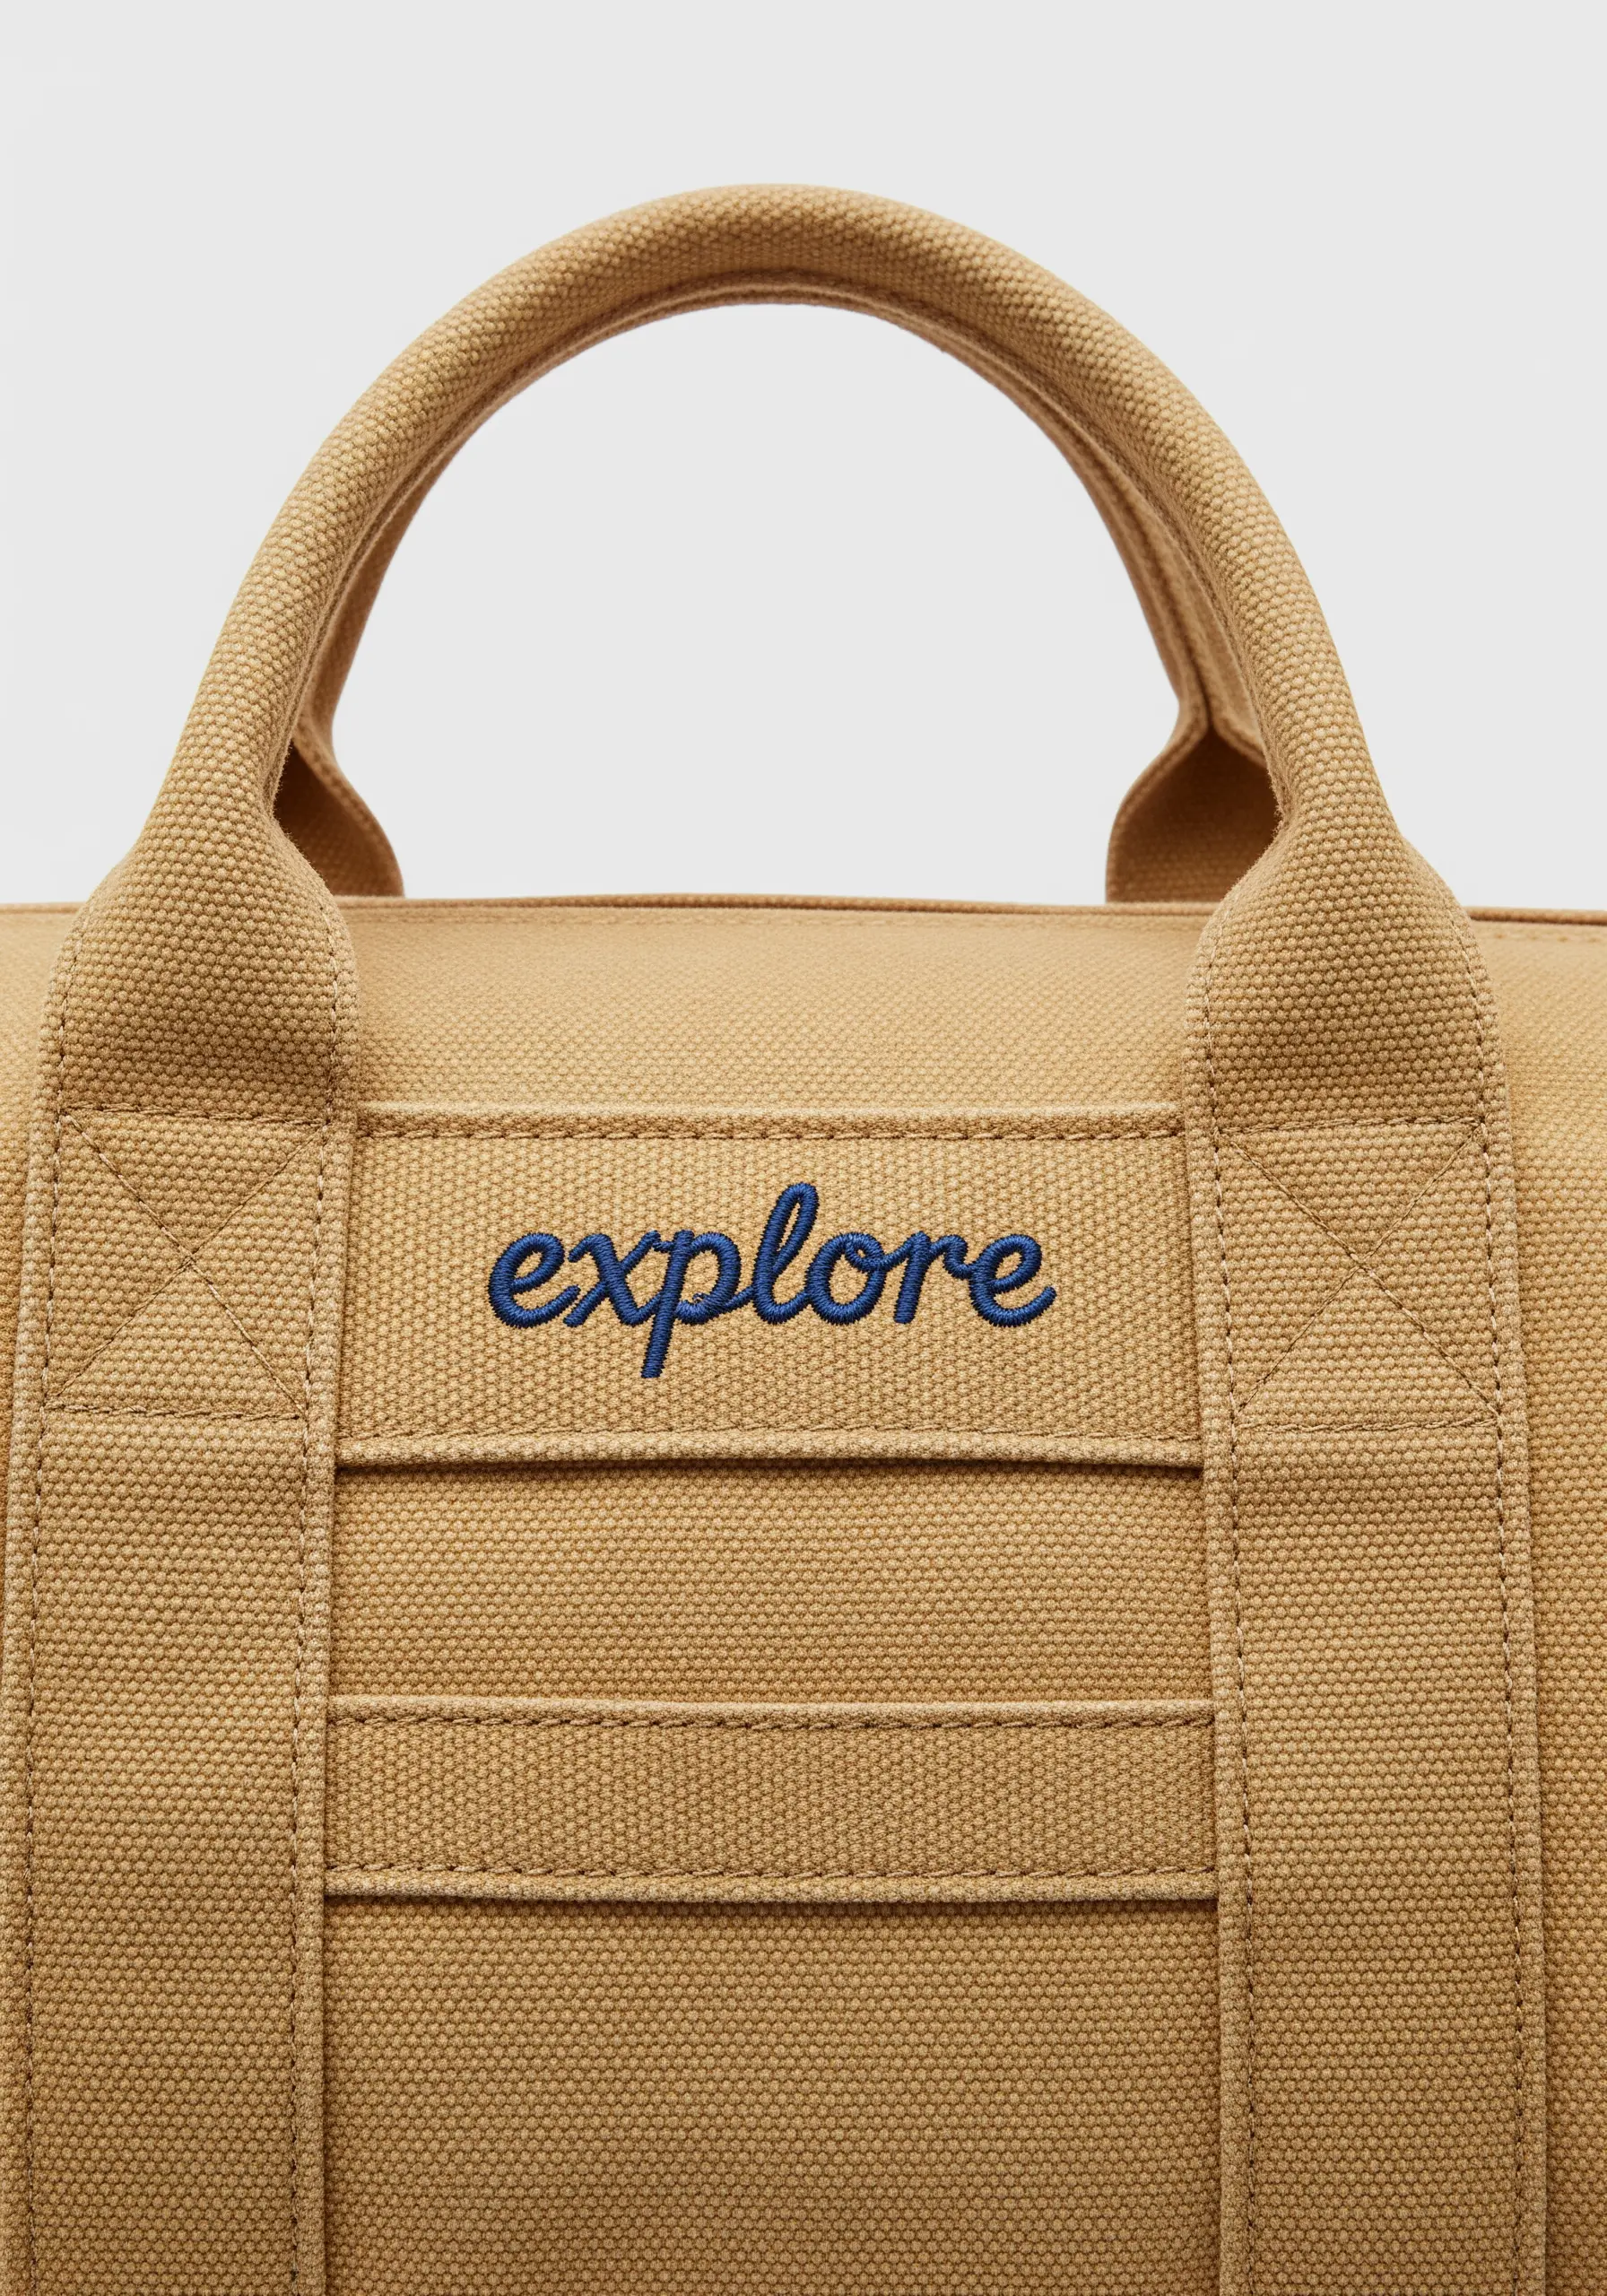
11. Create a Polished Emblem with a Border
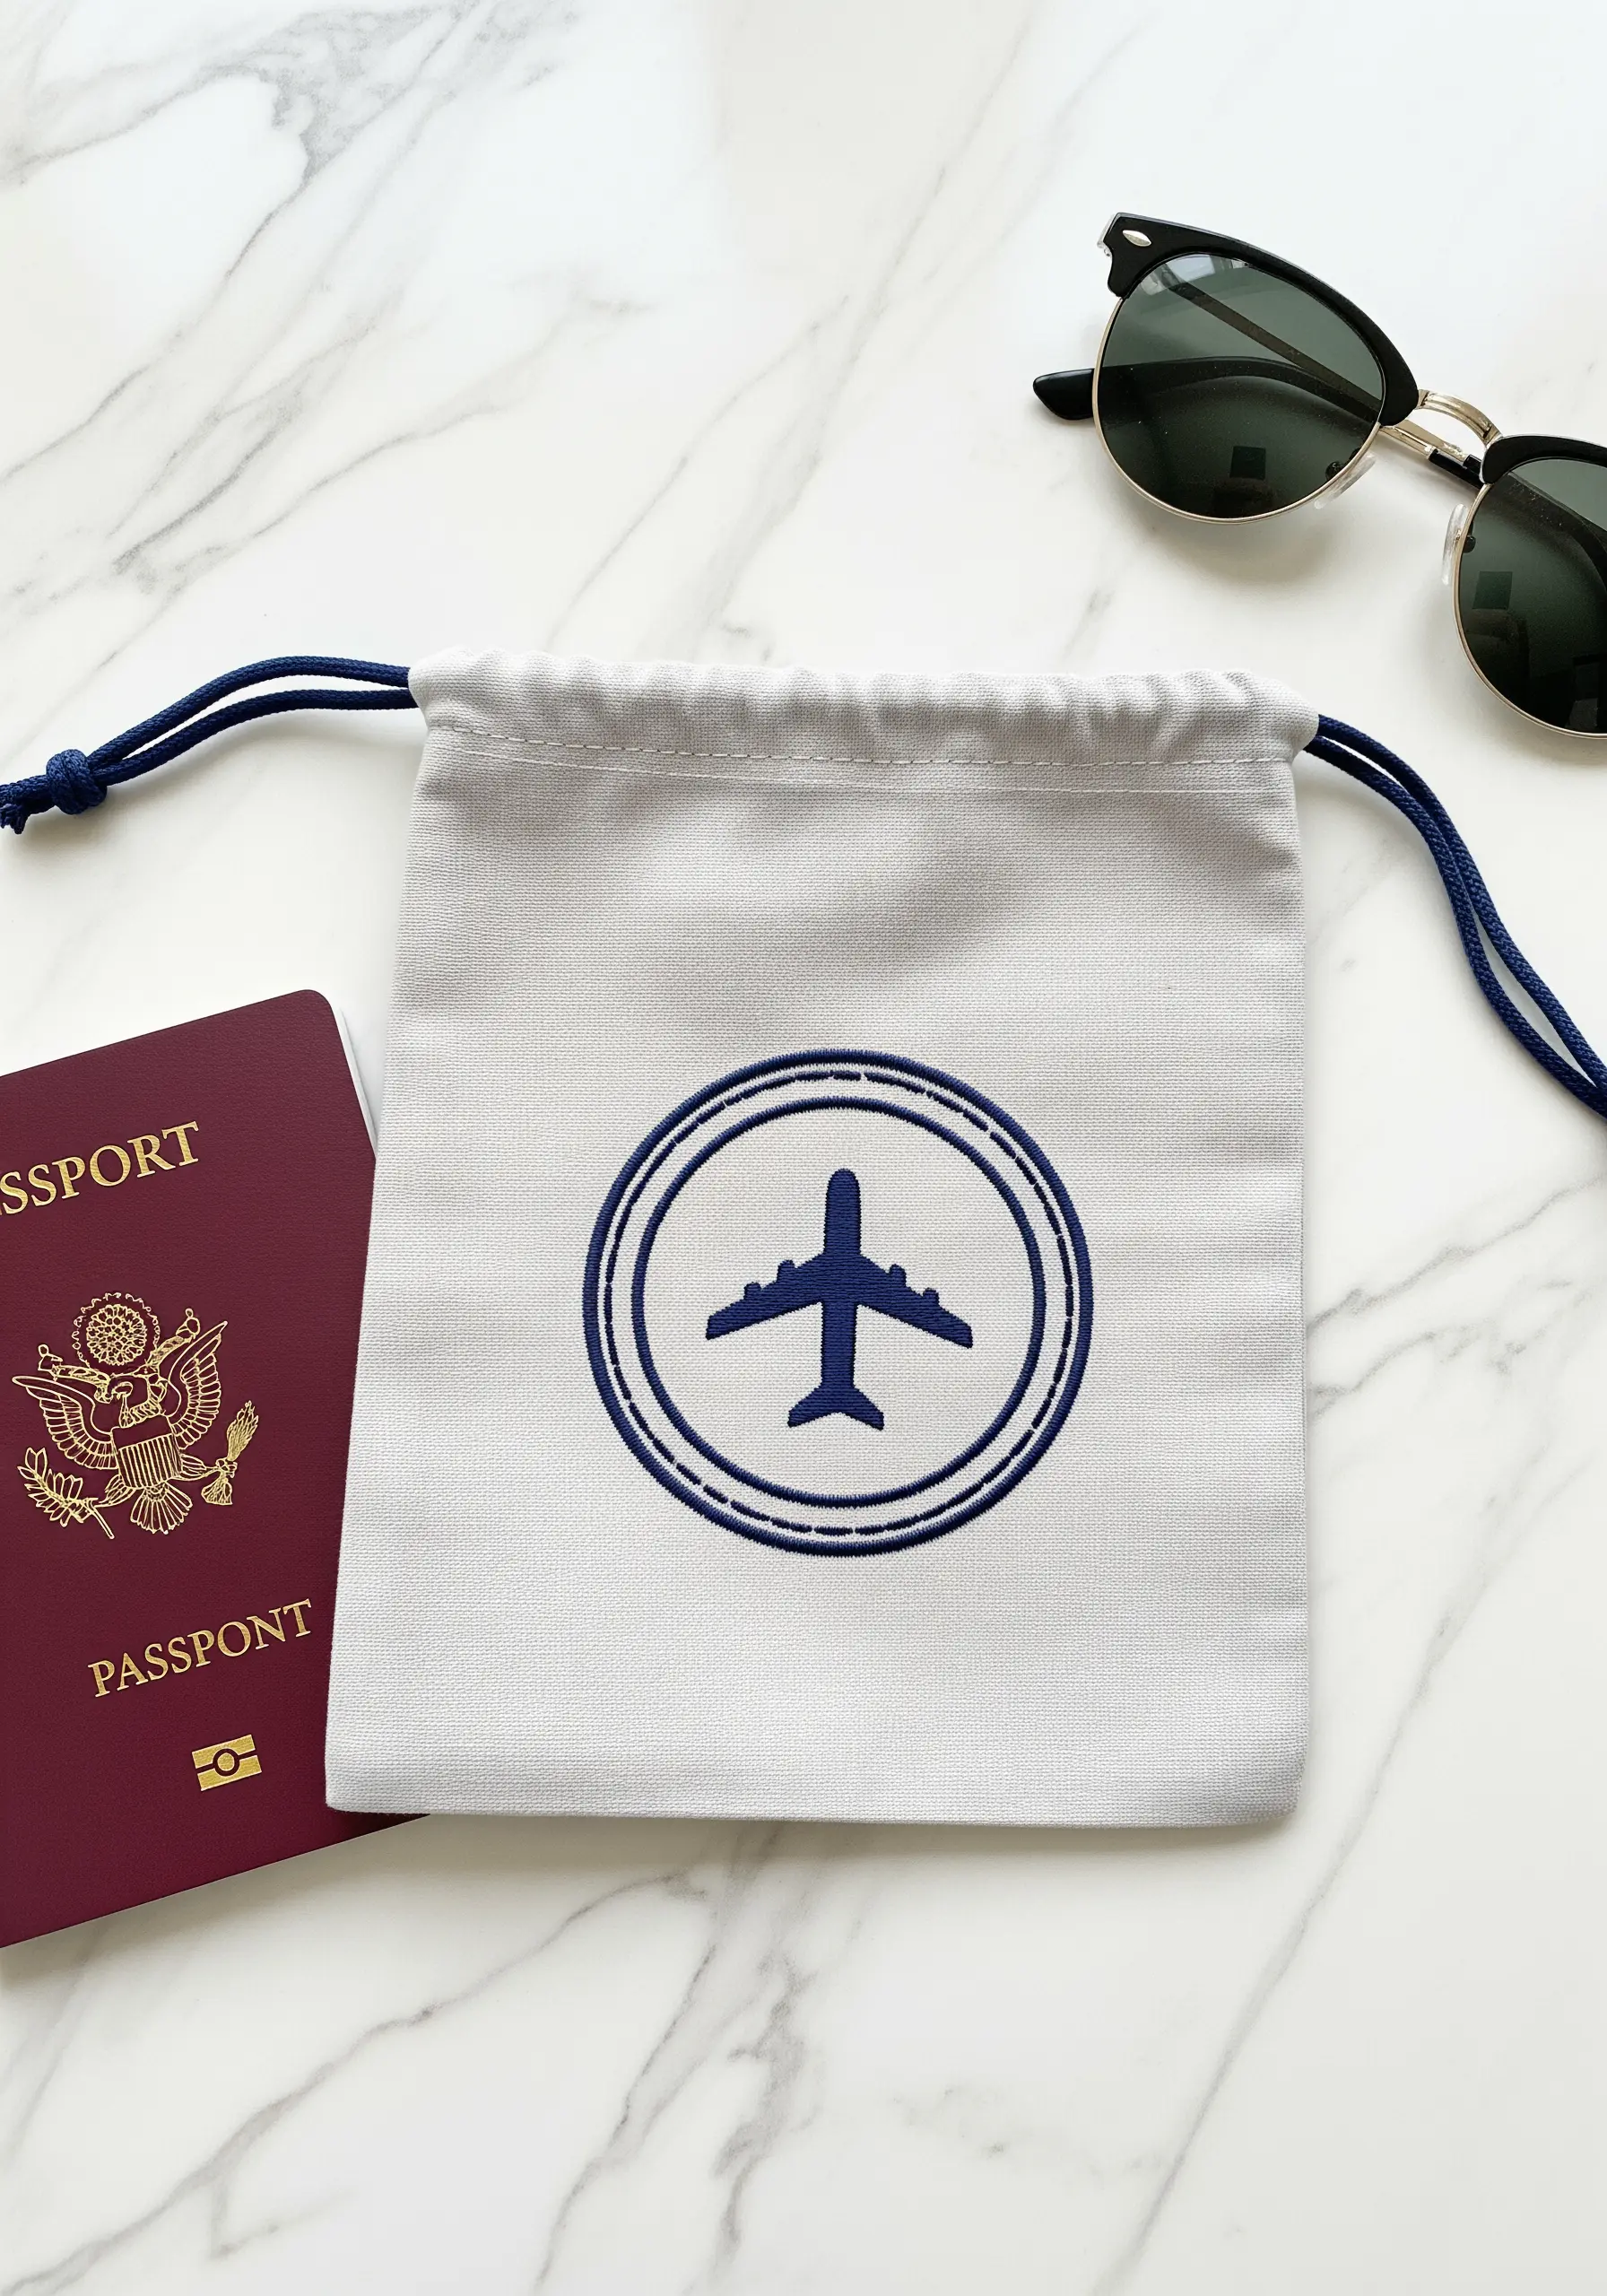
To give a simple icon a finished, badge-like appearance, frame it within a stitched circle.
Embroider your central motif—like an airplane—using a smooth satin stitch.
Then, use a heavy chain stitch or a whipped backstitch to create a substantial, raised border around it.
This containment gives the design weight and intentionality, turning a simple graphic into a sophisticated emblem for a travel pouch.
12. Build Petals with Layered Long-and-Short Stitches
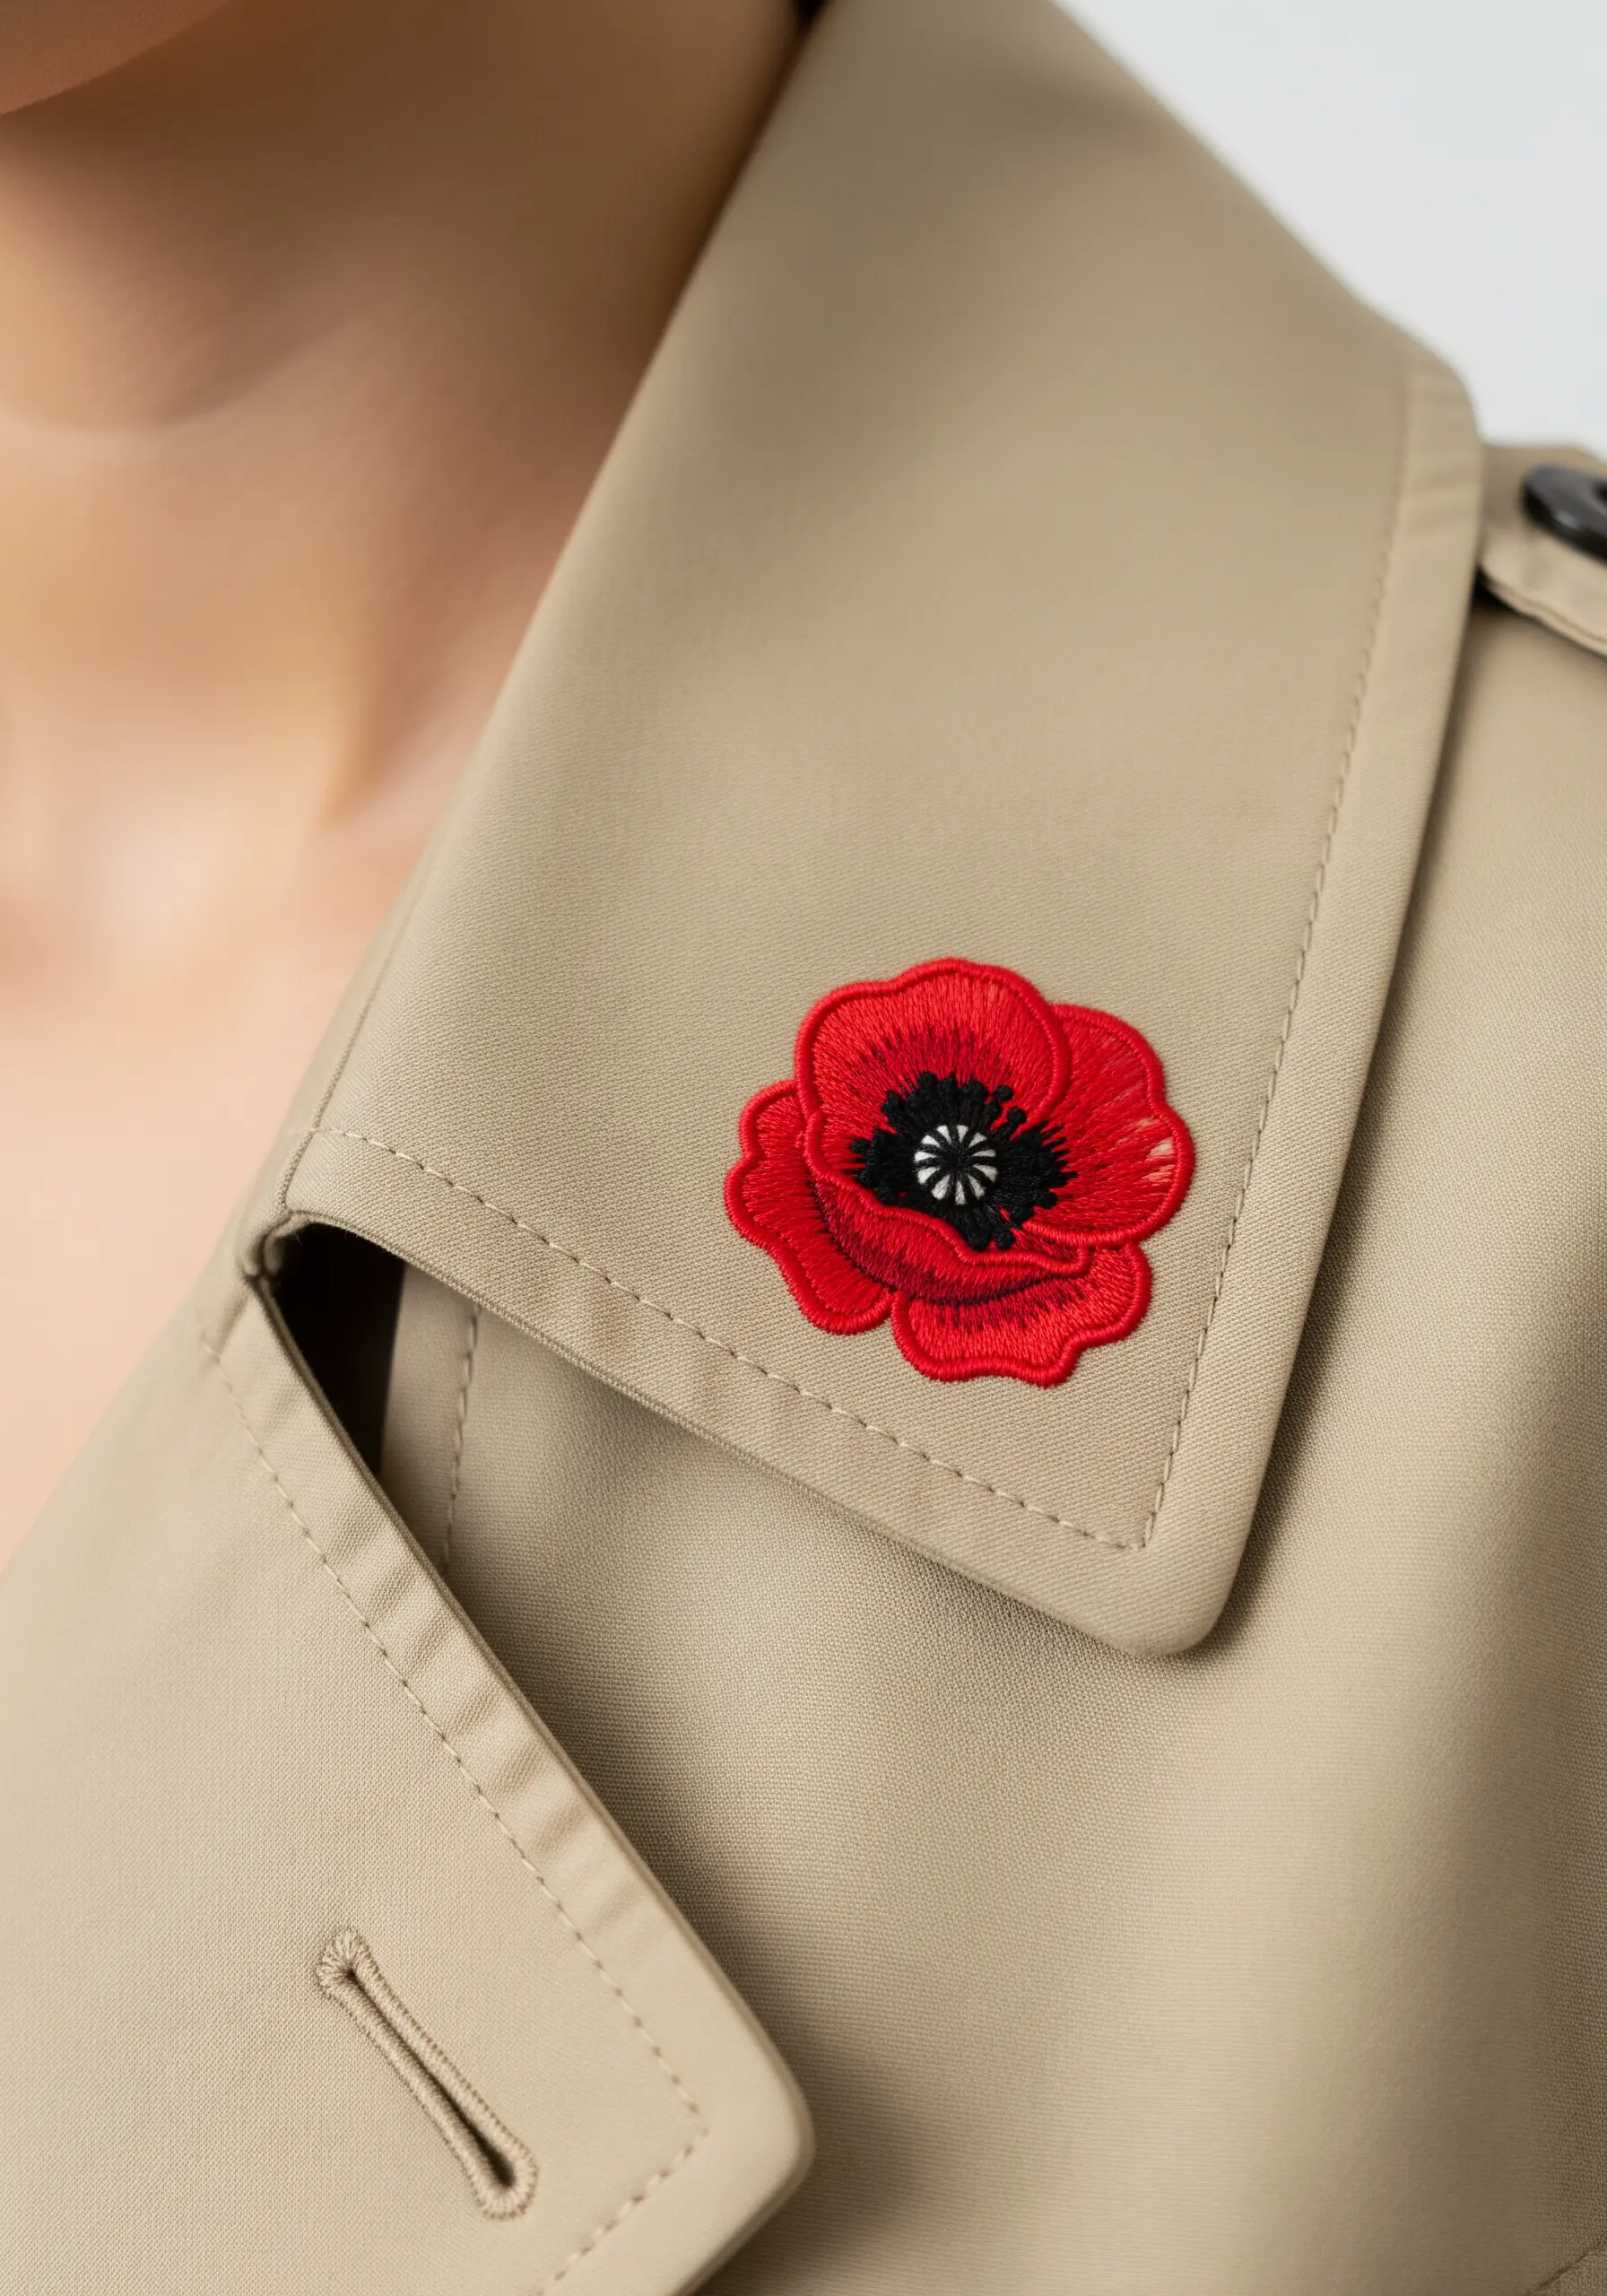
To create a vibrant, realistic flower like a poppy, build the petals in layers.
Start with the black center, using French knots for texture.
For the red petals, use a long-and-short stitch, working from the outer edge inward.
Slightly overlap your rows of stitches and vary their length to create a soft, shaded effect rather than a hard block of color.
Finish with a black backstitch outline to define the shape and make the red pop.
13. Imply a Scene with Minimal Lines
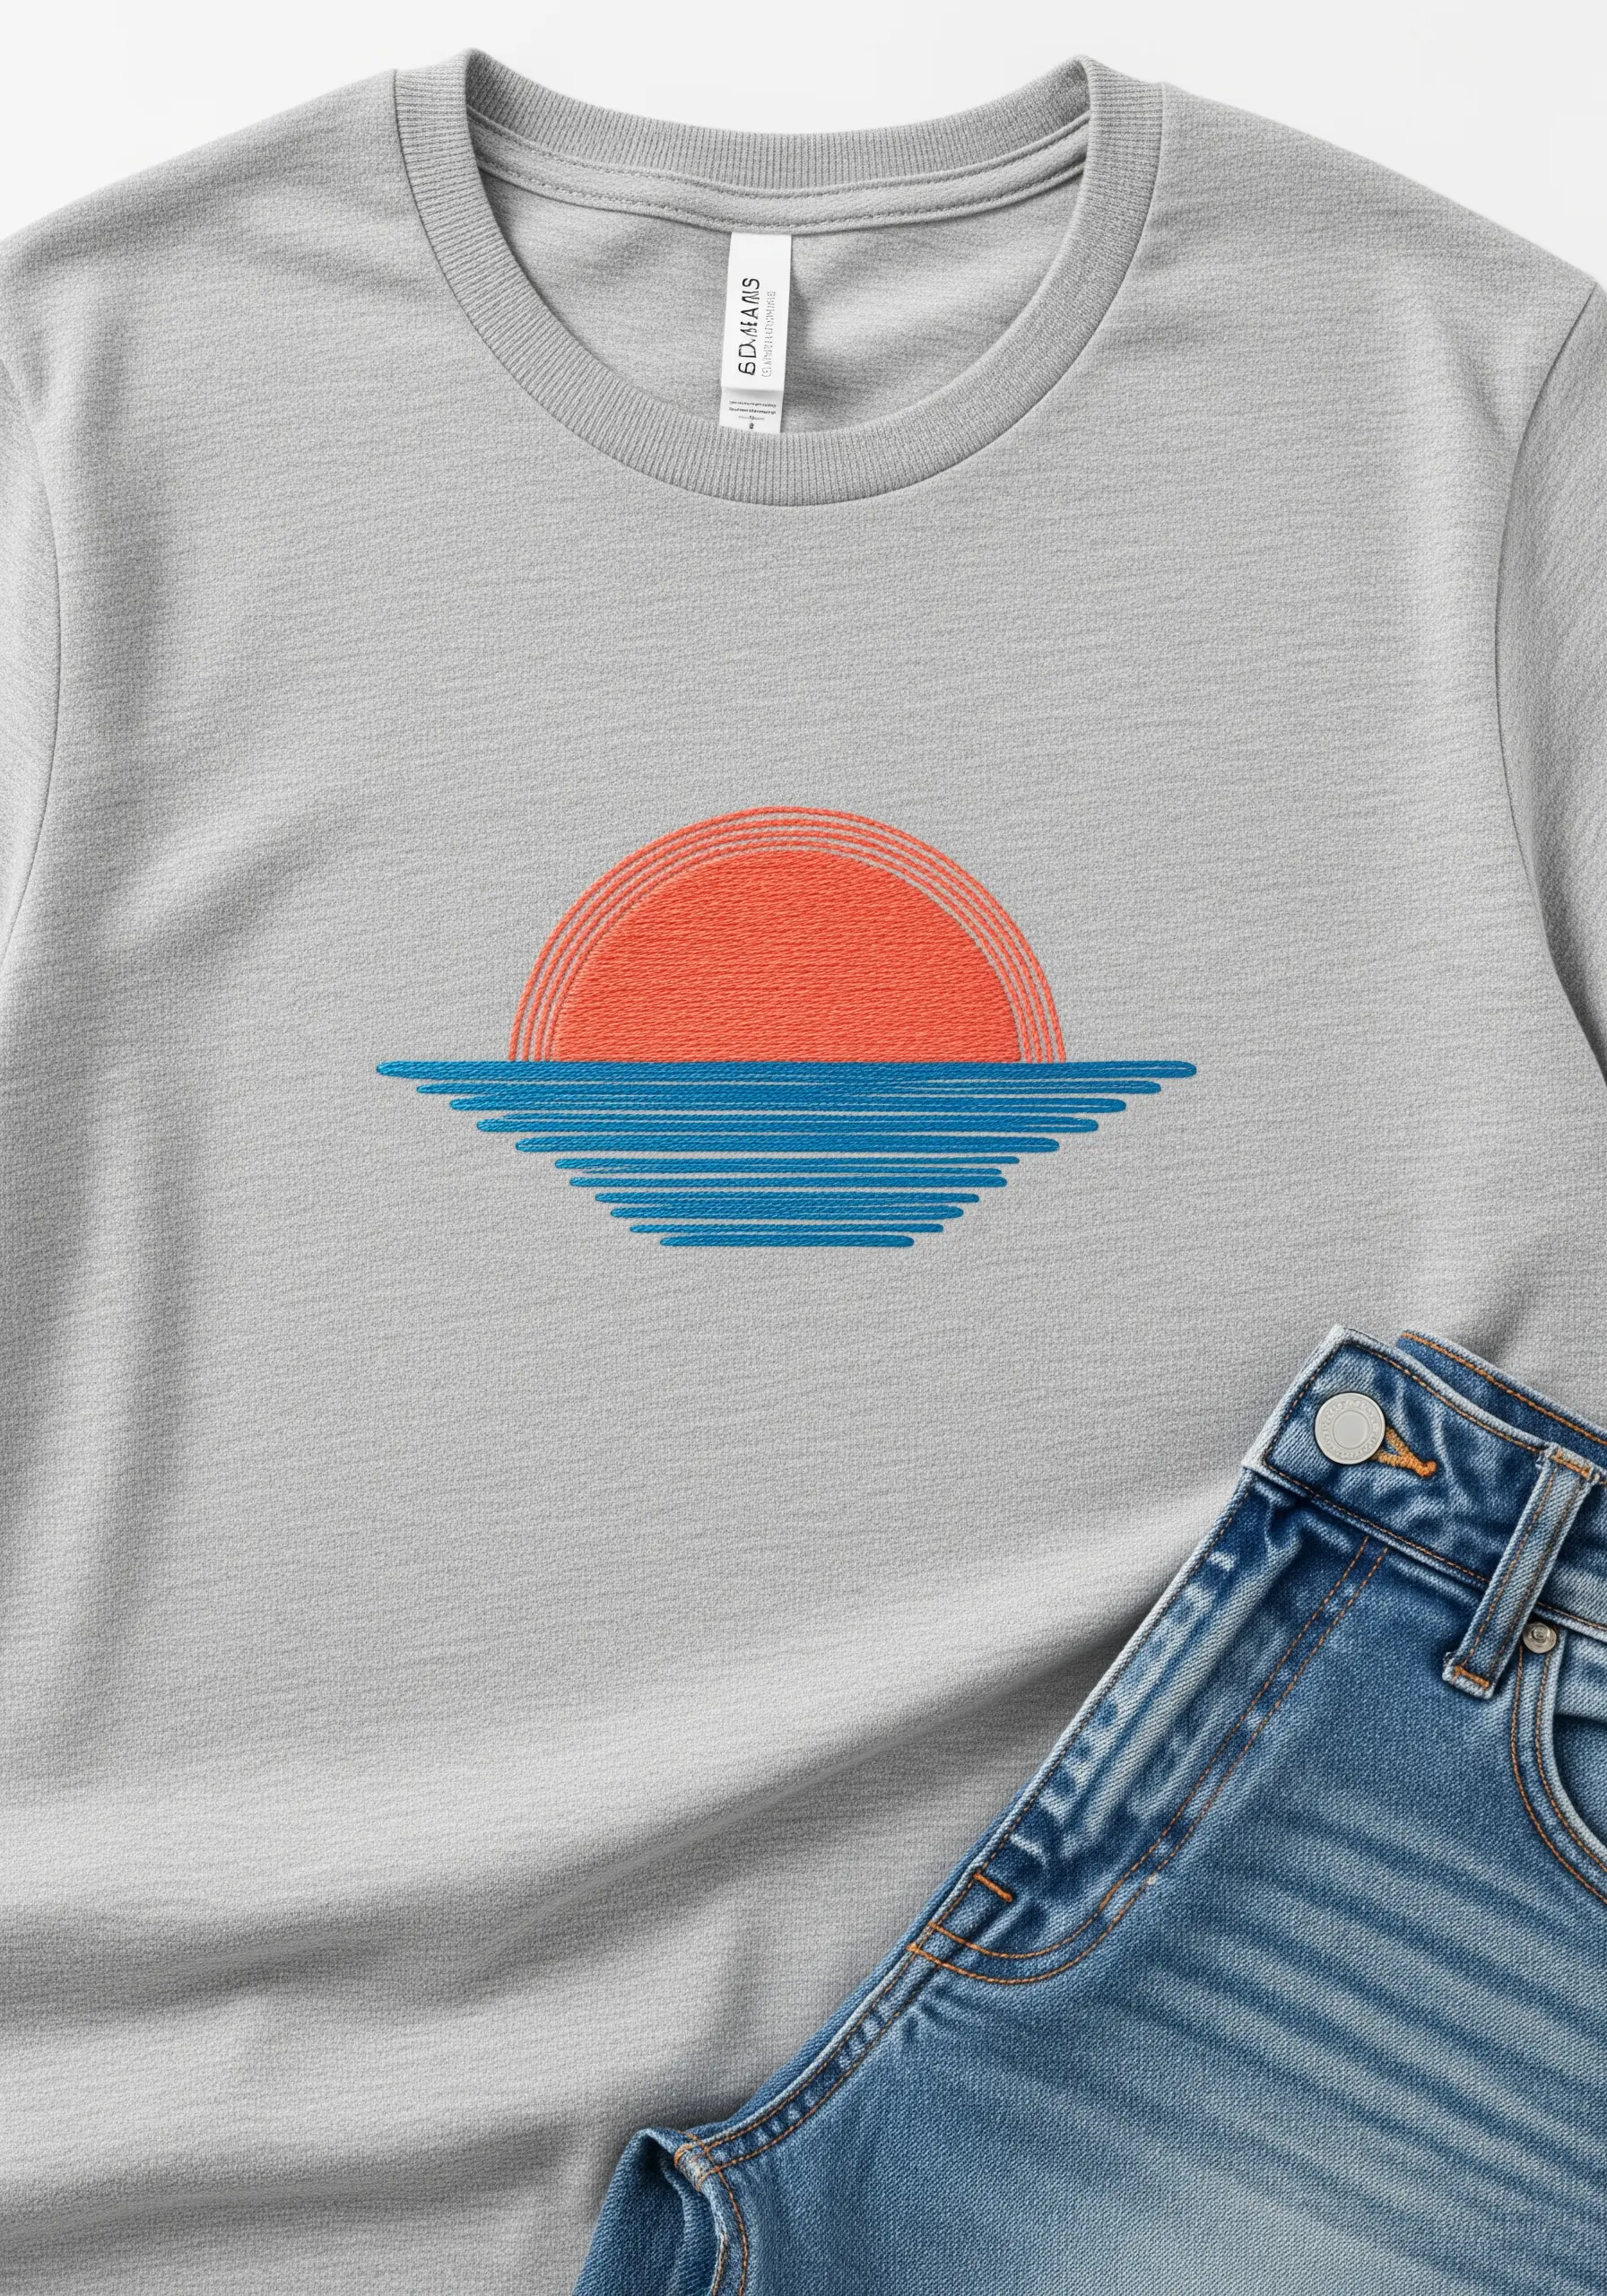
You don’t need a full landscape to evoke a feeling; suggest it with abstract lines.
Use a series of parallel satin stitches in graduating warm colors to represent a sunset.
Below it, use parallel lines of blue to suggest the sea.
This technique strips a scene down to its essential colors and forms, creating a modern, graphic representation that feels both calm and nostalgic.
14. Decorate Functional Items with Geometric Stitches
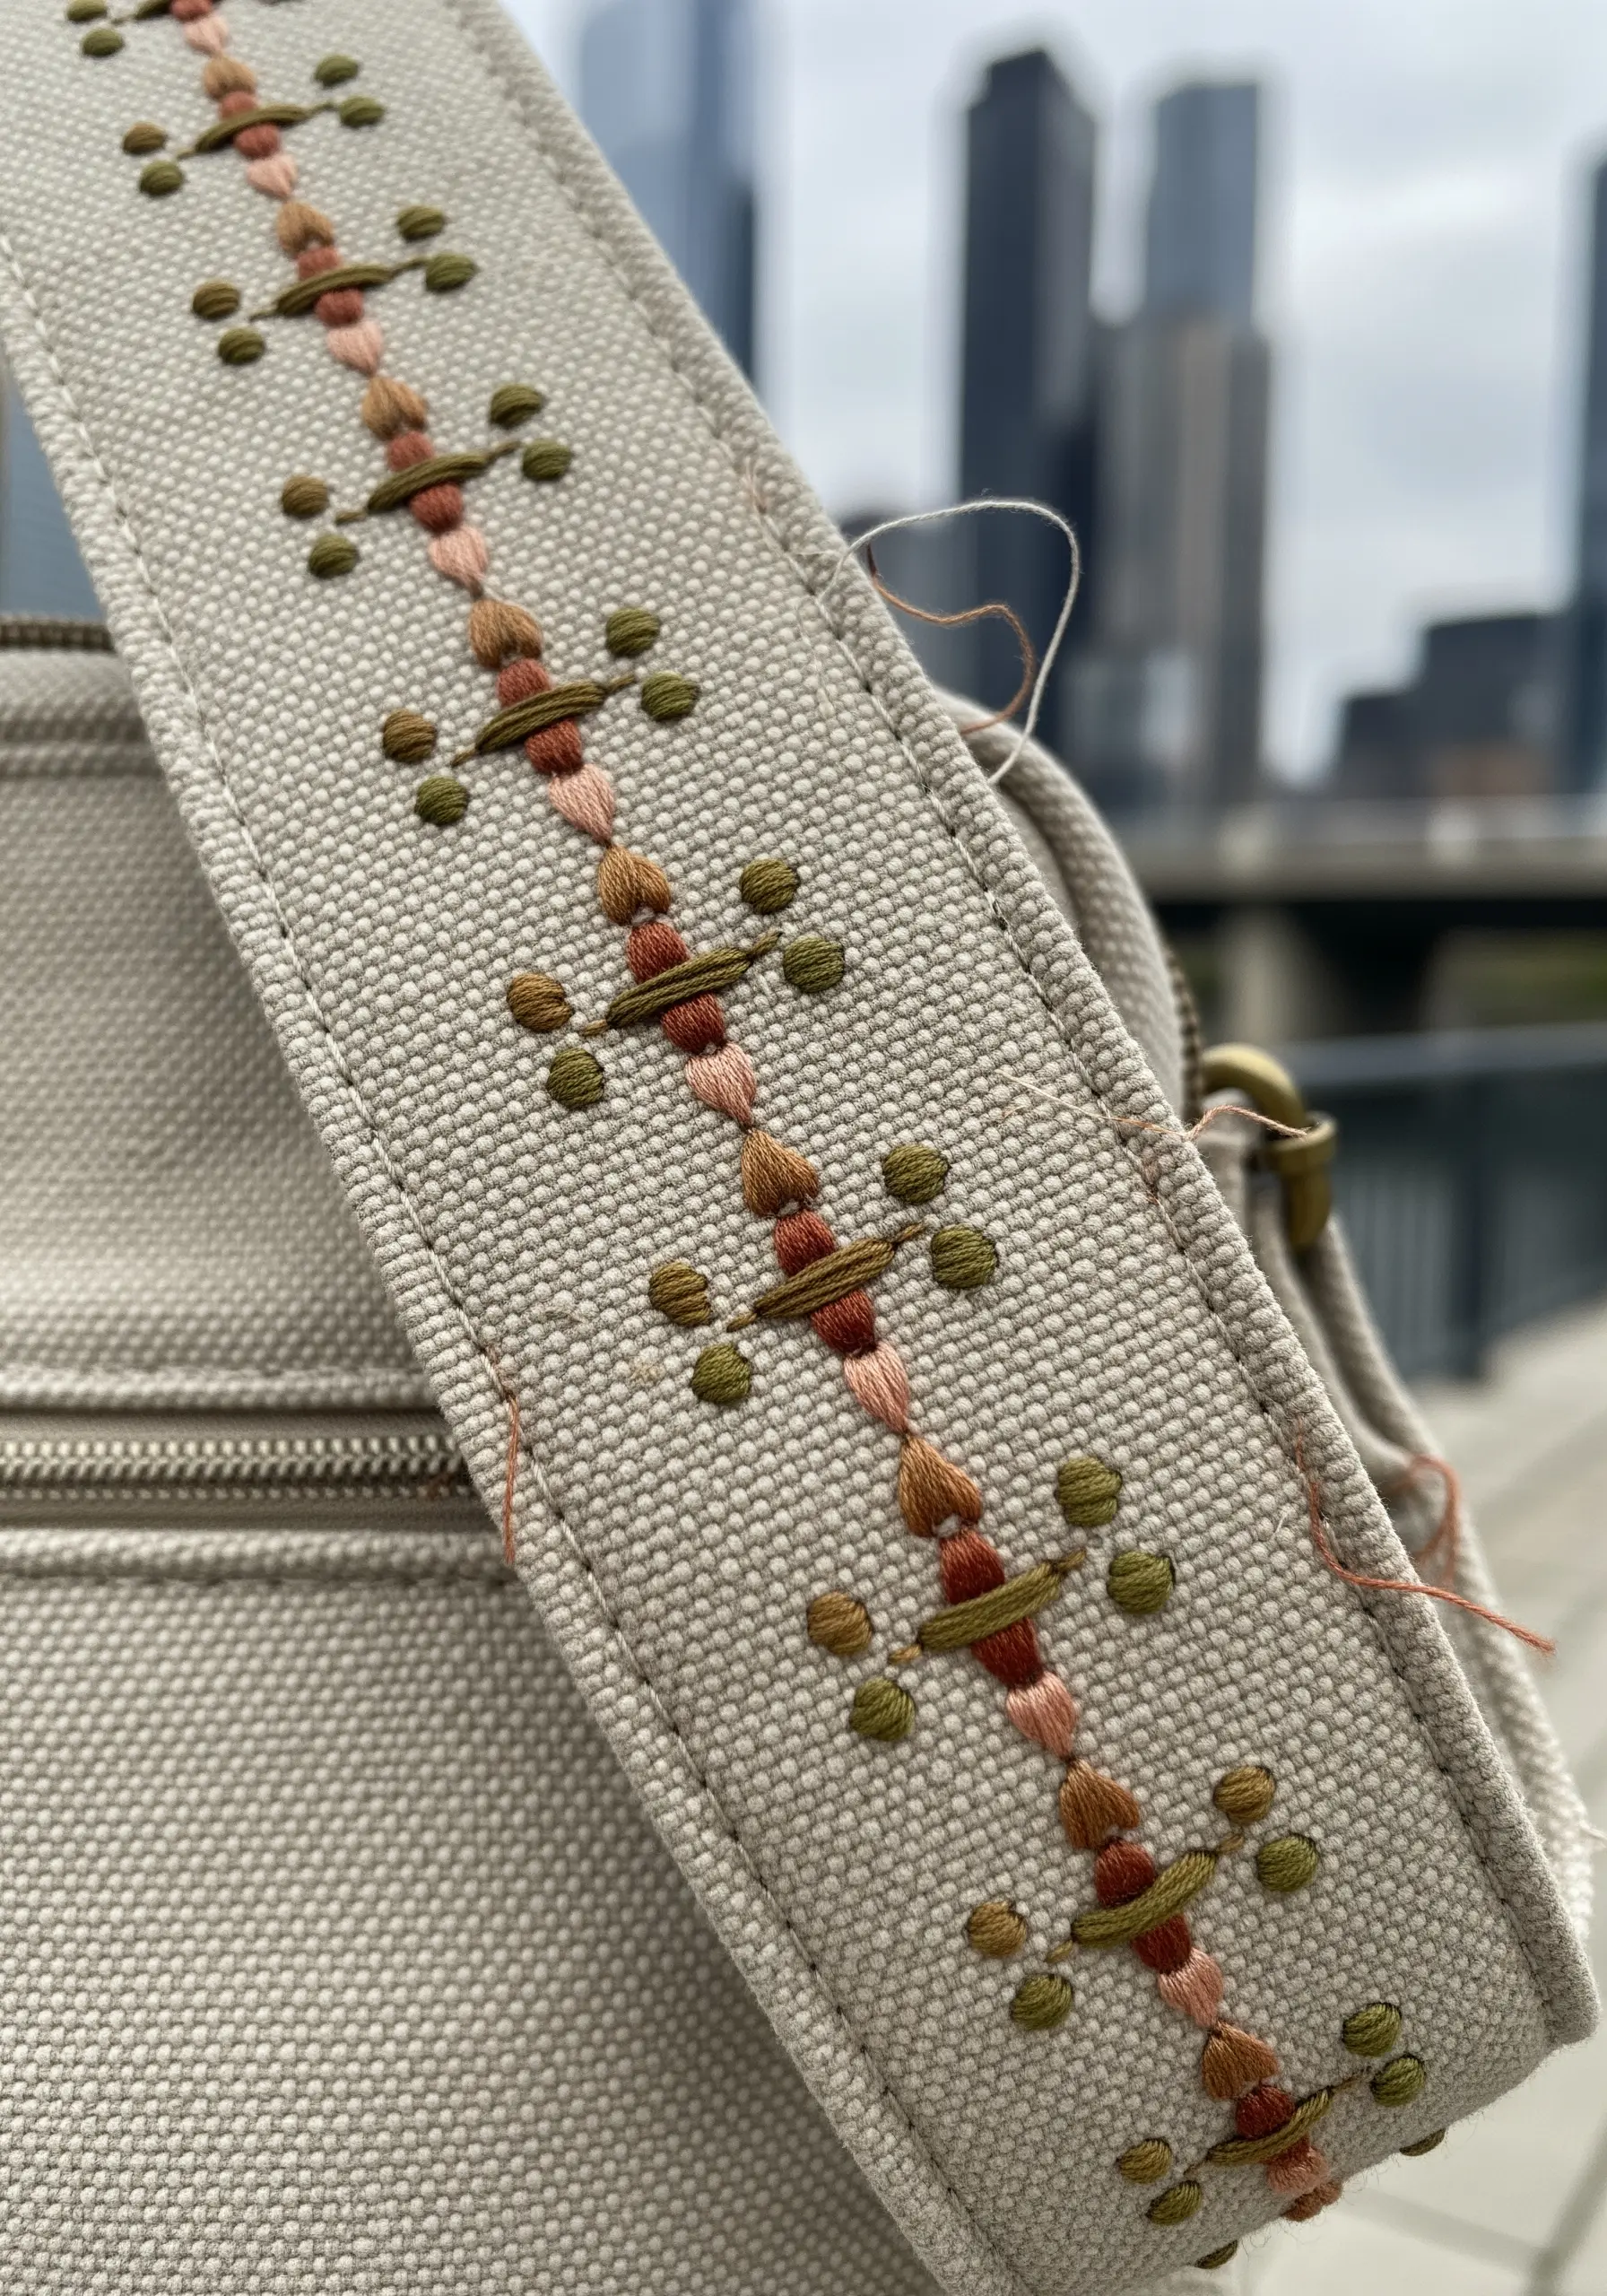
Transform a purely functional item, like a bag strap, into a piece of decorative art.
Use a combination of simple stitches—like French knots, straight stitches, and satin stitches—to create a repeating geometric pattern.
Varying the thread colors in a subtle, earthy palette keeps the design from becoming overwhelming.
This approach not only personalizes your accessories but also celebrates the beauty of traditional, simple stitch work.
15. Choose the Right Stitch for Small, Detailed Outlines
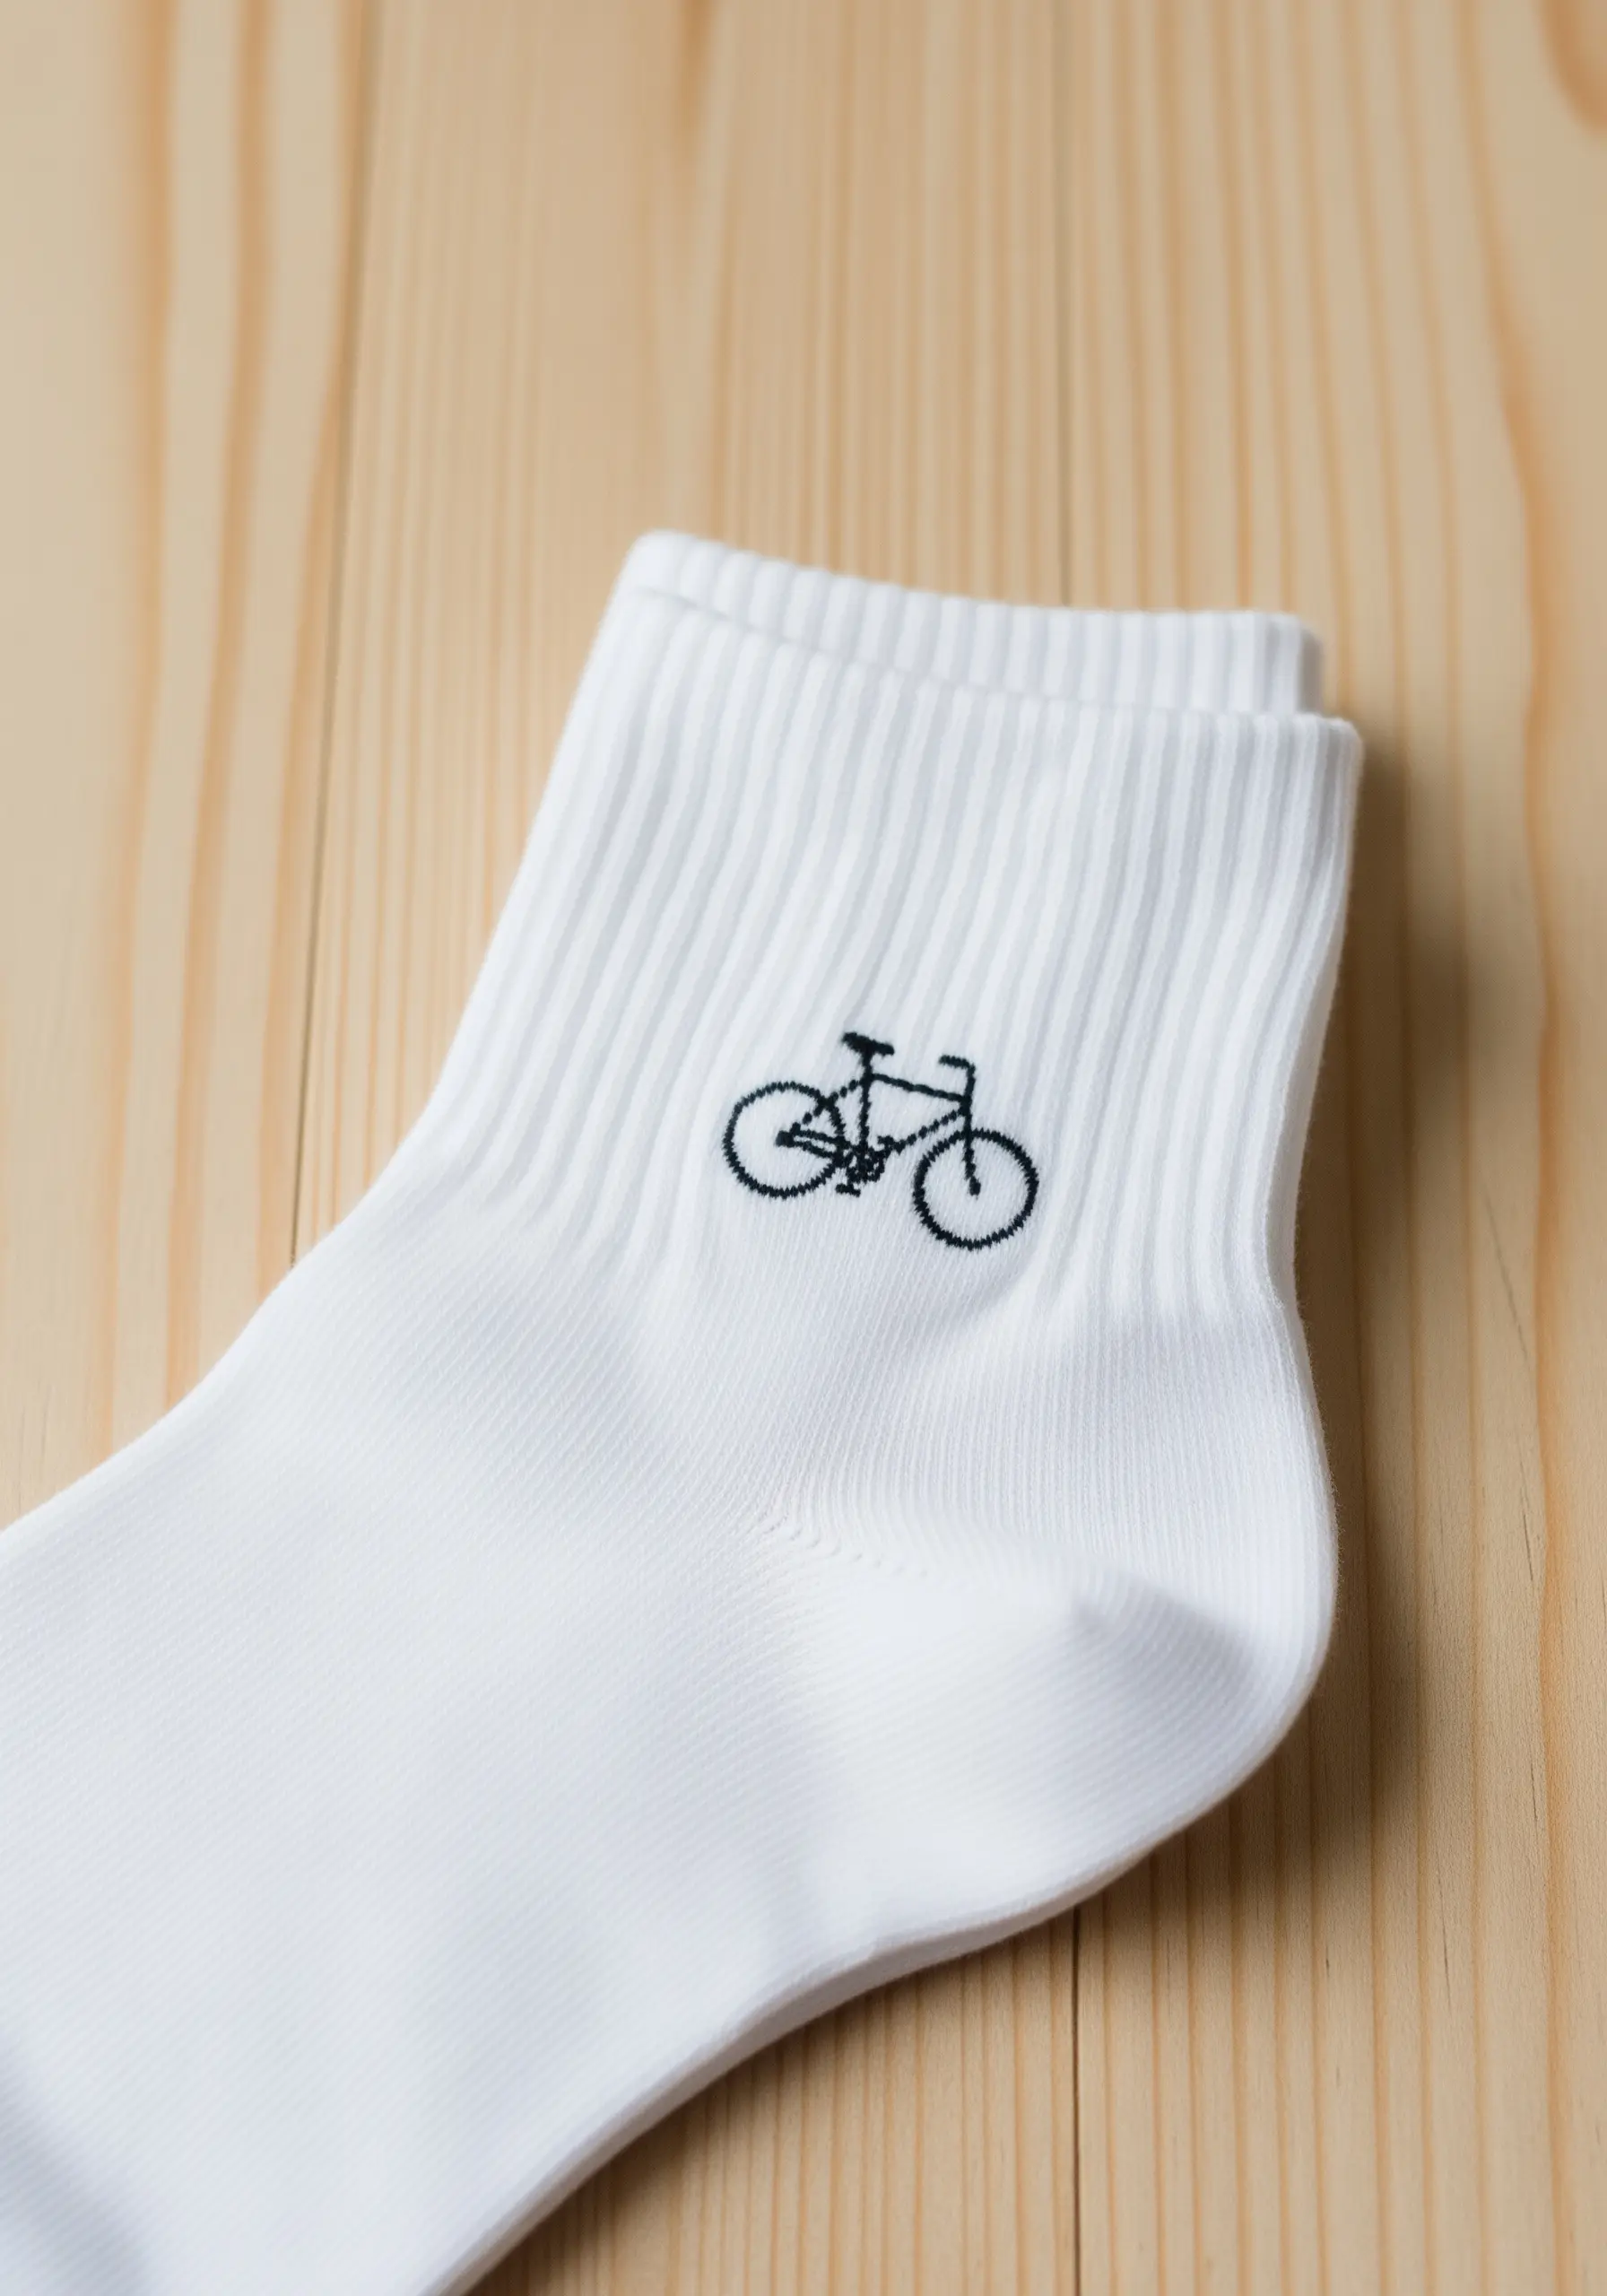
When embroidering a small, detailed object like a bicycle on a stretchy fabric like socks, a standard backstitch can look disjointed.
Instead, use a split stitch.
By piercing the previous stitch with your needle, you create a smooth, continuous line that resembles a miniature chain stitch.
This technique provides the definition needed for tiny details to remain clear and connected, even on difficult fabrics.
16. Use High-Contrast Thread for Architectural Silhouettes
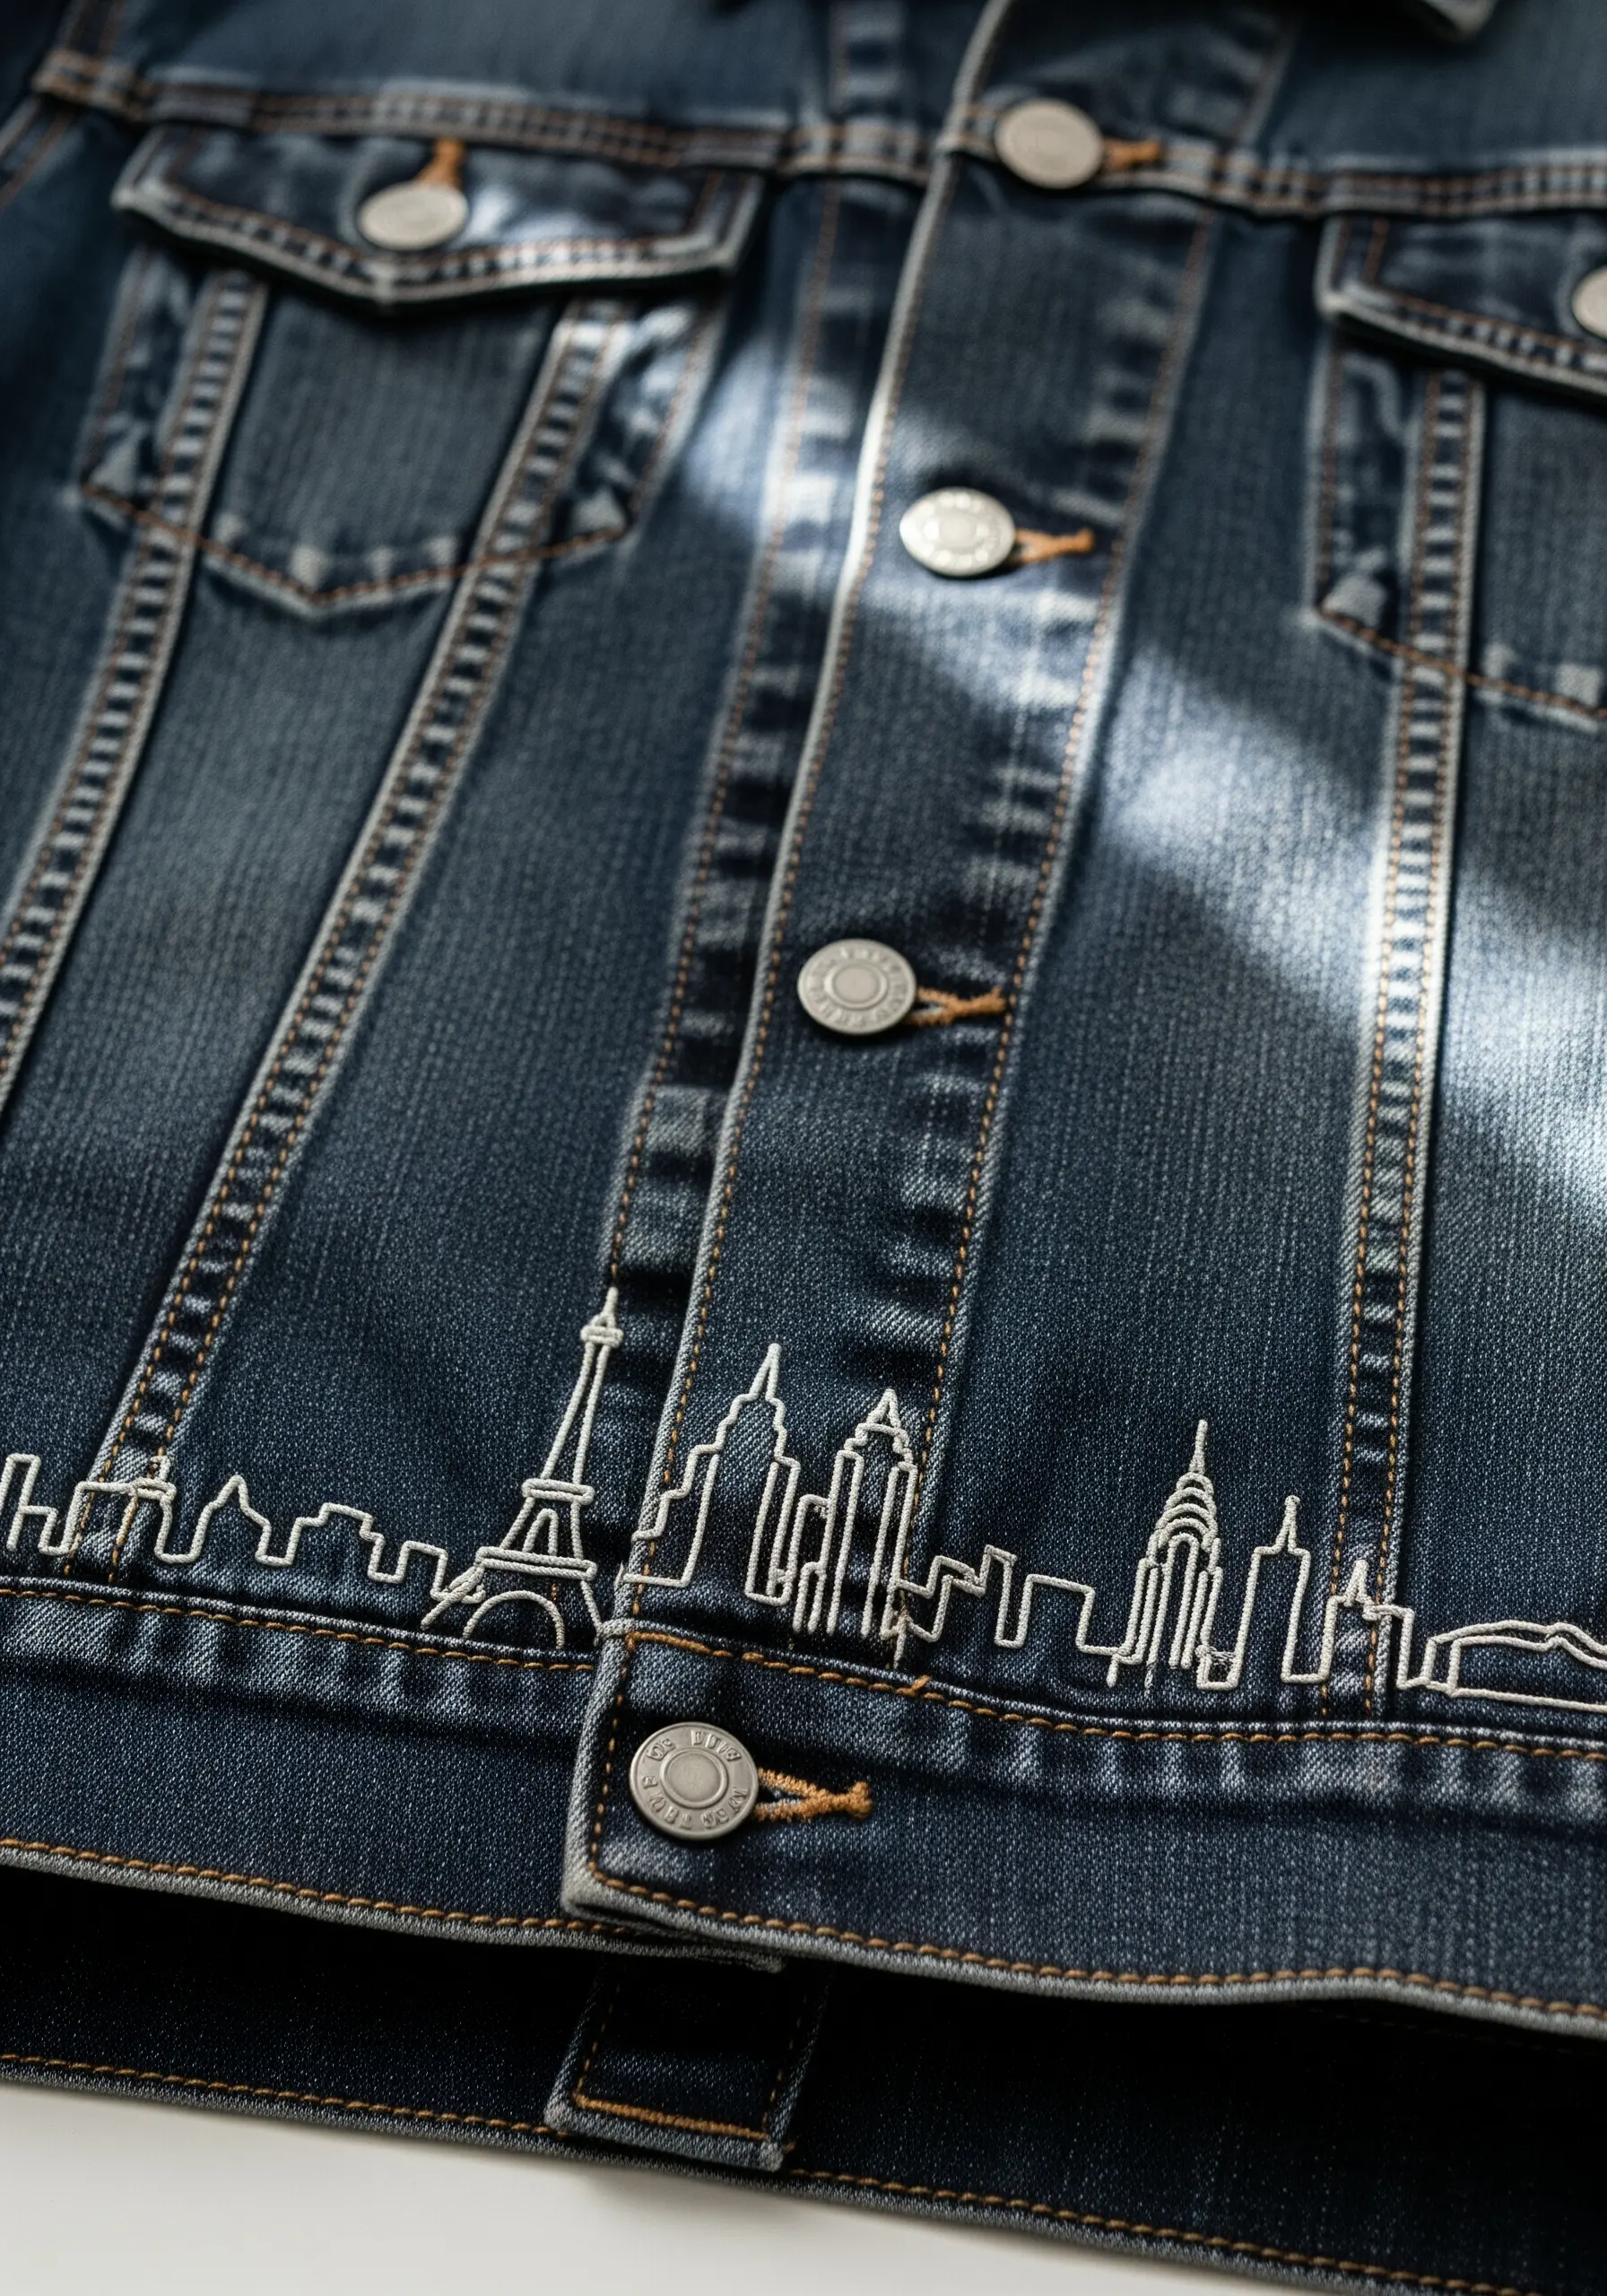
To capture the essence of a cityscape on dark denim, the key is high contrast and simplicity.
Use a bright white or silver thread and a simple, clean backstitch to trace the skyline.
Don’t try to include every detail; focus on the most iconic architectural shapes that make a city recognizable.
The stark contrast between the thread and the fabric does all the work, creating a dramatic and elegant homage to a favorite place.
17. Create Asymmetrical Balance with Line and Form
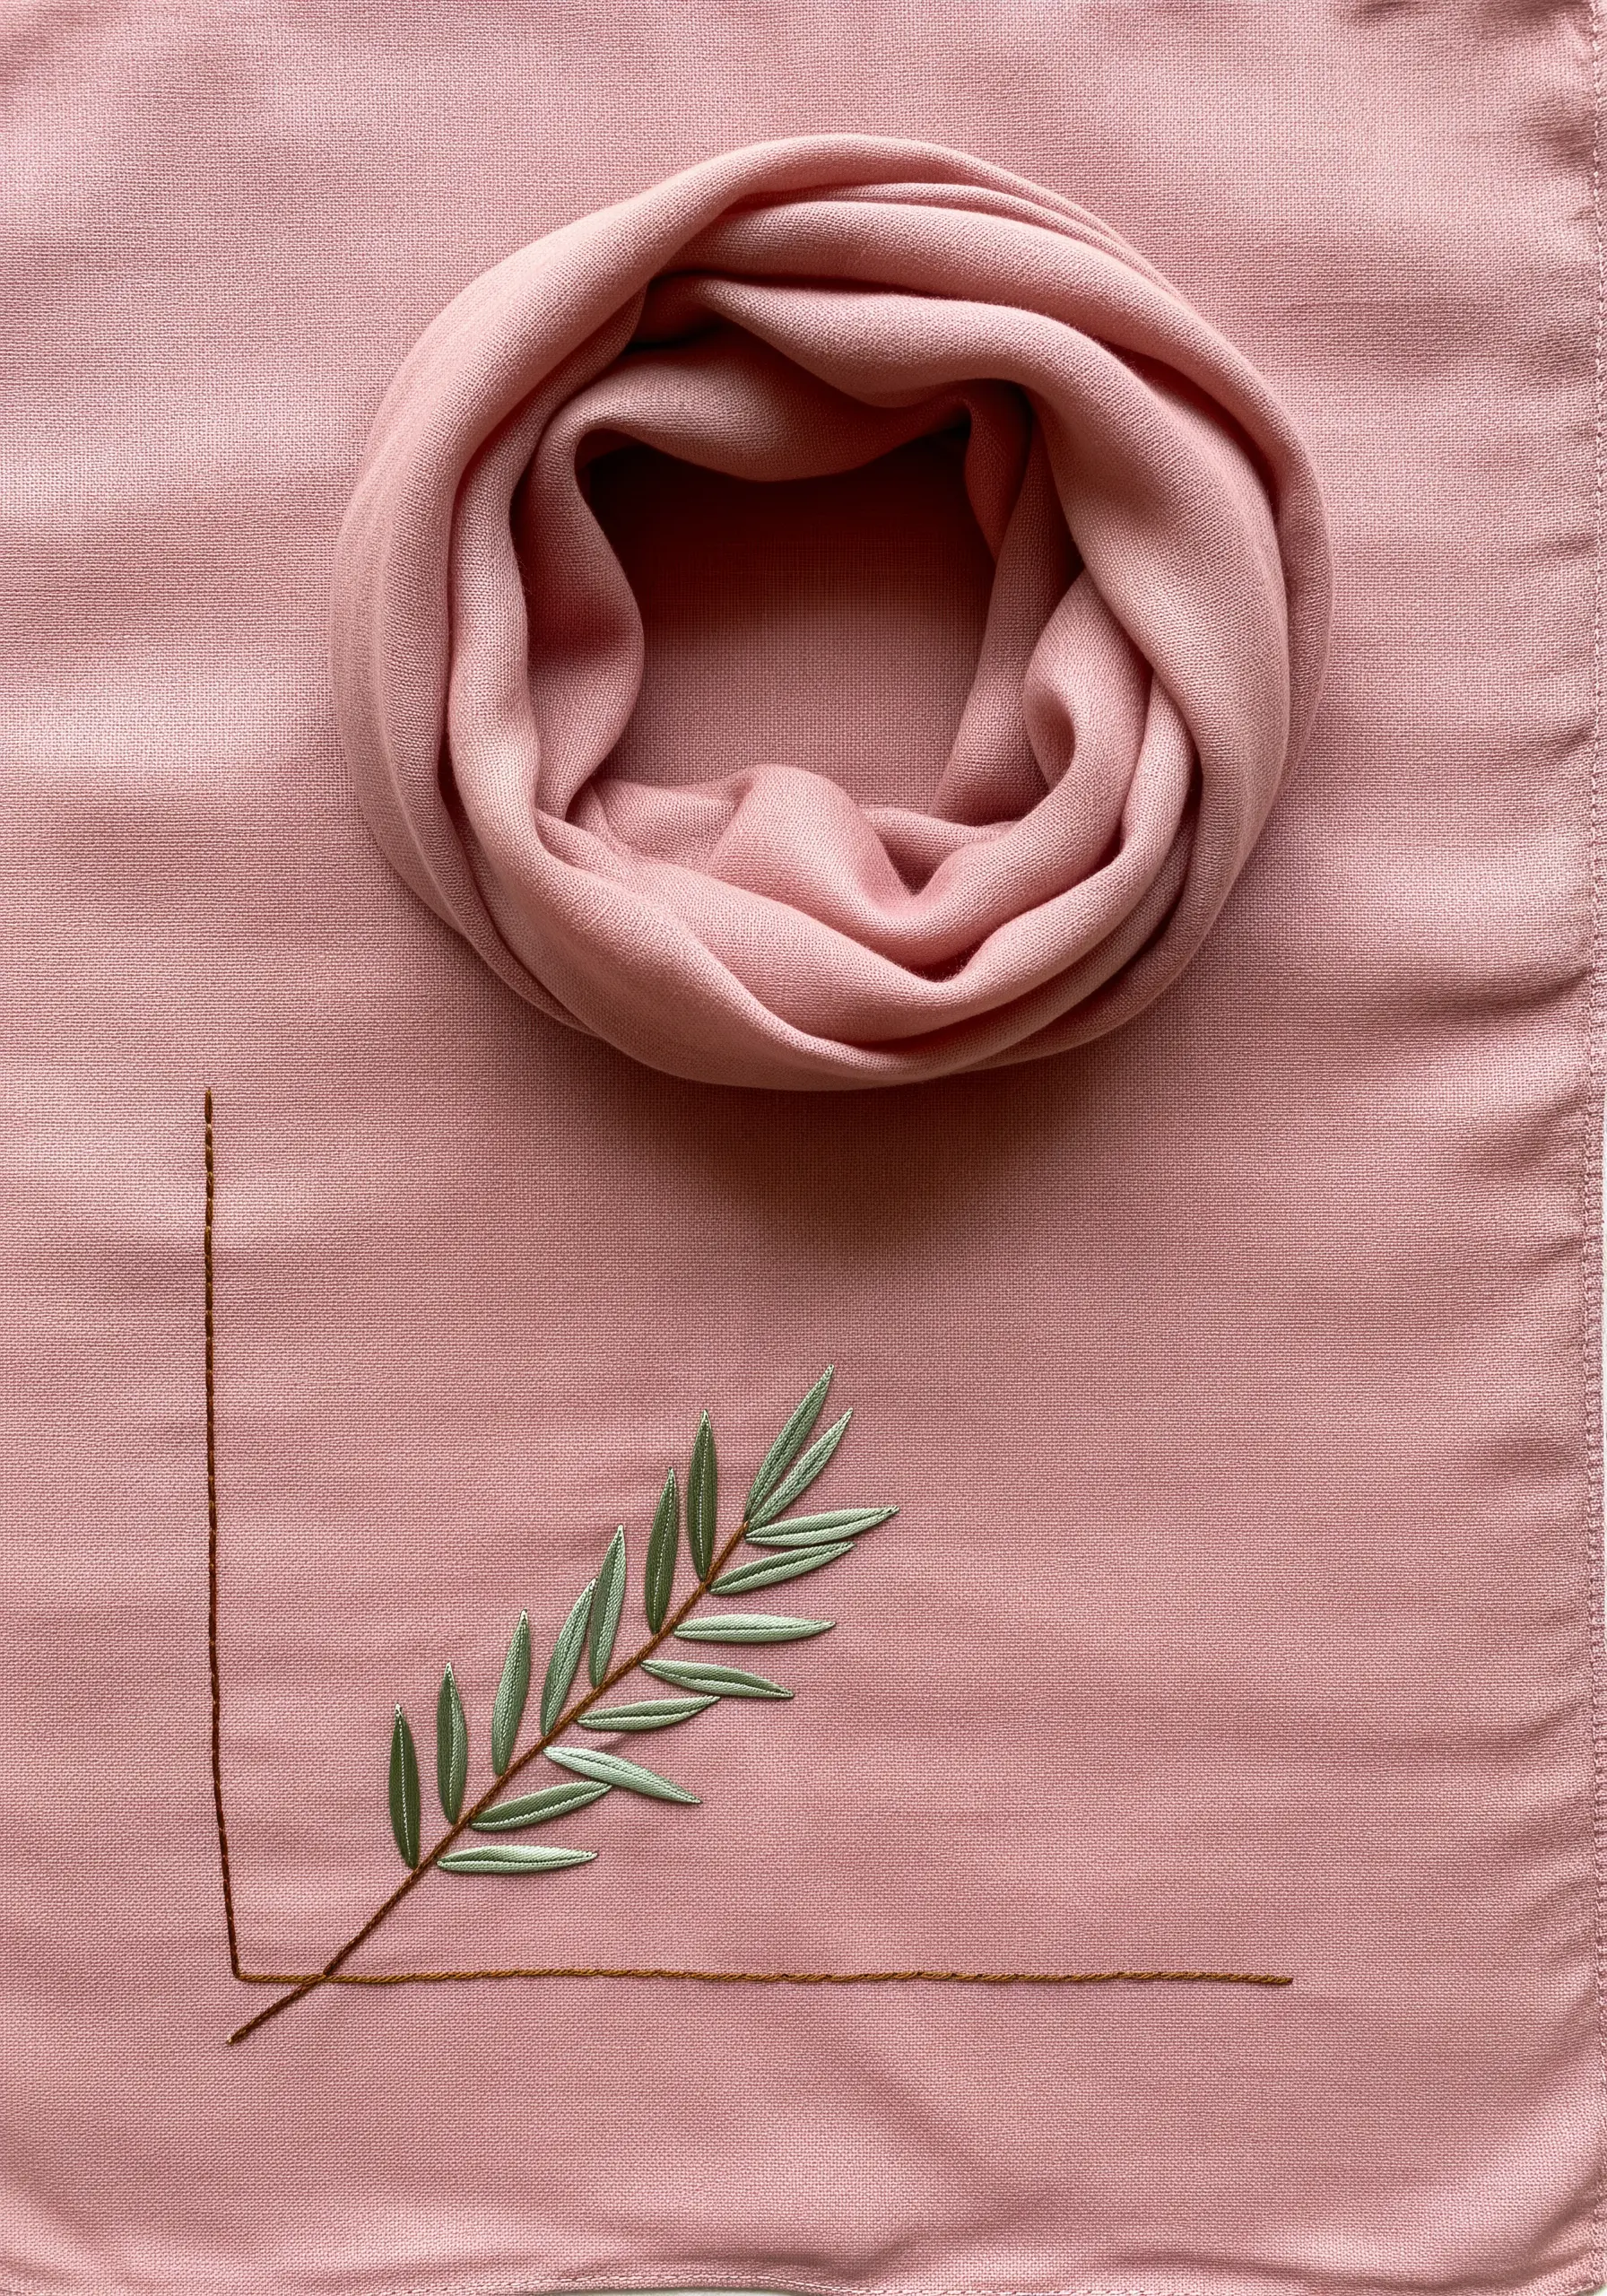
For a modern, artistic composition, play with asymmetrical balance.
Place a detailed, softly filled element—like an olive branch made with satin-stitched leaves and a stem stitch—off-center.
Then, ground it with two simple, intersecting backstitched lines that form a corner.
This contrast between the organic form and the stark geometric lines creates a dynamic composition that feels balanced yet unconventional, perfect for a modern scarf or textile art piece.
18. Define Shapes with a Bold Outline on Patterned Fabric

When embroidering on a busy patterned fabric like plaid, your design needs a strong outline to avoid getting lost.
Use a thick, raised stitch like a chain stitch or a satin stitch border around your entire motif.
This creates a clean boundary that separates the embroidery from the background pattern.
Fill the interior with bright, solid colors to ensure the design stands out as a clear, intentional focal point.
19. Add Subtle Sparkle with Beaded Accents
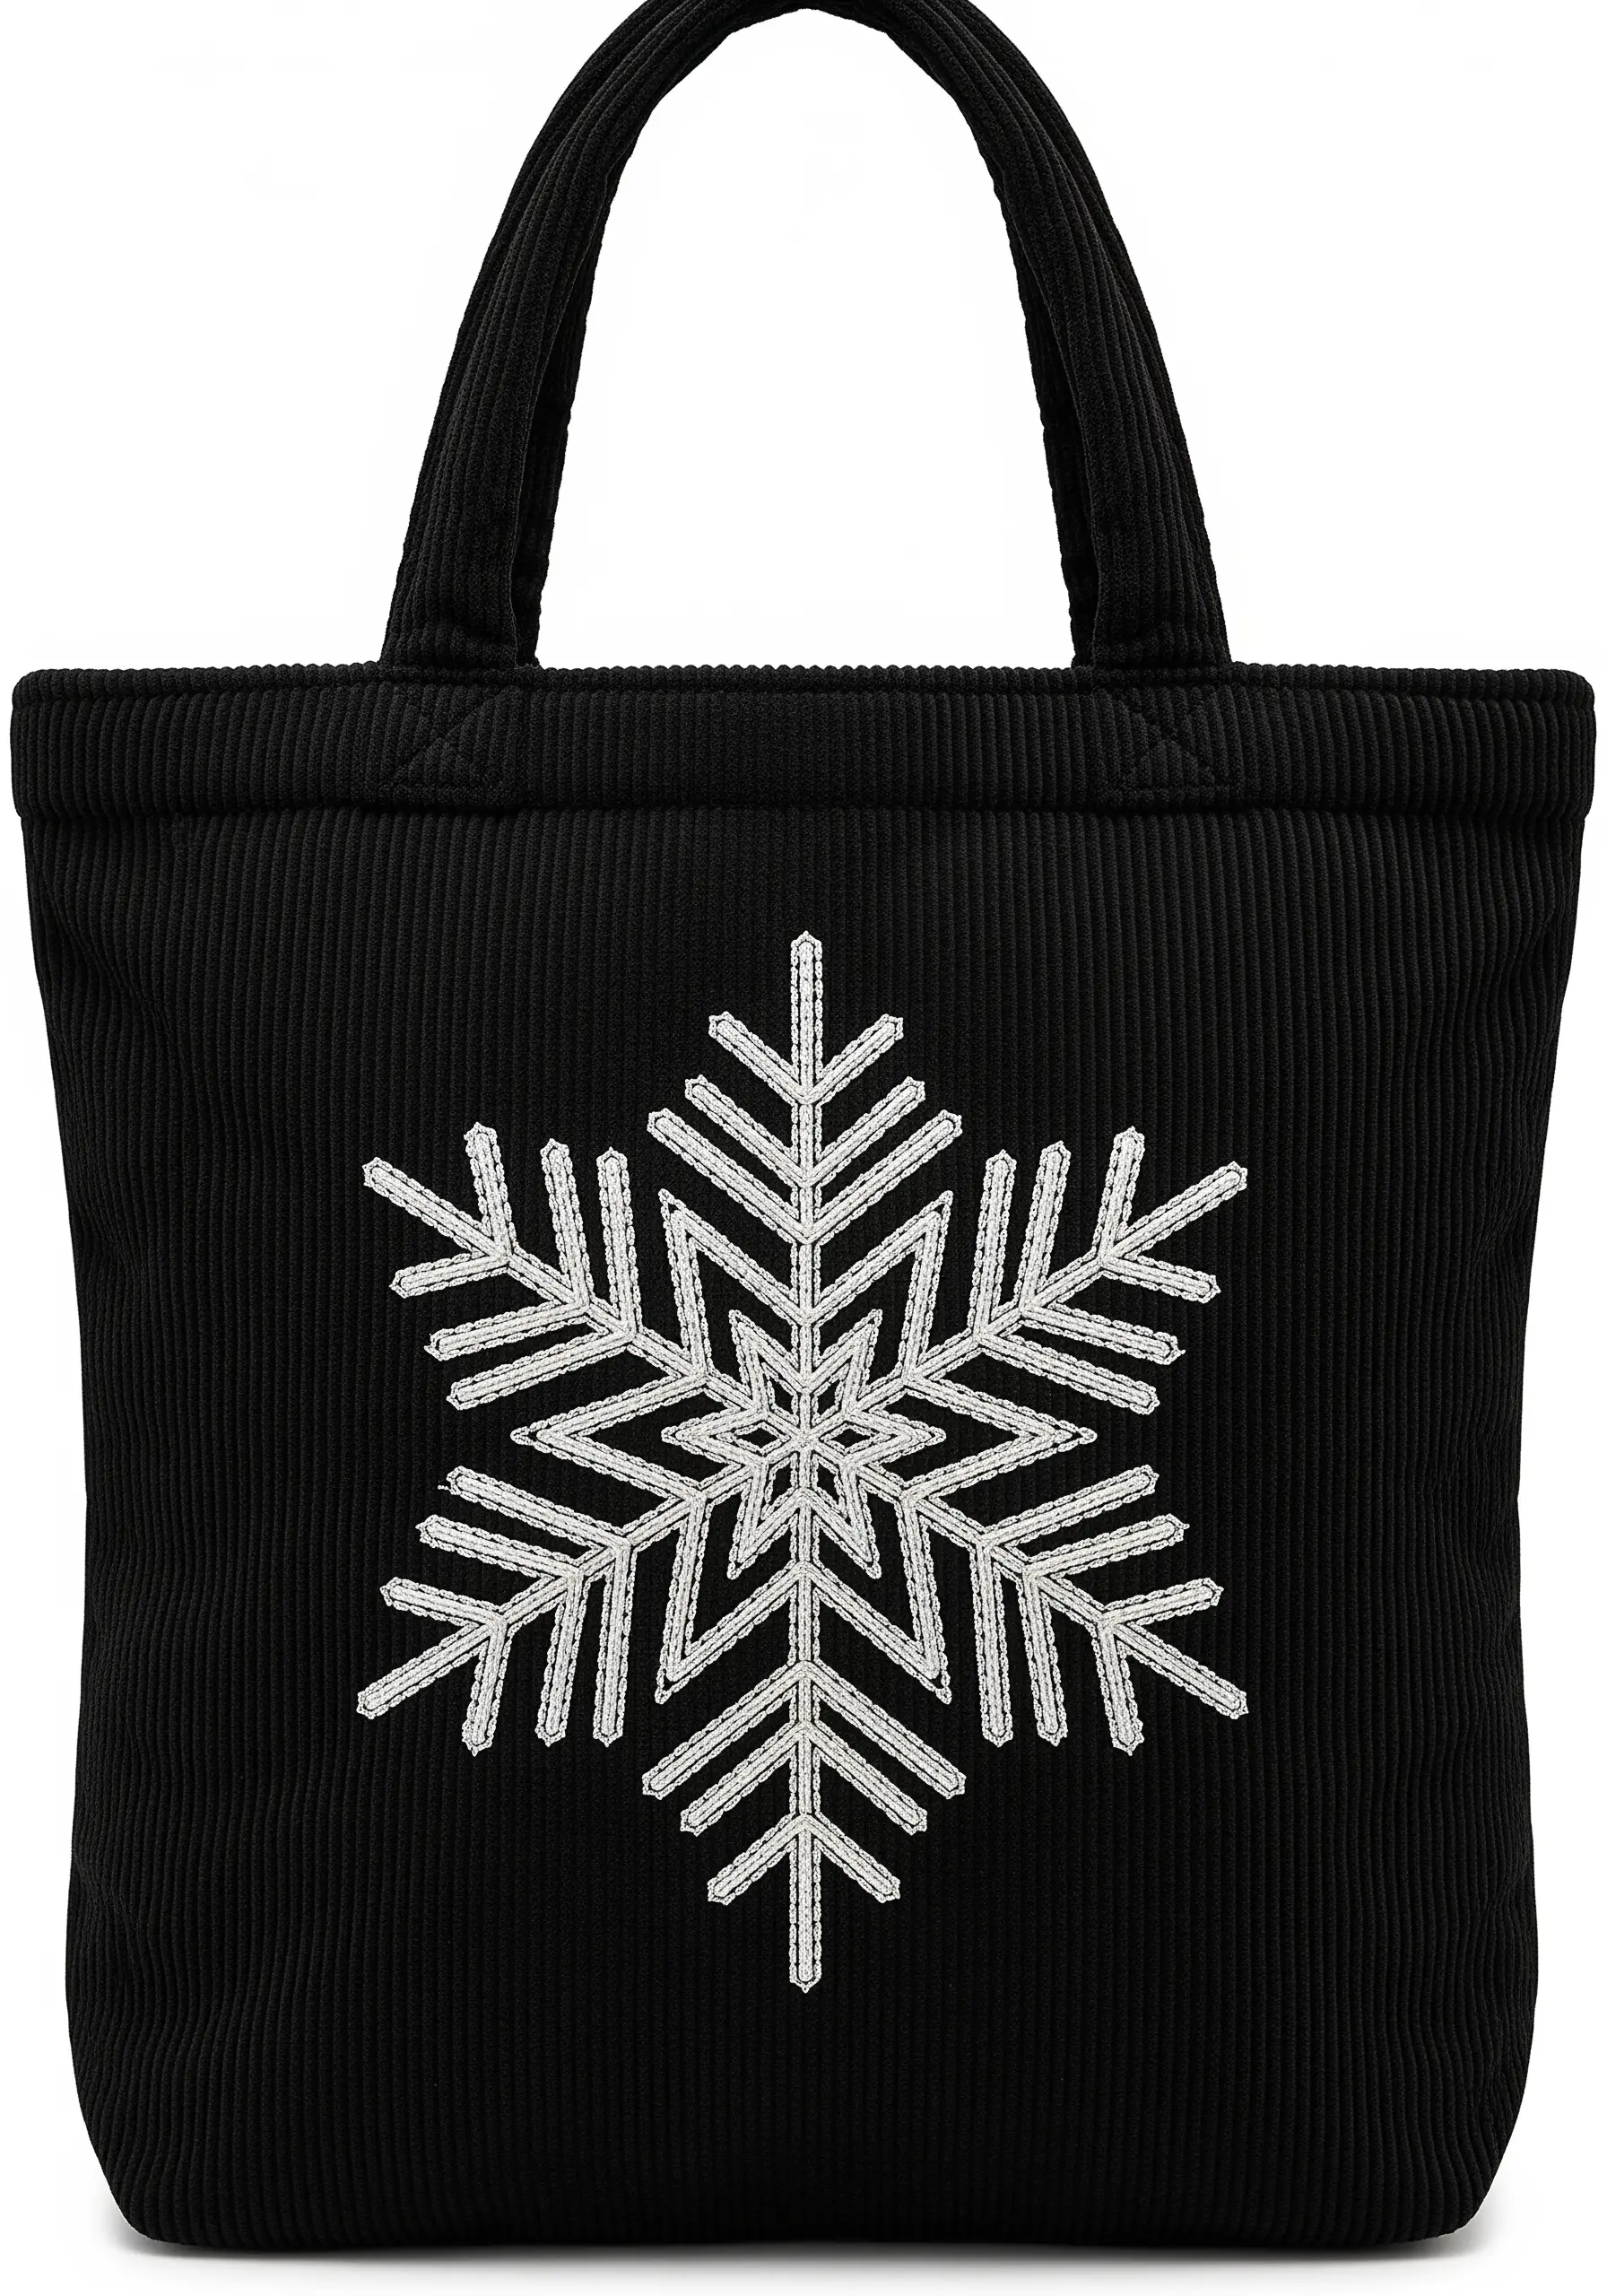
To give a snowflake motif an icy, crystalline shimmer, incorporate tiny seed beads.
First, embroider the main structure of the snowflake using a silver or white backstitch.
Then, go back and secure a single clear or silver seed bead at the tip of each branch and at the center.
This subtle embellishment catches the light and adds a delicate, textural sparkle that thread alone cannot achieve, perfect for a winter accessory.
20. Achieve Smooth Color Gradients with Thread Blending
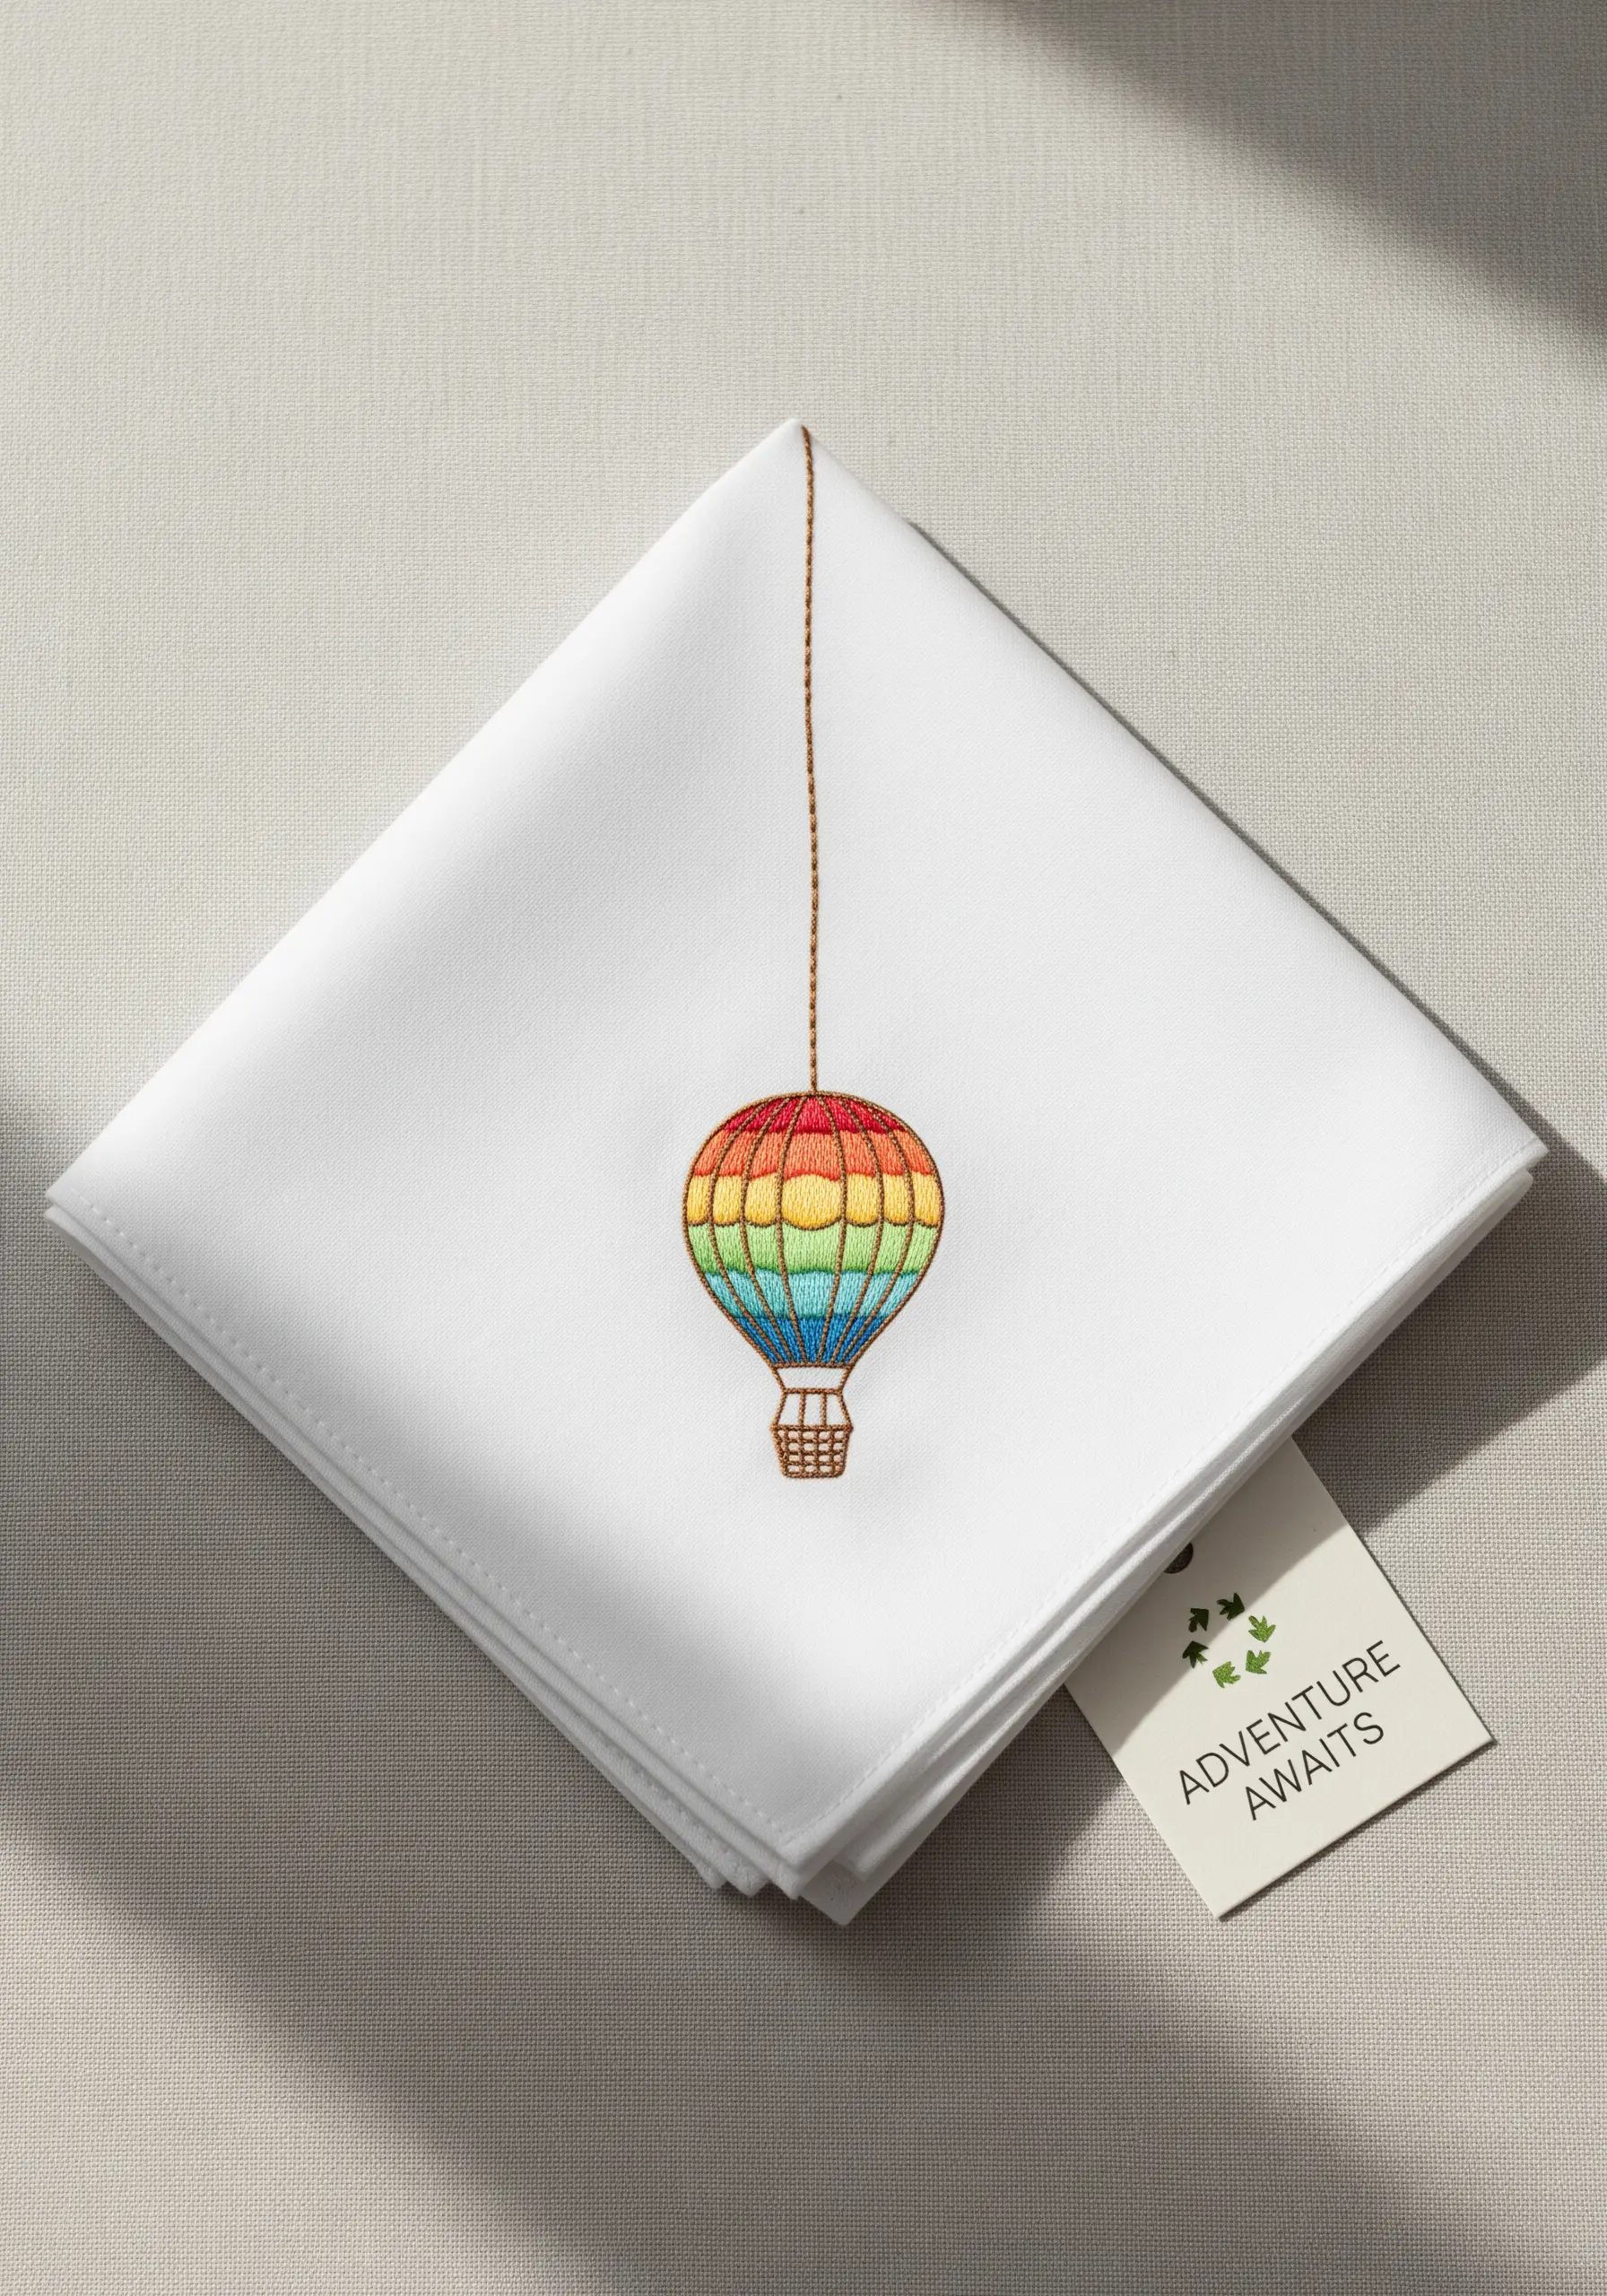
To create the smooth, rainbow-like gradient on a hot air balloon, you need to blend your threads.
Instead of switching abruptly from one color to the next, use one strand of the first color and one strand of the second color in your needle for a few rows.
This technique, used with a long-and-short stitch, creates a seamless transition between hues.
It gives the design a professional, painterly finish that makes the colors flow beautifully into one another.
21. Stitch a Personal Map onto Denim
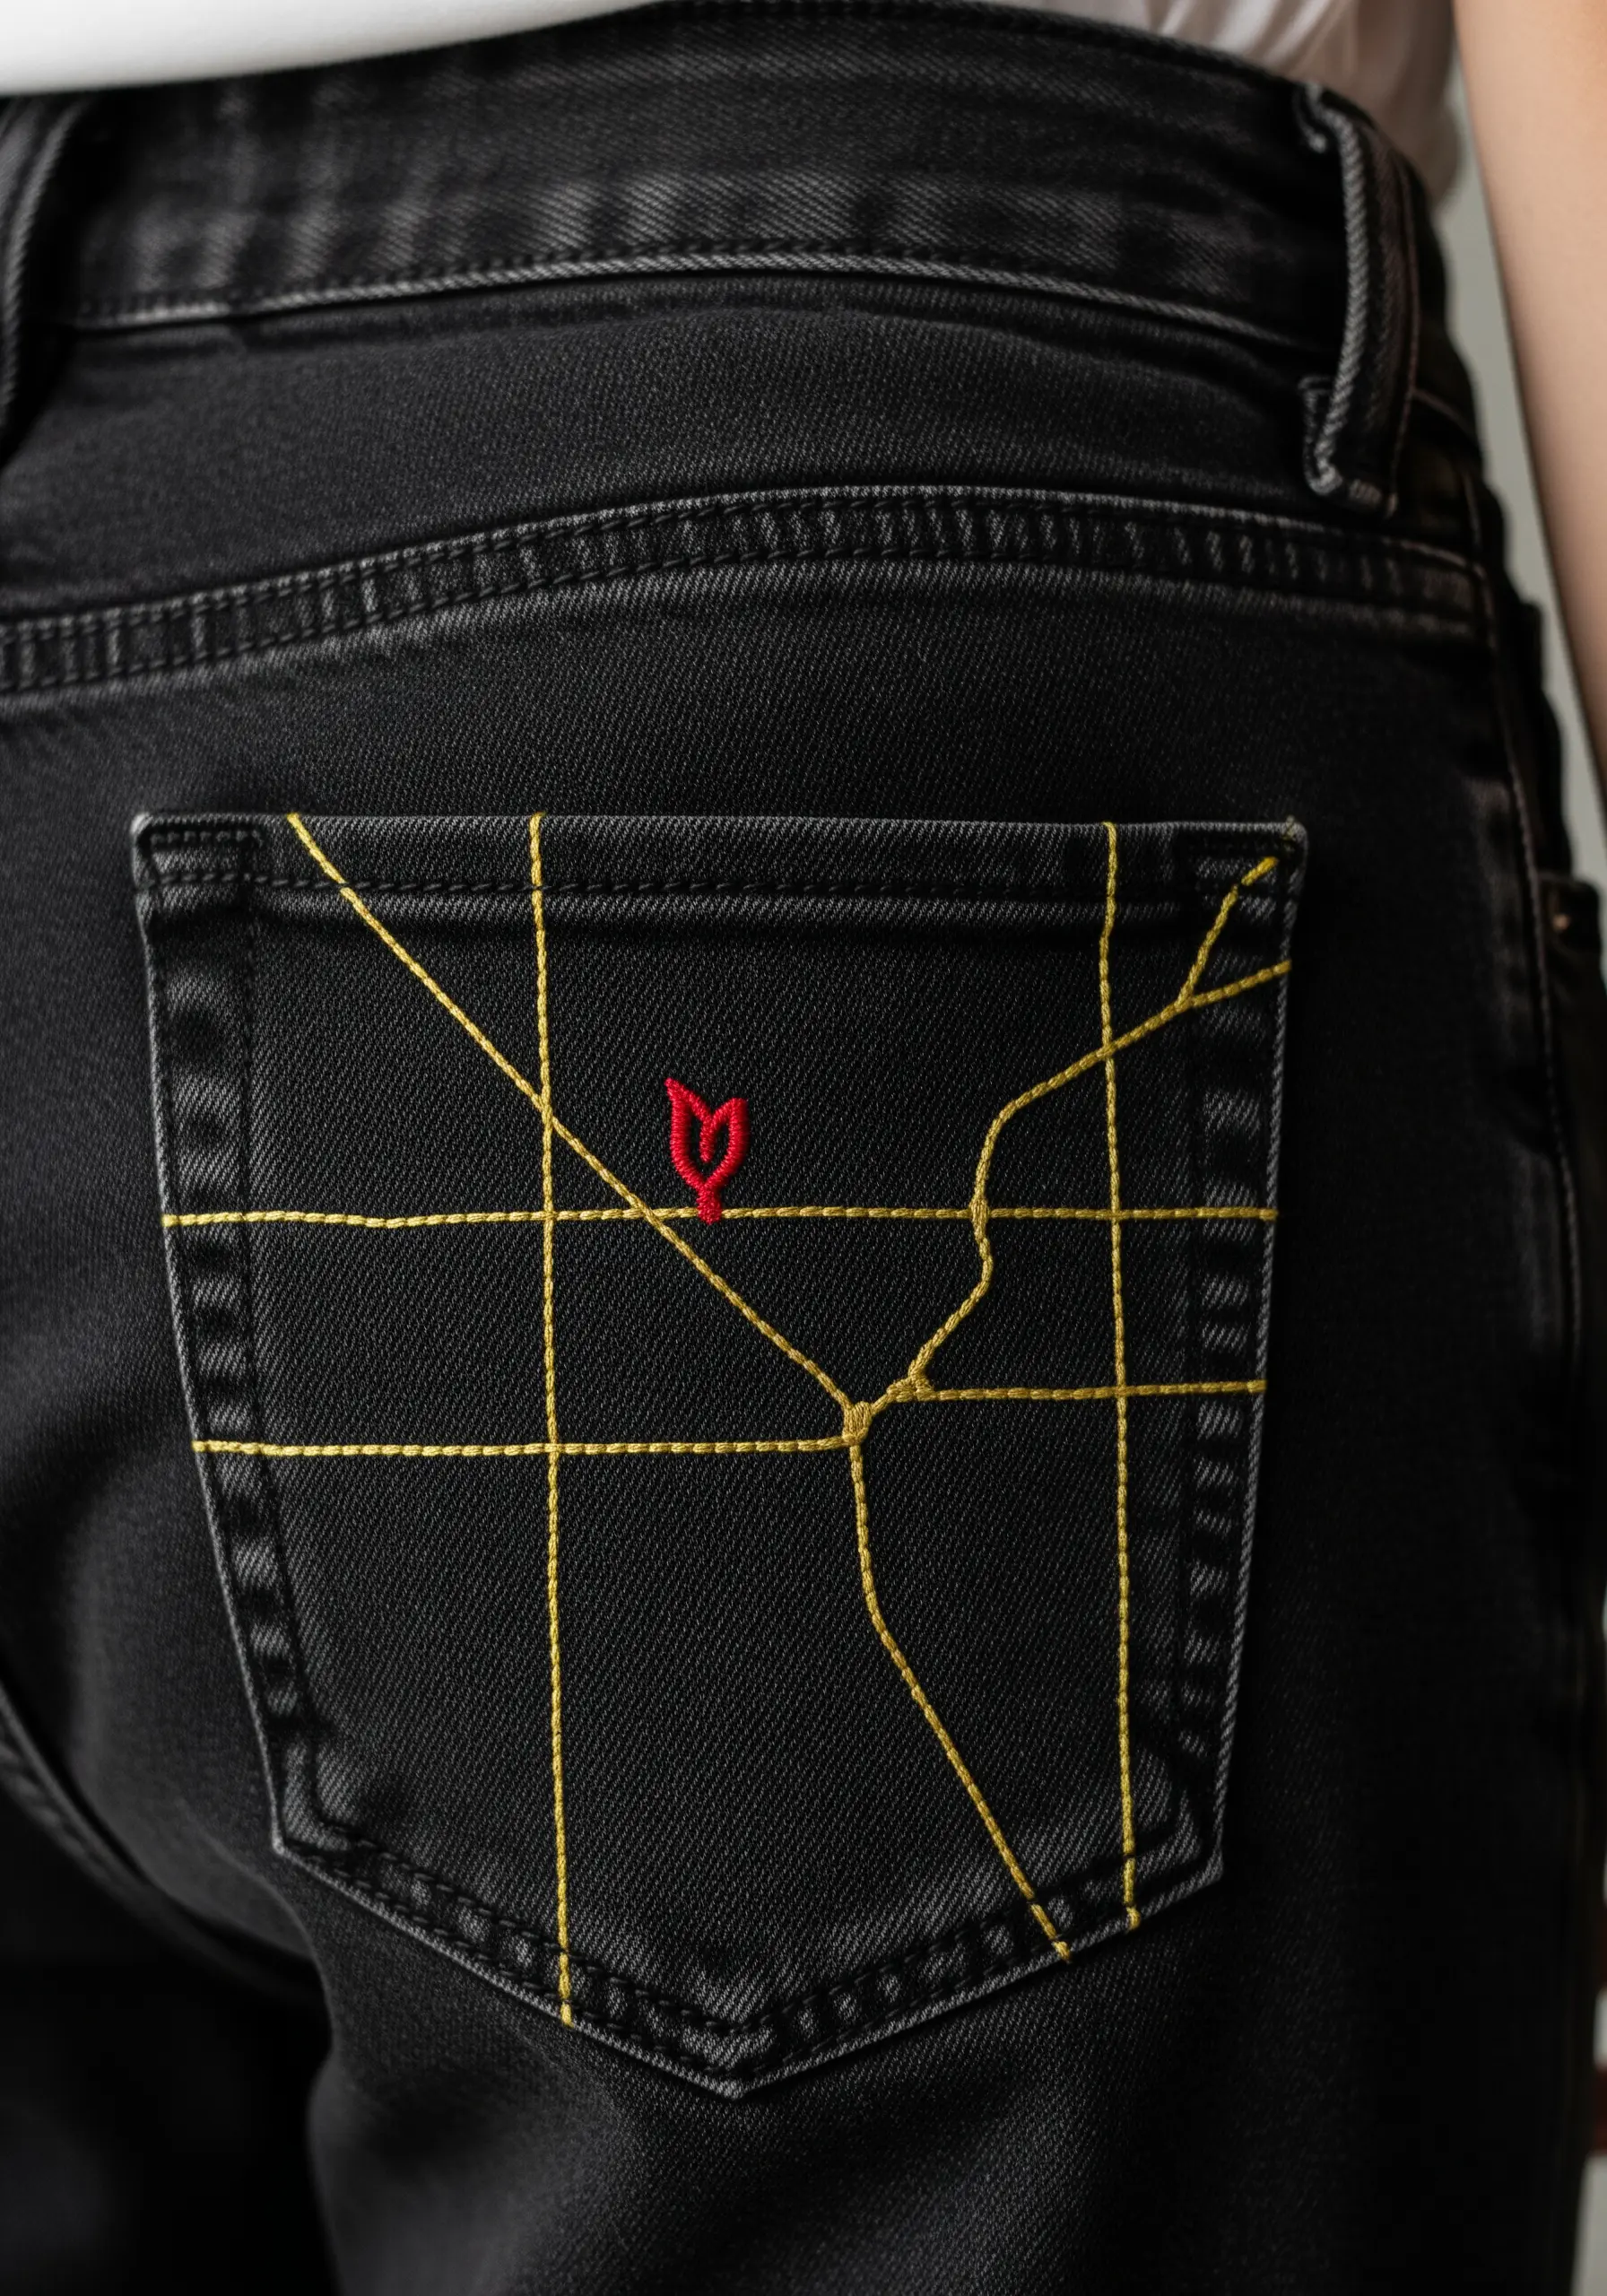
Turn a back pocket into a canvas for a personal journey by stitching a minimalist map.
Use a simple backstitch in a contrasting color, like yellow on black denim, to create the grid of streets or a coastline.
Mark a significant spot—a home, a favorite café, a first meeting—with a small, contrasting icon like a tiny heart or star.
This abstract design is a subtle, meaningful way to carry a memory with you.
22. Use Metallic Thread for a Subtle Glow
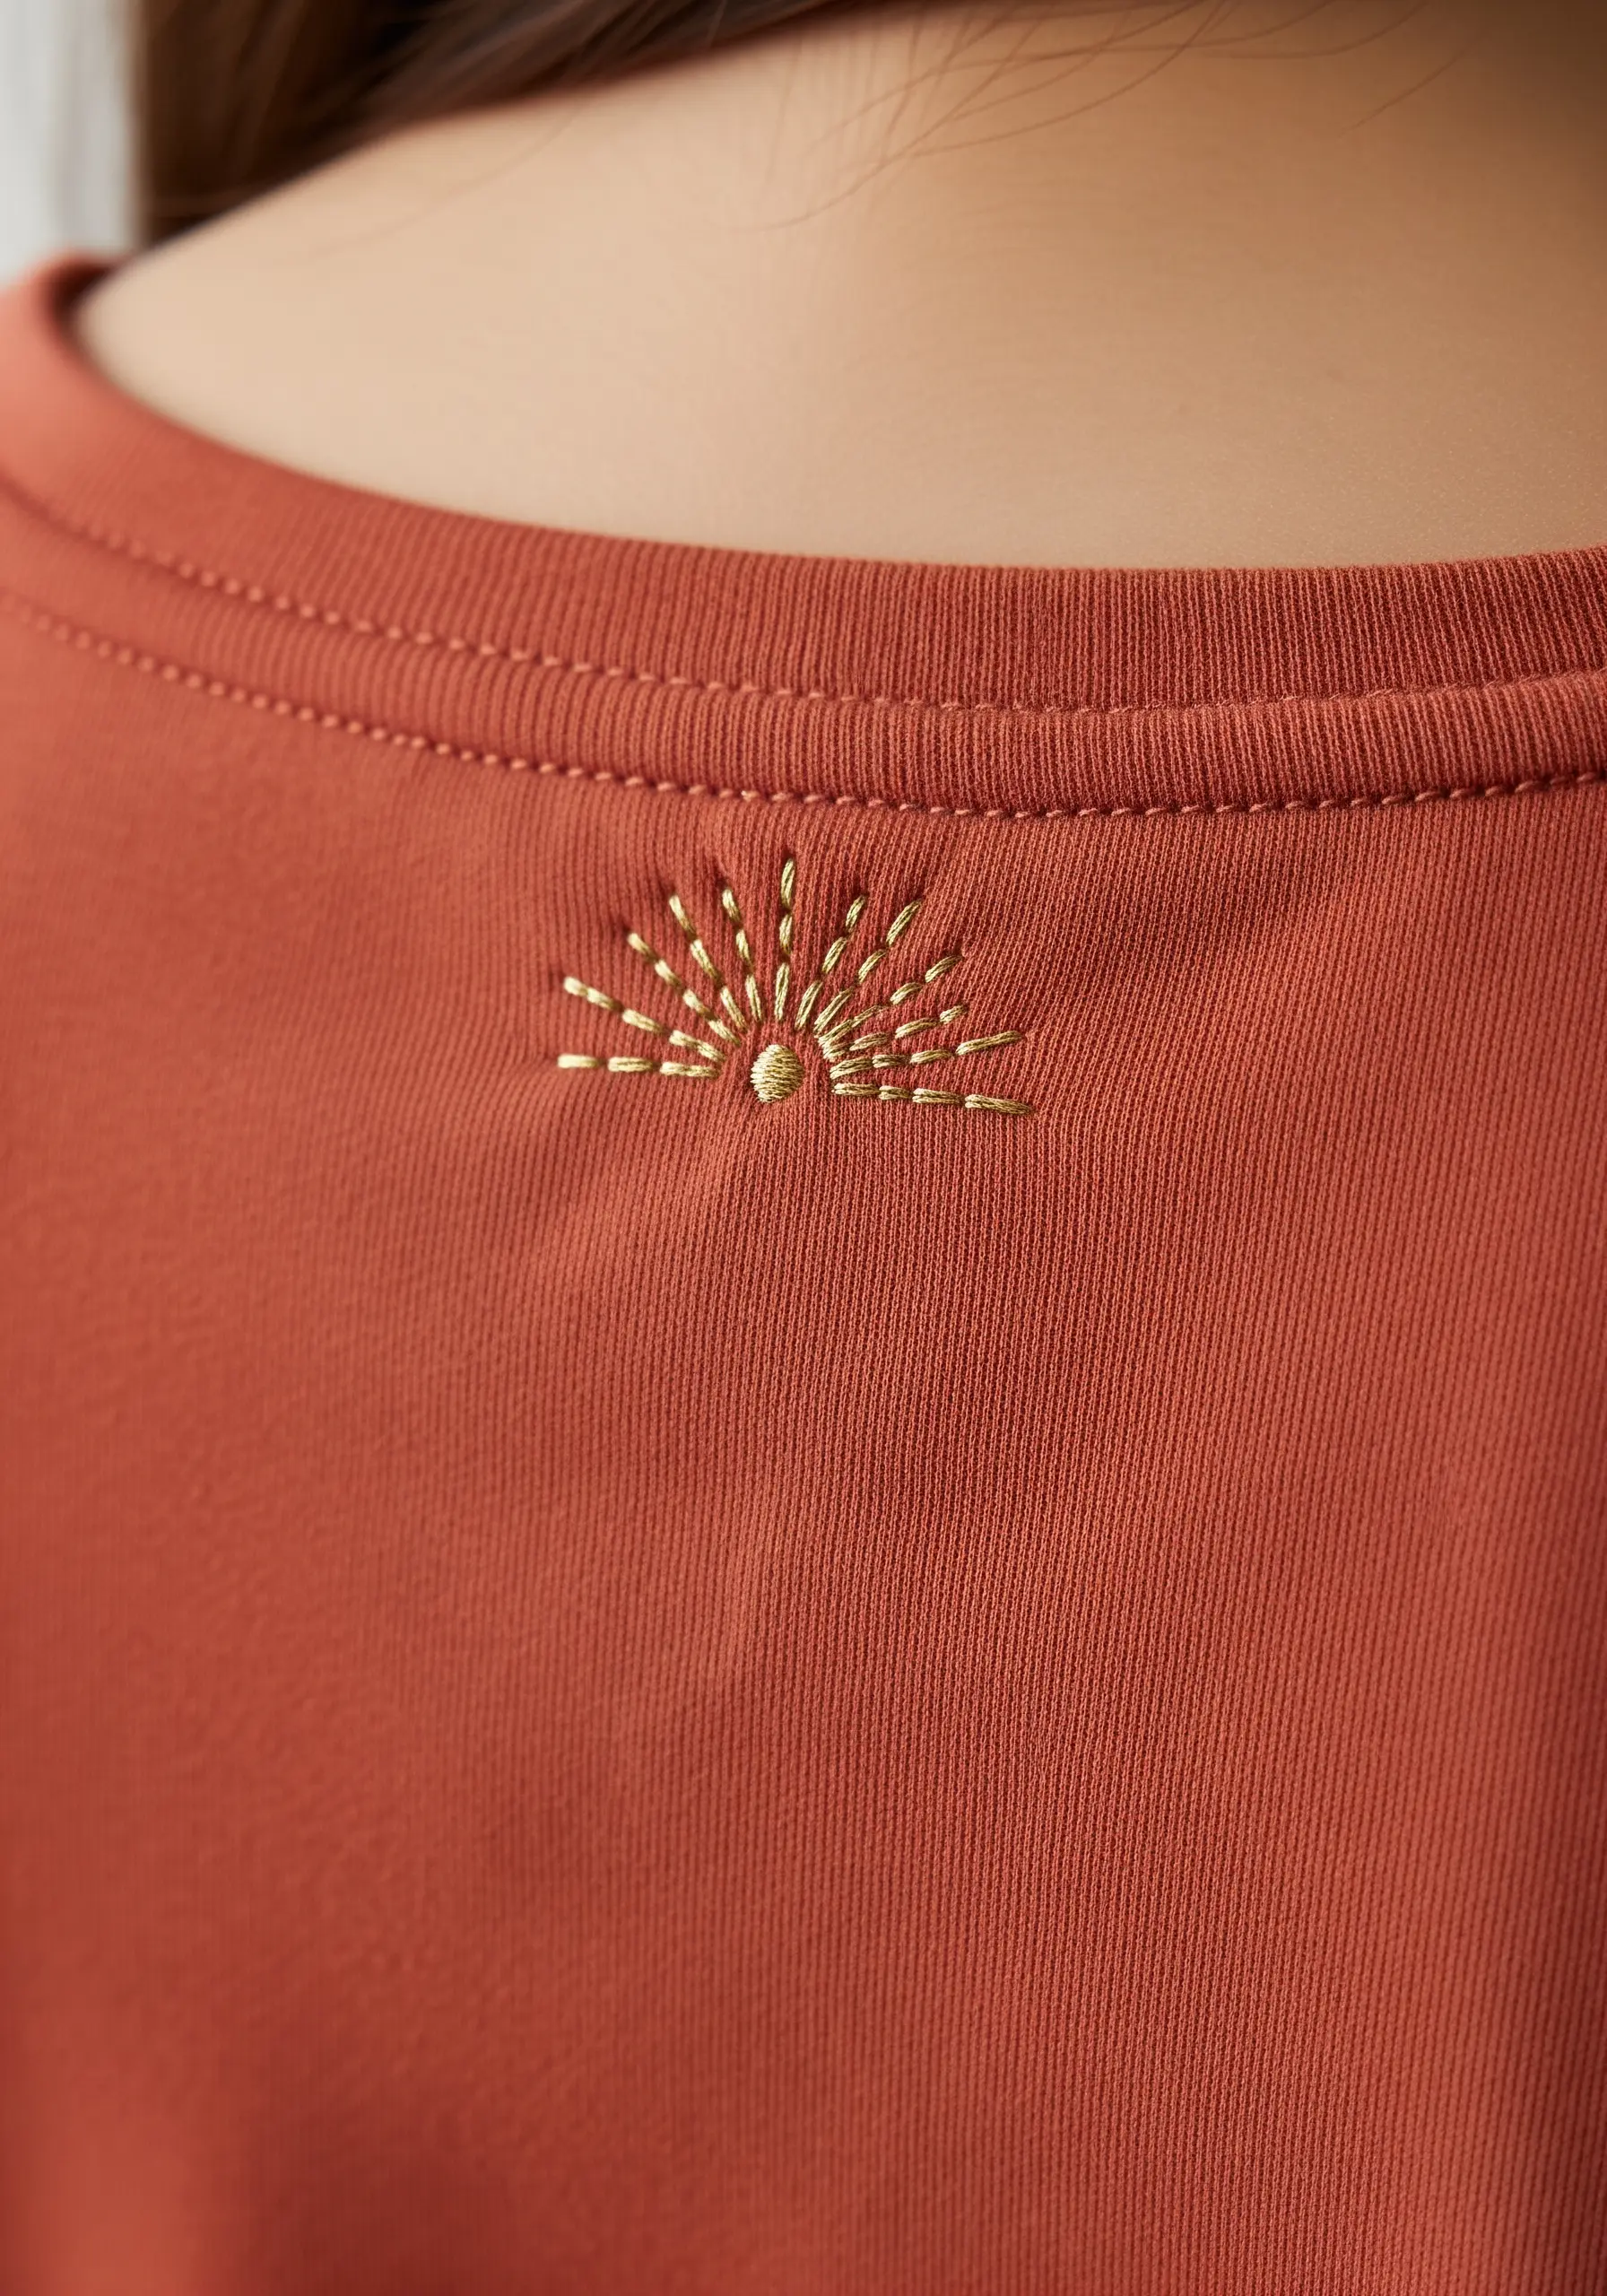
For an understated yet elegant effect, use metallic thread on a tonal background.
Stitch a simple sunrise or sunset motif using radiating straight stitches.
On a matte fabric like cotton jersey, the metallic thread will catch the light subtly, creating a gentle shimmer rather than an overt sparkle.
This technique adds a touch of quiet luxury, perfect for an accent on the nape of a t-shirt or a sleeve cuff. Use a thread conditioner to make metallic floss easier to work with.
23. Create Crisp Shapes with Directional Satin Stitch
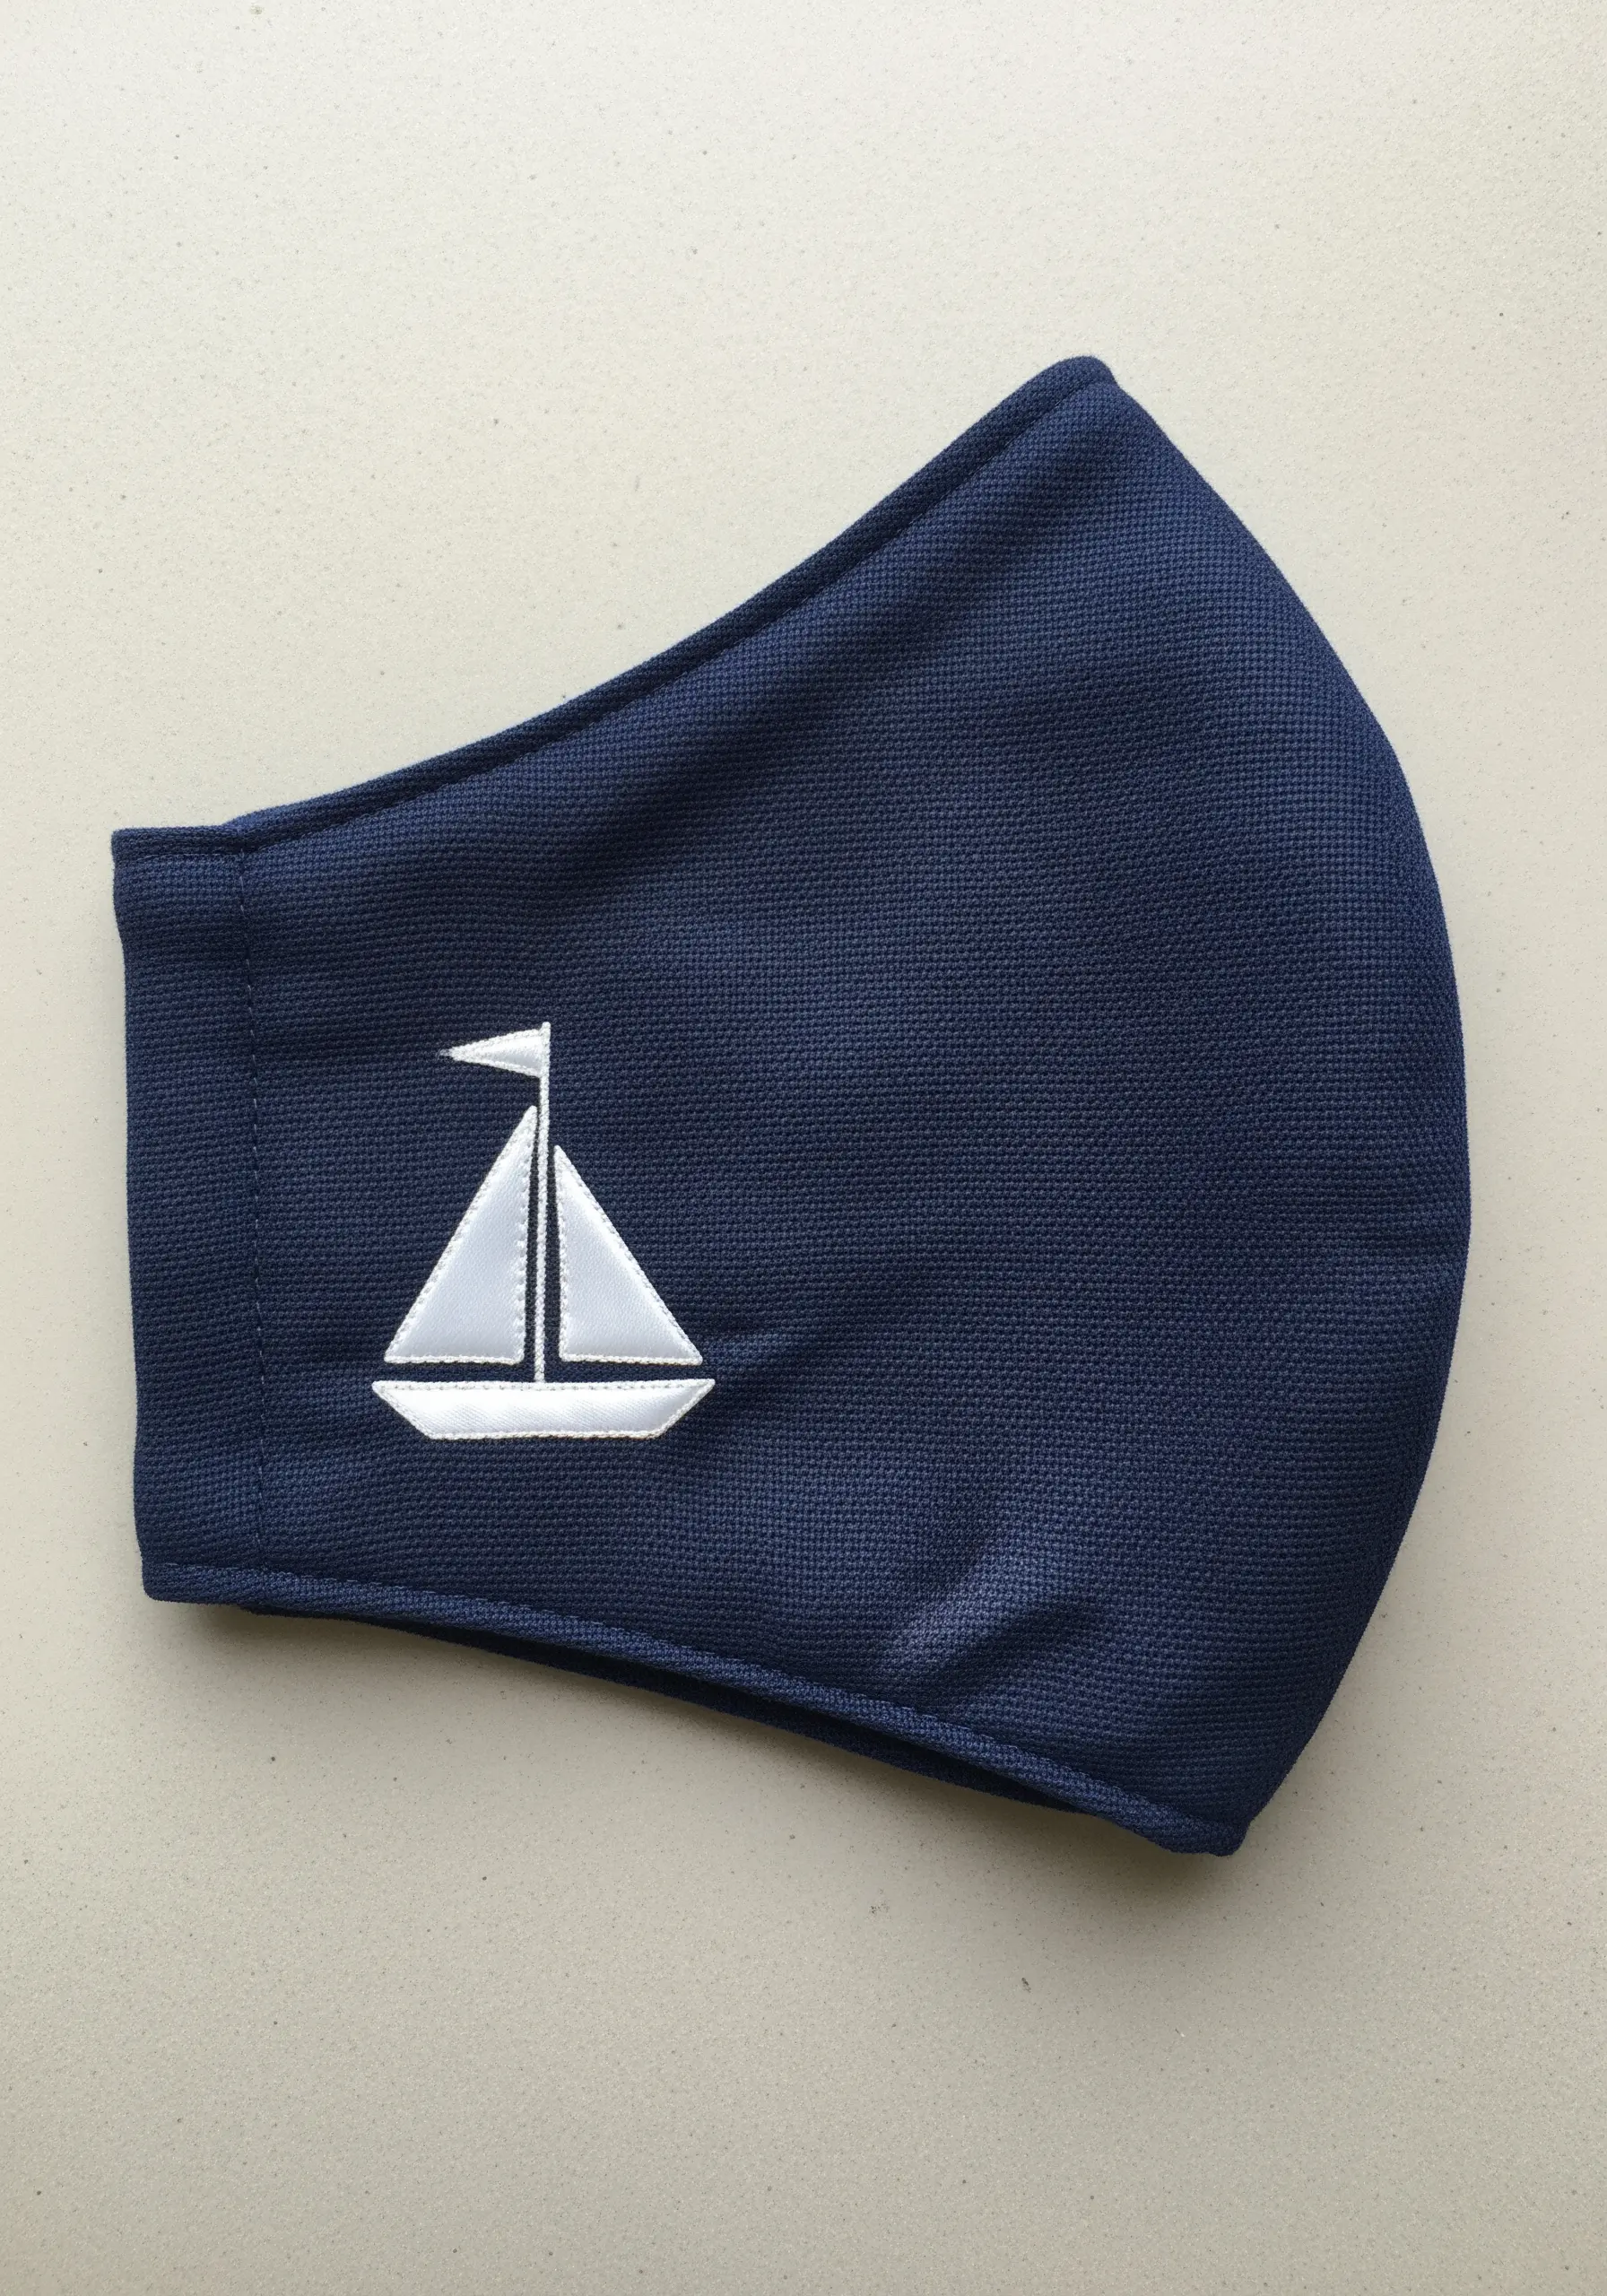
For geometric designs like a sailboat, the direction of your satin stitches is crucial for a clean finish.
Divide the shape into smaller, manageable sections—in this case, two triangles for the sail.
Stitch each section with parallel satin stitches, ensuring the angle of your stitches is consistent within each shape.
This precision prevents the stitches from looking messy and defines the crisp, angular lines of the motif.
24. Add a Secret Detail to a Shirt Placket
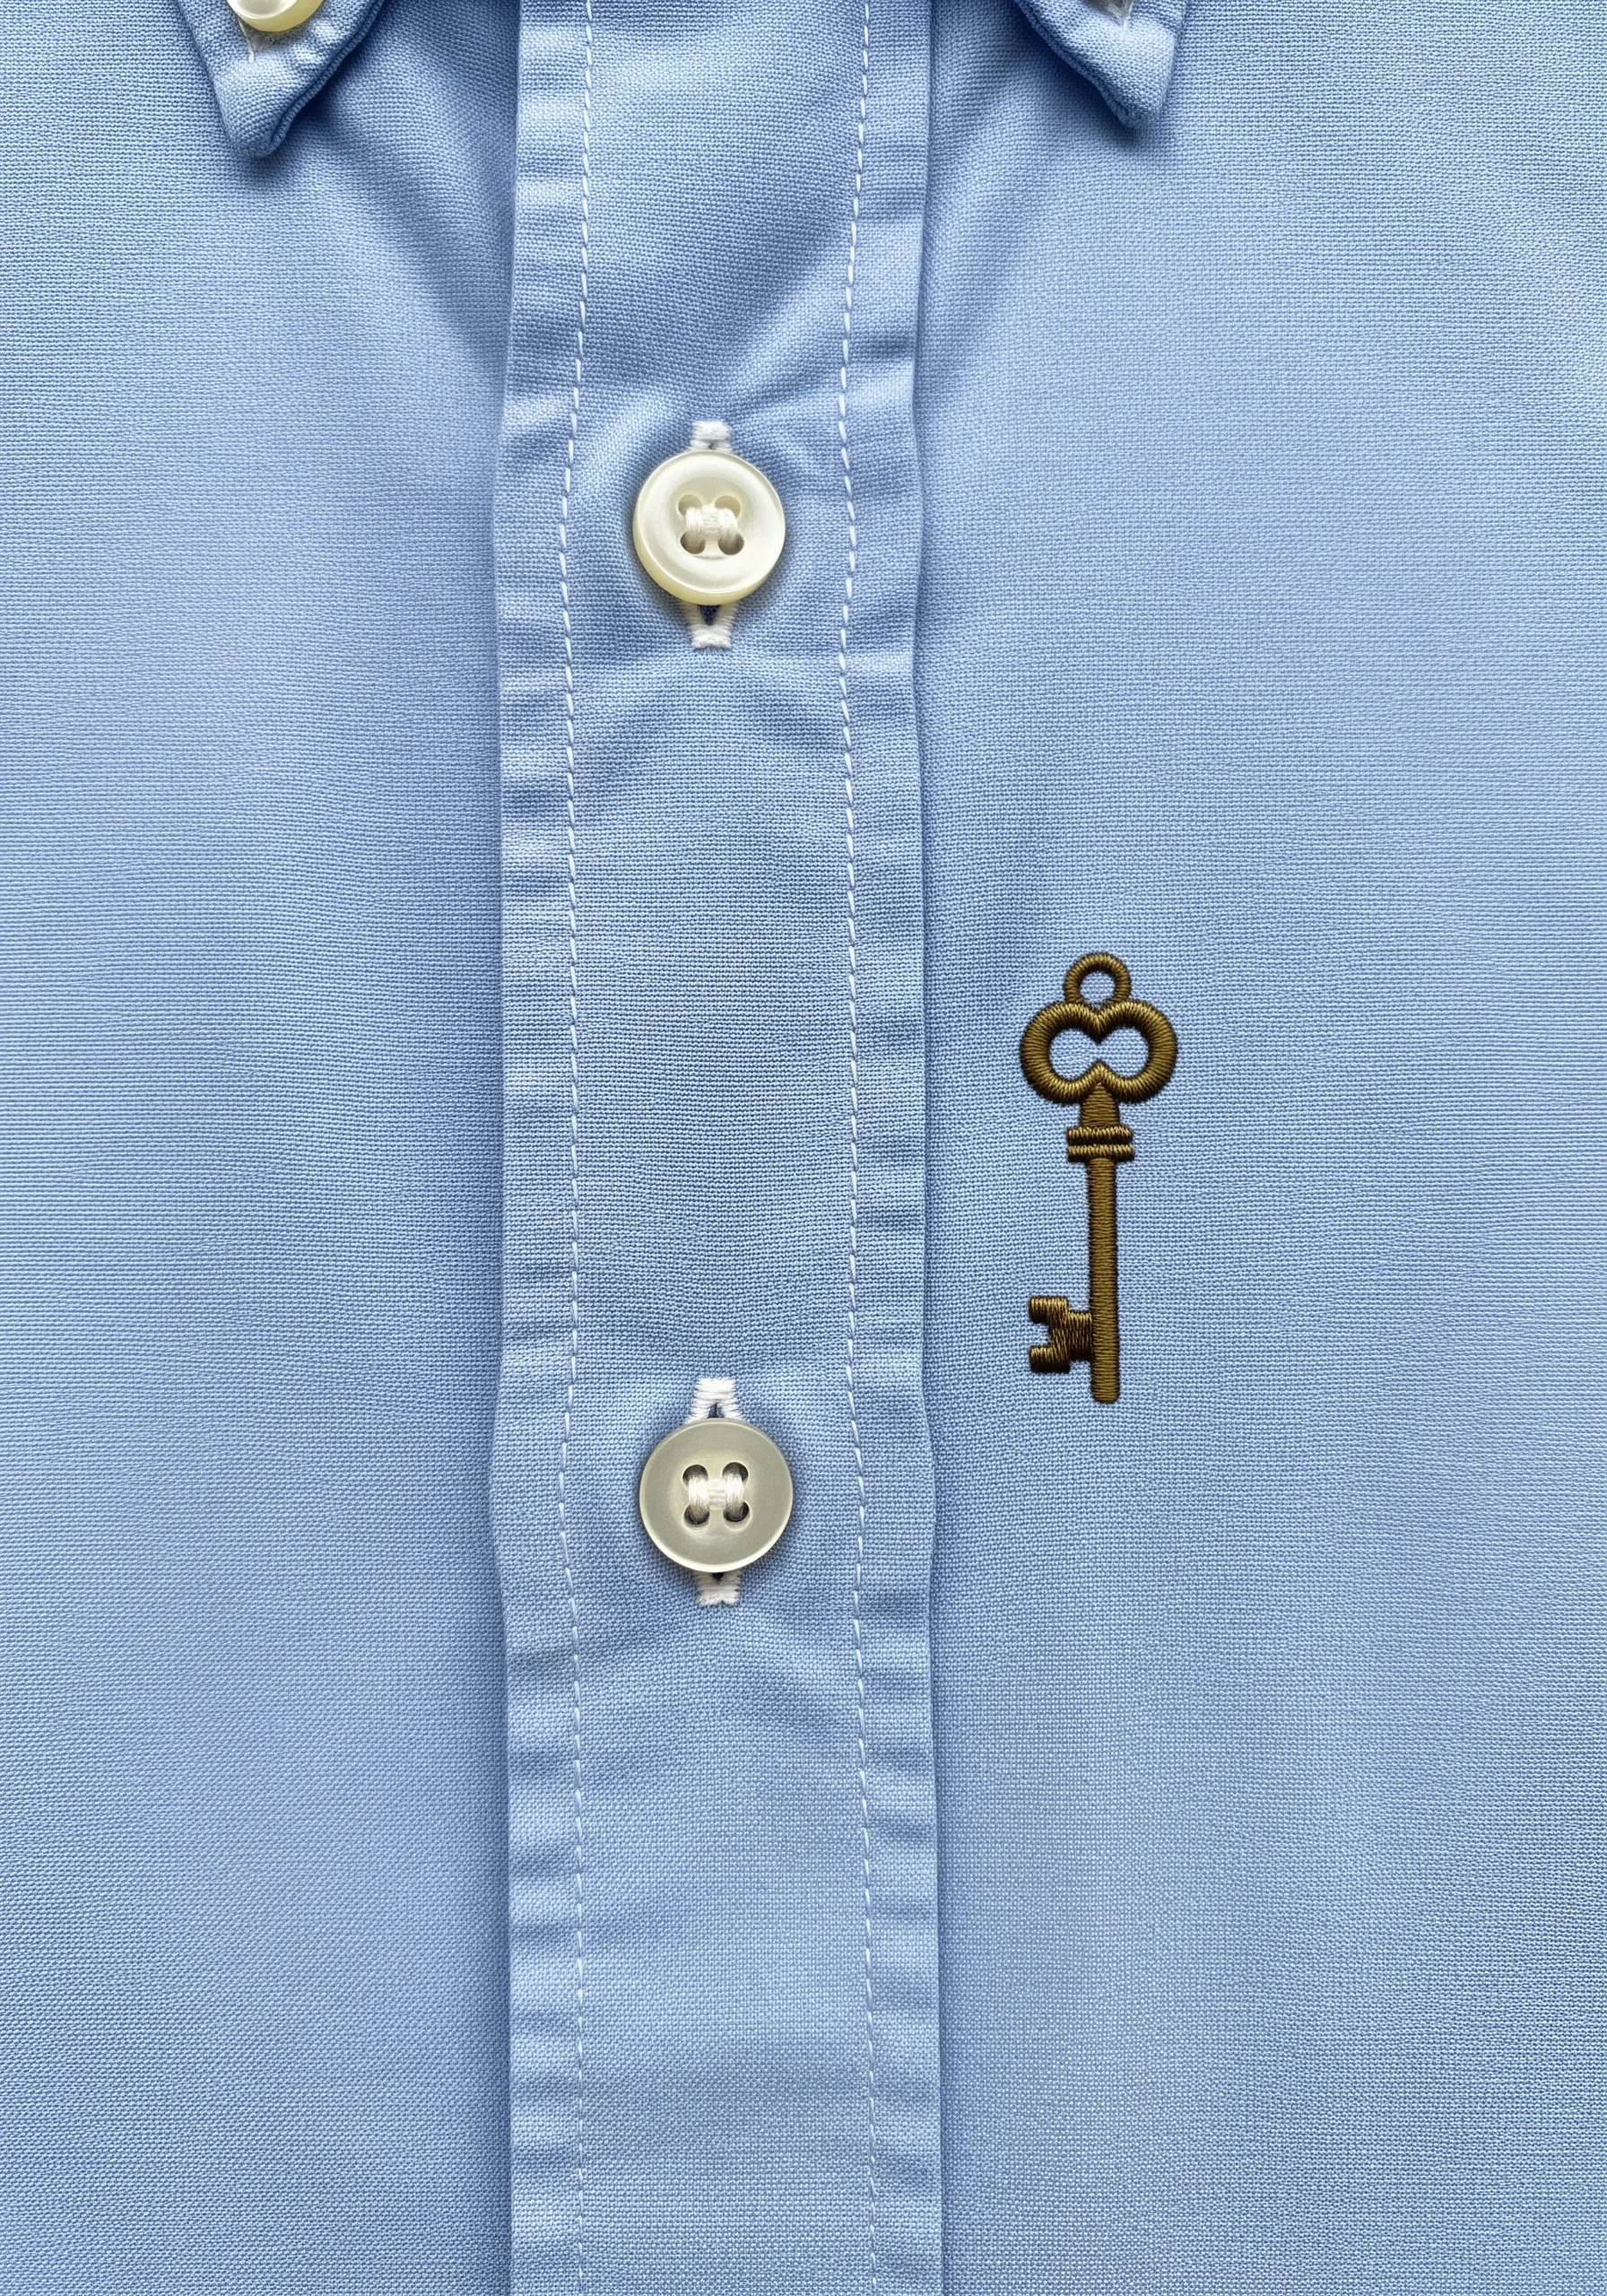
Place a tiny, unexpected motif alongside the buttons of a shirt for a discreet personal touch.
Choose a simple, symbolic object, like a vintage key, and render it with a detailed split stitch or a fine satin stitch.
The small scale and unusual placement make it a subtle discovery rather than a loud statement.
This is a sophisticated way to customize a classic piece of clothing, making it uniquely yours.
25. Achieve Realistic Leaves with a Fishbone Stitch
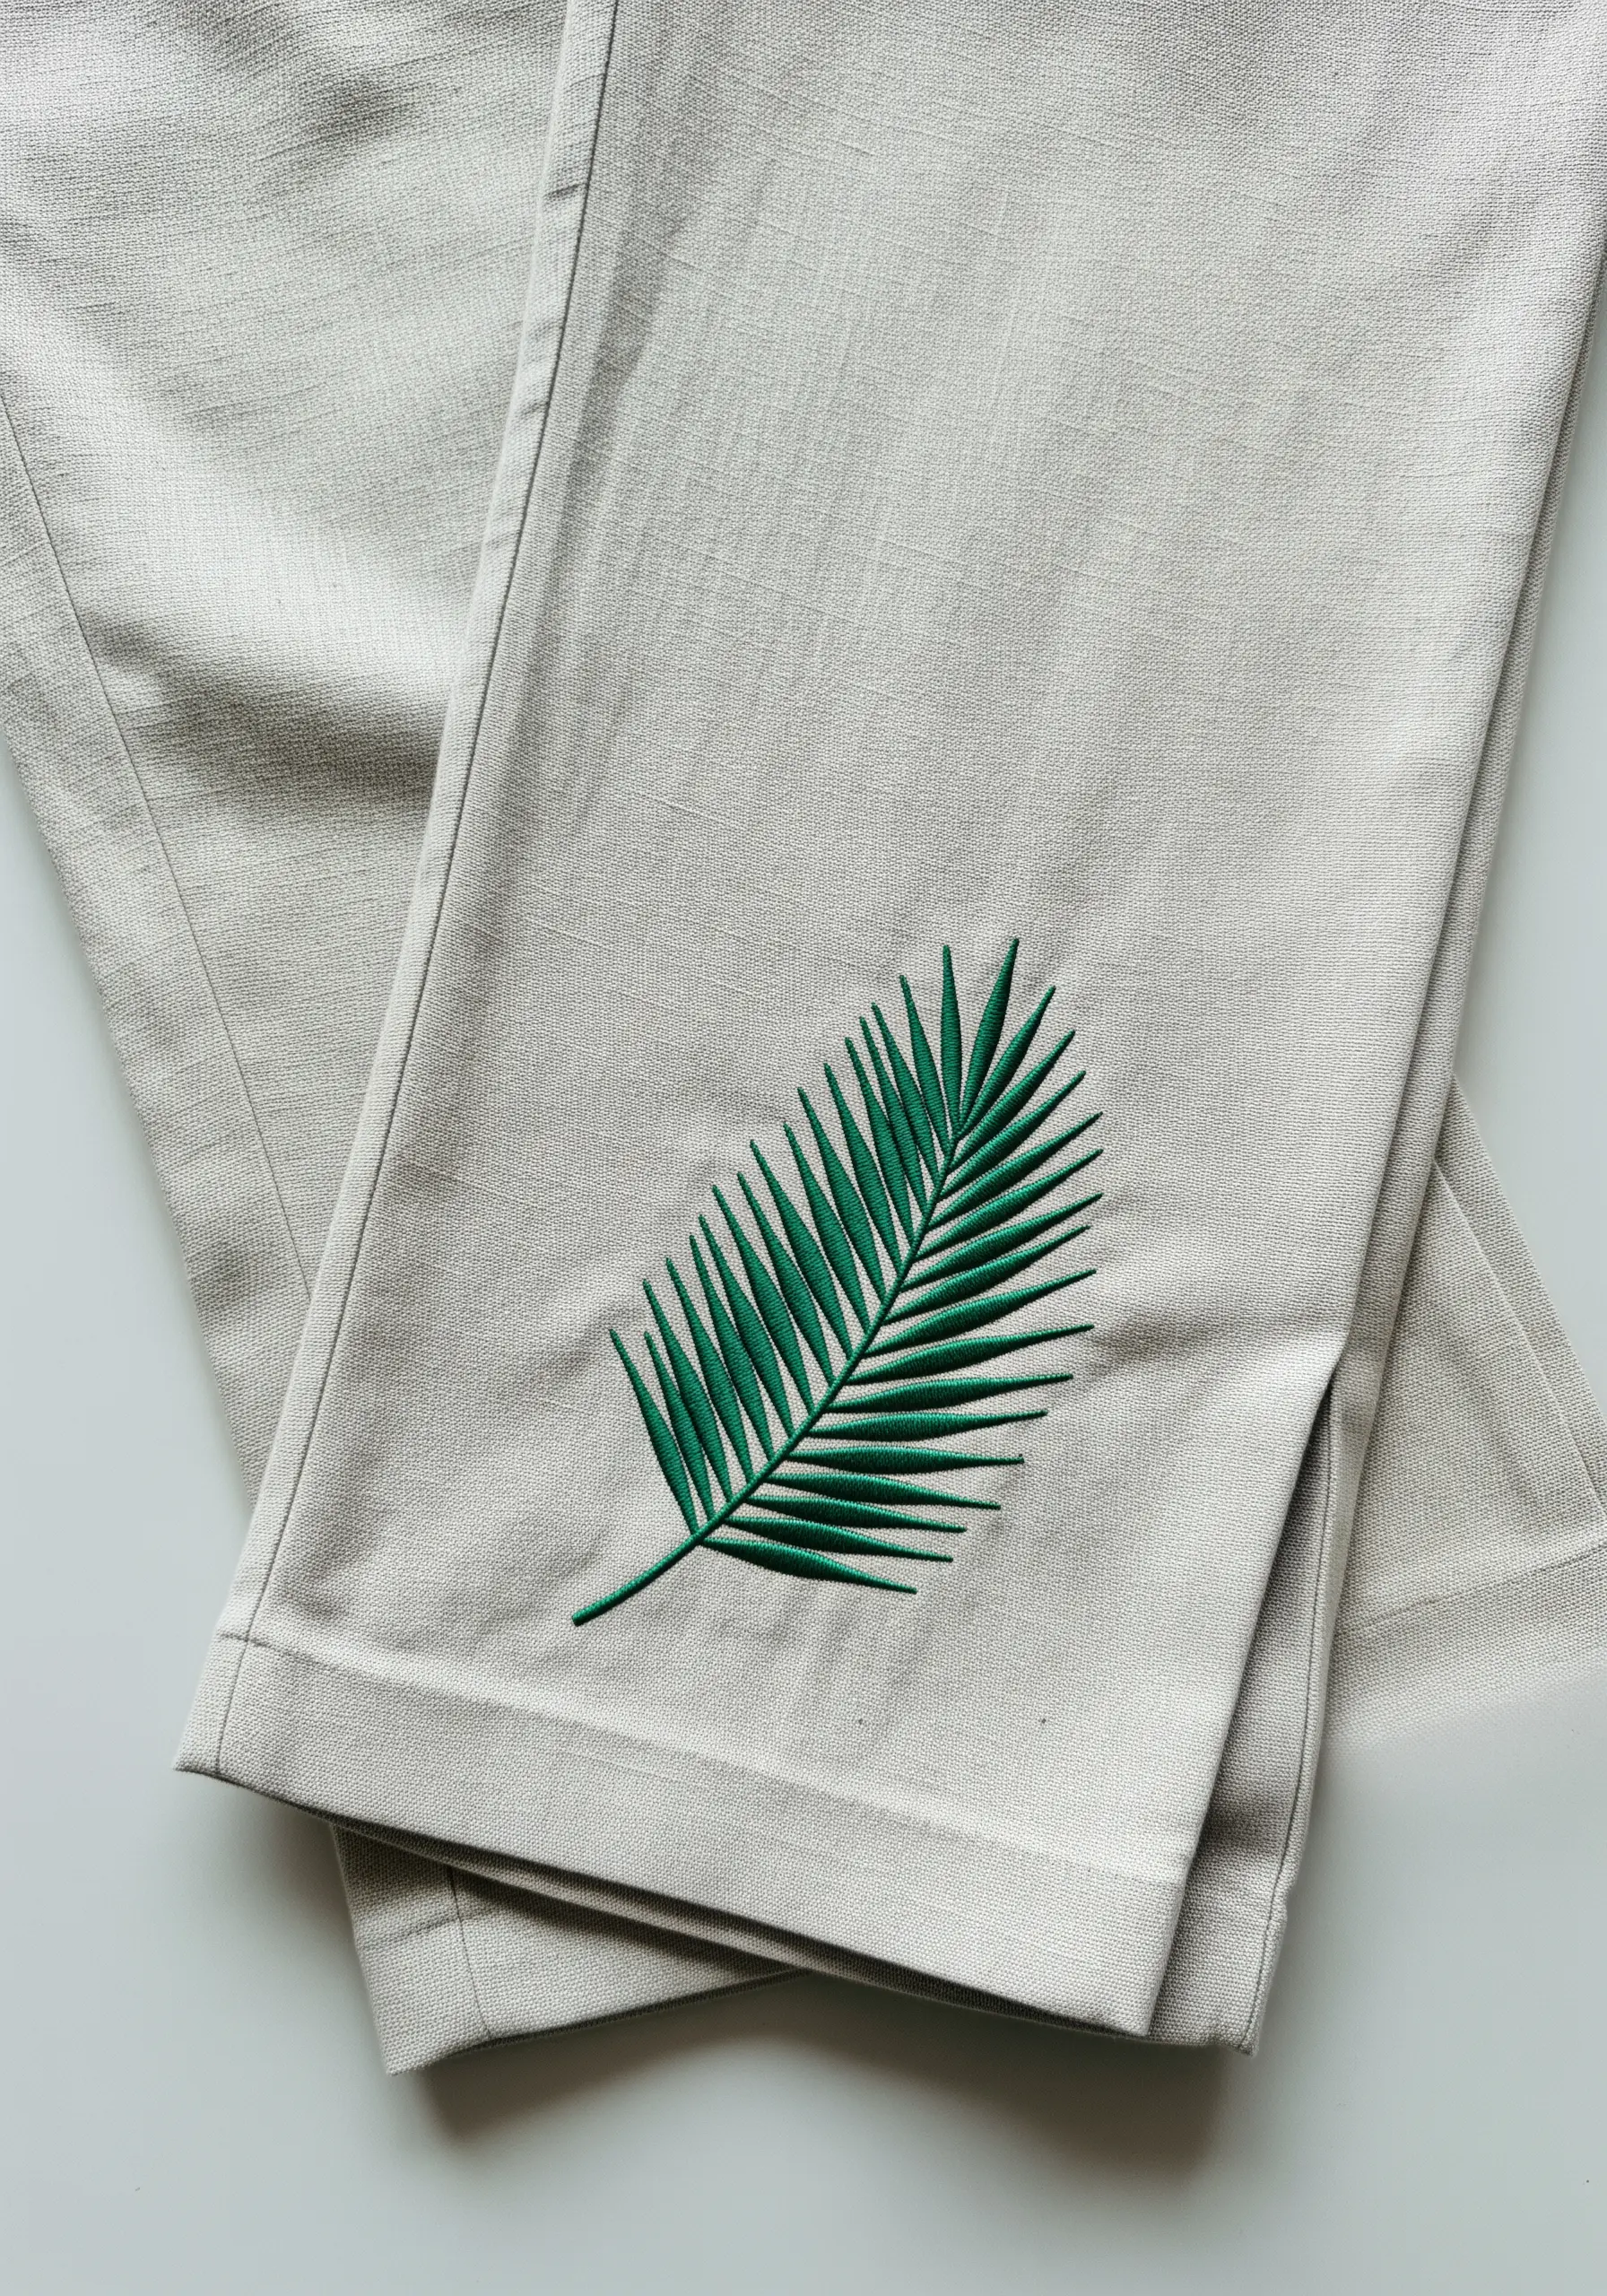
The fishbone stitch is the perfect choice for creating natural-looking leaves with a defined central vein.
You work the stitch from the tip of the leaf downwards, alternating sides and crossing the threads slightly in the center.
This action automatically creates the raised spine and angles the stitches outward, mimicking the structure of a real leaf.
It’s an efficient stitch that provides both fill and texture in one motion for any fern & foliage stitch variations.
26. Map the Stars with French Knots and Running Stitches
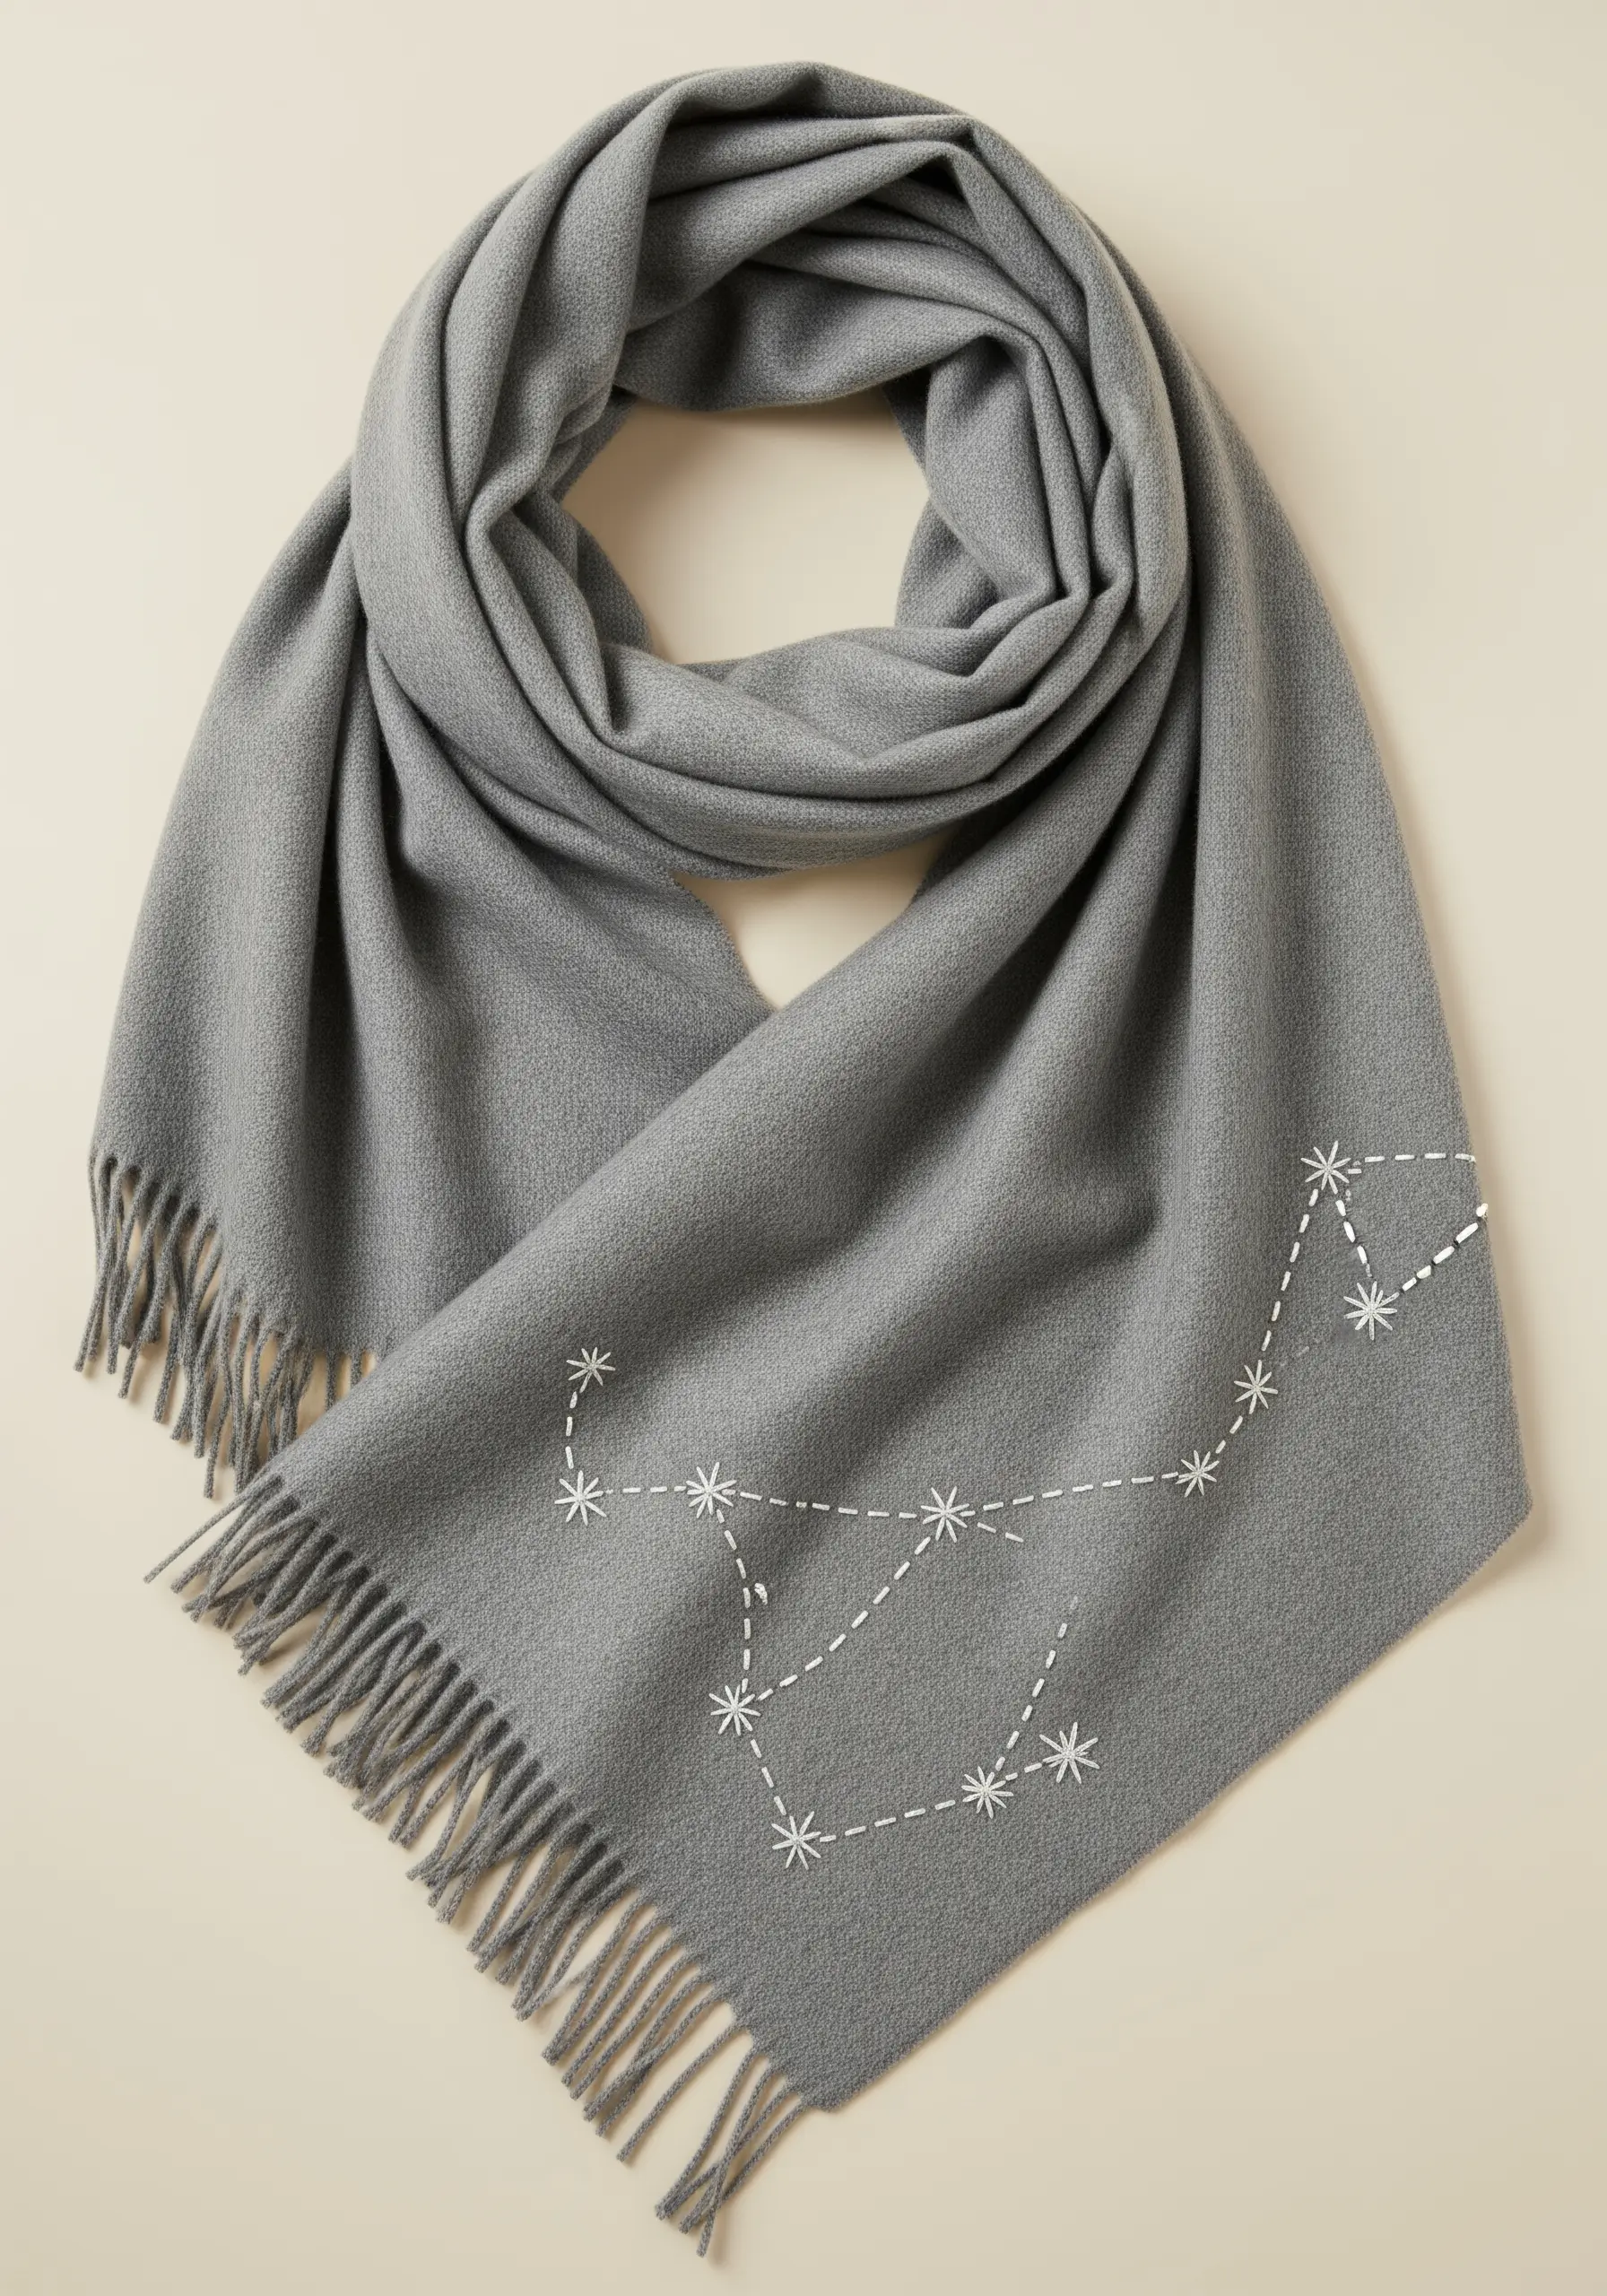
To embroider a constellation, combine two simple stitches for a delicate, celestial effect.
Use small French knots or star stitches to represent the individual stars—vary the number of wraps on your French knots for stars of different magnitudes.
Then, connect them with a faint, dashed running stitch in the same color thread.
The resulting design feels airy and ethereal, perfect for embellishing a soft woolen scarf or the corner of a blanket.
27. Make Lettering Pop with a Padded Satin Stitch
To give your embroidered text a raised, three-dimensional effect, use padding underneath your satin stitches.
First, stitch the letters using a simple running stitch or split stitch just inside the outline of your word.
Then, cover this padding with smooth, even satin stitches laid perpendicular to the padding stitches.
This technique makes the text physically stand up from the fabric, giving it a professional, high-quality finish on a duffel bag or pouch.
For more refined tiny lettering embroidery ideas, use fewer strands.
28. Achieve Fine Lines with a Single-Thread Backstitch
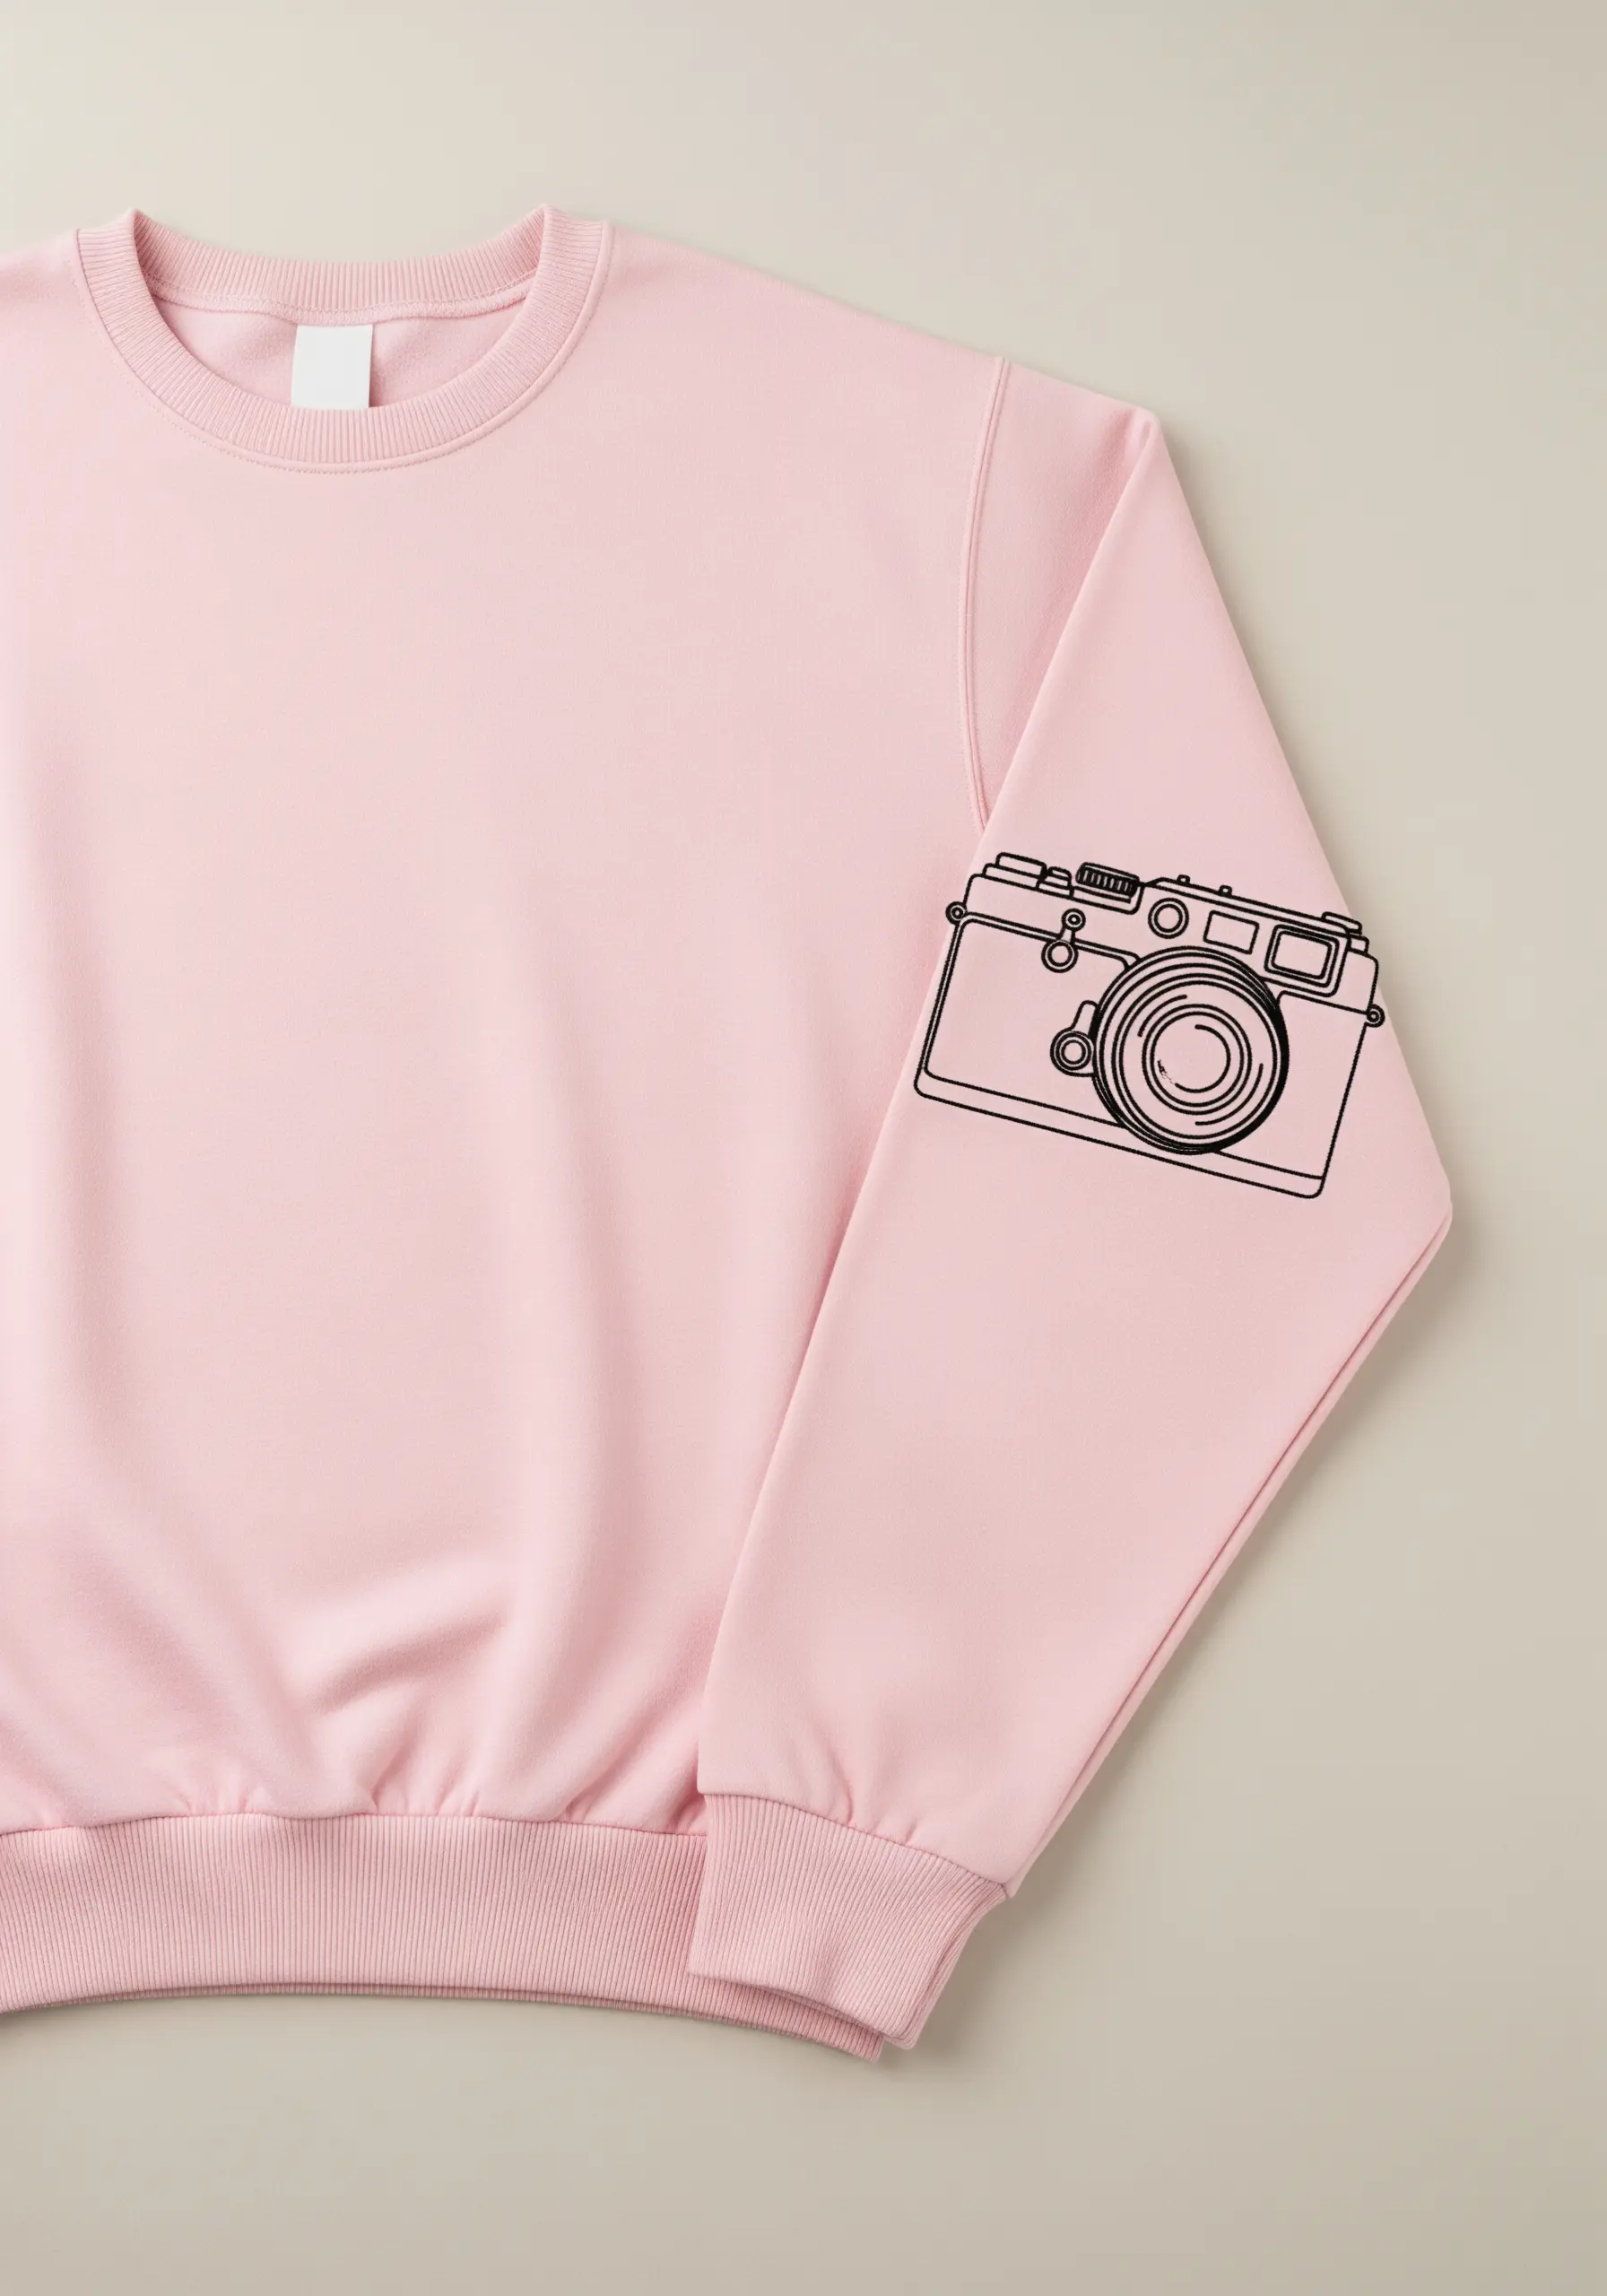
For designs with intricate, fine-line details like a vintage camera, resist the urge to use thick thread.
Use only a single strand of six-strand floss and a sharp, small needle.
Stitch the entire outline with a tiny backstitch, keeping your stitch length consistent.
This approach ensures that all the small details—dials, buttons, lenses—remain crisp and clear, resulting in a design that looks like a delicate ink drawing on fabric.
29. Use a Contrasting Color for a Classic Accent
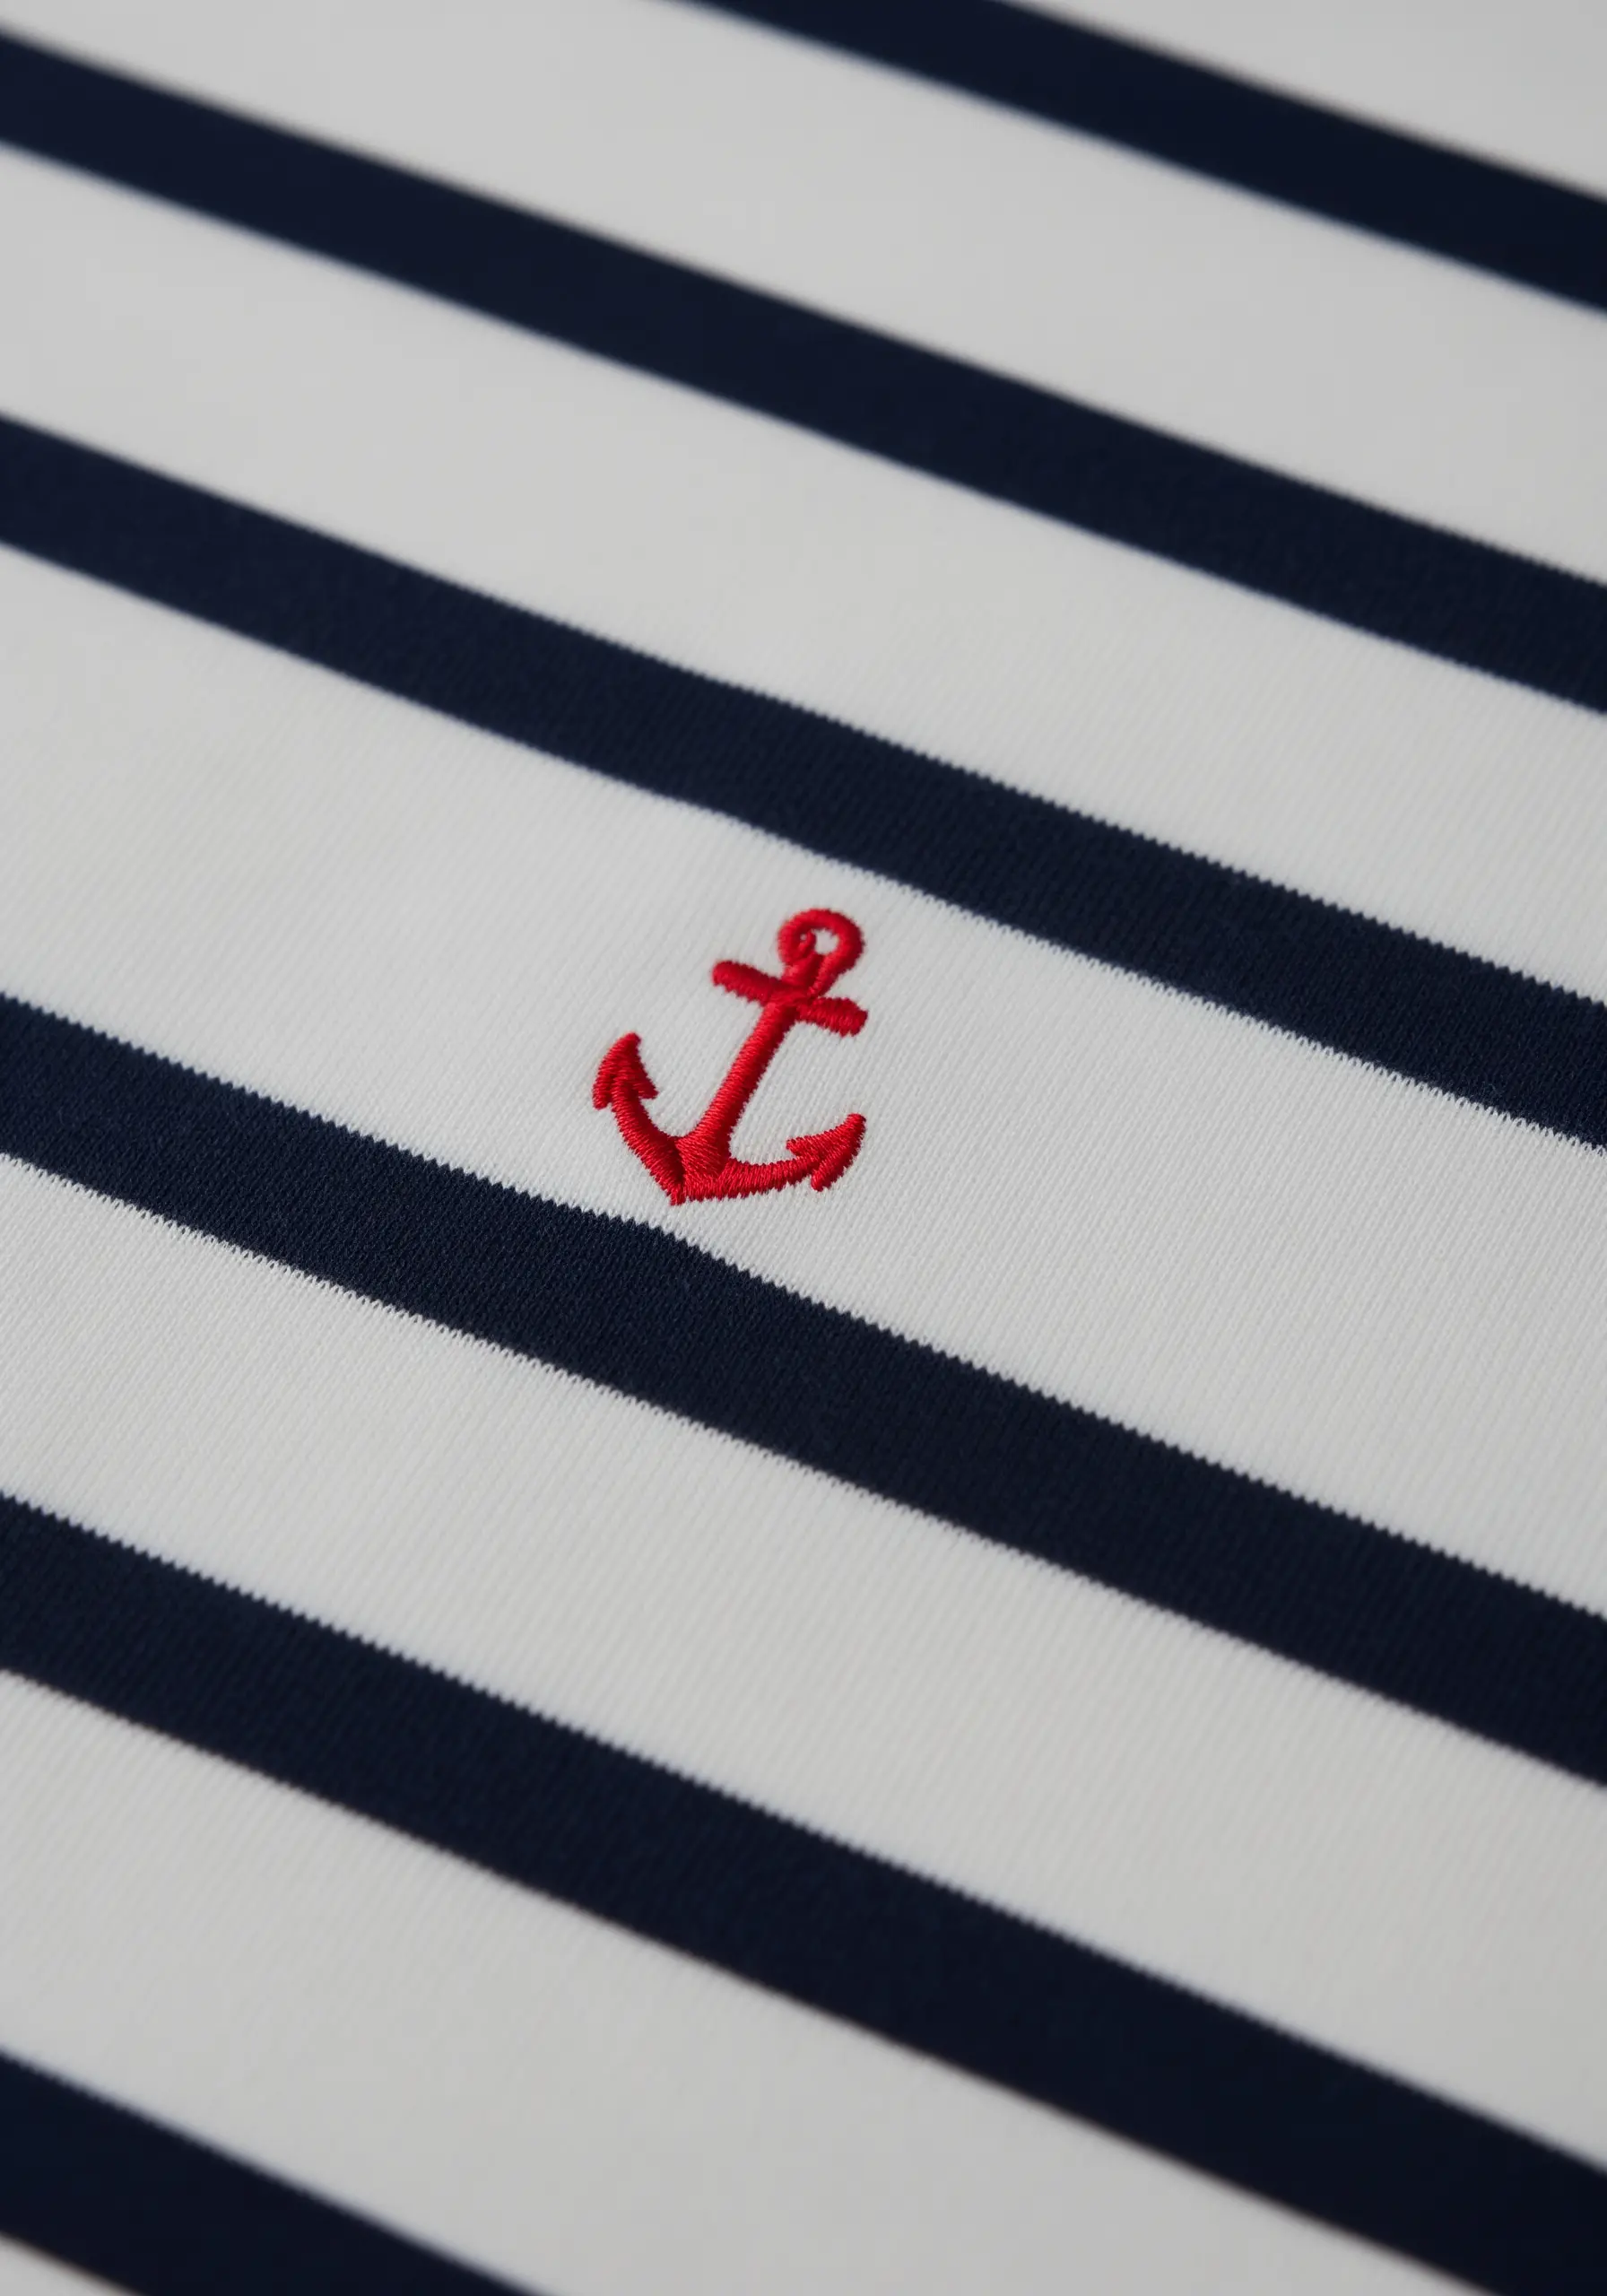
Sometimes the simplest choice is the most effective. On a classic striped fabric, a small motif in a single, bold primary color creates a timeless nautical look.
Choose a simple shape like an anchor and fill it with a dense, smooth satin stitch.
The block of solid color provides a focal point that stands out against the busy stripes without competing with them.
This is a classic pairing that always feels fresh and intentional.
30. Suggest Texture on Felt with a Whipped Running Stitch
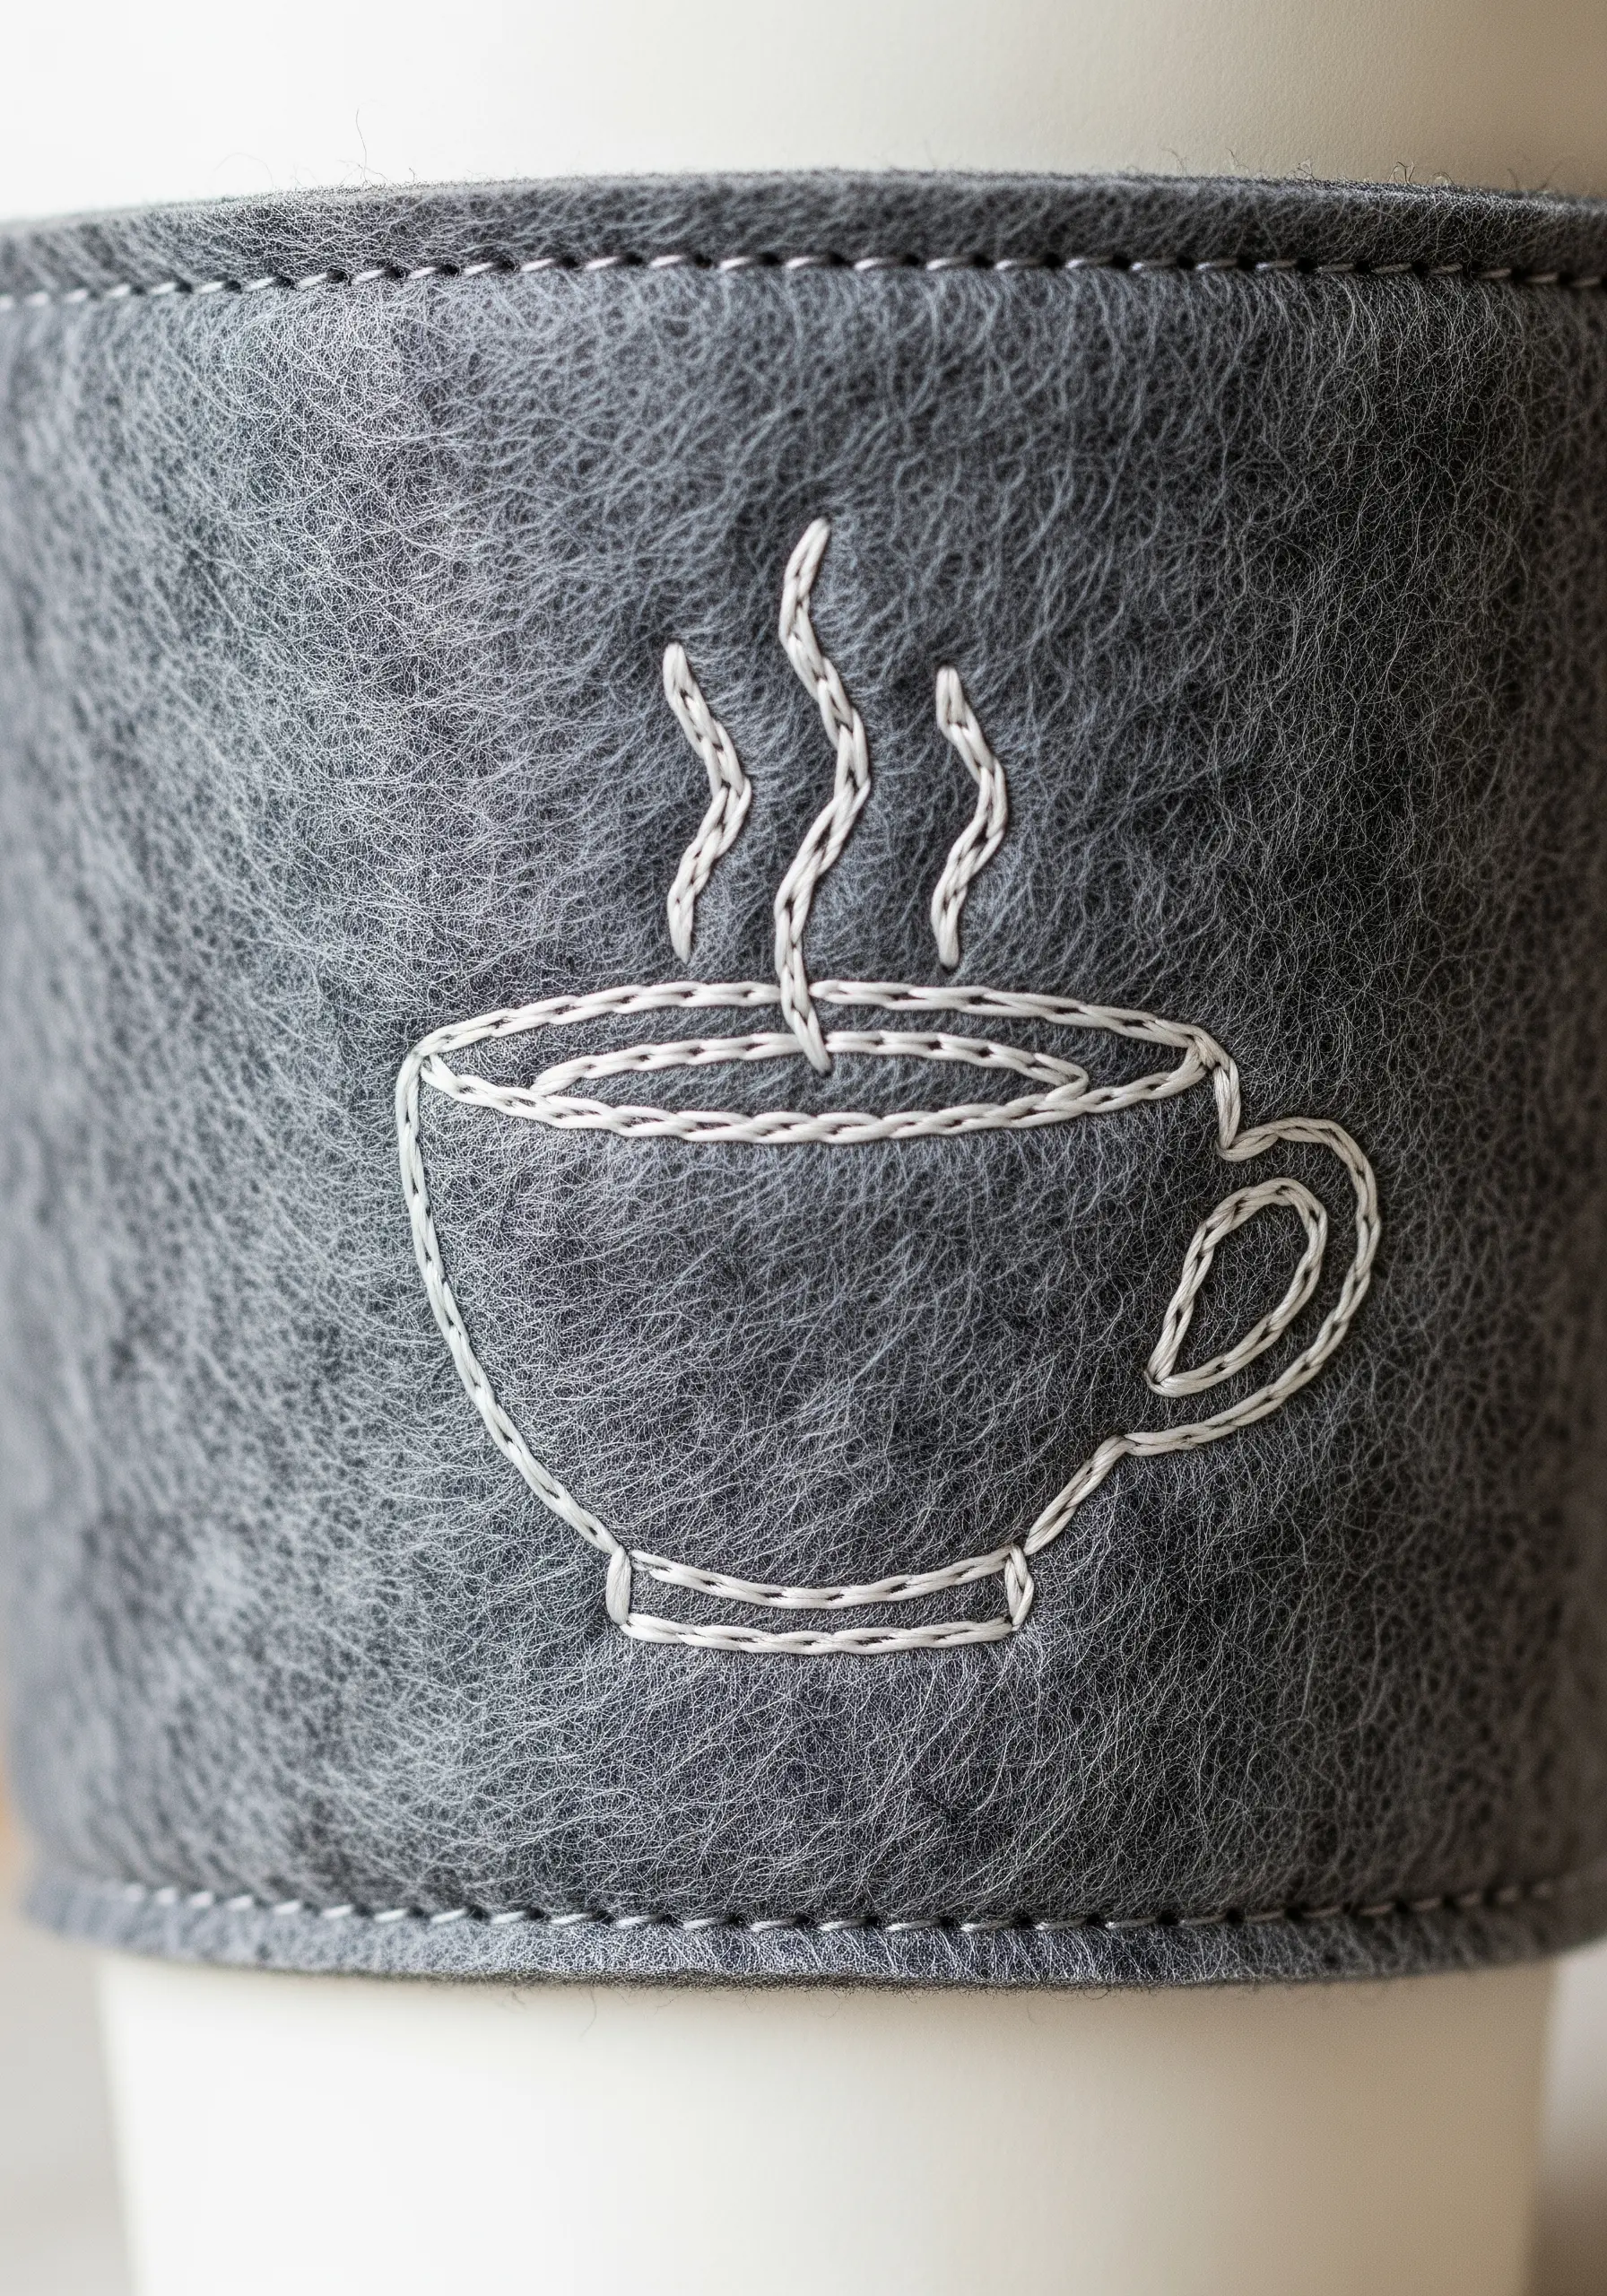
Embroidering on felt can be tricky, as the fibers can obscure fine details.
Instead of a complex stitch, use a simple running stitch for your outline, then whip it with the same color thread.
This technique adds definition and a subtle, corded texture that sits on top of the felt’s surface, ensuring your design remains clear and tactile.
For the steam, a simple, wavy backstitch provides a delicate contrast to the bolder cup outline.
31. Create a Narrative with Repeating Motifs
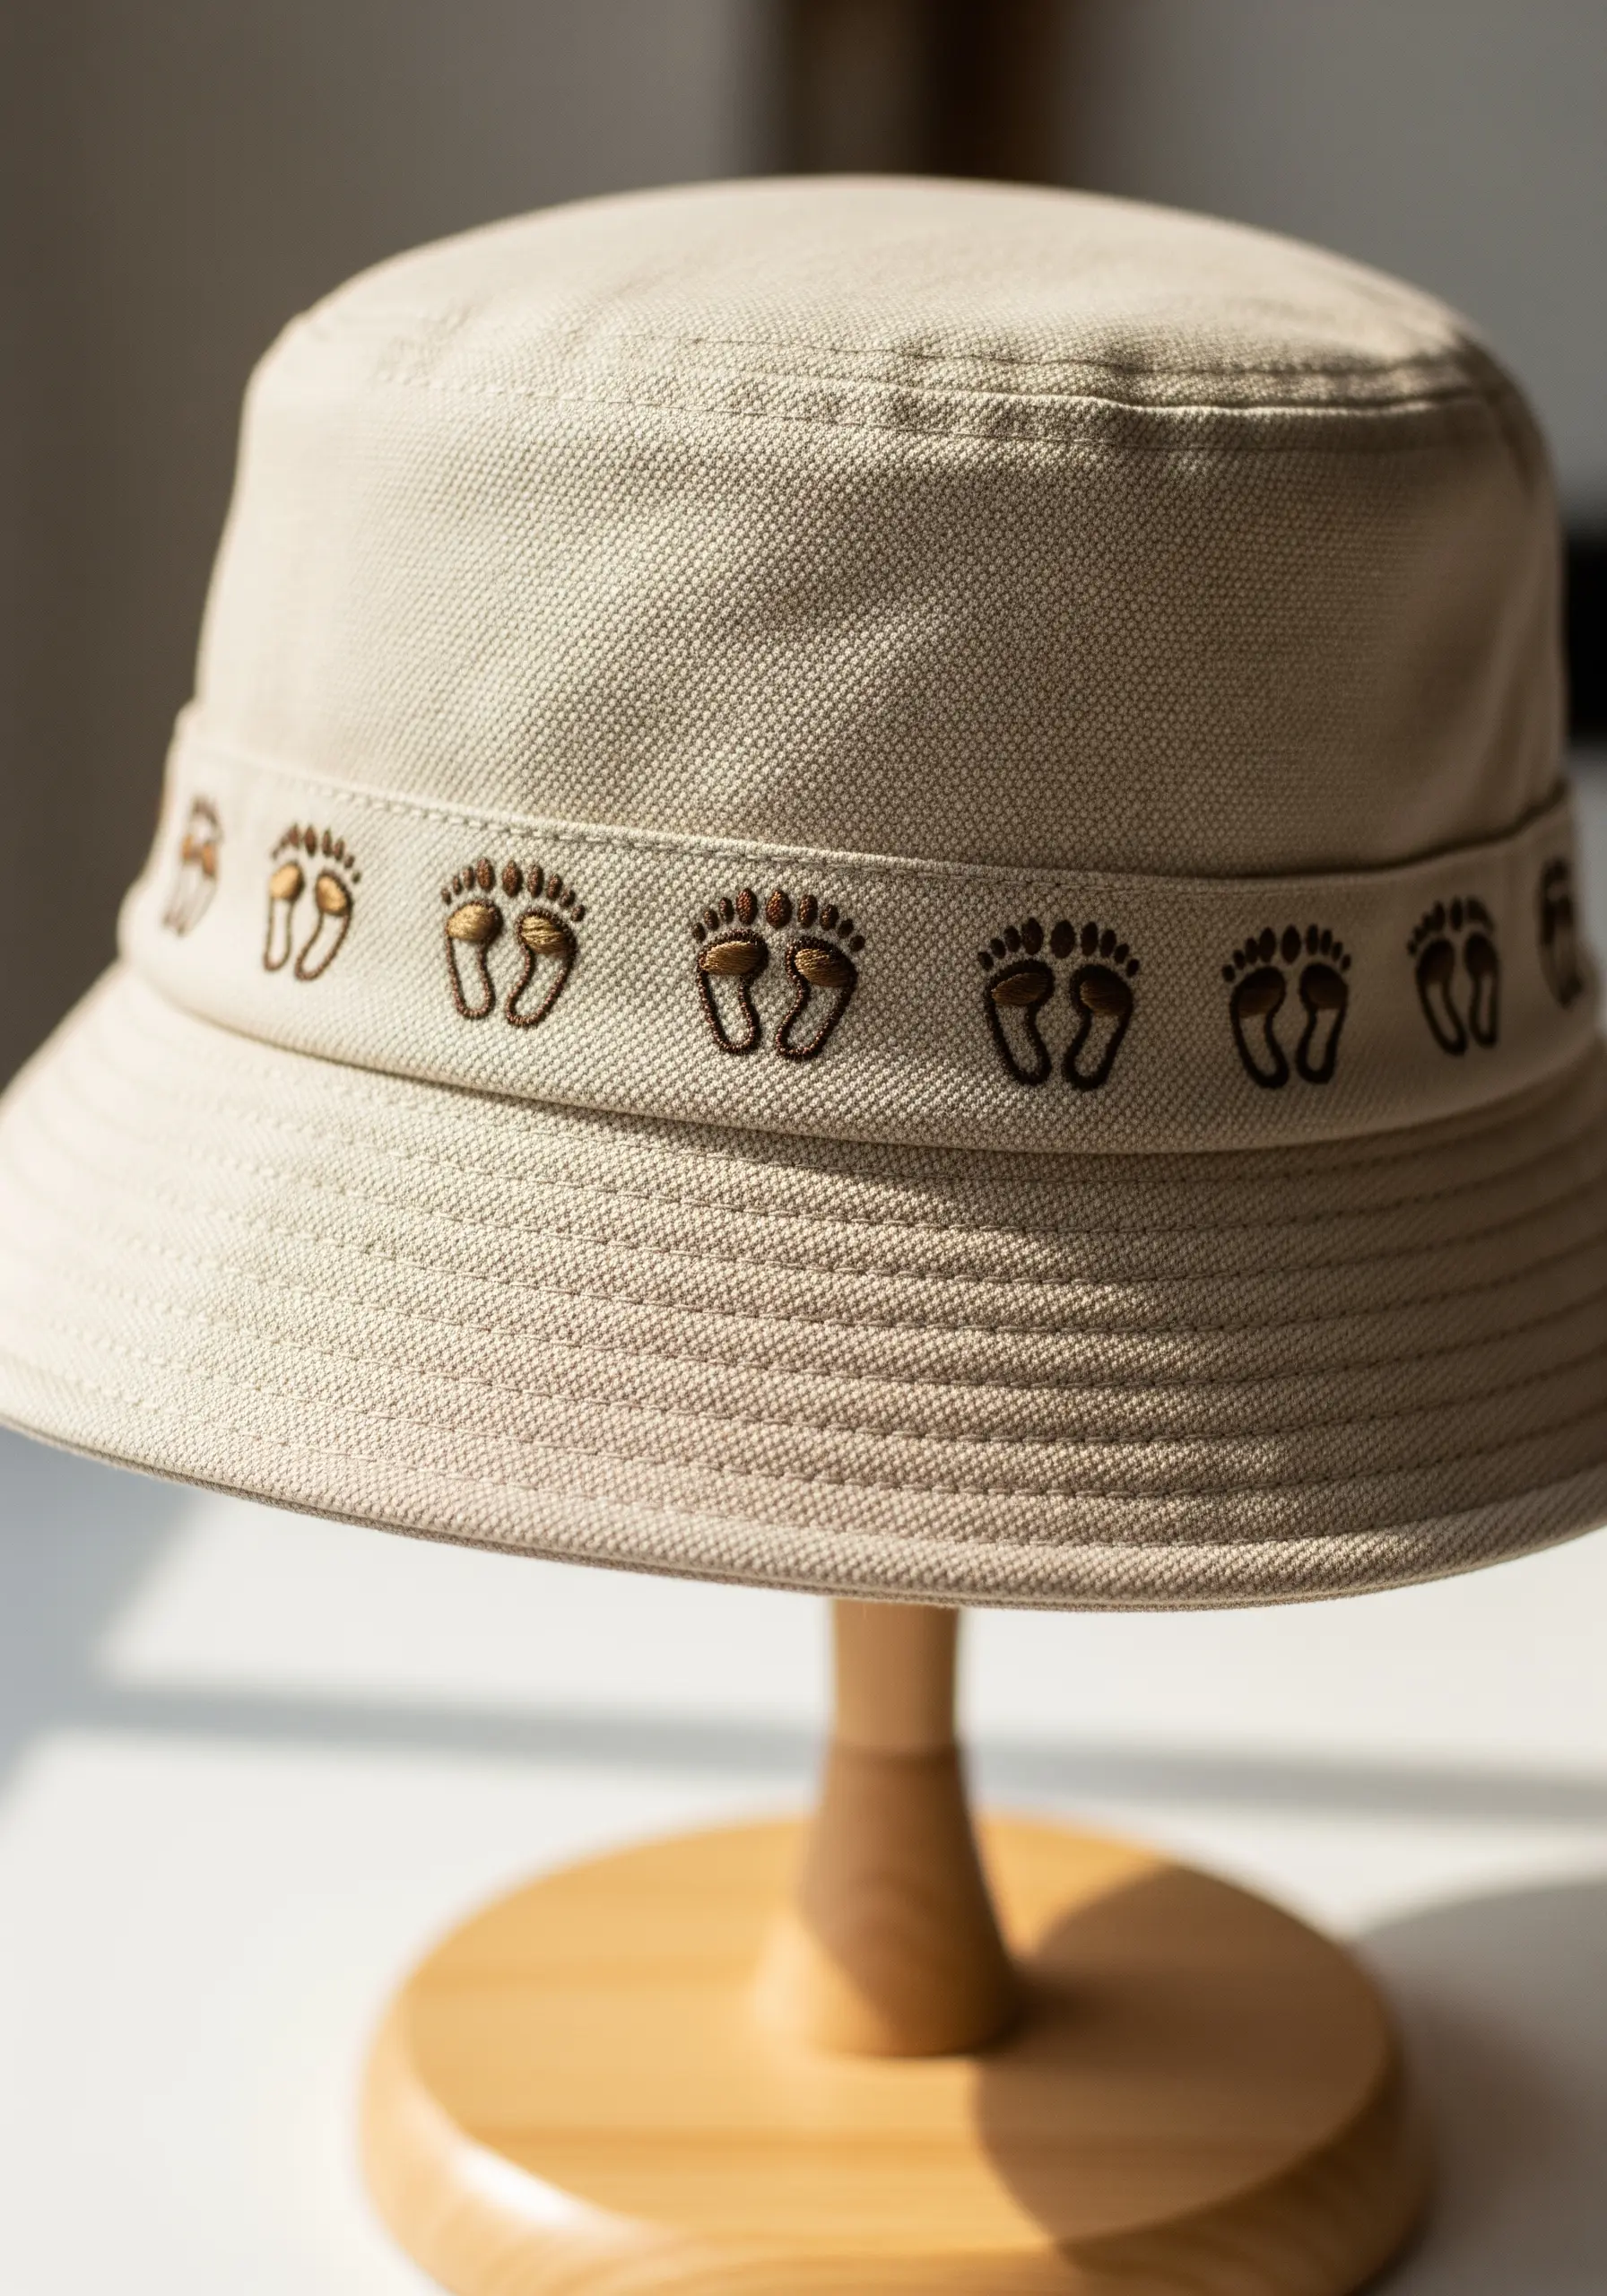
Tell a story of a journey by stitching a series of small, repeating motifs around a band or border.
Embroider a simple icon, like a footprint, and repeat it at regular intervals.
For subtle variation, you can slightly alter the angle of each motif.
This technique turns a simple decorative border into a narrative of movement and exploration, perfect for a hatband, cuff, or bag strap.
32. Capture a Feeling of Lightness with Floating Stitches
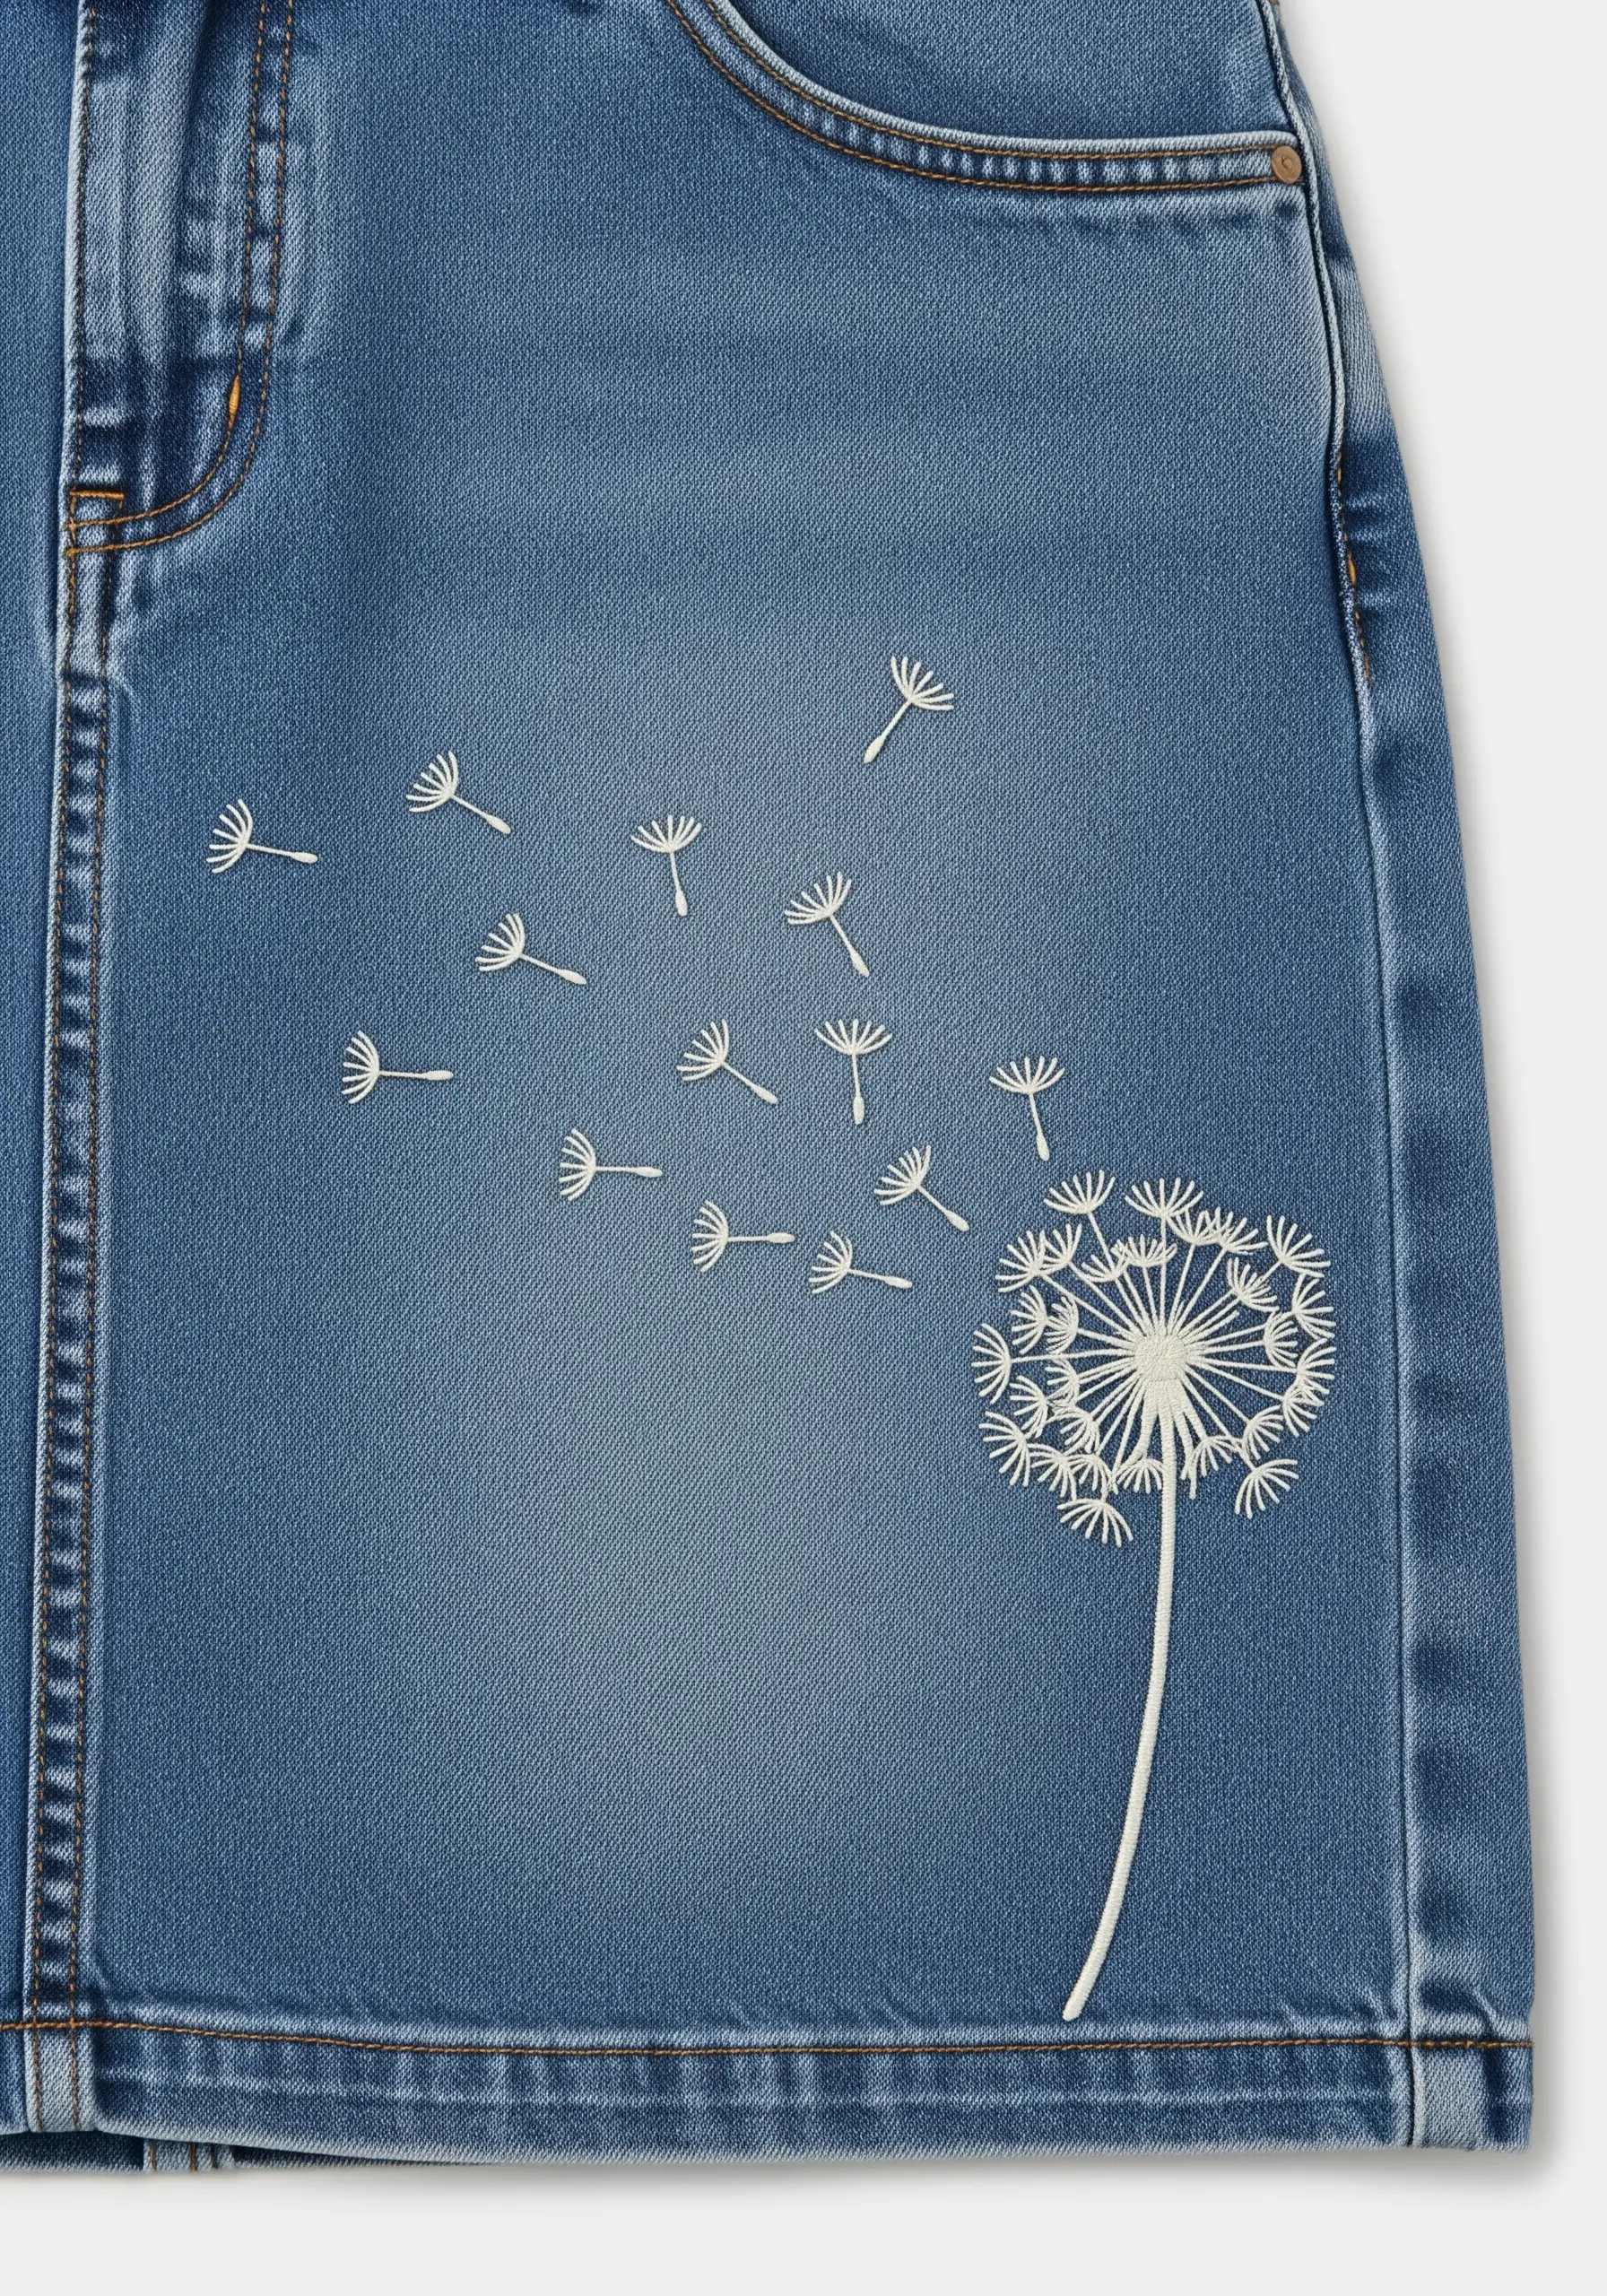
To embroider something as delicate as dandelion seeds floating on the wind, your stitches need to feel weightless.
Use a single strand of thread and a combination of tiny, detached stitches.
A long straight stitch can form the stem, with a few tiny, fanned-out straight stitches or lazy daisy stitches at the top to create the pappus.
The key is the negative space between them, which creates the illusion of them drifting apart.
33. Use a Split Stitch for Delicate Lines on Leather
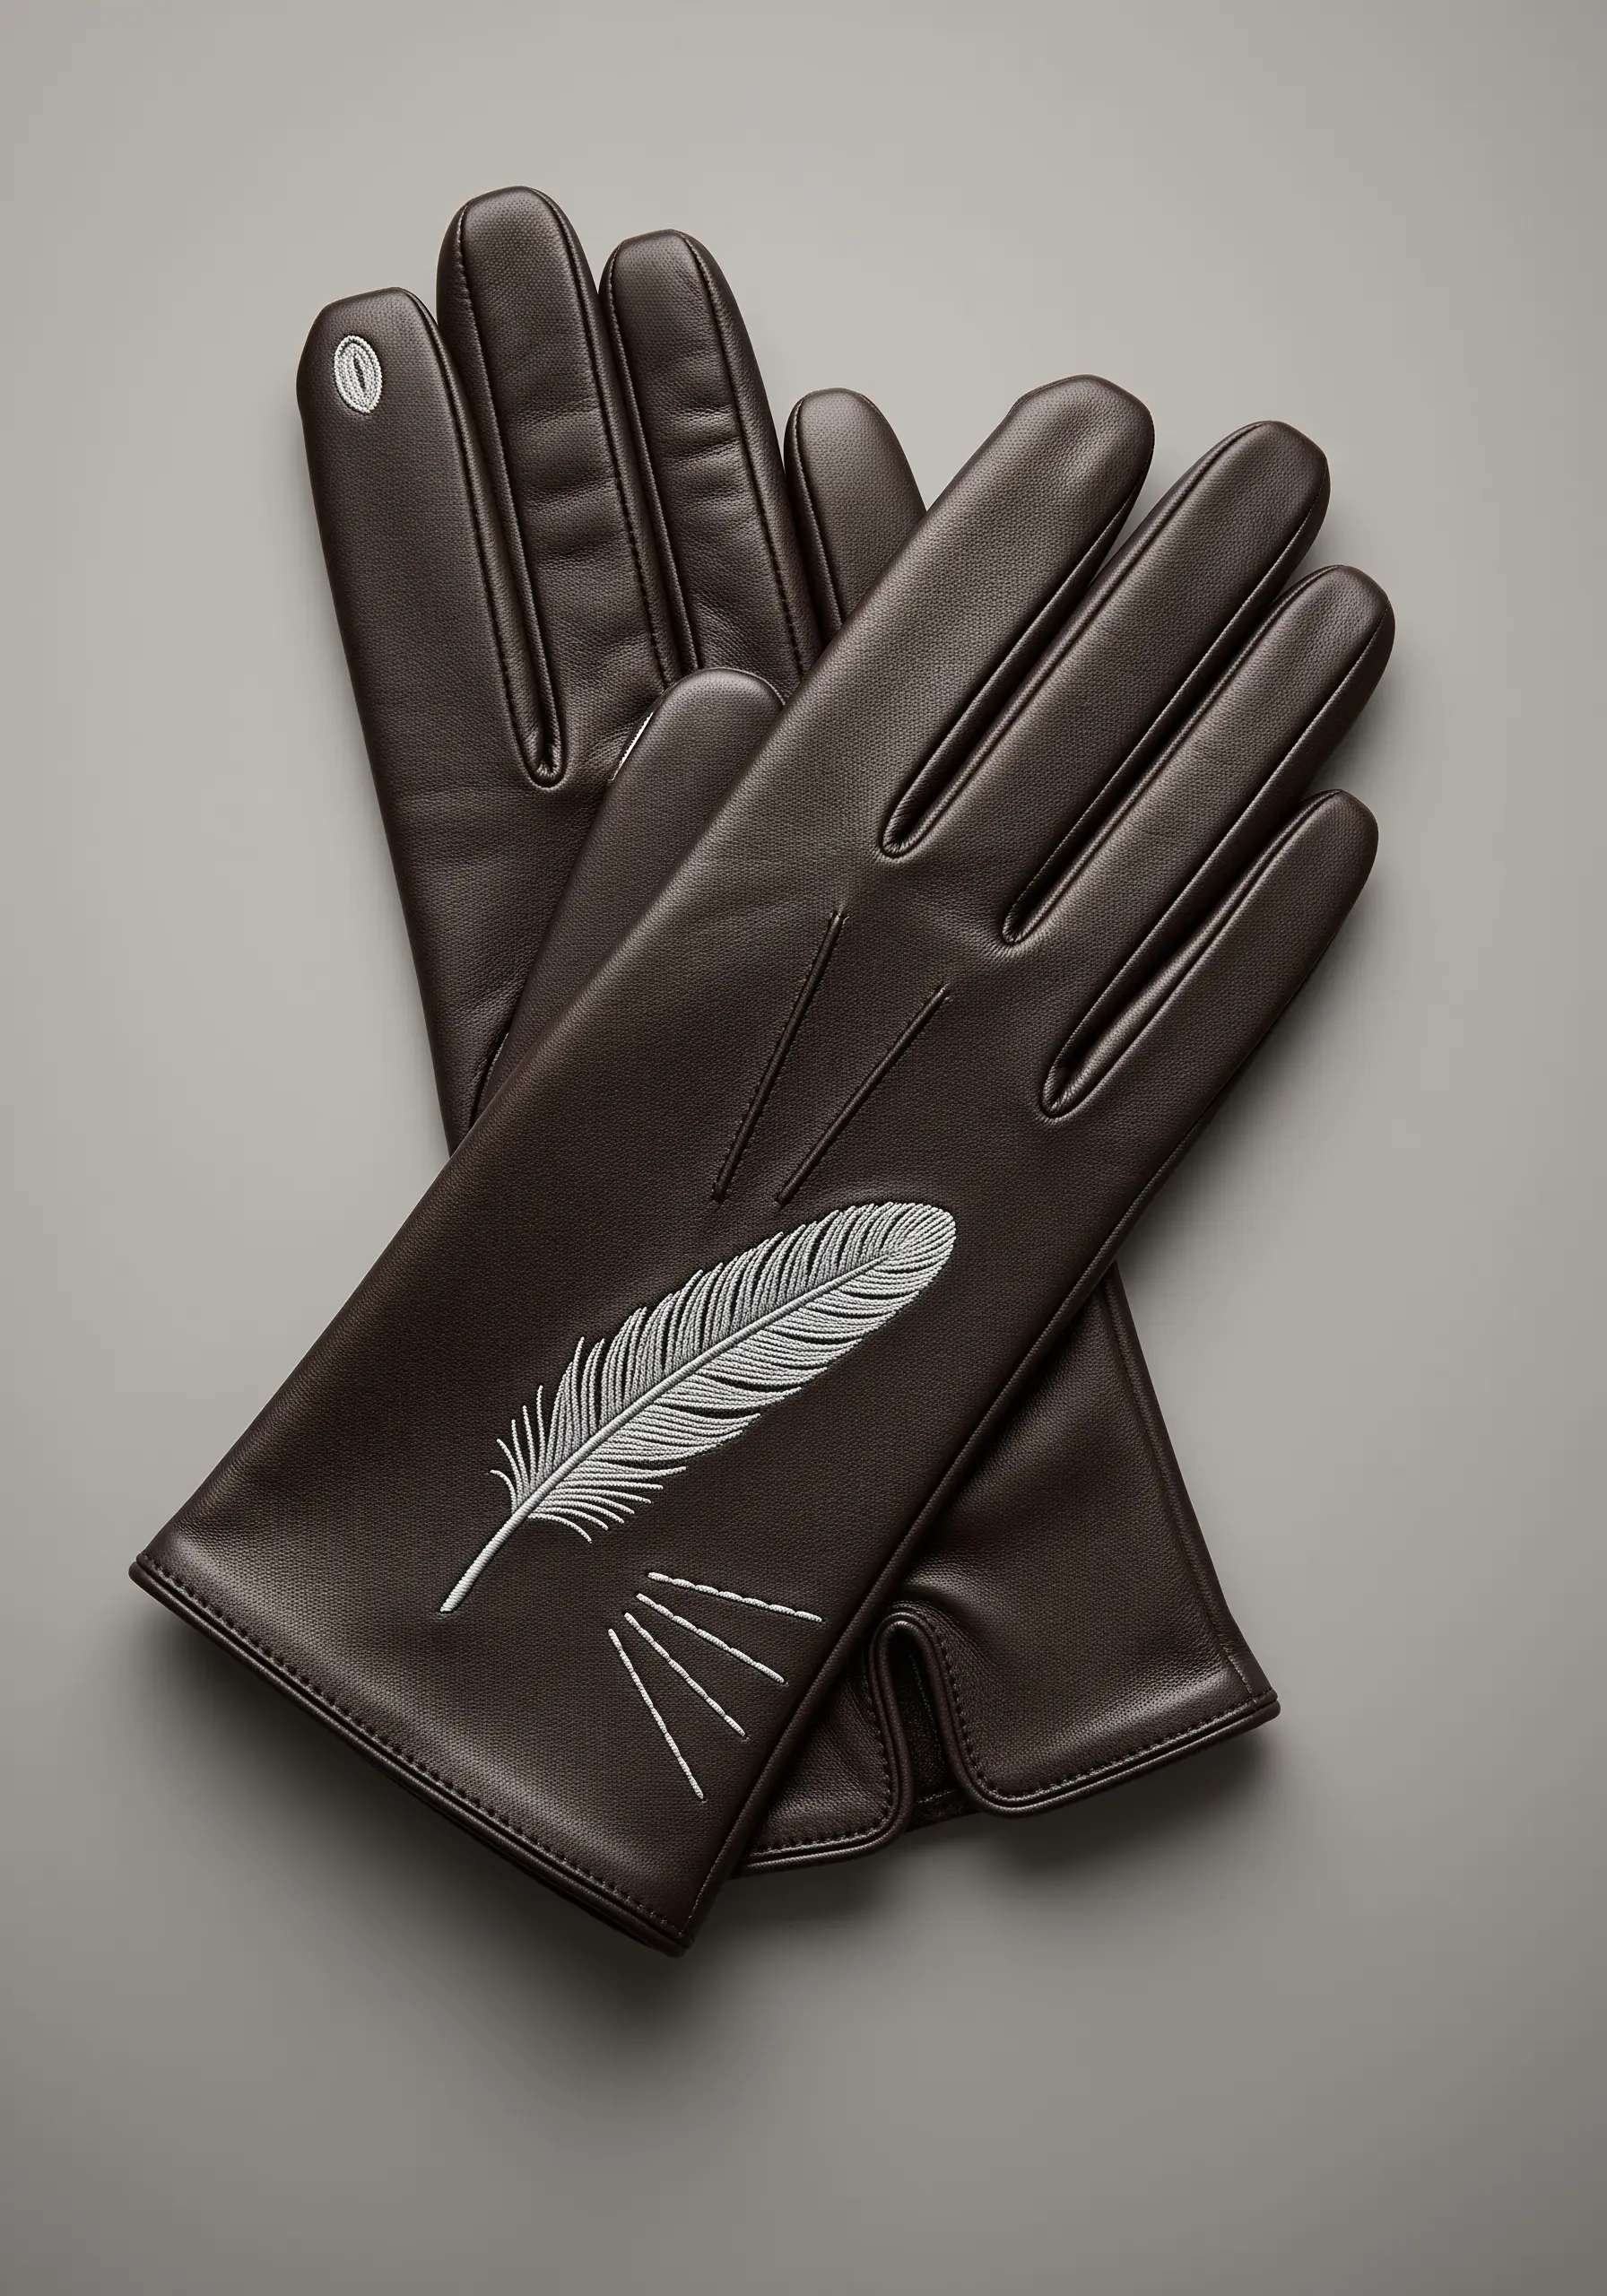
Stitching on leather requires a different approach than fabric, as every needle puncture is permanent.
Use a designated leather needle to create clean holes without tearing.
For the design, a split stitch is ideal because it allows you to reuse existing holes as you work, minimizing punctures.
This creates a smooth, elegant line that is gentle on the material while providing the fine detail needed for a delicate motif like a feather.
34. Create Shading and Depth in a Small Space
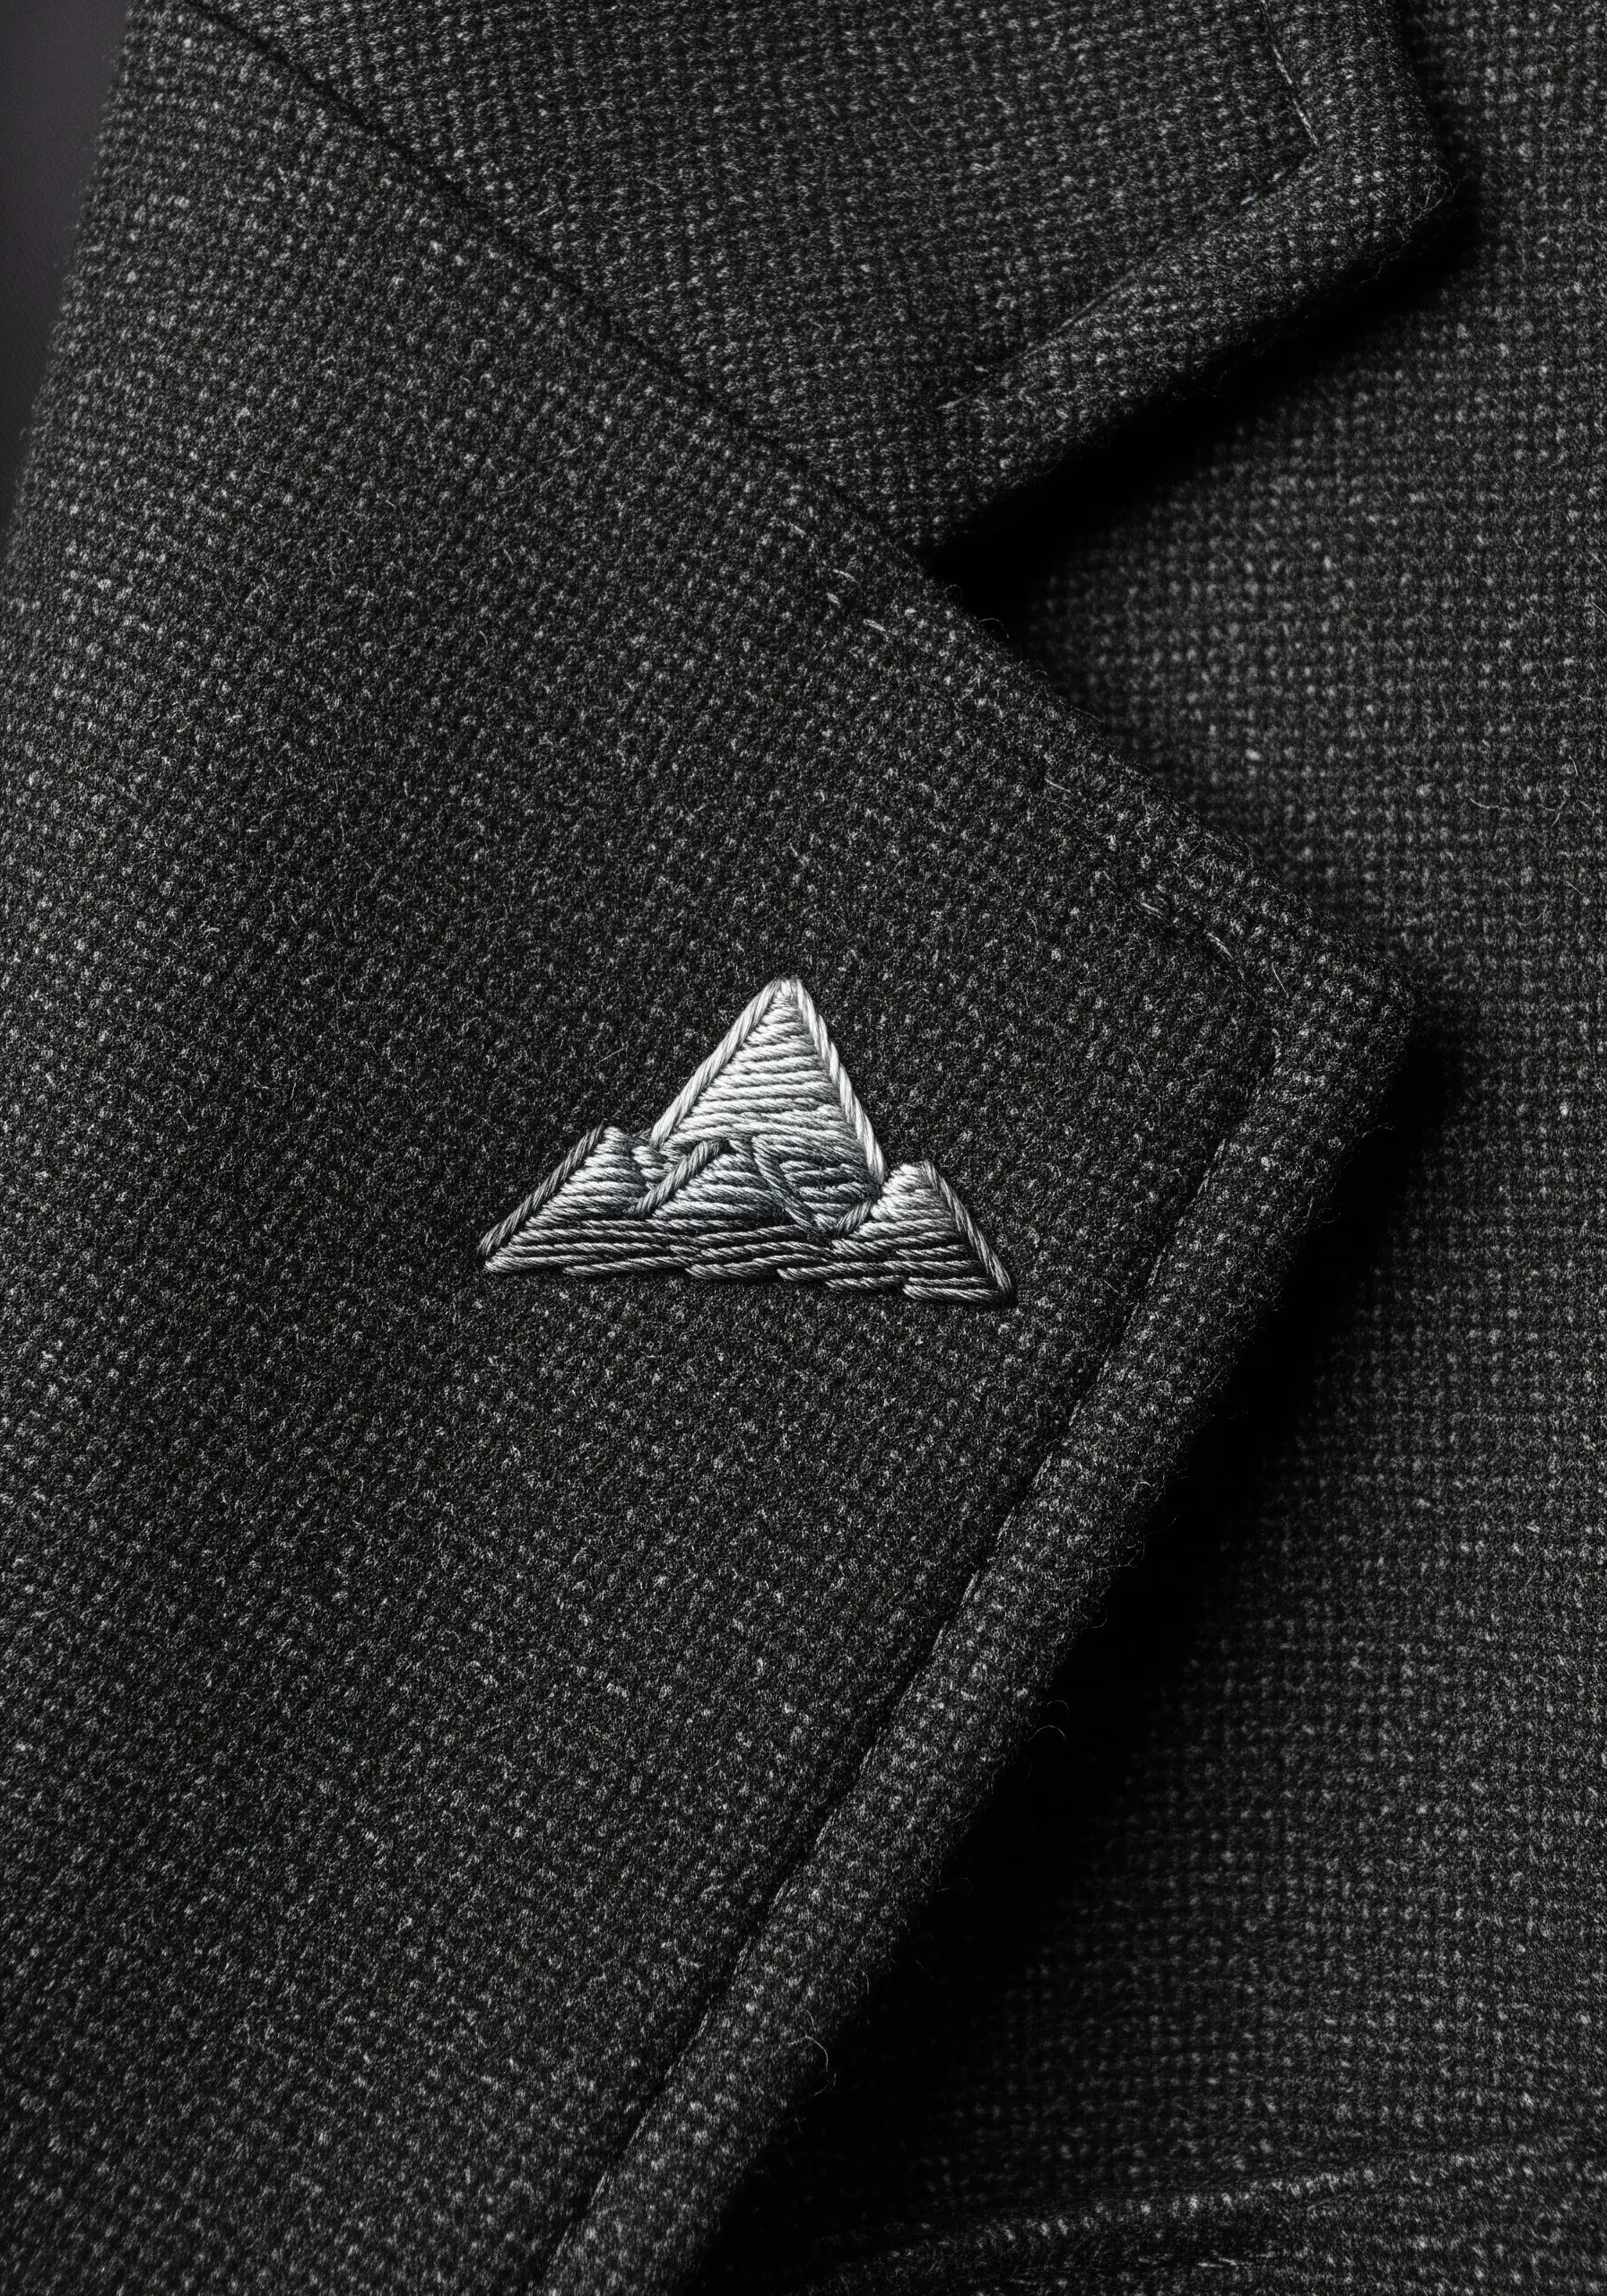
To give a tiny embroidered motif, like a mountain on a lapel, a sense of depth, use thread painting techniques on a miniature scale.
Use single strands of floss in three or four shades of the same color (e.g., light grey, medium grey, charcoal).
Fill small sections with a long-and-short stitch, blending the shades to create highlights and shadows.
This meticulous shading transforms a flat outline into a tiny, textured landscape that looks incredibly sophisticated.
35. Imply Motion with Simple, Angled Stitches
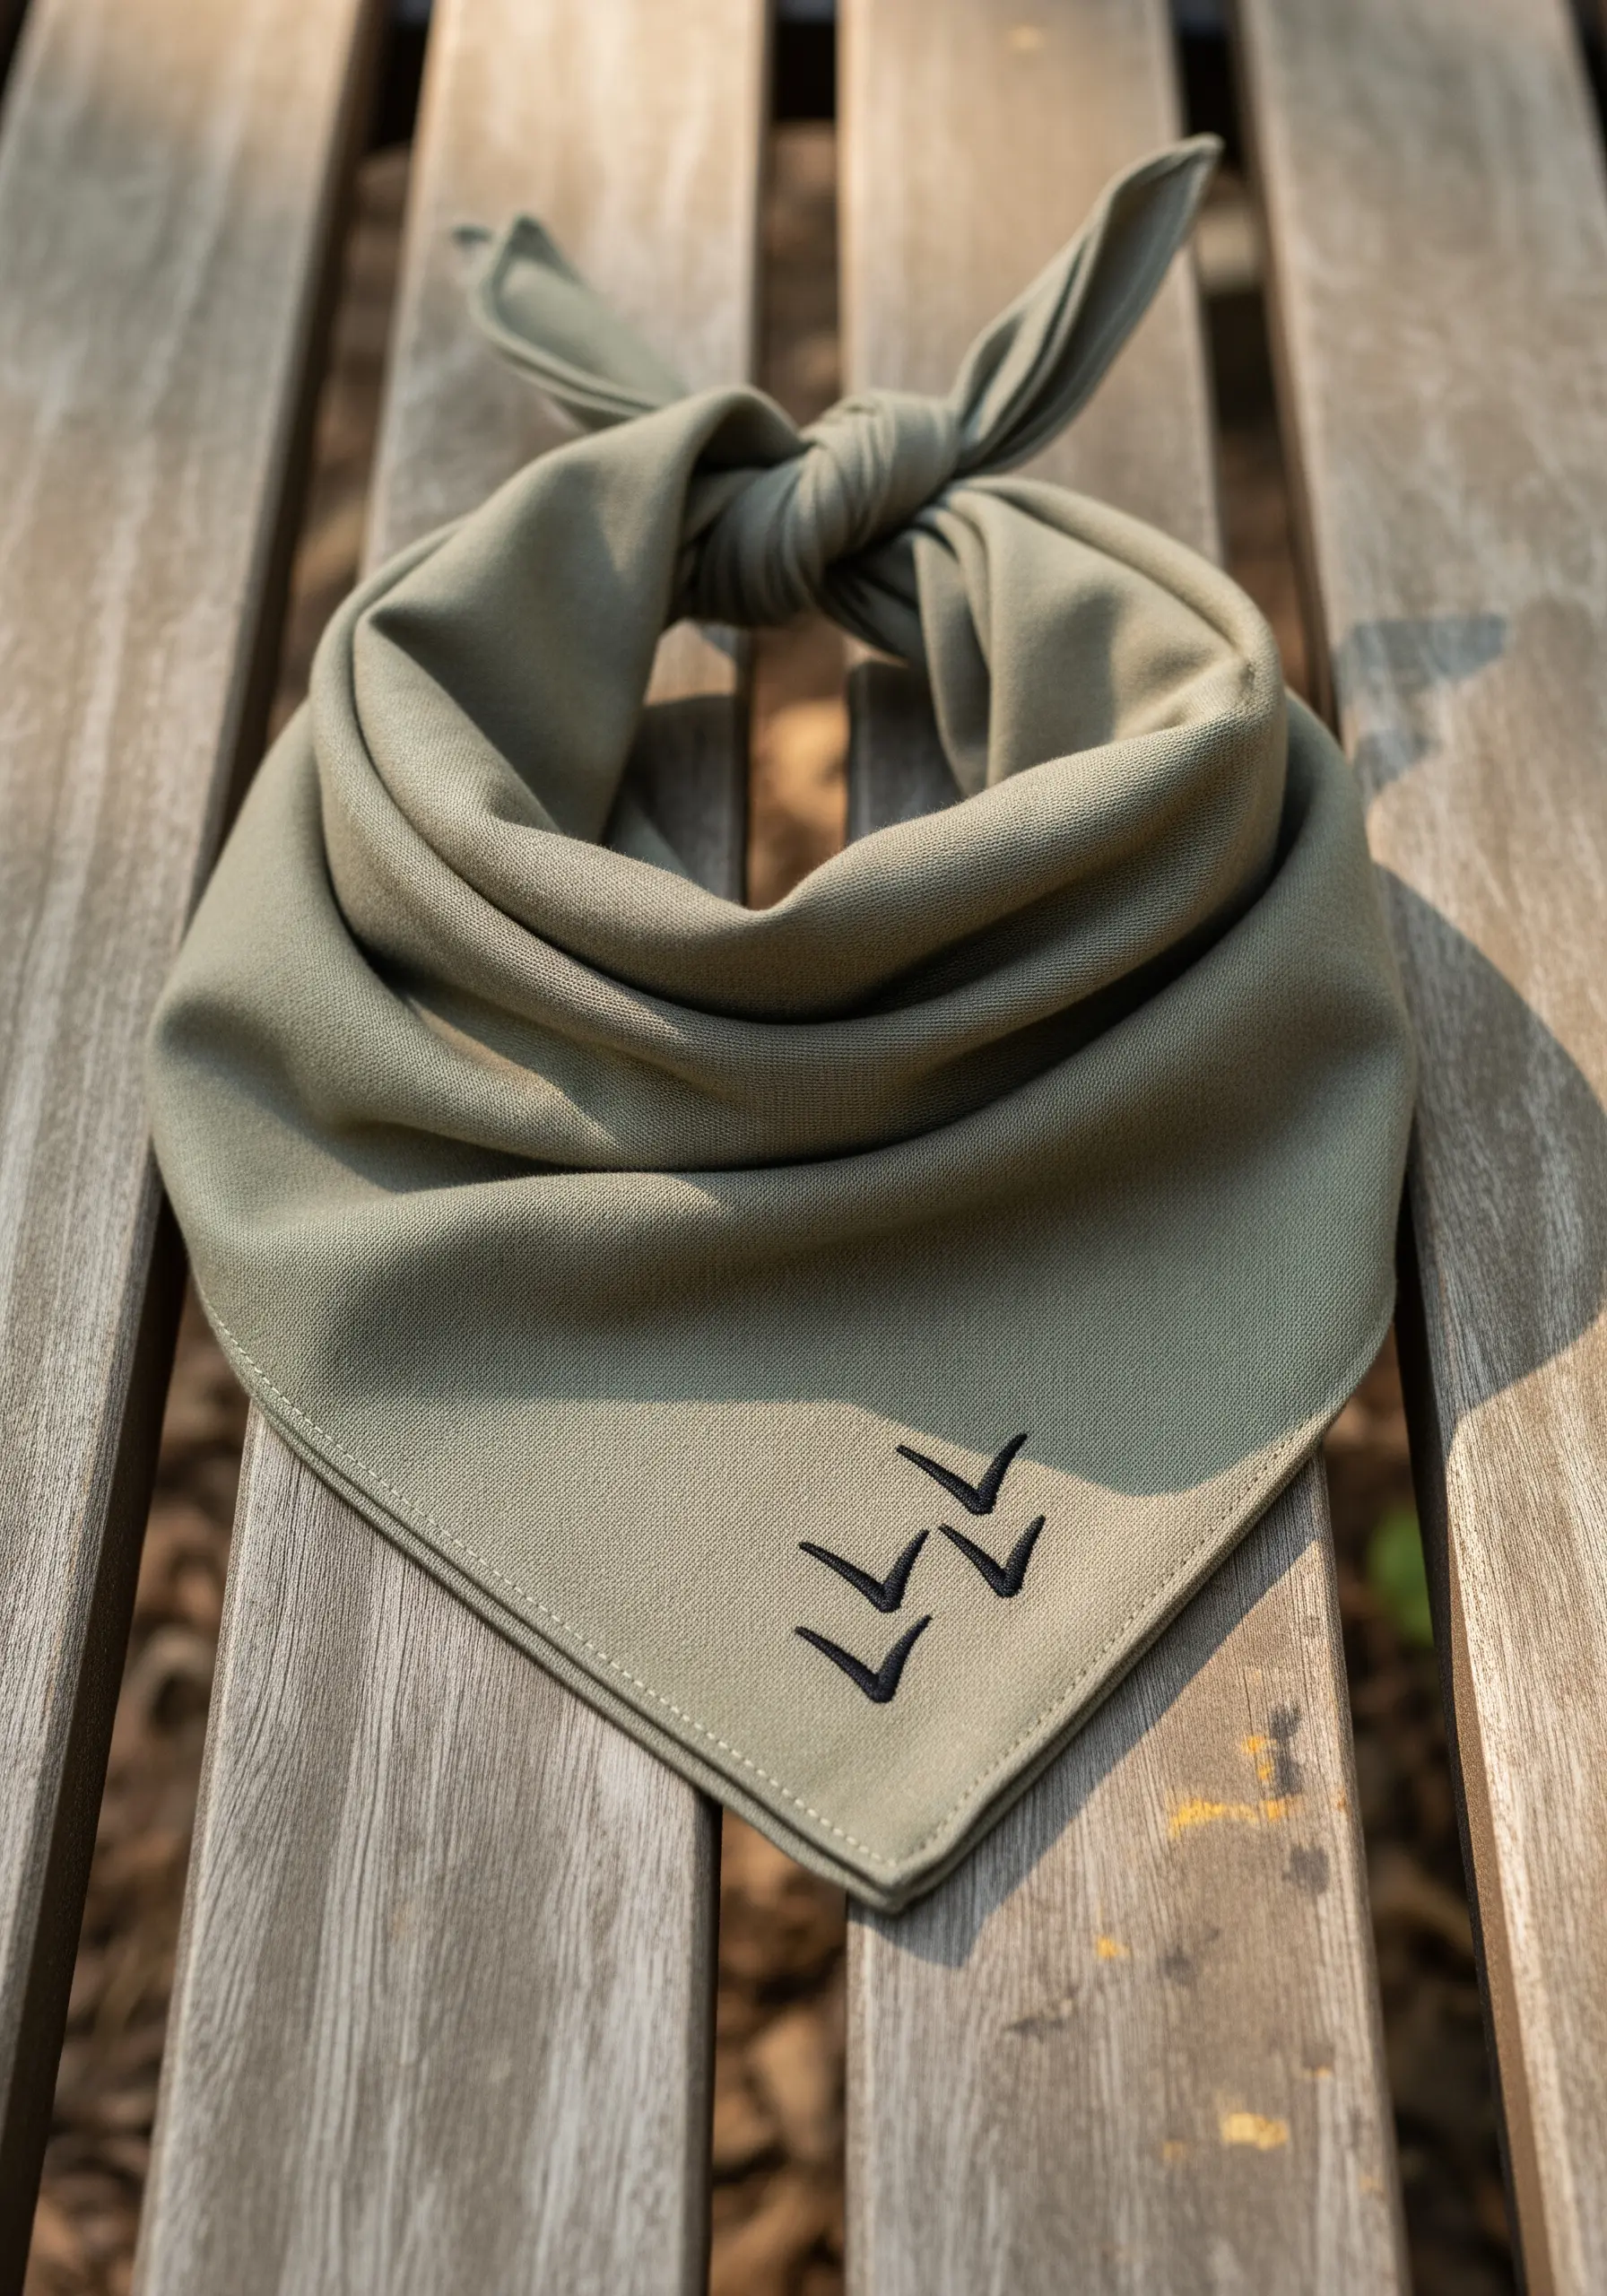
You don’t need a complex design to suggest movement. Three simple, V-shaped marks are universally recognized as birds in flight.
Use a thick thread or multiple strands and create each bird with just two straight stitches that meet at a point.
Arrange them in a classic flying-V formation to enhance the sense of direction and purpose.
This minimal embroidery pattern is a powerful example of how simple shapes can carry significant meaning.
36. Achieve Elegant Lettering with Roman Numerals
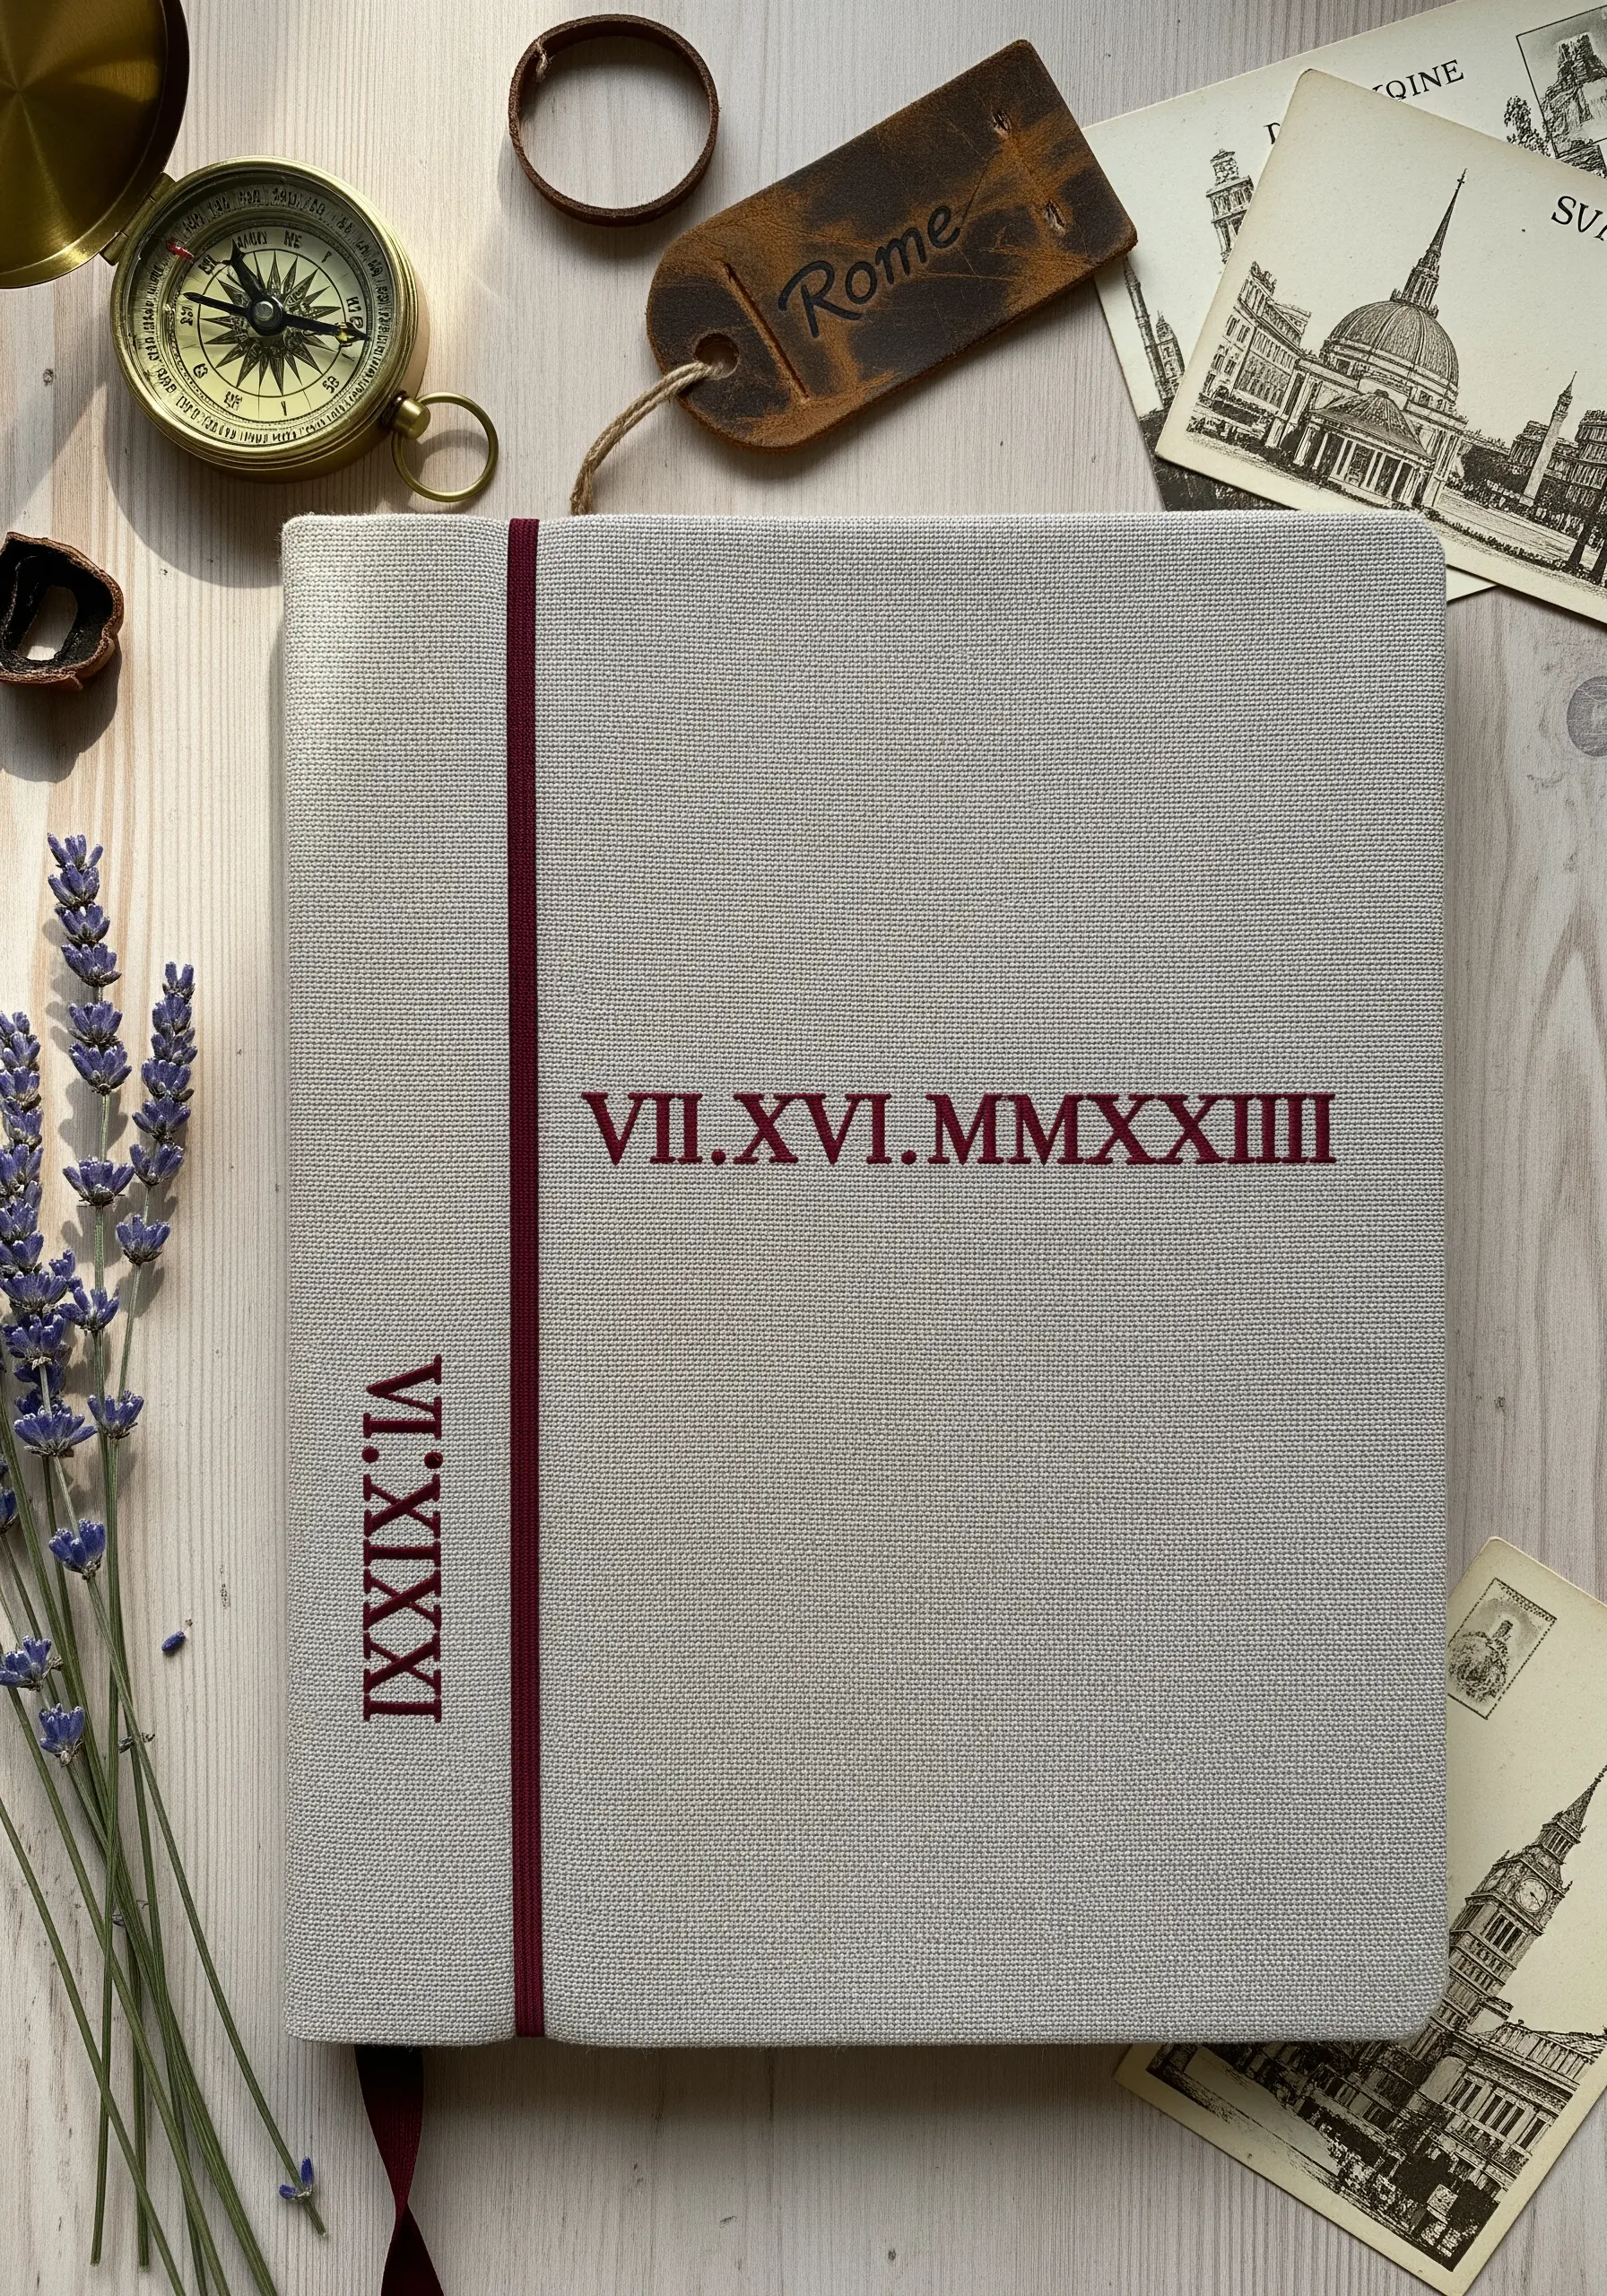
For a timeless and sophisticated way to commemorate a date, use Roman numerals.
The straight lines are perfectly suited for embroidery. Use a simple backstitch or a fine satin stitch for each character.
To ensure perfect alignment and spacing, draw your guides with a water-soluble pen before you begin stitching.
This classic lettering style adds a sense of history and importance, making it ideal for a travel journal or memory book.


