

There comes a moment when you want your embroidery to do more than just sit on fabric. You have scraps of beautiful paper, old letters, and fabric remnants that feel too precious to discard, and you sense they could become part of your work. This is where collage invites you in, offering a way to add story and texture to your work.
Think of thread not just as a decorative element, but as the unifying force. It can be the line that connects disparate ideas, the stitch that secures a fragile memory, or the texture that transforms a flat surface into something dimensional. This isn’t about complex new skills; it’s about shifting your perspective to see all materials as part of your palette.
Here, you’ll find ways to integrate these elements with intention and artistry. Each idea is designed to help you move beyond the hoop and into a more expressive, personal form of fiber art. Let your needle be the tool that brings paper, fabric, and memory together into a cohesive, beautiful whole.
1. Layered Botanicals: Stitching Through Paper and Fabric
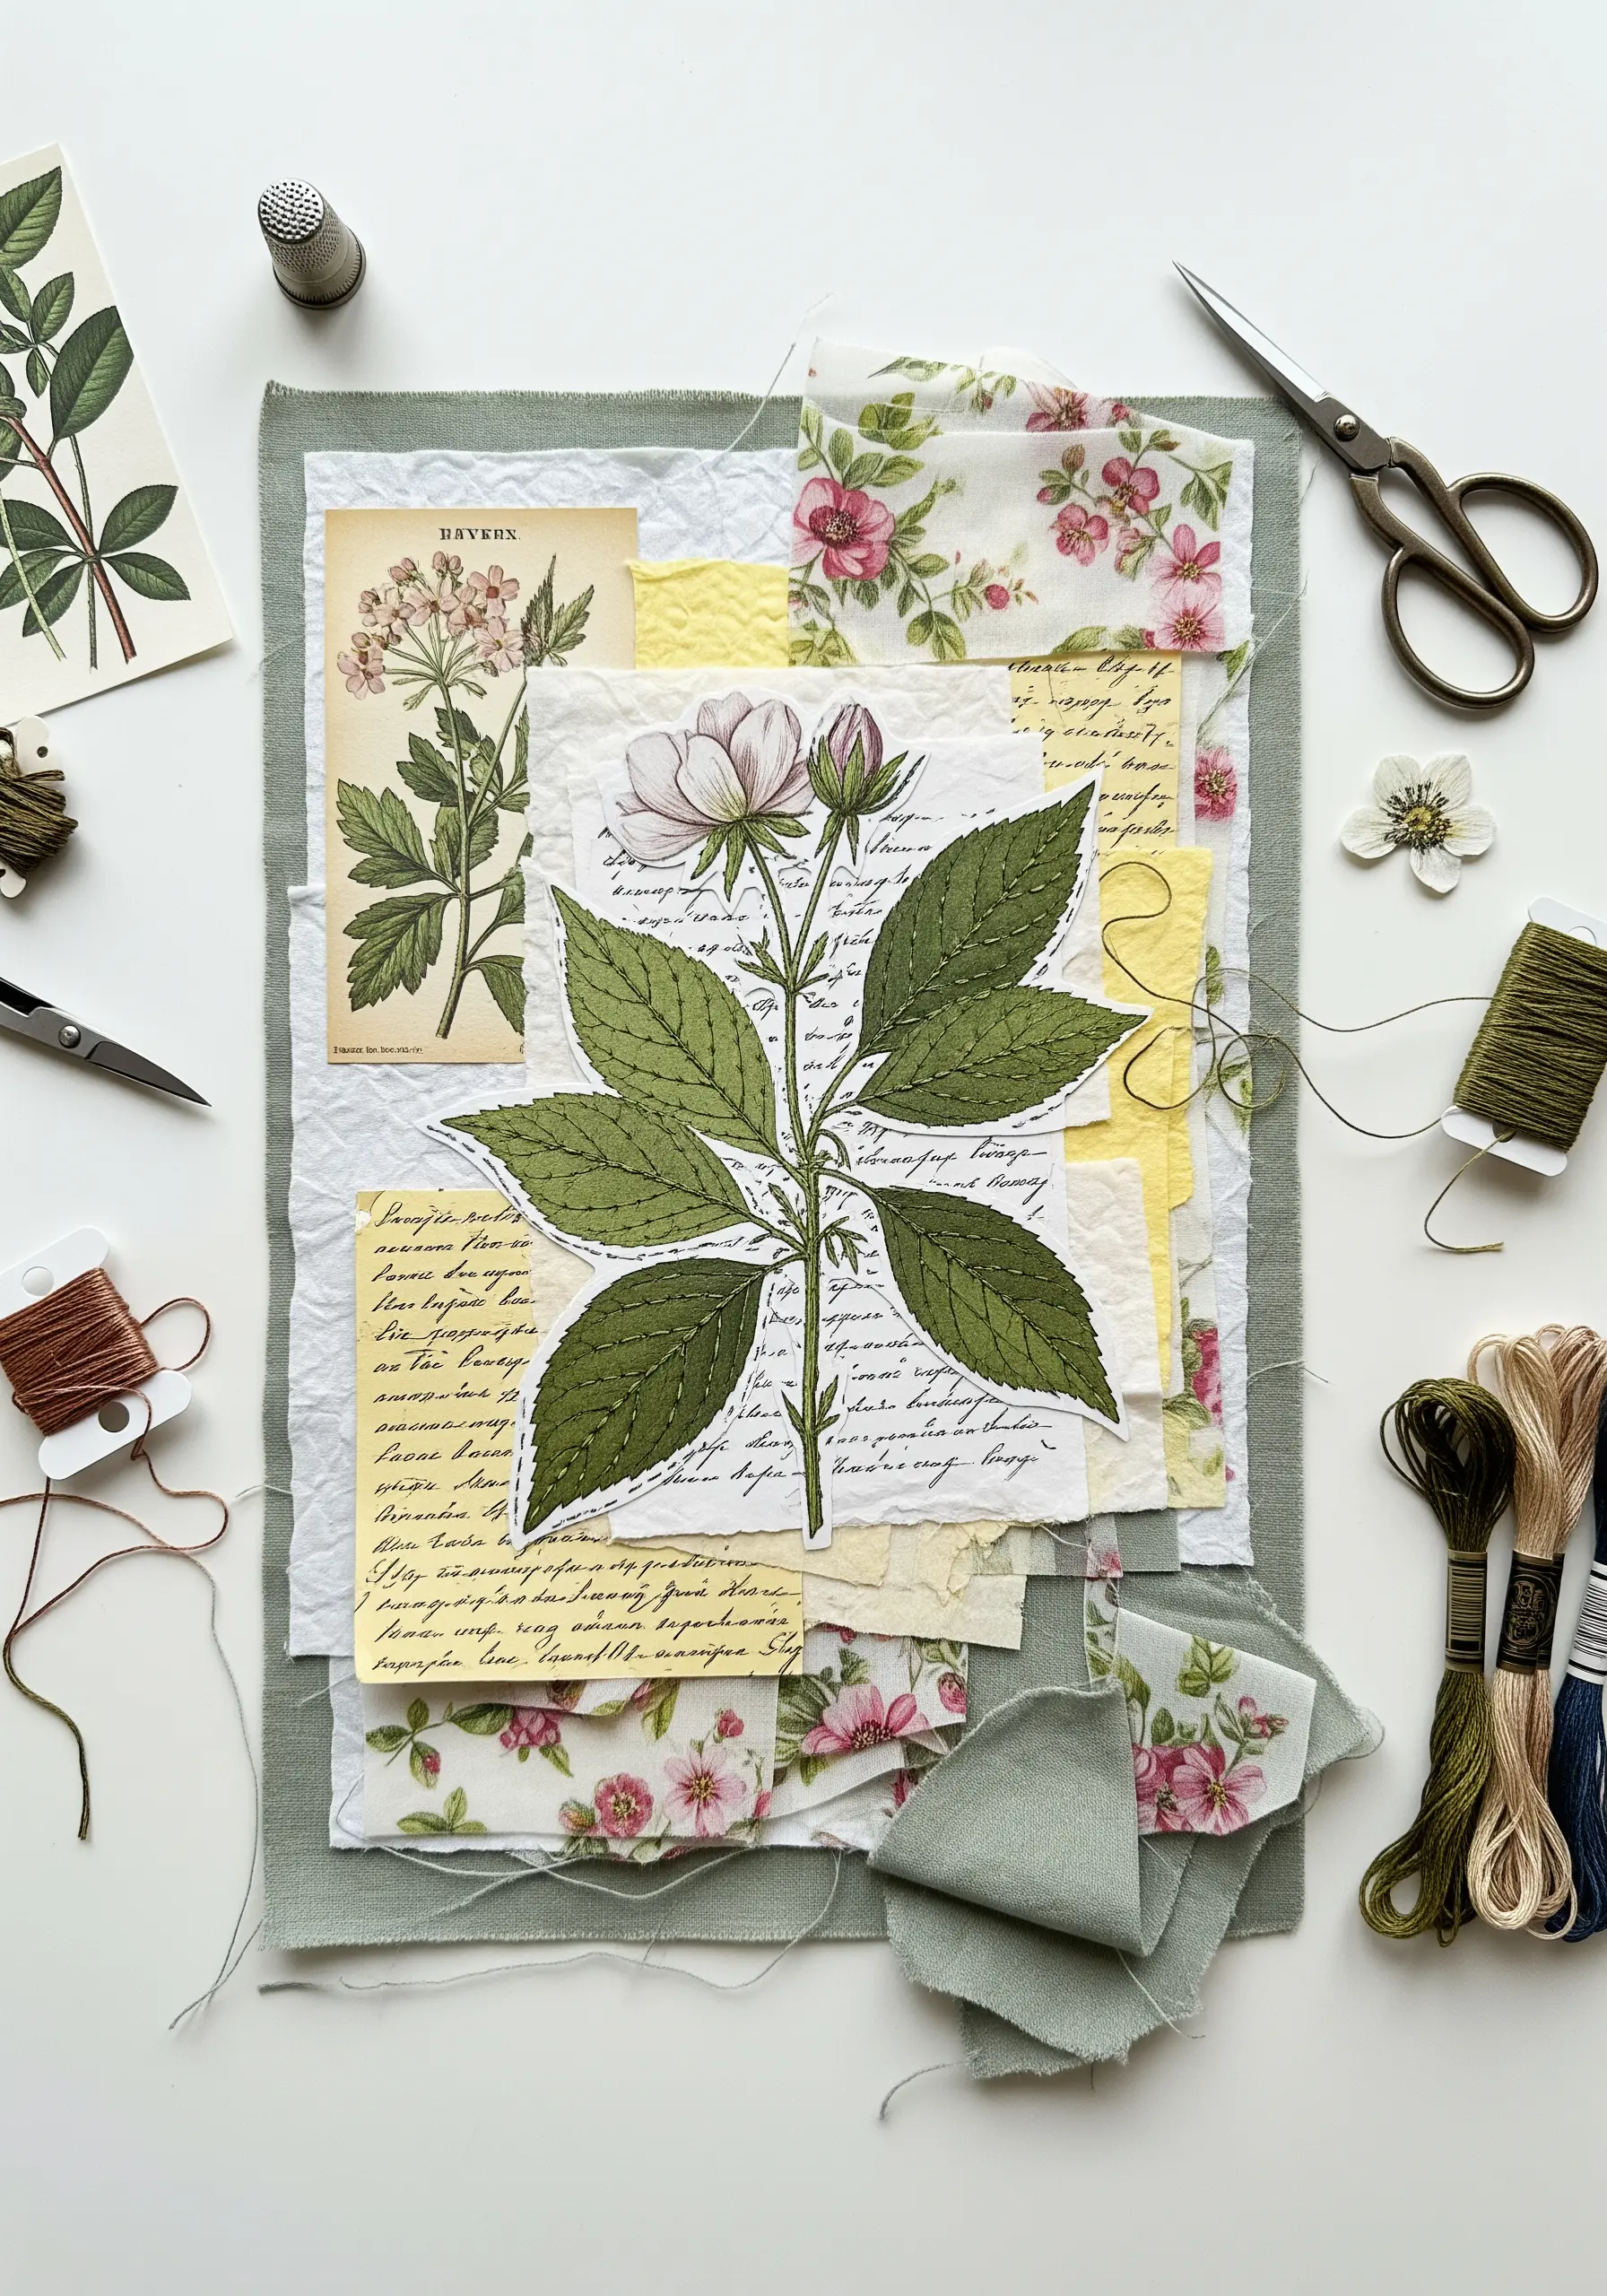
Begin by composing a layered background on a linen base using torn paper and soft fabric scraps.
This creates a gentle, textured foundation for your central motif.
Position your primary paper illustration on top and use a simple running stitch to anchor it, stitching through all layers.
The thread serves a dual purpose: it secures the delicate paper while adding a visible, handmade quality that unifies the entire piece.
This technique allows you to essentially draw with thread, adding definition and integrating the collage elements seamlessly.
2. Graphic Contrast: Stitching Bold Lines Over Mixed Media
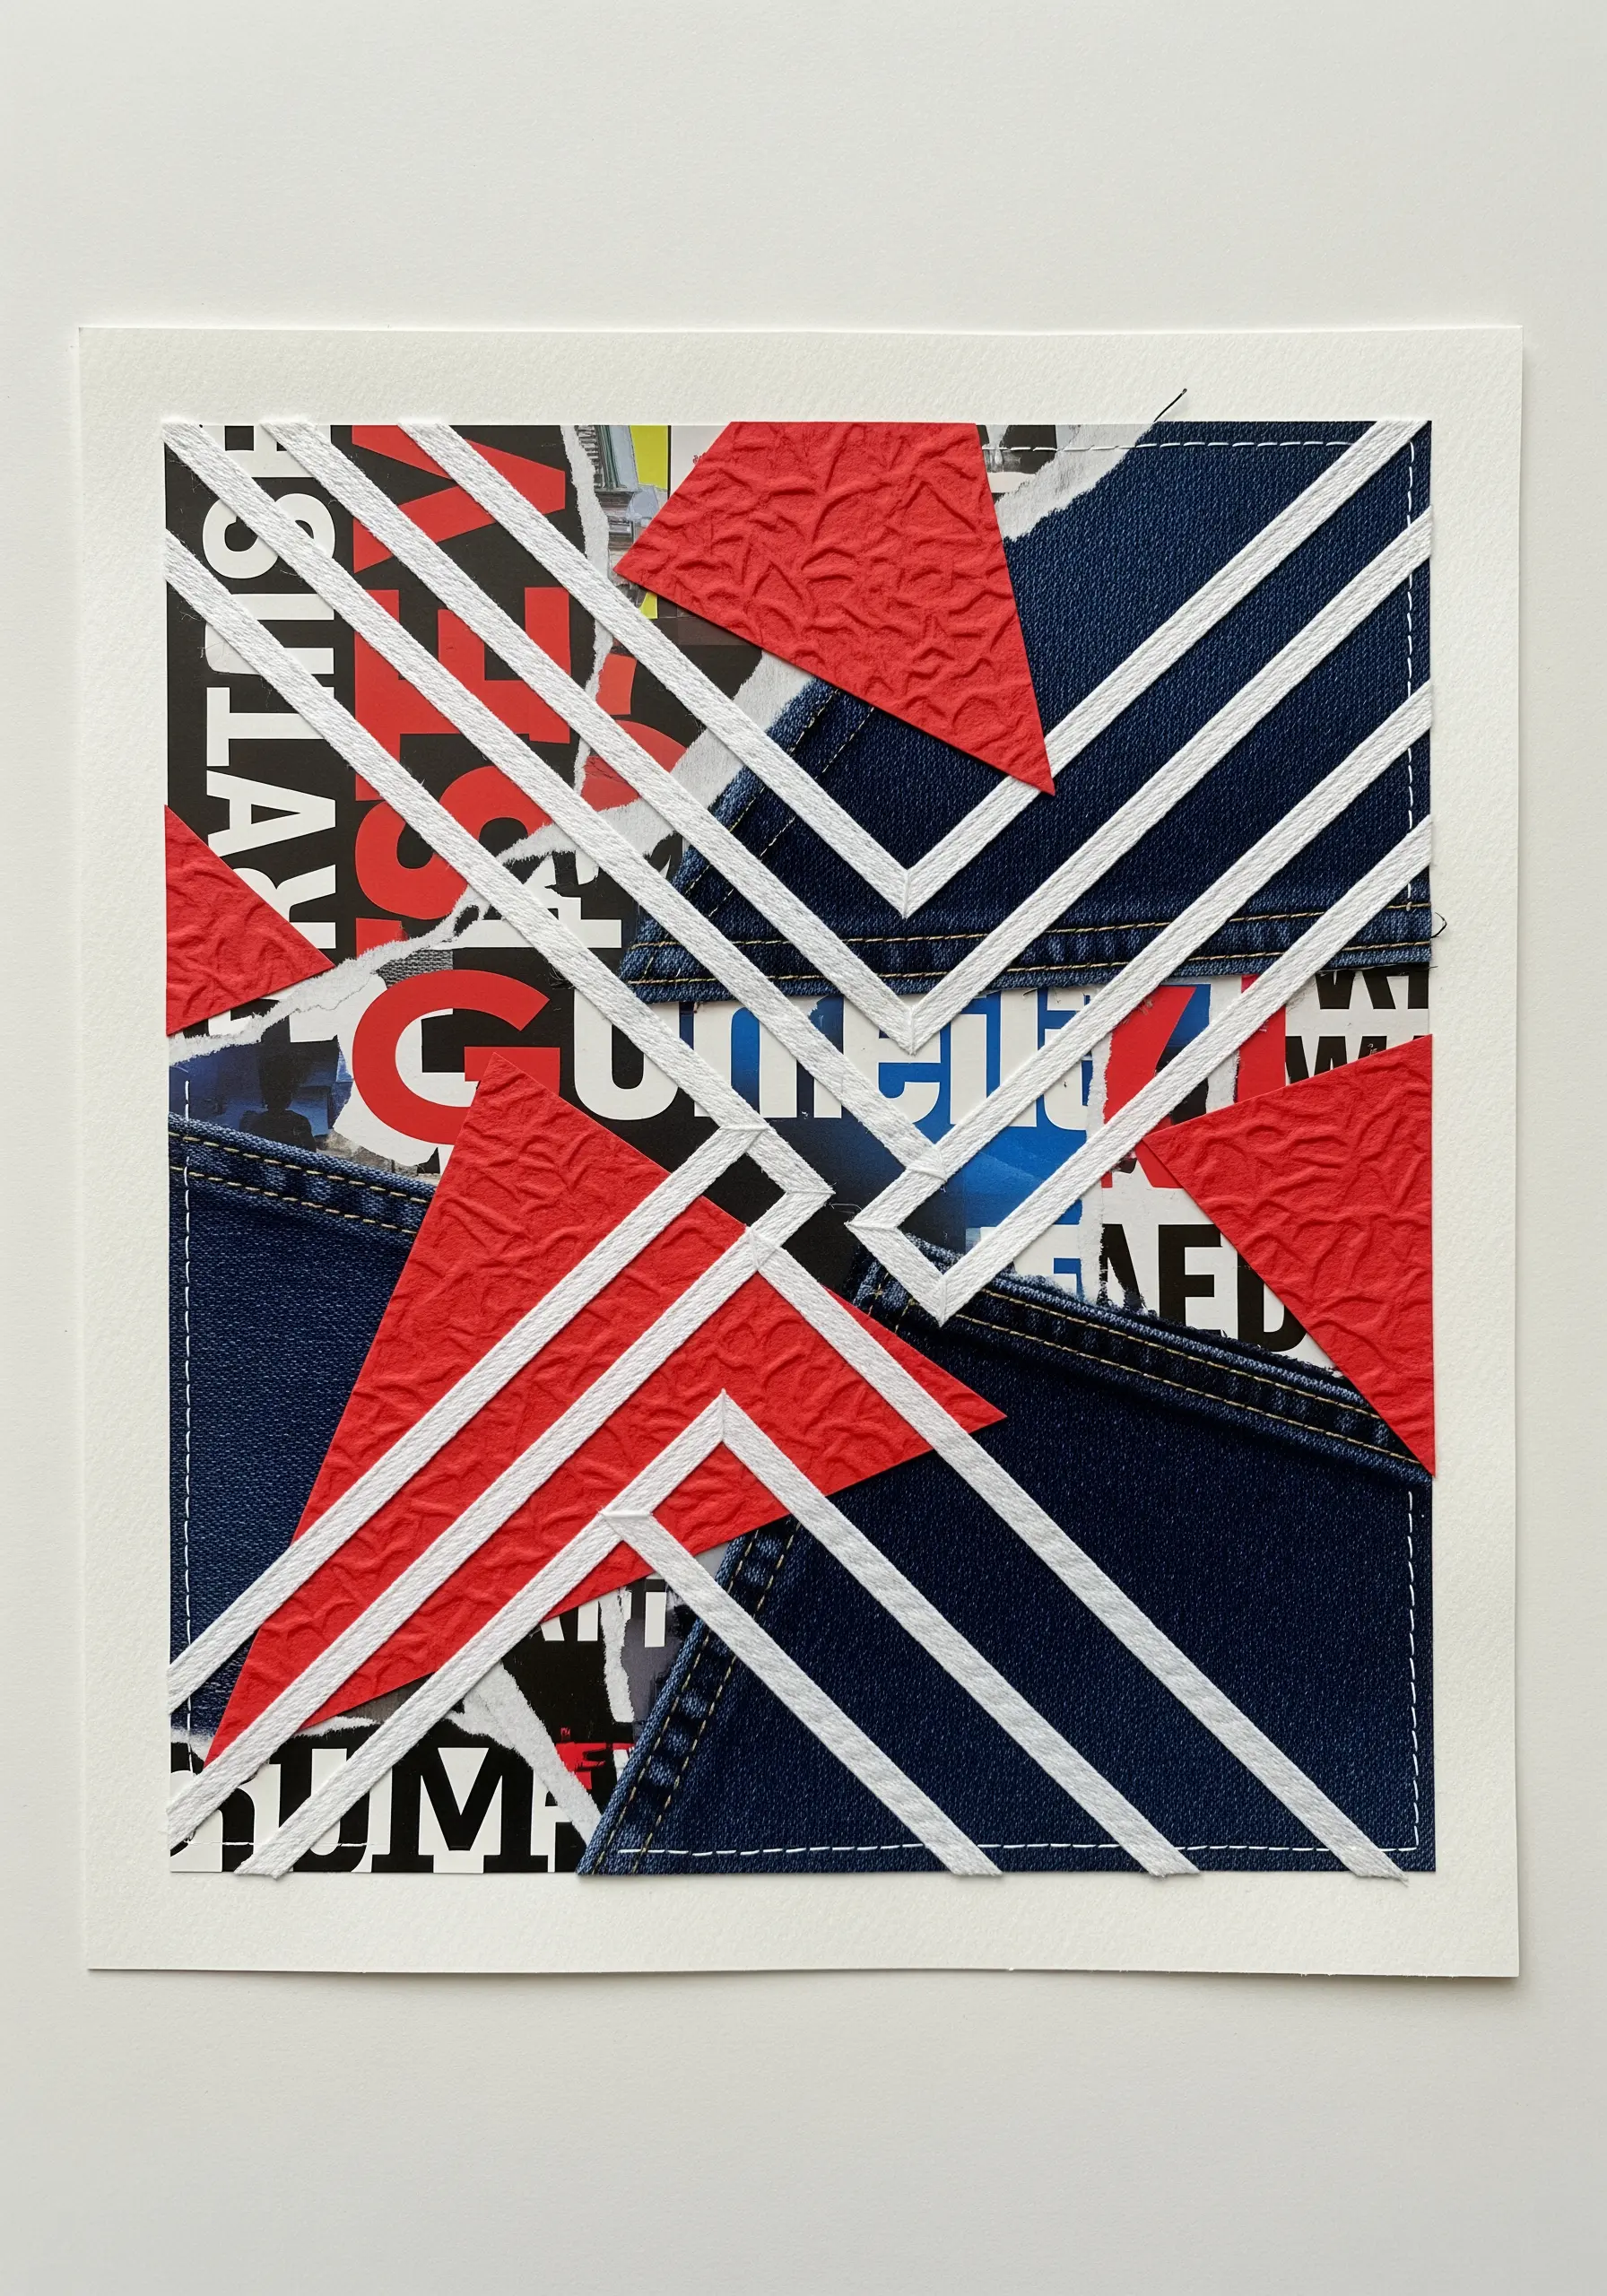
Combine materials with opposing textures, such as rugged denim and smooth, embossed paper, to create immediate visual interest.
Use a heavy-weight thread—like sashiko thread or 6-strand floss—to stitch bold, geometric lines directly through all layers.
This act of piercing the different materials with a single thread physically and visually unifies the composition.
The high contrast of white thread against dark denim and vibrant red creates a powerful focal point and a clean, modern aesthetic.
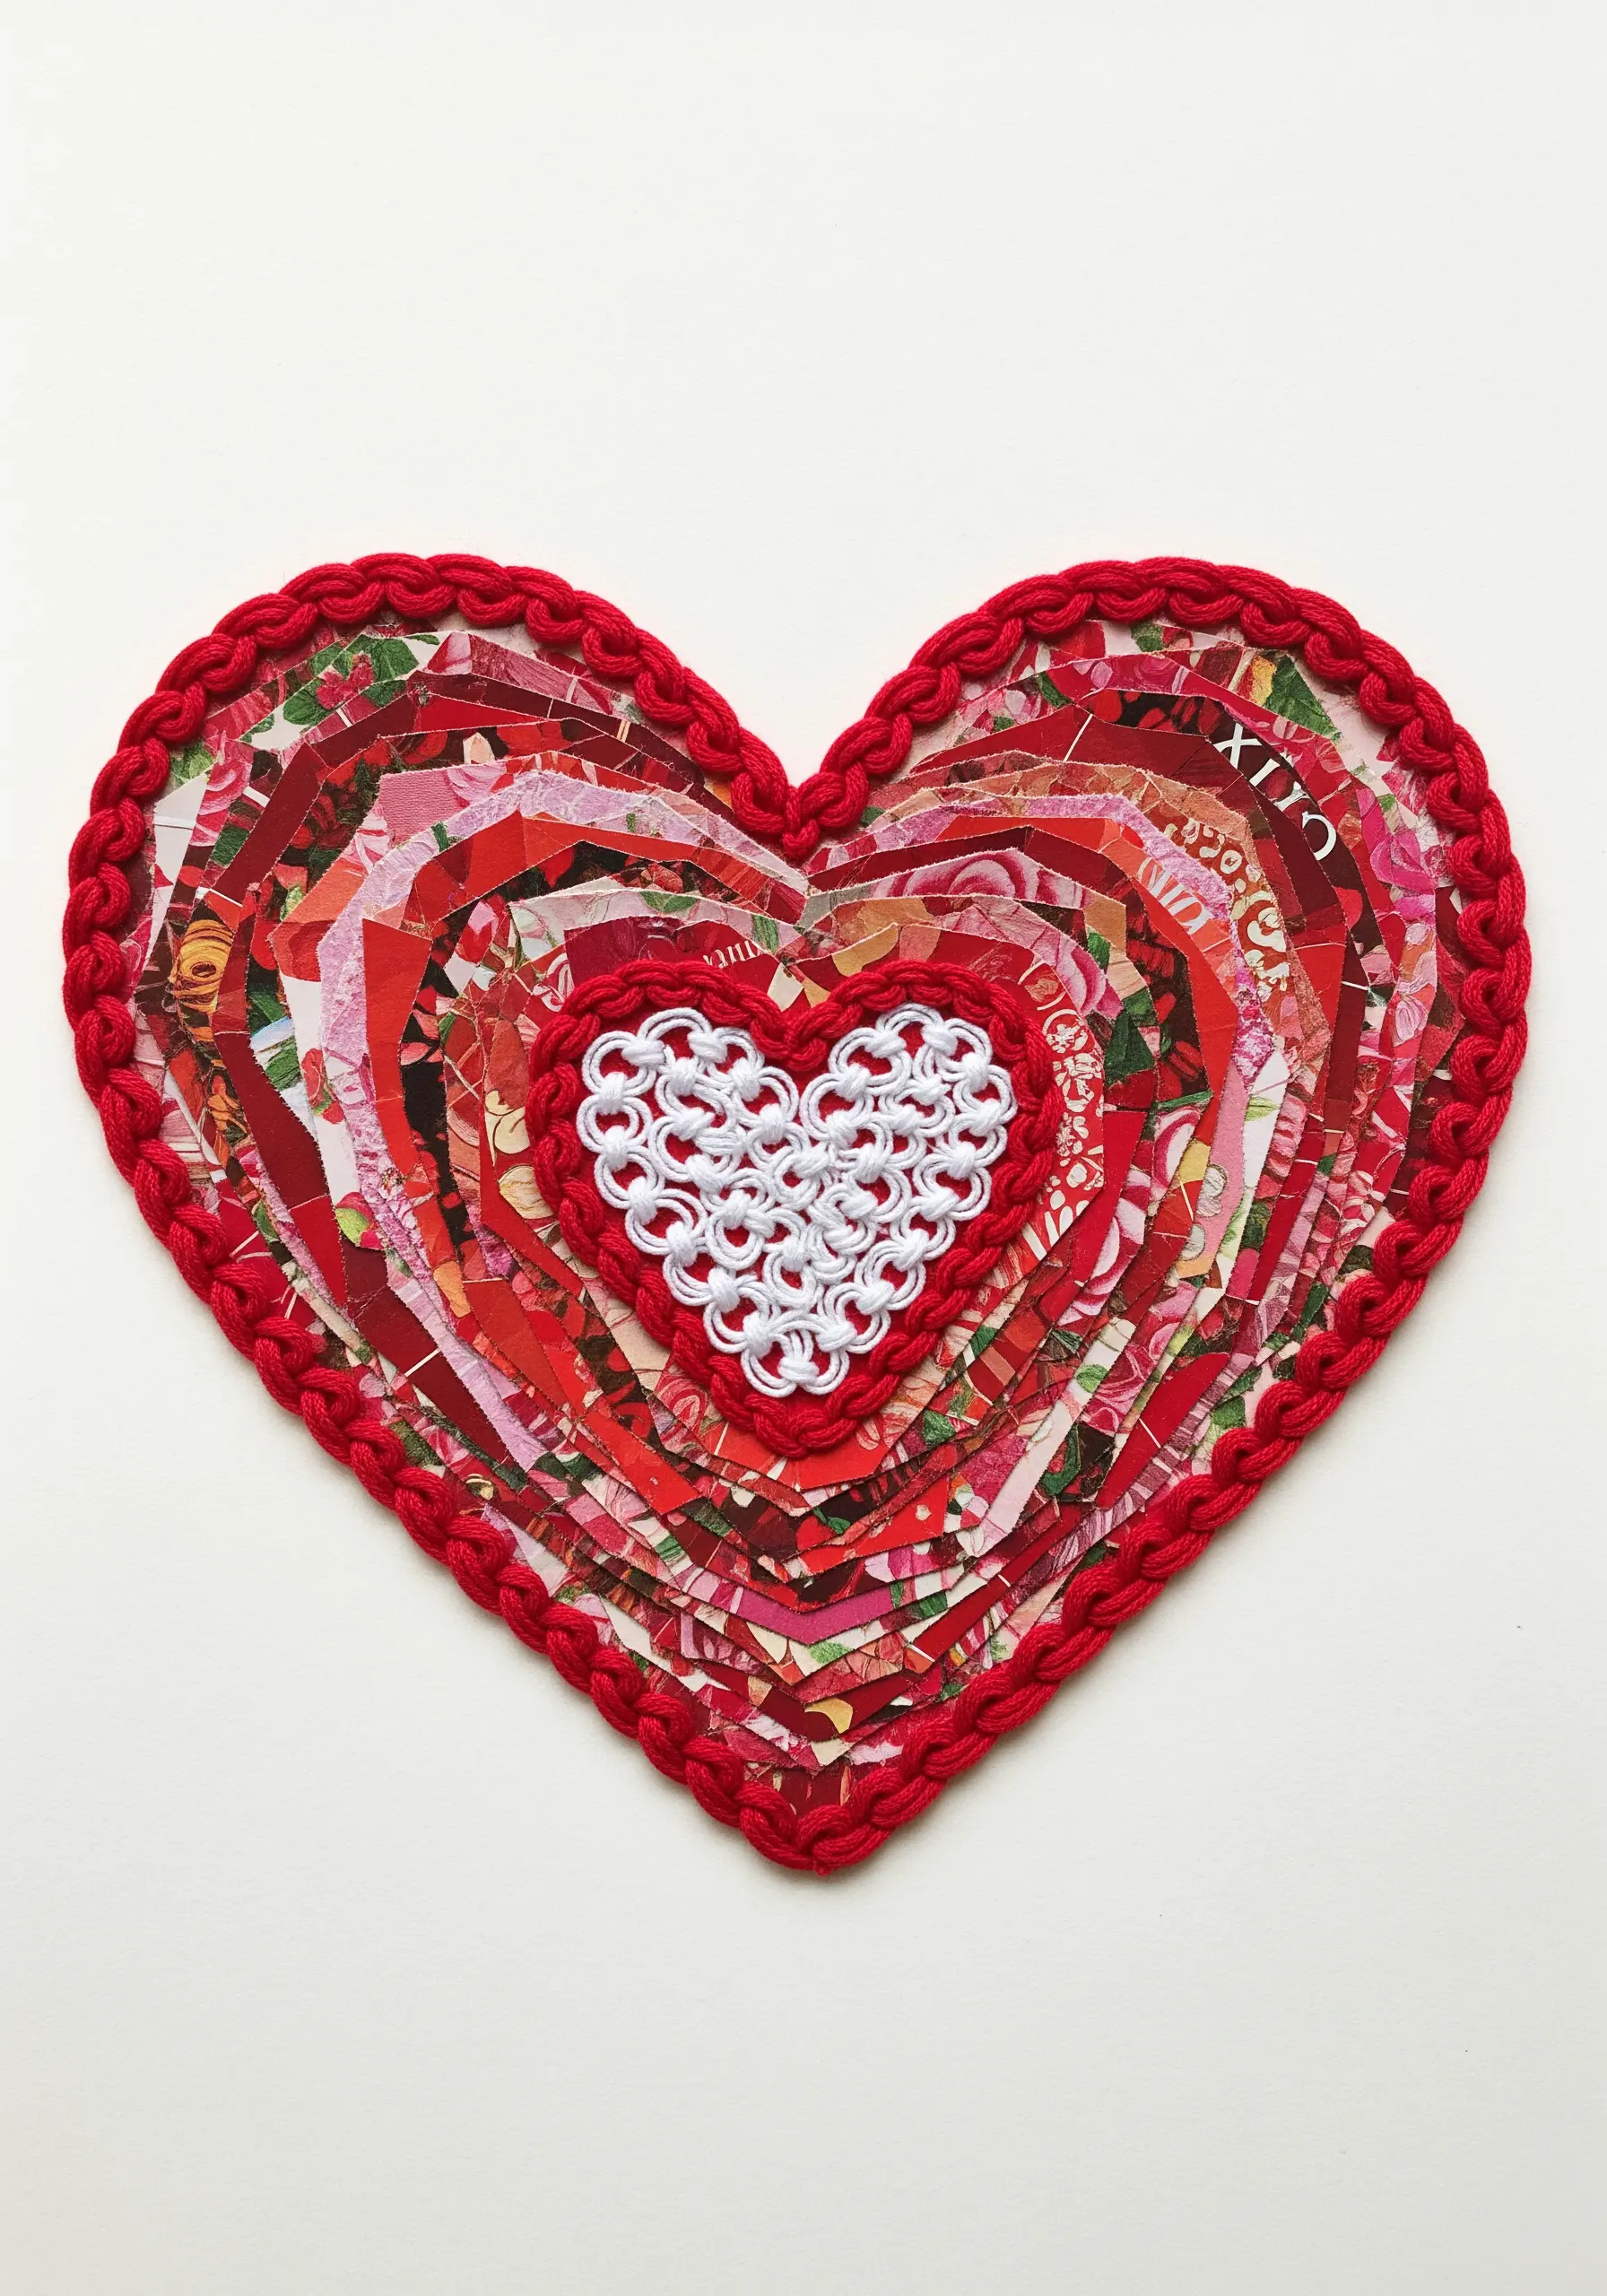
3. Narrative Threads: Weaving Stories With Ephemera
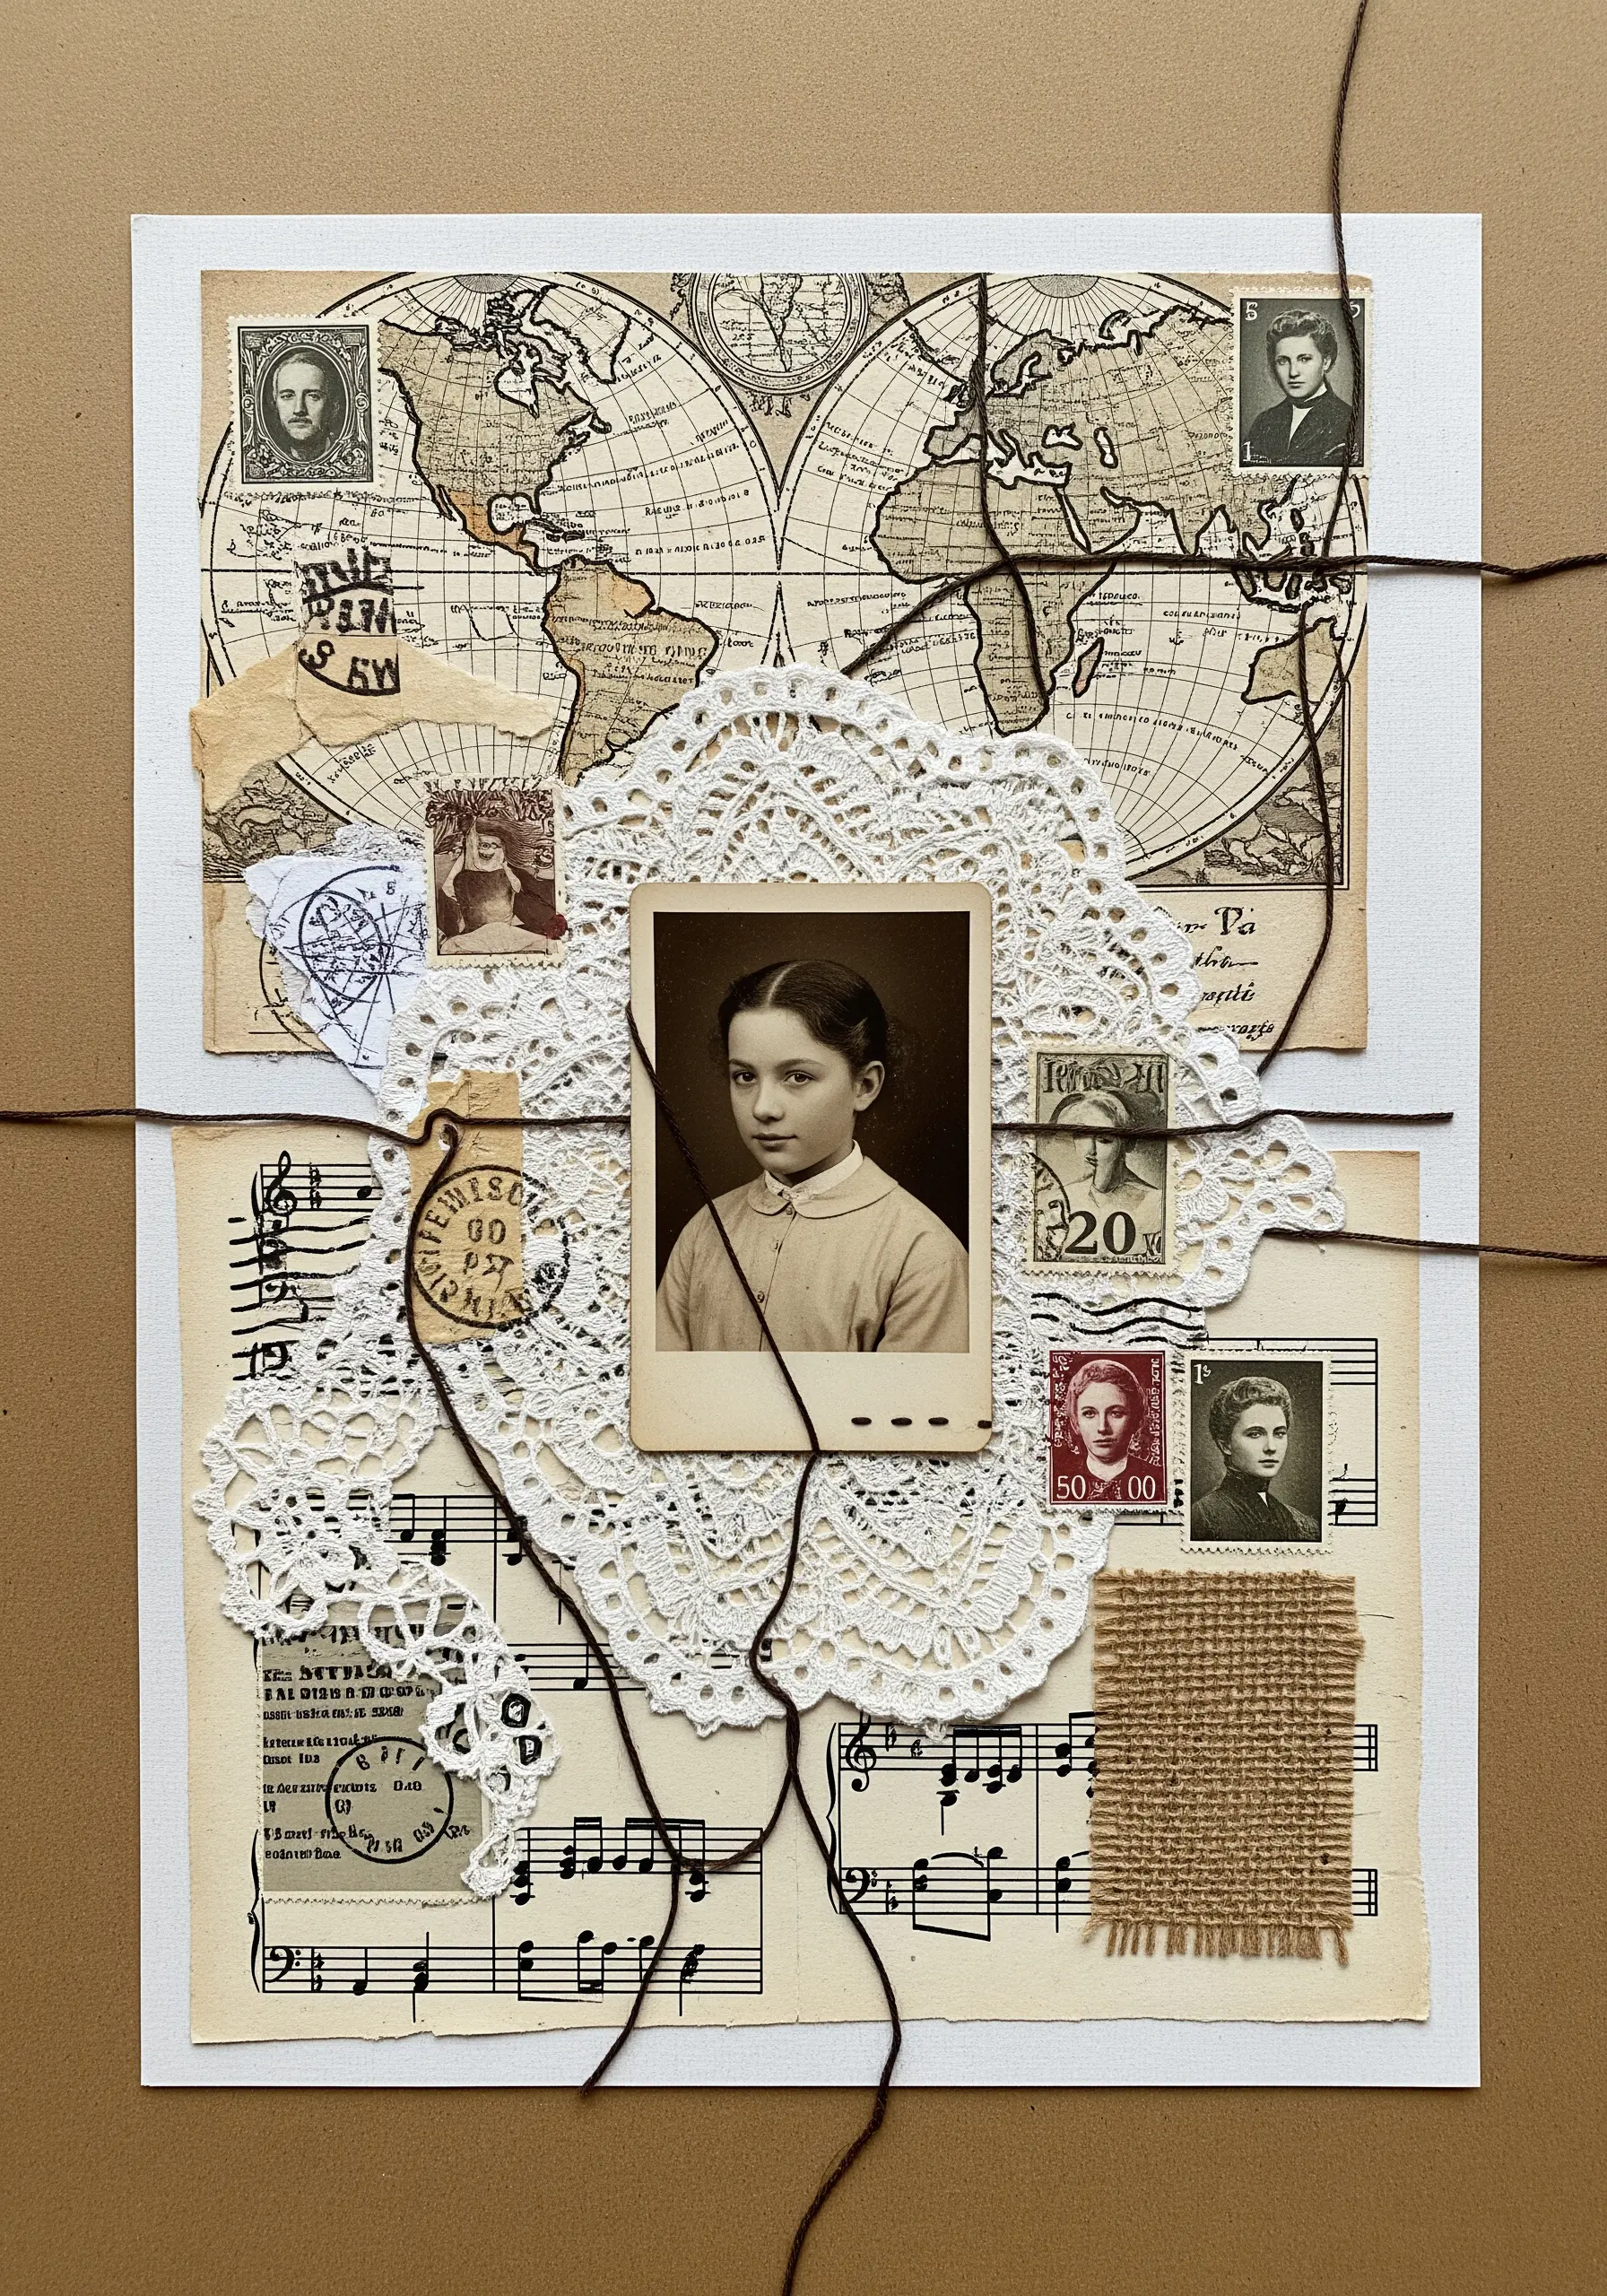
Arrange vintage photographs, stamps, sheet music, and maps to build a visual story.
Instead of stitching through these fragile items, use a single dark thread to wrap around and connect different elements.
This method adds a delicate, sculptural quality, suggesting unseen connections and timelines without damaging the ephemera.
The thread acts as a visual guide, leading the eye from one part of the story to the next while honoring the delicate nature of your materials.
4. Sheer Dimensions: Layering Fabric Appliqué
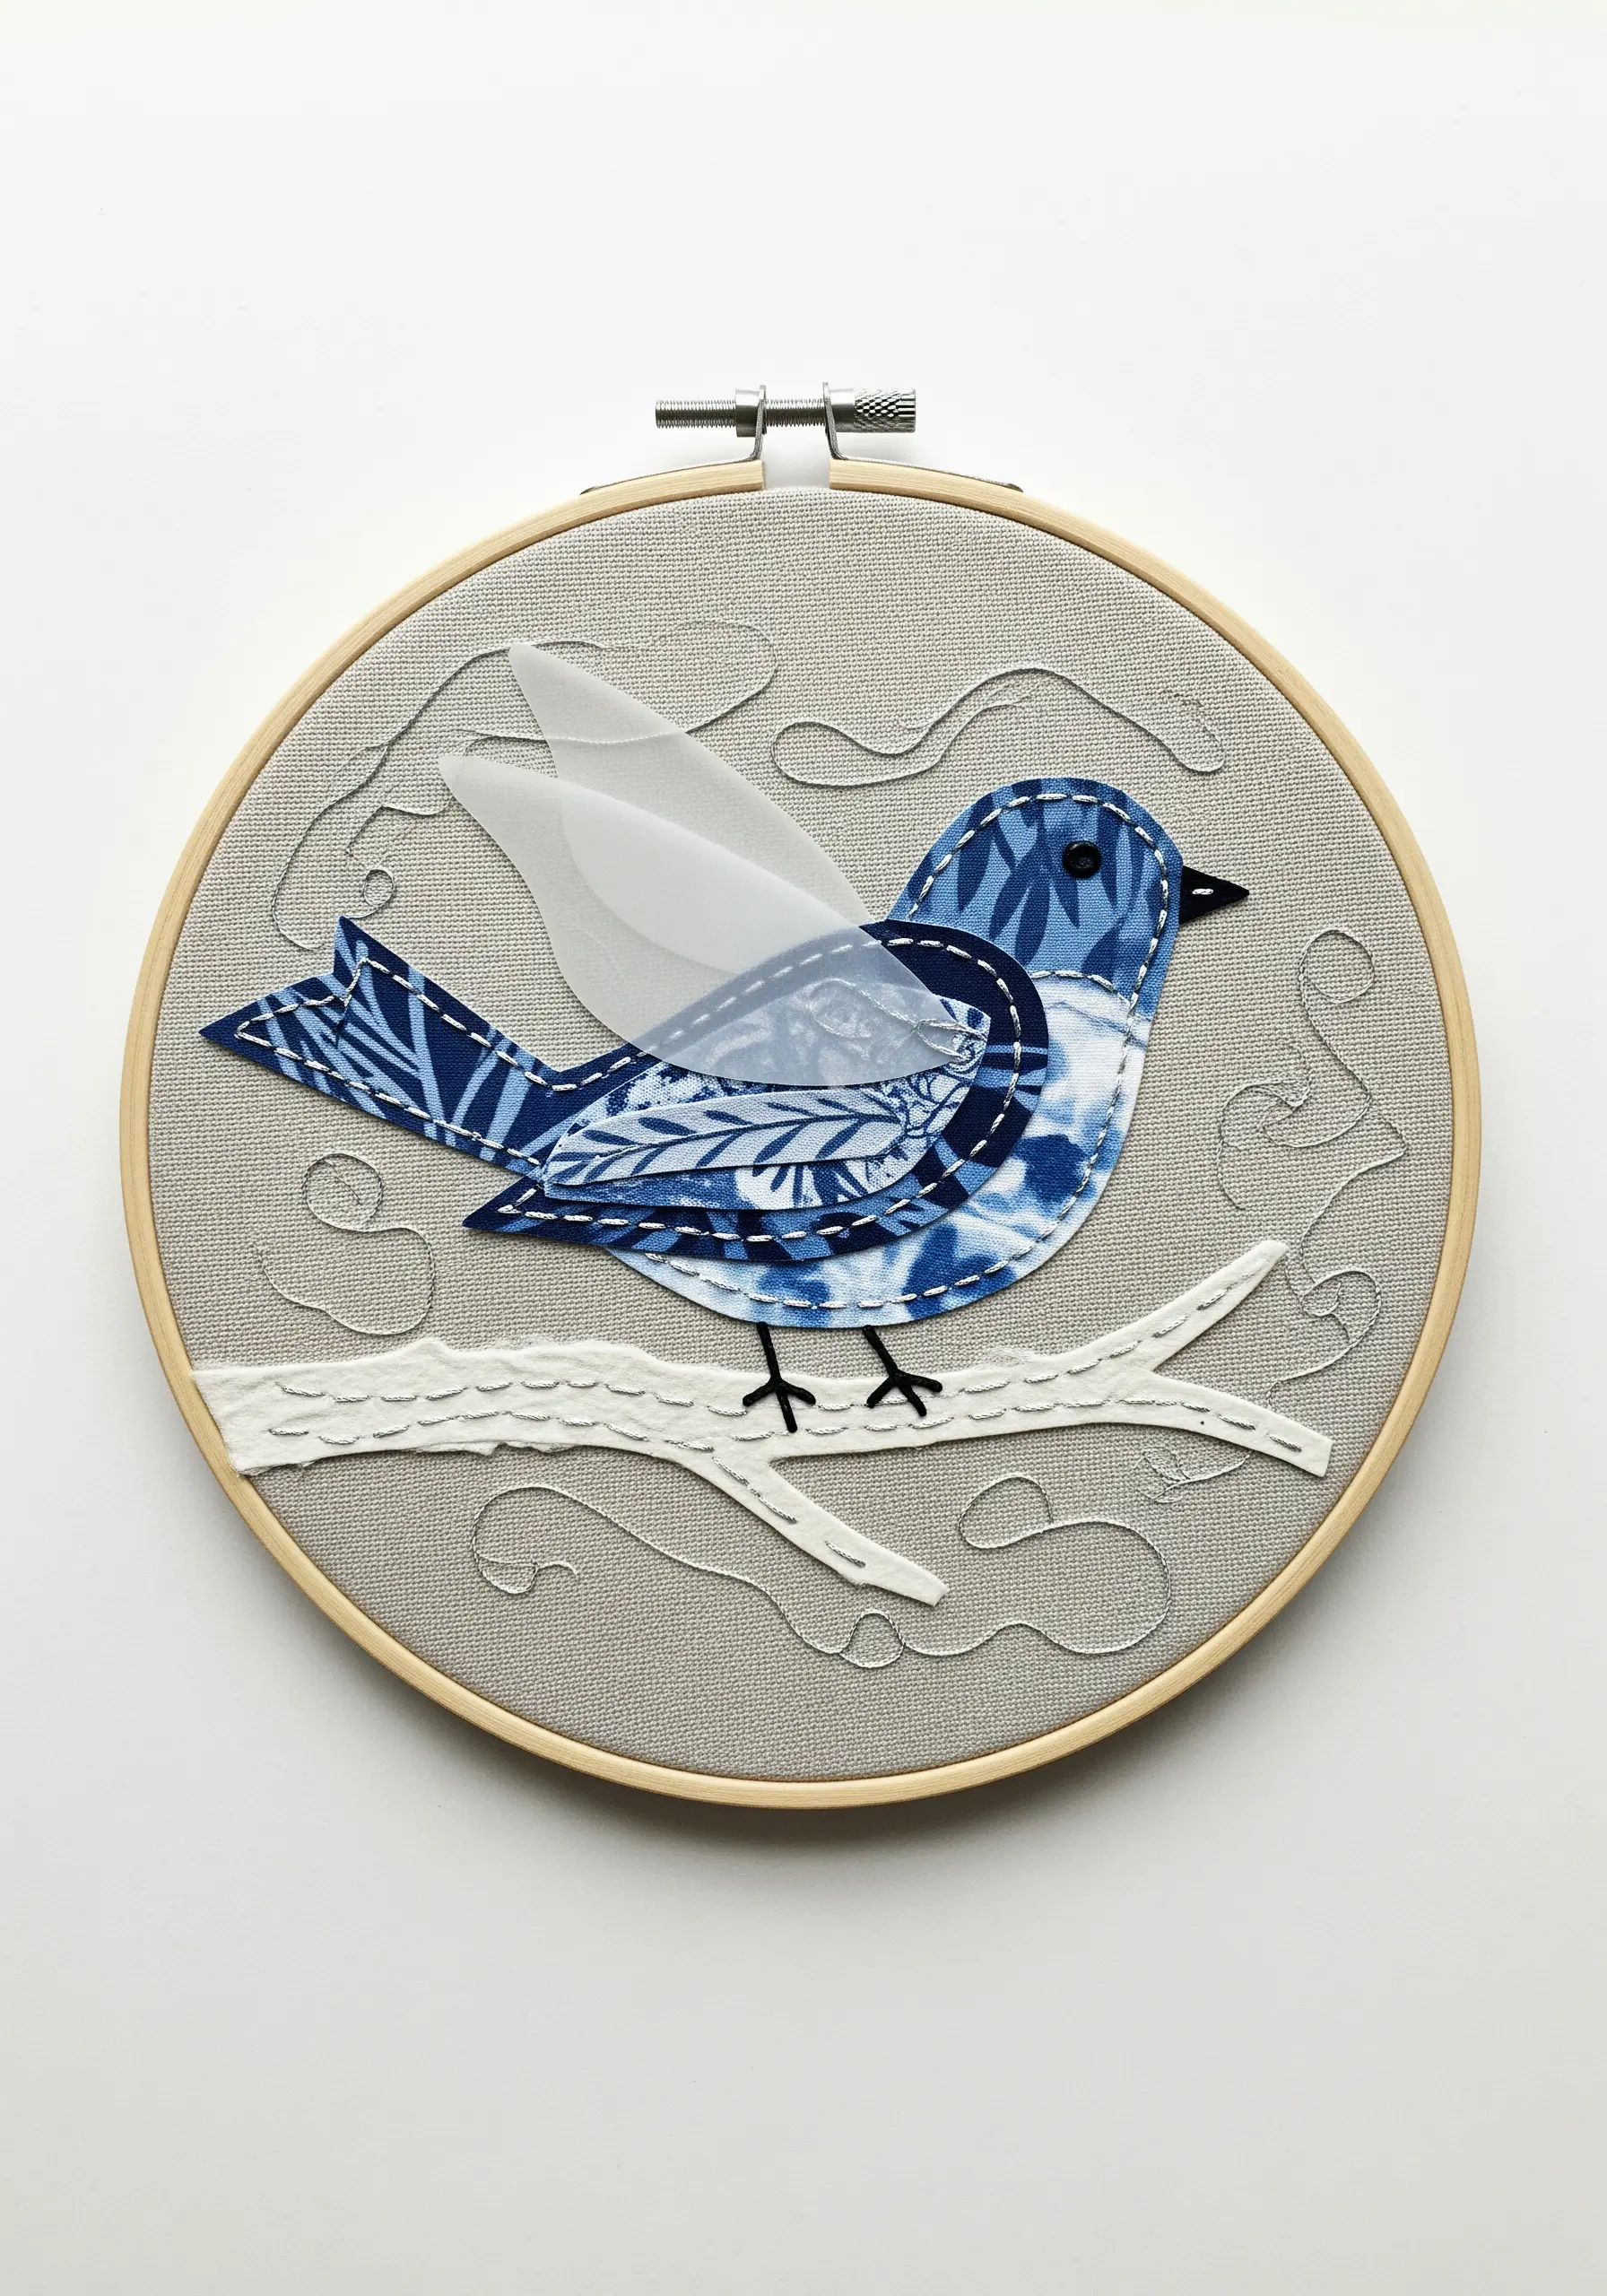
Cut your primary motif from patterned fabric and secure it to your base with a neat running stitch or whipstitch.
To introduce an element of ethereal depth, add a sheer overlay, like organza or tulle, for details like a bird’s wing.
Stitch this transparent layer down with a contrasting thread to emphasize its form and translucency.
This simple addition instantly elevates a flat appliqué, transforming it into a piece with subtle dimension and softness.
5. Architectural Tension: Abstract Lines in Urban Collage
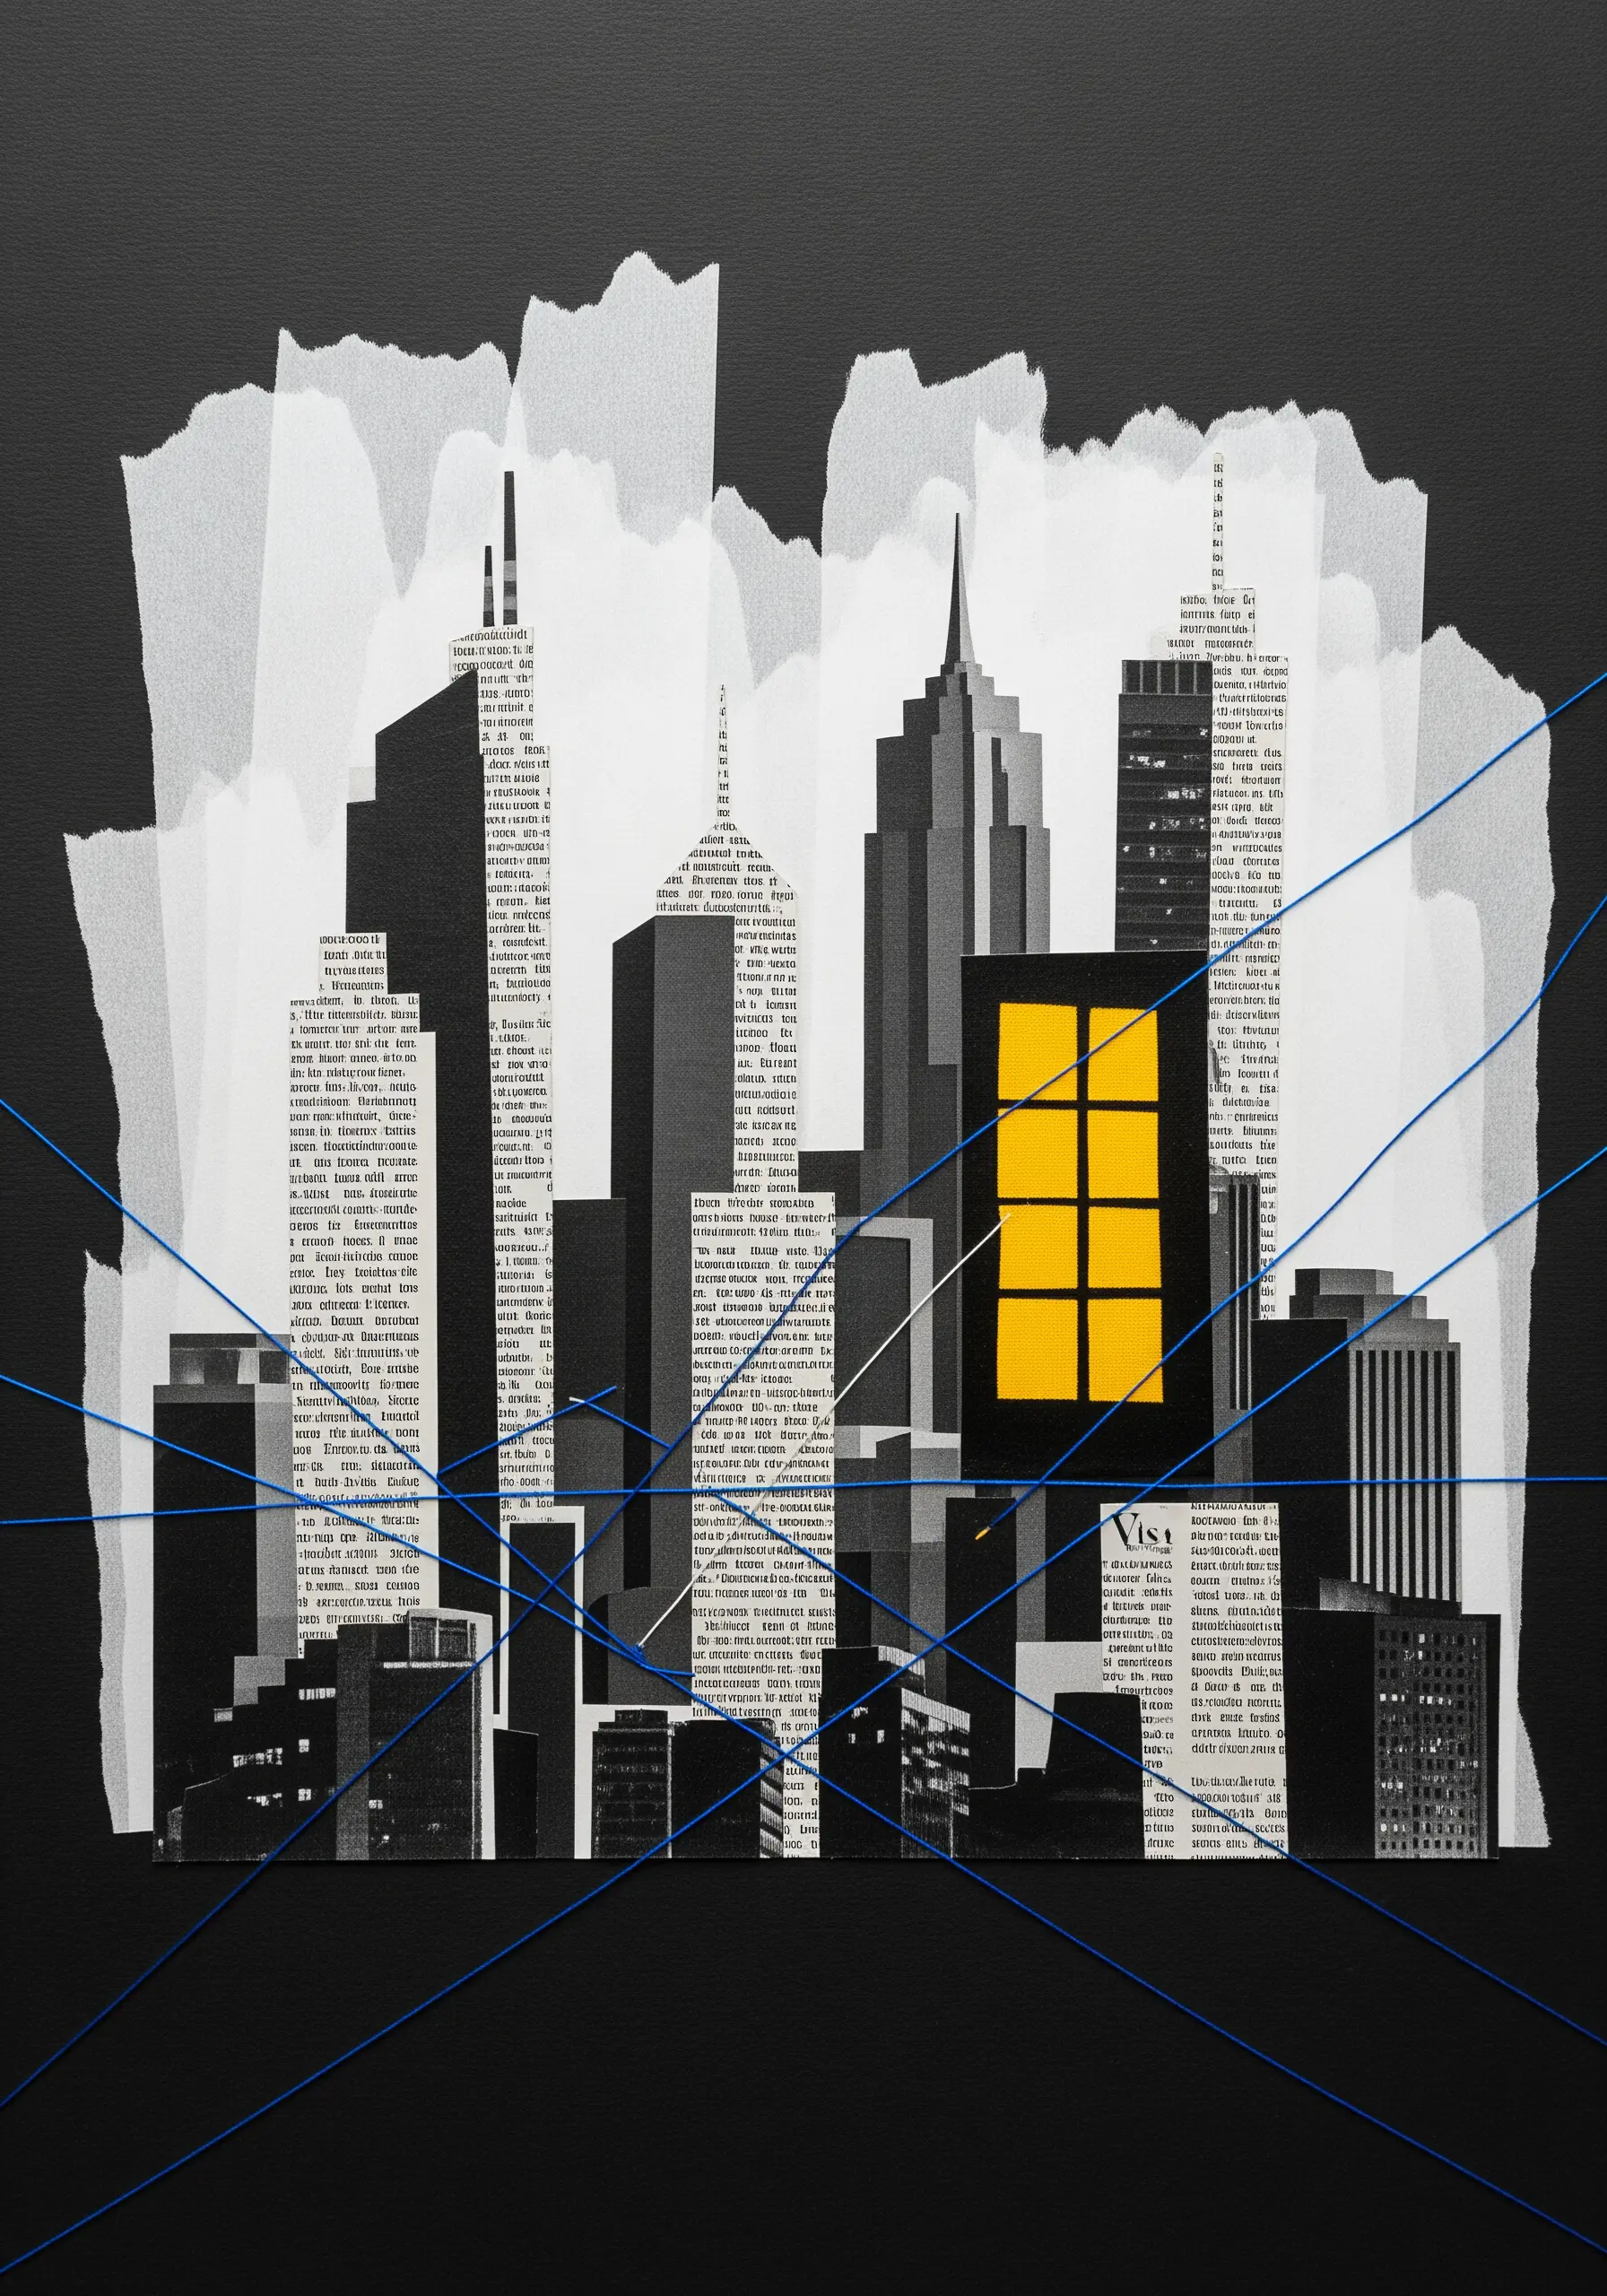
Construct a cityscape using paper cutouts—try using old book pages against black cardstock for textural contrast.
Introduce a sense of dynamic energy by stretching single strands of thread tautly across the entire composition, anchoring them at the edges of your canvas.
These sharp, clean lines cut across the flat paper forms, suggesting perspective, movement, or abstract energy grids.
The tension in the thread creates a powerful contrast with the static nature of the paper city.
6. Celestial Mandalas: Stitching With Metallic and Tulle
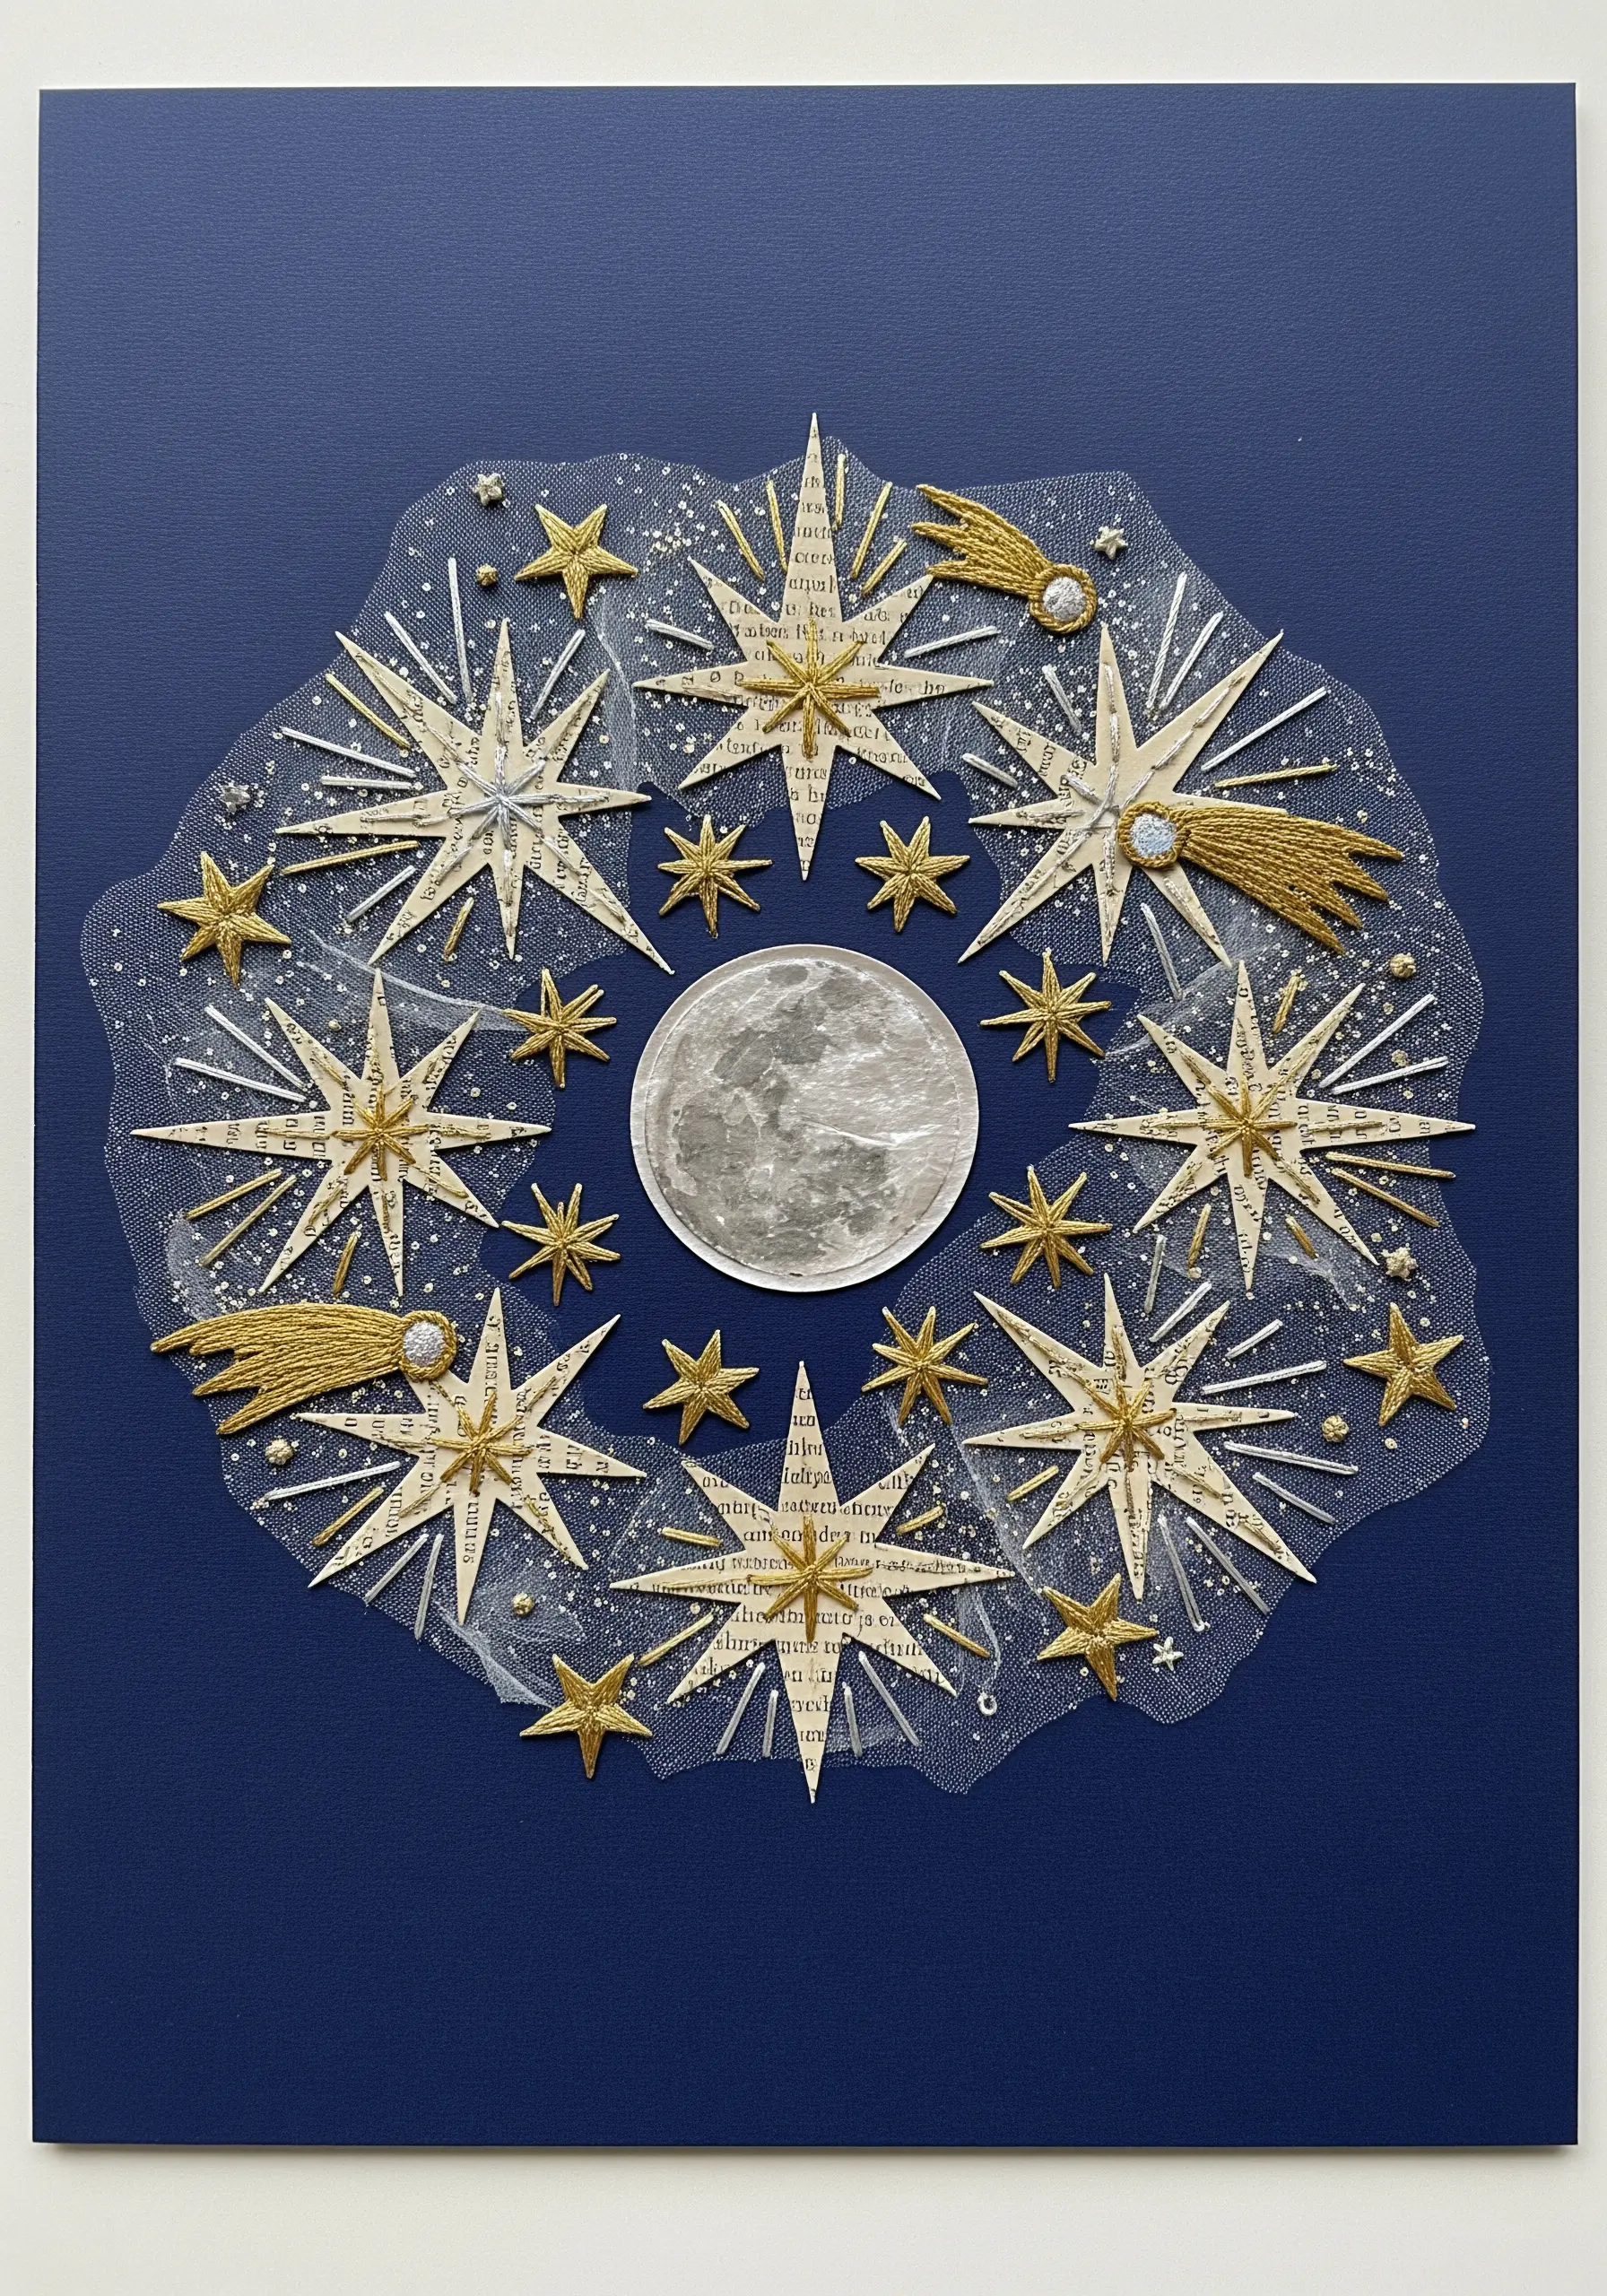
Build your design on a sheer fabric like tulle to create a magical, floating effect against a dark background.
Use a gold metallic thread for radiating lines, applying it with a couching stitch—tacking it down with a finer, matching thread.
Couching prevents metallic threads from fraying and twisting, ensuring a smooth, high-shine finish.
Intersperse your stitched lines with tiny seed beads or French knots to mimic distant stars and add delicate, light-catching texture.
7. Thread as Texture: Creating Hair and Contours
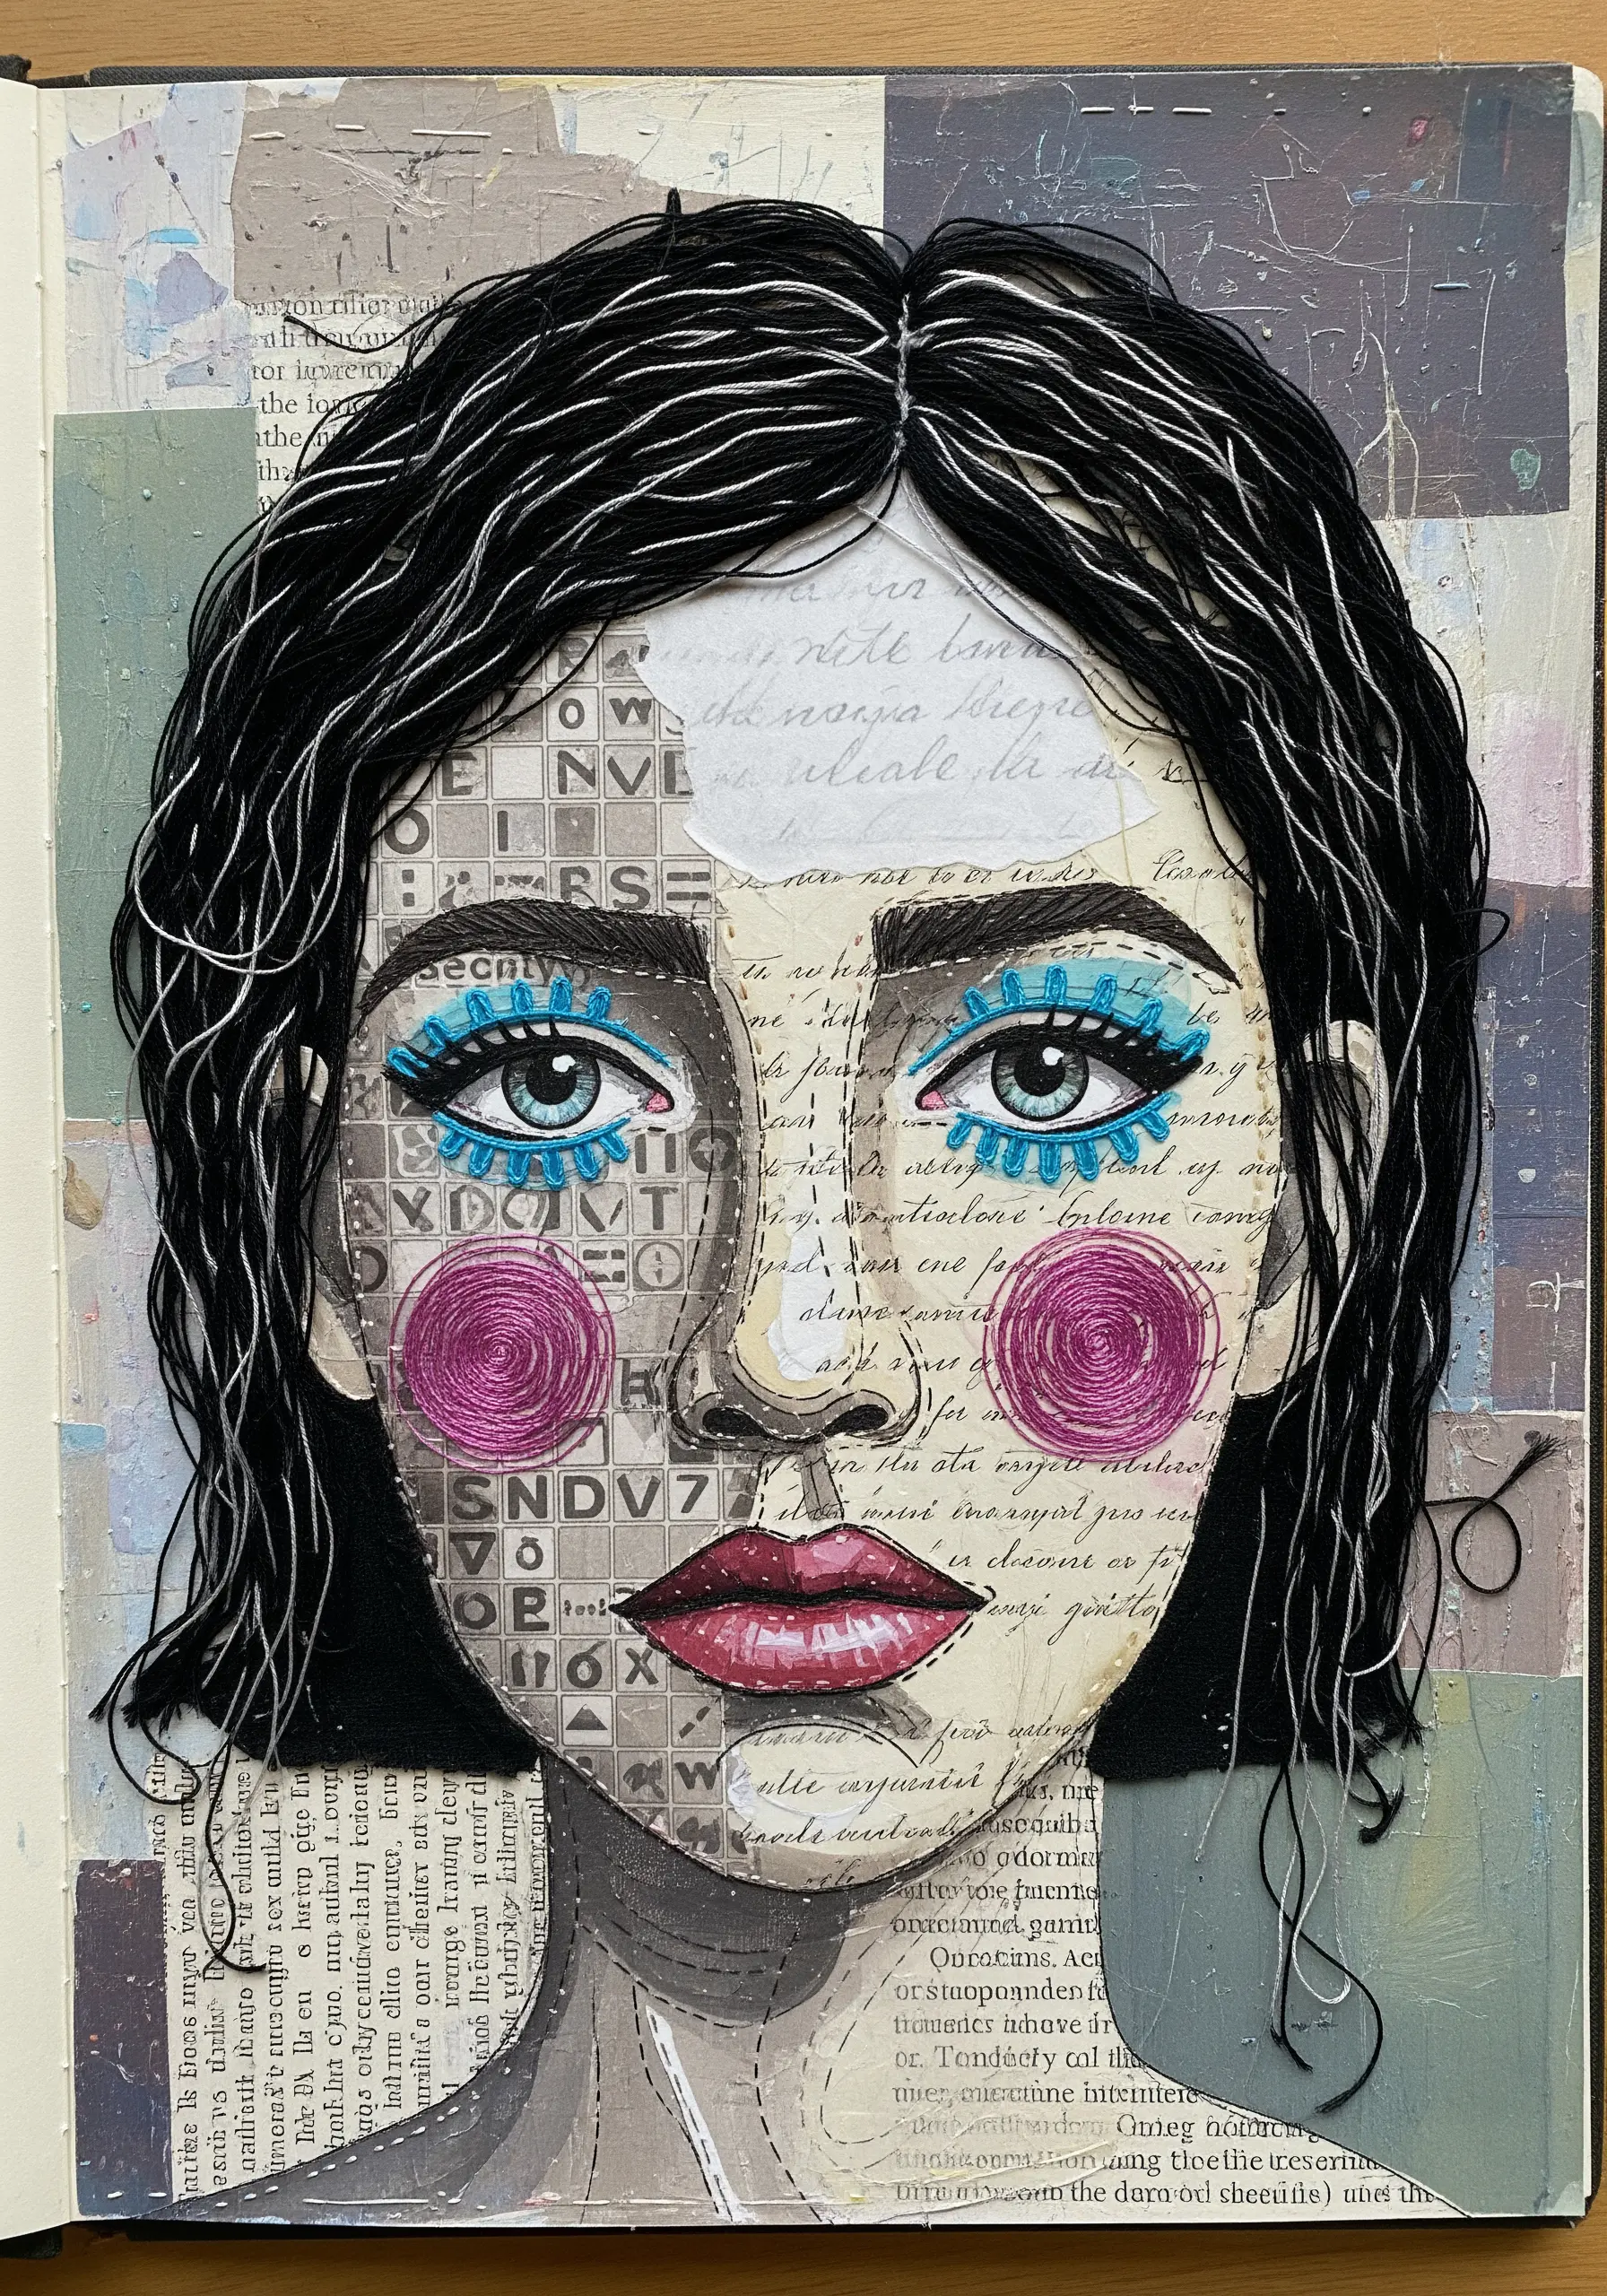
After assembling a paper collage portrait, let thread create the most expressive, dimensional elements.
For hair, lay down long strands of embroidery floss, allowing some to hang loosely to create movement, and then tack them in place with discreet couching stitches.
For densely textured areas like cheeks or lips, use concentric circles of satin stitch to build up a vibrant, tactile focal point that contrasts with the flat paper surface.
8. Minimalist Landscapes: Combining Torn Paper and Thread
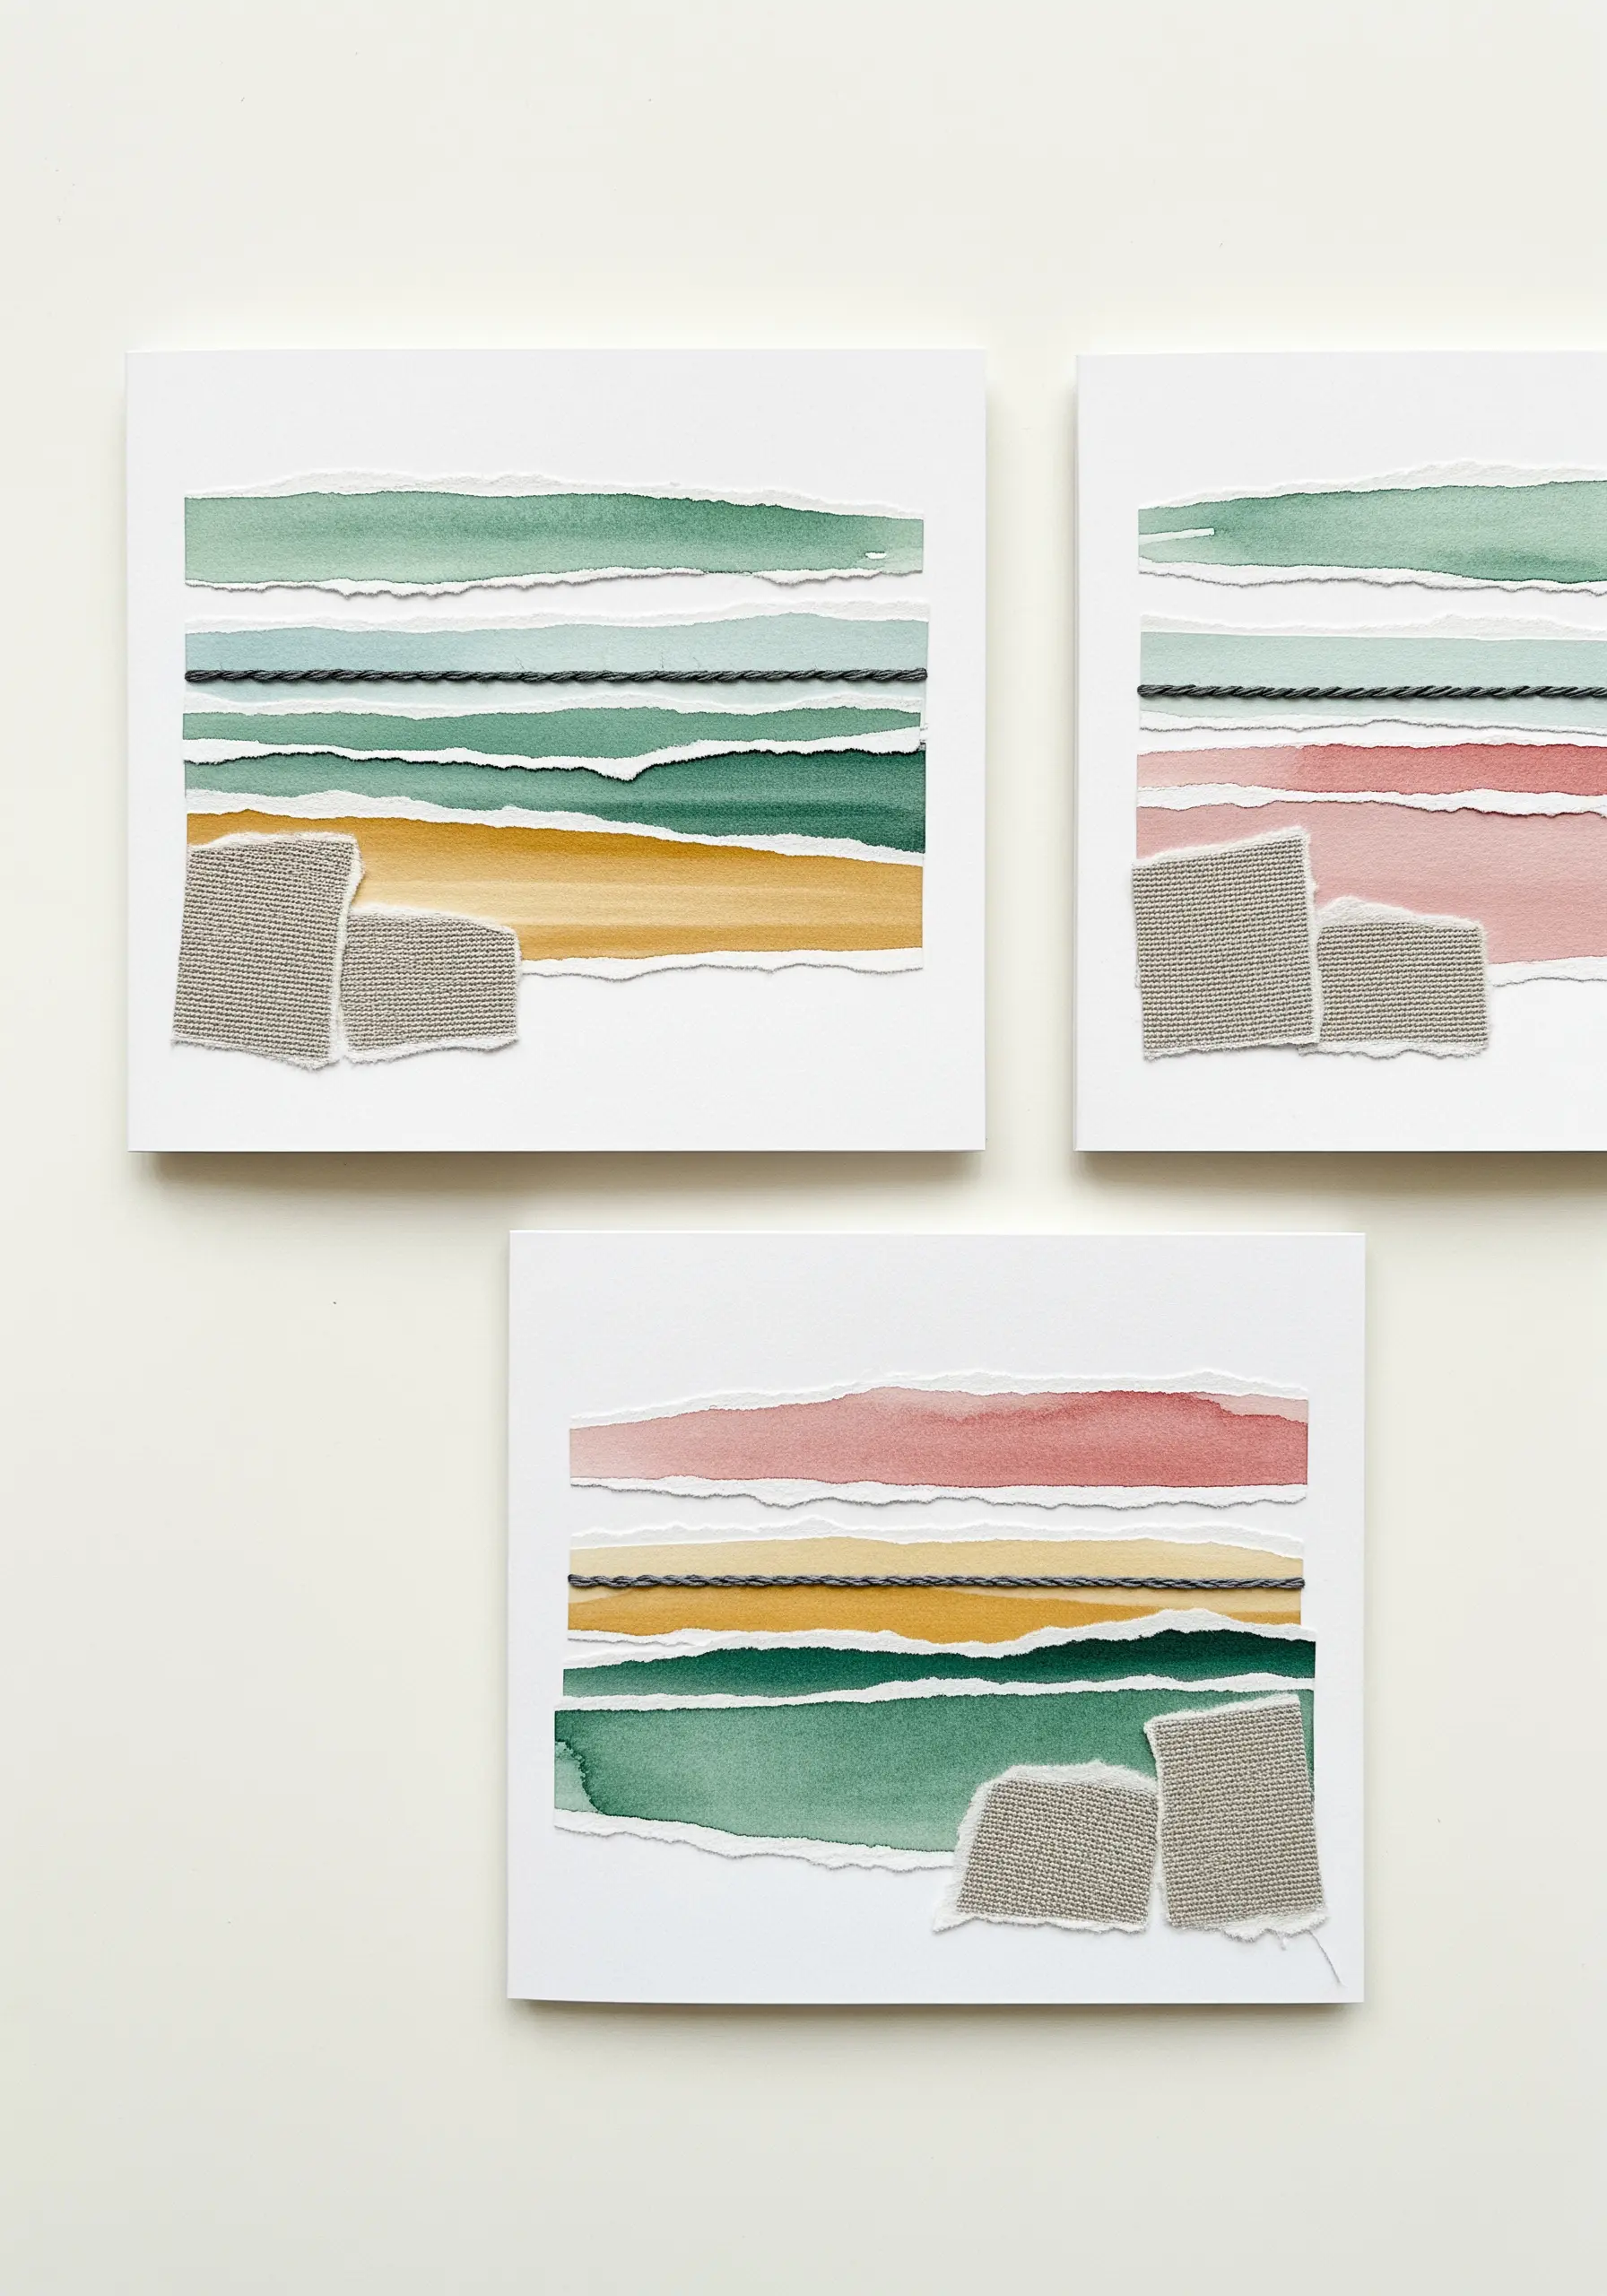
Create serene, abstract scenes by layering torn watercolor or handmade paper.
The soft, feathered edge of torn paper provides a natural, organic feel that crisp, cut lines cannot replicate.
Introduce a single, contrasting texture, like a small swatch of burlap or linen, to ground the composition.
Finally, anchor the piece with a few clean, straight lines of couched thread, adding a touch of disciplined structure to the soft landscape.
9. Maximalist Texture: A Study in Freeform Fiber Art
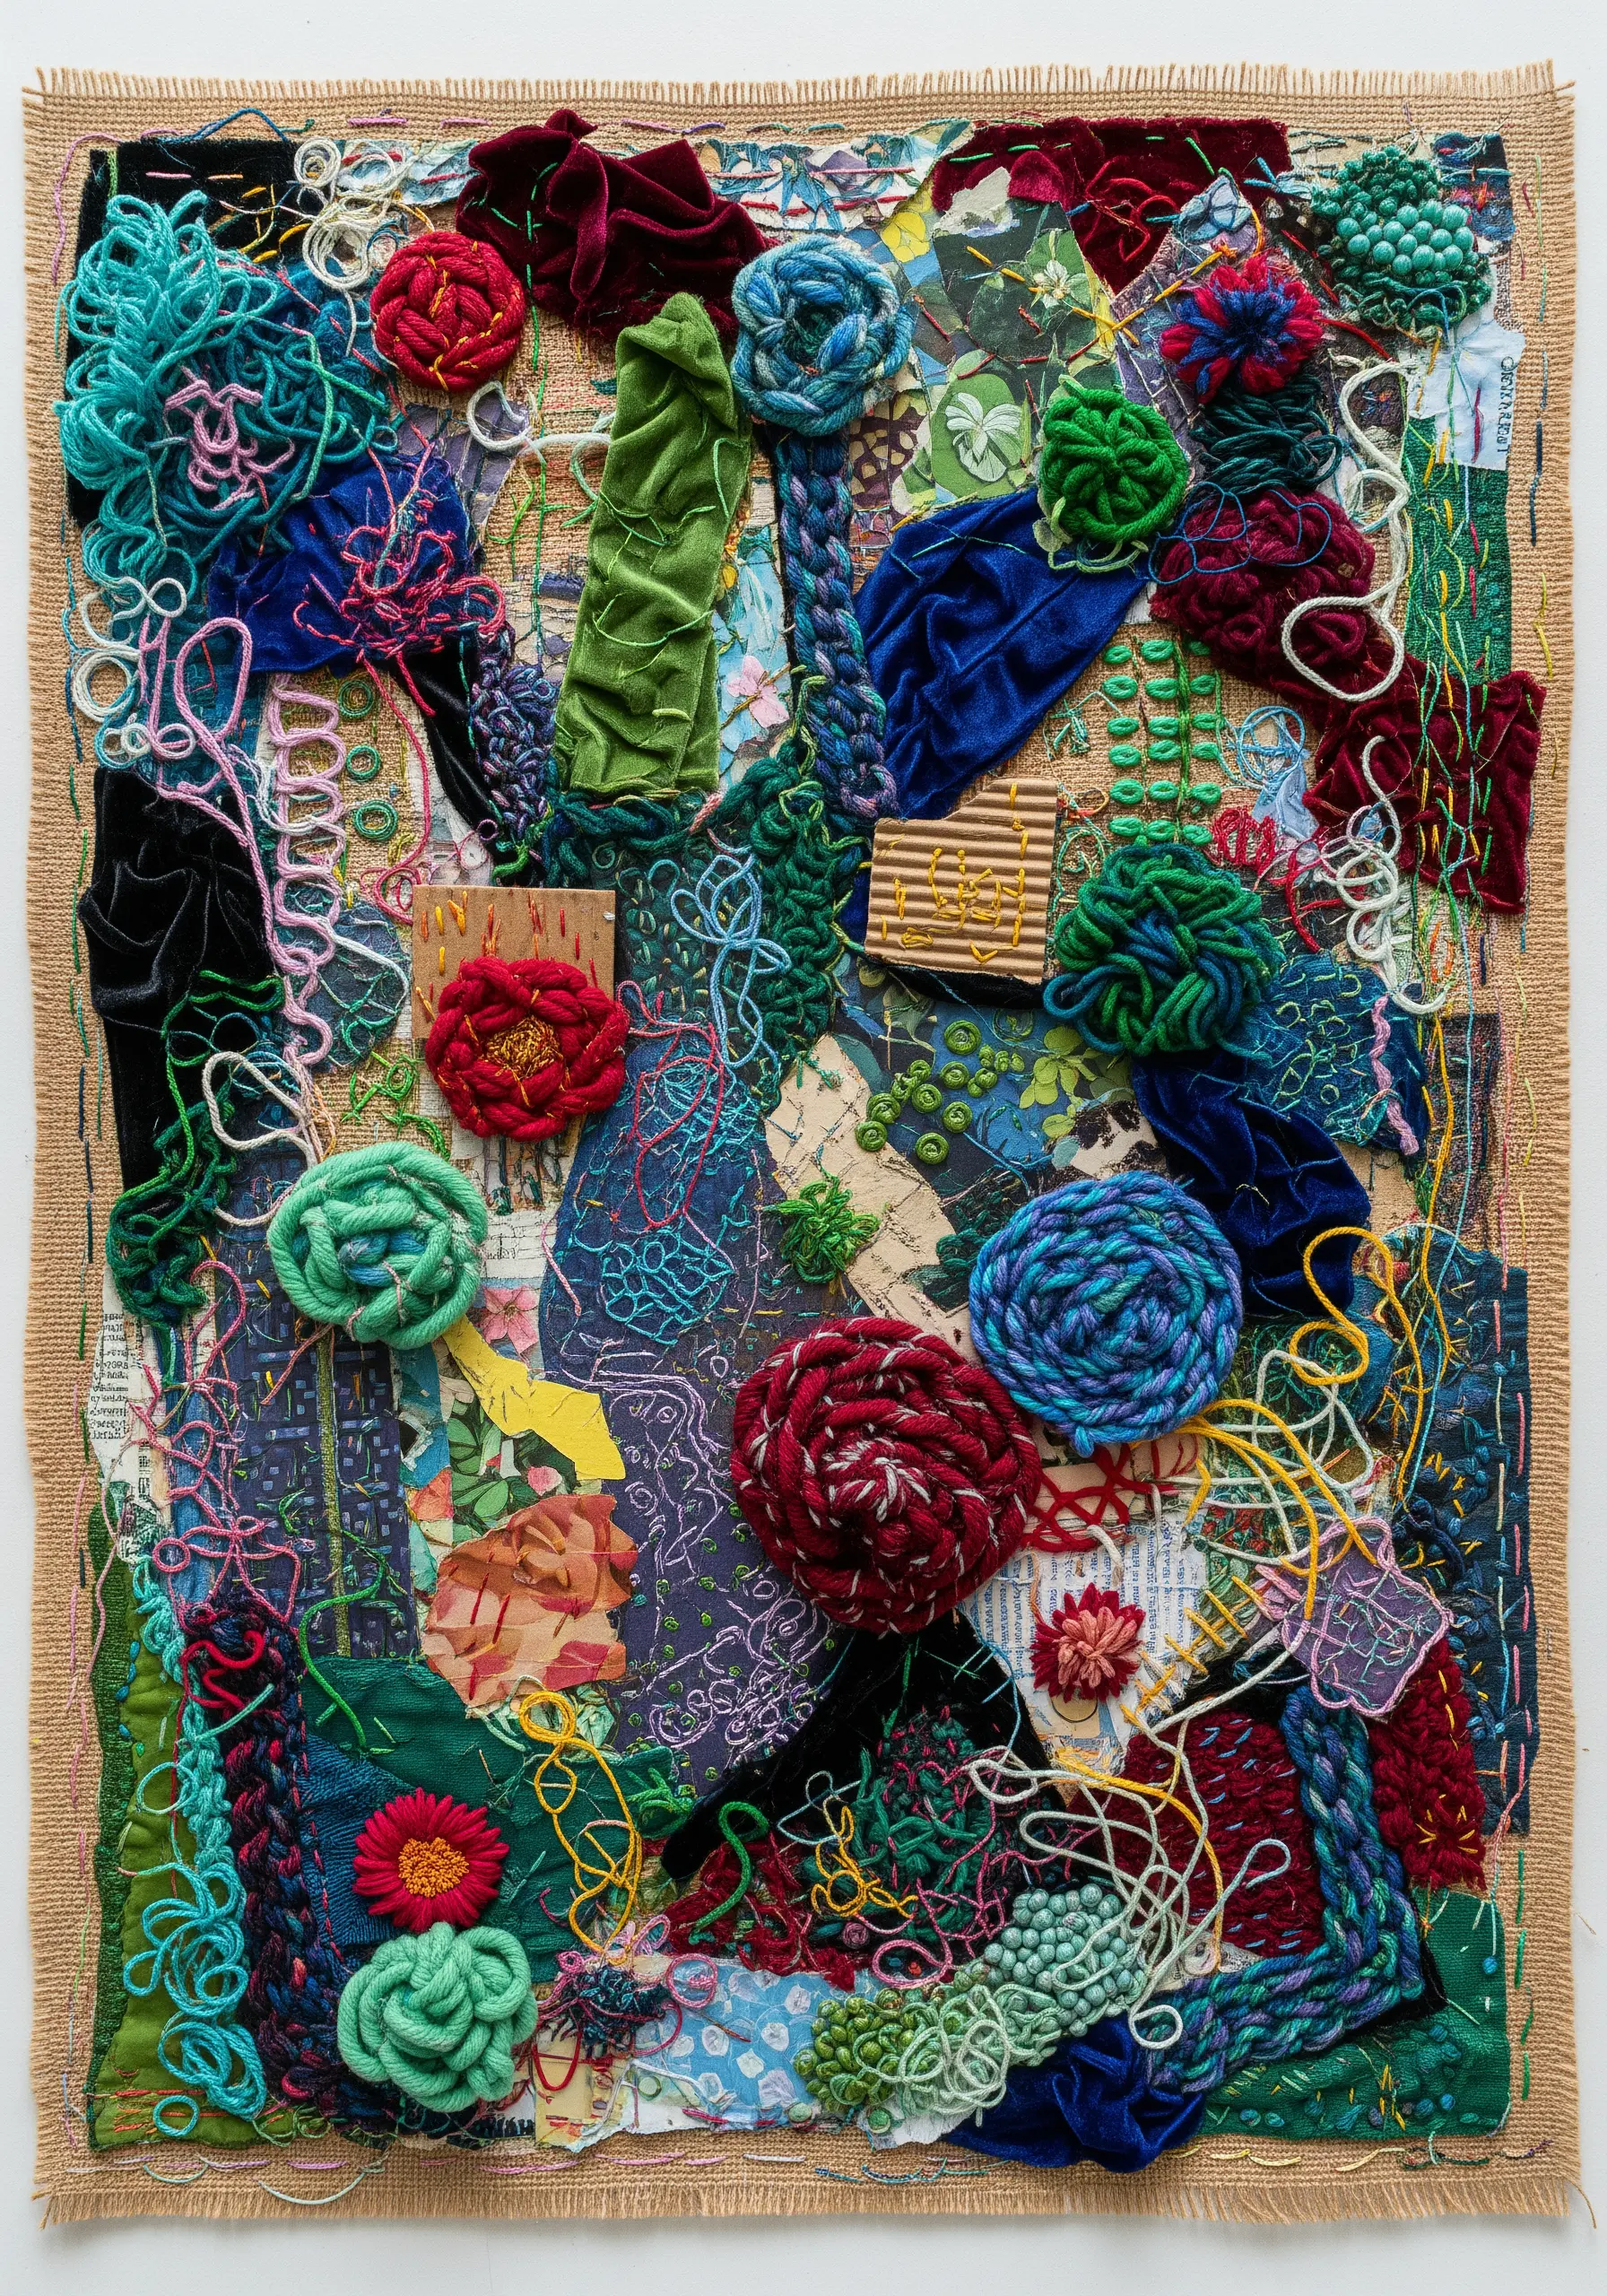
Work on a sturdy base like burlap or felt and embrace a more intuitive, process-driven approach.
Layer fabric scraps, thick yarns, and threads, securing them with a variety of textural stitches like French knots, woven wheel stitches, and couching.
Vary the density of your stitching, leaving some areas sparse and others heavily embellished.
This method is less about creating a specific image and more about celebrating the joyful interplay of color and texture.
10. Underwater Currents: Stitching Flow and Motion
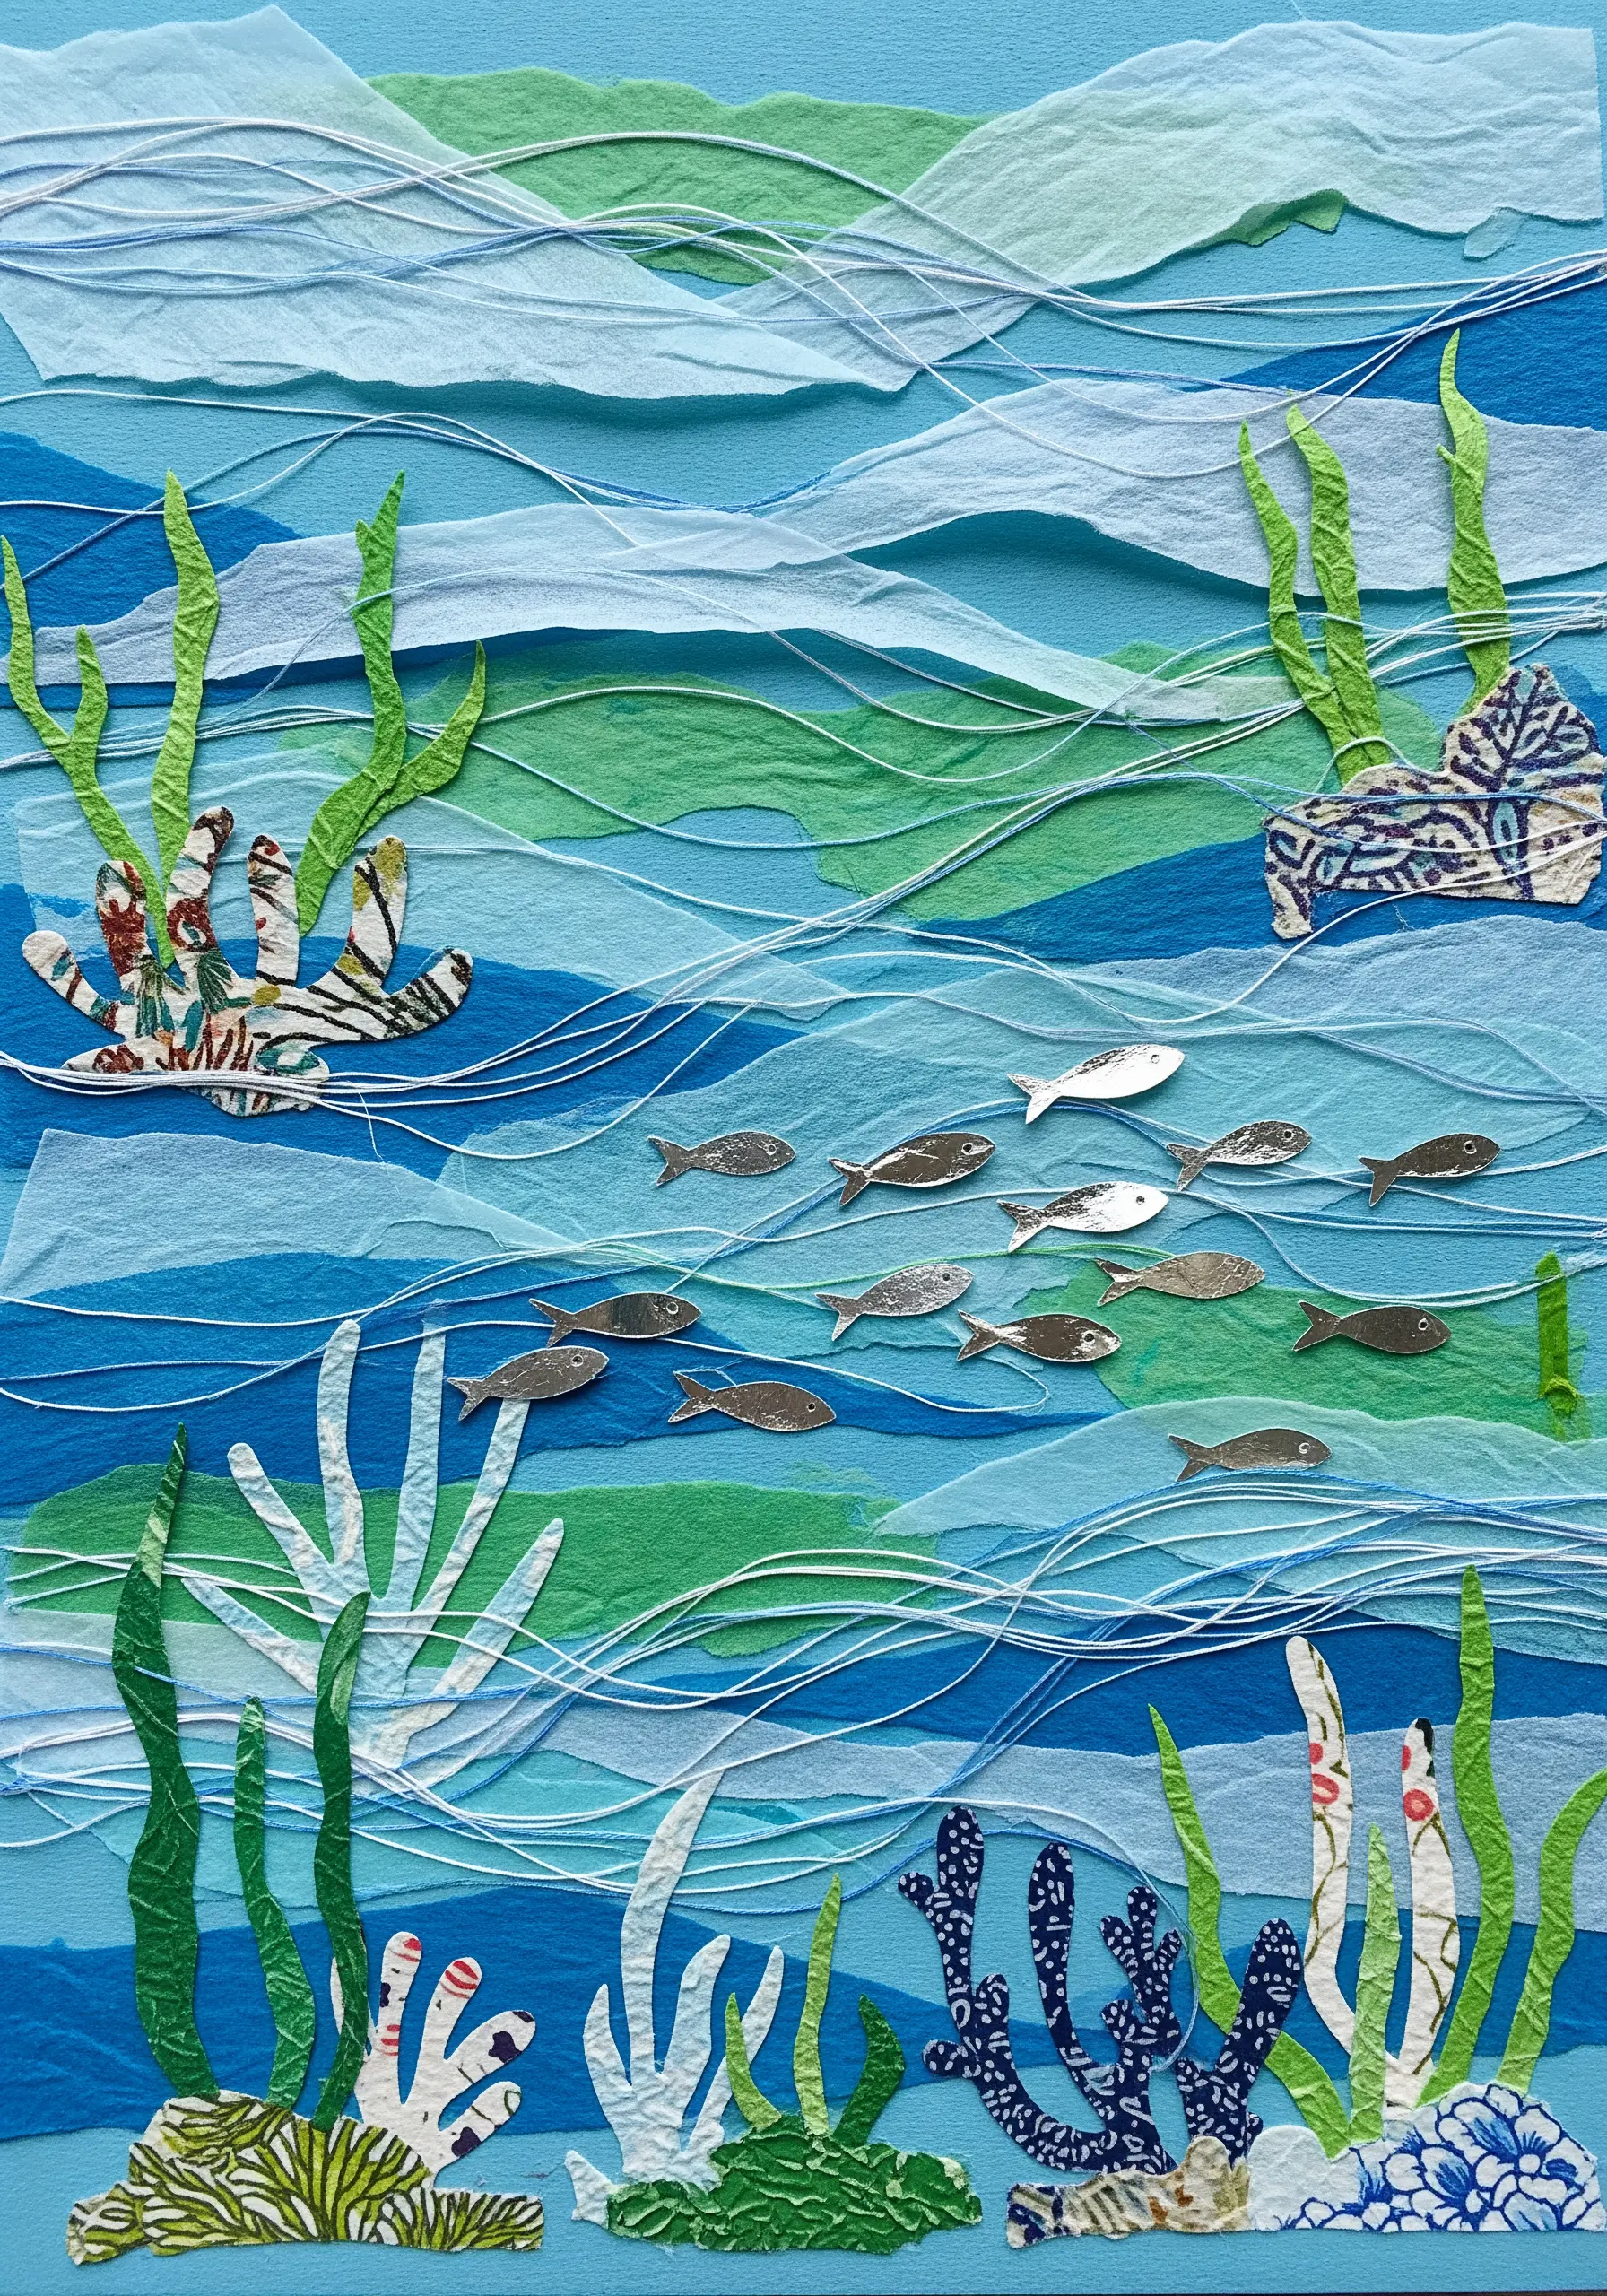
To mimic the depth of water, layer translucent papers like vellum or tissue paper in shades of blue and green.
Use a single, fine white thread to stitch long, undulating lines across the surface, representing water currents.
Vary the tension of your thread—some taut, some slightly looser—to enhance the feeling of gentle, organic movement.
This simple stitching technique breathes life into the composition, transforming a static collage into a dynamic underwater scene.
11. Typographic Interruption: Bold Thread Overlays
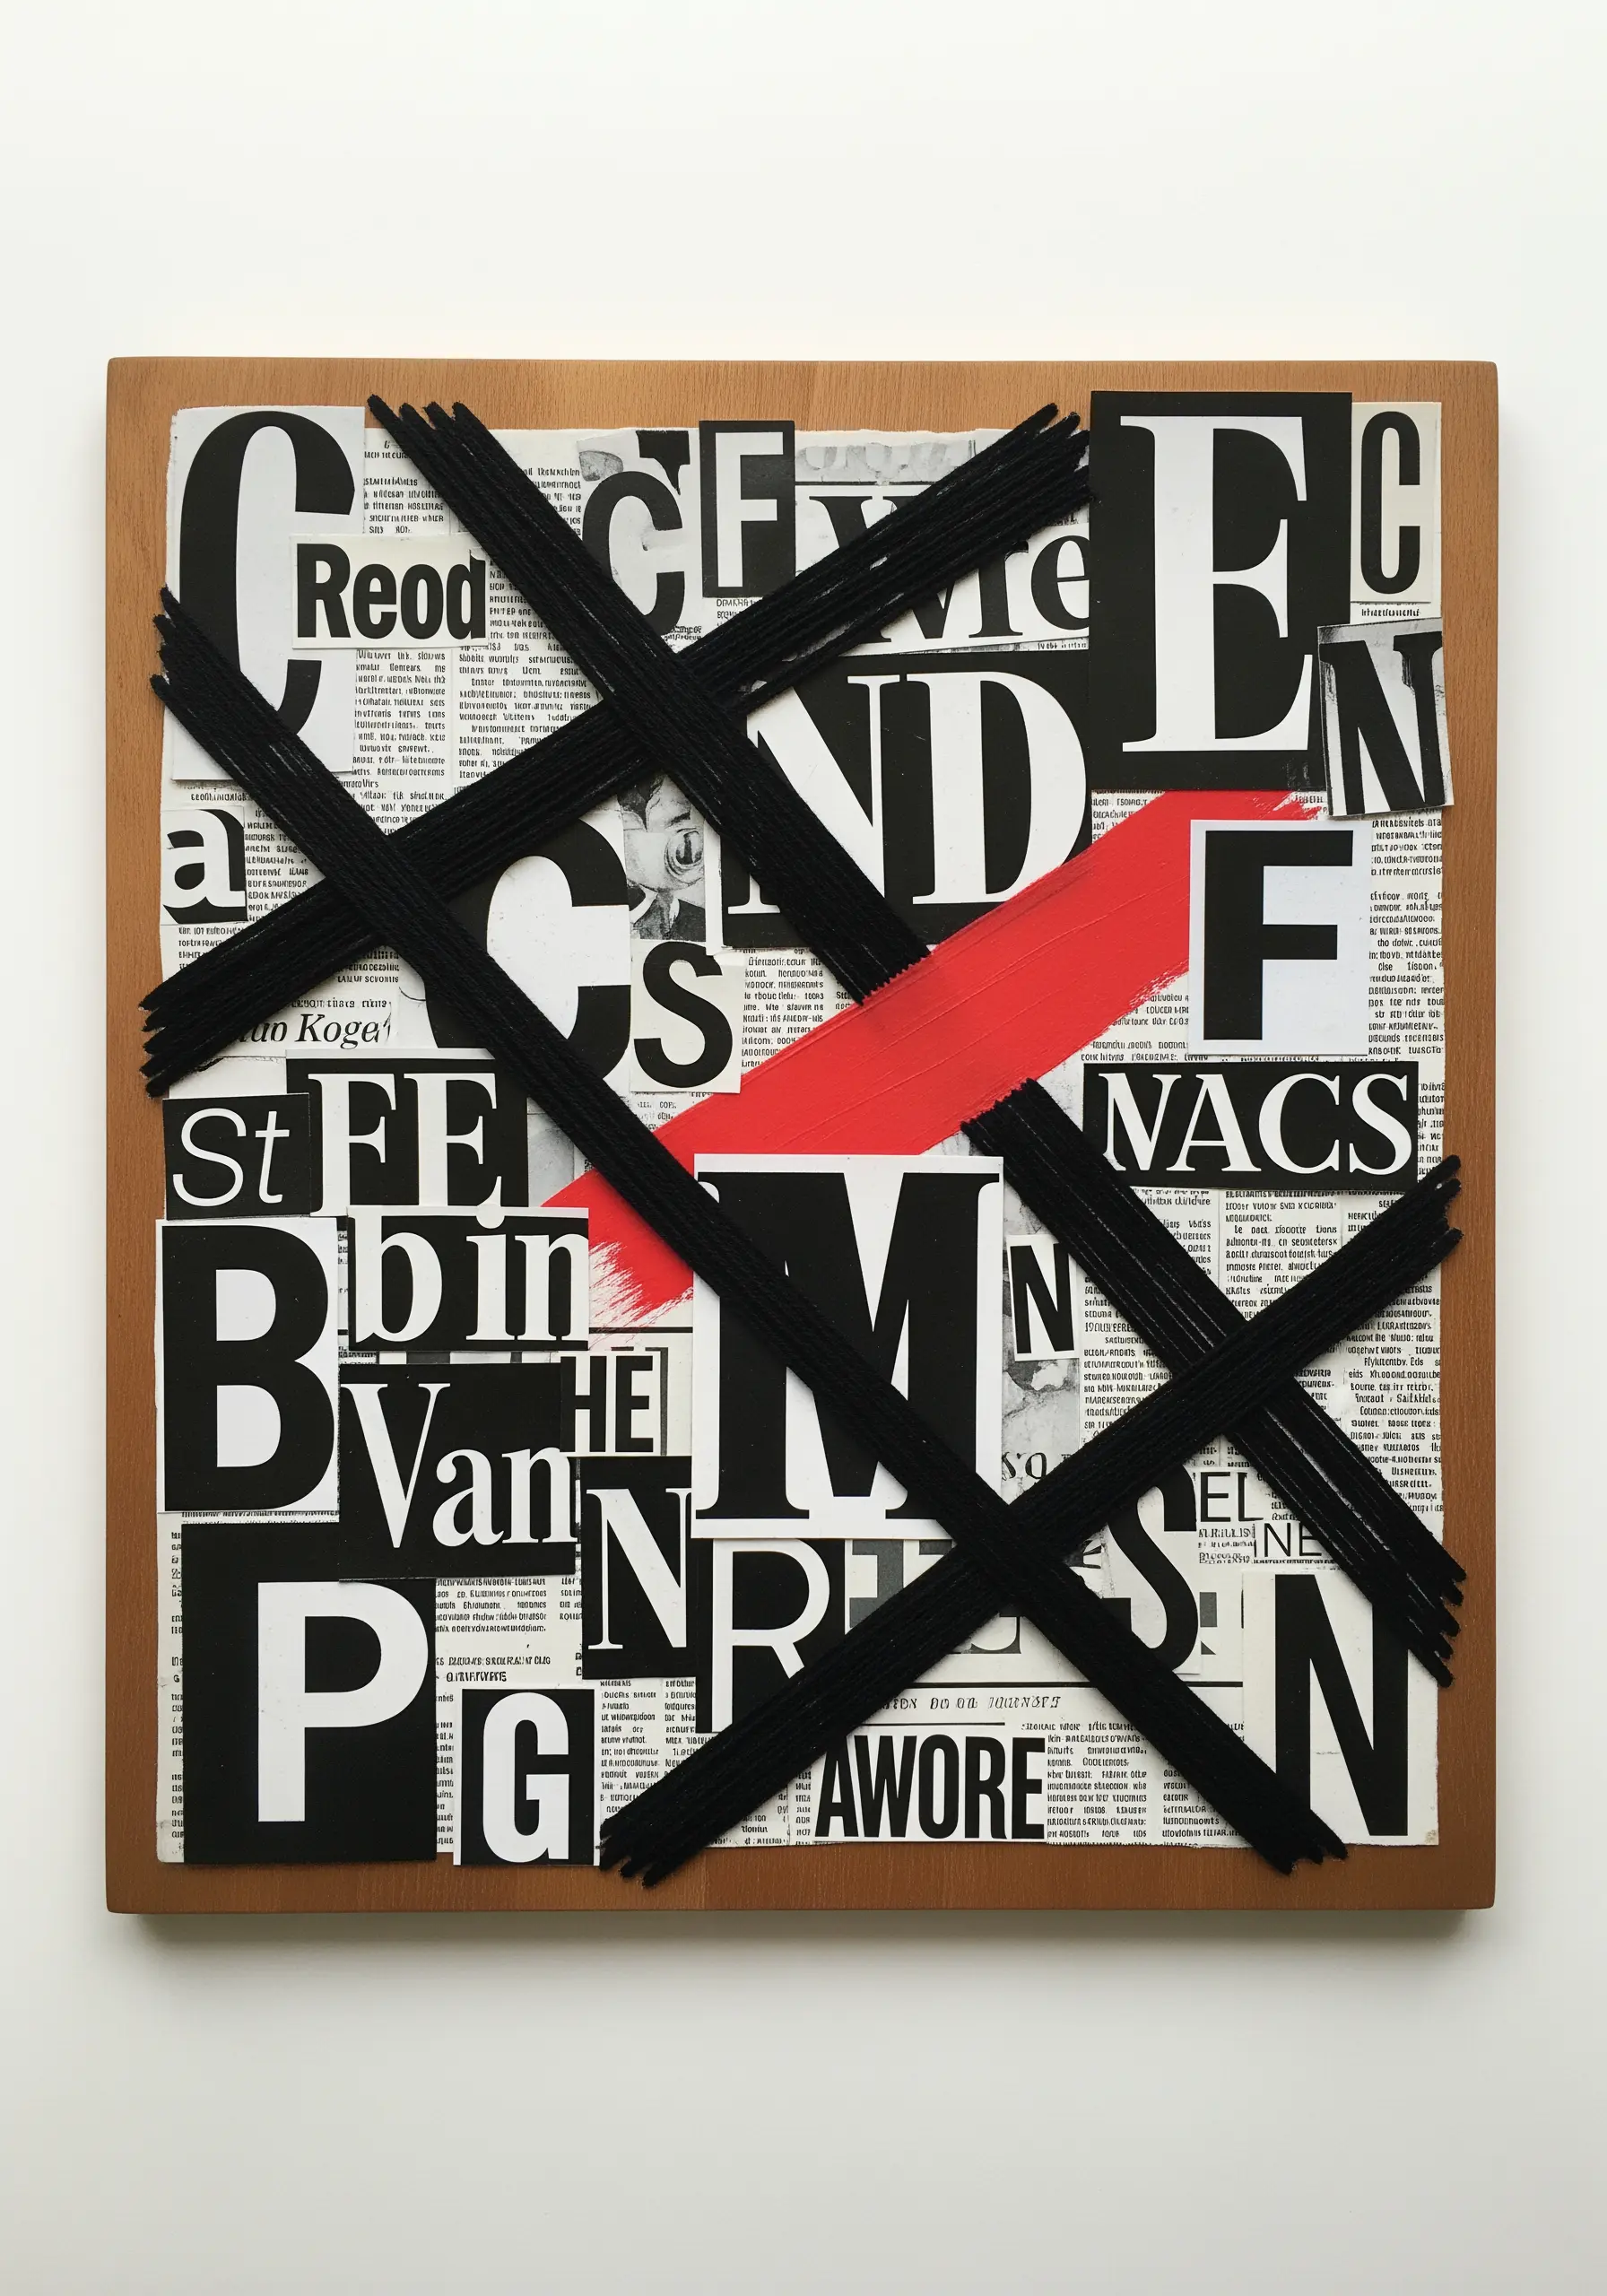
Assemble a high-contrast background using black-and-white newspaper or magazine clippings.
Introduce a single, powerful slash of color with paint or paper to disrupt the monochrome pattern.
Then, create a bold graphic overlay by tightly wrapping thick black yarn or cord around the entire piece, securing it at the back.
This technique adds a strong structural element that interacts with the typography beneath, creating layers of visual tension.
12. Paper Quilting: Recreating Patchwork With Stitches
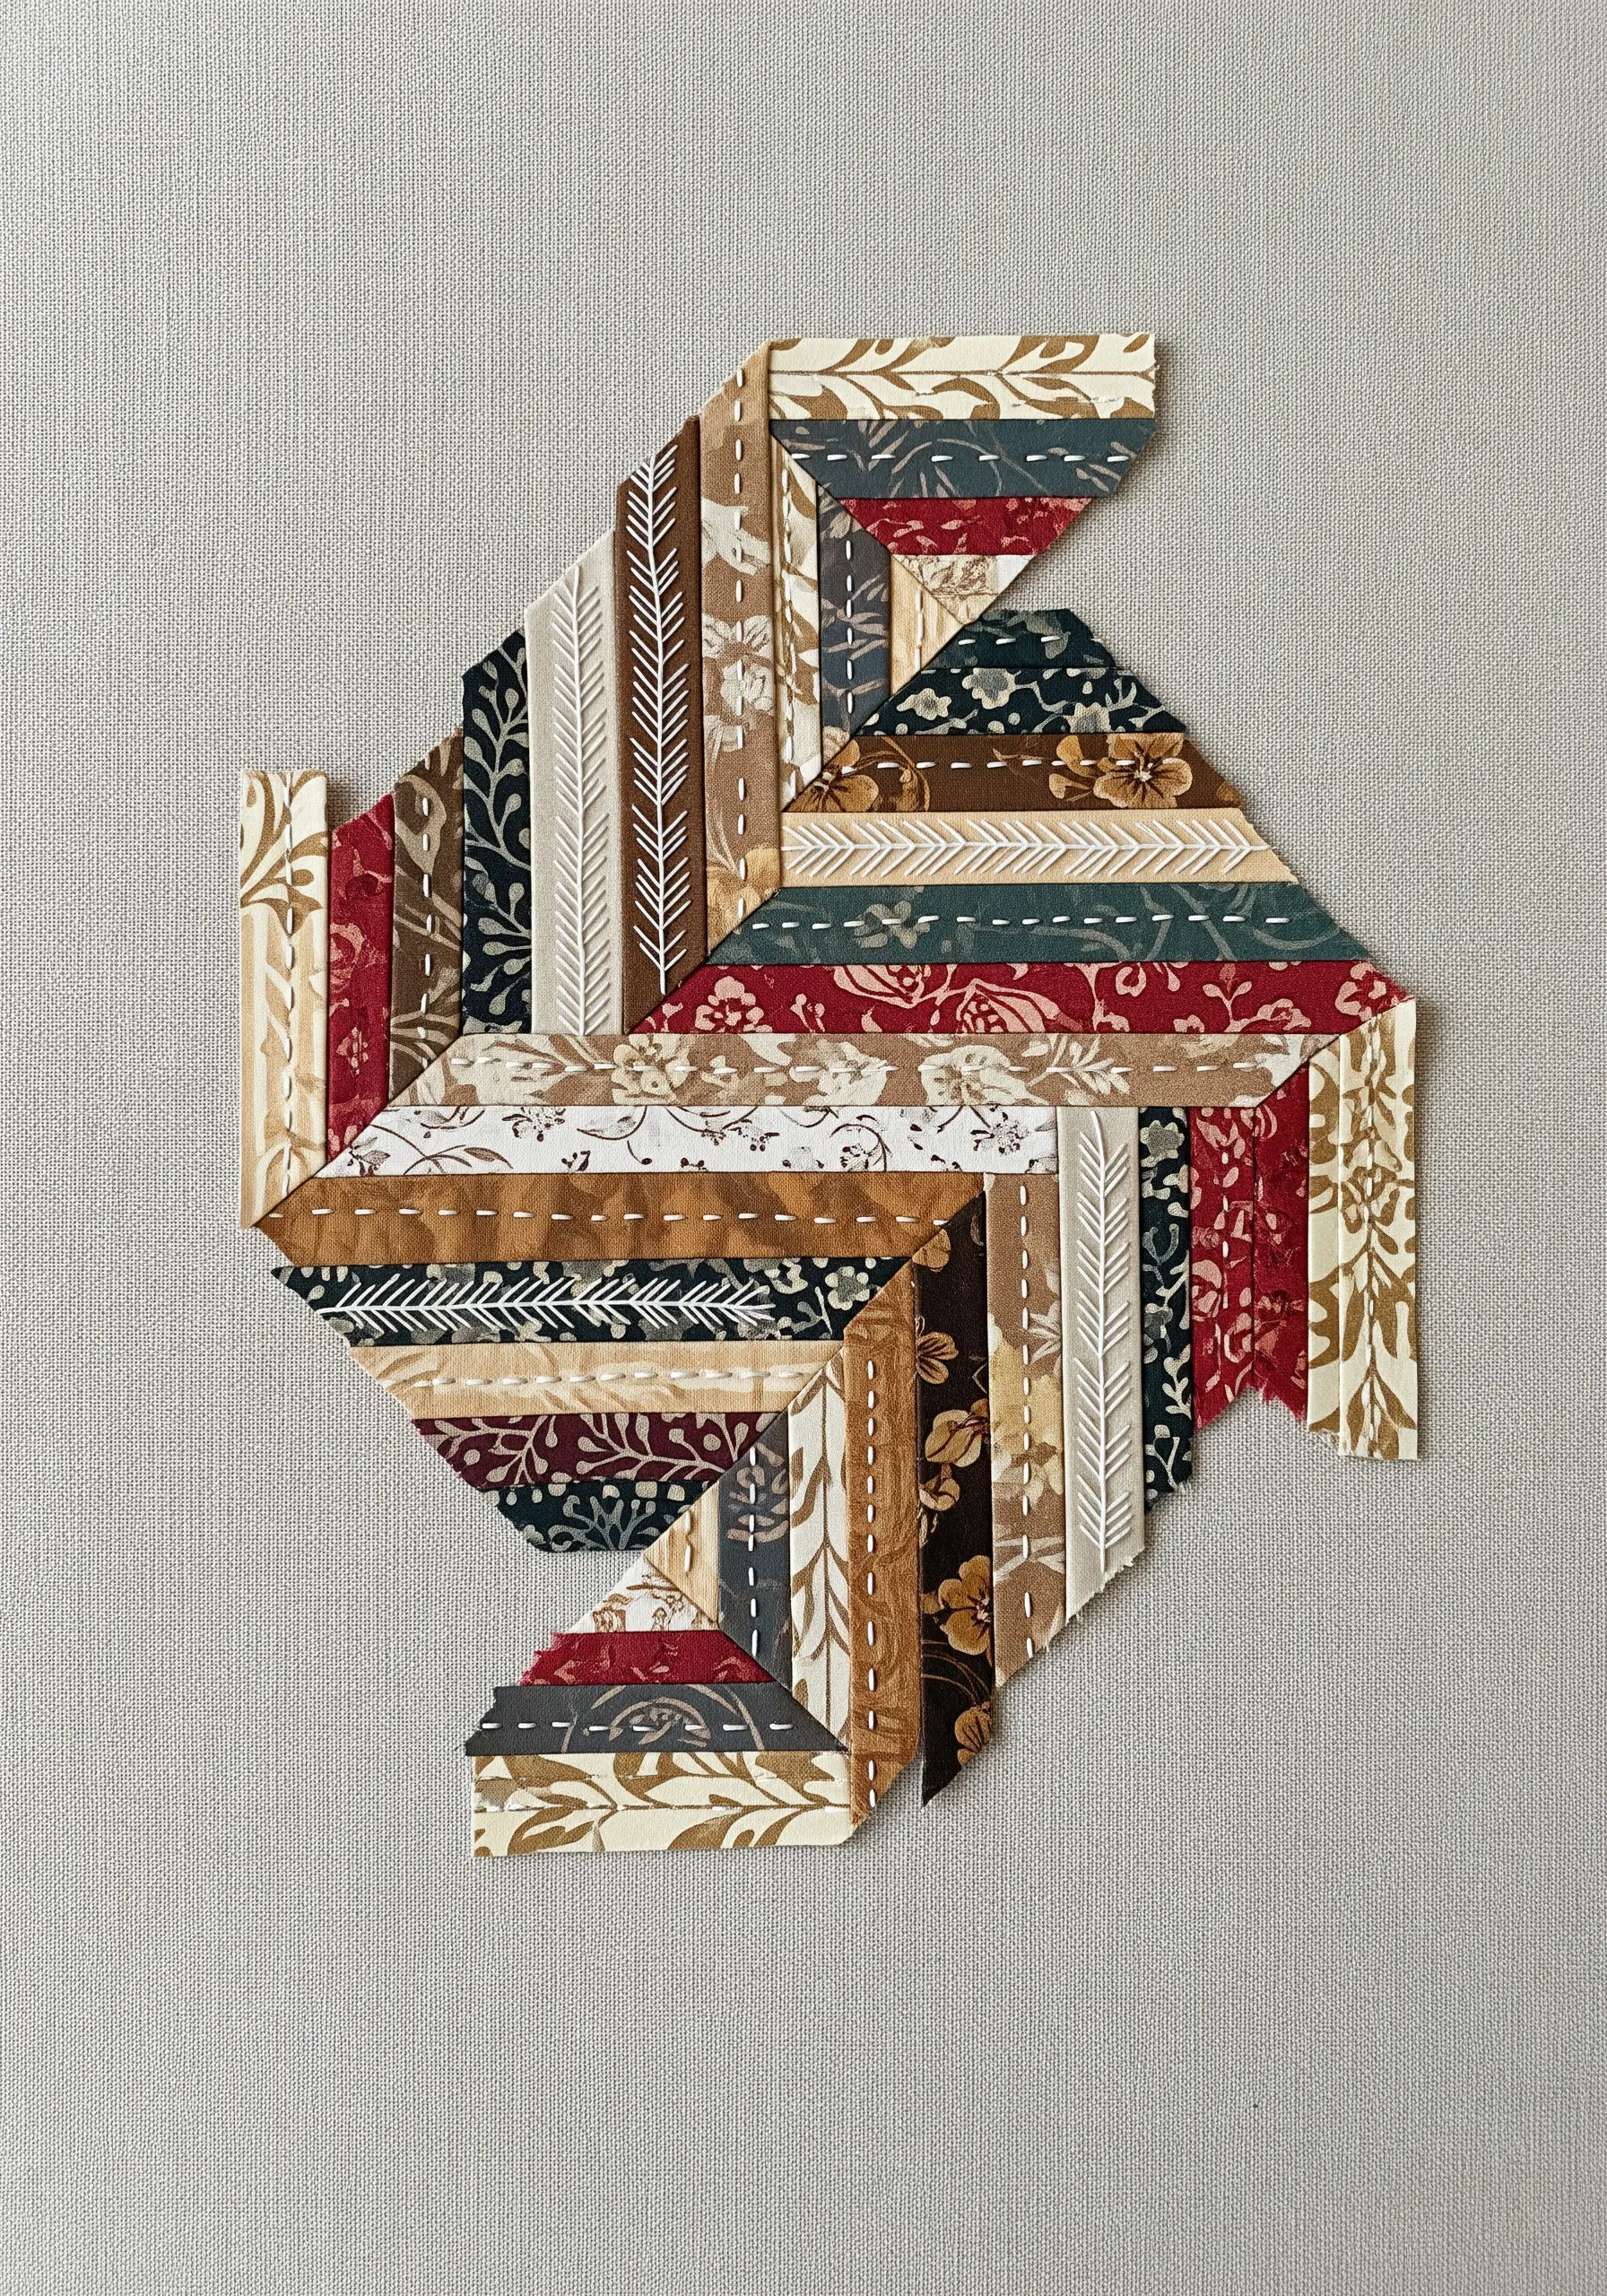
Arrange patterned paper strips on a fabric base to mimic a traditional quilt block design, like a log cabin or courthouse steps pattern.
Instead of stitching every seam, select just a few key lines to accent with a simple, visible running stitch.
Use a contrasting thread, like a classic off-white, to evoke the look of traditional hand-quilting.
This adds authentic charm and texture, beautifully blending the worlds of paper craft and needlework.
13. Architectural Grids: Defining Space With Thread
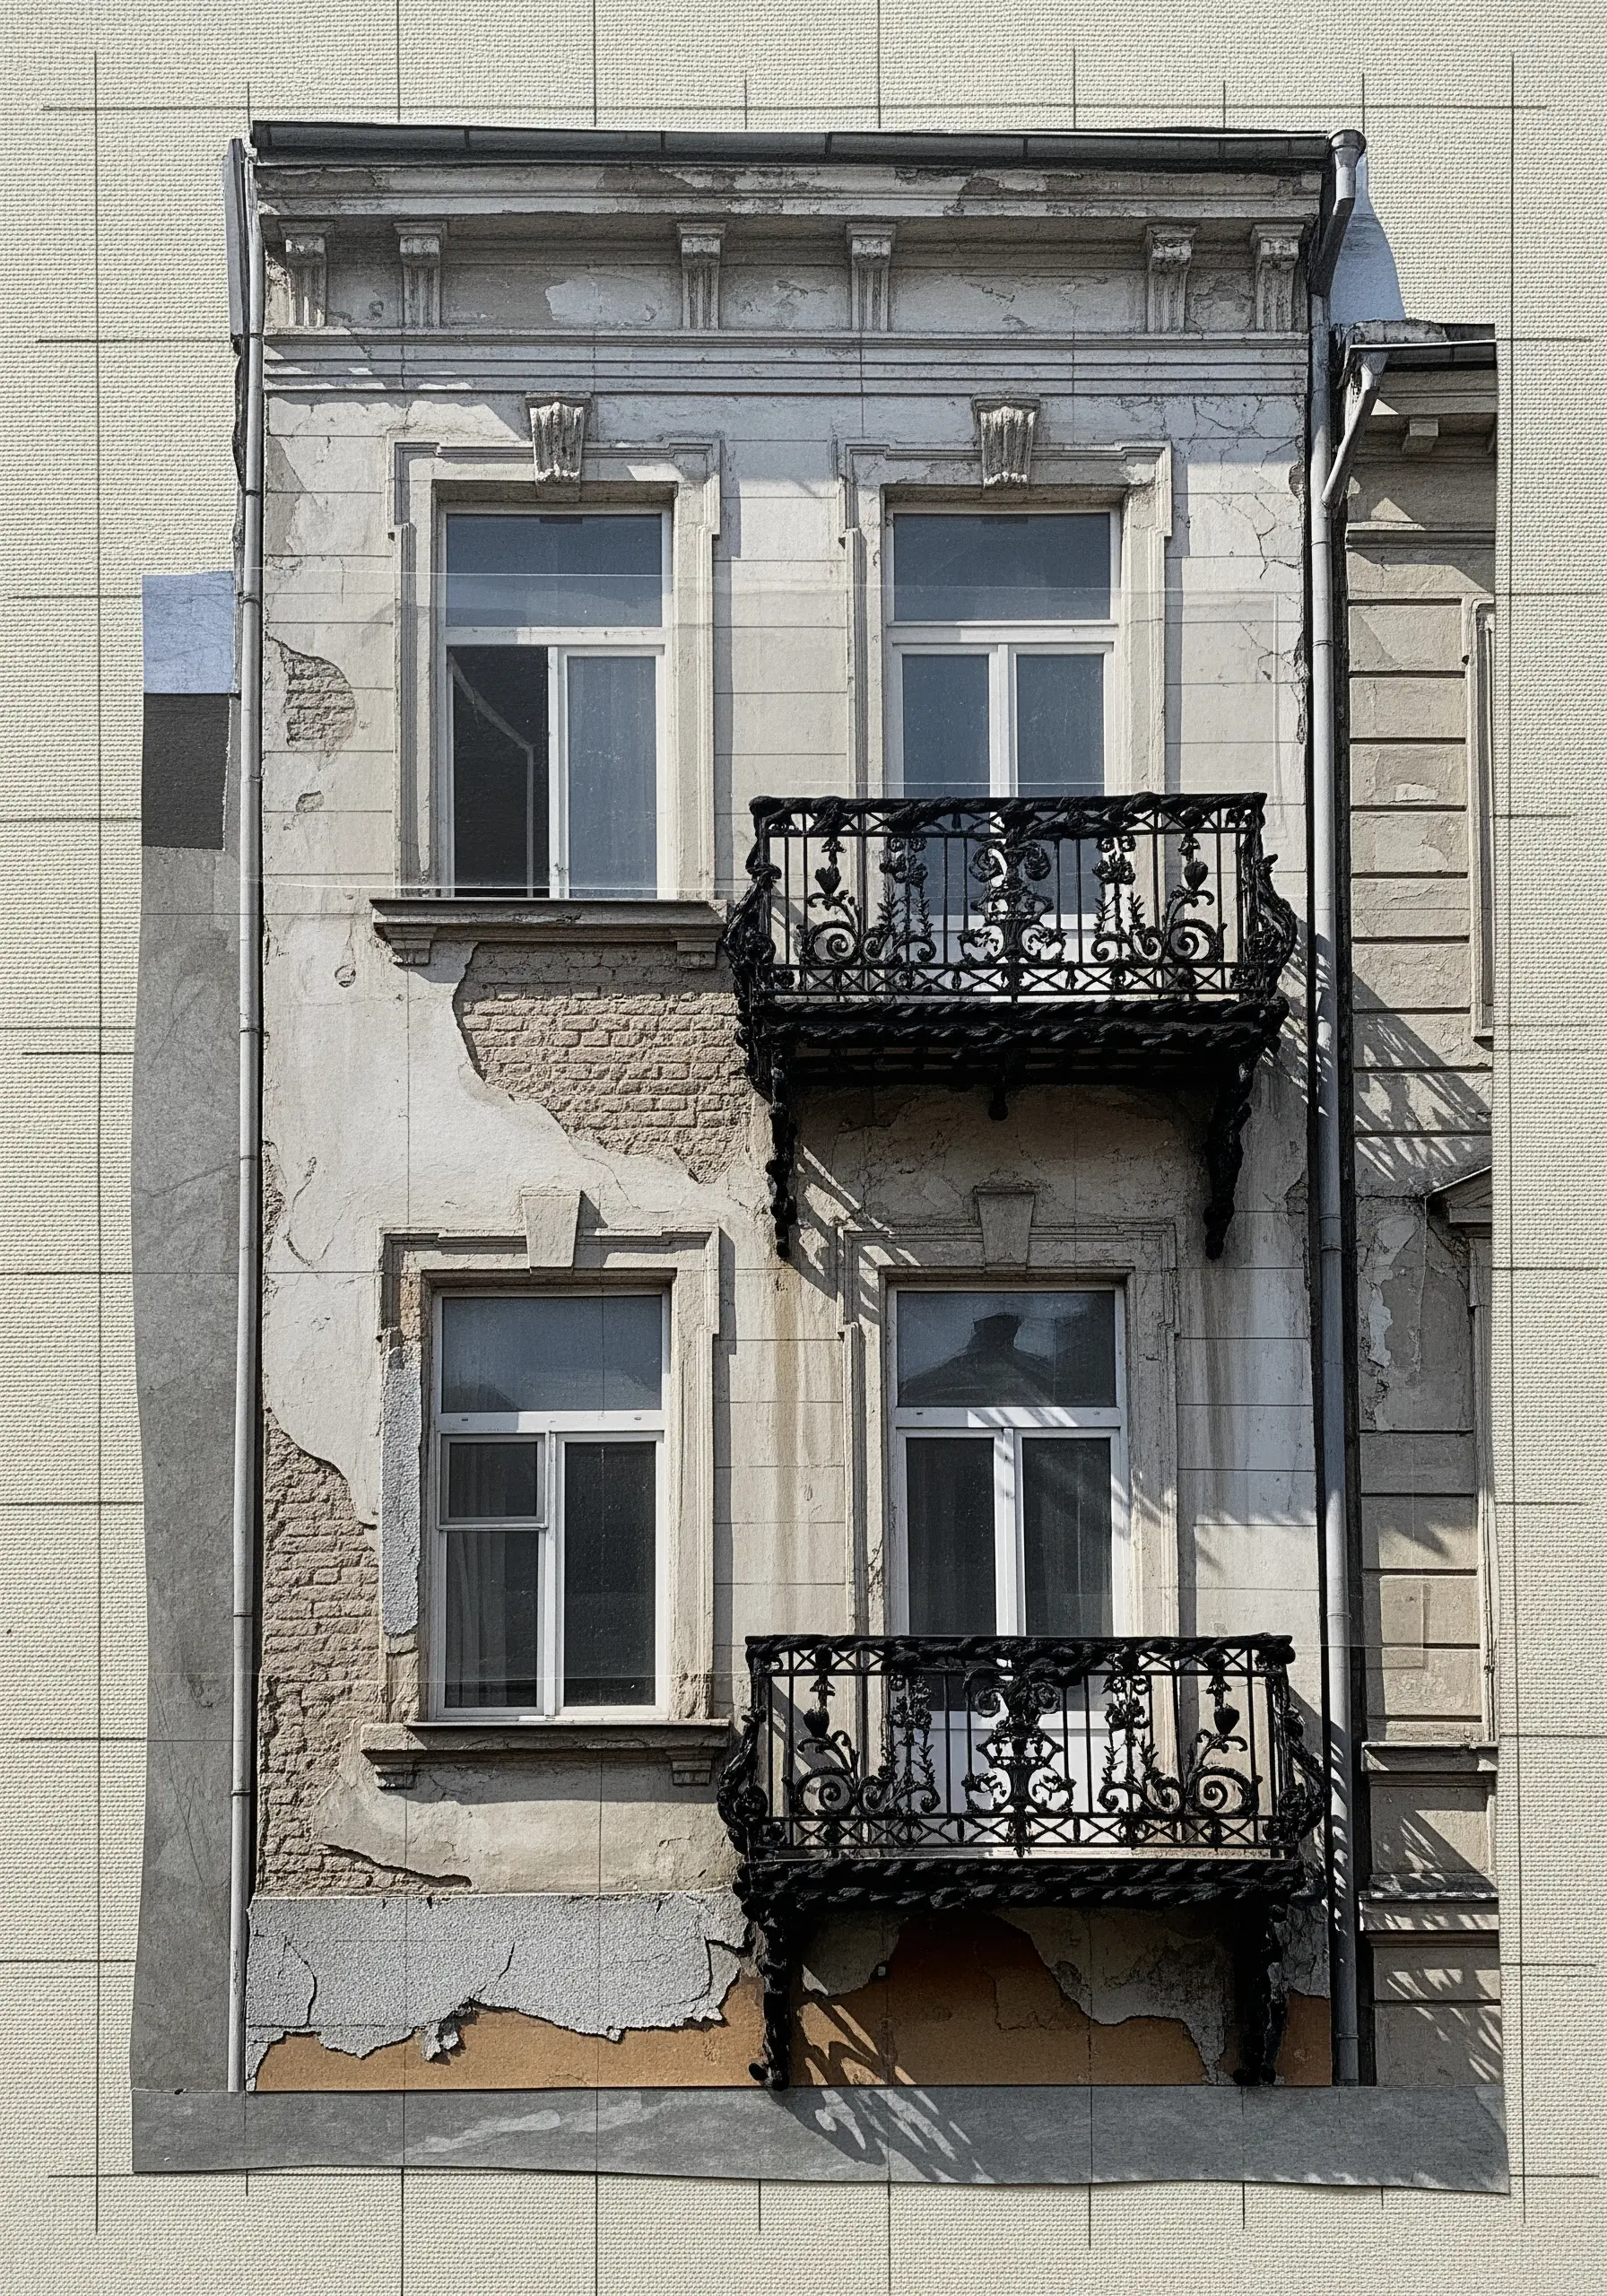
Mount a photographic collage of a building onto a piece of neutral-colored fabric.
Using a single strand of thread and a ruler for precision, stitch a fine, even grid across the background fabric surrounding the image.
This technique adds a subtle, blueprint-like quality that complements architectural subjects.
The grid provides a sense of order and structure, framing the central image with clean, technical lines that enhance its form.
14. Stitched Entomology: Crafting 3D Paper Moths

Construct your moth wings from layered, patterned paper for depth and color variation.
Create a plush, three-dimensional body by tightly wrapping embroidery floss around a small piece of chenille stem or rolled felt.
For the fuzzy antennae, use turkey work stitches or create tiny tufts by looping and snipping your thread.
Assembling these components creates surprisingly lifelike 3D specimens, perfect for displaying in a shadow box.
15. Stitched Veins: Adding Detail to Paper Leaves

Create a rustic backdrop by layering textured materials like burlap, corrugated paper, and handmade paper.
Cut leaf shapes from cardstock and arrange them over your collage.
Use a metallic gold thread to stitch the central vein and delicate radiating lines on each paper leaf, using a simple backstitch or straight stitch.
This single detail elevates the paper cutouts, turning them into elegant botanical elements with a touch of shimmer.
16. Neon Energy: Expressive Lines With Thick Yarn
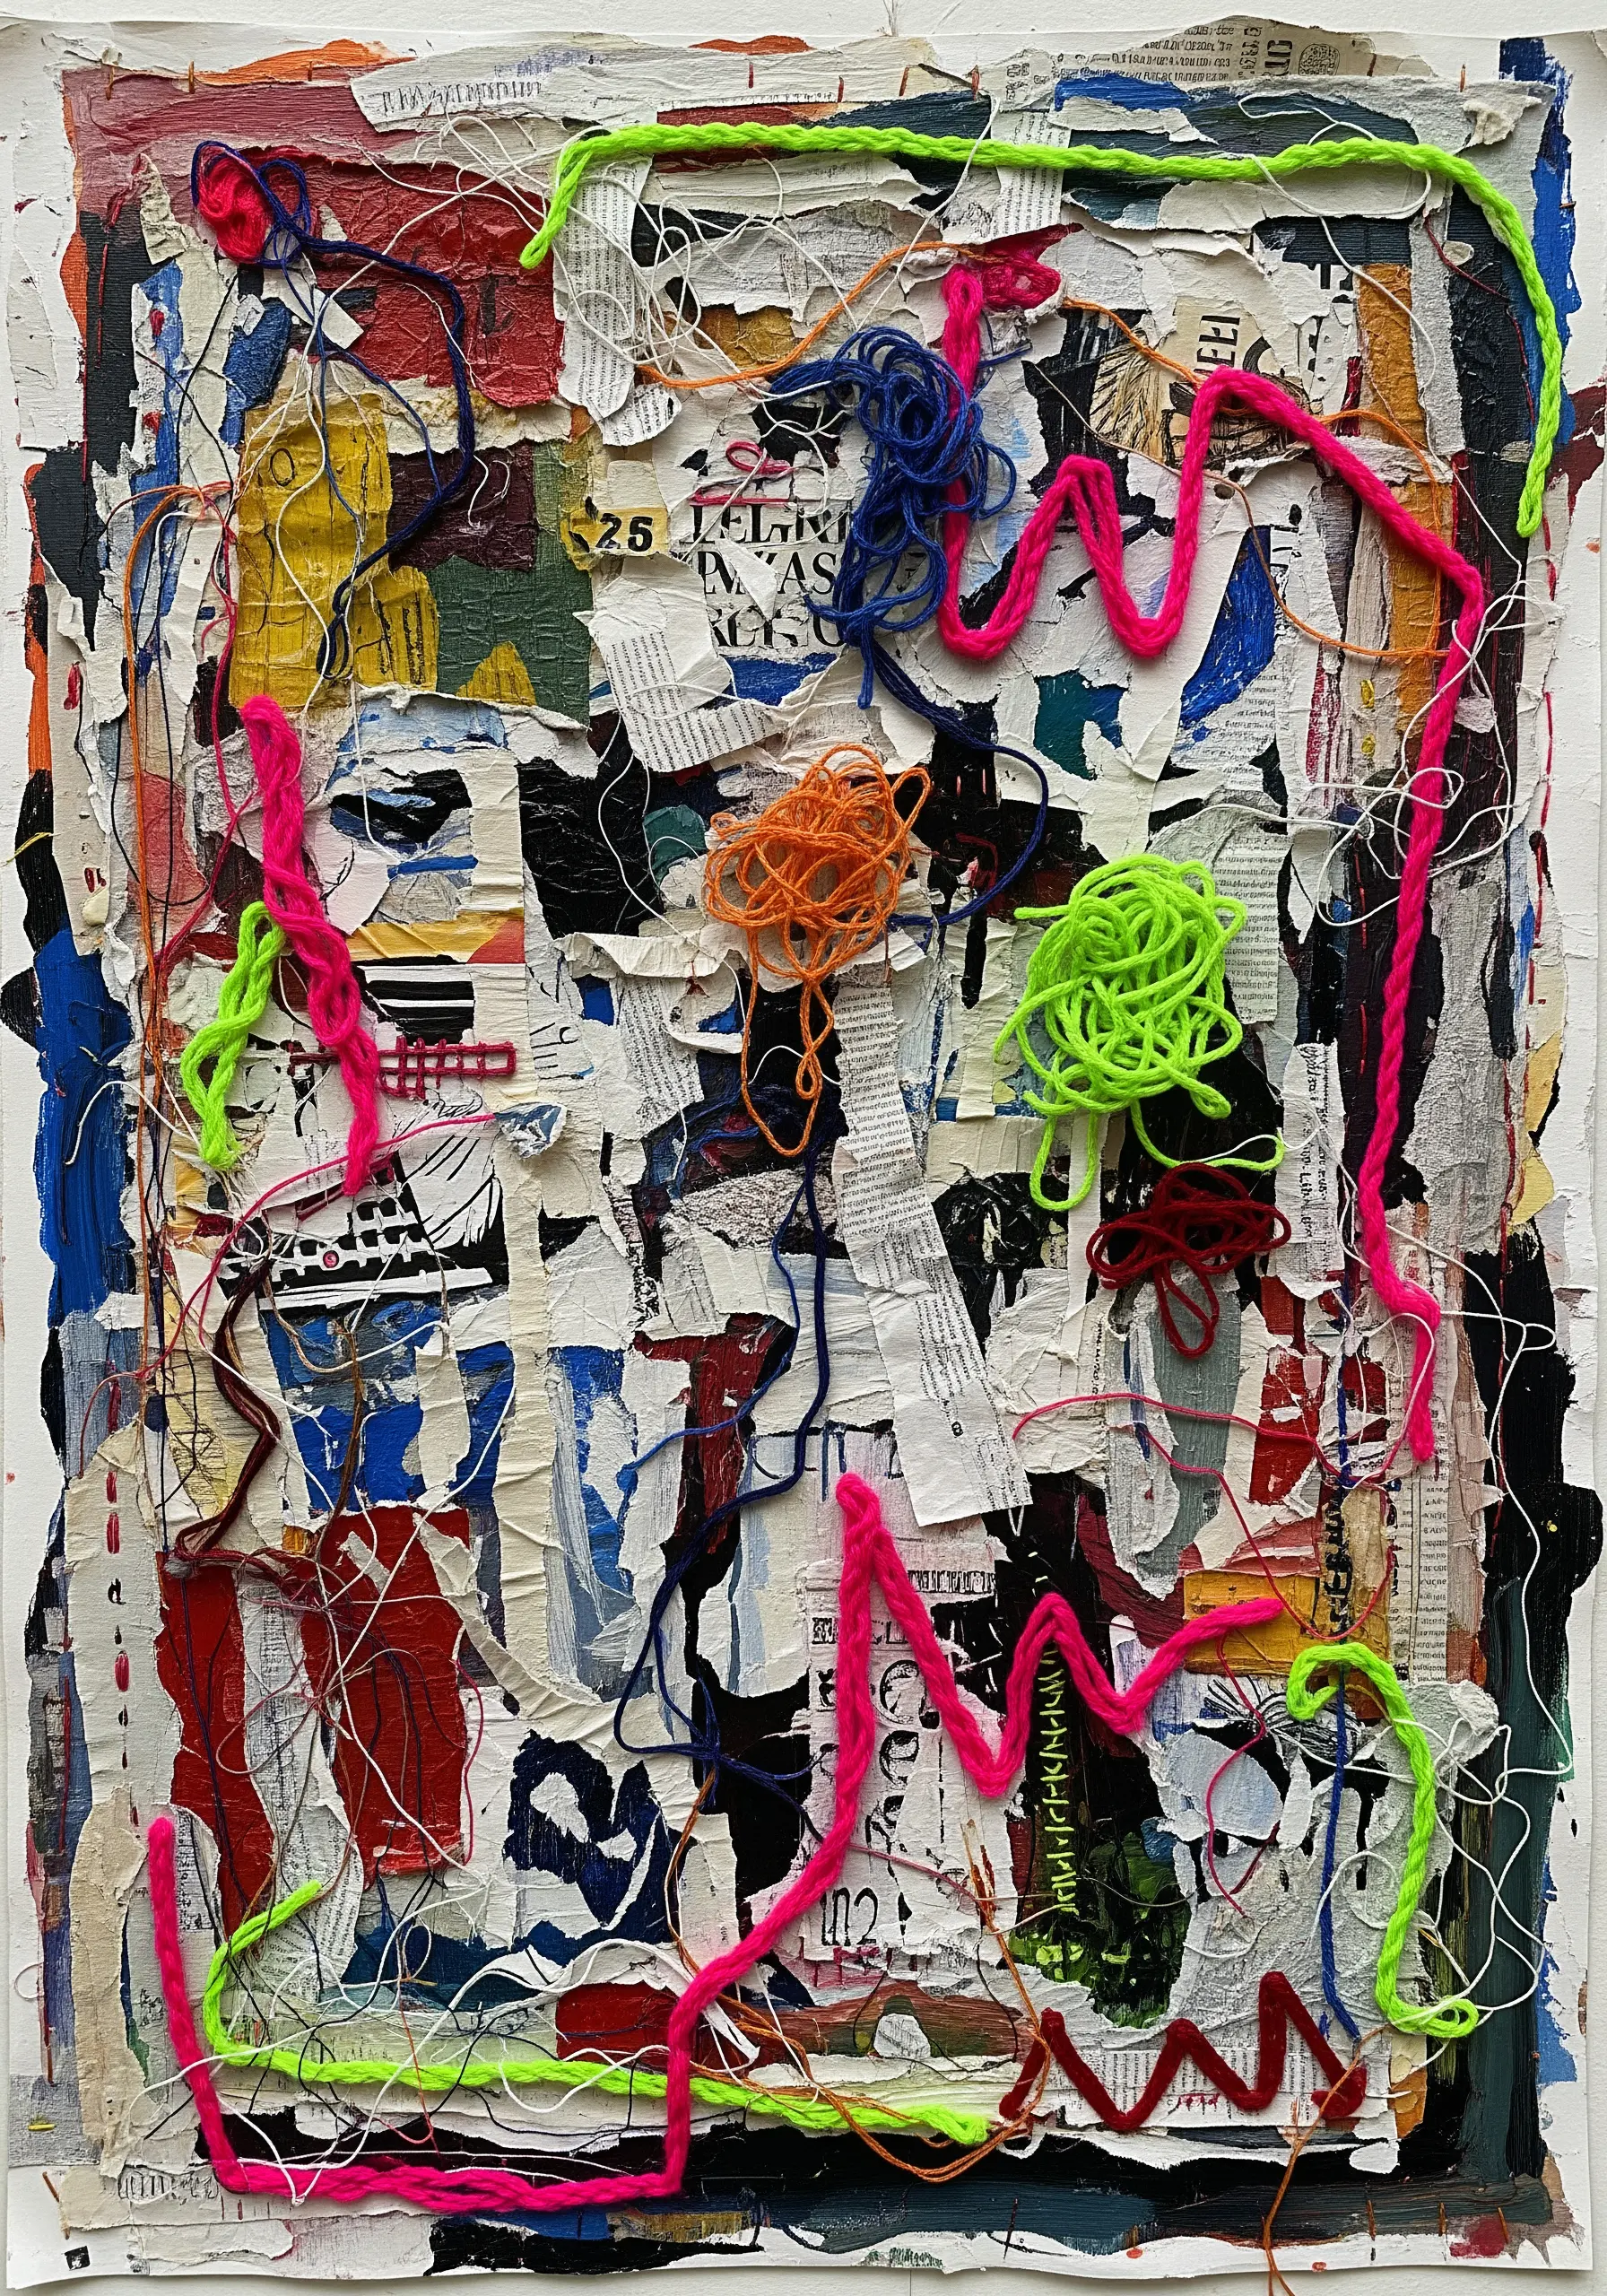
Build a chaotic, multi-layered background with torn paper, paint, and ink marks.
Instead of stitching through this dense base, lay thick, brightly colored yarn on the surface in expressive loops and sharp zigzags.
Secure the yarn with a few discreet couching stitches in a matching fine thread, or use a strong fabric glue.
This approach allows you to make bold, graphic marks while preserving the full, soft texture of the yarn.
17. Fabric Couture: Creating Volume with Fabric Scraps

Start with a simple line drawing of a figure on paper or fabric.
To create a dimensional garment, try layering and pleating strips of fabric, tulle, and ribbon directly onto the artwork.
Secure the gathered materials at the “waistline” with a few strong backstitches, allowing the ends to remain loose and full.
This technique creates a dynamic, three-dimensional skirt that appears to have movement and beautiful volume.
18. Garden Pathways: Mapping a Scene with Running Stitch
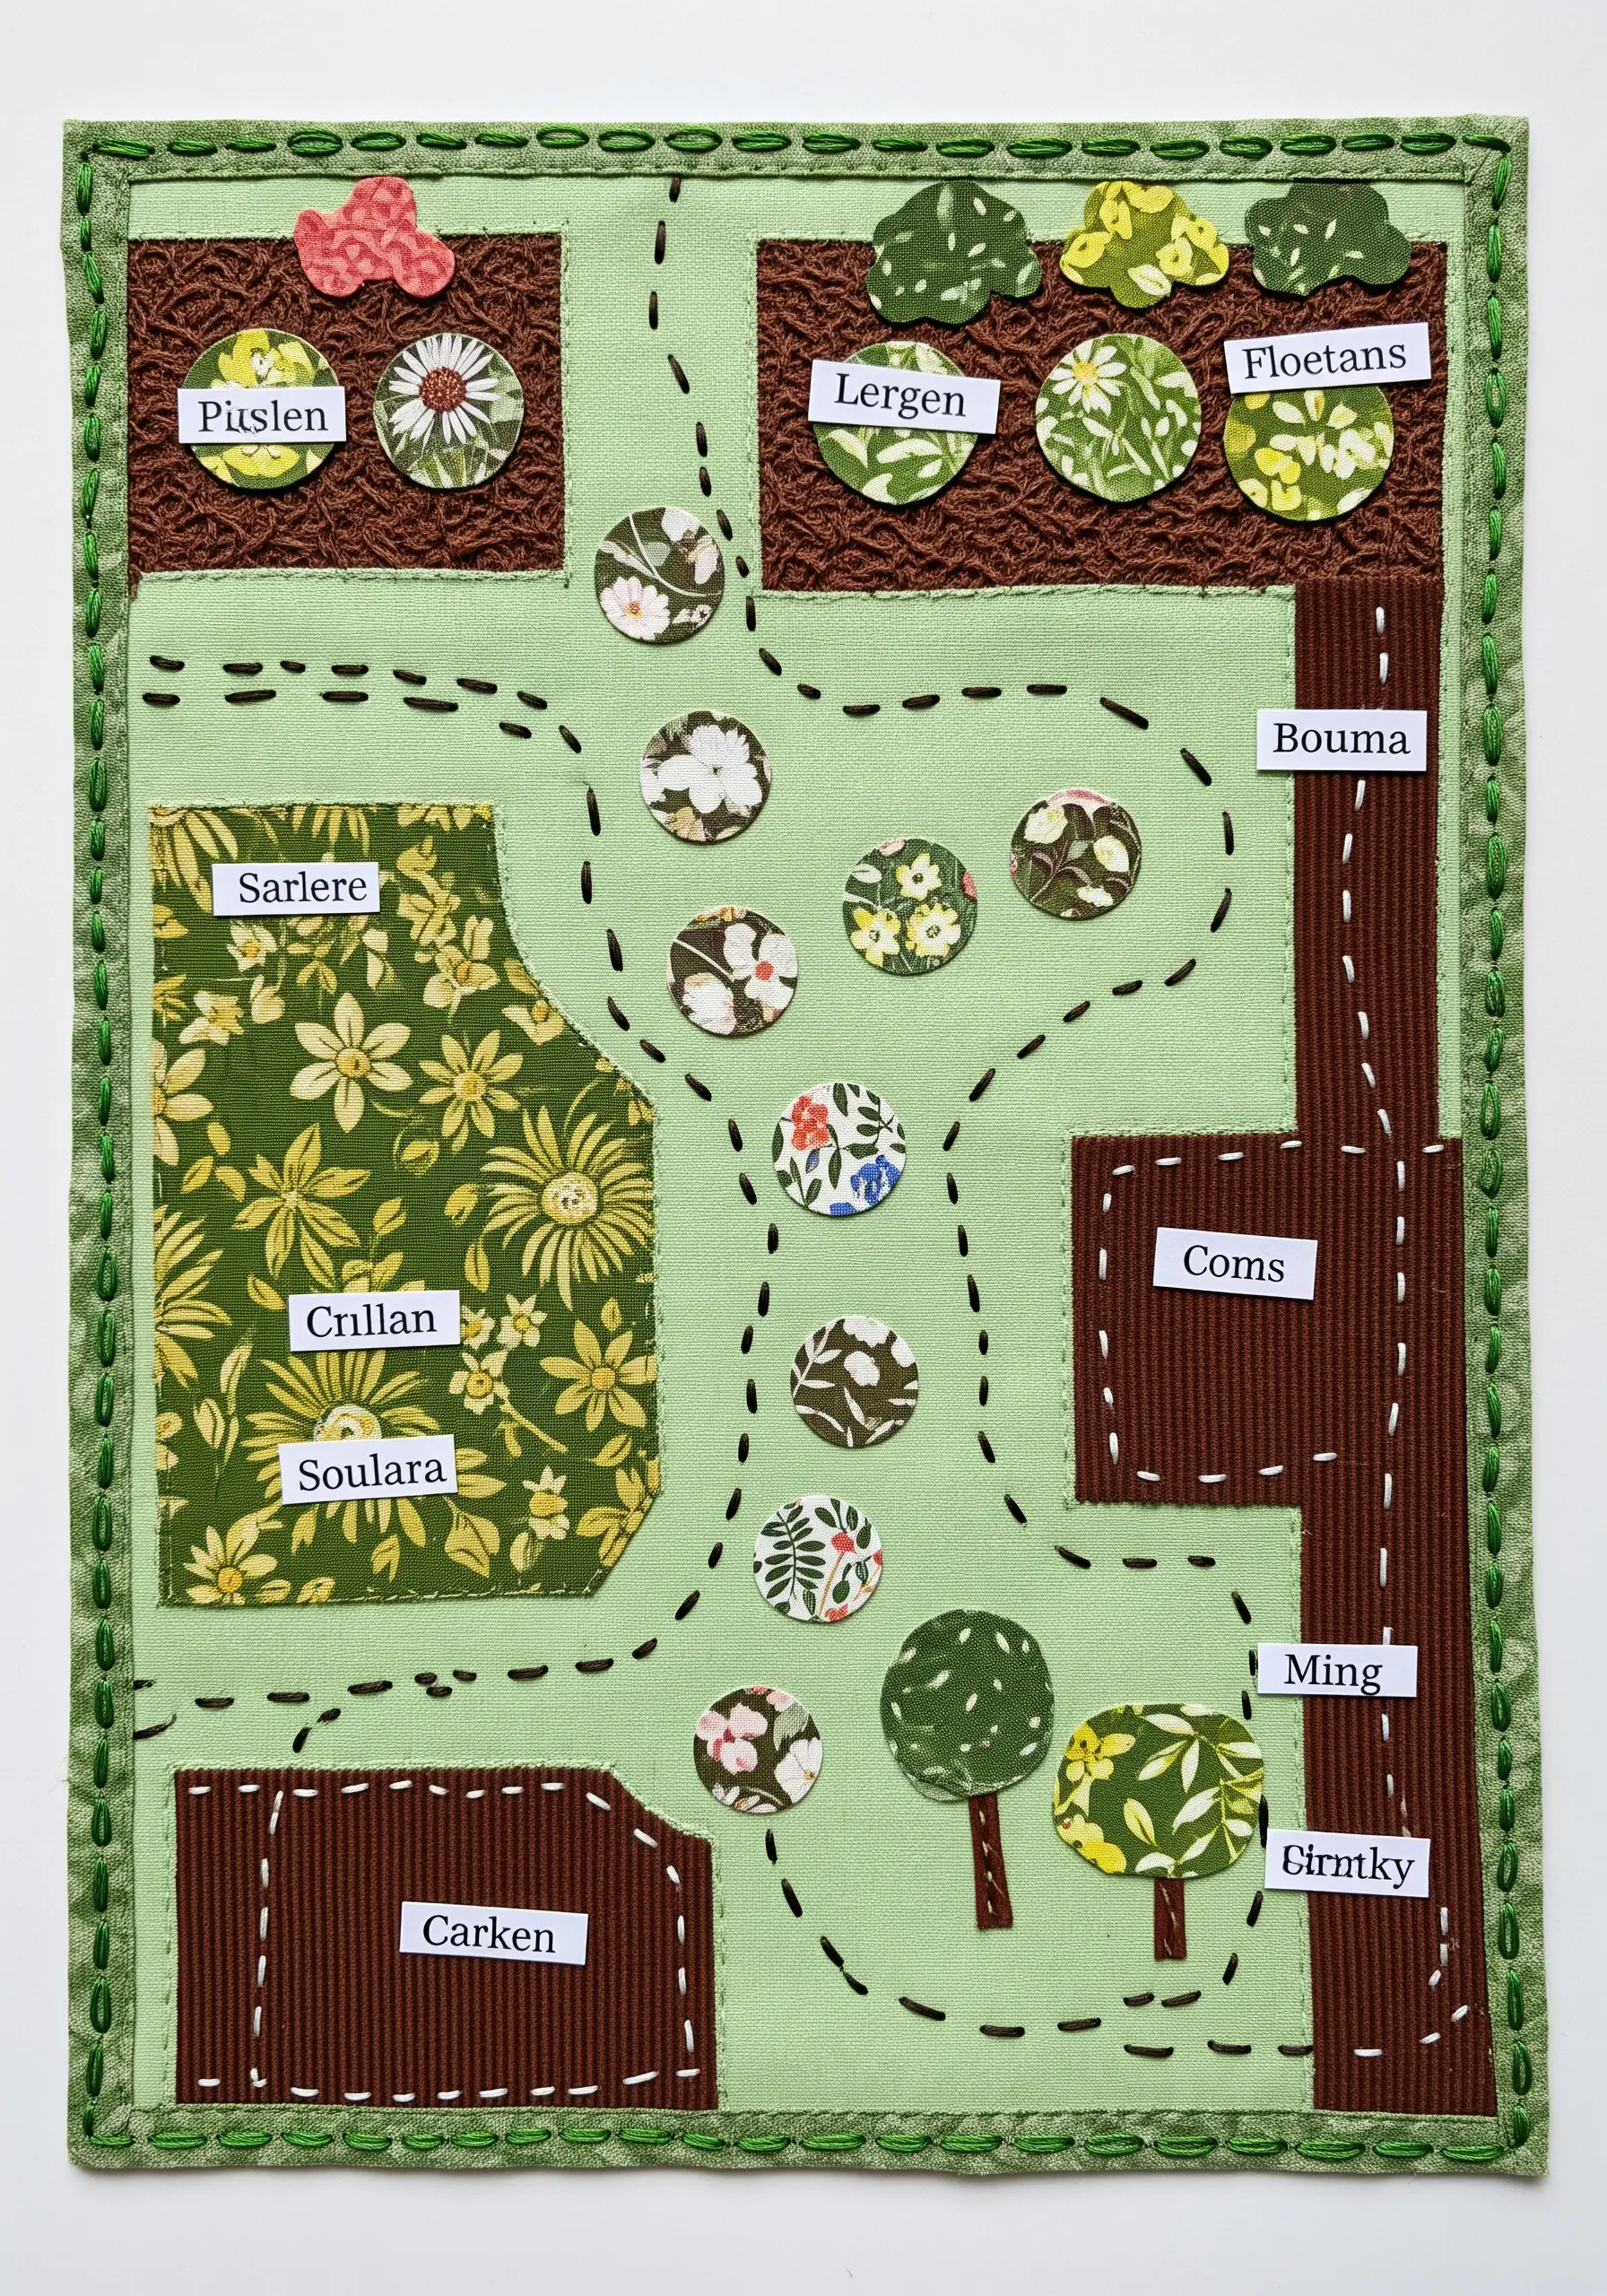
Design a visual map by applying appliqué fabric shapes to a solid background, representing garden plots or fields.
Use a simple running stitch in a contrasting, earthy tone to define pathways, borders, and rows.
This functional stitch becomes a key design element, guiding the viewer’s eye through the composition just as a real path would guide a visitor through a garden.
The visible stitches add a charming, handmade narrative to the piece.
19. Crocheted Frames: Edging a Collage With Texture
After assembling your layered paper collage on a sturdy cardstock or matboard base, carefully punch holes around the perimeter with an awl.
Use these holes as your foundation to crochet a border directly onto the piece.
A simple single crochet or shell stitch in a coordinating yarn adds a soft, tactile frame.
This unexpected finish beautifully contrasts with the sharp, flat edges of the paper elements within.
20. Sculptural Sound: Forming Shapes With Thread
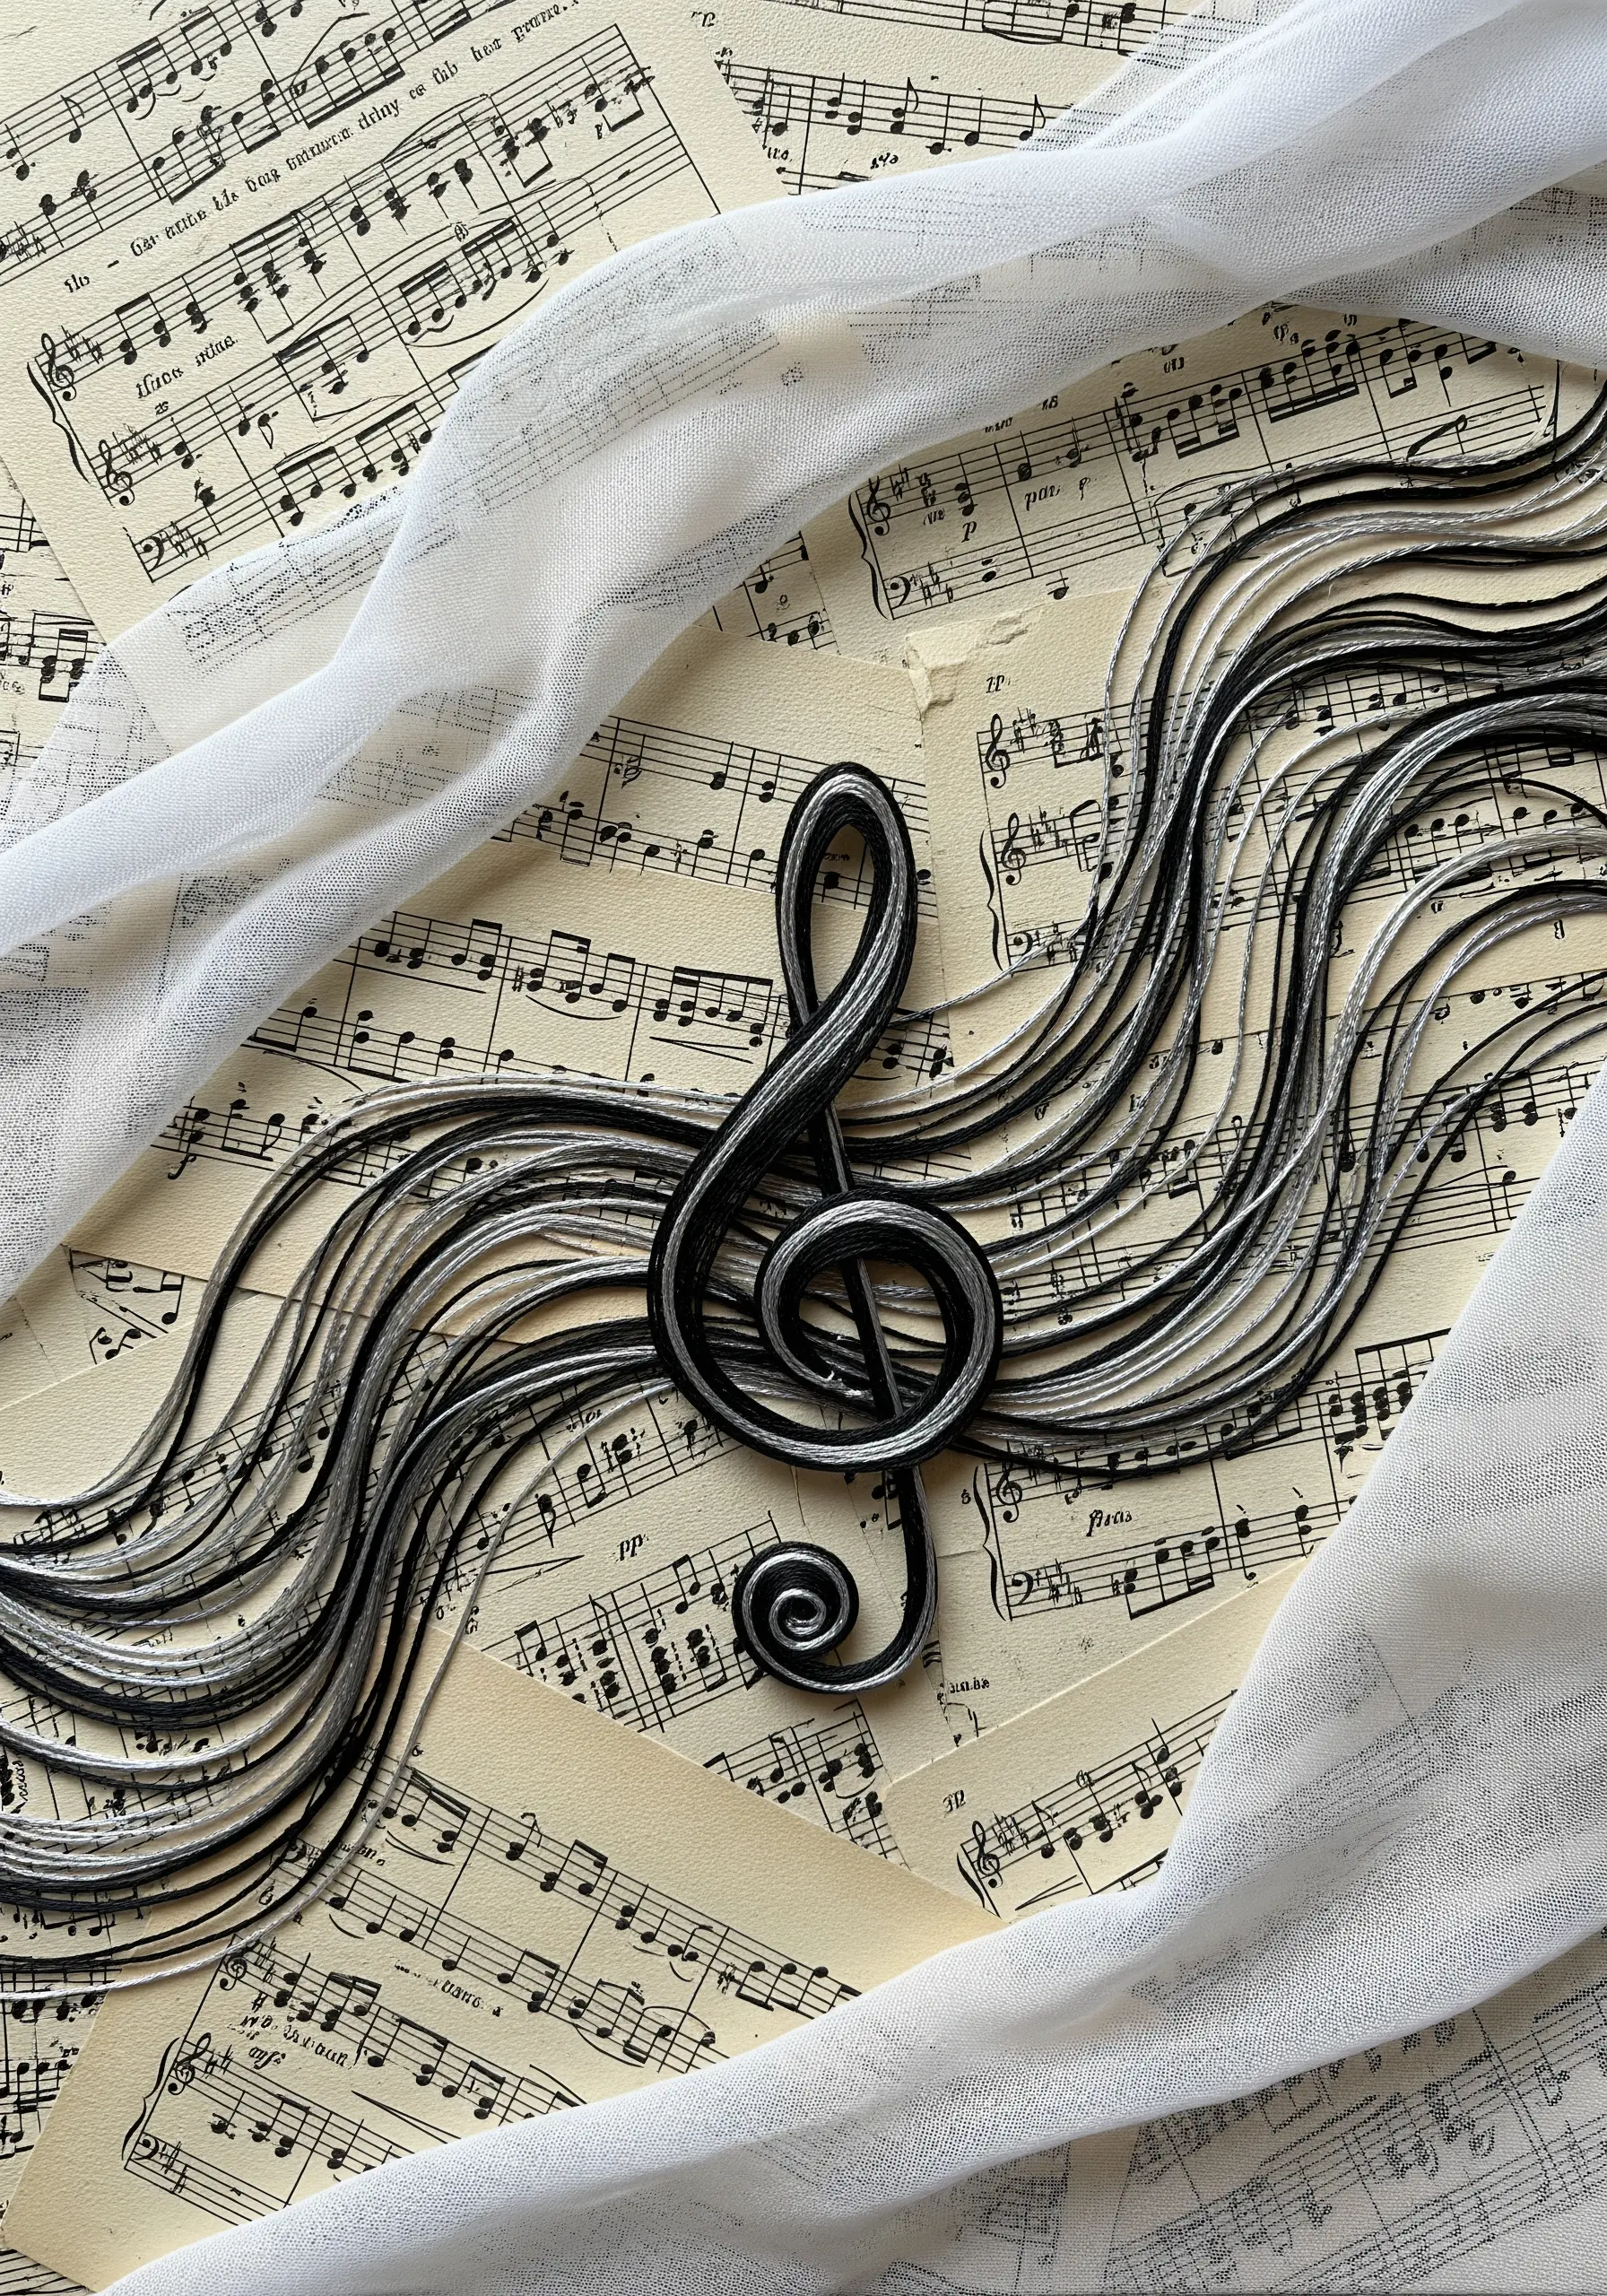
On a background of vintage sheet music, lay down dozens of parallel threads to create a sense of linear flow and energy.
To form a raised, sculptural element like a treble clef, use a piece of craft wire as an armature.
Wrap the wire tightly and evenly with your chosen thread, then bend it into the desired shape.
This technique allows you to create precise, three-dimensional forms that appear to float above the flat collage surface.
21. Wabi-Sabi Composition: Finding Beauty in Scraps
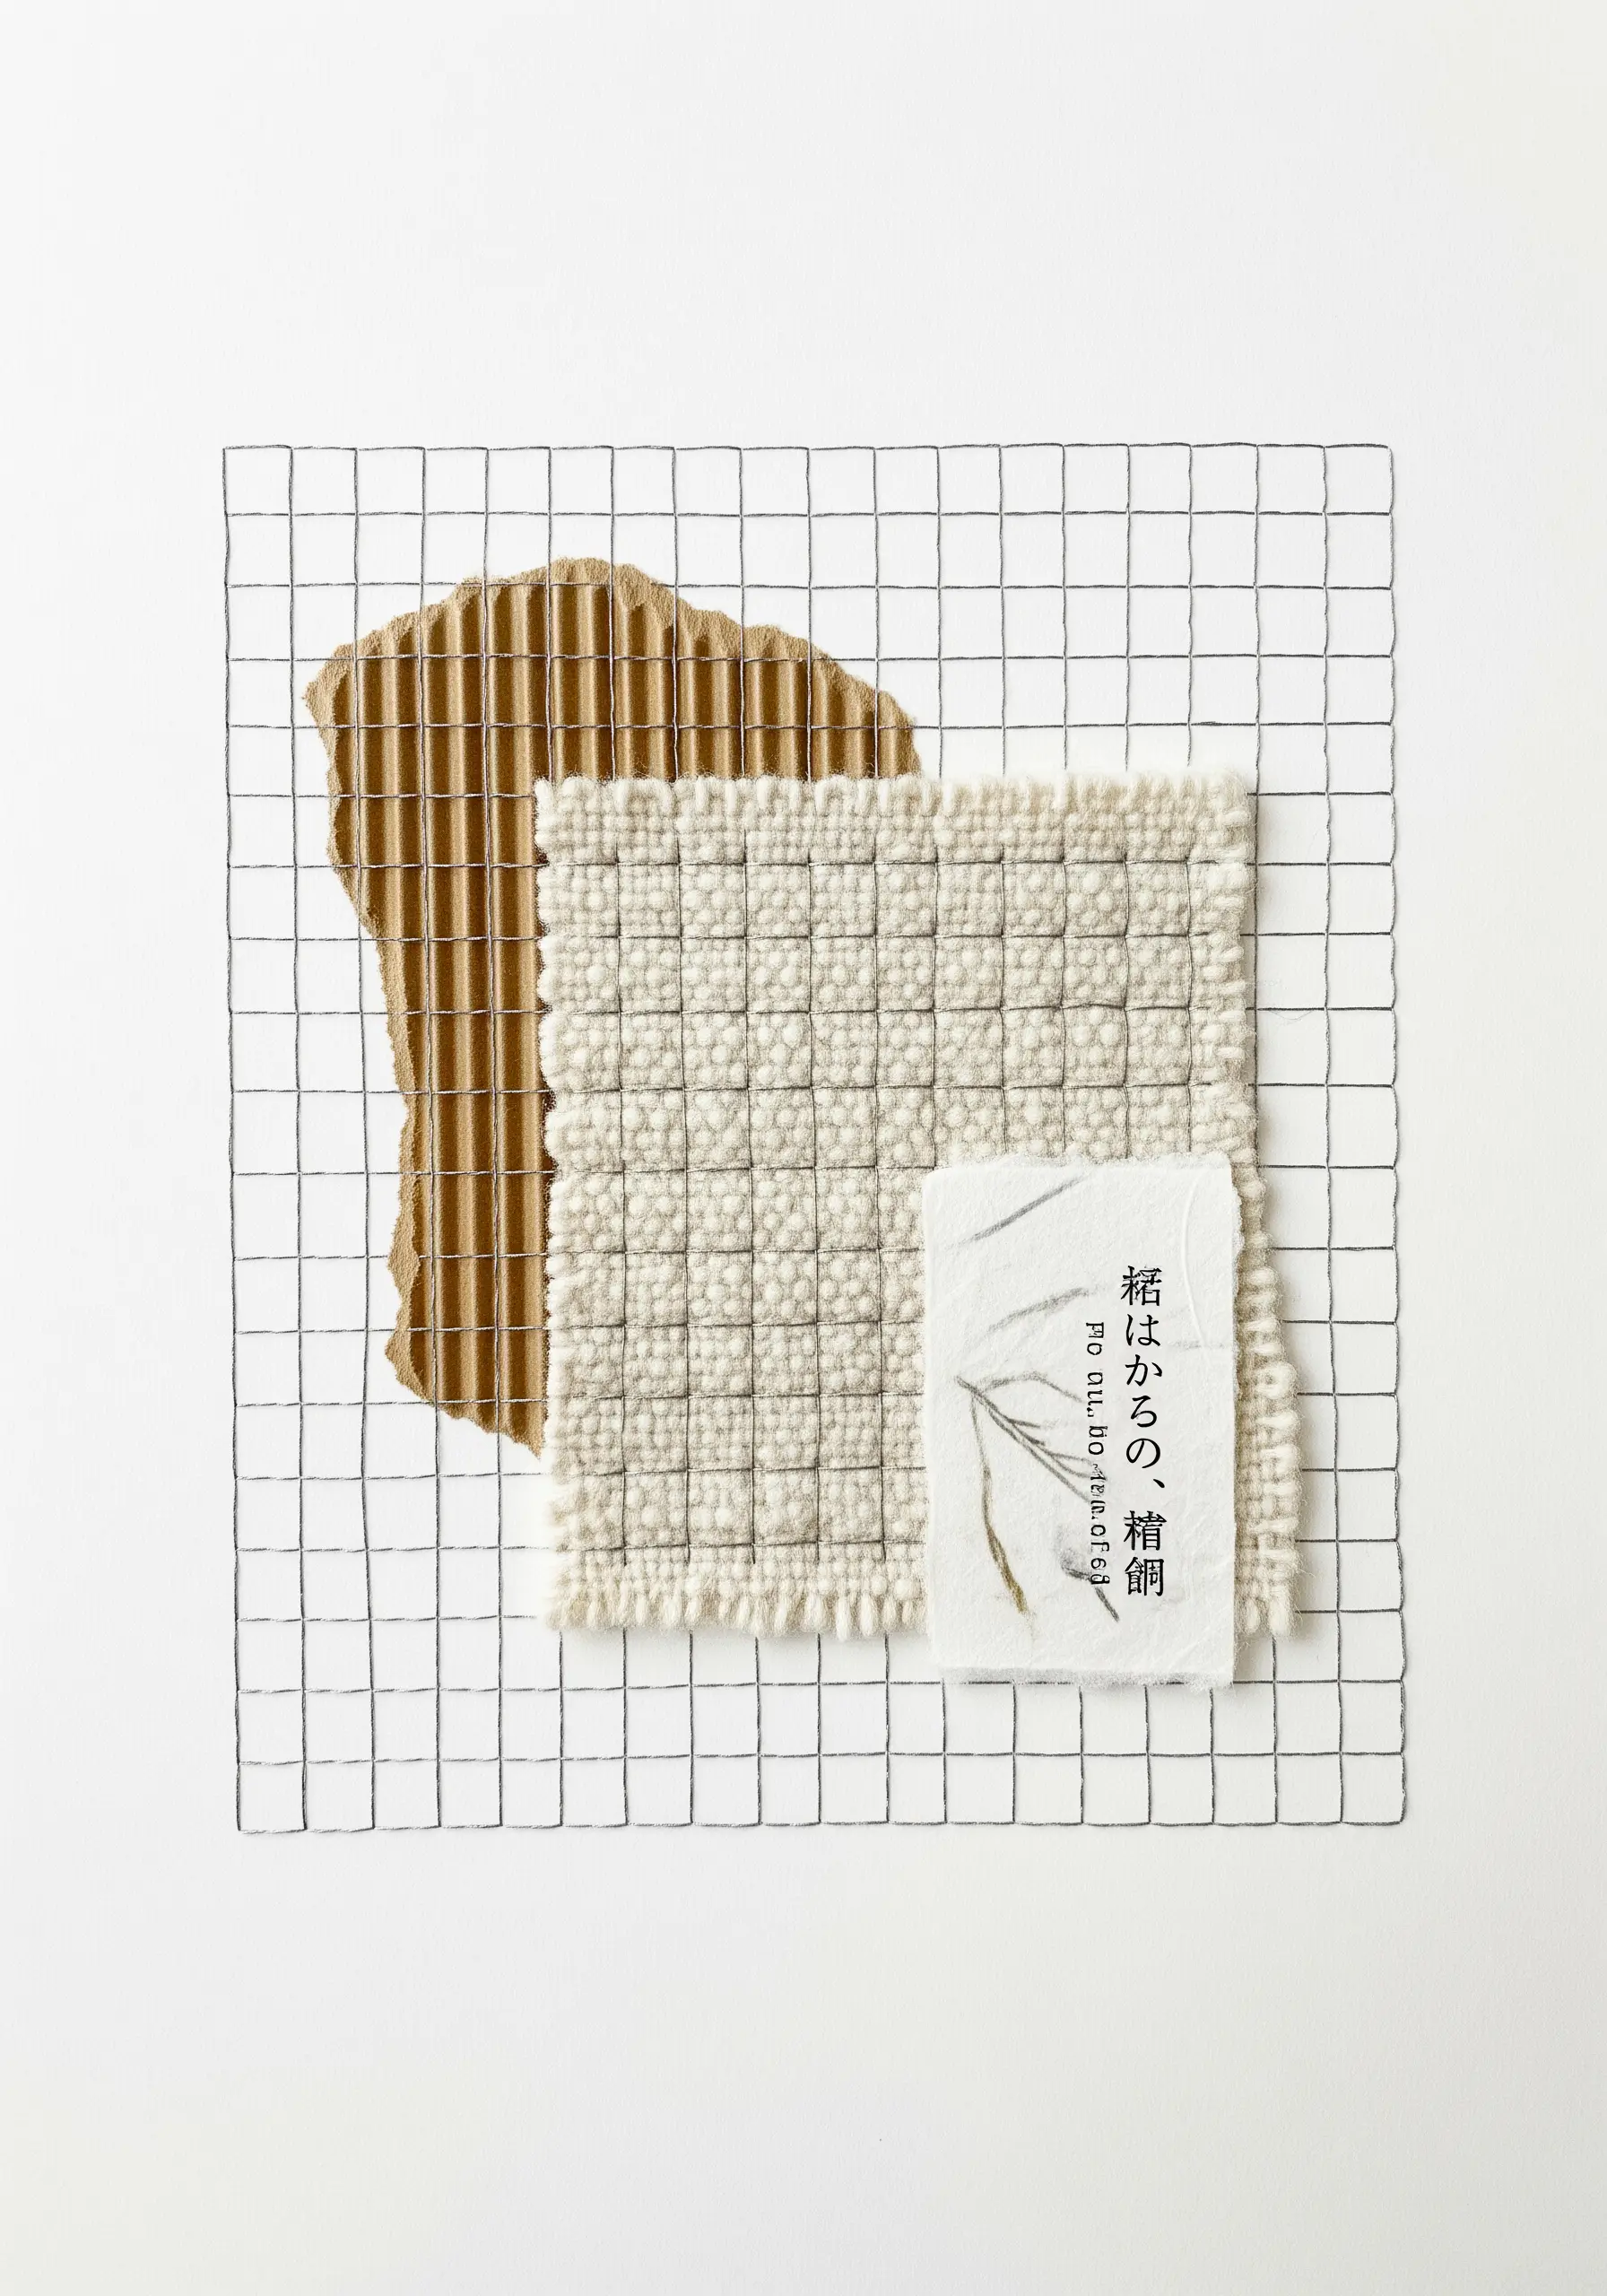
Embrace a quiet, minimalist approach by focusing on the inherent beauty of your materials.
Create a balanced composition by juxtaposing different textures: a rigid metal grid, the raw edge of corrugated cardboard, and a soft, handwoven fabric scrap.
Use a single, delicate stitch to attach one final element, like a piece of handmade paper holding a sprig of dried grass.
This minimalist approach celebrates the harmony between industrial and organic, perfect and imperfect.
22. Stitched Sprinkles: Decorative Stitches on Felt
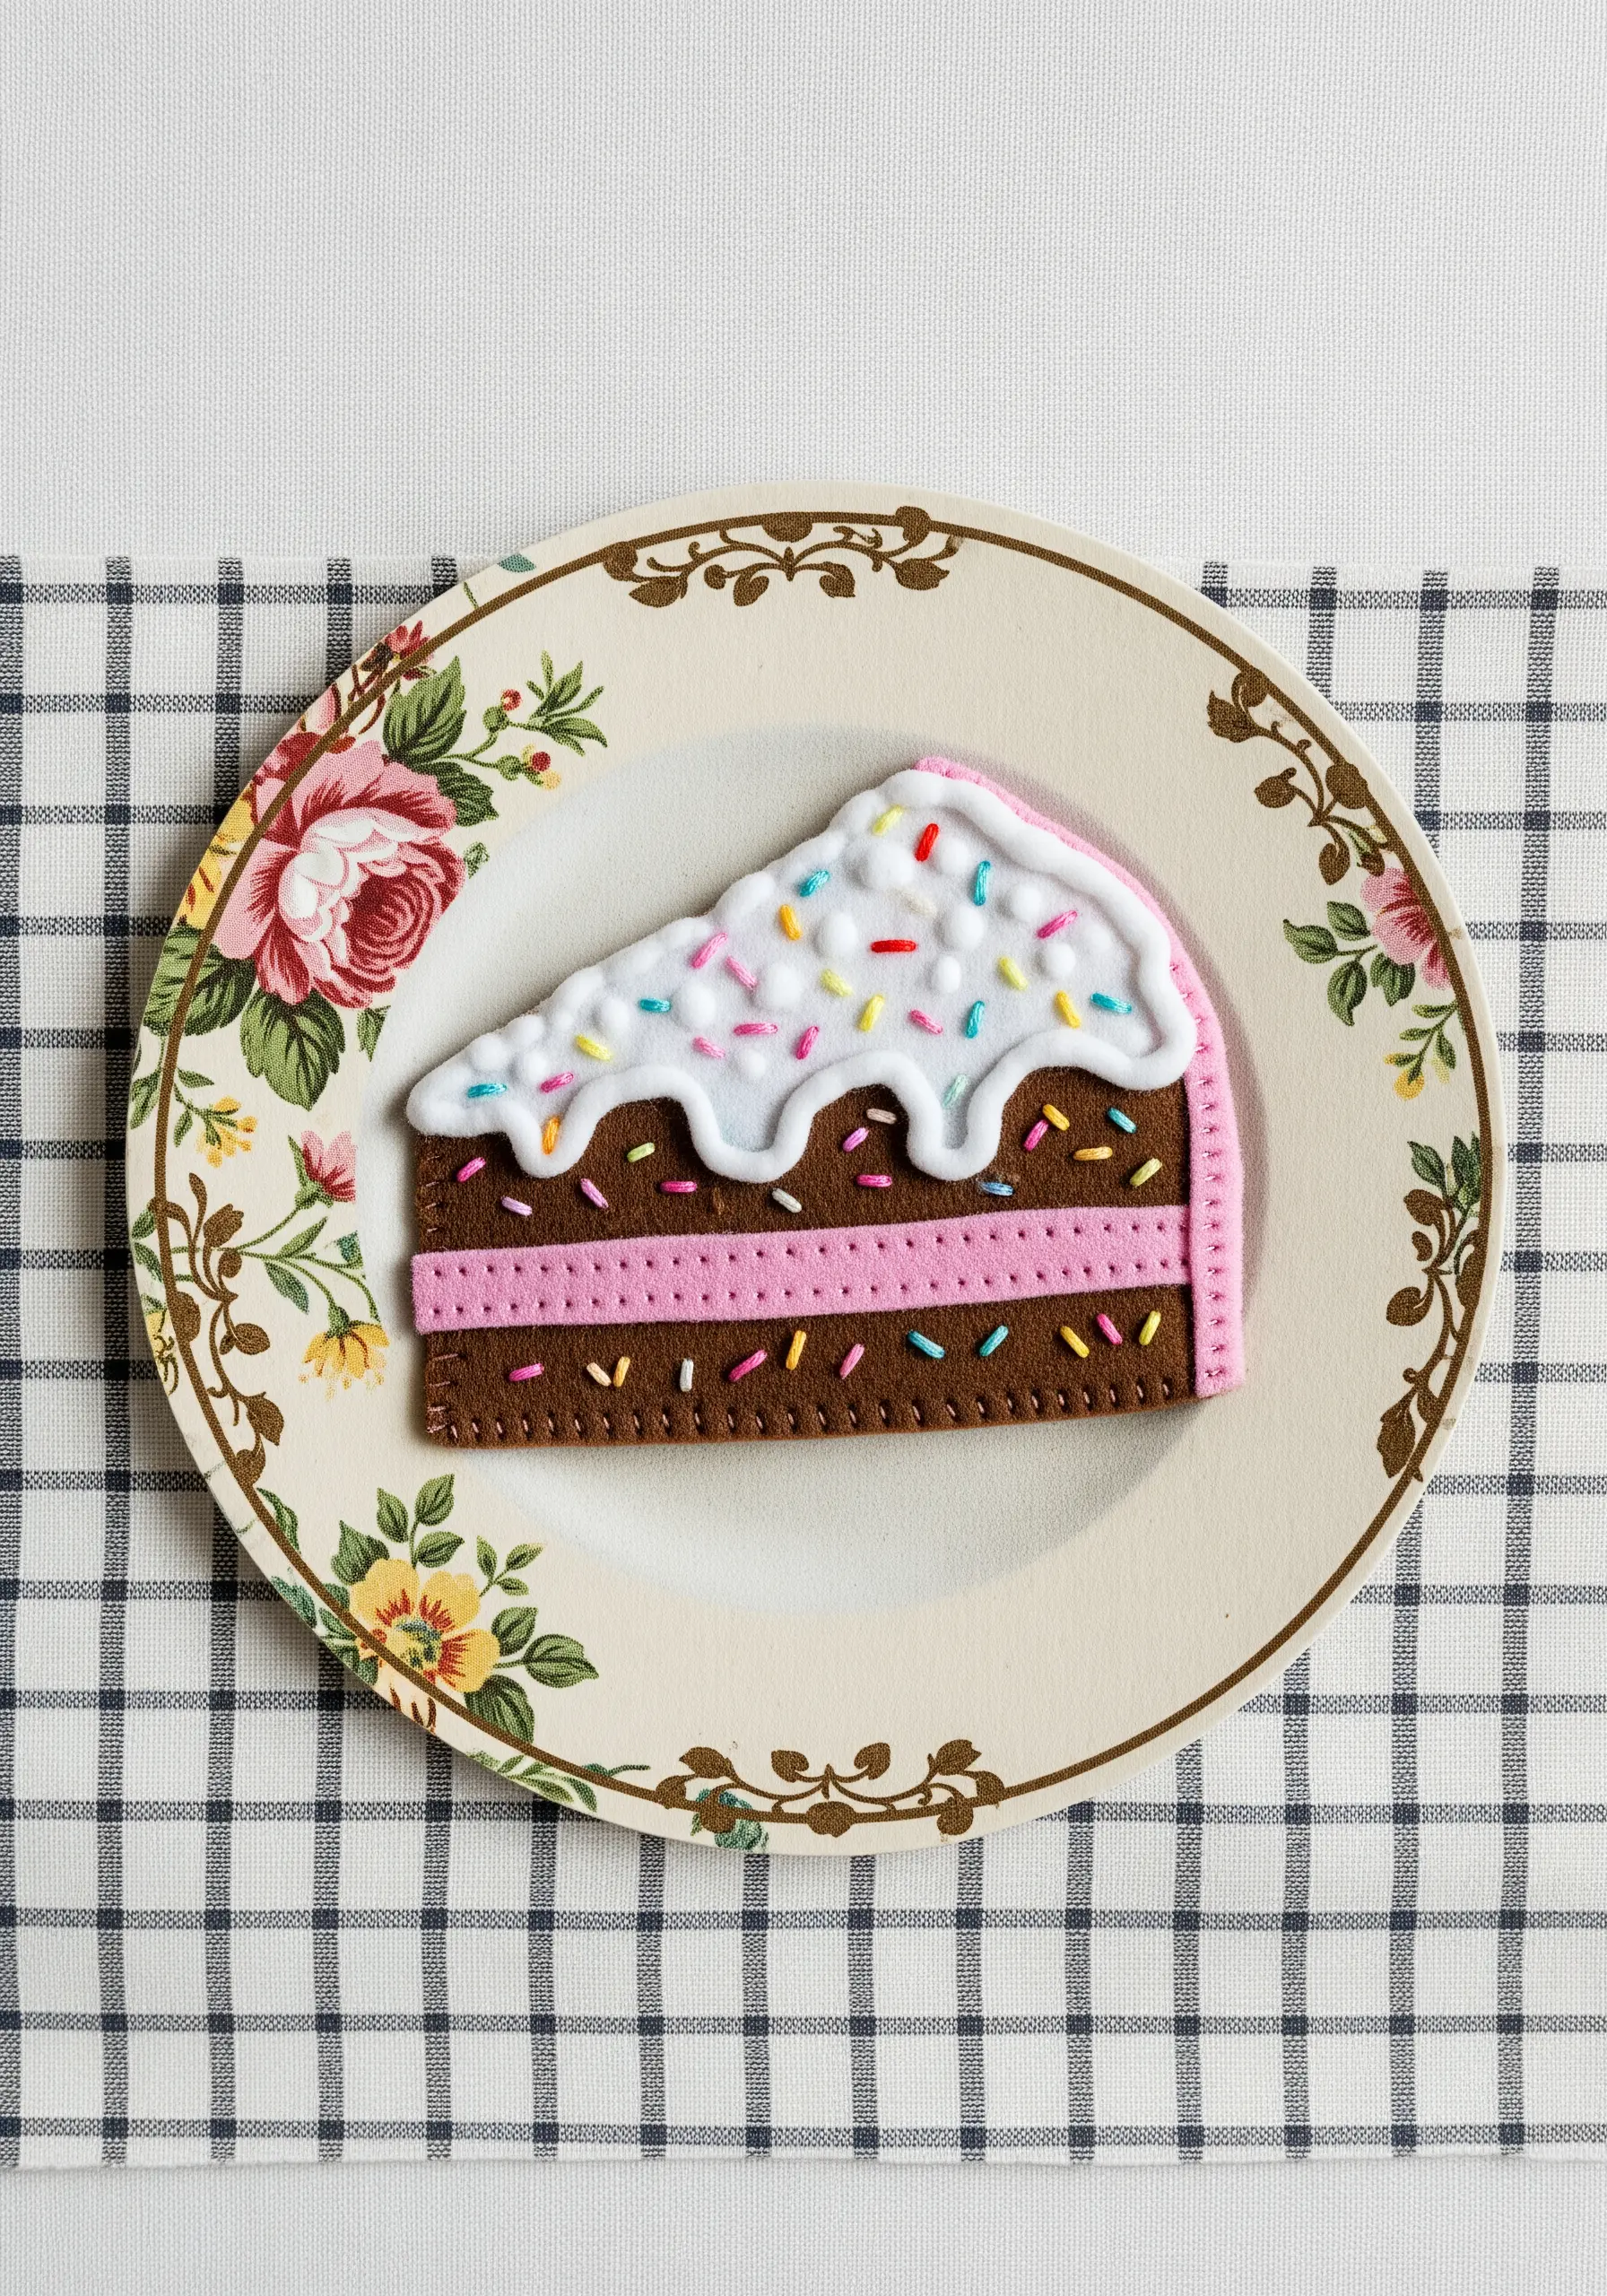
When working with felt appliqué, use your stitches as a primary decorative tool, not just for construction.
Outline your shapes with a neat, contrasting blanket stitch to give them a clean, polished, and handmade finish.
For fine details, use tiny straight stitches as sprinkles and a textured whipped backstitch for swirls of icing.
These simple additions transform basic felt shapes into charming, character-filled creations.
23. Embellished Landscapes: Integrating Buttons and Stitches
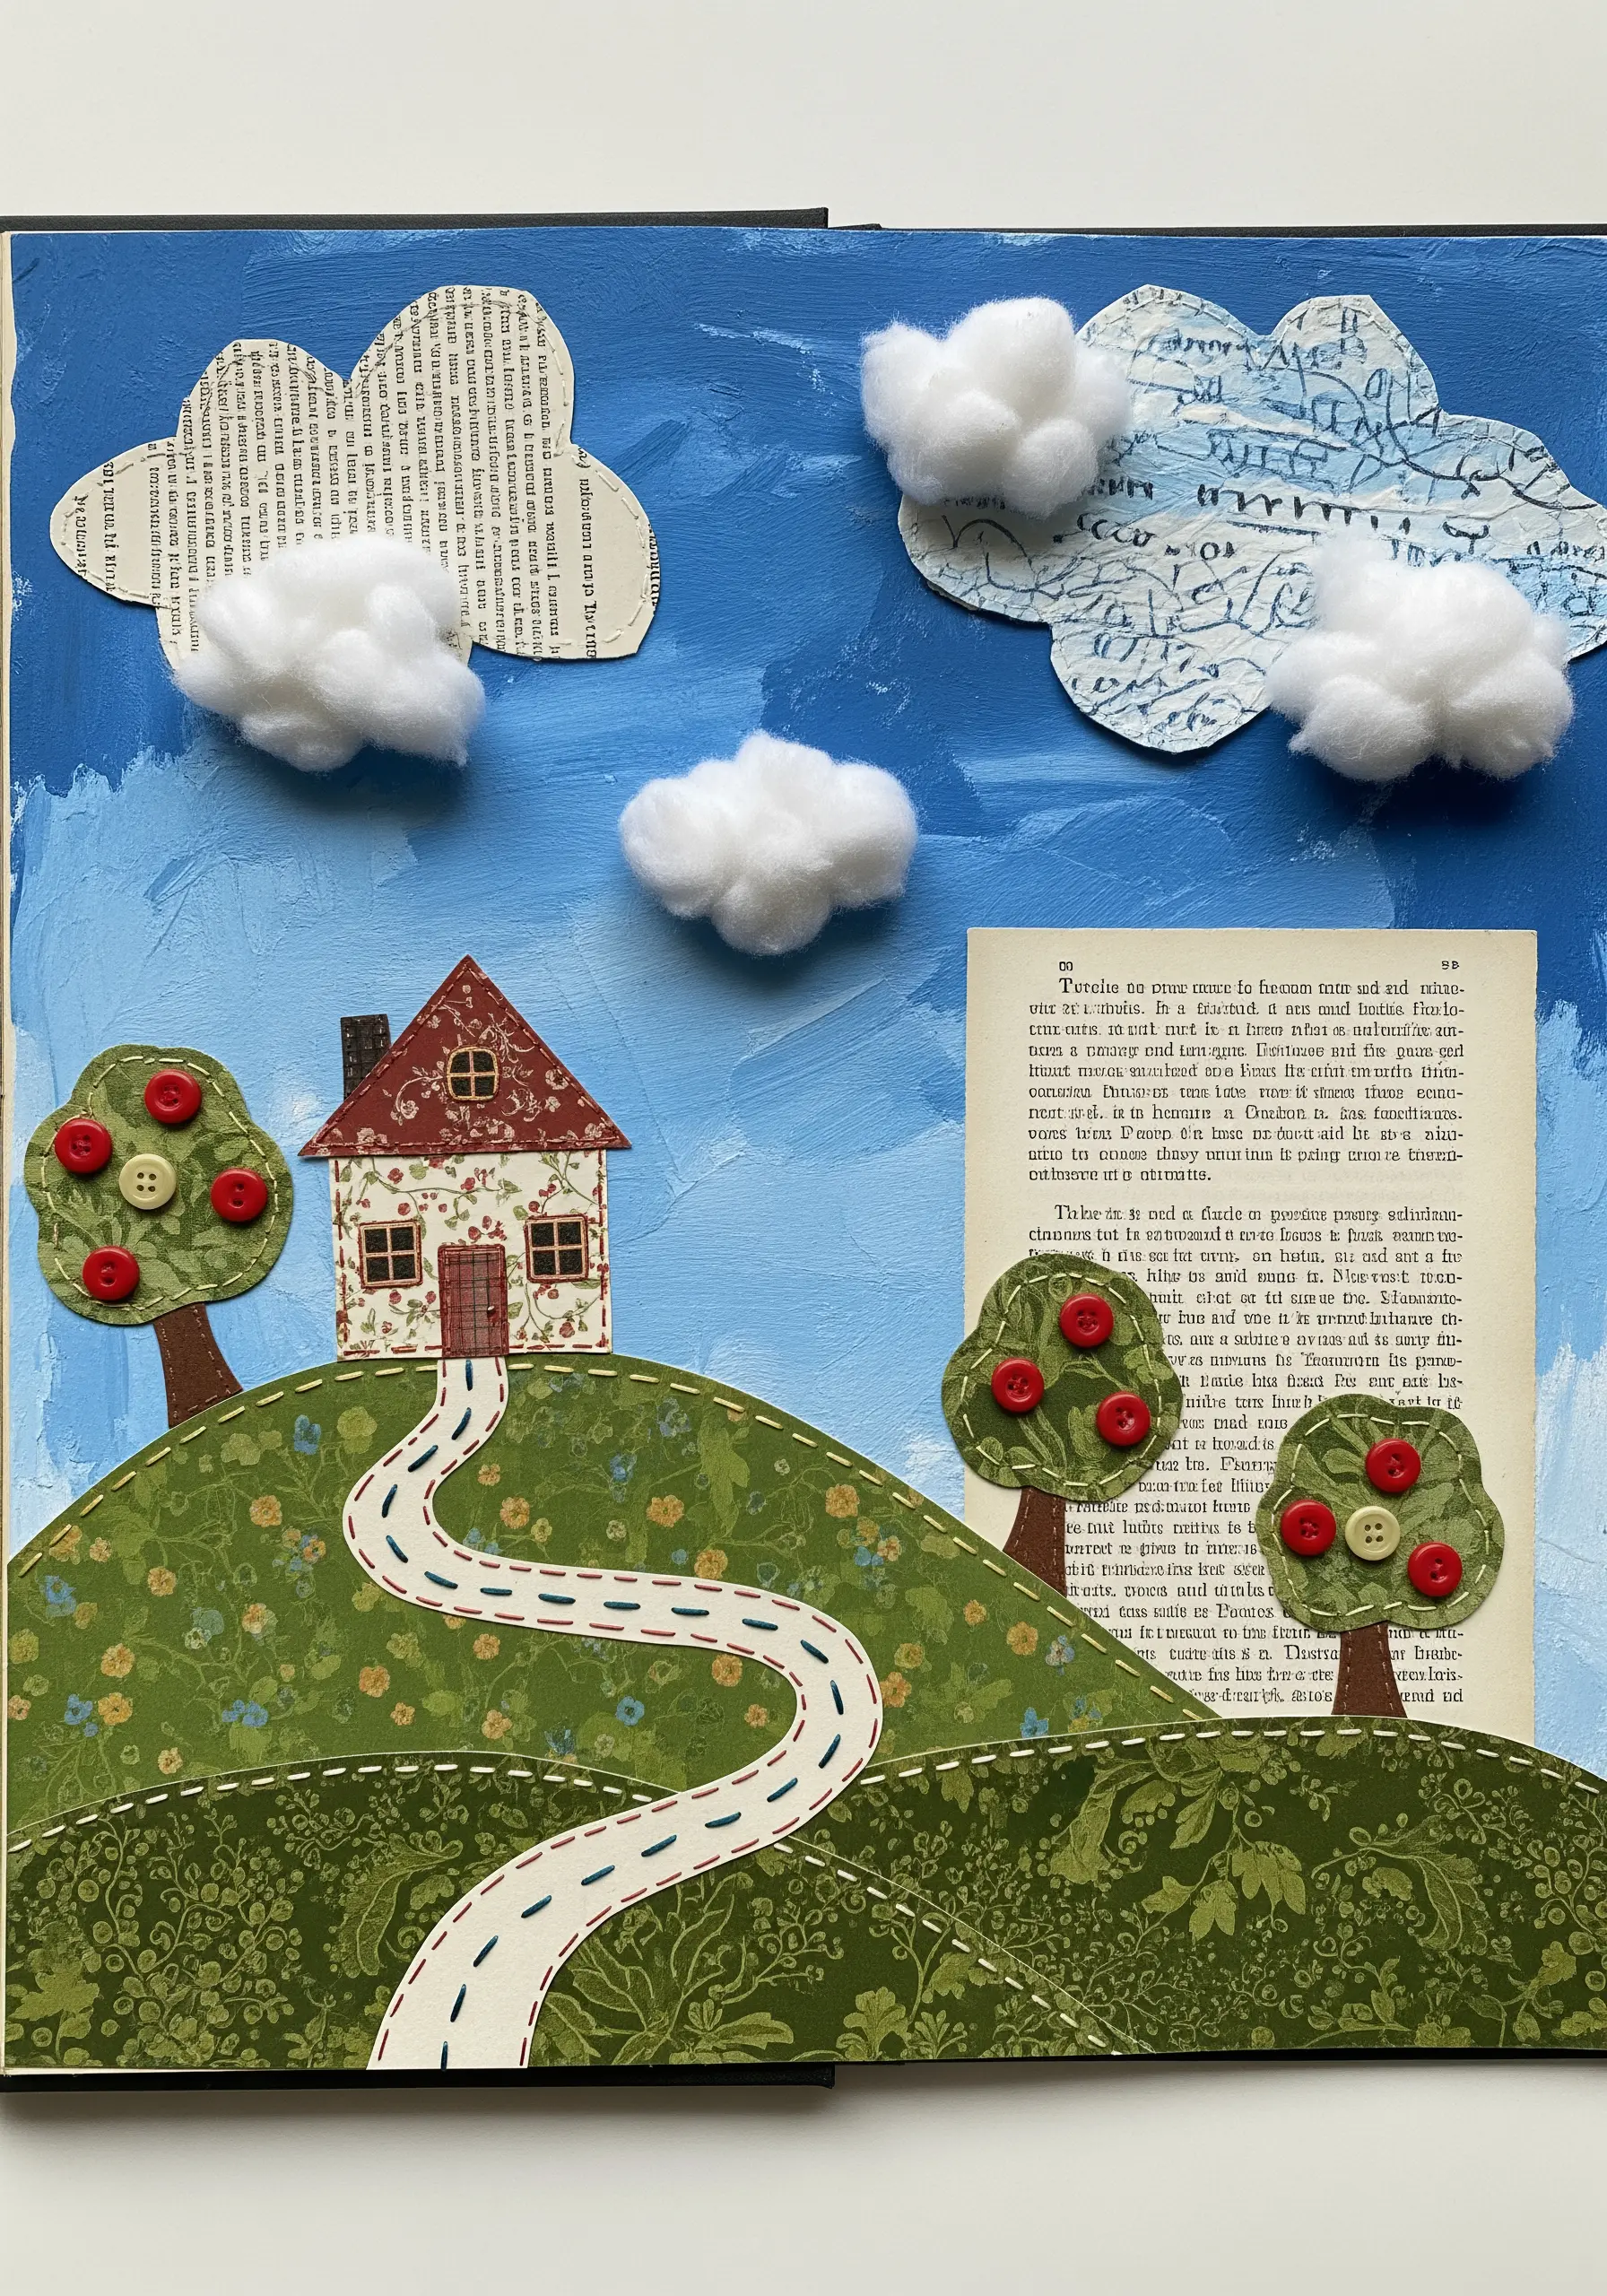
In a paper or fabric collage landscape, incorporate found objects like buttons as intentional, three-dimensional details.
Stitch them on to represent apples on a tree, flowers in a field, or stones along a path.
Secure them with a contrasting thread color to highlight them as a deliberate design choice rather than a mere addition.
This technique adds whimsical depth and playful embellishments that invite touch and closer inspection.
24. Framed Chaos: Using Negative Space and Stitching

Create a vibrant, energetic collage on a base paper using iridescent foils, metallic leaf, and colorful scraps.
Next, take a sheet of dark cardstock and cut an organic shape out of the center to create a “window.”
Place this window over your chaotic collage, deciding which area you want to frame.
Finally, use a simple running stitch in a light-colored thread to outline the inner edge of the cutout, securing the layers and adding a clean, graphic finish.


