
Let’s move beyond the hoop for a moment and rethink your canvas. If you’re looking to create art that feels layered, tactile, and deeply personal, collage offers a world of possibility where thread is not just decoration, but a vital part of the story.
Here, paper, fabric scraps, found objects, and photographs become your new foundation. Stitching is no longer just for filling shapes—it’s for connecting ideas, creating texture where none existed, and drawing lines that guide the eye through your composition.
These projects are designed to shift your perspective. You’ll discover how a simple running stitch can transform torn paper, how couched yarn can sculpt a landscape, and how a single thread can hold a memory in place. This is where your embroidery skills meet the boundless freedom of mixed media.
1. Stitch a Celestial Map on Layered Paper
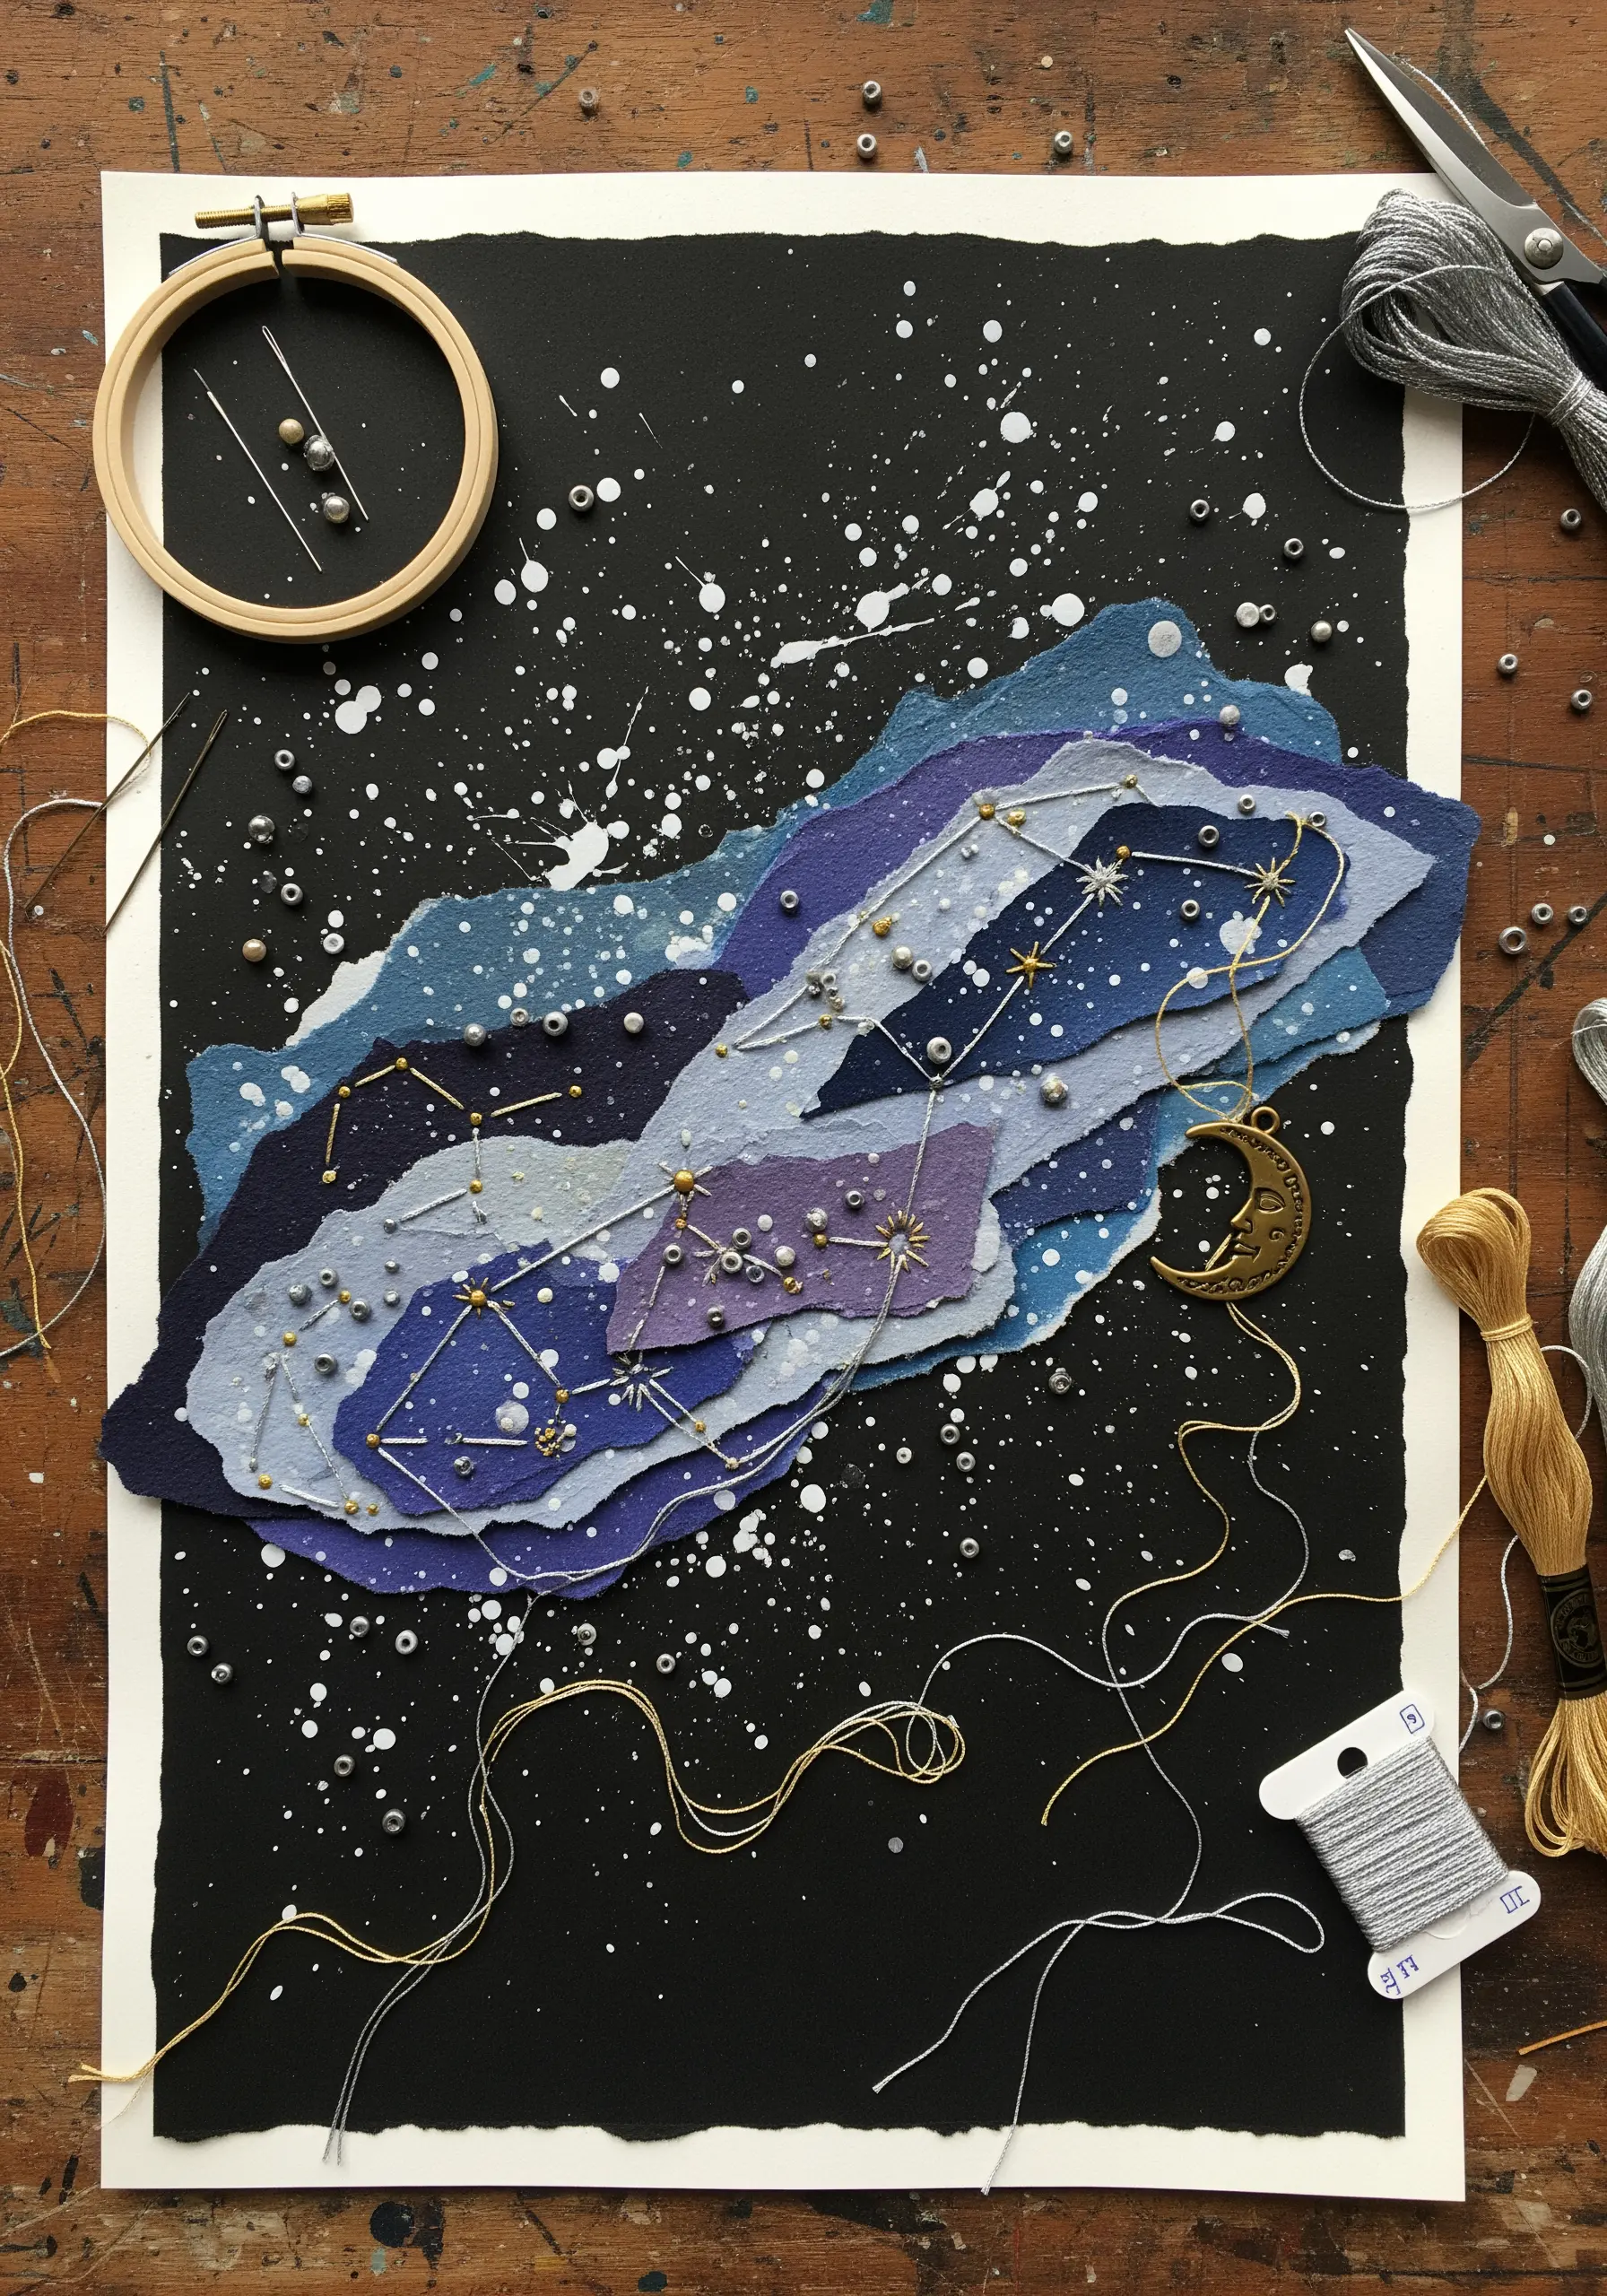
Create a cosmic backdrop by layering torn, watercolor-washed paper in shades of blue and purple.
Before stitching, gently pierce your constellation points with a fine needle or awl to prevent the paper from tearing when you pull the thread through.
Use a single strand of metallic gold or silver floss for the constellation lines; its reflective quality perfectly mimics starlight against the matte paper.
Secure tiny seed beads with a single stitch to represent stars, adding a subtle three-dimensional texture that catches the light.
2. Create Botanical Depth with Stitched Vellum
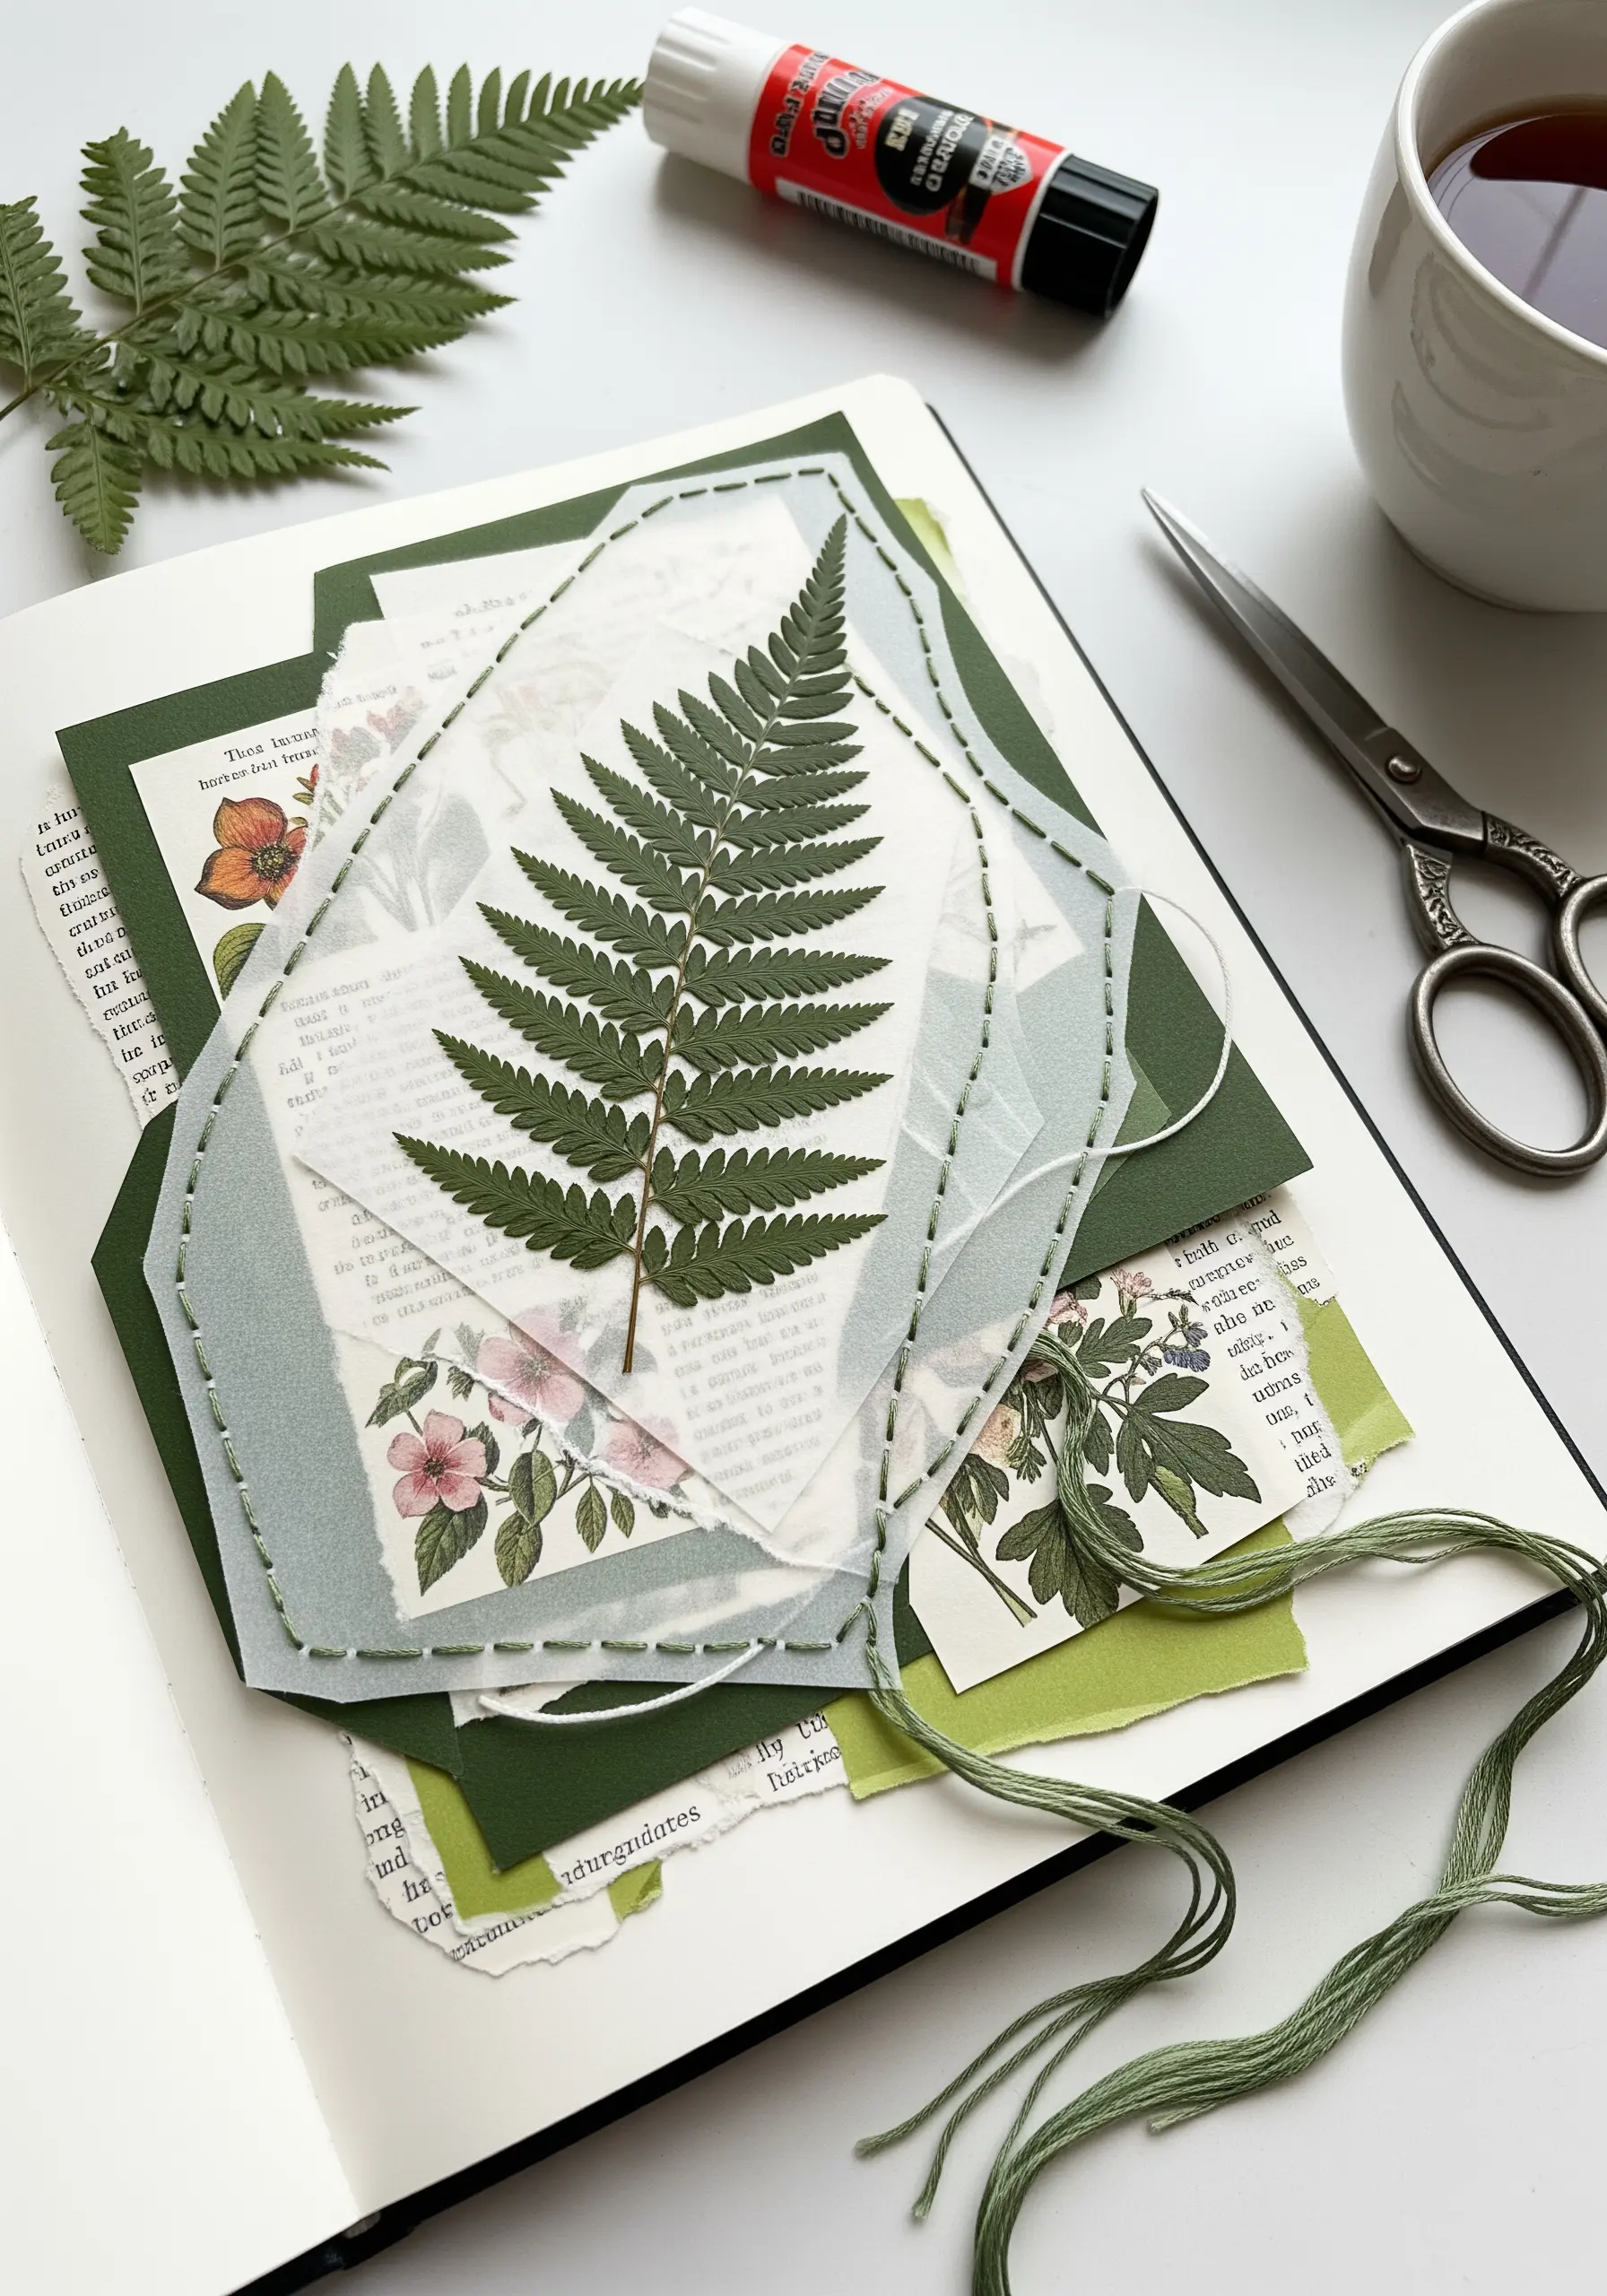
Layer a piece of translucent vellum or tracing paper over botanical illustrations to create a soft, ethereal filter effect.
Use a simple running stitch with two strands of cotton floss to outline a geometric shape, securing the vellum to the page below.
Lengthen your stitch (around 4-5mm) to minimize paper perforation and maintain structural integrity.
This technique allows you to frame a focal point, like a pressed fern, while letting the background elements show through softly.
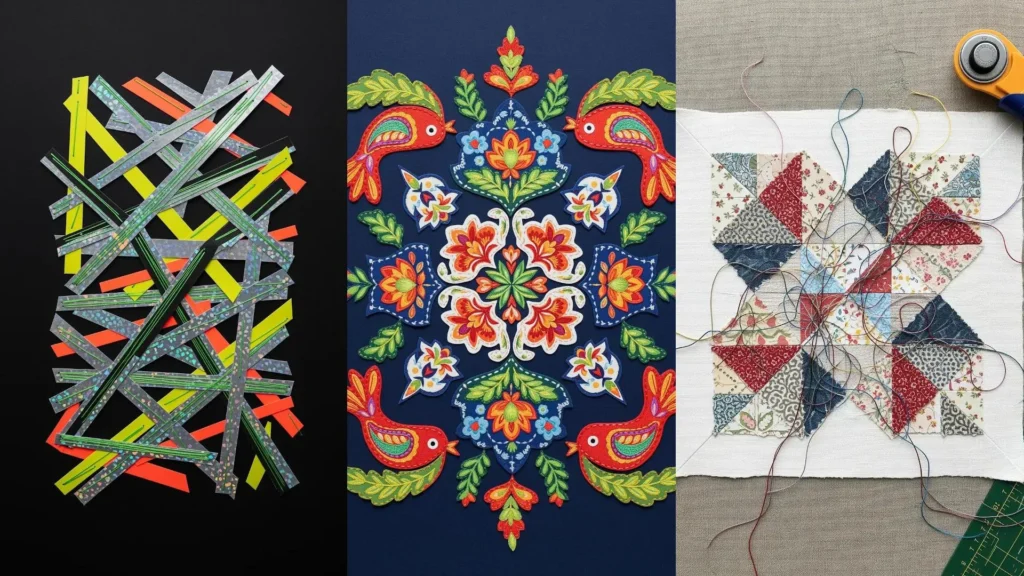
3. Weave Paper and Couch Yarn for Graphic Art

Combine the rigidity of woven paper with the softness of yarn for a striking textural contrast.
Start by creating a geometric background with bold, colored cardstock, gluing the pieces onto a firm canvas board.
Instead of stitching through the board, use a couching technique: lay thick yarn or cord on the surface and secure it with small, evenly spaced stitches using a finer matching thread.
This method lets you create flowing, organic lines that move independently of the paper grid, adding dynamic movement to the composition.
4. Sculpt an Ocean Scene with Torn Fabric

Build a seascape by layering torn strips of cotton or linen fabric in an ombré of blues and greens.
The raw, frayed edges of the fabric naturally mimic the texture of waves, so resist the urge to create perfectly neat lines.
Add visual structure by stitching a loose grid over the ‘sky’ with a simple running stitch in a contrasting white thread.
For the seafoam, don’t stitch in neat loops. Instead, couch a tangled bundle of fine white thread to the surface for a more chaotic, realistic effect, creating coastal-inspired fabric collage scenes.
5. Outline Architectural Forms on Metallic Paper
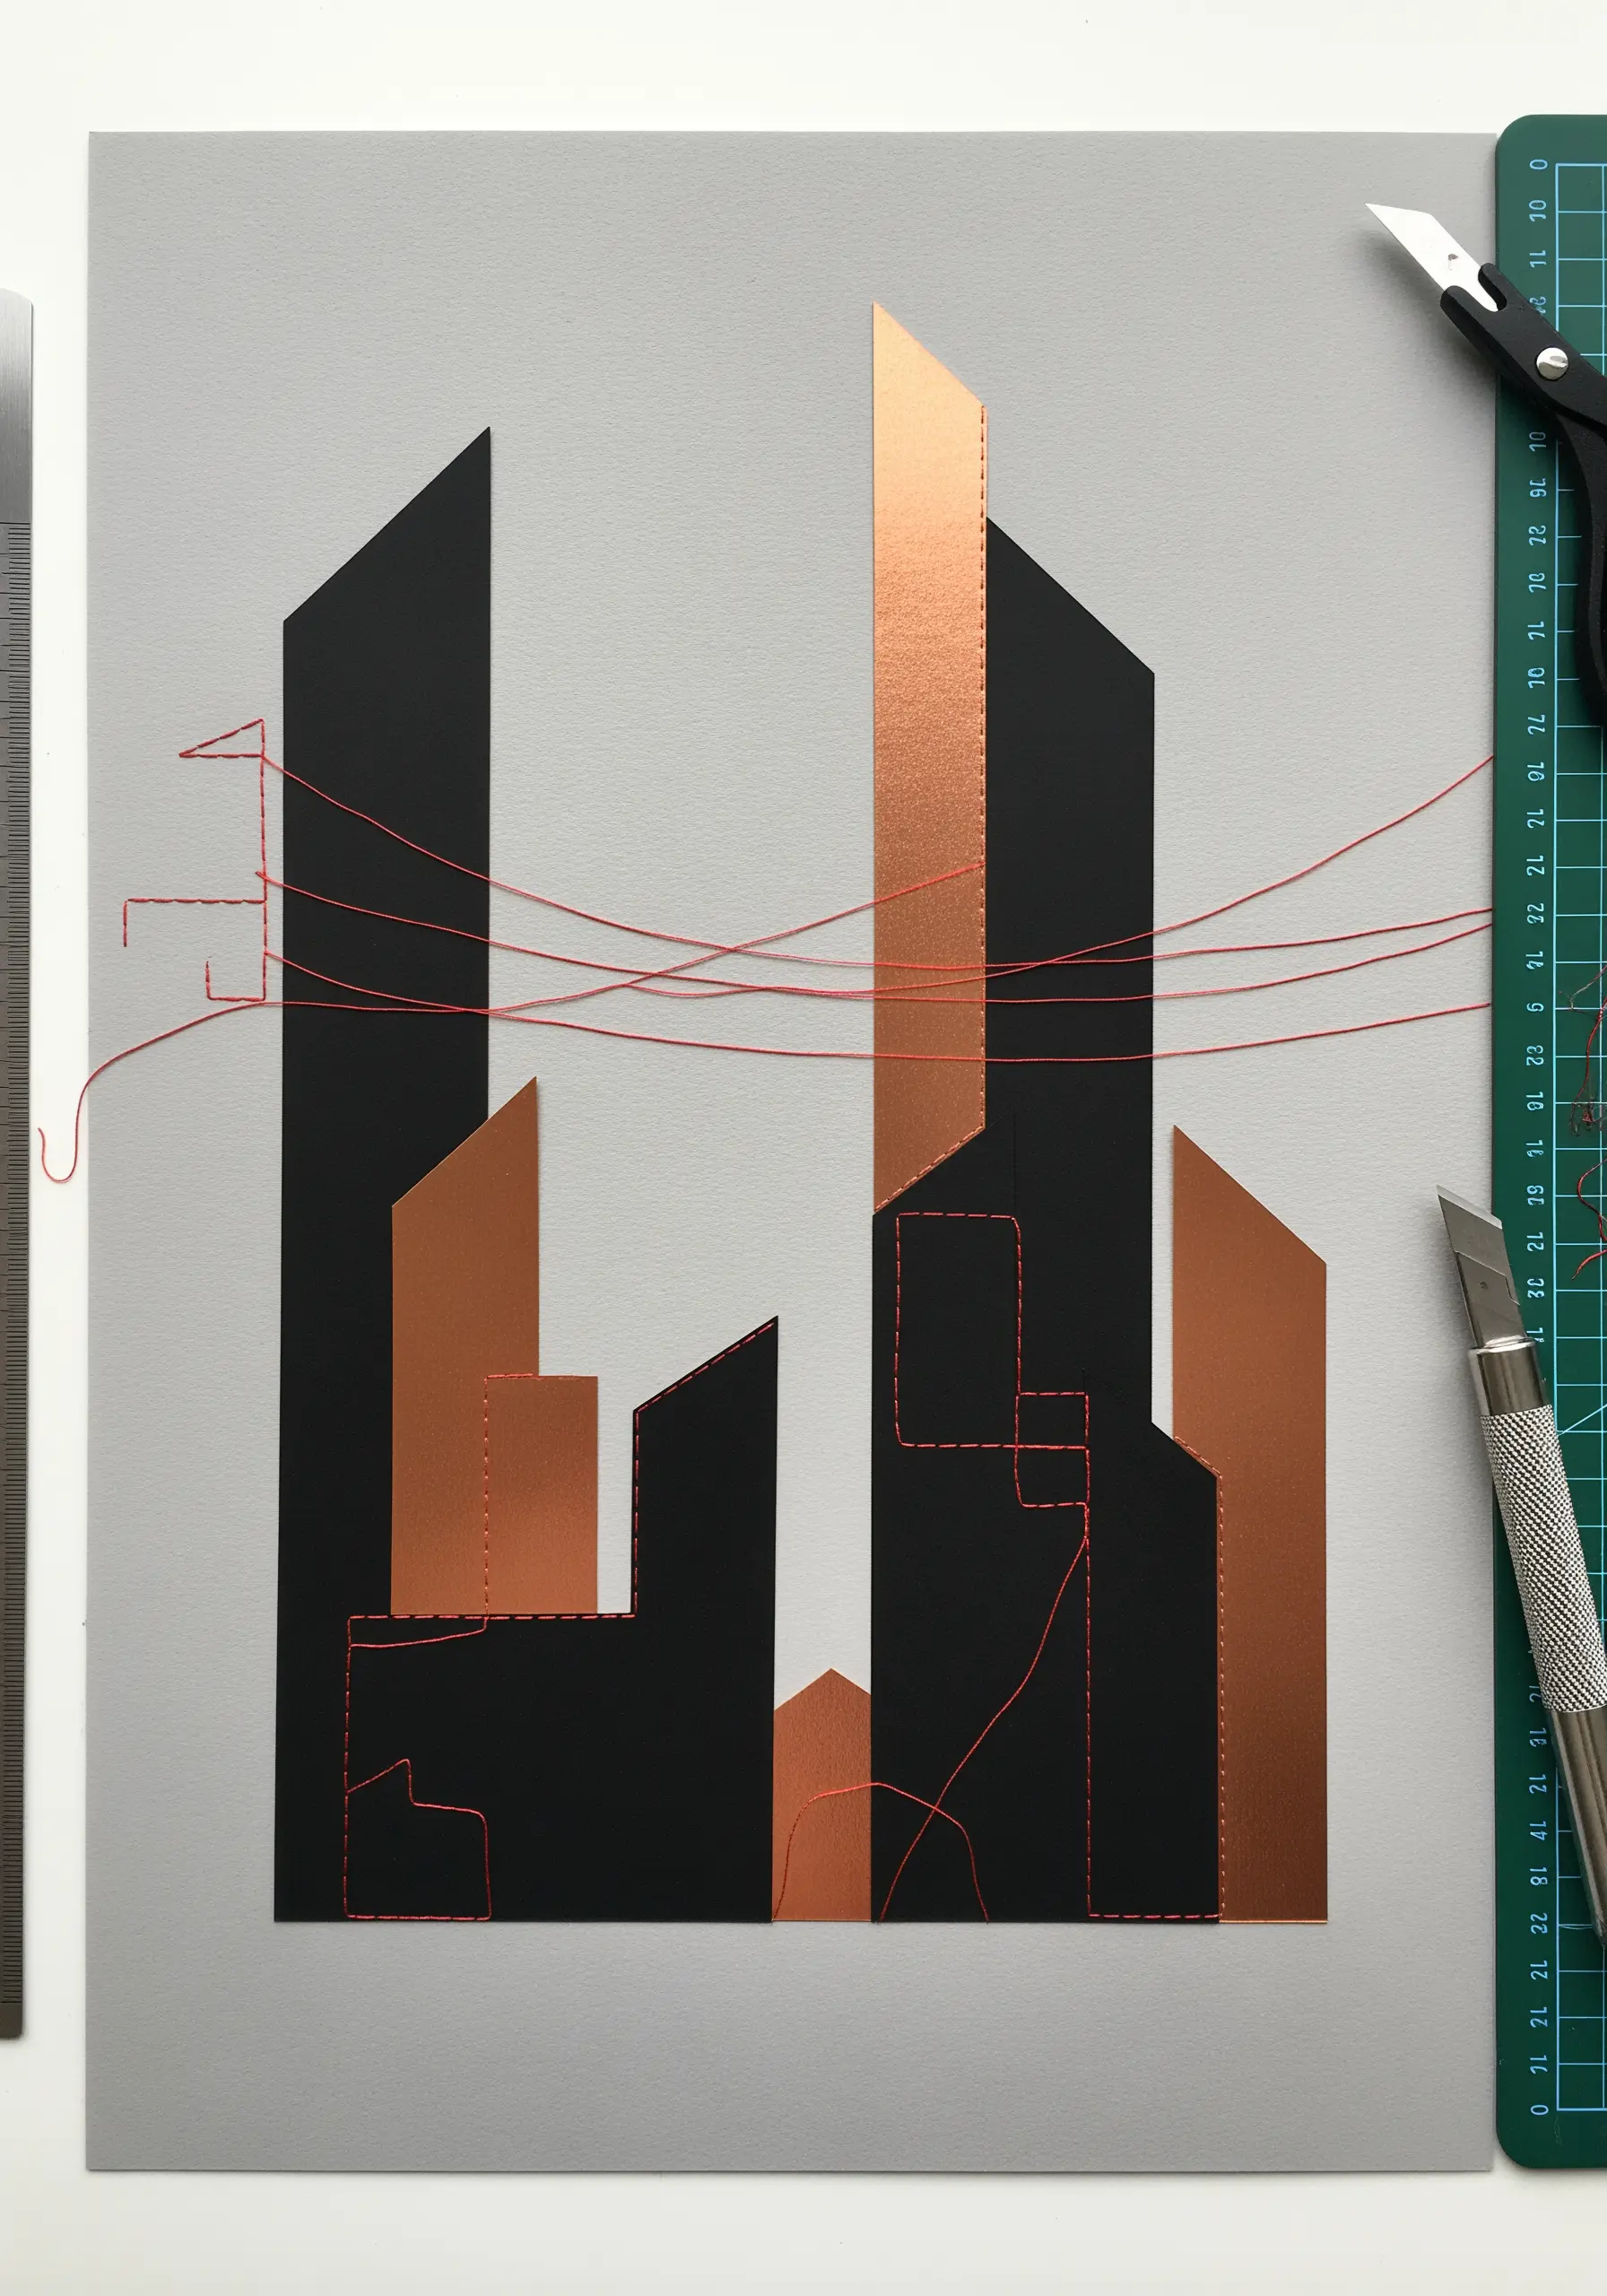
Juxtapose the clean, sharp edges of paper cutouts with the organic quality of hand stitching.
Choose a high-contrast palette like black and copper paper to give your architectural shapes a modern, graphic impact.
Instead of stitching a complete outline, use fragmented running stitches or backstitches to suggest form and connection between the shapes.
Allow some threads to span across the negative space, creating a sense of energy and tension that transforms a static skyline into a dynamic piece of art.
6. Build a 3D Diorama with Stitched Elements

Create a whimsical scene by combining paper cutouts with highly textured yarn stitches.
Use Turkey work or dense French knots with a fluffy, moss-green yarn to create a border that literally pops off the canvas, framing your collage.
To add more dimension, mount some paper elements on small foam dots before gluing them down, allowing them to cast subtle shadows.
A braided yarn or rope detail at the base grounds the scene and adds another layer of rustic texture.
7. Trace a Journey with Stitches on a Map
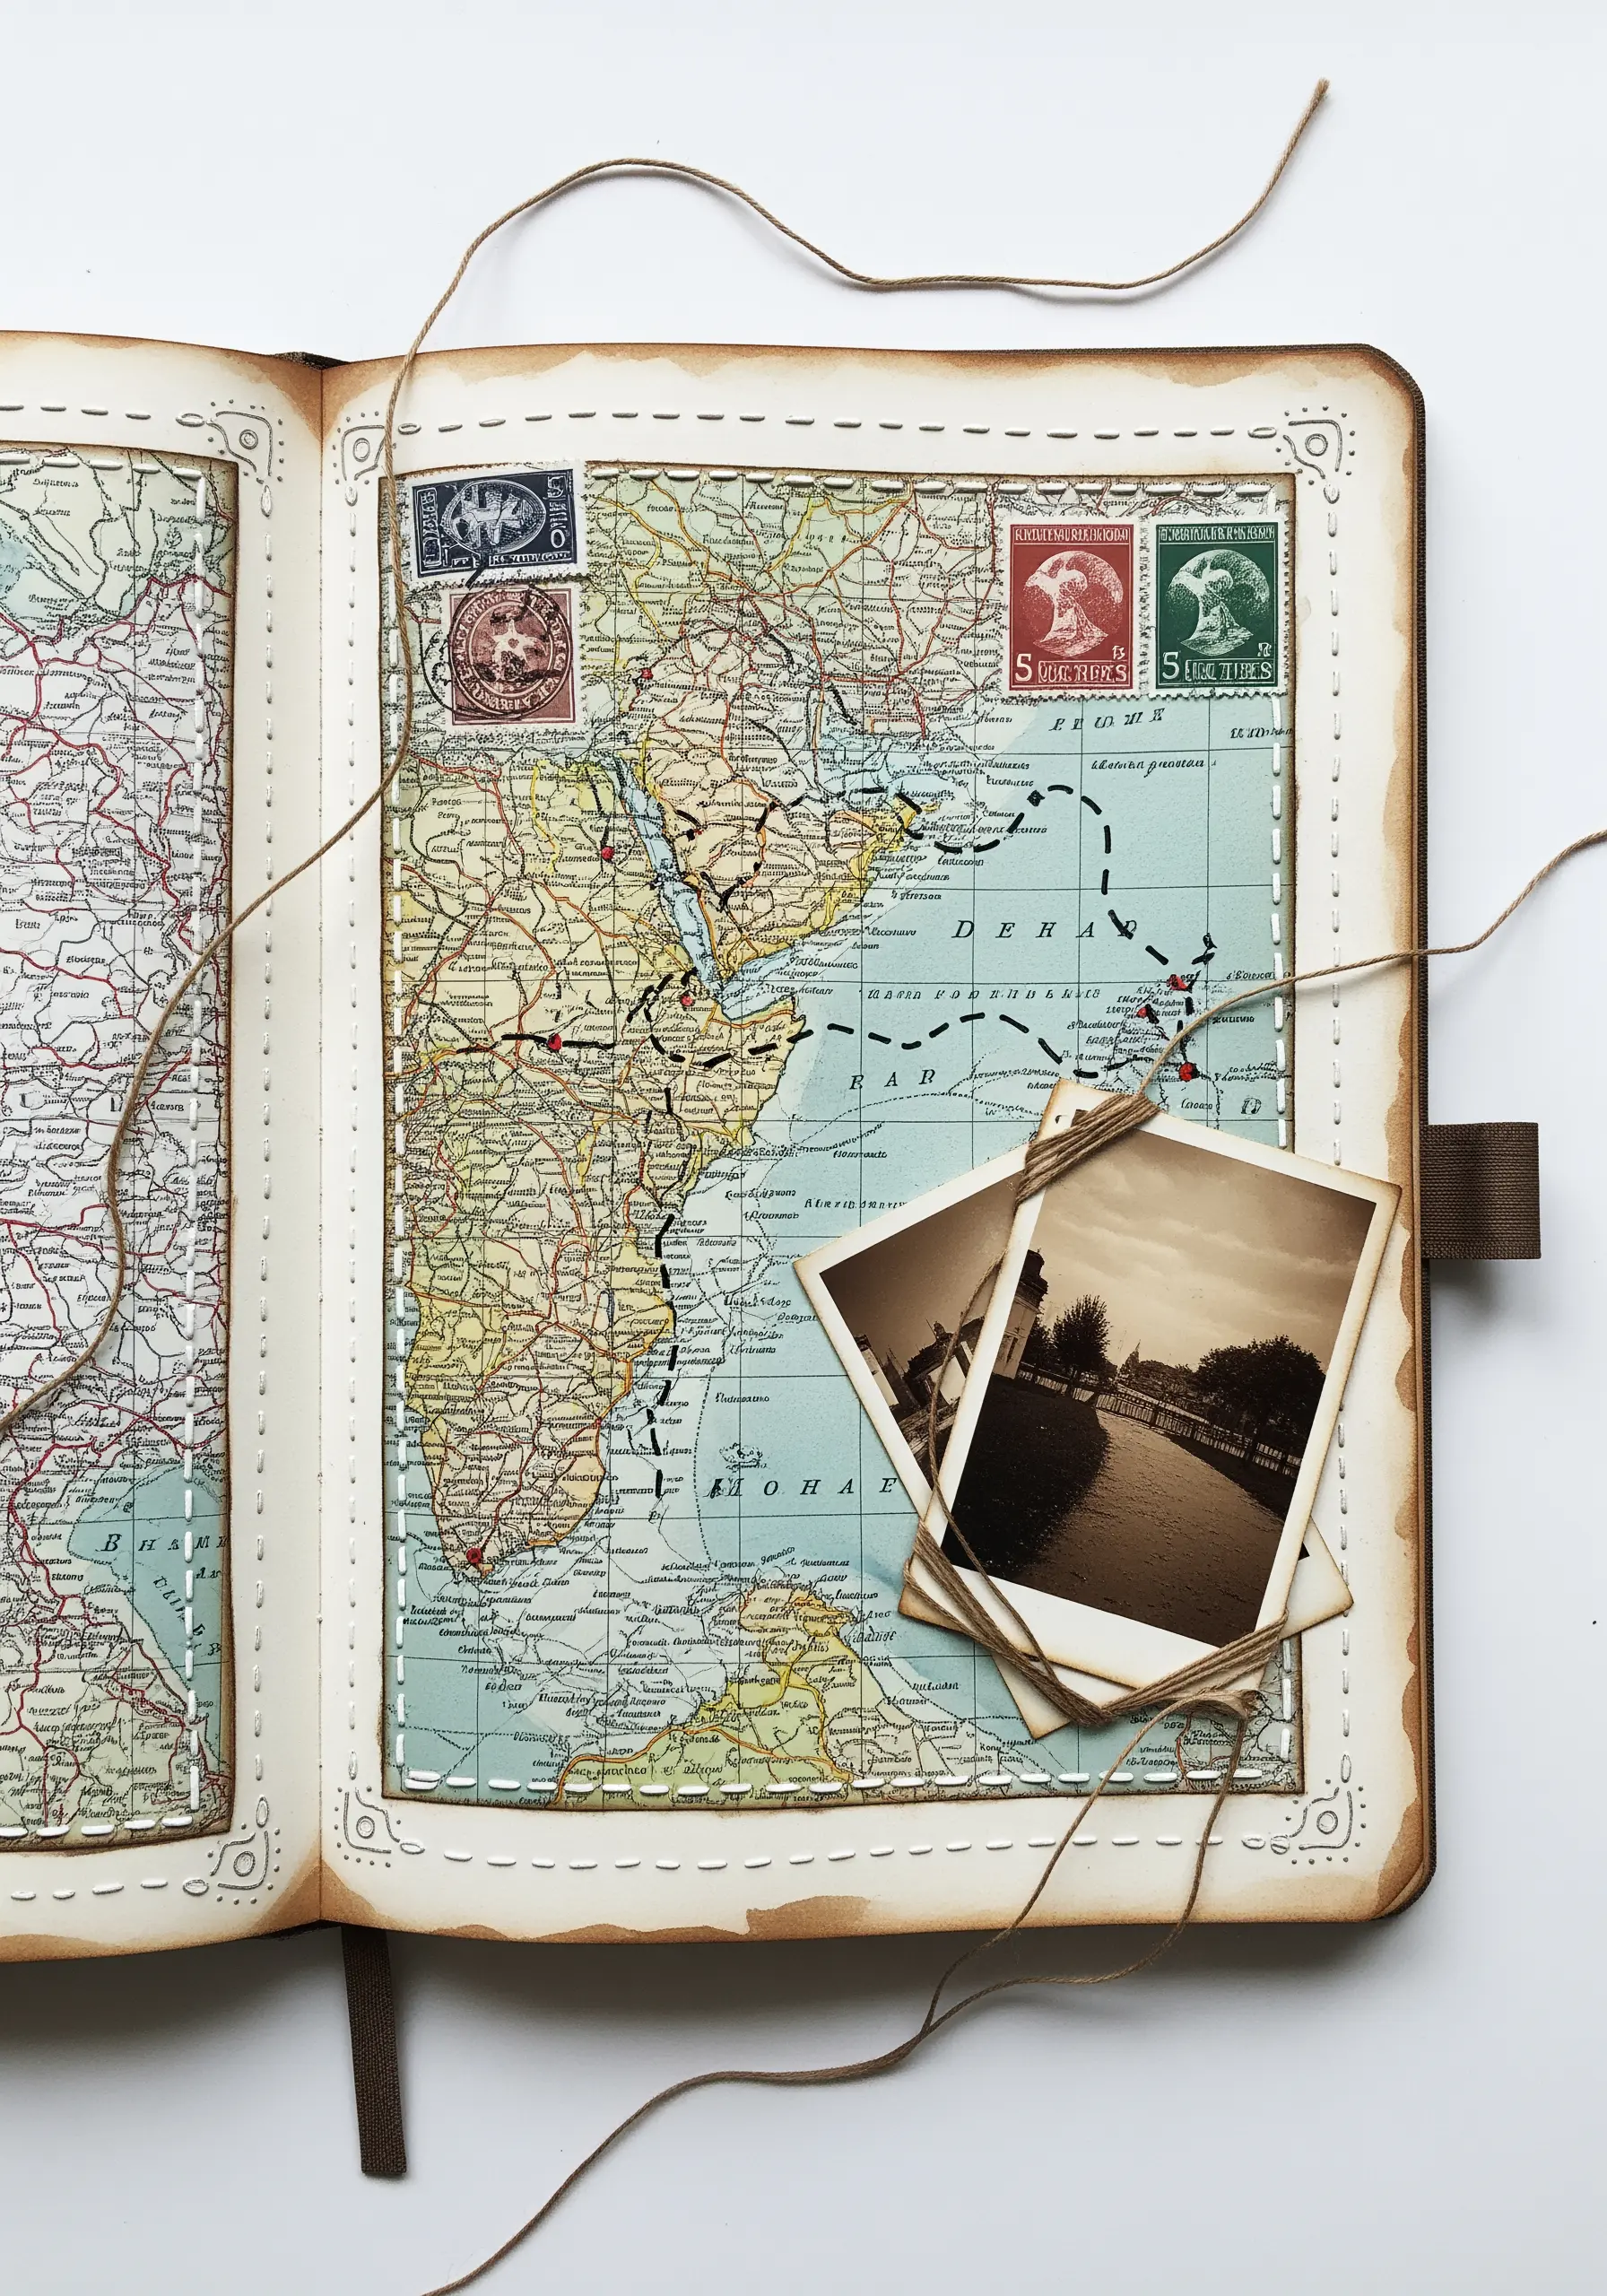
Transform a vintage map into a personal narrative by stitching your travel routes directly onto the paper.
Use a simple backstitch for a clear, defined line that is easy to follow across continents and oceans.
To anchor key locations or memories, add a French knot or a tiny cross-stitch instead of just a pinhole.
A thicker thread like twine or sashiko thread can be couched onto the page to attach photos or mementos, integrating them physically into your stitched story.
8. Illuminate Paper Sunbeams with Satin Stitch
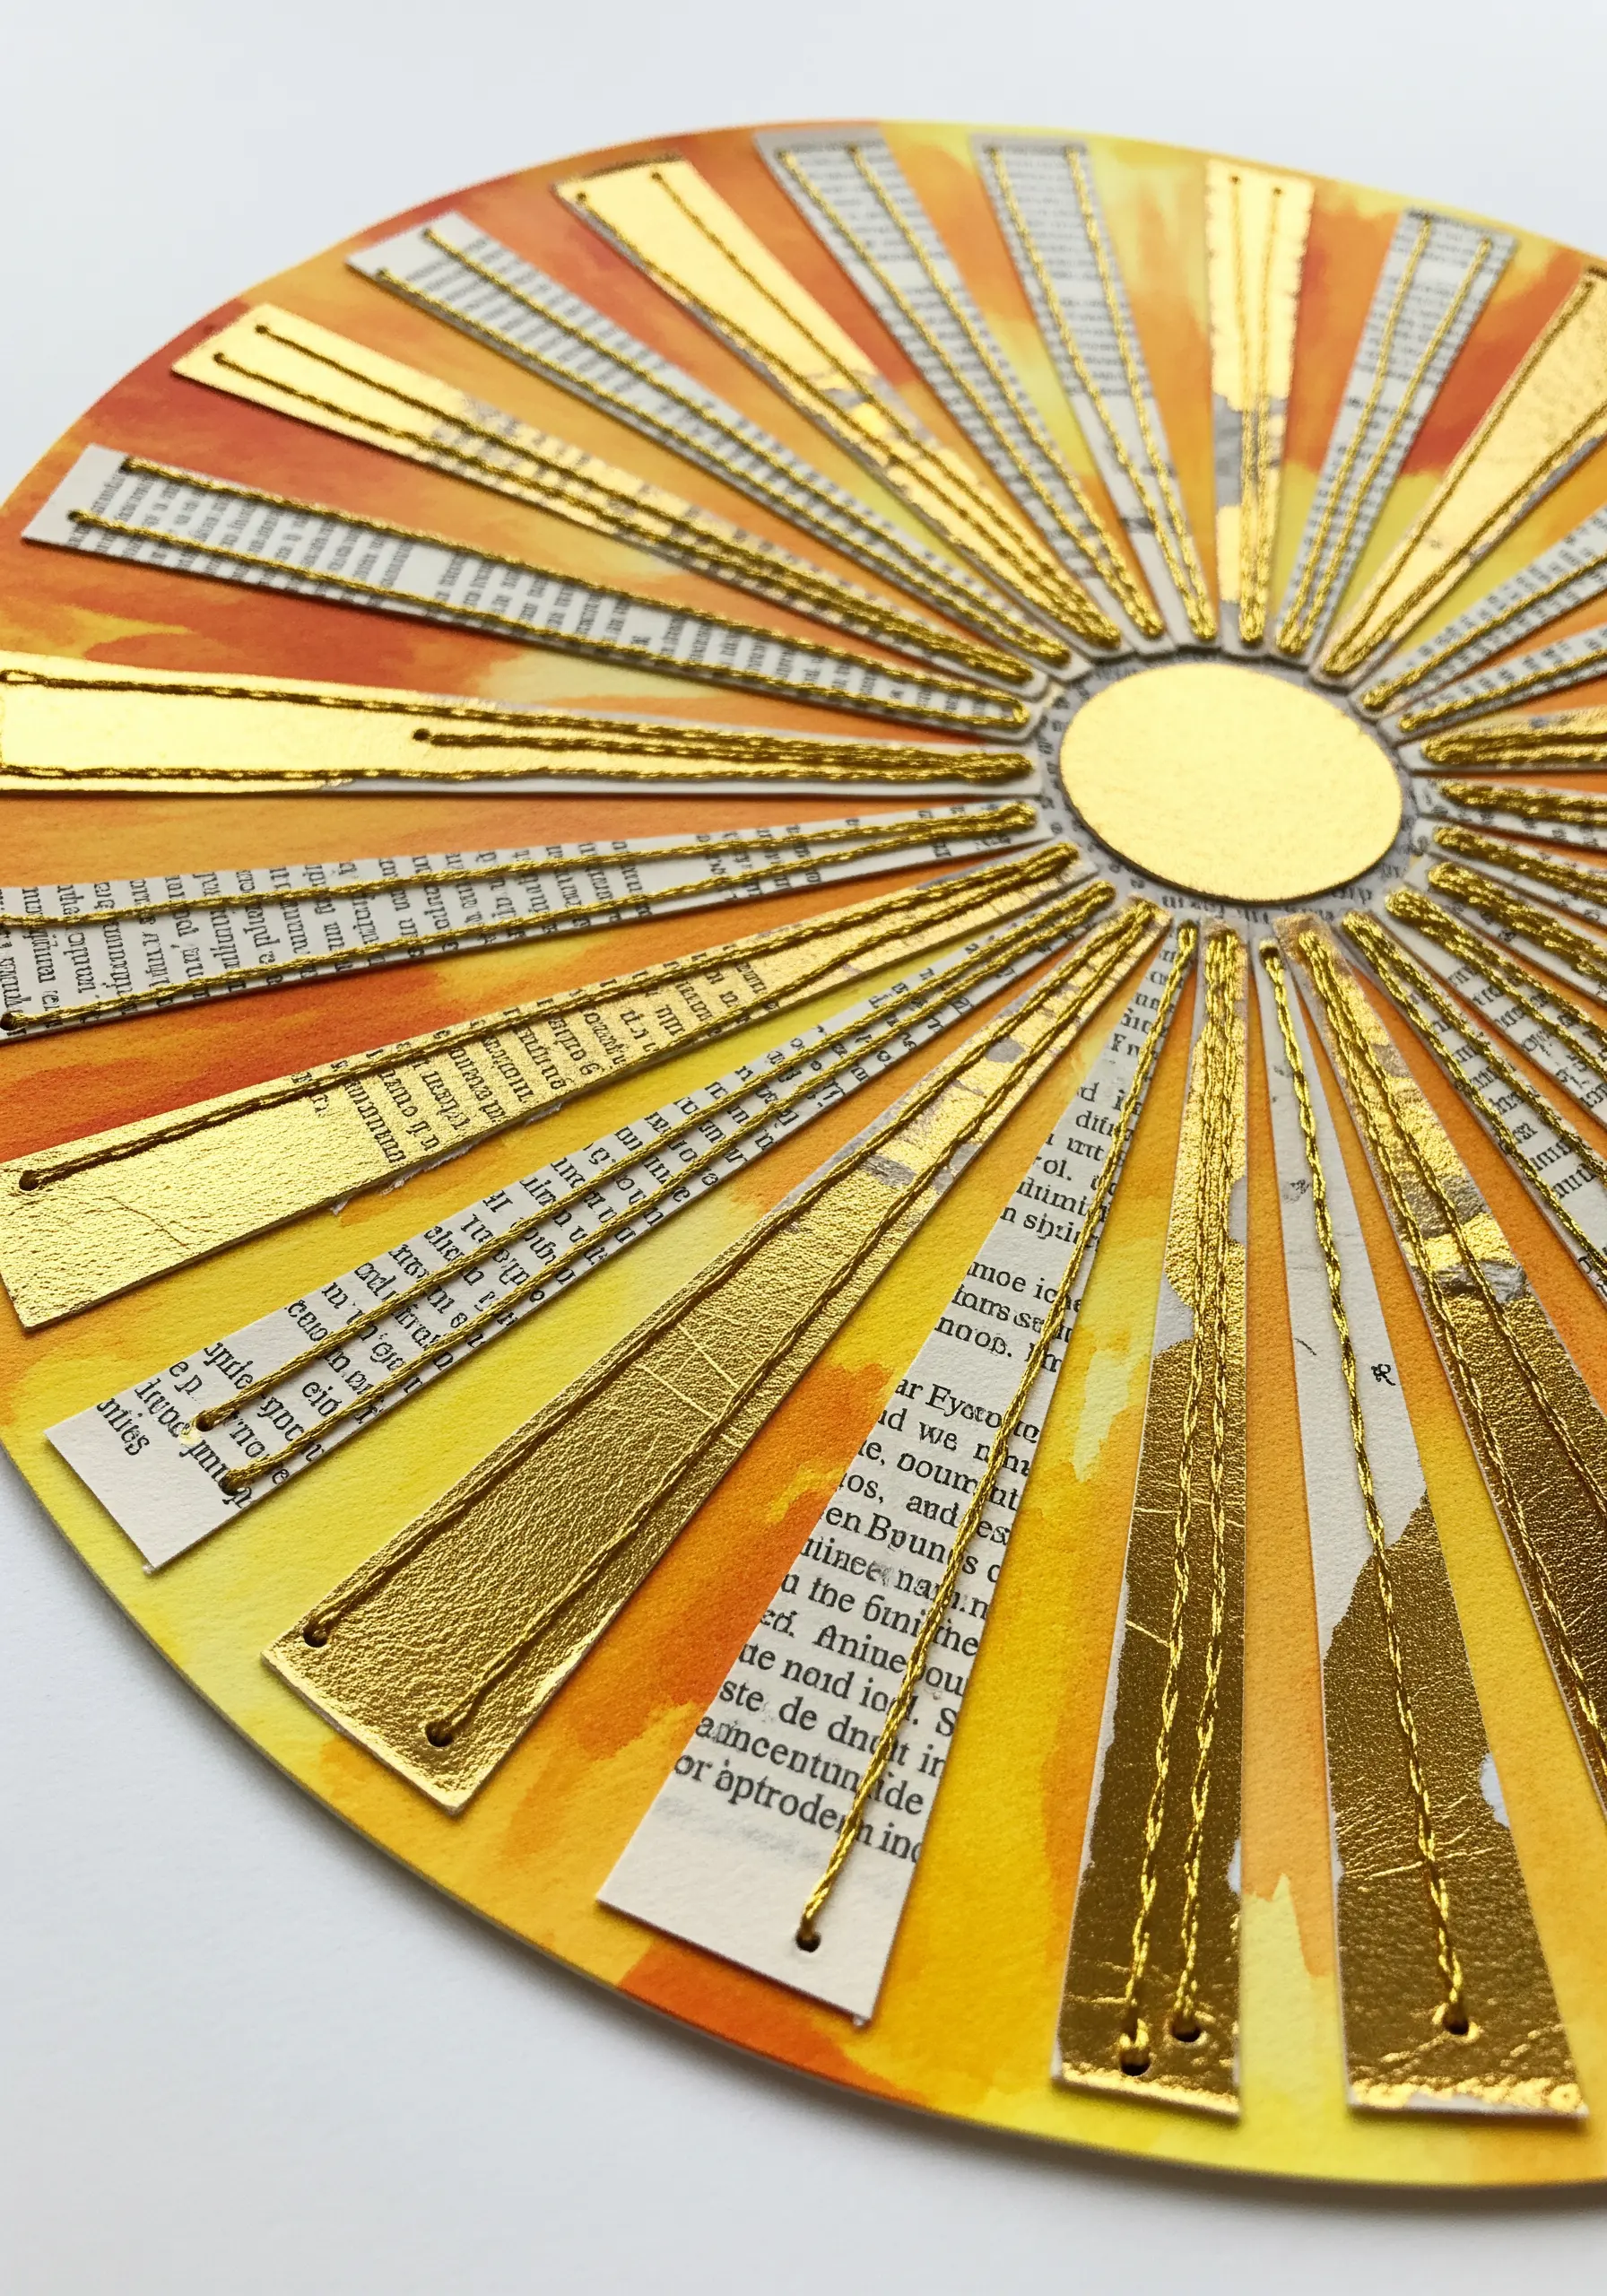
Combine watercolor washes with stitched paper to create a radiant, sun-inspired medallion.
First, paint a circular background with a warm color gradient. Then, layer paper strips—some metallic, some from old book pages—to form the sun’s rays.
Instead of filling the entire ray, use a long satin stitch down the center of each metallic strip with a matching gold thread.
This technique adds a subtle, linear texture that enhances the metallic sheen without overpowering the delicacy of the paper.
9. Explore Monochrome Texture on Embossed Paper
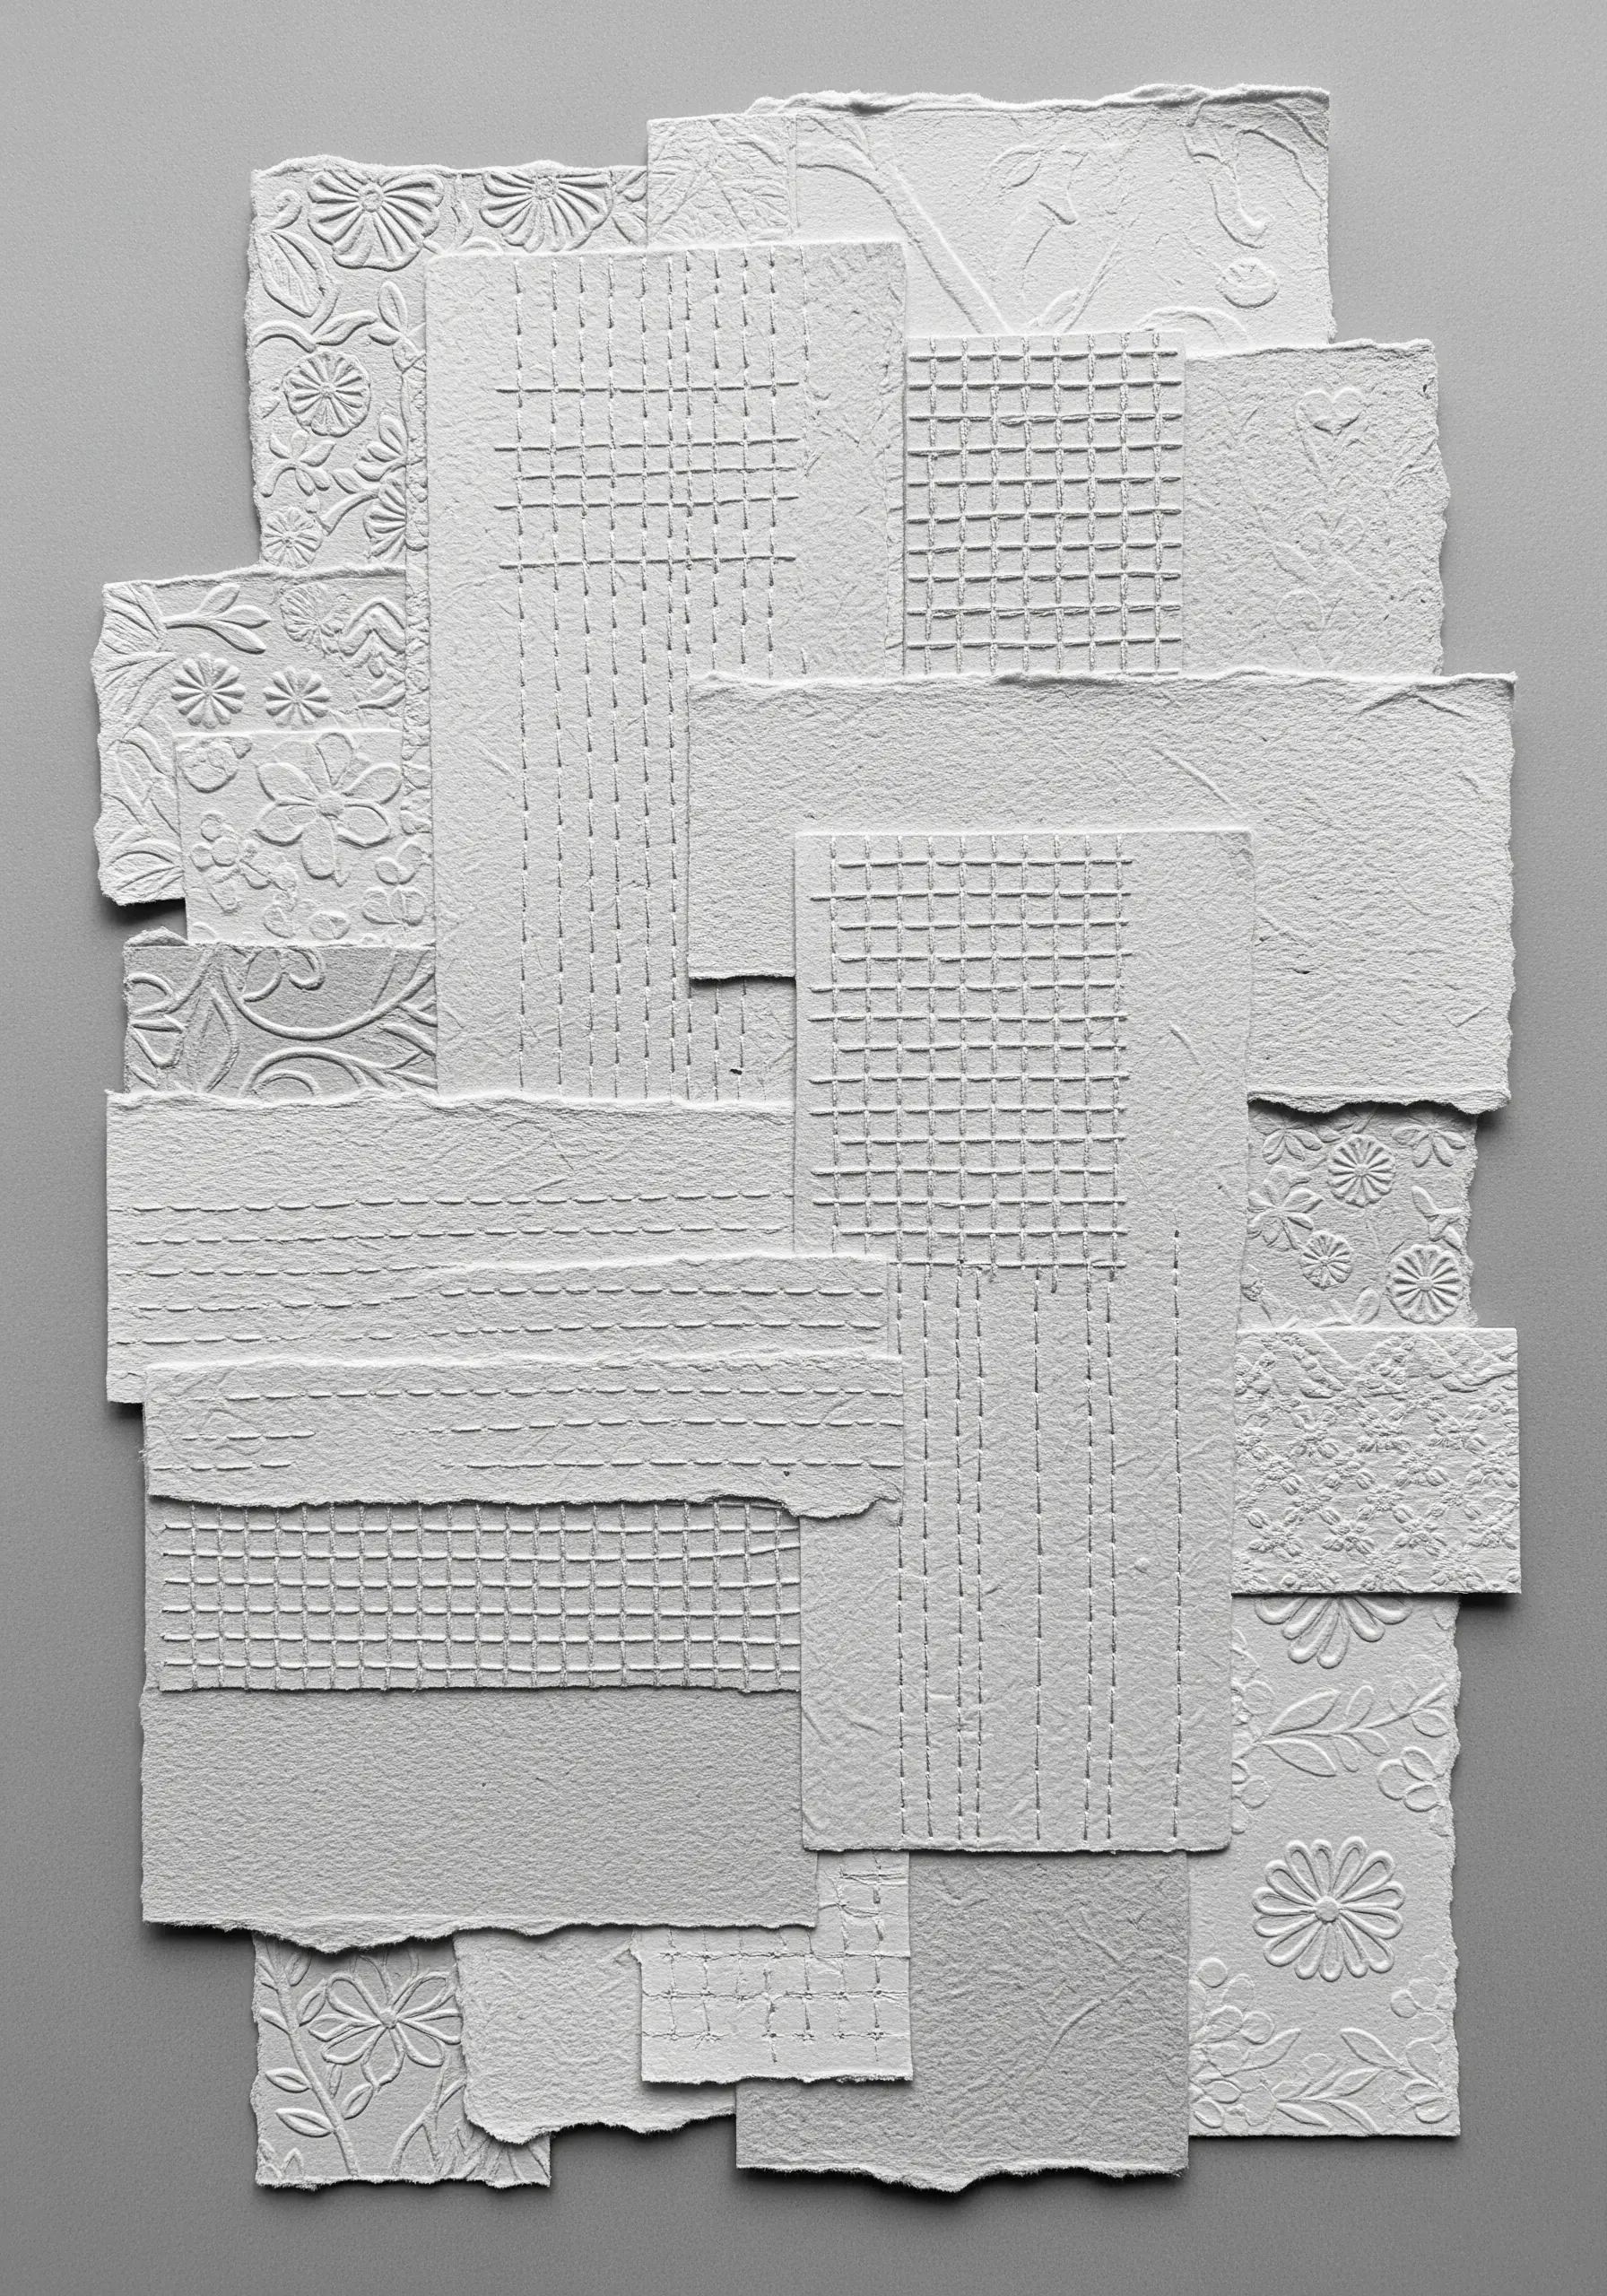
Create a sophisticated, low-contrast collage using only white and off-white papers with varied textures.
Incorporate embossed or handmade papers with deckled edges to provide inherent visual interest before you even add a stitch.
Use a simple running stitch in vertical and horizontal grids to add a quiet, geometric layer to the organic paper forms.
The beauty of this method is in its subtlety; the shadows cast by the stitches and embossed patterns create a complex surface that invites closer inspection, turning into abstract texture play designs.
10. Assemble Folk Art Motifs with Fabric Appliqué
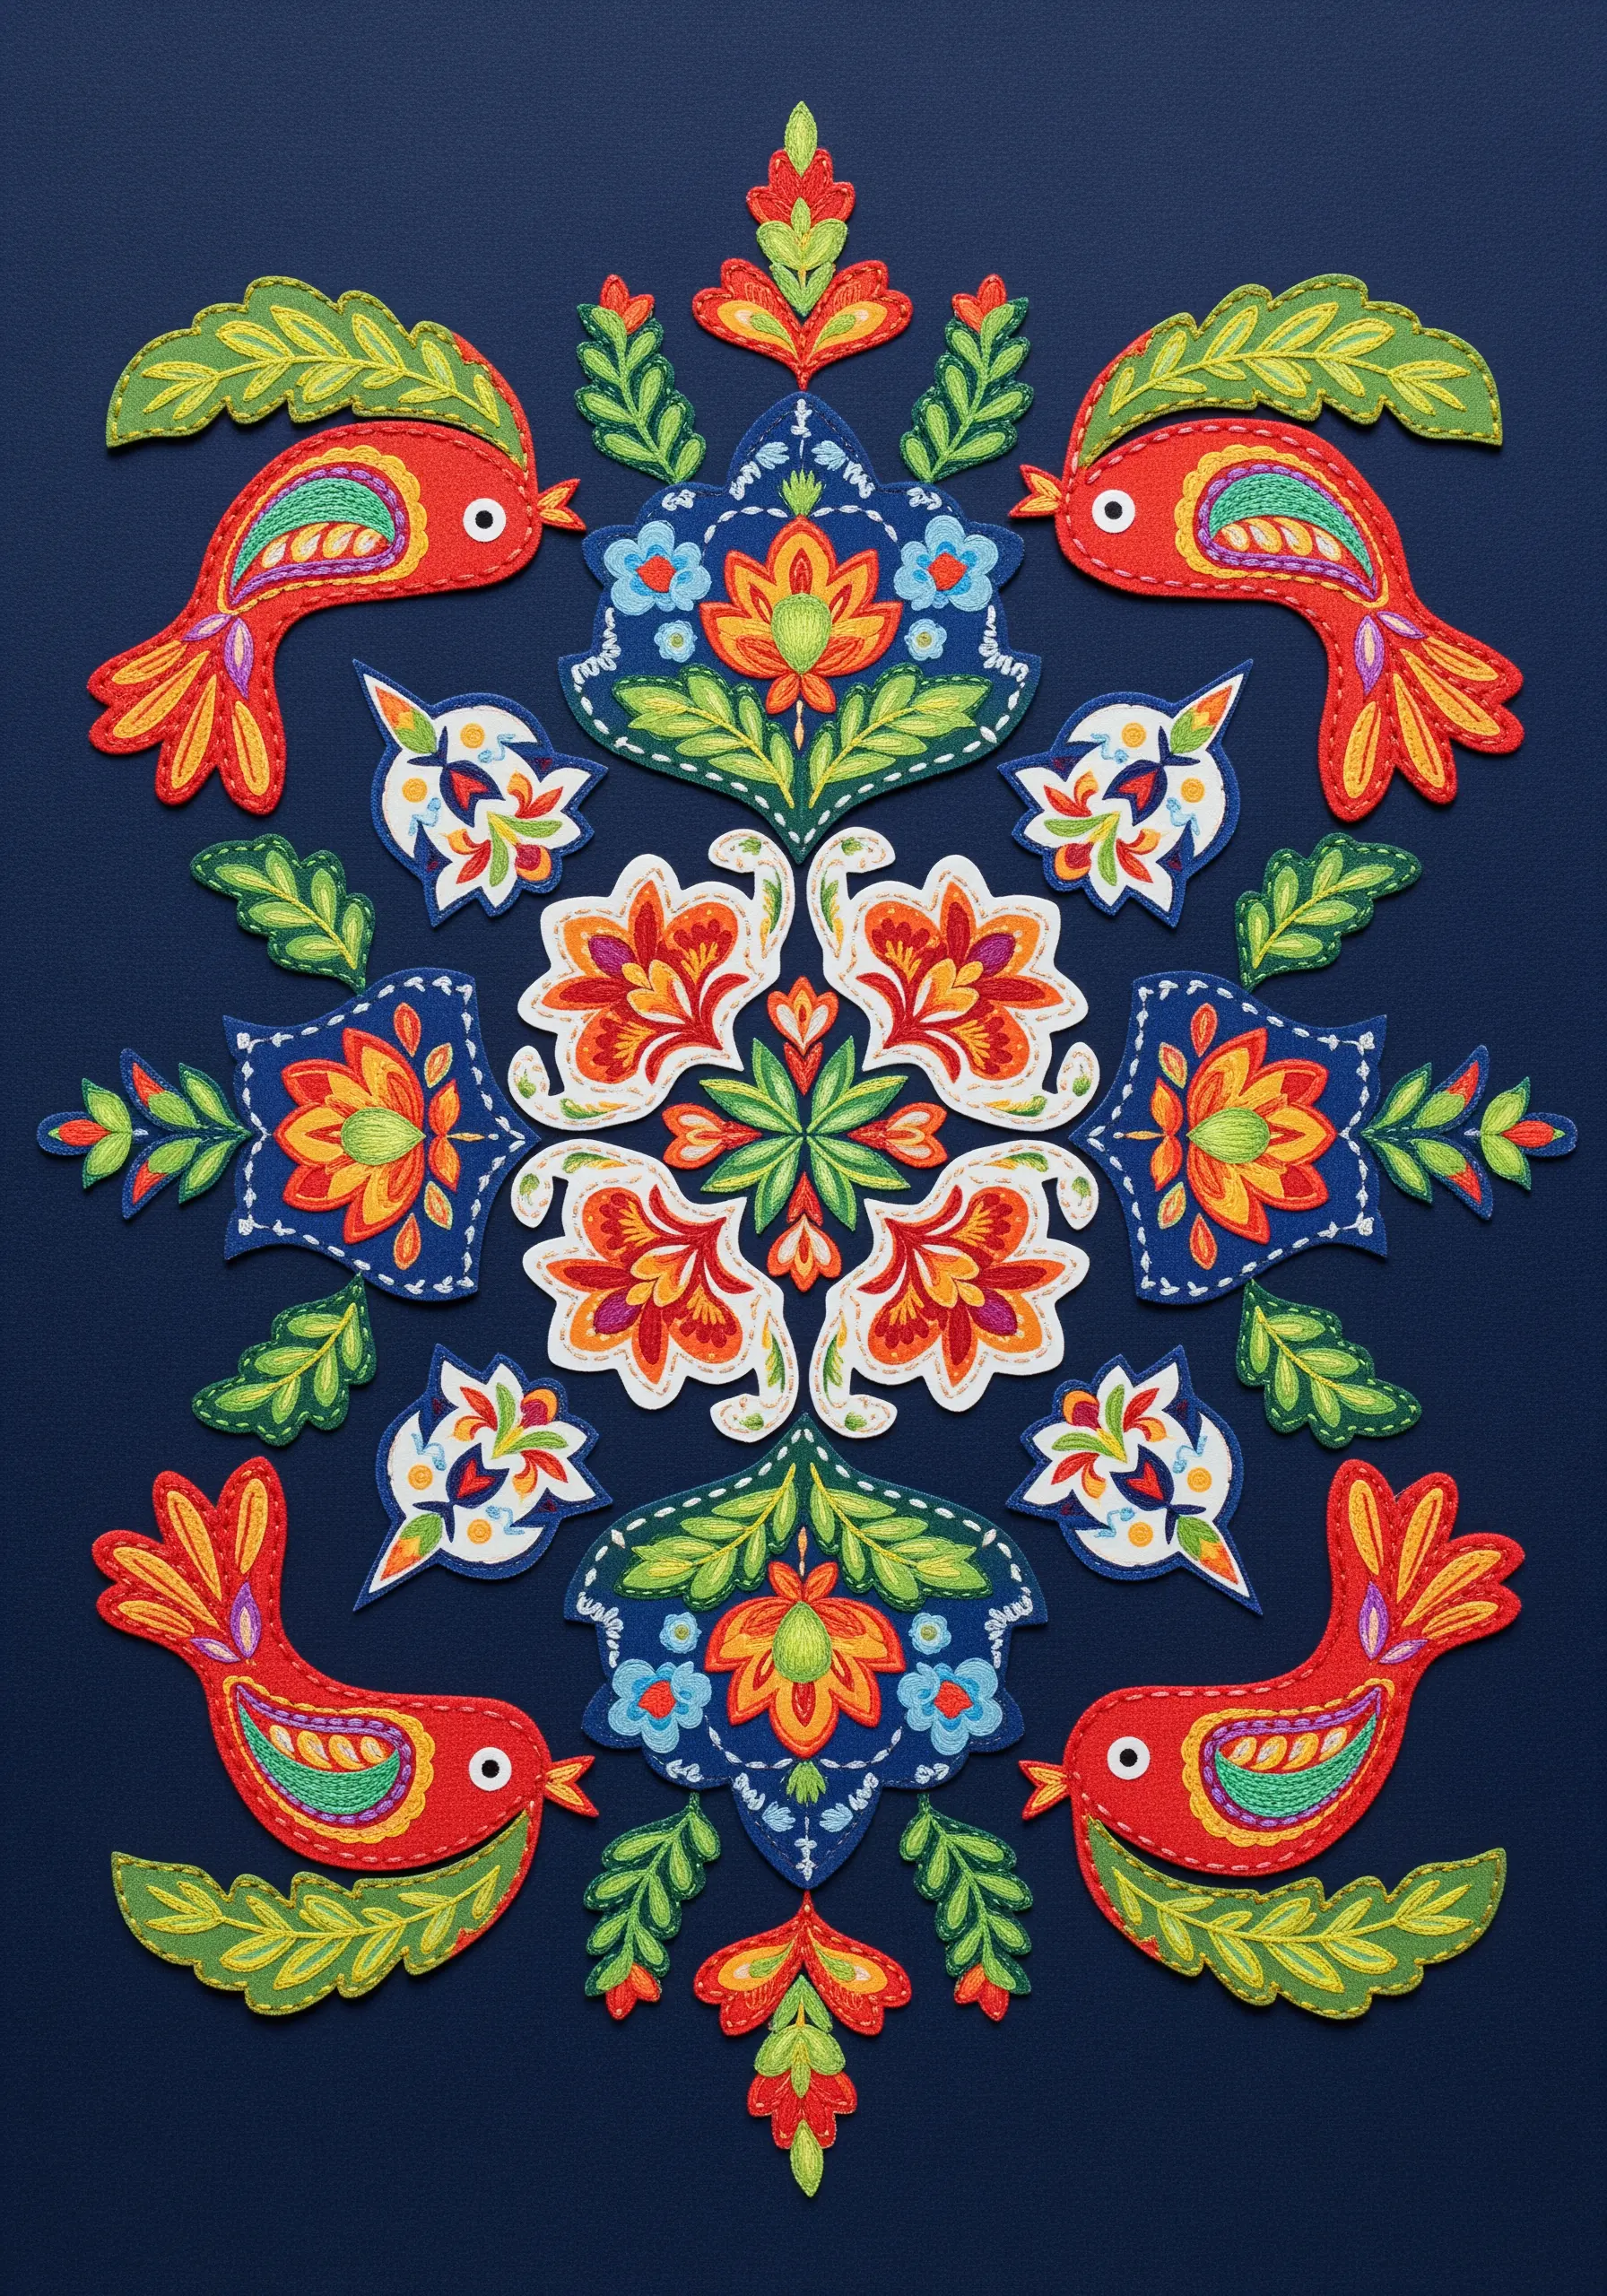
Construct intricate folk art designs by layering embroidered fabric shapes onto a solid background.
Embroider your motifs—like birds and flowers—on separate pieces of felt or sturdy cotton first. This allows you to perfect each element before committing to the final composition.
Cut out each embroidered piece with a narrow border, then use a whipstitch or a fine blanket stitch around the edge to attach it securely to your base fabric.
This appliqué technique results in a clean, raised effect that makes your colorful motifs stand out with exceptional clarity and depth.
11. Deconstruct a Quilt Block with Abstract Stitching

Use thread to create a deliberate sense of chaos over an orderly, pieced-fabric background like a quilt block.
After assembling your patchwork, instead of quilting it, leave long, loose threads trailing from various points across the design.
Use a few anchoring stitches in the center to create a focal point of tangled color, allowing the threads to radiate outwards.
This approach transforms a traditional craft form into a piece of contemporary fiber art, exploring the relationship between structure and freedom.
12. Sculpt Snowy Peaks with Yarn and Layered Paper
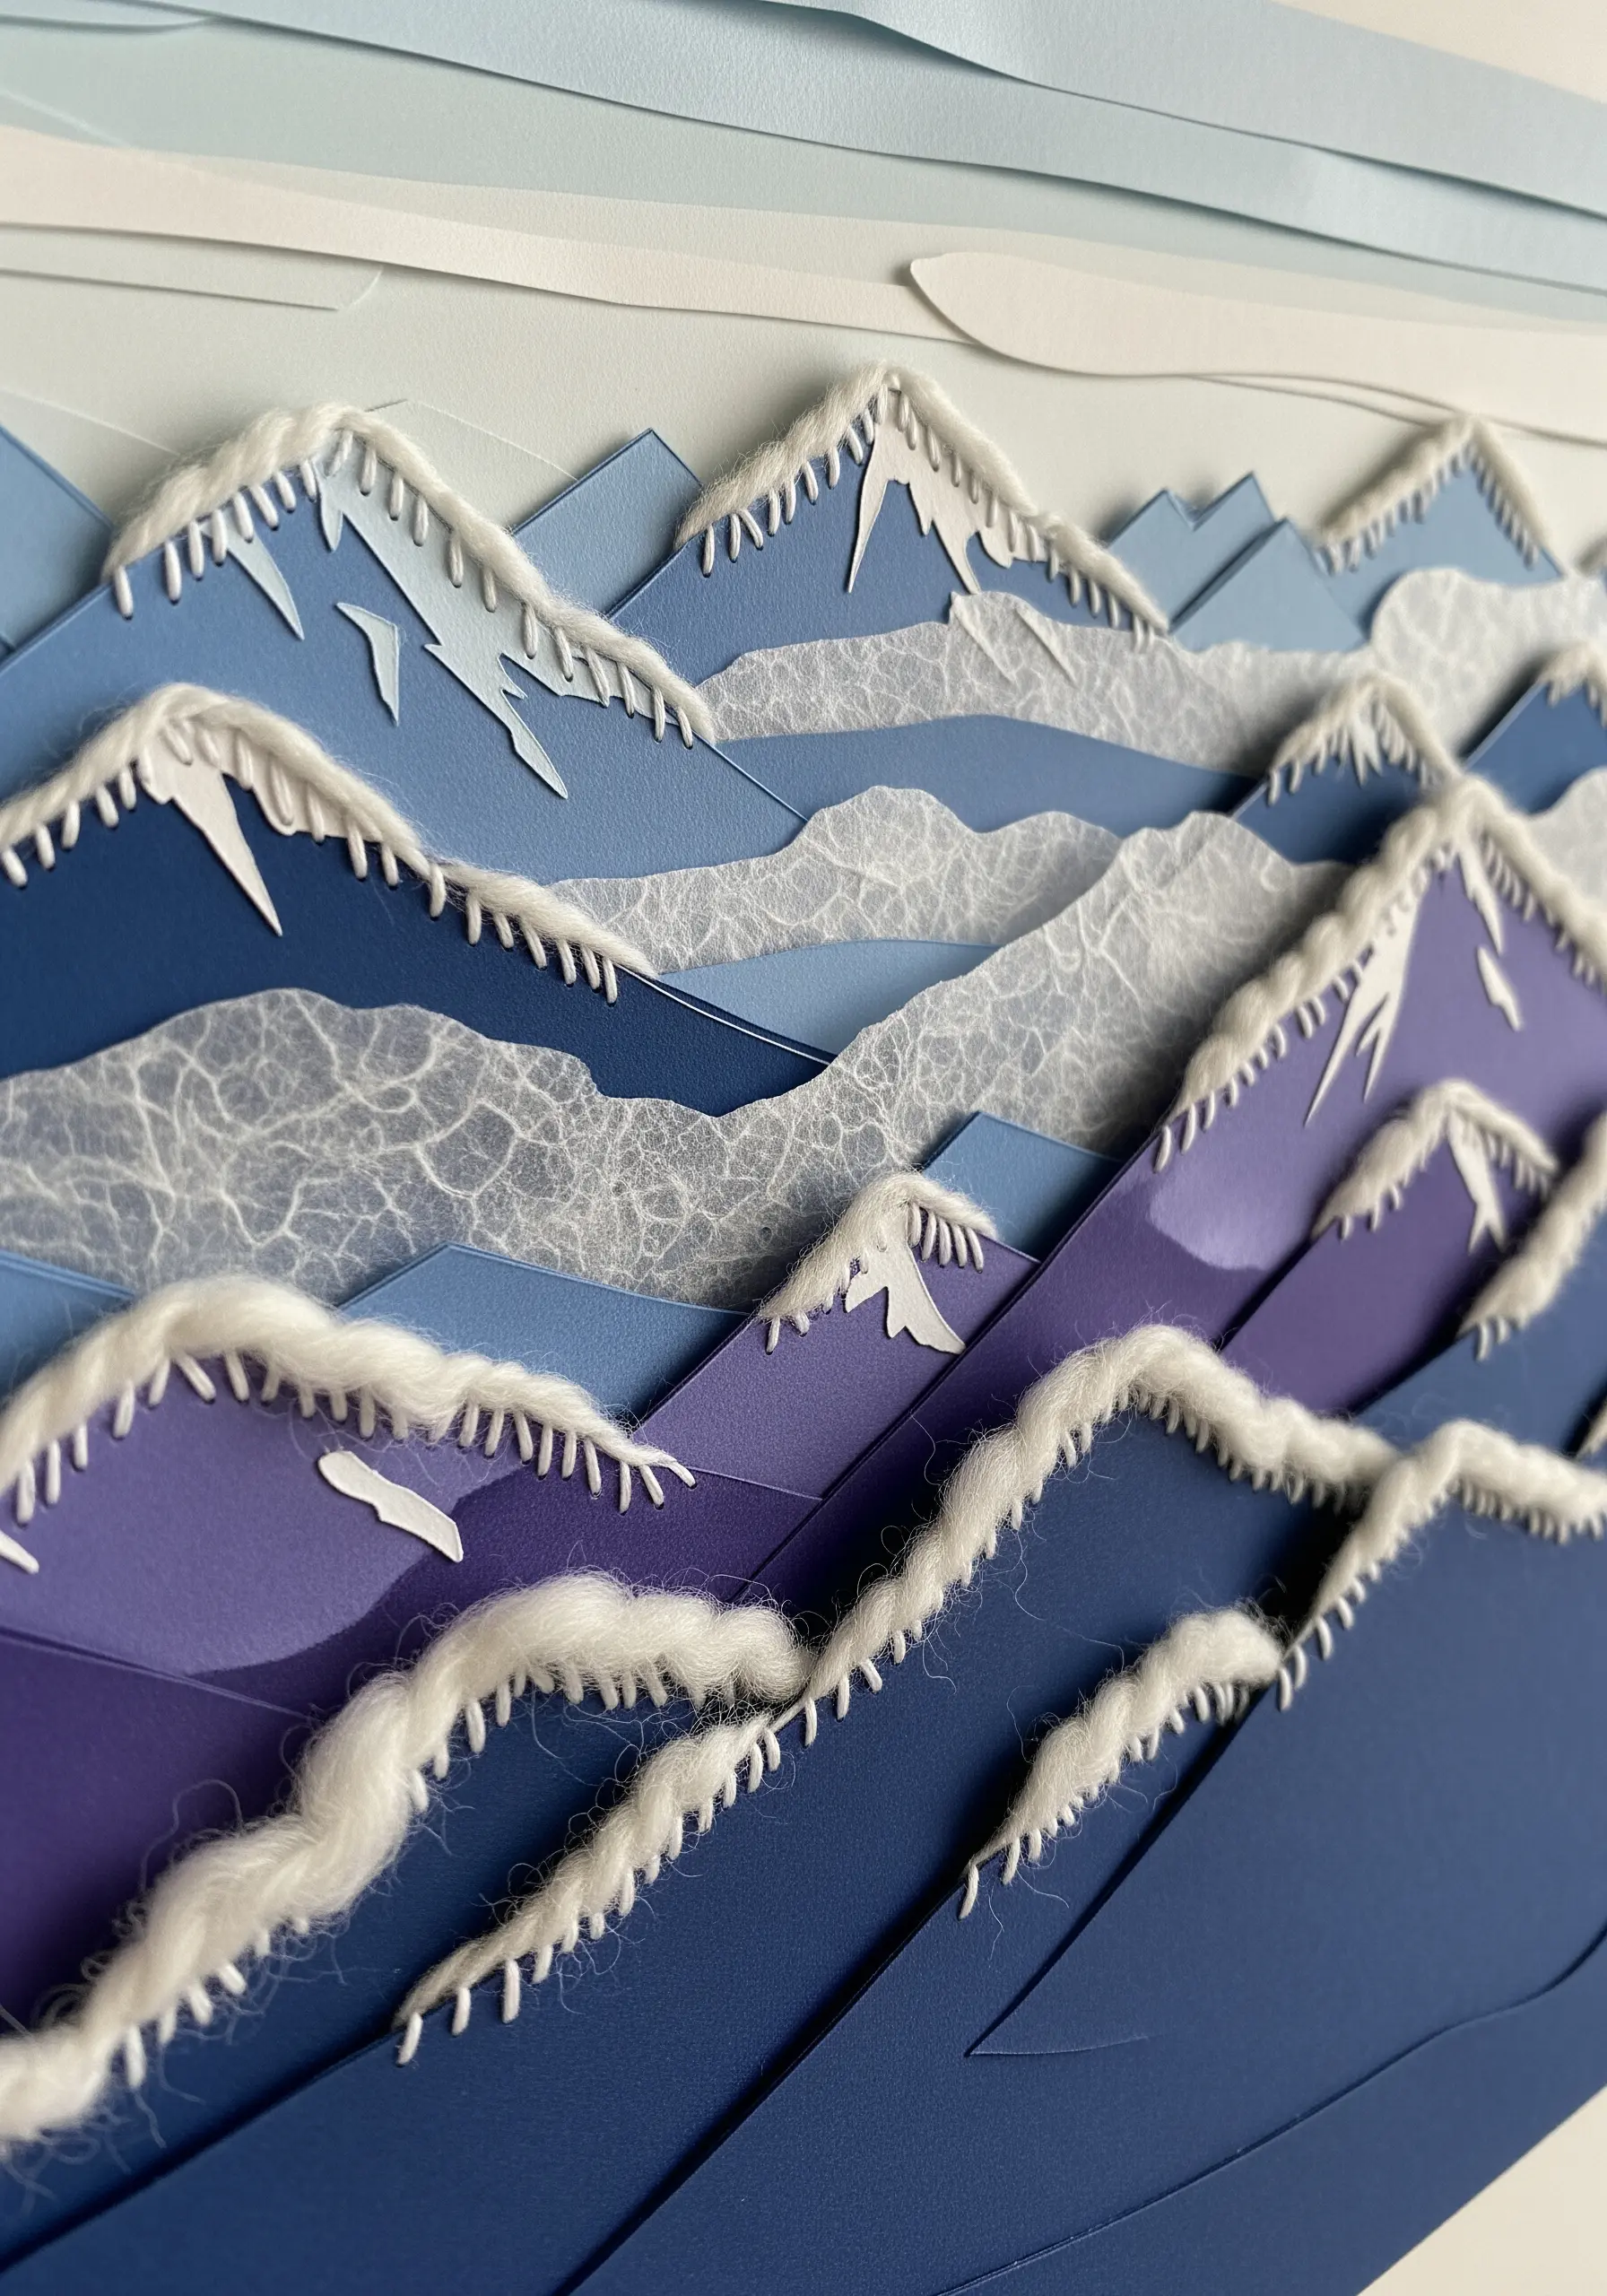
Build a mountain range with depth by layering cut paper in receding shades of blue and purple.
Introduce a sheet of fibrous or handmade paper in a middle layer to represent distant, misty textures.
Instead of stitching a fine line, use a thick, fluffy white yarn and a wide blanket stitch or Turkey work along the paper ridges to create soft, convincing snowcaps.
This heavy textural element in the foreground creates a powerful sense of atmospheric perspective against the flat paper layers behind it.
13. Create Graphic Energy with Stitched Neon Lines

Combine busy, patterned paper with stark, simple stitches for a high-energy abstract piece.
Cut various papers—holographic, neon, and patterned—into strips and arrange them in a seemingly random, overlapping pile.
Instead of intricate embroidery, use a basic running stitch in a contrasting neon thread to ‘staple’ the paper strips together visually.
The simplicity of the stitch acts as a unifying element, bringing a sense of intentional order to the chaotic layers beneath.
14. Superimpose Thread Drawings on Text
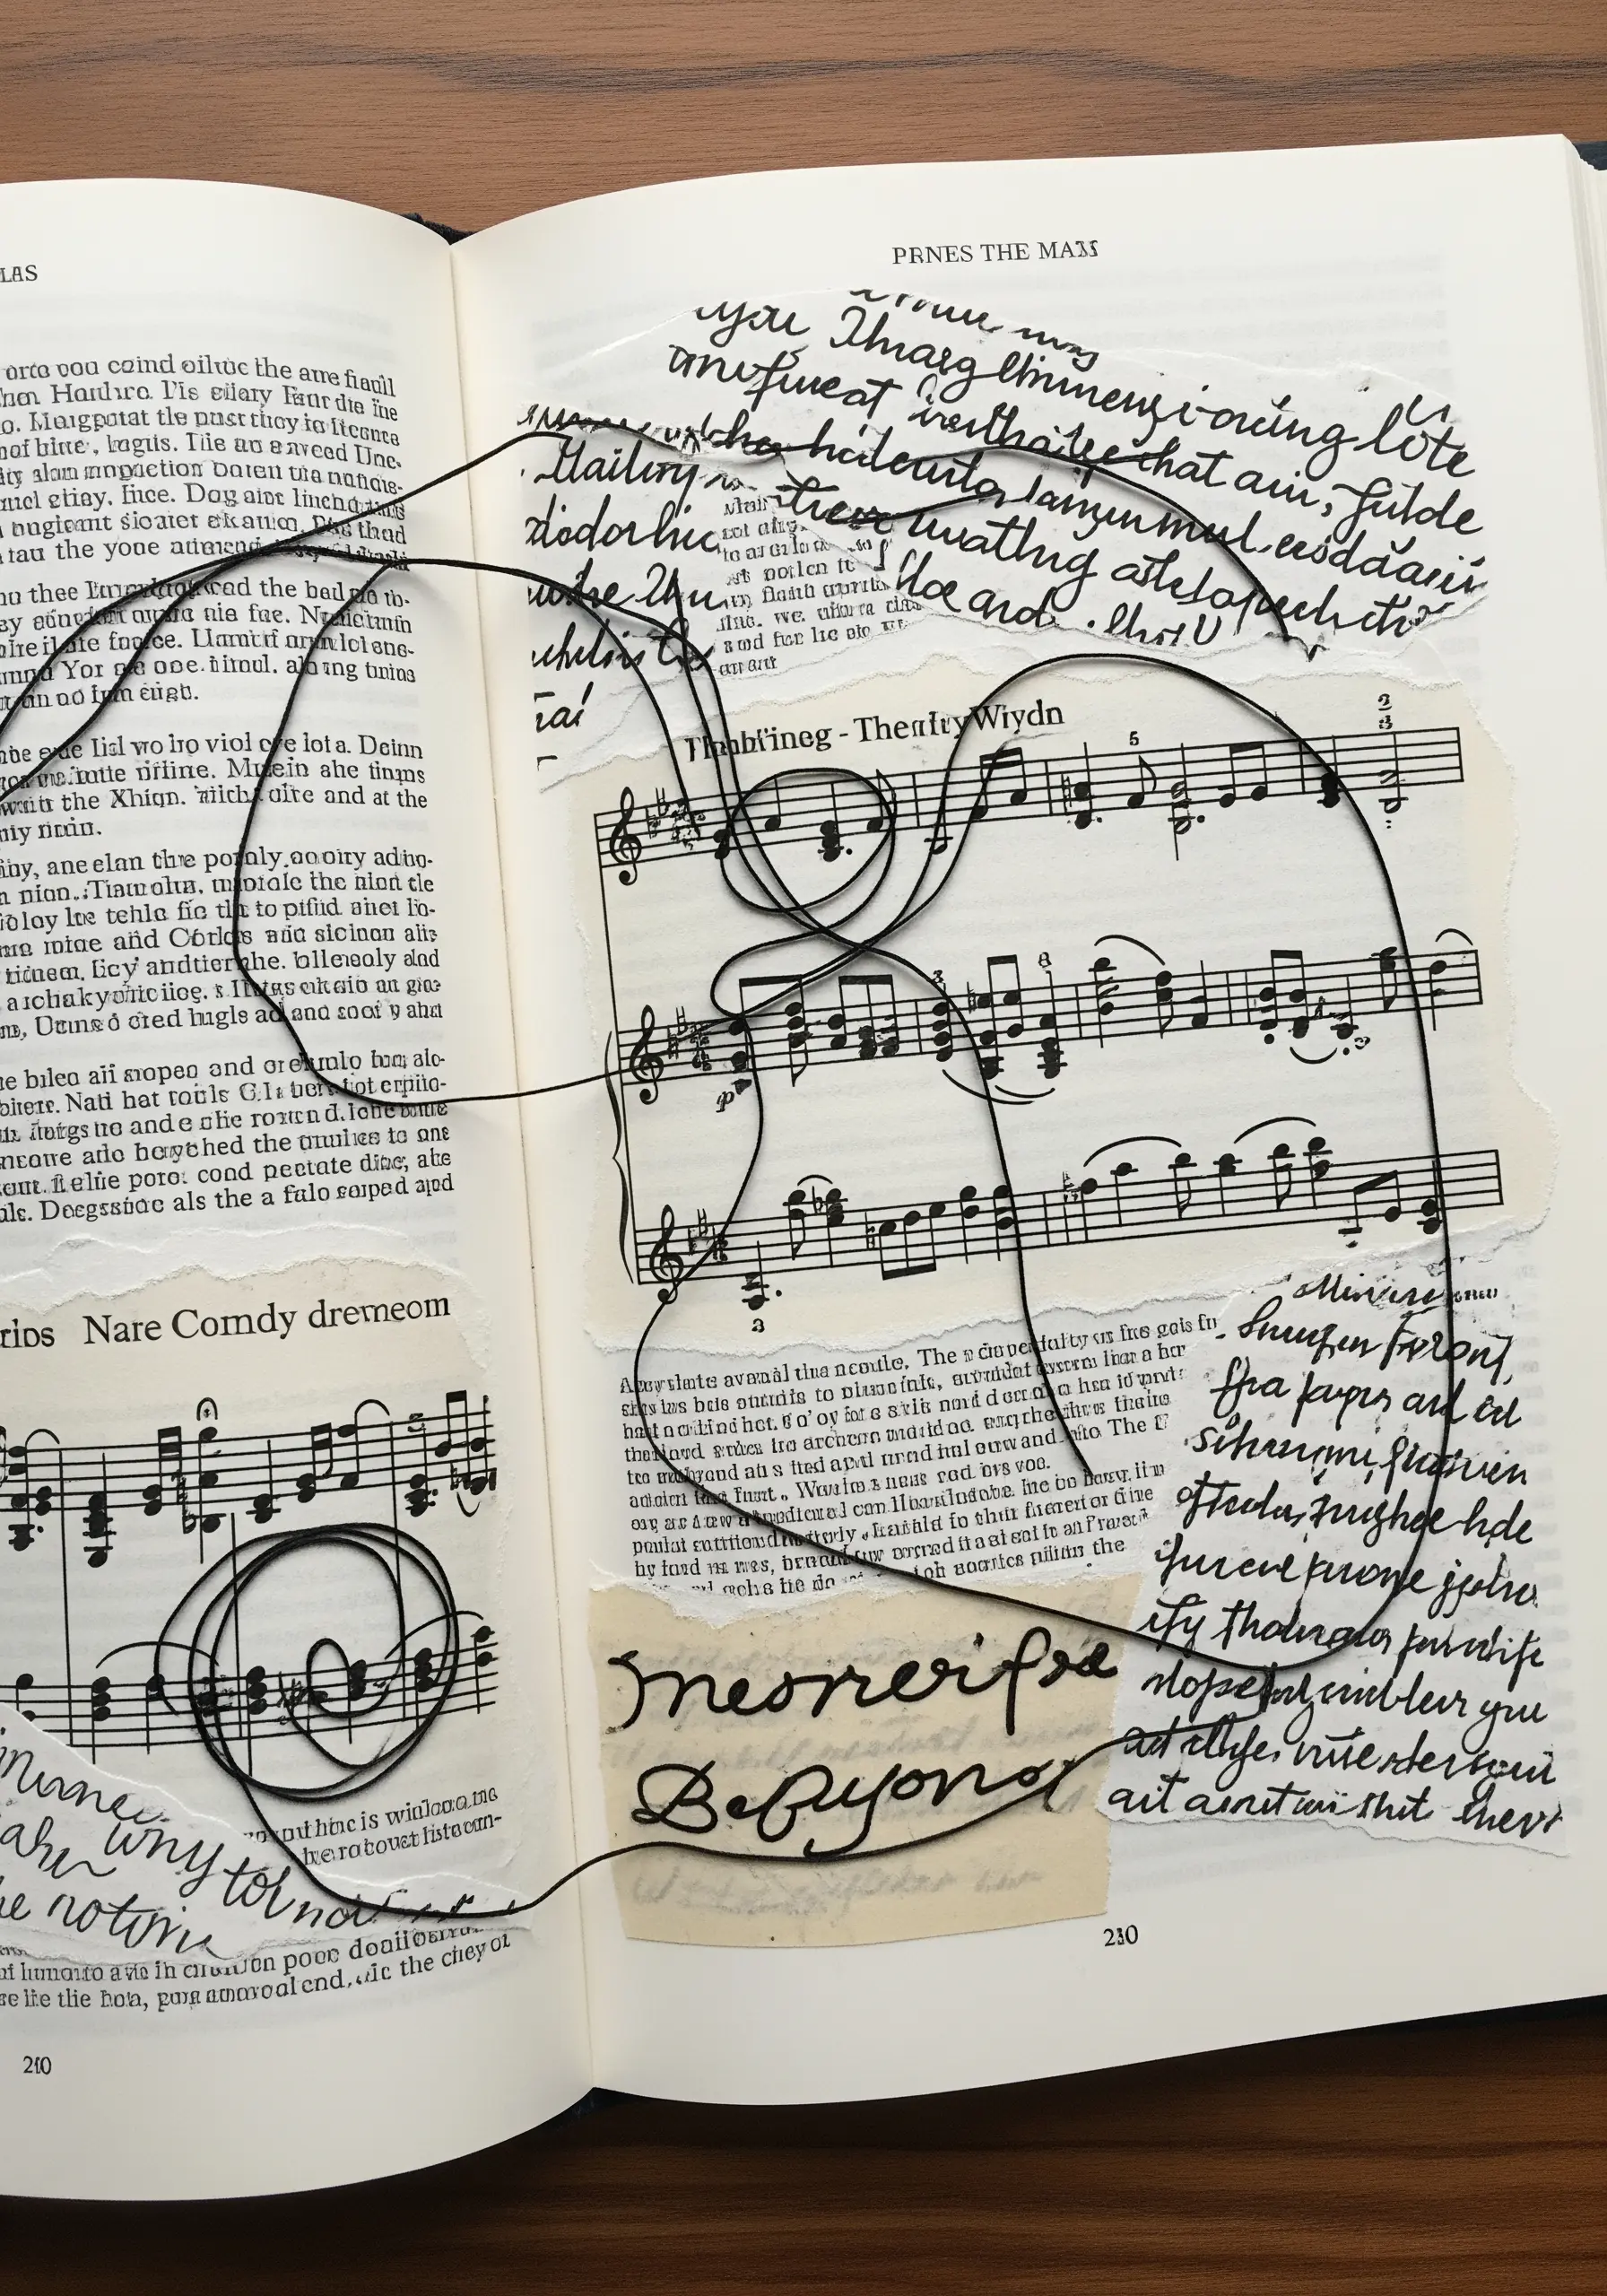
Use thread to create a ‘ghostly’ layer of imagery over existing text or sheet music.
Place a sheet of clear acetate or vellum over your chosen page. Pierce holes along your desired design first, then stitch through them using a single strand of black thread.
This technique allows you to create a free-flowing, hand-drawn line that interacts with the content beneath it without obscuring it.
The transparency creates a beautiful dialogue between the precision of the printed word and the organic, emotional quality of your stitch work.
15. Emulate Kintsugi with Gold Thread and Paper

Channel the Japanese art of Kintsugi by using gold thread and foil to ‘mend’ torn paper layers.
Create a base from layered, marbled, and textured papers that resemble natural stone or agate.
Instead of glue, use couched gold thread to join the ‘broken’ pieces, letting the stitch work become the beautiful repair.
Apply small flakes of gold leaf along the stitched lines to add a brilliant, metallic texture that elevates the piece from a simple collage to a statement on repair and beauty.
16. Weave a Heart with Variegated Thread

Create a string-art effect on paper by weaving thread between stitched anchor points.
First, stitch a border around your heart shape using a simple backstitch, which will provide a sturdy foundation for your weaving.
Use variegated floss to wrap and weave the thread across the shape, passing it under and over the border stitches.
The color shifts in the thread will create automatic depth and dimension, making the heart look complex and richly textured without any complicated stitch changes.
17. Design a Rain Shower with Thread and Sequins
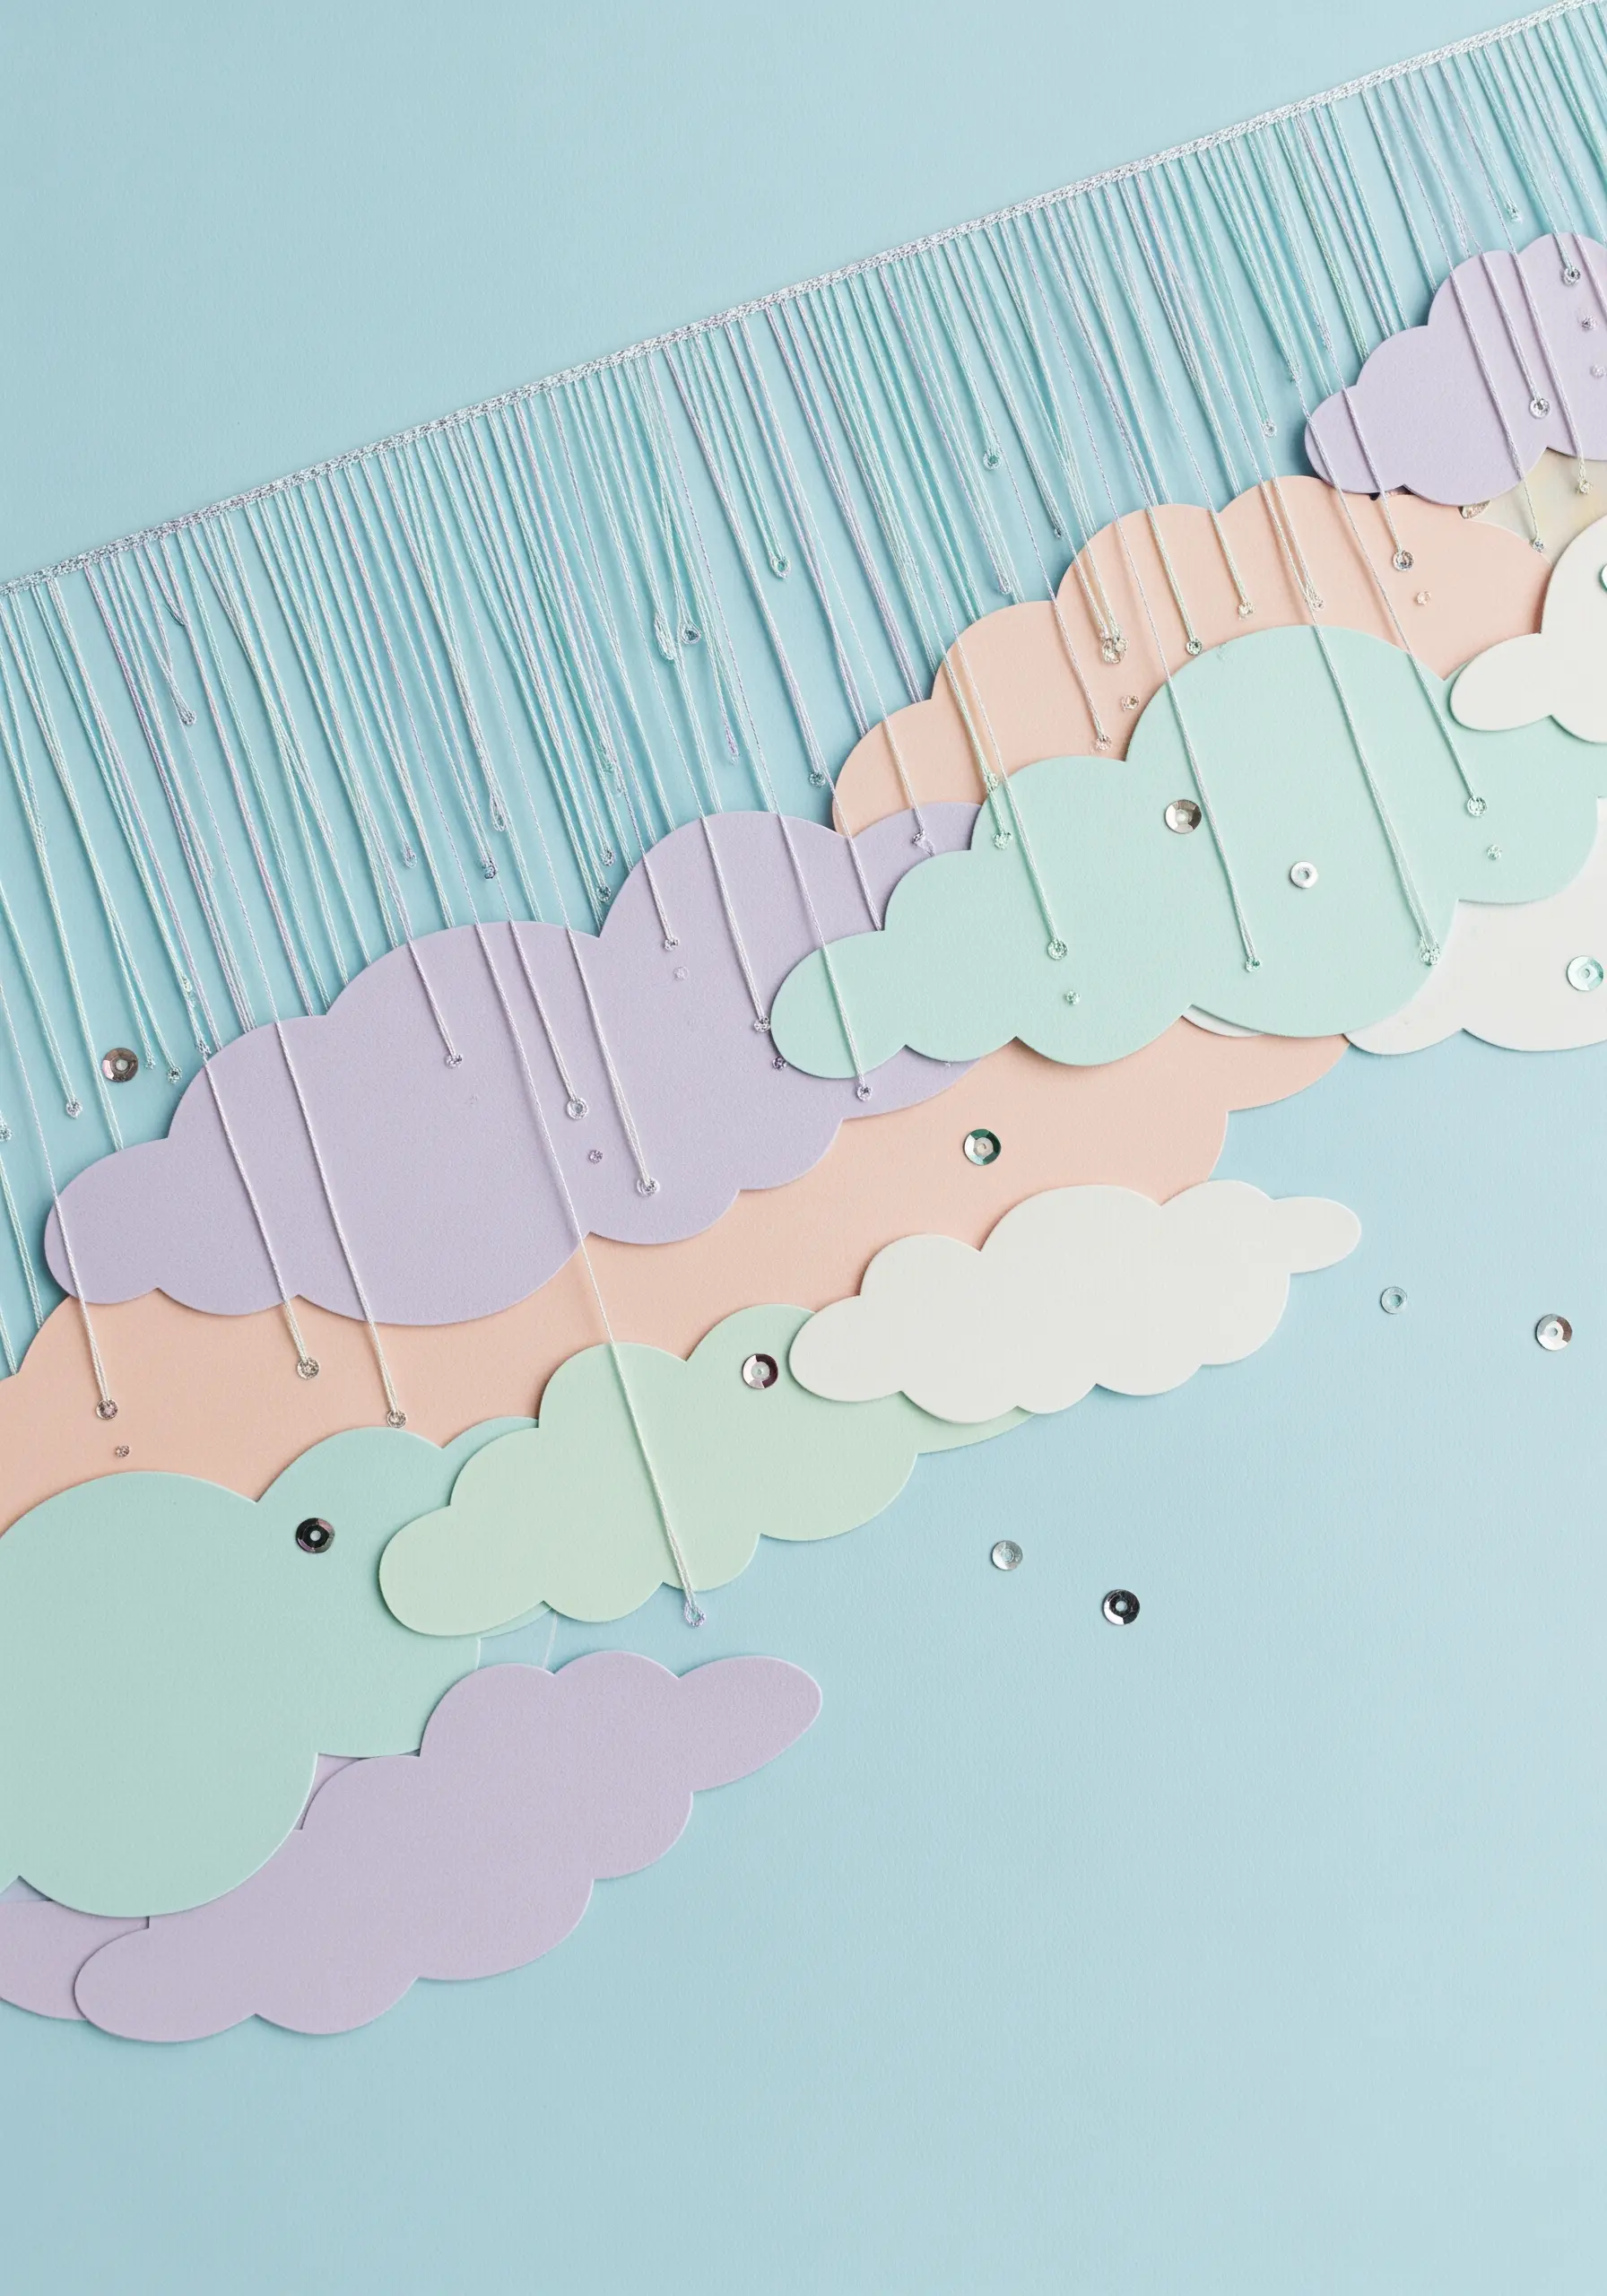
Illustrate a gentle rain shower by suspending threads and beads from a layered paper cloudscape.
Cut cloud shapes from pastel cardstock and arrange them in overlapping layers to create a sense of depth.
Instead of stitching onto the paper, pierce a hole at the bottom of each cloud and pass a single, long strand of thread through it, securing with a knot at the back.
Let the threads hang vertically, and stitch a few tiny sequins or clear beads onto them to represent raindrops, catching the light as they move.
18. Capture the Movement of Wind with Twine
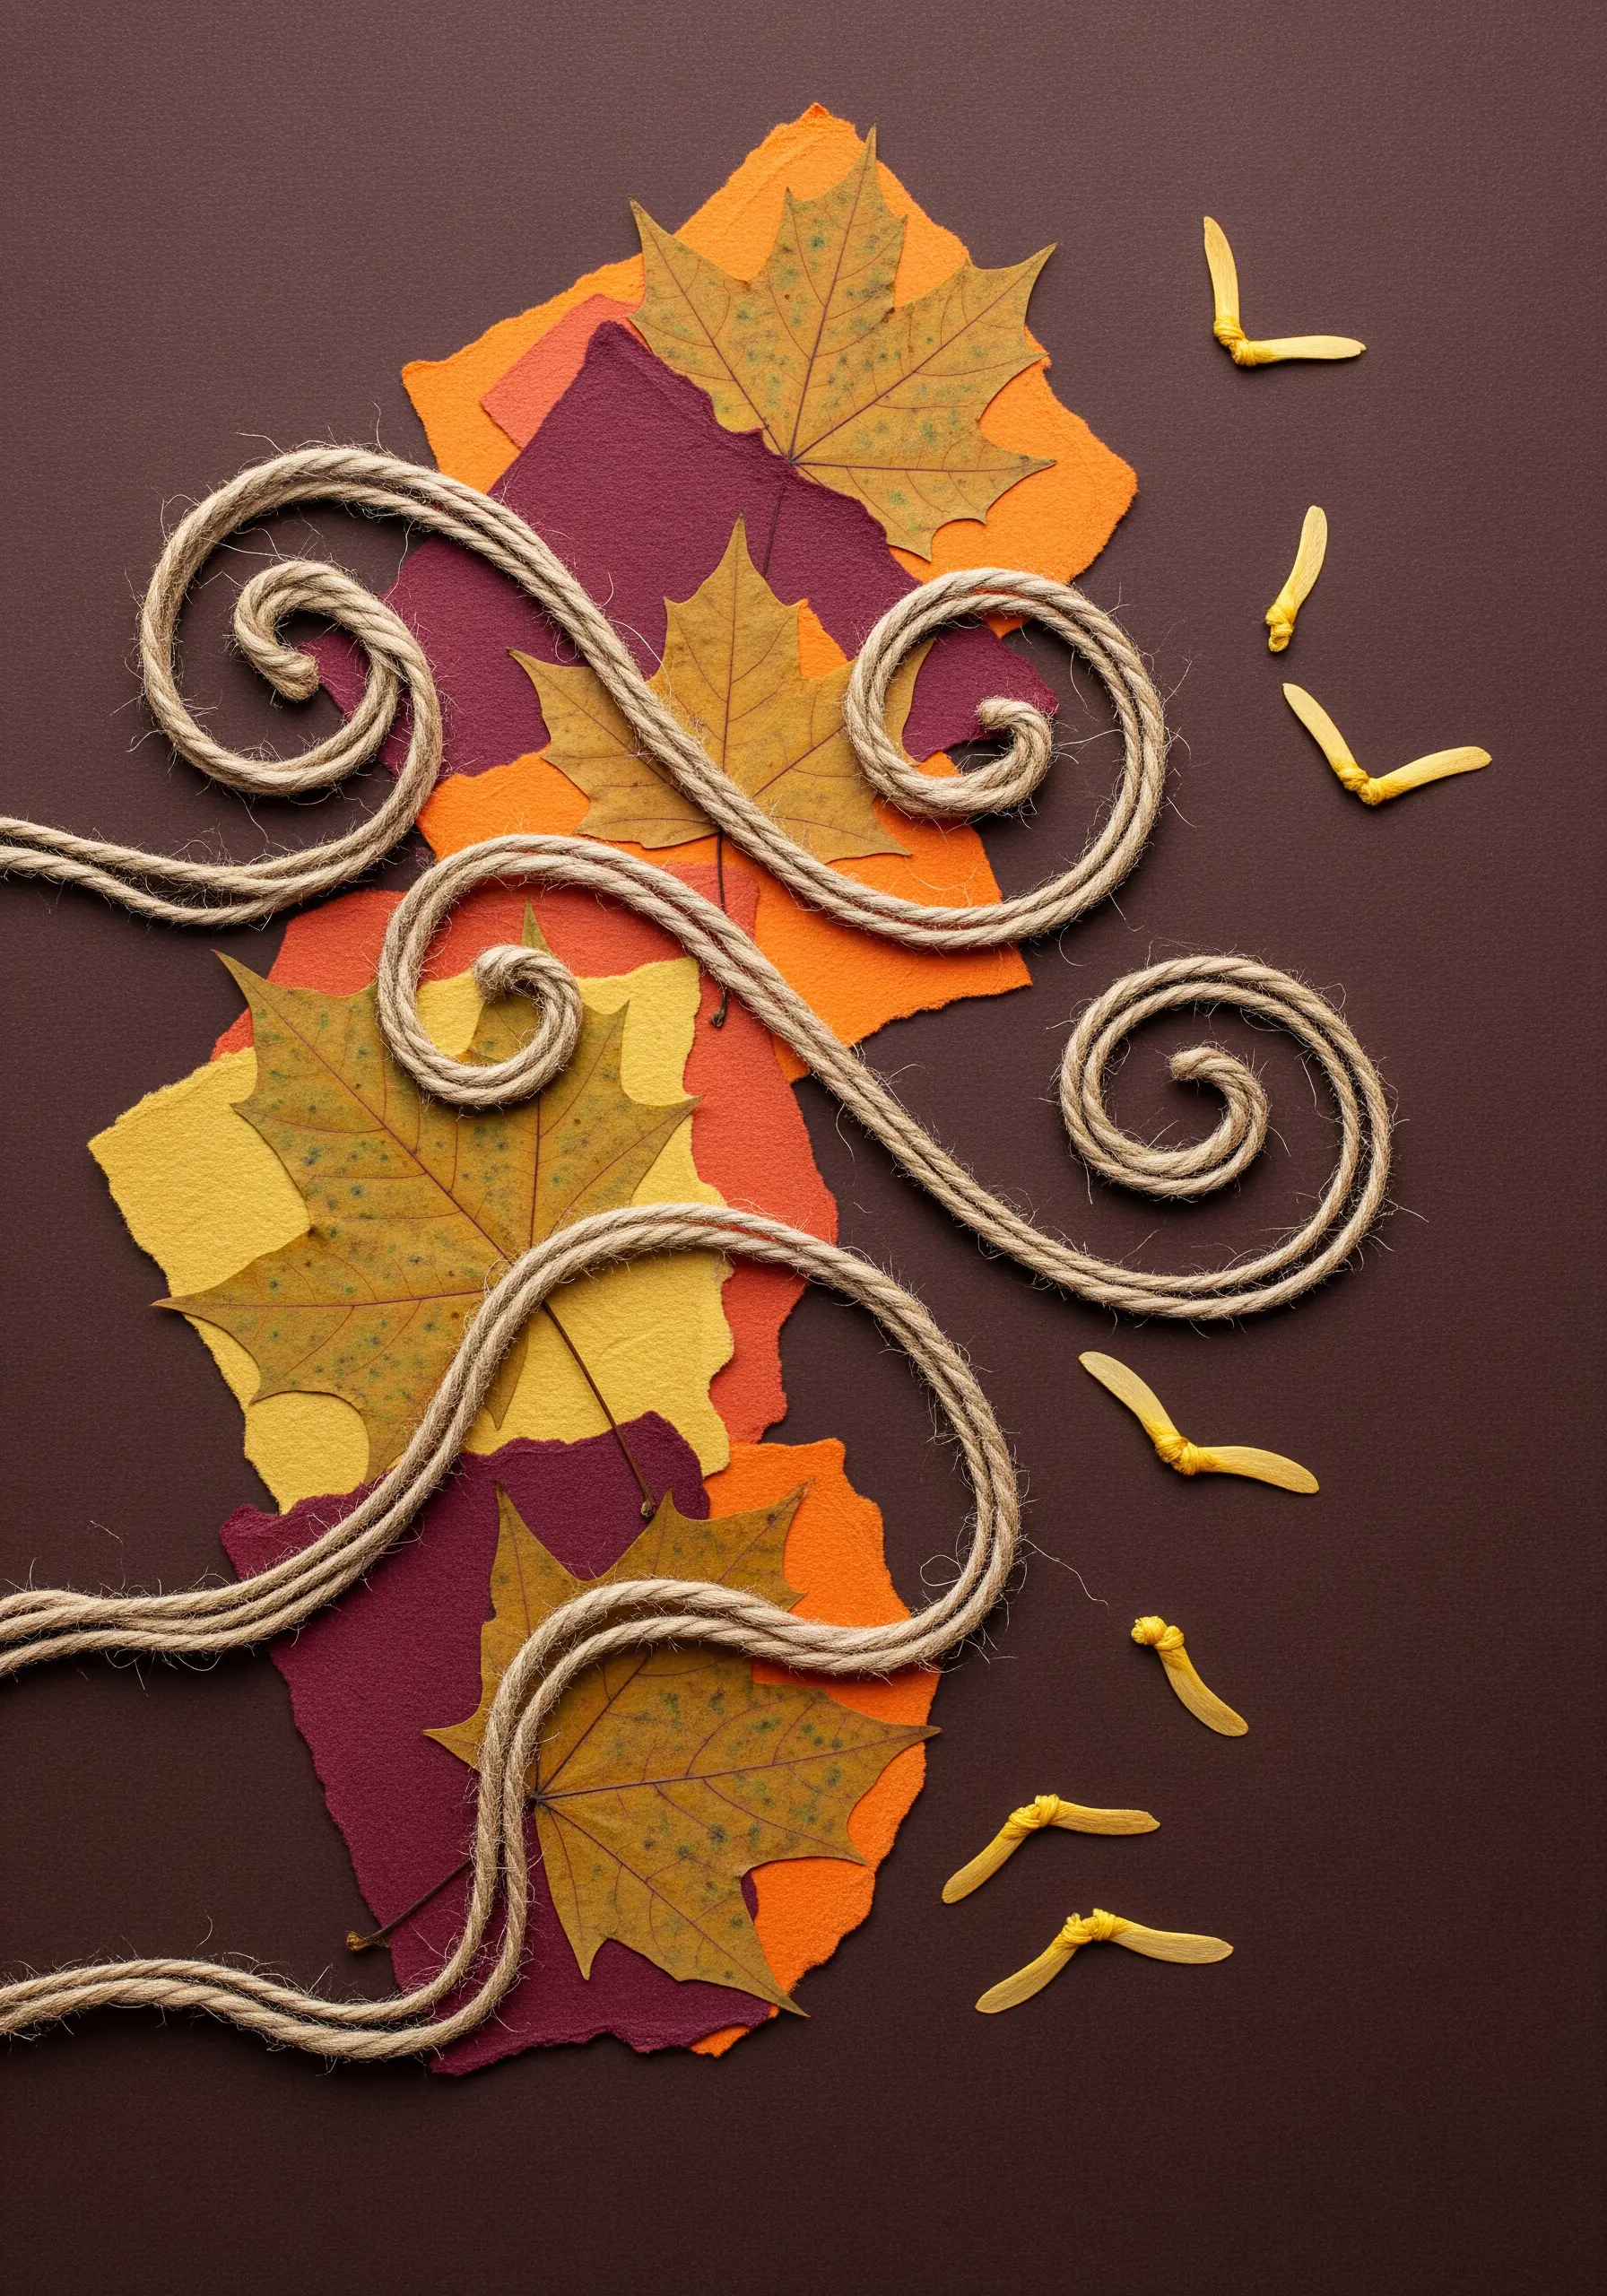
Use a thick, rustic material like jute twine to represent the invisible force of wind in an autumn scene.
Create a simple background collage with torn paper in autumnal colors and real pressed leaves.
Instead of stitching, shape the twine into dynamic swirls and couch it onto the paper with a strong, neutral-colored thread.
The thickness and texture of the twine provide a powerful, sculptural element that makes the concept of ‘wind’ tangible and visually compelling.
19. Create Optical Illusions with Striped Fabric
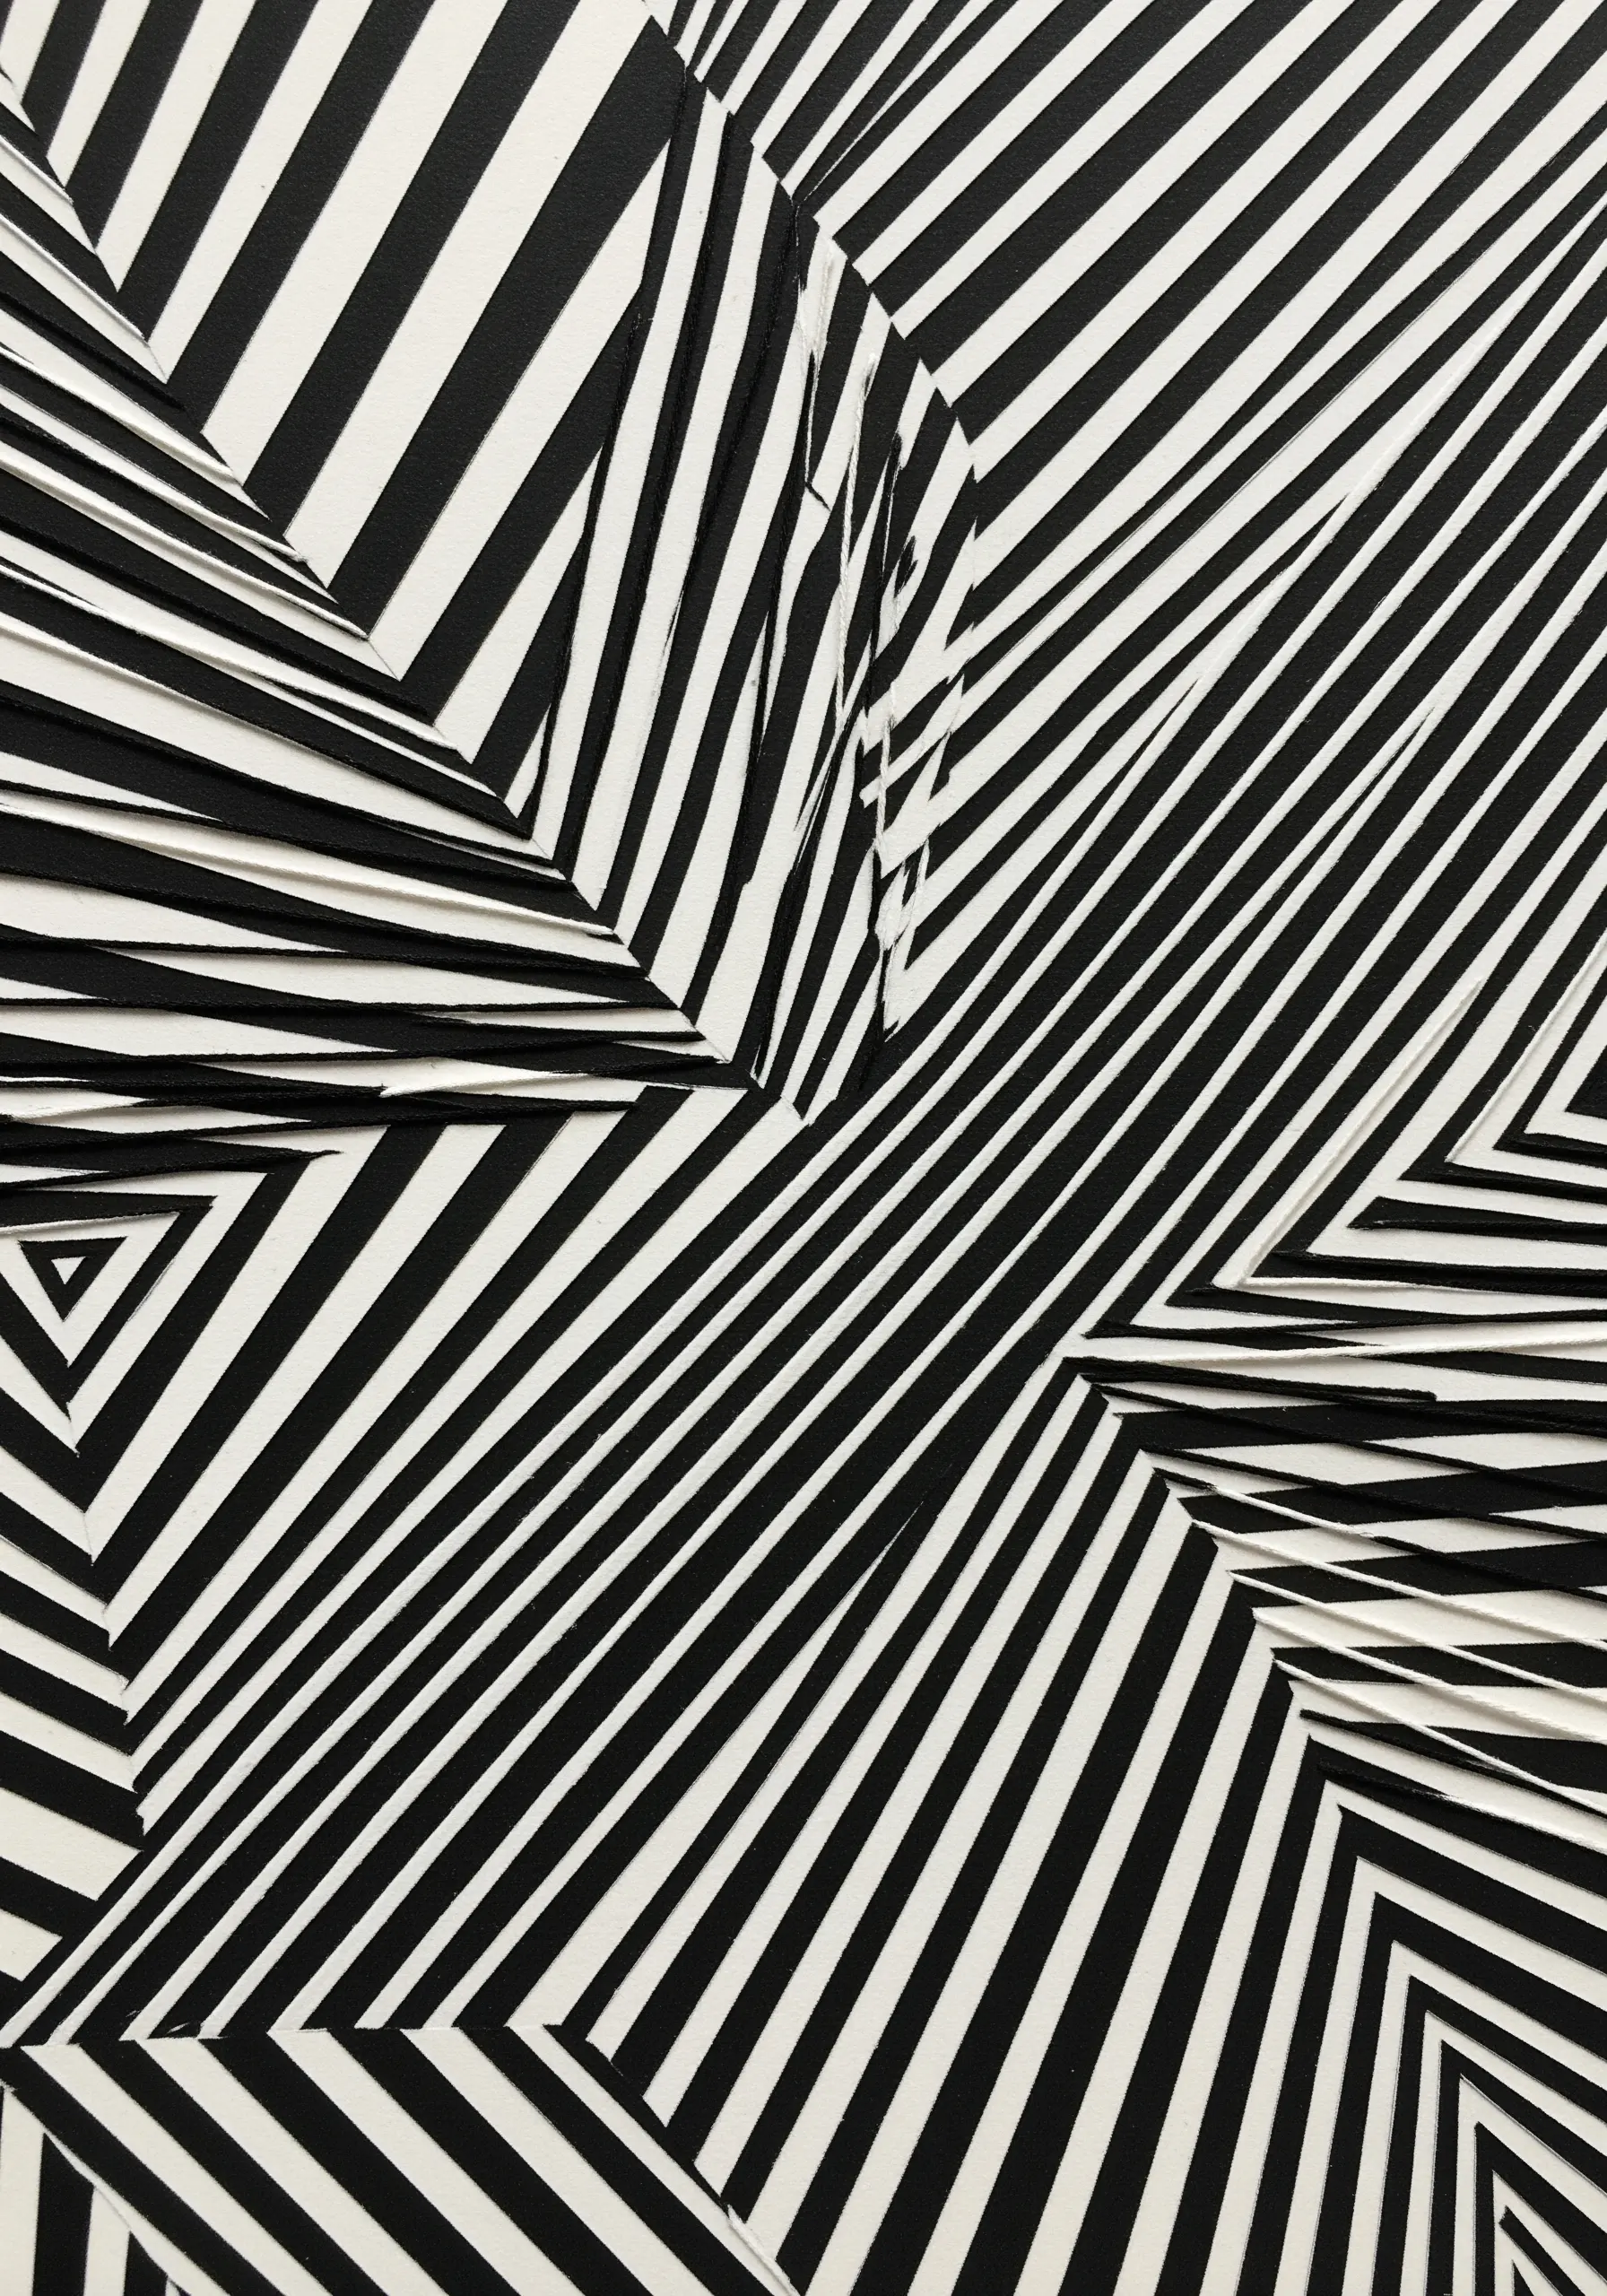
Manipulate striped fabric to create a dizzying, Op-Art inspired collage with dynamic movement.
Cut a black-and-white striped fabric into various geometric shapes—triangles, diamonds, and trapezoids.
Arrange the pieces so the stripes run in conflicting directions, creating tension and the illusion of three-dimensional planes.
Stitch the pieces together with an invisible appliqué stitch or by machine. The focus here is not the thread itself, but the powerful visual effect created by the precise arrangement of lines.
20. Add Stitched Veins to Paper Botanicals

Elevate simple paper cutouts by adding delicate, stitched details that mimic natural textures.
After cutting out your leaf and flower shapes, use a single strand of floss and a simple backstitch or running stitch to add veins to the leaves.
This tiny detail transforms the flat paper into a more realistic and tactile object. It’s a perfect way to introduce thread into a project without requiring extensive embroidery skills.
Layering these stitched paper elements creates a lush, dense jungle effect with surprising depth and realism, letting you explore ways to capture nature’s textures.
21. Frame Industrial Textures with Found Objects
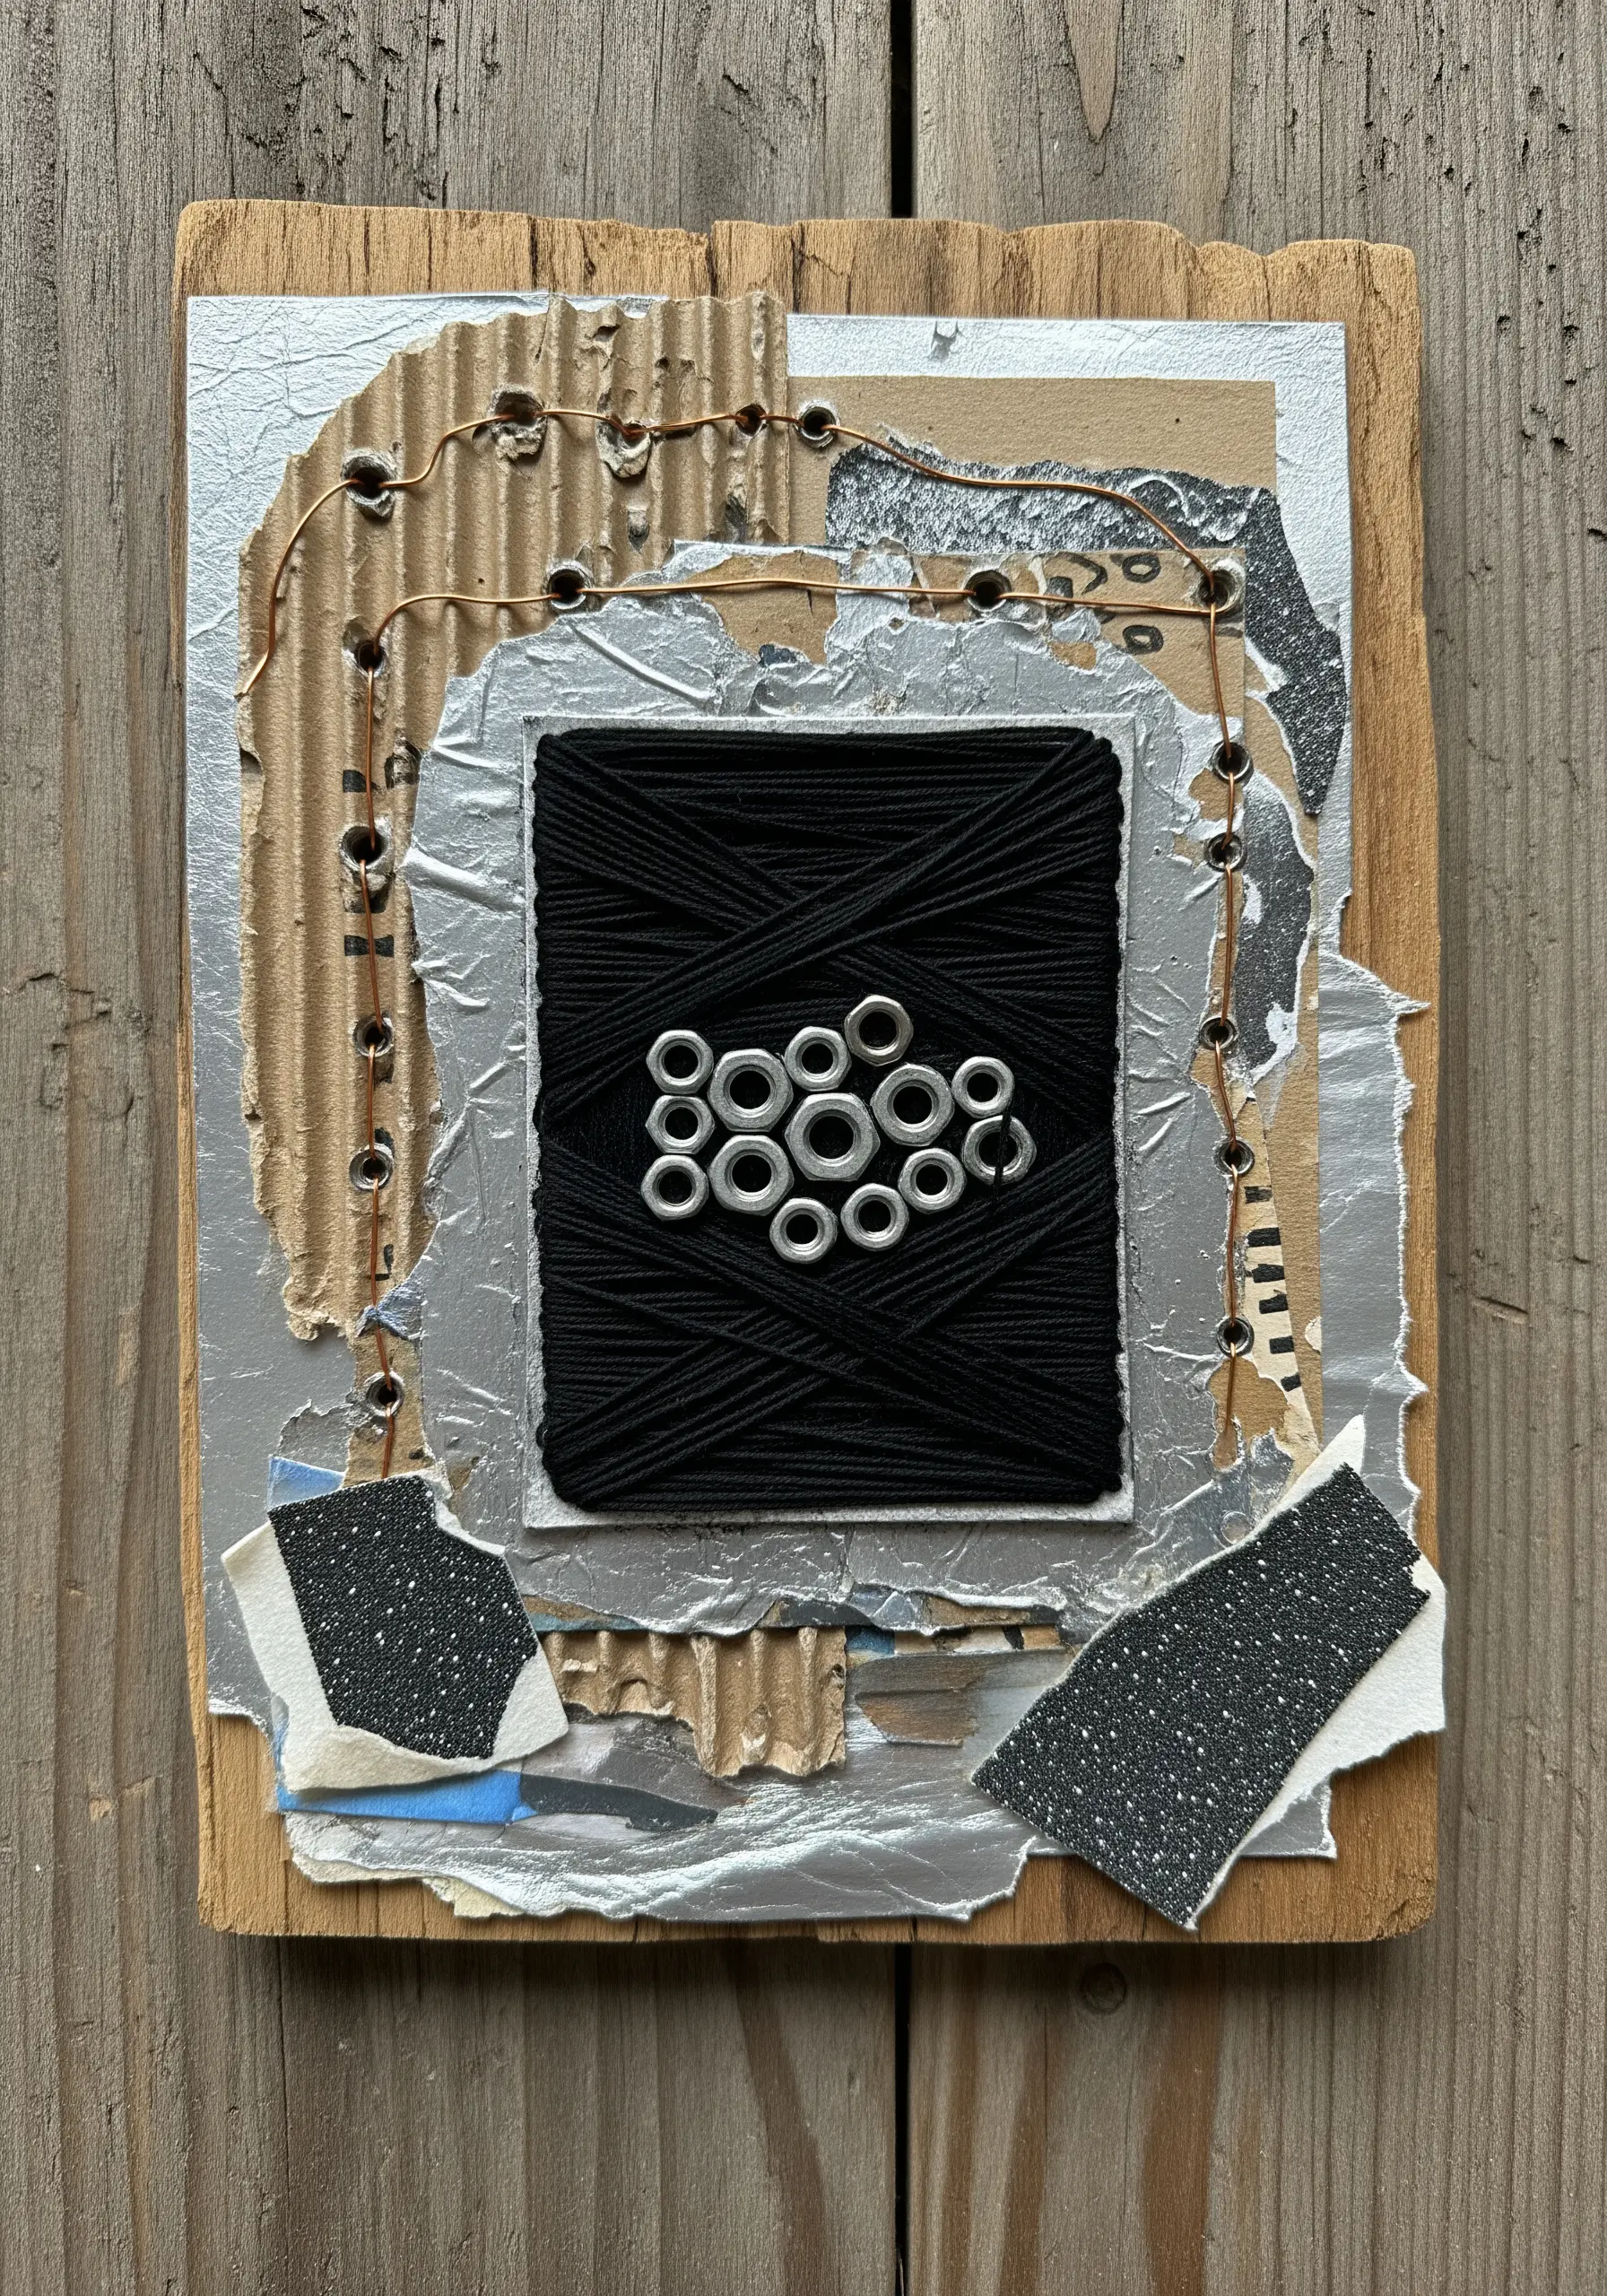
Combine salvaged materials like cardboard, foil, and hardware with stark, simple threadwork.
Mount your composition on a piece of reclaimed wood to enhance the rustic, industrial aesthetic.
Wrap a central element, like a piece of black card, tightly with thread to create a focal point of controlled, geometric texture amidst the chaotic collage.
Instead of stitching, punch holes in corrugated cardboard and weave wire or thick thread through them, integrating the act of ‘sewing’ into the structure of your materials.
22. Construct a Botanical Shadow Box with Thread
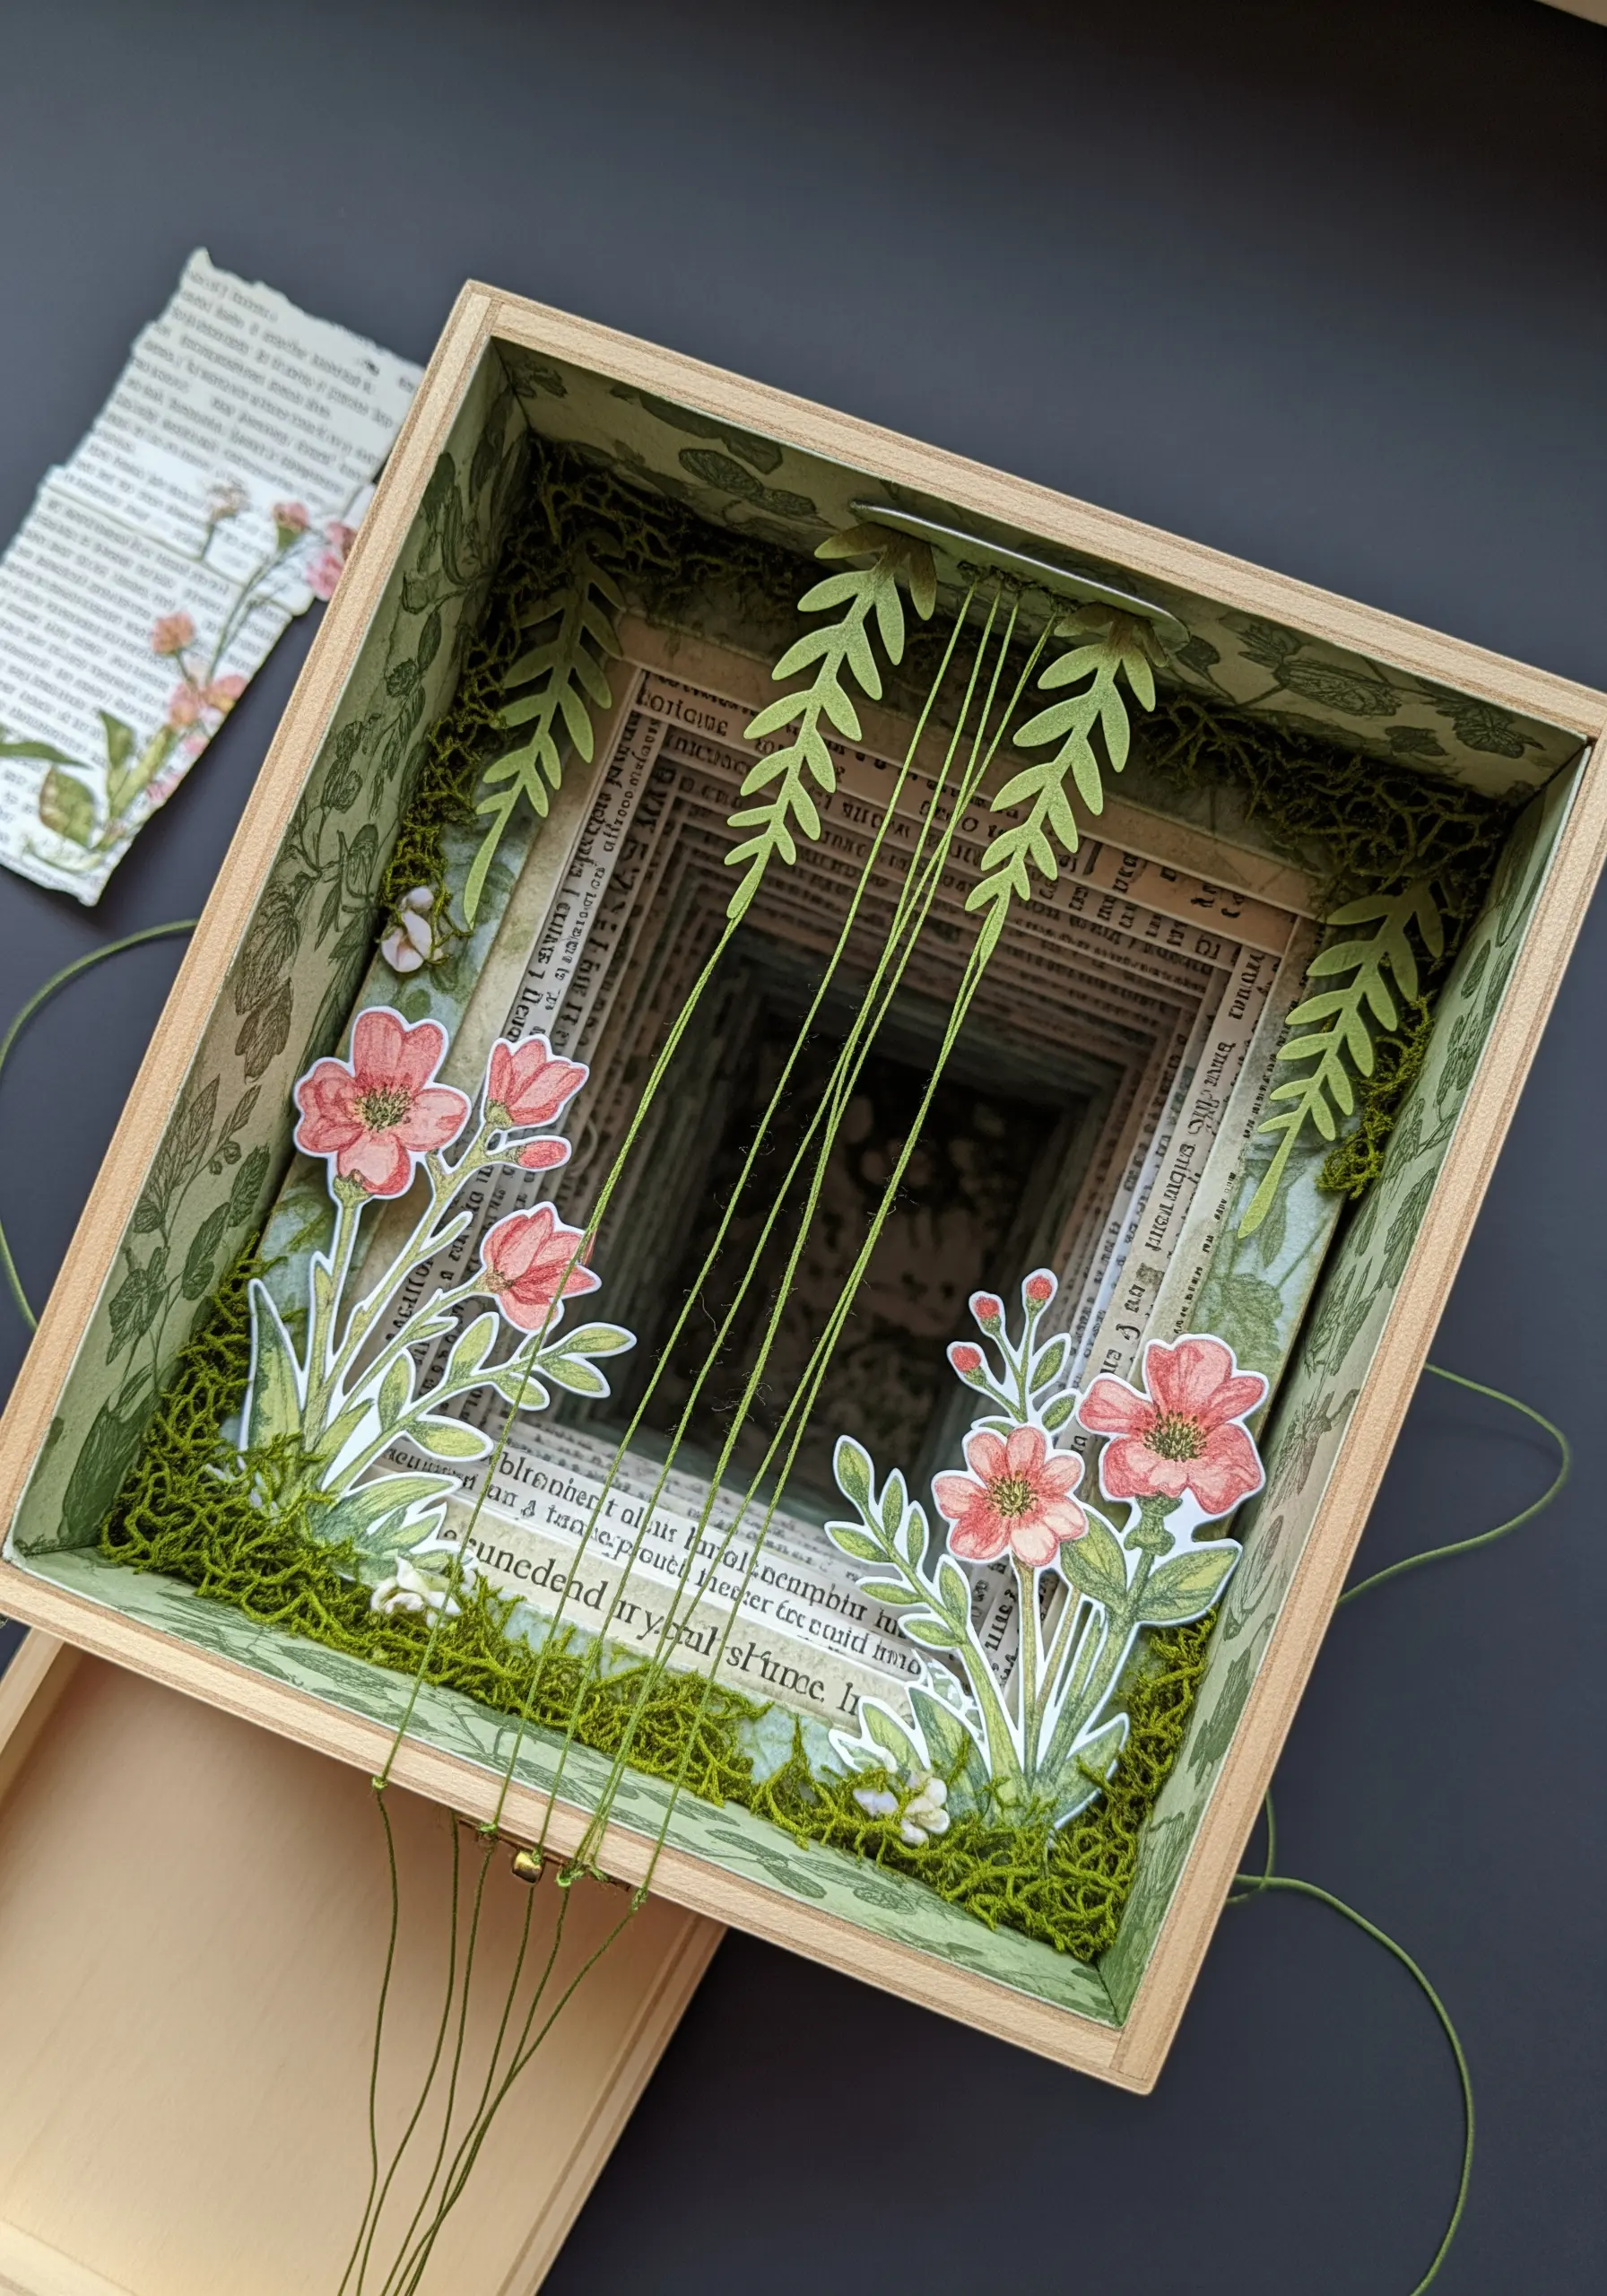
Build a multi-layered scene inside a shallow wooden box to create a captivating diorama effect.
Use paper cutouts of florals and foliage, mounting them at different depths within the box to build perspective.
Stretch long, vertical strands of green thread from the top to the bottom of the box’s interior, creating the illusion of hanging vines or stems.
This technique adds a delicate, linear element that breaks up the space and guides the viewer’s eye through the different layers of your botanical world.
23. Connect Torn Edges with Minimalist Stitching

Demonstrate the power of restraint by using a single line of stitching as the focal point of your work.
Tear two strips of contrasting paper—one smooth, one textured—to create soft, organic edges.
Position them on a clean, high-quality paper background, leaving a small gap between them.
Use a simple running stitch or whipstitch with a bright white thread to bridge the gap, turning the stitch line into a deliberate and beautiful connection between two separate elements. This is one of the most elegant minimalist embroidery ideas for a modern chic look.


