

Look closely at a pile of stones, a strip of birch bark, or the surface of rippling water. Nature is a masterclass in texture, and you can translate that incredible detail into your embroidery with surprisingly simple techniques.
You don’t need dozens of complex stitches to create something that feels rich, intentional, and expensive. Often, the most impactful designs come from mastering one or two basic stitches and then applying them with thoughtful attention to color, density, and form.
This collection is your guide to seeing texture everywhere and knowing exactly how to capture it with needle and thread. Let’s move beyond flat surfaces and start creating embroidery that invites you to reach out and touch it.
1. Sculptural Stone Textures with Spiral Stitching

Create the organic, smooth feel of river stones by using a simple spiral stitch.
Start with a single stitch in the center and work your way outwards in a continuous spiral, laying each new stitch right next to the previous one.
For a more defined, pebble-like texture, use a whipped backstitch as your base; the whipping motion adds volume and smoothness.
Vary the number of threads you use—from three to six strands of floss, or even a fine wool yarn—to create stones of different weights and dimensions.
A muted, earthy color palette of grays, soft greens, and beiges will give the composition a serene, natural feel, just like real stones.
This is one of the best embroidery patterns inspired by stones, wood, and leaves to try for a calming effect.
2. Birch Bark Illusion with Layered Fibers

Recreate the distinct texture of birch bark by combining thick vertical stitches with delicate, horizontal details.
Use a chunky yarn or multiple strands of floss to create the vertical tree trunks with long, straight stitches or couching techniques for high relief.
For the bark’s signature peeling effect, work tiny, irregular black and grey seed stitches over a cream-colored fabric base.
This contrast between the thick, uniform vertical lines and the scattered, fine markings is what makes the texture so convincing and visually striking.
Consider mounting the finished piece on a wooden dowel for a rustic wall hanging that enhances the natural theme.
3. Dimensional Moss Gardens Using French Knots
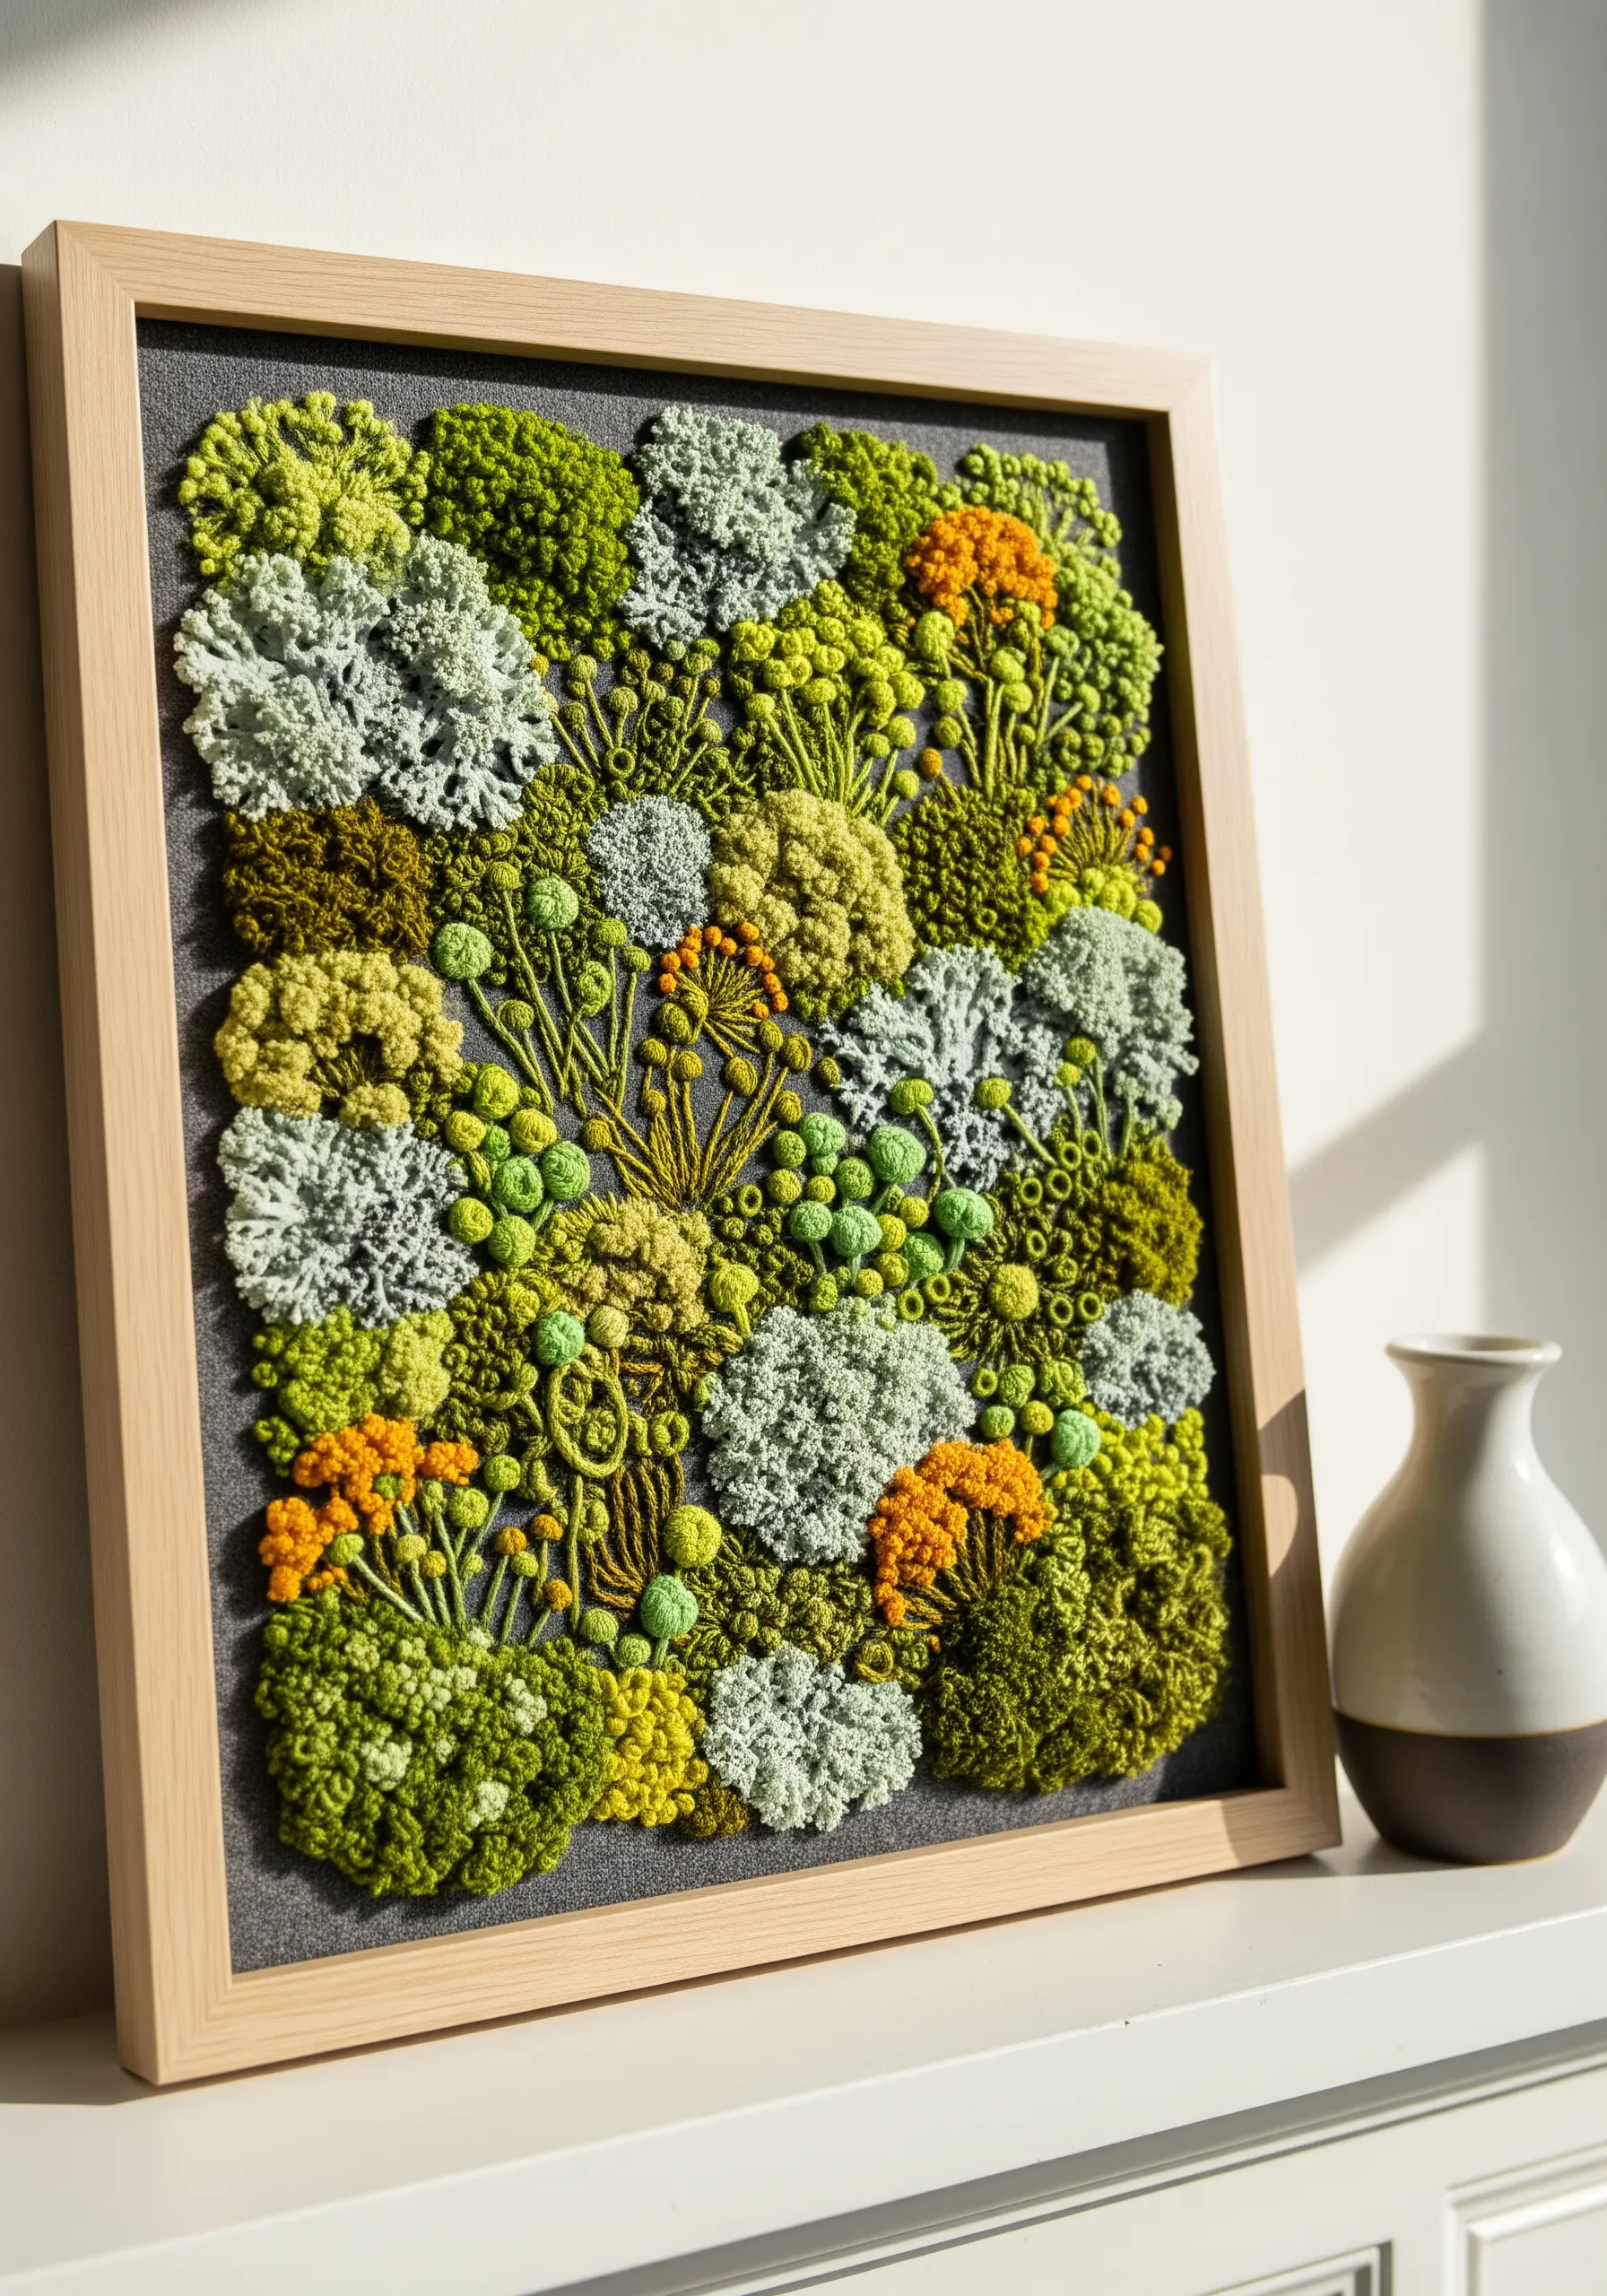
Cultivate a lush, three-dimensional moss texture with a dense application of French knots and colonial knots.
To achieve a realistic, overgrown look, vary the number of wraps around your needle for each knot—one wrap for tight buds, three or more for plush, mossy clumps.
Use a mix of variegated green and chartreuse threads to add depth and natural color variation without constantly changing your floss.
Combine dense clusters of knots with looser, more scattered stitches to mimic how moss naturally grows in patches.
This technique turns a simple stitch into a sculptural element, making your artwork incredibly tactile and visually rich.
4. Minimalist Sand Ripples with Raised Couching

Achieve a high-end, minimalist aesthetic by stitching uniform waves that mimic desert sand or water ripples.
The key to this design is creating raised lines. You can achieve this by couching a thick cord or yarn onto your base fabric, using a thinner, matching thread to tack it down.
For a purely embroidered effect, use a padded satin stitch, laying down a foundation of straight stitches before covering them with a smooth top layer.
Working in a single, neutral color like sand or off-white forces the eye to focus entirely on the texture and flow of the lines, which creates a sophisticated and calming effect.
These large-scale embroidery tapestries can become the focal point of any room.
5. Graphic Starbursts with High-Contrast Thread

Create a striking geometric pattern using only straight stitches arranged in a radial pattern.
The illusion of complexity comes from perfect symmetry and high contrast—think white thread on black fabric or copper on navy.
To ensure your lines are perfectly spaced, use a water-soluble marker and a protractor to mark your anchor points around the center before you begin stitching.
This simple technique requires no intricate stitch knowledge but delivers a sharp, modern aesthetic that looks incredibly precise and intentional.
Group several hoops of varying sizes to create a dynamic gallery wall installation.
6. Floating Petal Appliqué with Seed Stitches

Add a layer of dimension to cushion covers by combining simple appliqué with textural stitch work.
First, cut out organic, cloud-like shapes from a contrasting fabric and secure them to your base fabric with a few tacking stitches.
Fill these shapes with dense clusters of French knots or seed stitches to create a raised, fluffy texture reminiscent of moss or flower petals.
Connect the shapes with delicate lines of running stitch or backstitch to create a sense of movement and cohesion in your design.
This technique elevates a simple scatter cushion into a piece of tactile art.
7. Dried Earth Effect with Whipped Backstitch
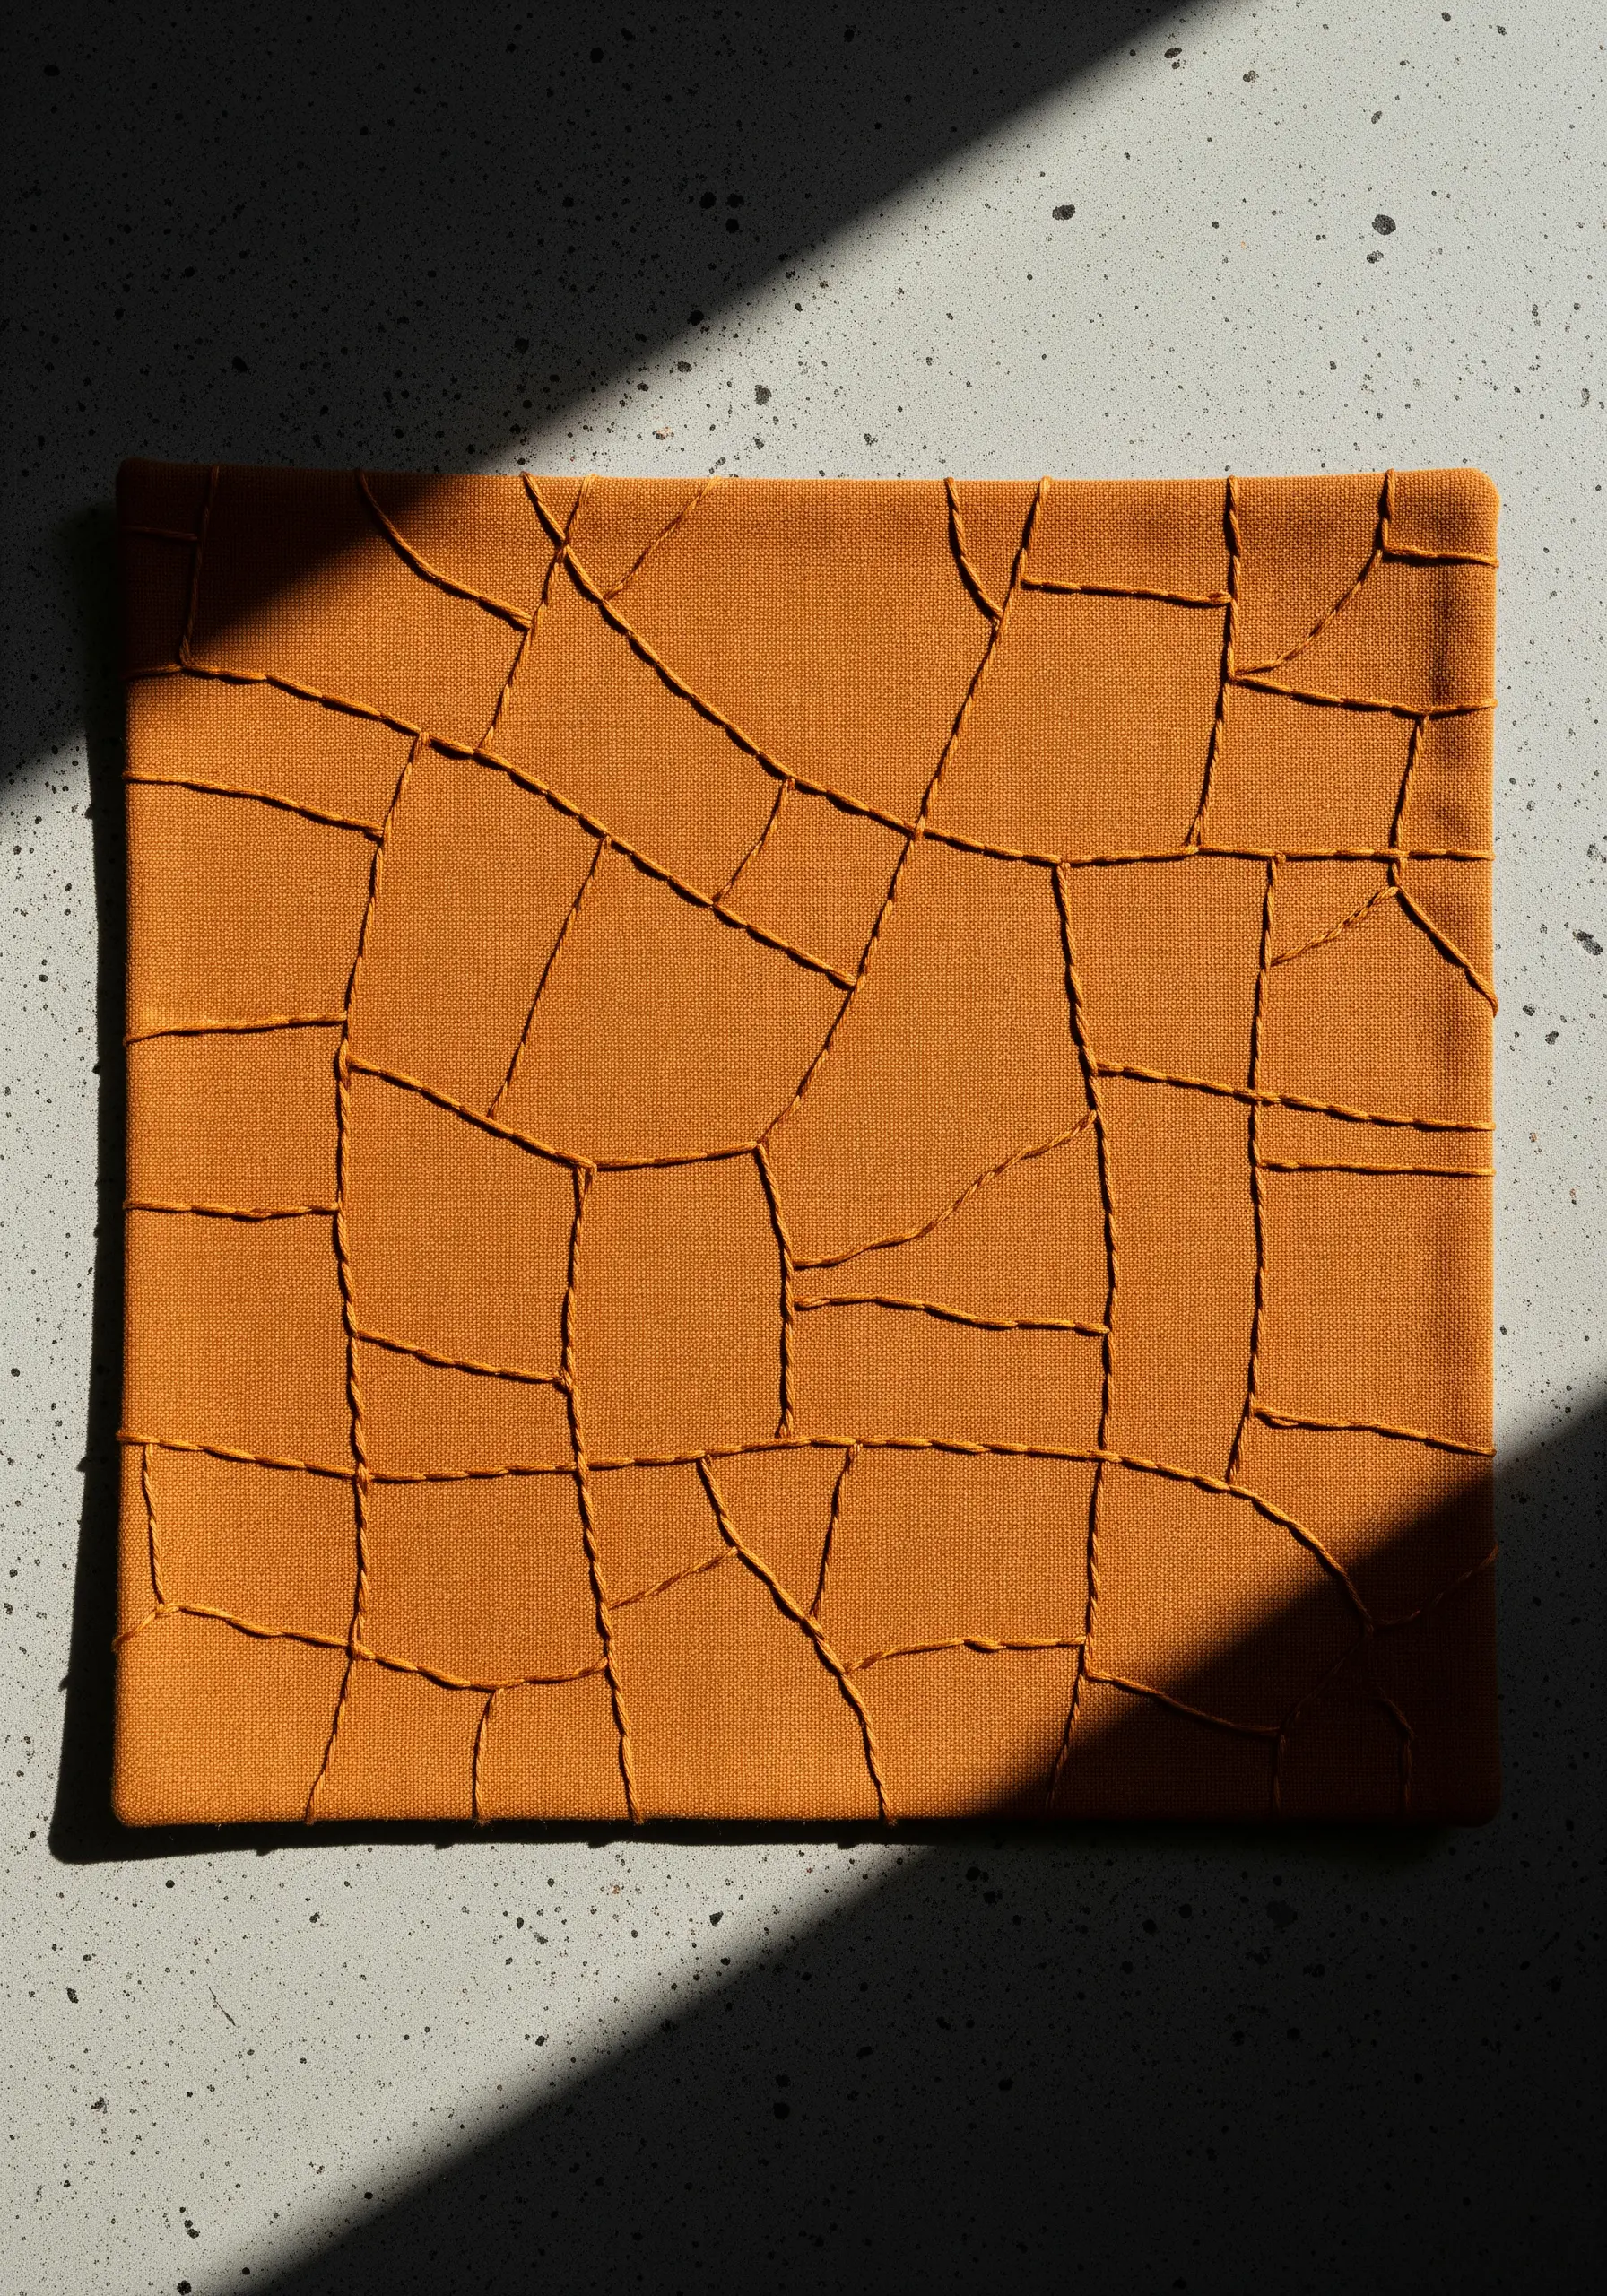
Capture the graphic pattern of cracked, dry earth using a tone-on-tone whipped backstitch.
First, lay down a framework of irregular, intersecting lines with a simple backstitch.
Then, using the same color thread, whip the stitches without piercing the fabric. This covers the backstitch, creating a smooth, raised line that sits on top of the fabric.
Using the same color thread for both the fabric and the stitching creates a subtle, shadow-like effect that emphasizes texture over color, resulting in a sophisticated, minimalist piece.
8. Ethereal Botanicals on Sheer Fabric

Create a delicate, floating effect by embroidering botanical motifs onto a sheer or semi-sheer fabric like linen or voile.
Use simple line stitches—such as backstitch, stem stitch, or even a basic running stitch—to outline ferns, leaves, and seed heads.
A single color of thread, like charcoal gray or off-white, keeps the look airy and sophisticated, allowing the light to play through the fabric and the stitches.
The magic is in the composition: start with a dense cluster of botanicals at the bottom and let them become sparser as they move up the fabric, creating a sense of lightness.
Try these embroidered curtain borders that add warmth to cold rooms for a similar light-filtering effect.
9. Sculptural Leaf Veins with Wrapped Cord

Transform a simple felt cutout into a striking piece of wall art by focusing on sculptural details.
Cut a bold leaf shape from a thick, high-quality felt in a muted color like olive green or charcoal.
Instead of stitching the veins directly, wrap a fine cord or wire with a contrasting embroidery floss (like ivory or beige) and glue it onto the felt surface.
This technique creates a clean, three-dimensional effect that is much faster than traditional satin stitching but delivers a high-impact, graphic look perfect for modern interiors.
10. Tree Ring Textures with Coiled Fibers
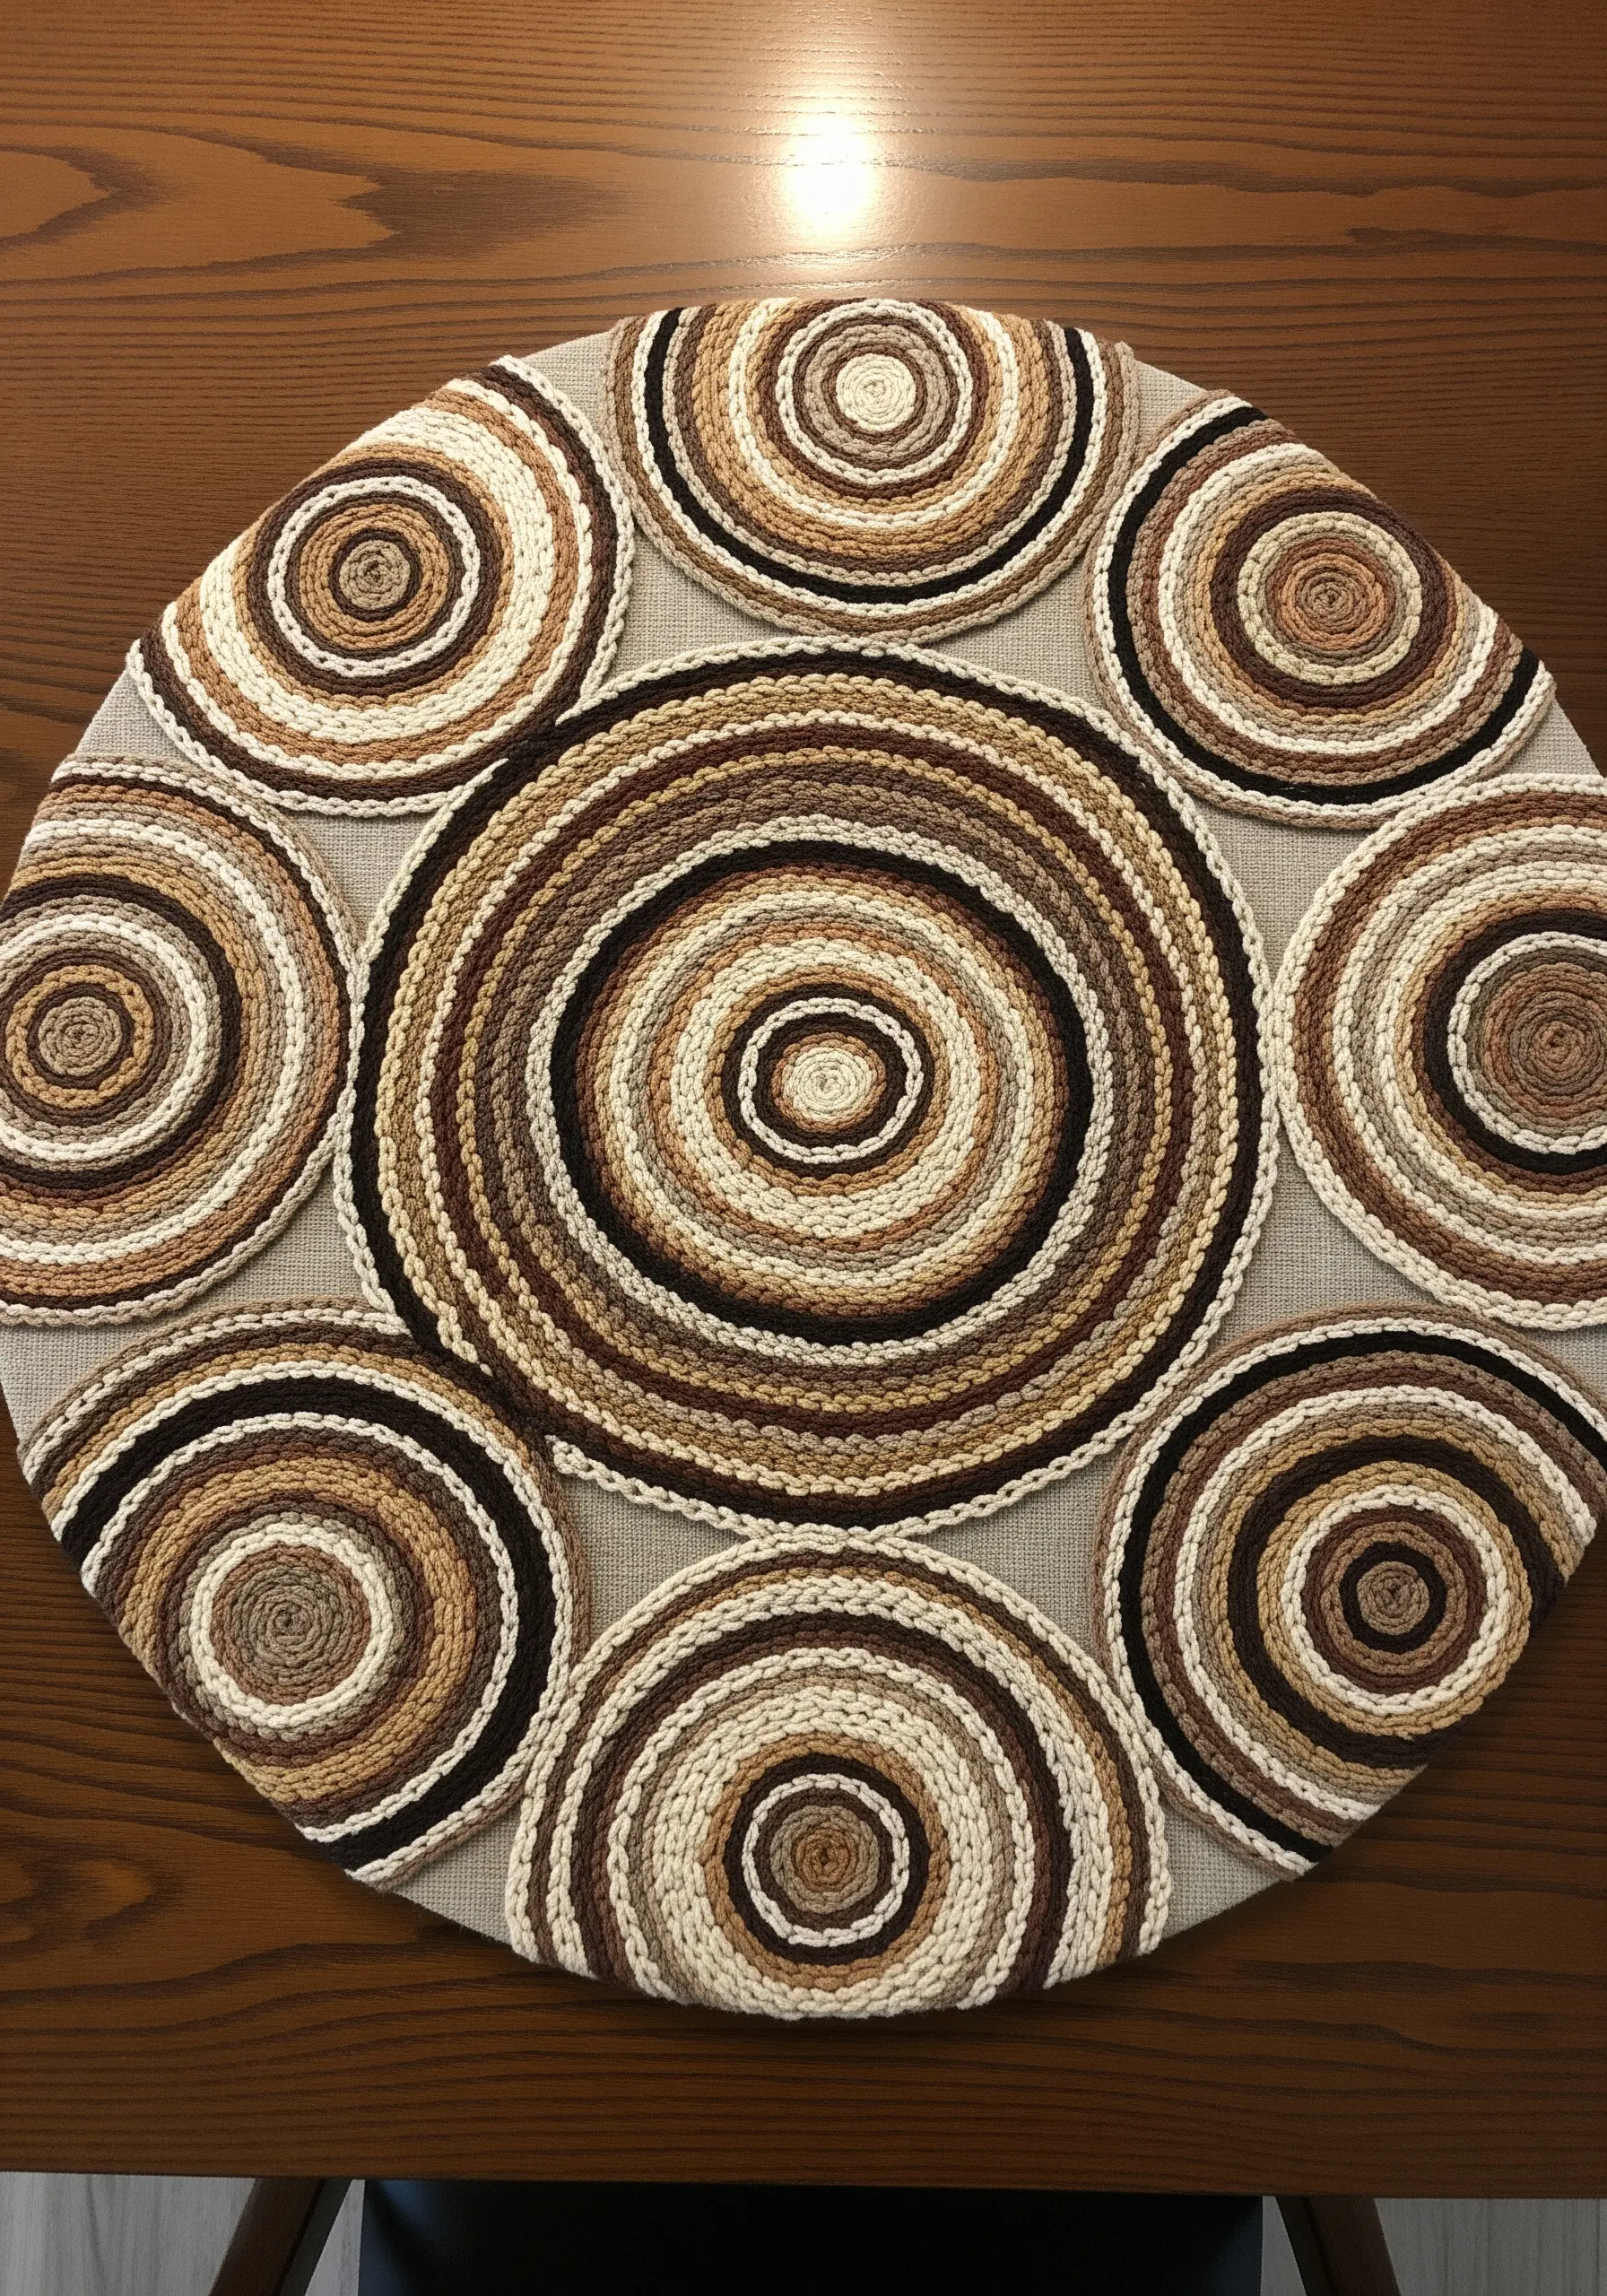
Mimic the concentric rings of a tree trunk by coiling and couching various threads and yarns.
Start in the center of each circle and couch down a thick piece of yarn or multiple strands of floss, working in a spiral.
Introduce different colors and textures—like jute, wool, and cotton floss—in each ring to create a rich, layered effect that looks like natural wood grain.
Arrange multiple ‘tree rings’ of different sizes on a single piece of fabric to create a compelling abstract composition that celebrates natural patterns.
11. Sunburst Coasters with Satin Stitch Blocking
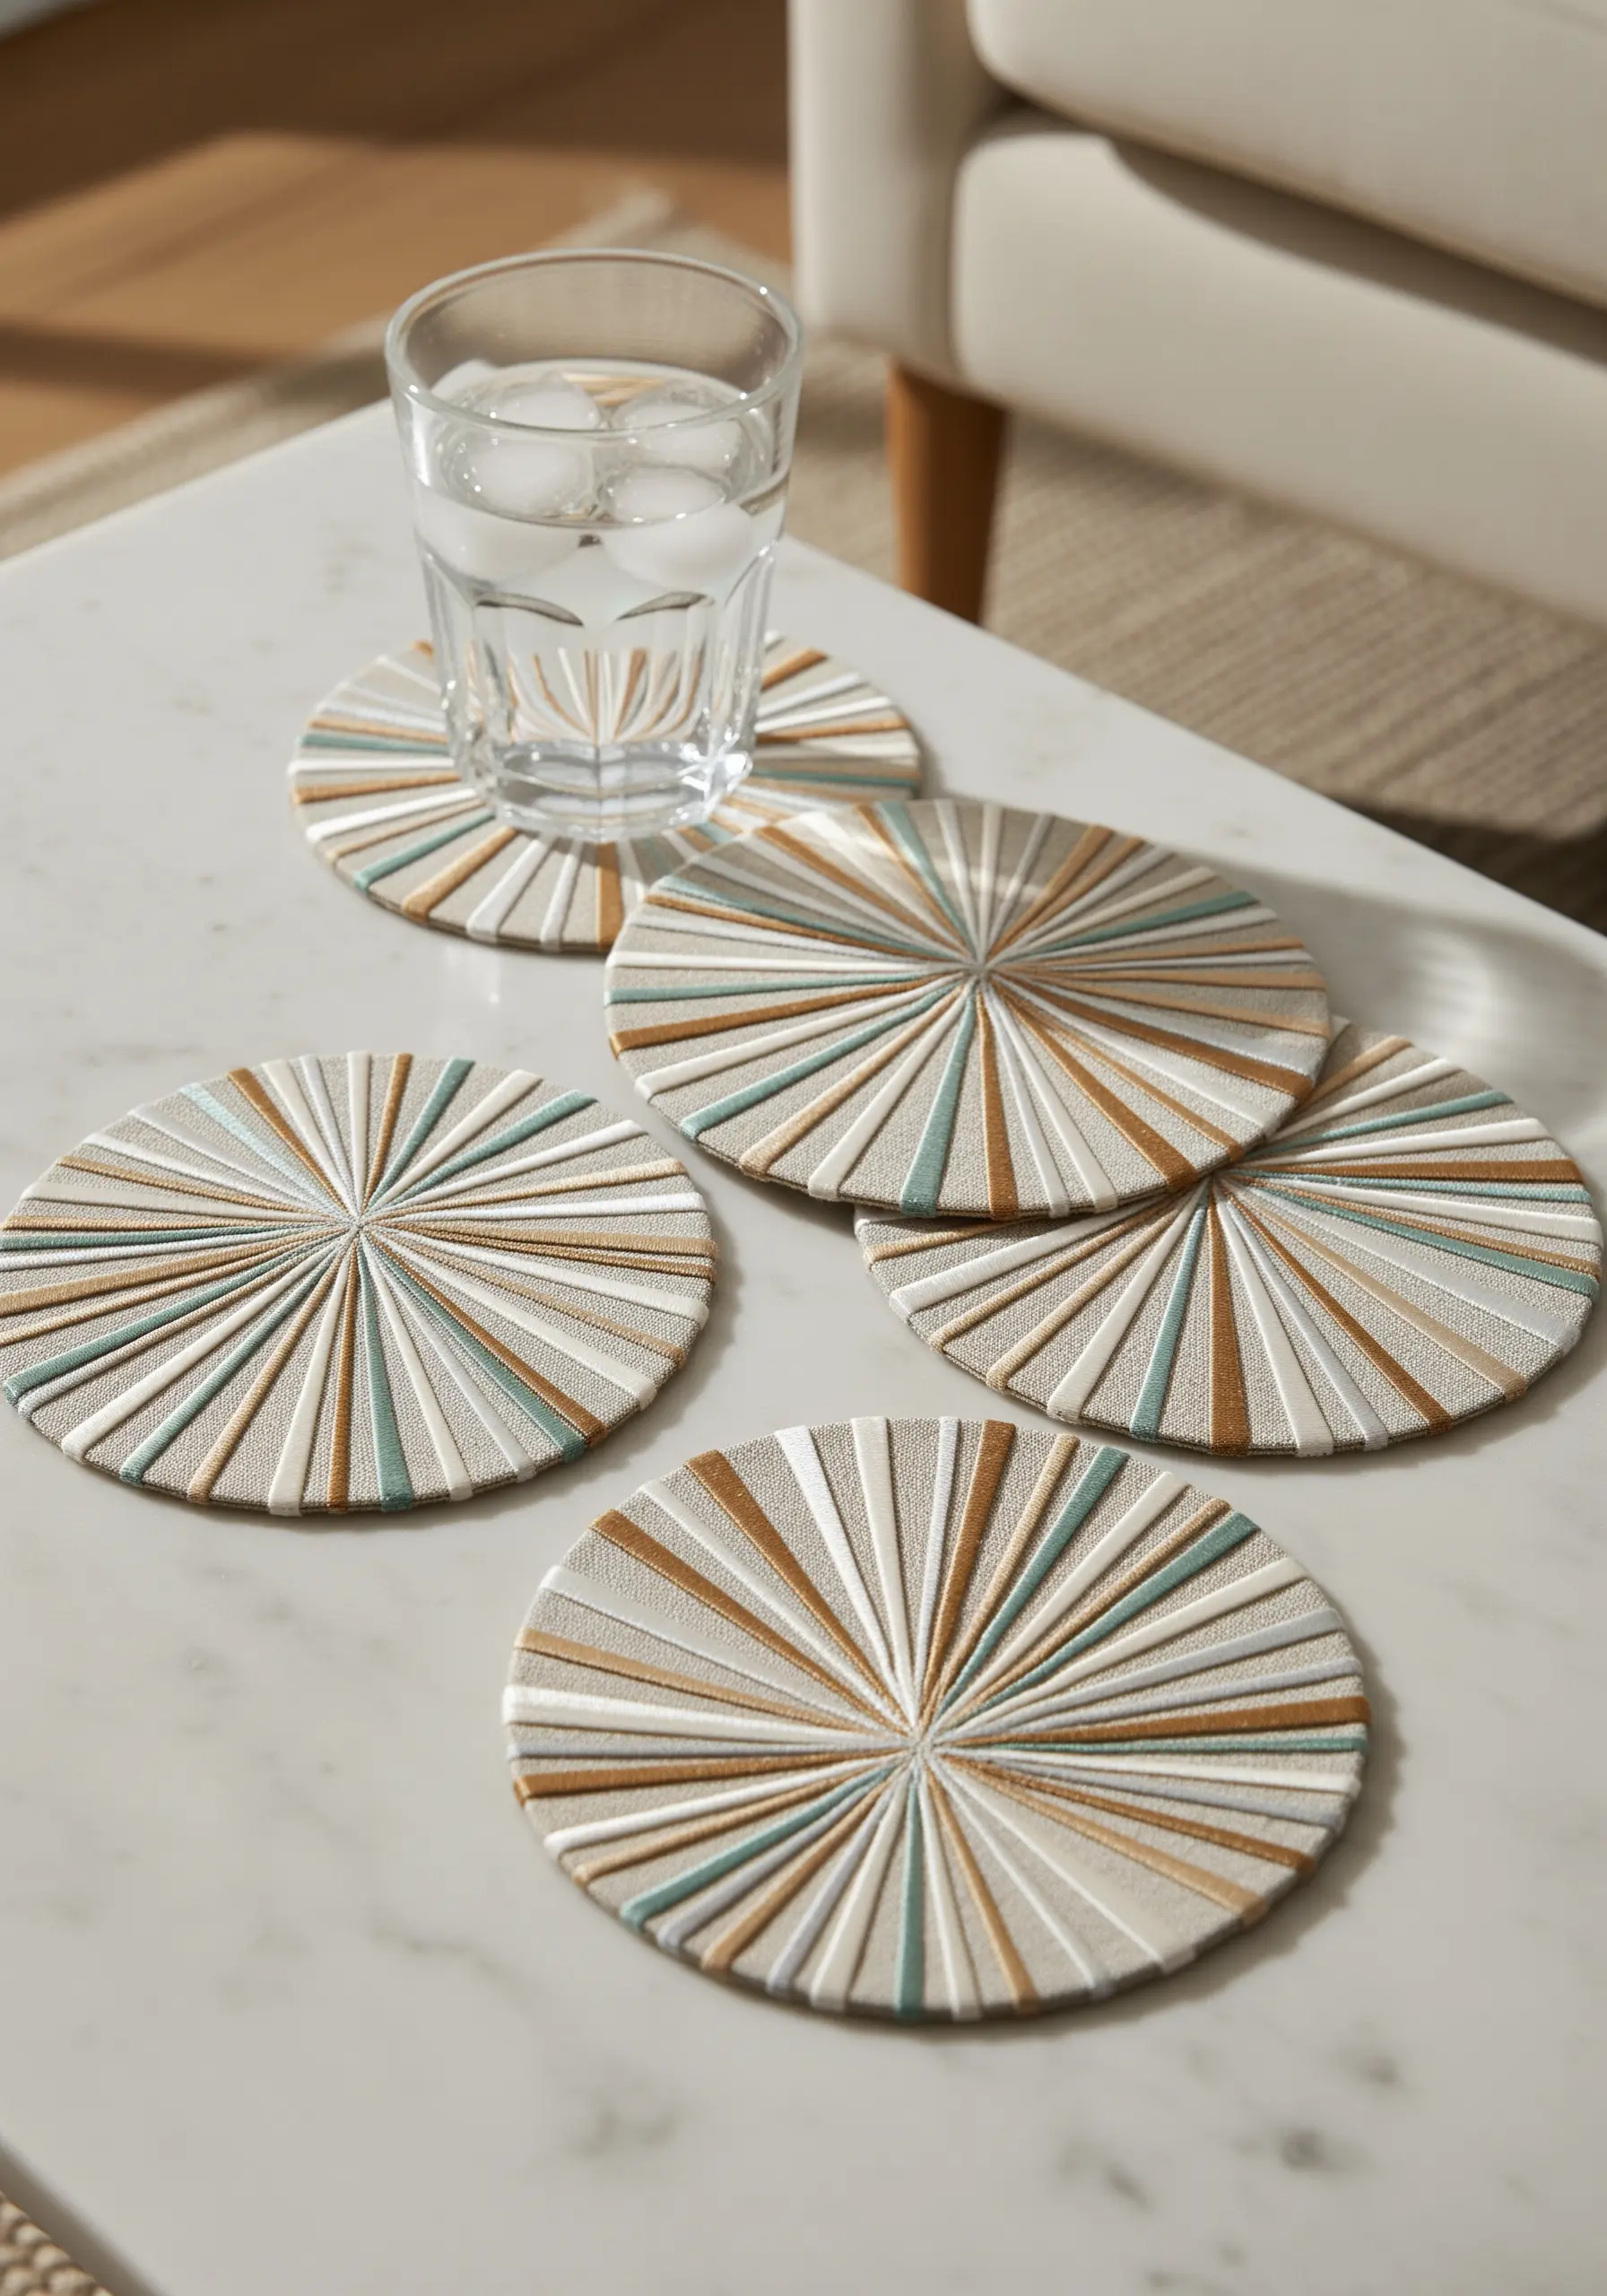
Elevate simple coasters by using satin stitch in a color-blocked, radial pattern.
Divide your circular coaster shape into wedges, like a pizza, using a fabric marker.
Fill each wedge with long satin stitches, alternating between two or three complementary colors to create a sunburst effect.
The key to a polished look is ensuring your stitches are perfectly parallel and lay flat against the fabric. A laying tool (or even a large tapestry needle) can help guide the threads into place for a smooth, glossy finish.
12. Birch Bark Panels with Linear Stitching
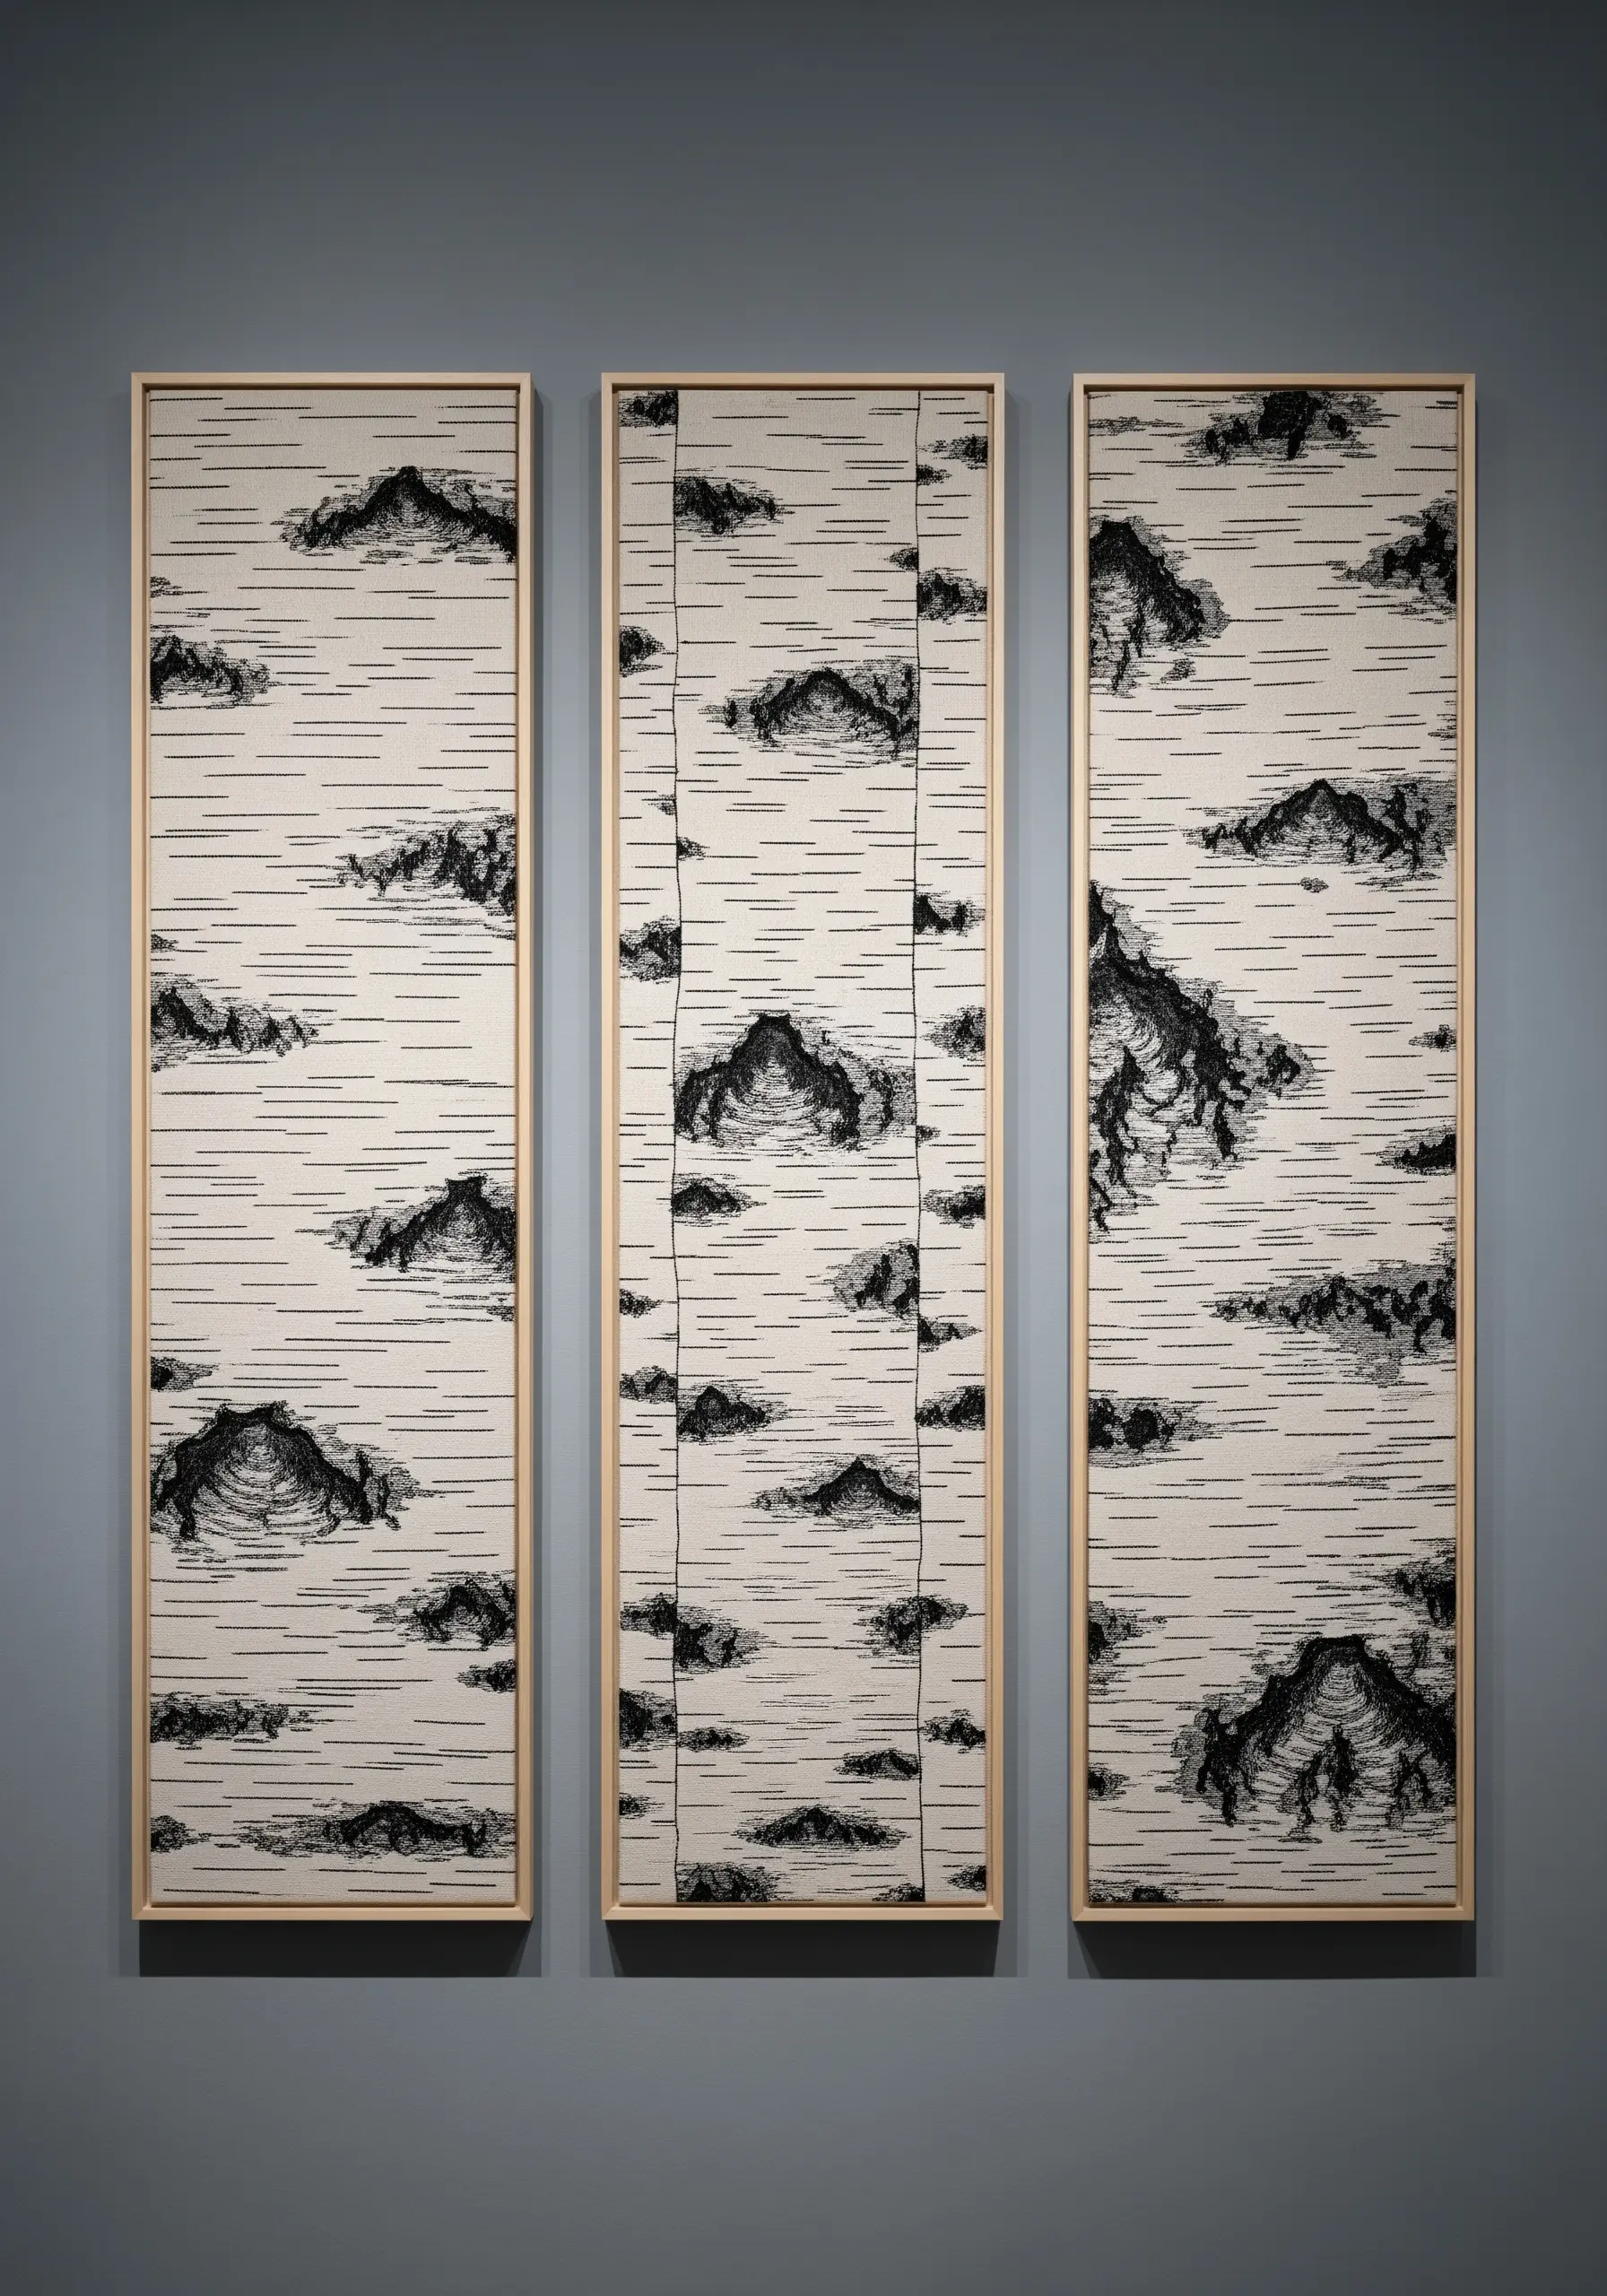
Create a sophisticated, large-format artwork by translating the texture of birch bark into minimalist line work.
Use a long and narrow frame to emphasize the verticality of the trees. Within this space, work horizontal running stitches and seed stitches in black thread on a light background.
Vary the density of the black stitches to create the knots and peels characteristic of birch bark. Leave some areas sparse and others heavily worked to create visual interest and realism.
Displaying three panels together as a triptych turns a simple stitch study into a significant and impactful piece of art.
13. Geometric Honeycomb with Whipped Backstitch
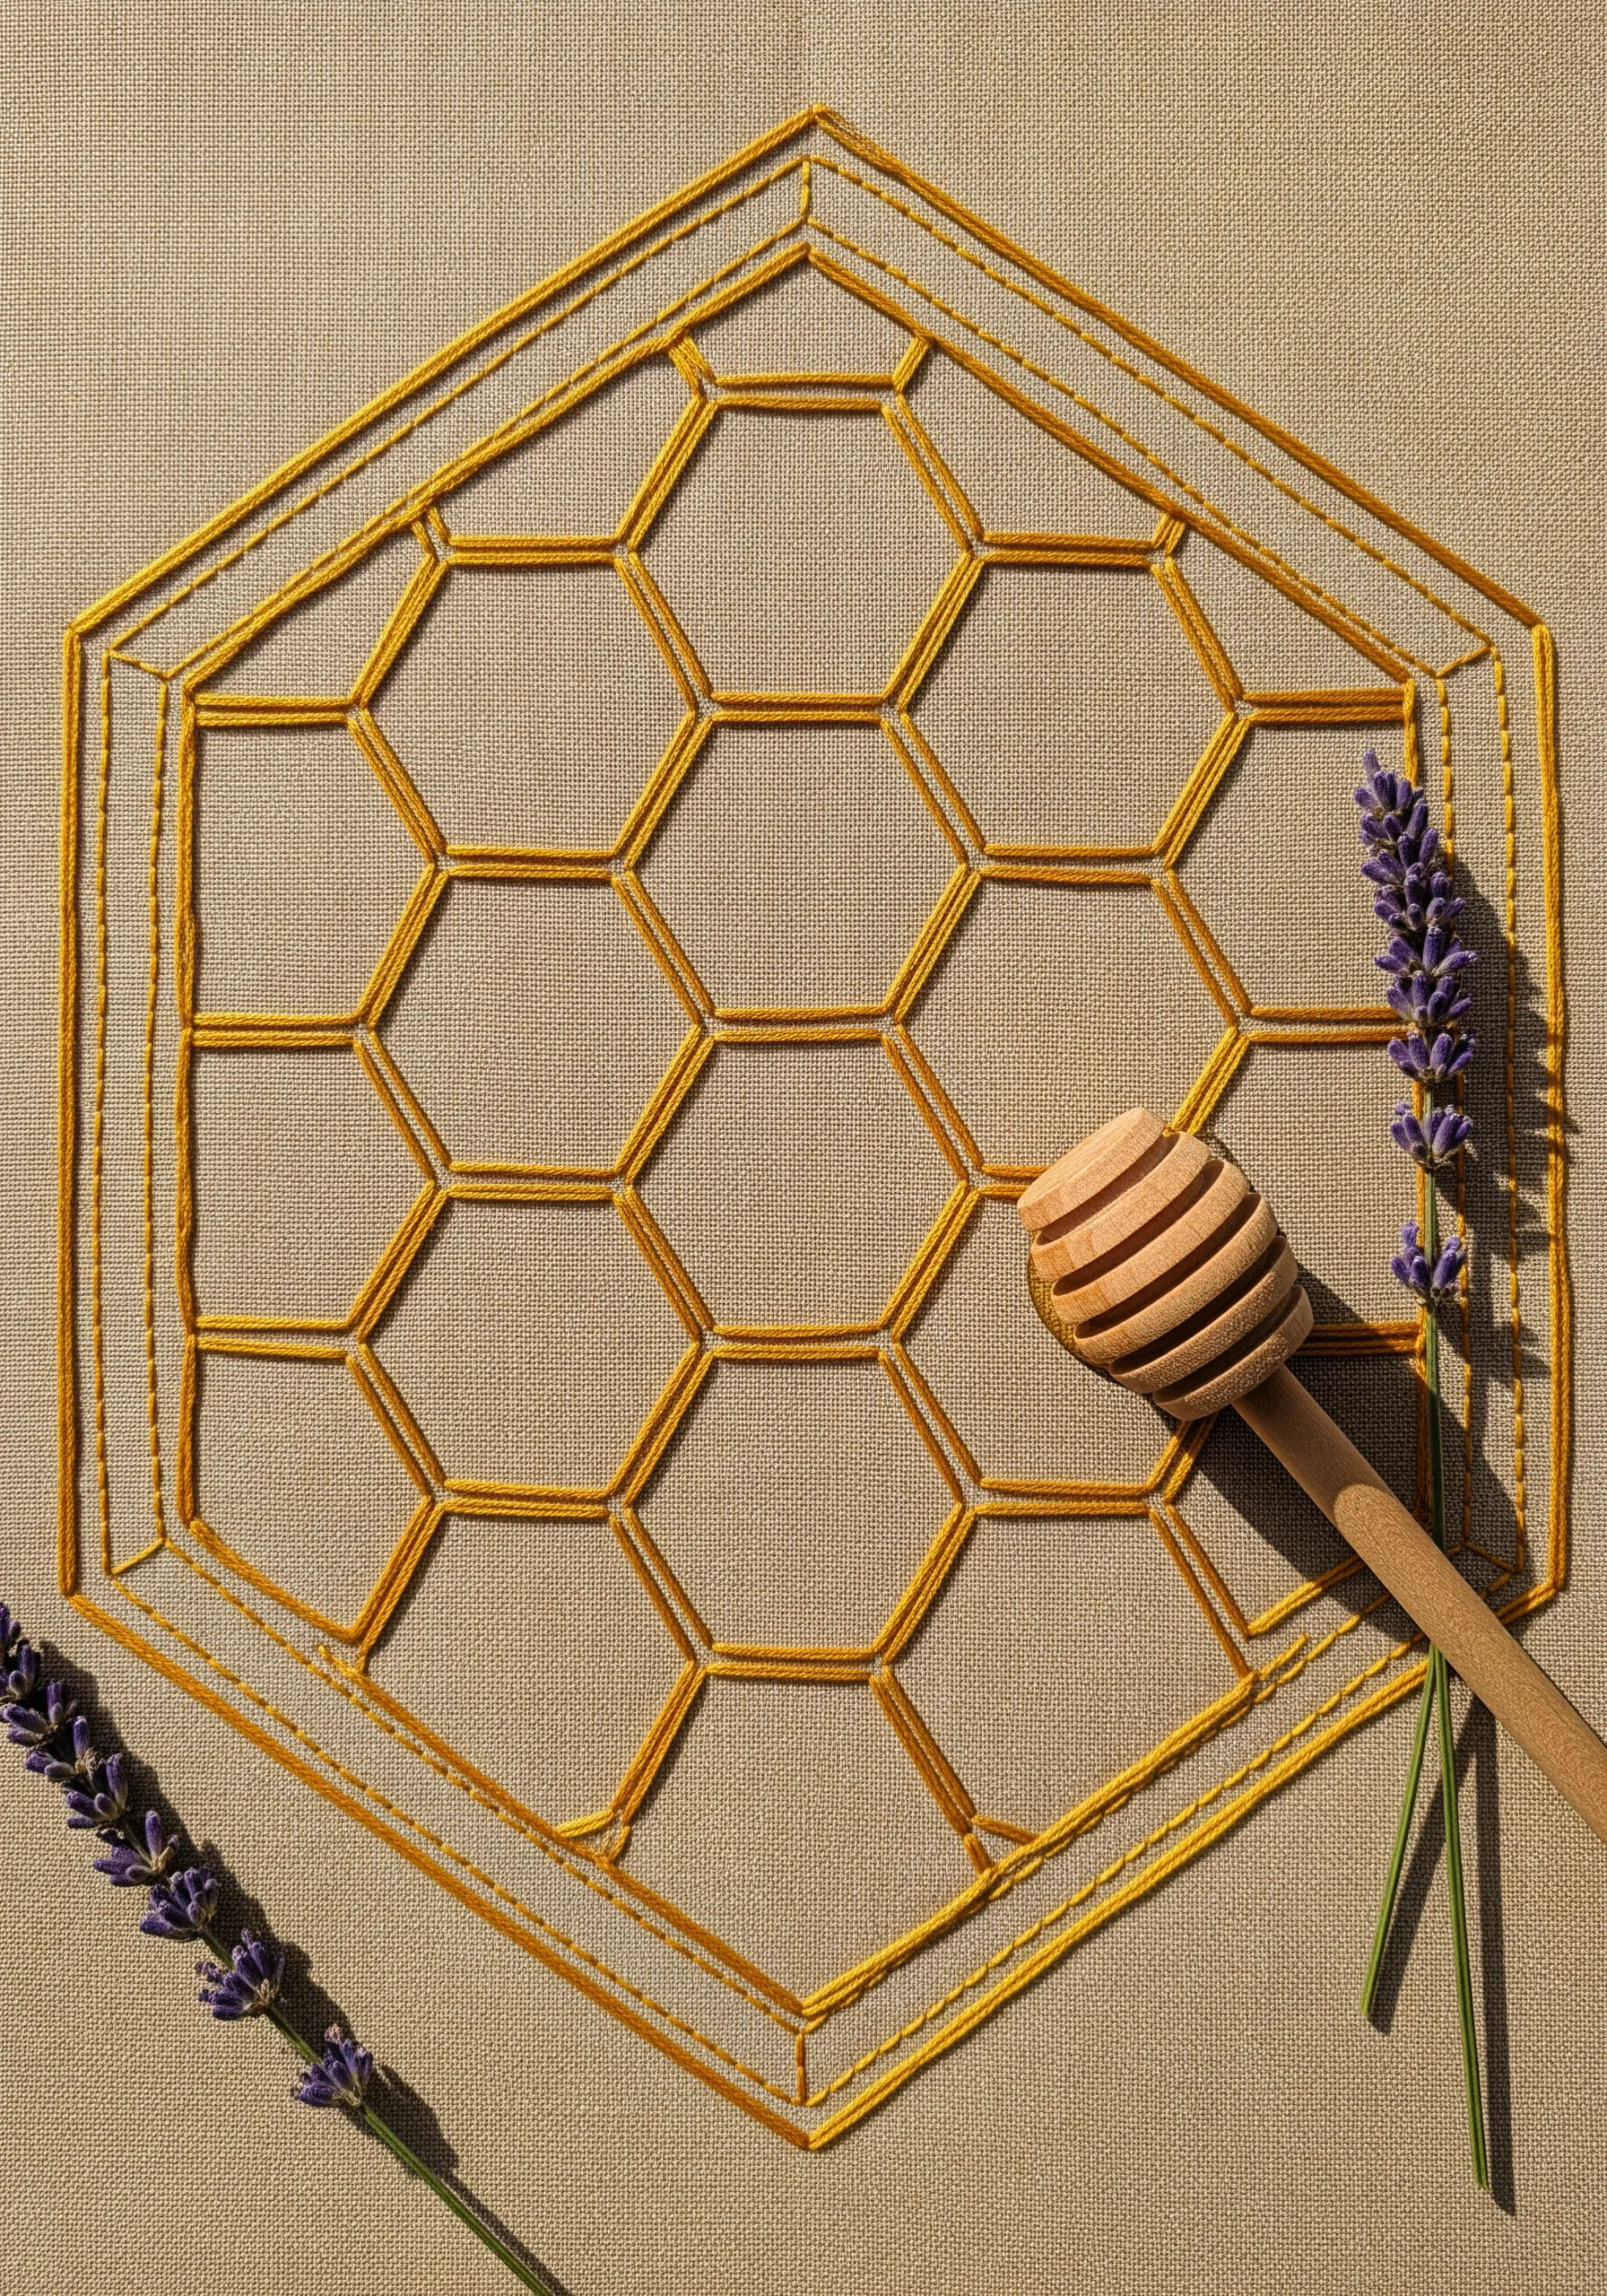
Achieve crisp, clean geometric lines for a honeycomb pattern by using a whipped backstitch or stem stitch.
Instead of a standard backstitch which can look segmented, whipping the stitches with a second pass of thread creates a smooth, uninterrupted line that looks incredibly professional.
For an even more dimensional look, trace the outline twice to create a double border. This adds weight and definition to the geometric shapes.
Using a rich golden or ochre thread on a neutral linen background makes the pattern pop while maintaining a warm, natural aesthetic.
15. Ocean Currents with Seed Stitch Pointillism
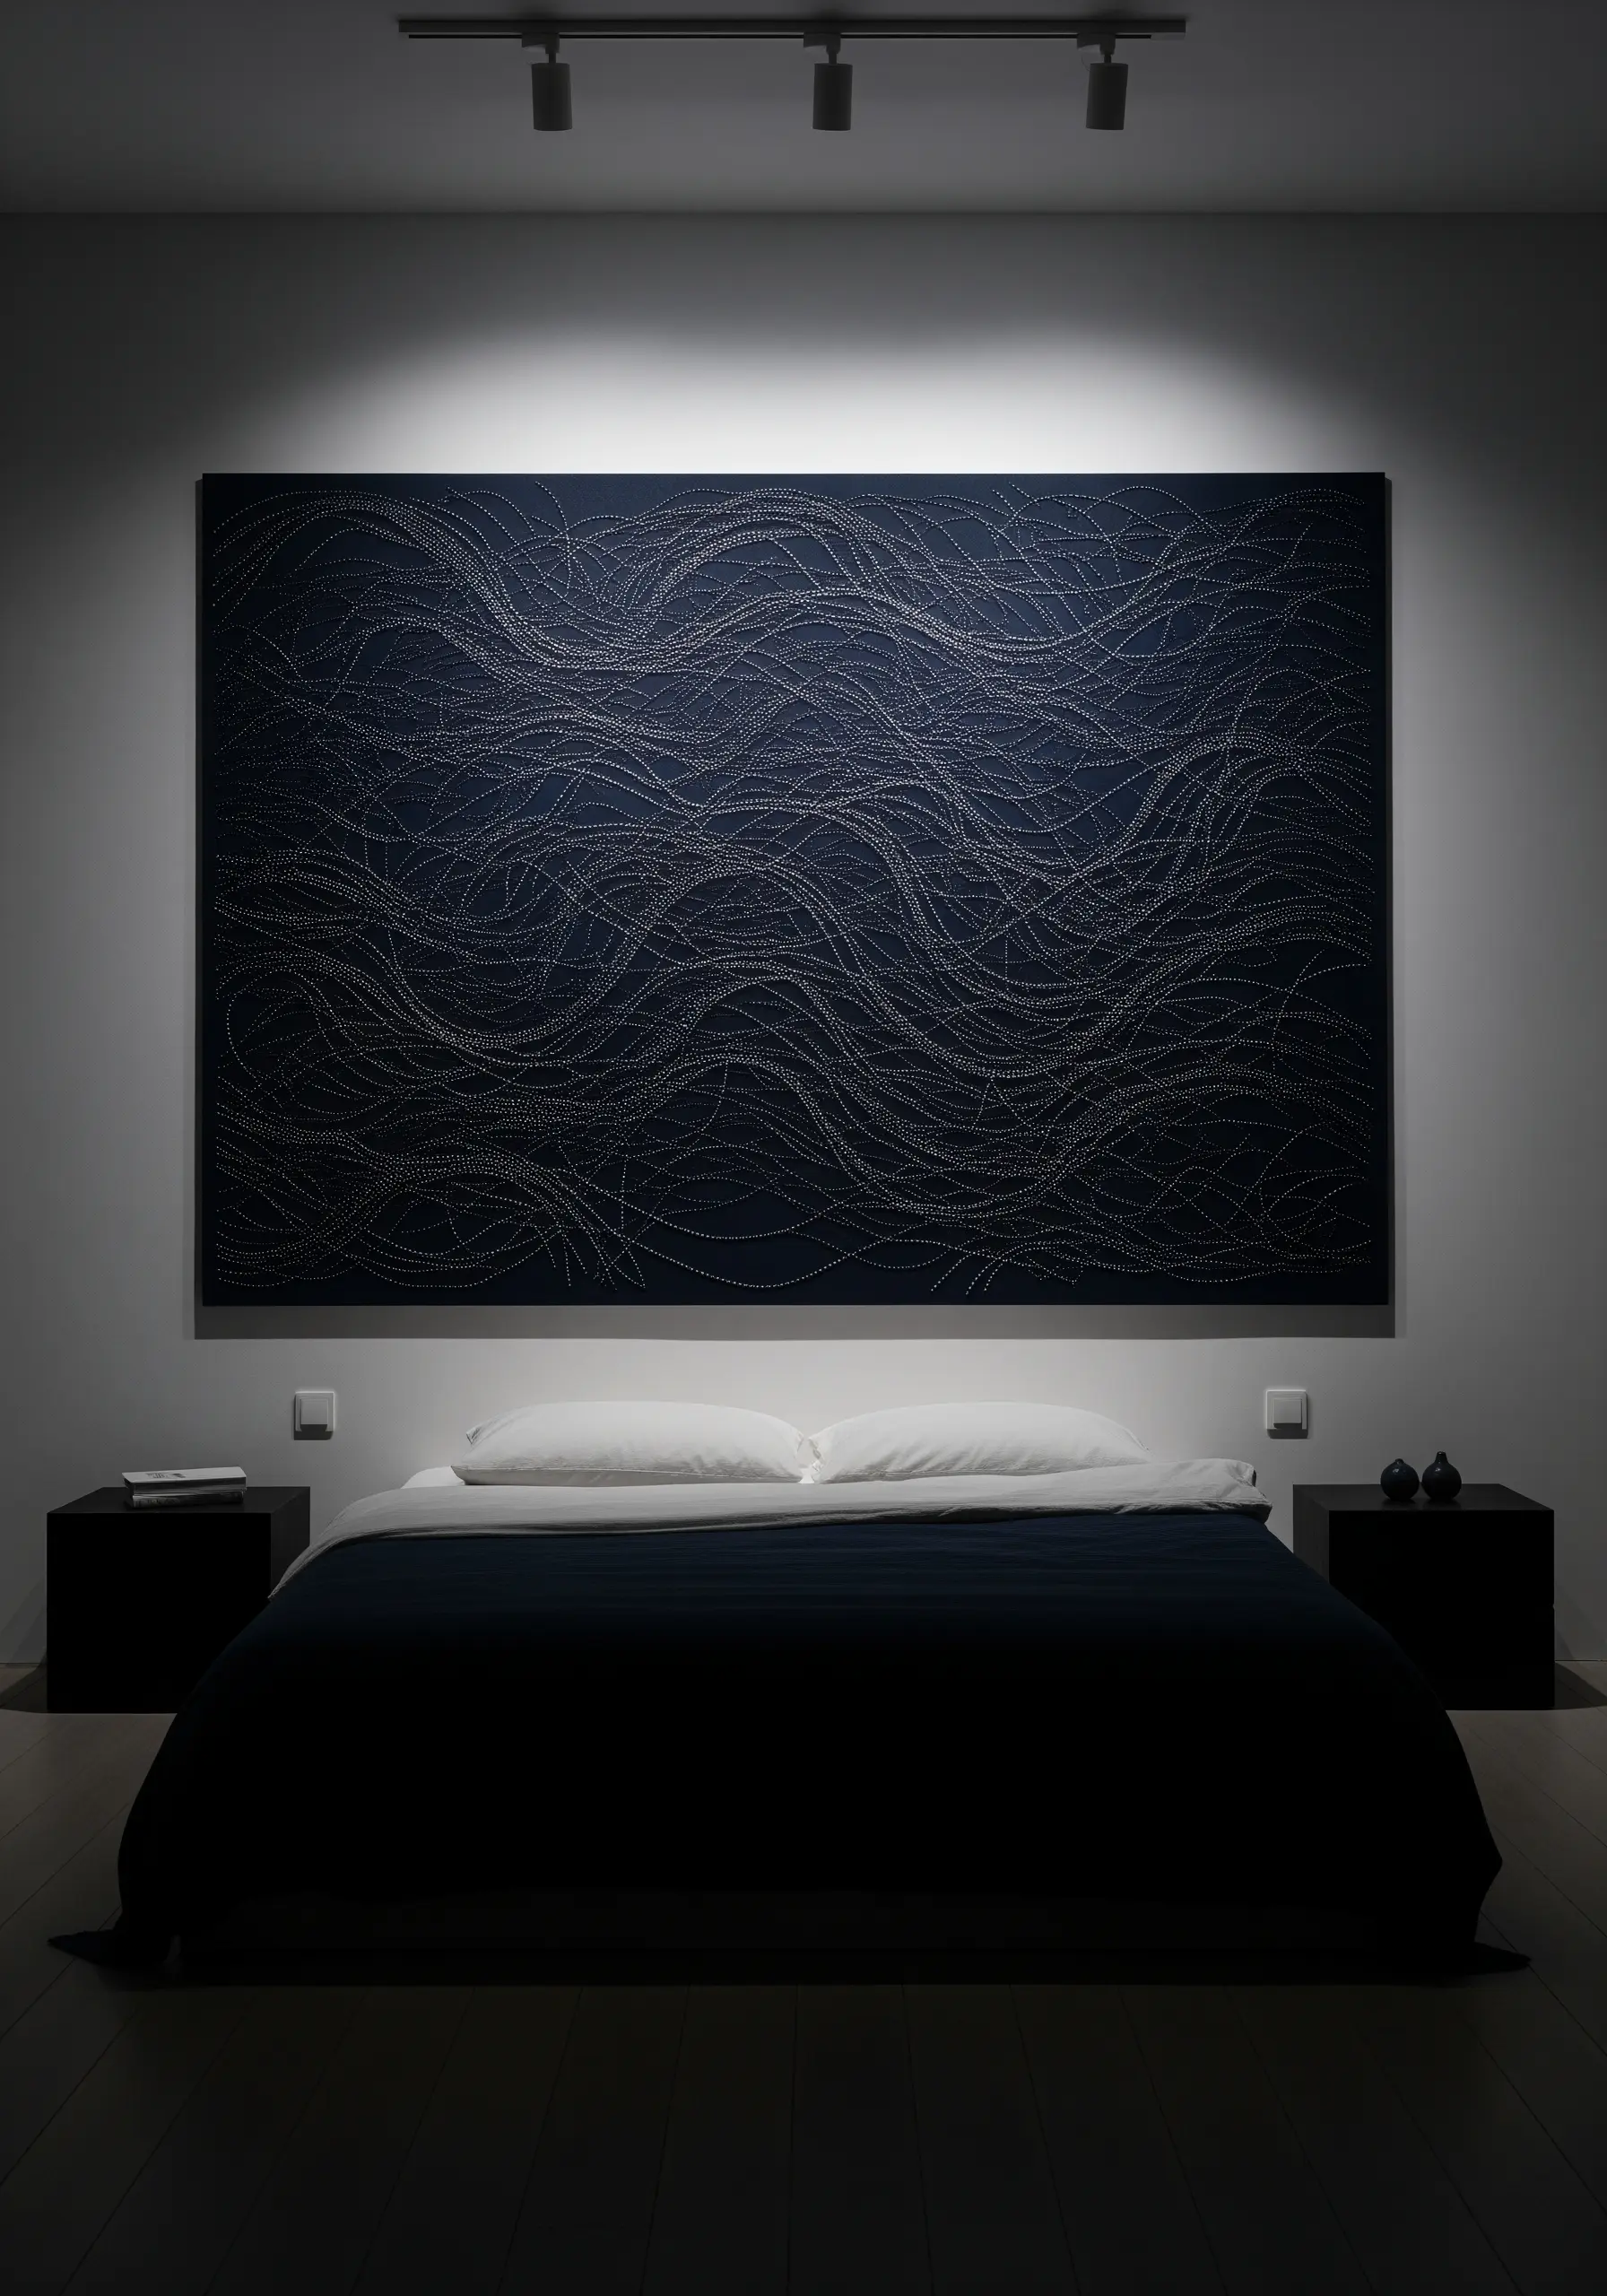
Suggest the movement of water on a grand scale by using thousands of tiny seed stitches.
On a dark navy or black canvas, use a light-colored thread like silver or off-white to create flowing, wave-like patterns with single, disconnected stitches.
The technique is meditative and simple, but the collective effect is powerful. By varying the density of the stitches—placing them closer together in some areas and further apart in others—you can create the illusion of light hitting the water’s surface.
This approach works beautifully for abstract thread embroidery ideas inspired by nature, turning a blank wall into a dramatic focal point.
16. Seafoam Texture with French Knot Clusters
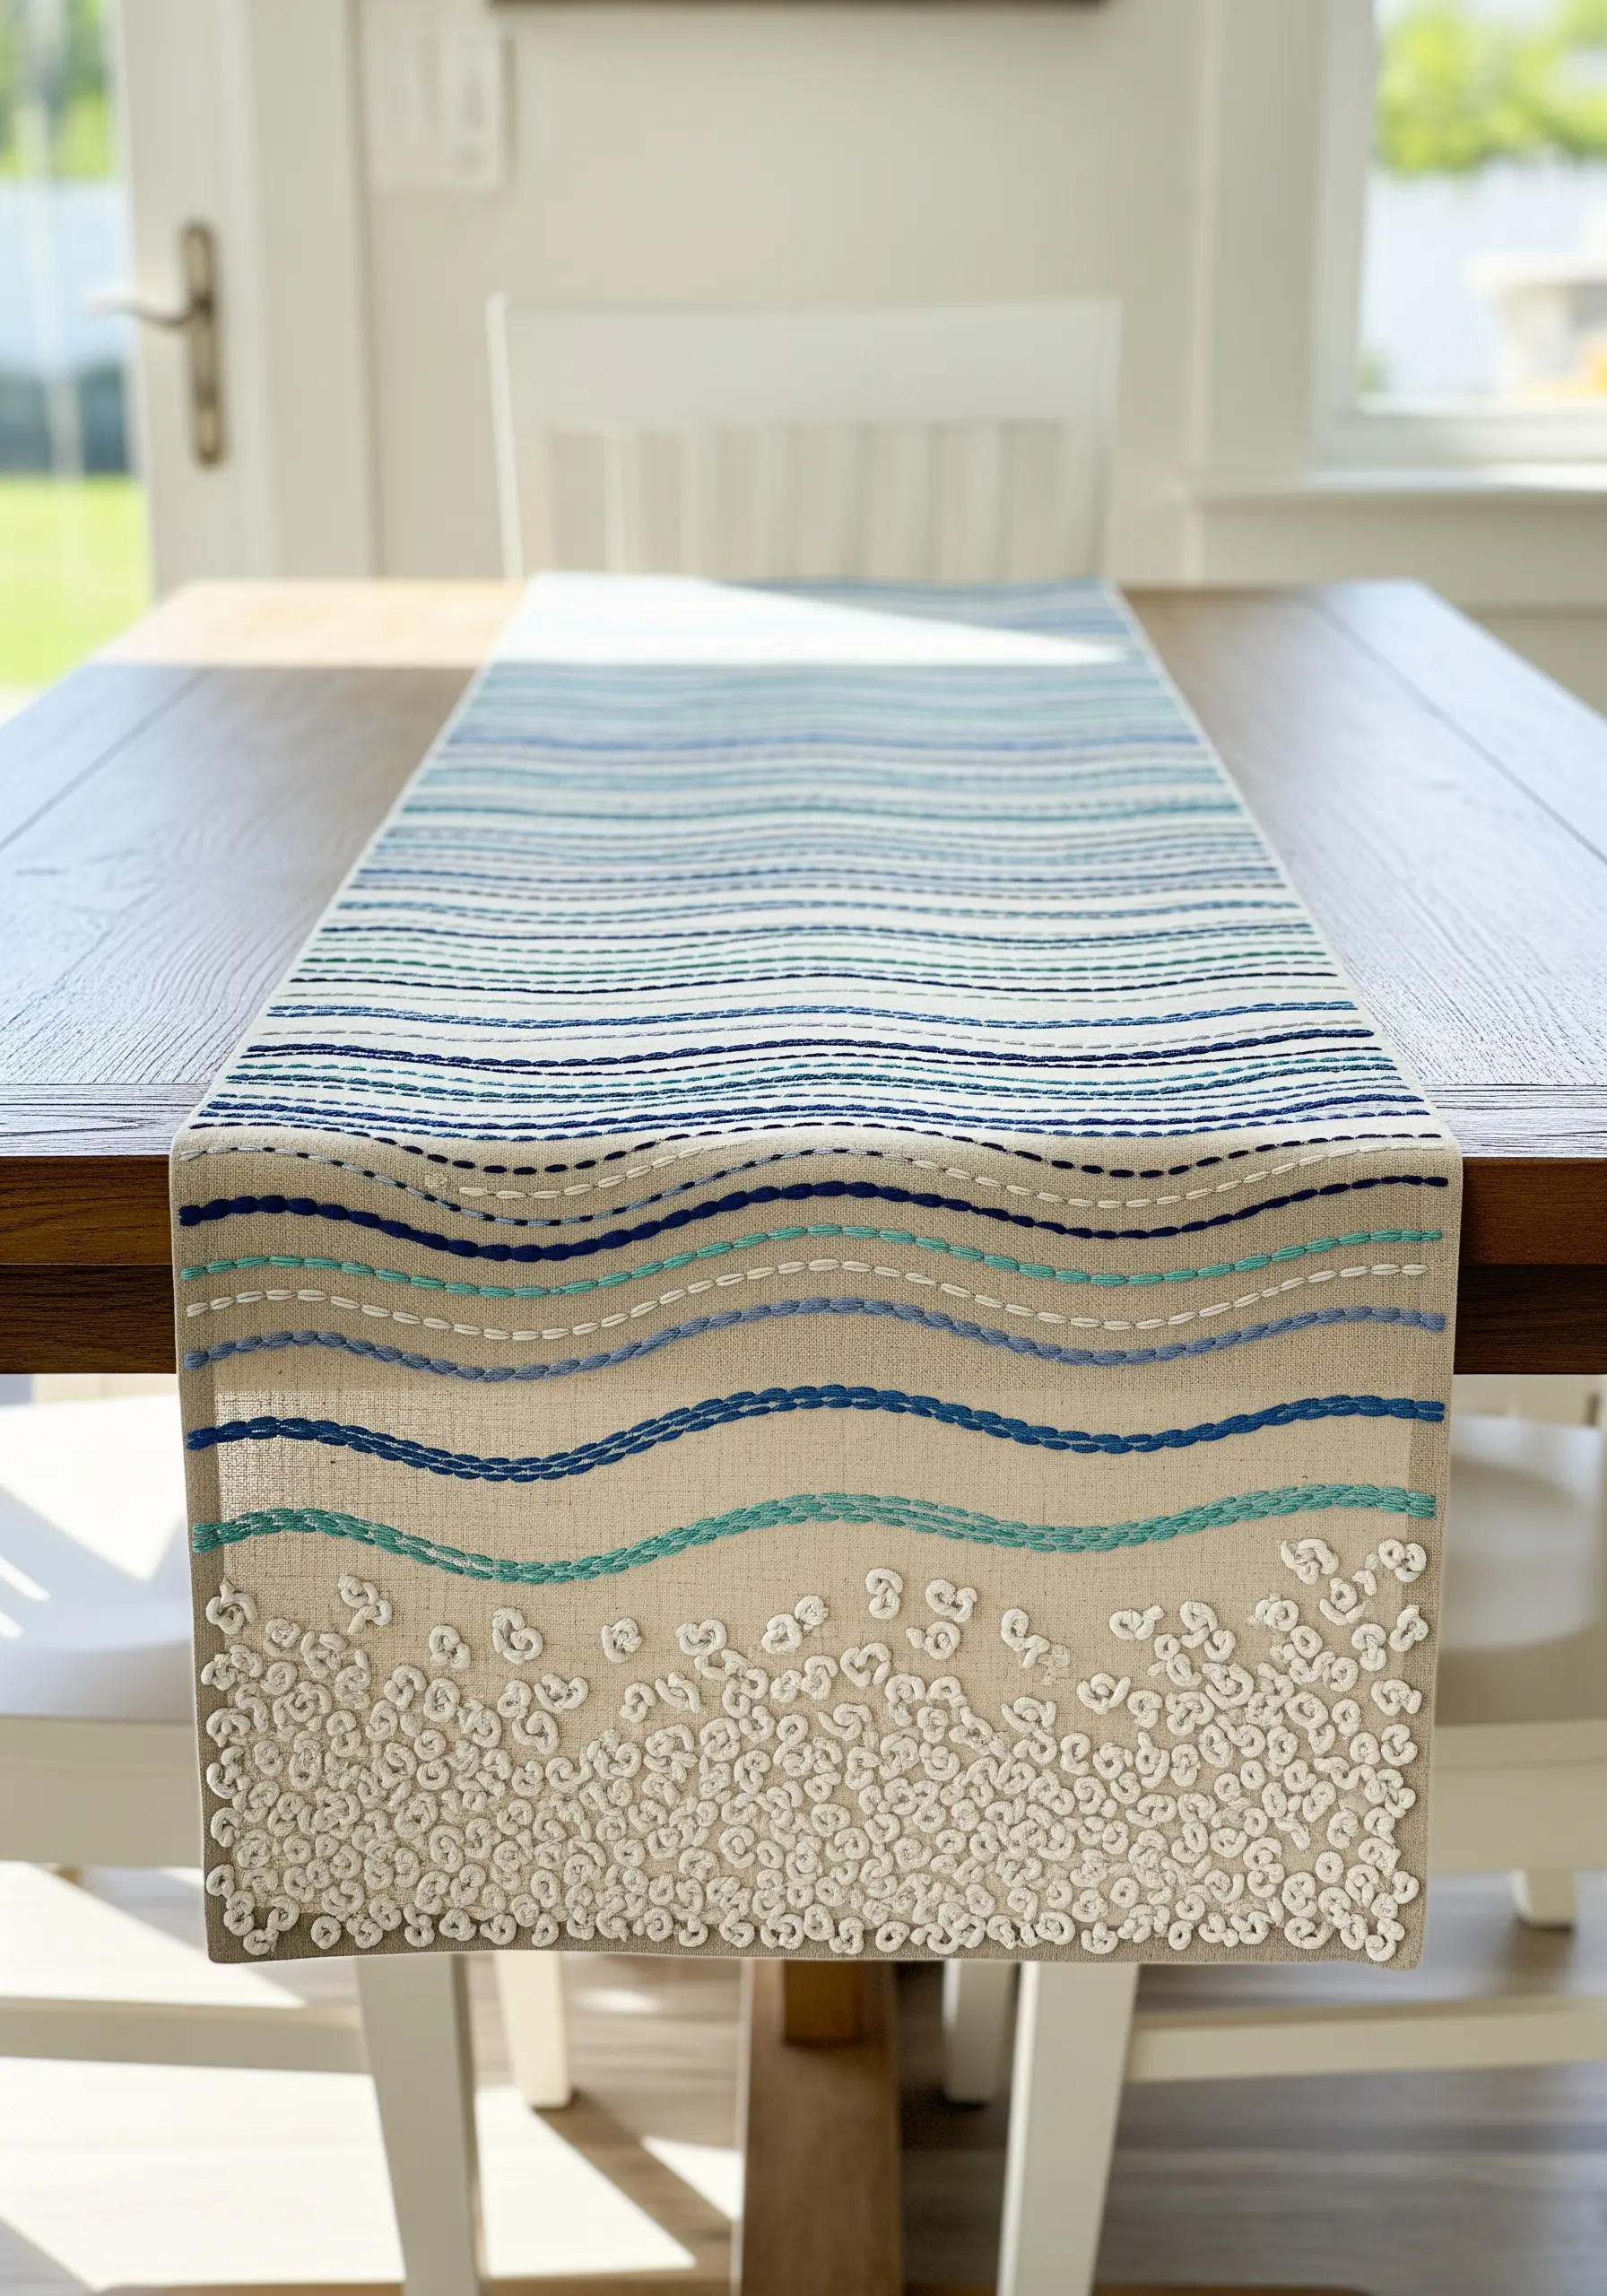
Evoke the frothy edge of the ocean by combining wavy lines with clusters of textural knots.
Create the waves using a simple backstitch or stem stitch in varying shades of blue and sea green. Allow the lines to be slightly irregular and overlapping for a natural feel.
For the seafoam, fill the end of the table runner with a dense, scattered arrangement of white and off-white French knots.
This contrast between the smooth, linear waves and the bubbly, three-dimensional knots is what makes the design so effective and evocative of a real shoreline.
You can find more ideas in our guide to hand-stitched table runner embroidery designs.
17. Agate Slice Effect with Padded Satin Stitch

Recreate the layered, flowing lines of an agate stone with careful color blocking and padded satin stitch.
Draw your wavy, concentric lines onto the fabric first. To create the raised, 3D effect, fill each band with a layer of underlying straight stitches before covering it with the final satin stitch.
Place darker colors next to lighter ones to enhance the sense of depth and dimension. The key is to keep your satin stitches perfectly smooth and uniform within each band.
Adding a single, shimmering line of metallic thread introduces a touch of luxury and mimics the crystalline veins found in real geodes.
18. Neural Network Lines with Couching
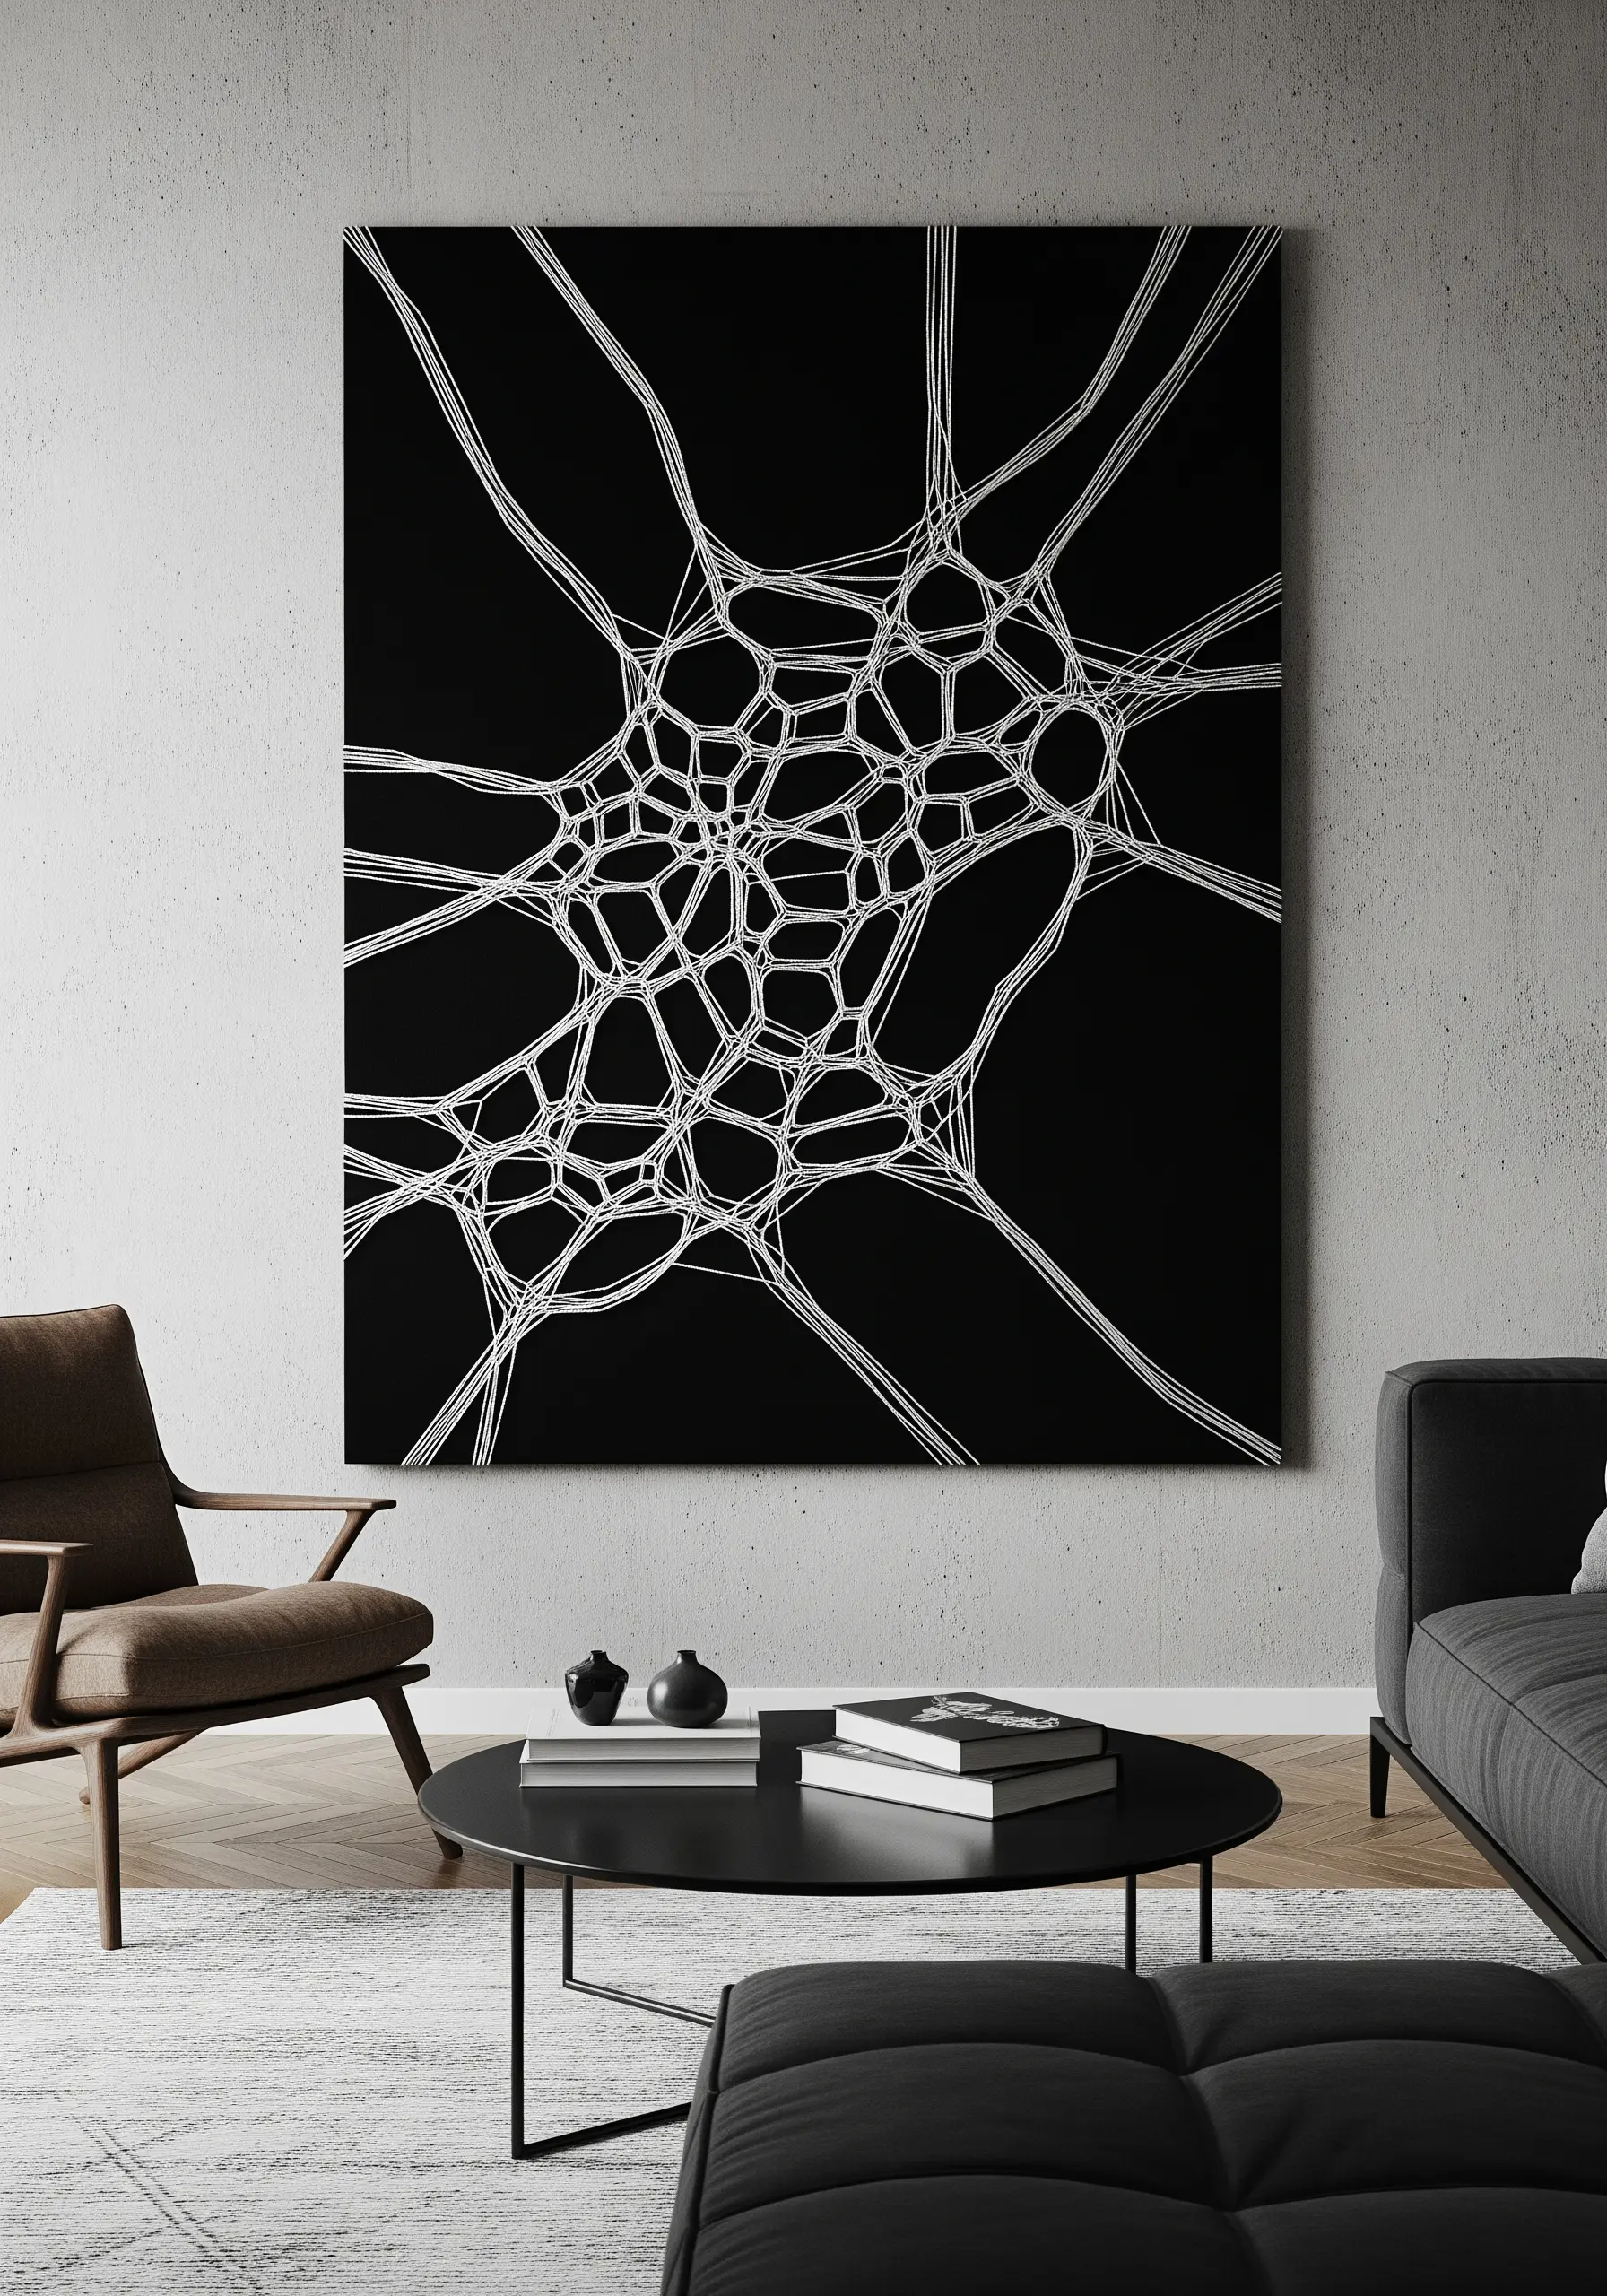
Create a dramatic, large-scale abstract piece that mimics natural networks—like neurons or root systems—using a simple couching technique.
On a black canvas, lay down a thick white cord or yarn in an organic, web-like pattern.
Secure the cord to the canvas with a thinner, near-invisible thread (like a white or translucent filament). This allows the thick white lines to appear as if they are floating on the surface.
The high contrast and bold, graphic nature of this design make a powerful statement in a modern living space.
19. Dandelion Head with French Knots and Straight Stitches

Construct a delicate dandelion head by combining two simple stitches for maximum textural contrast.
Create the fluffy seed center with a dense cluster of French knots in a light brown or off-white color. To add more dimension, use a beading needle to incorporate tiny seed beads among the knots.
For the airy seed pappus, stitch radiating straight stitches from the central cluster. Group them in small triangular bunches to mimic the natural structure of a dandelion clock.
The interplay between the tight, bumpy knots and the light, flyaway straight stitches makes the design feel both structured and ephemeral.
20. Seed Pod Motifs for Small Gift Bags

Embellish simple linen bags with charming botanical motifs inspired by seed pods and dried flowers.
Use satin stitch to create the solid pod shapes, and add definition with a backstitched outline in a slightly darker thread.
Incorporate French knots to represent seeds and use a simple stem stitch for the branches. This combination of stitches adds a lovely variety of textures to a small design.
Sticking to an earthy, neutral color palette gives these bags a rustic, handmade charm that makes any small gift feel more thoughtful and special.
These are great DIY embroidered presents that everyone will actually want.
21. Abstract Cloud Texture with Turkey Stitch
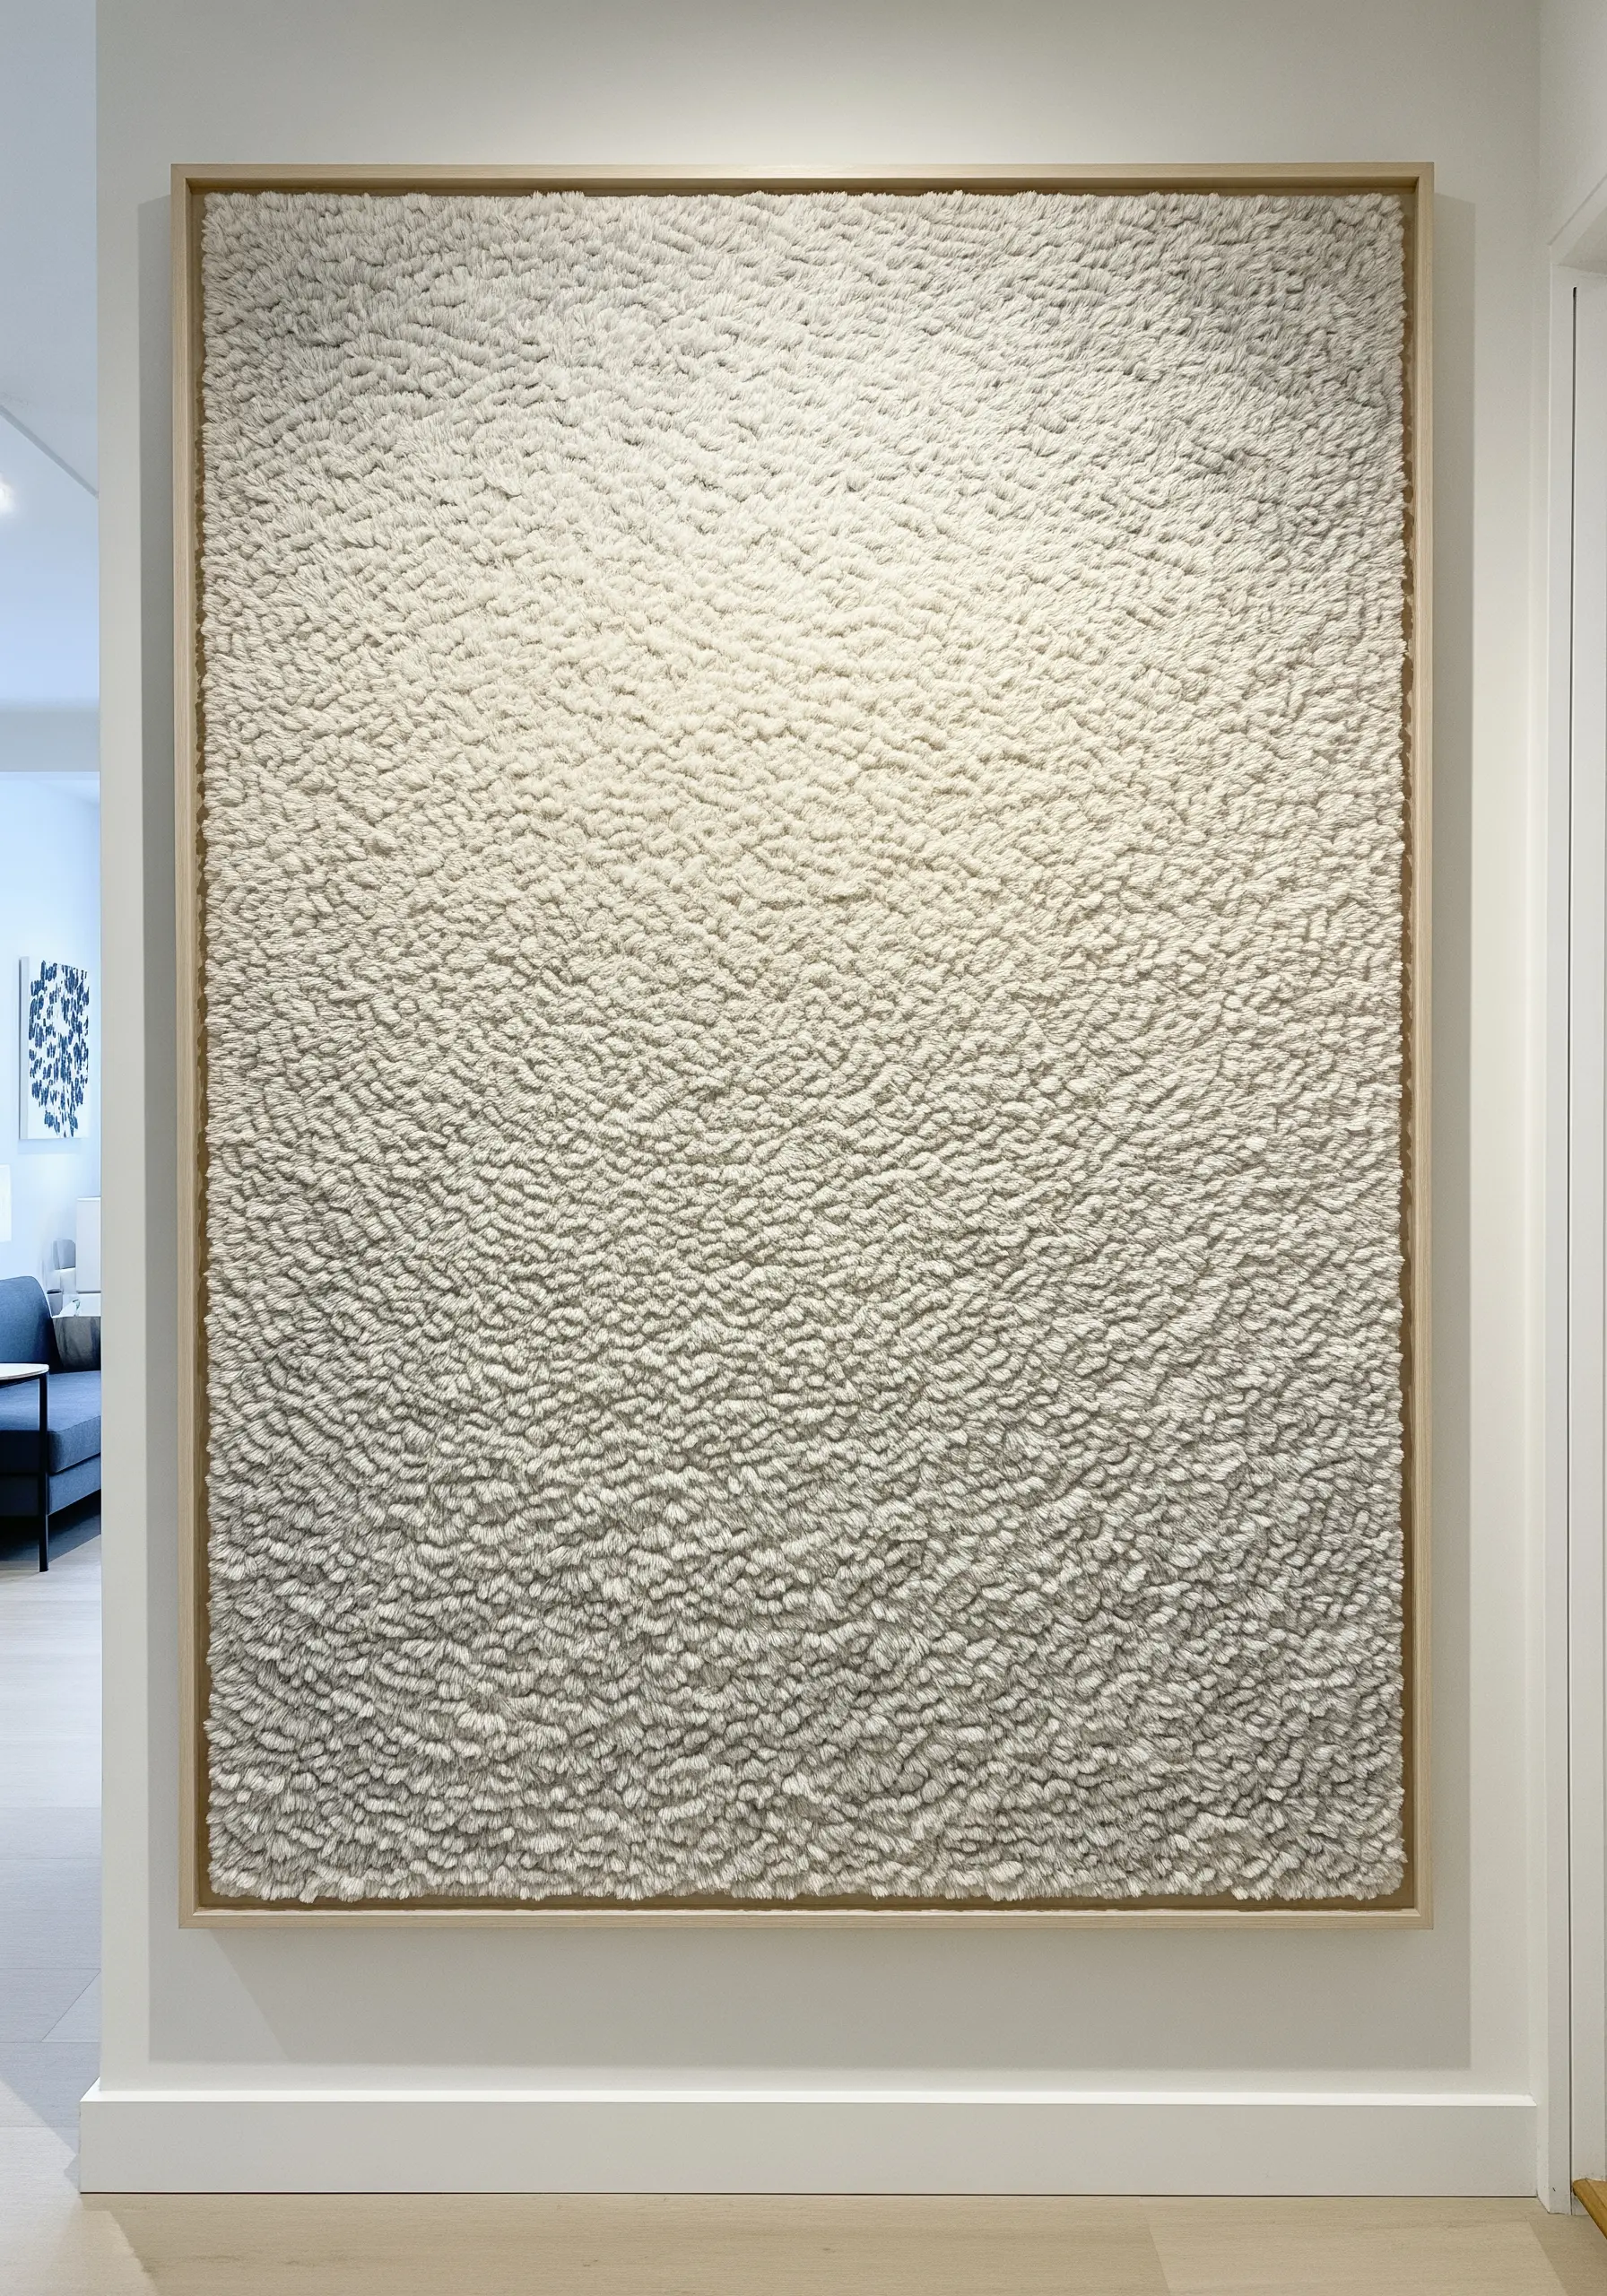
Achieve a deep, plush texture reminiscent of soft wool or clouds by using the turkey stitch, also known as the ghiordes knot.
This stitch creates loops on the surface of your fabric, which you can then trim to your desired length to create a dense, rug-like pile.
Work the stitches very close together for a thick, luxurious feel. Once you’ve filled your area, use sharp scissors to shear the loops, revealing a soft, velvety texture.
Using a single color of wool or cotton yarn in a large-scale piece like this creates a minimalist, high-impact artwork where texture is the undisputed star.
22. Braided Rug Effect with Thick Yarn Couching
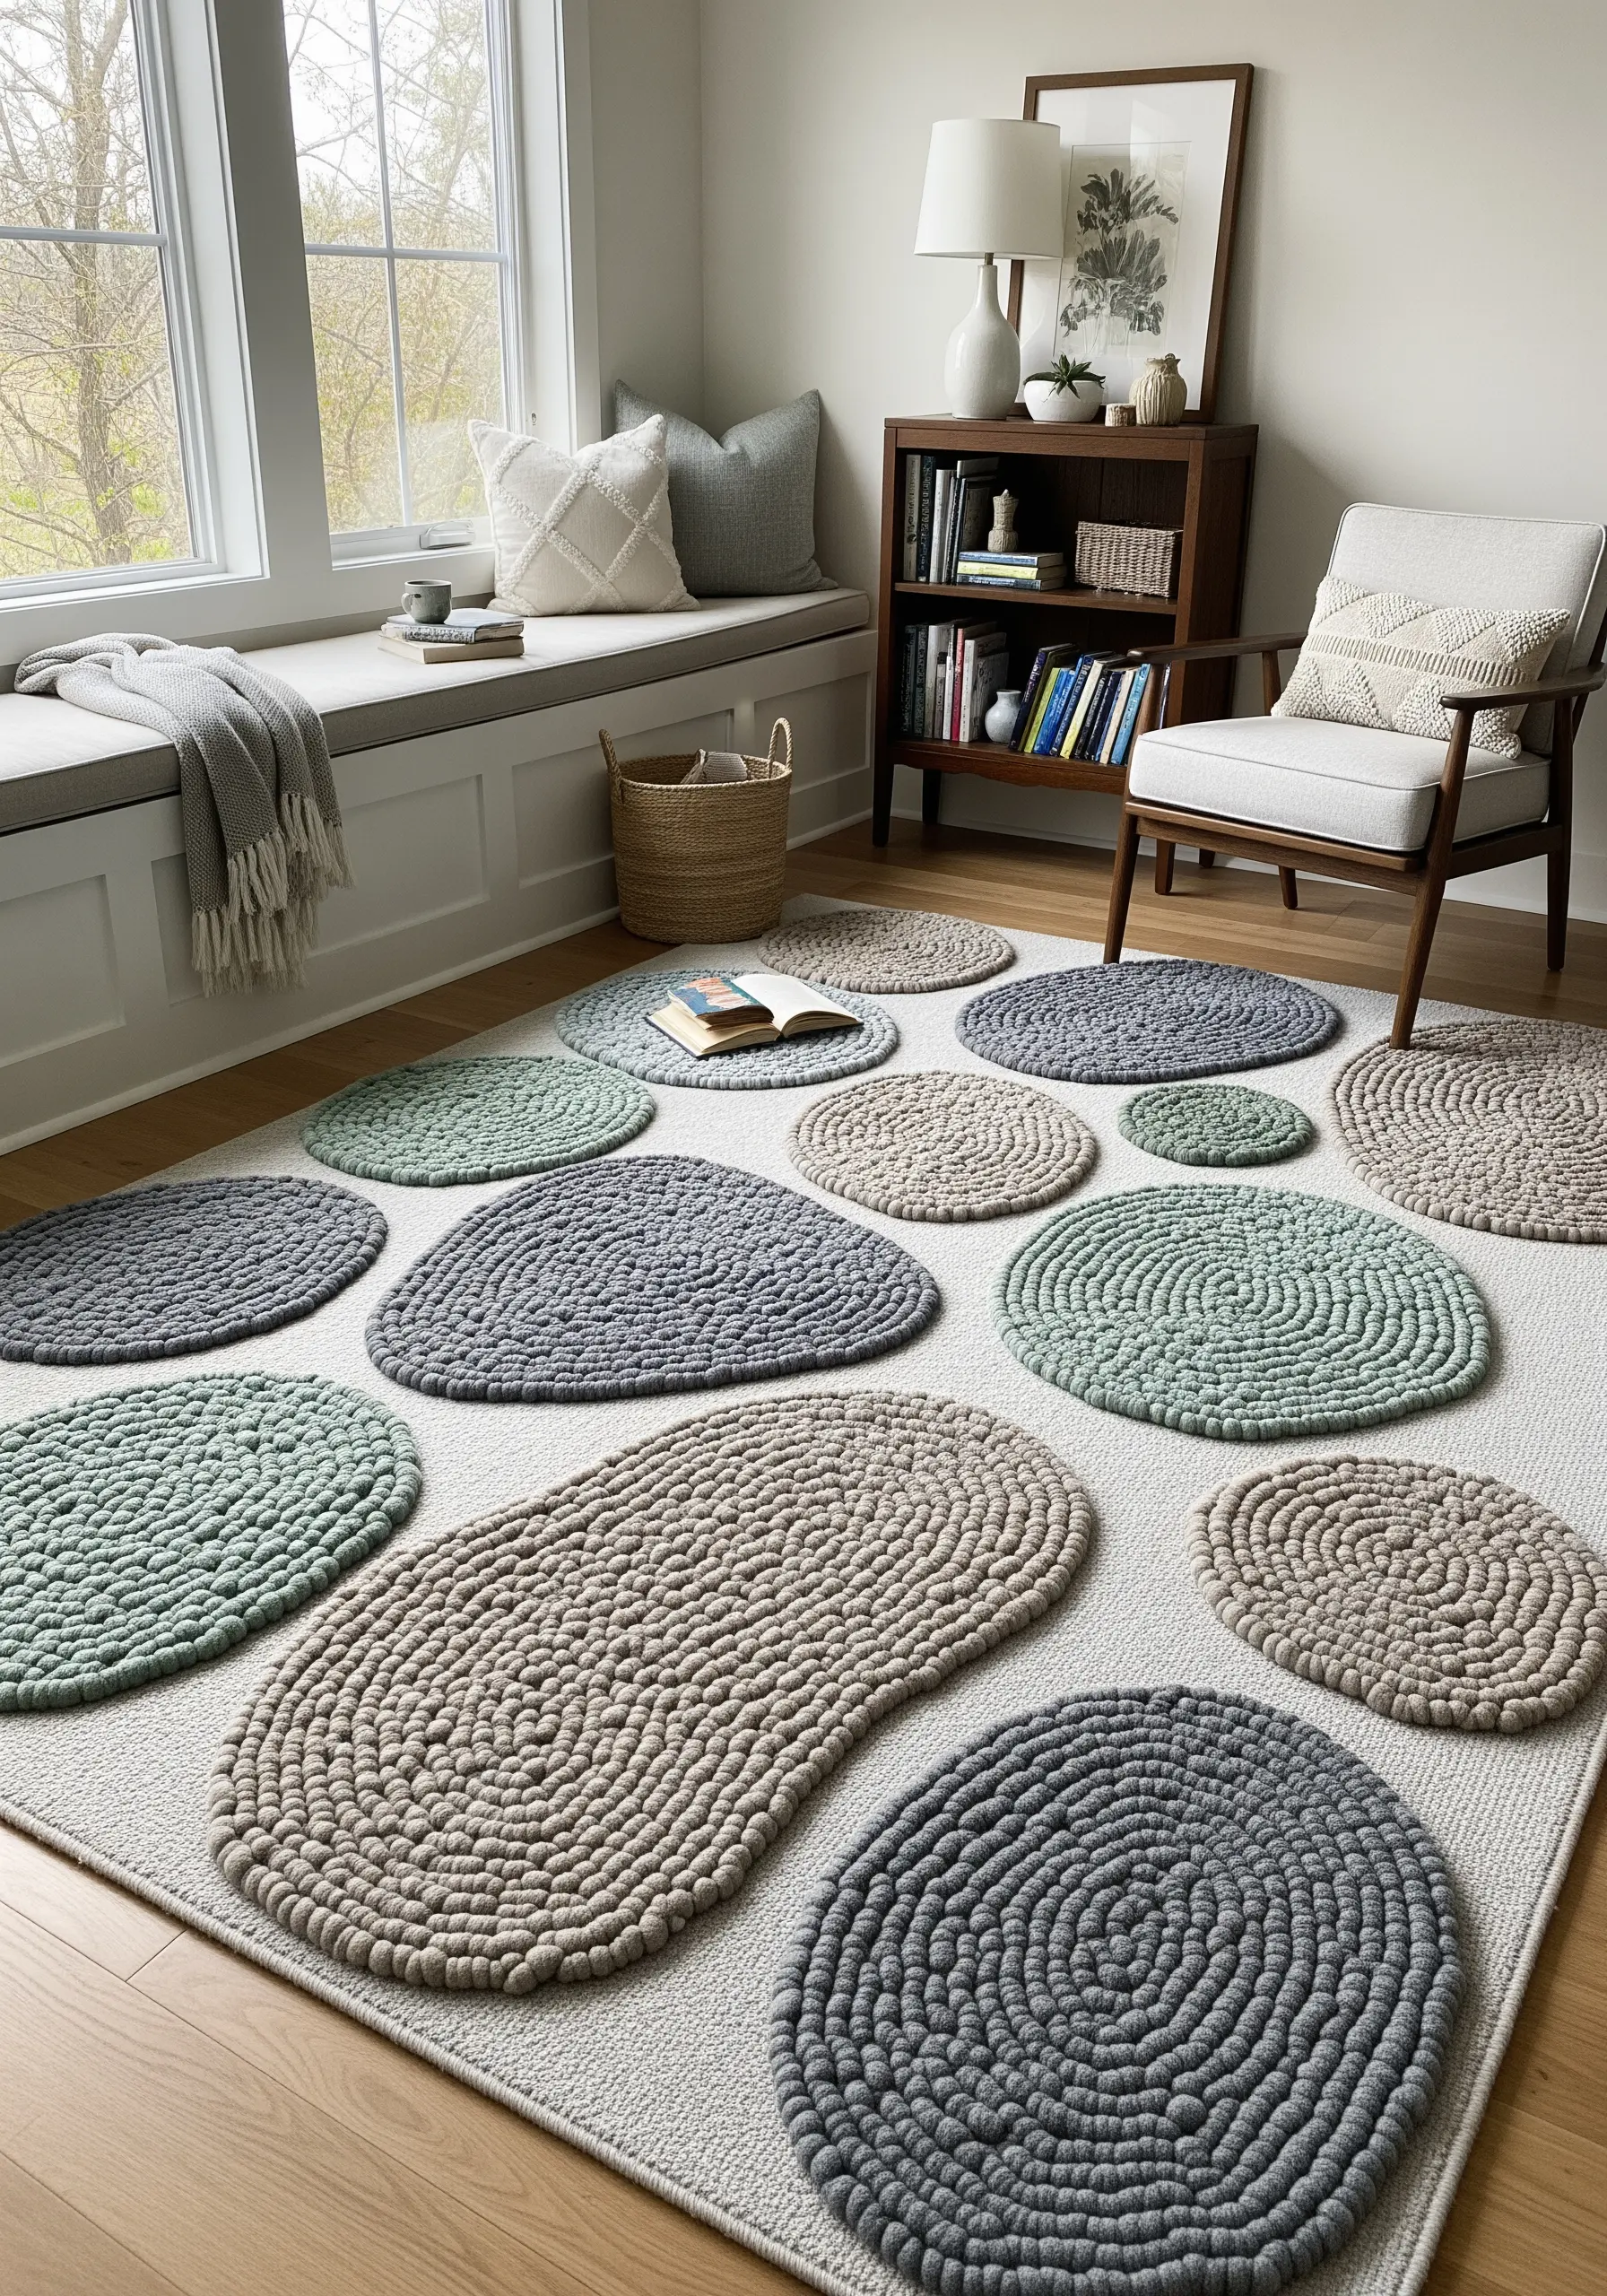
Create the look of a braided rug without any weaving by coiling and couching super-chunky yarn.
Choose a thick, soft yarn in muted, earthy tones for a calming aesthetic. Working on a sturdy canvas or felt backing, begin coiling the yarn in a spiral or oval shape.
Use a strong, matching thread to stitch the yarn down to the backing fabric, hiding your stitches between the coils of yarn.
You can create multiple ‘pebbles’ and arrange them on a larger rug base for a unique, custom-designed floor covering that is soft, textural, and visually stunning.
23. Woven Landscape with Varied Stitches
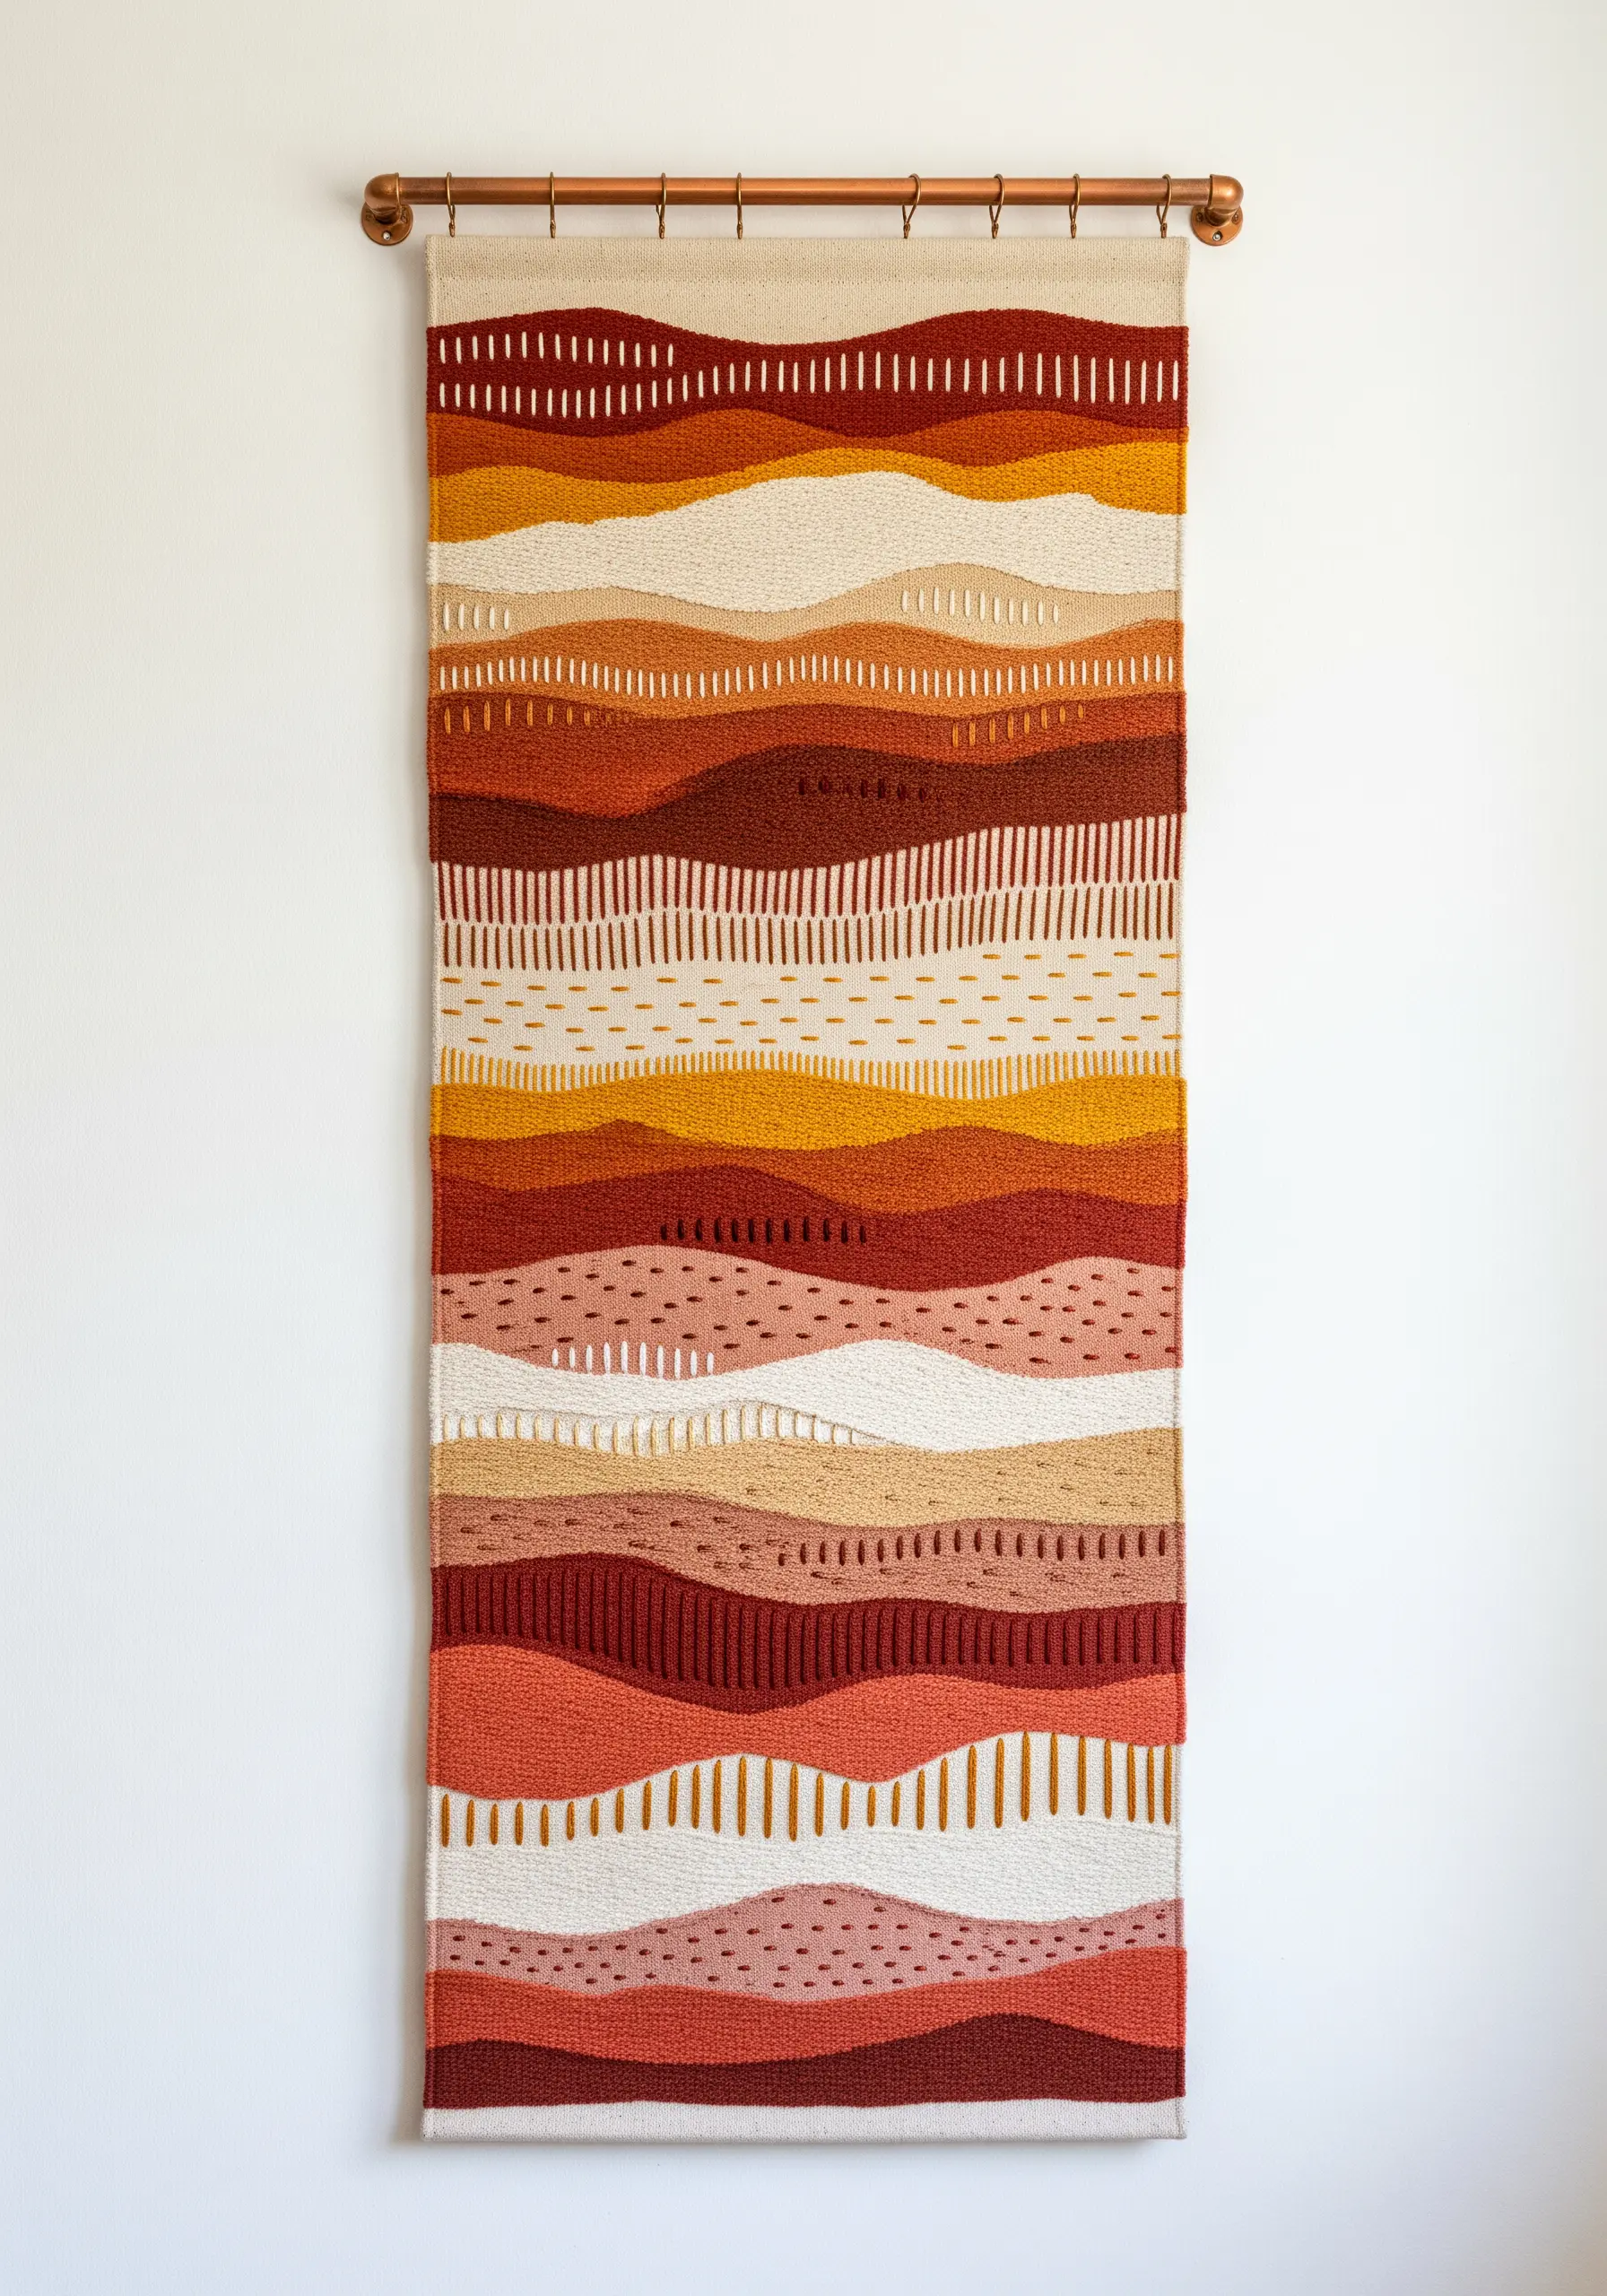
Capture the layered look of a desert landscape by combining areas of flat color with sections of textural stitches.
Use long-and-short stitch or satin stitch to create the smooth, rolling hills of color in warm, earthy tones like terracotta, ochre, and sand.
Intersperse these smooth sections with bands of simple straight stitches, seed stitches, or even French knots to represent different soil textures or sparse vegetation.
This technique, often used in weaving, translates beautifully to embroidery, creating a wall hanging that is rich with both color and tactile detail.
24. Coral Reef Texture with Knots and Woven Wheels

Build a vibrant, tactile coral reef using a playful combination of highly dimensional stitches.
Use bullion knots to create worm-like coral shapes and dense clusters of French knots for brain coral textures. For a unique 3D effect, try the cast-on stitch to build up bumpy, organic forms.
Incorporate woven wheel stitches (or spider web roses) for circular, flower-like anemones. Use a contrasting color for the spokes and the weaving to make them pop.
The key is to pack the stitches tightly together, overlapping them to create a dense, fascinating ecosystem of thread.
25. Delicate Dragonfly Wings with Metallic Thread

Capture the fragile, veined structure of a dragonfly’s wing using a fine metallic thread on a sheer or light-colored fabric.
Use a single strand of metallic floss and a simple backstitch to create the main veins of the wing. This provides a strong structural outline.
For the intricate, web-like cells in between, use a couching technique. Lay down the metallic thread in the desired pattern and tack it in place with a much finer, translucent thread.
This method allows you to create delicate, intersecting lines without piercing the fabric too many times, preserving the sheer quality of the wing.
26. Wild Grasses with Raised Stem Stitch and Knots

Create a field of swaying grasses on a cushion by using dimensional stitches and a varied color palette.
Use a padded stem stitch or a whipped backstitch for the long, flowing blades of grass. This will make them stand out from the fabric surface.
Incorporate bullion knots or elongated French knots at the tips of the stalks to represent seed heads and grains, varying their size and color for a more natural look.
Overlapping the stitches and using multiple shades of green, gold, and cream will create a sense of depth and movement, turning a simple pillow into a piece of botanical art.
27. Falling Snowflakes with Minimalist Stitches
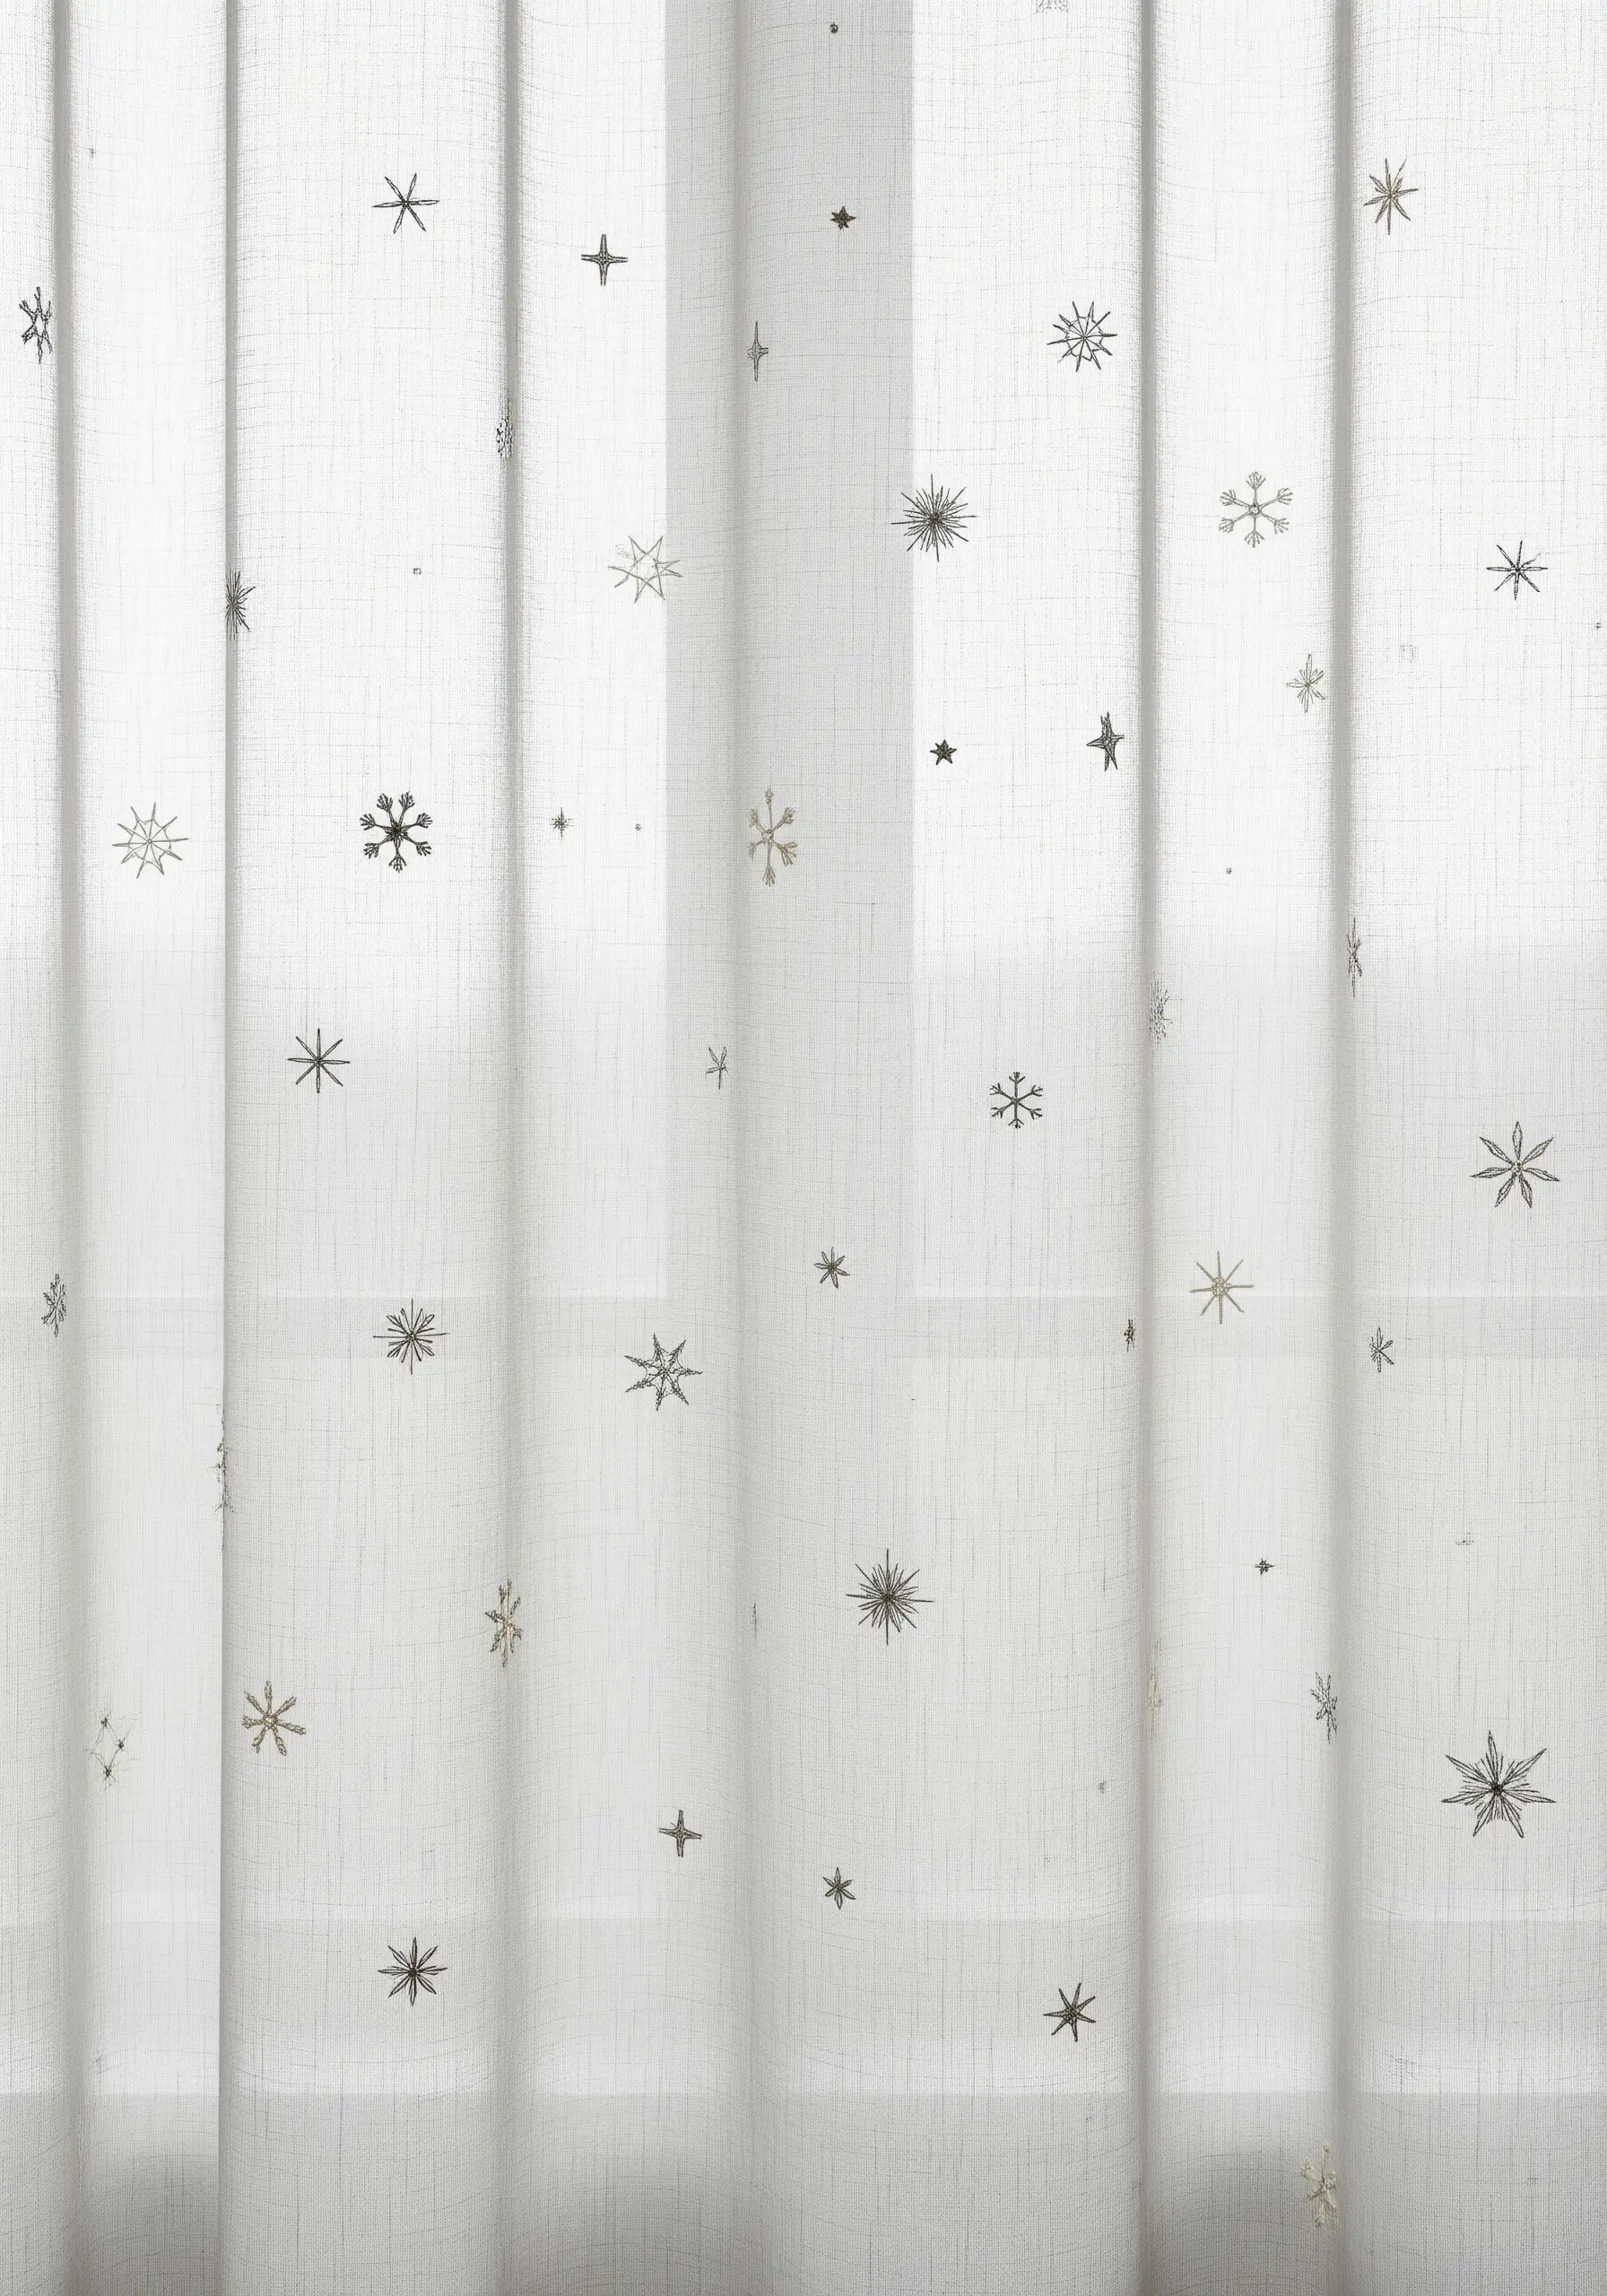
Embellish sheer curtains with the delicate, fleeting beauty of snowflakes using just a few simple stitches.
Use a single strand of metallic silver, white, or light gray thread to keep the design light and airy.
Create a variety of snowflake shapes using basic straight stitches, lazy daisy stitches for looped ends, and tiny French knots for the centers.
Scatter them randomly across the fabric, varying their size and complexity. The negative space is just as important as the stitches, creating the feeling of a gentle, sparse snowfall.
28. Hydrangea Petals with Long-and-Short Stitch
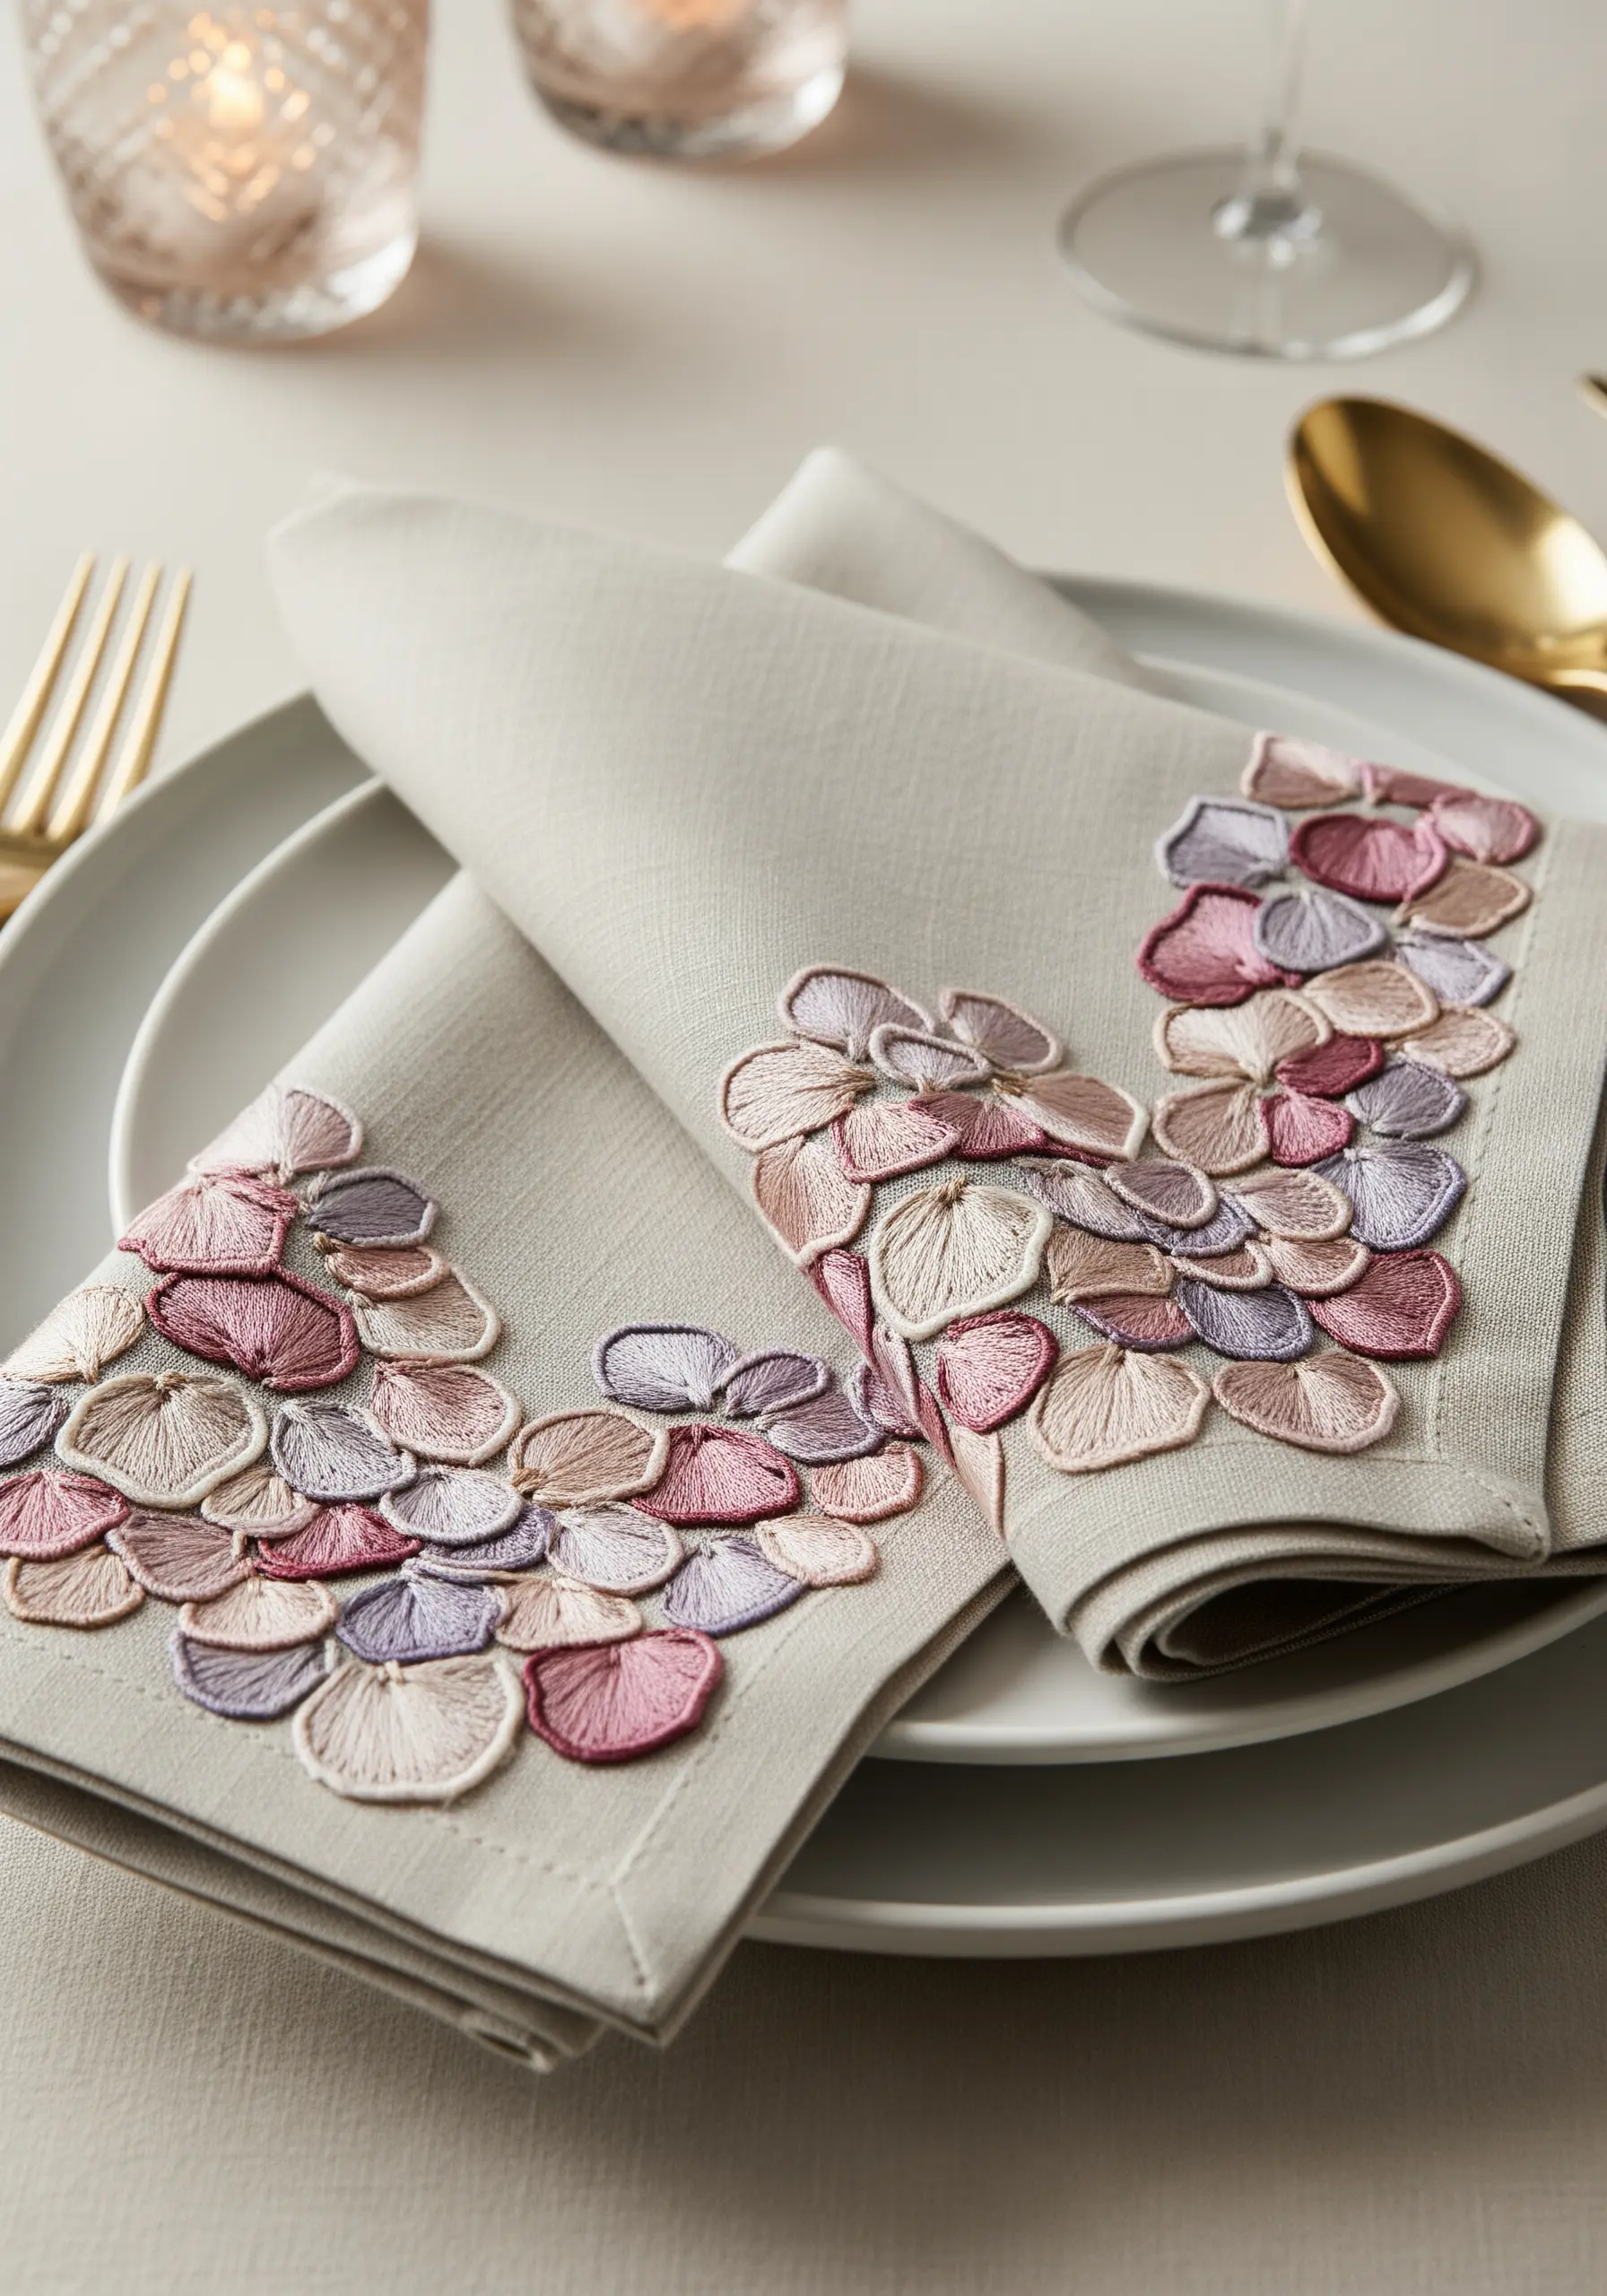
Achieve the soft, painterly look of hydrangea petals by using the long-and-short stitch, also known as thread painting.
Instead of filling each petal with a flat satin stitch, this technique allows you to blend colors seamlessly. Start with one color at the edge and work inwards, using stitches of varying lengths.
Introduce a new shade by bringing your needle up through the previous stitches, creating a soft, natural gradient.
For these beautiful hydrangea color blend techniques, outline each petal cluster with a delicate backstitch to give it definition against the linen fabric.
29. Geometric Tiling with Padded Satin Stitch
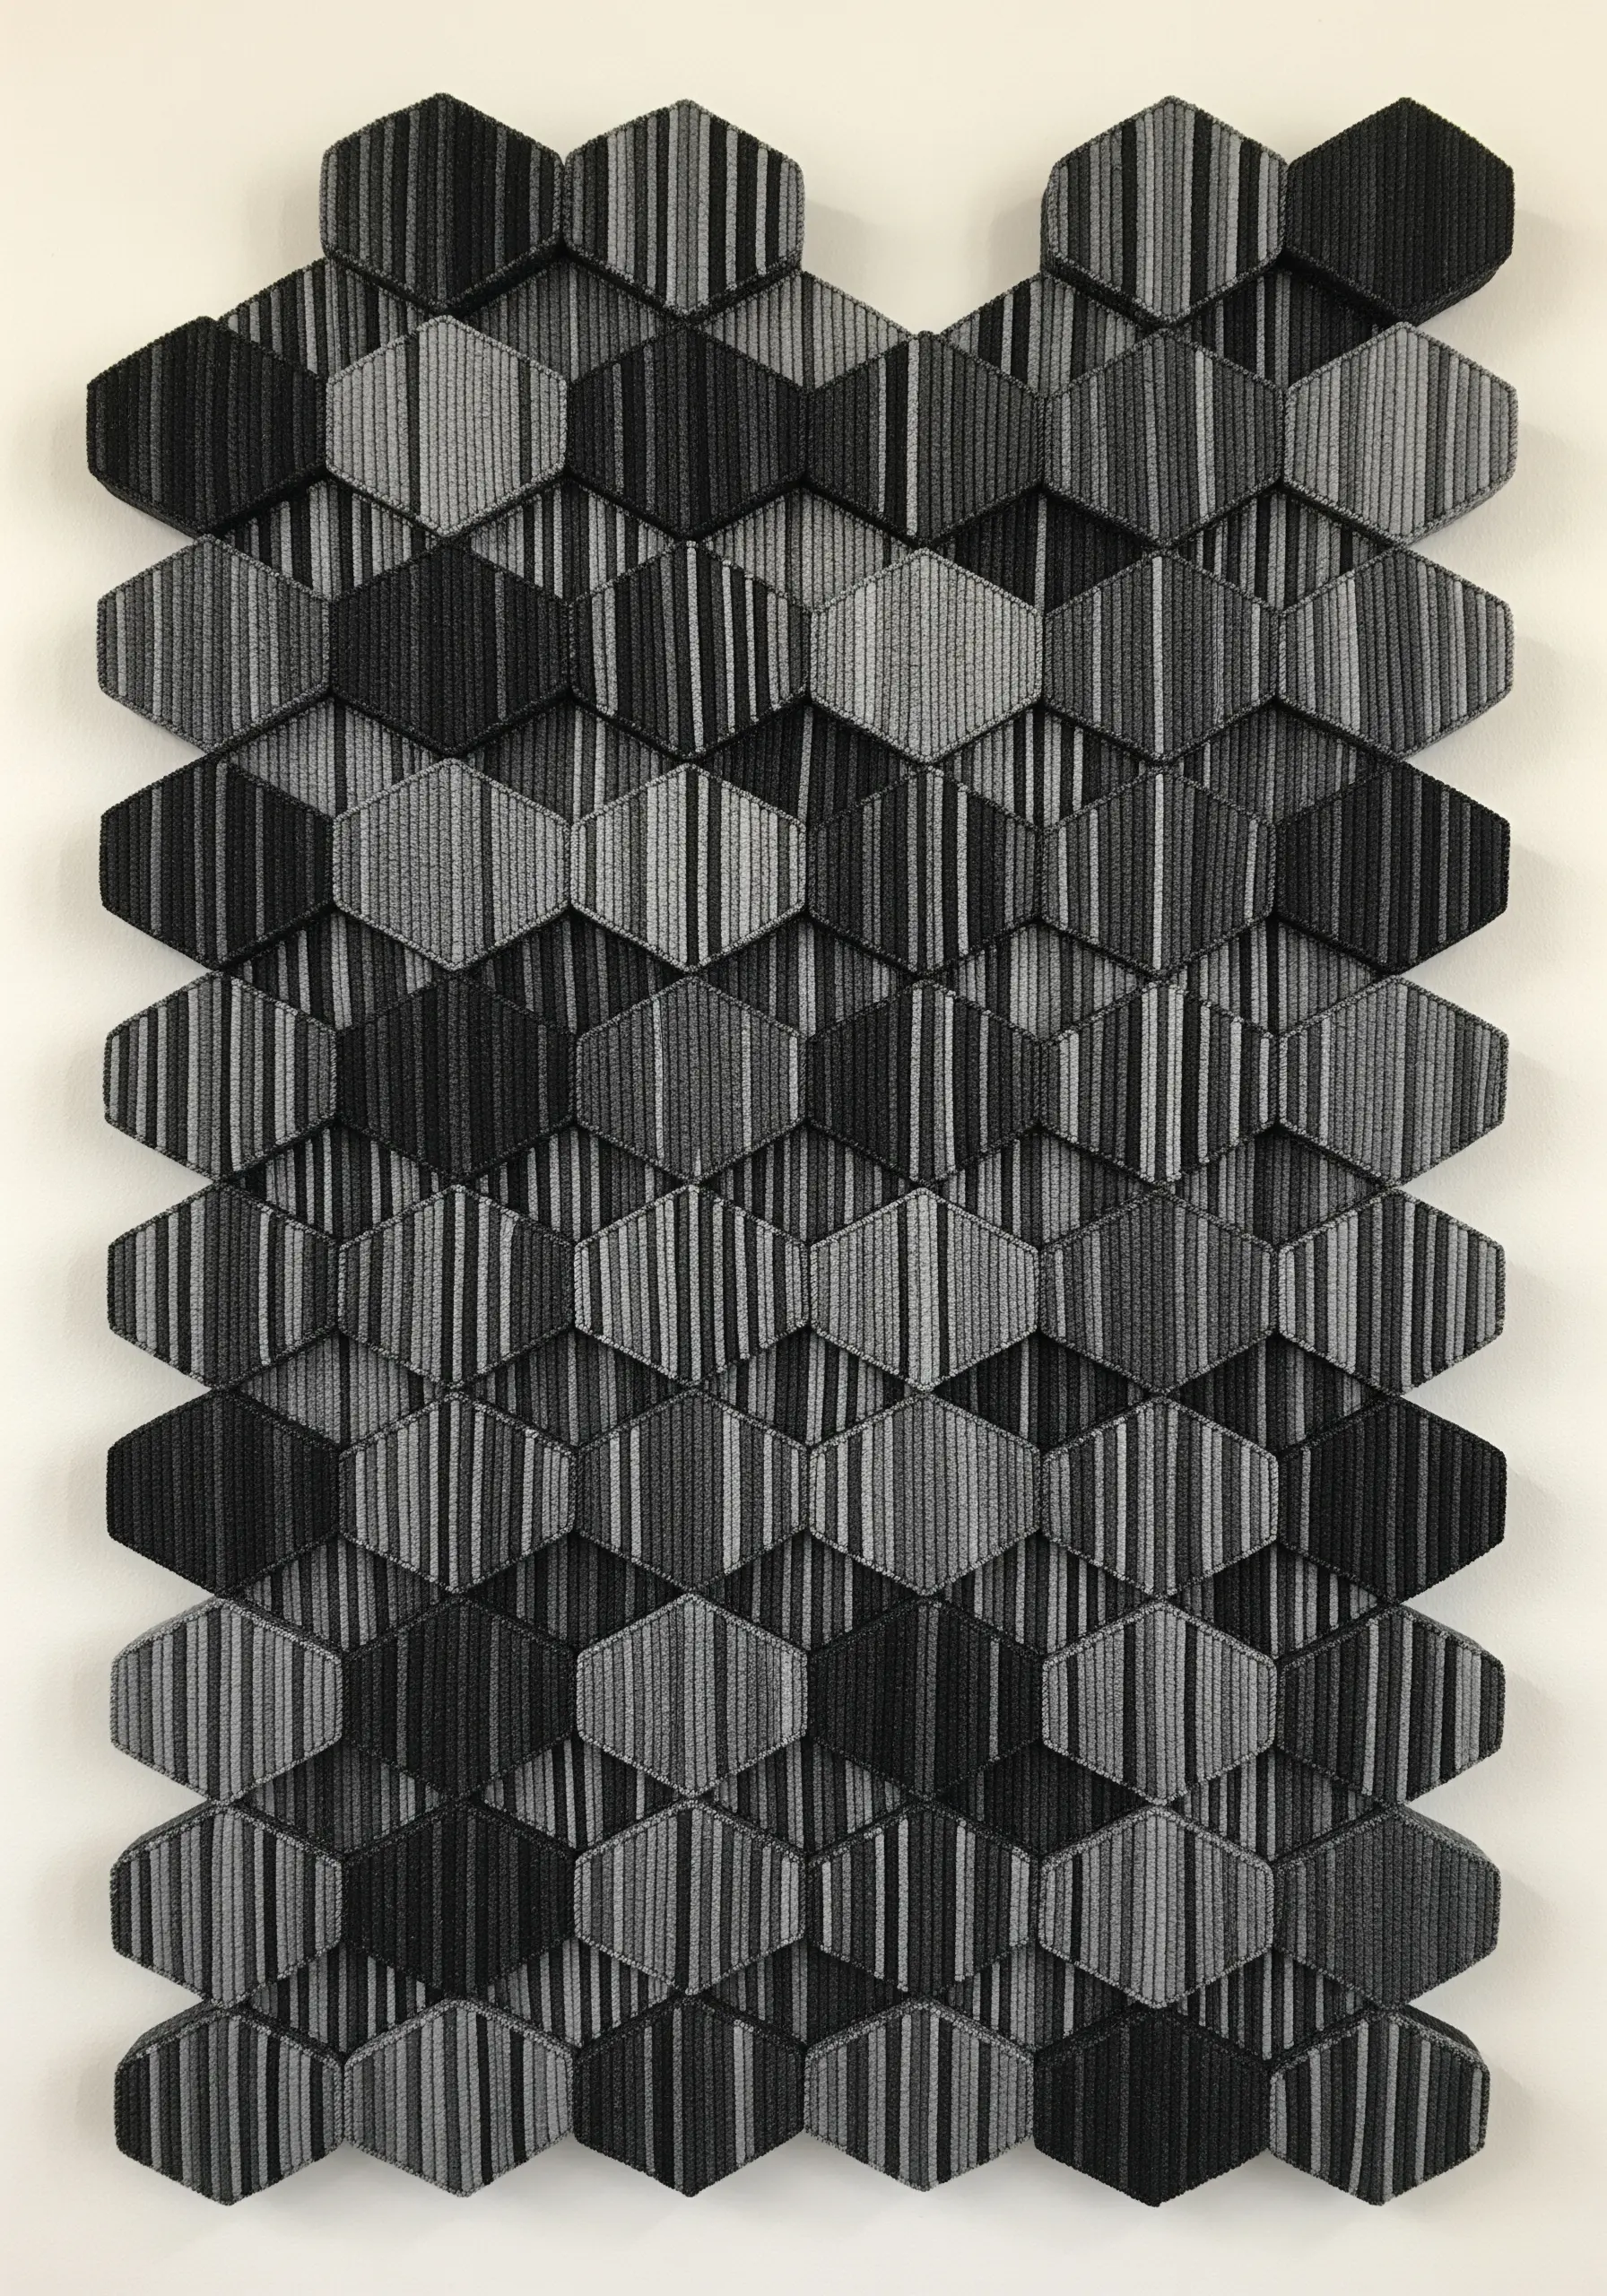
Create a 3D, tiled effect by embroidering individual hexagonal shapes and arranging them in a honeycomb pattern.
For each hexagon, use a padded satin stitch to give it loft and dimension. You can achieve this by first filling the shape with horizontal stitches, then covering those with vertical satin stitches.
Alternate the direction of the final satin stitch layer (vertical on one, horizontal on the next) to make the tiles reflect light differently, enhancing the geometric illusion.
Mounting the individual embroidered shapes on a firm backing before arranging them creates a truly sculptural piece of wall art.
30. Spiderweb with Beaded Dewdrops
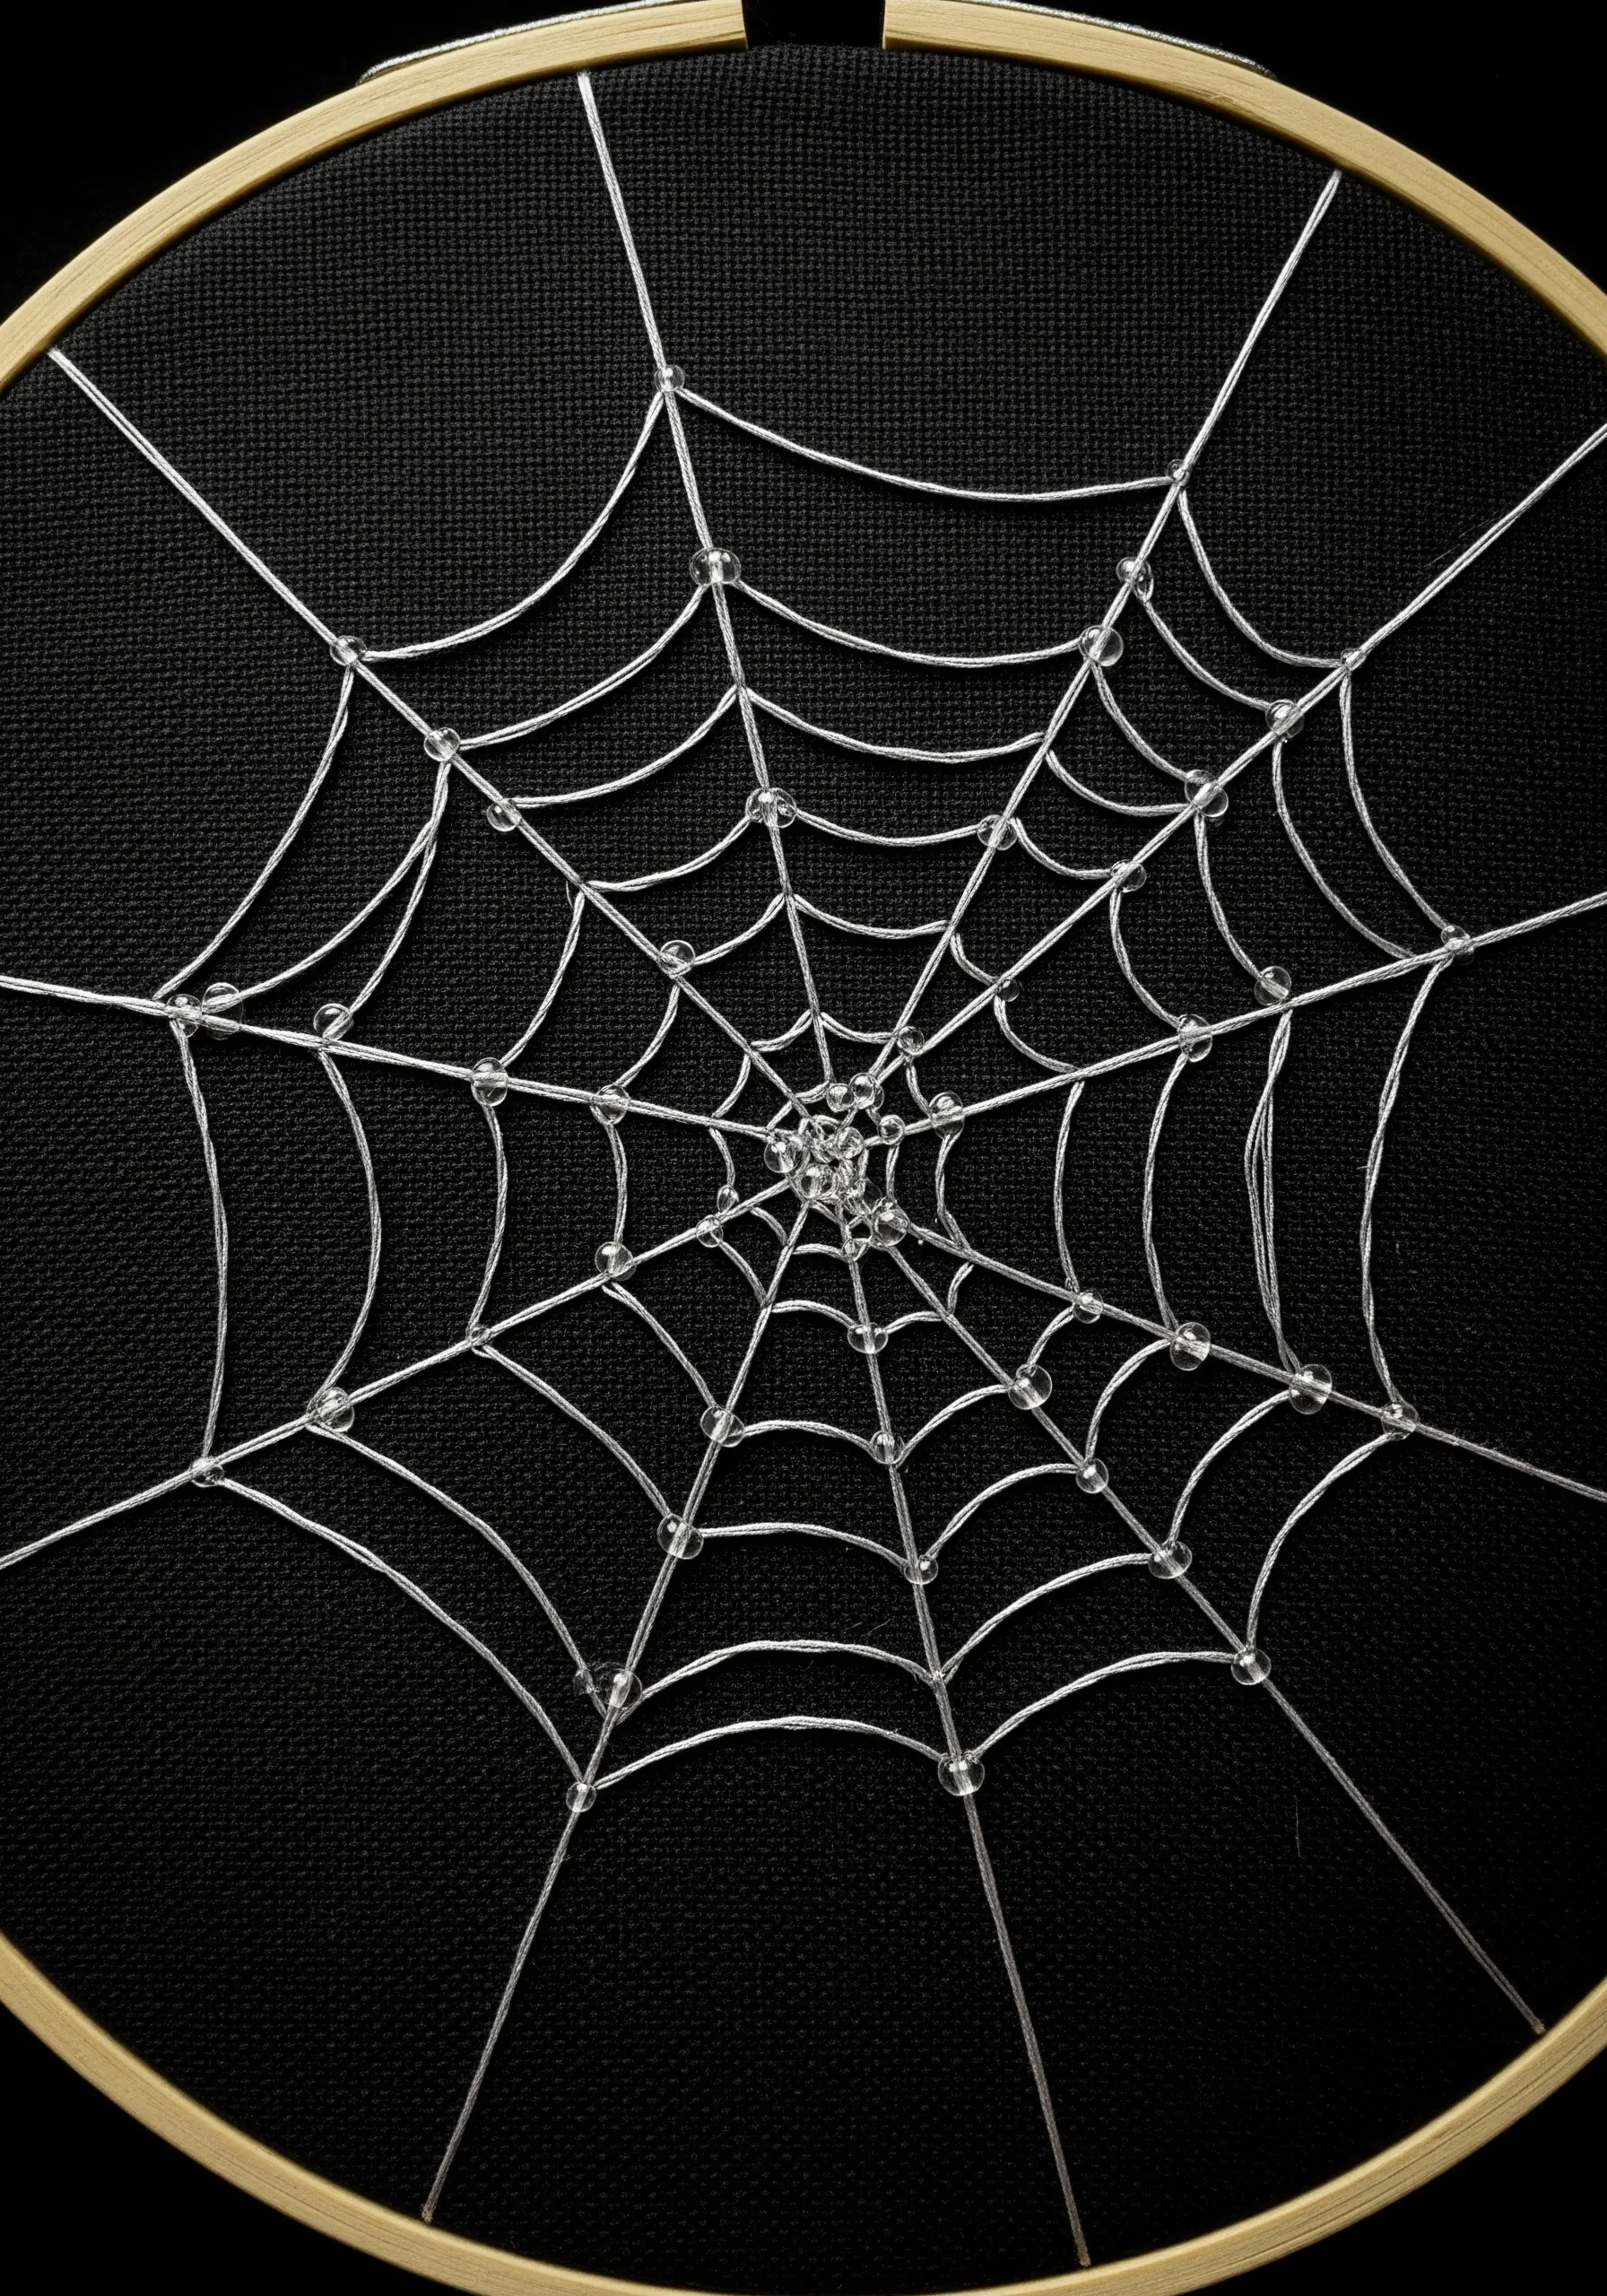
Construct an ethereal spiderweb that looks both delicate and structured by combining fine thread with tiny beads.
Use a single strand of a fine, strong thread like a silk or metallic filament in silver or white. Create the radiating spokes of the web first, ensuring they are taut.
Then, couch the spiraling threads on top, securing them at each spoke with a tiny, almost invisible stitch.
Add tiny, clear seed beads or crystals at the intersections to mimic dewdrops. This adds a subtle sparkle and enhances the web’s delicate, magical quality, especially against a dark fabric.
31. Riverbed Lace with Detached Chain Stitches
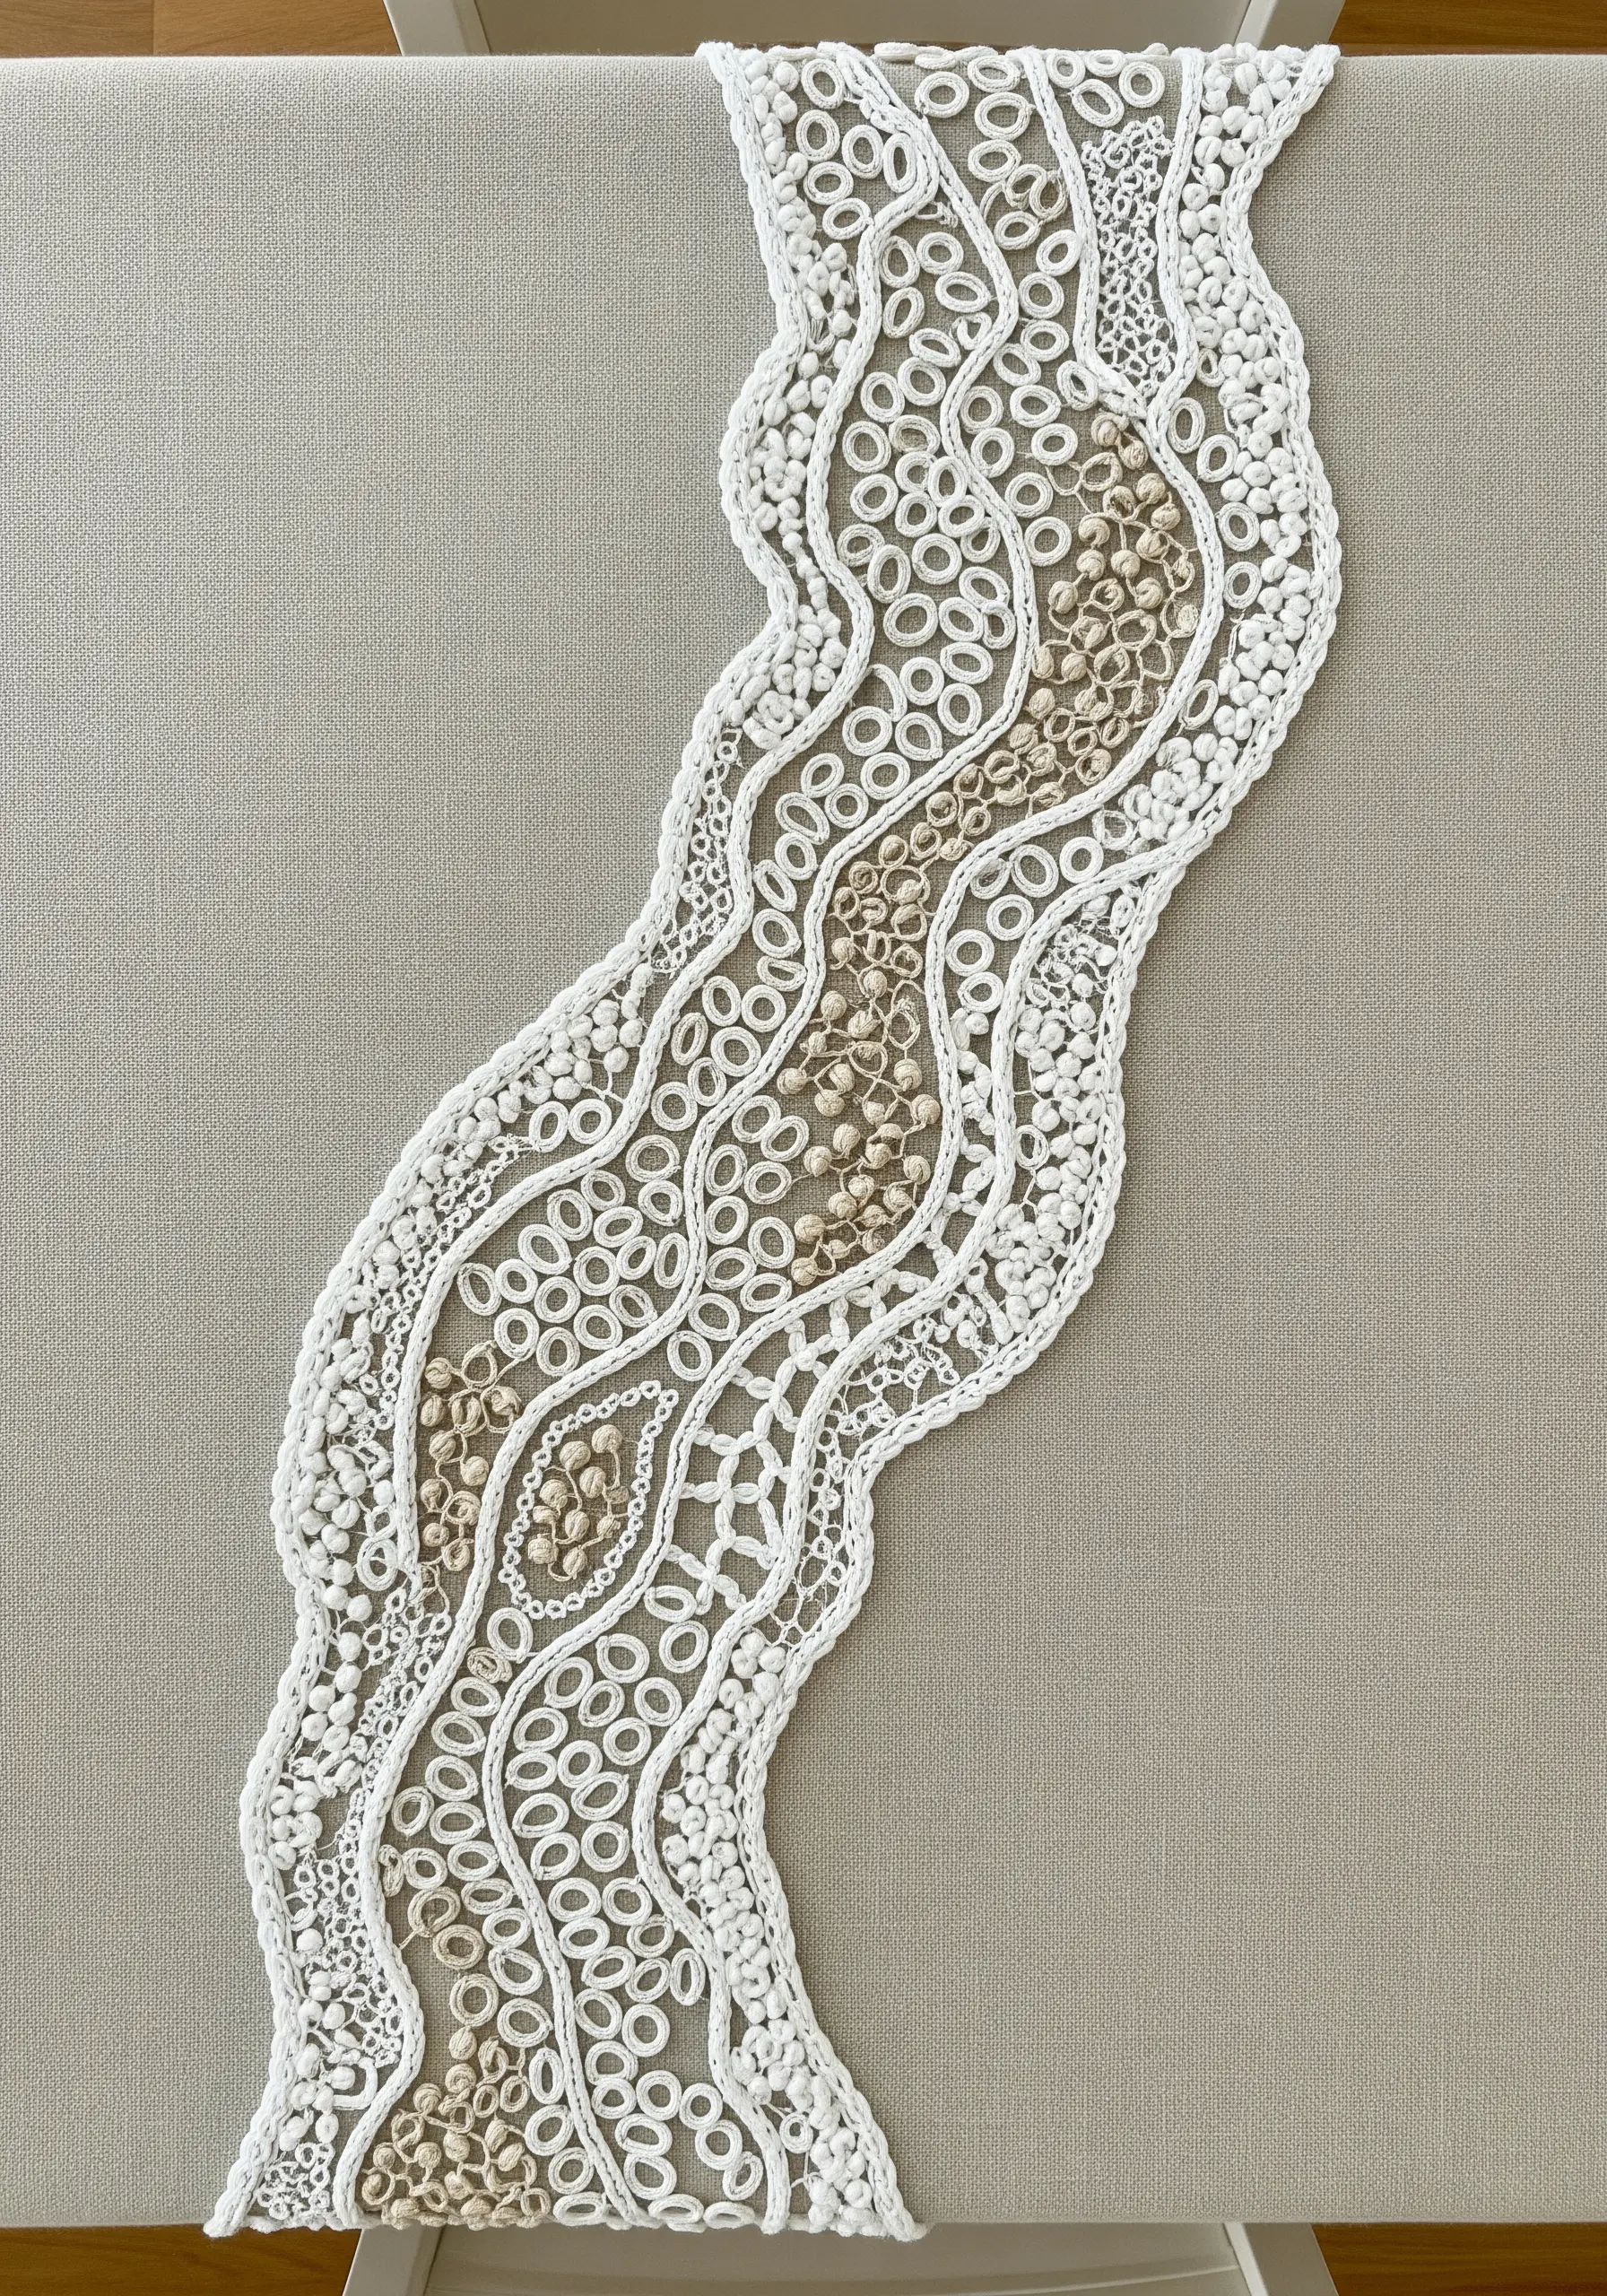
Create an intricate, lace-like texture that mimics a flowing riverbed using detached chain stitches and French knots.
Outline the main flow of your ‘river’ with a simple backstitch. Then, fill the areas with dense patterns of single detached chain stitches (lazy daisies), leaving some open and filling others with French knots or seed beads.
Working in a single color, like white or ivory, on a neutral background emphasizes the incredible texture and intricate detail of the stitch work.
This technique creates a rich, tactile surface that looks complex but is built entirely from simple, repetitive stitches.
32. Snakeskin Effect with Thread Painting
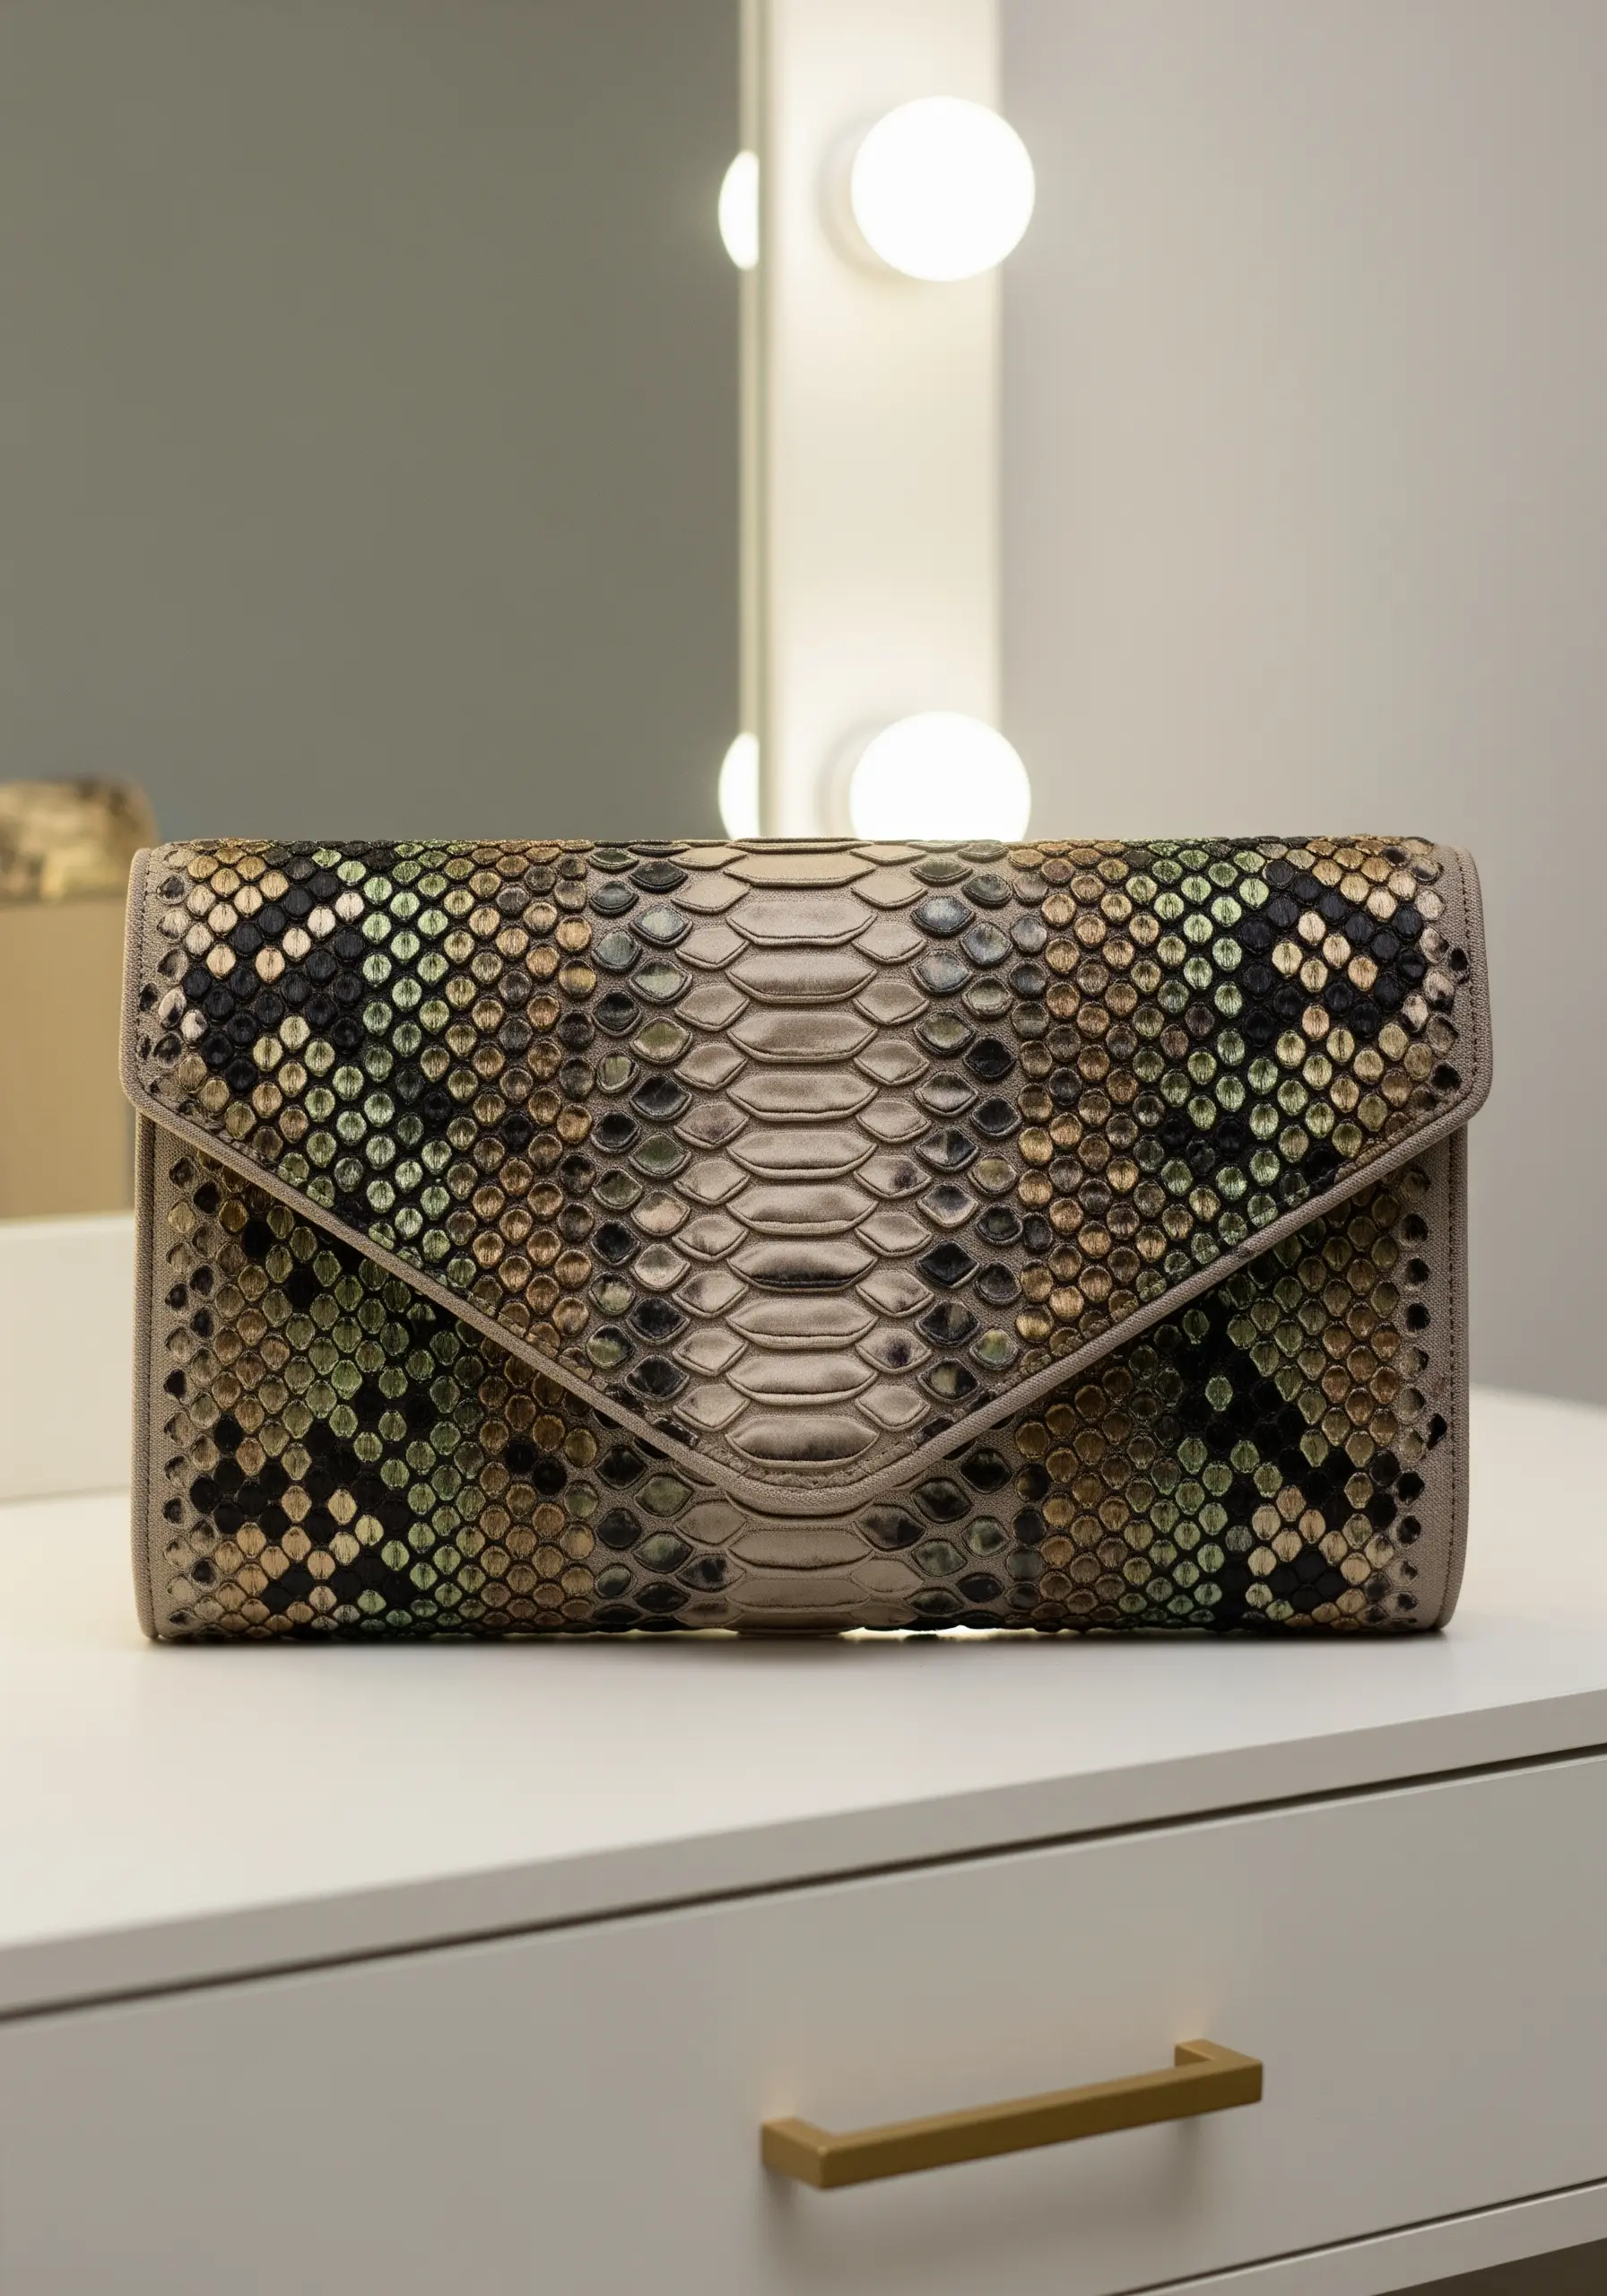
Mimic the intricate, iridescent pattern of snakeskin using careful color blending with the long-and-short stitch.
Start by lightly sketching the scale pattern onto your fabric. Working one scale at a time, use single strands of floss to blend shades of beige, green, black, and gold.
The key to realism is to make your stitches follow the curve of the scale. A single black or dark brown backstitch to outline each scale after it’s filled will create the definition needed to make the pattern pop.
This is a time-intensive technique, but it produces a stunningly realistic and luxurious texture that’s perfect for accessories like clutches or decorative patches.
33. Galactic Swirl with Woven Wheel Roses and Pins

Create a dynamic, swirling galaxy of texture by combining woven wheel stitches with strategically placed pins.
Create hundreds of woven wheel roses in varying sizes and colors—pinks, purples, blues, and whites work well for a cosmic palette.
Arrange them in a dense, flowing spiral on a dark blue or black canvas. This technique works best on a stretched canvas or fabric-covered board rather than a hoop.
For a starry, explosive effect, insert simple sewing pins with metallic heads into the canvas, radiating out from the main cluster. They catch the light and add a sharp, modern contrast to the soft, floral texture of the roses.
34. Golden Wheat Sheaves with Satin Stitch
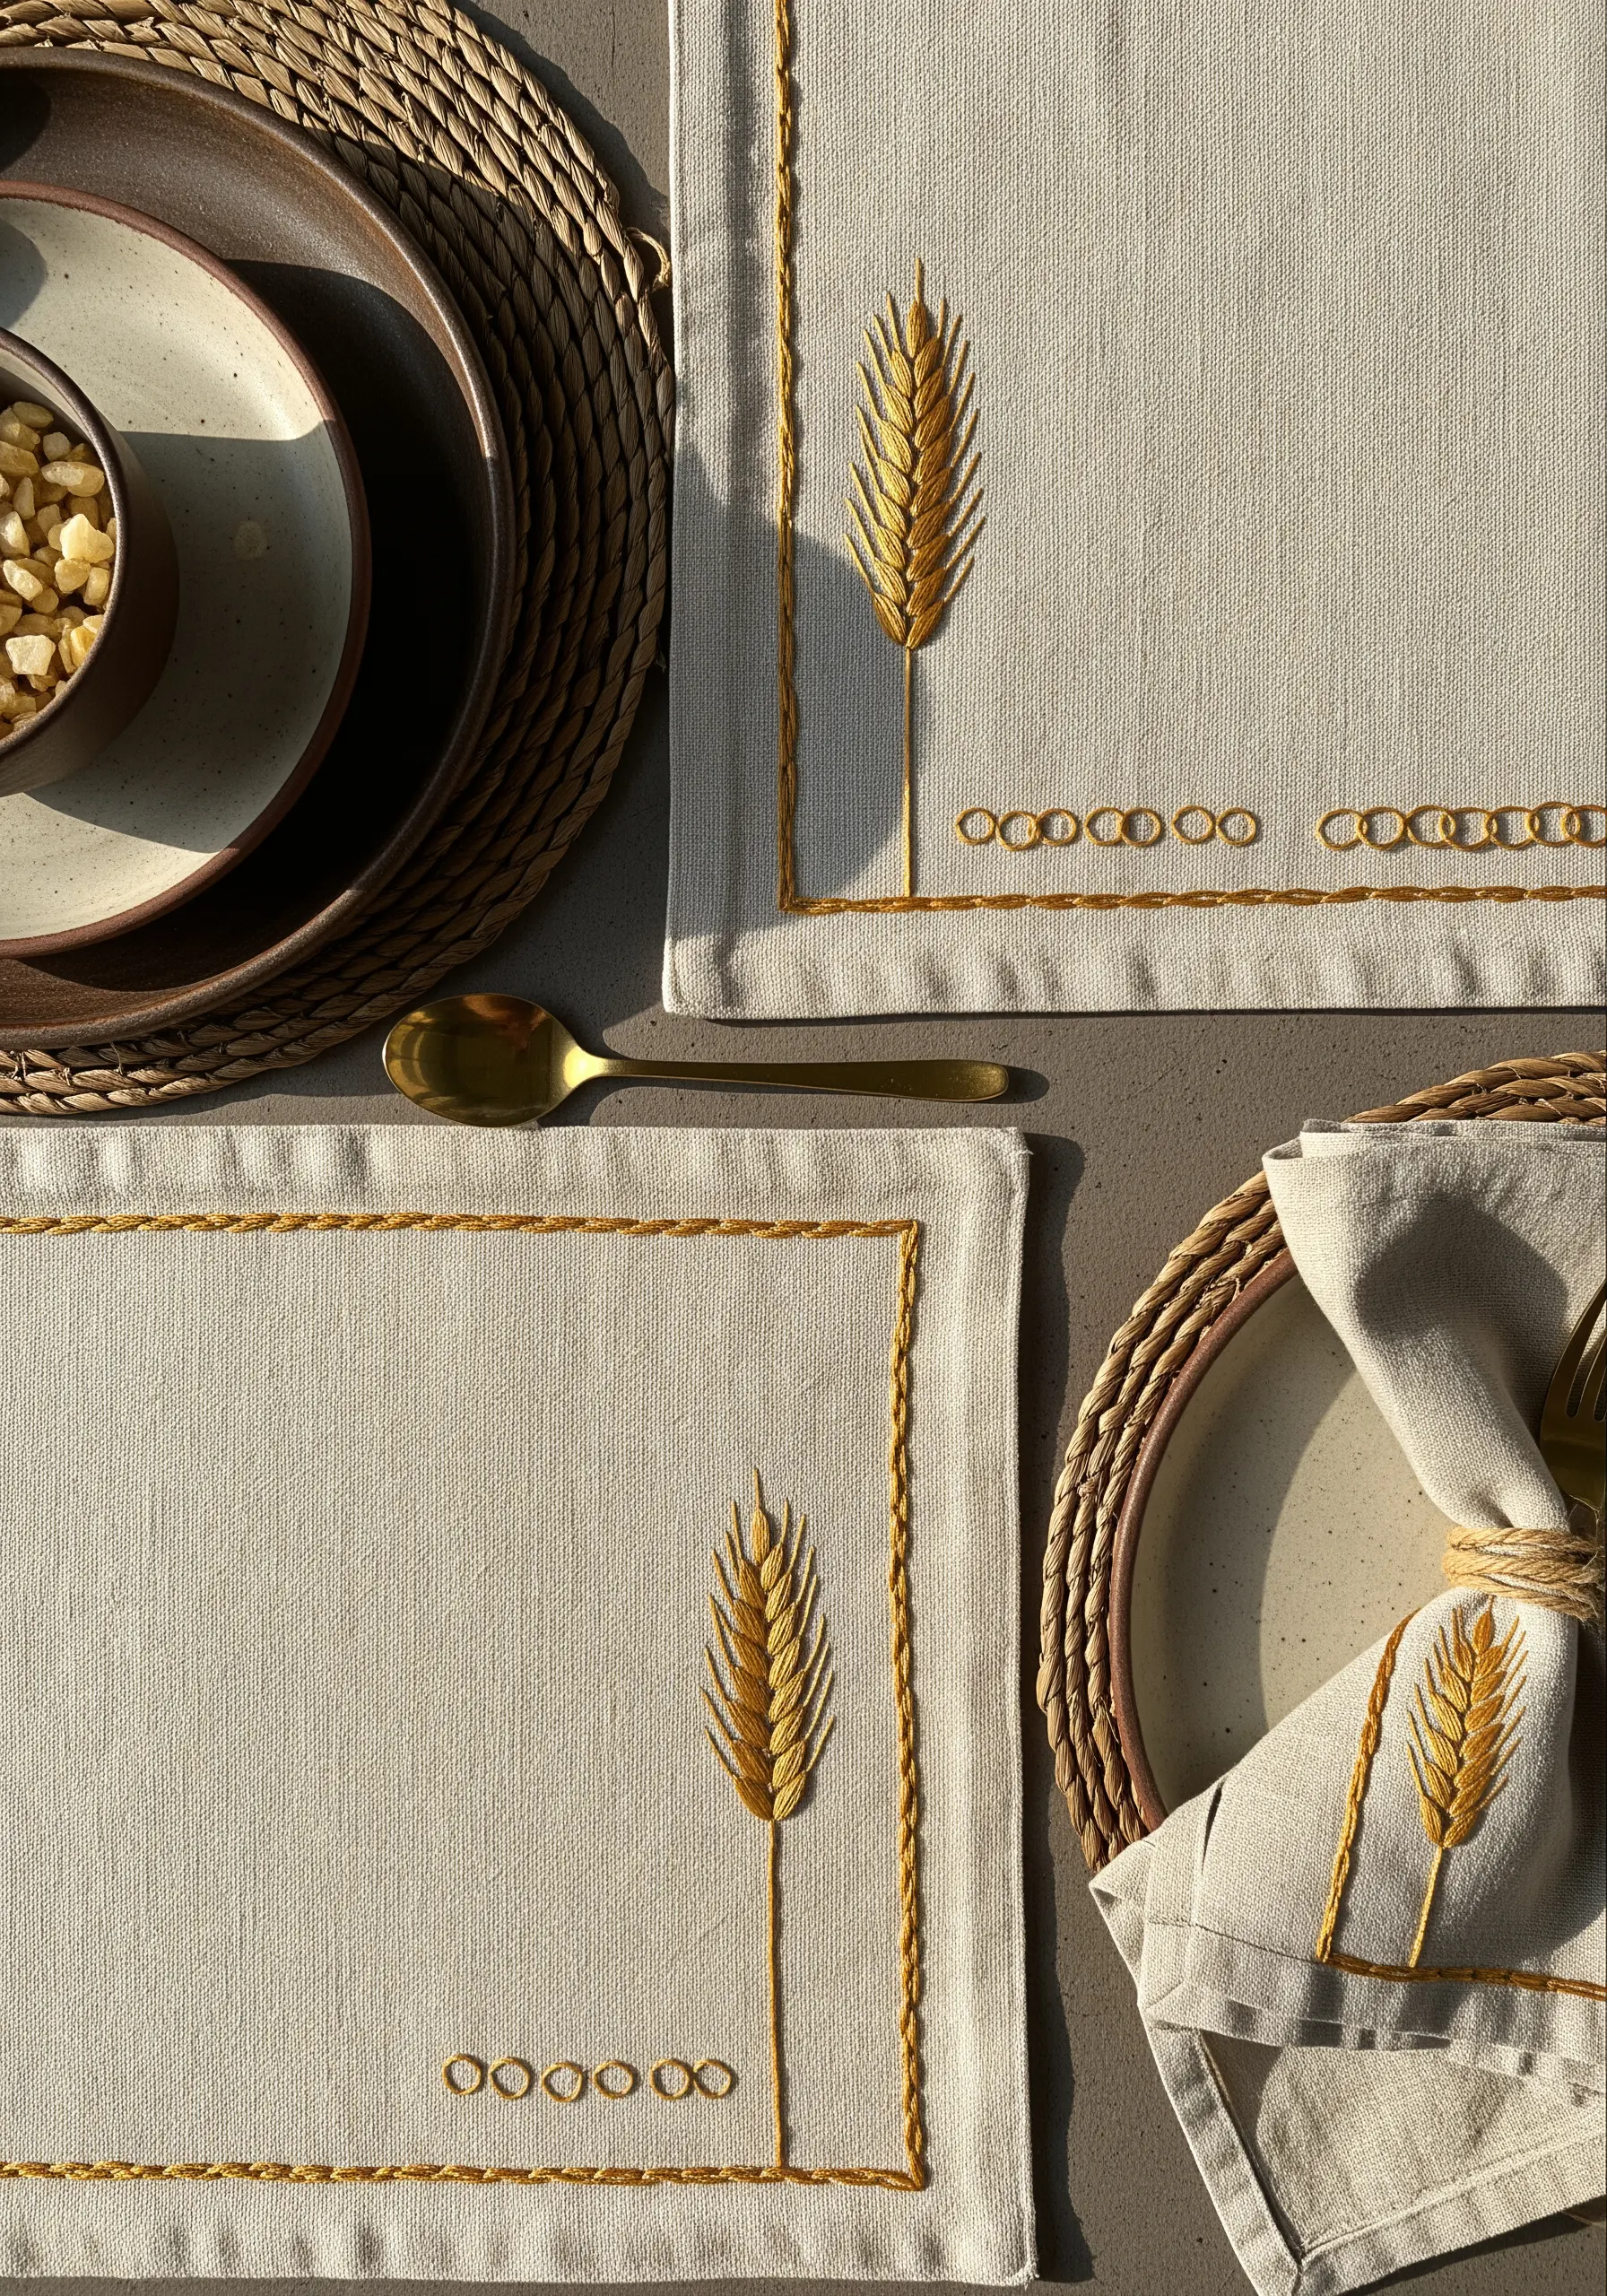
Embellish table linens with elegant, minimalist wheat sheaves that look both modern and timeless.
Use a lustrous golden or bronze thread to catch the light. The head of the wheat can be created with a series of overlapping satin stitches or even a single, well-placed fishbone stitch for a plaited look.
A simple stem stitch forms the stalk. The beauty of this design lies in its simplicity and clean execution. Ensure your satin stitches are smooth and lie perfectly flat for a high-end finish.
This motif is perfect for adding a subtle, sophisticated touch to placemats, napkins, and table runners.
35. Ocean Wave Texture with Flowing Straight Stitches
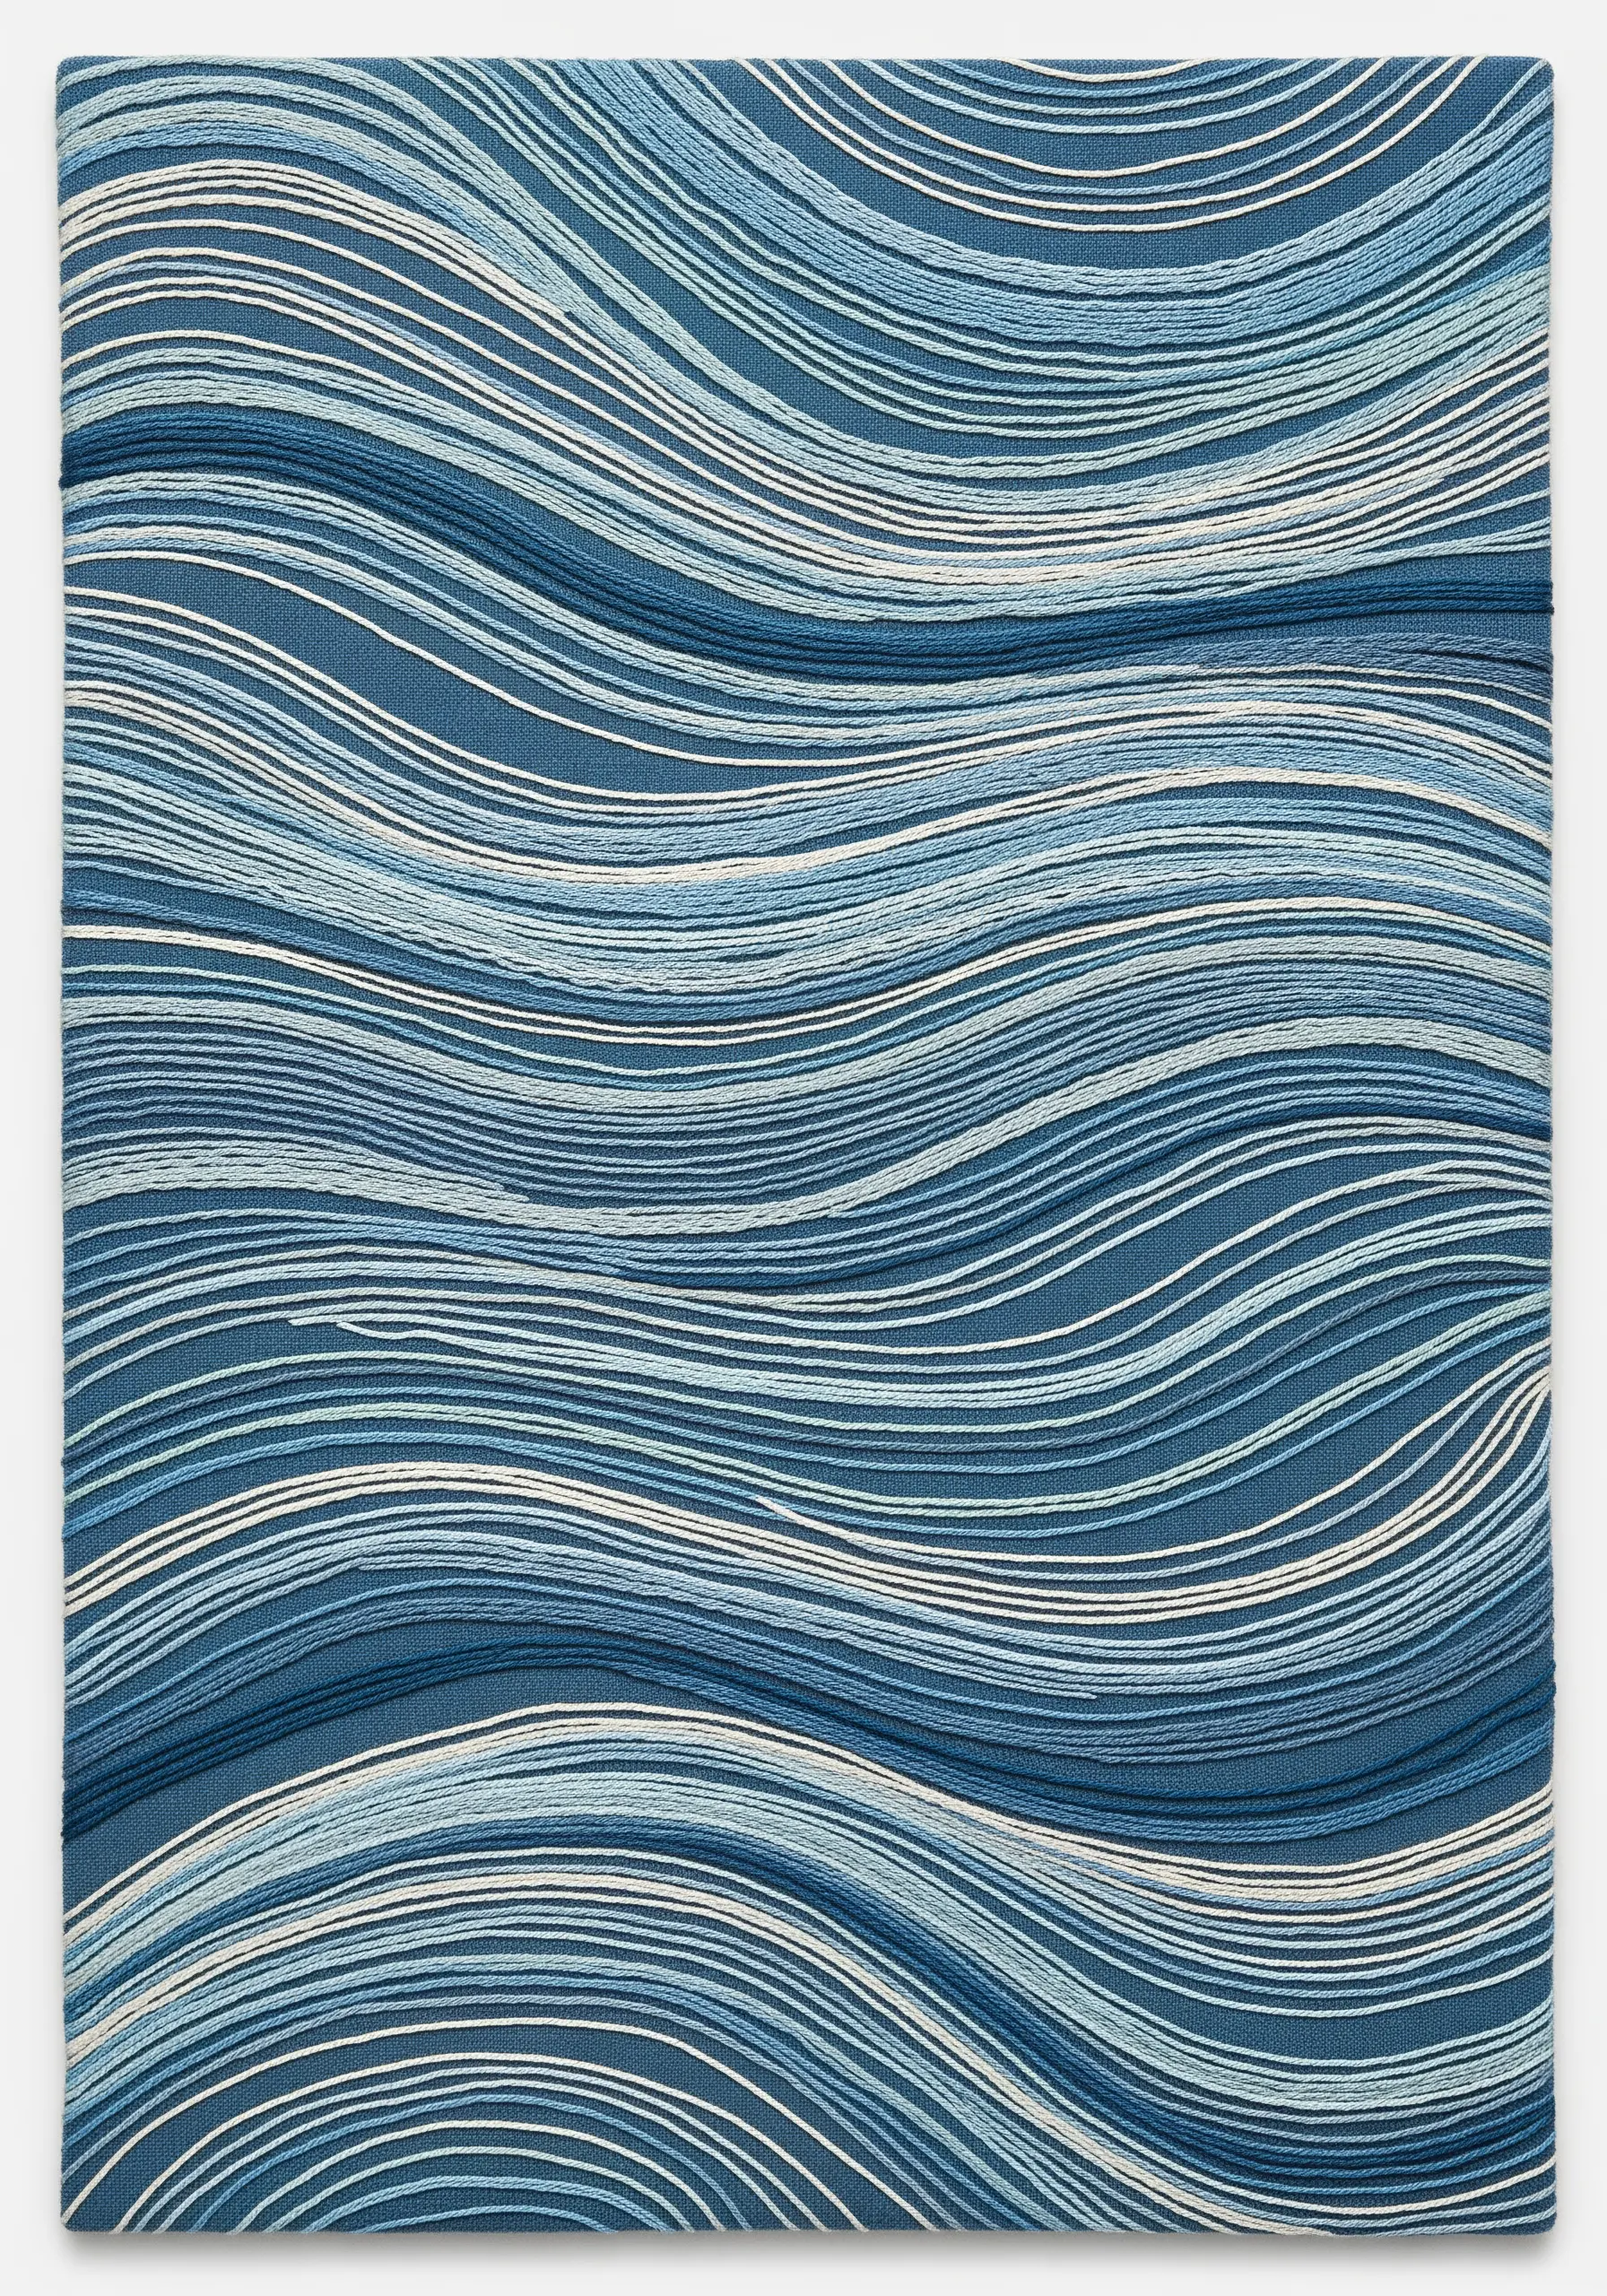
Capture the rhythmic movement of ocean waves by layering long, flowing straight stitches.
Working on a blue background, use various shades of blue, aqua, and white thread to create your waves. Instead of trying to make each line perfect, let them undulate and overlap naturally.
Use more strands of floss (or a thicker thread) for the crests of the waves in white and lighter blues, and fewer strands for the darker, deeper parts of the water.
This layering technique creates a sense of depth and motion that is both visually compelling and remarkably simple to execute.


