

It’s easy to look around your home and feel a desire to soften the edges, to add a layer of personality that is quiet, personal, and uniquely yours. Embroidery holds that promise, but the thought of a large, complex project can feel daunting. The secret isn’t to do more, but to stitch with more intention.
This is where the power of a single, well-placed motif comes in. A tiny sprig of lavender on a dinner napkin, a minimalist house on the corner of a throw blanket, or a simple vine climbing a sheer curtain—these small details have the power to transform an everyday object into something cherished. They invite a closer look and infuse a space with the quiet warmth of the handmade.
Think of these ideas not just as patterns, but as ways of seeing your home textiles as a canvas. We will explore how stitch direction can create realism, how a simple border can add polish, and how even the simplest line can become a piece of art. It’s about making your mark, one thoughtful stitch at a time.
1. The Sculptural Bee: Layering for Dimension
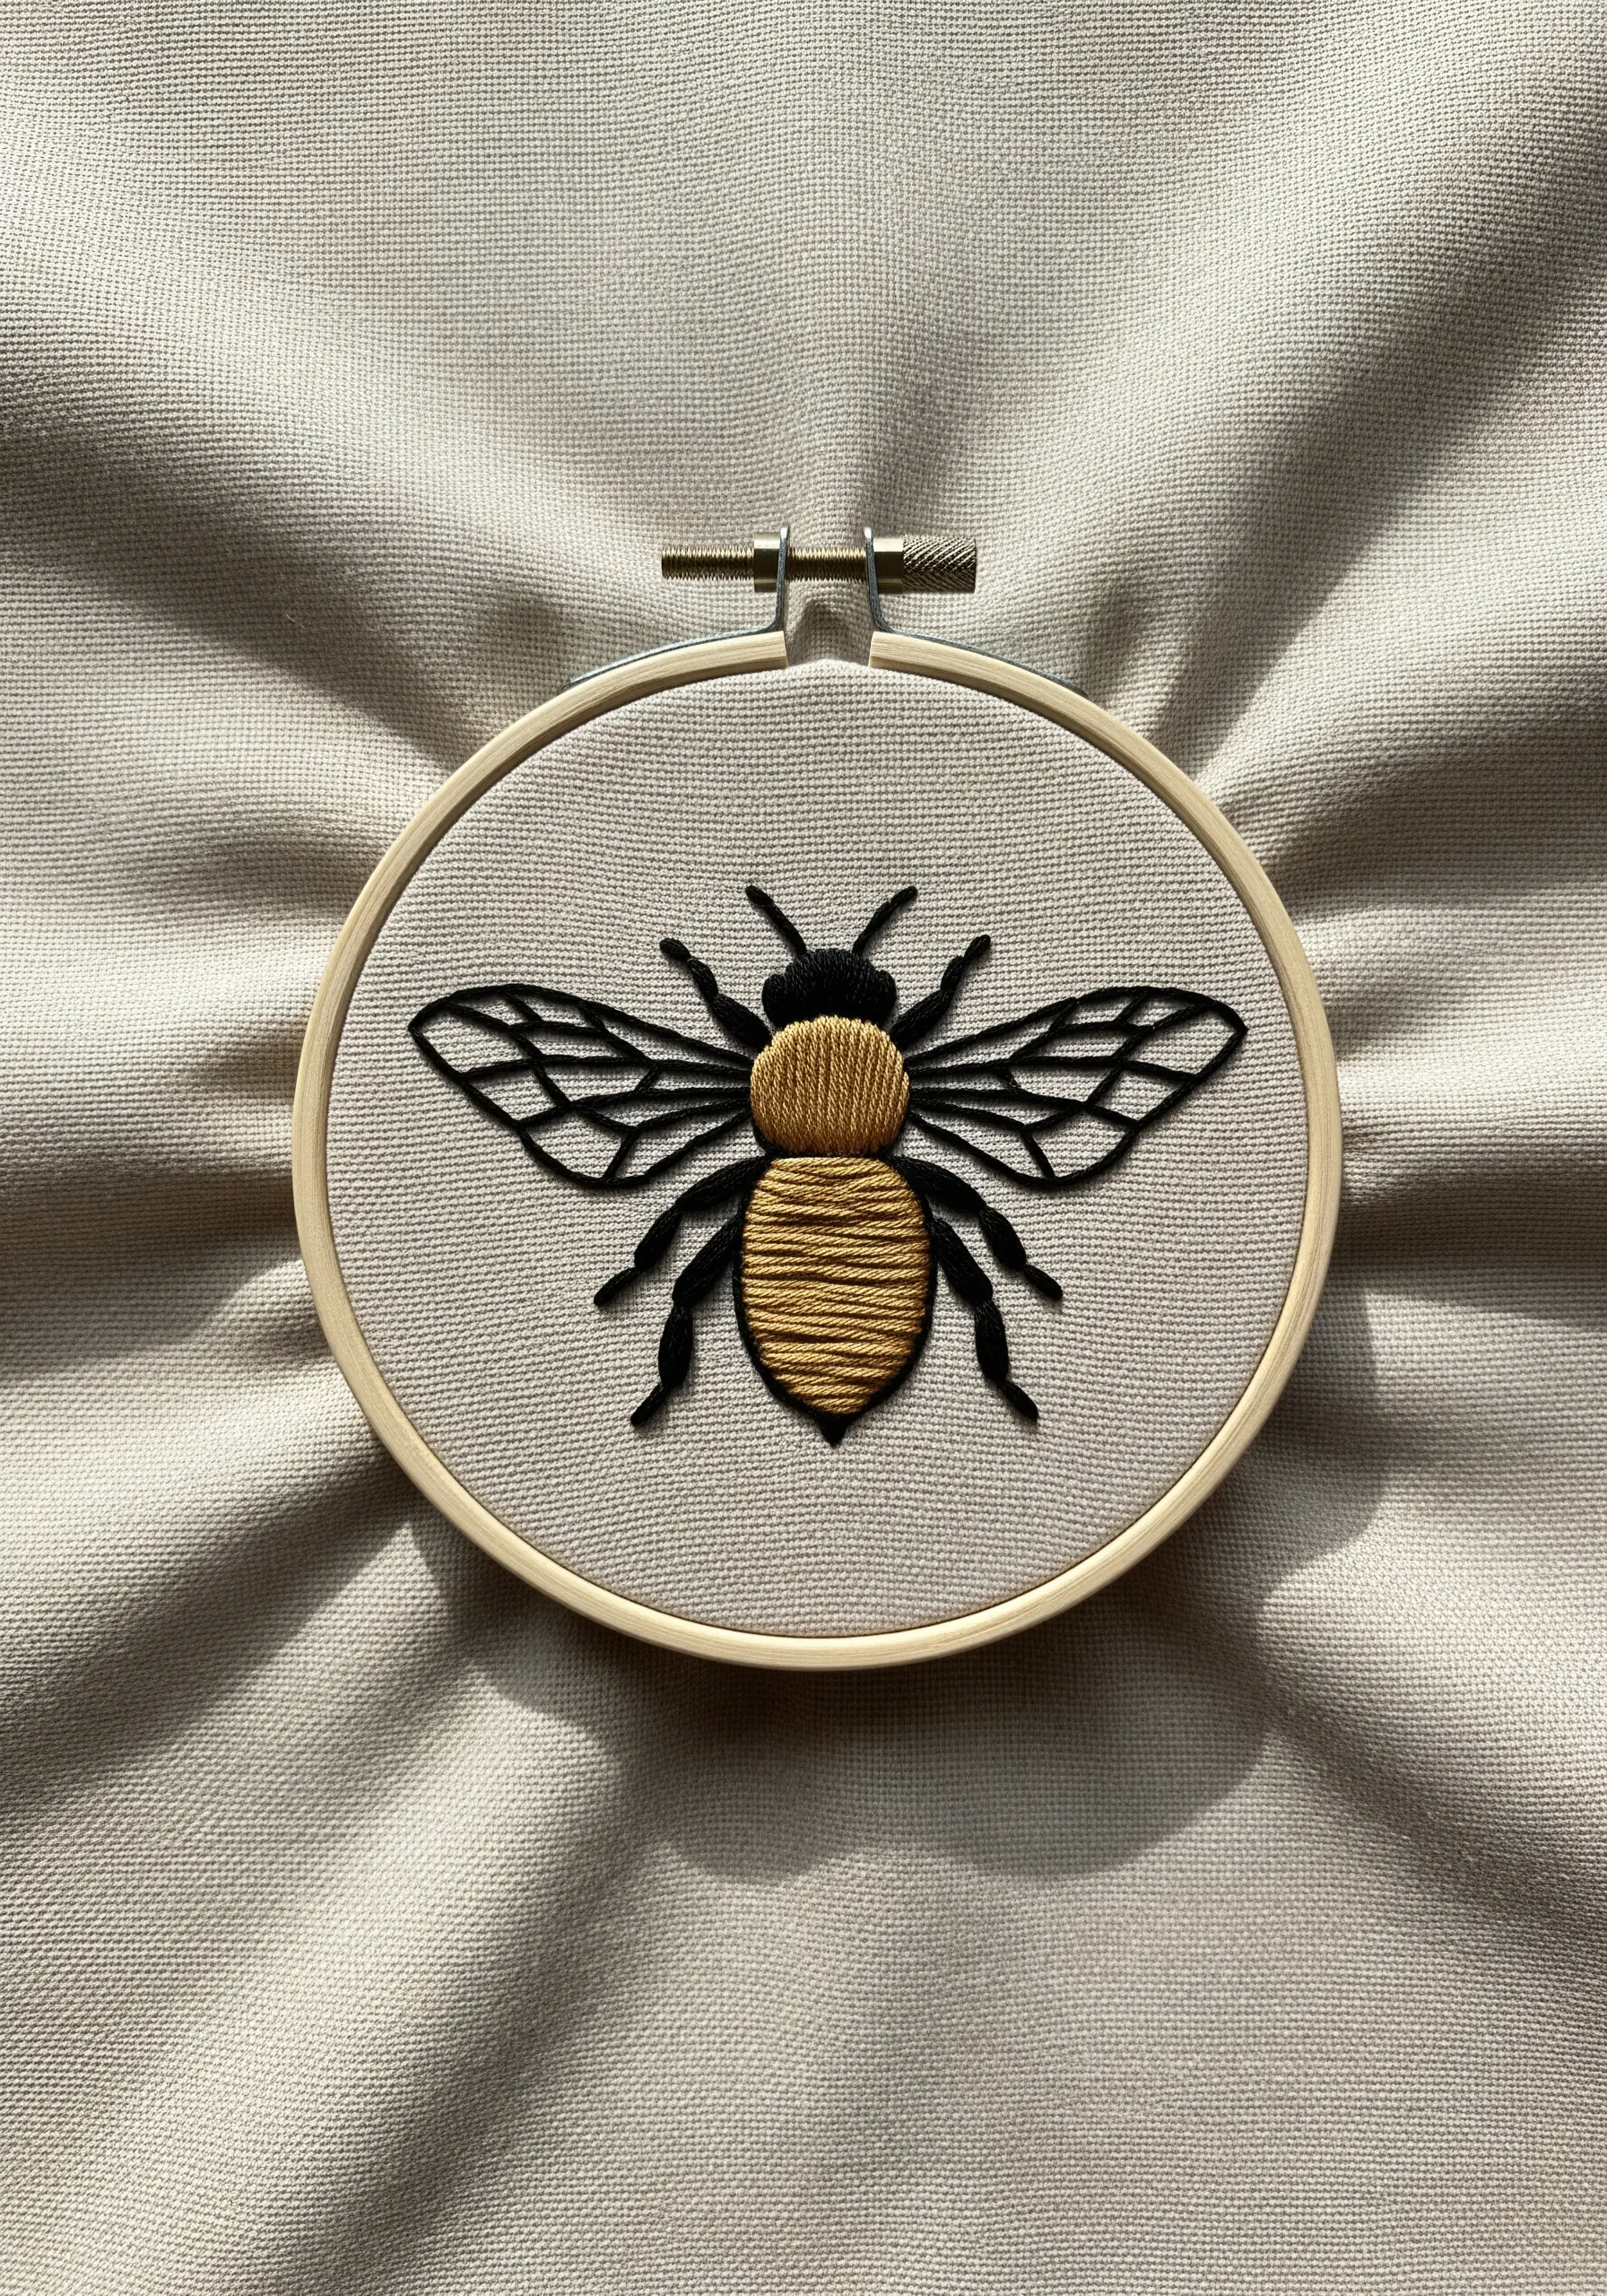
To give your bee a lifelike, three-dimensional quality, focus on contrasting densities and stitch direction.
Fill the abdomen and thorax with a padded satin stitch, laying down a base of straight stitches first to create a raised surface.
For the delicate wings, use only two strands of floss and a simple backstitch outline. This makes them feel transparent and light against the solid body.
This contrast between the dense, volumetric body and the airy, open wings is what brings the entire composition to life.
2. Celestial Accents: The Perfect Satin Stitch Edge
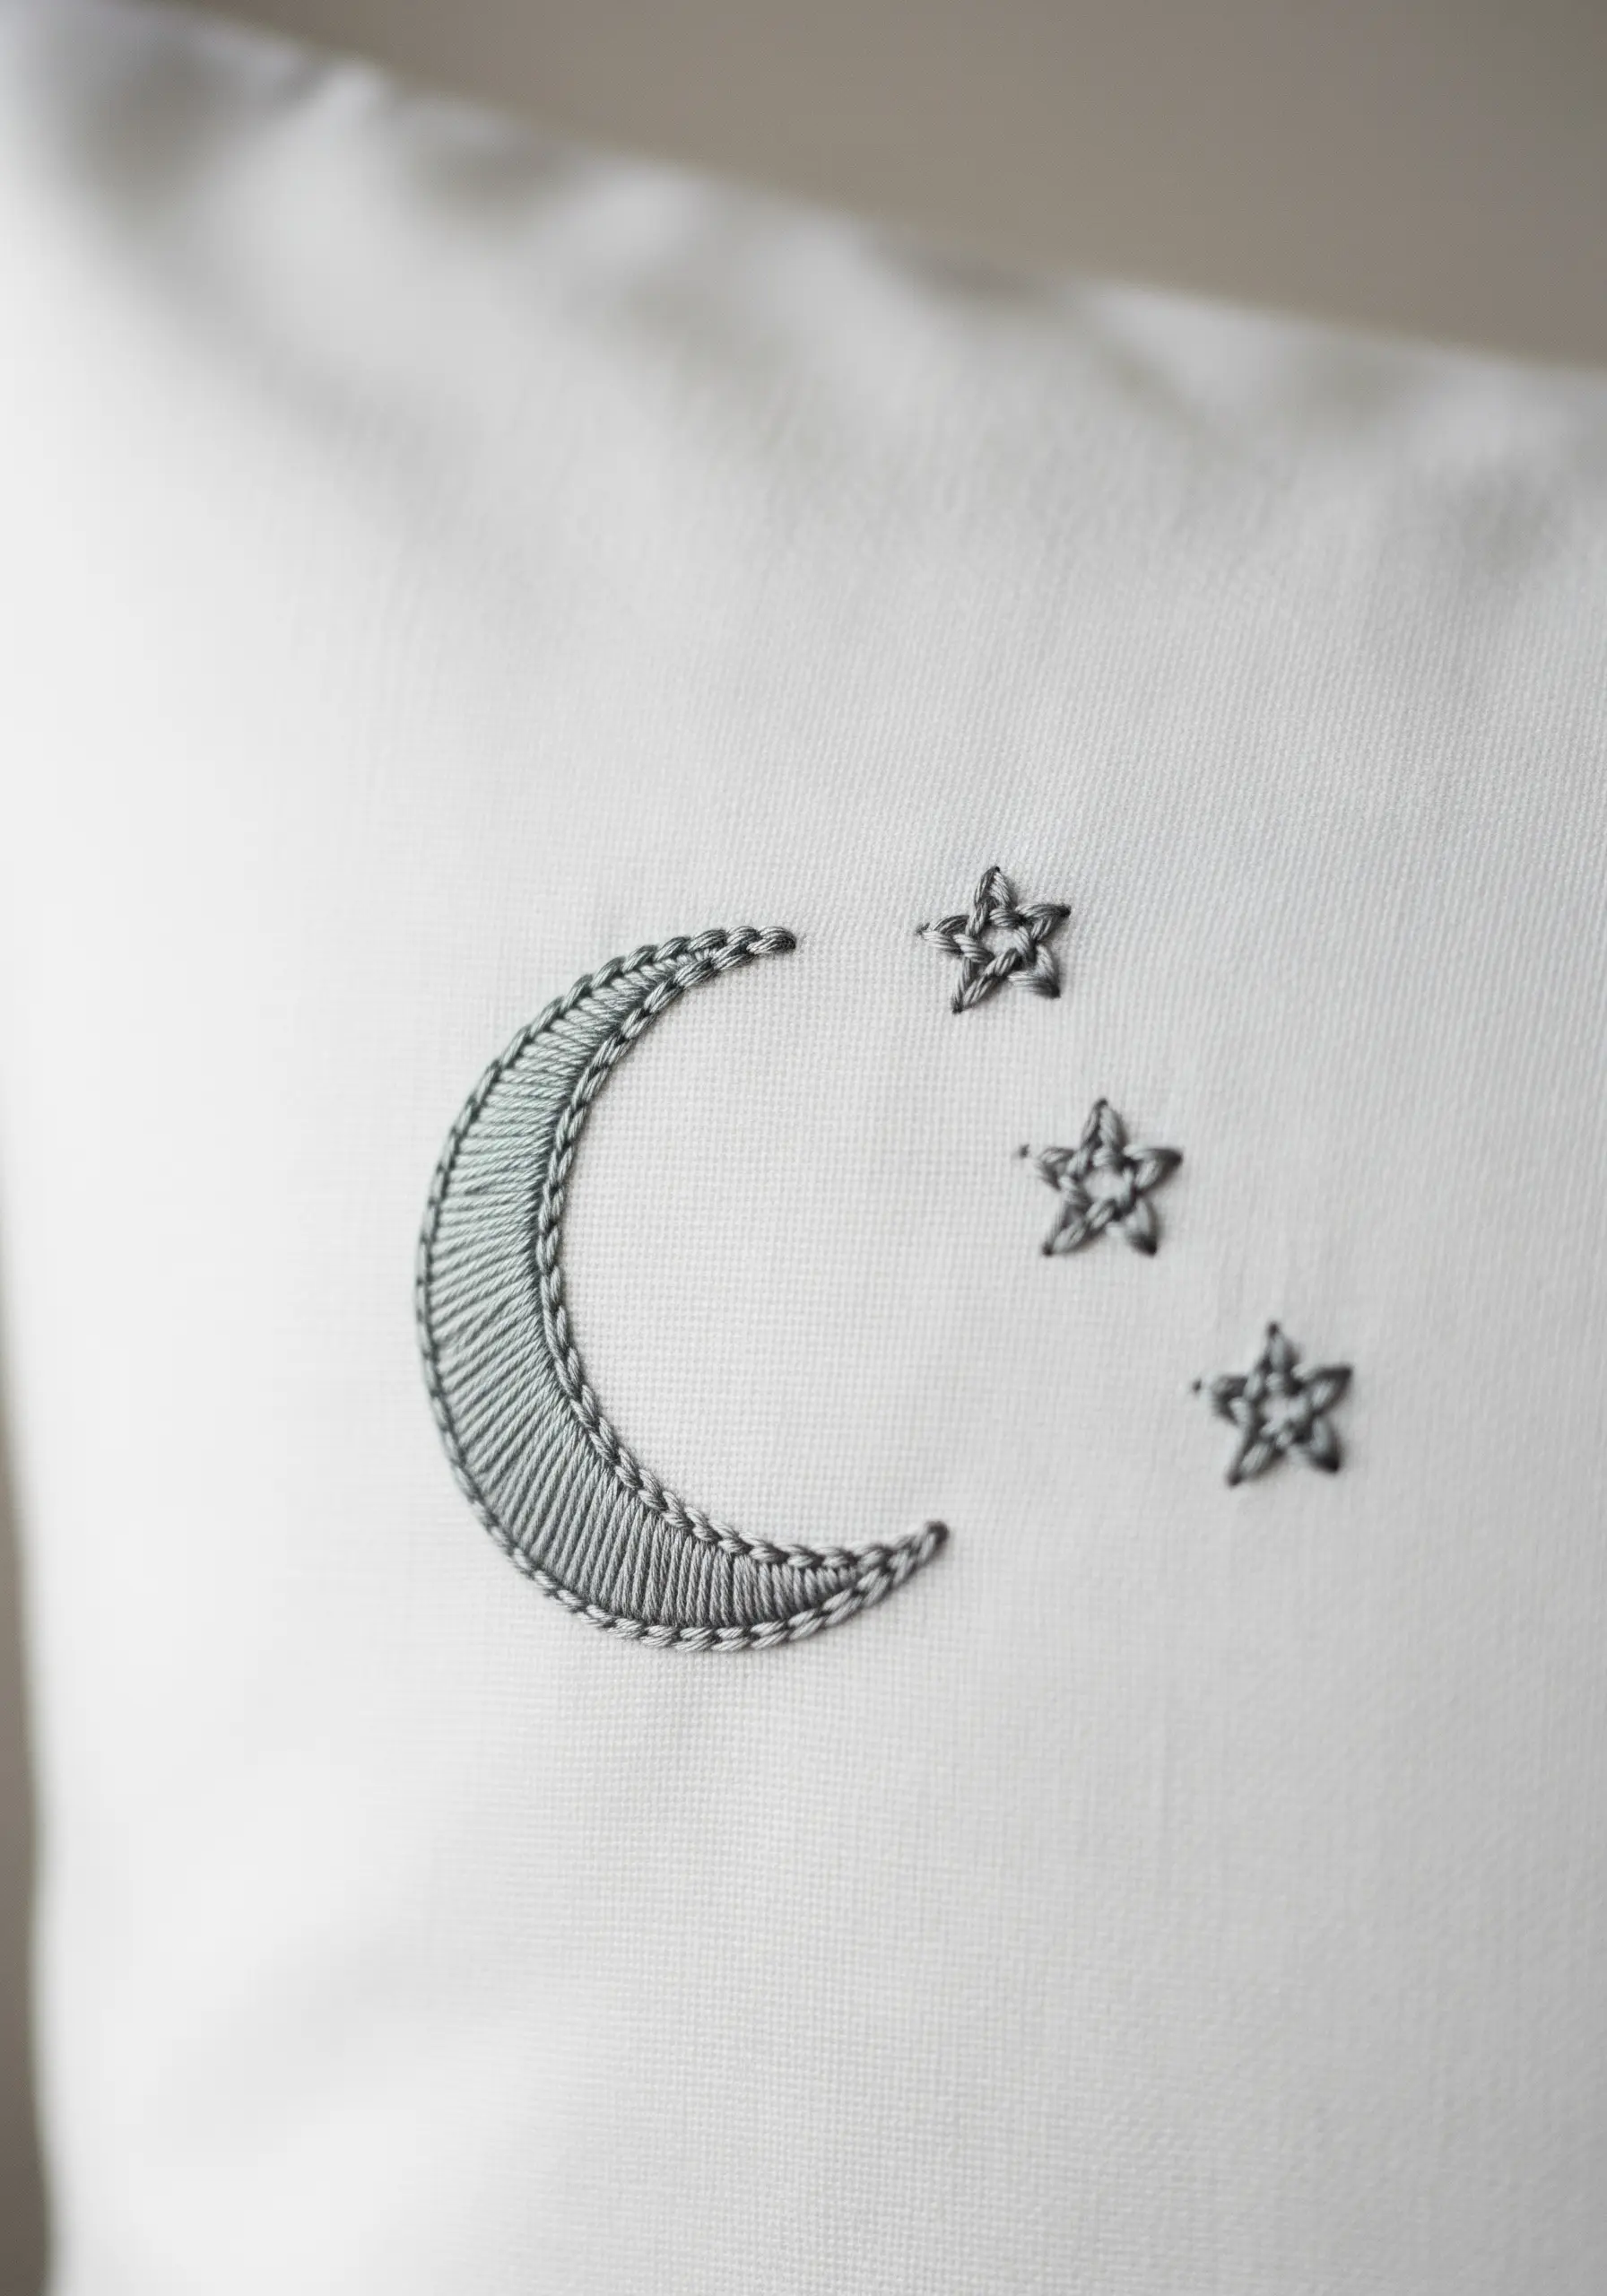
The secret to a flawlessly smooth satin-stitched shape, like this crescent moon, is creating a defined boundary for your stitches.
Before you begin filling, outline the entire shape with a tight split stitch. This creates a slightly raised ‘wall’ for your satin stitches to tuck into.
As you fill the shape, bring your needle up just outside the split stitch line and down just inside the opposite line. This ensures a clean, sharp edge with no gaps.
For delicate stars, a few clustered French knots offer a subtle textural counterpoint to the moon’s liquid sheen, making the design feel balanced.
3. Napkin Botanicals: The Art of Miniaturization

When embroidering on fine linens like napkins, scale and thread weight are everything.
Use only one or two strands of floss for a tiny motif like this lavender sprig. This prevents the design from feeling bulky and stiff on the delicate fabric.
Combine French knots for the lavender buds with a fishbone stitch for the leaves. This mix of textures adds surprising realism, even at a miniature scale.
Placing the design in a corner ensures it remains visible when the napkin is folded, adding an elegant touch without interfering with its use.
4. Radiating Color: Mastering Directional Fills
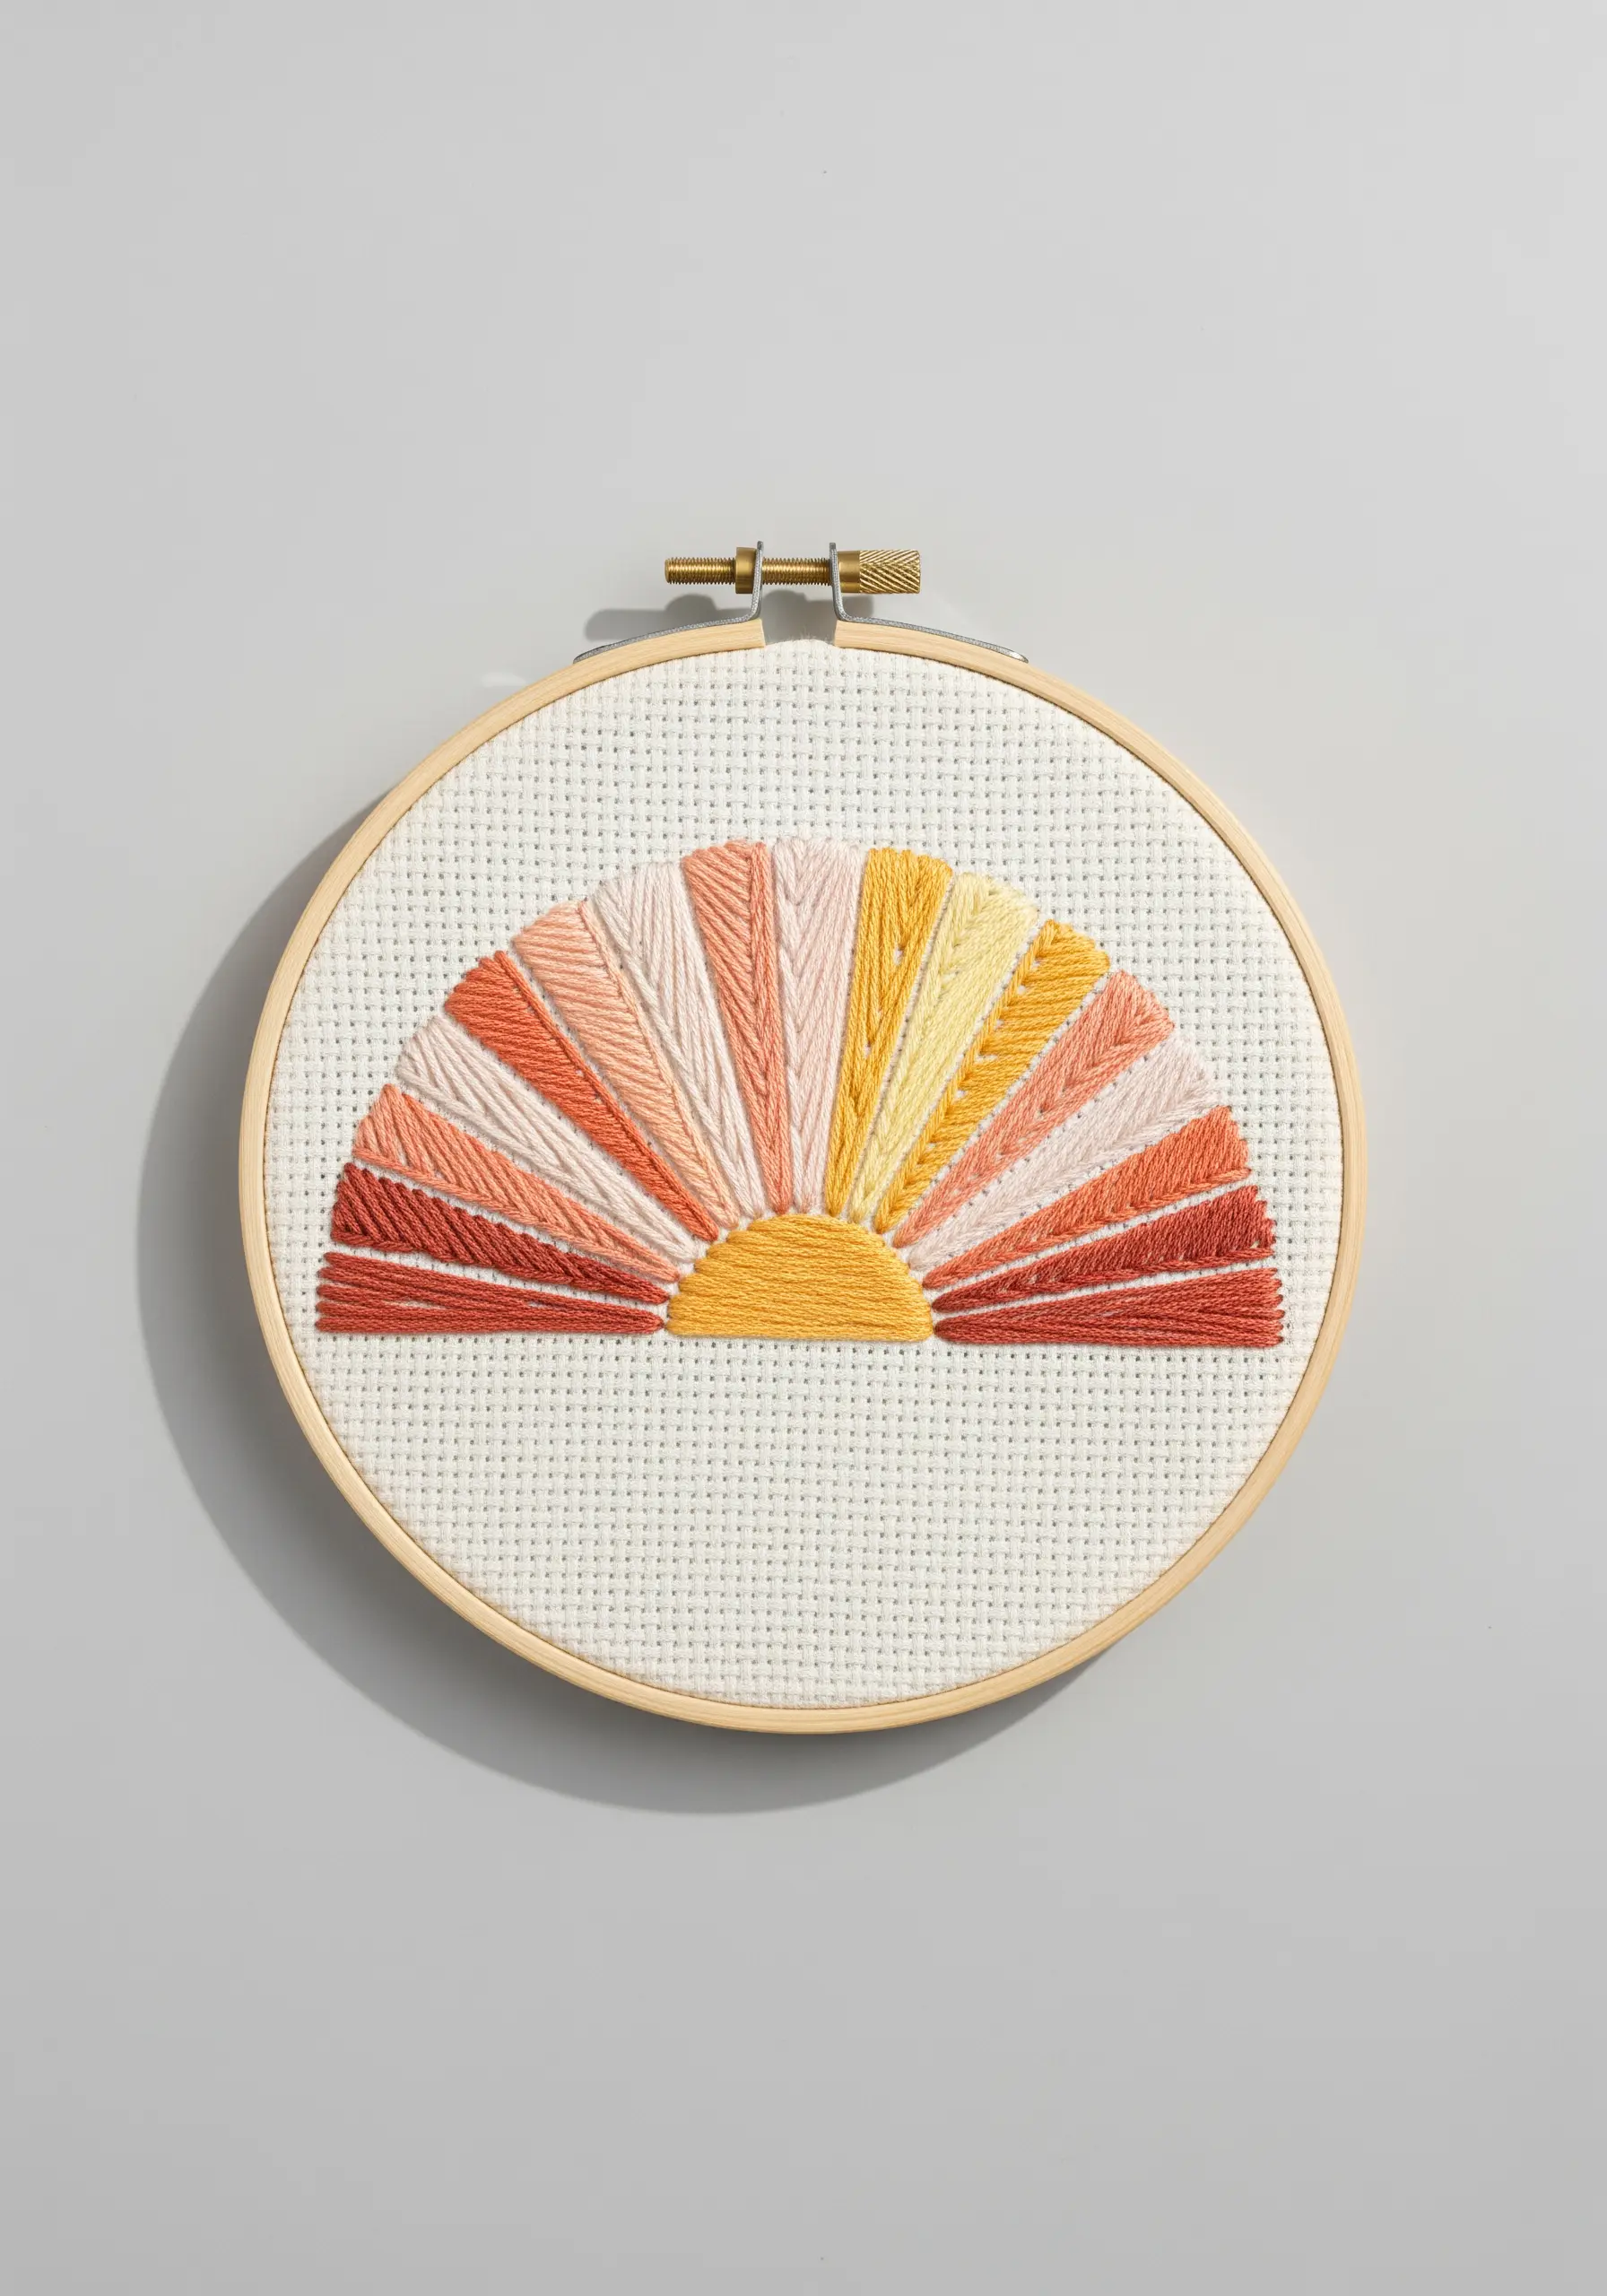
Create a dynamic sunrise not with color alone, but with the direction of your stitches.
Instead of a standard satin stitch, use a long-and-short stitch for each ray, angling your stitches outward from the central point.
Draw faint pencil lines as a guide to ensure all rays radiate evenly, creating a powerful sense of movement and light.
Stitching on Aida cloth, typically used for cross-stitch, can provide a helpful grid for keeping your geometric segments perfectly aligned.
5. The Expressive Outline: Elevating Line Work
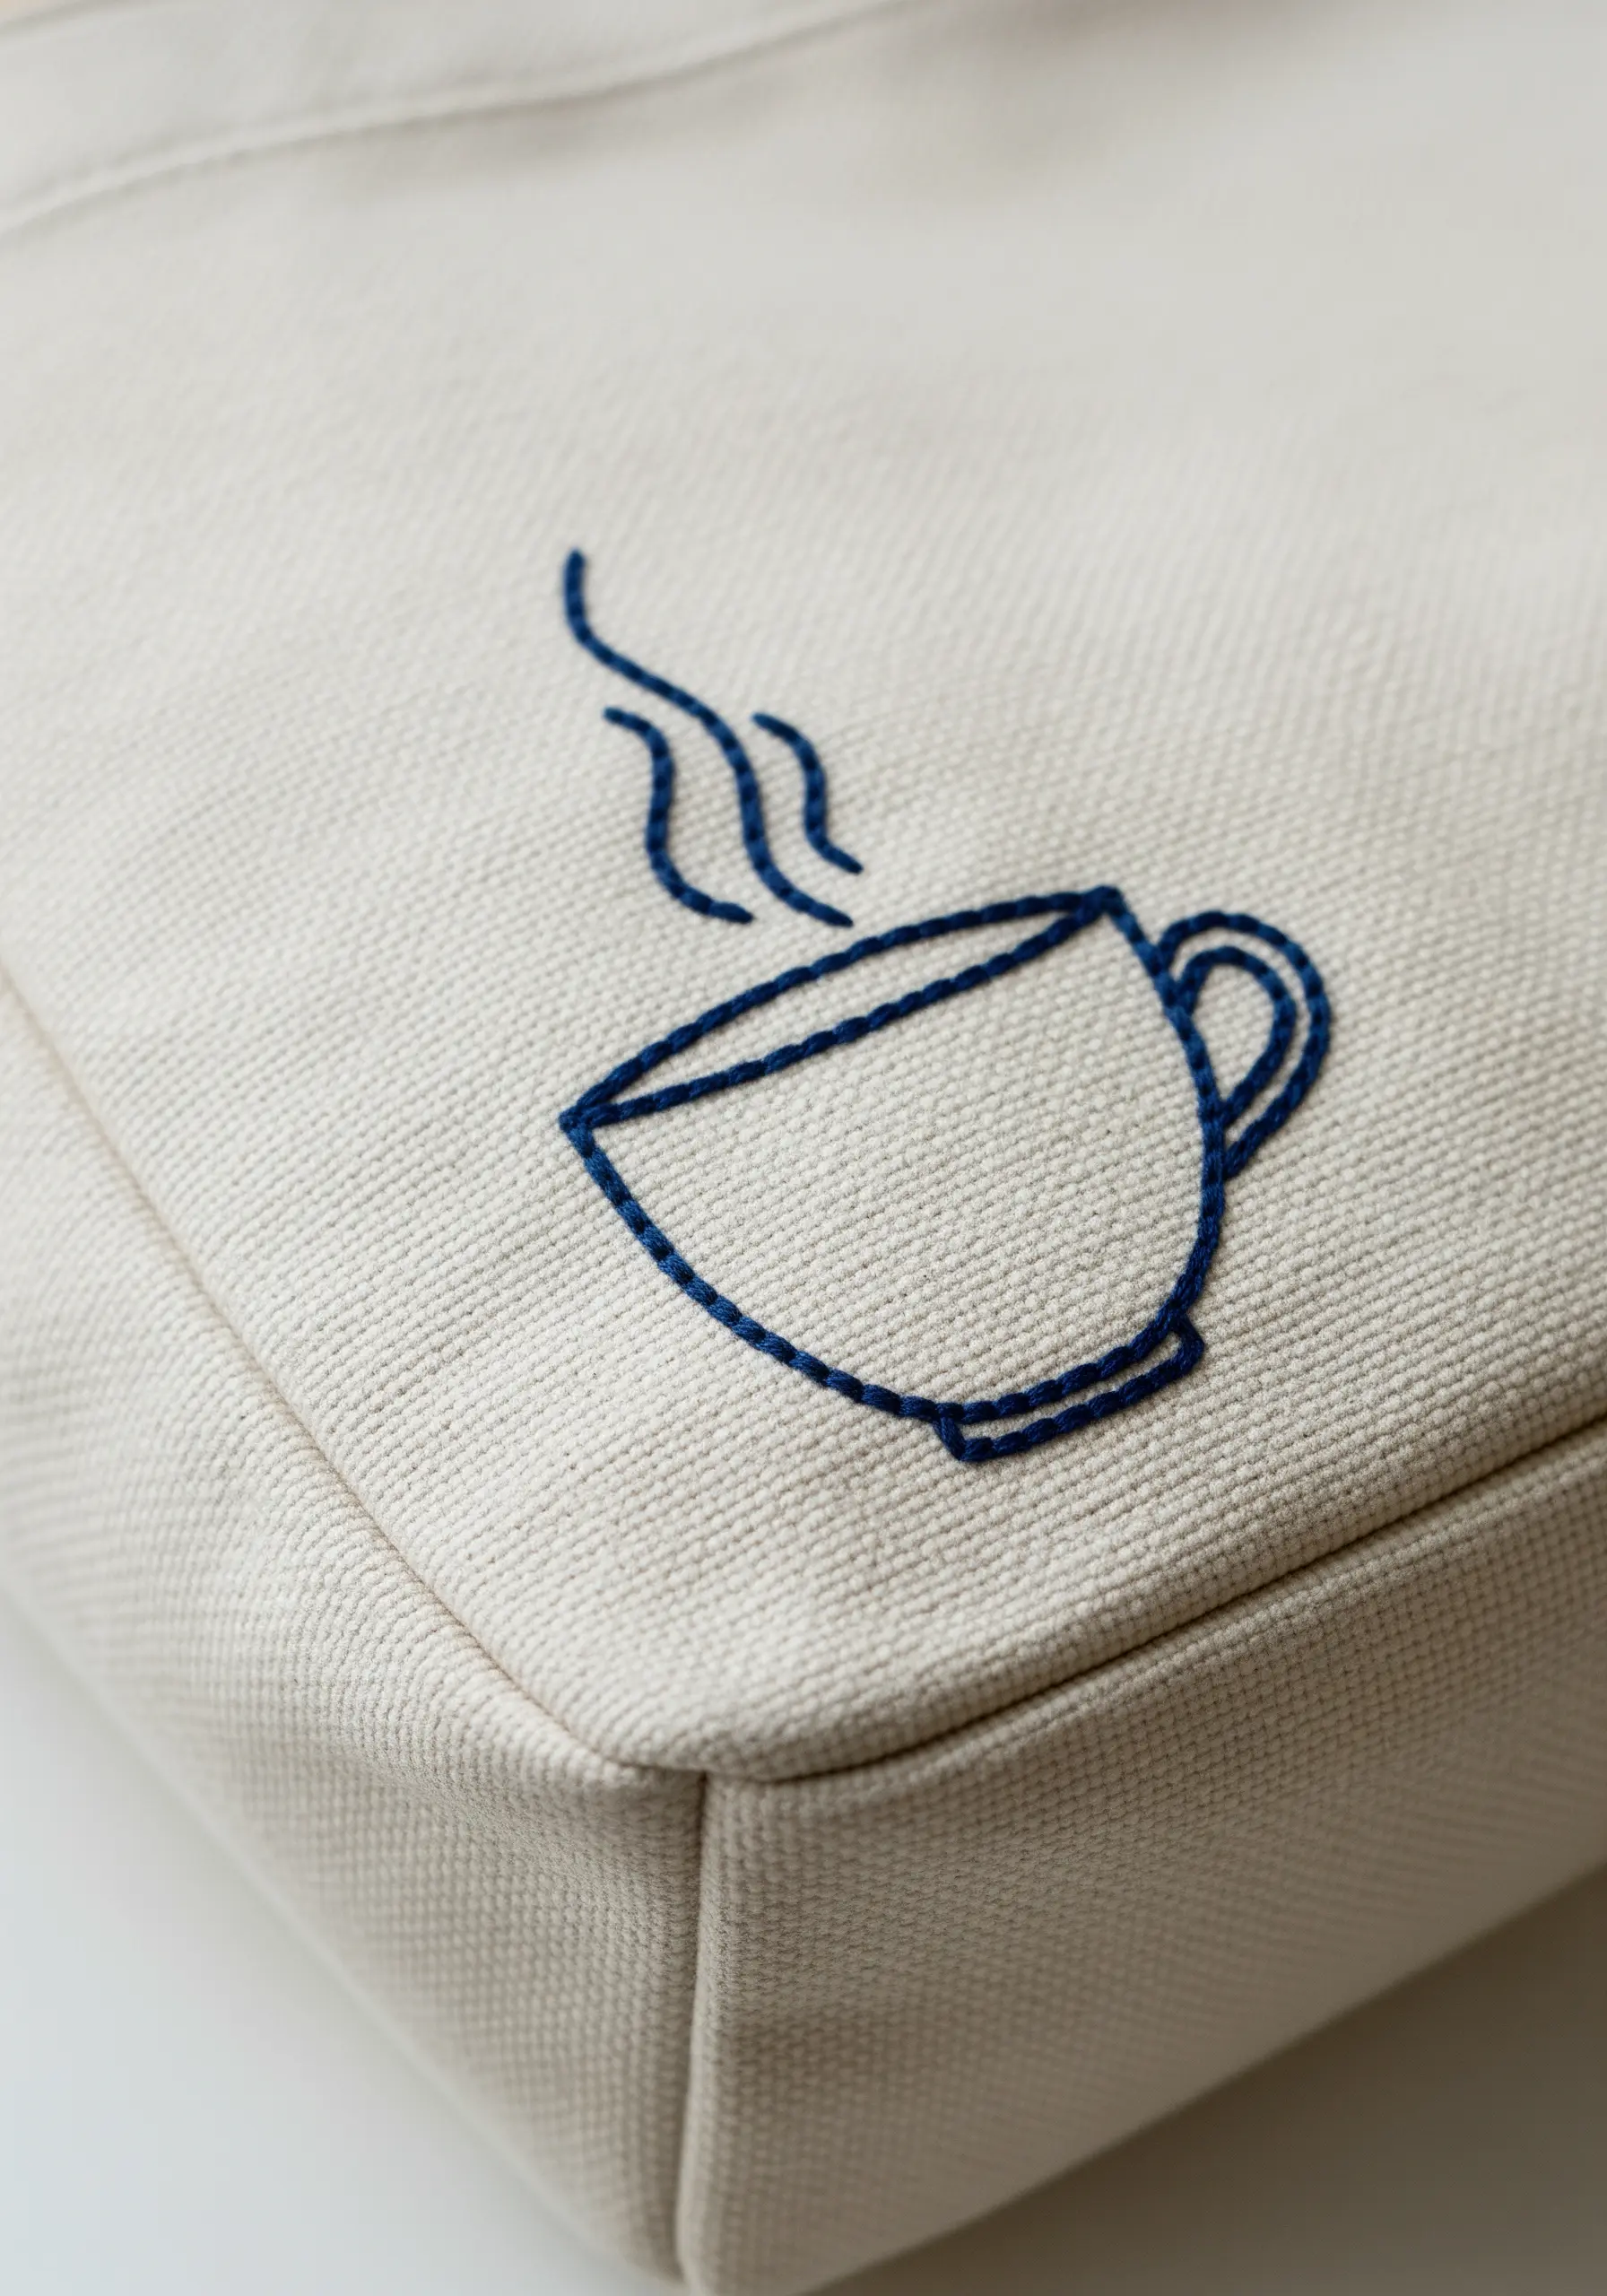
A simple outline can become a statement when you choose the right stitch.
Instead of a standard backstitch, use a whipped backstitch or a stem stitch. Both stitches create a thicker, smoother line that has the fluid quality of ink.
On curves, shorten your stitch length. This small adjustment will prevent the line from looking jagged and instead create a seamless, elegant arc.
The technique works beautifully on heavy canvas, where a bolder line is needed to stand out against the fabric’s texture.
6. Texture on Texture: Stitching on Waffle Weave
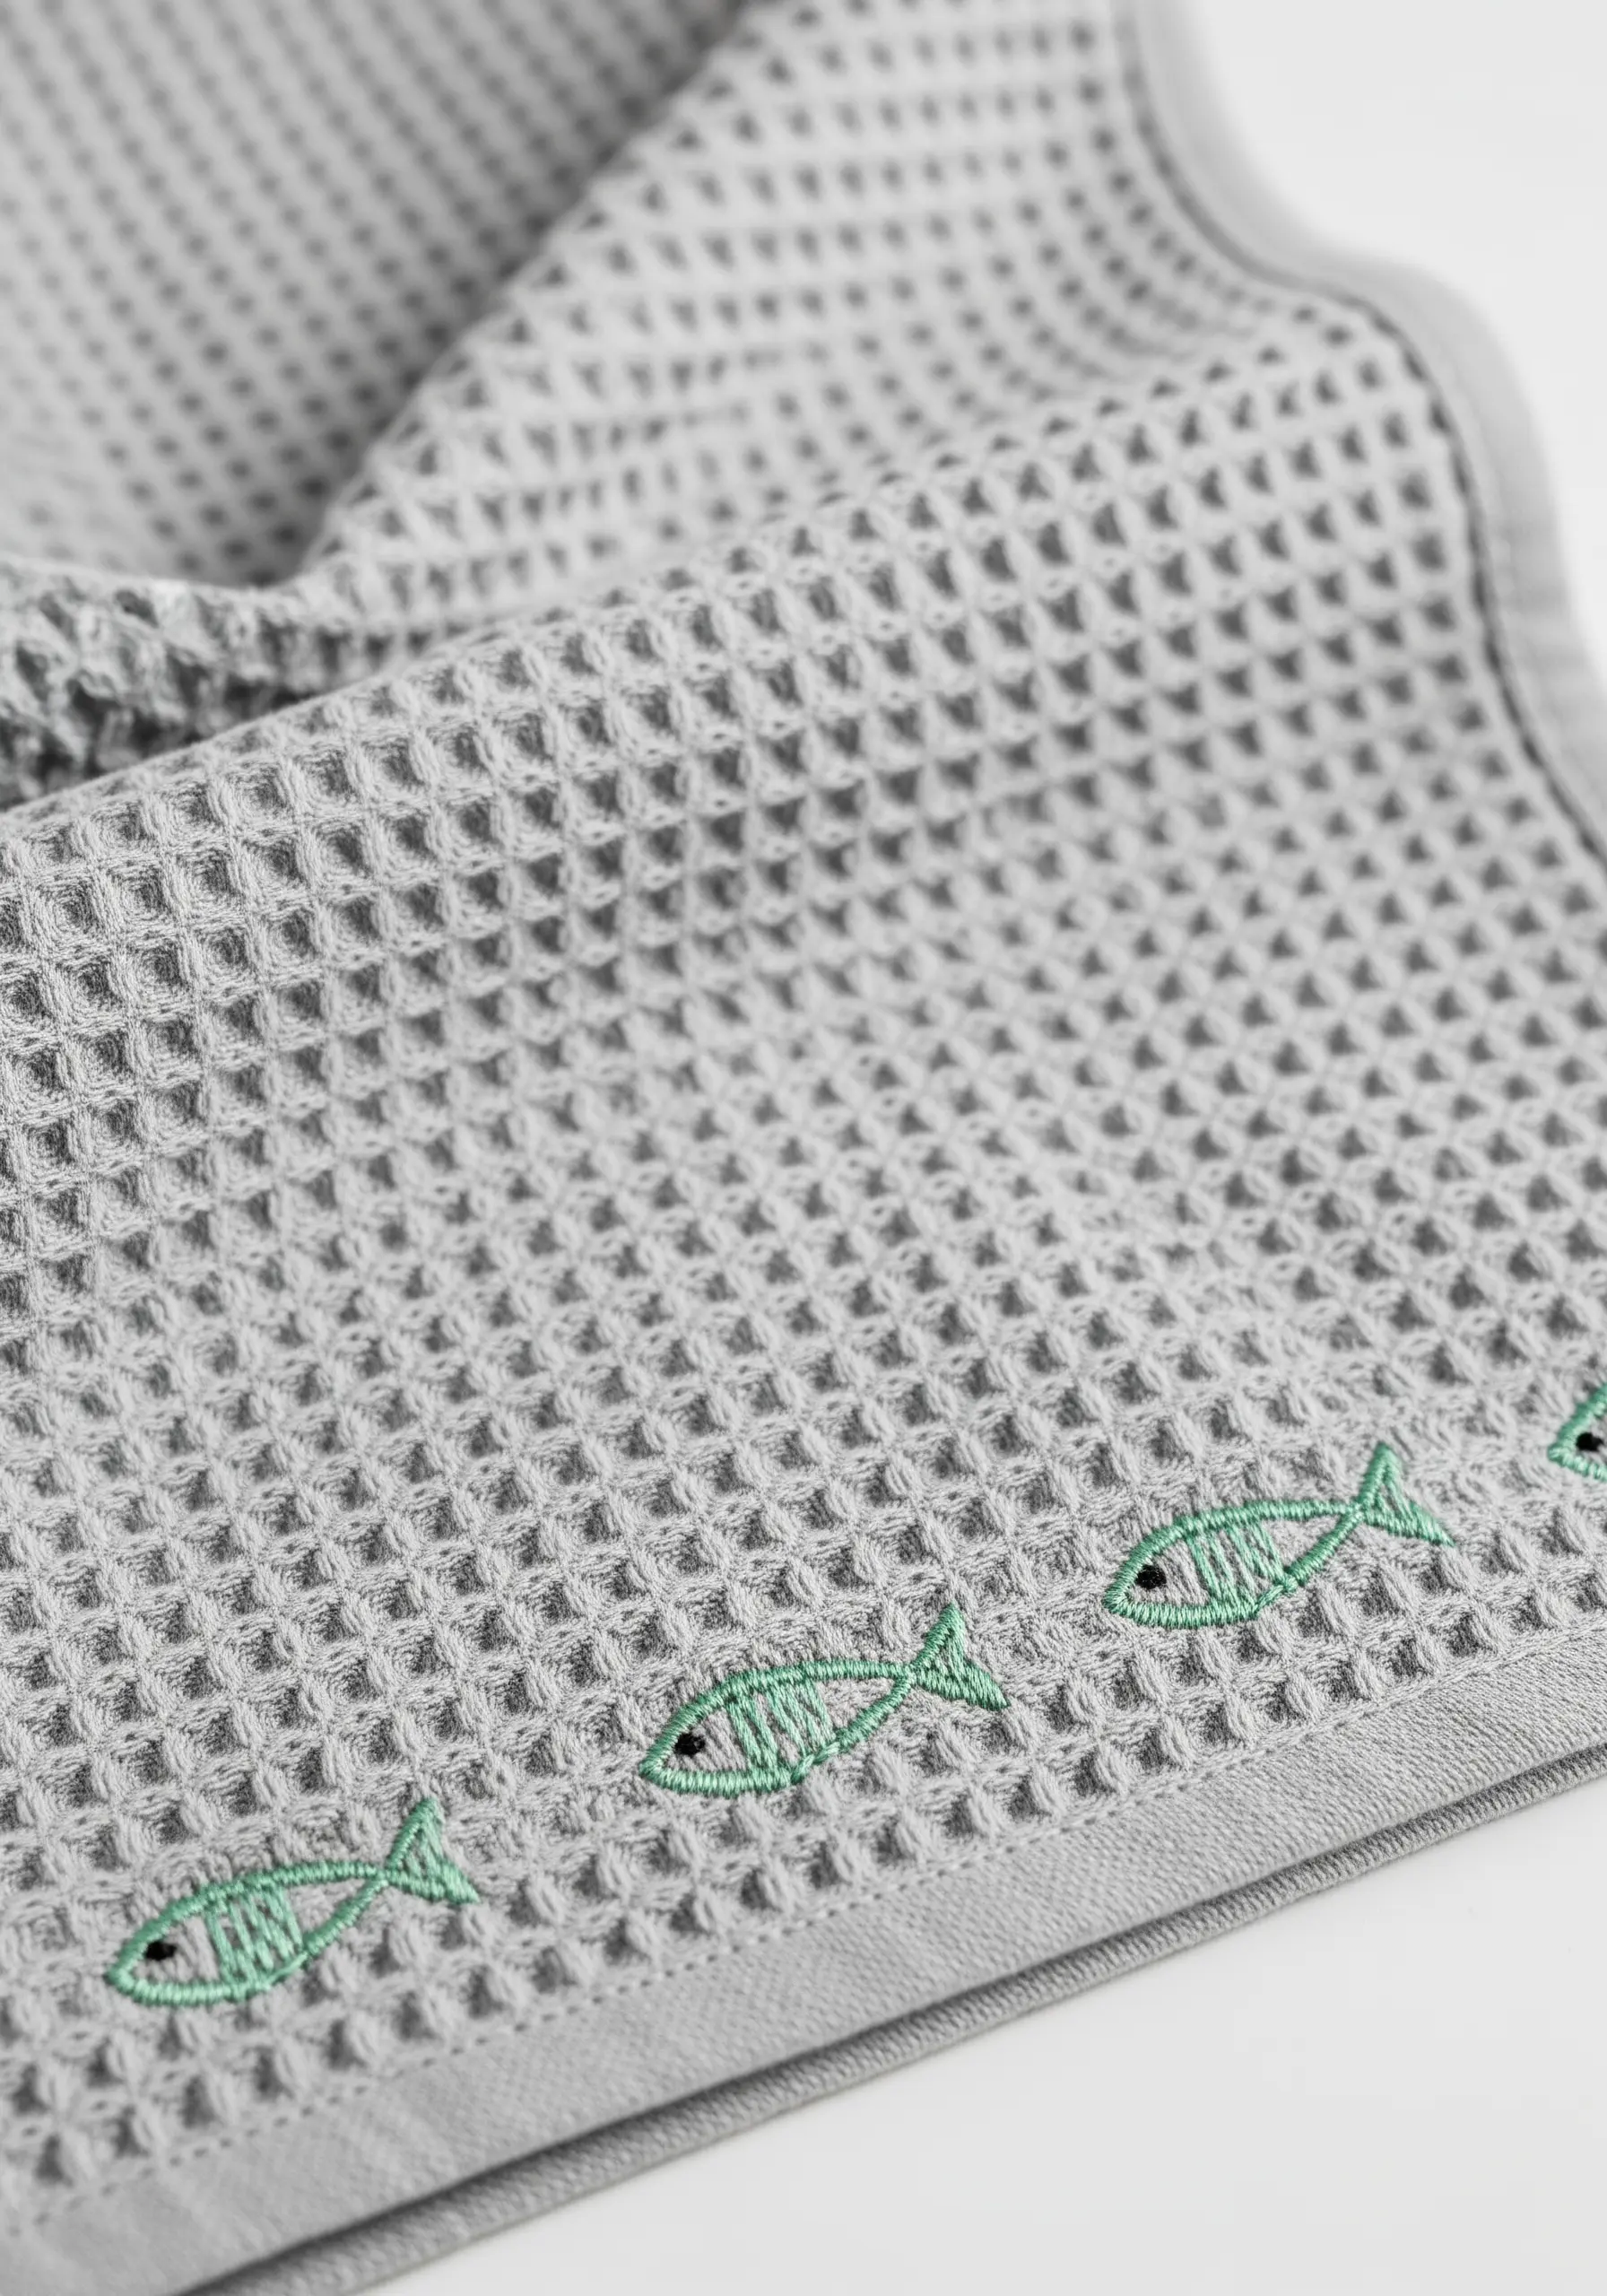
Embroidering on highly textured fabric like a waffle-weave towel requires a technique that allows your design to sit on top of the surface, not sink into it.
Always use a stabilizer on the back of the fabric. It provides a solid foundation and prevents the stitches from disappearing into the weave’s recesses.
Opt for simple, graphic shapes filled with satin stitch. Outline the entire motif with a backstitch to give it a crisp, defined edge that separates it from the busy background.
Use all six strands of embroidery floss or a thicker pearl cotton to ensure the design has enough weight and presence.
7. The Perfect Fill: Directional Satin Stitch
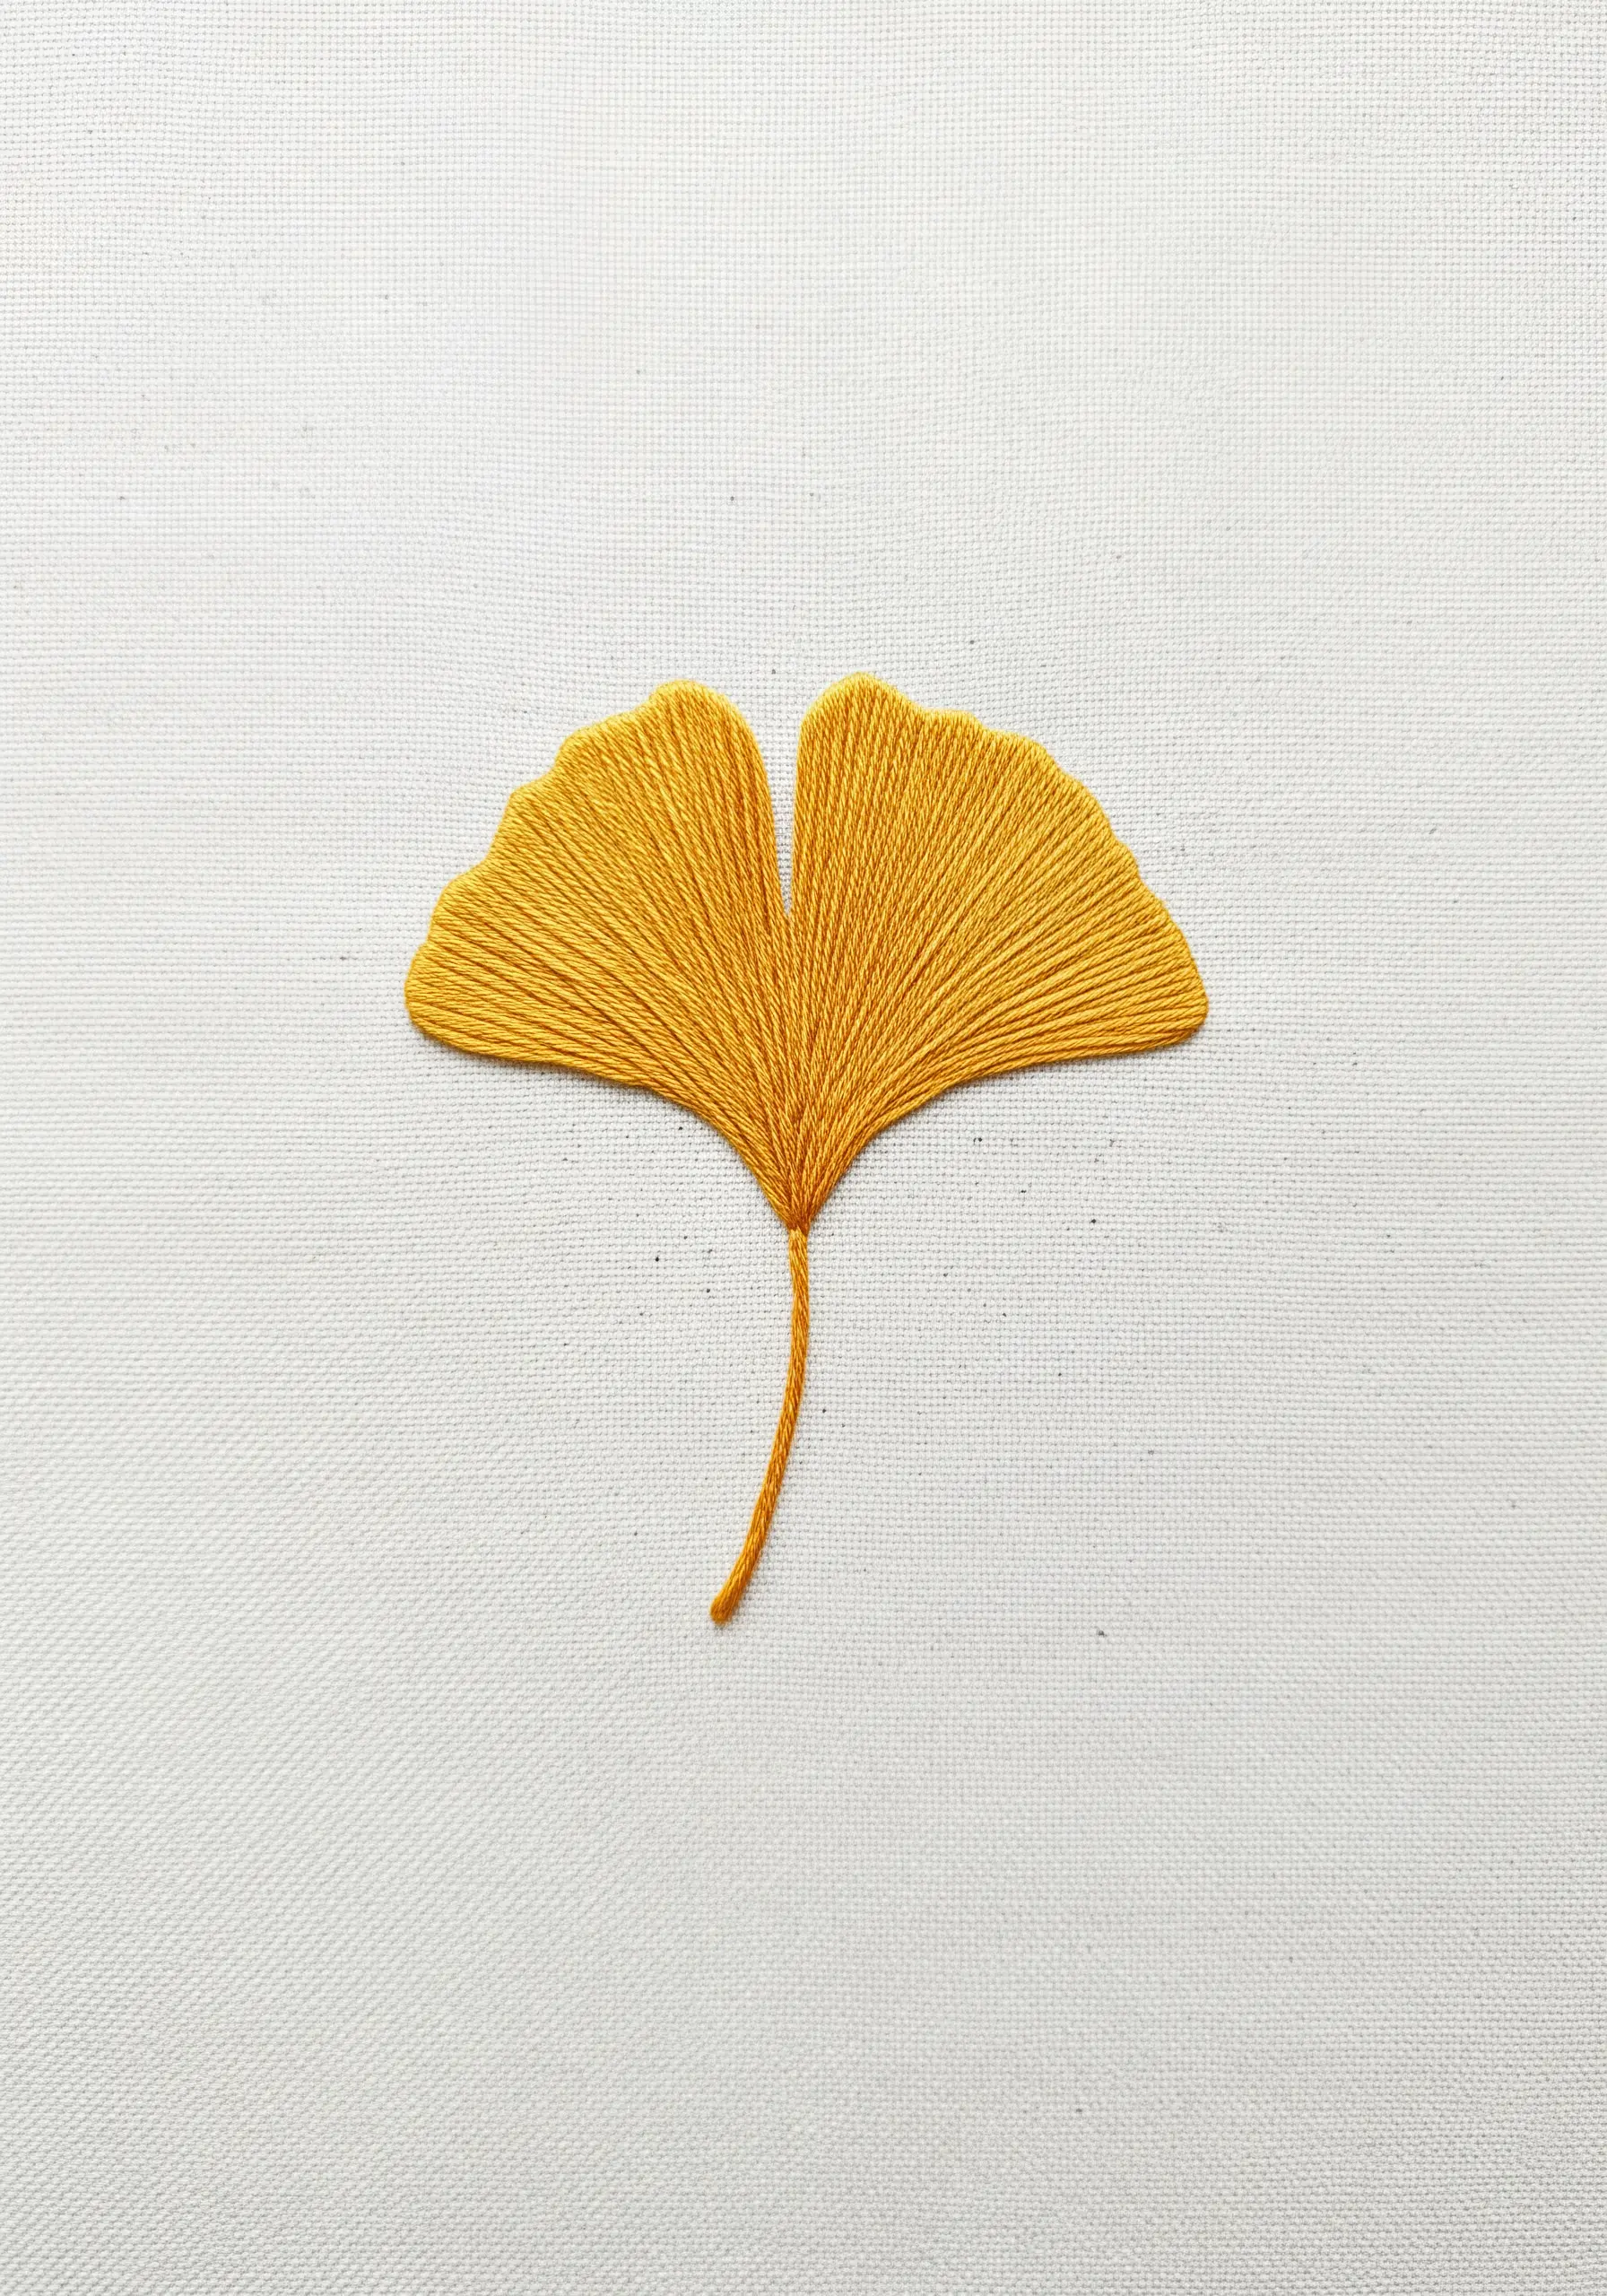
Make your botanical motifs look more organic and realistic by letting the stitch direction mimic the object’s natural form.
For a ginkgo leaf, angle your satin stitches to follow the delicate veins, fanning out from the stem.
Mentally (or with a fabric pen) divide the leaf into two halves. Stitch each side separately, meeting your stitches at a subtle line in the center. This small detail adds incredible depth.
Finish with a clean stem stitch for the stalk, grounding the beautifully filled leaf shape.
8. Tonal Embroidery: Subtle Detail on Fleece
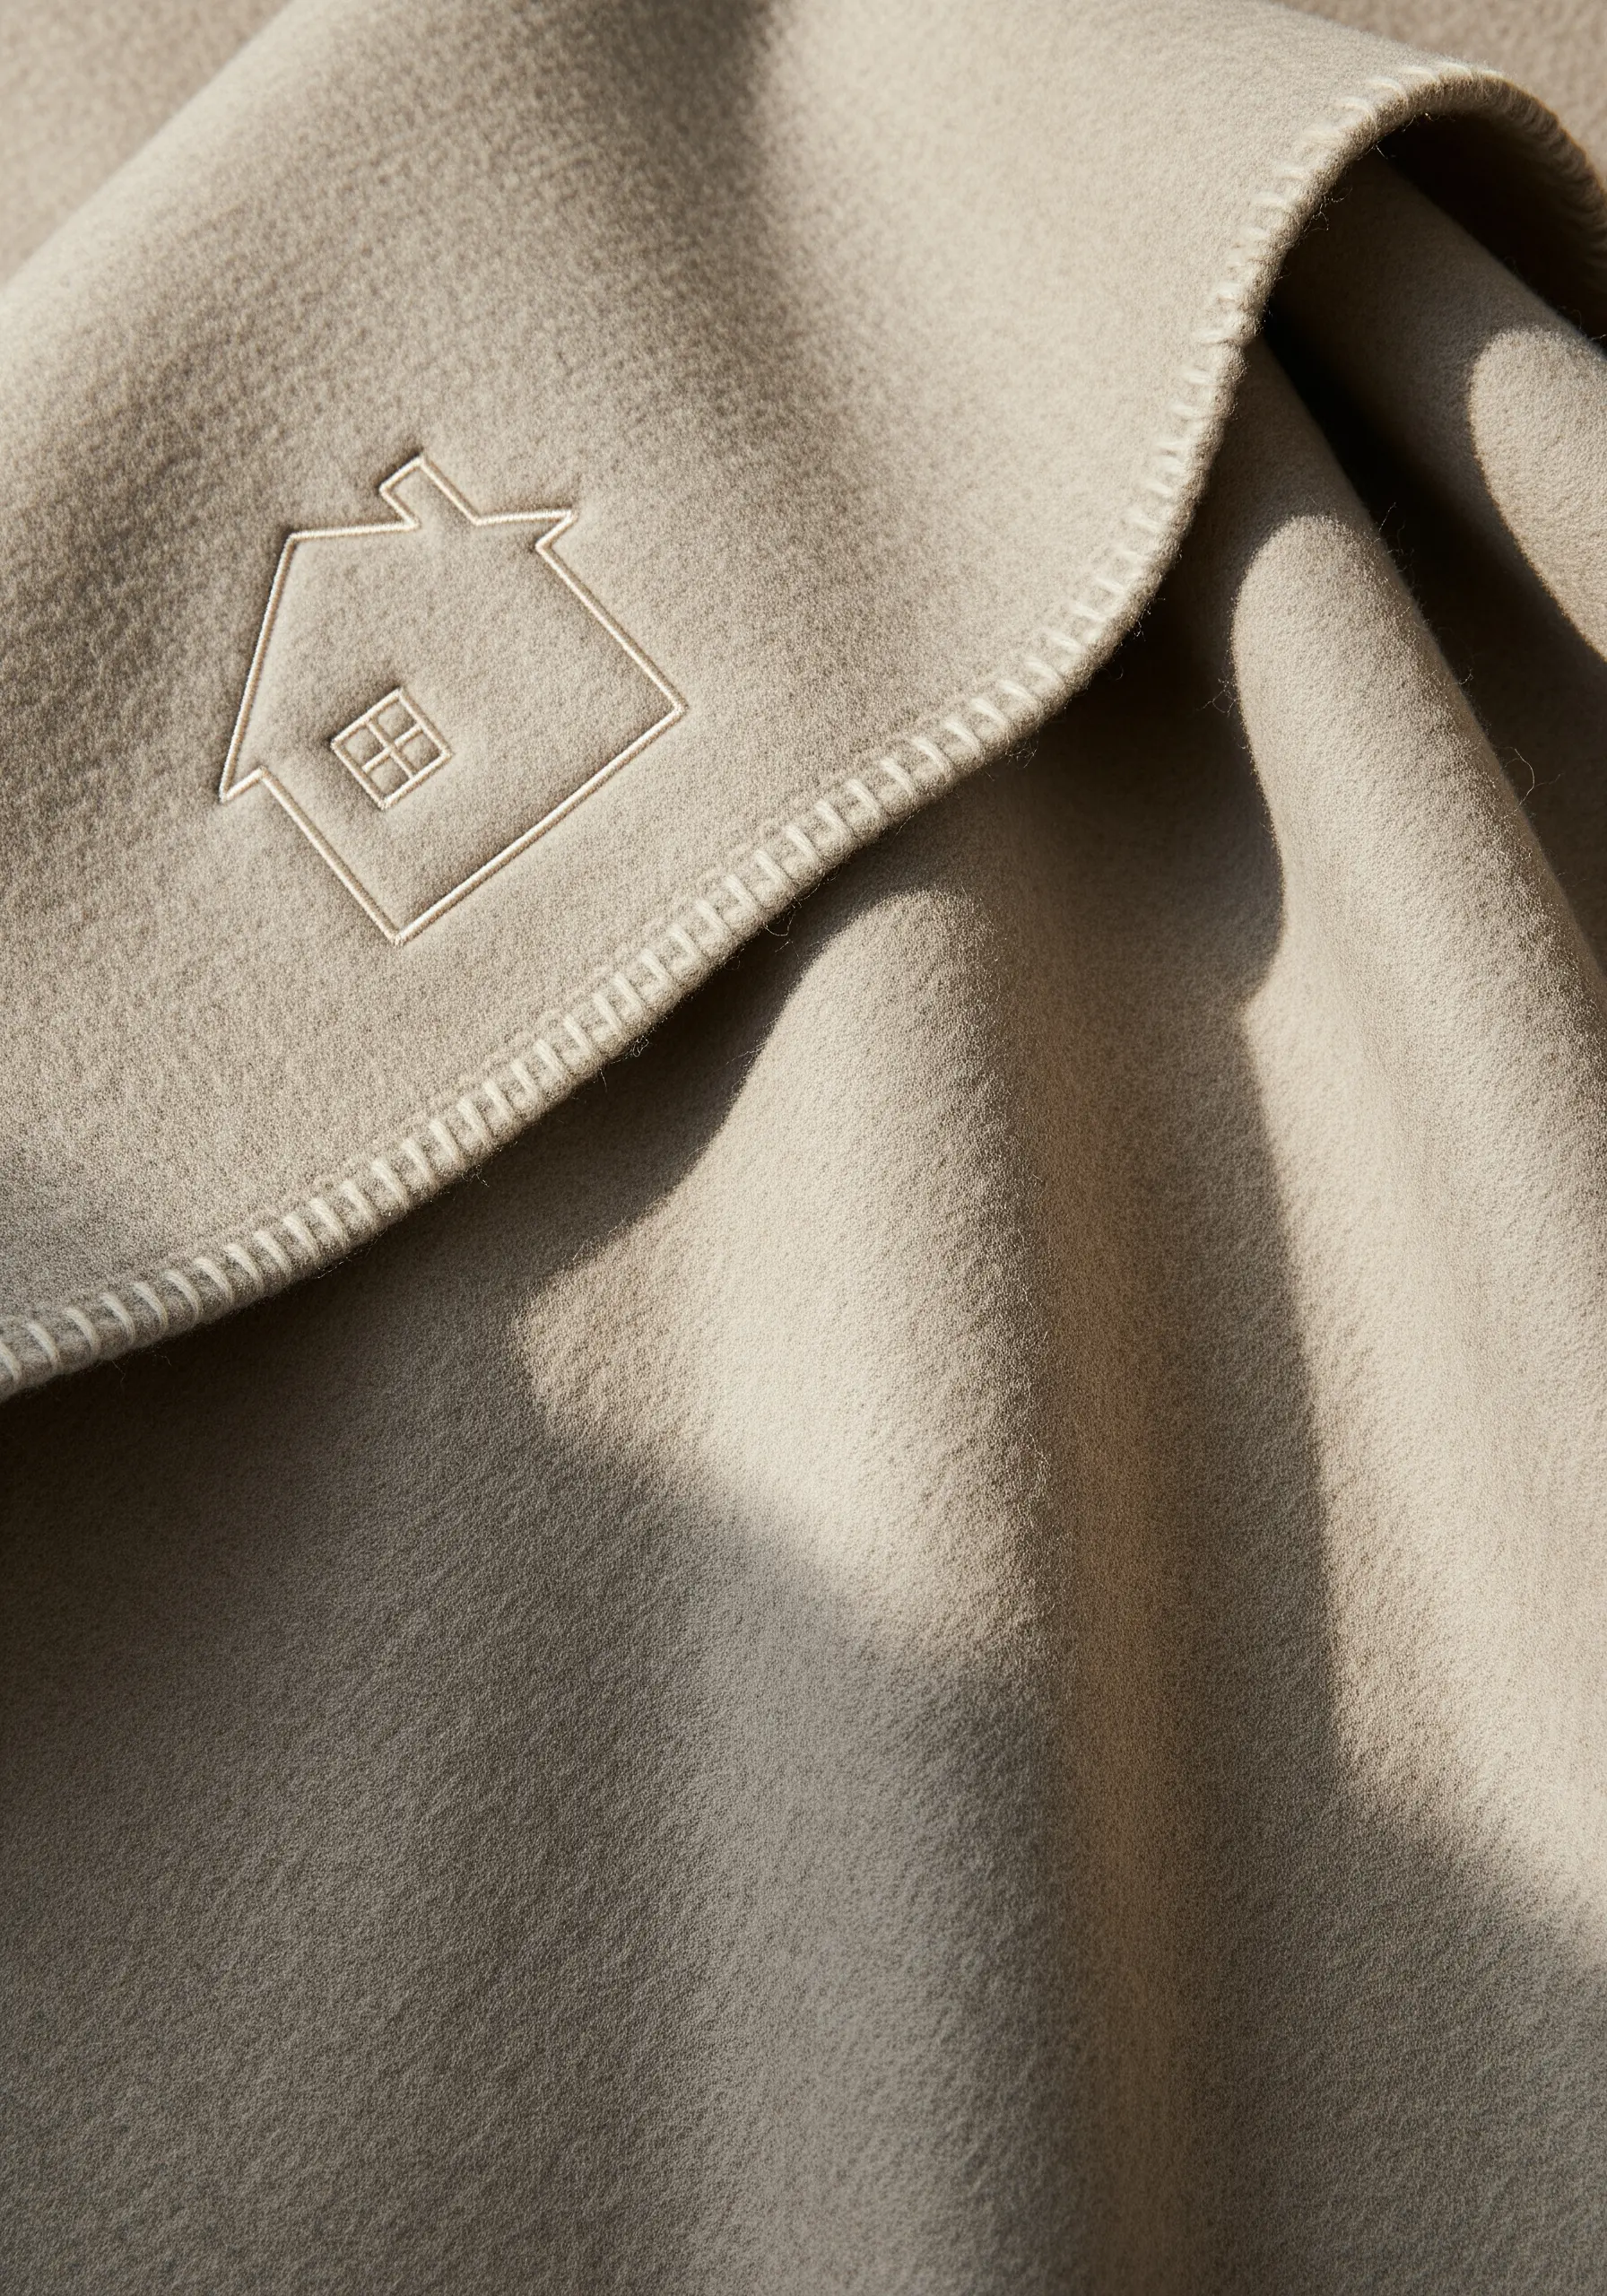
For an effect that feels both minimalist and luxurious, try tonal embroidery.
Choose a thread color that is just one or two shades different from your base fabric. The goal is to create a subtle shift in texture and sheen, not a bold color statement.
A simple backstitch or stem stitch is perfect for this technique, as it creates a clean, graphic line that won’t get lost in the pile of fabrics like fleece or wool.
This method transforms a simple blanket into a bespoke piece, proving that the most impactful details are often the quietest.
9. Fabric Application: Stitching on Book Cloth

You can add a personal touch to journal covers and other fabric-bound objects with a few adjustments.
Use a sharp, sturdy needle (a quilting needle works well) and a thimble to protect your fingers as you push through the thick book board.
Simple, graphic line art motifs are ideal. Dense fill stitches can warp the cover, so stick to backstitch, split stitch, or stem stitch for clean, defined lines.
Keep your tension firm but not overly tight to avoid puckering the book cloth.
10. Modern Coasters: Minimalist Mark-Making
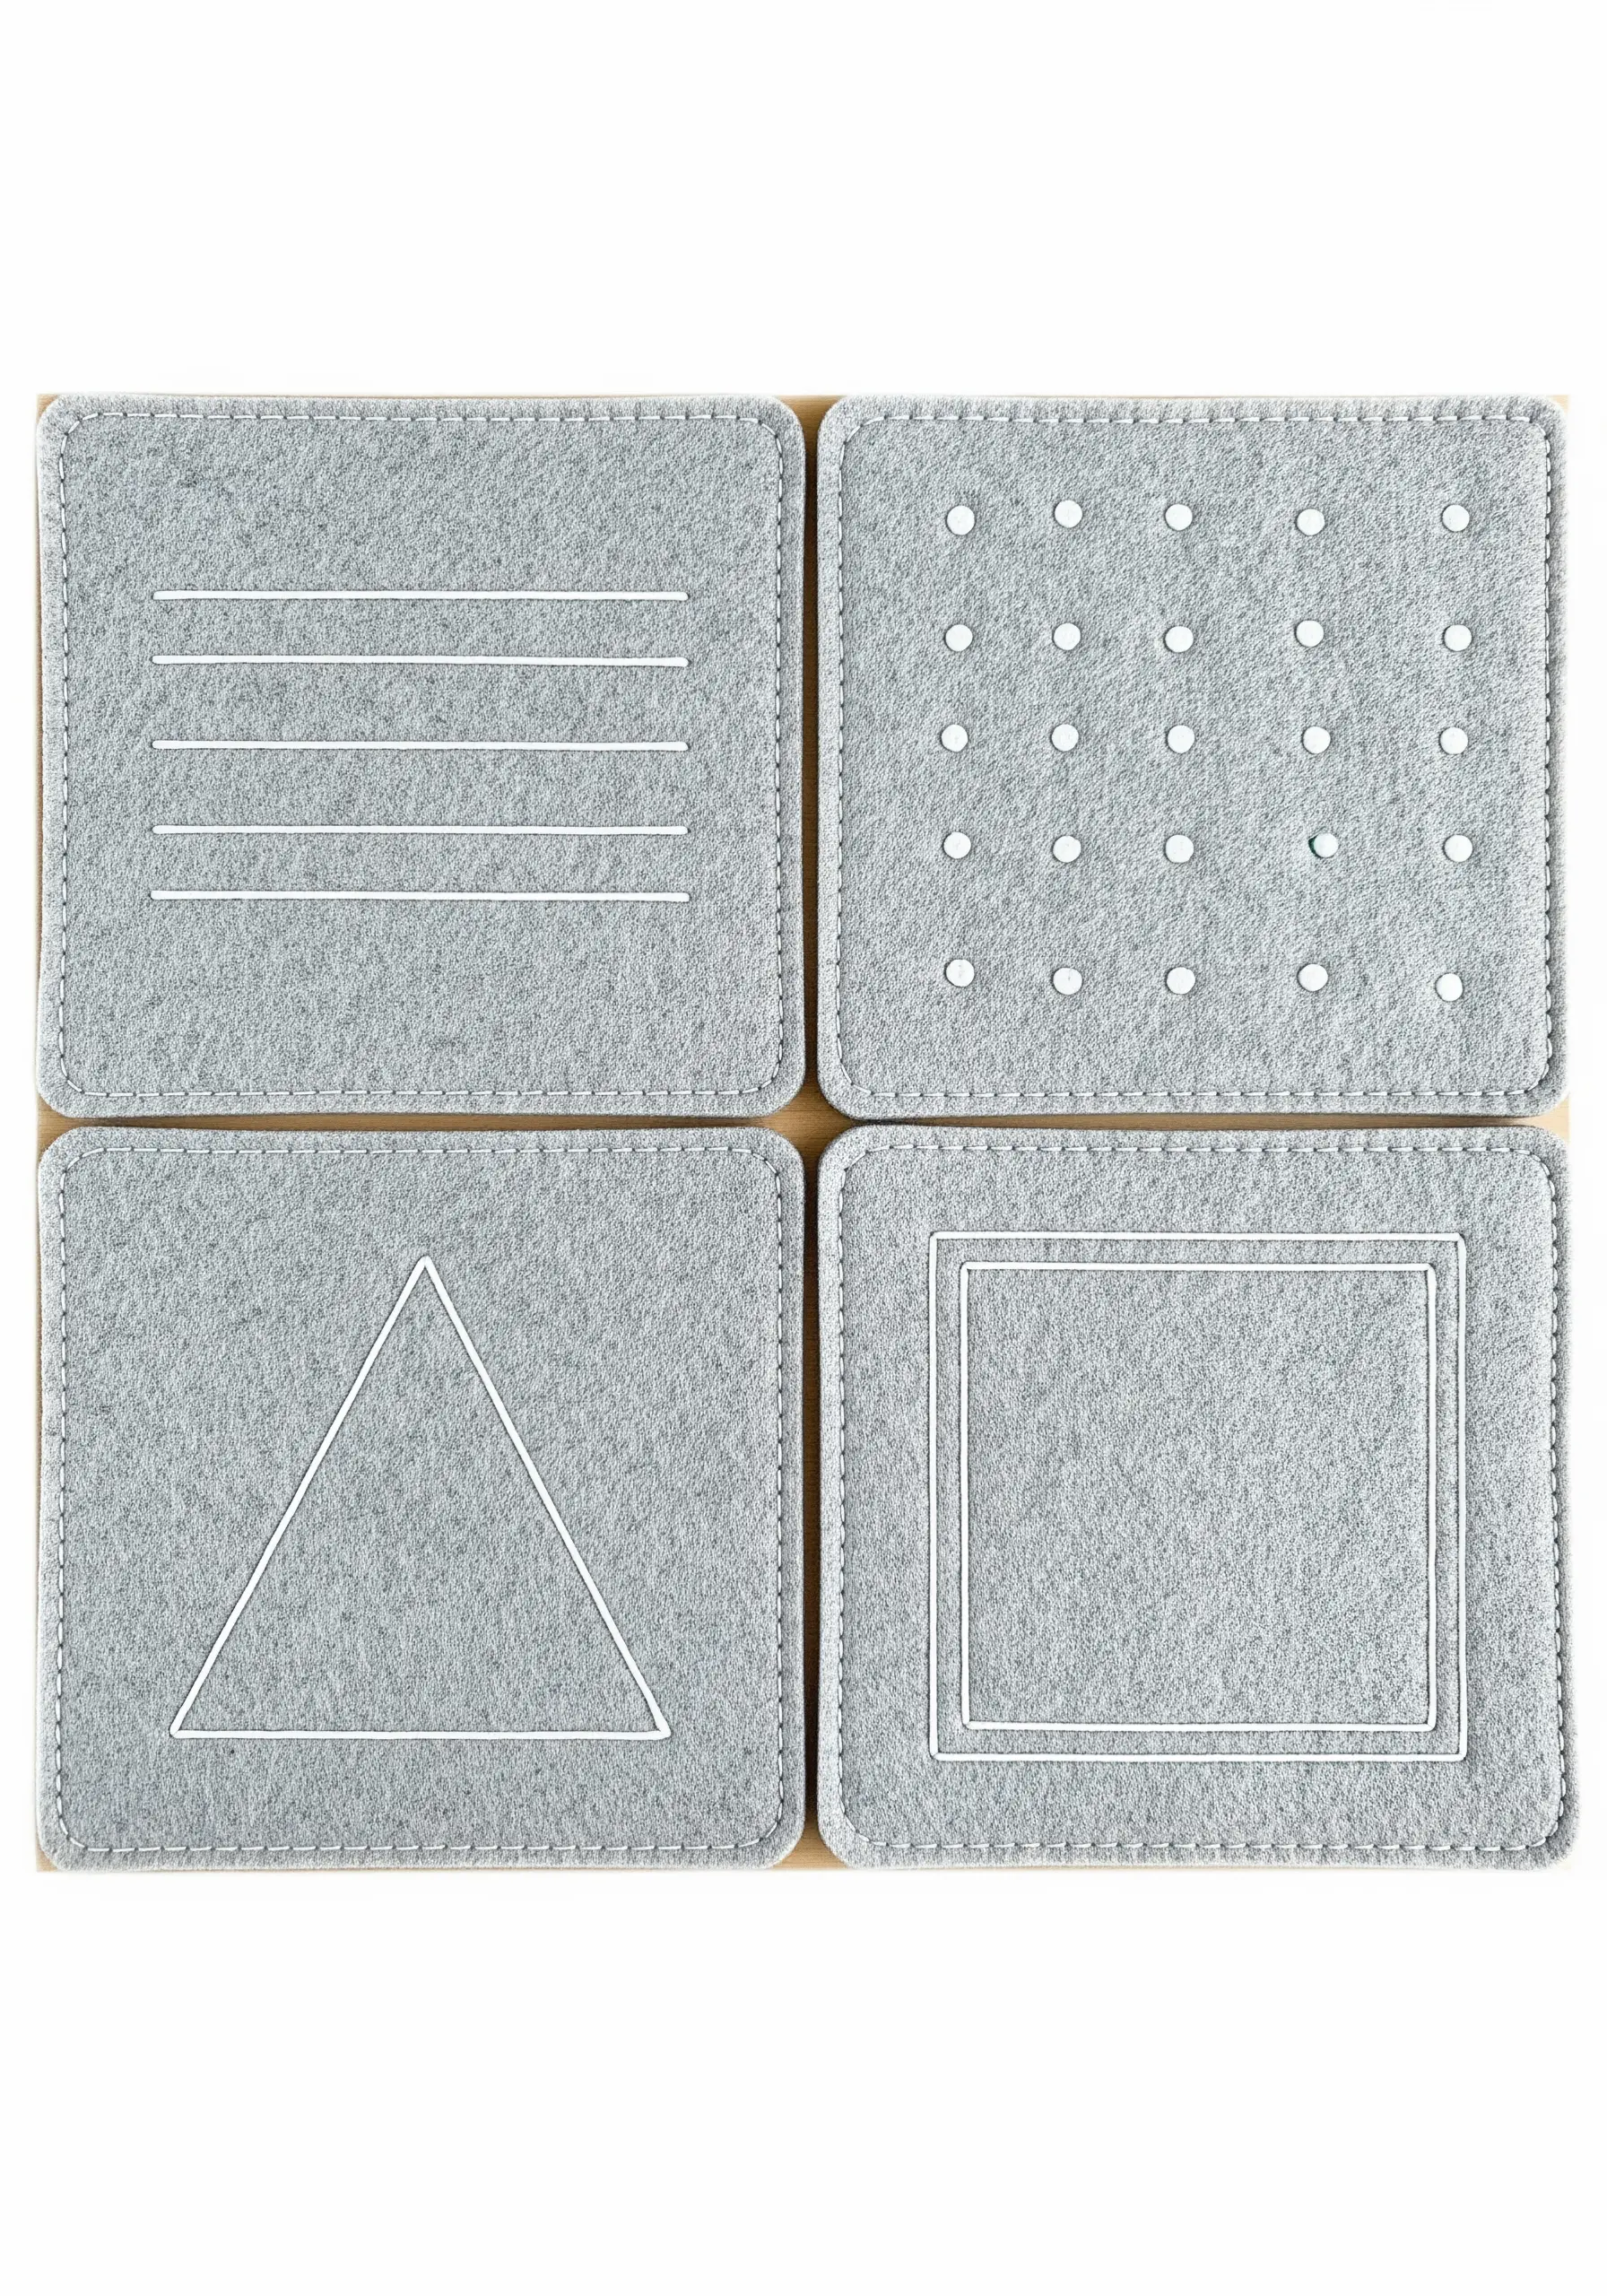
Transform simple felt coasters into a modern, graphic set with high-contrast stitching.
Use a simple running stitch or backstitch to create clean geometric patterns. The key to a polished look is perfectly even stitch length and spacing.
To achieve this precision, use a ruler and a heat-erasable fabric pen to mark out your entire design before you begin stitching.
A bright white thread on a neutral grey felt emphasizes the minimalist forms, making the hand-stitched texture the star of the show.
11. Denim Embellishment: The Faux Patch

To make your embroidery on denim look like a crisp, professional patch, the finishing detail is crucial.
After filling your shape with satin stitch, outline the entire motif with a tight backstitch in a contrasting color, like white against red.
This outline contains the satin stitch, giving it a sharp, defined edge and creating the illusion of an applied patch.
Always use a tear-away stabilizer on the inside of the garment to prevent the dense stitches from puckering the sturdy denim fabric.
12. Woven Abstraction: Layering with Thread
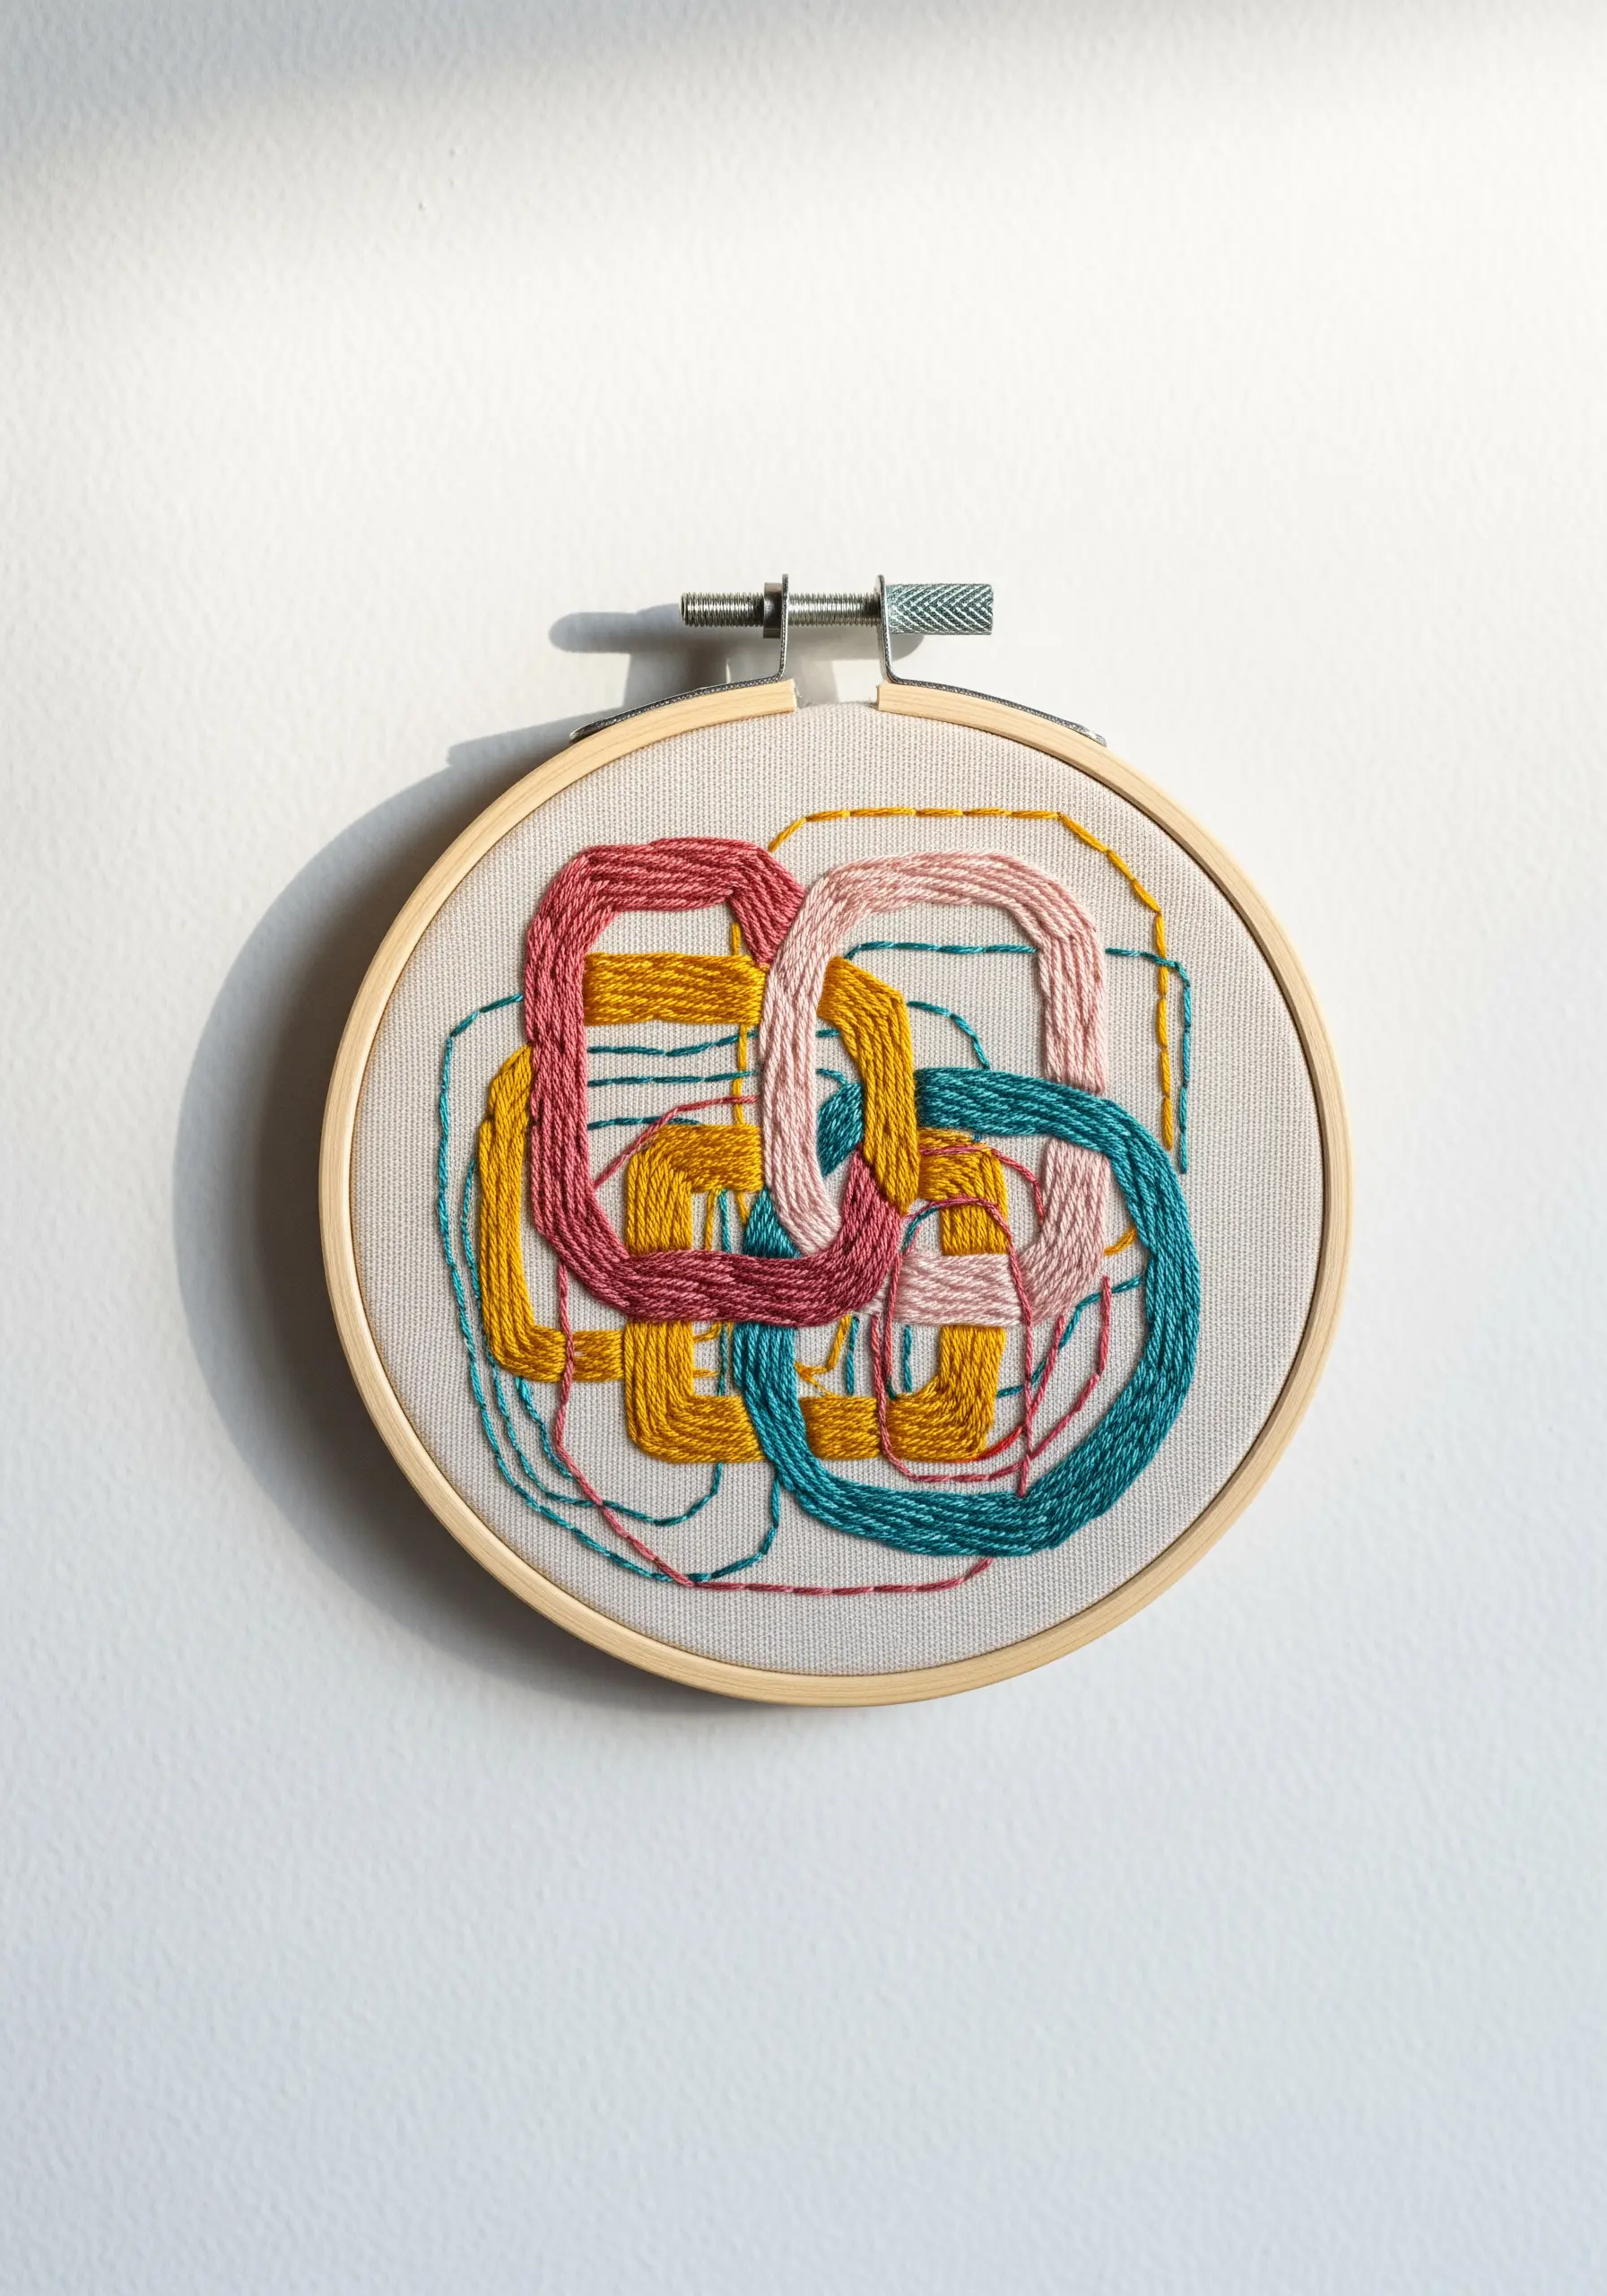
Create the illusion of interwoven shapes by carefully planning your layers.
Stitch the rearmost shapes completely first. Then, stitch the shapes that appear to be on top, bringing your needle up and down just at the edge of the previous stitches to create a clean overlap.
Use a dense chain stitch or satin stitch to fill the shapes, giving them a solid, blocky feel that enhances the woven effect.
Choose a limited palette of three or four coordinating colors. This helps the abstract design feel cohesive and intentional rather than chaotic.
13. Off-Center Composition for Visual Interest
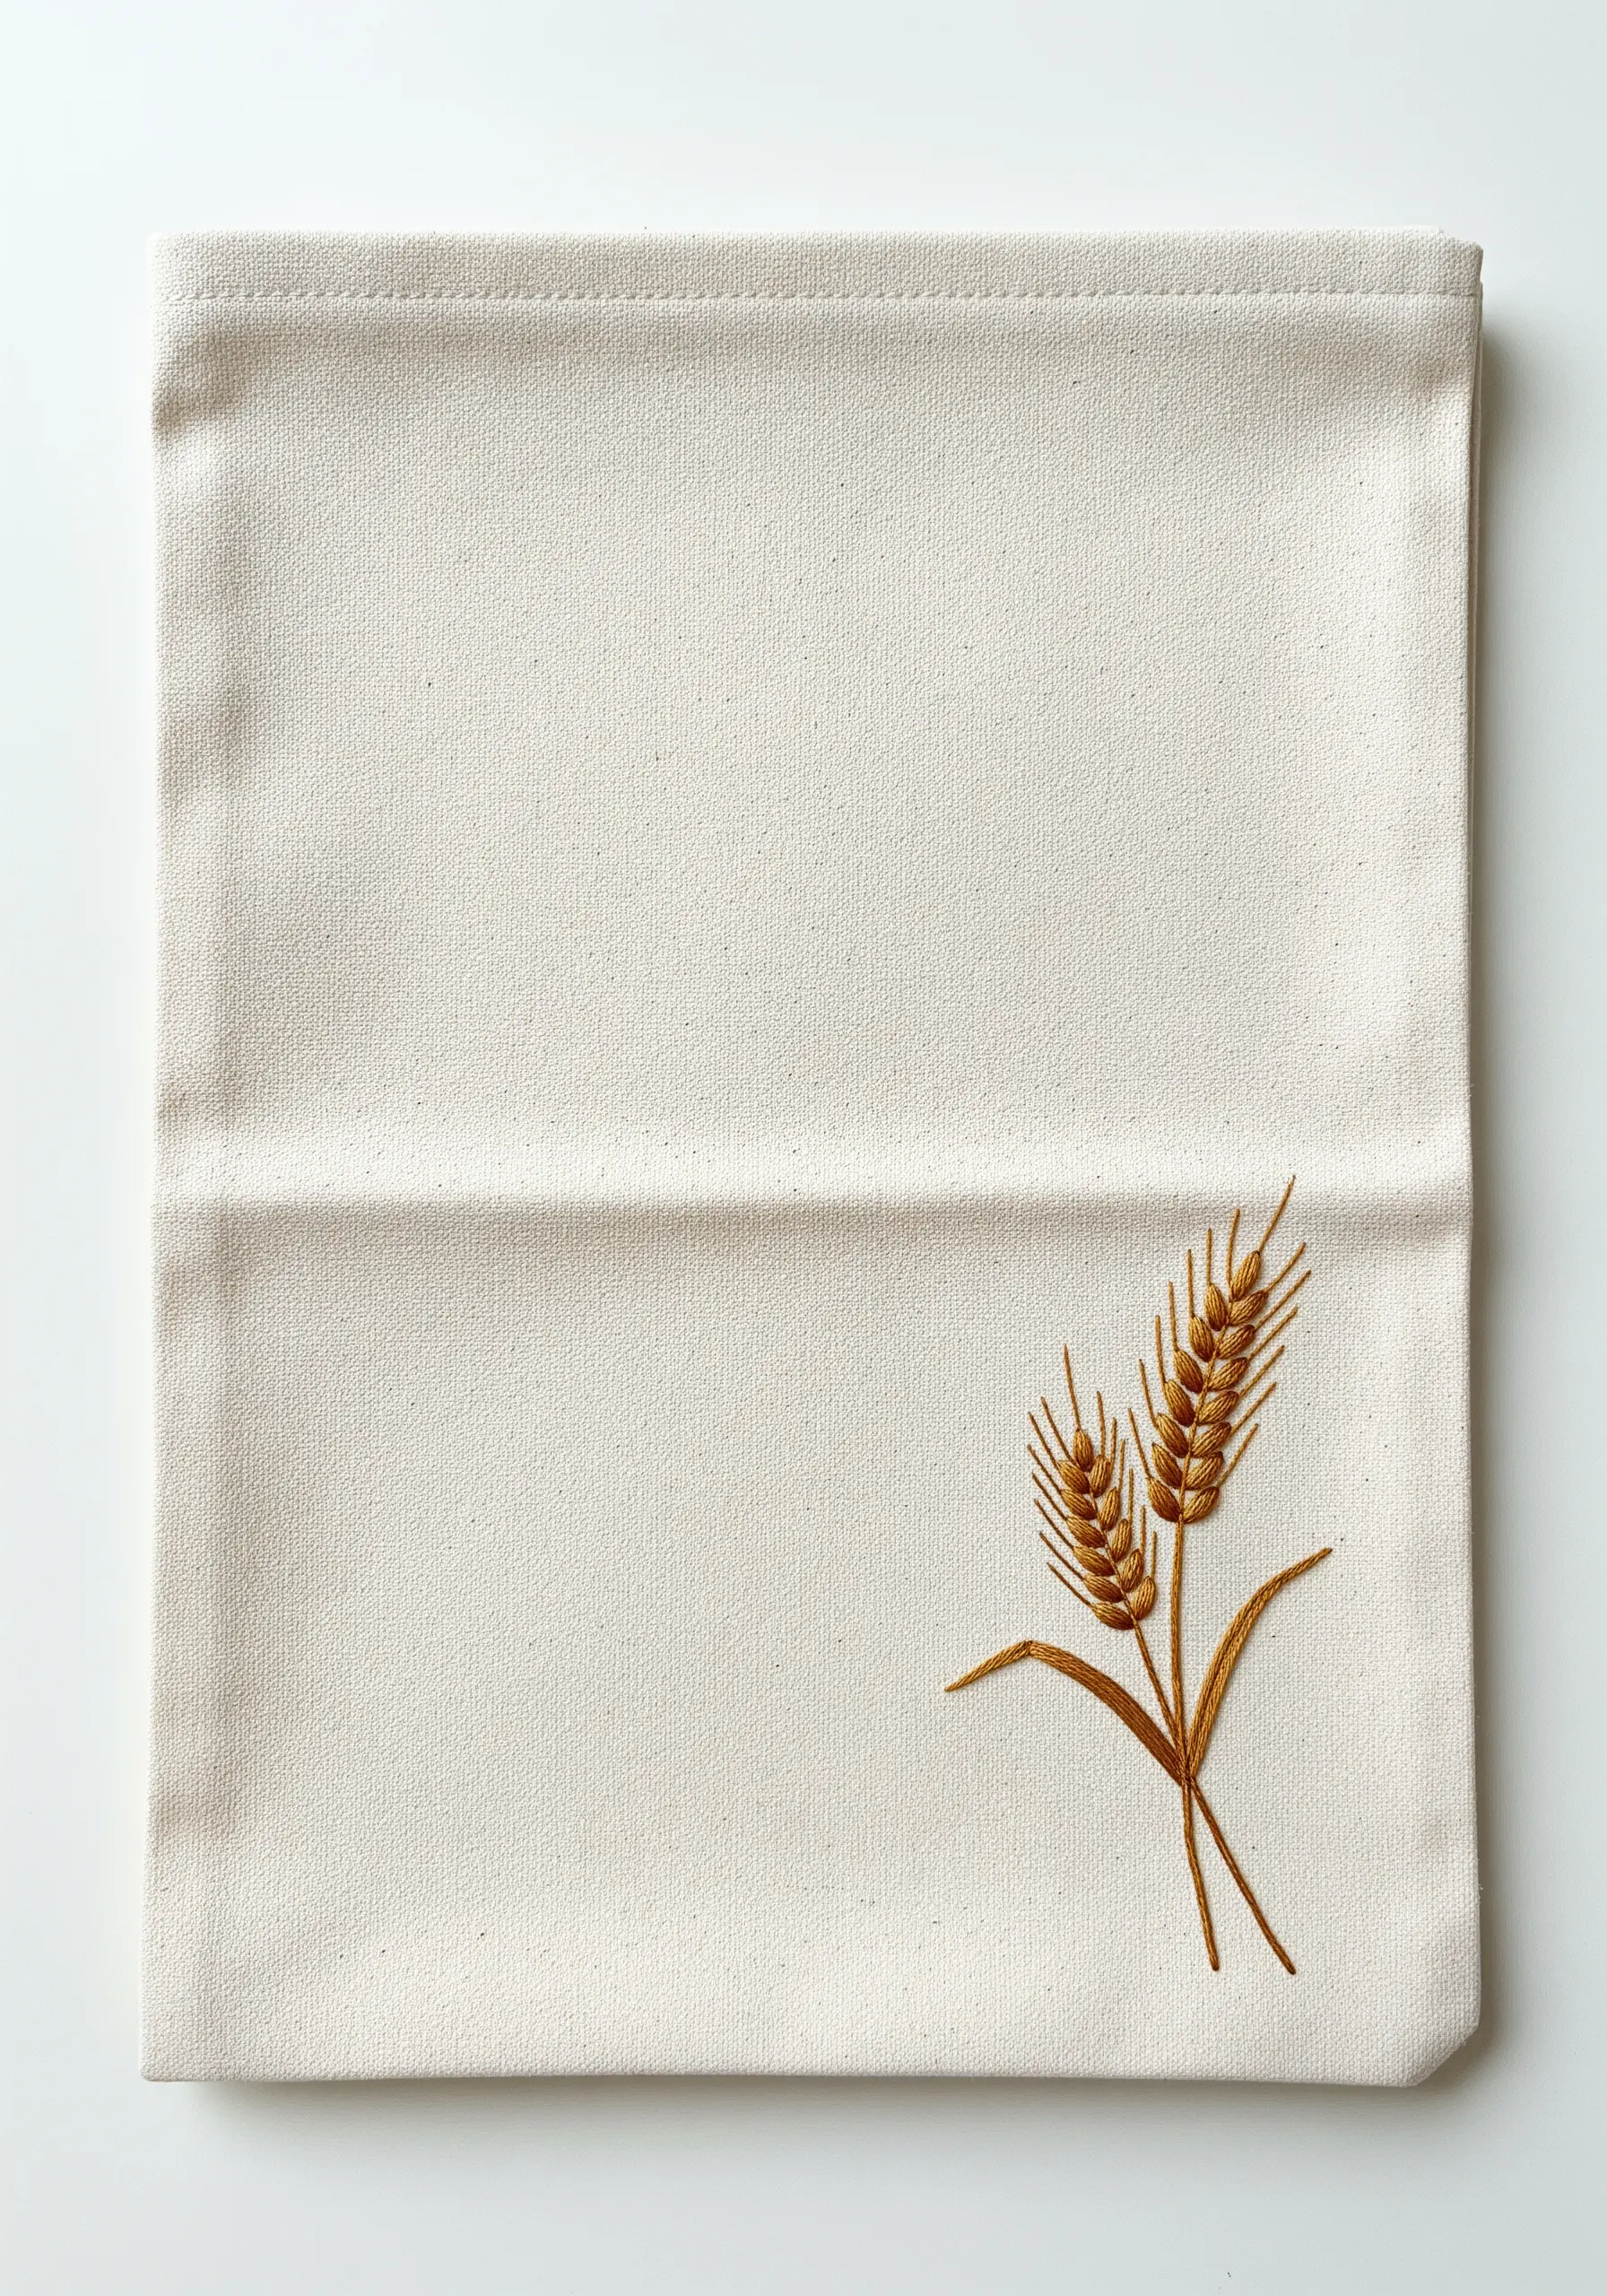
Break free from the center. Placing your embroidery motif off-center creates a more dynamic and sophisticated composition.
Imagine your fabric divided into a 3×3 grid. Position your main design element, like these wheat stalks, where the lines intersect—typically in the lower right or left third.
This principle, known as the rule of thirds, draws the viewer’s eye across the piece and makes the surrounding negative space an active part of the design.
It’s a simple change in placement that instantly elevates pillow covers, tea towels, and tote bags.
14. Ethereal Stitches: Embroidering on Sheers
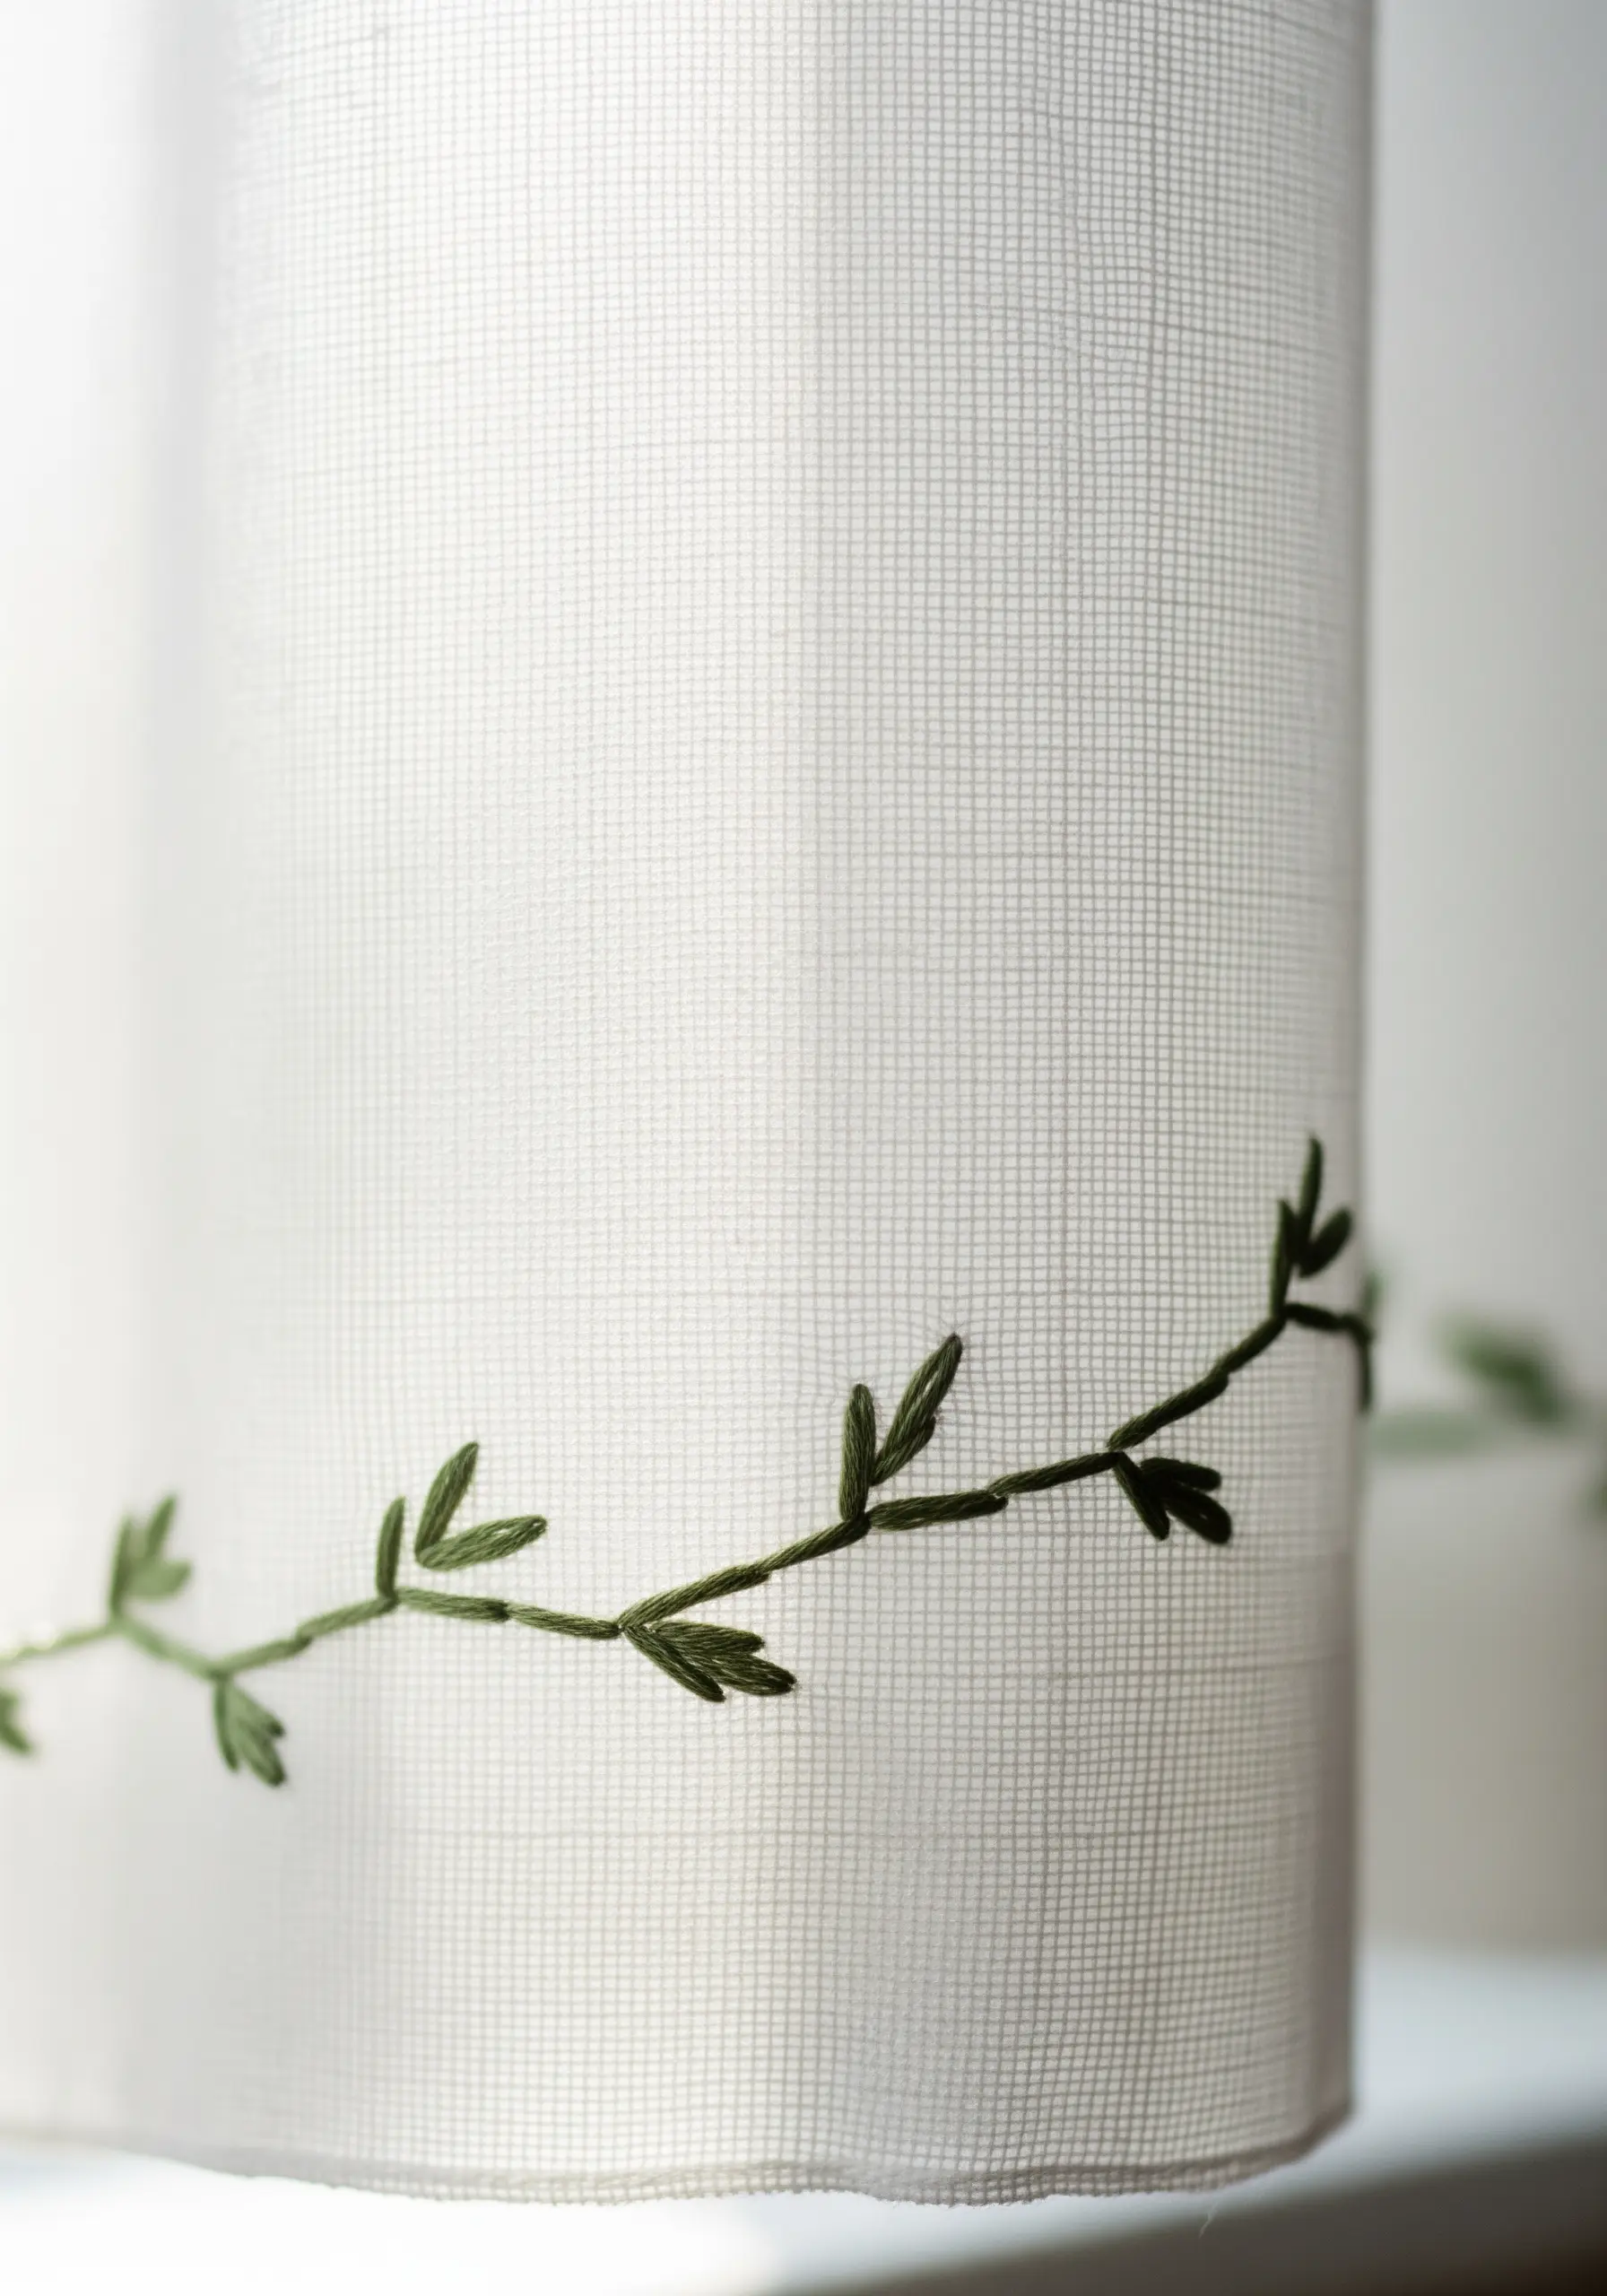
When embroidering on sheer or semi-sheer fabric, the back of your work is as important as the front.
Keep your stitches exceptionally neat and avoid carrying your thread across open spaces. Instead, travel discreetly behind stitches you’ve already made.
Use a fine, sharp needle and a lightweight thread (two strands maximum) to avoid pulling or damaging the delicate weave.
Simple, open stitches like lazy daisy and stem stitch work beautifully, creating a design that seems to float weightlessly on the fabric.
15. Capturing Motion with Dispersed Stitches
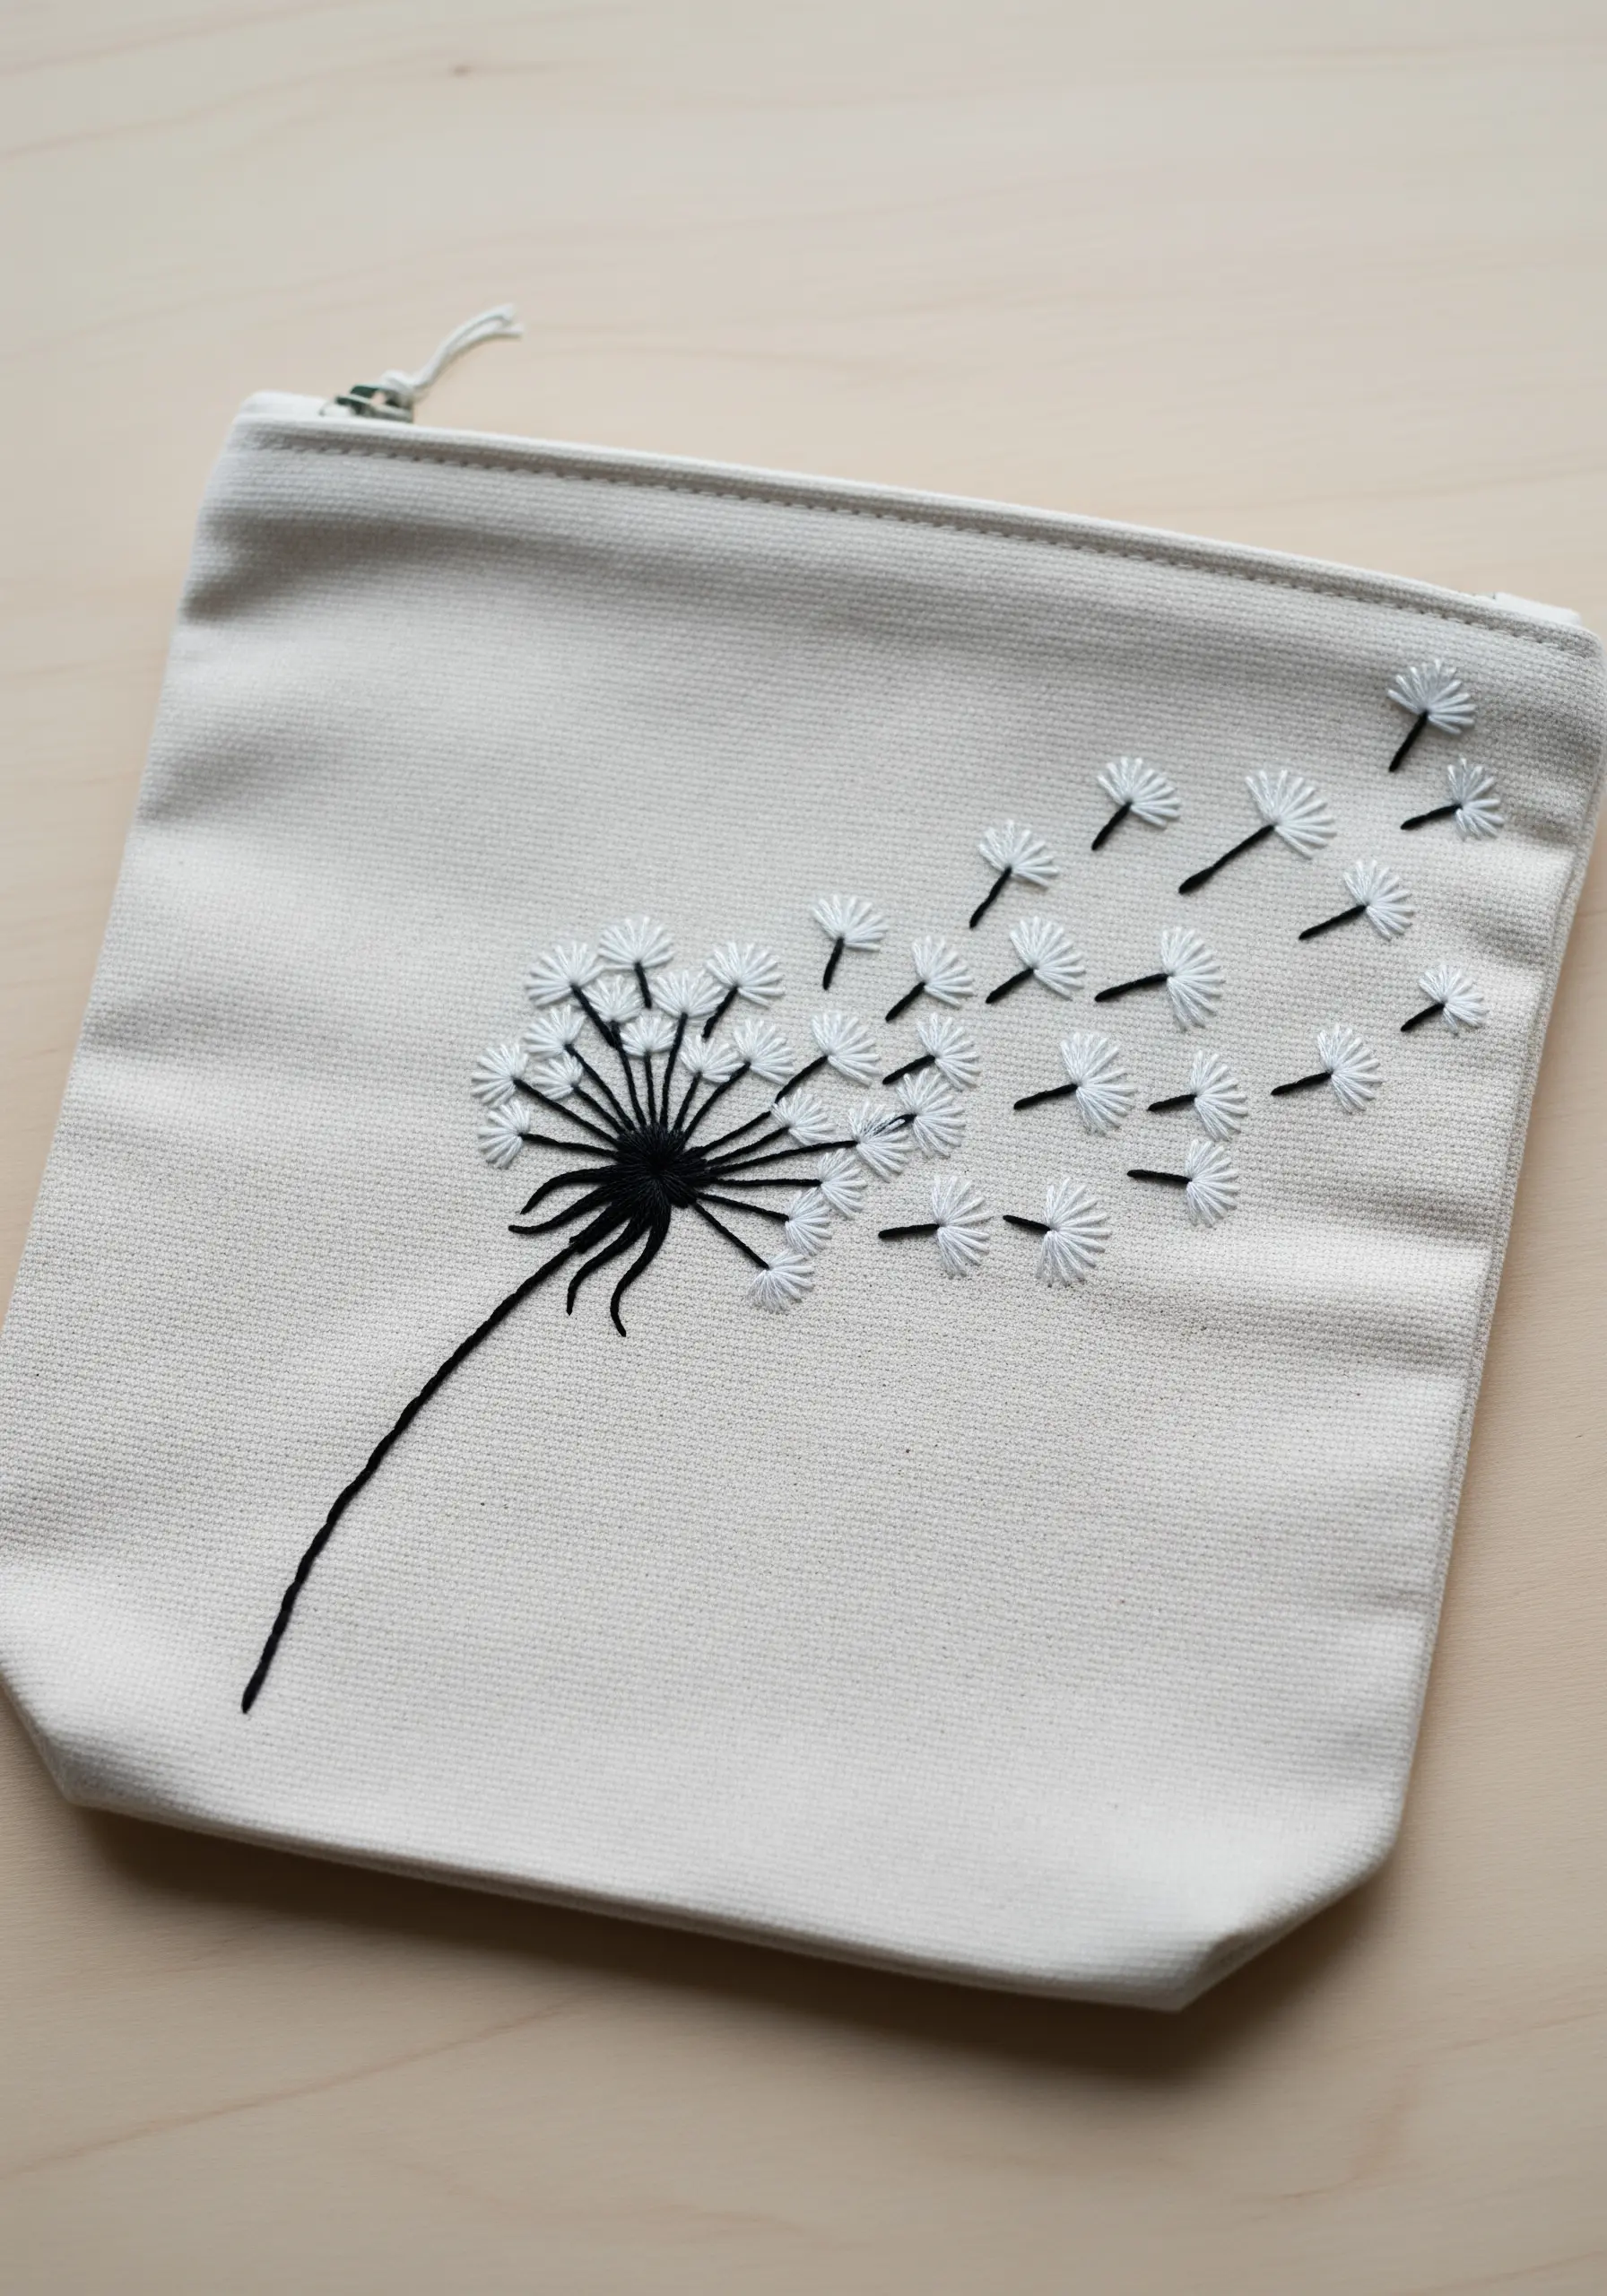
To create a feeling of movement, think beyond the central motif and consider how its elements would interact with an invisible force like the wind.
Stitch the main dandelion head, then add the seeds as detached chain stitches (lazy daisies) with straight stitch stems.
Arrange these floating seeds in a gentle, sweeping S-curve that moves away from the flower. This creates a much more natural sense of dispersal than a straight line.
Vary the spacing and angle of each seed slightly to enhance the organic, breezy feel.
16. Shading for Realism: The Long-and-Short Stitch
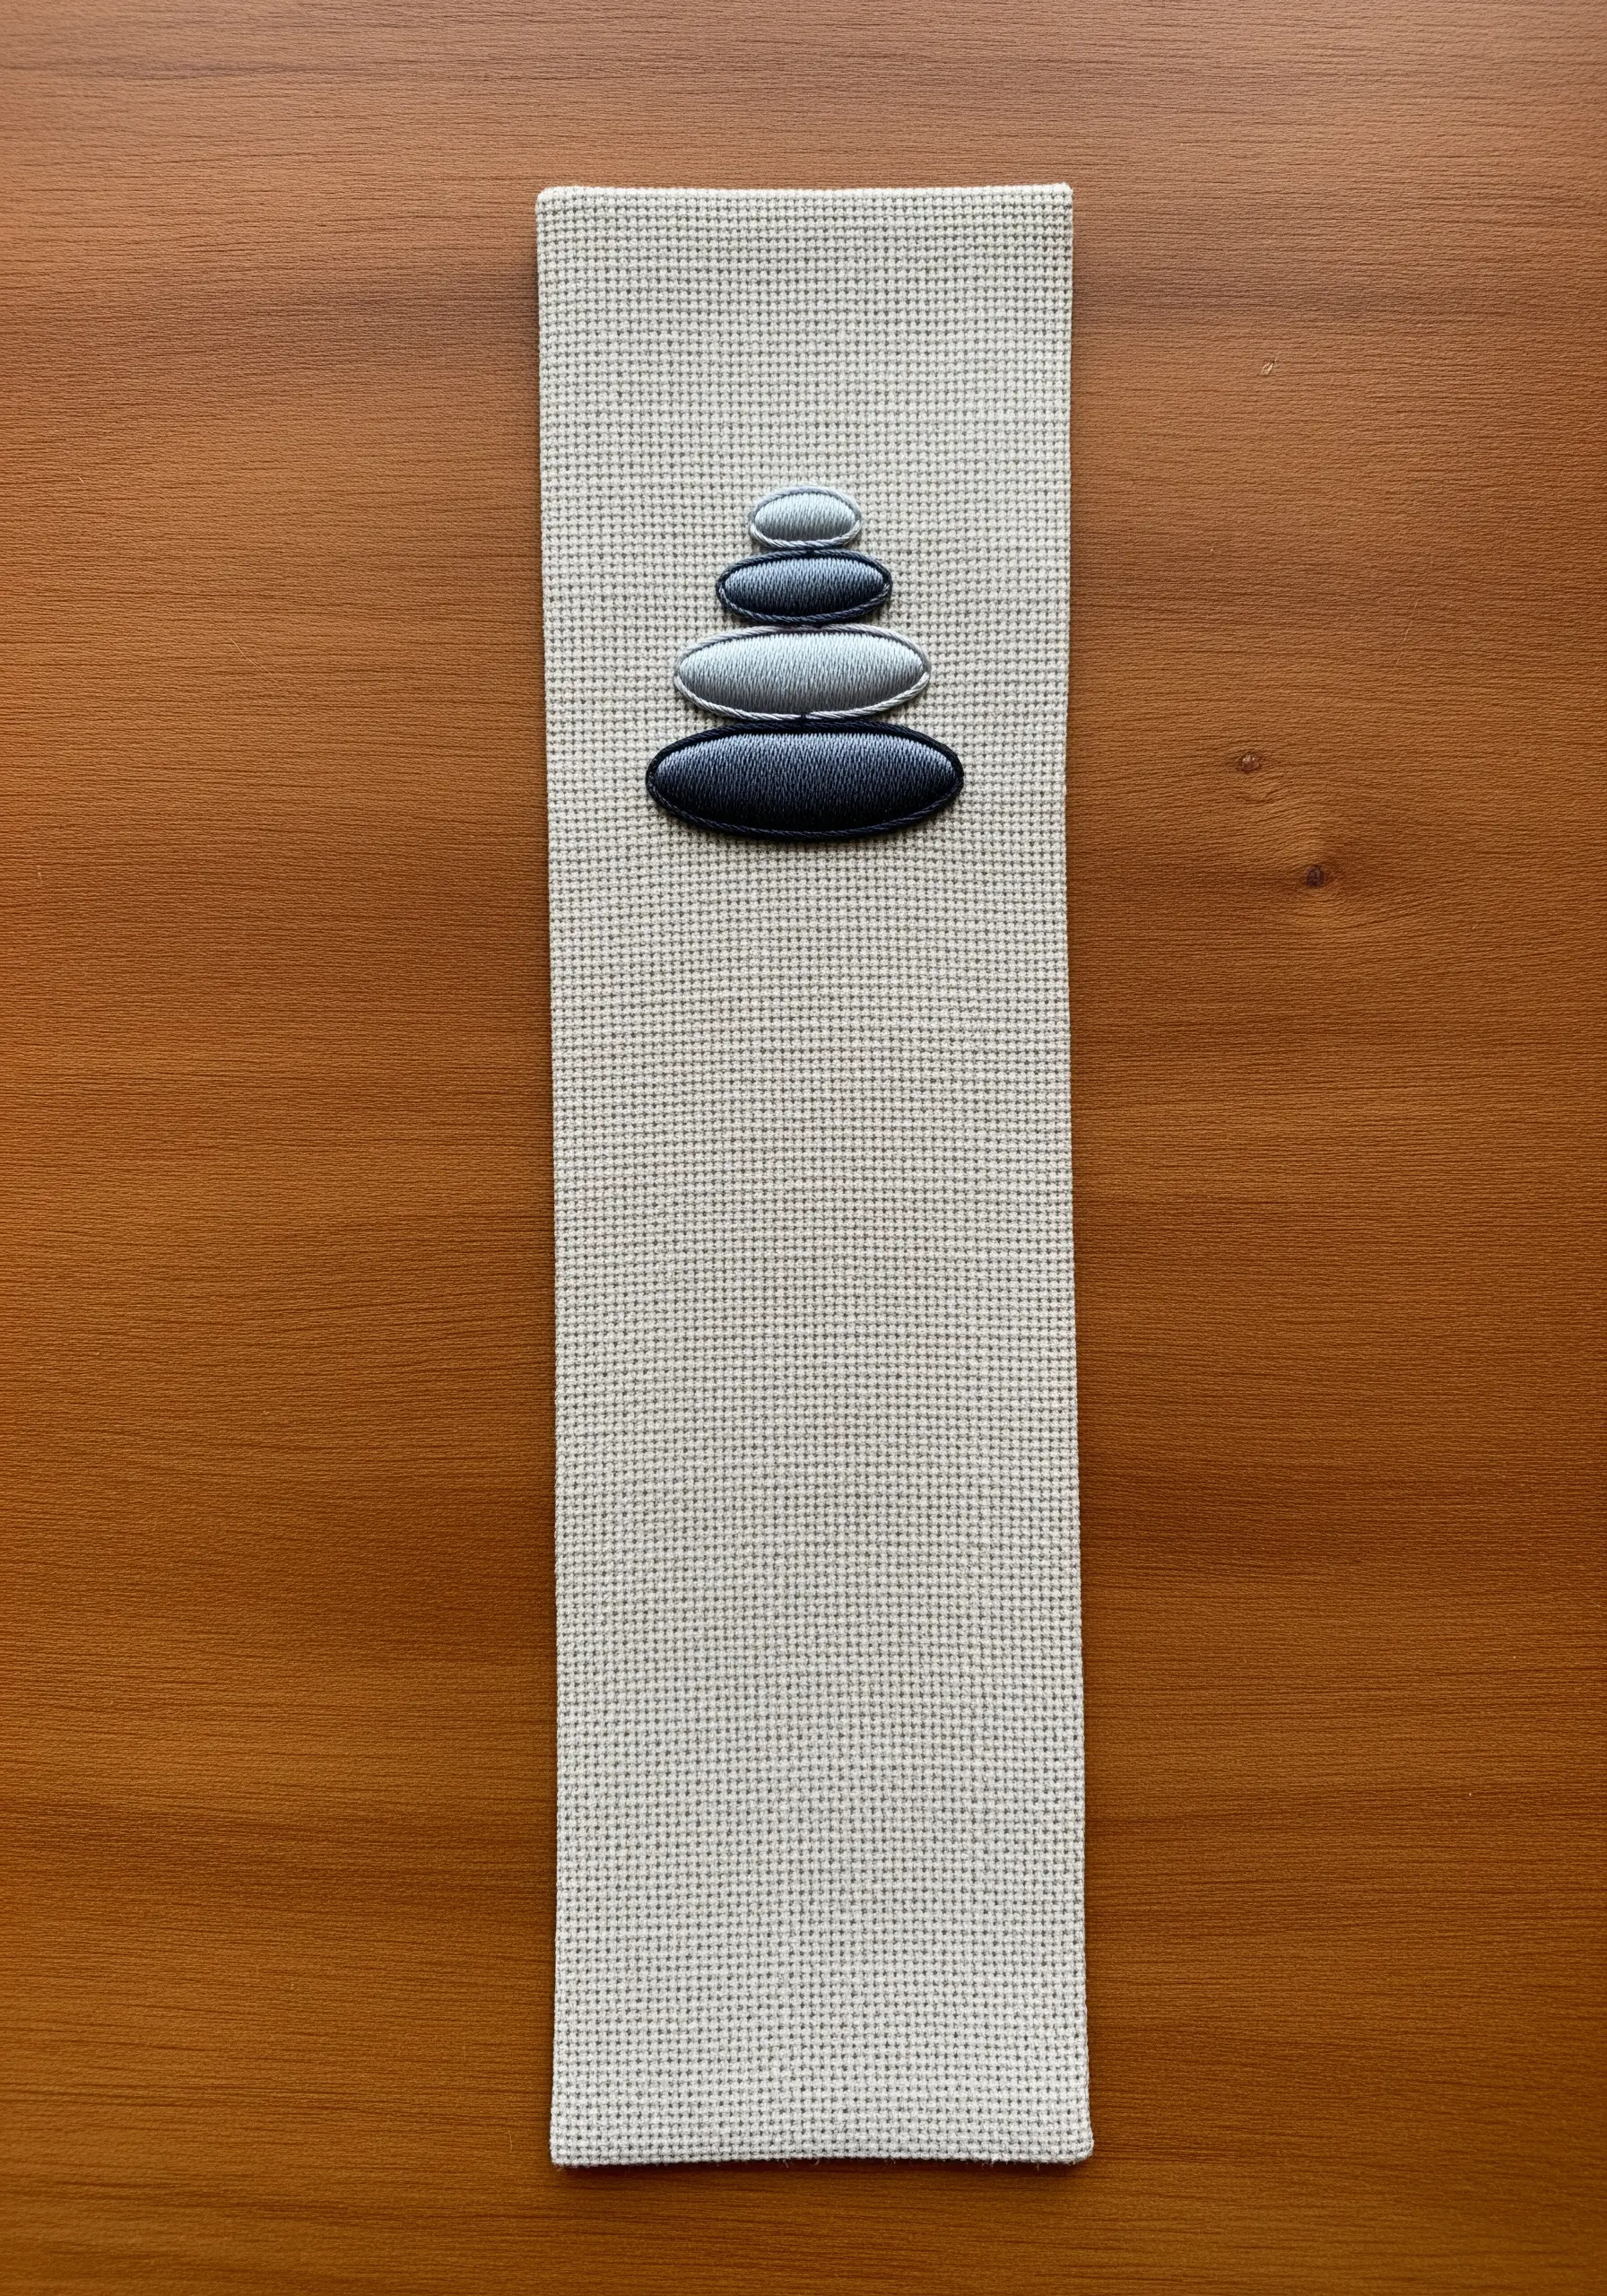
Achieve smooth, paint-like gradients by mastering the long-and-short stitch.
Begin by filling the first section of a shape with alternating long and short stitches. The next row of stitches then comes up through the fabric and goes down into the previous row, interlocking the colors.
For the most seamless blend, use only a single strand of floss and choose colors that are very close in value, like a light grey, mid-grey, and charcoal.
Keep your stitch direction consistent across each stone to mimic the way light hits a curved surface, enhancing the three-dimensional illusion.
17. Refined Edging: The Finishing Border
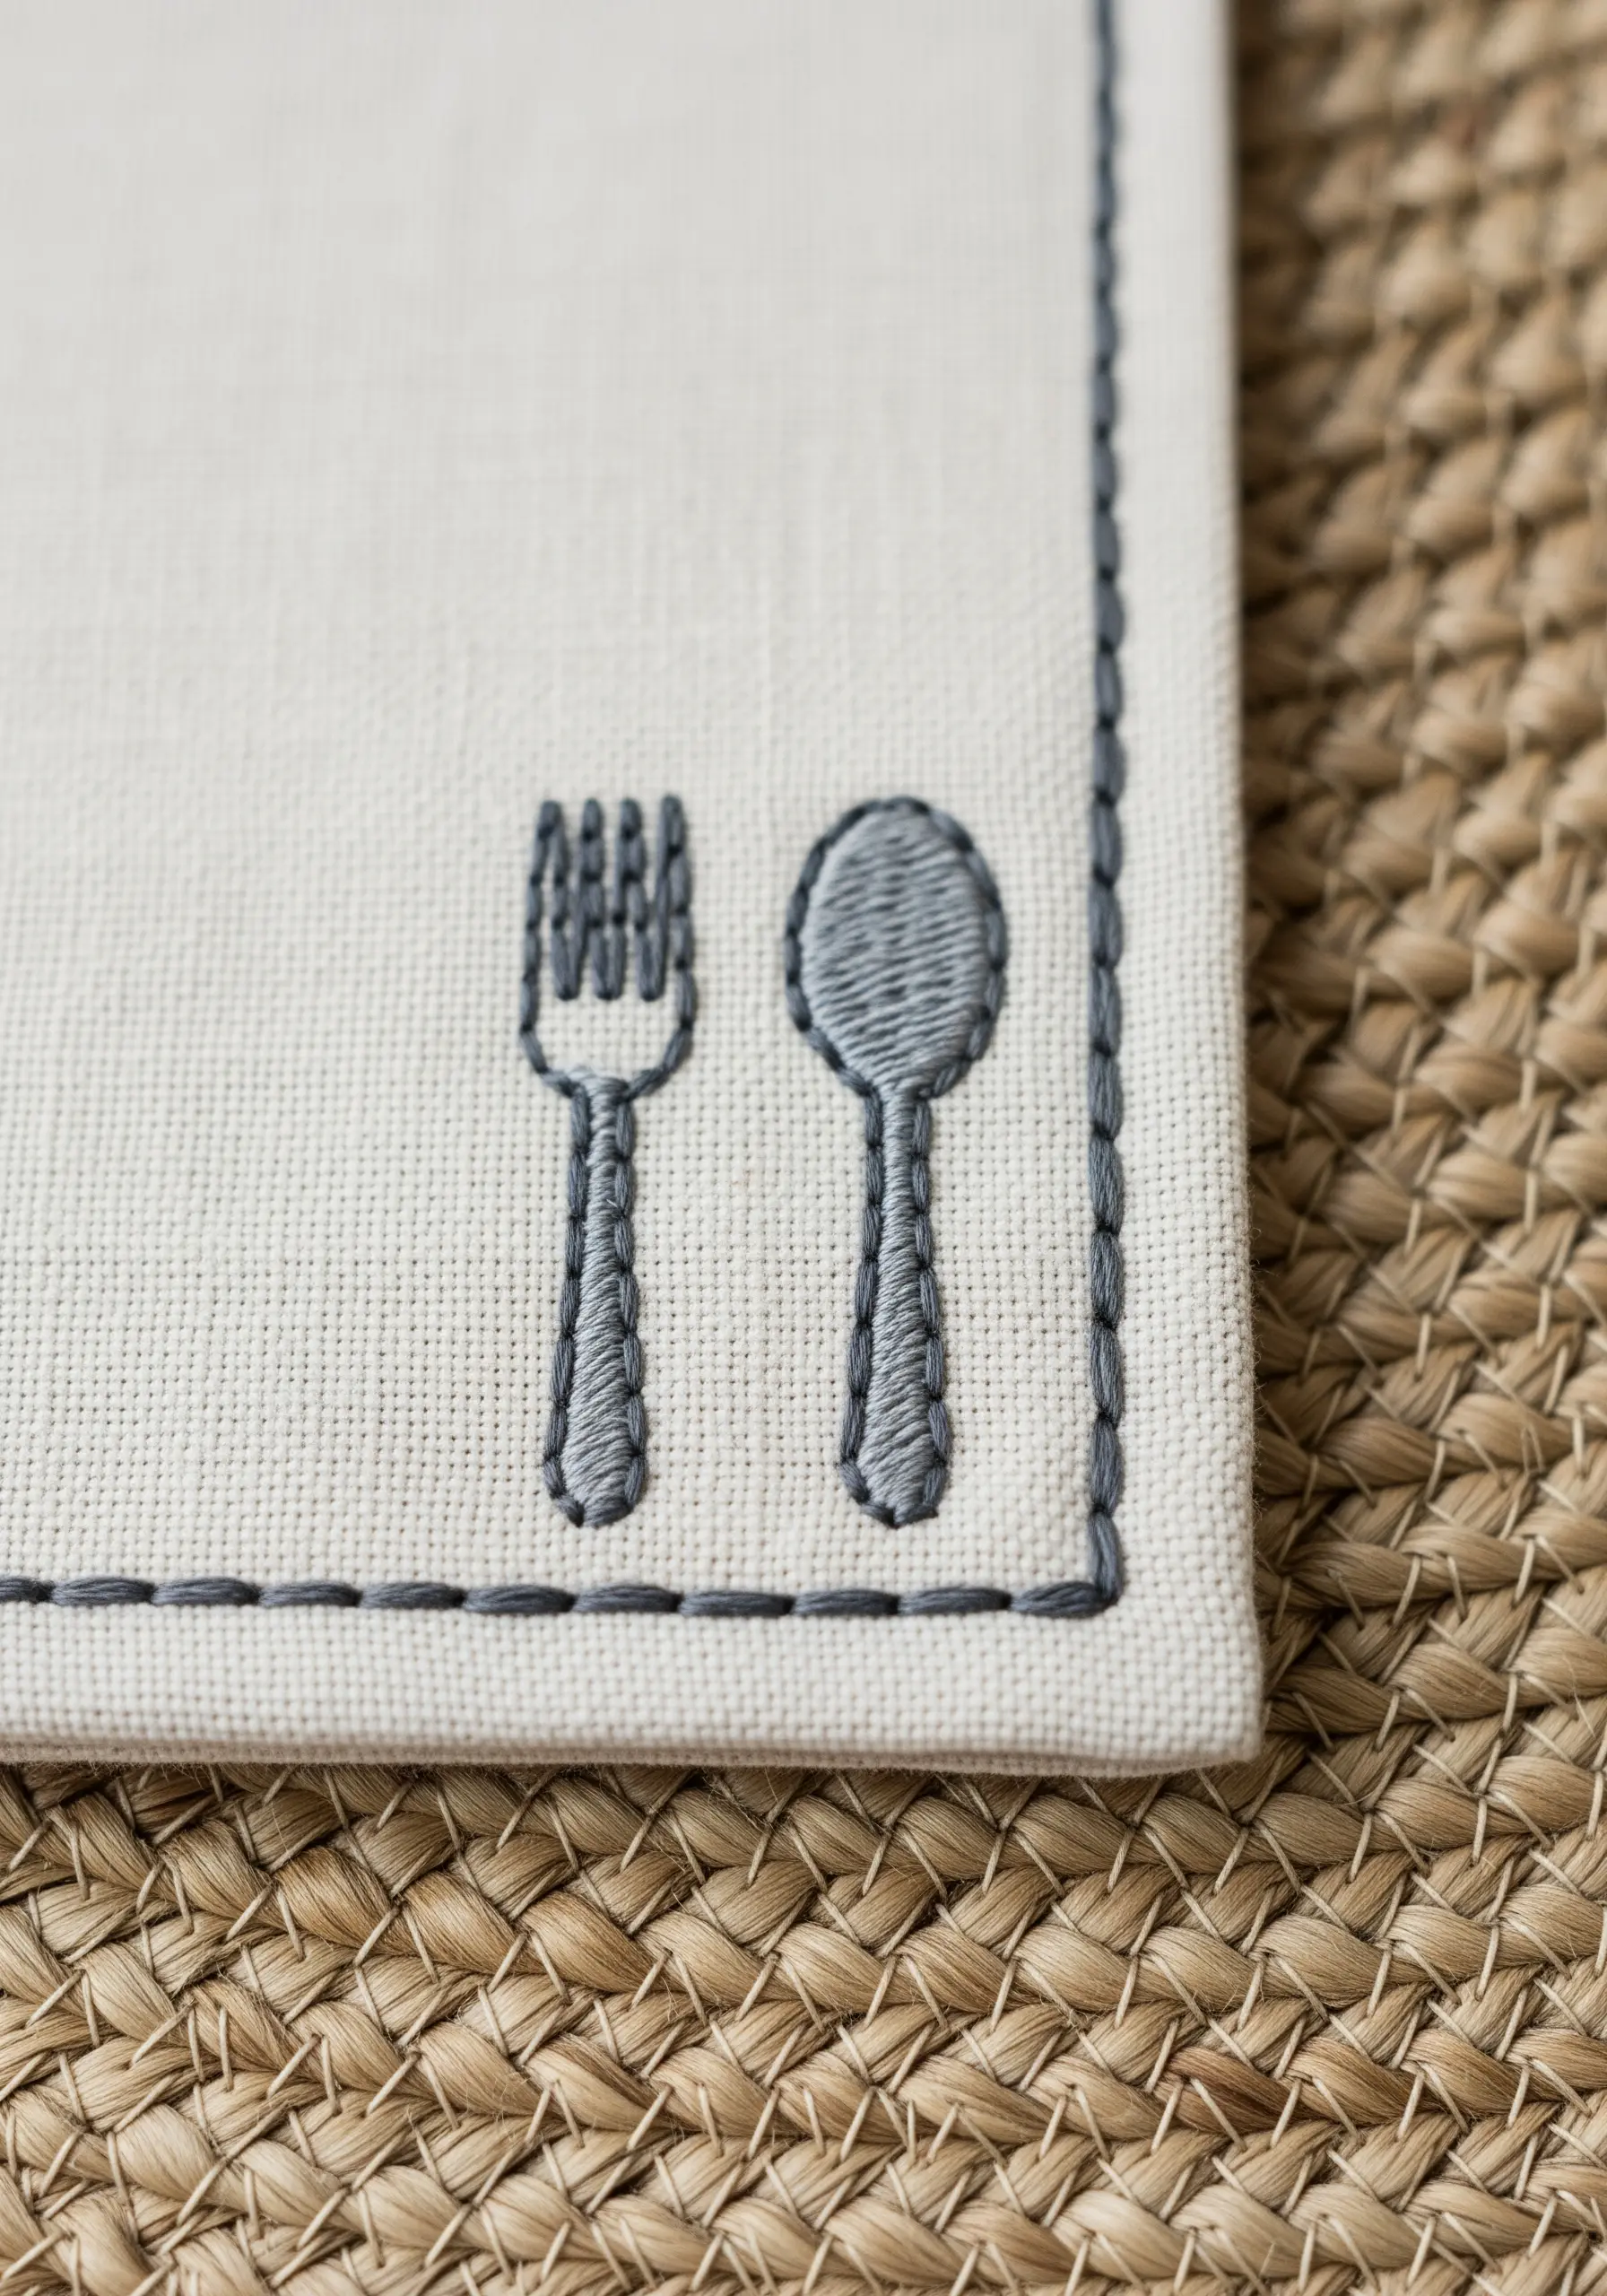
A simple stitched border is a small detail that can make a handmade item look professionally finished.
Use a simple running stitch or backstitch placed about a quarter-inch from the hemmed edge of a placemat or napkin.
Match the border thread color to the color used in your central motif. This simple act of color repetition ties the entire piece together, making it feel cohesive and intentional.
This technique frames your work beautifully and adds a layer of thoughtful detail.
18. Functional Art: Embroidering 3D Objects
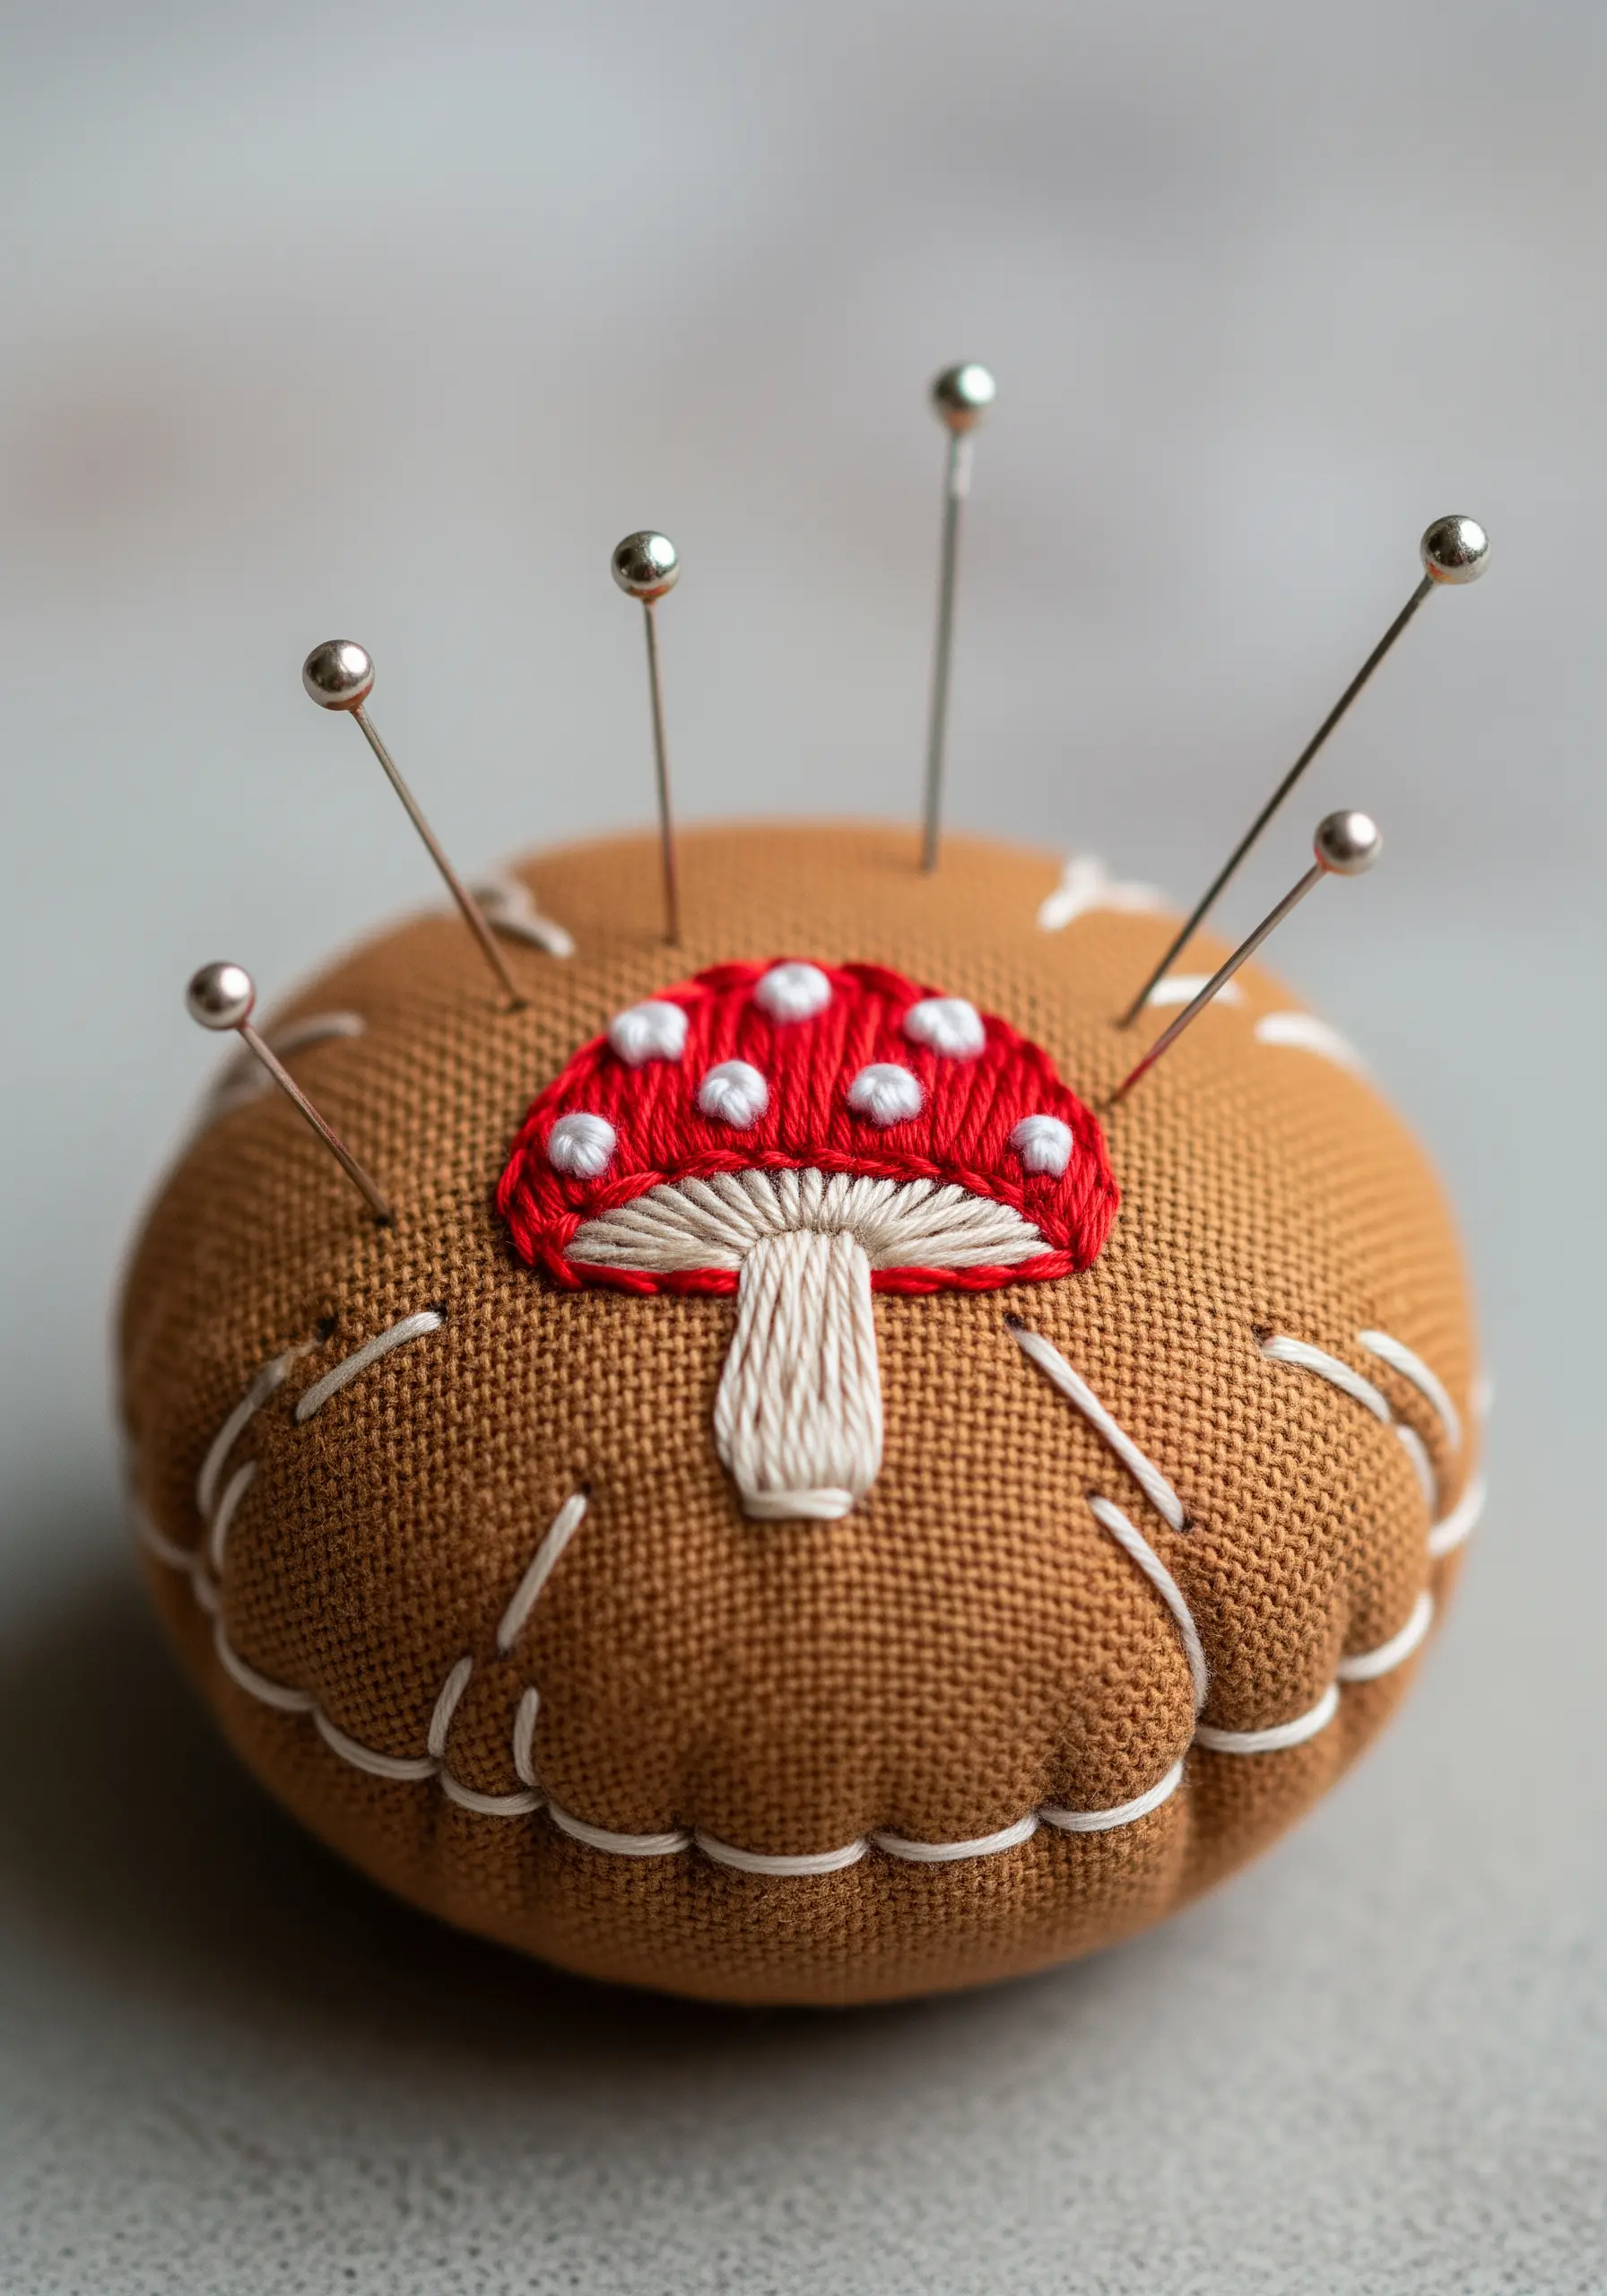
To add embroidery to a three-dimensional object like a pincushion, always complete your stitching while the fabric is still flat.
Embroider your mushroom design on the fabric piece that will become the top of the cushion. This allows you to use a hoop for proper tension.
Use a padded satin stitch for the mushroom cap to give it extra loft and dimension, which will stand up to daily use.
Only after the embroidery is complete should you cut, sew, and stuff the object. It’s a simple workflow change that makes complex projects manageable.
19. Dimensional Details with Raised Stitches

Move beyond flat stitches and add captivating texture with raised, sculptural elements.
These tiny stars are created with a detached woven picot stitch or a bullion knot, which sits raised off the fabric surface.
Working on a dark, high-contrast fabric like navy blue makes these white, textural stitches pop, creating a dramatic celestial effect.
Connect these dimensional ‘stars’ with a simple, delicate backstitch to ensure the focus remains on the stunning 3D details.
20. The Applied Patch for Difficult Items
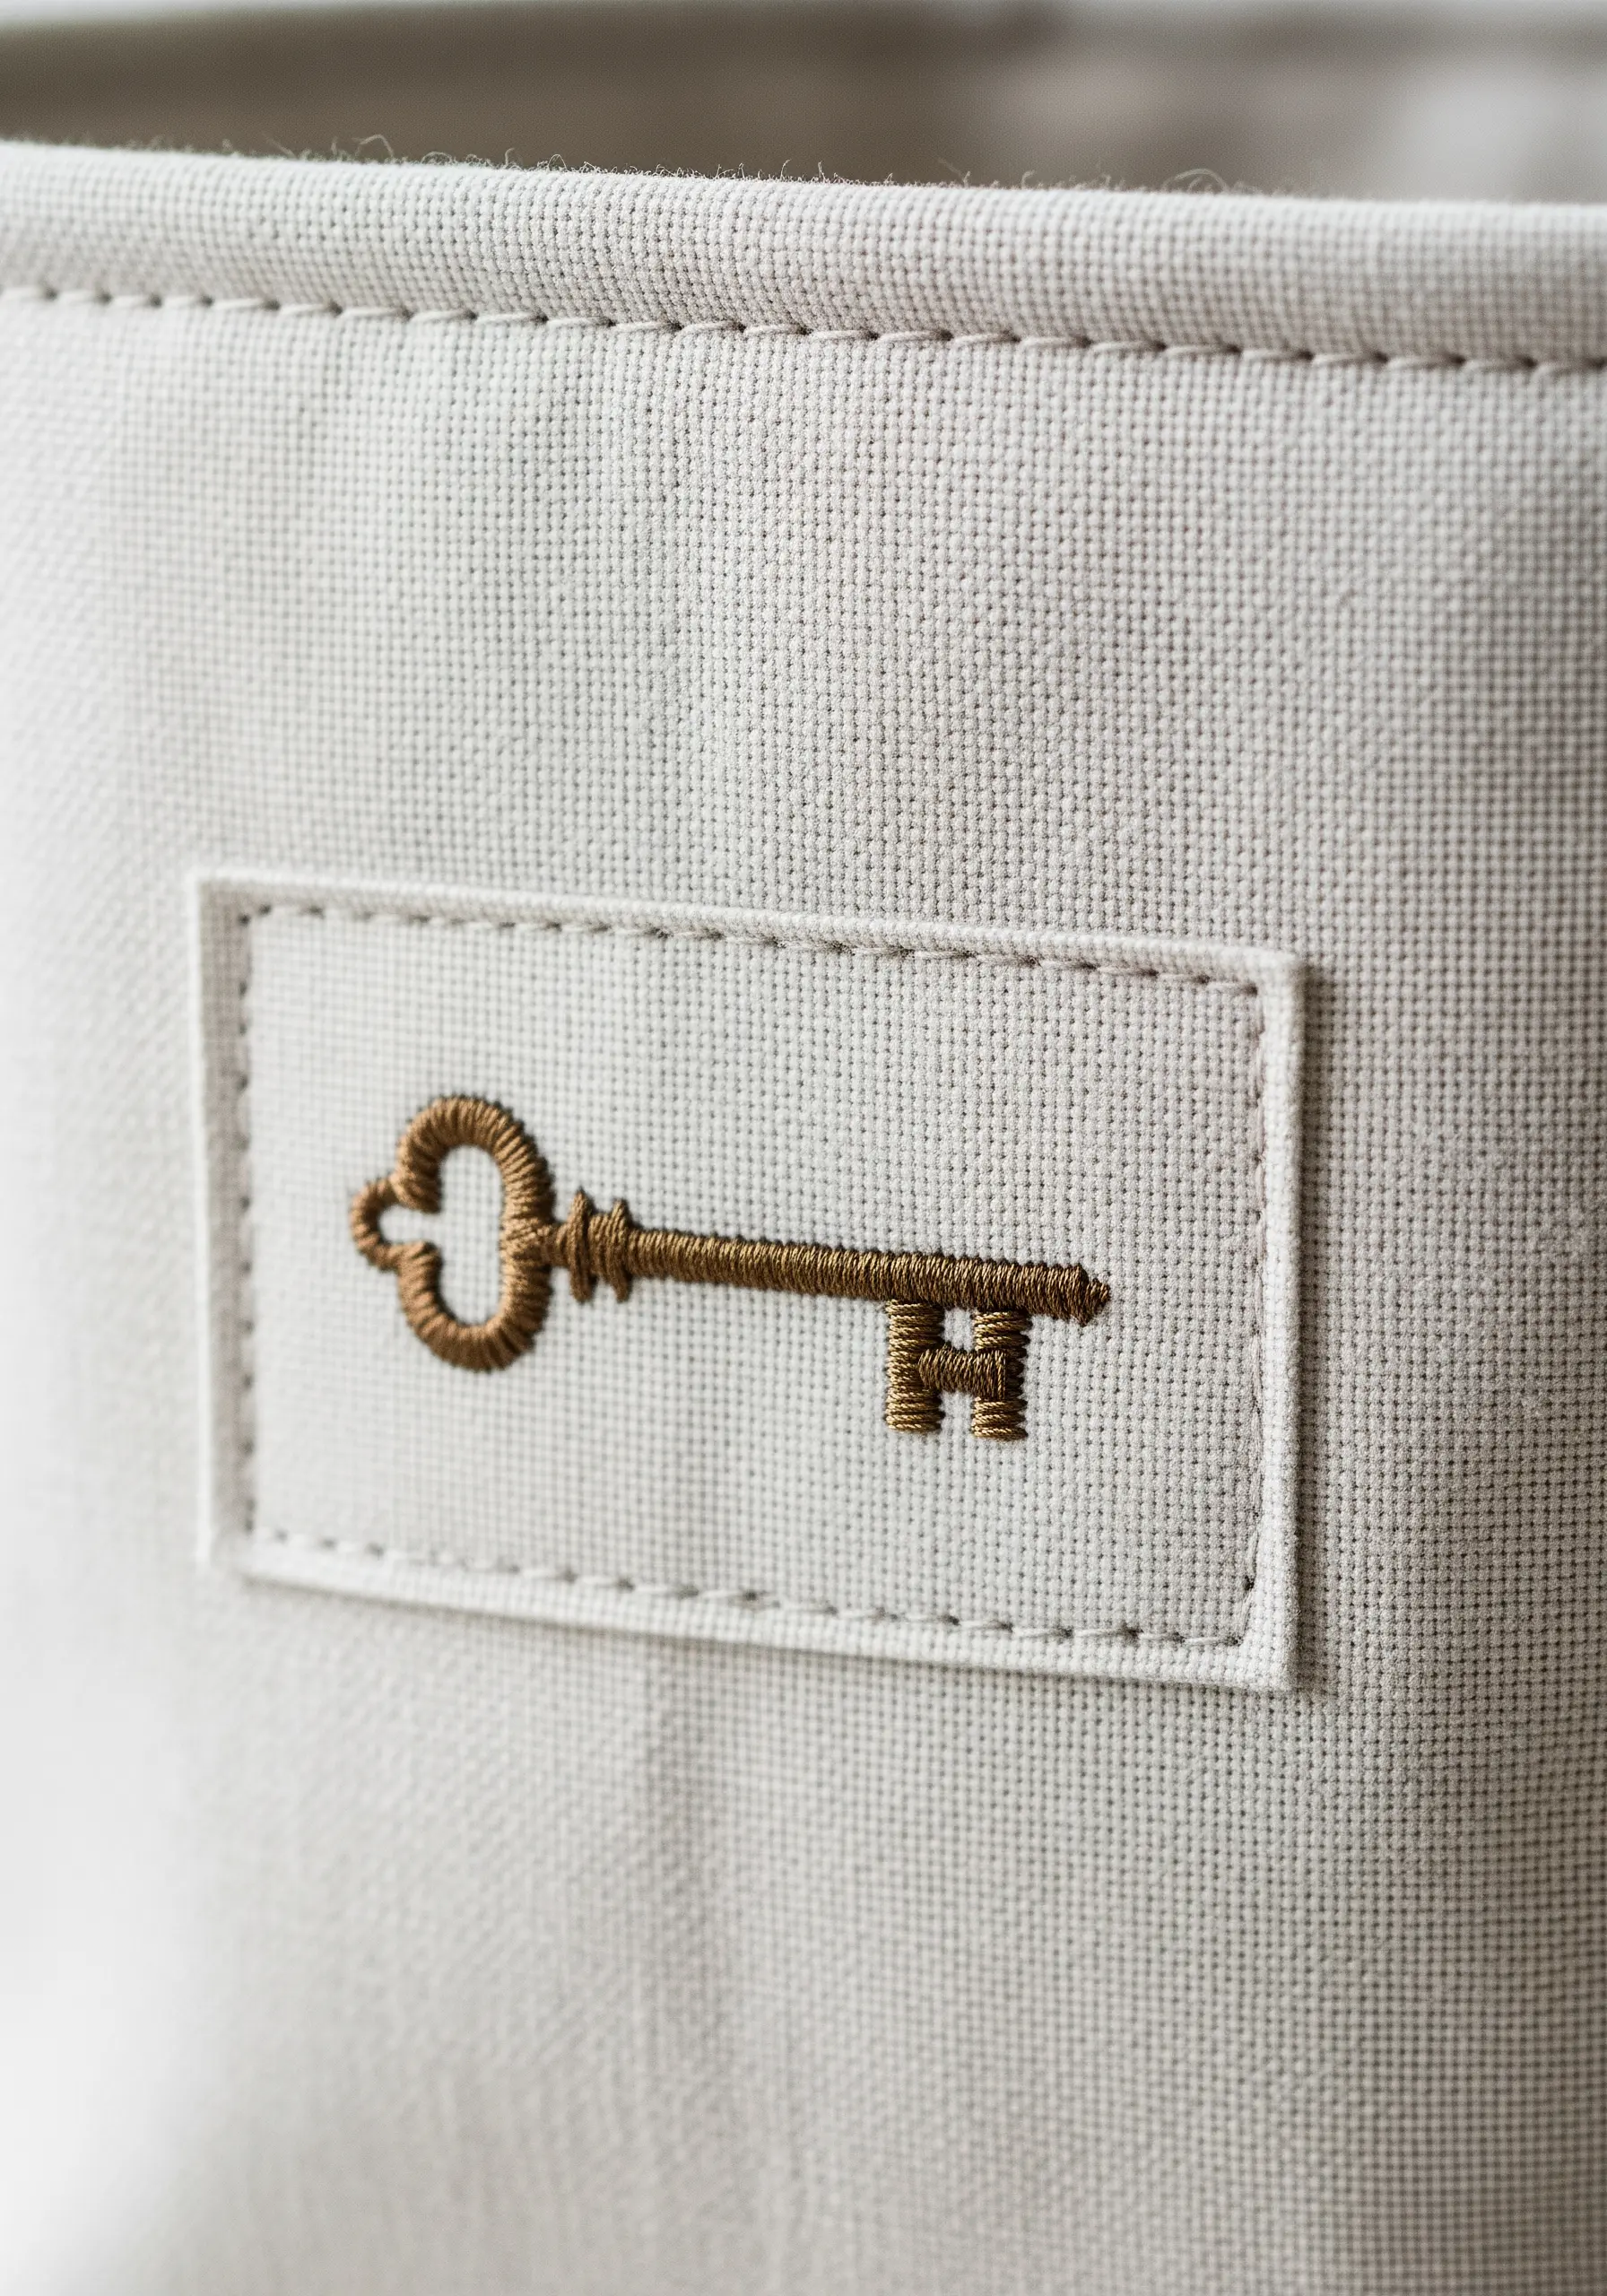
When you want to embroider on an item that’s impossible to hoop—like a thick canvas basket—create an appliquéd patch.
First, stitch your design onto a stable piece of fabric like linen or felt, leaving ample space around the motif.
Once complete, cut the embroidered fabric into your desired patch shape (like a rectangle) and press the raw edges under.
Finally, secure the patch to your basket with a neat running stitch around the border. This gives you a clean, framed look and endless customizing potential.
21. Geometric Borders with Fly Stitch
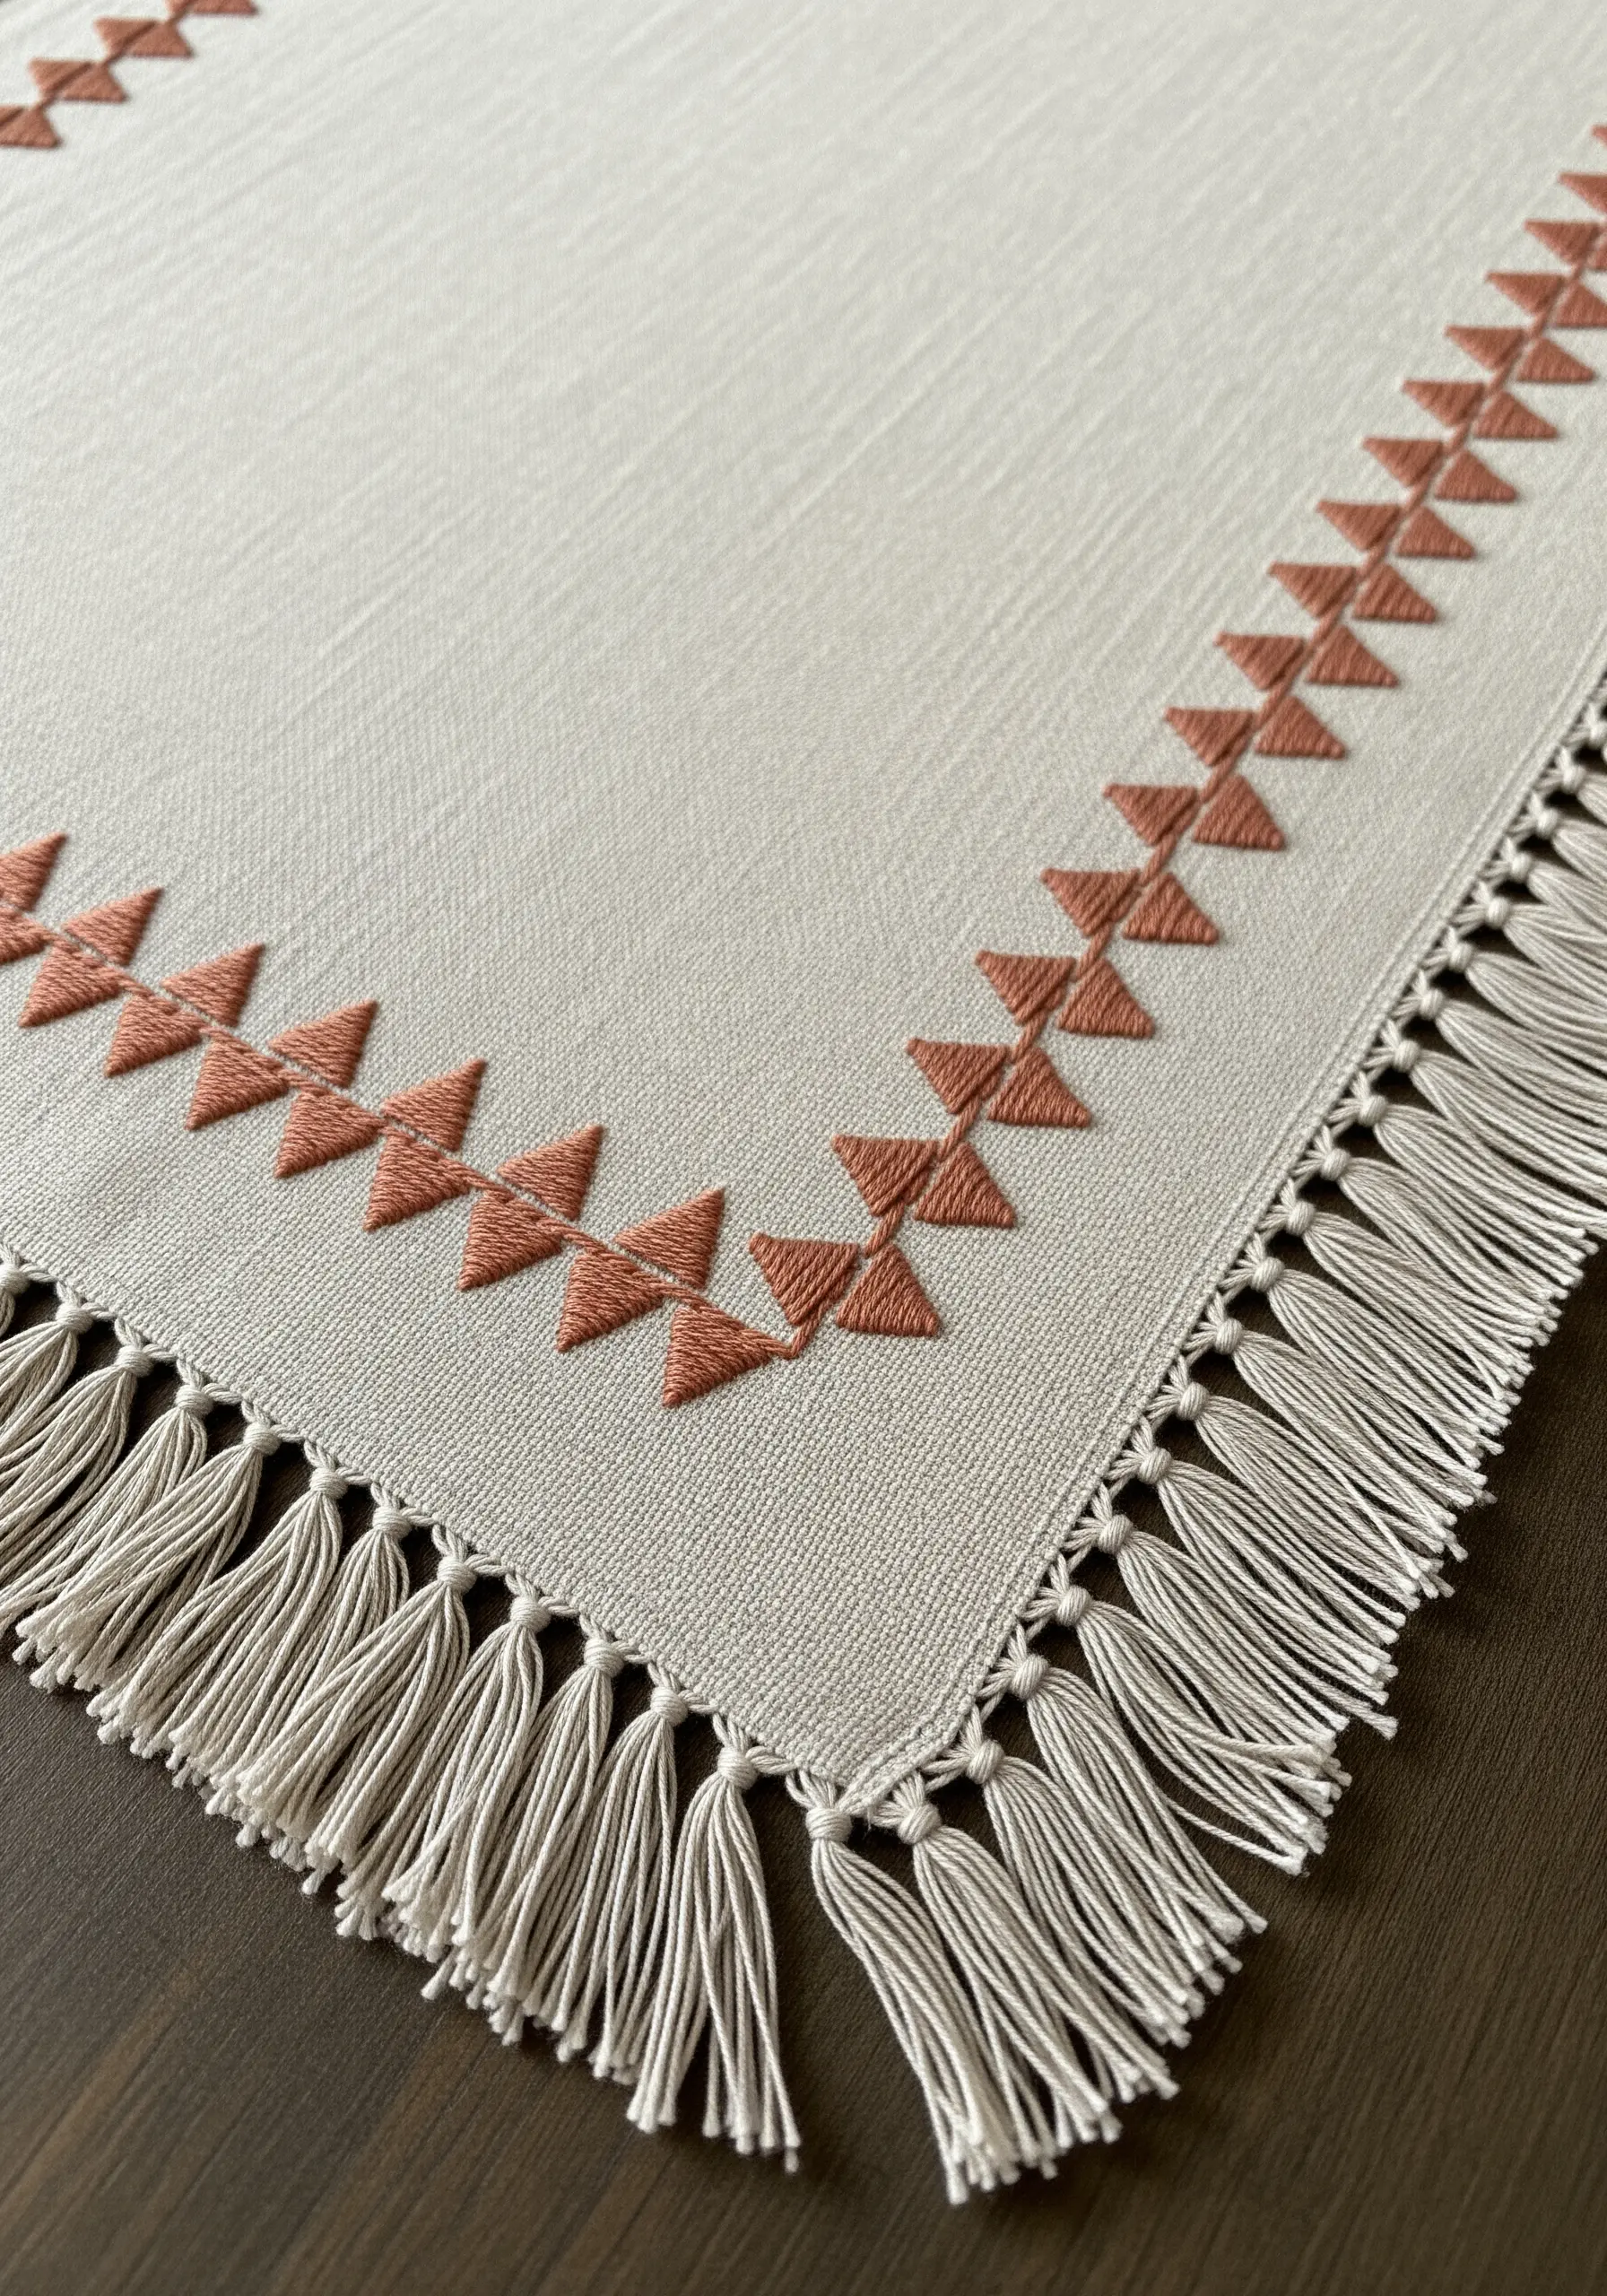
You can create striking geometric patterns using one of the simplest stitches in your repertoire.
This sharp, triangular border is made entirely of fly stitches stacked closely together. Each triangle is a single fly stitch, pulled taut to create two straight sides and a flat base.
To ensure a perfectly uniform pattern, use a water-soluble marker and a ruler to draw parallel guidelines for the top and bottom points of your triangles.
This method is incredibly versatile for creating modern, graphic borders on table runners, pillowcases, and cuffs.
22. Embroidering on High-Pile Fabrics
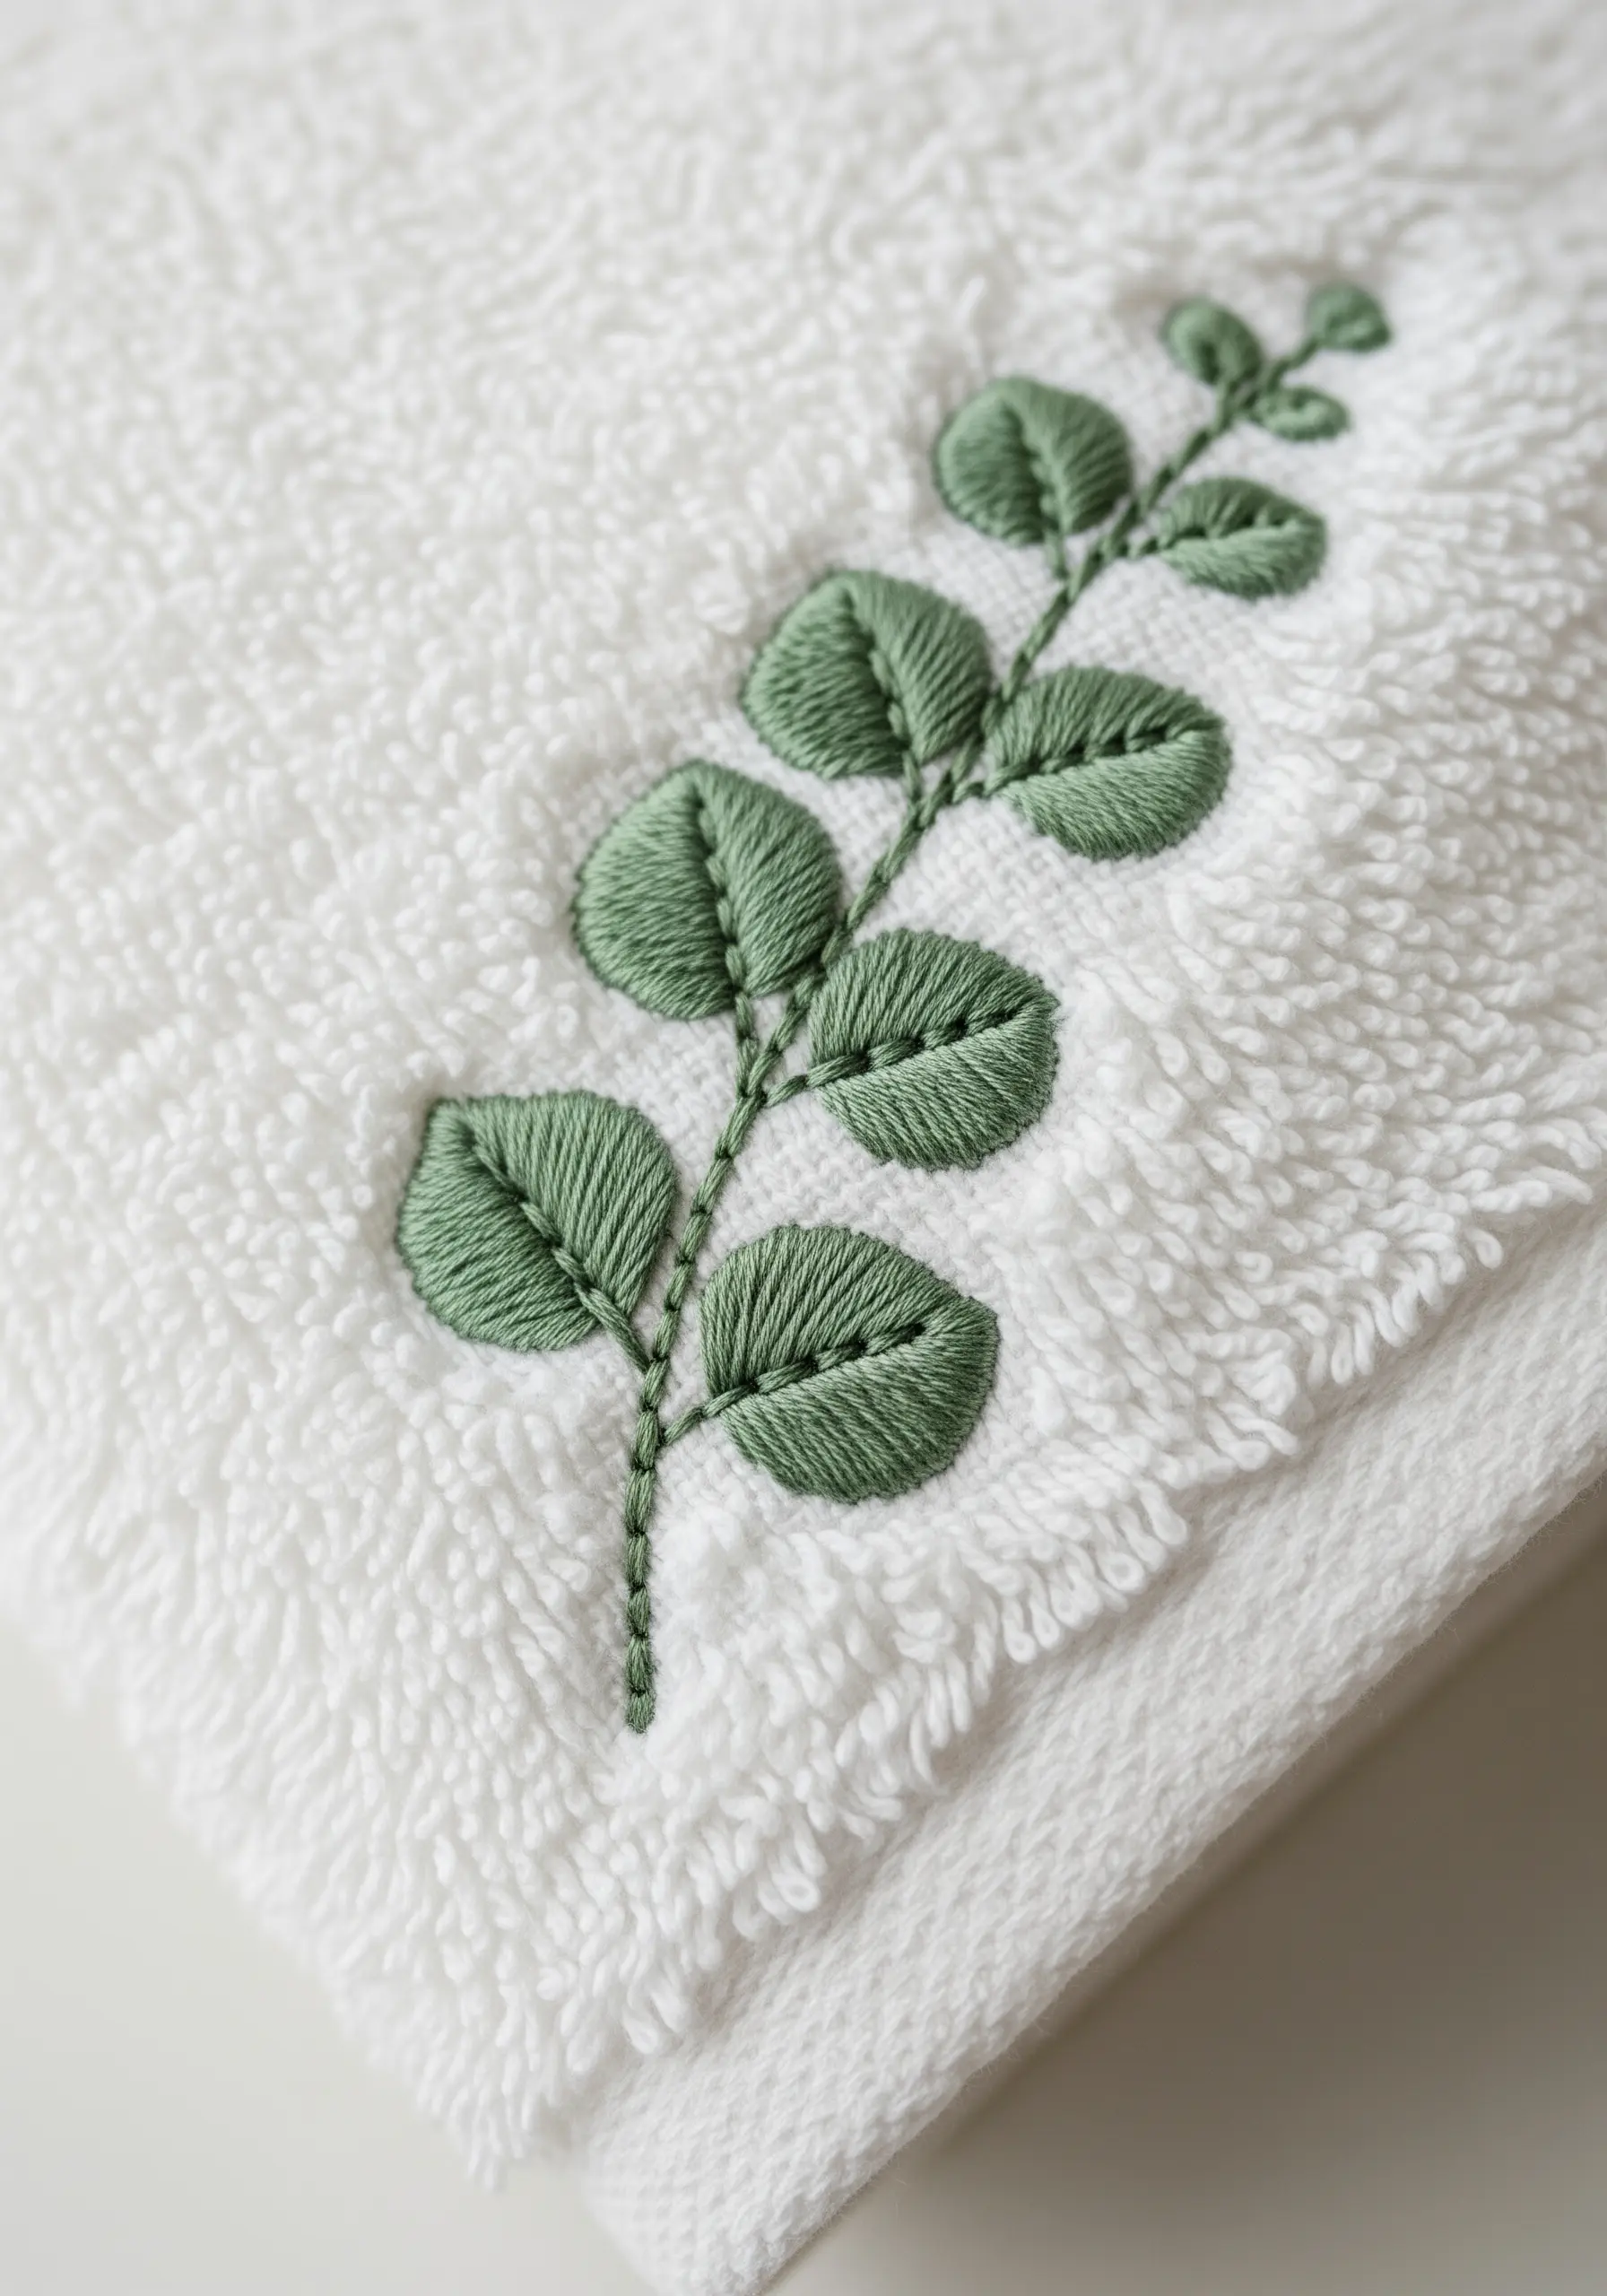
To prevent your stitches from getting lost in the plush pile of a terrycloth towel, you need to create a stable foundation.
First, lay down a series of simple straight stitches, or ‘underlay,’ in the basic shape of your leaves and stem. This foundation will sit on top of the loops.
Then, work your final satin and stem stitches directly over this underlay. This ensures your design is smooth, raised, and clearly defined against the textured background.
This professional technique is the key to achieving crisp, beautiful results on any plush or high-pile fabric.


