

You have the threads, the fabric, and the desire to create something beautiful. But sometimes, your finished pieces don’t quite capture the vision in your mind. They feel… homemade. I want to help you move beyond that.
The shift from ‘craft’ to ‘art’ isn’t about mastering impossibly complex stitches. It’s about intention. It’s in choosing a single strand of thread over six for delicate details, in understanding how the direction of a stitch can mimic the reflection of light, and in seeing nature not just as a subject, but as a teacher of texture, color, and form.
These ideas are your starting point. They are invitations to look closer, to translate what you see in the natural world into art you can hold. You already have the skill. Now, let’s refine your eye.
1. Create Dimensional Stumpwork Mushrooms
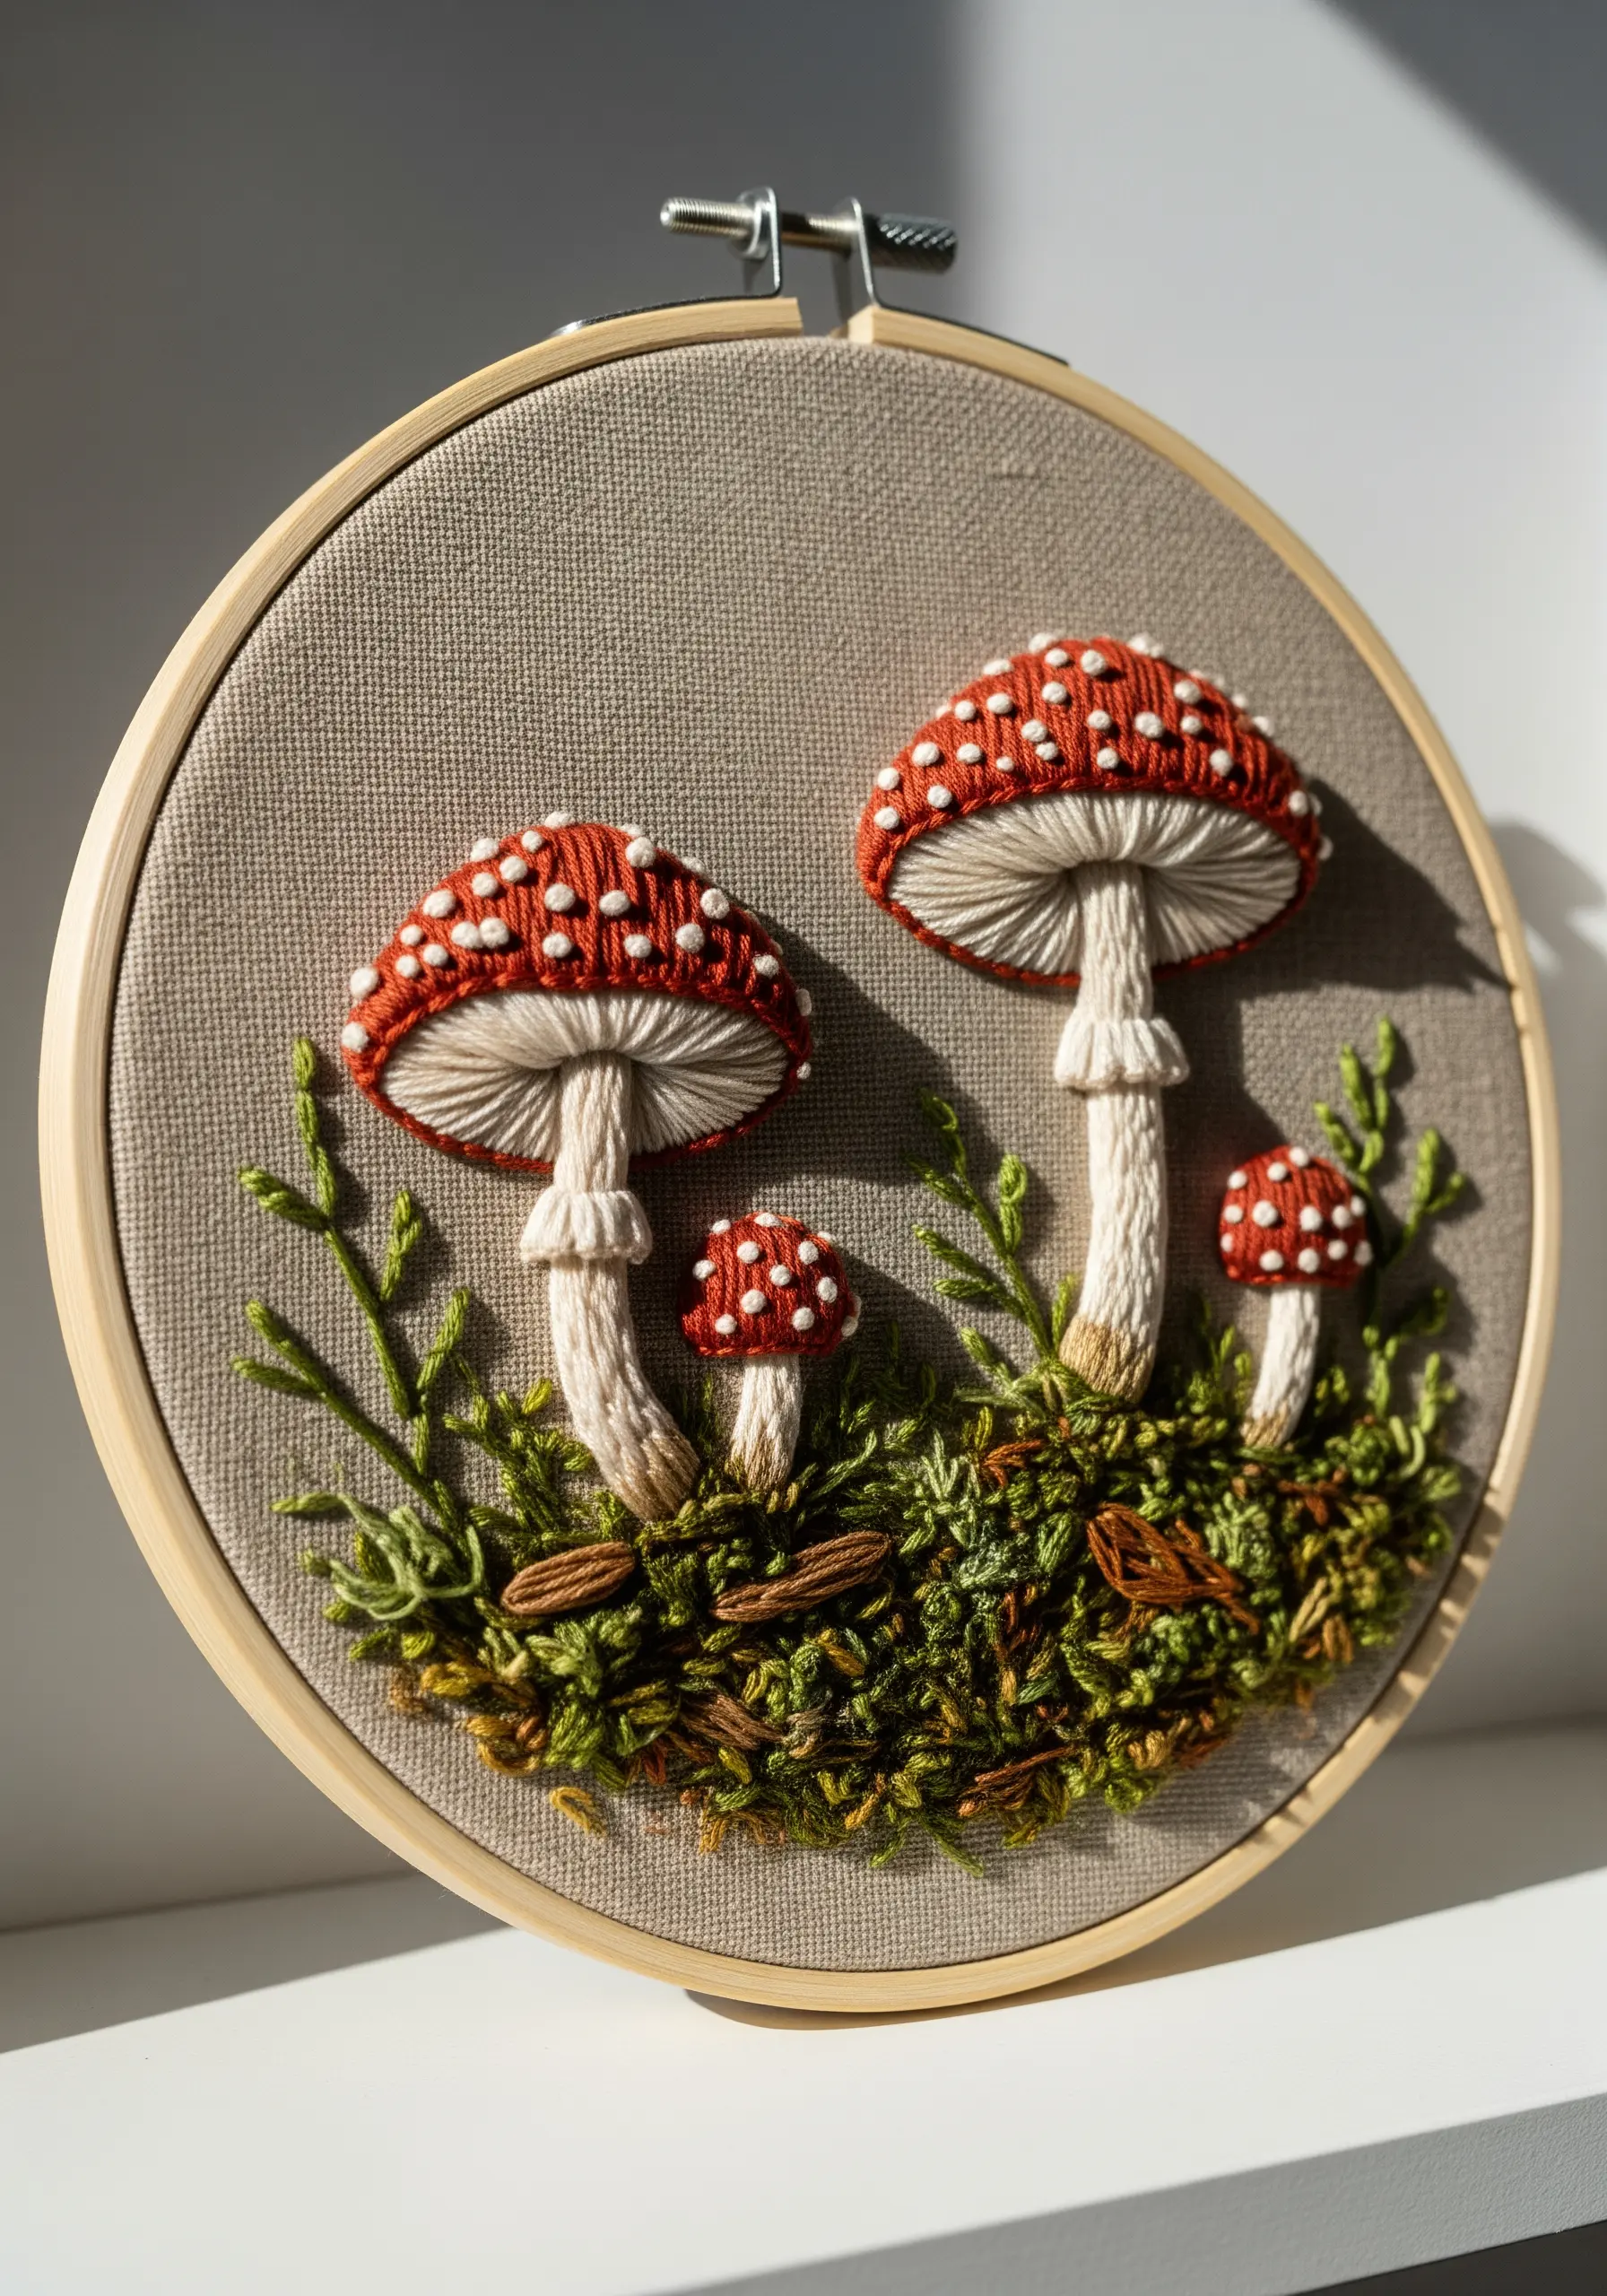
To achieve this realistic, three-dimensional effect, move beyond flat stitches.
Build the mushroom caps using a raised satin stitch over padding stitches, or wrap thread around a small piece of felt cut to shape.
For the mossy ground, use a combination of turkey work loops (which you can trim to different lengths) and French knots in varied shades of green and brown.
This layering of textures is what gives the final piece its lifelike depth and transforms a simple hoop into one of the most compelling nature-texture embroidery projects.
2. Preserve Botanicals in Resin Coasters
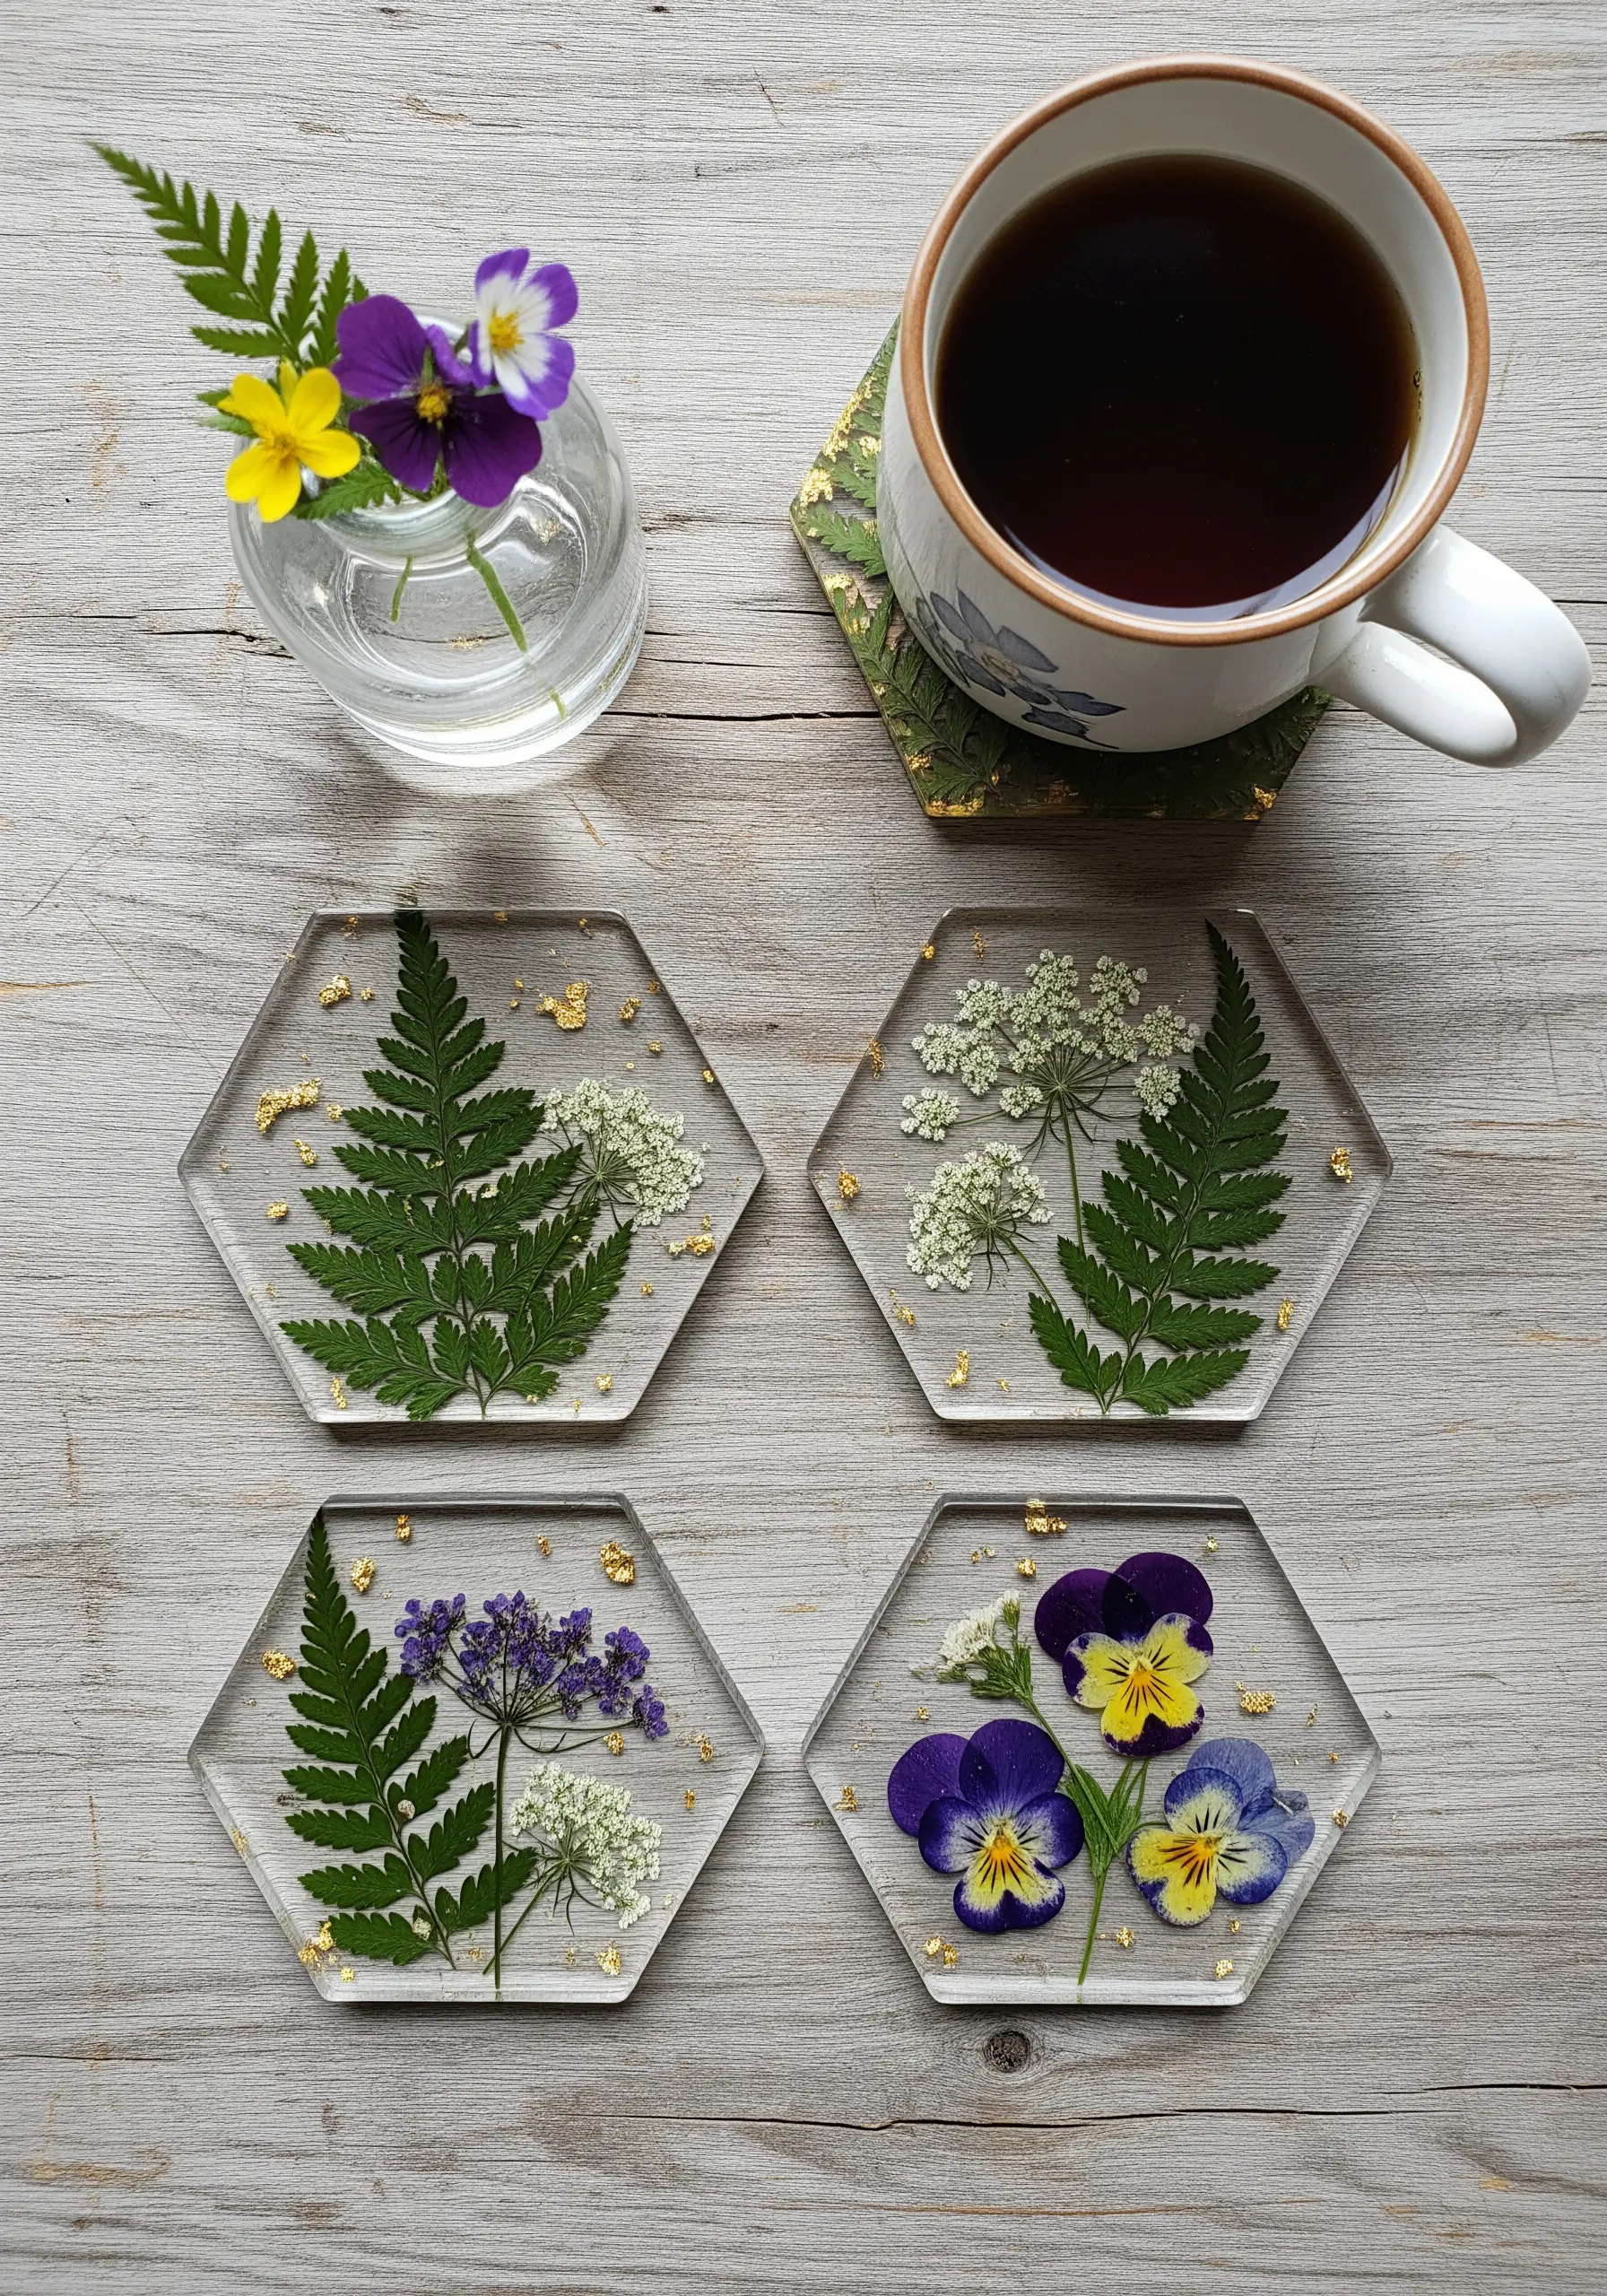
Think of arranging pressed flowers and leaves in resin as you would compose motifs in an embroidery hoop.
Start by pouring a thin, clear base layer of resin and letting it partially cure; this creates a shelf that prevents your botanicals from sinking to the bottom.
Arrange your pressed ferns and flowers, then sprinkle gold leaf flakes to add light and contrast, much like using metallic thread.
A final top coat of resin seals the composition, creating a functional piece of art that captures a fleeting moment of nature.
3. Combine Macrame with Embroidered Accents
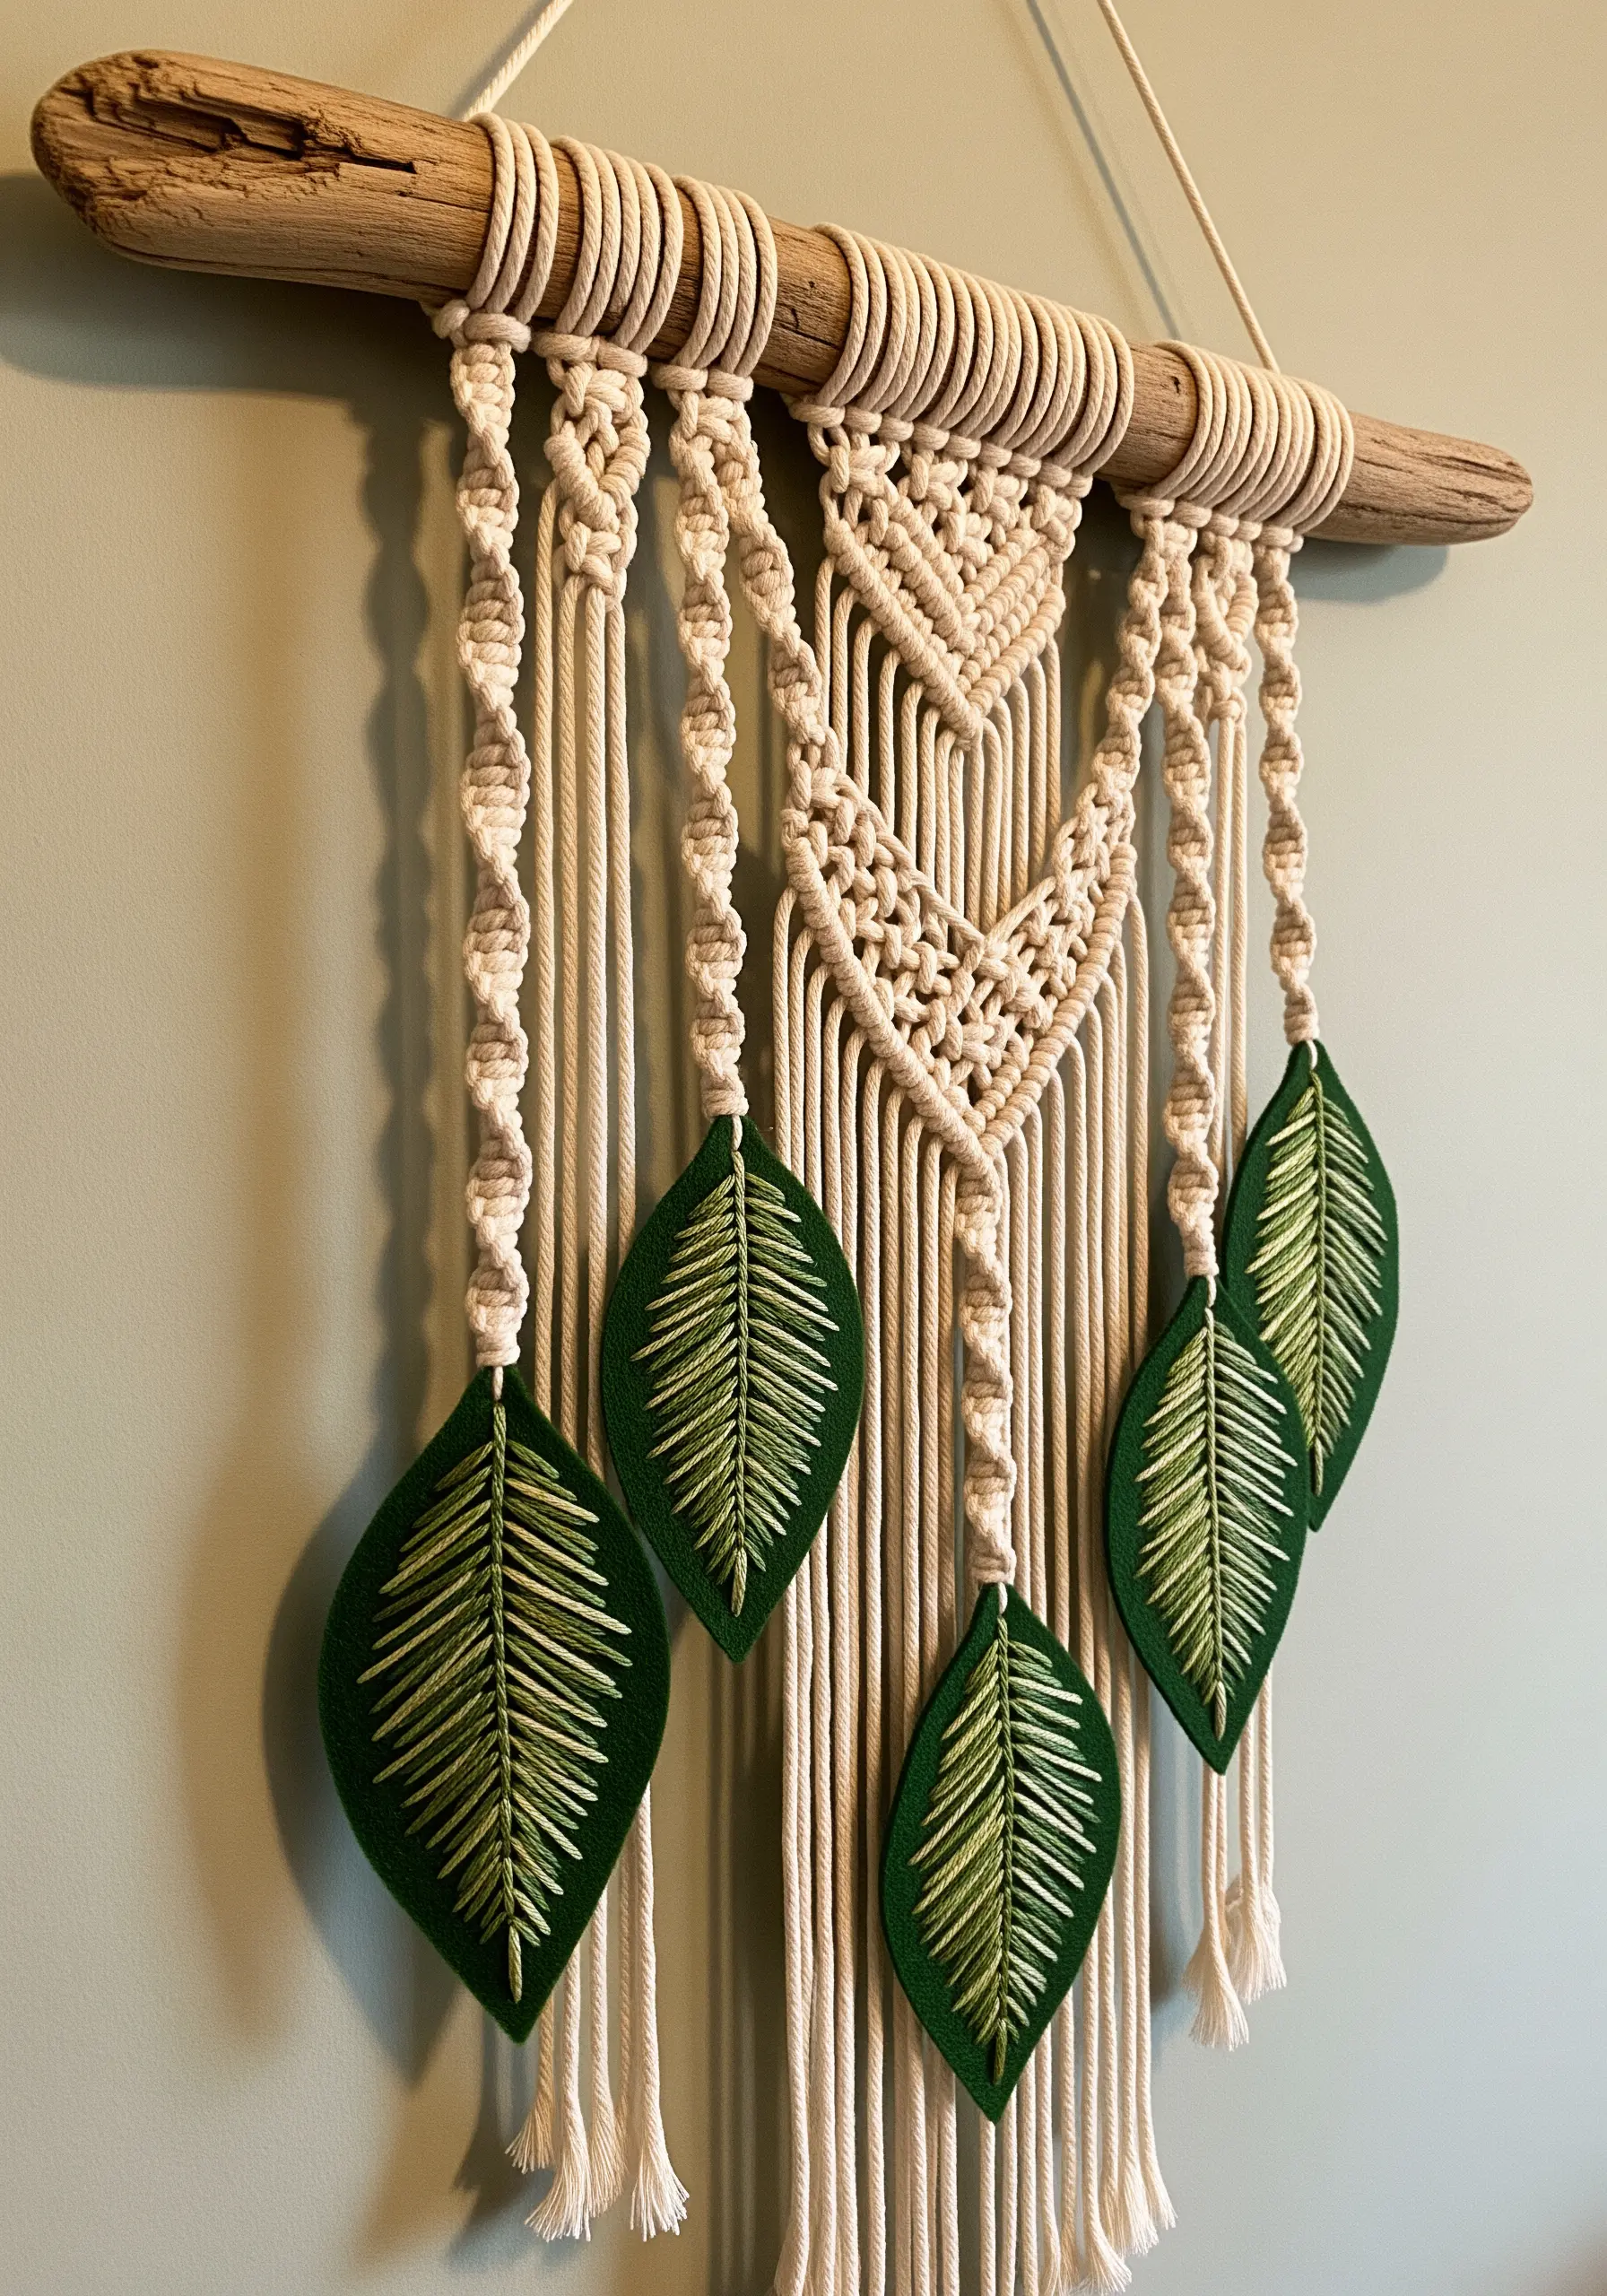
Elevate a simple macrame wall hanging by introducing embroidered elements.
Cut leaf shapes from stiff felt, which provides a stable, no-fray base for stitching.
Use a fishbone stitch with two or three shades of green thread to create the variegated look of a real leaf vein.
Finish with a clean backstitch outline before attaching the leaves to the macrame cords. This fusion of techniques creates sophisticated, mixed-fiber wall hangings that feel both rustic and refined.
4. Use Cyanotype Prints as Stitching Guides
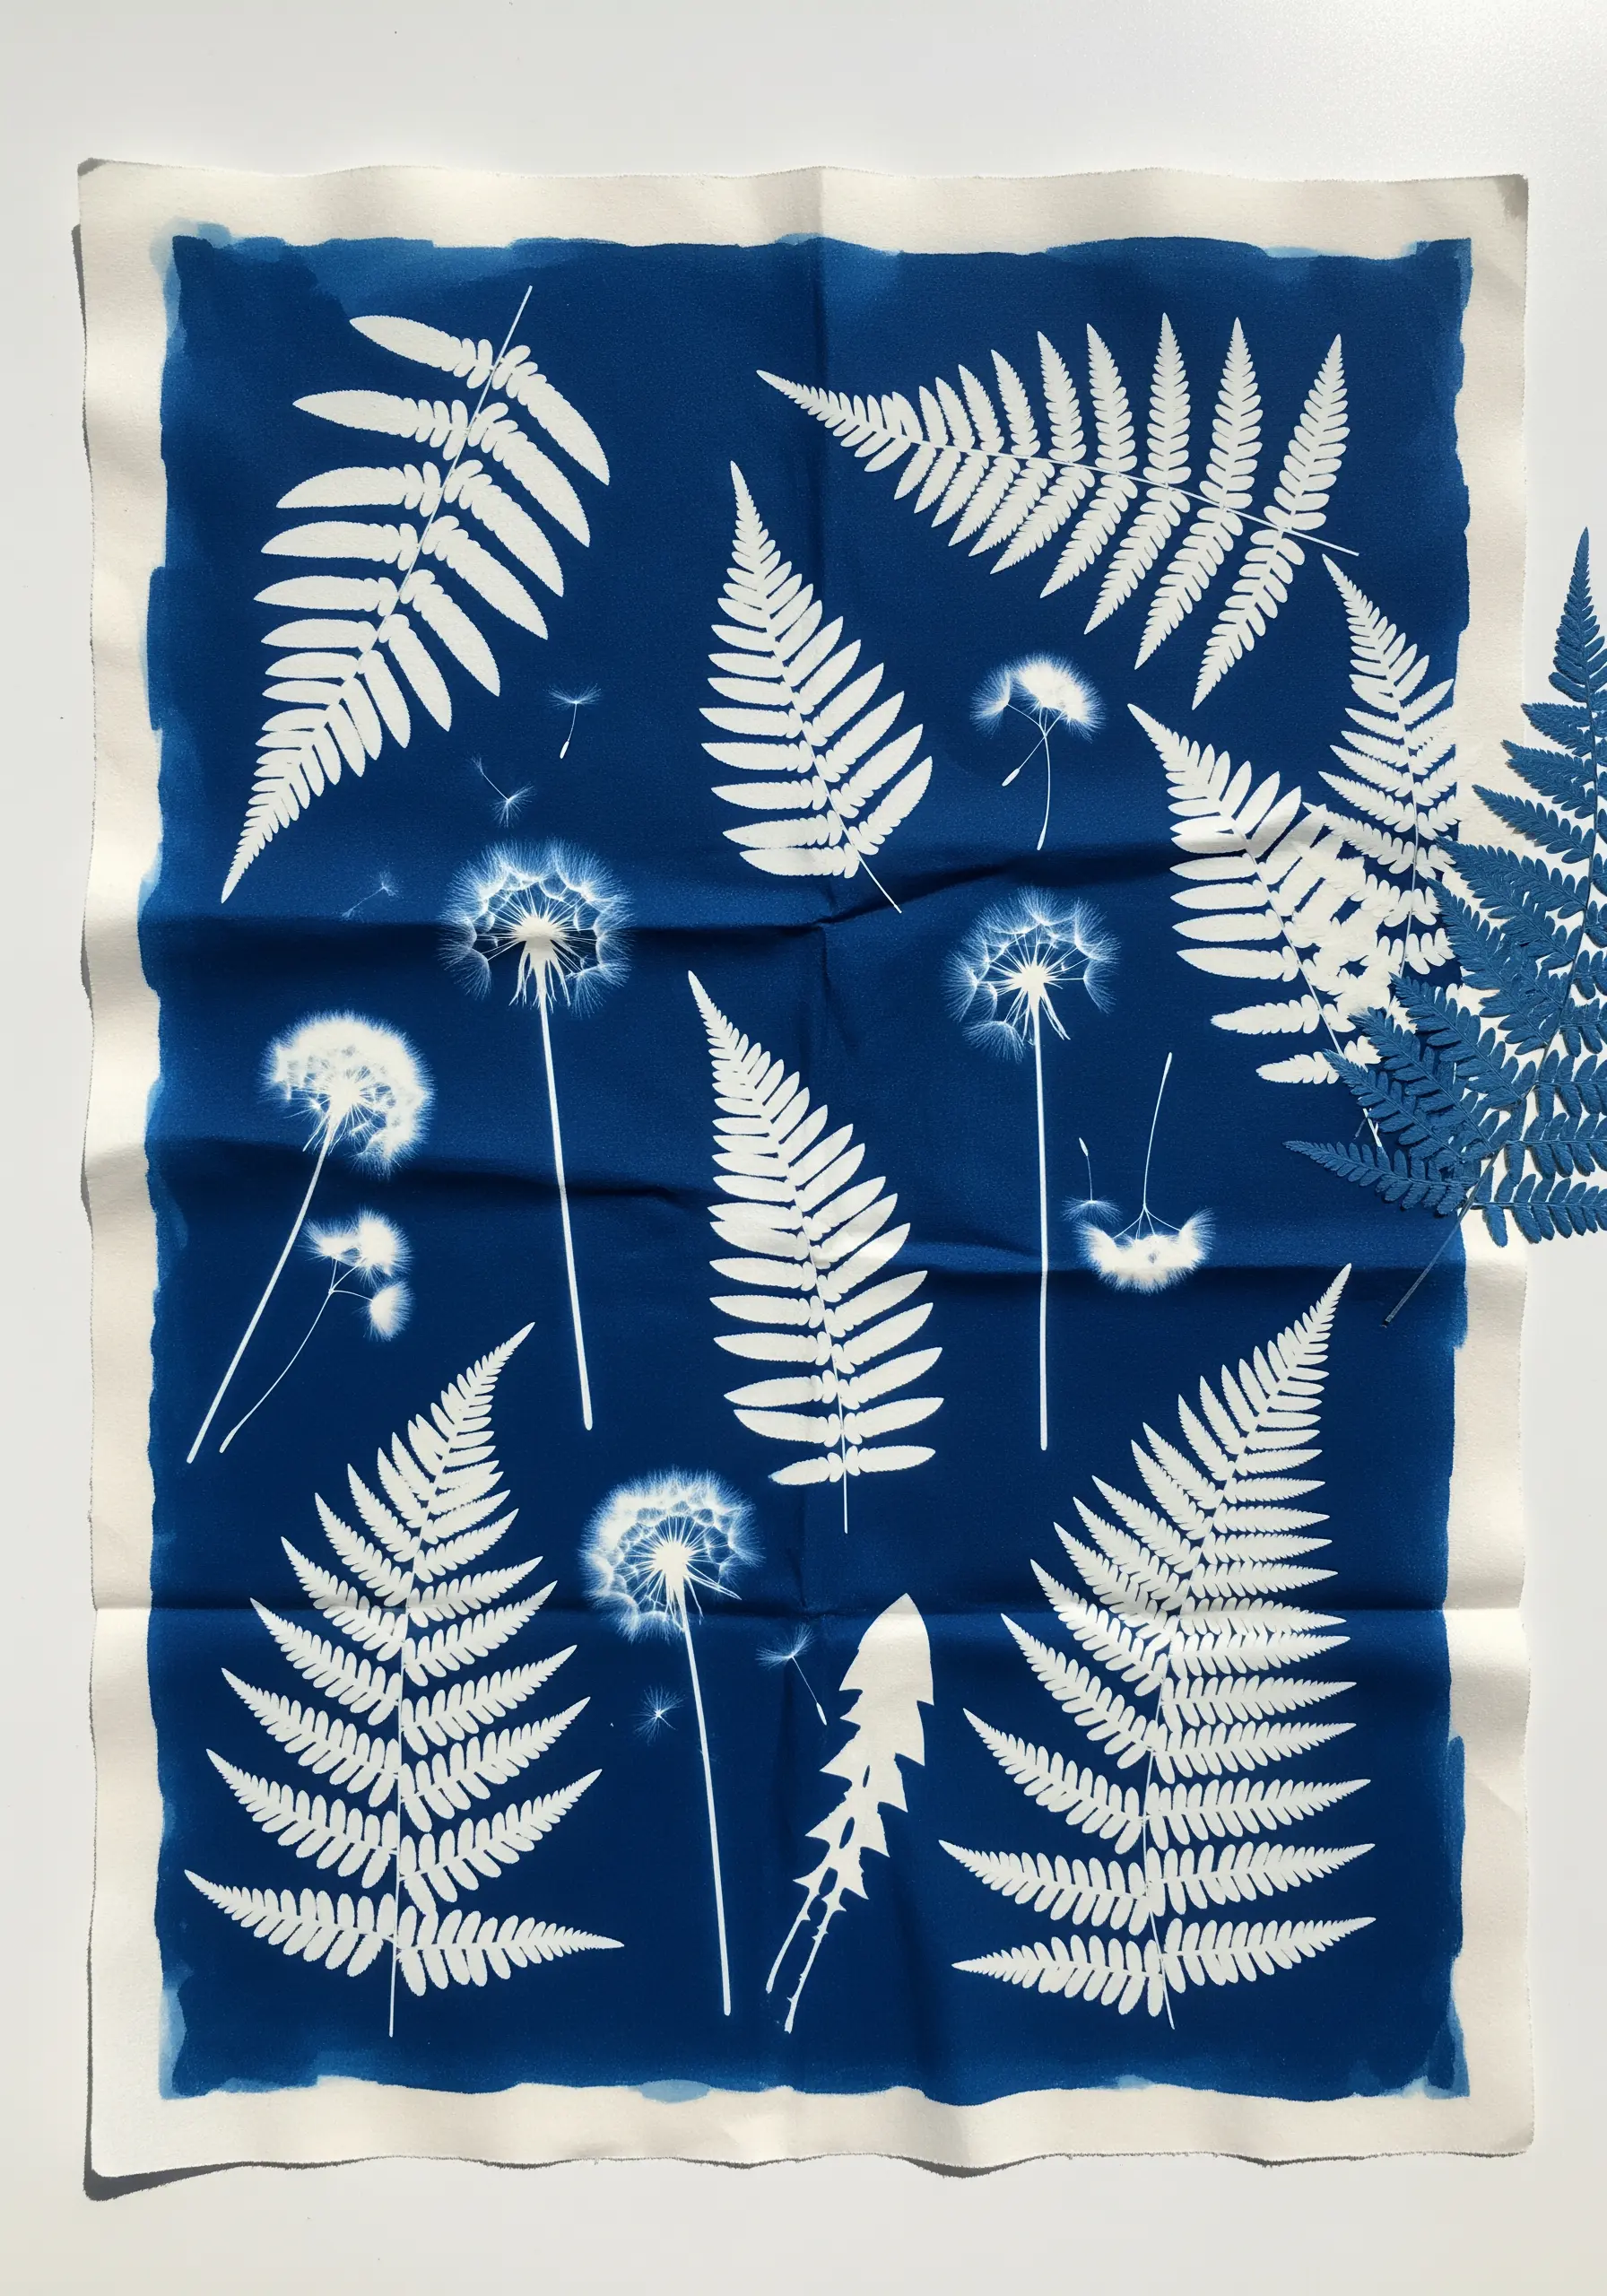
Create a cyanotype by placing botanicals on chemically-treated fabric and exposing it to sunlight. The result is a stunning, deep blue print with ghostly white silhouettes.
While beautiful on its own, this print can be your canvas.
Use the botanical outlines as a guide for minimalist stitching. A single strand of white or silver thread in a simple backstitch or stem stitch can add texture and highlight the delicate details of a fern or dandelion seed head, turning a print into a mixed-media textile piece.
5. Paint Nature Studies on Smooth Stones
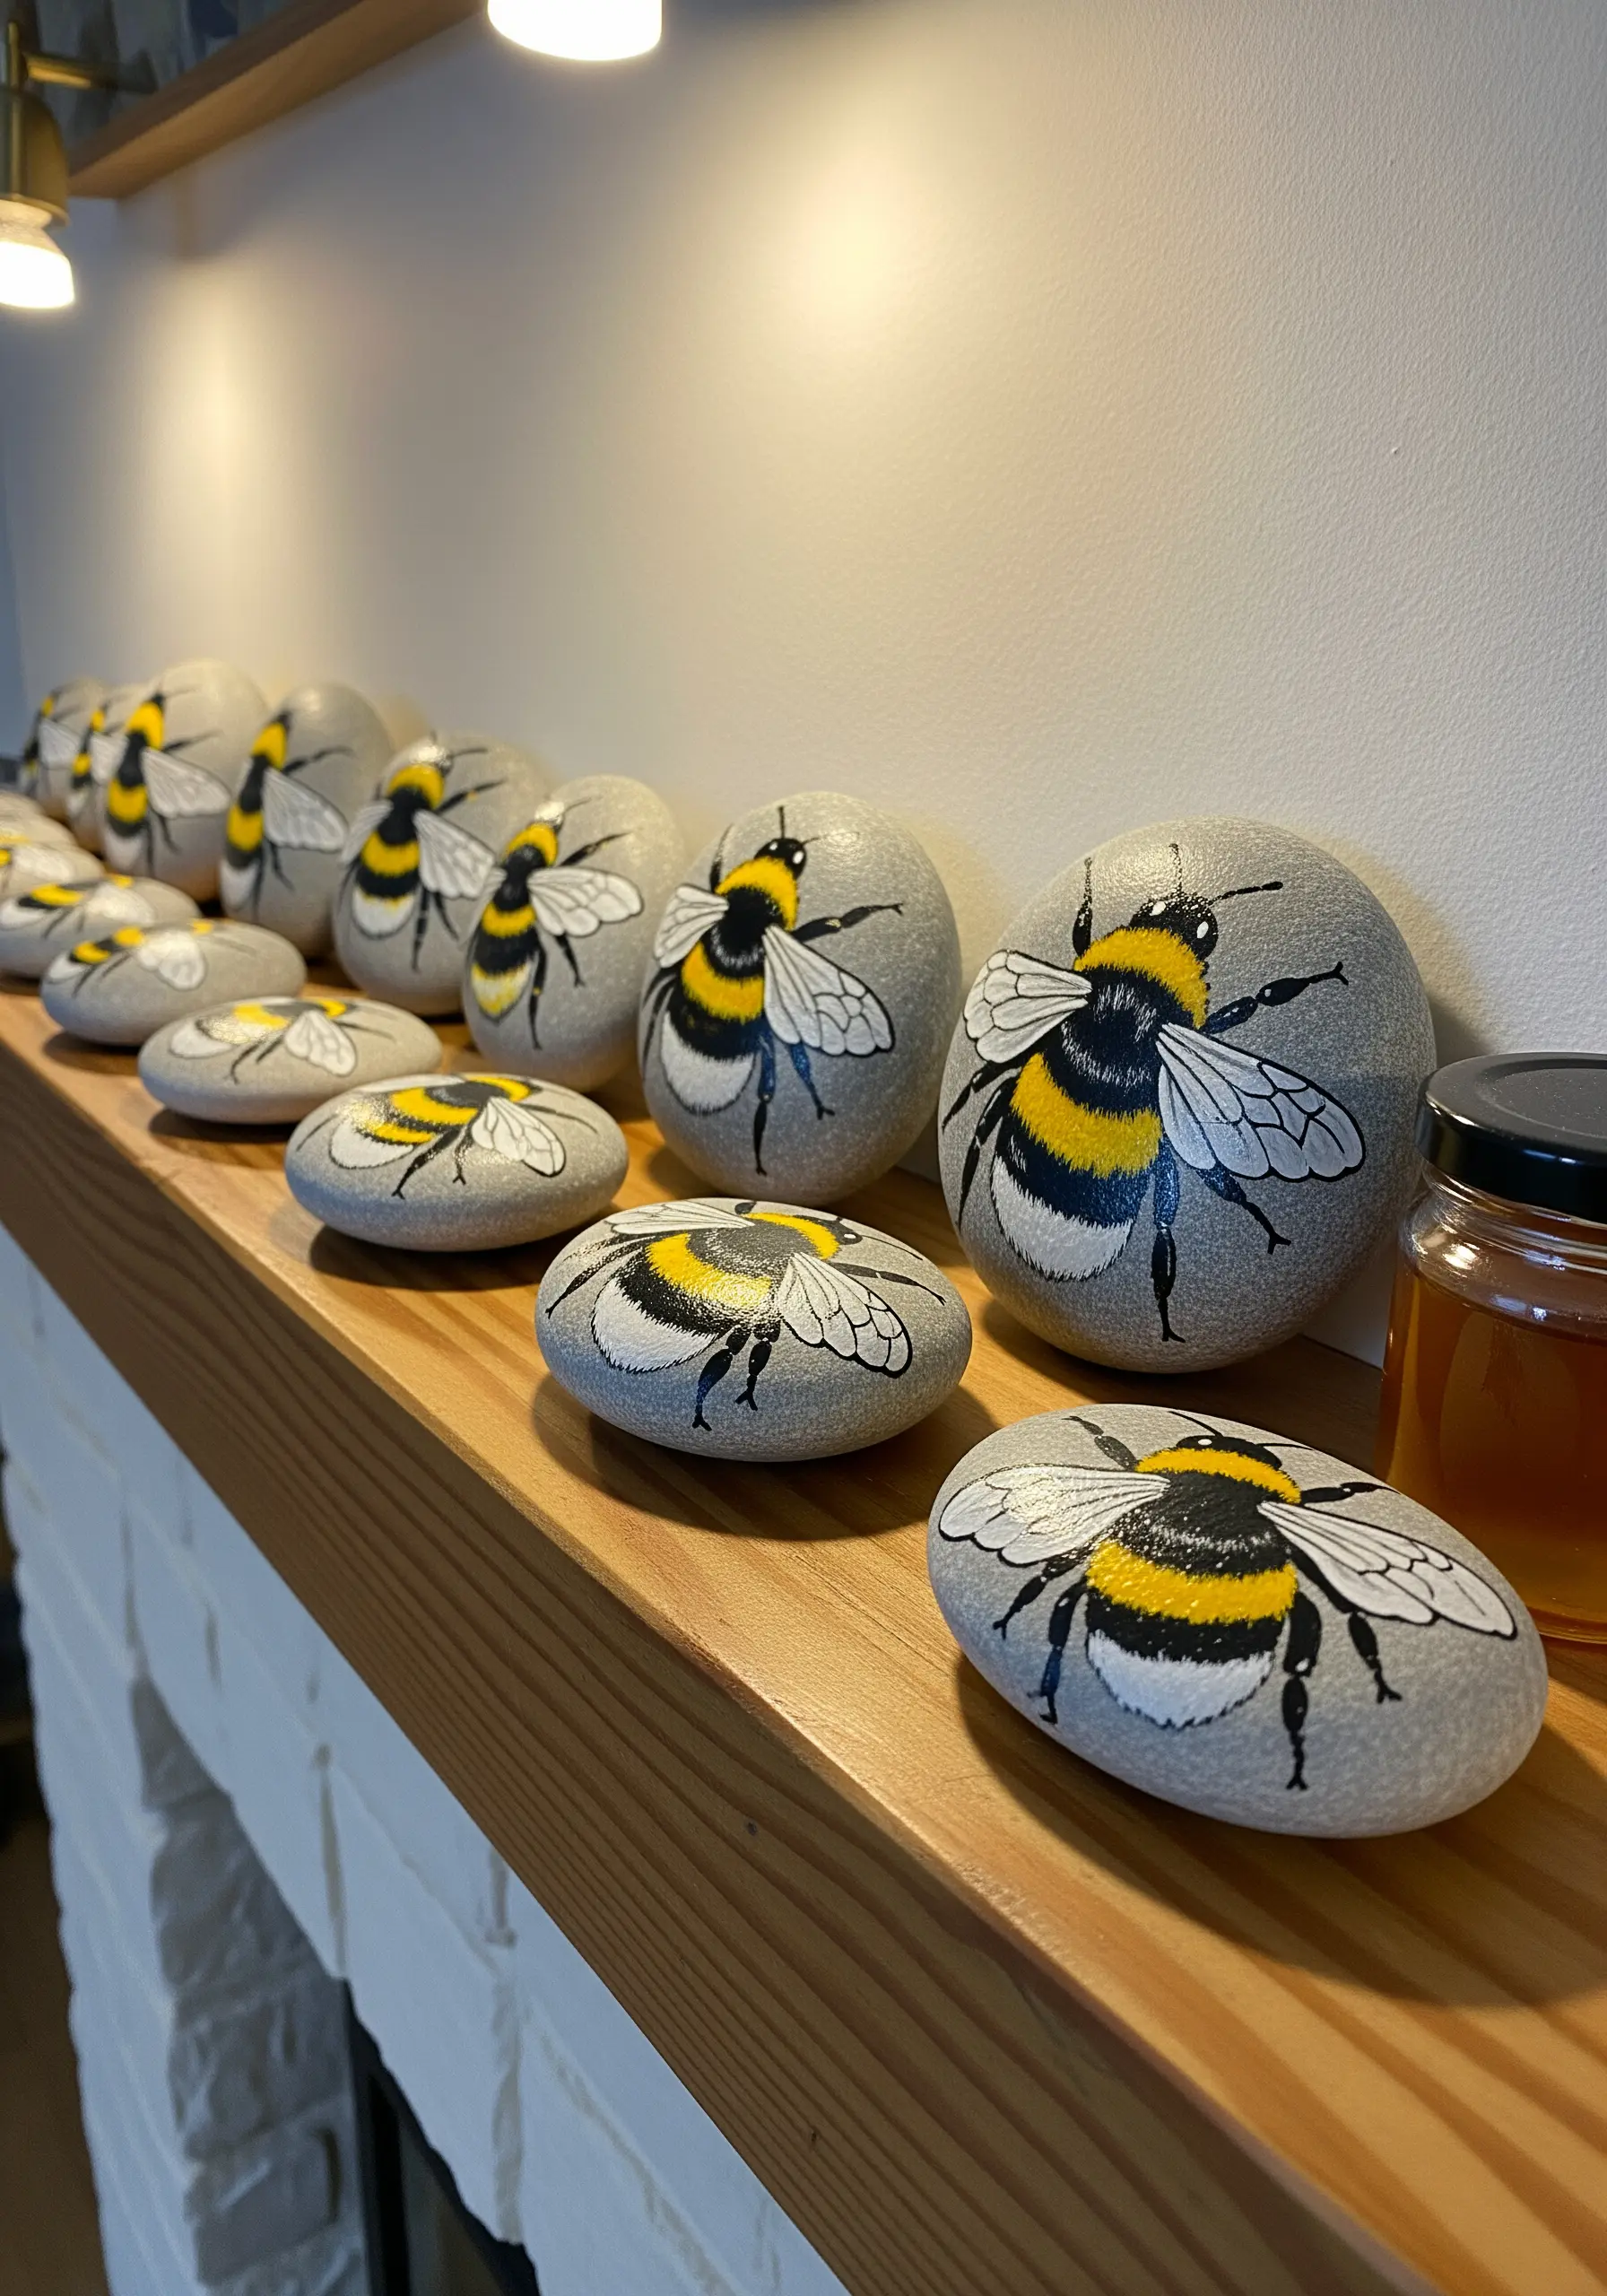
This project is about translating nature’s details onto a three-dimensional surface.
Choose smooth, flat river stones and apply a base coat of neutral acrylic paint for a consistent canvas.
Use fine-tipped brushes to paint bees or other insects, focusing on layering colors to create depth—a wash of white for translucent wings, and layered yellow and black for a fuzzy body.
Seal with a matte or satin varnish to protect your artwork from the elements. Display them on a mantelpiece or in a garden as a charming, handcrafted detail.
6. Craft a Metallic Ginkgo Leaf Mobile

This elegant mobile relies on balance and light.
You can create the ginkgo leaves from thin brass sheets, or for a textile approach, use an embroidery technique called freestanding lace.
Stitch the leaf designs onto a water-soluble stabilizer using a metallic gold thread. Once you dissolve the stabilizer, you’re left with delicate, thread-only leaves.
Hang them from a brass hoop with clear filament line at varying lengths to allow them to spin and catch the light independently.
7. Paint a Sunset with Thread
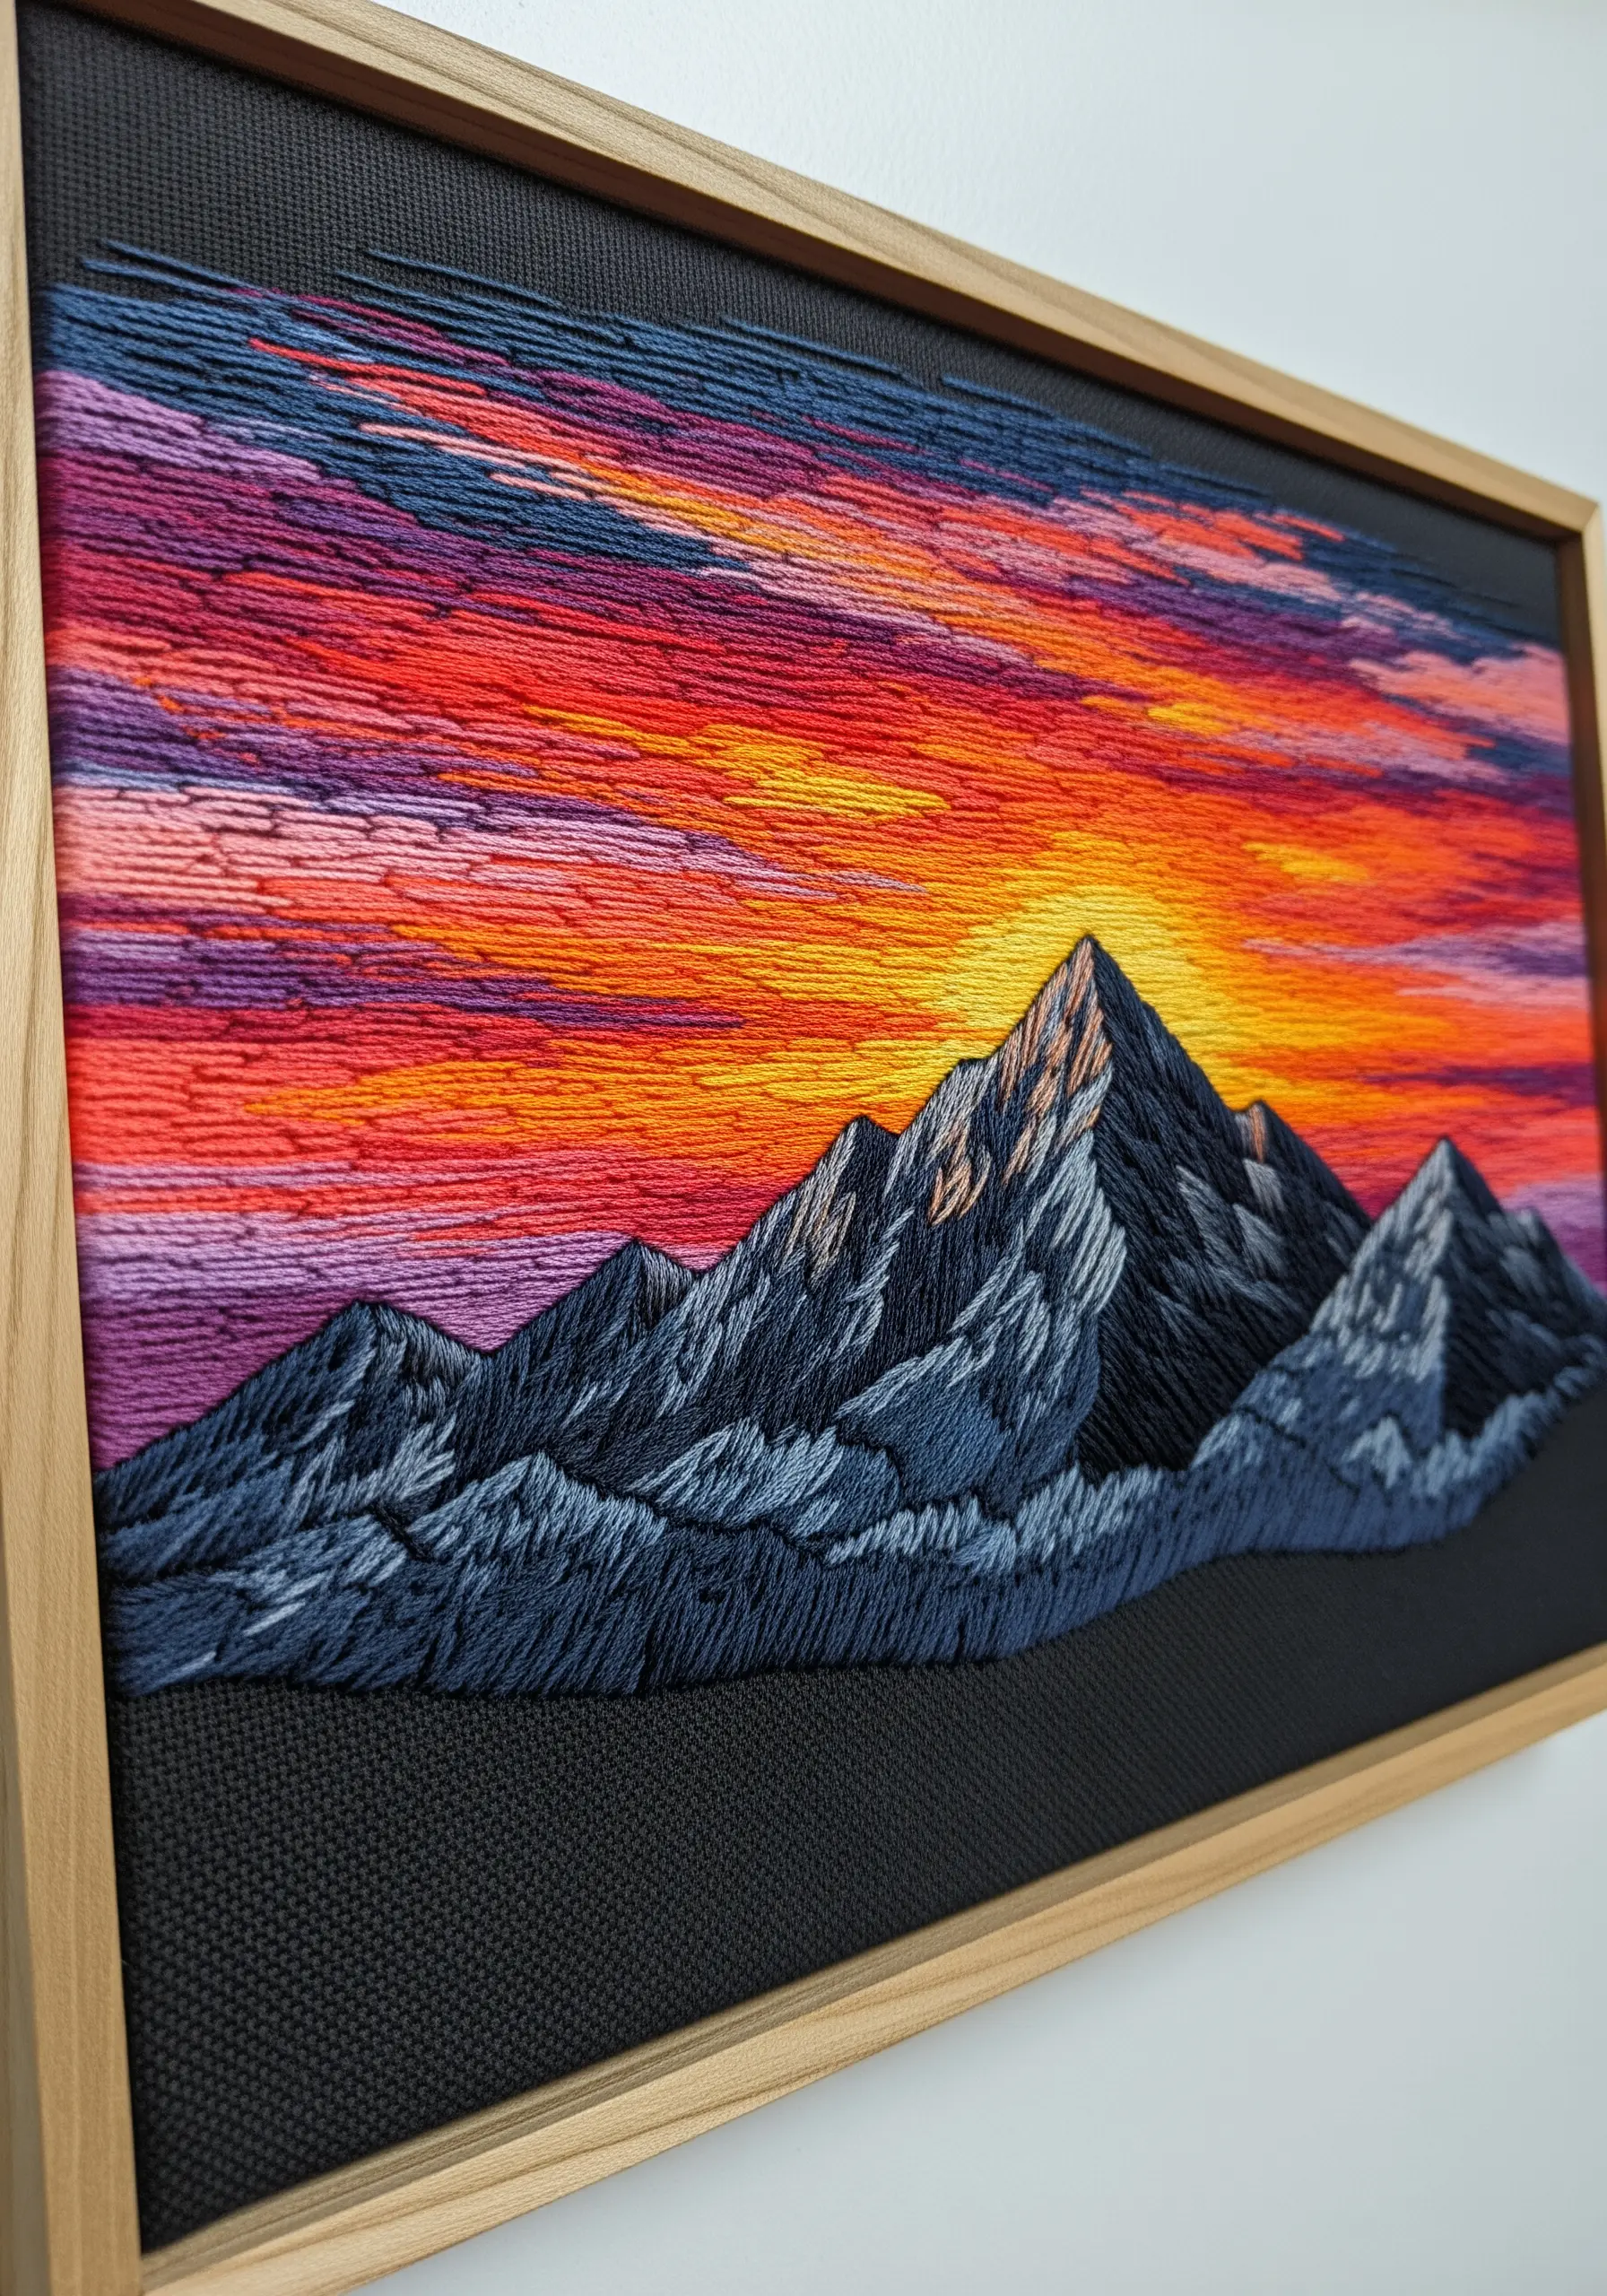
To capture the vibrancy of a sunset, your stitch direction is everything.
Use long-and-short stitches horizontally across the sky, blending oranges, pinks, and purples to create a soft, painted gradient.
For the mountains, switch to angled satin stitches, using darker blues and greys to define sharp peaks and shadowed valleys. This contrast in direction and color saturation is what makes mountain landscape thread painting techniques so effective.
Stitching on black Aida cloth makes the colors appear even more luminous.
8. Carve a Lifelike Songbird from Wood
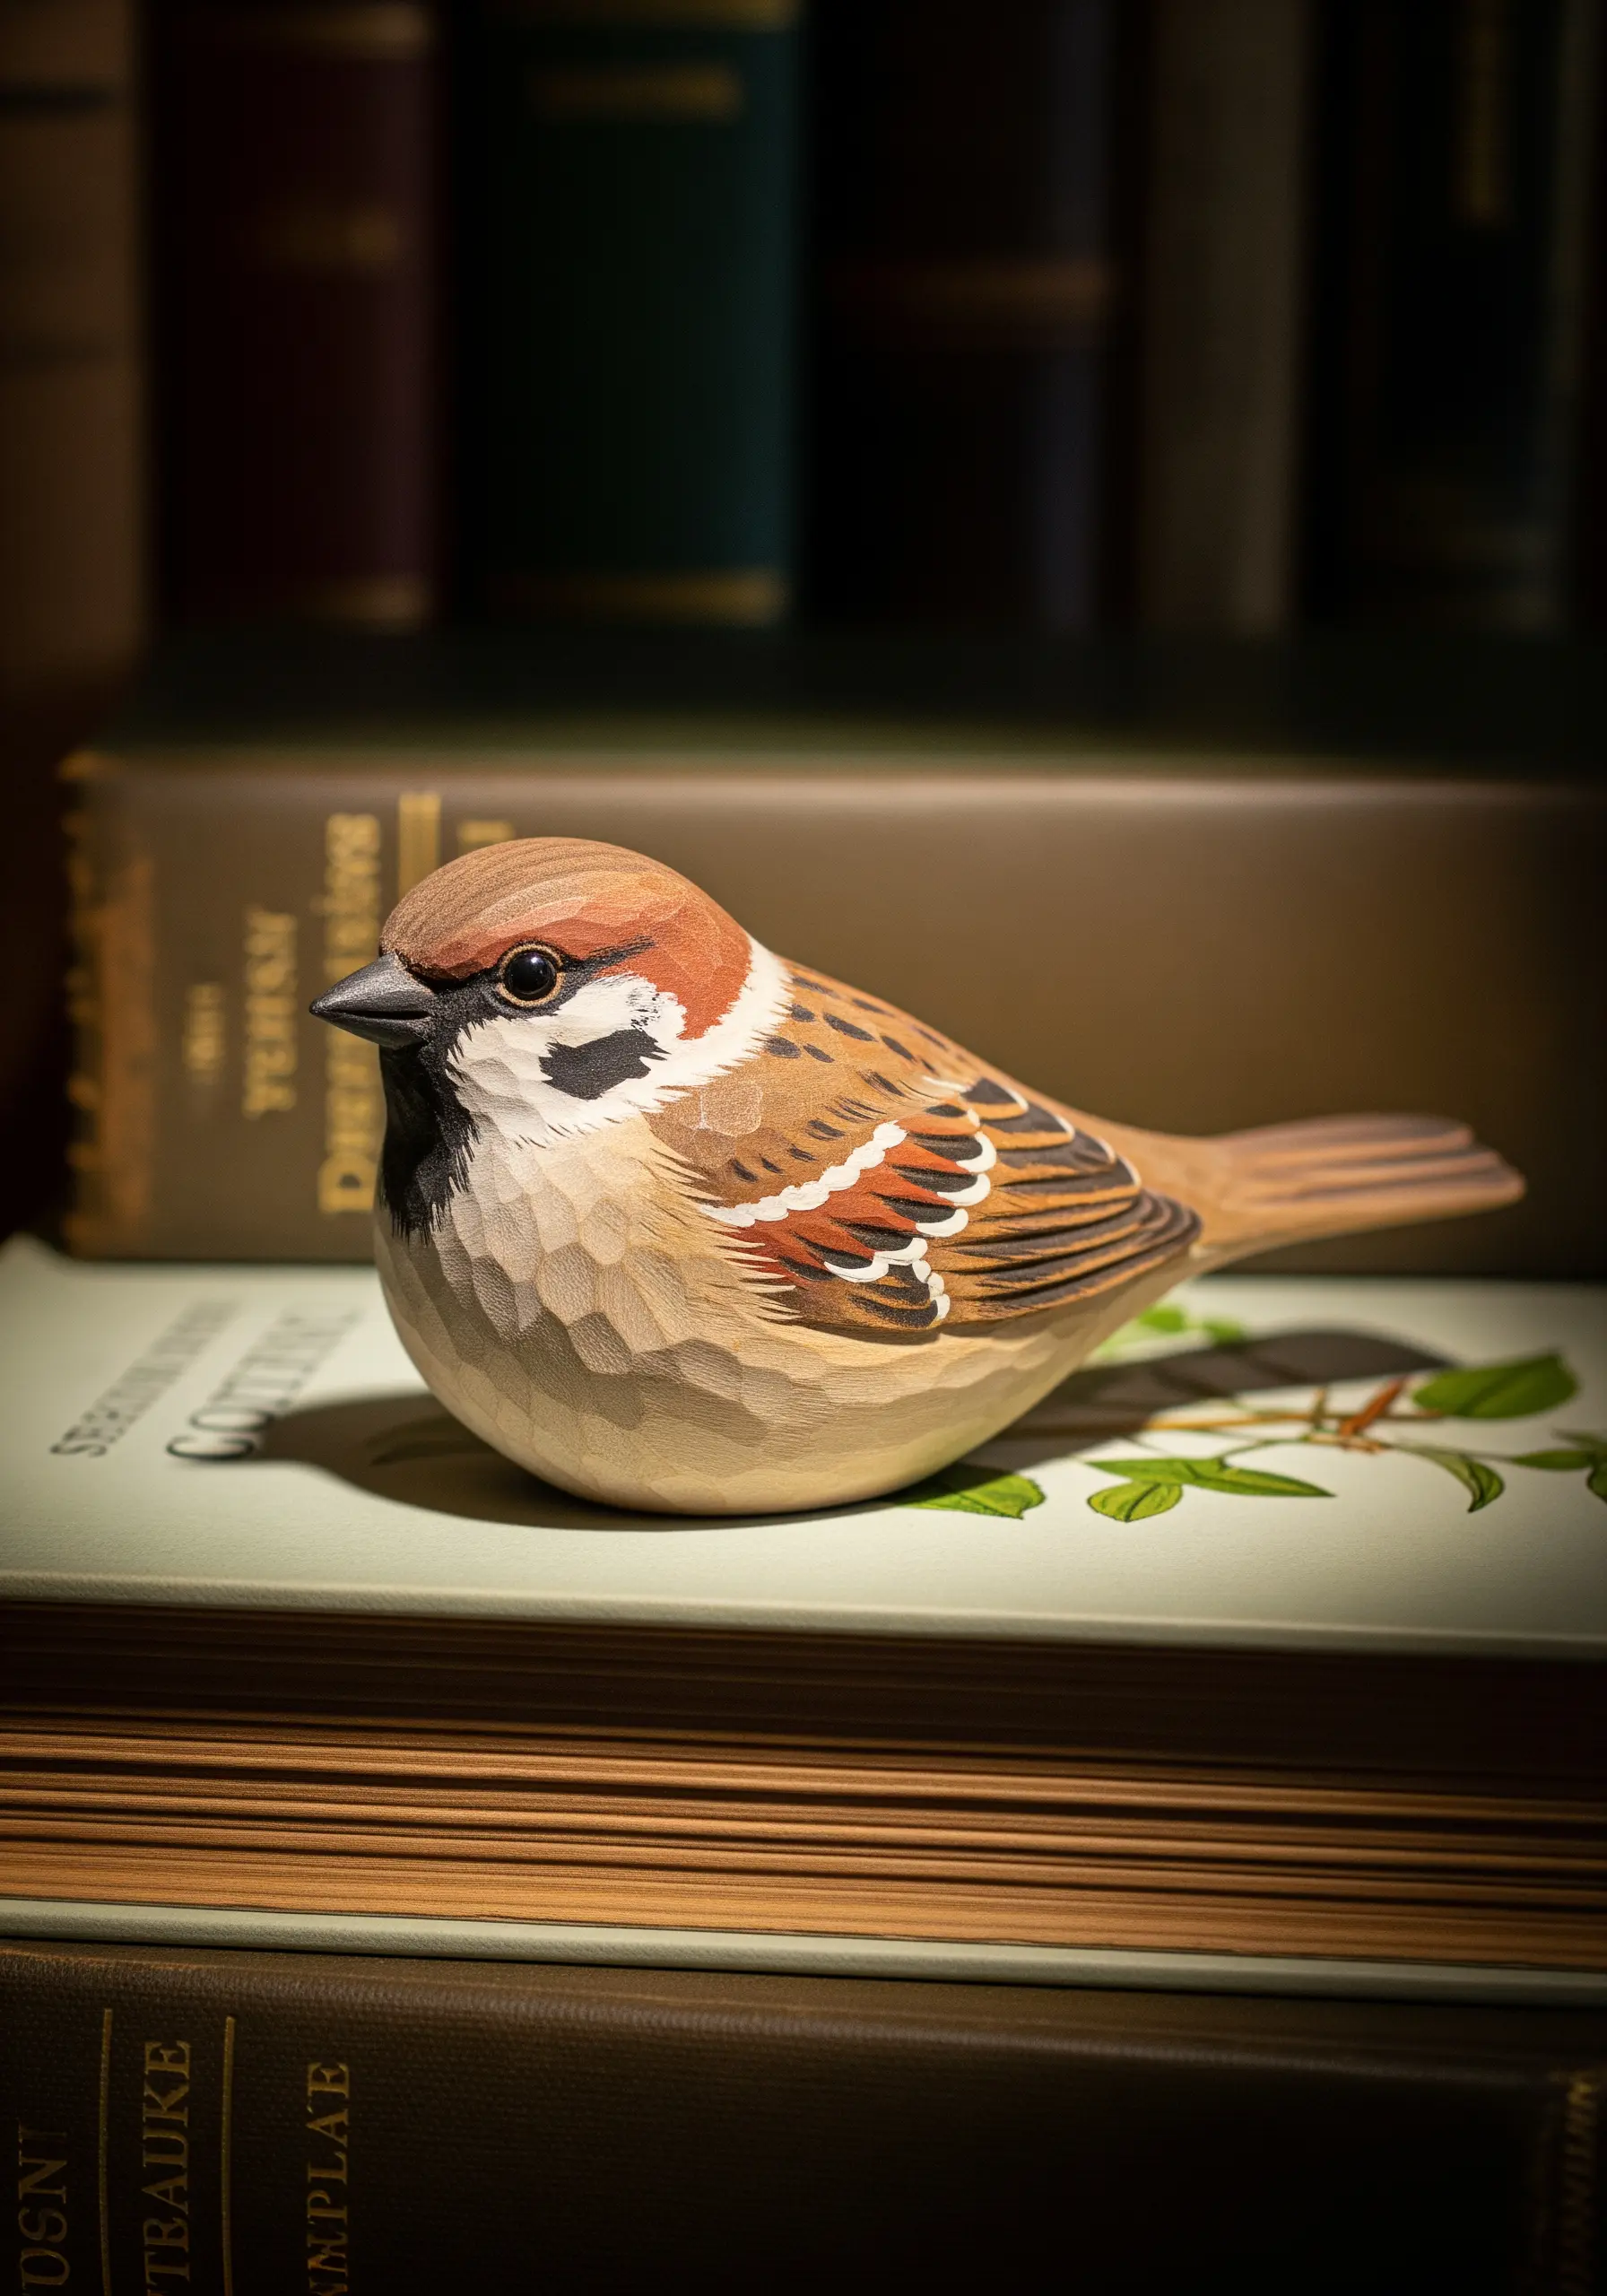
Wood carving is an art of subtraction, where every cut reveals form and texture.
Start with a block of basswood, which is soft and ideal for beginners.
Use a reference photo to sketch the bird’s profile on the wood, then slowly begin removing material with a carving knife, focusing on the primary shapes first.
The fine details, like feather textures, are created with smaller V-tools and delicate, precise cuts. The final form is a testament to patience and observation.
9. Stitch Delicate Lavender on Linen Napkins
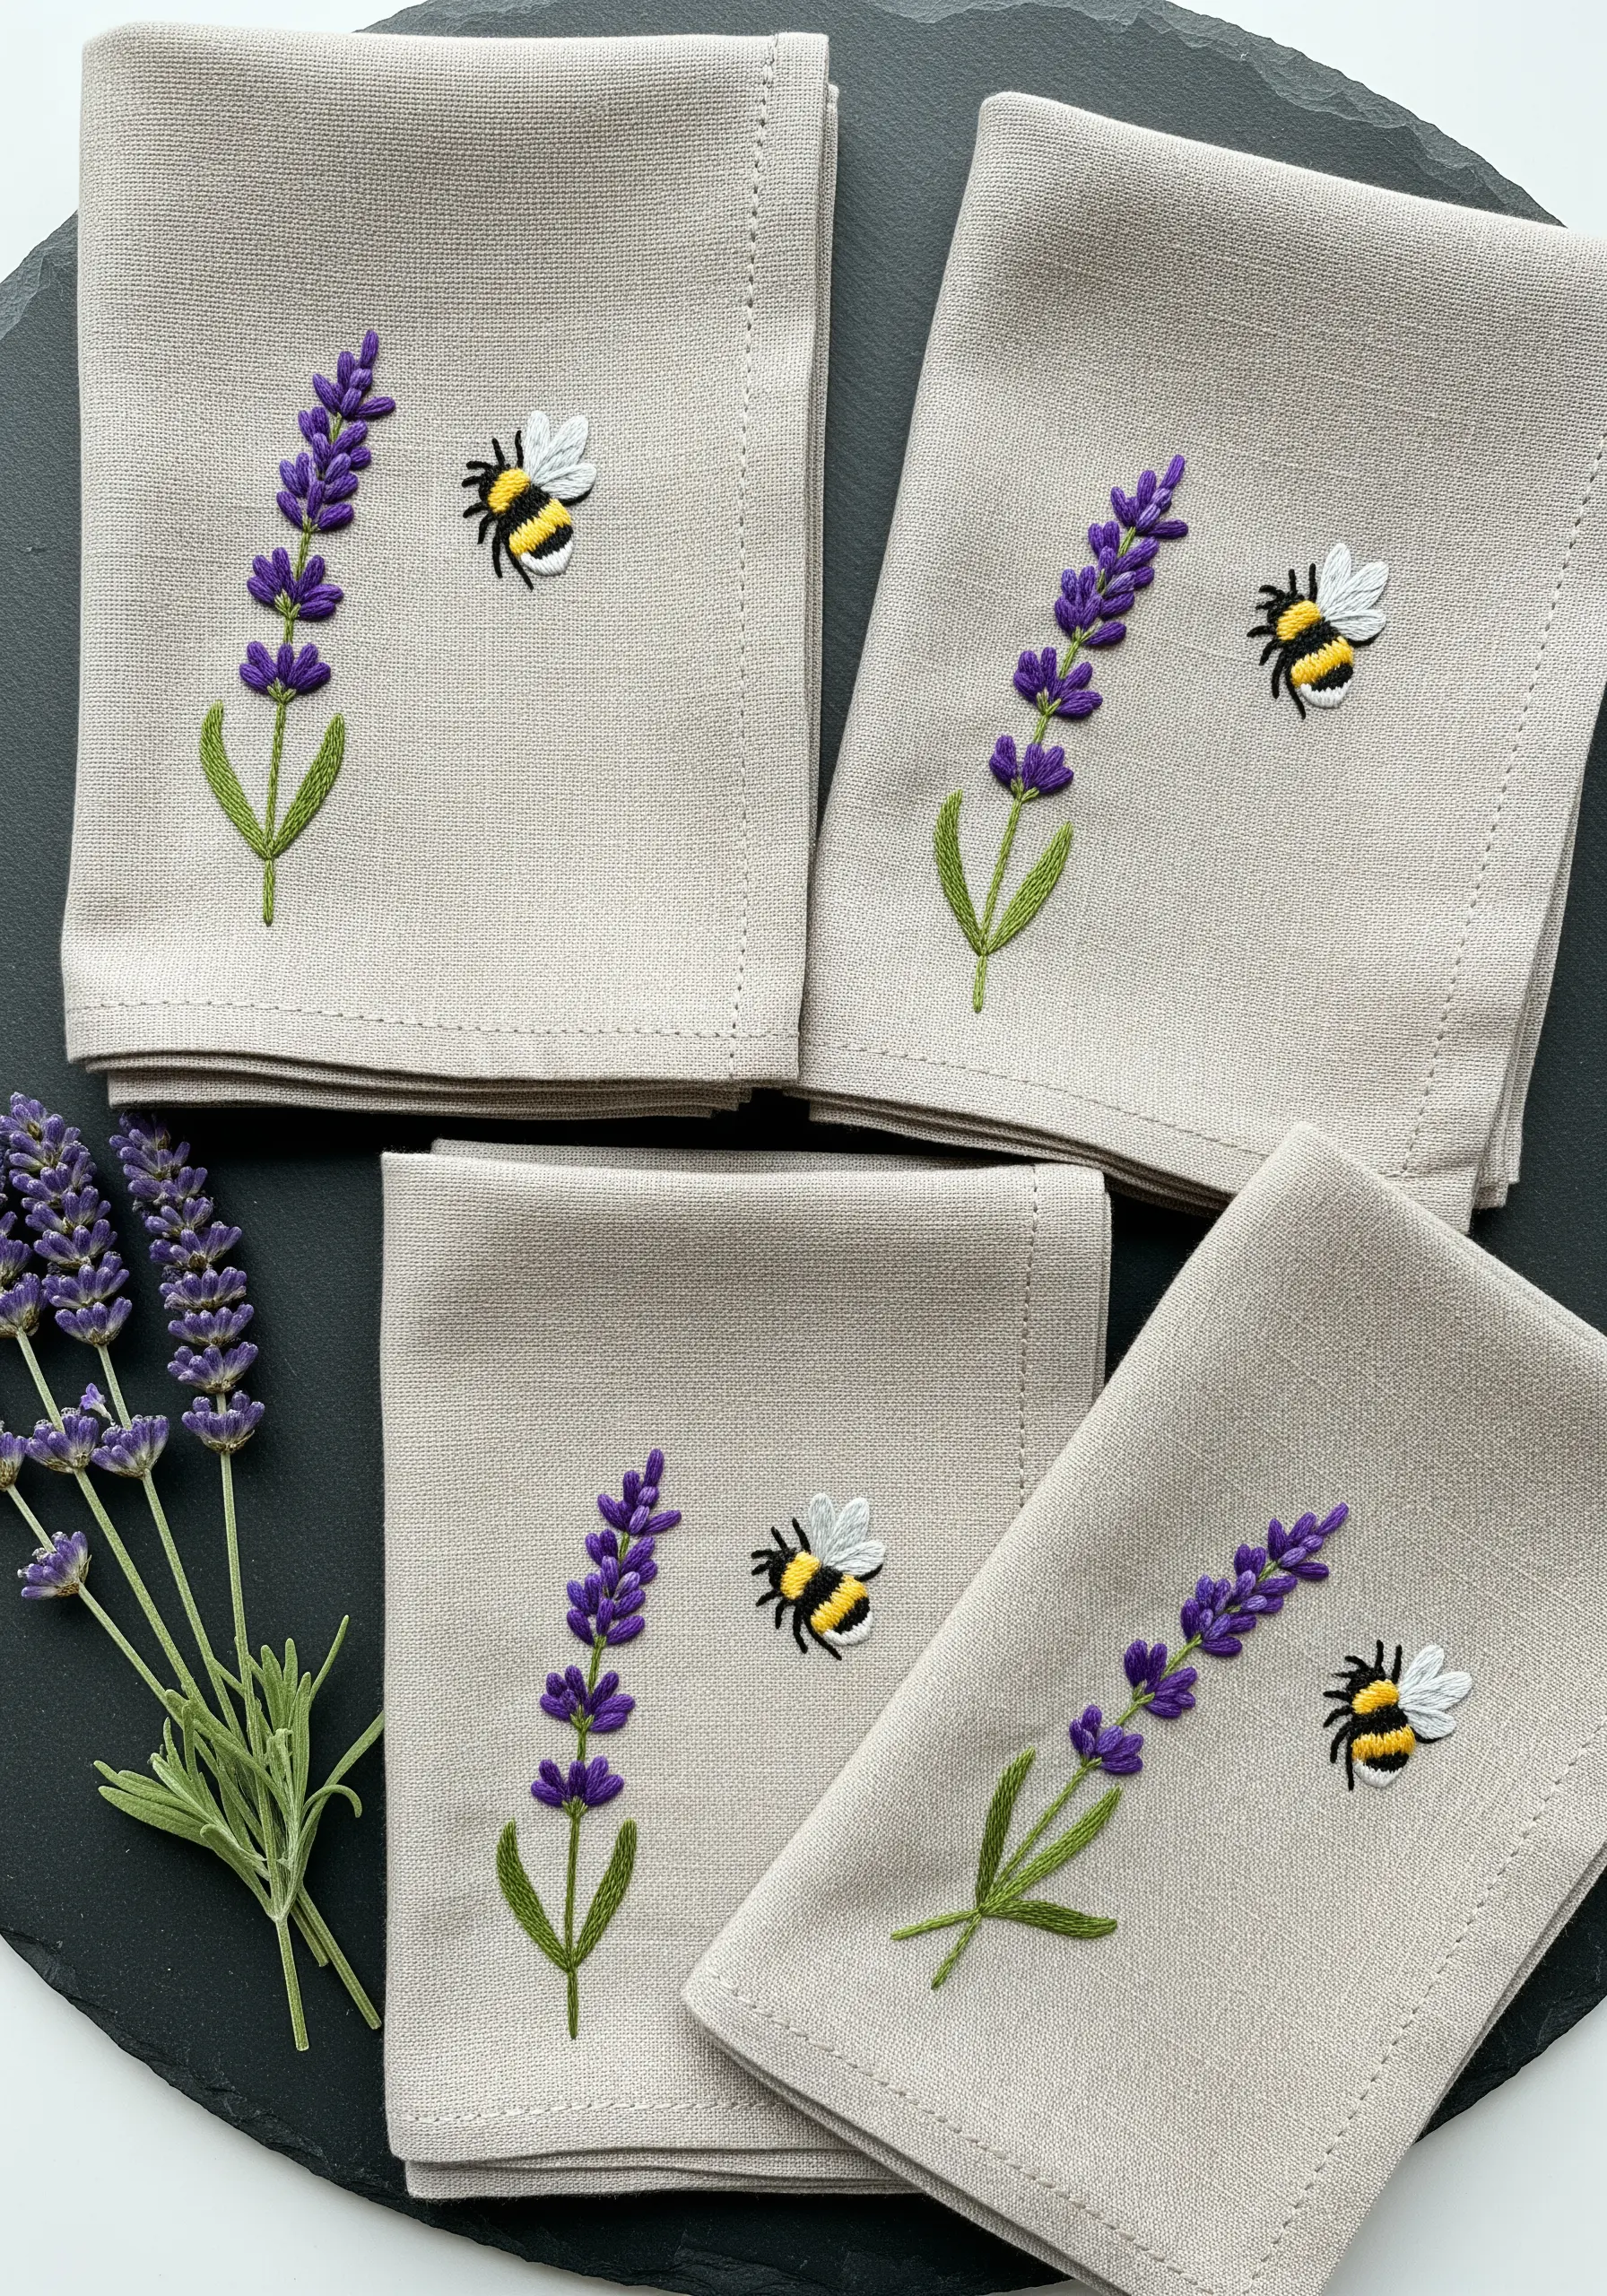
For embroidery on functional items like napkins, precision is key.
Use two strands of floss for the lavender stems (stem stitch) and bee’s body (satin stitch) for durability.
Switch to a single strand for the bee’s wings to give them a delicate, translucent quality.
Create the lavender florets with bullion knots or French knots, clustering them tightly at the top and spacing them out toward the stem for a natural look. These delicate lavender stitch ideas elevate simple linen into a cherished set.
10. Embroider a Constellation on a Journal

Stitching on bookcloth or paper requires a different approach than fabric.
Pre-pierce your holes with a fine awl or a thick needle to prevent tearing. This ensures your stitches will be clean and even.
Use a single strand of metallic or silk thread for a refined, celestial shimmer that won’t overwhelm the design.
For the moon, appliqué a small circle of felt or faux leather, adding tiny craters with seed stitches for a touch of texture. It’s an ideal way to create tiny night sky embroidery designs on unique surfaces.
11. Build a Miniature World in a Terrarium
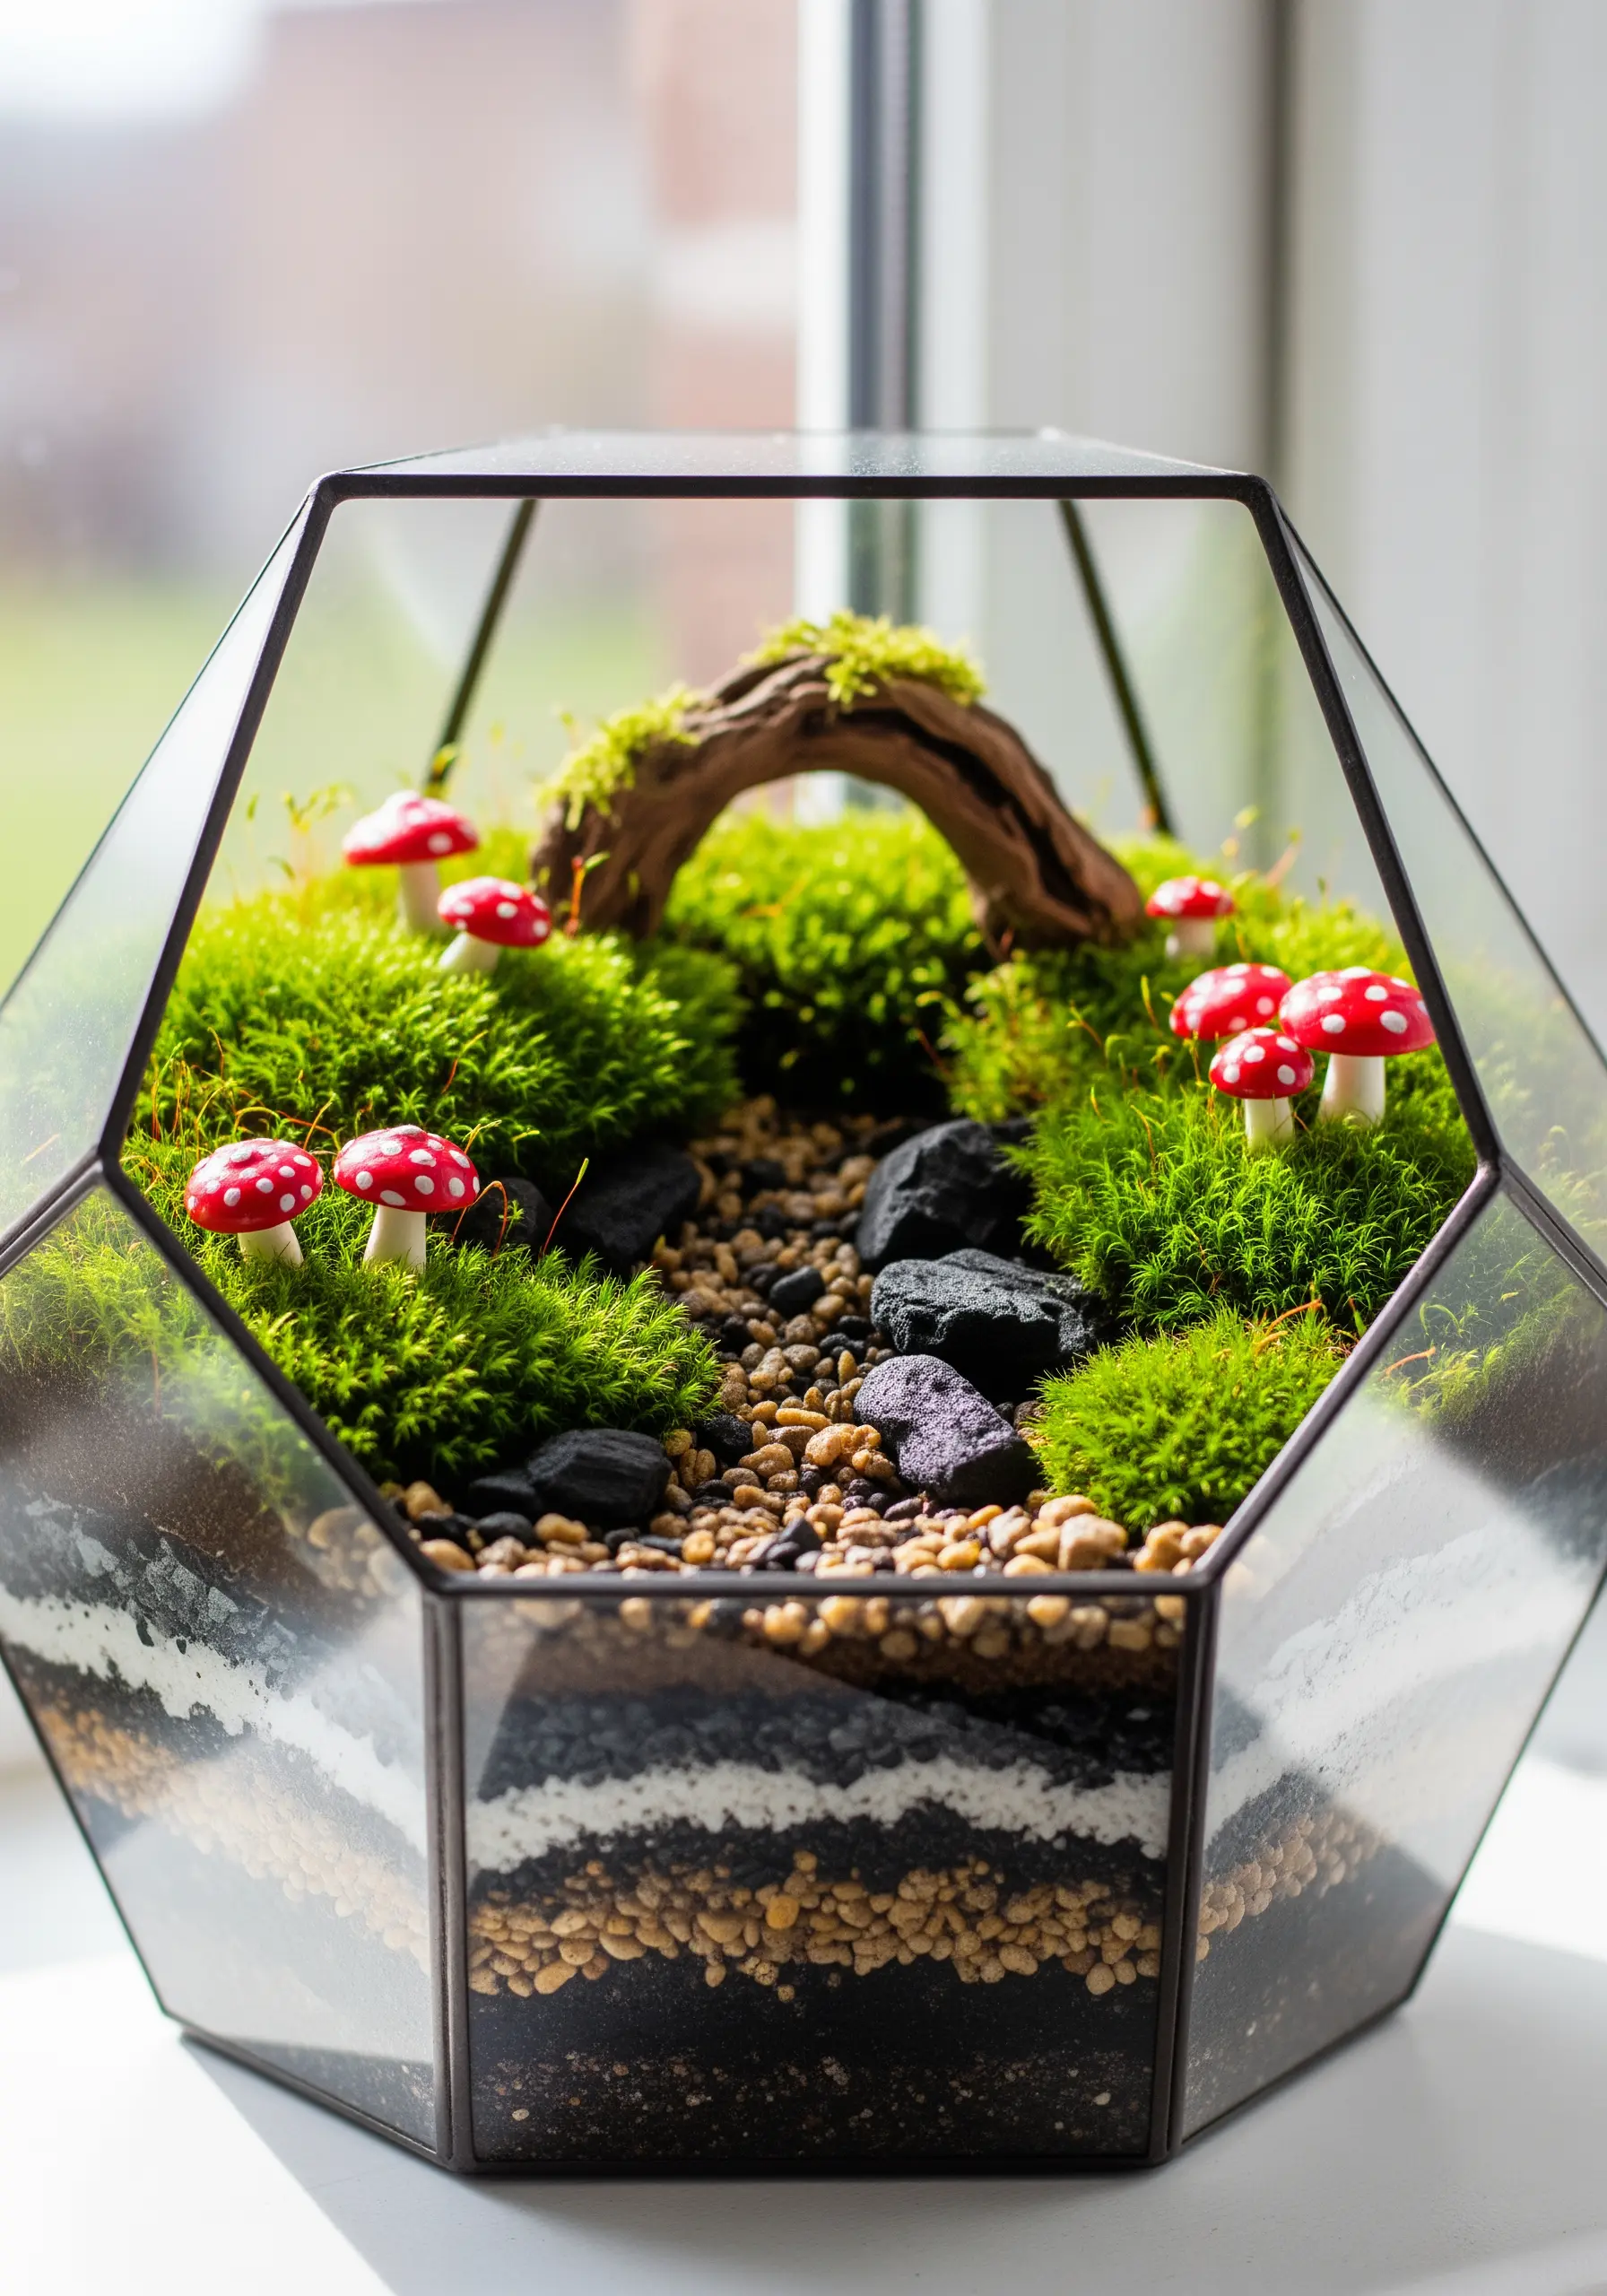
A terrarium is a living sculpture that celebrates layers and composition.
Start with a drainage layer of pebbles or sand, followed by activated charcoal to keep it fresh.
Add a layer of soil, and then begin landscaping. Use moss for lush ground cover, small stones to create pathways, and a piece of driftwood for a dramatic focal point.
The miniature mushrooms add a whimsical touch, turning a simple glass container into a self-contained, magical ecosystem.
12. Illustrate Seashells with Watercolor and Ink
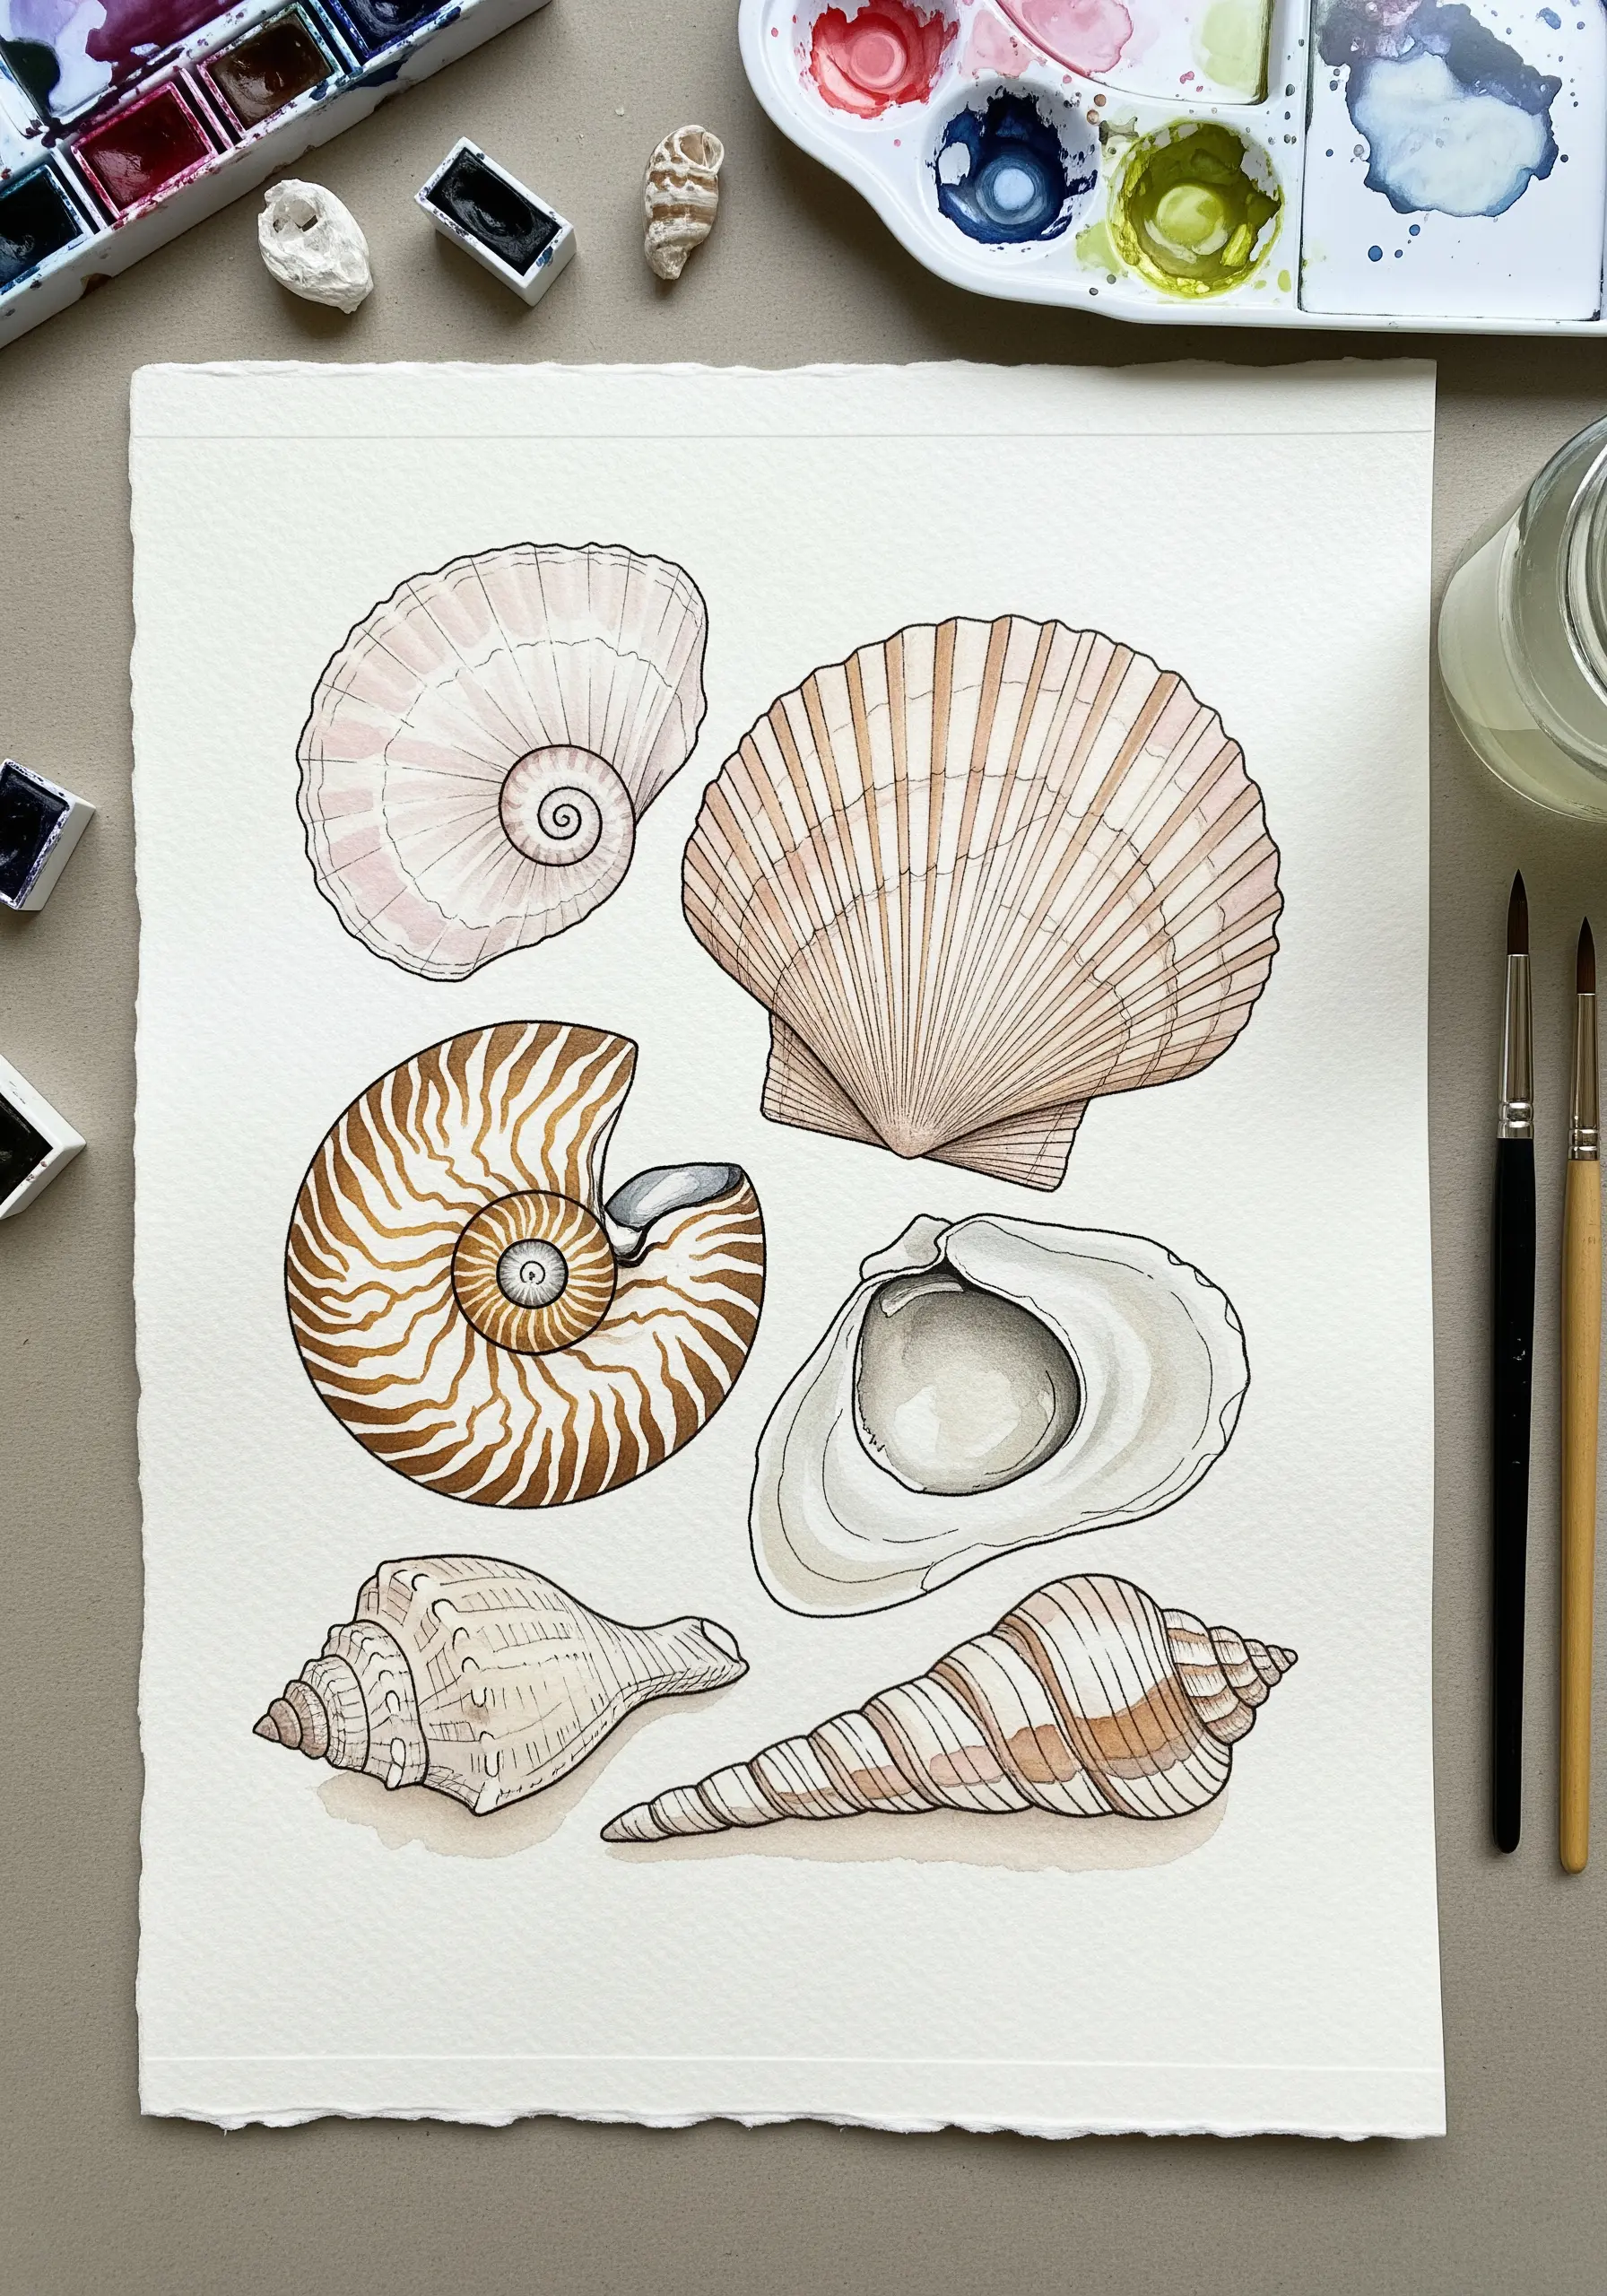
To achieve this clean, illustrative look, ink your outlines first with a waterproof pen and let them dry completely.
Apply a light wash of water to one section of a shell, then drop in subtle colors like beige, pink, and grey. The water will diffuse the pigment, creating soft, natural gradients.
This technique can directly inspire watercolor-style embroidery patterns, where you would use single-strand floss in similar shades to blend colors softly within an outlined shape.
13. Sculpt a Landscape with Punch Needle
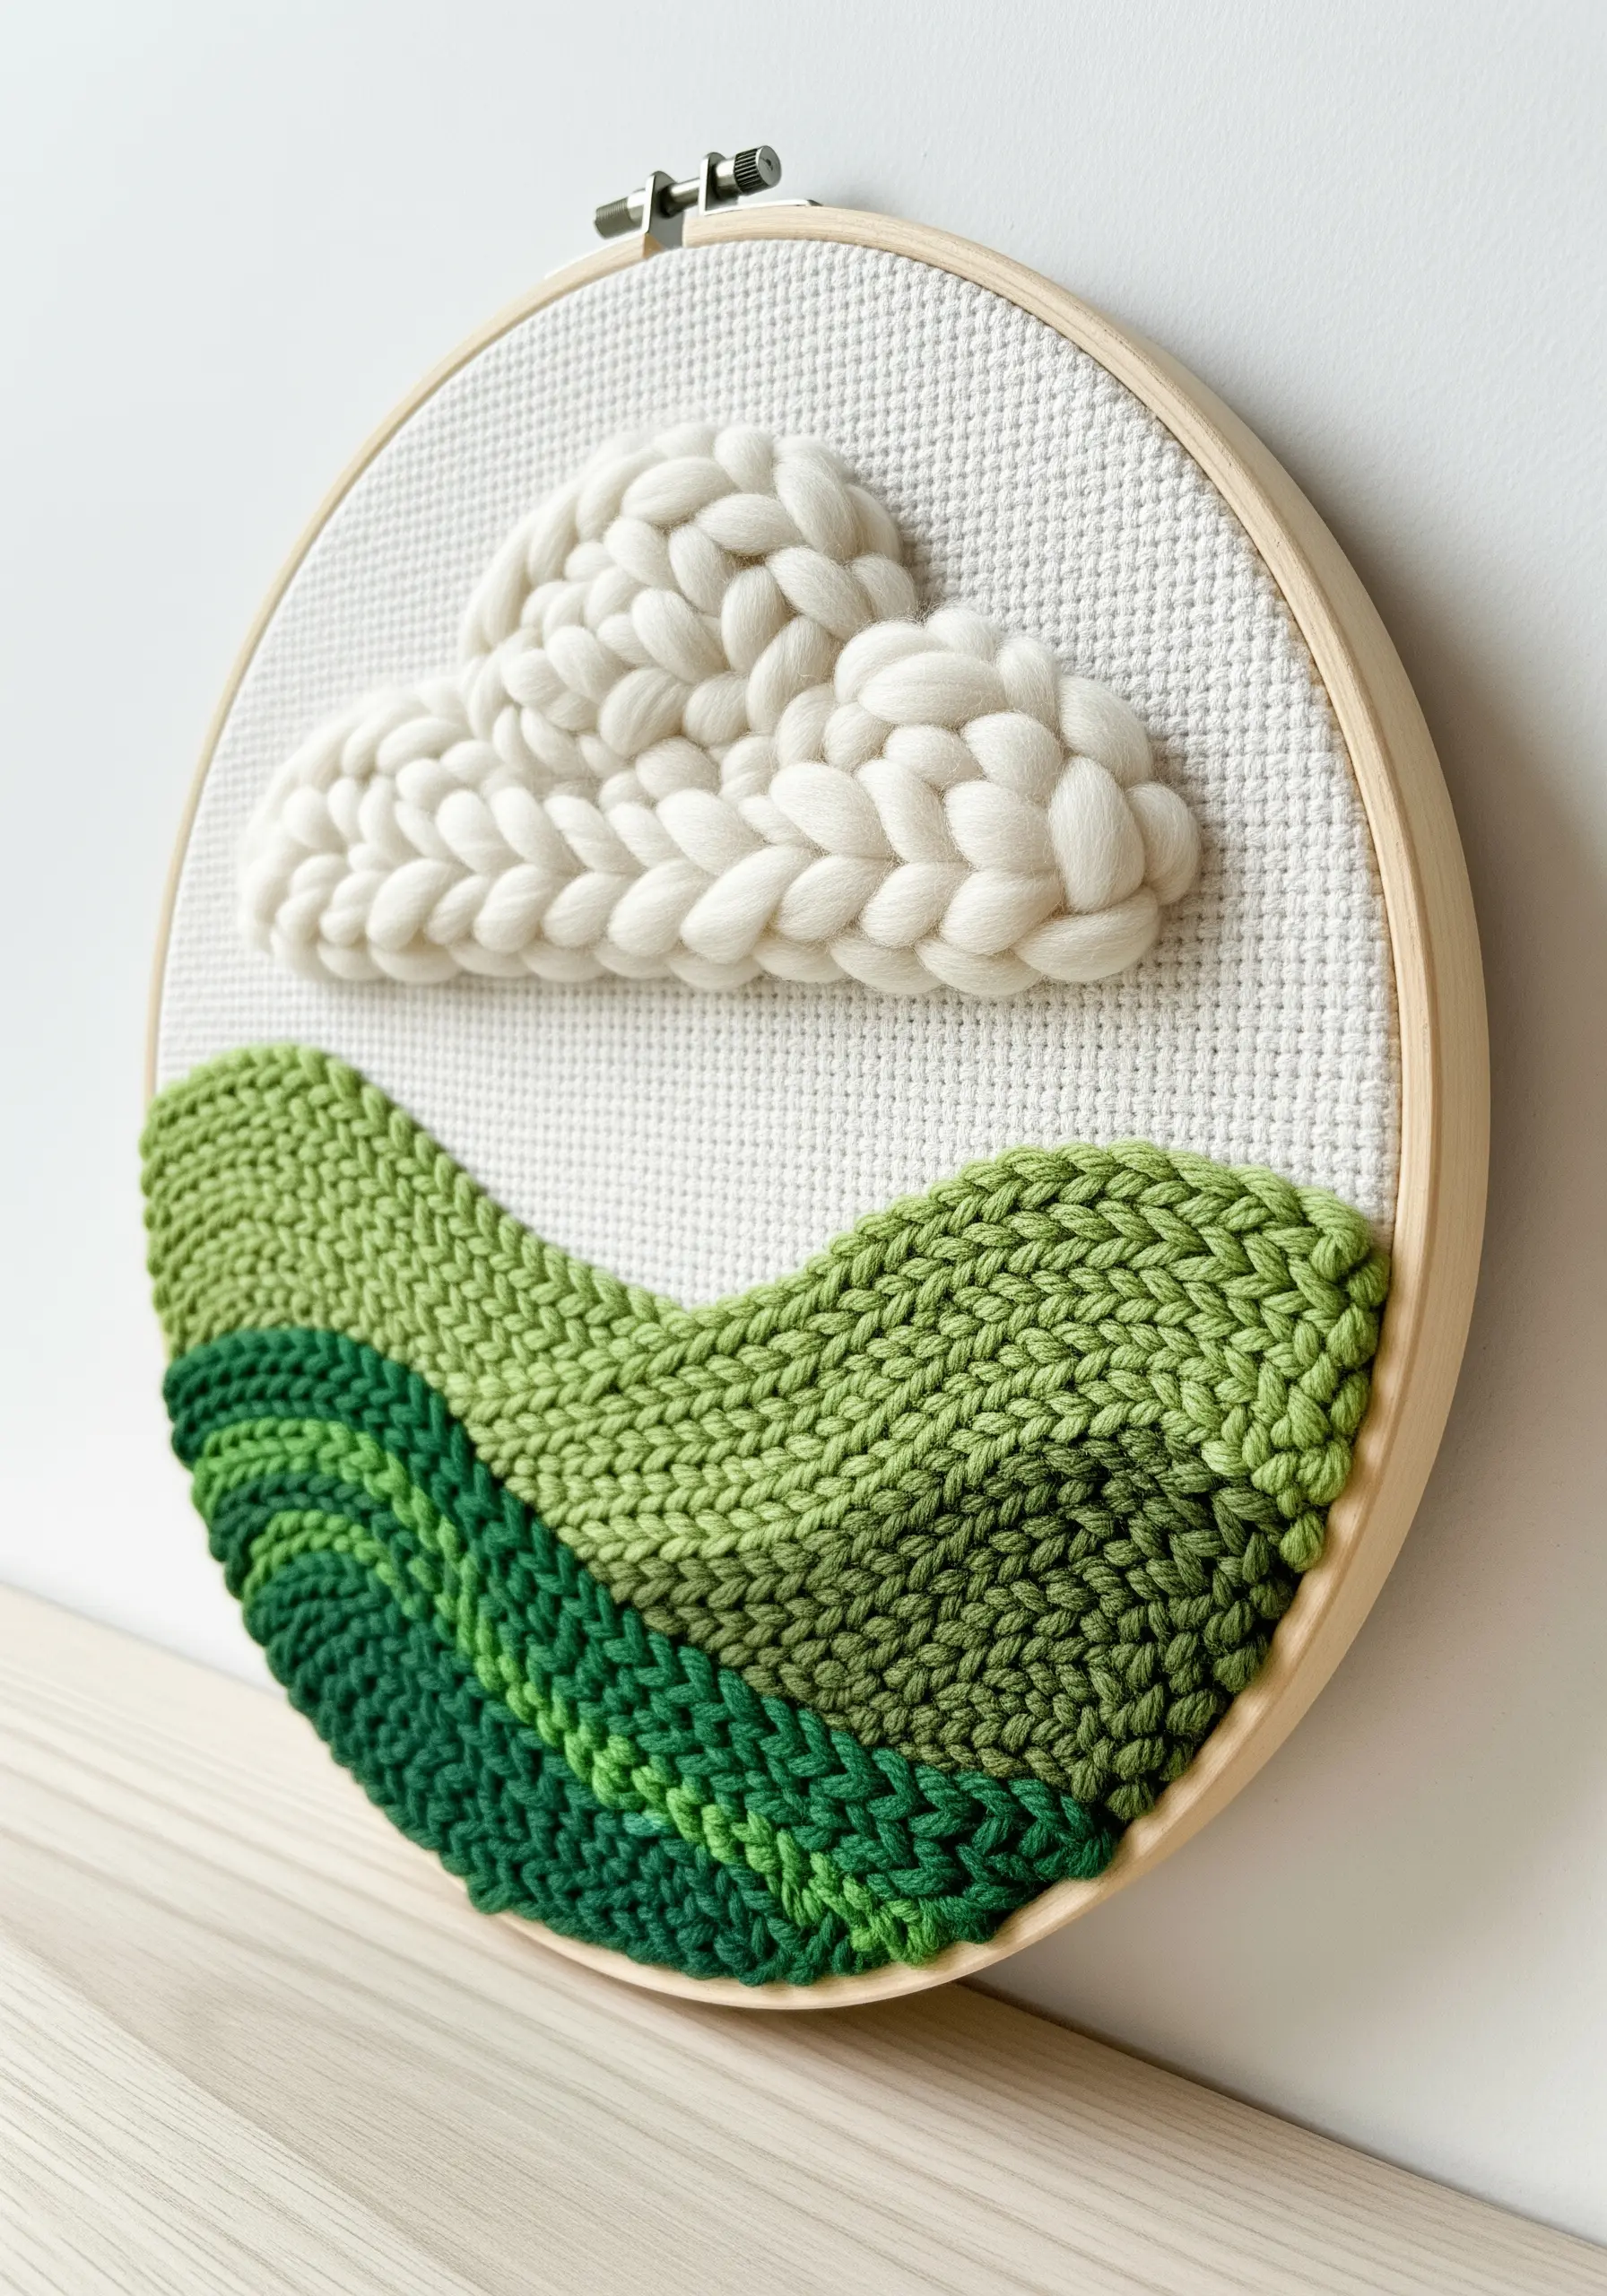
Punch needle offers a fast way to create highly textured art.
Use chunky wool roving for the clouds to create dramatic, oversized loops that stand in high relief against the background fabric.
For the rolling hills, use a standard yarn in several shades of green. By varying the height of your loops, you can create a contoured, topographical effect.
The contrast between the tight stitches of the hills and the plush clouds makes the composition dynamic and tactile, perfect for texture-rich embroidery ideas.
14. Weave a River Scene into a Wall Hanging
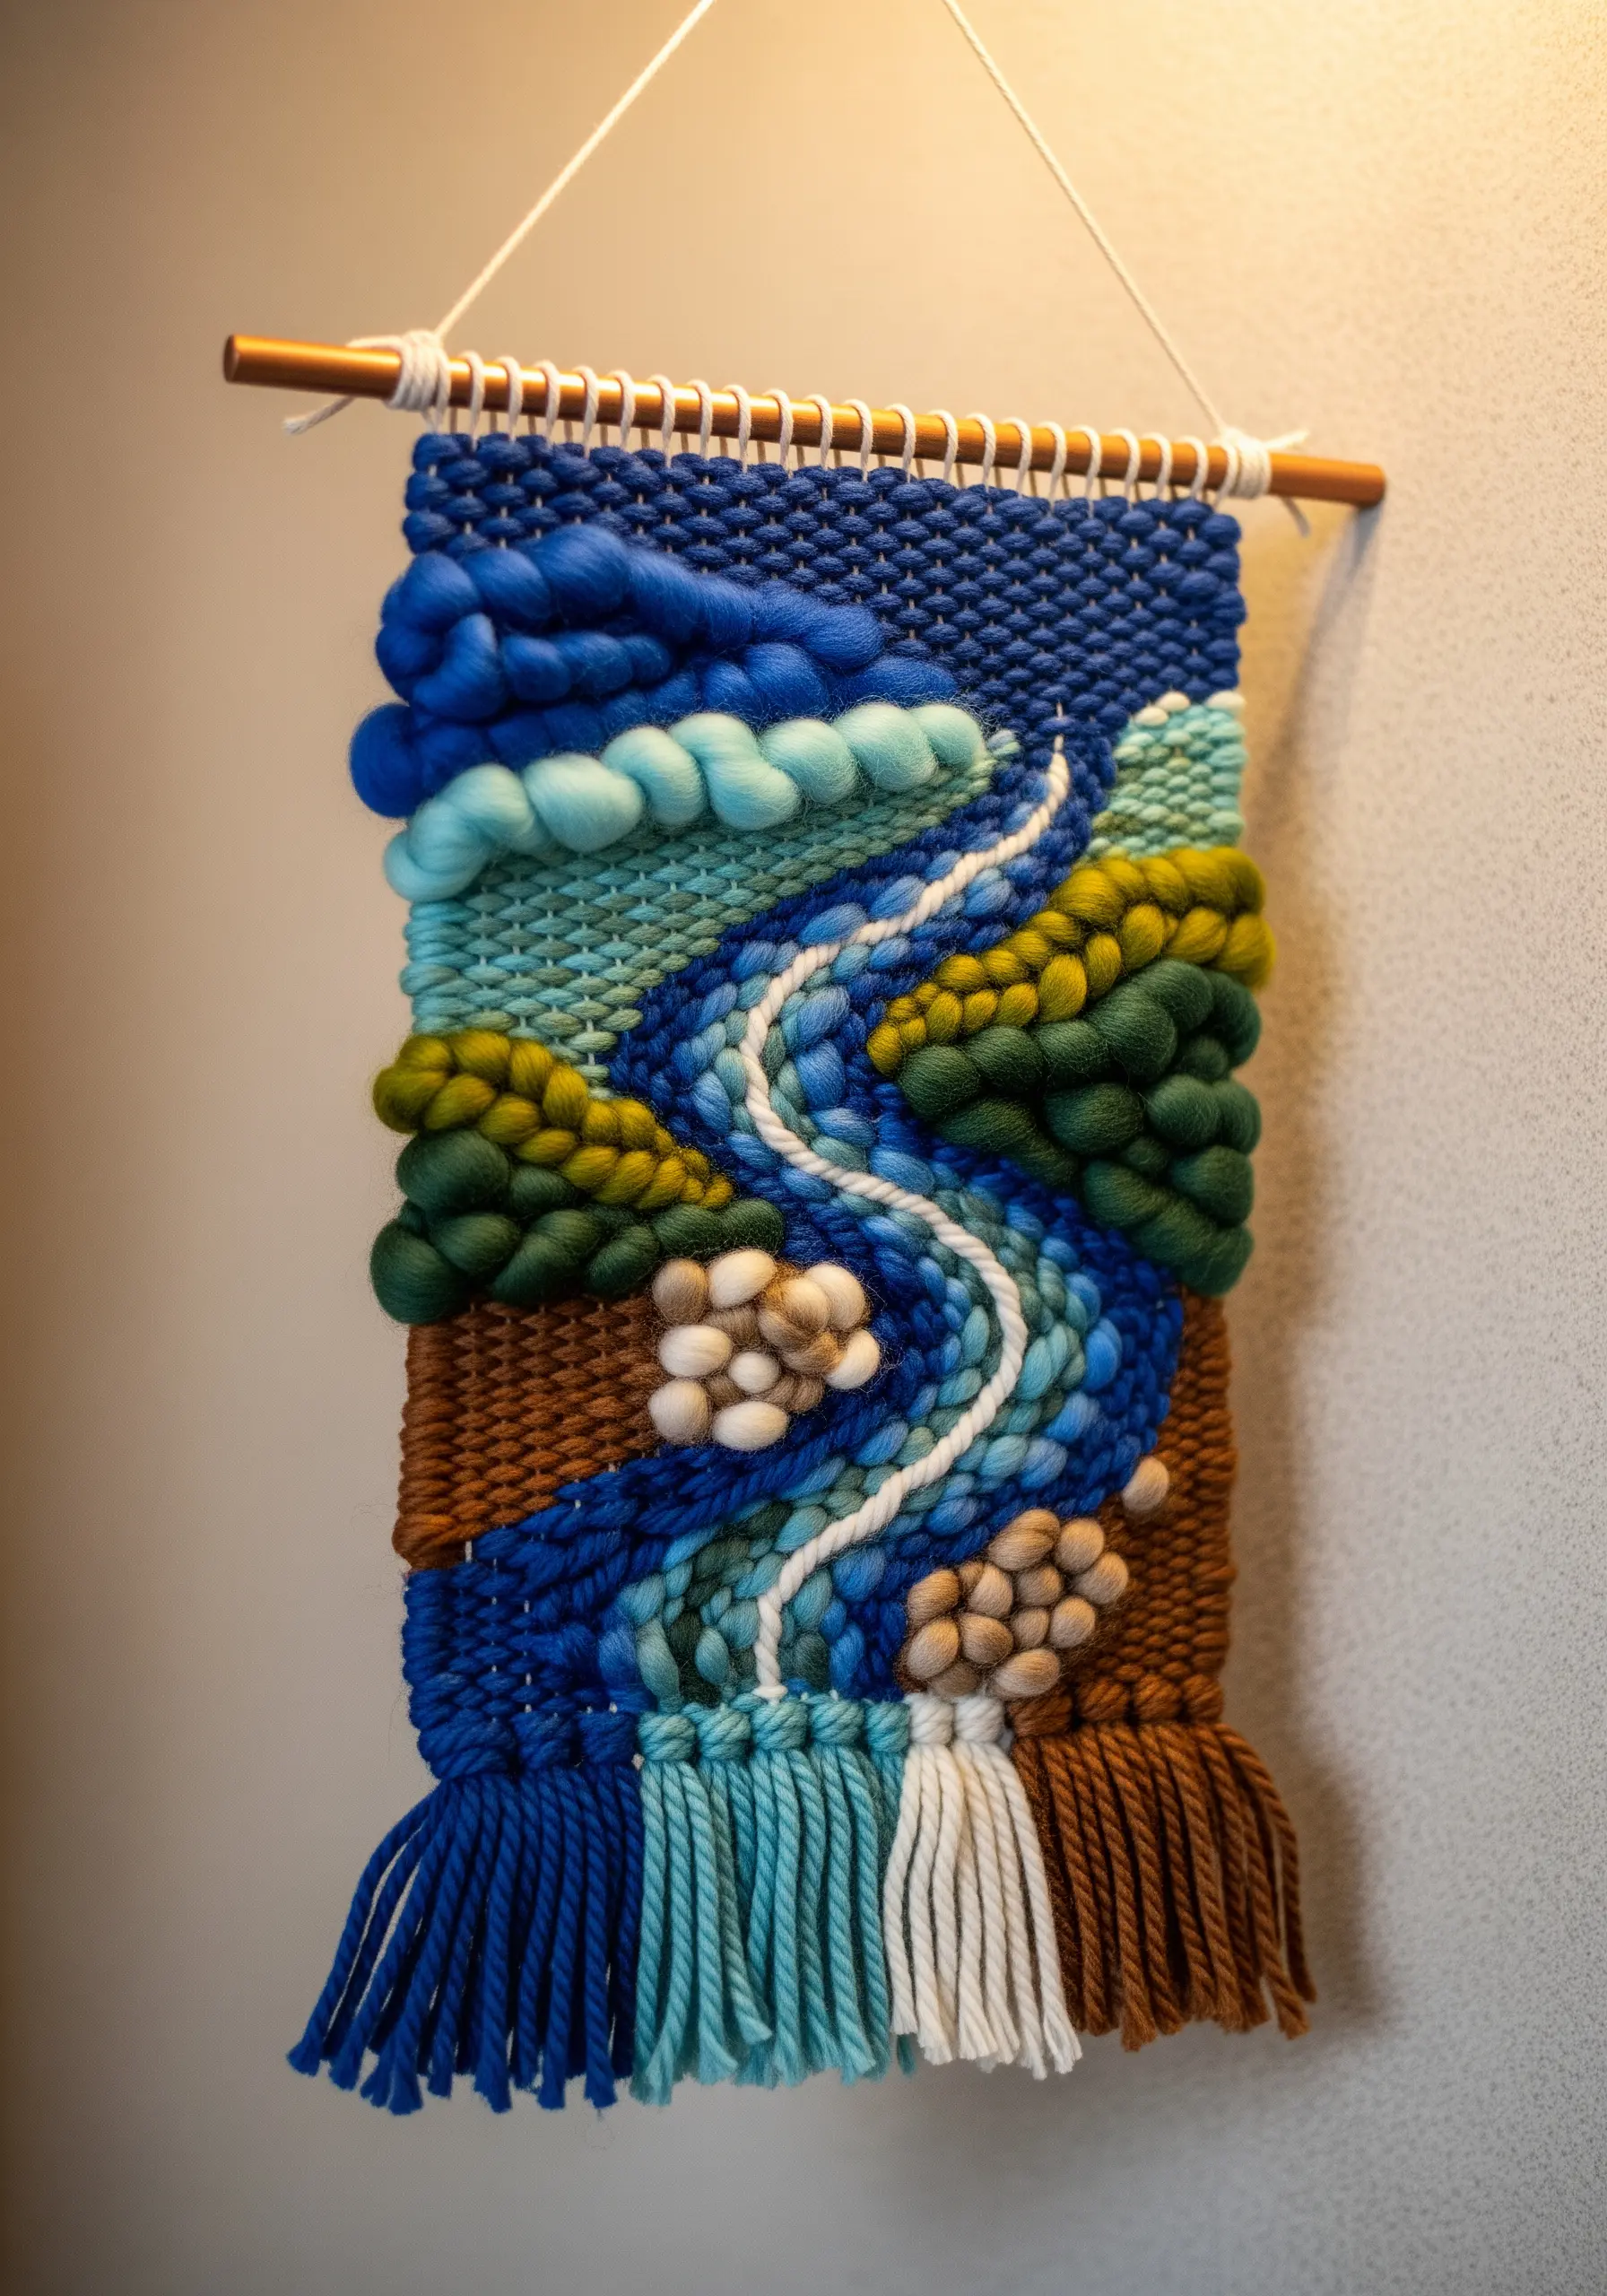
Weaving allows you to paint with fiber, blending colors and textures to create a cohesive scene.
Map out your design before you begin warping the loom.
Use different weaving techniques to represent natural elements: a classic tabby weave for the river, soumak stitch for the texture of trees, and thick, bubbly roving for clouds.
Allowing the warp threads to show through in some areas can create the impression of waterfalls or rain, adding another layer of detail to your yarn wall art creations inspired by nature.
15. Layer a Sandscape in a Glass Bottle
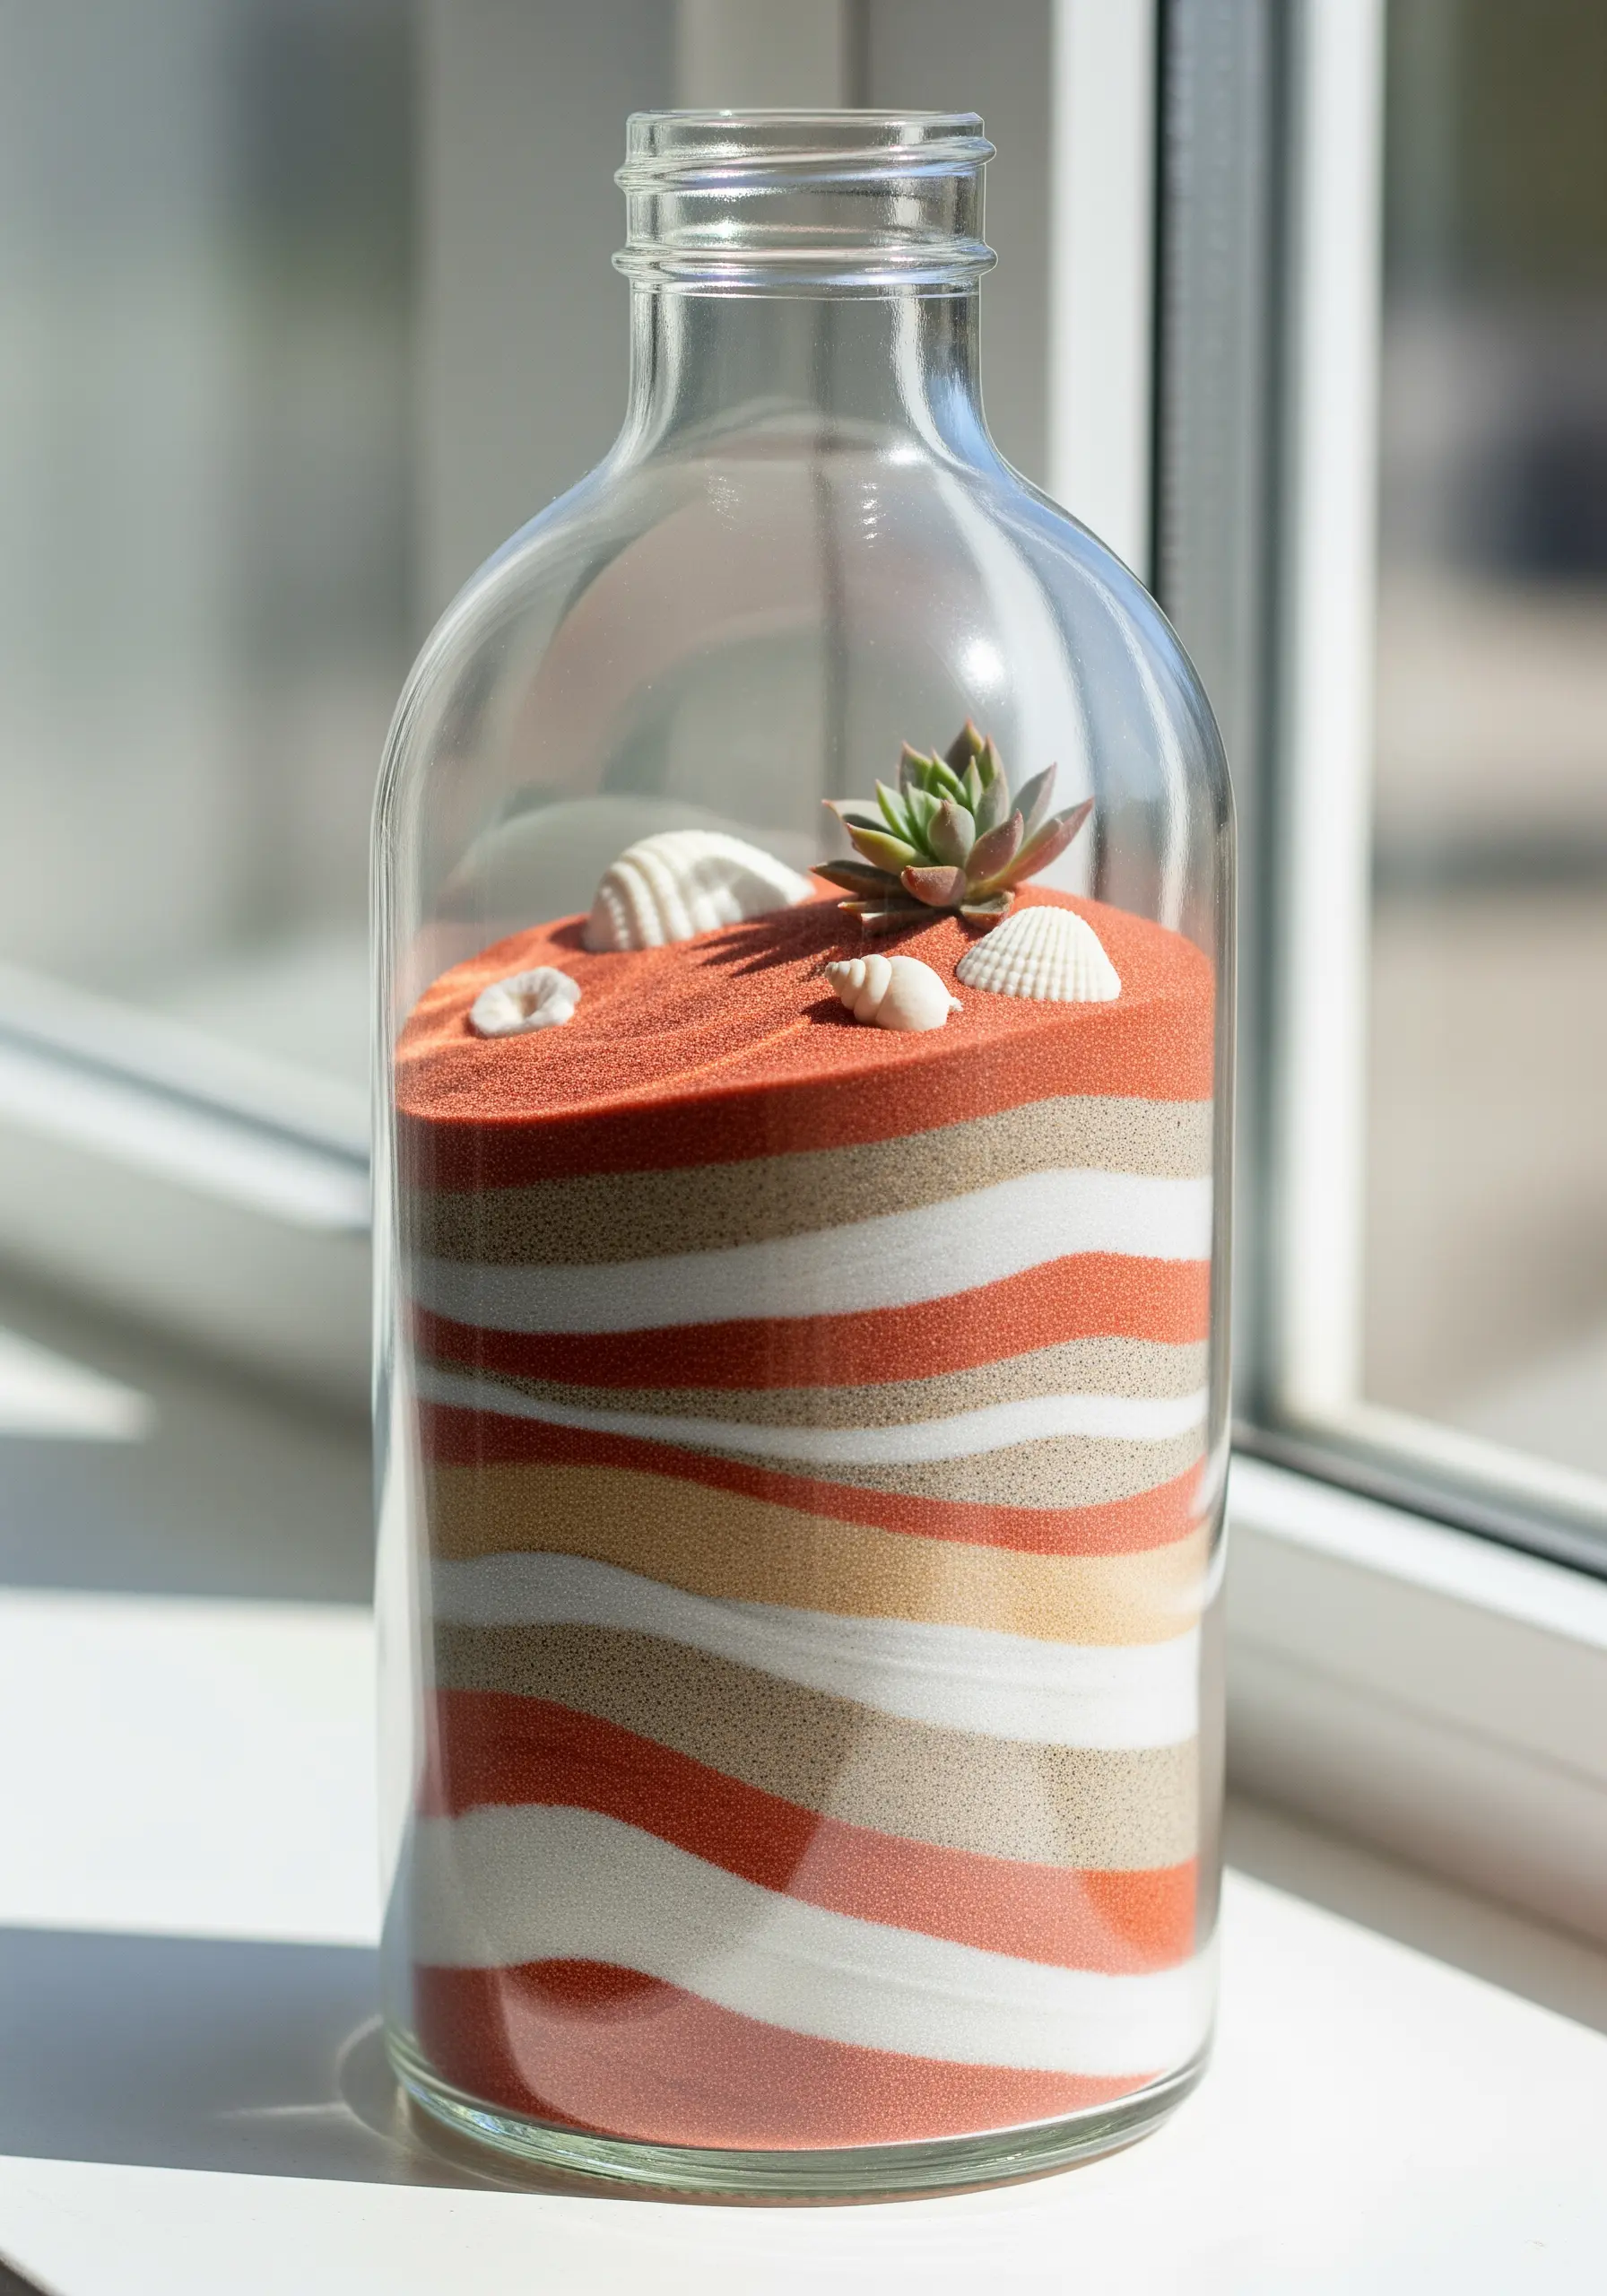
This simple project is a beautiful study in color and layering.
Use a funnel to carefully pour thin layers of colored sand into a clear glass bottle. Alternate between warm tones like terracotta and ochre with neutral creams and greys.
Gently tilt the bottle as you pour to create soft, undulating waves rather than perfectly straight lines.
Finish by placing a few tiny shells or a small air plant on the surface, creating a miniature desert scene preserved under glass.
16. Illustrate with Thread Using String Art
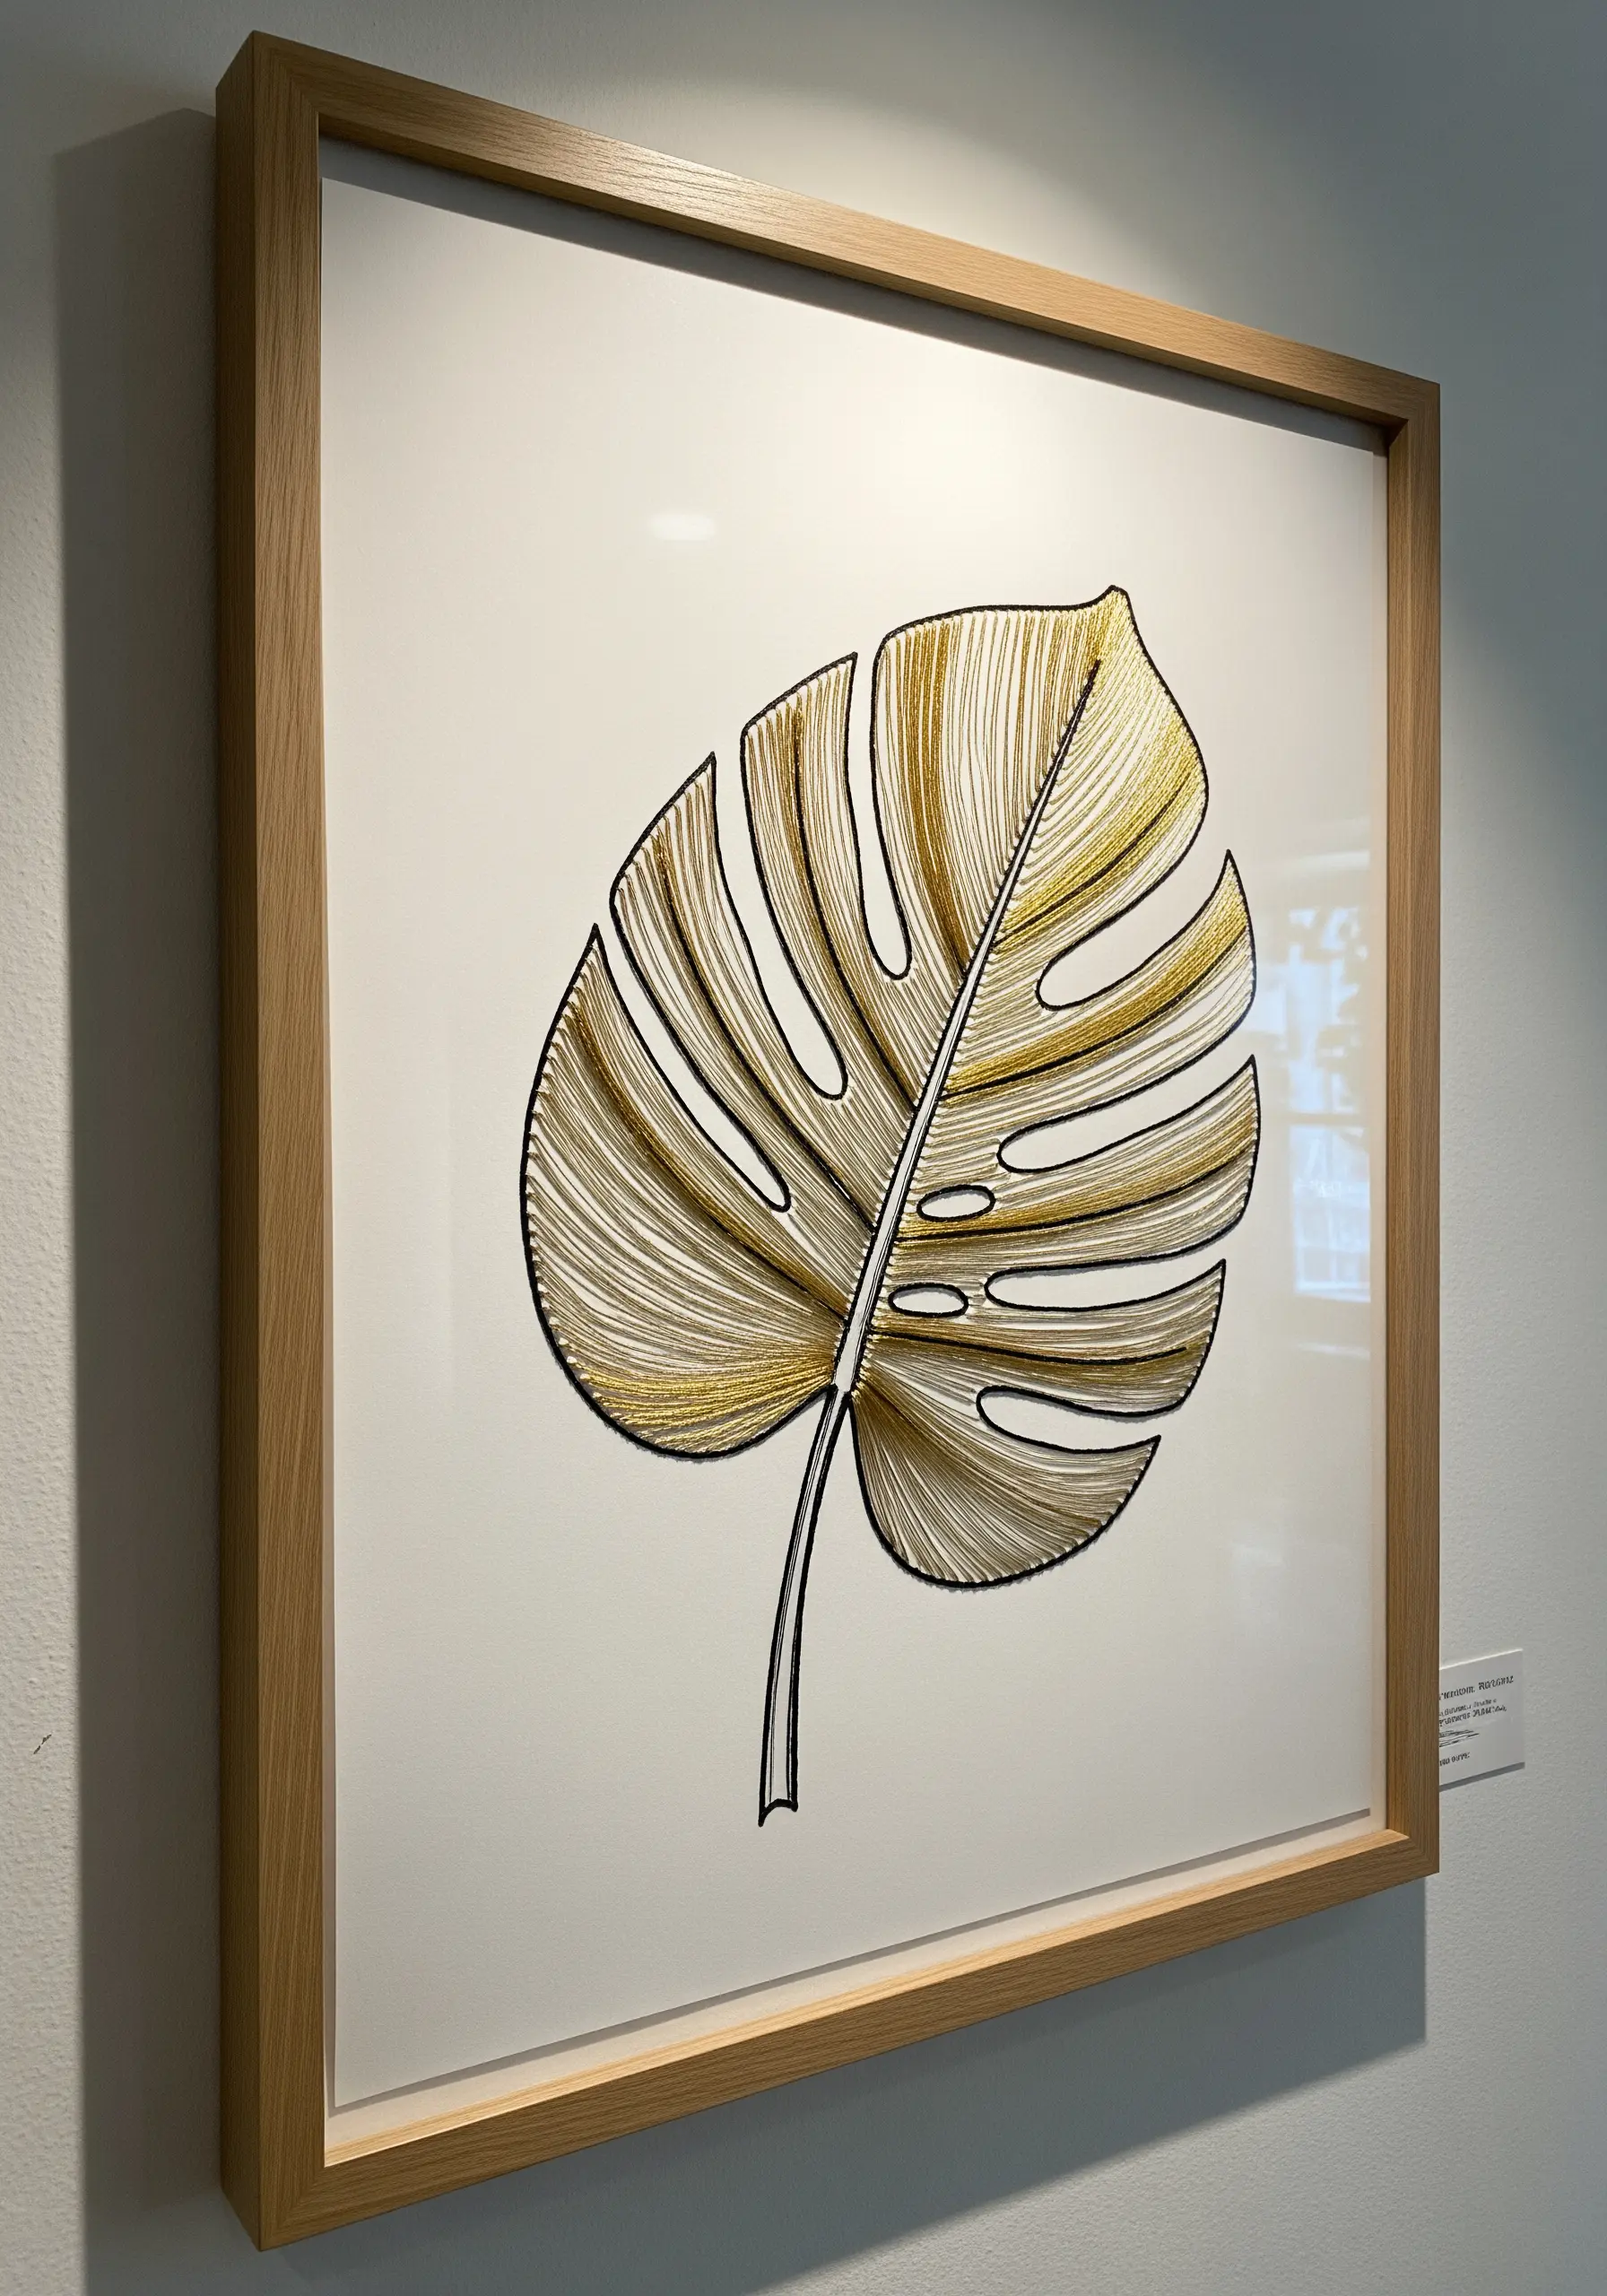
String art translates a simple line drawing into a complex, geometric artwork.
Start by transferring a monstera leaf outline onto a piece of wood or sturdy foam core.
Hammer small nails evenly along the outline. Then, begin wrapping your thread. Use a dark thread for the outline first to define the shape.
Fill the interior by wrapping metallic gold thread back and forth between the nails in long, straight lines. The overlapping threads create a sense of depth and shimmer, much like long satin stitches in embroidery.
17. Dye Your Own Textiles with Natural Pigments

Working with naturally dyed textiles adds a layer of depth and soul to any project.
You can create a surprising range of colors from kitchen scraps: avocado pits and skins produce soft pinks, while onion skins yield golden yellows and oranges.
Simply simmer the botanicals in water to extract the color, then add your pre-mordanted fabric or thread (mordanting helps the color adhere).
These eco-friendly embroidery tips not only connect you to an ancient craft but also result in a harmonious, earthy color palette that is impossible to replicate with synthetic dyes.
18. Craft a Geode-Inspired Air Plant Holder
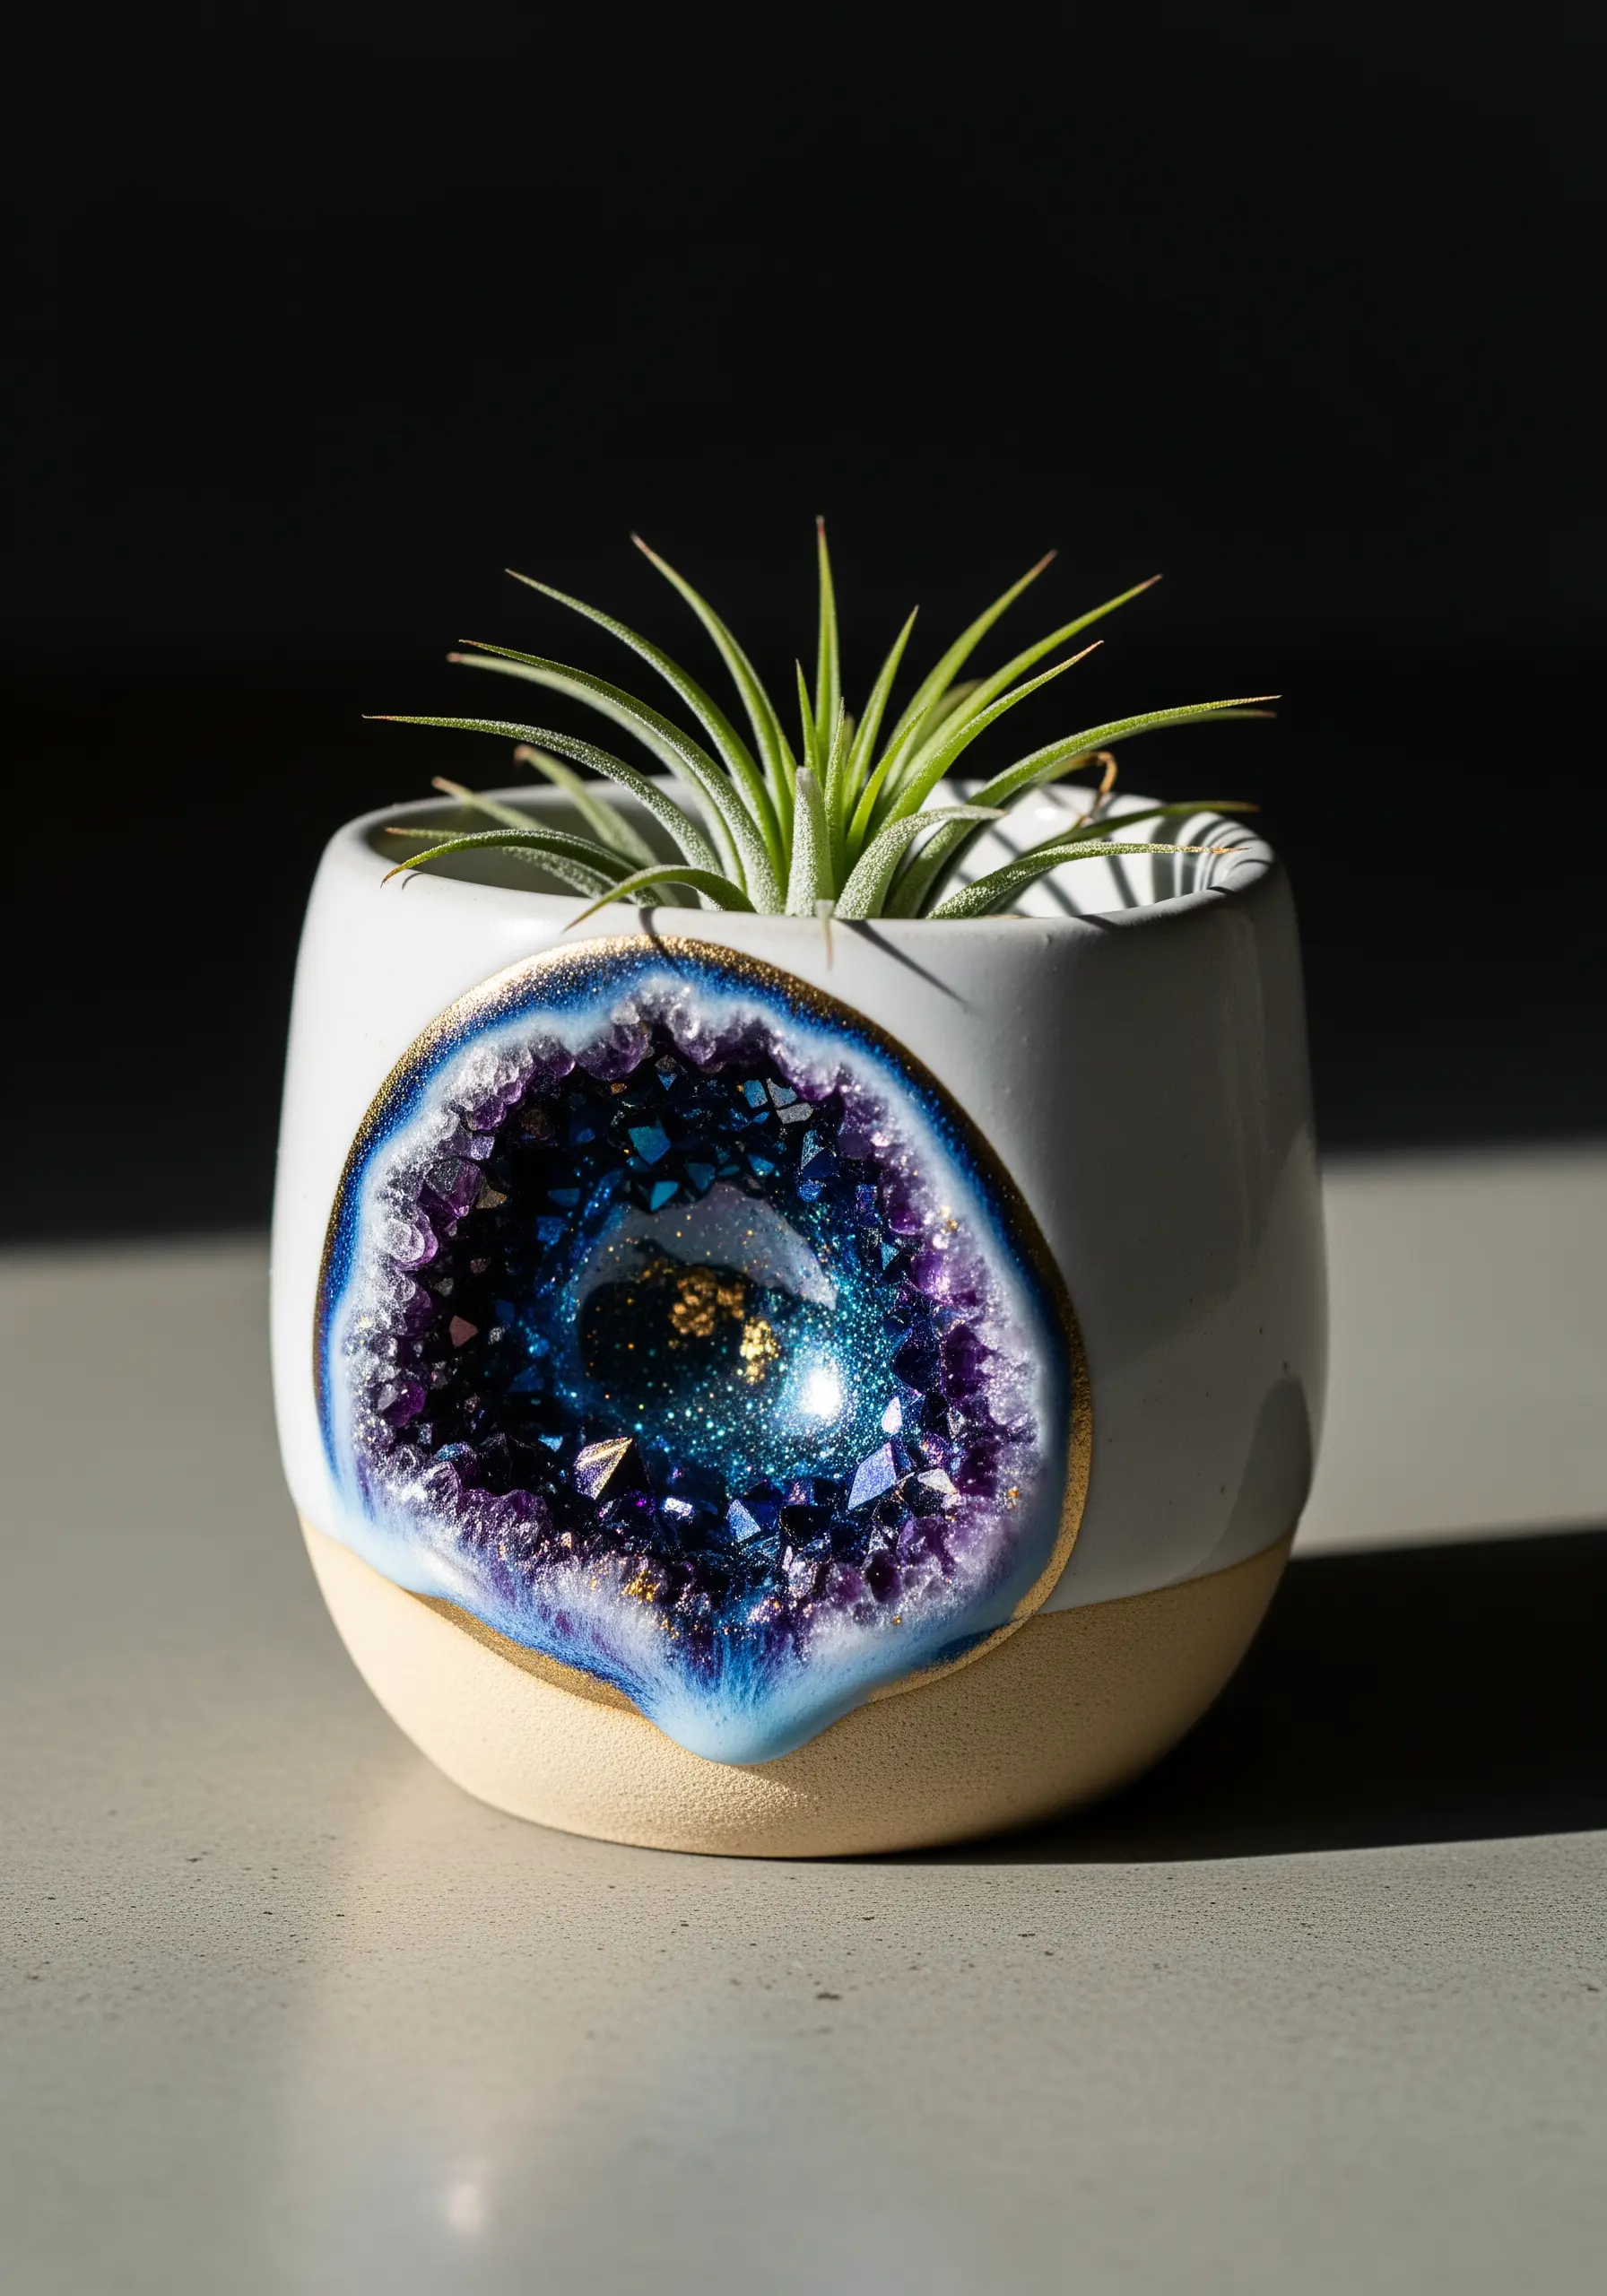
Combine ceramics with crystalline textures to create a unique planter.
This effect is achieved by adhering crushed glass and crystals to the surface of a ceramic pot with a strong adhesive or resin.
Use a variety of sizes and colors—like deep purple amethyst and clear quartz—to mimic the organic growth of a real geode.
Painting a thin gold line around the edge of the geode adds a polished, finished touch. It’s a perfect home for an air plant, which requires no soil and completes the minimalist, natural aesthetic.


