

When you pick up a needle and thread, you’re holding more than just craft supplies—you’re holding the potential to create a quiet, lasting piece of art for your home. It’s easy to feel stuck in a loop of simple patterns, but I want to help you see beyond the lines and start thinking about texture, depth, and light.
The difference between a nice project and a stunning piece of art often lies in one small adjustment: a change in stitch direction, the choice to use a single strand of thread instead of two, or the courage to mix in an unexpected material like a bead or a ribbon.
In the pieces that follow, look closely at how form is created. Notice how texture tells a story, and how even the simplest stitches, when executed with intention, can build a world within a frame. Let this be your guide to creating work that not only looks beautiful but feels resonant and truly your own.
1. Build Dimension with Layered Textures
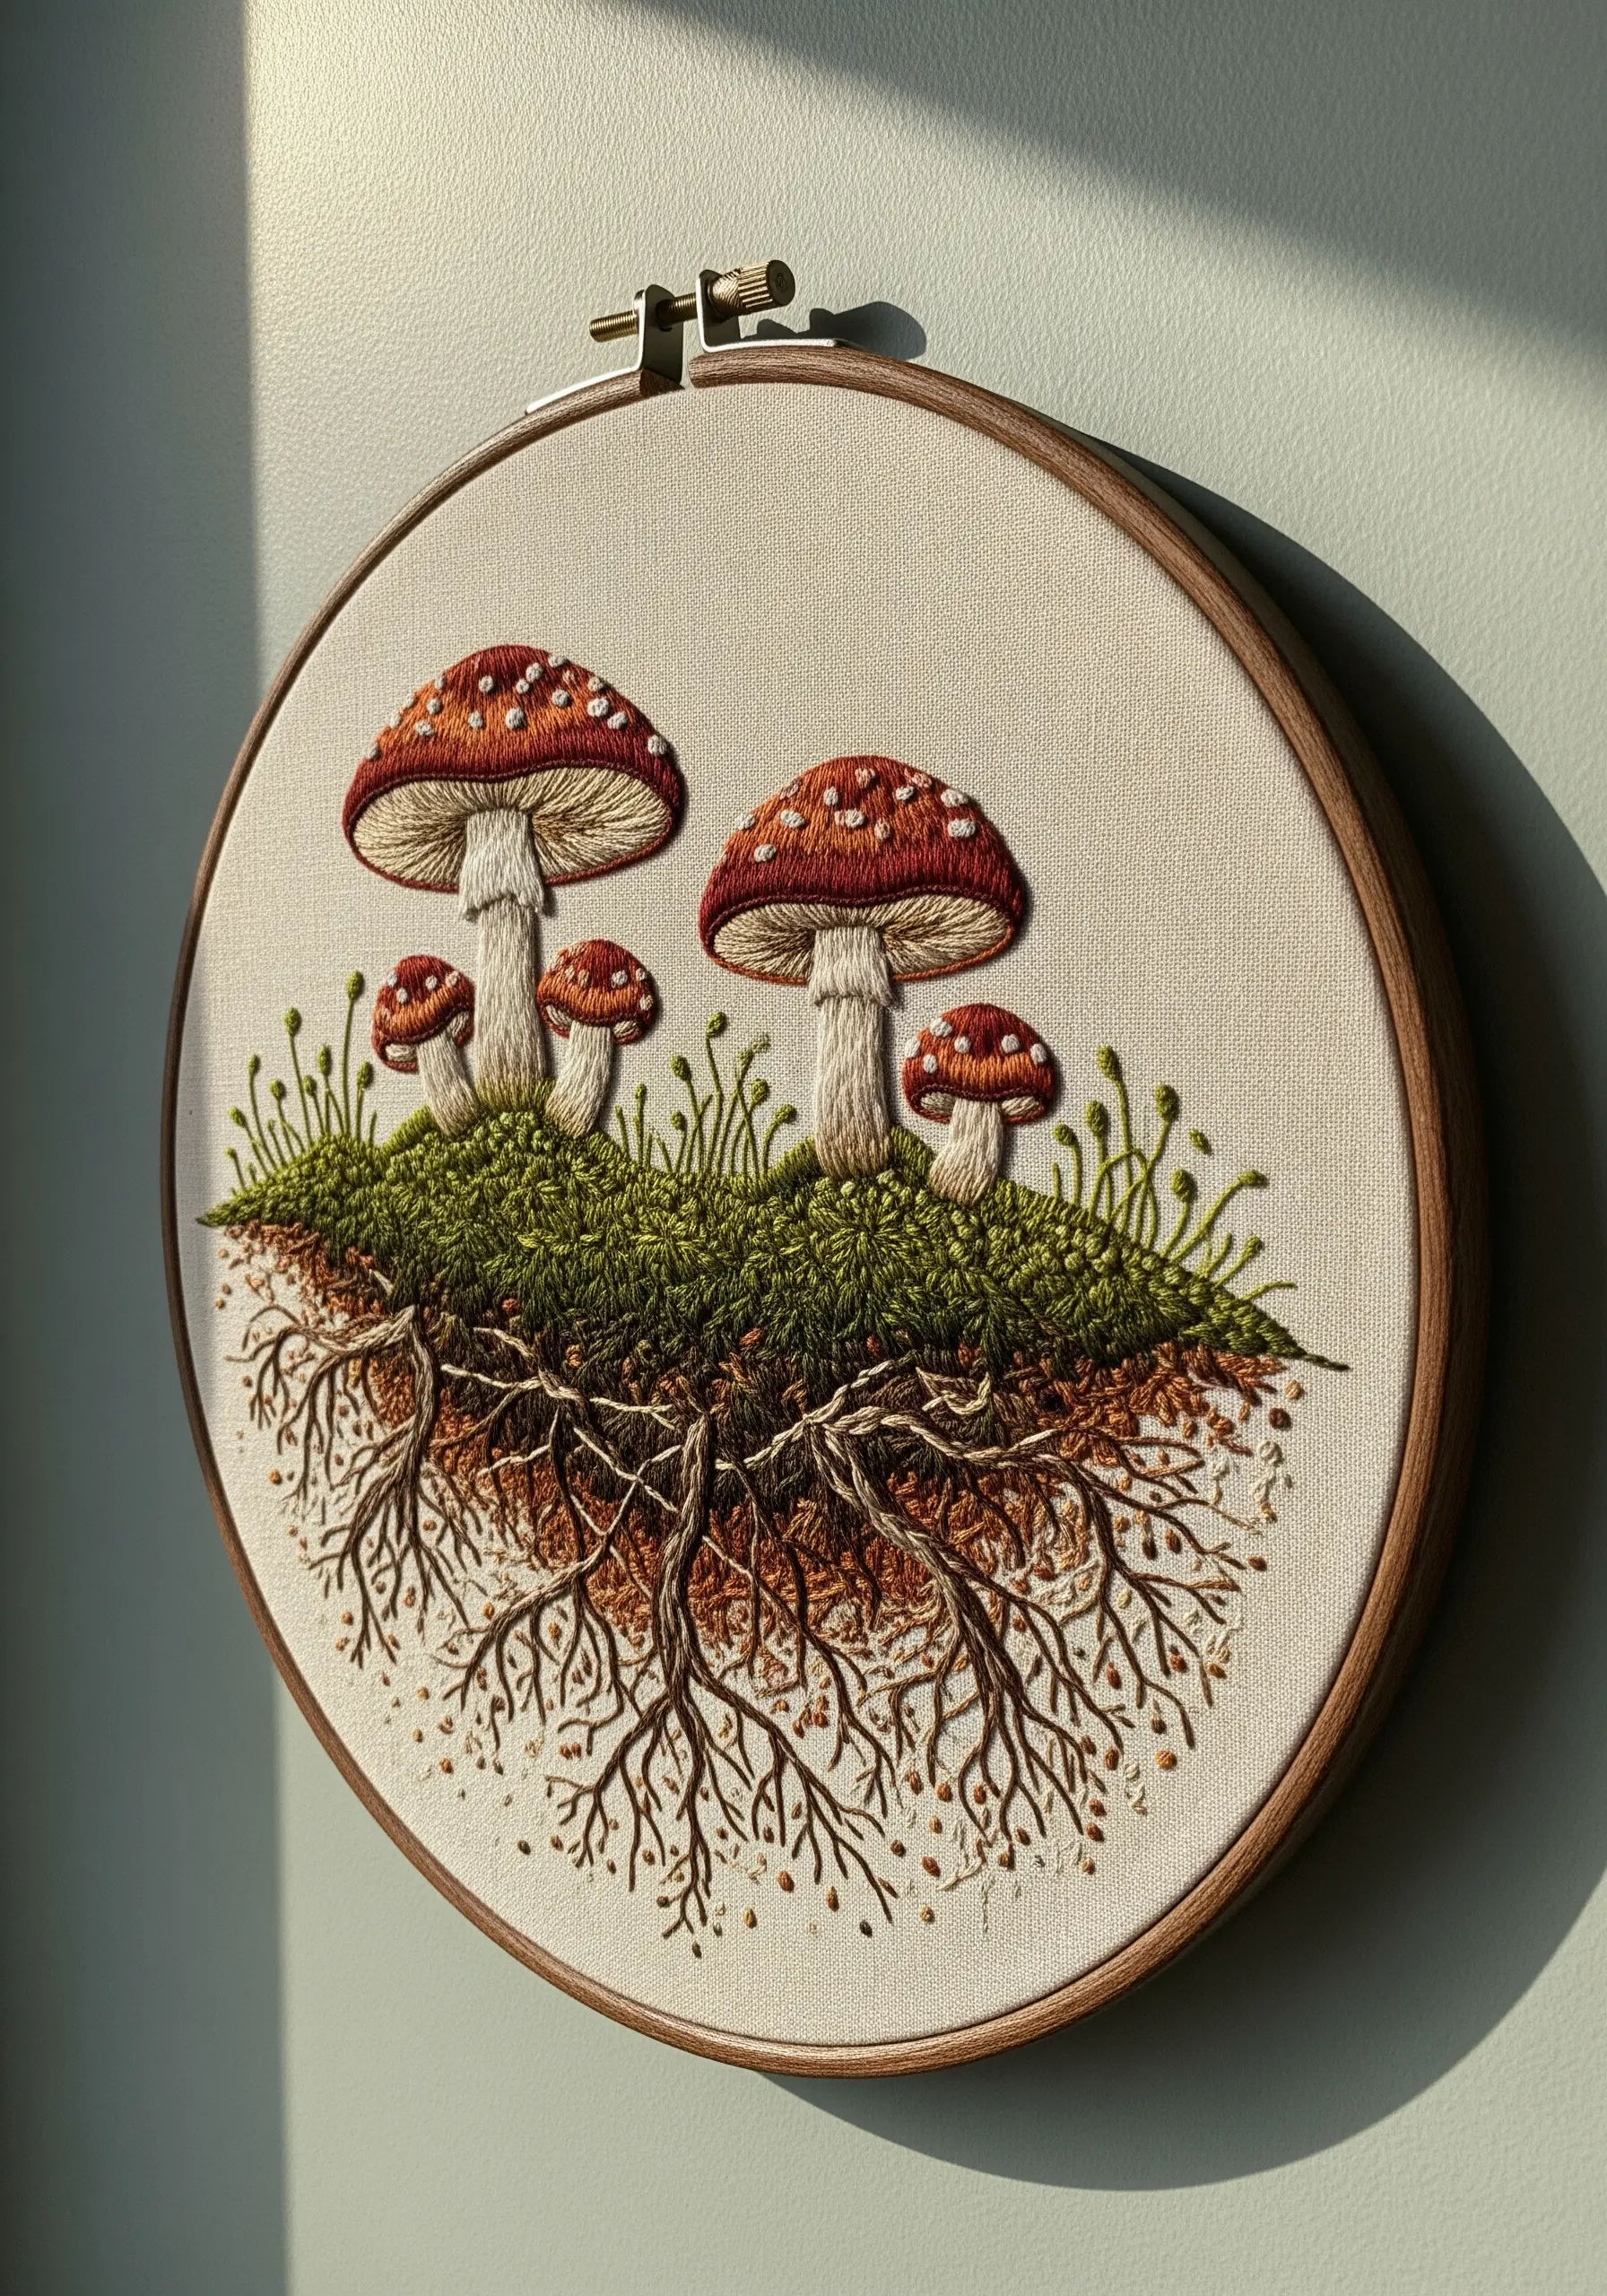
To give your botanical subjects a lifelike quality, think in layers—just like in nature.
Create a dense, mossy ground using clusters of French knots in varied shades of green and olive.
For the mushroom caps, use a long-and-short stitch to blend reds and browns seamlessly, creating a smooth, rounded surface.
Finally, suggest a hidden root system with delicate, wandering lines of couched single-strand thread, adding depth that extends beyond the visible world.
This combination of textures transforms a flat image into a tactile, three-dimensional scene.
2. Design a Large-Scale Abstract Triptych
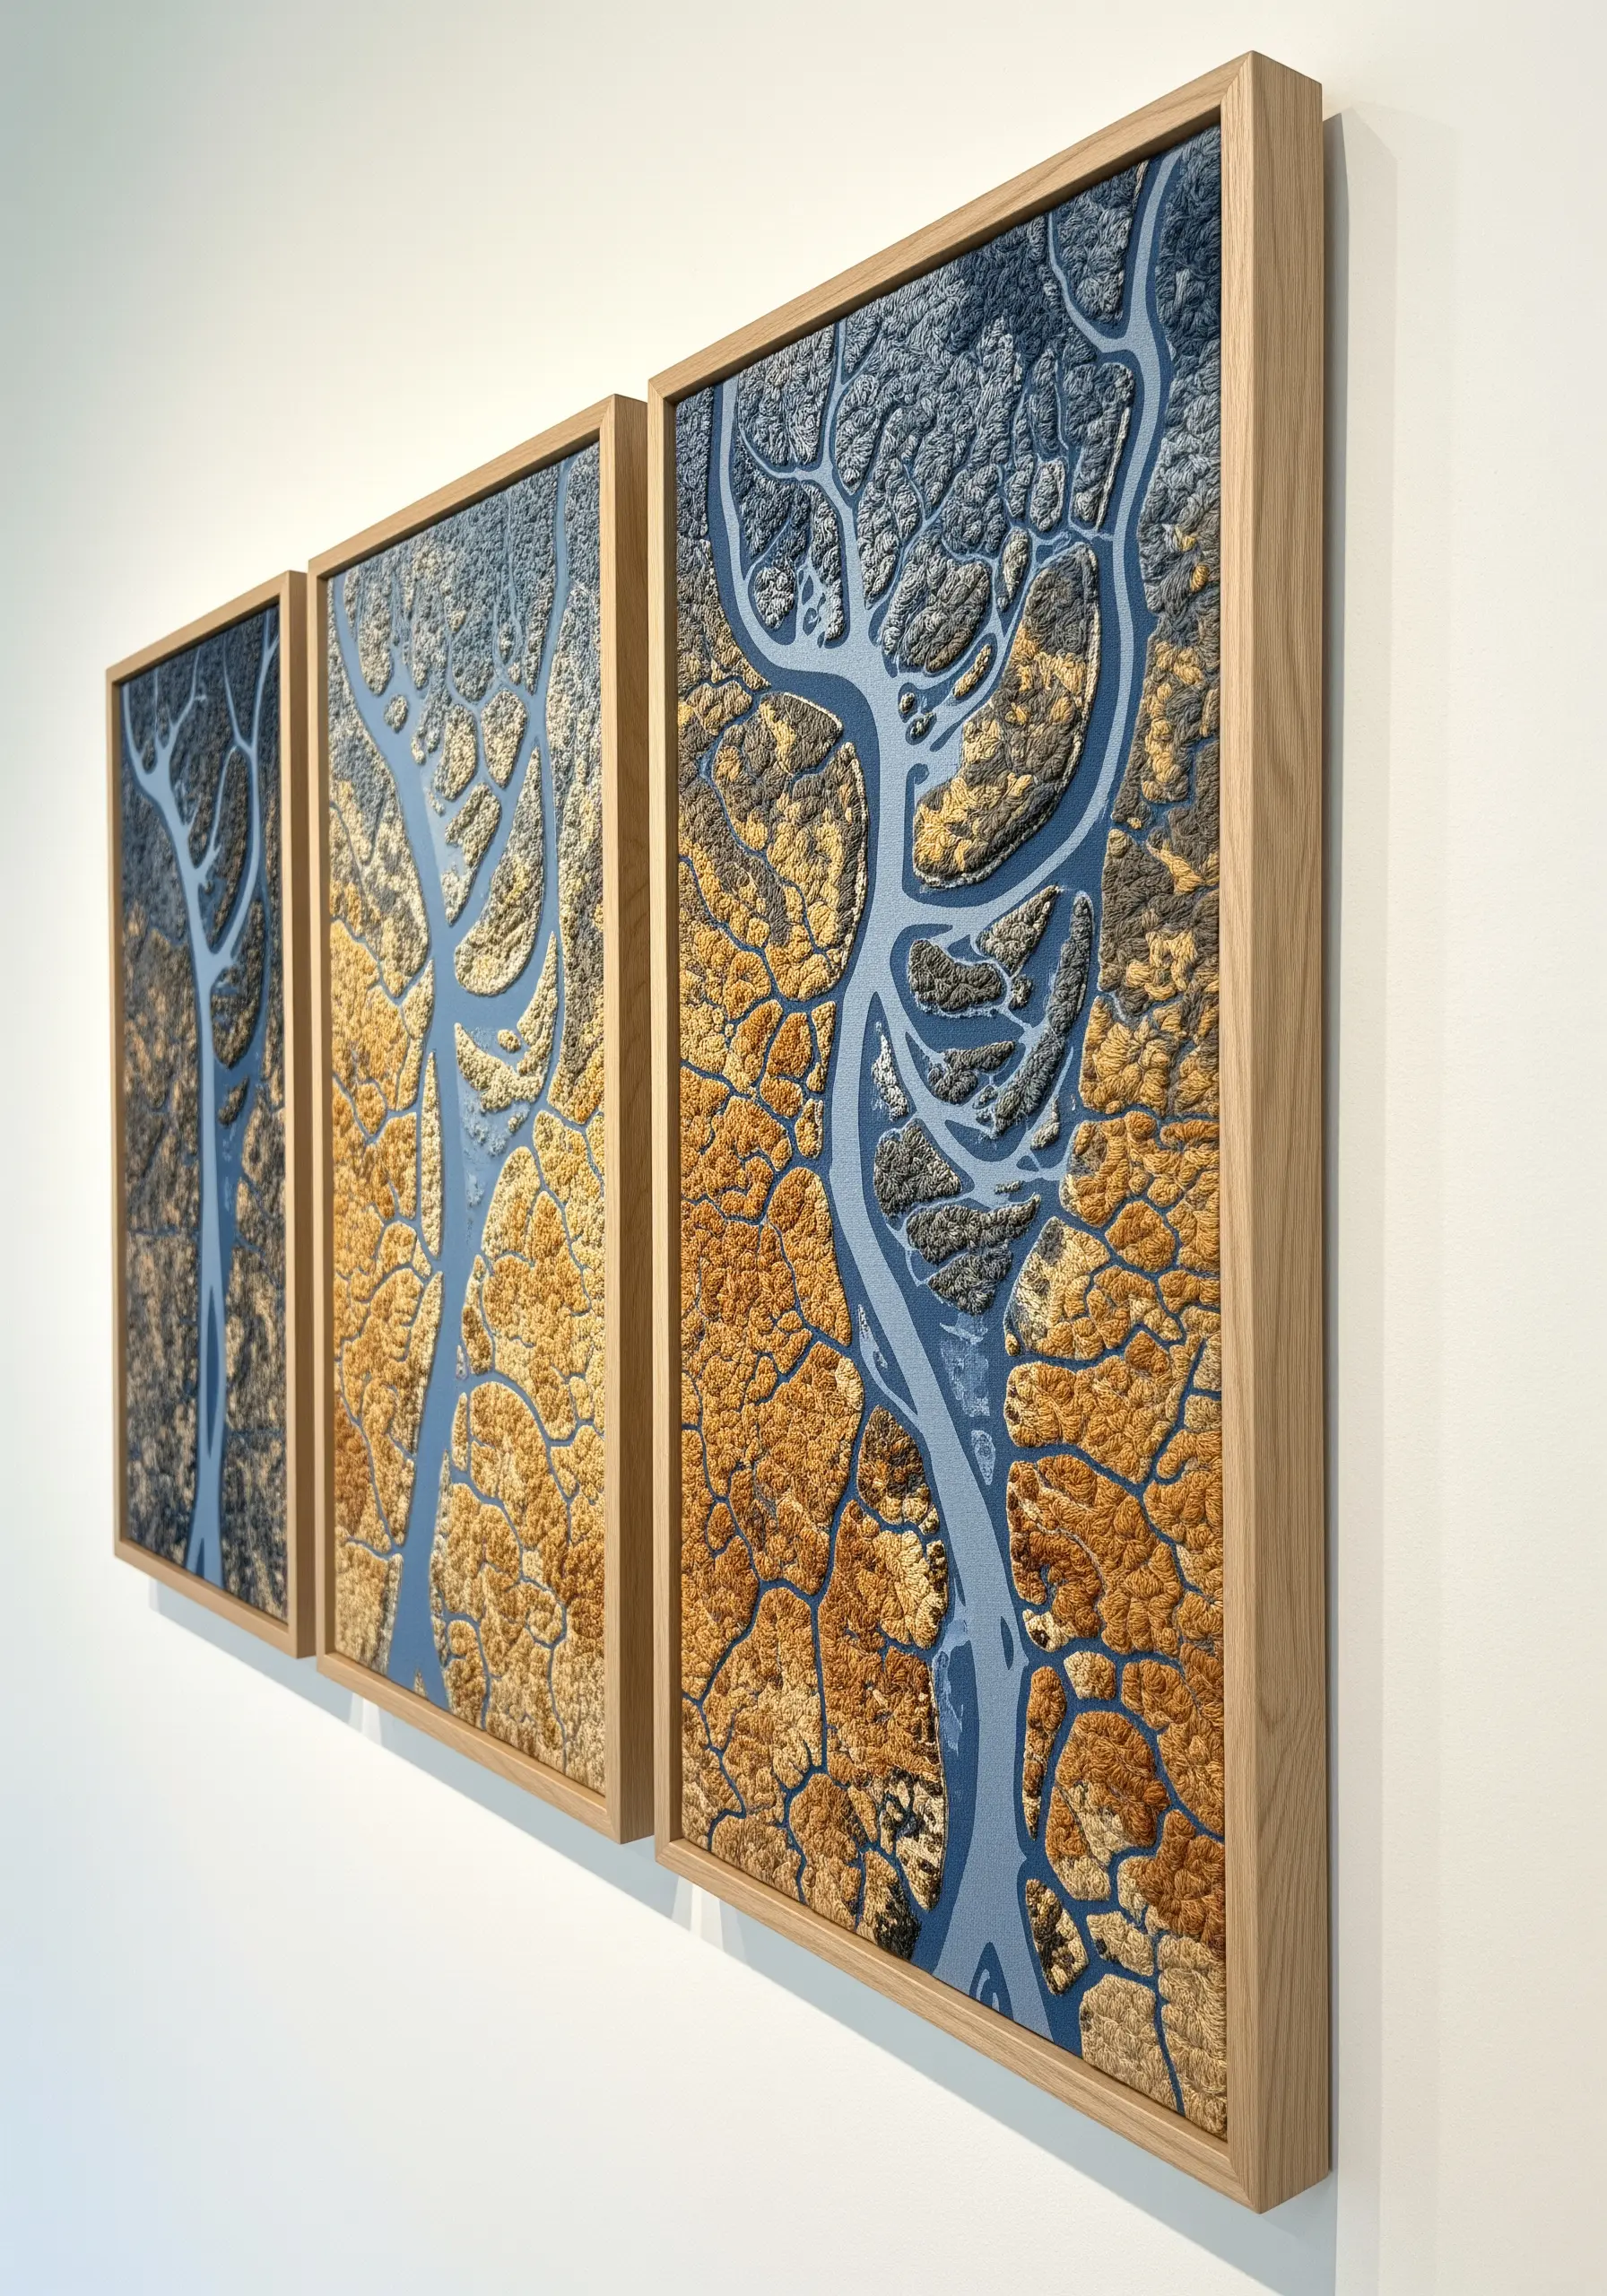
Transform a single concept into a commanding piece of wall art by dividing it into a triptych.
This approach makes a large, complex design more manageable to stitch and adds a contemporary, graphic quality to the finished work.
Use high-density French knots or colonial knots to create a rich, stippled texture that contrasts beautifully with the clean lines of the negative space.
Working in this way allows you to explore abstract texture play and create a cohesive statement piece for a large wall.
3. Create Drama with High-Contrast Celestial Scenes
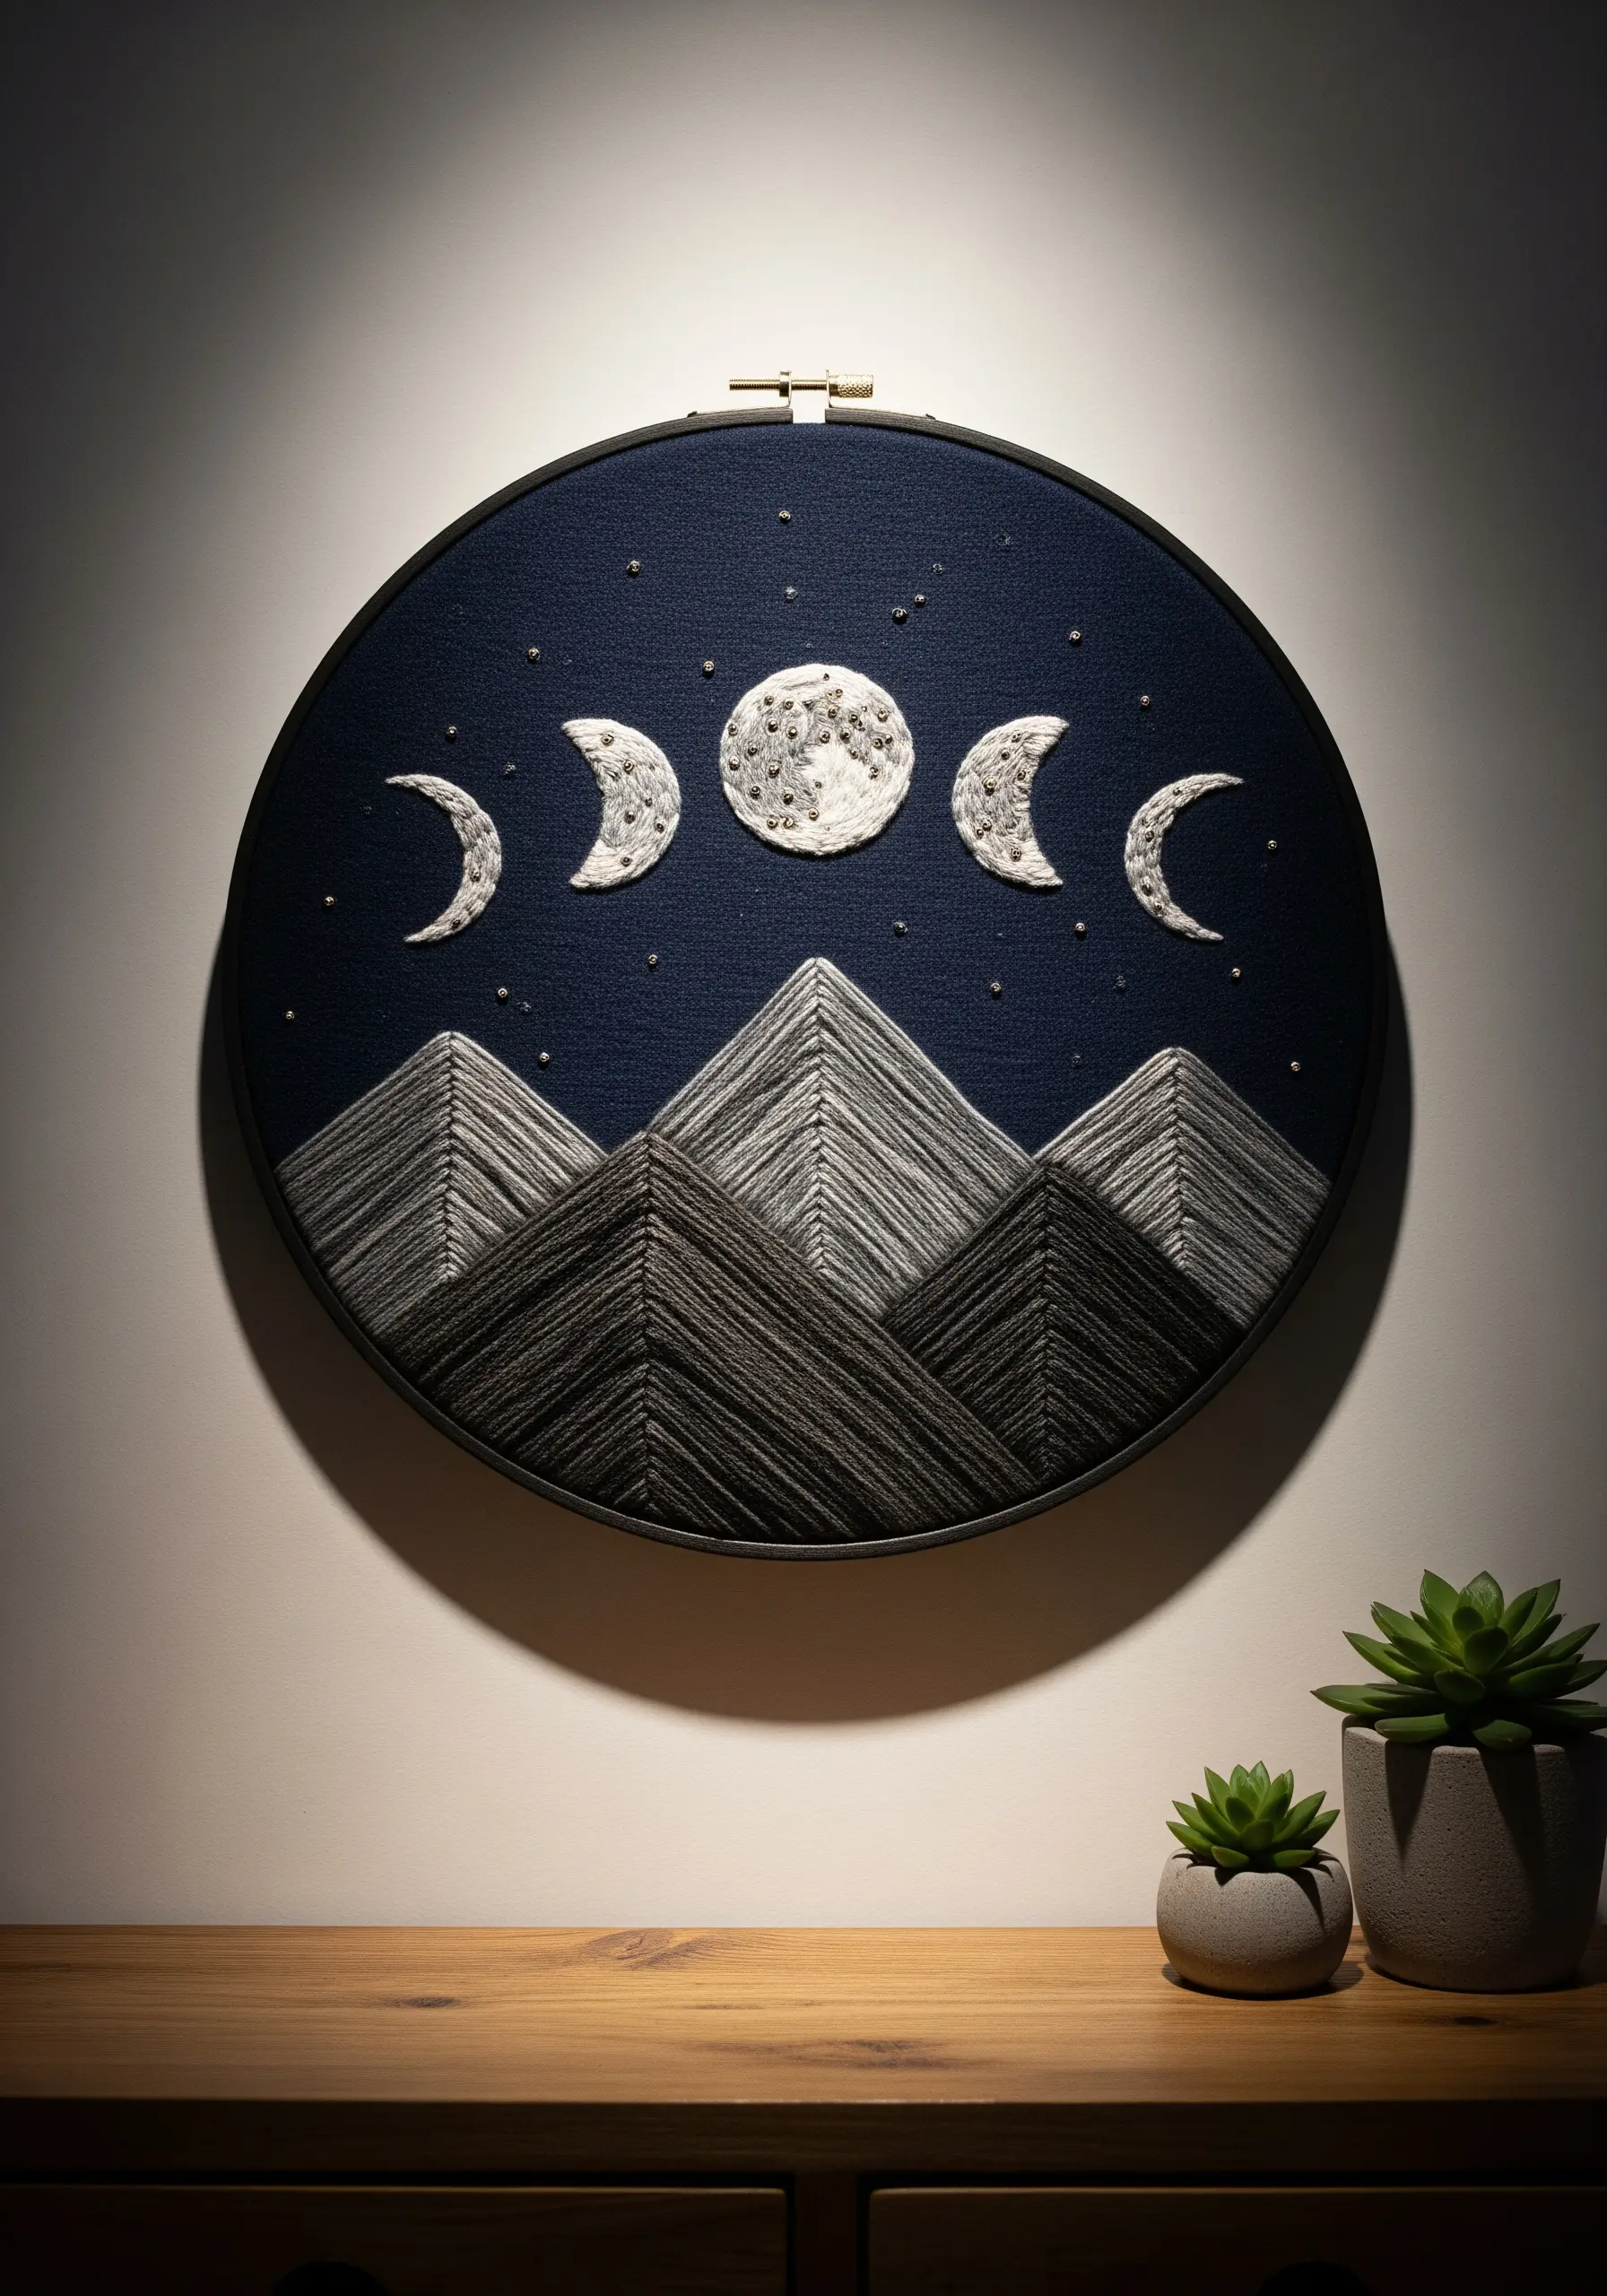
Let your stitches shine by working on a dark, solid background like navy blue or black cotton twill.
Use a bright white or metallic silver thread for sharp contrast, making every stitch count.
For the moon phases, fill the shapes with tiny seed stitches or even small, iridescent sequins to mimic the cratered, light-reflecting surface.
Construct the mountains with disciplined straight stitches layered in monochromatic shades, creating geometric depth that grounds the celestial elements above.
4. Stitch on Sheer Fabric for a Floating Effect
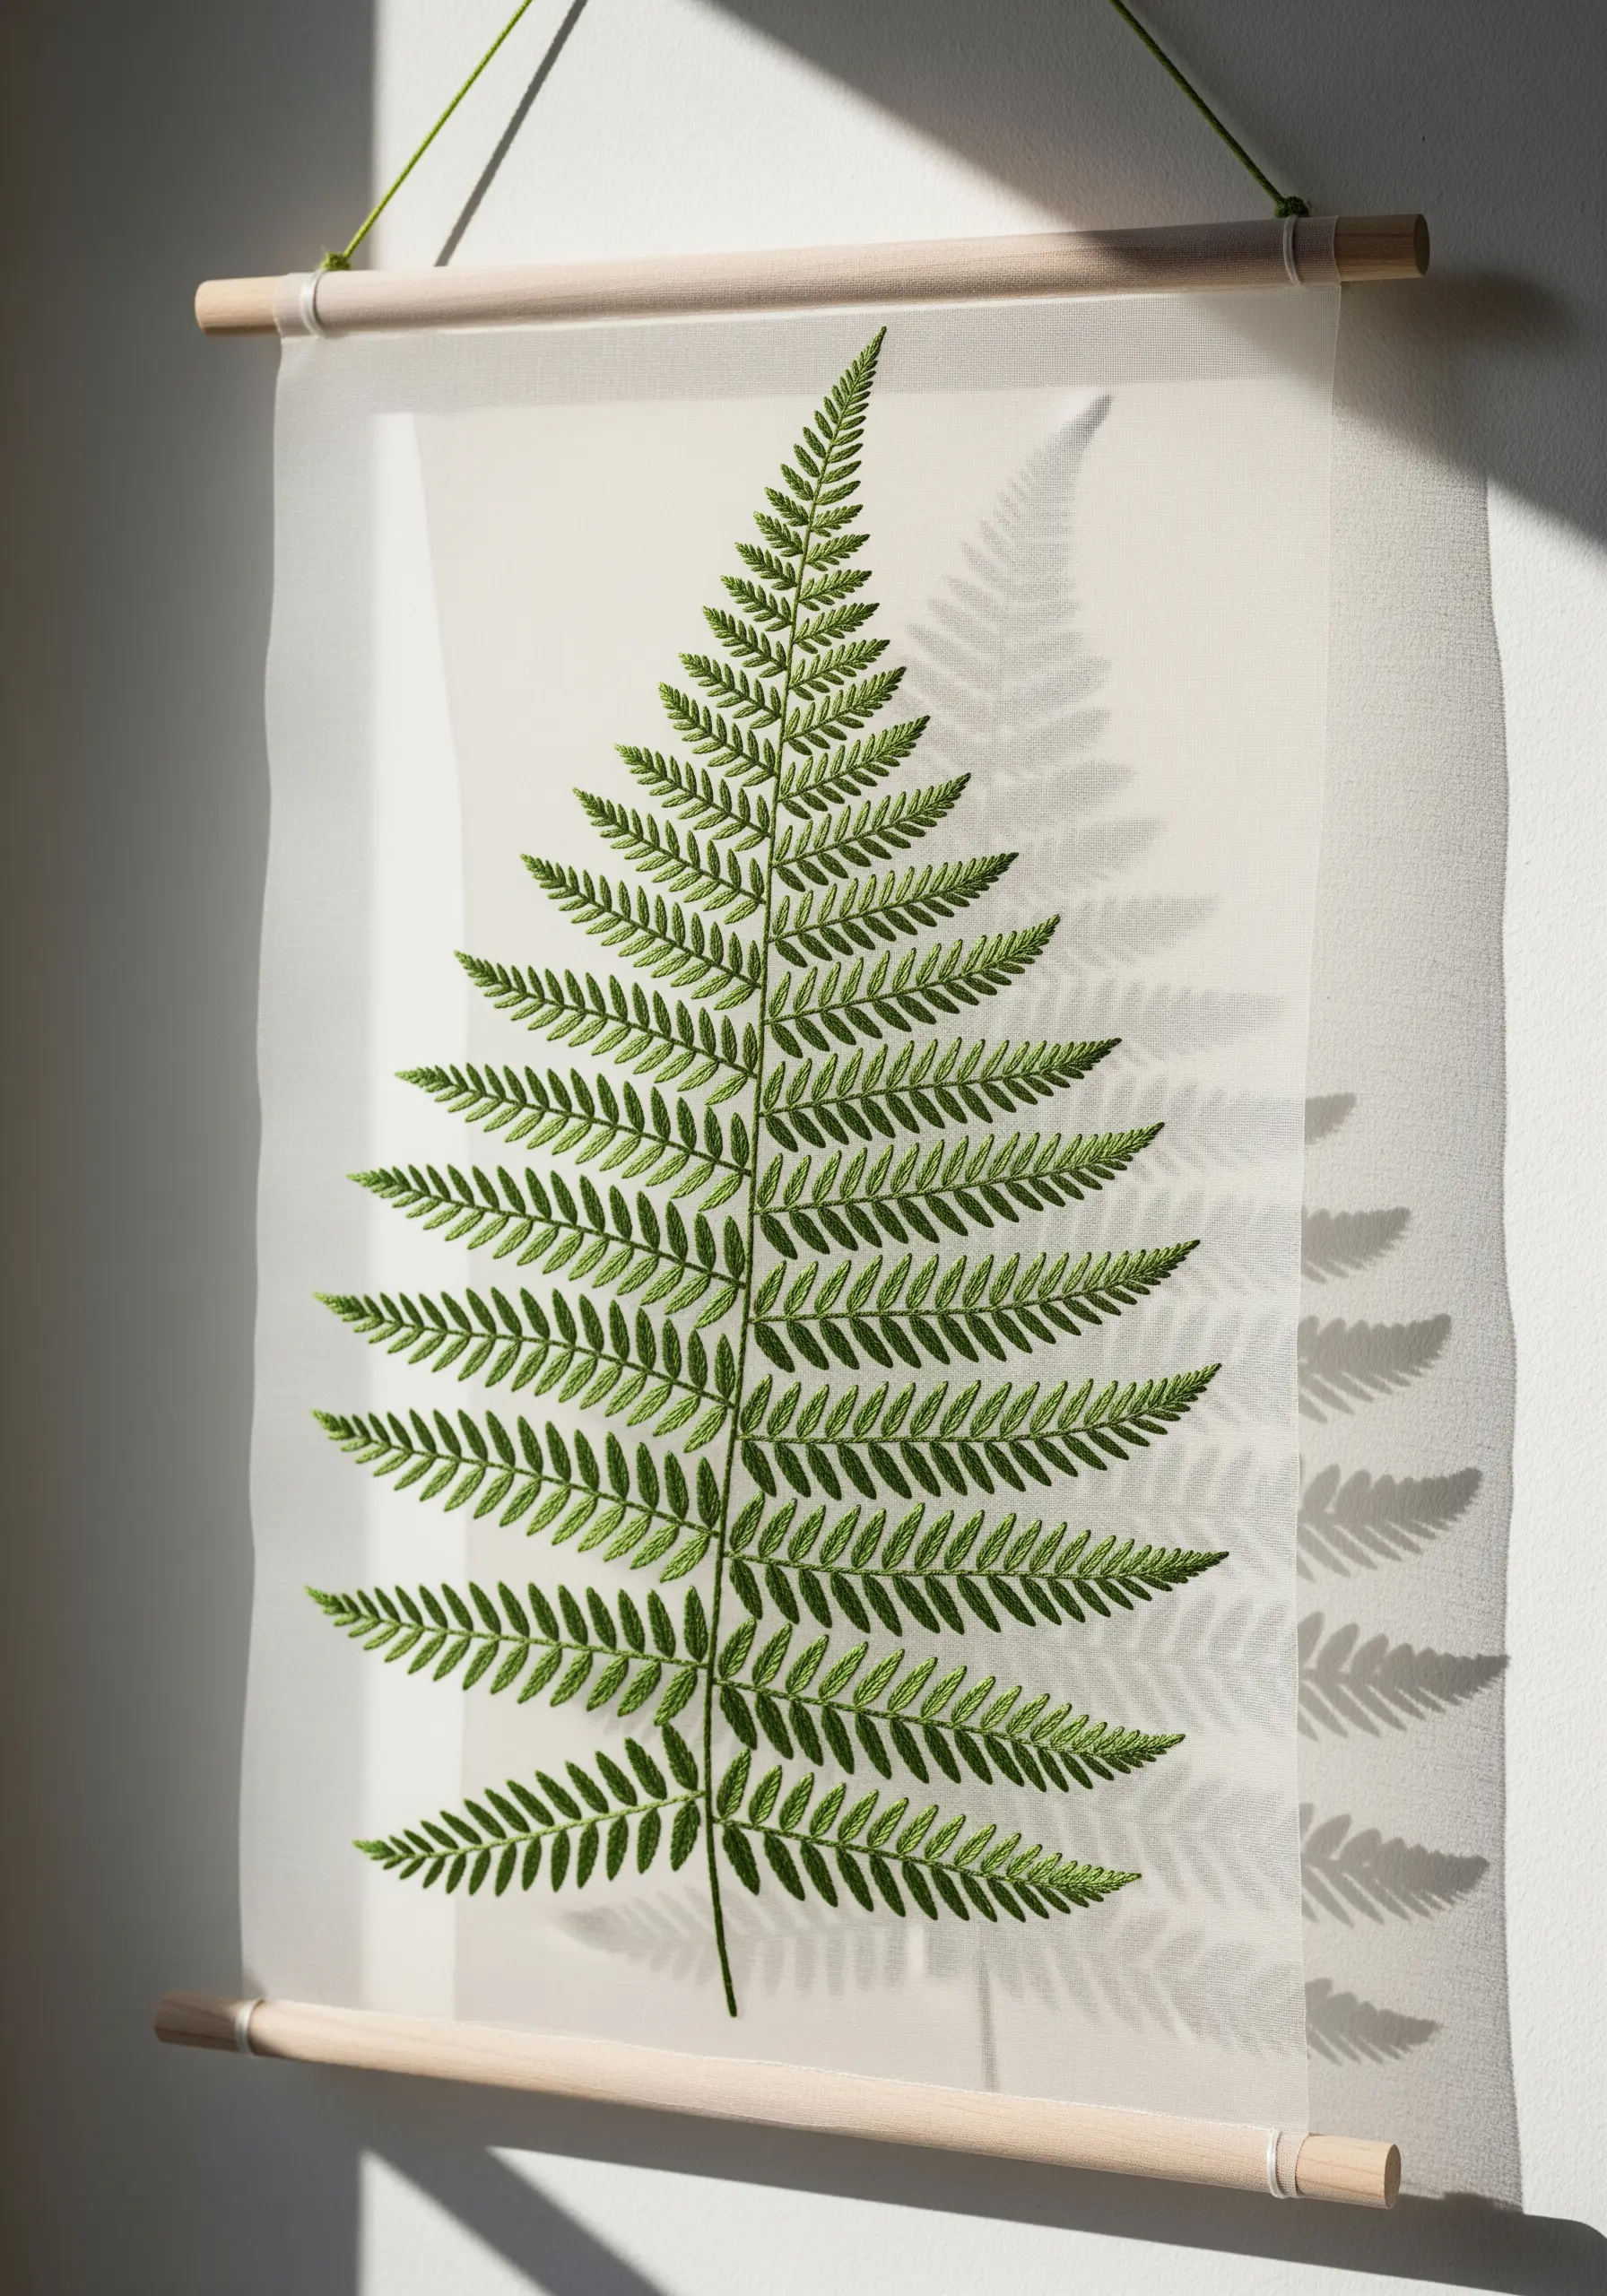
Create an ethereal, delicate piece by embroidering on a transparent fabric like organza or tulle.
To ensure your stitches don’t pull or pucker, use a stabilizer behind the fabric while you work, which can be carefully trimmed or washed away later.
A simple, clean stitch like a stem stitch or split stitch is all you need to define the fern’s intricate shape.
This technique allows light to pass through, creating beautiful shadows and making the motif appear to float in mid-air—a stunning example of using negative space to achieve luxury minimal art.
5. Weave Chunky Fibers for Sculptural Landscapes
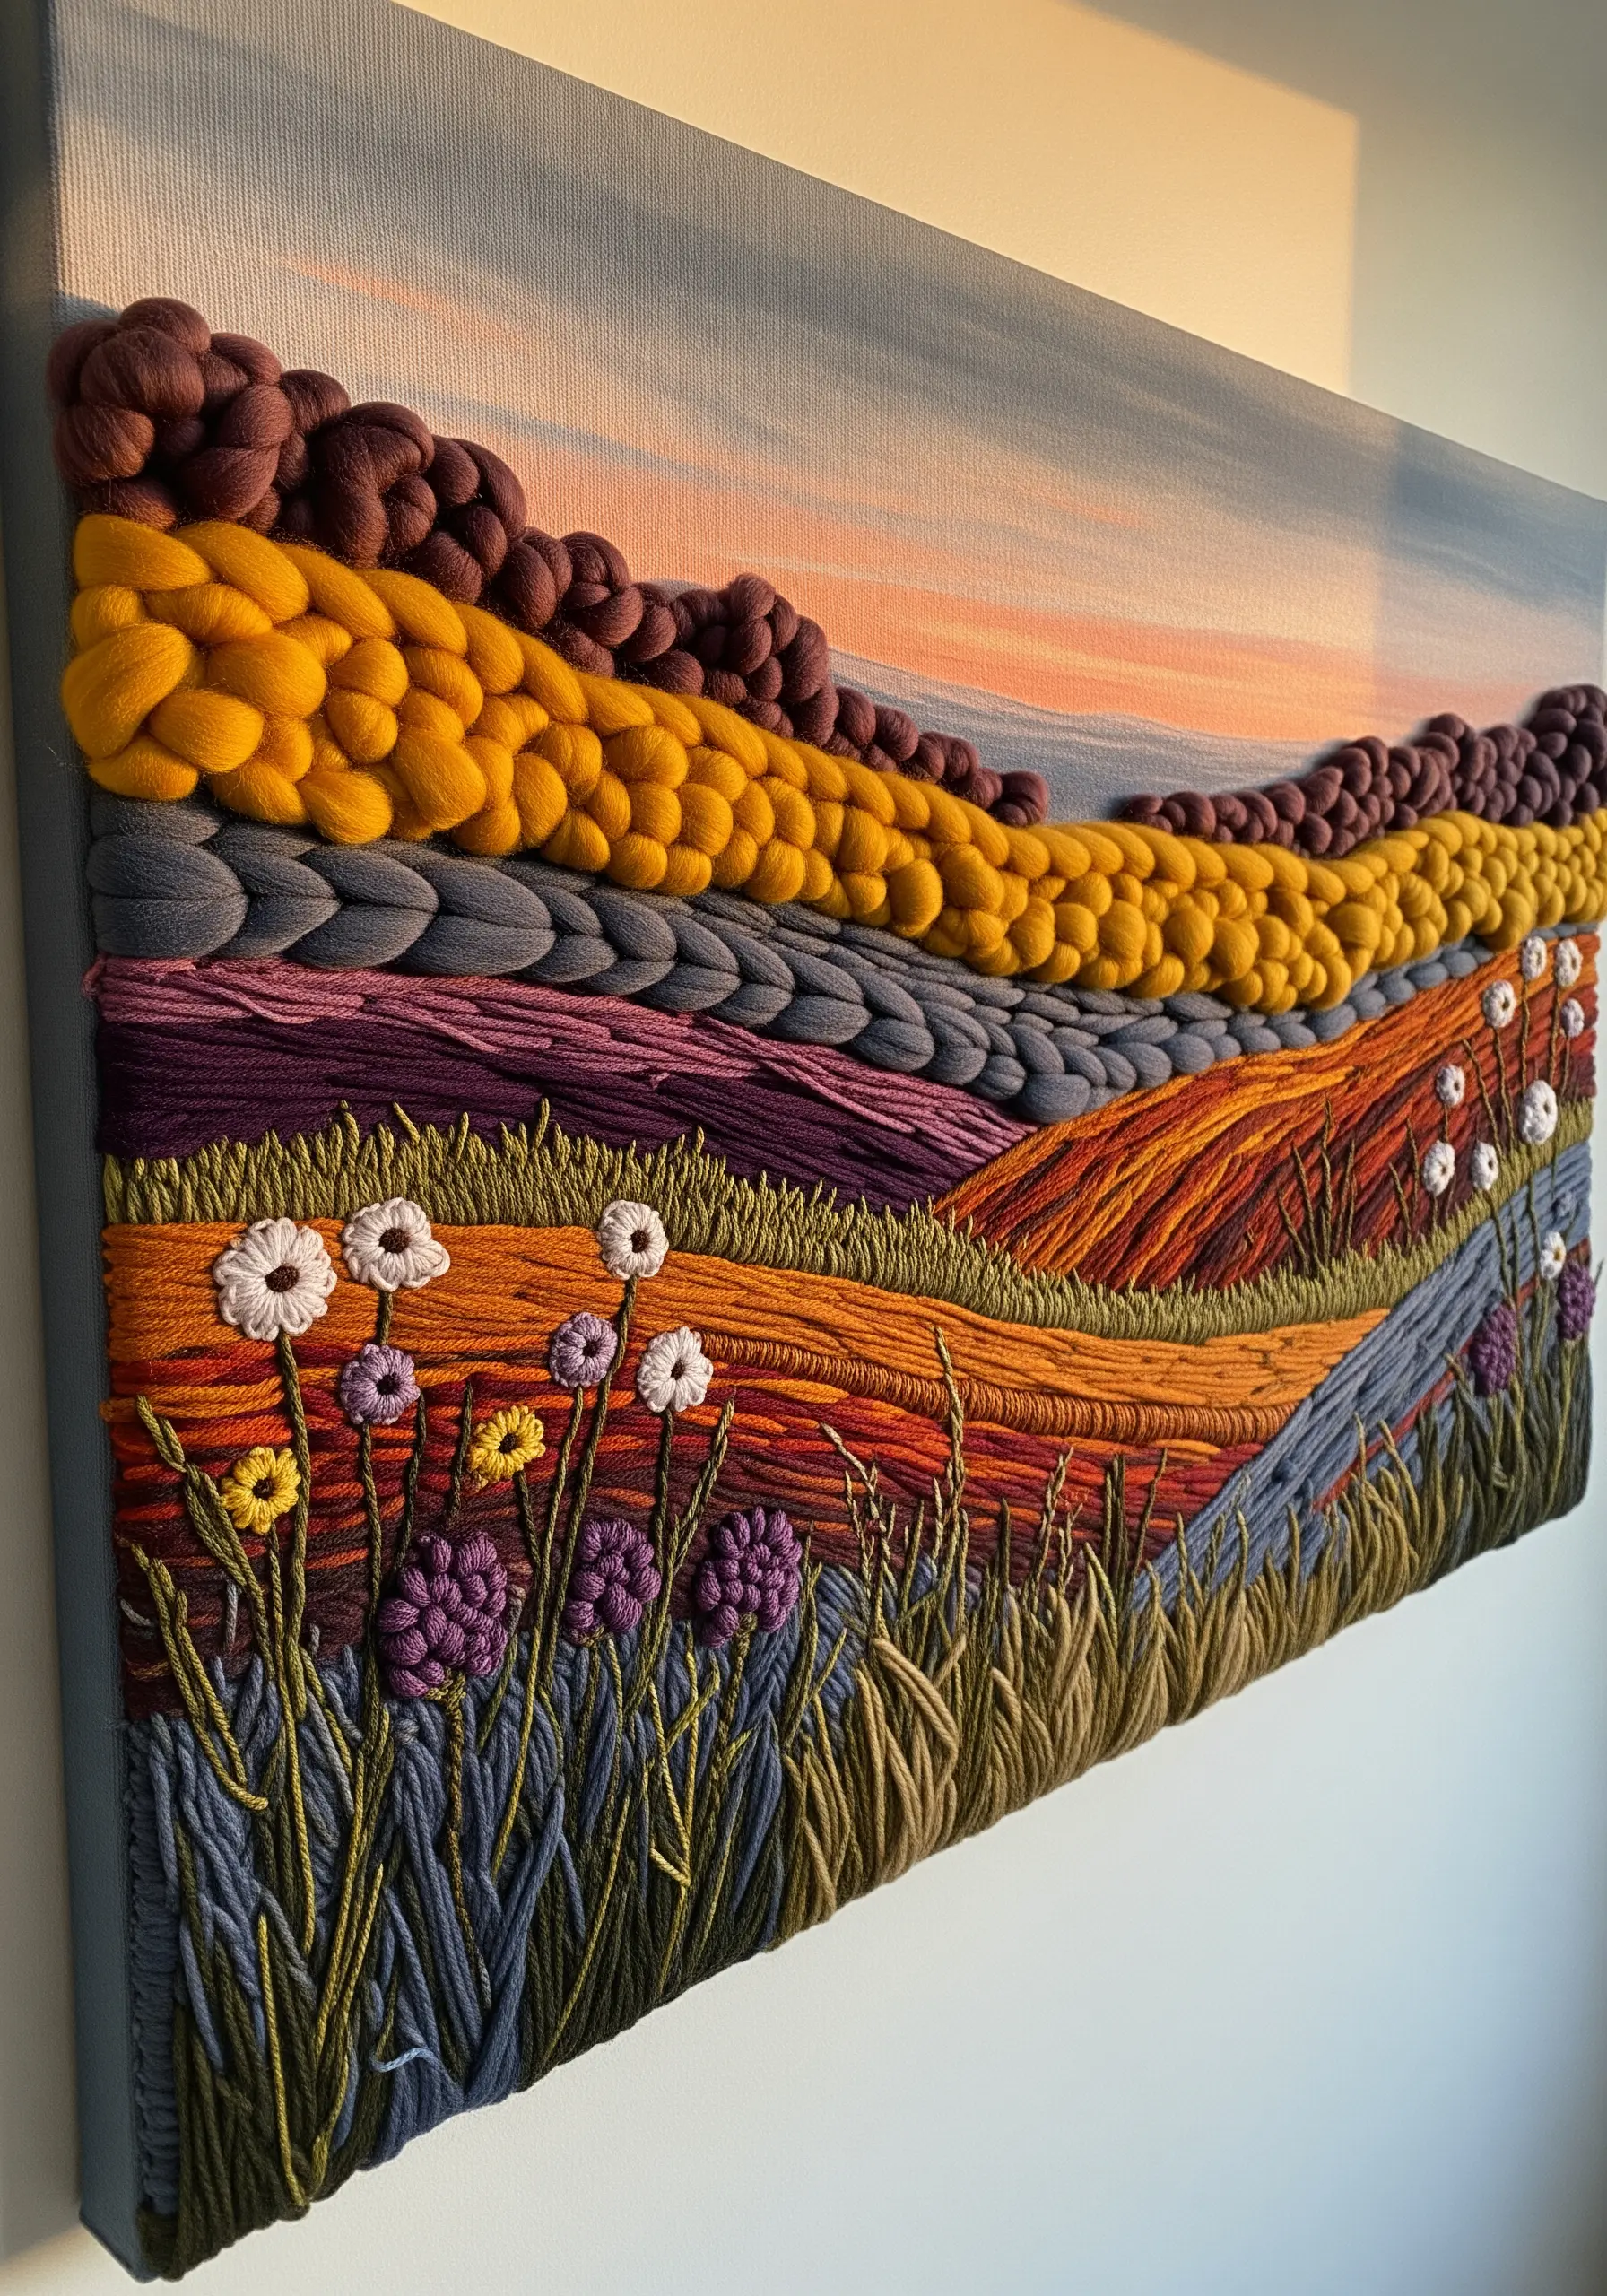
Move beyond traditional floss and incorporate thick, chunky yarns to build a landscape with dramatic, sculptural relief.
Use a technique called couching, where you lay the thick yarn on the surface of the fabric and tack it down with a thinner, matching thread.
You can also weave the yarn directly into the base fabric or create oversized French knots for bold, floral textures.
This mixed-fiber approach transforms the surface from a simple canvas into a rich, tactile tapestry that begs to be touched.
6. Curate a Cohesive Mini-Hoop Gallery Wall
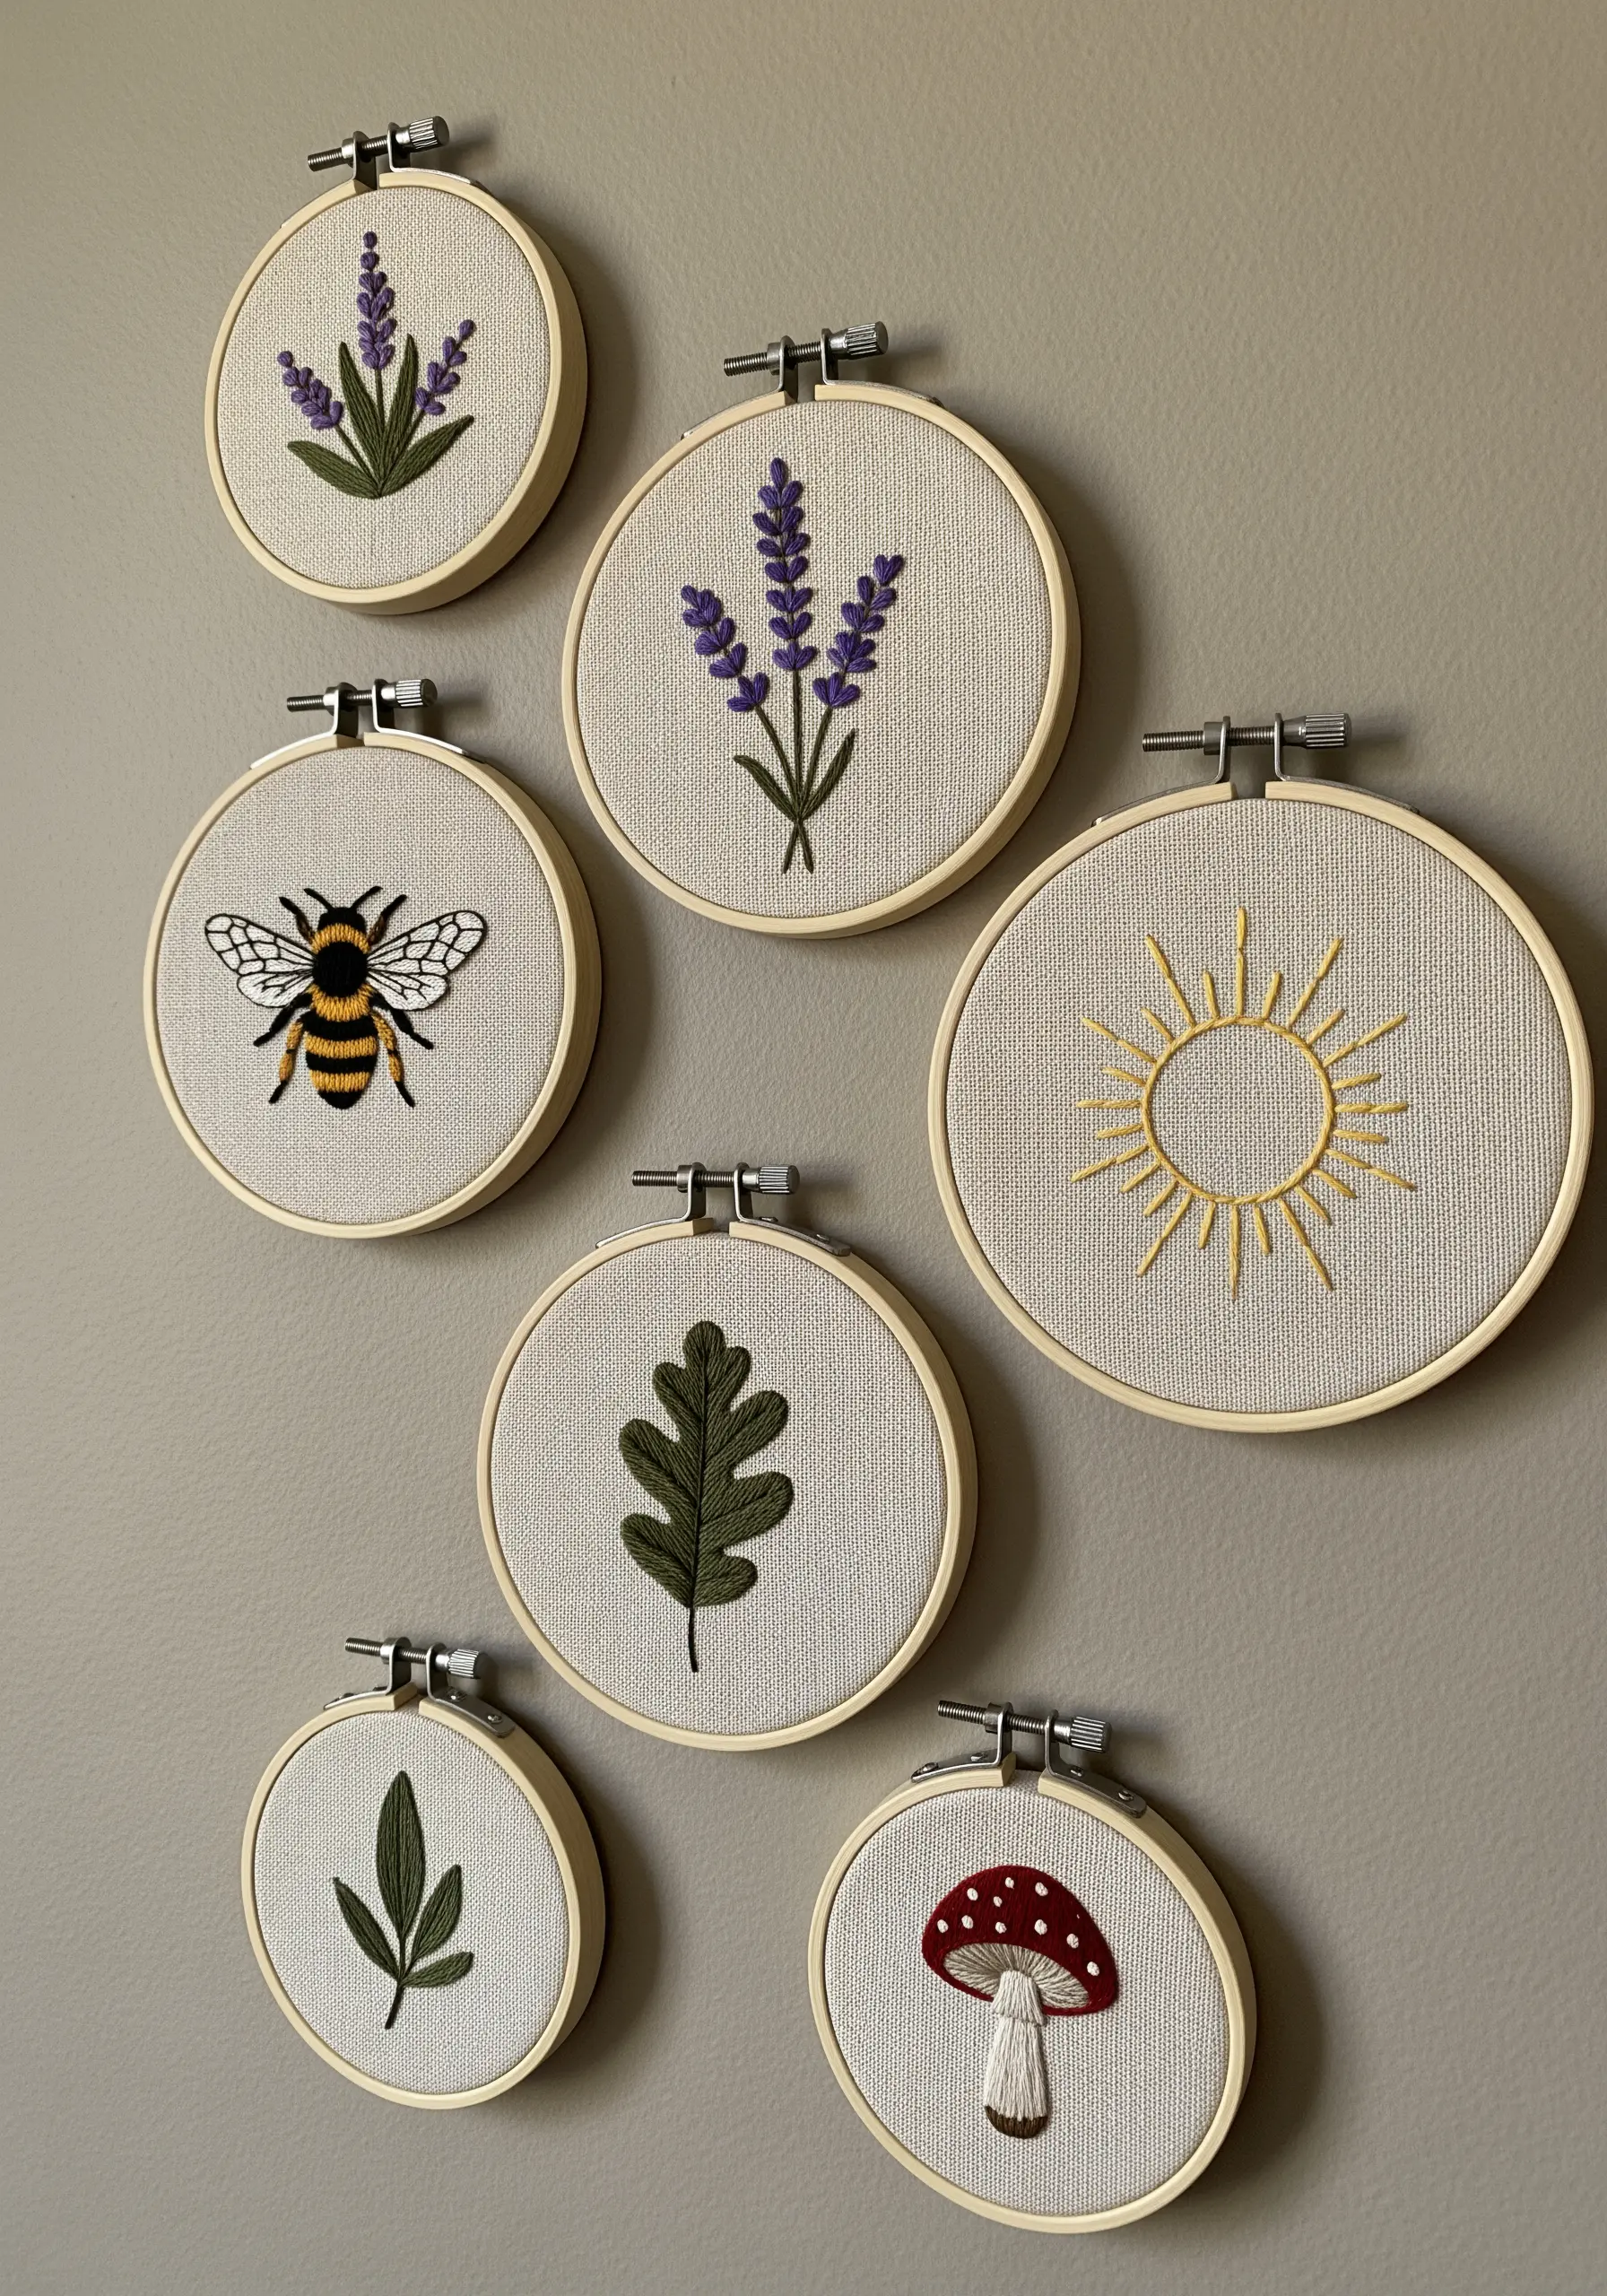
Amplify the impact of small designs by grouping them into a thoughtful collection.
Choose a unifying theme, such as botanical elements or celestial symbols, and a consistent color palette to ensure the pieces feel connected.
Mount each design in a simple, matching hoop to maintain visual harmony.
Arranging tiny hoop embroidery projects together allows you to tell a larger story and create a personalized focal point on any wall.
7. Emulate Geodes with Beads and Ribbon
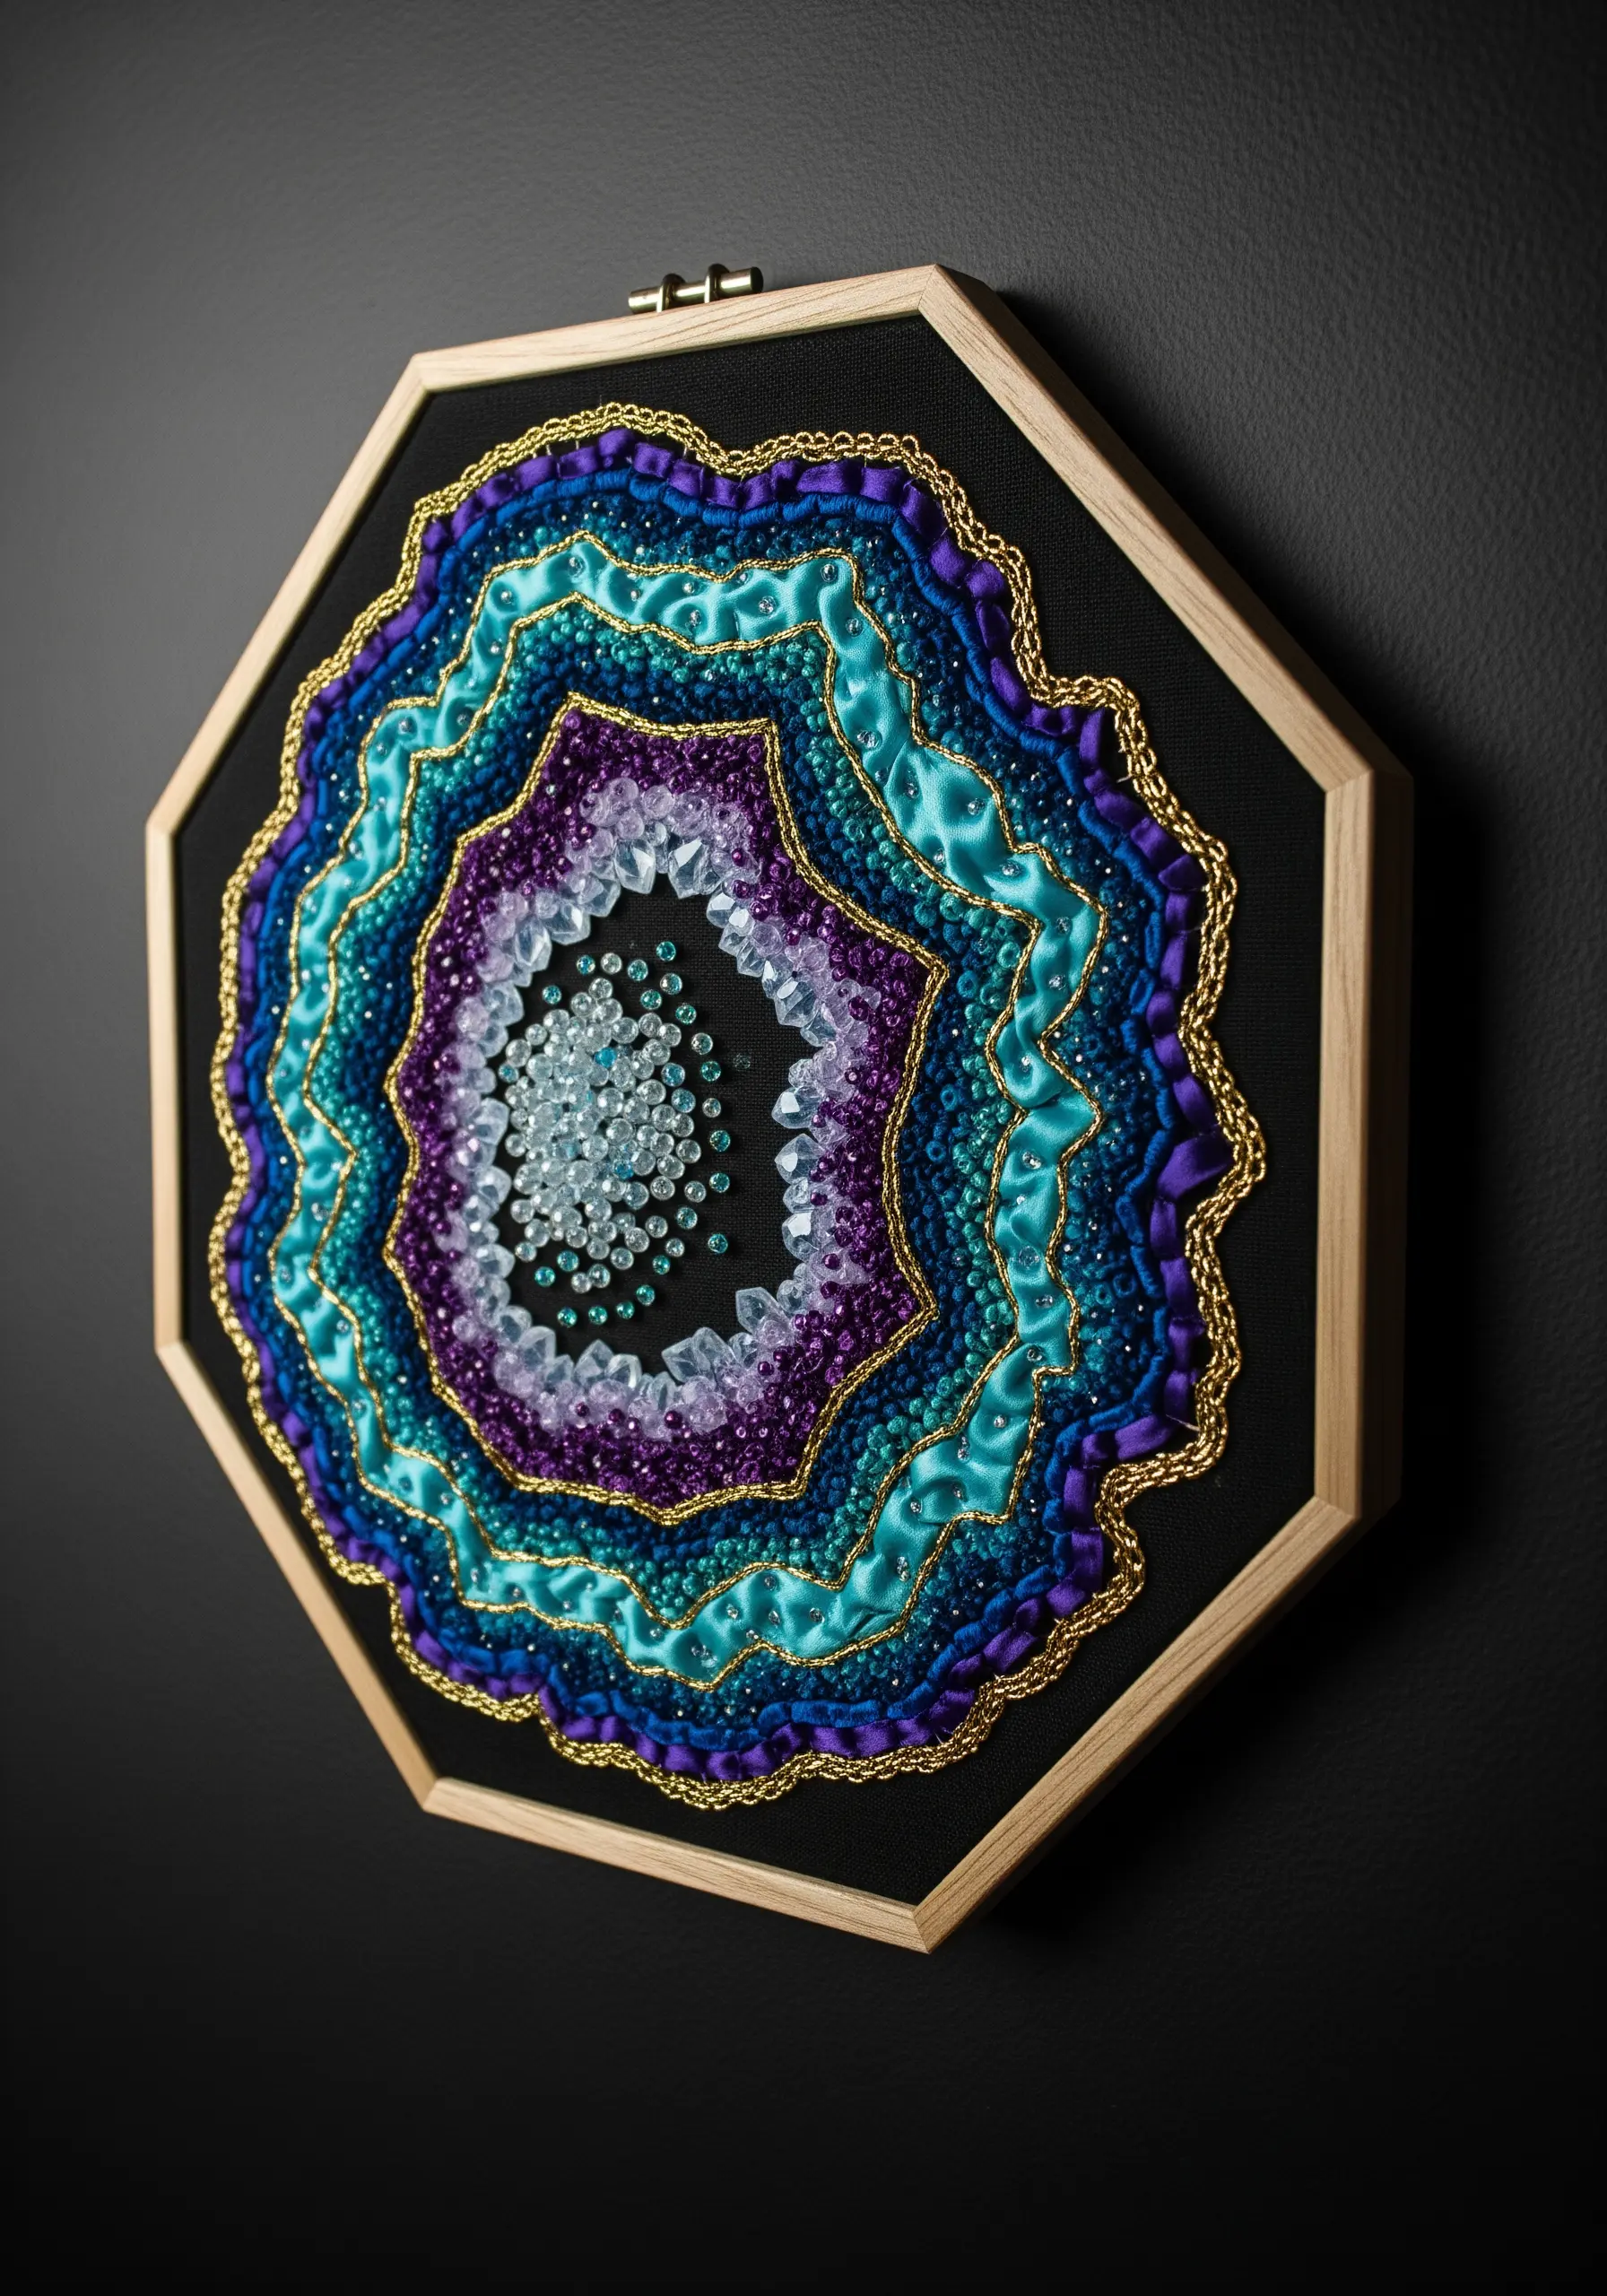
Replicate the stunning, layered texture of a natural geode by incorporating mixed media into your embroidery.
Use rows of silk ribbon stitch to create shimmering, undulating bands of color that catch the light differently than standard floss.
Fill the central cavity with a dense cluster of seed beads or tiny crystals for a sparkling, crystalline effect.
Outline each layer with a fine metallic thread, like a gold couching stitch, to define the concentric rings and add a touch of luxury.
8. Harness the Power of a Single, Meditative Line
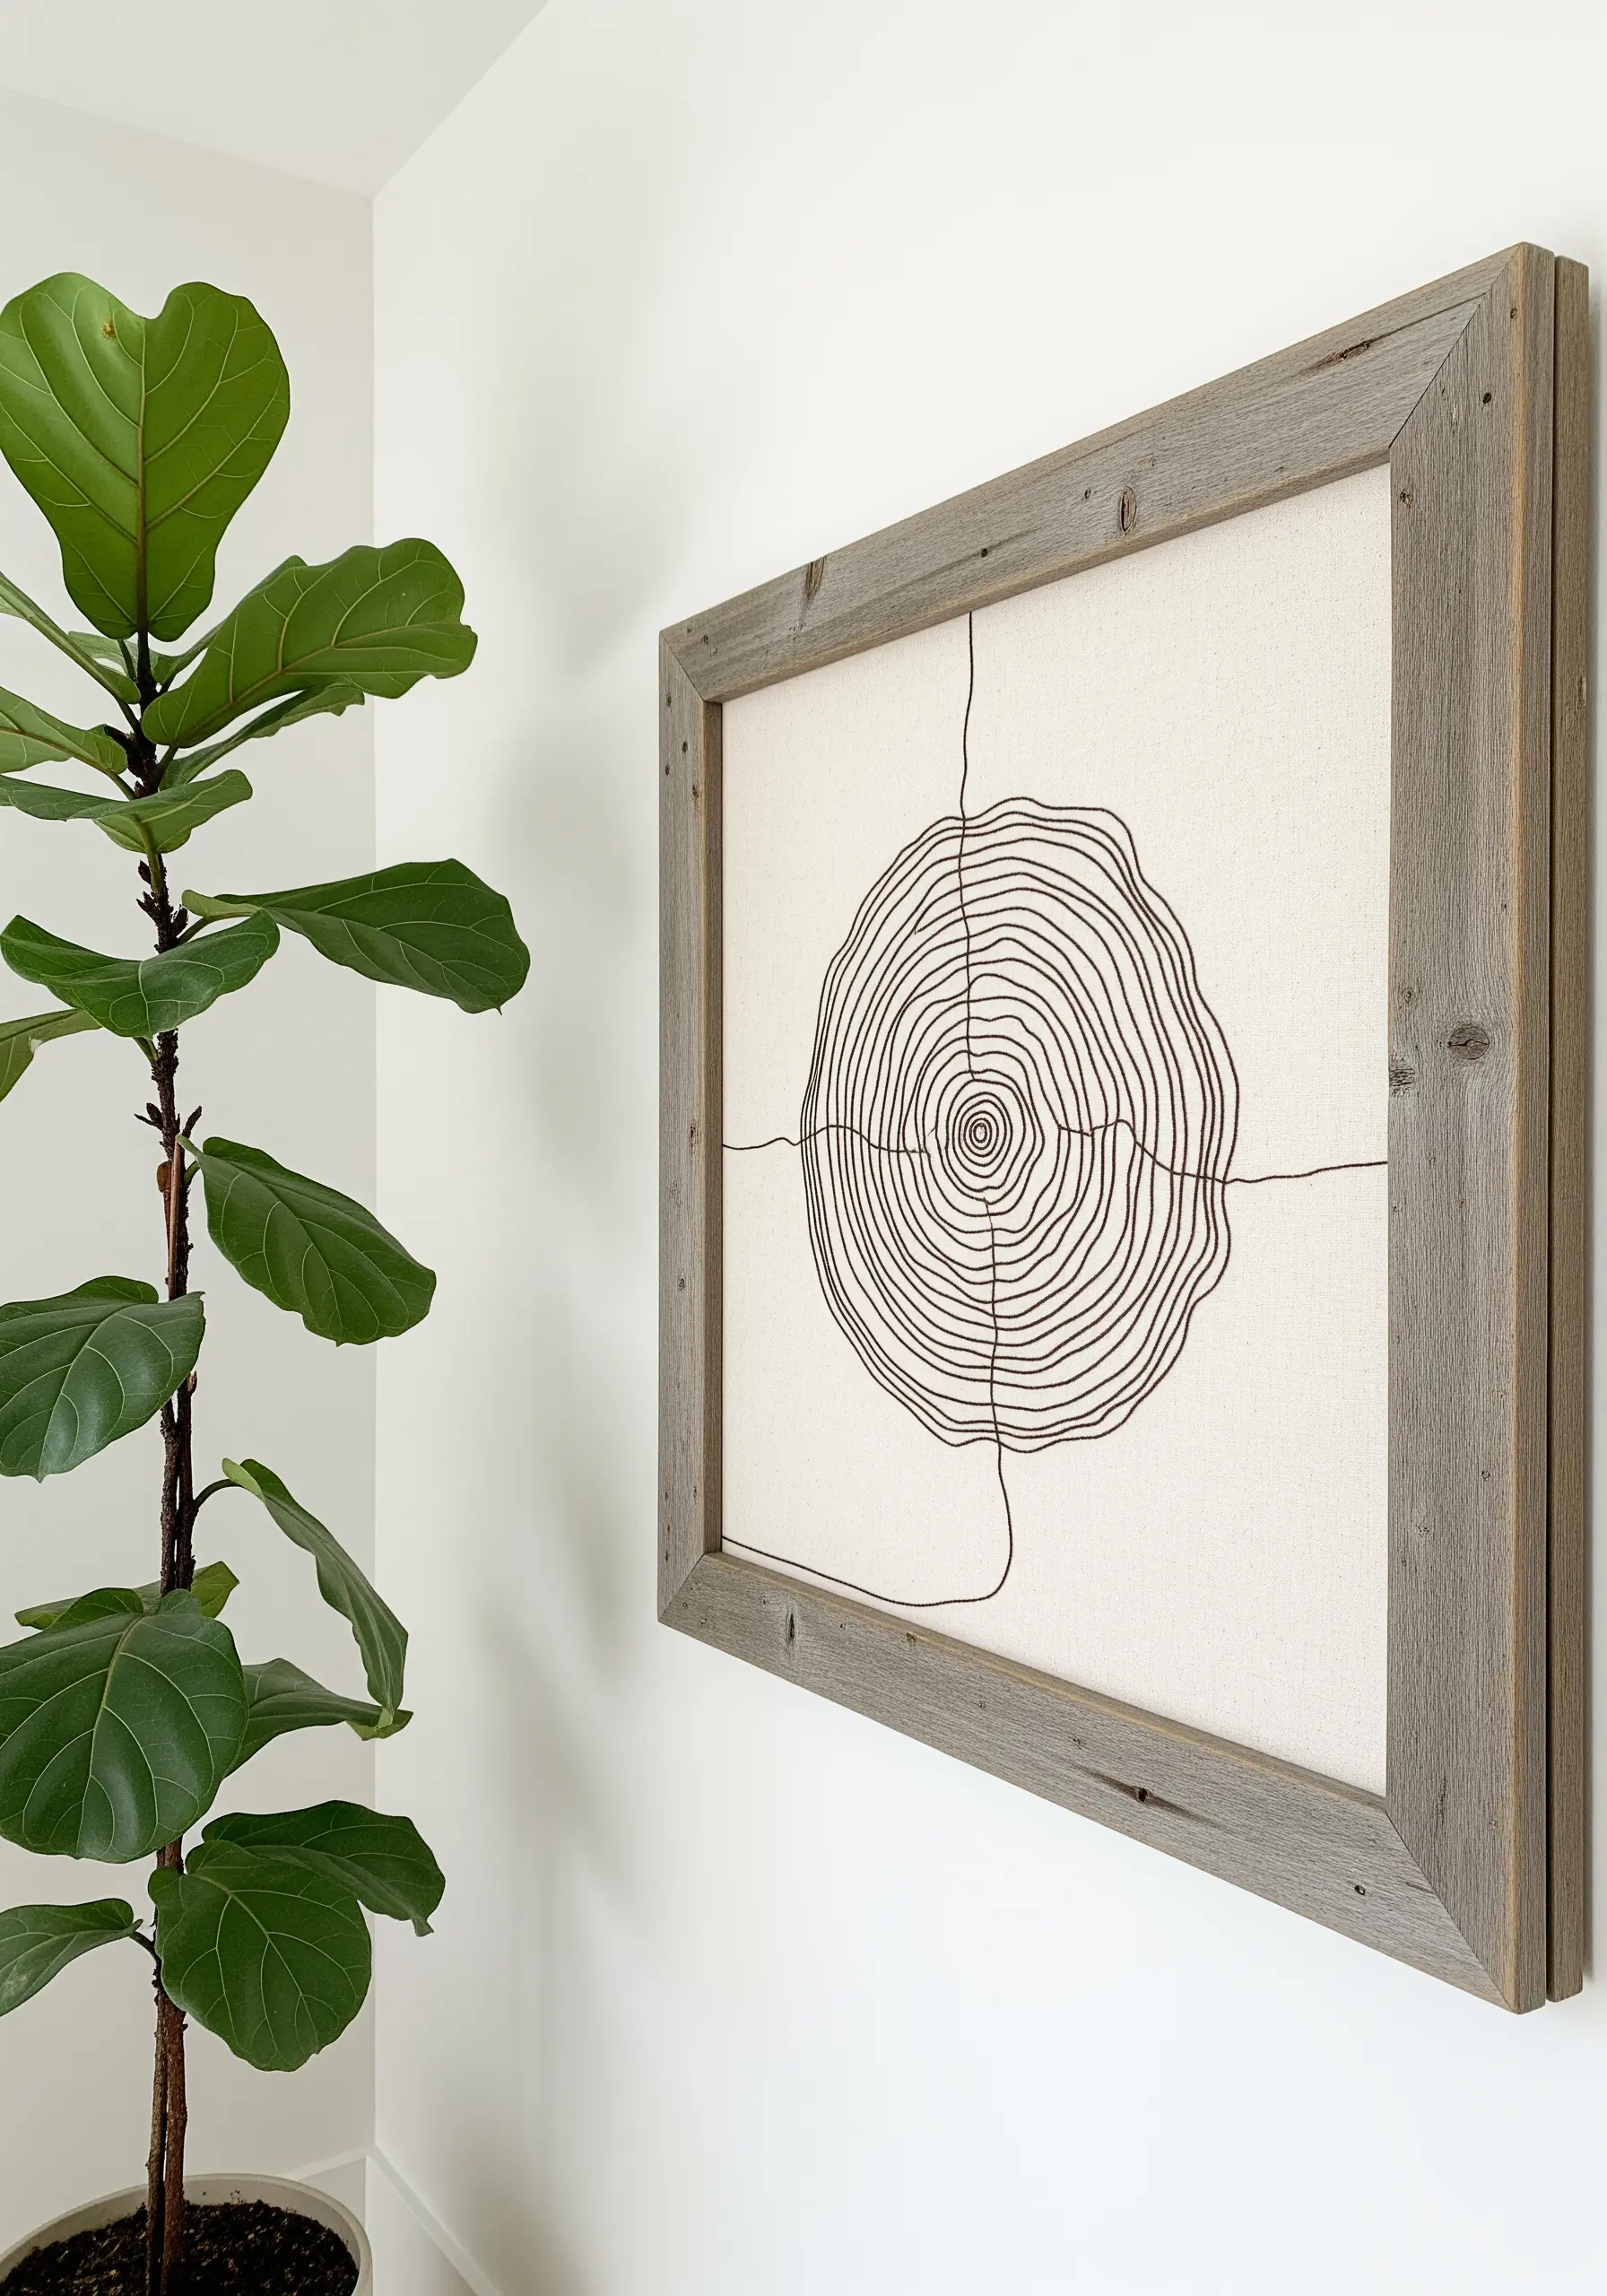
You don’t need complex stitches or a full spectrum of colors to create a powerful piece of art.
Focus on the simple elegance of a continuous line to render an organic shape like tree rings.
Use a stem stitch or a whipped backstitch with a dark, contrasting thread on a neutral linen canvas.
The beauty of this approach lies in its imperfections—the slight wobbles and variations in the line give the piece a hand-drawn, authentic character that feels both modern and timeless.
These minimalist embroidery ideas are perfect for a calm, contemporary space.
9. Create an Underwater World with Textural Stitches
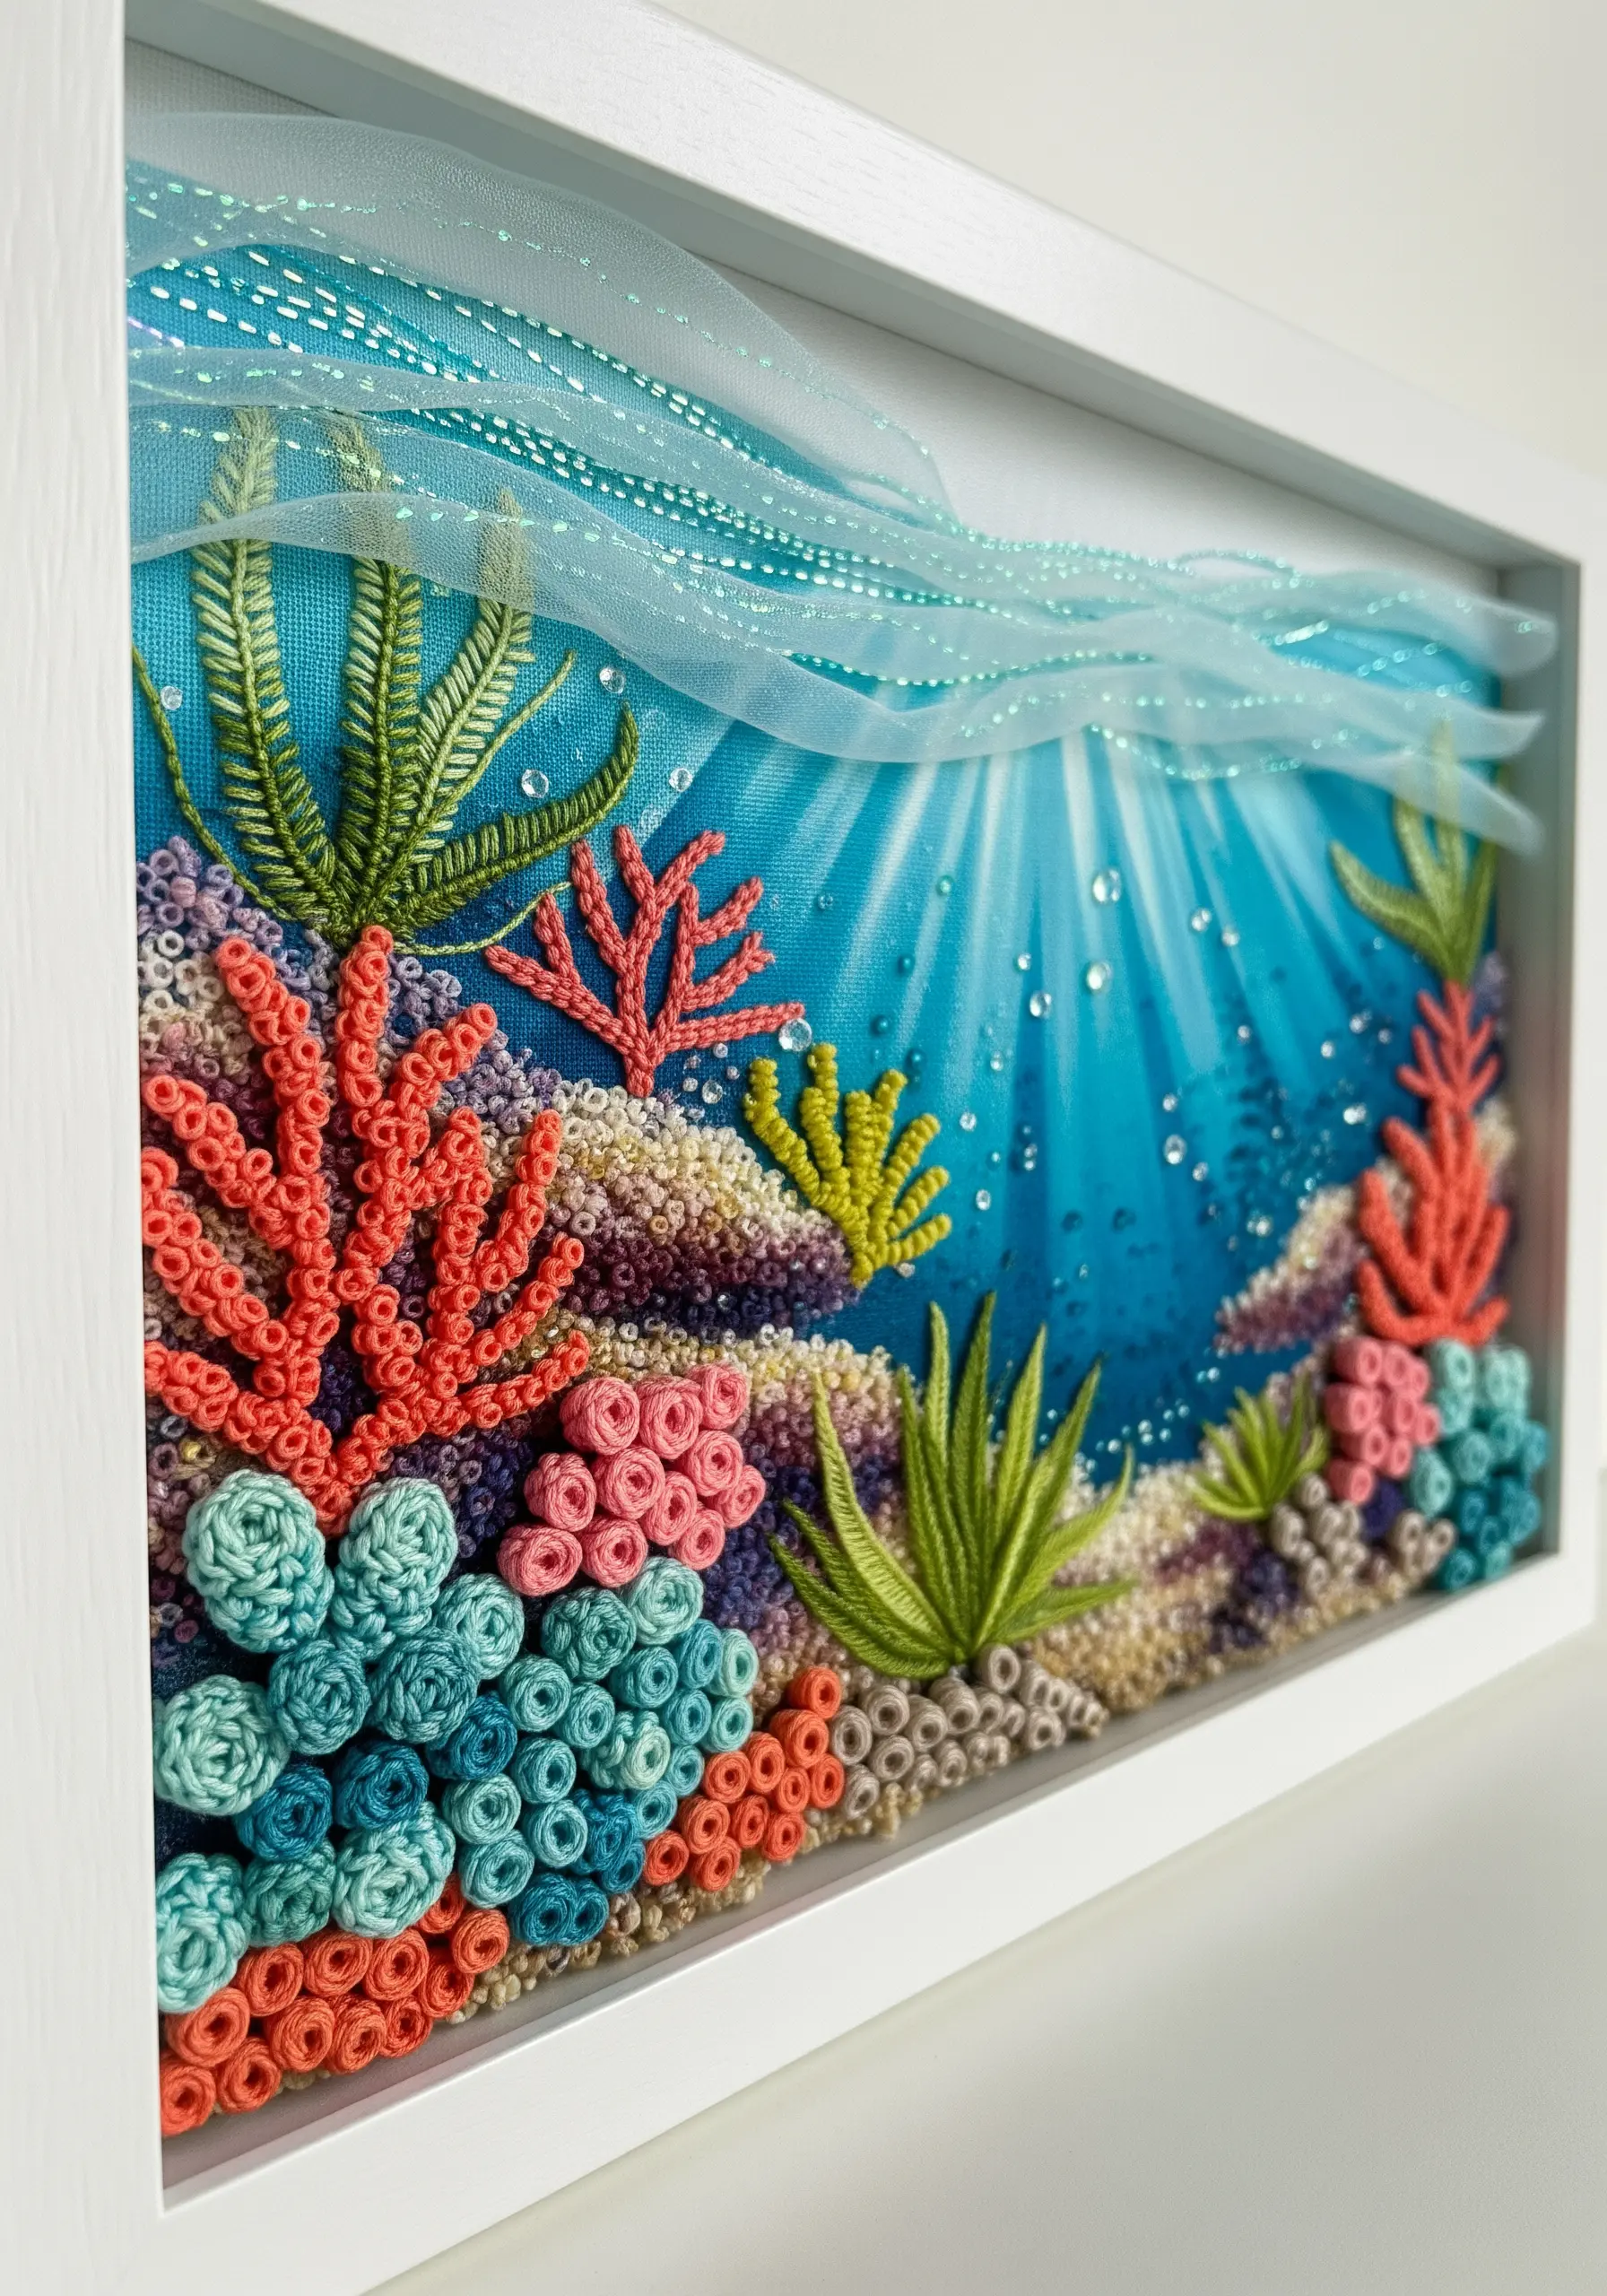
Build a vibrant coral reef by assigning a different textural stitch to each element.
Use tightly packed woven wheel stitches (or rosettes) for the larger coral structures, varying their size and color for a natural look.
Stitch smaller coral branches with the knotted lazy daisy stitch or bullion knots.
Create a sandy ocean floor with a dense field of French knots in beige and off-white tones, and add delicate seaweed with smooth, directional satin stitches.
This ocean-inspired hoop embroidery demonstrates how stitch variety creates a dynamic, lifelike scene.
10. Capture Graceful Movement with Directional Stitches
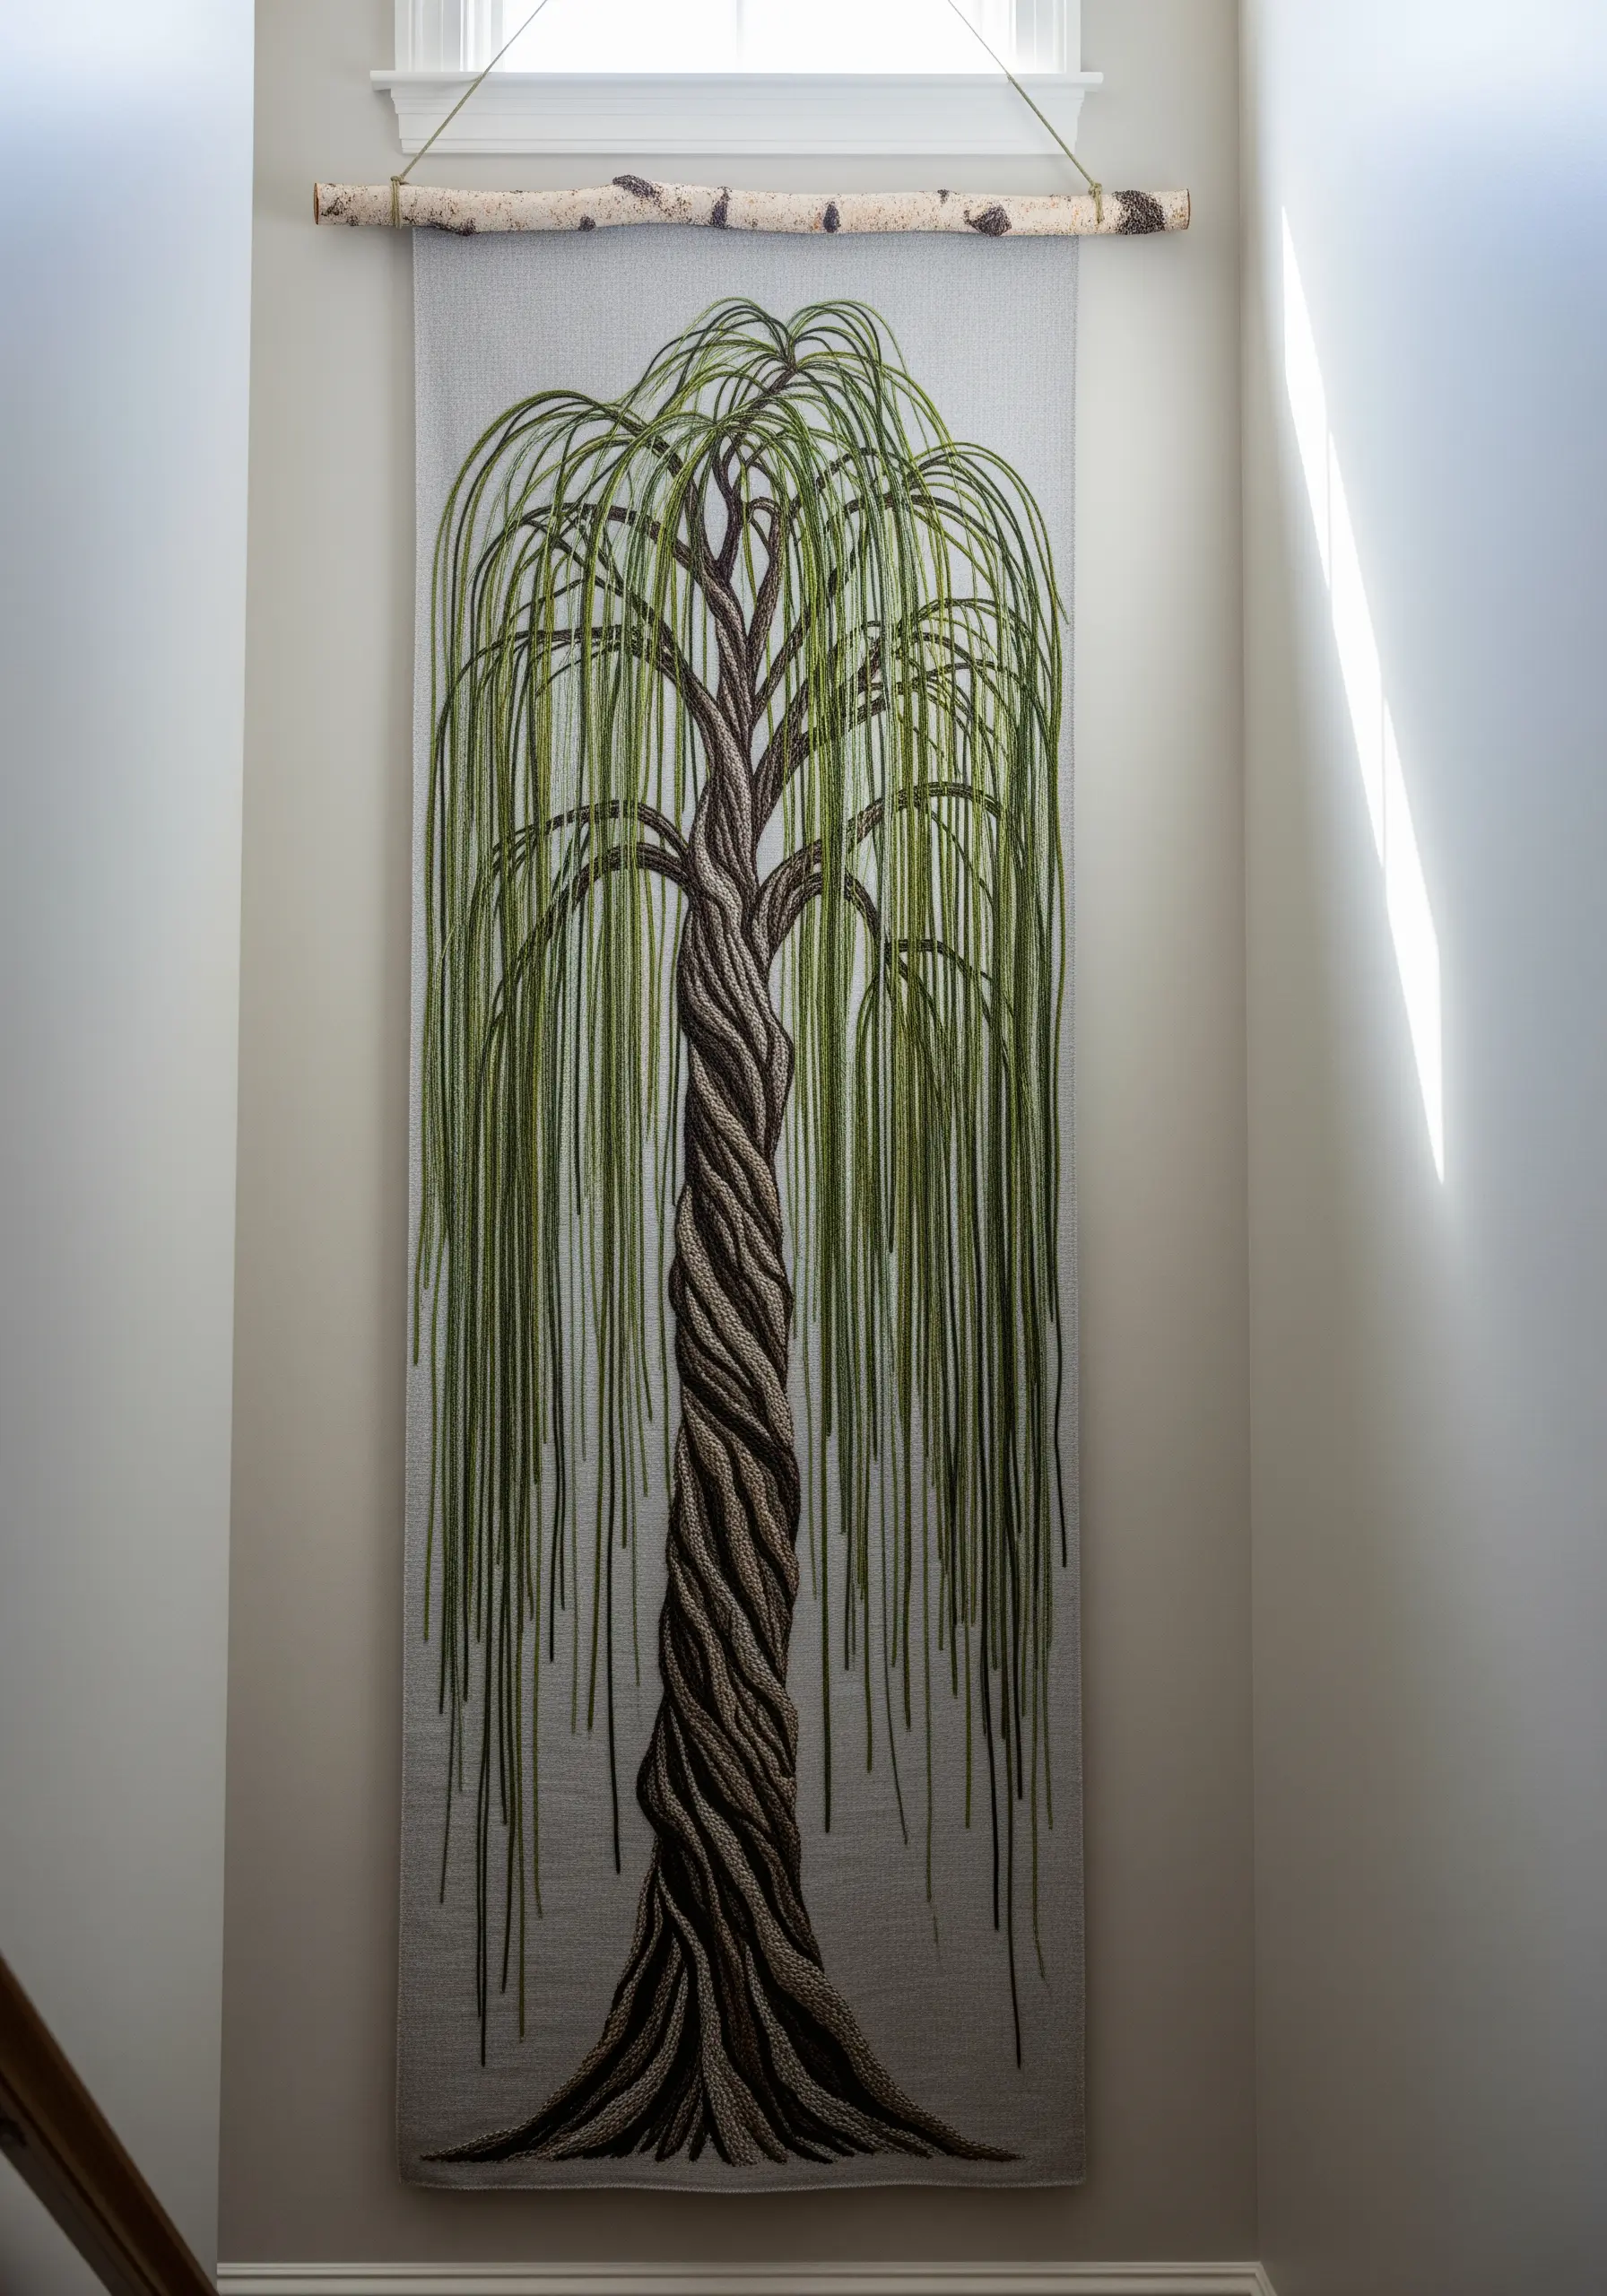
Suggest the gentle sway of a weeping willow by focusing on the direction of your stitches.
For the twisted trunk, alternate the angle of your satin stitches or long-and-short stitches to create the illusion of bark wrapping around the tree.
Let the weeping branches flow downwards with long, single straight stitches, using a few different shades of green to add dimension.
This technique proves that how you place your stitches is just as important as which stitches you choose.
11. Map the Stars with Precision and Sparkle
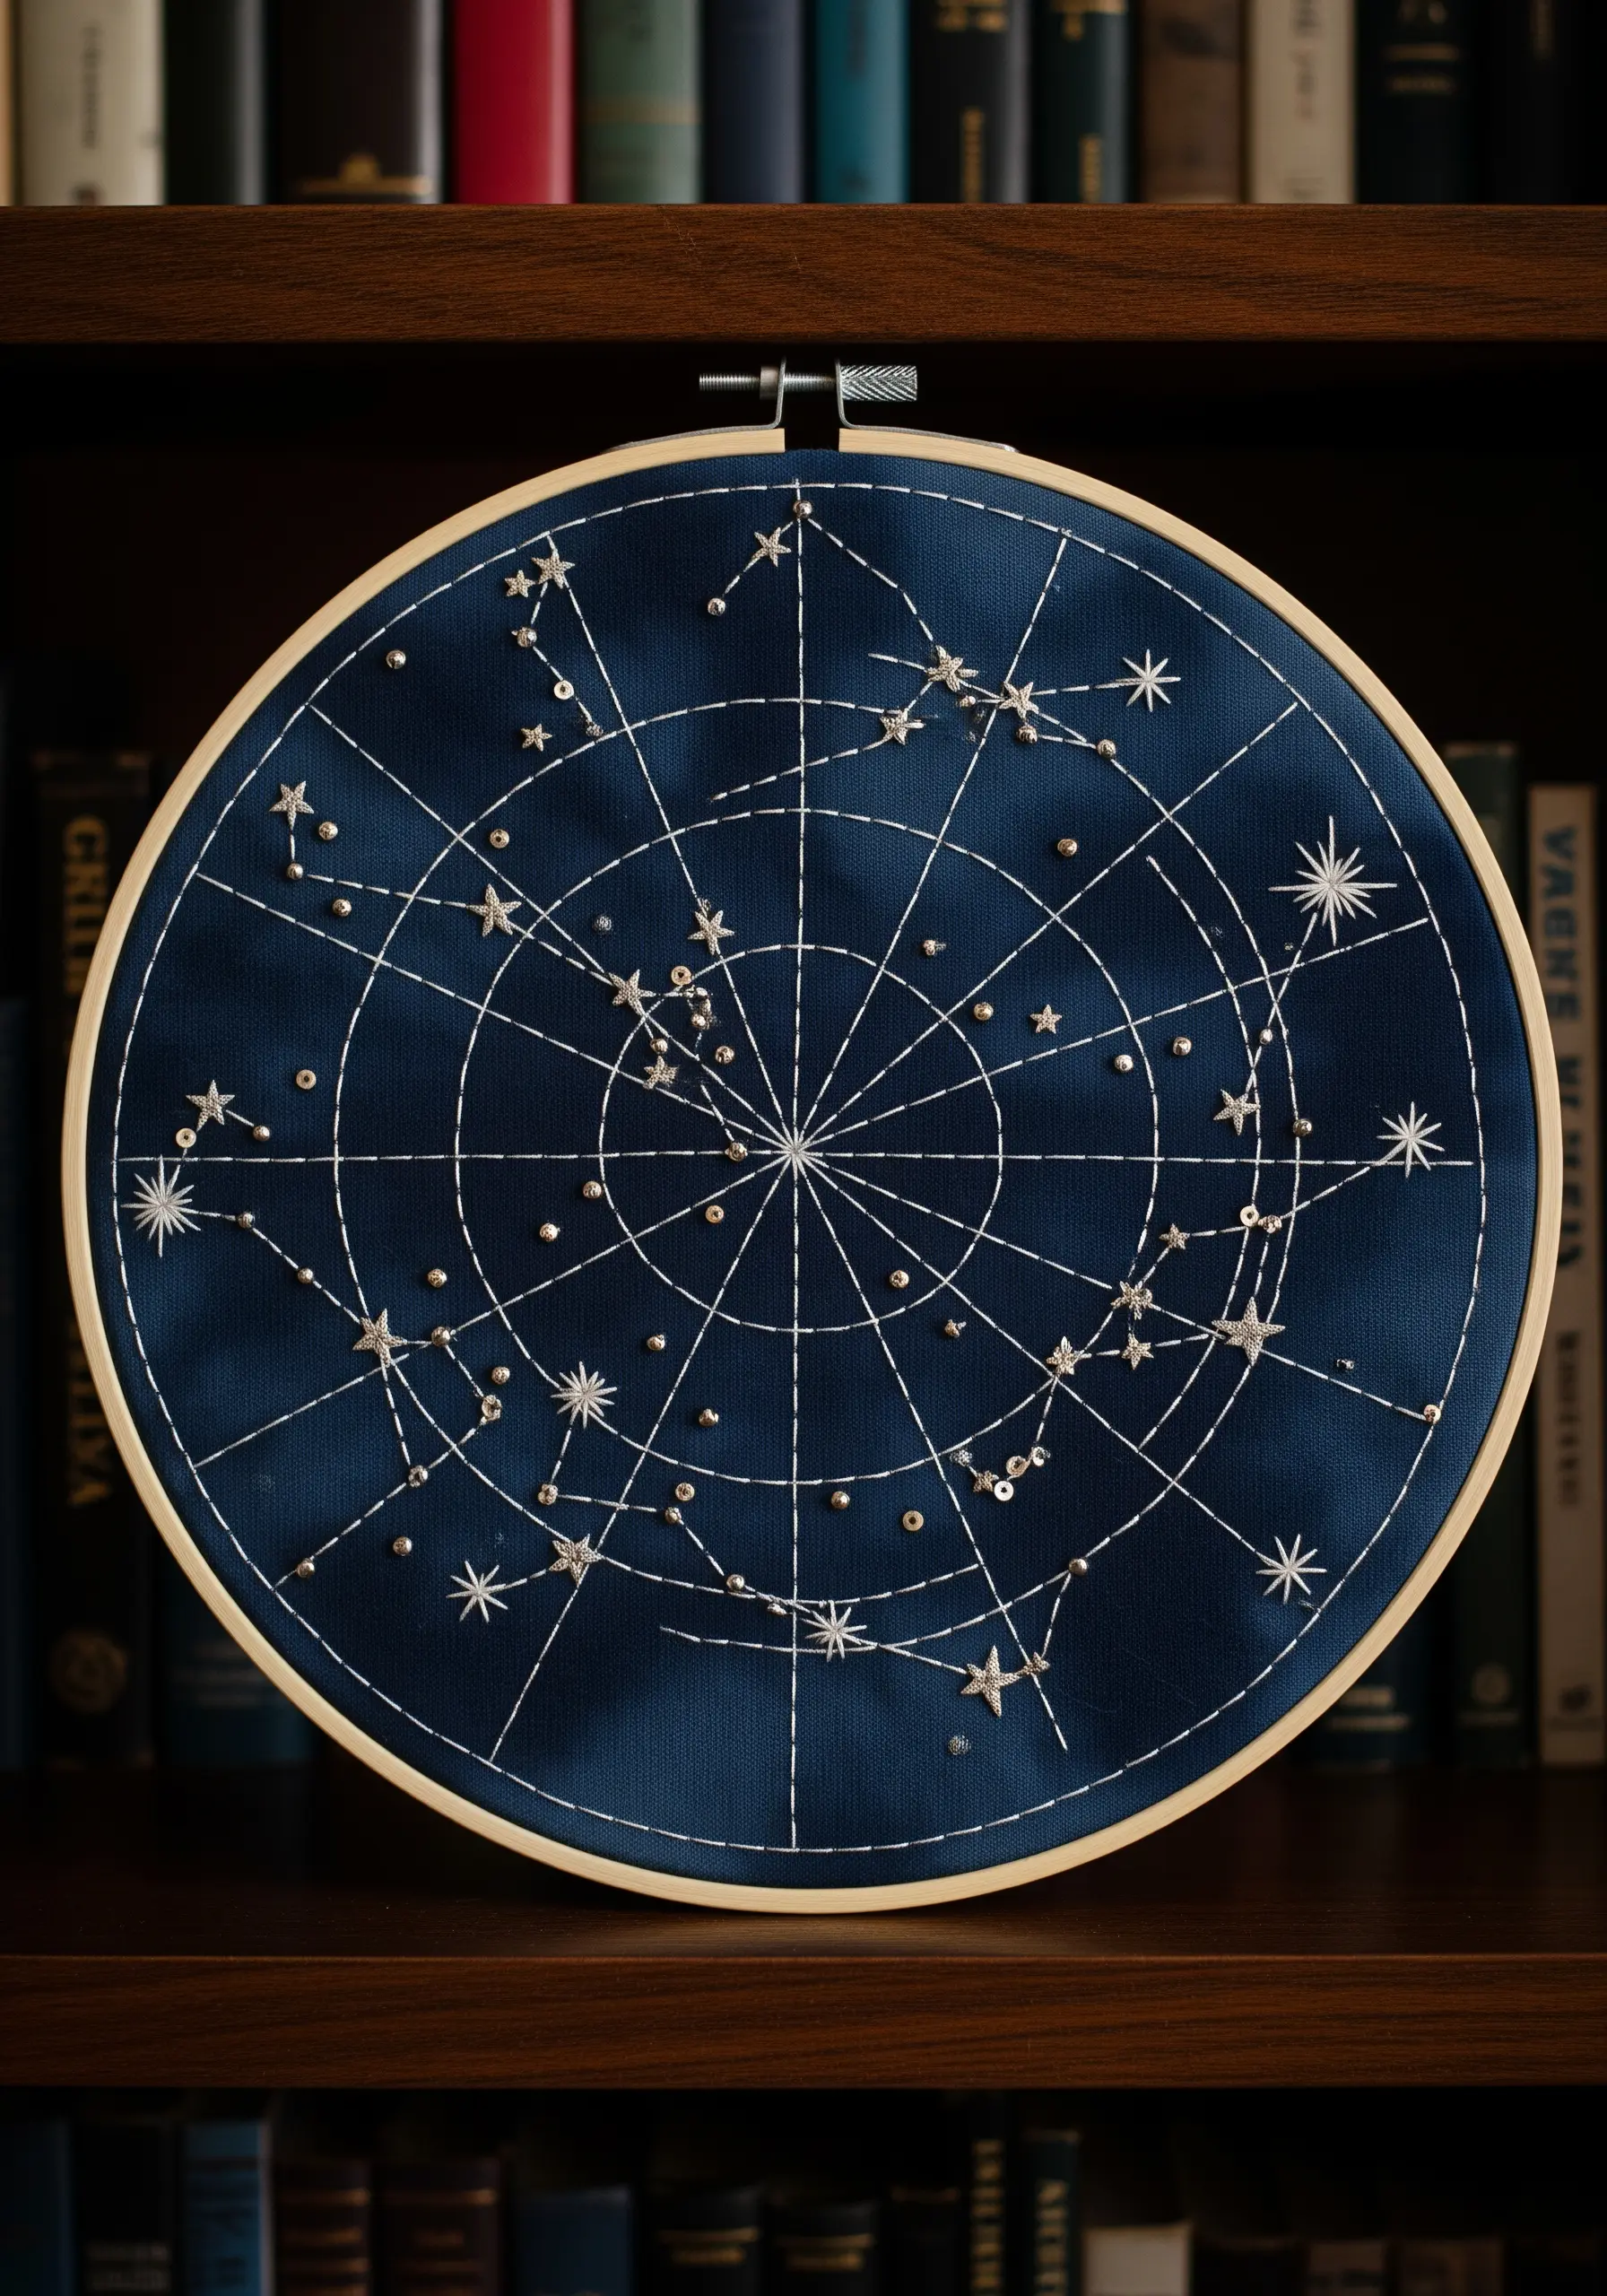
Turn your hoop into a celestial map by combining clean lines with delicate embellishments.
Use a simple backstitch in a crisp white or silver thread to draw the constellation lines on a dark navy or black fabric.
Mark the stars themselves not with French knots, but with tiny, sparkling seed beads or strategically placed single stitches that radiate outwards.
This combination of graphic lines and shimmering accents creates a sophisticated piece that feels both astronomical and artistic.
12. Master Realistic Blending with Thread Painting
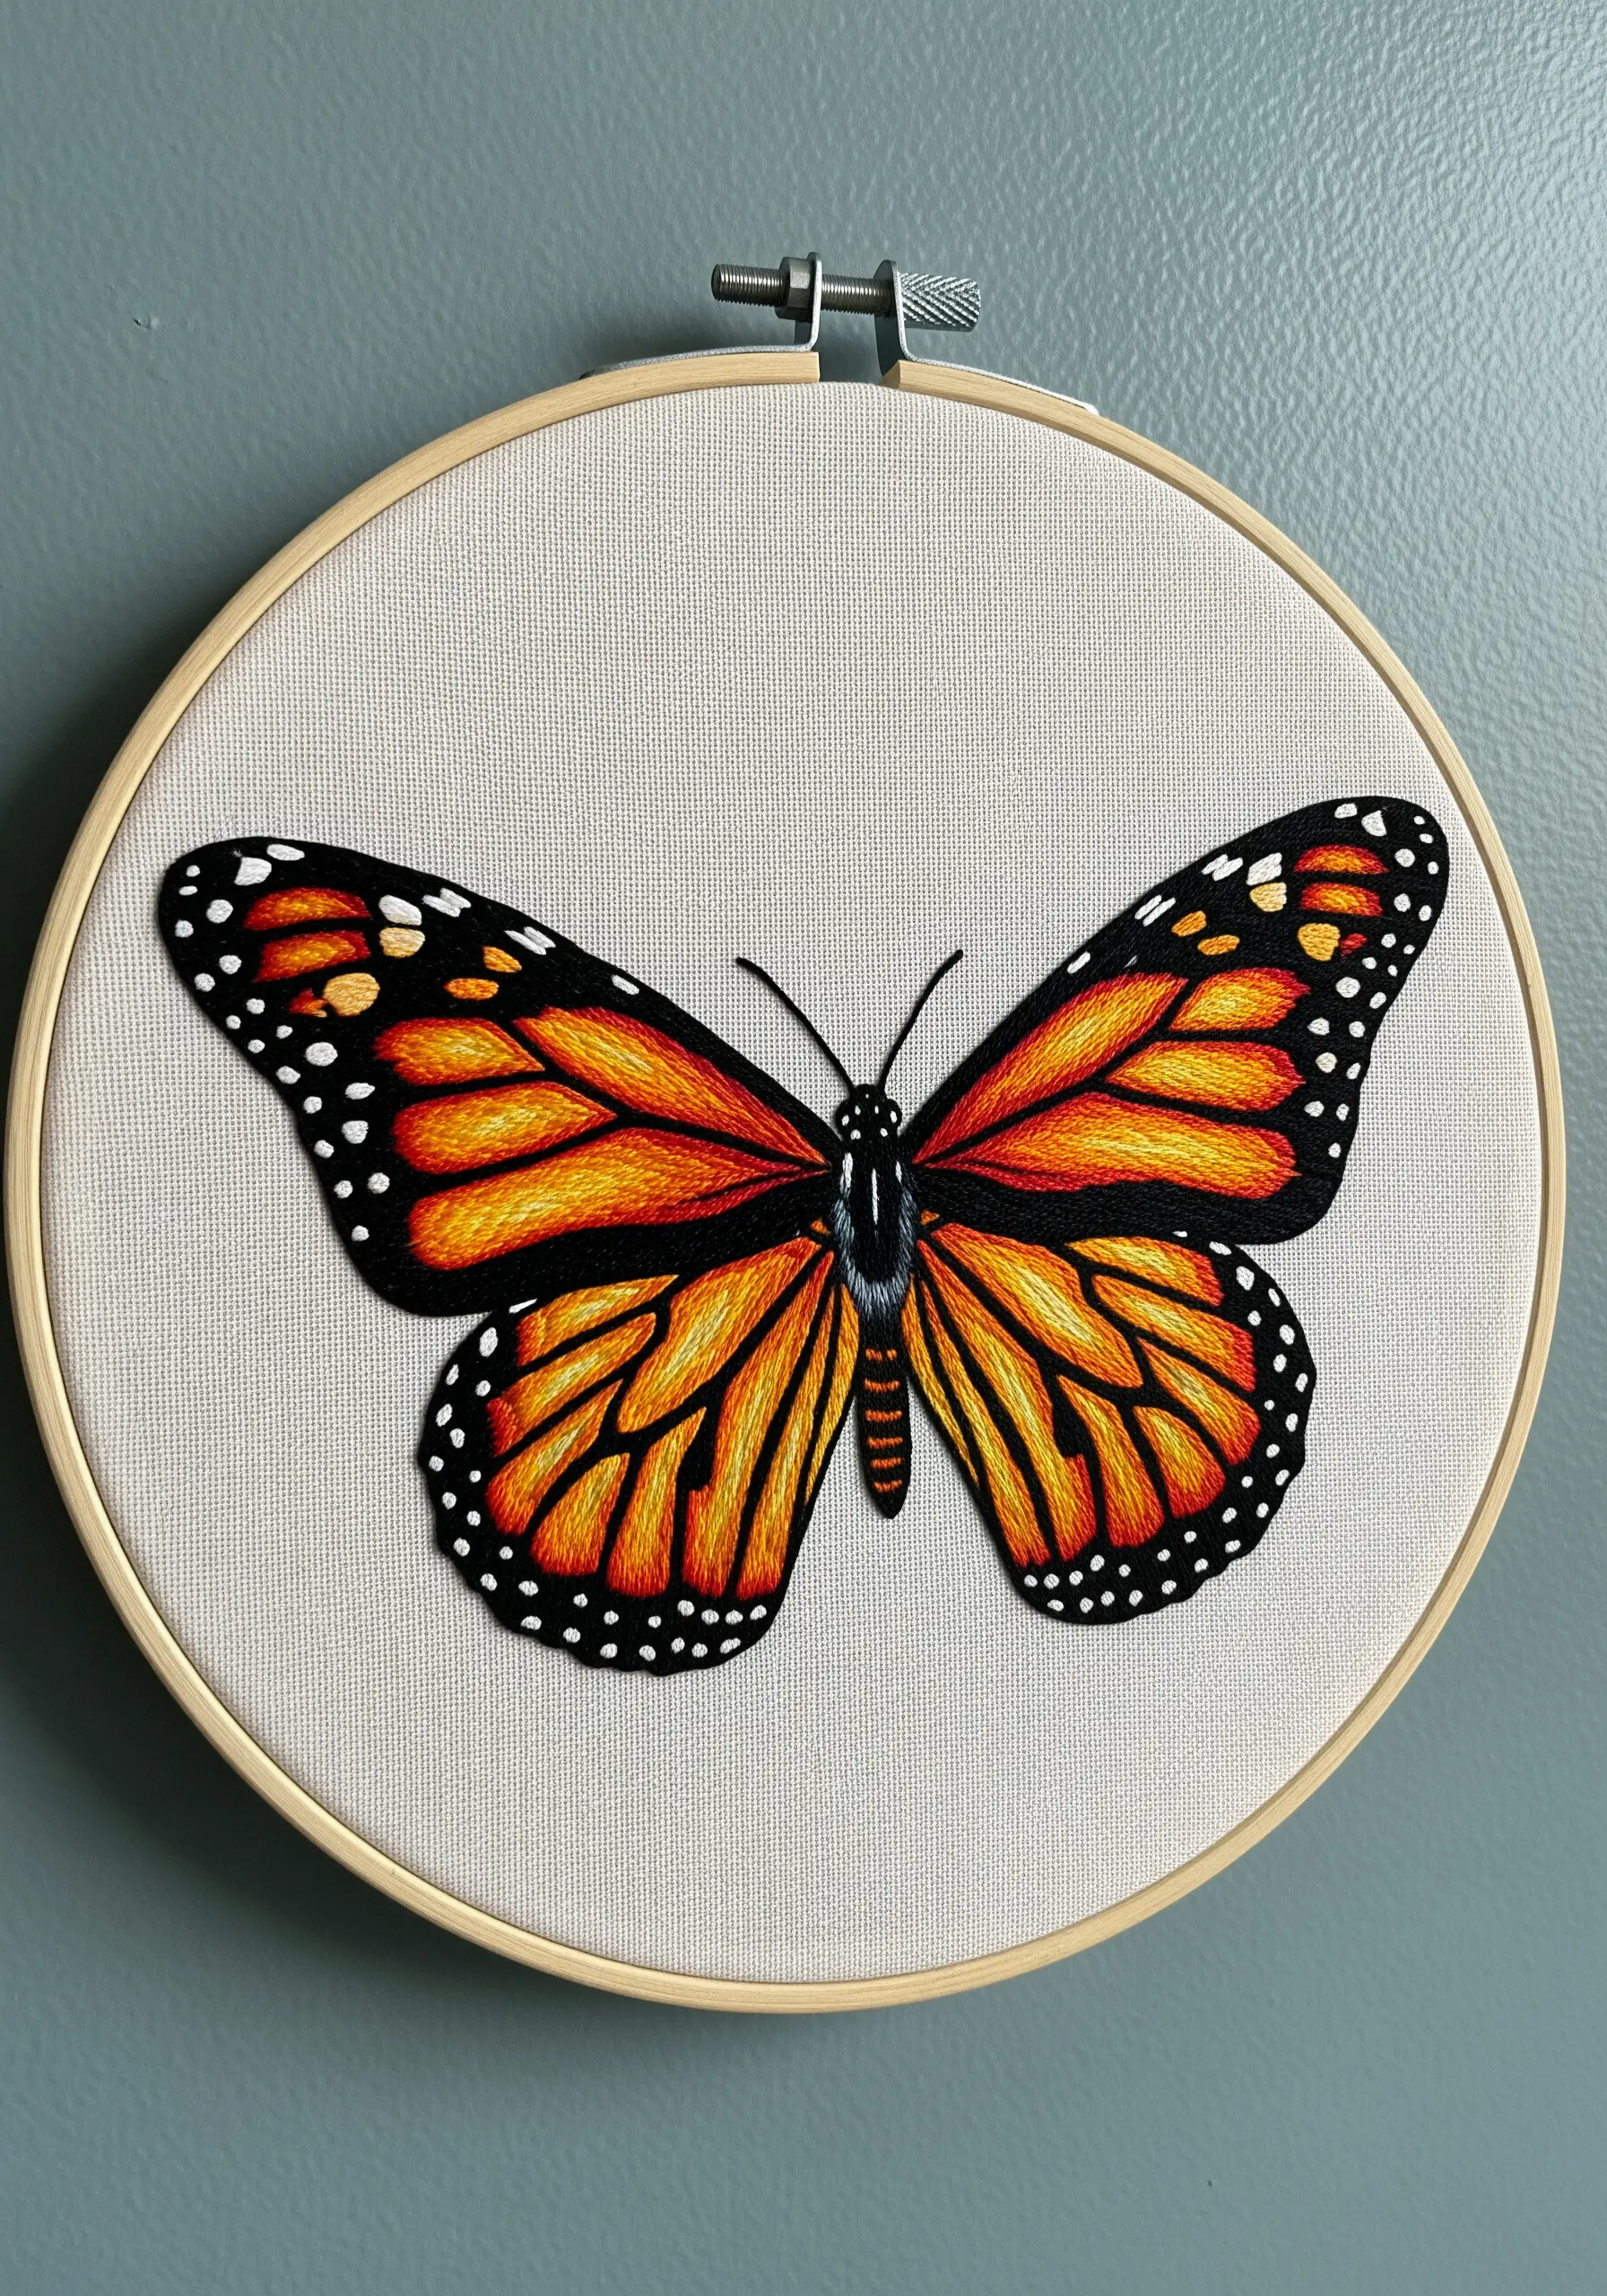
Achieve the smooth, painterly gradients of a butterfly’s wing with the long-and-short stitch technique.
Work with a single strand of floss to ensure the finest detail and the most seamless color transitions.
Start with one color, making your first row of stitches varied in length.
Then, bring your needle up through the middle of the previous stitches to begin the next color, interlocking the shades like a zipper.
This meticulous technique is the key to creating photorealistic texture and depth.
13. Push Boundaries with Sculptural Fiber Art
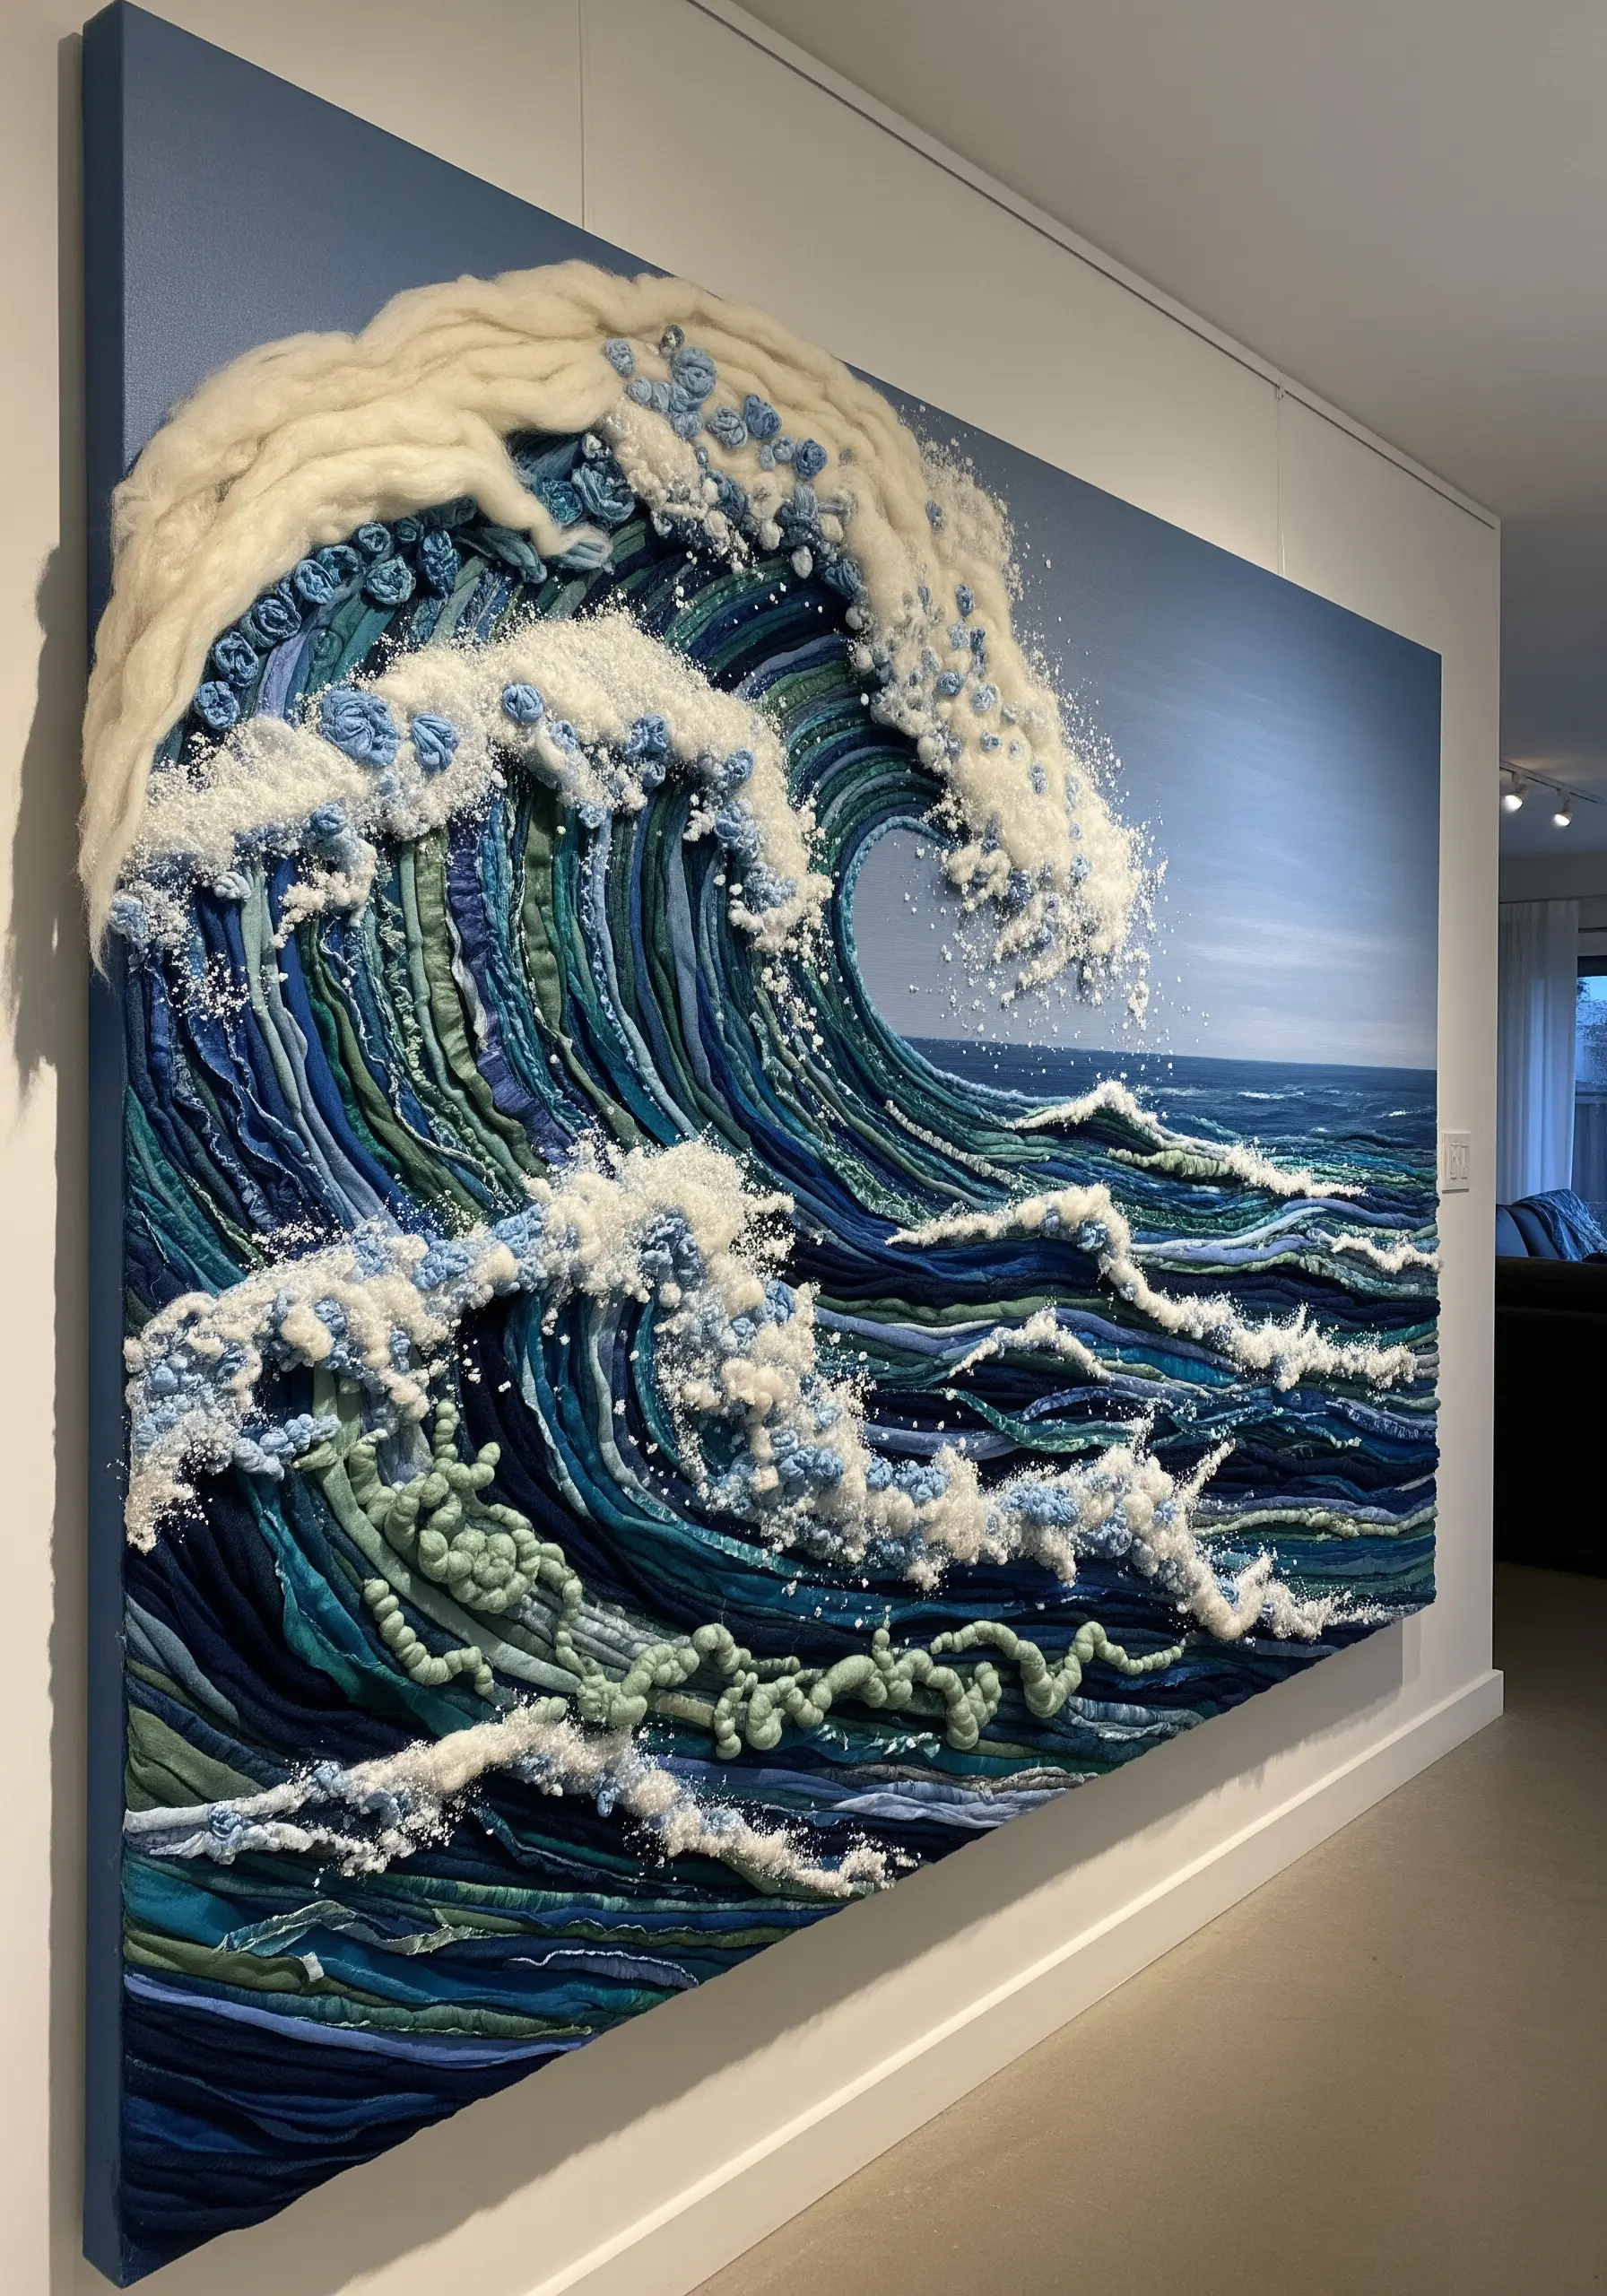
Elevate your embroidery from a surface decoration to a three-dimensional sculpture by incorporating unconventional materials and techniques.
Build up the body of the wave using layers of appliquéd fabric strips and couched yarns in various shades of blue.
Create the crashing sea foam with needle-felted wool roving or clusters of Turkey work loops, which you can trim to create a frothy texture.
This method transforms a painted canvas into a dynamic fiber art installation that captures the raw energy of the ocean.
14. Layer Stitches for a Lush Embroidered Terrarium
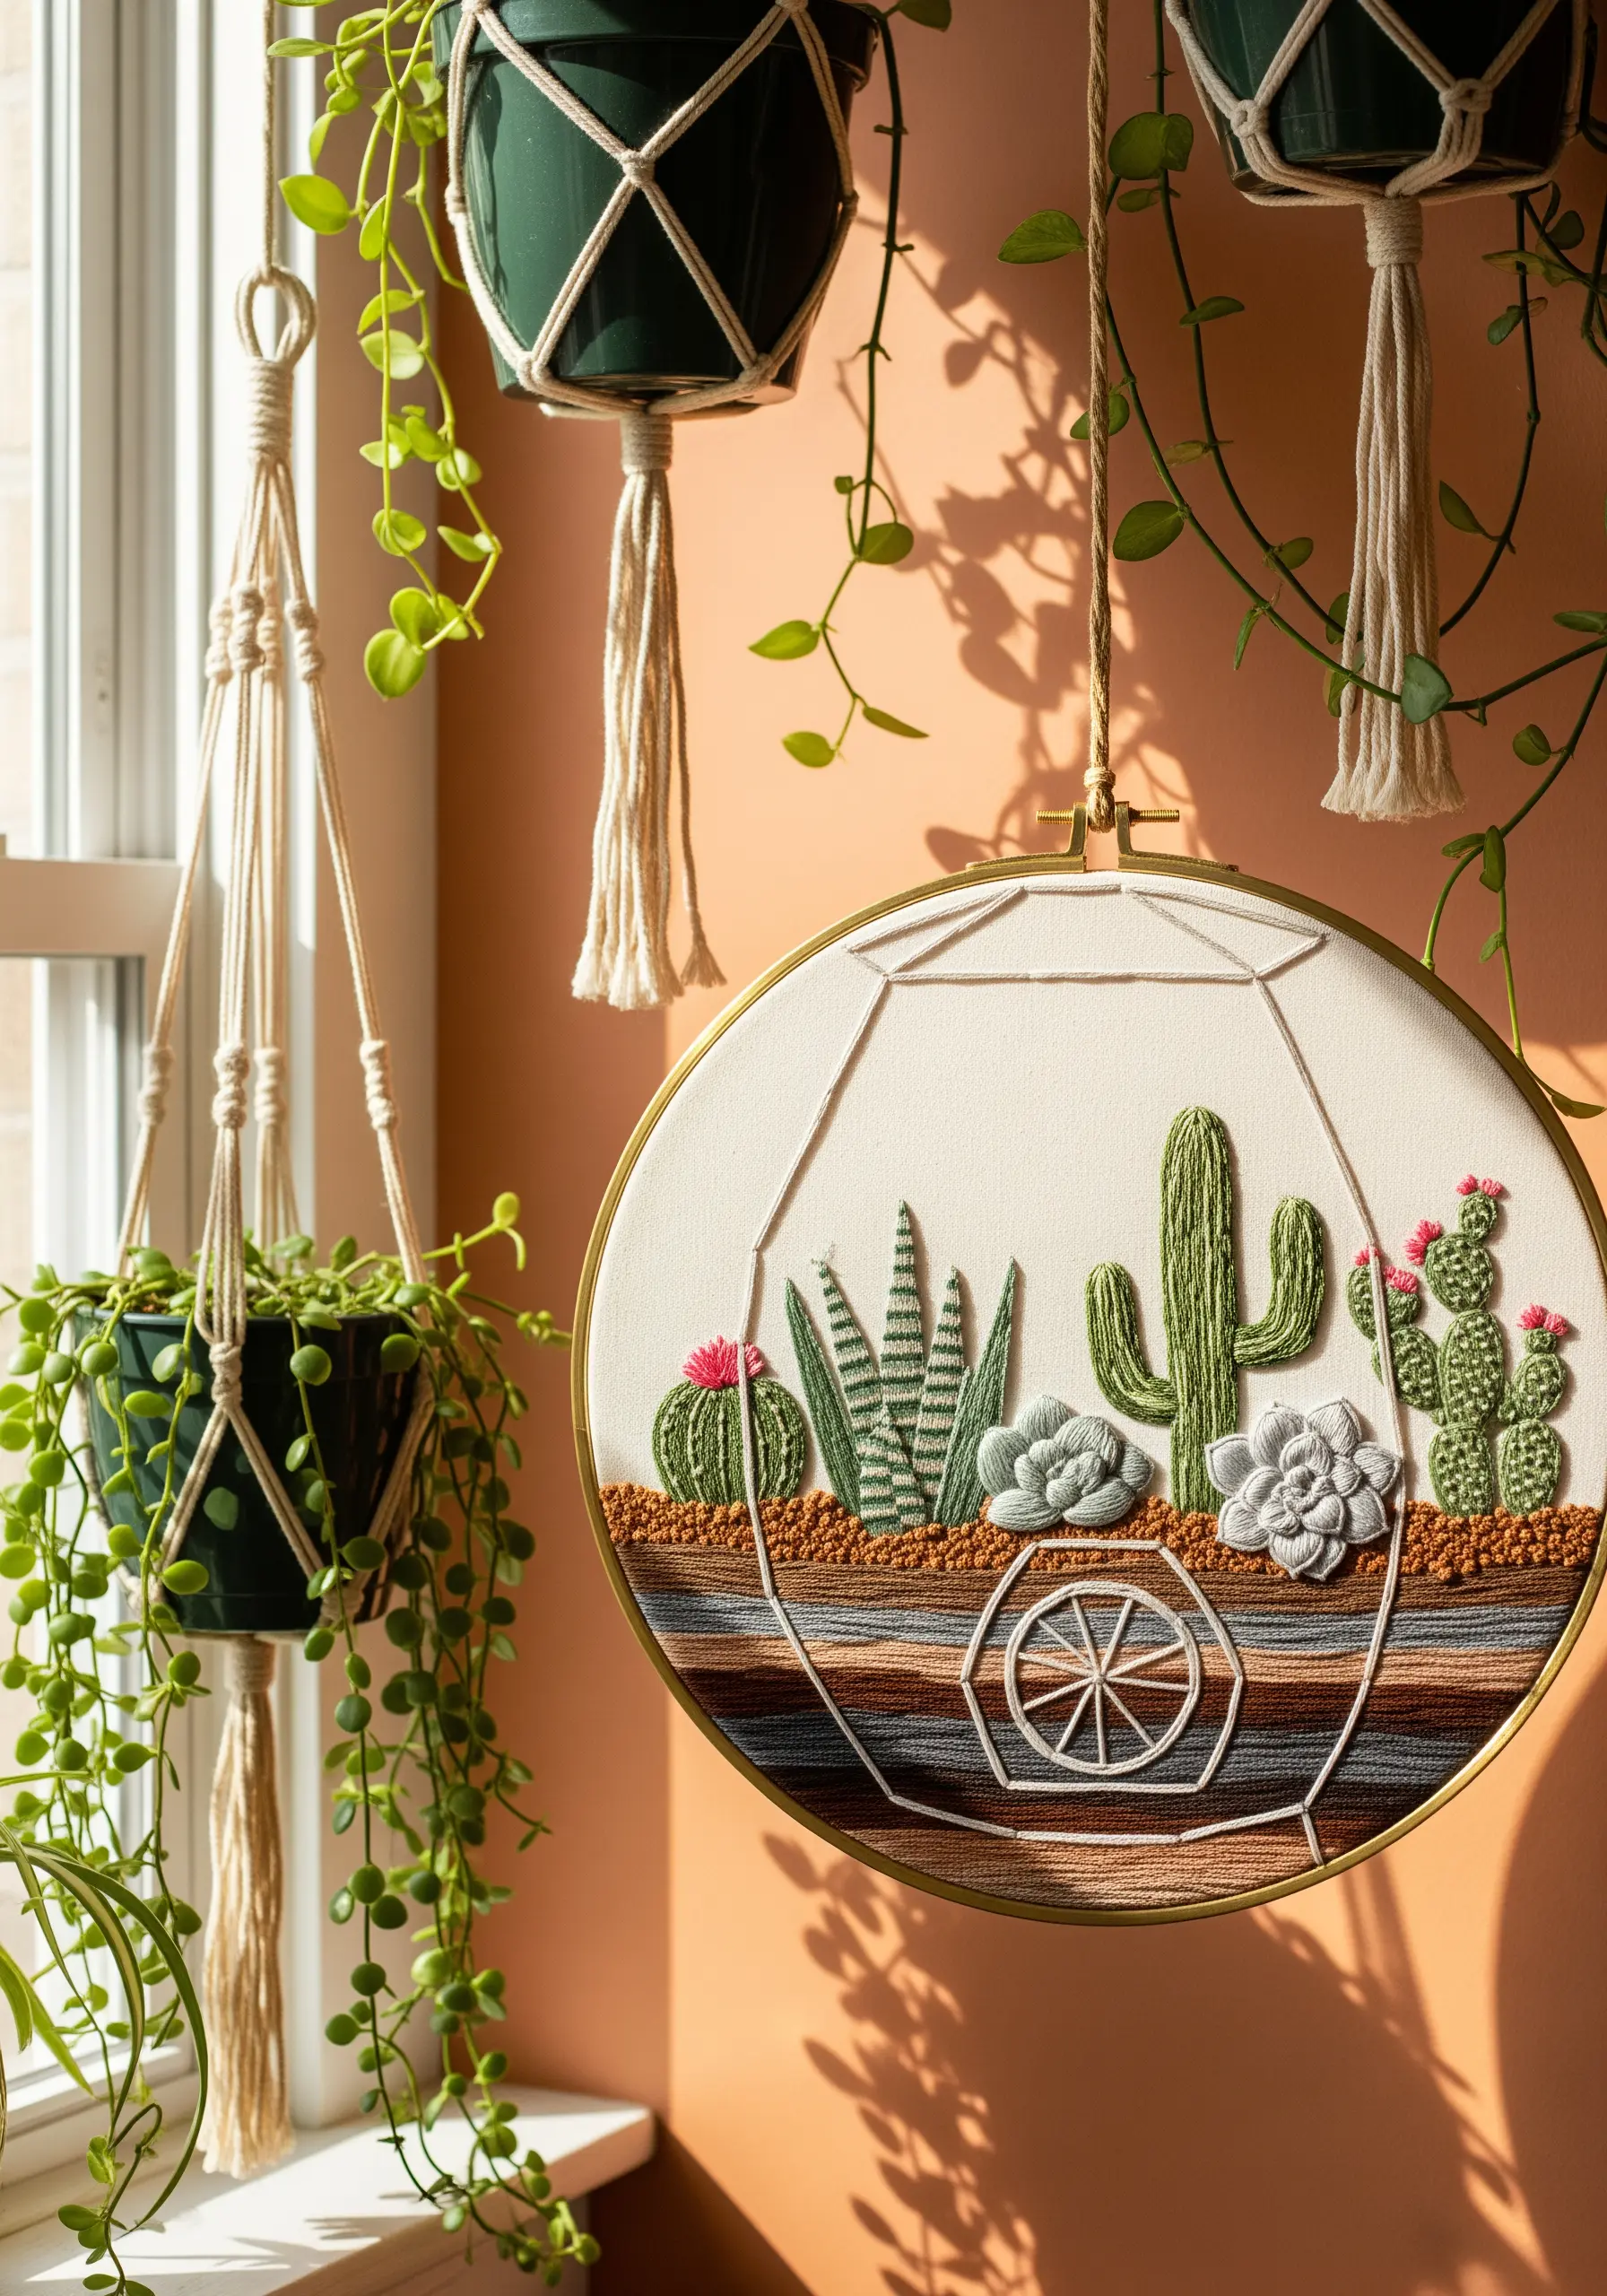
Create the illusion of a self-contained ecosystem by carefully layering different textures within a defined shape.
Use padded satin stitch for plump succulents, giving them a raised, 3D quality. For spiky cacti, try a series of single straight stitches or fishbone stitch.
Define the layers of soil and sand at the base with simple, horizontal satin stitches in earthy tones.
The geometric outline of the terrarium provides a modern frame that contains and highlights the organic textures within.
15. Combine Opaque and Sheer Elements for Realism
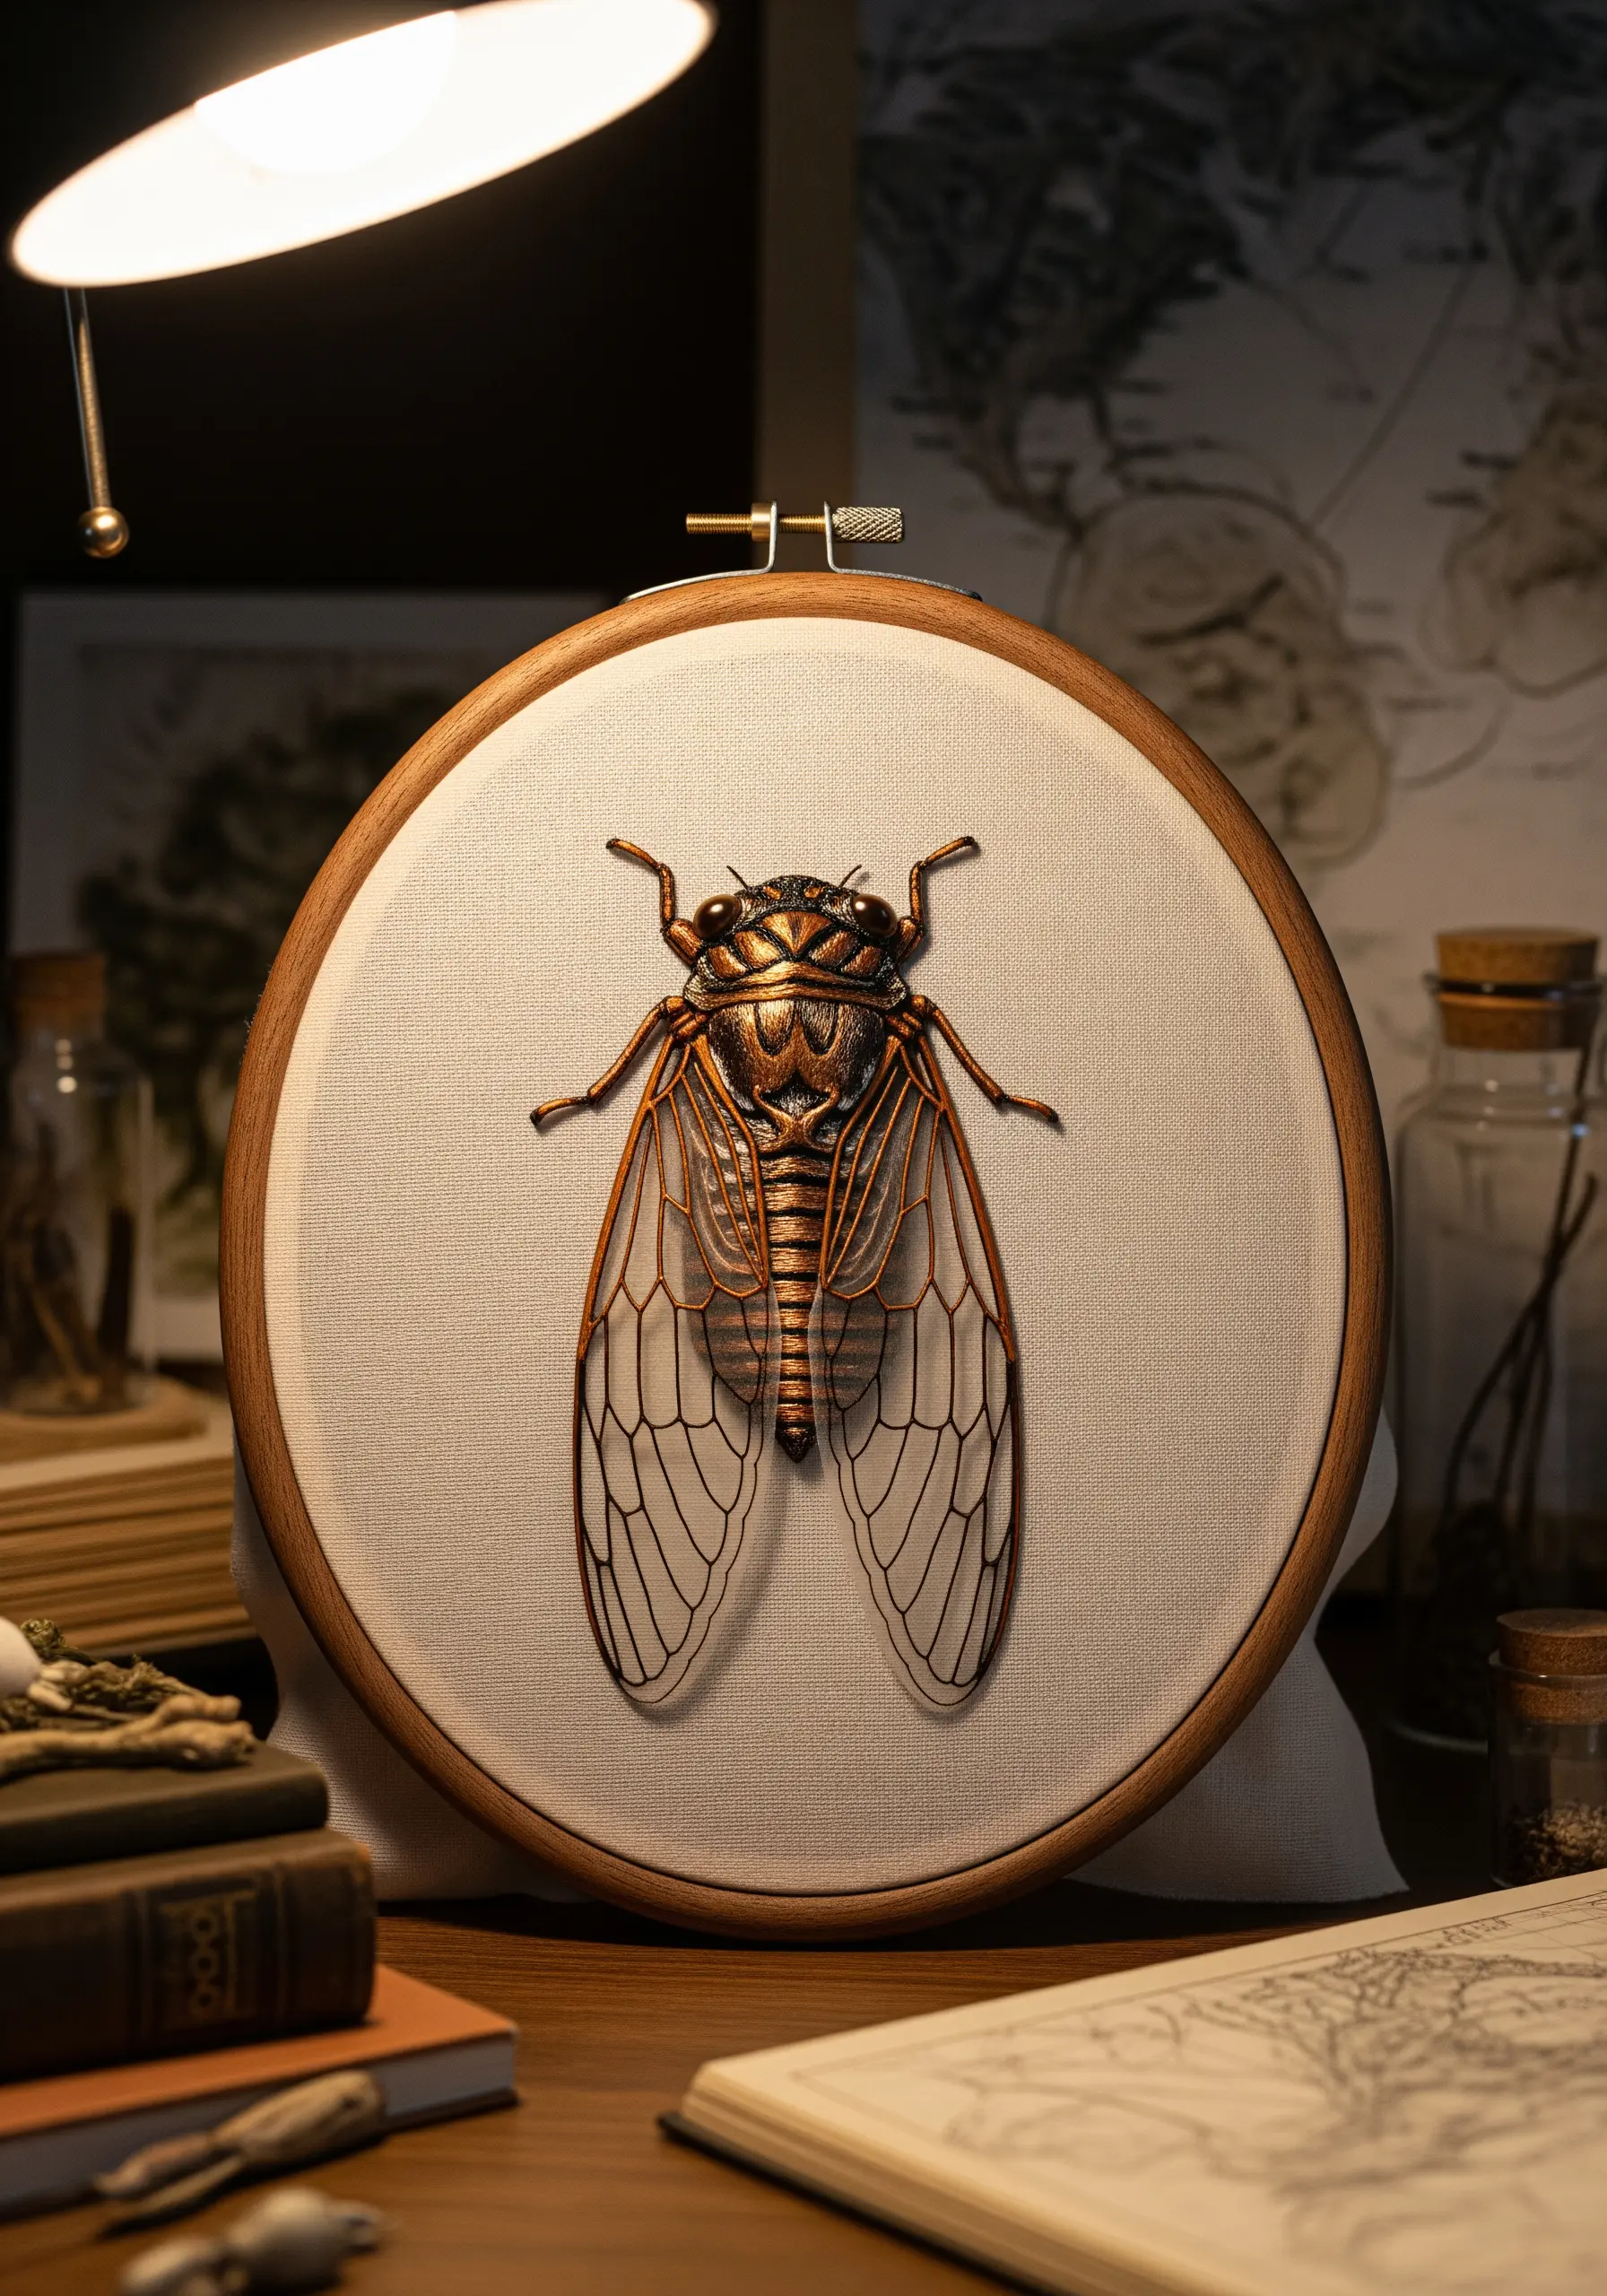
Add a surprising touch of realism to insect embroidery by using mixed materials for different body parts.
Stitch the body with rich, metallic threads to capture the iridescent sheen of an exoskeleton. Use a padded satin stitch to give it a solid, rounded form.
For the delicate wings, don’t stitch them directly. Instead, appliqué a layer of fine, transparent organza or tulle over your line drawing, allowing the underlying fabric to show through.
This contrast between the solid body and the translucent wings creates a stunningly lifelike effect.
16. Integrate Pressed Botanicals into Your Stitching
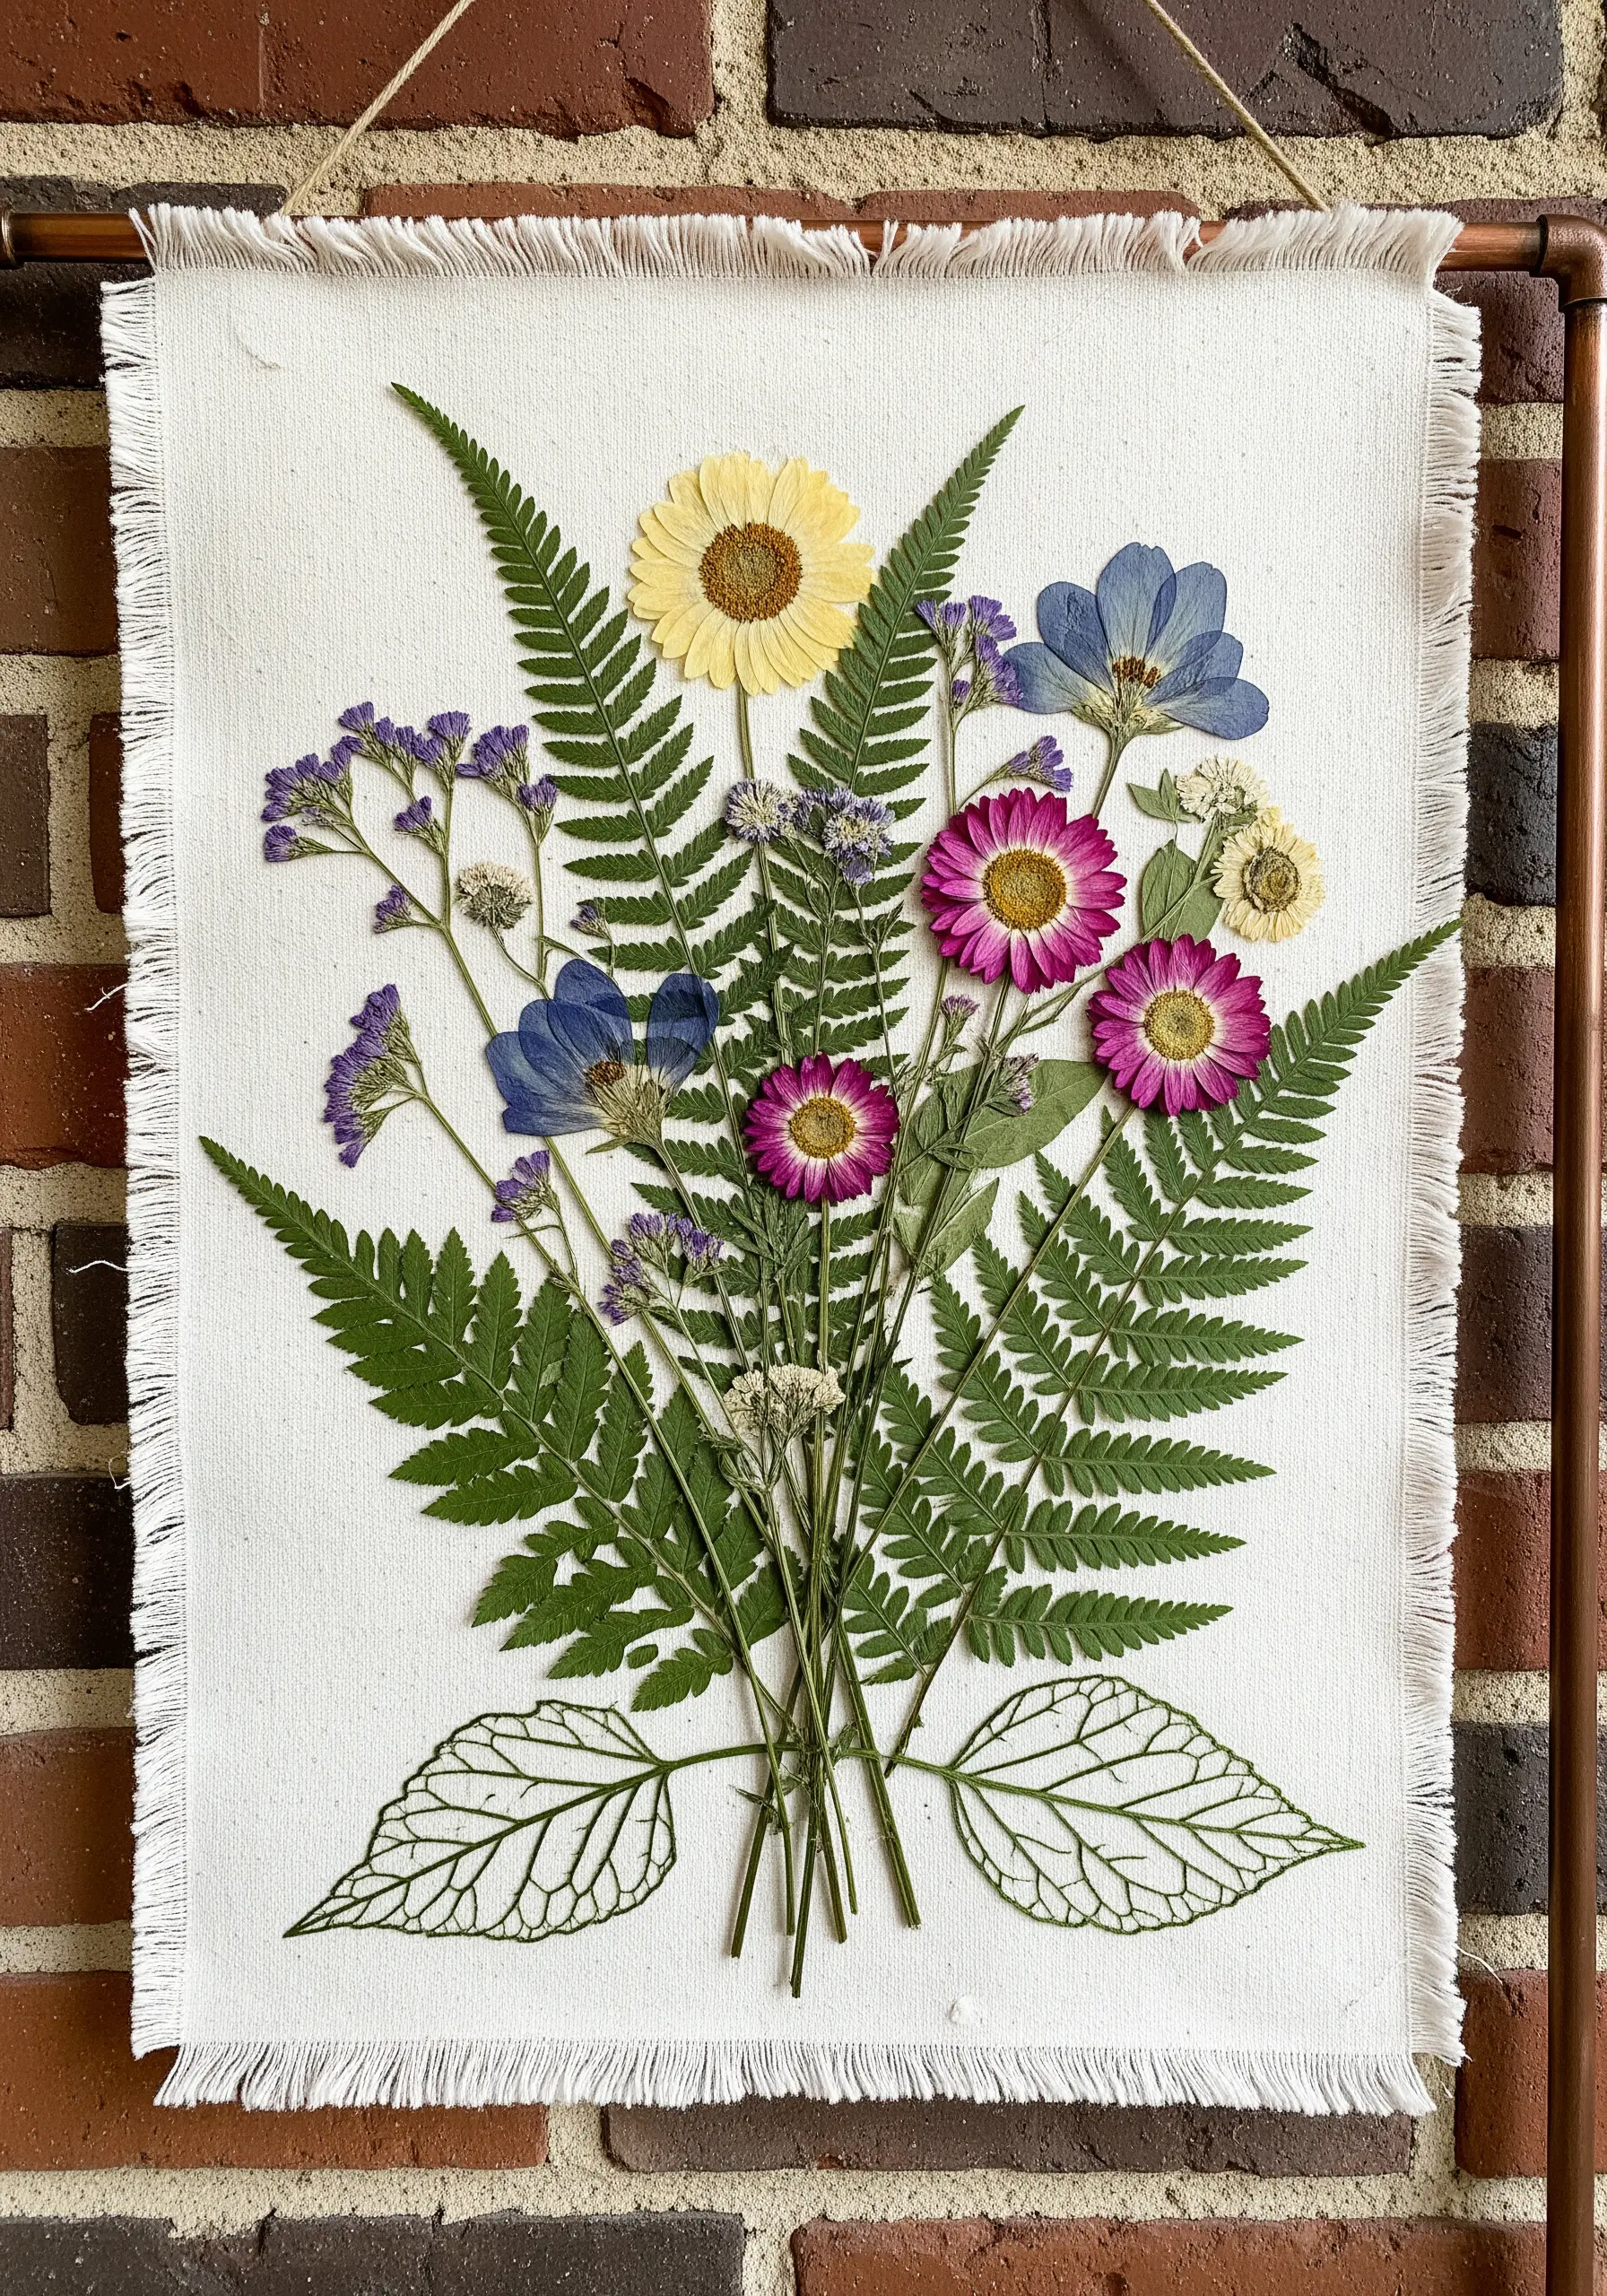
Merge the worlds of embroidery and nature by incorporating real pressed flowers and leaves into your work.
Carefully arrange and secure your dried botanicals onto a sturdy fabric like canvas or linen using a clear, acid-free craft glue.
Instead of stitching over them, add embroidered elements that complement their forms, such as delicate leaf outlines or subtle stems.
This step-by-step pressed flower embroidery technique creates a beautiful mixed-media piece that celebrates organic textures in their truest form.
17. Explore Emotion Through Abstract Color Blocking

Convey a mood or a memory through the simple power of color and clean lines.
Create solid blocks of color using disciplined satin stitches, ensuring each stitch lies flat and parallel to the next for a smooth, uniform finish.
Choose a color palette that evokes a specific feeling, like the warm, nostalgic gradient of a sunset.
Even the most simple embroidery patterns can become a sophisticated statement when you focus on precise execution and thoughtful color selection.
18. Translate Topography into Thread
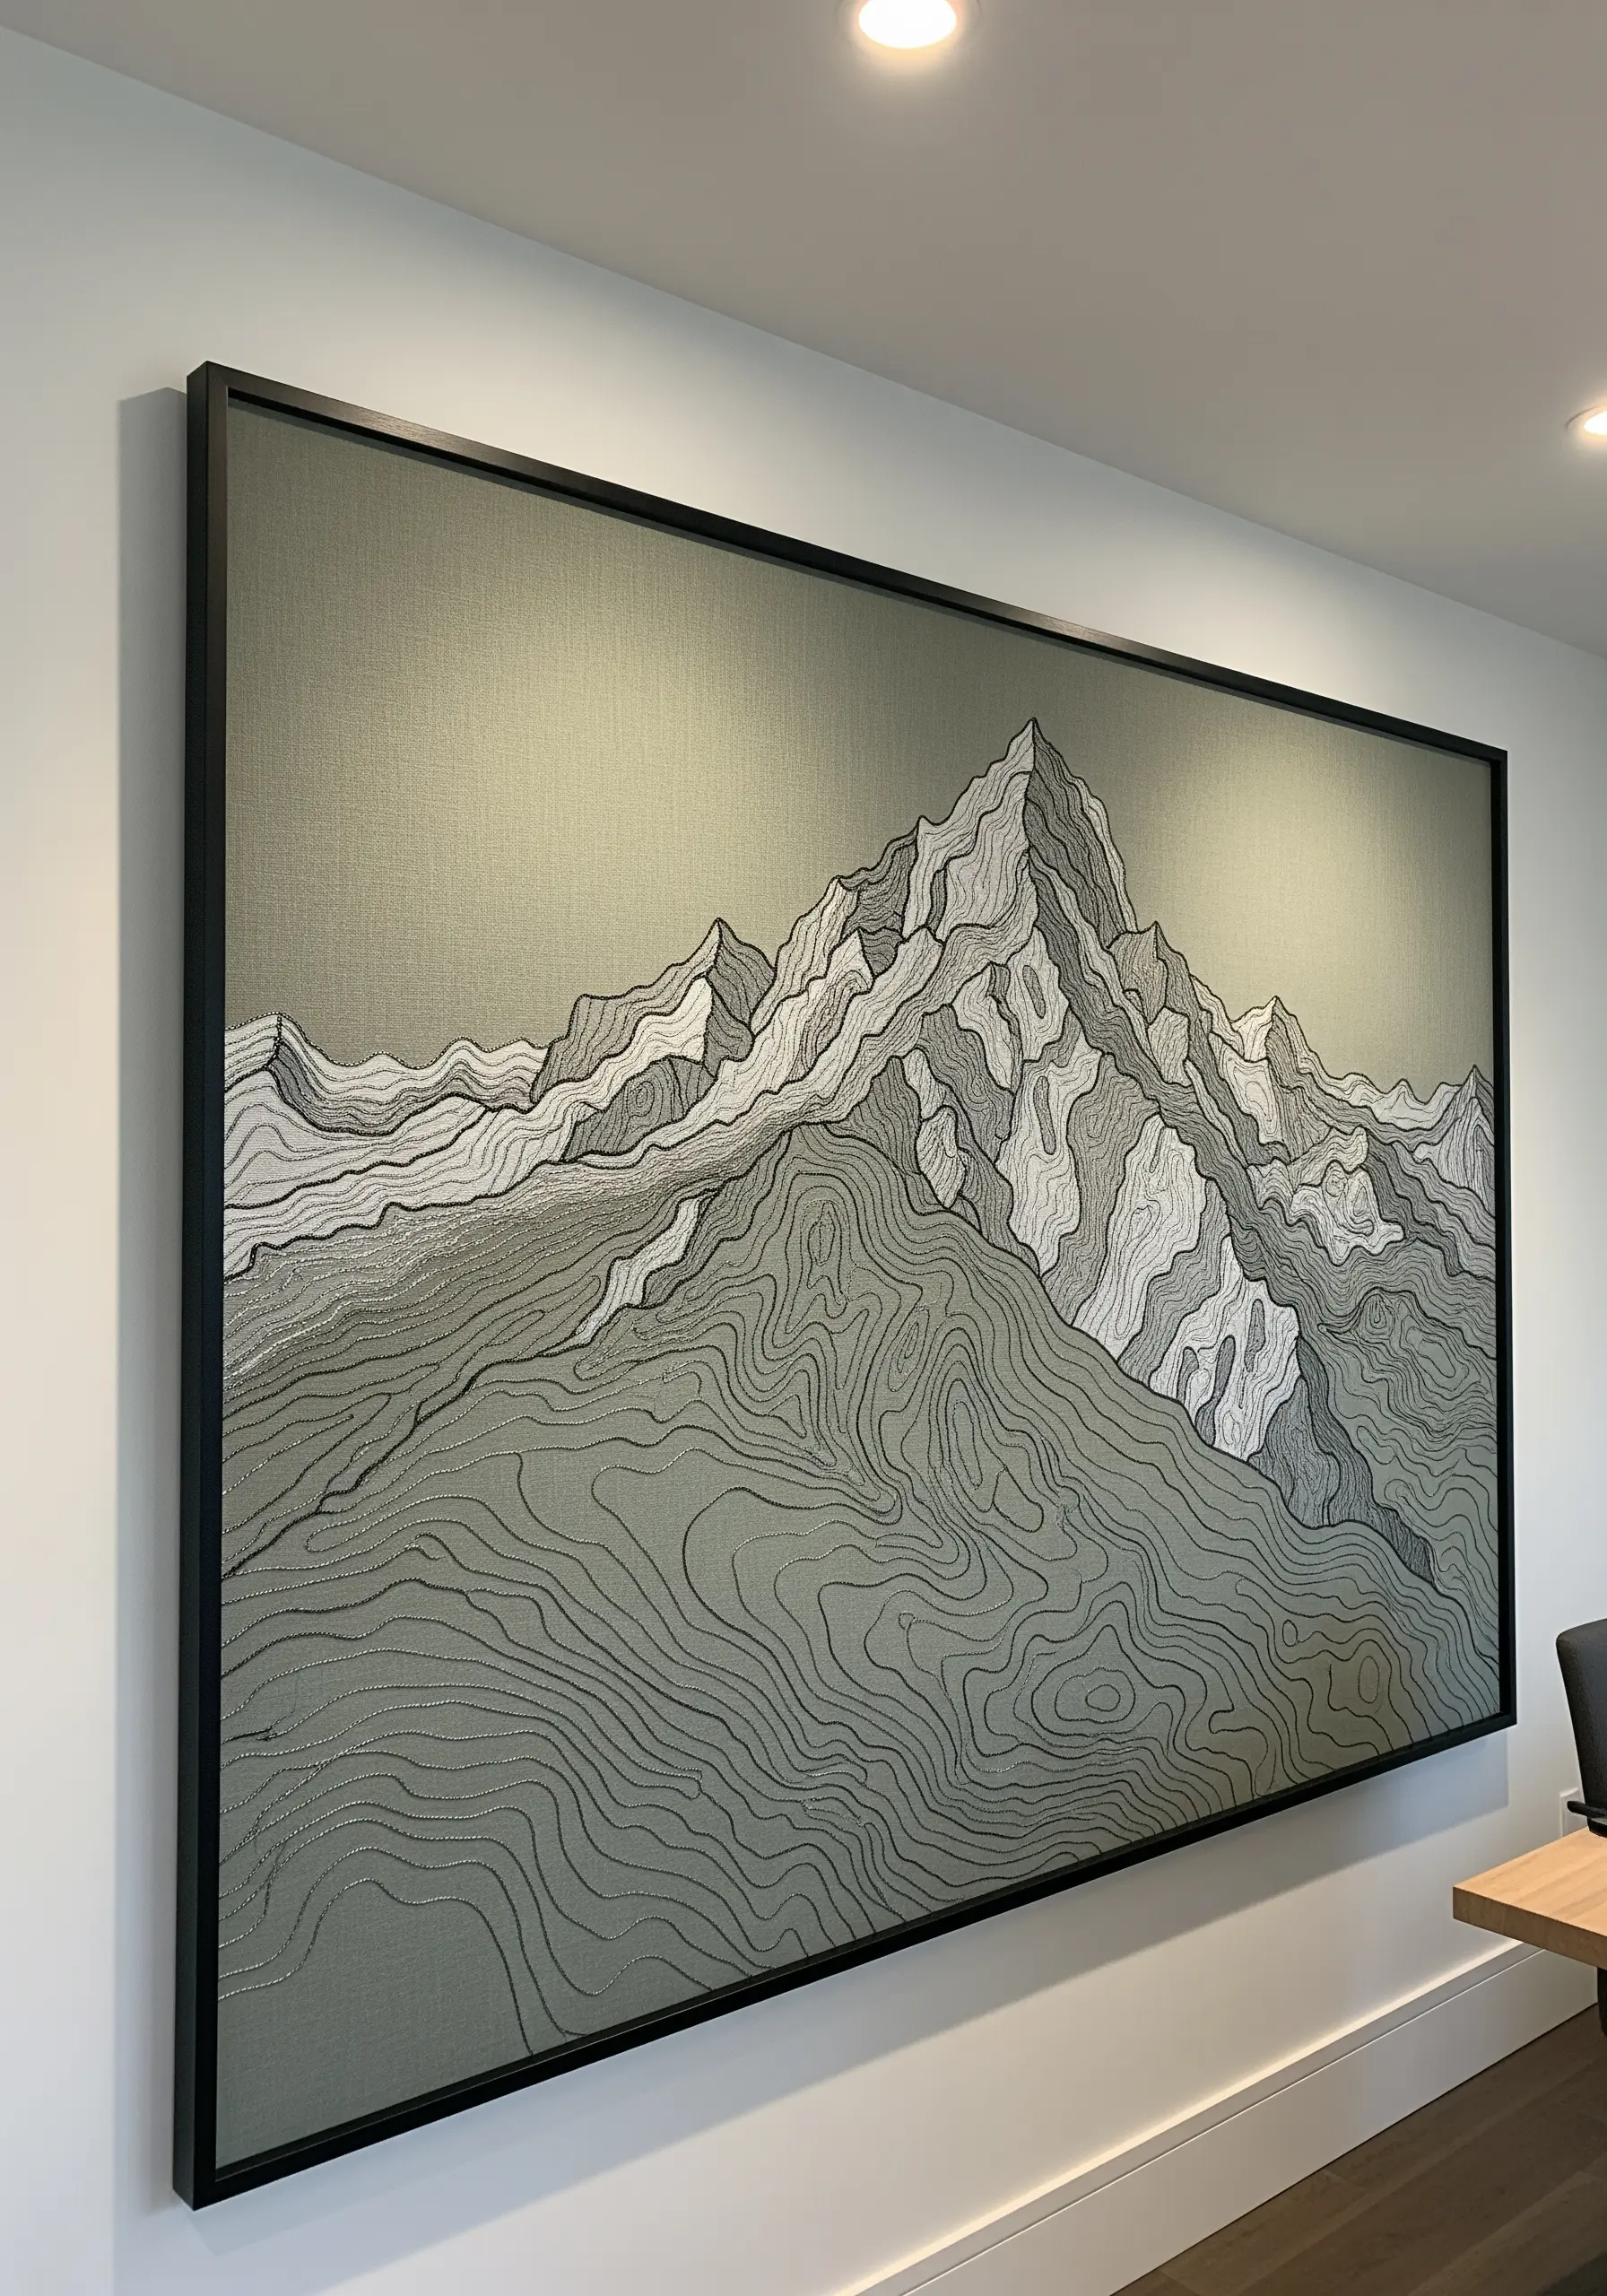
Use embroidery to create a large-scale, textural interpretation of a topographic map.
Define the primary ridges of the mountains with bold outlines using a stem stitch or chain stitch.
Fill the sections with varied stitches to indicate elevation and shadow—use dense seed stitches for darker areas and sparser straight stitches for lighter, sun-hit slopes.
Working on a large canvas transforms this concept from a simple drawing into an immersive piece of art with incredible depth and detail.
19. Create Playful Texture with French Knots
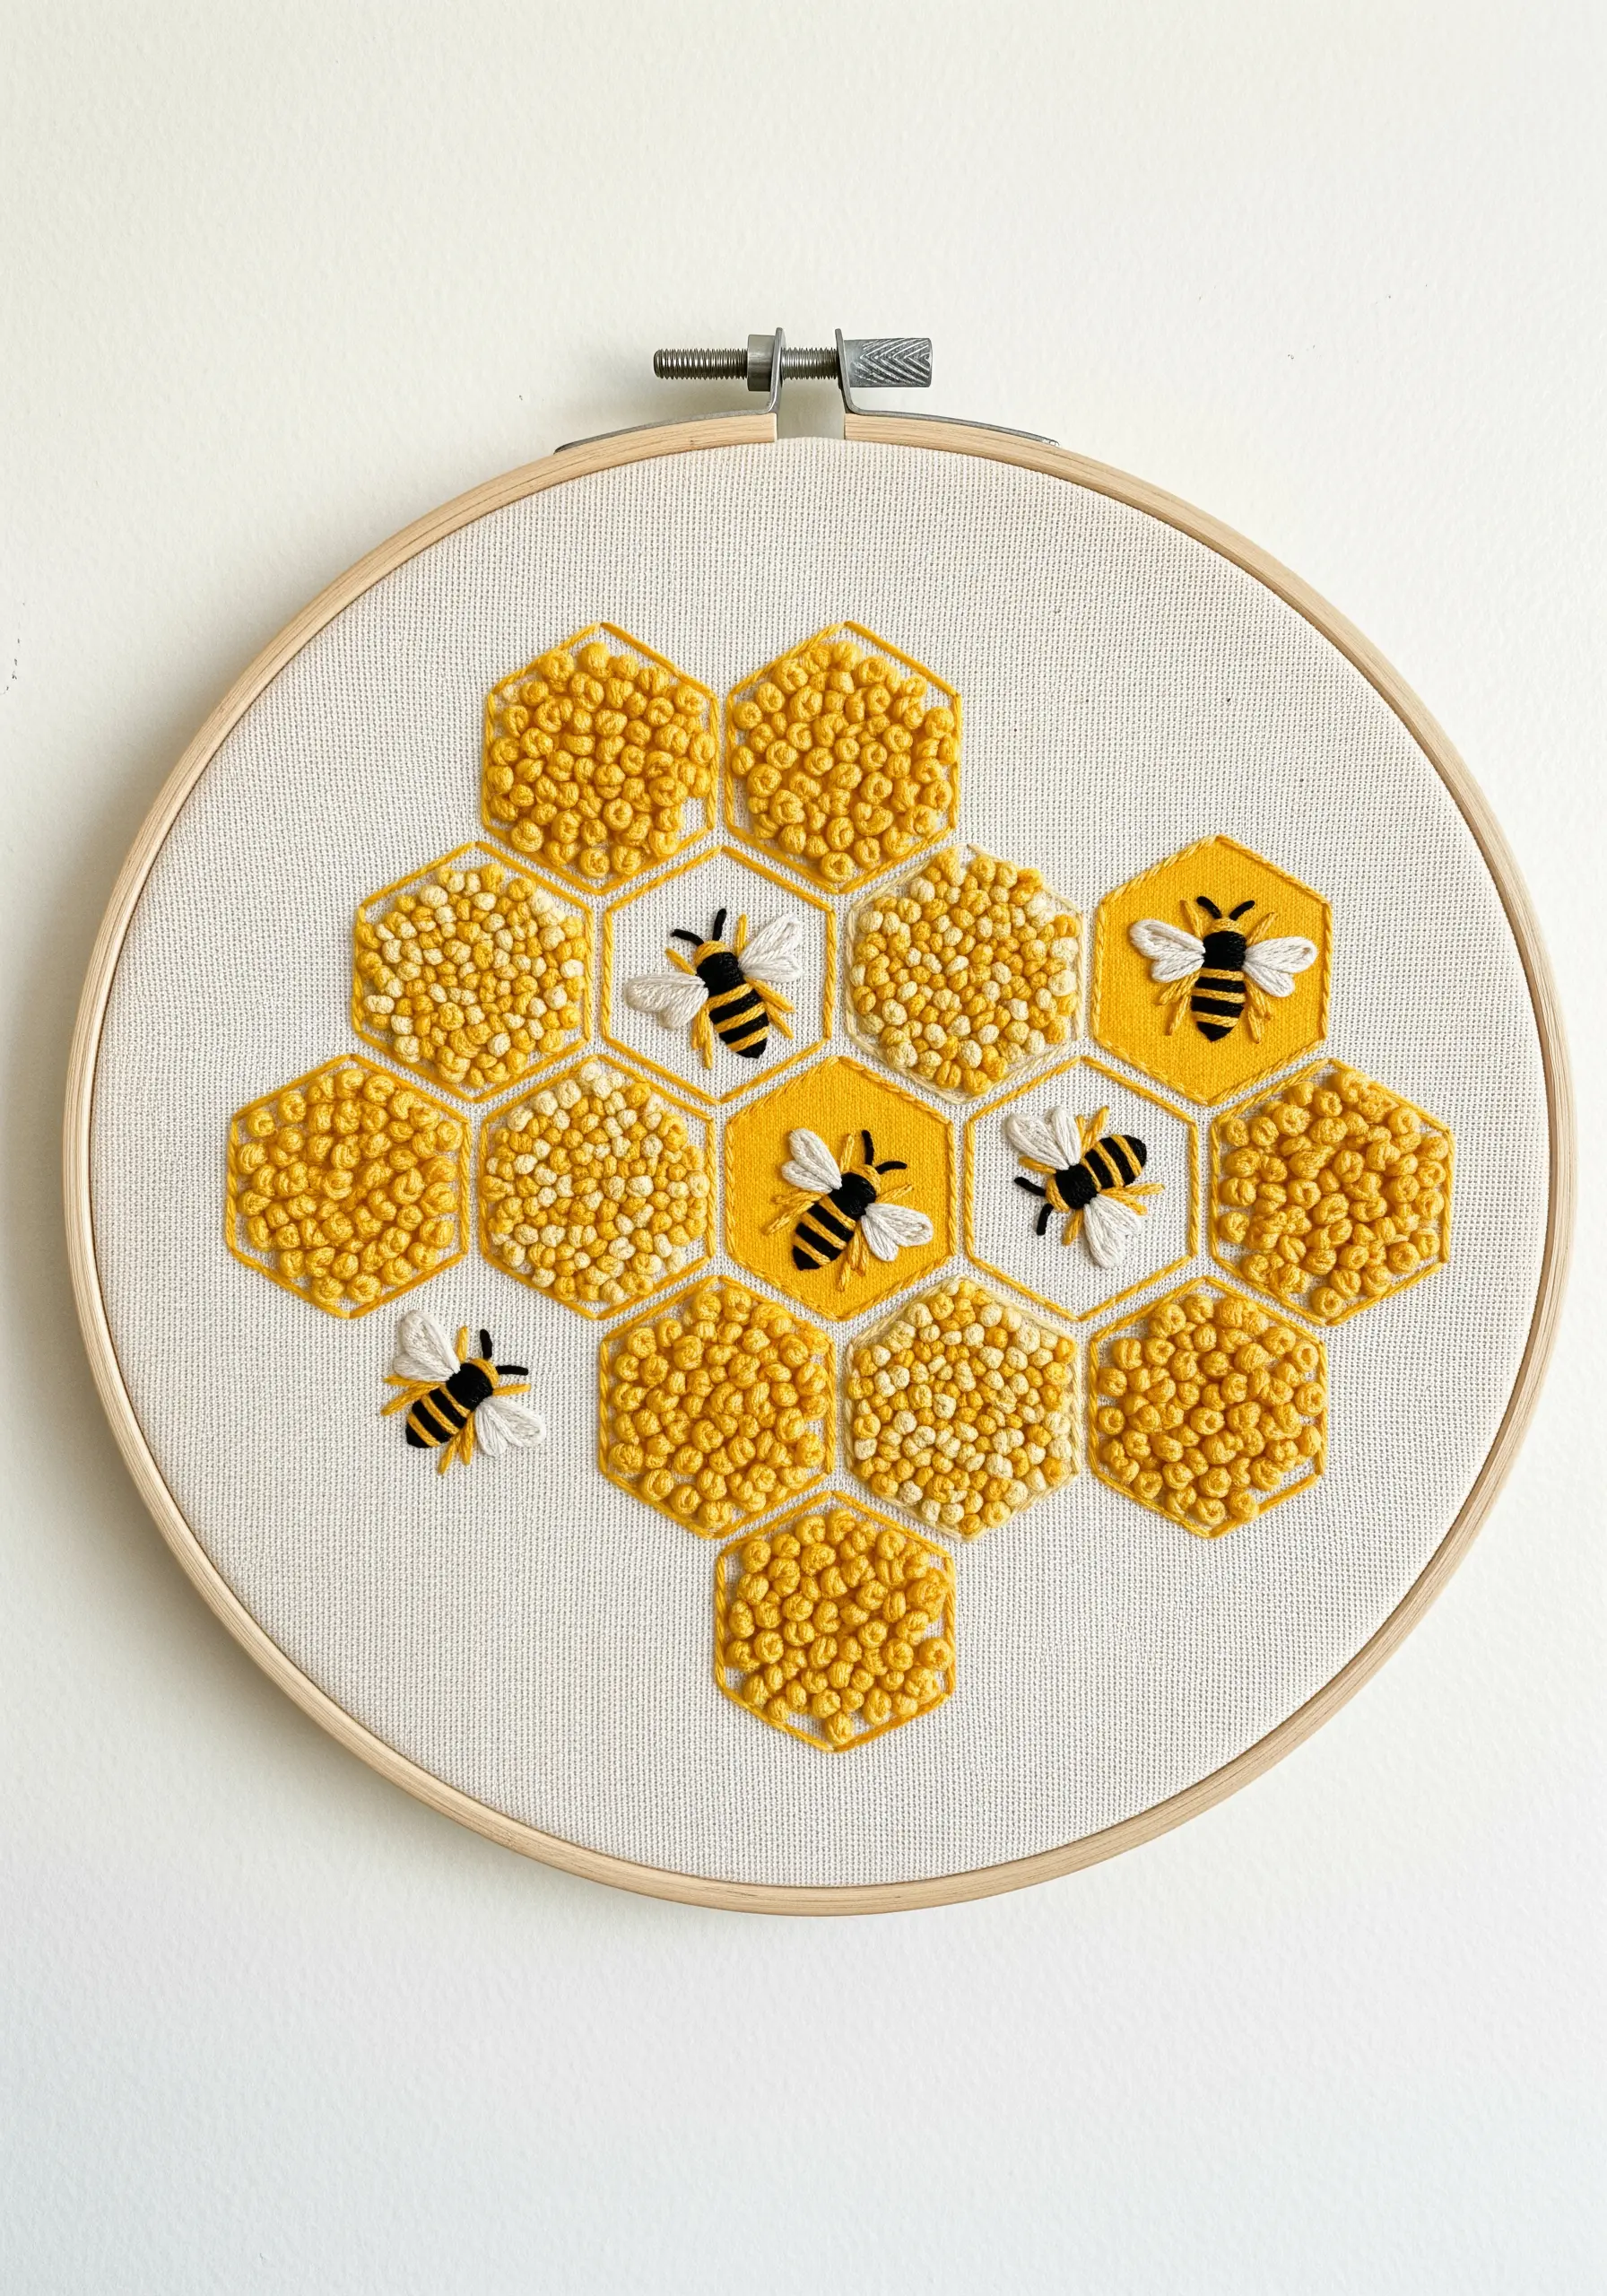
Go beyond using French knots as simple accents and use them as a primary fill stitch to create a wonderfully bubbly texture.
Outline your honeycomb shapes with a simple backstitch, then fill them with dense clusters of French knots in shades of yellow and gold.
Vary the density of the knots—packing some cells tightly while leaving others more sparse—to create visual interest and rhythm.
This technique is meditative, satisfying, and results in a playful, tactile surface.
20. Build Organic Forms with Directional Fill Stitches
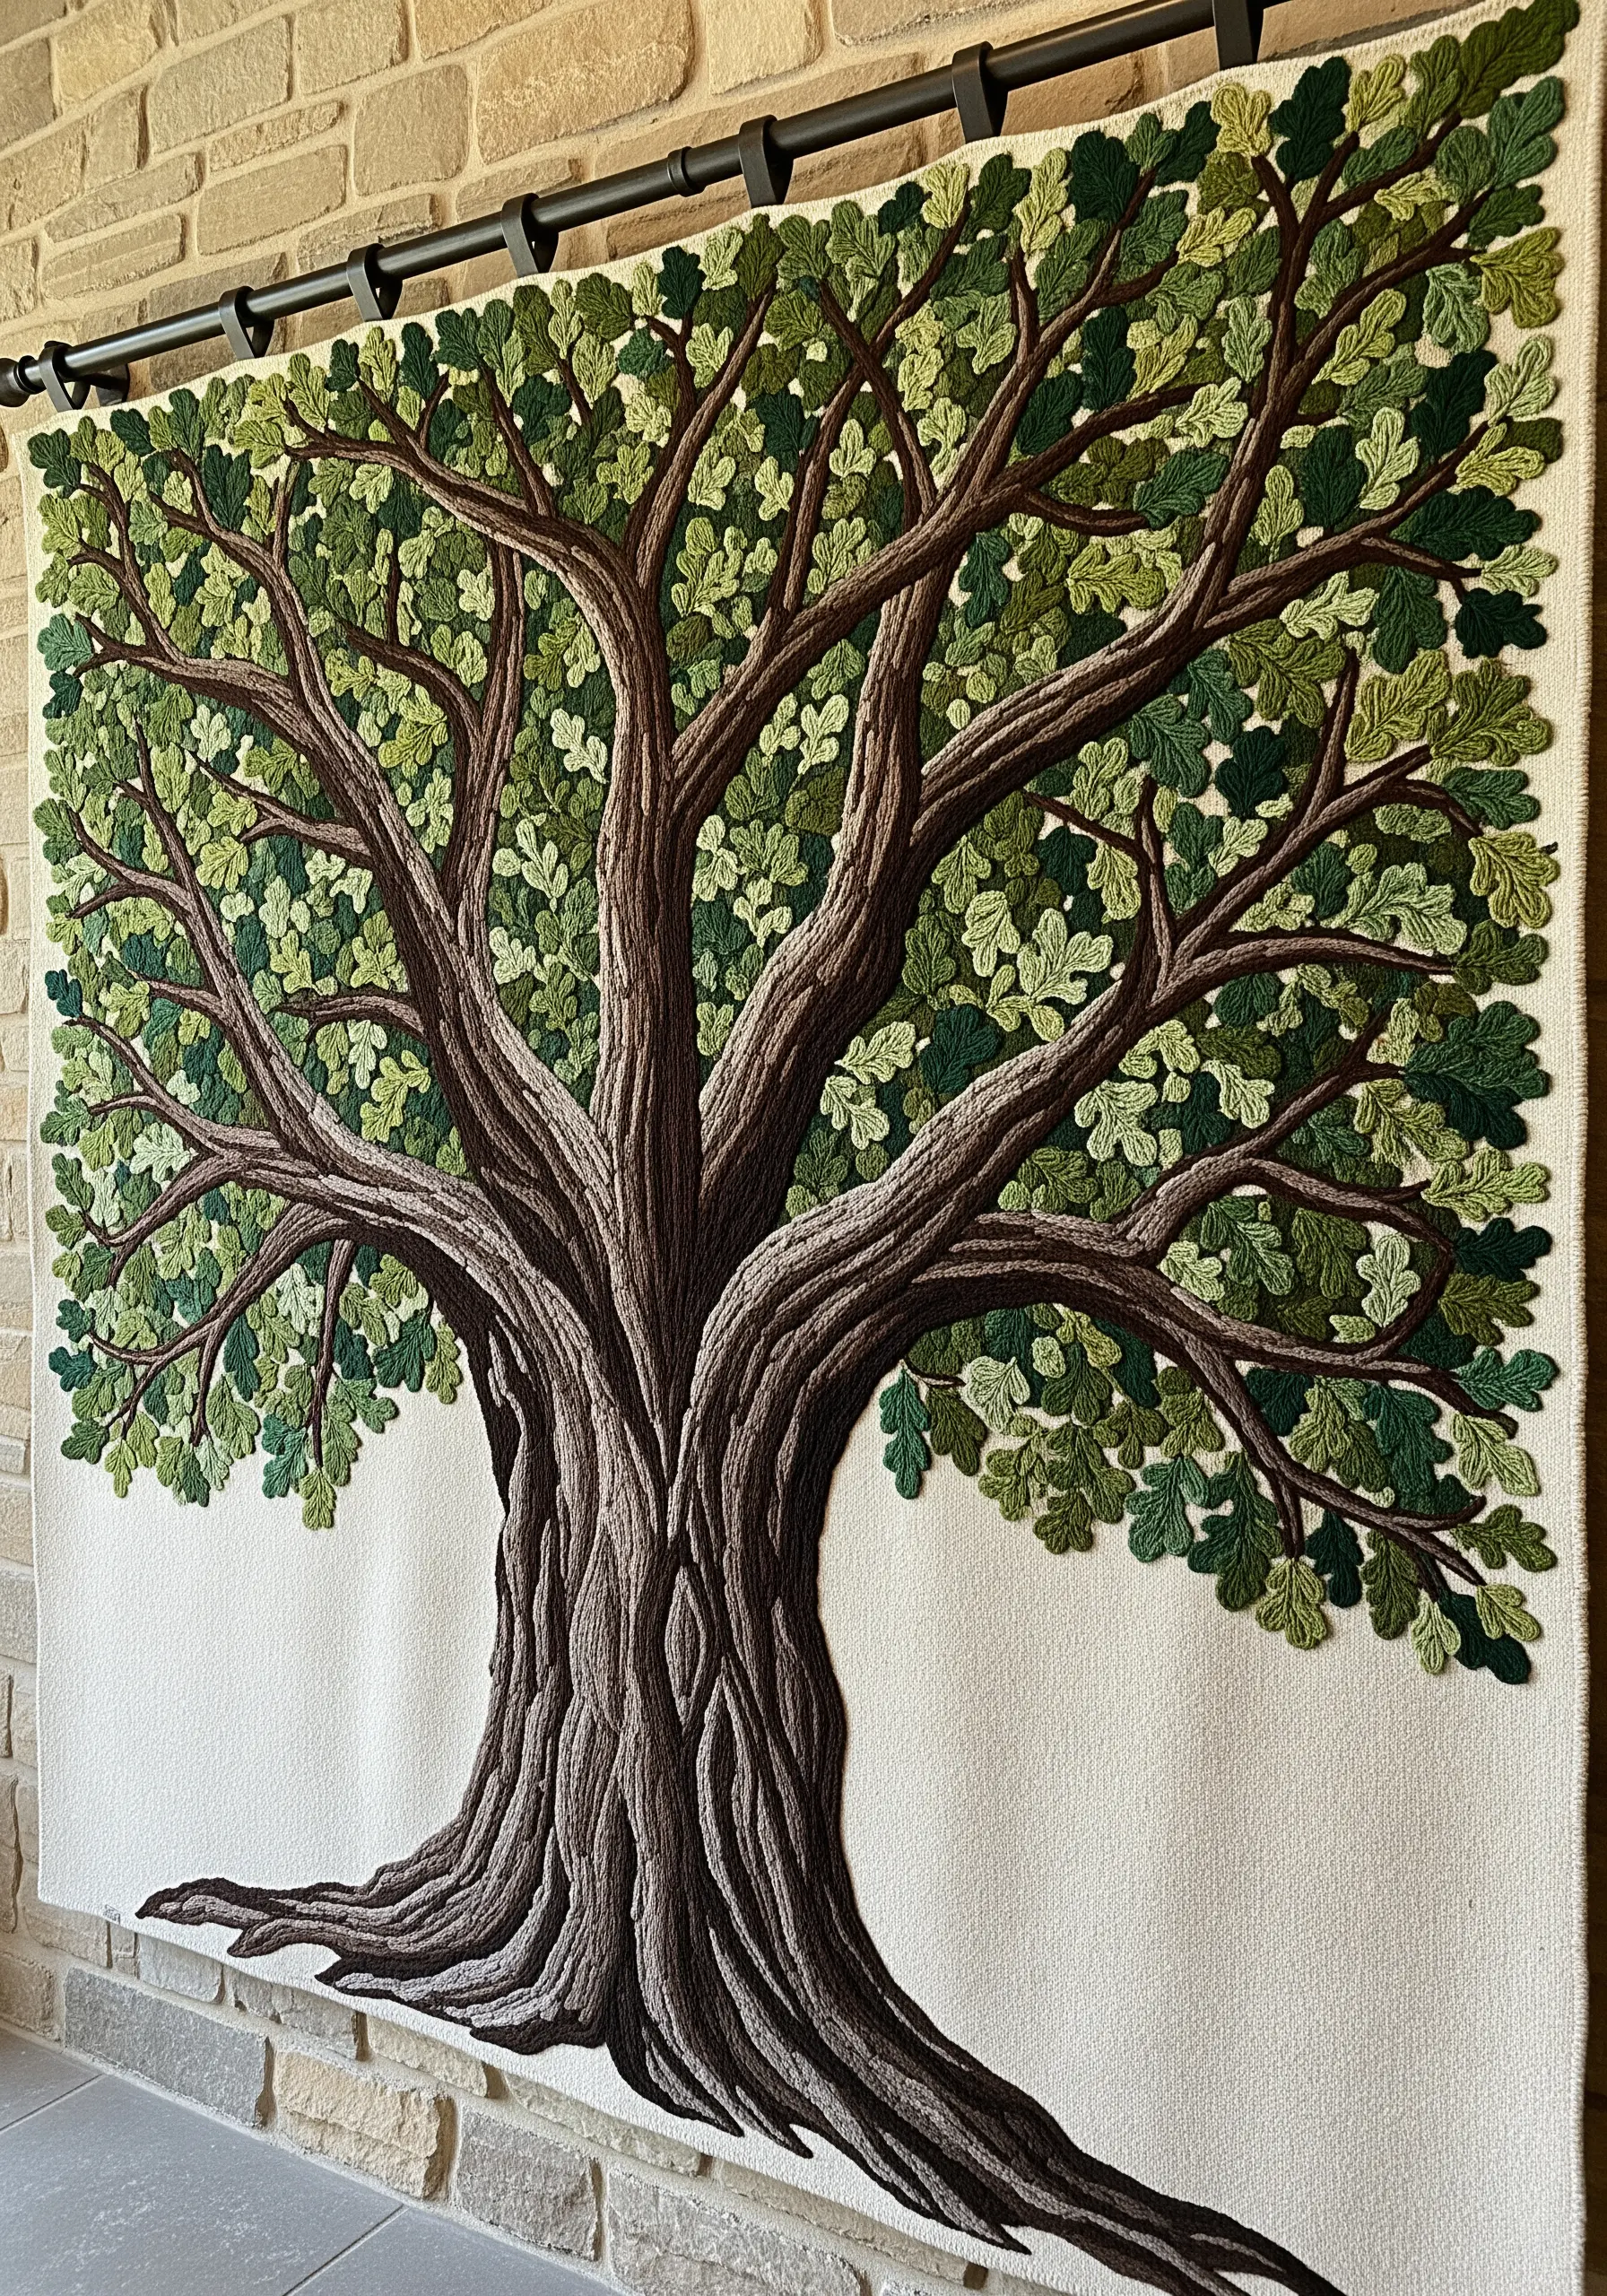
When tackling a complex organic subject like a large tree, let the direction of your stitches define its form.
For the trunk and branches, use a mix of long-and-short stitch and satin stitch, always angling your needle to follow the natural curves and grain of the wood.
Use variegated threads to create subtle shifts in color that mimic light and shadow on the bark.
For the leaves, simple fishbone stitches or detached chain stitches in various greens will create a sense of lush, layered foliage without needing photorealistic detail.
21. Convey Lightness with Detached and Open Stitches
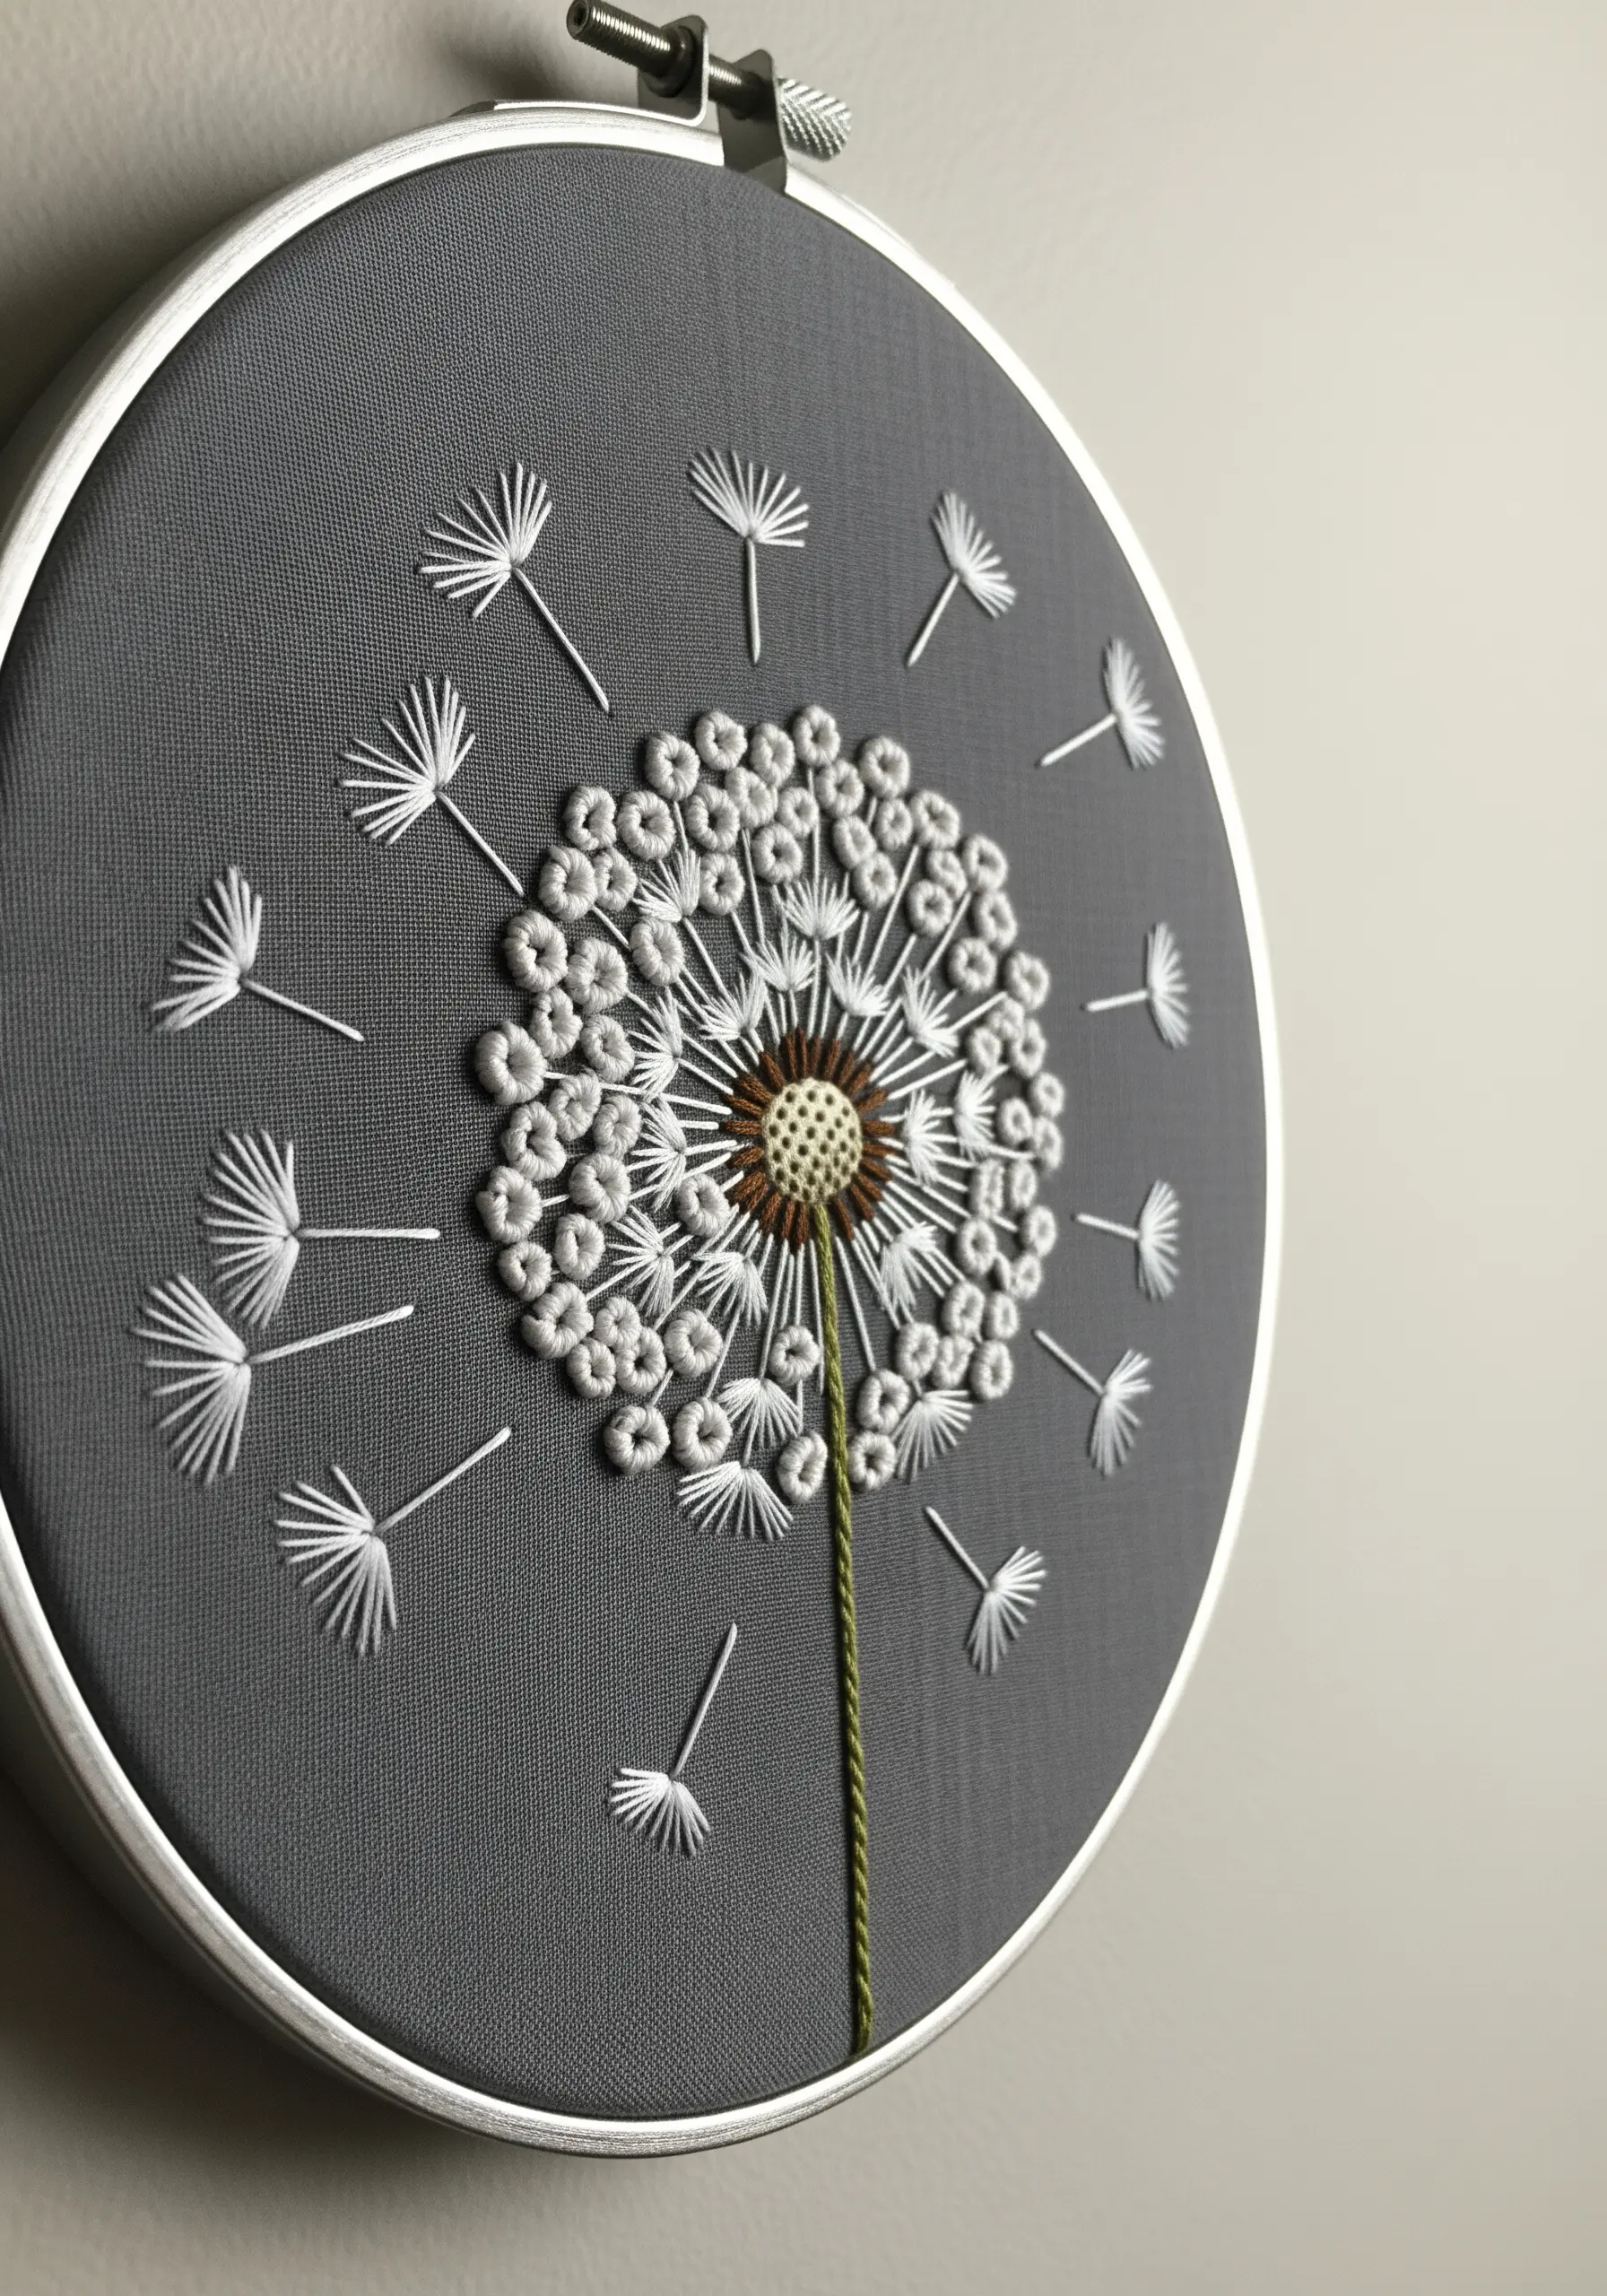
Capture the delicate, airy quality of a dandelion clock by choosing stitches that feel light and create movement.
Use detached chain stitches or fly stitches for the individual seeds, scattering them across the fabric as if caught in a breeze.
For the central puff, a ring of looped bullion knots or French knots creates a dense core, while the radiating stems are simple straight stitches.
The contrast between the dense center and the floating seeds is what gives this design its magical, ephemeral quality.
22. Find Inspiration in Microscopic Patterns
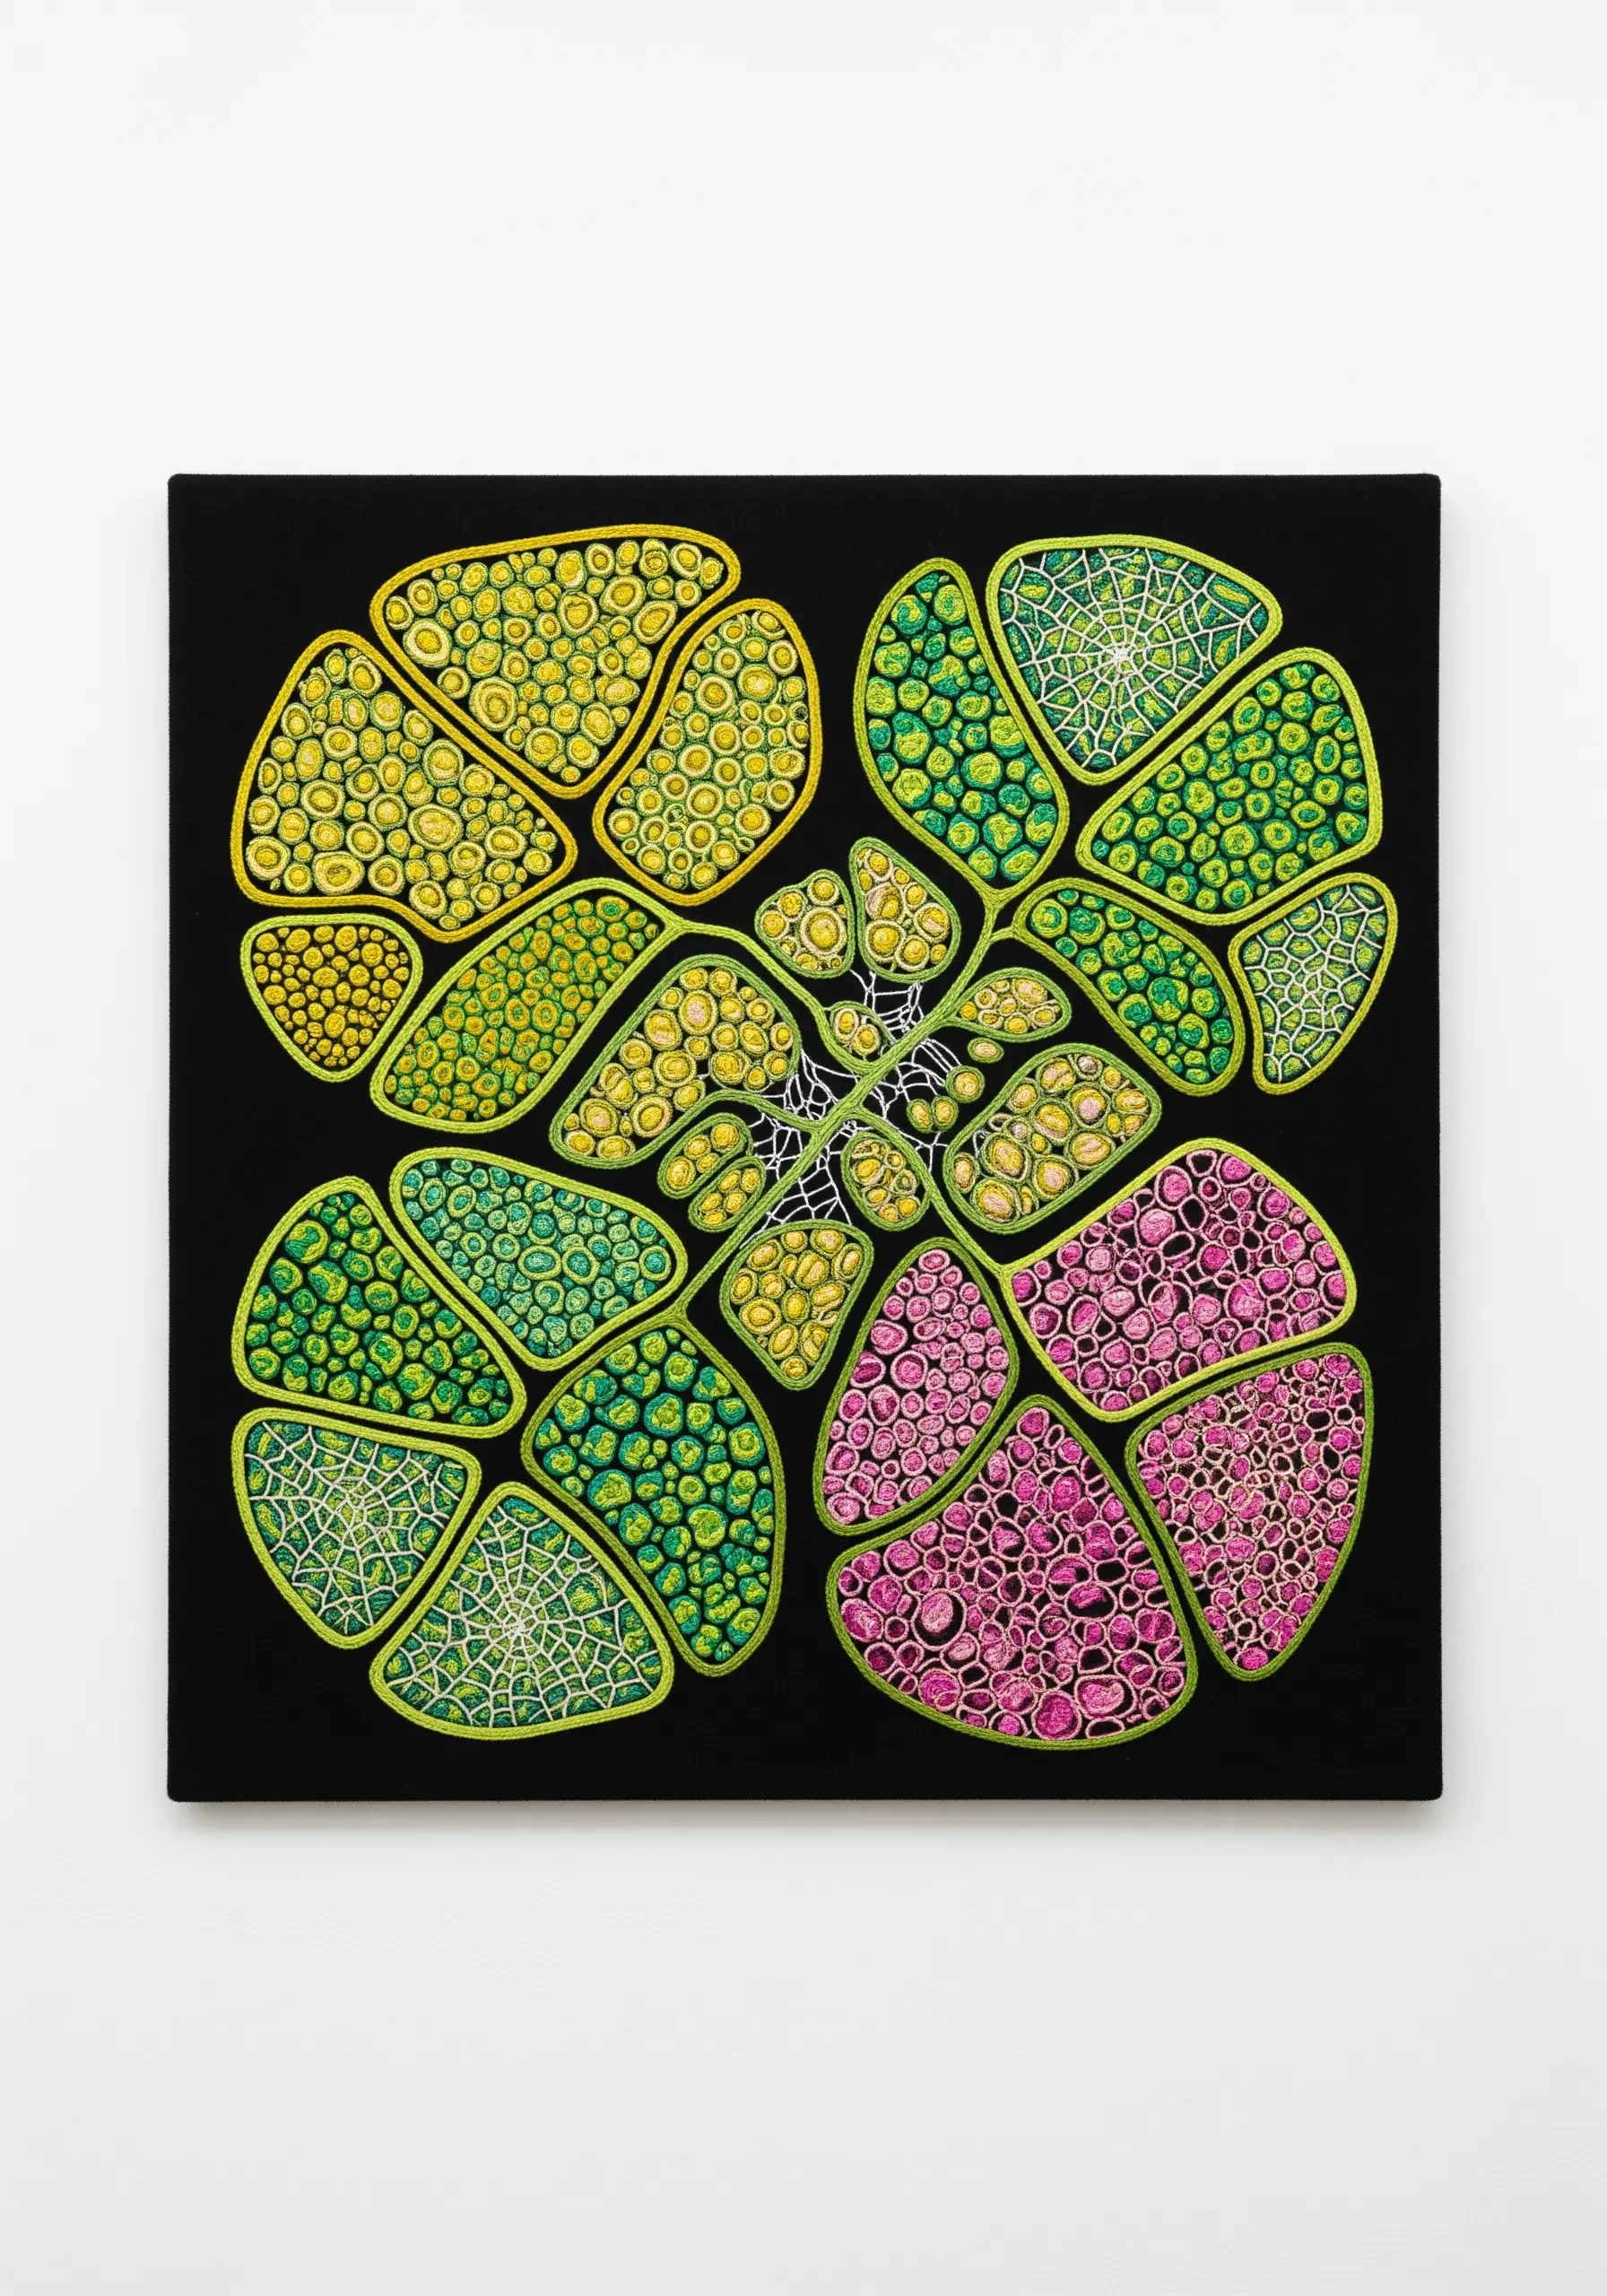
Look to the natural world at a cellular level for unique and compelling abstract design inspiration.
Use a bold backstitch or stem stitch to create the organic, cell-like outlines.
Fill each shape with a different textural stitch or color palette. Dense French knots, seed stitches, or even intricate web-like patterns of straight stitches can create fascinating variations.
Stitching these abstract embroidery patterns on a black background makes the vibrant, biological colors pop with life.
23. Achieve a Spherical Effect with Curved Stitches
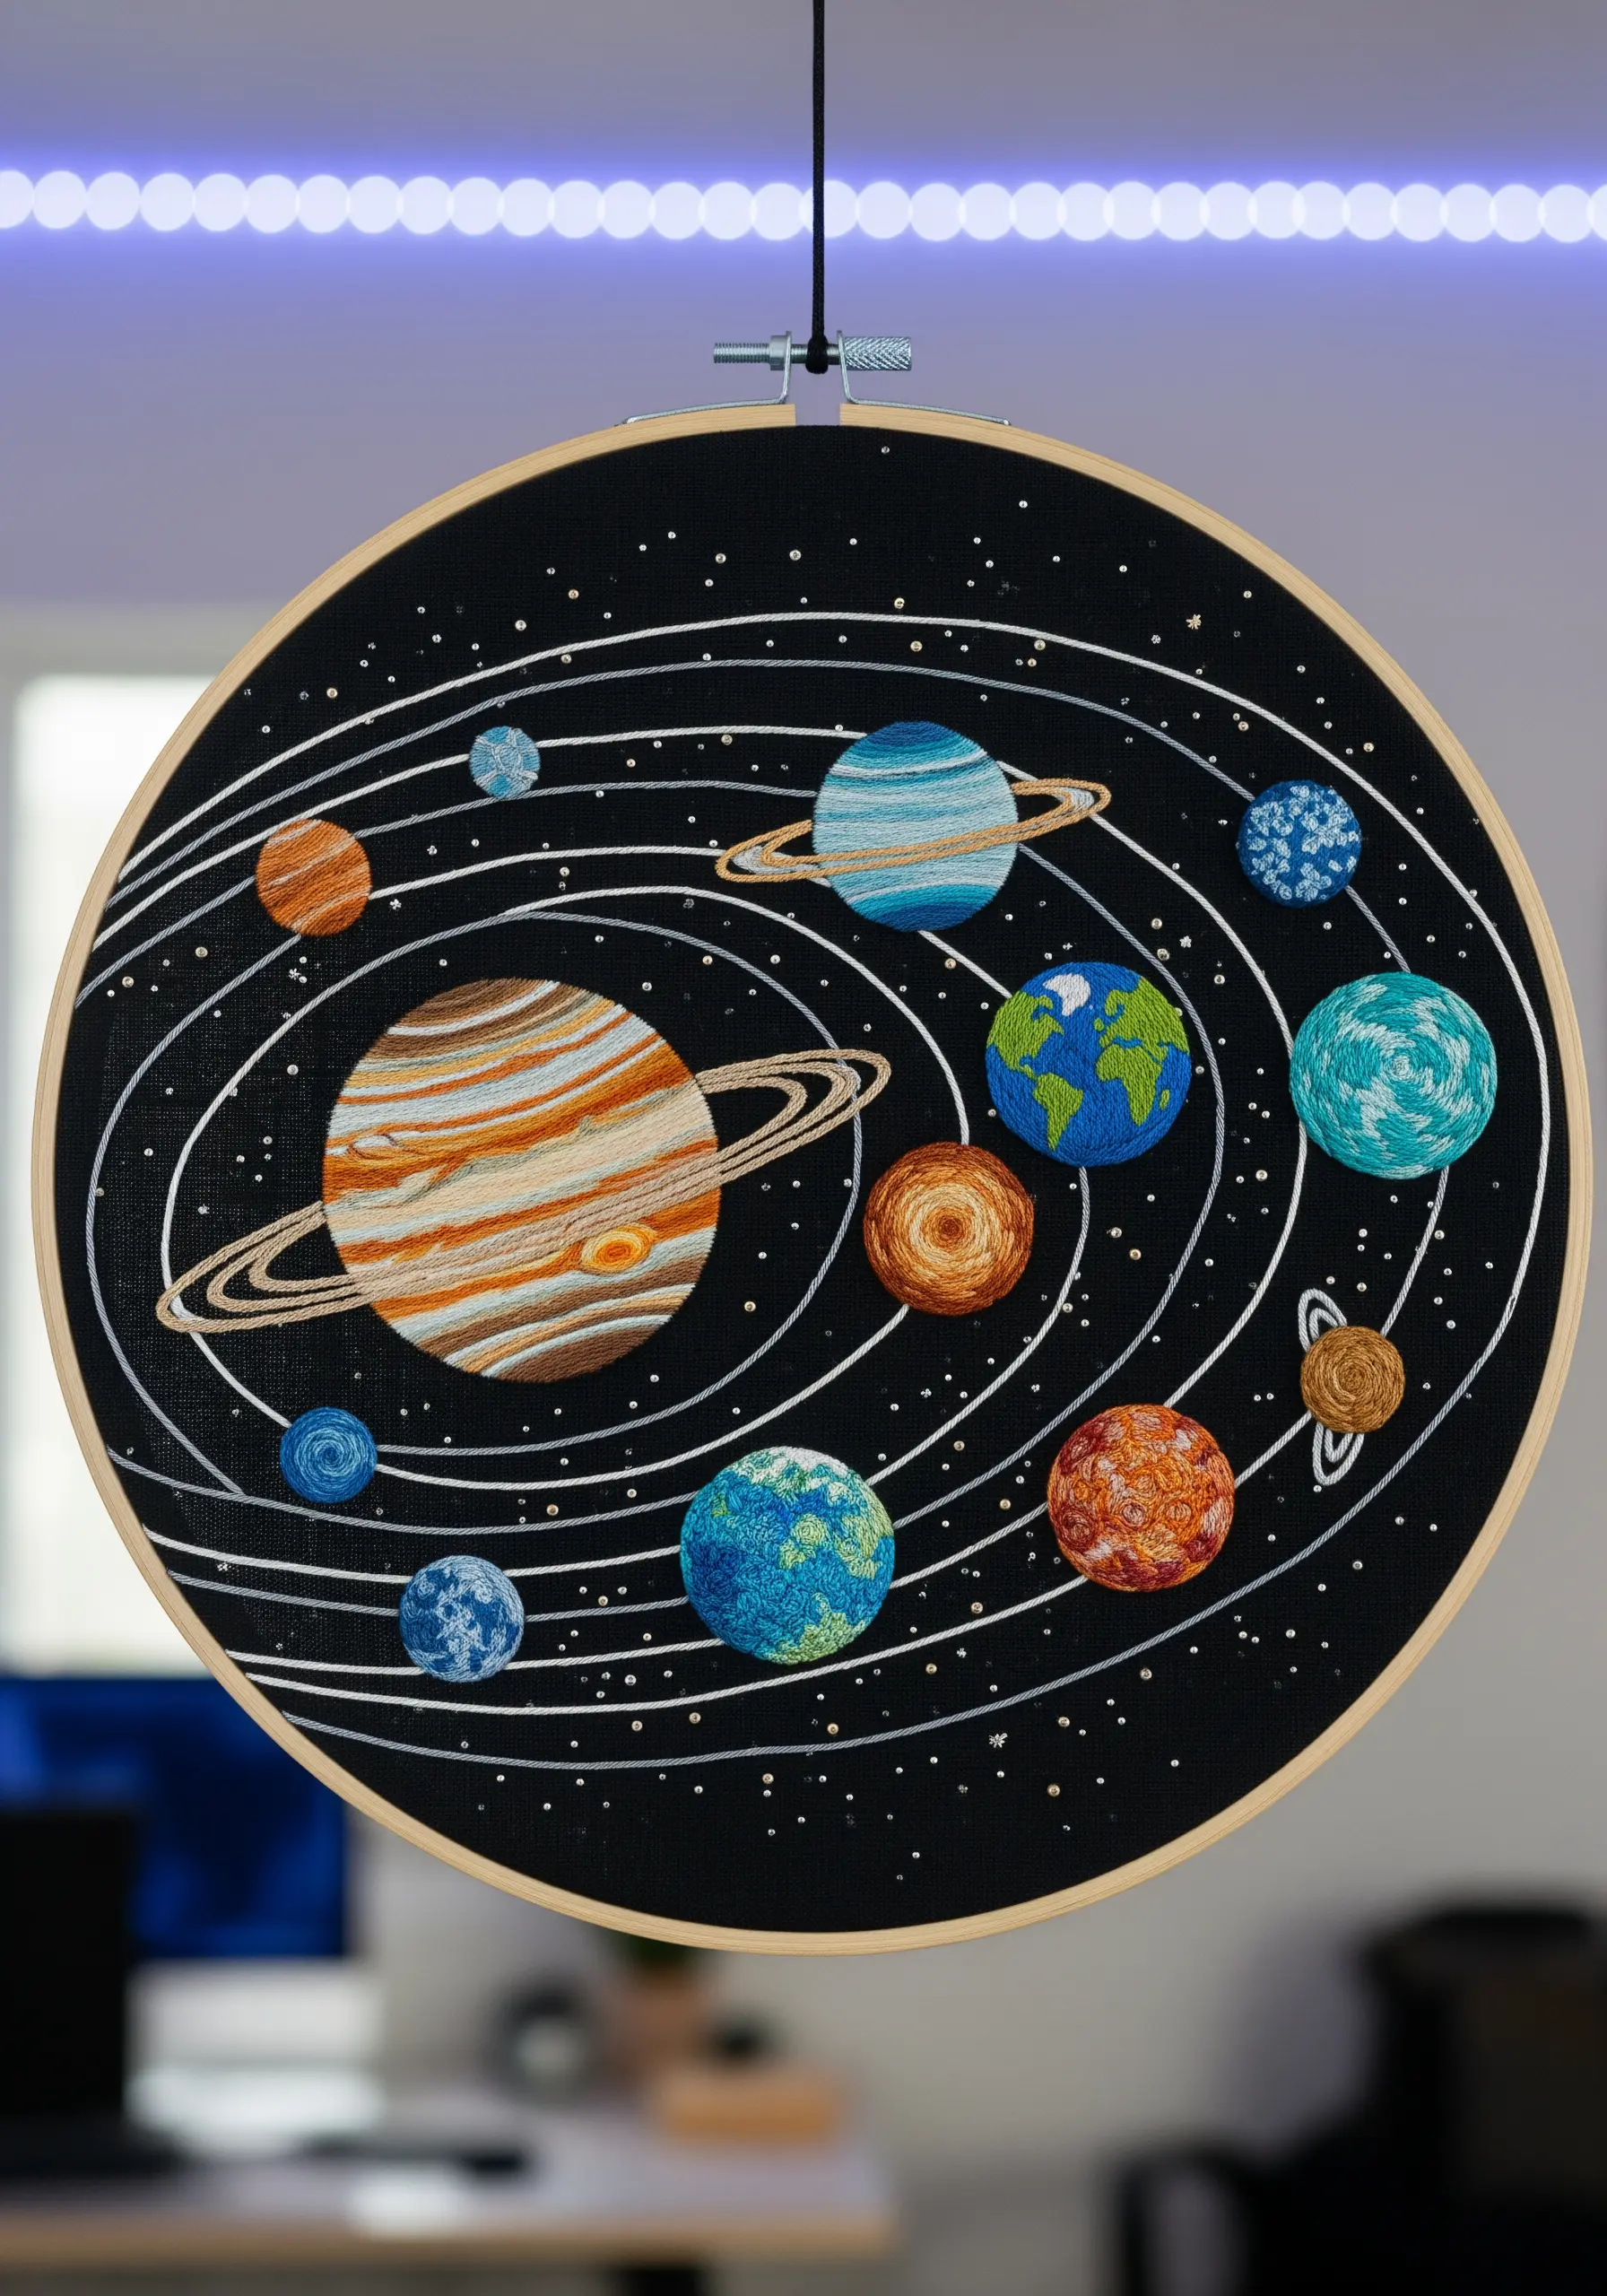
To make a flat circle look like a three-dimensional sphere, your stitches must follow its curve.
When thread painting planets, don’t stitch in straight lines. Instead, use long-and-short stitches that arc gently with the planet’s circular shape.
This simple adjustment tricks the eye into seeing a rounded, voluminous form rather than a flat disc.
Use a single strand of floss for the smoothest color blending, and add fine details like rings with a precise, single backstitch.
24. Paint a Landscape with Textural Thread
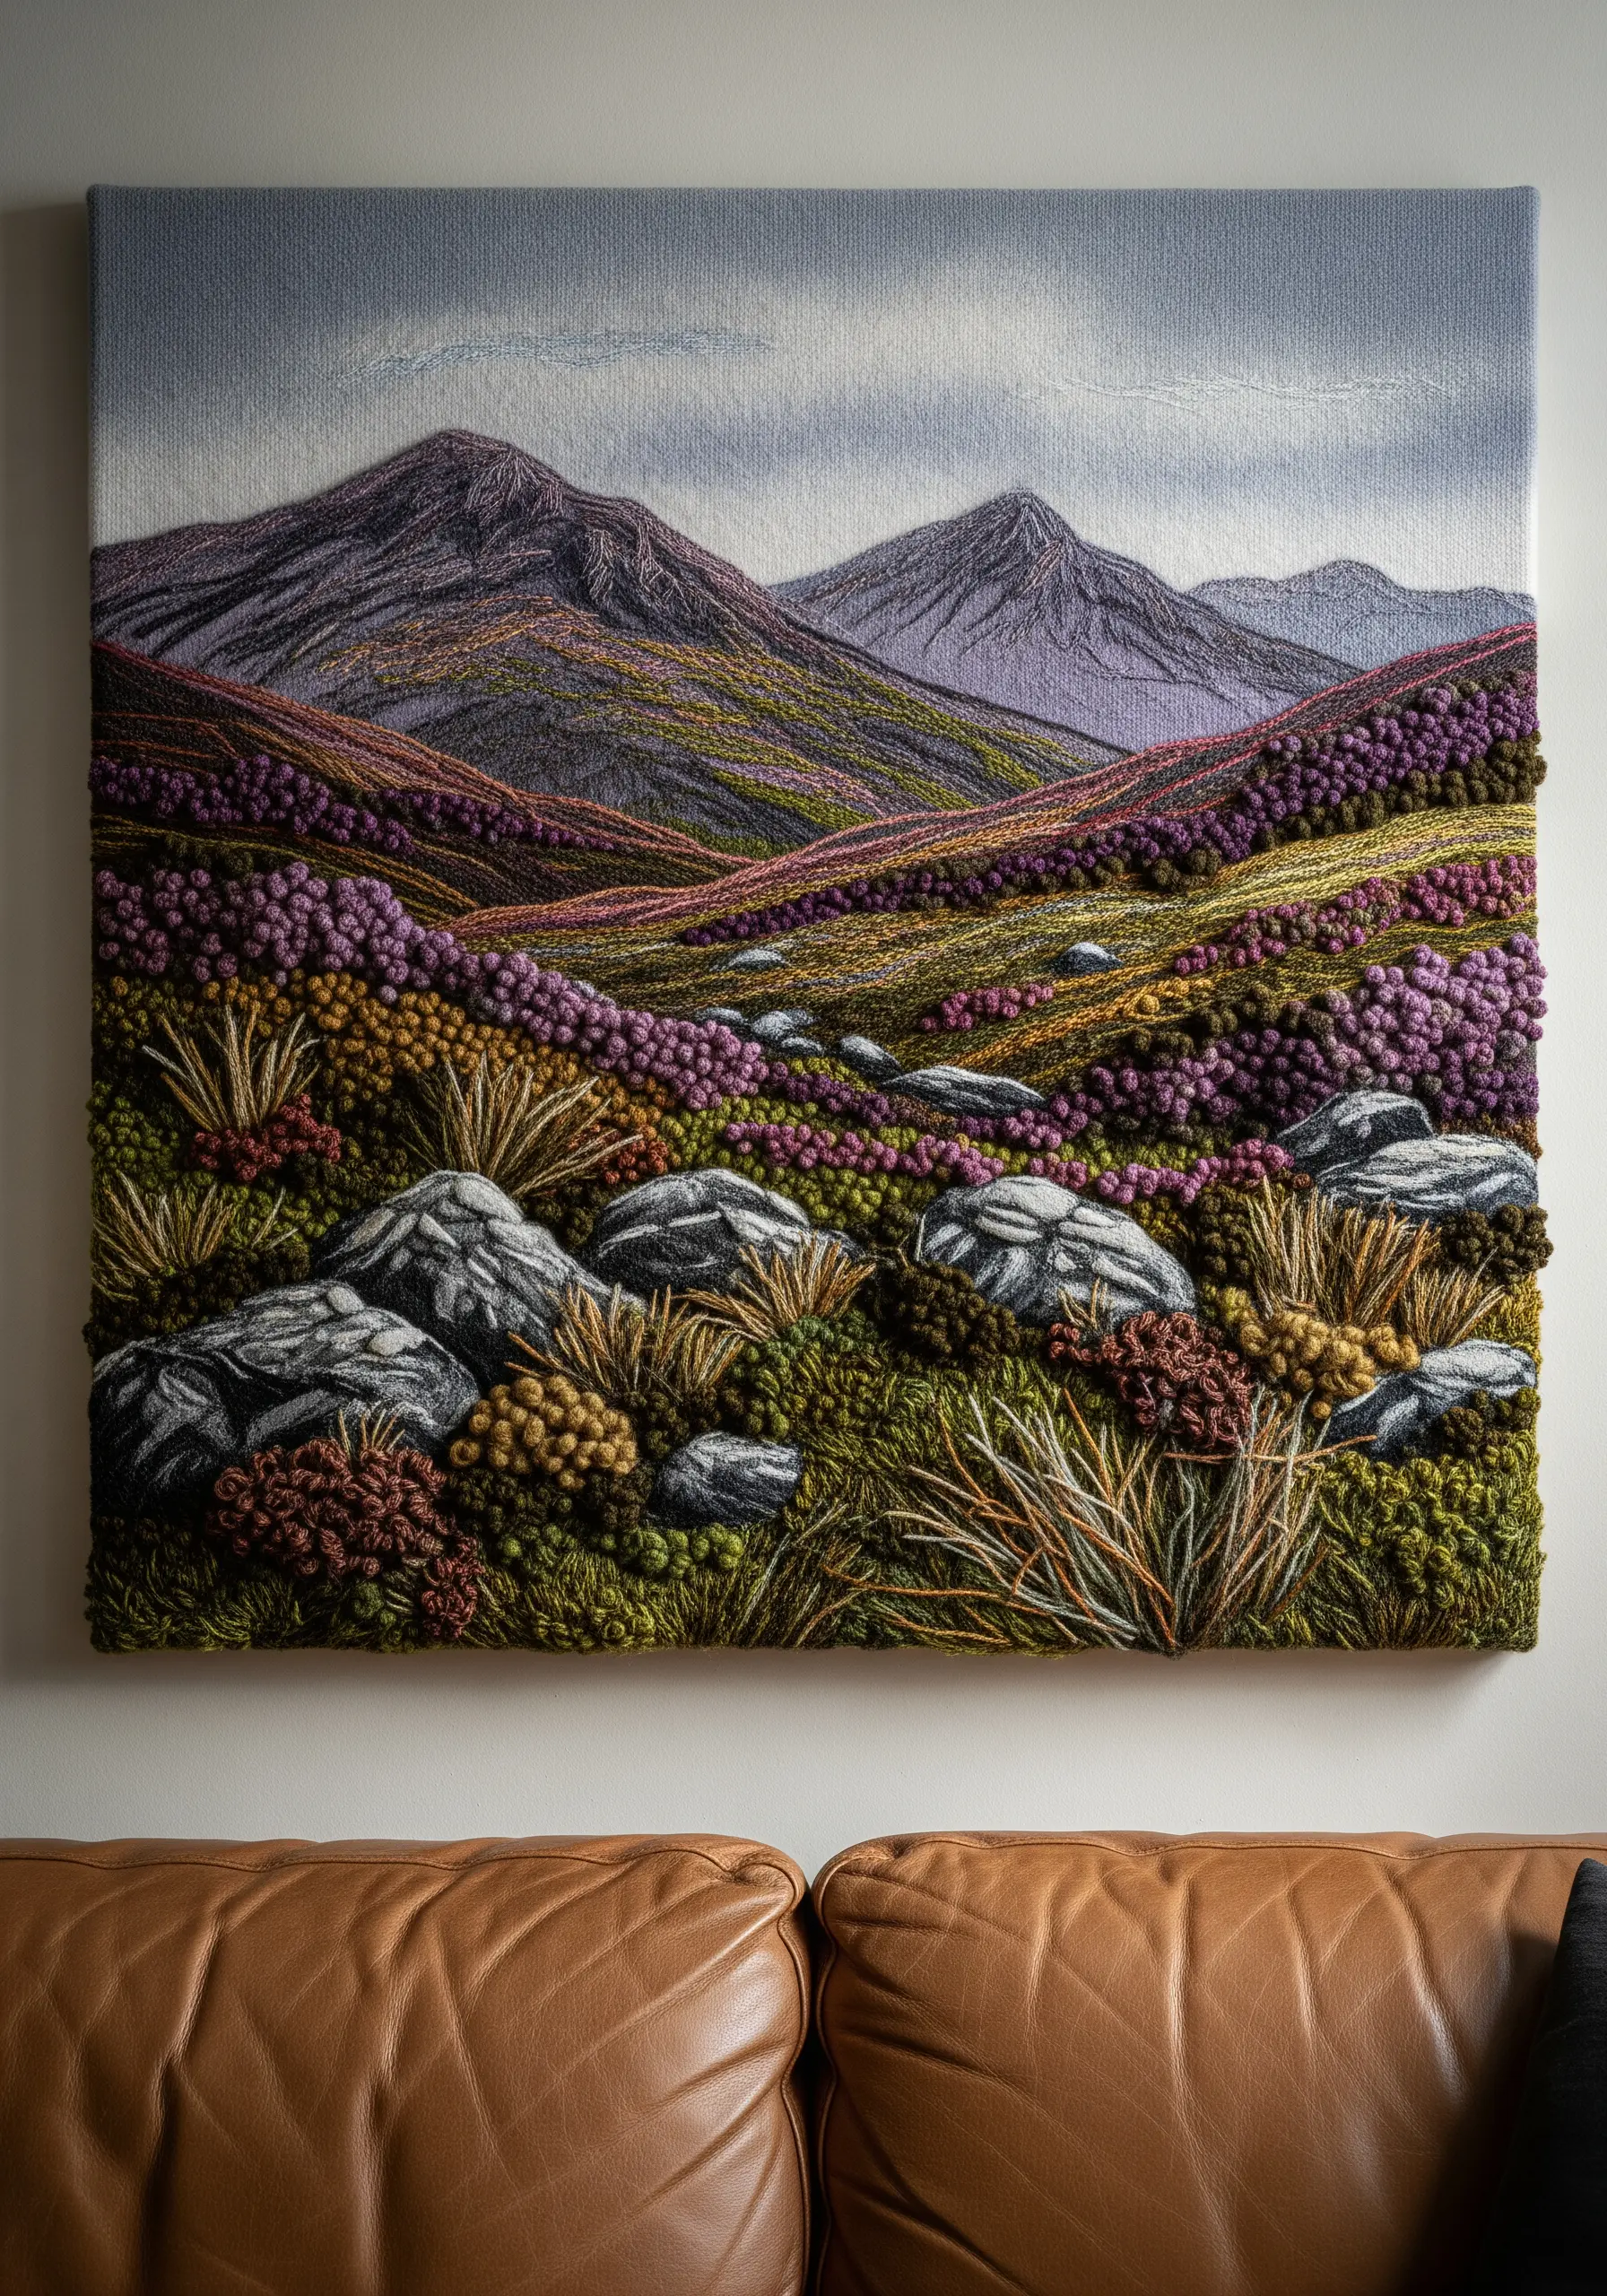
Create a deep, atmospheric landscape by using different stitches to represent different natural textures.
Use a mass of French knots in purples and pinks for fields of heather, and use long, vertical satin stitches for distant rain or low-lying clouds.
Stitch foreground grasses with a mix of straight stitches and detached chain stitches in various earthy tones.
For the distant mountains, use a soft, blended long-and-short stitch to create a sense of atmospheric haze.
This approach transforms your needle and thread into a painter’s brush and palette.
25. Embrace Graphic Simplicity and Negative Space
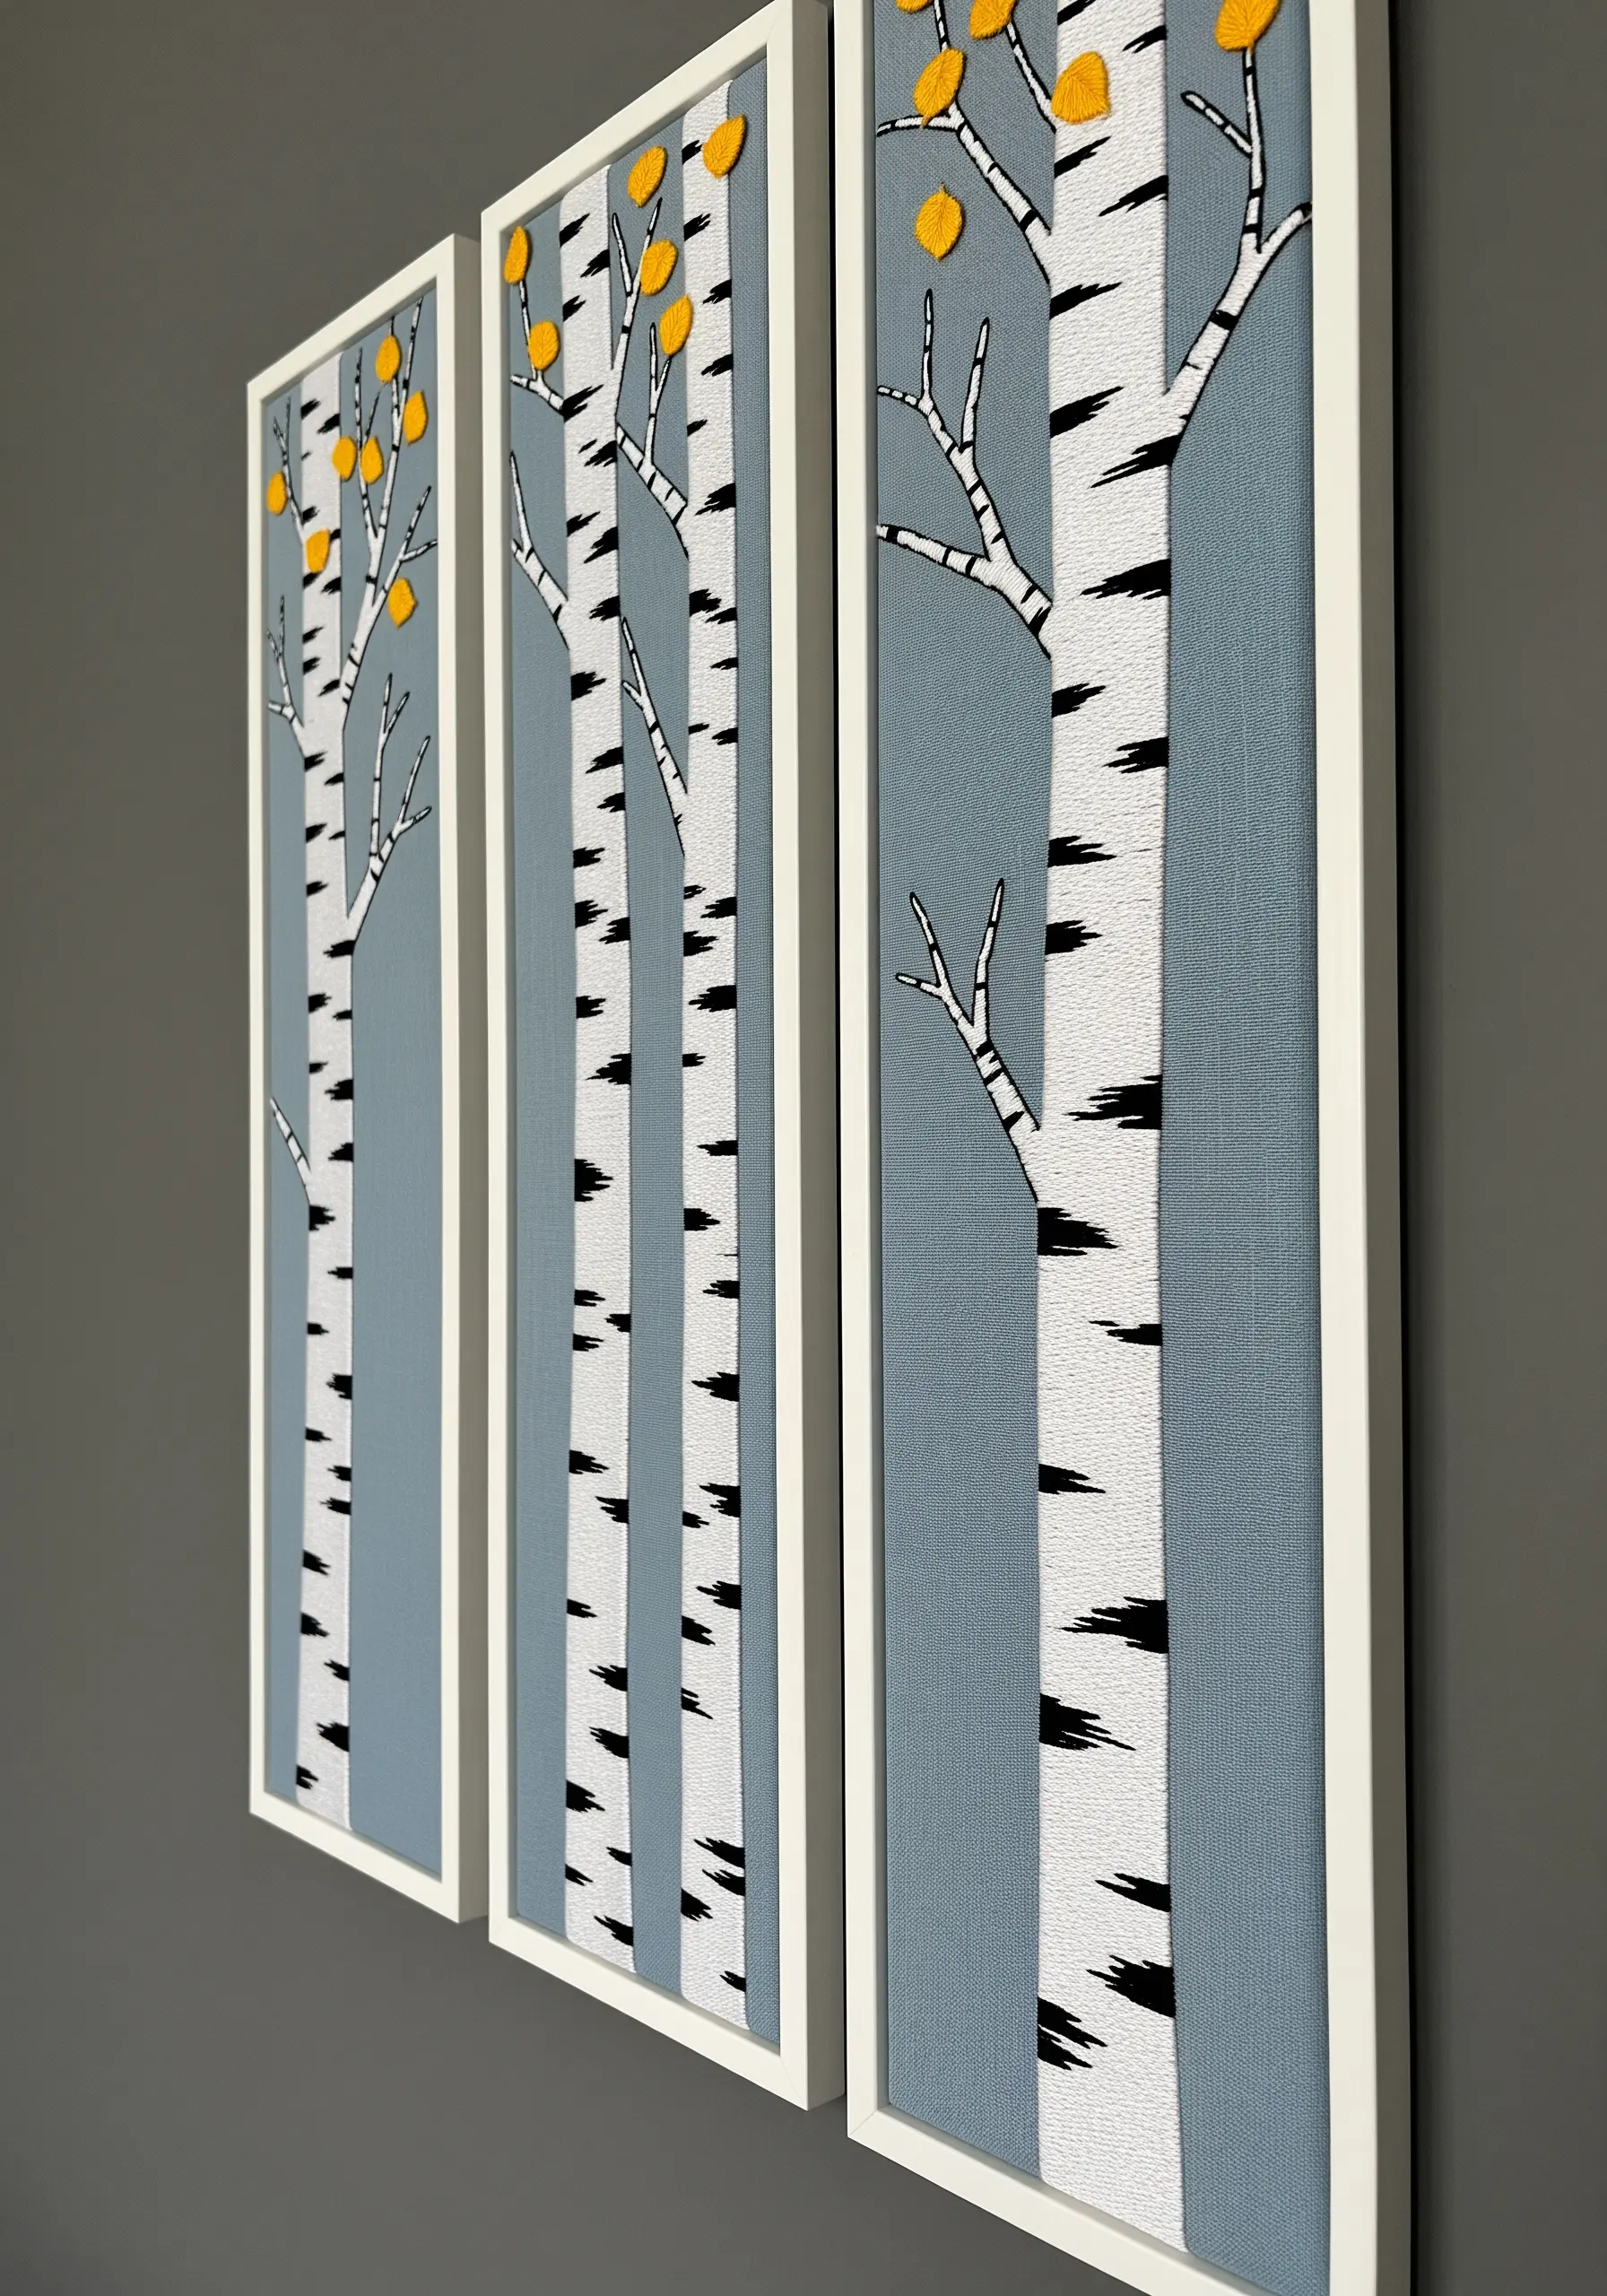
Create a bold, modern statement by simplifying natural forms into their essential graphic elements.
Fill the birch tree trunks with clean, vertical satin stitch in a bright white thread.
Use small, horizontal straight stitches in black to create the characteristic bark markings. There’s no need for complex shading or detail.
Presenting this minimalist scene as a triptych enhances its graphic quality and allows the colored background—the negative space—to become an integral part of the design.
26. Use Stitch Direction to Master Feather Textures
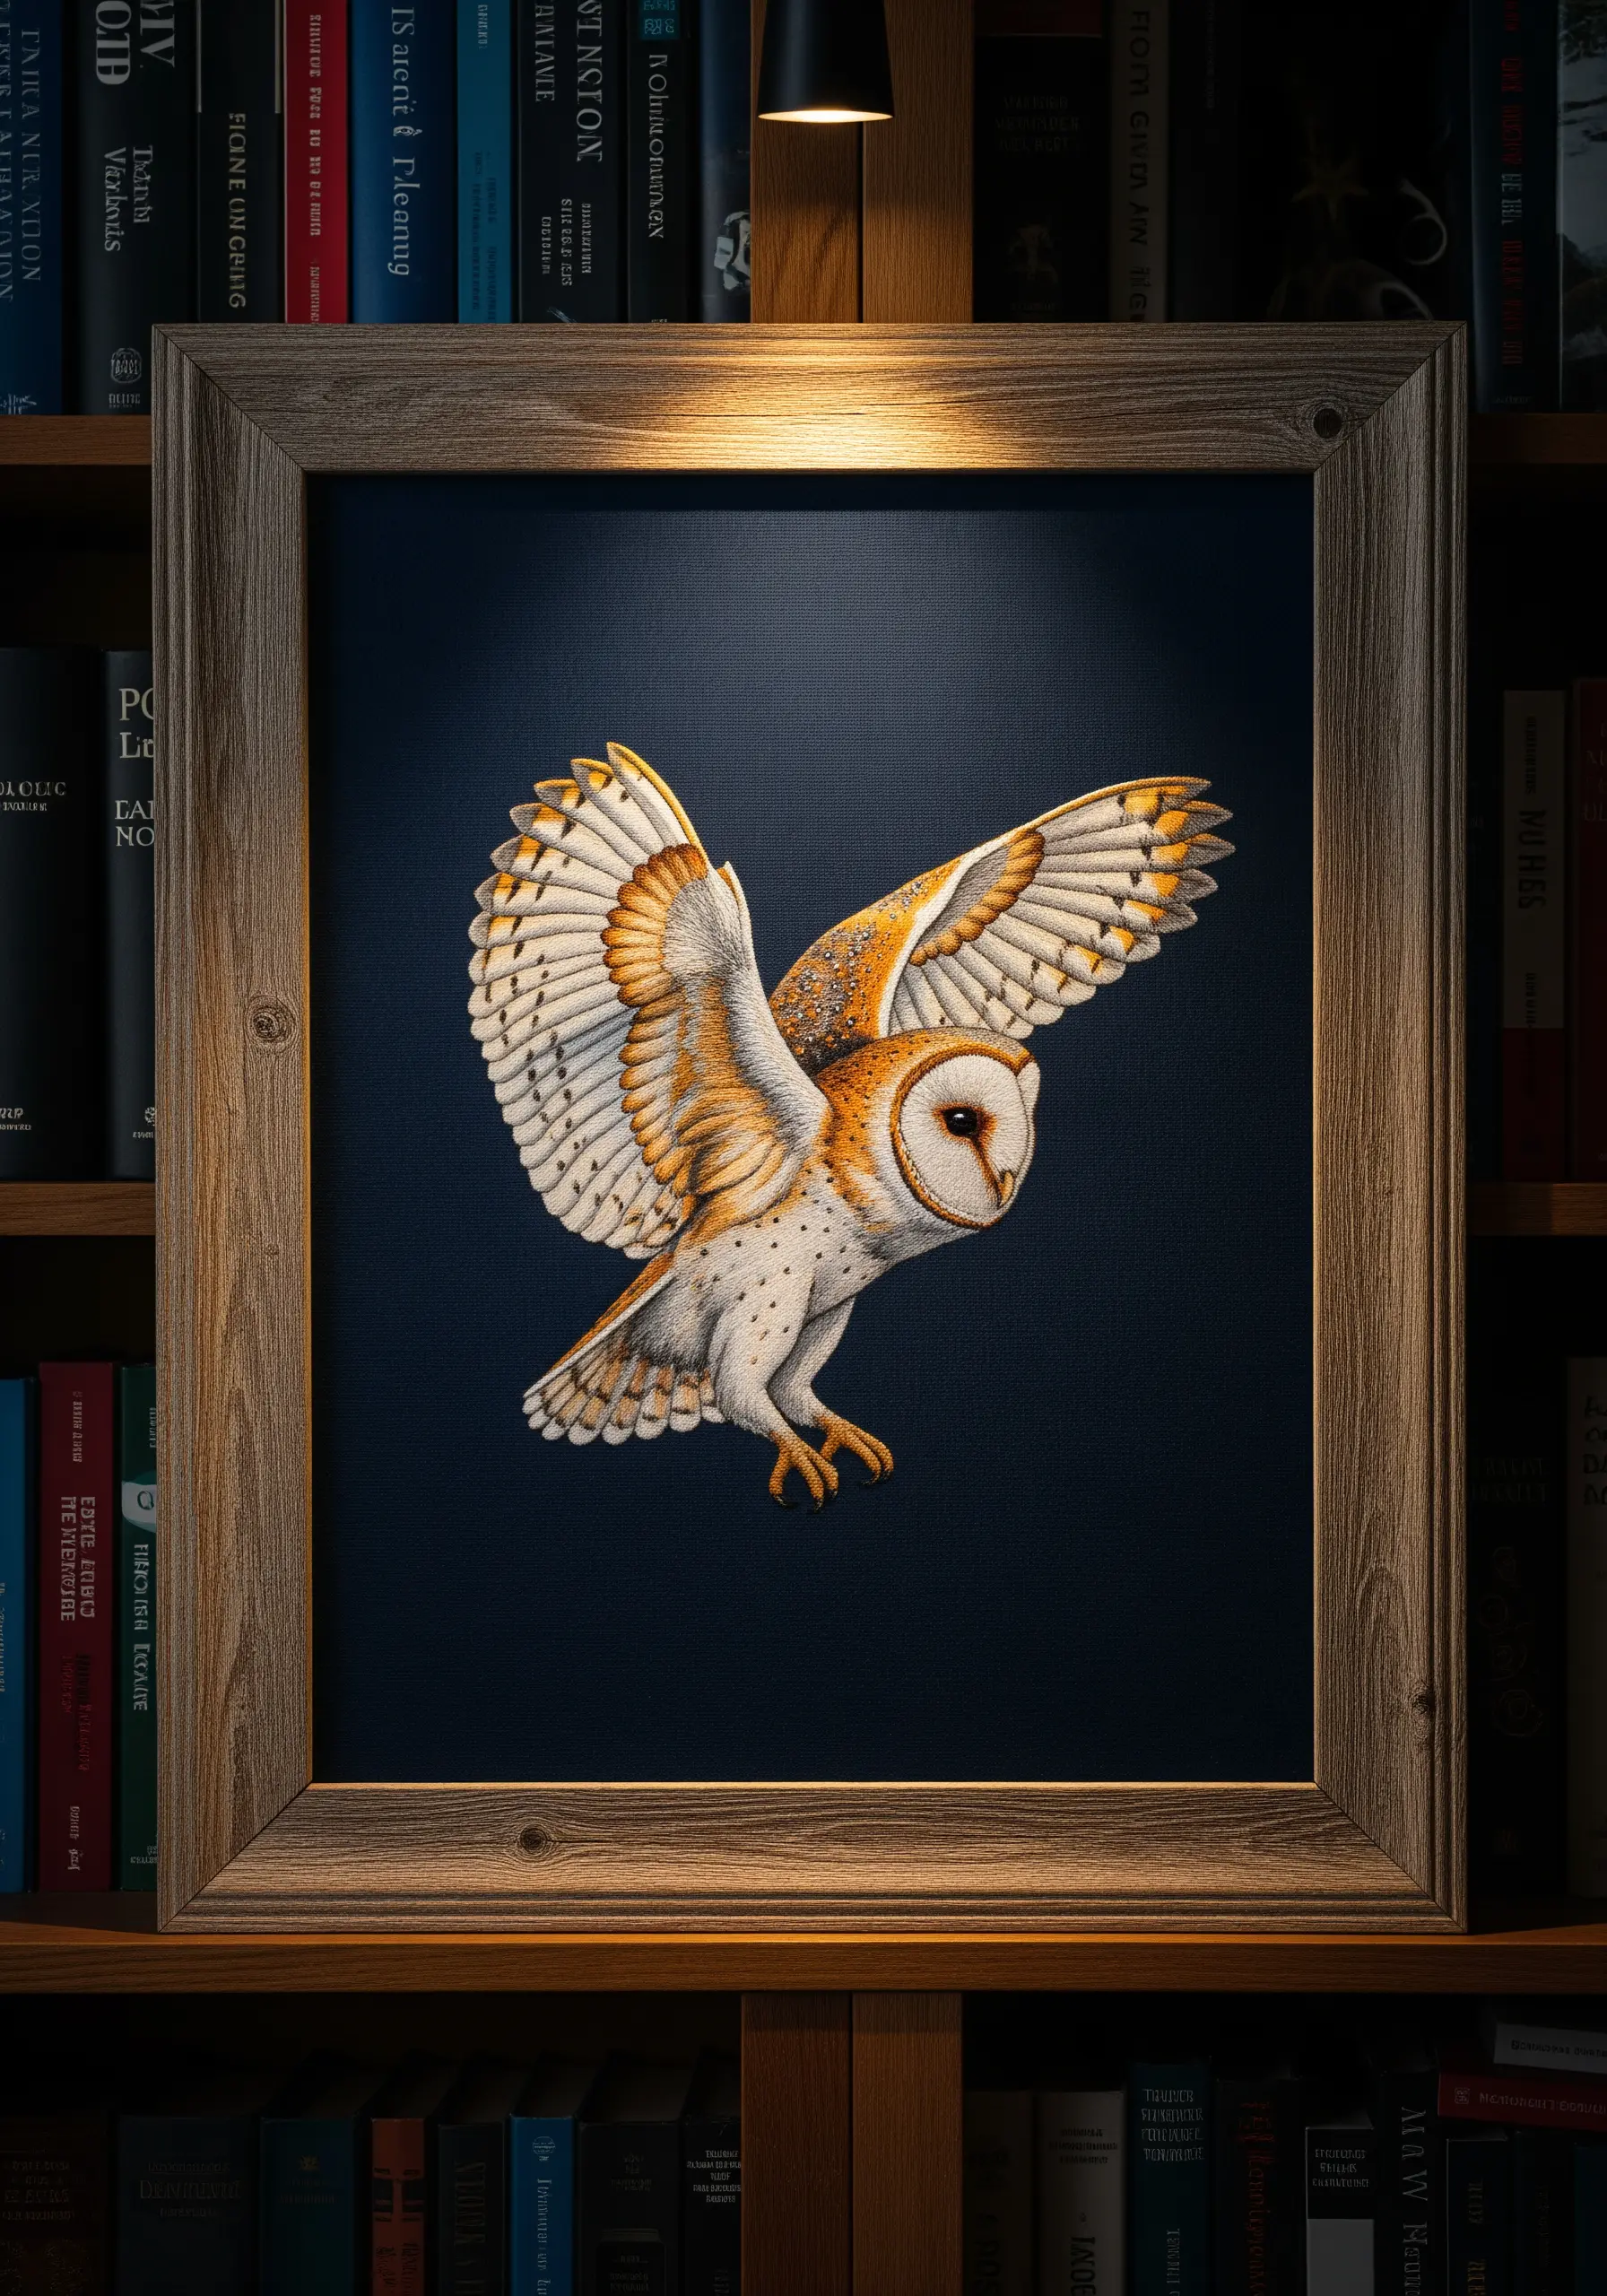
The secret to realistic embroidered birds lies in meticulous stitch direction that mimics the flow of feathers.
Use a single strand of floss and the long-and-short stitch technique, always angling your stitches to follow the direction the feathers would naturally lie.
Layer your stitches just as feathers overlap, starting from the tail and working your way up the body.
For tiny facial details and sharp edges, switch to a precise split stitch. This attention to flow and direction is what breathes life into your work.
27. Create Smoothness and Form with Satin Stitch
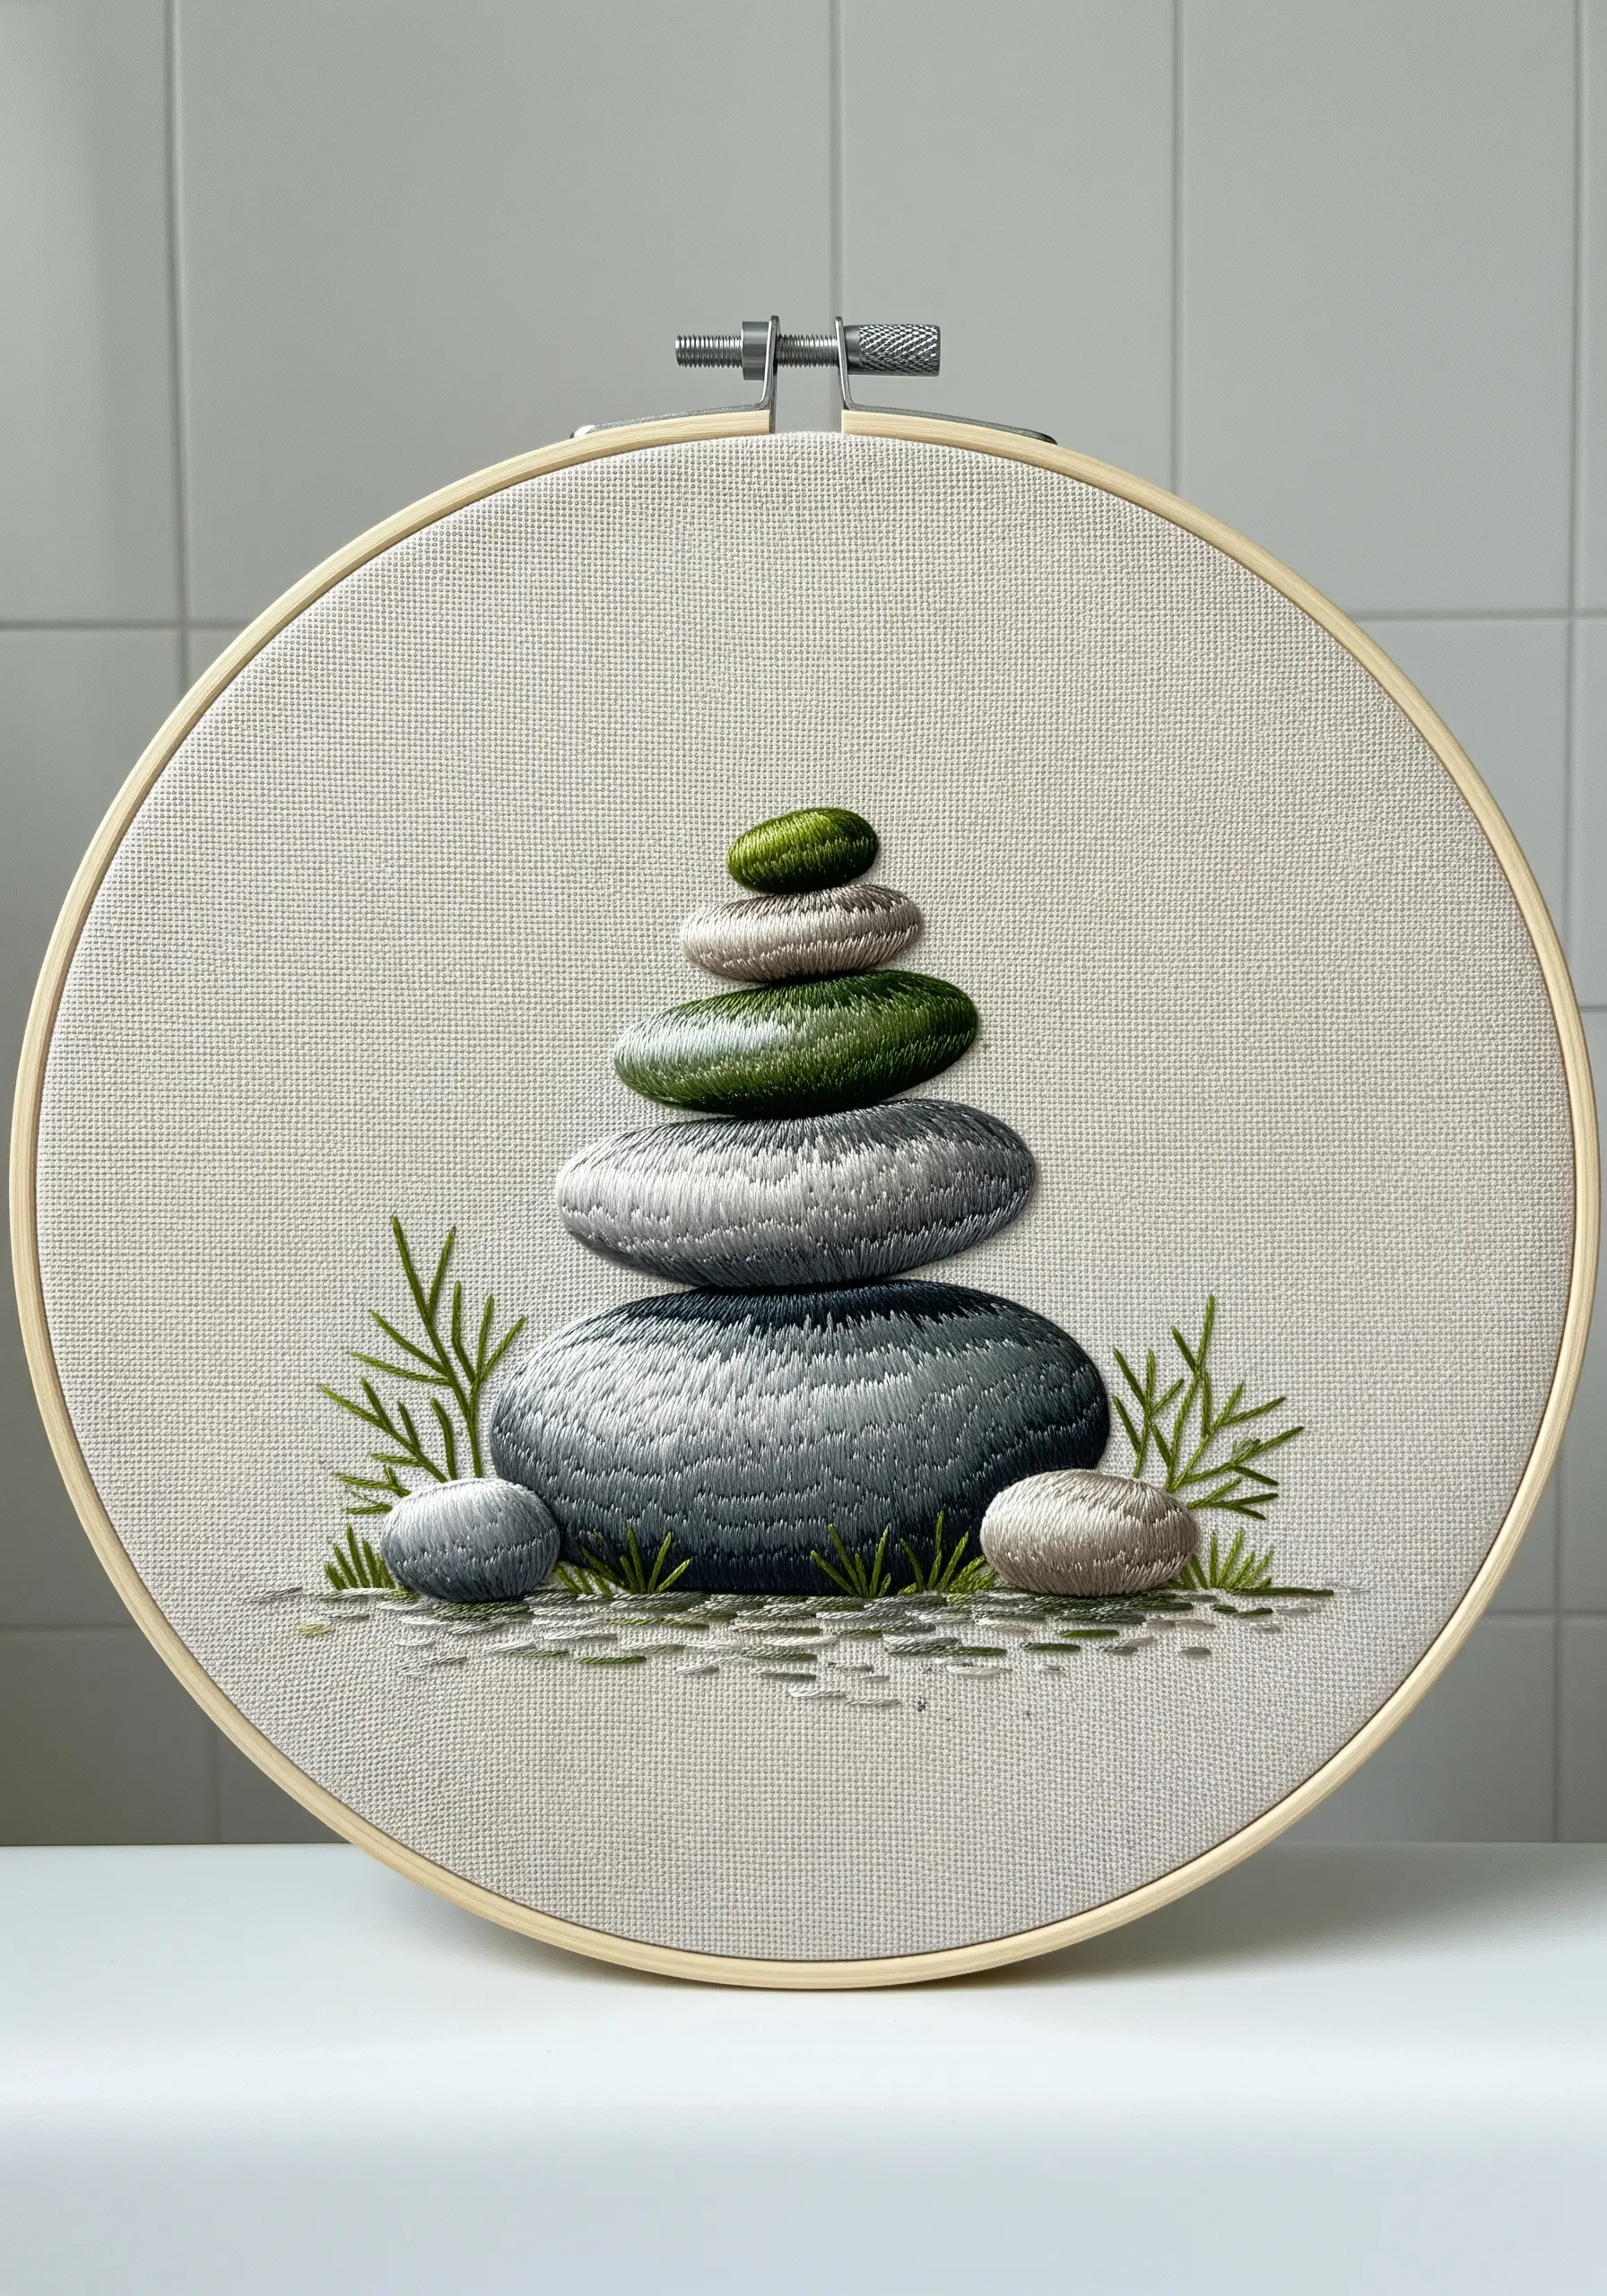
For a design that requires a smooth, solid, and serene finish, the satin stitch is your best tool.
To create the illusion of rounded stones, orient your satin stitches to follow the object’s contours. For the larger, flatter stone, use horizontal stitches; for the taller stones, use vertical stitches.
Use slightly different shades of grey and green to suggest light and shadow, which enhances their three-dimensional quality.
The result is a calm, meditative piece that celebrates clean form and simple texture.
28. Layer Colors for a Striking Desert Vista
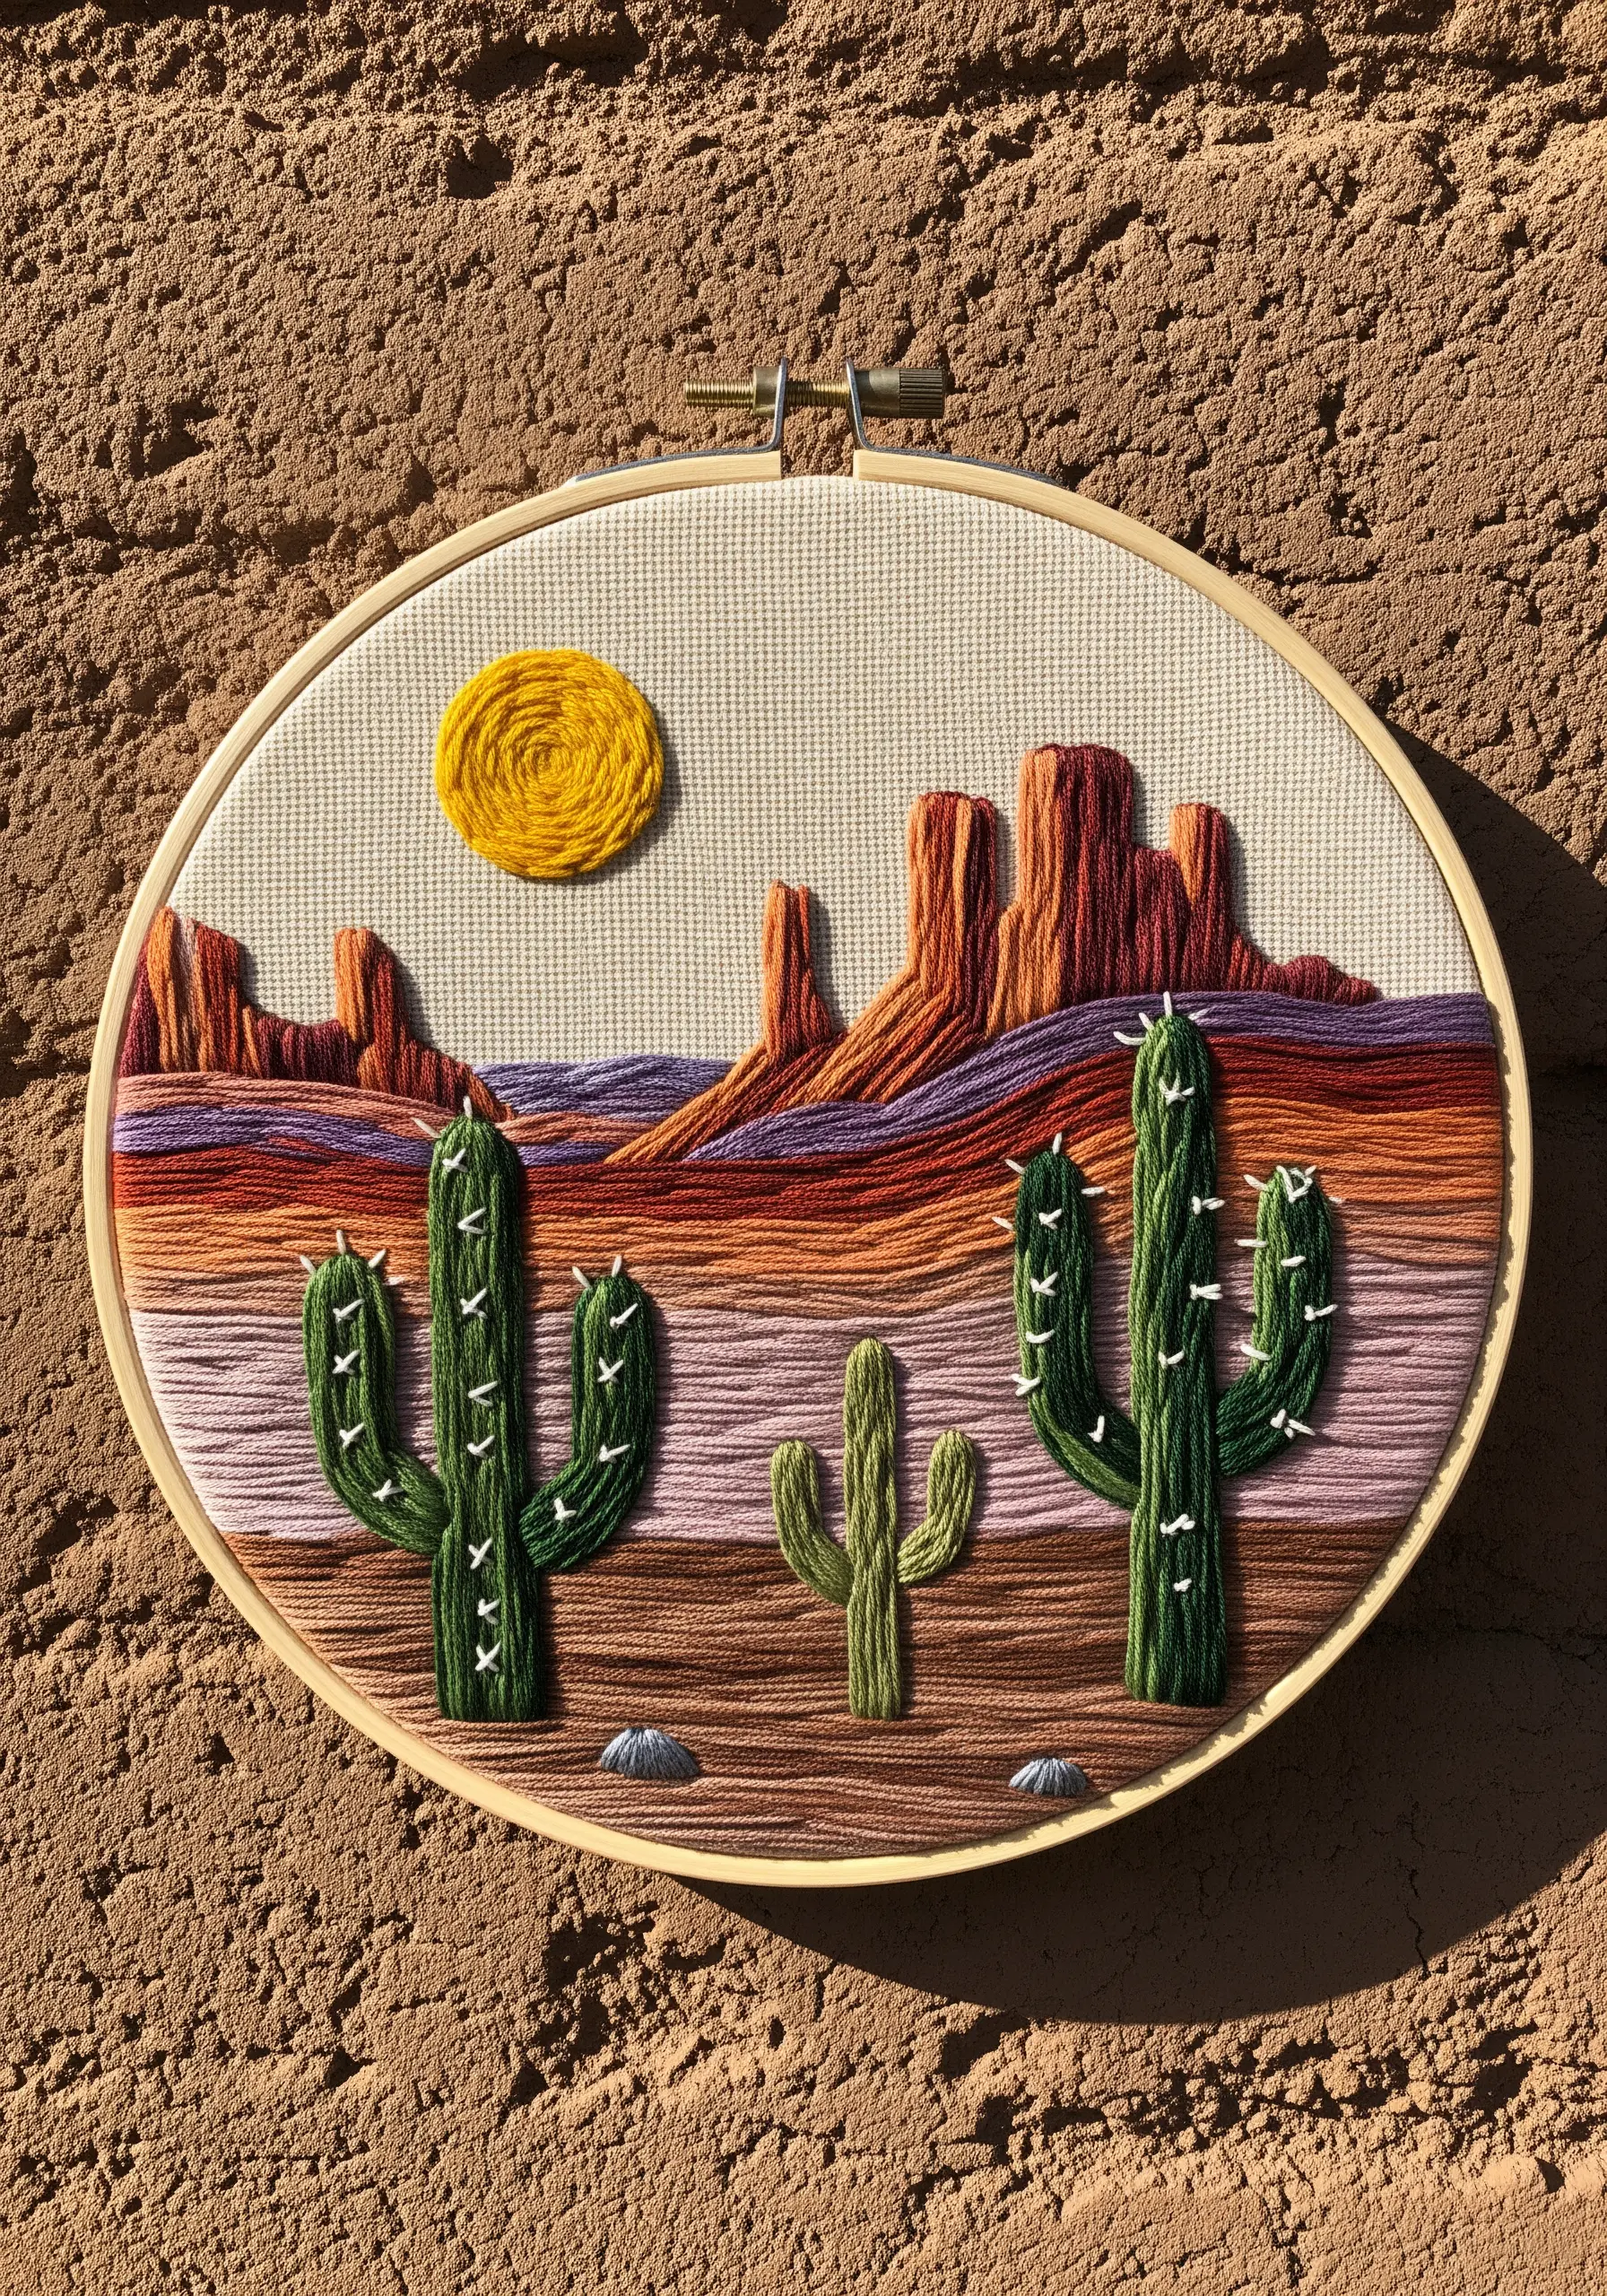
Capture the layered, stratified beauty of a desert landscape with long, horizontal bands of color.
Use a simple satin stitch, but allow the edges where colors meet to be slightly uneven and organic, mimicking natural geological formations.
Work with a rich palette of terracotta, ochre, purple, and brown to evoke the warmth of the desert sun.
Even the cacti are created with simple vertical satin stitches, proving that a single stitch style, when combined with a masterful color strategy, can create a complex and evocative scene.
29. Explore 3D Embroidery with Stumpwork
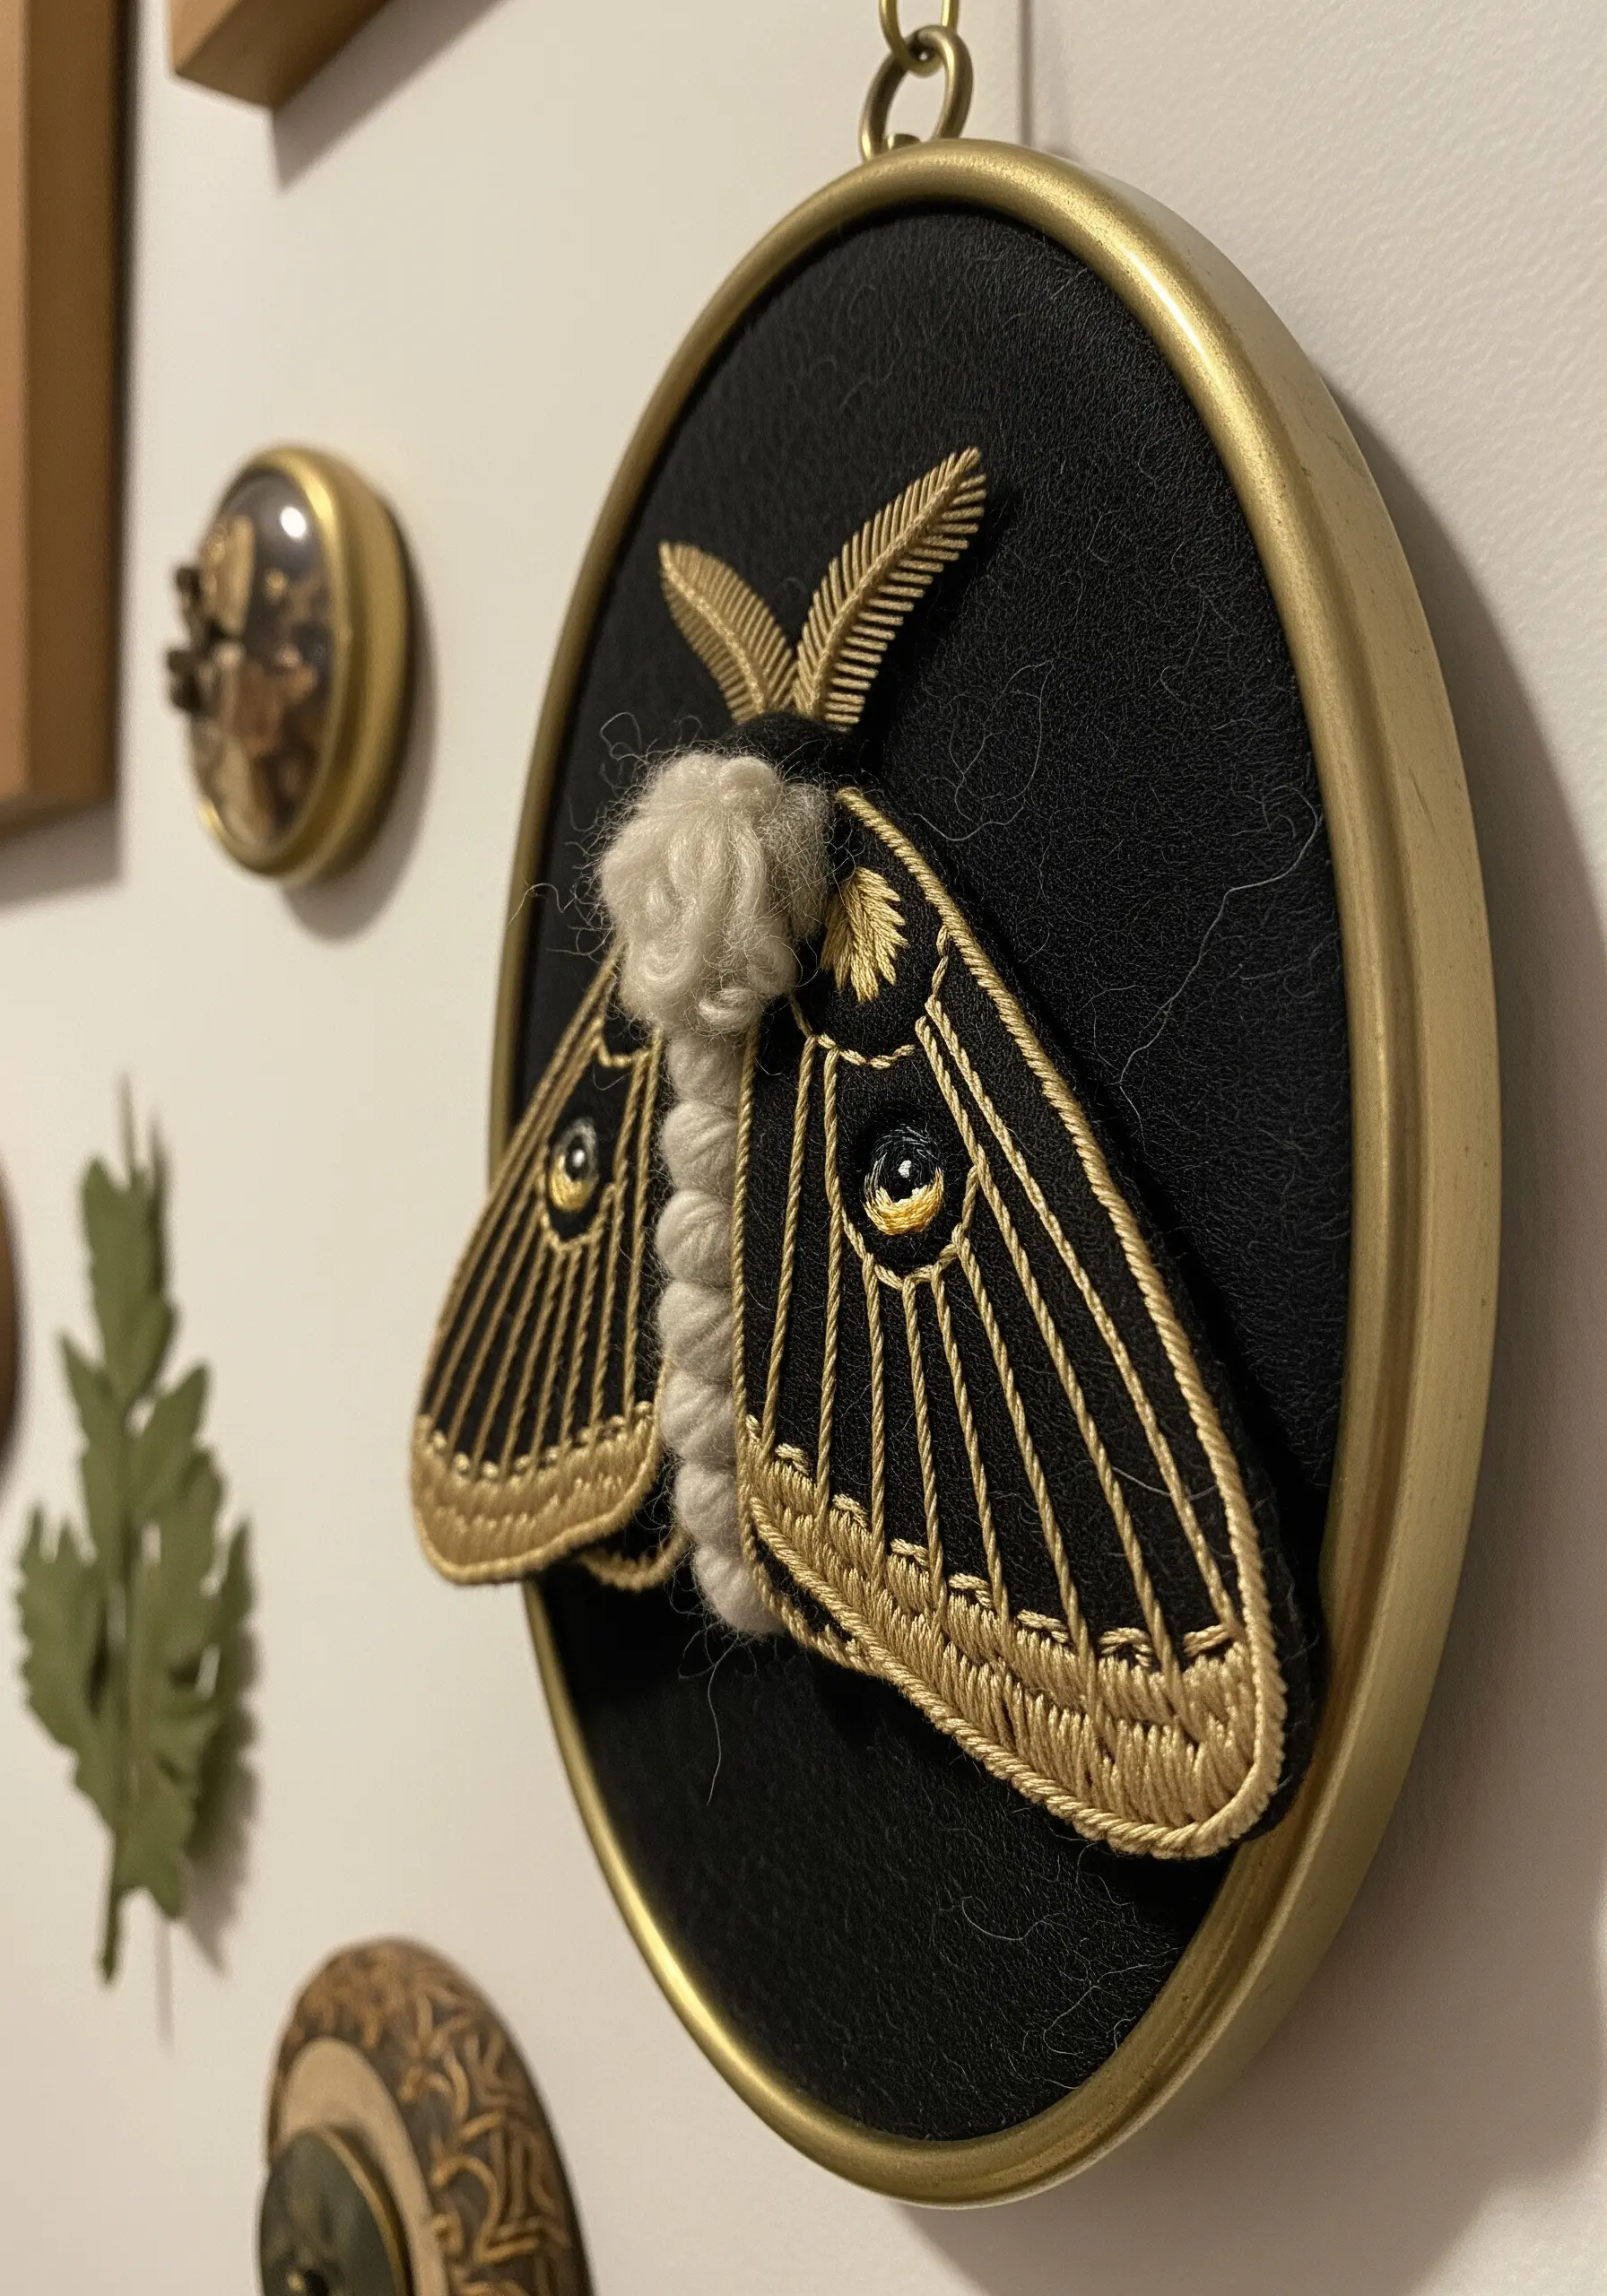
Bring your subjects right off the fabric with the stumpwork technique, creating true three-dimensional elements.
To create raised wings, stitch them separately onto a spare piece of fabric over a thin wire frame. Then, cut them out and attach them to the body, bending the wire to give them shape and lift.
For the fuzzy body, use Turkey work—a series of loops that you can trim to create a plush, velvety texture.
These modern texture layering embroidery techniques add an astonishing level of realism and drama.
30. Stitch a Garden with Playful, Dimensional Stitches
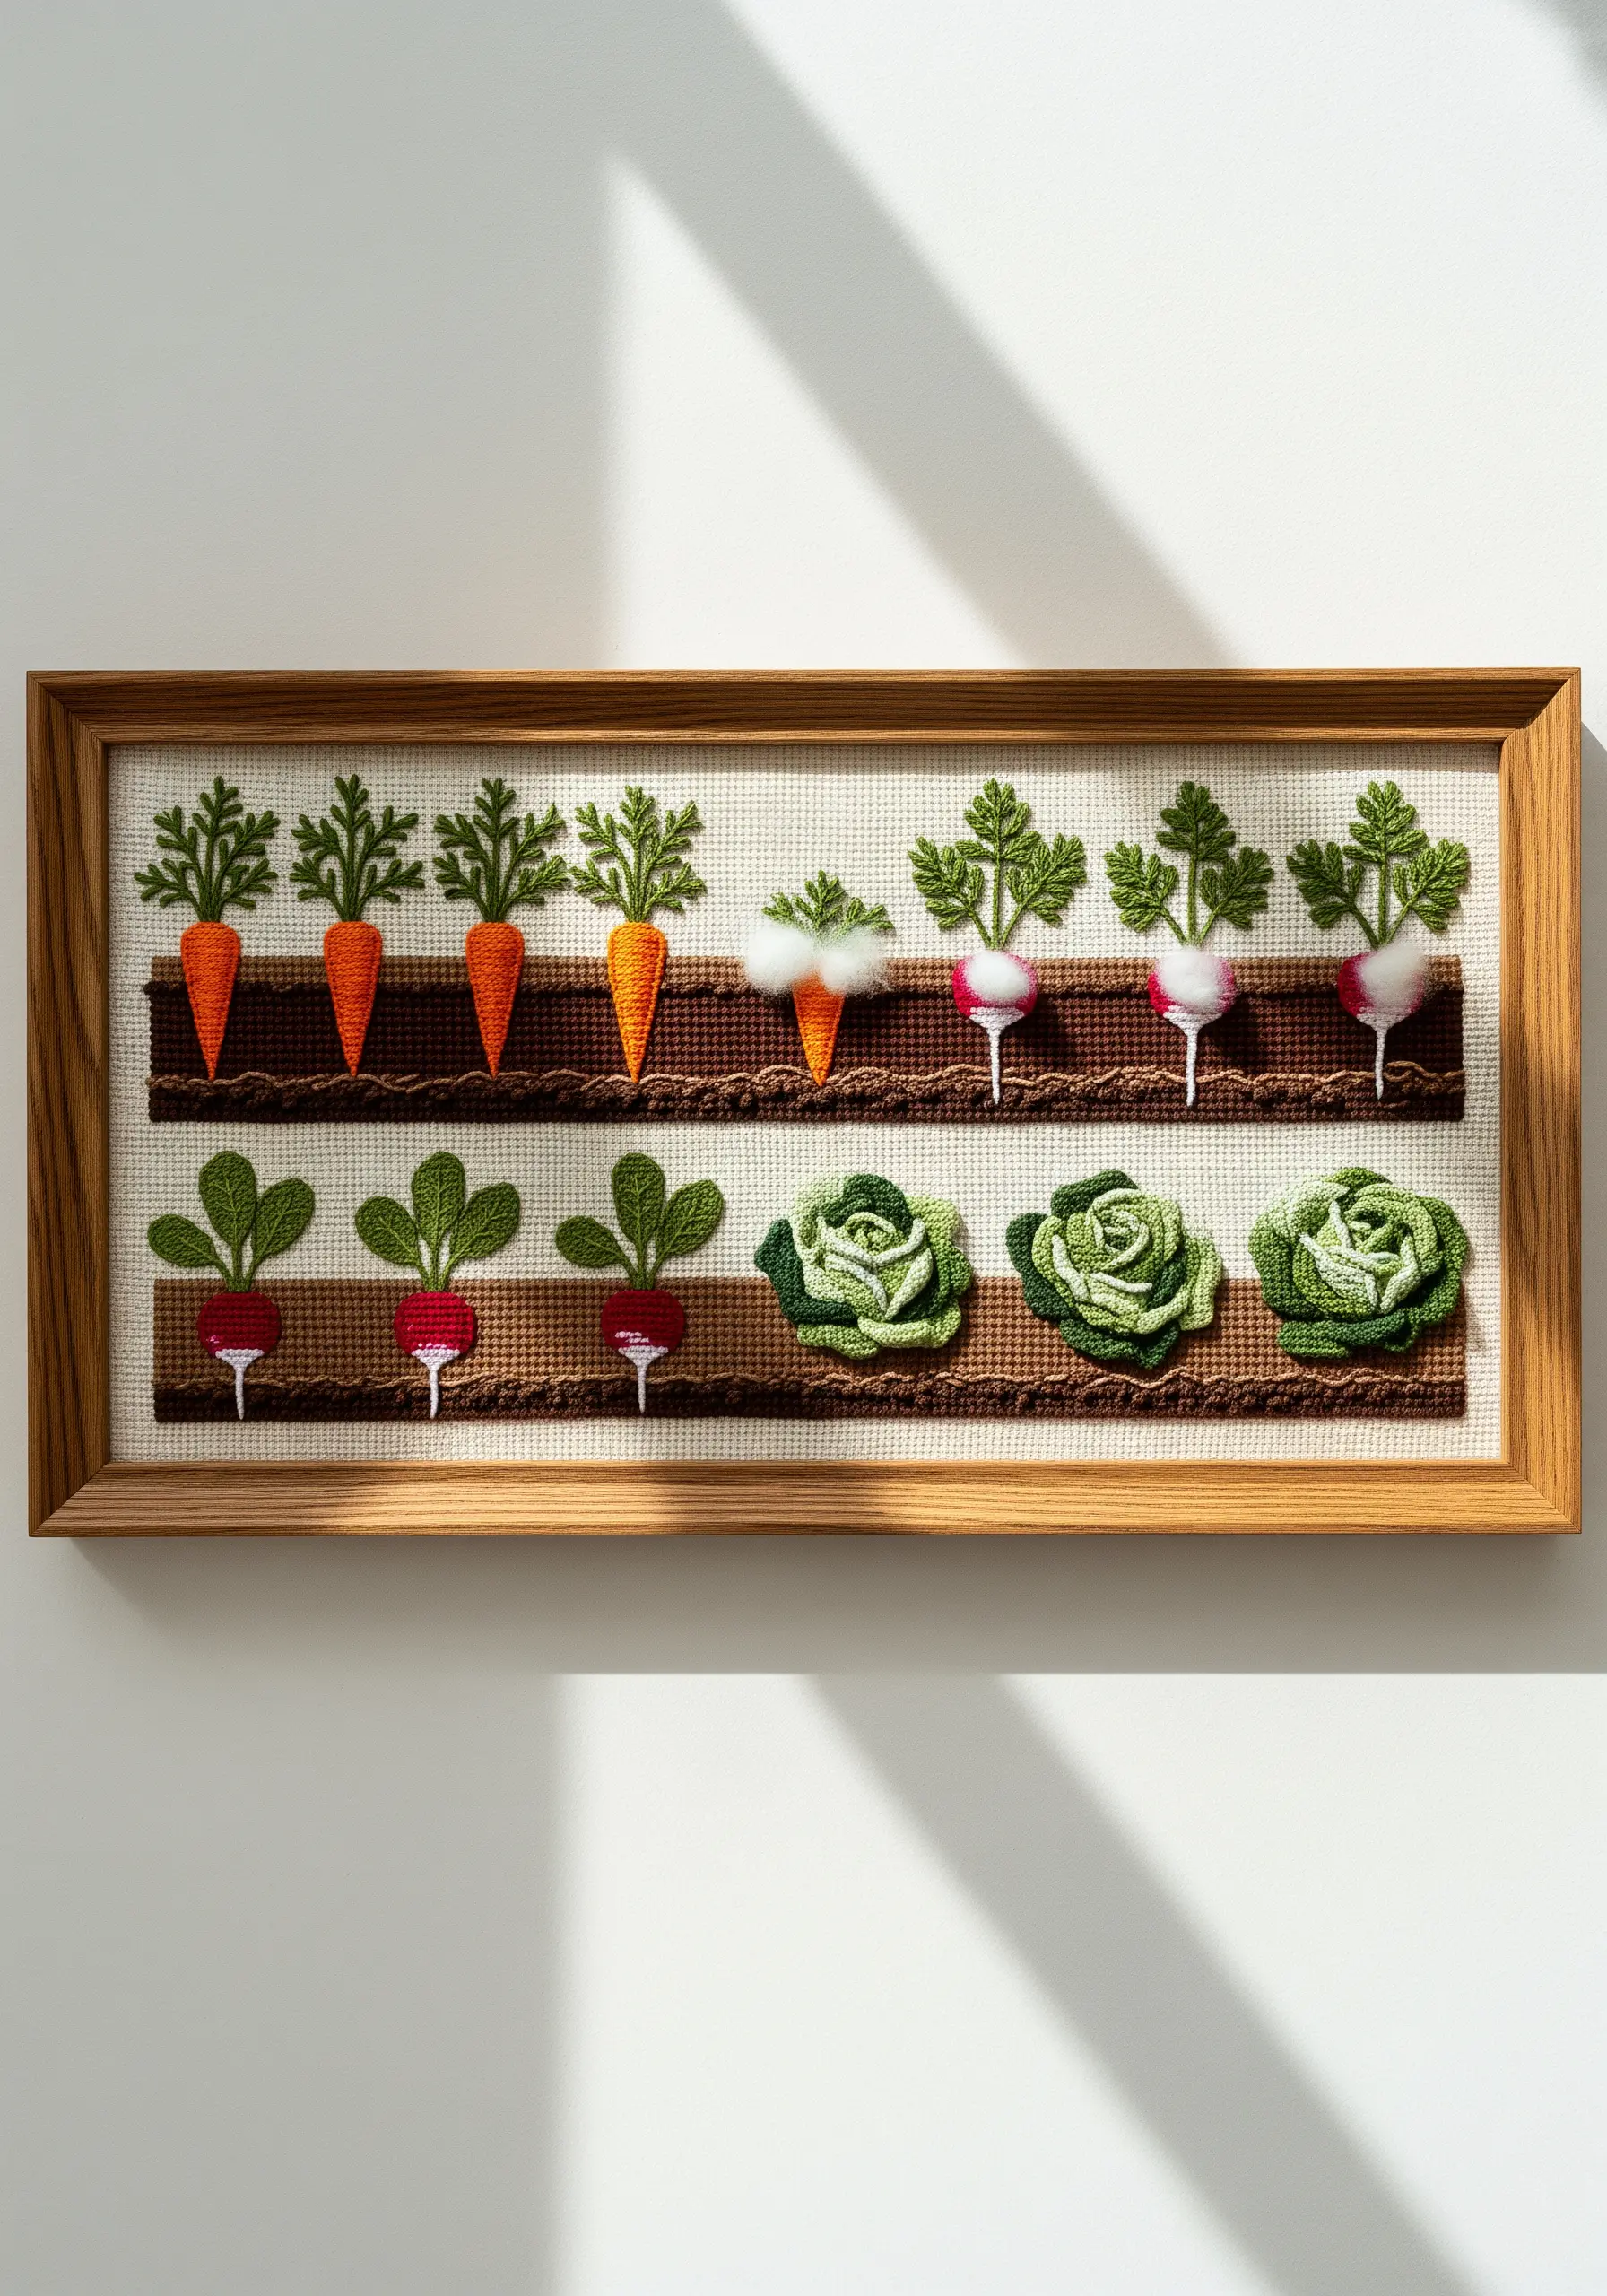
Assign unique, textural stitches to each vegetable to create a charming and whimsical garden scene.
Use the woven picot stitch to create the tapered, three-dimensional shape of carrots.
For the full, leafy heads of lettuce or cabbage, a woven wheel stitch (or rosette stitch) layered in different greens is perfect.
Small bullion knots make excellent radishes, and simple detached chain stitches create lovely, delicate leaves. It’s a delightful way to build a sampler of fun, useful stitches.
31. Cultivate an Organic, Freeform Composition
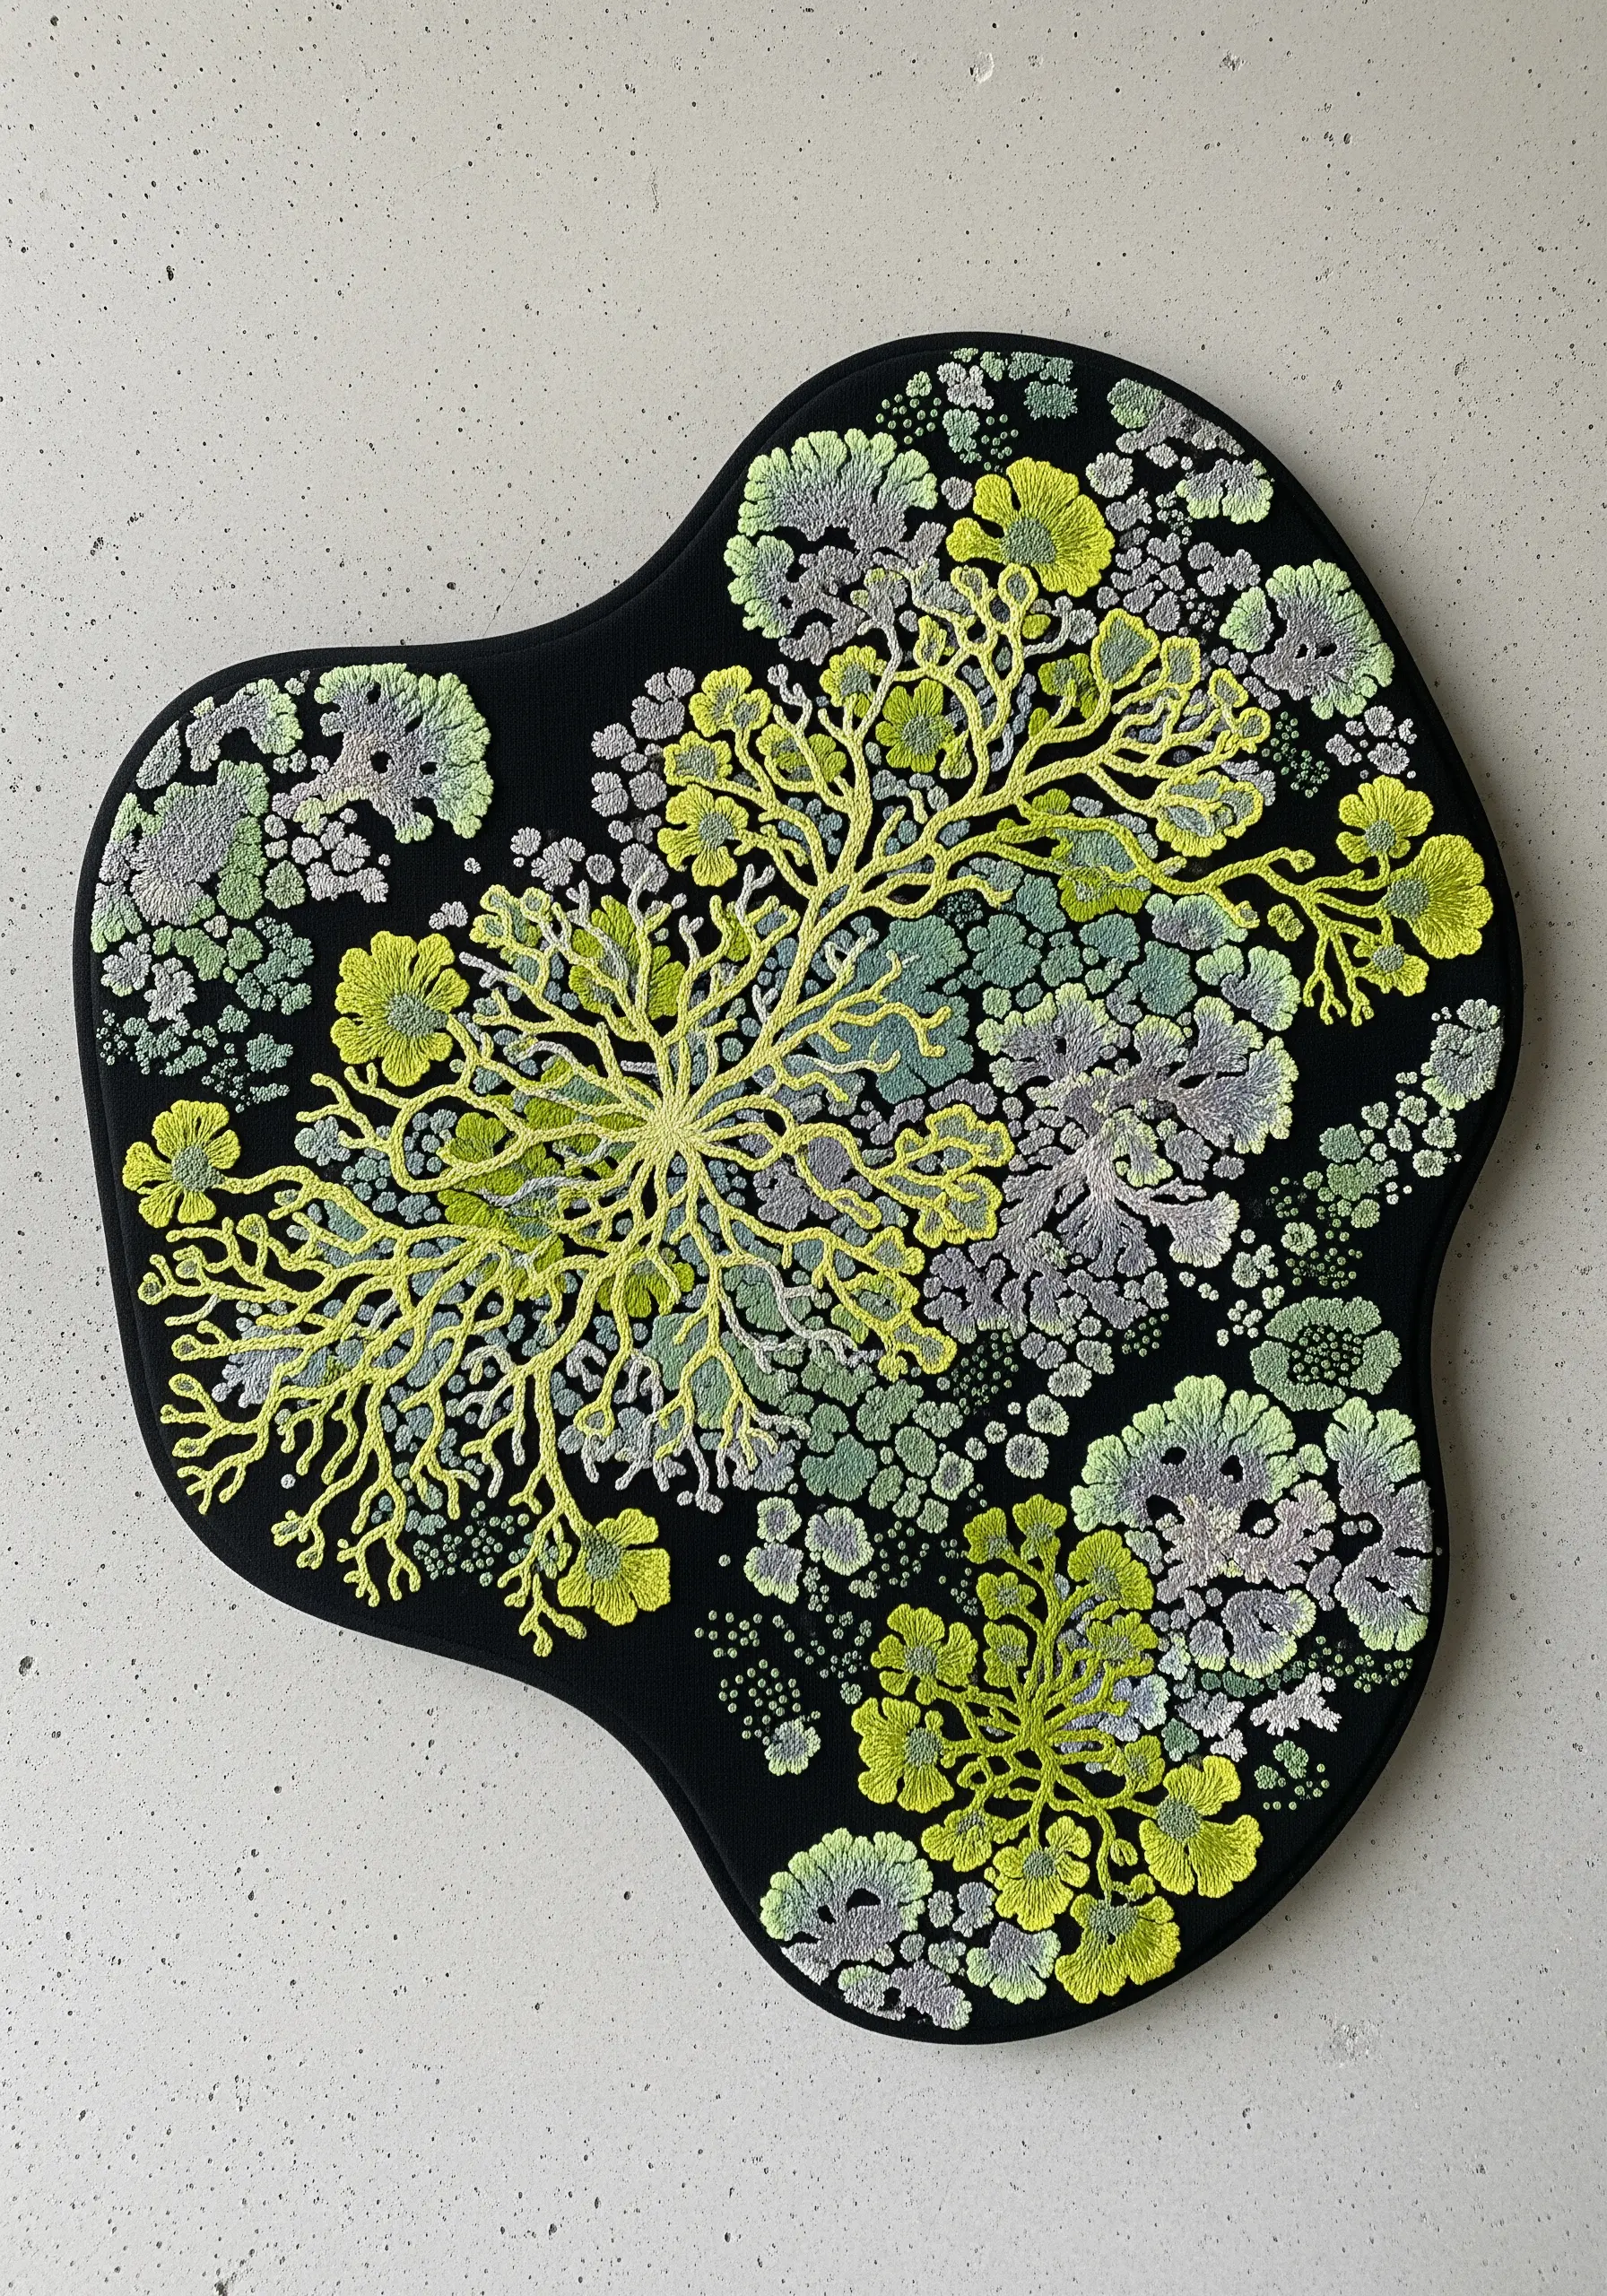
Break free from the hoop and let your embroidery grow organically across the fabric, just like lichen on a stone.
Mount your fabric onto an irregularly shaped board or frame to enhance the freeform aesthetic.
Build up the texture by creating dense, overlapping clusters of small stitches: French knots, seed stitches, and tiny lazy daisy stitches in a palette of greens, greys, and chartreuse.
This intuitive approach to stitching results in organic shape embroidery patterns that feel alive and completely unique.


