

Have you ever looked at a finished piece and felt that something was missing? That elusive spark that transforms a neat stitch into an emotional statement?
Often, the answer isn’t in learning a dozen new complex stitches, but in refining how you use the ones you already know. It’s in the weight of a line, the subtle shift in thread texture, or the deliberate use of space that allows a simple gesture to speak volumes.
These modern line art hands are more than just patterns; they are exercises in intention. Here, you’ll discover how a simple adjustment—like swapping a backstitch for a whipped stitch or adding a single, unexpected 3D element—can elevate your work from handmade craft to meaningful art. Let’s stitch with purpose.
1. The Unbroken Line: Mastering the Pinky Promise
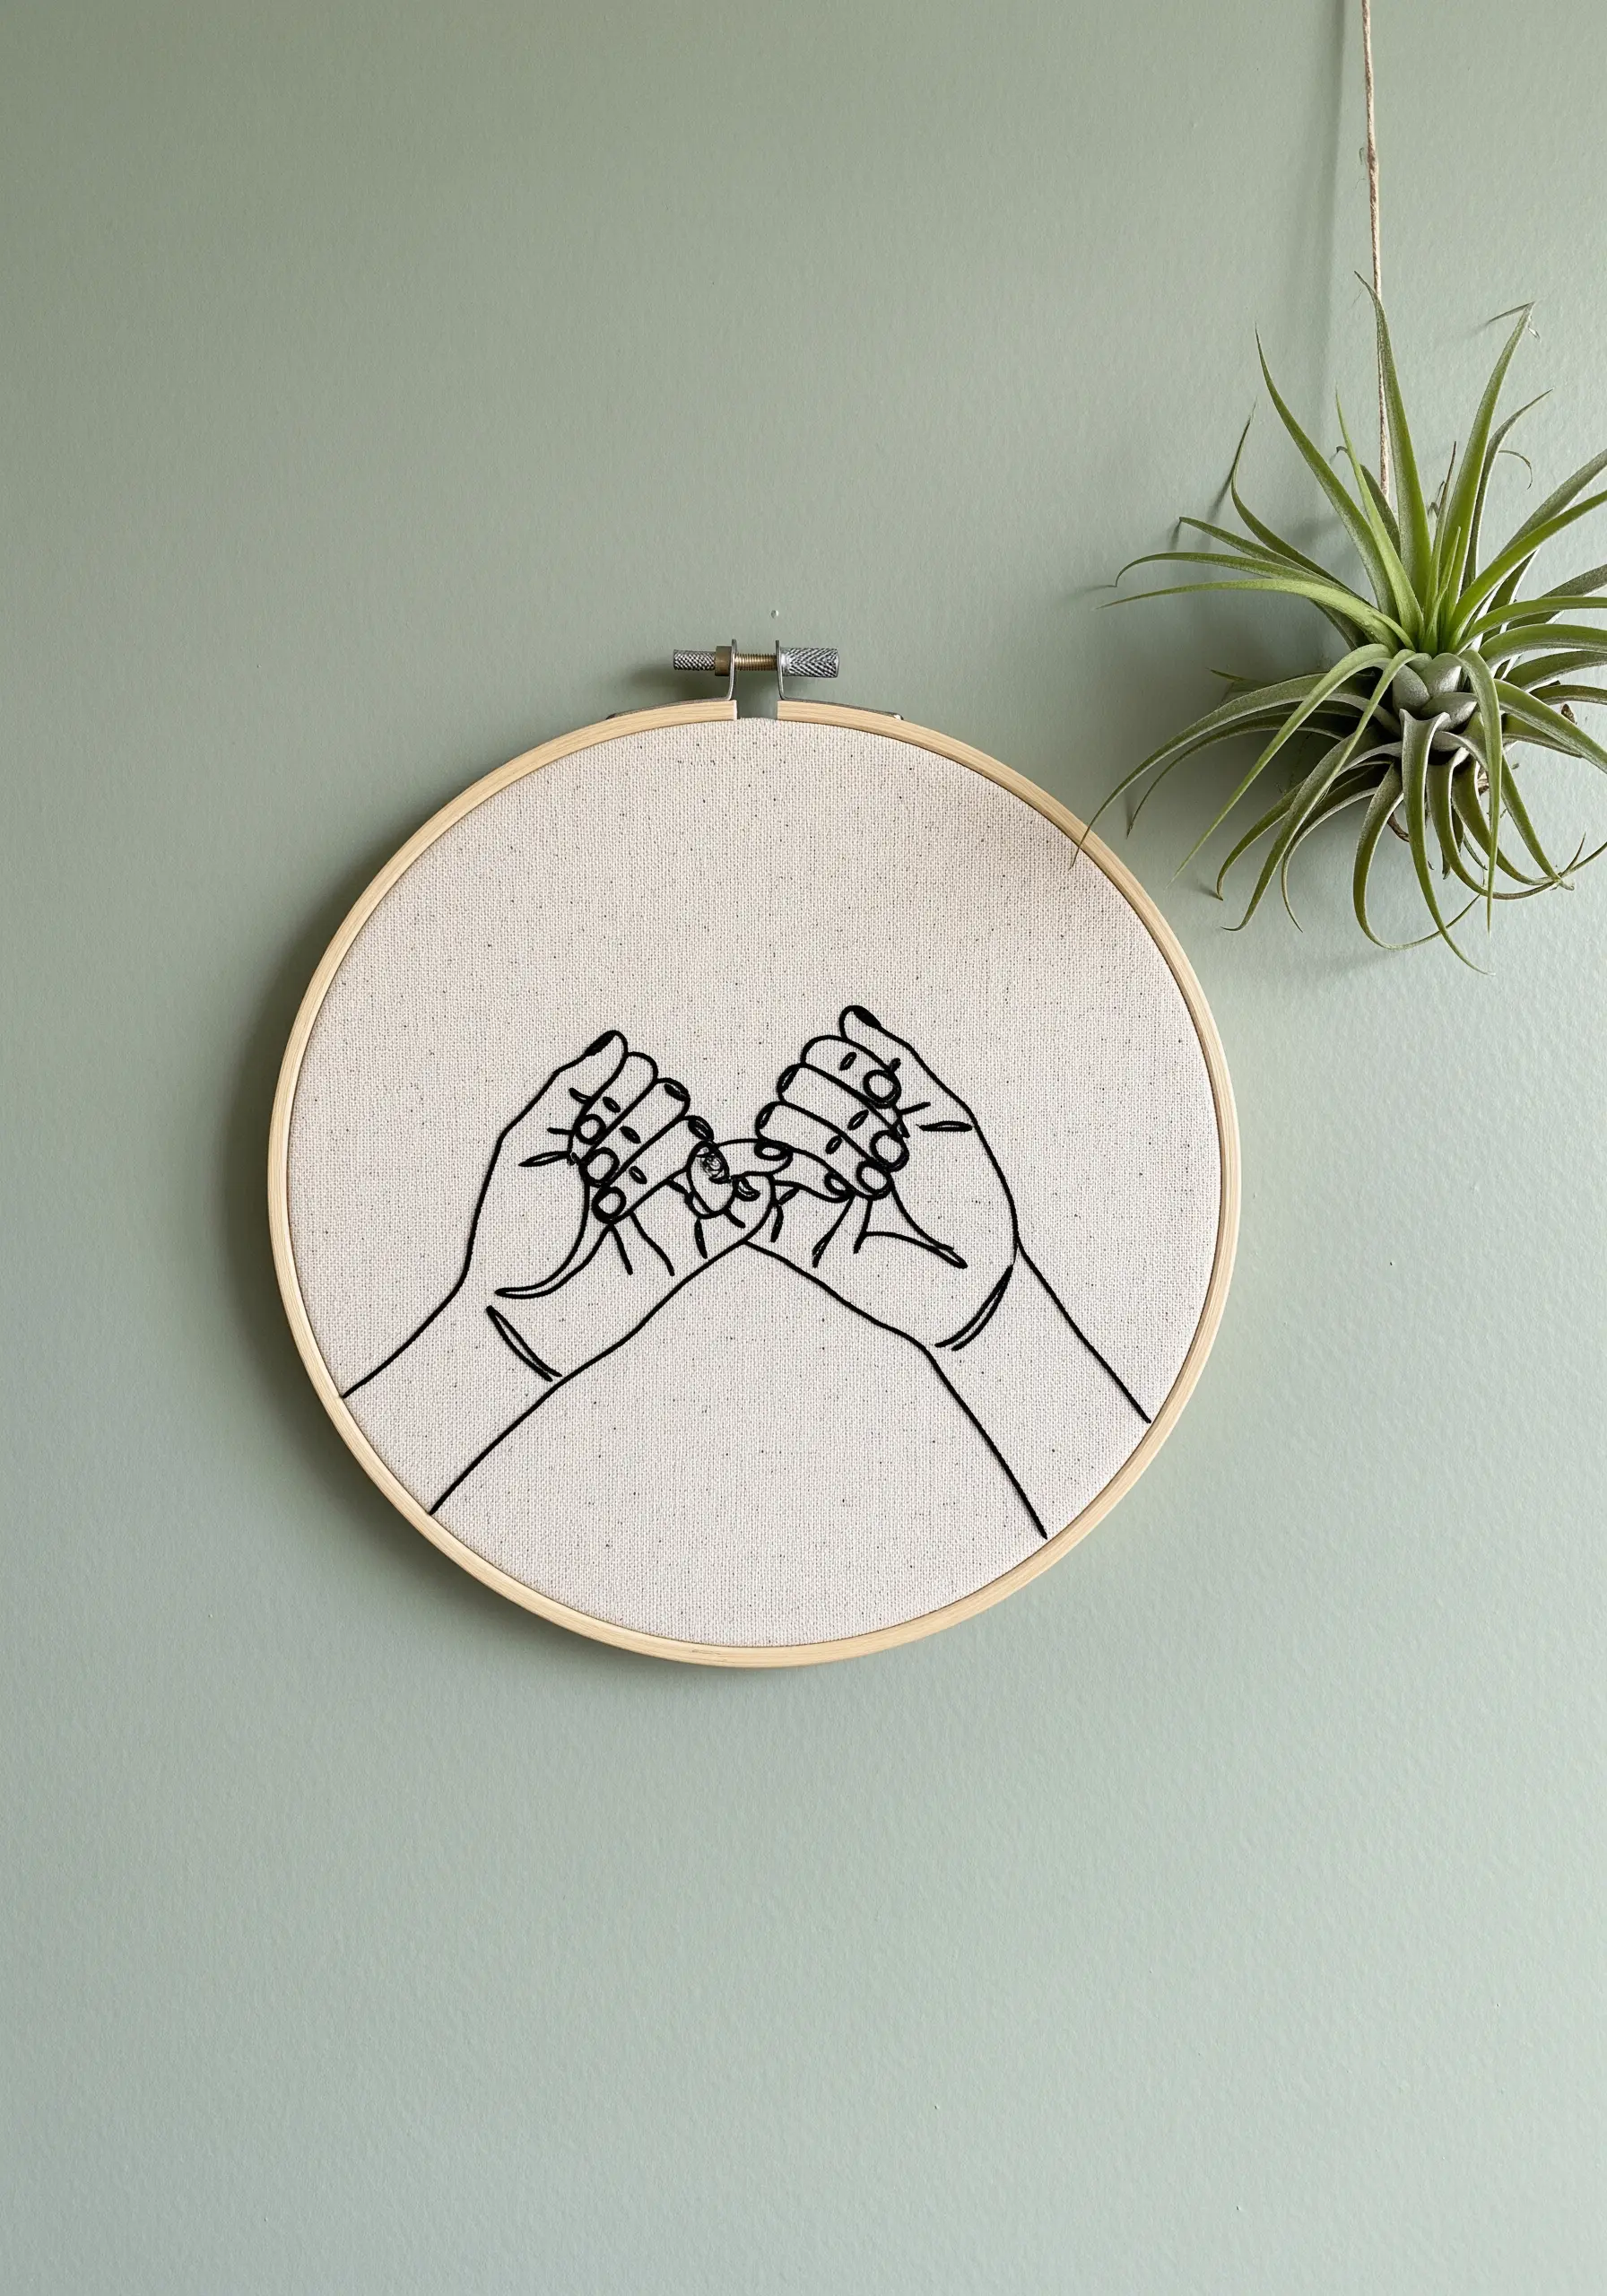
To achieve a perfectly smooth and continuous line for this gesture, use a whipped backstitch.
First, create a standard backstitch outline using three strands of black floss.
Then, take a new thread of the same color and, without piercing the fabric, weave it under and over each backstitch, creating a raised, cord-like effect.
This technique eliminates the segmented look of a simple backstitch, giving your line art a fluid, ink-drawn quality that feels polished and intentional.
Stitch on a tight-weave cotton or linen canvas to prevent distortion and keep your lines crisp.
2. Cultivating Detail: The Satin-Stitched Sprout

Combine bold line work with a delicate focal point to guide the viewer’s eye.
Use a consistent backstitch with three strands for the hands, but switch to a single strand for the finer crease lines on the palms to create visual hierarchy.
For the sprout, fill the leaves with a satin stitch using two strands of green floss.
Angle your satin stitches at about 45 degrees, following the natural direction of leaf growth, to give the small motif life and movement.
This contrast between the stark outline and the soft, filled element adds narrative depth to your piece.
3. A Touch of Brilliance: The Glimmering Star

Create a point of high contrast and focus by using metallic thread for a single, impactful element.
Stitch the hand using a simple backstitch in a neutral white or off-white on dark navy or black canvas.
For the star, use a gold metallic floss and a series of straight stitches radiating from a central point.
To prevent metallic thread from tangling, work with shorter lengths (no more than 12 inches) and use a thread conditioner like beeswax.
This minimal use of a specialty thread creates a luxurious focal point without overwhelming the design.
4. The Unity Gradient: Blending with Long-and-Short Stitch
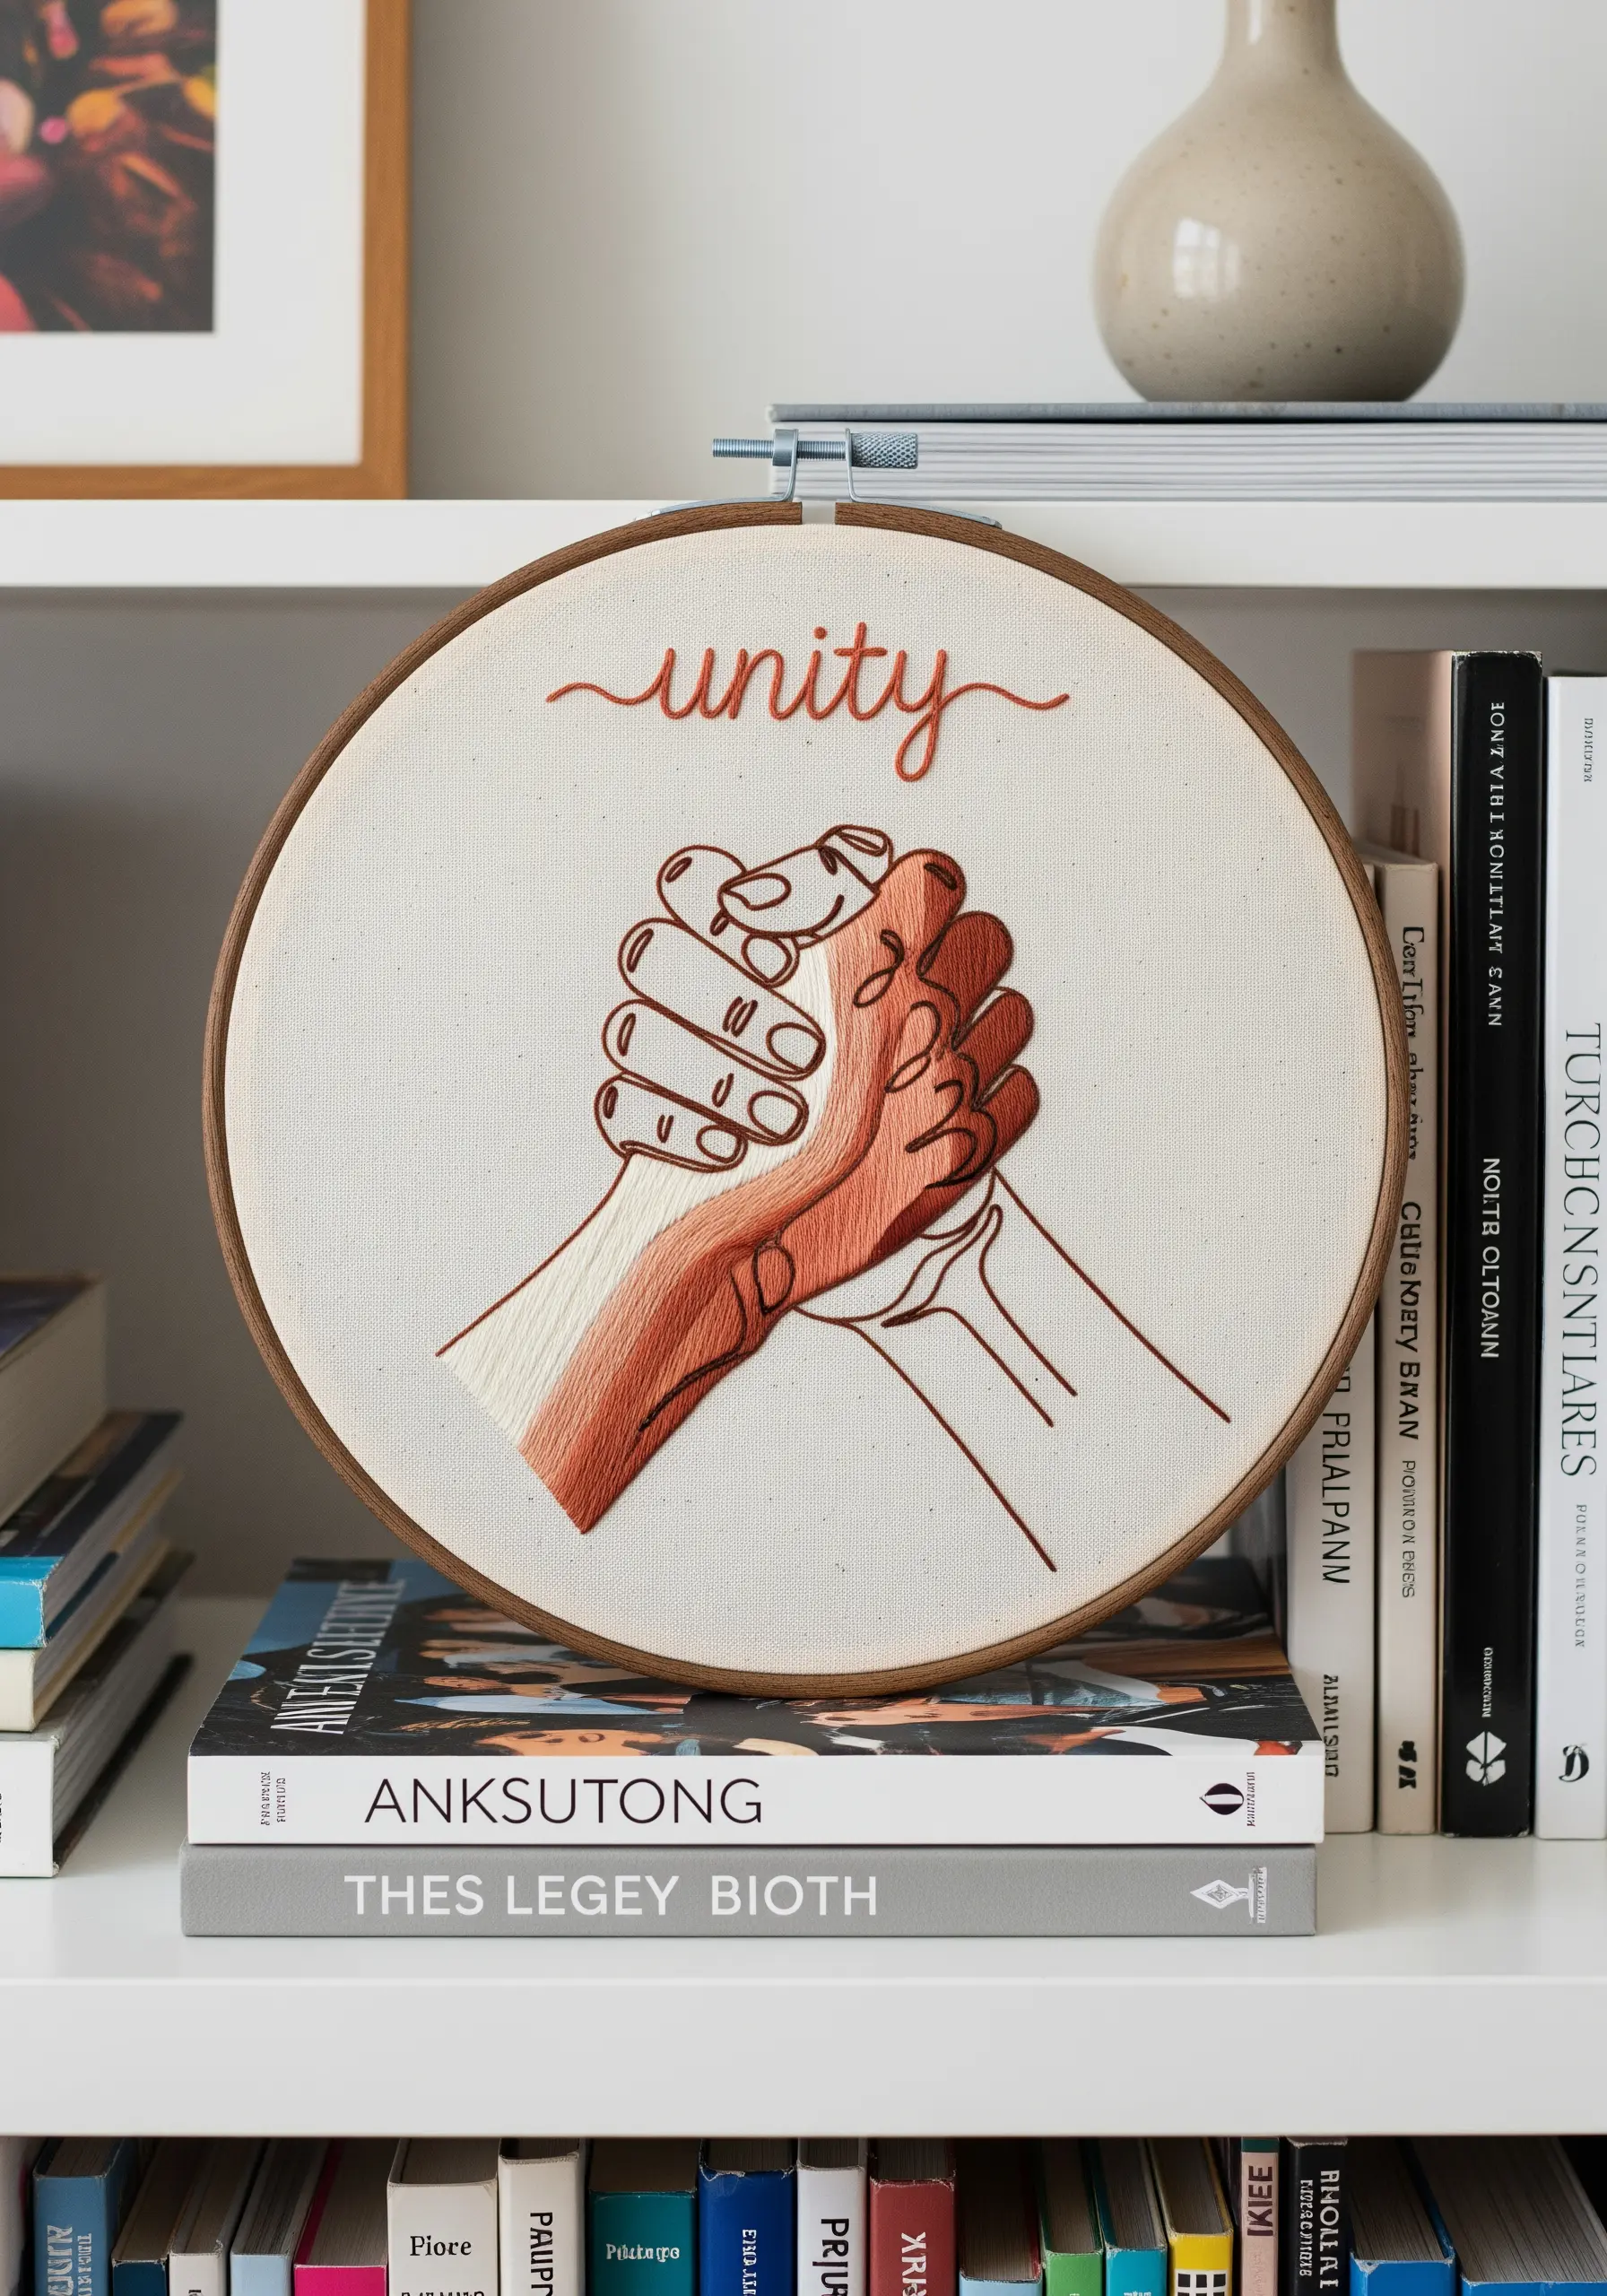
Move beyond flat color by using a long-and-short stitch to create a seamless gradient that signifies connection.
Outline the entire gesture first with a split stitch in a dark rust color to define the shape.
Using three analogous shades from light to dark, fill one hand with staggered long-and-short stitches, ensuring the stitches of each new color overlap with the previous row to blend them softly.
Keep your stitches parallel to the direction of the arm to enhance the sense of form and strength.
This technique adds warmth and dimension, transforming a simple outline into an emotive statement.
5. Botanical Peace: Integrating 3D Floral Elements

Add a surprising textural contrast to a bold graphic outline by incorporating small, three-dimensional florals.
Use a thick thread (like all six strands of floss) or a whipped backstitch for the hand to give it a strong, graphic presence on the muted pink fabric.
For the daisies, create detached chain stitches (lazy daisies) for the petals and a single French knot in a contrasting yellow for the center.
By having the flowers emerge from the fingertips, you create a playful, surrealist touch that softens the iconic gesture.
6. The Sculptural Line: Creating Raised Contours

Transform a flat line drawing into a tactile, sculptural piece by using a raised stem stitch.
Instead of a simple backstitch, use a stem stitch with all six strands of floss, keeping your stitches small and tight around the curves of the face and fingers.
This technique creates a rounded, cord-like line that sits high on the fabric, catching the light and casting subtle shadows.
Stitch it on a sturdy, non-stretch fabric mounted on a canvas or in a frame to ensure the tension remains even and the lines don’t pucker.
The result is a minimalist piece with surprising physical depth.
7. Energetic Outlines: The Imperfect Satin Stitch
Inject energy and a hand-drawn feel into your work by using a deliberately imperfect satin stitch for the outline.
Instead of a thin line, fill the outline of the hand gesture with short, slightly varied satin stitches using a bold red thread.
Don’t worry about perfect uniformity; the slight variations in stitch angle and length will create a dynamic, sketchy texture.
This method works best for filling thicker lines and gives the piece a raw, expressive quality that a simple backstitch can’t replicate.
It’s a faster way to create a bold shape and adds a unique tactile finish.
8. Delicate Gestures: Color-Coordinated Botanicals

Create a harmonious and elegant composition by matching the thread color of your line art to the botanicals it holds.
Use a single shade of purple for both the hand outline and the lavender stems, varying the number of strands—three for the hand, two for the stems—to create subtle definition.
For the lavender buds, use tiny satin stitches or seed stitches in a slightly darker and lighter shade of the same purple to add texture and realism.
This monochrome approach feels sophisticated and calm, letting the texture of the stitches provide the detail.
9. Minimalist Connection: The Power of Negative Space

For a design this delicate, the choice of stitch and thread is critical to maintaining its elegance.
Use a single strand of floss and a tiny split stitch for the outline of the hands.
A split stitch creates a finer, less broken line than a backstitch, which is ideal for capturing the gentle curves of the heart shape.
Stitching on a high-quality, bright white cotton fabric enhances the power of the negative space, making the simple gesture the undisputed focal point.
This minimalist approach ensures the emotion of the piece is conveyed with clarity and grace.
10. Bold Statements: Couching with Thick Yarn

Create a powerful, sculptural statement by swapping fine floss for thick yarn.
This effect is achieved through couching: lay down a thick black yarn along your design line, then use a thinner, matching embroidery thread to tack it onto the fabric with small, perpendicular stitches.
These anchoring stitches should be evenly spaced and nearly invisible, securing the yarn without distracting from its bold form.
This technique offers incredible texture and dimension, turning a simple fist outline into a piece of DIY wall art that demands attention.
11. Narrative Dimension: Extending Beyond the Hoop

Tell a story that breaks the boundaries of the hoop by combining embroidery with small, external embellishments.
Stitch the hand on a serene blue fabric using a simple backstitch.
For the birds, you can either stitch them directly onto the fabric or use pre-made metallic bird charms, sewing them on to create a three-dimensional effect of flight.
Arrange the birds in a flowing line that moves from the hand outwards, creating a sense of release and movement.
This mixed-media approach adds a layer of narrative and visual surprise to your embroidery.
12. Liquid Metal: Capturing Reflections with Thread
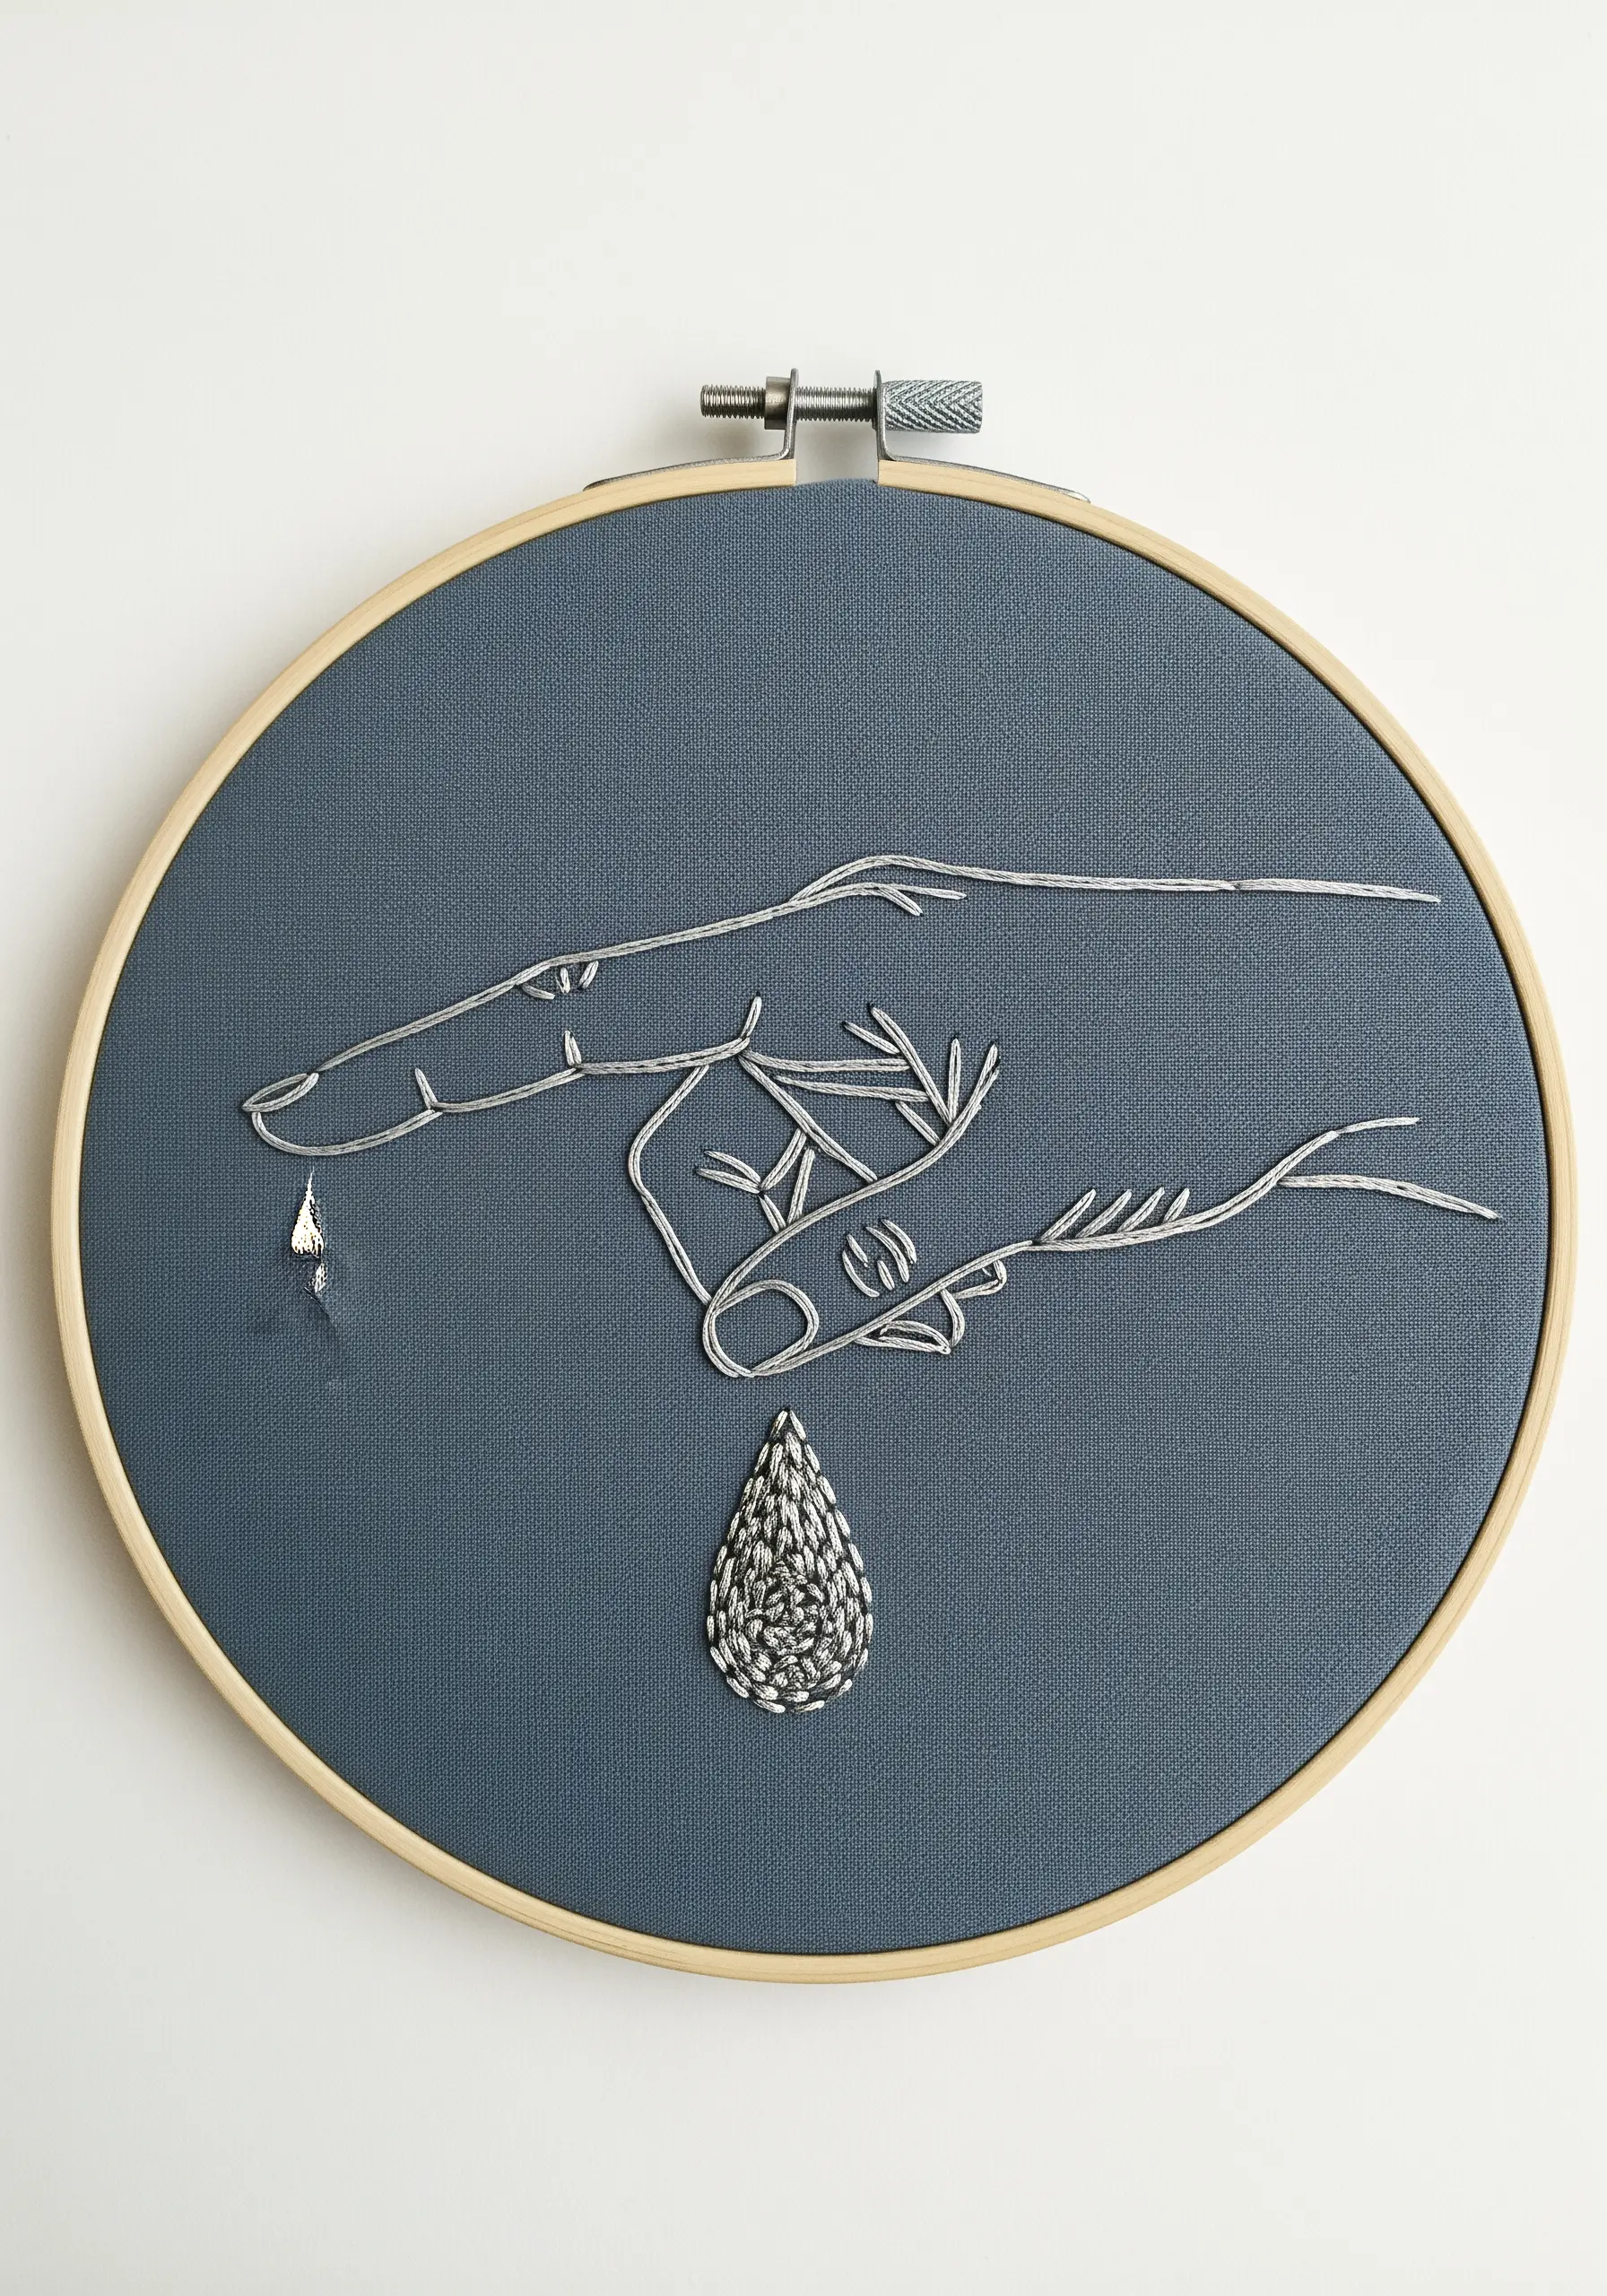
Recreate the reflective quality of liquid by using silver metallic thread and directional stitching.
Use a fine, single strand of silver thread for the hand outline to give it a delicate, wire-like appearance on the dark fabric.
For the teardrop, fill the shape with a dense satin stitch, angling your stitches to create a highlight, as if light were hitting a real droplet.
You can even couch a slightly thicker metallic cord around the droplet’s edge to define its shape and add extra dimension.
Working with abstract metallic thread projects like this adds a touch of modern alchemy to your craft.
13. Cozy Comfort: Adding Texture with French Knots
Evoke the comforting steam from a warm mug by combining clean outlines with soft, textural details.
Use a whipped backstitch for the hands and mug to ensure the lines are smooth and solid.
Fill the mug with a single piece of appliqué fabric or a light satin stitch, then scatter tiny white French knots across it to represent polka dots or light reflections.
For the steam, use a wispy, open chain stitch or a simple running stitch with a single strand of white floss to create a sense of delicate, upward movement.
14. The Whispered Line: Precision in Minimalism

When a design is this spare, every stitch counts.
To achieve these crisp, clean lines, use two strands of floss and a stem stitch, which creates a slightly more substantial and smoother curve than a backstitch.
Pay close attention to the points where lines converge, like the fingertips and lips, ensuring your stitches meet precisely without overlapping or creating bulk.
Transfer your pattern with a fine-tipped, water-soluble pen for maximum accuracy.
This abstract line art relies on precision to convey its quiet, confident message.
15. Selective Realism: A Pop of Thread Painting

Create a stunning focal point by contrasting a simple line-art gesture with a single, realistically stitched element.
Stitch the hand using a simple backstitch with just two strands of a muted, dusty pink thread to create a ghostly, sketched outline.
For the butterfly, switch to a thread painting technique (long-and-short stitch) using vibrant, high-contrast colors like orange, yellow, and black.
By rendering the butterfly in full, realistic detail, you make it appear alive and poised to fly away, creating a magical, surrealist moment.
16. Radiating Energy: Dynamic Straight Stitches

Amplify the energy of a gesture by adding radiating lines in a complementary color gradient.
First, stitch the ‘OK’ hand gesture using a bold satin stitch fill with a bright yellow, six-strand floss.
Then, using straight stitches in varying lengths, create rays of light emanating from the hand.
Use a gradient of yellow, orange, and even a touch of metallic gold thread for these rays to give them a shimmering, dynamic quality.
This simple addition transforms a static symbol into a burst of positive energy.
17. The Unframed Narrative: Finishing as a Wall Hanging
Let your embroidery become a piece of textile art by finishing it as an unframed wall hanging.
Stitch your design on a larger piece of rustic linen or canvas, leaving ample space around the motif.
Instead of placing it in a hoop, finish the top edge by folding it over a wooden dowel and securing it with a whipstitch.
Leave the bottom edge raw or create a frayed fringe for a soft, organic feel.
This presentation style gives iconic art a modern, tactile twist and allows the fabric itself to be part of the final piece.
18. Cursive Elegance: Mastering the Whipped Backstitch
For flawless embroidered script, a whipped backstitch is your most reliable technique.
First, stitch the word ‘dream’ using a standard backstitch with three strands of a rich blue floss.
Then, using a second thread, whip it around each backstitch without piercing the fabric.
This covers the gaps between stitches, creating a smooth, uninterrupted line that mimics the flow of ink.
For the quill, use long-and-short stitch with shades of gray, white, and blue to create the soft, feathery texture.
19. Implied Form: The Art of the Open Outline

Suggest form and connection without a fully closed outline to create a softer, more intimate feel.
Notice how the line of the hand doesn’t connect to the cat’s back, and the cat’s legs are left open at the bottom.
This technique, known as using an open contour, invites the viewer’s eye to complete the shape, creating a gentle, airy composition.
Use a simple backstitch with three strands of a warm brown thread on an off-white fabric to enhance the cozy, sketch-like quality of this delicate pet line art.
20. Sonic Texture: Stitching Sound Waves
Visualize sound by translating it into varied stitches and textures.
For the hand gesture, use a bold satin stitch fill to make it pop against the vibrant pink fabric.
Represent the sound waves with a combination of stitches: use a whipped backstitch for the main wave to give it a solid, defined line.
Incorporate silver metallic thread for accents that catch the light, and use straight stitches for the smaller musical notes.
This mixed-media technique creates a dynamic, multi-sensory experience.
21. Integrating Objects: The 3D Key Element
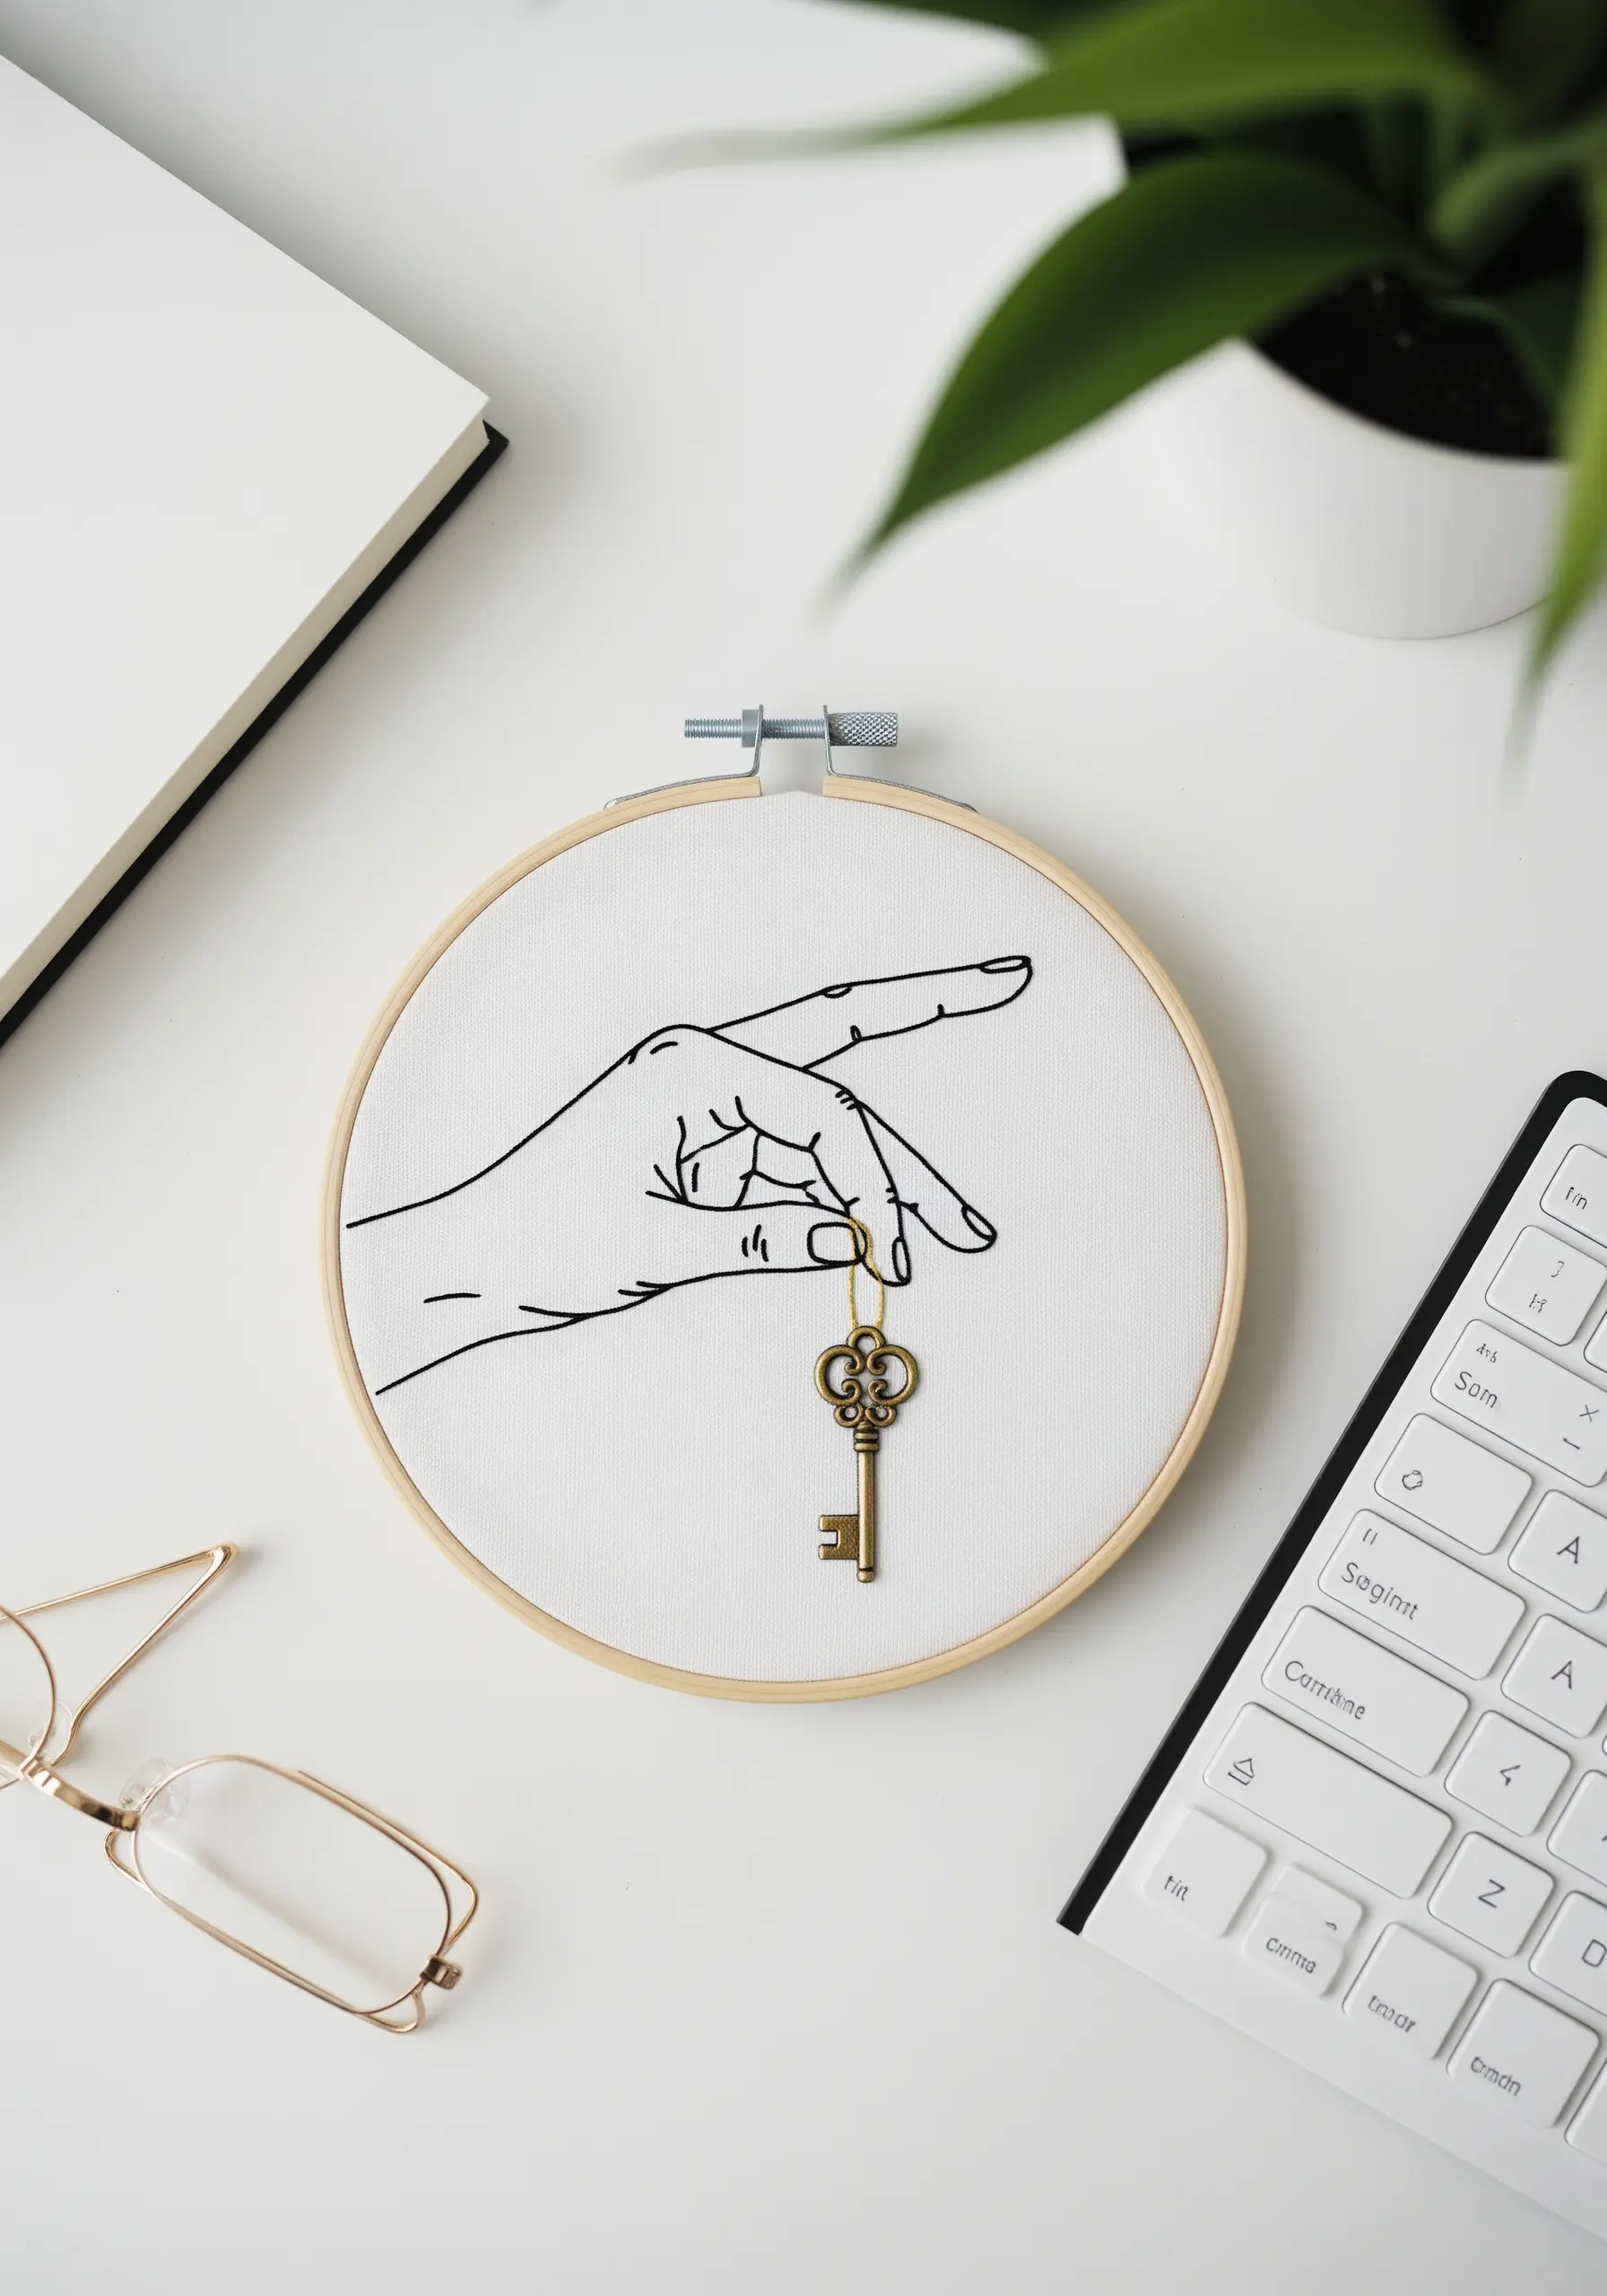
Create an interactive and surprising piece by incorporating a real-world object into your stitched design.
Embroider the hand using a clean backstitch, positioning the fingers as if they are genuinely holding something.
Before finishing your piece, securely sew a small, antique-style key onto the fabric using a thread that matches the key’s metal finish.
Use several strong stitches, looping them through the key’s handle and securing them tightly on the back of the fabric.
This simple addition transforms the embroidery from a representation into a tactile story.
22. A Burst of Joy: Simple Stitches for Big Impact

Convey energy and celebration with the simplest of stitches: the straight stitch.
After outlining the clapping hands in a bold black backstitch, use vibrant floss in contrasting colors like red and yellow for the celebratory bursts.
Group the straight stitches in small clusters of three, radiating outwards from a central point to create a firework or sparkle effect.
Vary the length and angle of each stitch to give the composition a sense of spontaneous movement and joy.
This is a quick and effective way to fill space and add dynamic energy to your work.
23. After-Dark Magic: Stitching with Glow Thread
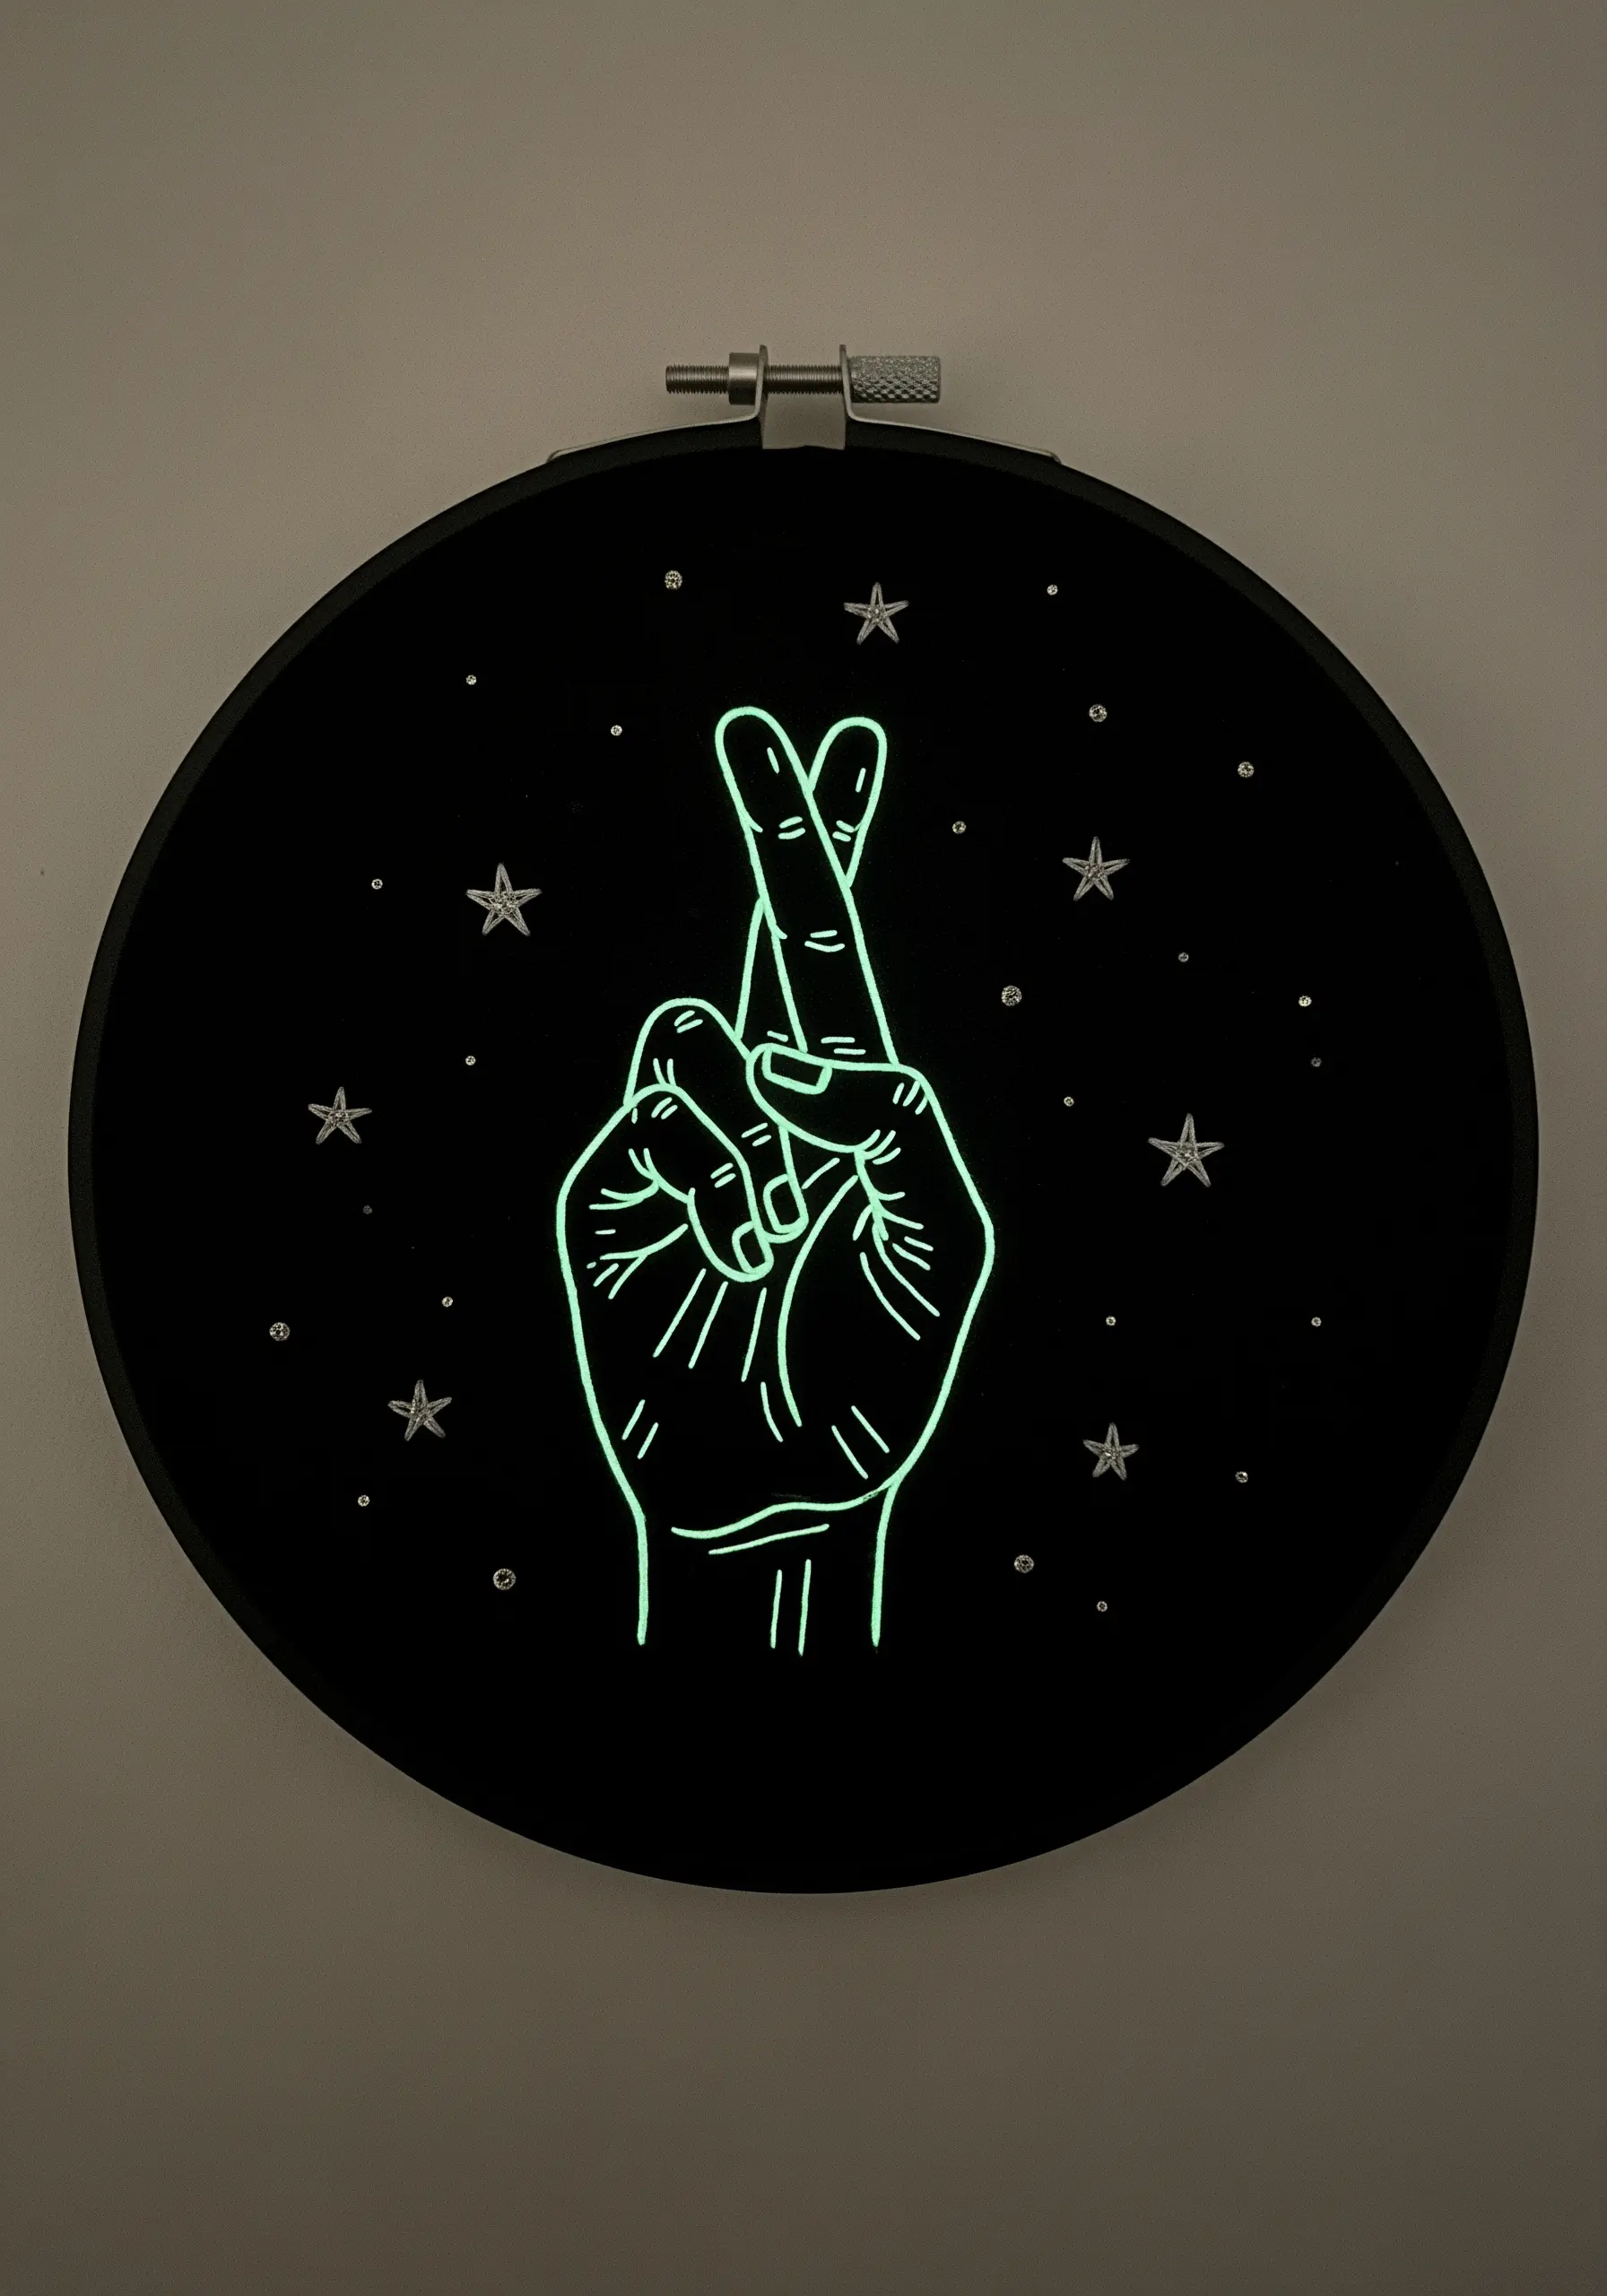
Add an element of pure magic to your embroidery by using glow-in-the-dark thread.
On a dark black or navy fabric, stitch your entire design using a high-quality phosphorescent floss.
Use a slightly thicker line—a stem stitch or a 3-strand backstitch—to ensure the glowing effect is strong and visible.
To ‘charge’ the thread, simply expose the finished piece to a bright light source for a few minutes.
For extra sparkle, you can add tiny silver beads or crystals to represent stars, which will catch the light even when the thread isn’t glowing.
24. Professional Finish: Large-Scale Canvas Art

Elevate your embroidery to the level of fine art by mounting it on a stretched canvas for a gallery-style presentation.
Complete your stitching on a piece of fabric that is several inches larger than your canvas frame.
Center the design, then wrap the fabric tightly around the wooden frame, securing it on the back with a staple gun.
Start by stapling the center of each of the four sides, then work your way towards the corners, pulling the fabric taut as you go for a perfectly smooth, professional finish.
This method is ideal for statement-size wall art ideas and eliminates the need for a traditional frame.


