
You have the threads, the hoops, and the desire to create something beautiful. But perhaps you feel a gap between the work you’re making and the art you envision. It’s not about learning a hundred new stitches; it’s about learning to see.
This is where your embroidery transforms. It’s in the choice to use a single strand of thread for a delicate line, the decision to fill a shape with French knots instead of satin stitch for texture, or the way you frame a finished piece not just in a hoop, but as a true work of art. These small, intentional choices are what elevate your craft.
Here, we’ll move beyond the pattern and into the artistry. You’ll find techniques that add warmth and sophistication to your neutral home, turning simple textiles into personal, organic statements. Let’s begin.
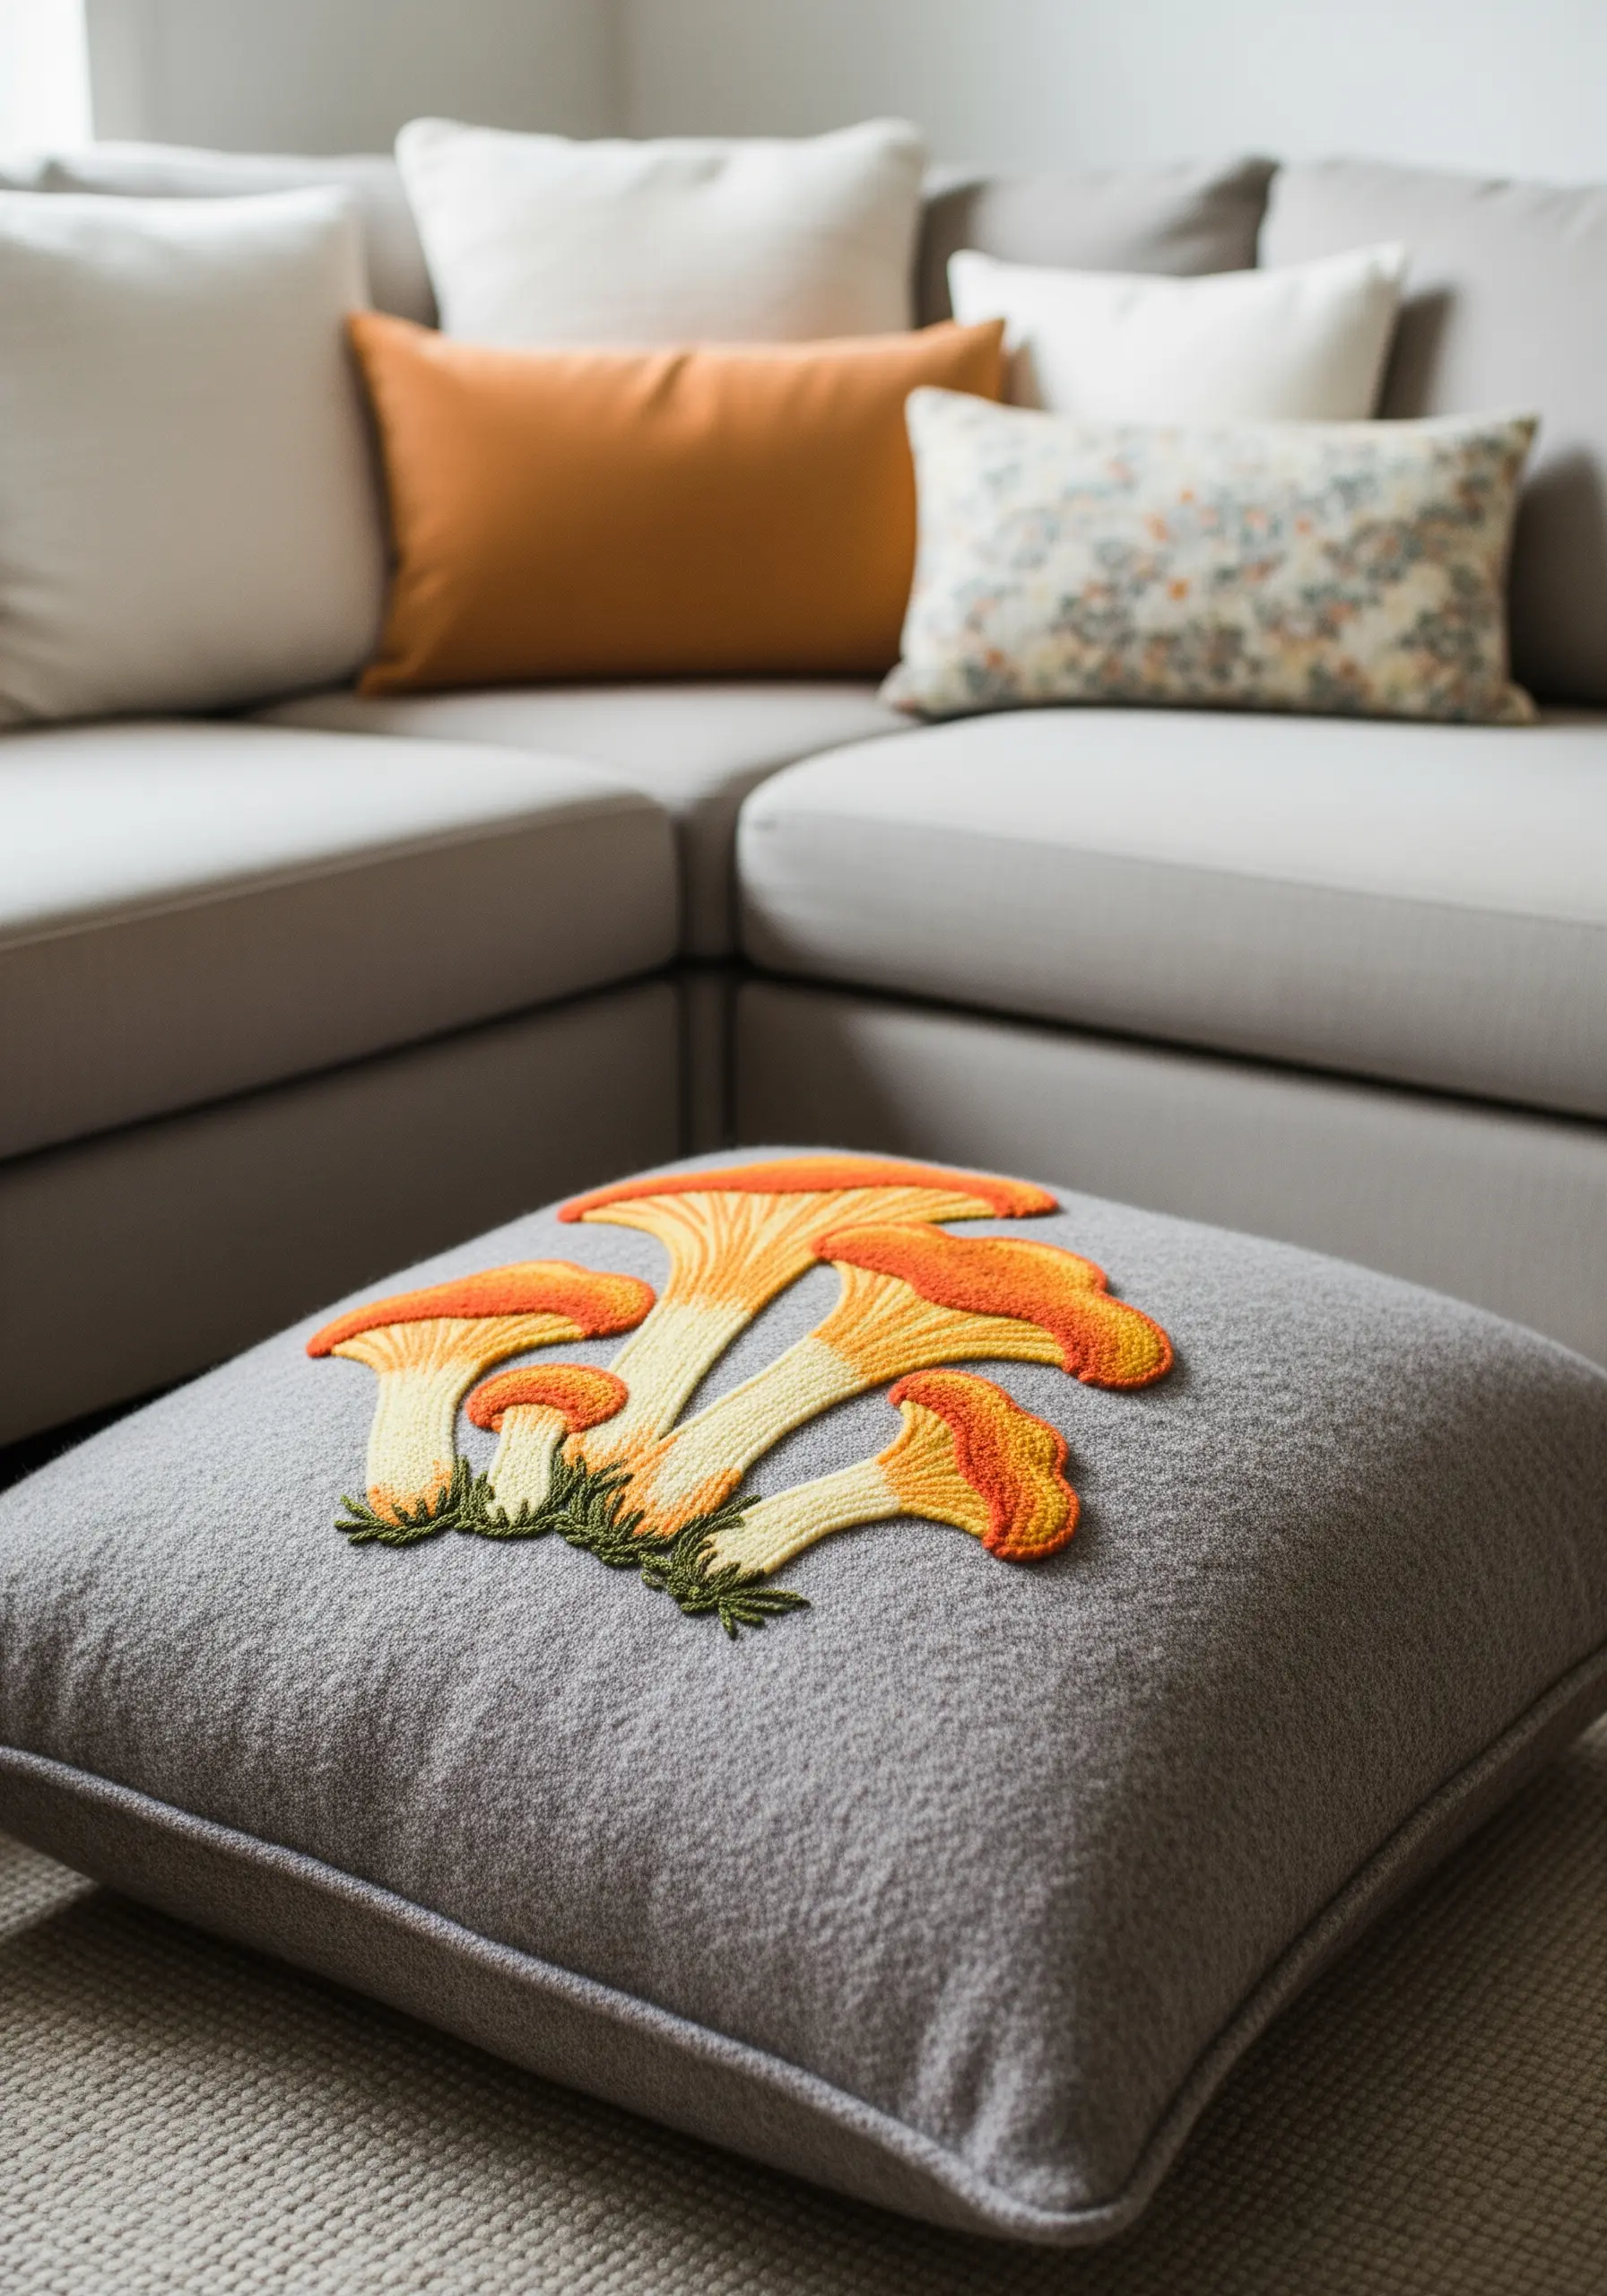
1. Build Tactile Landscapes with Dimensional Stitches

To create a truly immersive piece, think in layers of texture, not just color.
Use a punch needle or dense French knots to build up a plush, mossy ground, varying the density to create shadows.
For the mushroom caps, make your stitches slightly tighter and more uniform, which gives them a smooth, rounded appearance that stands out.
Finally, overlay fine details like tree roots using a simple backstitch or couching stitch; this contrast between sharp lines and soft textures is what brings the entire scene to life.
These handmade organic pieces add instant warmth and character.
2. Couch Thick Yarn for Bold, Graphic Impact

When you want to make a bold statement on a pillow or cushion, filling large areas with satin stitch can cause puckering and take forever.
Instead, lay down thick yarn or roving in your desired shape and use a thinner, matching thread to tack it down every quarter-inch.
This technique, called couching, is quick, stable, and creates a clean, sculptural line that adds immediate graphic appeal.
Play with different yarn weights for the sun’s rays to introduce a subtle rhythm to the design.
3. Curate a Cohesive Botanical Gallery Wall

The secret to an elegant embroidery hoop gallery is restraint.
Instead of choosing dozens of colors, limit your palette to two or three complementary shades and use them across a series of simple botanical designs.
This disciplined approach ensures the collection feels curated and intentional.
For fine stems, use a single strand of floss and a whipped backstitch for a smooth, uninterrupted line.
These minimal embroidery wall designs allow each piece to breathe while contributing to a harmonious whole.
4. Add Sculptural Dimension to Plain Table Runners

Transform a simple burlap or linen runner into a piece of functional art with a single, bold line.
Use a thick cotton macrame cord instead of standard embroidery floss for a three-dimensional effect that you can see and feel.
Lay the cord in a gentle, meandering pattern down the center of the runner and secure it with small, discreet whipstitches in a matching thread color.
The contrast between the soft, sculptural cord and the flat, rustic fabric creates an understated elegance perfect for a neutral home.
These hand-stitched table runner embroidery designs are surprisingly simple to execute.
5. Use Texture to Define Your Landscapes

Instead of relying solely on color to create depth in a landscape, let texture do the work.
Use a punch needle or a dense field of French knots to build your scene, but alter your technique for each element.
Keep the loops short and uniform for the distant sun to give it a smooth, solid feel.
For the foreground, use slightly longer, more varied loop heights and directions to create a sense of rugged, organic terrain.
Learning ways to create depth in your embroidery using natural textures will fundamentally change your work.
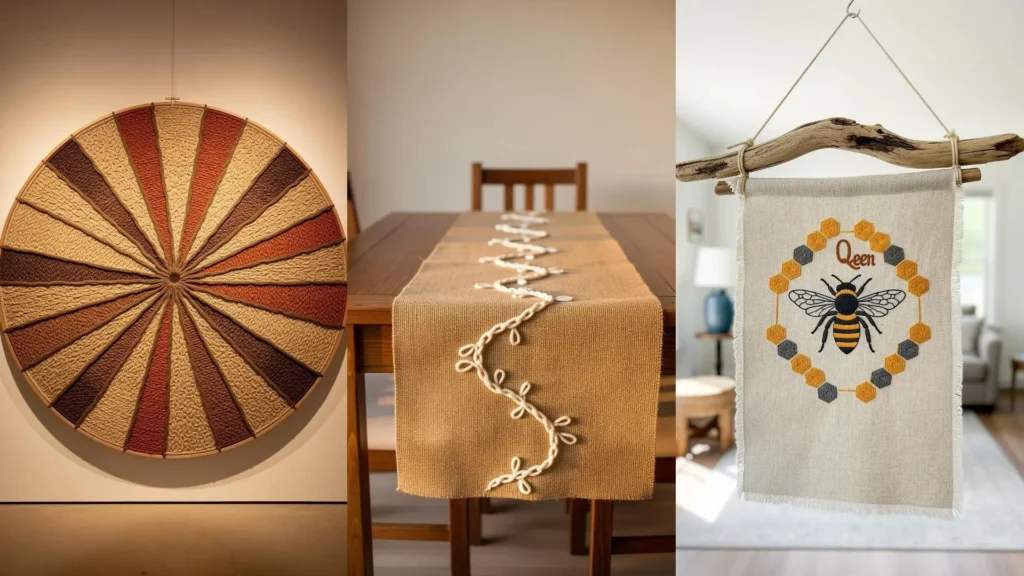
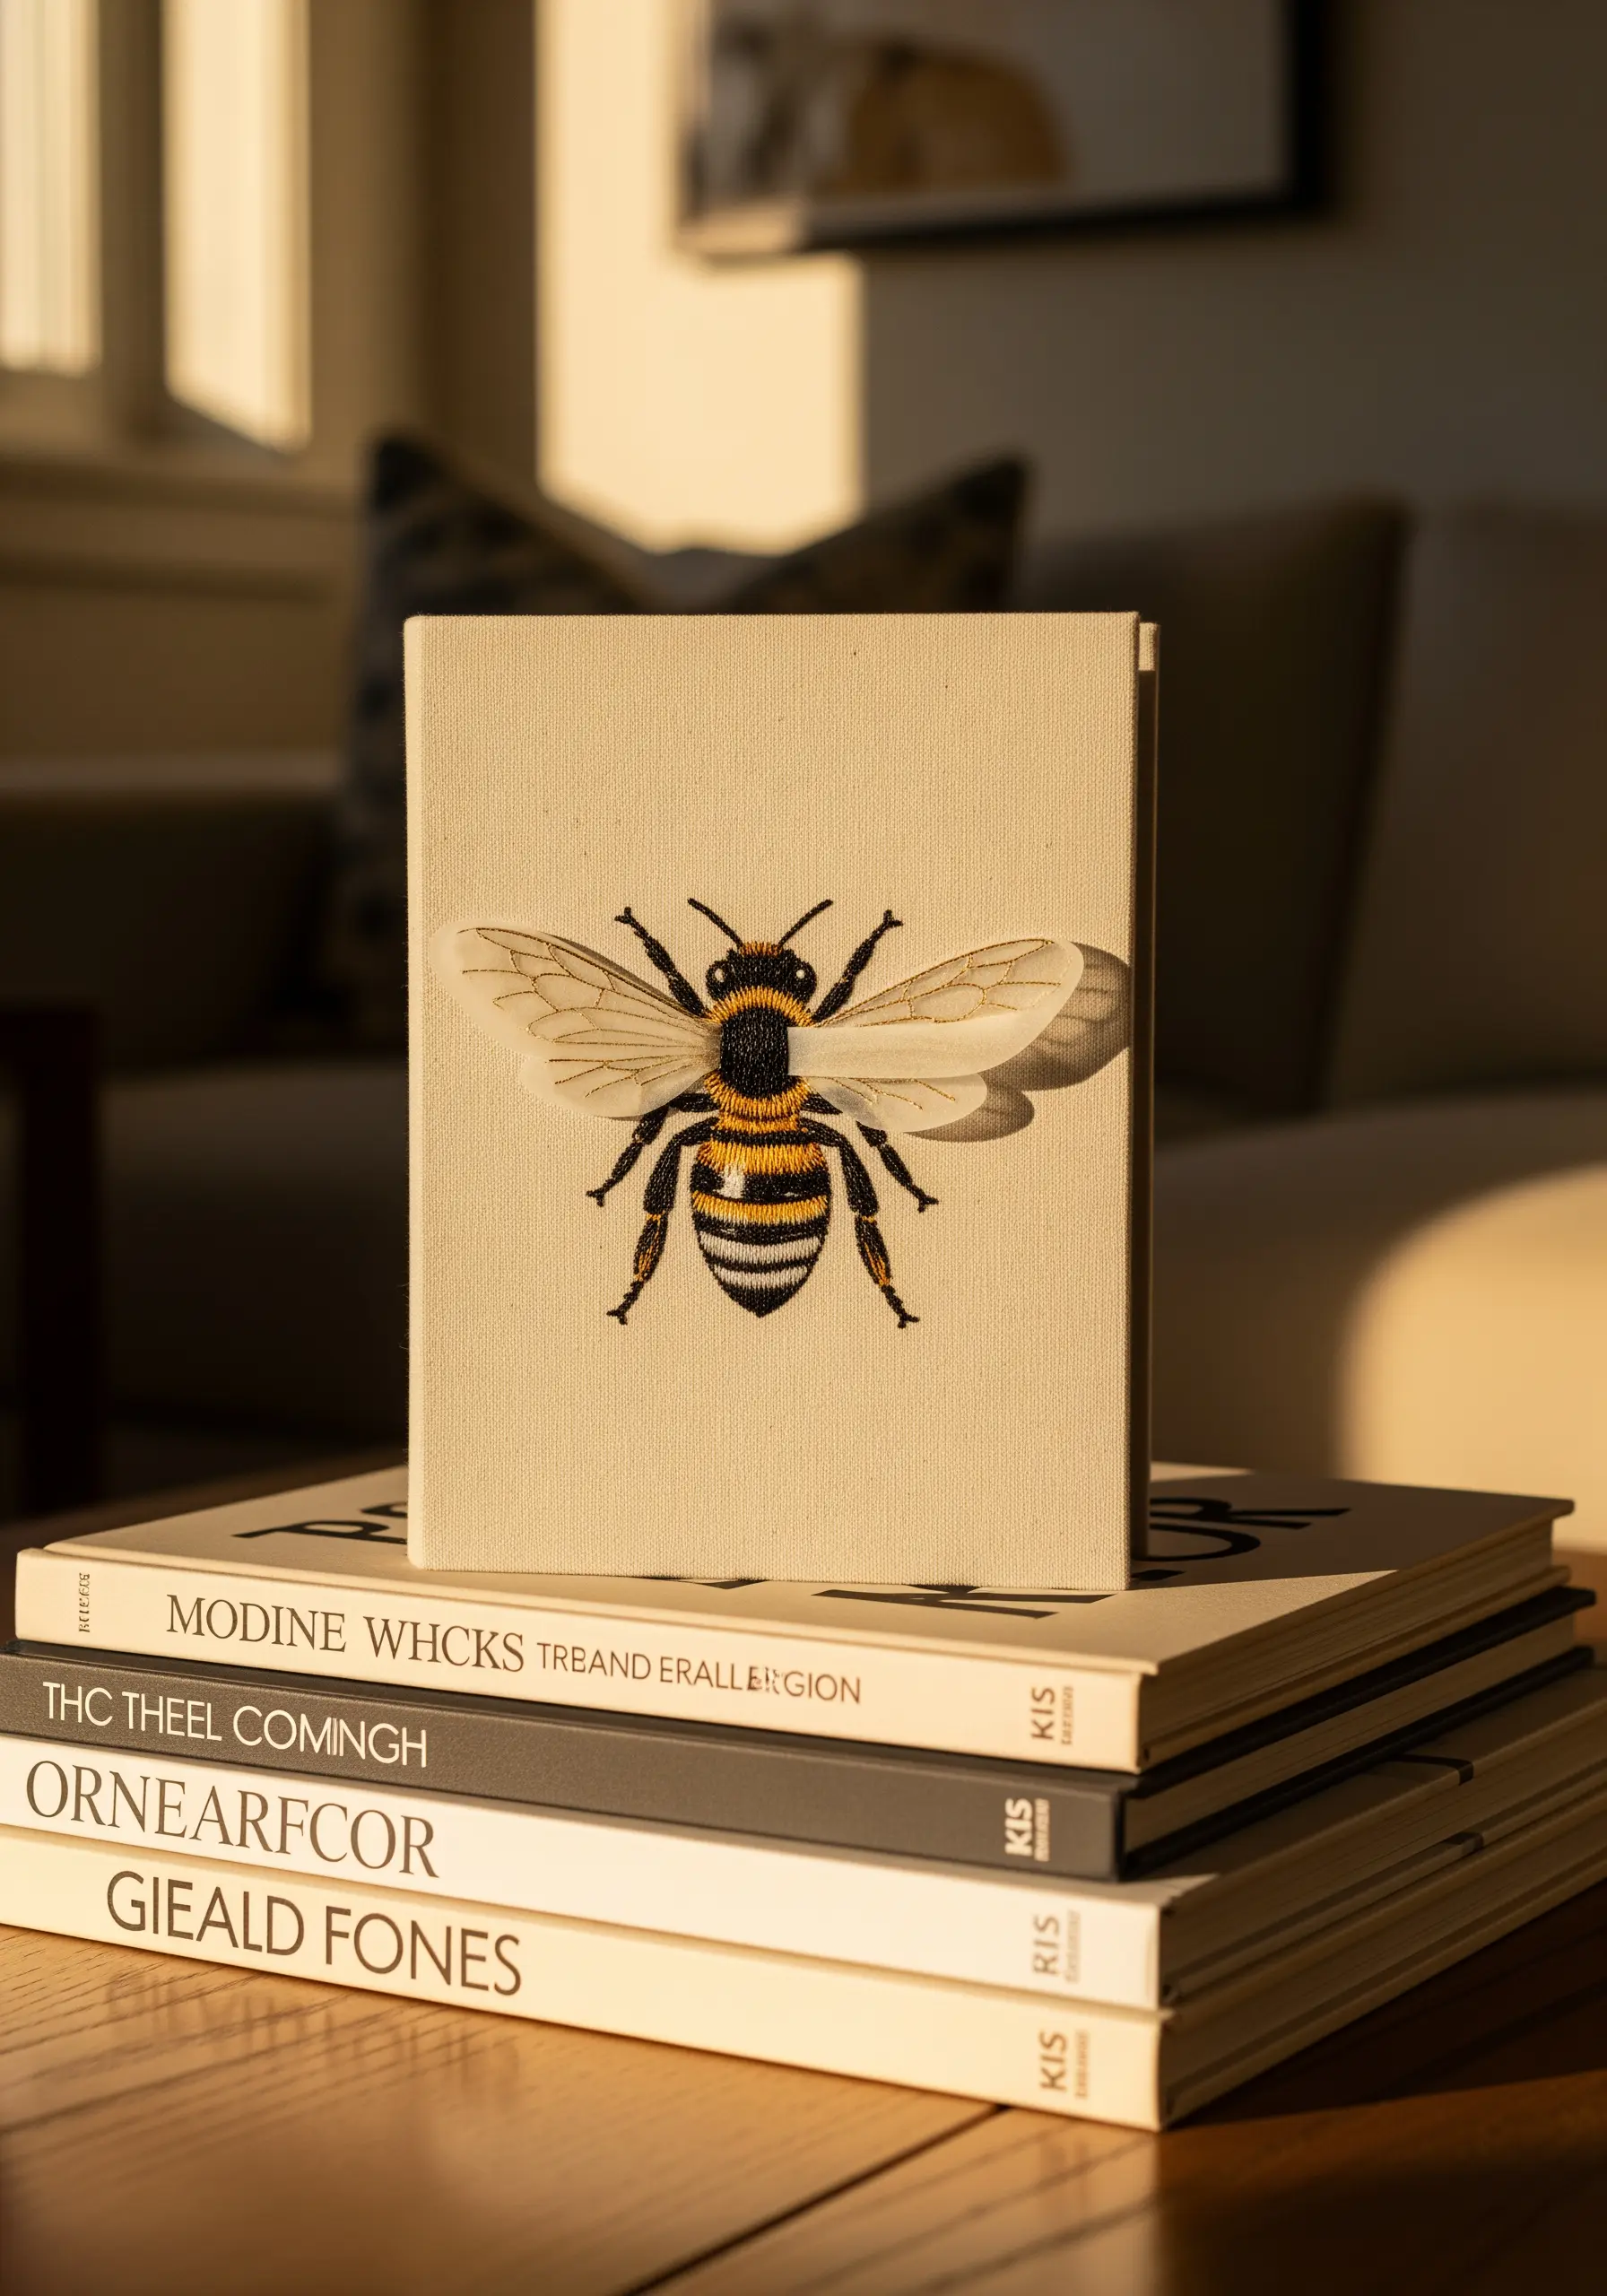
6. Combine Geometric Fills and Crisp Outlines
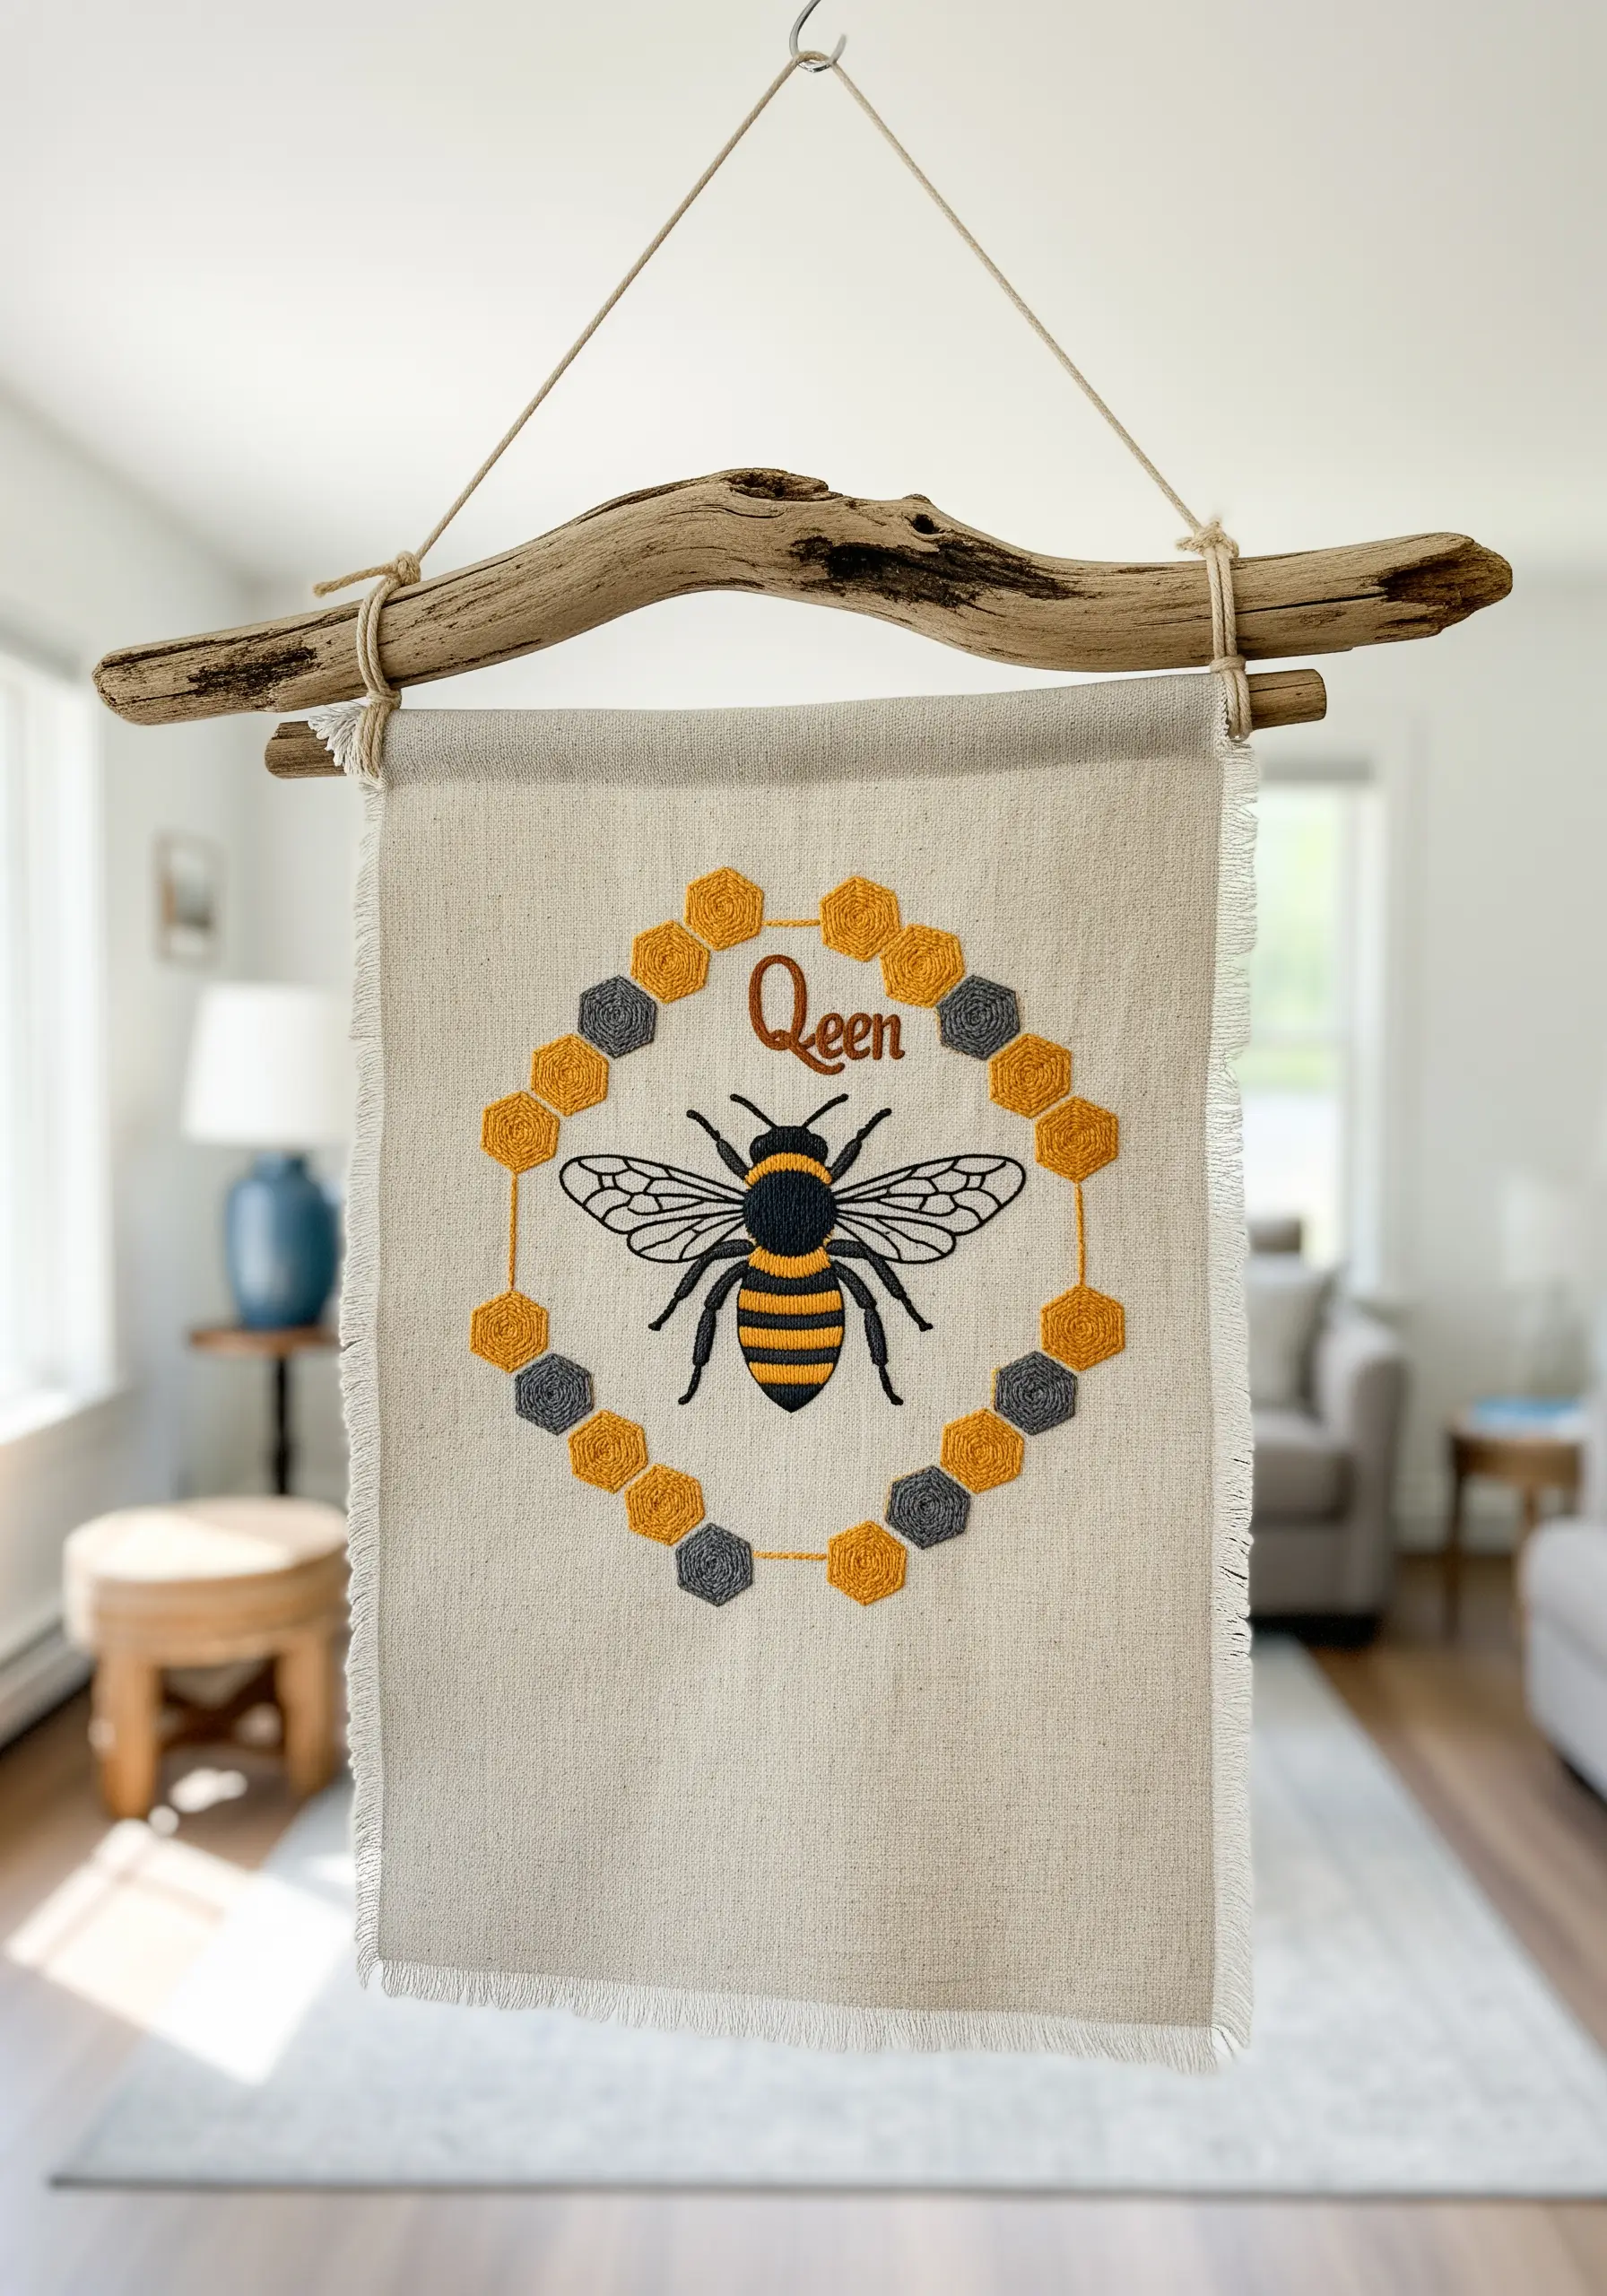
To make a graphic motif truly pop, focus on the interplay between fill and outline.
For the honeycomb shapes, fill them with a satin stitch using a slightly thicker thread, like a #8 pearl cotton, to give them a subtle loft and texture.
Then, for the delicate bee wings and lettering, switch to a single strand of standard floss and use a precise backstitch.
This contrast in thread weight and stitch style makes the central element sharp and clear while the geometric border feels soft and textural.
7. Make Motifs Pop with Padded Satin Stitch
To give your embroidered motifs a raised, almost three-dimensional quality, build a foundation before you even begin your satin stitch.
First, fill the shape with a layer of small seed stitches or a simple running stitch.
Then, work your final satin stitches over this padding.
The underlying stitches create a gentle lift, causing the motif to stand out from the fabric surface.
This technique works especially well on textured fabrics like wool felt, where the contrast between the smooth, raised embroidery and the soft background is most apparent.
Explore more creative ways to stitch natural textures like a pro.
8. Embroider on Knitwear with a Stabilizer
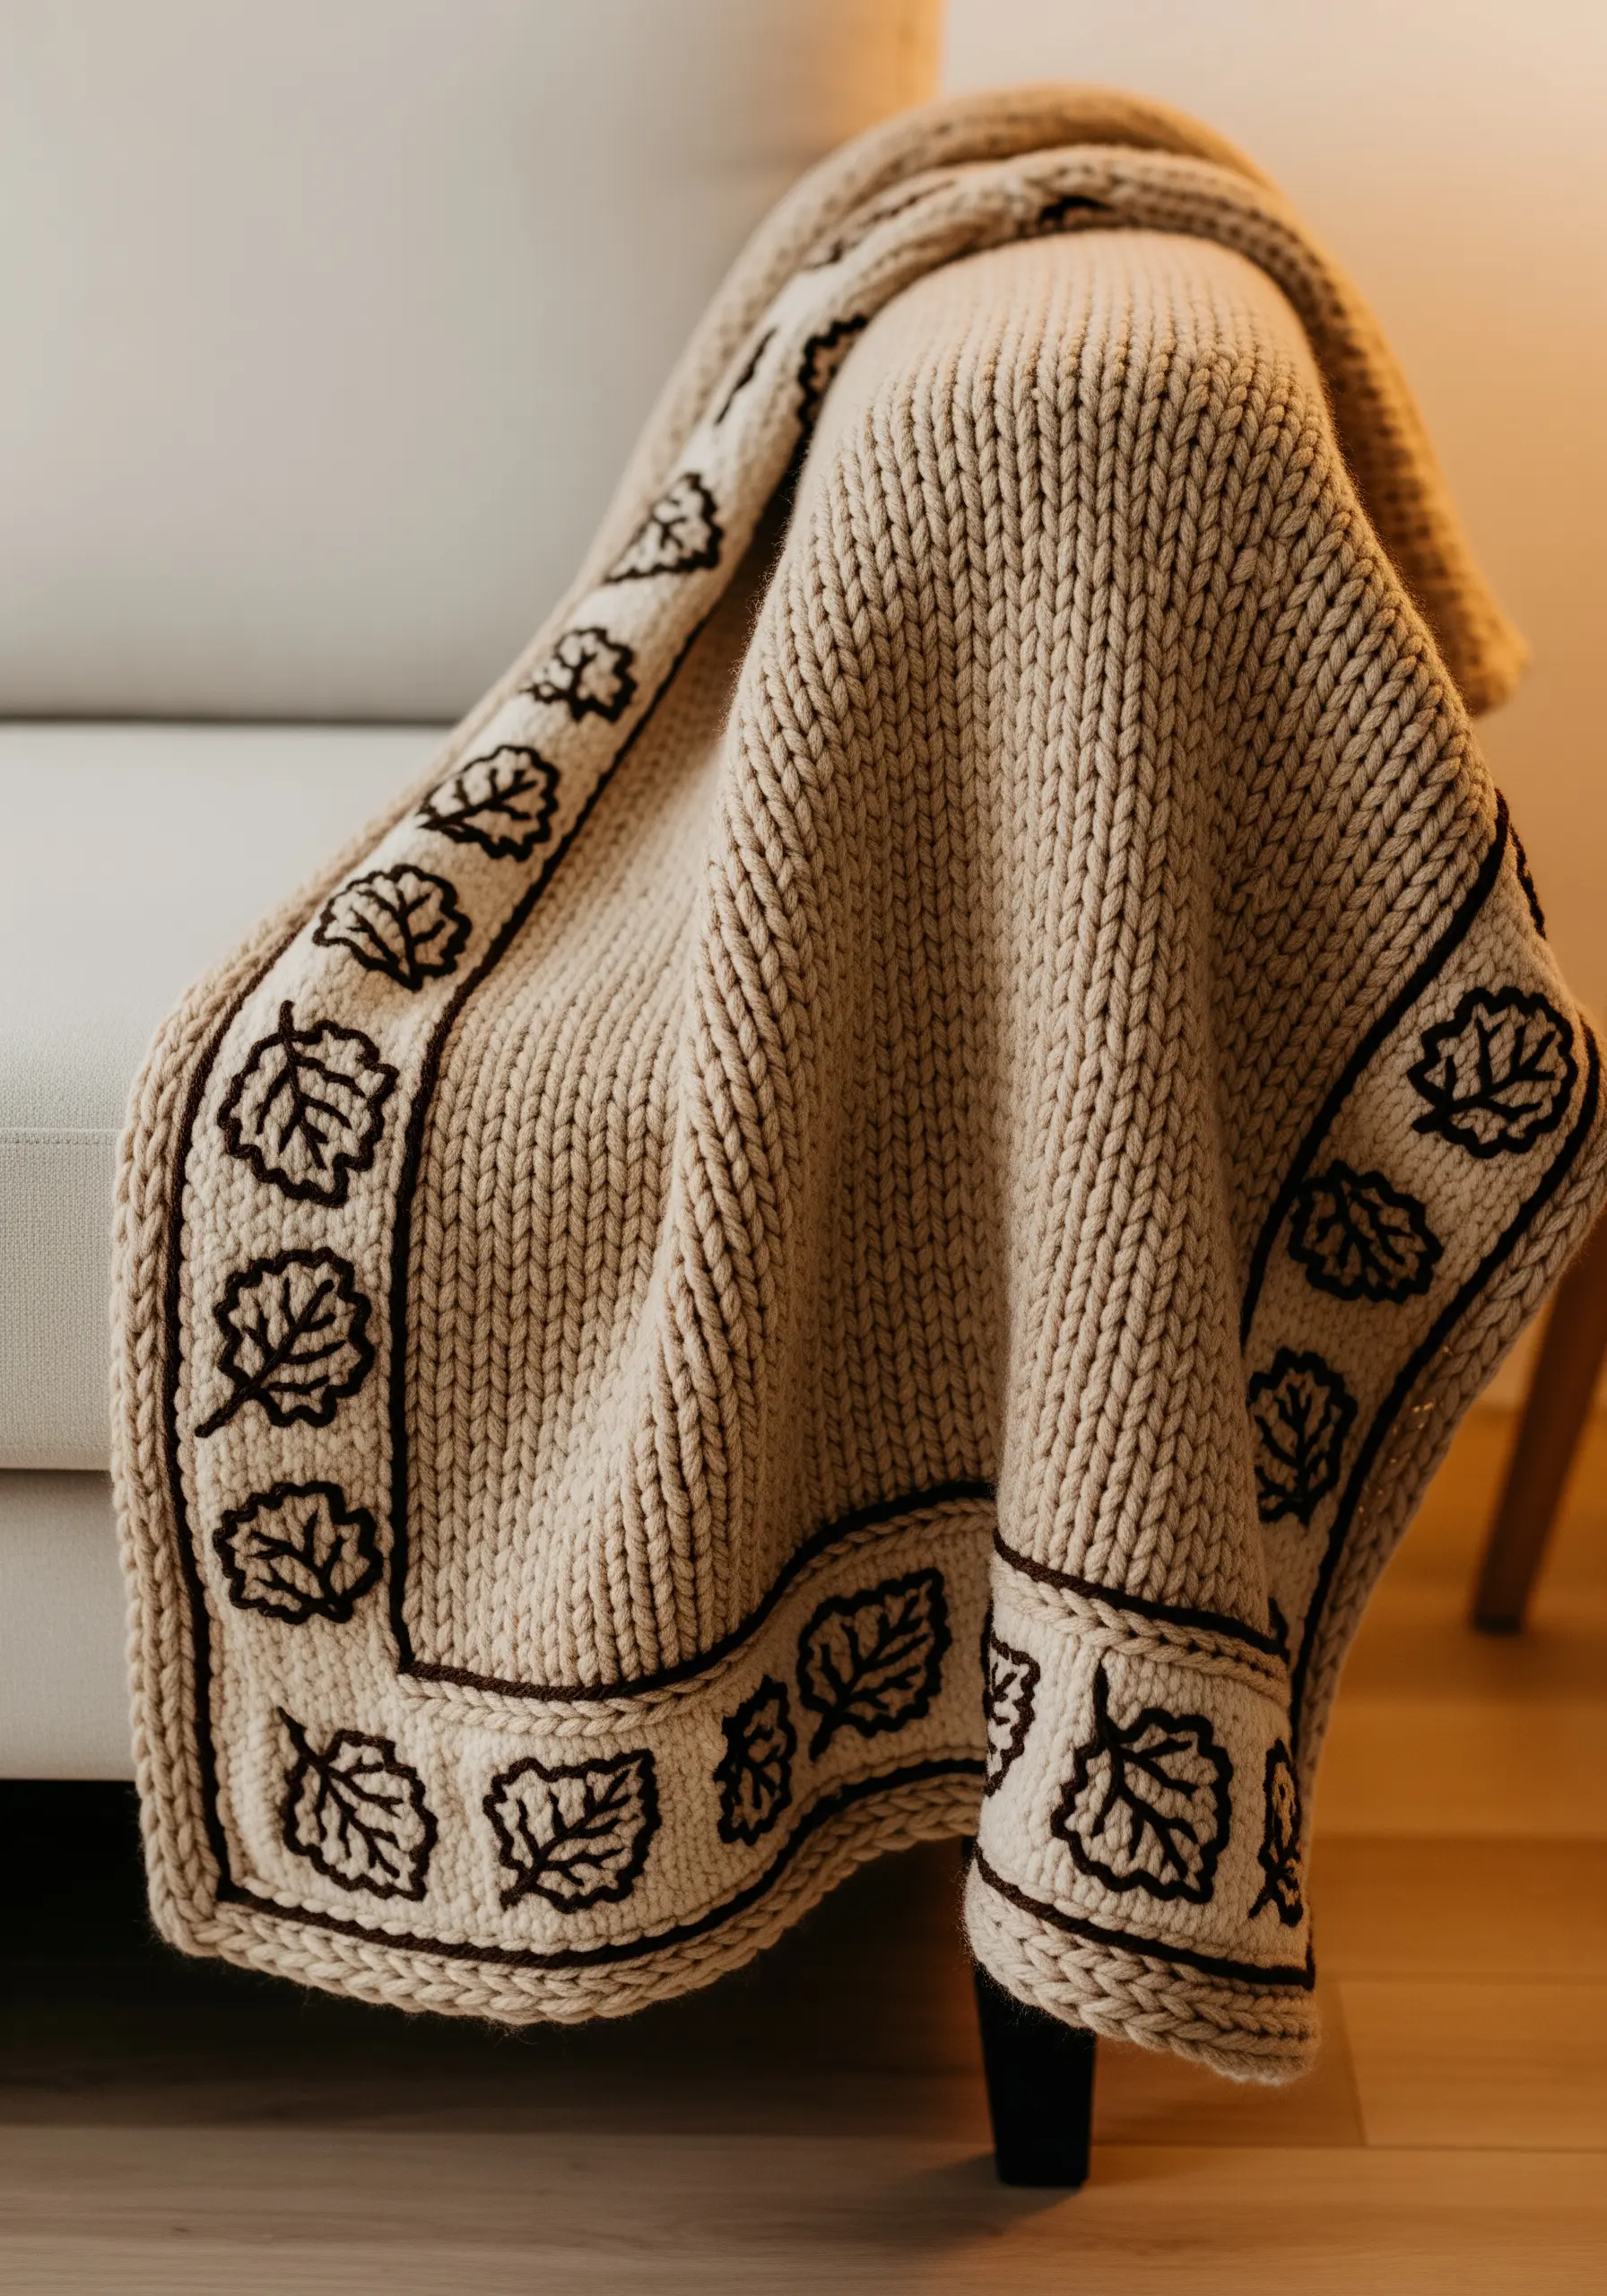
Stitching on a stretchy knit fabric like a blanket can be intimidating, as stitches can pull, warp, or disappear into the weave.
The solution is a water-soluble stabilizer.
Simply hoop the stabilizer with your fabric, stitch your design directly onto it, and then wash it away once you’re finished.
It provides a smooth, stable surface for your stitches, ensuring your simple leaf outlines remain clean and uniform without distorting the cozy knit structure of the blanket.
9. Create Abstract Art with Thread Wrapping
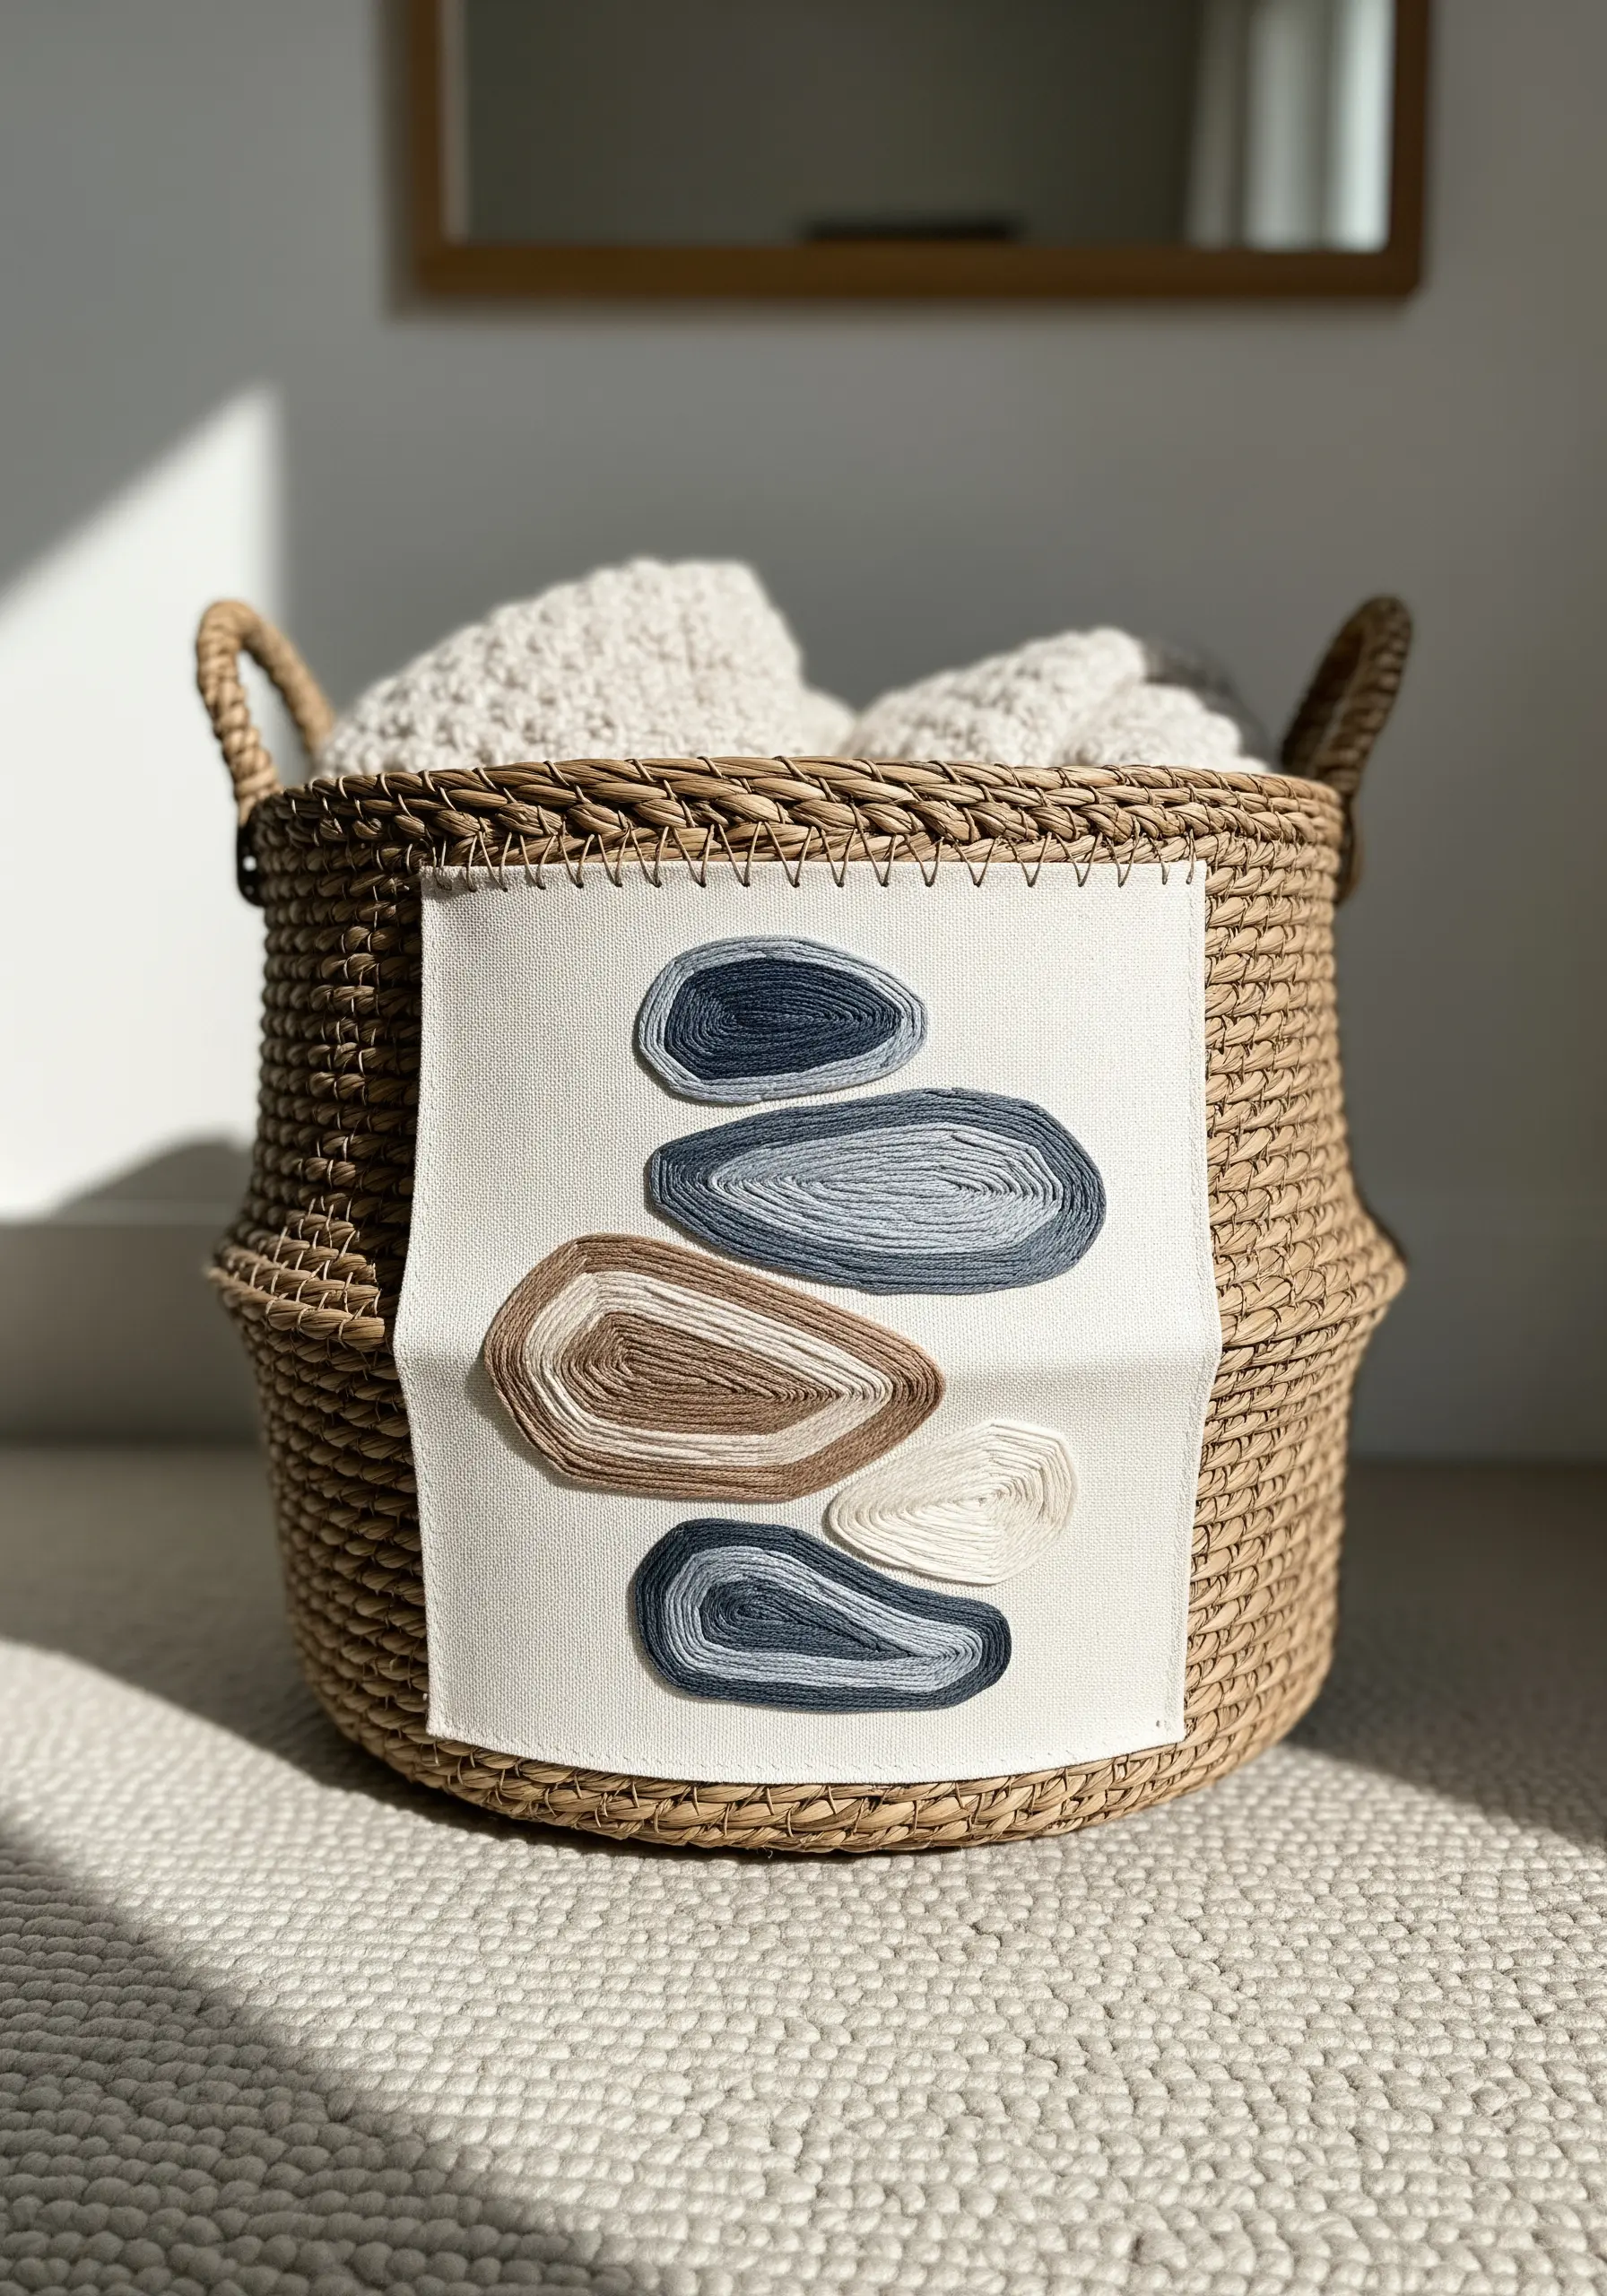
You don’t need complex stitches to create a compelling piece of art.
Start with a simple organic shape, like a smooth stone, and outline it with a backstitch.
Then, instead of filling it, simply wrap your thread in concentric lines, following the initial outline.
Use a single, continuous strand of thread for each color section to maintain a smooth, hypnotic flow.
This meditative process turns simple lines into a beautiful study of form and color, perfect for adding a touch of serene abstraction to any space.
Discover more abstract thread embroidery ideas that turn simple lines into mesmerizing wall art.
10. Stitch on Sheer Fabric for an Ethereal Effect

Embroidering on sheer curtains or voile allows you to play with light and shadow in a way that opaque fabrics cannot.
To prevent puckering, use a lightweight tear-away or water-soluble stabilizer on the back as you stitch.
Choose a simple, elegant design like a weeping willow branch, and use a delicate fishbone stitch for the leaves.
This stitch creates a central vein and angled sides in one motion, giving the leaves a natural, graceful drape that looks stunning when backlit by a window.
11. Elevate Your Work with Museum-Style Framing

How you present your embroidery is as important as the stitching itself.
For a truly polished look, mount your finished piece on acid-free foam board before framing.
This prevents sagging and ensures the fabric remains taut and smooth.
Choose a deep shadowbox frame to accommodate any raised stitches or 3D elements, like the dense French knots of a mushroom cap.
The space between the art and the glass creates a sense of importance and turns your embroidery into a gallery-worthy object.
These framed embroidery artworks that capture tiny details beautifully become instant heirlooms.
12. Capture Fluid Motion with Continuous Stitches

To create an all-over pattern that feels fluid and energetic, choose a stitch that flows naturally, like the chain stitch or stem stitch.
Instead of starting and stopping for each swirl, work in long, continuous lines, allowing the design to guide your needle.
Use a medium-weight thread, such as pearl cotton, which has a beautiful sheen and twisted texture that emphasizes the movement of the stitches.
This approach transforms a simple piece of furniture into a dynamic surface that ripples with texture and energy.
You can use abstract thread waves & swirls to capture motion and flow in your embroidery.
13. Explore Texture on a Grand Scale

Working on a large scale requires you to think differently about texture.
Instead of tiny, delicate stitches, embrace bold, tactile fills.
Use a thick tapestry wool or yarn and experiment with different textured stitches to fill each segment—try a dense satin stitch, bumpy seed stitch, or uniform French knots.
The subtle variation in light reflection and surface quality between each stitch is what will give your large-scale piece its richness and depth, turning it into a commanding focal point.
Create your own statement-size embroidered textile hangings to fill large walls without paint.
14. Add a Secret Glow to Your Decor
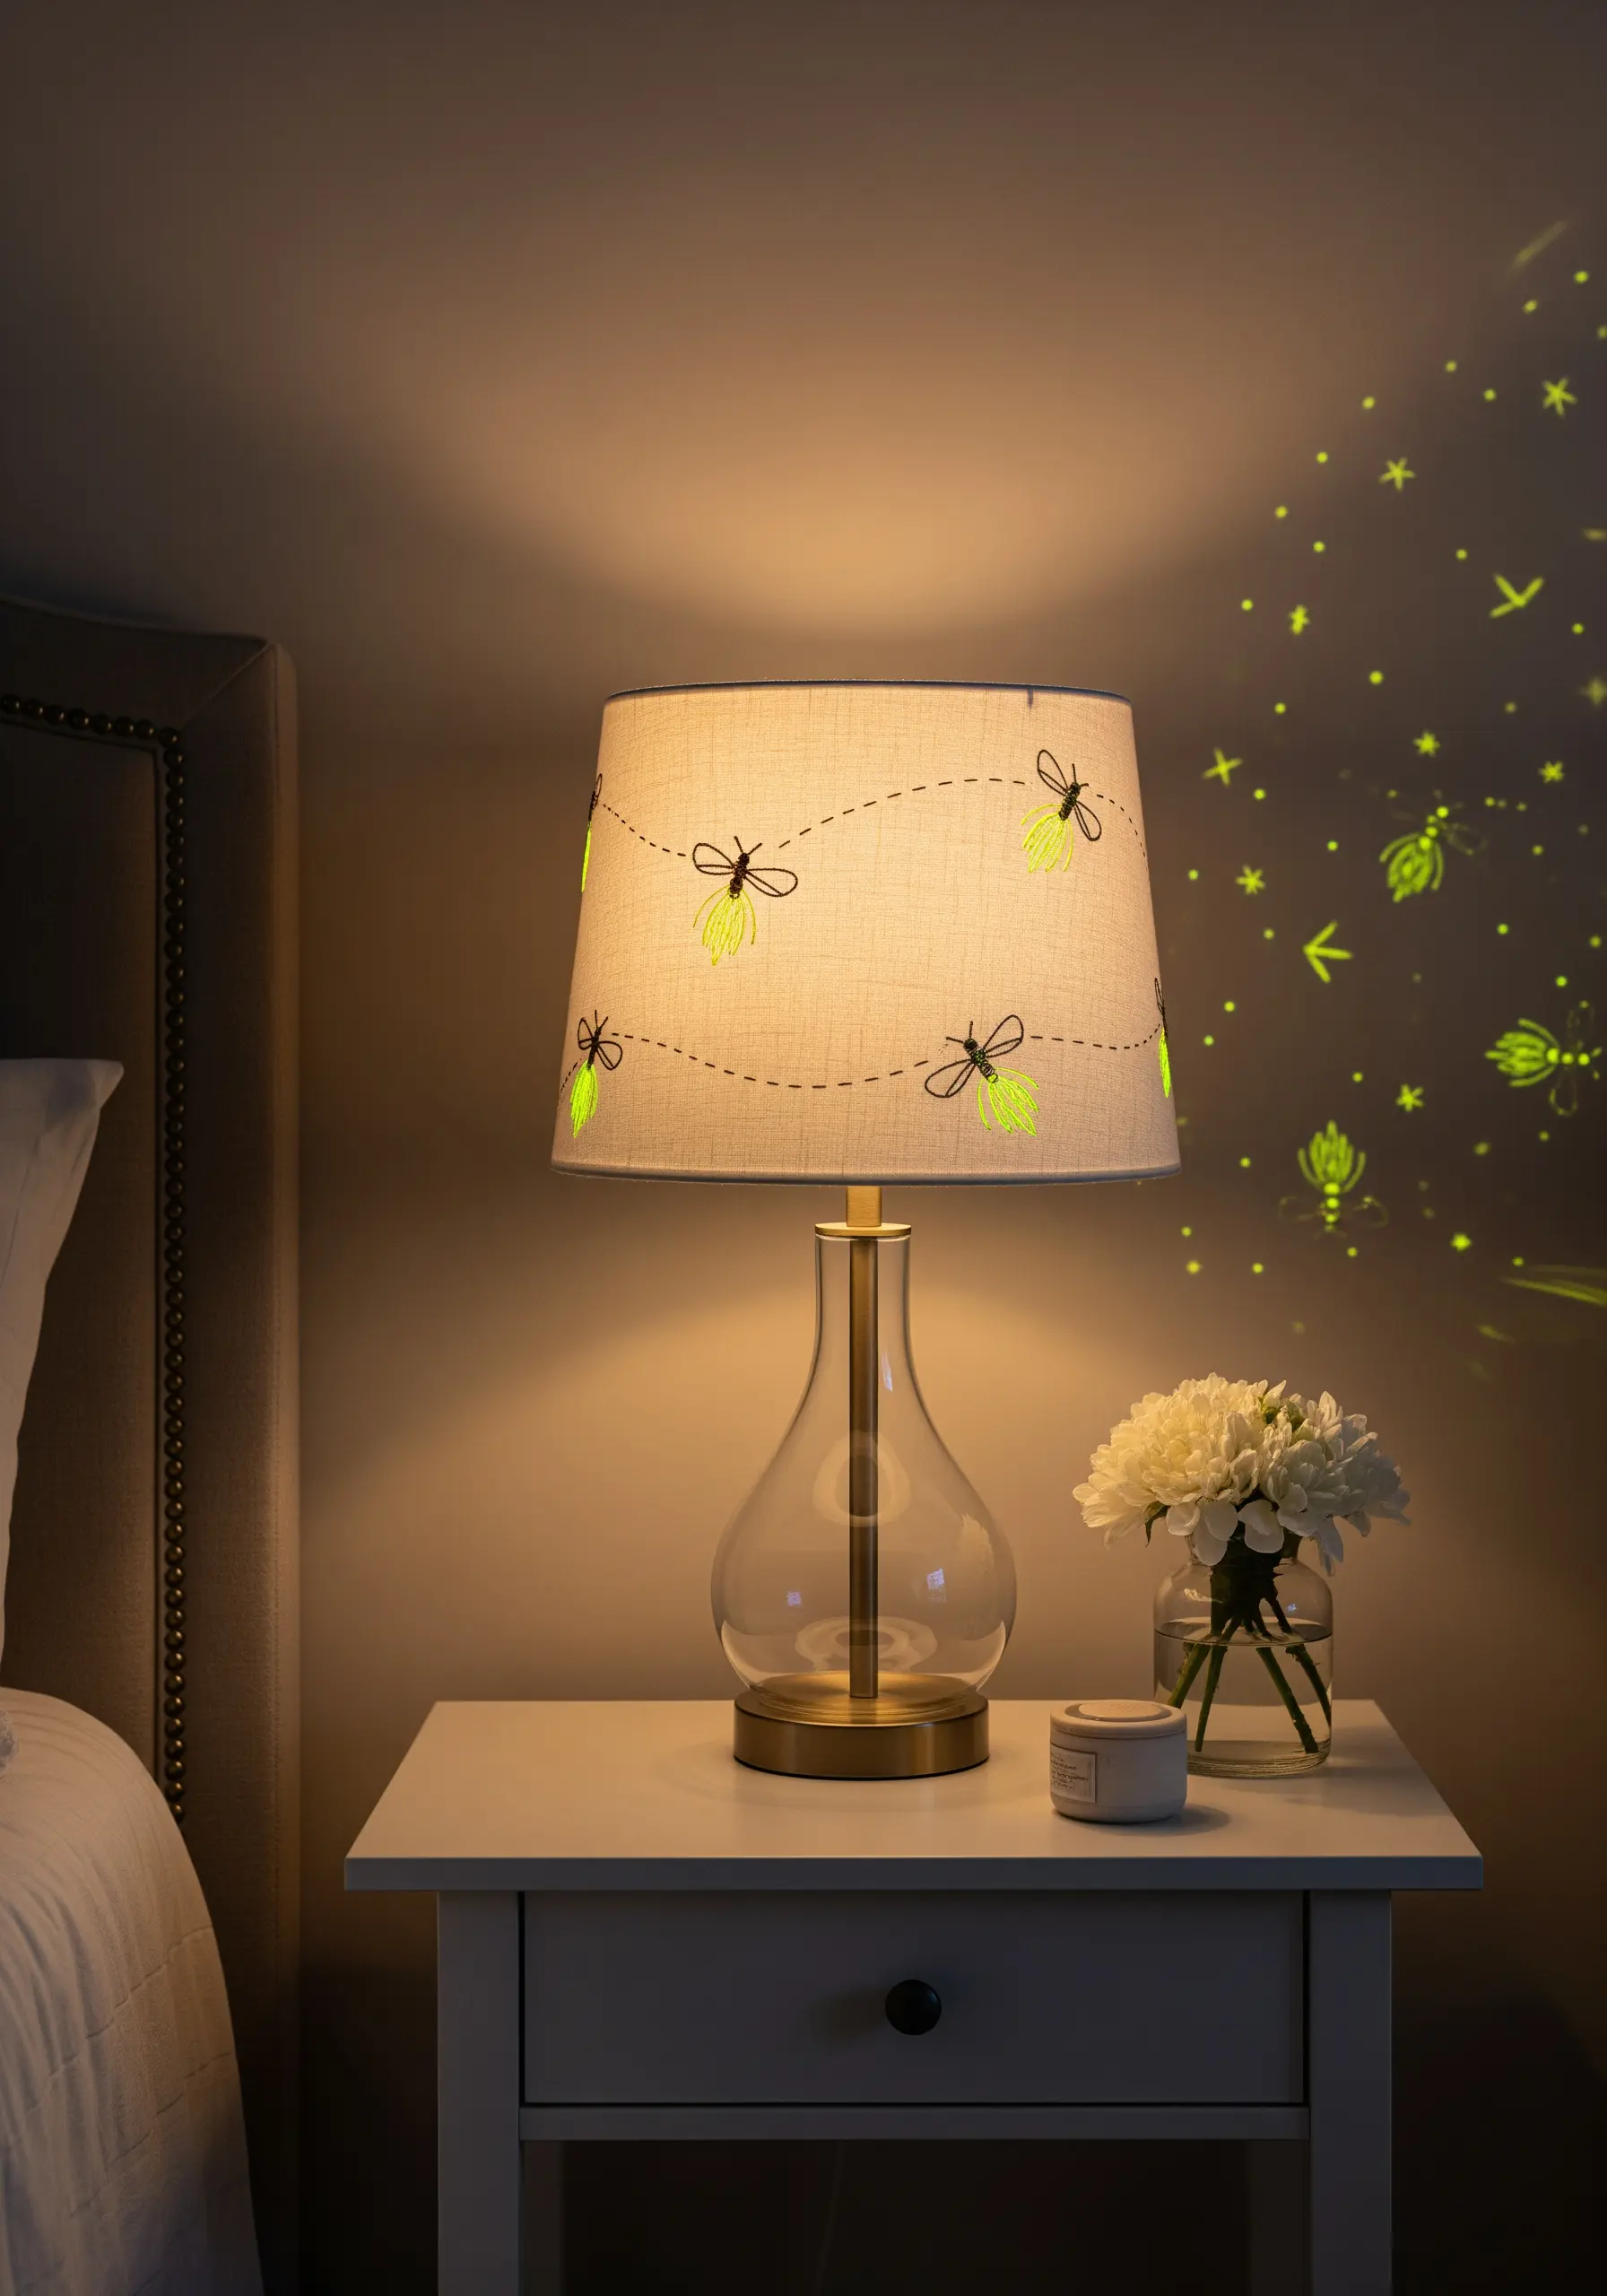
Incorporate an element of surprise into your embroidery with glow-in-the-dark thread.
Use it strategically for details like fireflies, stars, or hidden messages.
During the day, it appears as a simple off-white or pale green stitch, blending seamlessly into a neutral design.
At night, however, it casts a soft, magical glow.
This is a wonderful way to add a playful, interactive layer to functional items like lampshades or bedroom decor, creating a piece that transforms when the lights go out.
15. Combine Felt and Thread for Quick Coasters
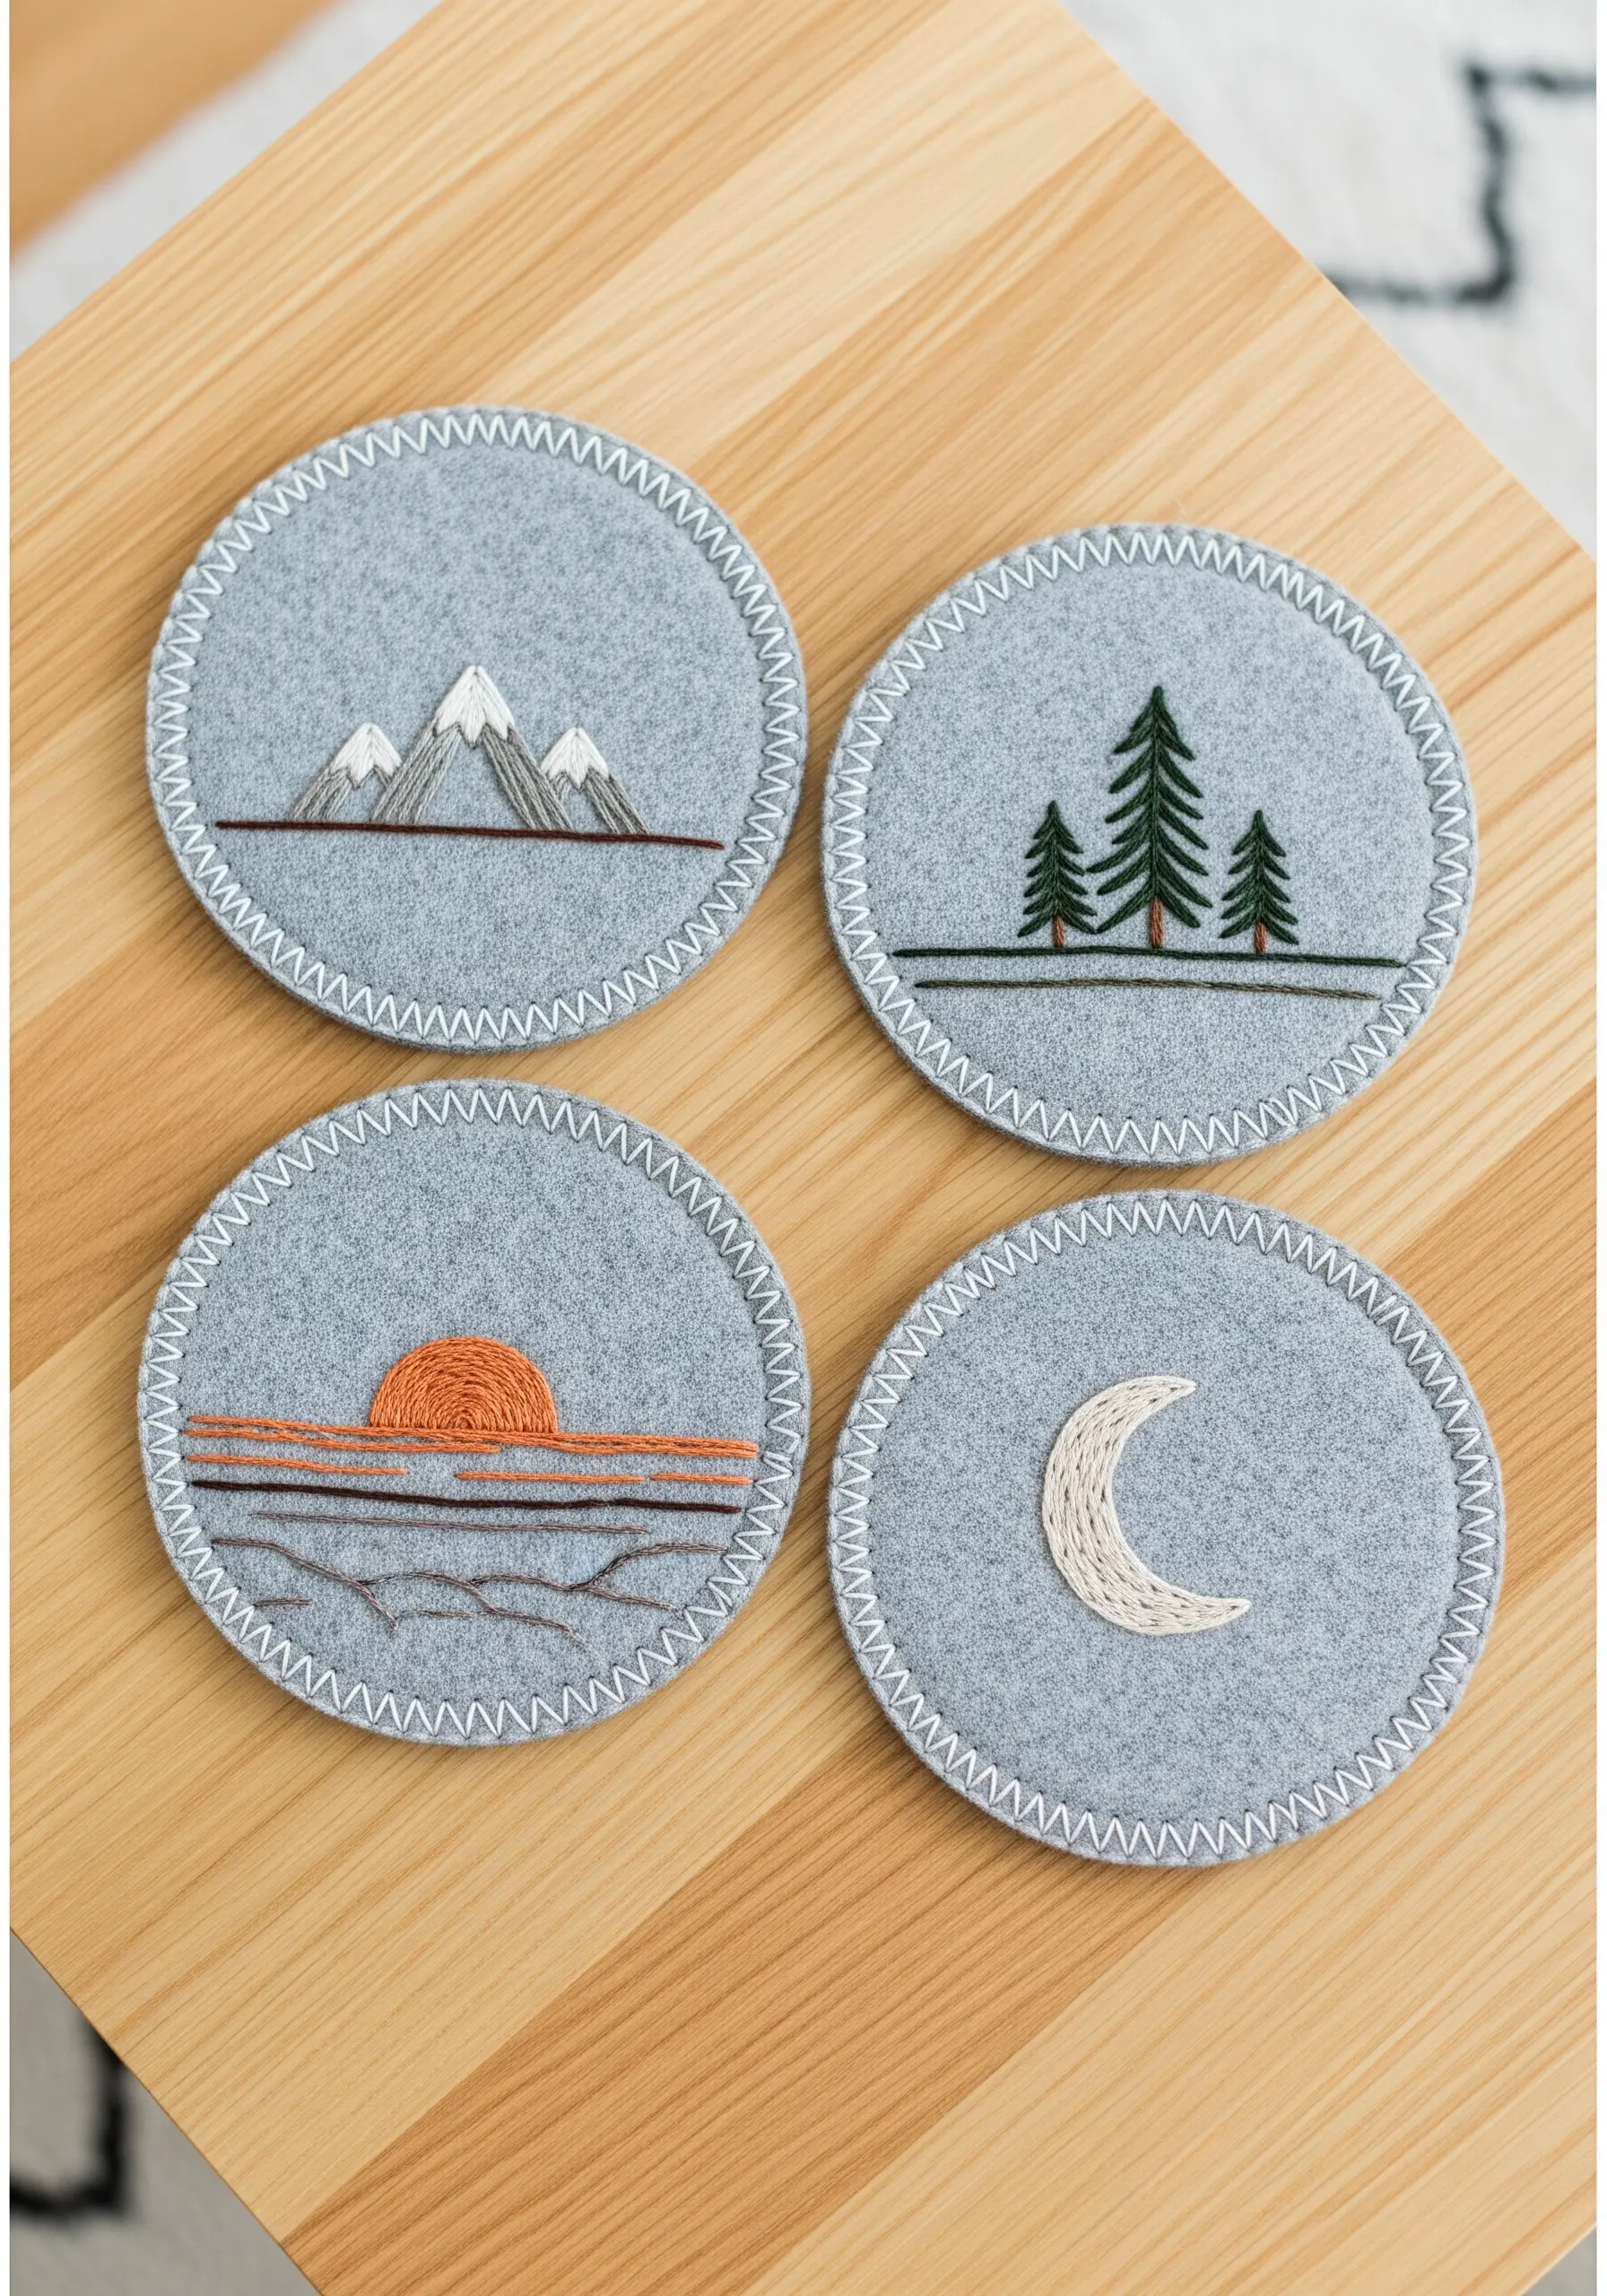
For a satisfying project you can finish in an afternoon, combine the stability of felt with the charm of simple embroidery.
Cut two identical circles of felt for each coaster and stitch your minimalist design—like a mountain range or a simple crescent moon—on just the top layer.
Then, place the second circle on the back and finish the edge with a decorative blanket stitch.
This not only hides the back of your work but also adds a durable, handcrafted edge to your finished piece.
These are perfect small DIY decor projects you can finish in a weekend.
16. Achieve Flawless Satin Stitch Fills

The key to a perfectly smooth satin stitch is preparation.
Before you begin filling your shape, create a border using a split stitch or backstitch.
This raised edge acts as a guide for your needle, ensuring your satin stitches start and end at precisely the same point, resulting in a crisp, clean outline.
Keep your stitches close together but not overlapping, and maintain an even tension throughout.
This small bit of prep work is the difference between a homemade piece and a professional-looking one.
17. Create Sculptural Forms with Fiber Roving
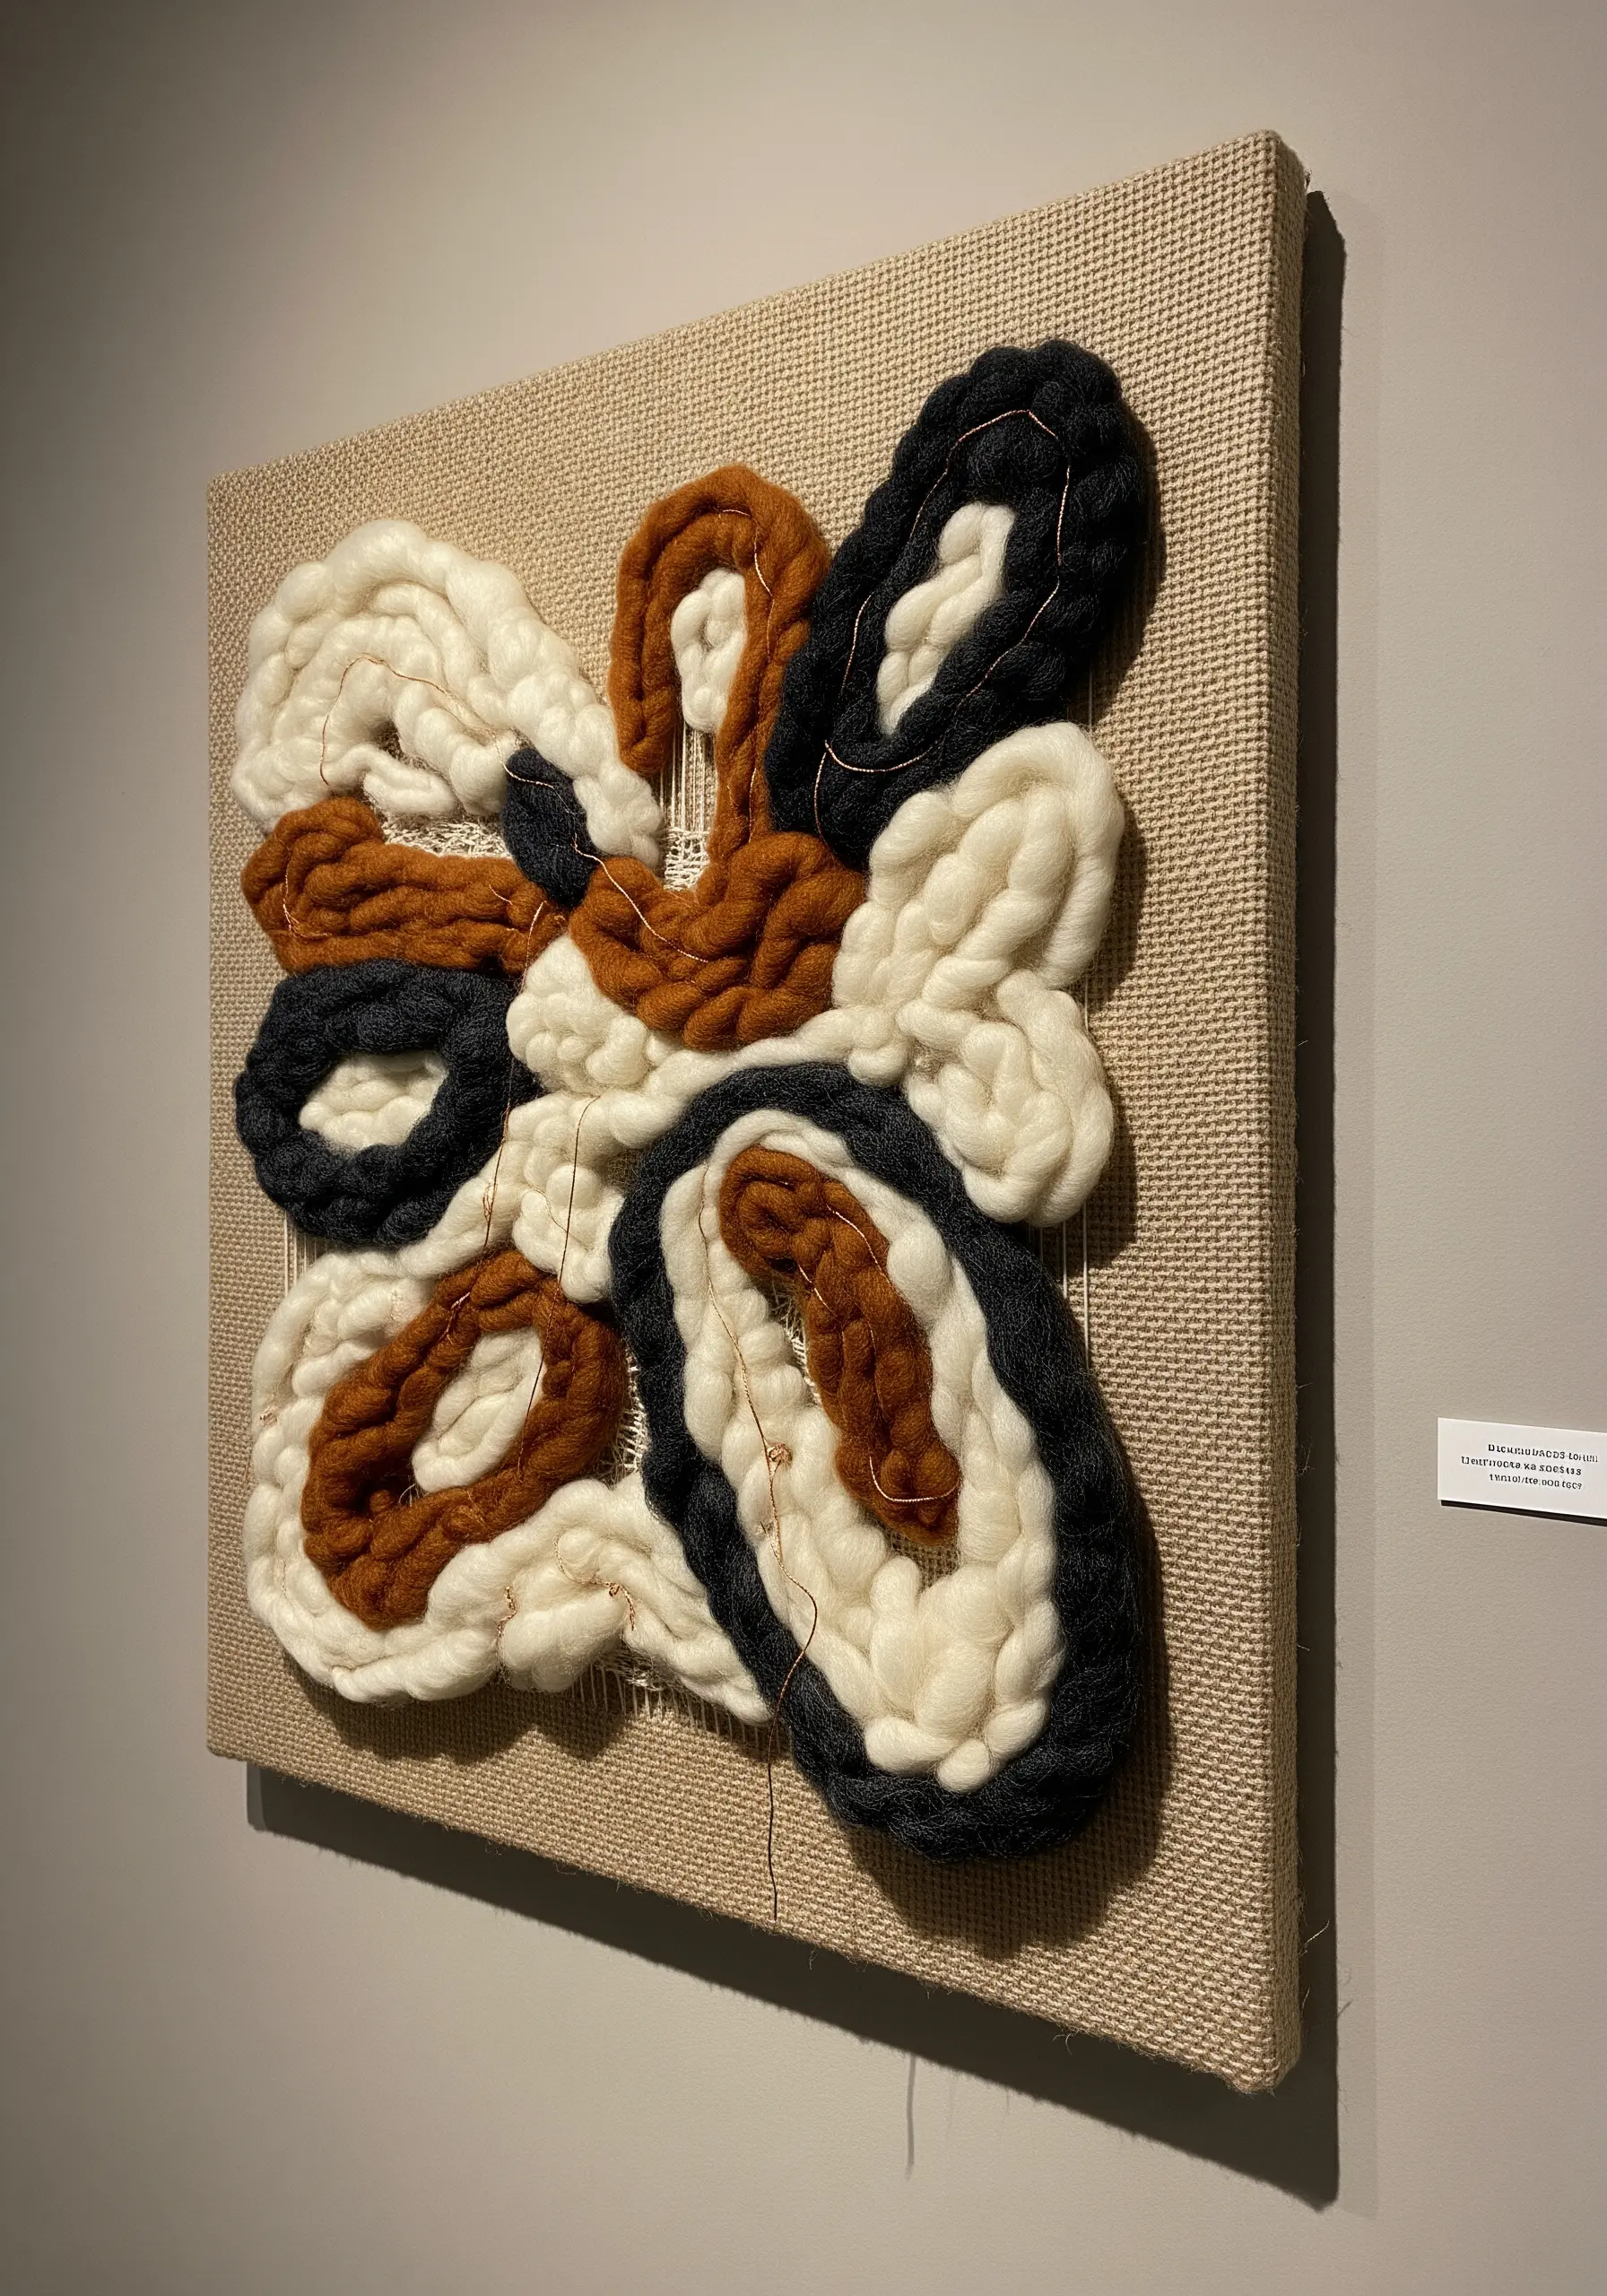
Break free from the flat plane of the fabric by incorporating thick wool roving into your work.
Use a technique called needle felting to tack down the roving in bold, sculptural loops and swirls, or simply couch it with a strong thread.
To add definition and a hint of contrast, wrap a thin metallic or dark-colored wire around some of the shapes.
This interplay between soft, voluminous fiber and sharp, metallic lines creates a dynamic, multi-dimensional piece of art that invites touch.
Try these contemporary texture techniques to create raised sculptural embroidery effects.
18. Master Realism with Thread Painting
To achieve a photorealistic effect, you need to think like a painter, blending colors to create light and shadow.
Use the long and short stitch with a single strand of floss, laying your stitches in the direction of the object’s natural texture—for an insect’s body, follow its curved segments.
To create a soft gradient, introduce new colors gradually, allowing the long and short stitches to interlock and blend seamlessly.
For the sheer wings, use a semi-translucent thread or a very light gray on a neutral background to create the illusion of transparency.
19. Scale Up Your Designs with Minimalist Line Art

You can transform an entire room with a single, well-placed line.
To embroider on a large surface like a headboard, first transfer your design using a water-soluble pen or a chalk pencil.
Choose a simple, continuous line drawing to maintain an elegant and uncluttered feel.
Use a sturdy backstitch with a thicker thread, like a #5 pearl cotton, so the line has enough presence to make an impact from across the room.
This technique turns a functional object into the focal point of a serene, modern bedroom.
These abstract line-art silhouettes that bring classy minimalism to black thread embroidery are perfect for this.
20. Select the Right Thread for Functional Textiles
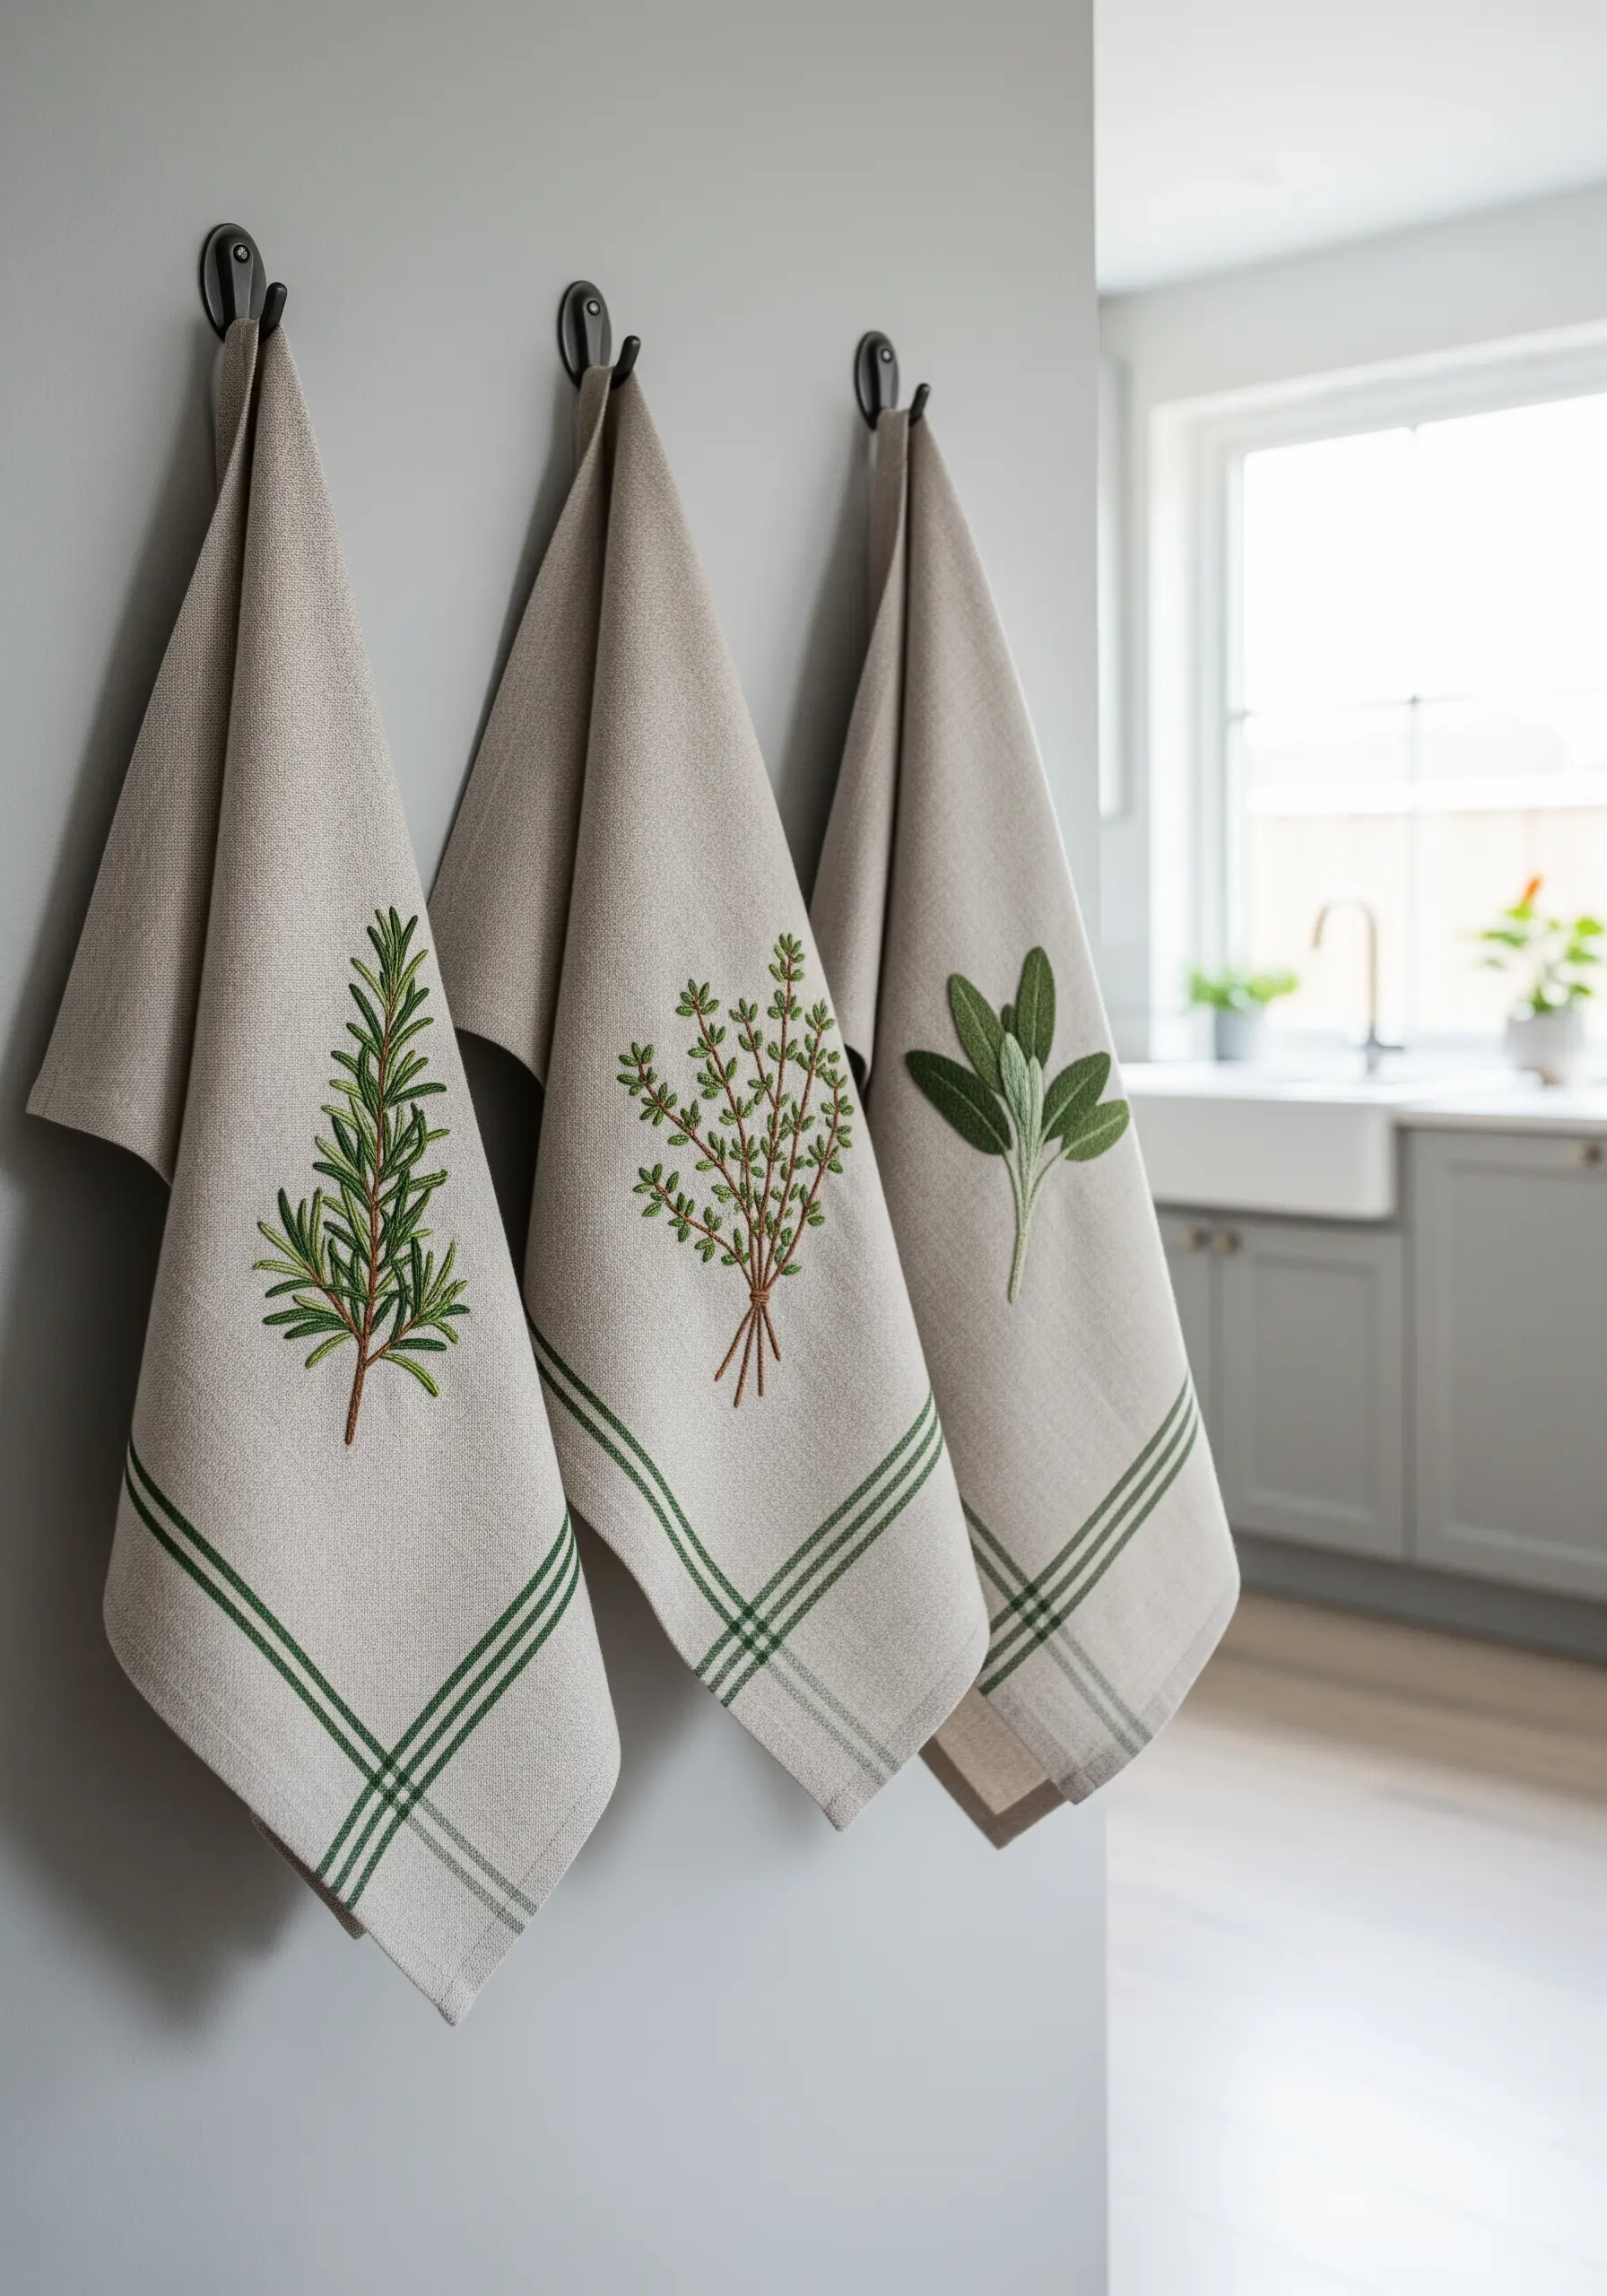
When embroidering items that will be frequently washed, like tea towels, thread choice is crucial.
Opt for high-quality, colorfast cotton floss, which is designed to withstand washing and wear without bleeding or fading.
For the designs, choose classic stitches that are both beautiful and durable, like the stem stitch for outlines and the fishbone stitch for leaves.
These stitches lie relatively flat against the fabric, reducing the risk of snagging while maintaining their elegant, textural quality through countless uses.
Try these medicinal herb embroidery designs on your next kitchen project.
21. Craft Freestanding Shapes with Felt and Stitch

To create an embroidered garland, you need to make motifs that hold their shape without a hoop.
The solution is to stitch your design onto a piece of felt, then carefully cut it out, leaving a small border around the edge of your stitching.
For a clean, professional finish, use a satin stitch or a dense blanket stitch around the entire border.
This not only secures the edges of the felt but also gives your appliqué leaves a defined, polished outline, turning them into sturdy elements ready to be strung together.
These are great seasonal wall art projects you can create.
22. Embellish 3D Objects with Wrapped Cord
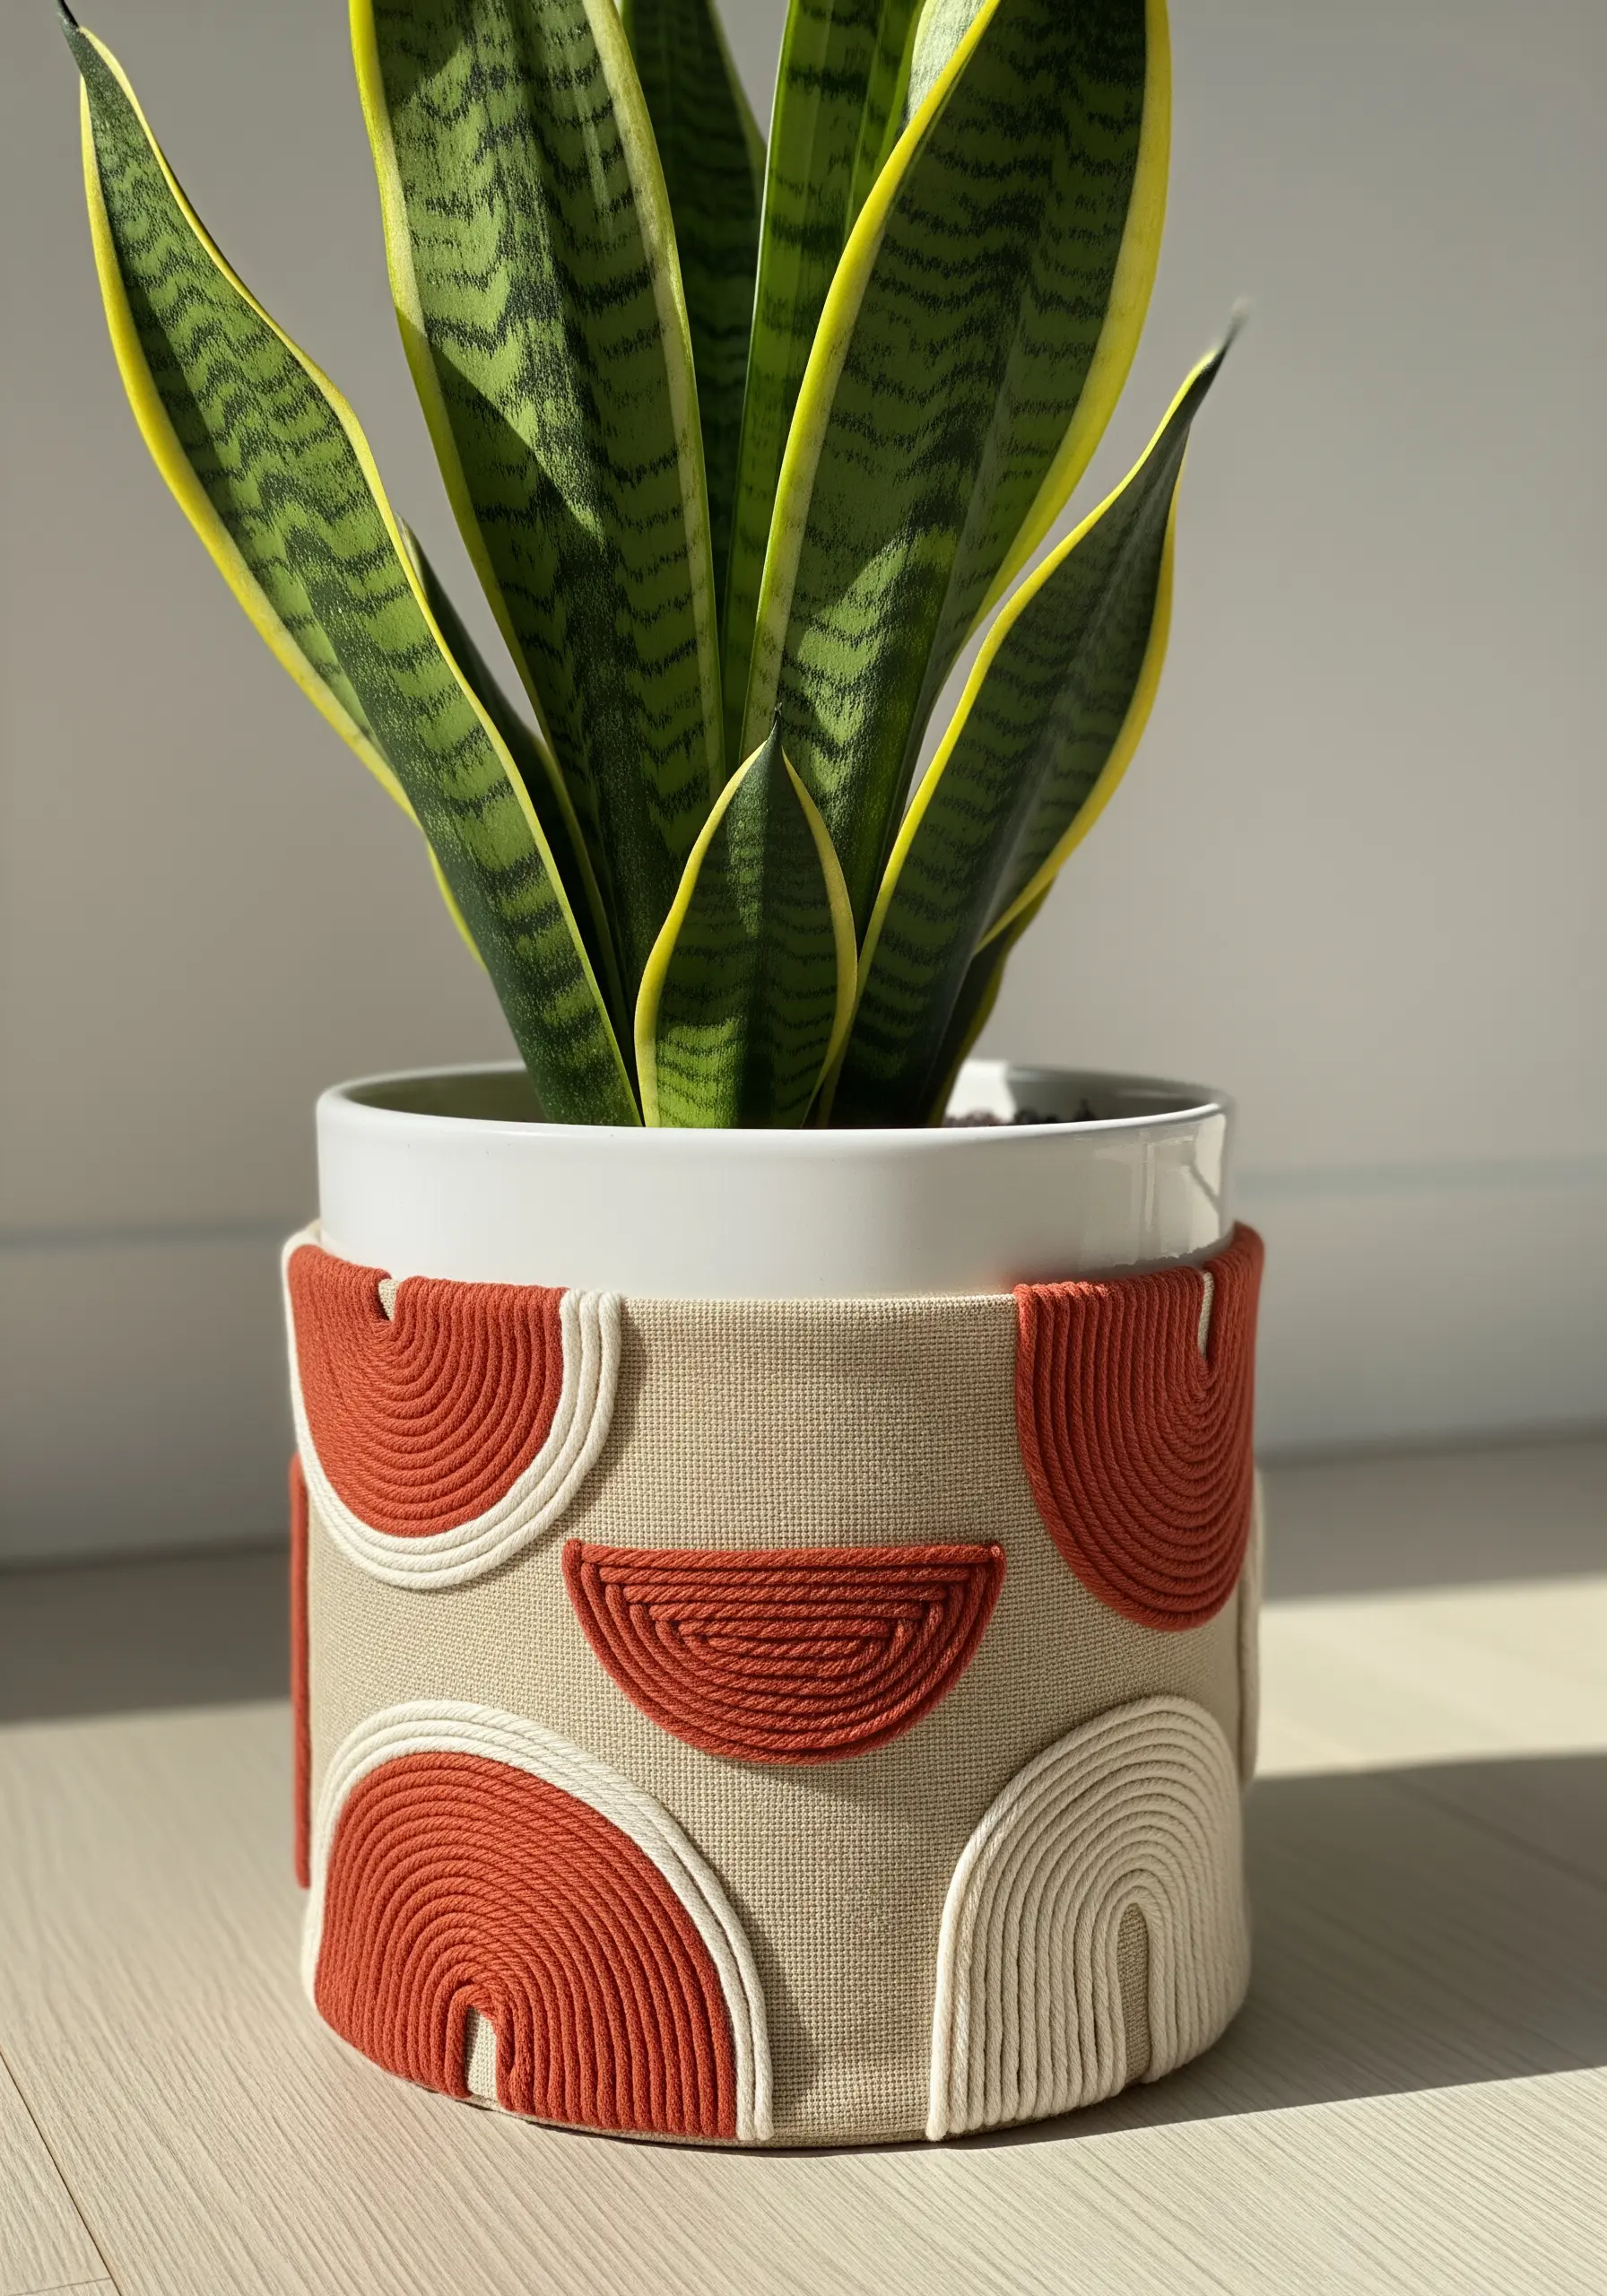
Take your embroidery off the hoop and onto everyday objects like planters.
Create a fabric sleeve to fit your pot, then use it as a canvas for couching or wrapping thick cord.
To create these graphic, semi-circular shapes, tack down the cord at the start and end of each arc using a strong, matching thread.
The tension of the wrapped cord itself will help it adhere to the fabric surface.
This method allows you to add bold, geometric texture to curved objects where traditional embroidery would be impossible.


