
When you look closely at a forest floor, you see more than just green; you see a universe of texture. The velvety plush of moss, the intricate paper of birch bark, the delicate veins of a fallen leaf. Your embroidery can capture that feeling, moving beyond flat color to become something you can almost feel with your eyes.
Forget the idea that realistic texture requires impossibly complex stitches. Often, the most profound effects come from simple techniques used with intention—varying the tension of a French knot, changing the direction of a straight stitch, or layering different weights of thread.
This collection is your guide to translating the quiet, complex beauty of the natural world into thread. Here, you’ll find the techniques to make your work not just seen, but felt. It’s time to stitch a world that feels as real and grounding as the forest itself.
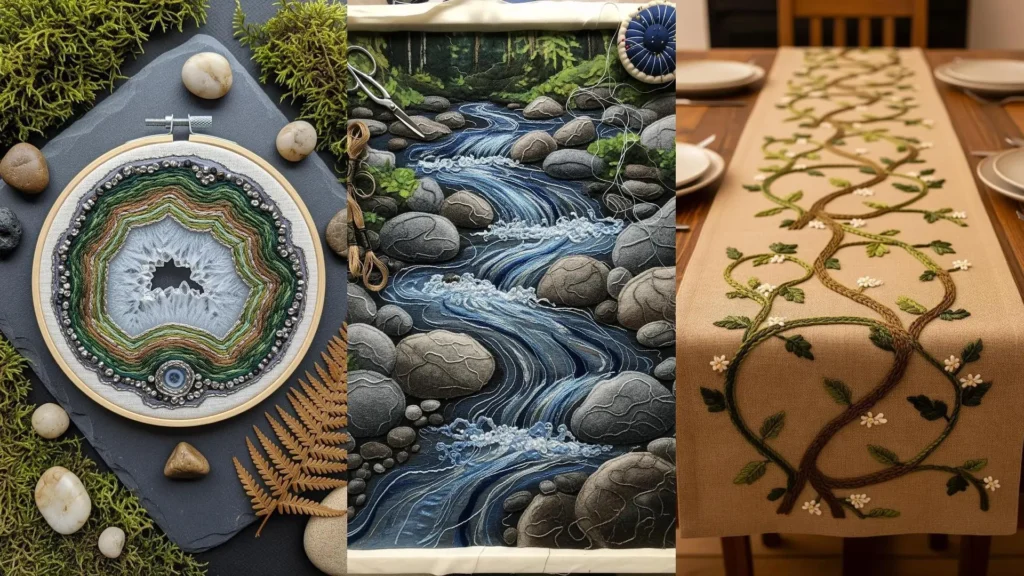
1. Create a Mossy Forest Floor with French Knots
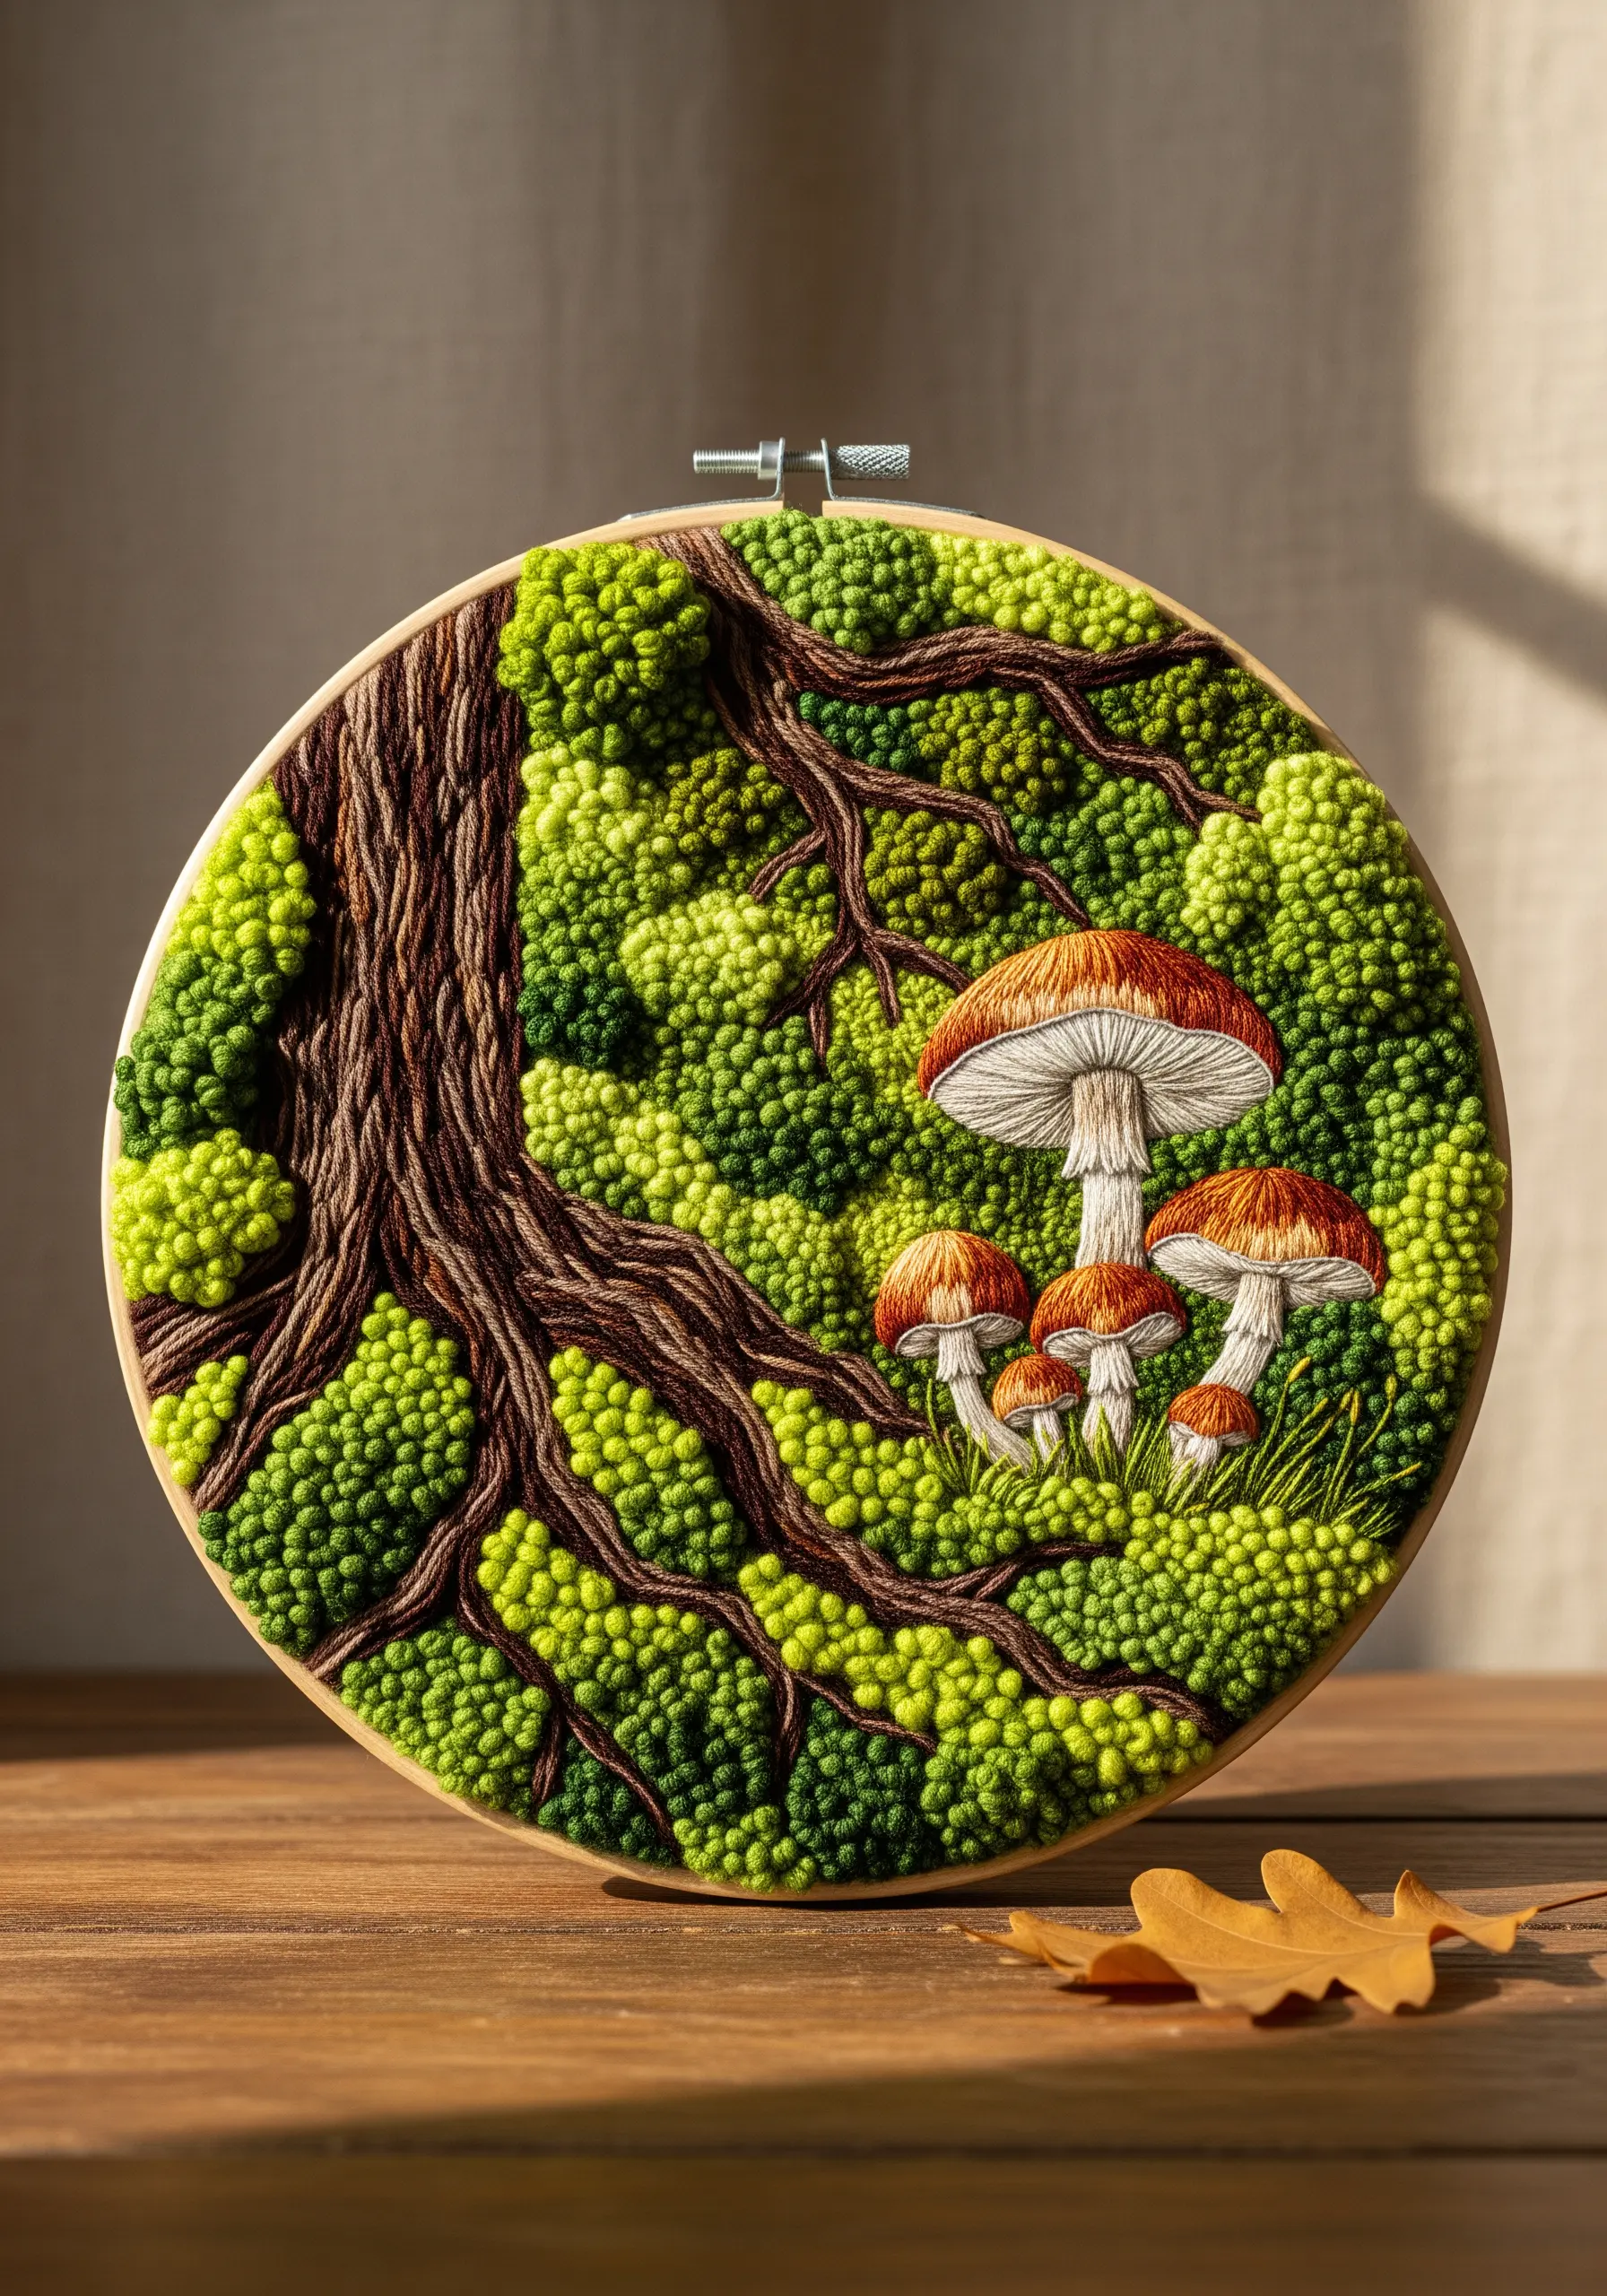
Build a dense, tactile forest floor by densely packing French knots together.
Use at least three to four similar shades of green—from lime to deep olive—and distribute them randomly to create natural-looking depth.
Vary the tension of your knots; tighter knots create small, bud-like textures, while looser ones appear fluffier, like mature moss.
For the tree roots, use a whipped backstitch with a dark brown thread to give them a raised, cord-like appearance that stands out against the moss.
2. Mimic Birch Bark with Laid Threads and Appliqué

Capture the delicate, papery texture of birch bark by laying long, straight stitches of white and grey thread vertically across your fabric.
Instead of a dense fill, leave negative space between the threads to create a light, linear effect.
To form the peeling bark, use small pieces of painted fabric or thick paper, stitching them down with dark, contrasting thread to define the edges.
This technique is less about perfect stitches and more about building layers to tell a story of growth and decay.
3. Illustrate Growth with a Fern Triptych
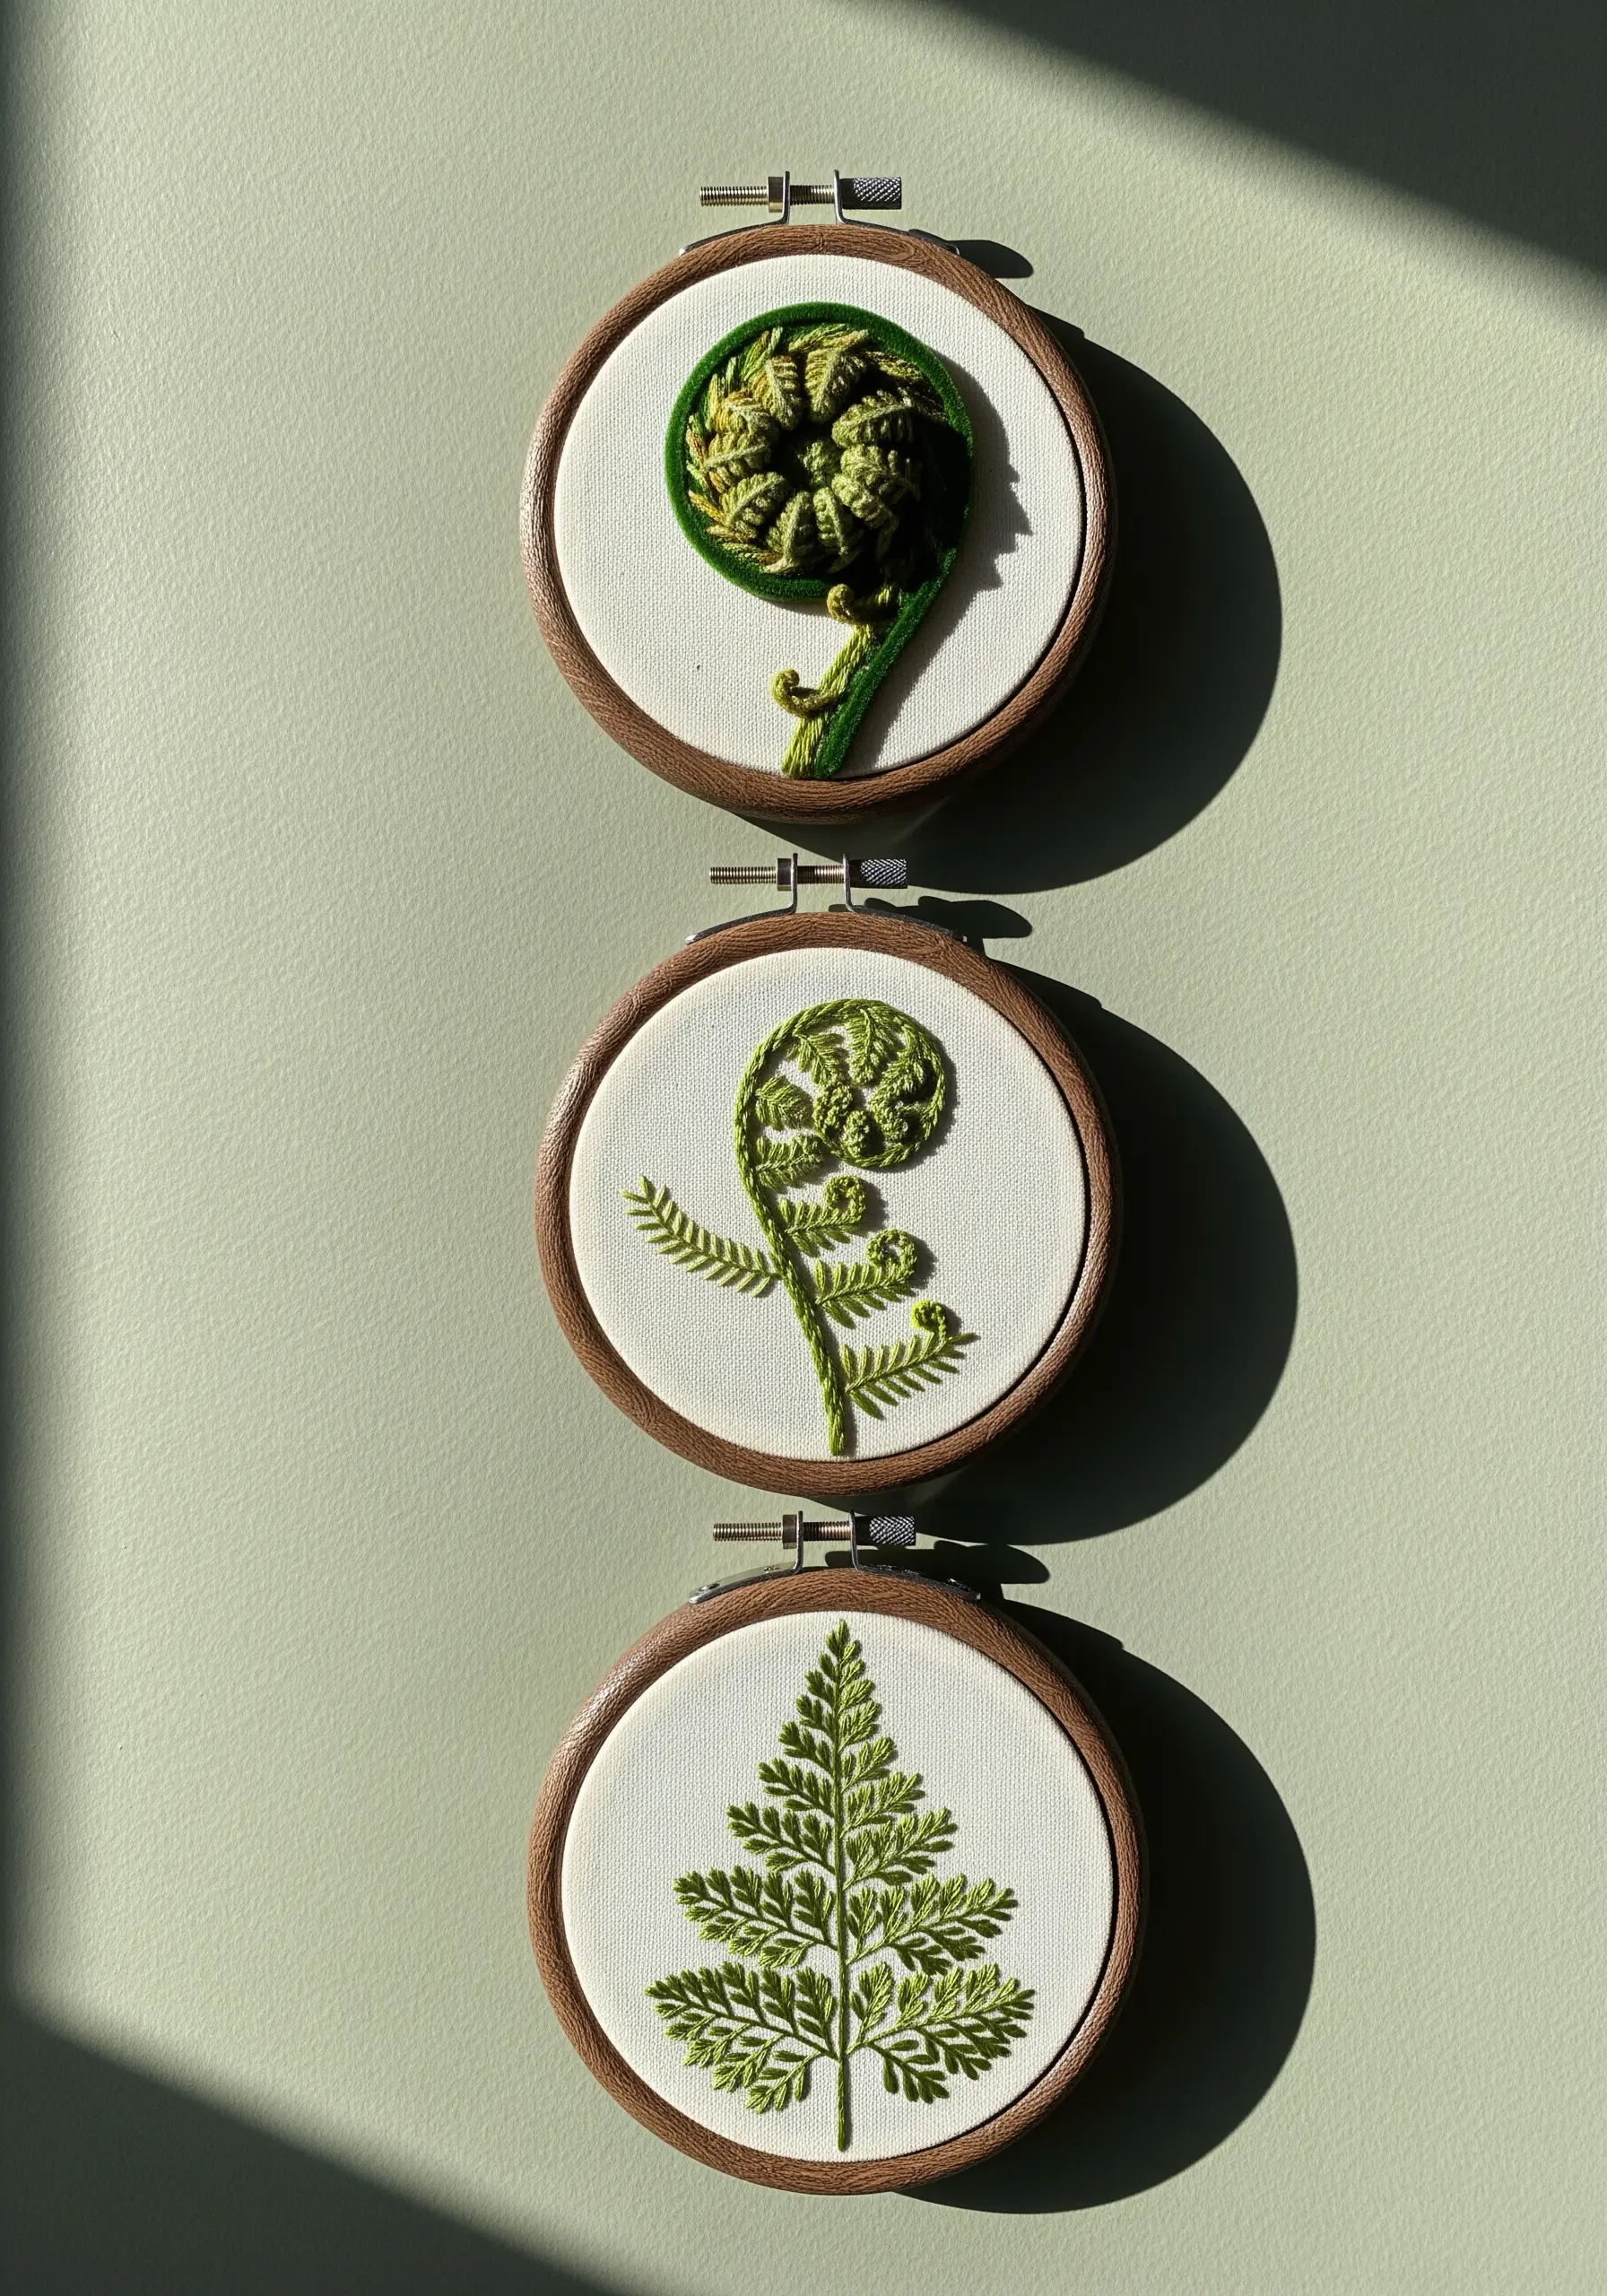
Show the life cycle of a fern by dedicating each hoop to a stage of growth, which also serves as a brilliant stitch exercise.
For the coiled fiddlehead, use raised satin stitch or a series of tight bullion knots to create a dense, sculptural form.
As the fern unfurls, switch to detached chain stitches for individual leaves and a whipped backstitch for the stem.
Finally, for the mature frond, use fly stitch to form the central stalk and tiny straight stitches for the delicate leaflets, creating a light, airy texture.
4. Elevate Florals with Metallic Couching and Beads
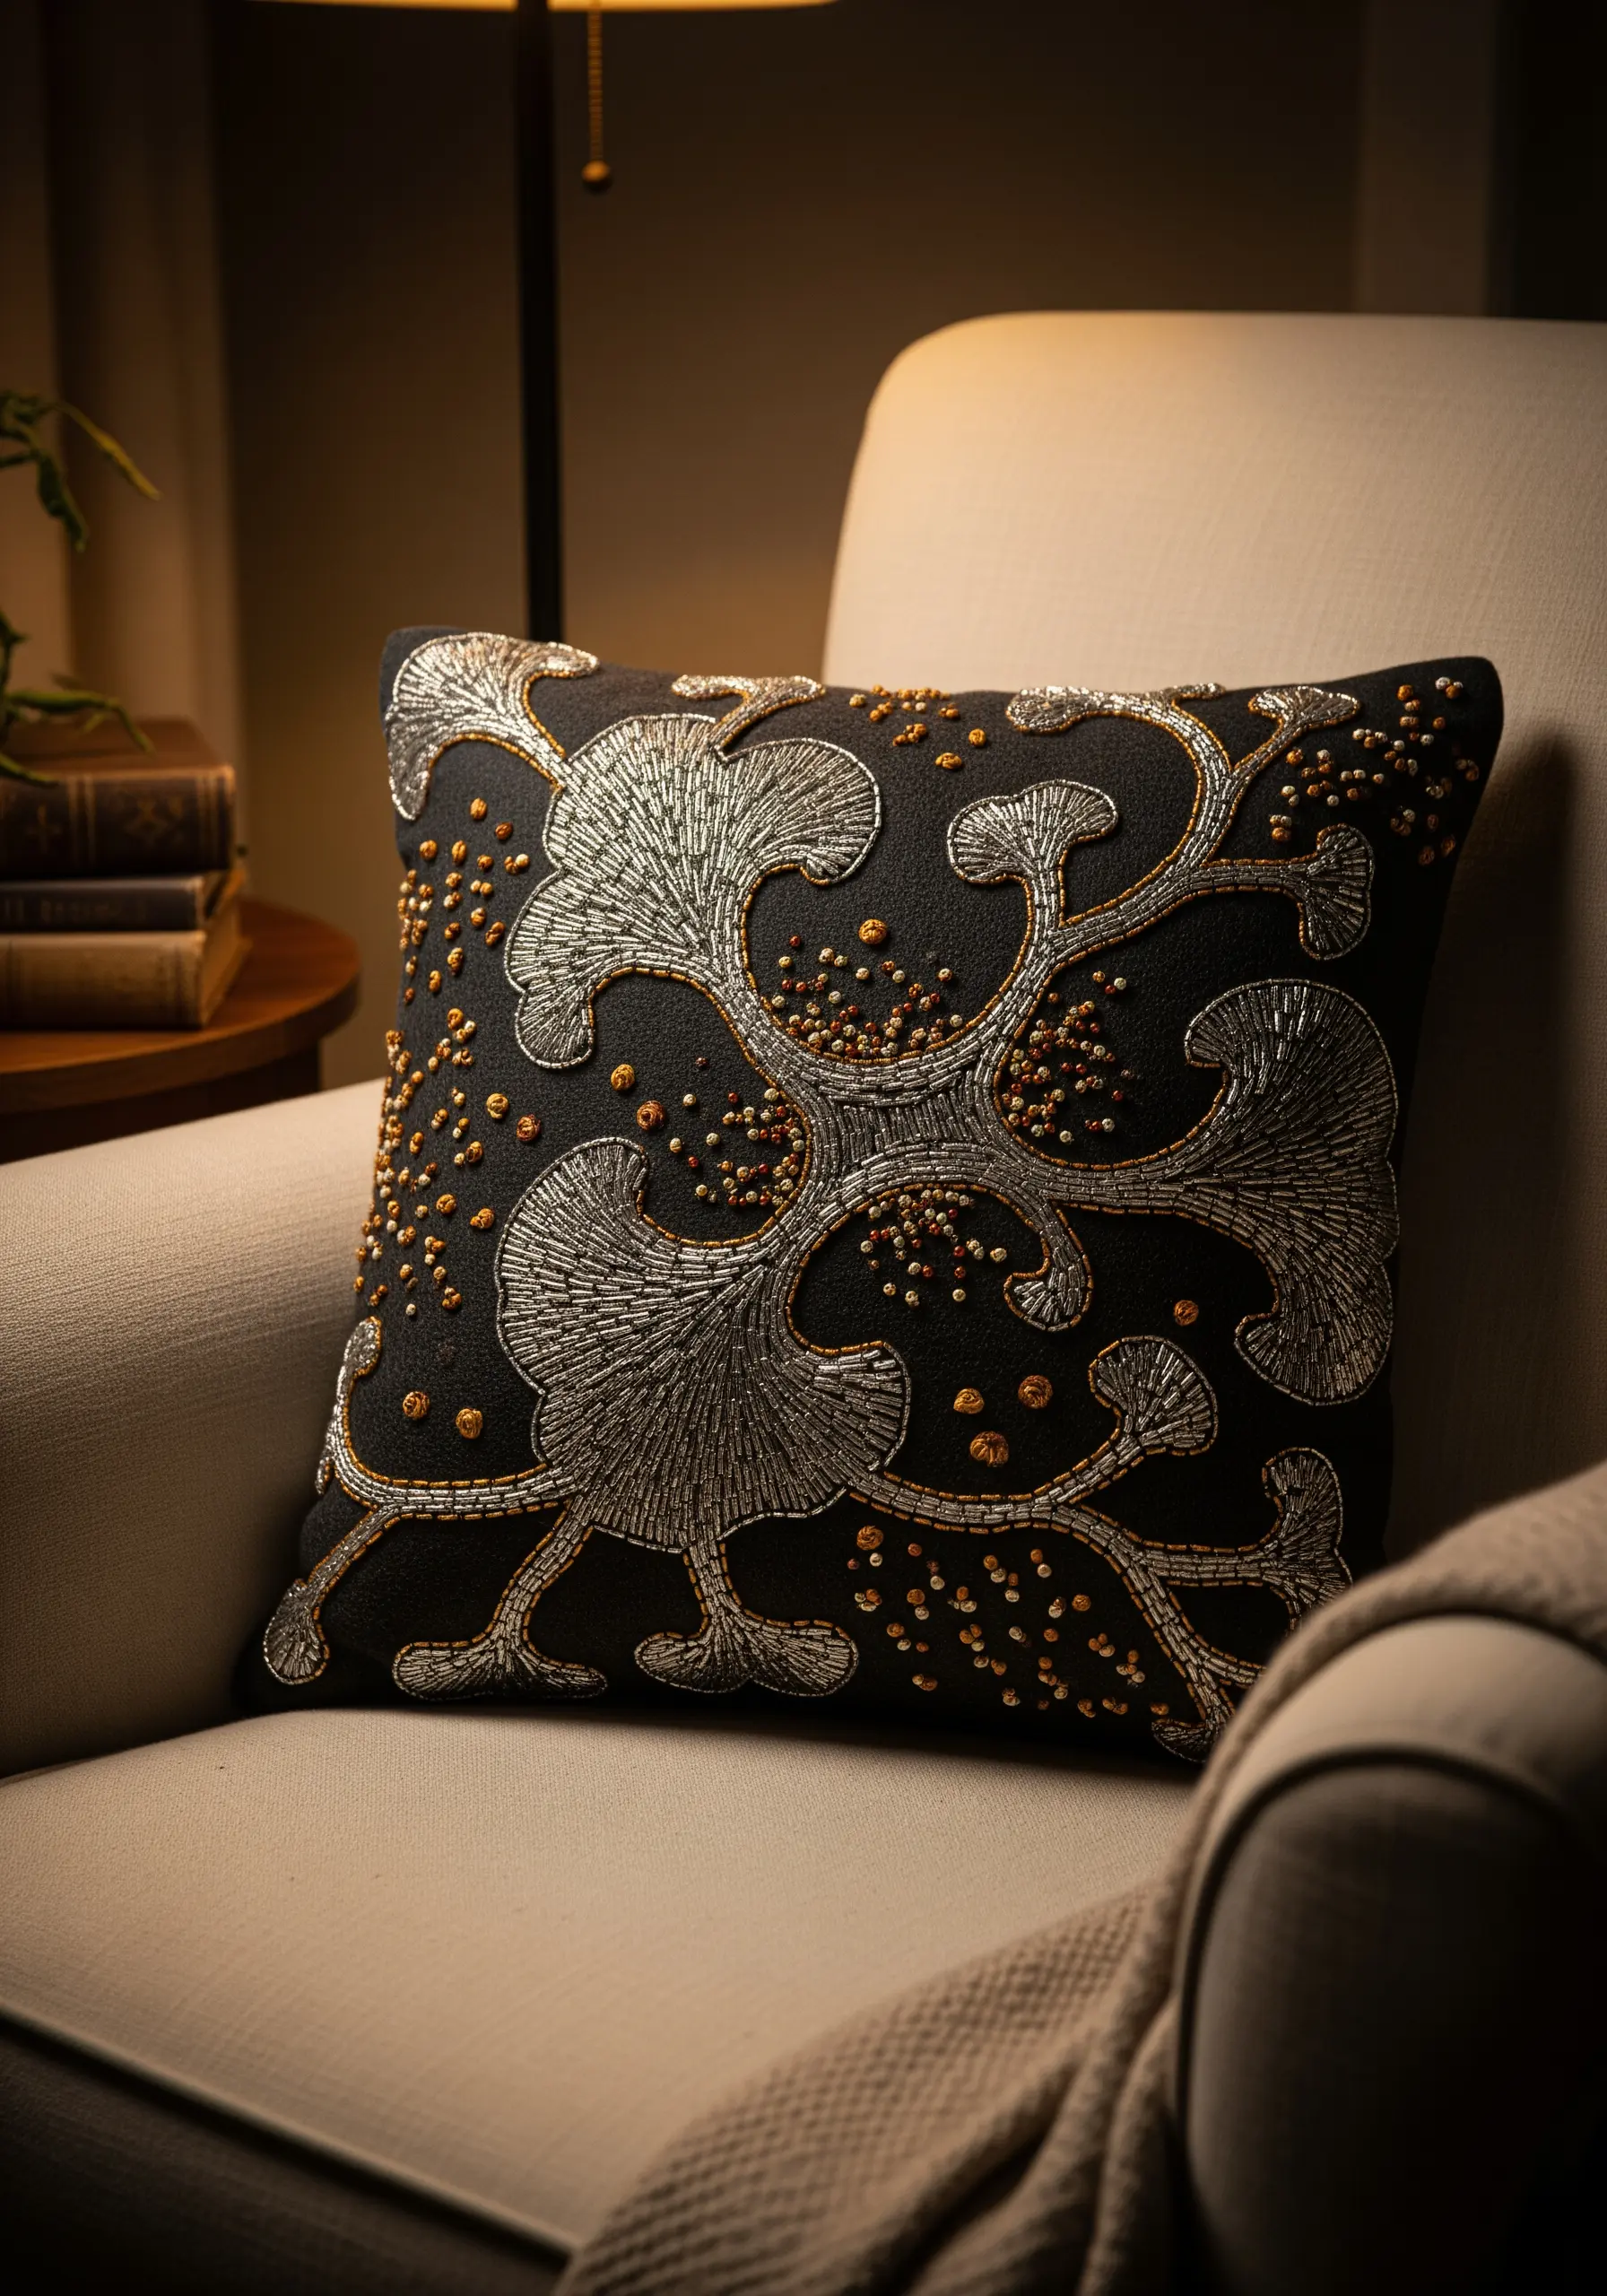
Combine metallic thread with matte beads for a sophisticated, high-contrast design on dark fabric.
Outline your ginkgo leaf shapes by couching a stiff metallic thread; this technique gives you perfect control over sharp curves without the thread twisting or snagging.
Fill the shapes with a smooth satin stitch using a silvery-grey cotton floss, allowing the metallic outline to frame the softer texture.
Scatter copper and gold seed beads or French knots in the negative space to add warmth and a secondary layer of delicate texture.
5. Layer Soil Textures with Mixed Fibers
Create a geological cross-section by assigning a unique stitch or fiber to each layer of earth.
Use Turkey work or a high-pile loop stitch for the top layer of grass, which you can trim to your desired height for a manicured or wild look.
Incorporate thick, braided yarn for the primary roots, couching it down to create a bold, 3D element that anchors the composition.
For the deeper soil and clay, experiment with rows of French knots, seed stitches, and satin stitch blocks in earthy tones to represent different mineral densities.
6. Use Sheer Fabric for Ethereal, Layered Leaves
Incorporate appliqué with sheer fabrics like organza to create delicate, translucent leaves that add a layer of sophisticated dimension.
First, tack the organza onto your base fabric, stitch your leaf outline and veins, and then carefully trim away the excess fabric from the outside.
Contrast the delicate leaves with a bold, graphic background; long, radiating straight stitches create a sense of movement and energy.
Embellish the sheer leaves with a few seed beads or tiny knots to add weight and catch the light.
7. Recreate Lichen with Knots and Variegated Thread
Capture the intricate texture of lichen growing on bark by clustering French and colonial knots in tightly packed groups.
Use a variegated thread in shades of pale green, grey, and orange to achieve a natural, mottled color effect with minimal effort.
For the orange-rimmed lichen, create a small ring of colonial knots and fill the center with a contrasting satin stitch.
Contrast these delicate clusters with thick, couched wool yarn to represent the rough, woody texture of the branch itself.
8. Add Soft Dimension with Raised Appliqué
Give your winter scenes a soft, touchable quality by using felt or fleece appliqué for snow.
Cut your snowdrift shapes and lightly stitch them onto the background fabric using a simple whipstitch around the edges.
This creates a subtle, raised effect that looks far more realistic than dense white satin stitching.
For a final touch of magic, add tiny silver seed beads to the branches to represent glistening ice crystals, which catch the light beautifully.
9. Paint with Thread Using Directional Stitches

Turn simple leaf shapes into miniature artworks by using long-and-short stitch to create painterly color gradients.
For a smooth blend, like in the red maple leaf, use only a single strand of floss and ensure your stitches follow the natural direction of the leaf’s veins.
This directional stitching is what tricks the eye into seeing realistic flow and dimension.
For a quicker, more graphic effect on the other leaves, use a variegated thread with a simple satin stitch, letting the thread’s color changes do the work for you.
10. Create Bold Graphics with Couched Rope
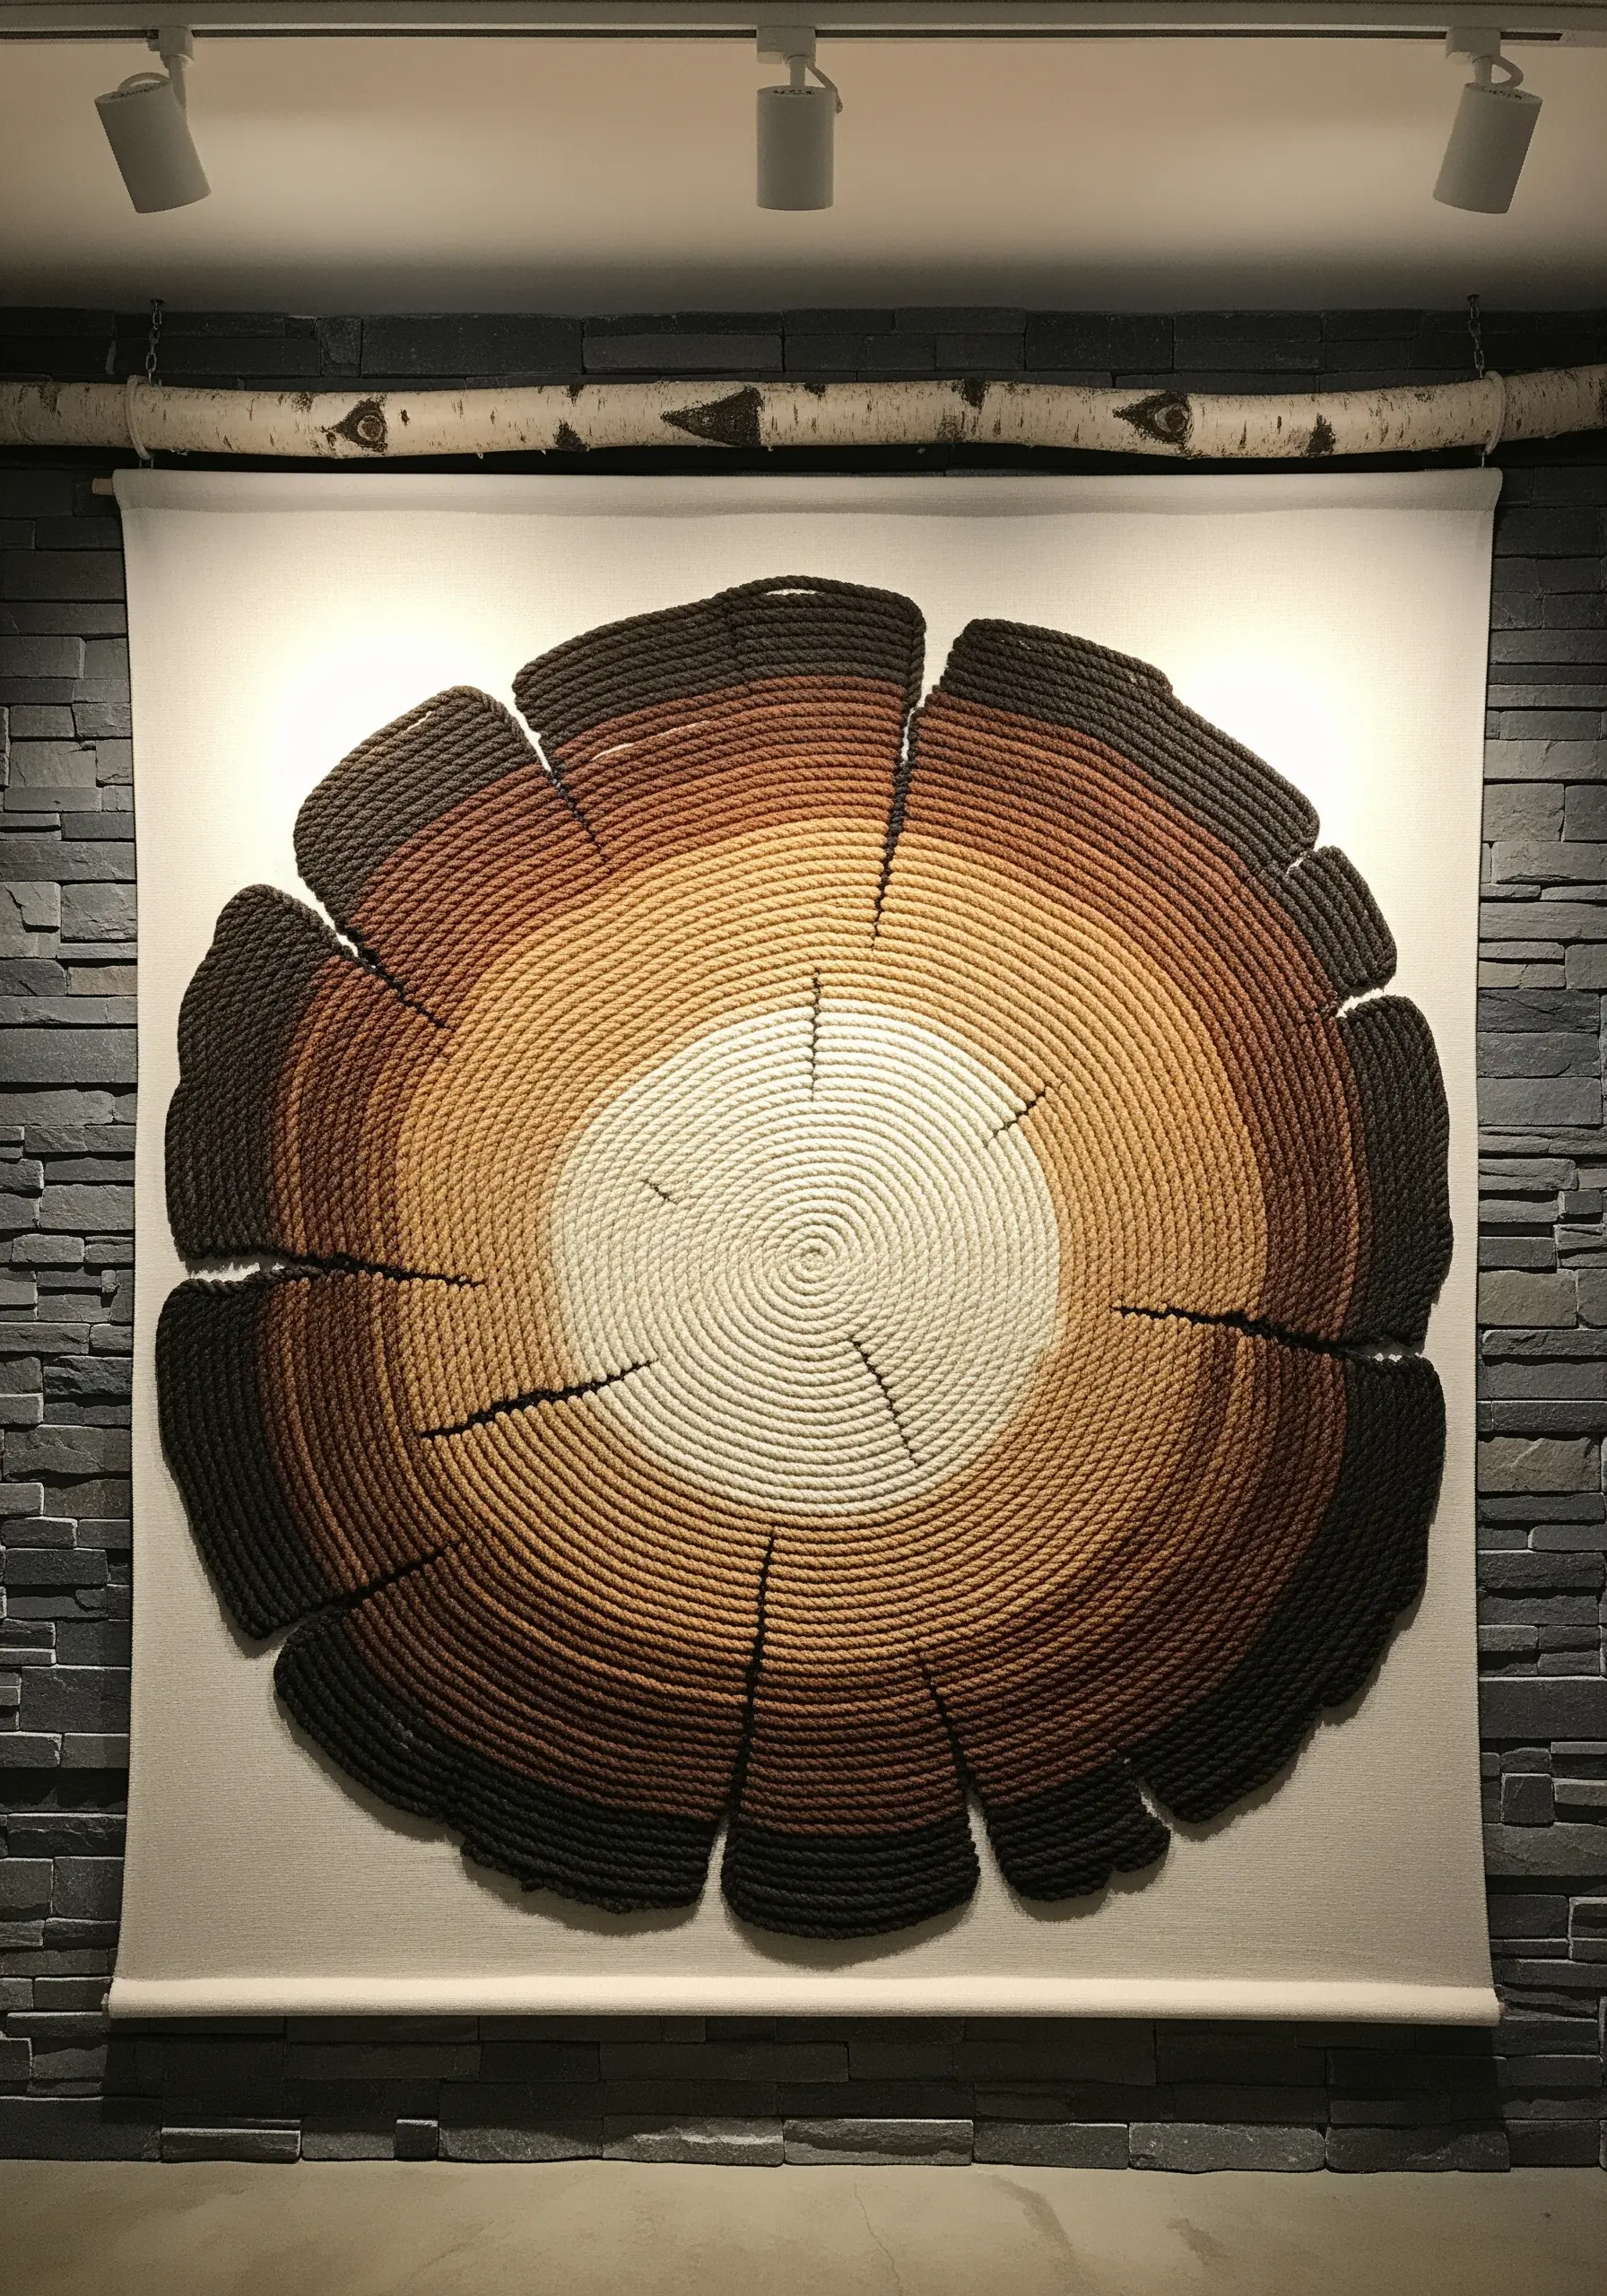
For a large-scale statement piece, ditch the fine floss and work with thick rope or cord instead.
Create the tree ring pattern by coiling different colored ropes and couching them down onto a heavy canvas backing with a strong, coordinating thread.
The texture comes from the rope’s natural twist, and the visual impact comes from the clean, graphic lines and color blocking.
The cracks in the wood are created by leaving intentional negative space between sections, a powerful design choice that adds realism and breaks up the solid form.
11. Give Berries Dimension with Padded Satin Stitch
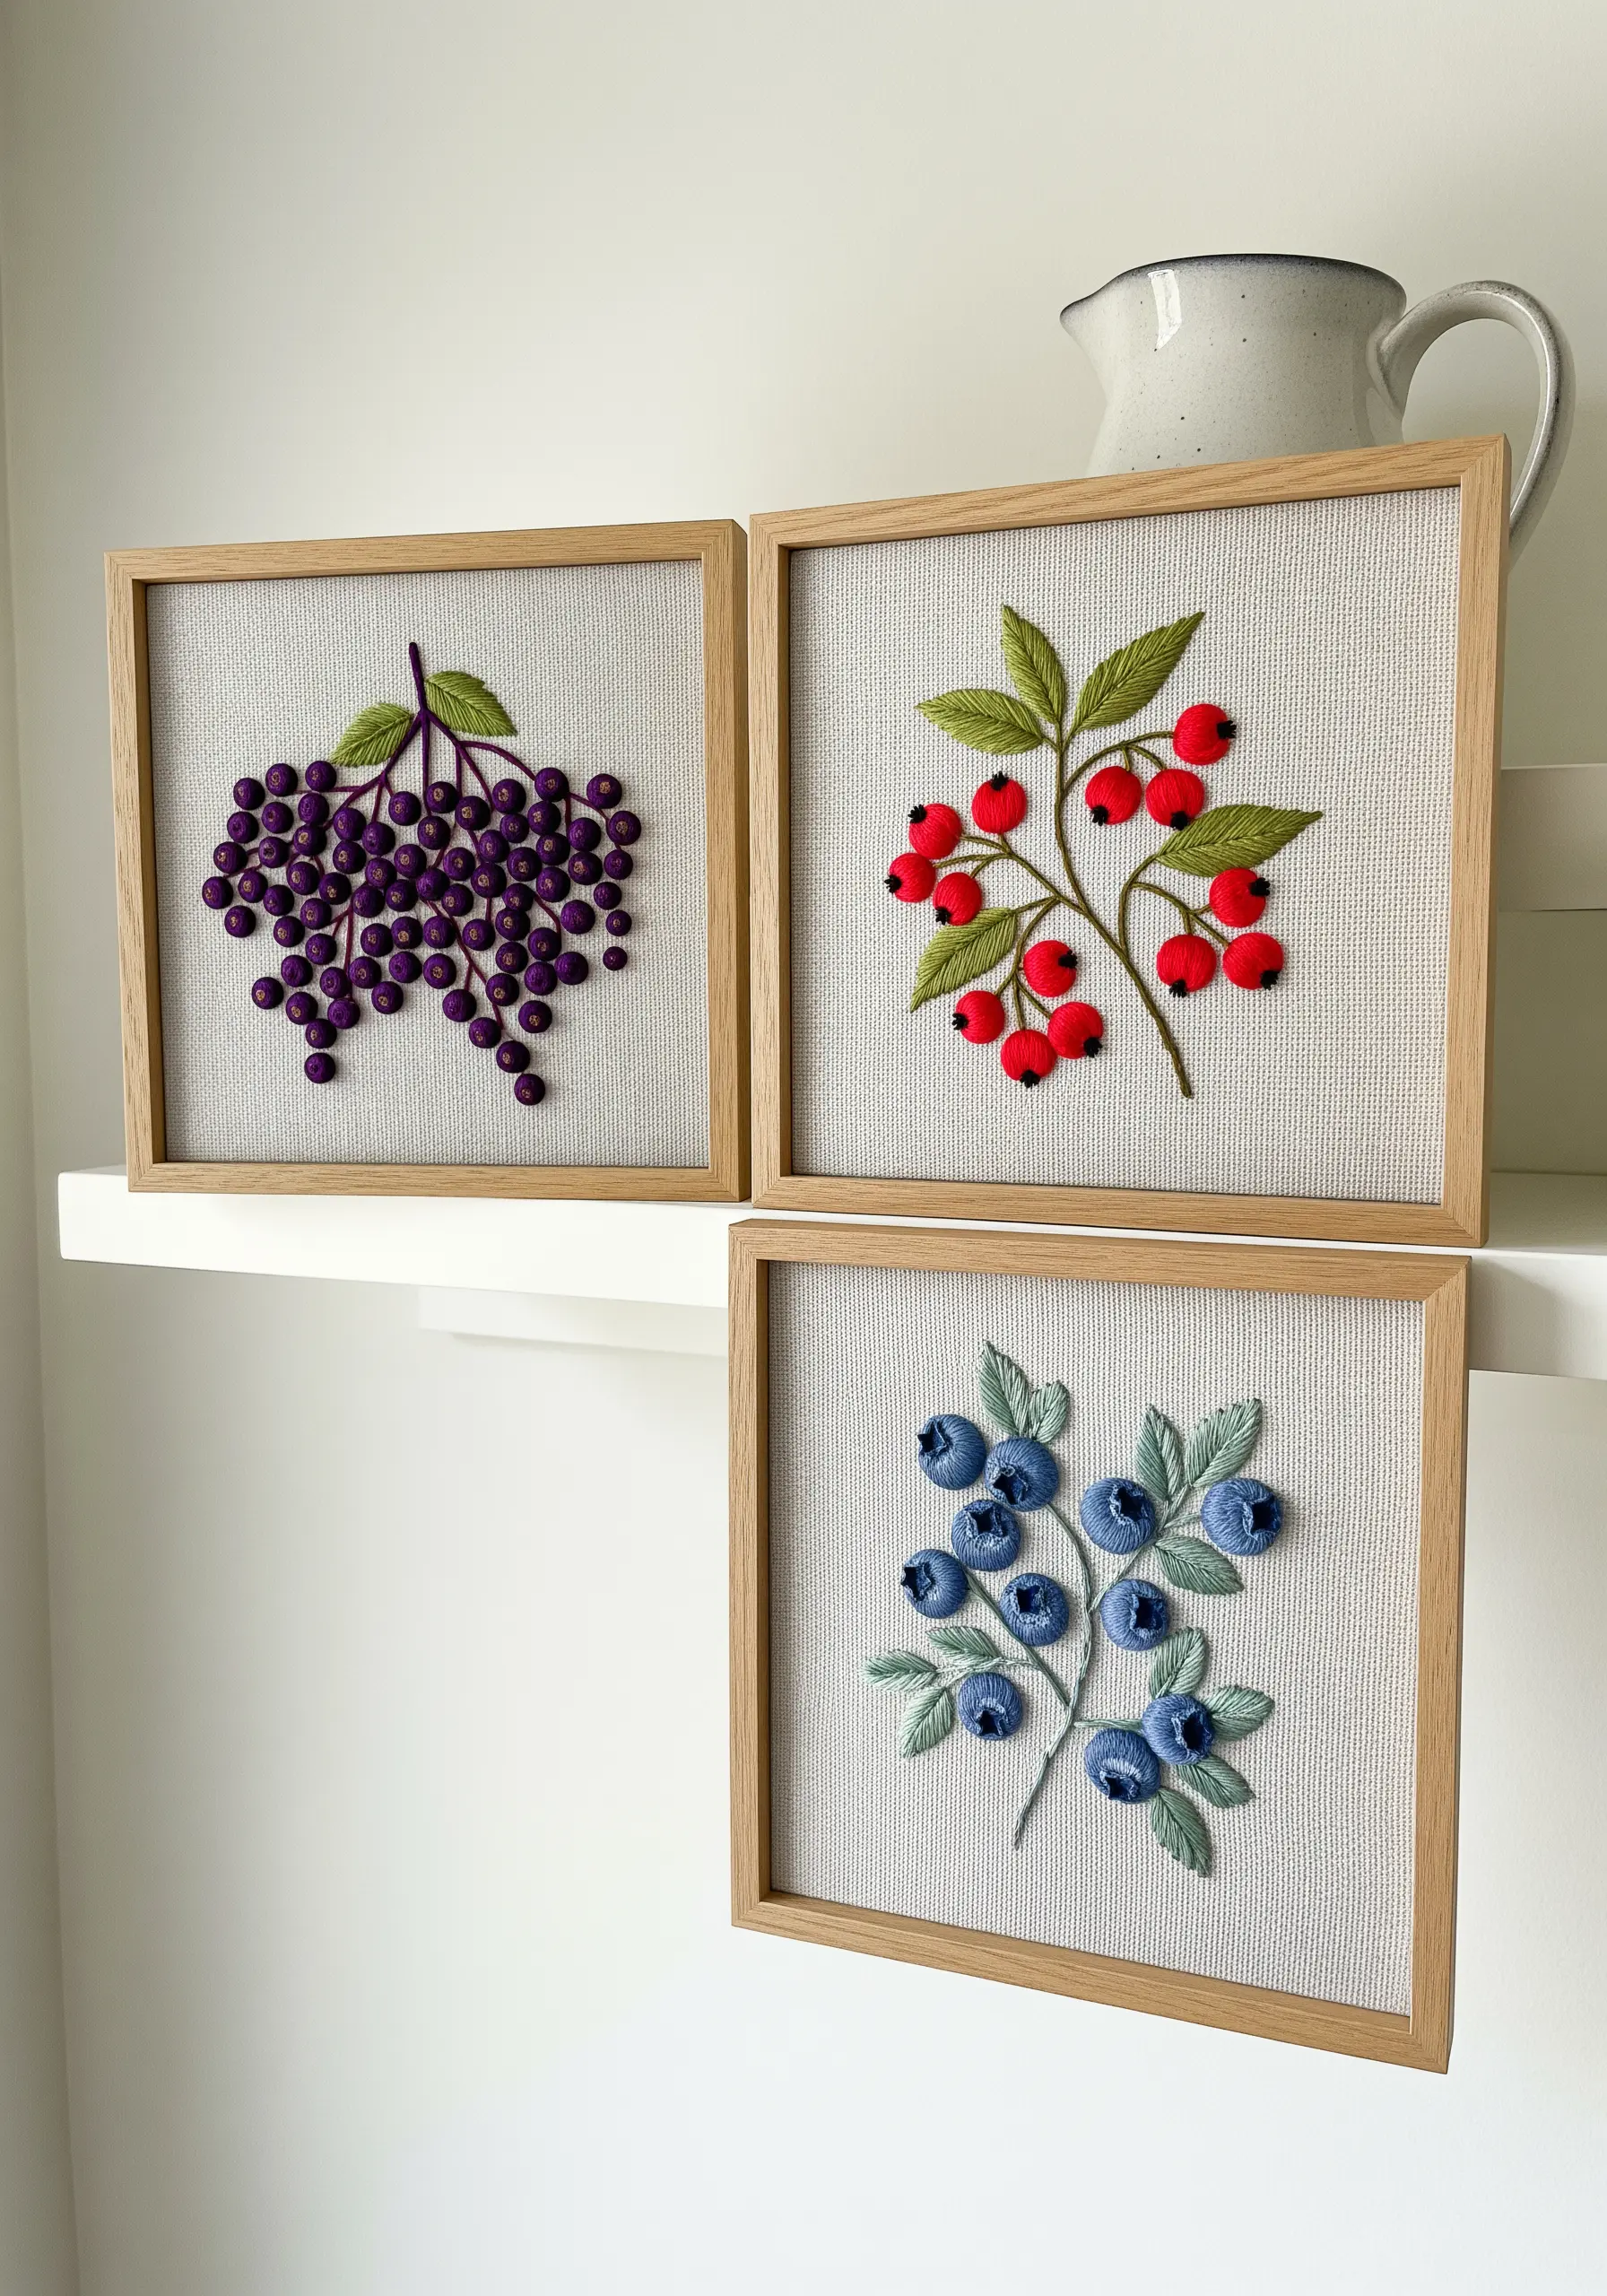
Make your embroidered berries look plump and three-dimensional by using a padded satin stitch.
Before stitching your final color, create a small under-layer of seed stitches within the outline of each berry.
Then, work your satin stitch over this padding; the raised foundation will make the surface curve and catch the light.
Add a single, tiny straight stitch in white or a lighter shade at the top of each berry to create a highlight, instantly enhancing the illusion of roundness.
12. Weave a Nest with Unconventional Fibers
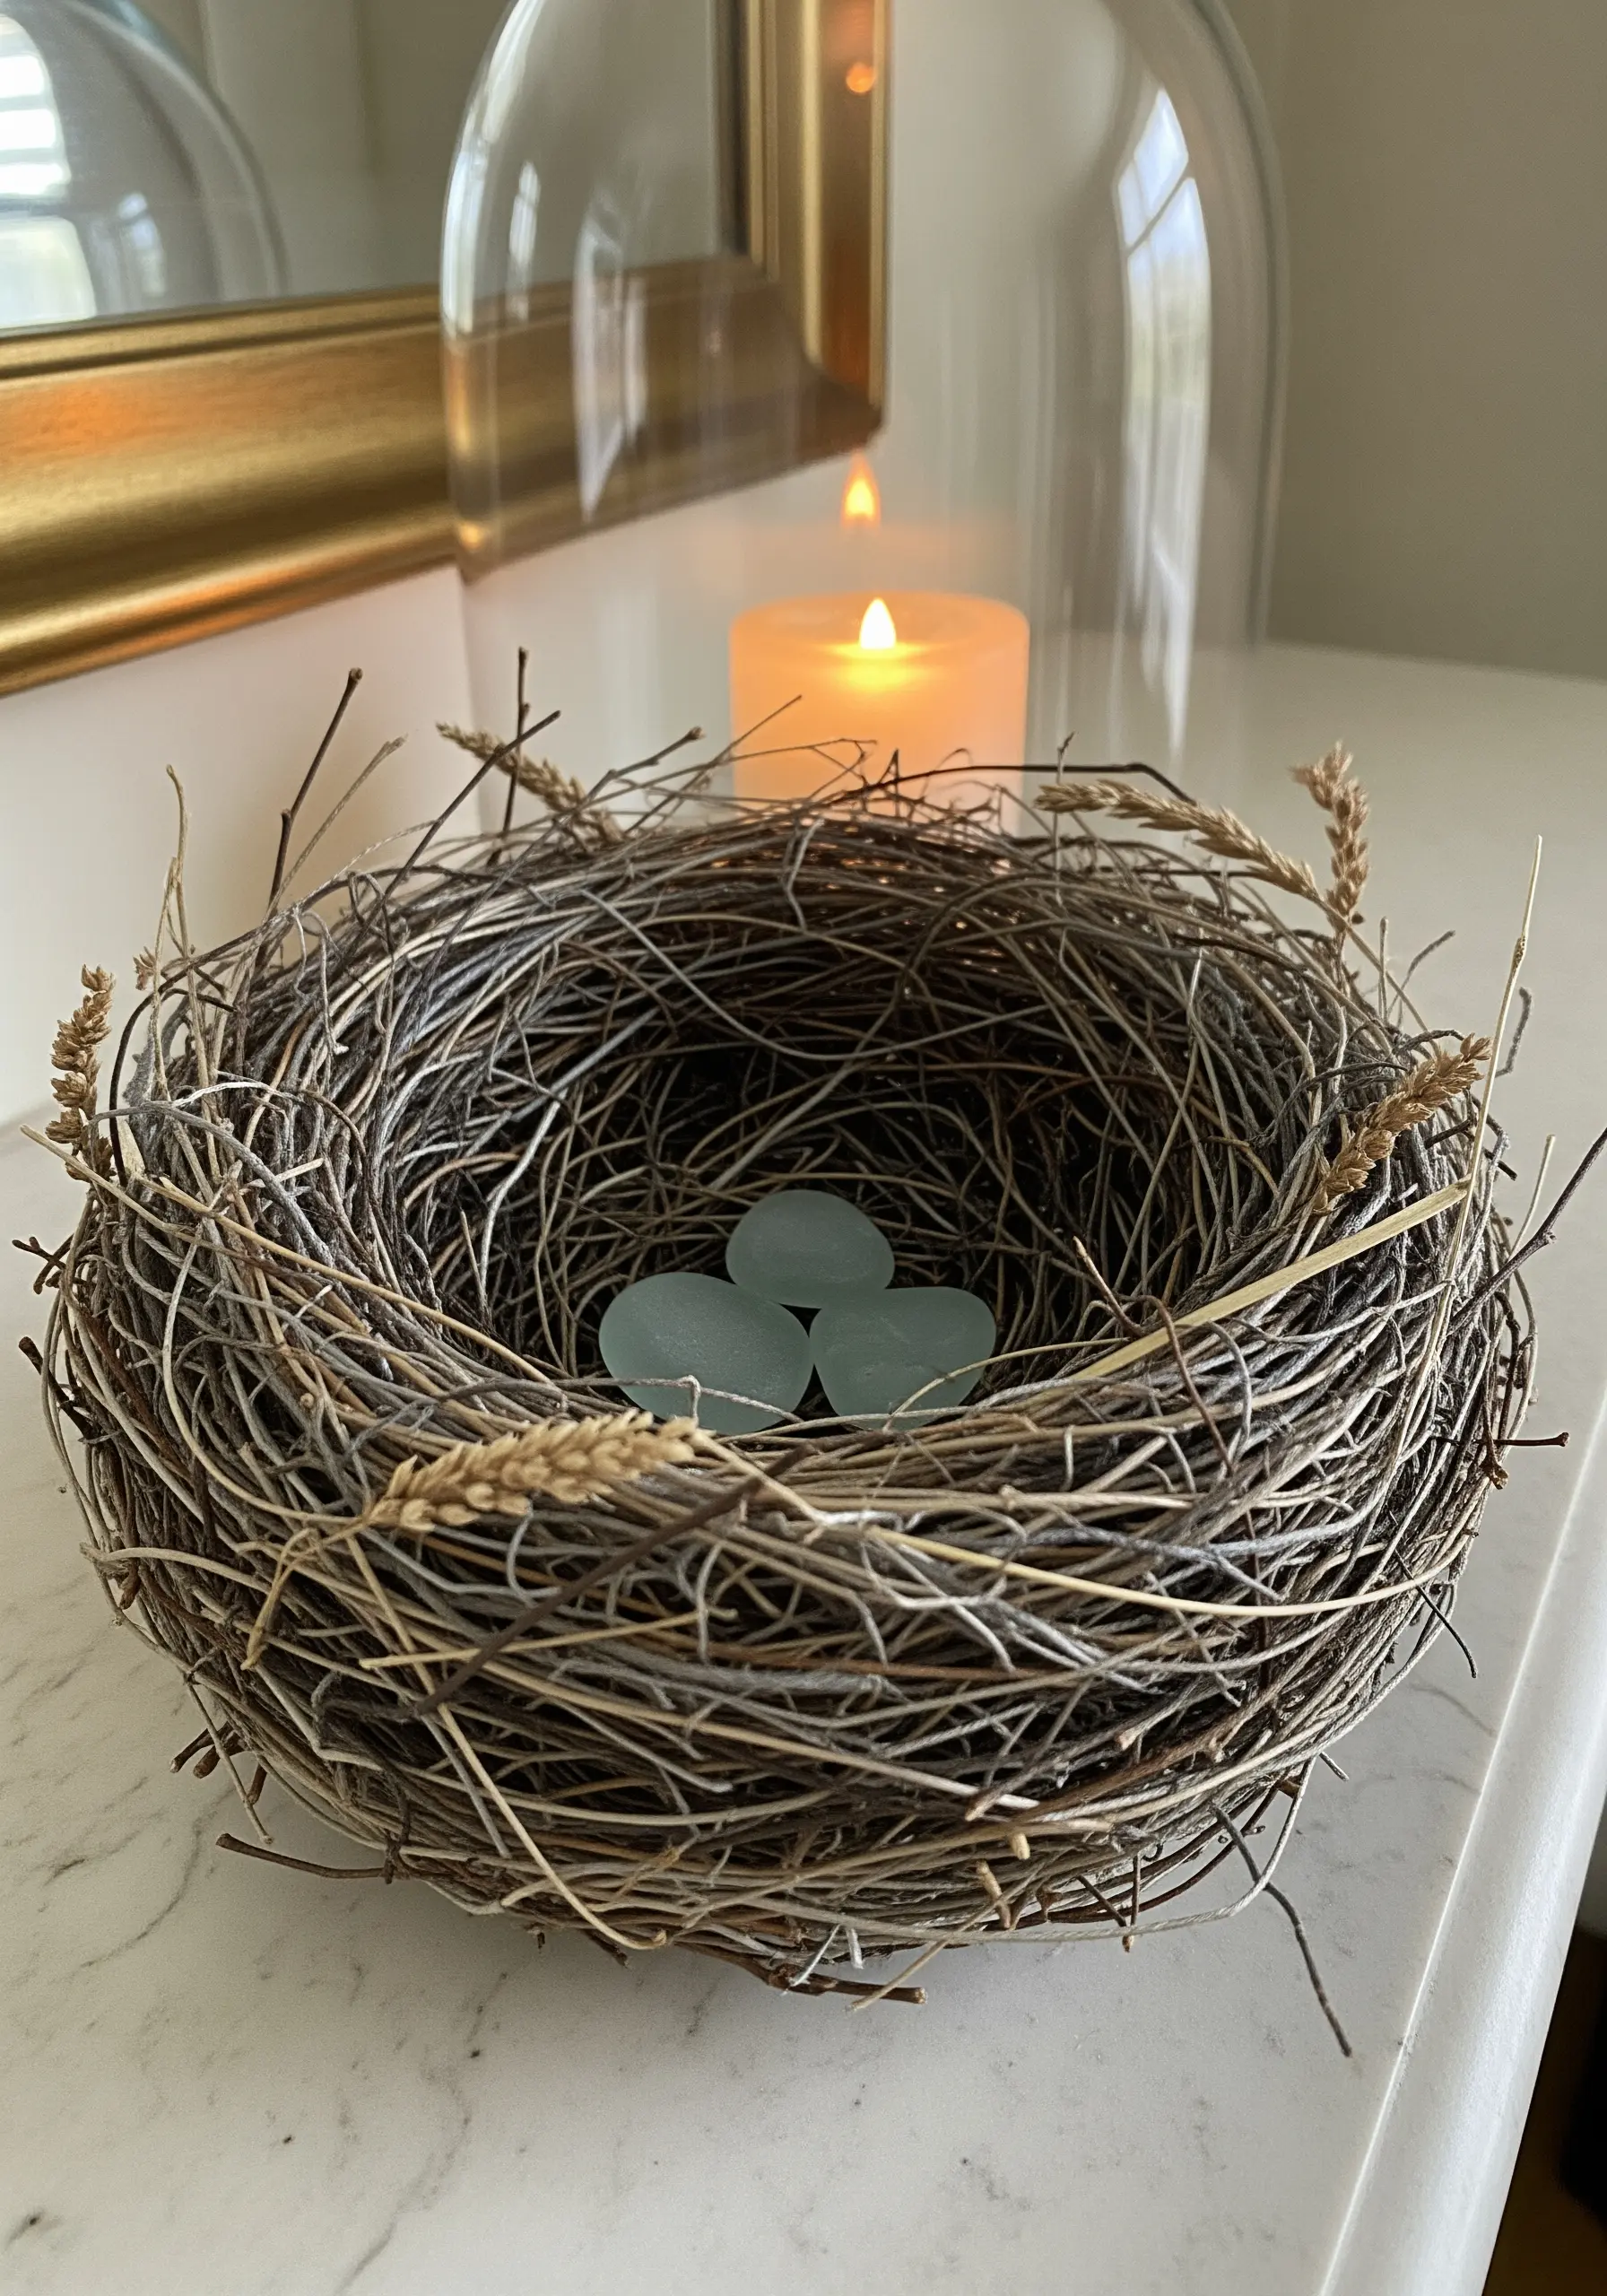
To embroider a bird’s nest that feels authentically chaotic, incorporate unconventional materials like raffia, twine, and un-plied wool.
Instead of traditional stitches, use couching to tack down these varied fibers in a circular, overlapping pattern.
Layering is essential; don’t be afraid to build up a thick, messy texture that looks just like a real nest.
For the eggs, create smooth ovals with satin stitch in a soft, contrasting color like pale blue or cream to provide a calm focal point amidst the texture.
13. Capture Water’s Movement with Stitch Direction

Create the illusion of flowing water by paying close attention to the direction of your stitches.
Use long, flowing straight stitches that follow the current, varying the shades of blue and grey to represent depth and reflection.
For the turbulent white foam, switch to dense clusters of French knots and short, chaotic seed stitches to break up the smooth flow.
Contrast the water’s movement with solid, stable rocks filled with satin stitch in varied grey tones, making the river appear even more dynamic.
14. Interpret Nature with Geometric Patterns
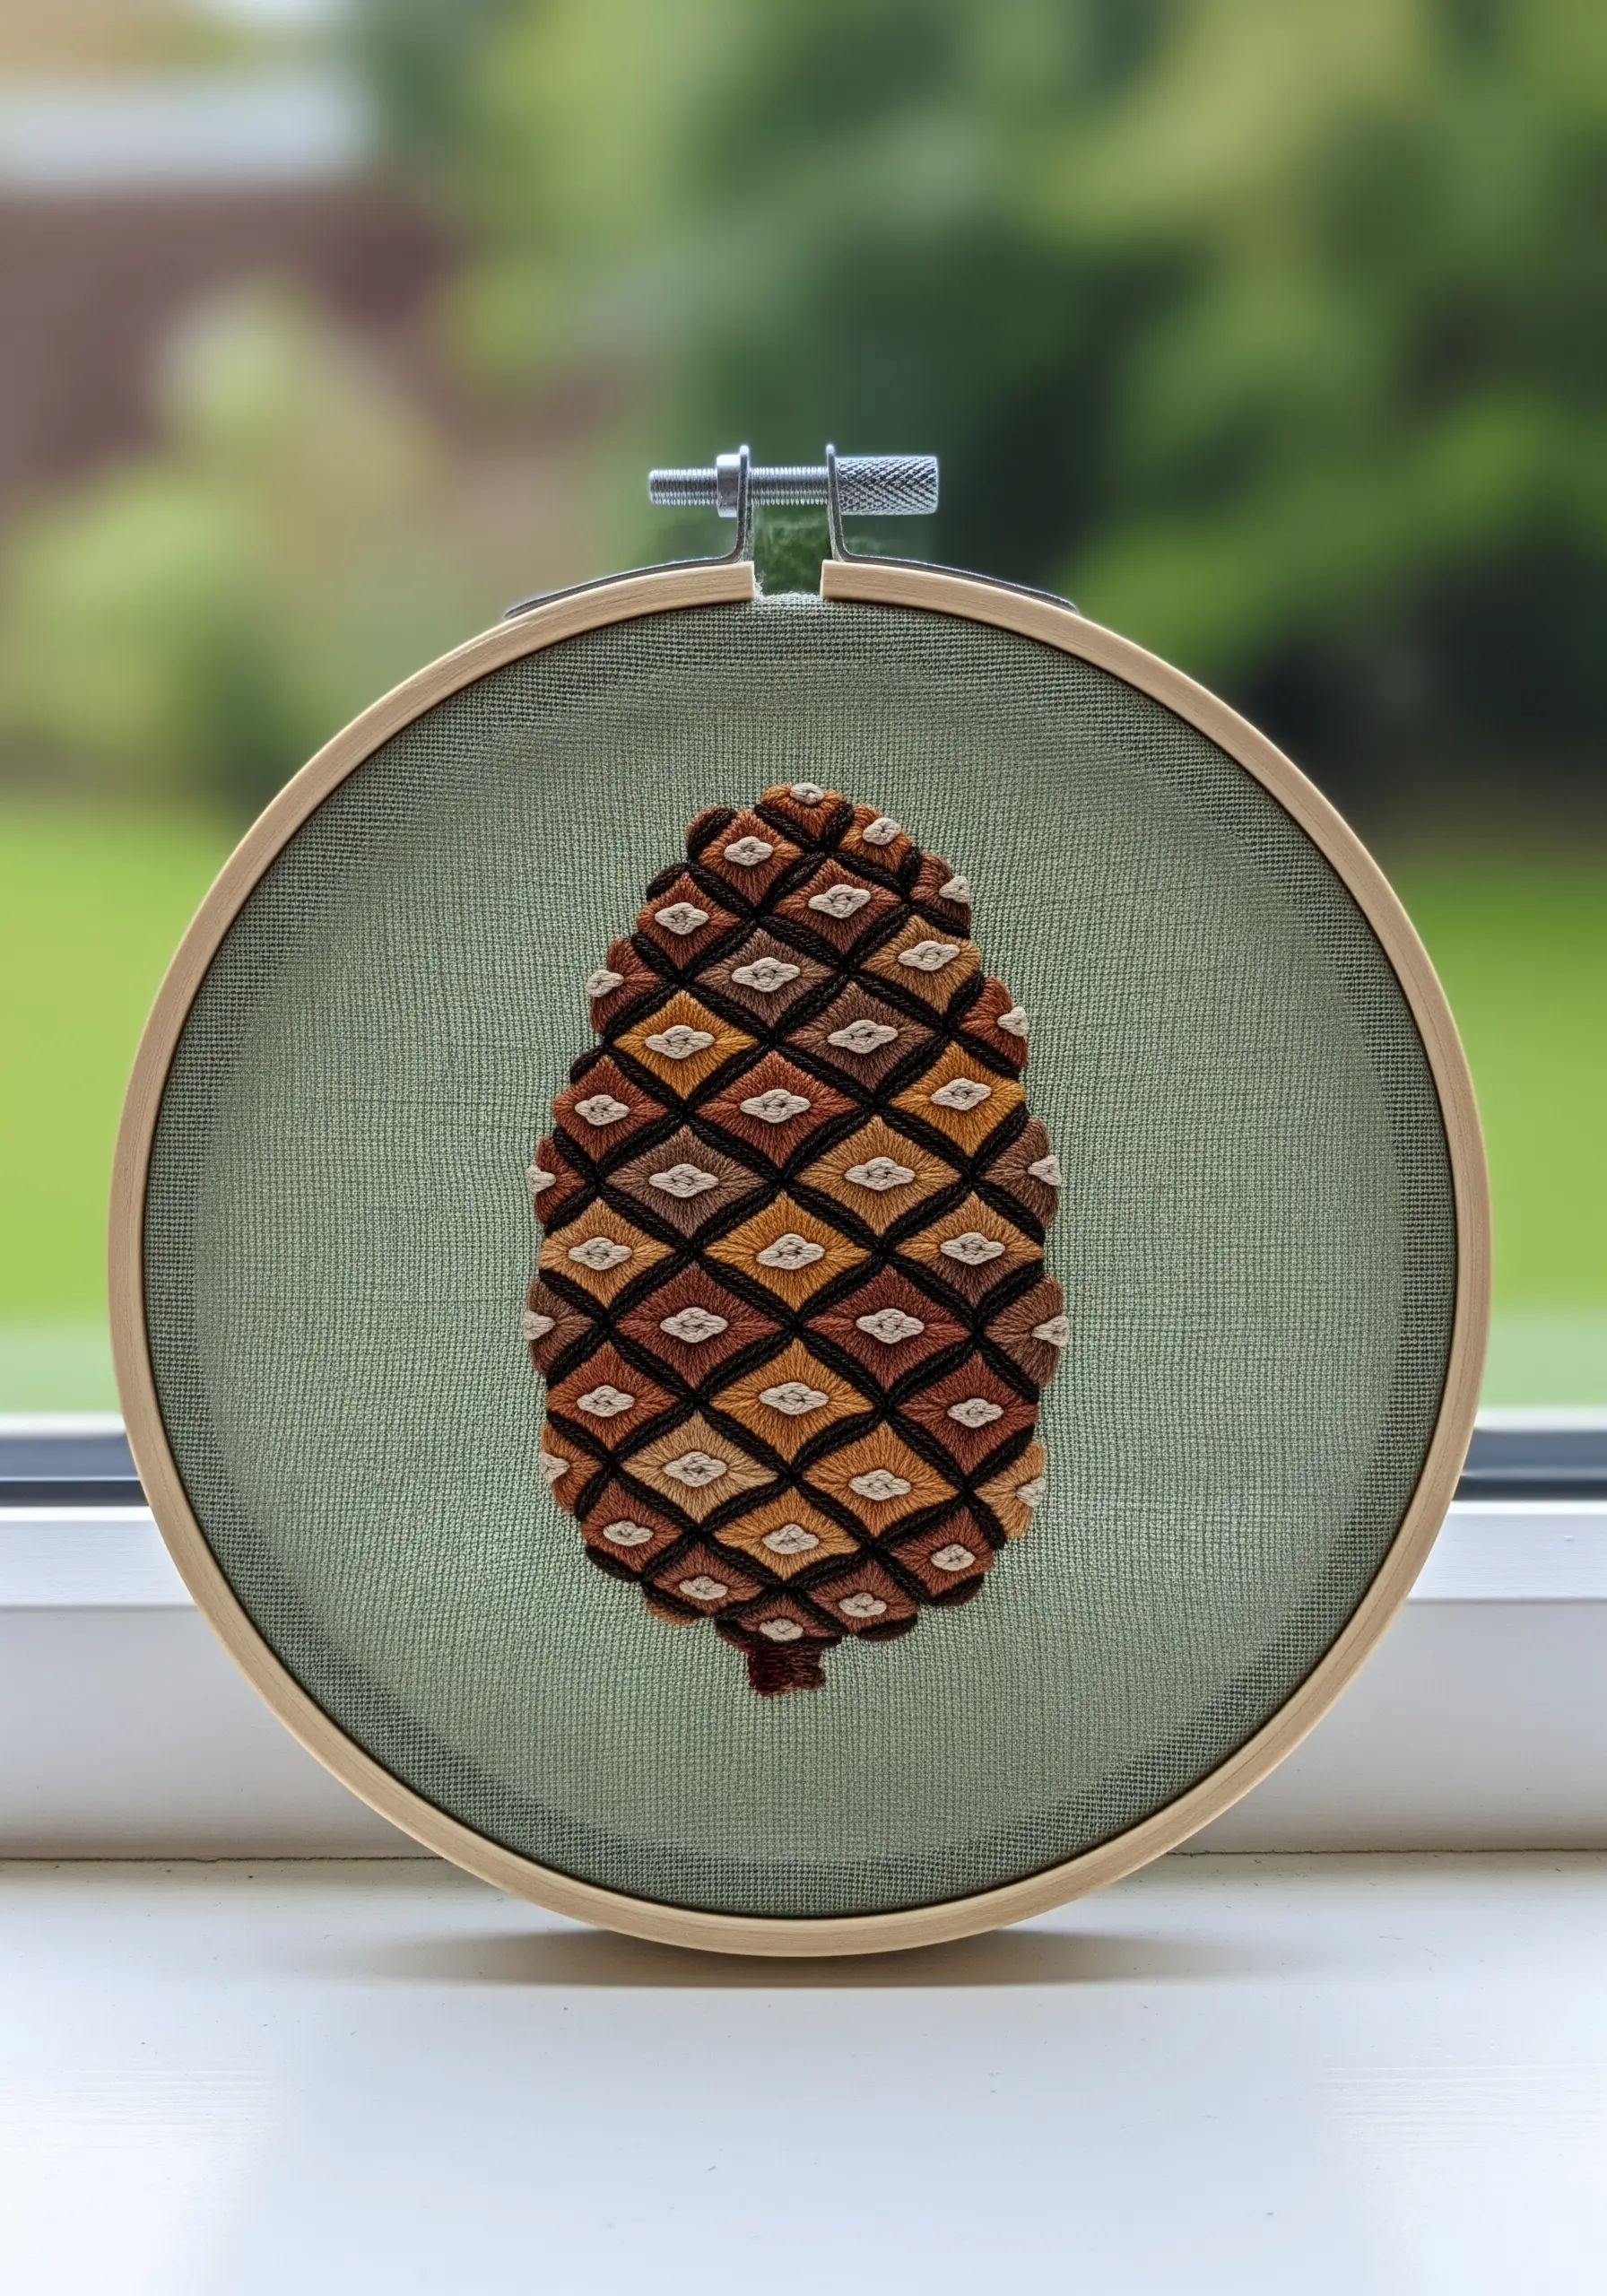
Instead of aiming for realism, translate a natural object like a pinecone into a clean, geometric pattern.
Use satin stitch to fill each diamond-shaped scale, alternating colors to create a visually striking, quilt-like effect.
The key to making this design sharp and clear is the negative space; leave a tiny unstitched outline around each shape to ensure crisp definition.
This approach is a perfect exercise in stitch precision and creating rhythm through color and shape.
15. Weave Vines with a Raised Stem Stitch Band
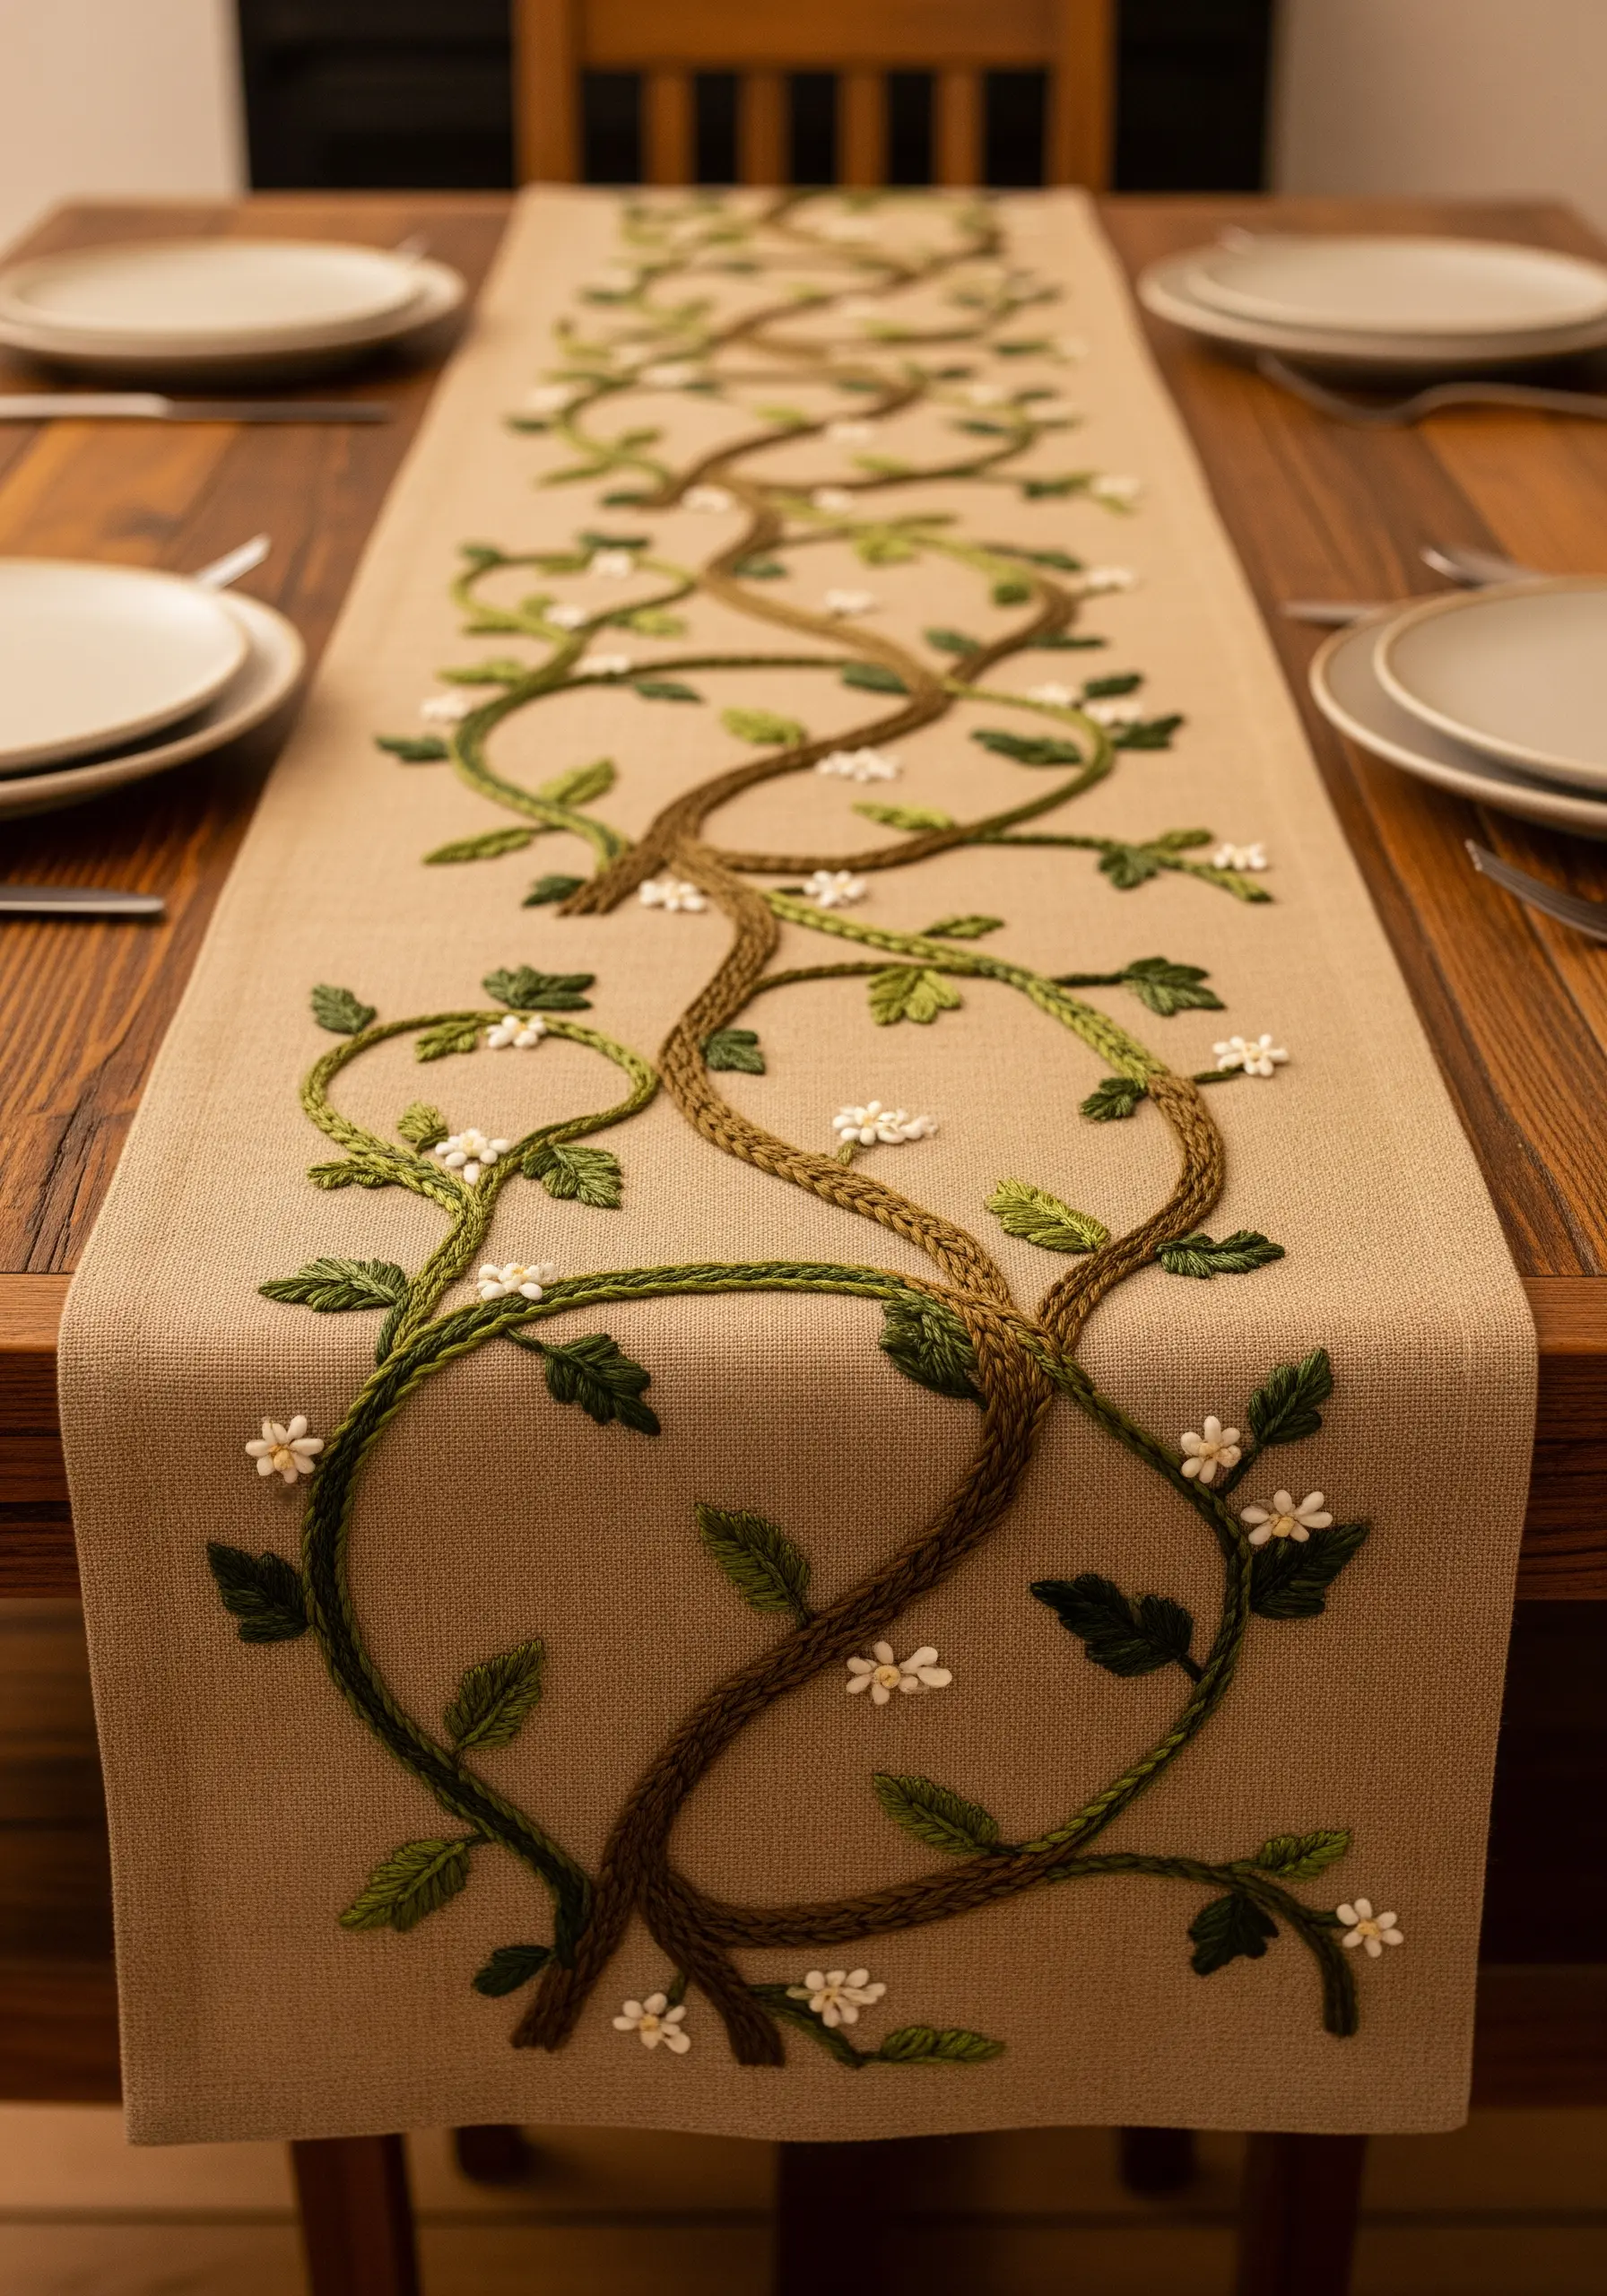
Elevate a simple table runner by creating bold, three-dimensional vines that twist across the fabric.
Achieve this sculptural effect with a raised stem stitch band, or by braiding several strands of six-ply floss together and then couching the braid down.
Vary the colors of the intertwined vines to add visual interest and the illusion of depth.
For the flowers, use a detached buttonhole stitch or woven picot stitch to create tiny, 3D blossoms that sit on top of the fabric’s surface.
16. Fill Silhouettes with Textural Seed Stitching
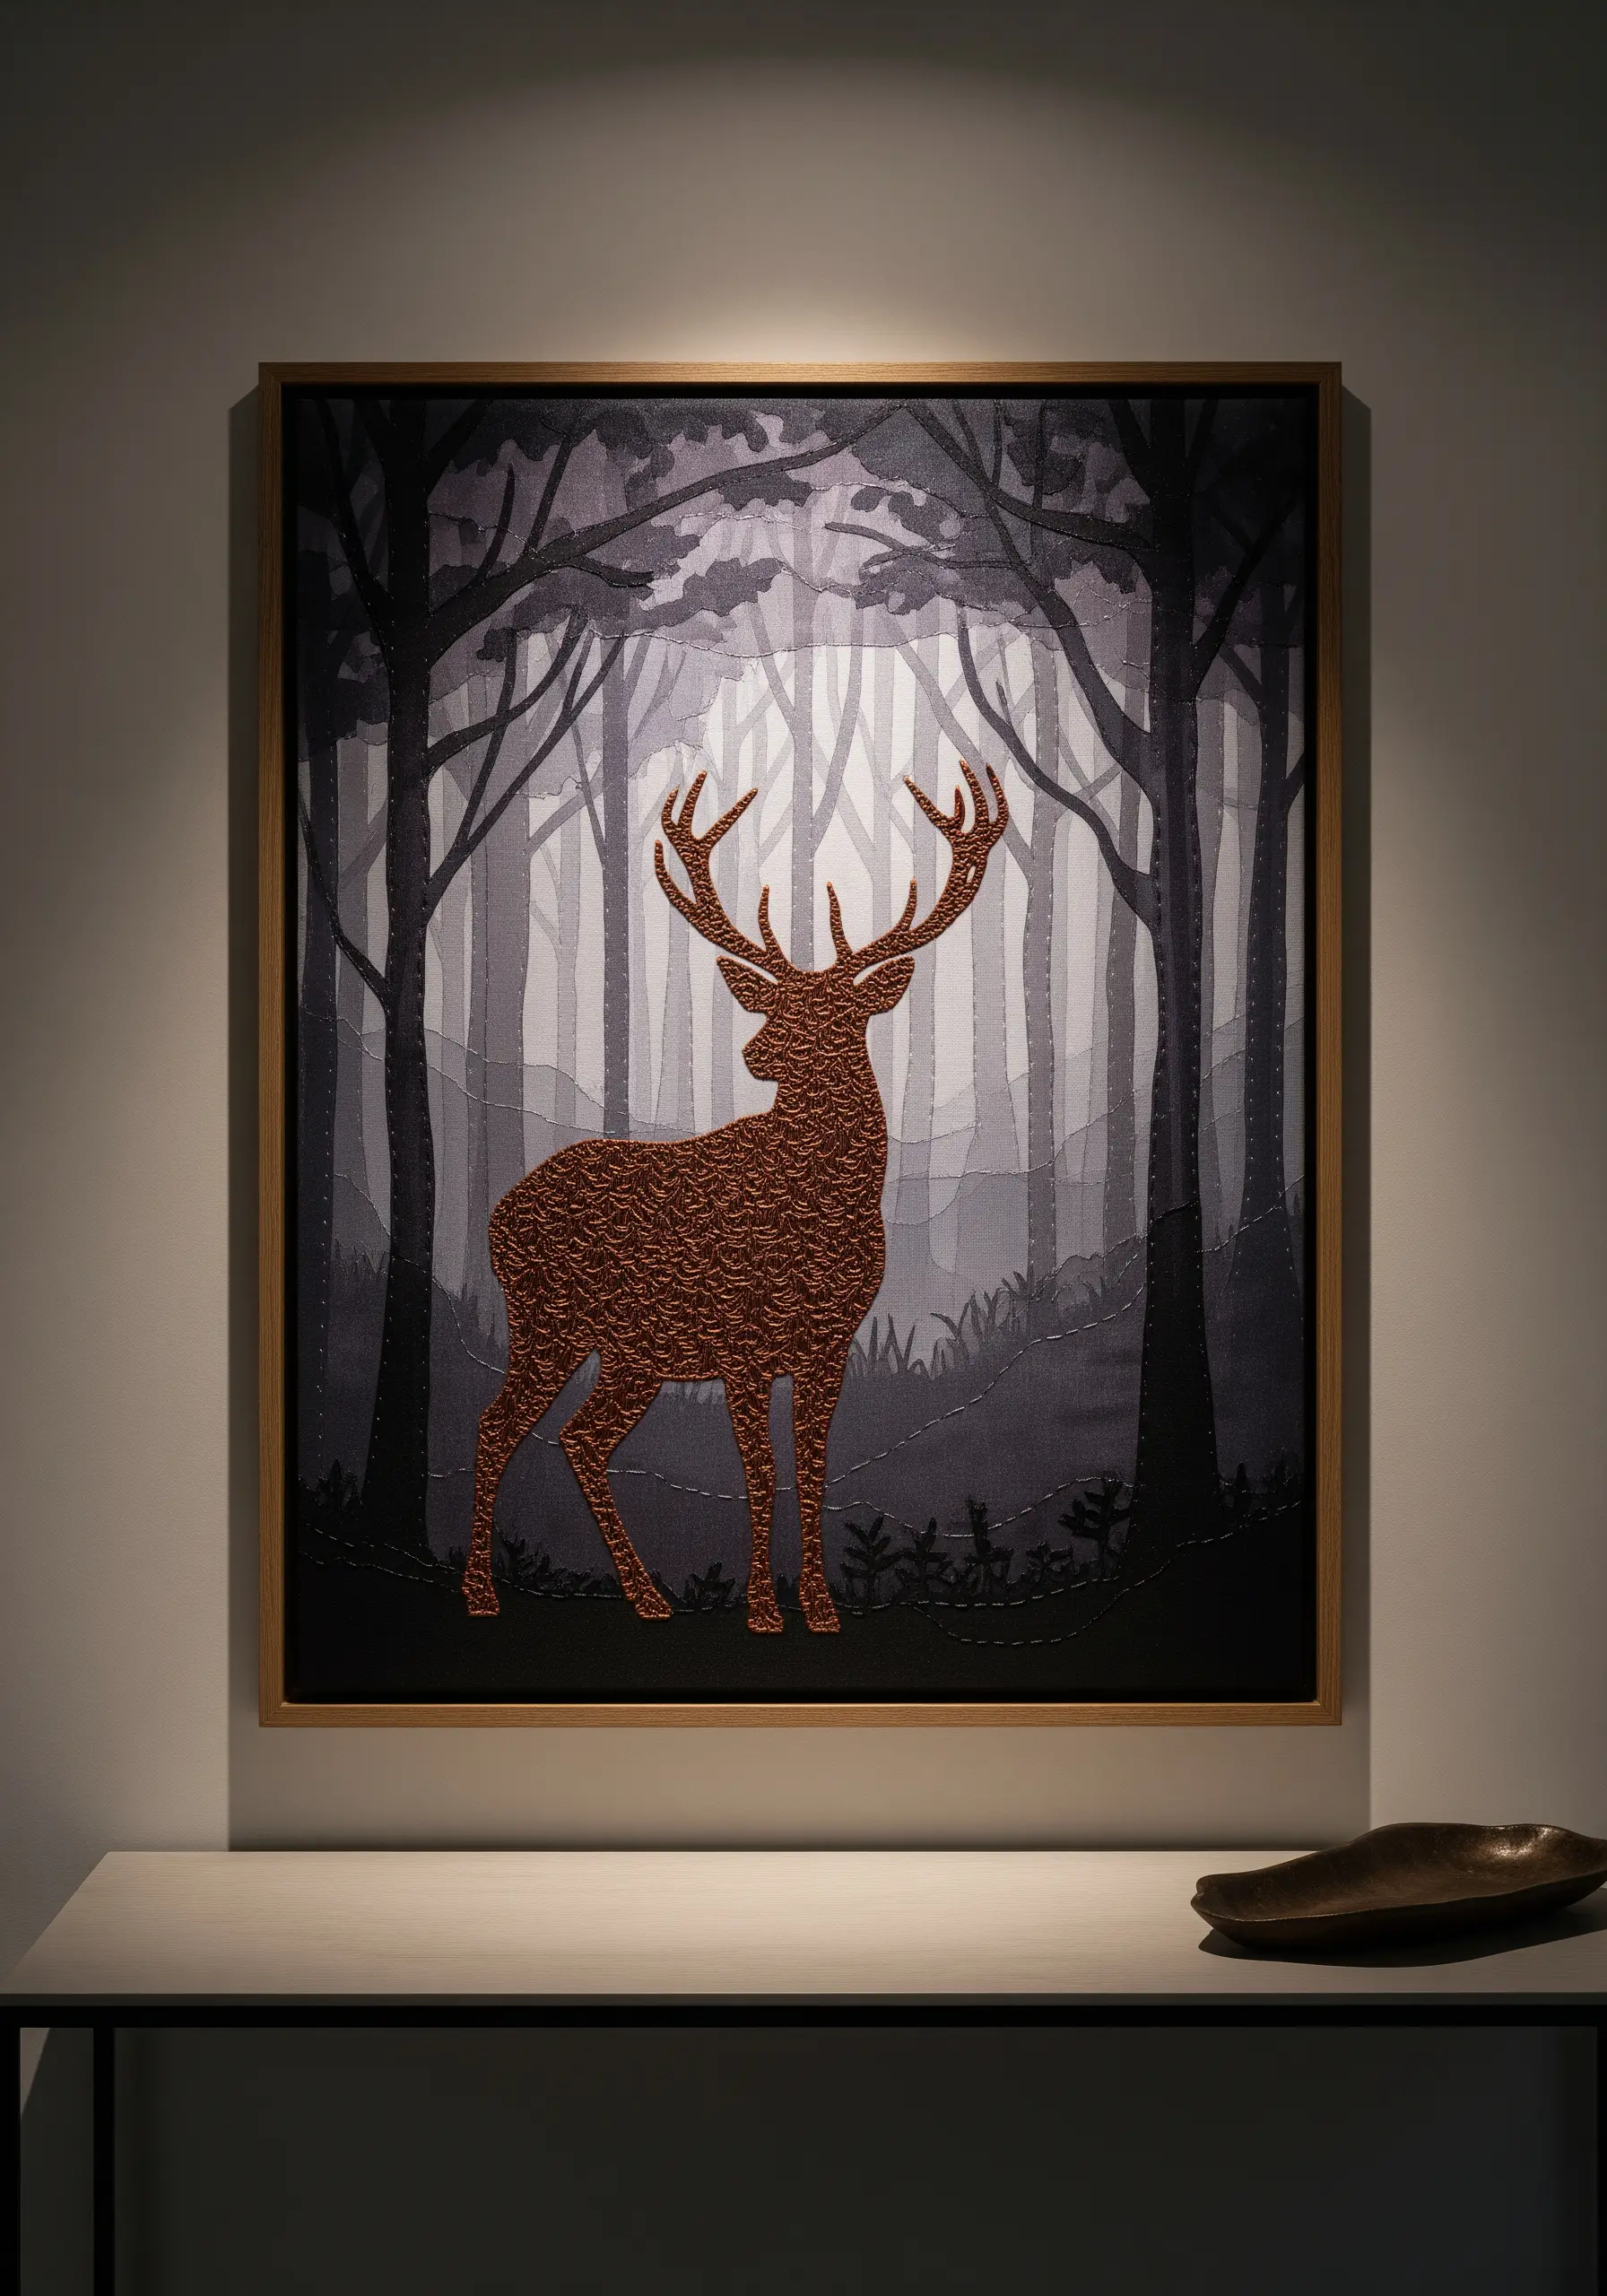
Create a powerful focal point by combining appliqué with a dense, textural fill stitch.
First, cut your deer silhouette from a complementary fabric and appliqué it onto your background.
Instead of leaving it plain, fill the entire shape with thousands of tiny seed stitches (or French knots) using a slightly contrasting thread.
This technique gives the silhouette a rich, tactile surface that invites touch and transforms it from a flat shape into a textured object.
17. Stitch Delicate Skeletons with Single-Thread Backstitch
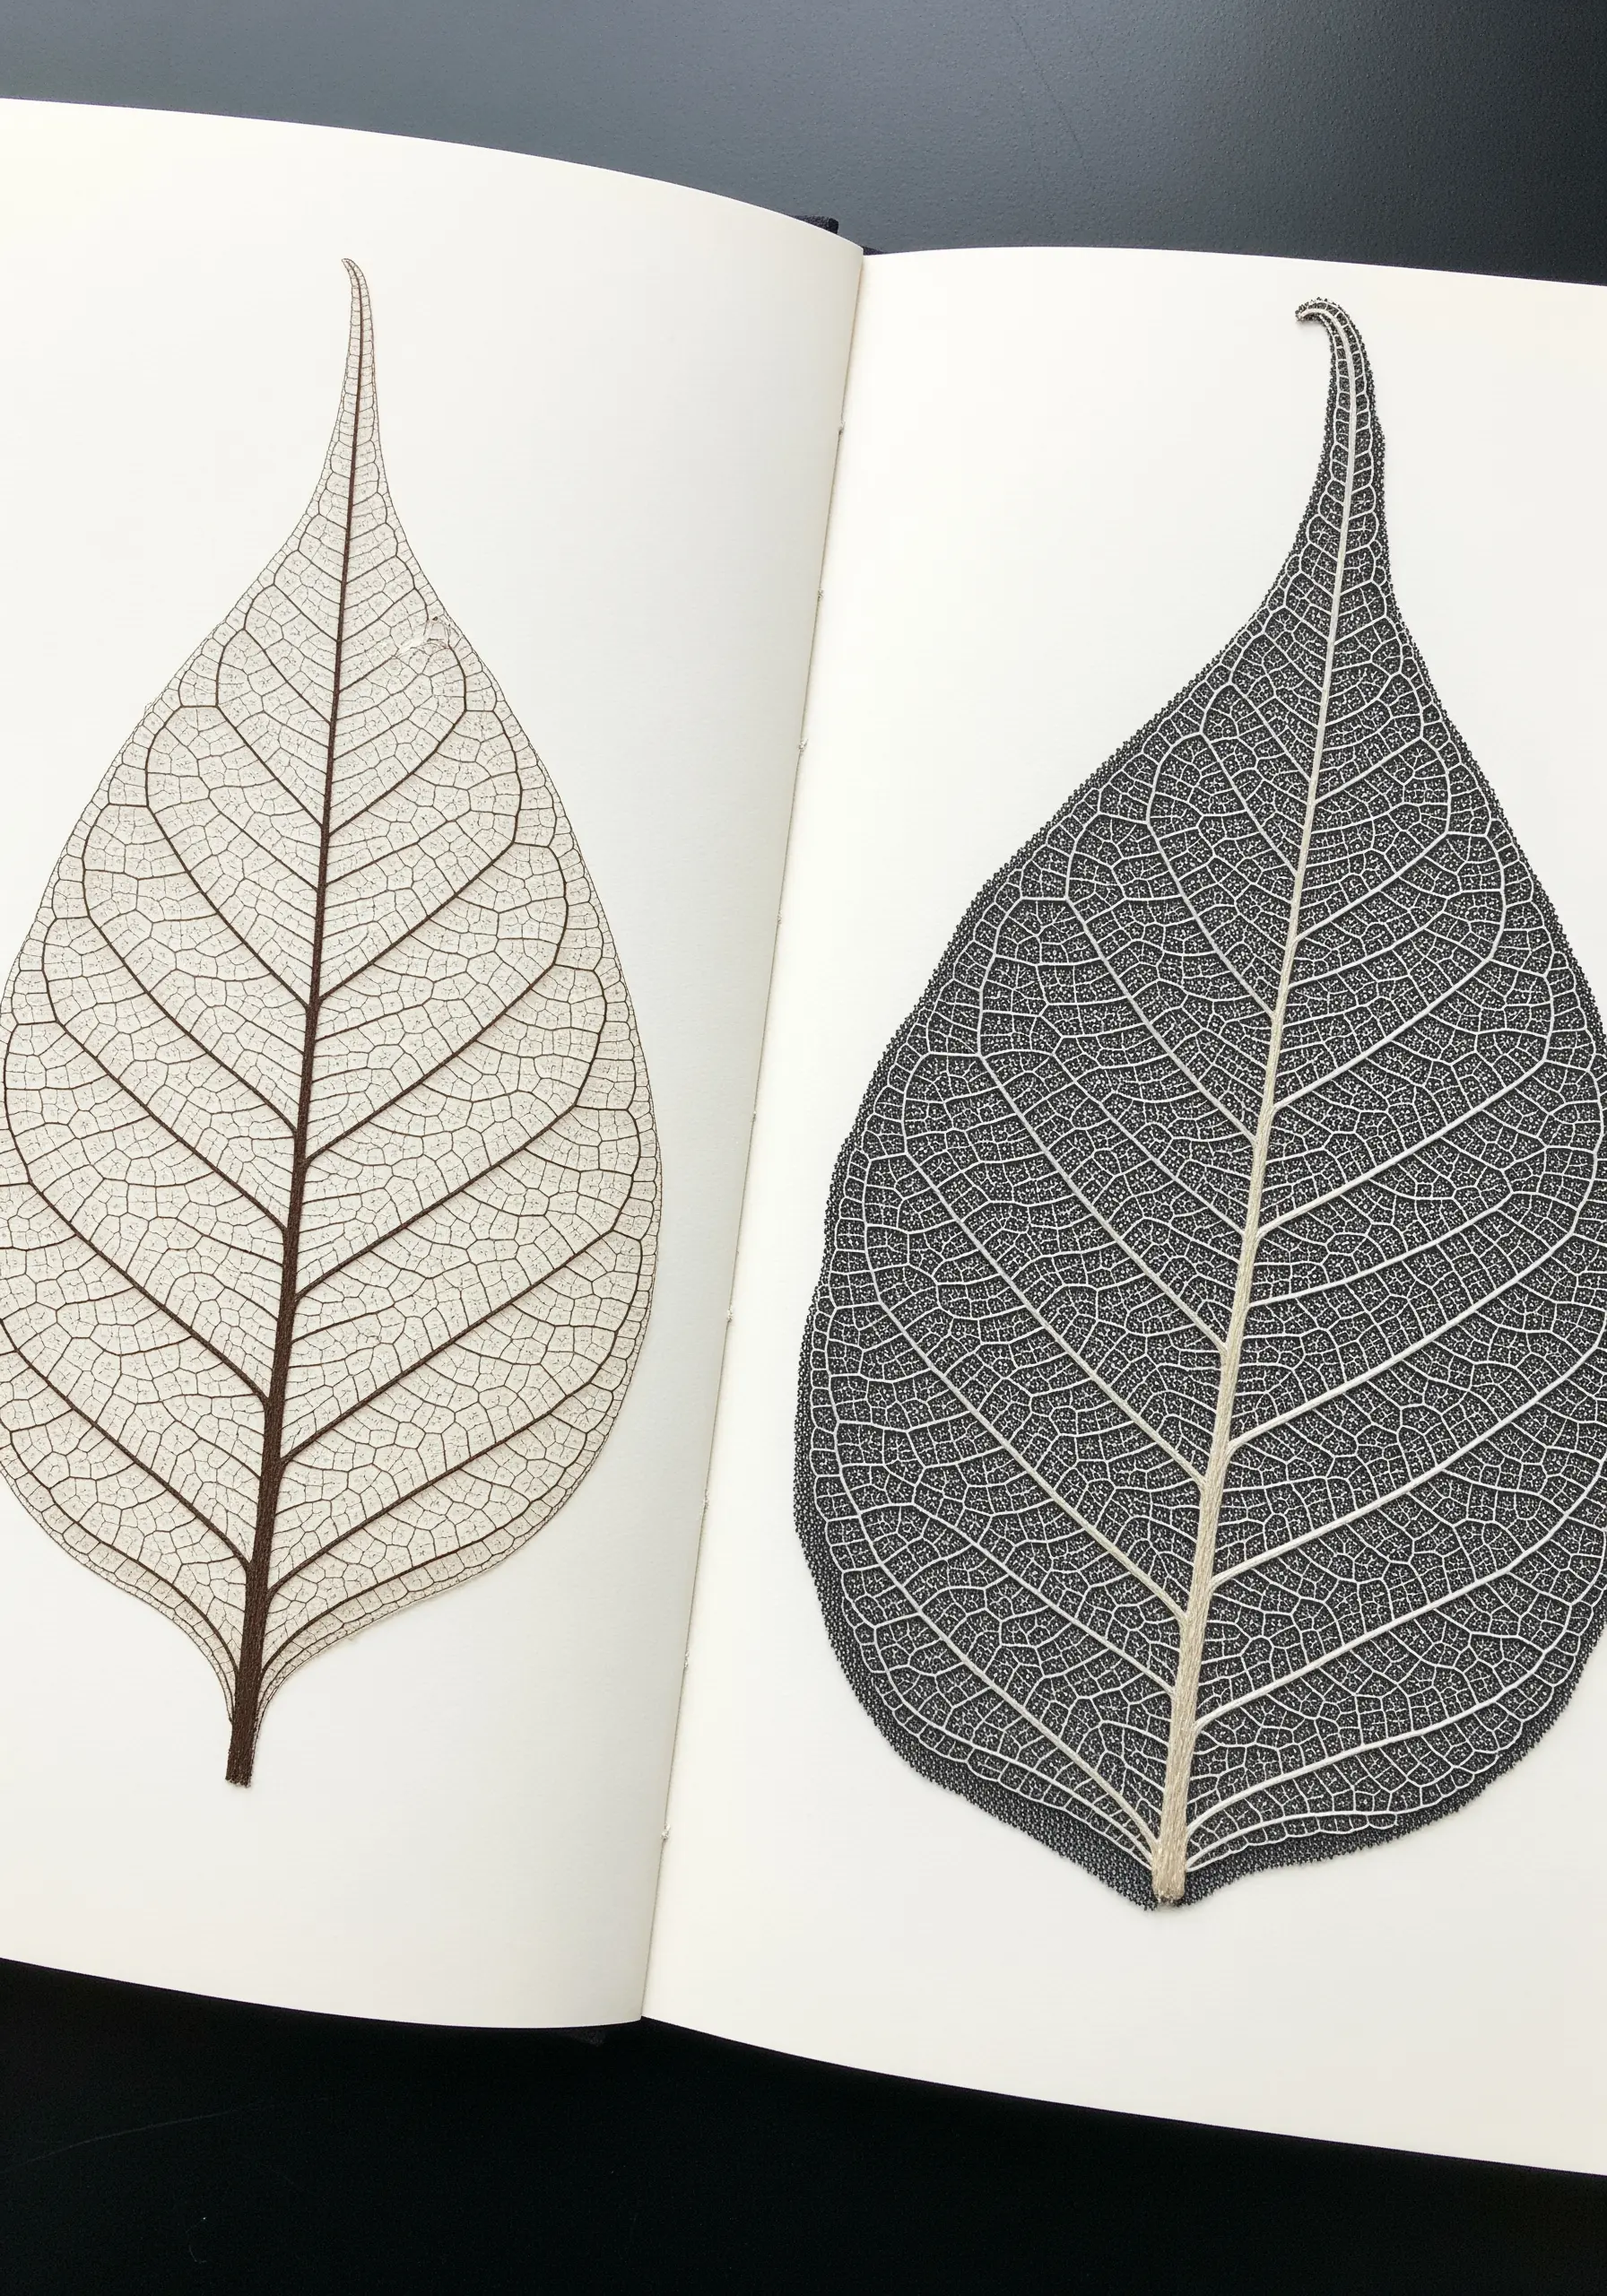
Recreate the fragile beauty of a skeleton leaf by focusing on precise, delicate line work.
Use a single strand of thread and a fine needle to work the intricate network of veins in a simple backstitch or stem stitch.
Choose a high-contrast color combination, like dark thread on a light fabric, to make the delicate lines stand out.
For an even more realistic effect, try stitching on a sheer fabric like organza, which mimics the transparency of a decayed leaf.
18. Create a Sampler of Organic Textures
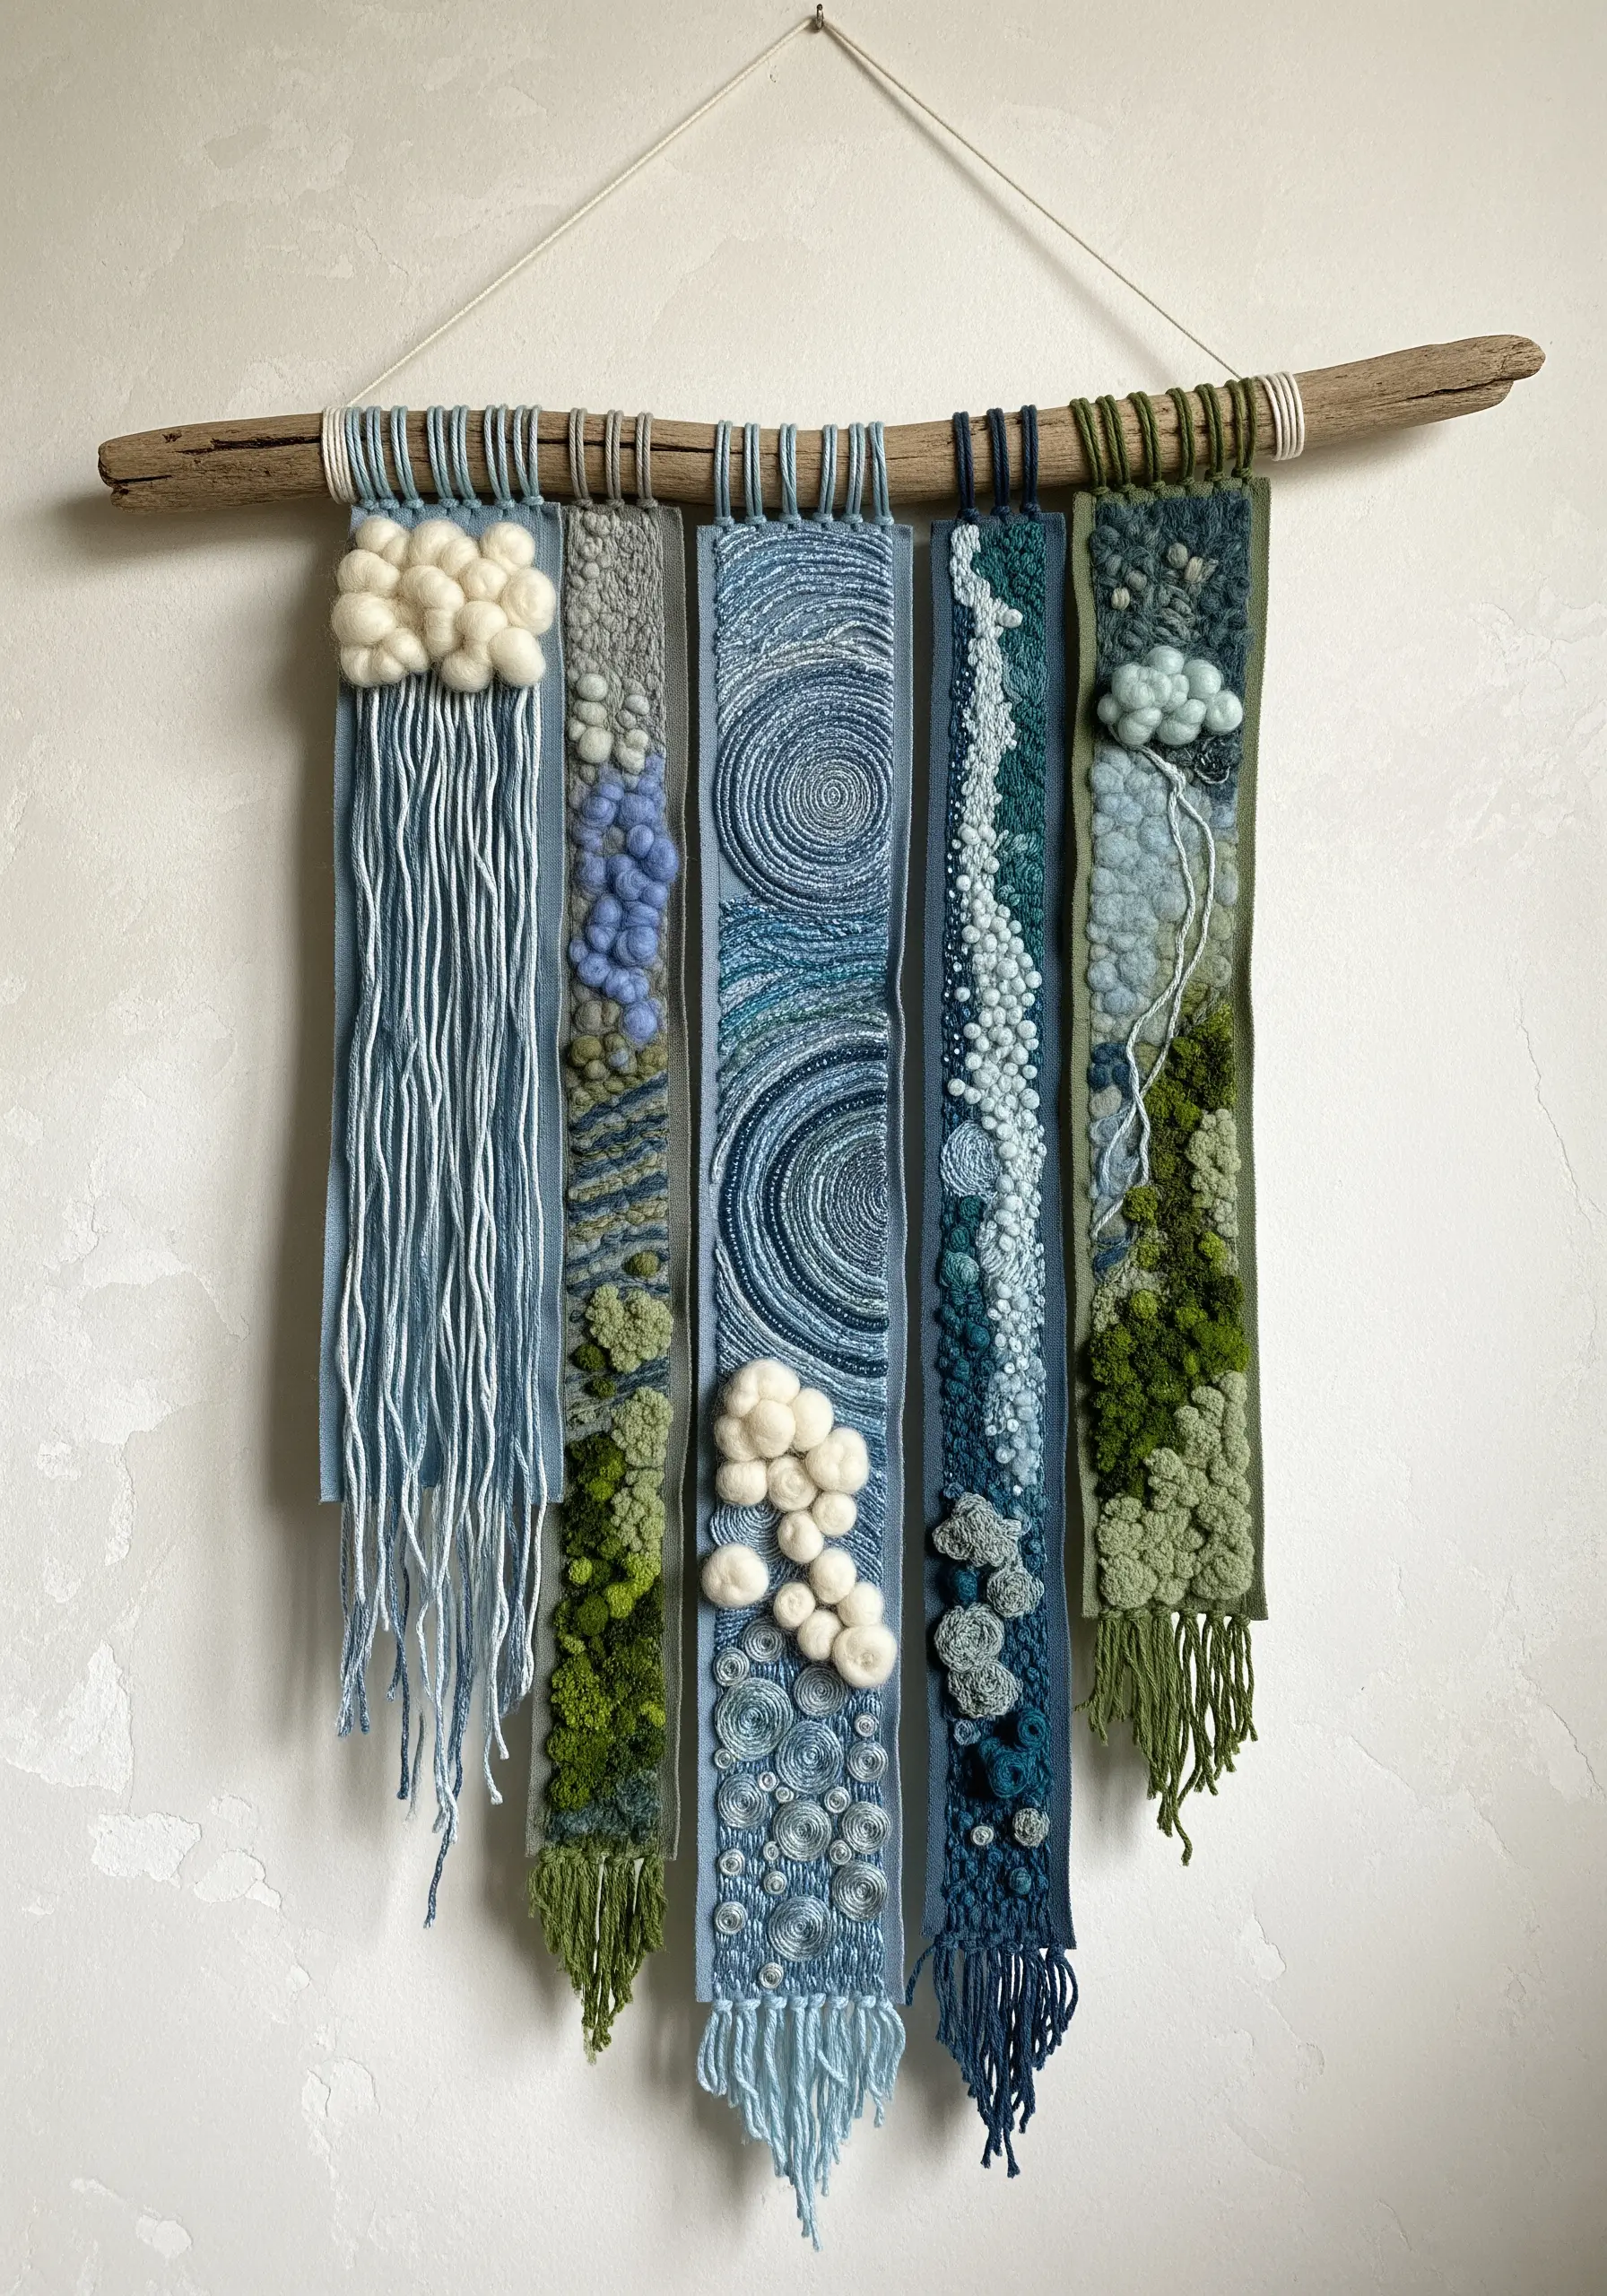
Design a wall hanging that acts as a playground for different textural stitches, free from the constraints of a realistic image.
Dedicate different sections to specific techniques: fluffy Turkey work for clouds or moss, dense French knots for pebbles, and whipped spider web stitches for circular, flower-like forms.
Incorporate different fibers, from fine cotton floss to chunky wool roving and soft yarn, to maximize the tactile variety.
This is the perfect project to use up thread scraps and build your stitch confidence in a creative, expressive way.
19. Make Fireflies Glow with French Knots and Metallics
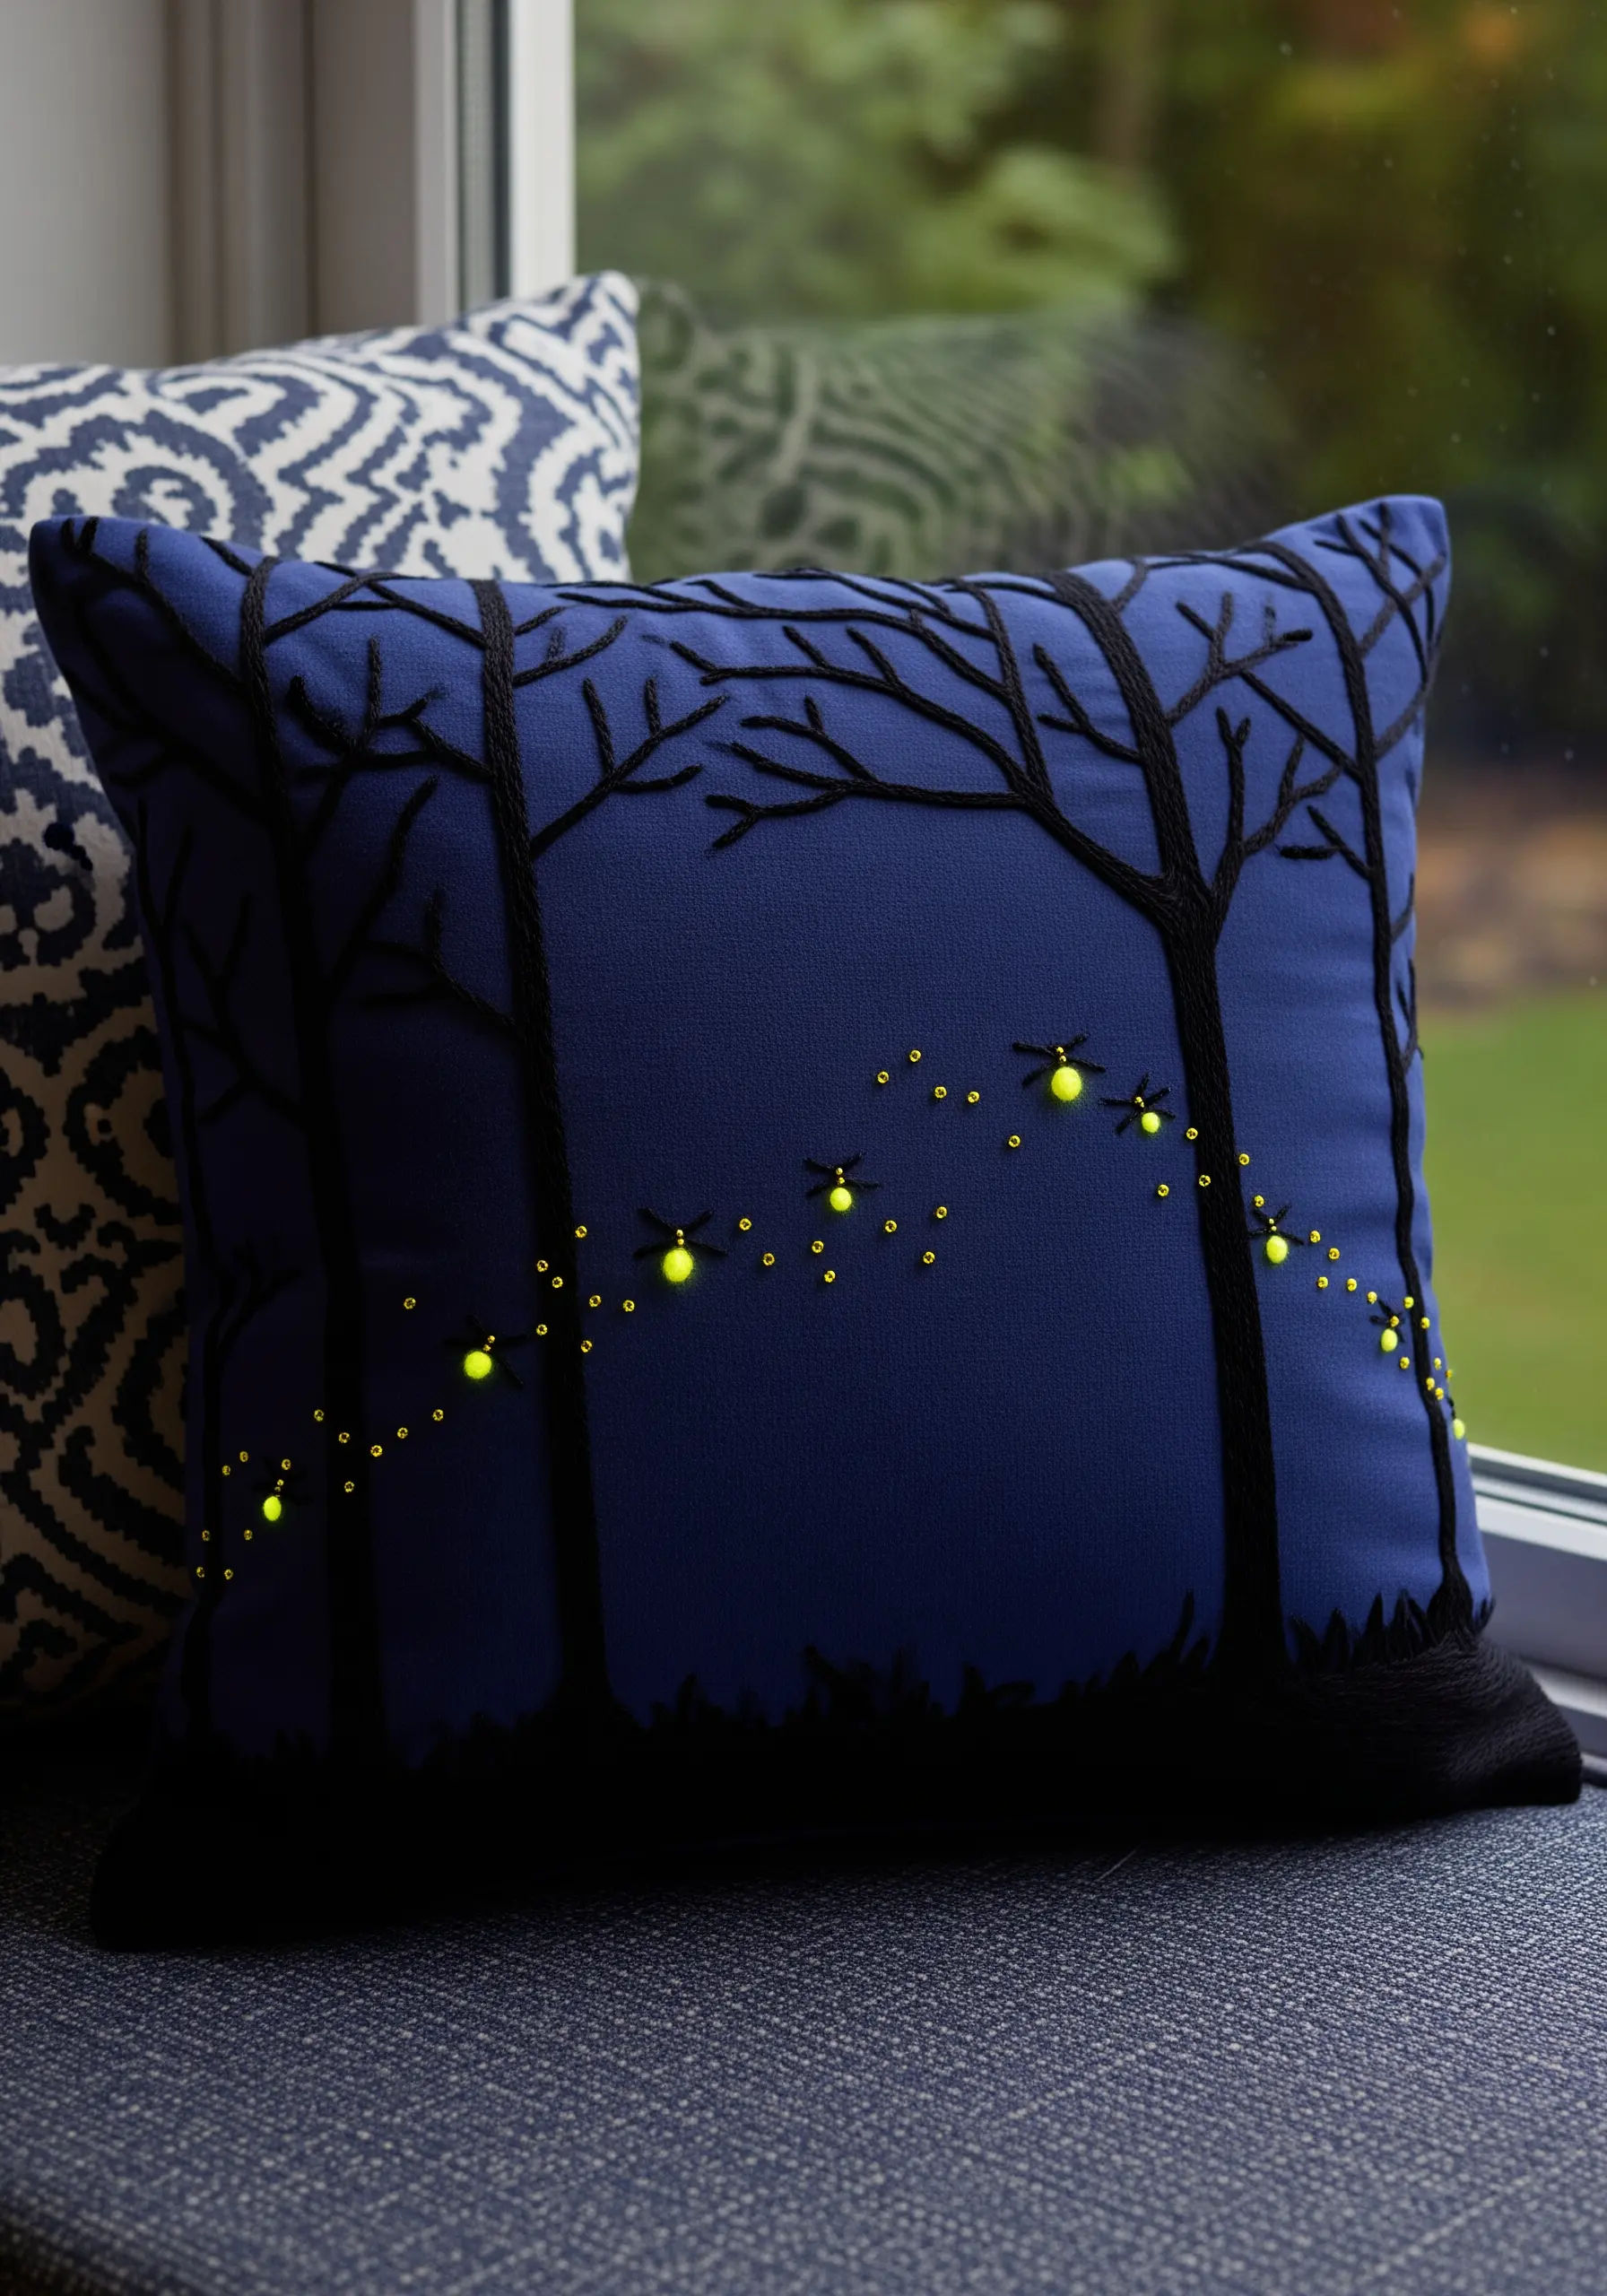
Capture the magic of a summer night with a few cleverly placed stitches.
Use thick, dark yarn couched onto the fabric to create bold tree silhouettes against a deep blue background.
For each firefly, create a single French knot with a vibrant yellow or chartreuse thread.
Then, add a few tiny seed stitches around the knot in a slightly lighter shade to create a ‘glow,’ and finish with two straight stitches in a fine metallic thread for wings.
20. Stitch a Geode with Concentric Rings of Texture
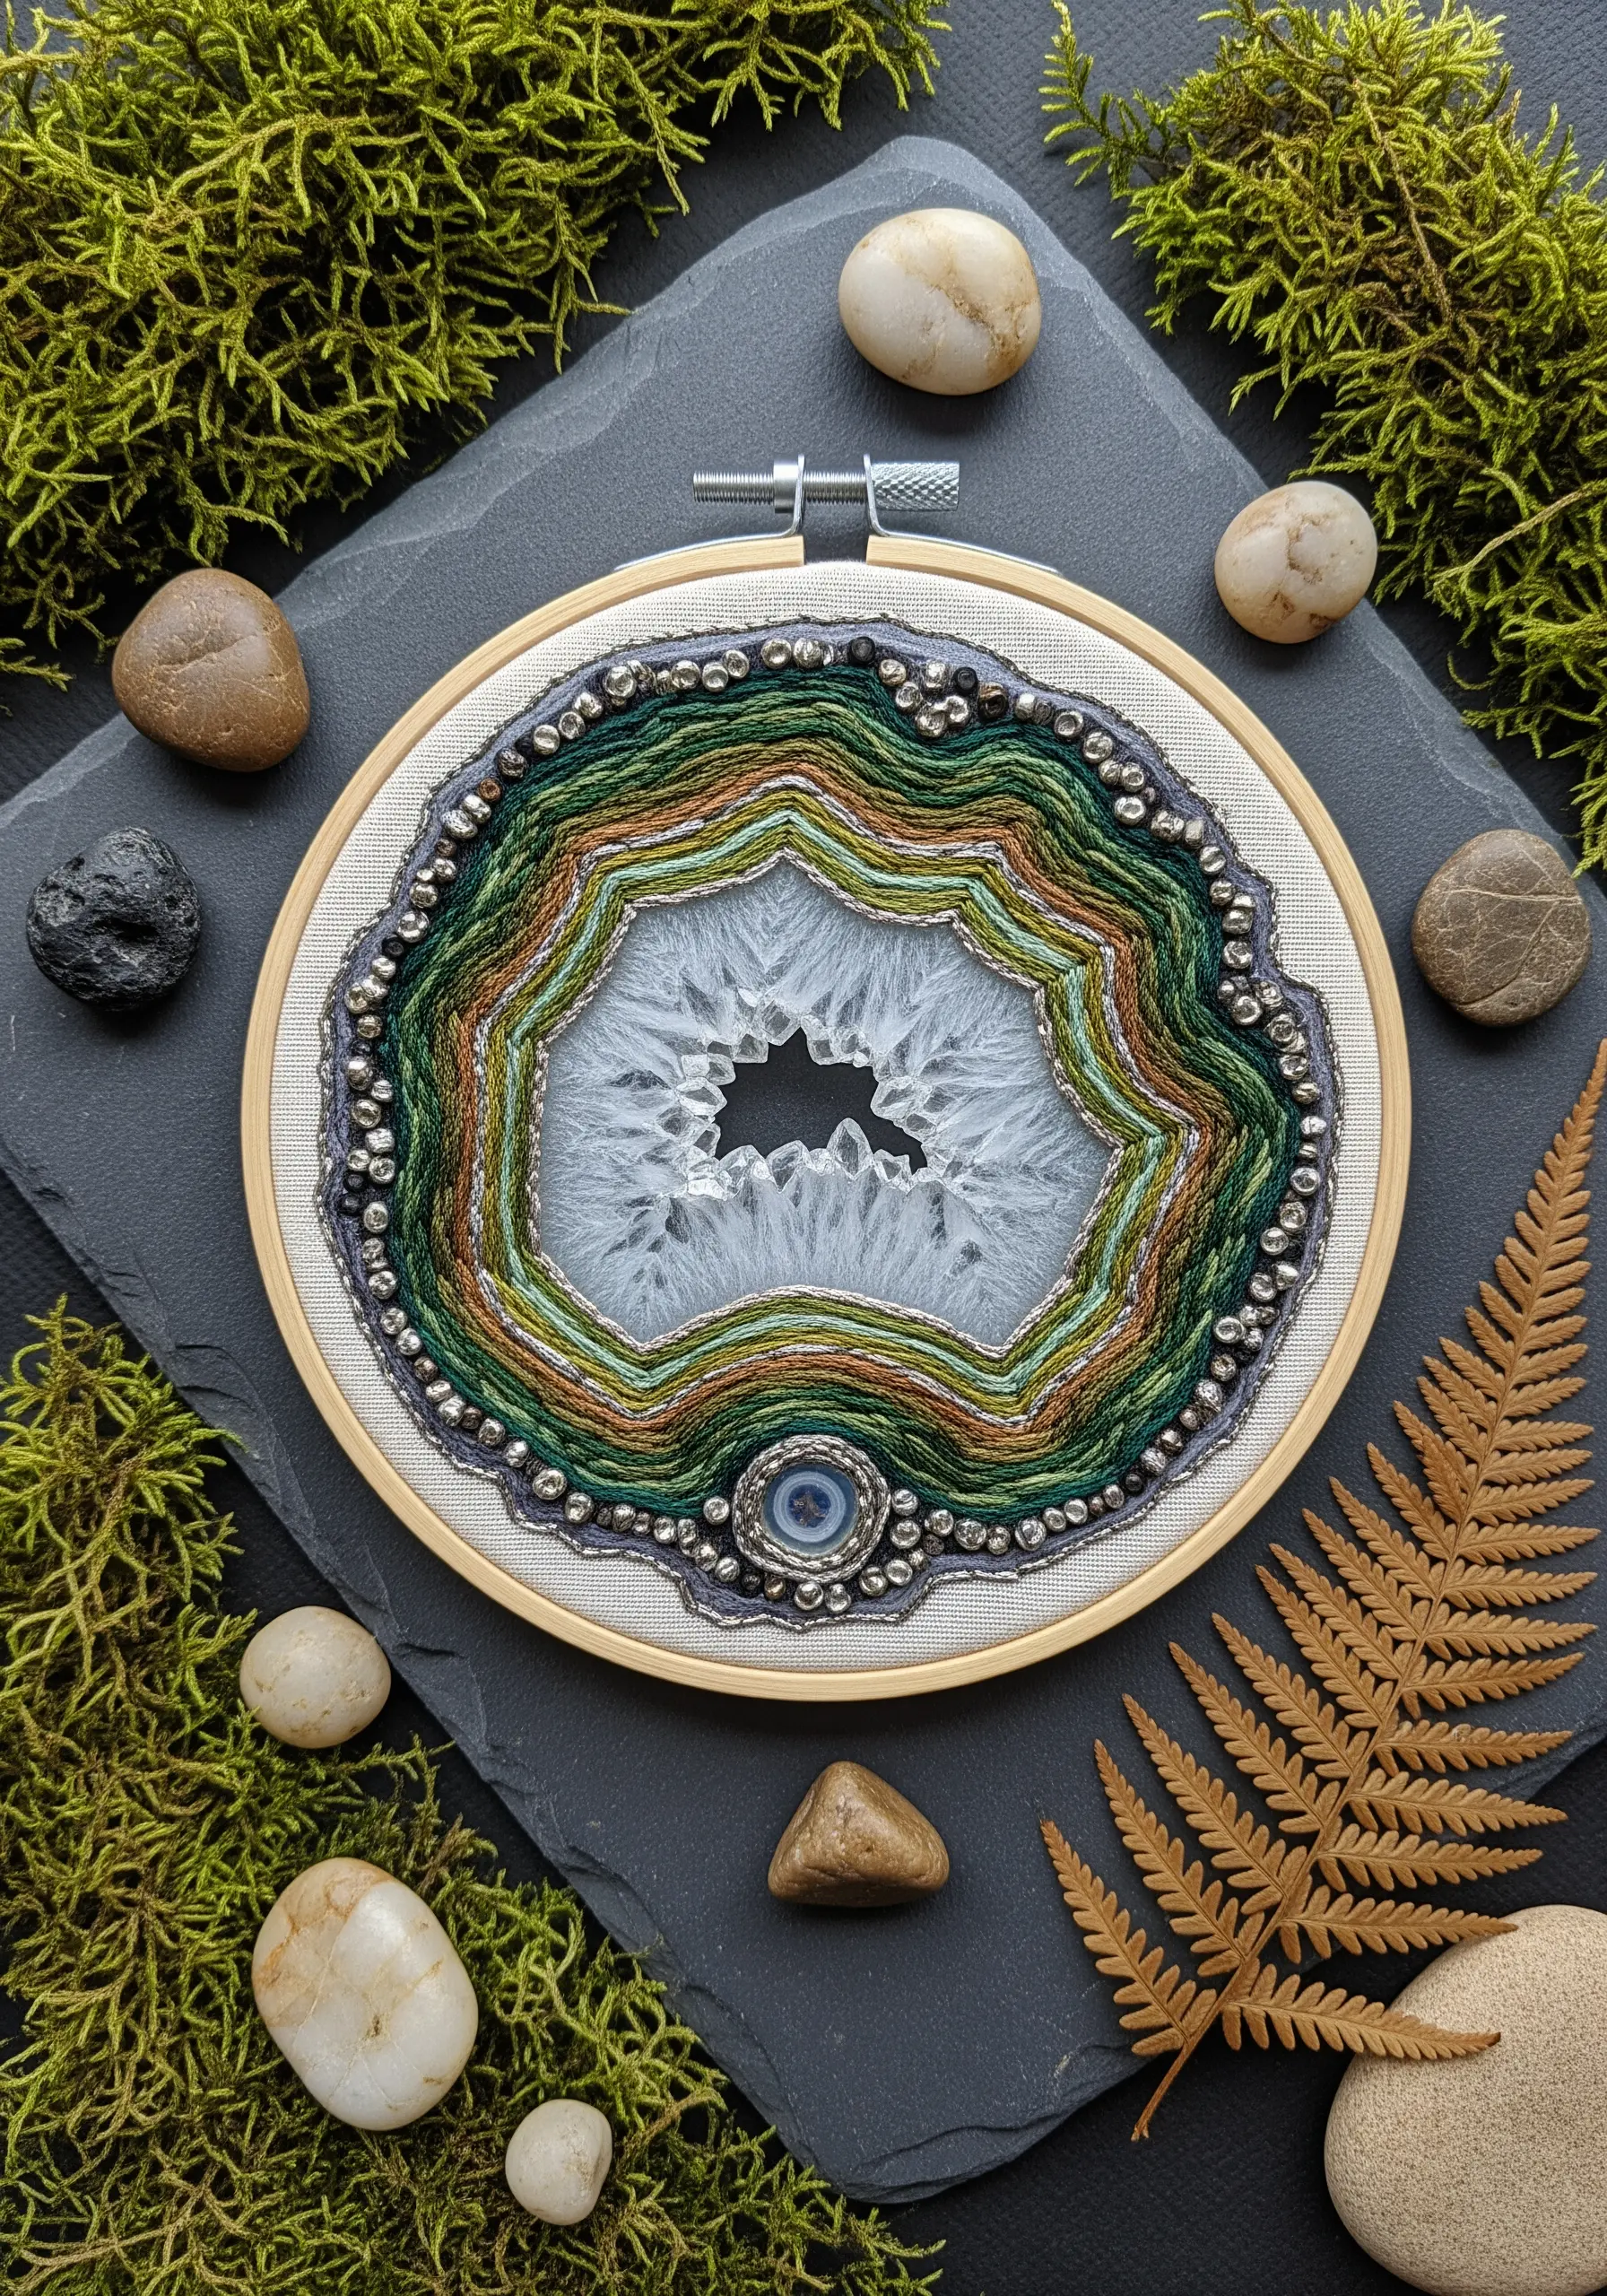
Mimic the crystalline structure of a geode by stitching concentric rings, each with its own unique texture.
Start with a center of radiating straight stitches or soft Turkey work to represent the inner crystals.
Build outwards with rows of different stitches—satin stitch, backstitch, chain stitch—in a gradient of natural colors.
For the outermost ring, couch a row of metallic beads to simulate the rough, mineral crust, adding a final layer of sparkle and dimension.
21. Design a Topographical Map with French Knots
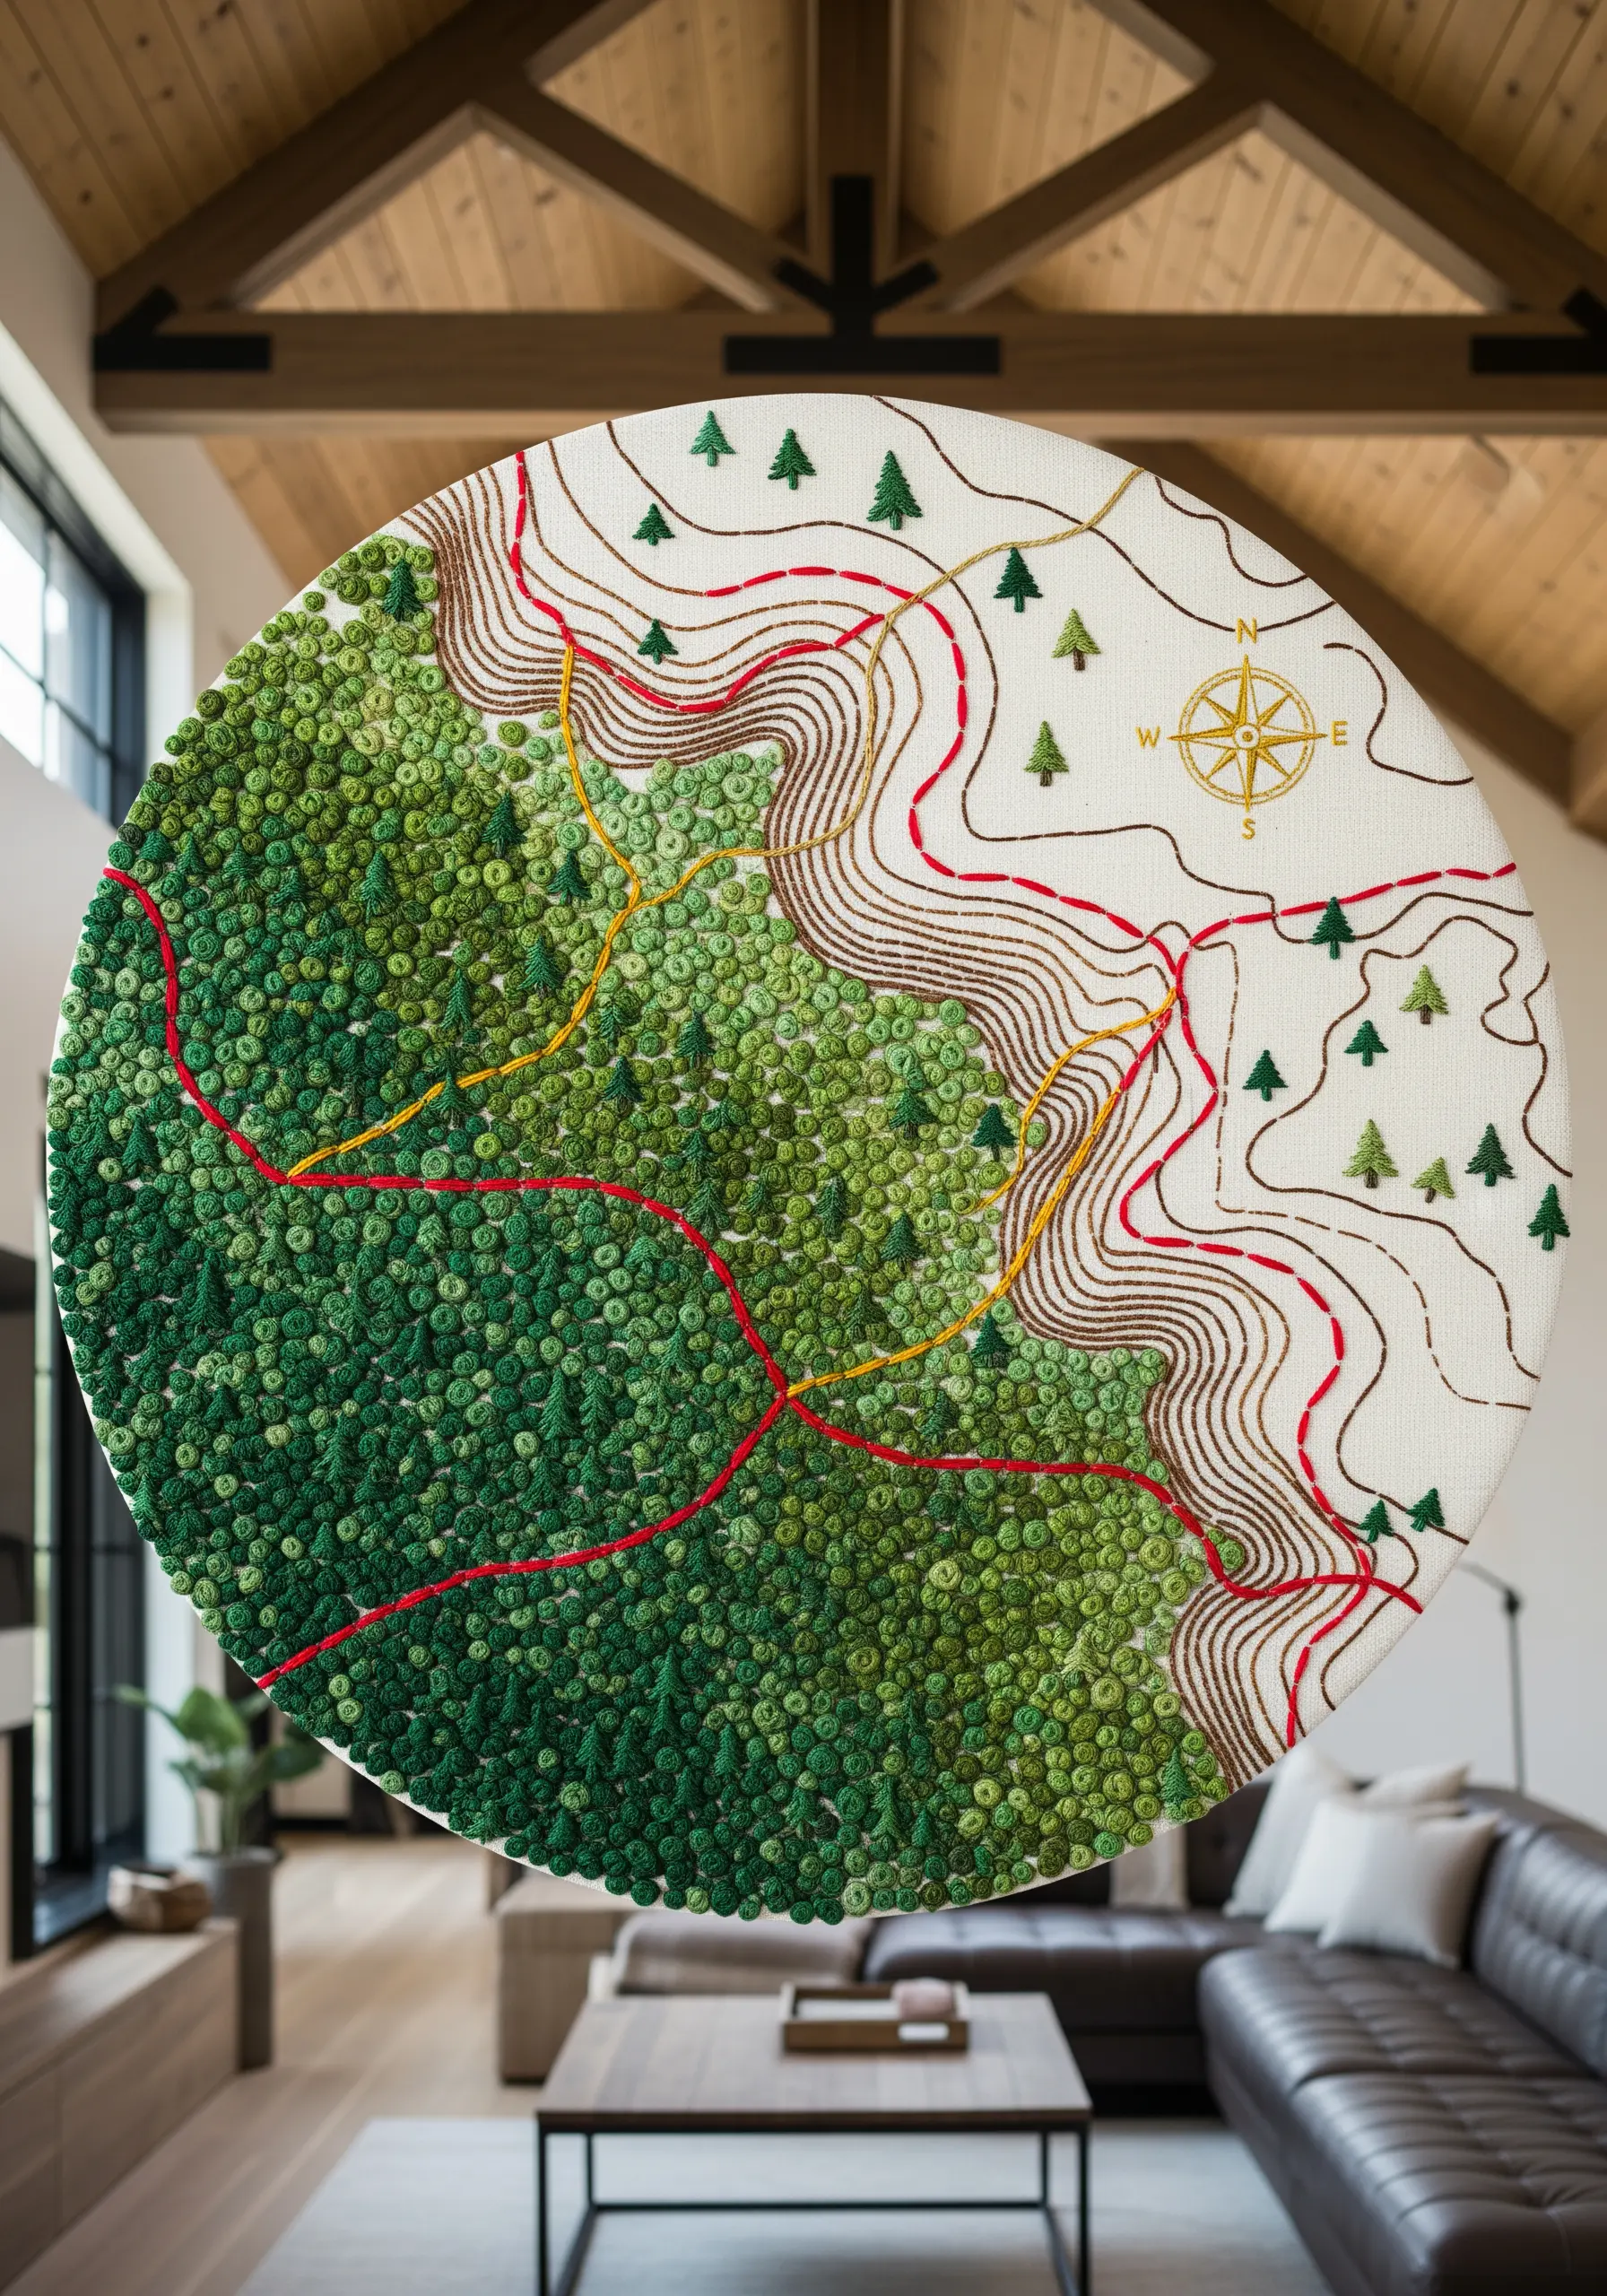
Personalize your art by translating a map of a meaningful location into a textural embroidery piece.
Use dense French knots in varying shades of green to represent forests and fields, creating a lush, three-dimensional surface.
Stitch the contour lines, roads, and trails using a simple backstitch in a contrasting color like brown or red.
This technique transforms abstract data into a deeply personal and tactile landscape that tells a story.
22. Embroider Pussy Willows with 3D Appliqué
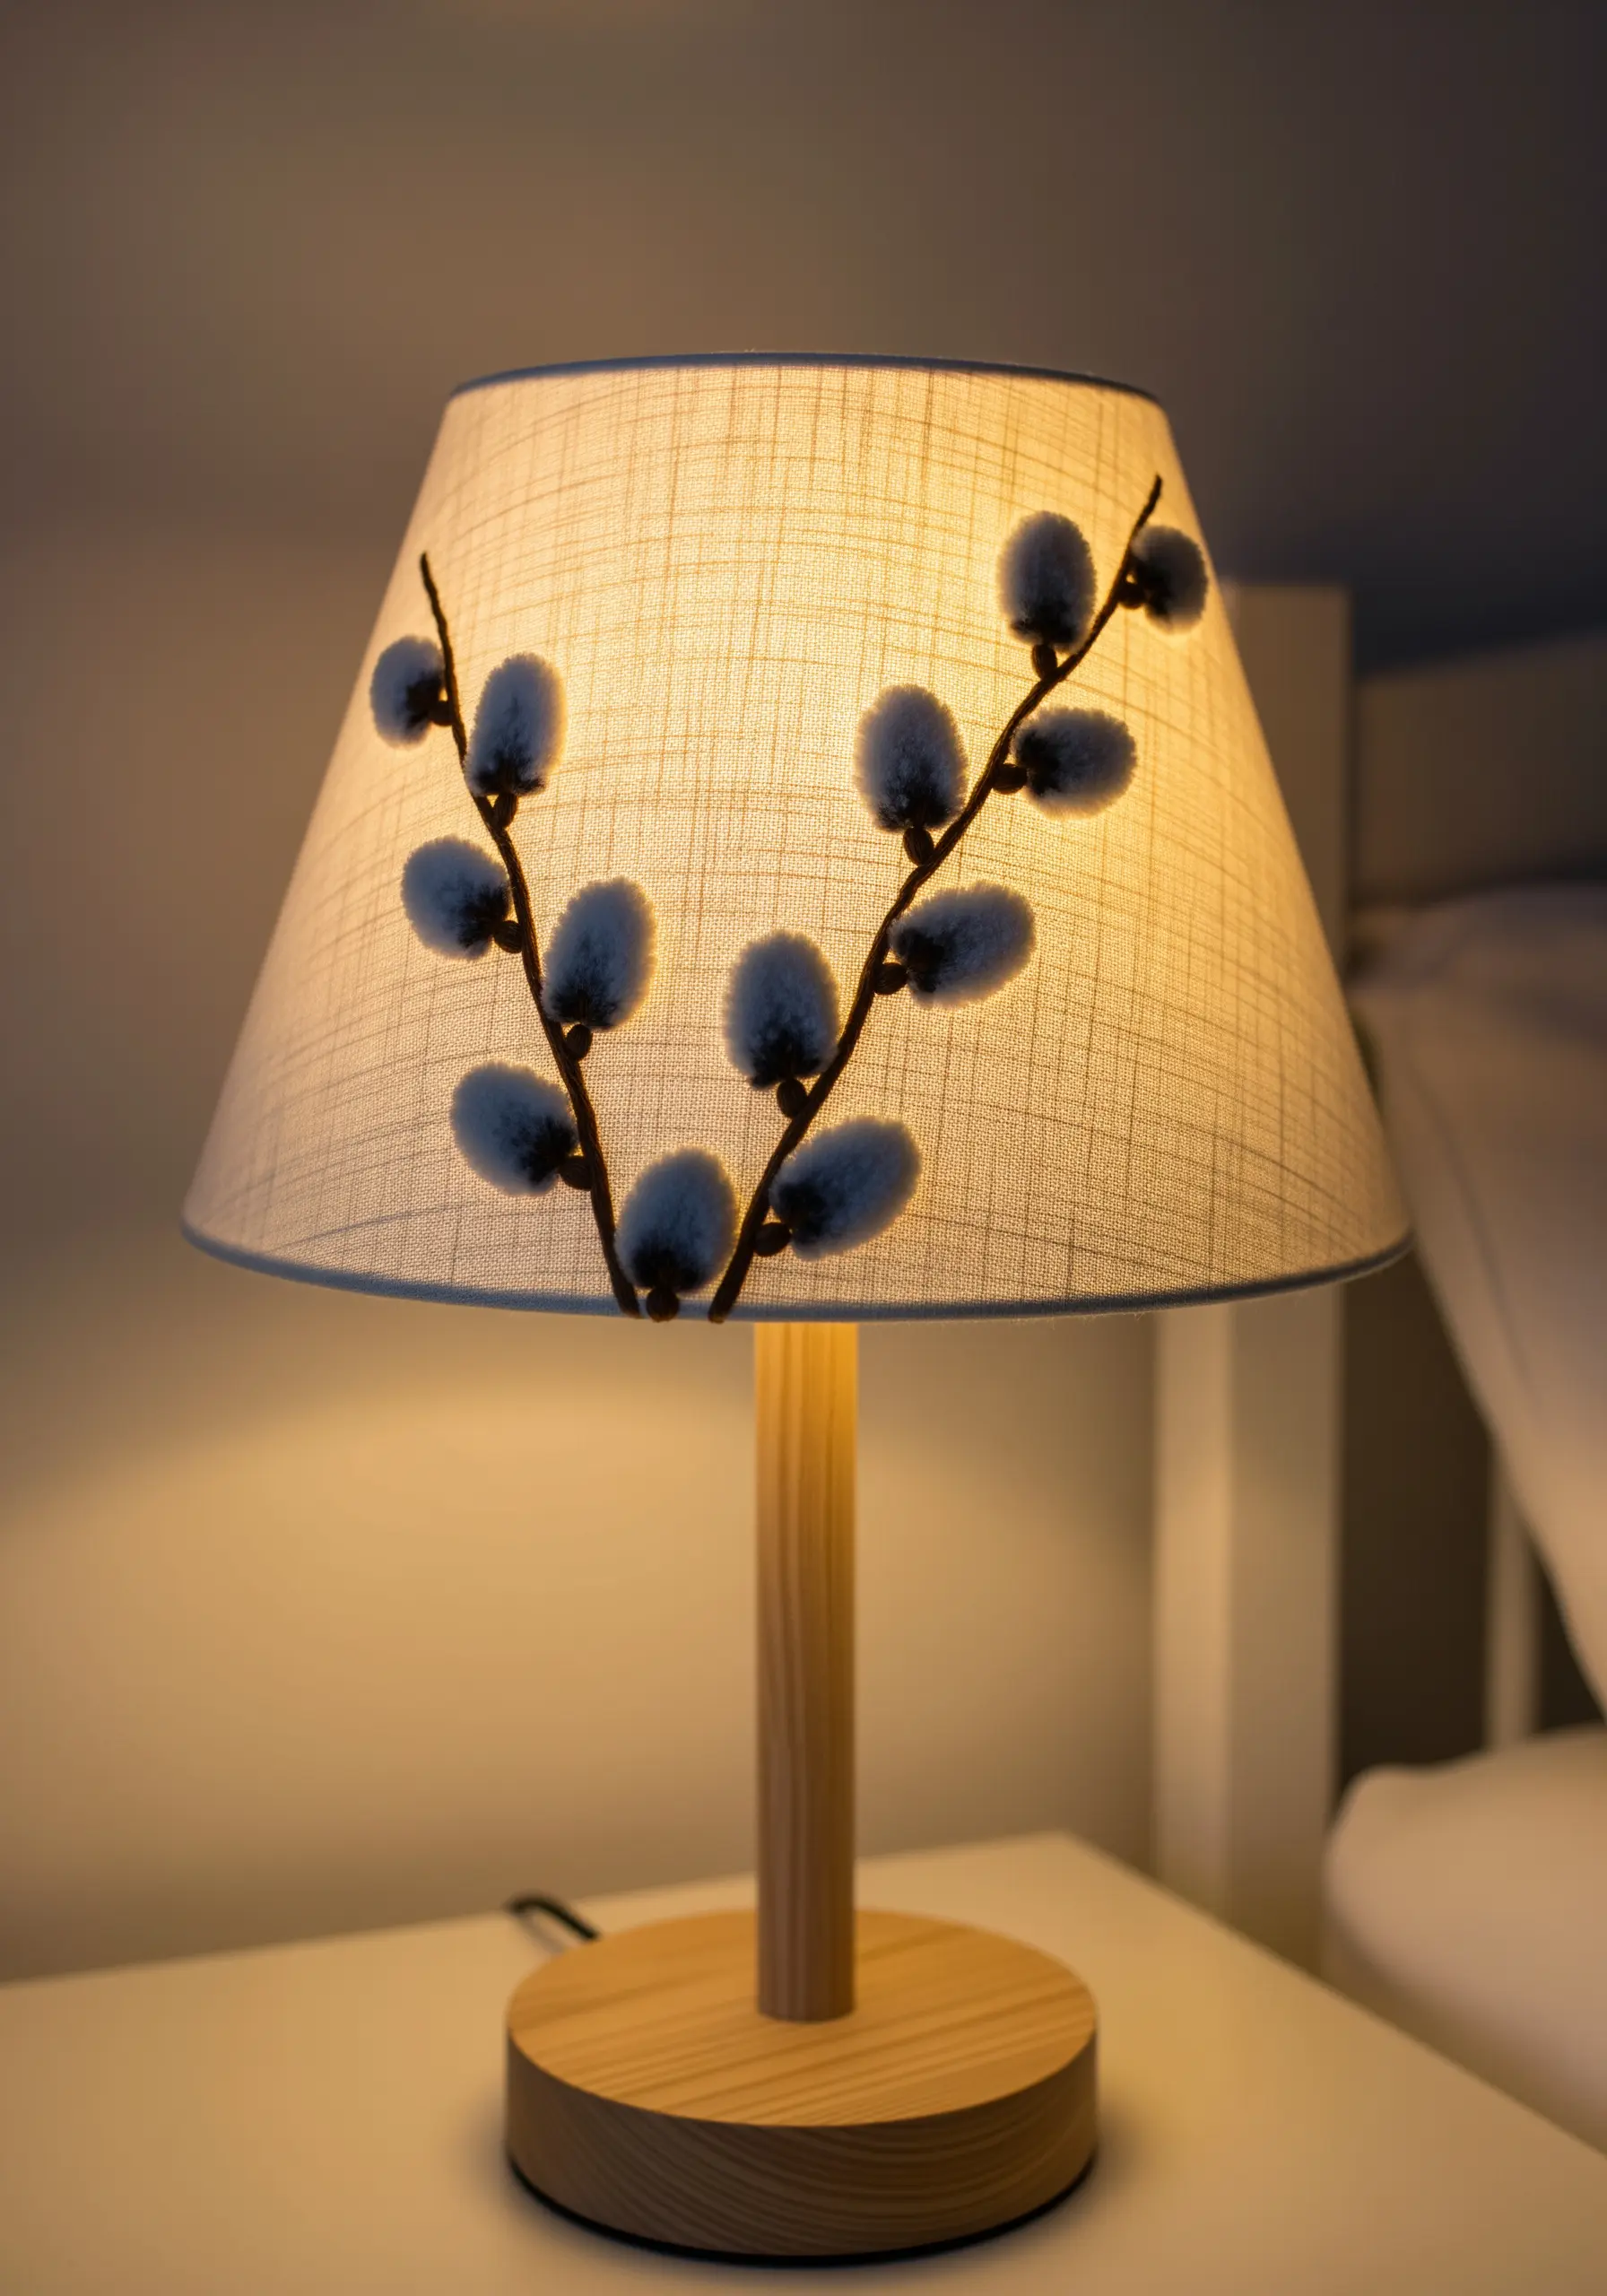
Add a soft, fuzzy texture to your work by creating dimensional pussy willow catkins from plush fabric.
Cut small ovals from grey felt, velvet, or chenille fabric and use a single tacking stitch to attach each one to your base fabric.
This simple appliqué technique instantly creates a raised, touchable effect that is difficult to achieve with thread alone.
Connect the catkins with a simple stem stitch in a contrasting dark brown thread to complete the branches.
23. Practice Advanced Stitches on Small Coasters
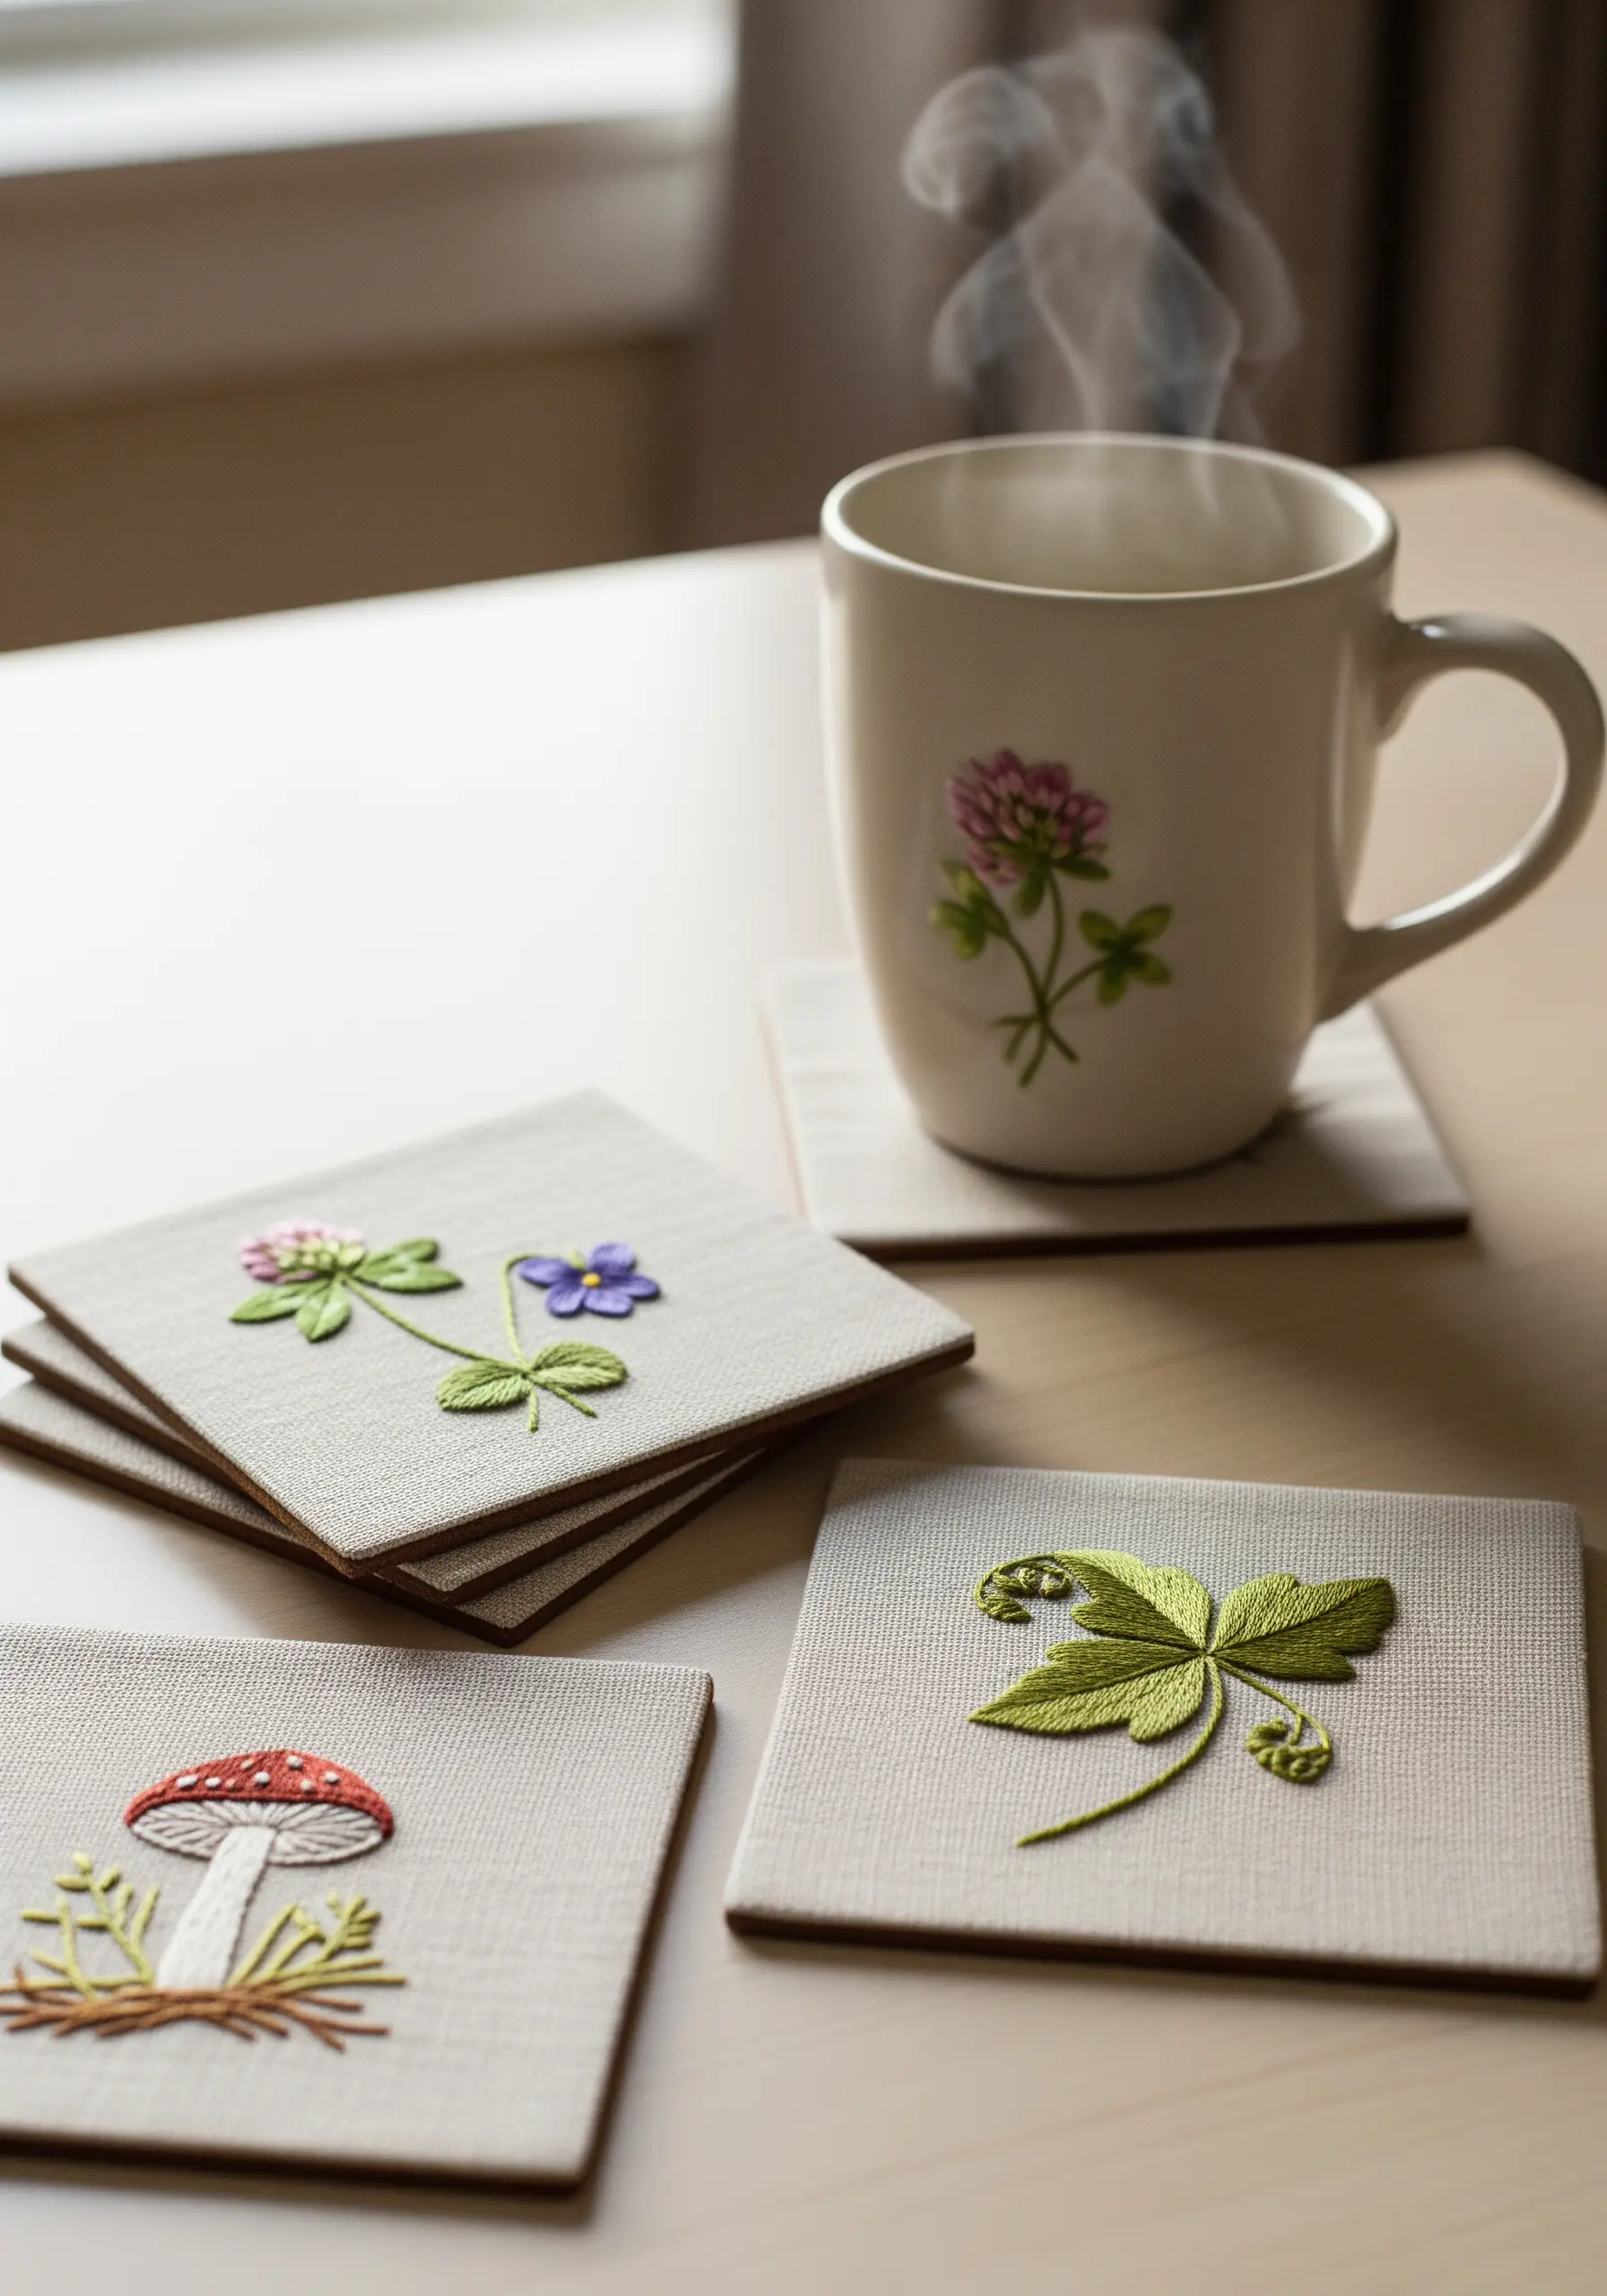
Master complex stitches by practicing them on small, functional items like coasters.
These low-commitment projects are perfect for perfecting your padded satin stitch on a mushroom, your long-and-short stitch on a clover, or your fly stitch on a fern.
Because the motifs are small, you can focus on quality and precision without feeling overwhelmed by a large composition.
Mounting the finished embroidery on cork or wood blanks turns your practice swatches into beautiful, usable art.
24. Sculpt a Mossy Bowl with Needle Felting and Knots
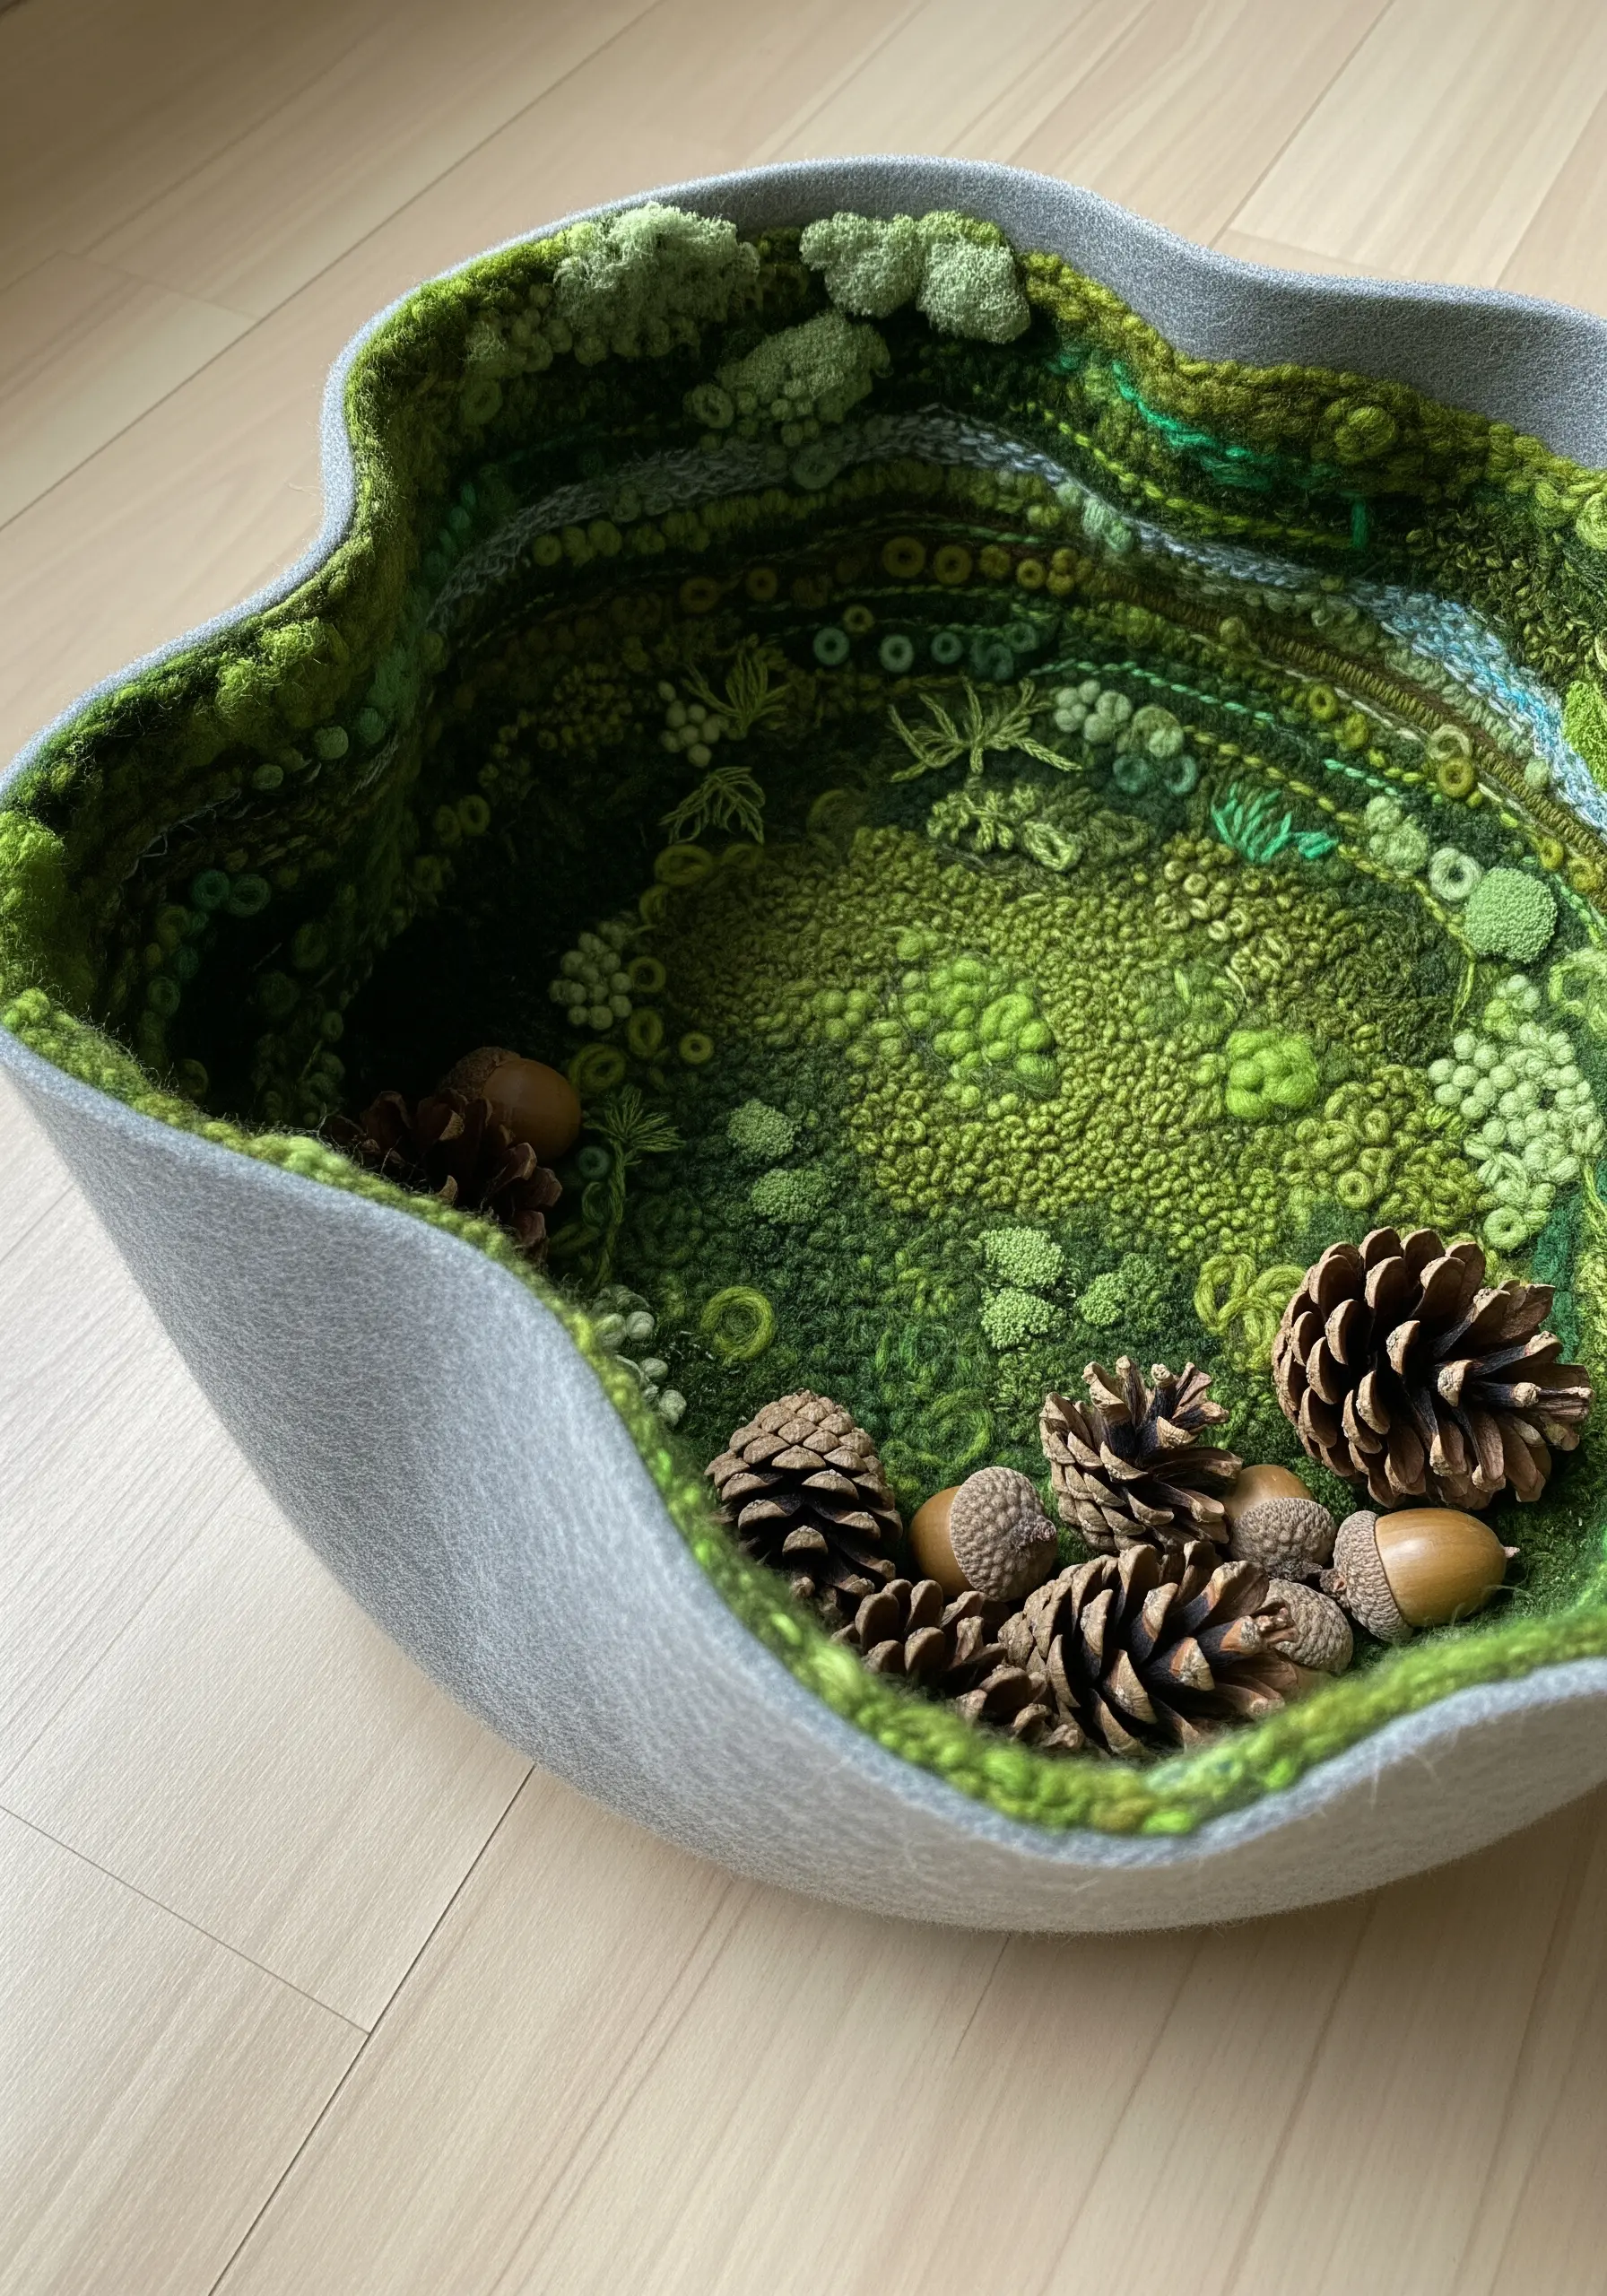
Combine embroidery with needle felting to create a truly sculptural, three-dimensional piece of art.
Start with a pre-made felt bowl or create your own shape using needle felting techniques.
Build up a rich, mossy landscape inside the bowl by adding layers of French knots, bullion knots, and Turkey work in various shades of green.
This mixed-media approach allows you to create depth and texture that goes beyond the flat surface of traditional hoop art.
25. Create Atmospheric Rain with Suspended Threads
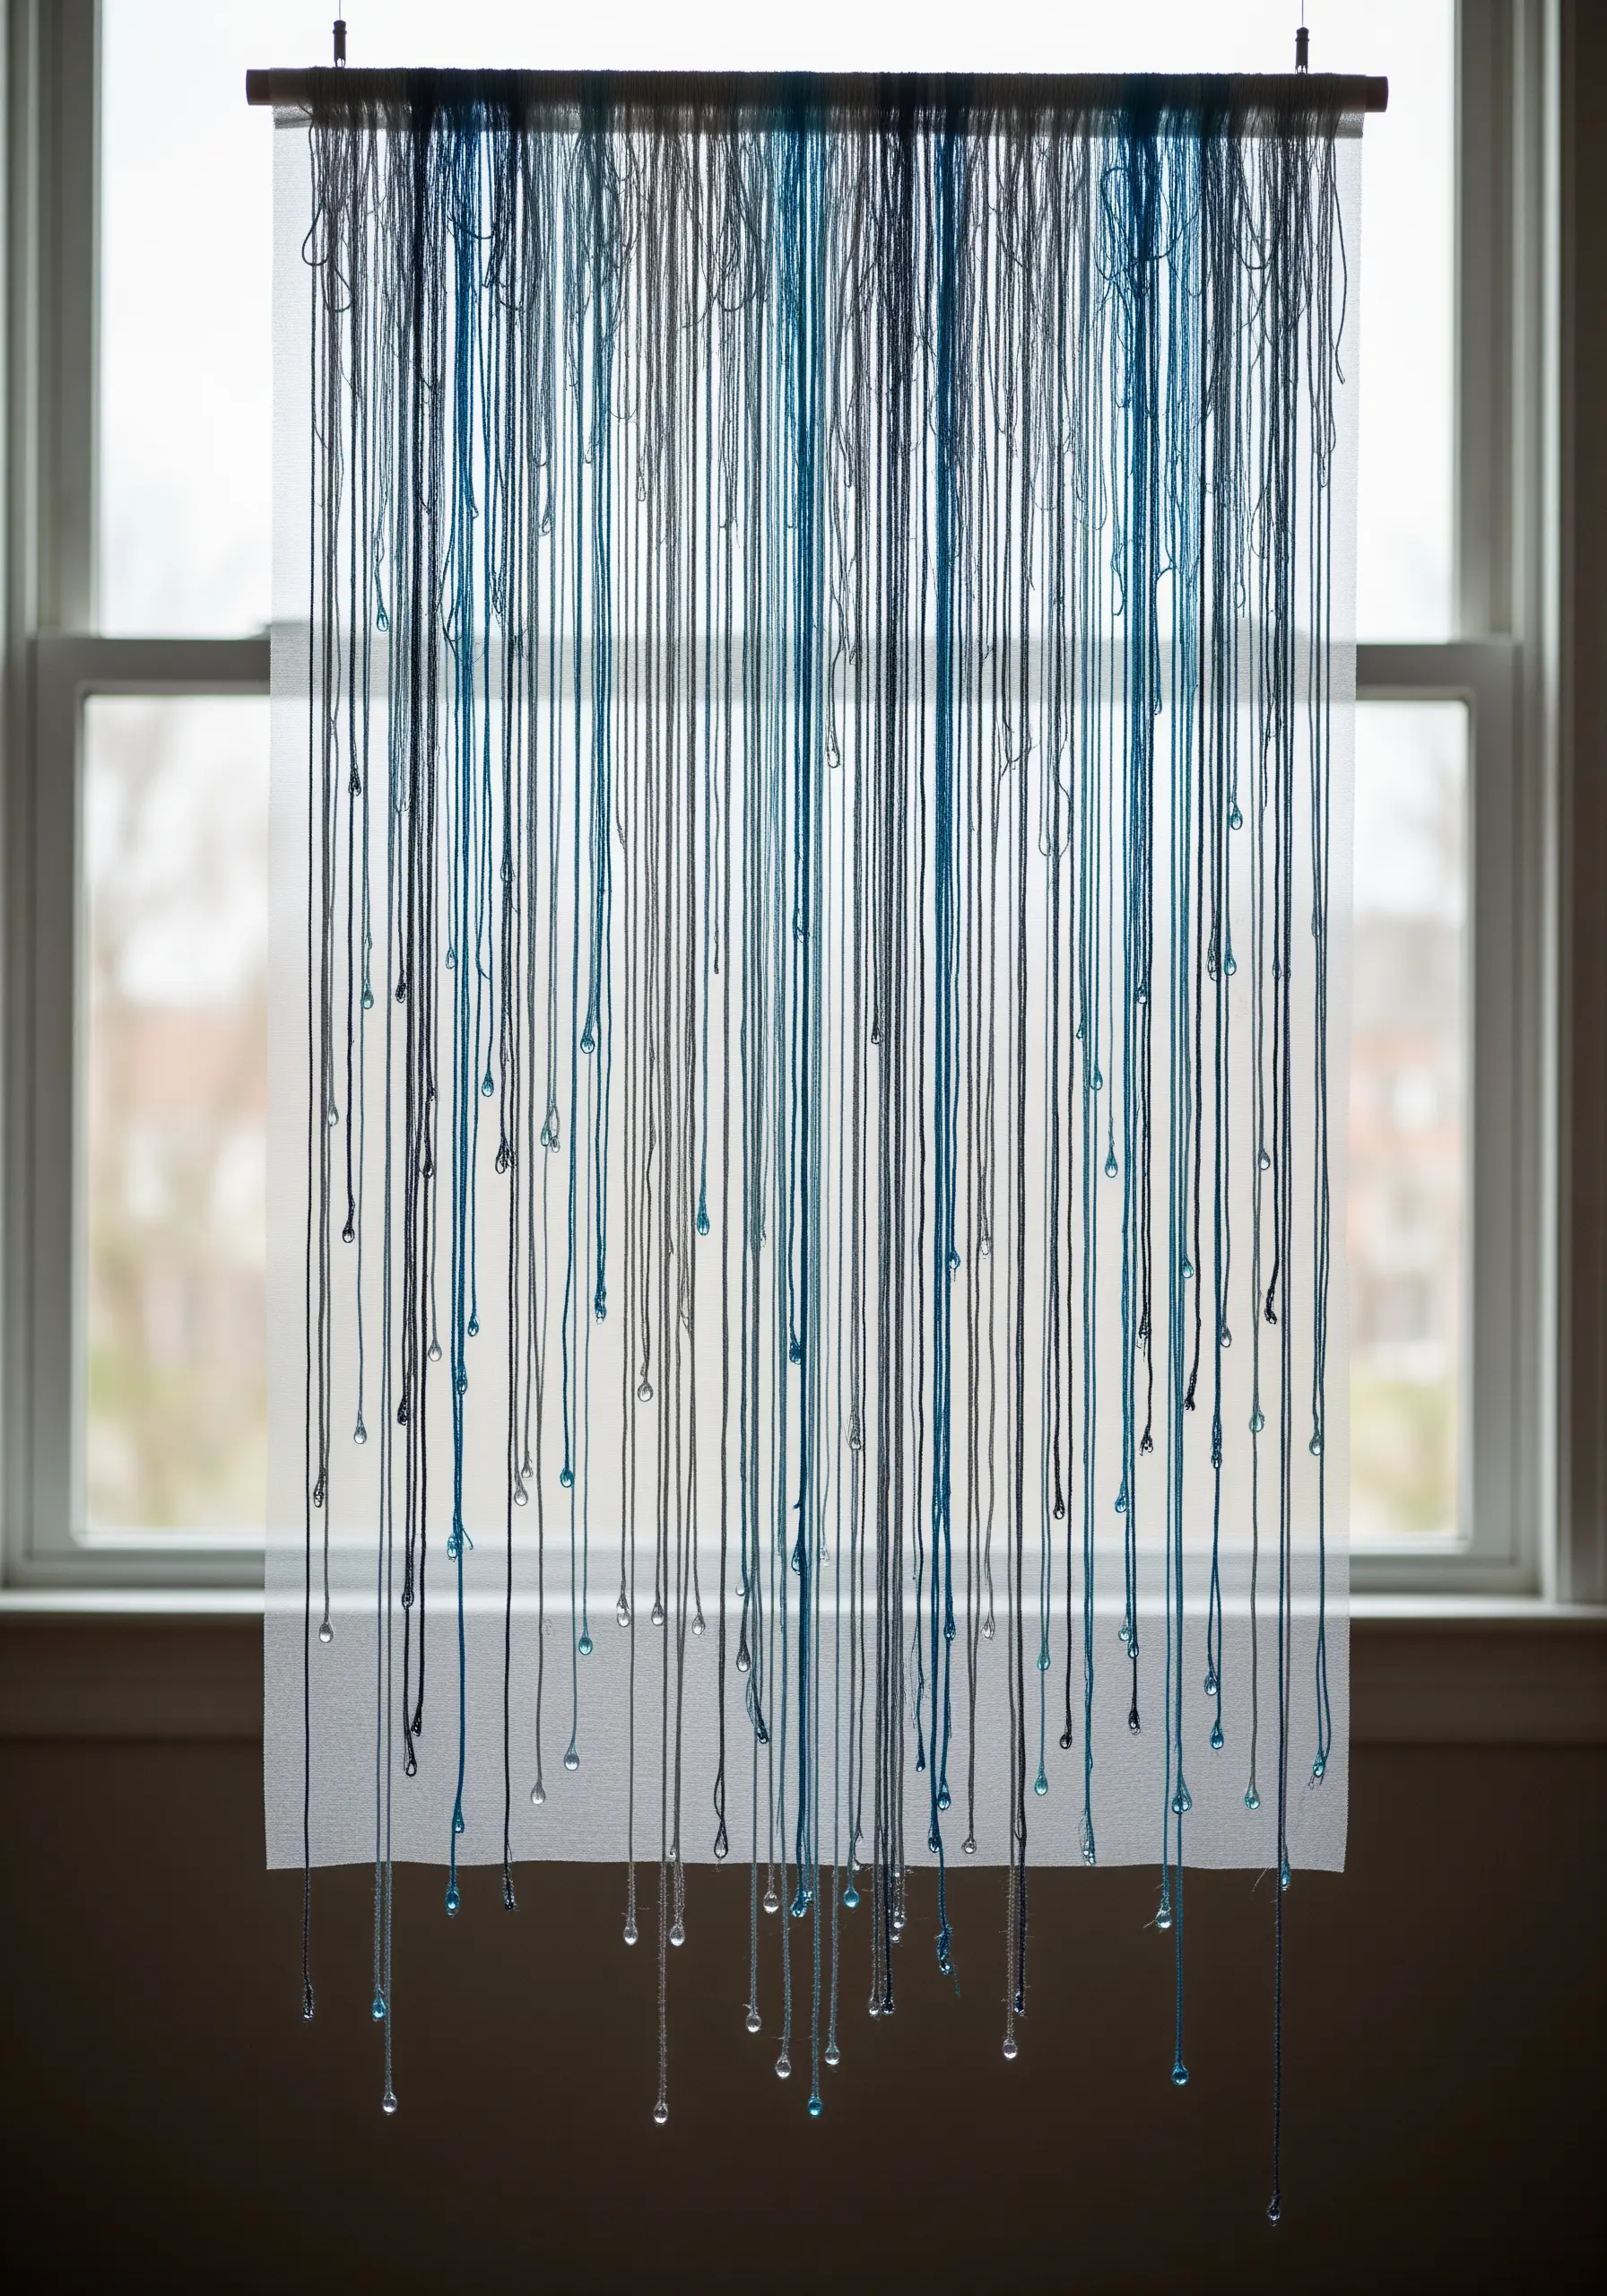
Evoke the feeling of rainfall with a minimalist wall hanging that plays with gravity and light.
Stitch a dense top border on a strip of fabric, but instead of cutting your threads, let them hang down freely in long, straight lines.
Use a color gradient from grey to blue to create a moody, atmospheric effect.
For a final touch, add a single glass bead or a dab of clear fabric glue to the end of each thread to represent a perfect, glistening raindrop.
26. Embellish Fabric ‘Stones’ with Delicate Lichen
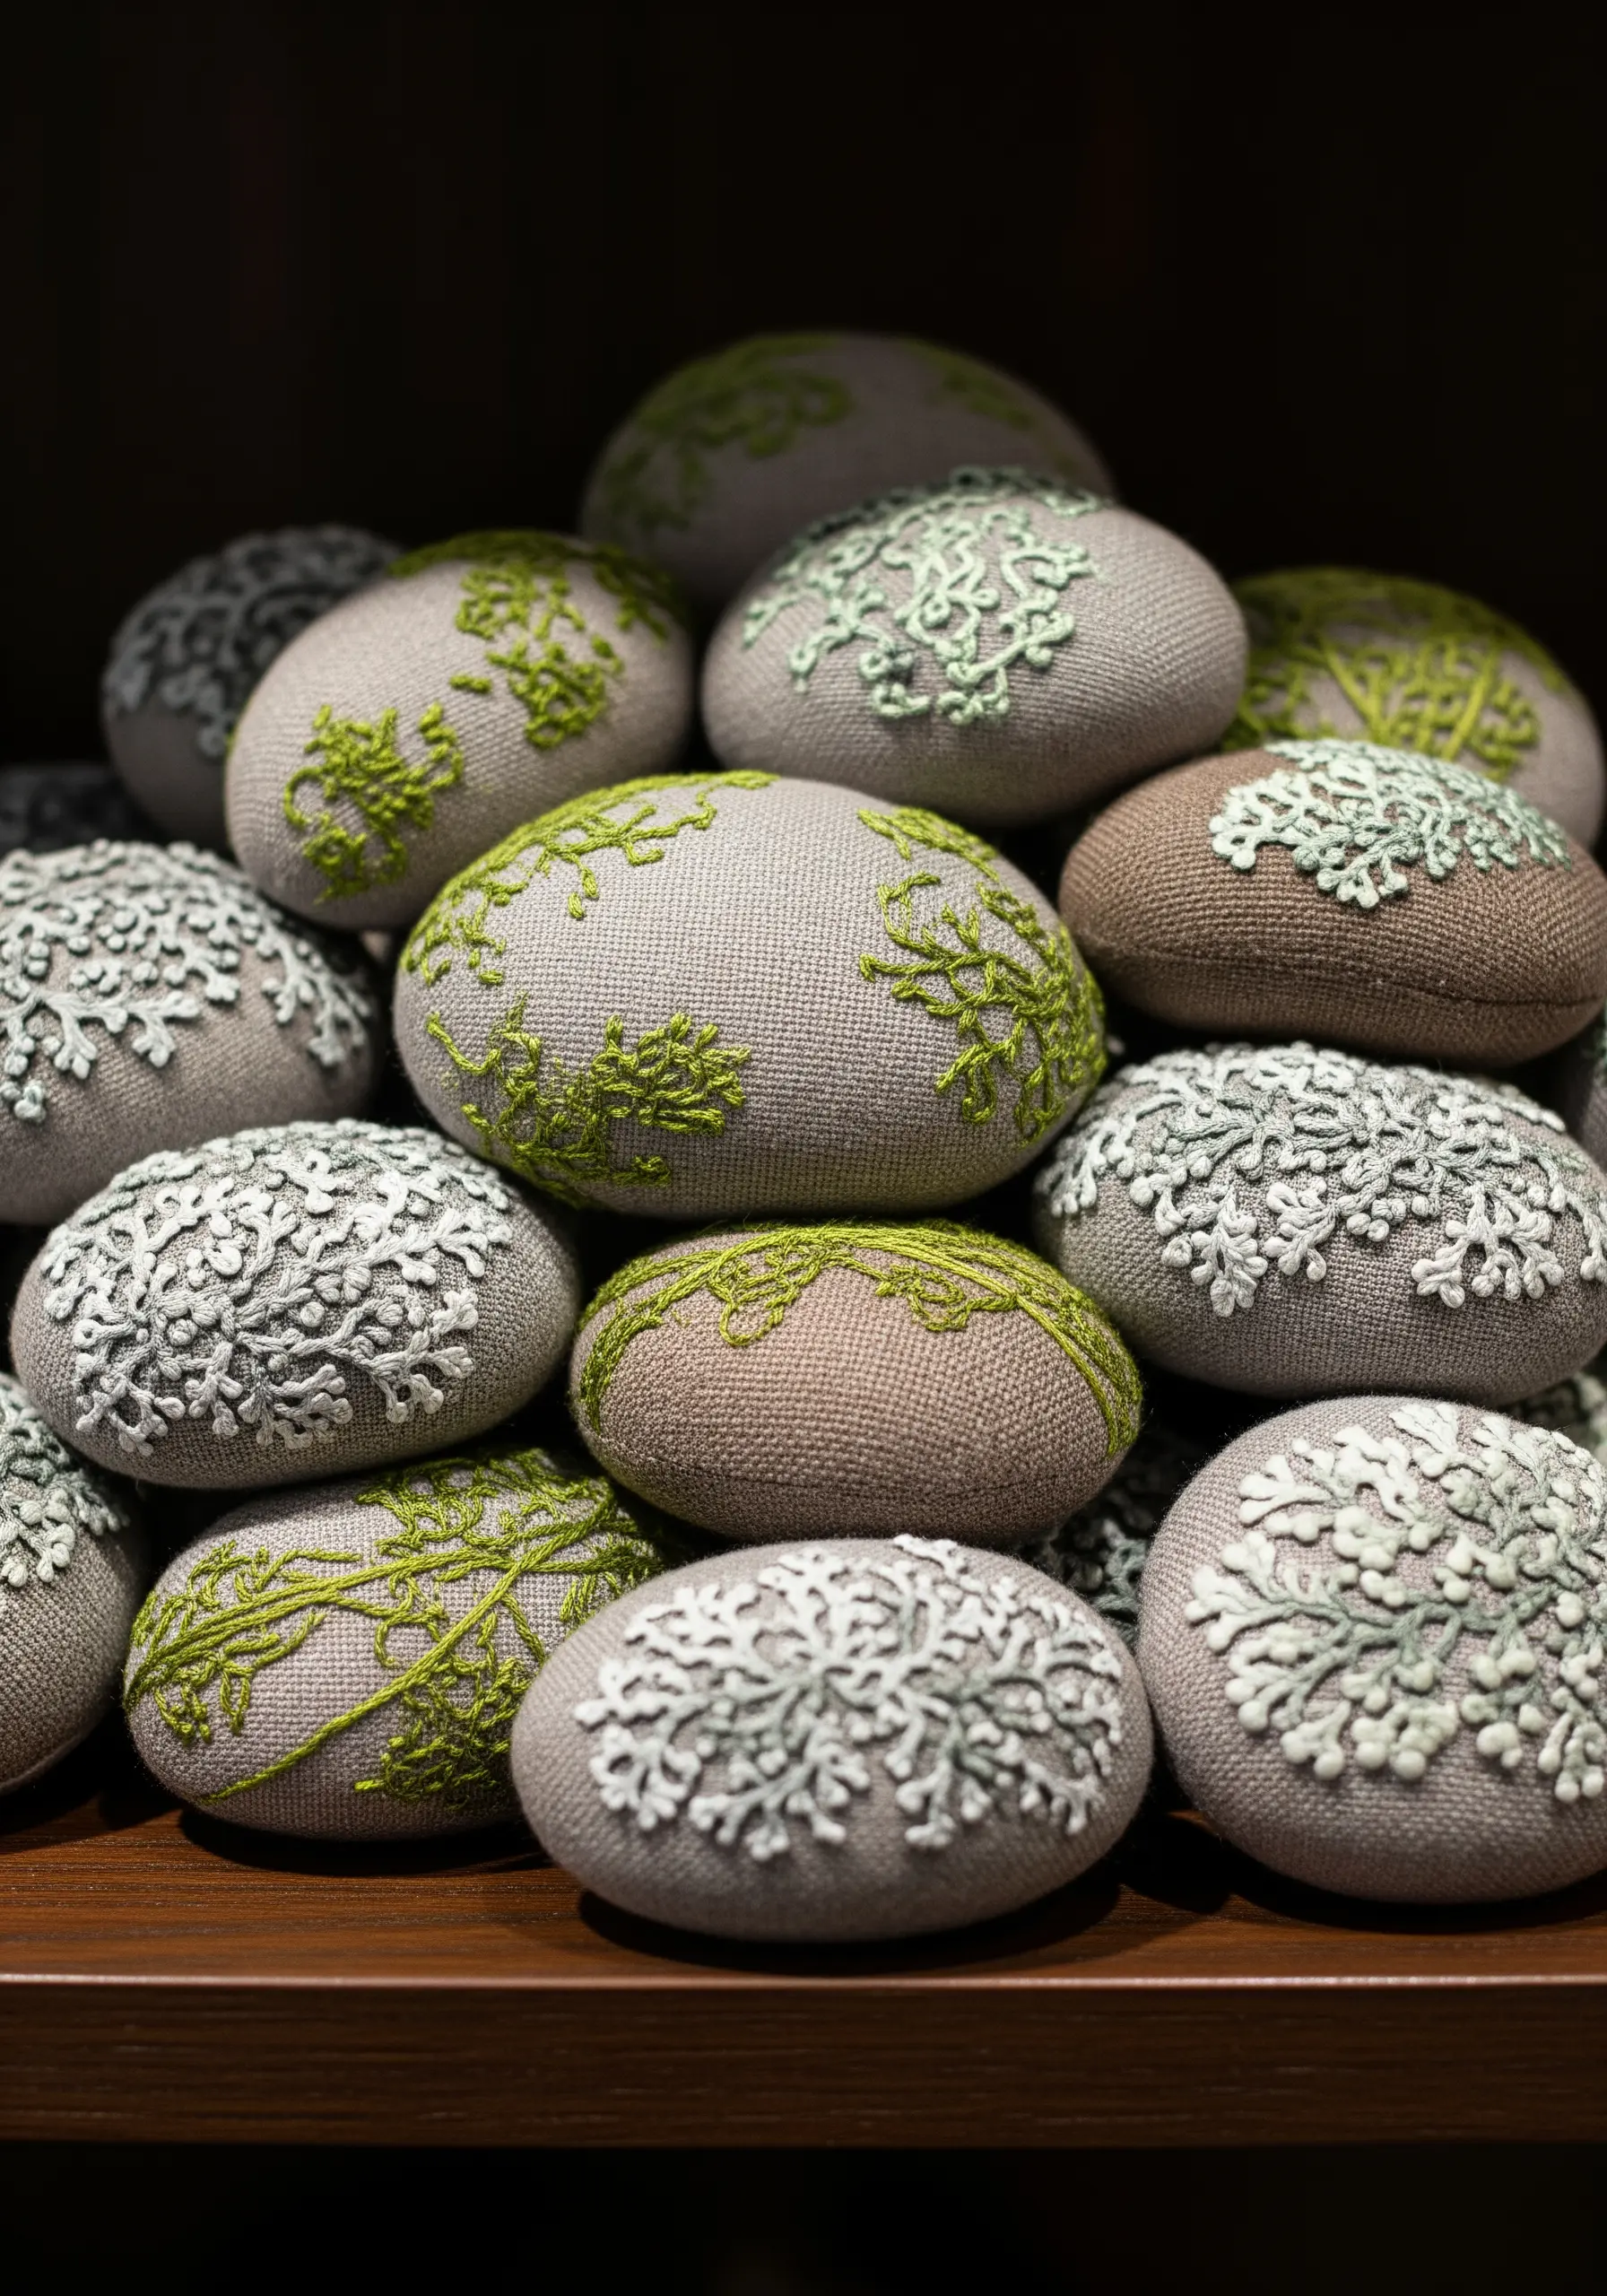
Create a collection of tactile, decorative objects by embroidering on small, fabric-covered forms.
Cover smooth river stones or create your own pebble shapes from fabric and stuffing.
Use colonial knots and detached chain stitches in pale green and grey thread to stitch delicate, lichen-like patterns across their surfaces.
These handmade art objects look beautiful grouped together in a bowl or scattered across a mantlepiece, bringing a quiet touch of nature indoors.
27. Build Realistic Bark with Layered Straight Stitches

Achieve the gnarled, textured look of an old tree’s bark by layering simple stitches.
Start by filling the trunk and branches with long, vertical straight stitches in several shades of brown, grey, and taupe.
Then, add short, horizontal stitches over the top layer to create the cracks and ridges characteristic of bark.
This layering technique creates a visual texture that is far more complex and realistic than a simple satin stitch fill.
28. Define Botanicals with Contrasting Outlines
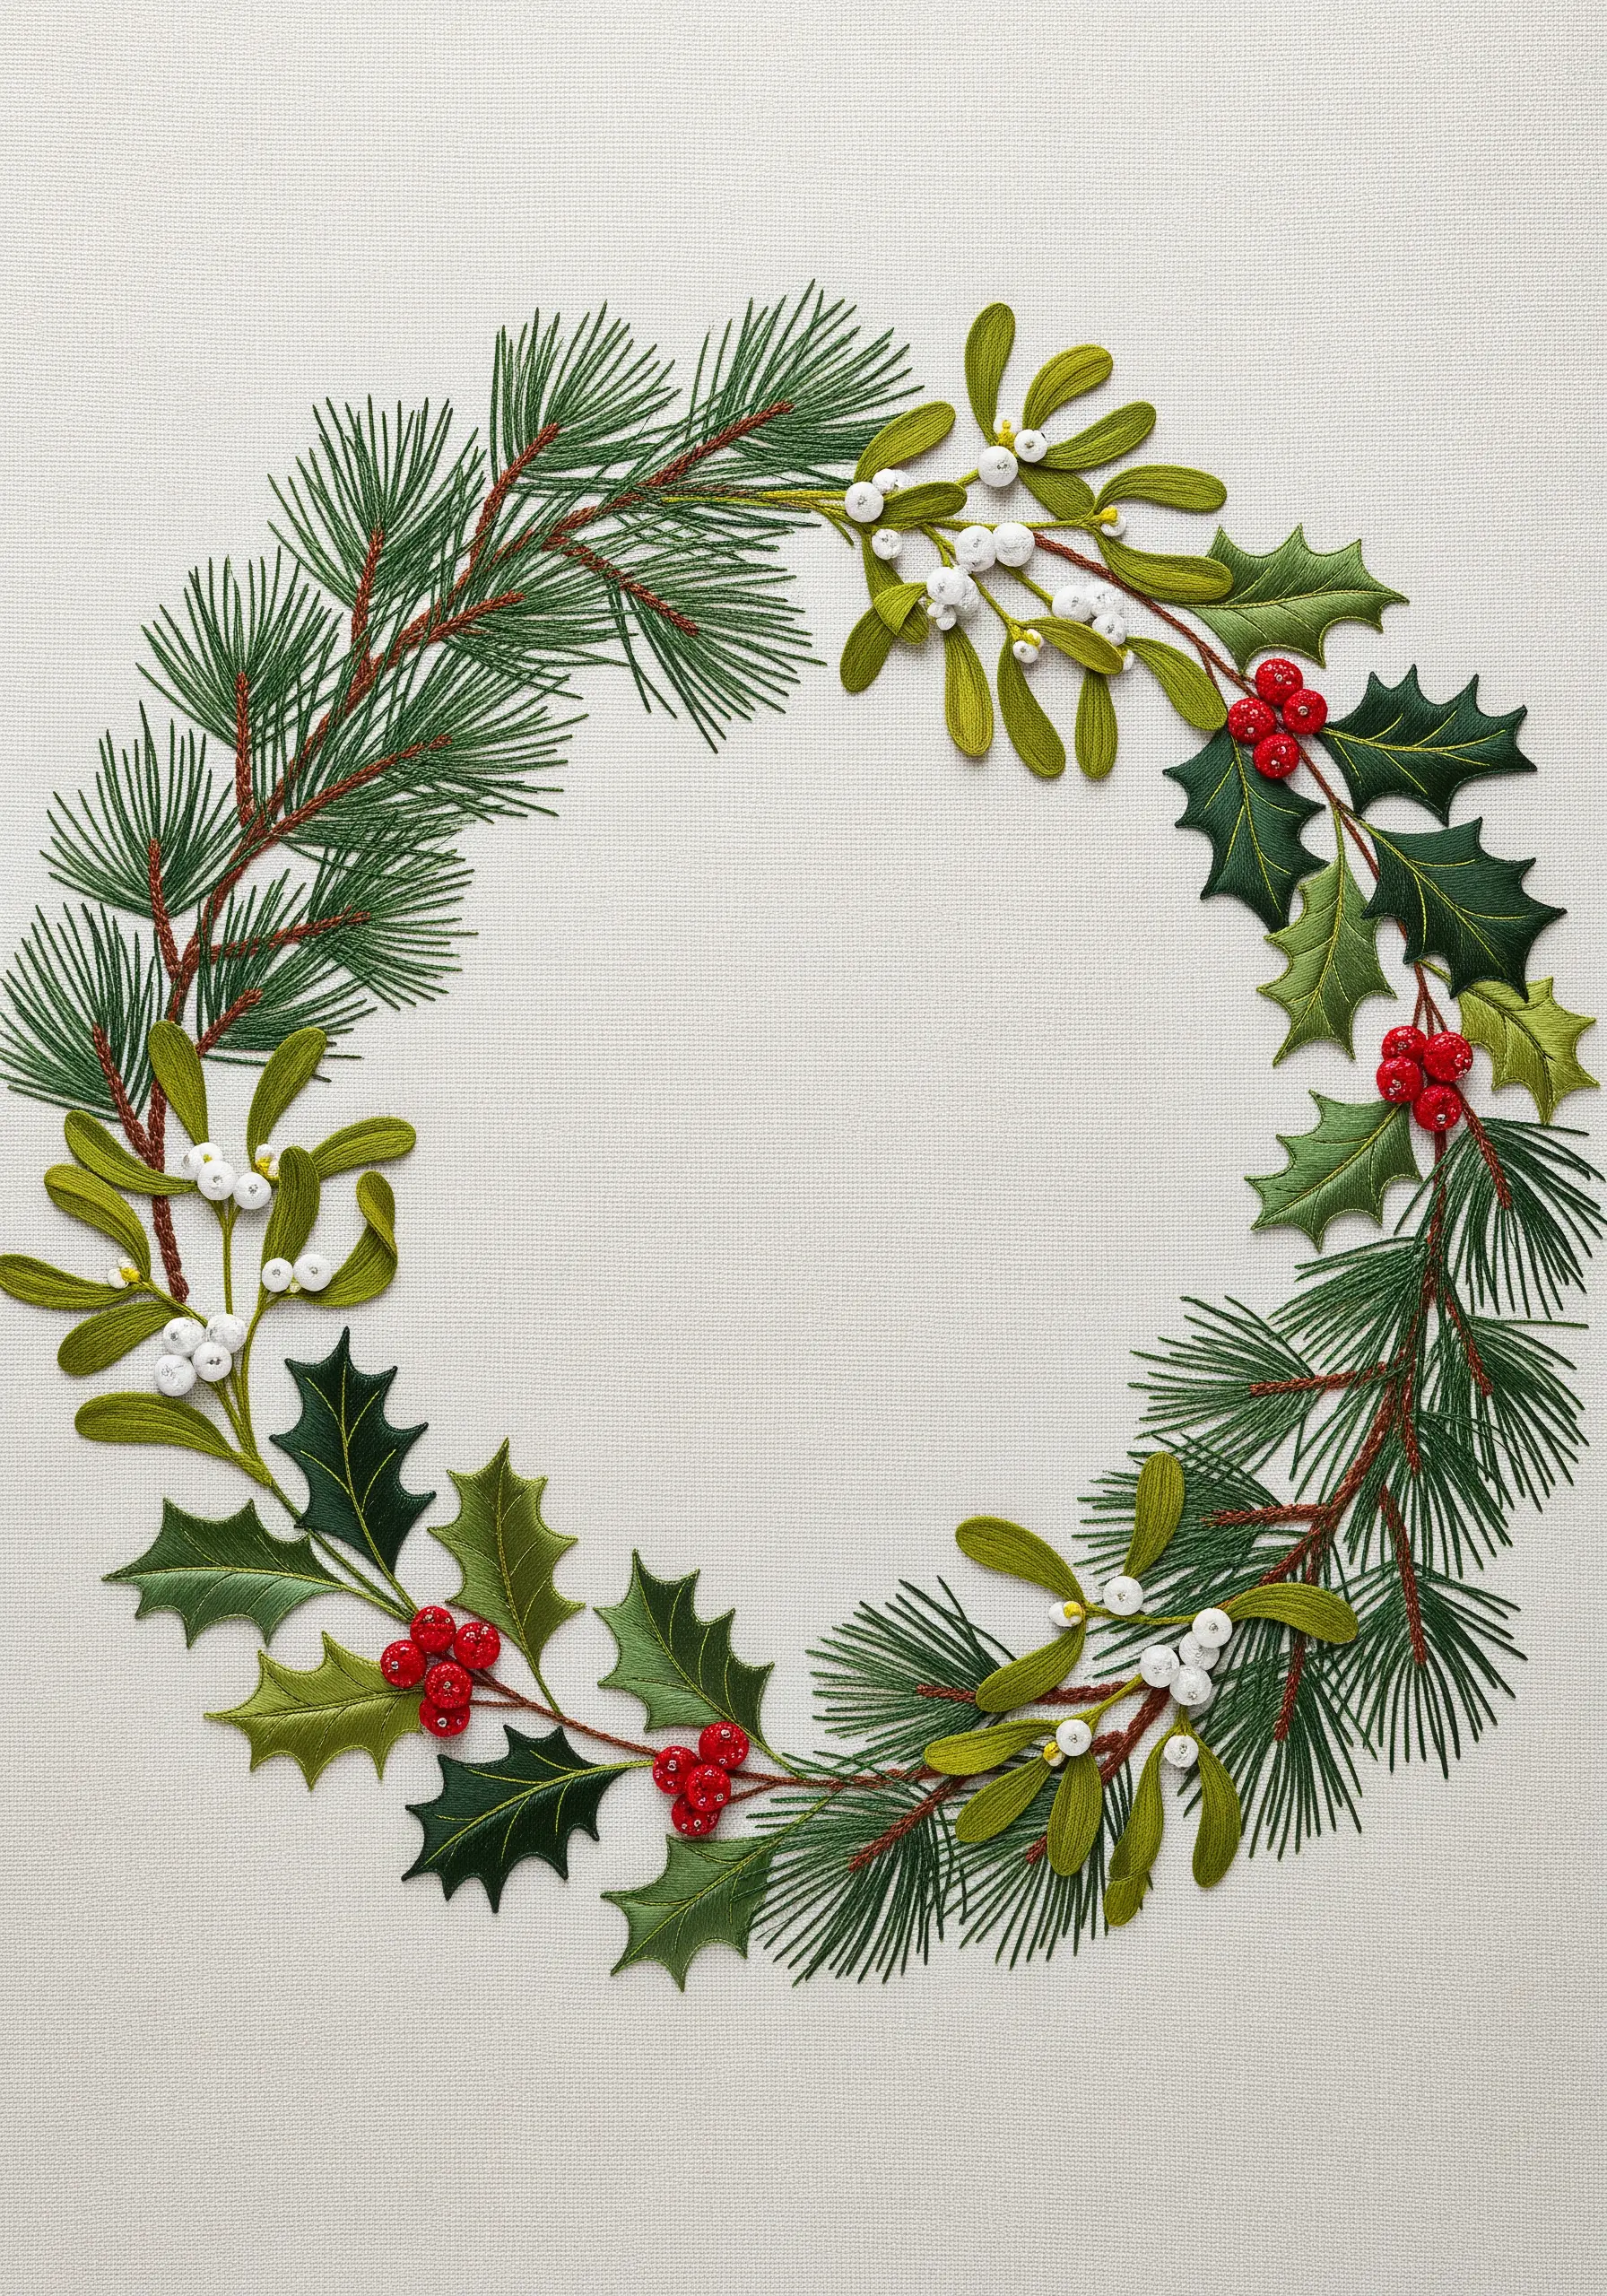
Make your holiday wreath look sharp and illustrative by giving each element a clean, defined edge.
For the holly and mistletoe leaves, use a satin stitch fill and then go back with a single line of stem stitch in a slightly darker shade around the perimeter.
This simple outline contains the shape and gives it a crisp, polished finish that stands out against the background fabric.
Use padded satin stitch for the berries to ensure they have a plump, 3D appearance.
29. Sculpt with Wire and Yarn for 3D Roots
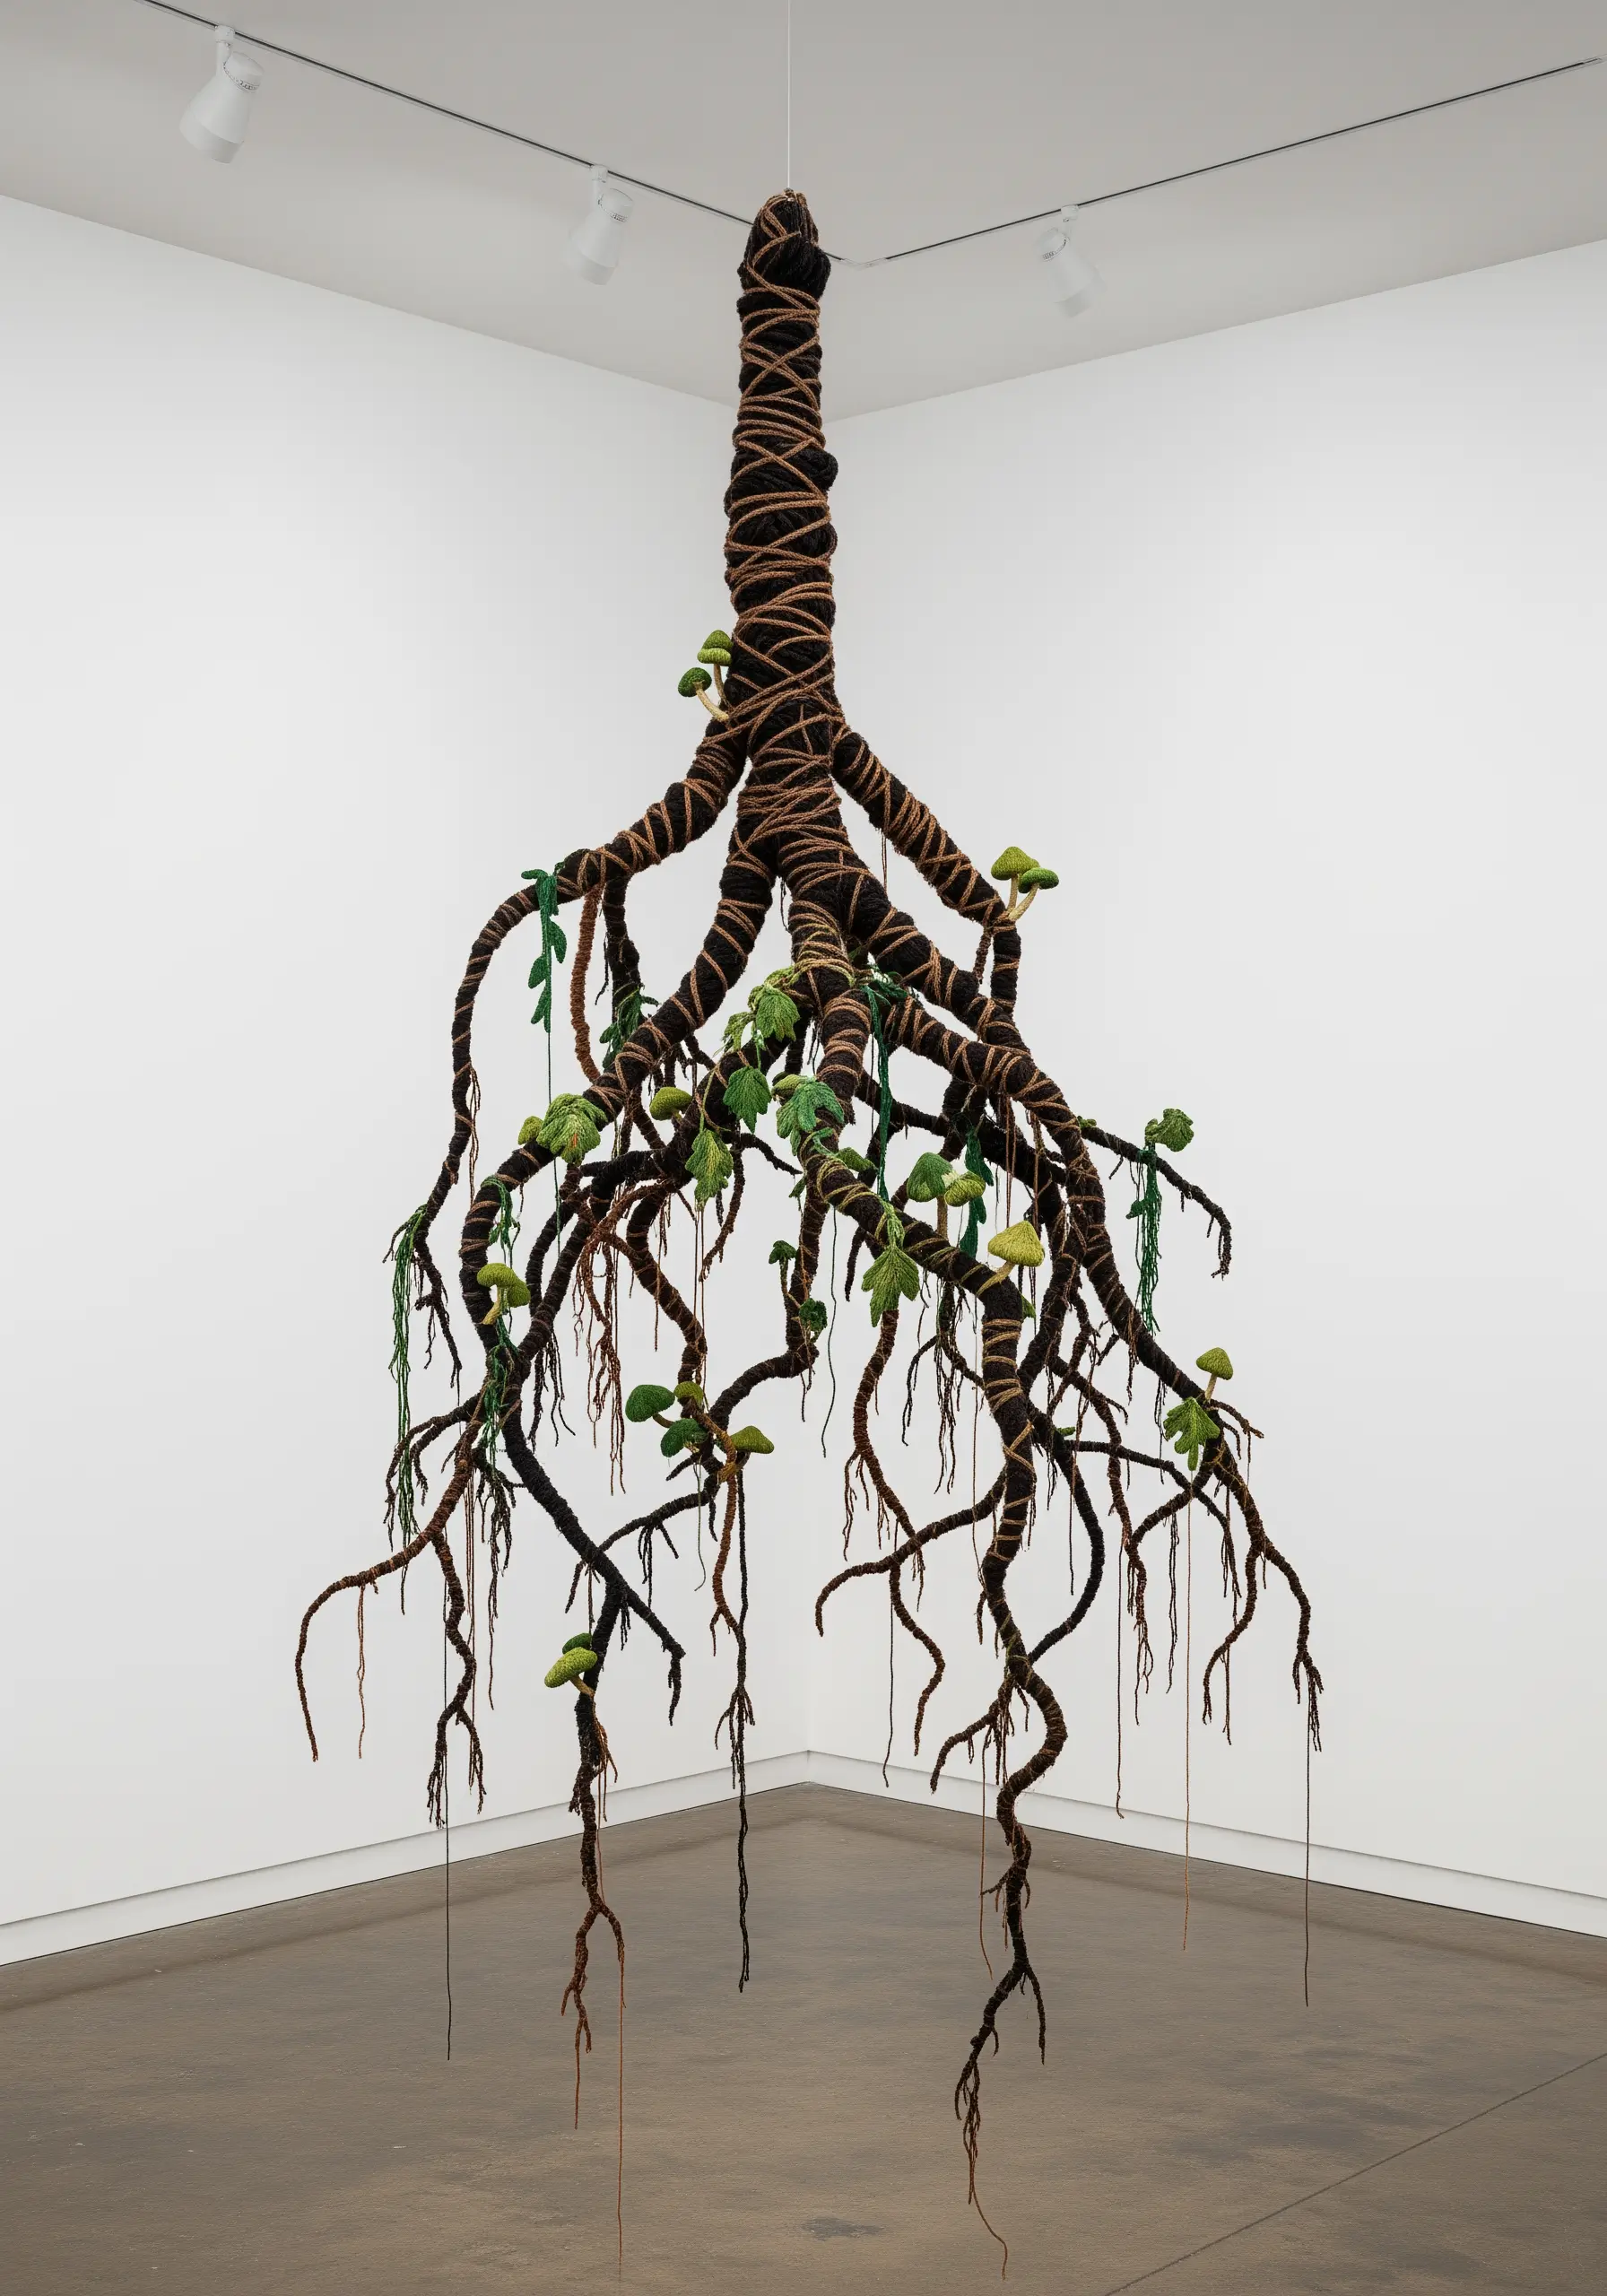
For truly three-dimensional botanical sculptures, use a wire armature as your base.
Bend craft wire into the shape of roots or branches, then wrap it tightly with various shades of brown and black yarn.
This technique allows you to create dynamic, twisting forms that extend off the wall and into the space.
You can then stitch small leaves or fungi directly onto the yarn-wrapped wire to add delicate, embroidered details to your sculpture.
30. Achieve a ‘Dusty’ Texture with Single-Strand Blending

Capture the soft, powdery look of a moth’s wings with meticulous thread painting.
Use a single strand of cotton floss and the long-and-short stitch technique, making your color transitions extremely gradual.
By blending several similar shades over a large area, you can create a soft, almost airbrushed effect that mimics the texture of tiny scales.
The key is patience and subtlety; the stitches should be nearly invisible, allowing the colors to flow seamlessly into one another.
31. Tell a Story with a Soil Profile Wall Hanging
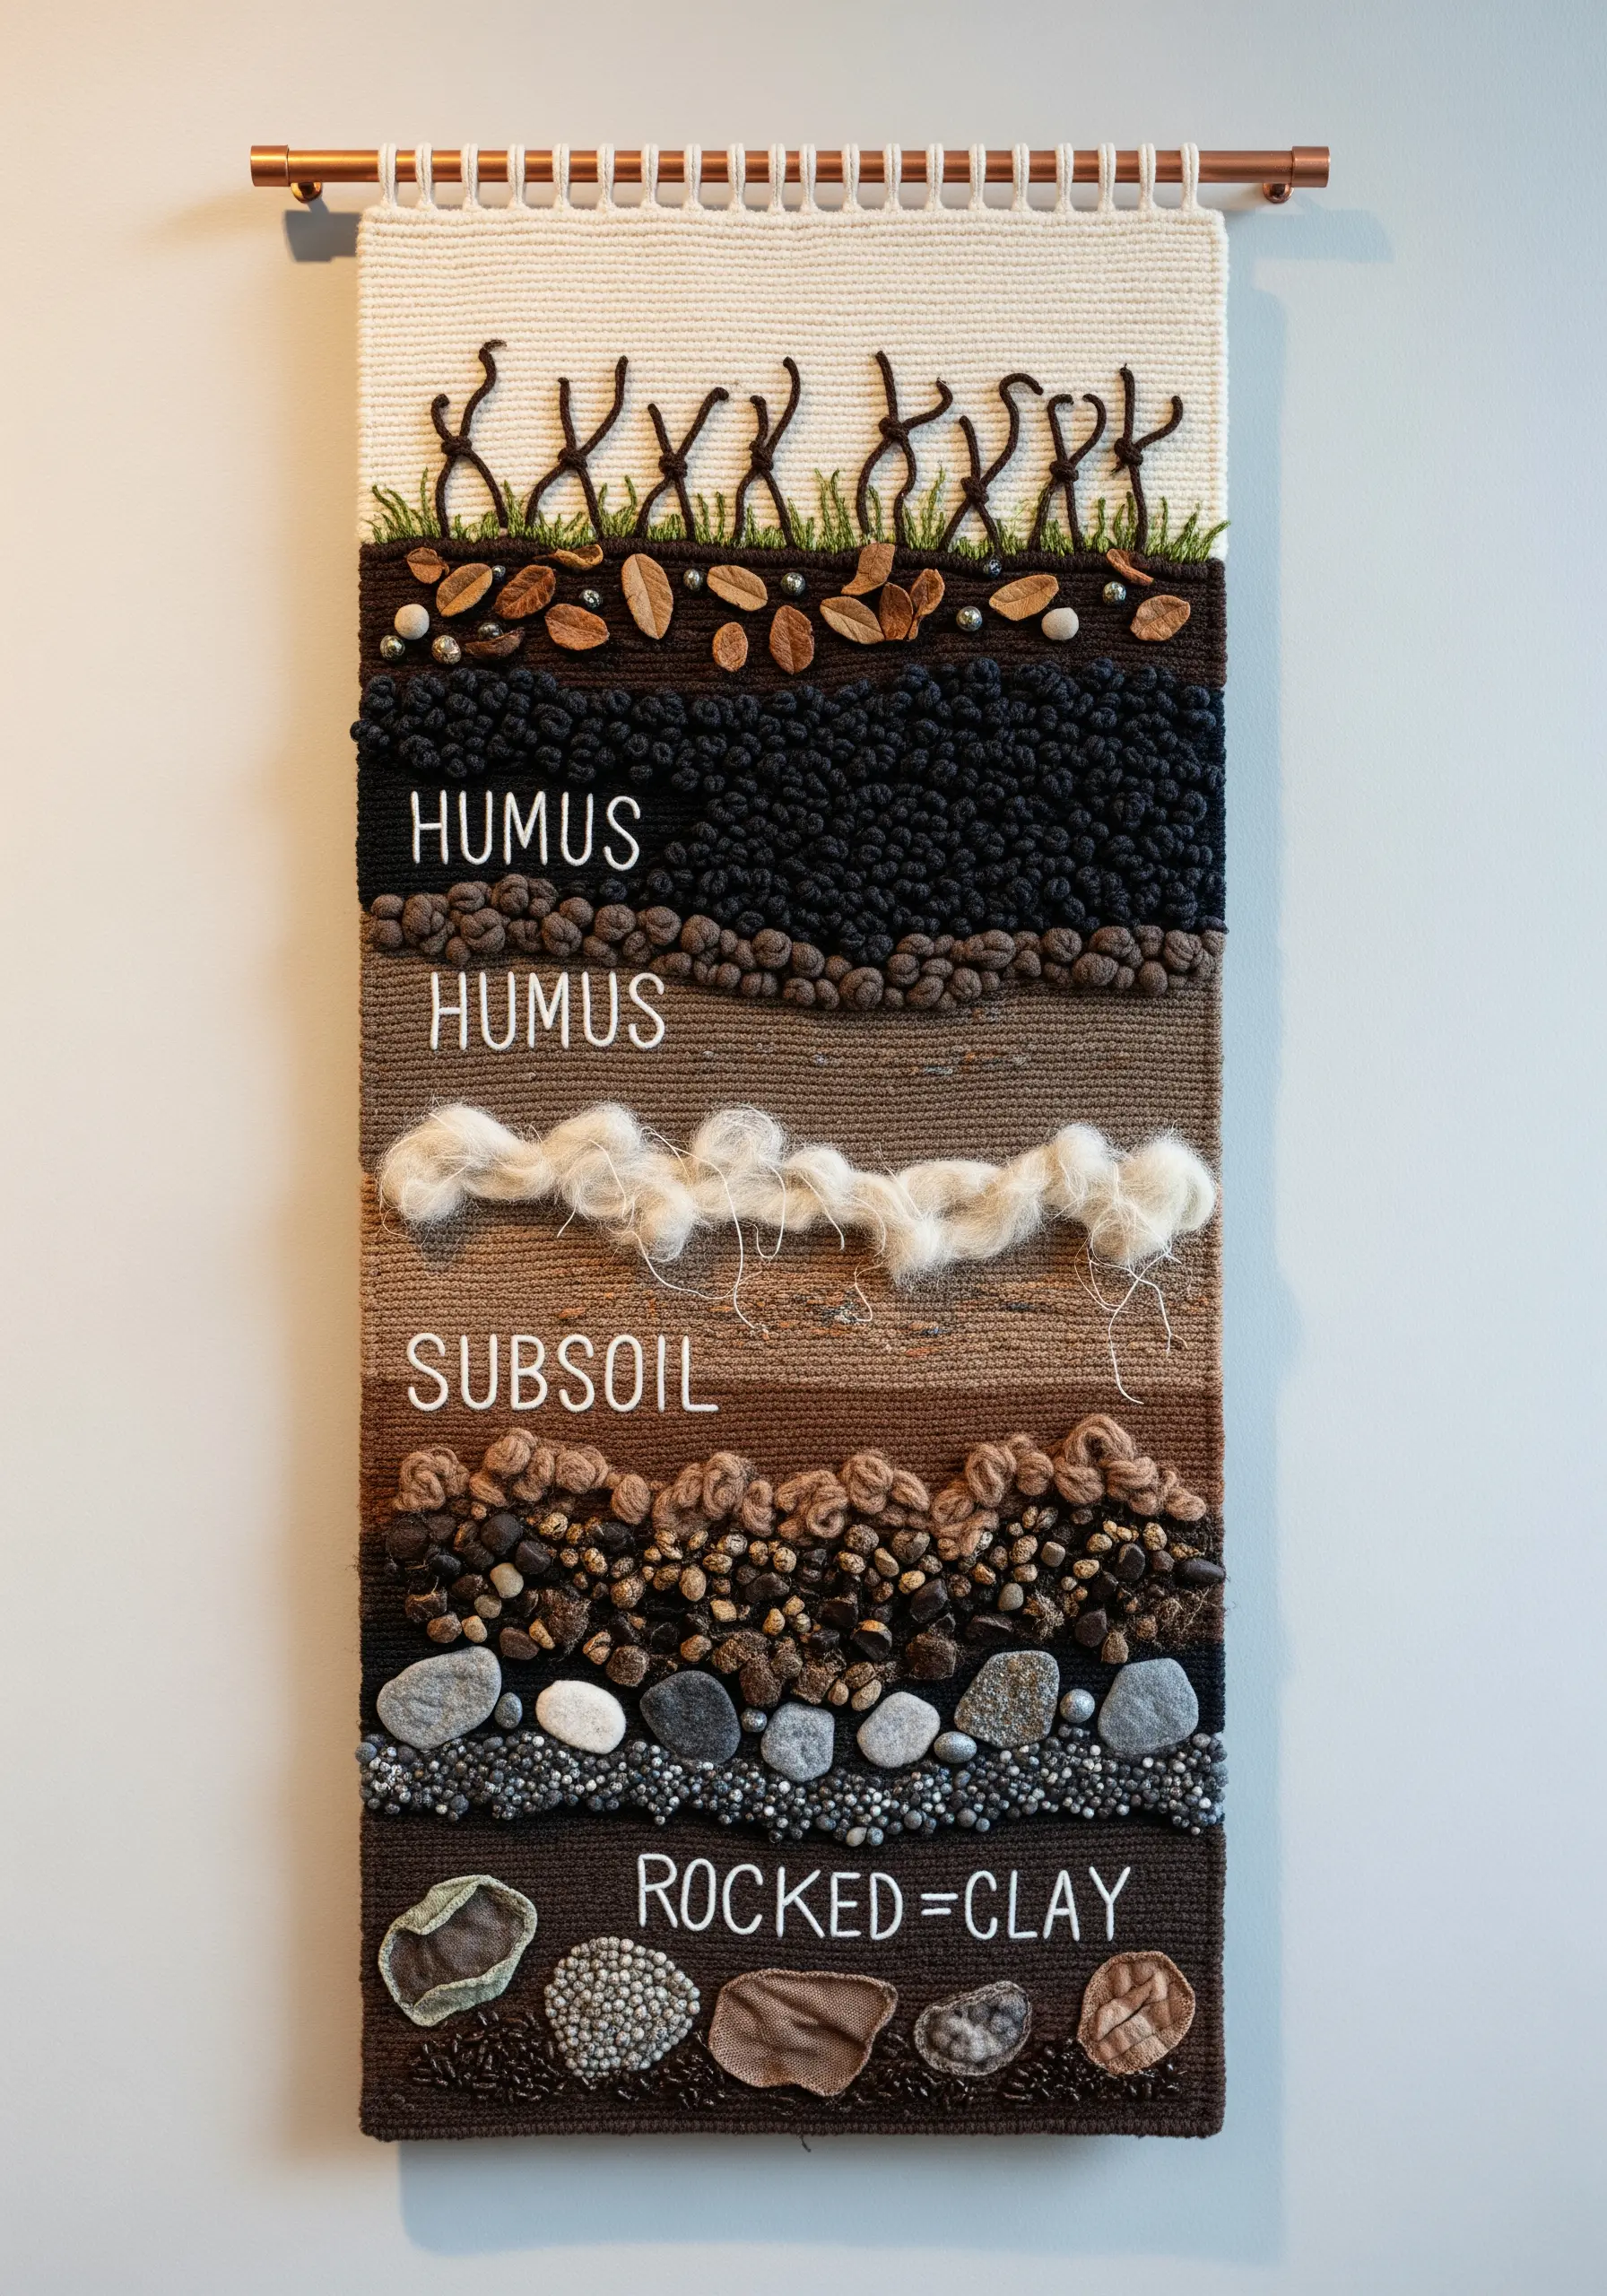
Transform an educational diagram into a work of art by representing each soil layer with a unique texture.
Use high-pile Turkey work for the dark, rich humus, and soft, unspun wool roving for the lighter subsoil.
Incorporate real polished stones, beads, and fabric appliqué in the lowest layers to represent rocks and clay.
This multi-sensory approach makes the piece not only visually interesting but also deeply tactile and engaging, turning science into art.
32. Create Ripples with Concentric Split Stitching
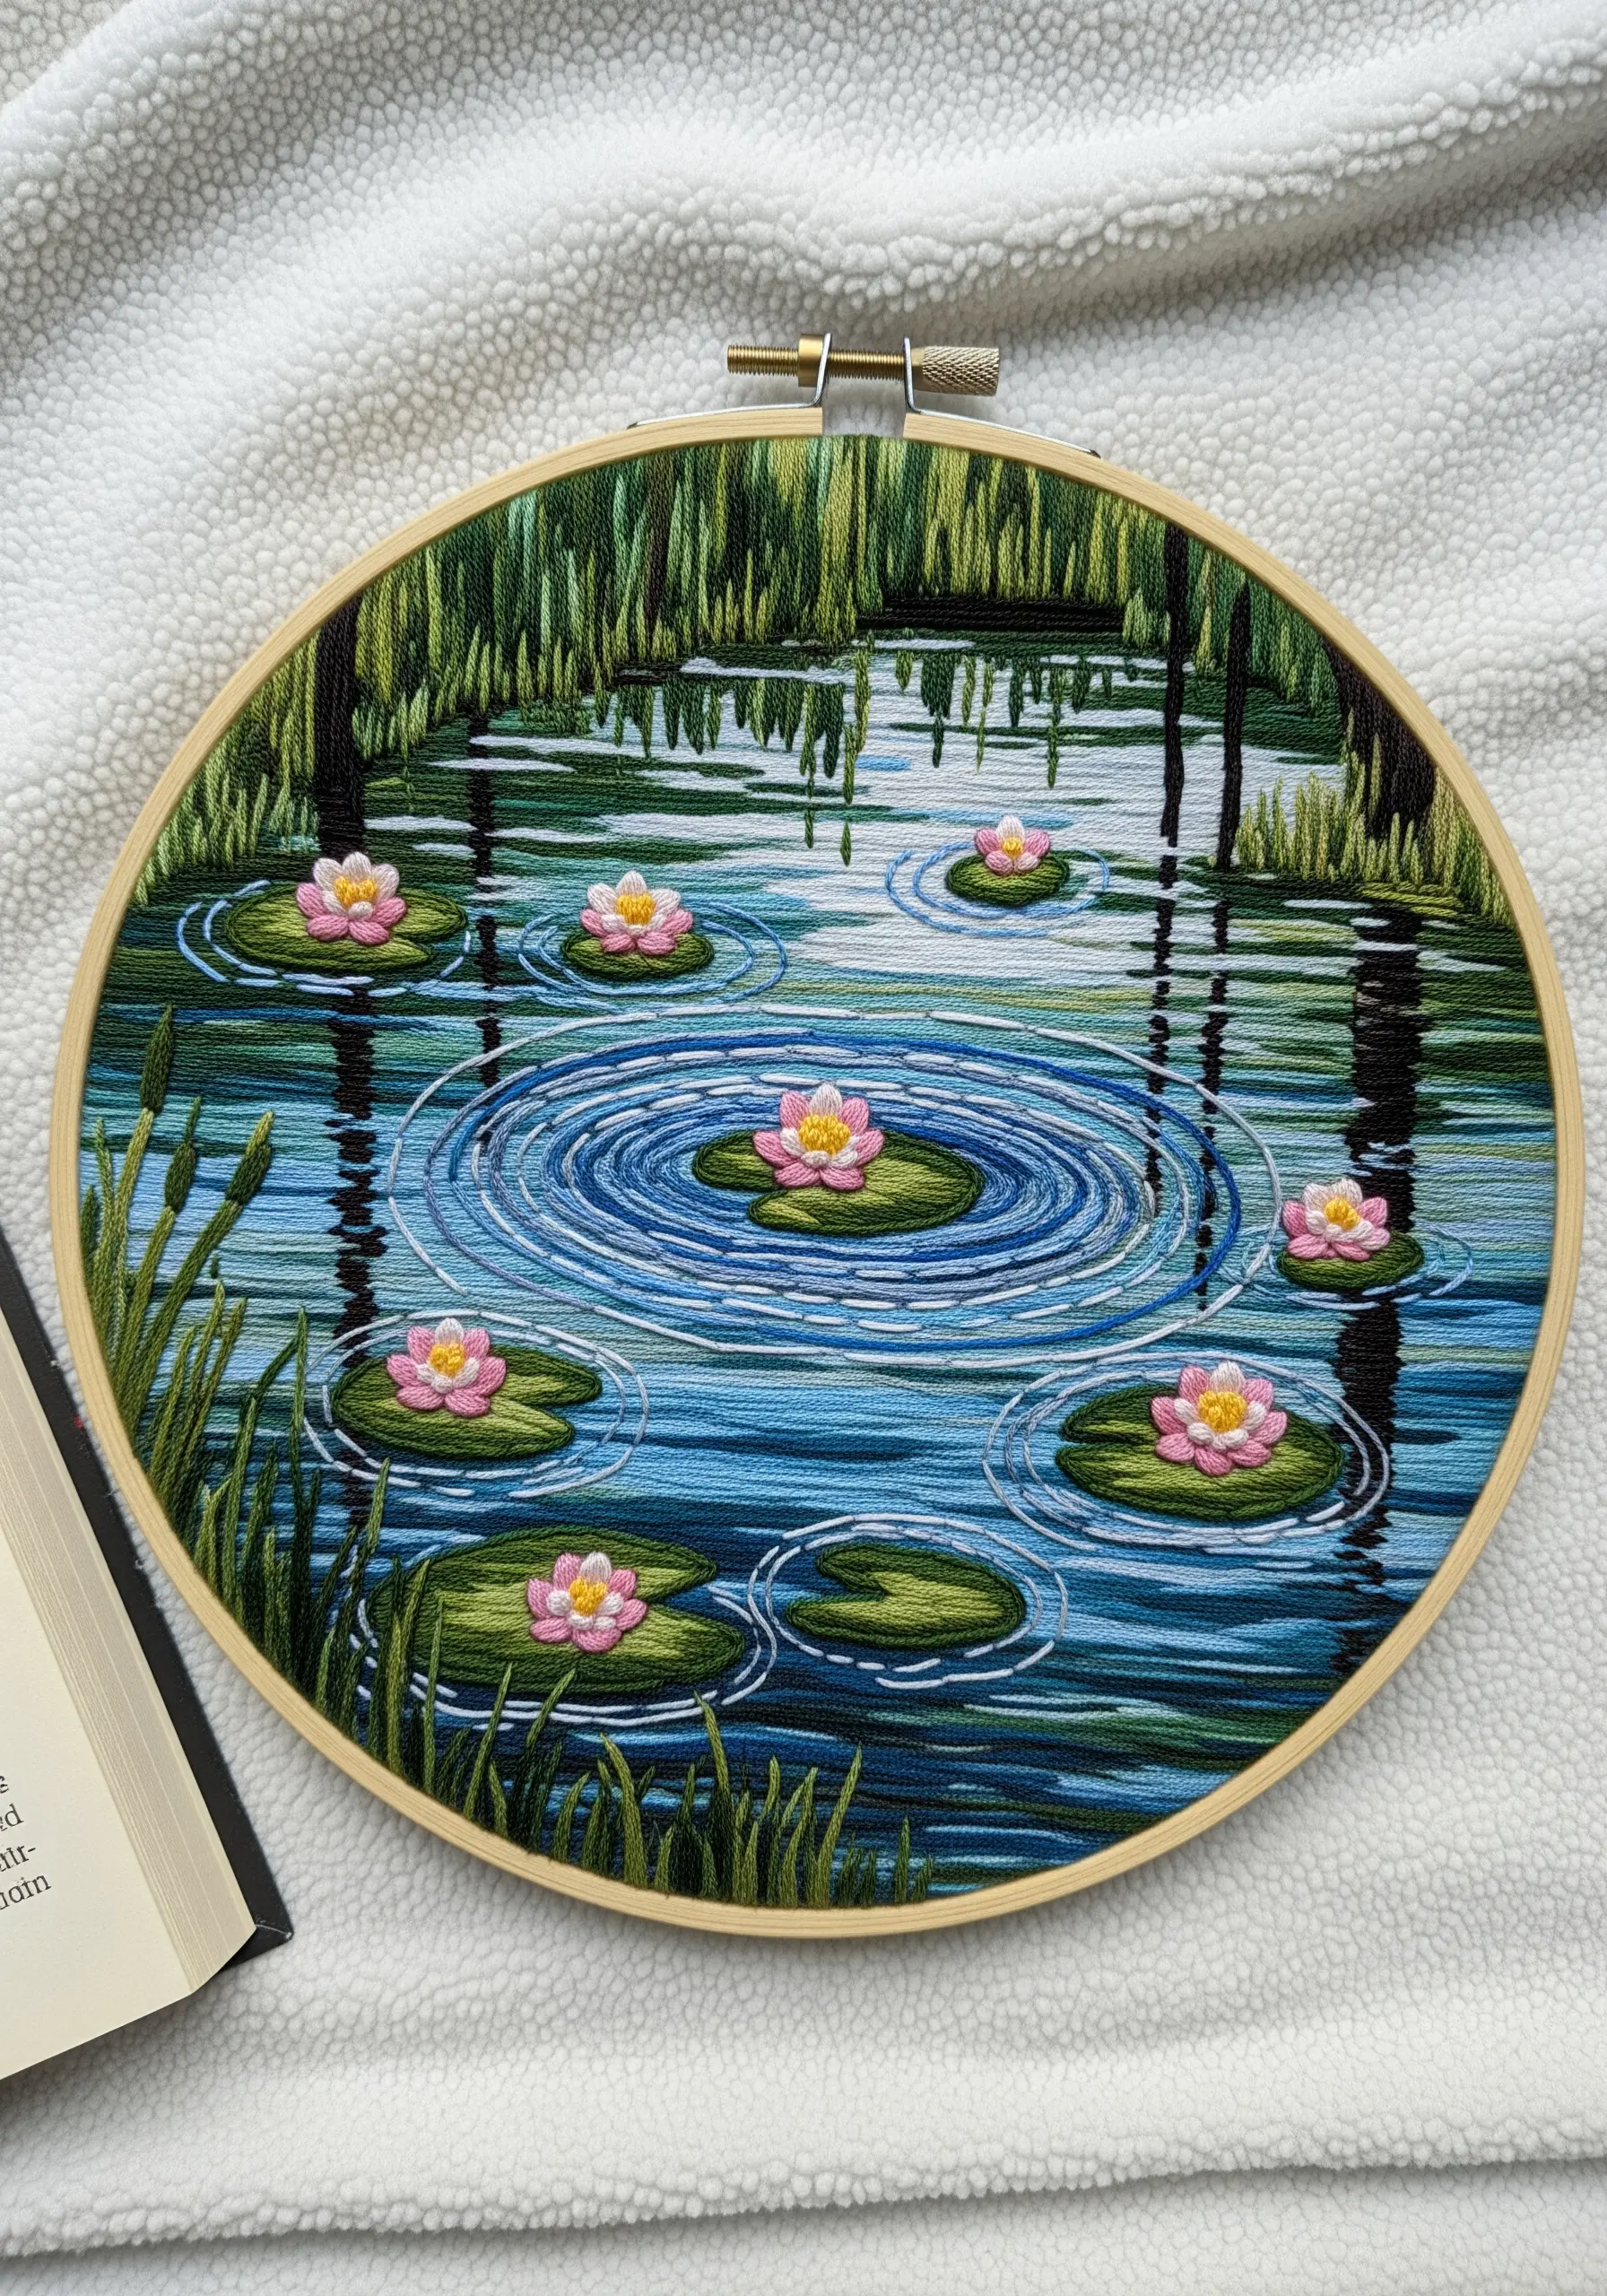
Emulate the effect of a water lily disturbing the surface of a pond with simple, concentric lines.
Use a split stitch or backstitch to create expanding circles around your lily pads, alternating between two or three similar shades of blue.
This subtle color variation gives the ripples depth and a sense of movement.
For the reflections of trees or reeds, use long, vertical straight stitches that are slightly wavy, breaking up the perfect circles and adding another layer of realism.
33. Maximize Texture with a Monochromatic Palette
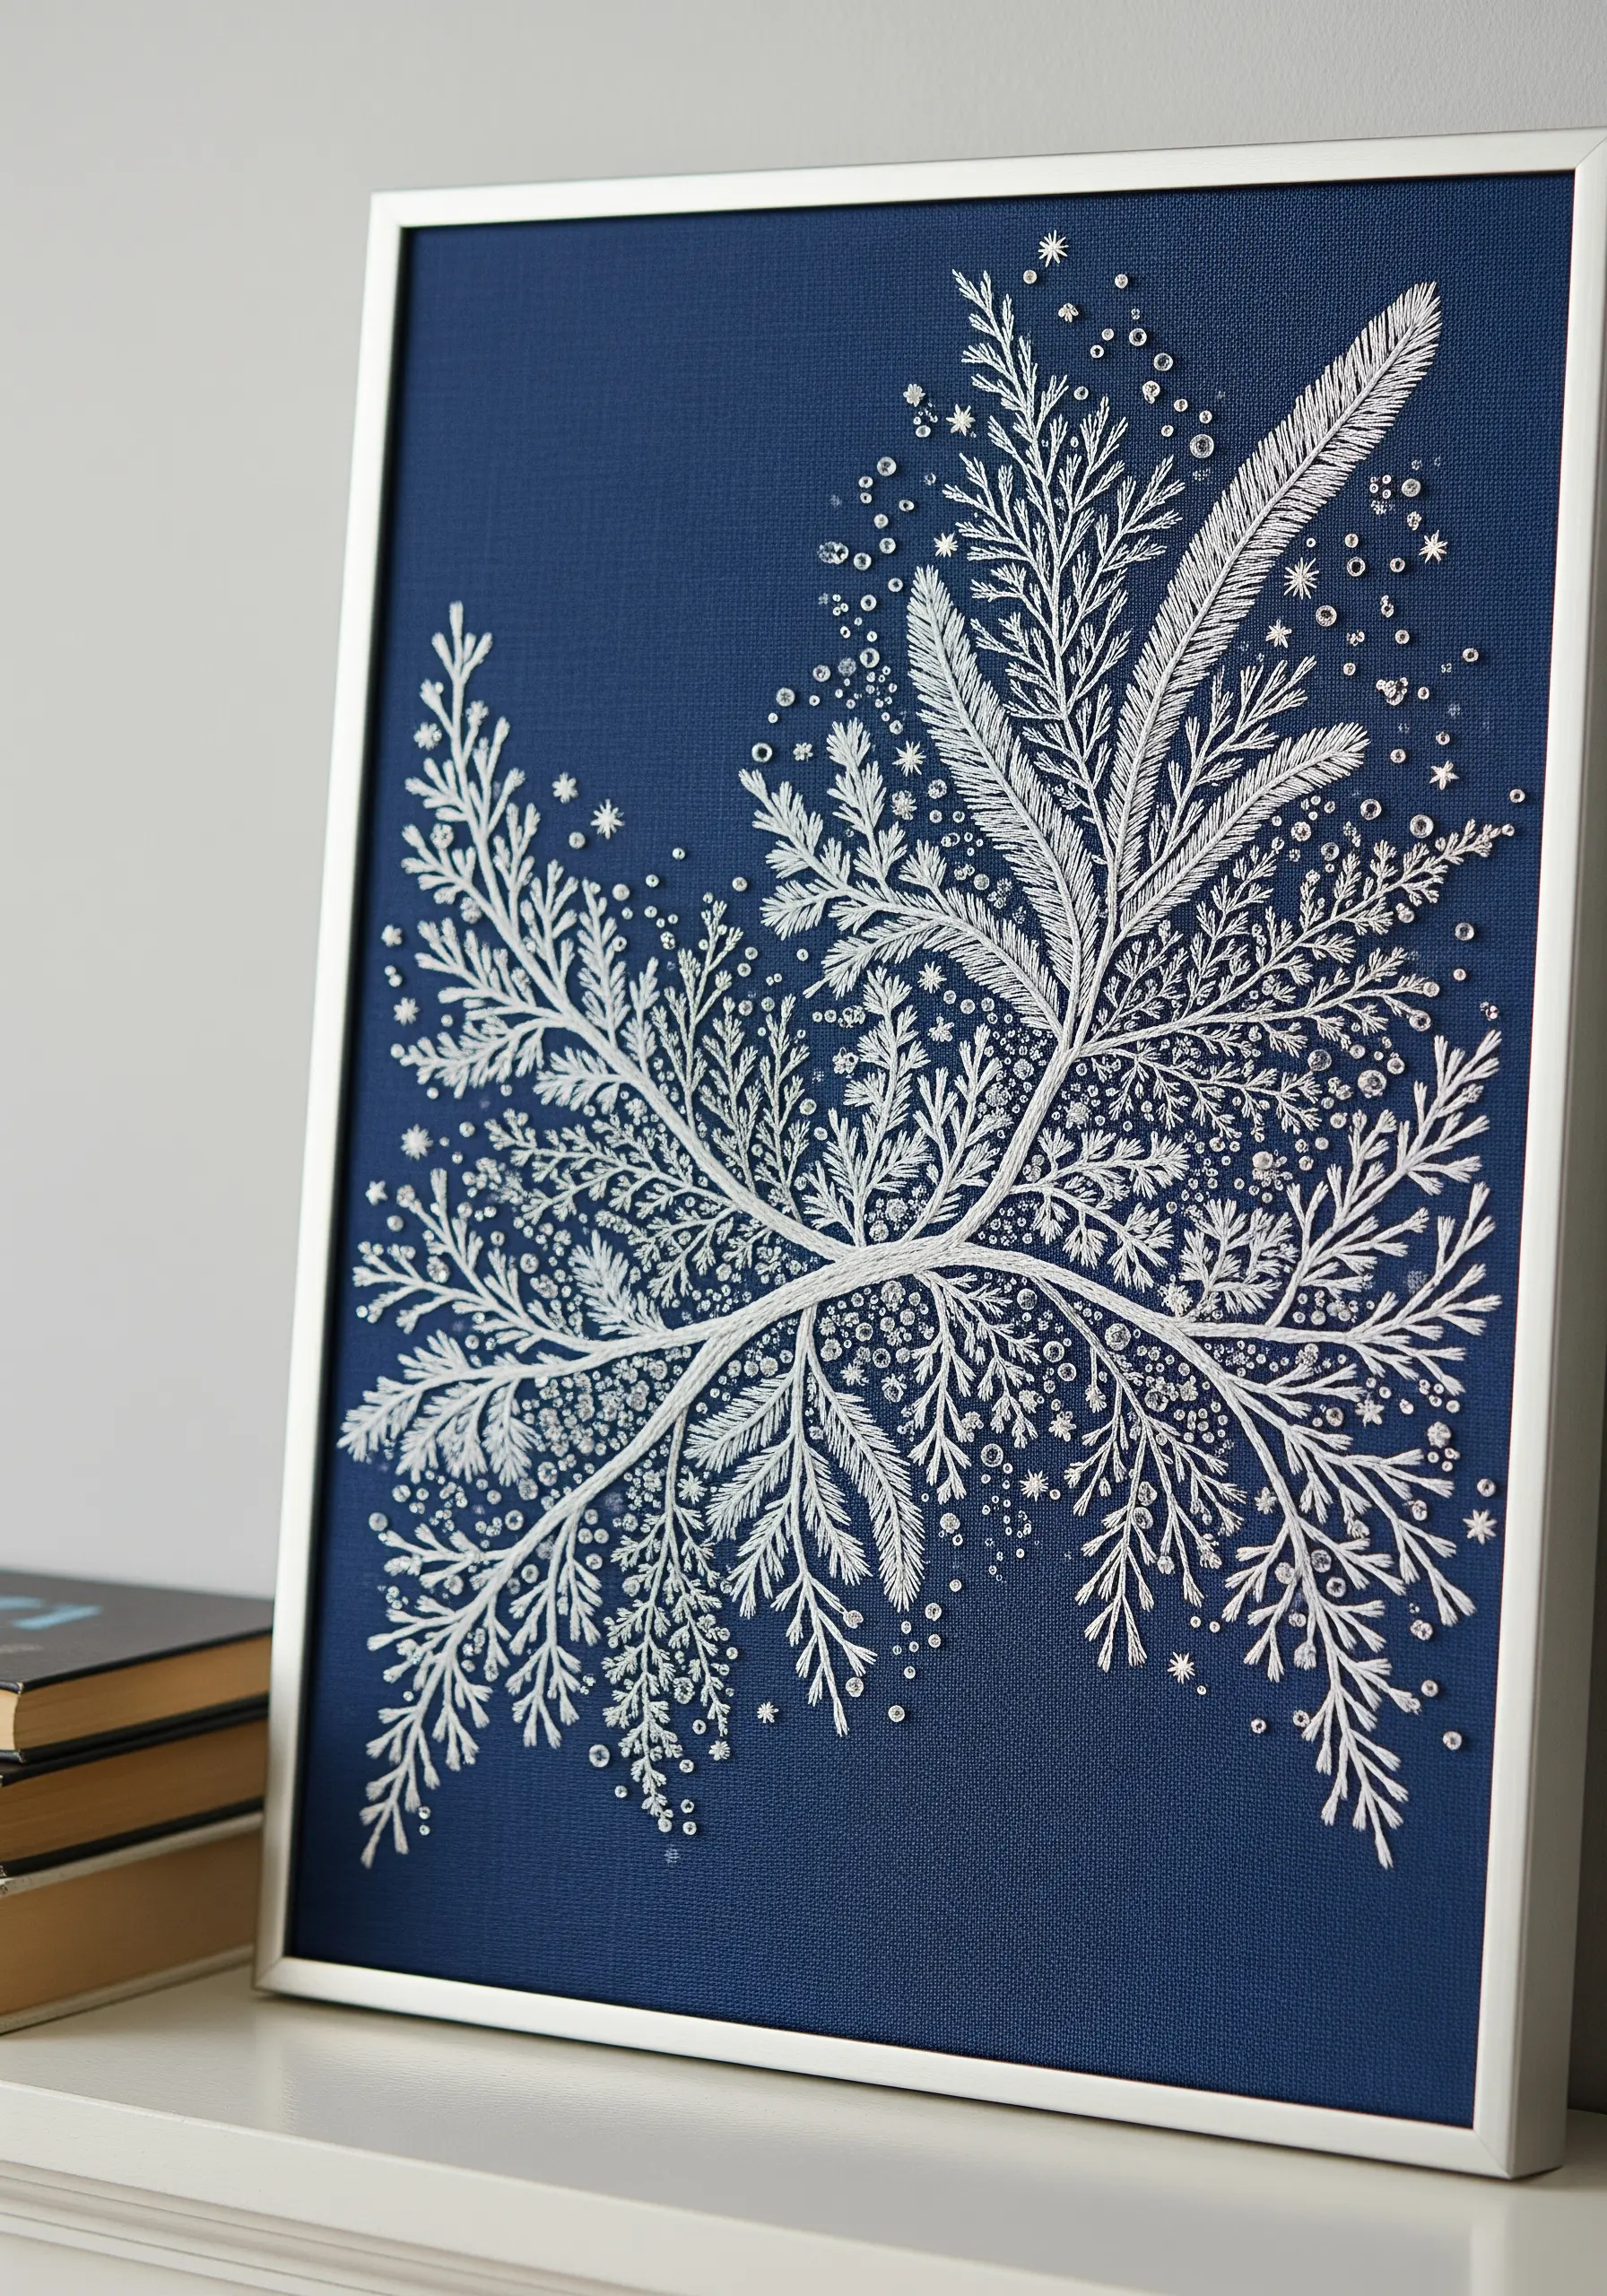
Emphasize the beauty of your stitchwork by removing color as a variable.
Working with only white thread on a dark background forces you to focus on creating interest through texture and stitch variation alone.
Combine different stitches—like fishbone, French knots, and seed stitch—to build a complex, layered design.
The high contrast makes every knot and line pop, resulting in a dramatic and elegant piece where the texture is the undisputed star.
34. Design Wearable Art with Velvet and Stumpwork
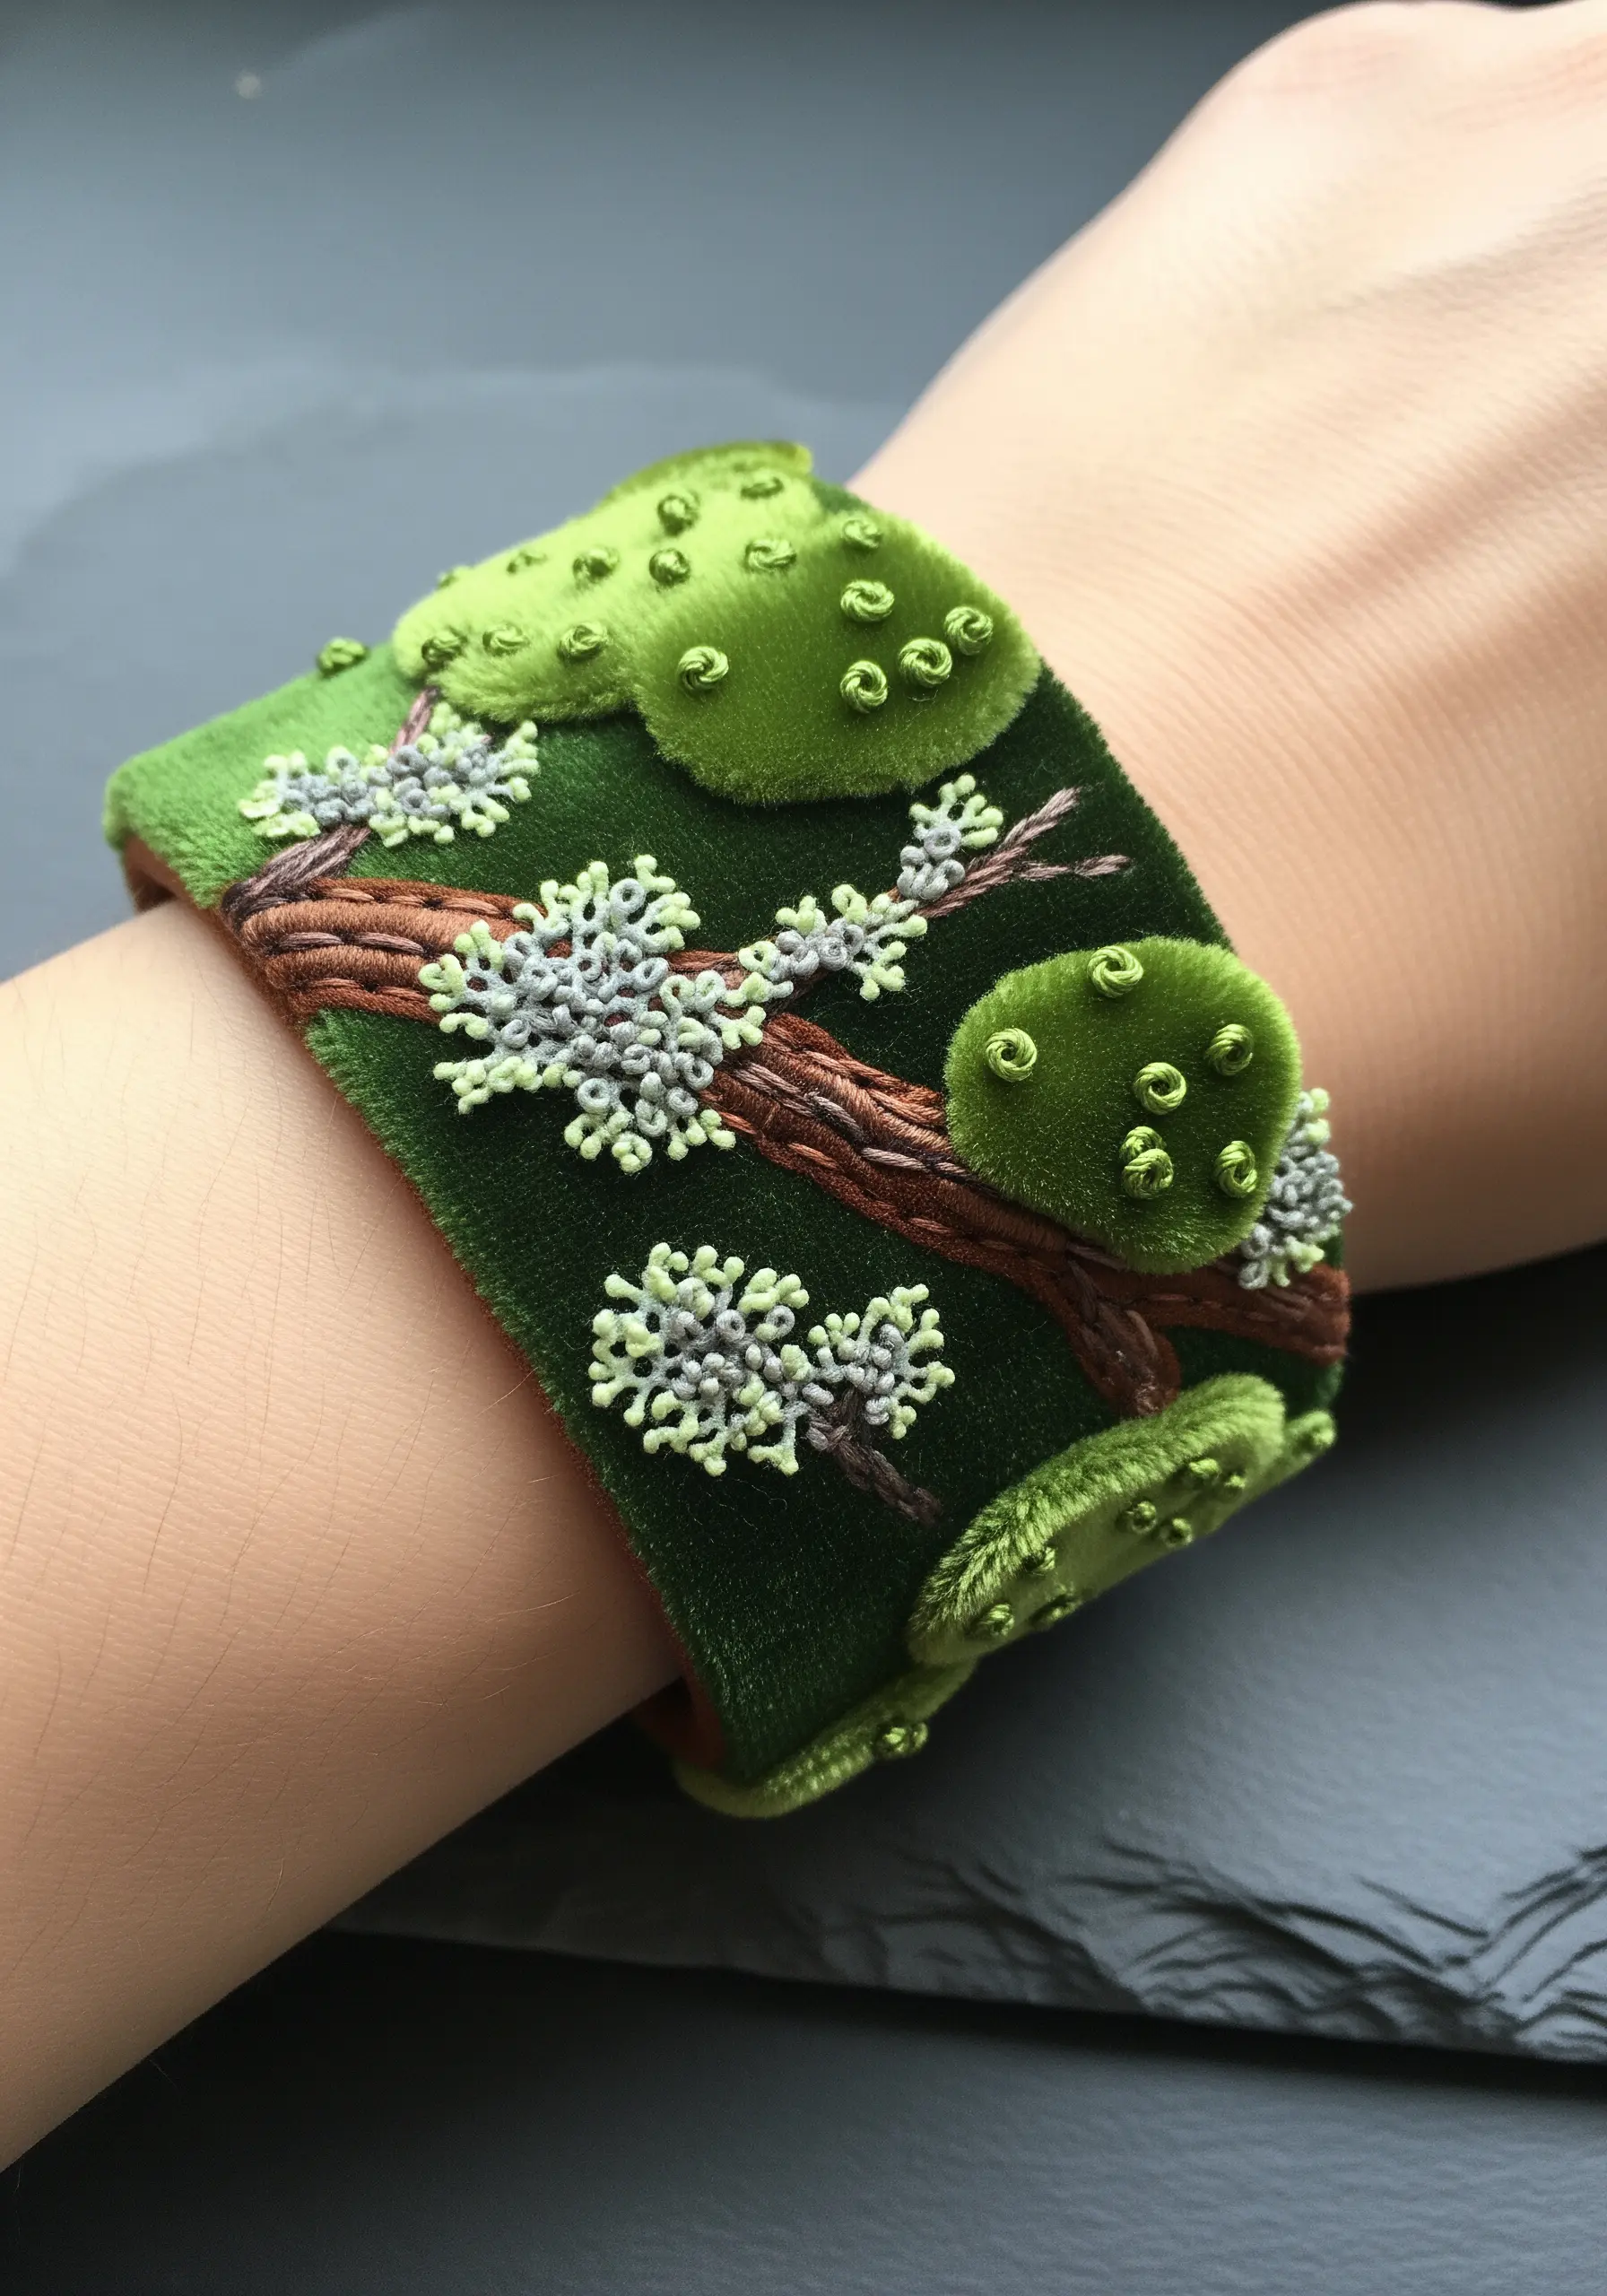
Translate large-scale organic textures into delicate, wearable art by working on a small scale.
Use a plush velvet base for your bracelet or cuff, which adds an immediate sense of luxury and tactile appeal.
Create tiny mossy mounds using stumpwork techniques or small pieces of raised velvet appliqué.
Add clusters of colonial knots and tiny straight stitches to simulate lichen, proving that even the most complex natural textures can be beautifully adapted for jewelry.


