
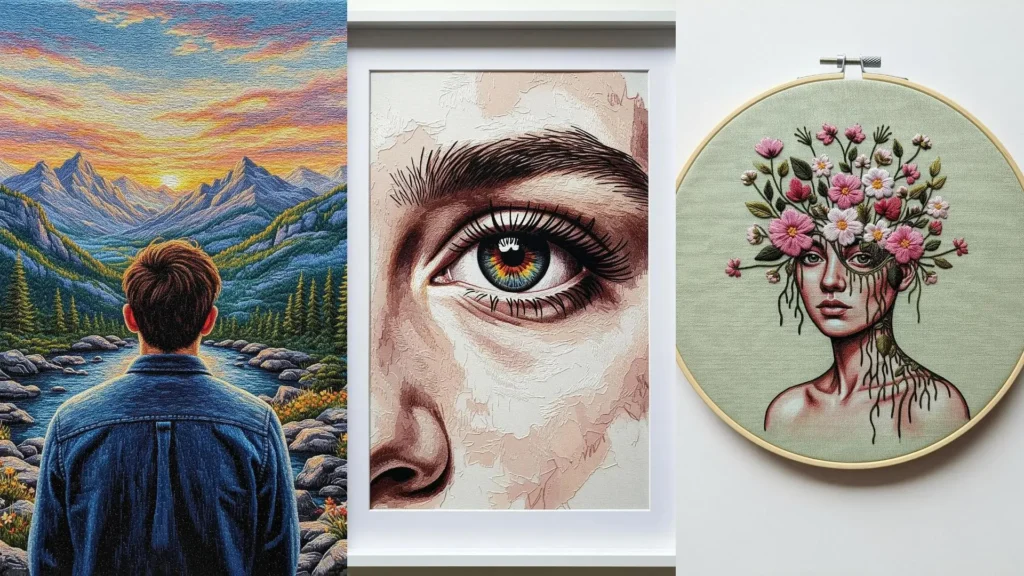
Have you ever looked at a piece of embroidery so realistic, so full of life, that you had to look twice to believe it wasn’t a photograph or a painting? It’s a breathtaking moment—one that might leave you feeling both inspired and a little intimidated.
But what if I told you that this level of artistry isn’t magic? It’s the result of intentional choices. It’s about learning to see thread not just as a line of color, but as a brushstroke. It’s about understanding how to use stitch direction to sculpt a cheekbone, how to blend colors to capture the warmth of skin, and how to use a single white stitch to bring an eye to life.
These hand-stitched portrait wall art ideas are more than just beautiful objects; they are a masterclass in technique. As you explore them, look closely. See how the artist used light, shadow, and texture. Then, pick up your own needle and thread, and allow yourself to think like a painter. Your next masterpiece is waiting.
1. Master Wrinkles with Directional Stitching
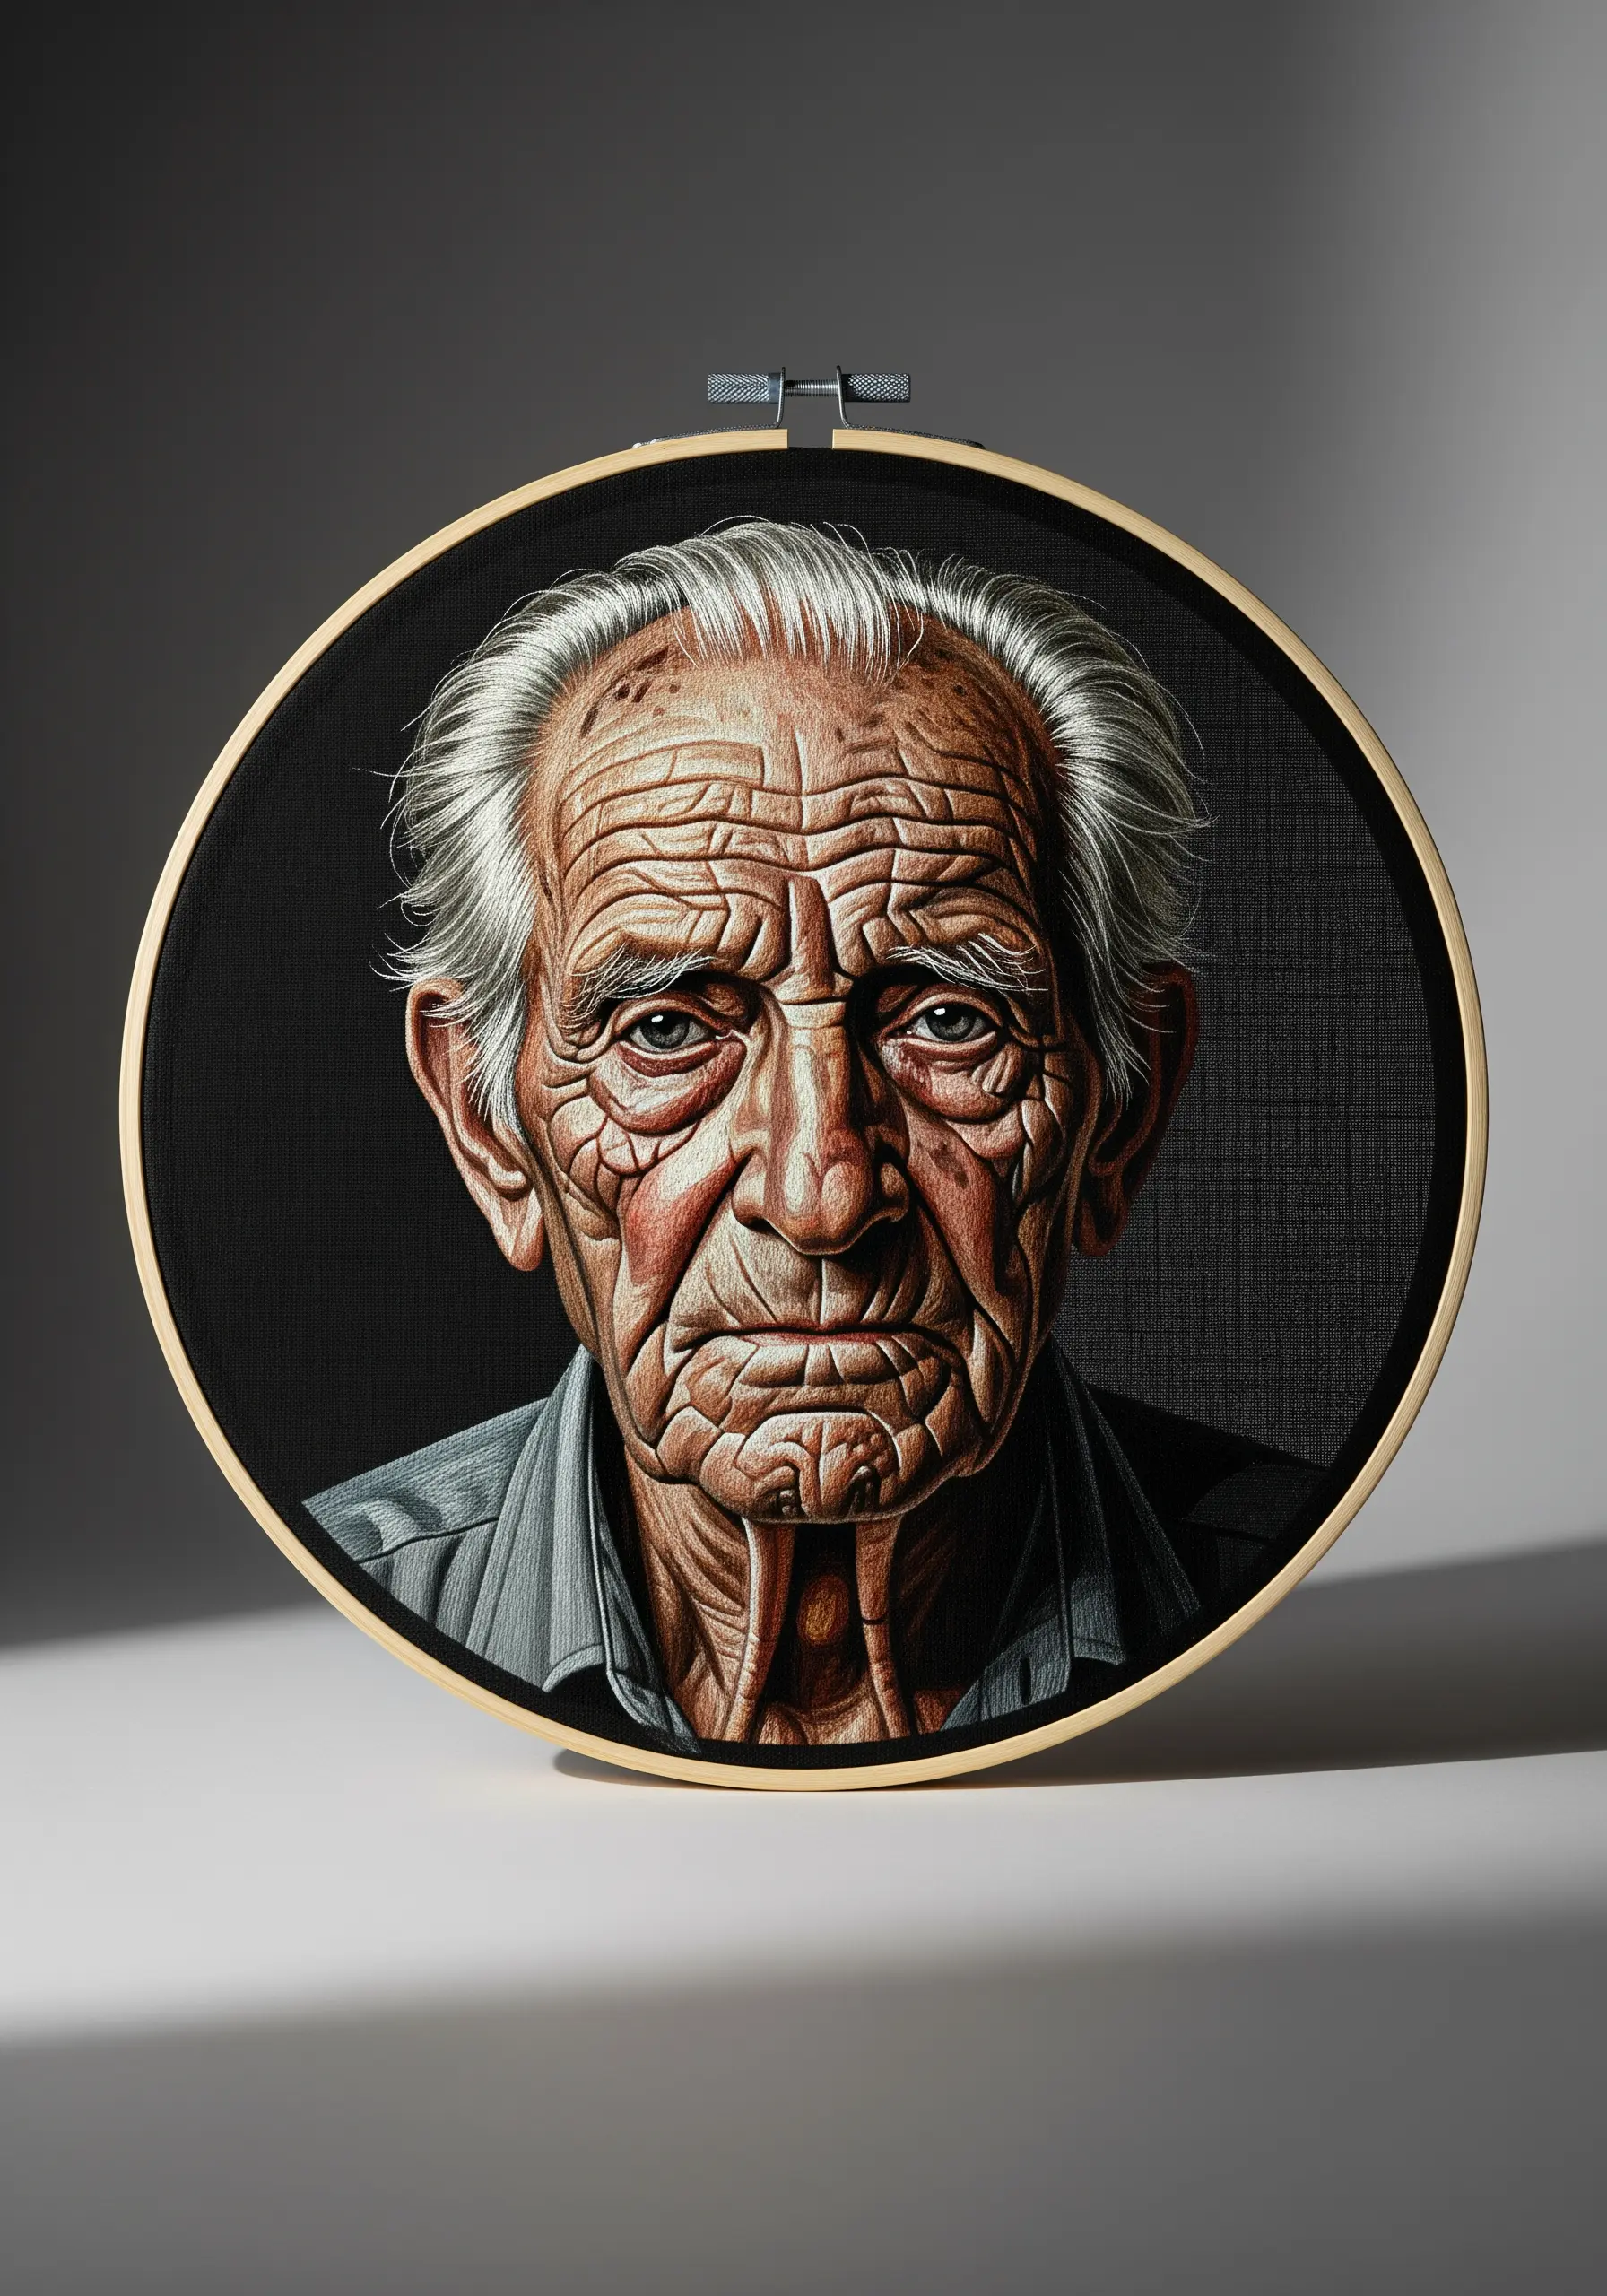
To achieve the stunning realism of aged skin, let your stitches follow the natural topography of the face.
Use a single strand of thread to place tiny stitches along the direction of each line and crease—never stitch against them.
This directional approach mimics how light falls on the skin, creating authentic highlights on raised surfaces and deep shadows in the furrows.
Work on a dark fabric like black linen; it acts as your deepest shadow, allowing you to build up form using only mid-tones and highlights, which saves time and thread.
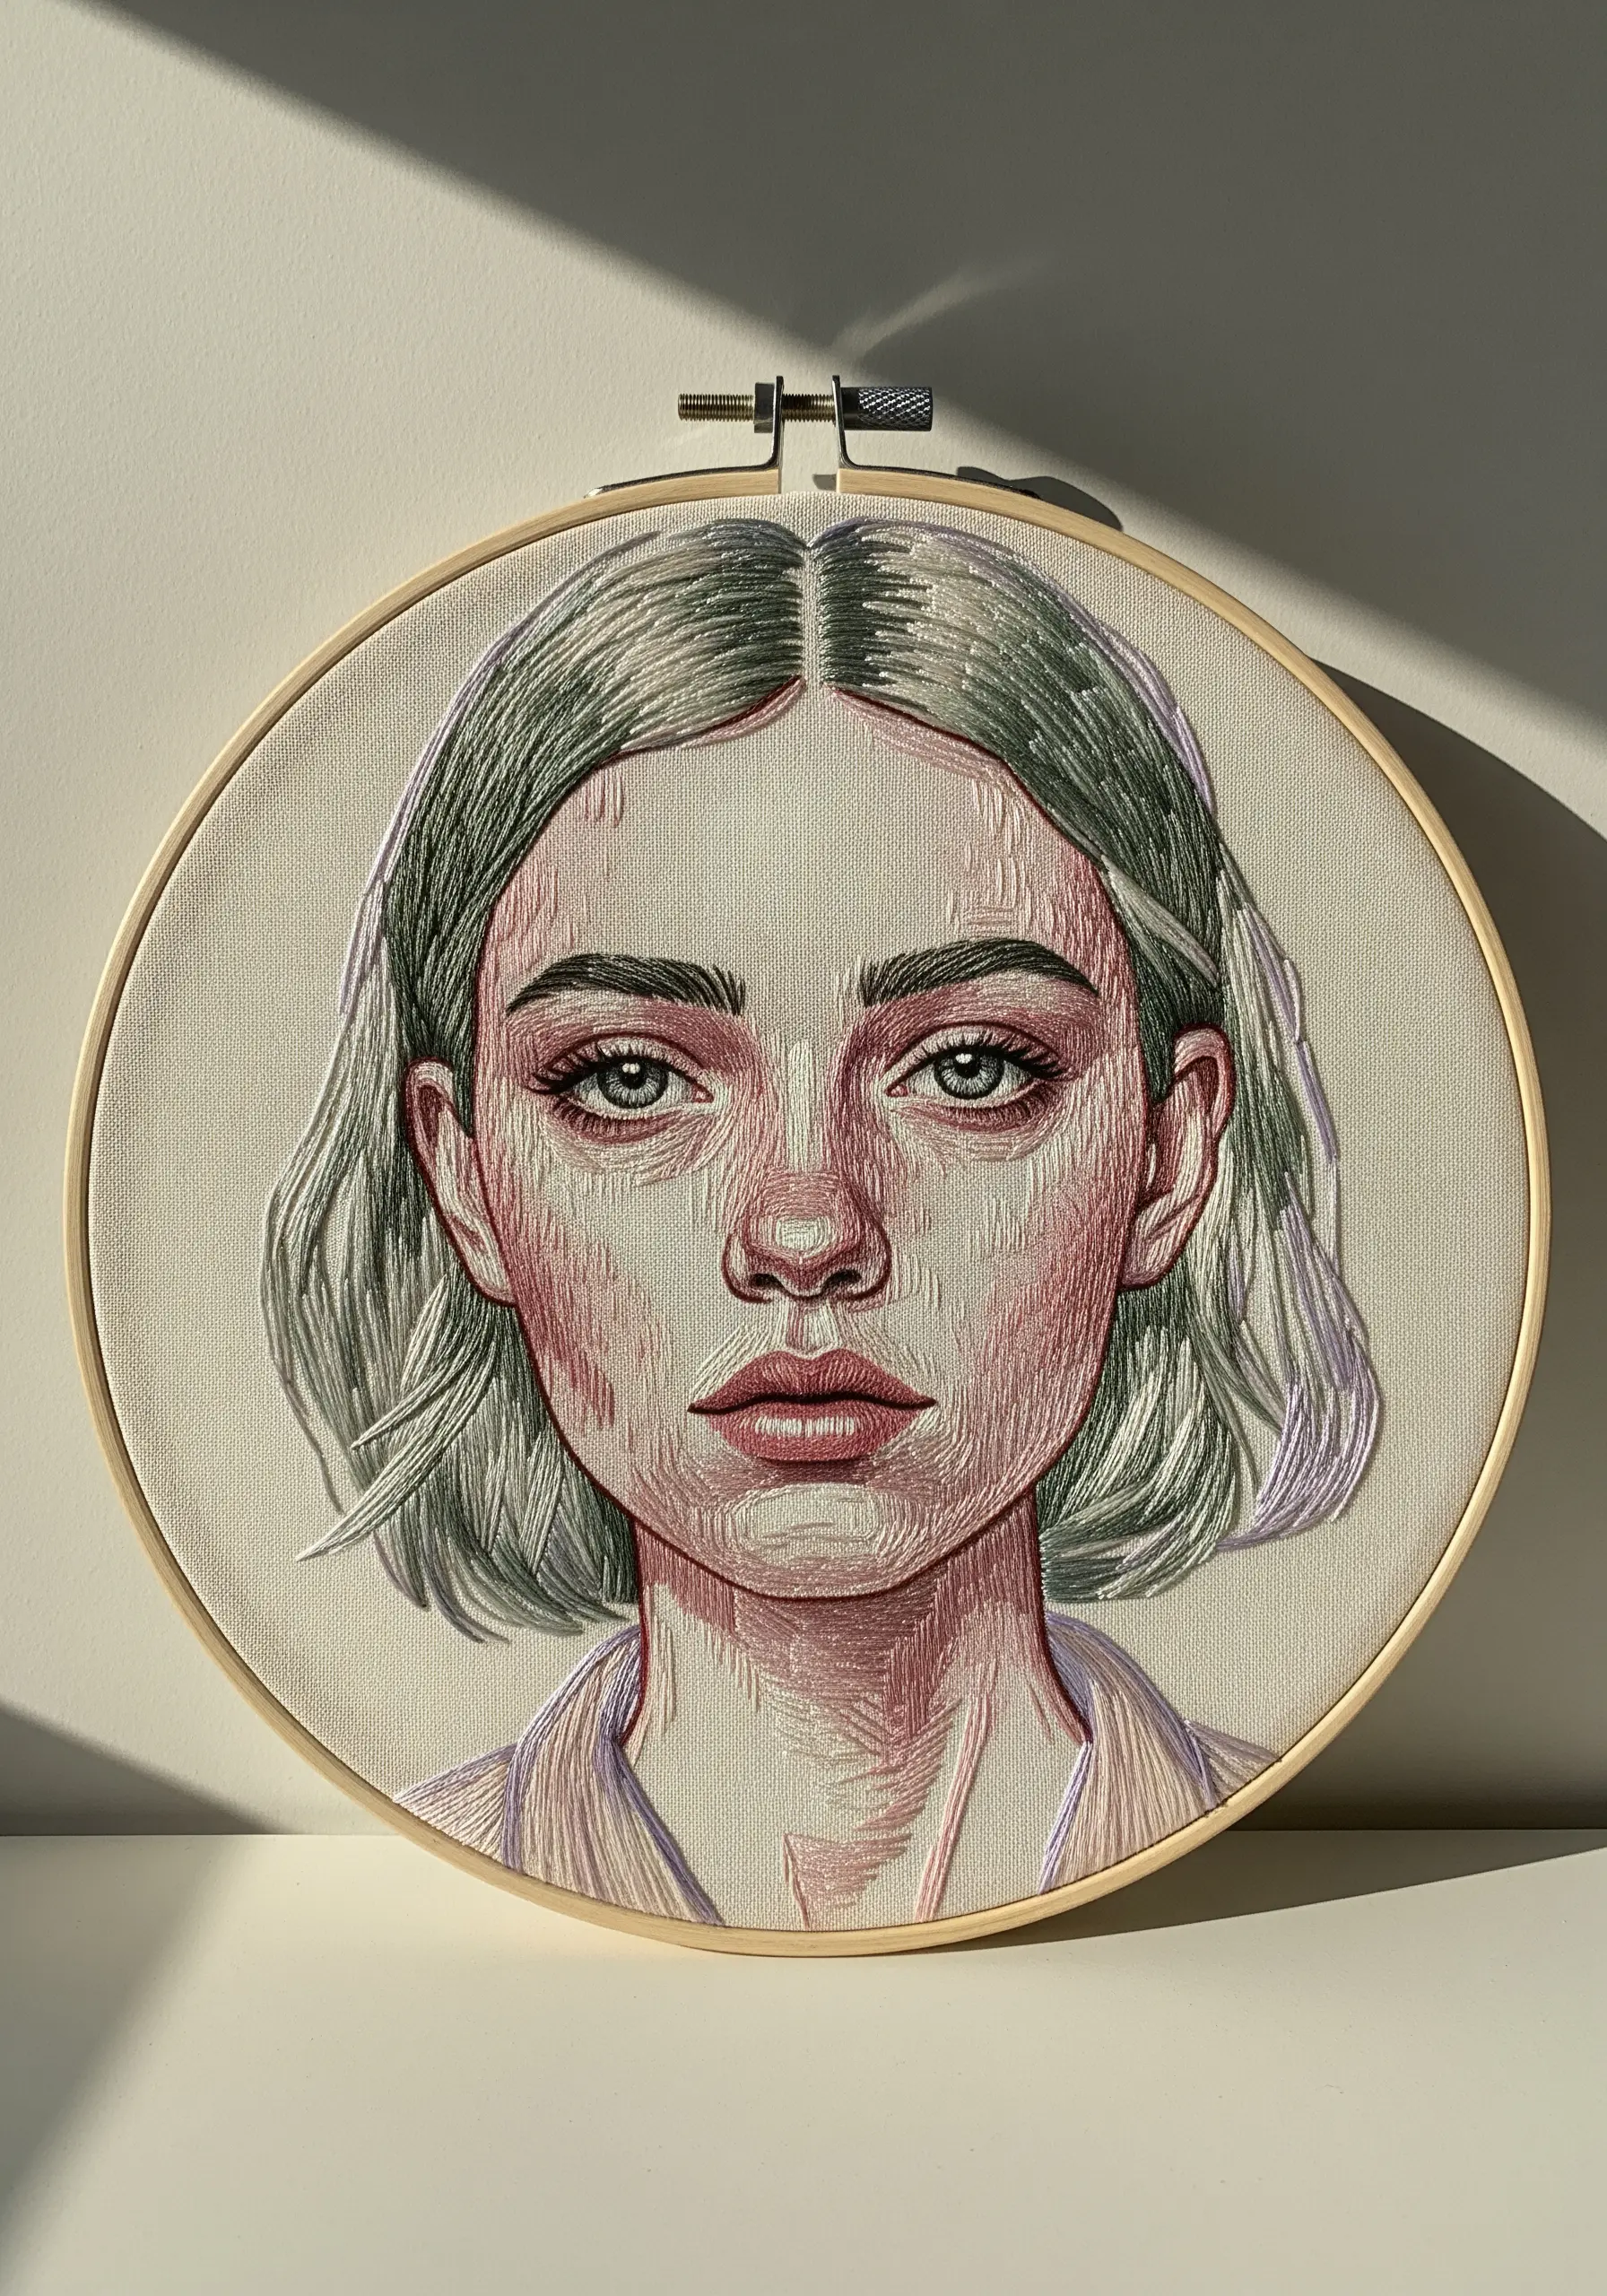
2. Layer Tones for Luminous, Multi-Dimensional Hair
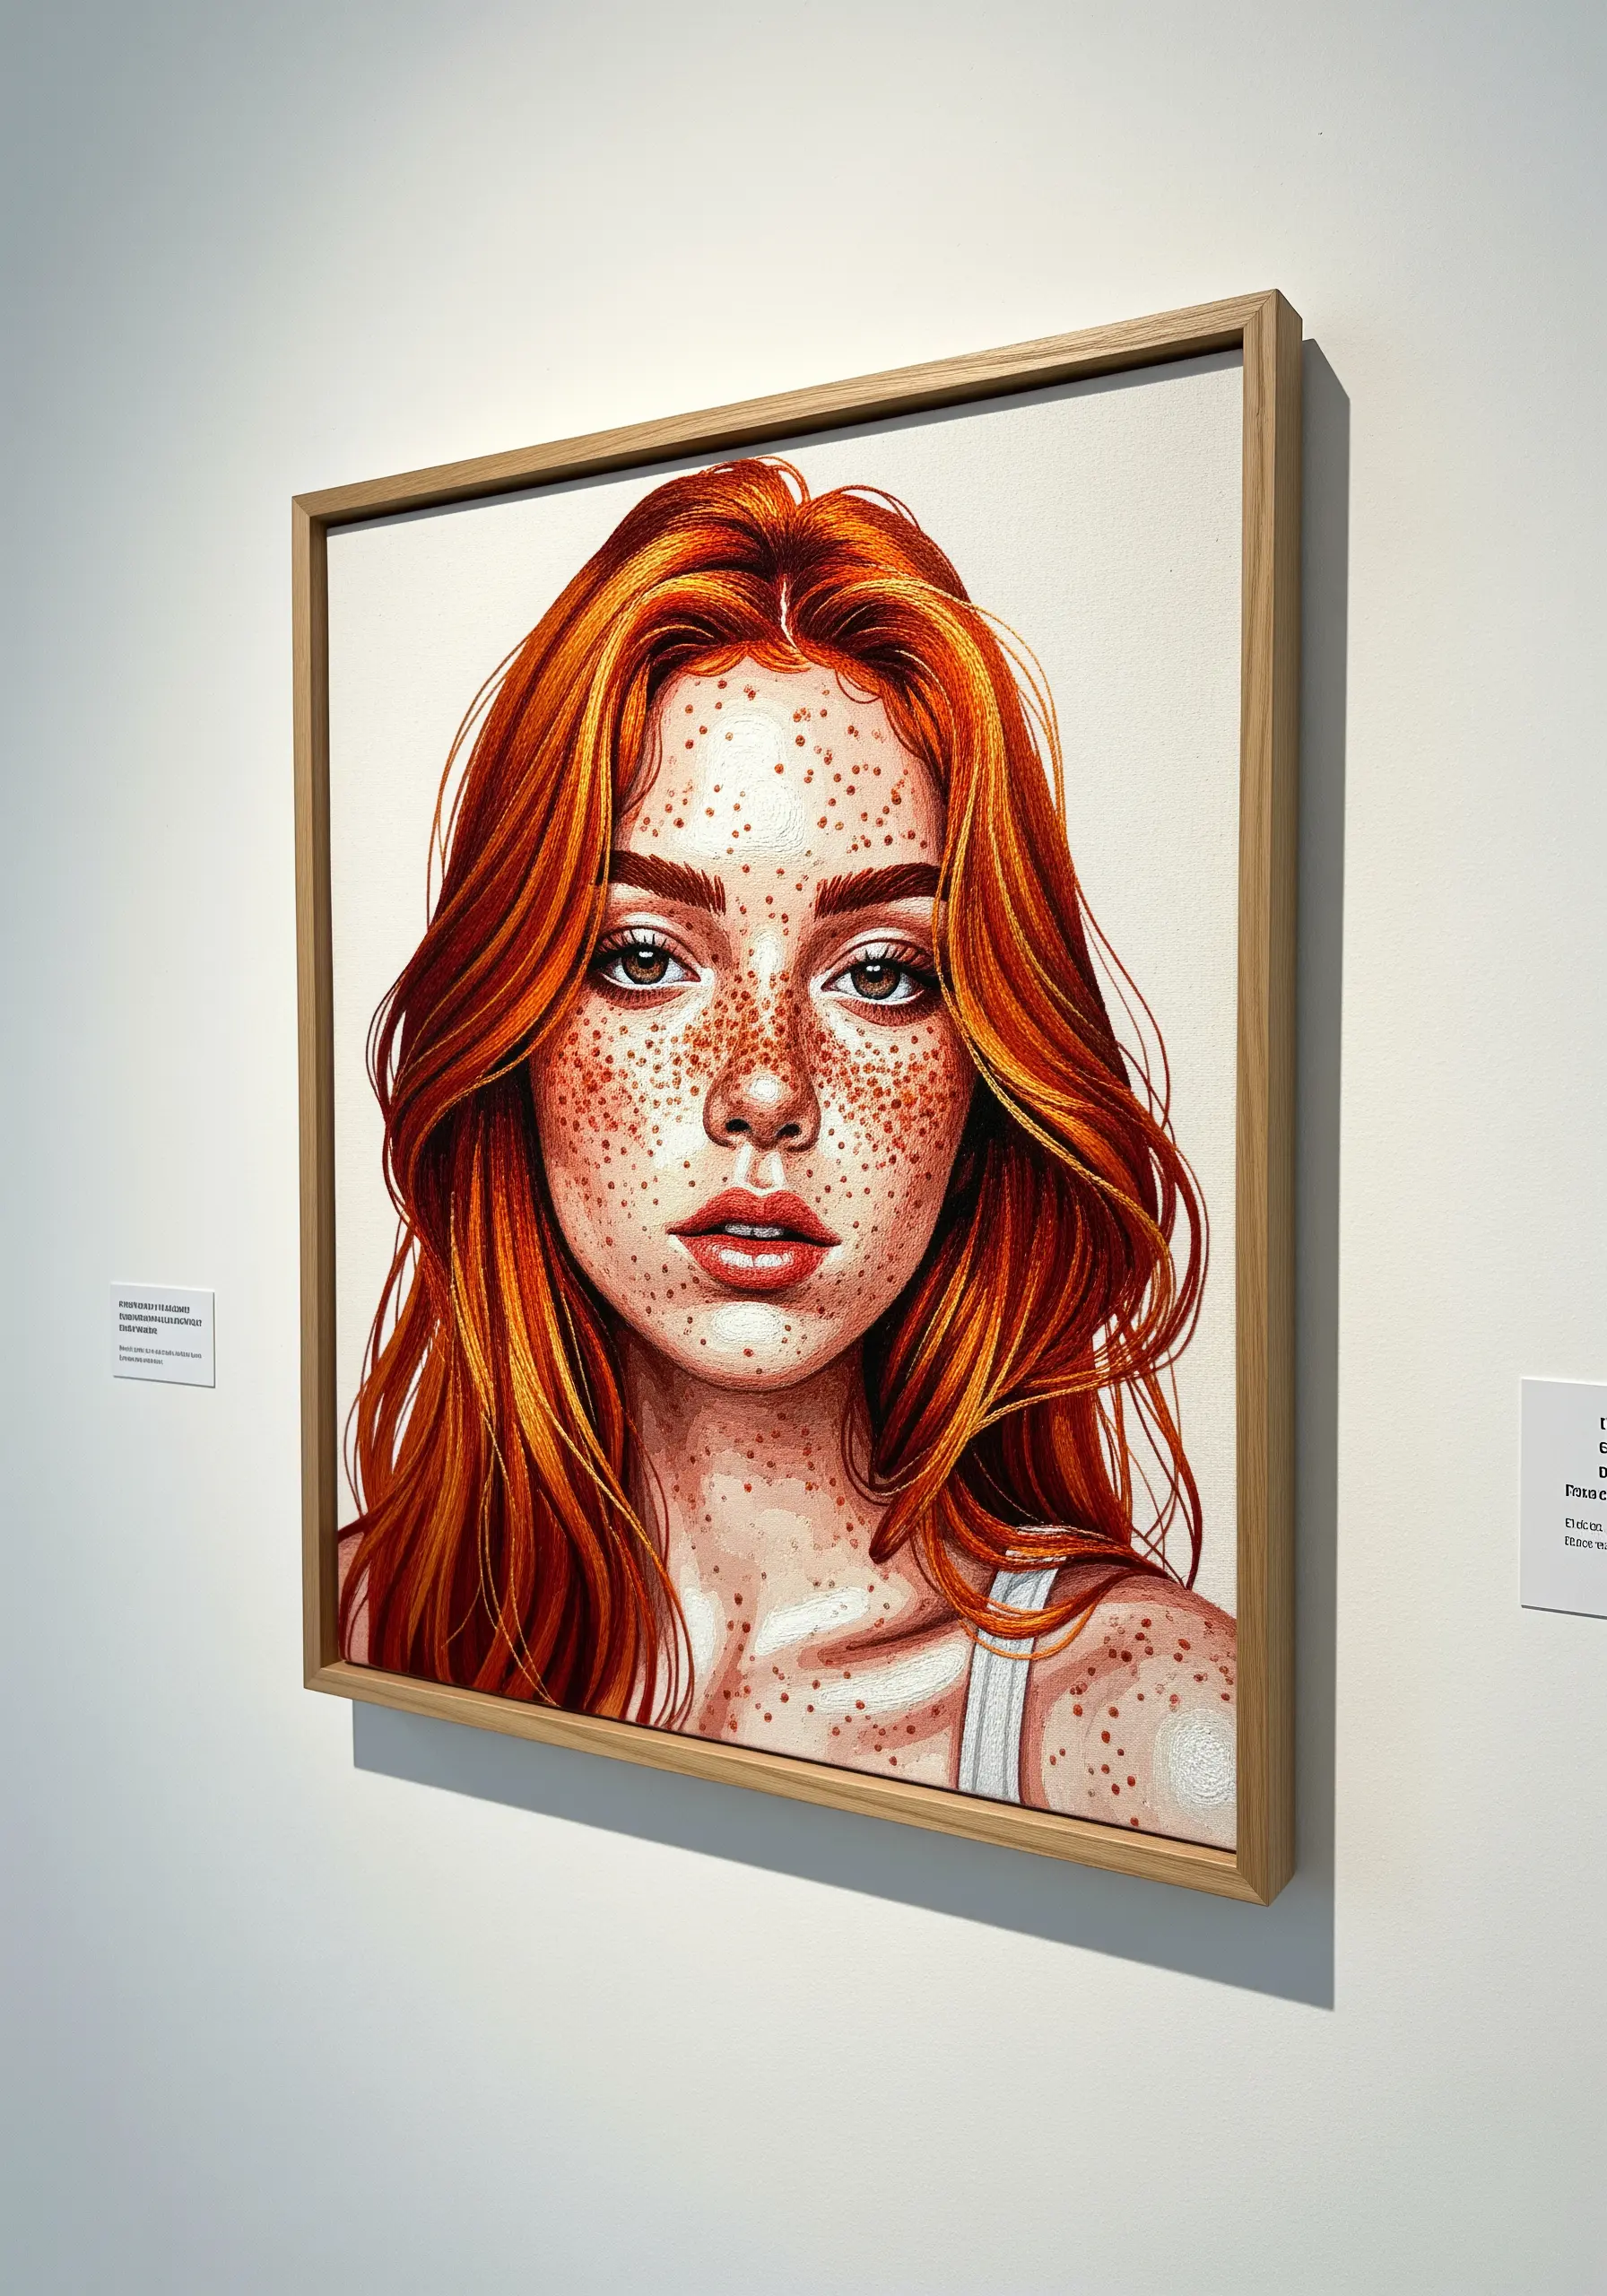
Avoid using a single color for hair, which can make it look flat and unnatural.
Instead, choose at least three to five similar shades—for red hair, think copper, auburn, gold, and terracotta.
Use the long-and-short stitch to blend these colors seamlessly, always following the direction of hair growth.
For freckles, scatter tiny, single seed stitches or French knots in varied tones of brown. This subtle variation is what makes them look like a natural feature, not a uniform pattern.
3. Create Realistic Reflections with Precision Satin Stitch
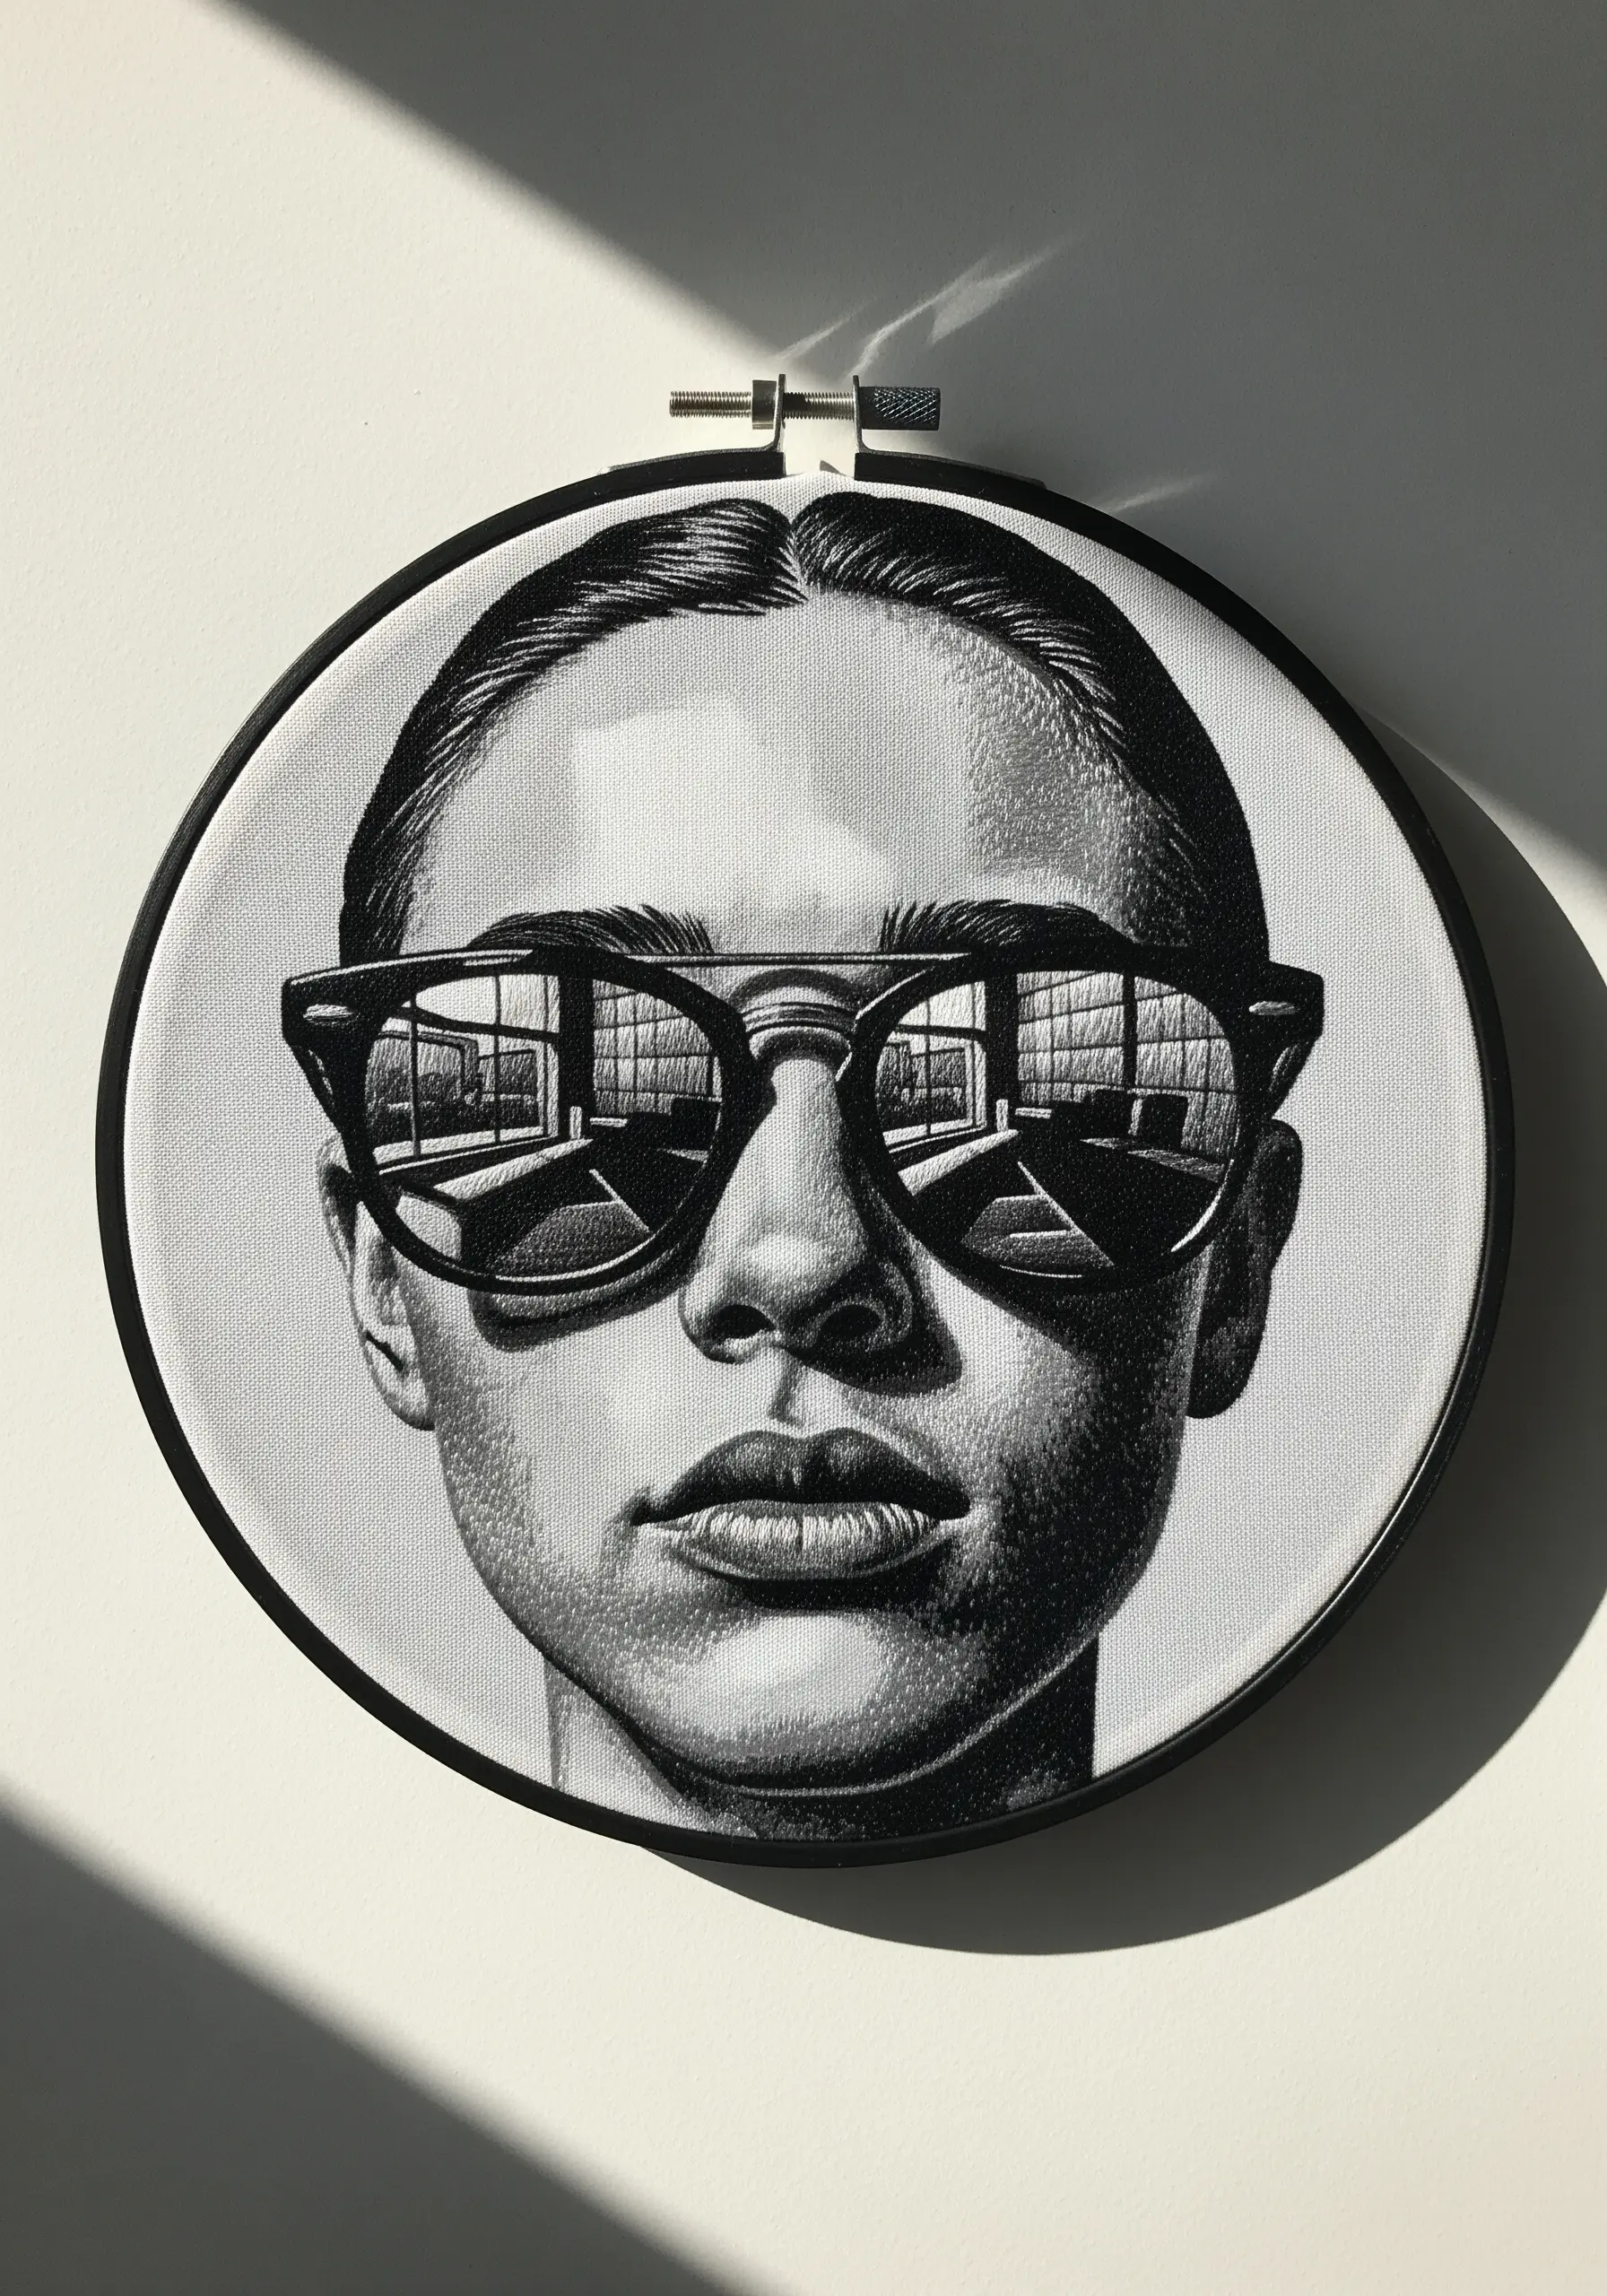
The key to stitching convincing glass or reflective surfaces lies in the absolute precision of your stitches.
Use a single strand of thread and a dense satin stitch, ensuring every stitch lies perfectly parallel to the next.
Map out the reflection first, breaking it down into small blocks of black, white, and grey.
The sharp contrast between the smooth, glossy texture of the lenses and the softer, more varied stitches of the skin creates a powerful and realistic illusion.
4. Capture Light on Polished Wood with Directional Blending
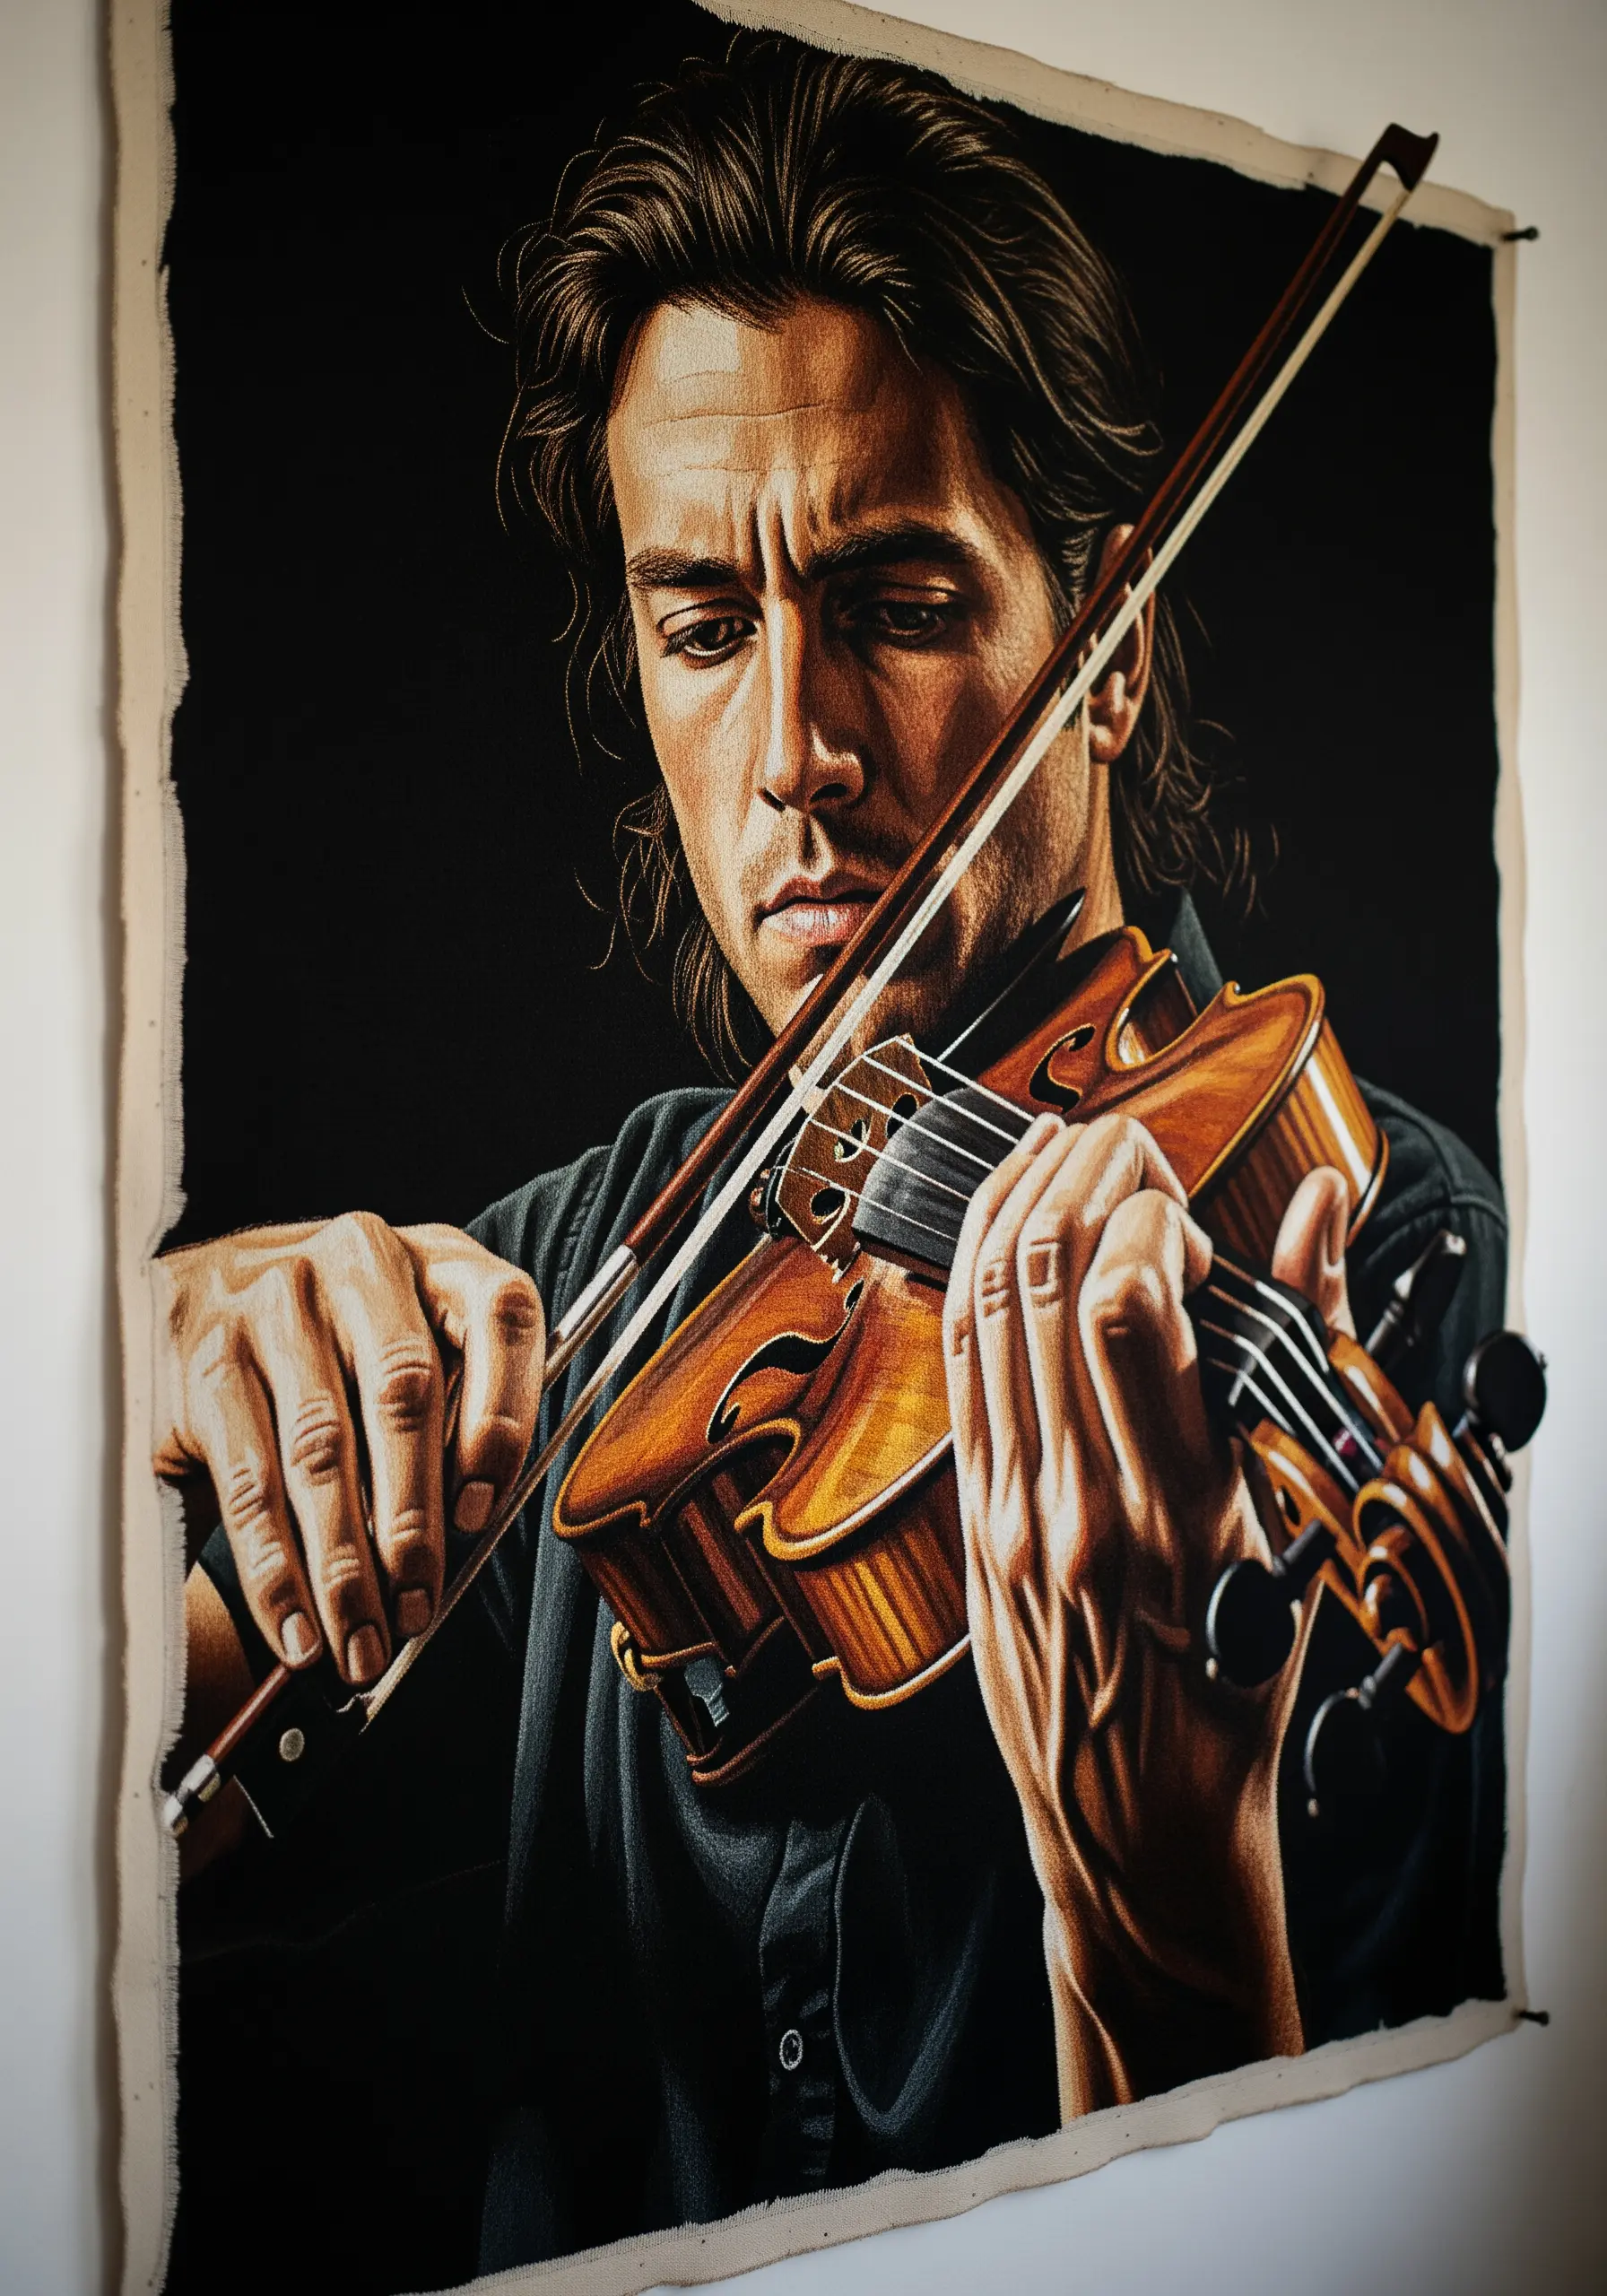
To mimic the glossy finish of a musical instrument, your stitch direction is paramount.
Use long-and-short stitch with a blend of ochre, brown, and gold threads, laying them down in the same direction as the wood grain.
The magic happens with the highlights. A few perfectly placed stitches in a bright white or pale yellow thread will instantly create the illusion of a light source reflecting off a polished, curved surface.
5. Define Form with Dramatic Negative Space

When you work on black fabric, the fabric itself does half the work for you—it becomes your deepest shadow.
This technique, known as chiaroscuro, allows you to build form using only light and mid-tones.
Focus your stitching on the illuminated side of the face, letting your stitches fade into the unstitched black canvas.
This high-contrast approach creates immediate drama and depth without needing to fill the entire surface.
6. Build Emotional Depth with a Monochromatic Palette
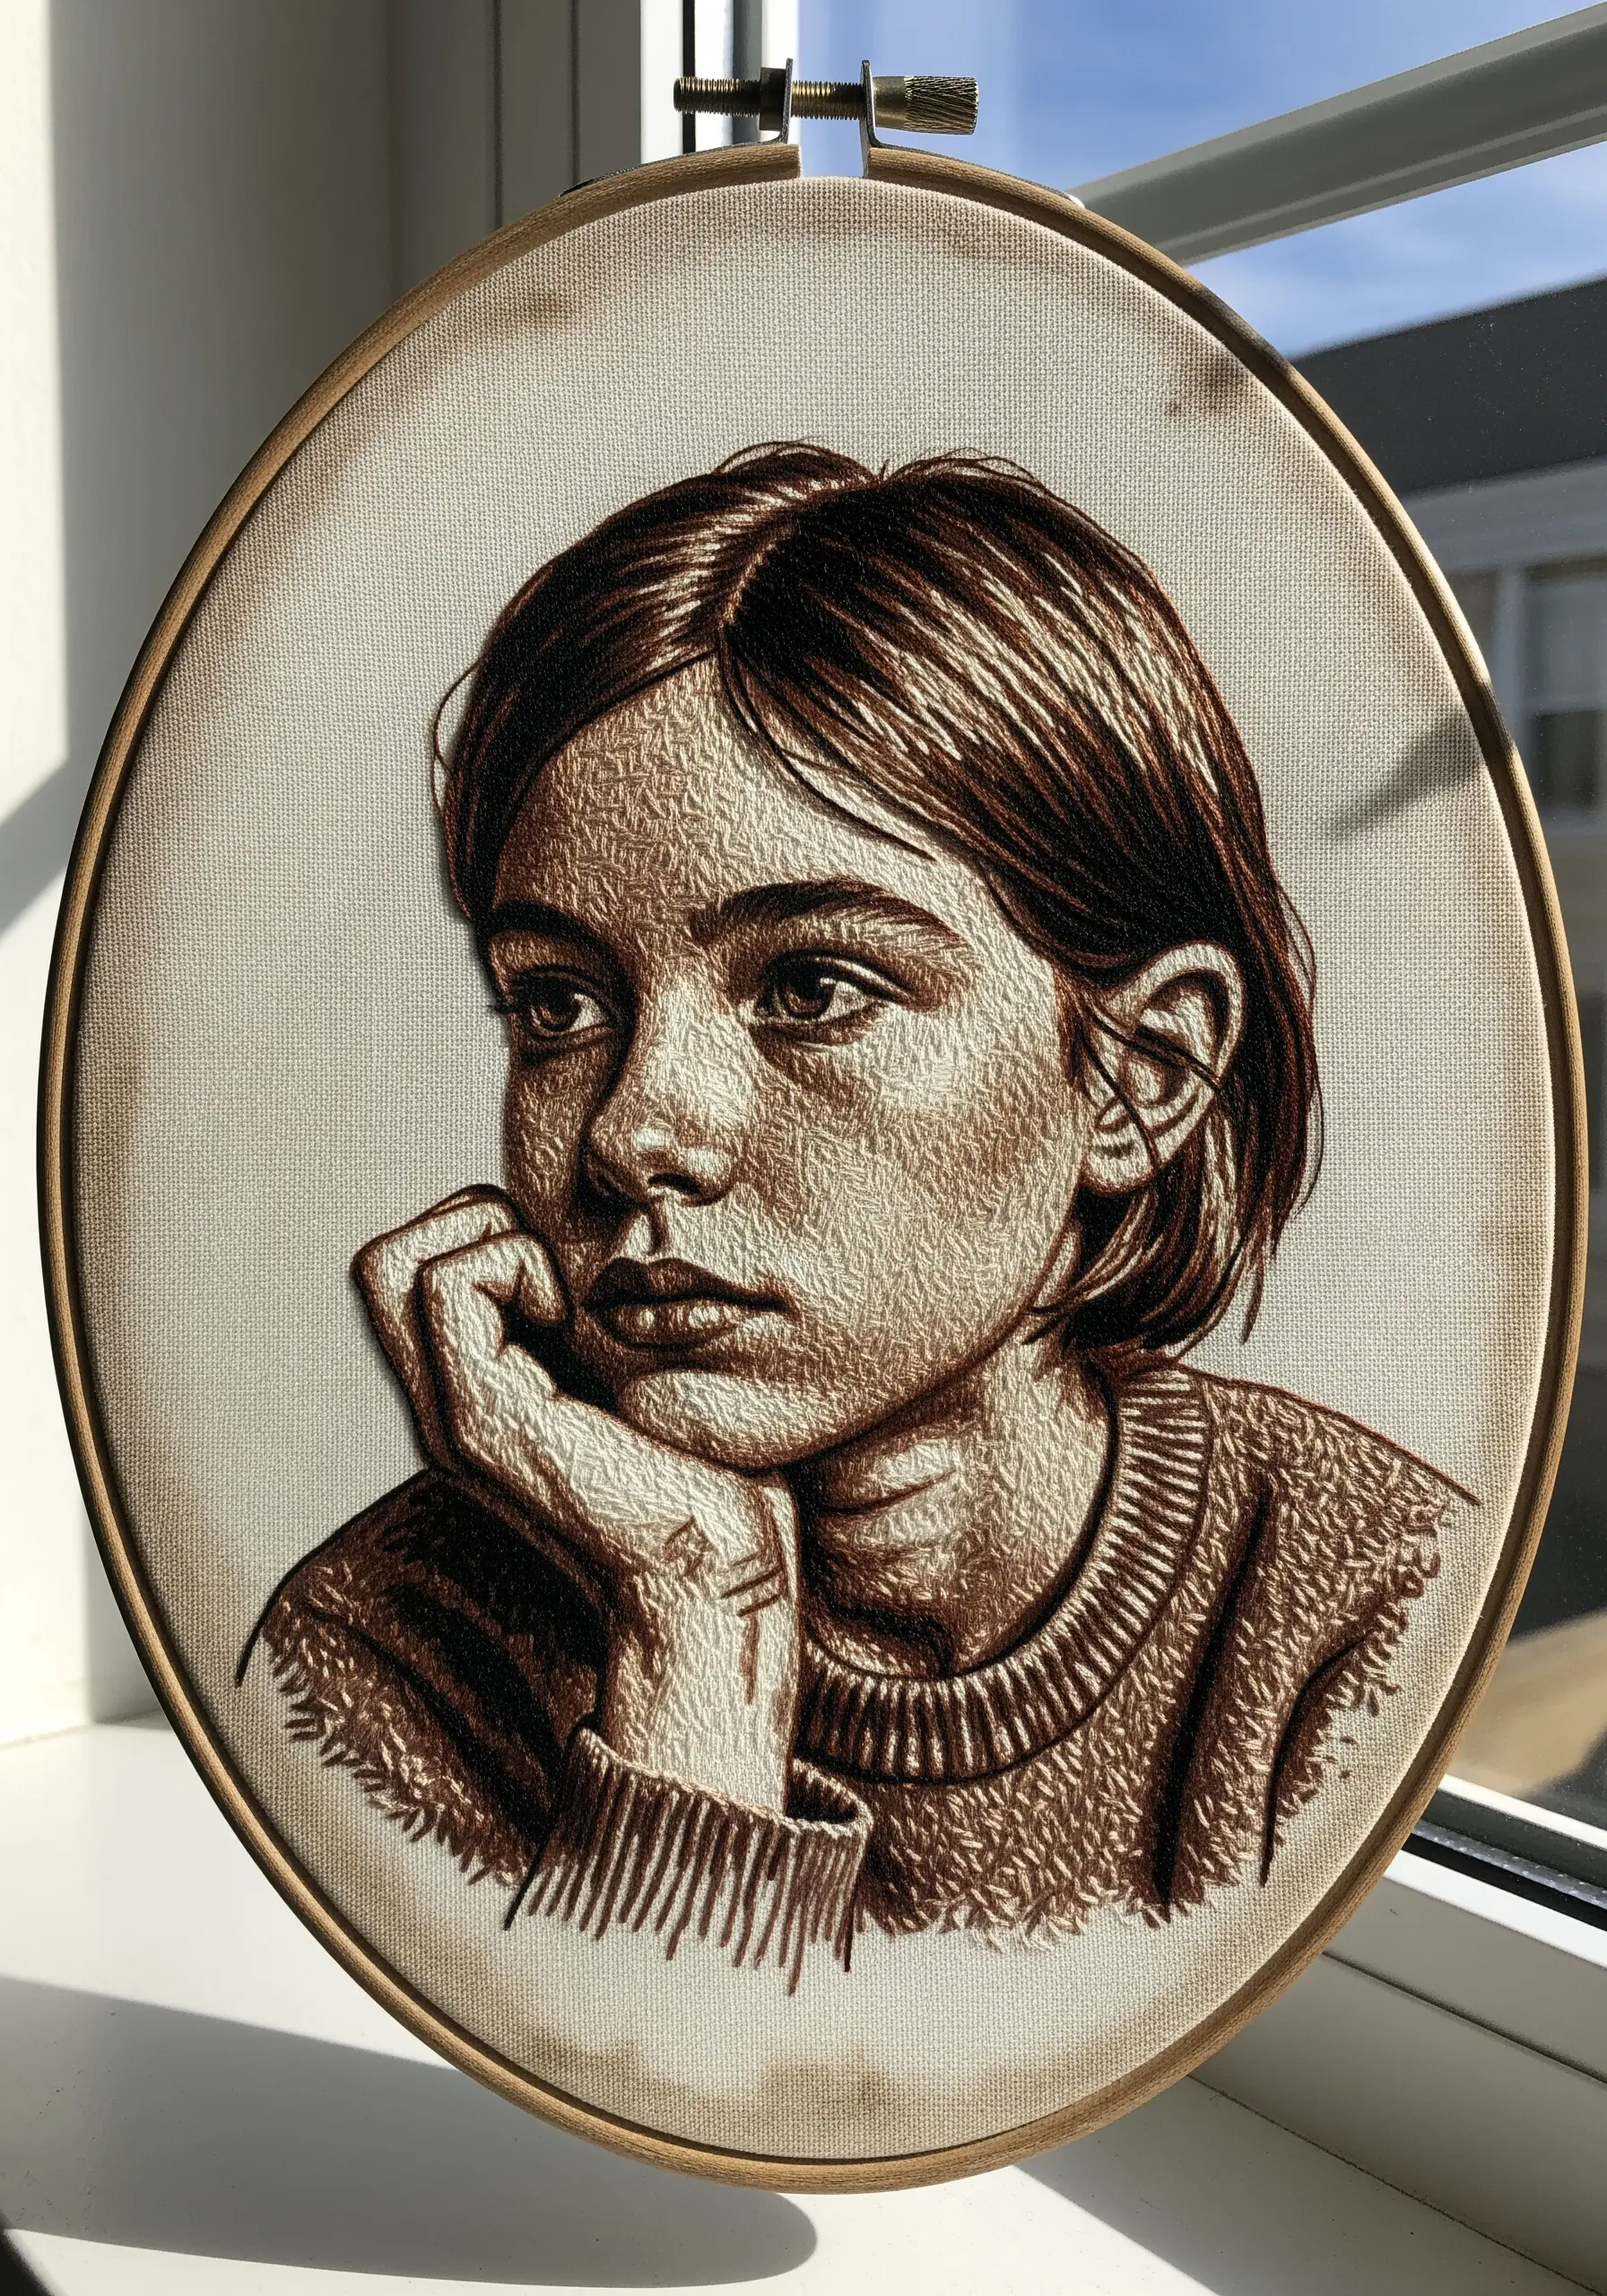
Working with a limited monochromatic palette forces you to become a master of light and shadow.
Choose three to four shades of a single color, like sepia, and assign them to your darks, mid-tones, and highlights.
Use the densest stitches for the darkest areas, and let the fabric show through in the lightest spots.
This method removes the distraction of color, allowing you to focus entirely on form and mood, resulting in a powerfully emotive portrait.
7. Capture a Sense of Movement with Loose Threads
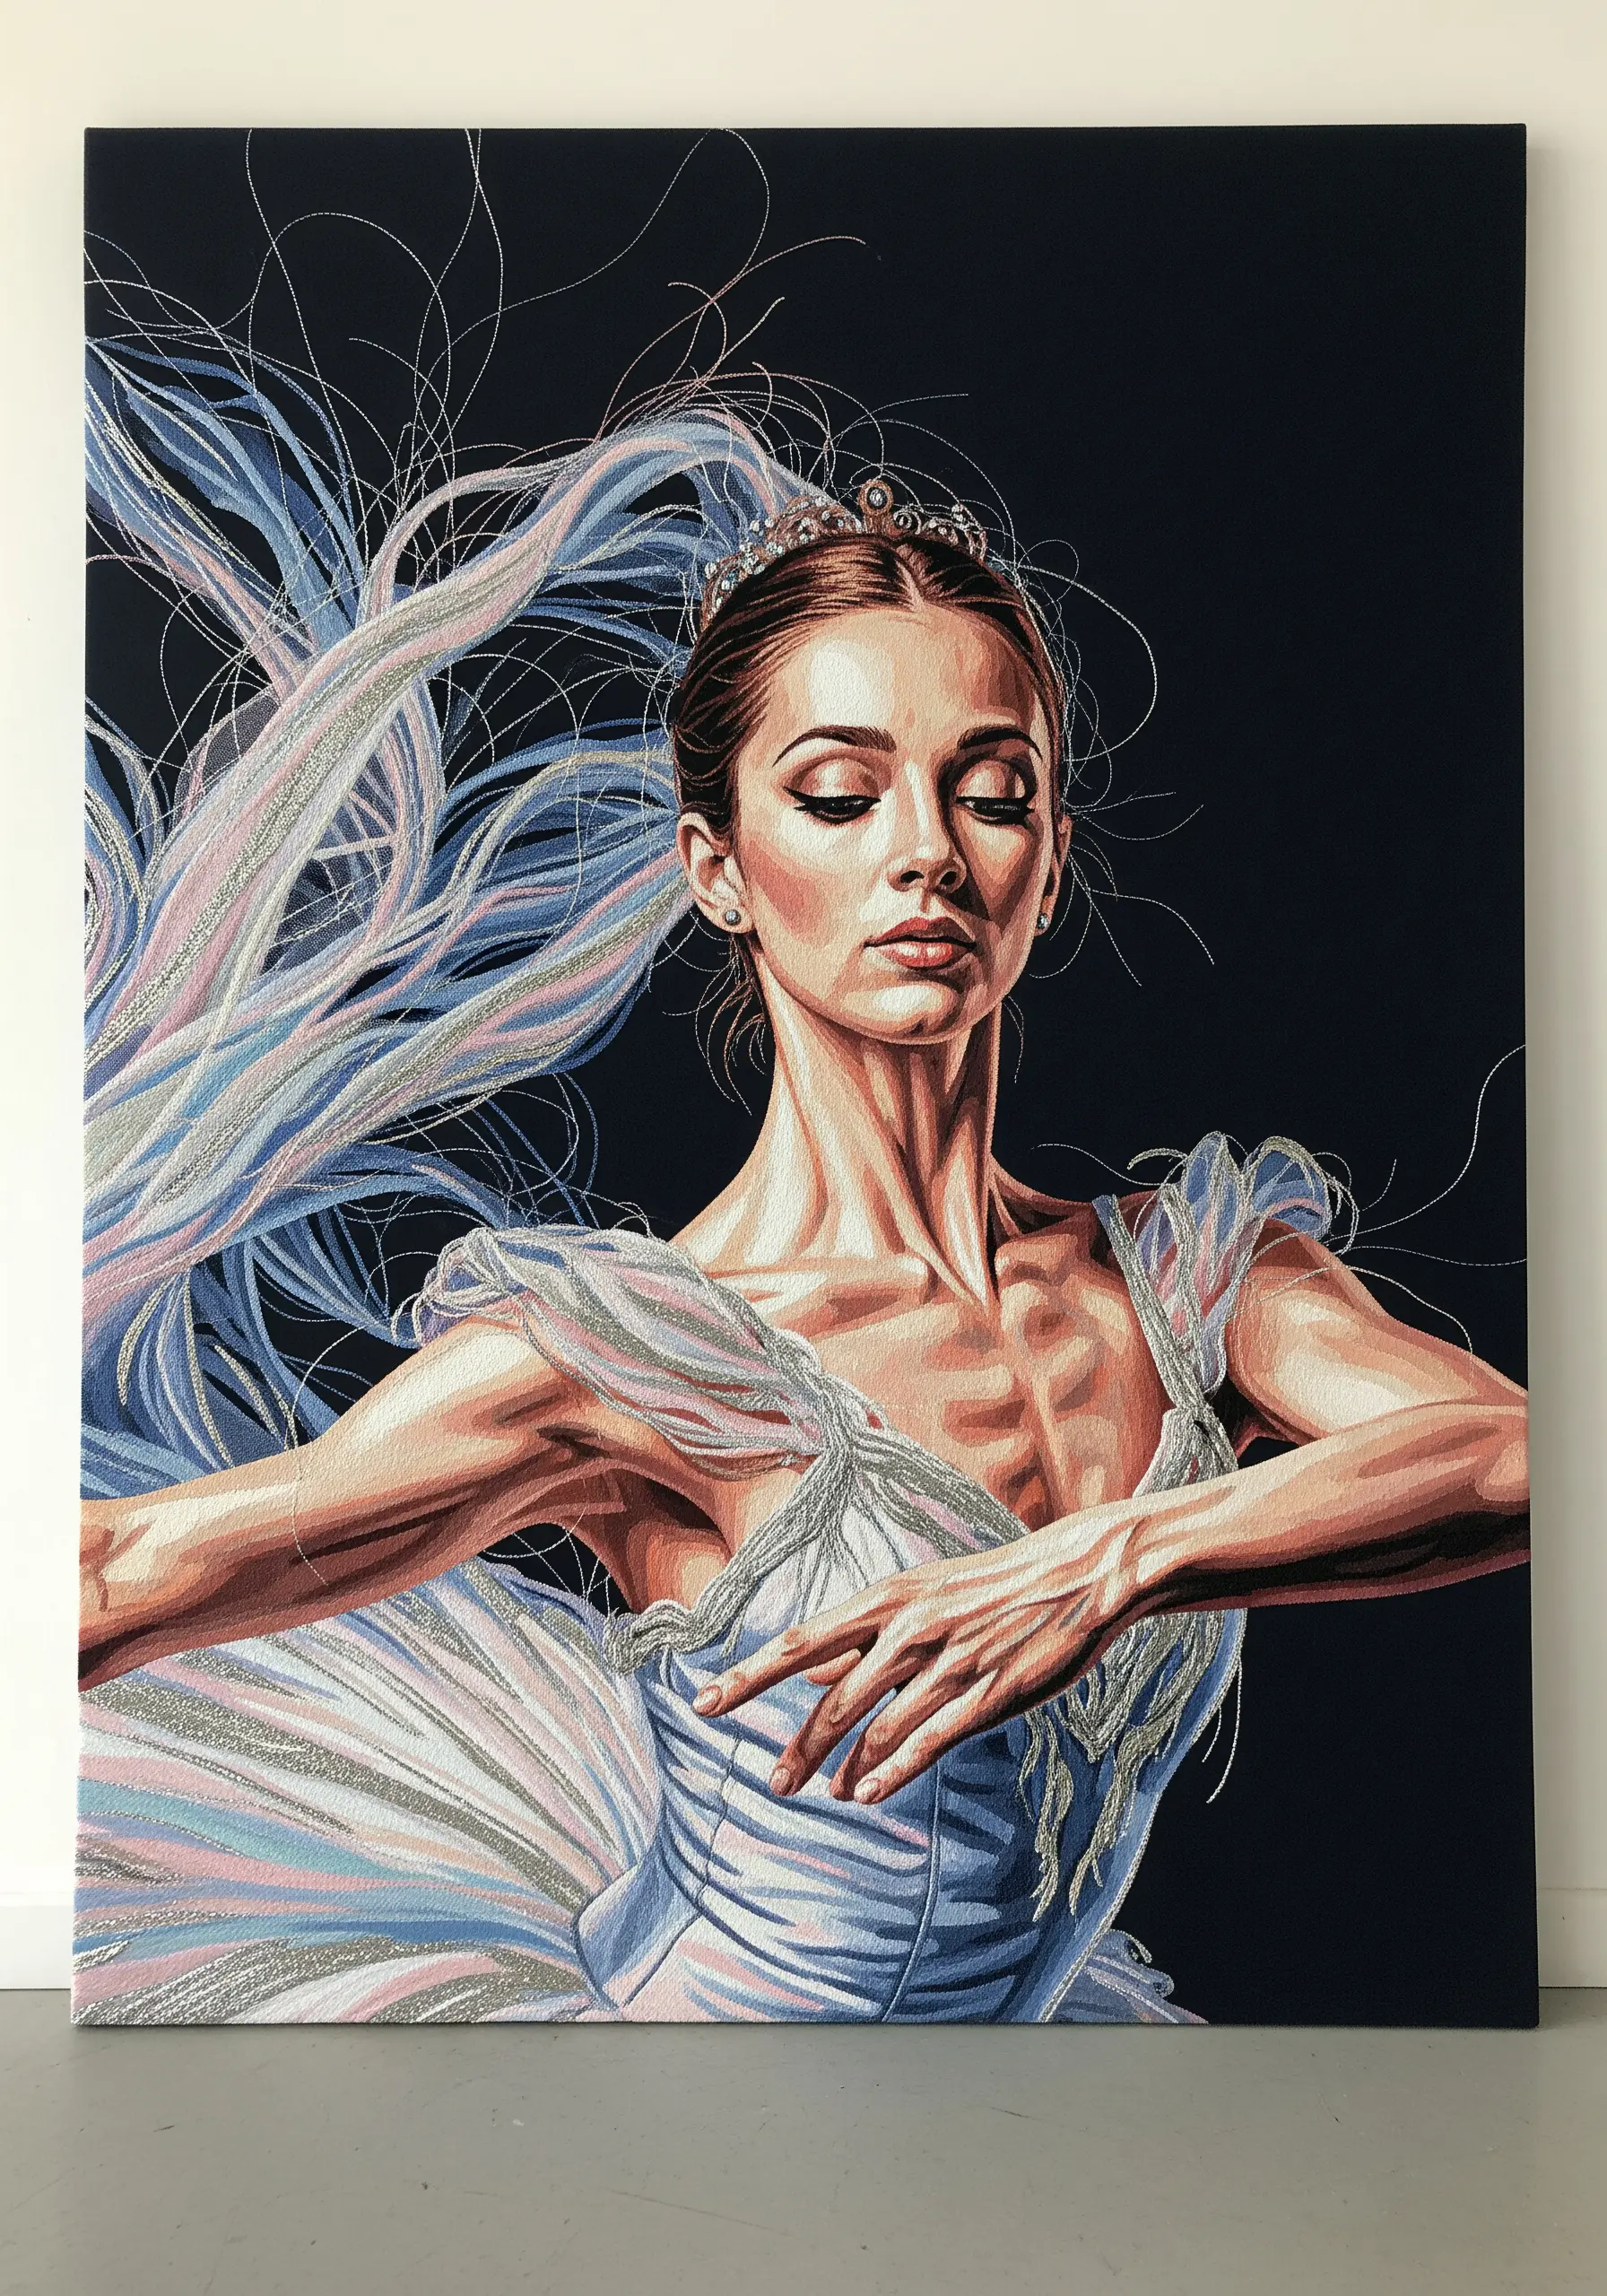
To create dynamic motion in a static piece, juxtapose areas of tight, controlled stitching with elements of expressive freedom.
Render the subject with precision, then allow threads to flow freely from parts of the costume or hair.
To do this, anchor long strands of thread at one end and let them drape and swirl across the canvas without tacking them down.
Using fine, light-catching threads like silk or metallics enhances this ethereal, kinetic effect.
8. Engineer a Halo Effect with Reflective Thread
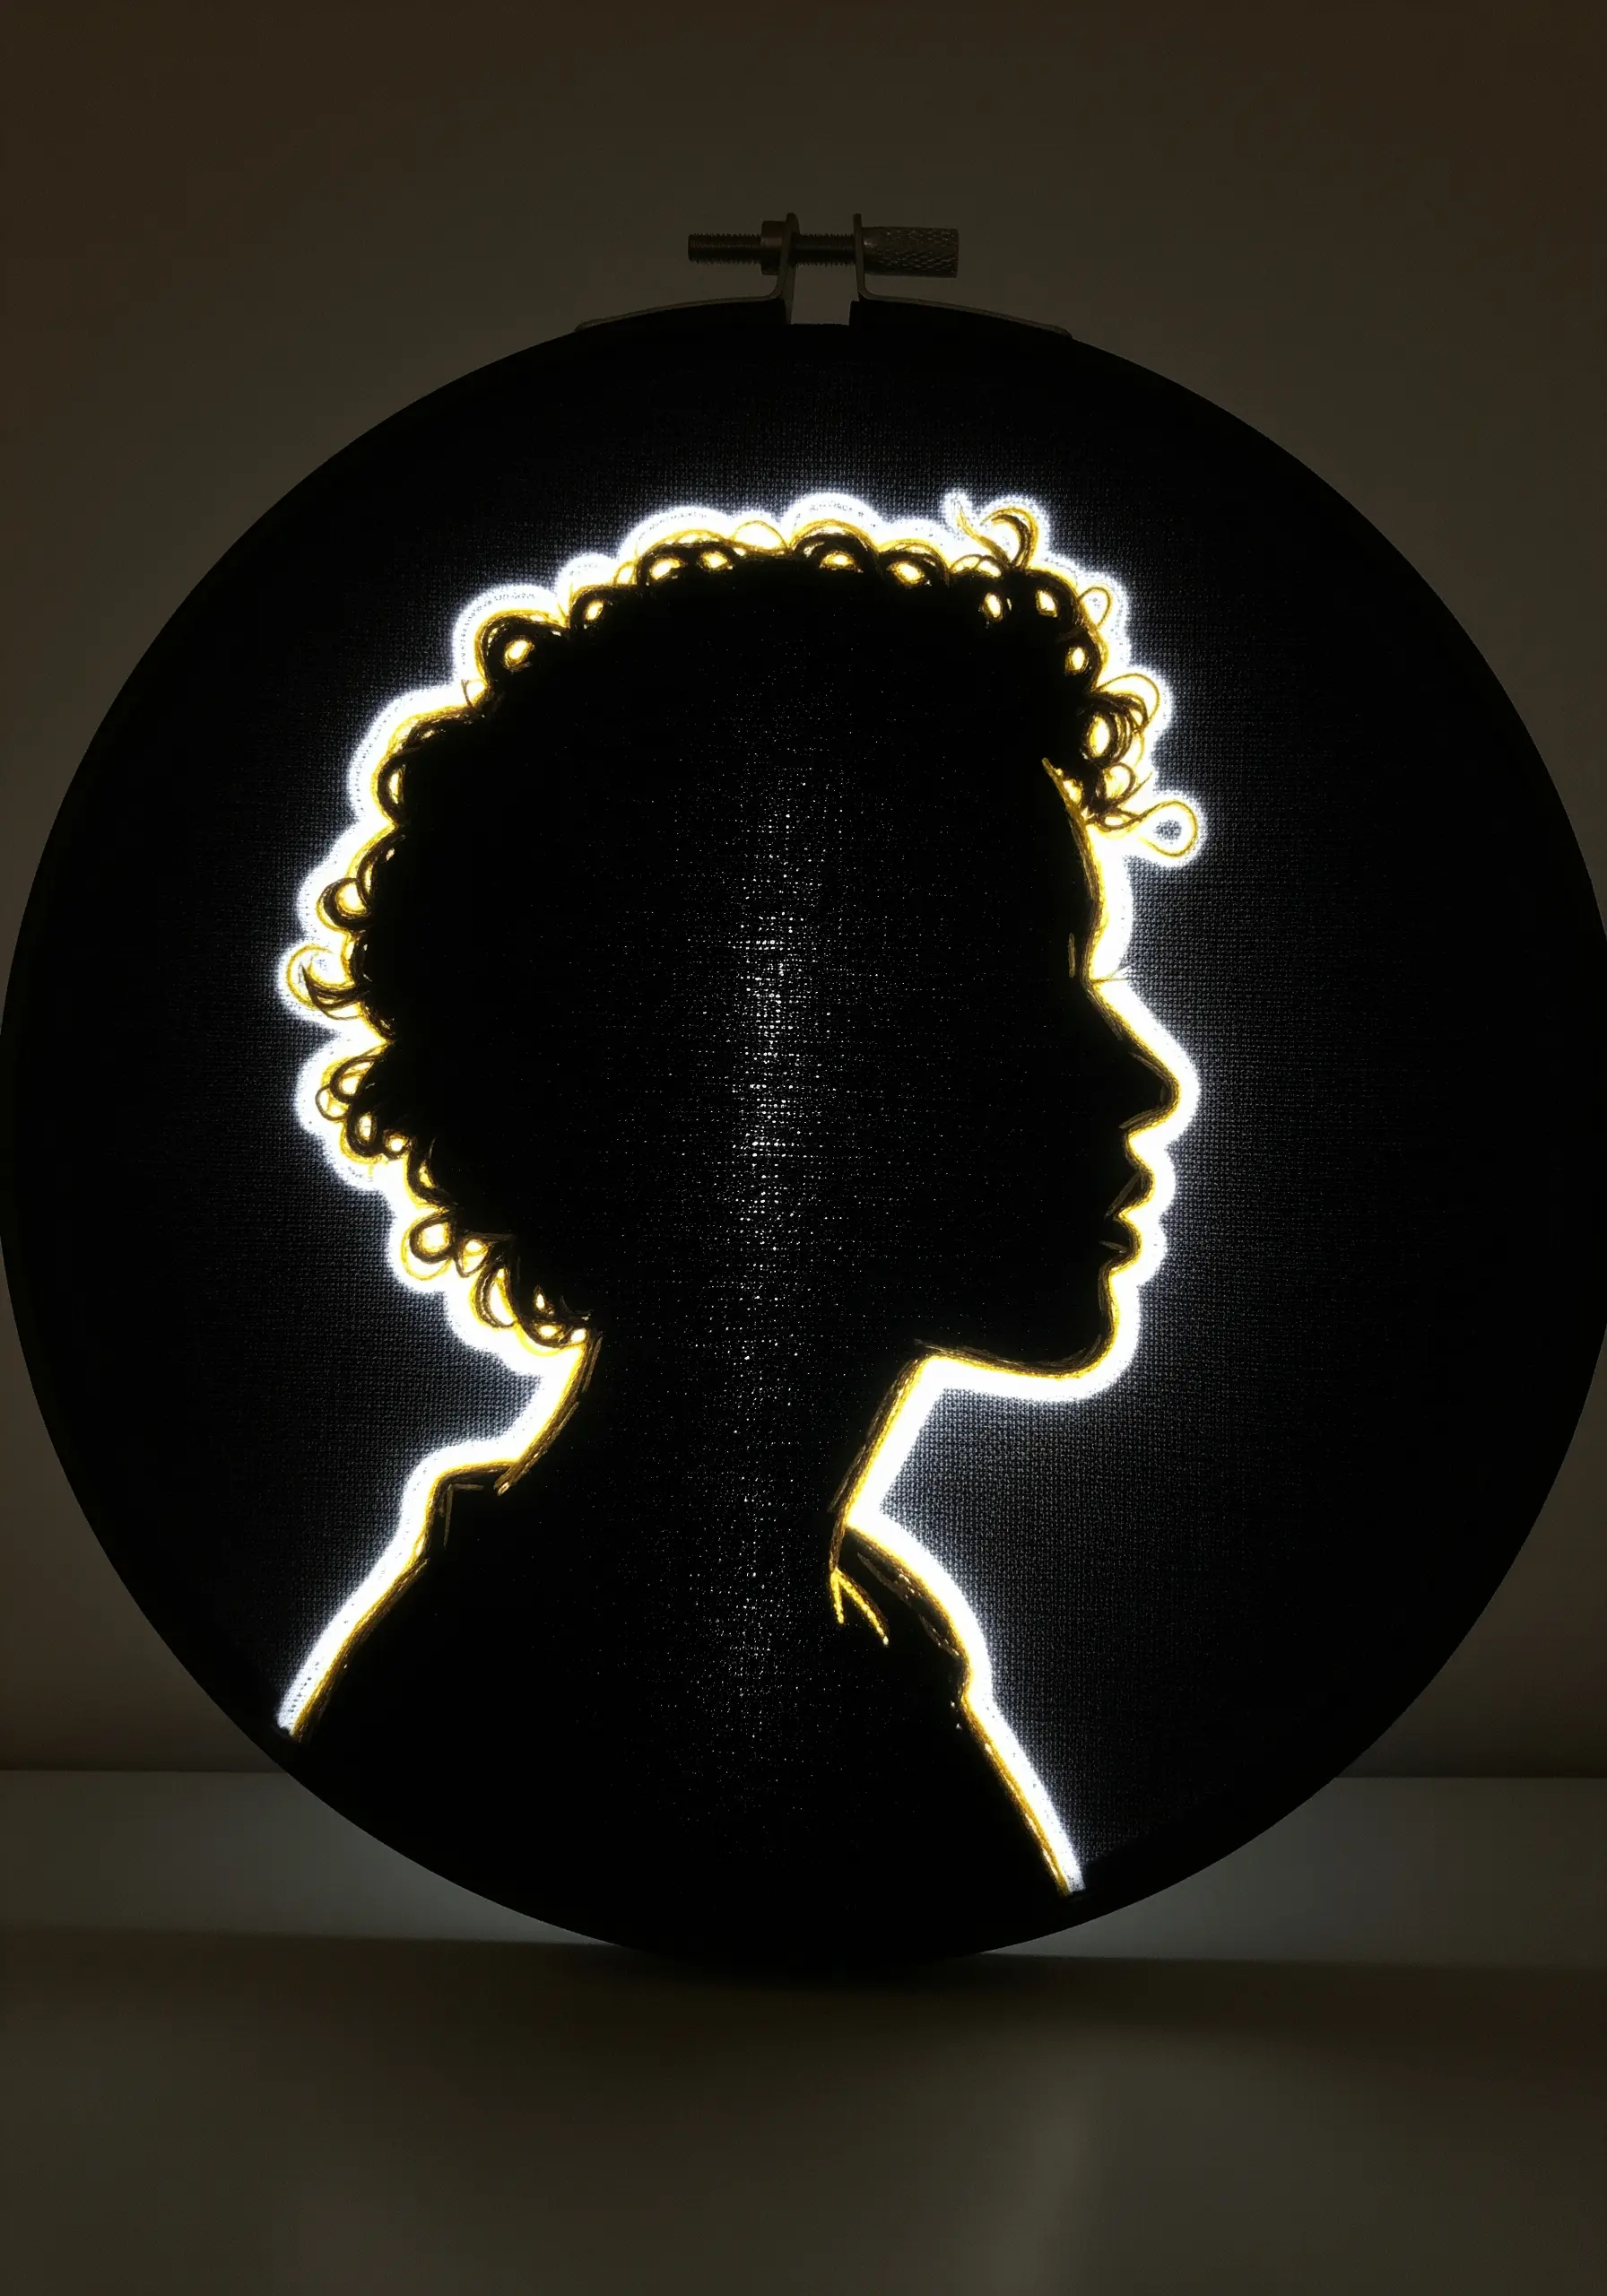
This striking silhouette is defined entirely by its outline, making thread choice critical.
Use a reflective or glow-in-the-dark thread against a matte black fabric to create maximum contrast.
Stitch the outline using a dense, raised stitch like a heavy chain stitch or padded satin stitch.
This thickness ensures the specialty thread catches as much light as possible, creating a radiant halo that appears to glow from within.
9. Stitch a Universe of Detail in the Iris
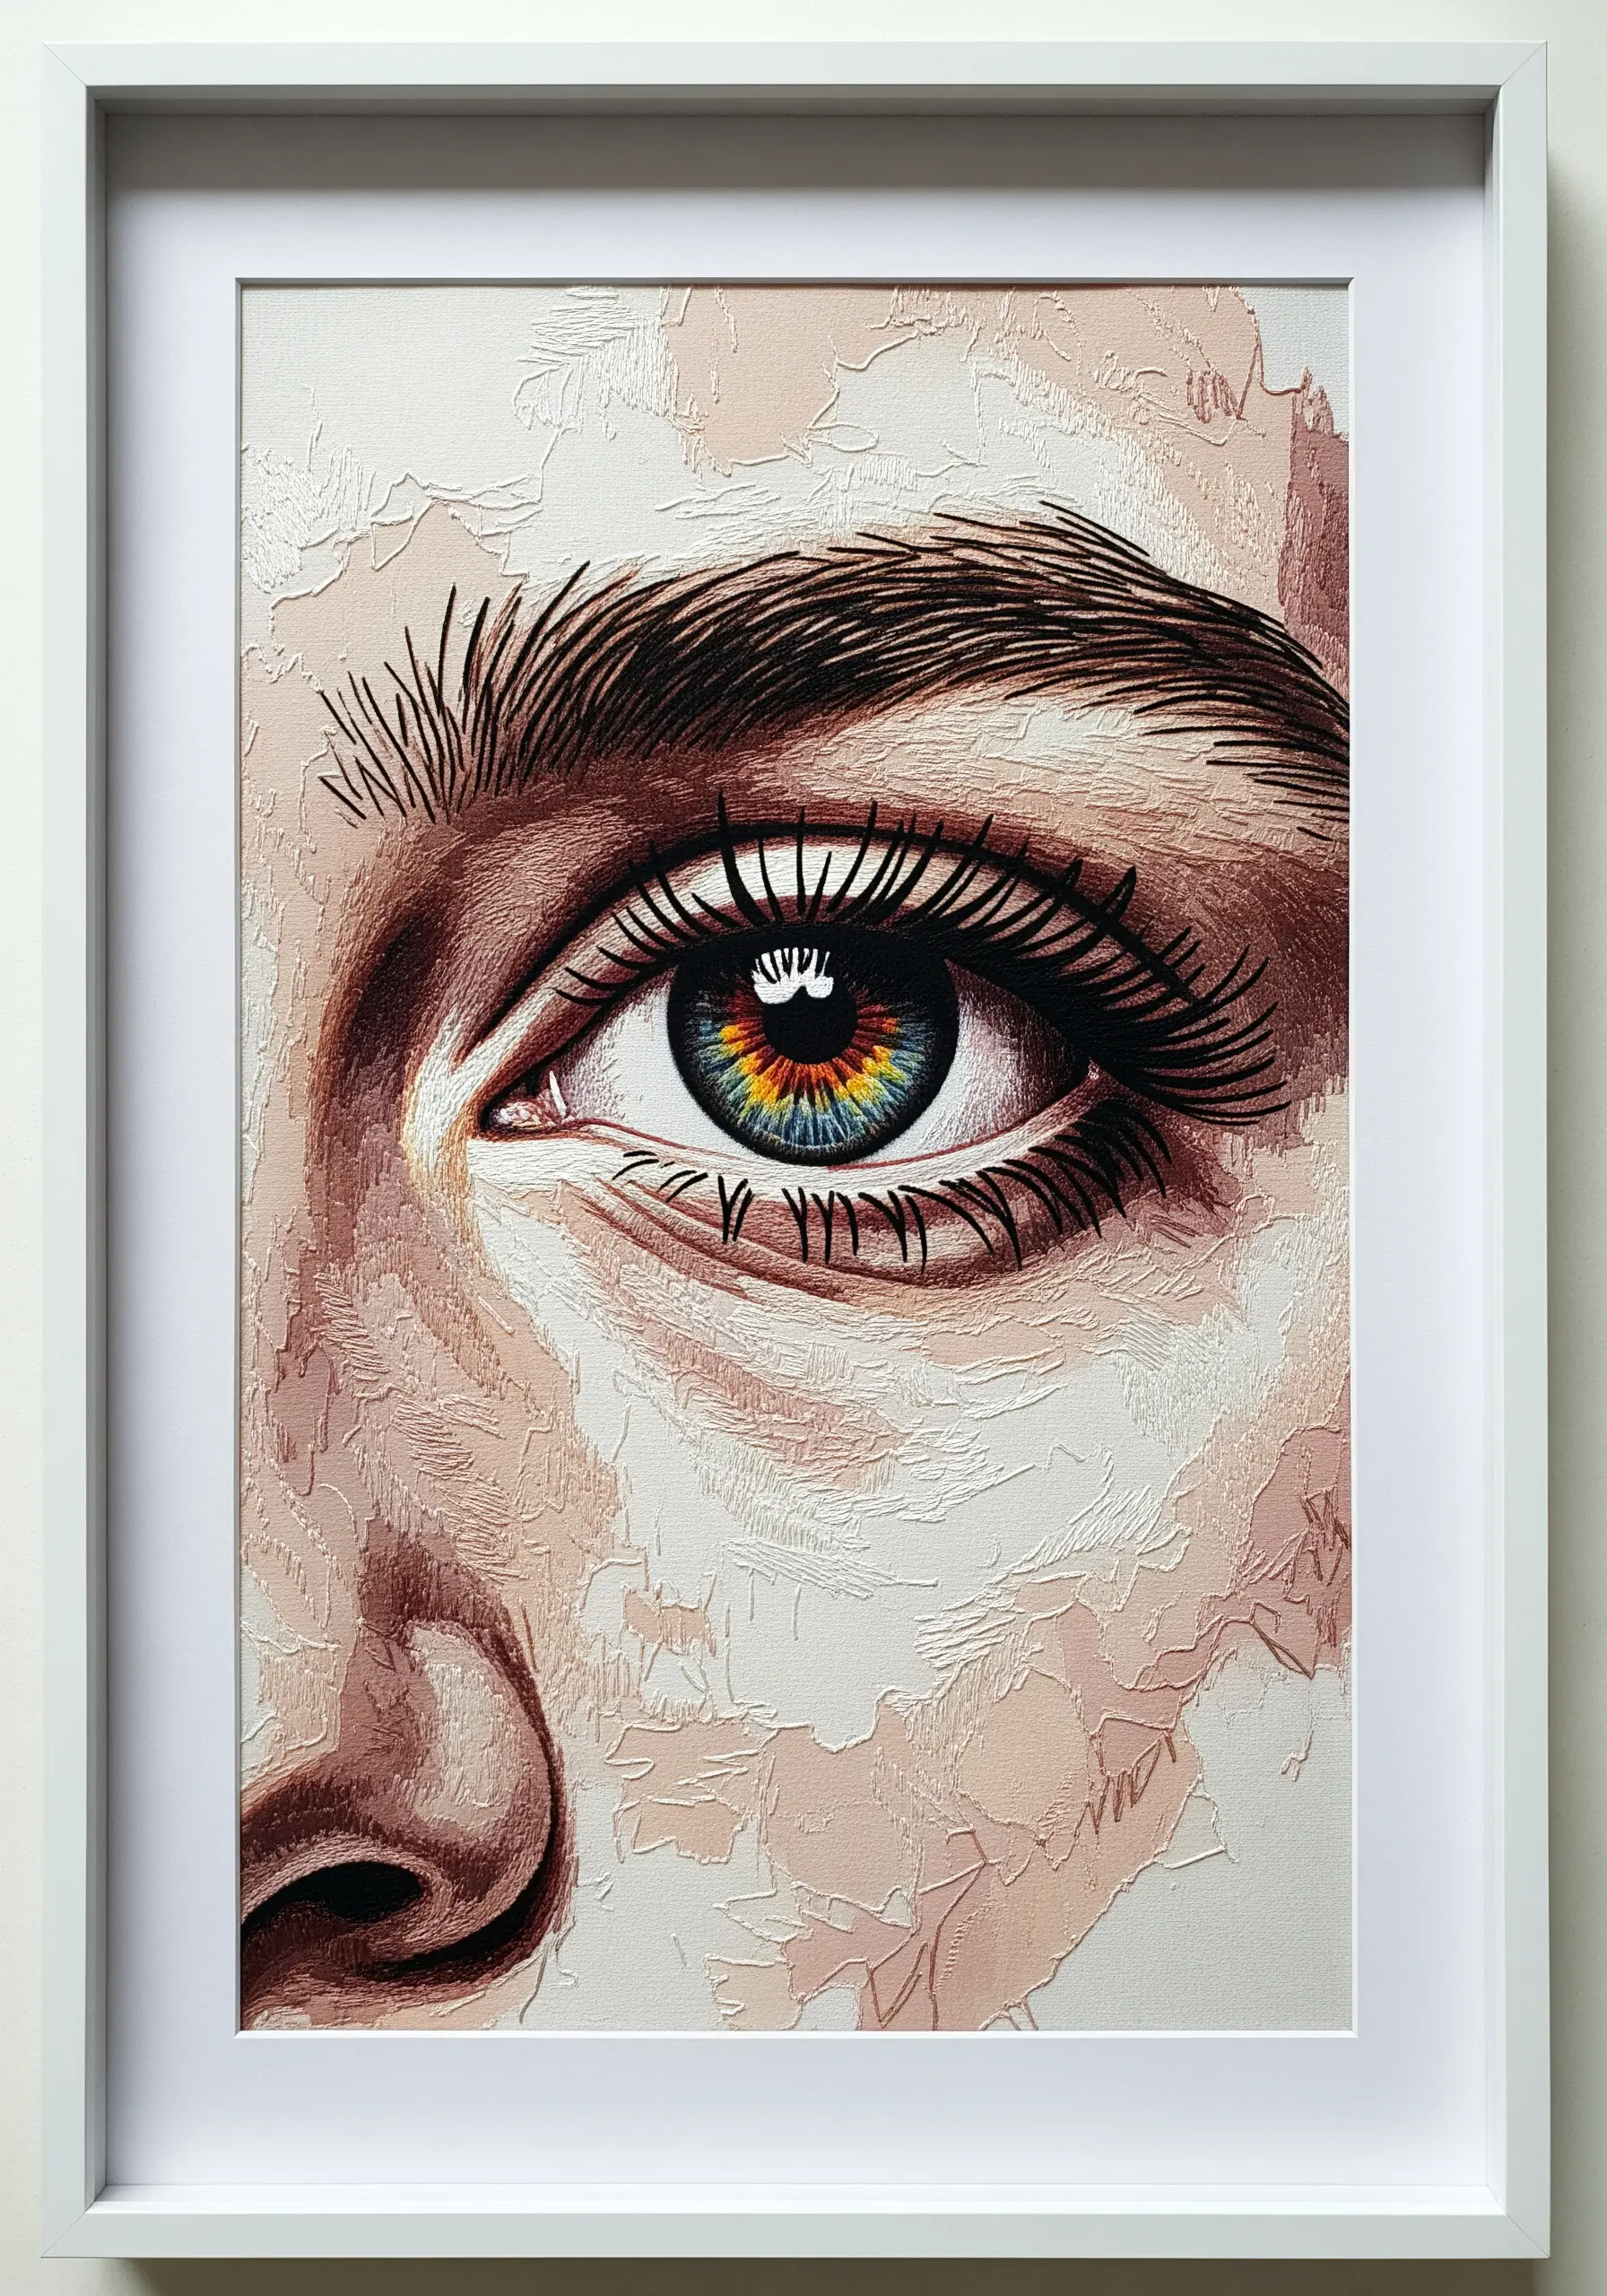
The secret to a lifelike eye is to never use just one color in the iris.
Look closely at a real eye—it’s a galaxy of blended tones. Use tiny, single straight stitches or seed stitches to layer multiple shades, such as blues, greys, and even flecks of gold or green.
The final, non-negotiable step is the catchlight: a single, sharp stitch of bright white thread. This tiny detail is what instantly breathes life into your portrait.
10. Define Contours with Continuous Line Stitching
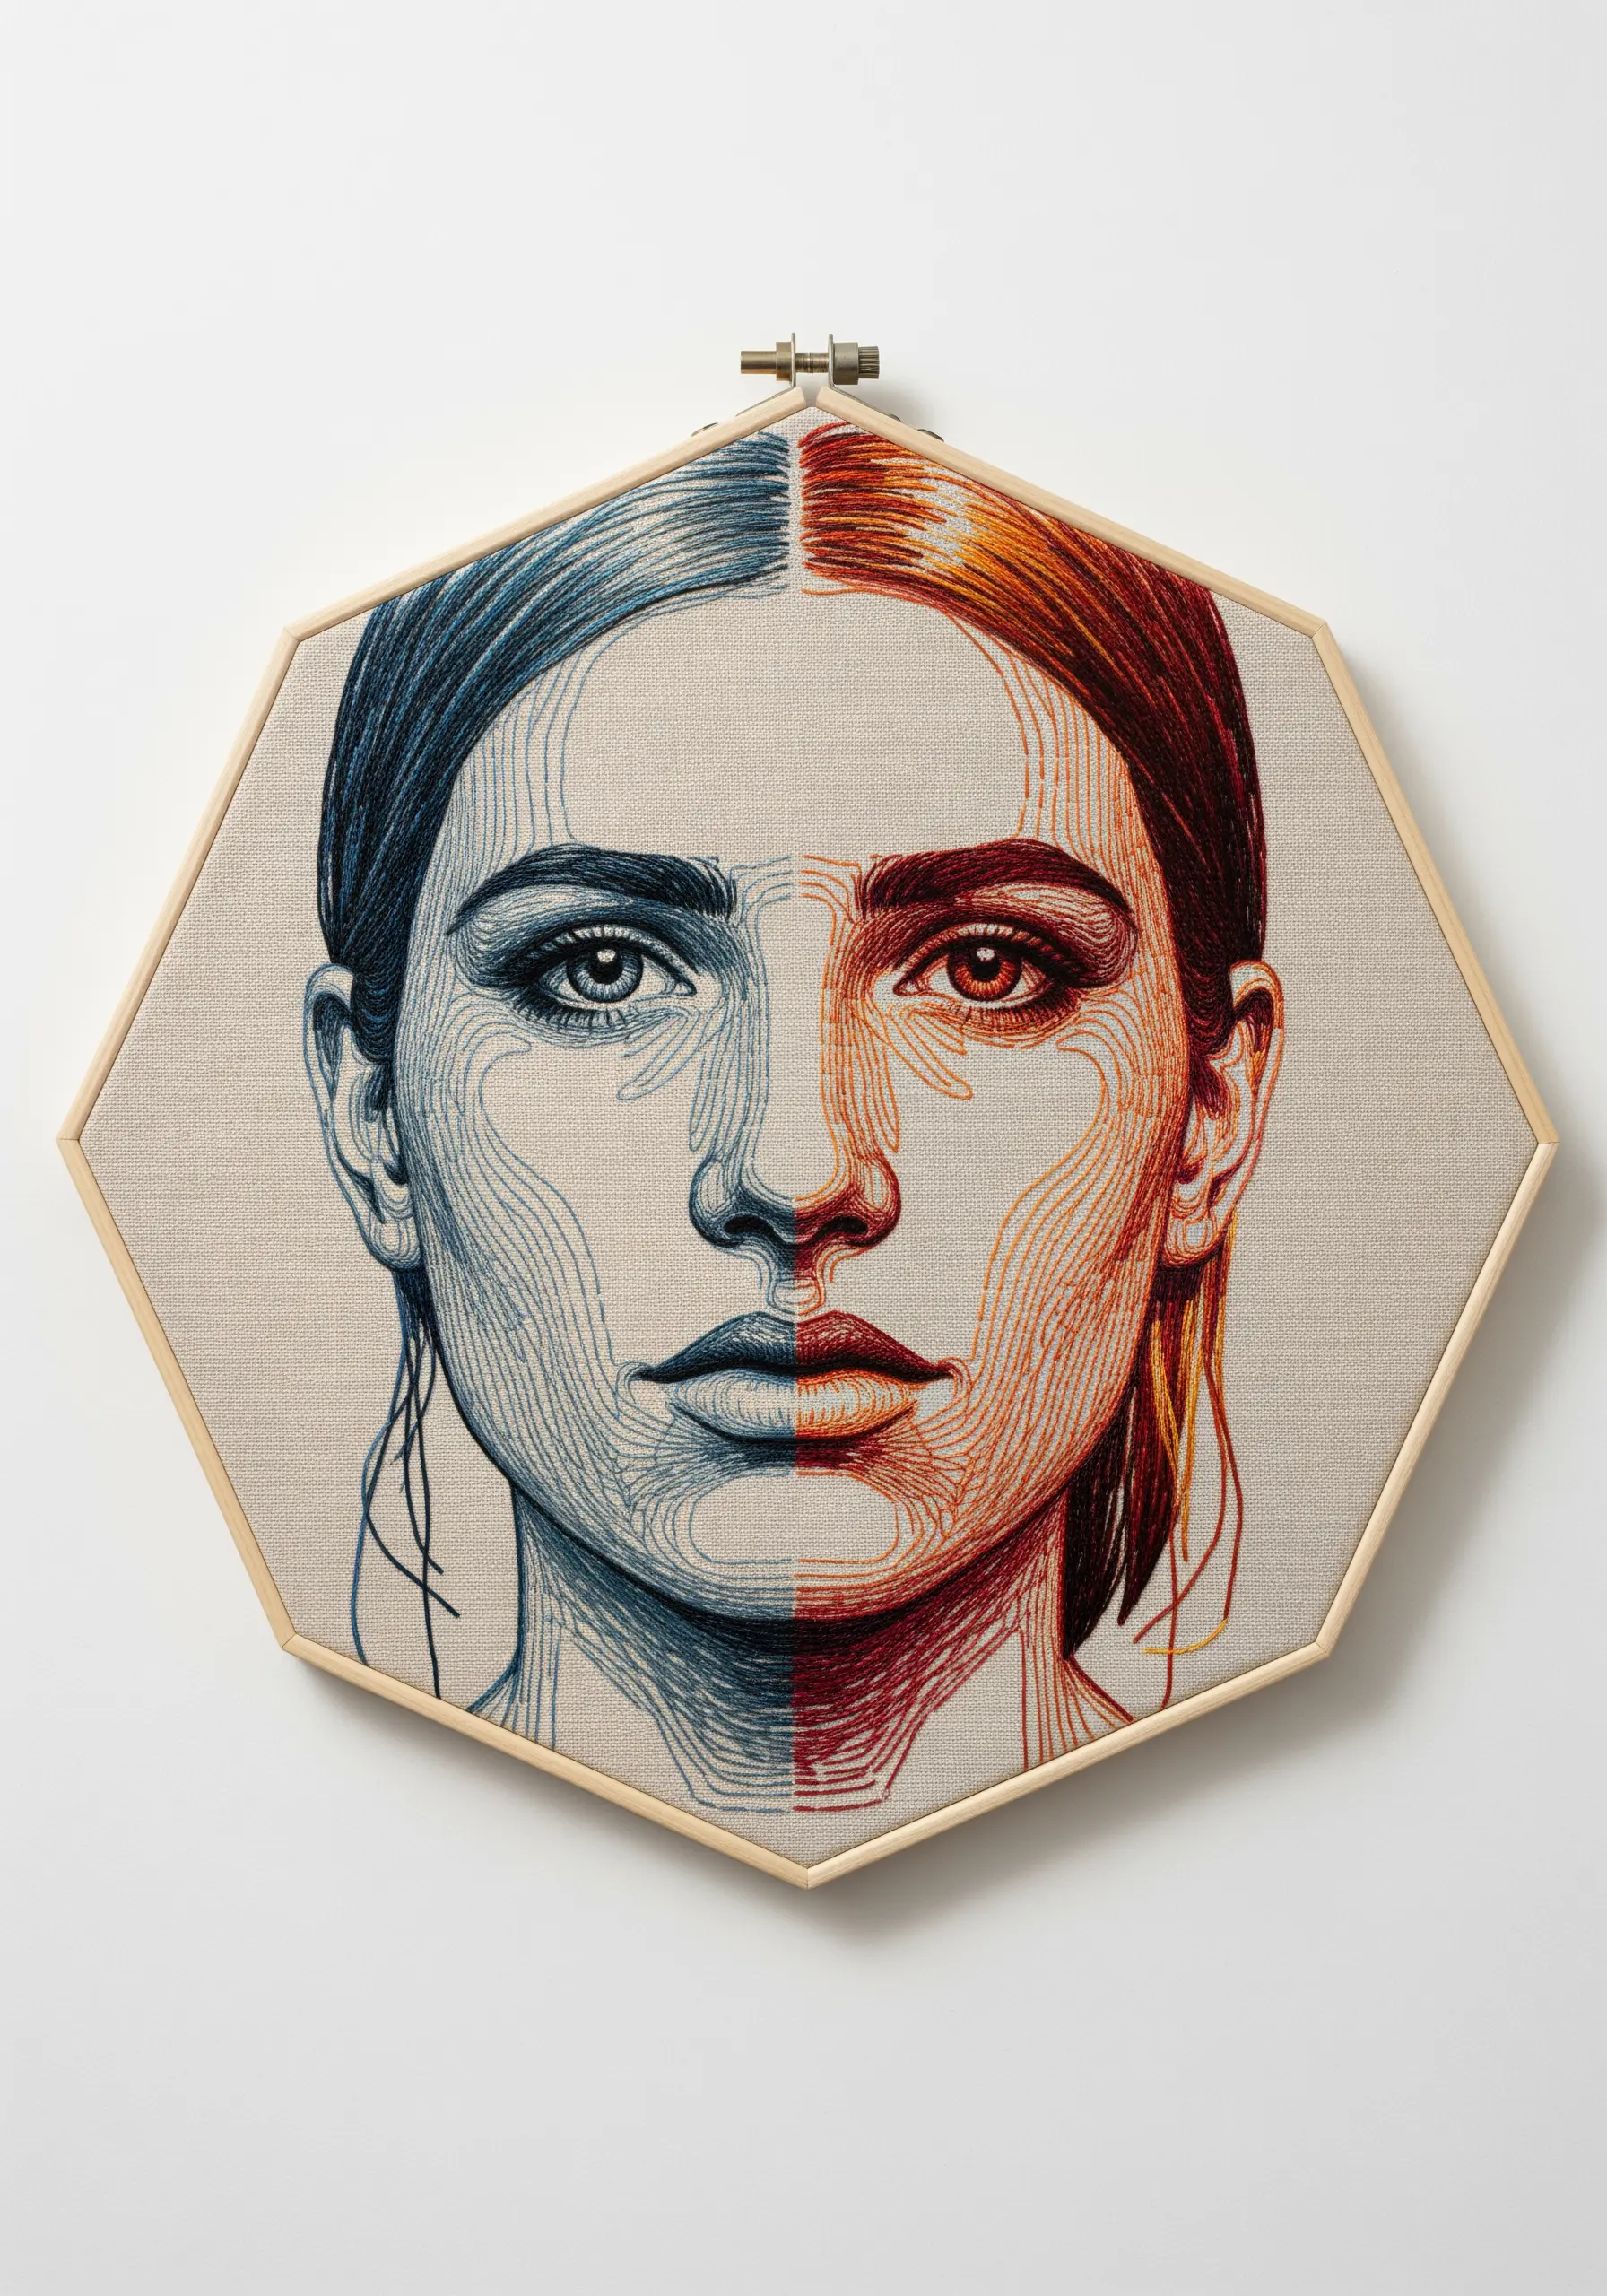
Instead of filling shapes with color, this technique uses a single, unbroken line to describe the form of the face, much like a contour drawing.
Use a smooth, consistent stitch like a stem stitch or split stitch to maintain a clean line.
The challenge and beauty of this style lie in how a single line can suggest complex shapes and shadows.
Splitting the design with two contrasting colors adds a modern, graphic dimension that elevates the piece from a simple sketch to a finished work of art.
11. Mimic a Neon Glow with Fluorescent Threads
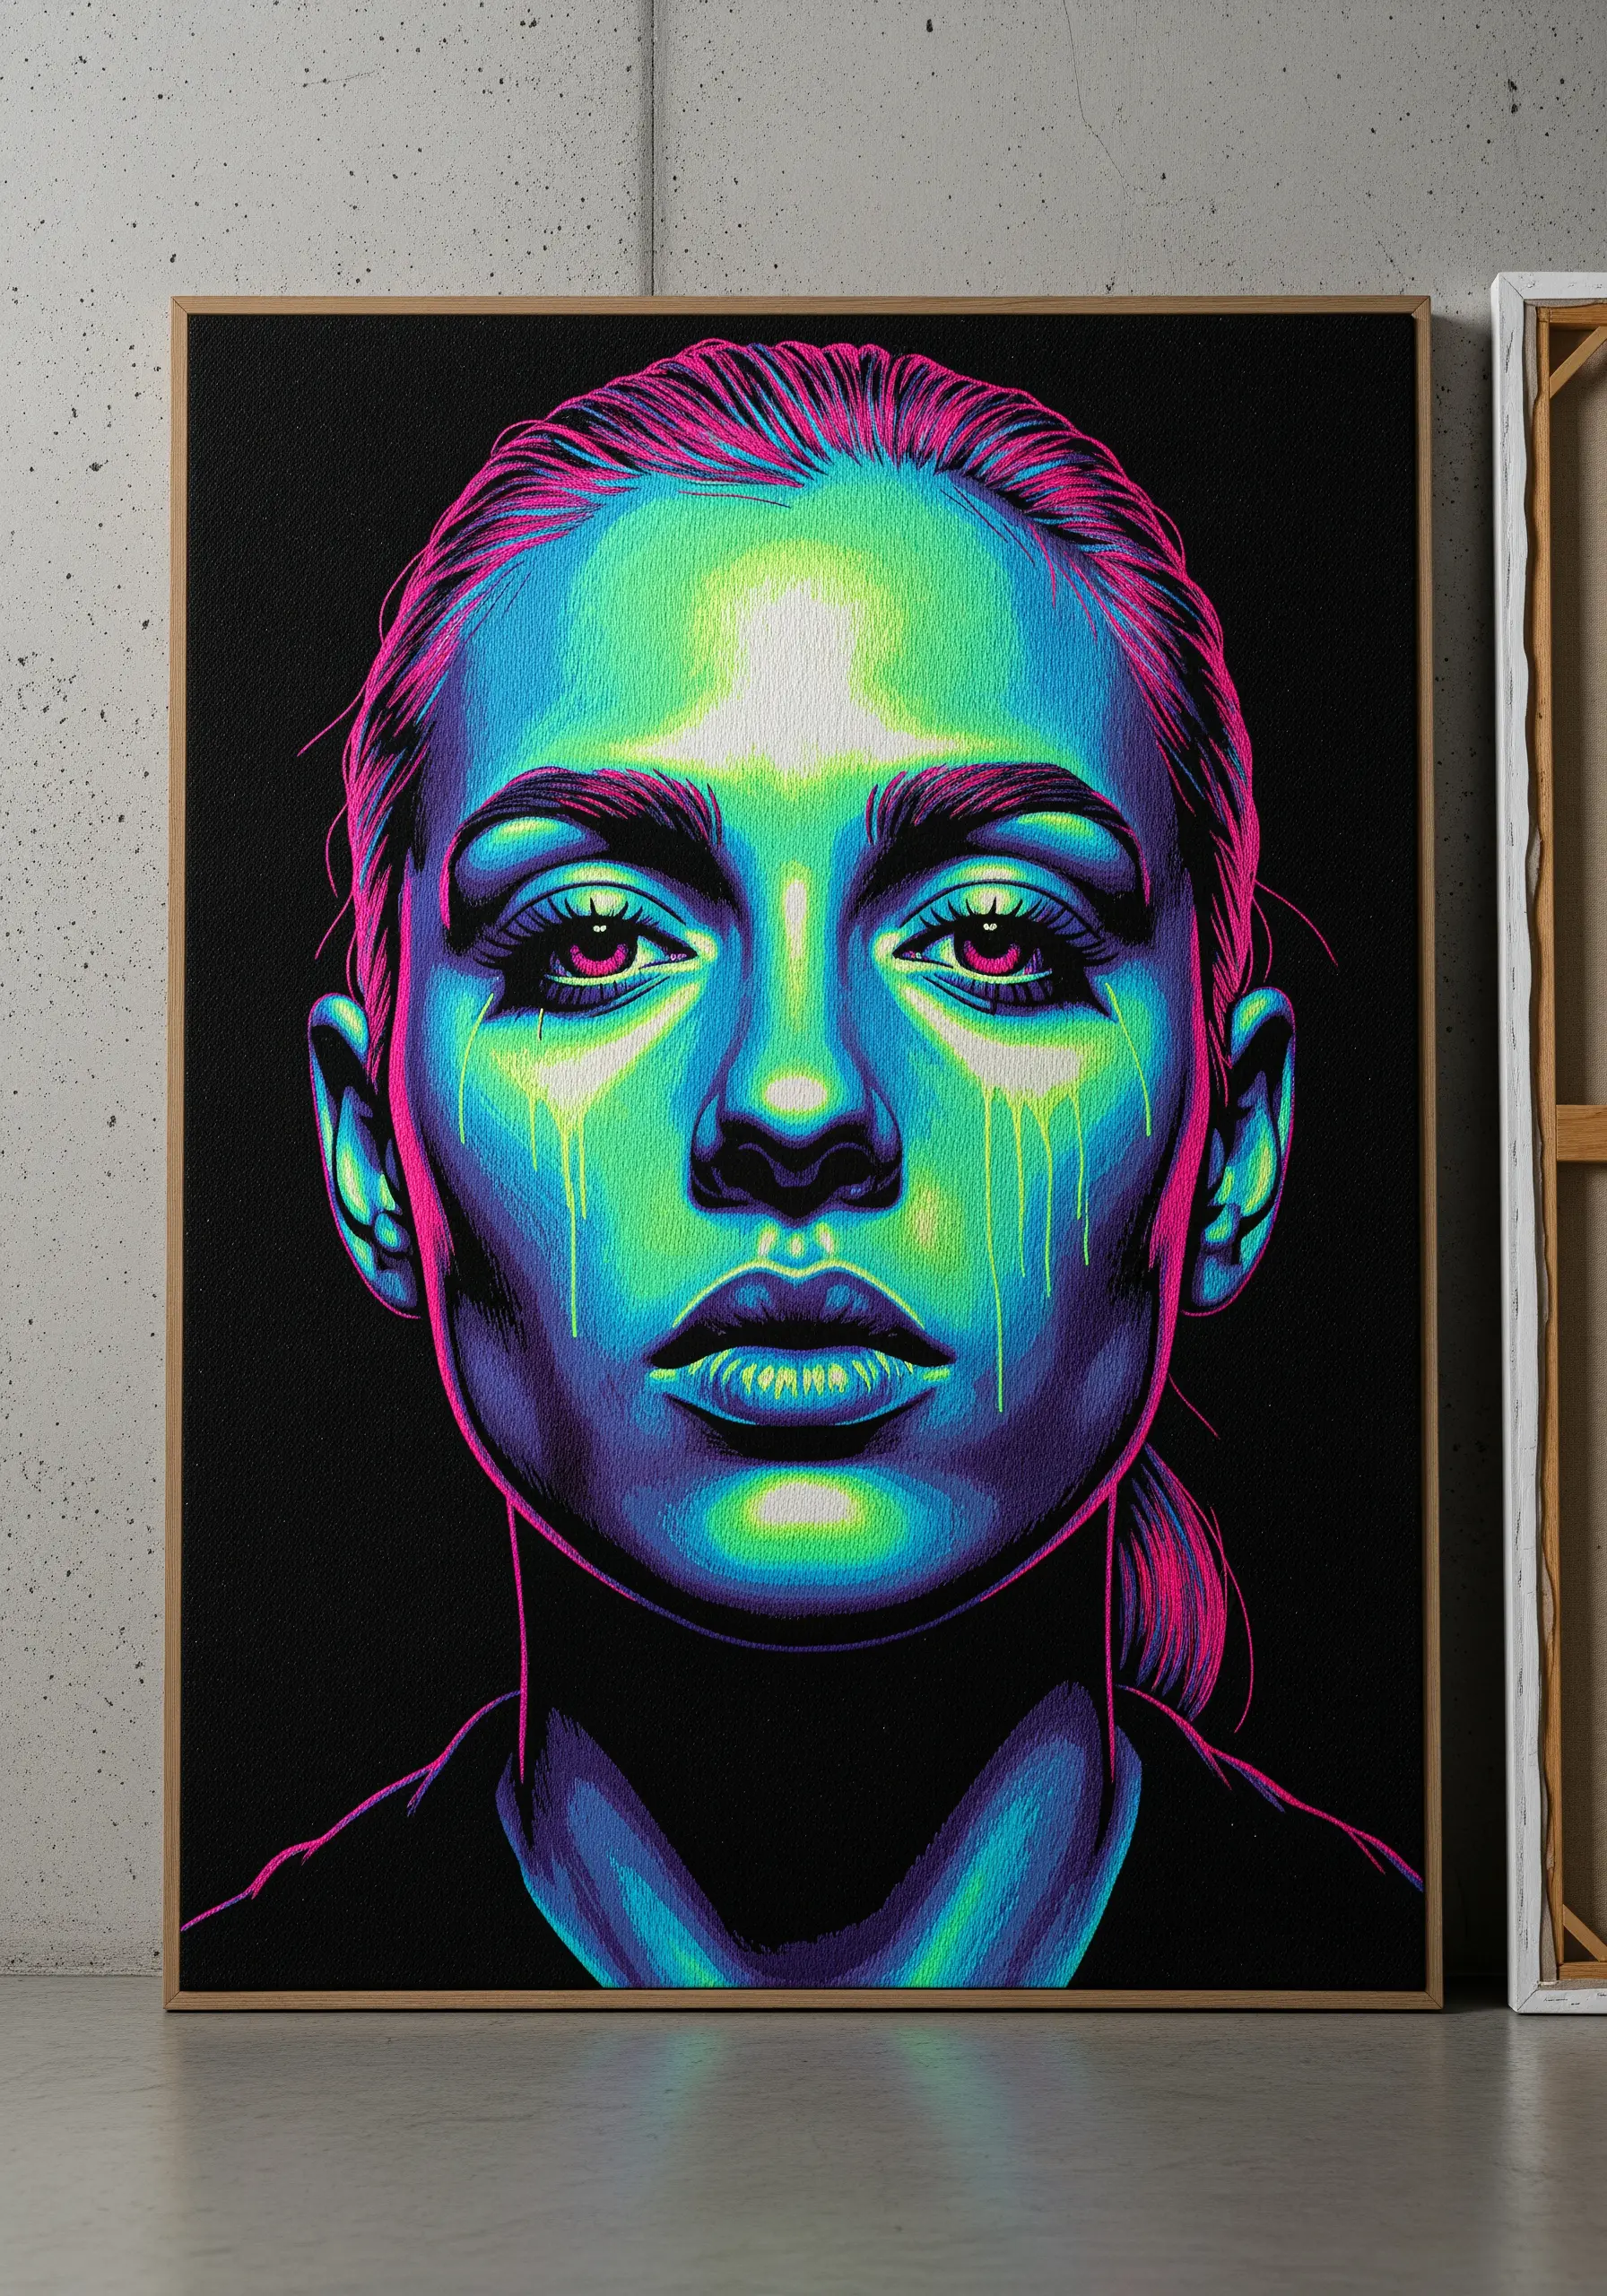
To achieve this vibrant, electric effect, you need two key ingredients: fluorescent embroidery floss and a stark black fabric background.
For the brightest areas, use a dense satin stitch to create solid blocks of intense color.
To create the illusion of a soft glow, surround these bright areas with sparser stitches in a slightly darker shade. This feathered edge mimics how light diffuses, making the neon effect incredibly convincing.
12. Achieve a Drawn Look with Open, Sketch-Like Stitches
This portrait feels more like a delicate pencil drawing than a photograph, and you can achieve this by varying your stitch density.
Use a single strand of thread and apply stitches directionally, as if you were cross-hatching with a pencil.
Allow the background fabric to show through in the lighter areas of the face. This creates a soft, ethereal quality that feels intimate and hand-drawn.
13. Create a Digital Glitch Effect with Color Blocking
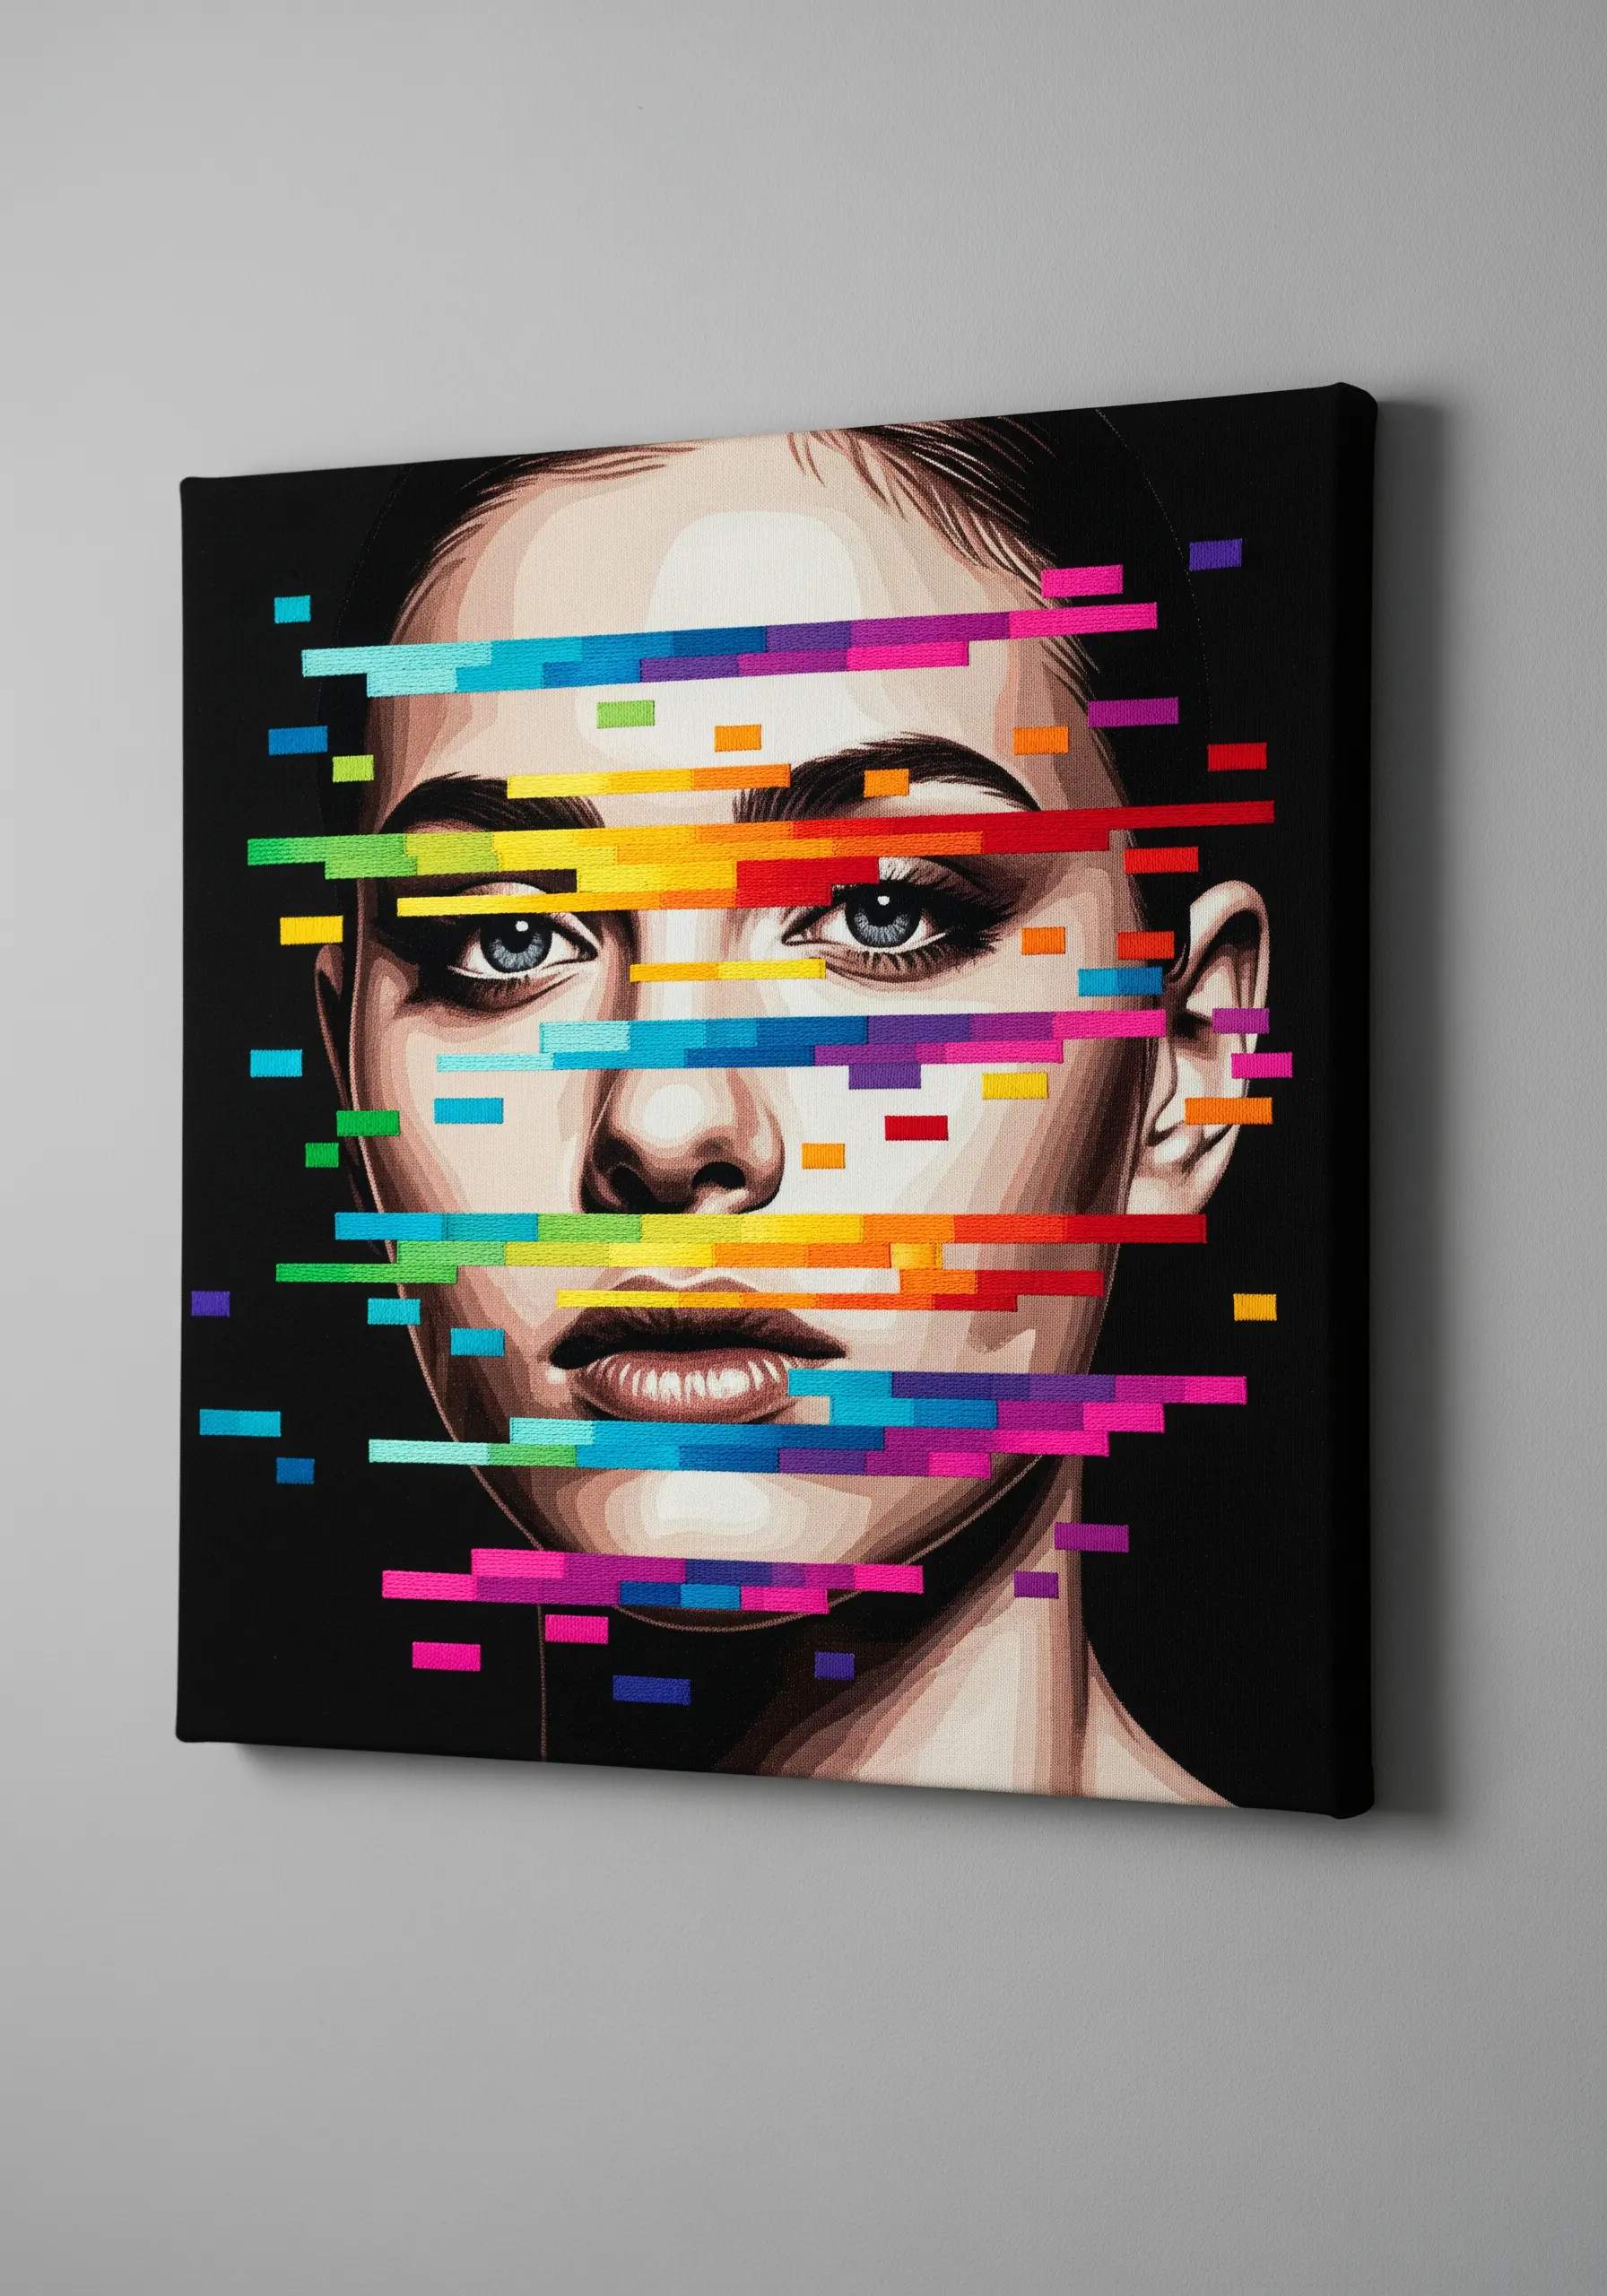
This contemporary style merges realistic portraiture with abstract, graphic elements.
First, stitch a base portrait in monochrome tones. Then, interrupt the image with bold, horizontal bars of color.
Use a perfectly smooth satin stitch for the color blocks to give them a sharp, digital feel that contrasts with the softer portrait beneath.
Intentionally misaligning the bars is what creates the dynamic ‘glitch’ effect, as if the image is beautifully breaking apart.
14. Stitch Realistic Water Droplets with Light and Shadow
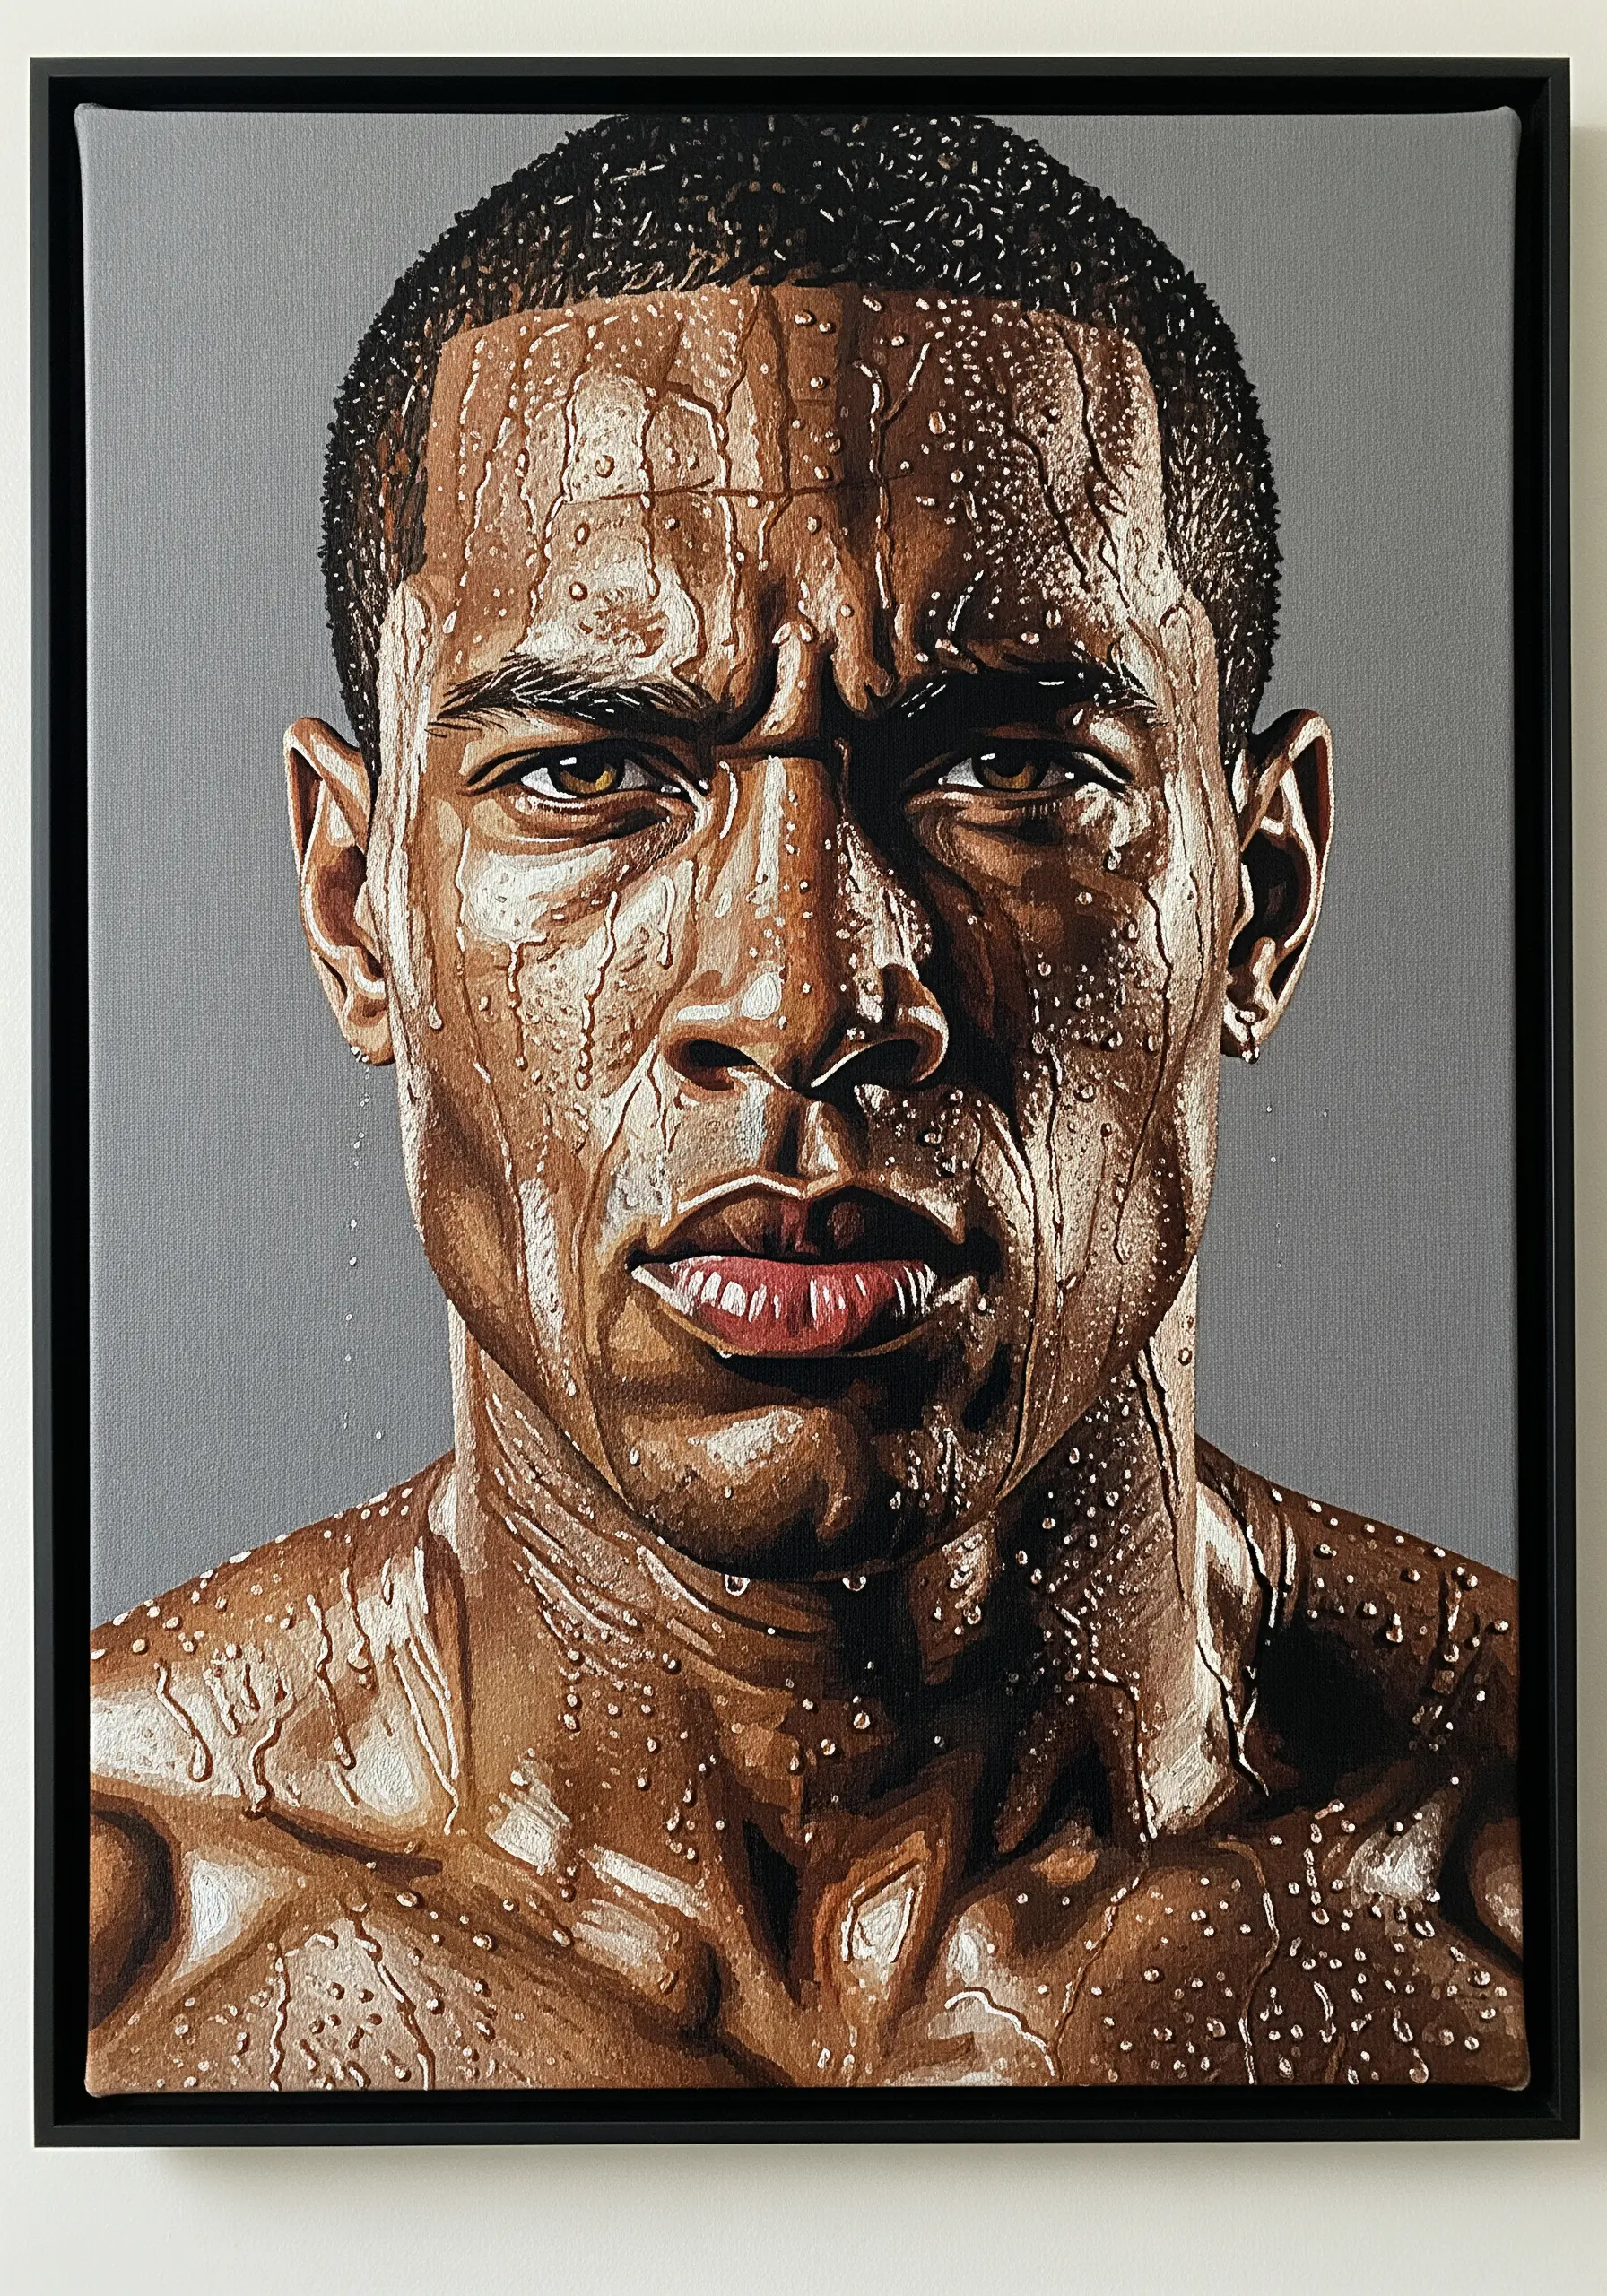
Creating the illusion of water is simpler than it looks; it’s all about understanding how light behaves.
Each droplet is a tiny composition of shadow and highlight. Place a small, curved stitch of a darker skin tone or grey at the bottom of the droplet to act as a shadow.
Then, place a sharp stitch of bright white at the top. This simple combination instantly tricks the eye into seeing a three-dimensional, glistening bead of water.
15. Build Form from Controlled, Chaotic Lines
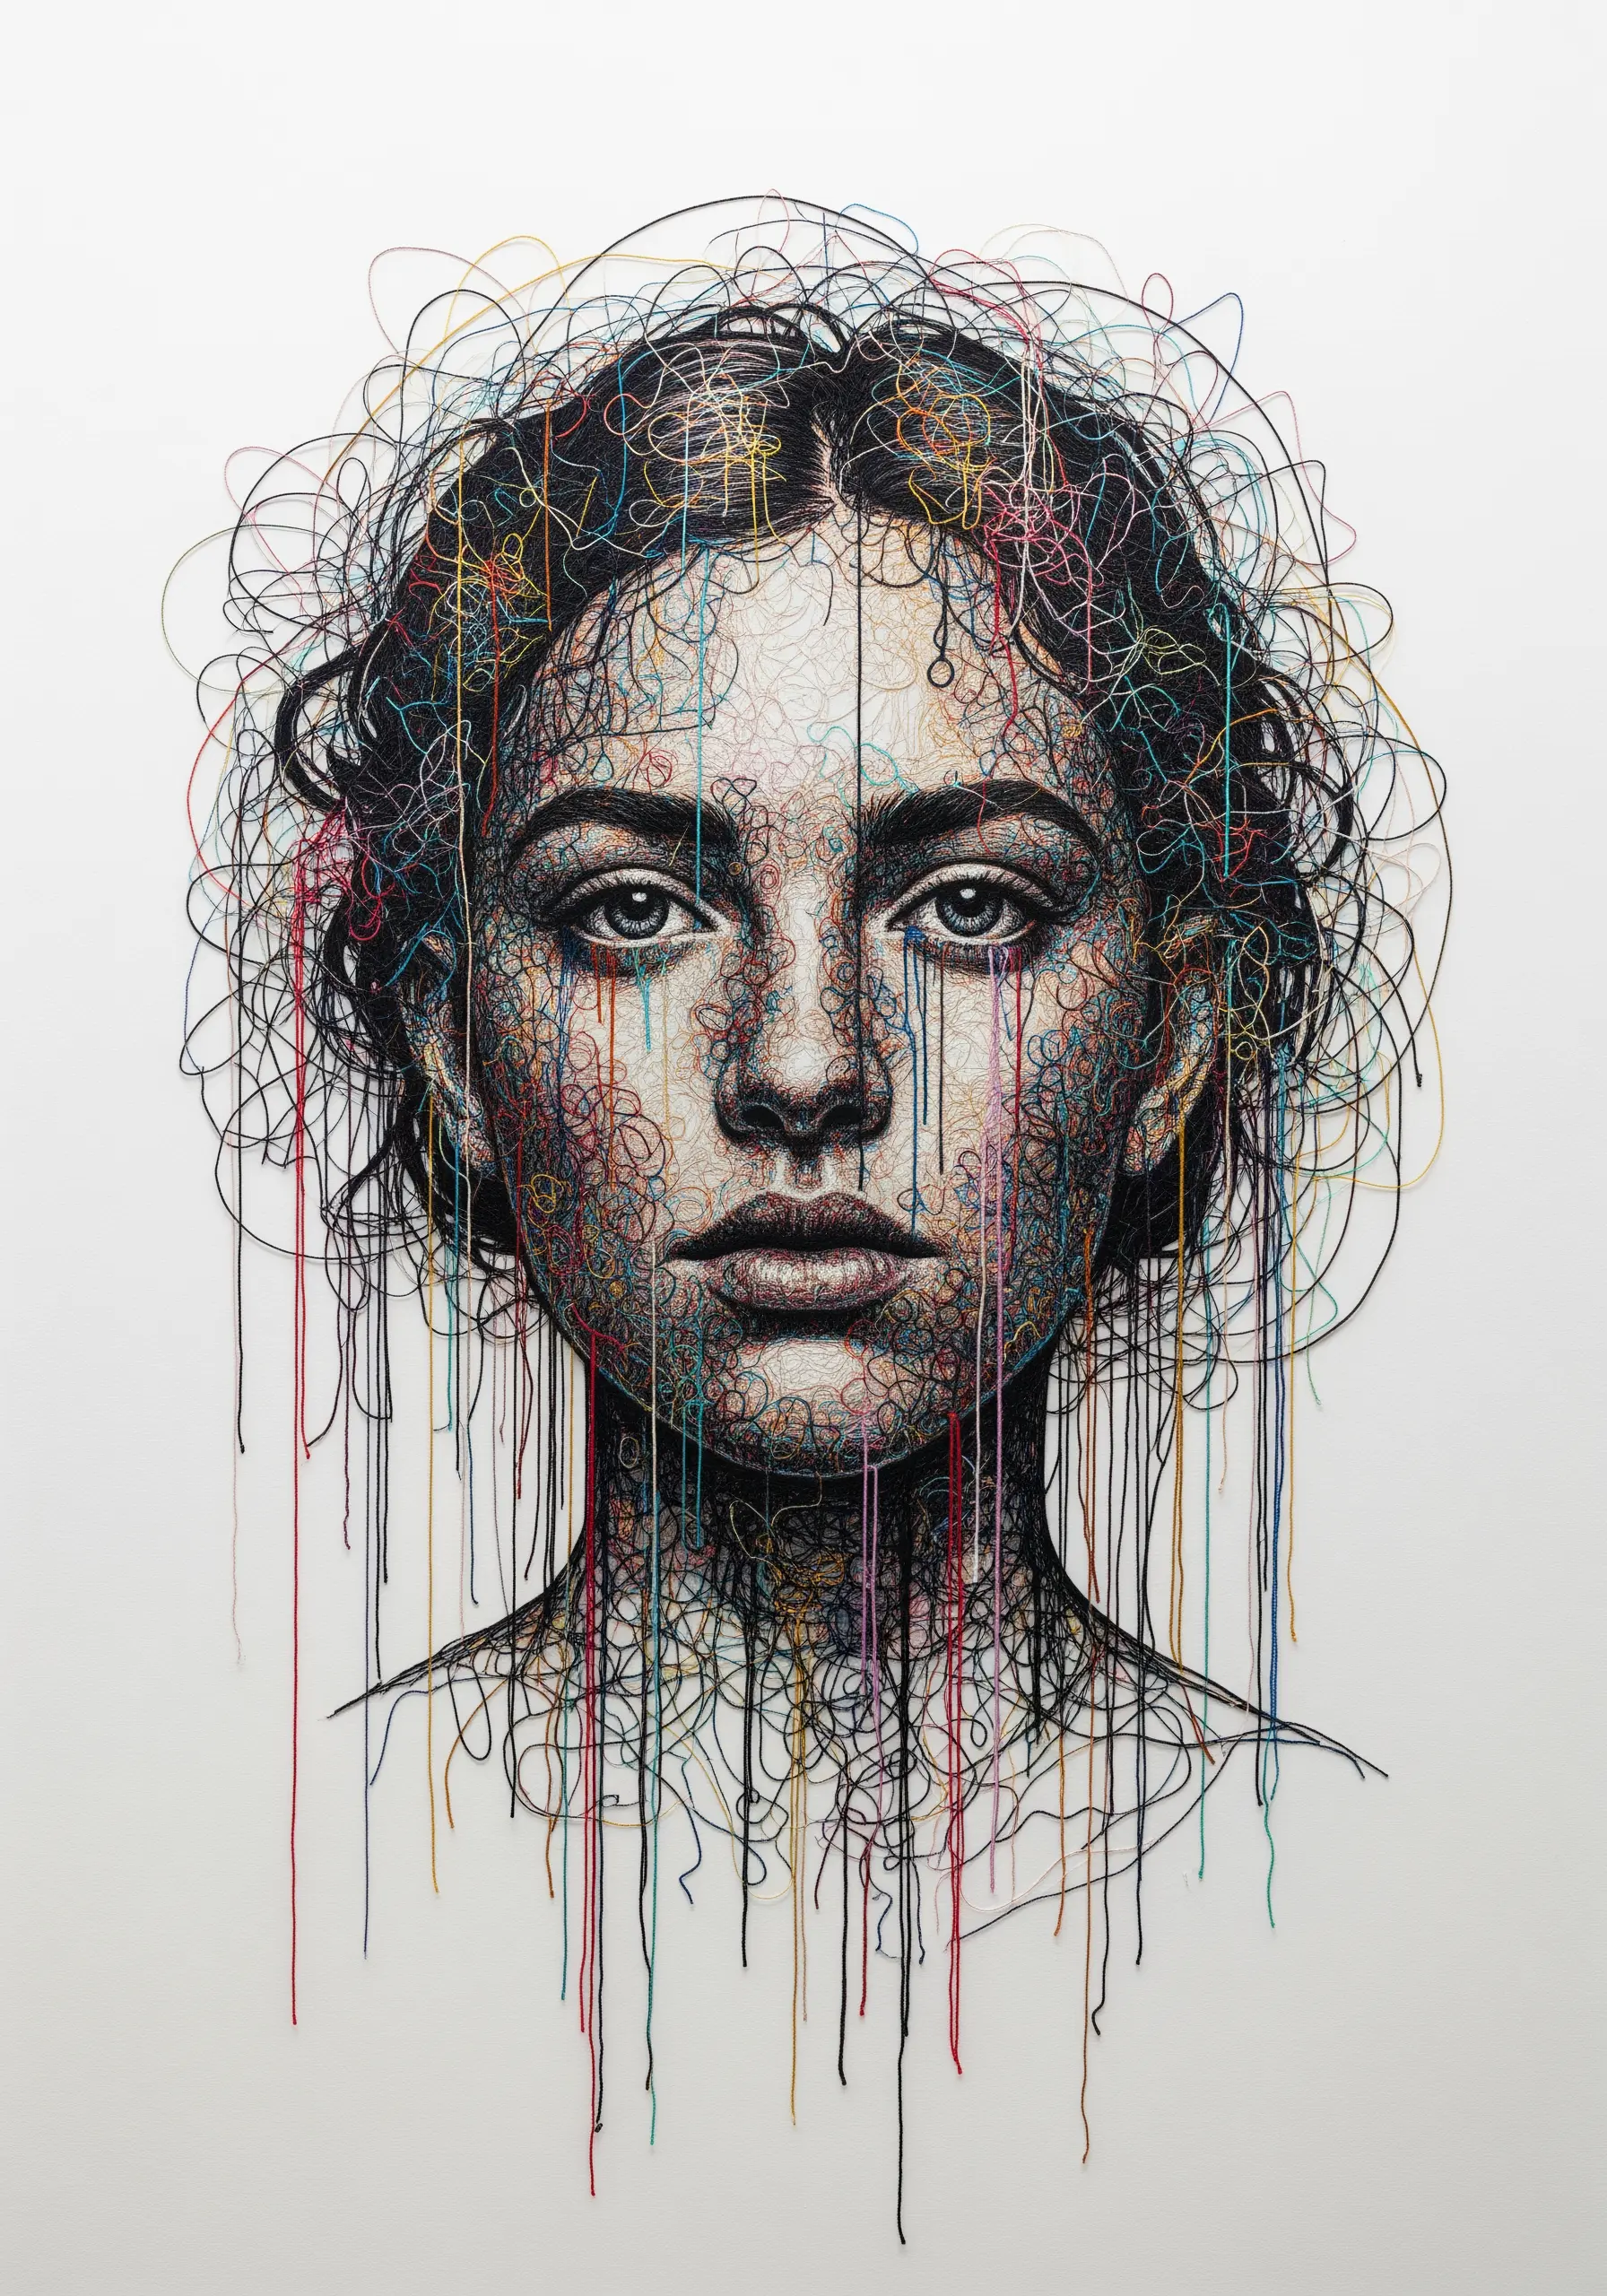
This powerful technique builds shape and shadow from what appears to be random scribbling.
Start with a simple line drawing of the face on your fabric as a guide. Then, begin layering loops and lines of thread, concentrating the stitches more densely in areas that require shadow, like under the cheekbones or jawline.
Using multiple colors adds depth, while allowing threads to hang loose at the bottom enhances the raw, expressive energy.
16. Create Ethereal Portraits on Sheer Fabric
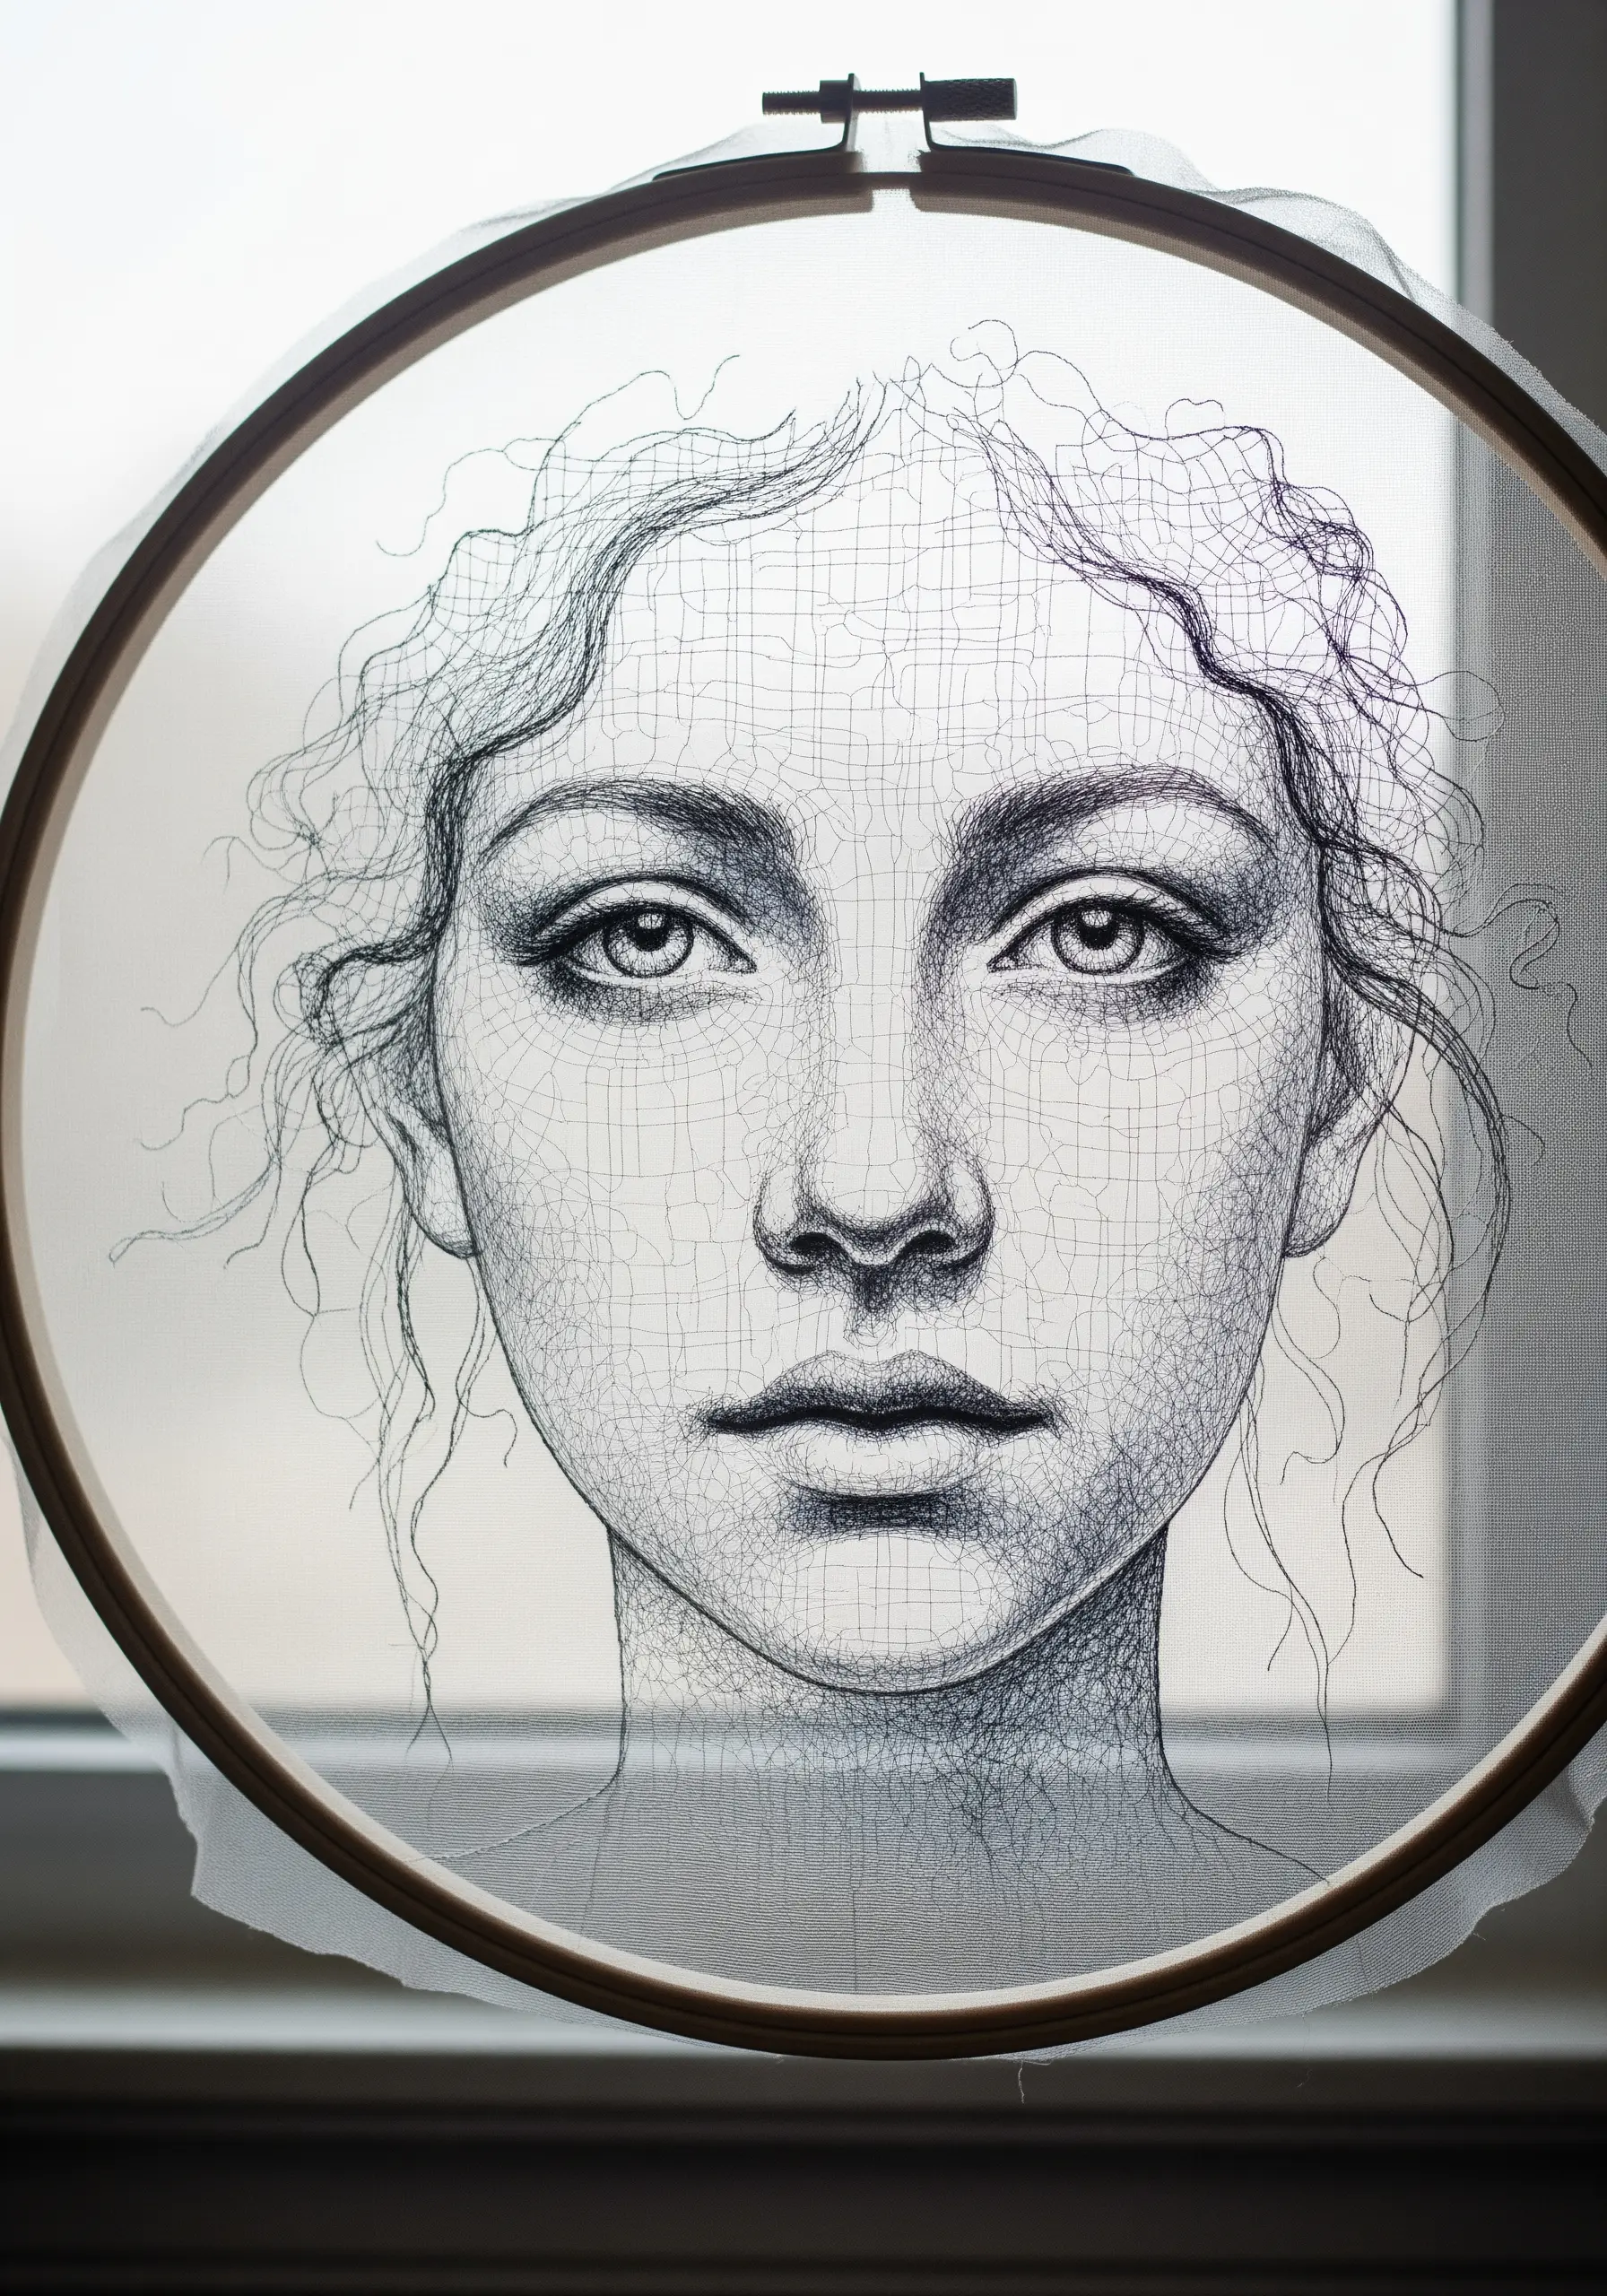
Stitching on a transparent fabric like tulle or organza creates a magical, floating effect.
Always use a stabilizer (water-soluble or heat-away) behind the fabric while you stitch to prevent puckering, then remove it once you’re done.
Because the back of your work may be visible, you must be mindful of keeping your stitches neat. This technique is ideal for minimalist line art that plays with light and transparency in a truly unique way.
17. Capture Authentic Joy with Dynamic Highlights
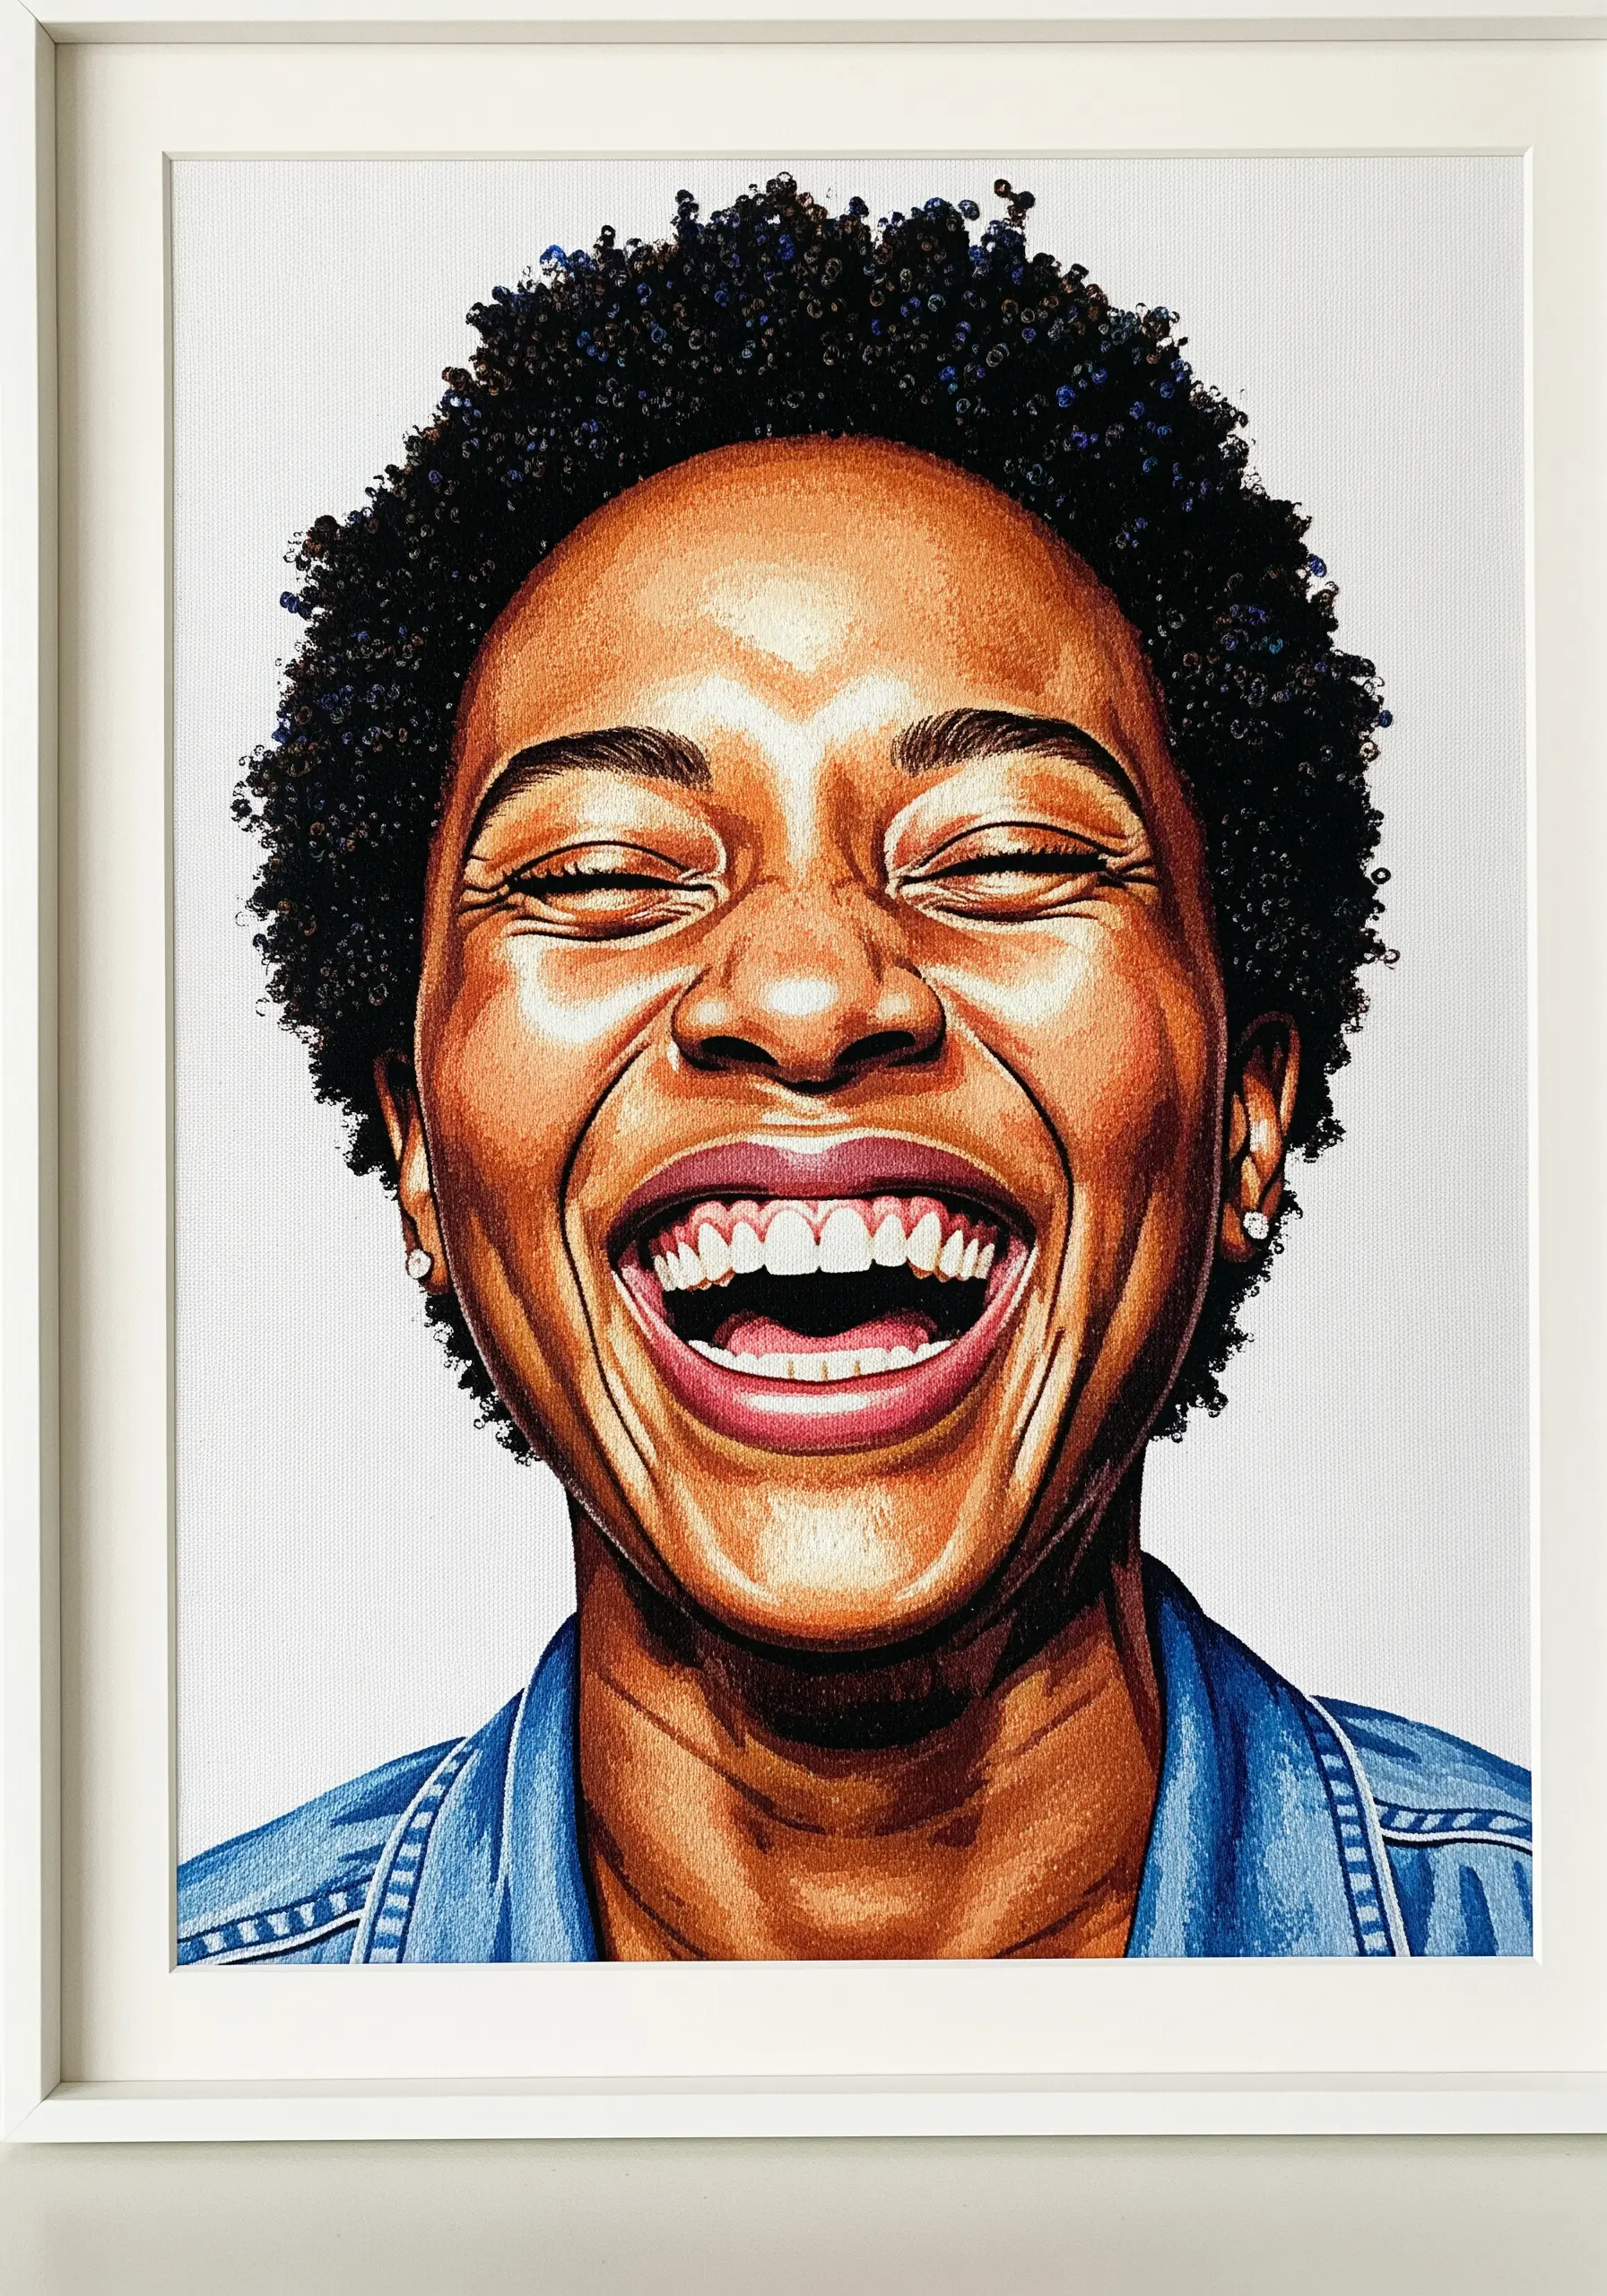
A genuine laugh transforms the entire face, and you can capture that energy by focusing on where the light hits.
Pay close attention to the highlights on the apples of the cheeks, the curve of the teeth, and the crinkles that form around the eyes.
Use your brightest white and palest skin-tone threads in these specific spots. Contrast them with deep shadows in the corners of the mouth and beside the nose to give the expression vibrant, three-dimensional life.
18. Integrate Typography for a Narrative Layer
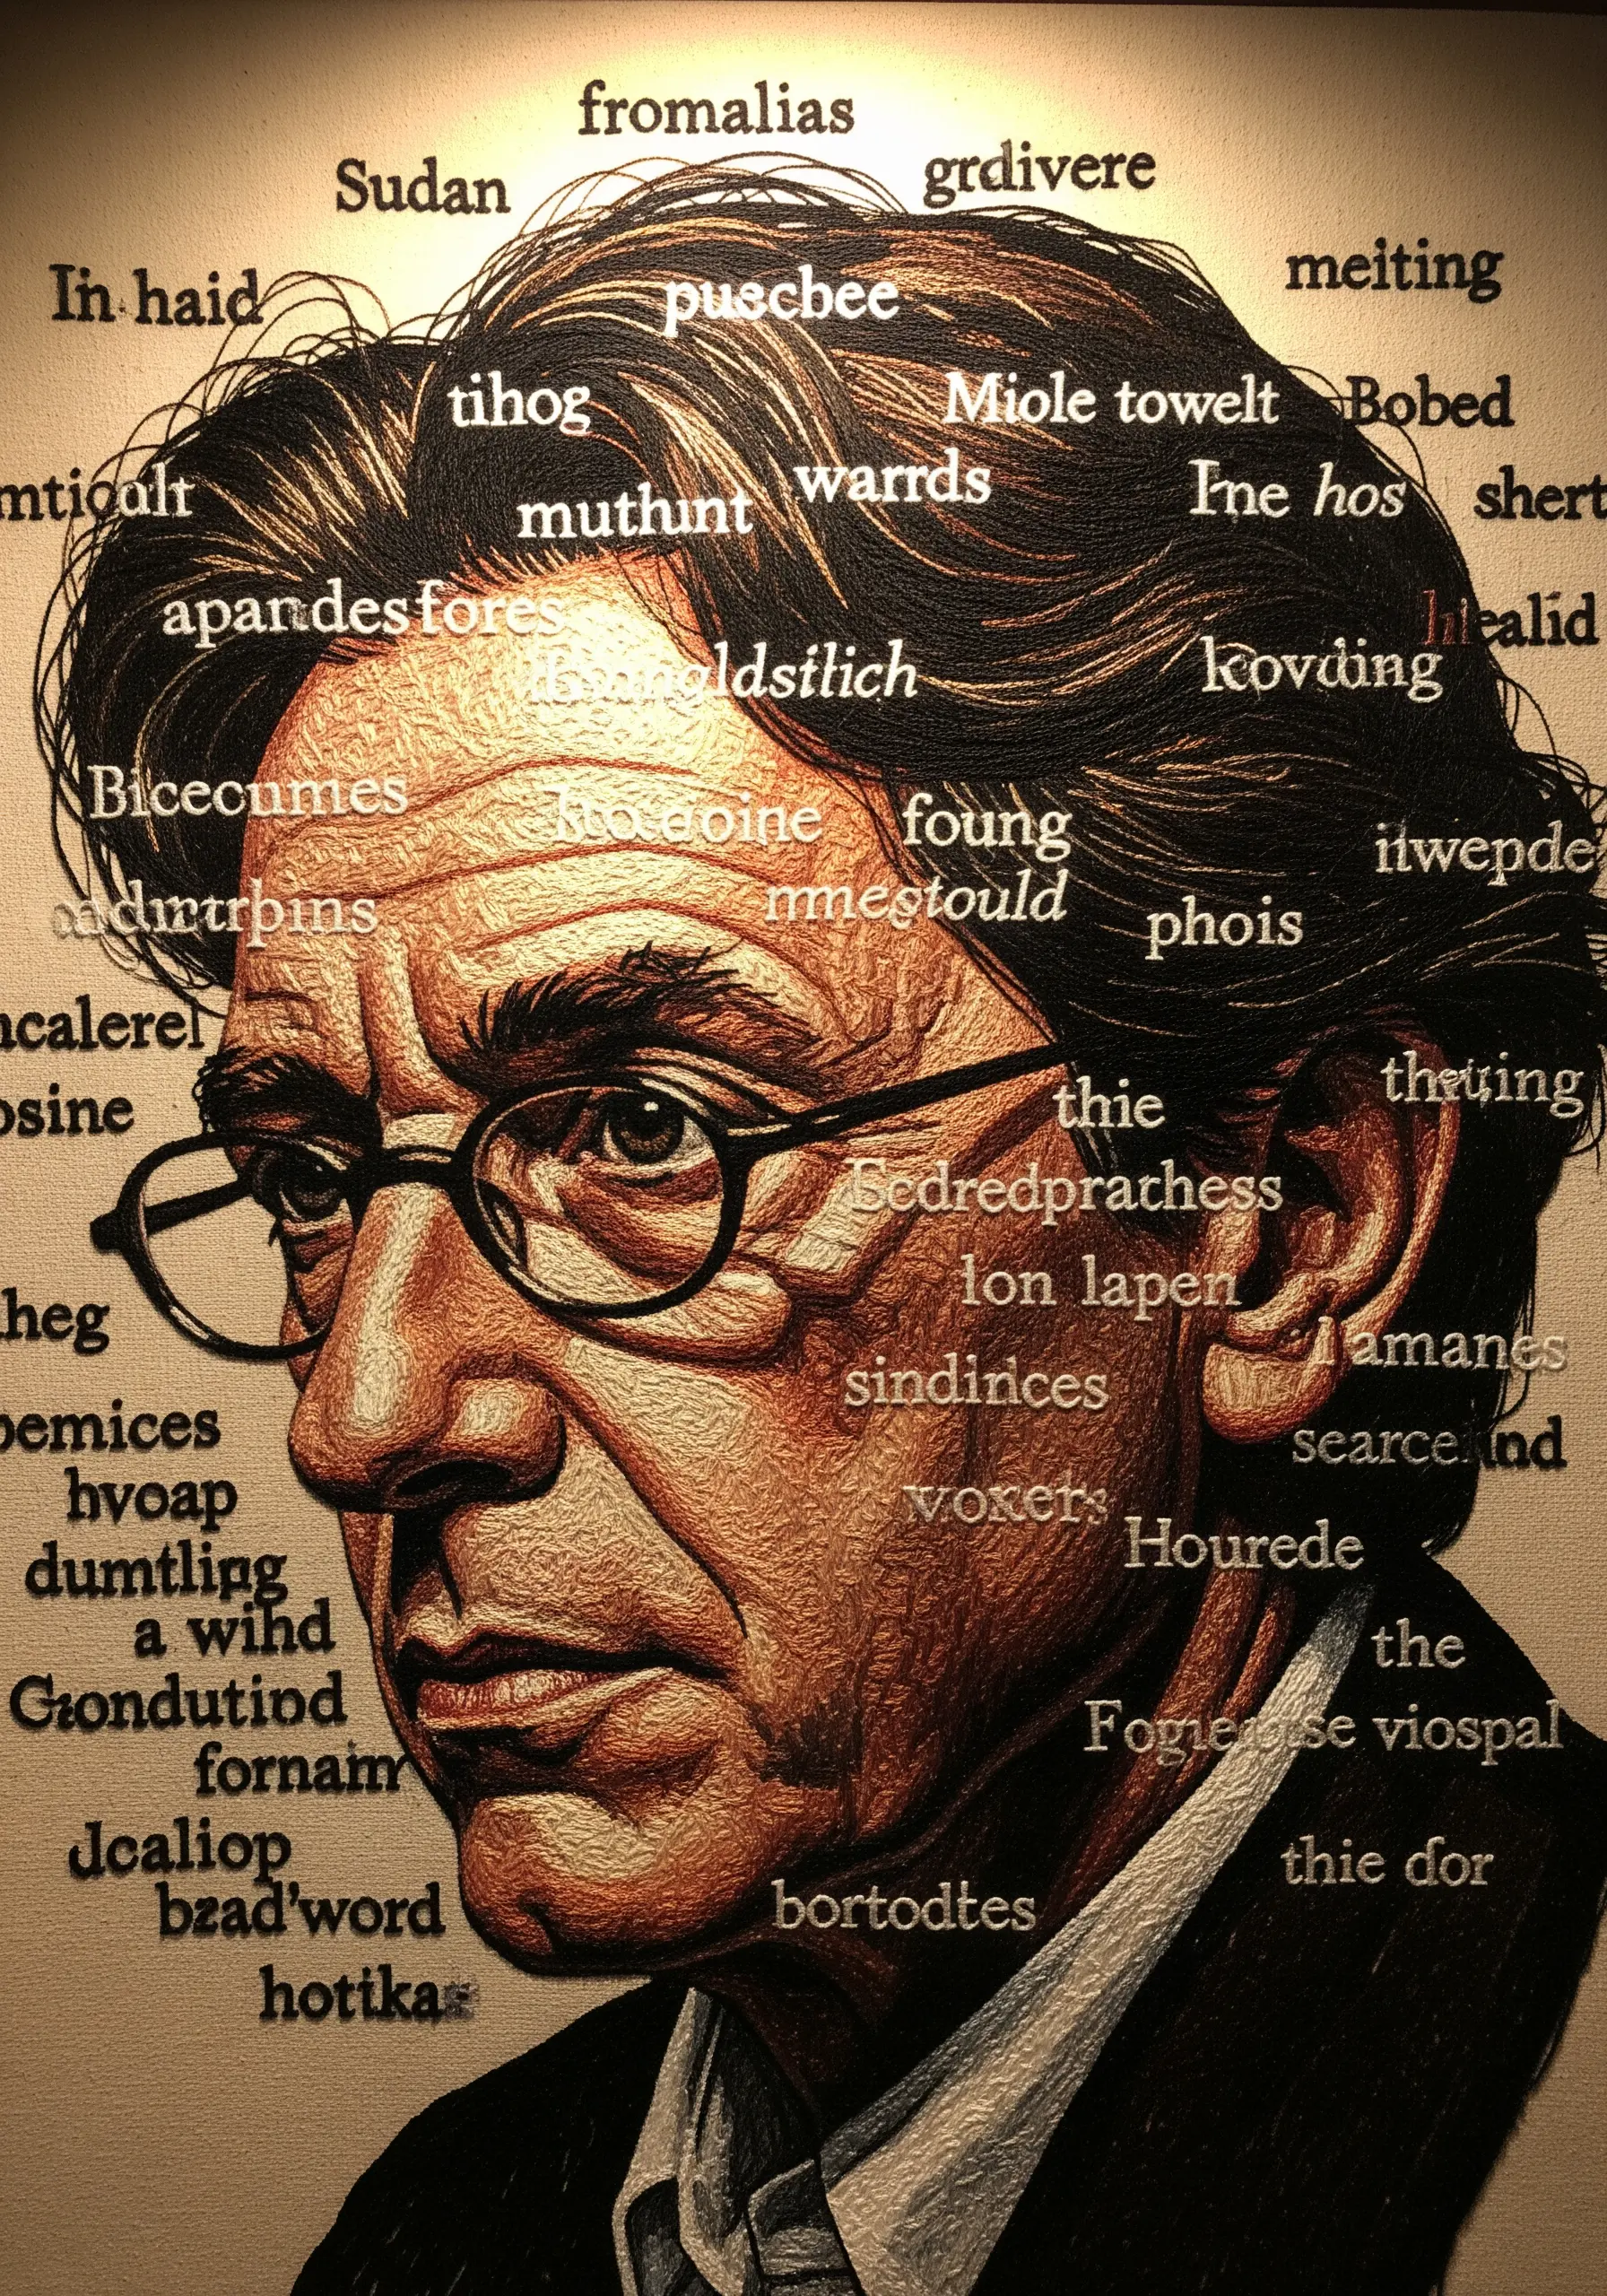
Weave text directly into your portrait to create a piece that is both visually and conceptually layered.
Complete the portrait first, establishing the form with careful shading. Then, overlay your chosen words using a clean, legible stitch like a simple backstitch or stem stitch.
Select a thread color that has enough contrast to be readable but still feels harmonious with the overall color palette of the portrait.
19. Convey a Specific Mood with a Single Color Story
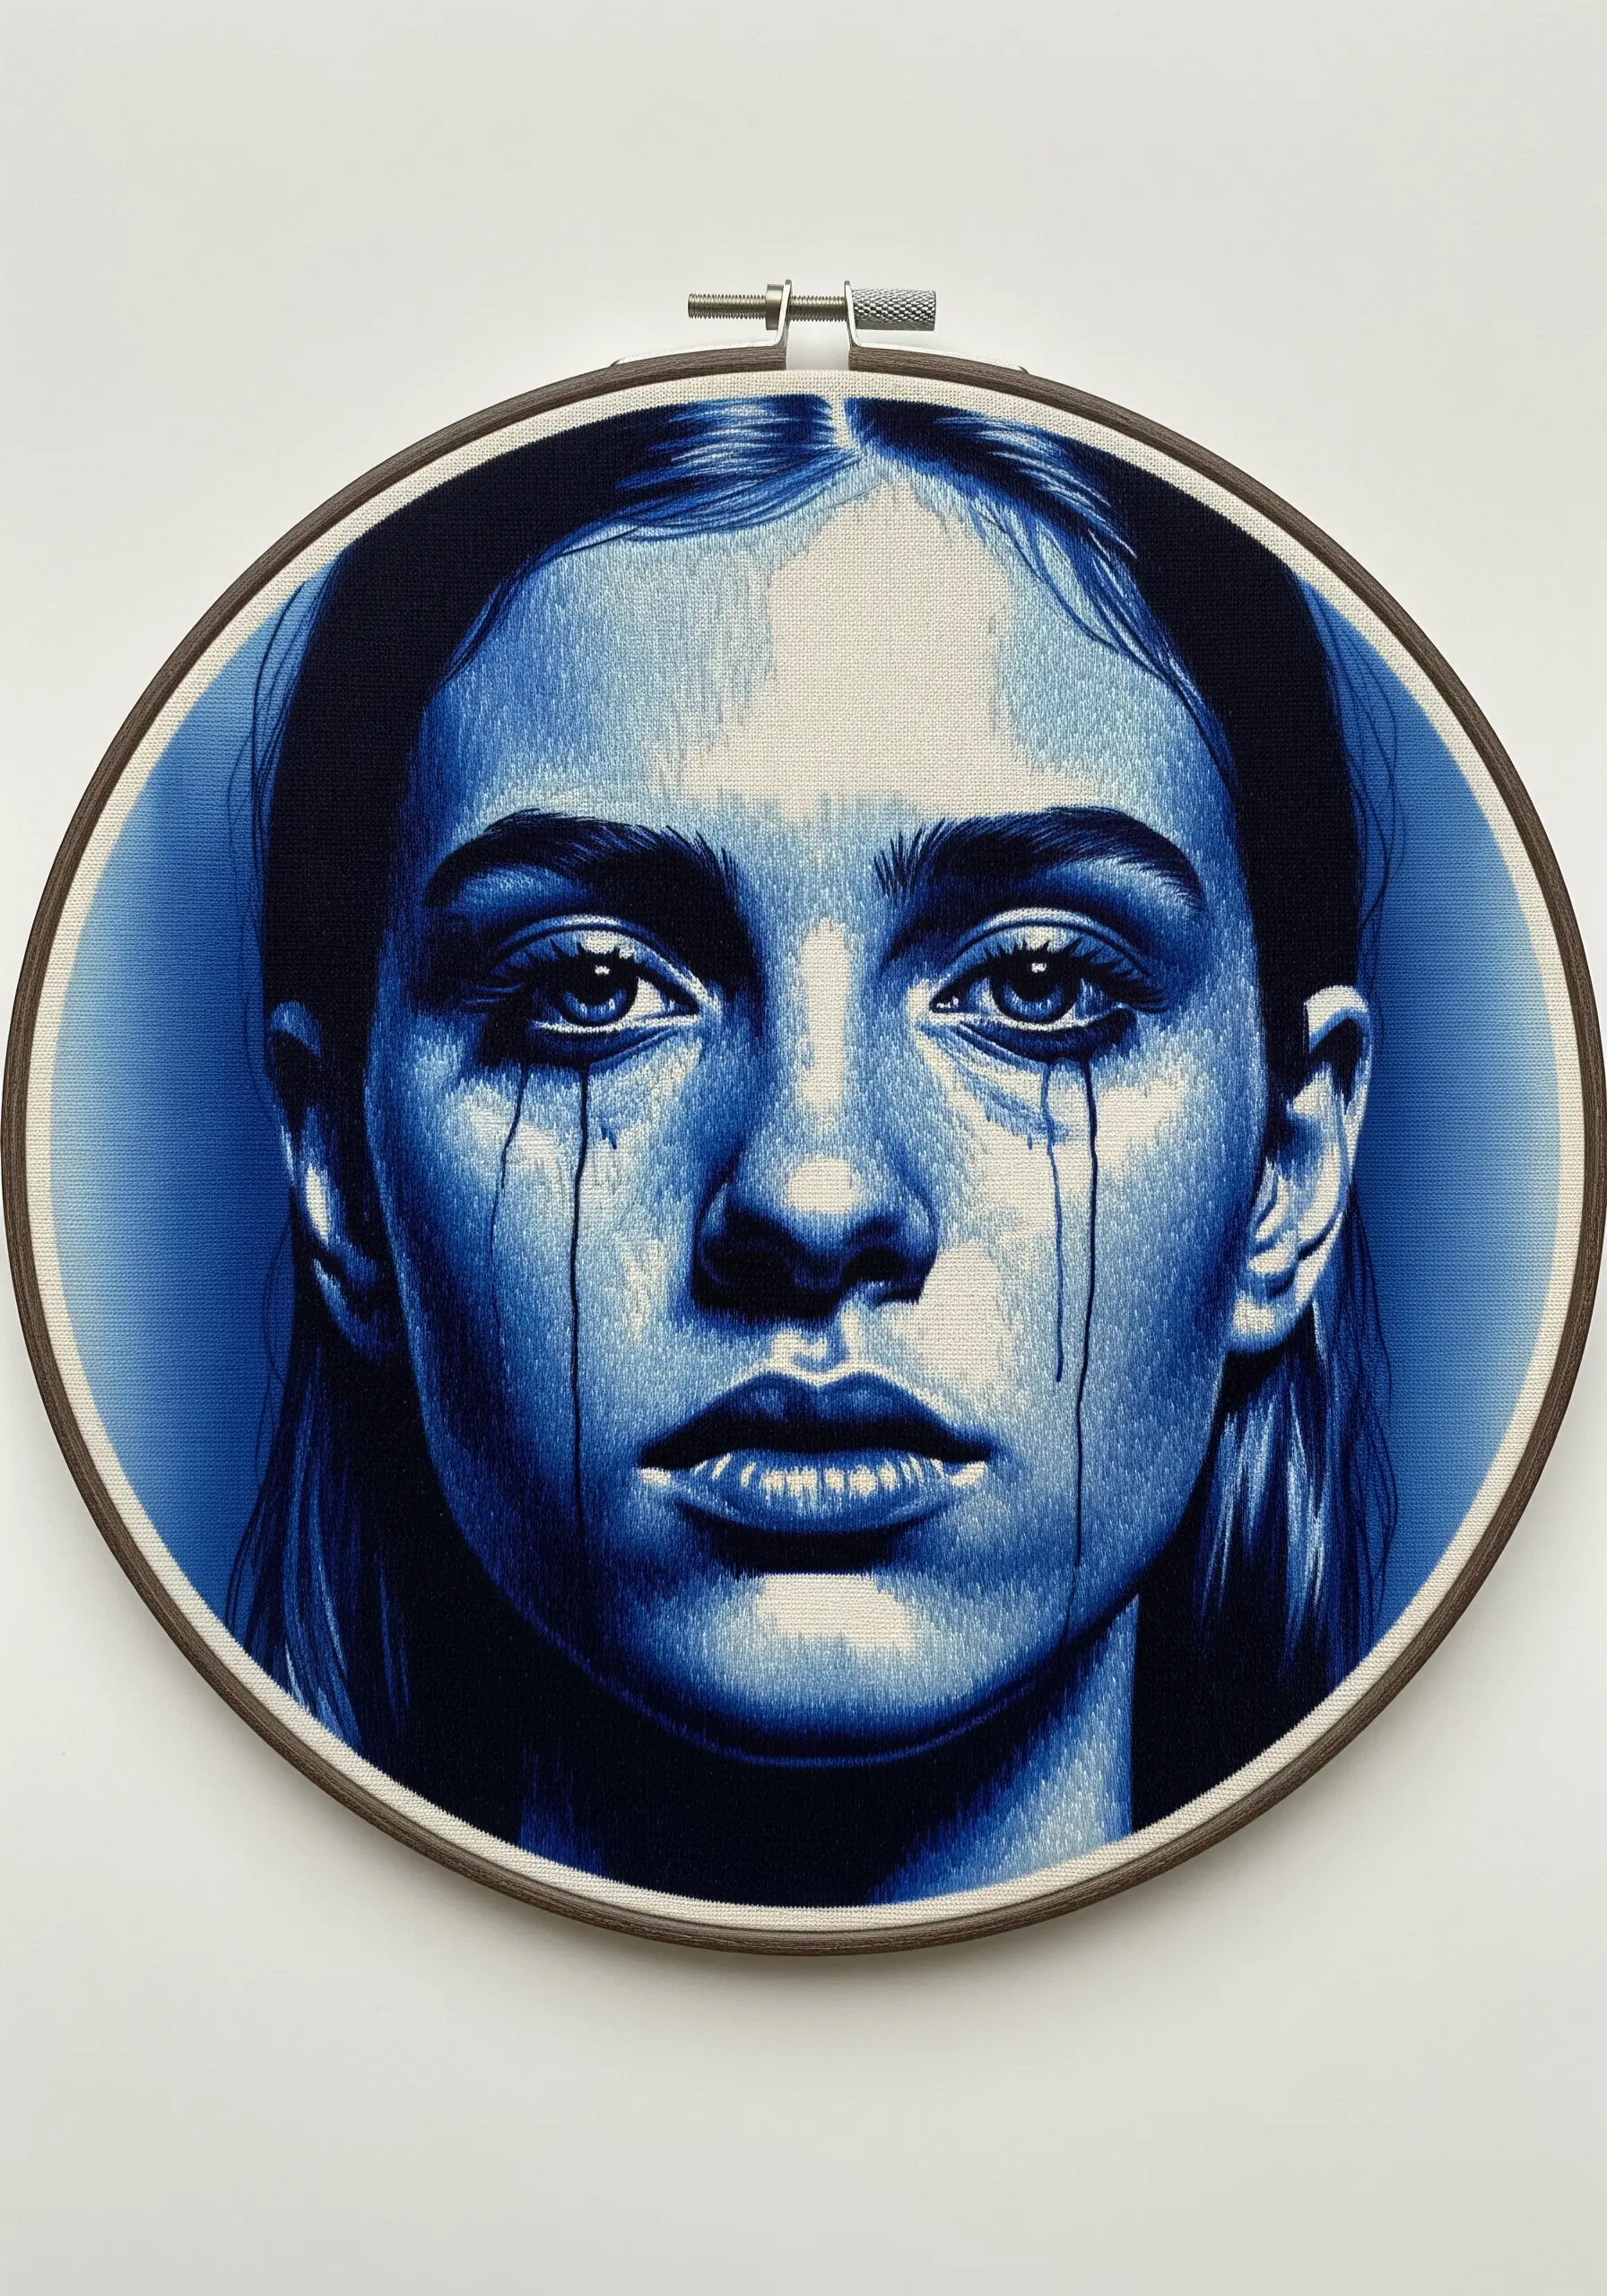
Like the sepia-toned piece, this portrait uses a monochromatic blue palette to evoke a powerful emotion—in this case, a sense of melancholy or introspection.
The illusion of tears is created by blending darker blue threads downwards from the eyes in uneven, painterly strokes. This mimics the way pigment might run in a watercolor painting, adding a fluid, artistic quality to the sadness.
20. Achieve Opulence with Metallic and Beaded Embellishments
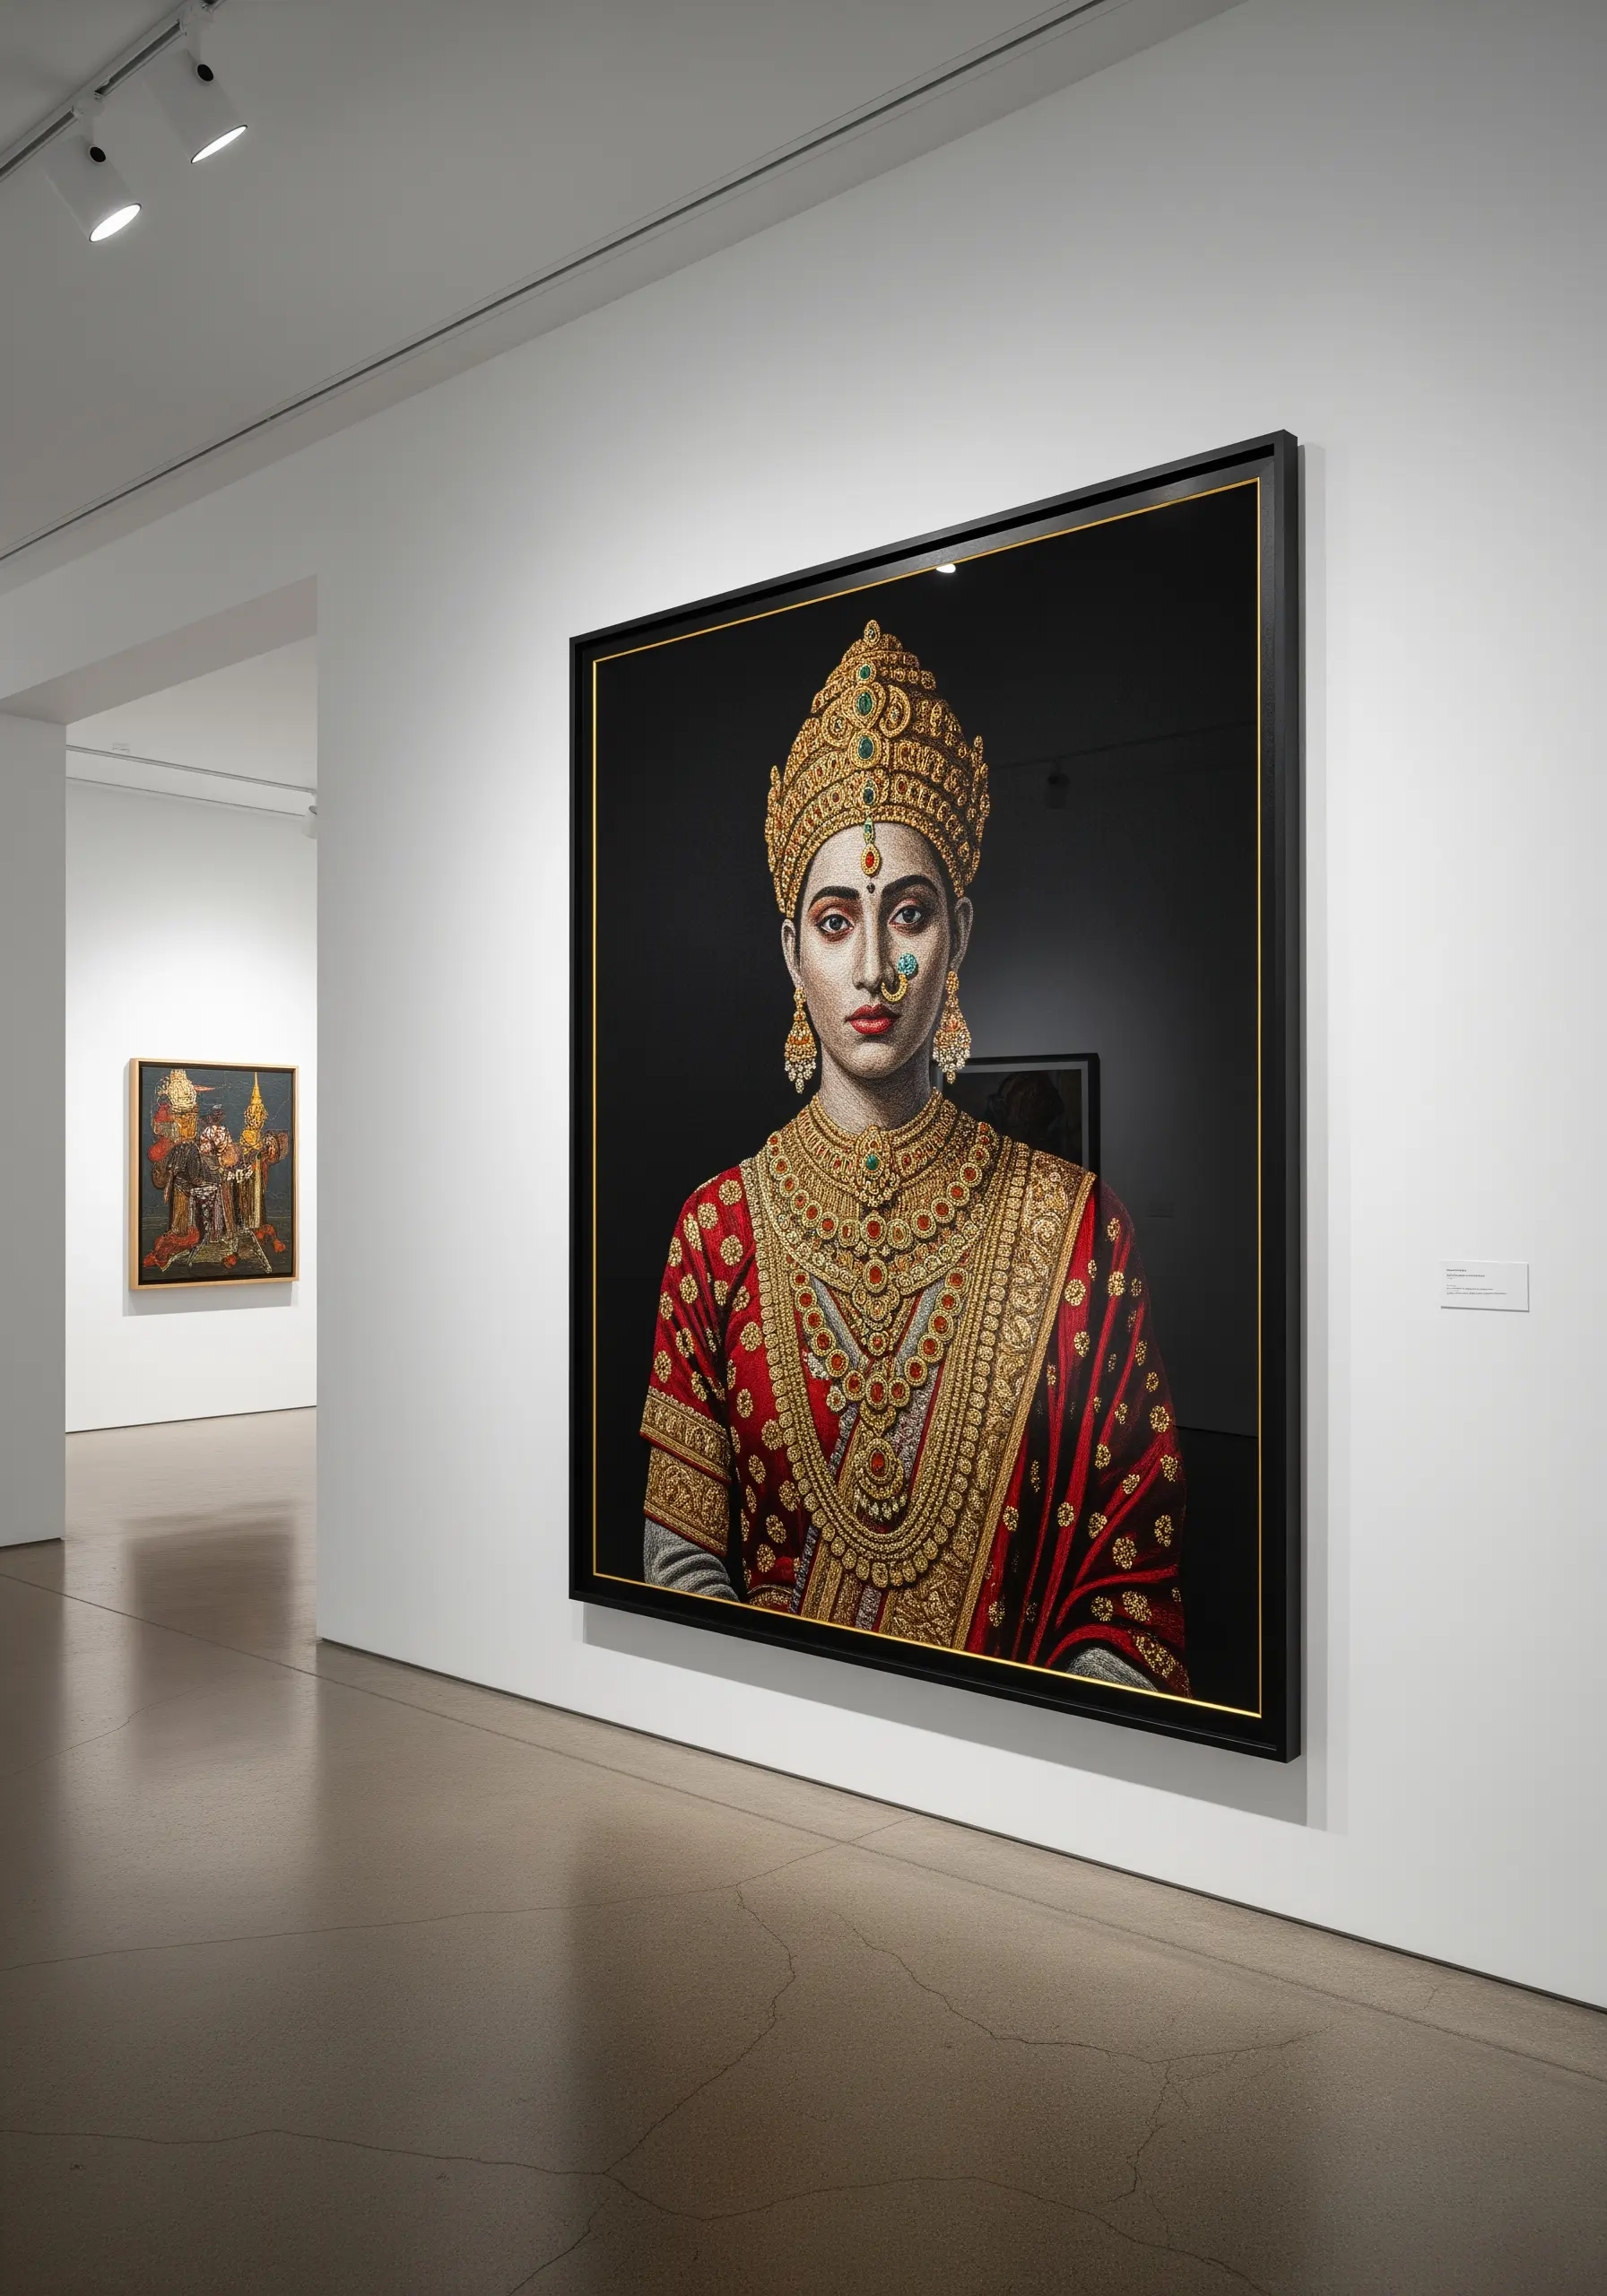
To replicate the intricate detail of jewelry and rich textiles, you need to introduce different textures and finishes.
Incorporate fine metallic threads for filigree and reflective details, and use tiny seed beads for gemstones.
Secure each bead with a single, strong stitch passing through it twice for durability. The raised texture and light-catching properties of these materials create a luxurious, three-dimensional effect that elevates the entire piece.
21. Create Sculptural Hair That Escapes the Canvas
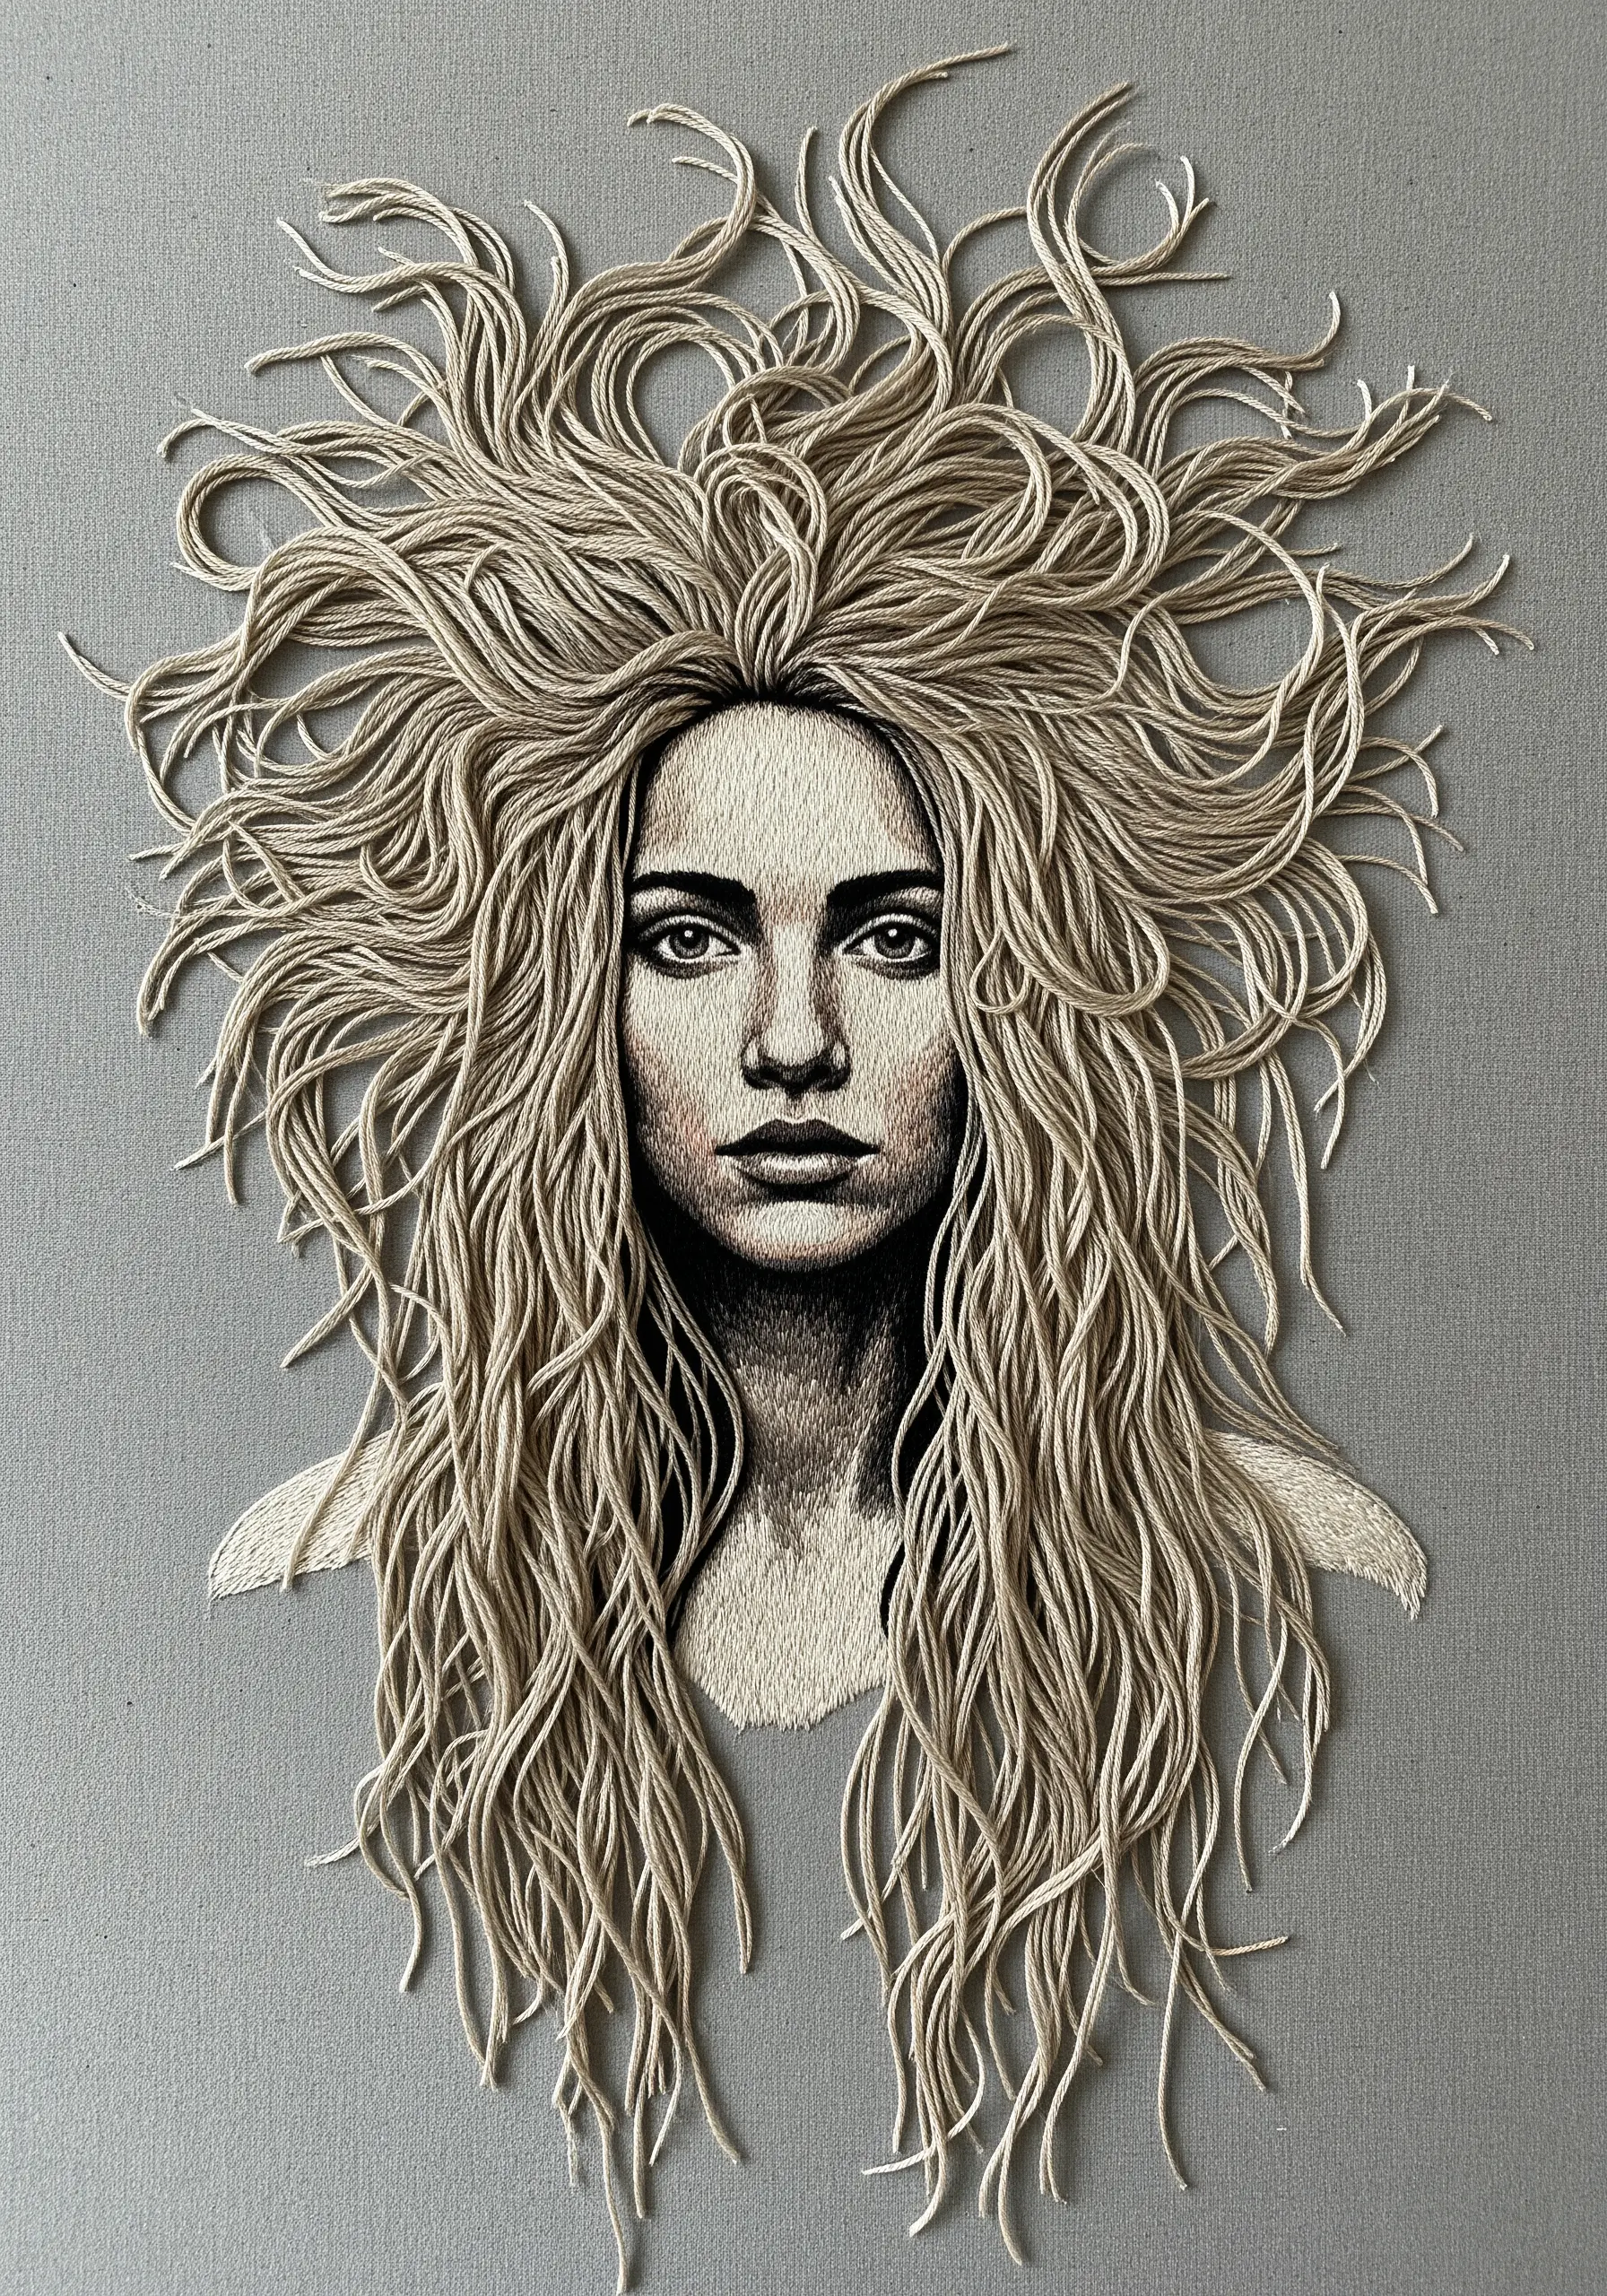
Give your portrait a stunning three-dimensional quality by allowing the hair to break free from the two-dimensional surface.
After stitching the face, anchor long strands of thread at the hairline but leave the ends completely loose.
You can then style, braid, or trim these threads to create incredible volume and movement. This technique, a simplified form of stumpwork, turns your embroidery into a captivating low-relief sculpture.
22. Explore the Power of an Unfinished Composition
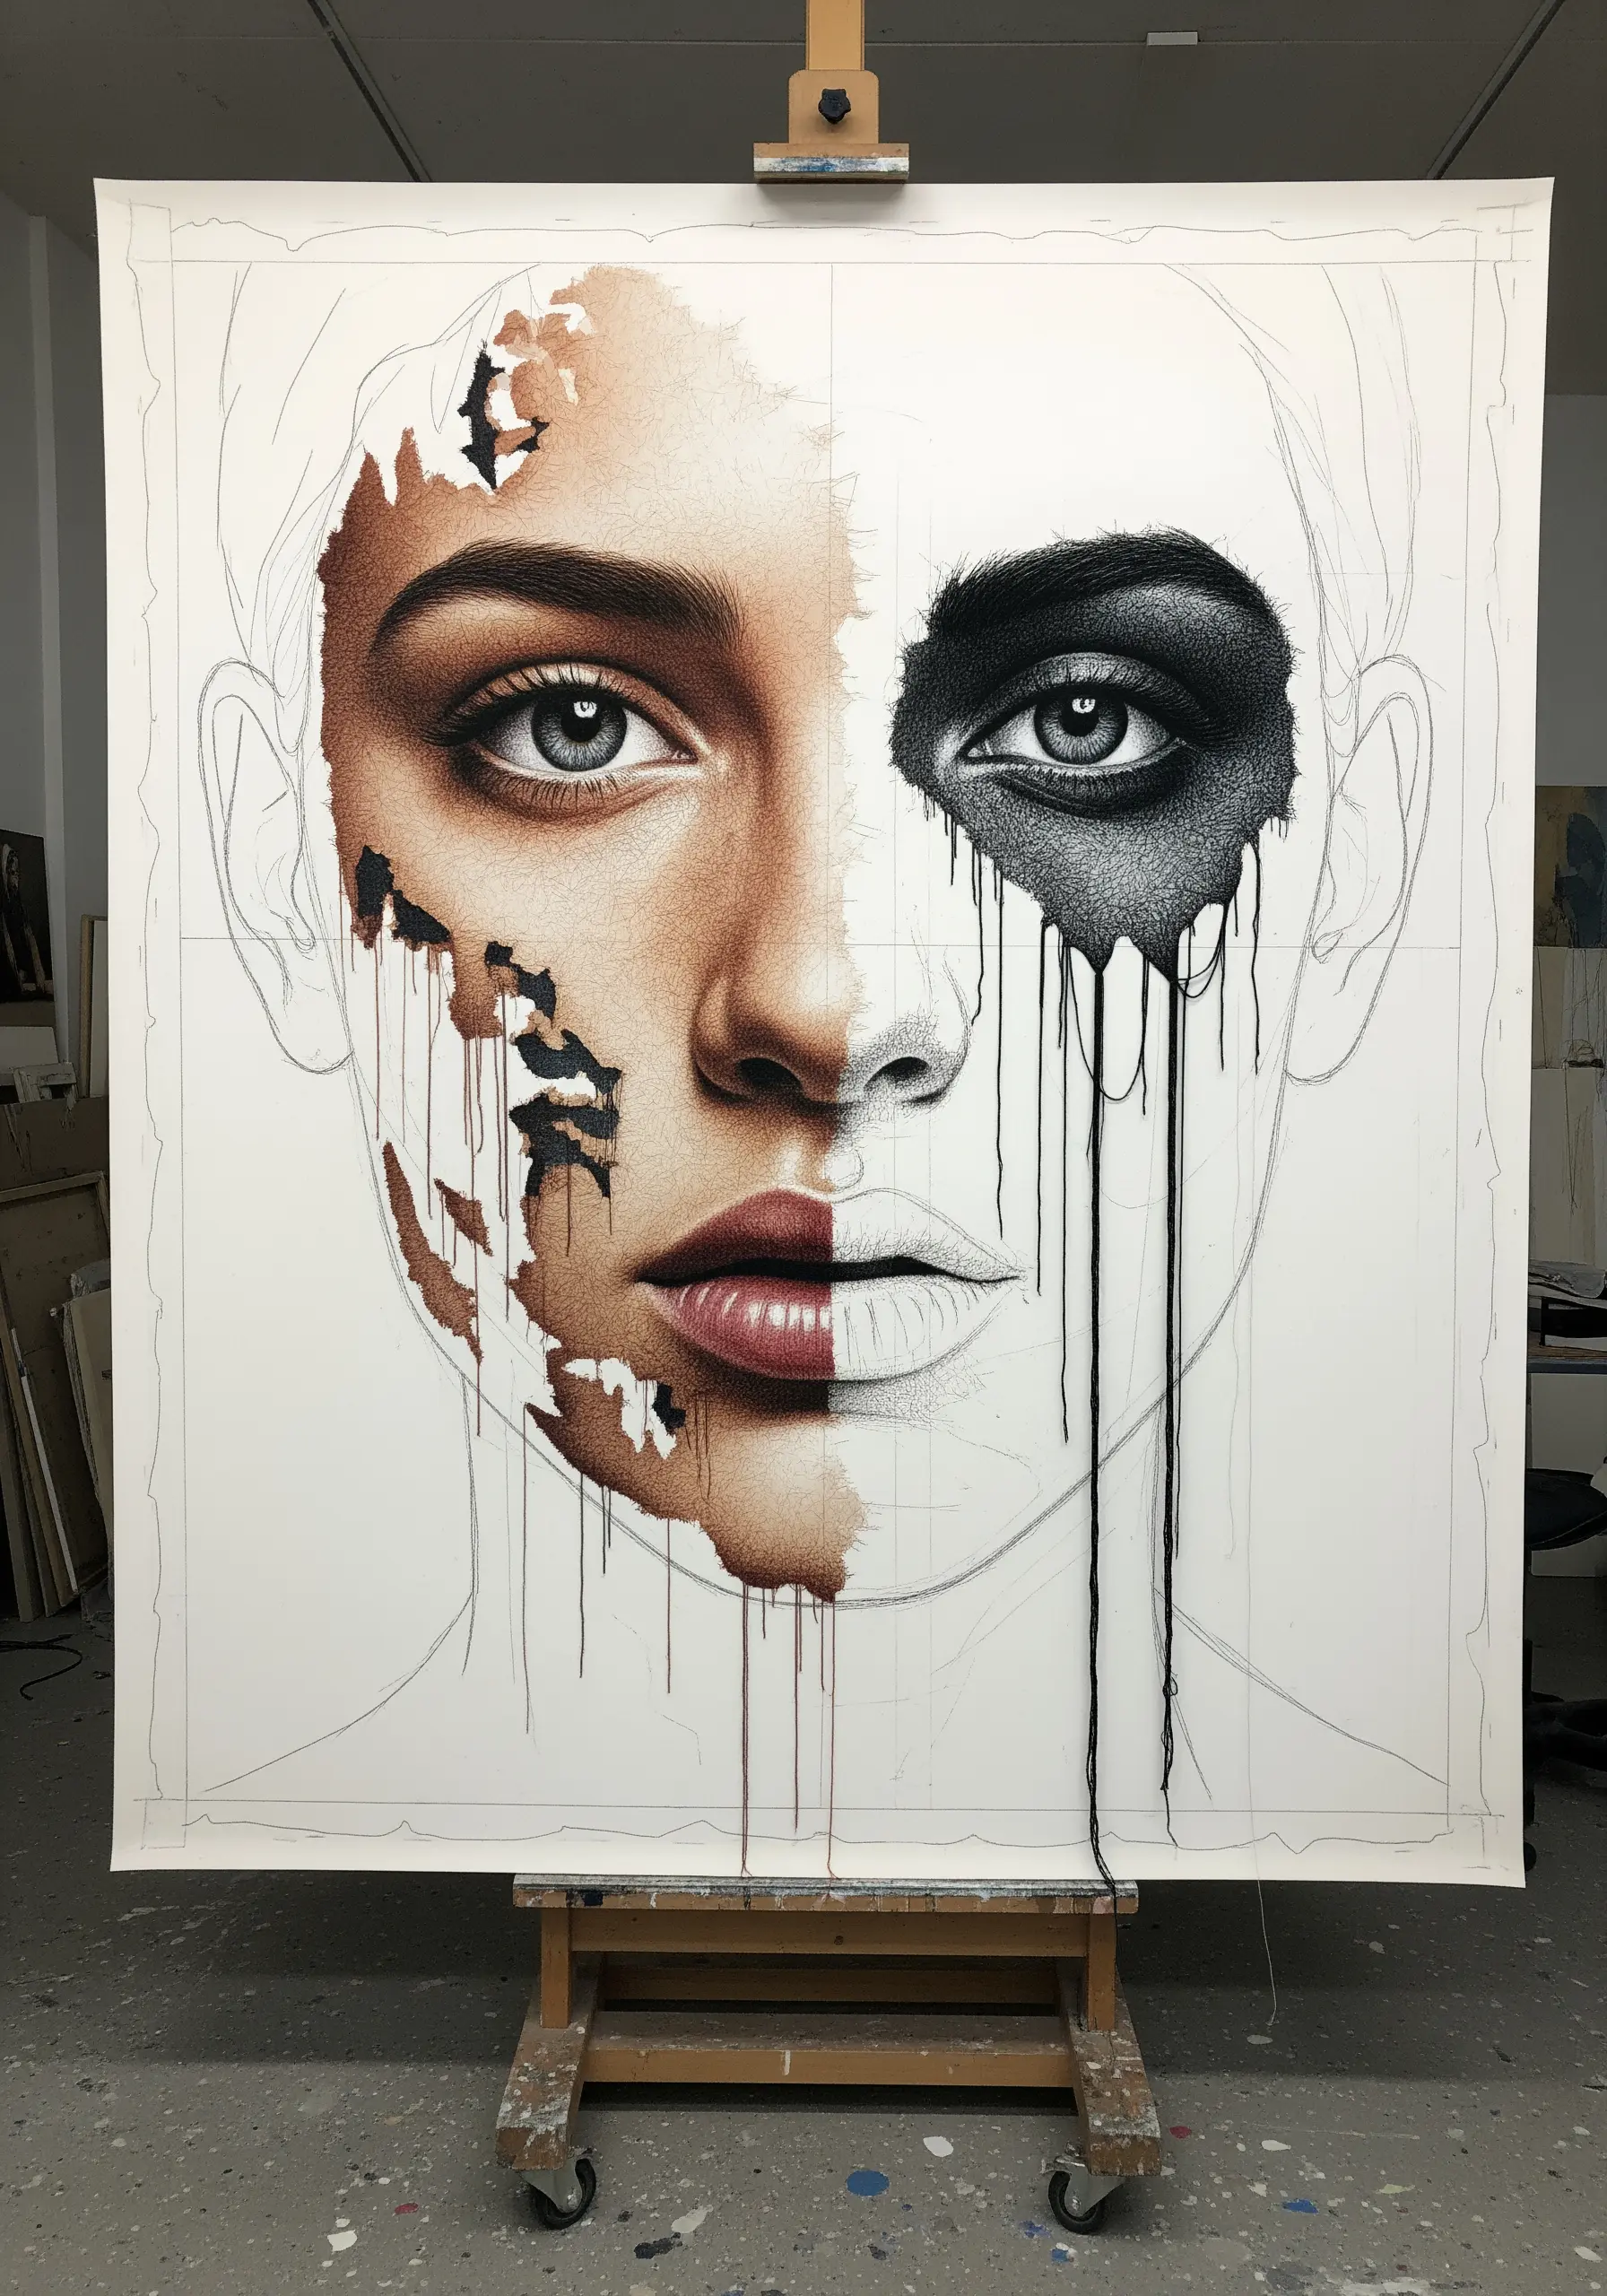
A portrait does not need to be fully rendered to feel complete or powerful.
By intentionally leaving parts of the underlying sketch visible, you create a dynamic contrast between the detailed, stitched areas and the raw pencil lines.
This technique not only draws the viewer’s eye exactly where you want it to go but also offers a beautiful glimpse into your creative process, making the final piece feel more intimate and authentic.
23. Stitch Translucent Steam with Wispy, Open Stitches
To create a believable steam or smoke effect, the key is suggestion, not definition.
Use a single strand of very fine white or light grey thread. Work in loose, swirling stem stitches or backstitches, allowing them to cross over each other randomly.
Critically, do not pull the stitches tight and let the background fabric show through. This translucency is what makes the steam feel ethereal and weightless, rather than like a solid white object.
24. Create a Rainy Window Illusion with Three Layers
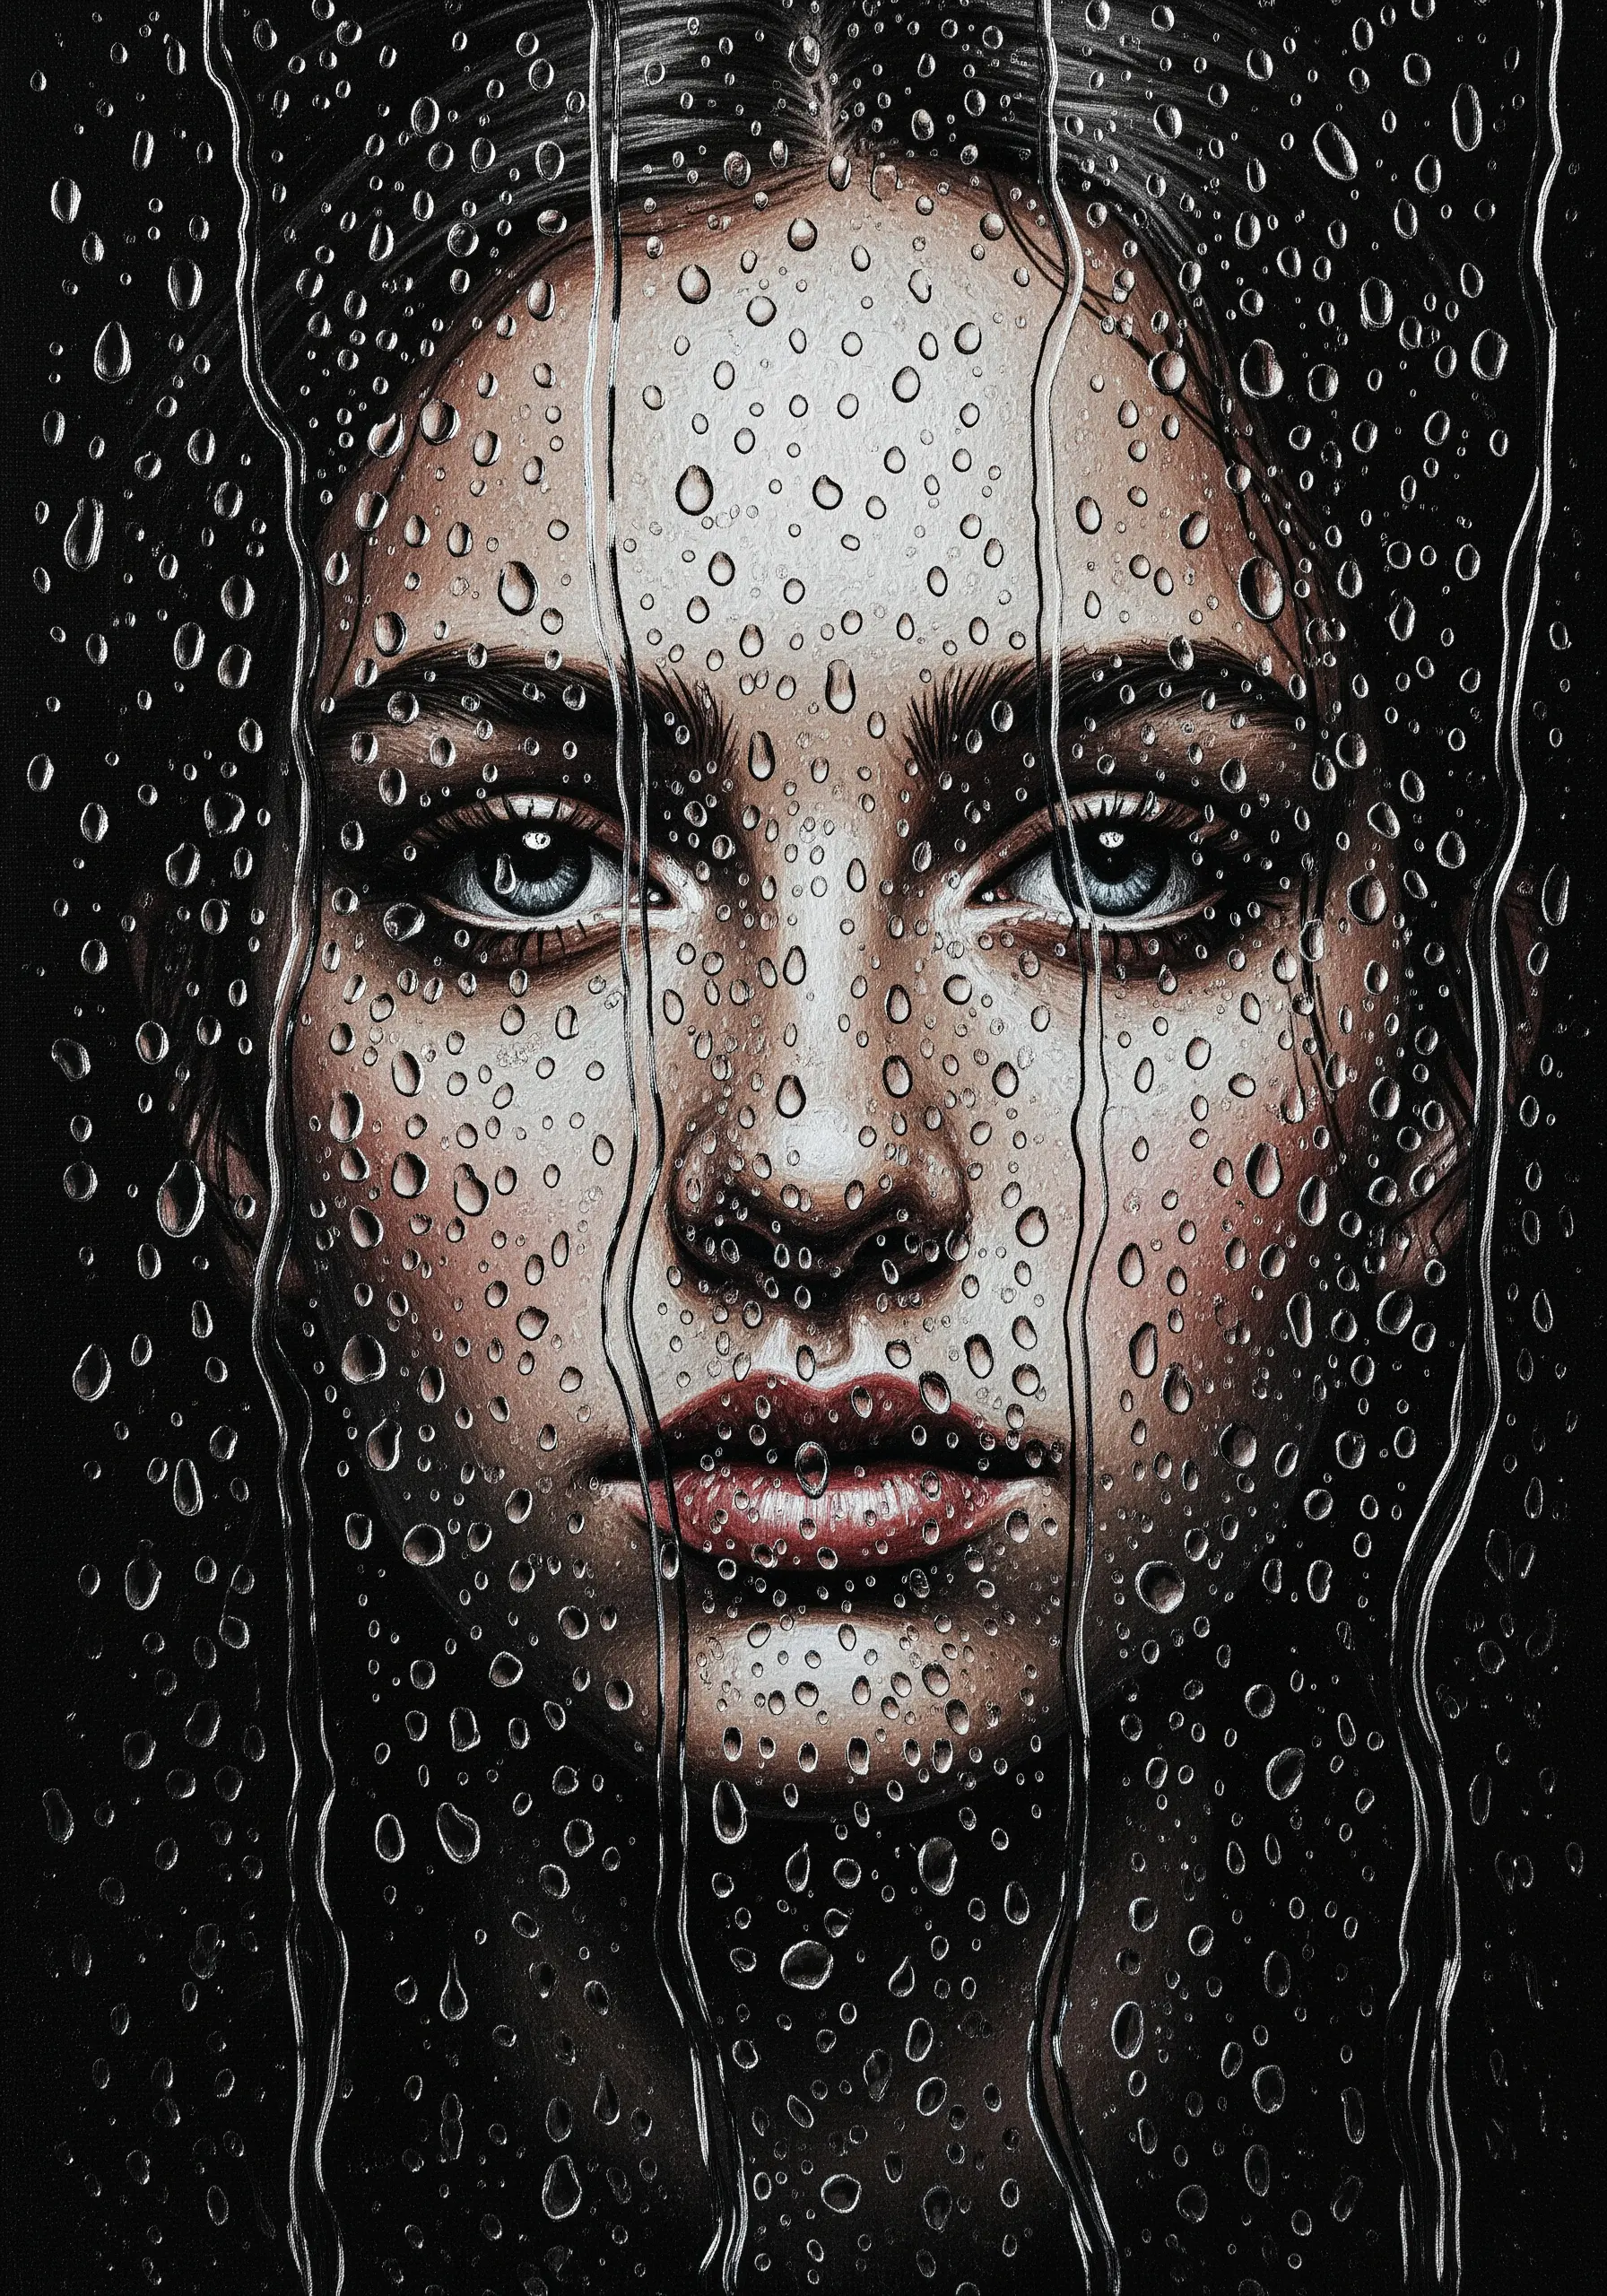
This incredibly realistic effect is achieved by thinking in layers.
First, stitch the portrait itself with slightly softer edges, as if it’s out of focus. Second, add long, vertical straight stitches in grey and white to represent water streaks running down the ‘glass’.
Finally, add the individual droplets on top, each one created with a small dark shadow and a sharp white highlight. The combination of these three layers creates a convincing illusion of depth and atmosphere.
25. Combine Fine Portraiture with 3D Botanical Elements
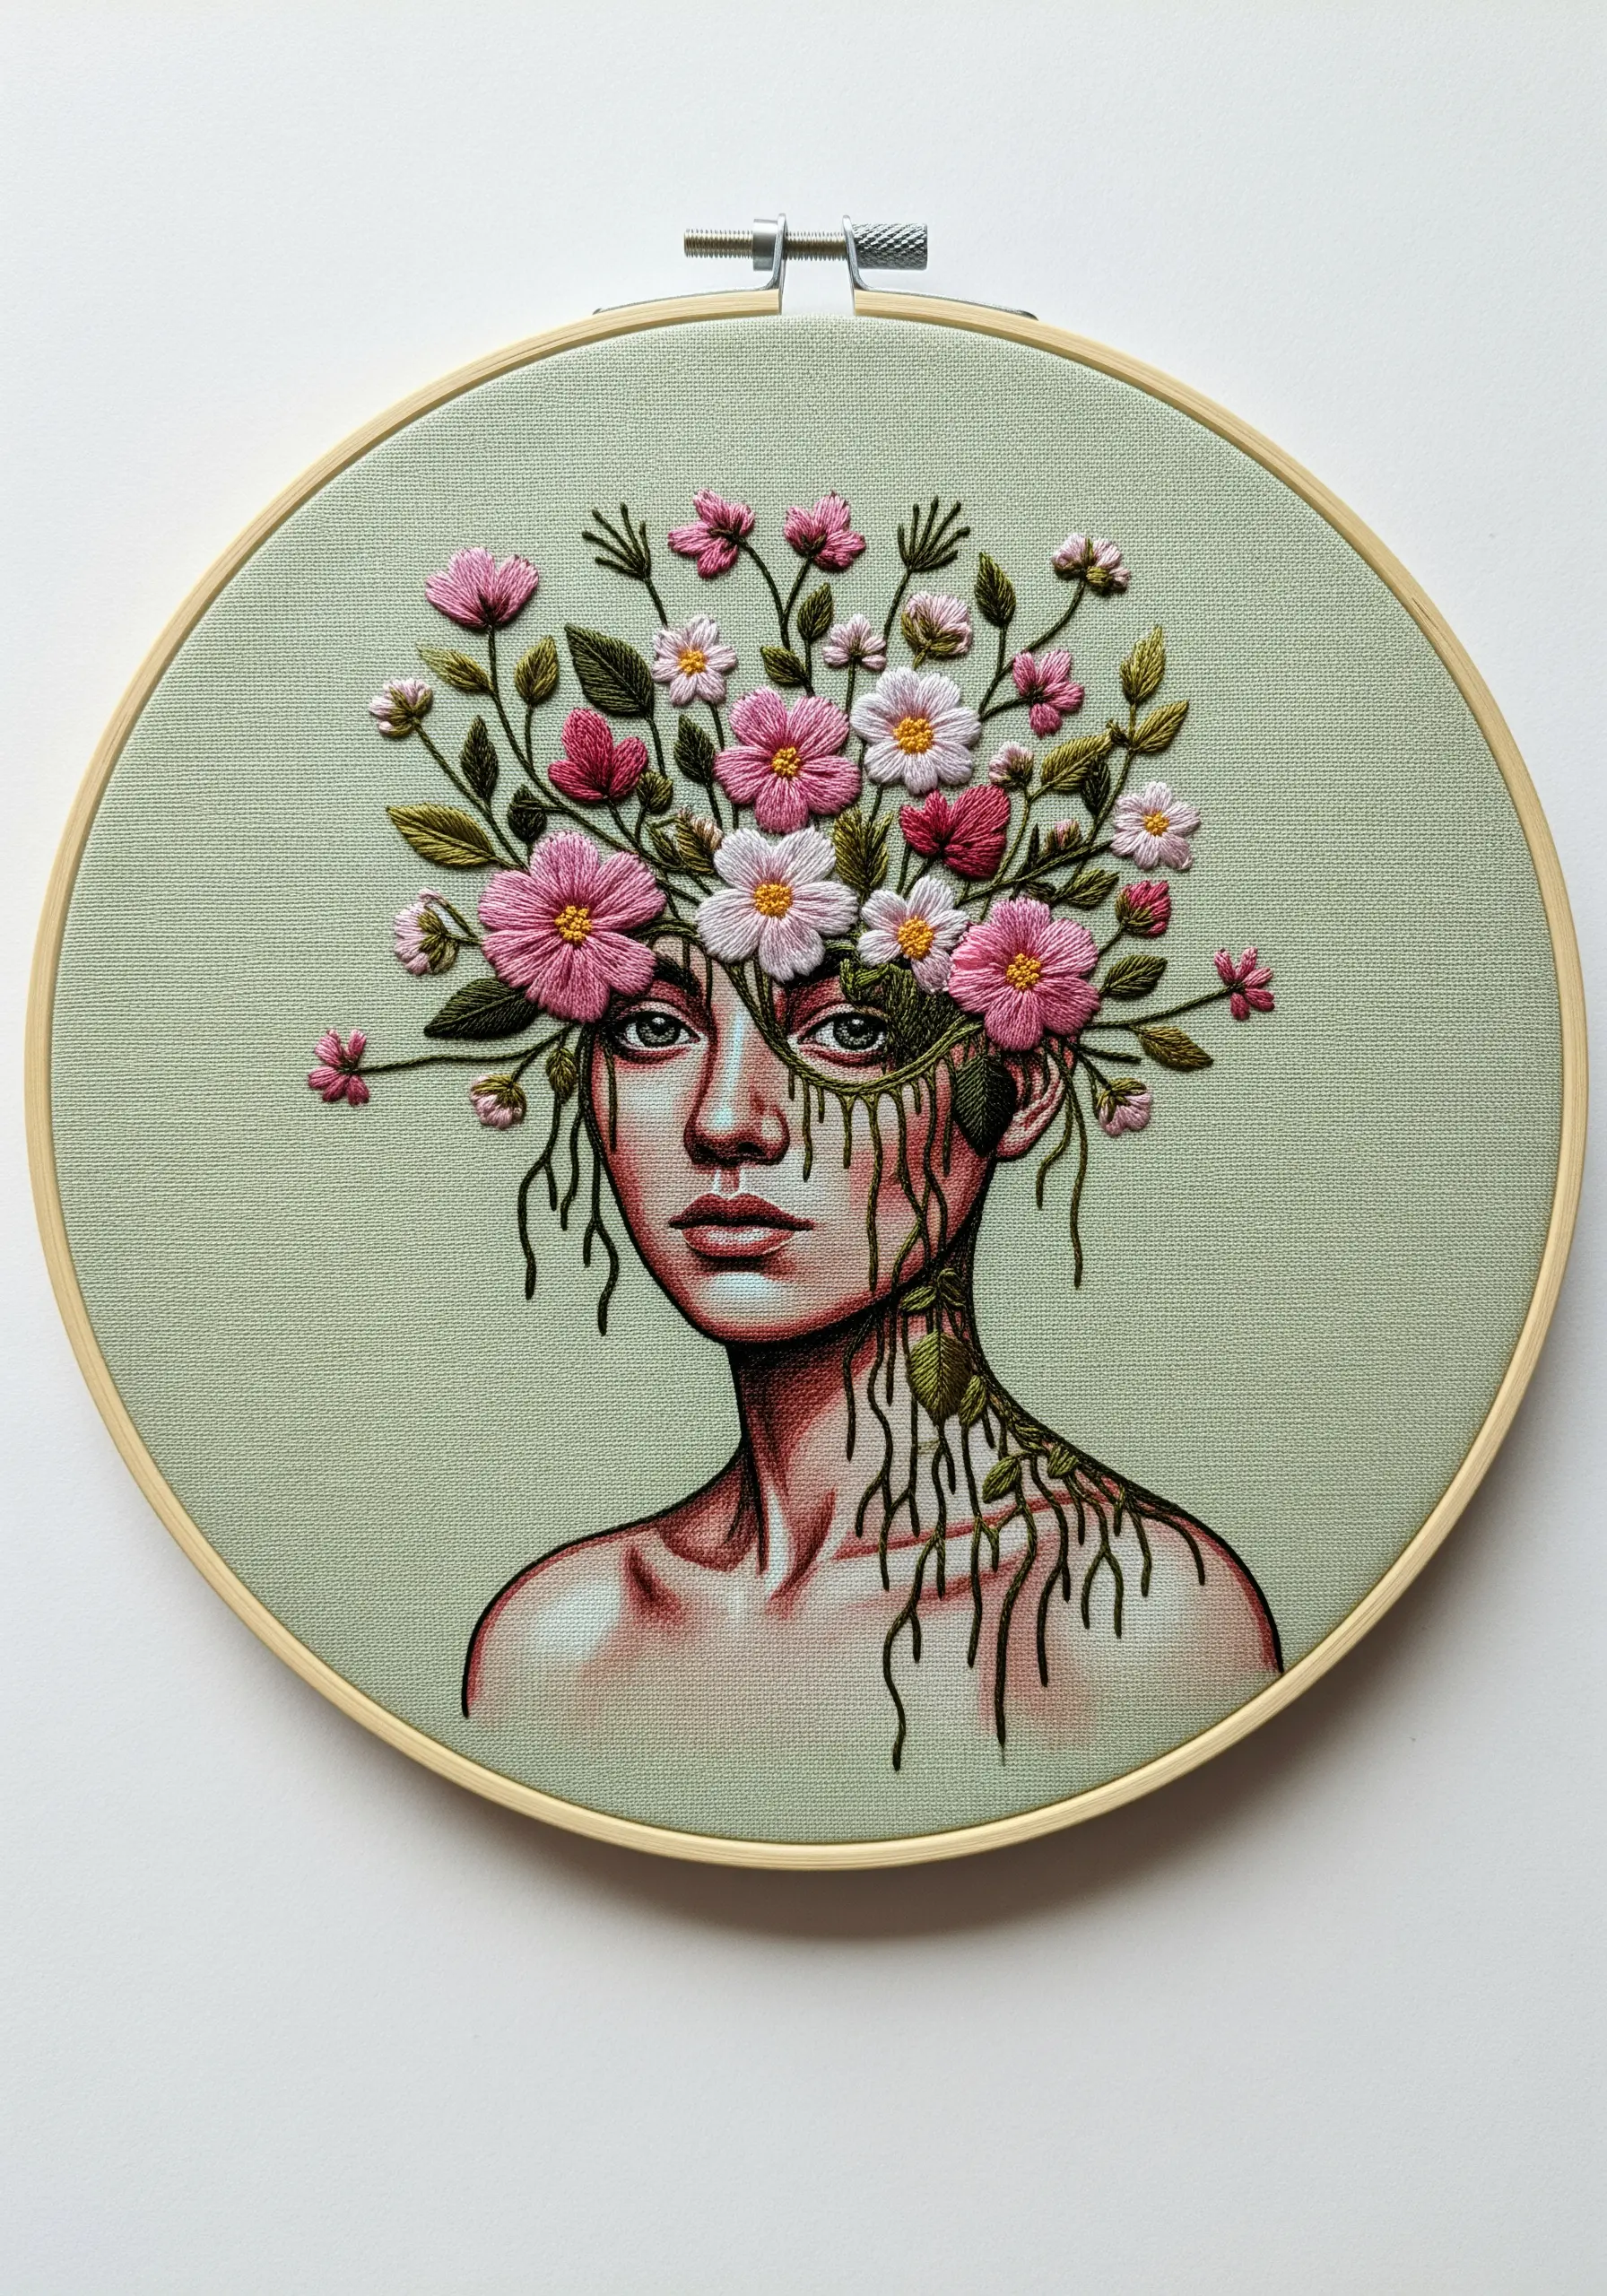
Create a stunning surrealist piece by merging a delicately stitched portrait with vibrant, dimensional botanicals.
Use padded satin stitch or layered petals for the flowers to make them pop off the surface, and add textured French knots for the centers.
By allowing roots and vines to creep across the skin, you integrate the two distinct subjects into a single, cohesive, and imaginative composition. It’s a beautiful way to blend portraiture with botanical elements.
26. Map Your Color Transitions Before You Stitch
For hyper-realistic portraits with smooth gradients, planning is everything. Before you thread your needle, lightly trace the main color zones onto your fabric with a heat or water-soluble pen.
Think of it as creating a paint-by-numbers guide for your thread blending. This roadmap ensures your highlights, mid-tones, and shadows are placed correctly, leading to seamless, painterly thread blending and a much more predictable and polished result.
27. Add Character with Unconventional Fabric Choices
The surface you stitch on is as much a part of the artwork as the thread itself. Don’t limit yourself to standard embroidery cotton.
Choosing a fabric with a visible texture, like a coarse, loosely-woven linen or burlap, adds instant depth and a rustic character to the piece.
Embrace the material by leaving the edges raw and frayed. This frames the work organically and celebrates the tactile nature of textile art.
28. Engineer a Sci-Fi Sheen with Metallic Threads
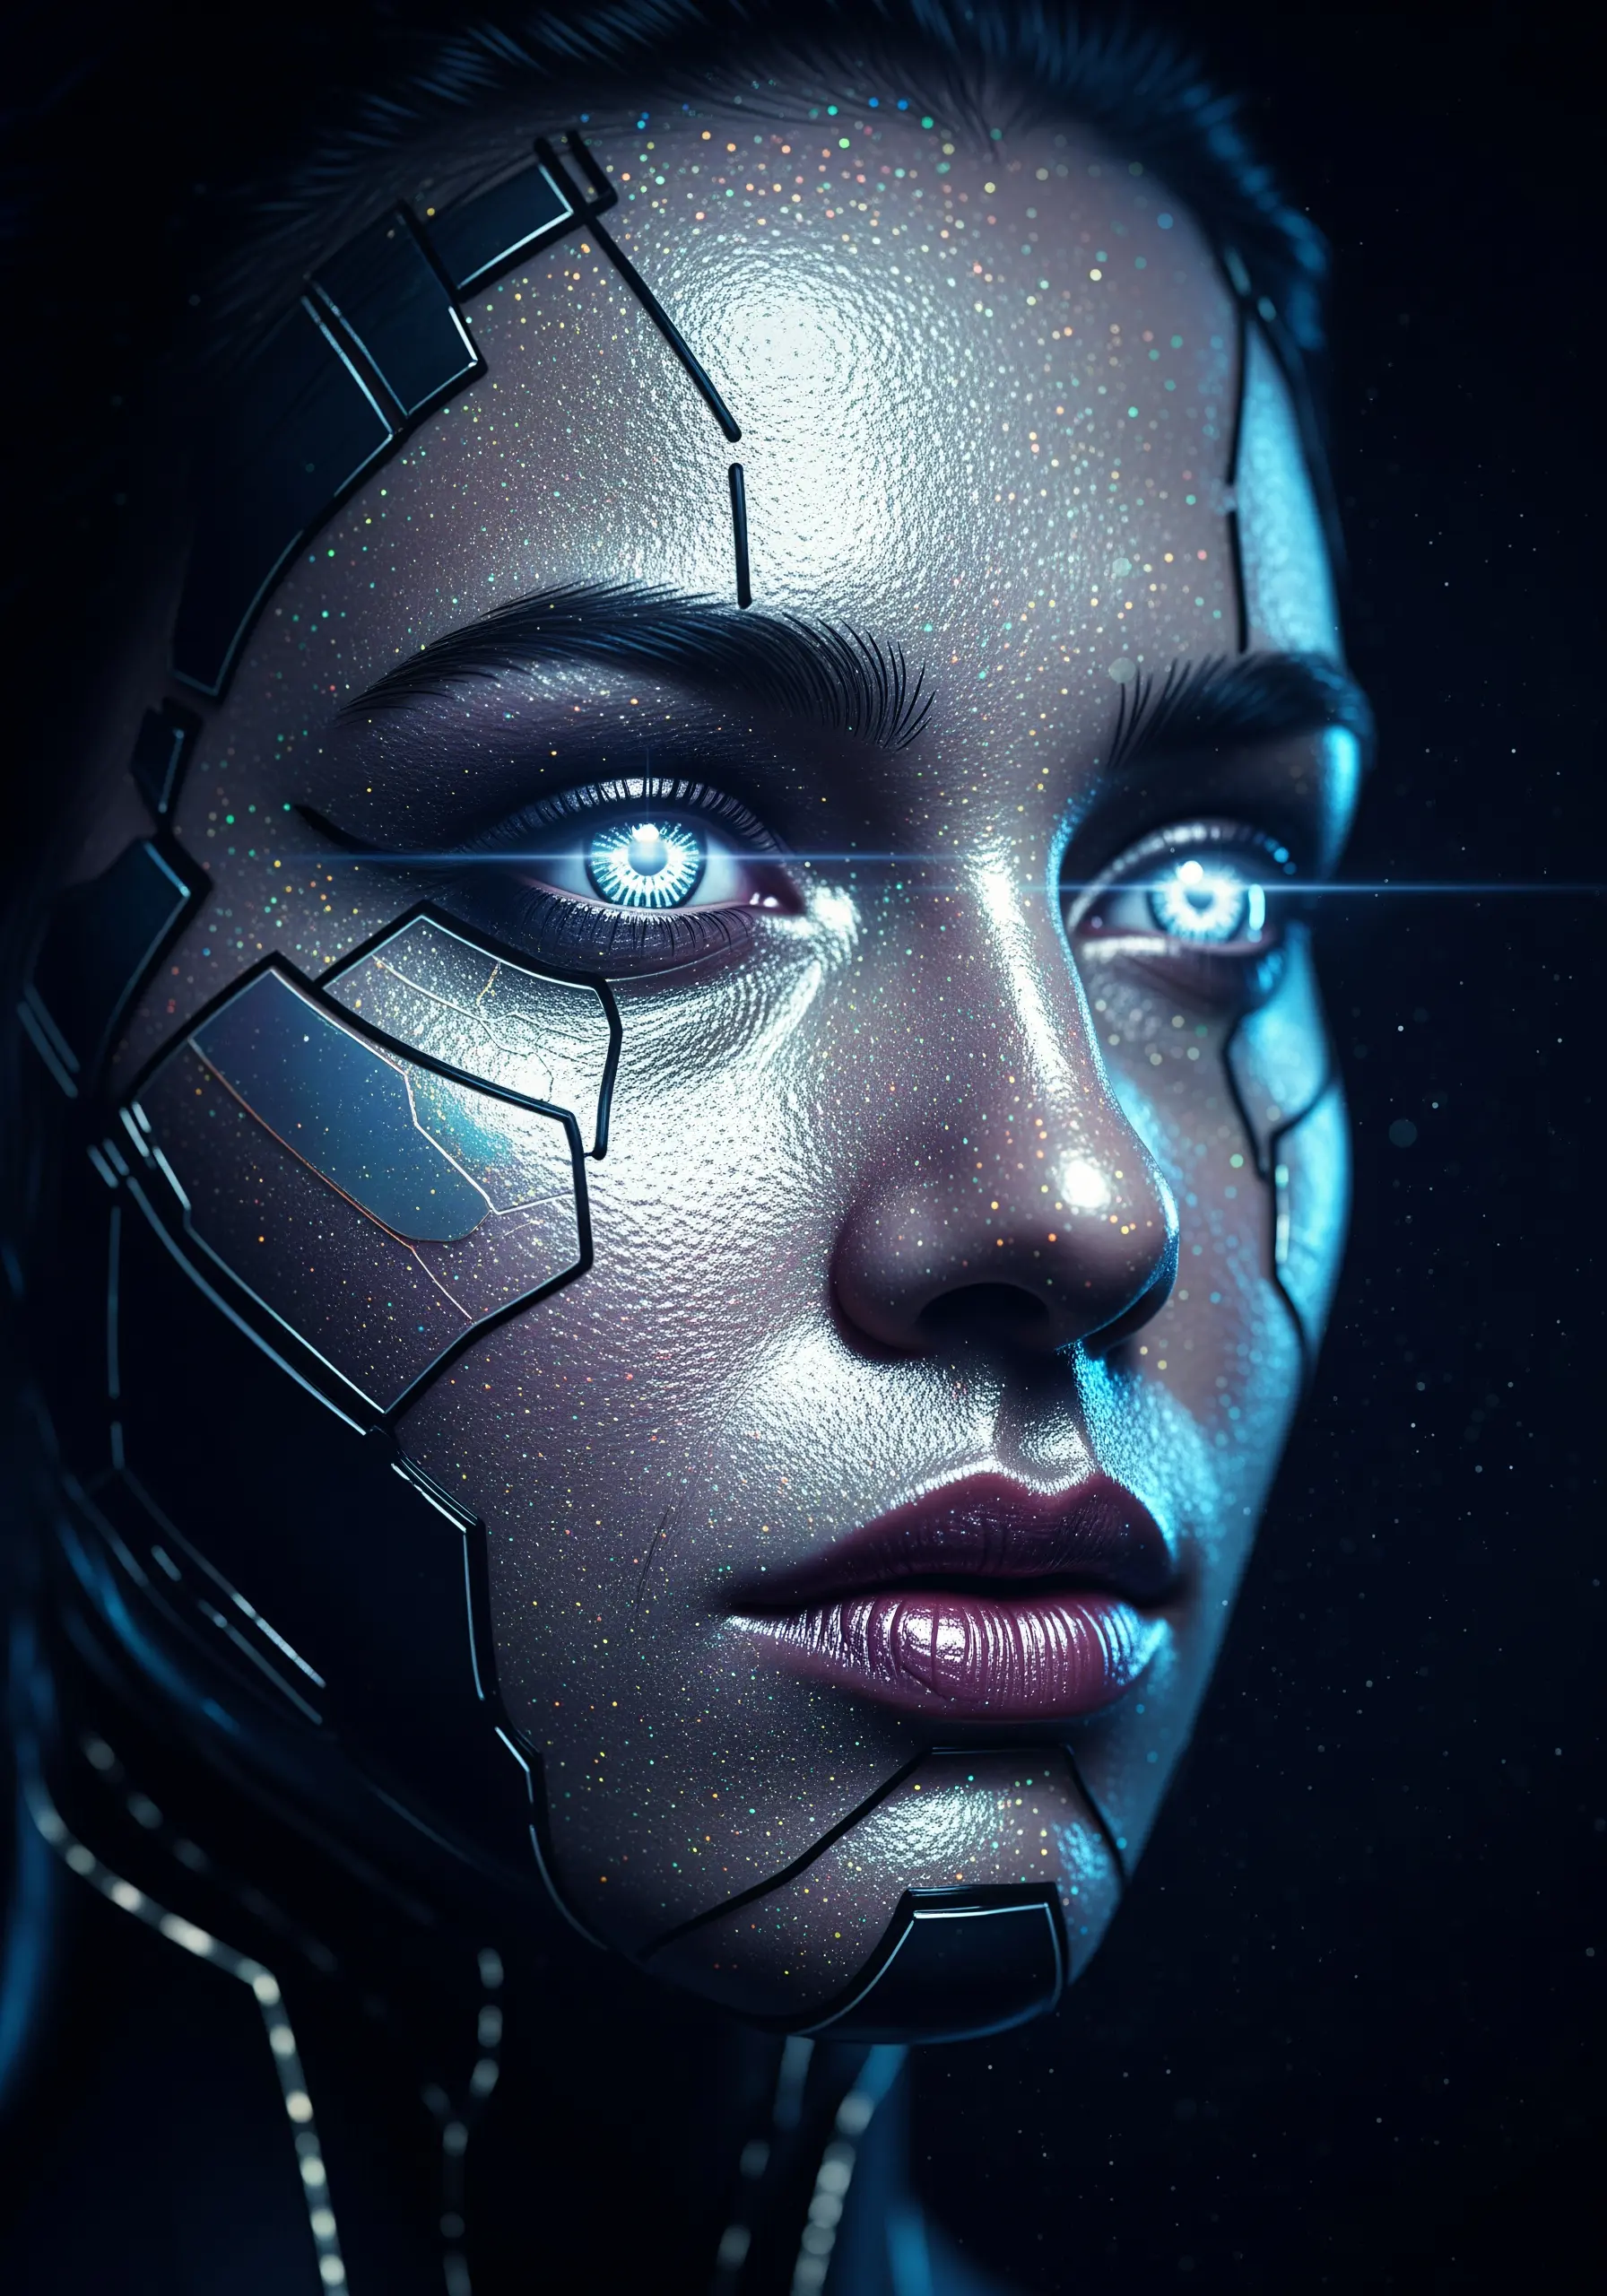
To create a futuristic, robotic, or otherworldly effect, strategic use of metallic thread is essential.
Use flat, smooth satin stitches with silver or gunmetal thread to create panels that look like polished metal, as they maximize light reflection.
For a subtler effect, add tiny French knots with an iridescent or glittery thread across the skin to mimic a field of stars or digital noise, completing the sci-fi aesthetic.
29. Situate Your Portrait Within a Stitched Landscape
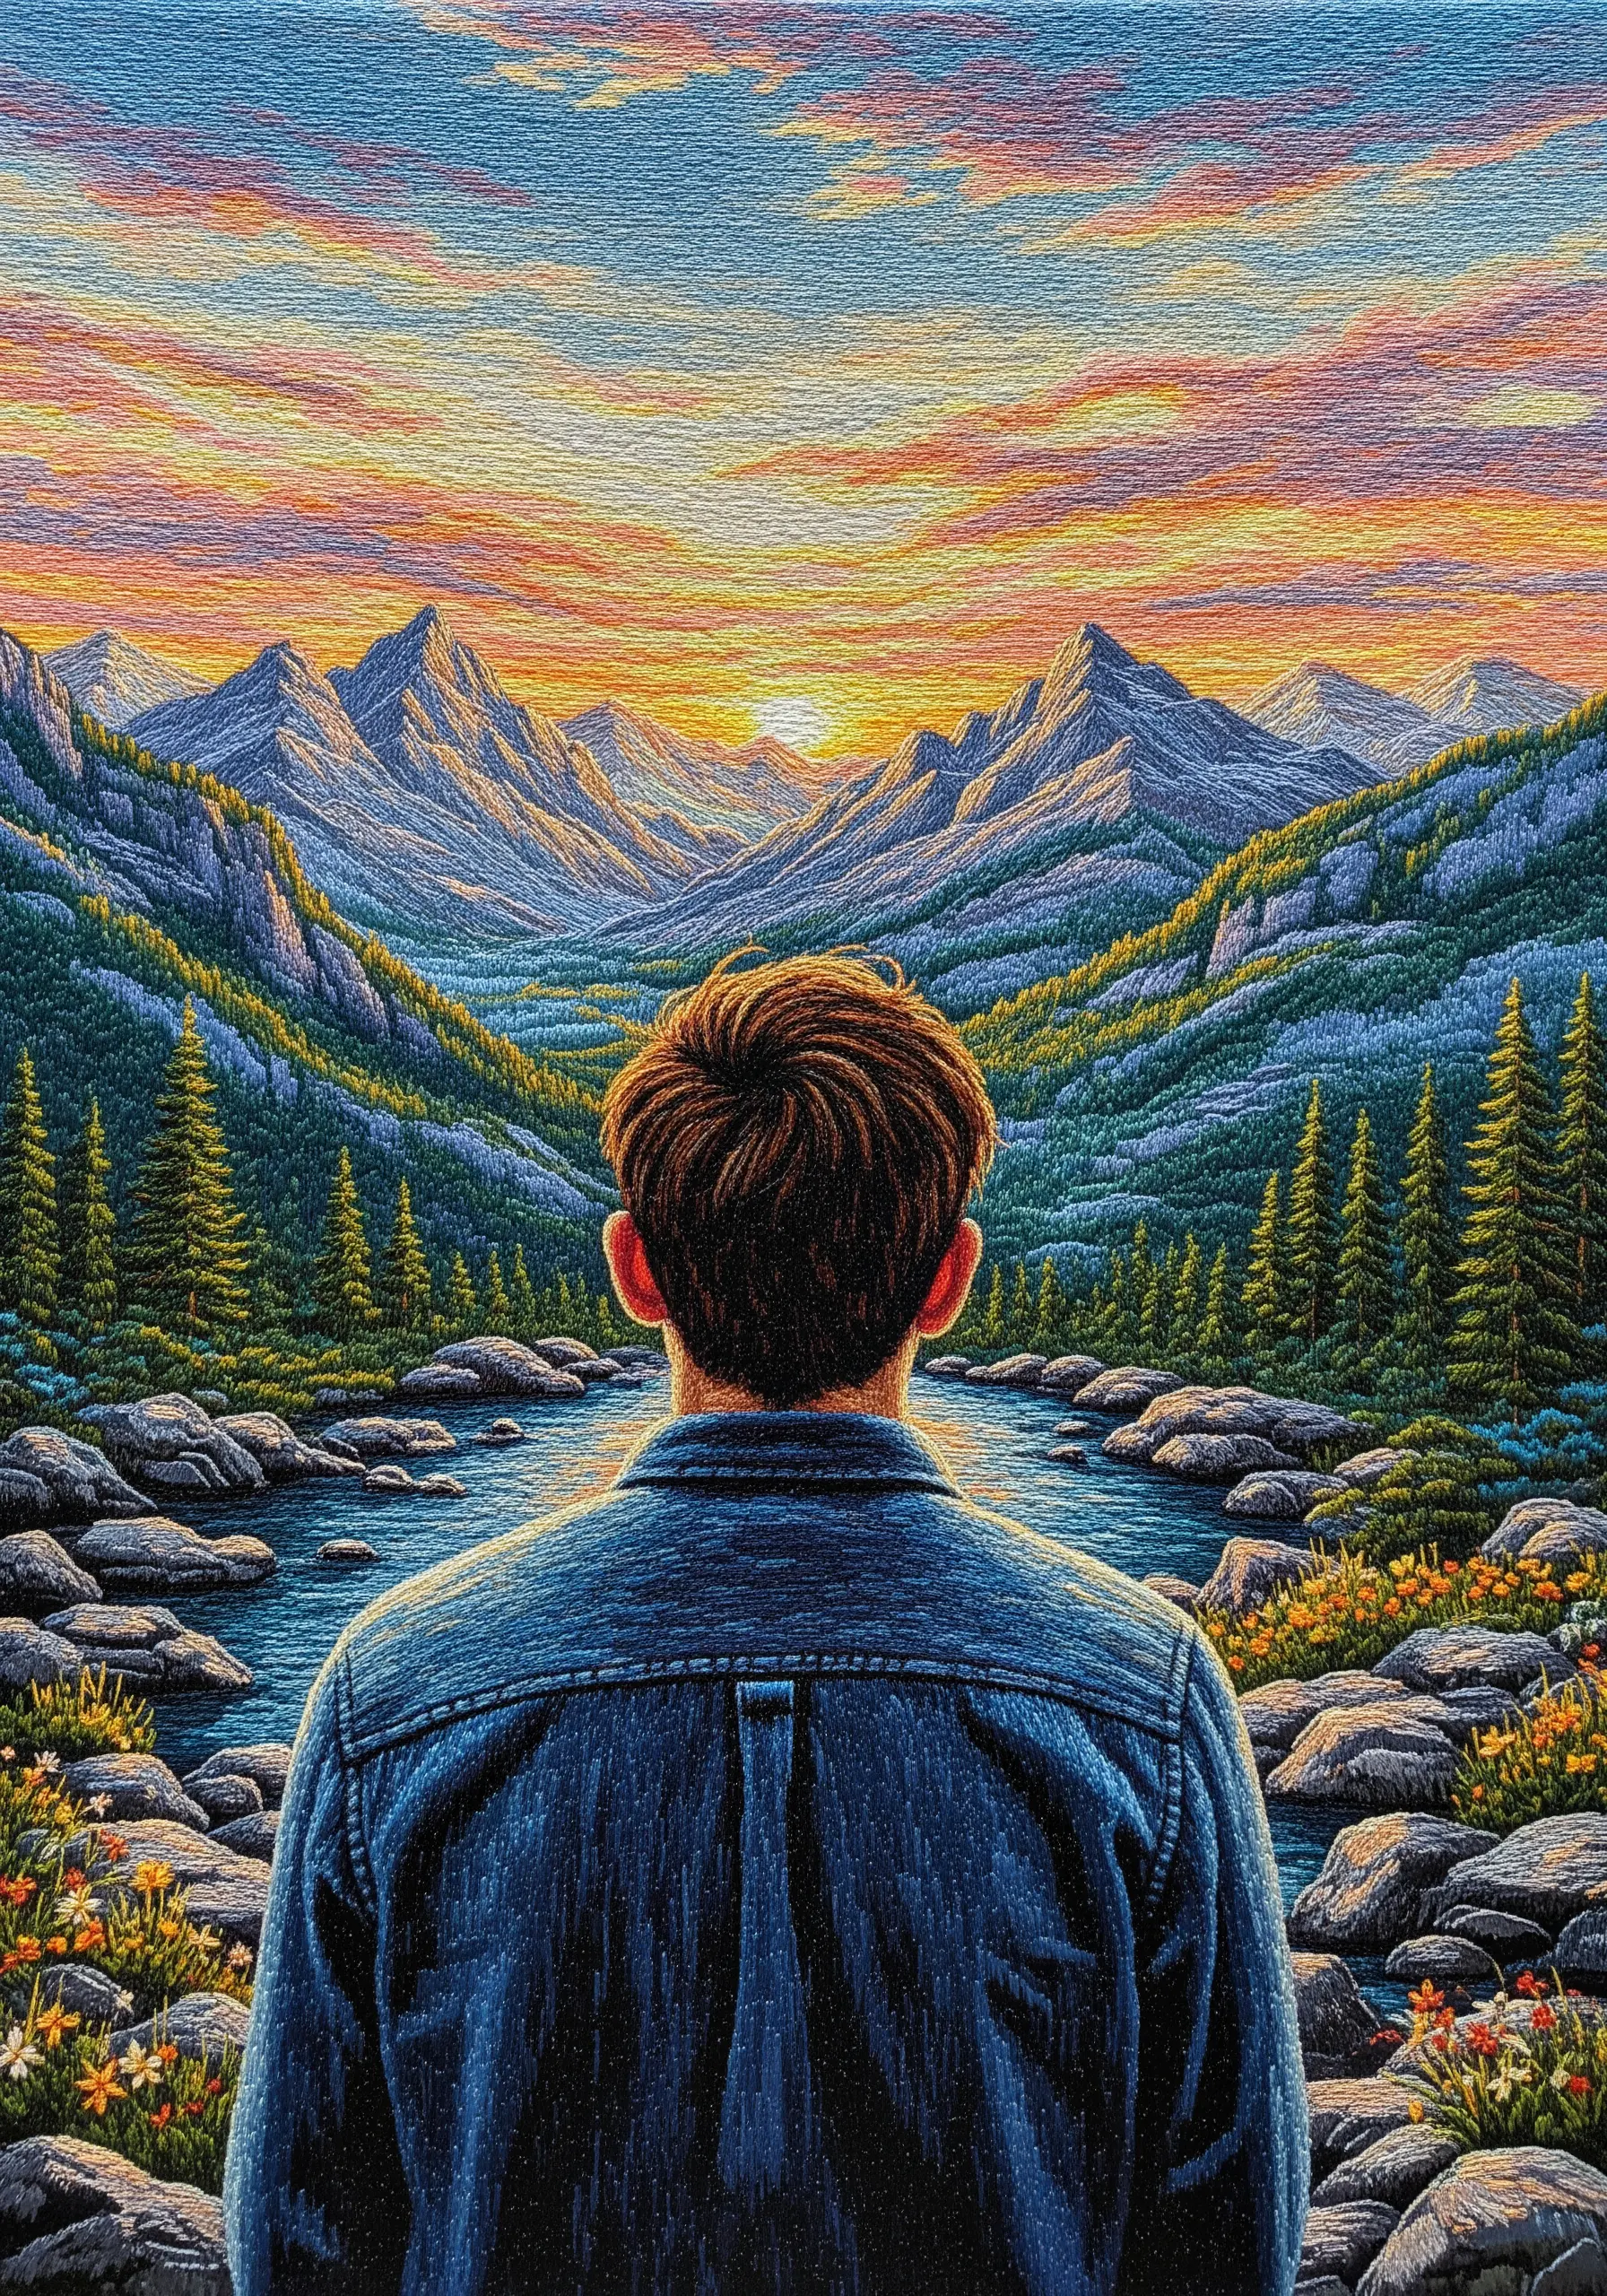
Give your subject context and create a sense of place by embedding them within a fully stitched environment.
Use atmospheric perspective to create depth: stitch foreground elements with more detail and texture (like French knots for flowers), while rendering distant mountains and sky with smoother, flatter stitches like long-and-short.
This variation in texture tricks the eye into seeing distance, making the entire composition feel more immersive and expansive.


