

This holiday season, let’s set aside the glitter and noise. Instead, let’s focus on creating gifts that feel quiet, personal, and full of intention. The most memorable handmade items aren’t the most complex, but the ones where every stitch feels considered and beautifully executed.
True elegance in embroidery comes from technique, not extravagance. It’s in the smoothness of a single line, the satisfying texture of a perfectly placed French knot, or the subtle way colors blend to create dimension. The ideas that follow are designed to sharpen your skills and your eye, showing you how small adjustments can transform a simple motif into a work of art.
Consider these motifs as starting points—frameworks for you to adapt and make your own. Whether you’re stitching on a paper gift tag, a linen napkin, or a cozy sweater, the goal is the same: to create something that feels thoughtfully made and genuinely special, using nothing more than a needle, thread, and your own two hands.
1. Embroider Mistletoe on Paper
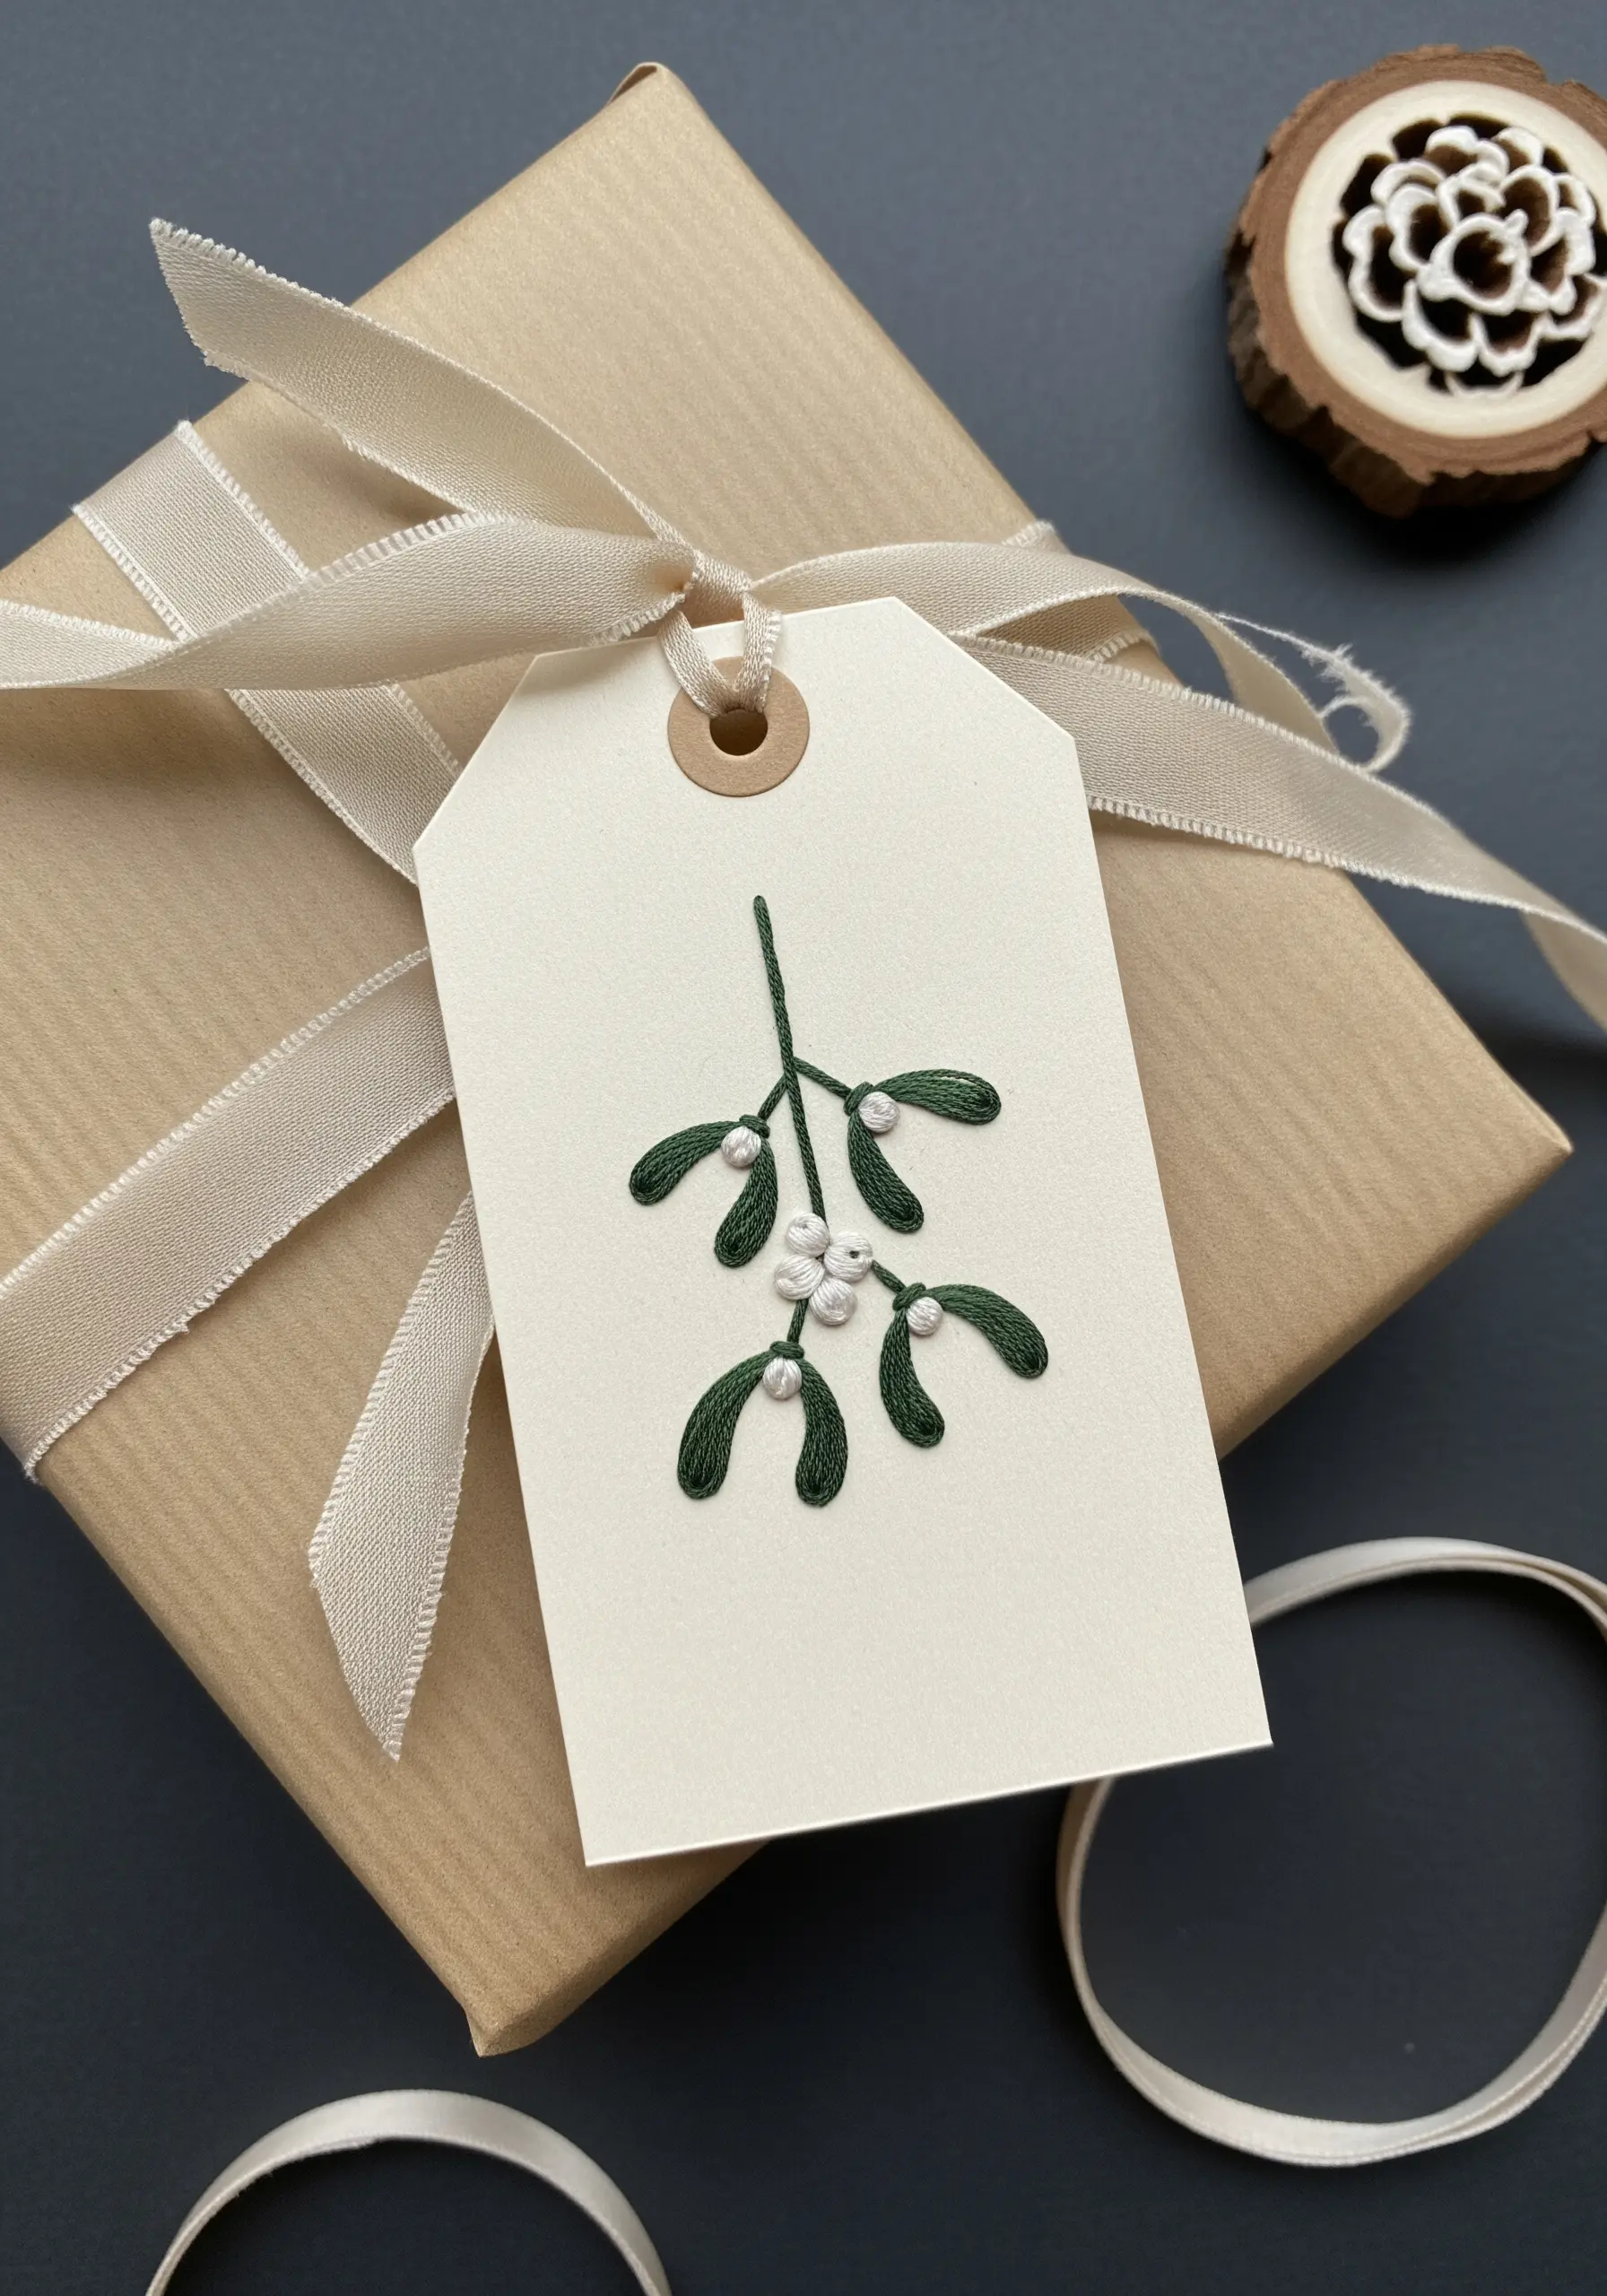
Stitching on heavy cardstock transforms a simple gift tag into a keepsake.
Use a sharp needle to pre-pierce your holes along the design outline before you begin stitching—this prevents the paper from tearing and ensures clean entry points.
Fill the leaves with a smooth satin stitch using three strands of cotton floss, and create the berries with tightly wrapped French knots for a raised, polished texture.
The contrast between the matte paper and the slight sheen of the thread creates a subtle, tactile elegance.
2. Render a Geometric Reindeer
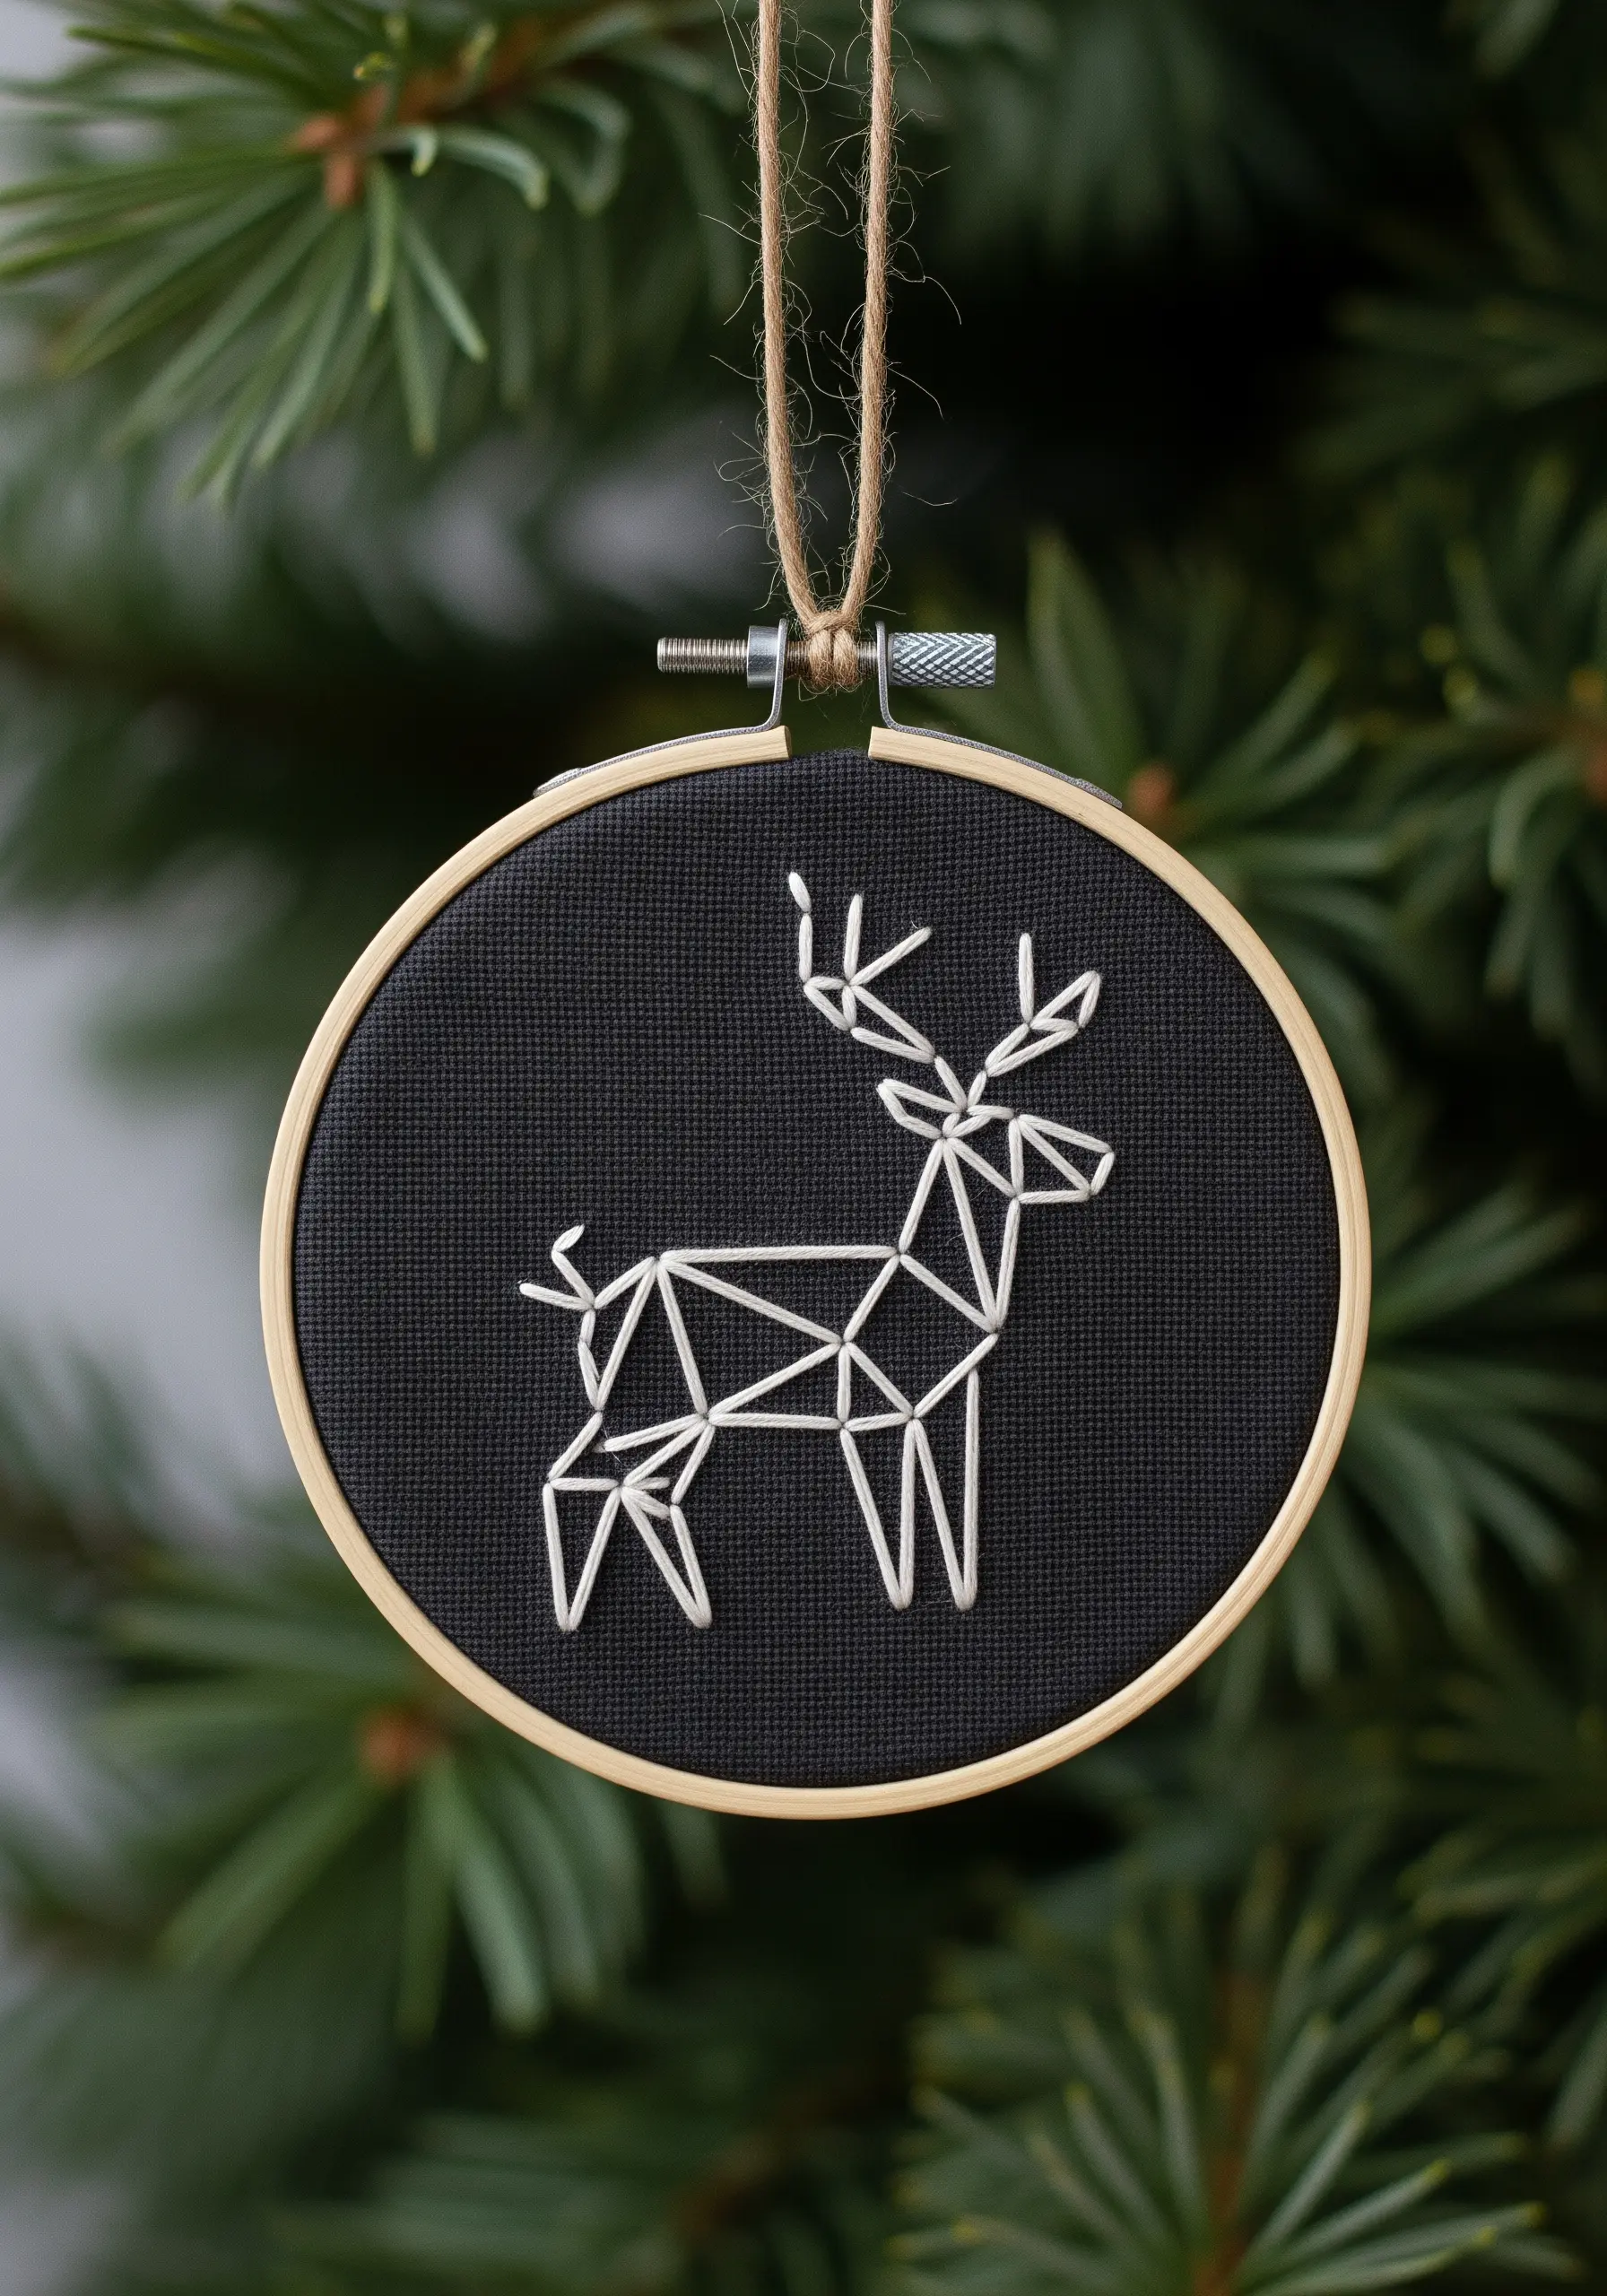
This modern, graphic style relies on the precision of straight lines and the drama of high contrast.
Choose a dark, even-weave fabric like Aida or linen, which provides a natural grid for keeping your lines sharp.
Instead of a standard outline stitch, use simple straight stitches to create sharp geometric shapes, focusing on clean start and end points.
Using a single, bright white thread against a black background makes the minimalist form feel bold and intentional.
3. Construct an Abstract Tree with Thread
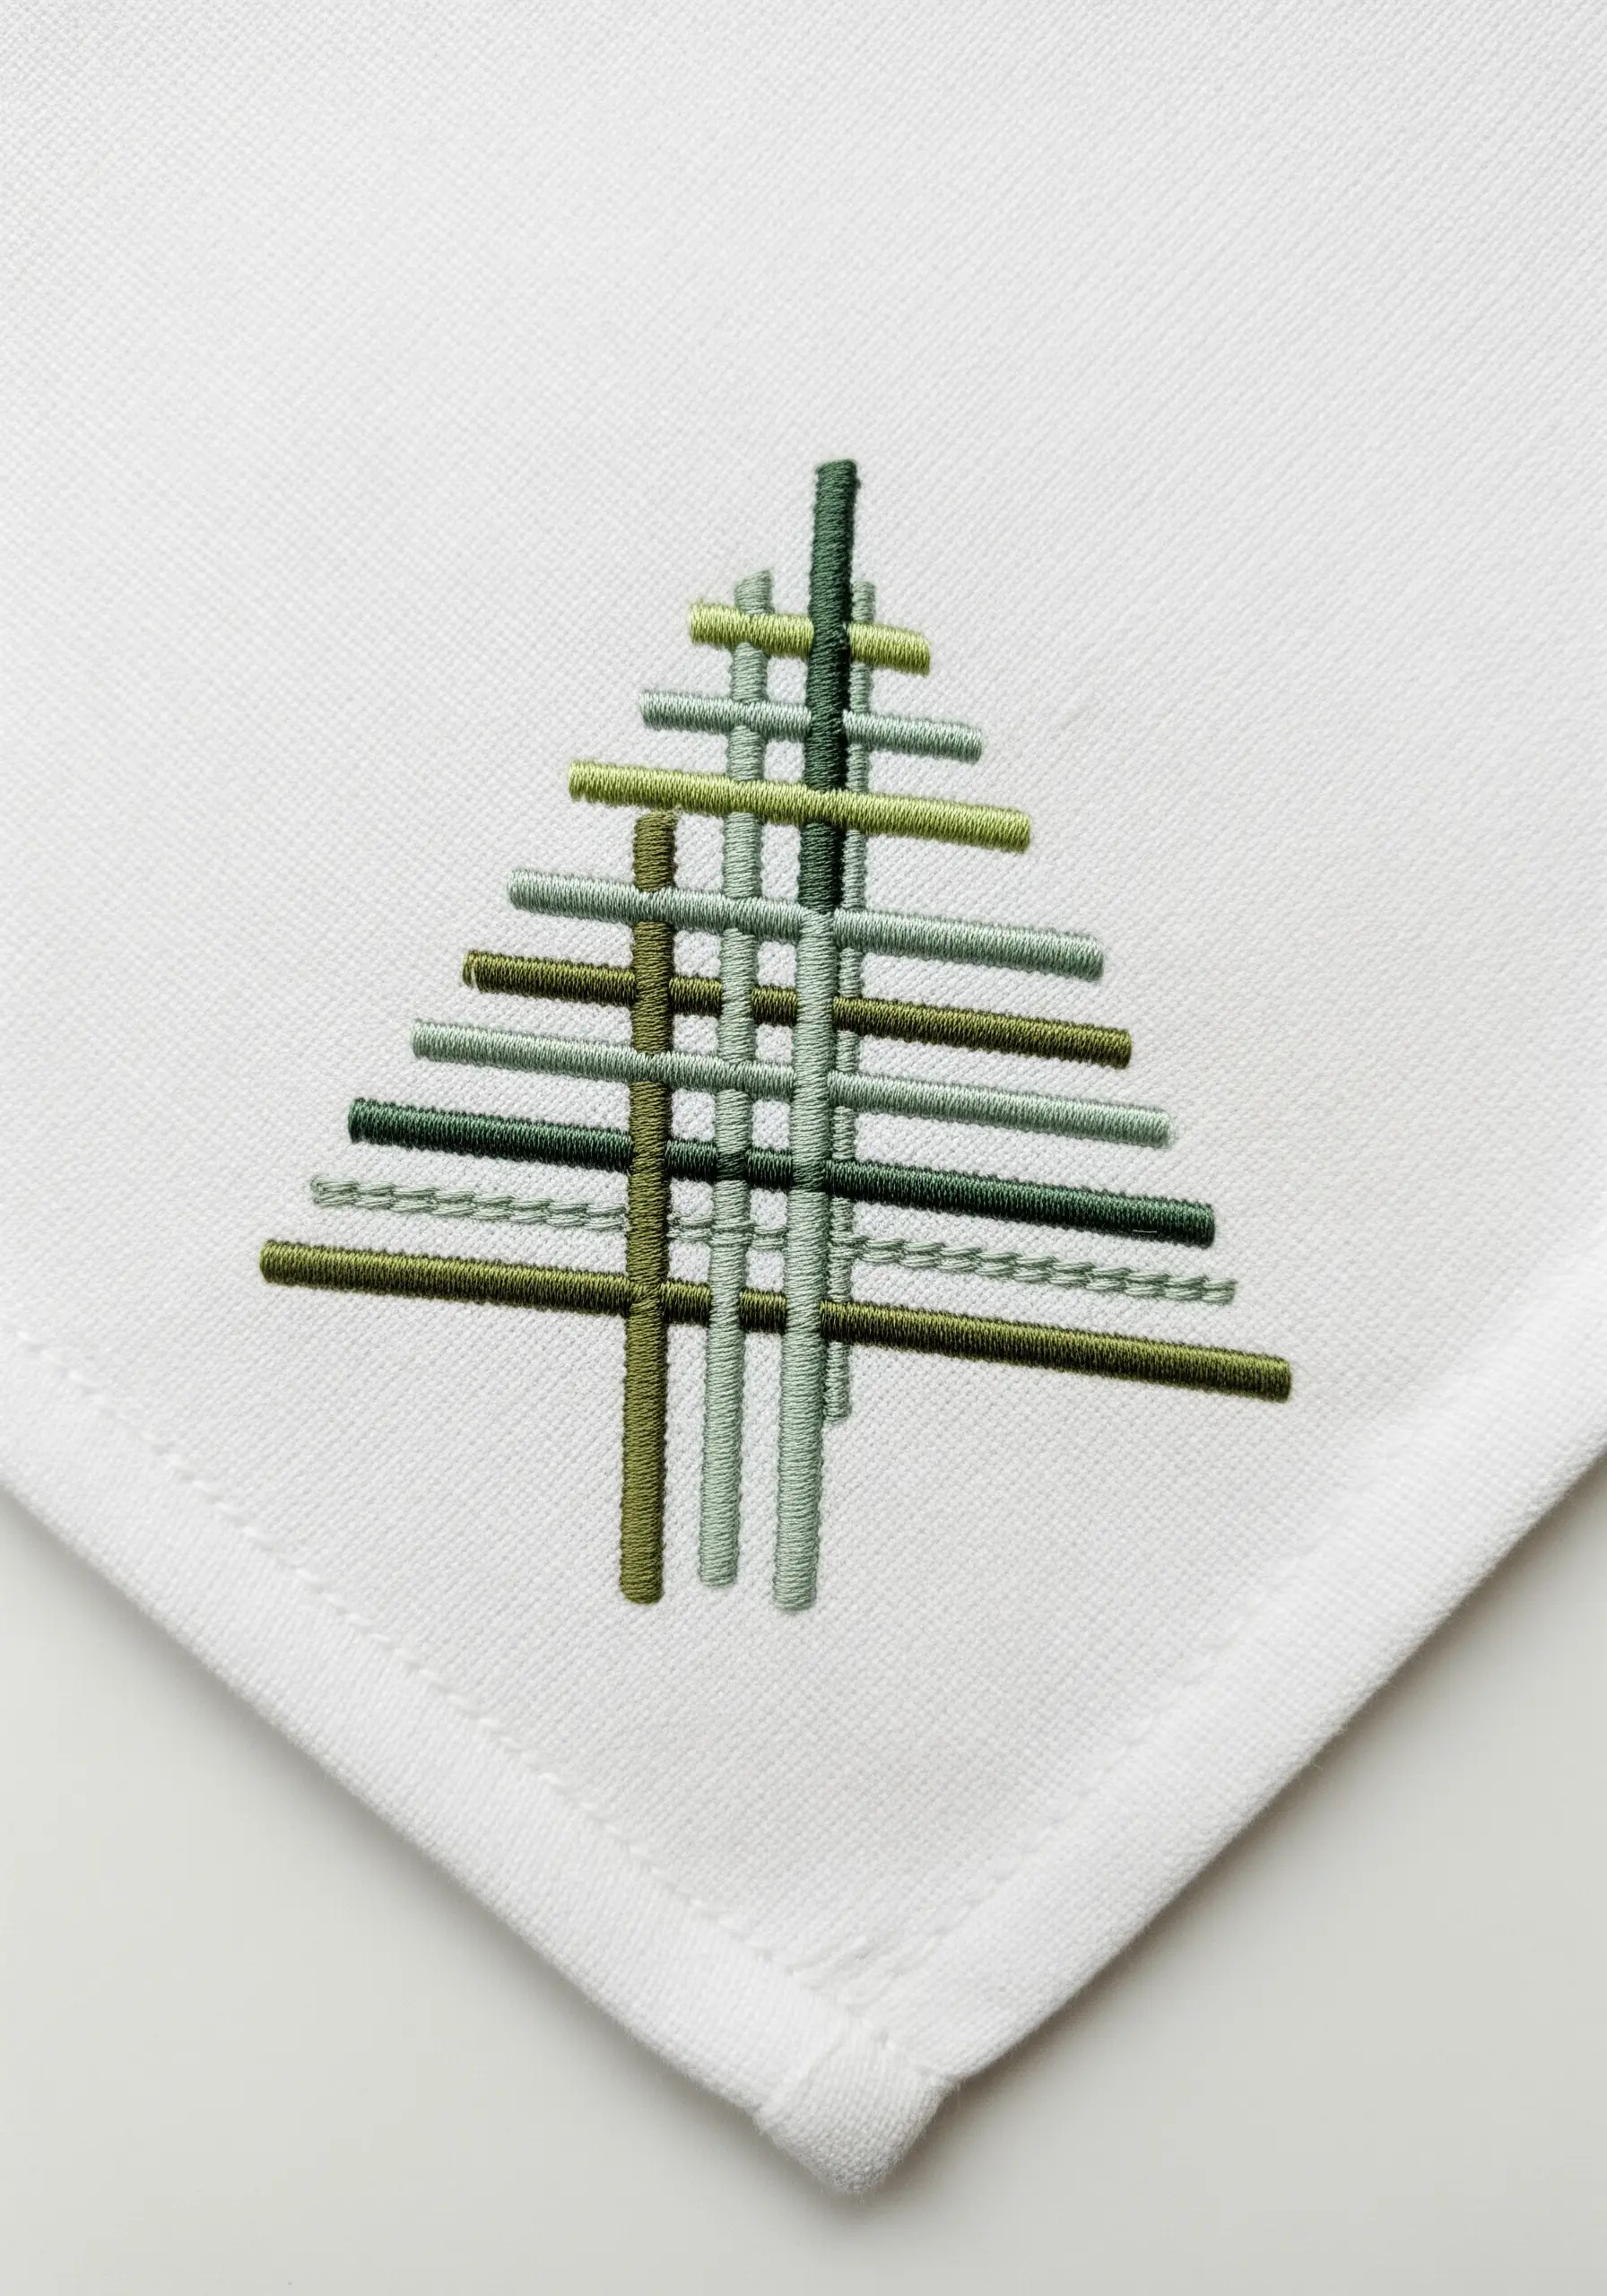
Move beyond traditional motifs by building a tree from layered satin stitch bars.
Work the vertical lines first, establishing the trunk and height.
Then, layer the horizontal branches over the top, varying the shades of green and the stitch length to create depth and visual rhythm.
This architectural approach works beautifully on crisp linen napkins, where the texture of the fabric complements the graphic nature of the stitches.
4. Stitch a Personal Constellation
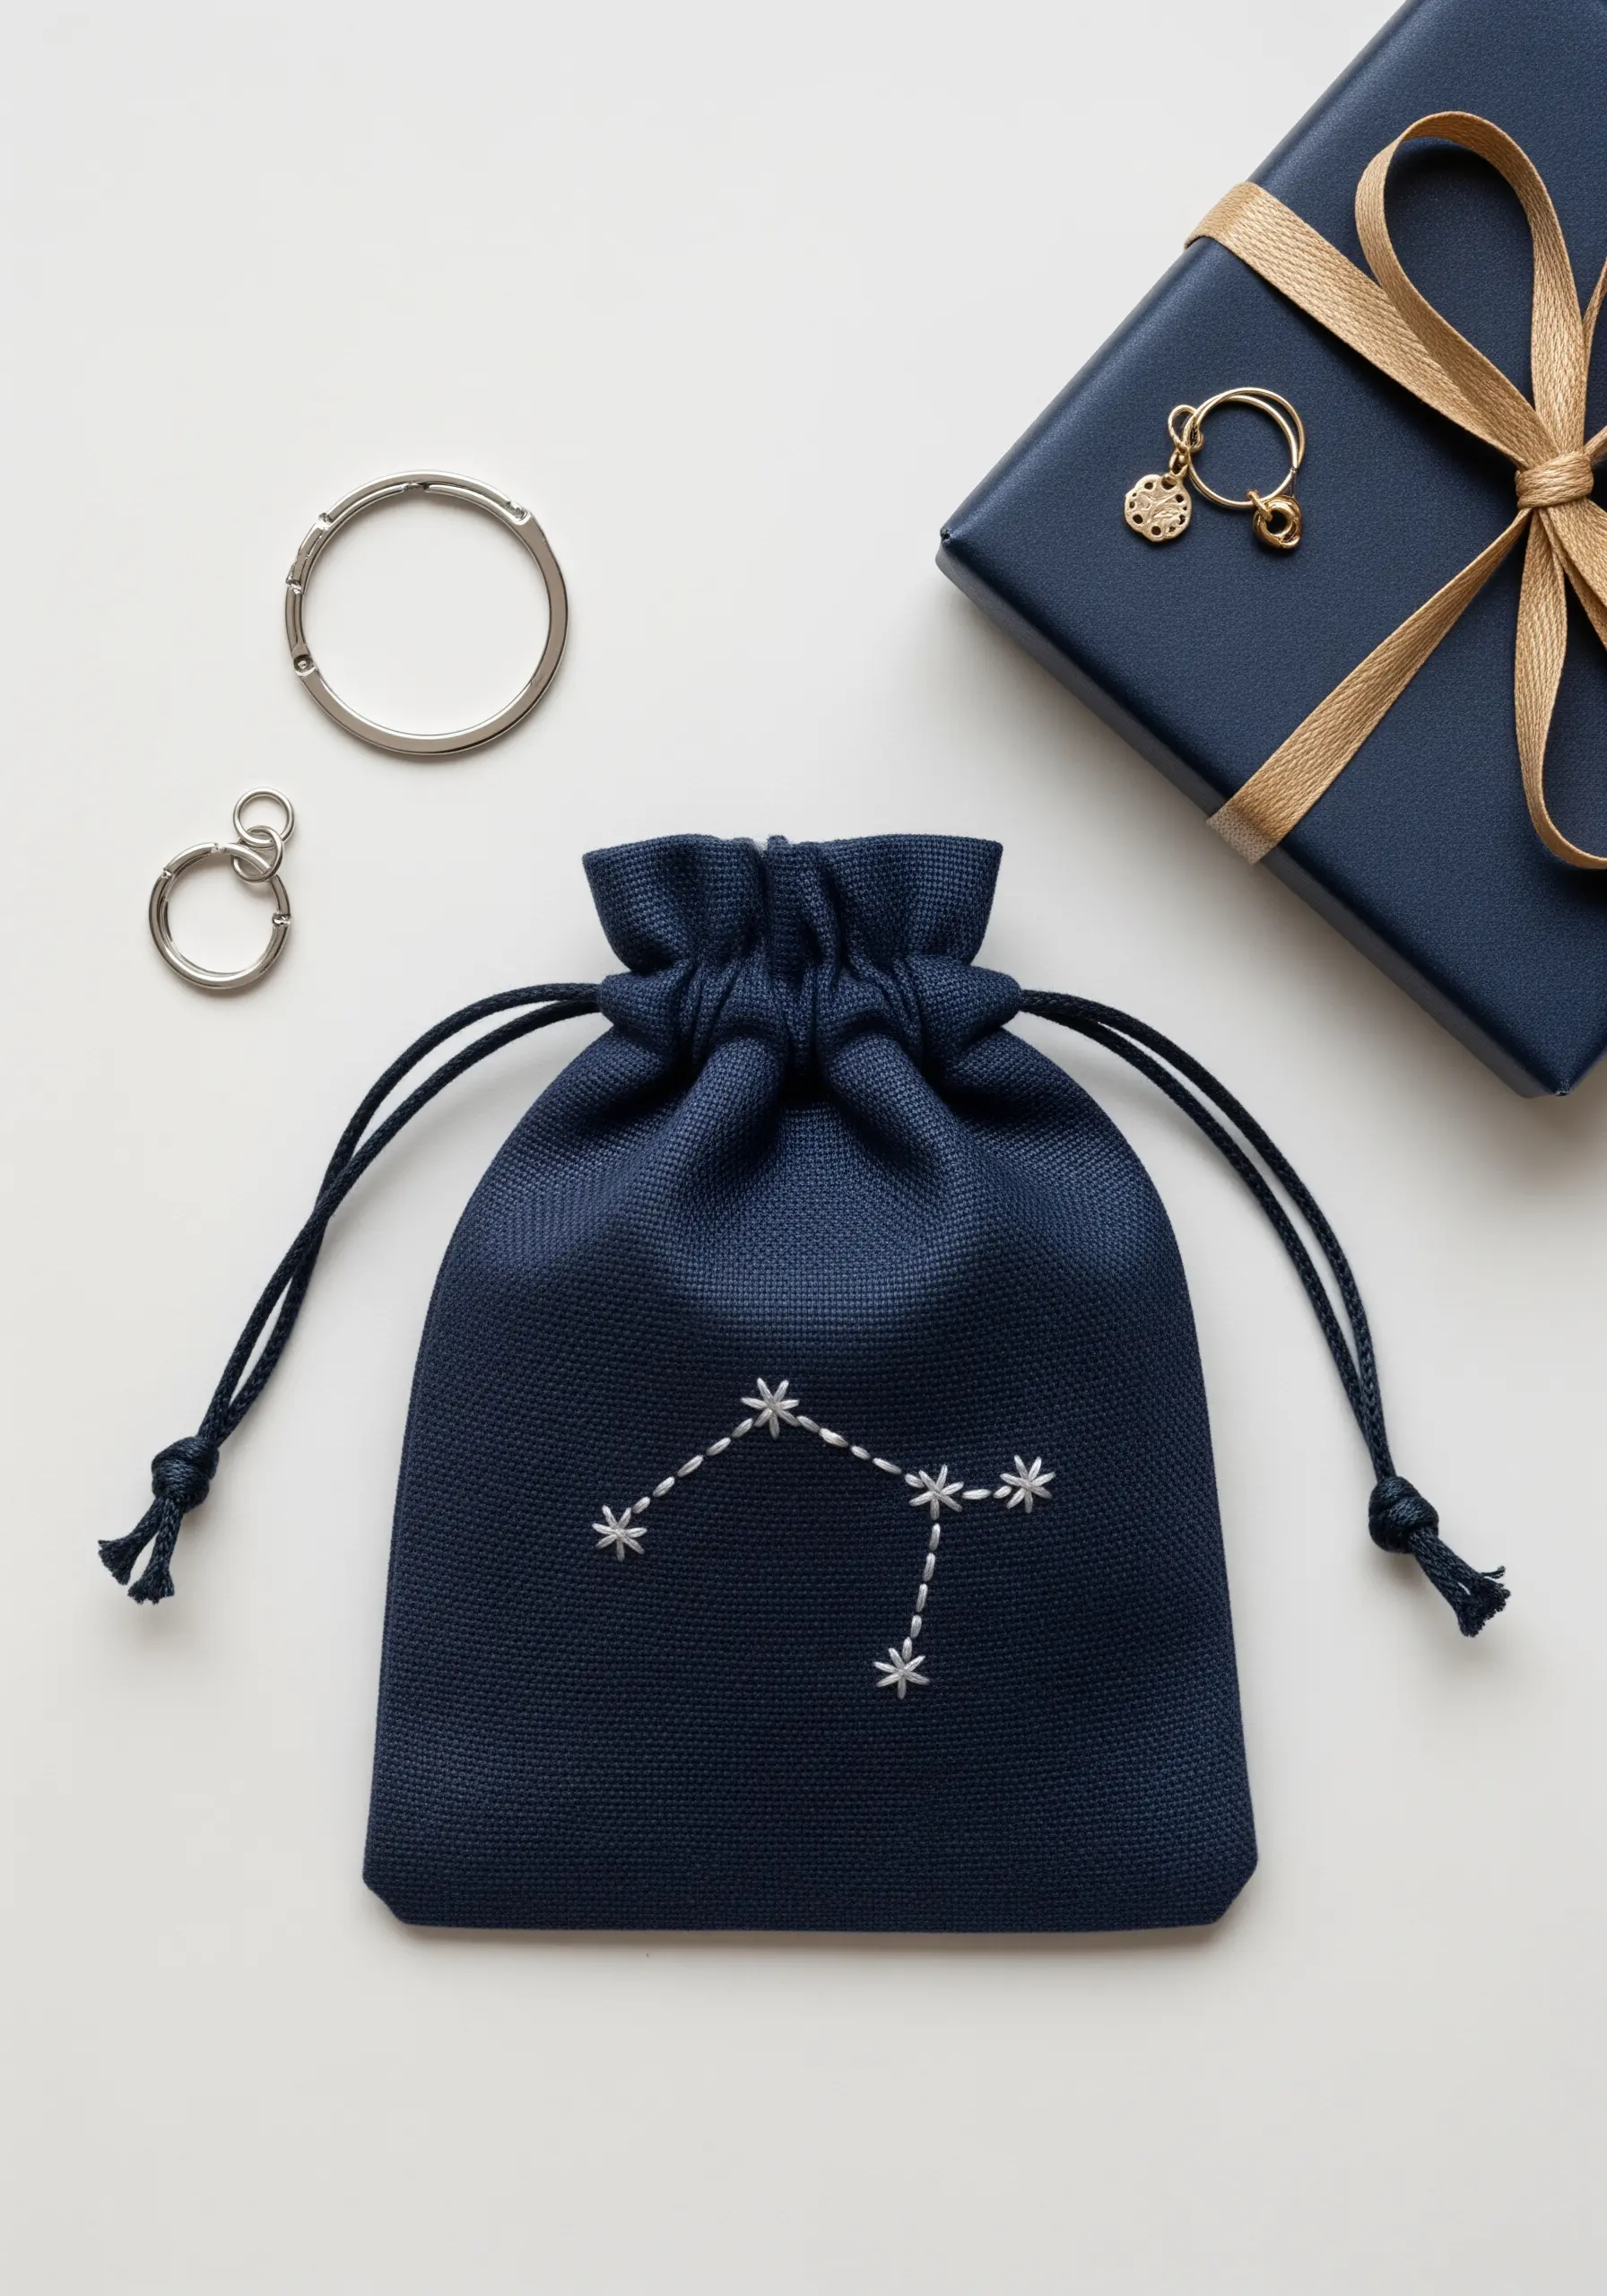
Embellish a simple gift bag with a custom constellation for a deeply personal touch.
Use a single strand of white or metallic thread on a dark fabric like navy linen or cotton to mimic a clear night sky.
Form the stars with tiny, delicate star stitches or single French knots, and connect them with discreet straight stitches.
The key is subtlety; the minimal design invites a closer look and feels more intimate than a bold, obvious motif.
5. Outline a Modern Poinsettia
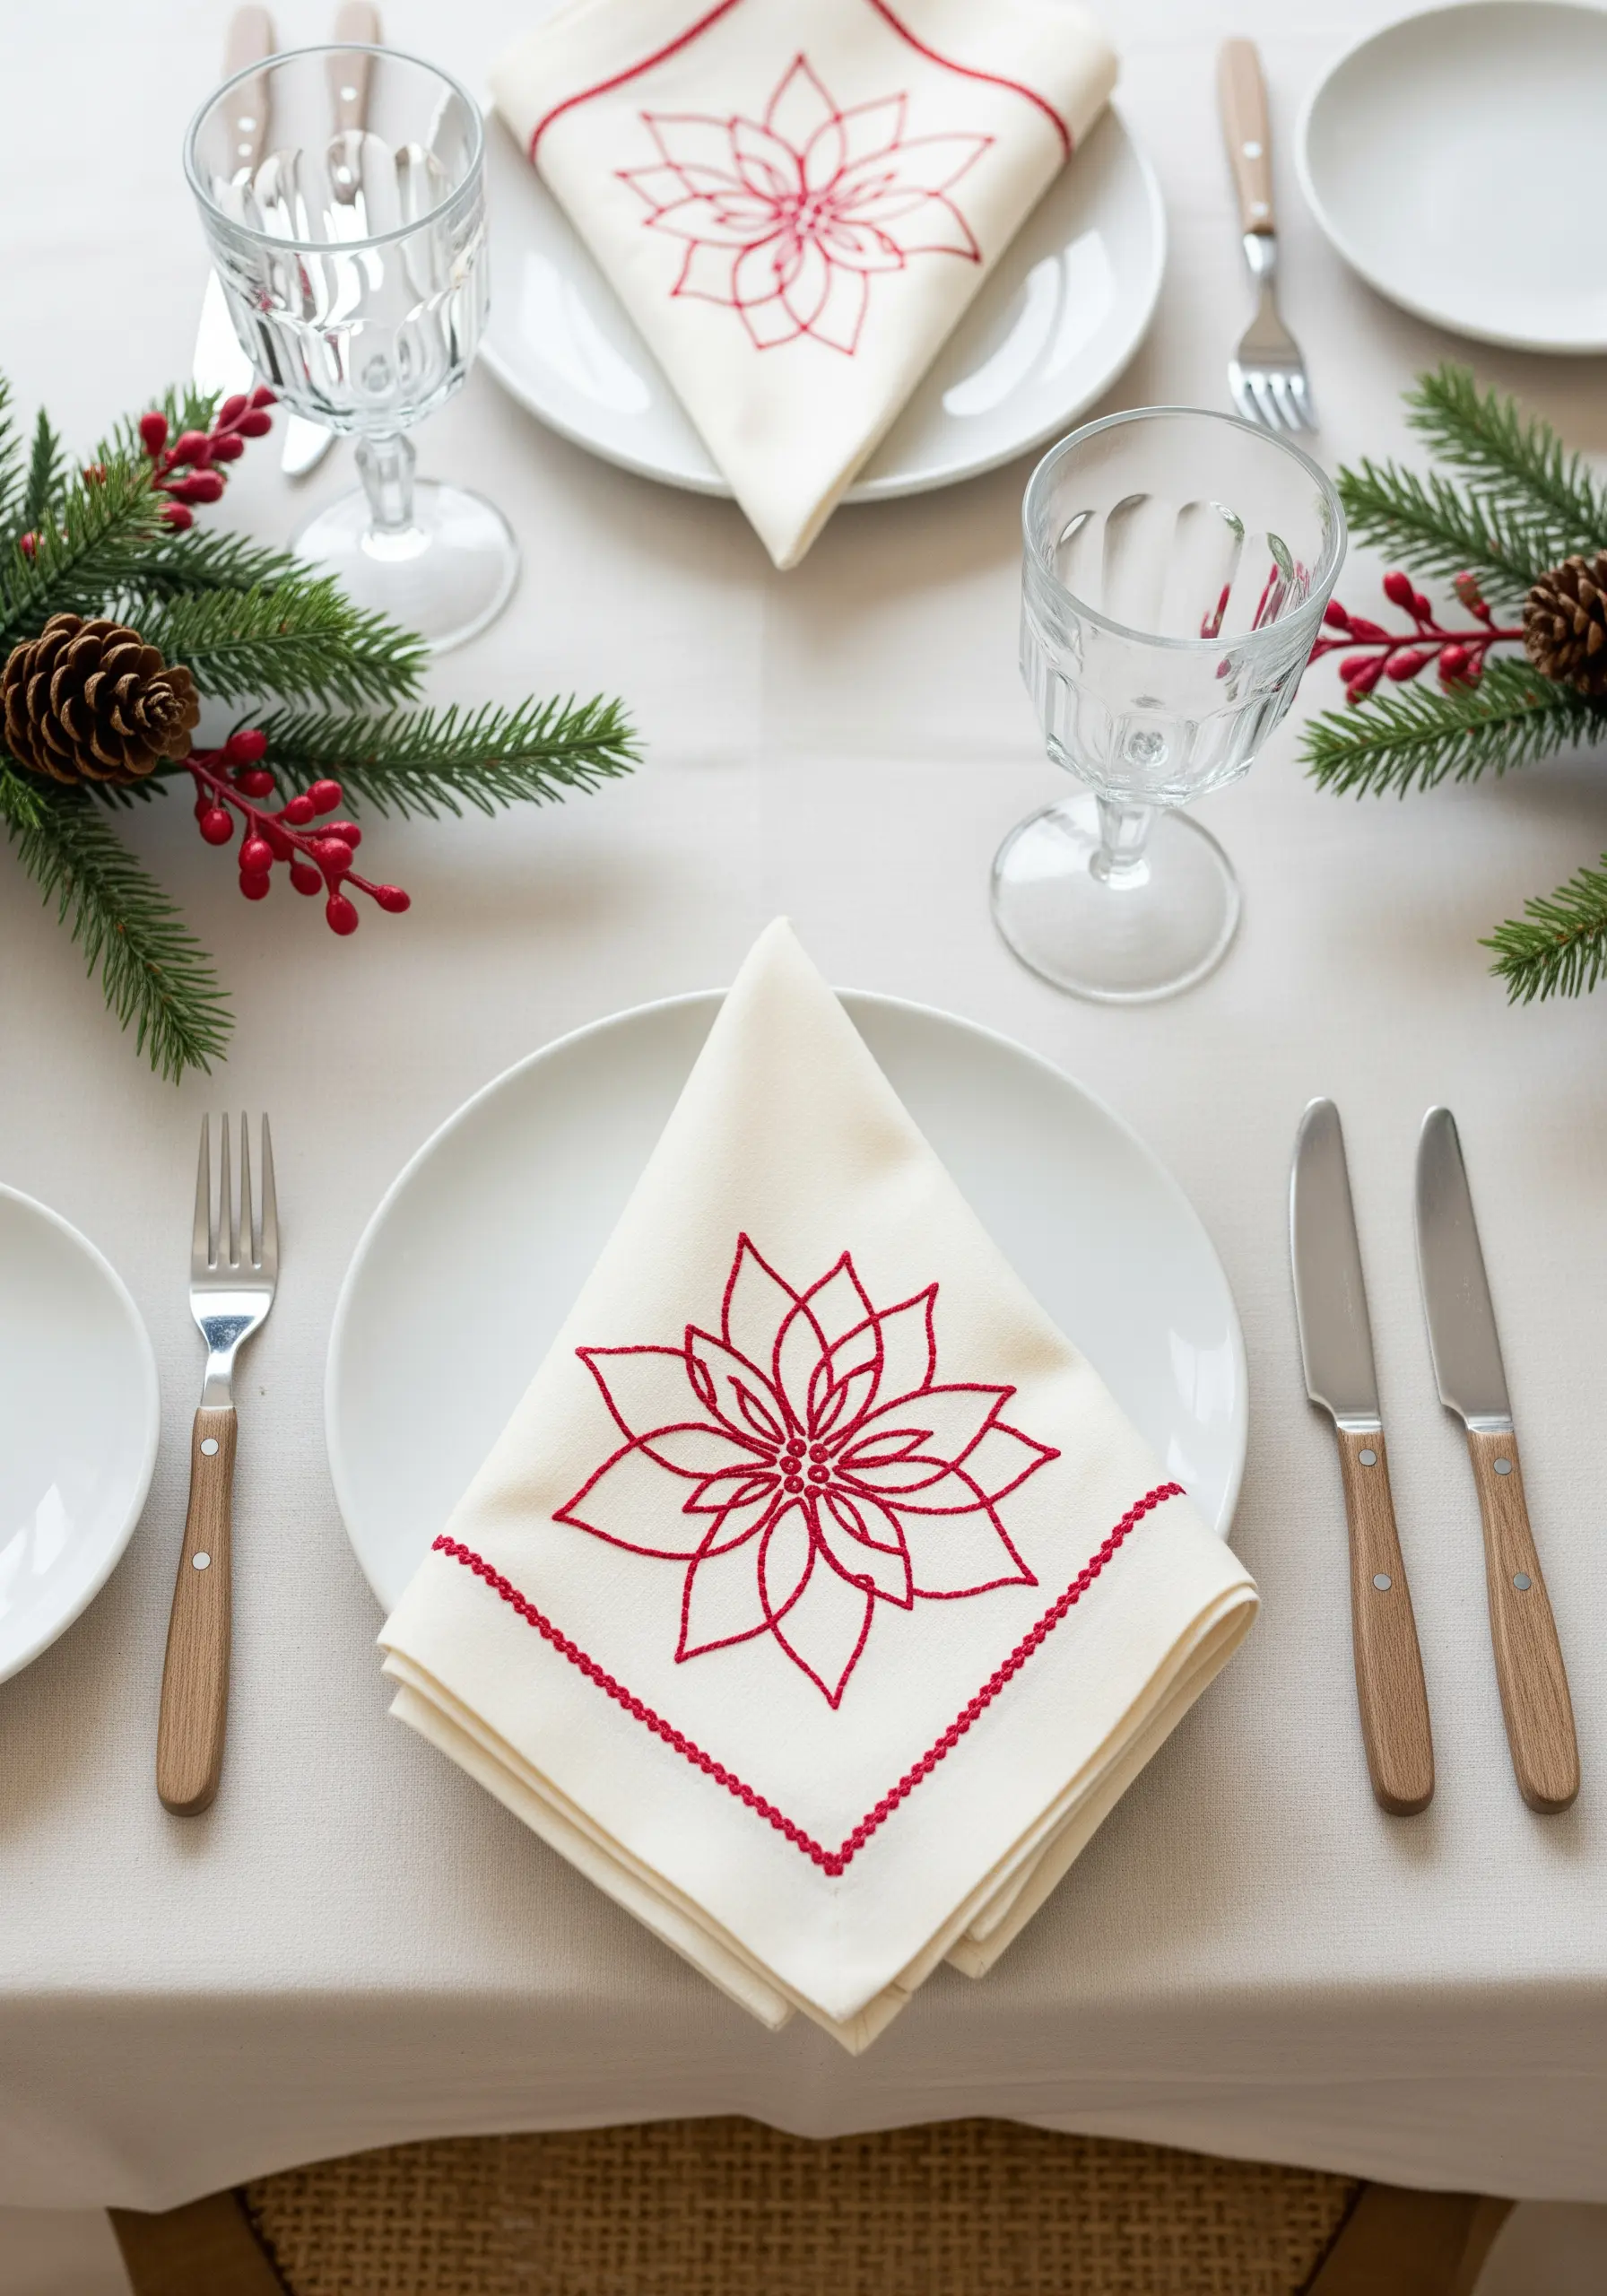
Capture the essence of a poinsettia with clean, confident line work instead of dense fill stitches.
A whipped backstitch is the perfect choice here, as it creates a smooth, solid line that looks almost like a single cord of thread.
Using a single, vibrant red on natural linen makes the design pop while remaining sophisticated.
Frame the motif with a border of small, evenly spaced seed stitches to ground the design and give your table linens a professionally finished look.
6. Weave a Dimensional Pinecone
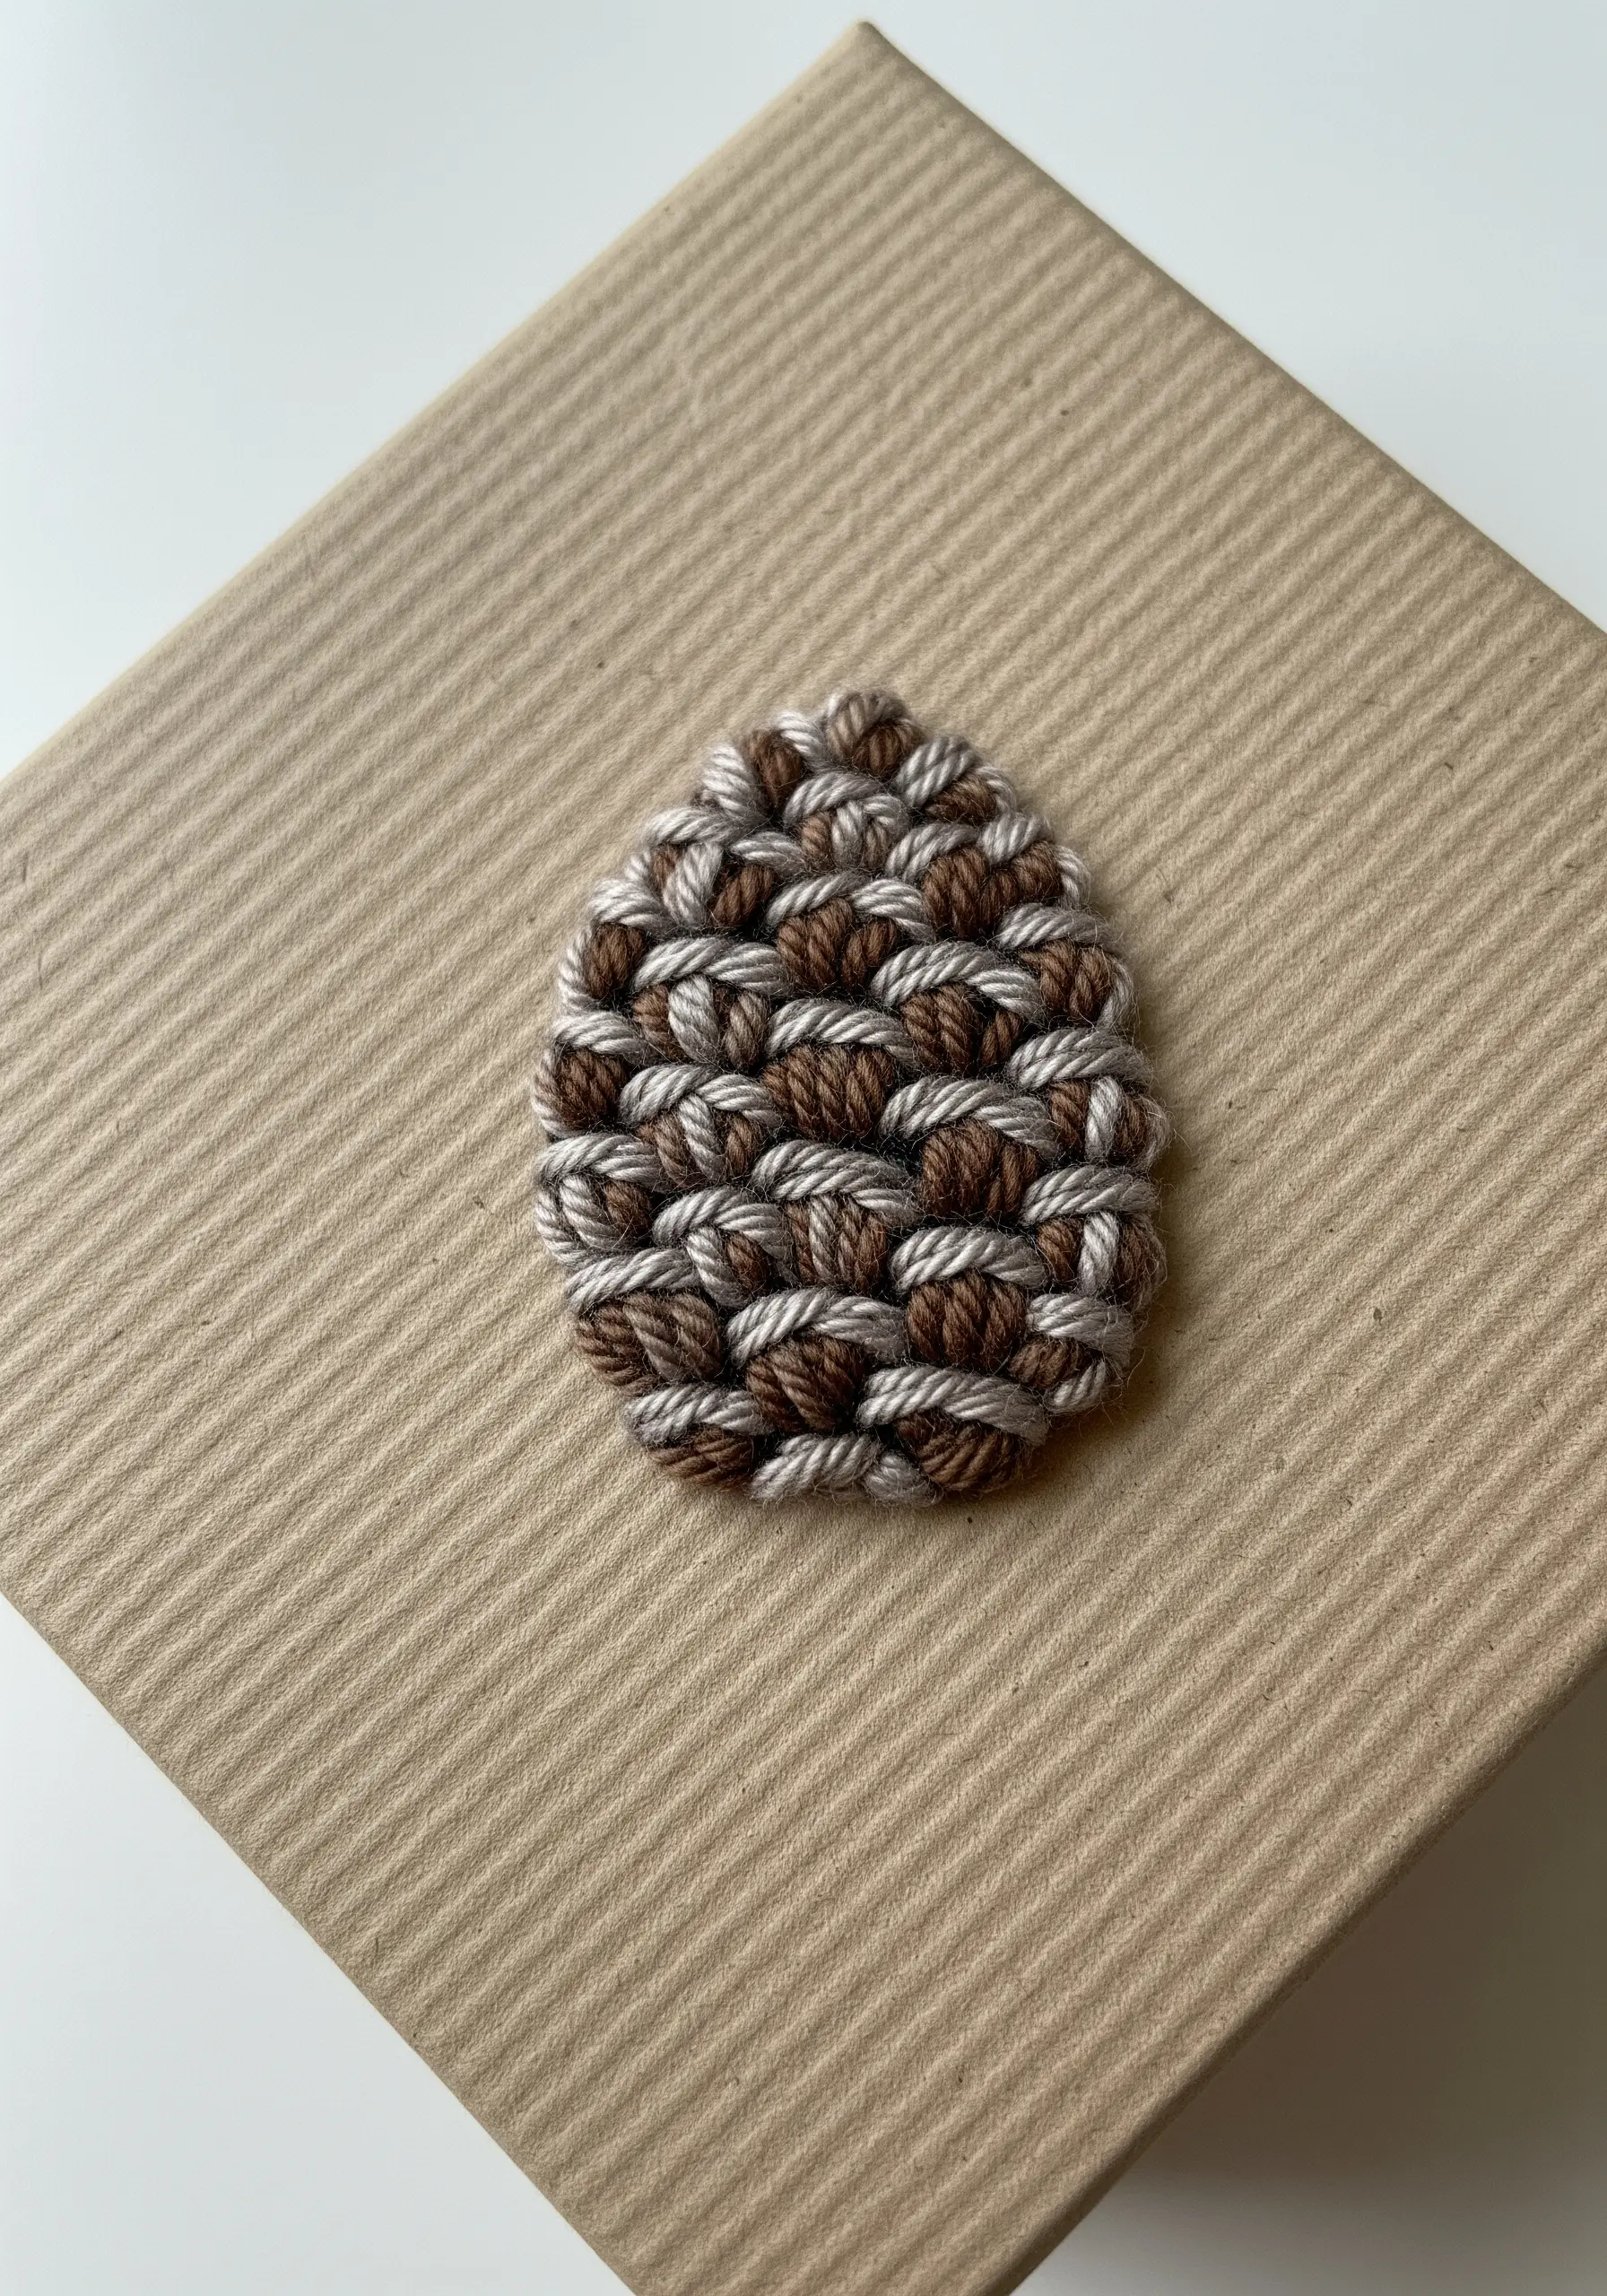
Create incredible texture by adapting a woven wheel stitch into an oval shape for a pinecone motif.
Start with a star of straight stitches as your foundation, then weave your working thread over and under these spokes without piercing the fabric.
Alternate two shades of brown perle cotton to give the final design natural dimension and a chunky, tactile quality.
This technique is perfect for embellishing the top of a gift box, turning the packaging into part of the present.
7. Add Detail to Velvet Ribbon
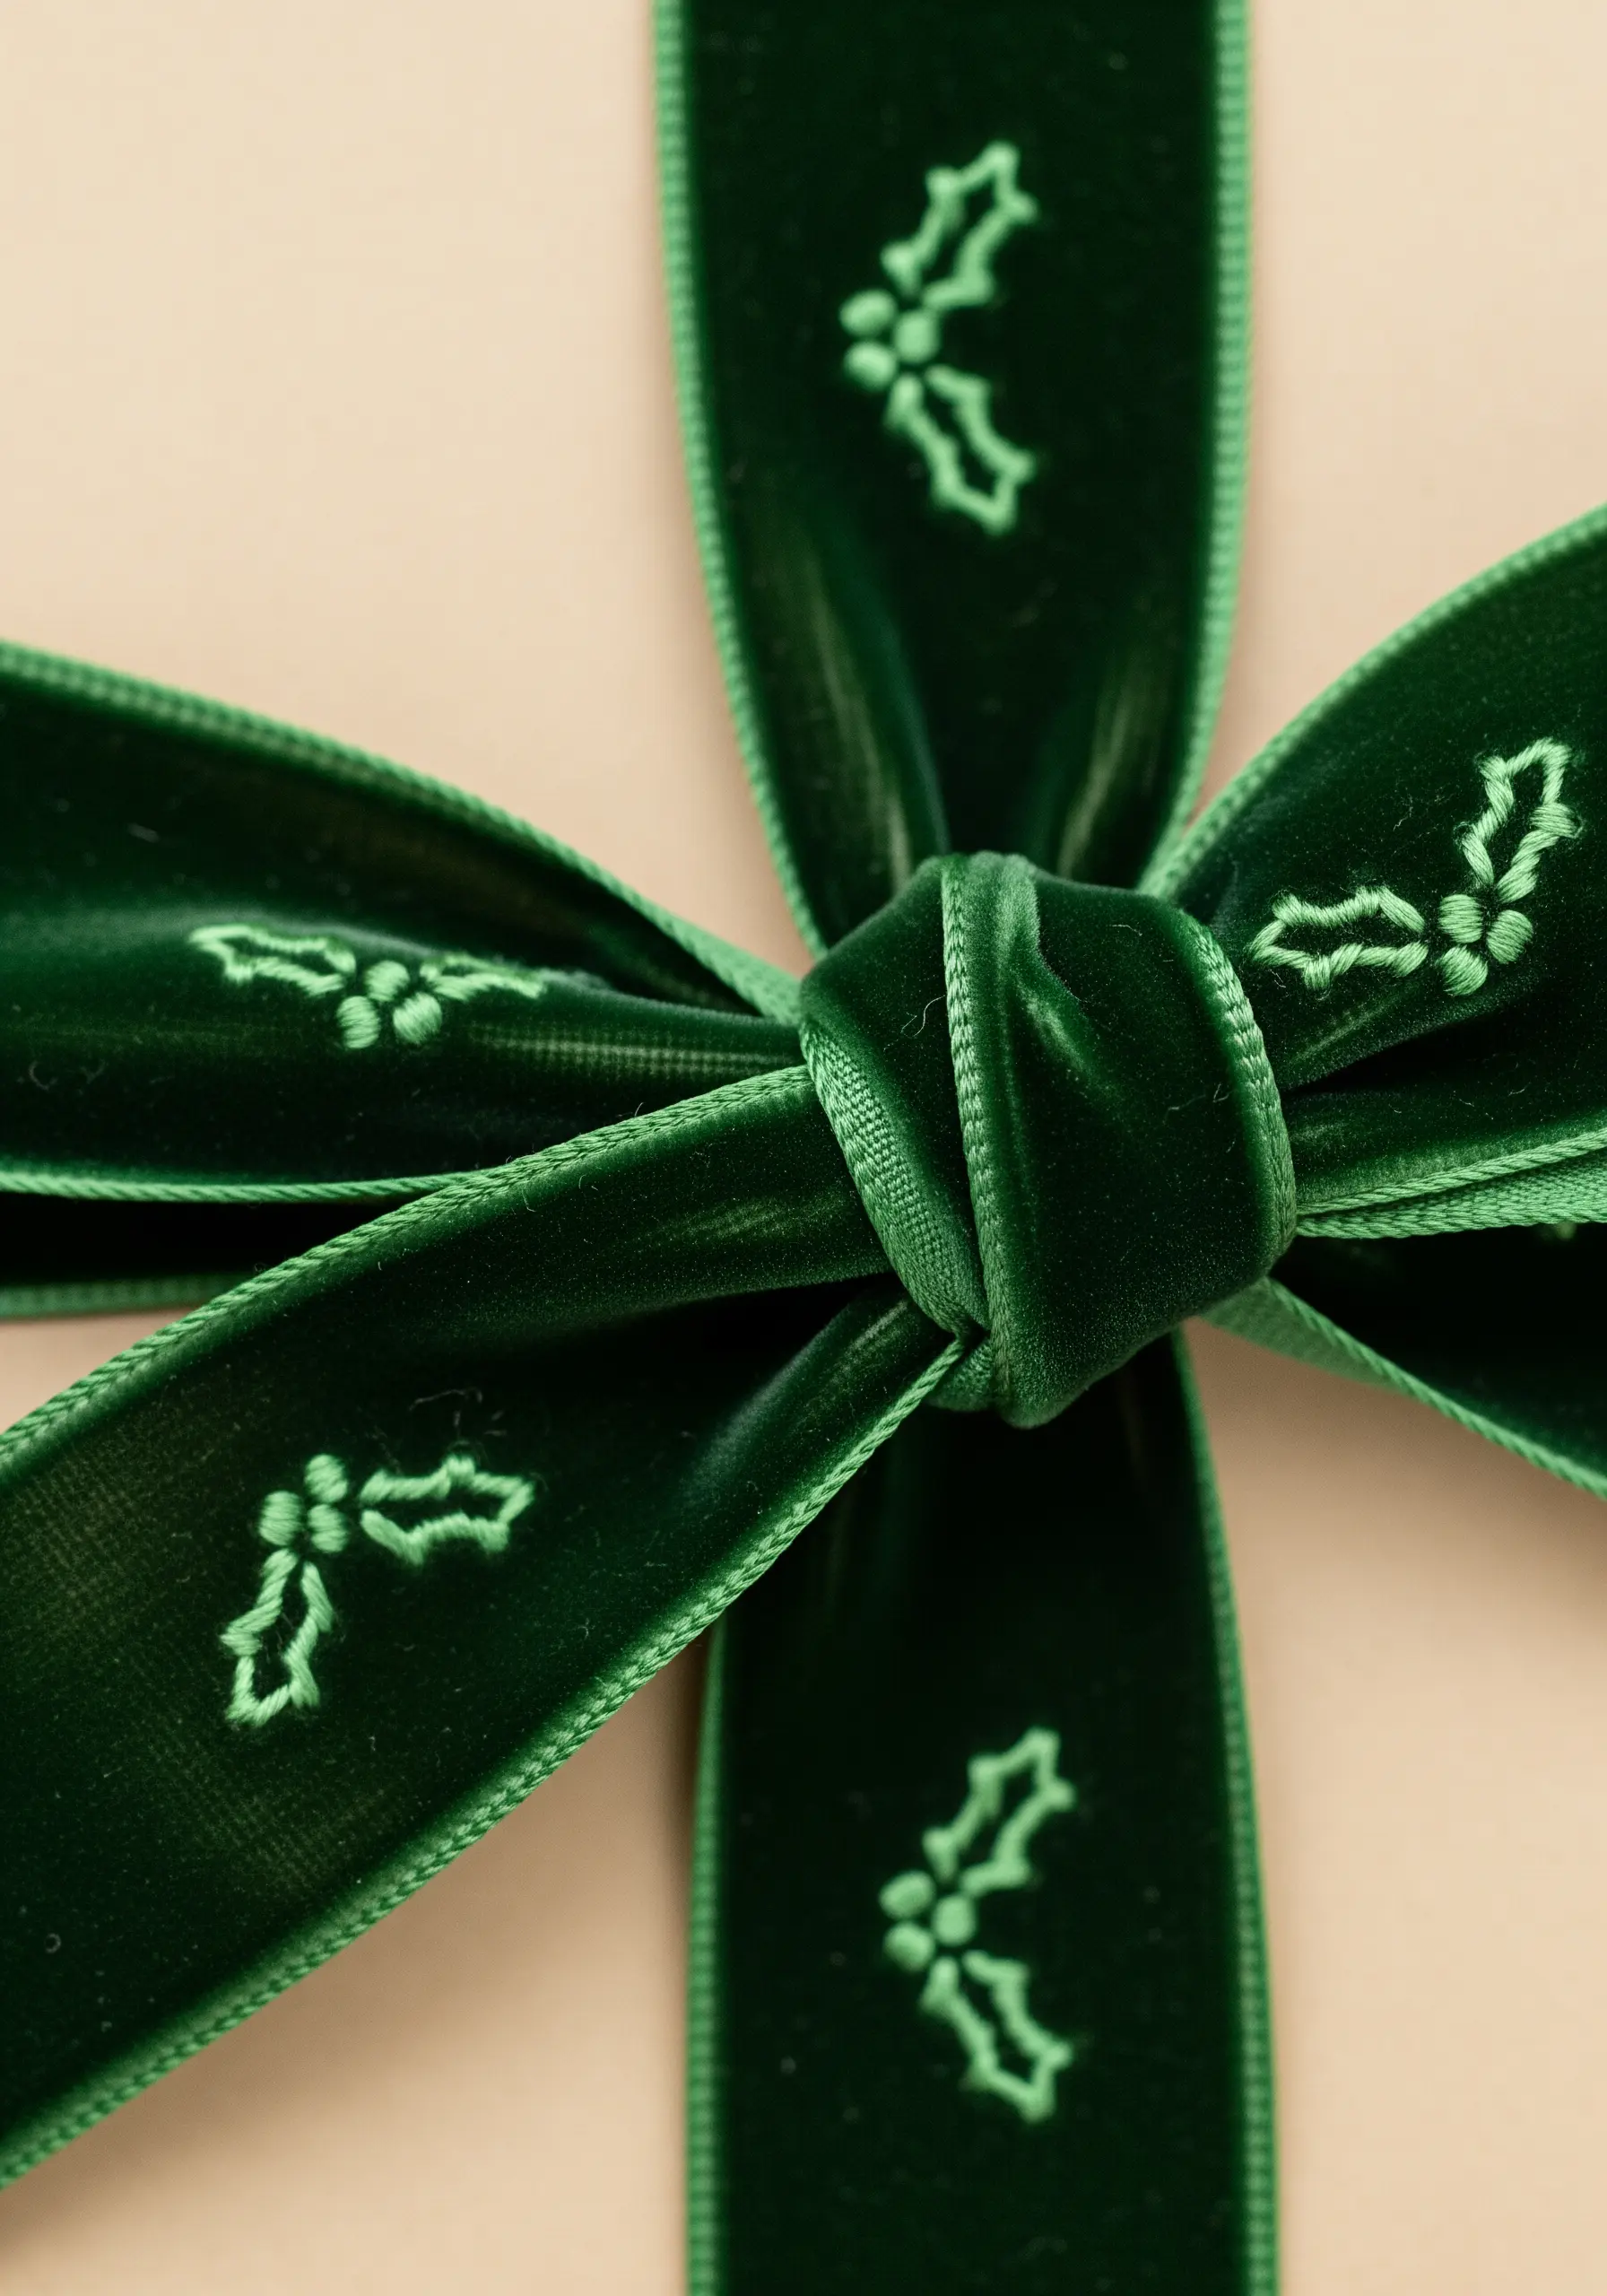
Embroidering on velvet requires a light touch to avoid crushing the pile.
Keep your motifs small and simple, like these tiny holly leaves, using a basic backstitch with just two or three strands of floss.
A sharp needle is essential for piercing the dense fabric cleanly, and a lightweight tear-away stabilizer on the back will prevent puckering.
The subtle contrast of matte thread on the plush, light-catching velvet is exceptionally luxurious.
8. Define a Snowflake on Felt

Felt is a forgiving and stable base for embroidery, making it ideal for creating coasters or ornaments.
For a crisp snowflake, use a combination of straight stitches for the main arms and tiny French knots at the tips to add definition and texture.
Using a six-strand floss in bright white against grey felt creates a sharp, graphic look that feels both cozy and modern.
Finish by whip stitching a second piece of felt to the back to hide your threads and create a durable, double-sided object.
9. Paint a Candle Flame with Thread
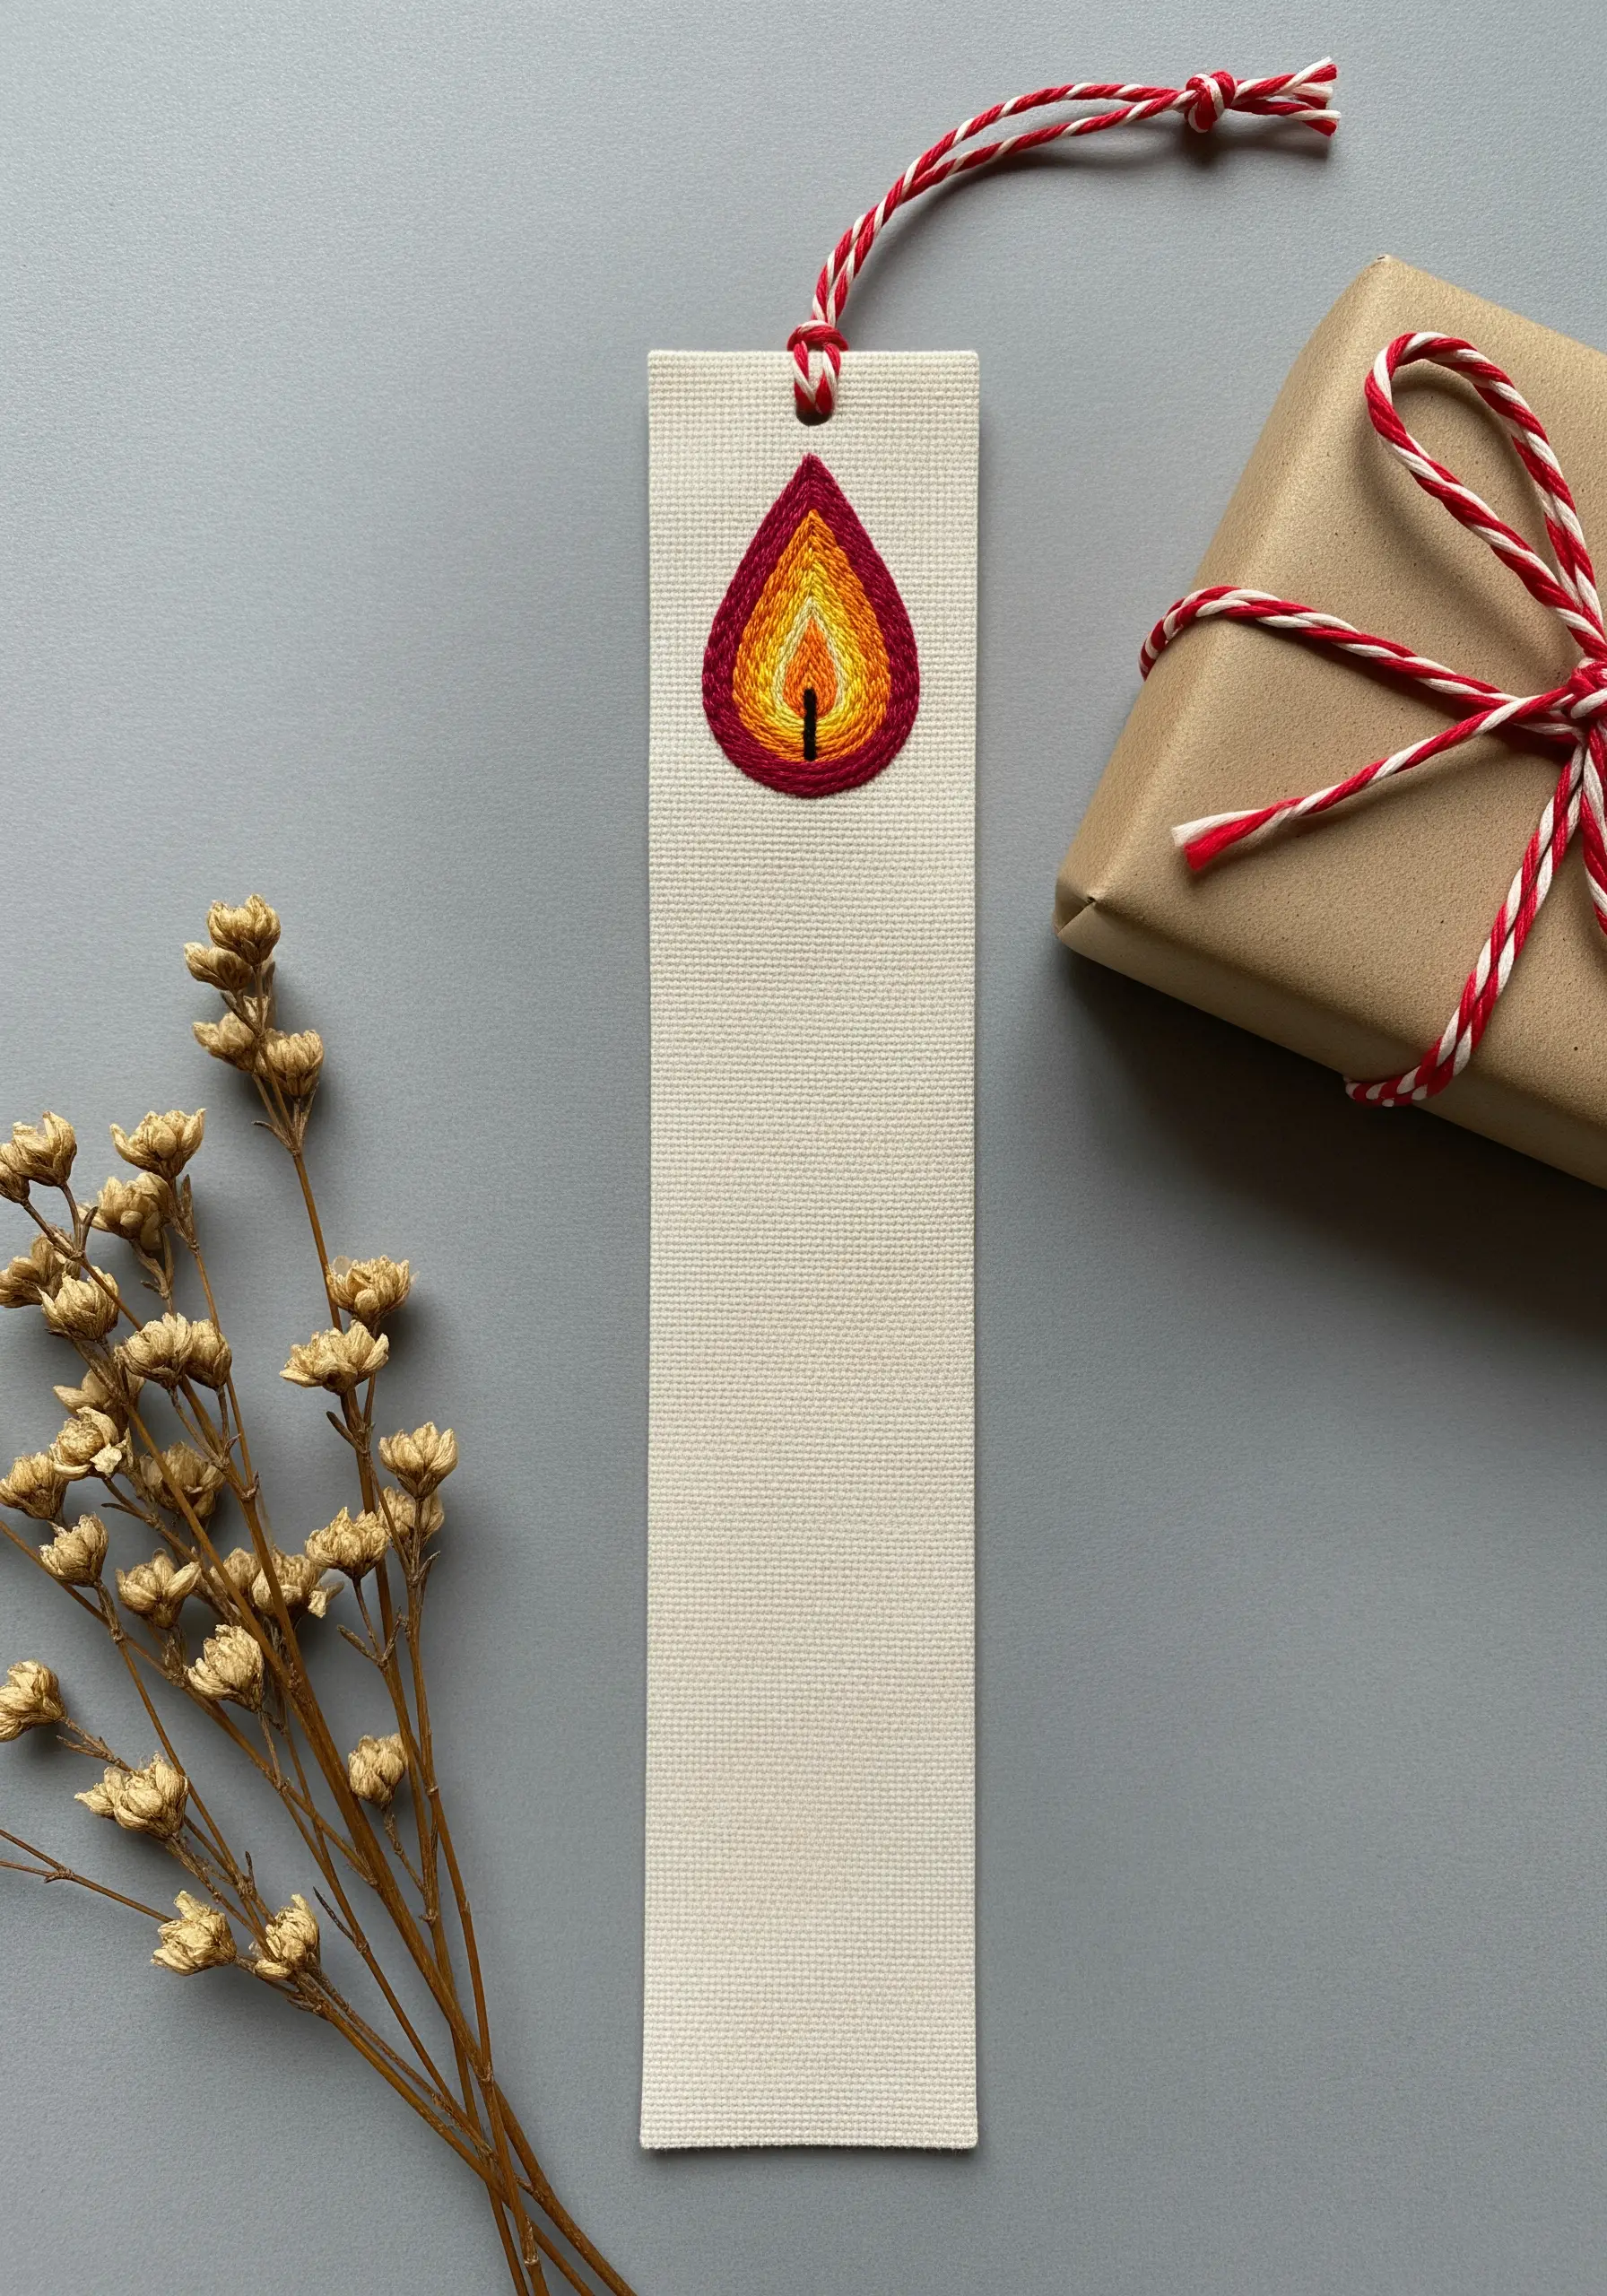
Capture the warmth of a candle flame by using thread painting in a miniature scale.
Use a long-and-short stitch to blend colors seamlessly from a warm base to a bright tip.
Start with deep red at the bottom, transition through orange and gold, and finish with a flick of pale yellow at the very top.
Direct your stitches upwards and towards the center to mimic the natural movement and shape of a flickering flame.
10. Capture the Softness of Eucalyptus
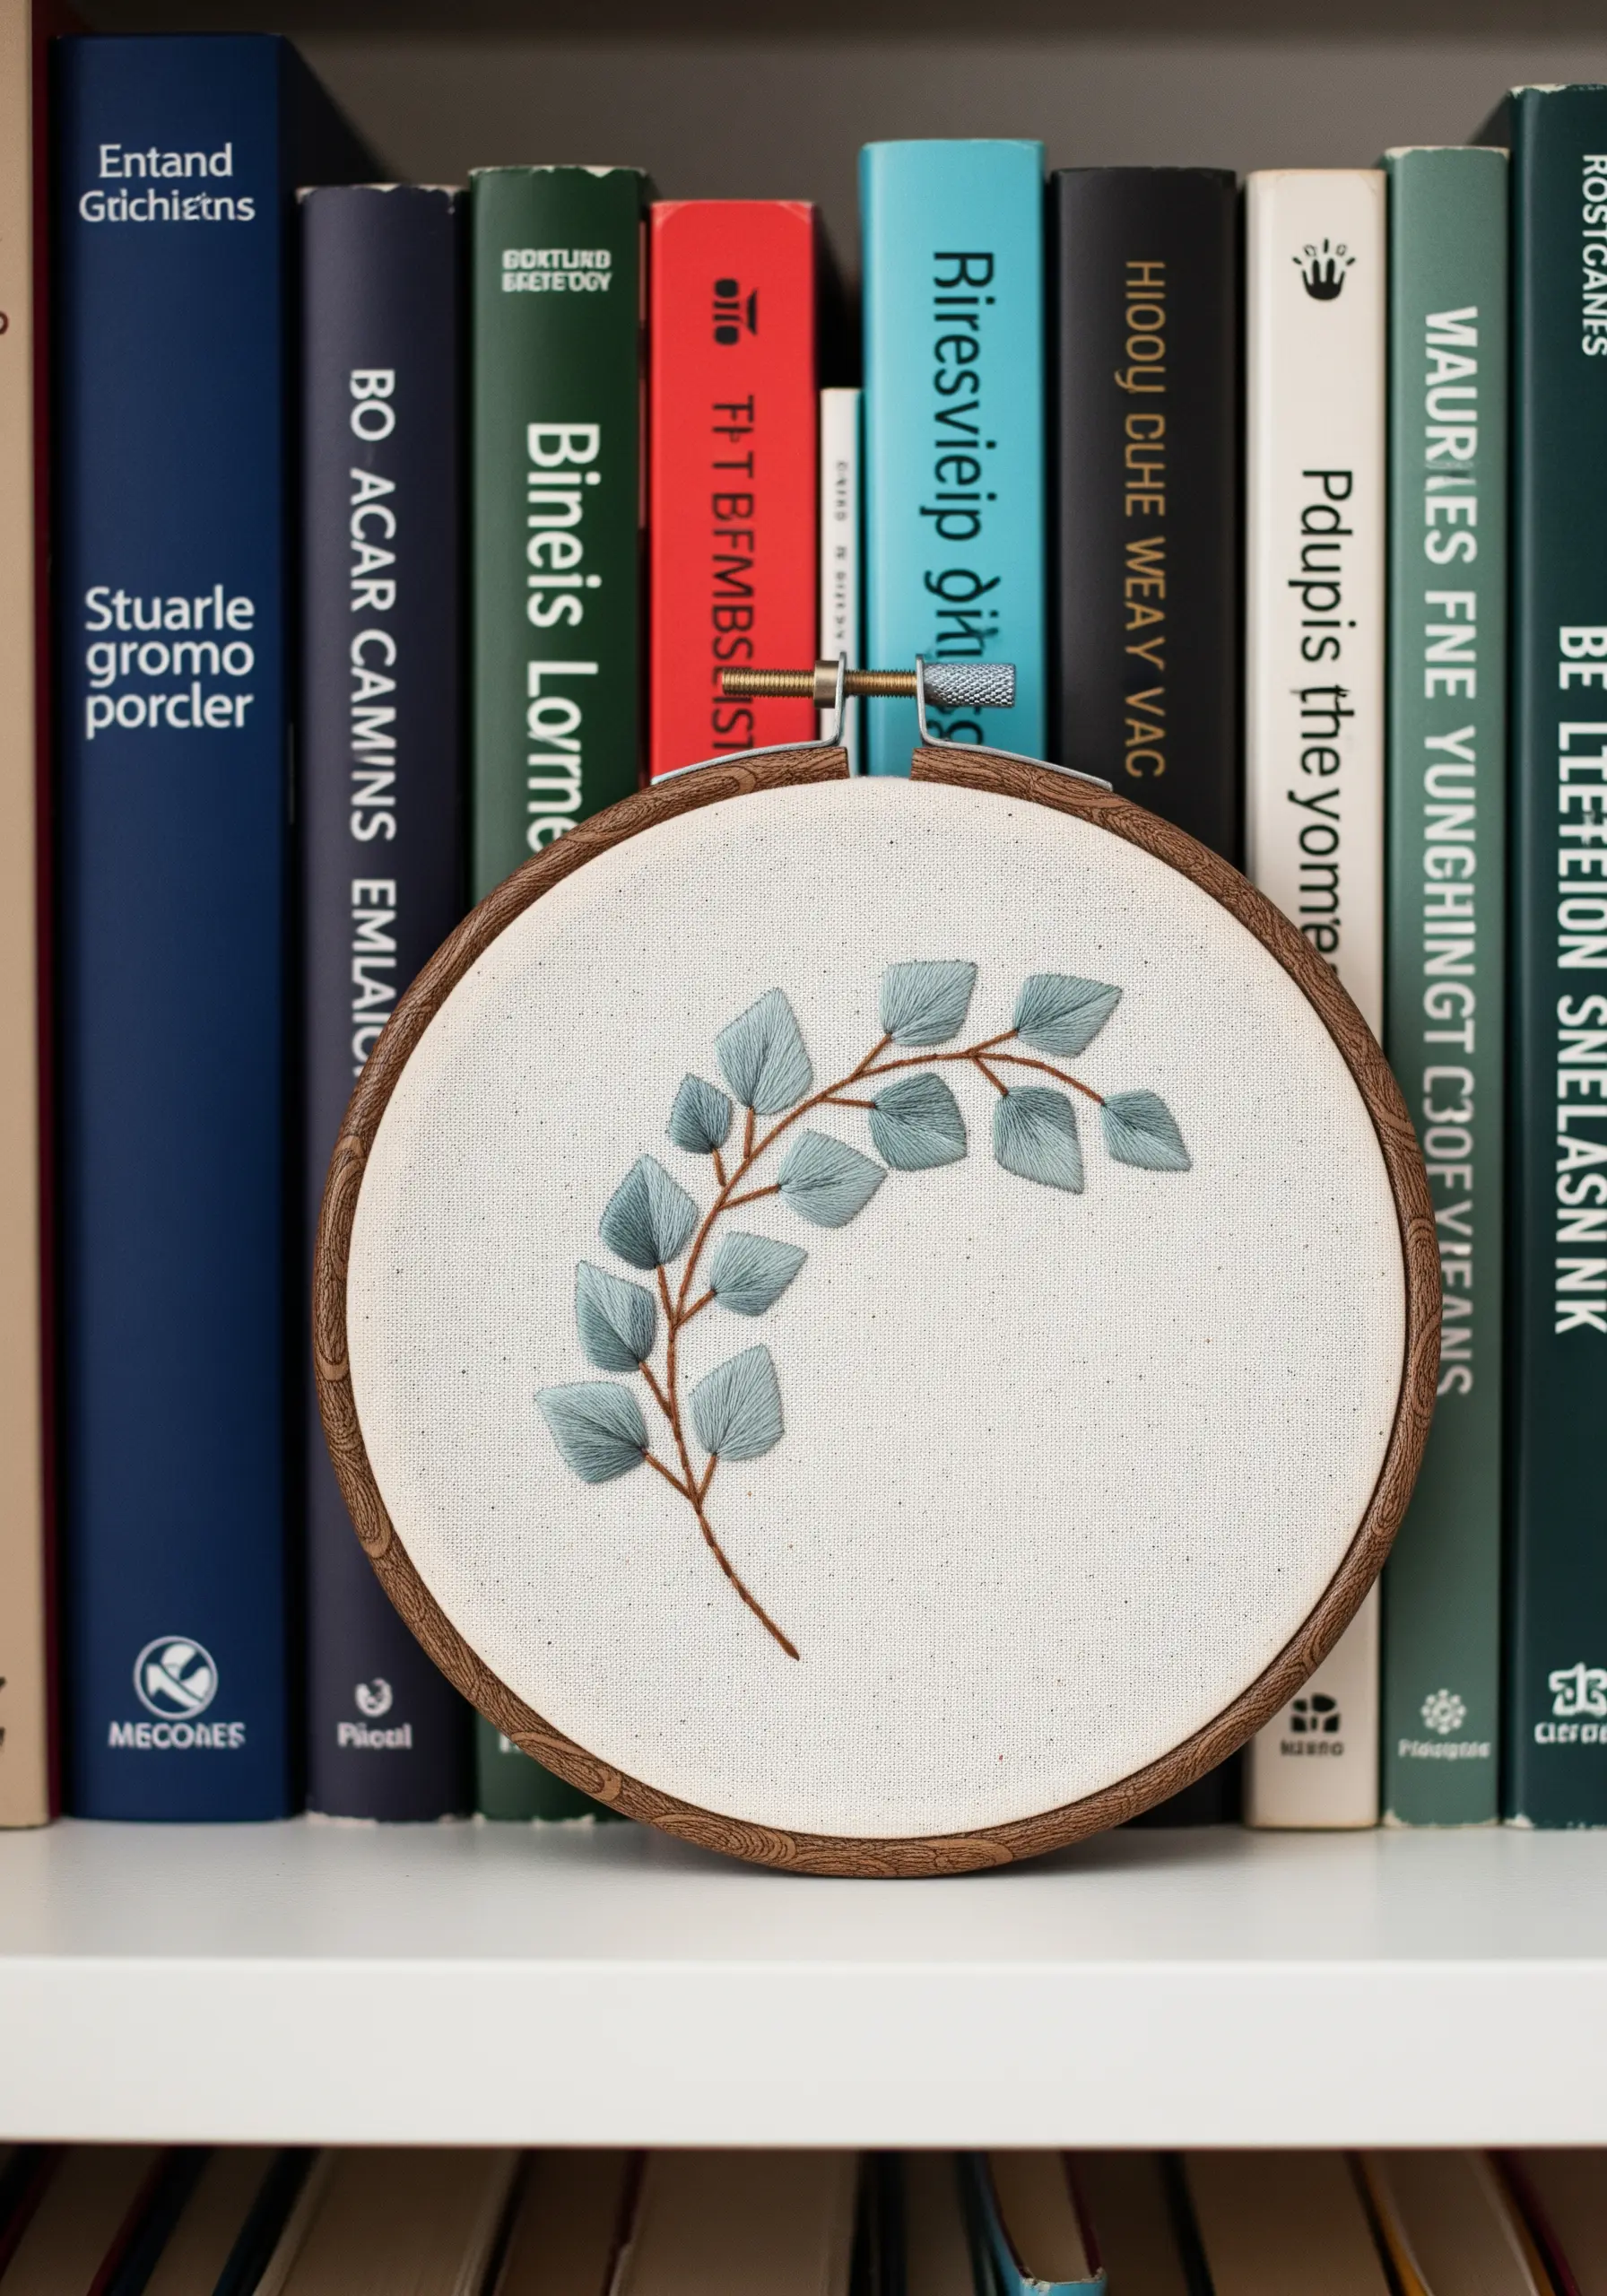
This graceful arching branch is a beautiful exercise in botanical line art and subtle shading.
Work the leaves in a directional satin stitch, angling your stitches to follow the natural curve of each leaf.
Use two or three closely related shades of dusty blue-green and blend them slightly to suggest light and shadow, giving the flat shapes a sense of volume.
A thin, delicate stem stitch in a contrasting brown anchors the airy leaves and completes the composition.
11. Scatter a Frosty Confetti on Knitwear

Embellish a sweater with a scattering of textural stitches for a look that feels like a delicate frost or snowfall.
Combine small lazy daisy stitches, French knots, and straight stitches in a palette of icy blue, silver, and white.
When stitching on knitwear, use a tapestry or ball-point needle to avoid splitting the yarn, and keep your tension loose to prevent puckering.
Concentrate the stitches more densely at the cuff and let them fade out as you move up the sleeve for a natural, organic effect.
12. Illustrate a Classic Holiday Ornament
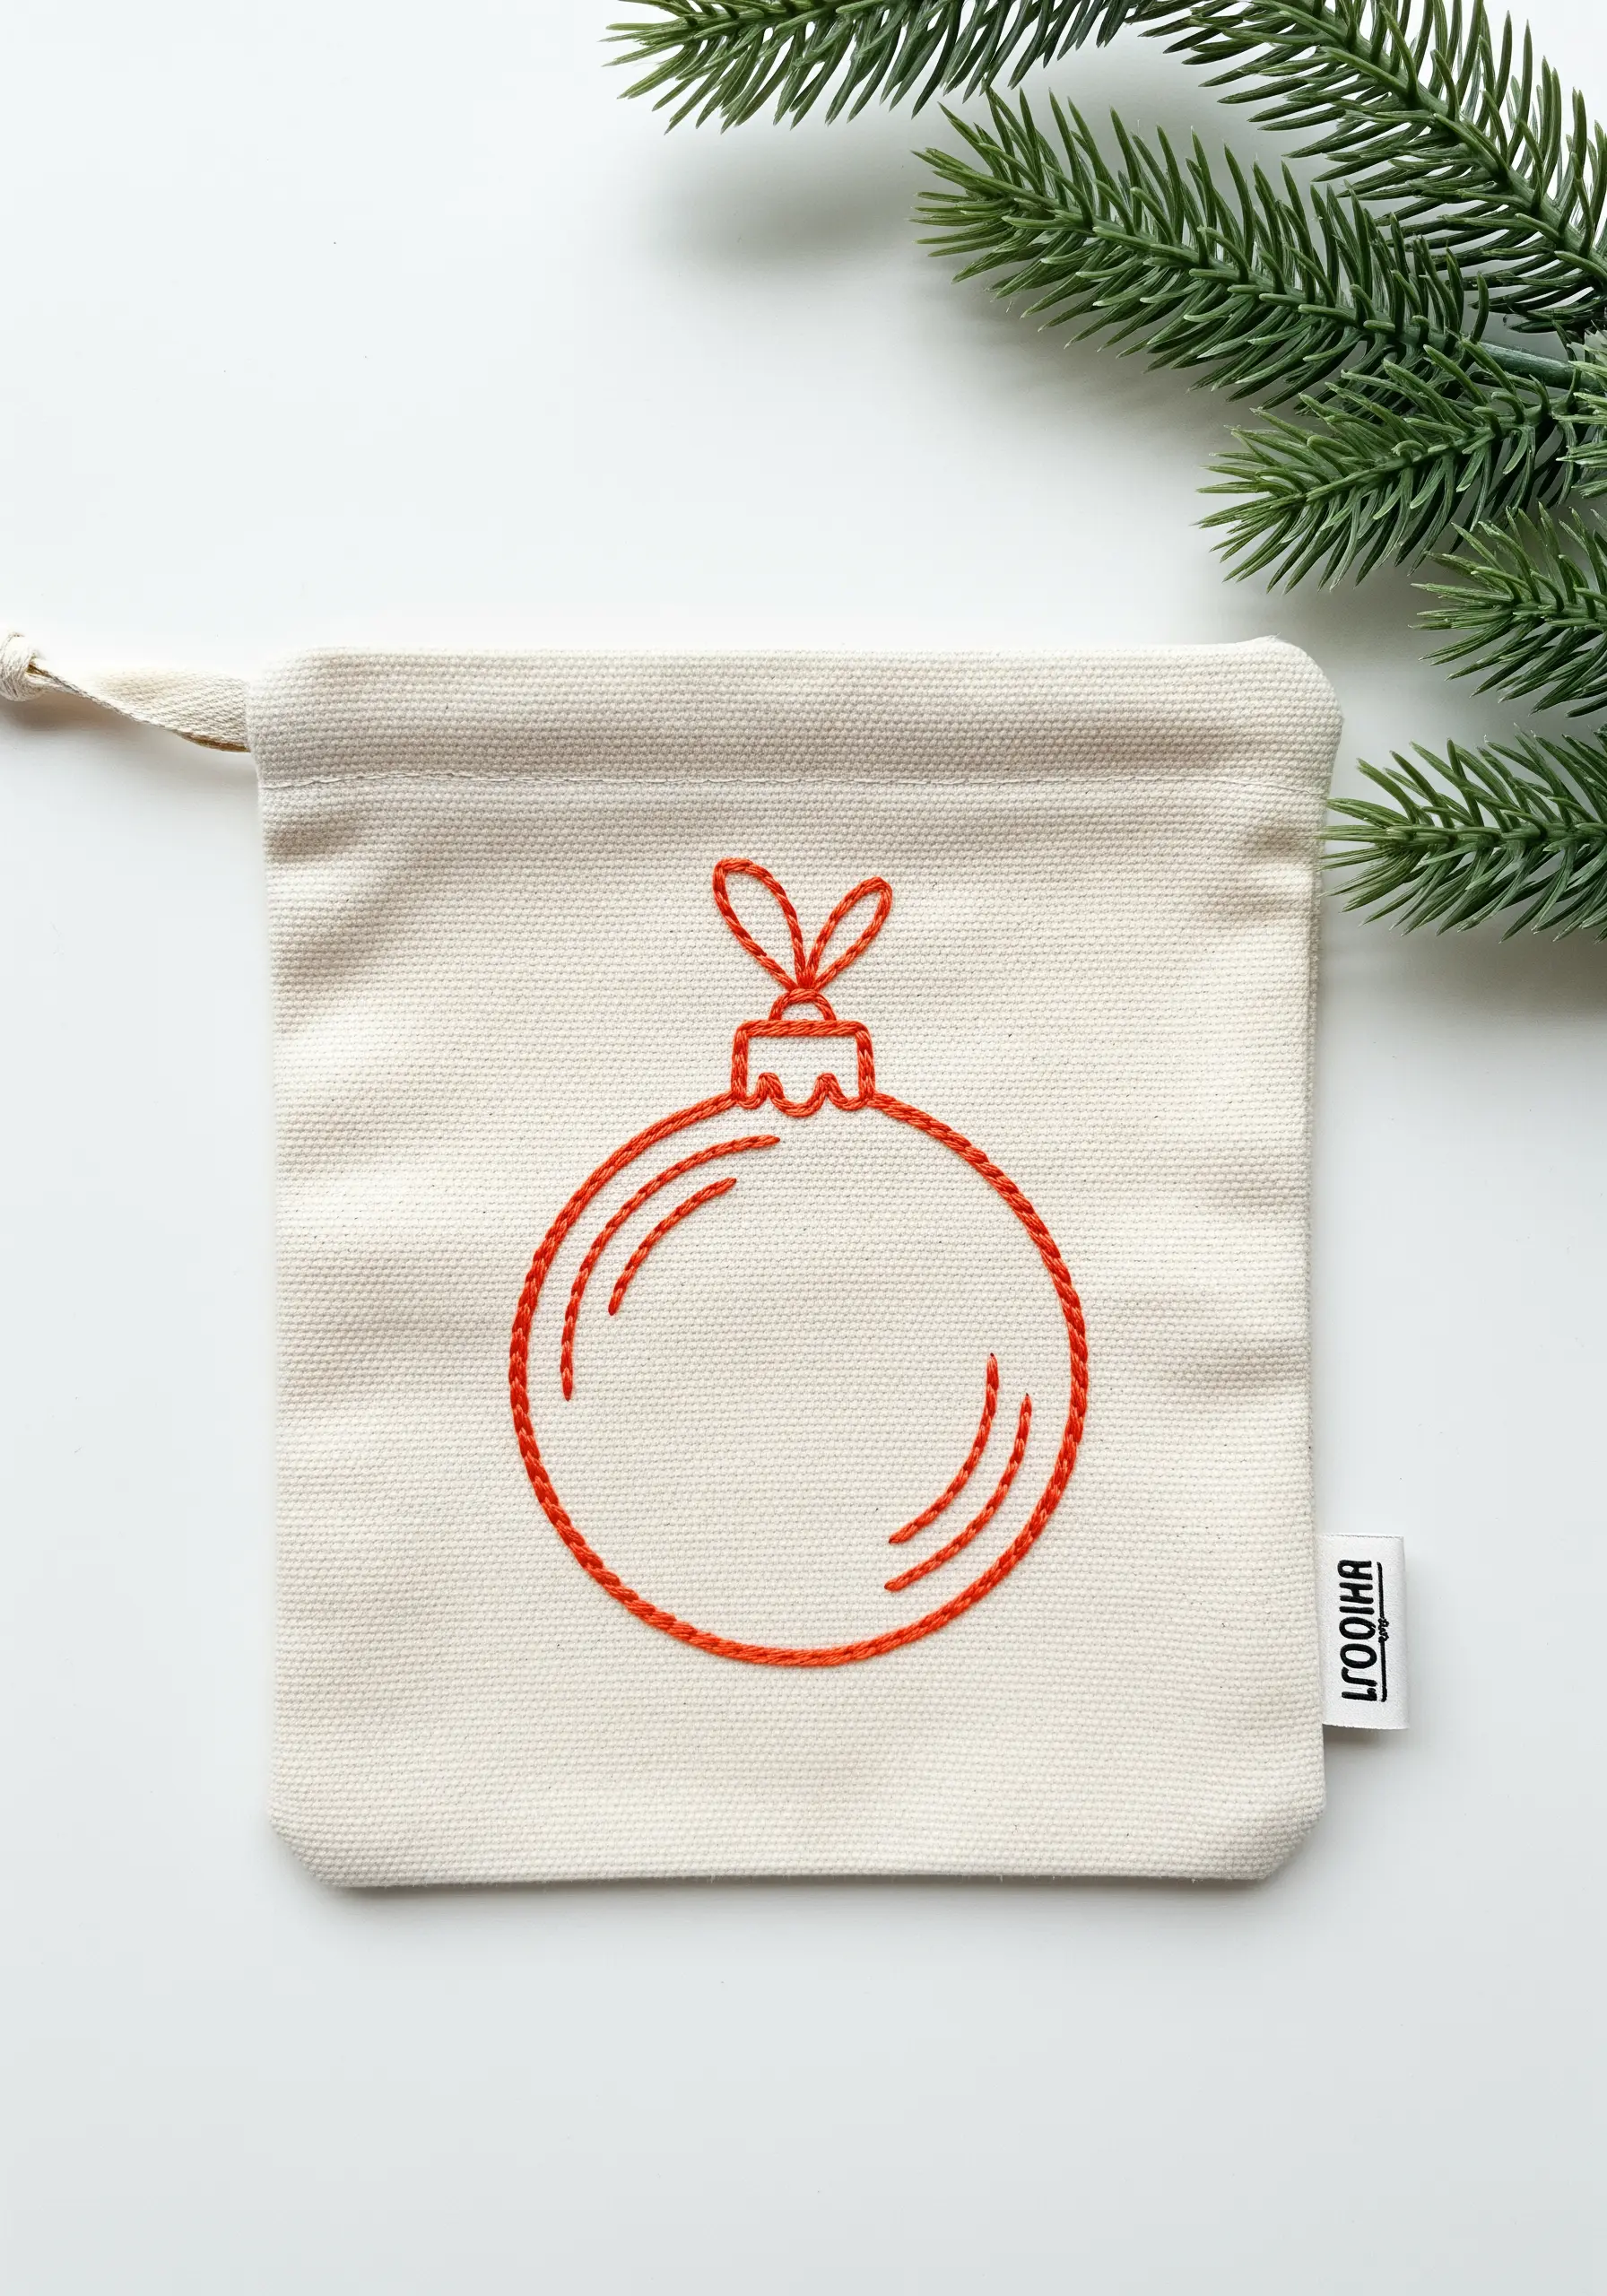
A simple line drawing in a bold color gains power from a perfectly executed stitch.
Use a split stitch with four strands of floss to create a thick, continuous line with a slightly braided texture that looks incredibly clean.
This stitch is superior to a backstitch for curves, as it eliminates the tiny gaps and creates a smoother, more graphic arc.
Stitching on a simple cotton or canvas pouch allows the minimalist design to take center stage.
13. Couch Metallic Thread for Clean Lines
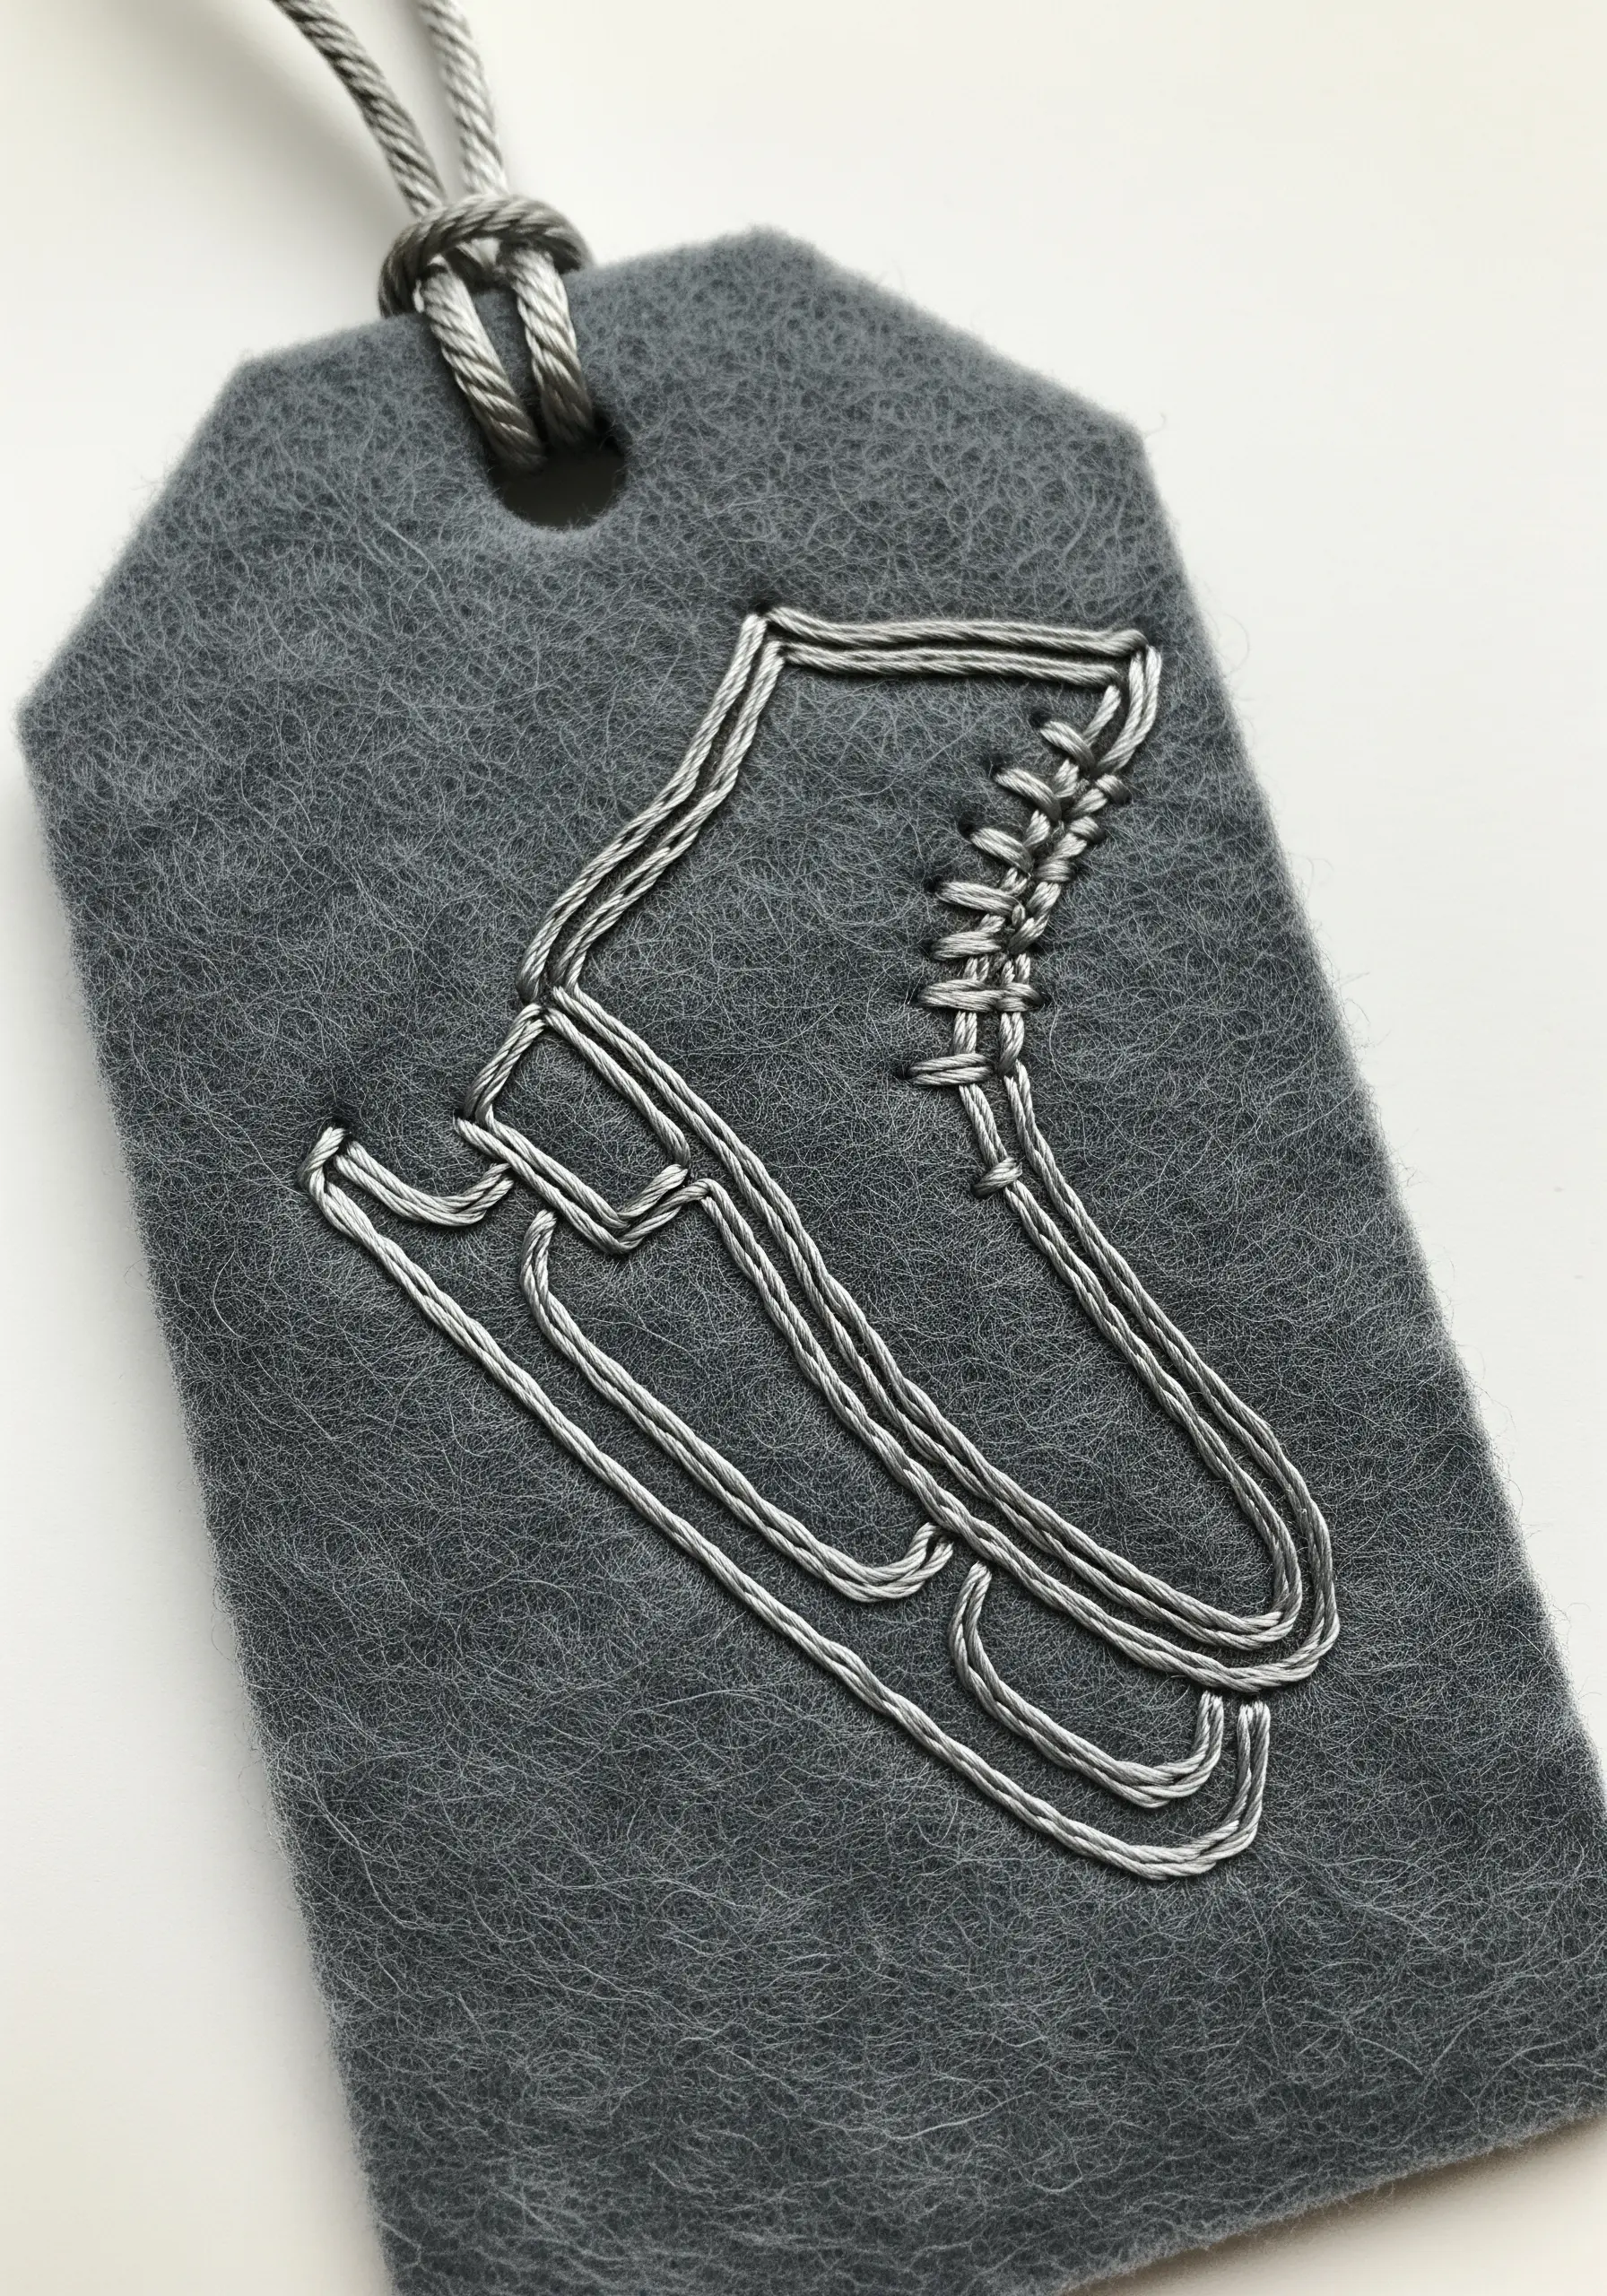
Metallic threads can be challenging, but couching gives you complete control for a flawless result.
Lay your metallic thread along the design line and use a second, finer thread (in a matching color) to tack it down with tiny, perpendicular stitches.
This technique allows you to create sharp corners and smooth curves without the metallic fiber twisting or snagging.
Stitching onto a sturdy, non-woven material like felt provides the perfect base for this highly defined style.
14. Fill Shapes with Tactile French Knots
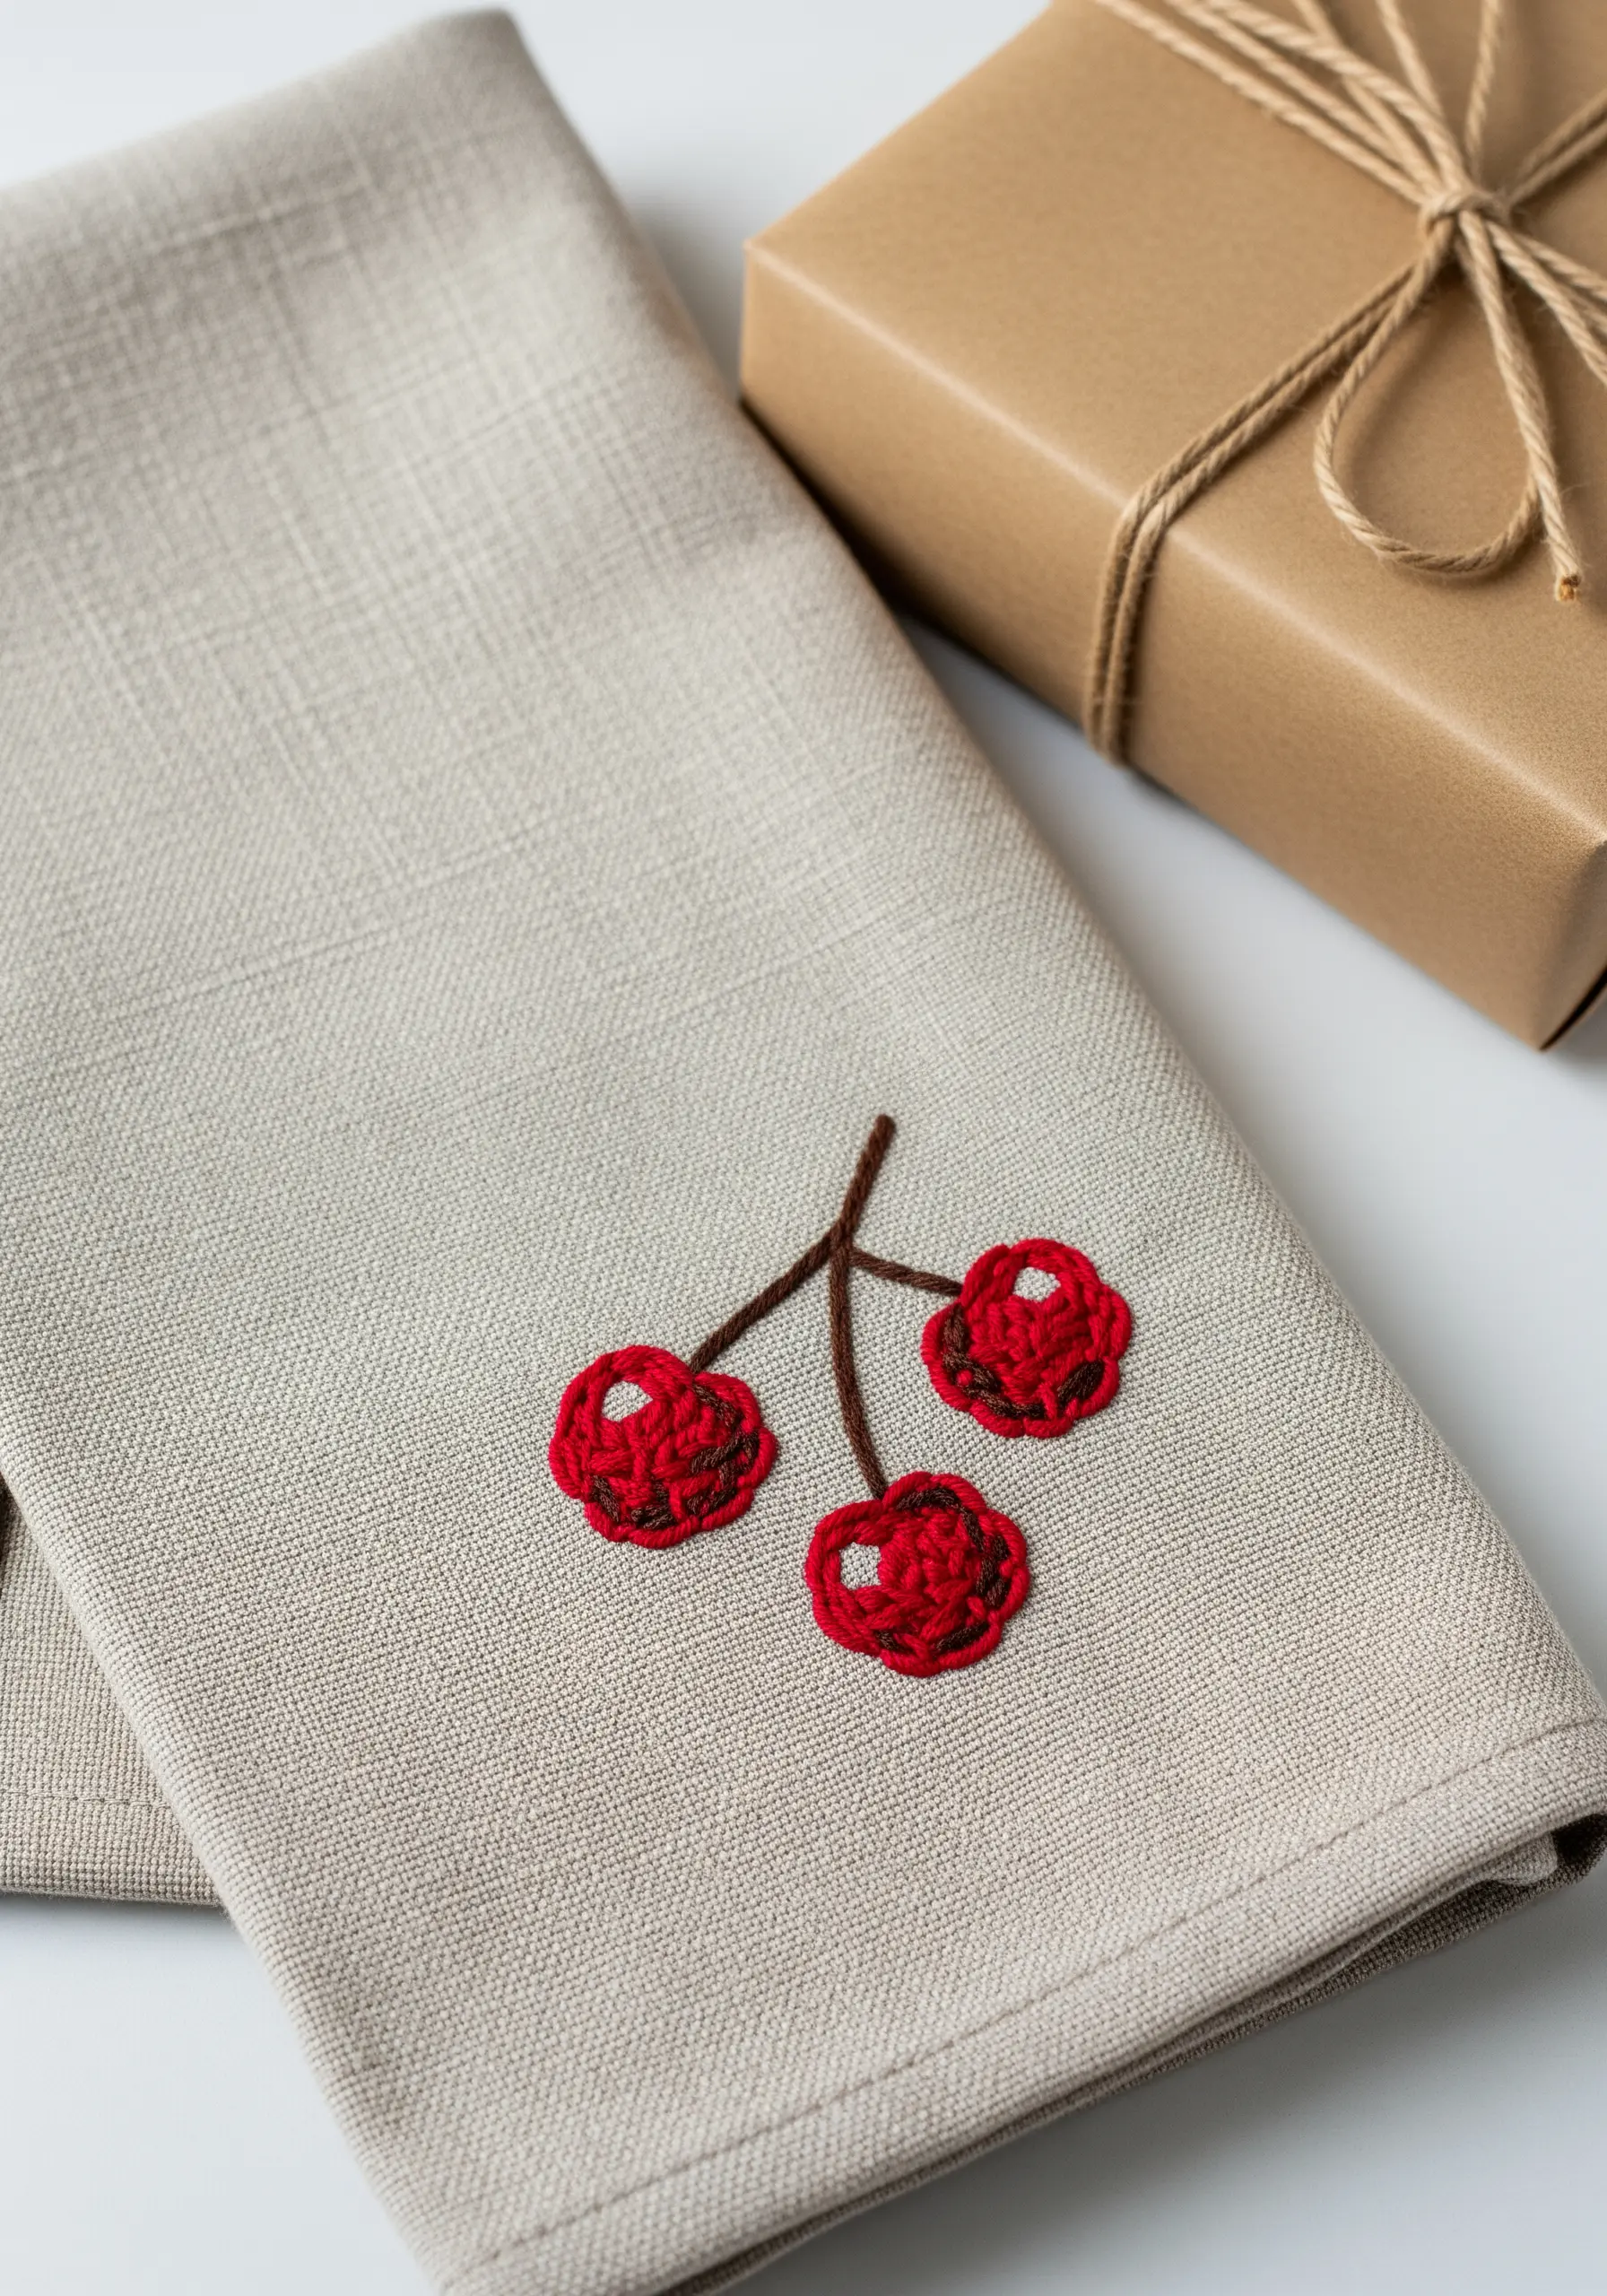
Instead of a flat satin stitch, fill small shapes with a dense cluster of French knots for a rich, bumpy texture.
For these cherries, use a vibrant red perle cotton, which is a single, non-divisible thread that creates plumper, more uniform knots than standard floss.
Outline the shape first with a split stitch to create a defined boundary, then fill the interior with knots, packing them tightly together.
The resulting three-dimensional effect is visually engaging and feels wonderful to the touch.
15. Create Shading with Straight Stitches on Paper
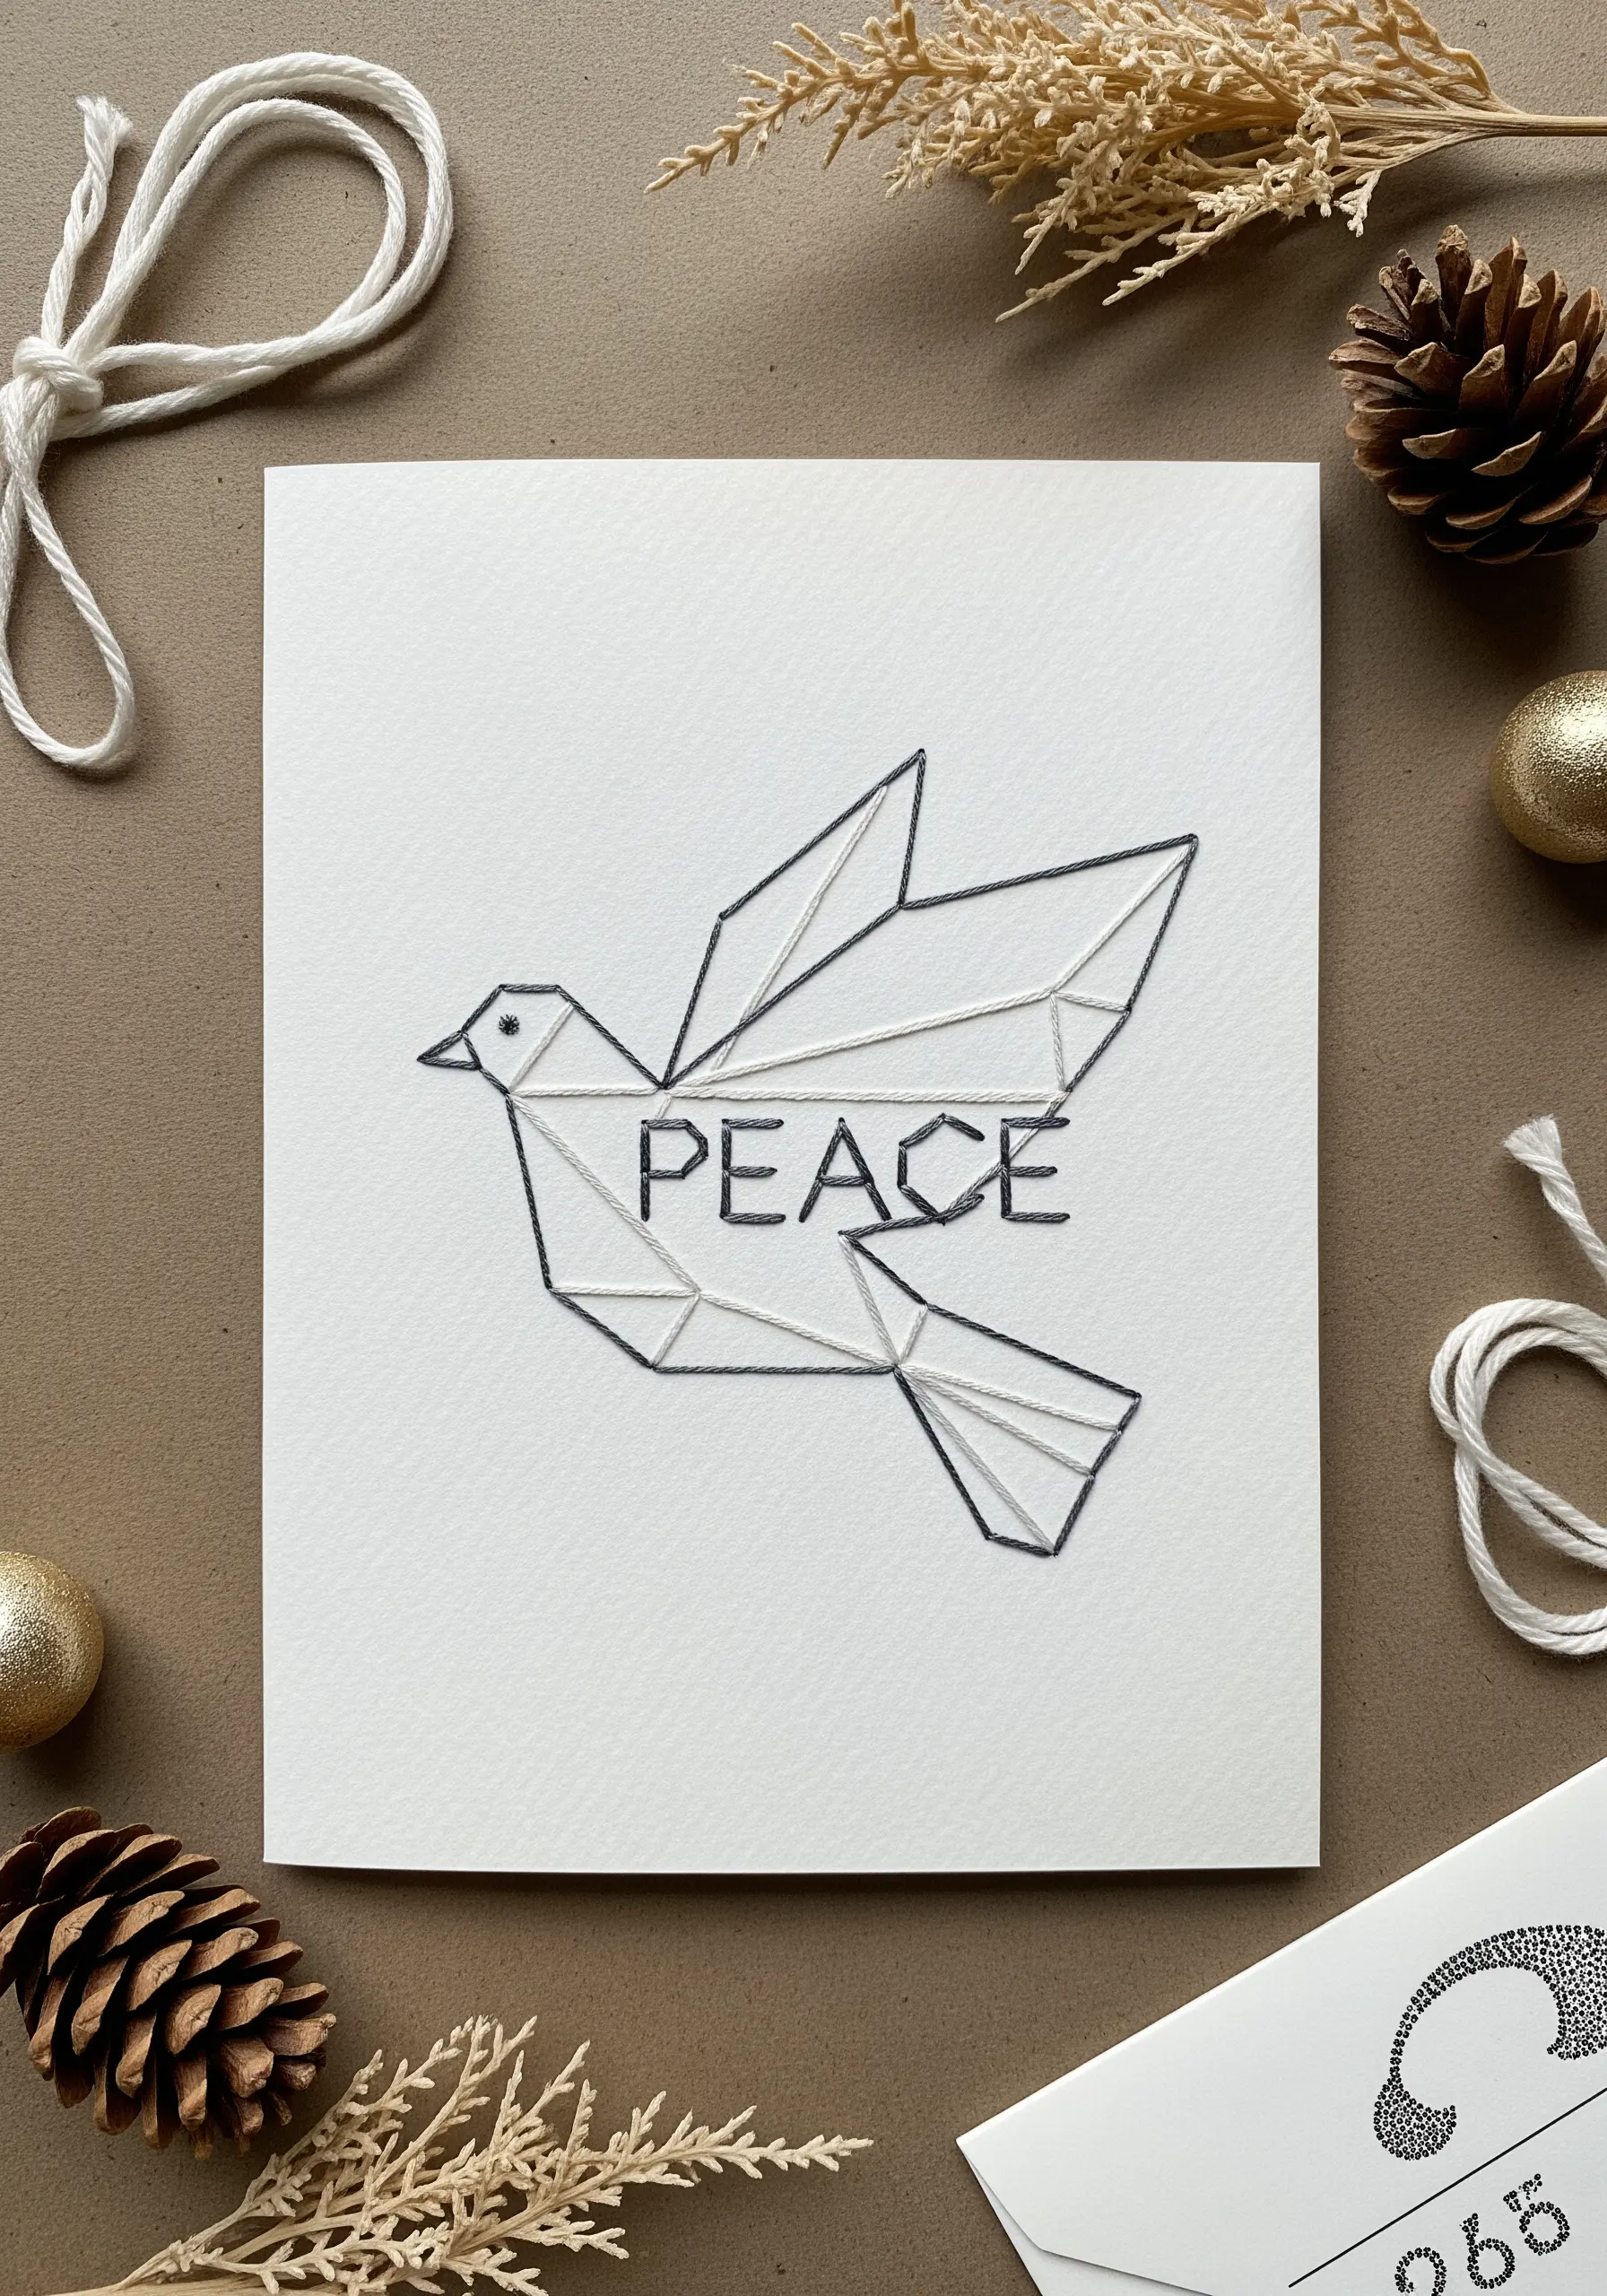
This geometric dove uses thread to create planes of light and shadow on a paper canvas.
After outlining the main shape in backstitch, fill in specific sections with straight stitches stretched from one side of the shape to the other.
By varying the spacing and angle of these stitches, you can create the illusion of shading and dimension.
Use a single strand of floss to keep the effect delicate and ensure the paper isn’t overwhelmed by thread.
16. Combine Linear Fills and Pointillist Texture
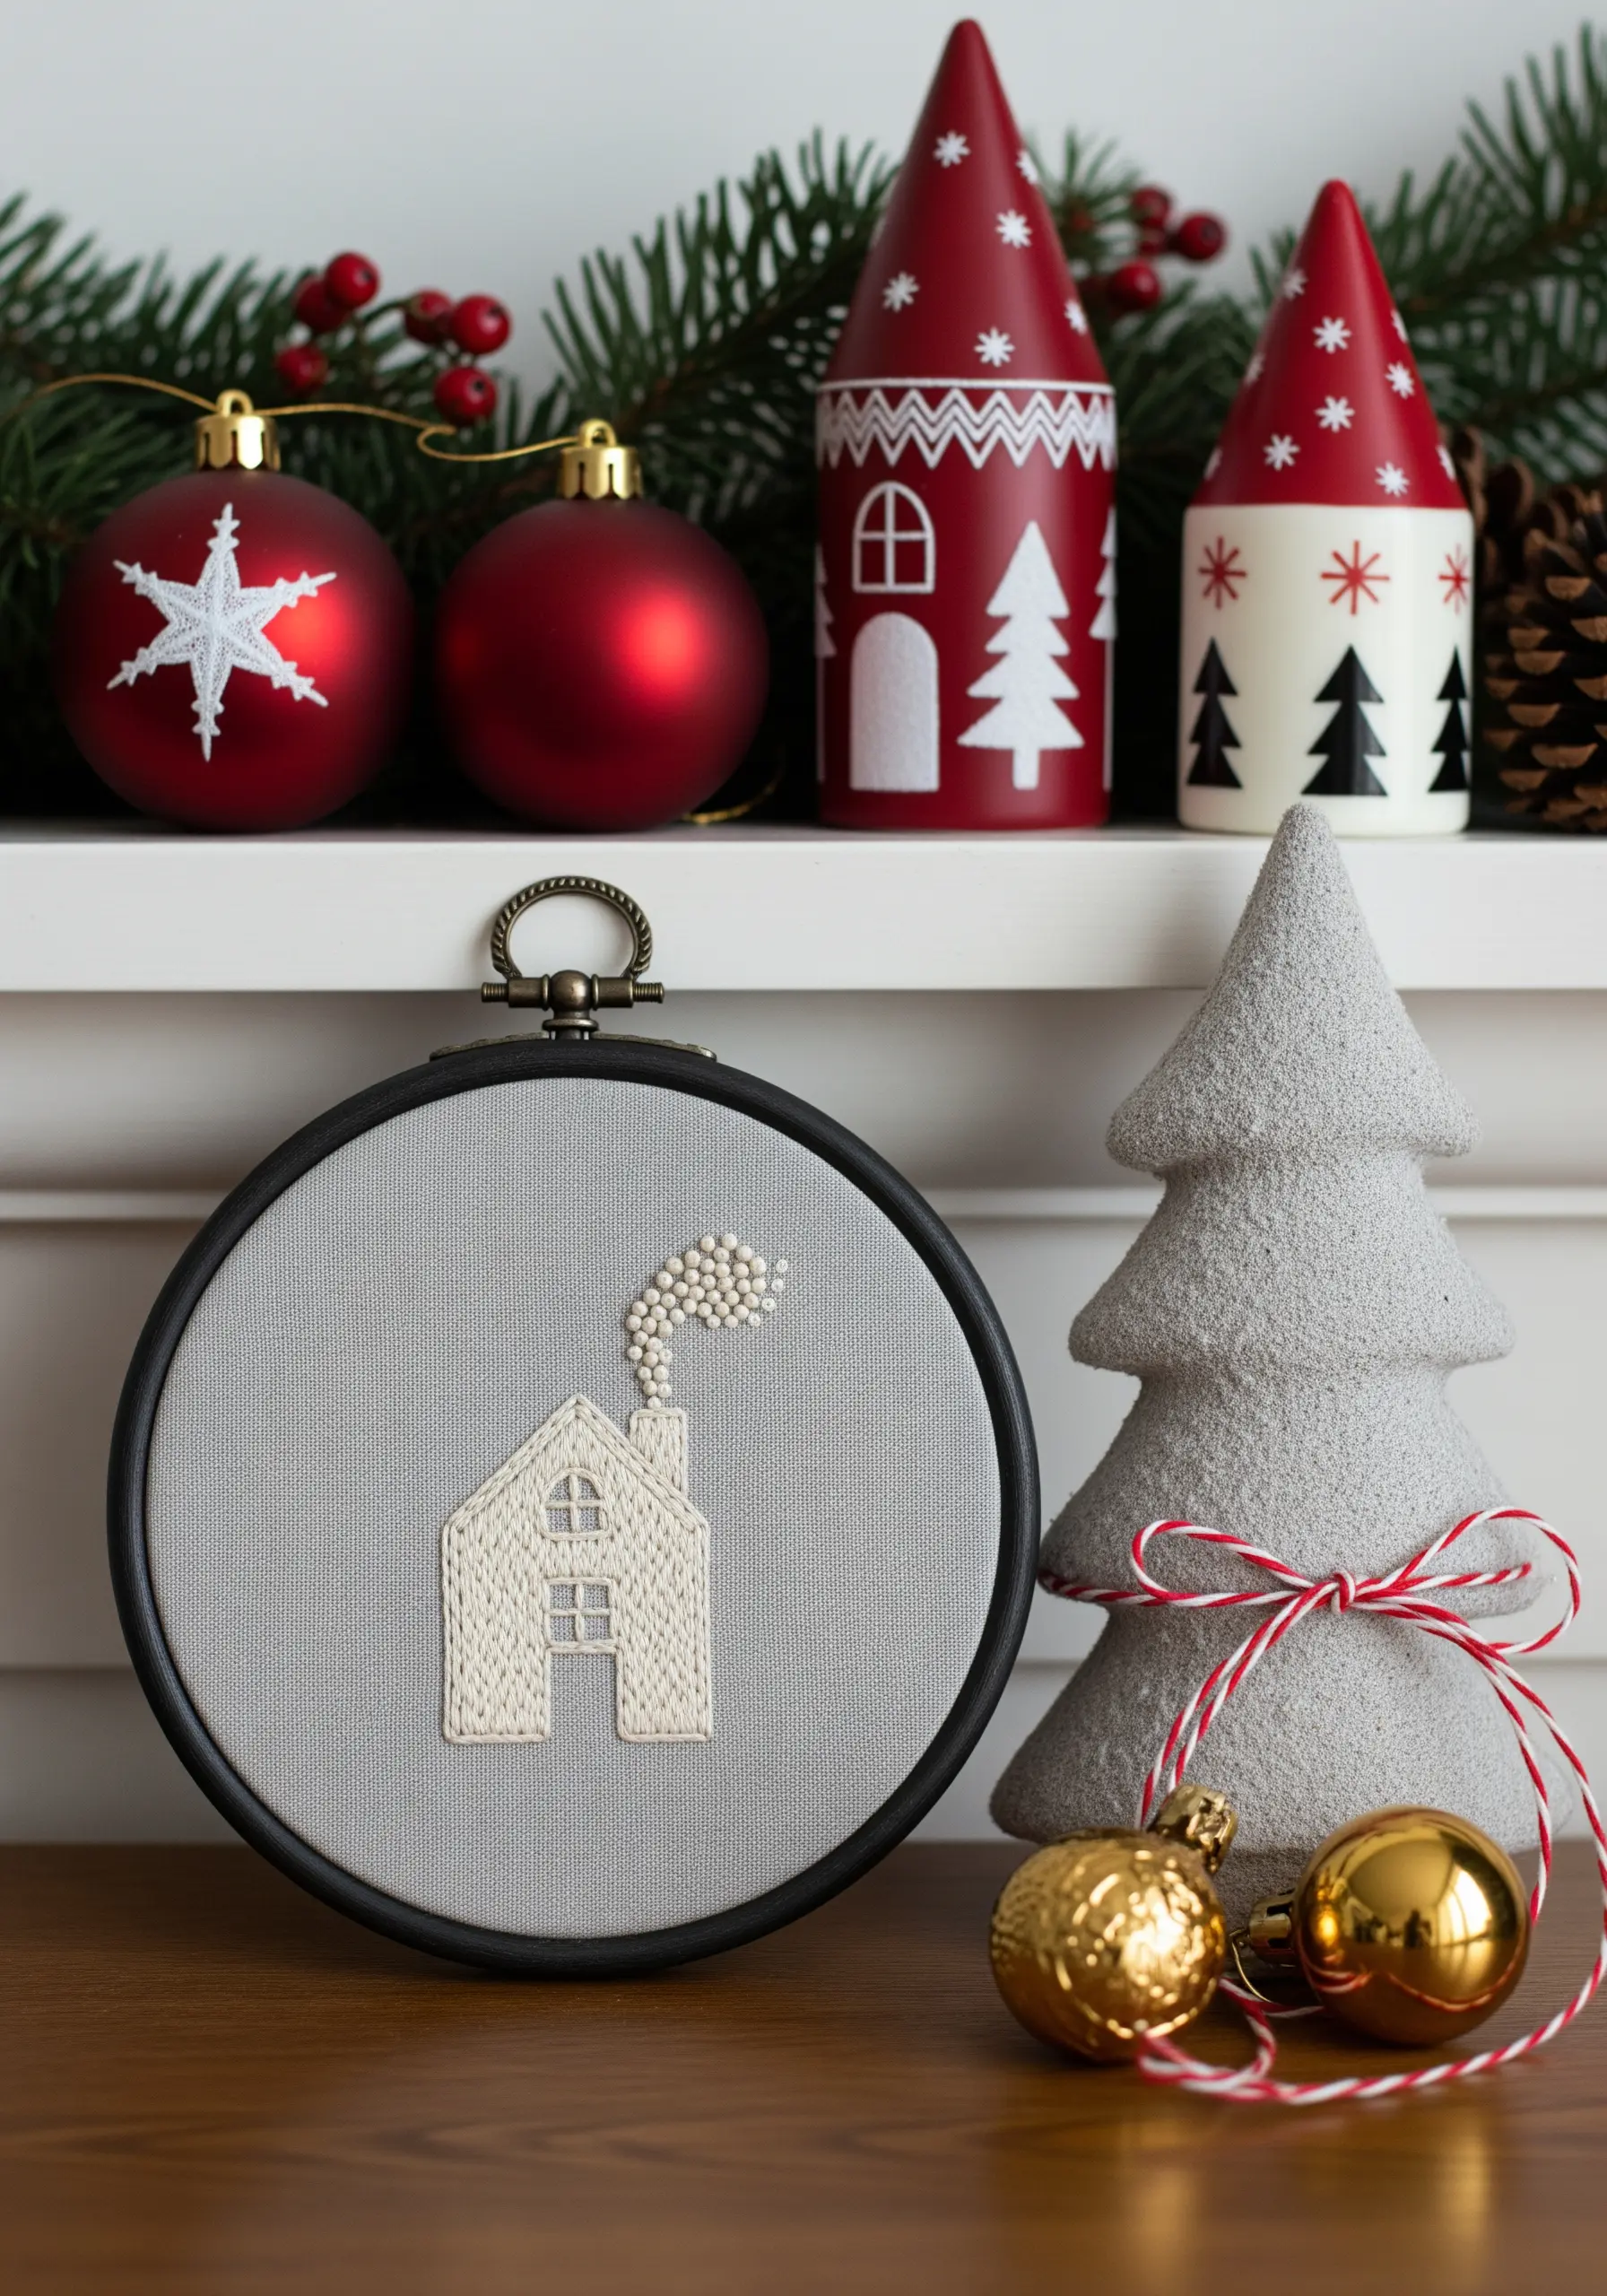
Create a charming composition by contrasting two distinct textures: one smooth and one clustered.
Use a vertical satin stitch or long-and-short stitch to fill the walls of the house, giving it a clean, structured feel.
For the smoke, switch to dense French knots in a contrasting color, allowing them to billow up in an organic, cloud-like shape.
This juxtaposition of smooth lines and bumpy knots makes the entire piece more dynamic and visually interesting.
17. Form a Pine Bough with Fly Stitch

The fly stitch is an incredibly efficient and elegant way to create motifs like fir branches or ferns.
Work a central line down the middle with a backstitch or stem stitch to serve as your guide.
Then, work your fly stitches off this central spine, angling them outwards to create the classic shape of pine needles.
Using a slightly variegated green thread will give the branch subtle, natural-looking color shifts without any extra effort.
18. Master the Radiating Satin Stitch
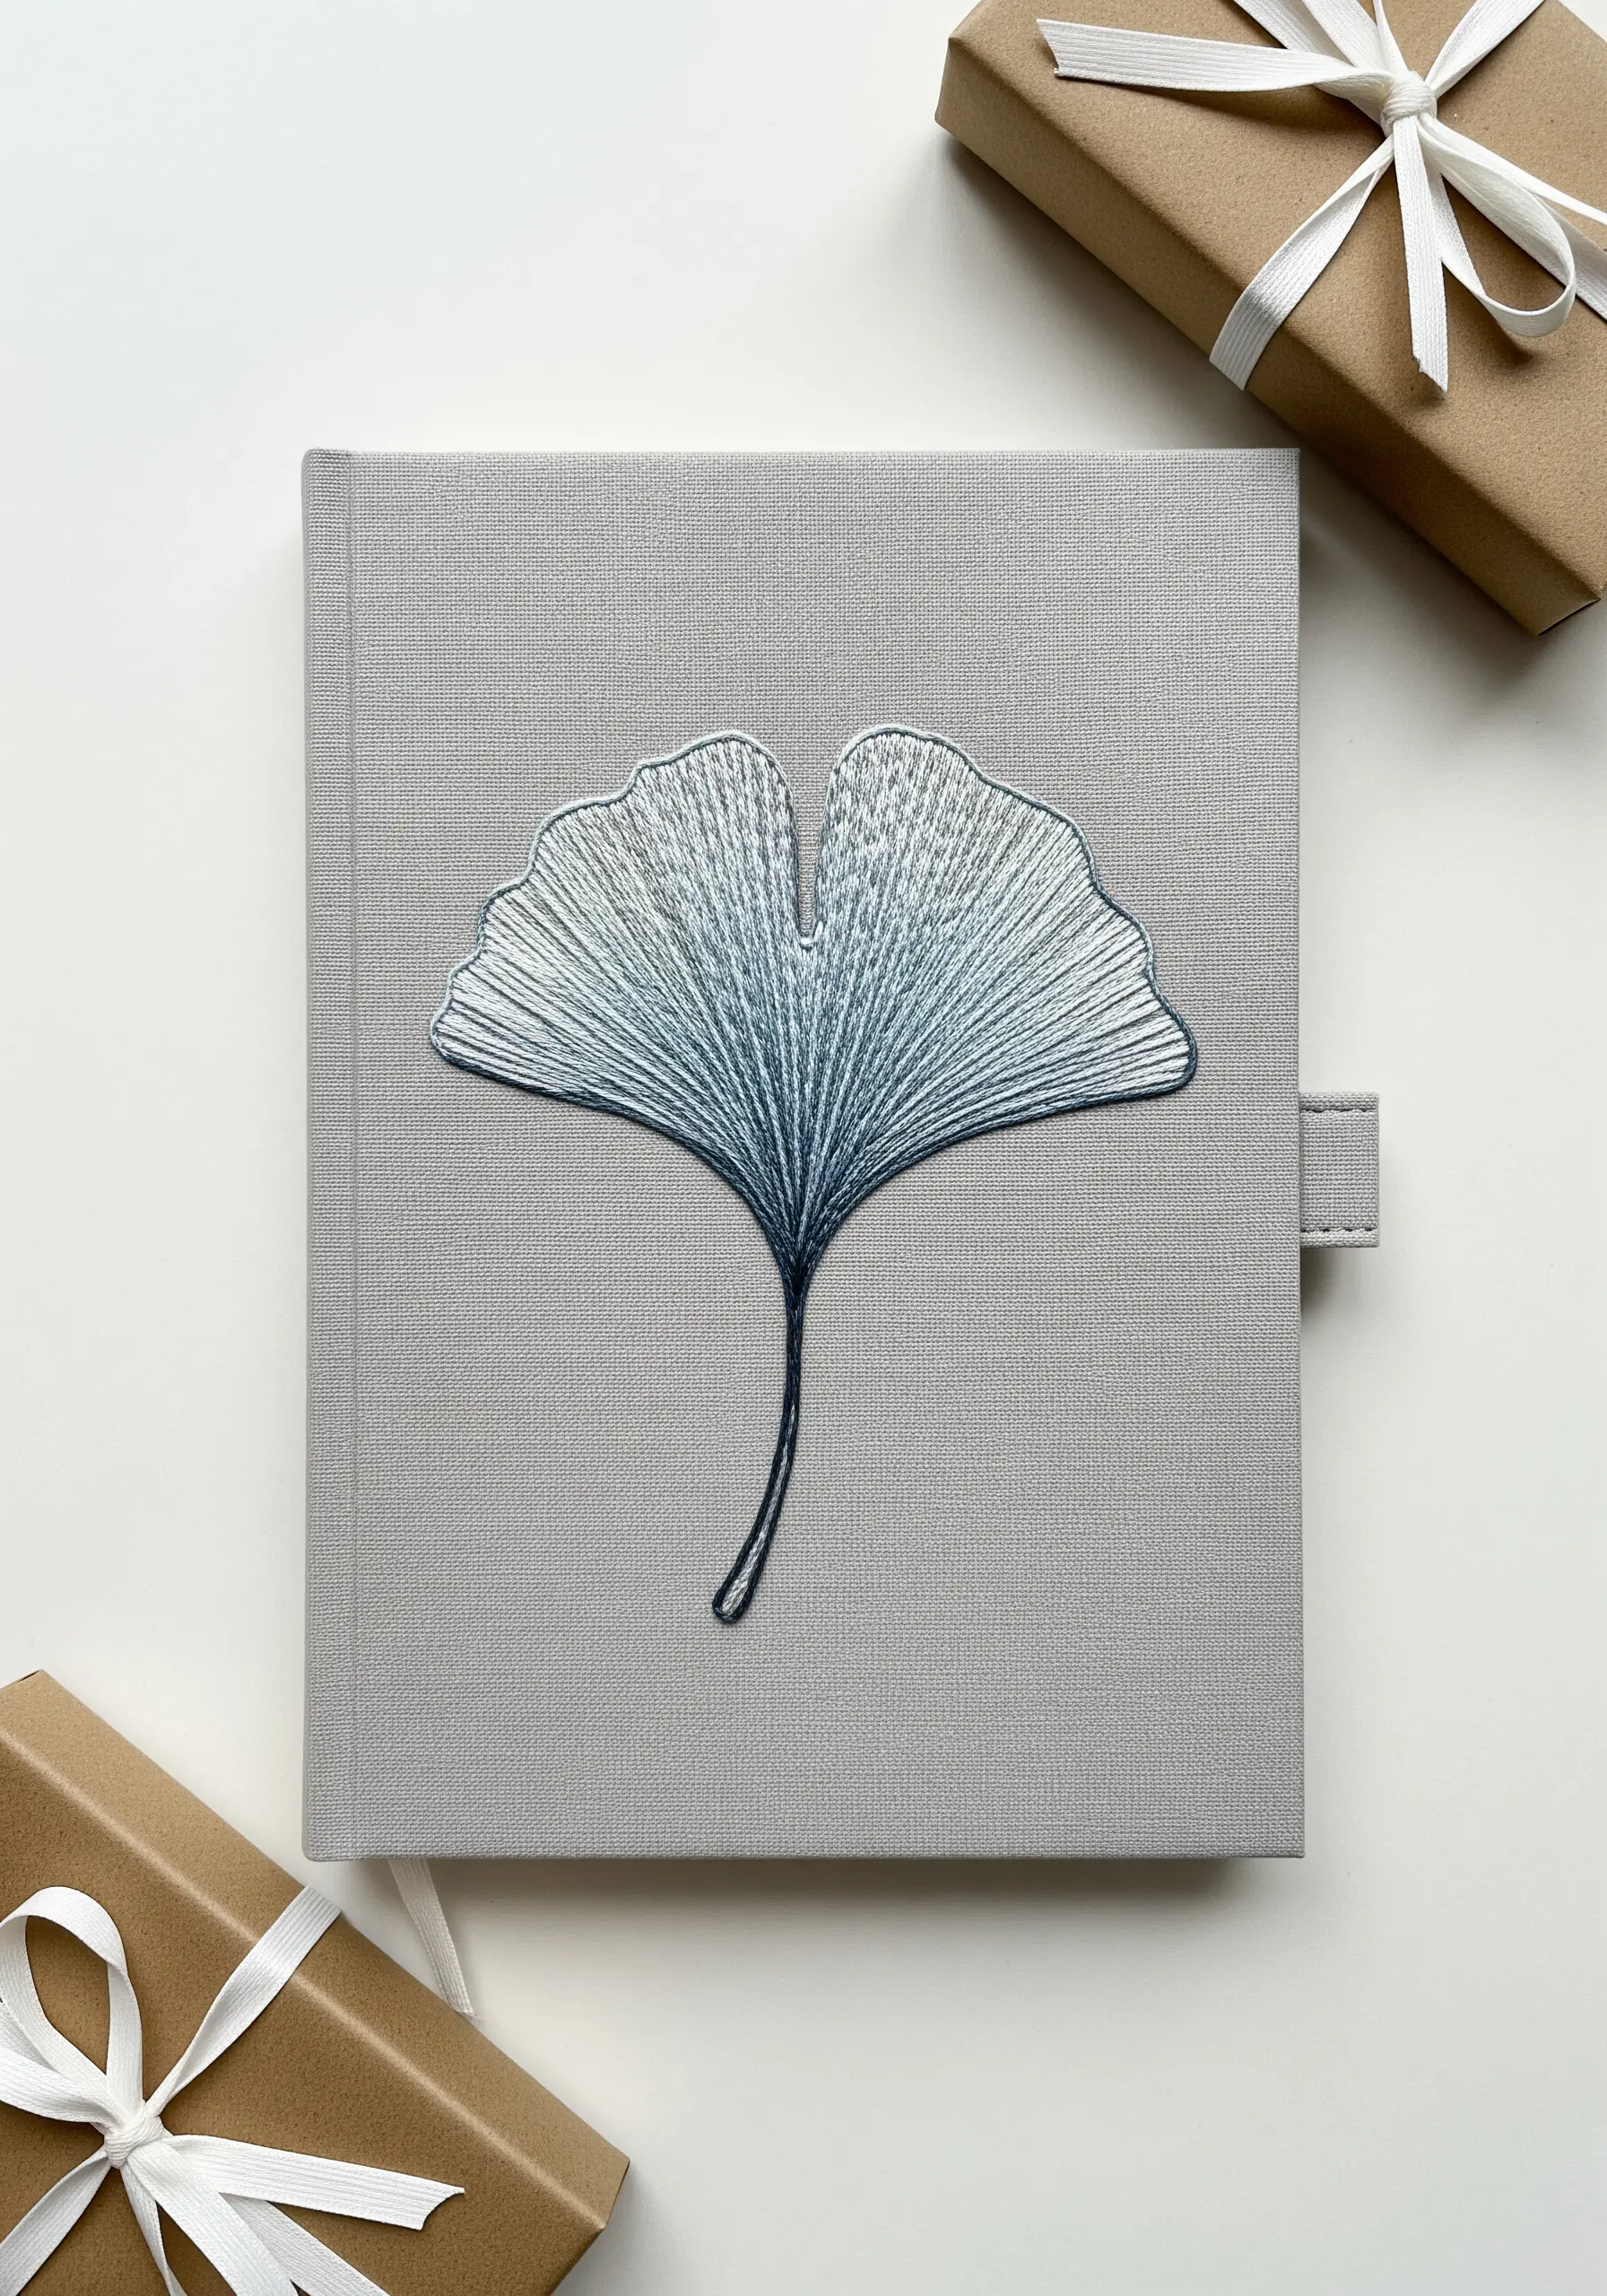
A ginkgo leaf provides the perfect template for practicing a radiating satin stitch, where all stitches fan out from a single point.
The key is to vary the length of your stitches to create the leaf’s scalloped outer edge while ensuring each stitch lies flat and smooth against the next.
To achieve the subtle color gradient, use a variegated thread or switch between two similar shades of blue-grey floss.
Stitching on a hard surface like a journal cover requires a thimble and a strong needle, but results in a stunning, permanent piece of art.
19. Scatter a Constellation of Starbursts
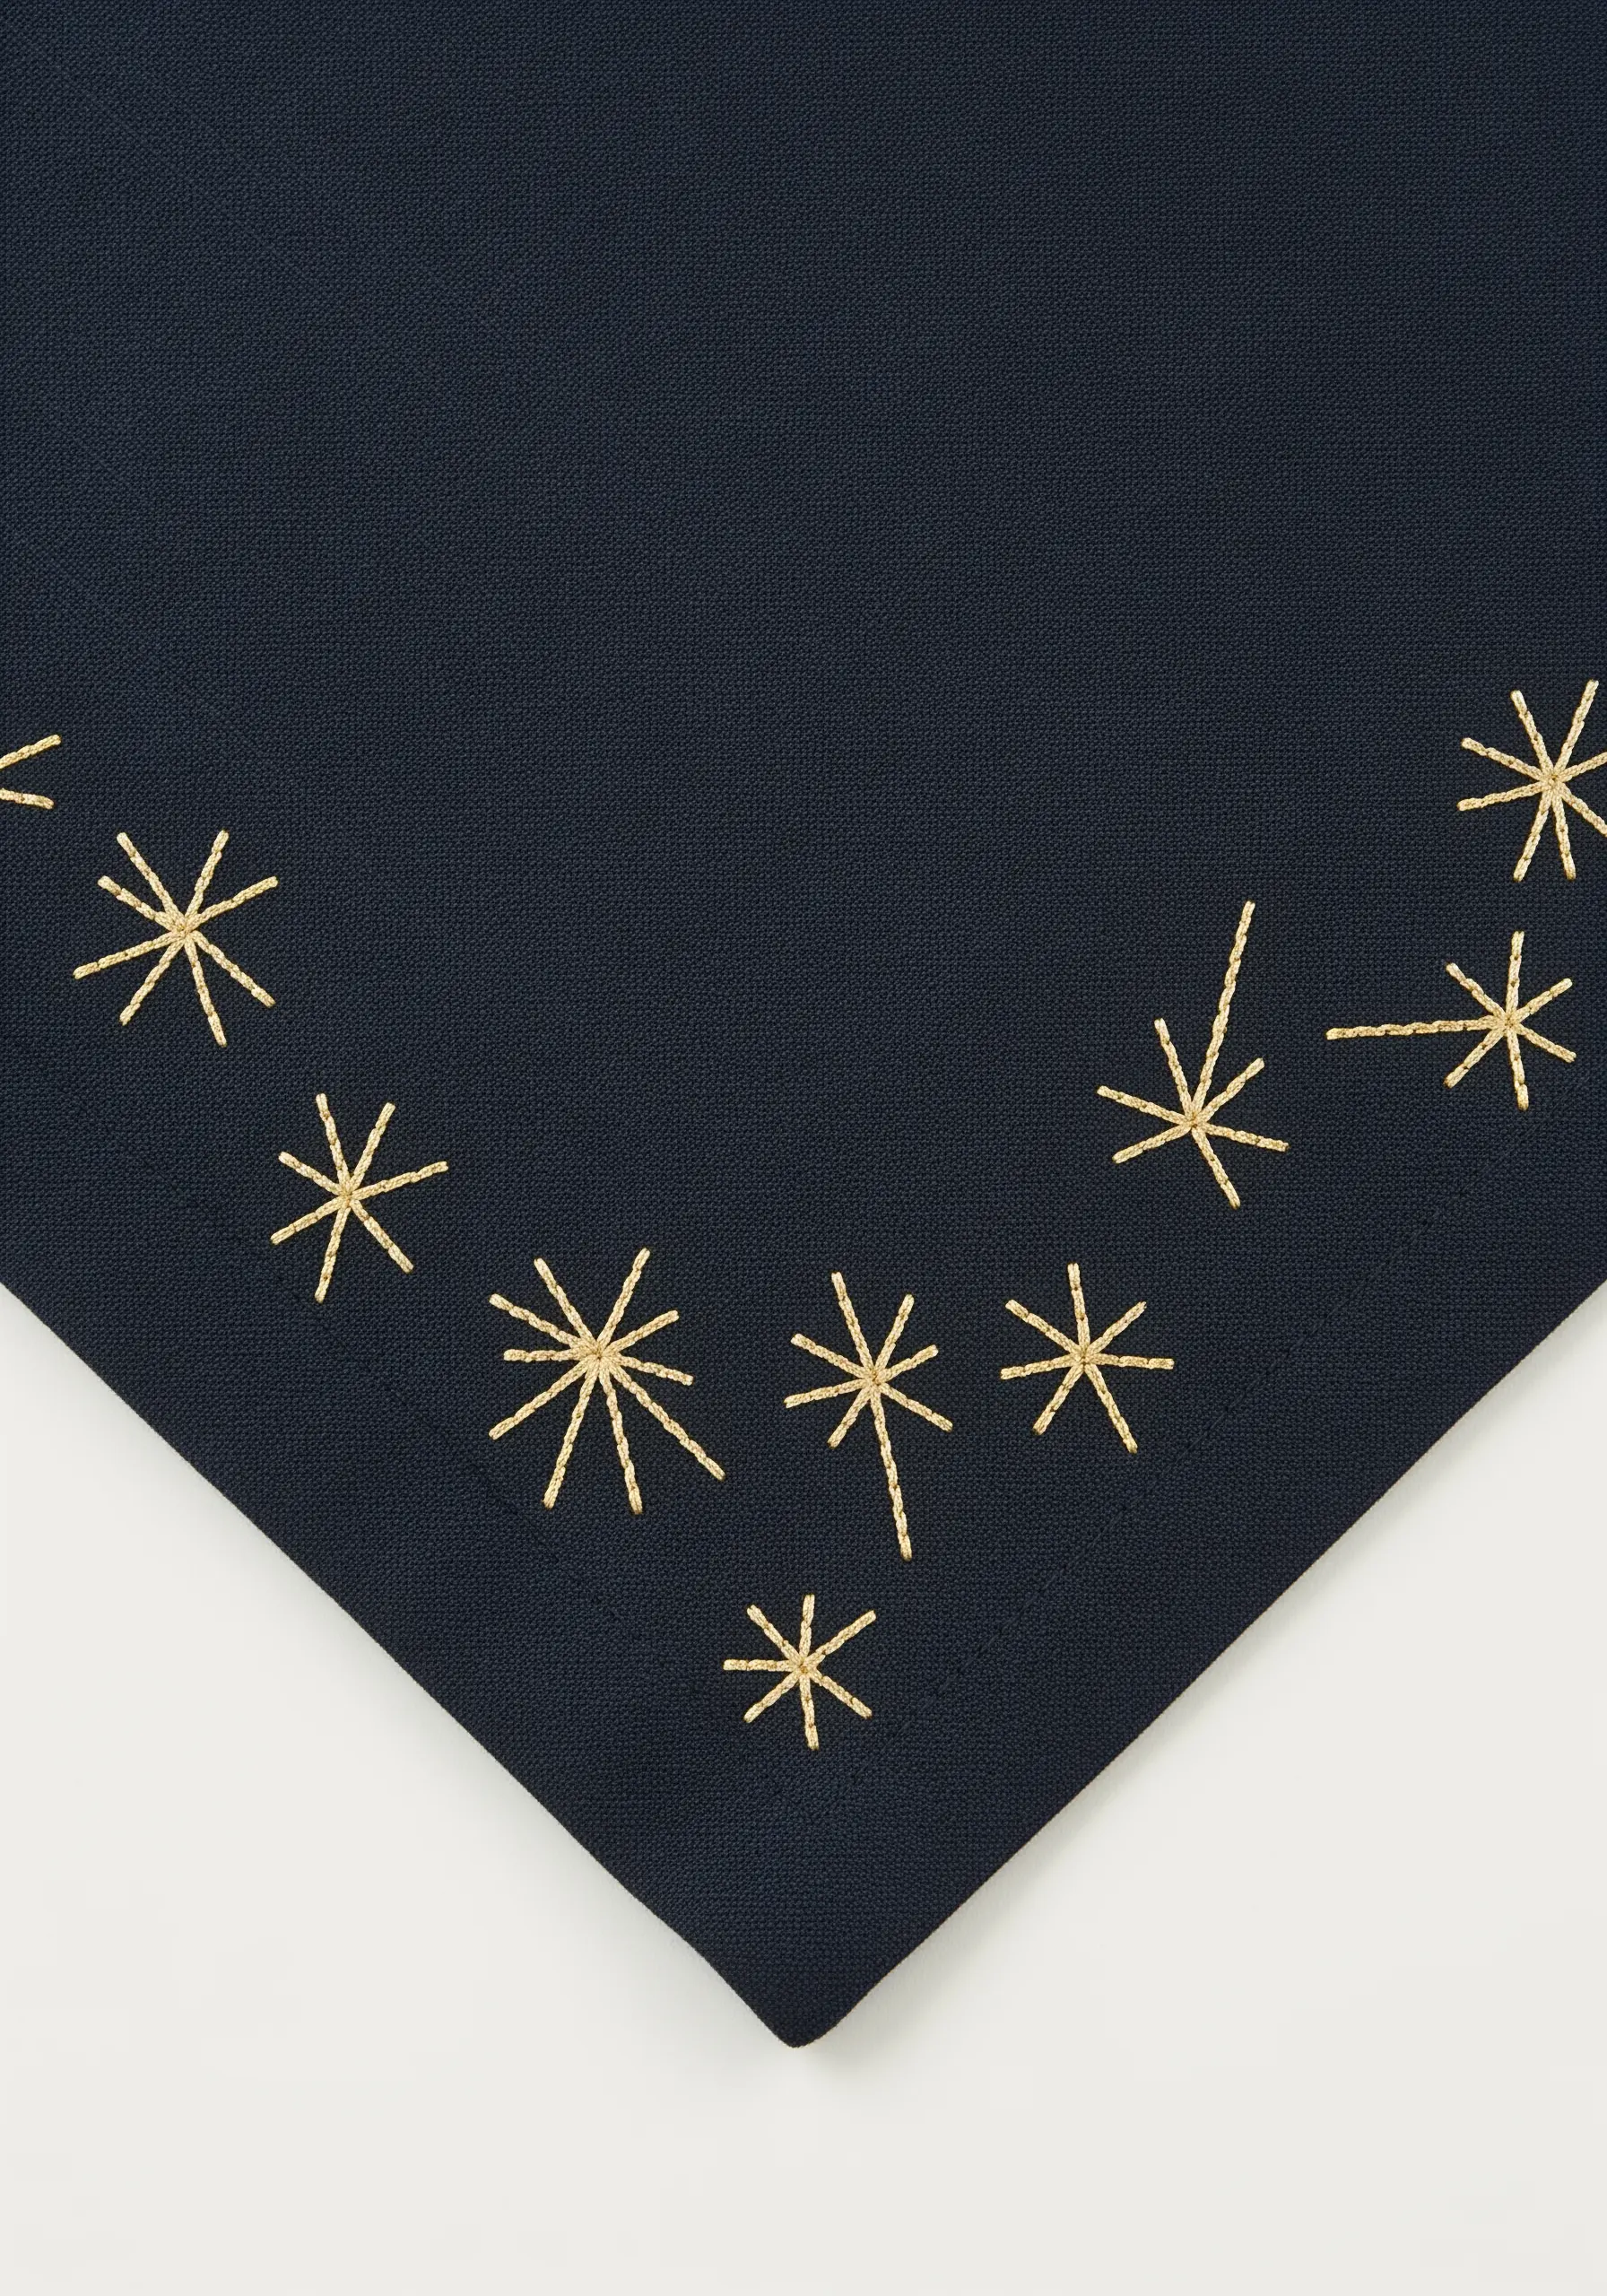
Evoke a starry night or festive sparkles with an artful arrangement of star stitches.
Instead of making every star identical, vary their size and the number of points—some can be simple four-pointed crosses, while others can have six or eight points.
Arrange them in a graceful arc, like a garland or a galaxy, to give the scattered composition a sense of purpose and flow.
Using a bright gold metallic thread on a deep navy fabric creates a classic, sophisticated holiday palette.
20. Braid a Wreath with Raised Chain Stitch
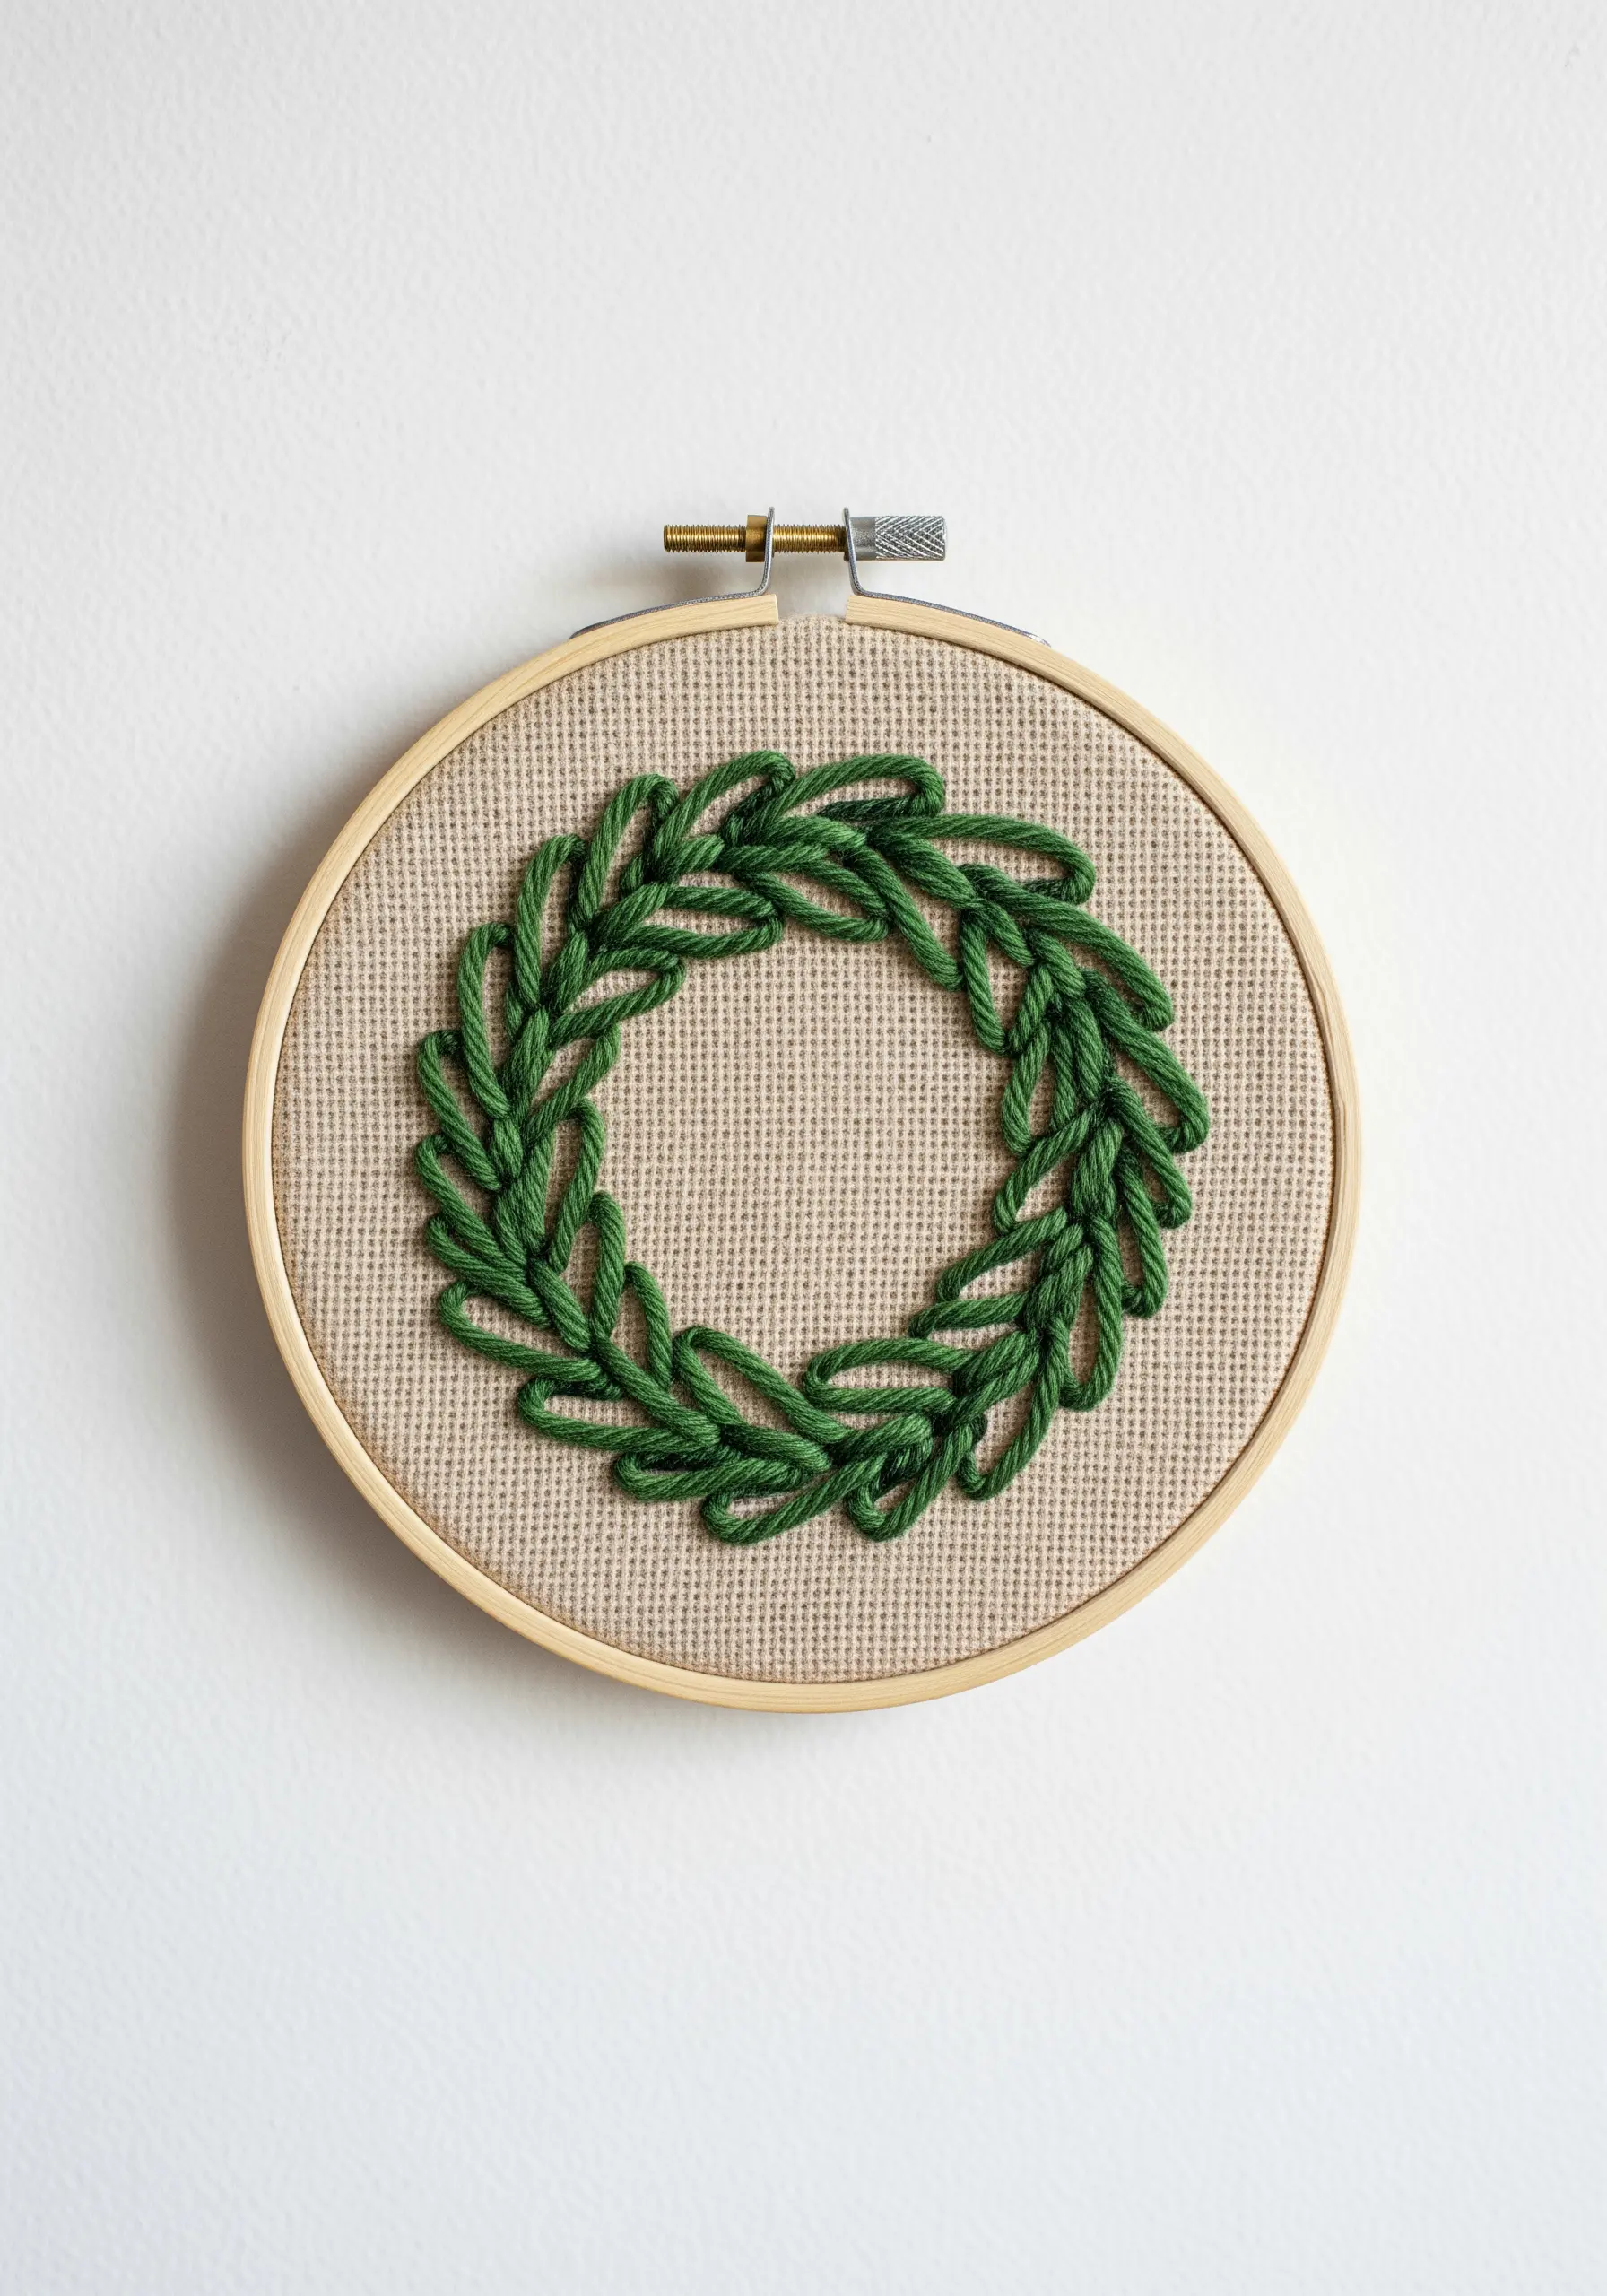
For a wreath that feels substantial and sculptural, use a raised chain stitch worked in a circle.
This stitch creates a thick, braid-like line that stands up from the fabric surface, offering incredible dimension.
Use all six strands of cotton floss or, even better, a perle cotton thread to maximize the chunky, textural effect.
The simplicity of the single green wreath on a neutral, textured fabric like linen or Aida cloth is timeless and elegant.
21. Define a Satin-Stitched Moon on Velvet

To make a satin-stitched shape truly pop on a plush fabric like velvet, you need a crisp, defined edge.
Before you begin your satin stitch, outline the entire moon shape with a tight split stitch in the same color. This creates a slightly raised border for your satin stitches to butt up against, resulting in a cleaner line.
For an even sharper edge, finish the completed satin stitch with a final outline of whipped backstitch in a contrasting color, like the silver seen here.
22. Layer a Graphic Tree on an Apron
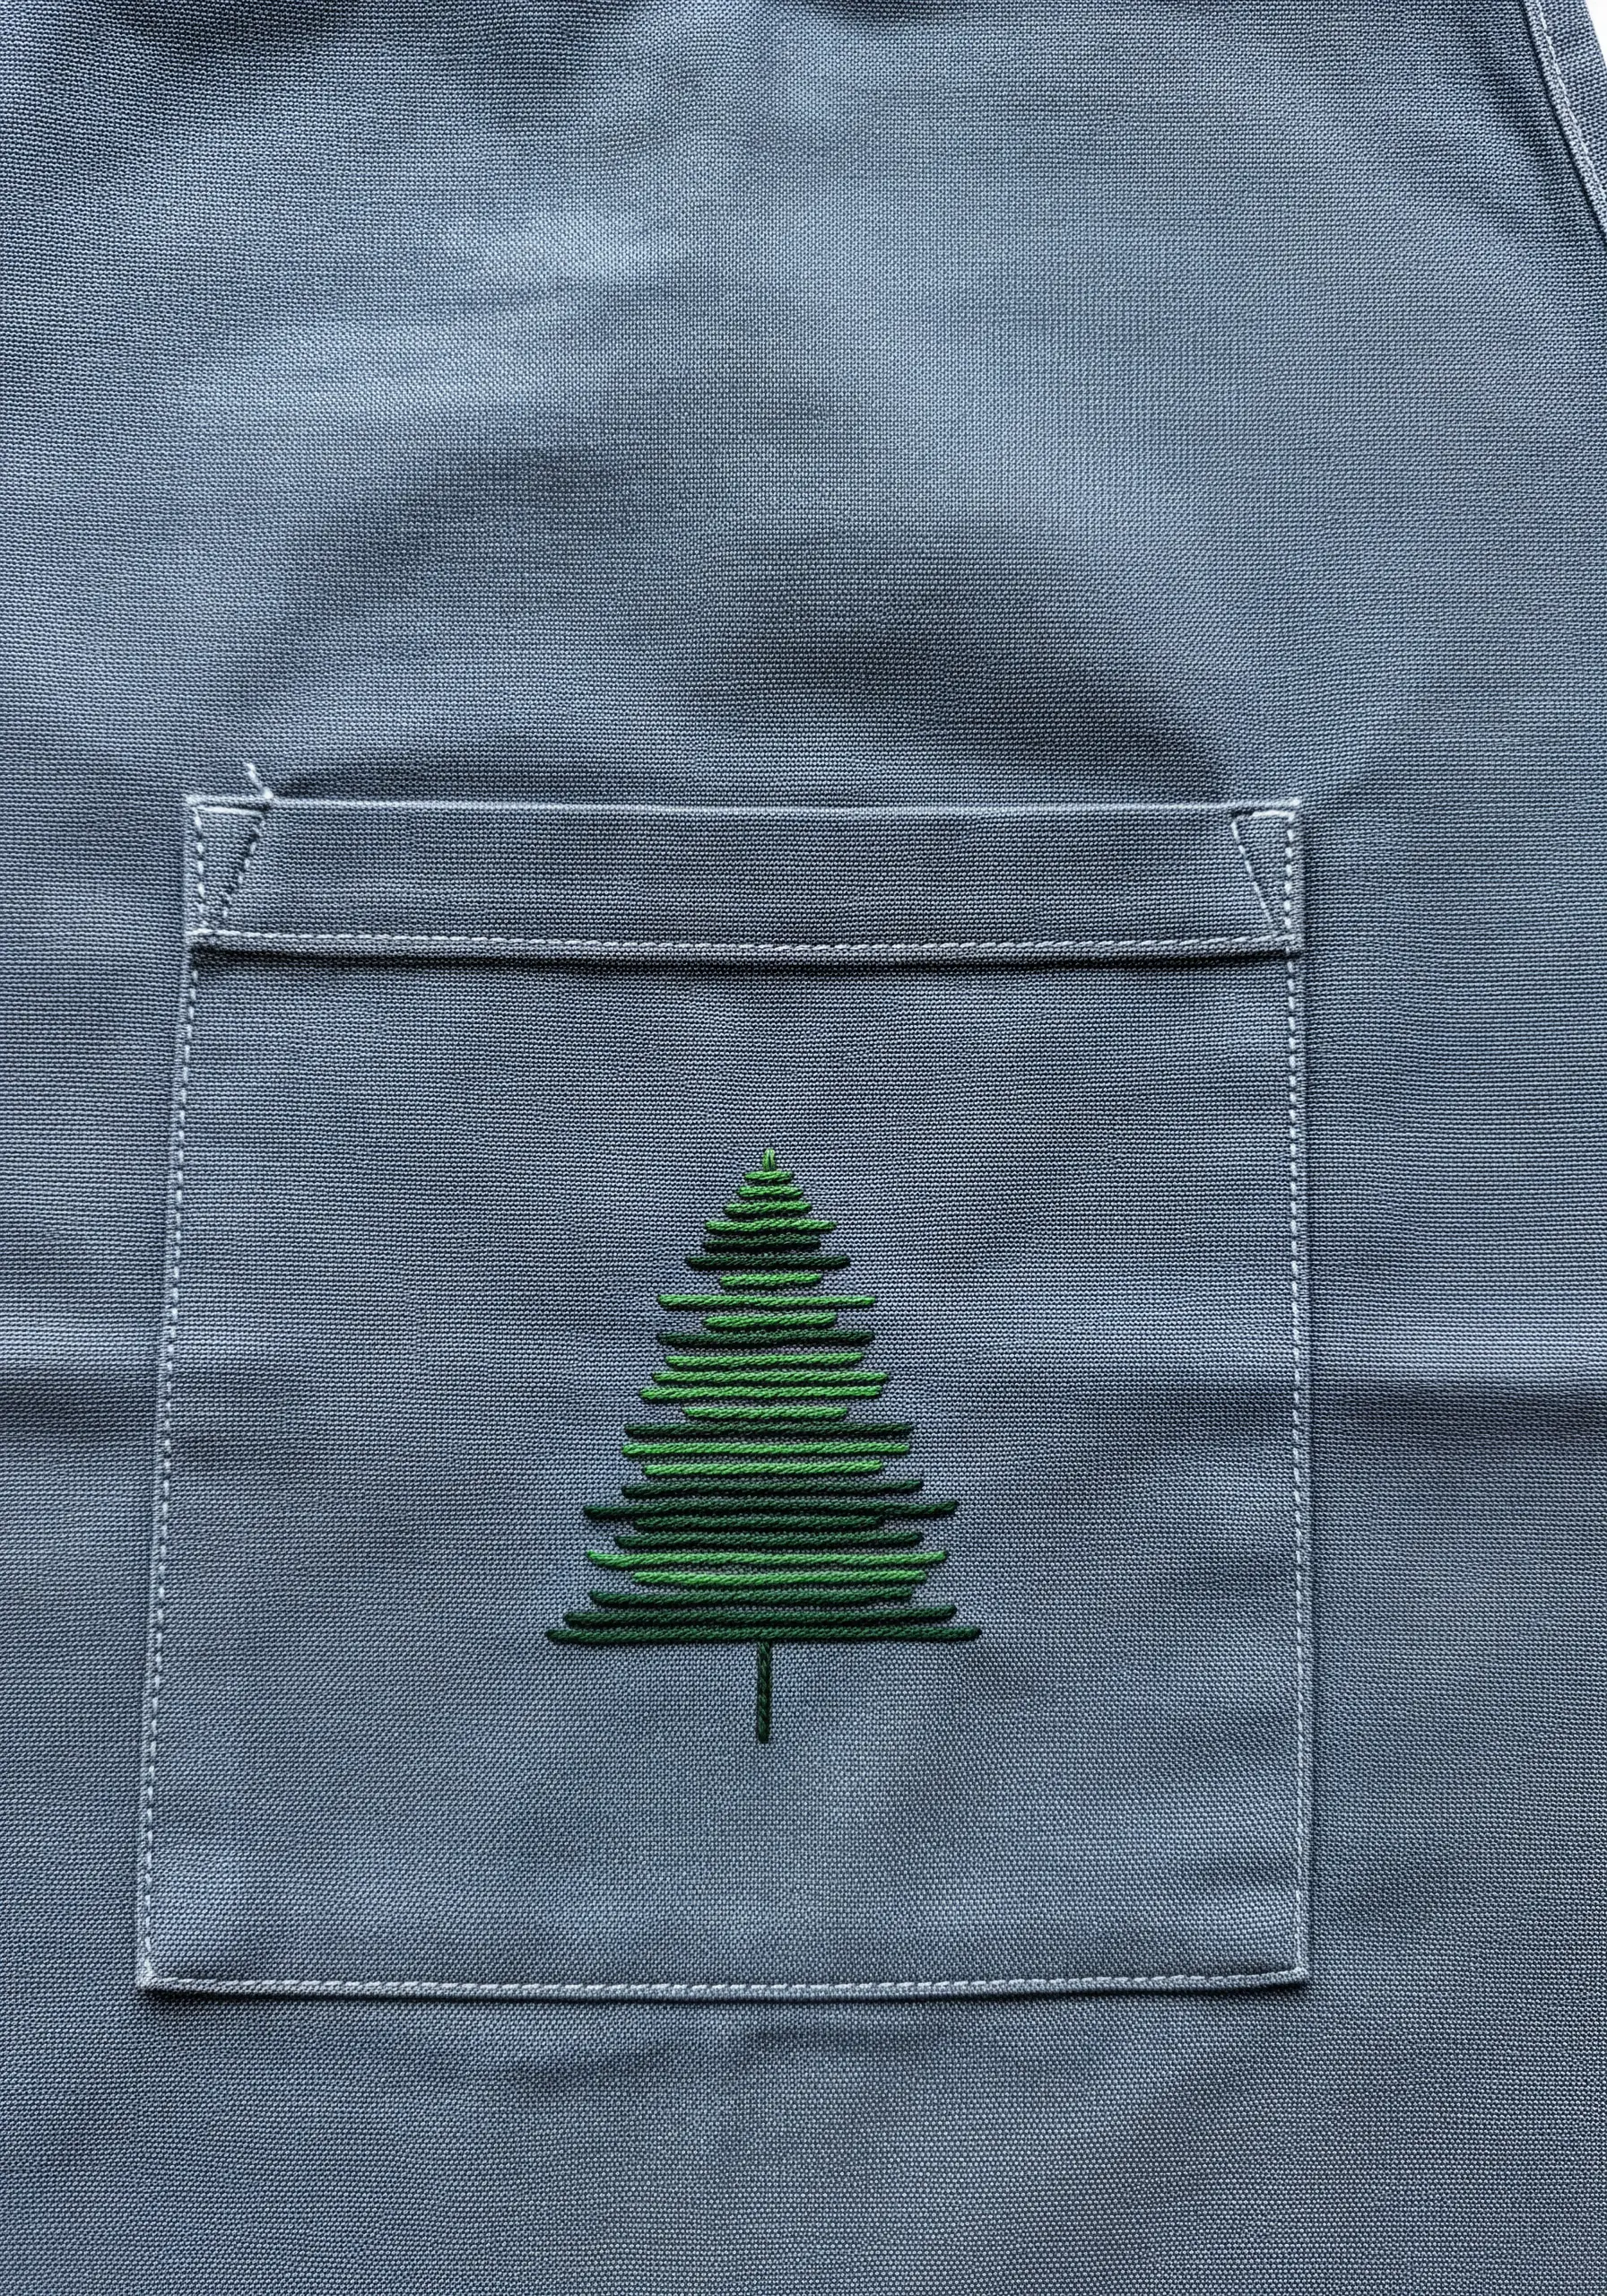
This modern tree is a perfect example of how simple, stacked shapes can create a powerful graphic motif.
The design is composed entirely of horizontal satin stitch bars that gradually decrease in length.
A single backstitched line in a contrasting dark color defines the edges and adds a clean, illustrative quality.
This type of minimal, geometric design is ideal for durable items like a kitchen apron, as it’s quick to stitch and has no delicate elements to snag.
23. Combine Appliqué with Embroidered Details

Create the illusion of a perfectly tied bow by combining fabric appliqué with delicate line embroidery.
Cut the bow shape from a contrasting fabric and secure it to your base with a neat, tight satin stitch border. This gives the shape a clean, finished edge.
Then, use a single strand of thread in a darker shade to add the folds and creases with simple straight stitches, giving the flat fabric piece the illusion of depth and movement.
24. Explore Abstract Thread Sculpture

Embroidery doesn’t always have to be pictorial; it can be a purely abstract exploration of line and tension.
Stretch a layer of sheer organza in a hoop and simply wrap your thread from one side to the other, creating an intersecting web of lines.
Play with different thread weights and colors, layering them to build up density and create a sense of depth.
This technique is less about specific stitches and more about composition, turning the hoop itself into a minimalist art object.
25. Sketch a Cozy Moment with Thread
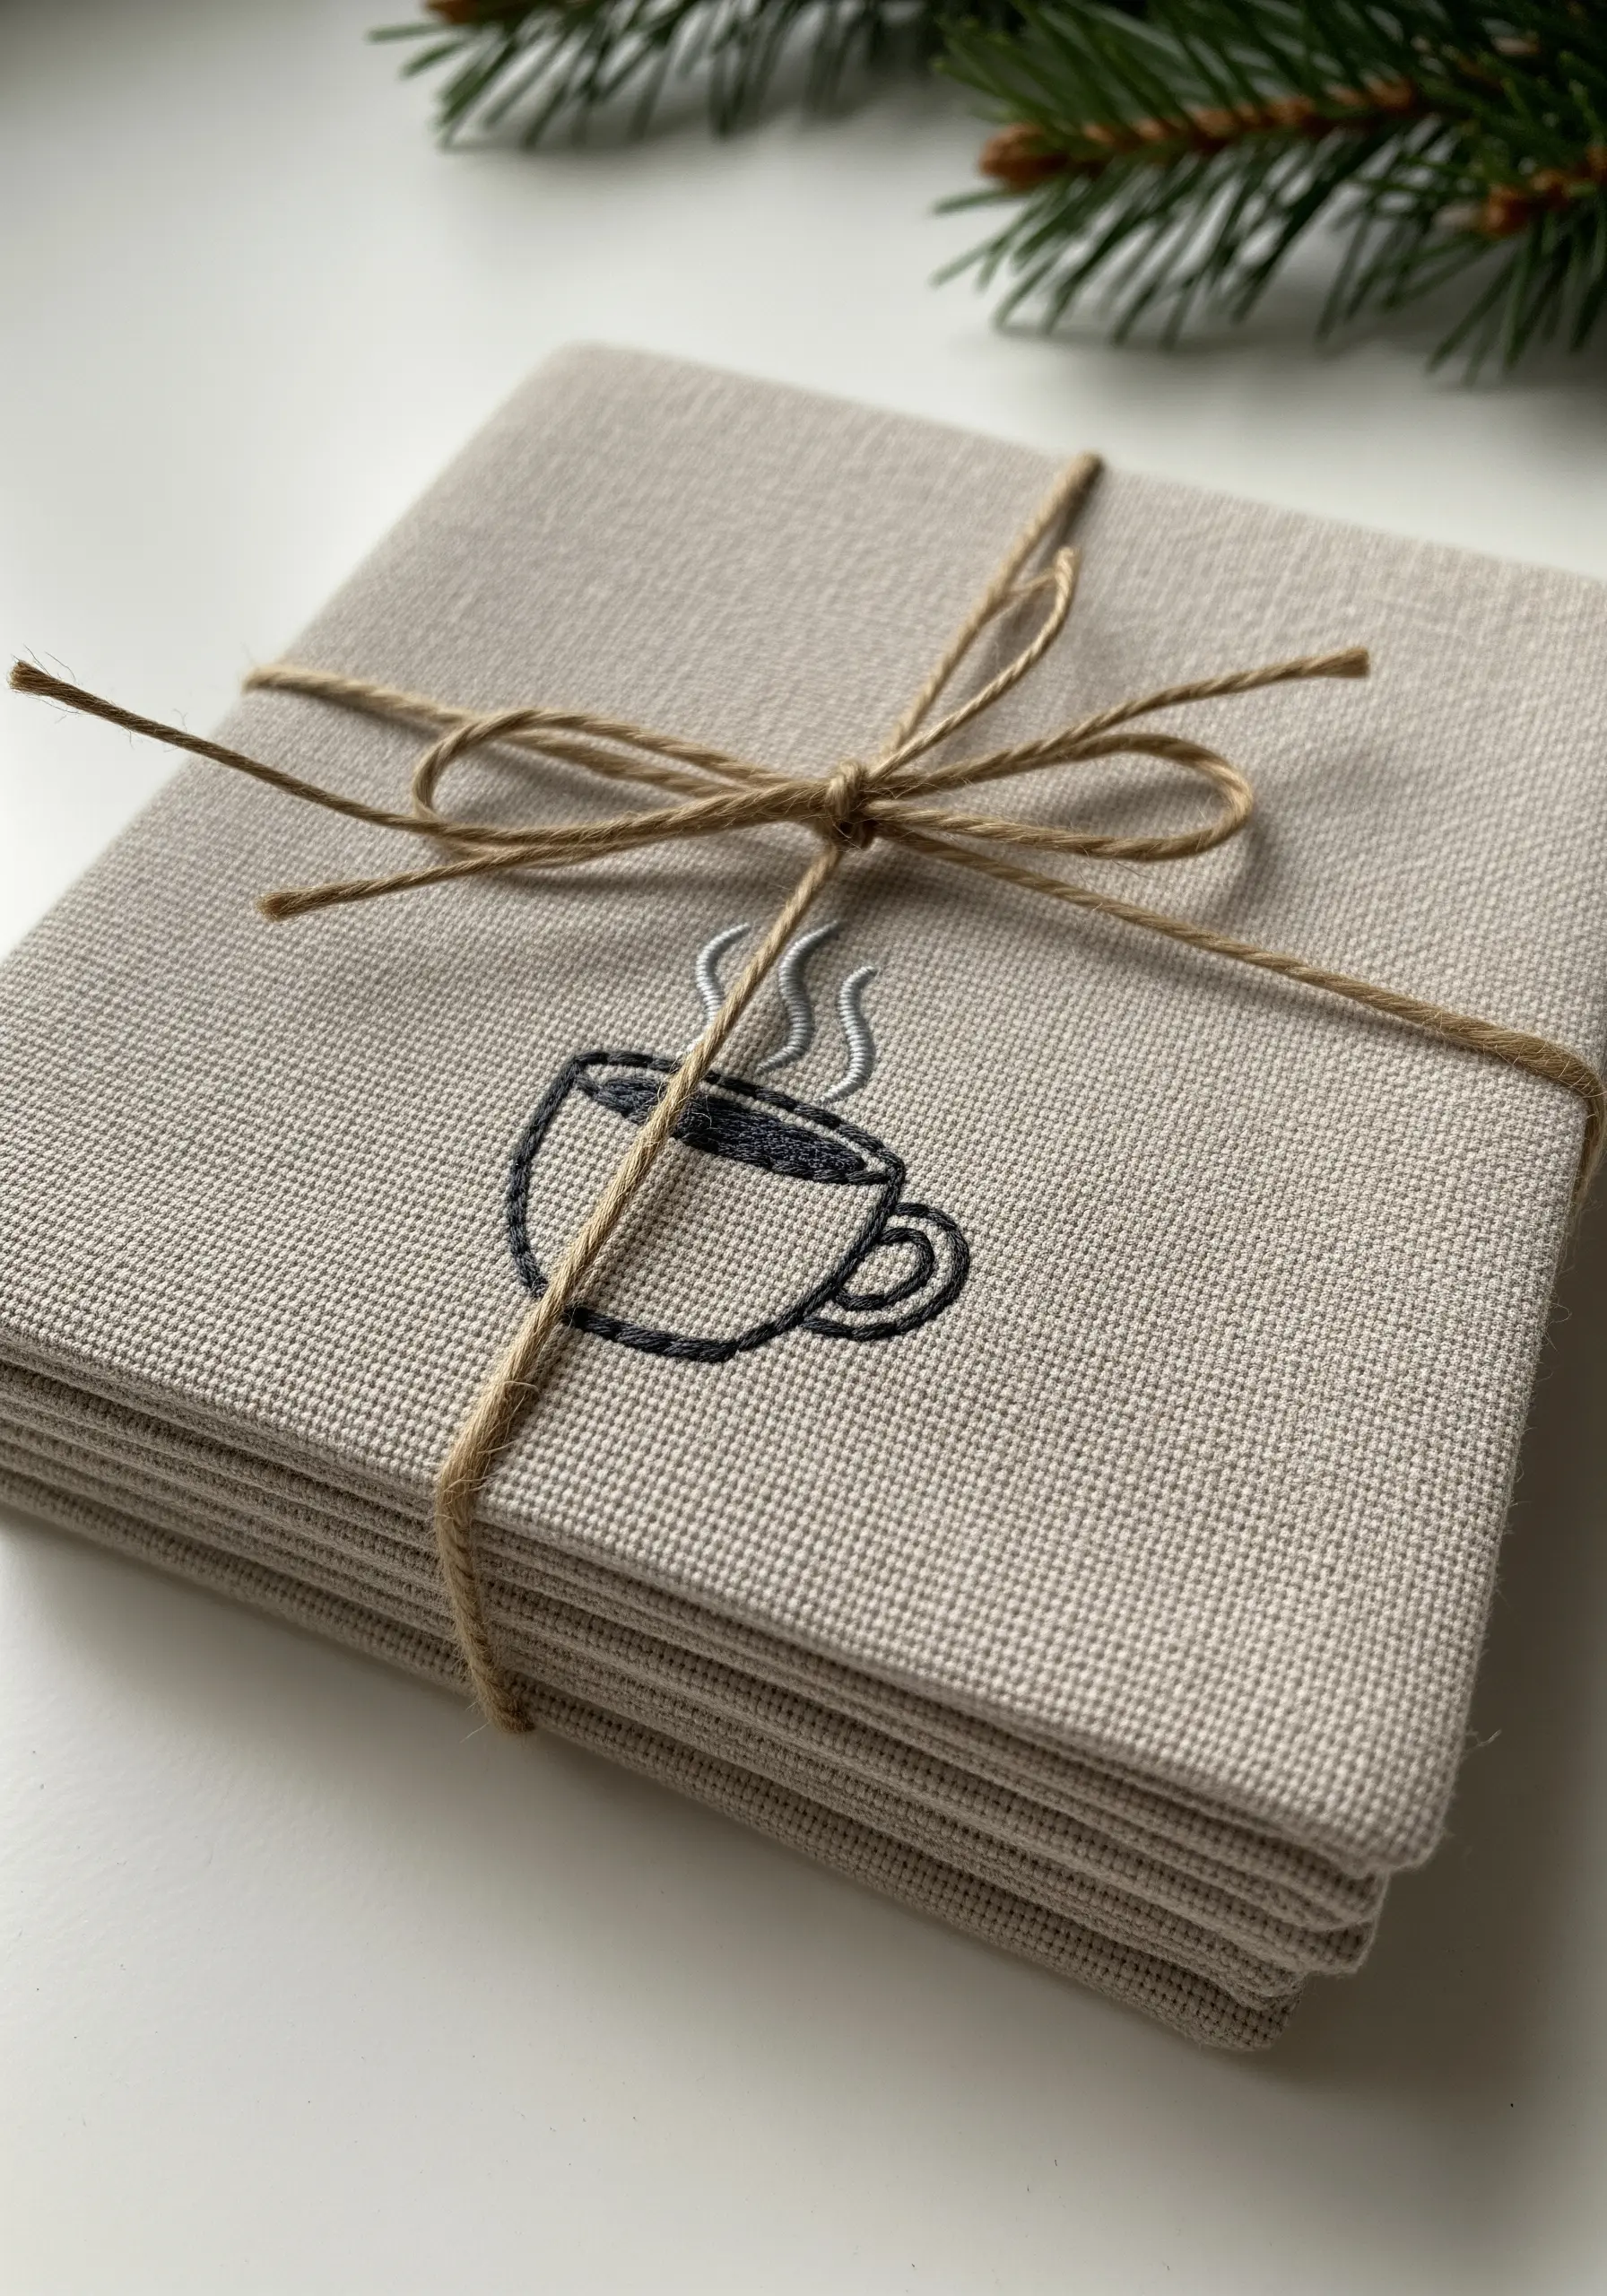
Sometimes the simplest motifs carry the most warmth. A quick sketch of a coffee cup is universally cozy.
Use a basic backstitch with three or four strands of floss to give the outline a satisfying weight.
For the steam, switch to a lighter, wavier stitch like a Pekinese stitch or simple, curved straight stitches using a lighter weight thread.
This is a perfect design for a set of linen coasters—a thoughtful and practical handmade gift.
26. Stitch a Feather with Fishbone Stitch
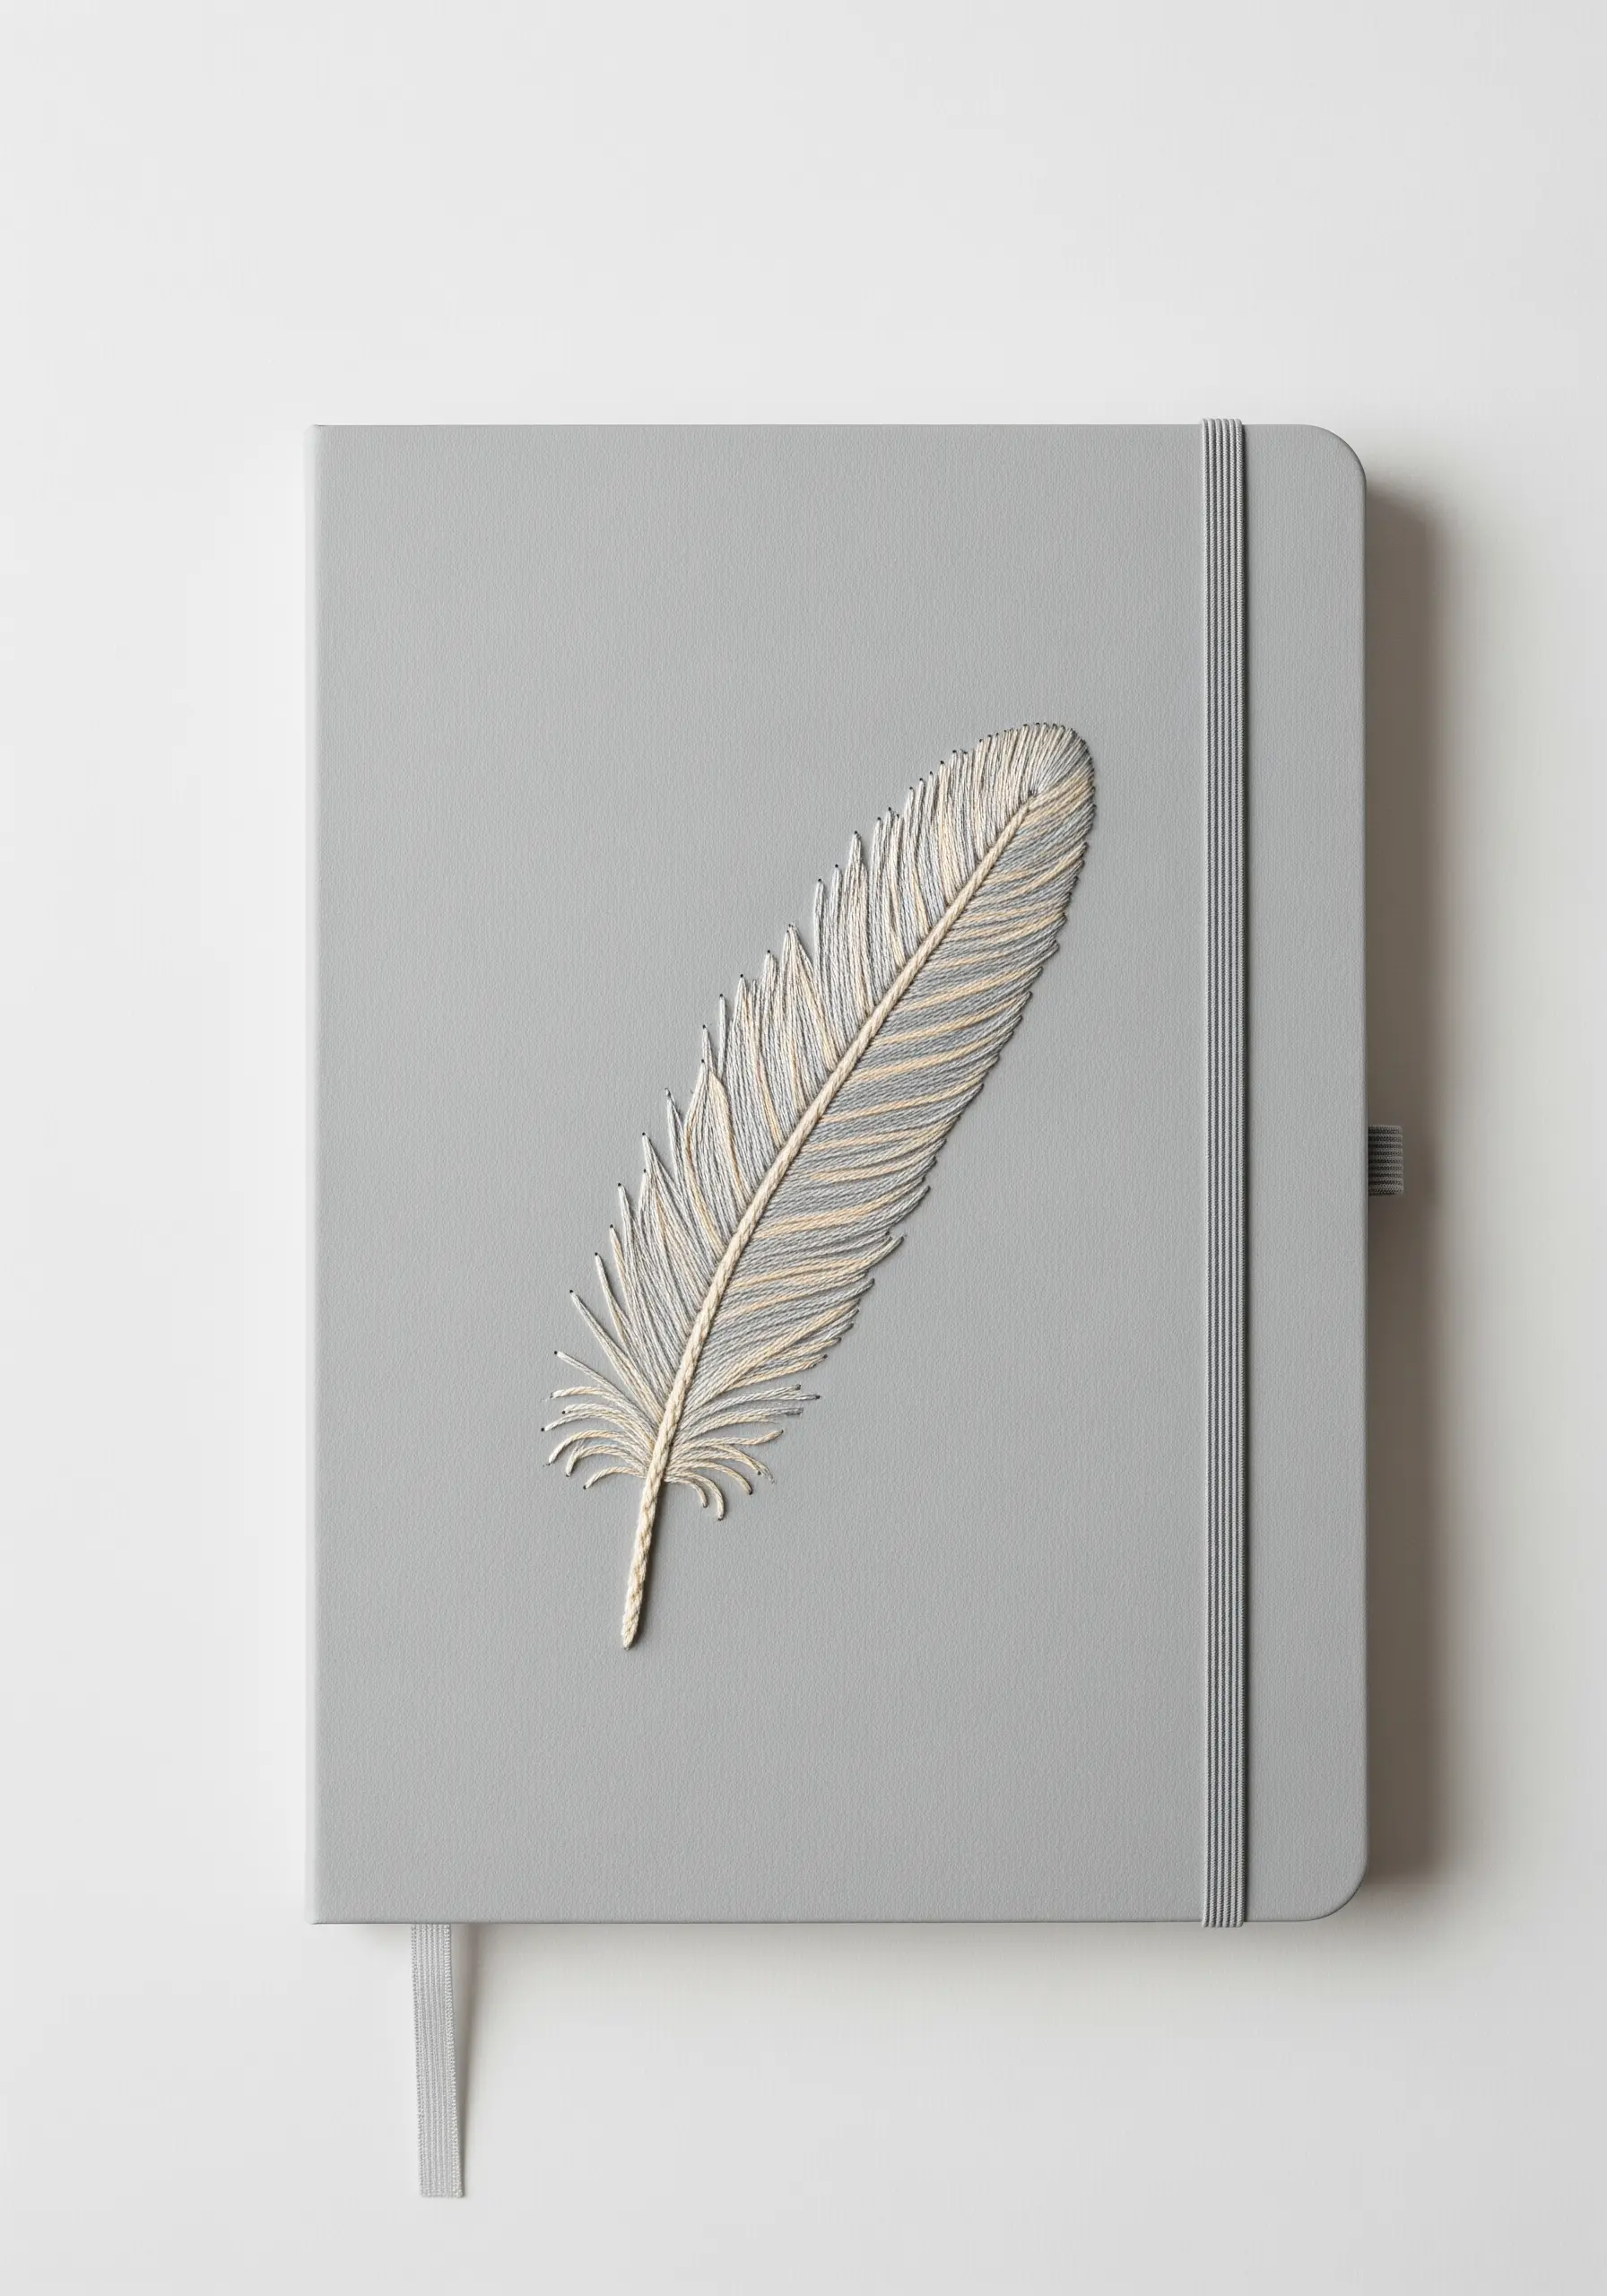
The fishbone stitch is perfectly suited for creating natural forms like leaves and feathers, as it creates a central spine and angled sides all in one motion.
To achieve a soft, realistic look, use a variegated thread or hold two different shades of floss together in your needle.
As you stitch, the colors will blend randomly, creating subtle shifts in tone that mimic natural iridescence.
A whipped backstitch along the central shaft adds a final, defined touch to the delicate form.
27. Achieve Flawless Embroidered Lettering
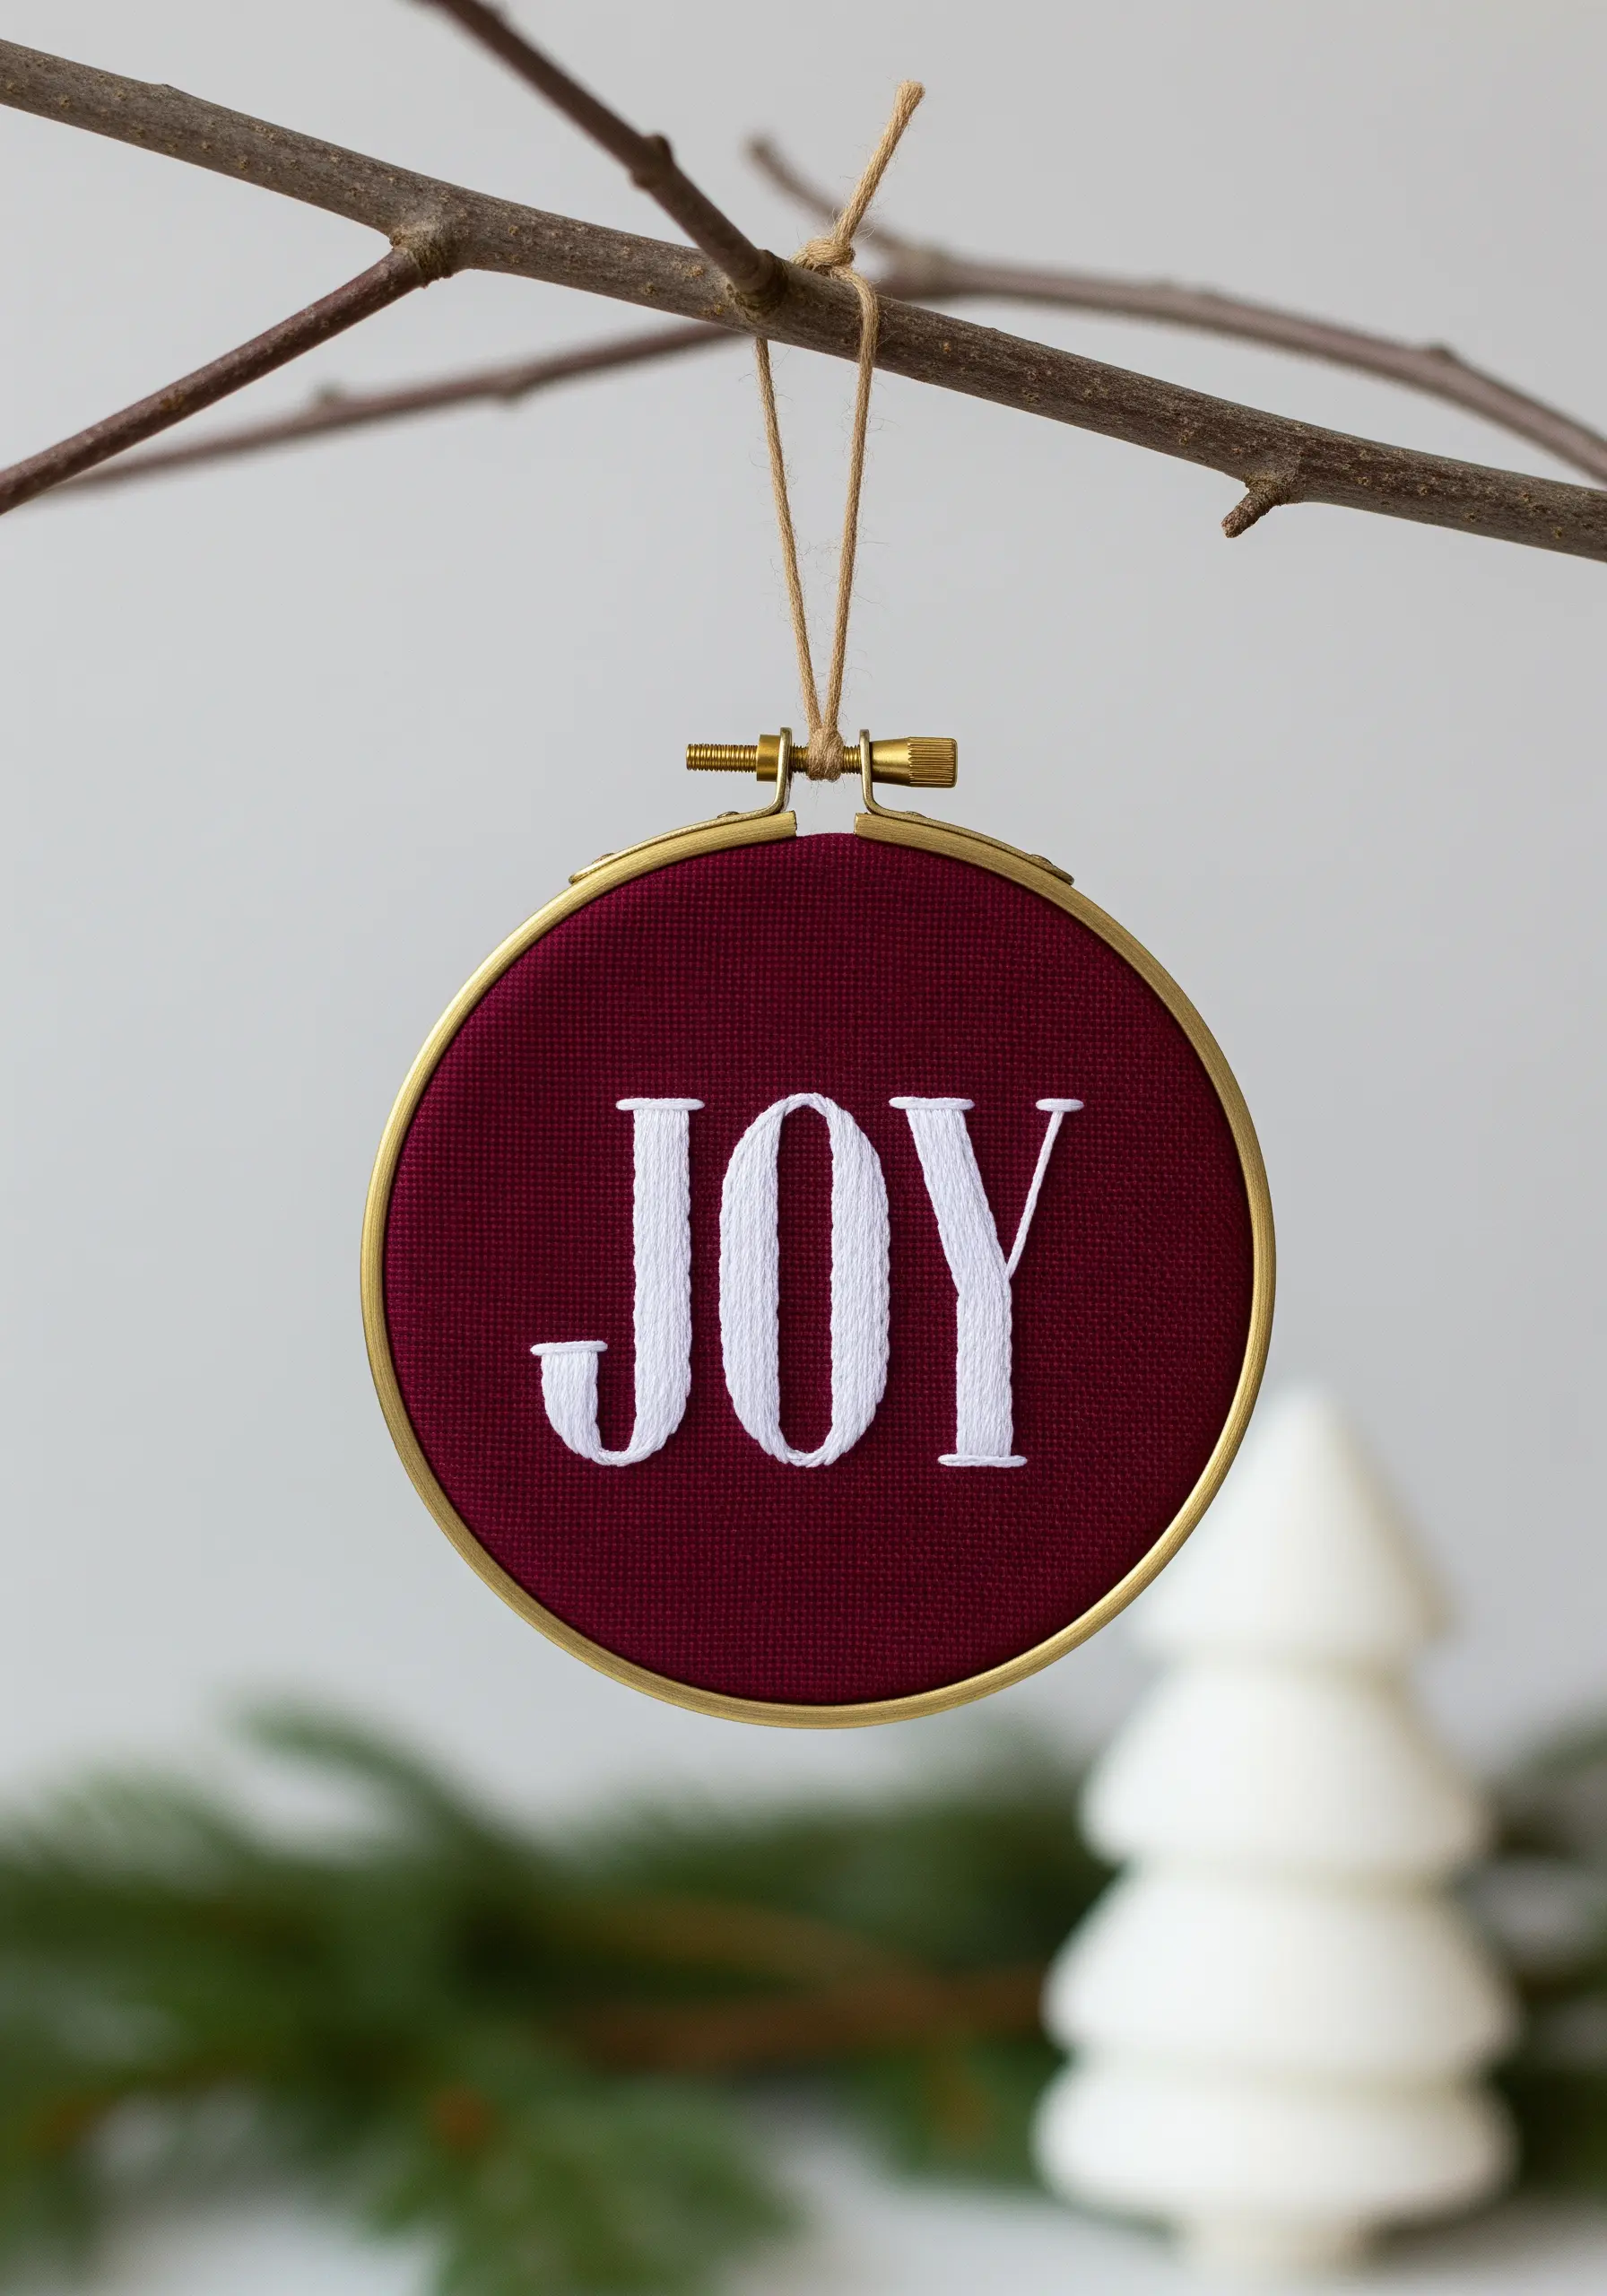
For bold, beautiful embroidered text, a perfect satin stitch is essential—and the secret is in the preparation.
First, trace your letters and outline them completely with a tight split stitch. This creates a raised, padded foundation.
Then, work your satin stitches over this foundation, keeping them perpendicular to the main direction of the letter segment.
The split stitch underlay not only adds dimension but also gives you a firm edge to tuck your satin stitches into, ensuring they are perfectly smooth and uniform.
28. Add Texture to an Acorn Cap

When embroidering on a thick or fluffy fabric like fleece, you need bold textures to stand out.
Fill the main body of the acorn with a smooth satin stitch, which will contrast nicely with the fabric’s texture.
For the cap, first lay down a base of horizontal satin stitches. Then, stitch a grid of vertical and horizontal straight stitches over the top to create a crosshatch pattern.
A clean backstitch outline contains all the elements and defines the shape against the soft background.


