
There is a unique satisfaction that comes from creating something beautiful with your own hands, especially when you start with the simplest of materials. You don’t need expensive supplies or complicated tools to make something that feels intentional, artistic, and deeply personal.
The real magic lies not in what you use, but in how you use it. It’s about seeing the potential for a sculpture in a glass bottle, a landscape in a pile of fabric scraps, or a delicate ornament in a fallen leaf. It’s about transforming the mundane into the meaningful through texture, form, and a touch of imagination.
This collection is an invitation to look at the everyday world around you with new eyes. Let it inspire you to pick up that needle, that ball of yarn, or that piece of paper and see where it can take you. You have everything you need to begin right now.
1. Transform Glass Bottles with Thread and Jute

Begin by wrapping a clean, empty glass bottle with natural jute twine, securing the start and end points with a strong craft glue.
To create the graphic color-blocked sections, switch from jute to thick embroidery floss or colored yarn.
Wrap the thread tightly, ensuring each new loop sits snugly against the last to create a solid, opaque band of color.
The key to a clean finish is to tuck the thread ends securely underneath the wraps, creating a seamless transition that contrasts beautifully with the rustic texture of the jute.
2. Weave a Textural Wall Hanging with Roving and Scrap Yarns
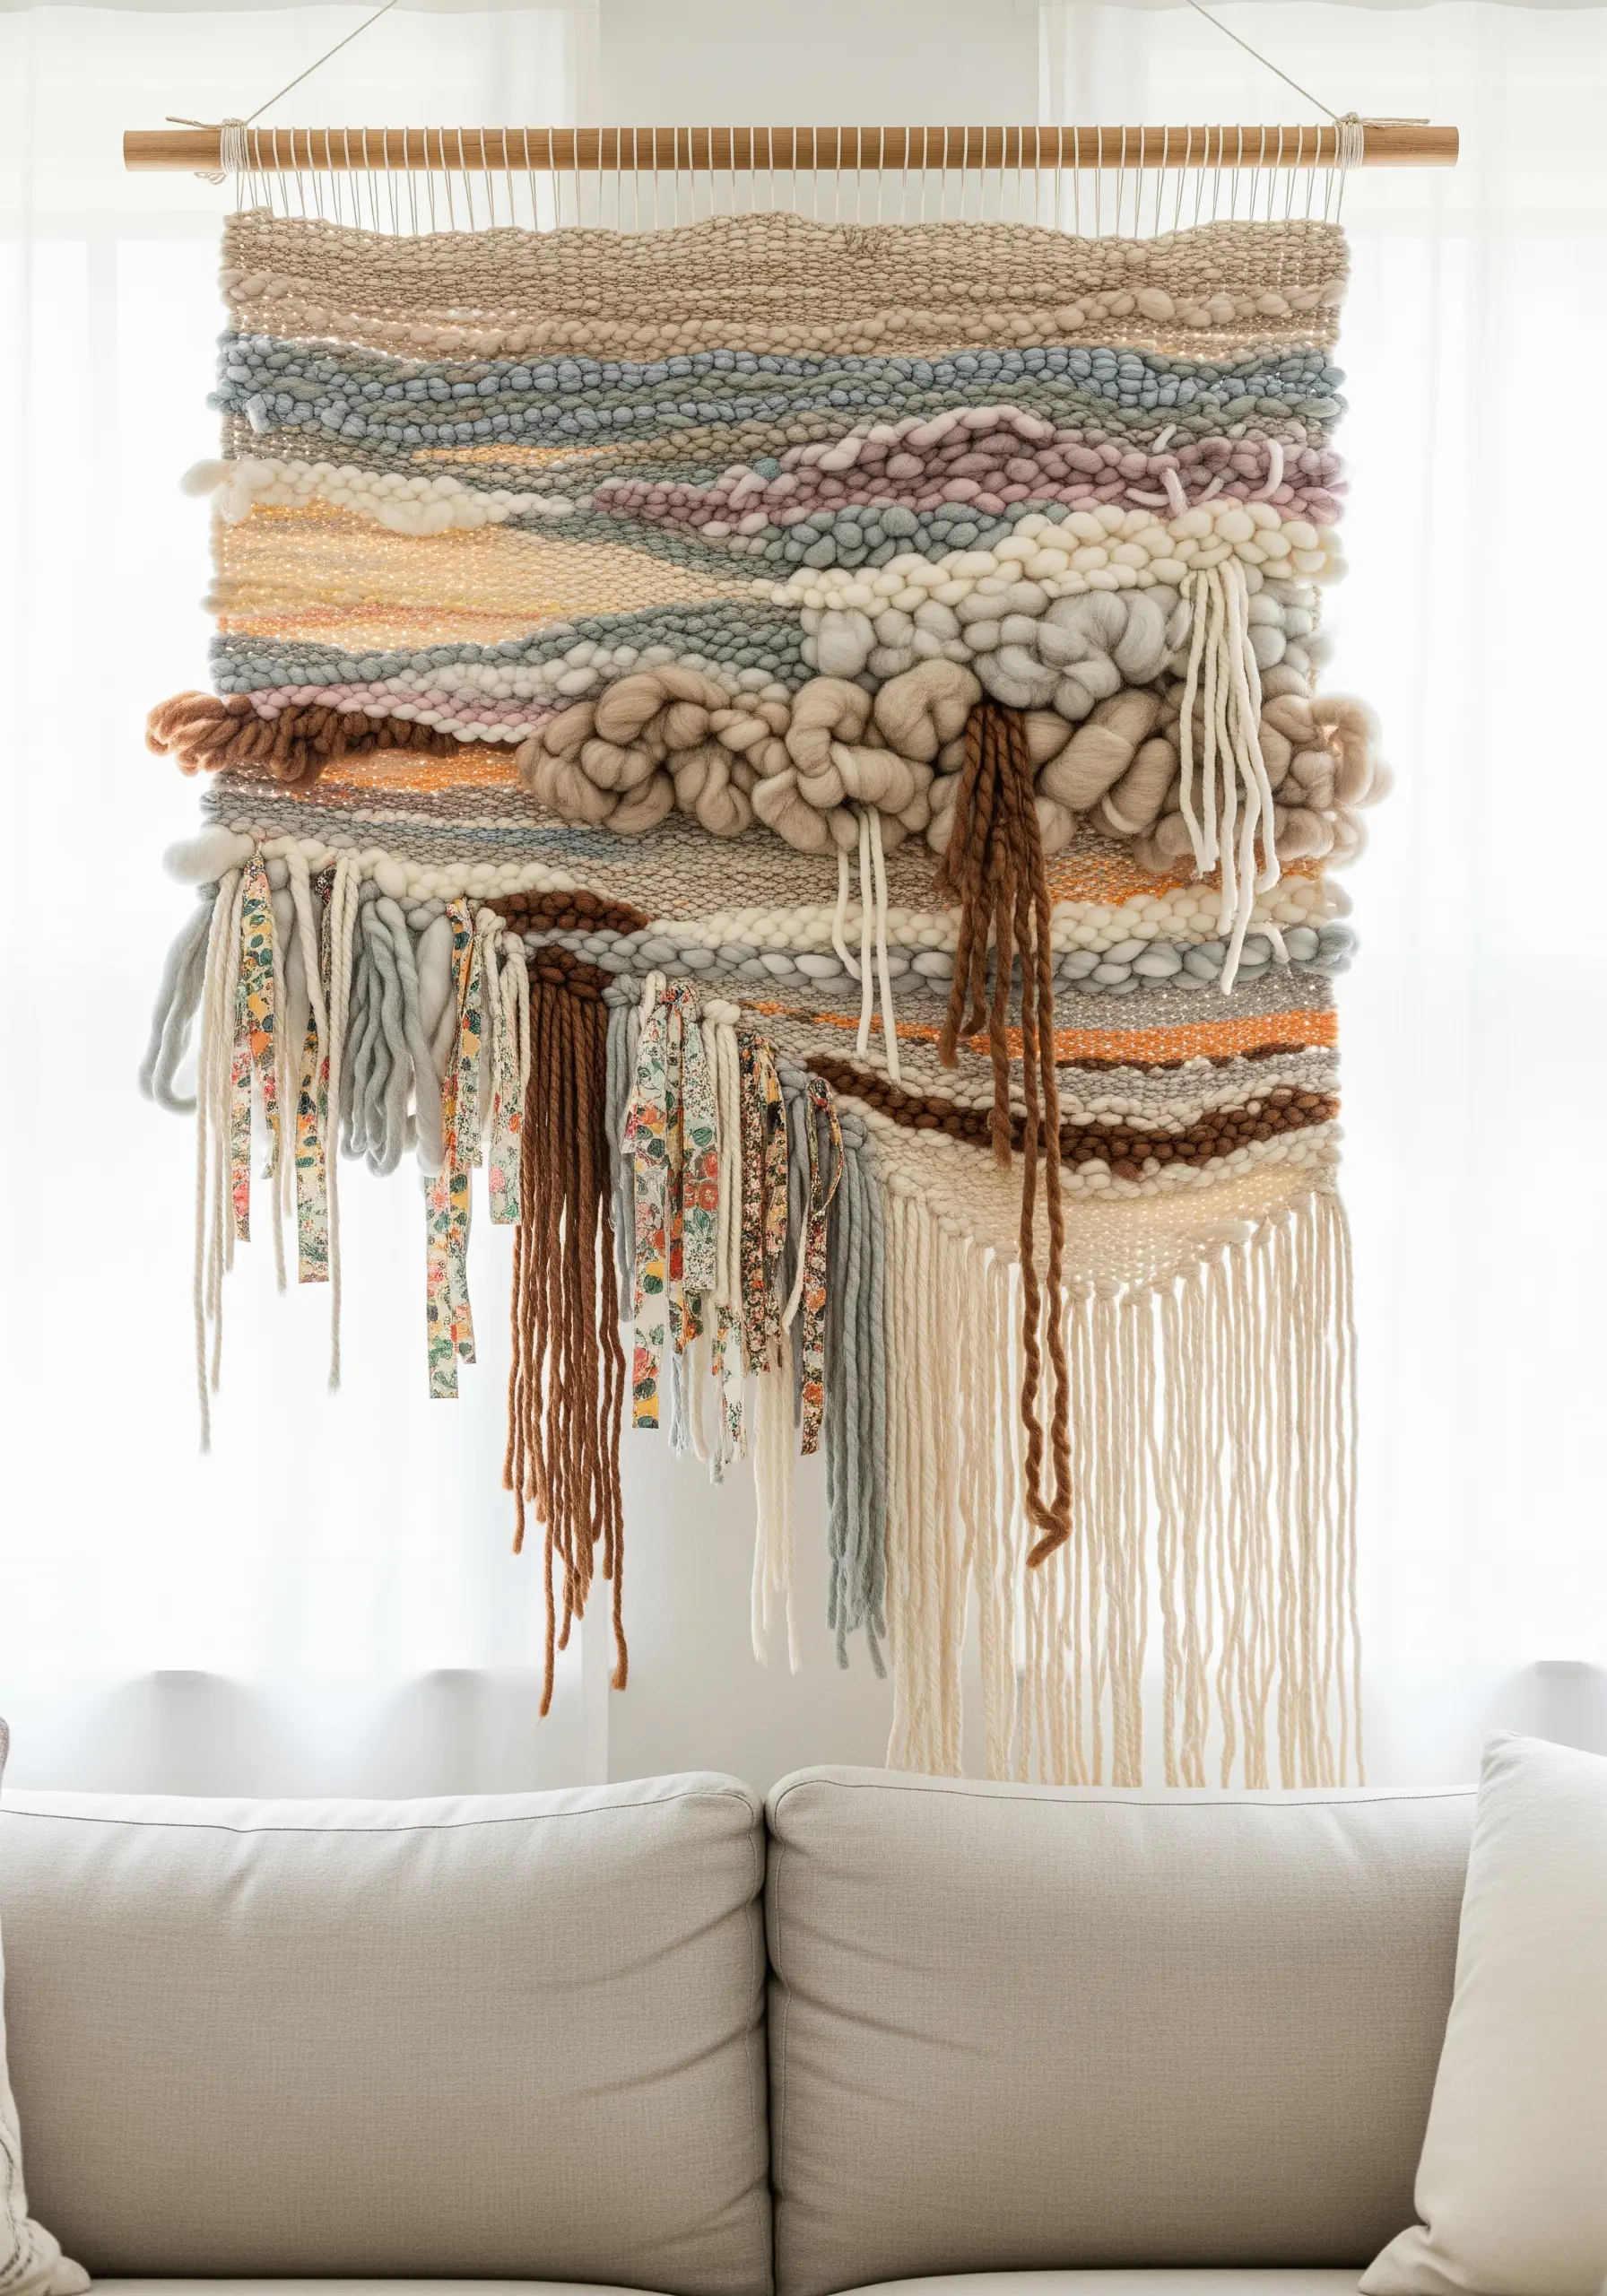
Create dramatic visual weight in your weavings by incorporating thick, unspun wool roving alongside standard yarns.
Use techniques like soumak stitch or simple loops to build highly textured, three-dimensional areas that feel soft and cloud-like.
Contrast these voluminous sections with tightly woven, flat areas to create a dynamic visual rhythm.
Integrate thin strips of scrap fabric or silk ribbons into your weaving for an unexpected touch of pattern and sheen, turning your piece into one of the most stunning mixed-fiber wall hangings you can make.
3. Create Embroidered “Worry Stones” with Felt and Thread
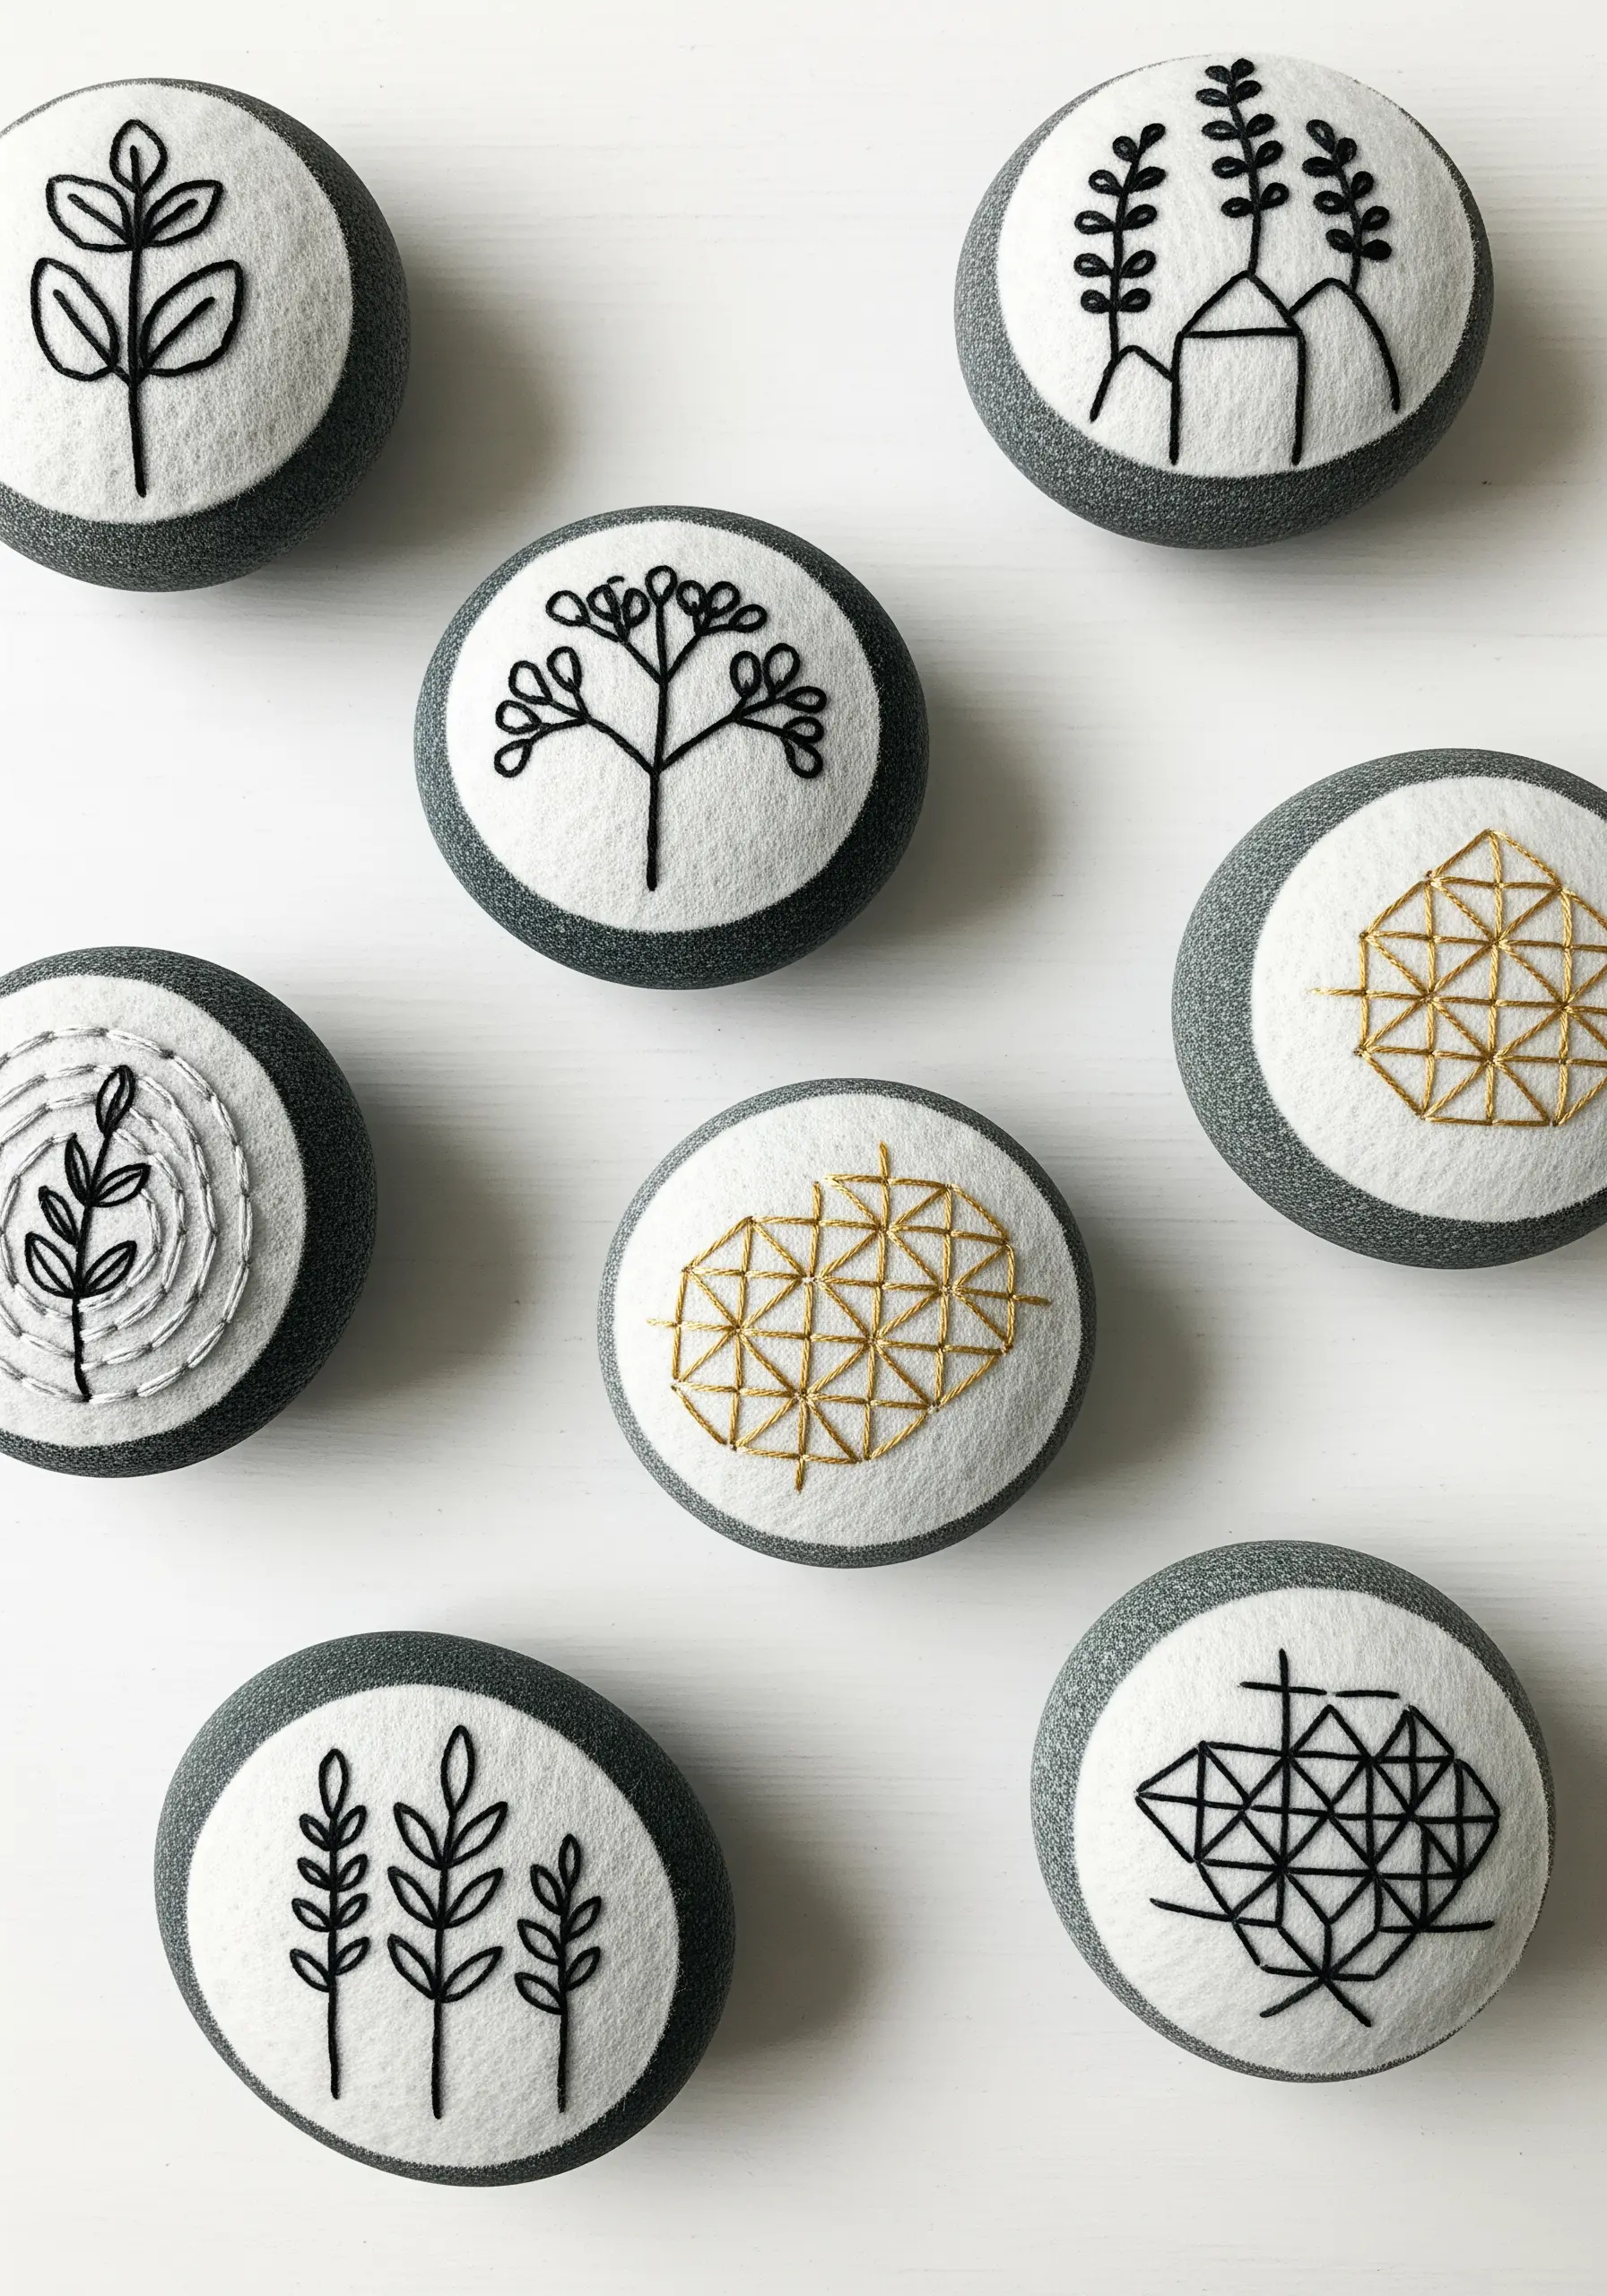
Transform a simple stone into a tactile art object by covering it with a circle of soft felt, pulled taut and secured on the underside with hot glue.
This creates a perfect, miniature canvas for embroidery that is both soft to the touch and structurally sound.
Use three strands of black cotton floss and a simple backstitch to create clean, graphic botanical or geometric motifs.
The contrast between the hard, heavy stone and the soft, stitched felt makes these pieces uniquely satisfying to hold and observe.
4. Craft a Papier-Mâché Vessel with a Gilded Edge
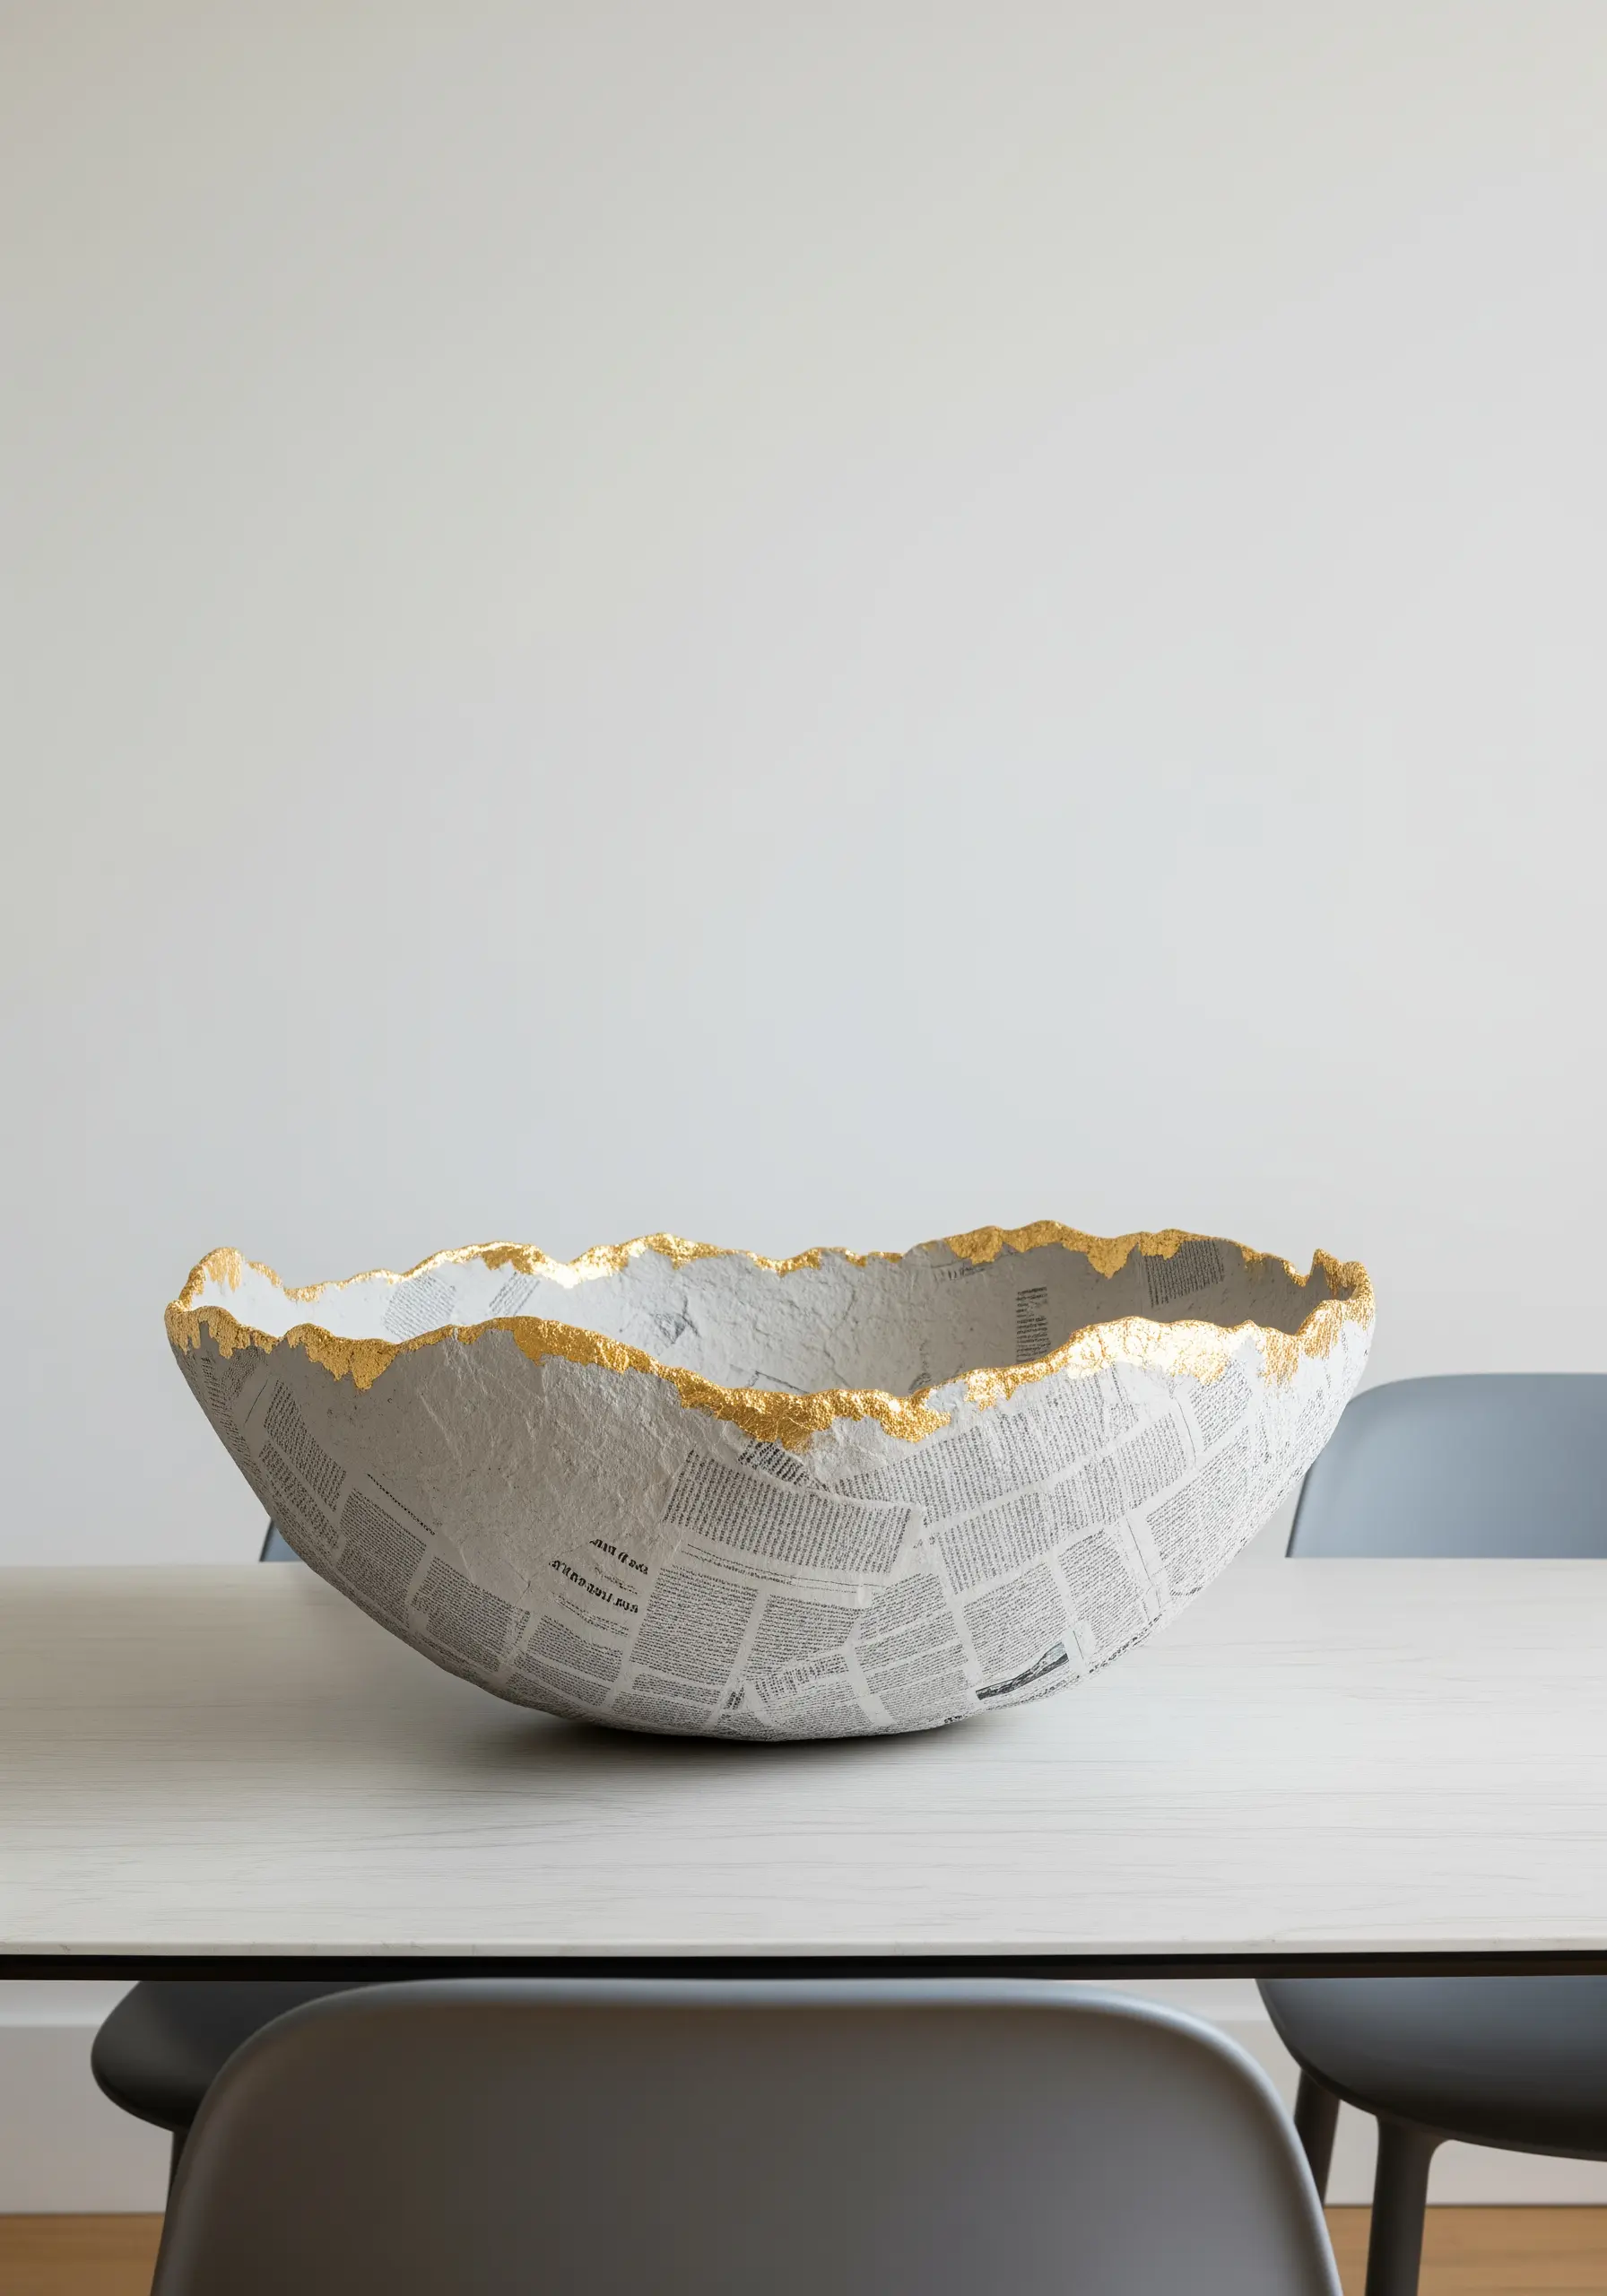
Elevate humble newspaper by crafting a large, organic-shaped bowl using the classic papier-mâché technique.
Use a large balloon or an existing bowl as a mold, layering strips of newspaper dipped in a flour-and-water paste until you have a thick, sturdy shell.
Once fully dry, paint the vessel a matte white or light gray, allowing hints of the newspaper text to subtly show through for added texture.
Apply gold leaf to the uneven rim using adhesive sizing for a final touch of luxury that contrasts beautifully with the raw paper material.
5. Fashion Intricate Lanterns from Upcycled Tin Cans
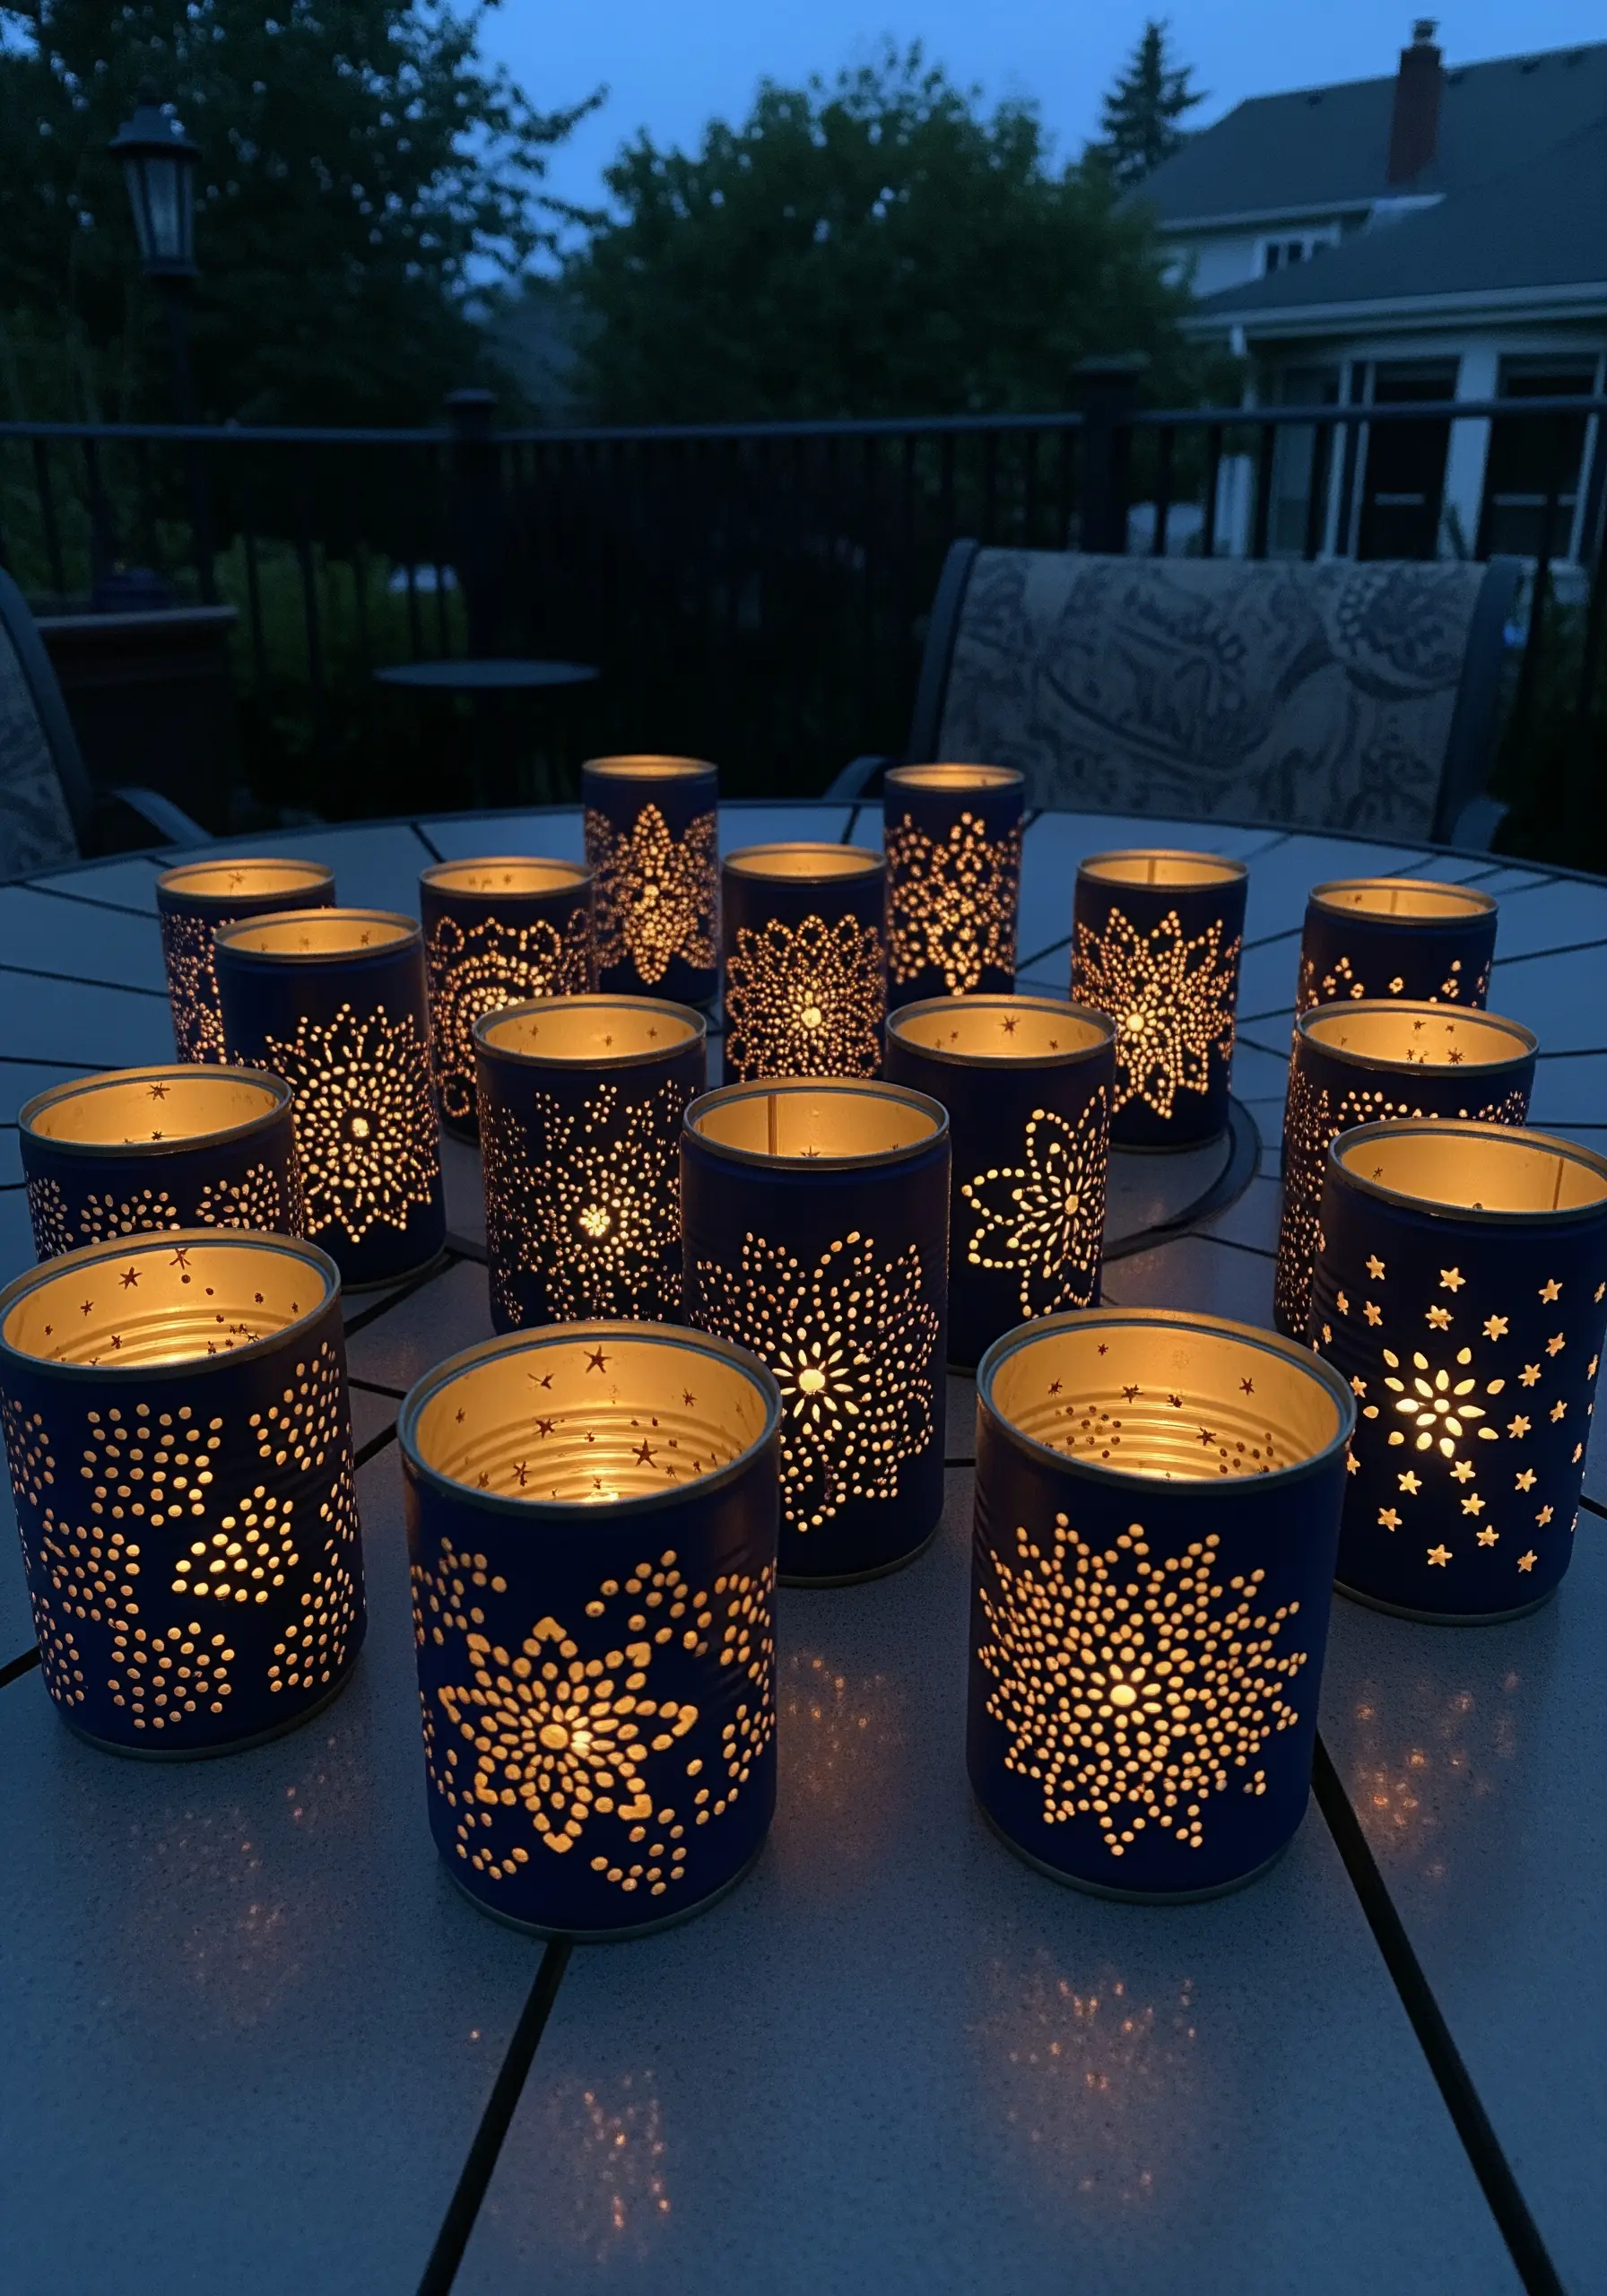
To create these delicate lanterns without crushing the can, fill it with water and freeze it solid.
The ice provides the internal support needed to hammer and punch designs into the metal without it denting.
Tape a paper pattern to the outside of the can as a guide, then use a nail of any size and a hammer to carefully punch out your design.
Once the ice has melted, paint the can a dark, matte color to make the pinpricks of light glow dramatically when a candle is lit inside.
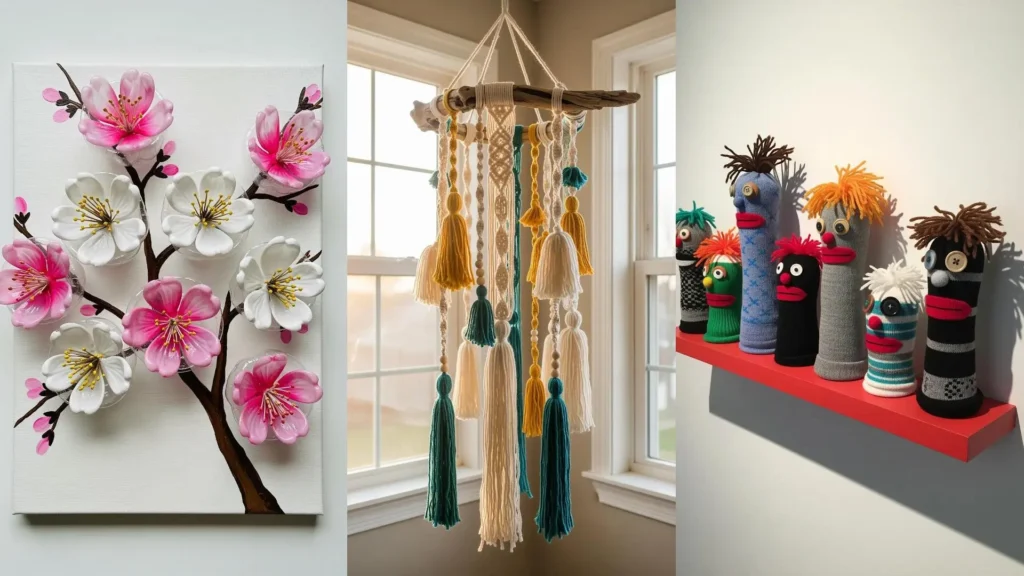
6. Compose an Abstract Landscape with Fabric Scraps
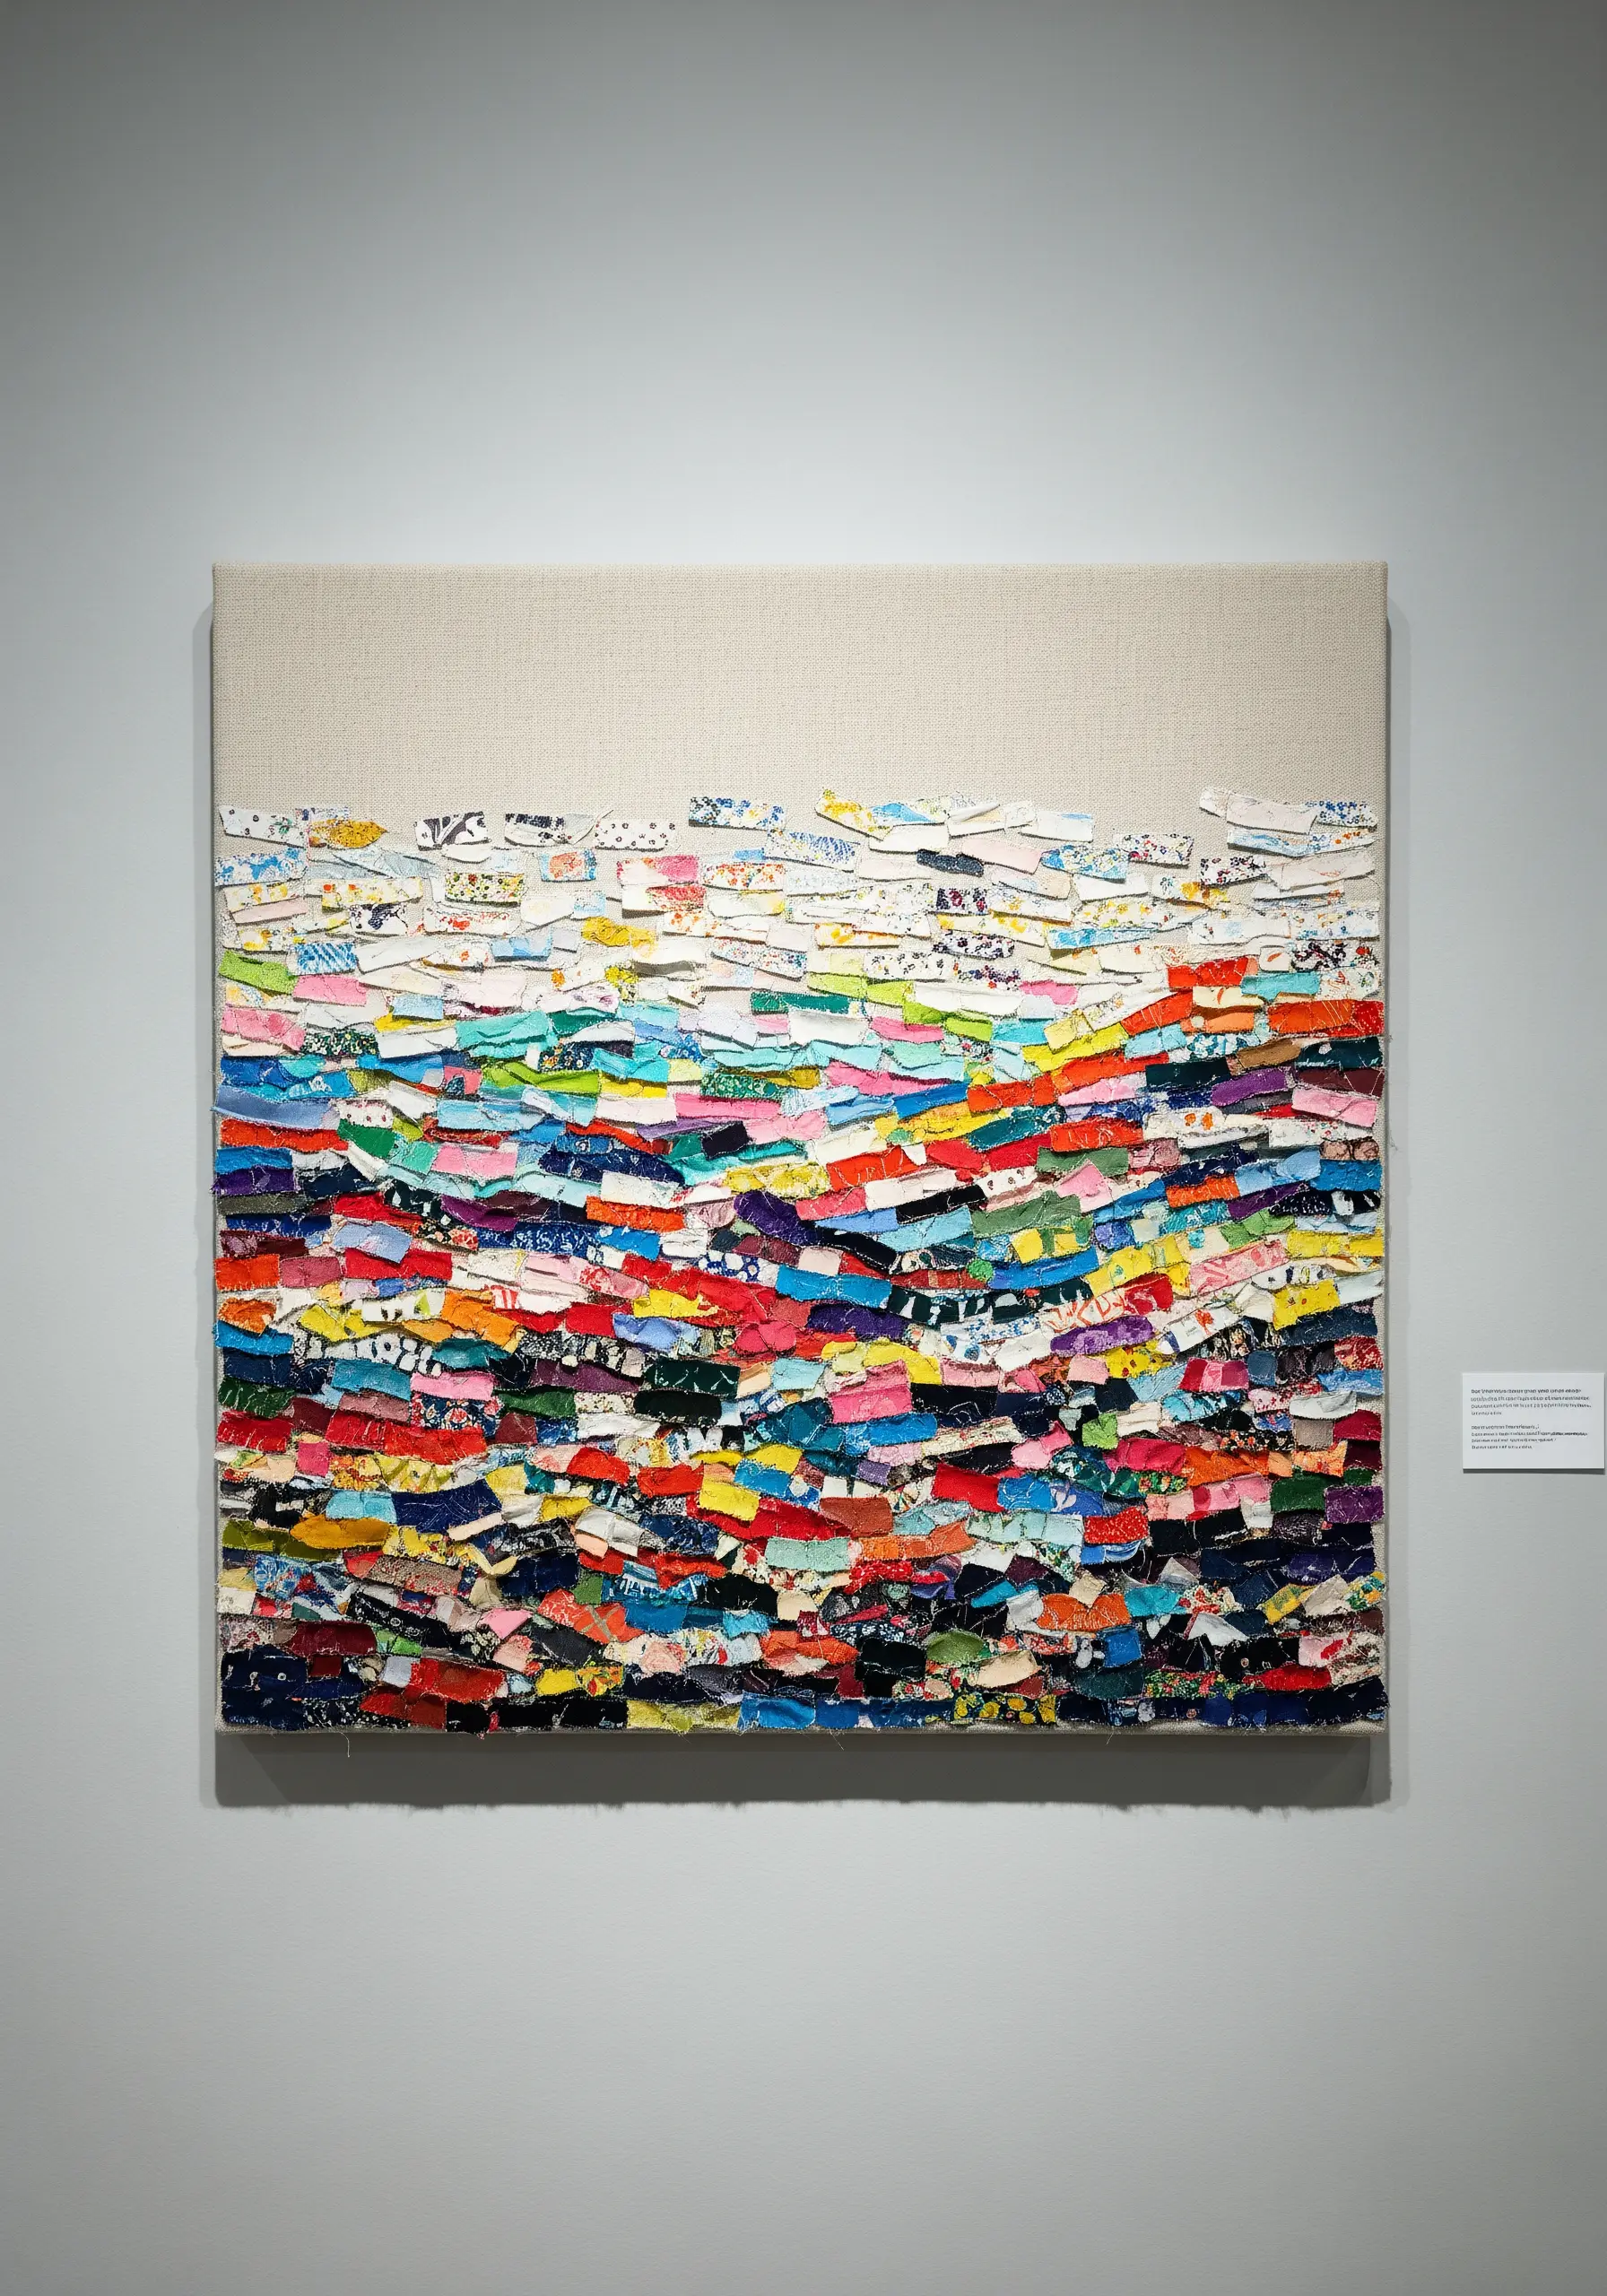
Turn even the smallest fabric offcuts into a vibrant textile collage that resembles a painterly landscape.
Working on a stretched canvas, start at the bottom and begin layering your scraps, overlapping them to create depth and texture.
Secure each piece with a small amount of fabric glue or a few simple running stitches.
This technique allows you to blend colors and patterns organically, turning what would be textile waste into a rich, tactile piece of art.
7. Design a Bohemian Tassel Mobile with Driftwood and Yarn
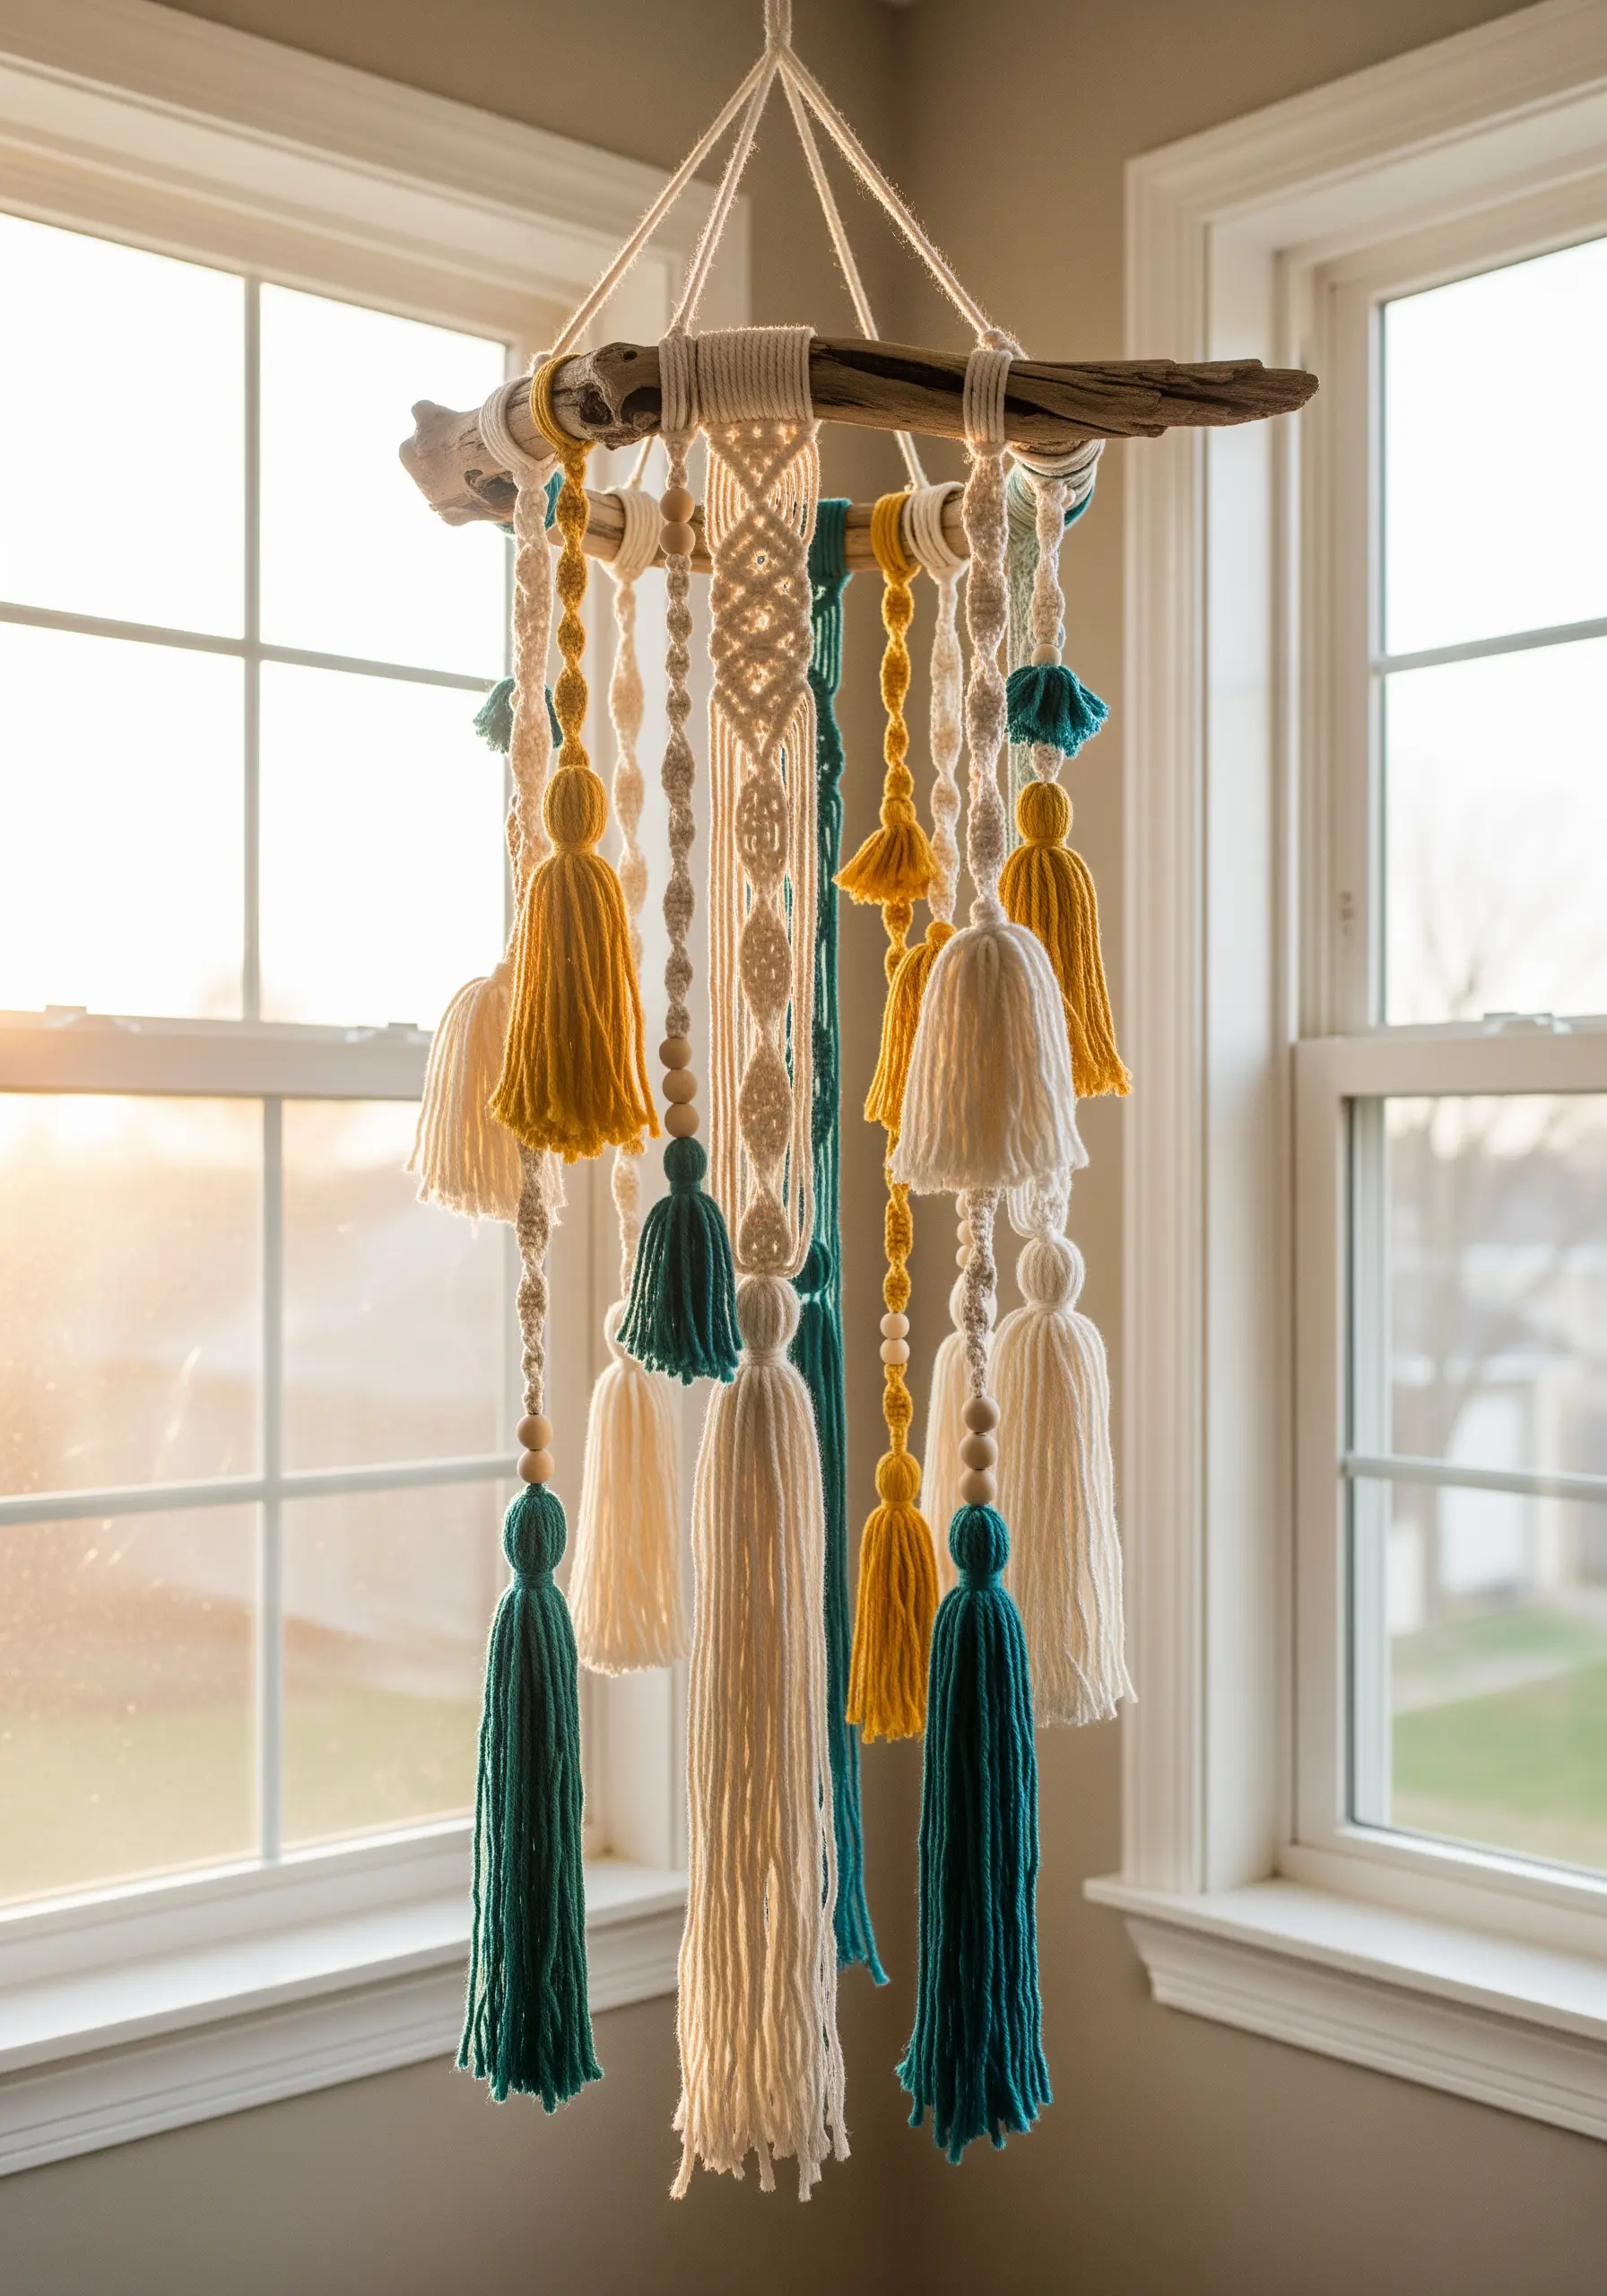
Create your own tassels by wrapping yarn around a piece of cardboard; a longer card will create a longer tassel, a shorter one a smaller tassel.
Vary the yarn weights and colors to add visual interest and rhythm to your mobile.
Attach the finished tassels at different lengths to a piece of found driftwood or a simple wooden dowel.
The combination of soft fiber, natural wood, and gentle movement makes for one of the most calming Bohemian yarn wall art projects you can create.
8. Suspend Pressed Botanicals in a Tulle Hoop
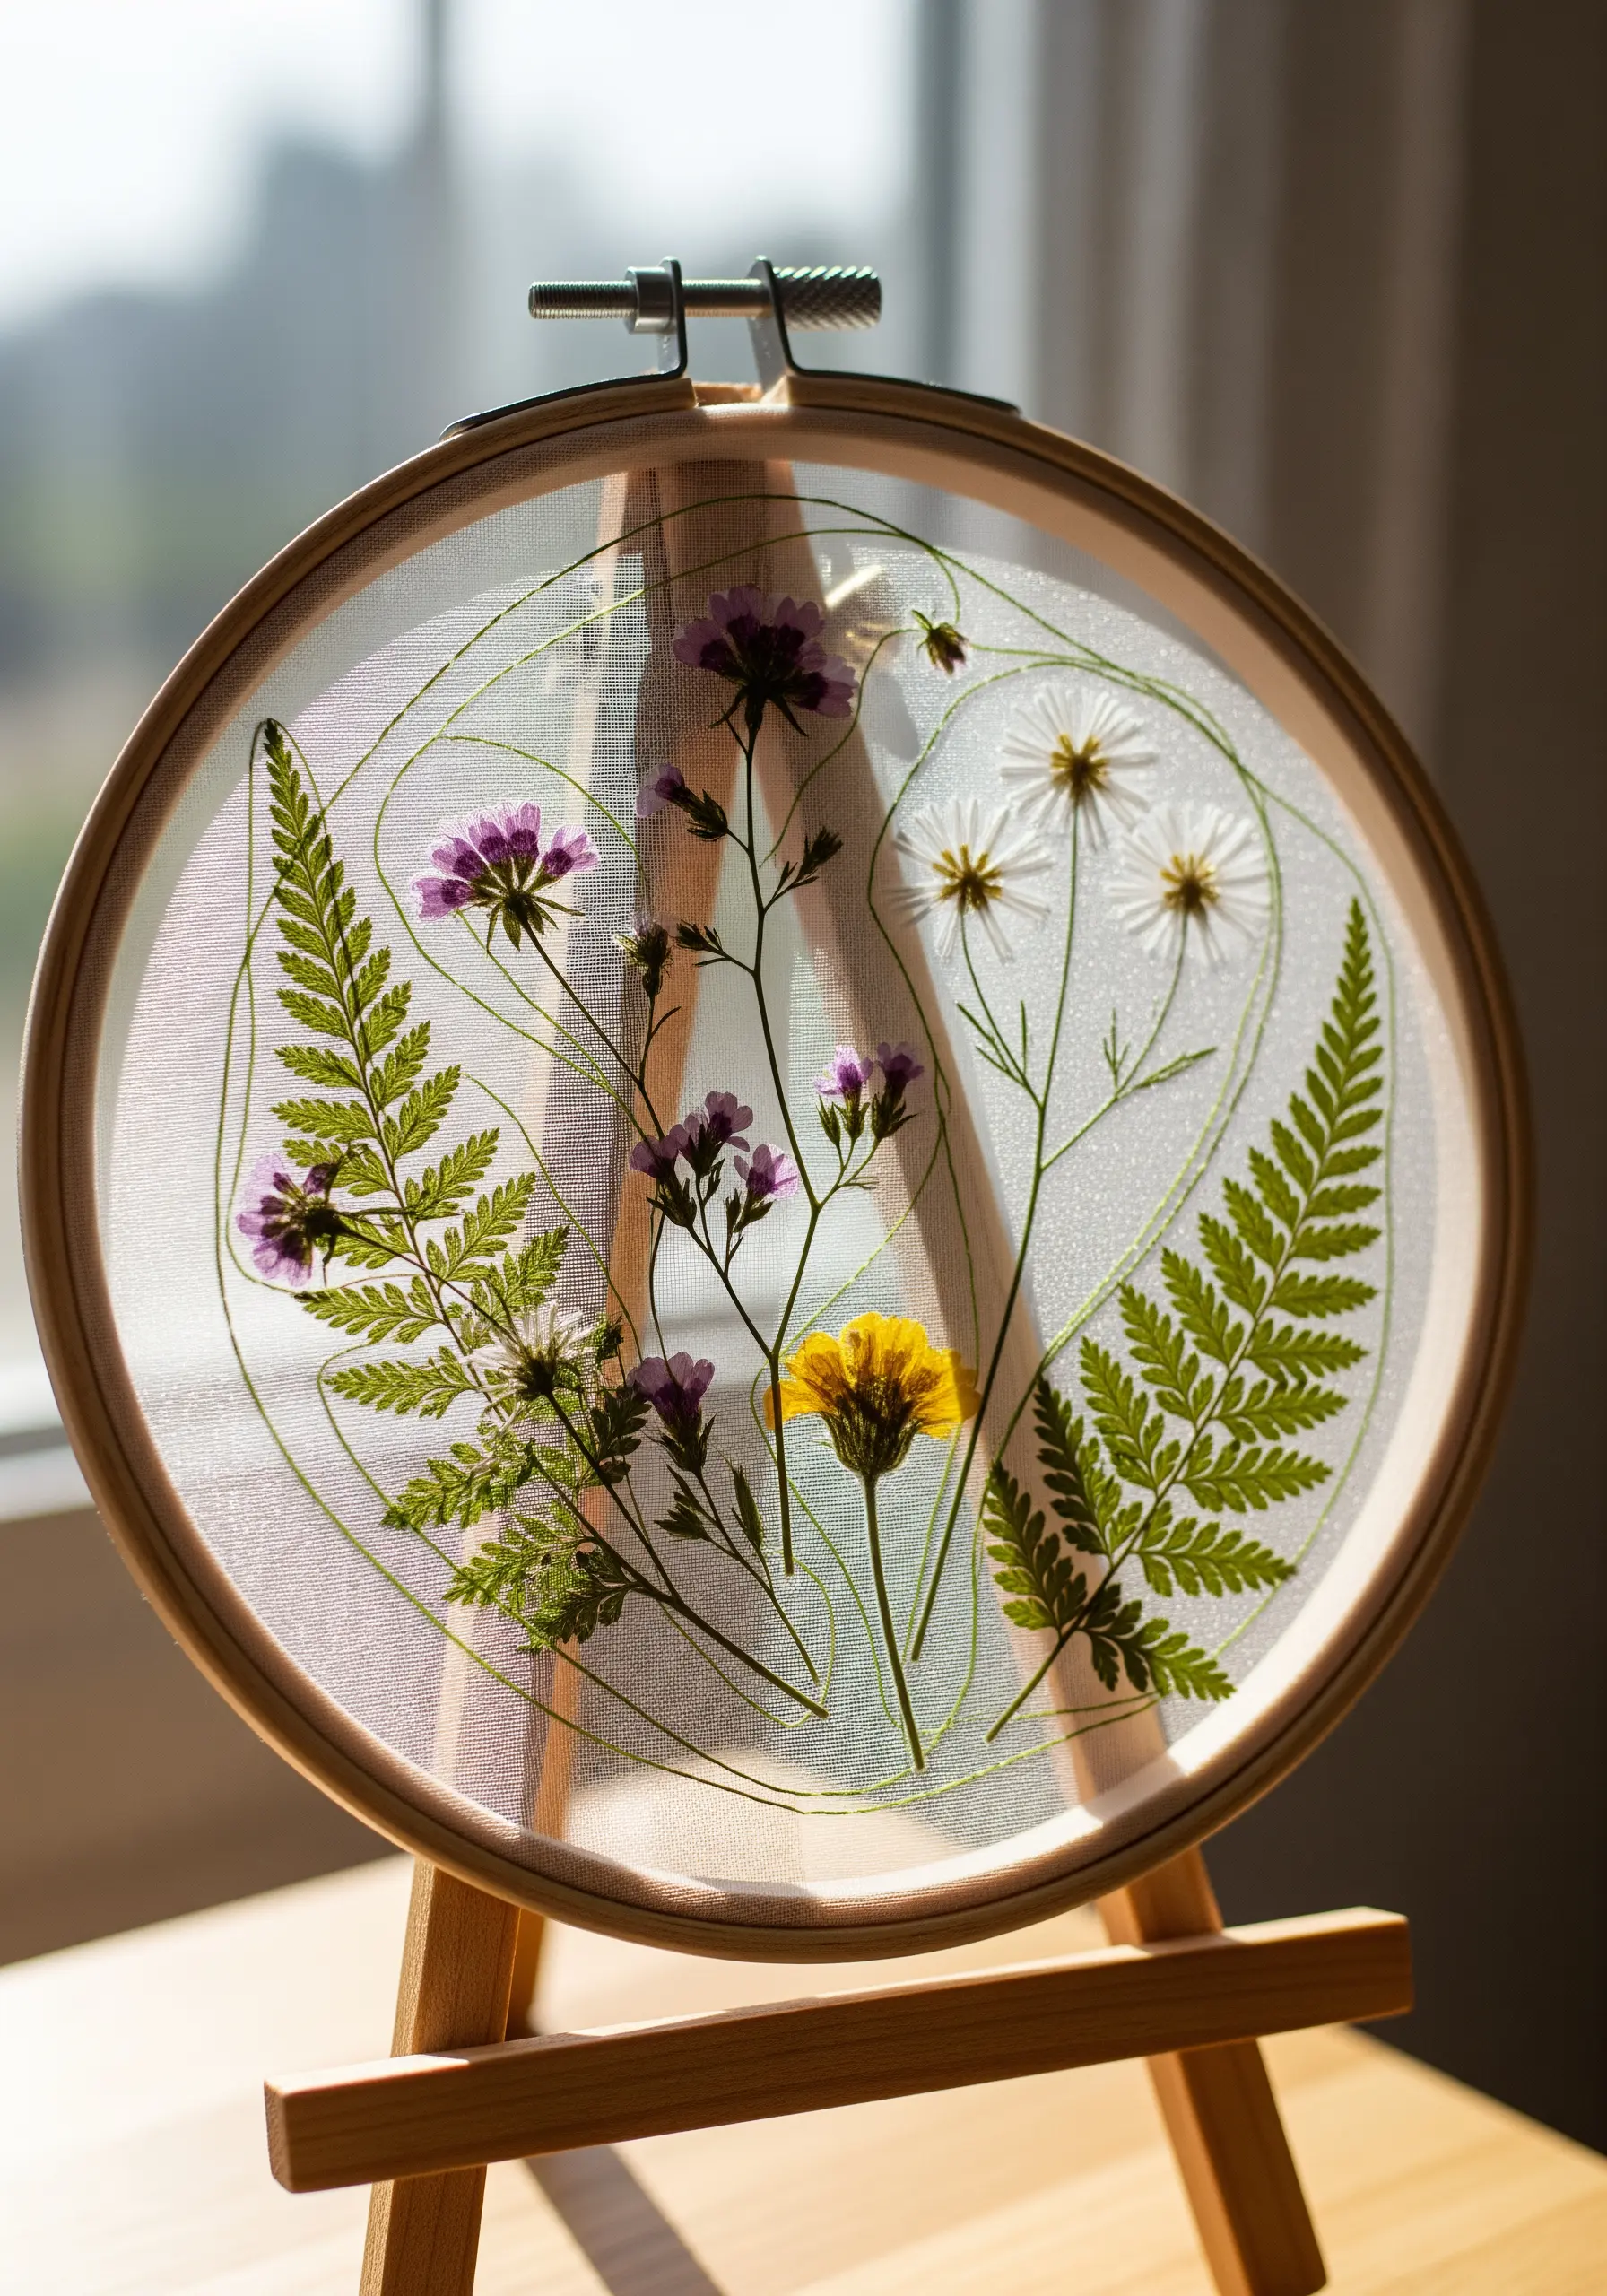
Create a floating, ethereal display for your pressed flowers using a standard embroidery hoop and sheer tulle.
Stretch two layers of tulle tightly in the hoop, creating a transparent canvas.
Carefully arrange your pressed ferns, flowers, and leaves between the two layers of fabric.
The tension from the hoop is often enough to hold everything in place, but you can add tiny, discreet stitches to secure delicate stems, mastering the secrets to making pressed flower art that looks professionally preserved.
9. Create Statement Wall Art with a Bottle Cap Mosaic
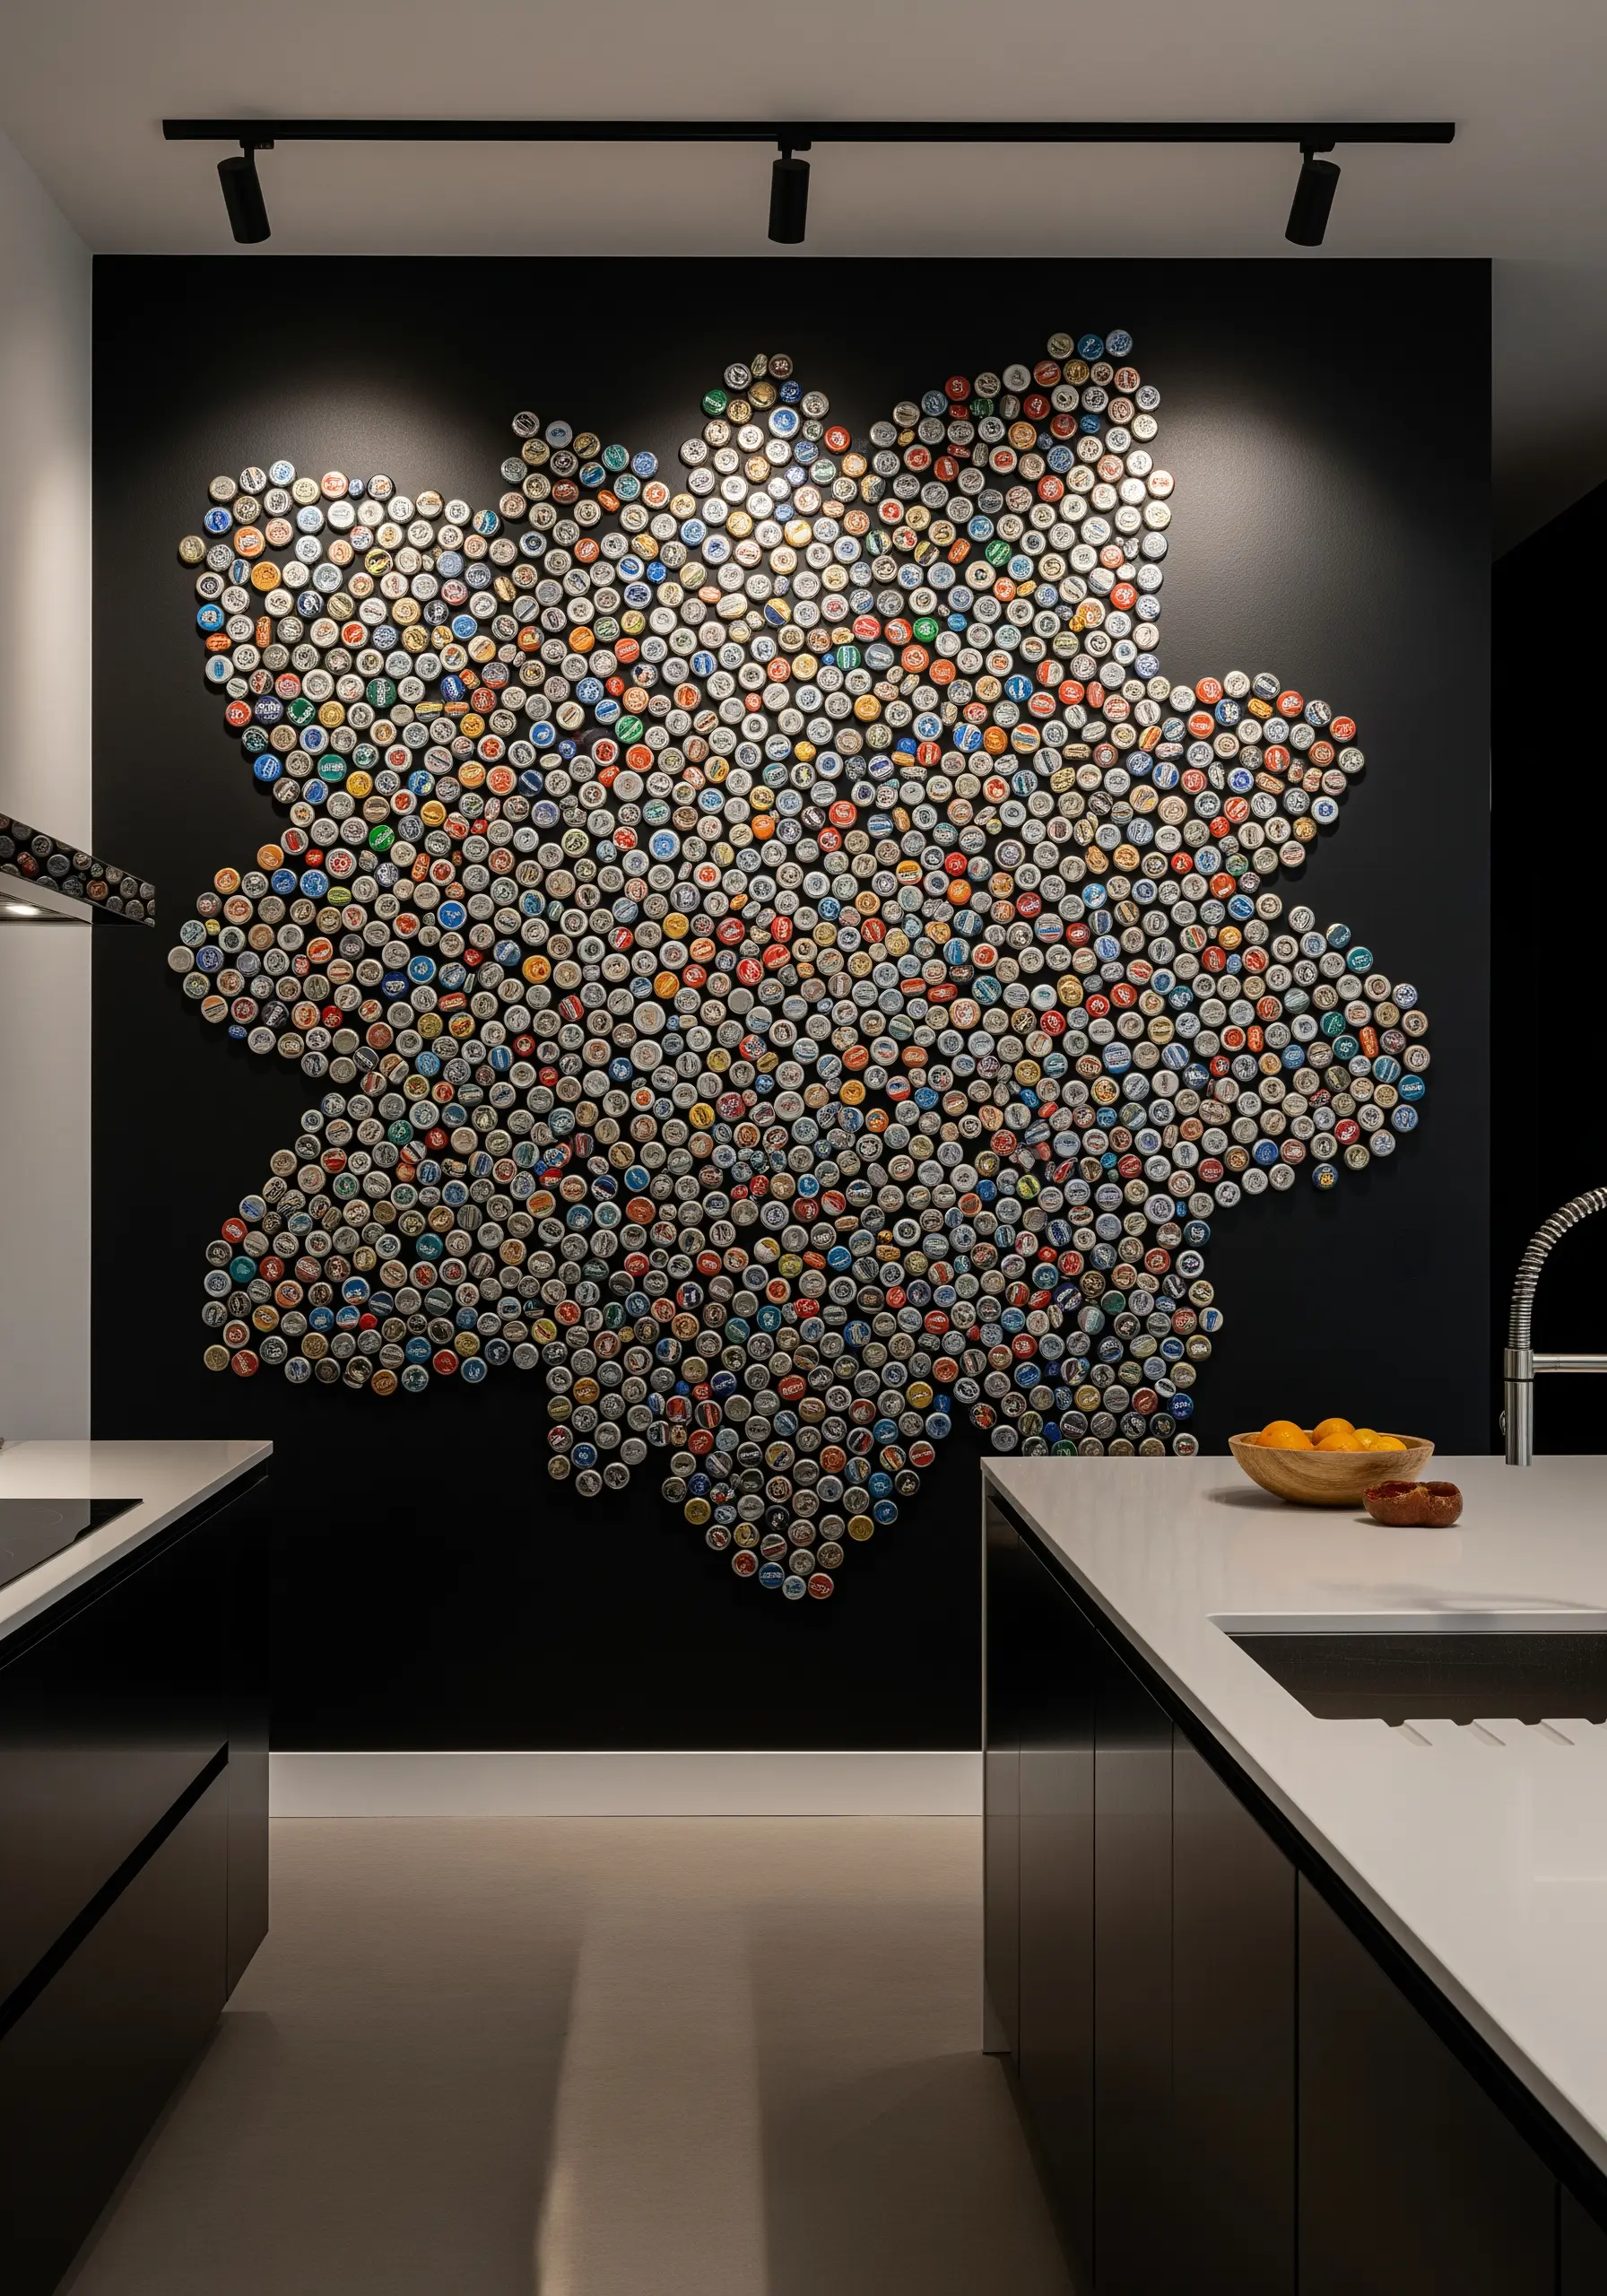
Transform a collection of bottle caps into a large-scale, impactful piece of pop art.
Start with a wood backing cut into your desired shape and painted a dark color, which will act as your ‘grout’ lines.
Begin gluing the bottle caps down from the center, working your way outwards in a circular or organic pattern.
The repetition of the simple shape, combined with the variety of colors, creates a pixelated effect that is stunning from a distance and fascinating up close.
10. Weave a Sturdy Basket from Rolled Newspaper
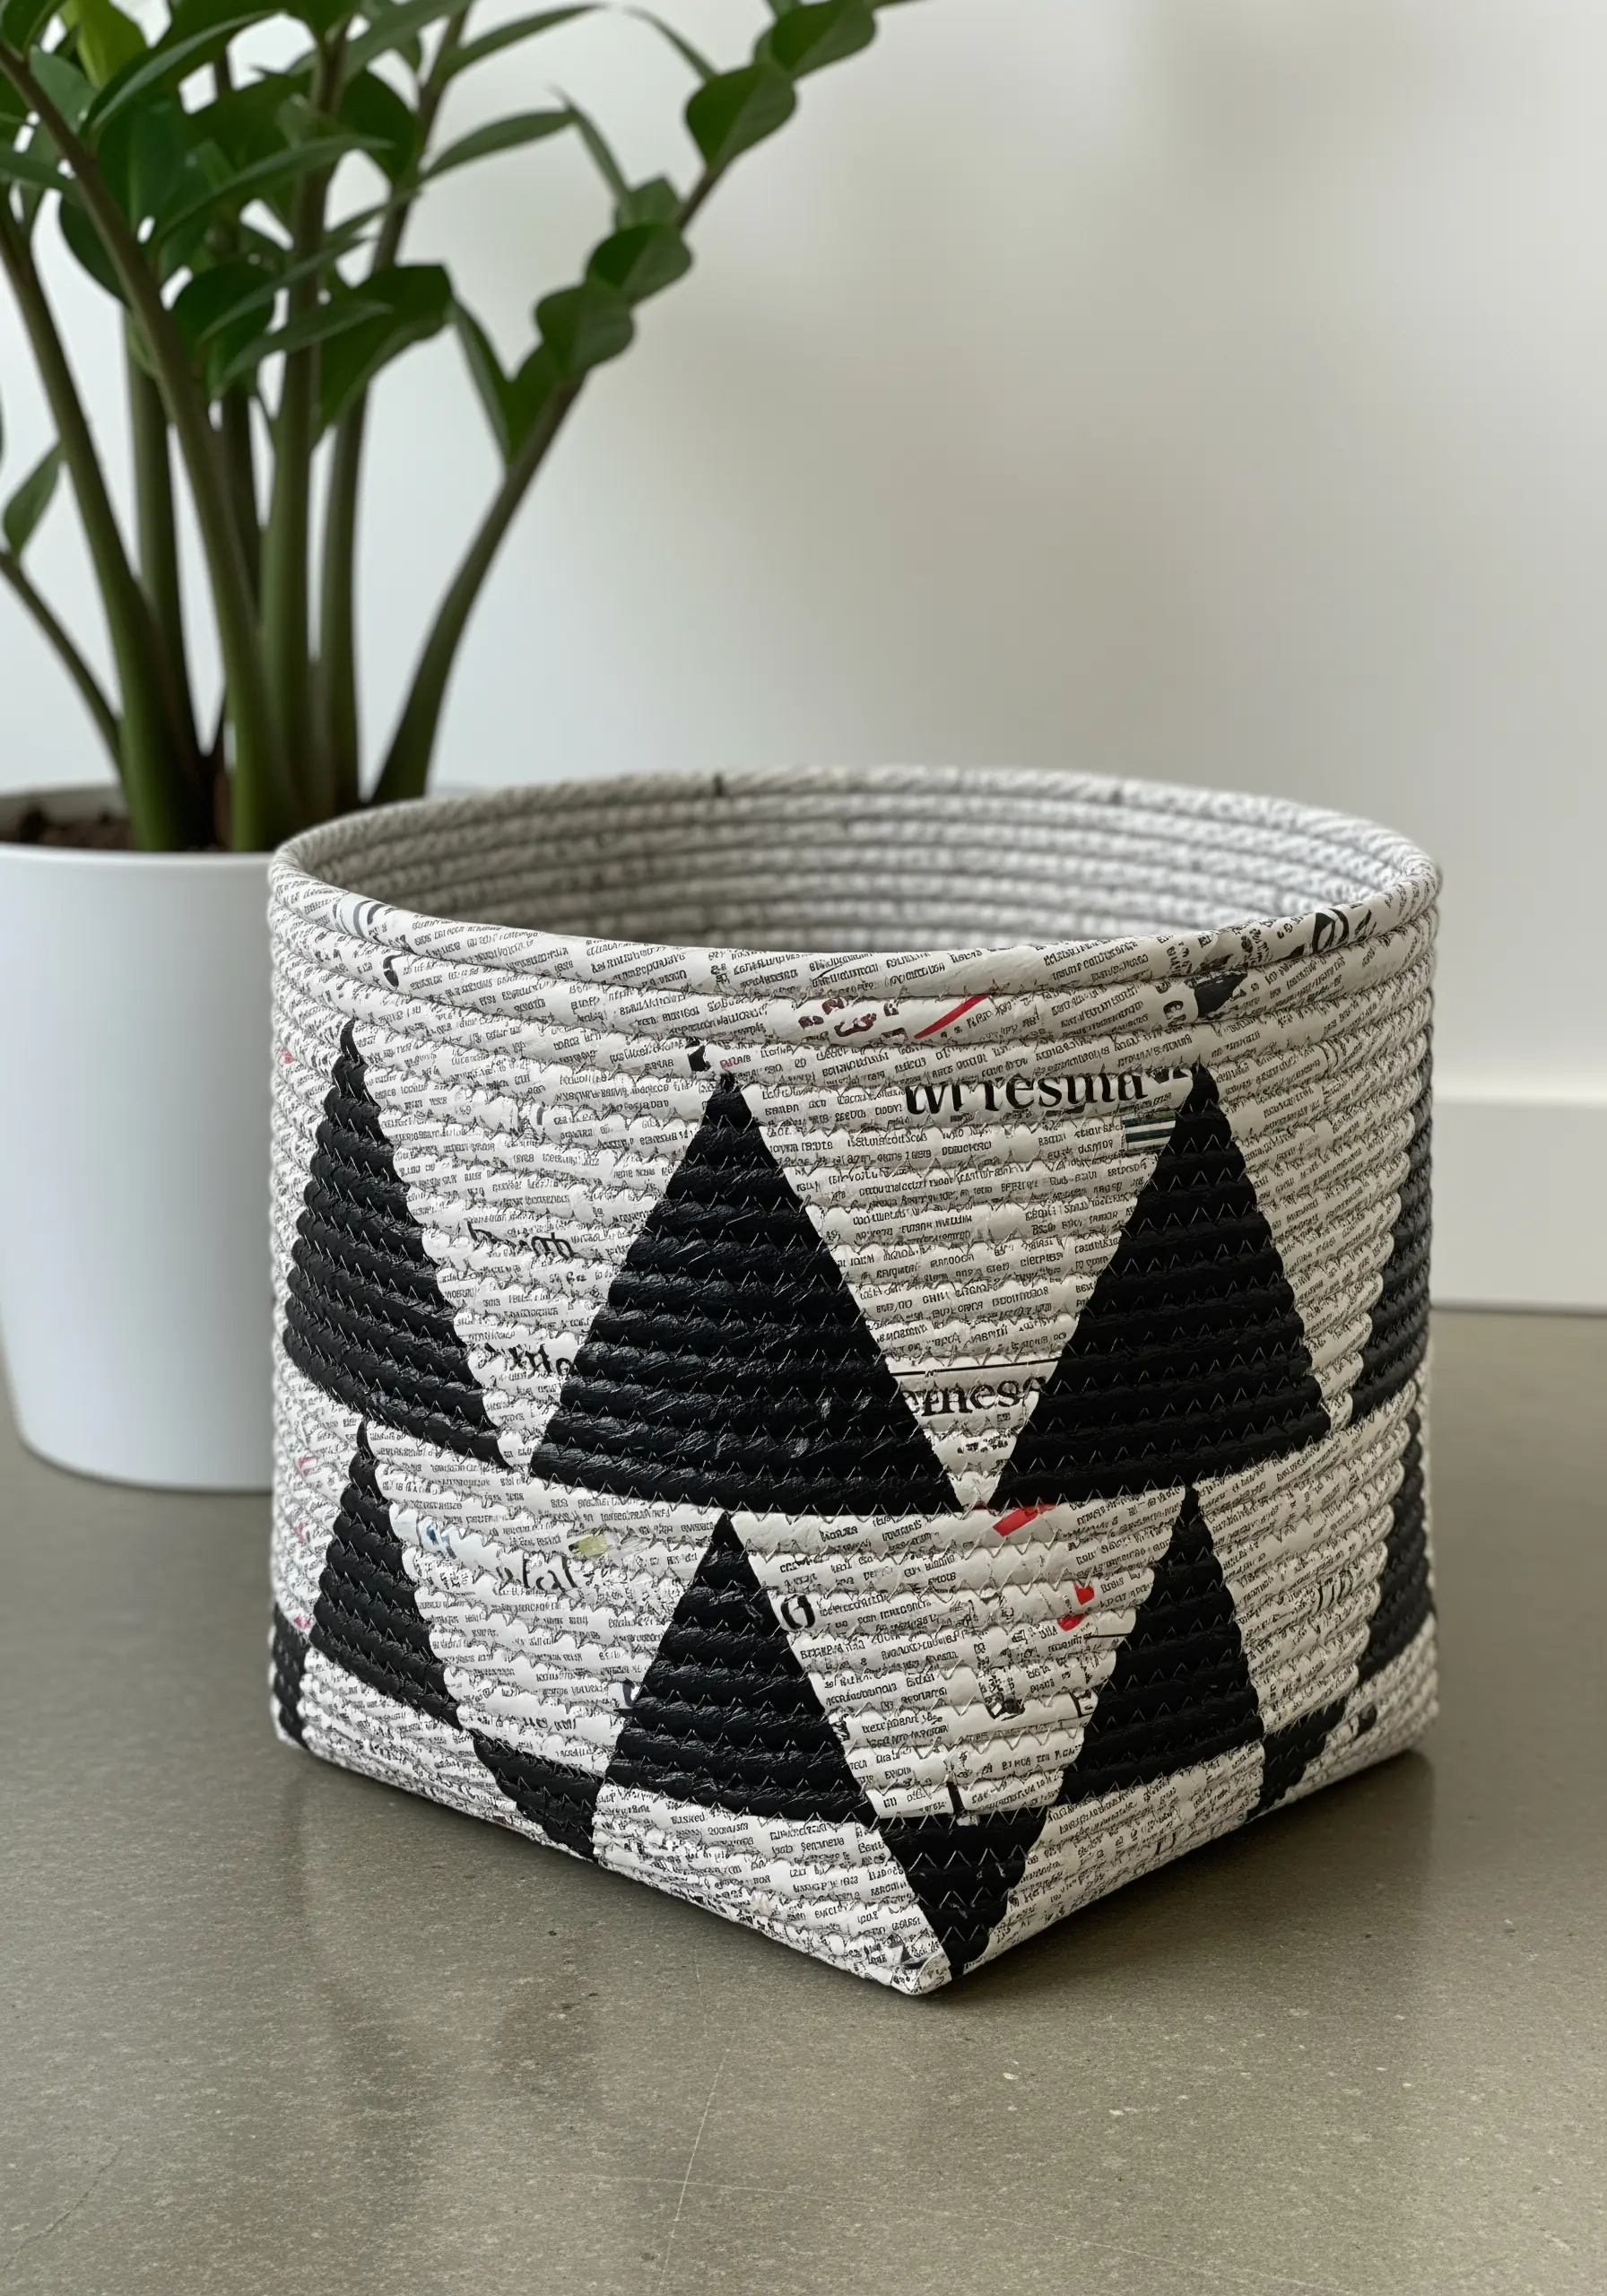
You can turn flimsy newspaper into a structural object by rolling individual sheets into tight, dense ‘reeds’ and securing the ends with glue.
Start the base by arranging several reeds in a starburst pattern, then weave another reed in and out to lock them in place.
Gently bend the base reeds upward to form the sides of the basket and continue your over-under weaving pattern.
The final object is surprisingly rigid and can be painted or sealed for a more durable finish.
11. Add Delicate Embroidery to a Skeleton Leaf
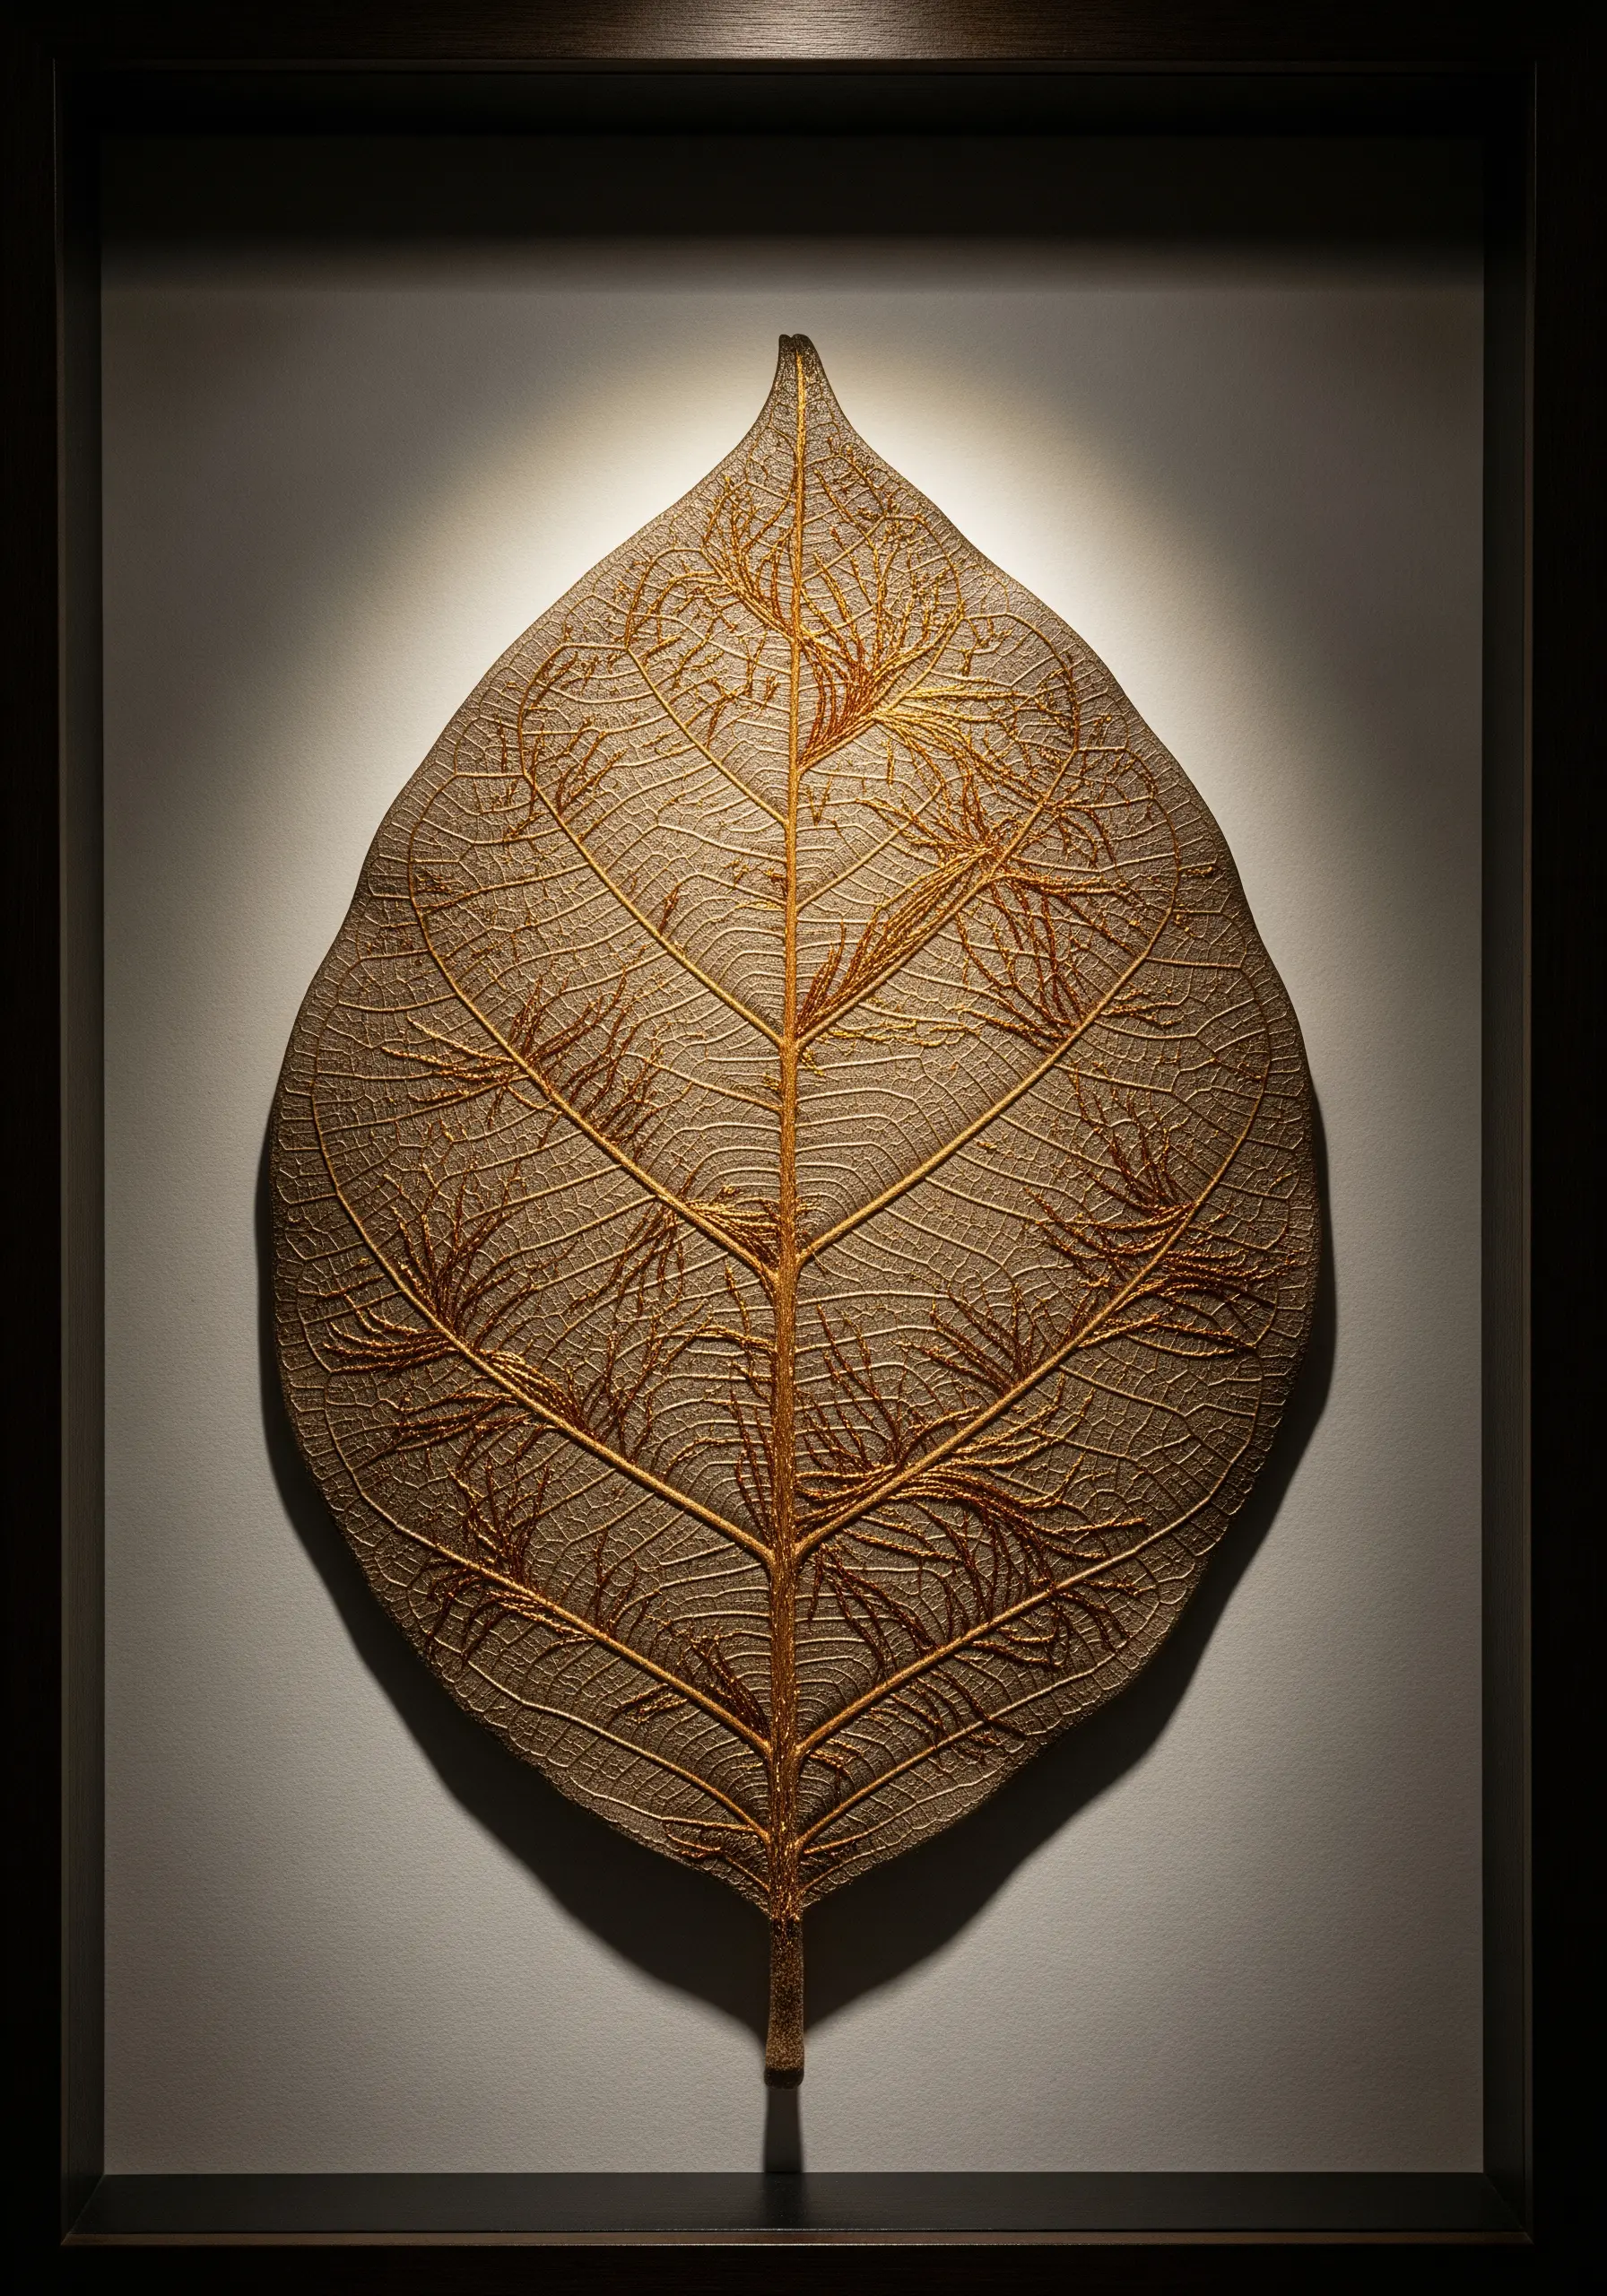
This project celebrates fragility and requires a very gentle hand. Use a fine needle and a single strand of metallic or silk thread to avoid tearing the leaf.
Instead of creating a new design, follow the natural patterns of the leaf’s veins with simple running stitches or tiny seed stitches.
The key is to maintain very light tension, letting the thread rest on the surface rather than pulling it tight.
This meditative process combines the beauty of nature with the elegance of one of the most delicate leaf stitch techniques.
12. Construct a Geometric Trivet from Wine Corks
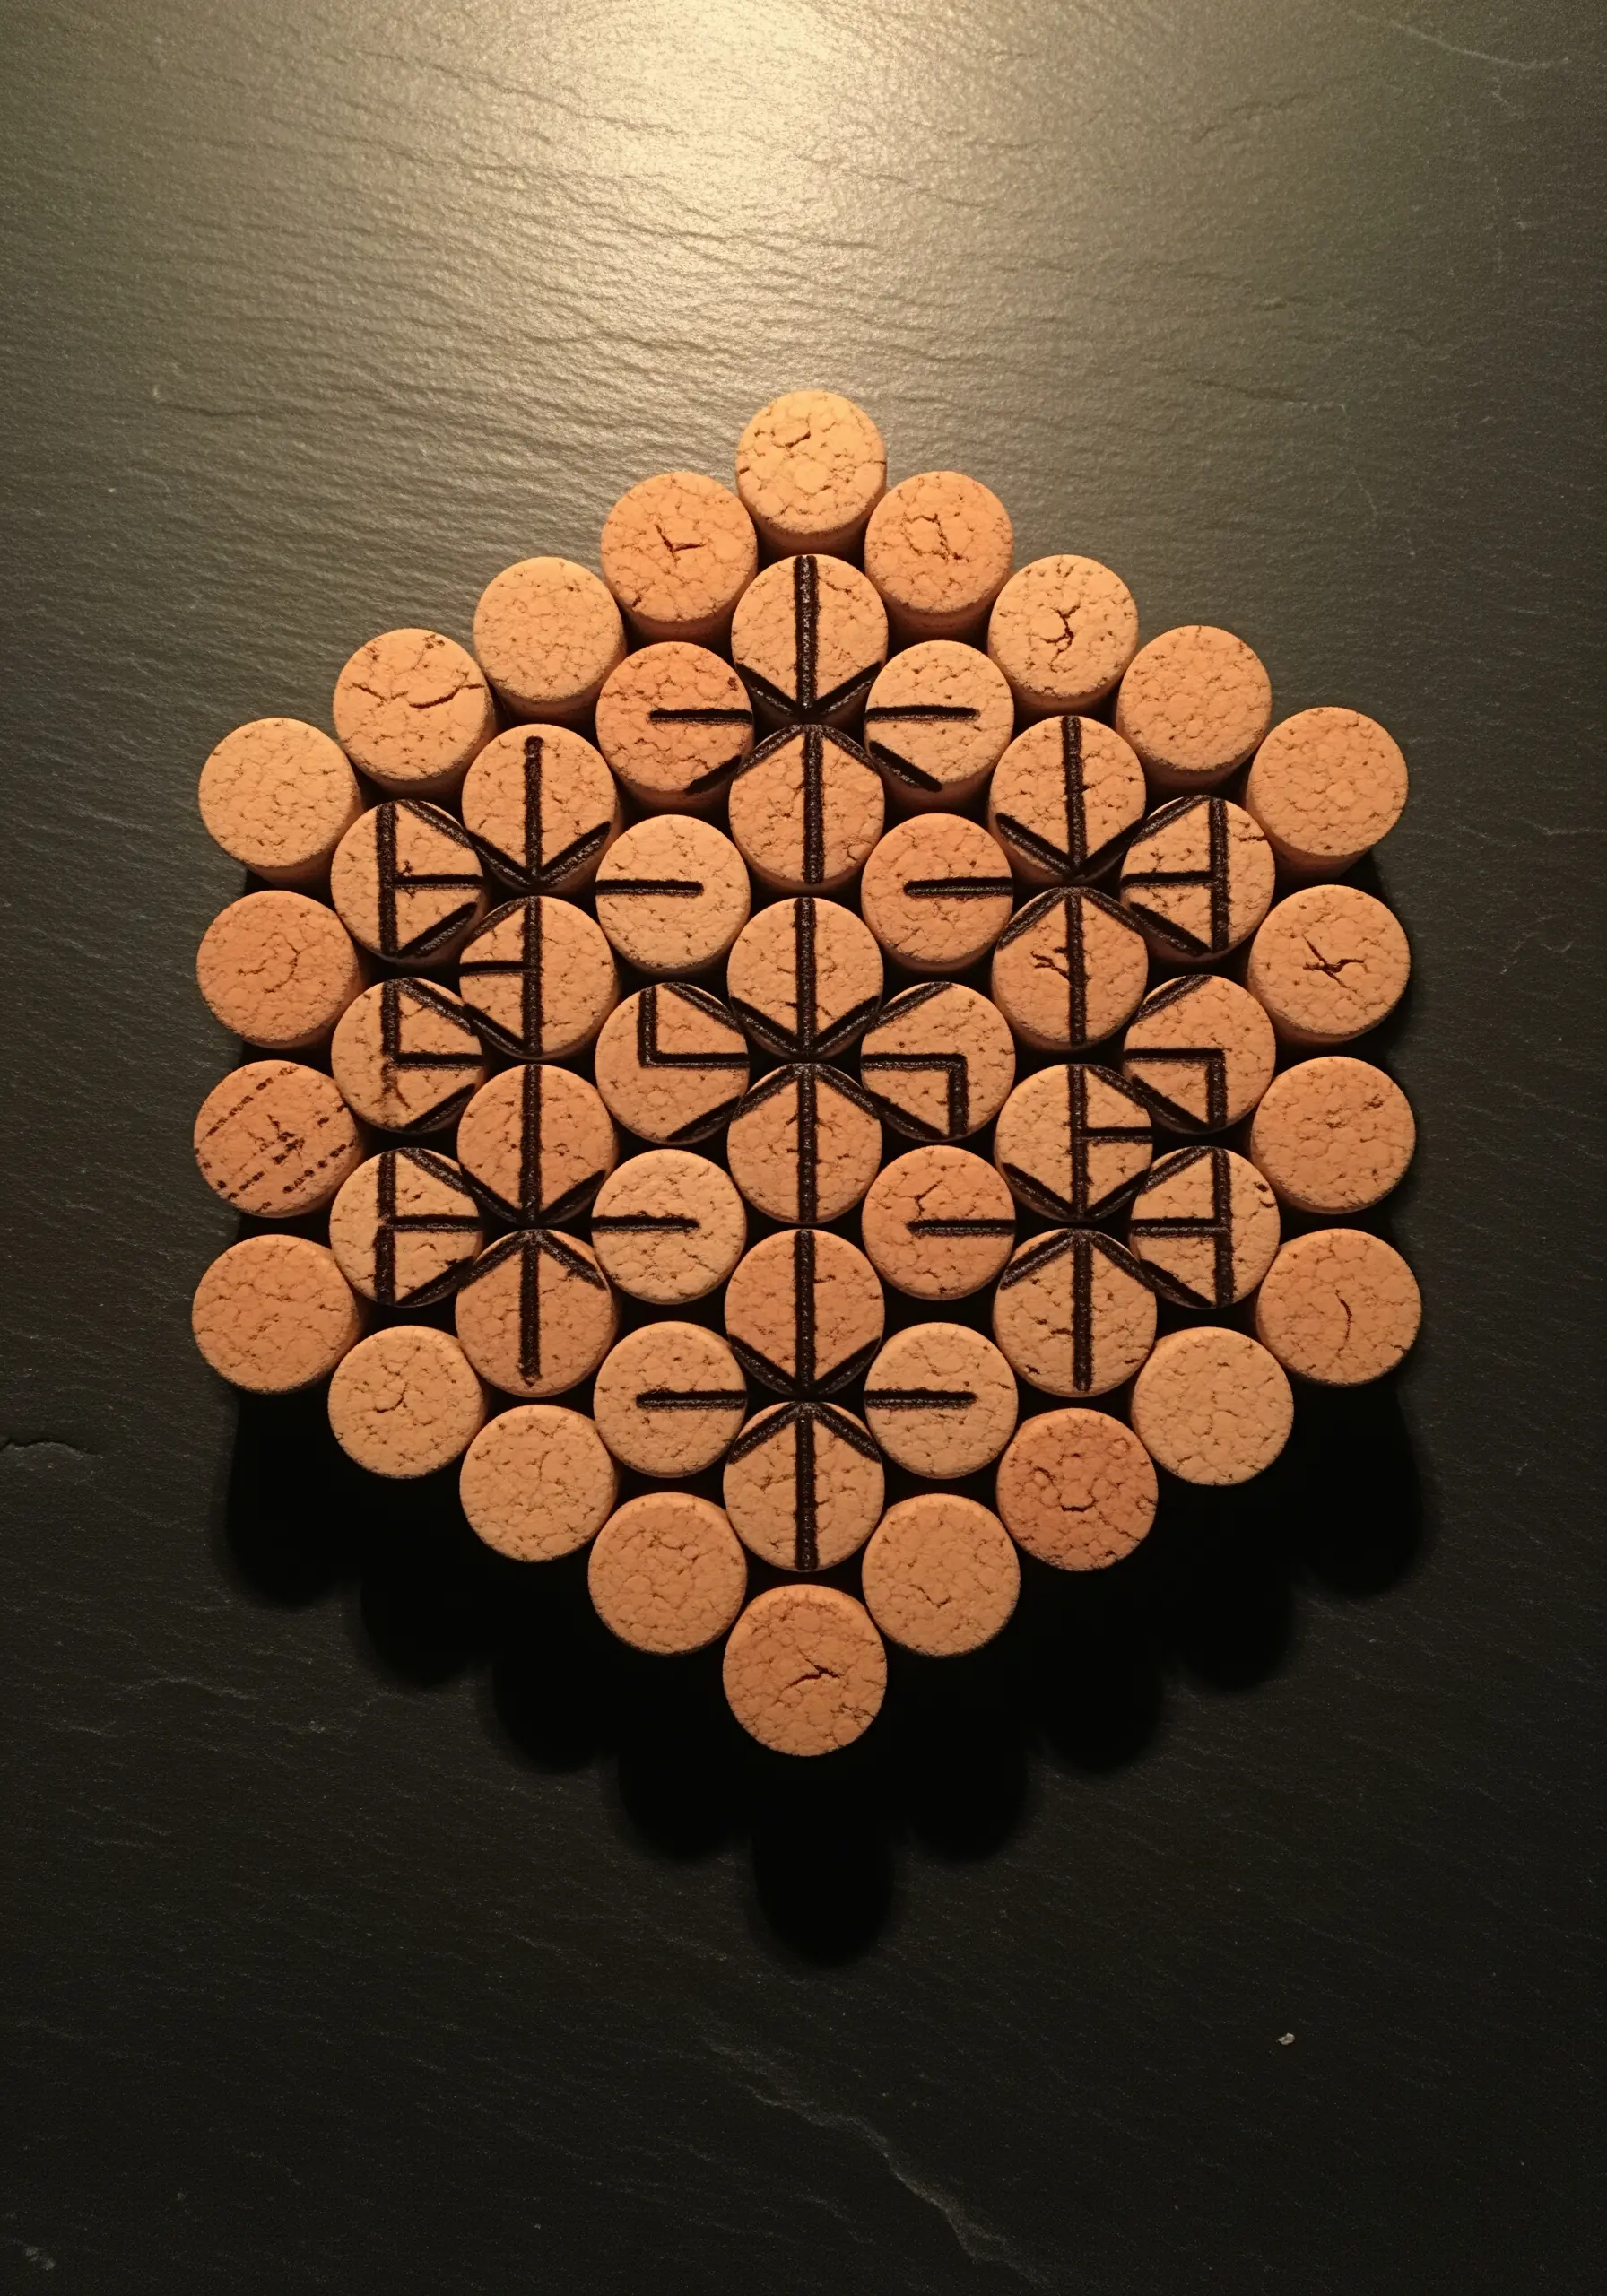
Give used wine corks a second life by transforming them into a functional and stylish trivet.
Arrange the corks on their ends in a honeycomb or hexagonal pattern, ensuring the tops are level.
Use a strong hot glue to secure them together, creating a stable, heat-resistant surface.
For a refined finish, use a wood-burning tool or a permanent marker to add a simple geometric design that flows across the tops of the individual corks, unifying the piece.
13. Brighten Your Décor with Yarn-Wrapped Branches

This simple technique, often called yarn bombing, adds an immediate pop of color and texture to your home.
Tightly wrap sections of clean, dry branches with different colors of yarn.
To create crisp stripes or color blocks, simply tuck the end of the old color and the start of the new color under your wraps.
Group several decorated branches in a tall vase for a modern, sculptural display that requires no artistic skill, just a bit of patience.
14. Craft a Macrame Feather Wall Hanging
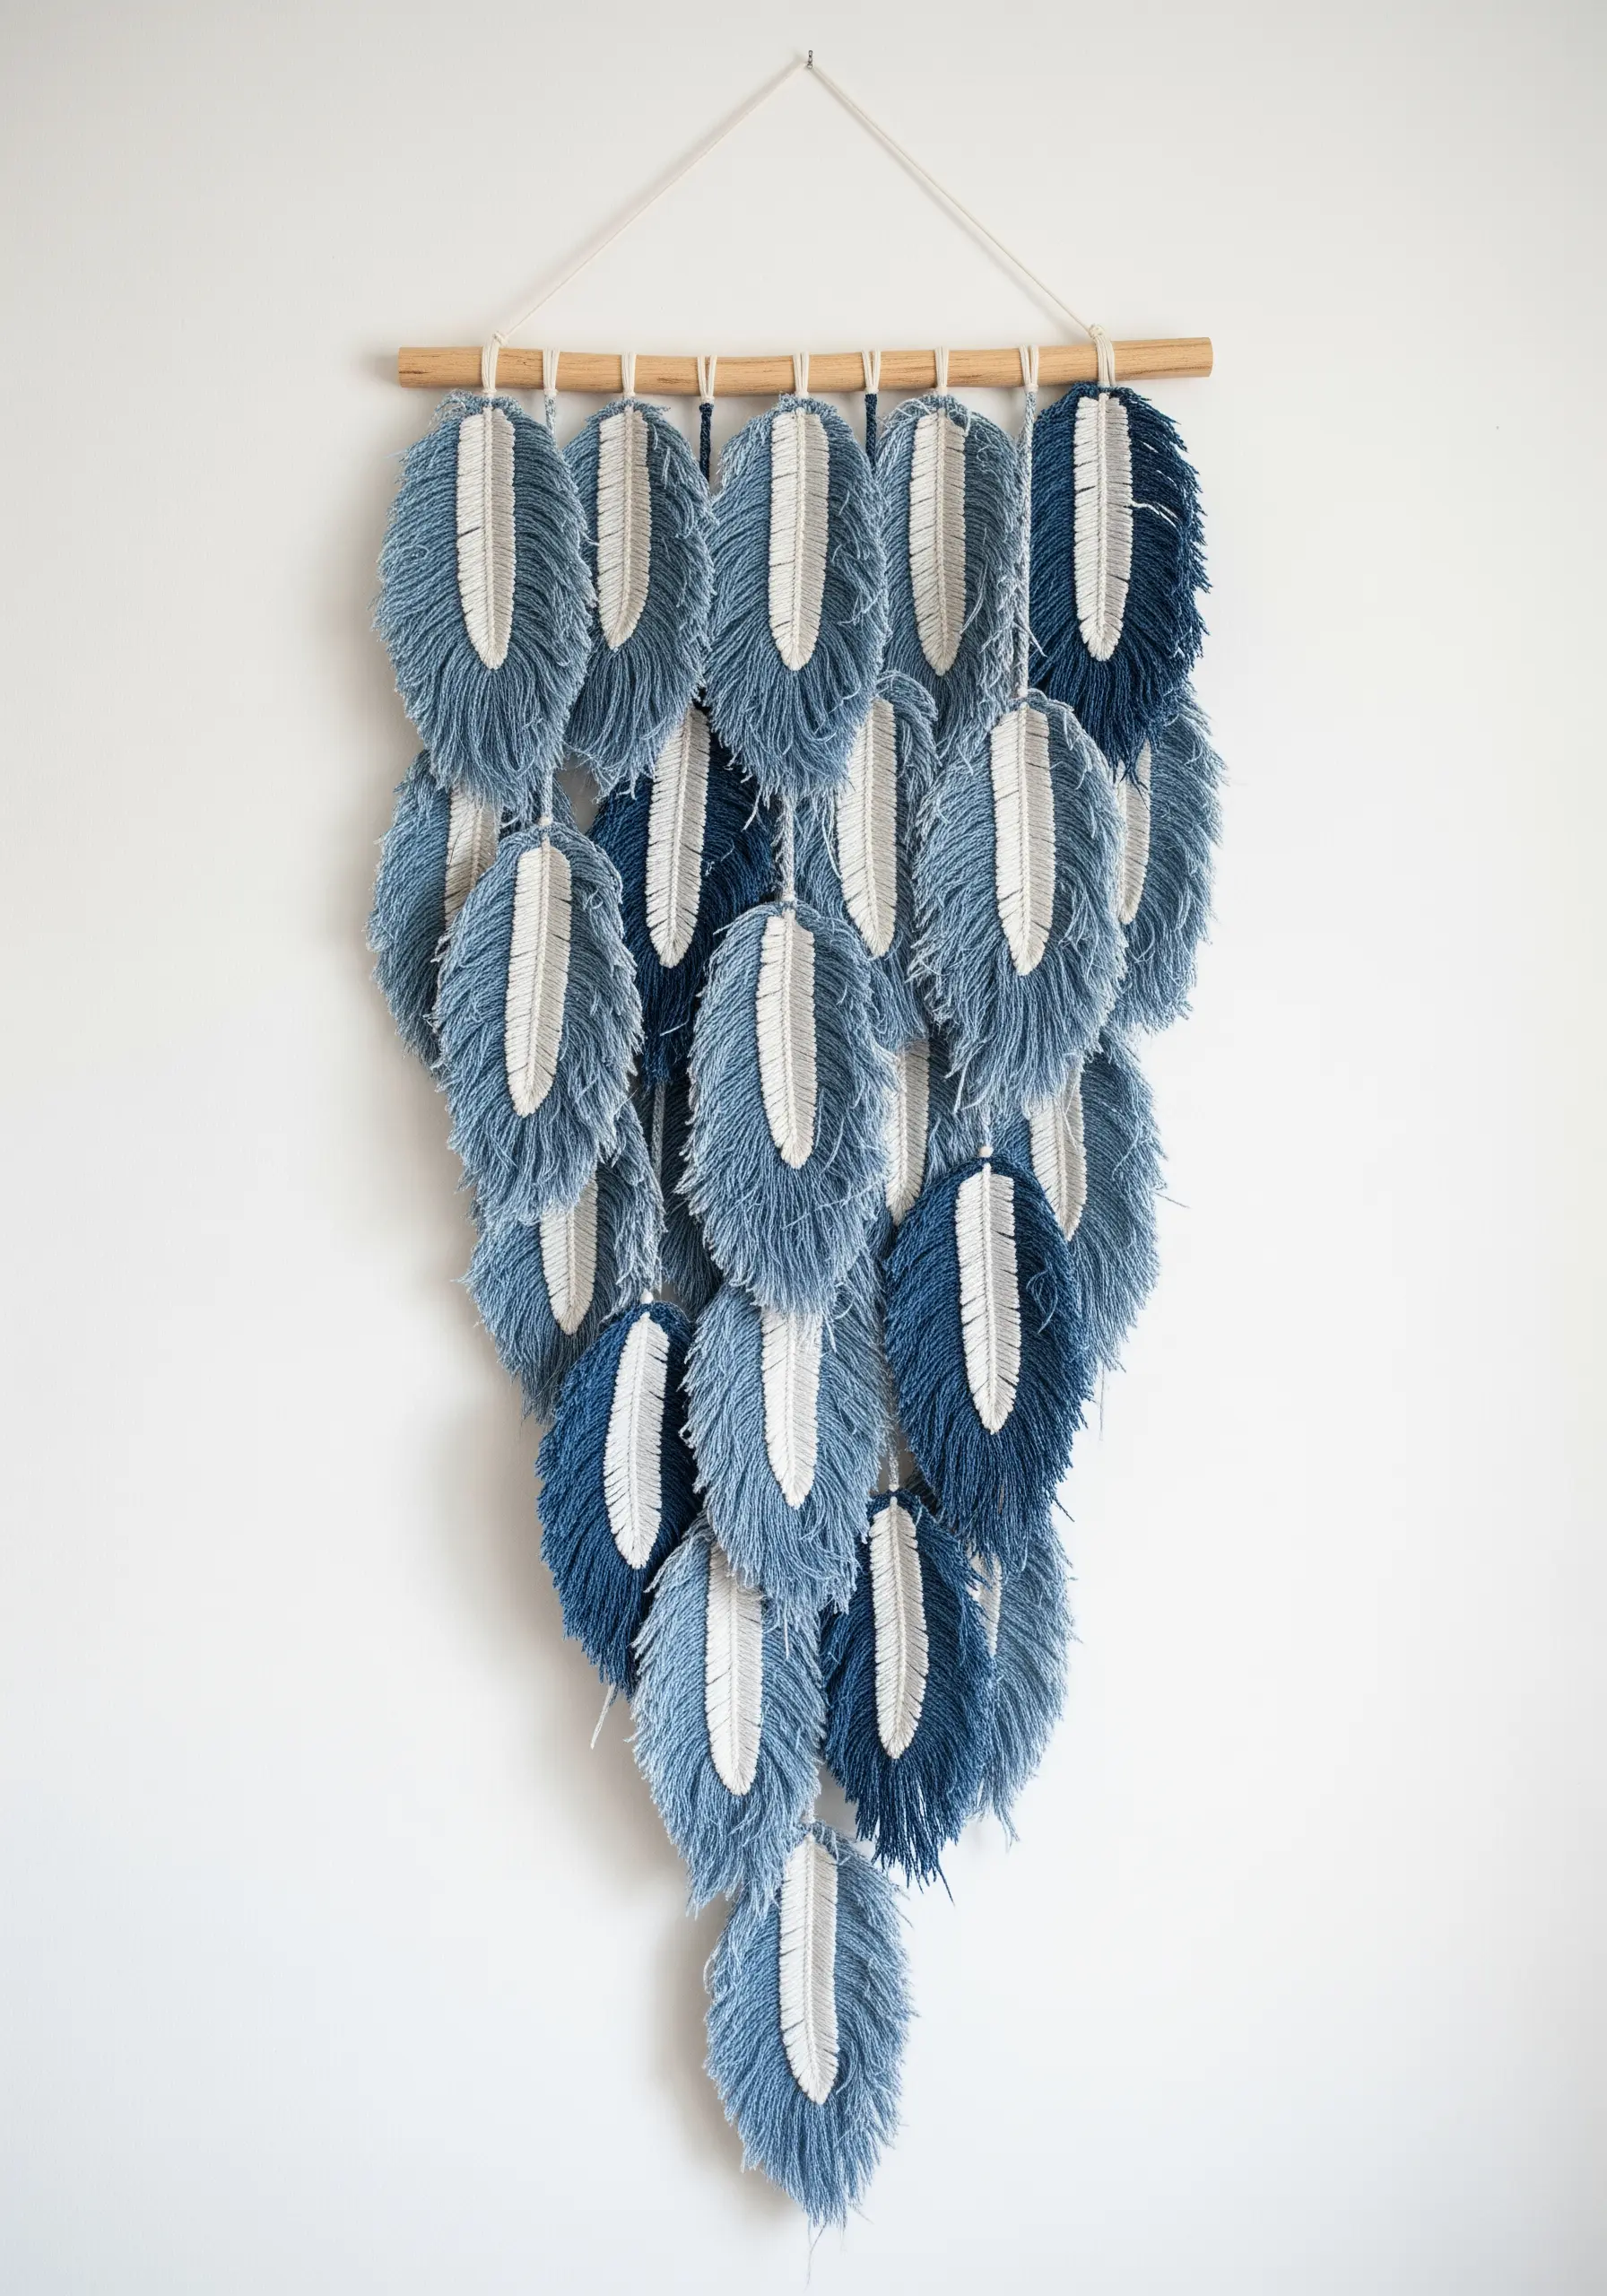
To create these soft, tactile feathers, you only need cord and a simple knot.
Fold a long cord in half to create the feather’s spine, then attach shorter cords to it using a series of lark’s head knots.
Once you’ve filled the spine, the magic happens: use a fine-tooth comb to completely unravel and brush out the shorter cords until they are soft and fluffy.
Finally, use sharp scissors to trim the frayed cord into a clean, elegant feather shape, making it one of the most beautiful DIY yarn wall hangings you can make.
15. Imprint Lace Textures onto Concrete Candle Holders
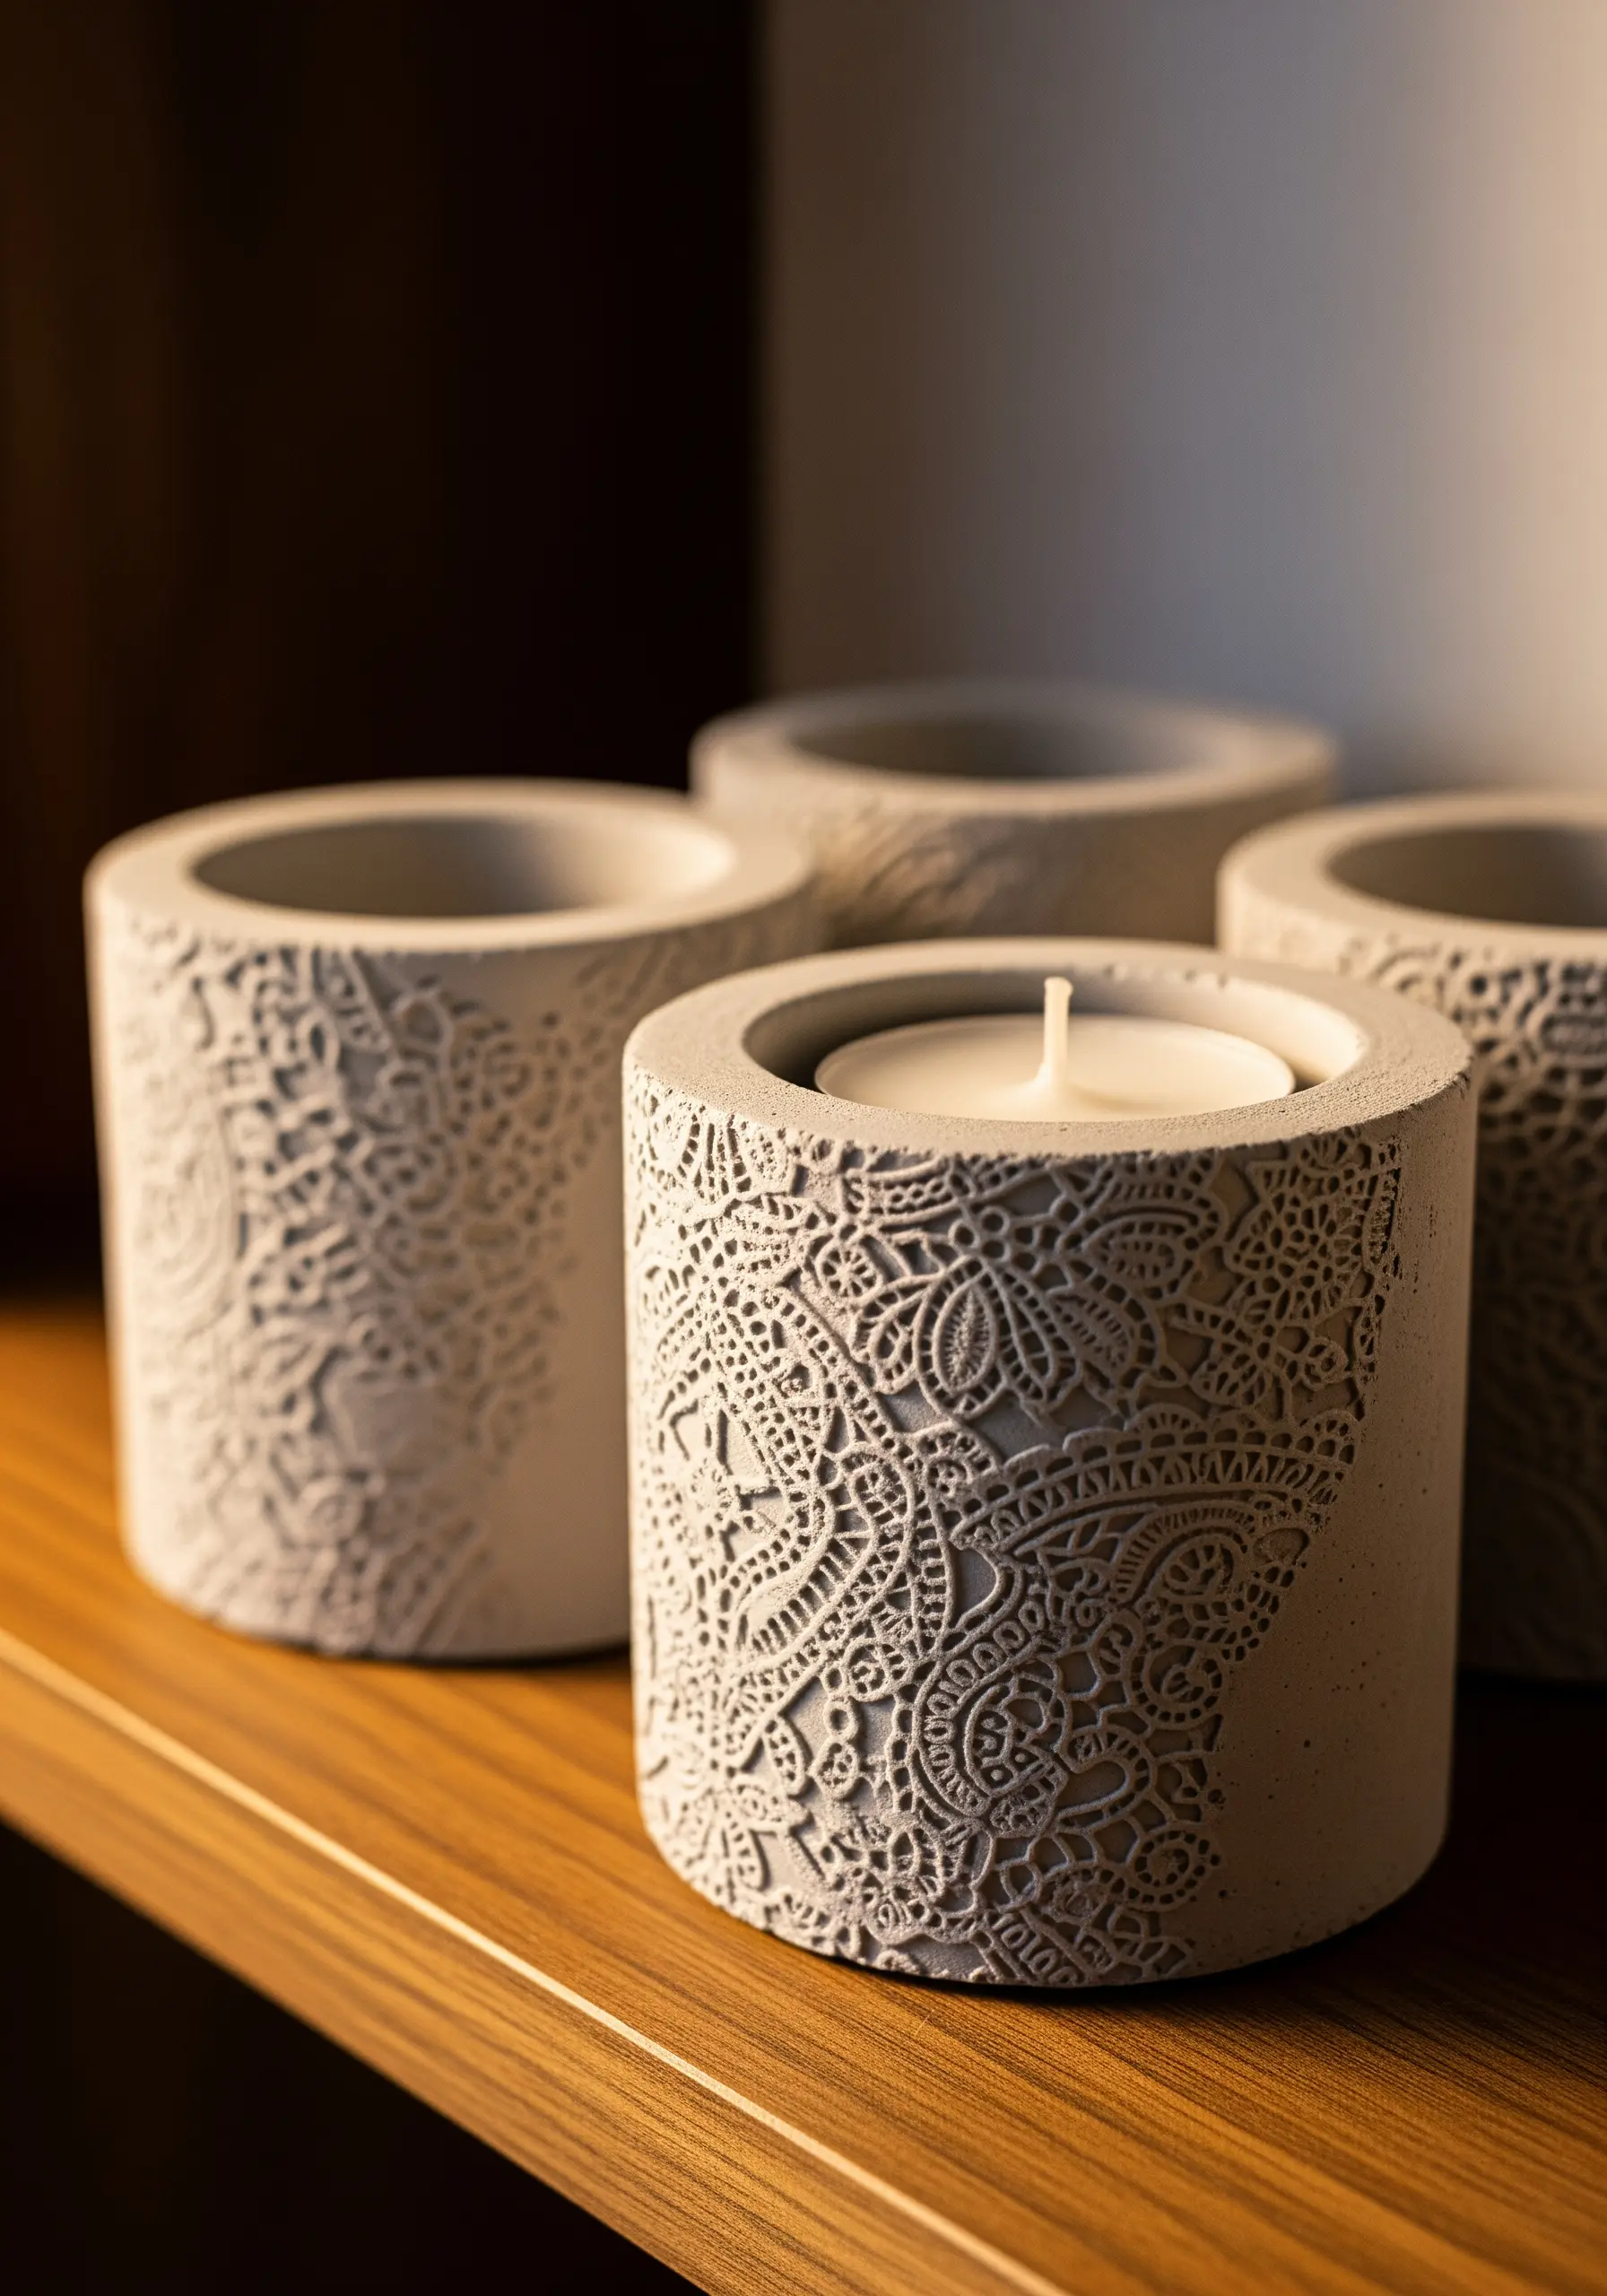
This project beautifully marries industrial and delicate aesthetics.
Line the inside of a disposable plastic container (your outer mold) with a piece of heavily textured lace.
Place a smaller, weighted cup in the center to create the cavity, then pour quick-setting concrete into the gap.
After it cures, removing the molds will reveal a perfect, intricate impression of the lace pattern on the hard concrete surface, creating a stunning textural contrast.
16. Create 3D Cherry Blossoms from Plastic Bottles
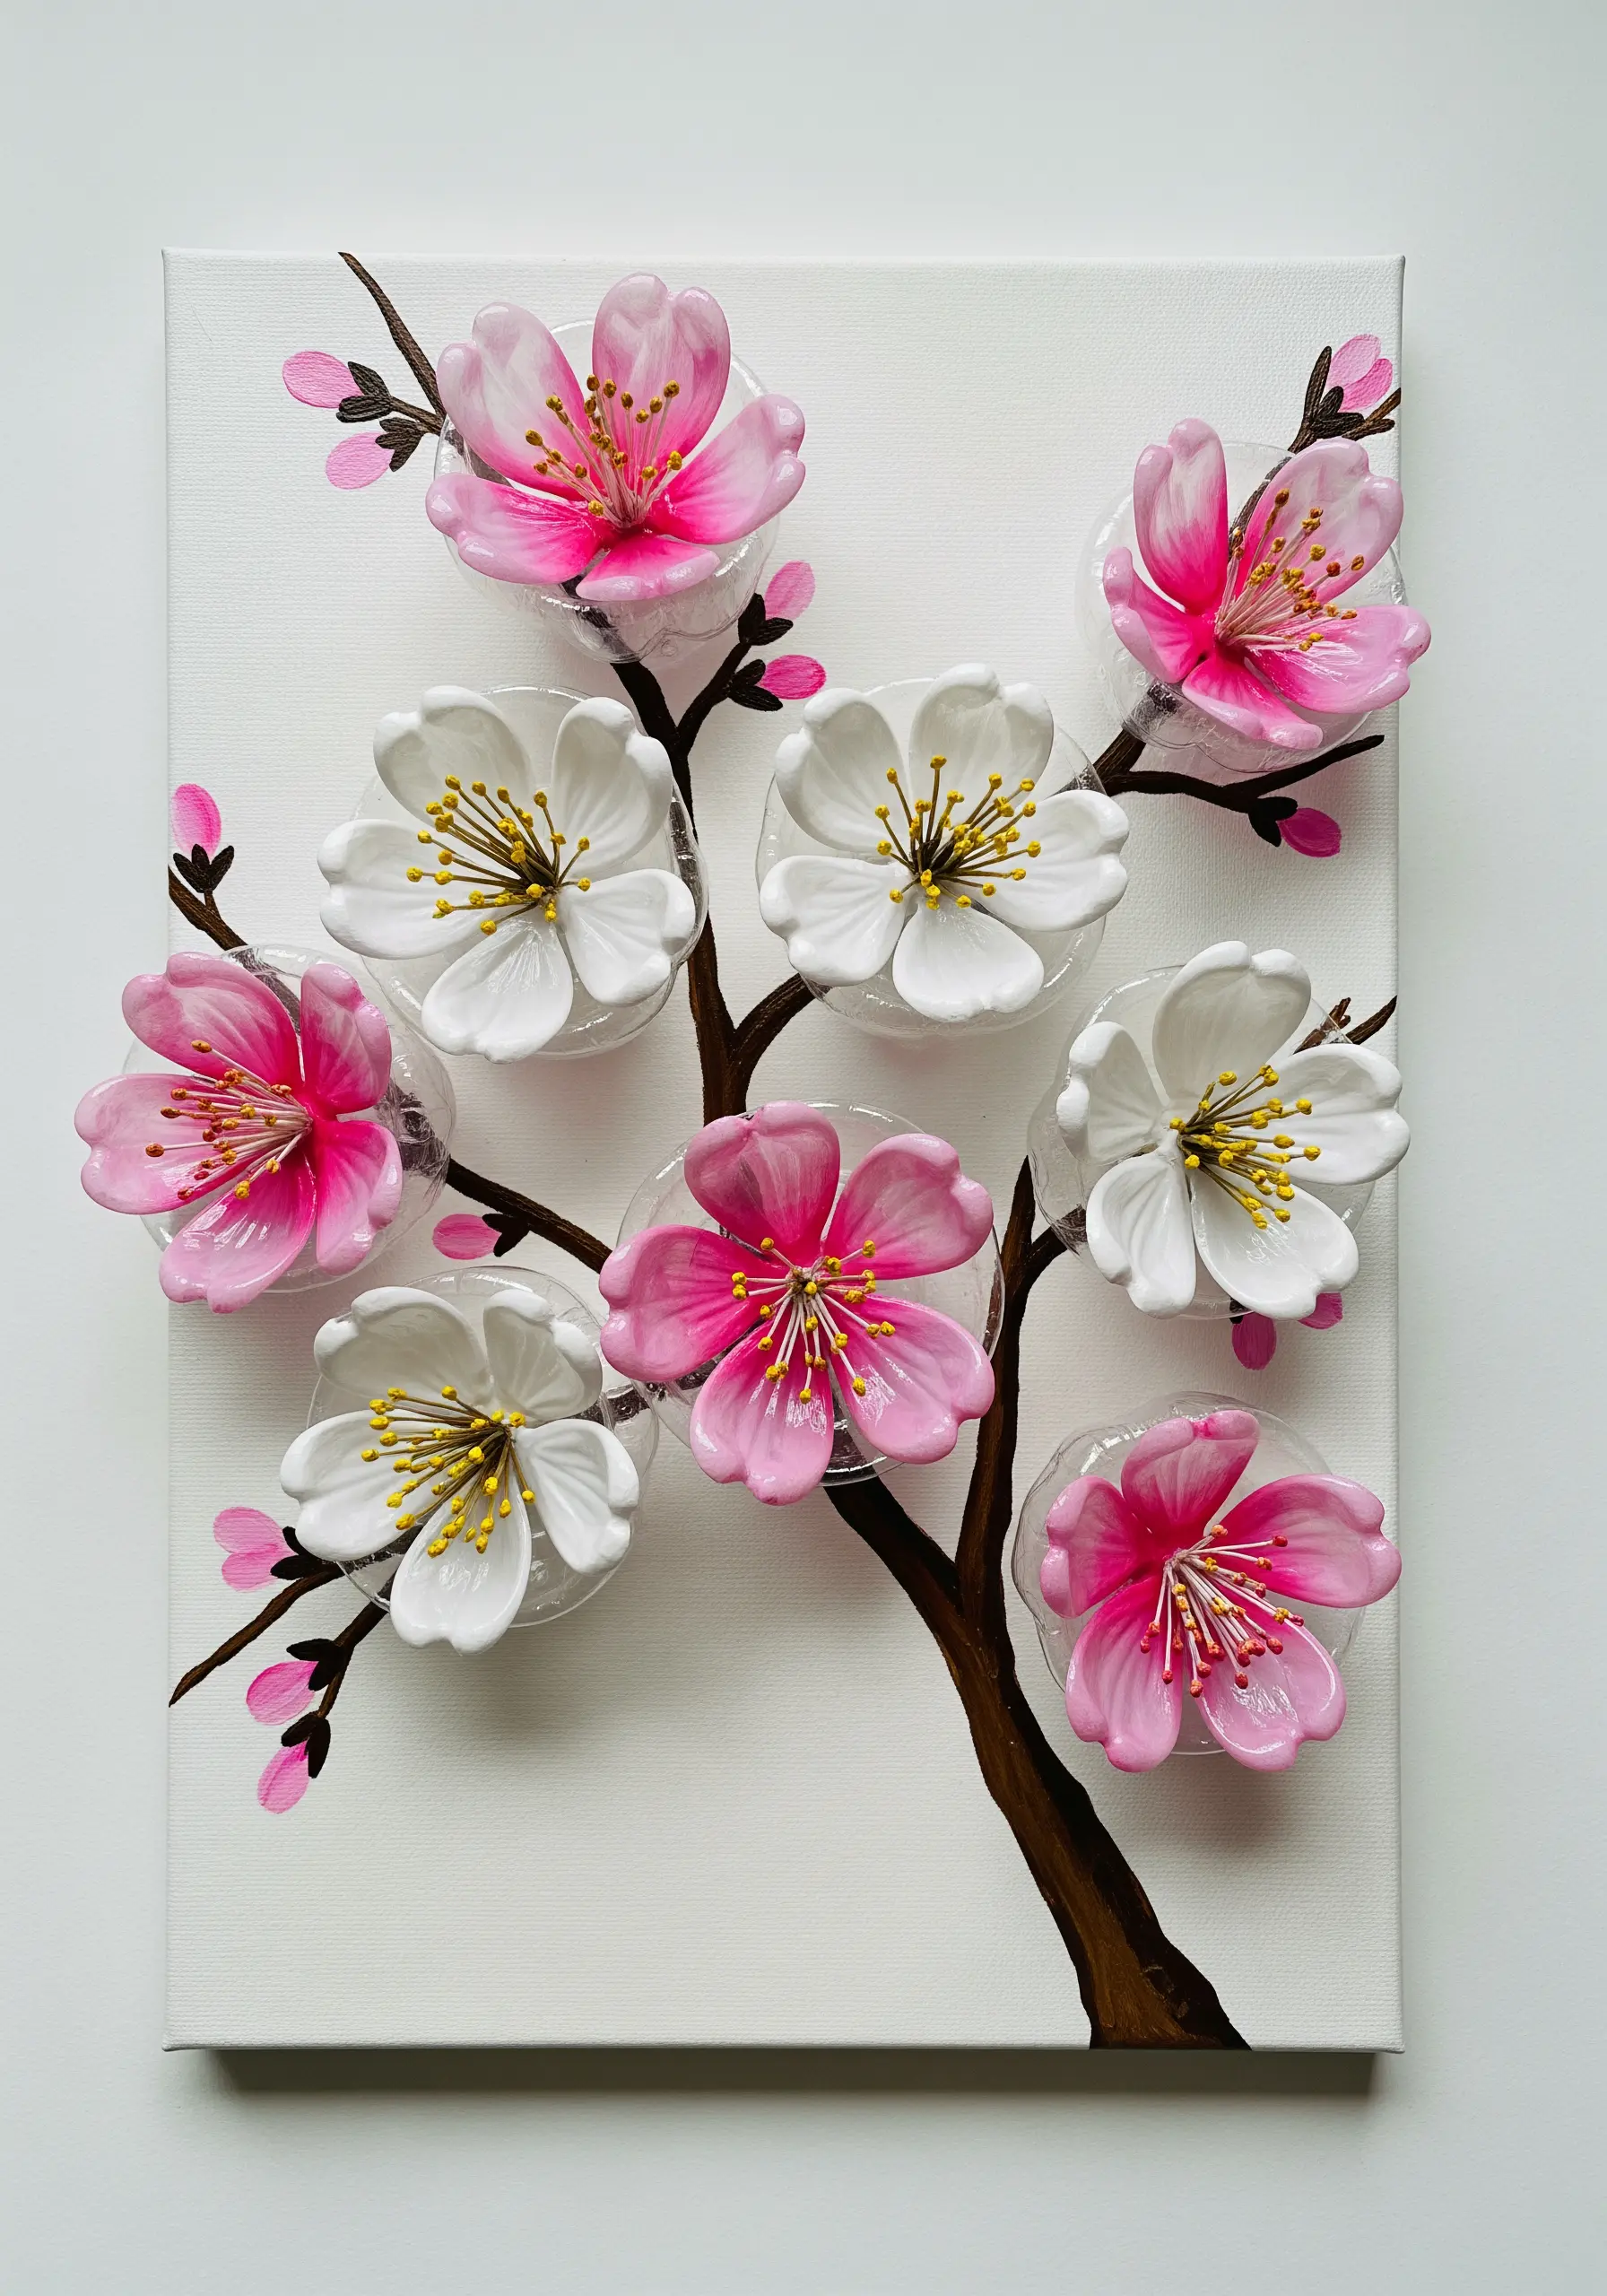
The five-pointed base of many plastic soda bottles is the perfect starting point for a flower.
Cut the bottom off the bottle, then carefully use a heat source like a candle or heat gun to gently soften the cut edges, which will cause them to curl organically like real petals.
Paint the flowers from the inside with acrylics to maintain a glossy finish on the outside.
Mount them on a painted canvas to create stunning, dimensional handmade art objects from recycled materials.
17. Fashion a Floral Wreath from an Egg Carton
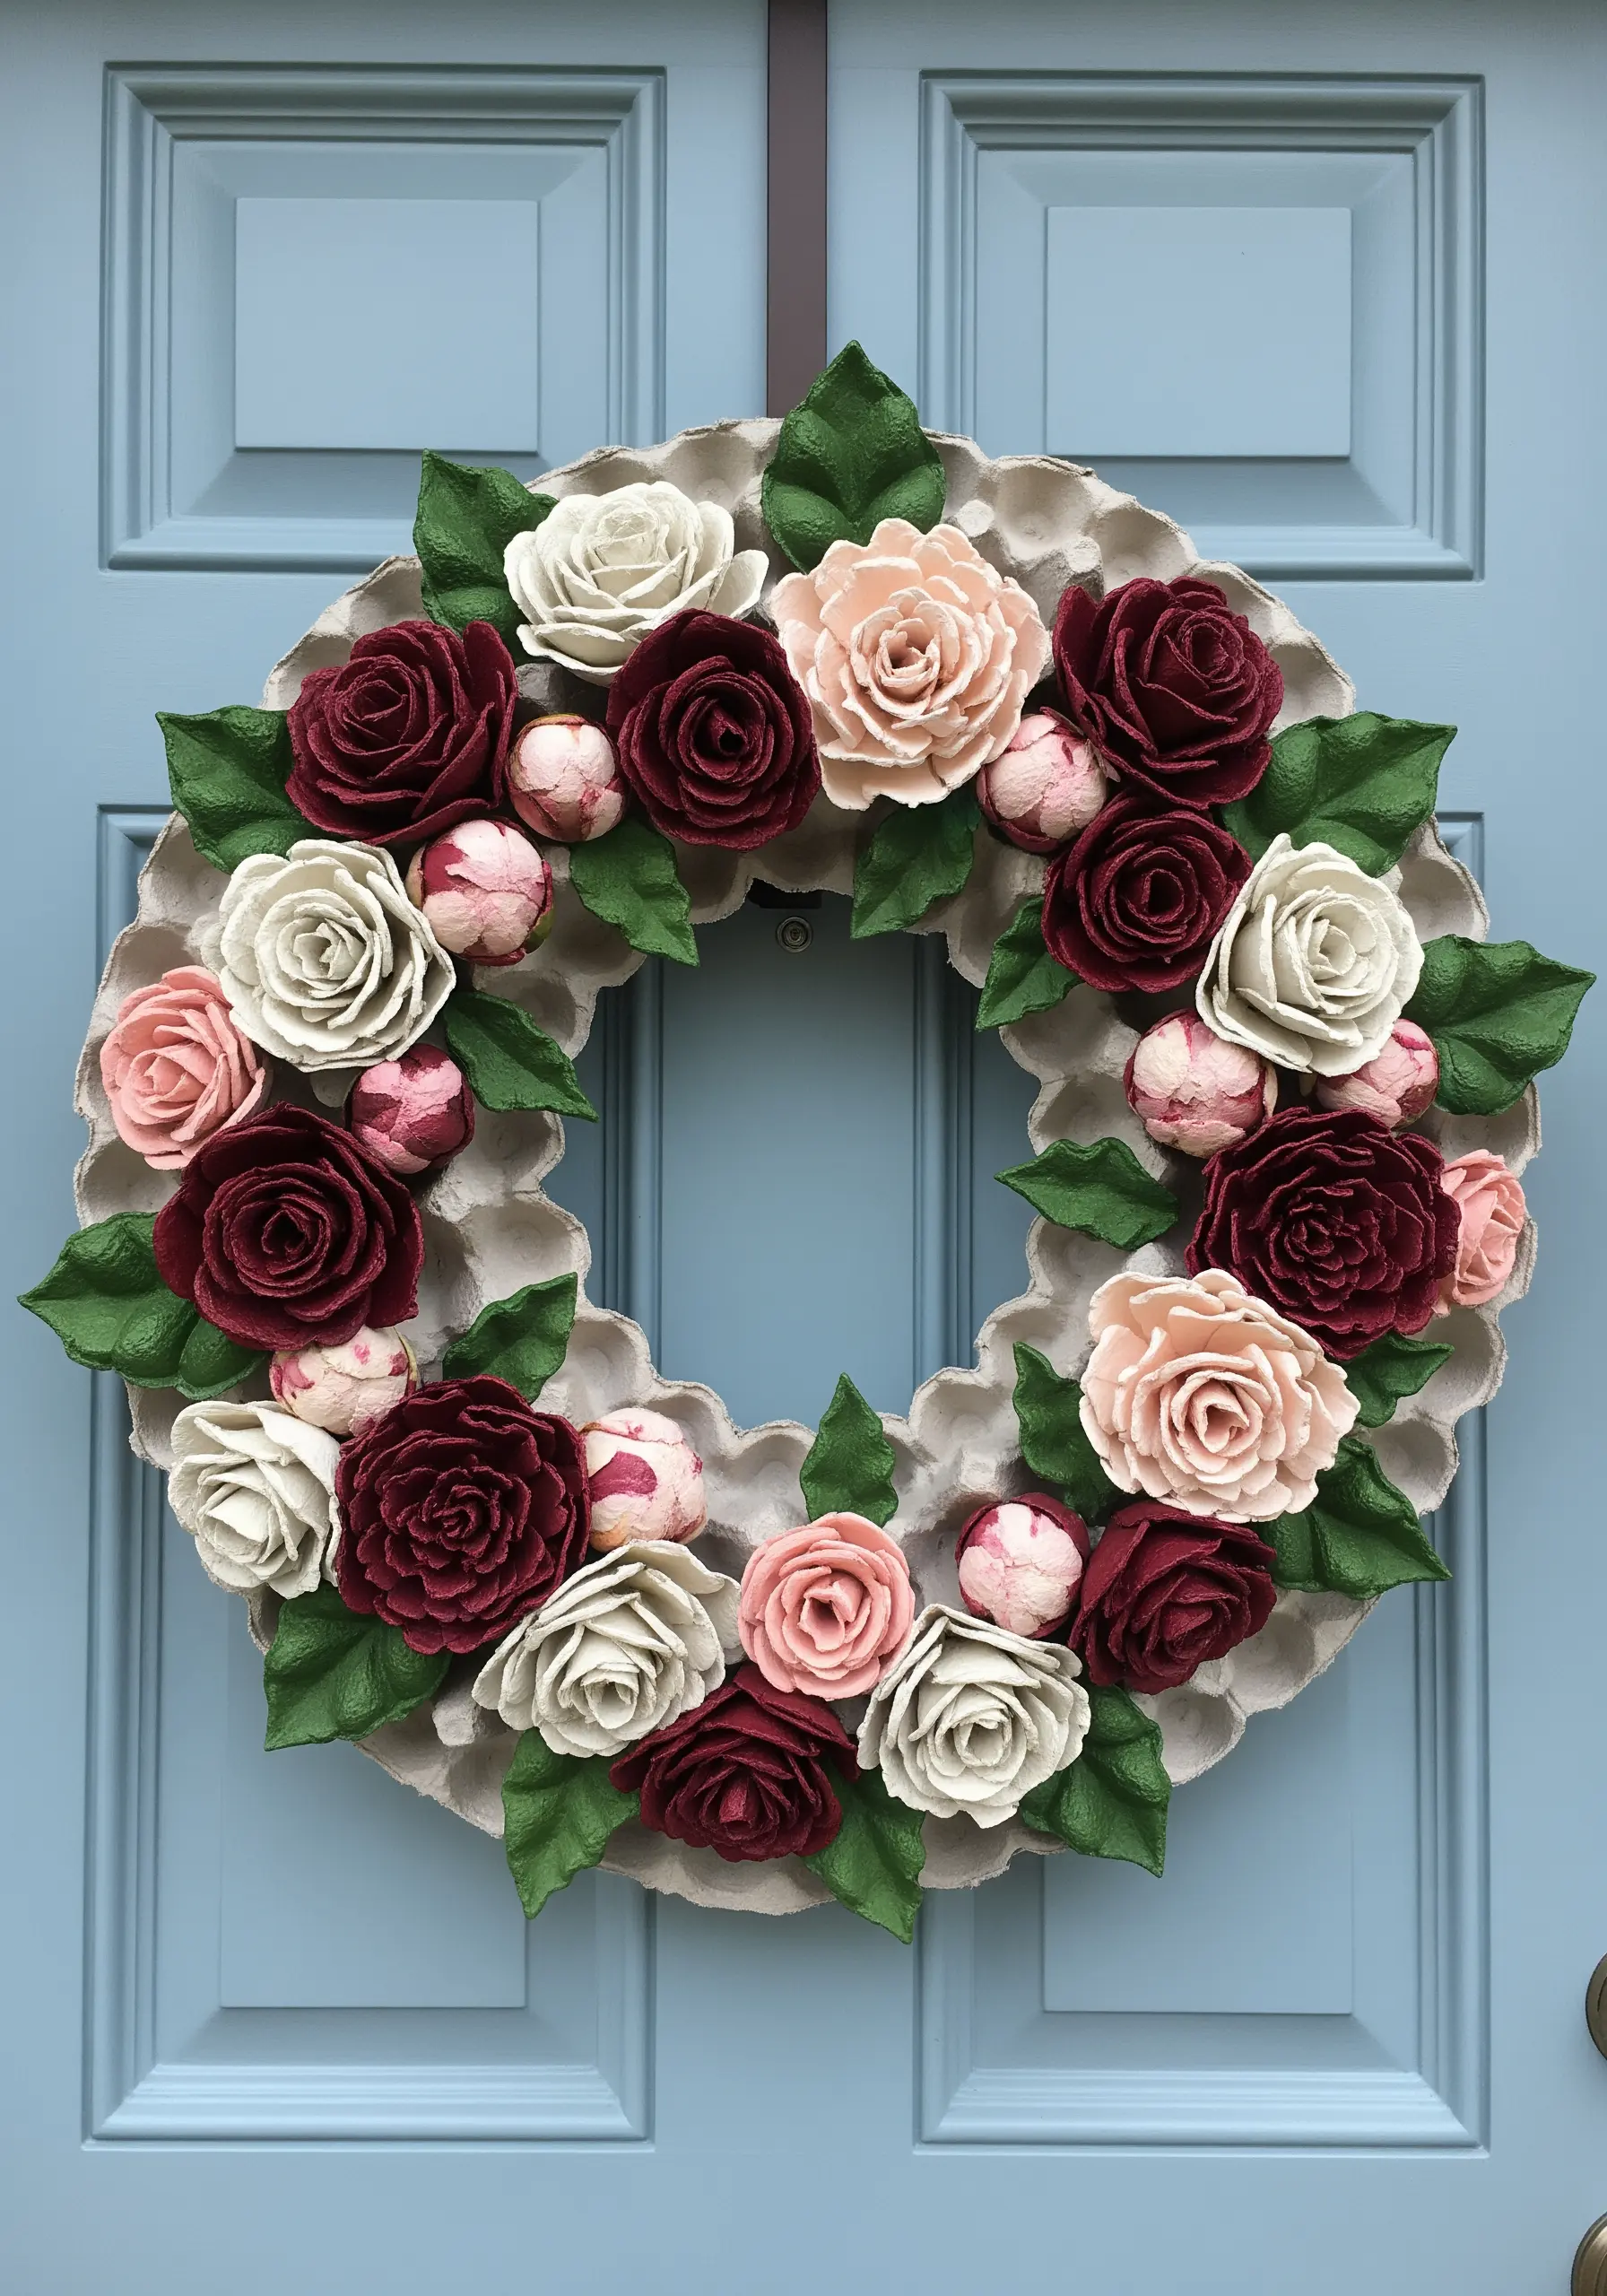
The individual cups of a cardboard egg carton are ideal for creating dimensional flowers.
Cut out each cup and shape them by making slits down the sides and curling the edges outward to form petals.
You can create fuller blooms, like roses and peonies, by layering several shaped cups inside one another.
Paint your flowers and leaves in rich, varied tones and hot glue them to a cardboard wreath form for a surprisingly lush and romantic piece of decor.
18. Craft a Lifelike Felt Succulent Garden
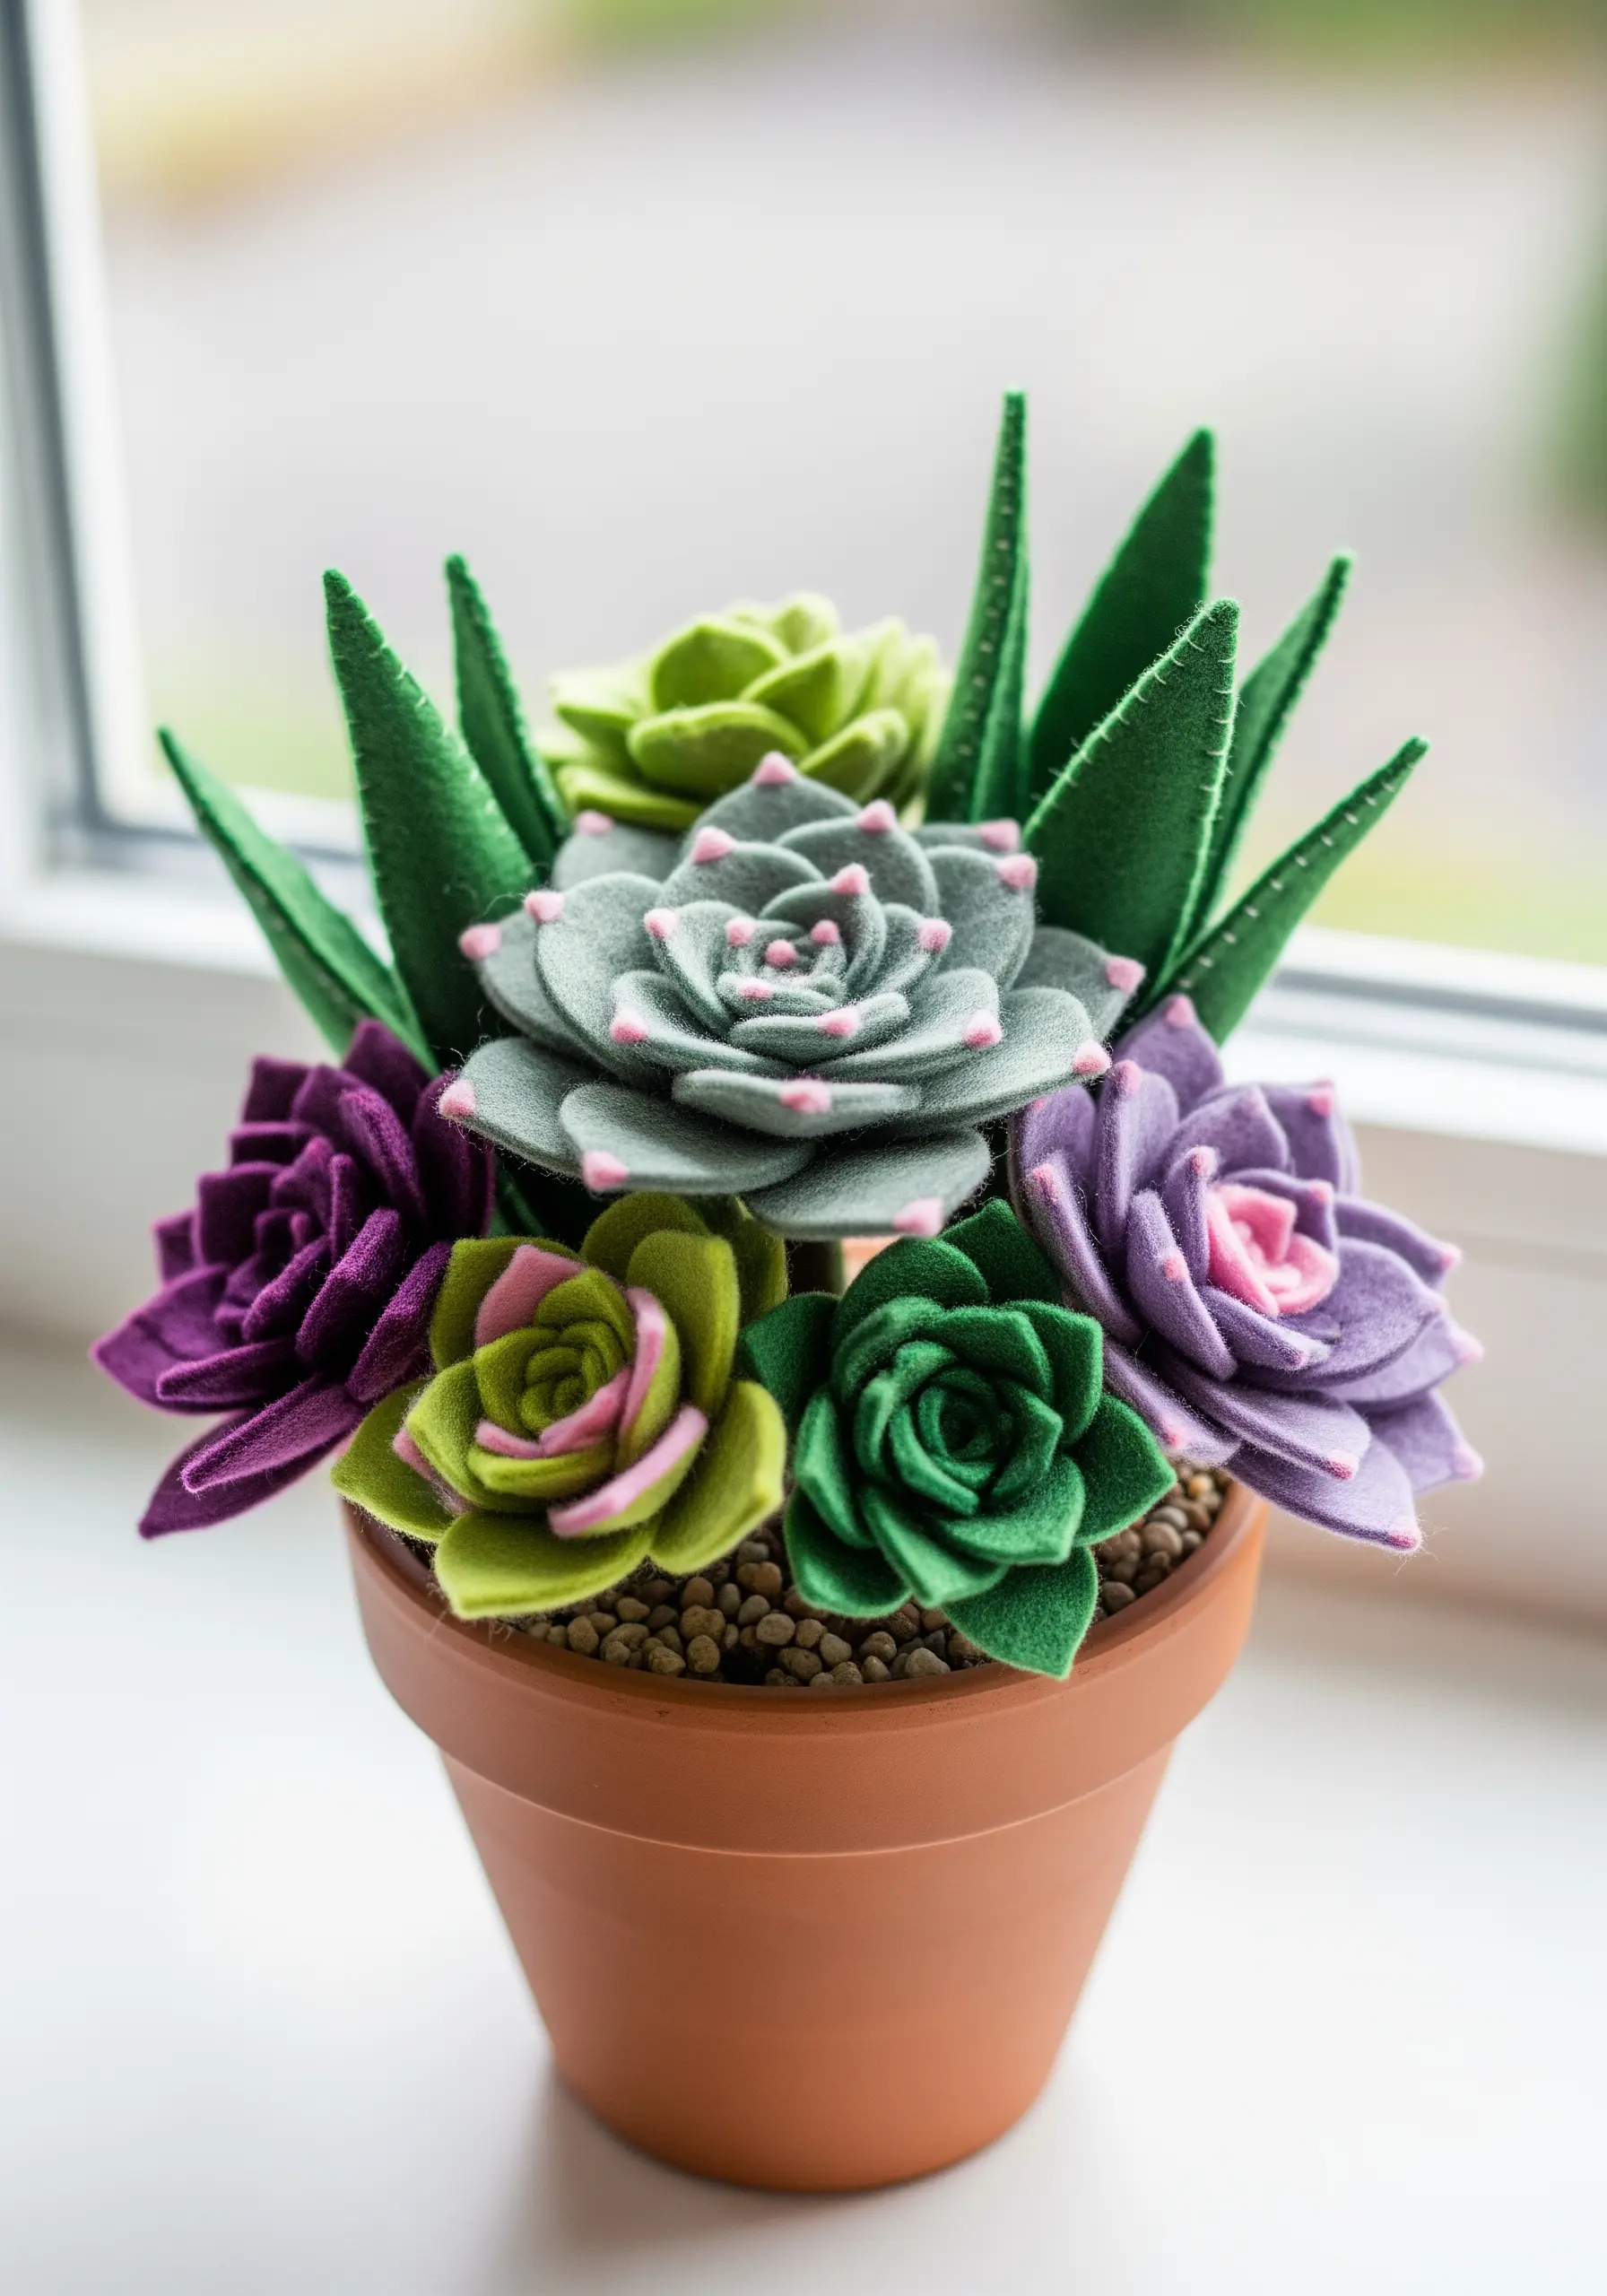
Build a botanical arrangement that will never wilt by cutting and layering felt.
Cut out dozens of individual leaf shapes from various shades of green, gray, and purple felt.
Begin assembling your succulent by hot-gluing the leaves to a small central point, working your way outwards to create the classic rosette form.
For added realism, brush the edges of the felt leaves with chalk pastels to mimic the subtle color variations of real succulents.
19. Create Meditative Mandala Stones with Dot Painting
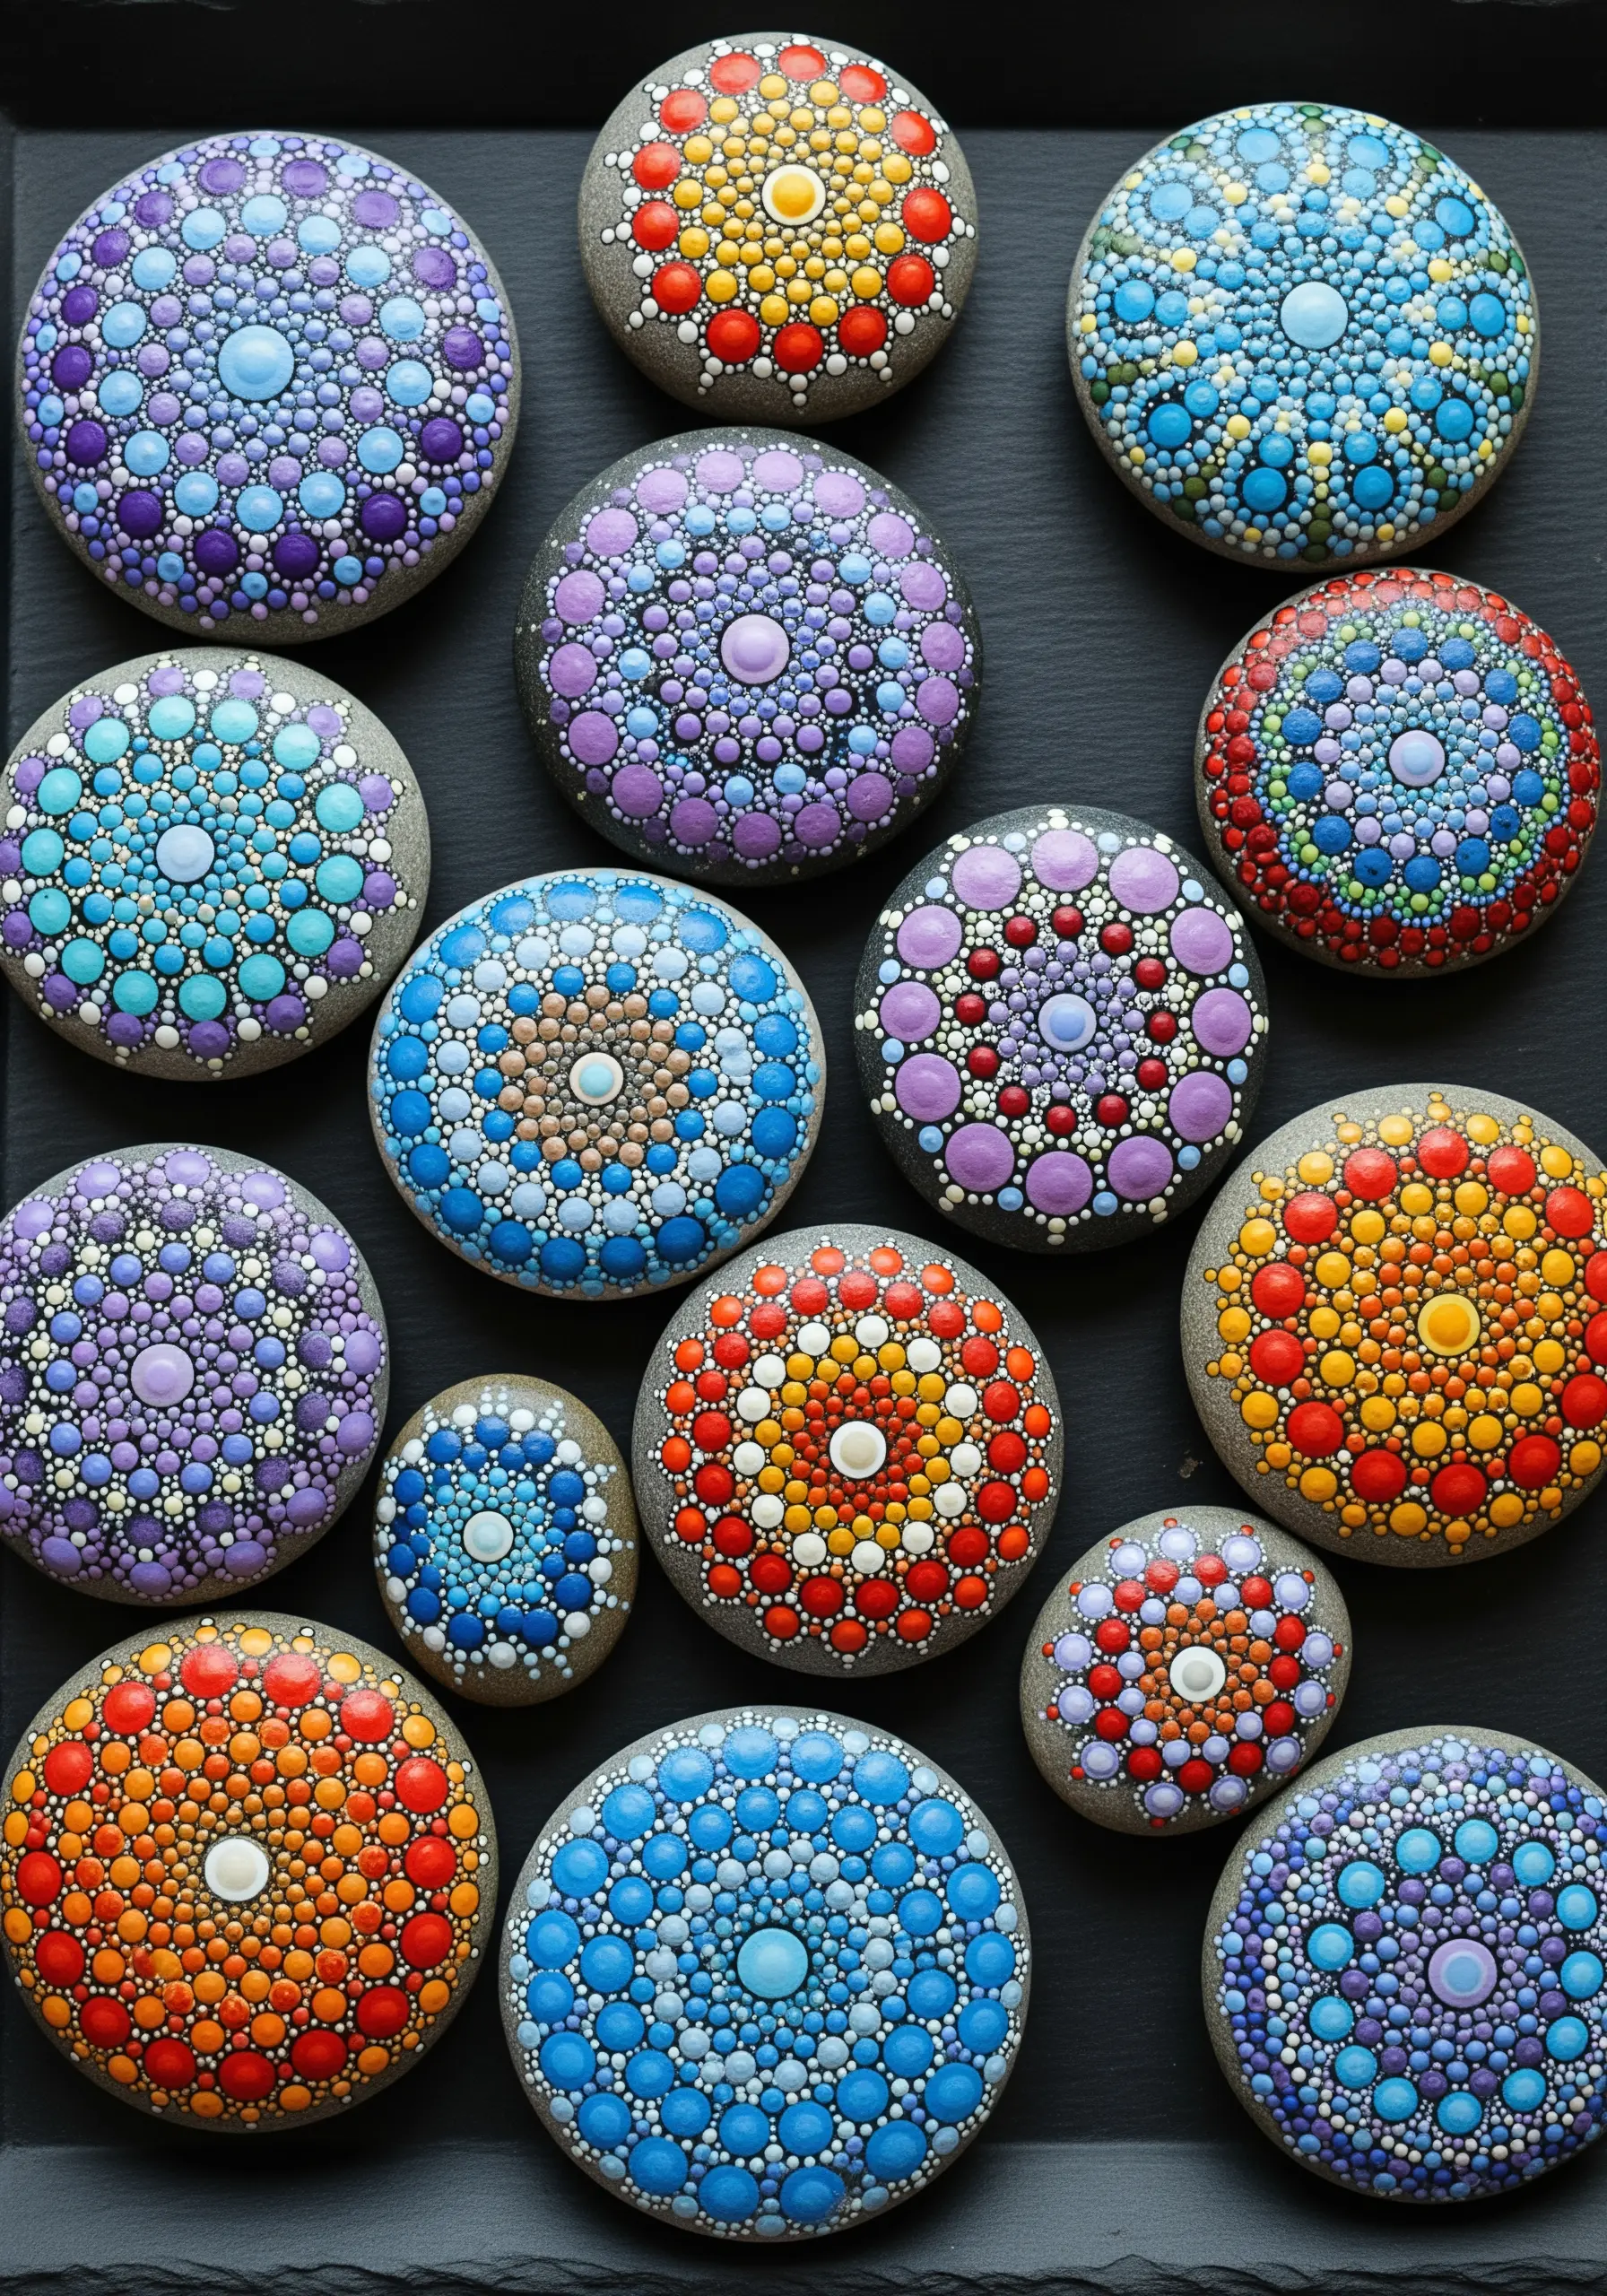
This relaxing process requires no drawing skills, only patience and rhythm.
Using smooth, washed river stones as your canvas, apply acrylic paint with dotting tools of various sizes (the back of a paintbrush, a pinhead, or a Q-tip work well).
Start with a central dot and build your design outwards in concentric circles, alternating colors and dot sizes to create a hypnotic, geometric pattern.
The key is maintaining consistent spacing and pressure for a clean, harmonious result.
20. Design a Shimmering Mosaic Bird Bath with Old CDs
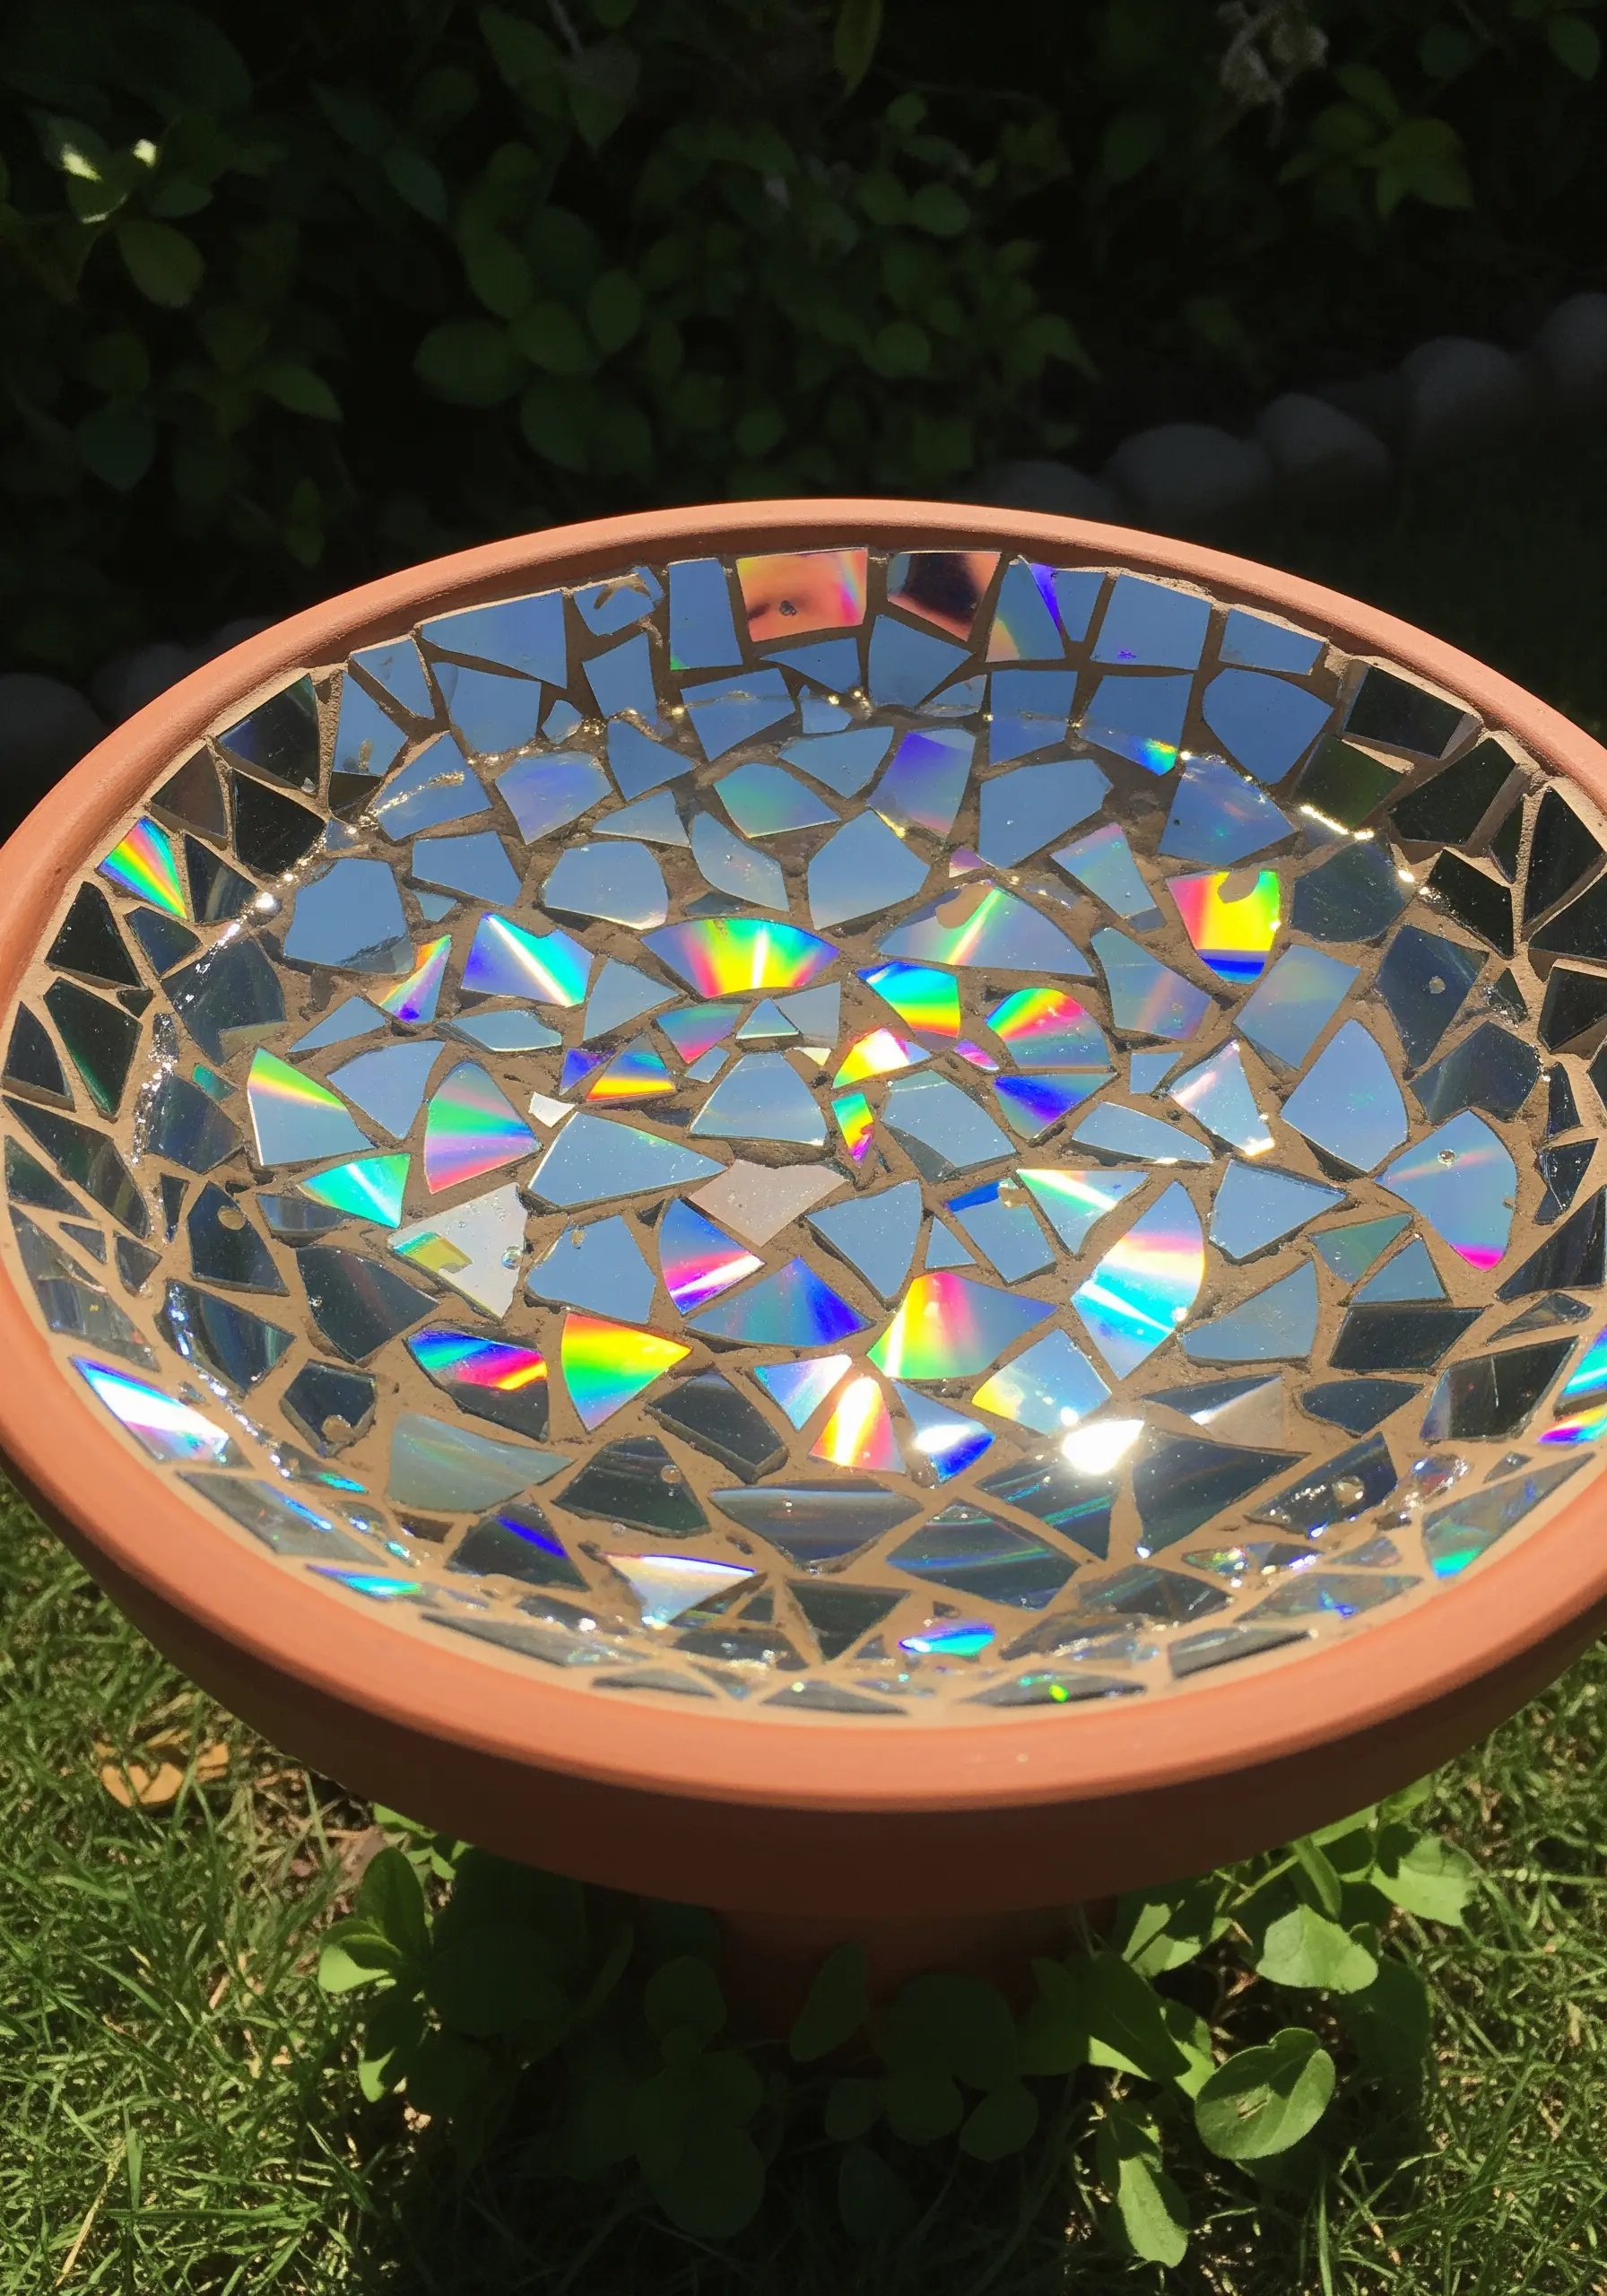
Give obsolete media a dazzling new purpose by turning it into a mosaic.
Carefully break old CDs and DVDs into small, irregular shards (wearing safety glasses is a must).
Glue the pieces shiny-side-up inside a terracotta plant saucer, leaving small gaps between them.
Once the glue is fully dry, apply a waterproof grout to fill the gaps, wiping the excess from the iridescent surfaces before it sets to reveal the shimmering, colorful mosaic.
21. Construct a Modern Geometric Sculpture from Paper
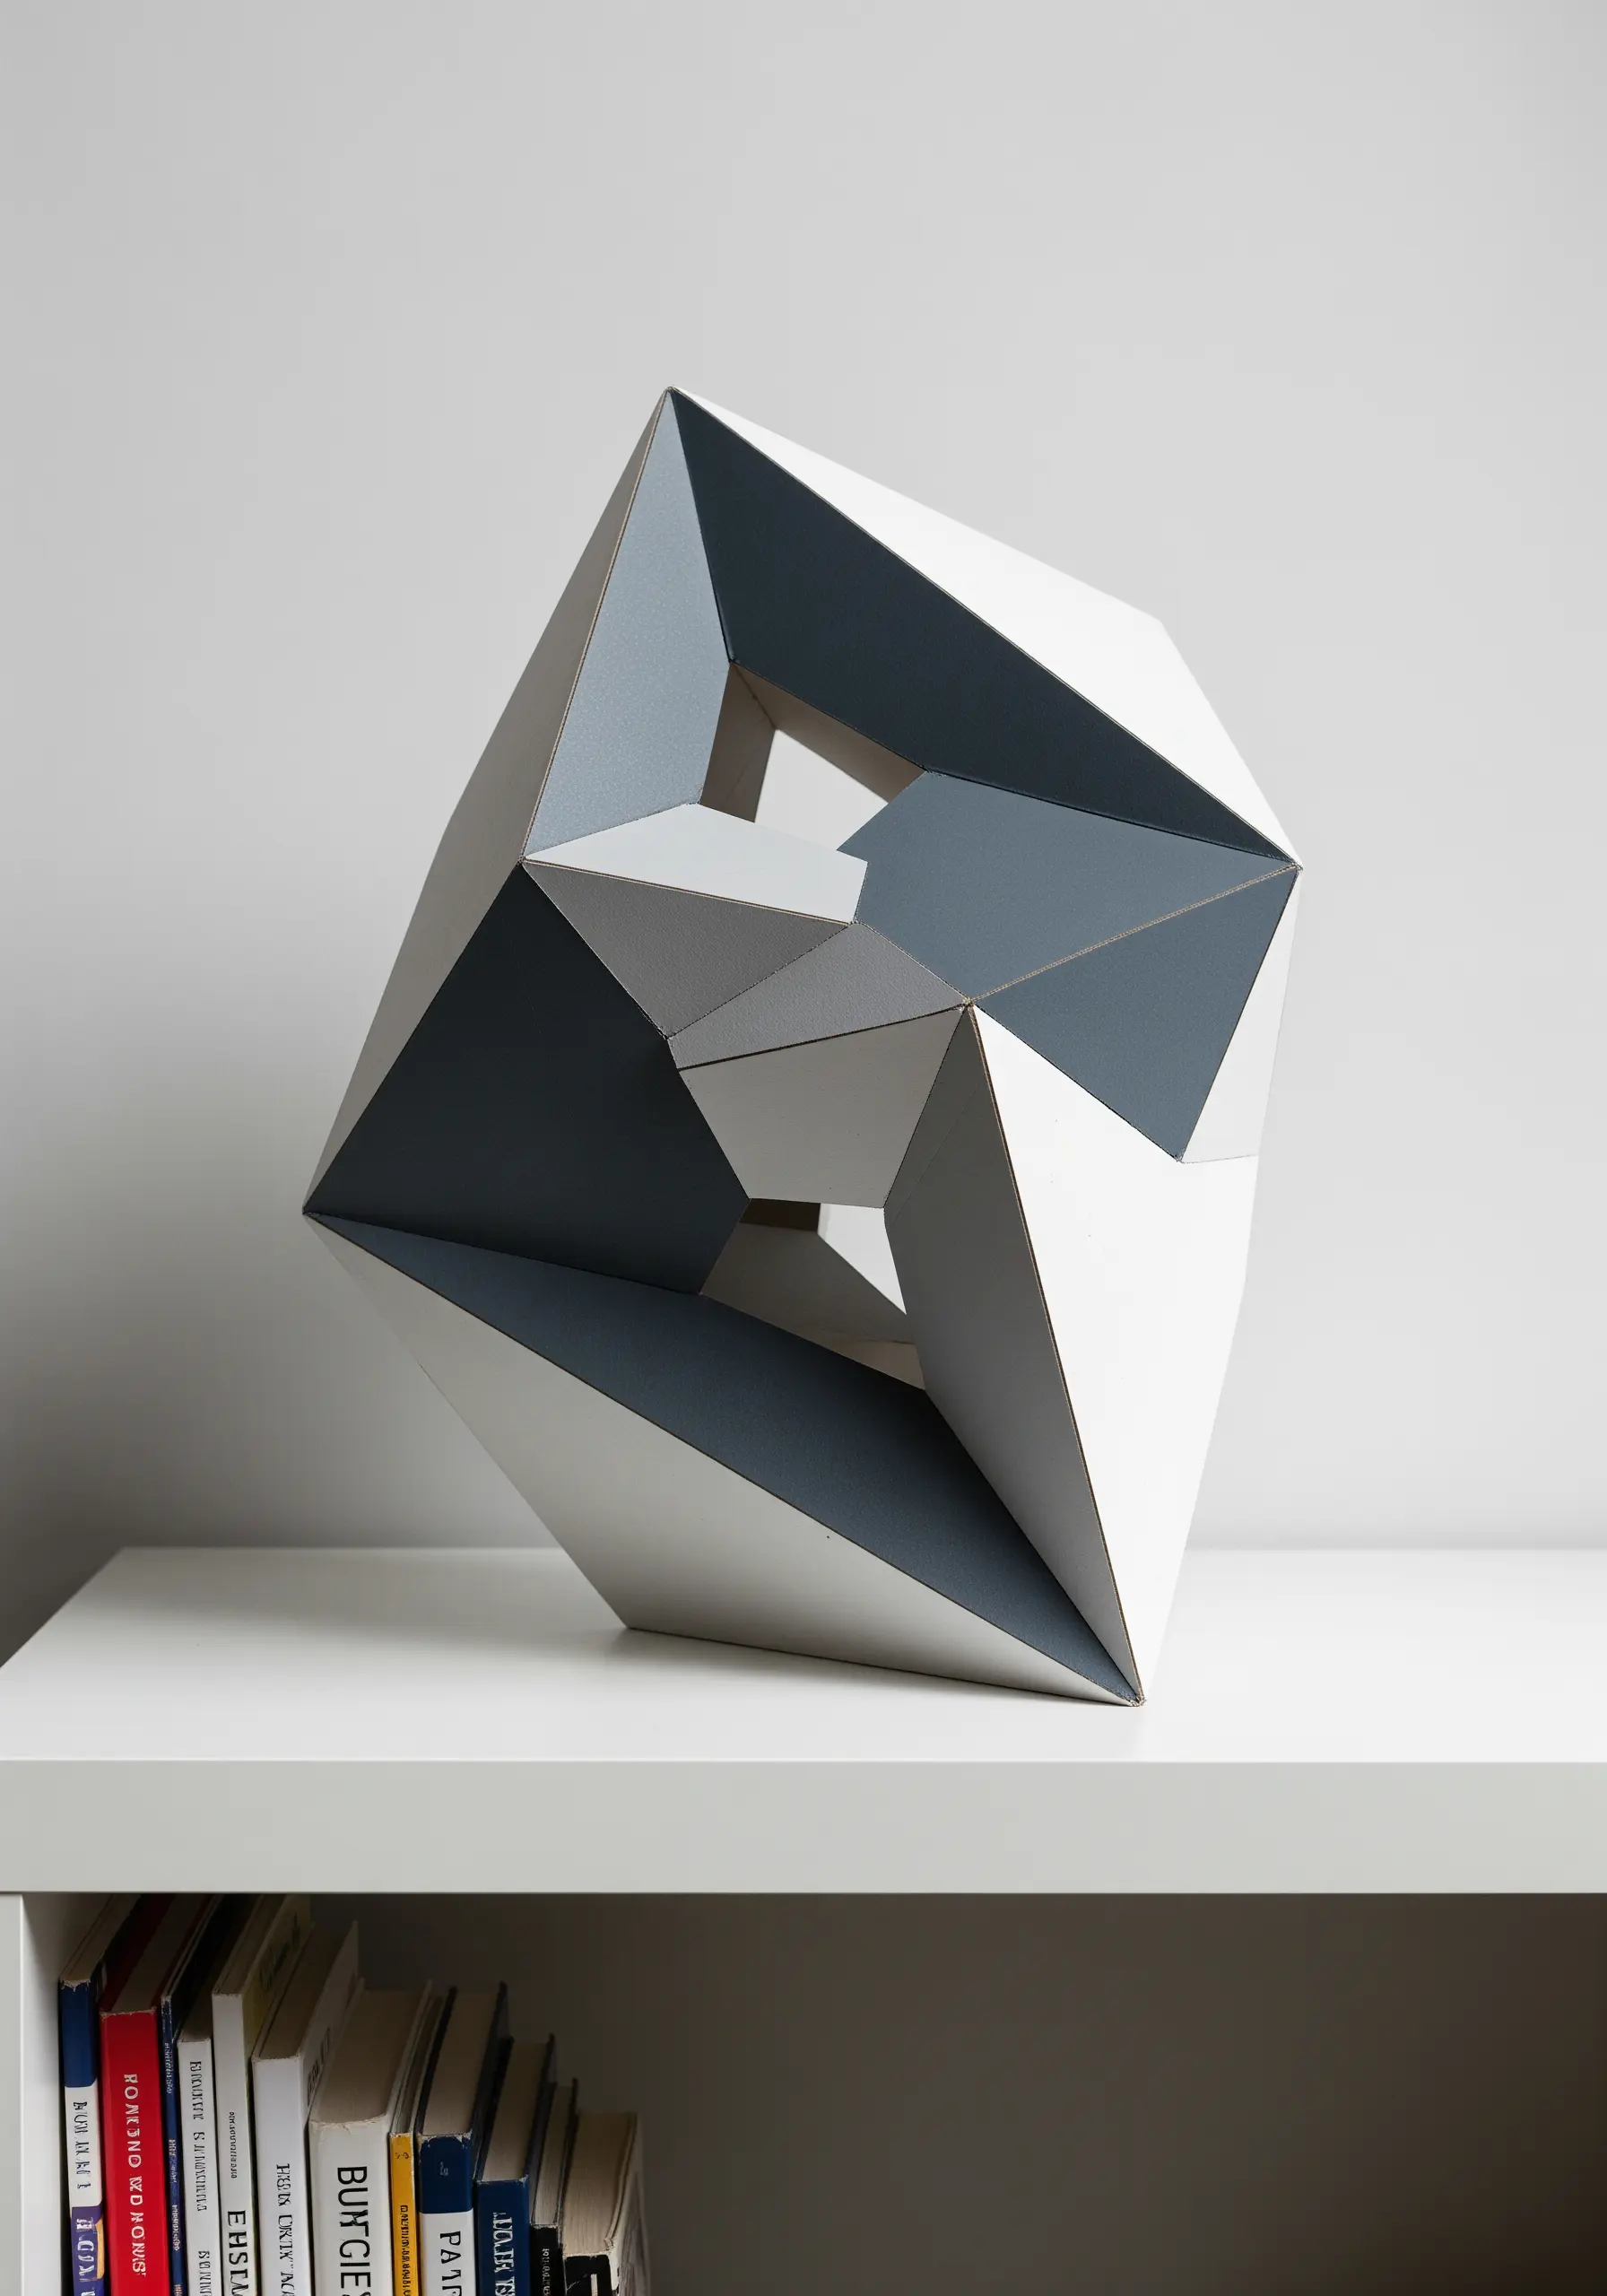
Explore the principles of architecture on a small scale by turning flat cardstock into a 3D object.
Find a printable template for a geometric shape online, or design your own.
The secret to a professional finish lies in precision: use a craft knife for clean cuts and score all fold lines with a ruler and a blunt tool before assembling.
Patiently gluing the tabs together will result in a crisp, architectural form that looks far more complex than the materials it’s made from.
22. Create a Striking Portrait with a Magazine Collage
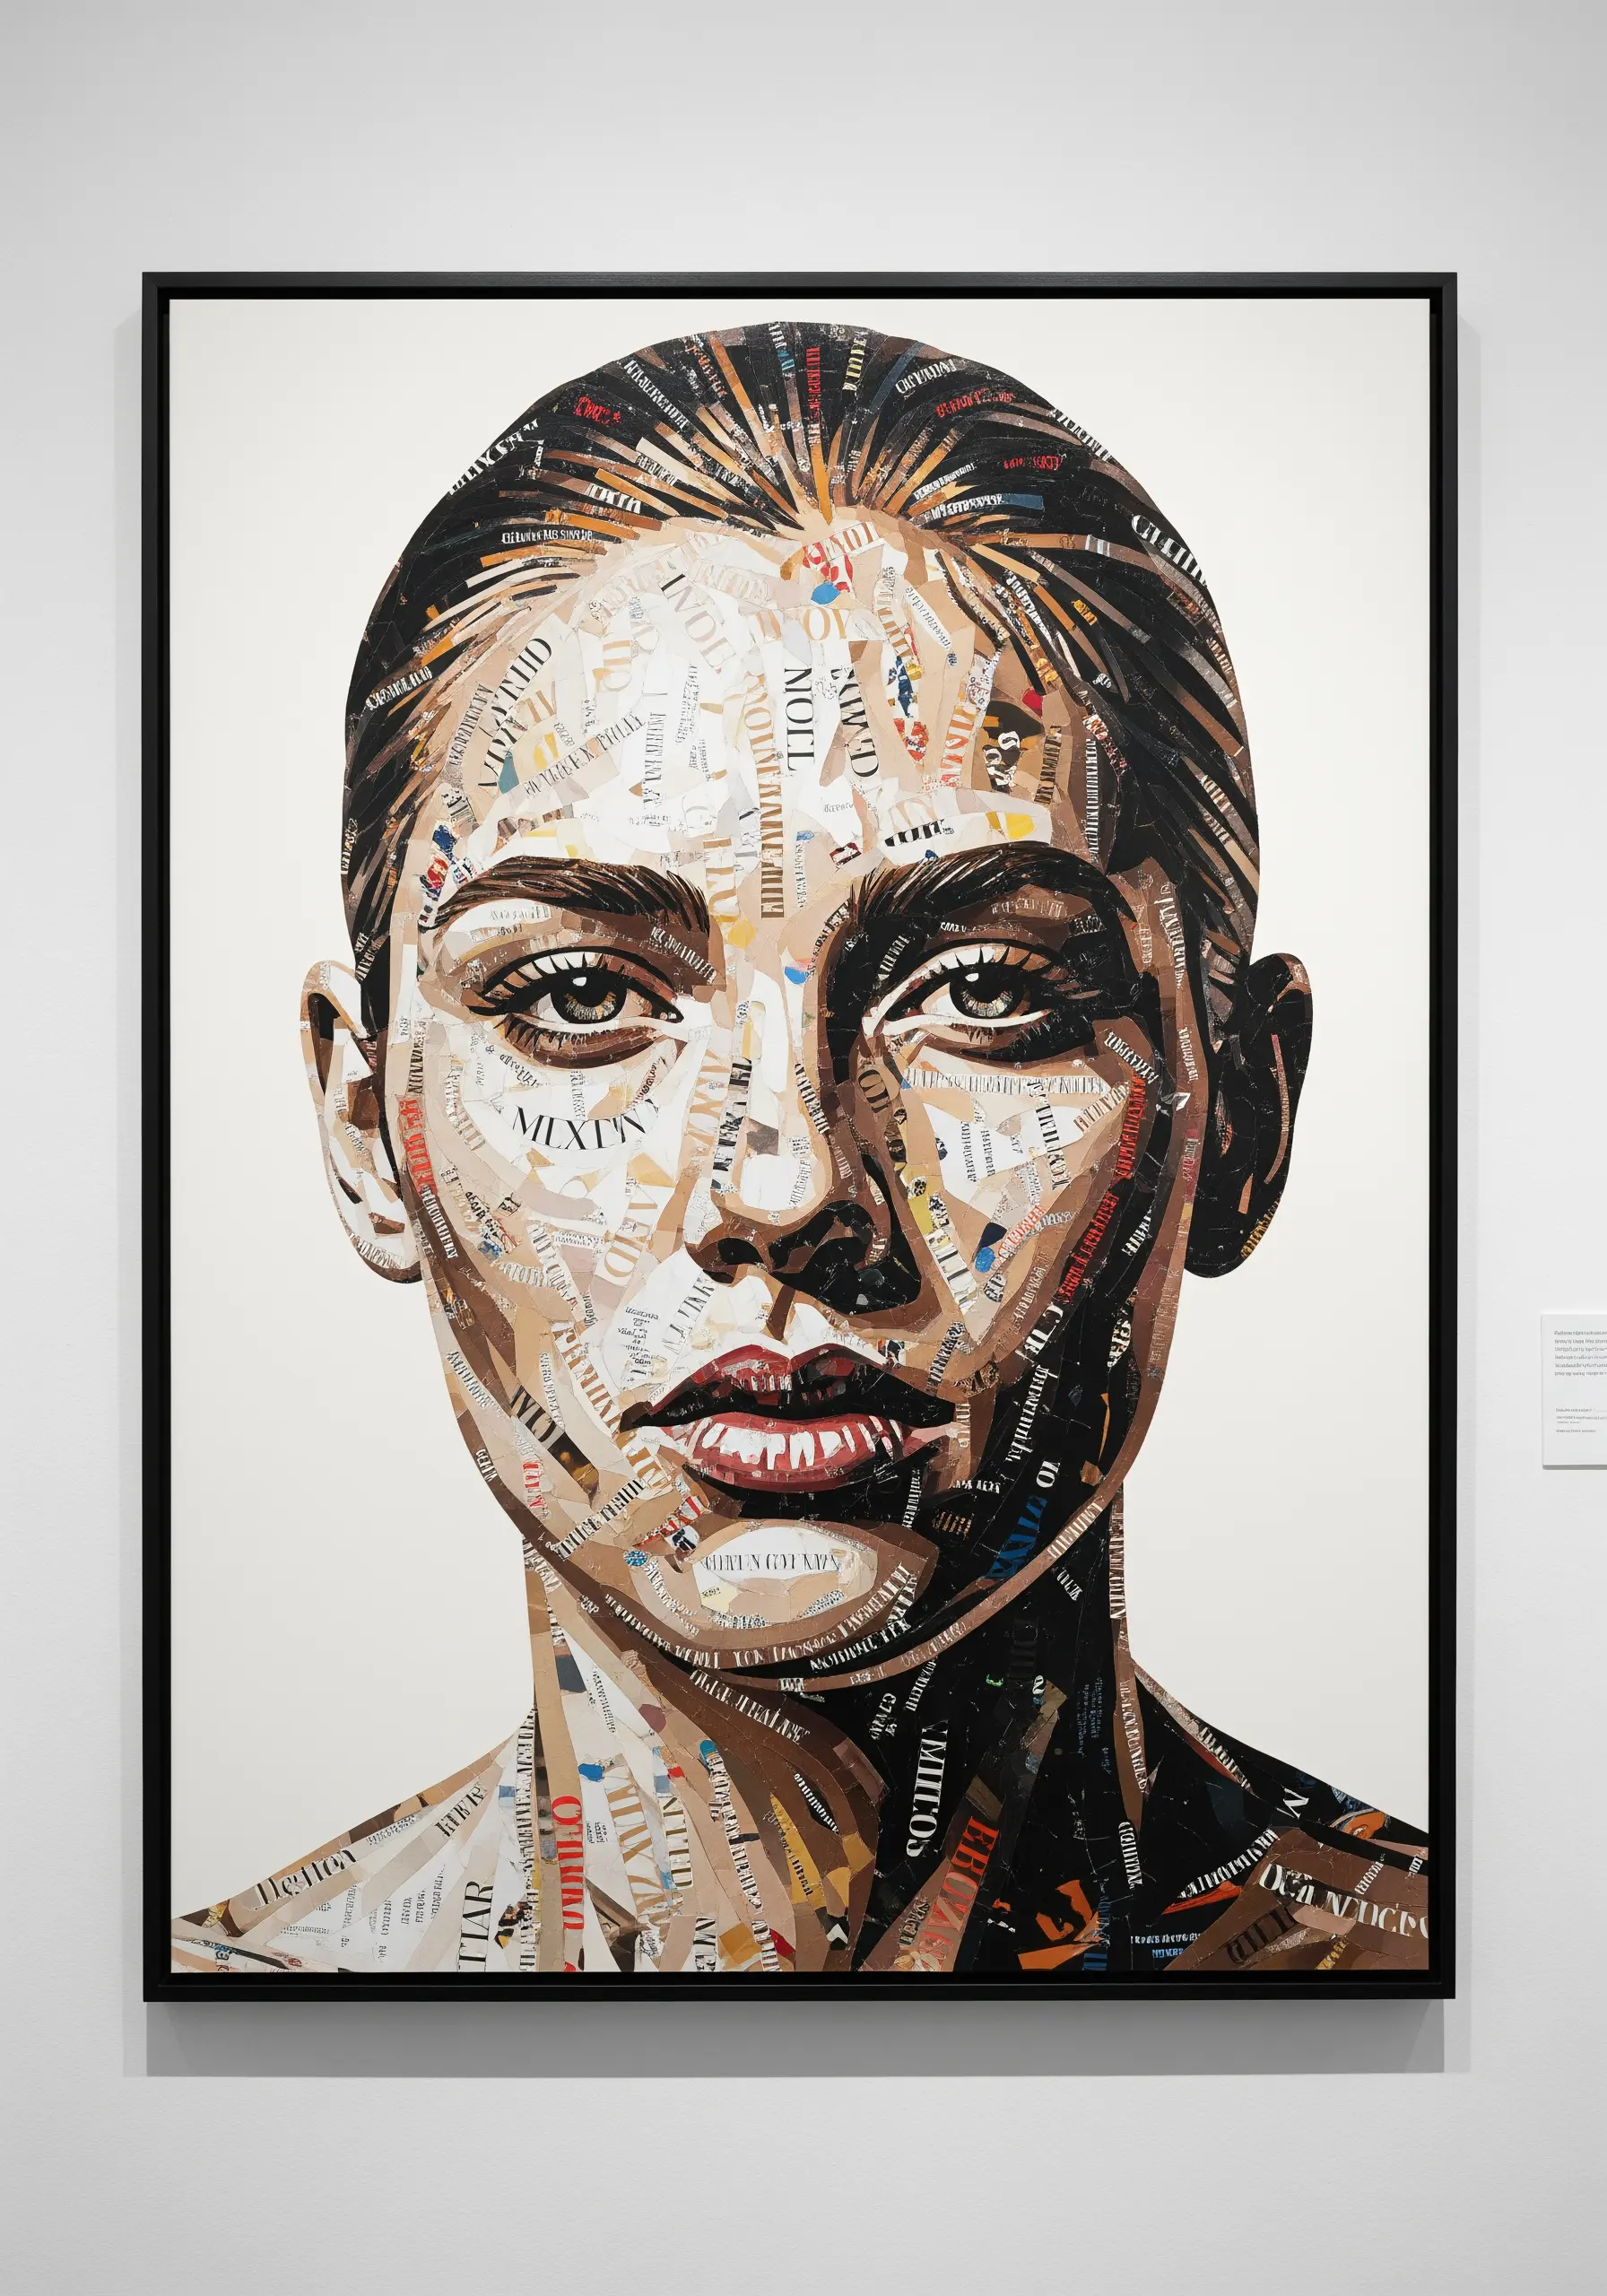
Think of this technique as painting with paper, using color, texture, and text as your palette.
Lightly sketch a portrait onto a canvas, then begin searching through magazines for strips of color that correspond to shadows, mid-tones, and highlights.
Tear or cut the paper and glue the pieces down, overlapping them to build up form and dimension.
The fragmented text and images within the paper strips add a layer of complexity and depth that paint alone cannot achieve, turning them into amazing DIY collage projects.
23. Craft 3D Knitted Word Art on a Burlap Canvas

Combine soft and rustic textures for a piece of decor with gentle, tactile appeal.
Use a knitting spool (or French knitter) to create a long, hollow tube of yarn called an I-cord.
Once you have a sufficient length, you can gently shape this flexible cord into cursive letters or words.
Mount your word art onto a stretched burlap canvas, securing it with a few discreet stitches or dabs of fabric glue for a beautiful 3D effect.
24. Weave Modern Placemats from Paper or Fabric Strips
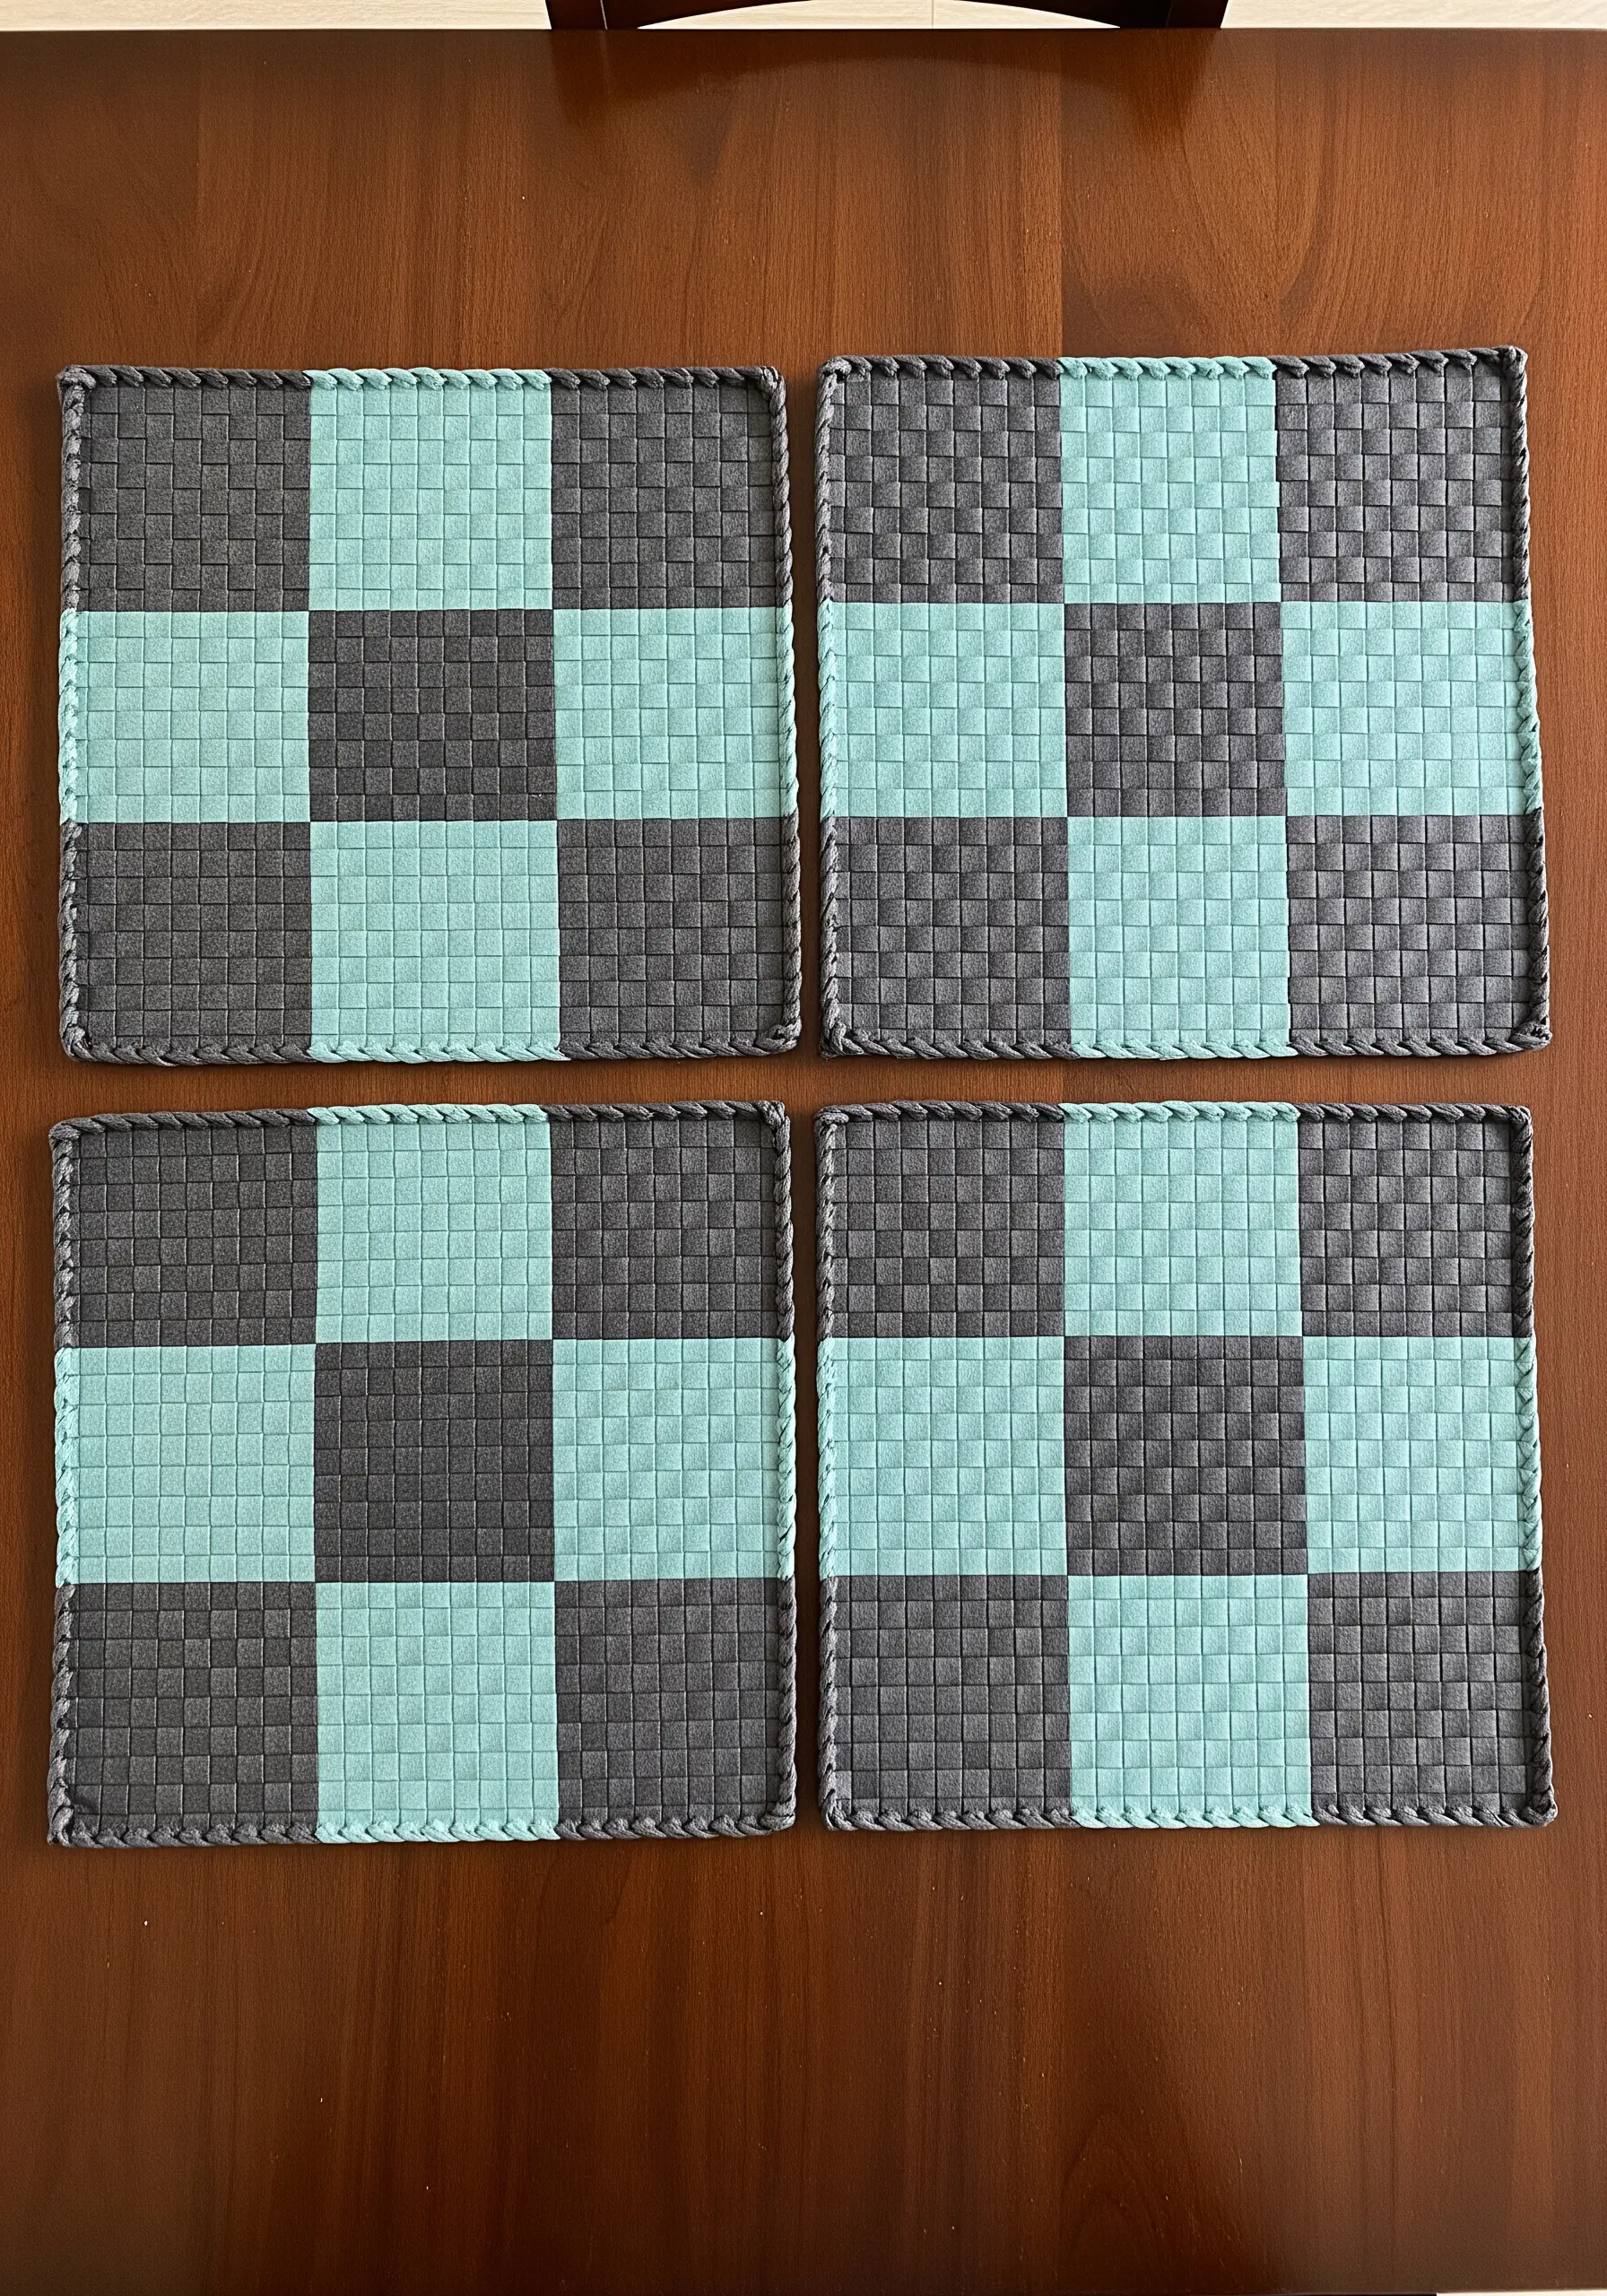
This classic weaving project is a perfect introduction to creating your own textiles.
You can use strips of sturdy cardstock, felt, or even upcycled fabric.
Use a simple cardboard loom or a picture frame to string your vertical ‘warp’ threads.
Then, simply weave your horizontal ‘weft’ strips over and under the warp threads, alternating colors to create a modern checkerboard or striped pattern.
25. Sculpt a Delicate Tree of Life with Wire and Beads
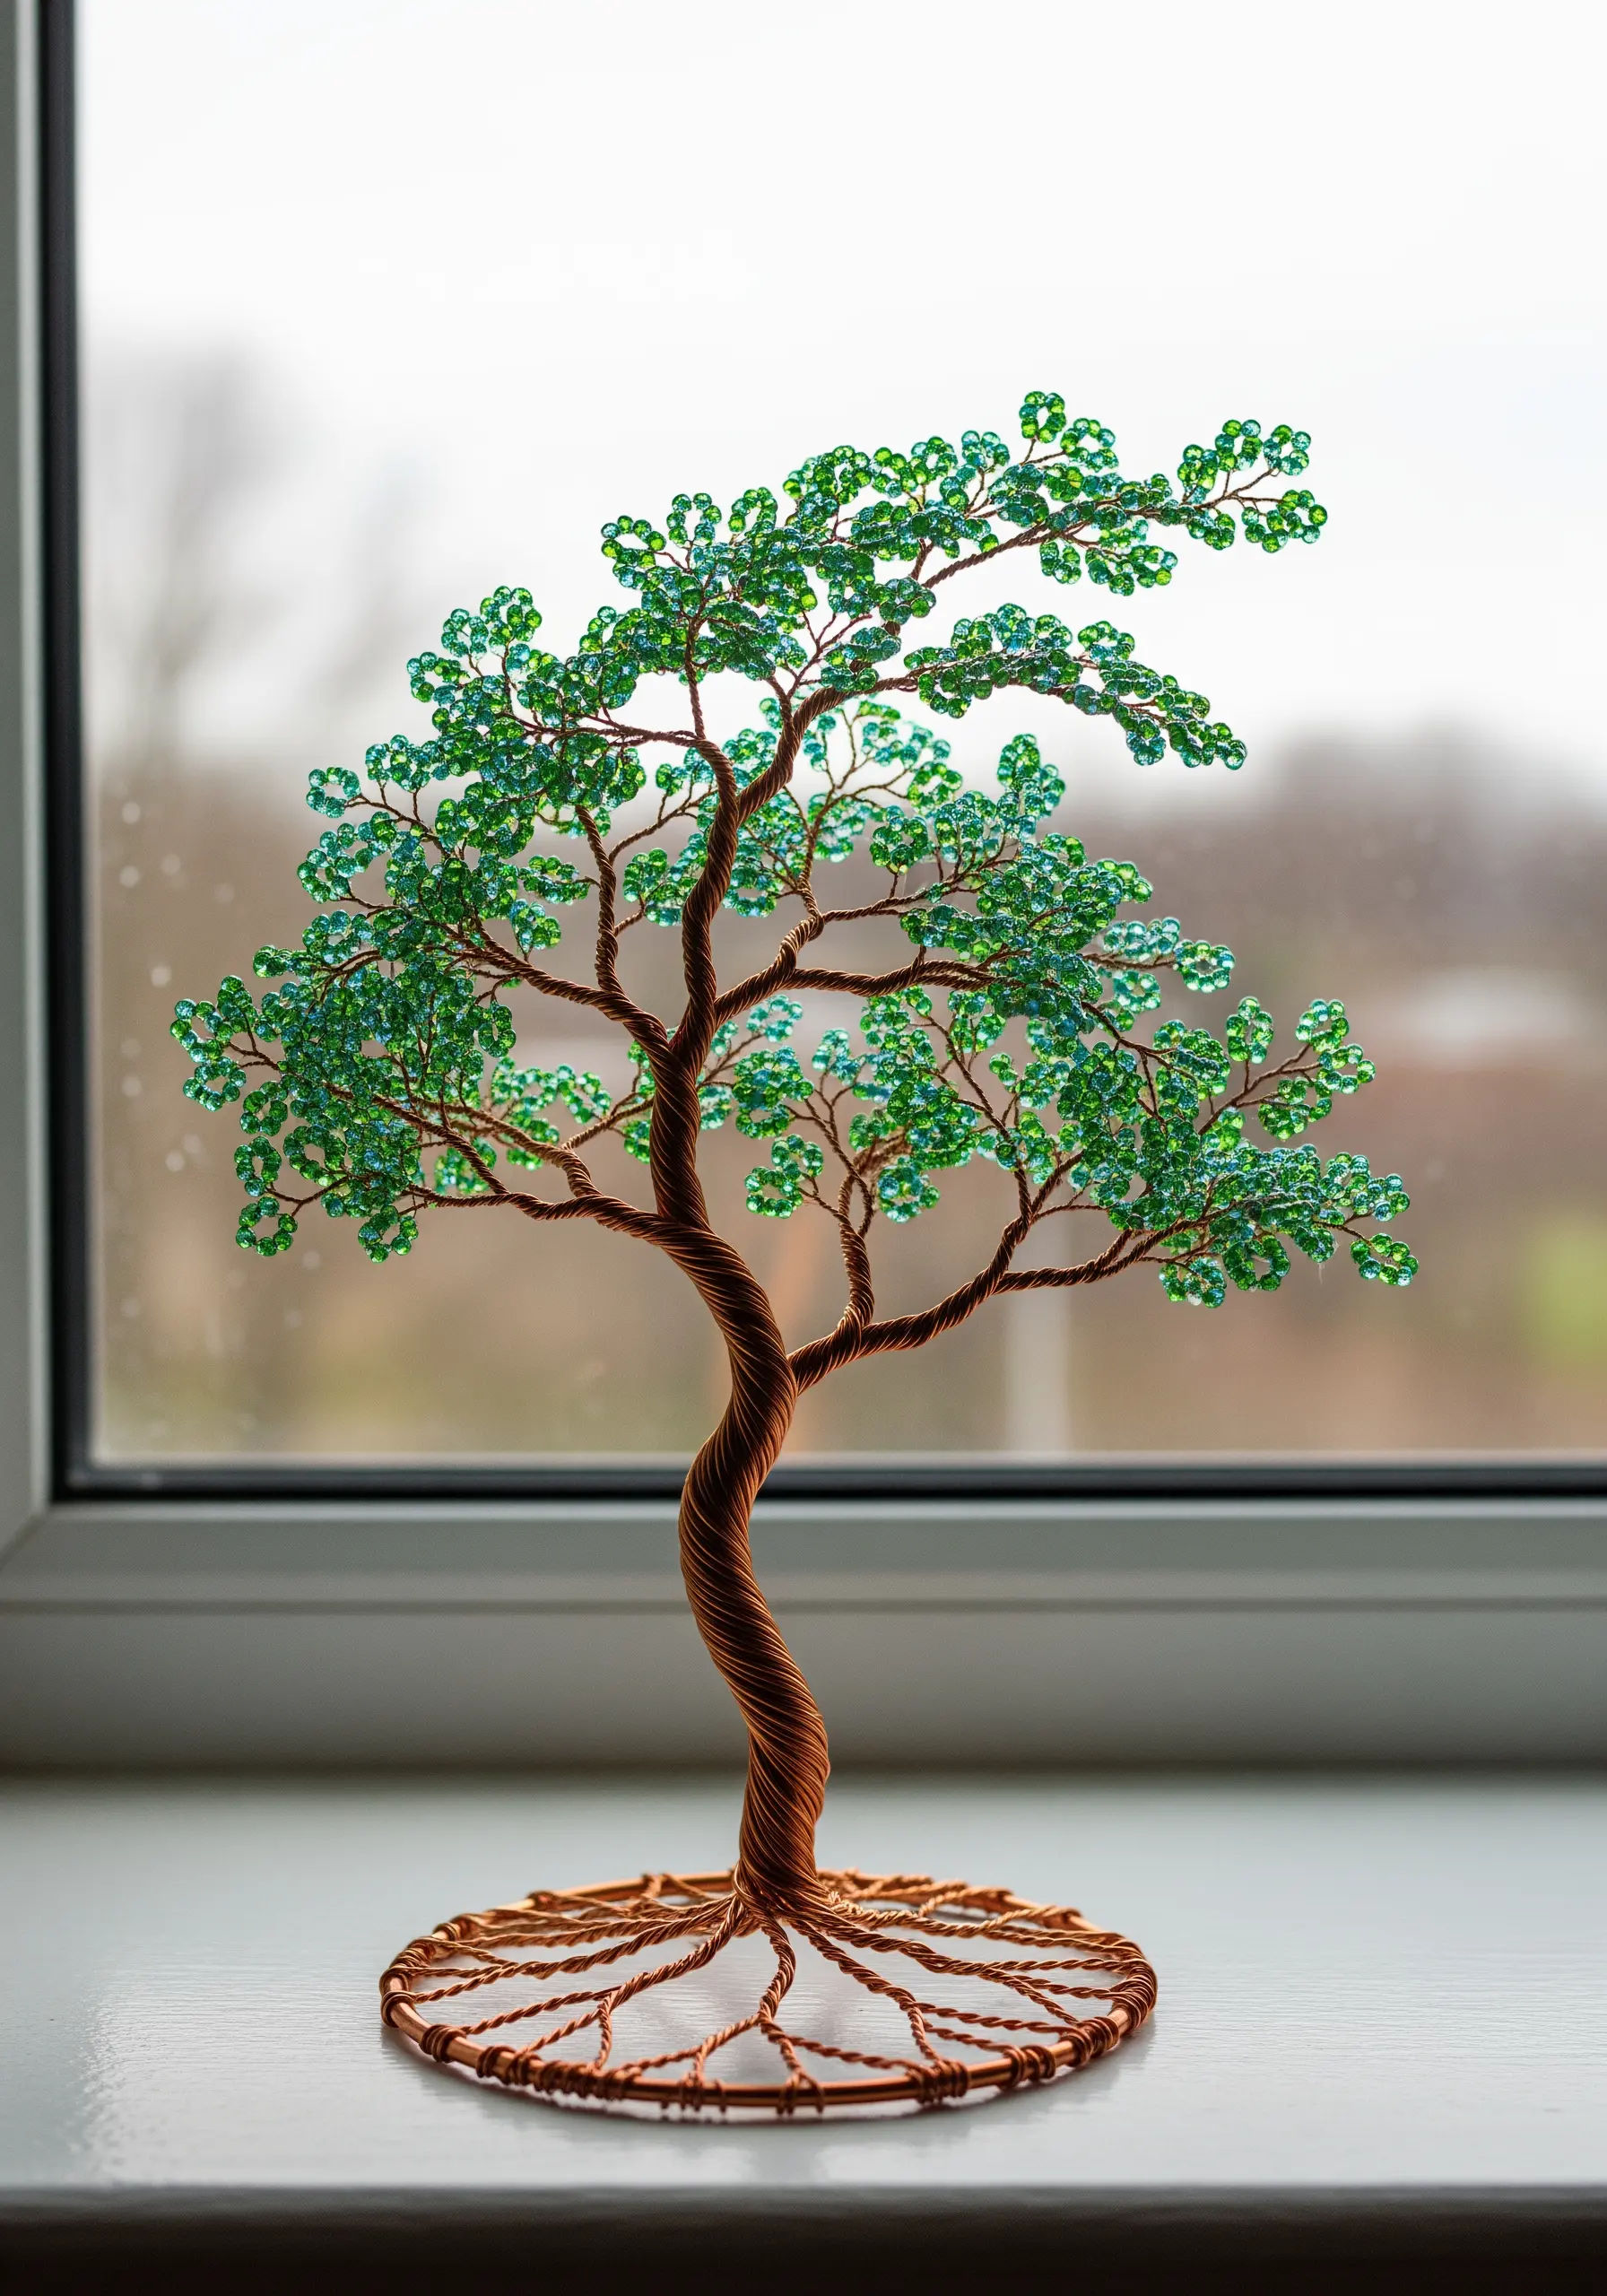
This sculpture is built through the simple, repetitive motion of twisting.
Bundle together several long strands of pliable craft wire and twist them tightly to form a trunk.
Divide and subdivide the strands to form branches and roots, twisting as you go.
On the finest branches, thread tiny seed beads to represent leaves, securing them by twisting the wire back on itself, creating one of the most stunning handmade sculptures from simple materials.
26. Create Expressive Characters from Mismatched Socks
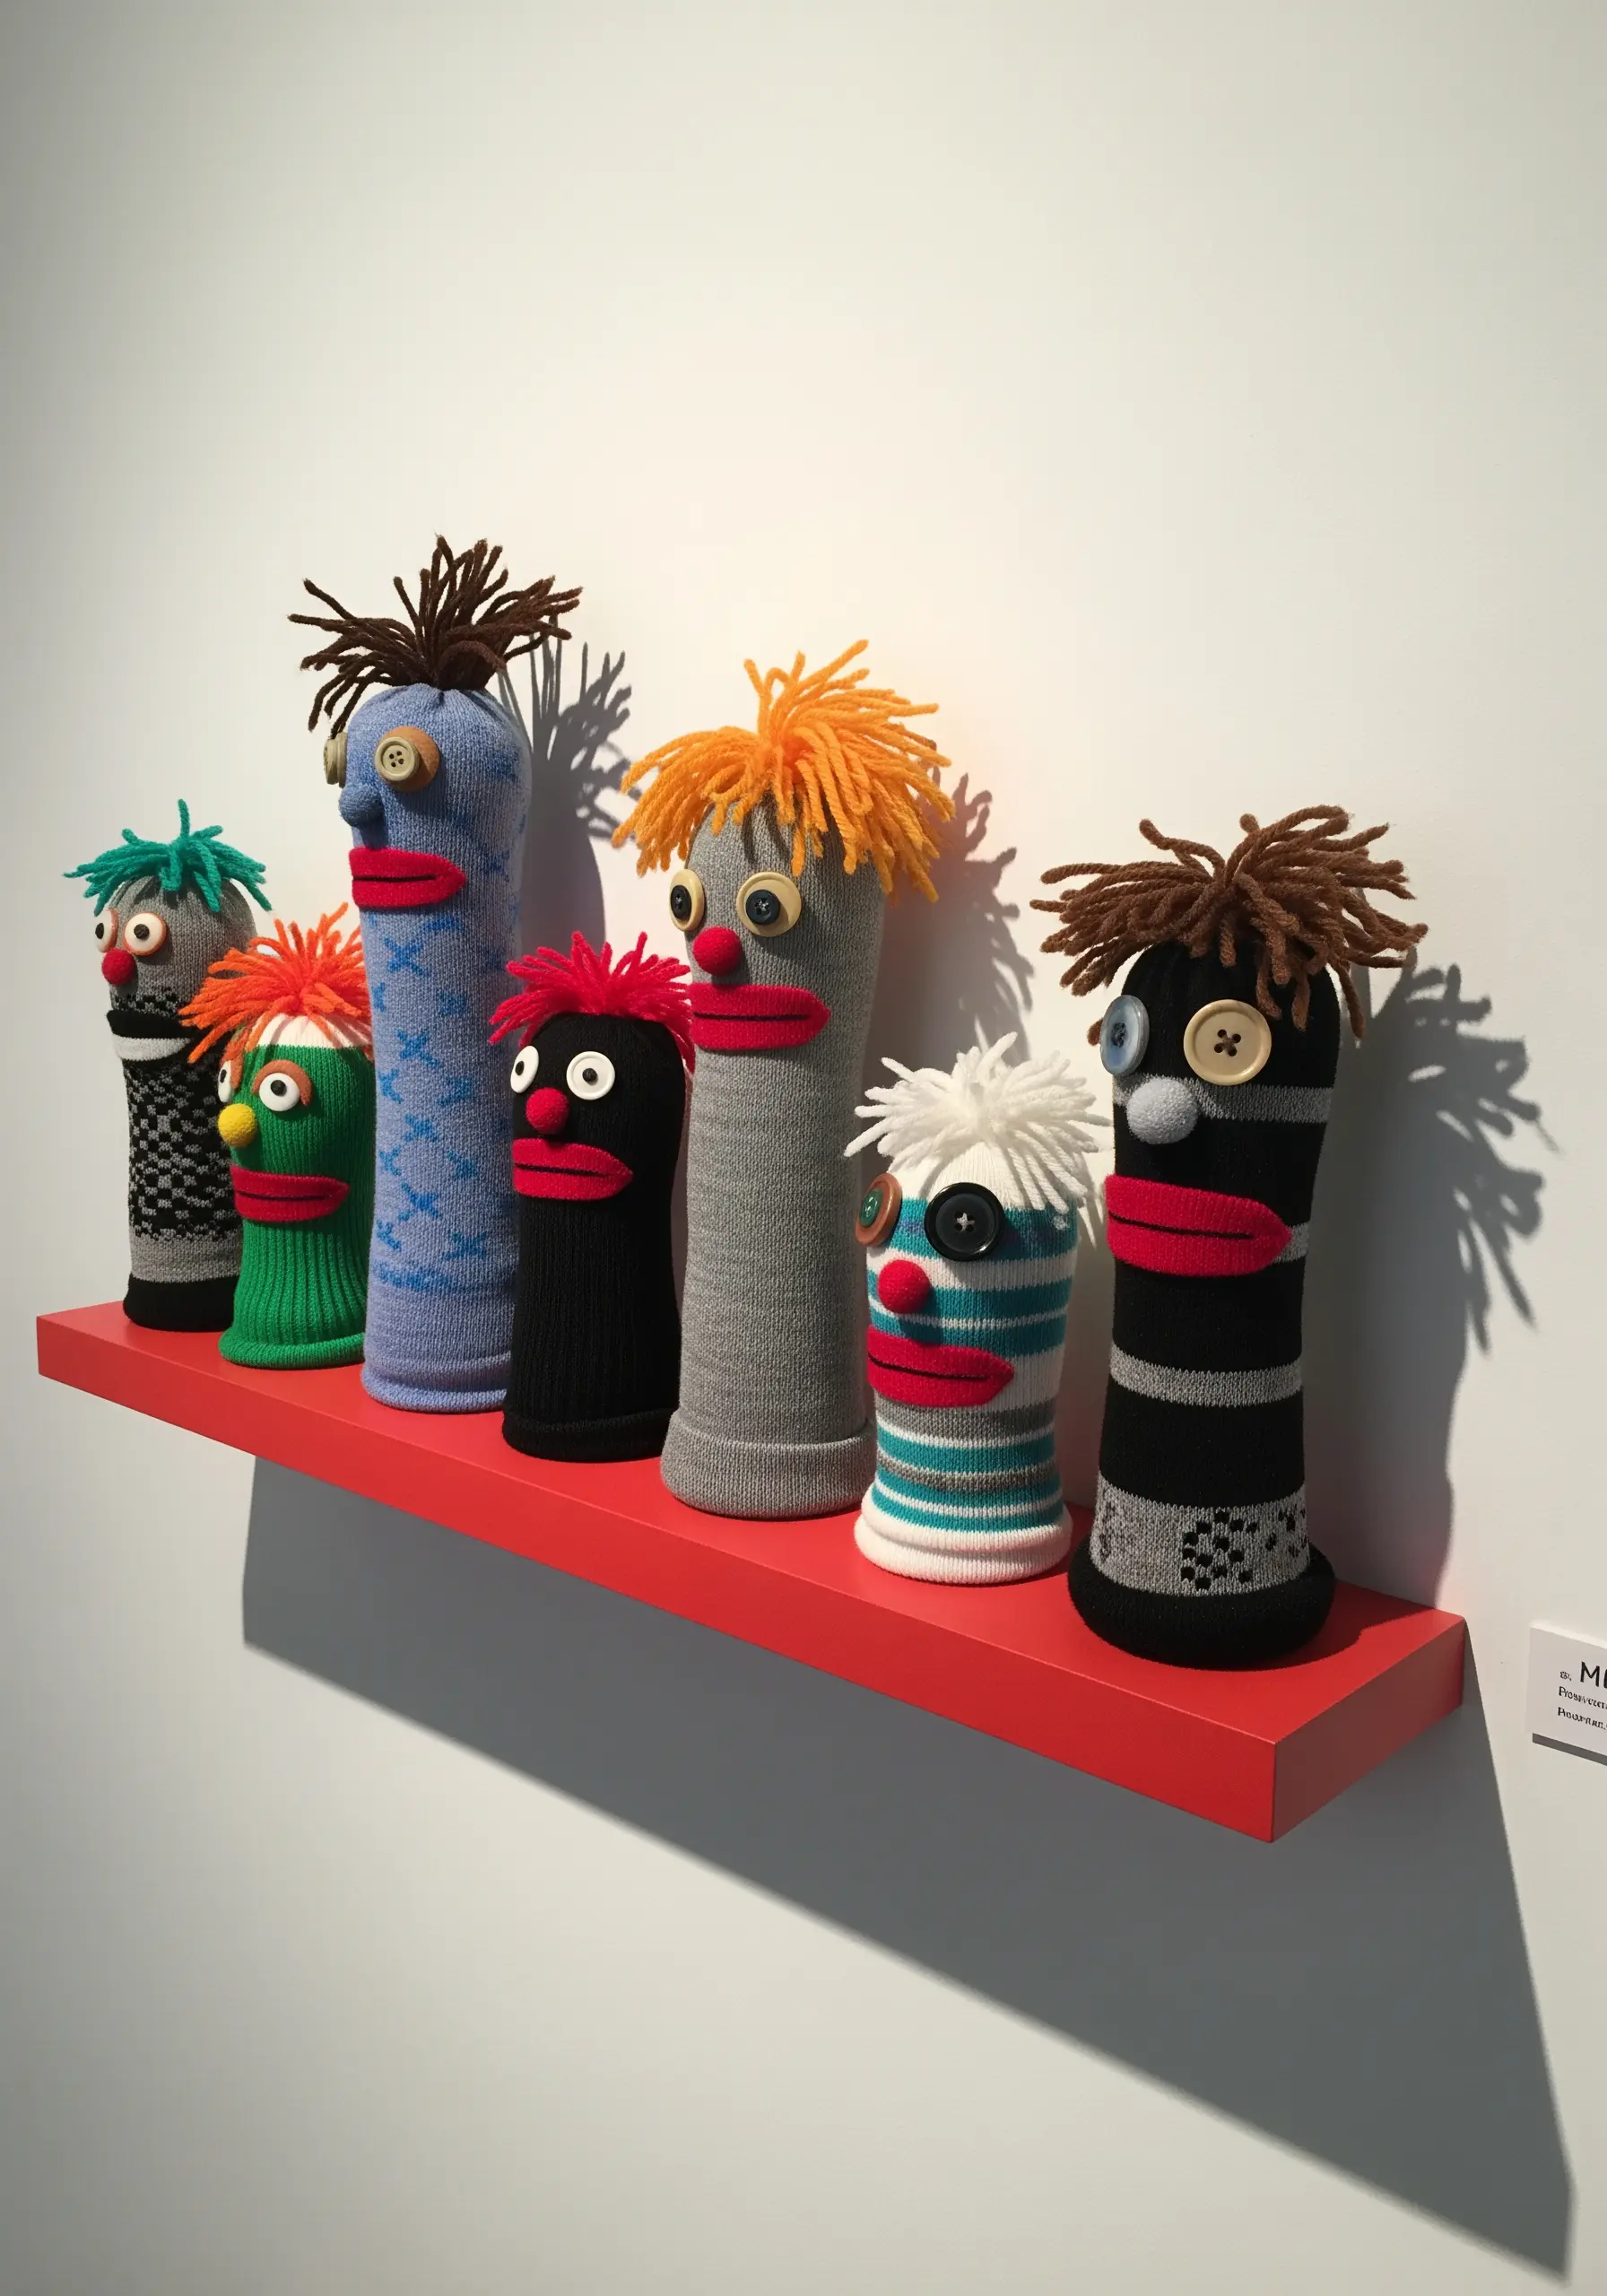
The charm of sock puppets lies in their quirky, handmade character, making them perfect for using up mismatched socks and odd craft supplies.
Use chunky yarn to create wild, expressive hair, and mismatched buttons for eyes to give each puppet a unique personality.
Scraps of felt are perfect for mouths, noses, and other features.
Don’t strive for perfection; embrace the asymmetry and playful nature of the materials.
27. Assemble a Coastal Wind Chime with Sea Glass and Driftwood
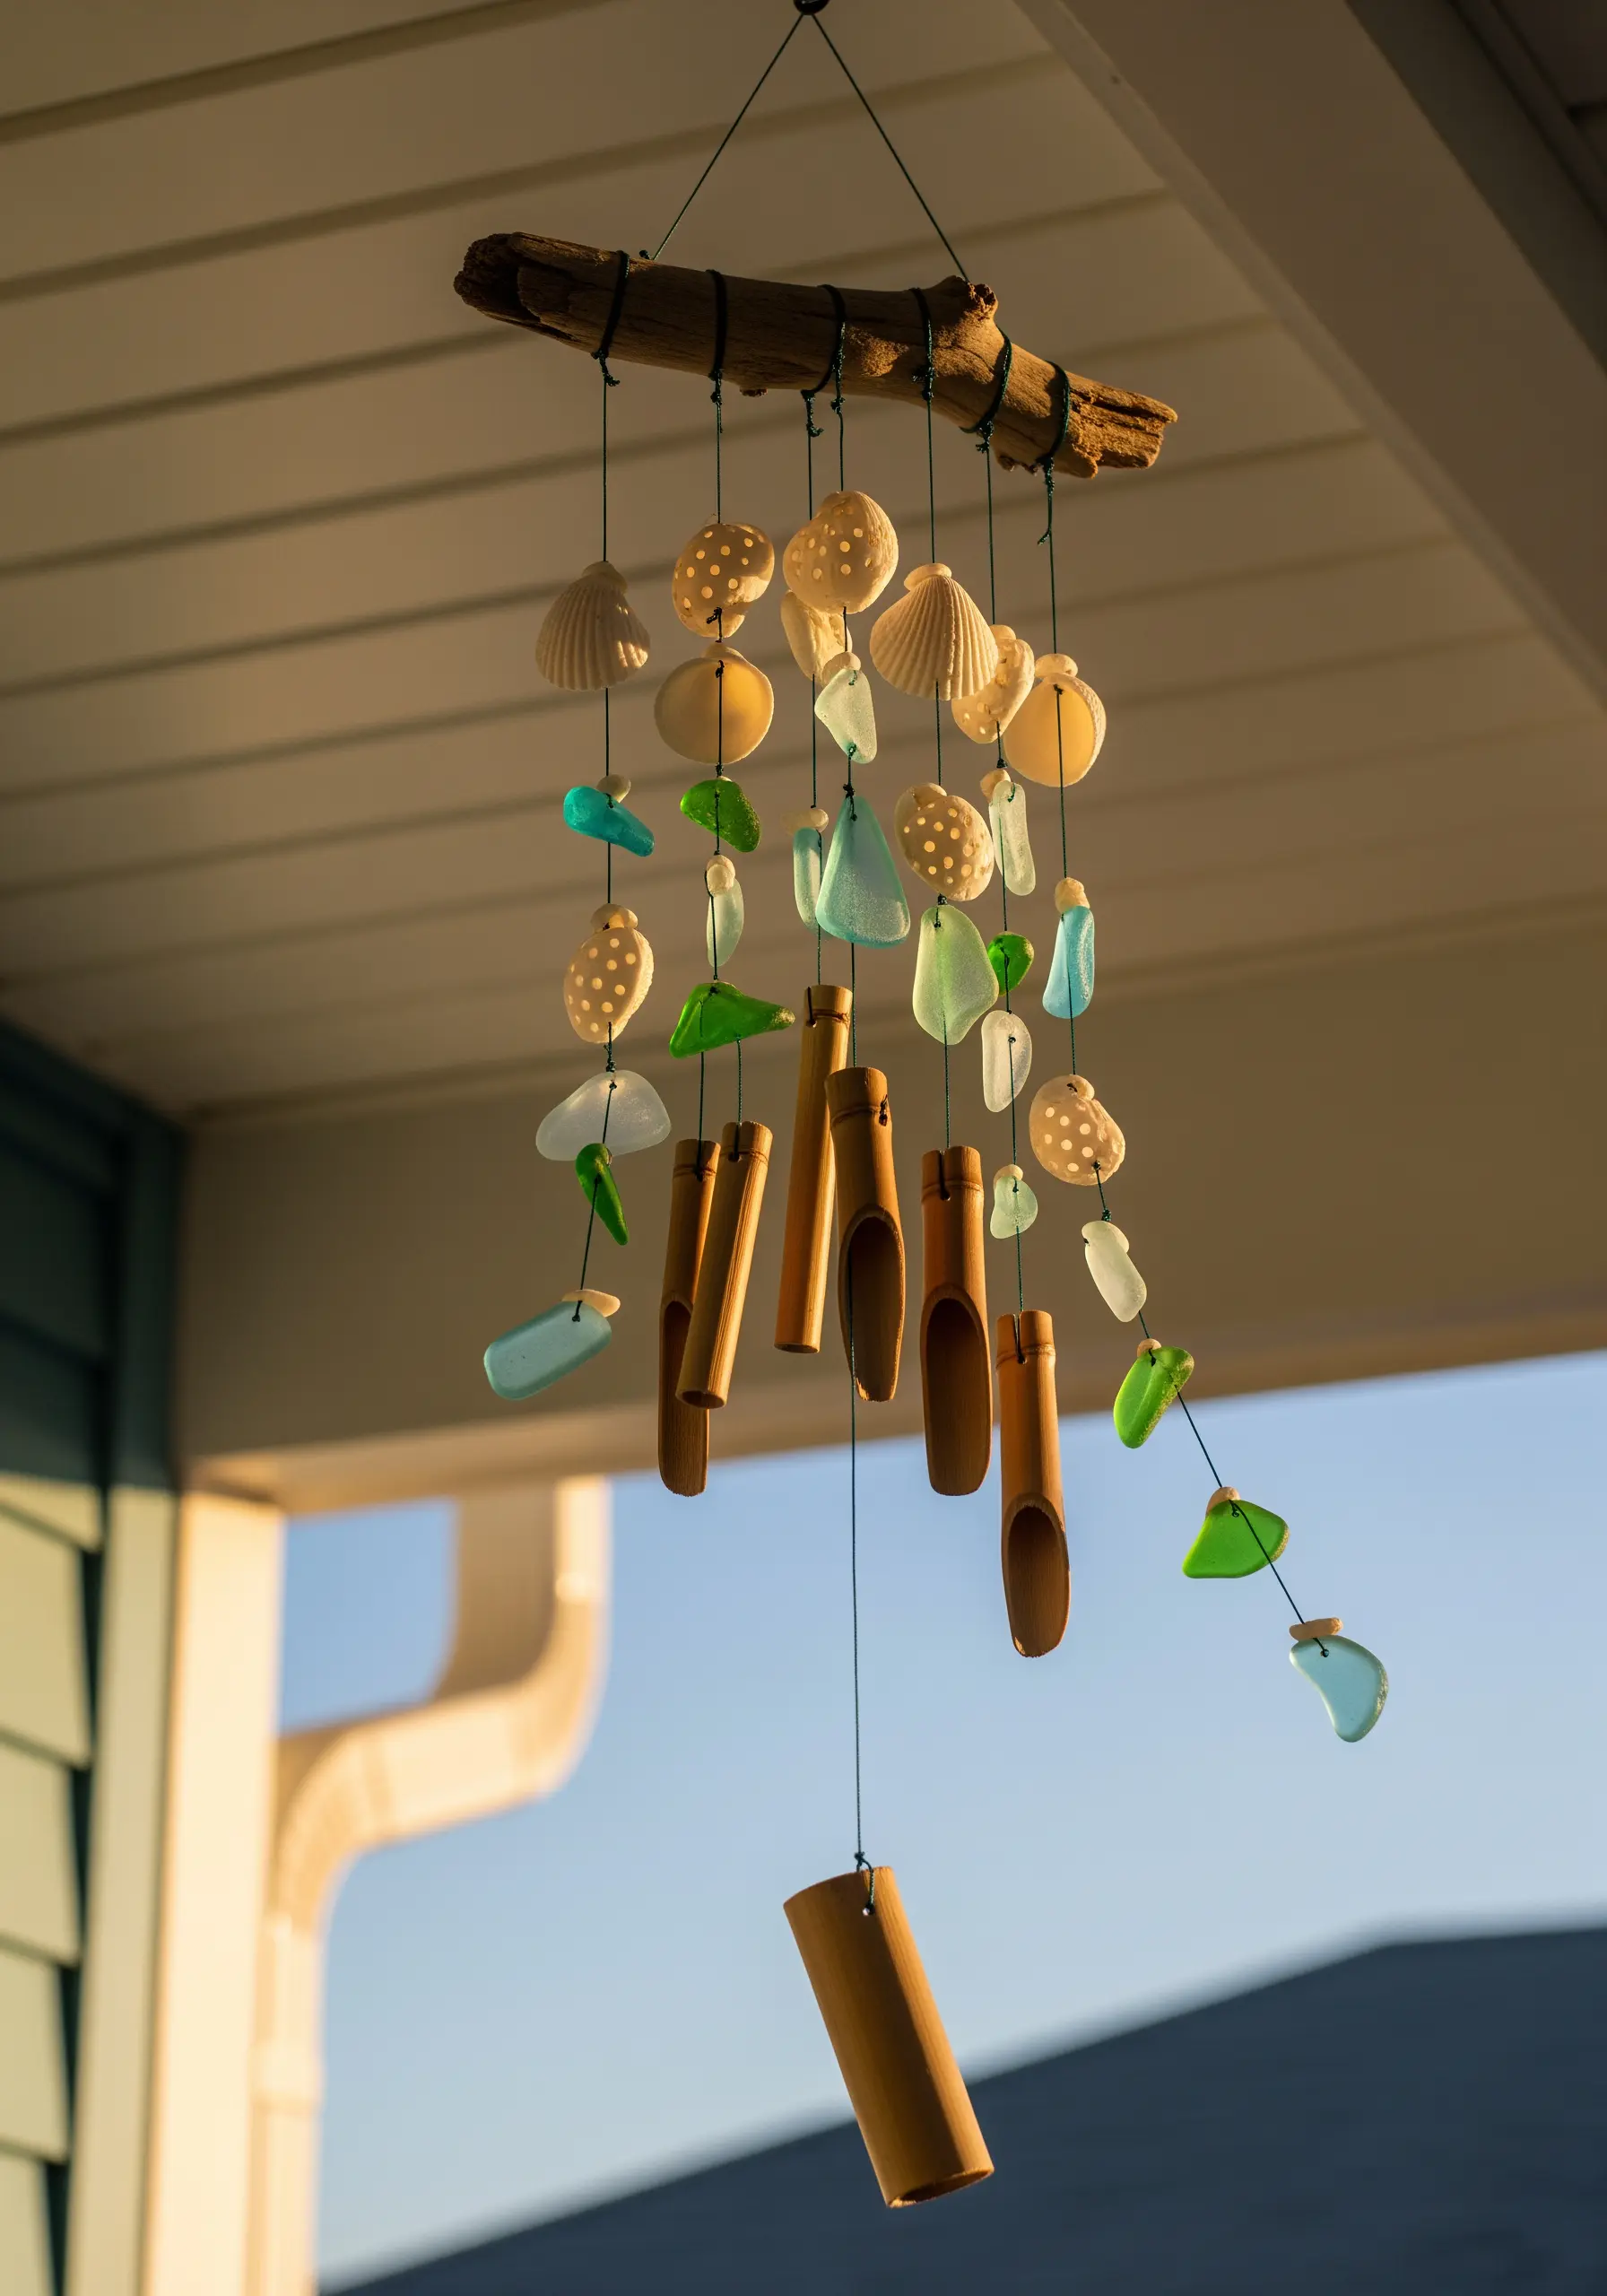
Capture the essence of the coast by combining found natural objects into a piece that offers both visual and auditory beauty.
Use a diamond-tipped drill bit to carefully drill small holes in sea glass and shells.
String your treasures on a durable cord, like waxed linen or fishing line, interspersing them with hollow bamboo pieces for a gentle chiming sound.
Suspend all the strands from a single piece of weathered driftwood to complete the natural, beach-combed aesthetic.
28. Build a Miniature Adirondack Chair from Popsicle Sticks
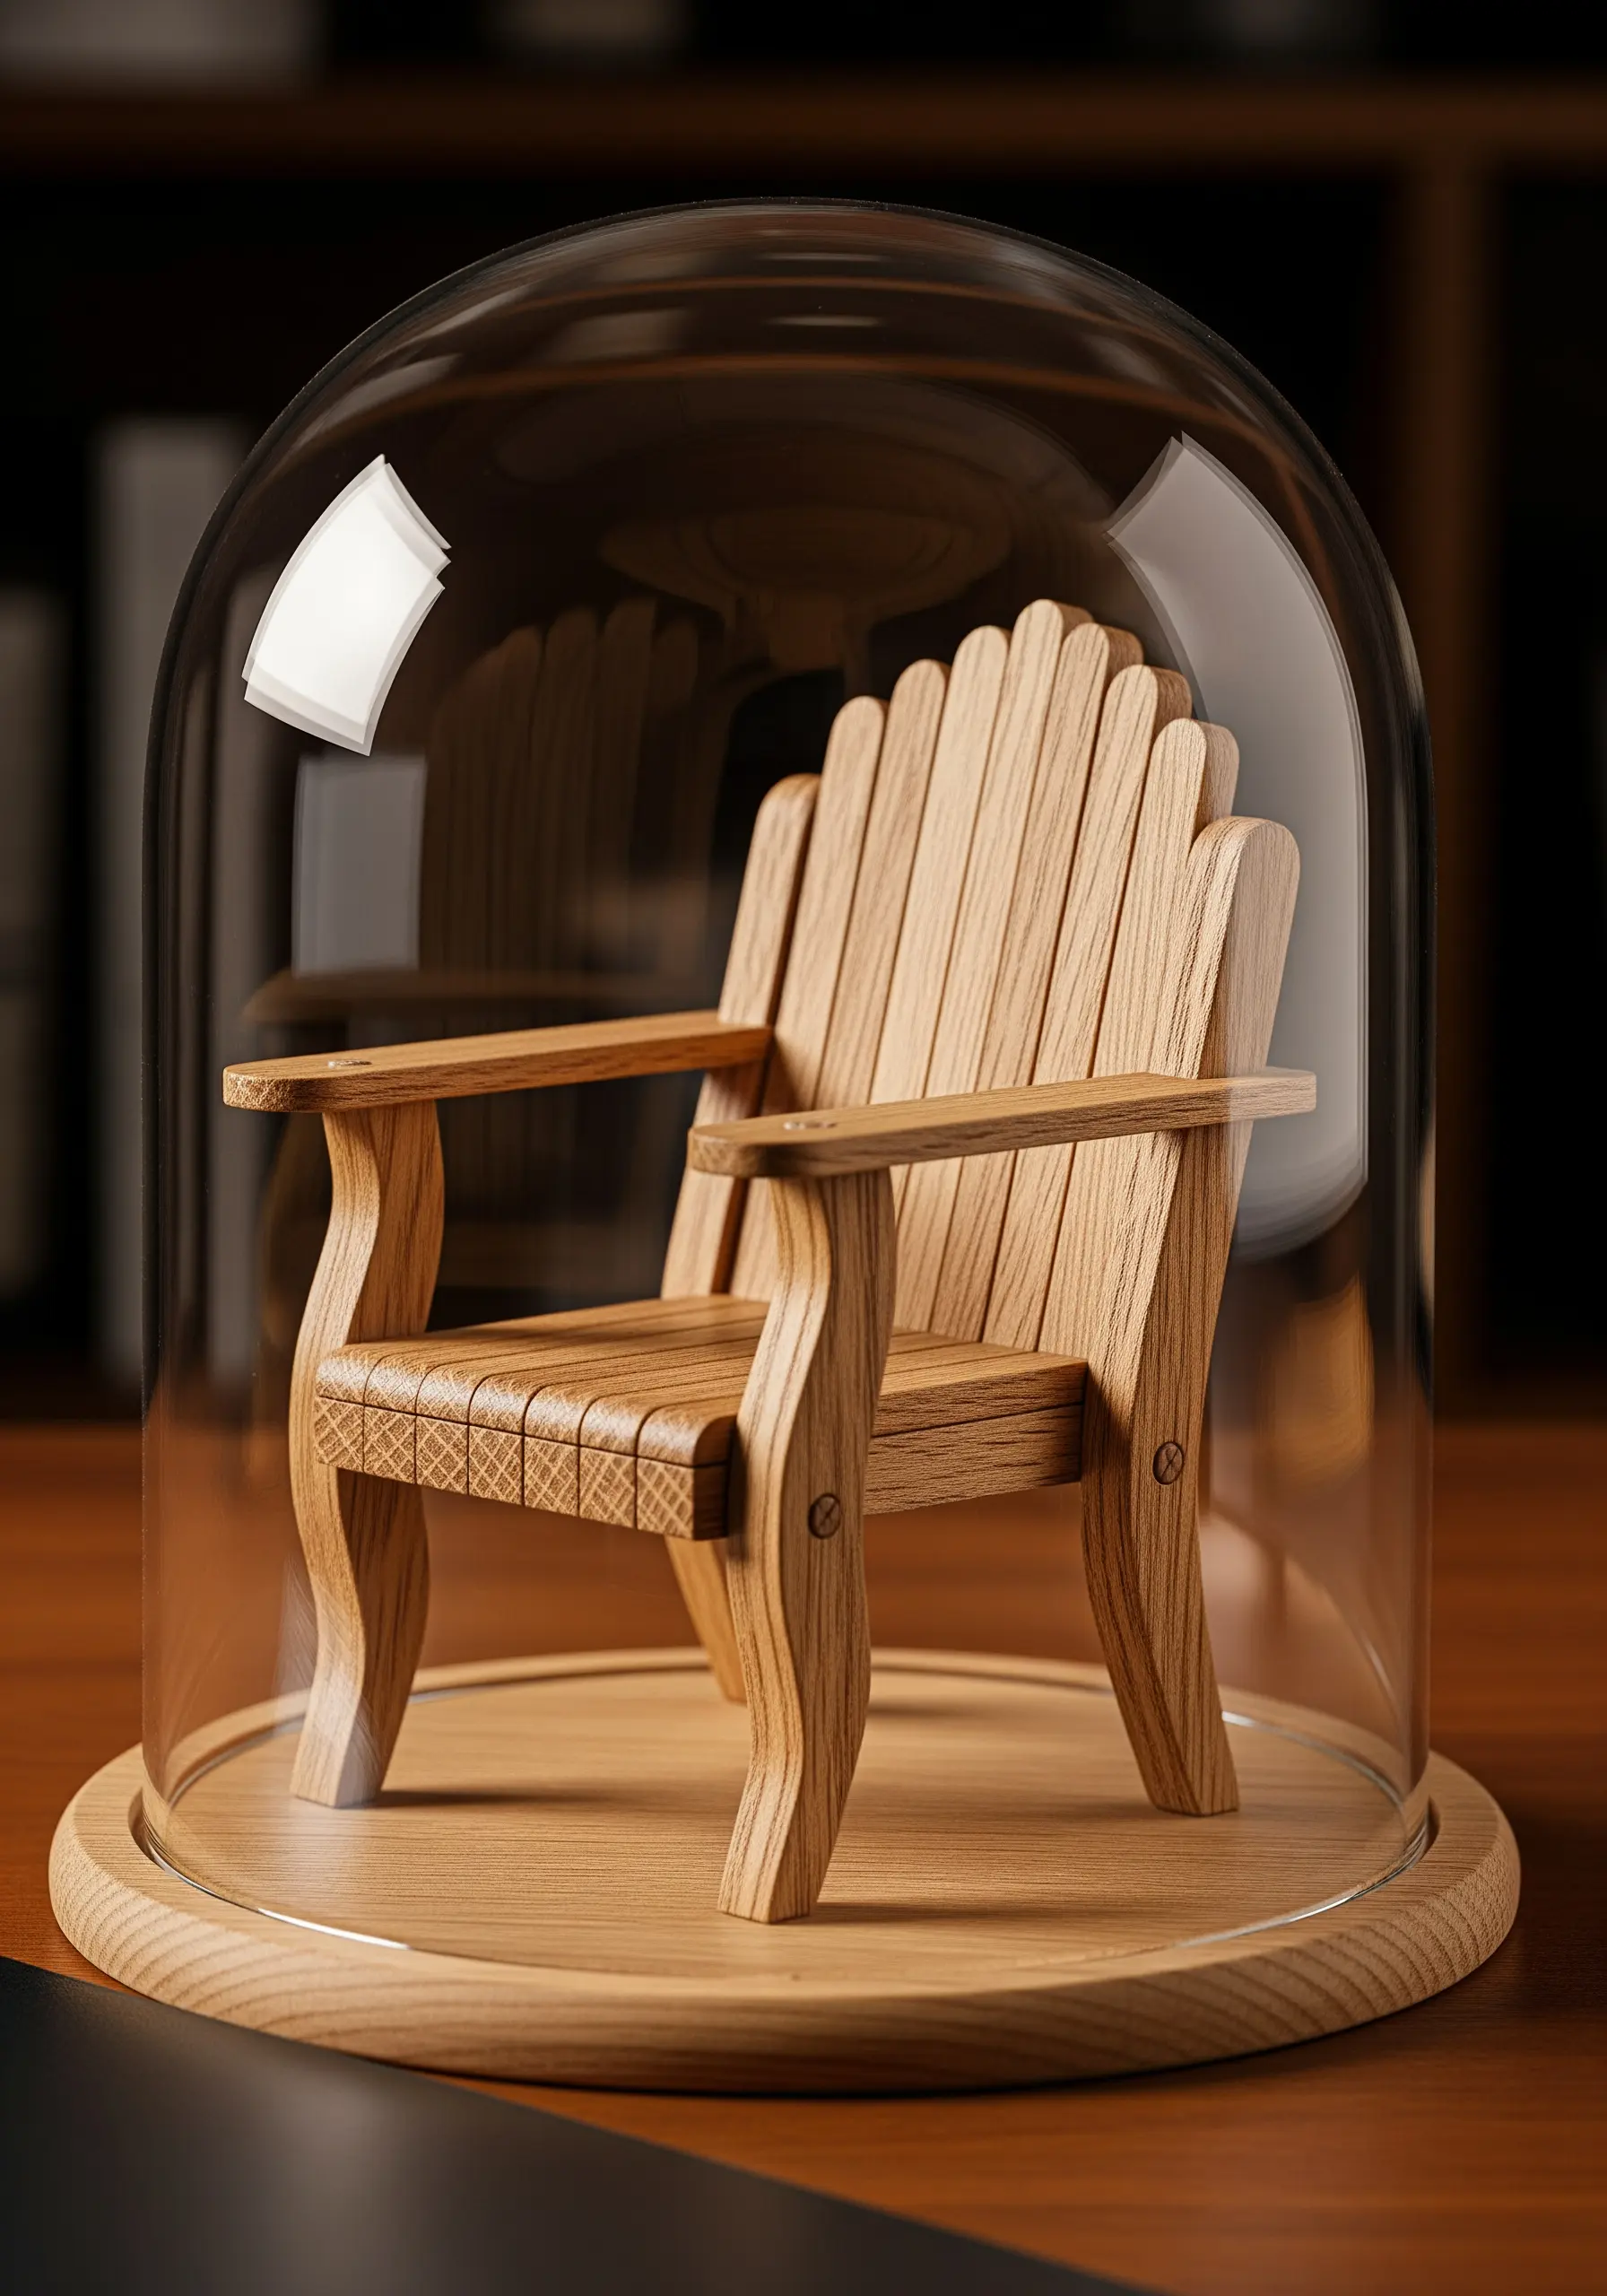
This project is a satisfying exercise in miniature construction and precision.
Using craft or popsicle sticks as your lumber, you will need to carefully measure and cut pieces to size for the legs, seat, back, and armrests.
Use a strong wood glue and work patiently, allowing each joint to dry fully before adding the next piece.
The result is a charmingly realistic miniature that showcases how simple materials can be transformed through careful craftsmanship.


