

There’s a quiet moment in embroidery, just before the first stitch, where the piece you imagine feels perfect. But sometimes, the finished work doesn’t quite capture that initial spark. You see the potential, but the texture, the lines, or the colors feel just a little bit off.
Let me reassure you: the distance between the embroidery you make and the embroidery you love is bridged by small, intentional choices—not by immense complexity or years of practice. It’s about knowing when to switch from three strands of thread to one, how to change the direction of a stitch to create shadow, or why one type of knot creates a softer texture than another.
These tiny adjustments are where the real artistry lies. In the ideas that follow, I want to show you exactly how these simple techniques can transform your work. Think of them not just as patterns, but as lessons in precision and expression that will make every piece you create feel more polished, more personal, and more alive on your walls.
1. Lavender Sprigs with Dimensional Texture
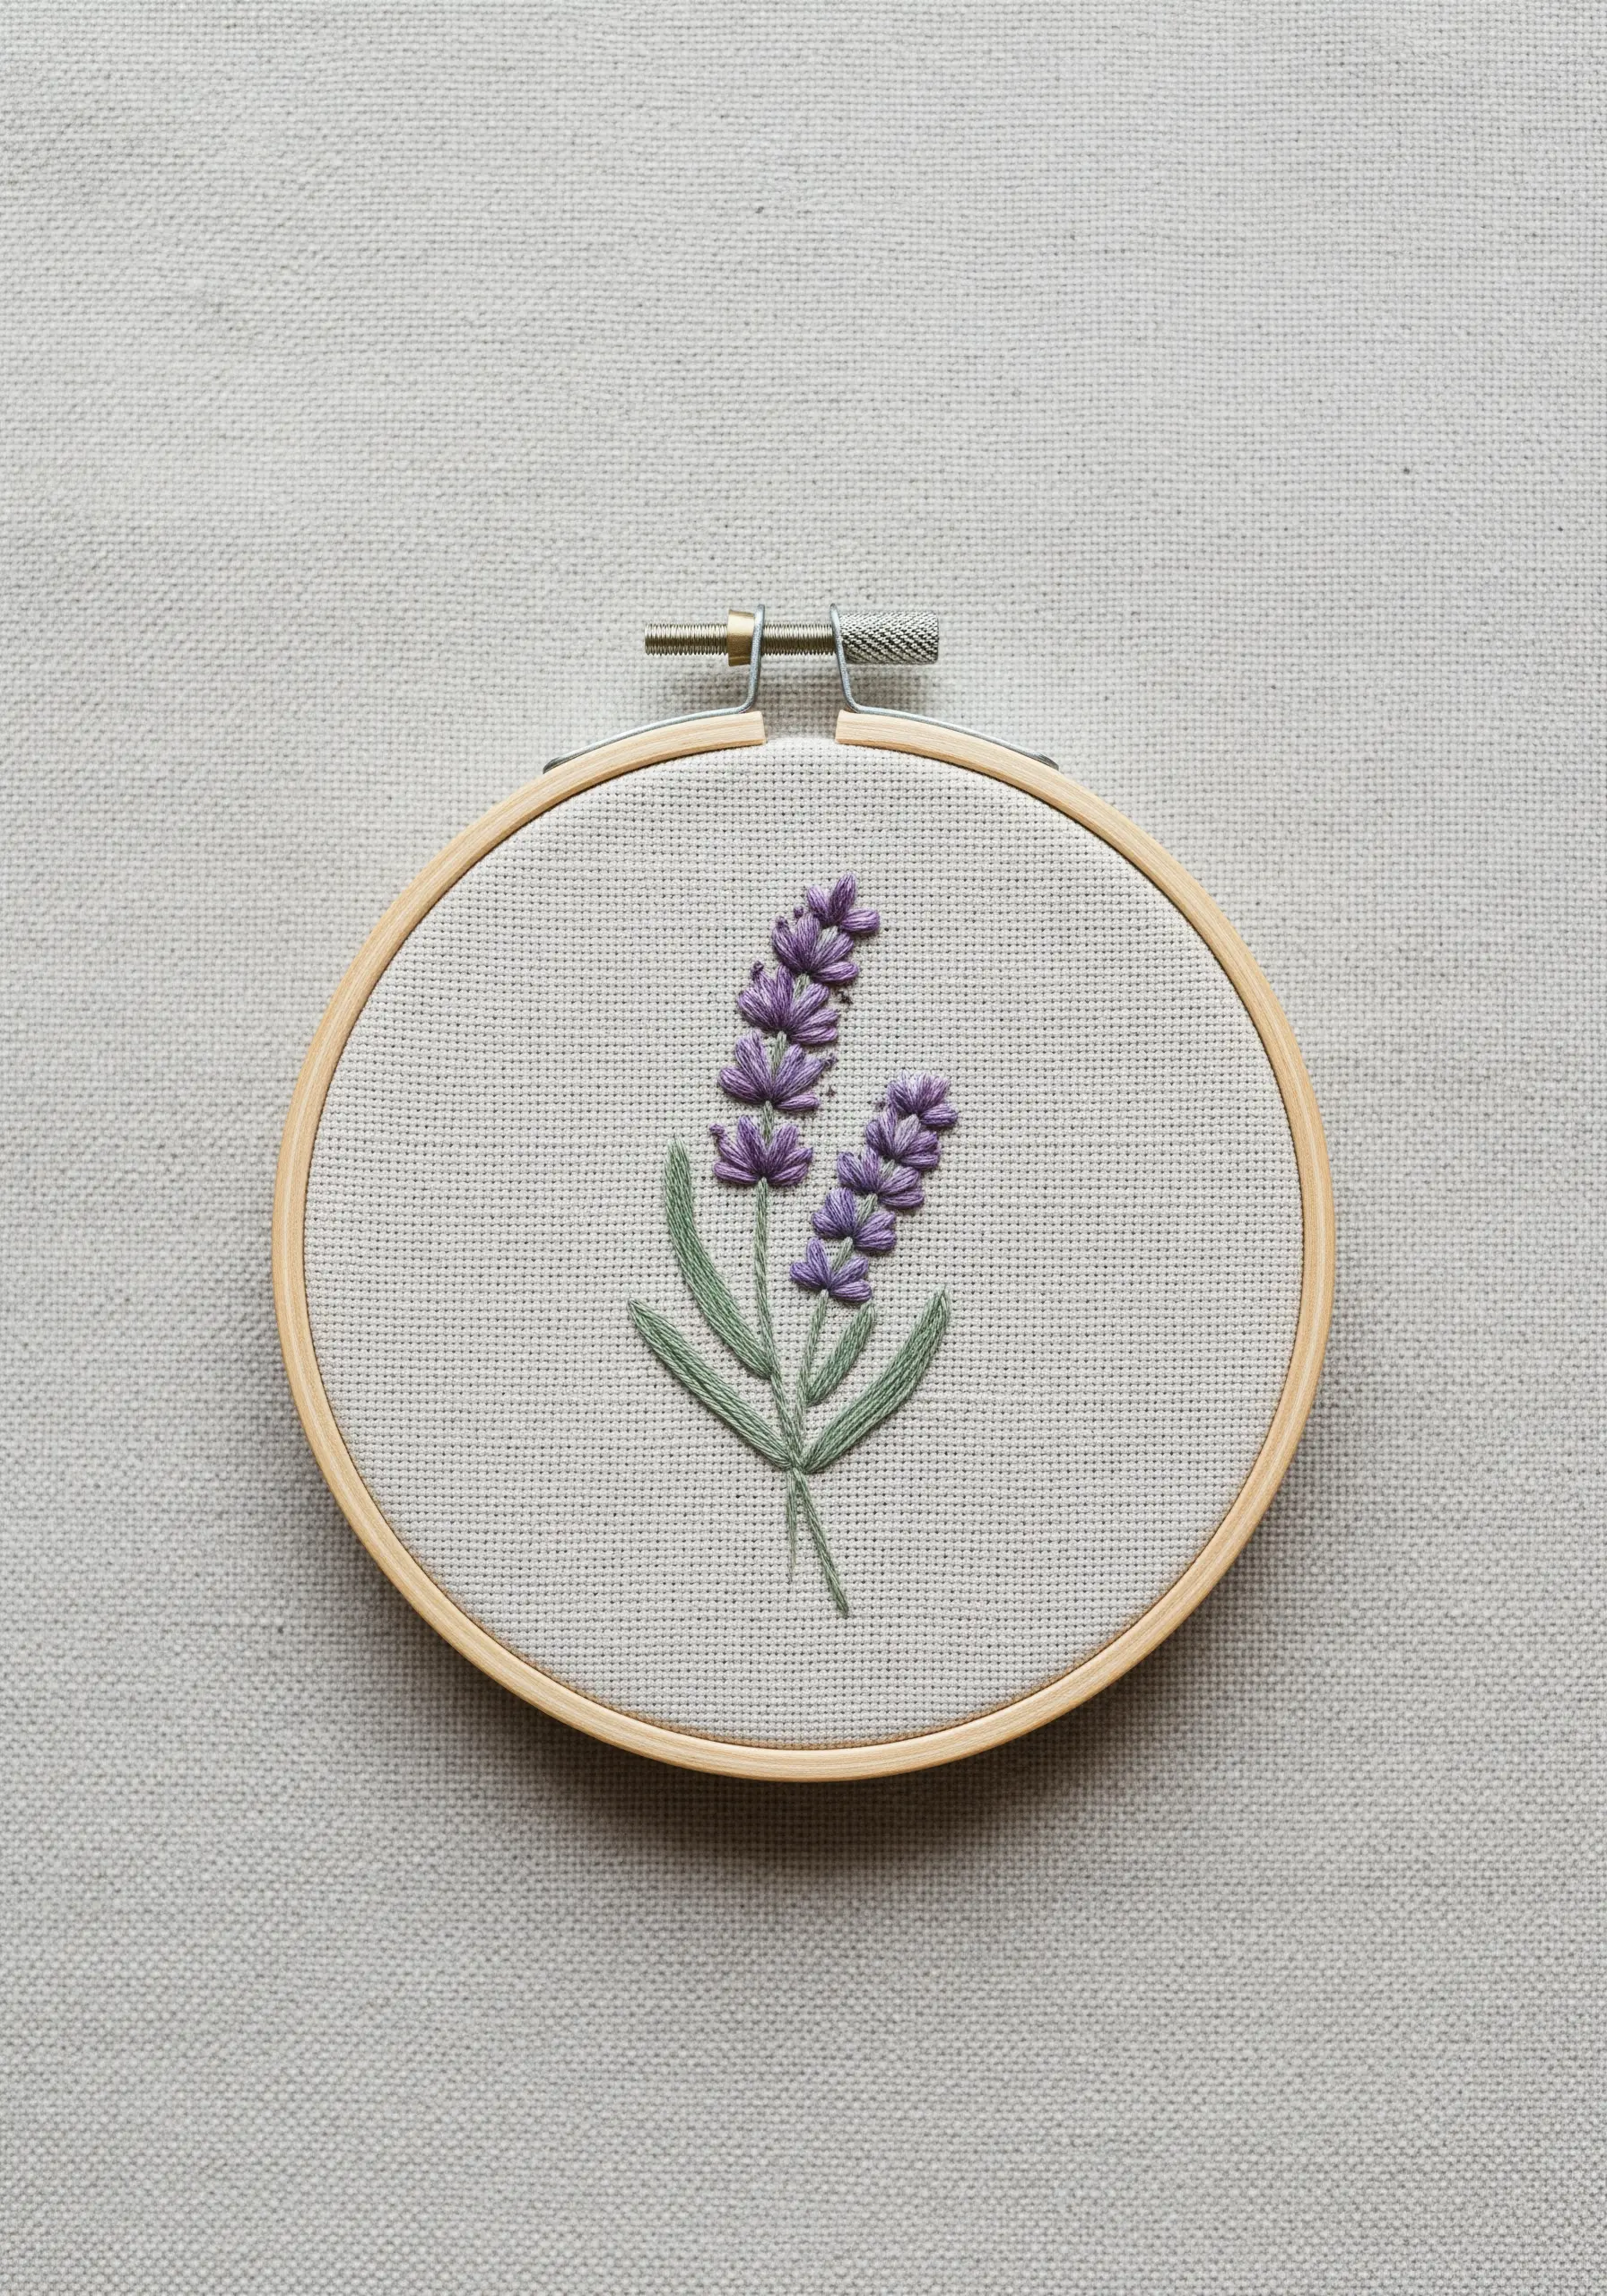
To give your lavender a realistic, plump texture, use French knots for the flower buds instead of a flat satin stitch.
Work with two strands of thread and vary the number of times you wrap the needle—once for smaller buds, twice for larger ones—to create an organic, uneven cluster.
For the stem, switch to a single strand of green thread and use a split stitch; this keeps the line delicate and prevents it from overpowering the blossoms.
This contrast between the textured flowers and the smooth stem creates visual depth and sophistication.
2. Dynamic Sunburst with Varied Ray Lengths
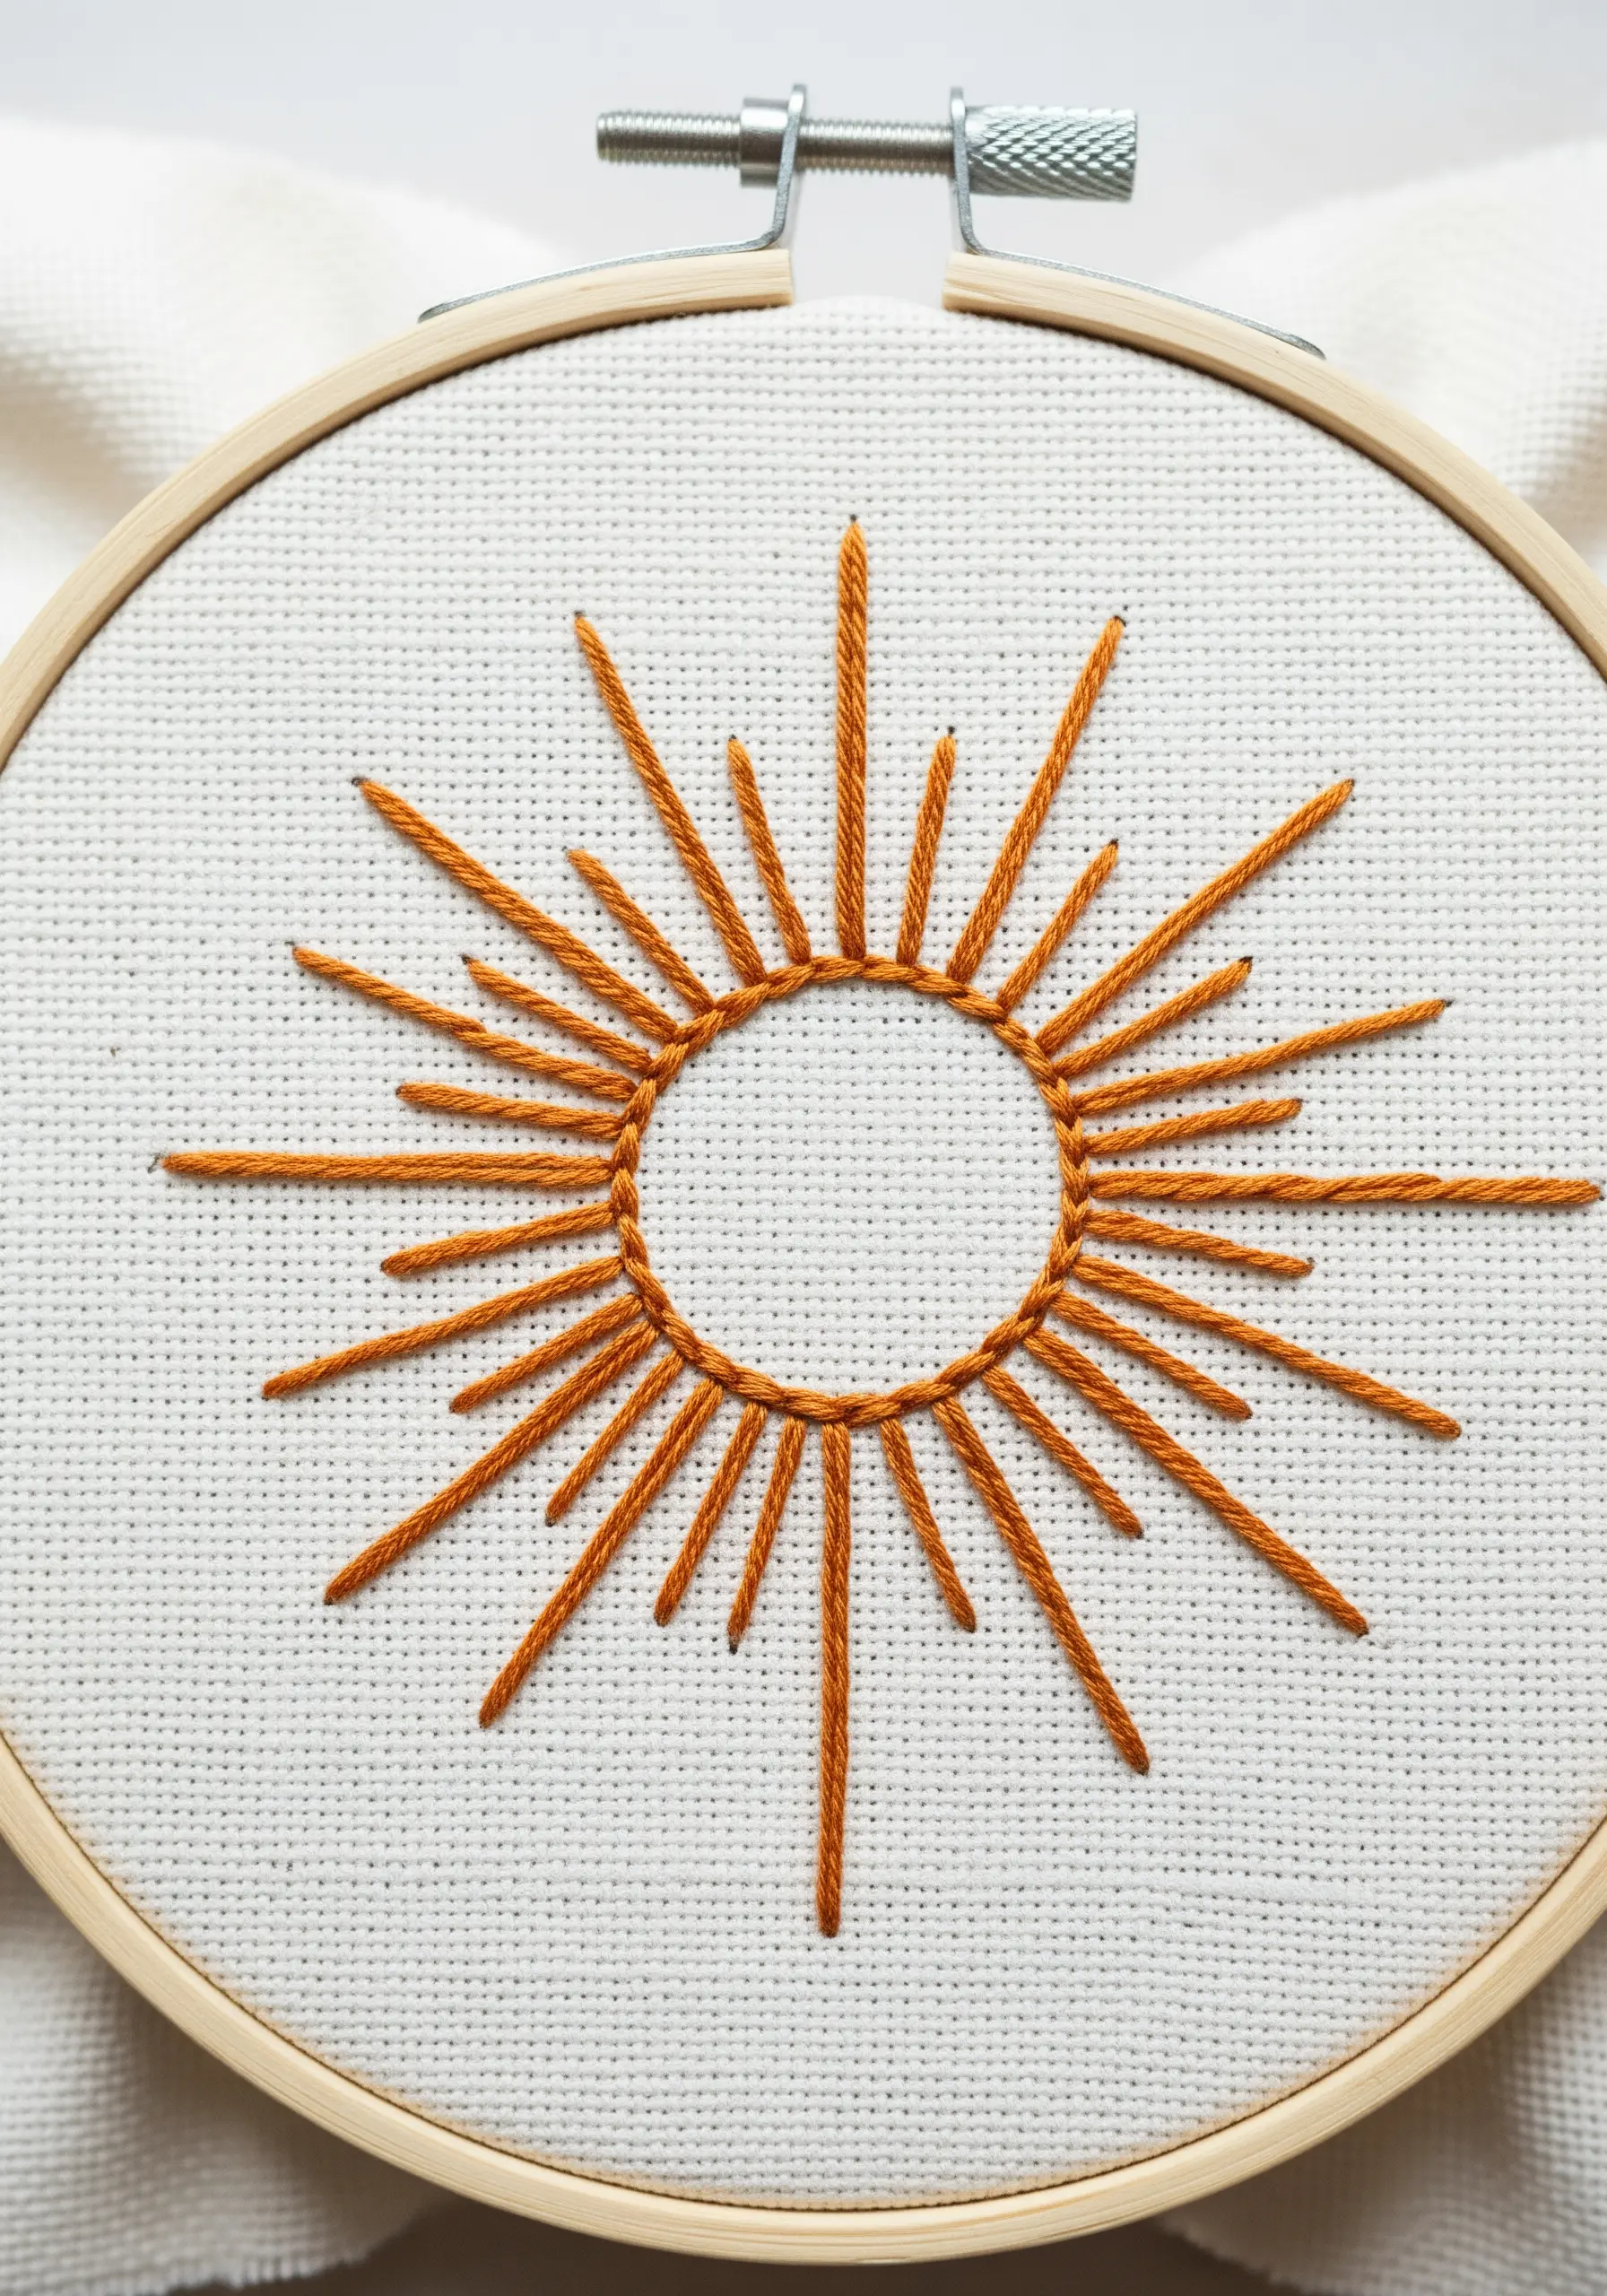
Create a sense of radiant energy by varying the length and thickness of the sun’s rays, rather than stitching them uniformly.
Use three strands of floss for the longer, primary rays and drop to two strands for the shorter, in-between ones.
This subtle shift in thread weight adds visual rhythm and stops the design from feeling static.
Anchor the composition with a perfectly round backstitch or stem stitch circle in the center for a clean, graphic finish.
3. Luminous Crescent Moon on a Night Sky
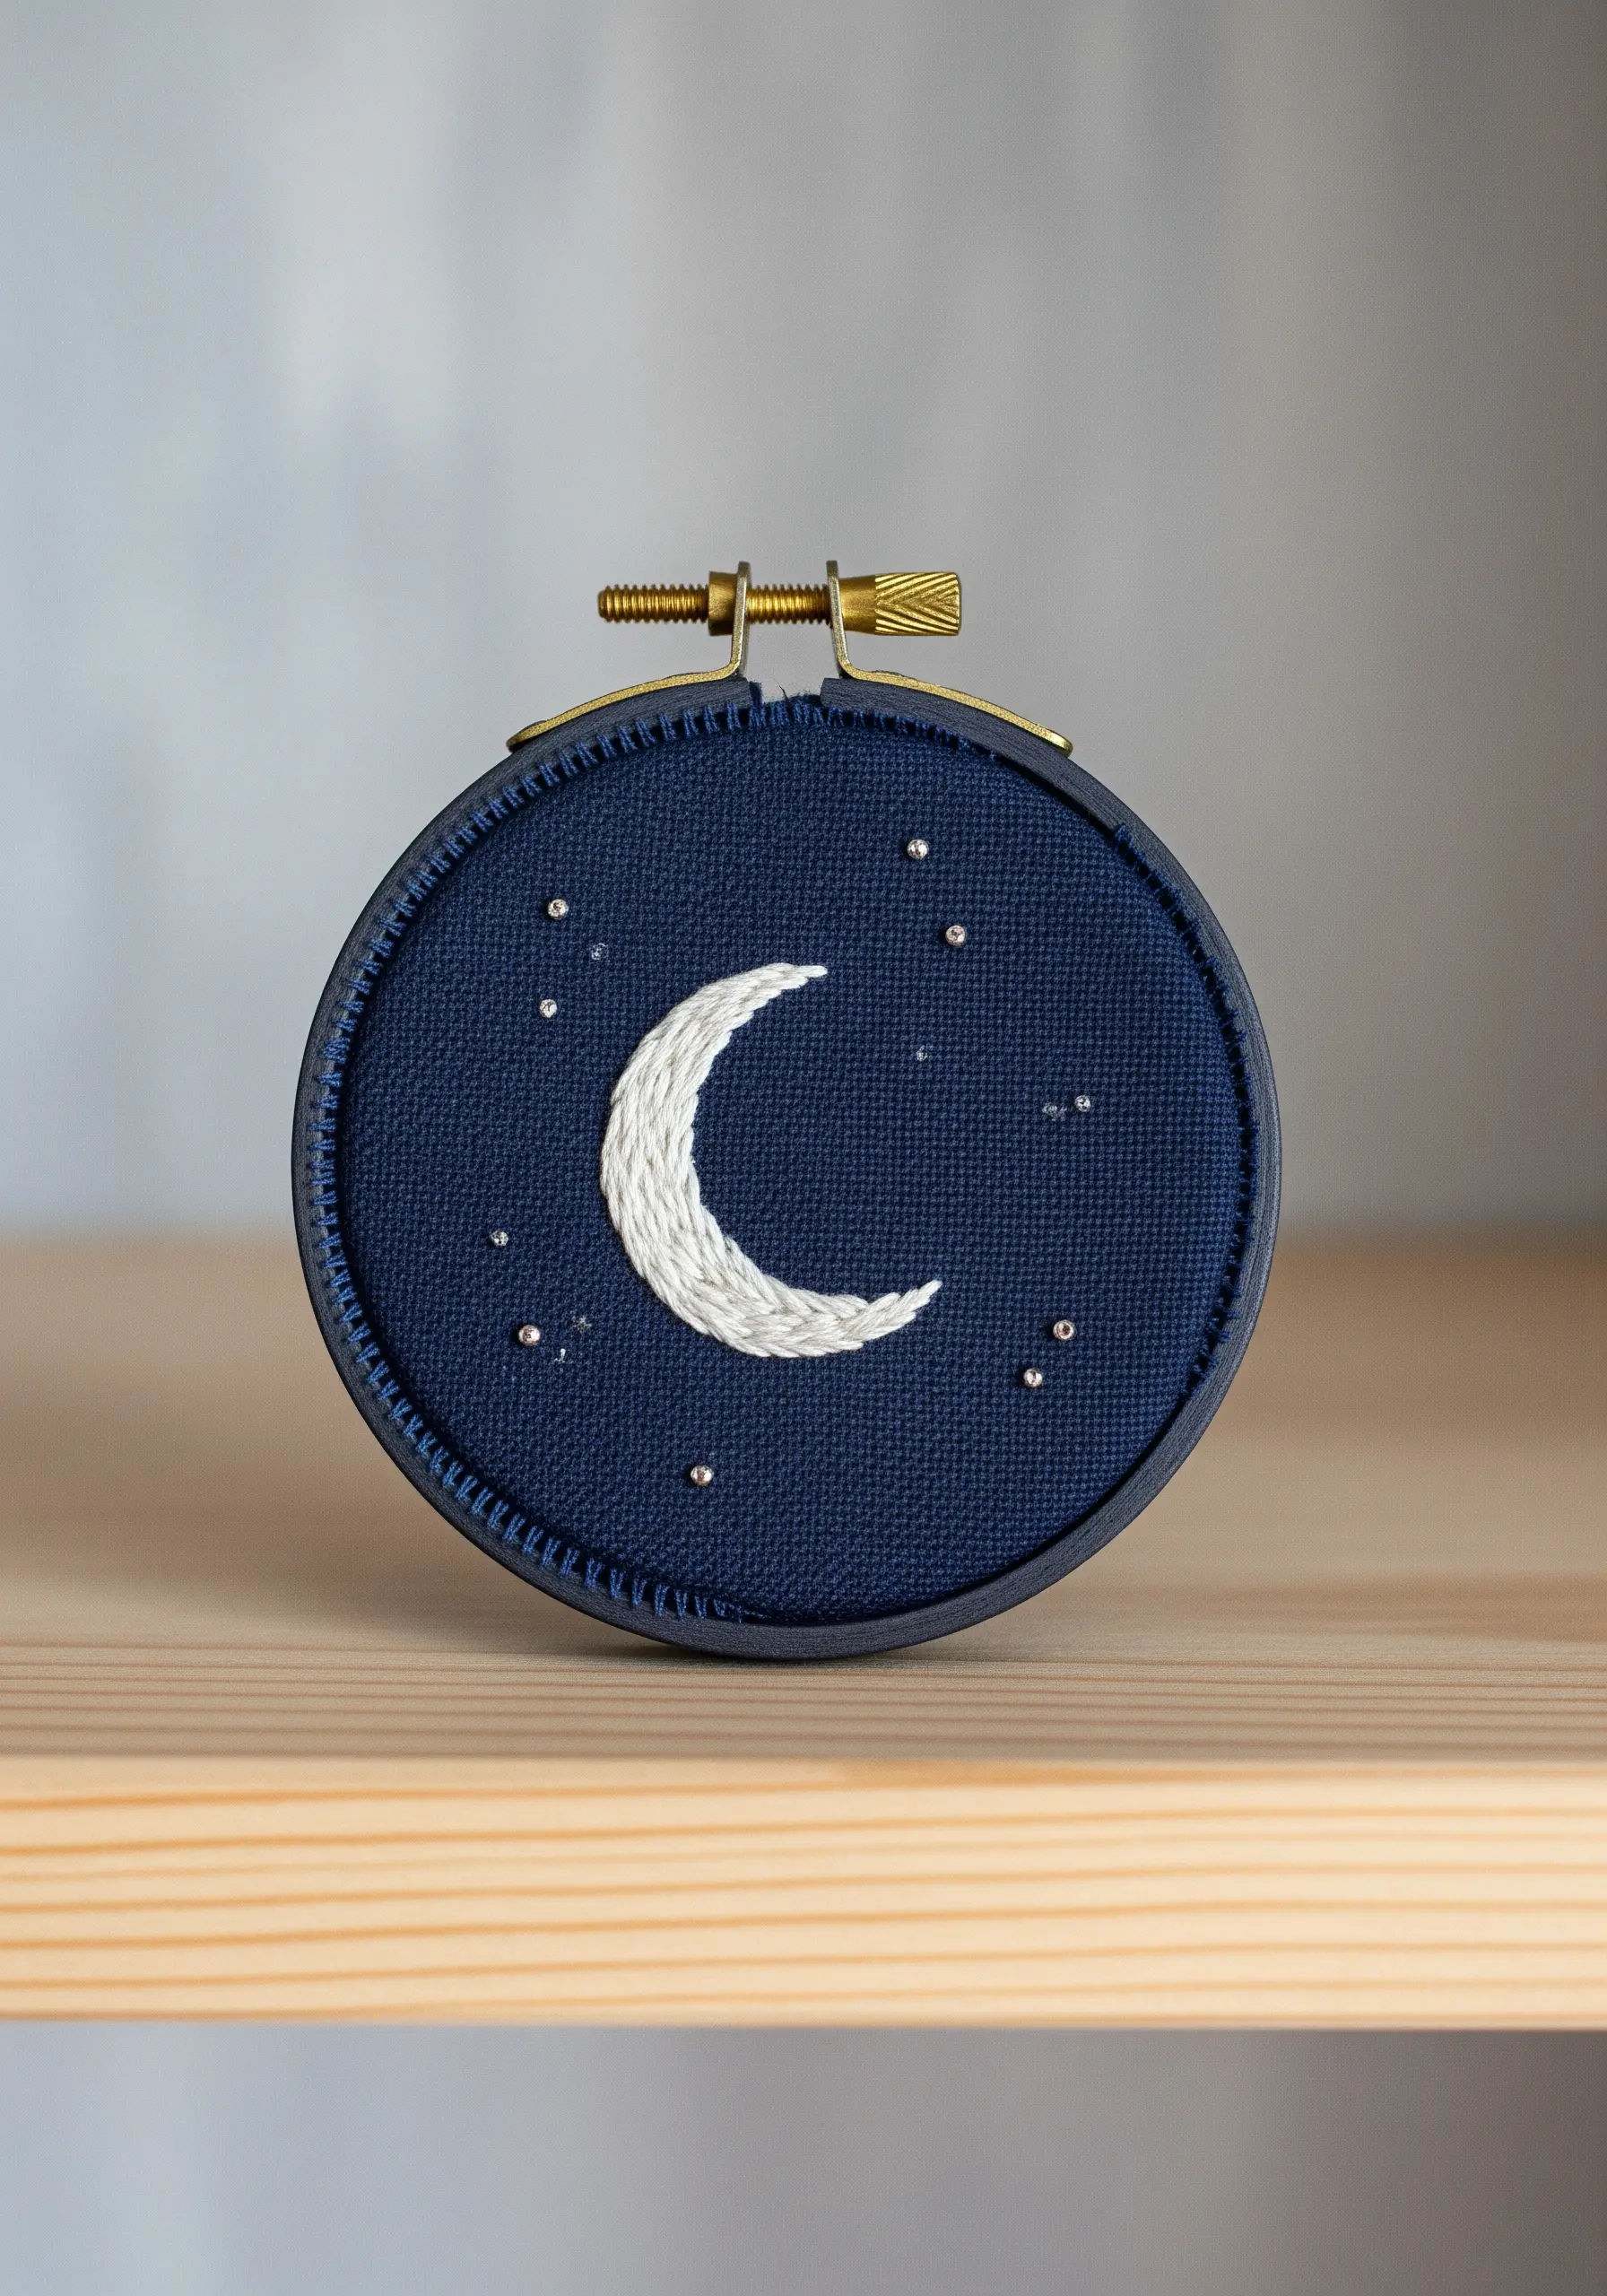
The success of a celestial design often lies in your choice of fabric and the subtlety of your details.
Select a tightly woven navy or black cotton to ensure the white floss appears crisp and luminous, without any fabric showing through.
Fill the moon with a satin stitch, angling your stitches slightly to follow the curve, which creates a soft, light-catching sheen.
For the stars, use a single strand of metallic silver thread to make tiny French knots or seed stitches; this adds a faint shimmer that feels more magical than plain white.
4. Playful Bee with Directional Satin Stitch
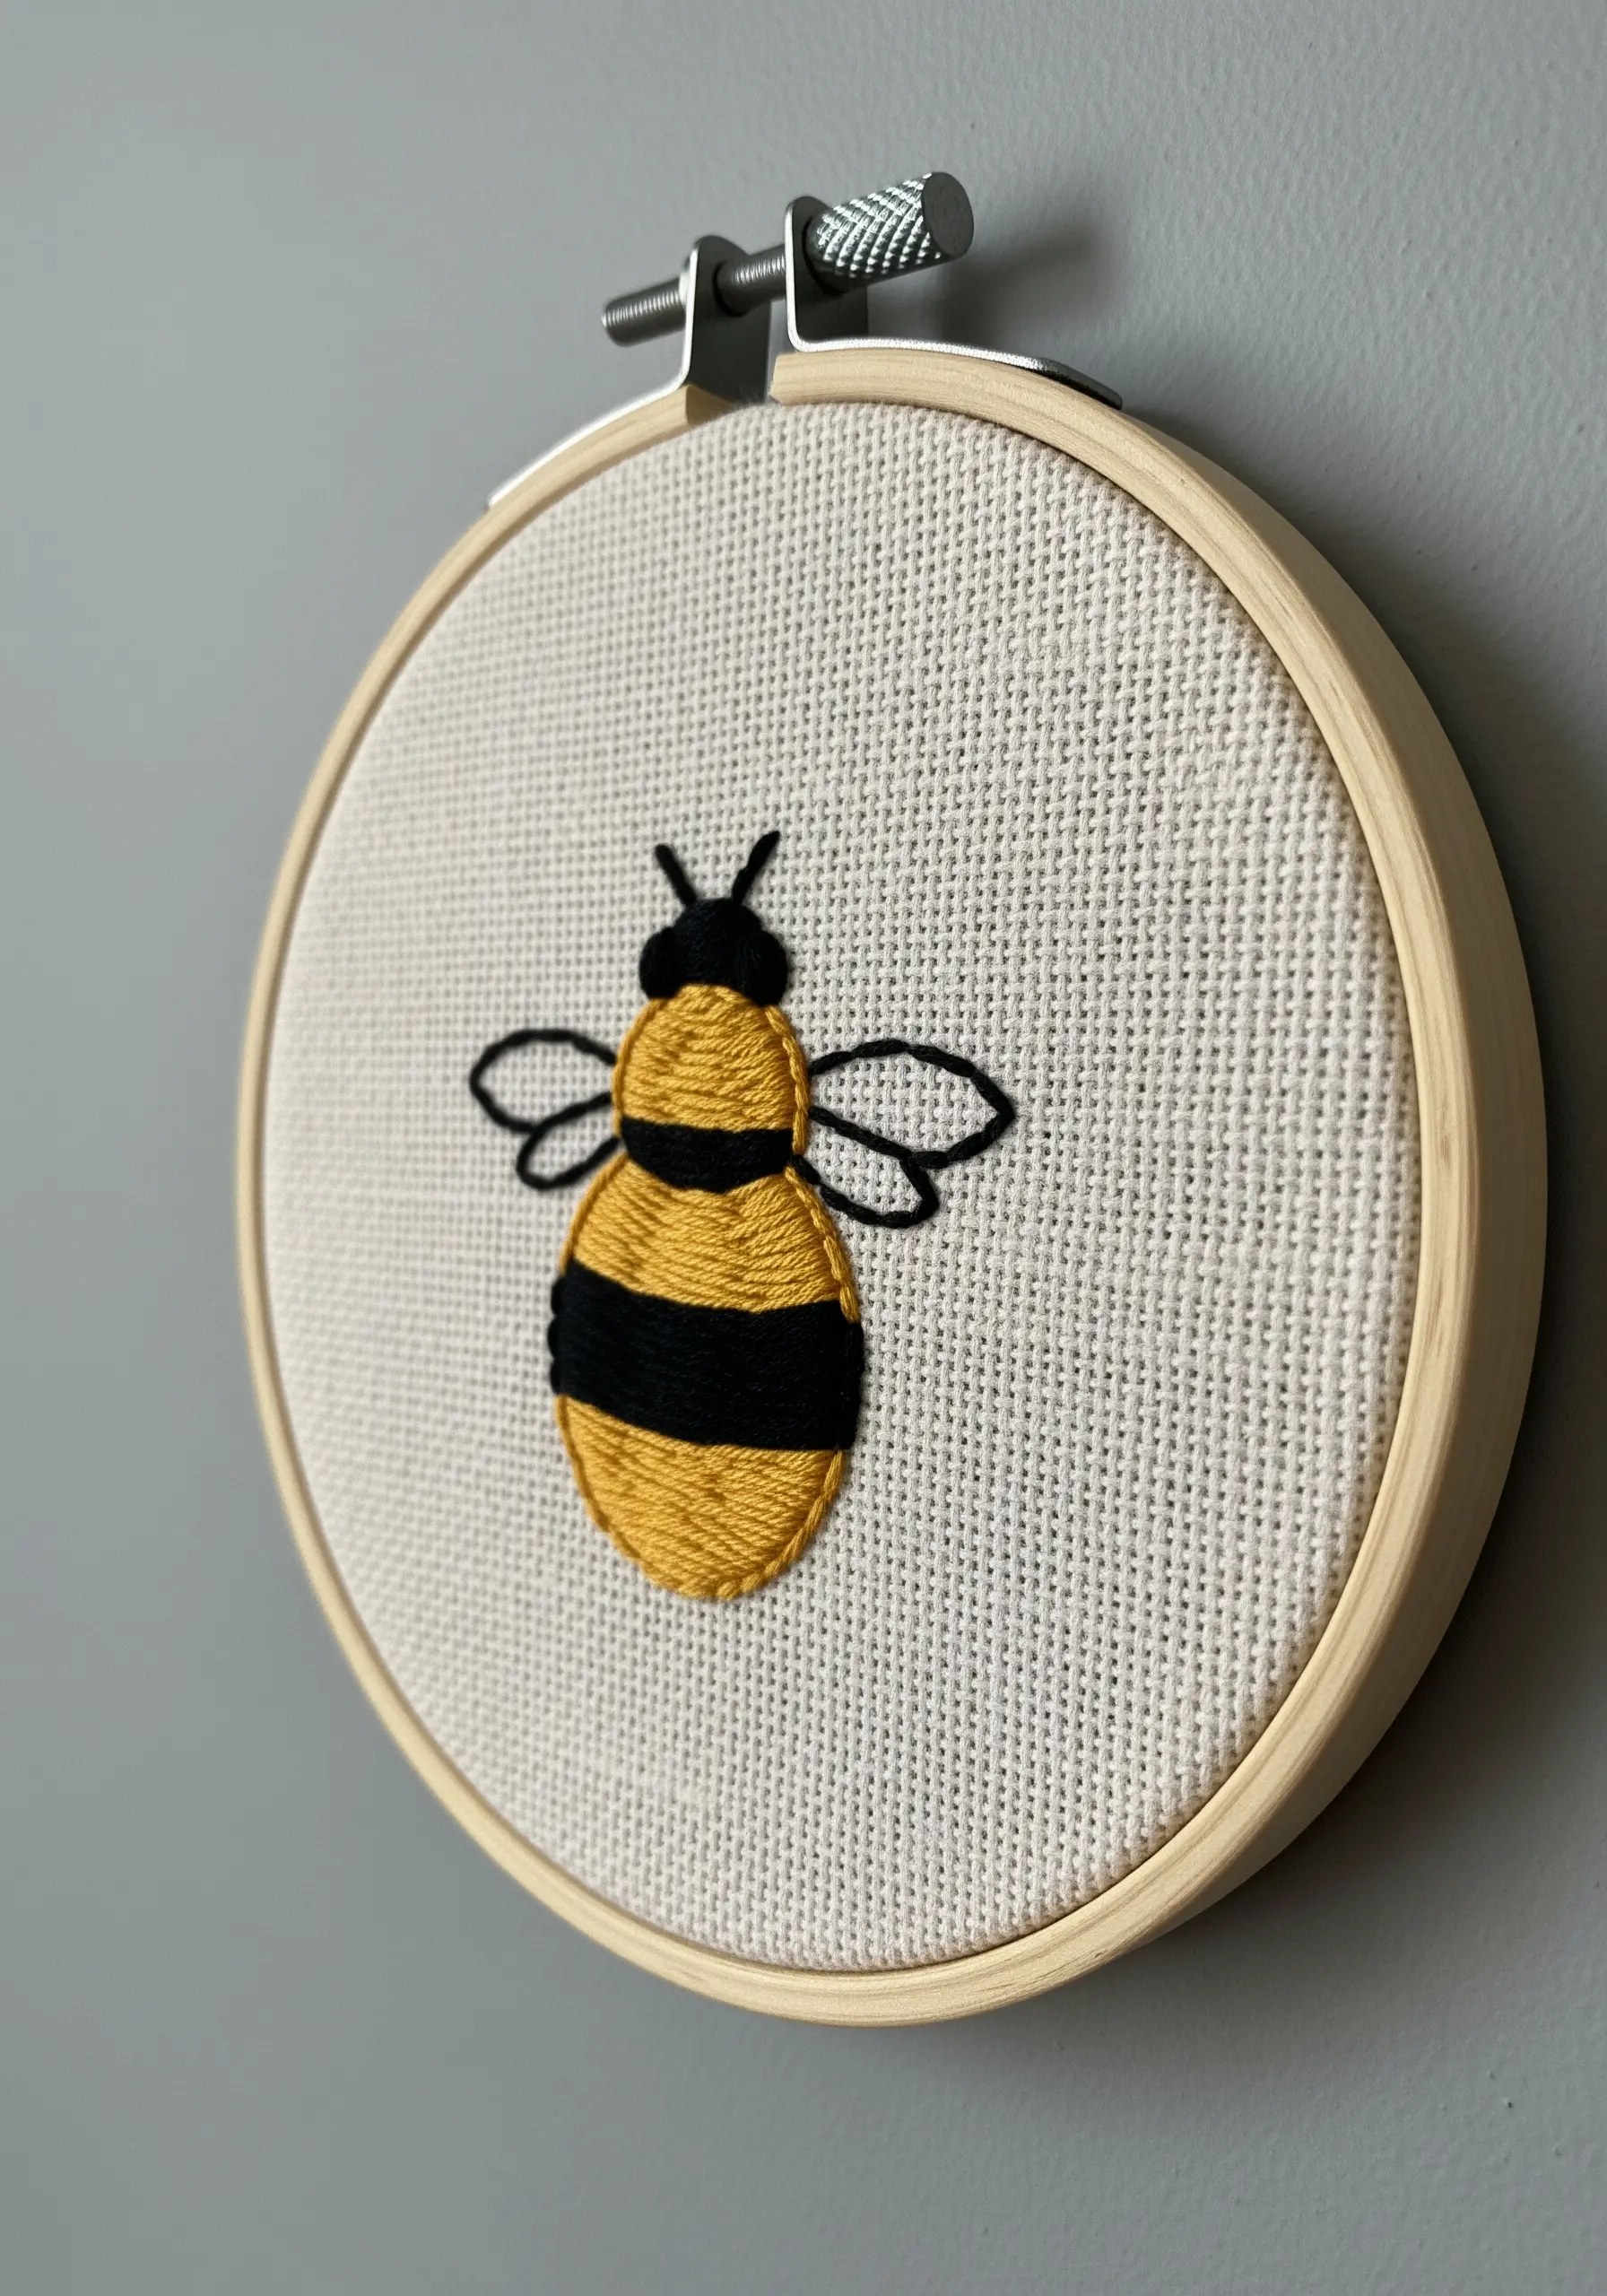
Give a simple bee motif a sense of volume by paying close attention to the direction of your satin stitches.
Fill the yellow body sections with horizontal stitches, then switch to slightly angled vertical stitches for the black stripes.
This simple change in direction tricks the eye into seeing a rounded, three-dimensional form. This technique brings life to many realistic animal & insect embroidery patterns.
Keep the wings light and airy by using a single strand of black thread in a simple backstitch outline.
5. Minimalist Mountain Range with Whipped Backstitch
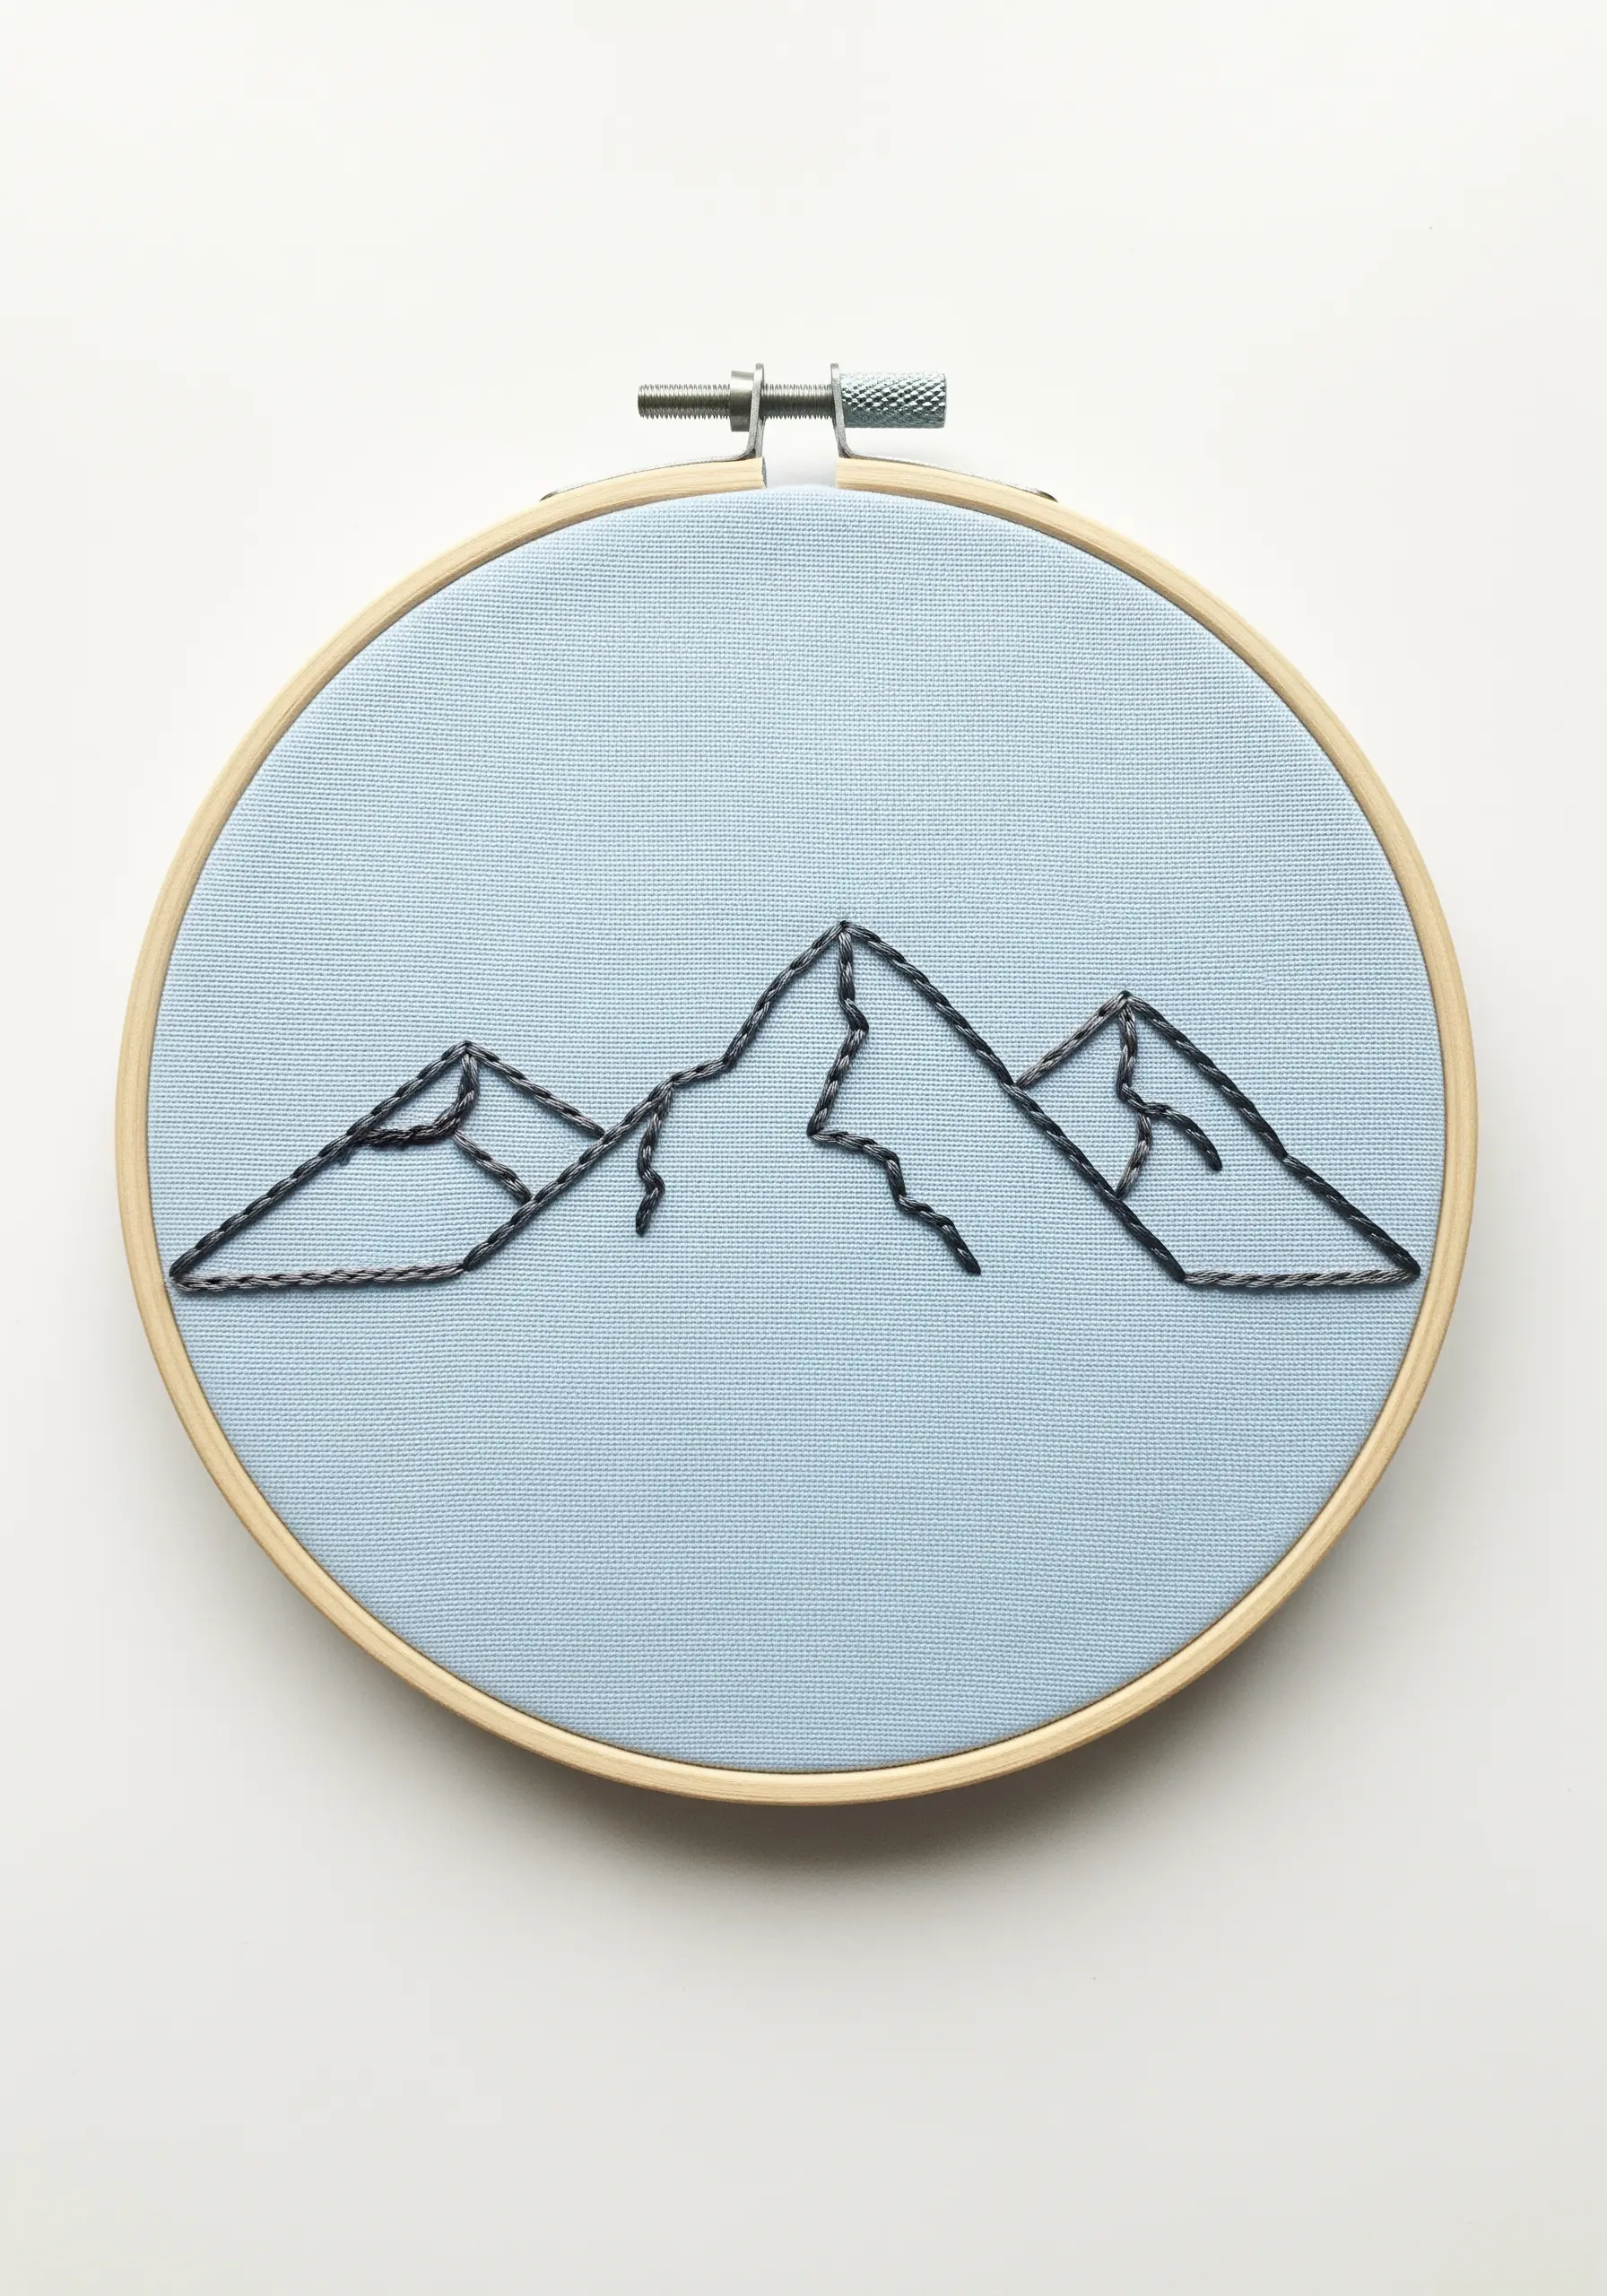
Elevate a simple line drawing by swapping a standard backstitch for a whipped backstitch.
First, create your mountain outline using a basic backstitch.
Then, take a second length of the same thread and, without piercing the fabric again, weave or ‘whip’ it around each backstitch.
This technique creates a solid, raised, rope-like line that has significantly more presence and texture, turning a simple sketch into a statement piece.
6. Layered Abstract Forms with High-Texture Fill
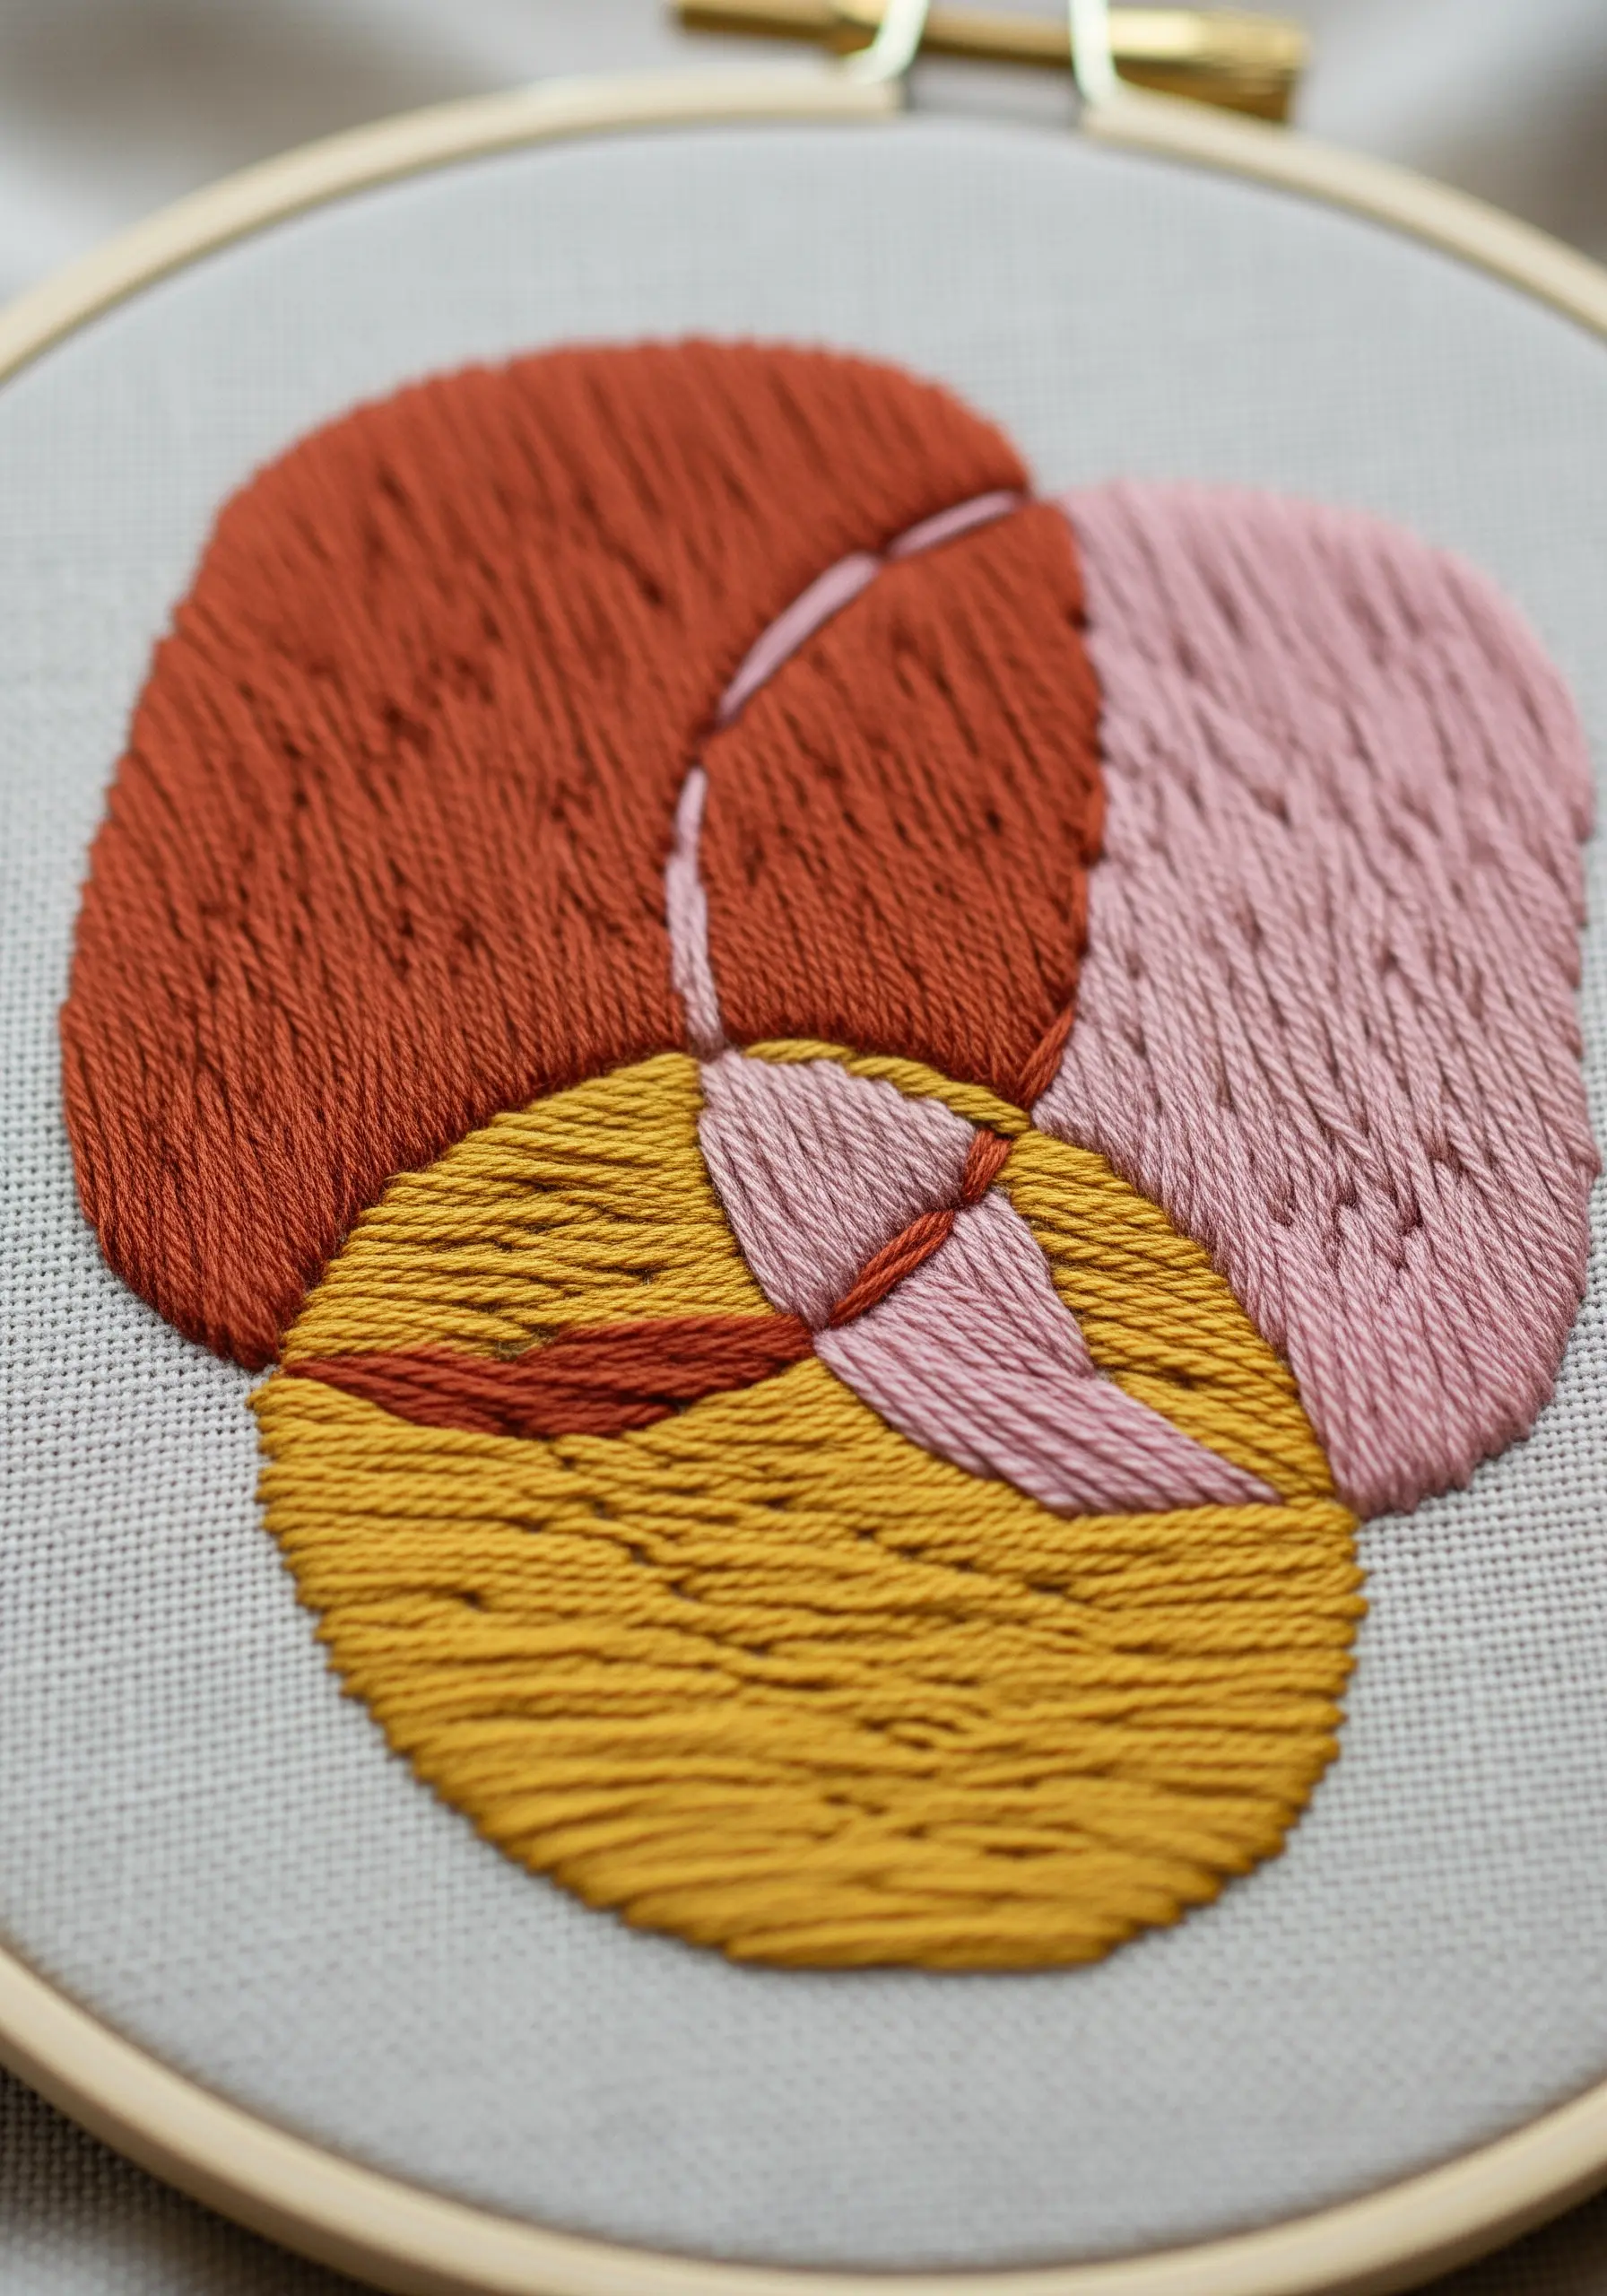
For an organic, painterly feel in abstract work, avoid a perfectly smooth satin stitch and instead use a brick or long-and-short fill stitch.
This approach creates a woven, textural surface that adds depth and character to each shape.
Slightly overlap the embroidered forms to create a sense of layering, just as you would with collage.
Introduce a single, thin line of split stitch to divide a shape or add a sharp detail, creating a focal point against the softer filled areas.
7. Gradient Leaf with Thread Blending
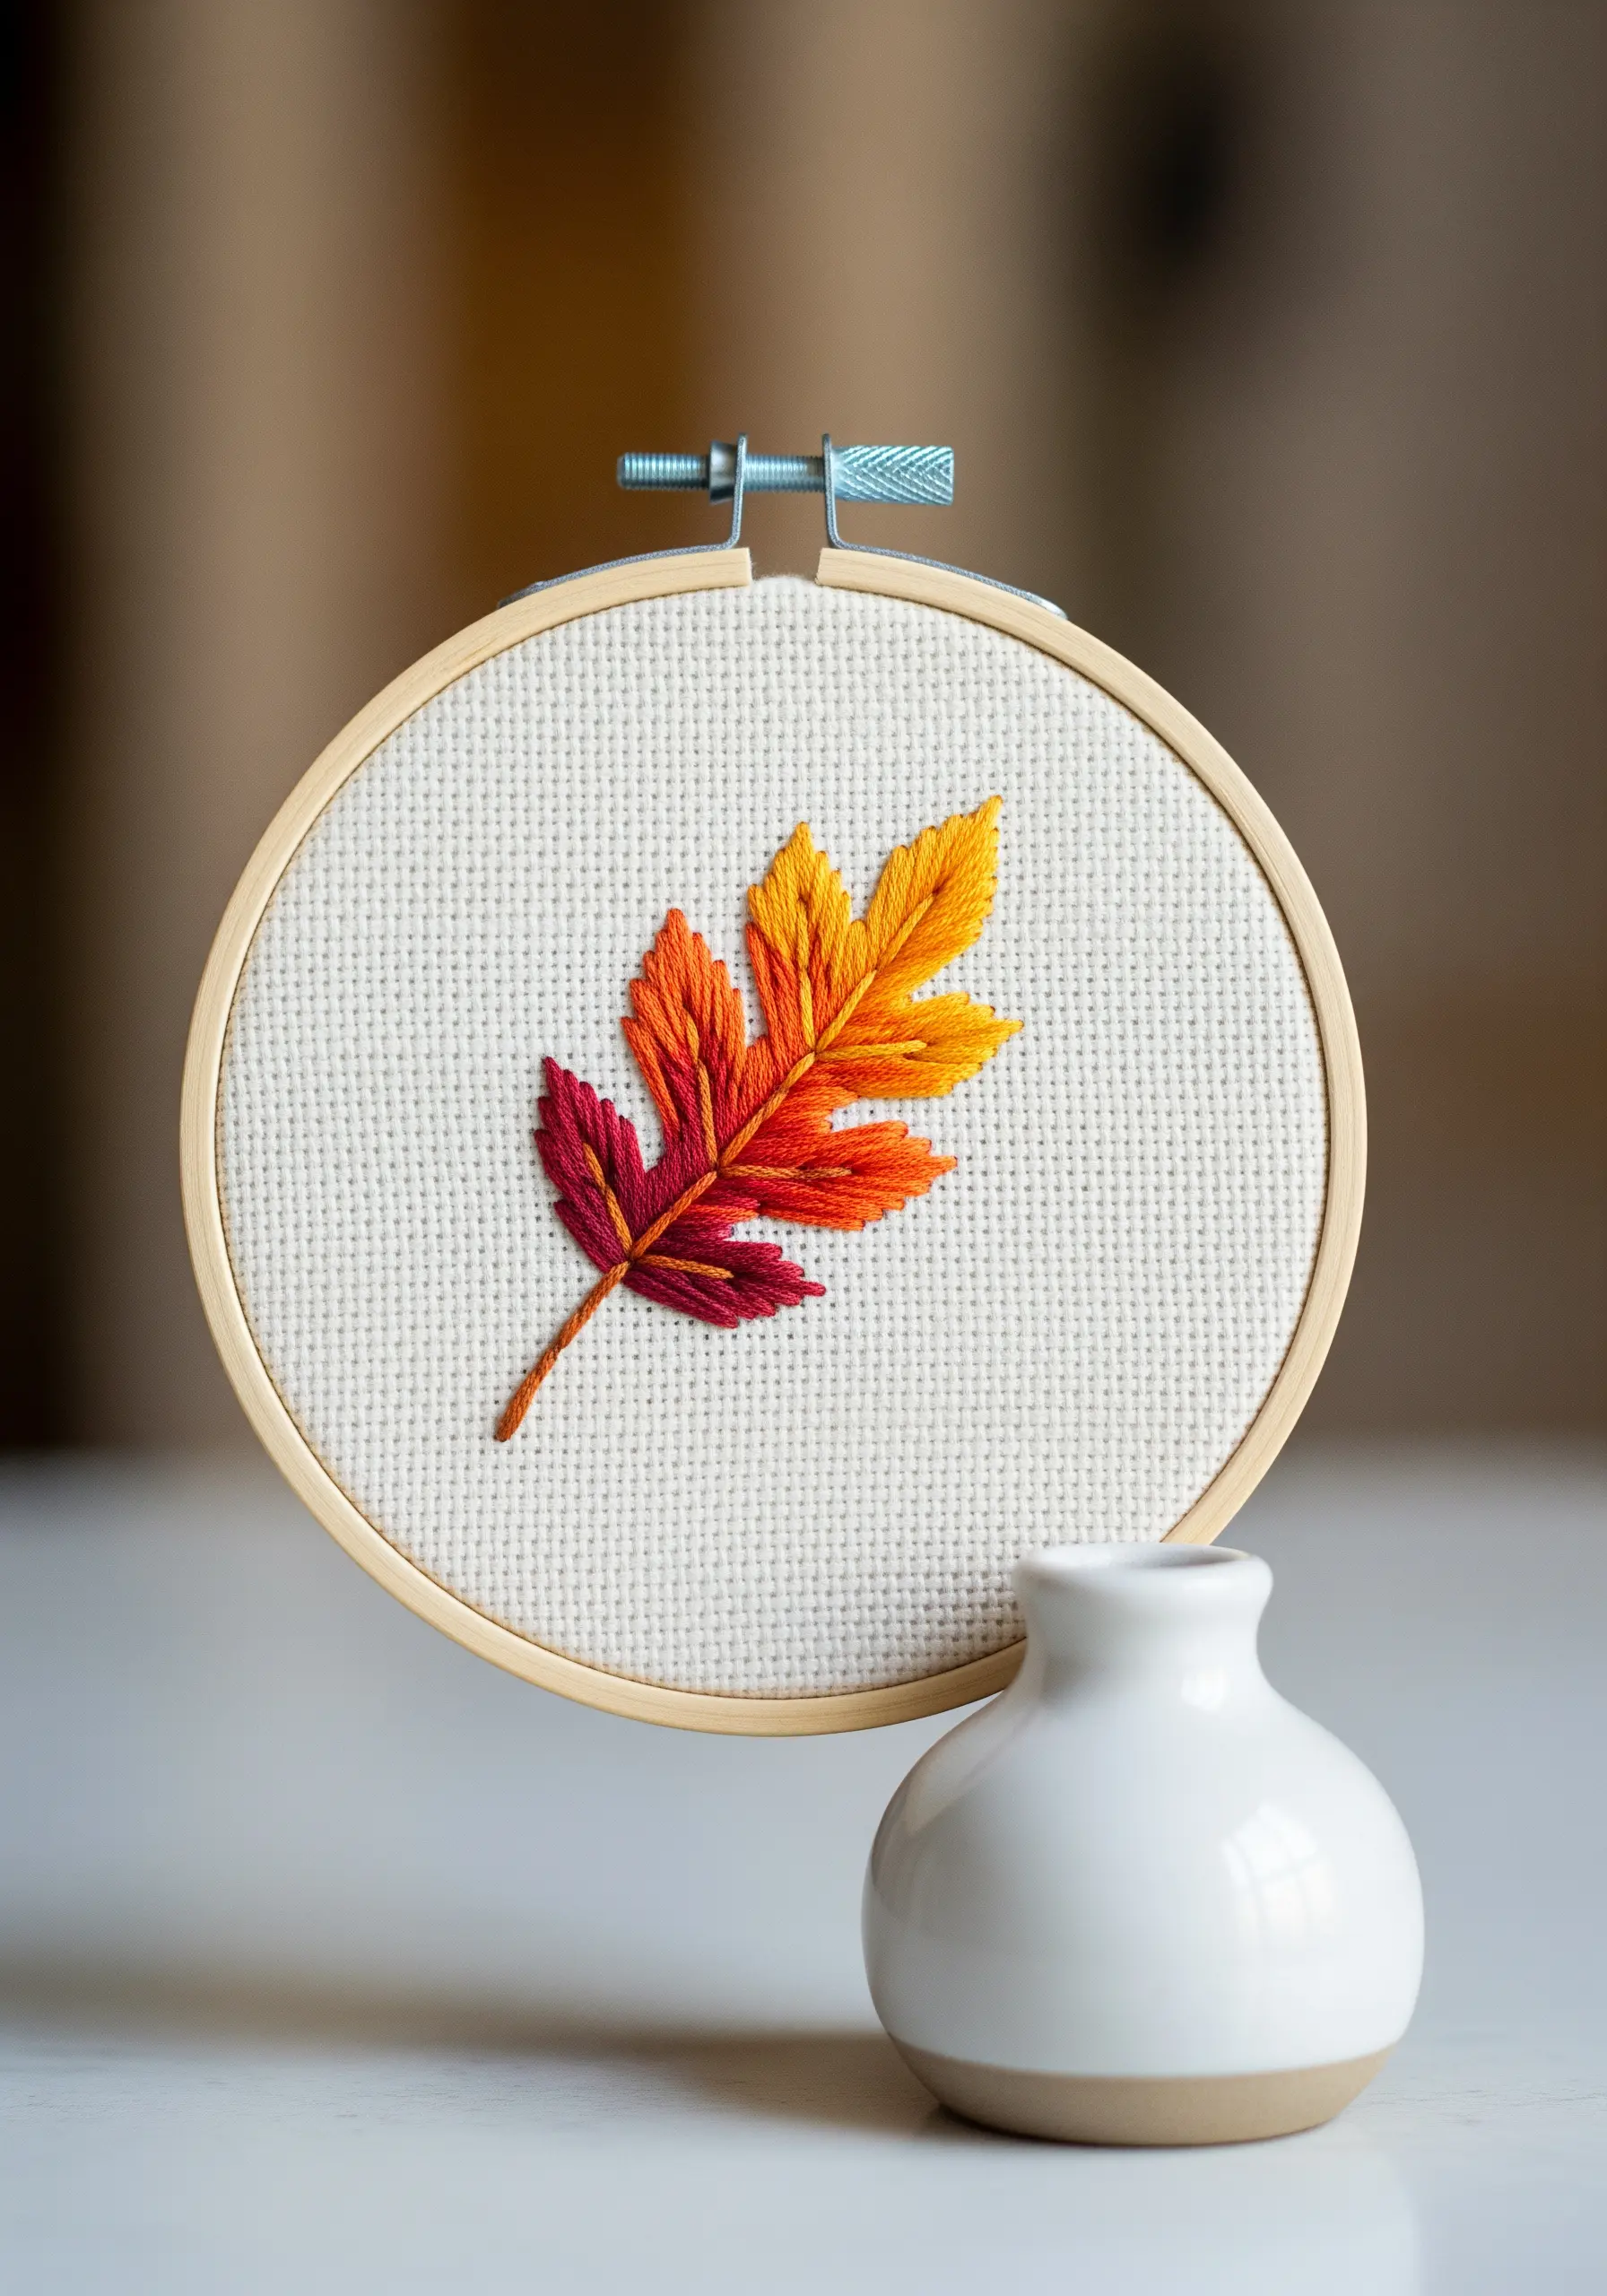
To achieve a seamless color gradient that looks painted, you need to master the long-and-short stitch.
Begin at one end of the leaf with your darkest color, making parallel stitches of slightly different lengths.
Bring your second color up through the fabric and stitch back into the first color block, interlocking the new stitches with the old ones.
This technique creates beautiful gradient color floral embroidery ideas that capture the subtle tonal shifts found in nature.
8. Delicate Dandelion Head with Fly Stitches
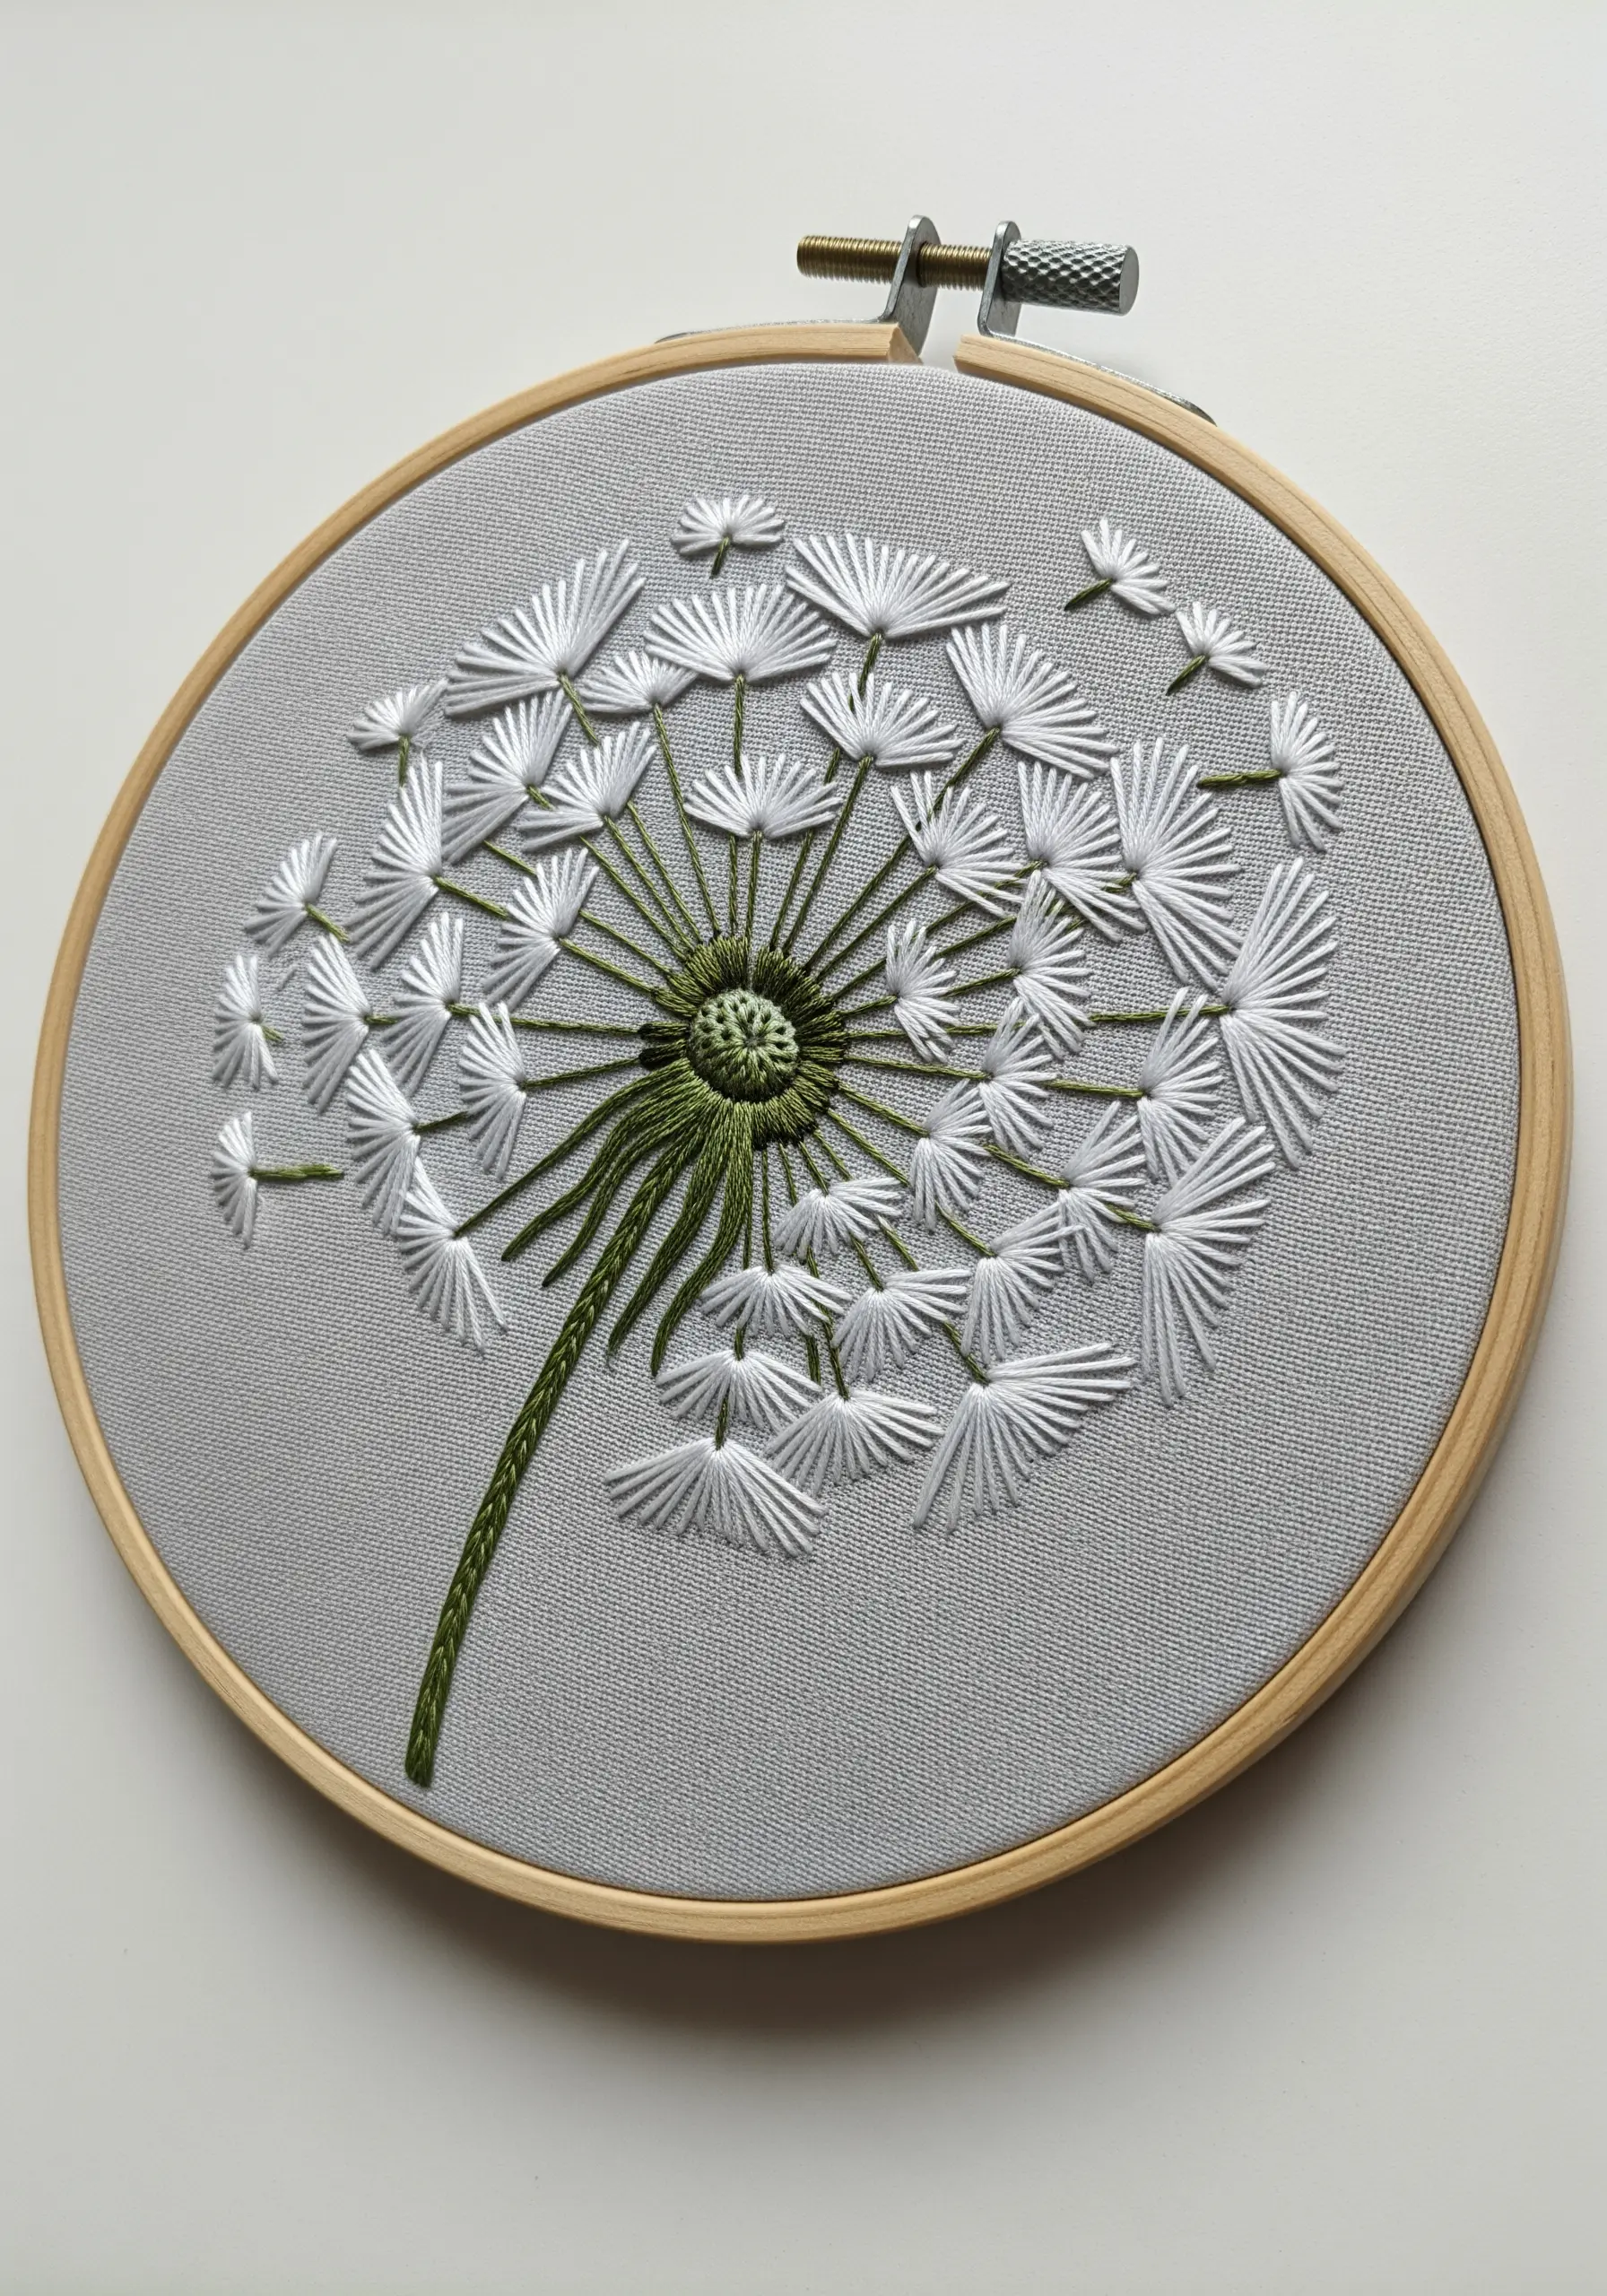
Capture the airy, fragile nature of a dandelion puff by using fly stitches for the seed clusters.
A fly stitch is a V-shape anchored by a small vertical tacking stitch, perfectly mimicking the parachute-like structure of a dandelion seed.
Group these stitches radially around the center, and then add a few individual straight stitches floating away to create a sense of movement.
Remember that negative space is crucial here; leaving room to breathe makes the design feel light.
9. Modern Outline with a Pop of Metallic Thread
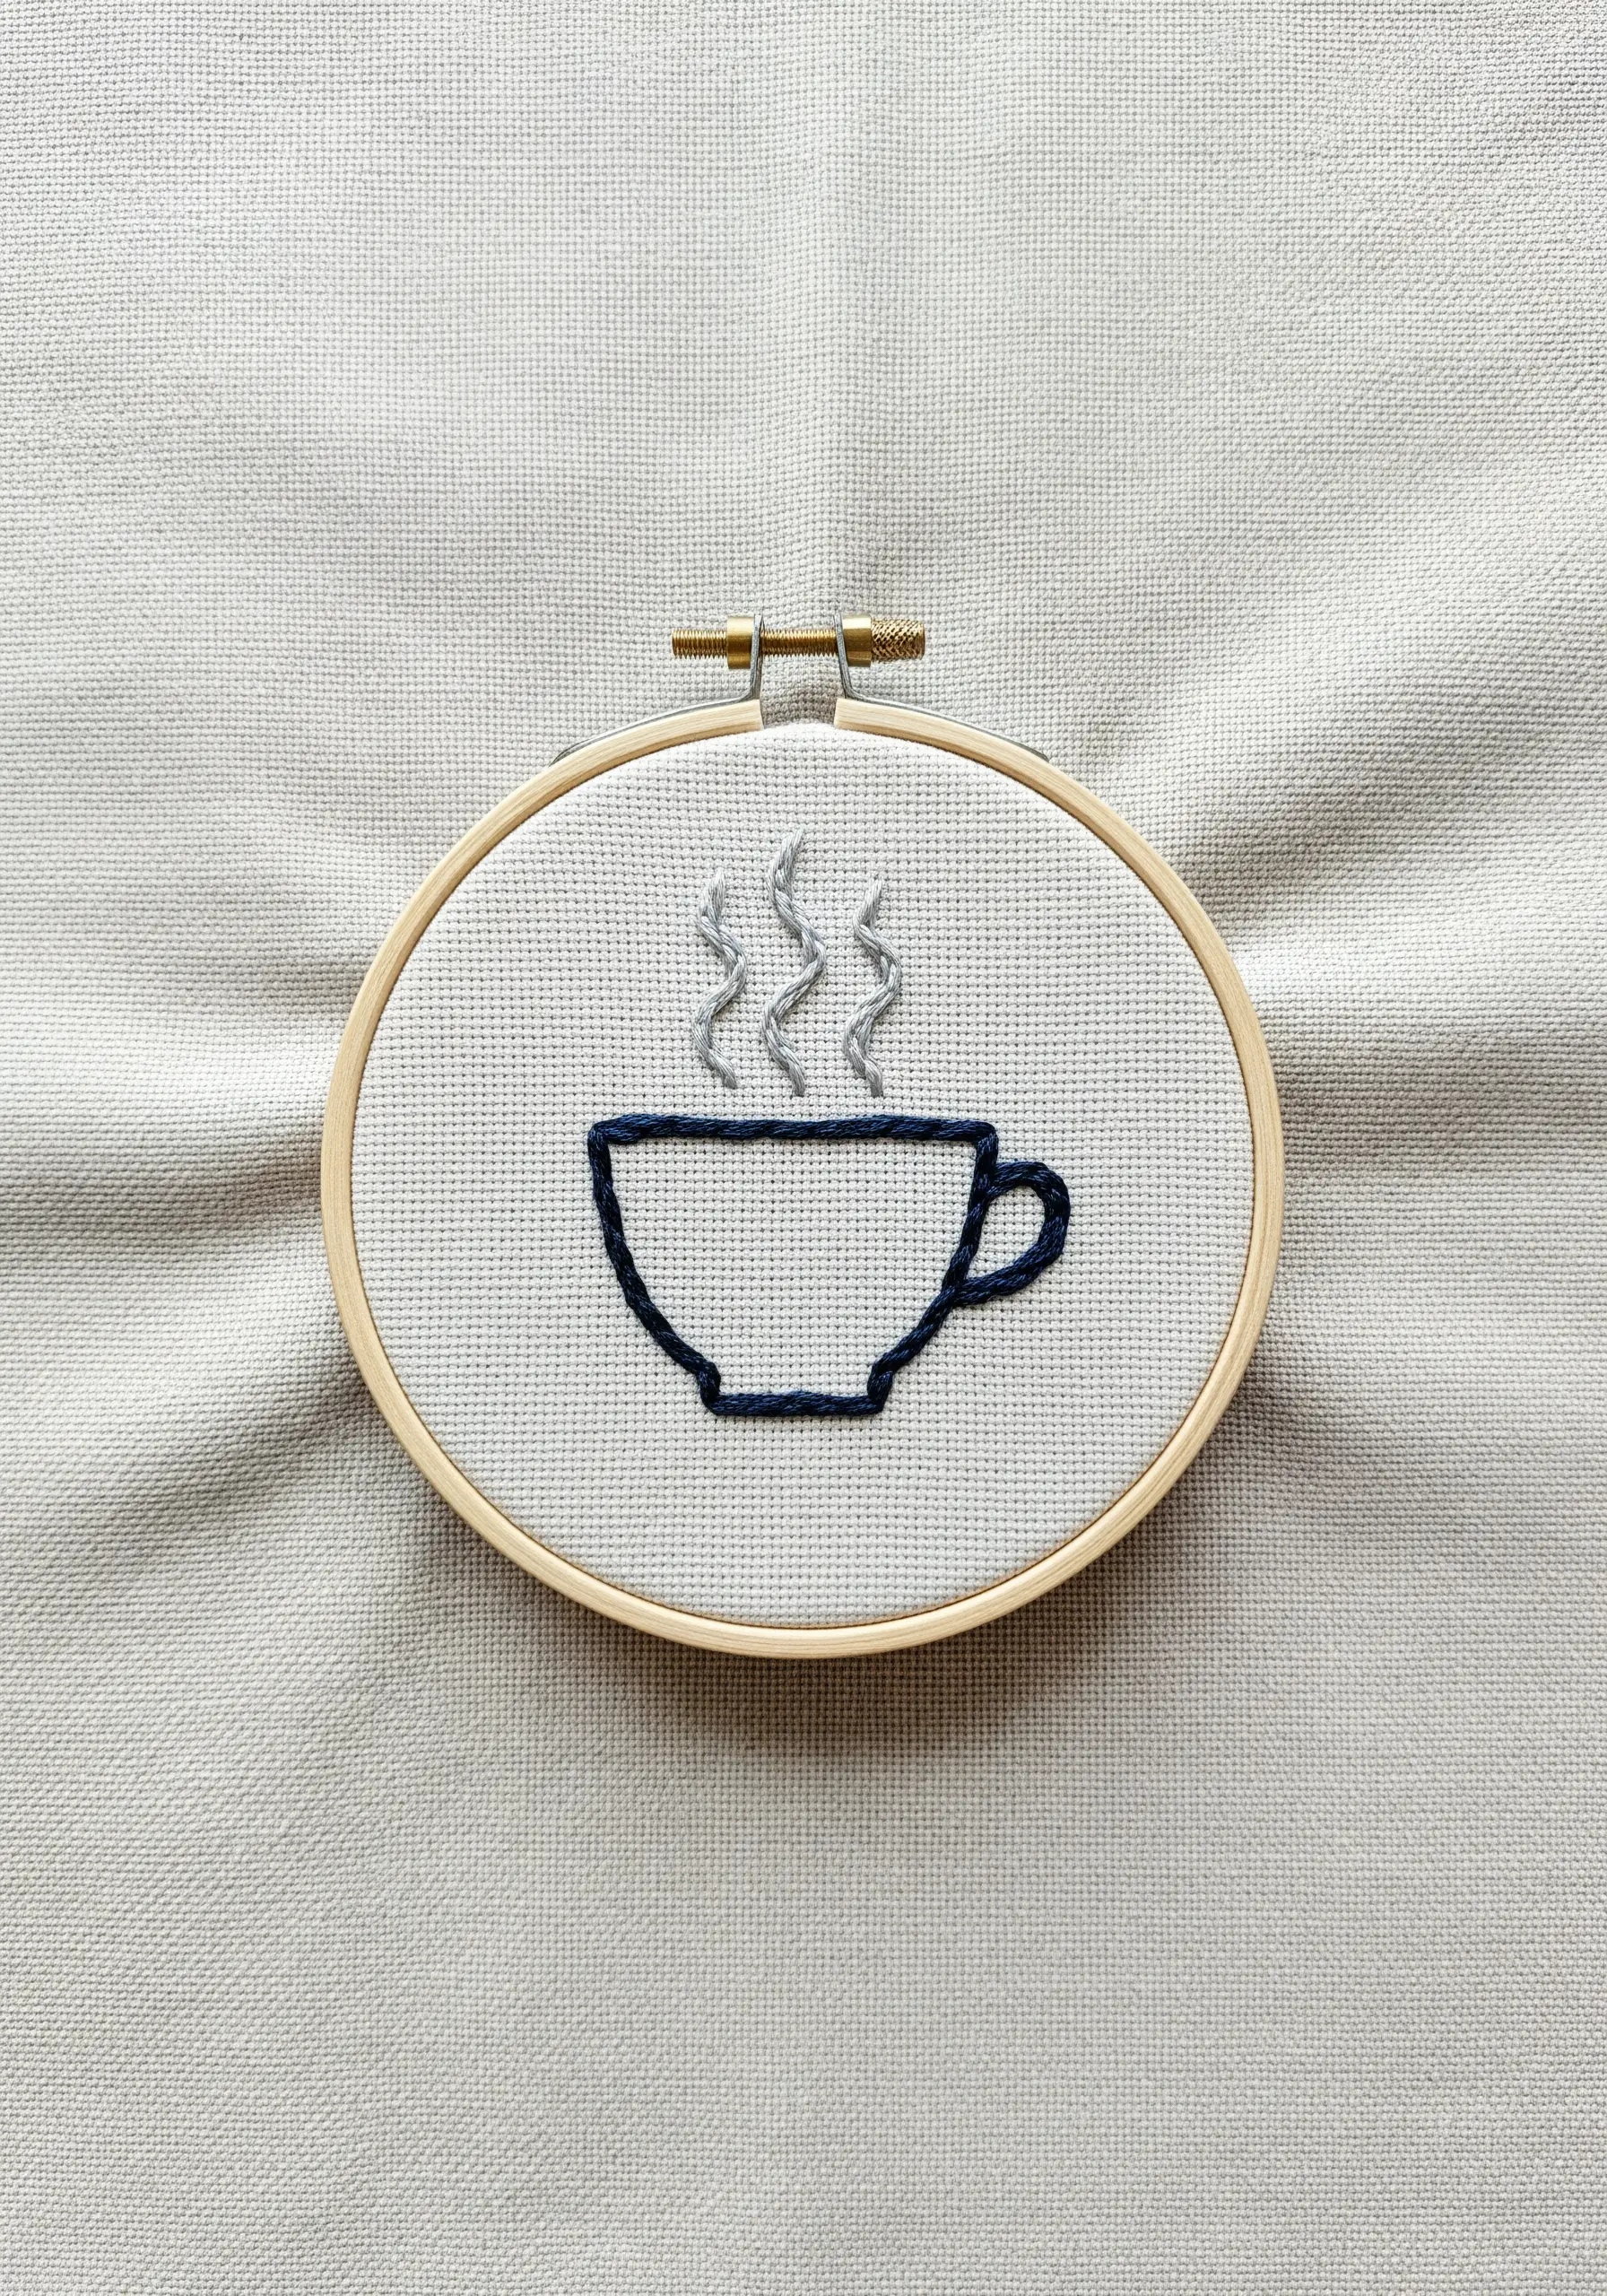
A simple outline becomes instantly more sophisticated with a thoughtful stitch choice and a surprising accent.
Use a two-strand stem stitch for the cup to create a smooth, slightly rounded line that feels more substantial than a backstitch.
For the steam, switch to a single strand of a light gray or a subtle metallic silver thread.
This shift in texture and finish makes the steam feel ethereal and distinct from the solid form of the cup.
10. Textured Houseplant with Layered Stitches
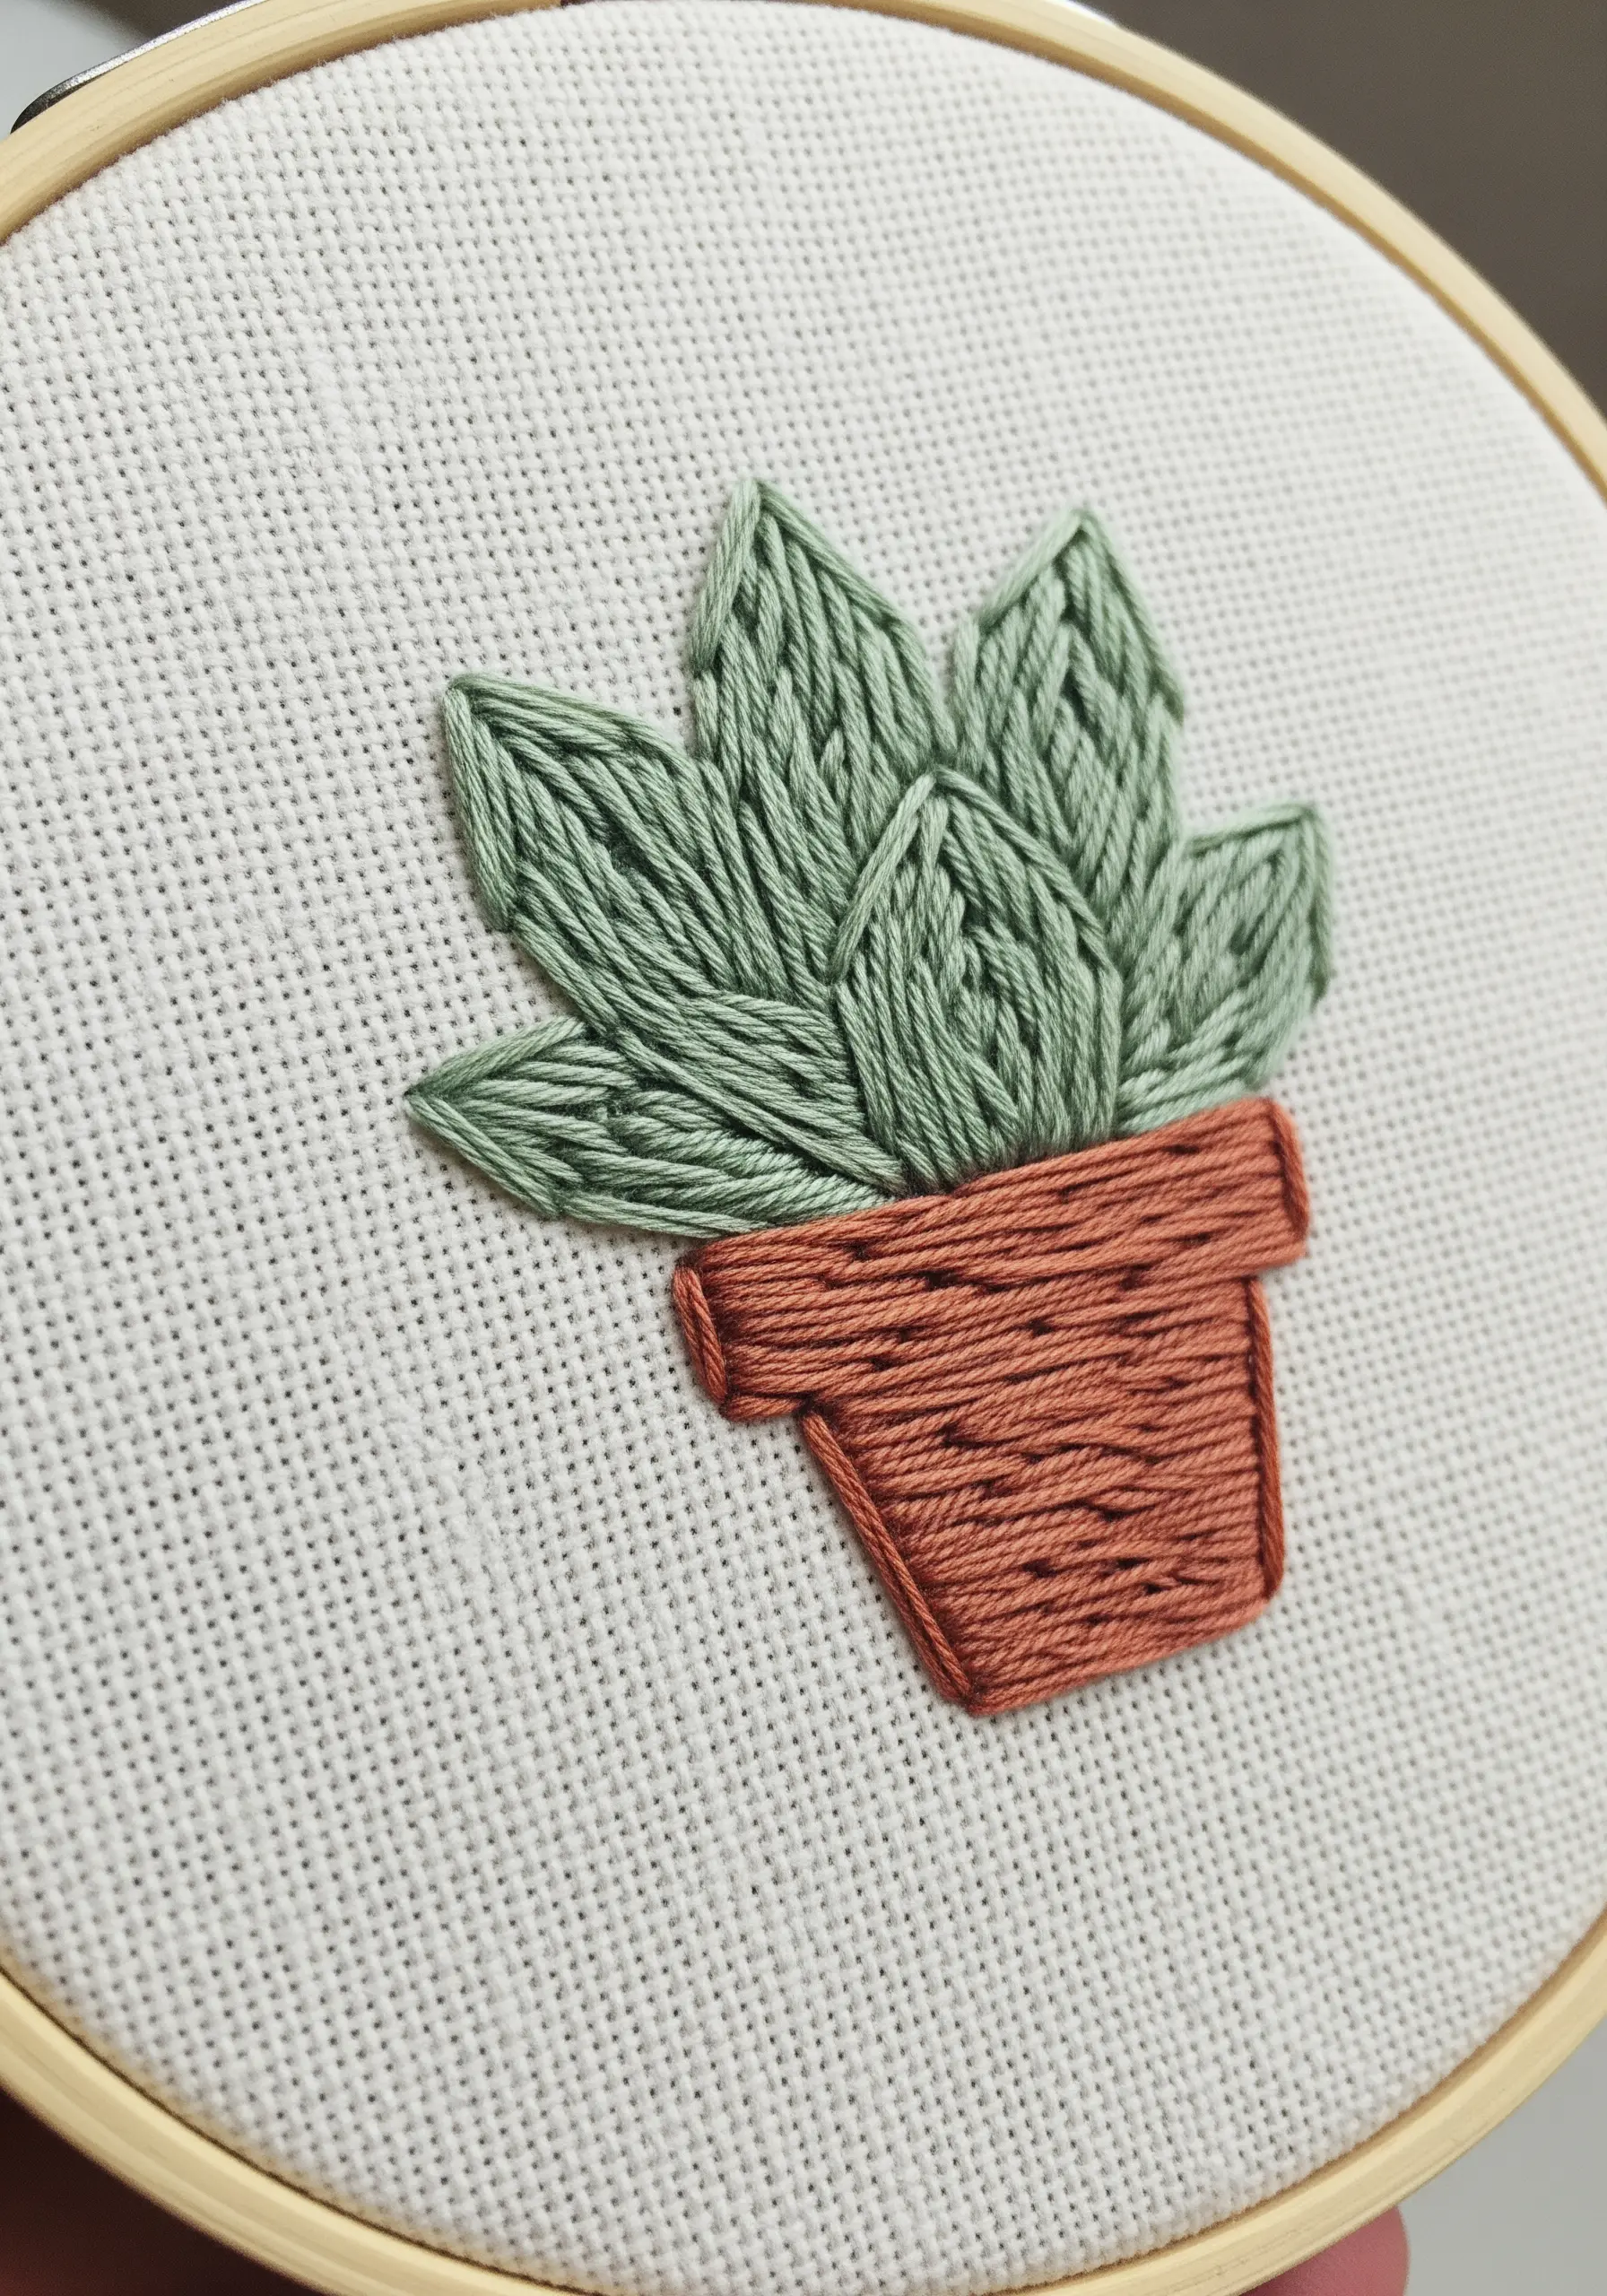
Create clear visual separation between the elements of your potted plant by using distinct stitches for each part.
Use a horizontal satin stitch for the terracotta pot to give it a smooth, solid feel.
For the leaves, a fishbone stitch is ideal because it creates a central vein and angled sides, perfectly mimicking the structure of a real leaf.
Slightly overlap the leaves as you stitch them to build believable depth and dimension.
11. Sculptural Berries with Clustered French Knots
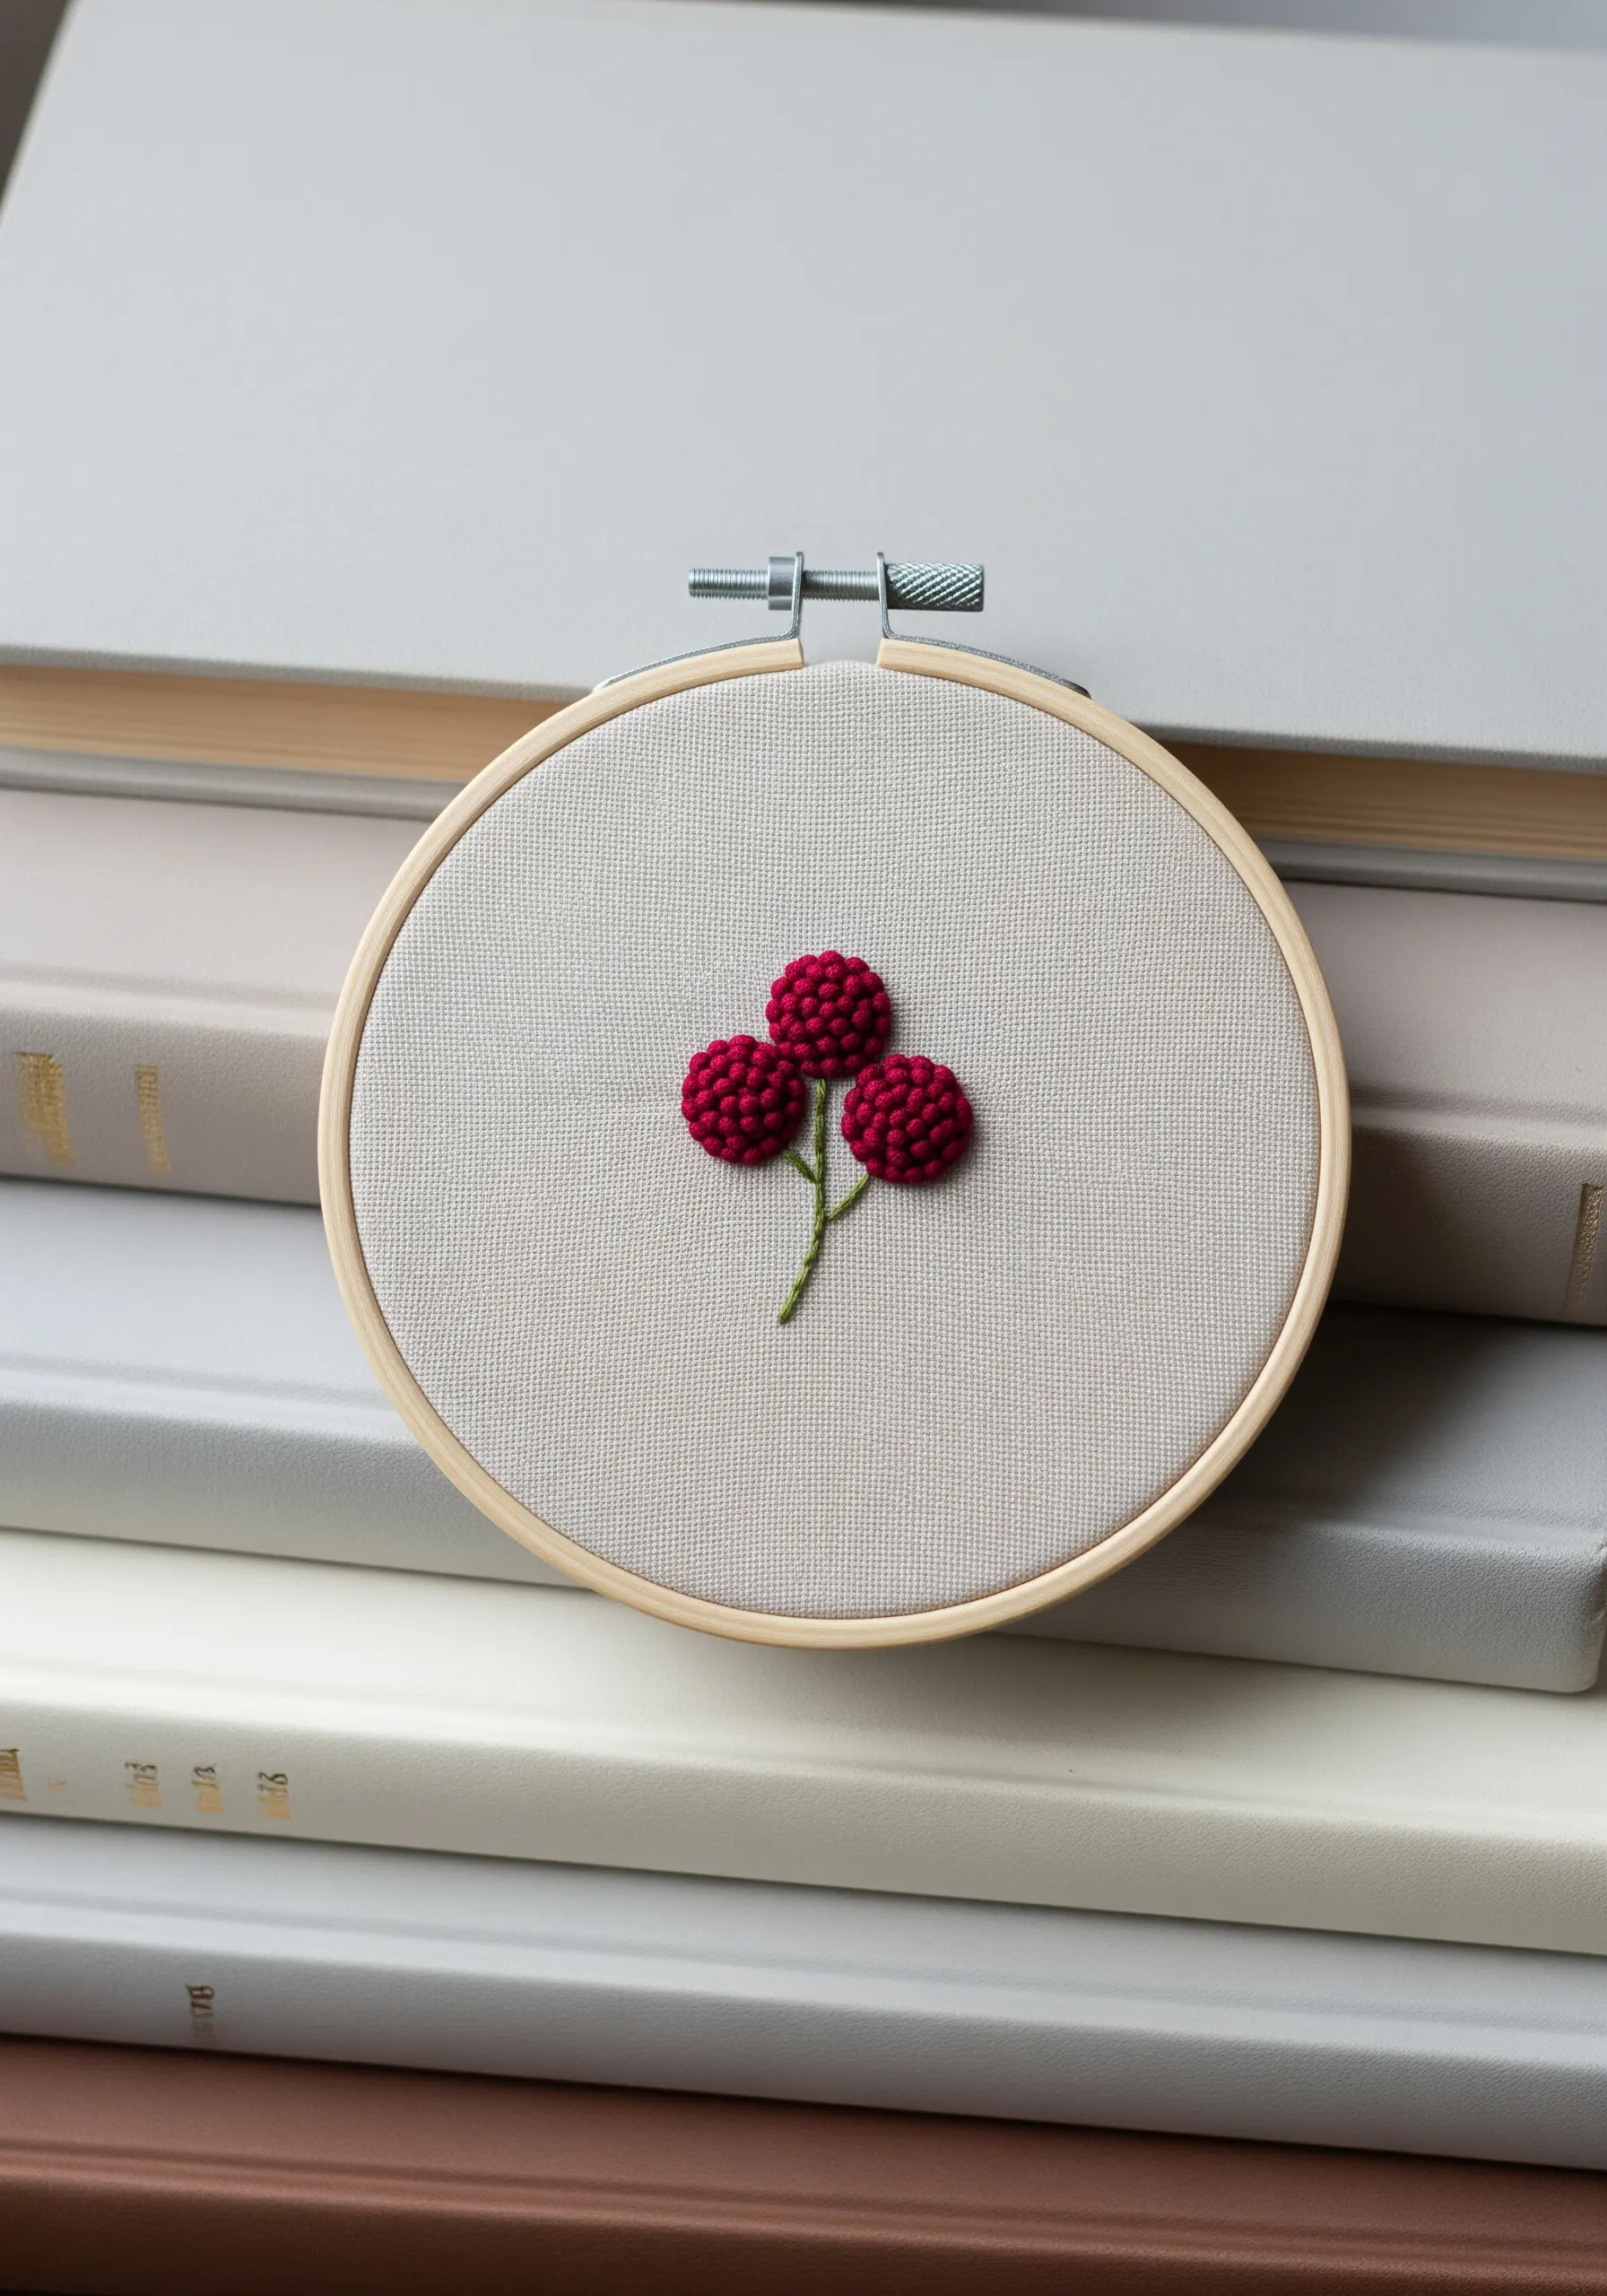
The key to creating these wonderfully tactile raspberries is the strategic use of French knots.
Outline your berry shape, then fill it entirely with tightly packed knots.
To make the texture look natural, vary the size of the knots slightly by alternating between one and two wraps of thread around your needle.
This transforms a flat motif into a sculptural element and turns your piece into one of those small handmade projects that double as thoughtful gifts.
12. Geometric Contrast with Negative Space

This design demonstrates that what you choose *not* to stitch can be just as impactful as what you do.
Use a clean, two-strand backstitch to create the honeycomb grid.
Instead of filling the entire pattern, select a small cluster of cells and fill them with a contrasting color and a textural stitch, like a basket weave or simple satin stitch.
This selective filling creates a striking focal point, while the surrounding empty space keeps the design feeling modern and uncluttered.
13. Realistic Feather with Angled Stitches
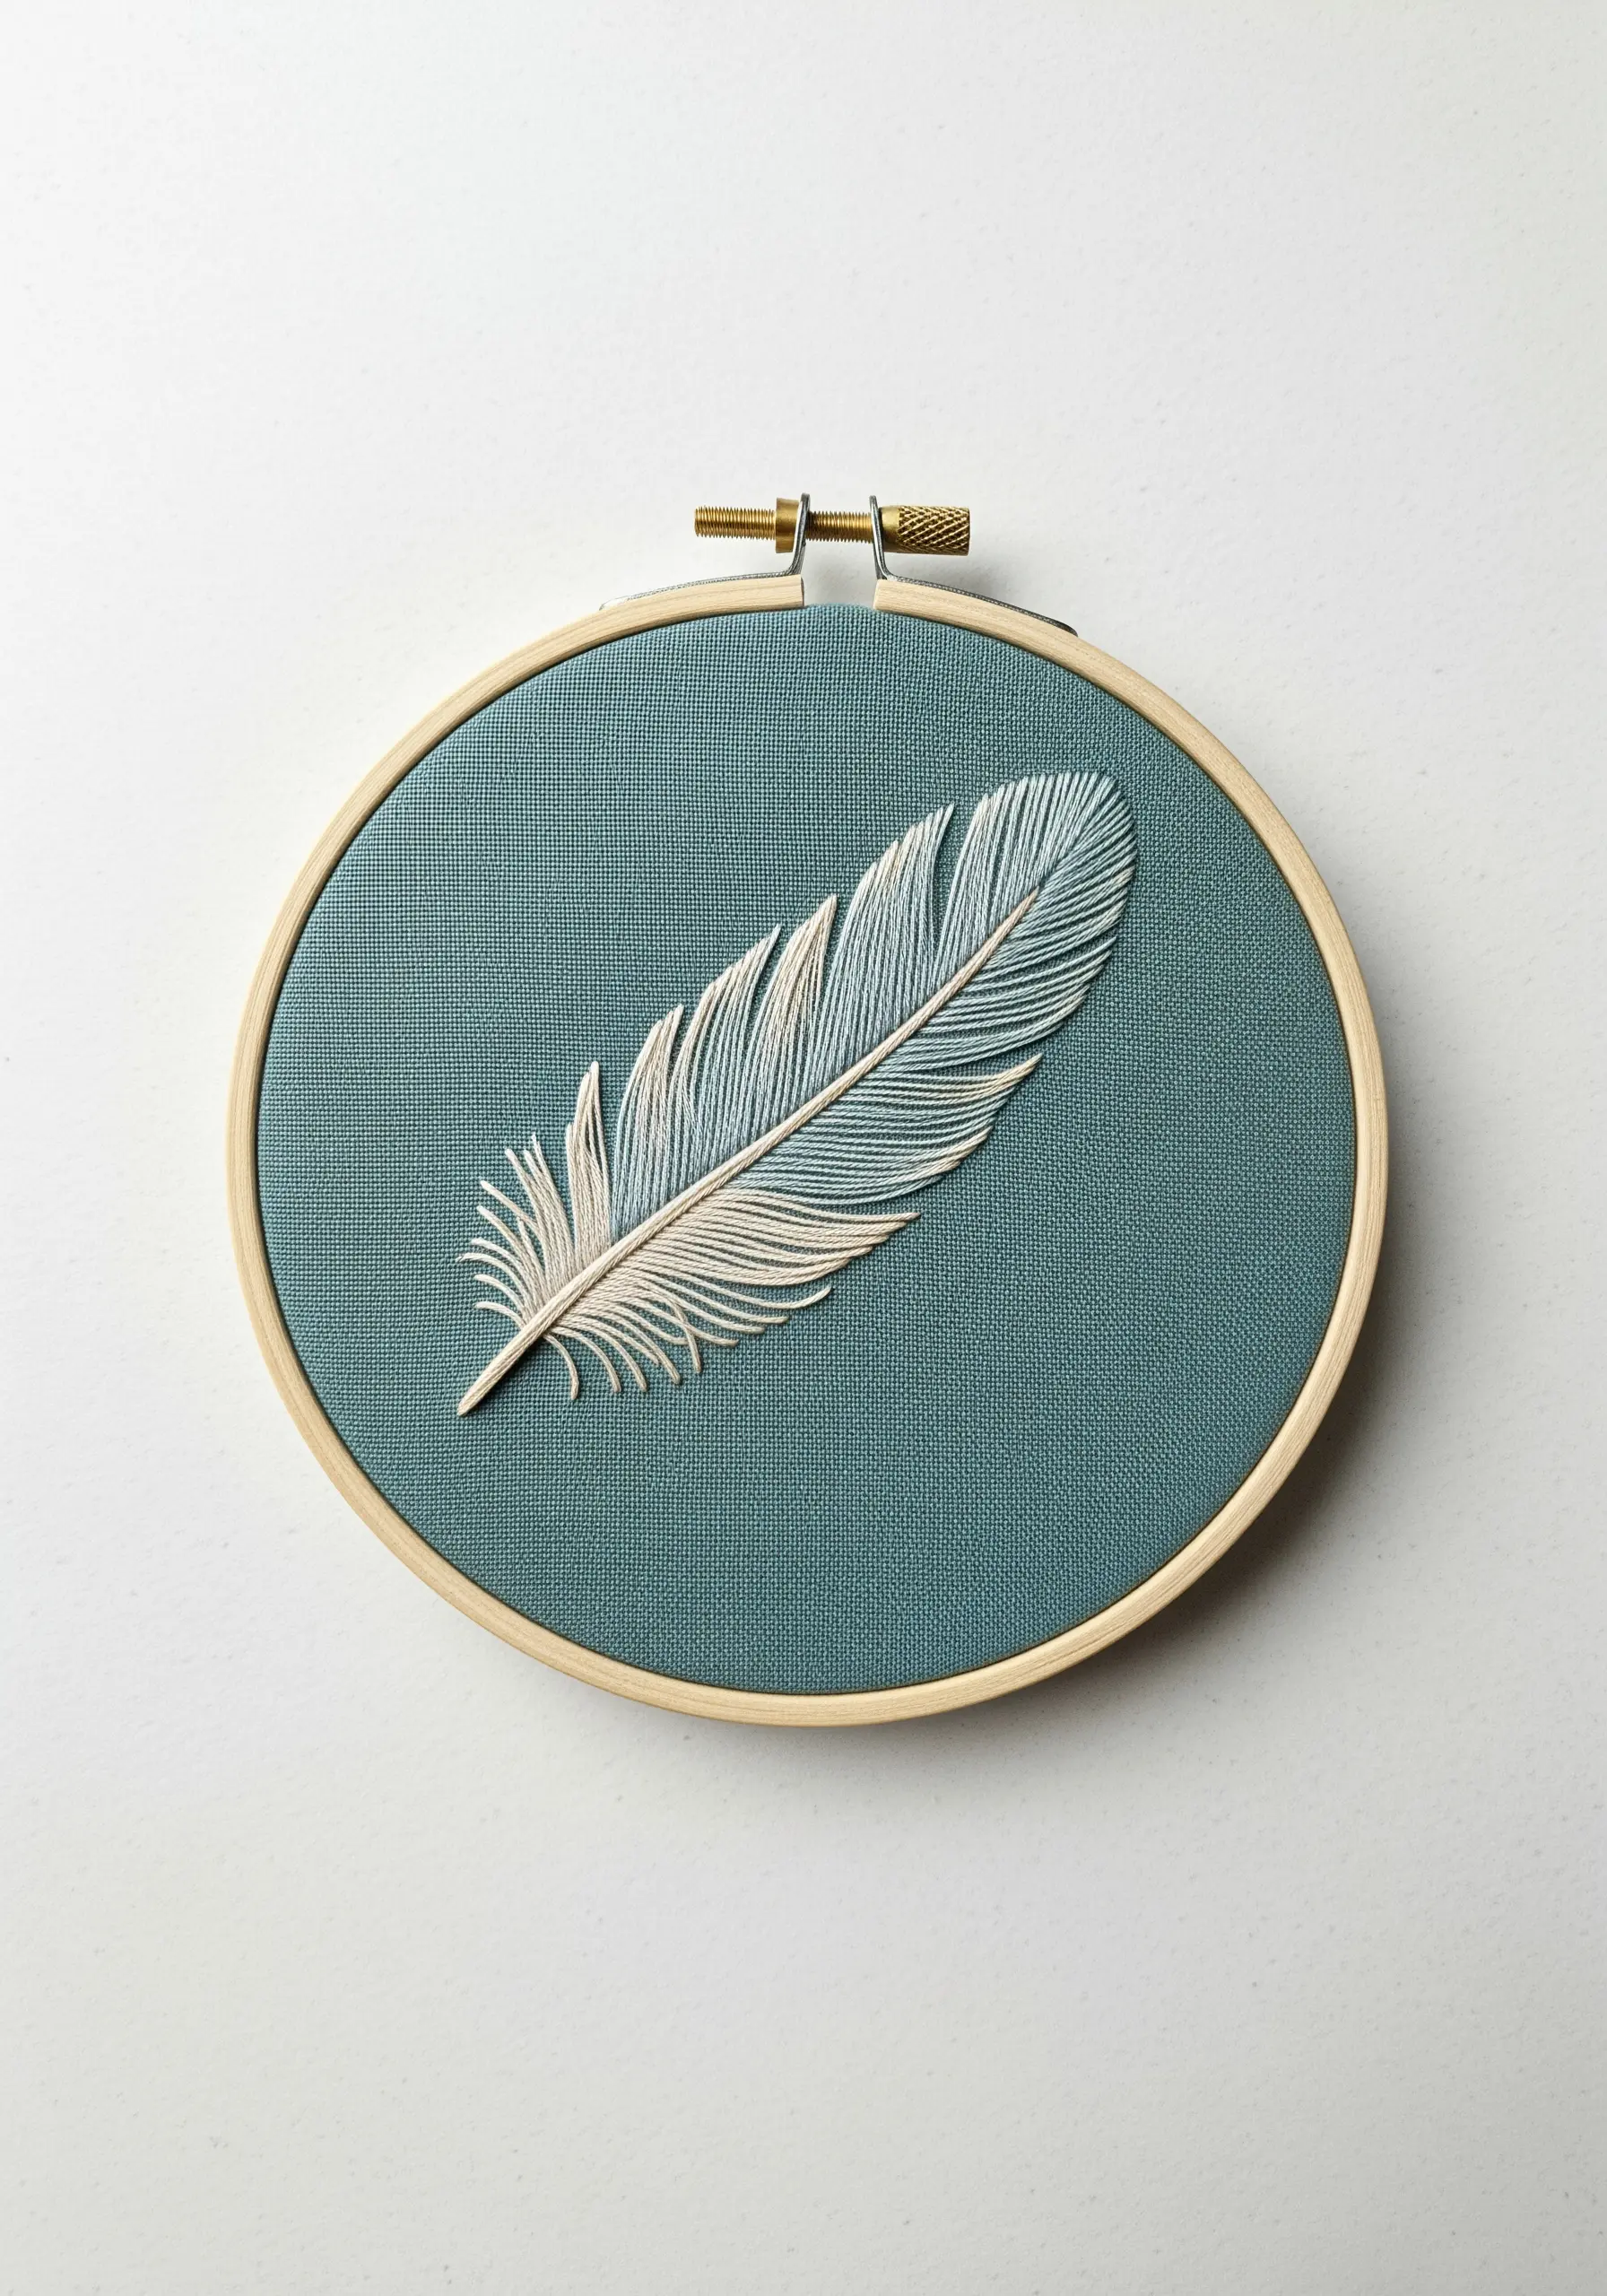
To capture the delicate structure of a feather, the angle of your stitches is everything.
First, create the central shaft with a solid split stitch.
Then, for the feather’s barbs, use single straight stitches fanning out at a sharp, upward angle from the shaft.
Use only one or two strands of floss to keep the lines fine and distinct.
Choosing a variegated thread in shades of white and ecru will add subtle color shifts for even greater realism.
14. Minimalist Wave with Color Blocking
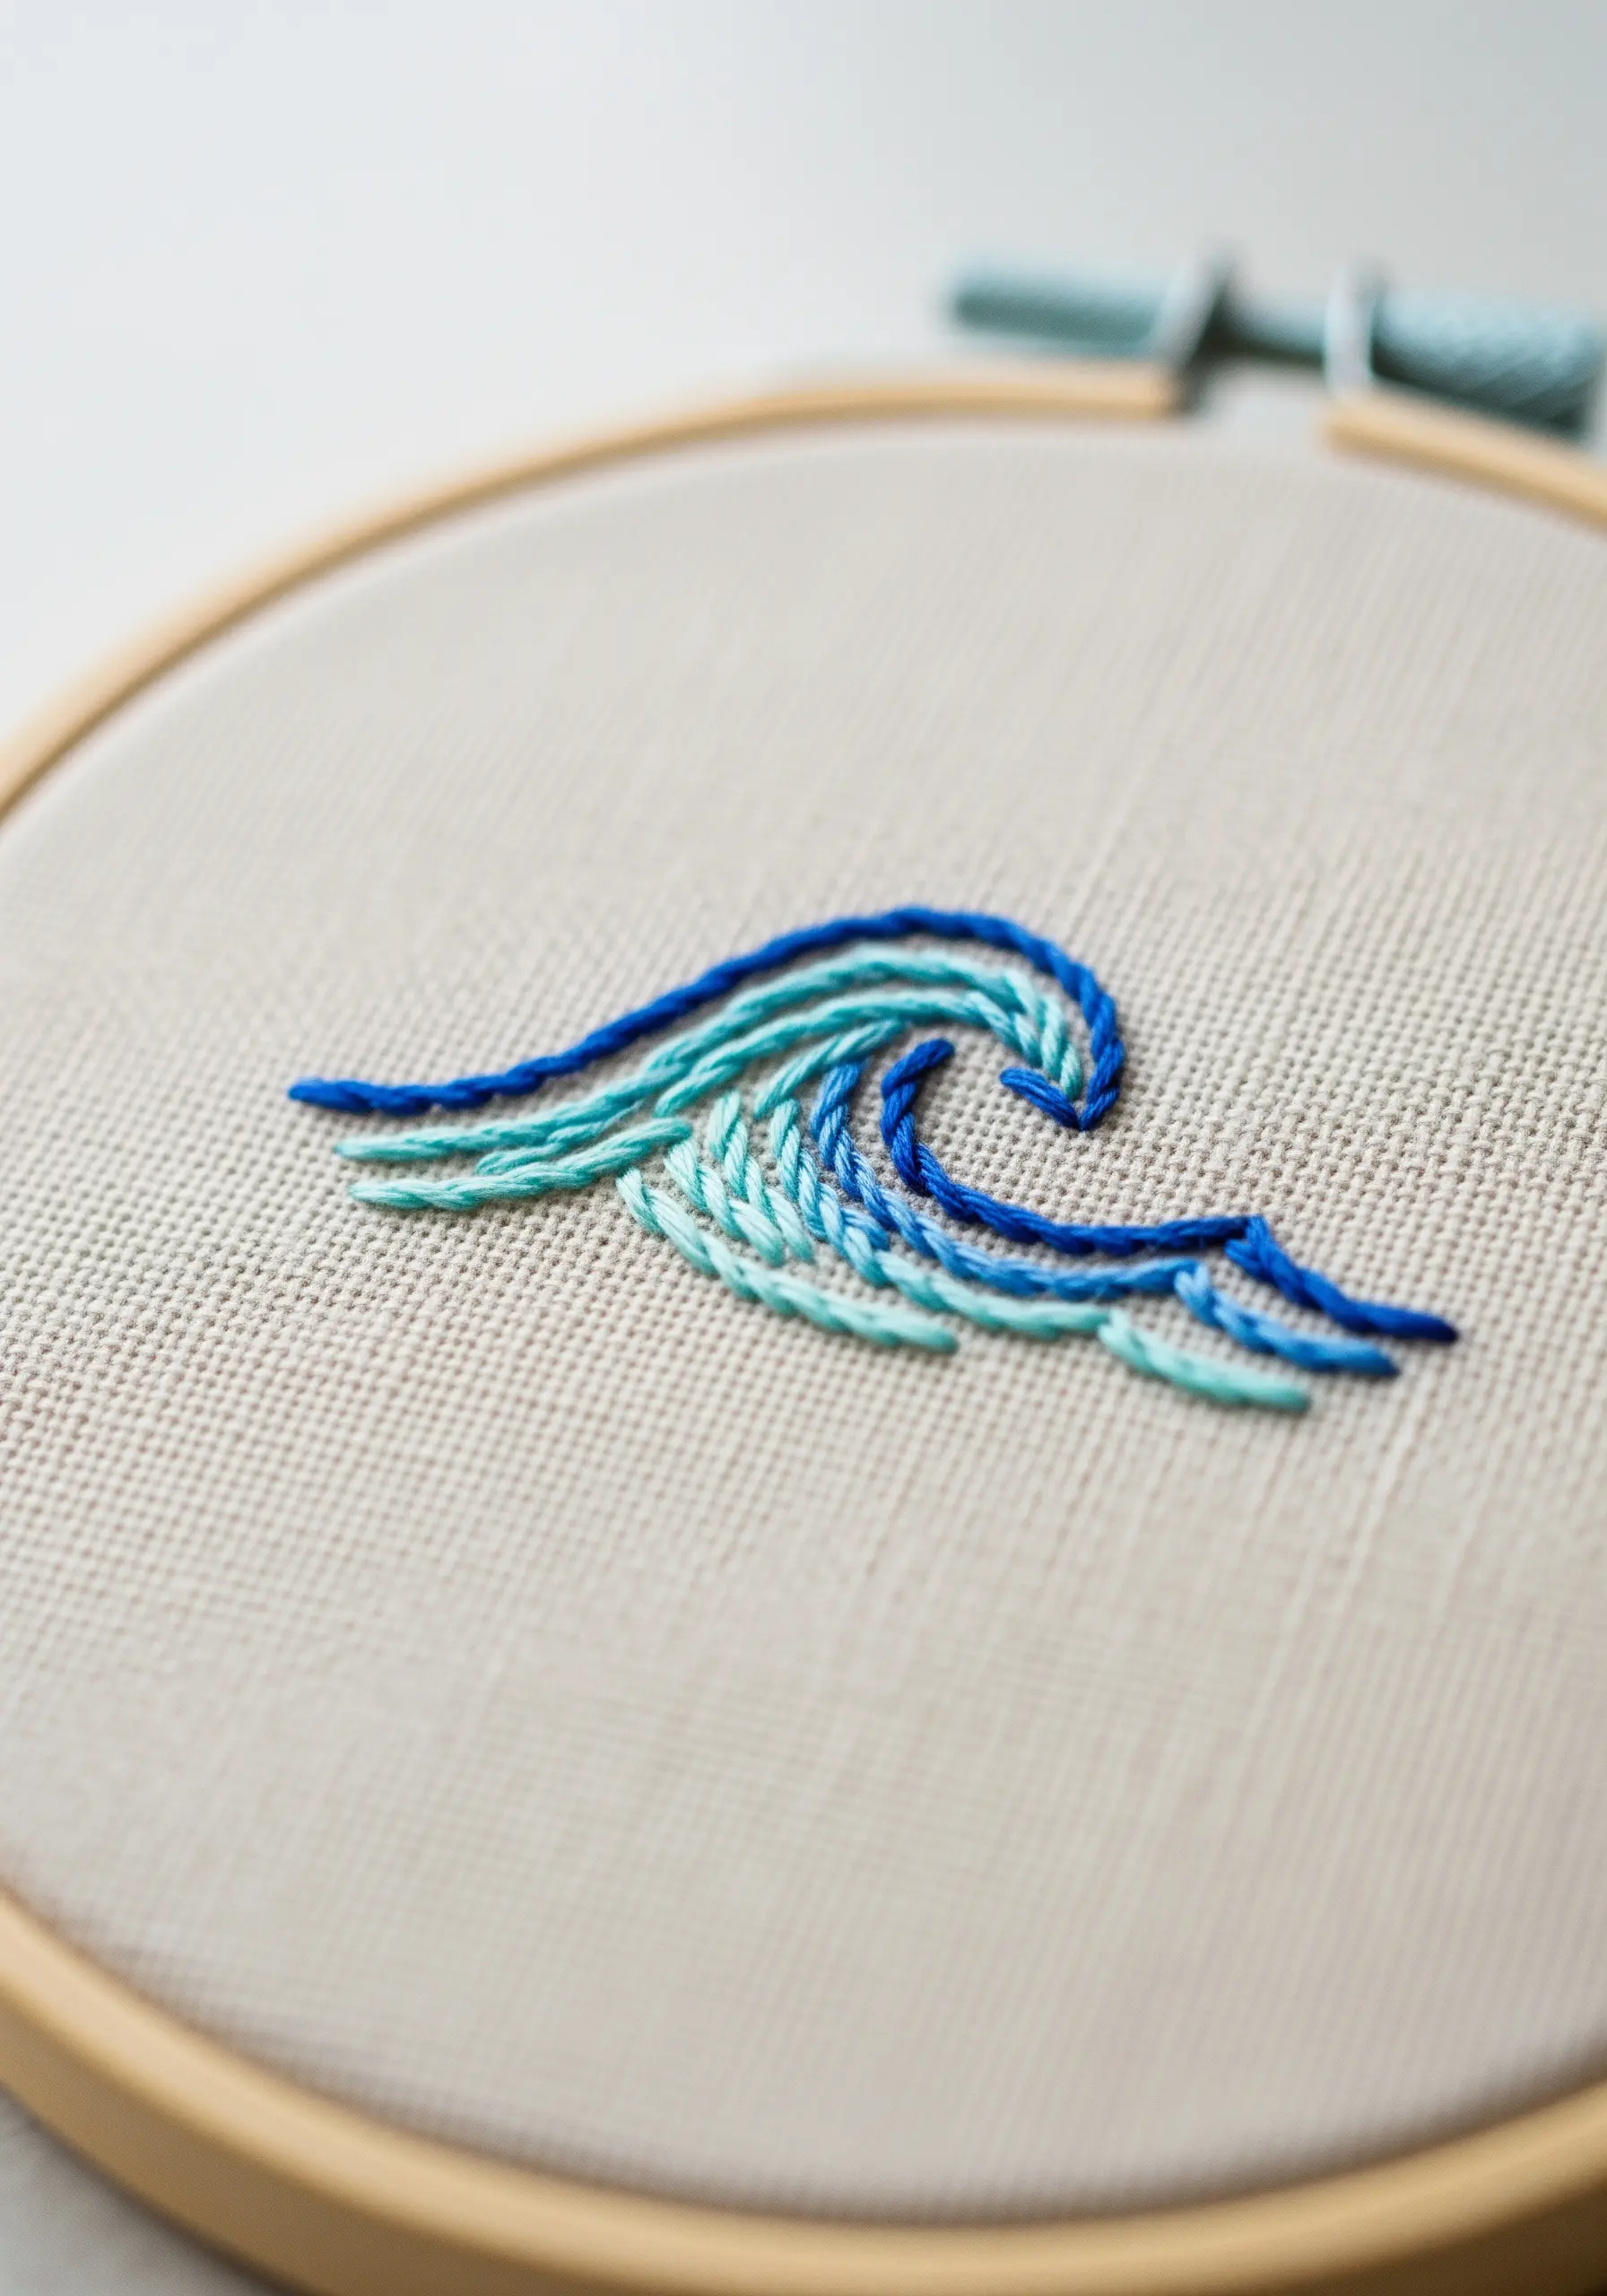
Suggest the movement and depth of water with a few strategically placed lines of color.
Use a smooth stem stitch or split stitch to create flowing, parallel curves.
The illusion of a wave is created by color blocking: use bands of different shades, from dark blue at the base to a light aqua and finally white at the crest.
Keeping the stitches running in the same direction reinforces the sense of fluid motion.
15. Whimsical Motion with a Dashed Line
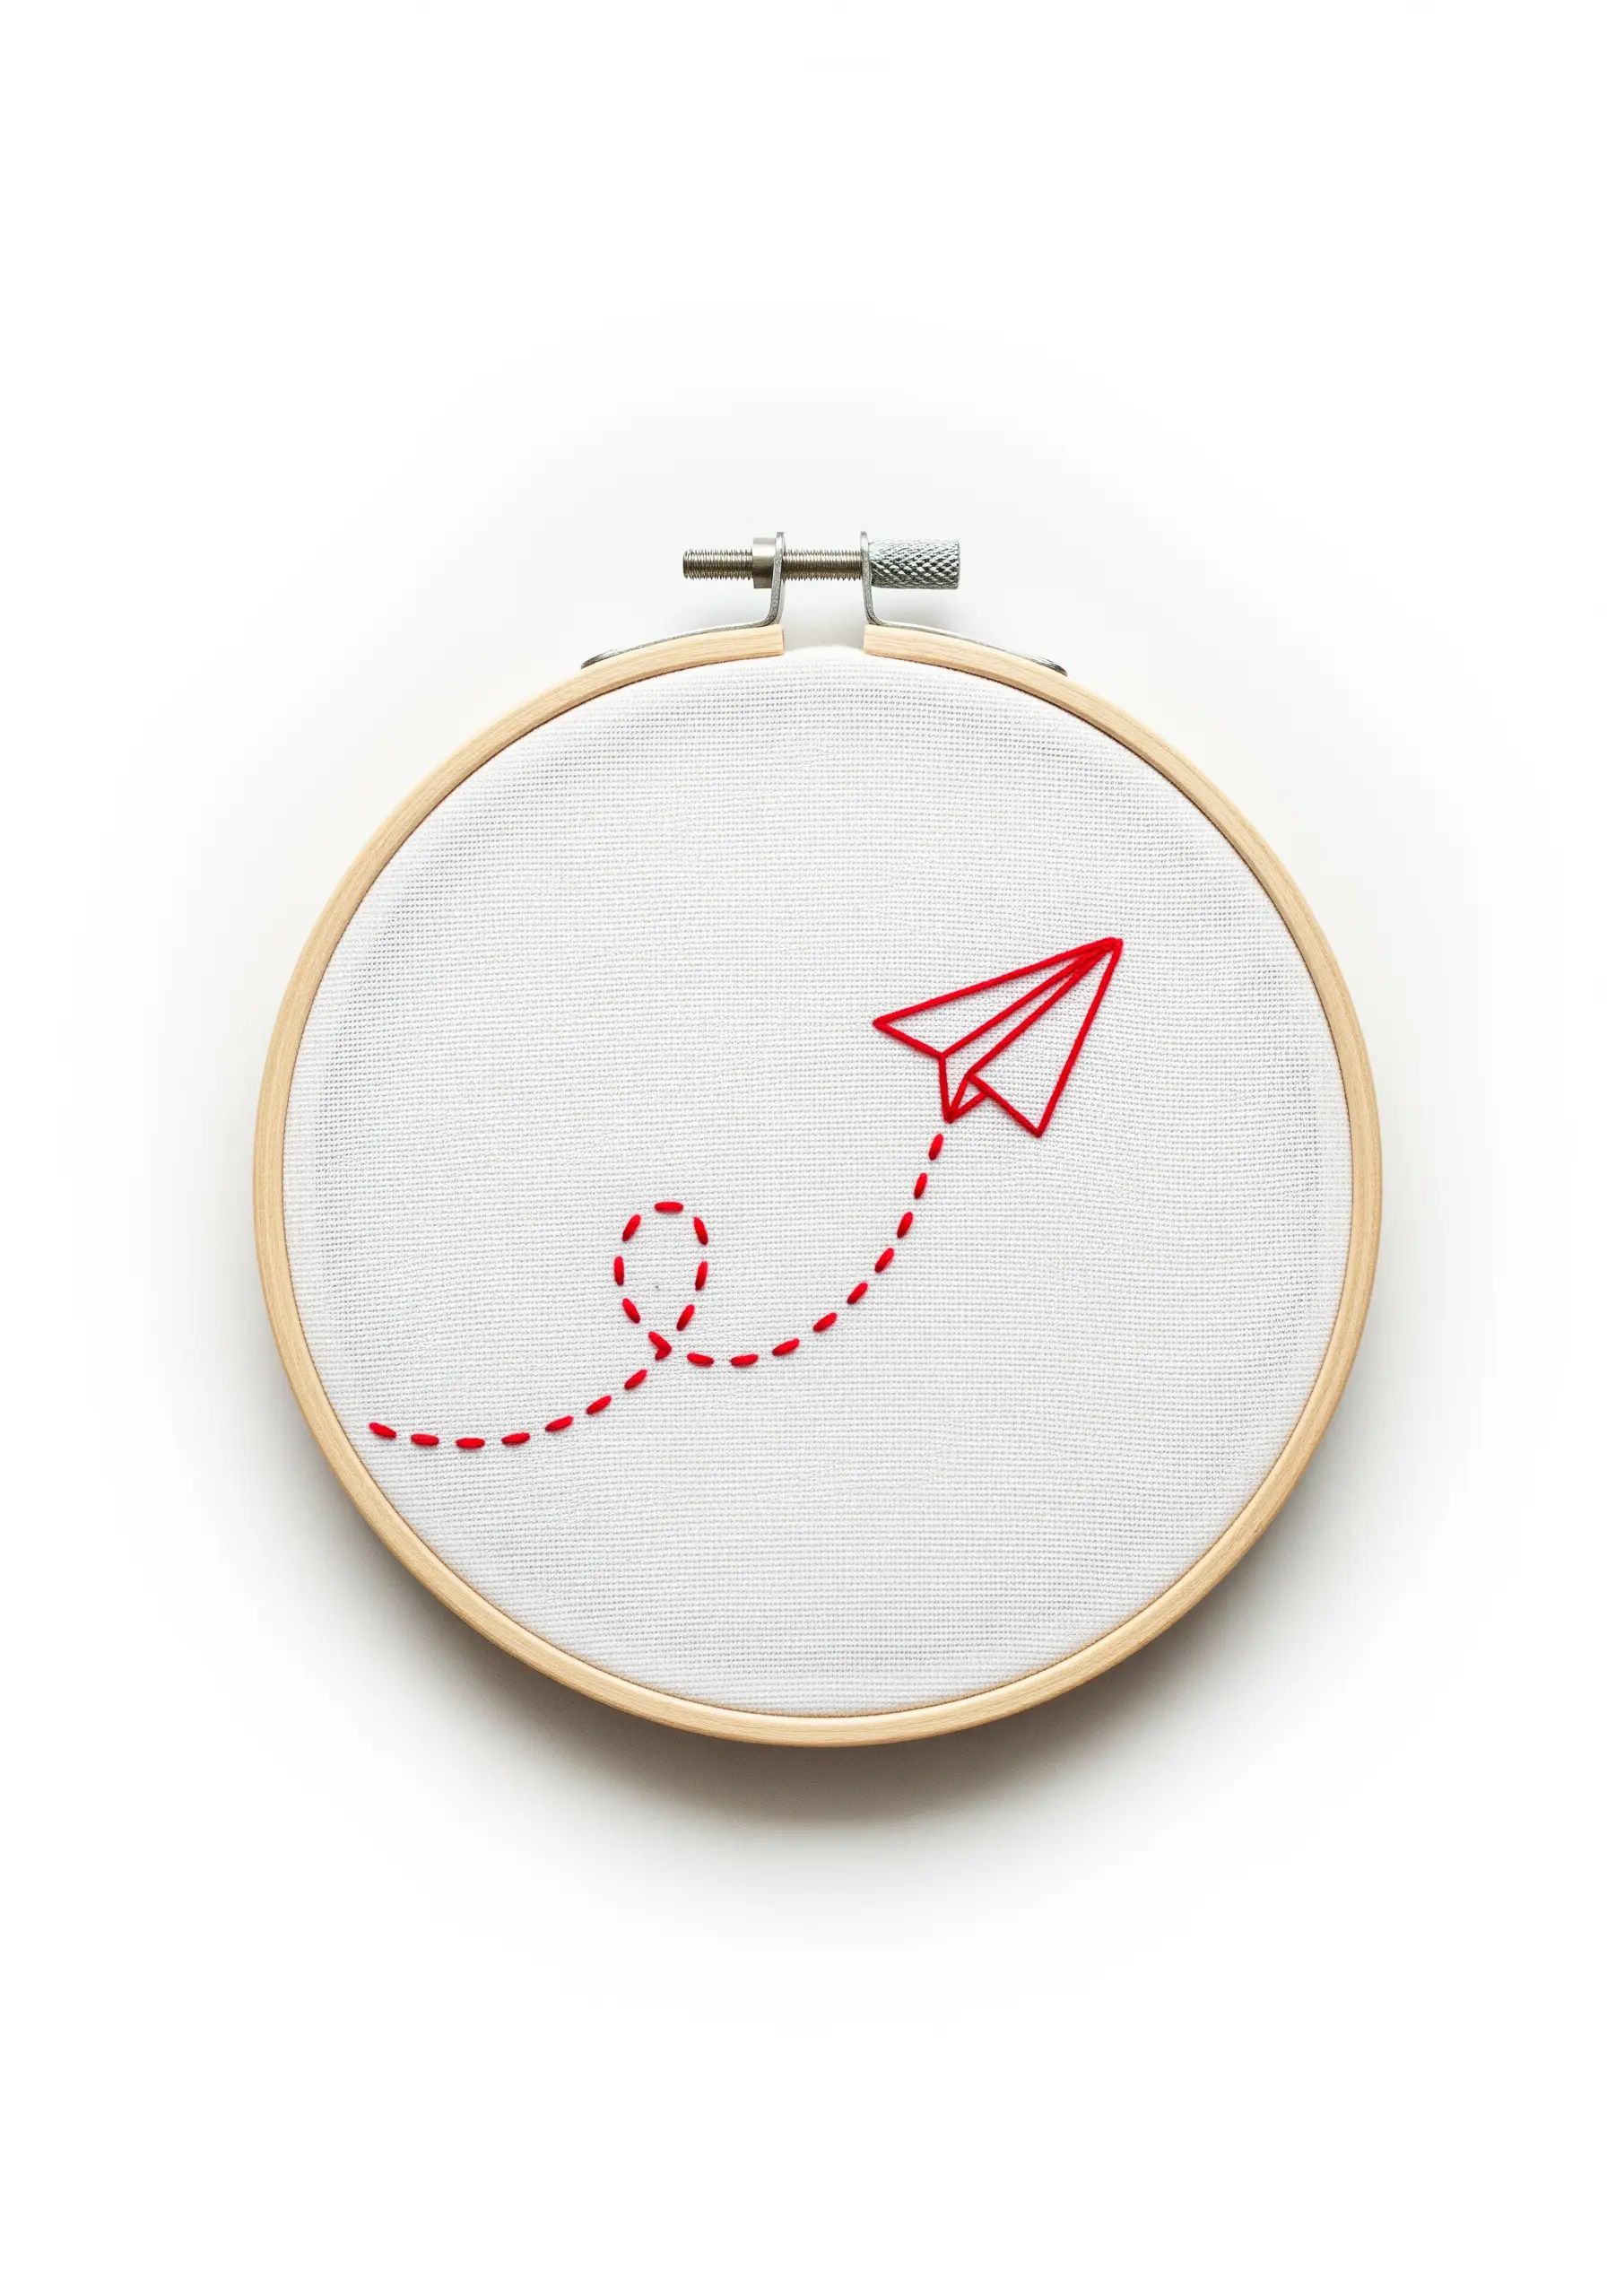
This design expertly tells a story through the simplest of means.
Use a crisp split stitch or backstitch for the paper airplane itself, ensuring the lines are sharp to mimic folded paper.
The real charm comes from the flight path: instead of a solid line, use a simple running stitch to create a dashed trail.
This immediately implies movement, speed, and a sense of lightness, making the entire composition feel dynamic and alive.
16. Delicate Blossoms with French Knots
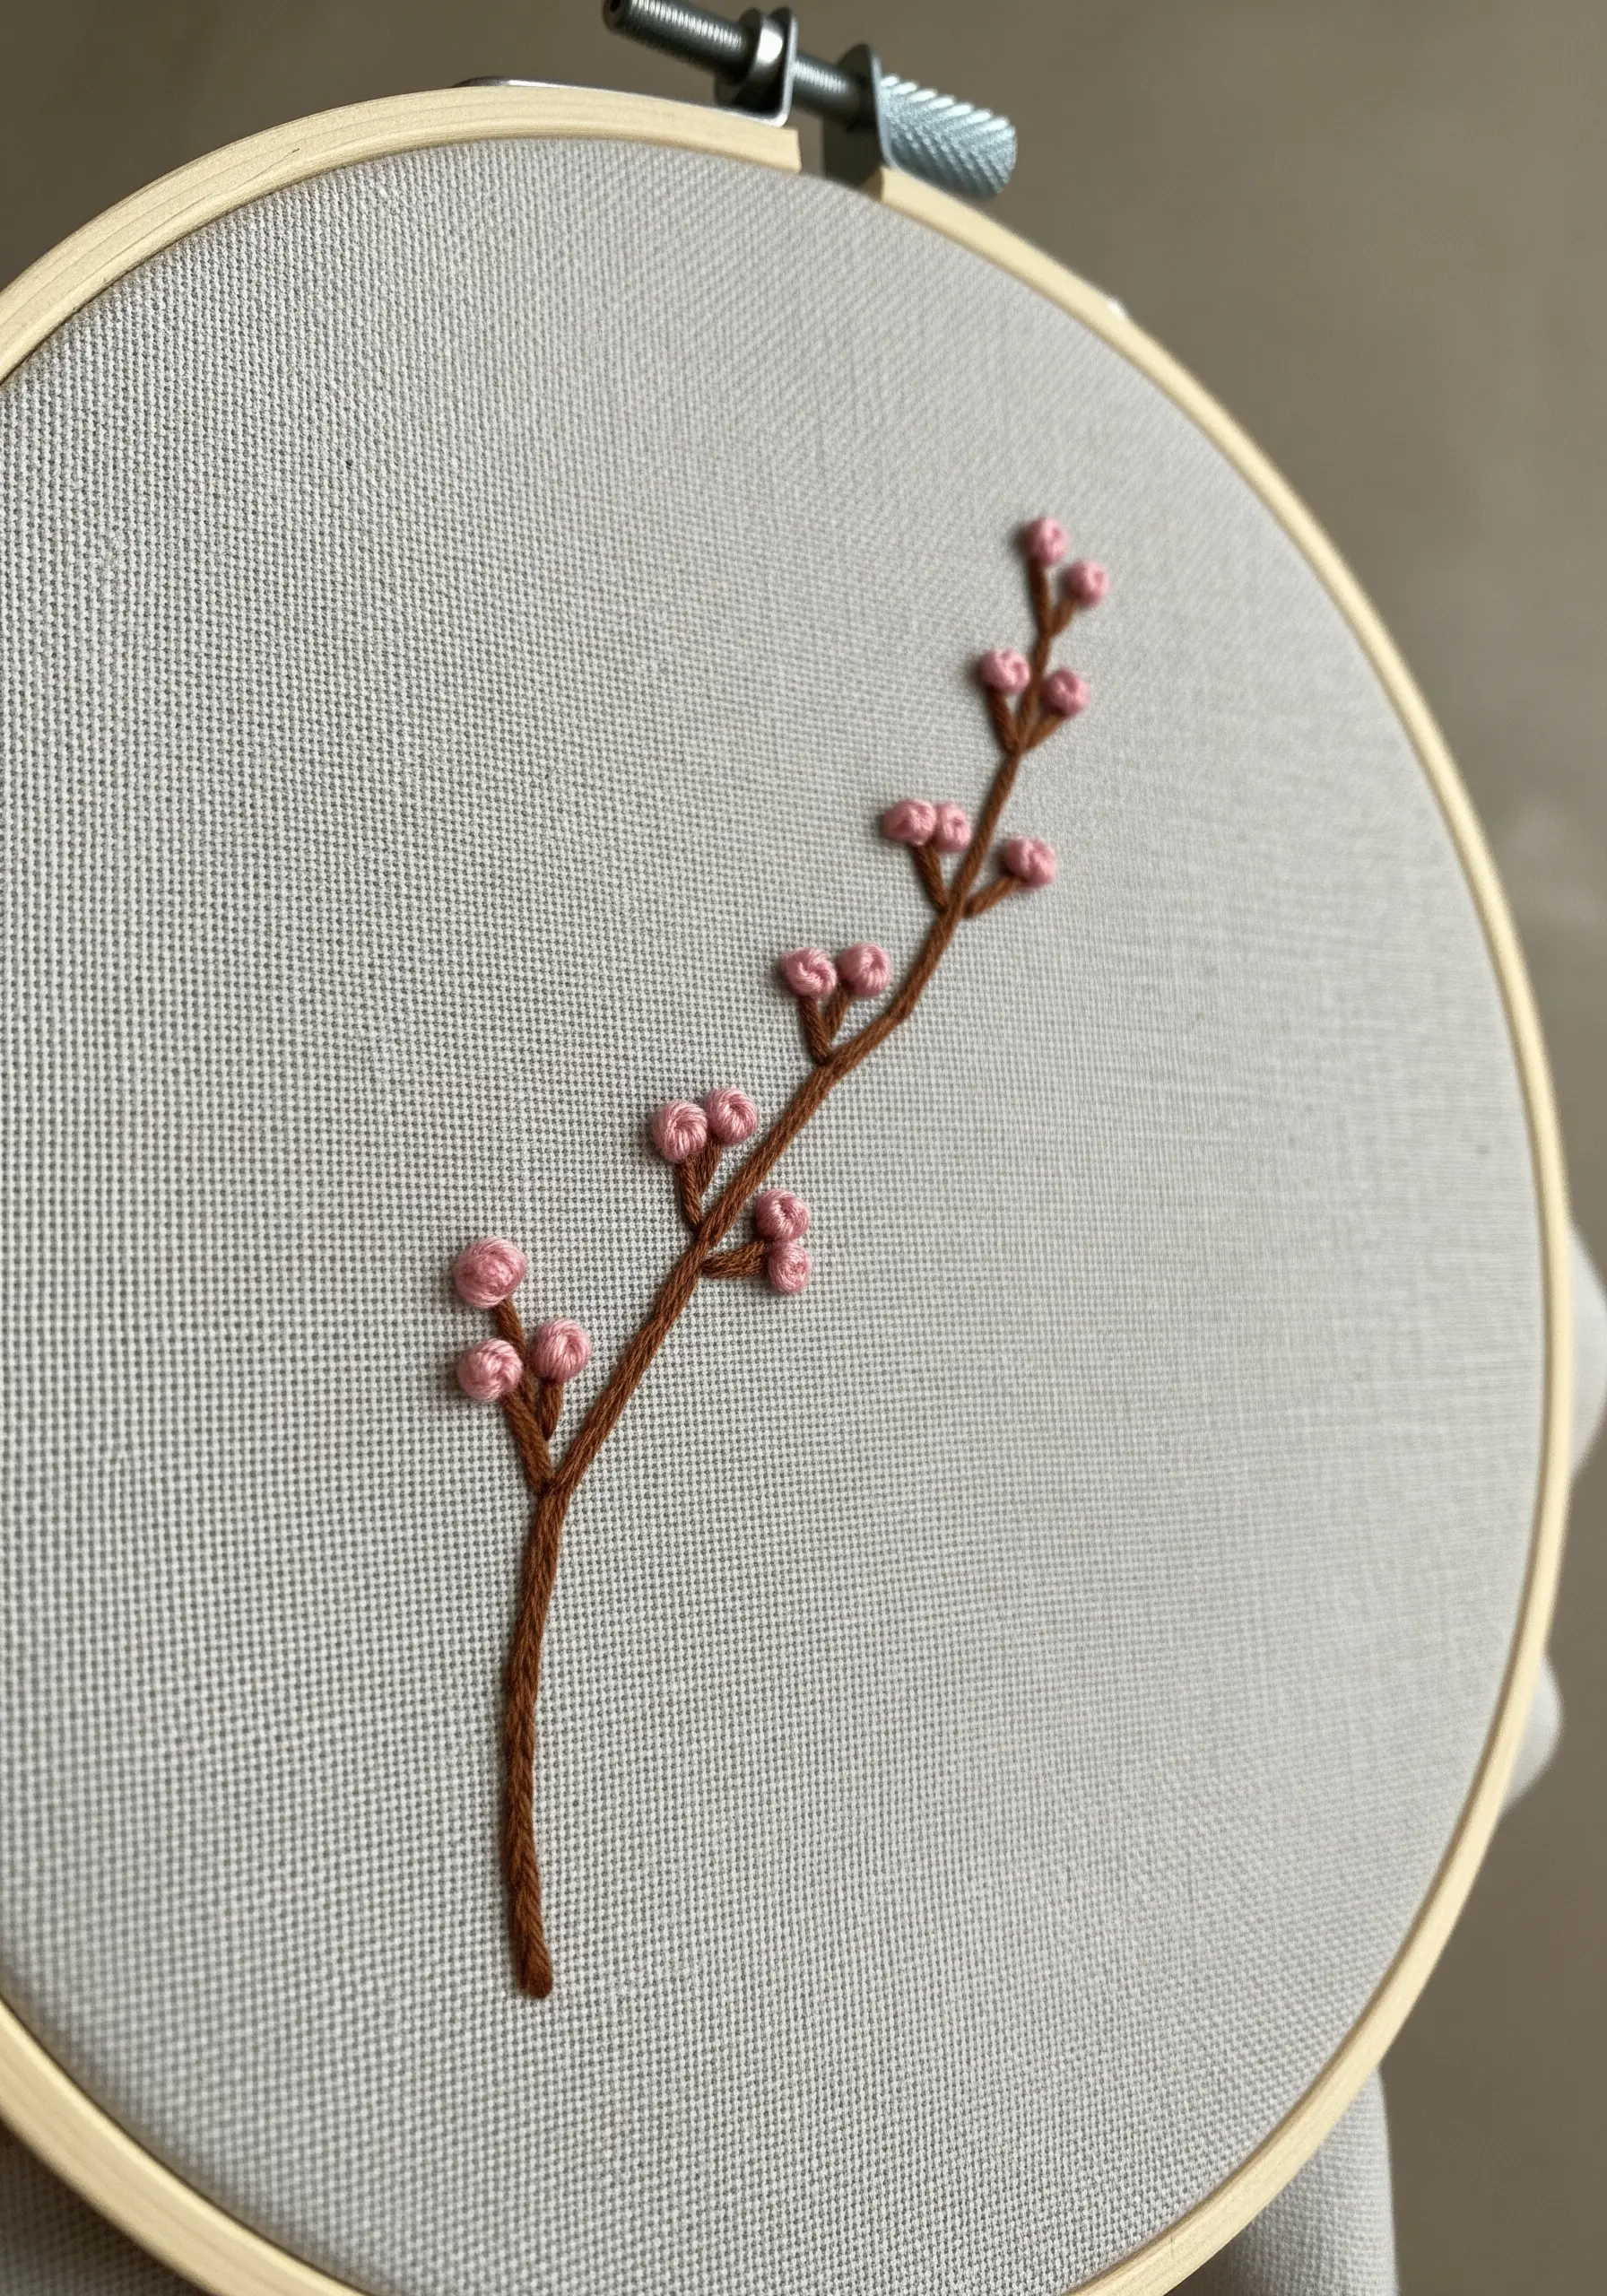
For an elegant botanical design, combine the texture of a stem stitch with the delicate punctuation of French knots.
Use a brown stem stitch for the branch; its twisted, rope-like appearance gives an organic feel perfect for bark or stems.
At the tips of the twigs, place tiny pink French knots to represent flower buds.
Use only two strands of floss and wrap the needle just once to keep the knots small, delicate, and in proportion with the fine branch.
17. Shaded Mushroom with Directional Satin Stitch
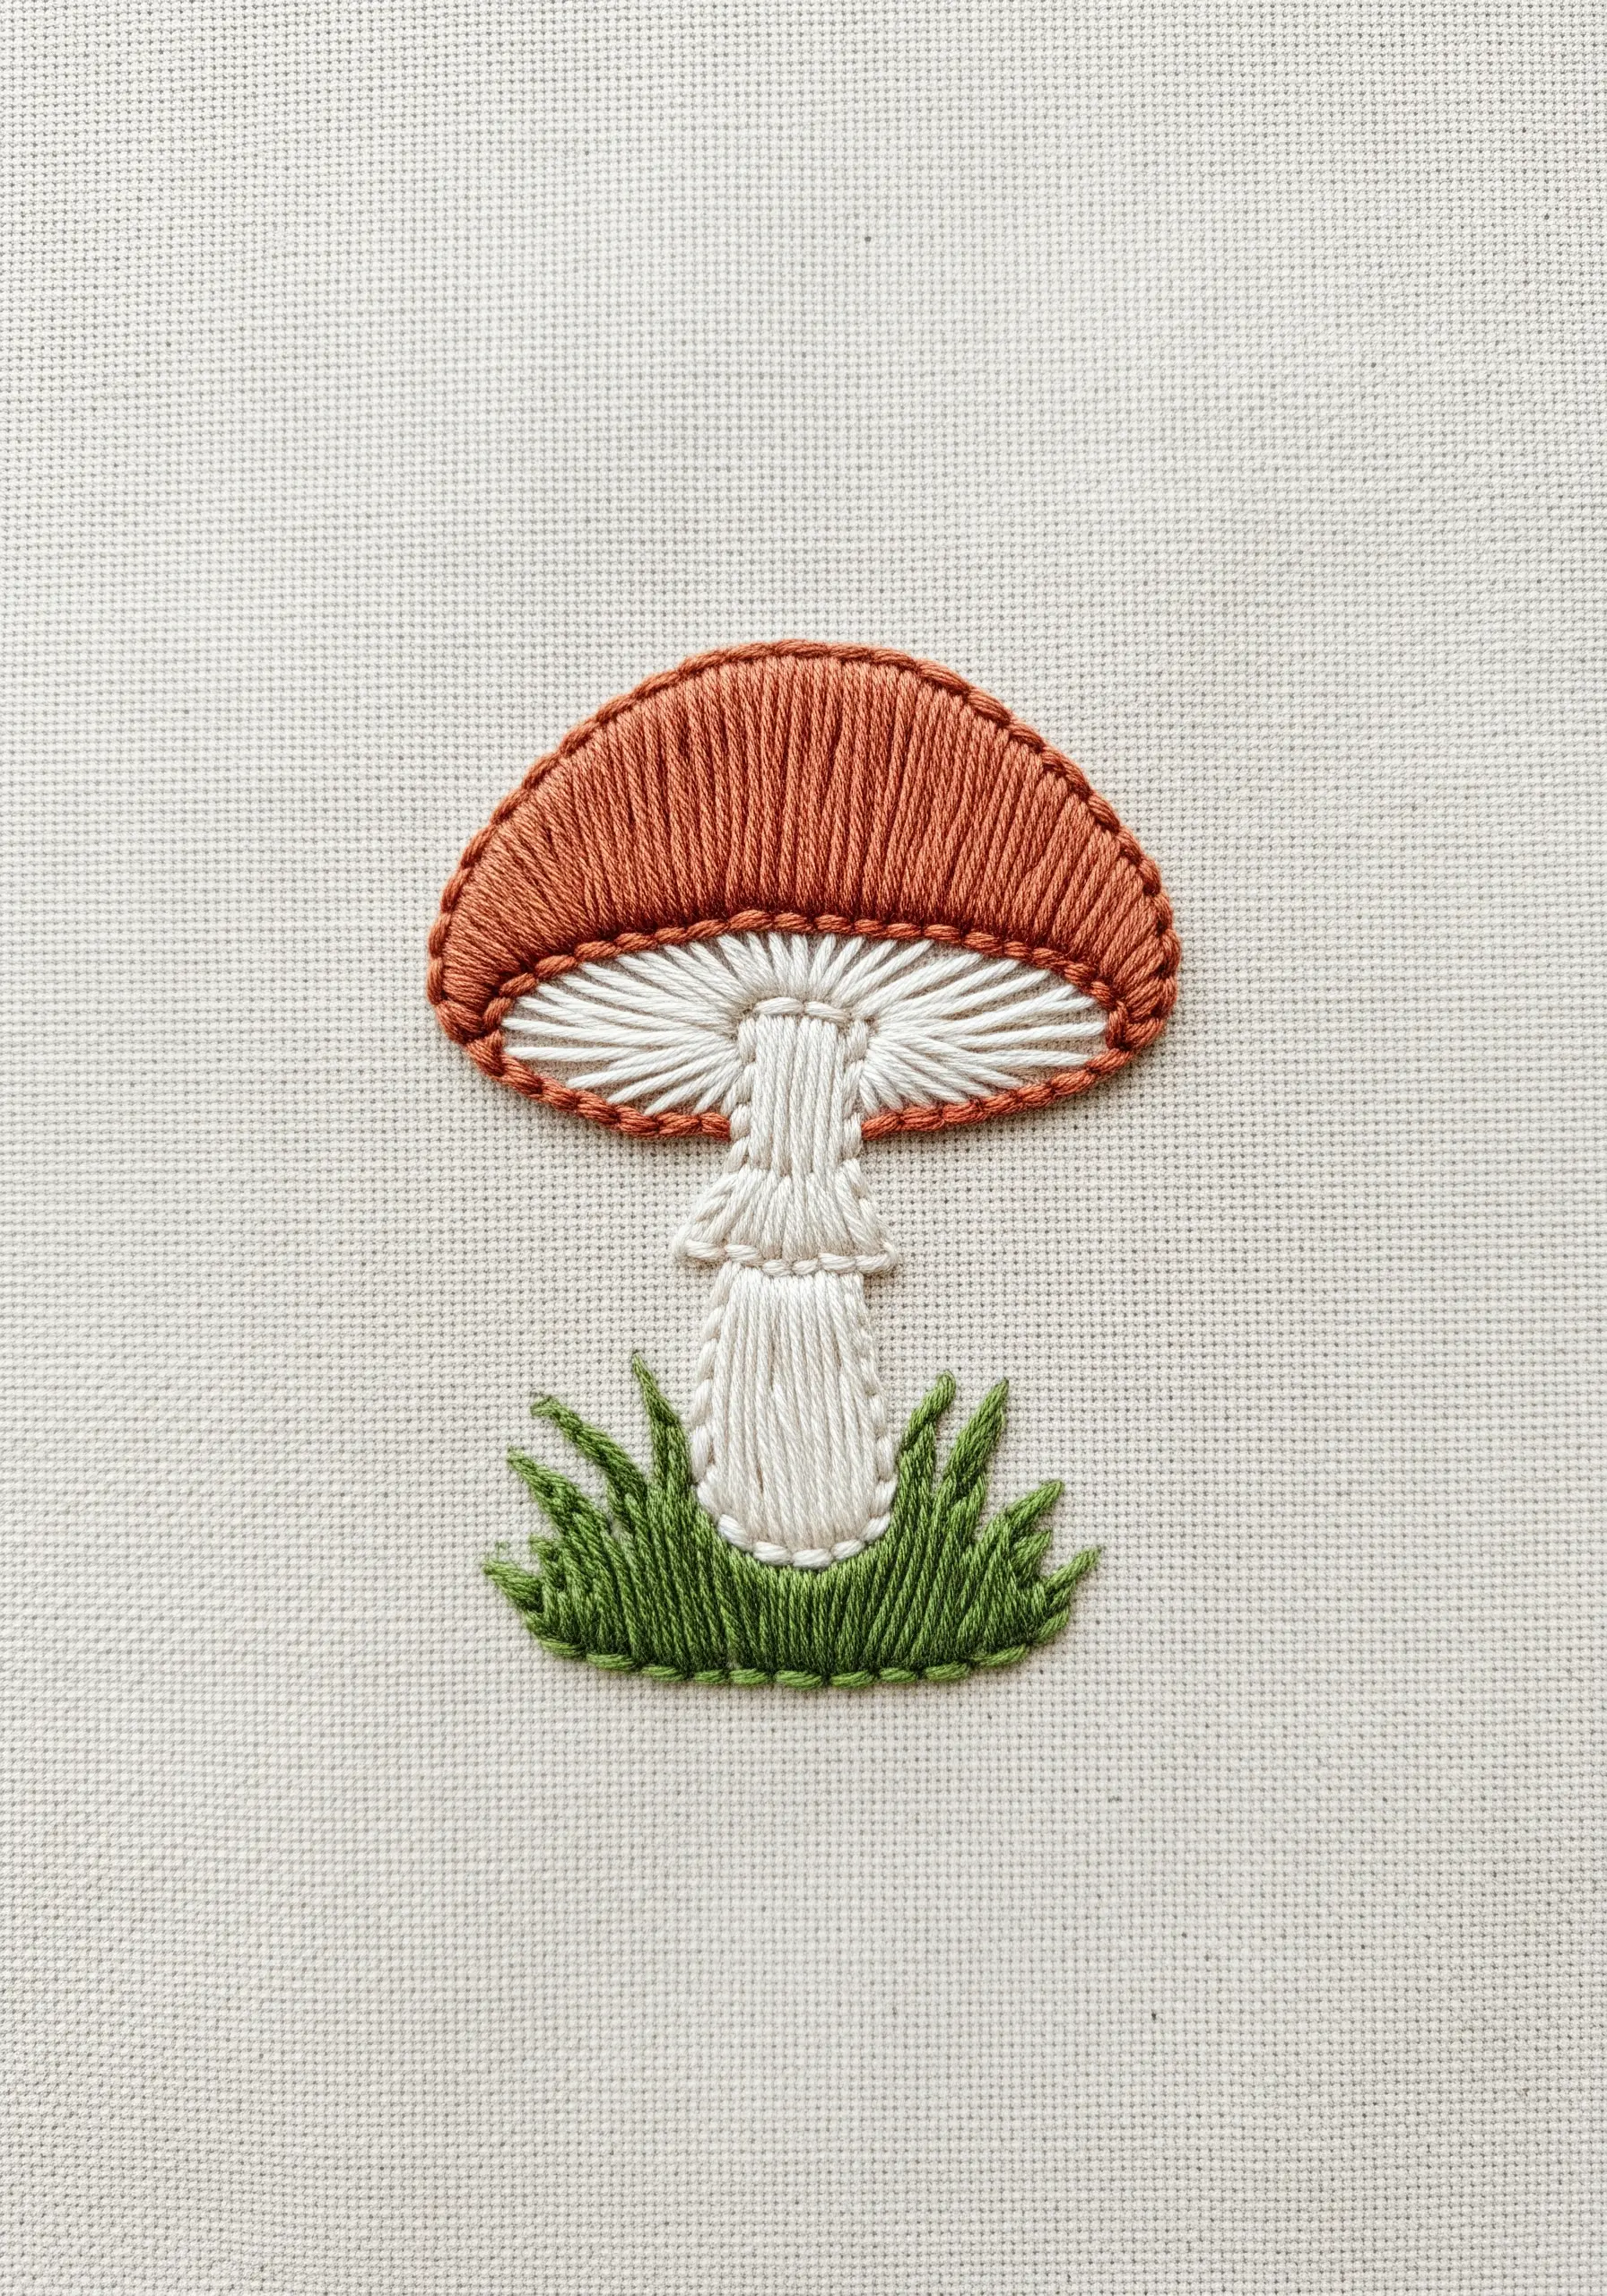
Create the illusion of a rounded mushroom cap by carefully directing your satin stitches.
Instead of stitching straight across, start with a small stitch at the top center of the cap and angle your subsequent stitches outwards, following the curve of the outline.
For the gills underneath, use contrasting straight stitches that fan out from the stem.
This difference in stitch direction between the cap and gills creates a convincing and simple three-dimensional effect.
18. Celestial Map with Star Stitches
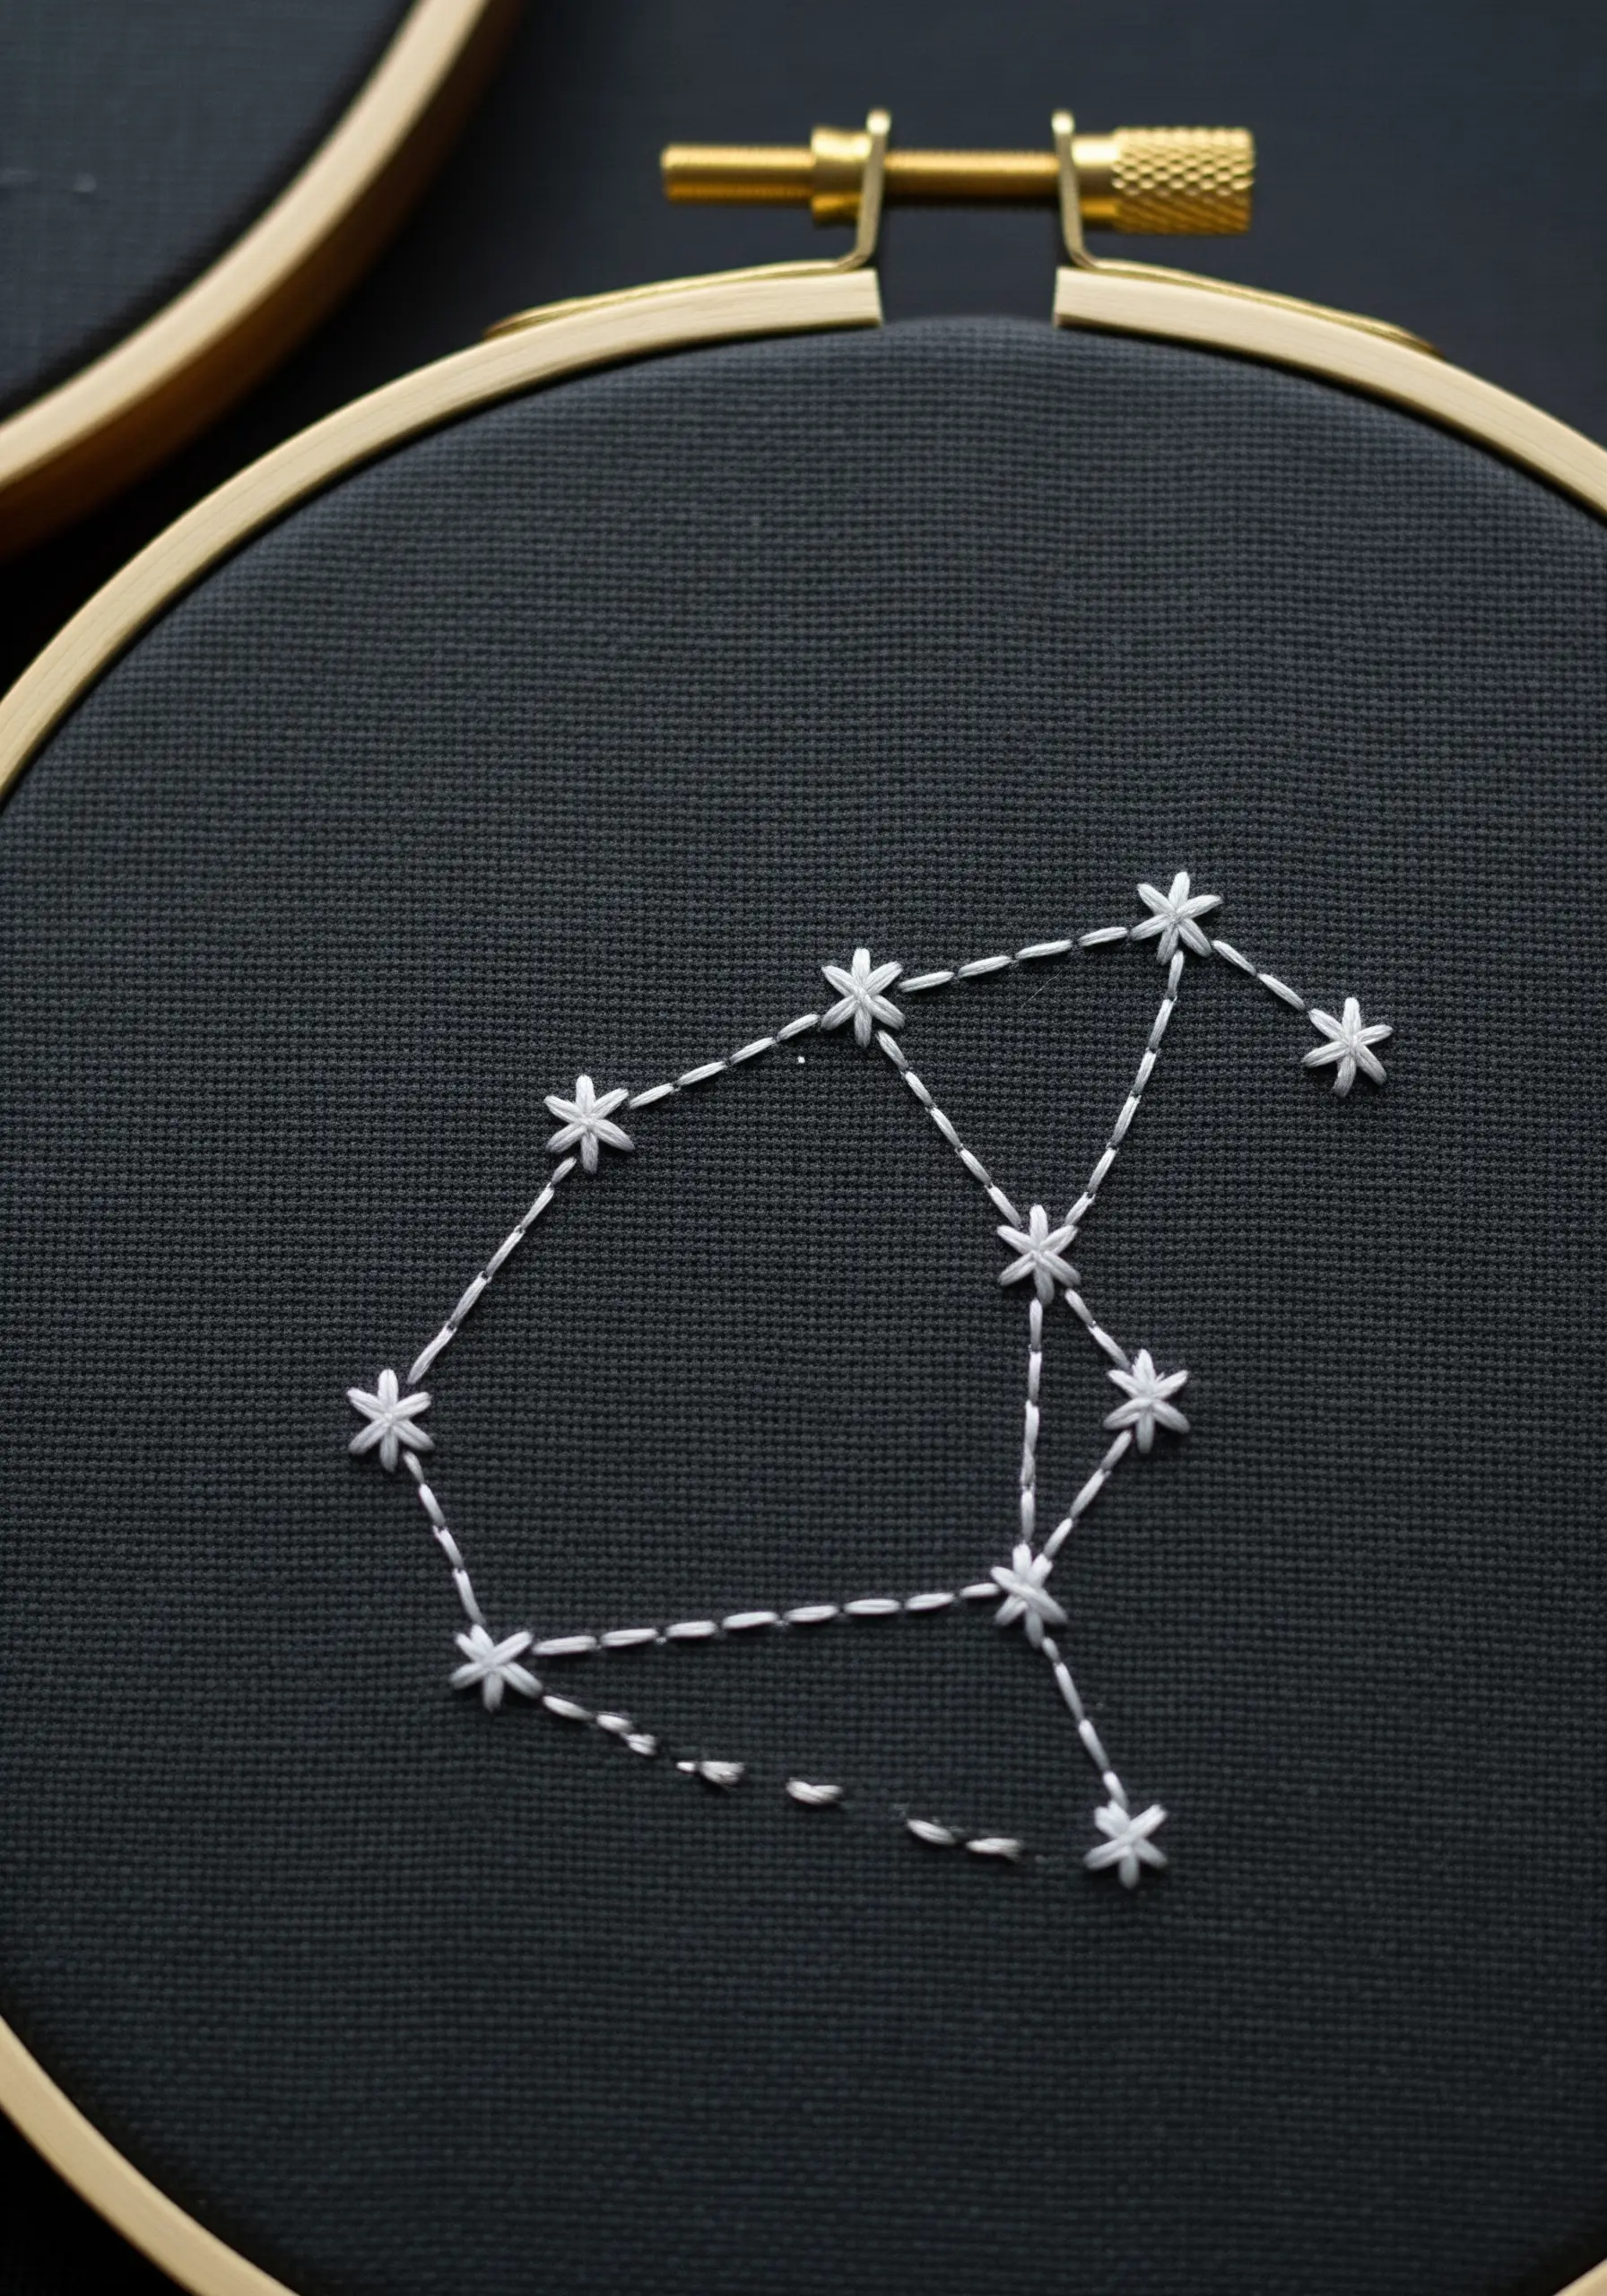
This is a perfect example of minimalist embroidery wall art ideas that look incredibly polished.
Use a simple running stitch for the connecting lines, varying the length of the stitches to give it a hand-drawn, map-like quality.
For the stars themselves, use a star stitch—made of three intersecting straight stitches—instead of a French knot.
This creates a crisp, graphic point of light that stands out beautifully against the dark fabric background.
19. Ornate Outline with Chain Stitch

When your design involves intricate curves, a chain stitch is often a better choice than a backstitch for the outline.
Each loop of the chain stitch flows seamlessly into the next, creating a continuous, bold line that navigates tight corners and circles with grace.
This gives the key a solid, almost illustrative quality, providing weight and presence without needing to fill the entire shape.
It’s perfect for creating a clean yet decorative statement.
20. Interlocking Rings with Careful Pathing
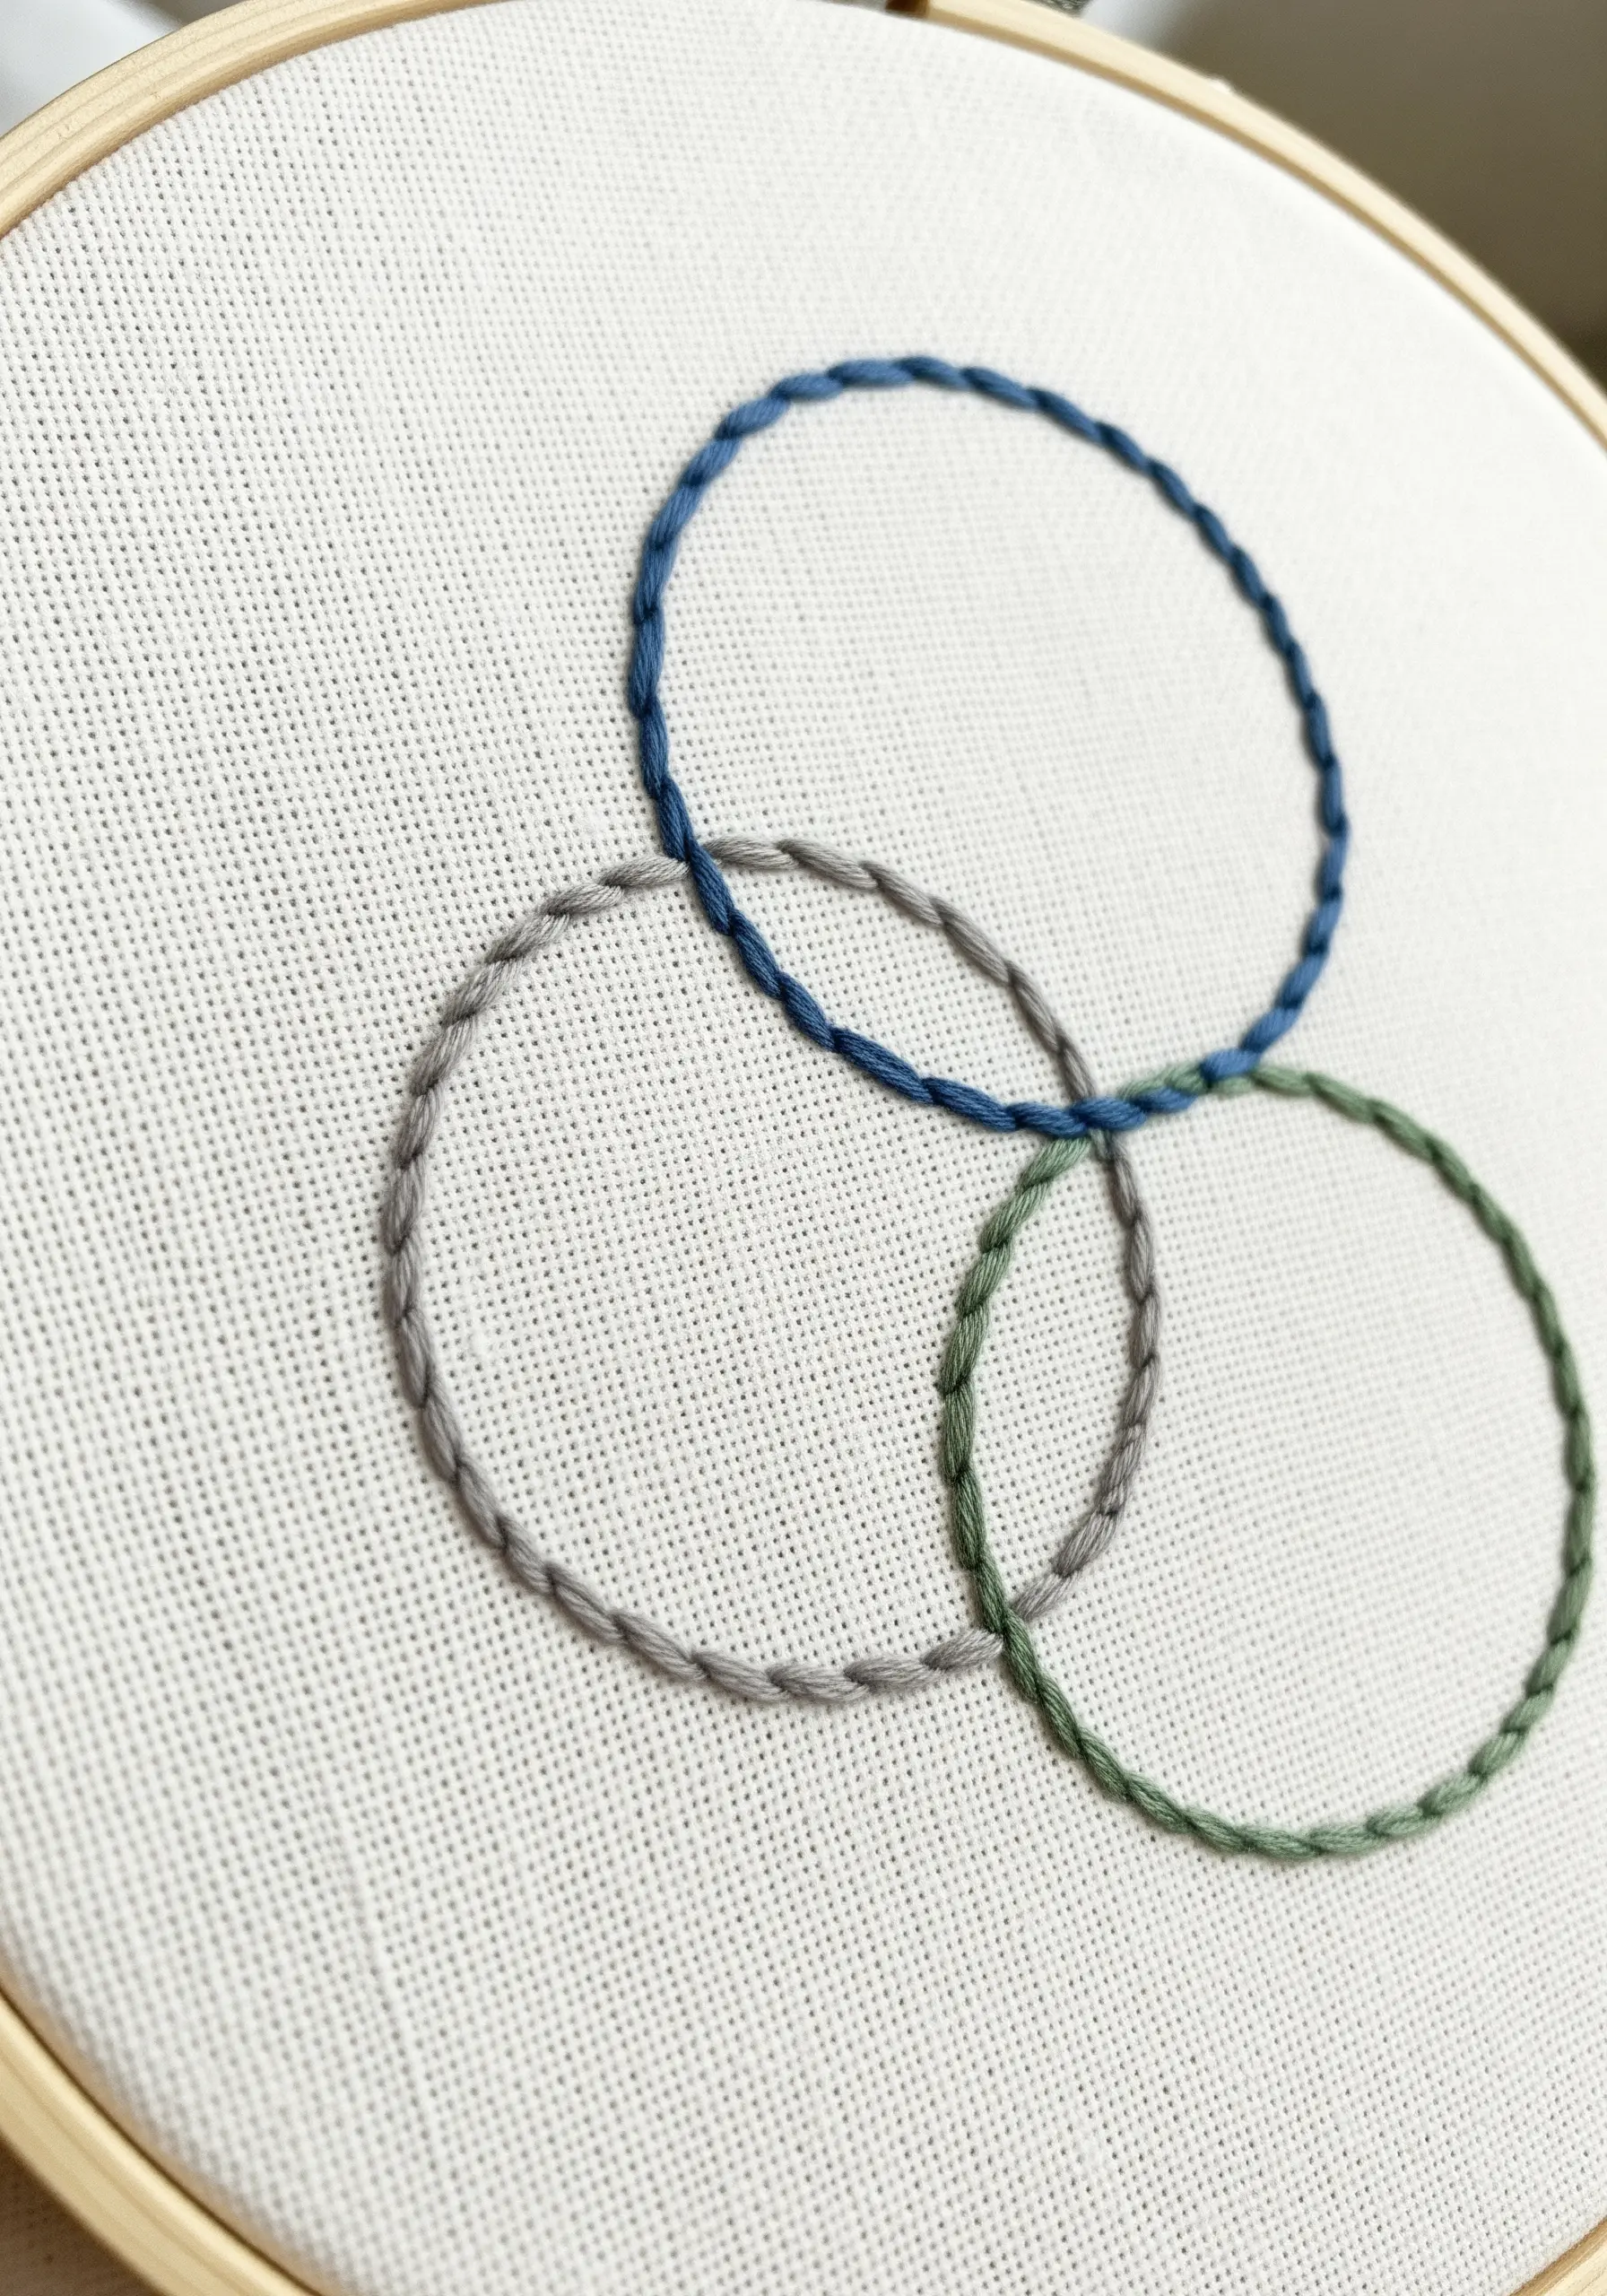
To create a convincing illusion of interwoven rings, you must plan your stitch path before you begin.
Decide where one ring will pass ‘over’ and ‘under’ another.
When stitching the ring that goes ‘under,’ leave a tiny gap in your outline where it crosses behind the other.
This small break in the line is all it takes to trick the eye into seeing depth. A whipped backstitch works beautifully here for a clean, rope-like texture.
21. Stylized Eucalyptus with Balanced Forms
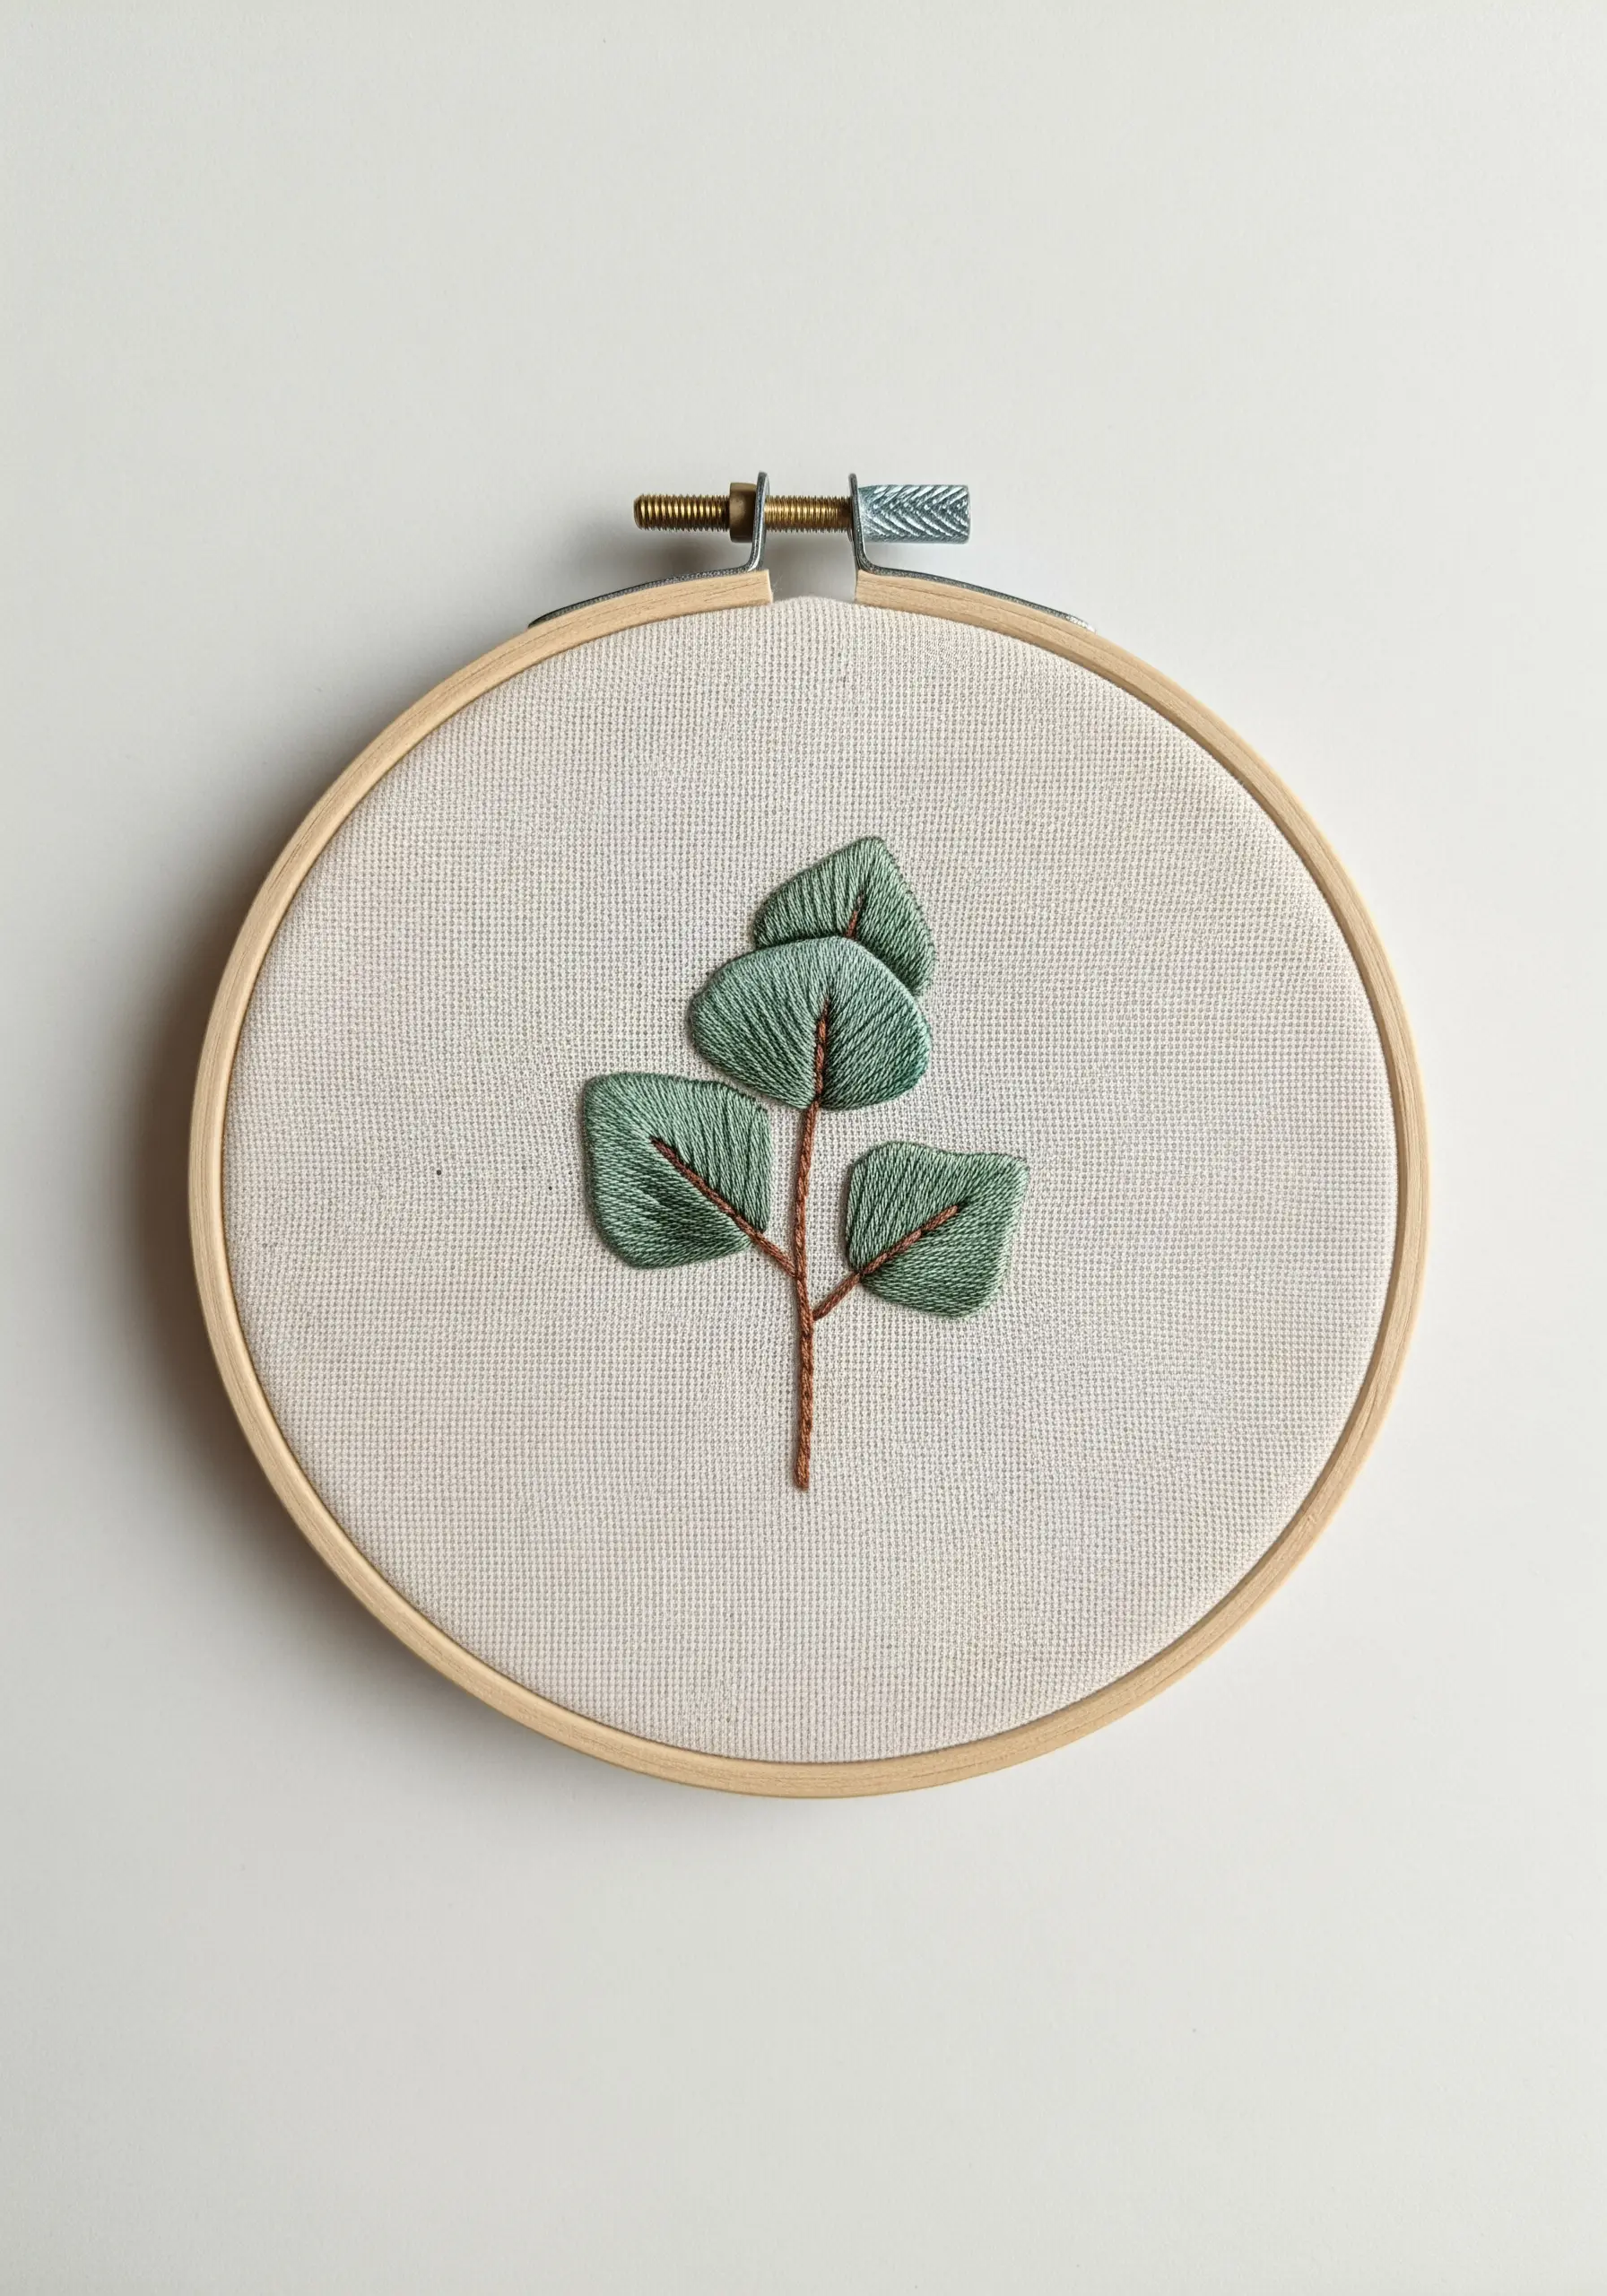
This design achieves a modern, graphic elegance by balancing bold shapes with delicate lines.
Fill the leaves with a neat satin stitch, ensuring your stitches lie flat and even.
To create the central vein, you can add a single line of split stitch down the middle after the fill is complete.
Contrast the full, heavy leaves with a very thin stem made from a single or two-strand backstitch. This approach is perfect for modern botanical line art embroidery patterns.
22. Serene Raindrops with Padded Satin Stitch
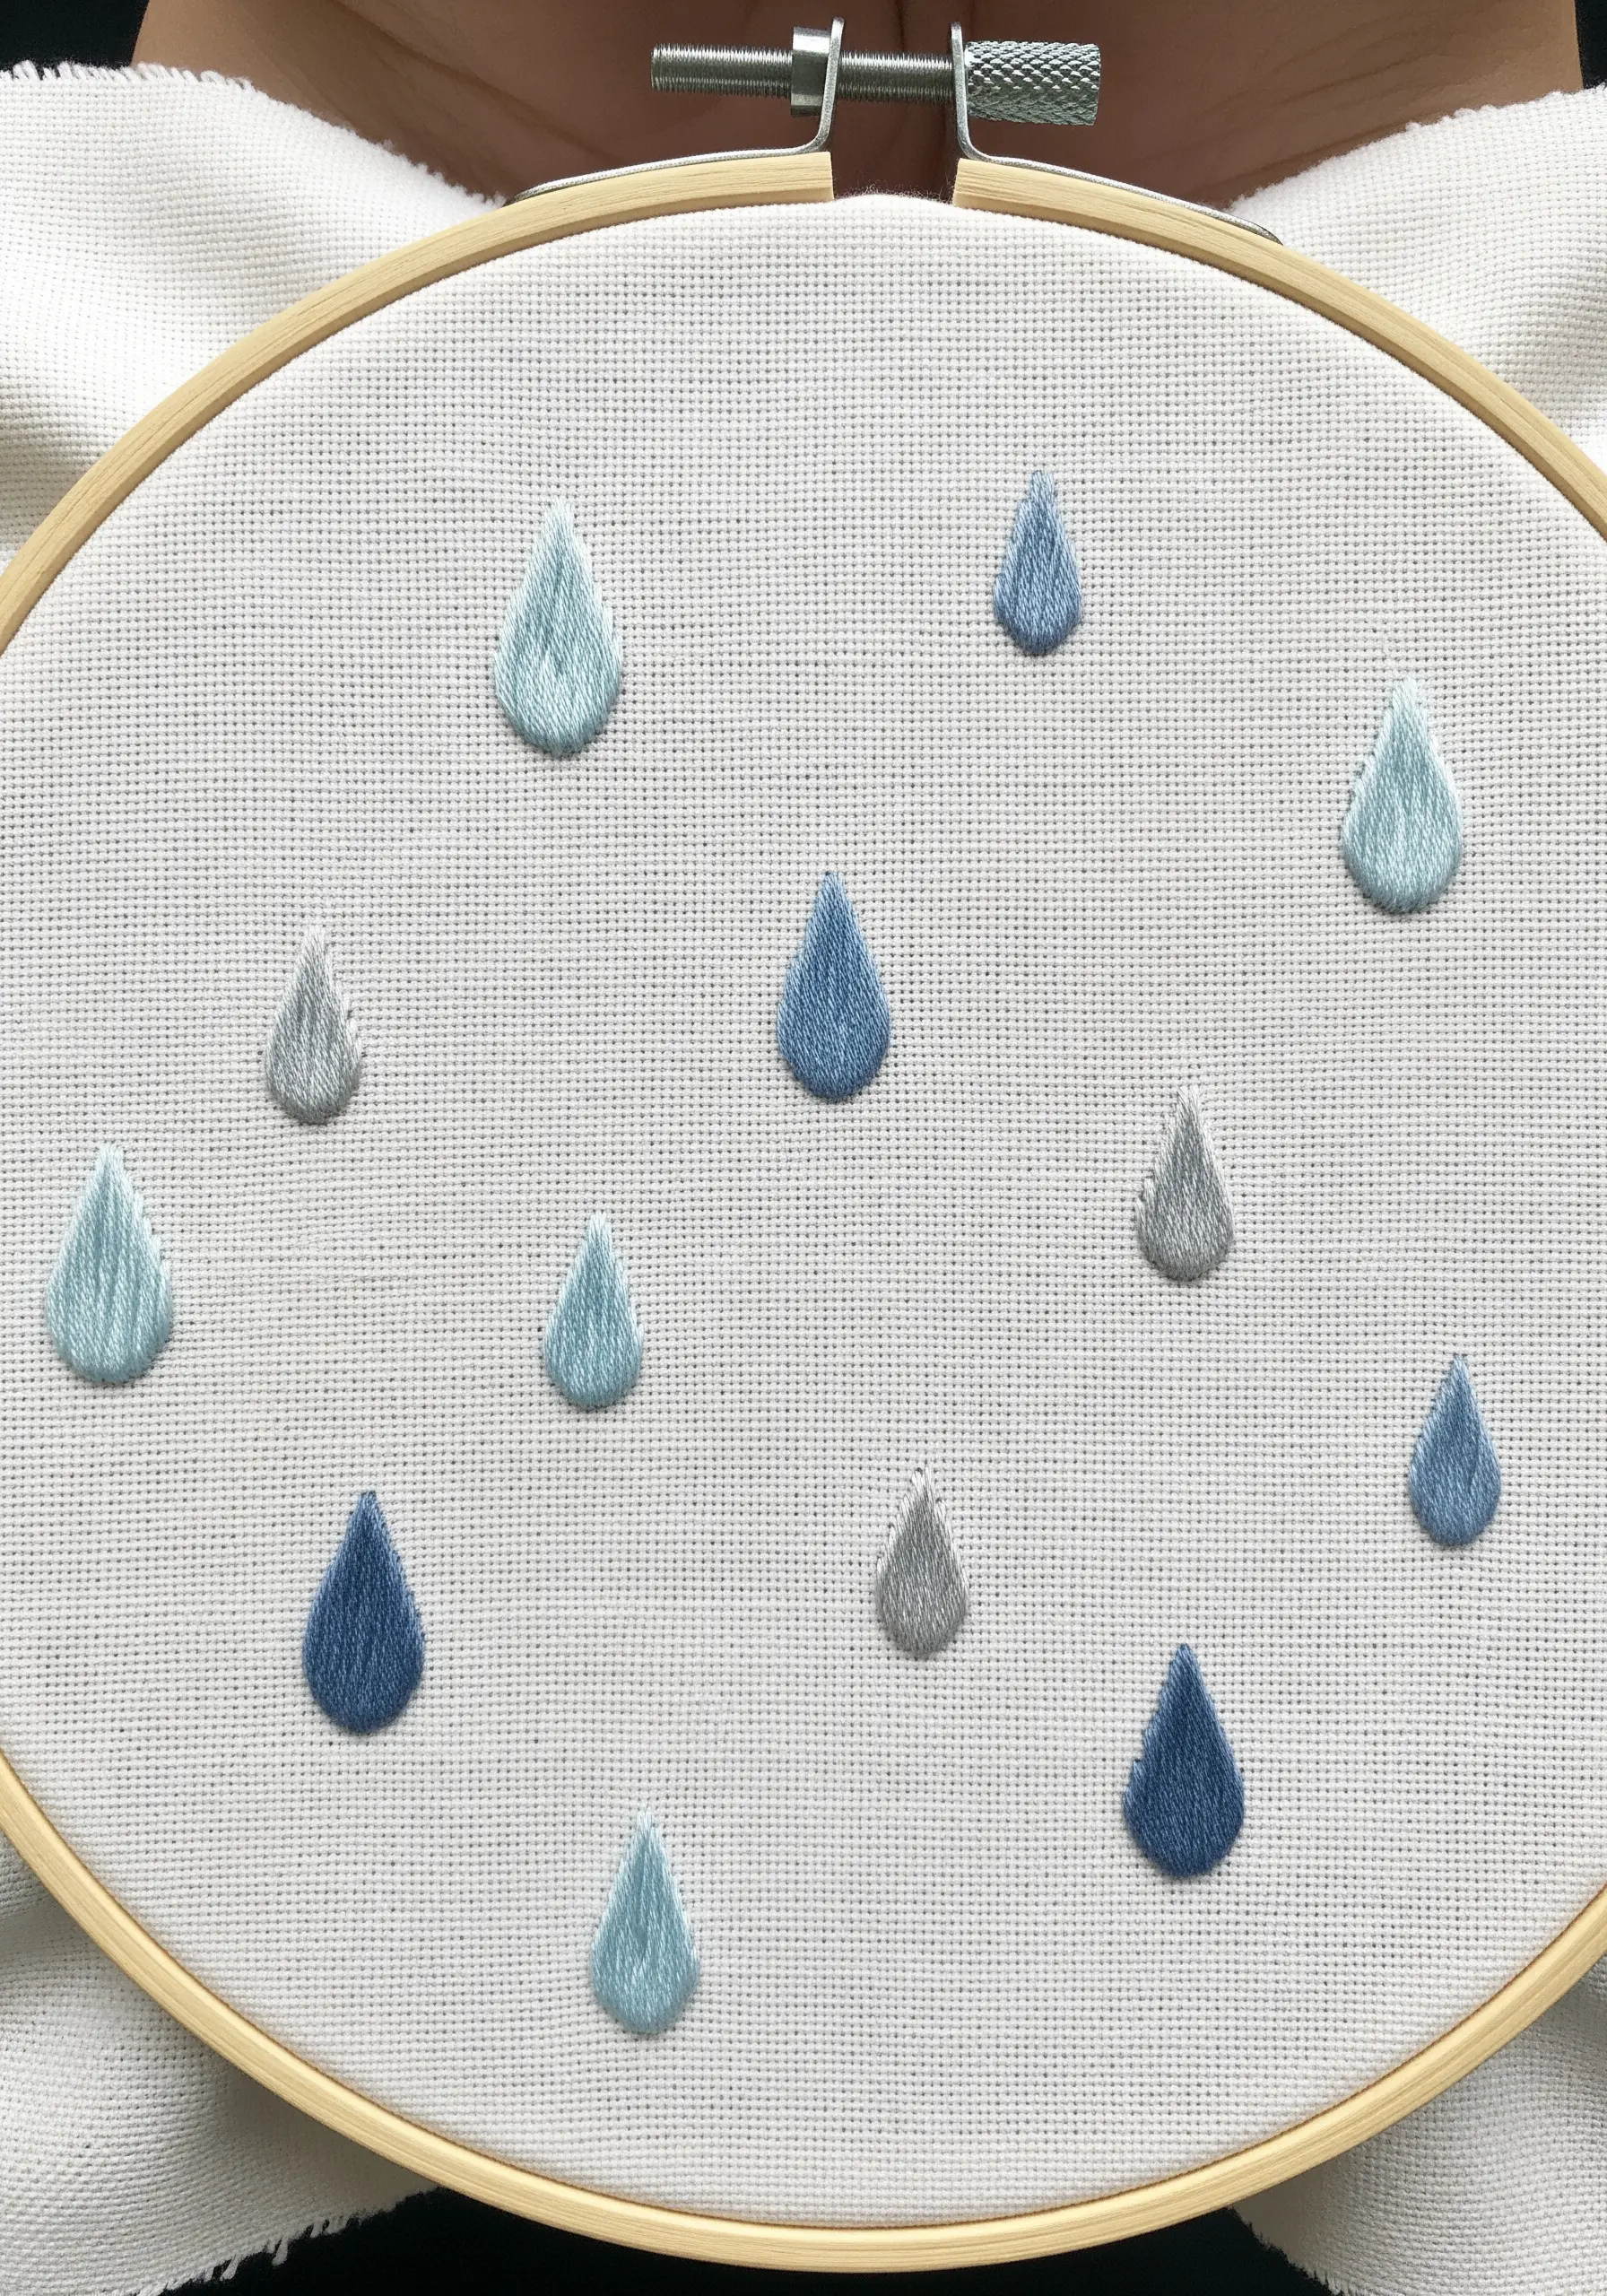
To give your raindrops a plump, raised appearance, use padding beneath your satin stitch.
First, fill the raindrop shape with a foundation of small seed stitches or a layer of satin stitches that run perpendicular to your final layer.
Then, work your final vertical satin stitches over this padding.
The underlying stitches push the top layer up, creating a smooth, three-dimensional dome that catches the light beautifully and adds a wonderful tactile quality.
23. Graphic Petals with Detached Chain Stitch

For stylized, open petals, the detached chain stitch (or lazy daisy) is your best friend.
Work each stitch from the center outwards, leaving a little slack in the loop before making the tiny tacking stitch at the tip.
This creates an airy, teardrop-shaped petal that feels light and graphic.
Arrange them in a circle around a textured center of yellow French knots to complete the flower. It’s one of those simple DIY embroidery tricks to transform plain fabric instantly.
24. Woven Knot with a Raised Chain Stitch Band
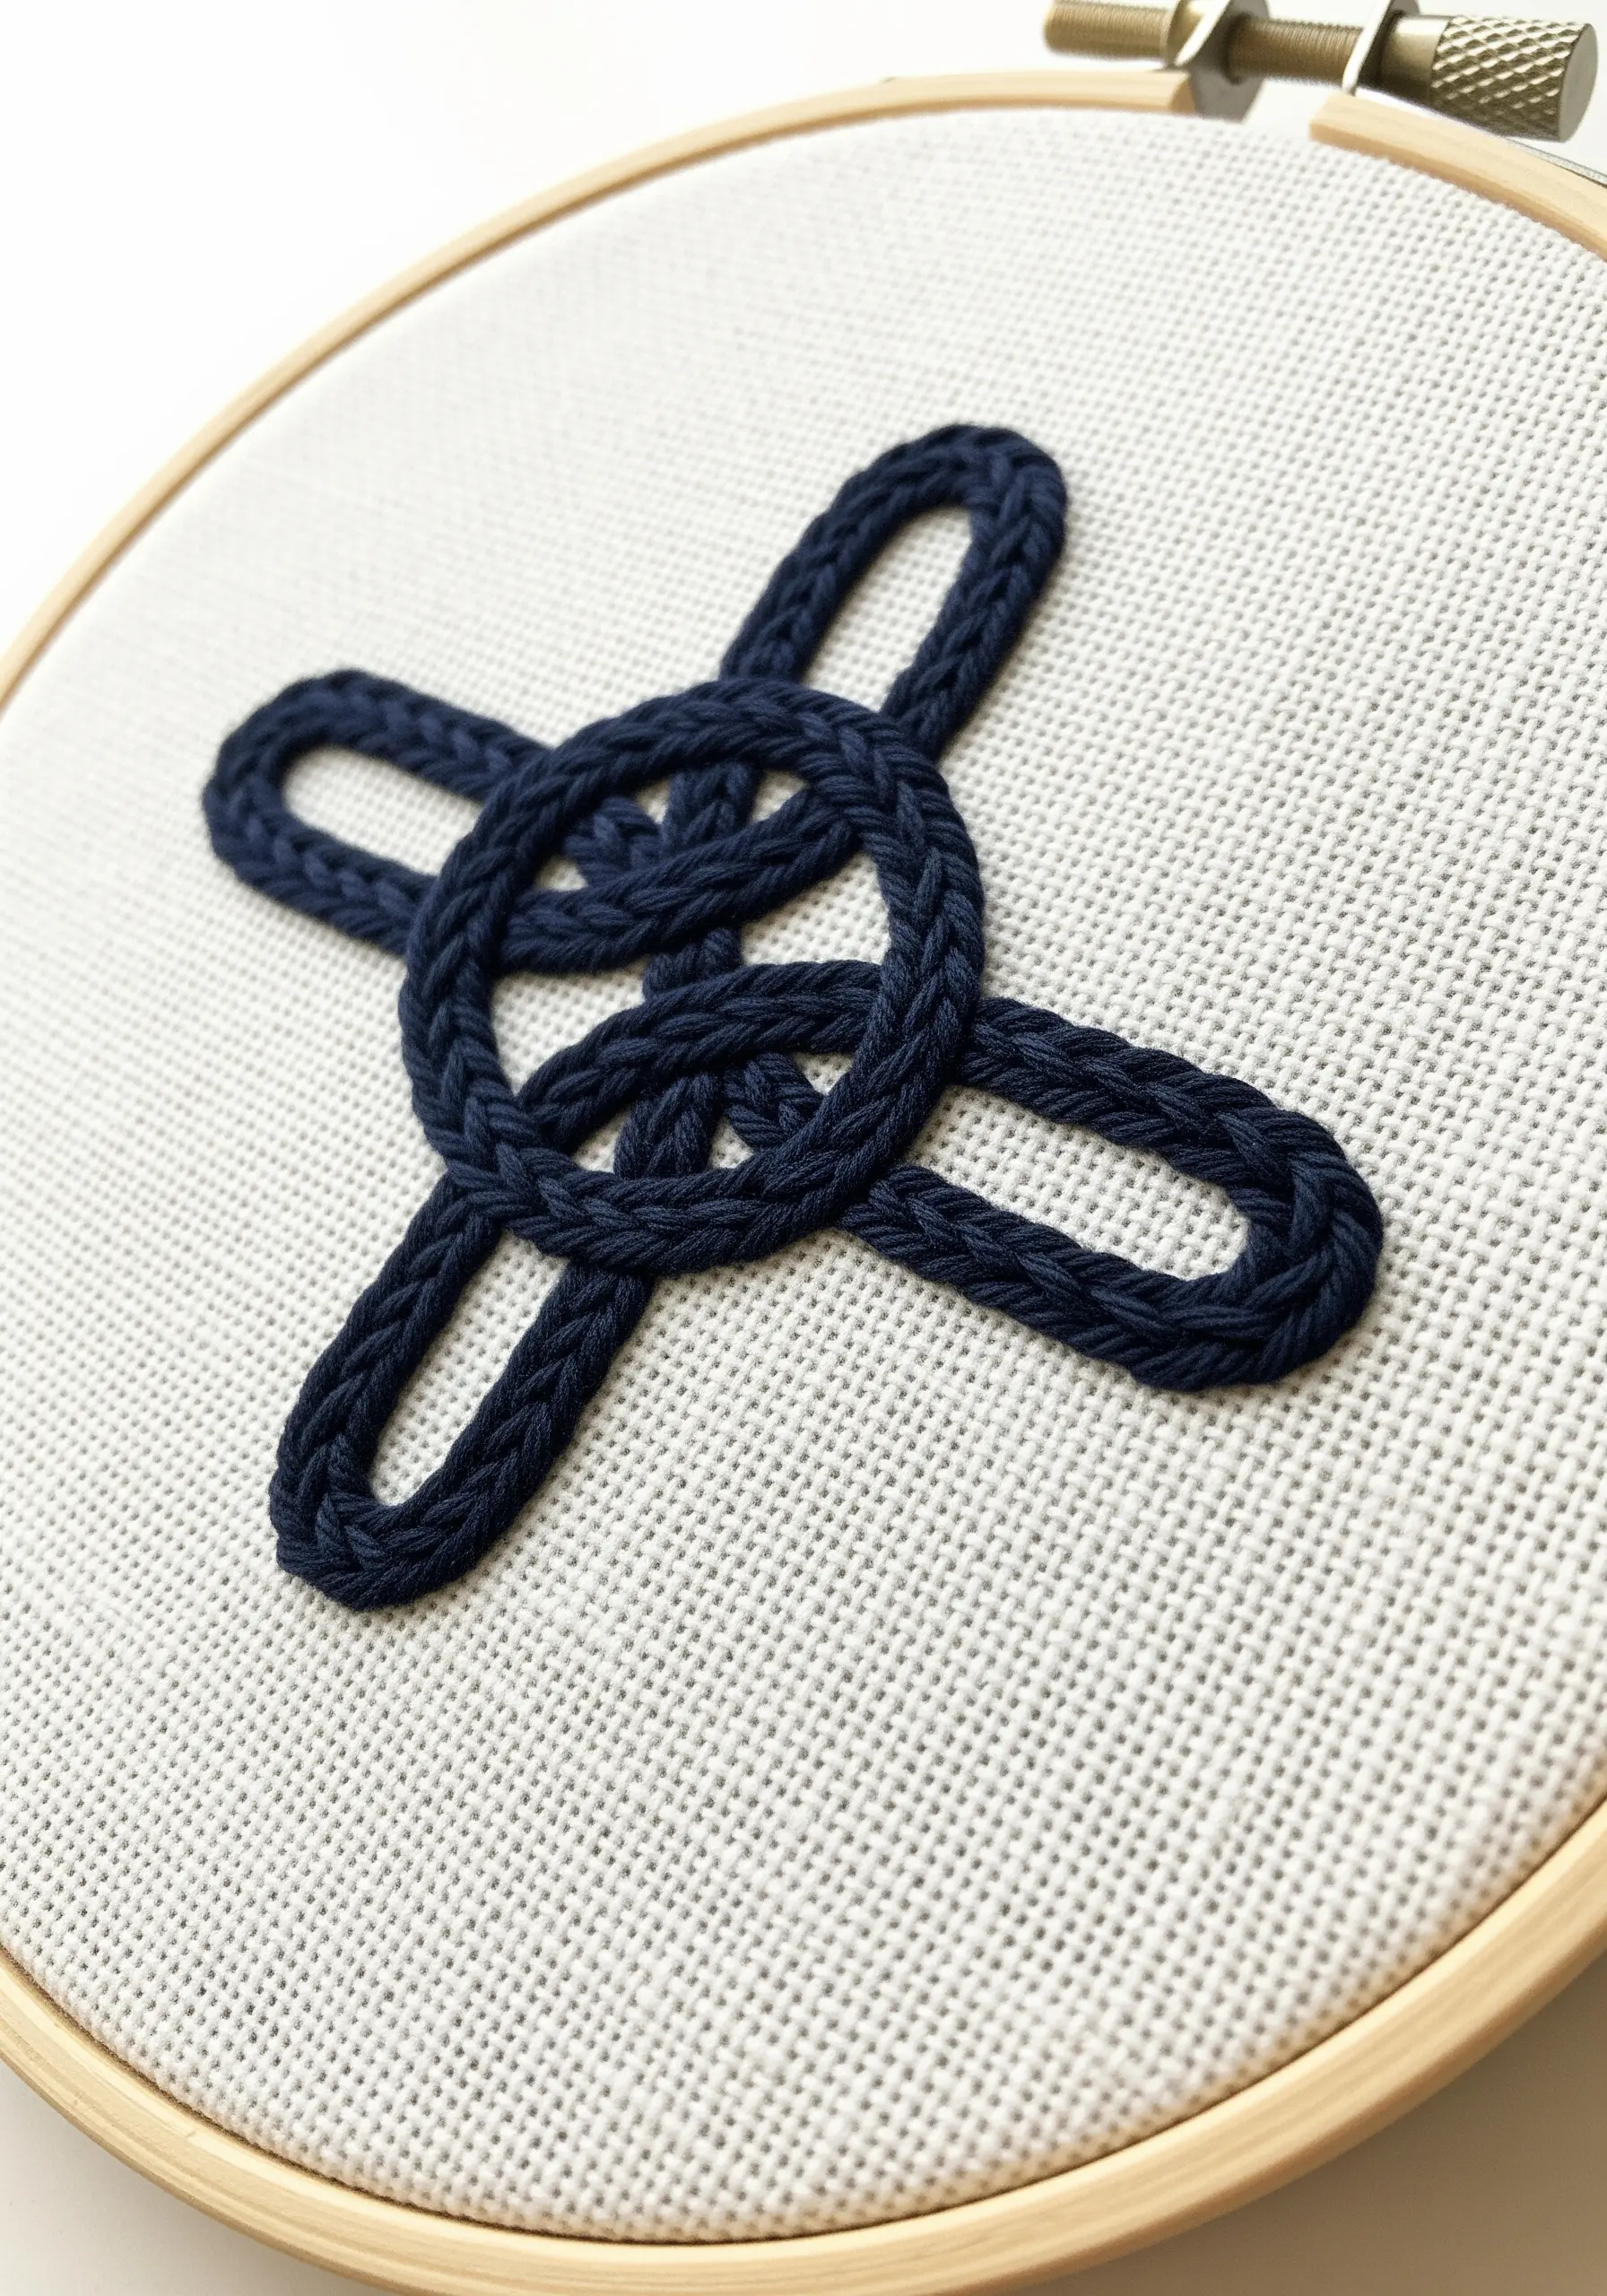
This incredible three-dimensional texture is created with a raised chain stitch band, a technique that sits on top of the fabric.
You first lay down a foundation of straight stitches to define the path of the knot.
Then, you work a detached buttonhole stitch over these foundation threads, without piercing the fabric.
This builds up a thick, woven cord that is perfect for creating Celtic knots and other intricate, tactile designs.
25. Simple Home Icon with a Color Focal Point
The power of this minimalist design lies in its restraint and single, deliberate pop of color.
Use a crisp, clean backstitch or stem stitch with two strands of black floss for the house outline.
By filling only one tiny element—the heart in the doorway—with a vibrant red satin stitch, you create an undeniable focal point.
These are the kind of tiny embroidered accents that make your home look designer-crafted and tell a story with just a few thoughtful stitches.


