

You have the threads, the fabric, and the desire to create something beautiful. But perhaps you feel stuck, repeating the same stitches, wondering how to make your work look less like a kit and more like art.
The secret isn’t in mastering dozens of complex techniques. It’s in the subtle, intentional choices you make—how you layer your colors, the direction of your stitches, or the way you use texture to tell a story. It’s about translating the quiet details of nature into thread.
Here, you won’t find quick trends. Instead, you’ll discover thoughtful, professional approaches to transform your embroidery. These patterns are designed to help you see the potential in a single strand of floss and to give you the confidence to create pieces that feel calm, sophisticated, and deeply connected to the natural world.
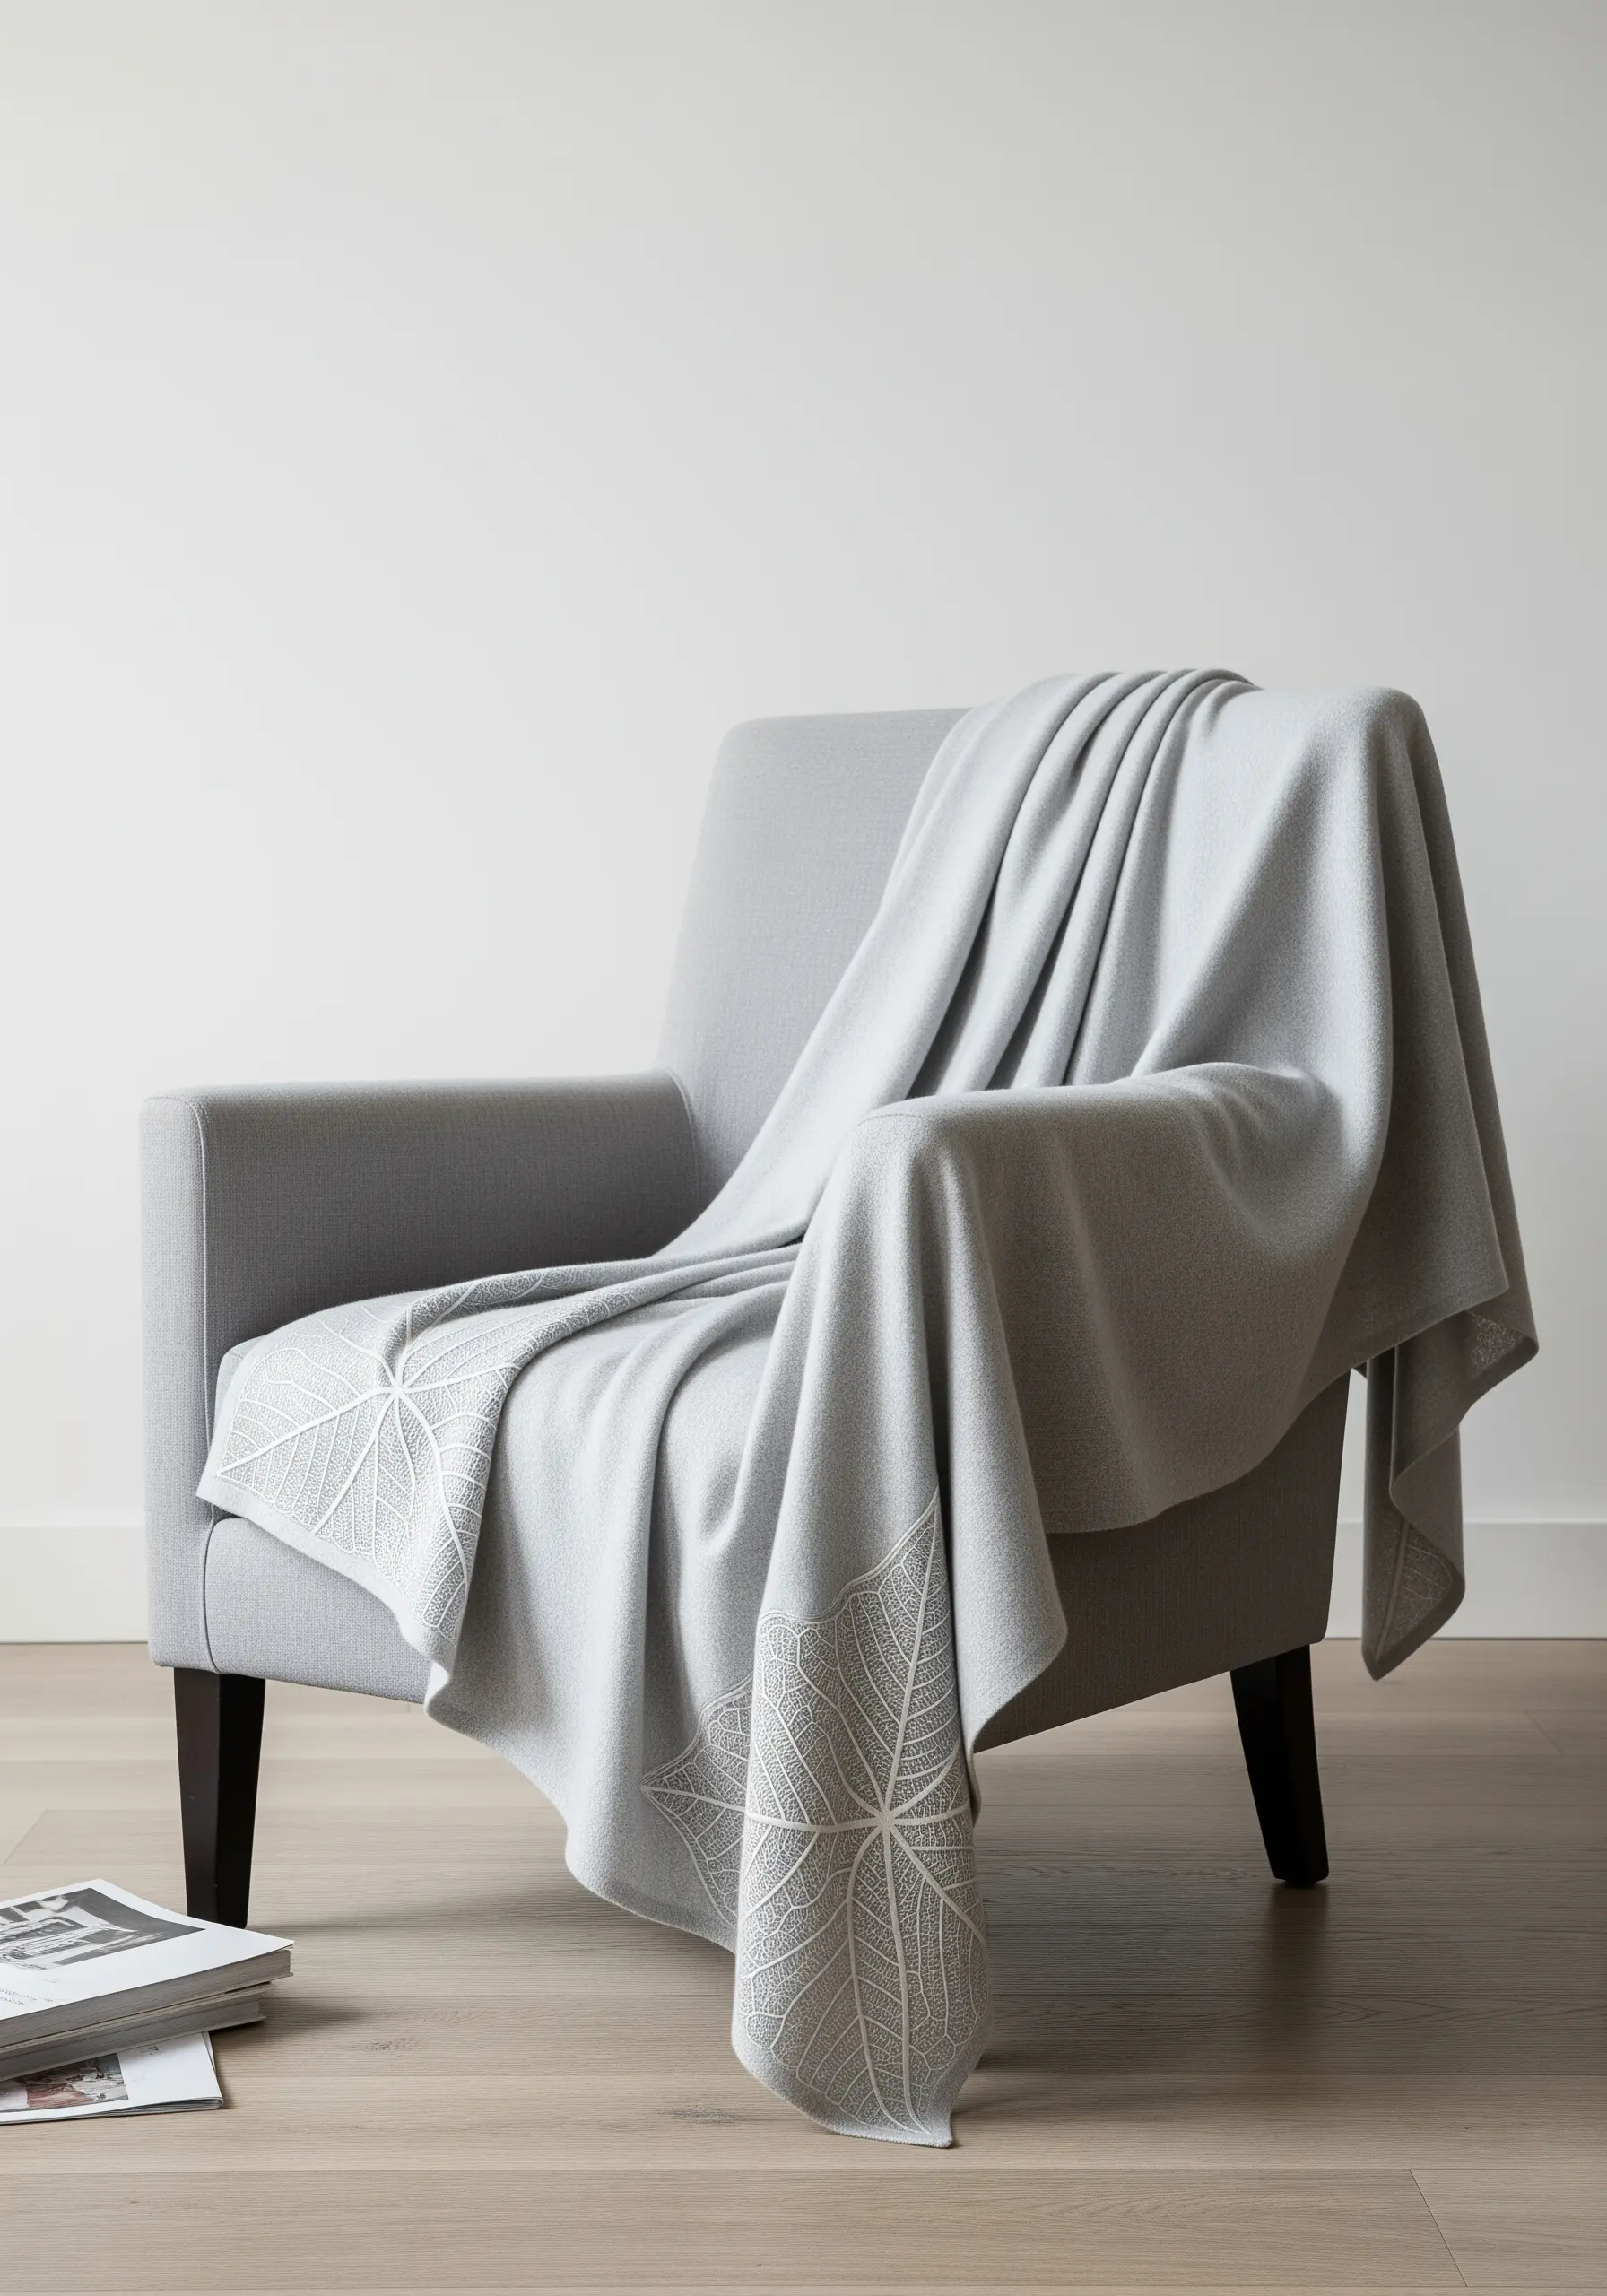
1. Layered Ferns with Tonal Shading
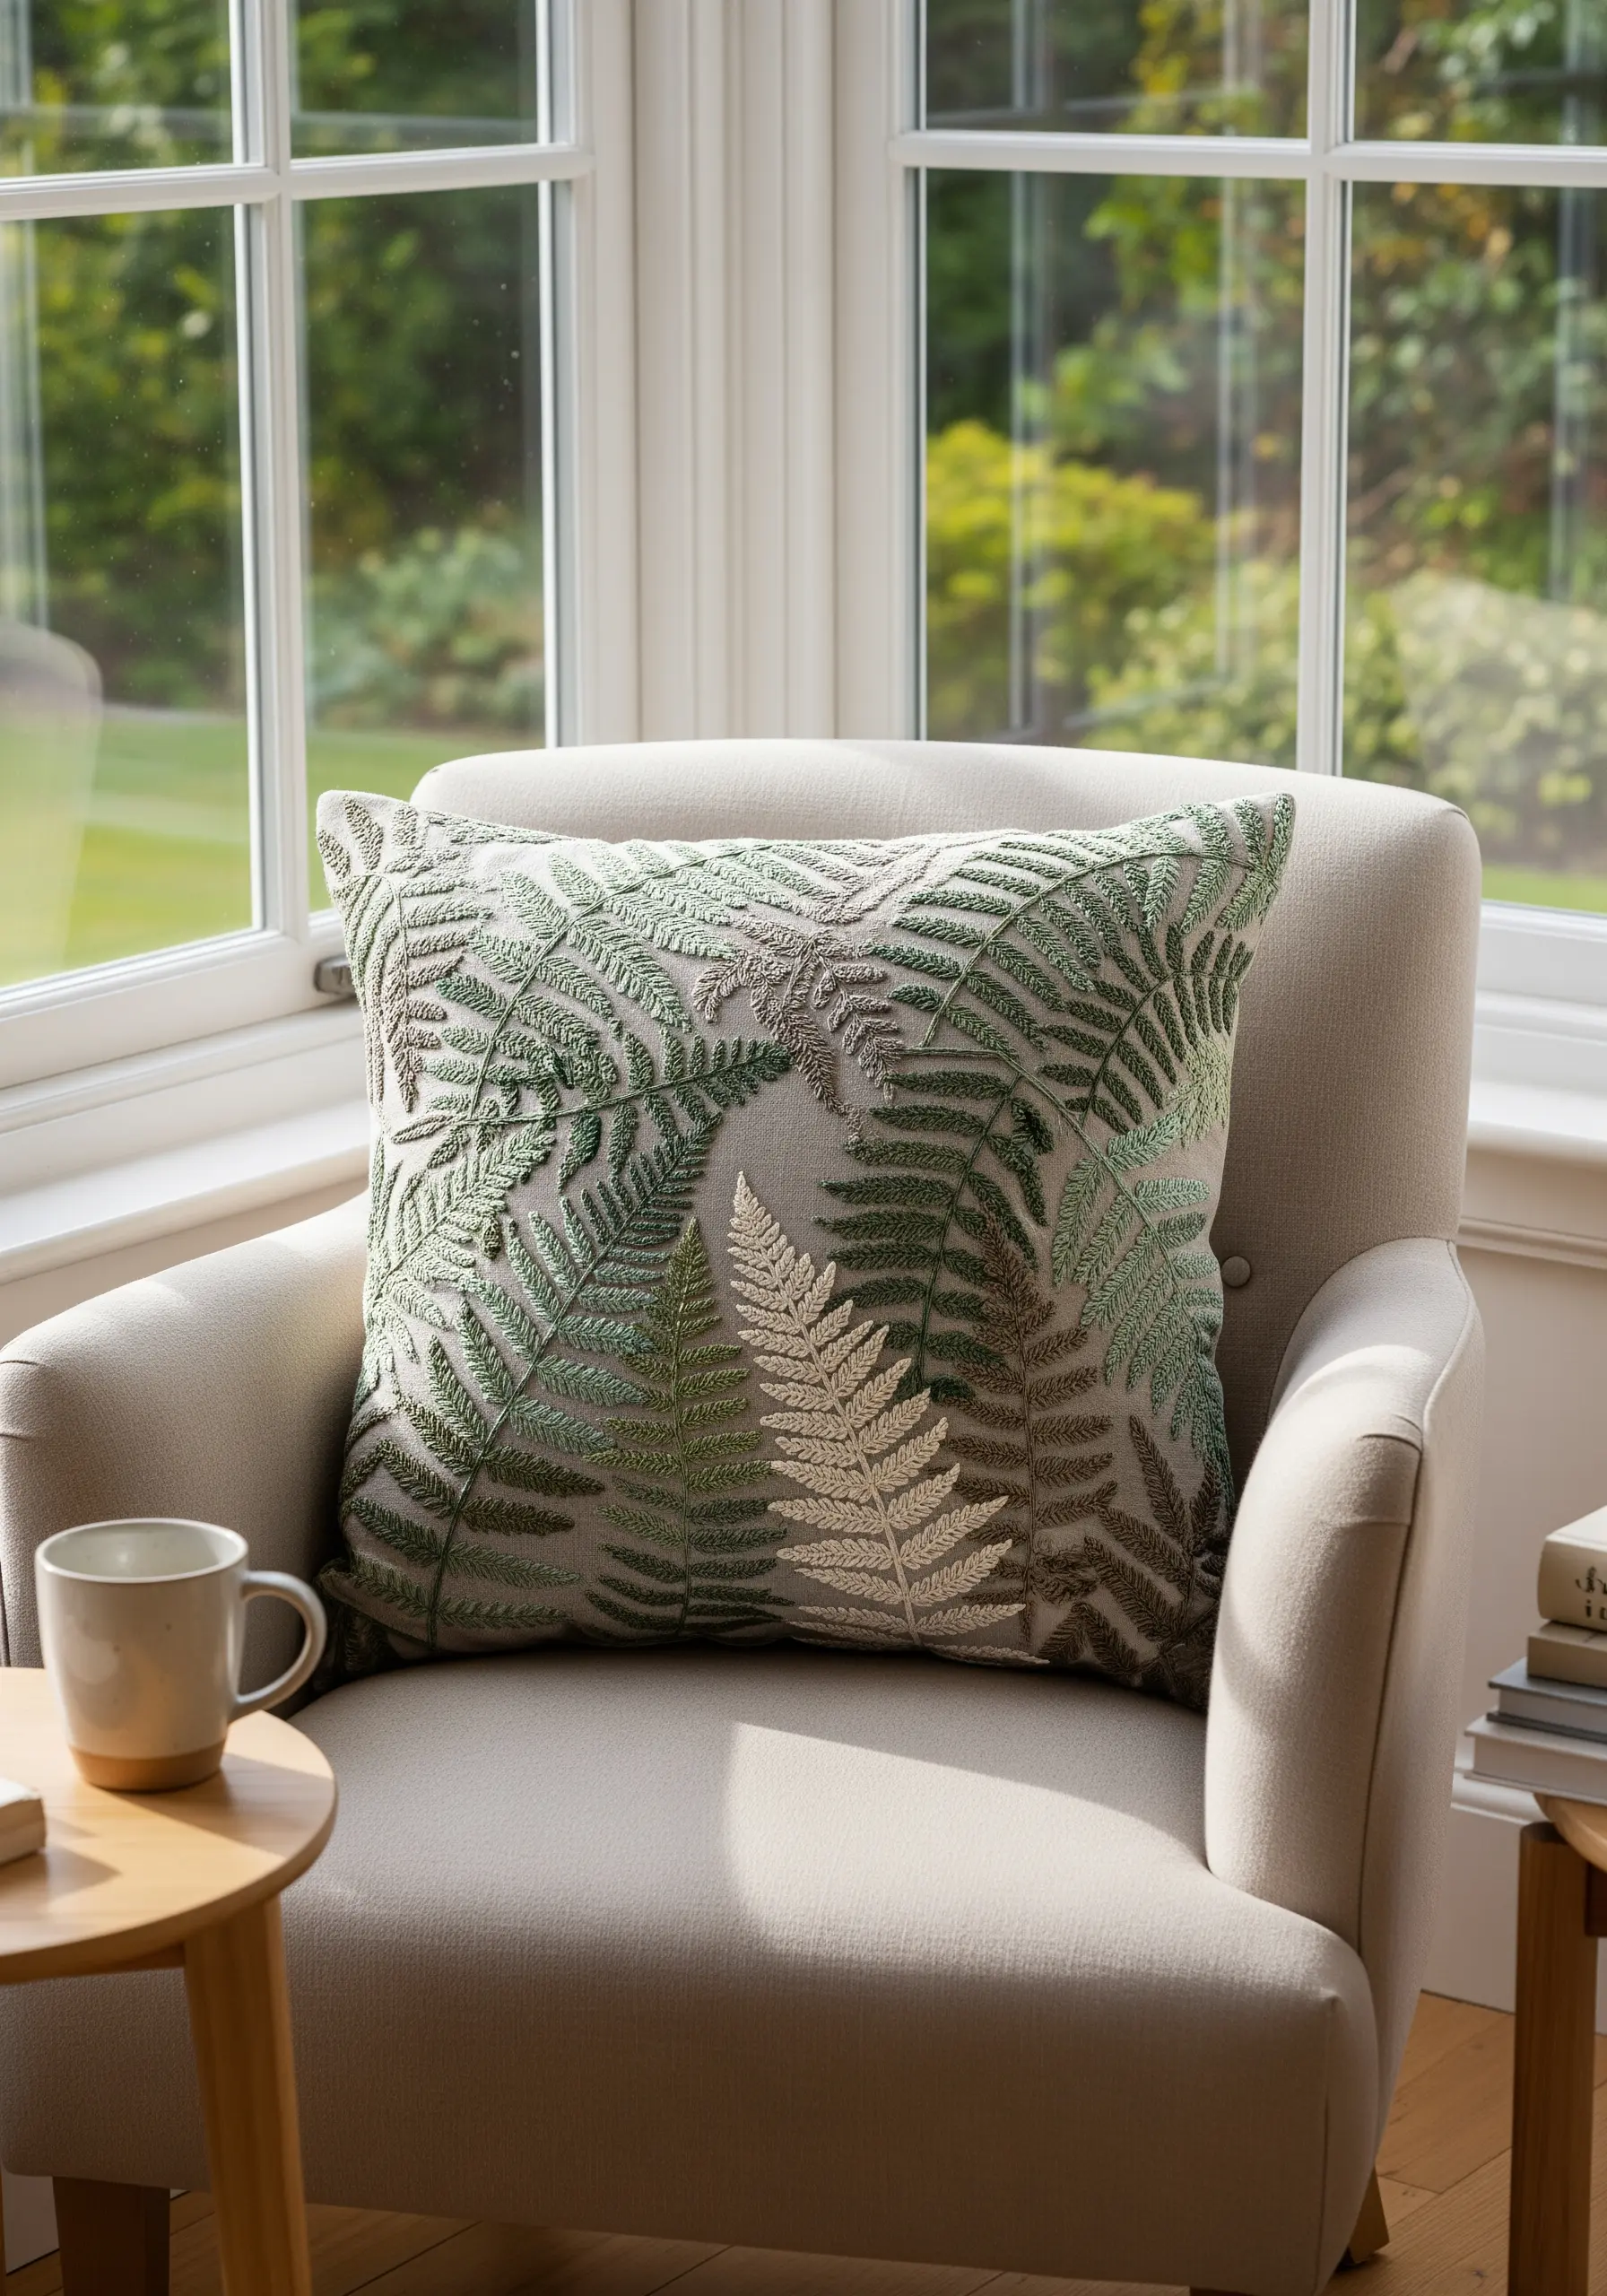
Create lush, realistic fern fronds by layering your stitches and using a tonal color palette.
Instead of filling each leaf with a single color, use three or four similar shades of green and beige floss.
Work the fronds in the background first, then stitch the foreground elements so they slightly overlap.
This technique creates an illusion of depth that makes the entire composition feel more dynamic and natural.
Use a fishbone stitch for each leaflet; it creates a central vein and gives the foliage a gentle, organic direction.
2. High-Texture Woodland Floor Scene
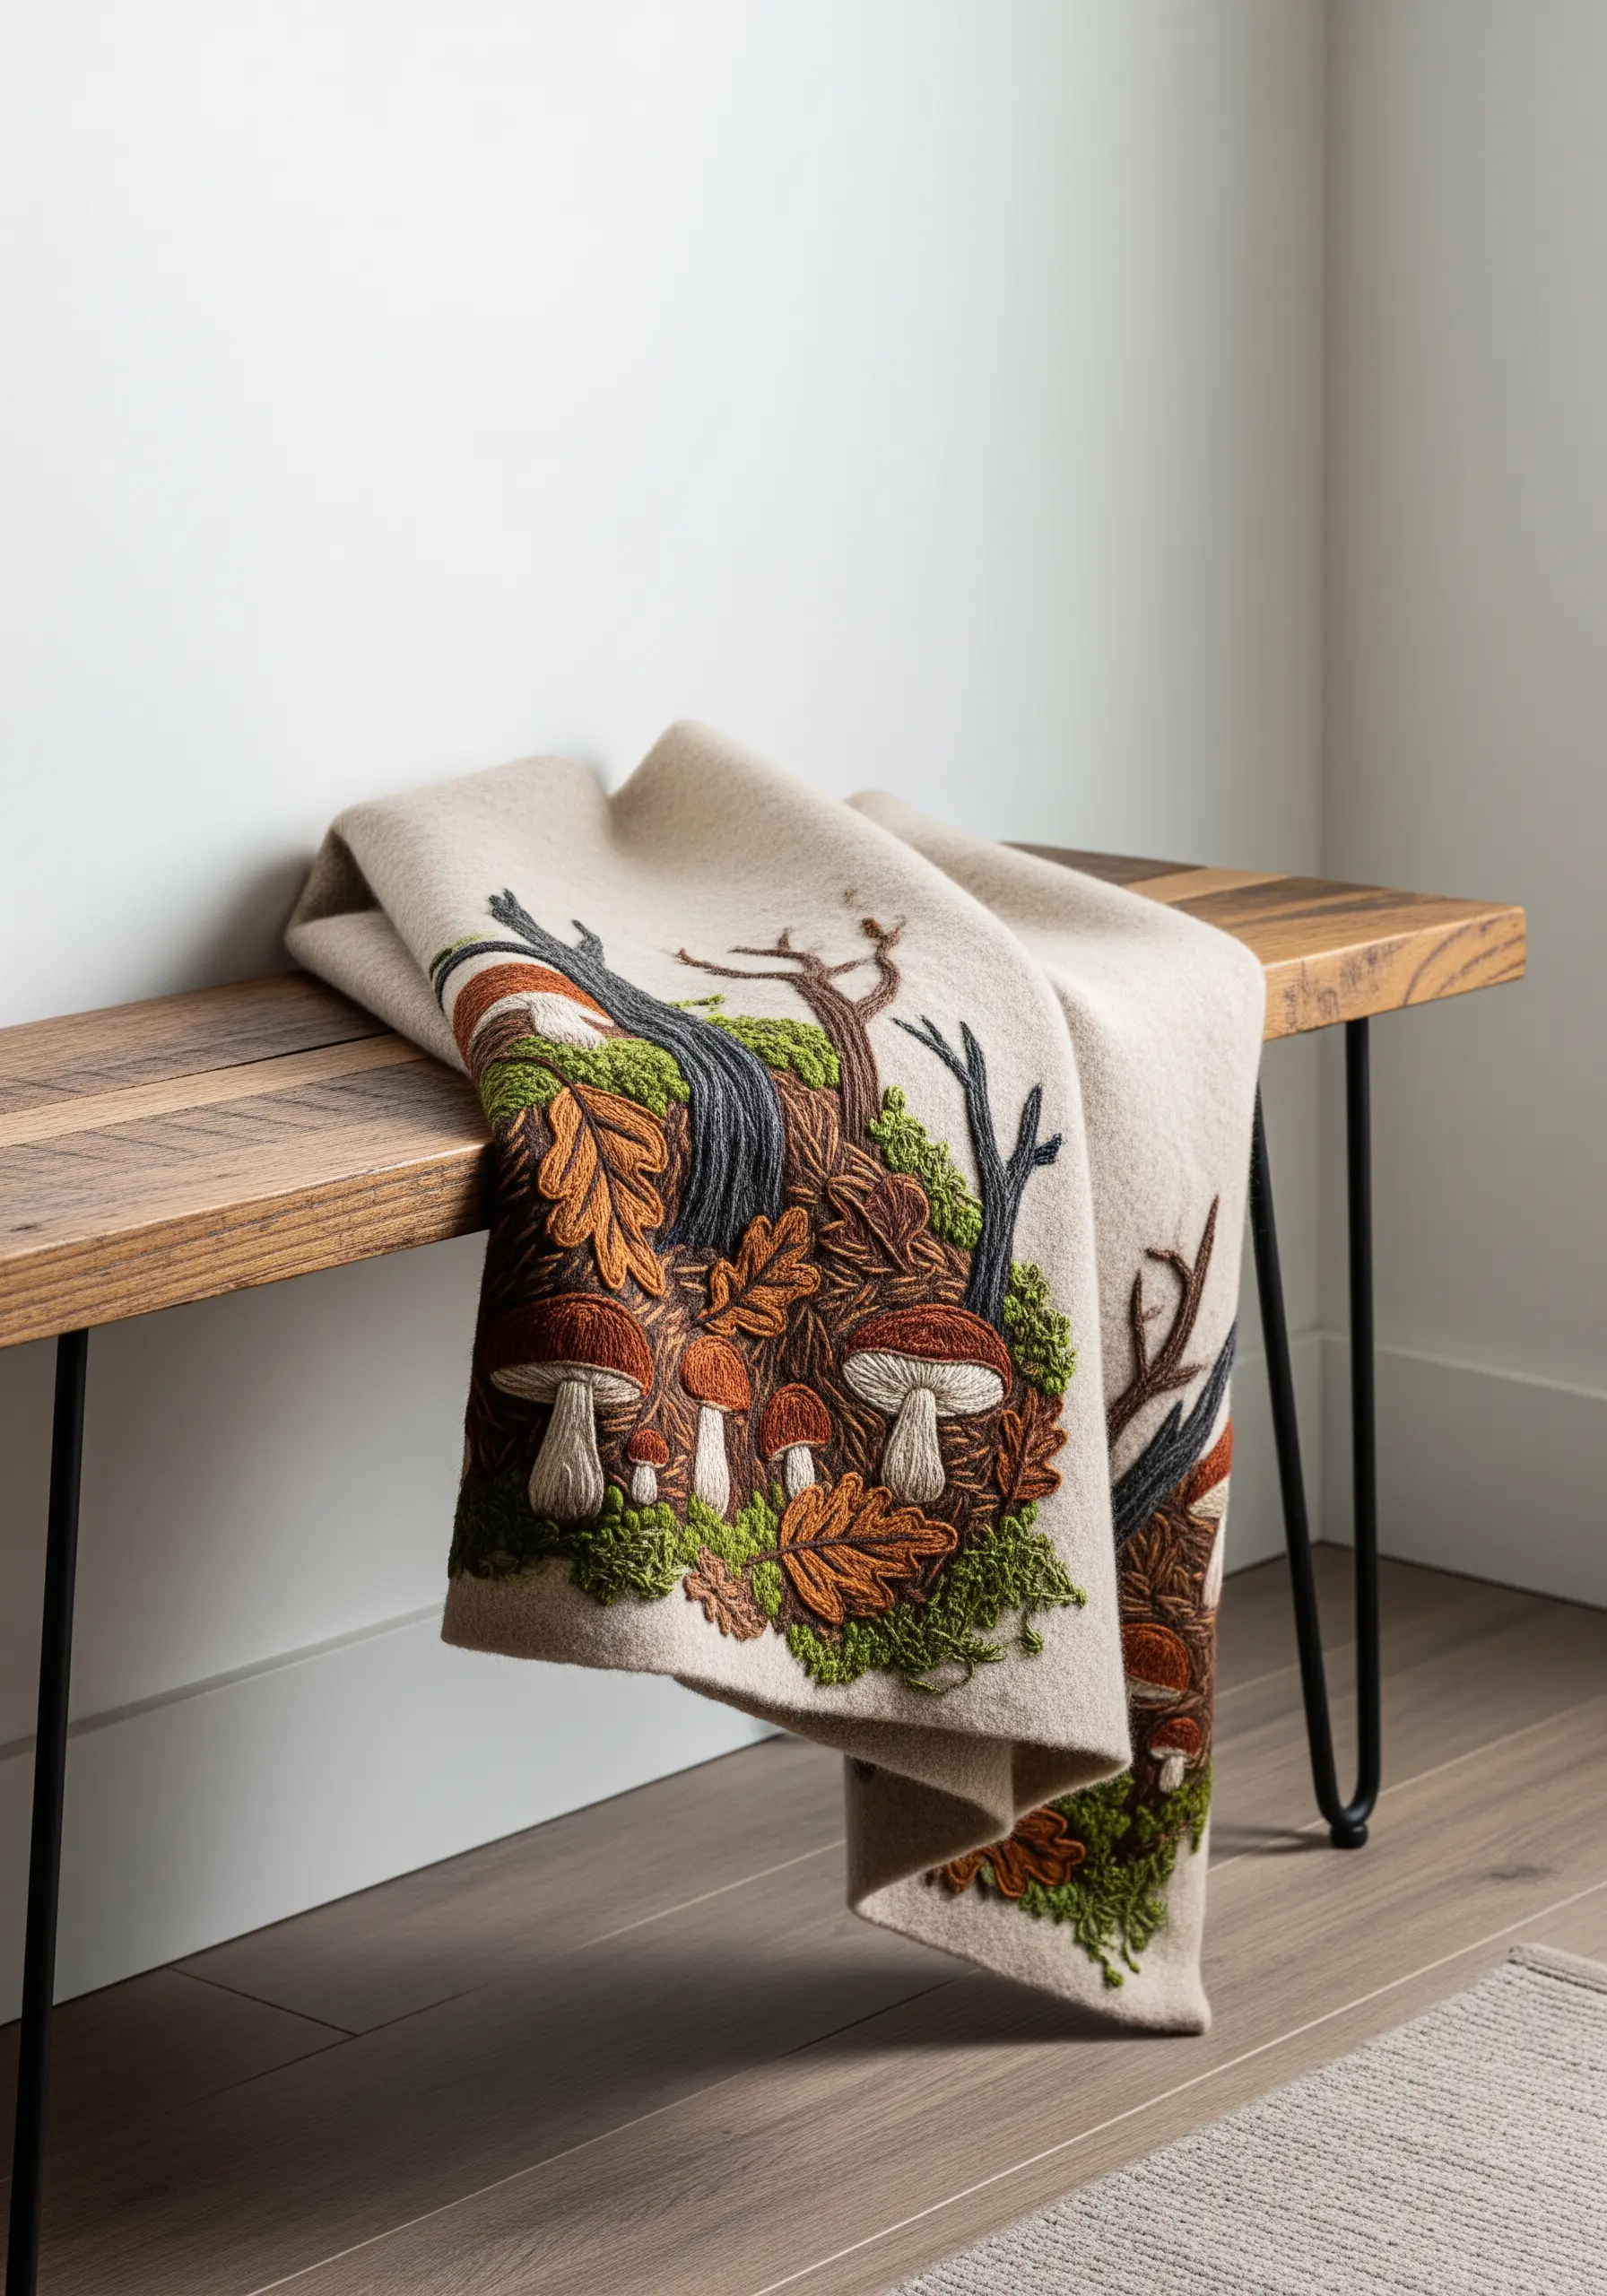
Build a dimensional forest scene by combining different threads and stitches to mimic natural textures.
Use a thick wool yarn or multiple strands of cotton floss for the mushroom caps, filling them with a dense satin stitch to make them pop.
Create gnarled branches with a couching stitch, laying down a thick thread and securing it with smaller, thinner stitches.
Finally, scatter French knots and bullion knots in mossy greens and earthy browns around the base to create a rich, tactile ground cover.
This mixed-fiber approach makes the piece visually and physically engaging.
3. Contour Stitching for Mountain Ranges
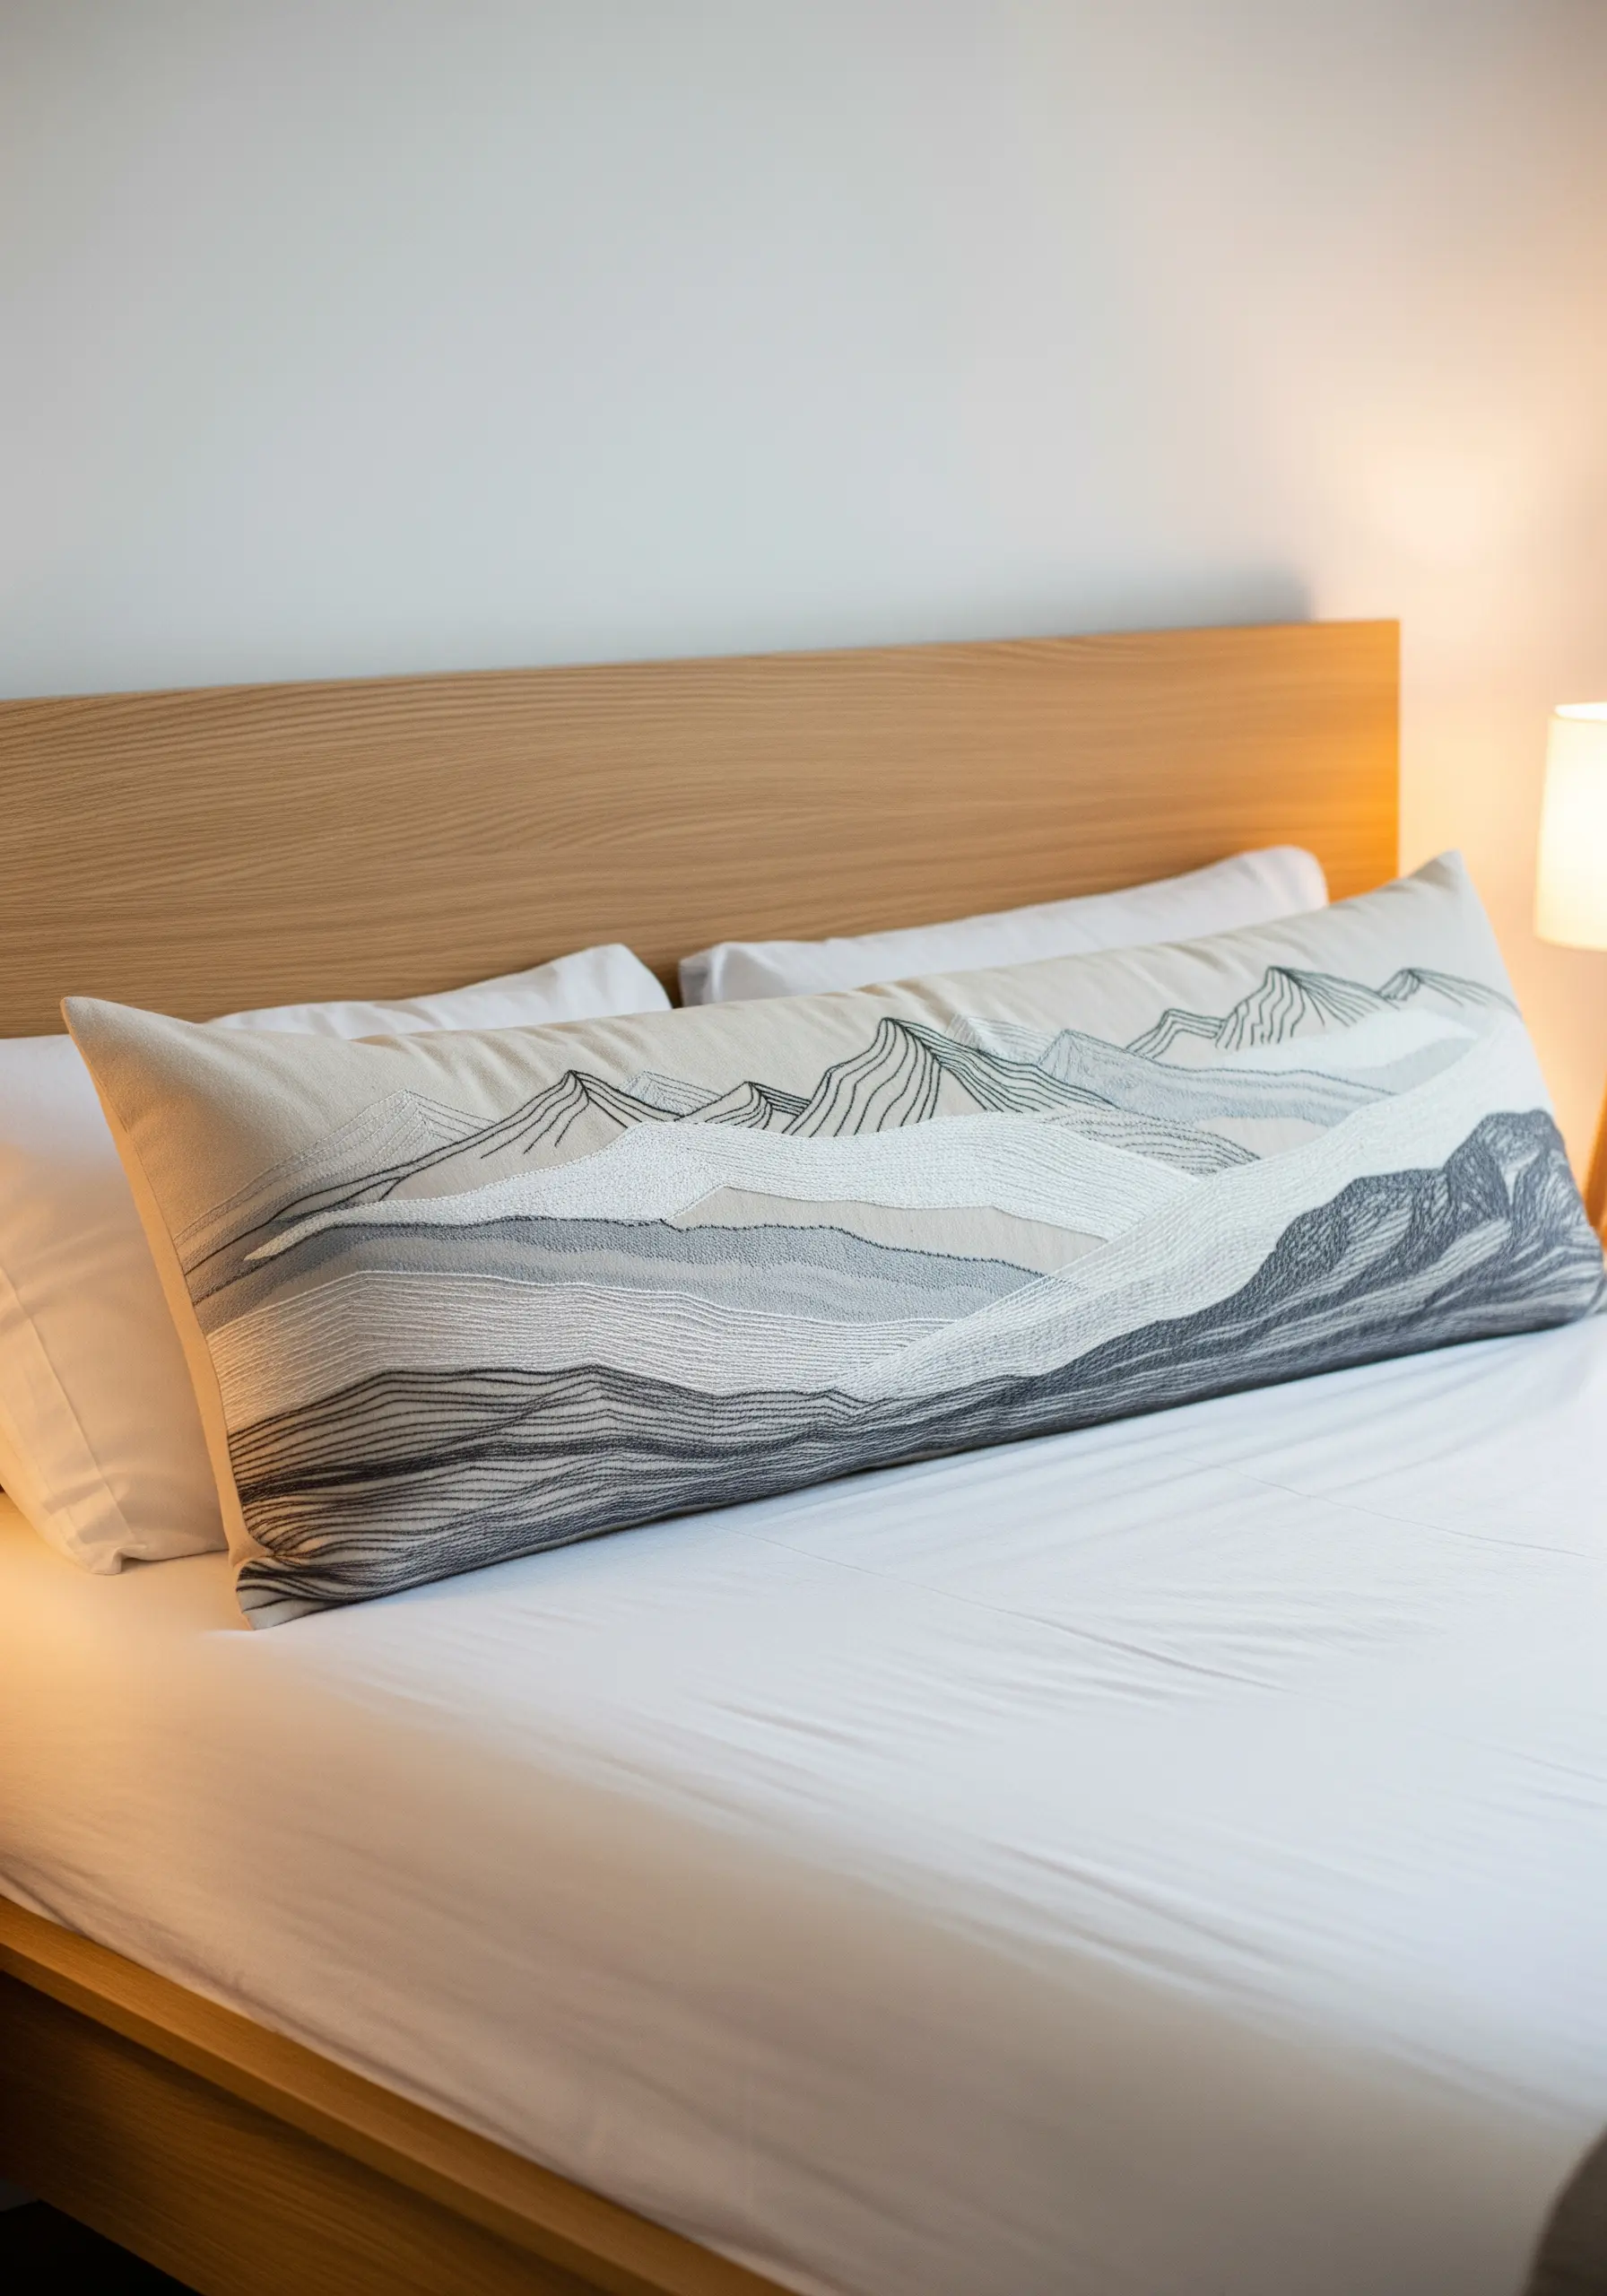
Capture the sweeping scale of a mountain landscape using directional stitching that follows the contours of the peaks.
Instead of filling shapes with a uniform satin stitch, use long-and-short stitch or even simple running stitches that flow with the terrain.
This method creates a sense of movement and perspective.
Enhance the depth by varying your thread weight: use four to six strands for the foreground mountains and just one or two for the distant, hazy peaks.
This subtle shift in thickness is a simple way to create a powerful illusion of distance.
4. Graphic Appliqué with Stitched Details
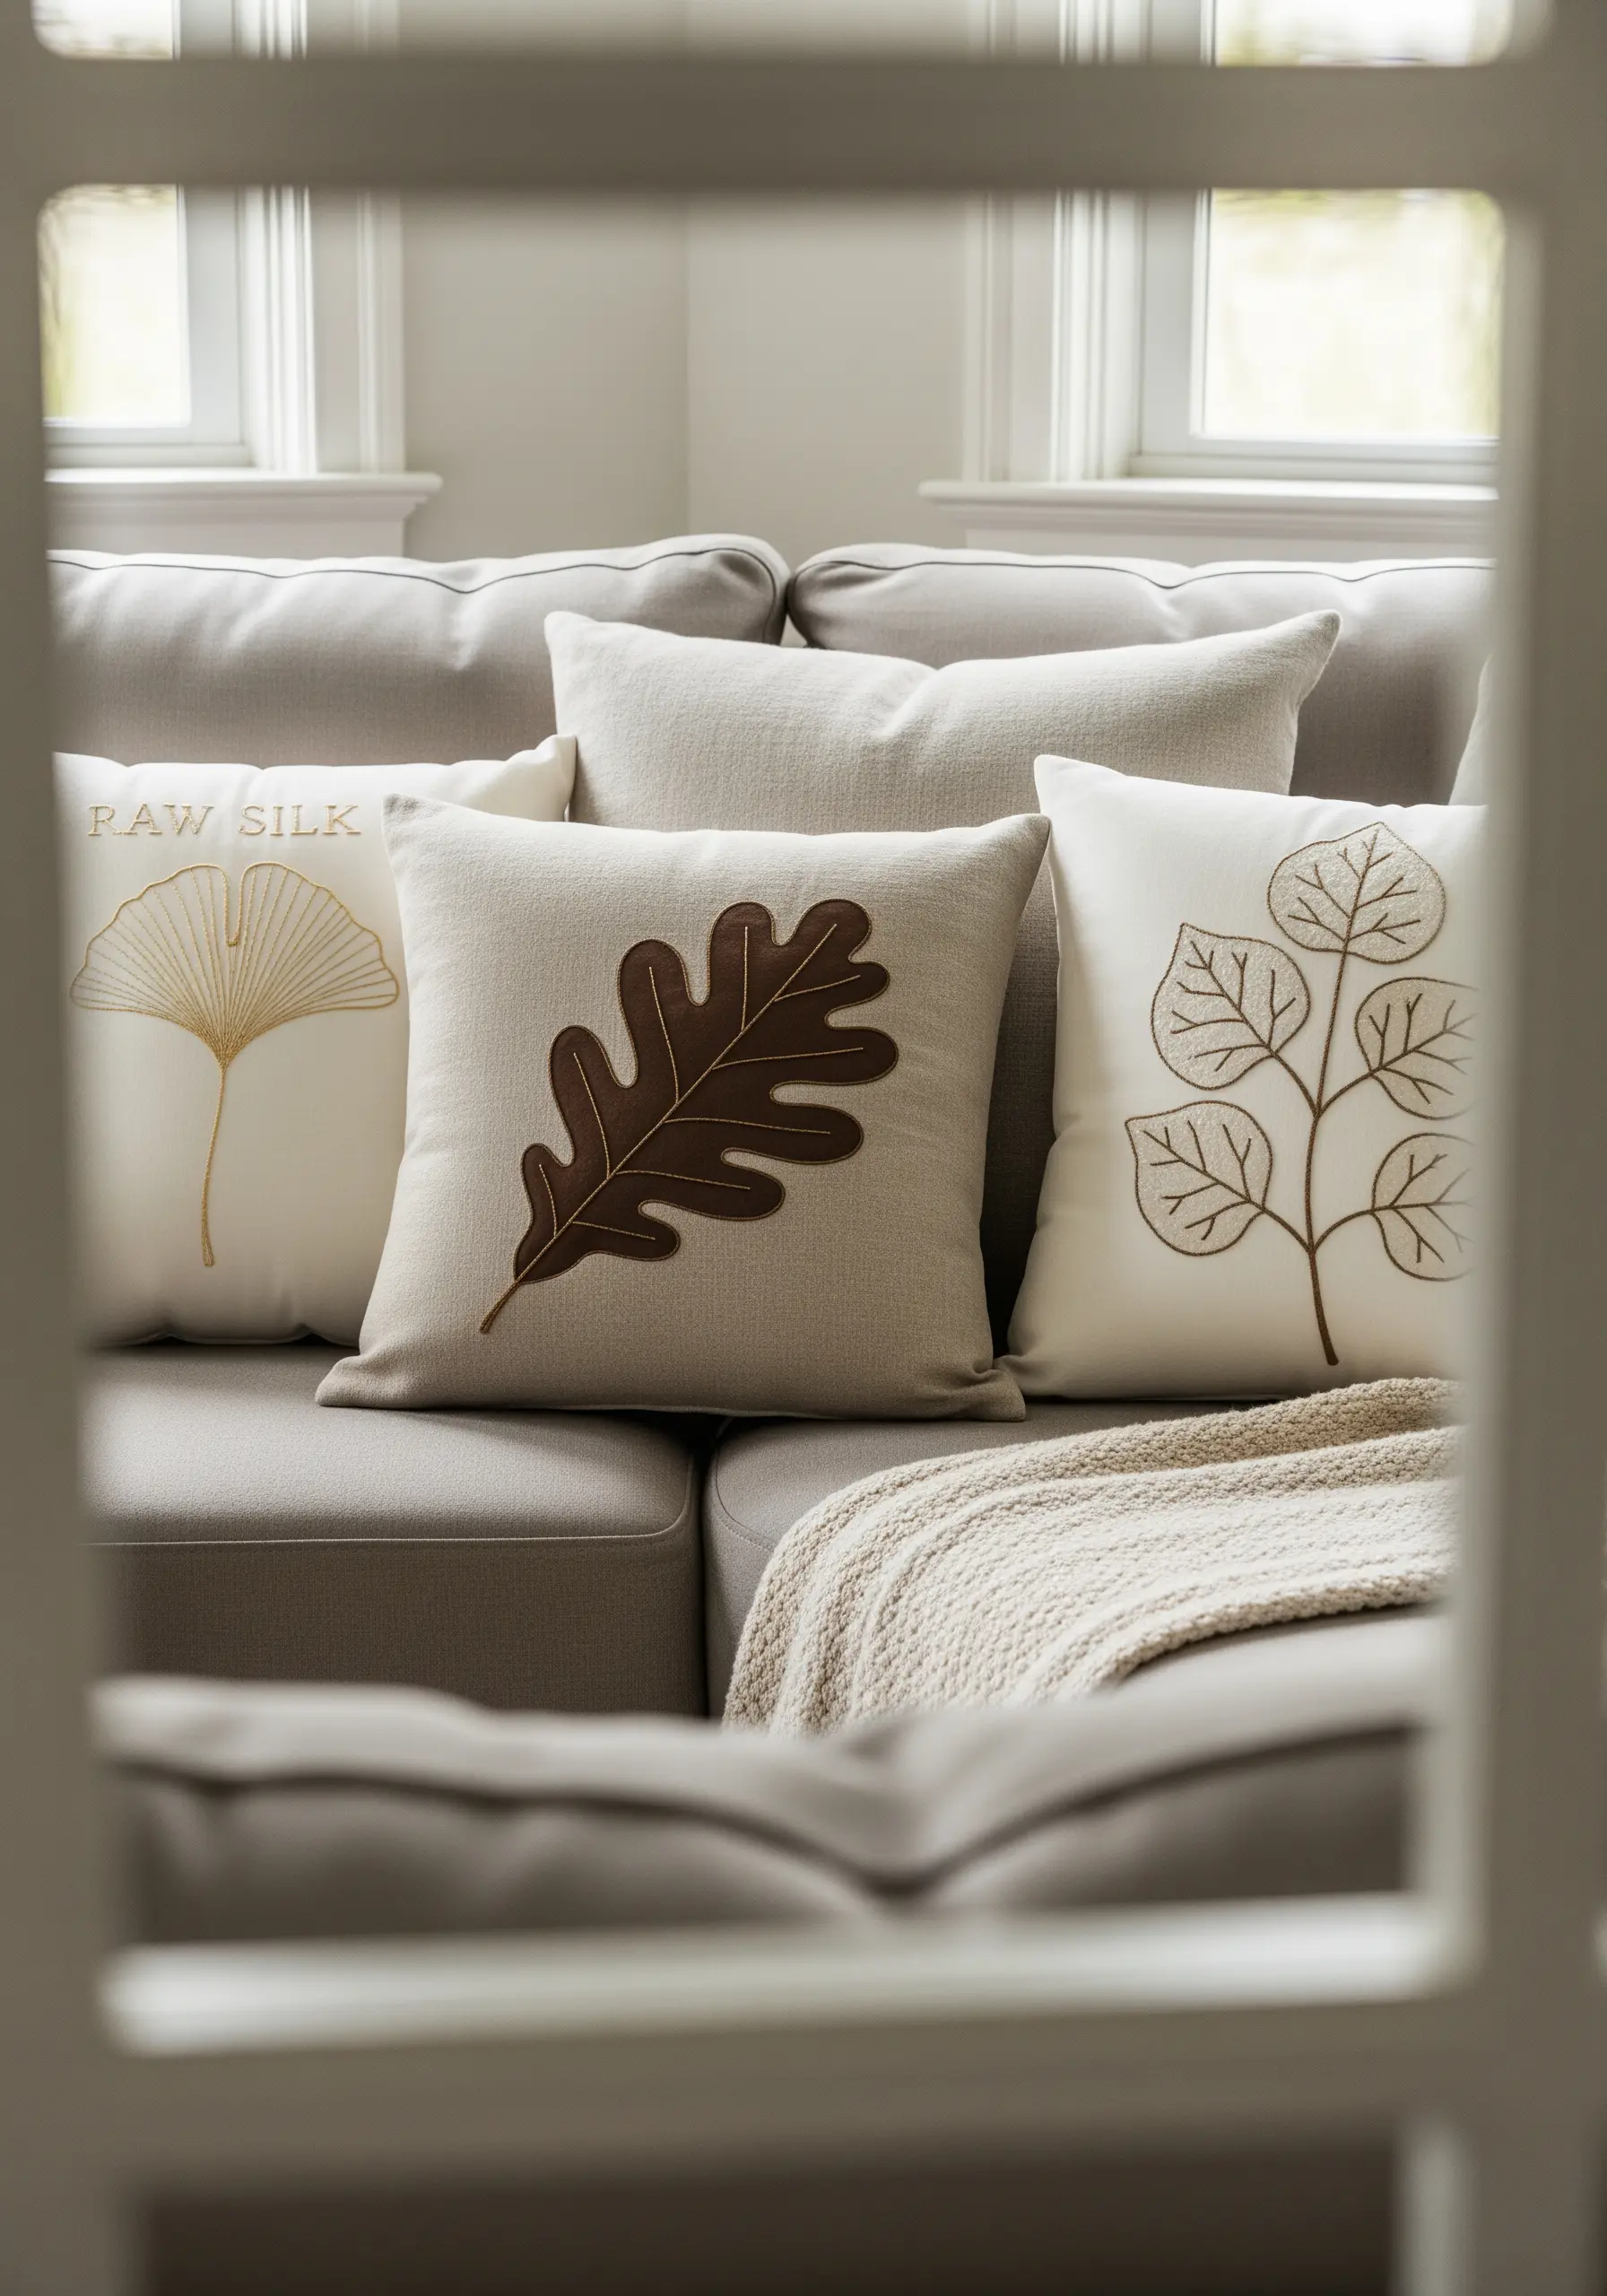
For bold, graphic botanicals, combine appliqué with simple embroidery.
Cut your leaf shapes from a non-fraying fabric like wool felt or stabilized linen in a contrasting color.
Secure the shape to your base fabric using a neat blanket stitch or a simple running stitch just inside the edge.
Then, add interior details like veins with a clean backstitch or stem stitch.
This technique is much faster than filling a large area with satin stitch and results in a clean, modern, and high-impact design.
5. Delicate Wildflowers on Table Linens
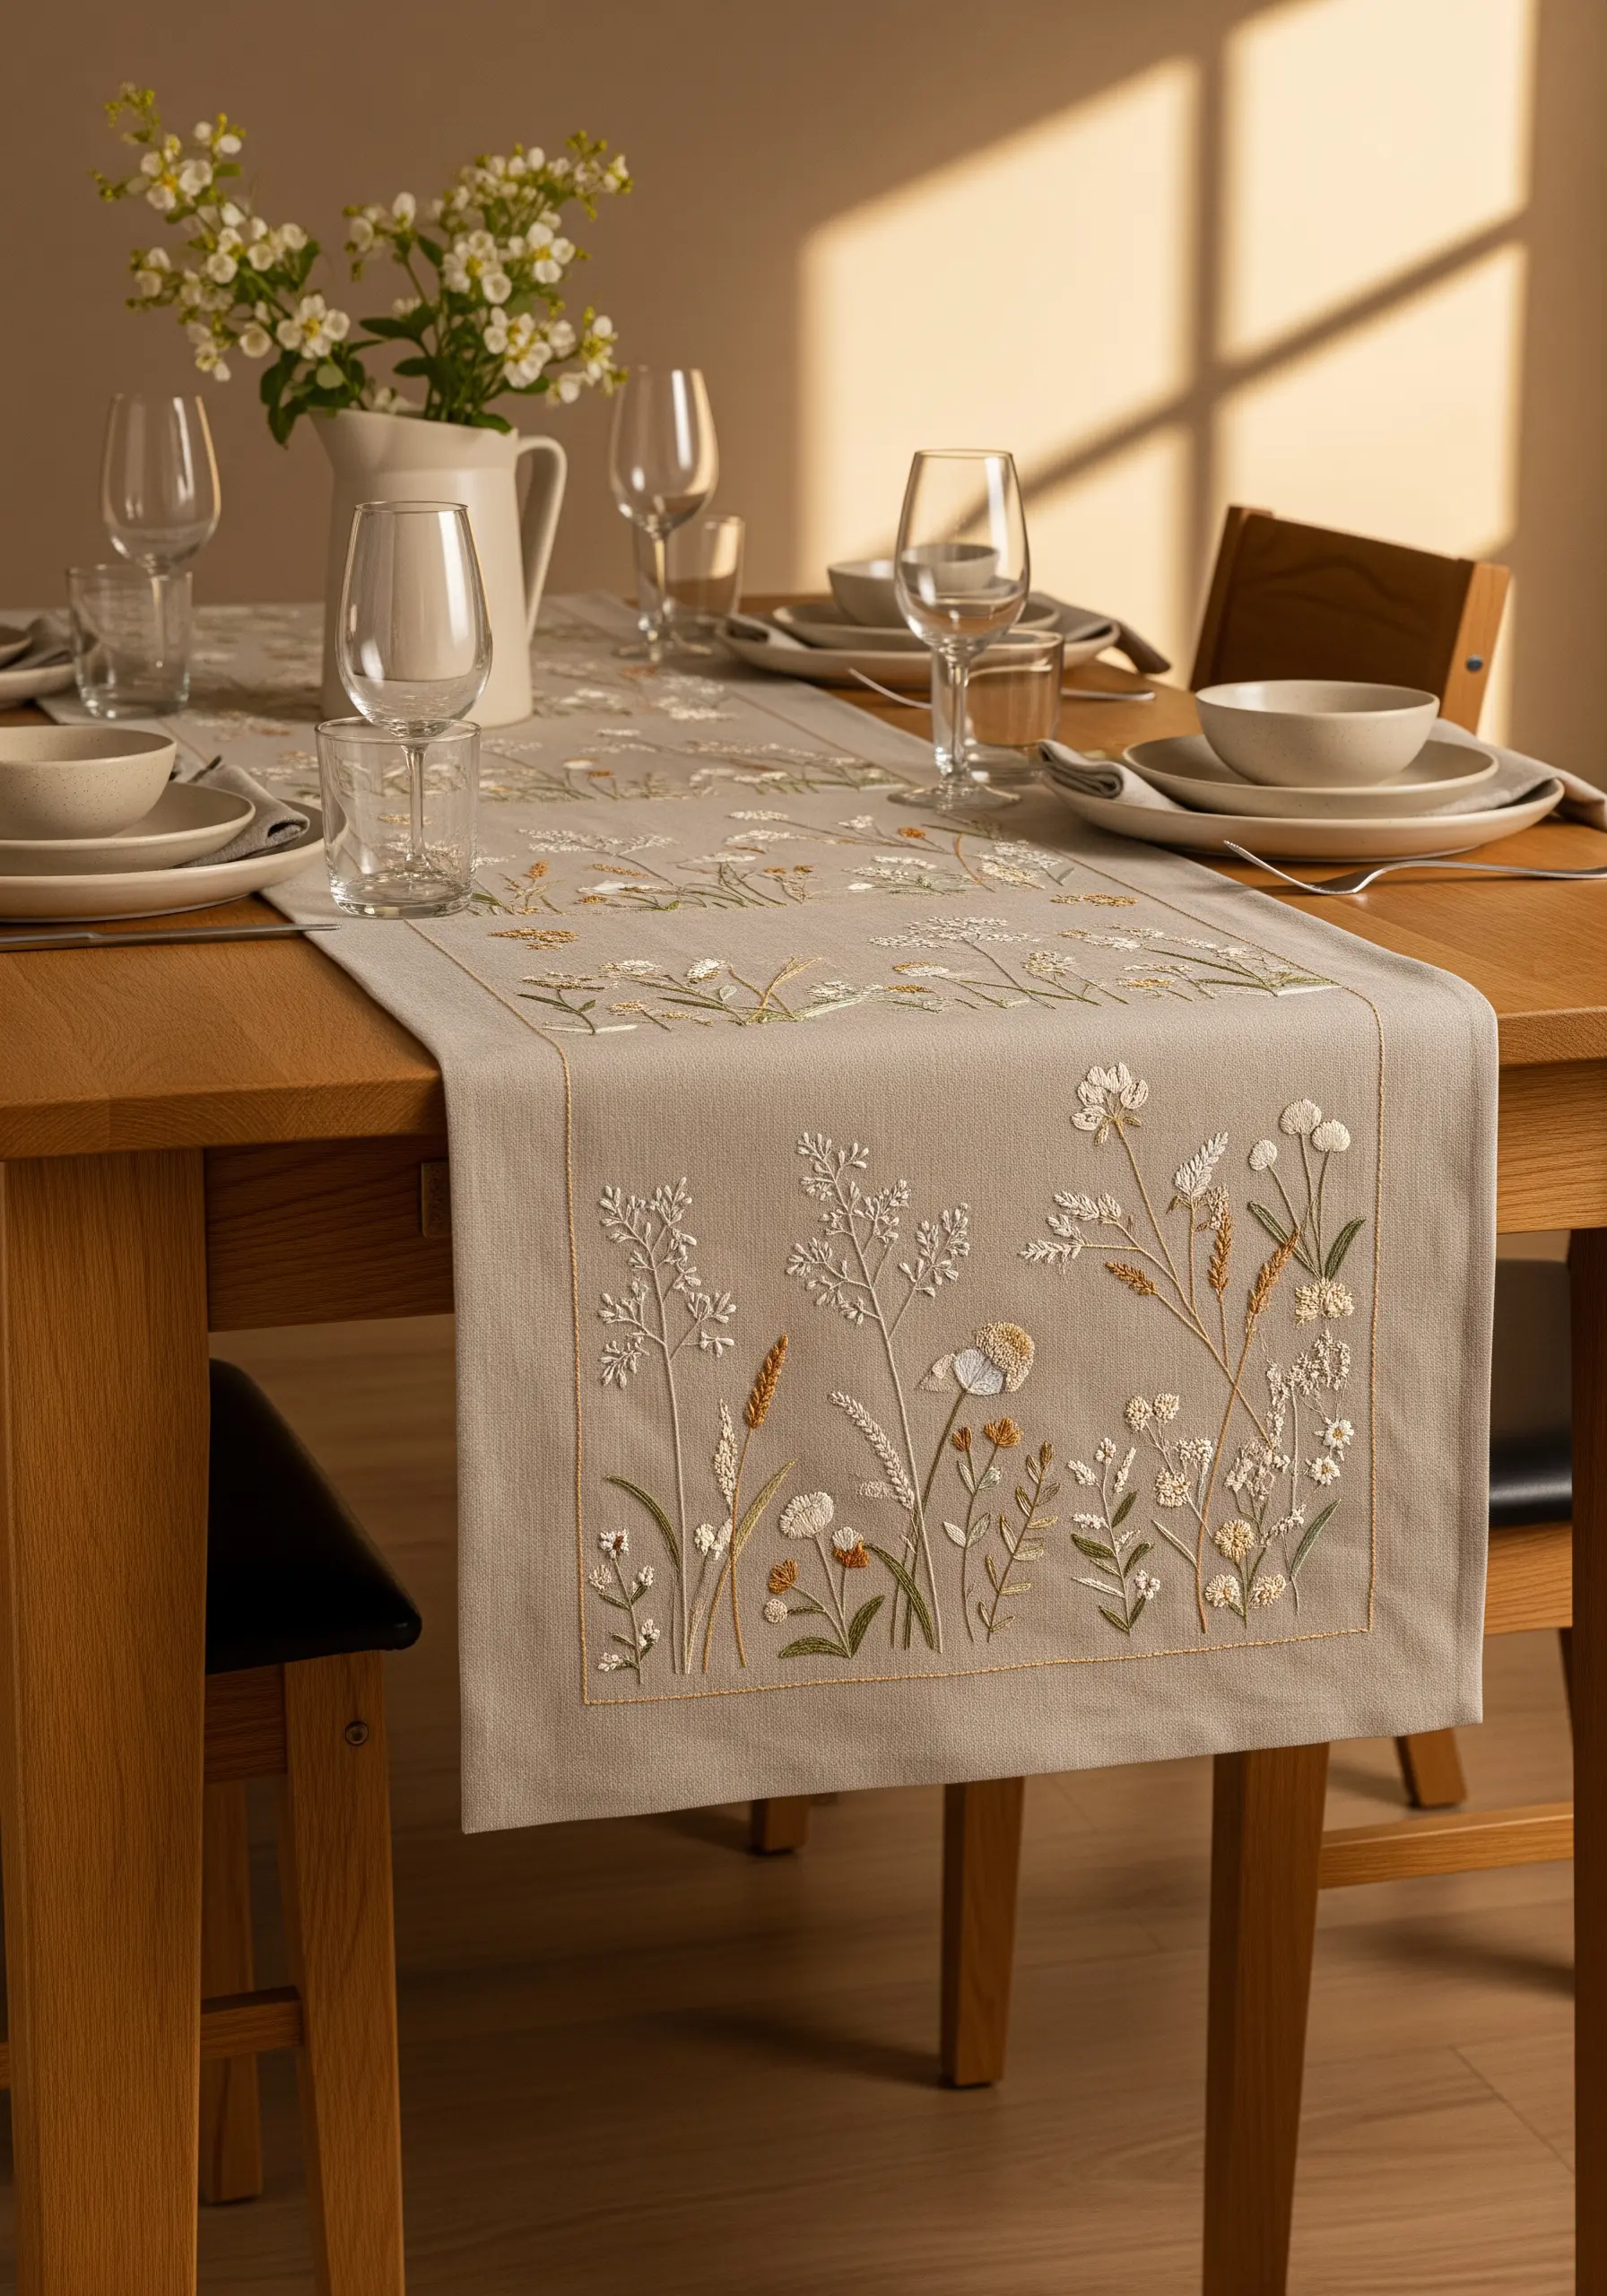
When embroidering fine linens, remember that negative space is your most powerful tool.
Create an airy, meadow-like feel by scattering delicate botanicals instead of clustering them tightly.
Use light, individual stitches like the detached chain stitch for petals, single straight stitches for grass, and tiny French knots for flower centers.
Stick to a limited, soft color palette—creams, sages, and pale yellows—to maintain an elegant and cohesive look on your table linen.
6. Clustered Hoops for a Gallery Wall
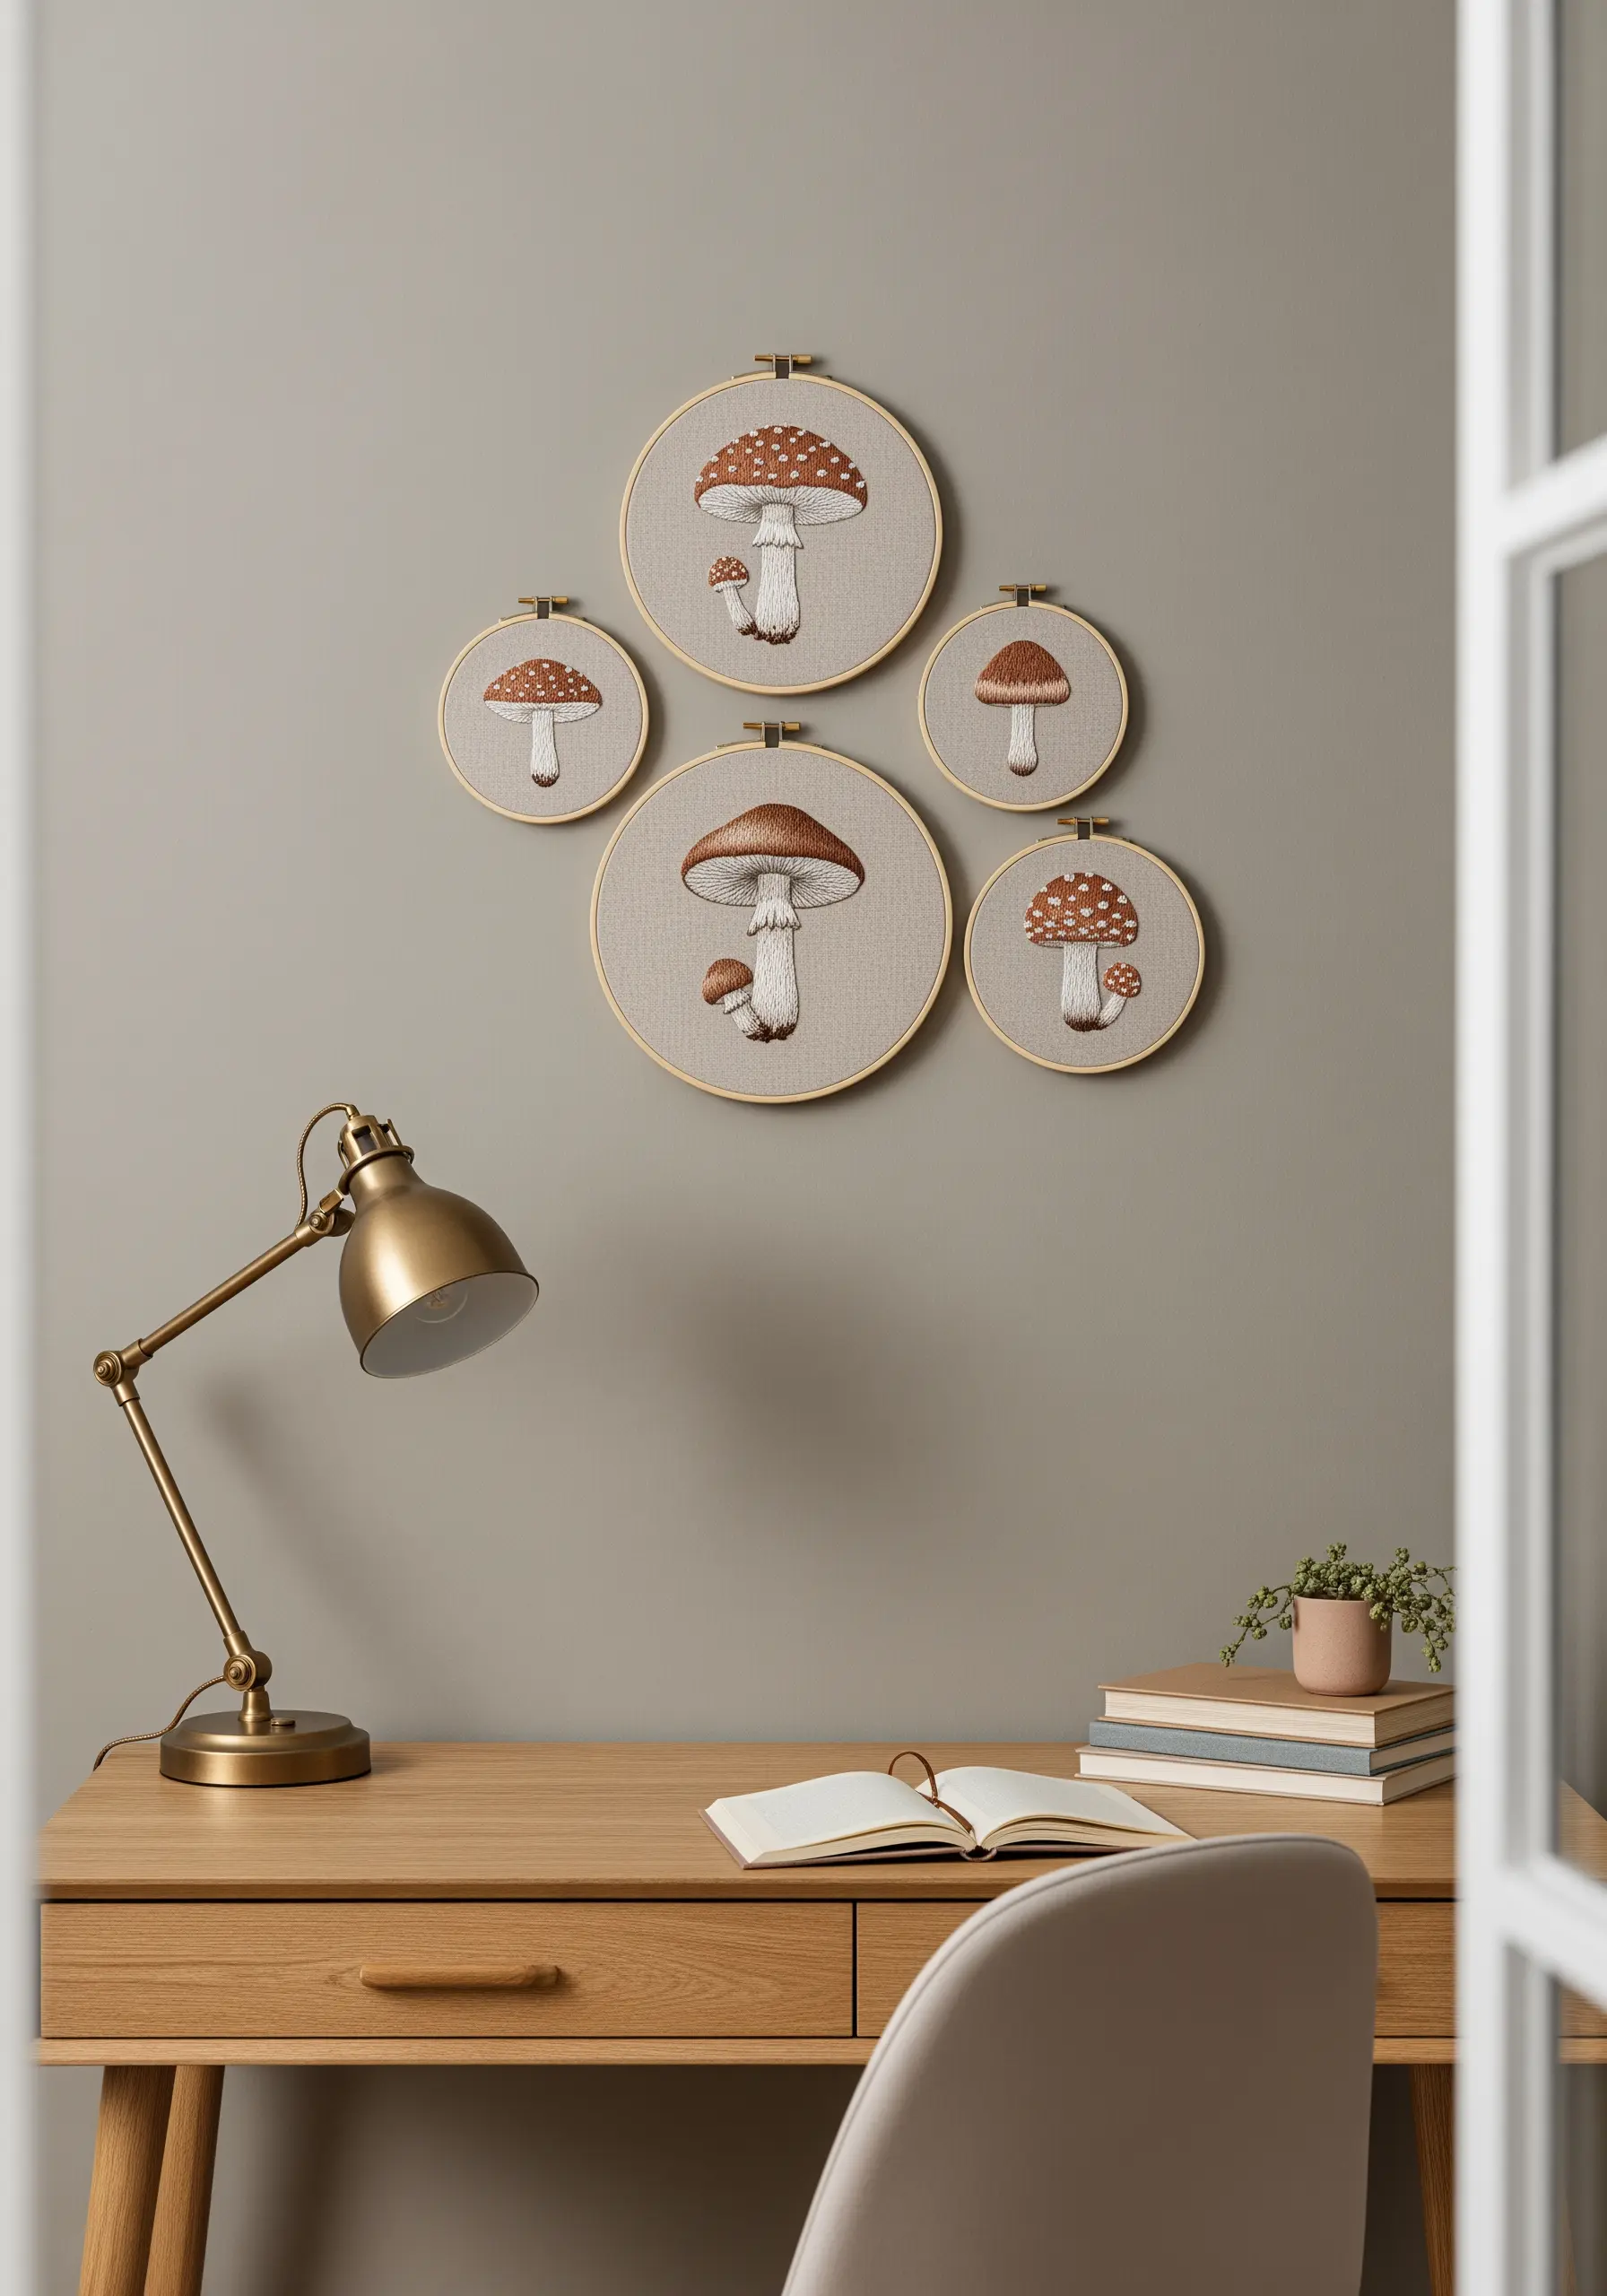
Turn simple motifs into a sophisticated art installation by stitching a series of them in different-sized hoops.
Choose one subject, like mushrooms, and create several variations.
To ensure the collection feels cohesive, use the same background fabric and a consistent, limited color palette across all the pieces.
For details like the mushroom spots, use French knots of varying sizes to create a more organic, textured look than perfect circles would achieve.
Arranging inspiring hoop art projects together elevates them from simple crafts to a curated display.
7. Feathery Pampas Grass with Turkey Work
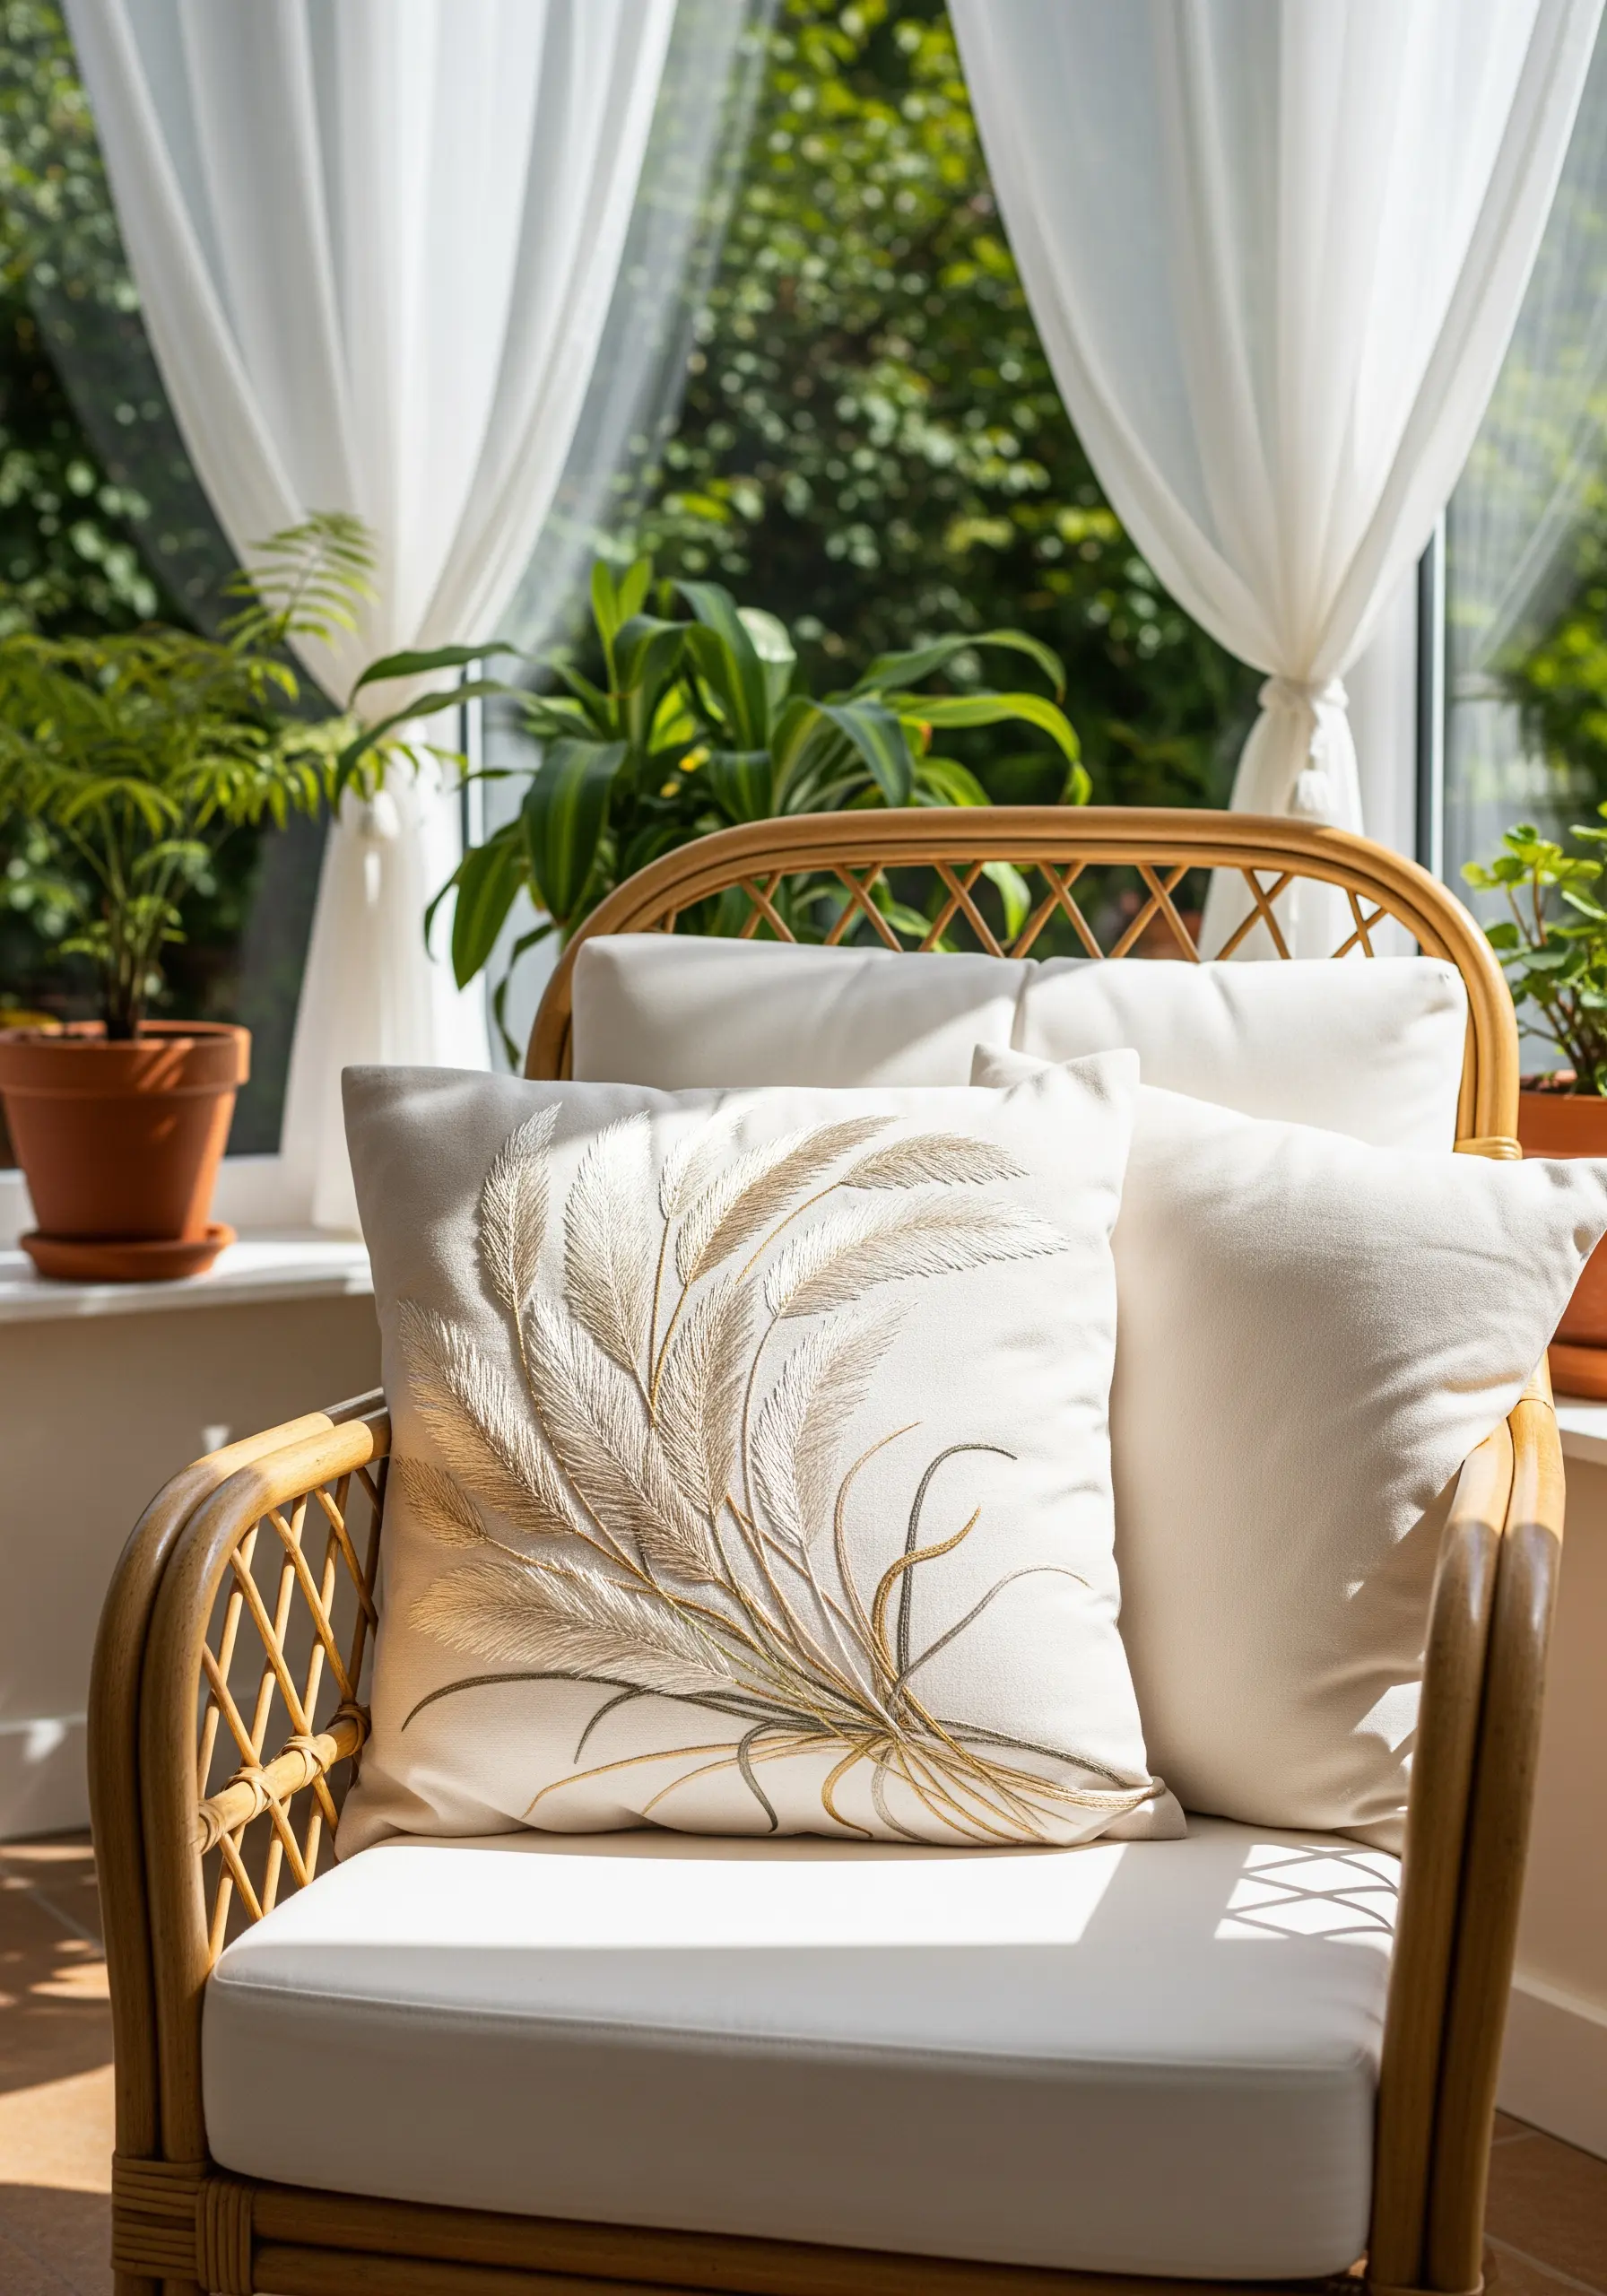
To achieve the soft, fluffy texture of pampas grass, you need a stitch that creates loops you can trim.
The turkey work stitch is perfect for this: you create a series of thread loops that are held in place with a small locking stitch.
Once an area is filled, carefully snip the tops of the loops with sharp scissors and fluff the threads with your needle to create a soft, brush-like pile.
For the slender stems and leaves, switch to a simple stem stitch using a single strand of silk or metallic thread to add a subtle sheen that catches the light.
8. Minimalist Borders for Sheer Fabrics
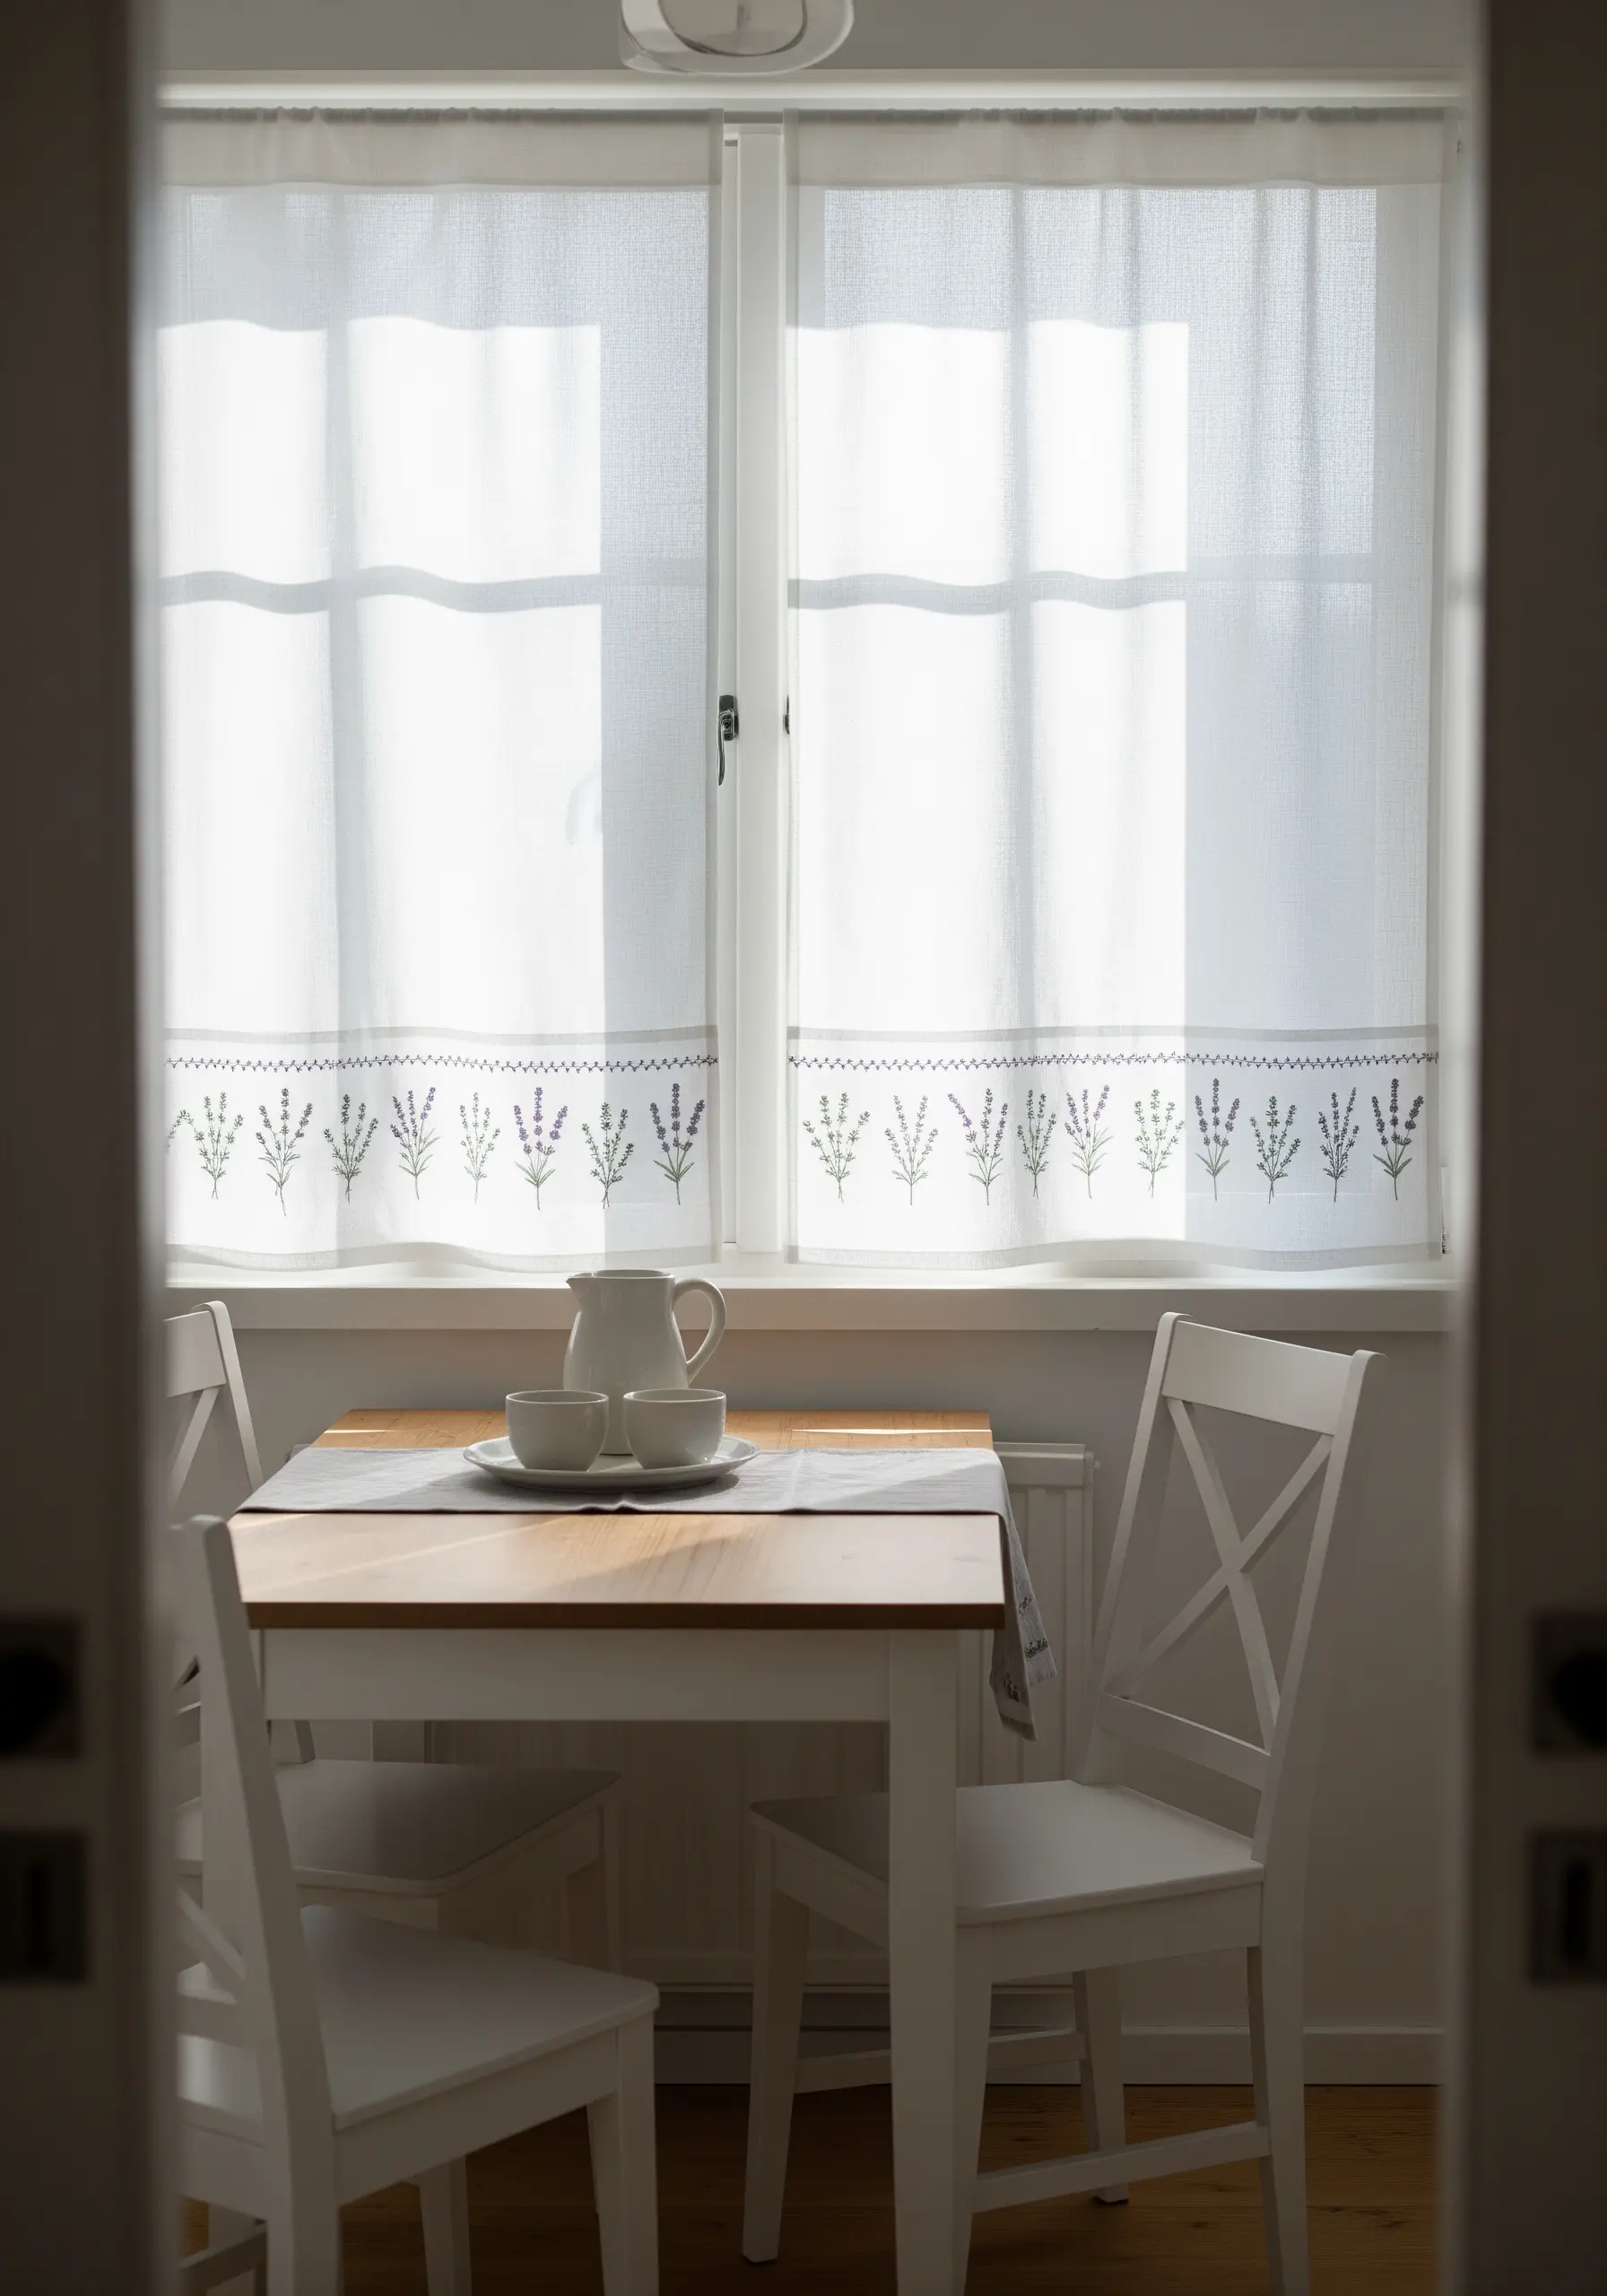
A simple, repeating border adds a touch of custom elegance to lightweight curtains without weighing them down.
Choose a minimalist design, like a single sprig of lavender, and use only a few simple stitches.
A detached chain stitch for the buds and a single backstitch for the stem are all you need.
Use just two or three strands of floss to keep the stitching from pulling or puckering the delicate fabric.
This restrained approach ensures the embroidery complements the fabric’s airy quality instead of competing with it.
9. Raised Stitches for Fossil Motifs
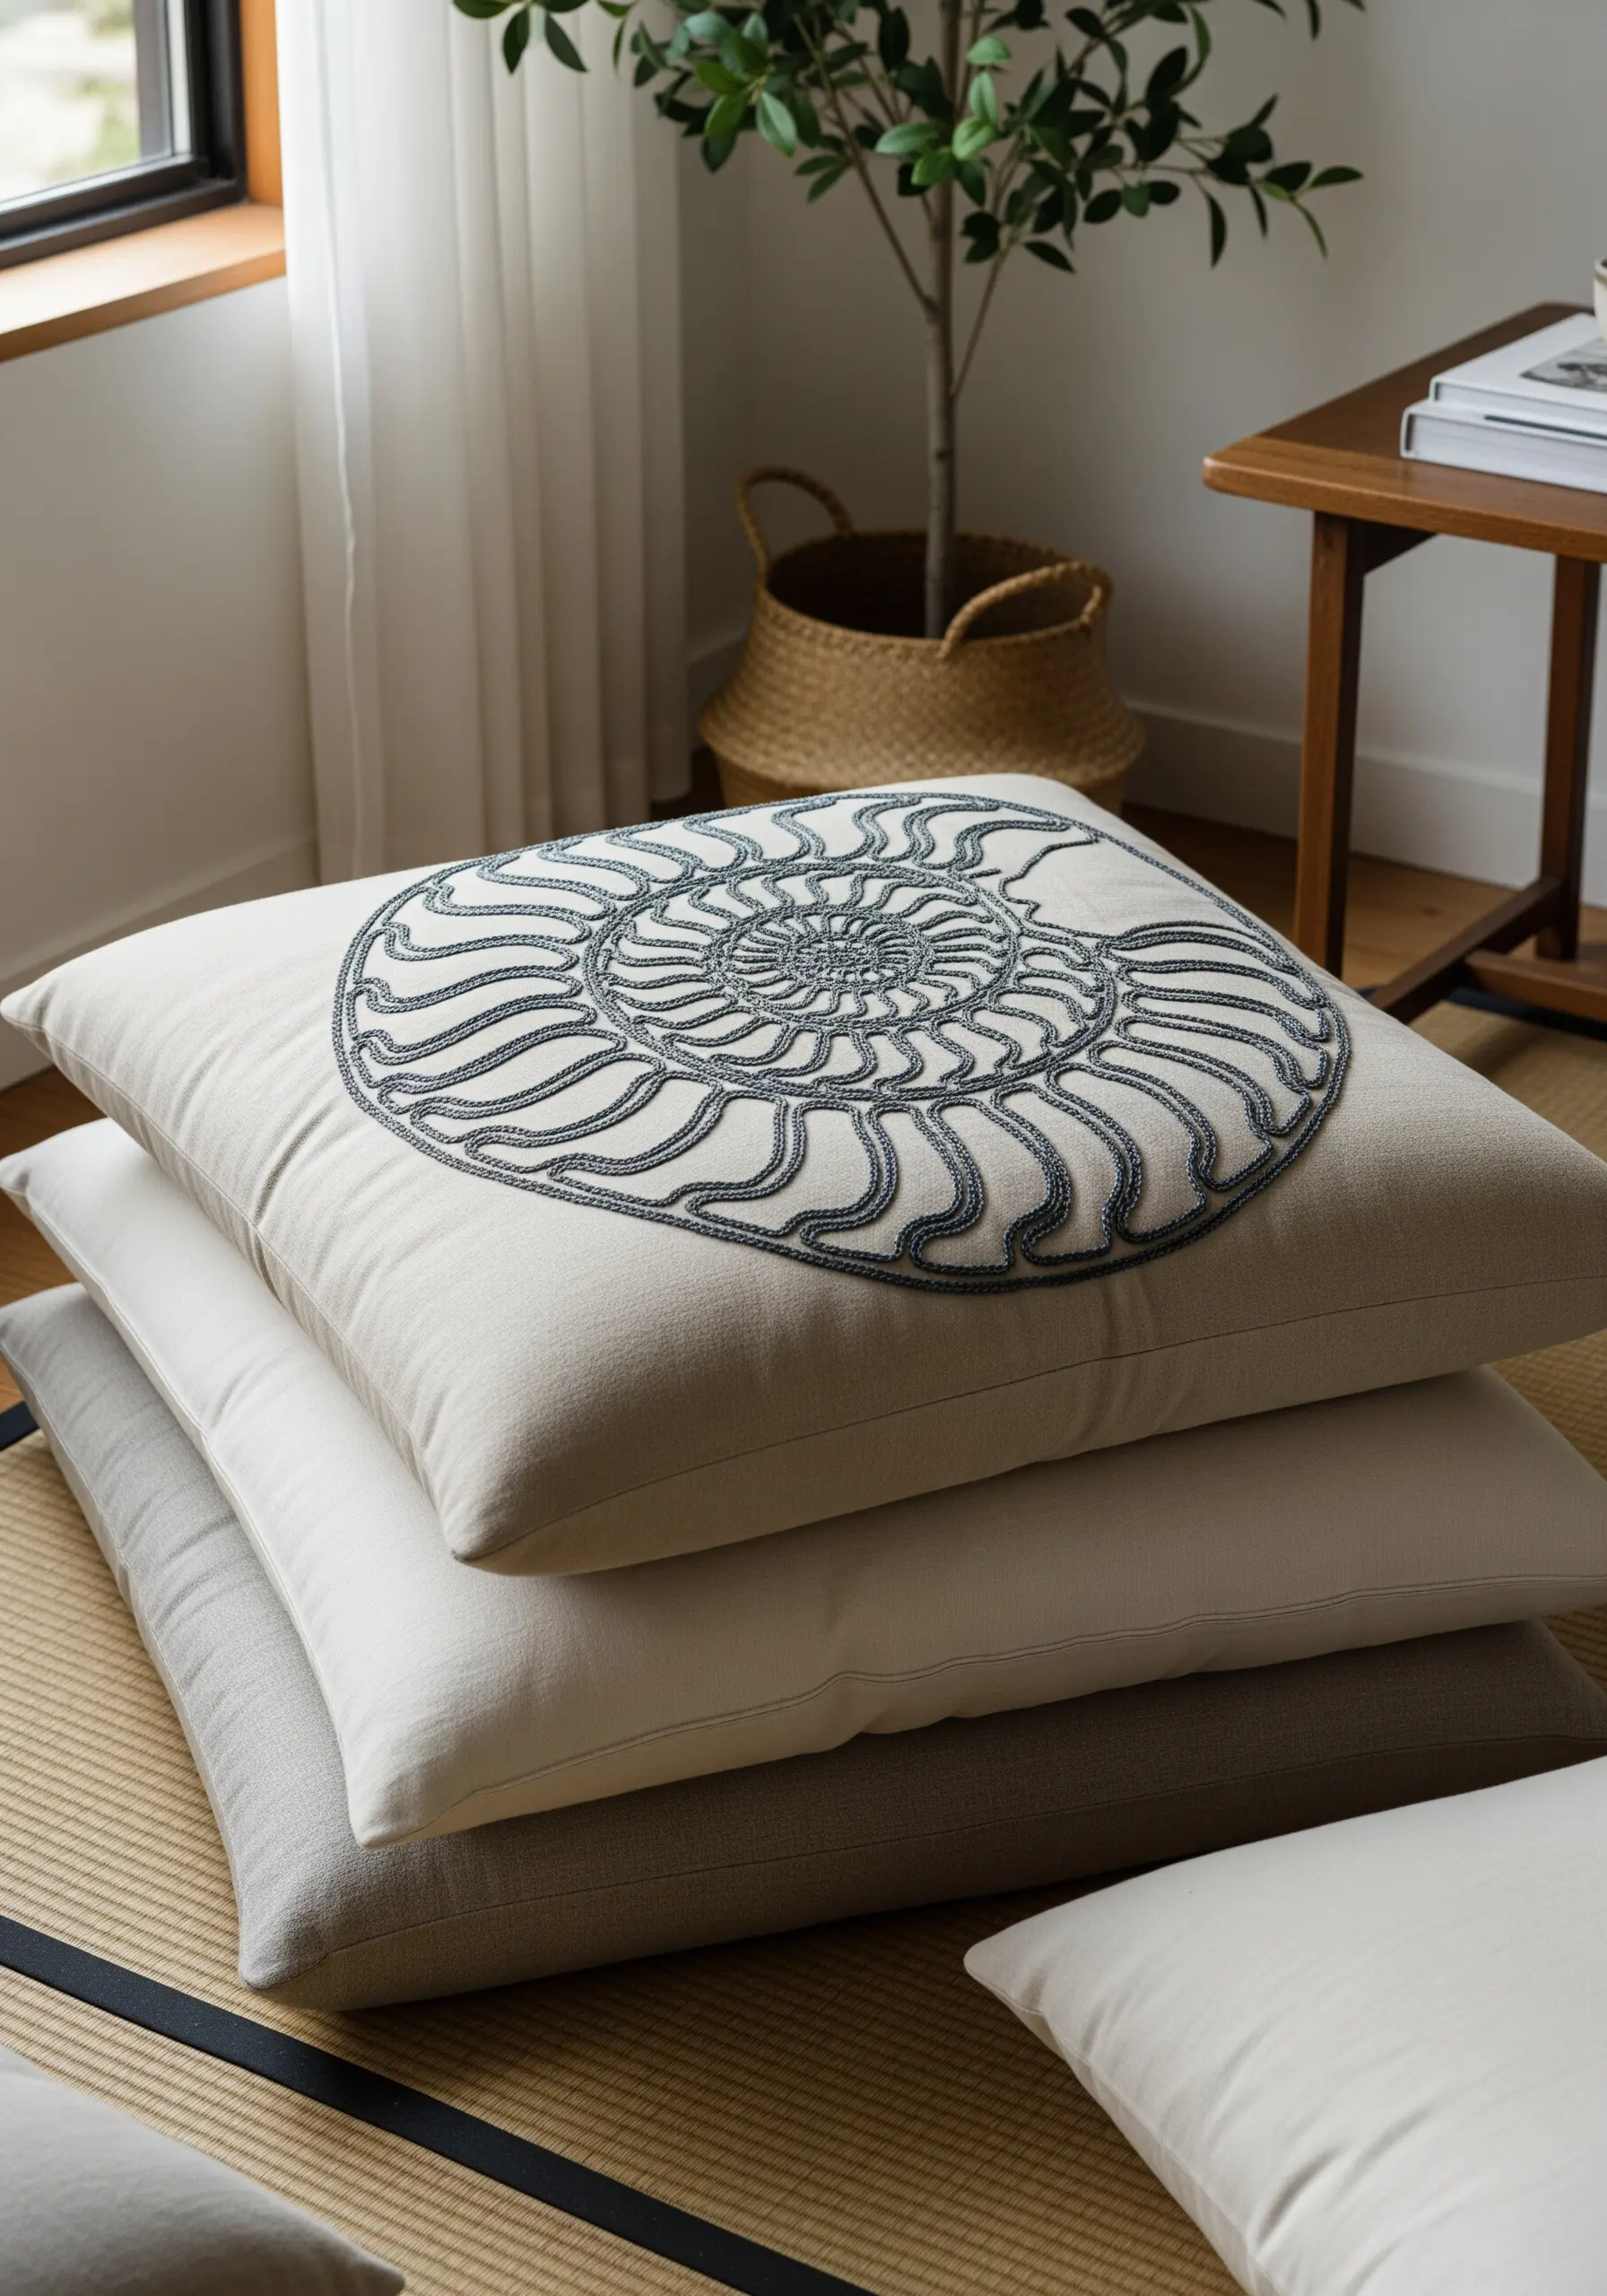
Give graphic, spiral motifs like fossils or shells a sculptural quality by using a raised, cord-like stitch.
A whipped backstitch is an excellent choice: first, create a standard backstitch outline, then weave a second thread through the stitches without piercing the fabric.
This technique creates a smooth, rounded line that stands out from the surface.
For an even bolder effect, try a heavy chain stitch using all six strands of floss. The raised texture invites touch and adds sophisticated detail to a simple floor cushion.
10. Dimensional Pinecones on Chunky Knits
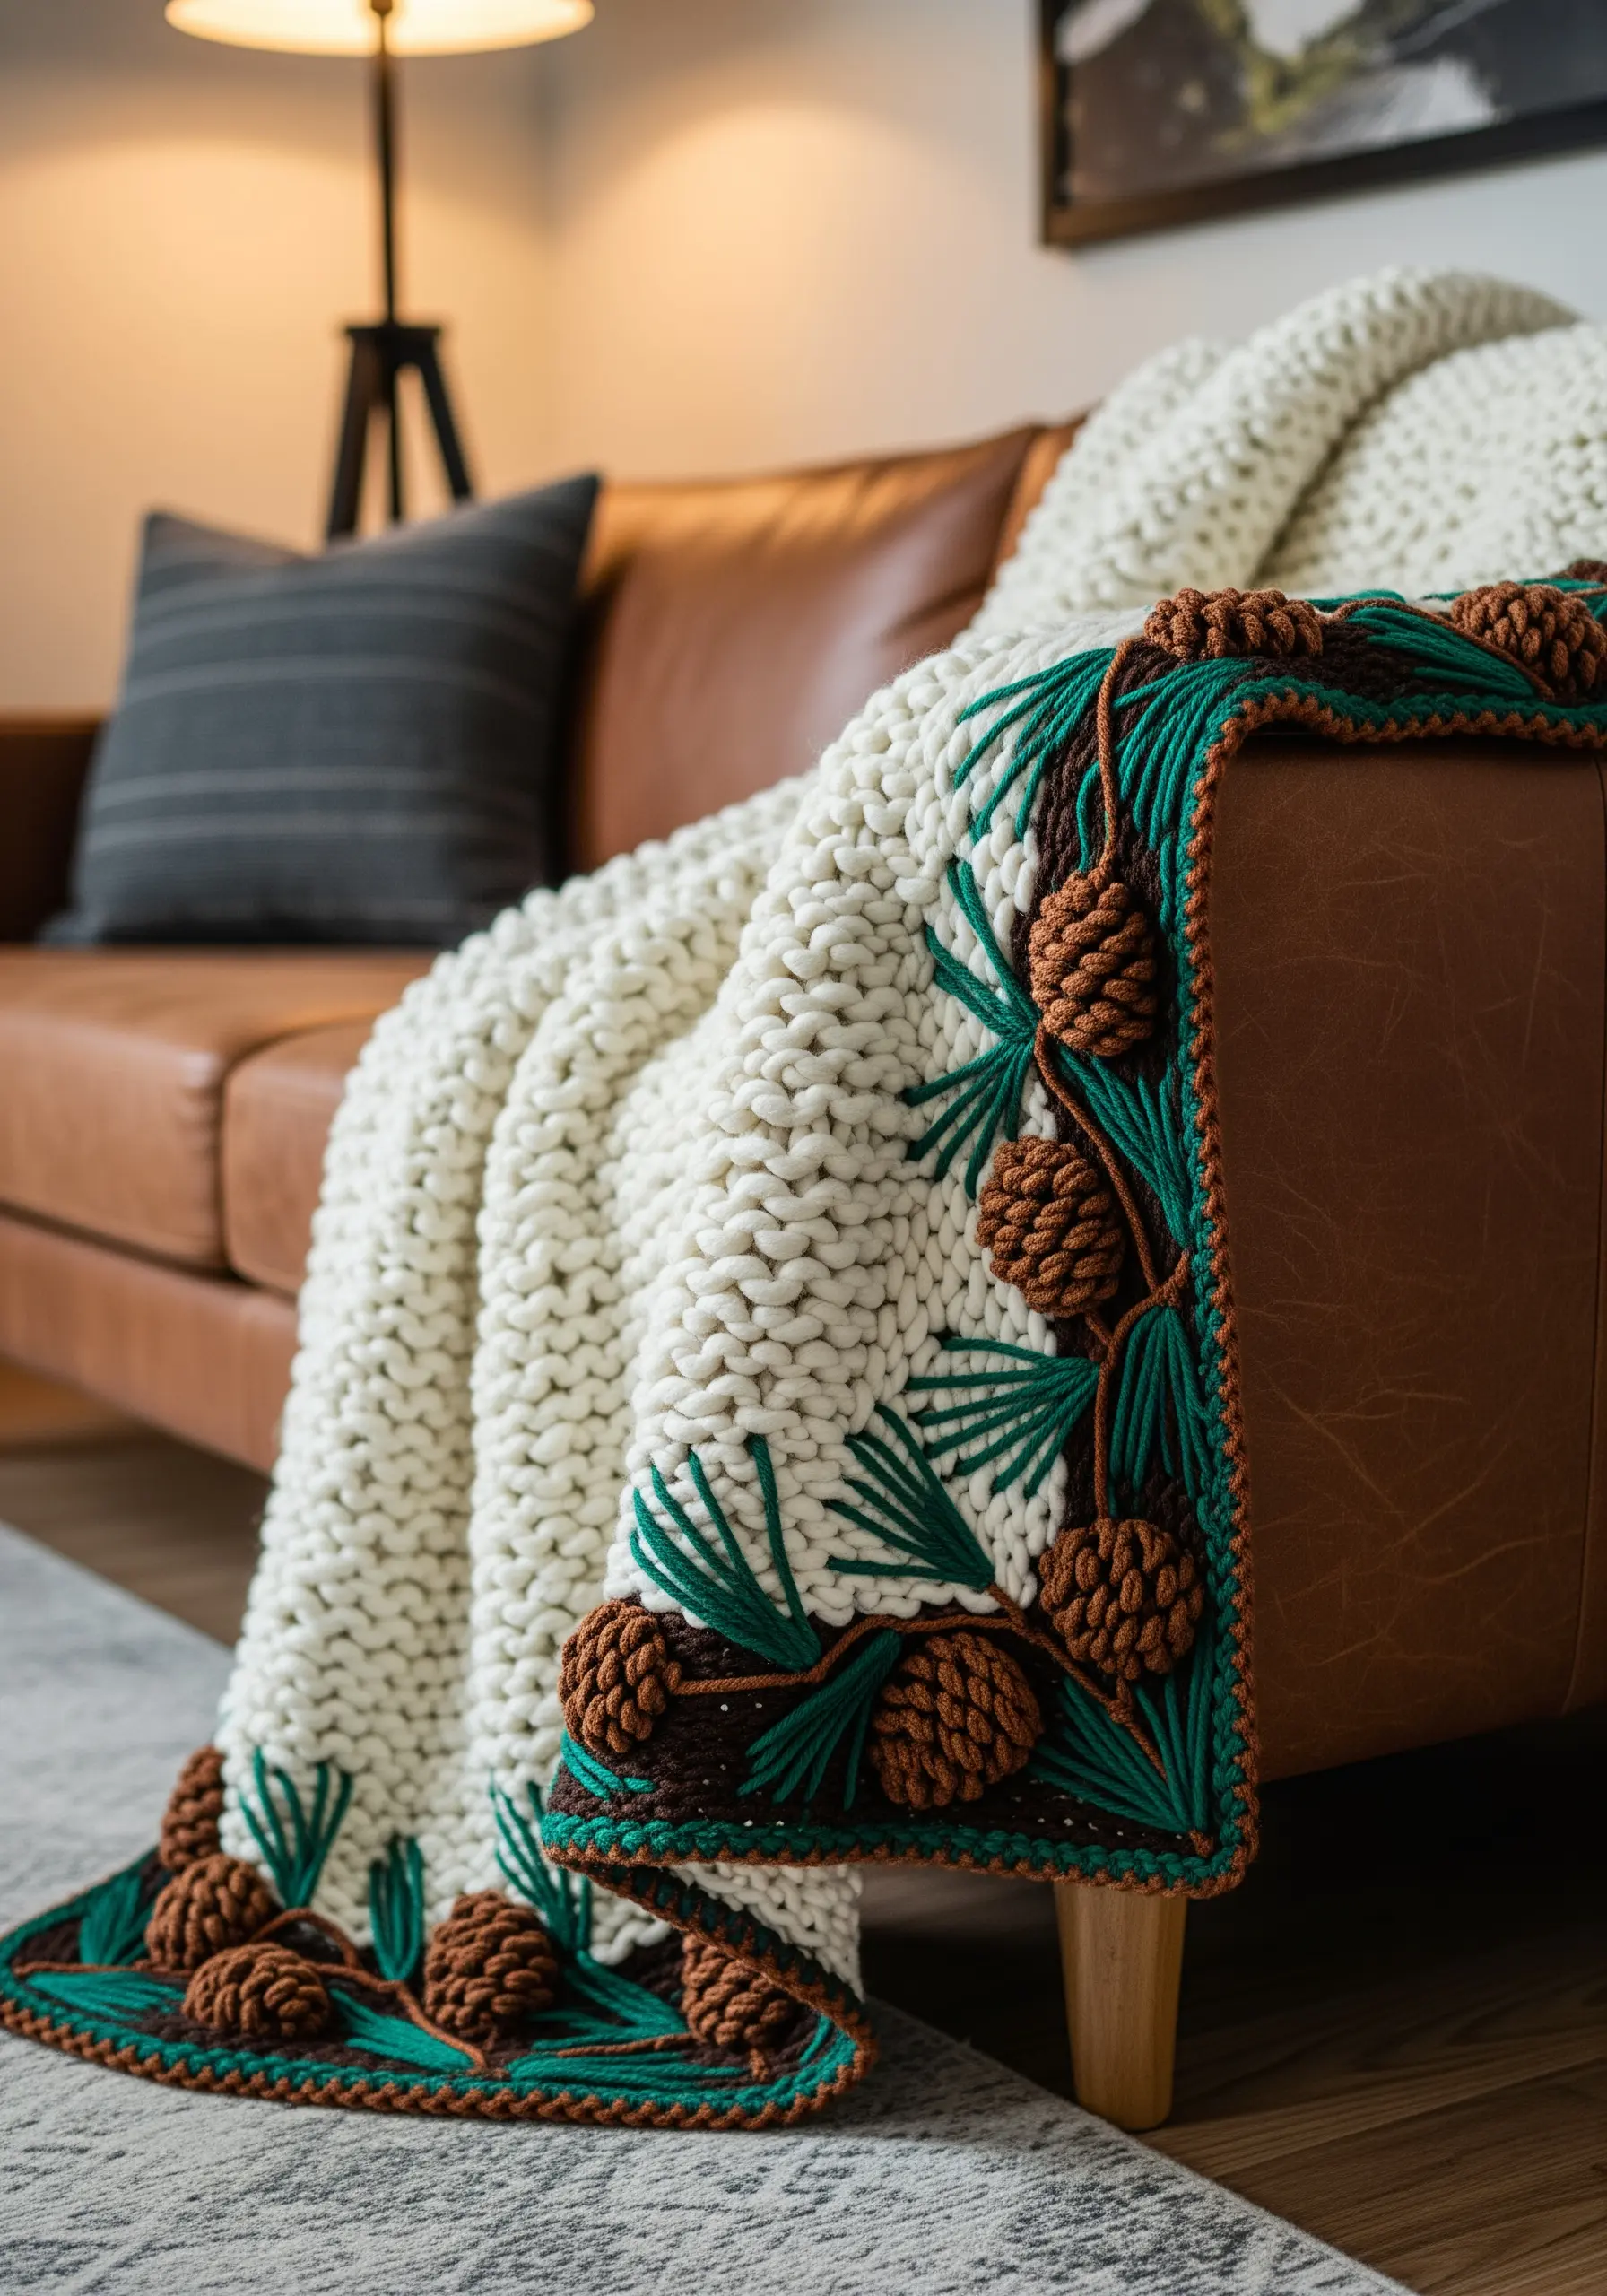
When embellishing a heavy textile like a chunky knit blanket, your embroidery needs to have enough presence to stand out.
Create dimensional pinecones using the woven wheel stitch (or spider web stitch), which builds a raised, circular shape that mimics the texture of a real cone.
For the pine needles, use long, straight stitches with a thick yarn in a contrasting color.
This combination of textures—the dense, woven cone and the sharp, graphic needles—creates a bold border that complements the cozy weight of the blanket.
11. Geometric Precision with Metallic Thread
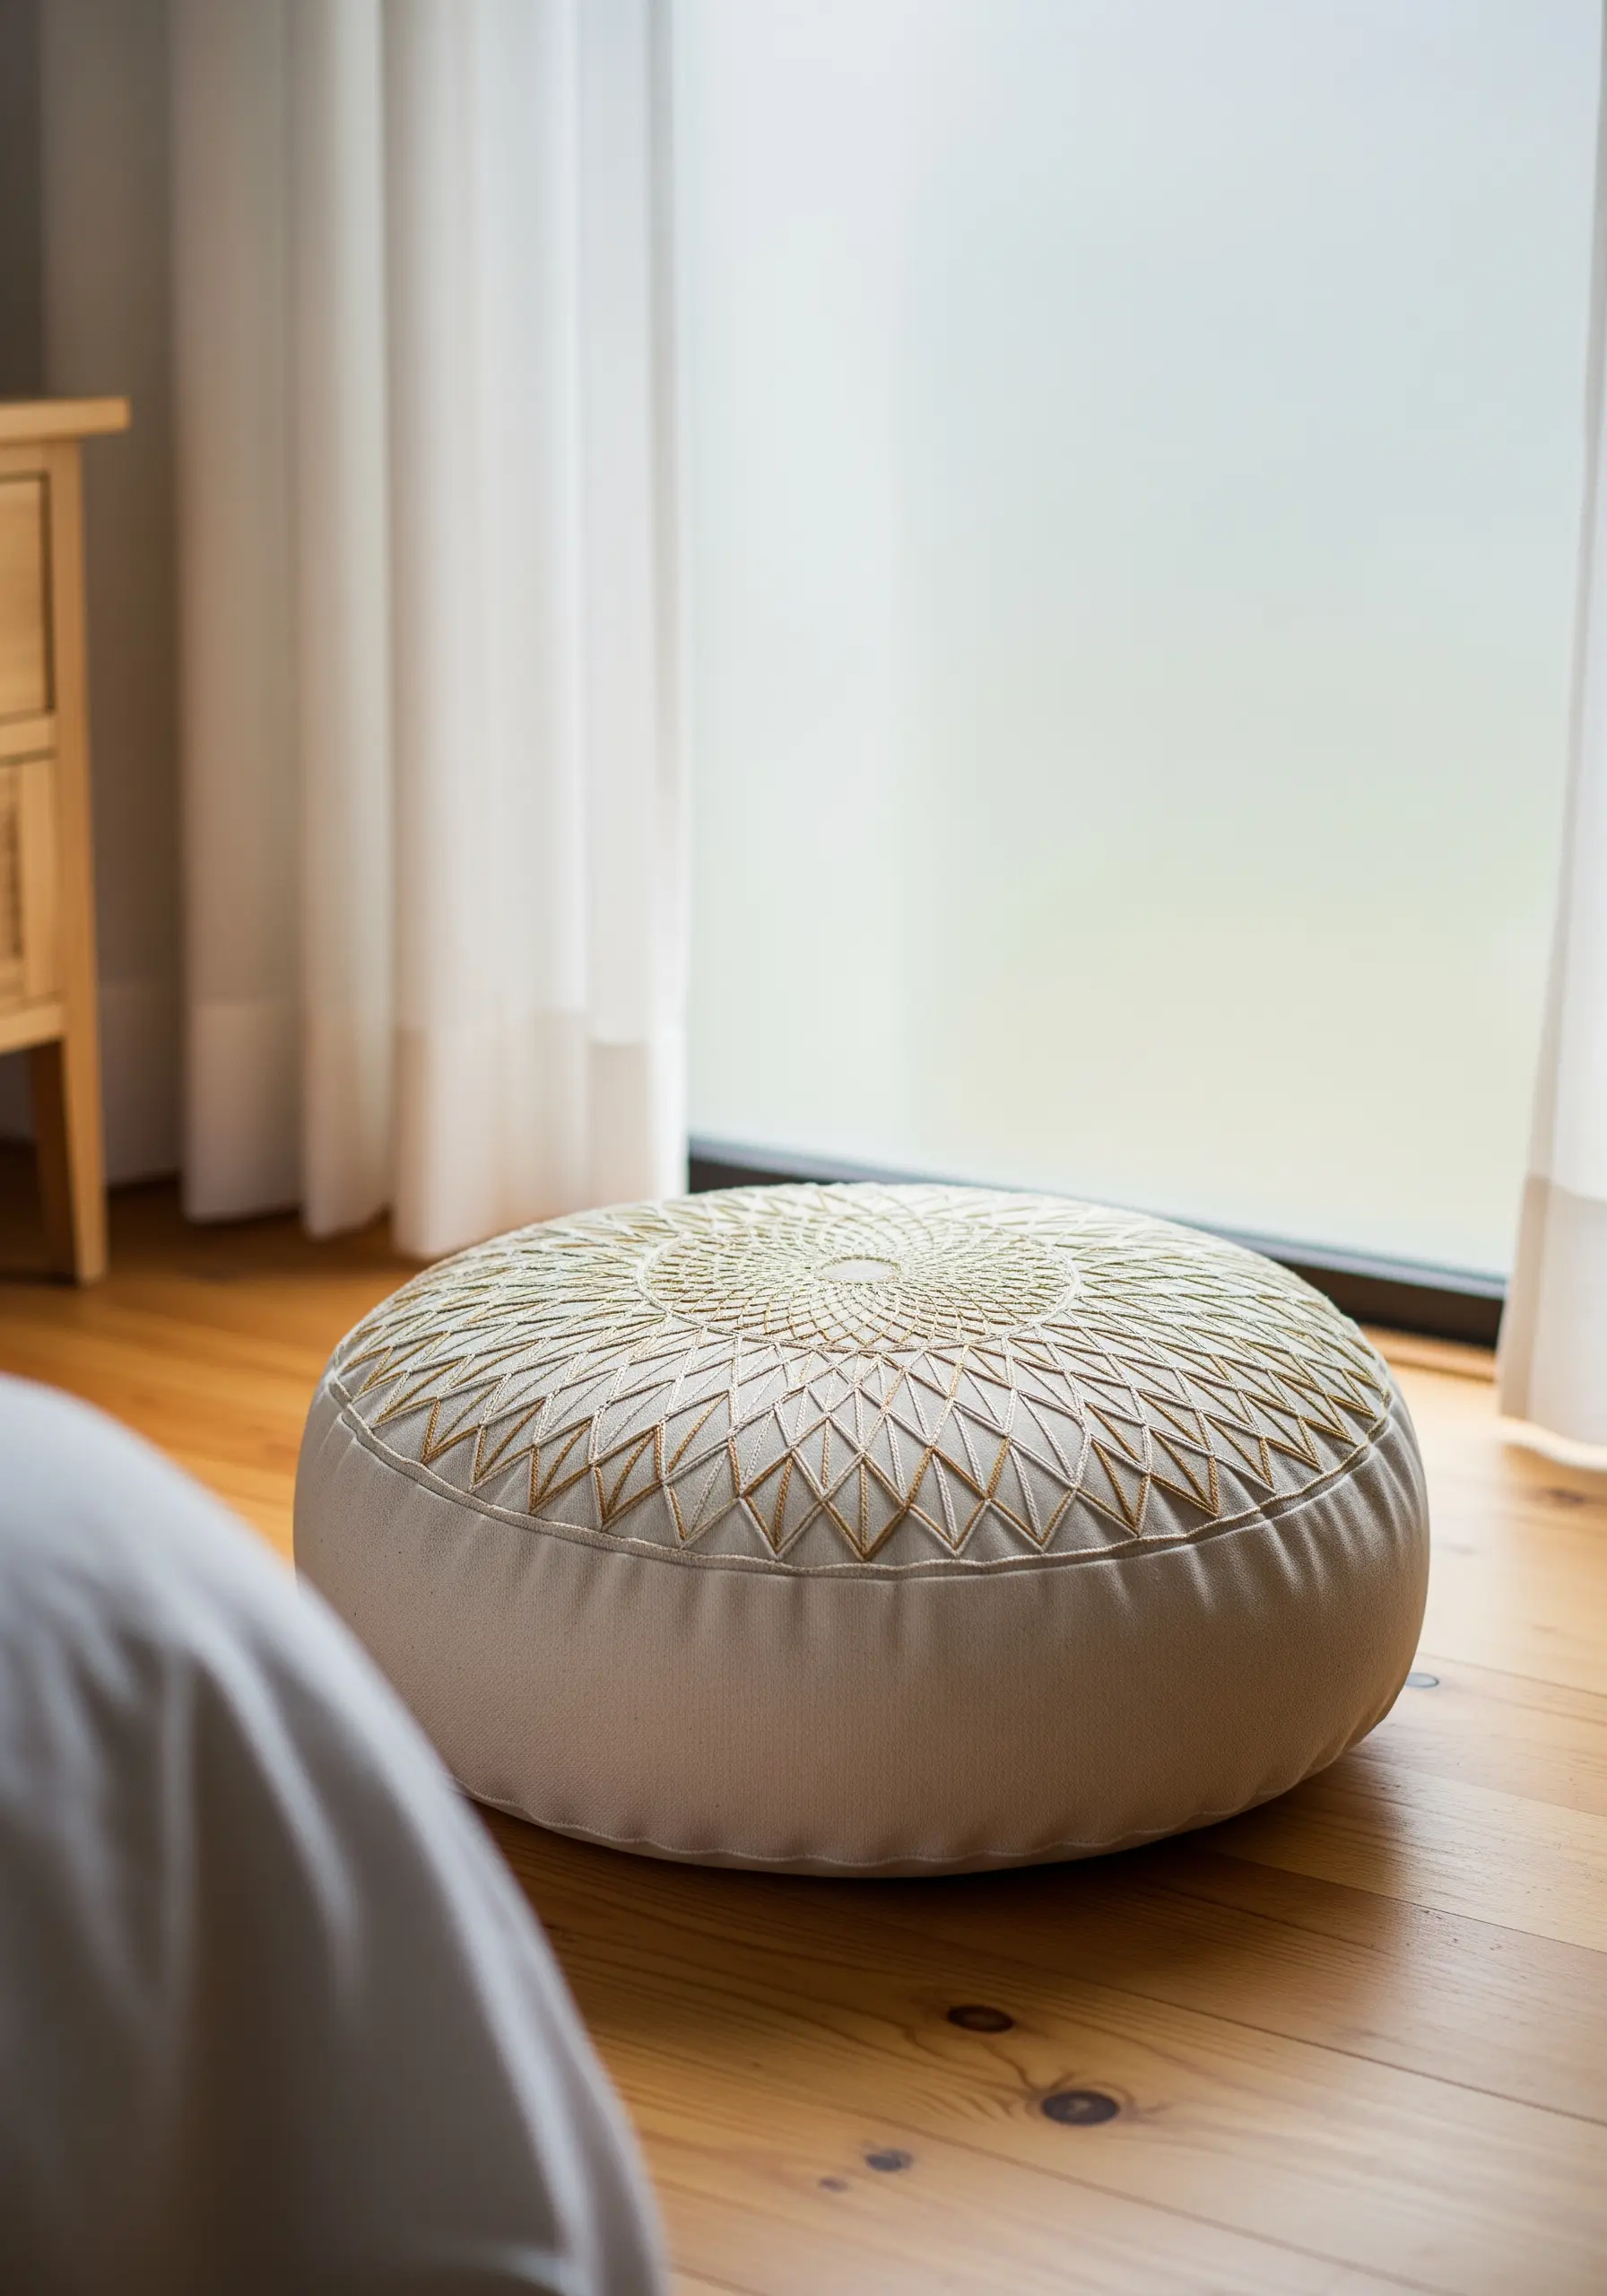
To achieve a crisp, modern geometric pattern, precision is everything.
Use a water-soluble marker and a ruler to carefully transfer your design onto the fabric before you begin.
Choose a stitch that creates a clean, solid line, like a backstitch or a stem stitch.
Using a high-sheen or metallic thread against a matte fabric will make the lines pop and add a touch of quiet luxury.
Stitch slowly and focus on maintaining consistent stitch length for a polished, professional finish on your geometric embroidered wall decor.
12. Organic Lines of Tree Ring Art
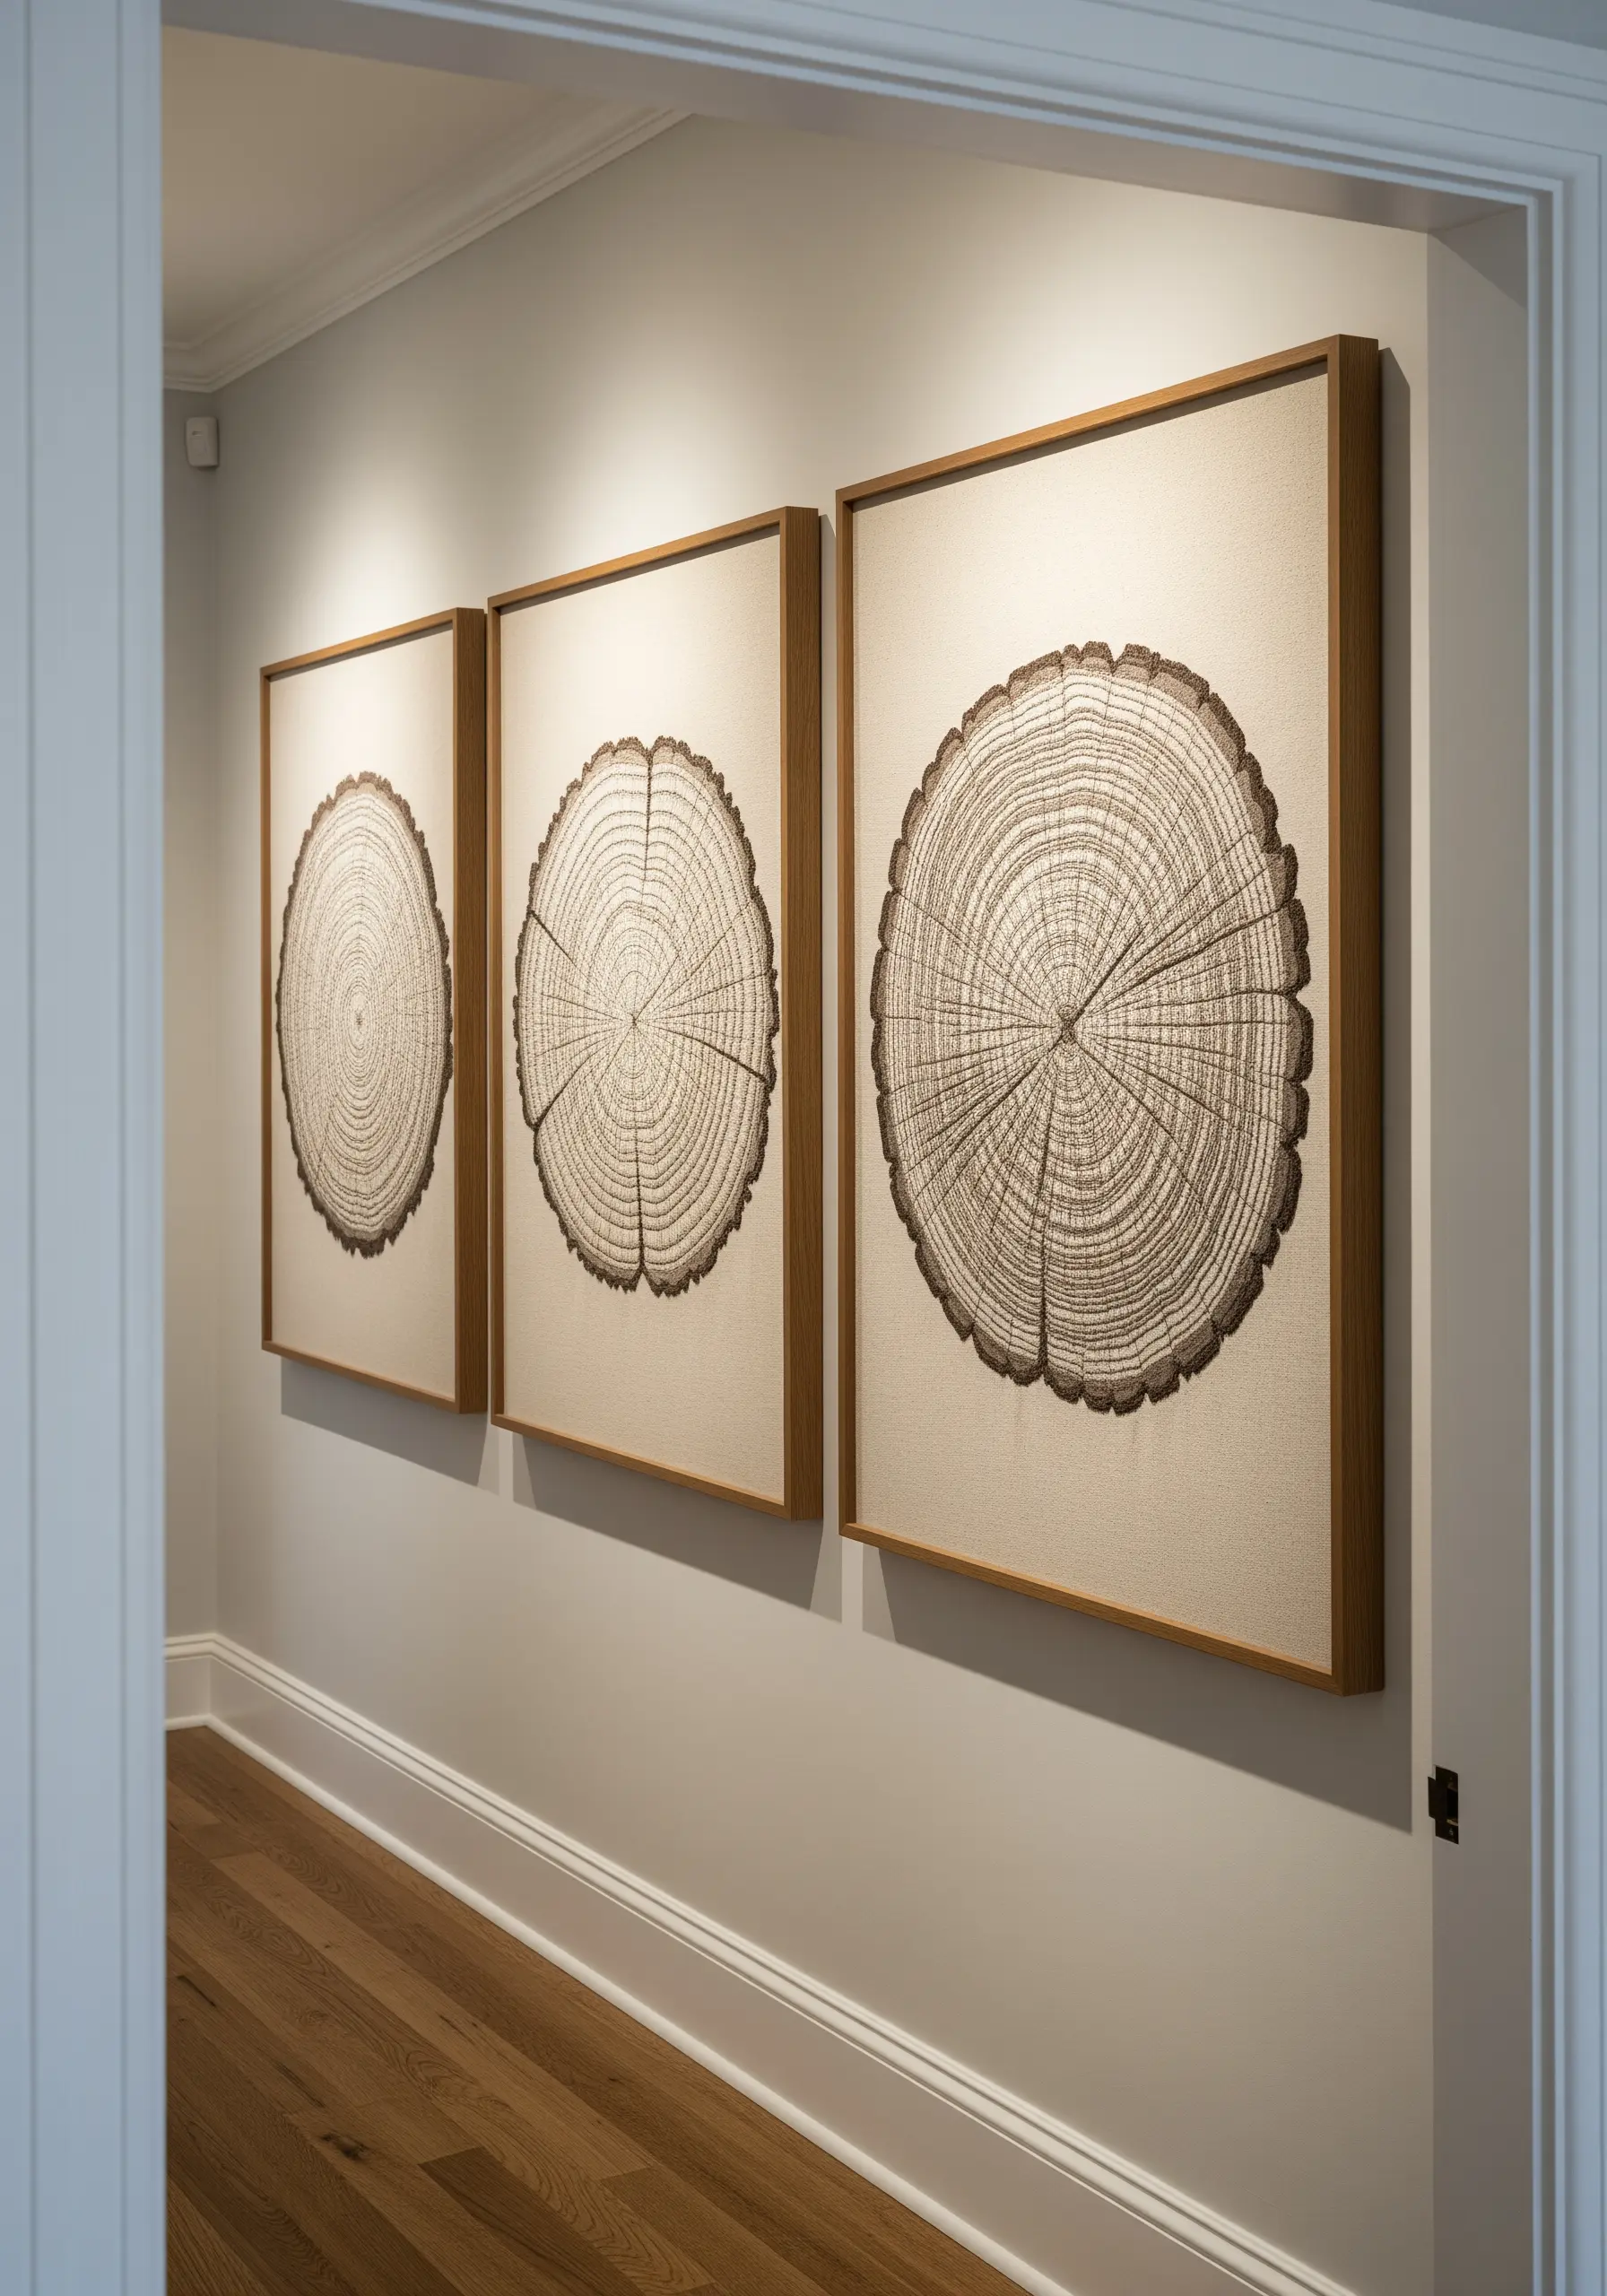
The beauty of a tree ring pattern lies in its natural imperfections.
To capture this, avoid perfectly symmetrical circles. Use a single, continuous line of split stitch or stem stitch, and allow your path to waver slightly.
Create depth by subtly shifting your thread color, moving from a dark, rich brown at the center to a lighter tan for the outer rings.
This slow, meditative process results in a sophisticated piece of art that celebrates the organic patterns found in nature.
13. Transparent Ripples with Single-Strand Stitches
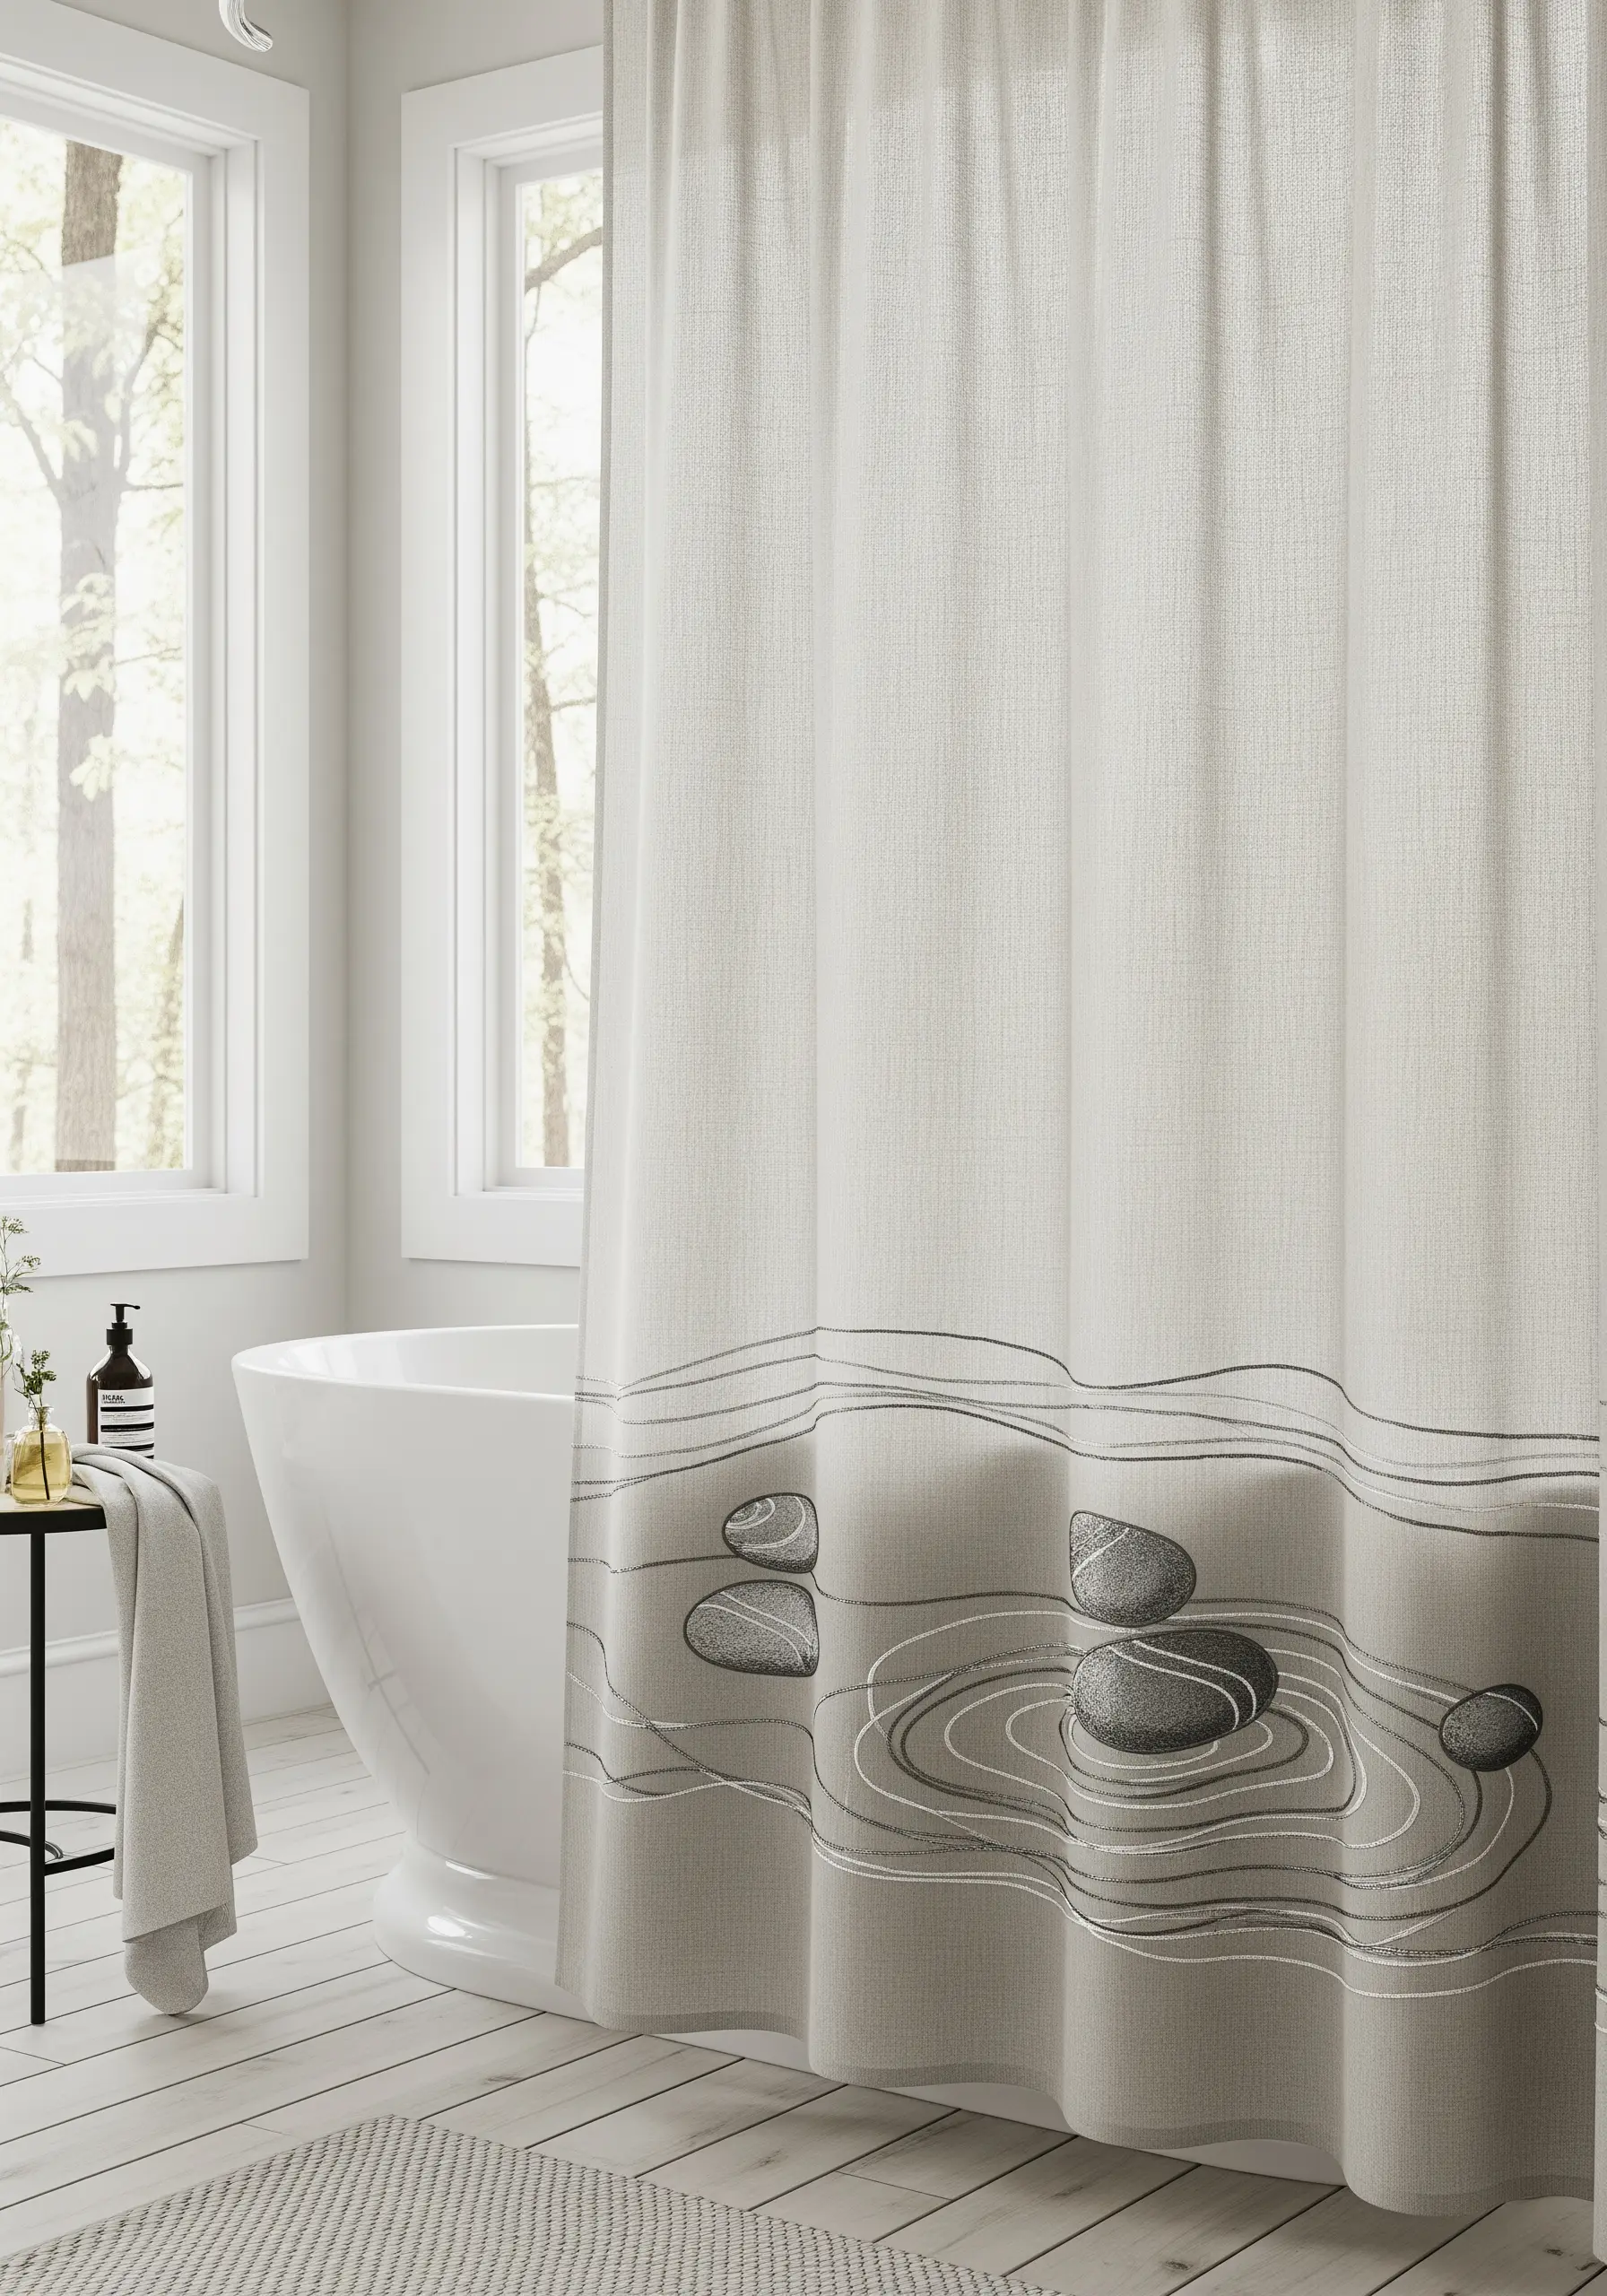
Create the delicate effect of ripples on water by using a single strand of white or silver floss.
Use a simple running stitch with varied lengths to create concentric, expanding lines around your central motif, such as stones.
The key is to keep the stitches light and airy, suggesting movement rather than defining a solid shape.
For the stones, switch to a dense satin stitch with six strands of floss in muted greys. This contrast between the heavy, solid stones and the light, transparent ripples makes the design compelling.
14. Floating Dandelion Seeds
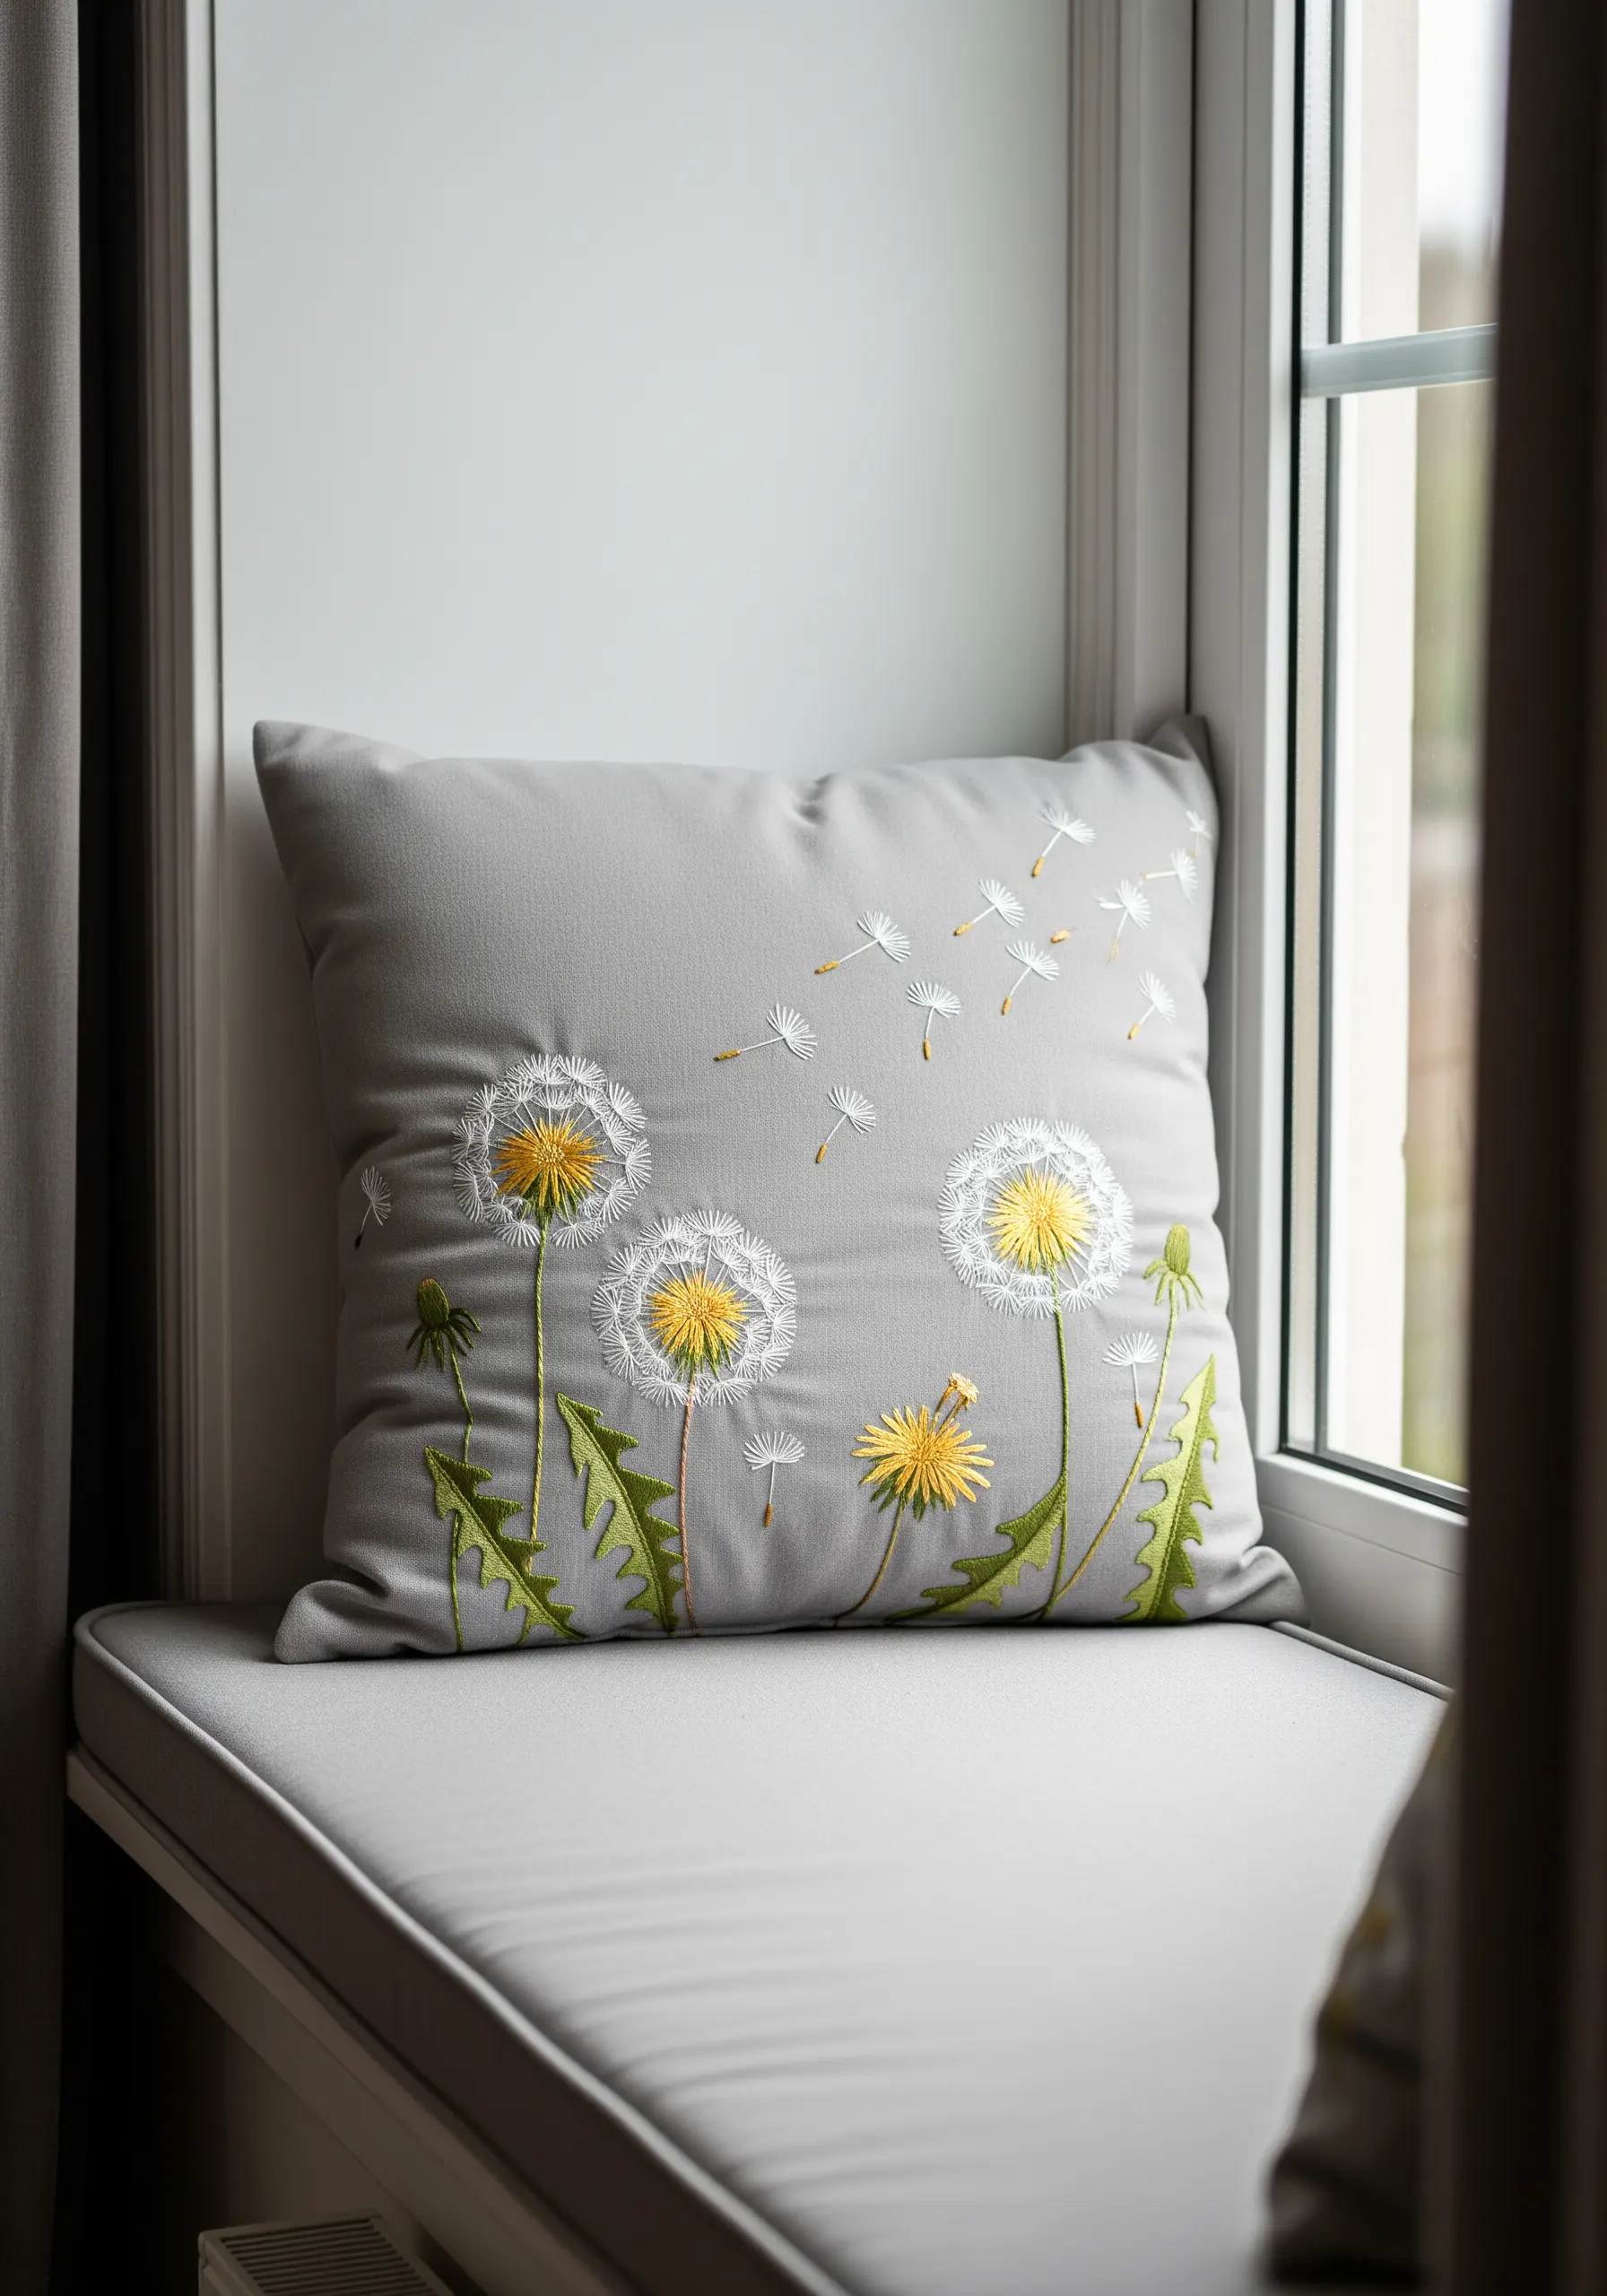
Capturing the ephemeral quality of dandelion seeds requires a light touch.
For the fluffy seed heads, build up texture by combining straight stitches of varying lengths with a scattering of French knots at the center.
To create the individual seeds floating away, use a single detached chain stitch for the seed pod, then add a long, straight stitch for its delicate tail.
Stitching with only one or two strands of white or cream floss will enhance the feeling of weightlessness and movement.
15. Translucent Wings with Open Fill Stitches
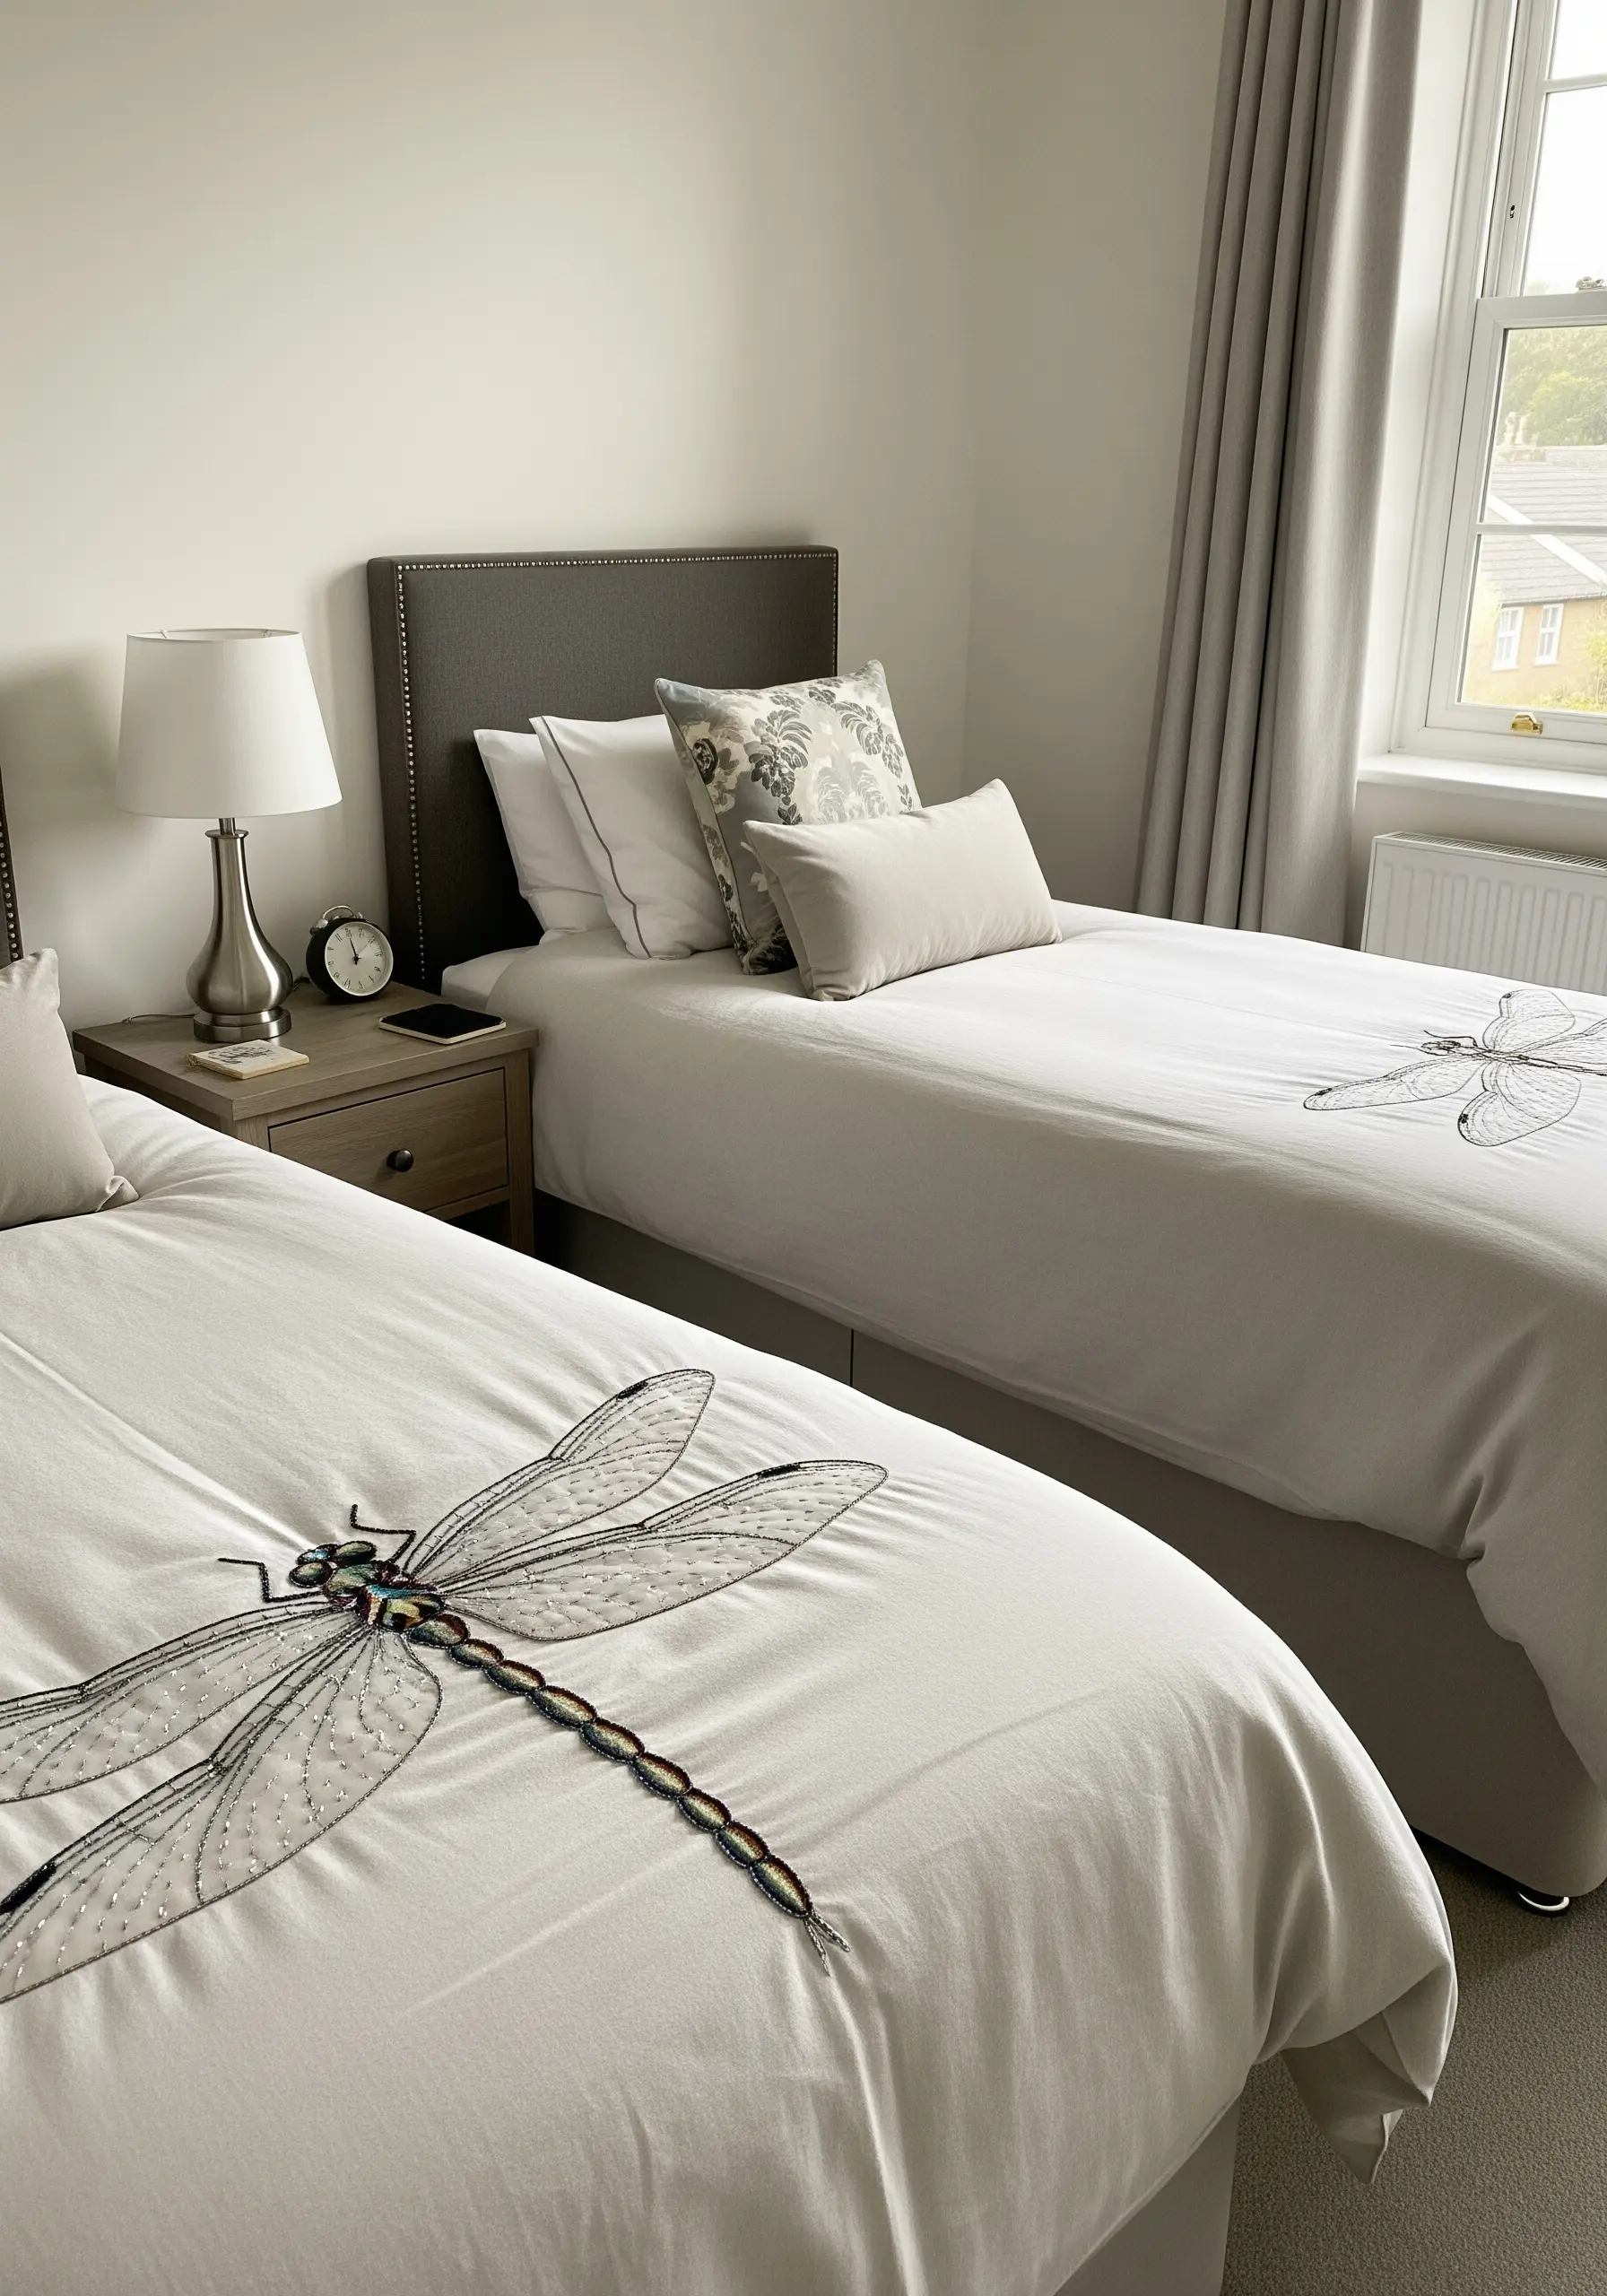
To mimic the delicate transparency of a dragonfly’s wings, avoid dense, heavy stitches.
First, create the outline of the wing shape with a fine split stitch.
Then, instead of filling it completely, use an open fill technique like seed stitch or a sparse cross-hatch of single stitches.
Using a sheer, iridescent, or metallic thread for this fill will catch the light and enhance the illusion of translucency.
This creates a beautiful contrast with the solid, satin-stitched body of the dragonfly.
16. Hyper-Textural Moss and Lichen Wall Art
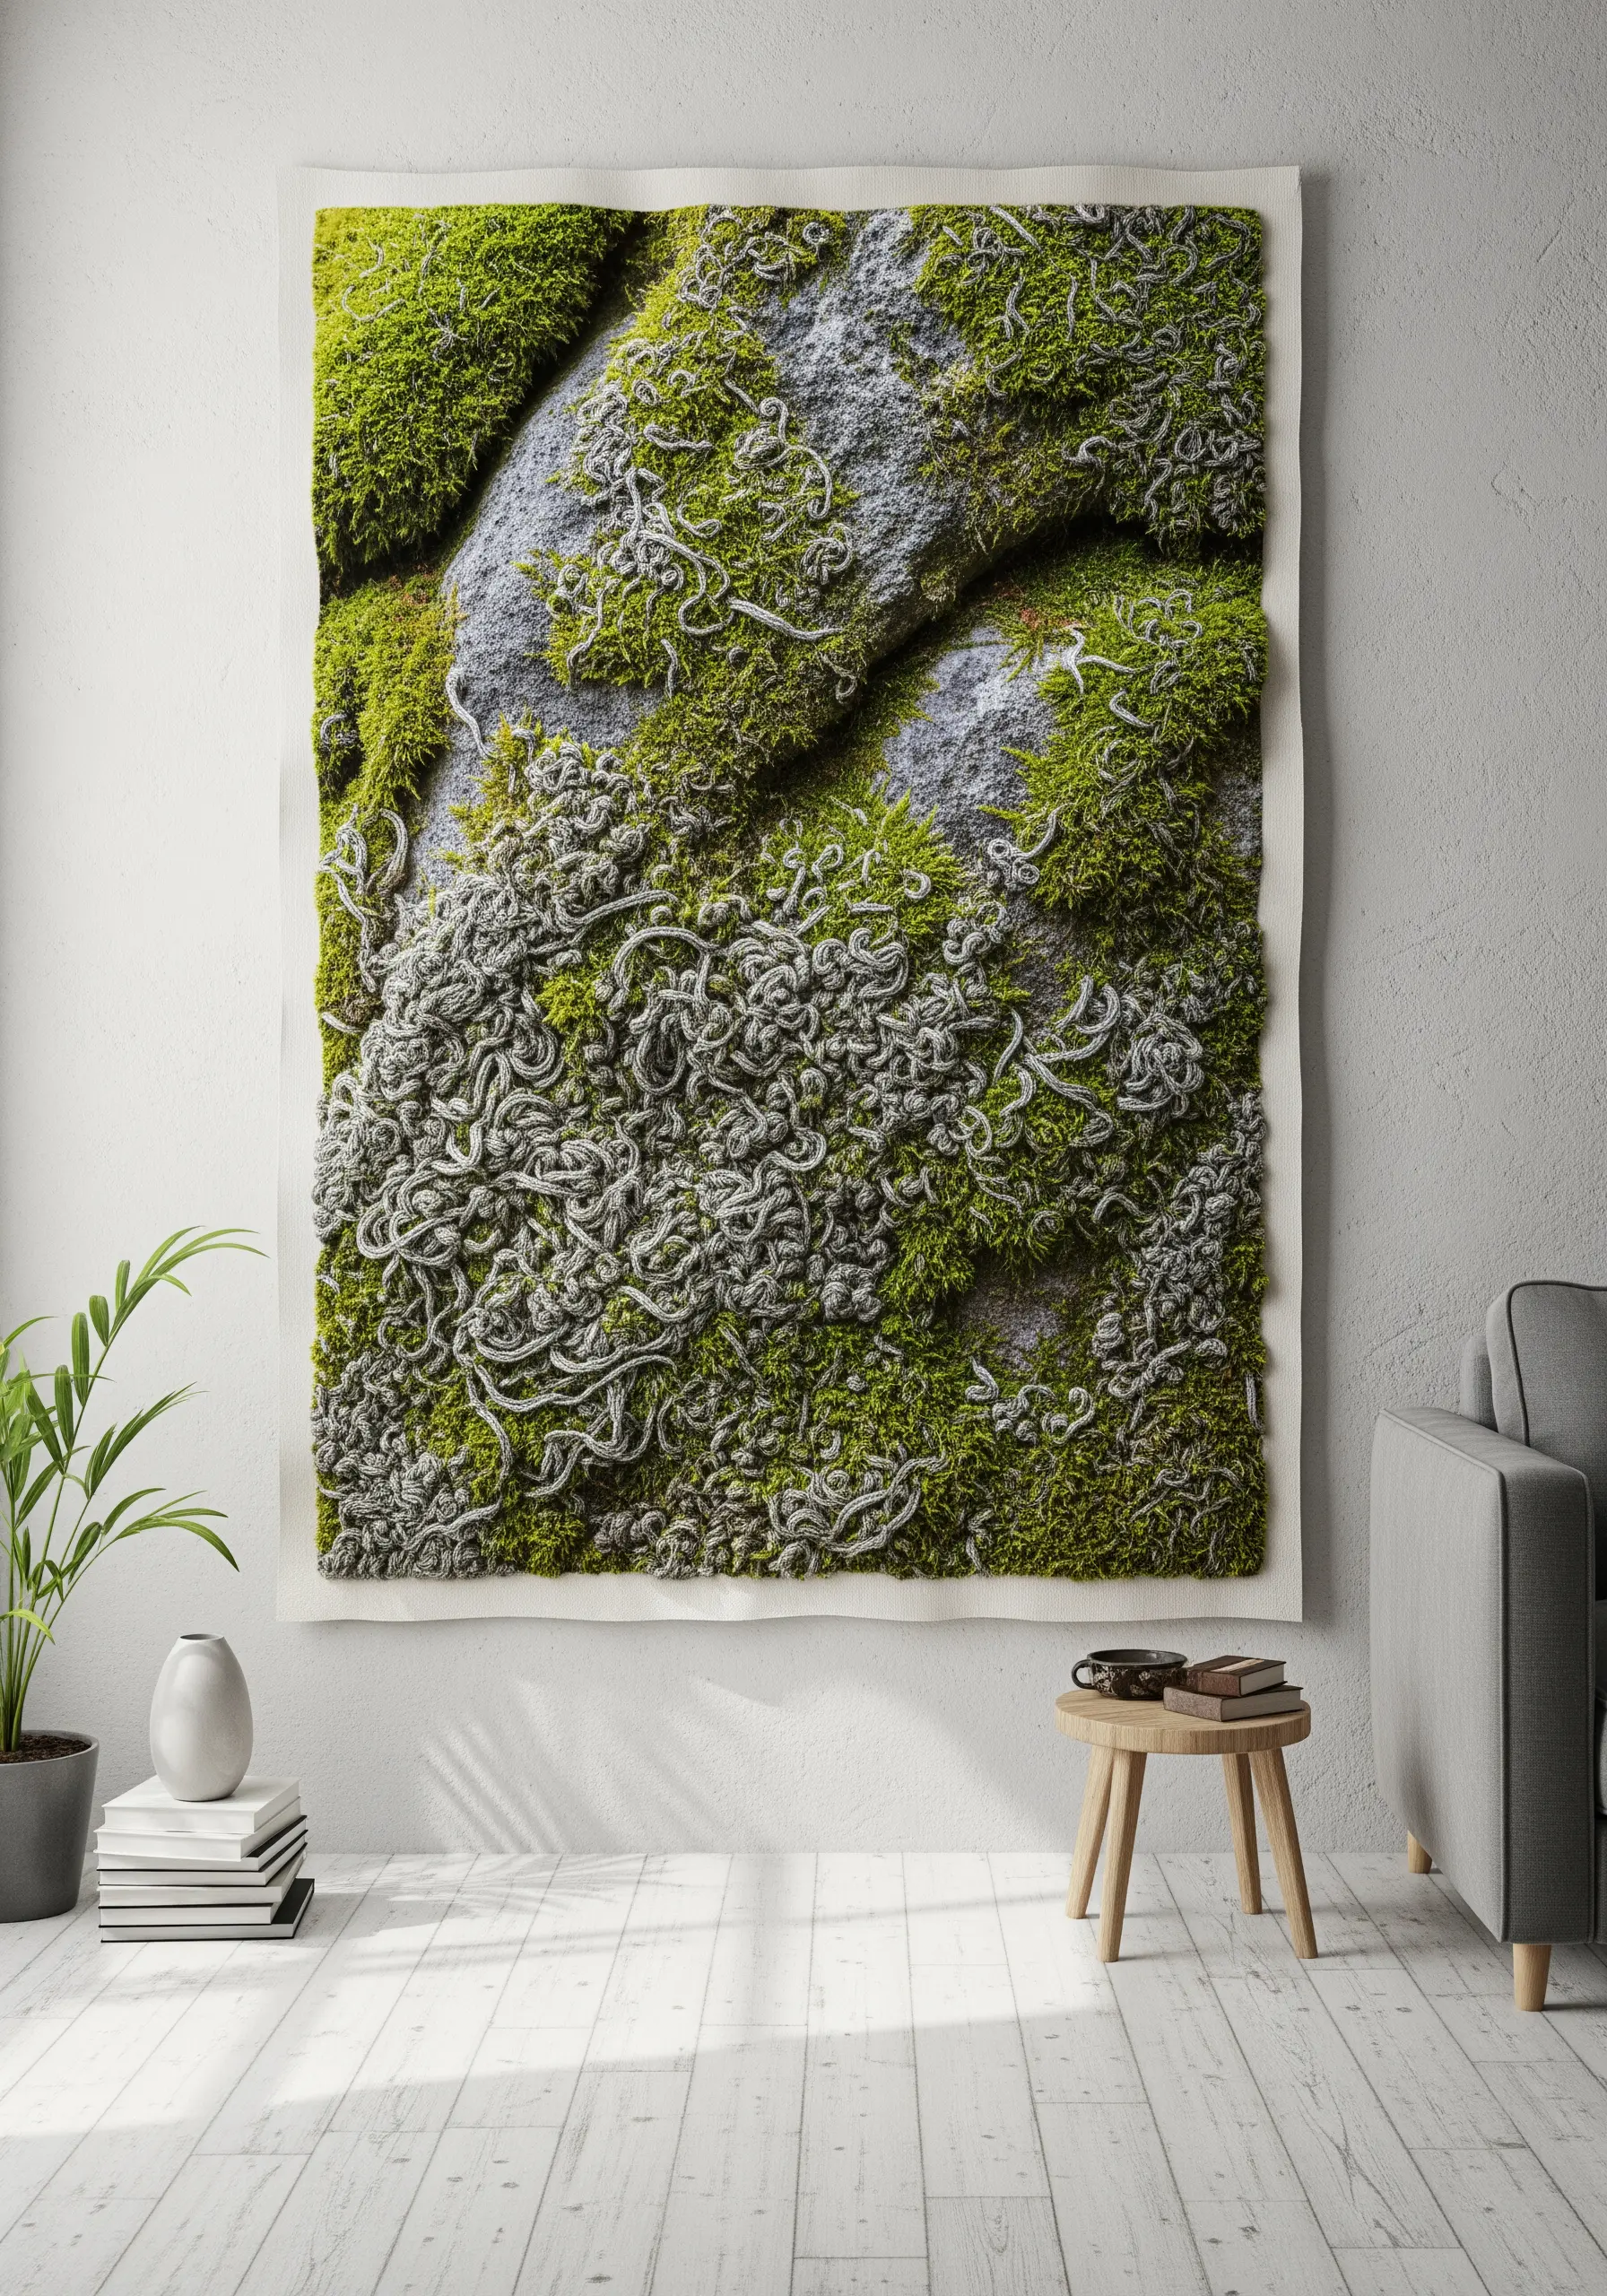
To build a truly three-dimensional textile surface that mimics moss on stone, you must layer your textures aggressively.
Combine a dense field of French knots in various greens for the mossy base. For a plusher feel, incorporate trimmed turkey work loops.
Create the stringy, delicate texture of lichen by using bullion knots or couching a crinkled, textured yarn on top of the mossy layer.
Working on a heavy canvas or felt background will provide the stability needed to support such dense, heavy stitching.
17. Fluid Curves with Couching Stitch
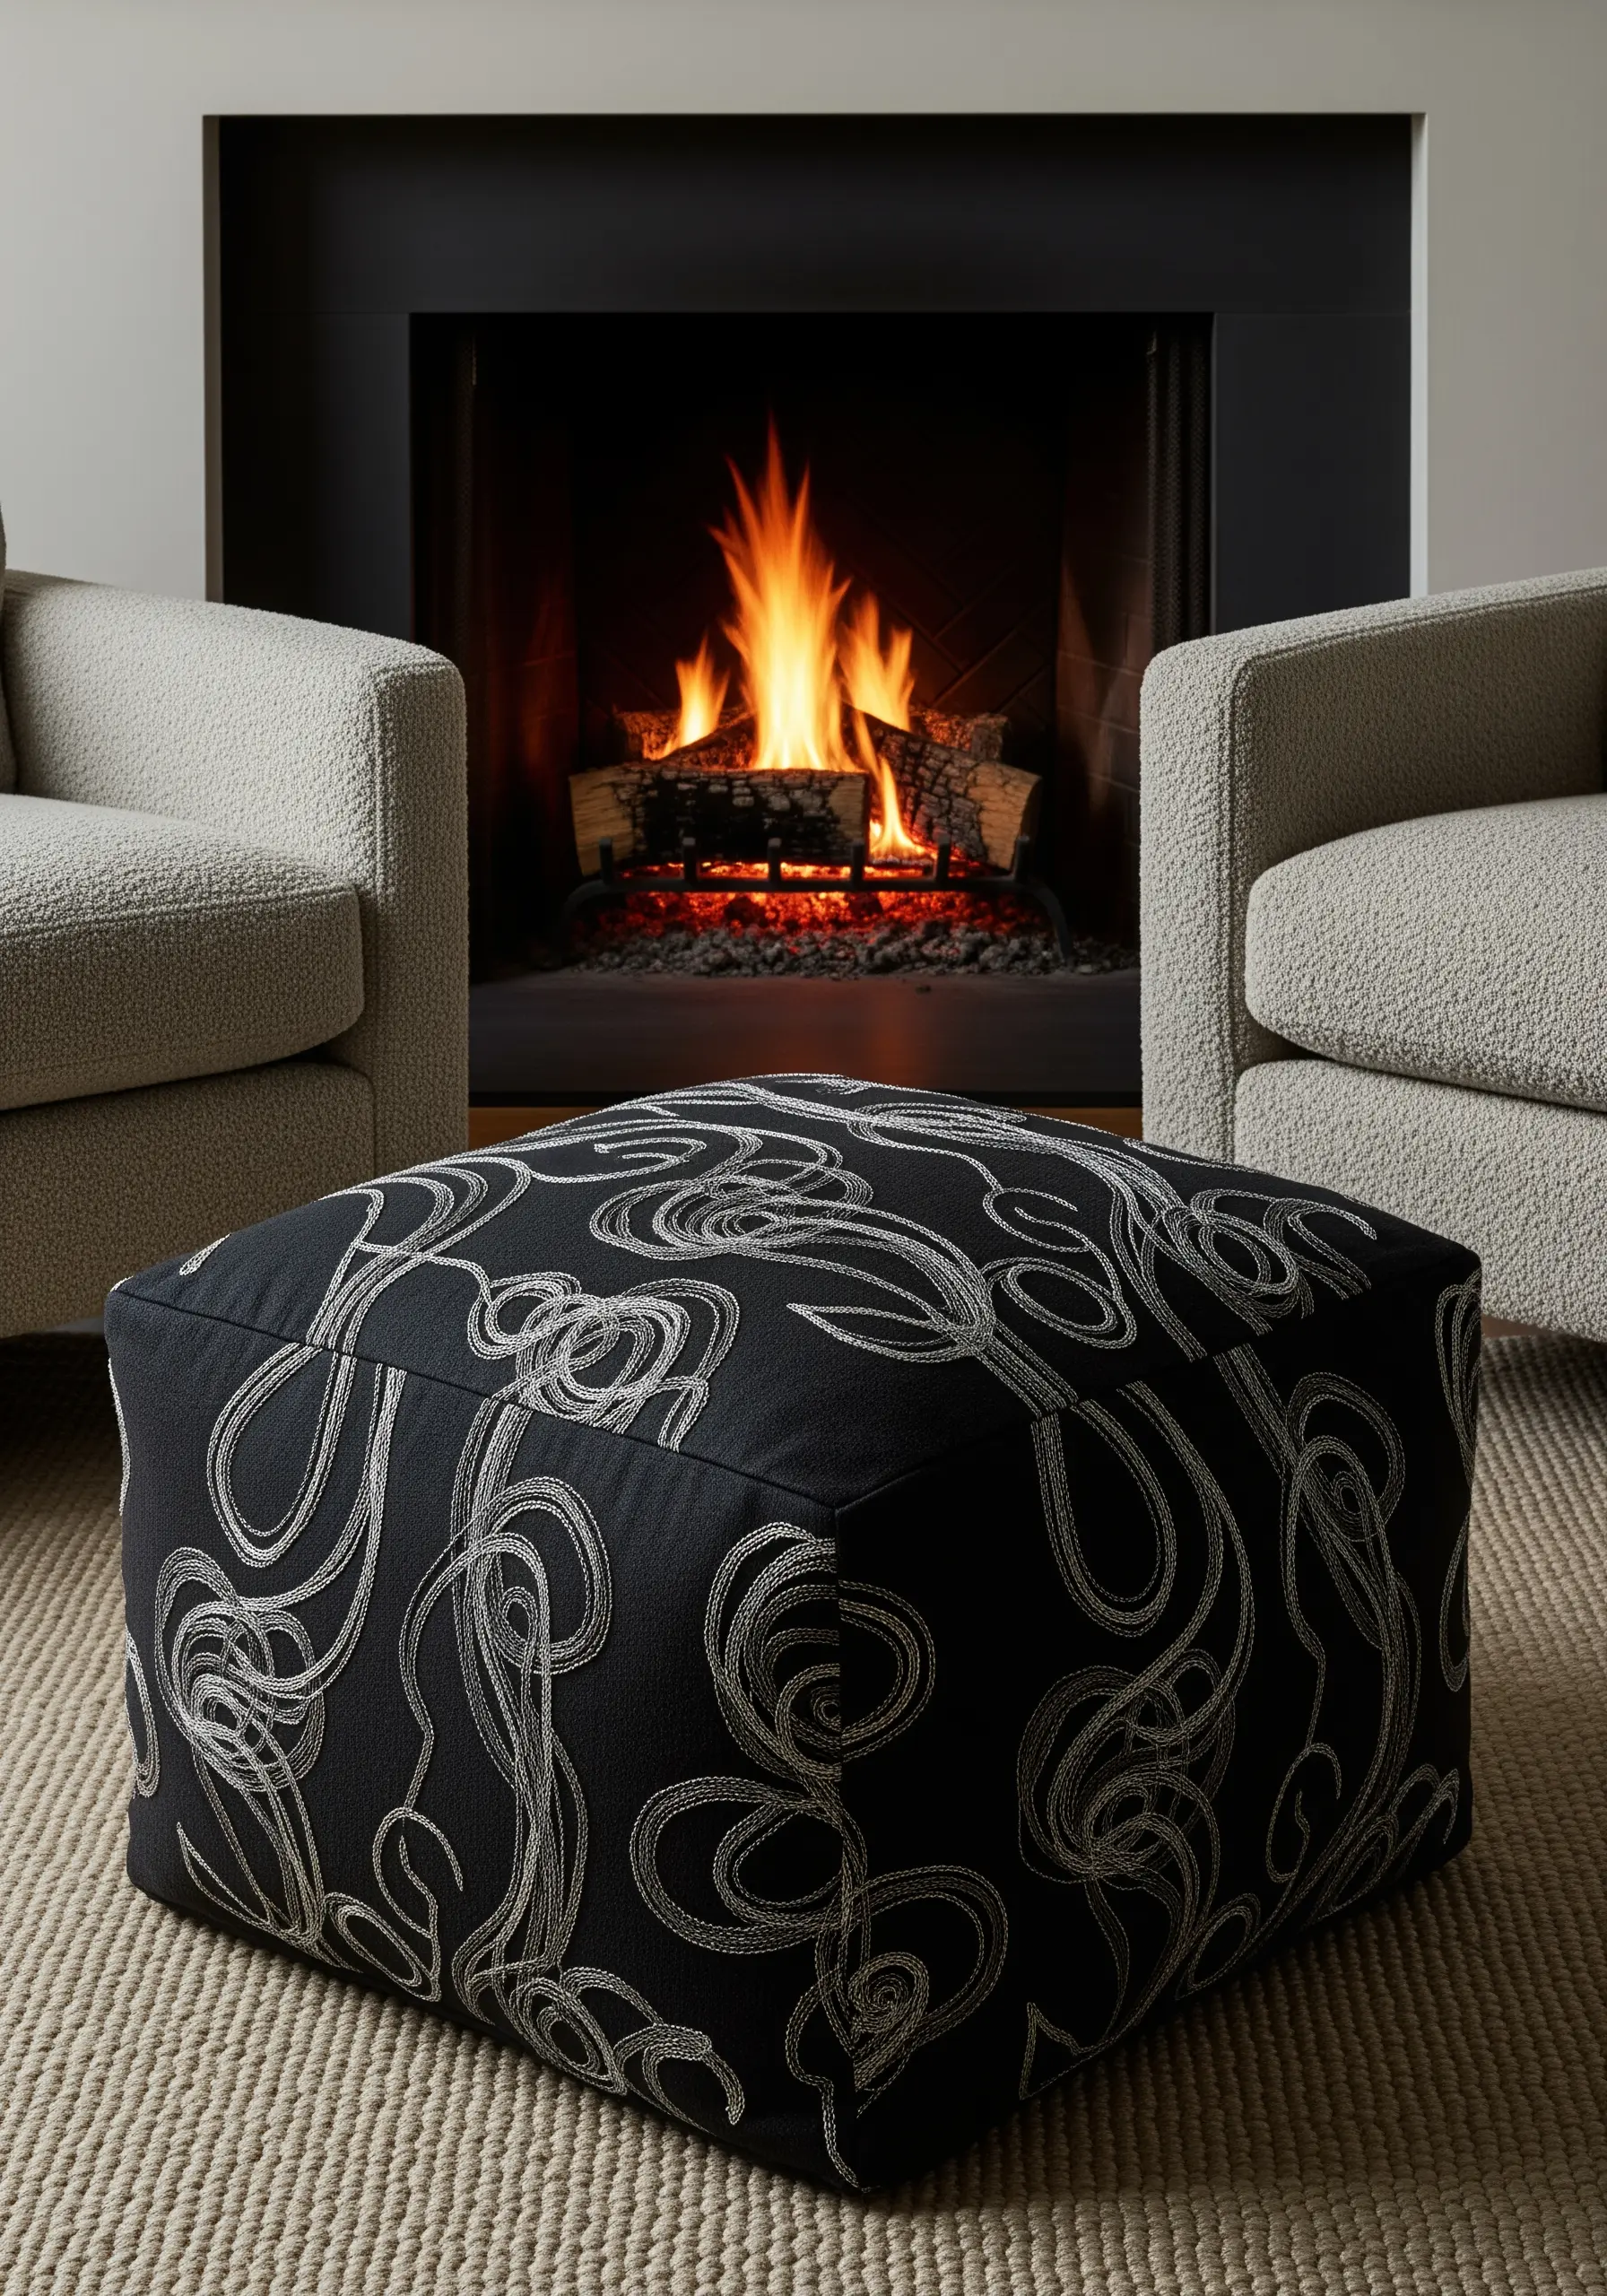
For designs with long, sweeping, abstract curves, a standard stitch can look broken or jagged.
Instead, use couching: lay a thick, decorative yarn or cord along your design line and tack it down with small, perpendicular stitches in a thinner, matching thread.
This technique allows you to create perfectly smooth, unbroken lines that flow across the fabric.
It’s an ideal way to add bold, graphic movement to functional pieces like an ottoman or cushion cover, and it works up much faster than a traditional line stitch.
18. Minimalist Line Art on Canvas
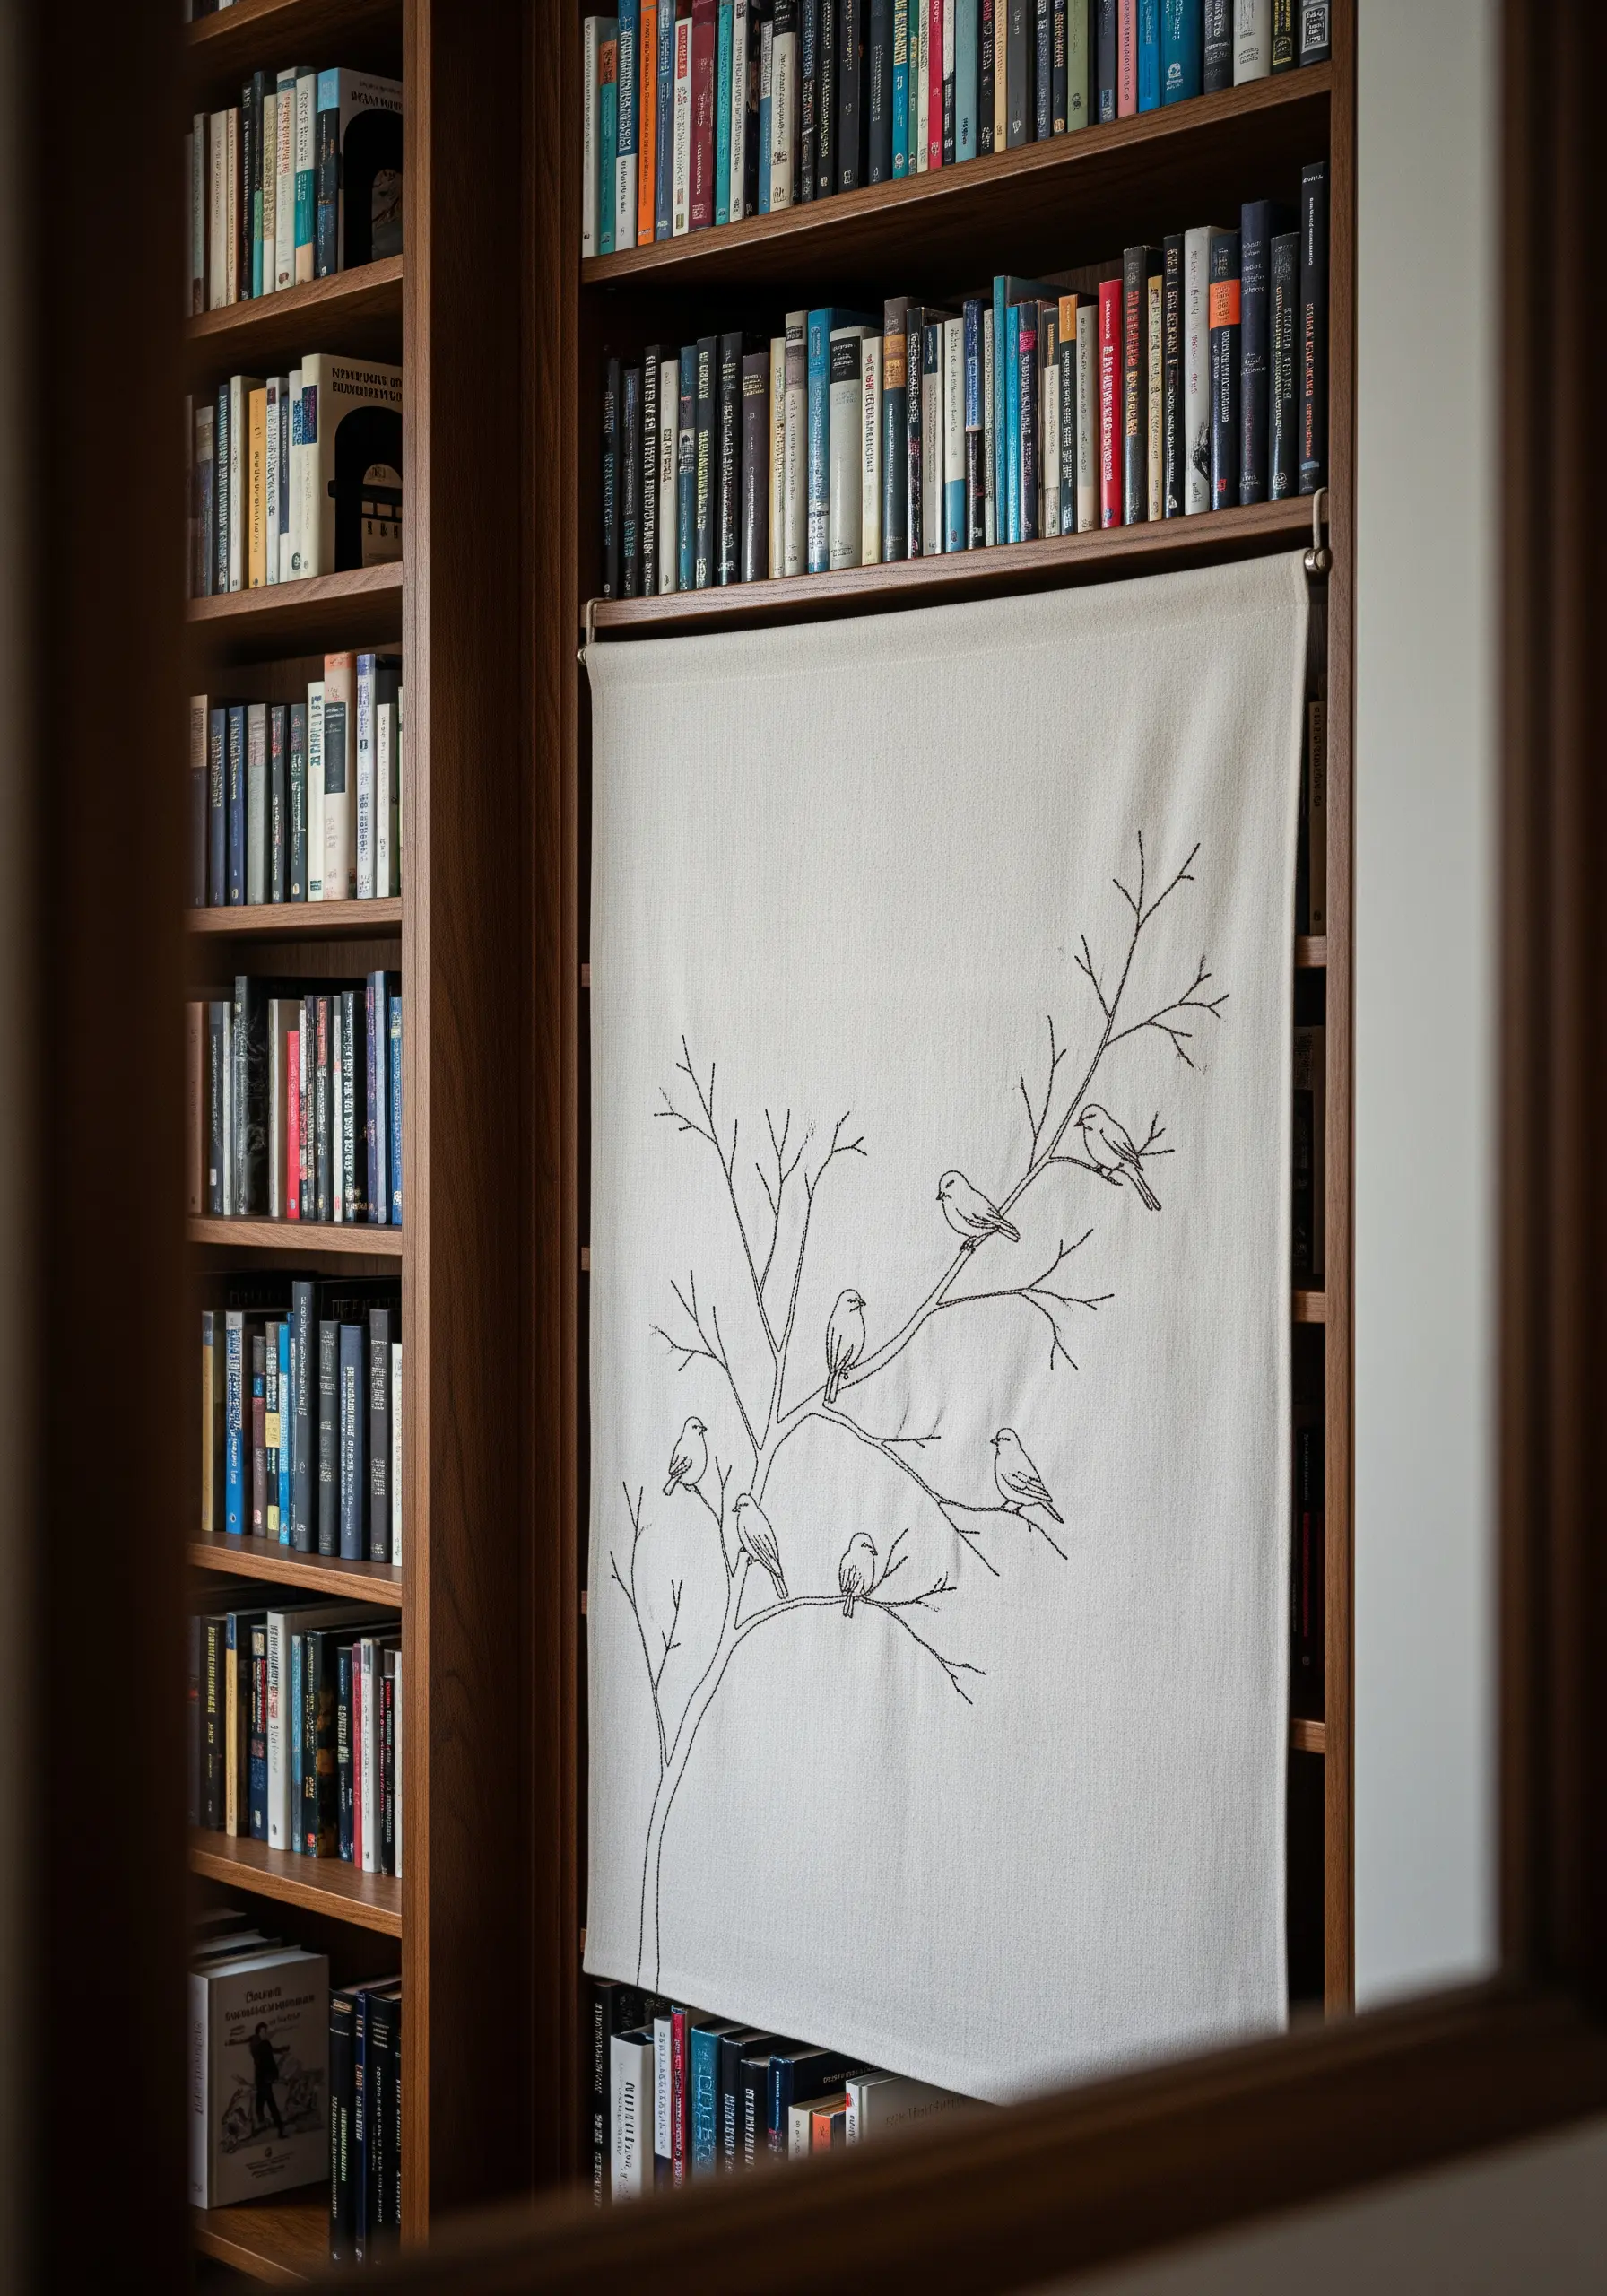
The power of a line-art piece is its simplicity. To ensure your work looks refined, focus on creating a single, clean, and continuous line.
A split stitch is perfect for this, as each new stitch pierces the previous one, creating a smooth, chain-like appearance that mimics a drawn line.
Use two or three strands of black cotton floss for clear definition without bulk.
The ample negative space around the motif is crucial to the design, giving it room to breathe and making it feel modern and intentional.
19. Detailed Insect Studies with Blended Color
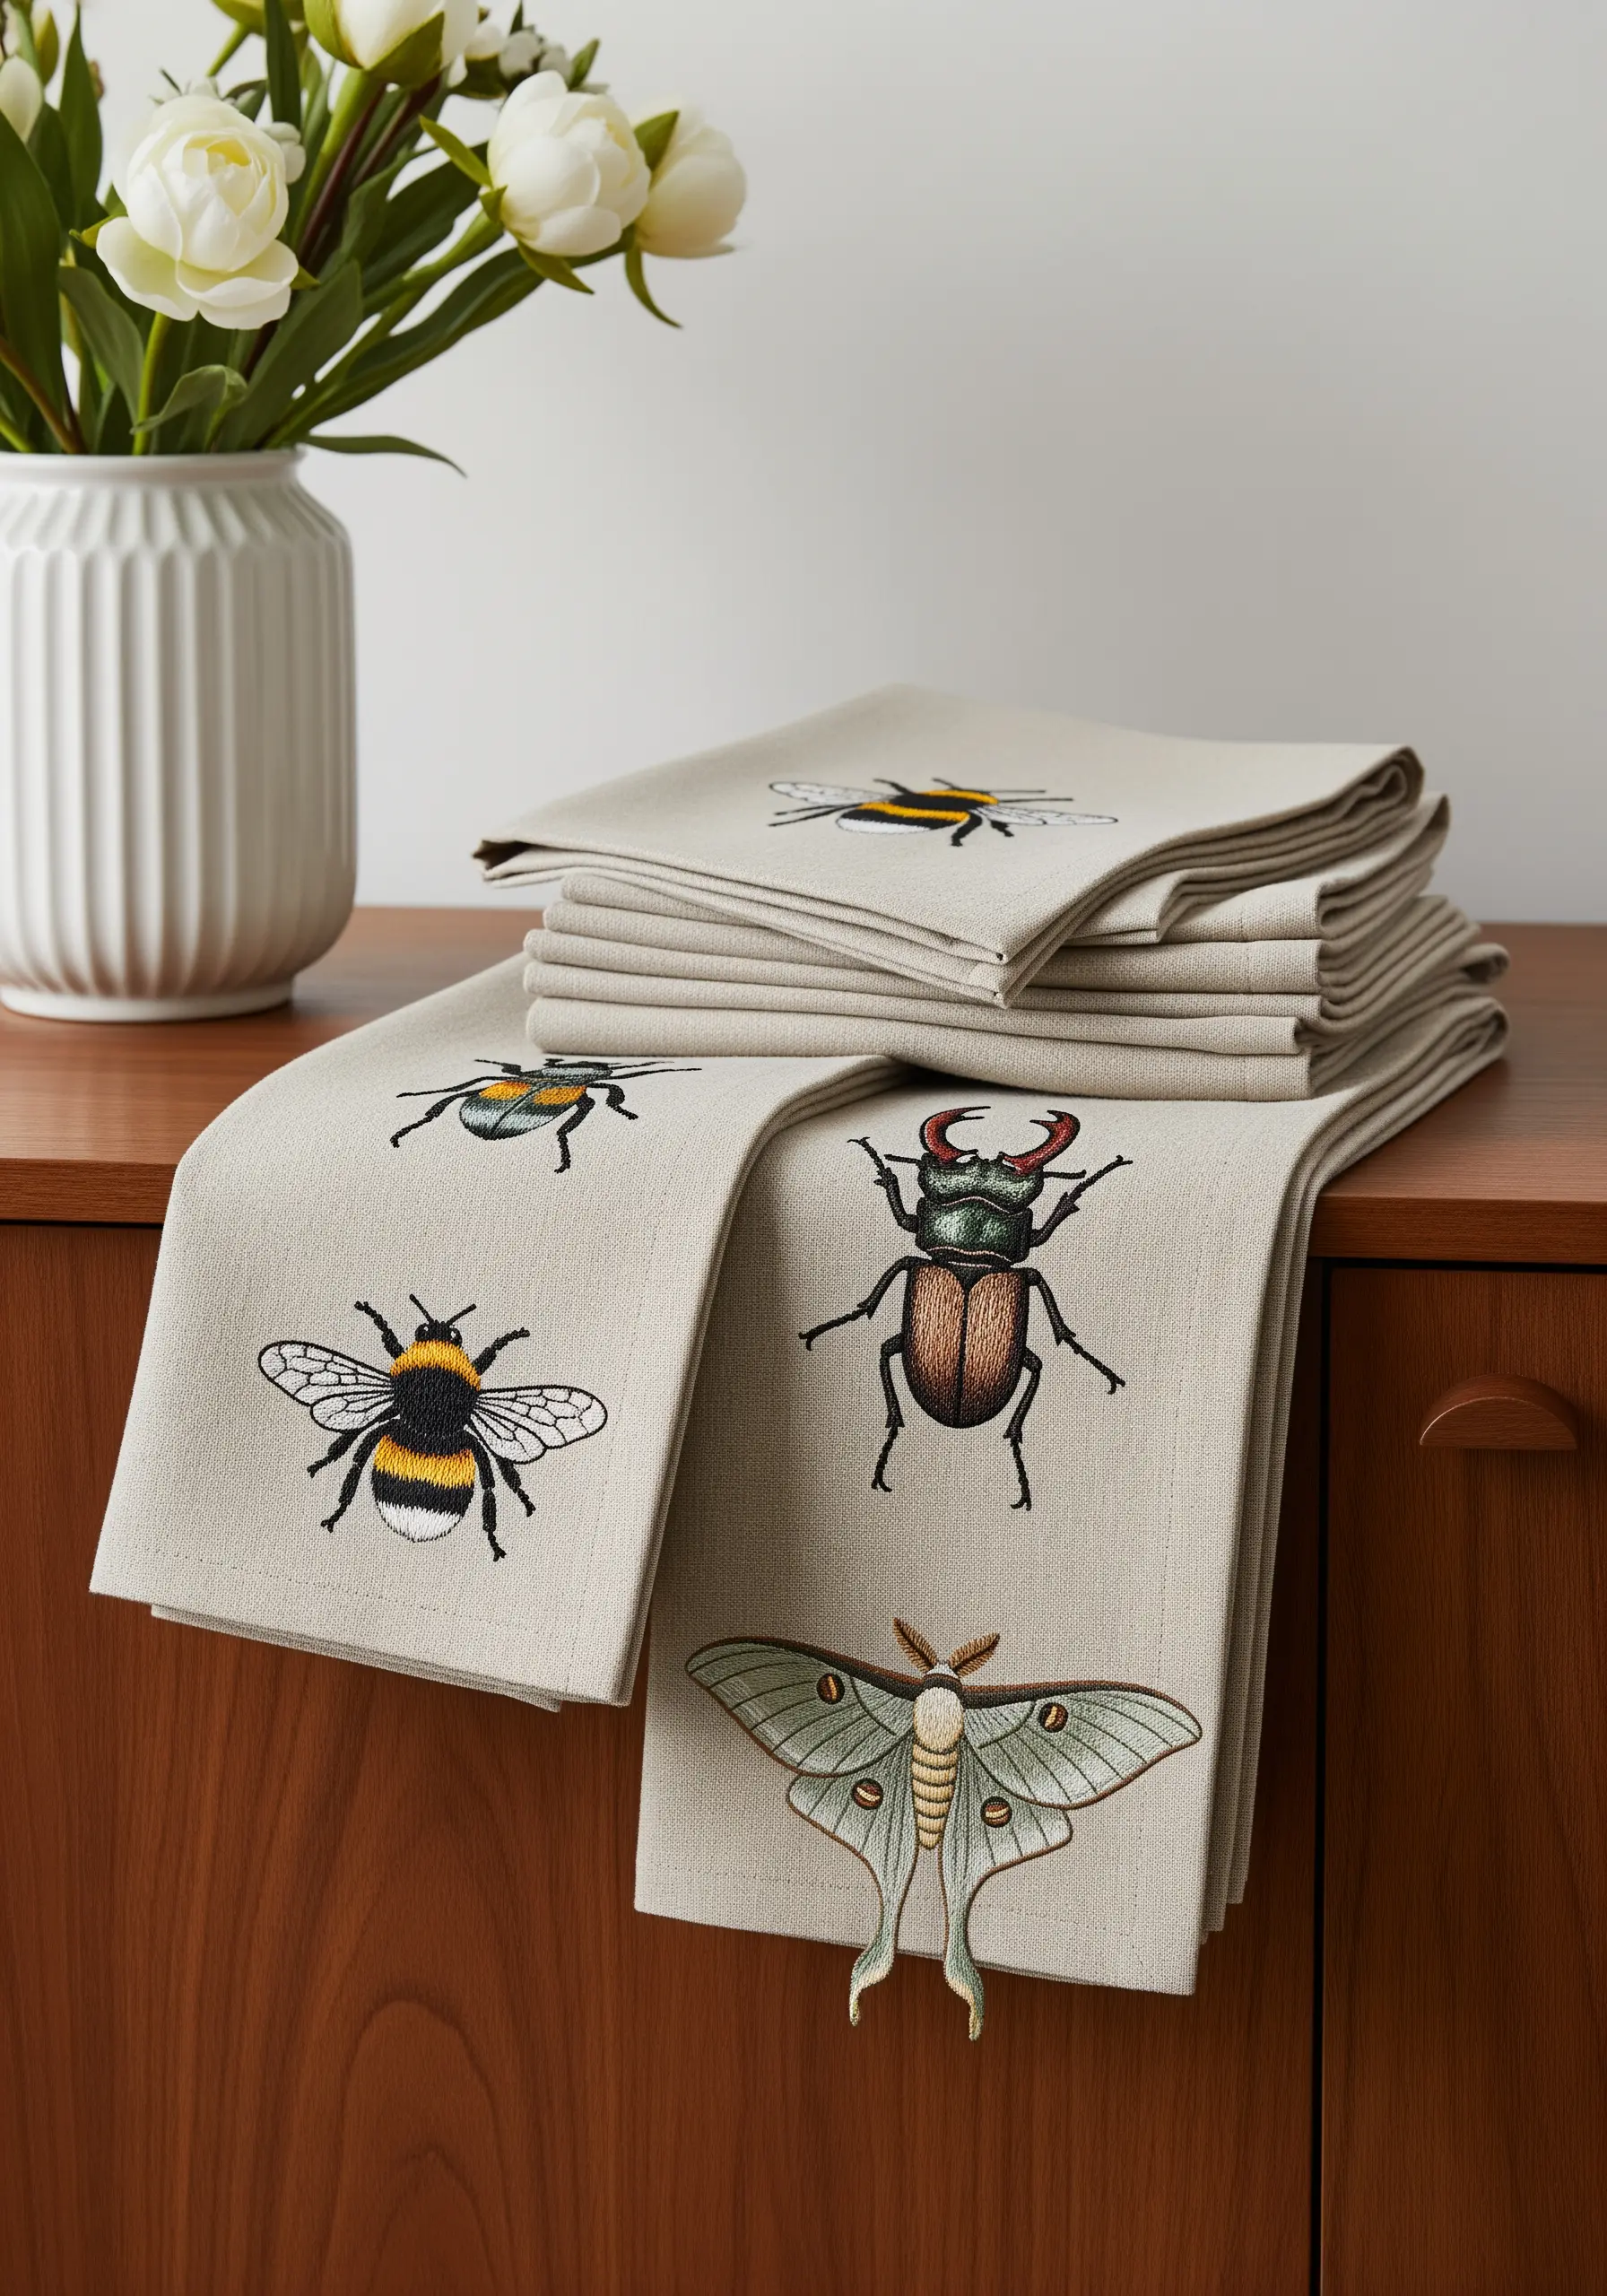
To accurately capture the iridescence and subtle color shifts on an insect’s body, long-and-short stitch is your best friend.
This stitch allows you to blend colors seamlessly without harsh lines.
Start with a crisp split-stitch outline to define the entire shape. Then, work in small sections, filling the area with staggered rows of straight stitches, introducing new shades as you go.
Use a single strand of floss for the finest details, like legs and antennae, to ensure they look delicate and realistic.
20. Cohesive Patchwork with a Limited Palette
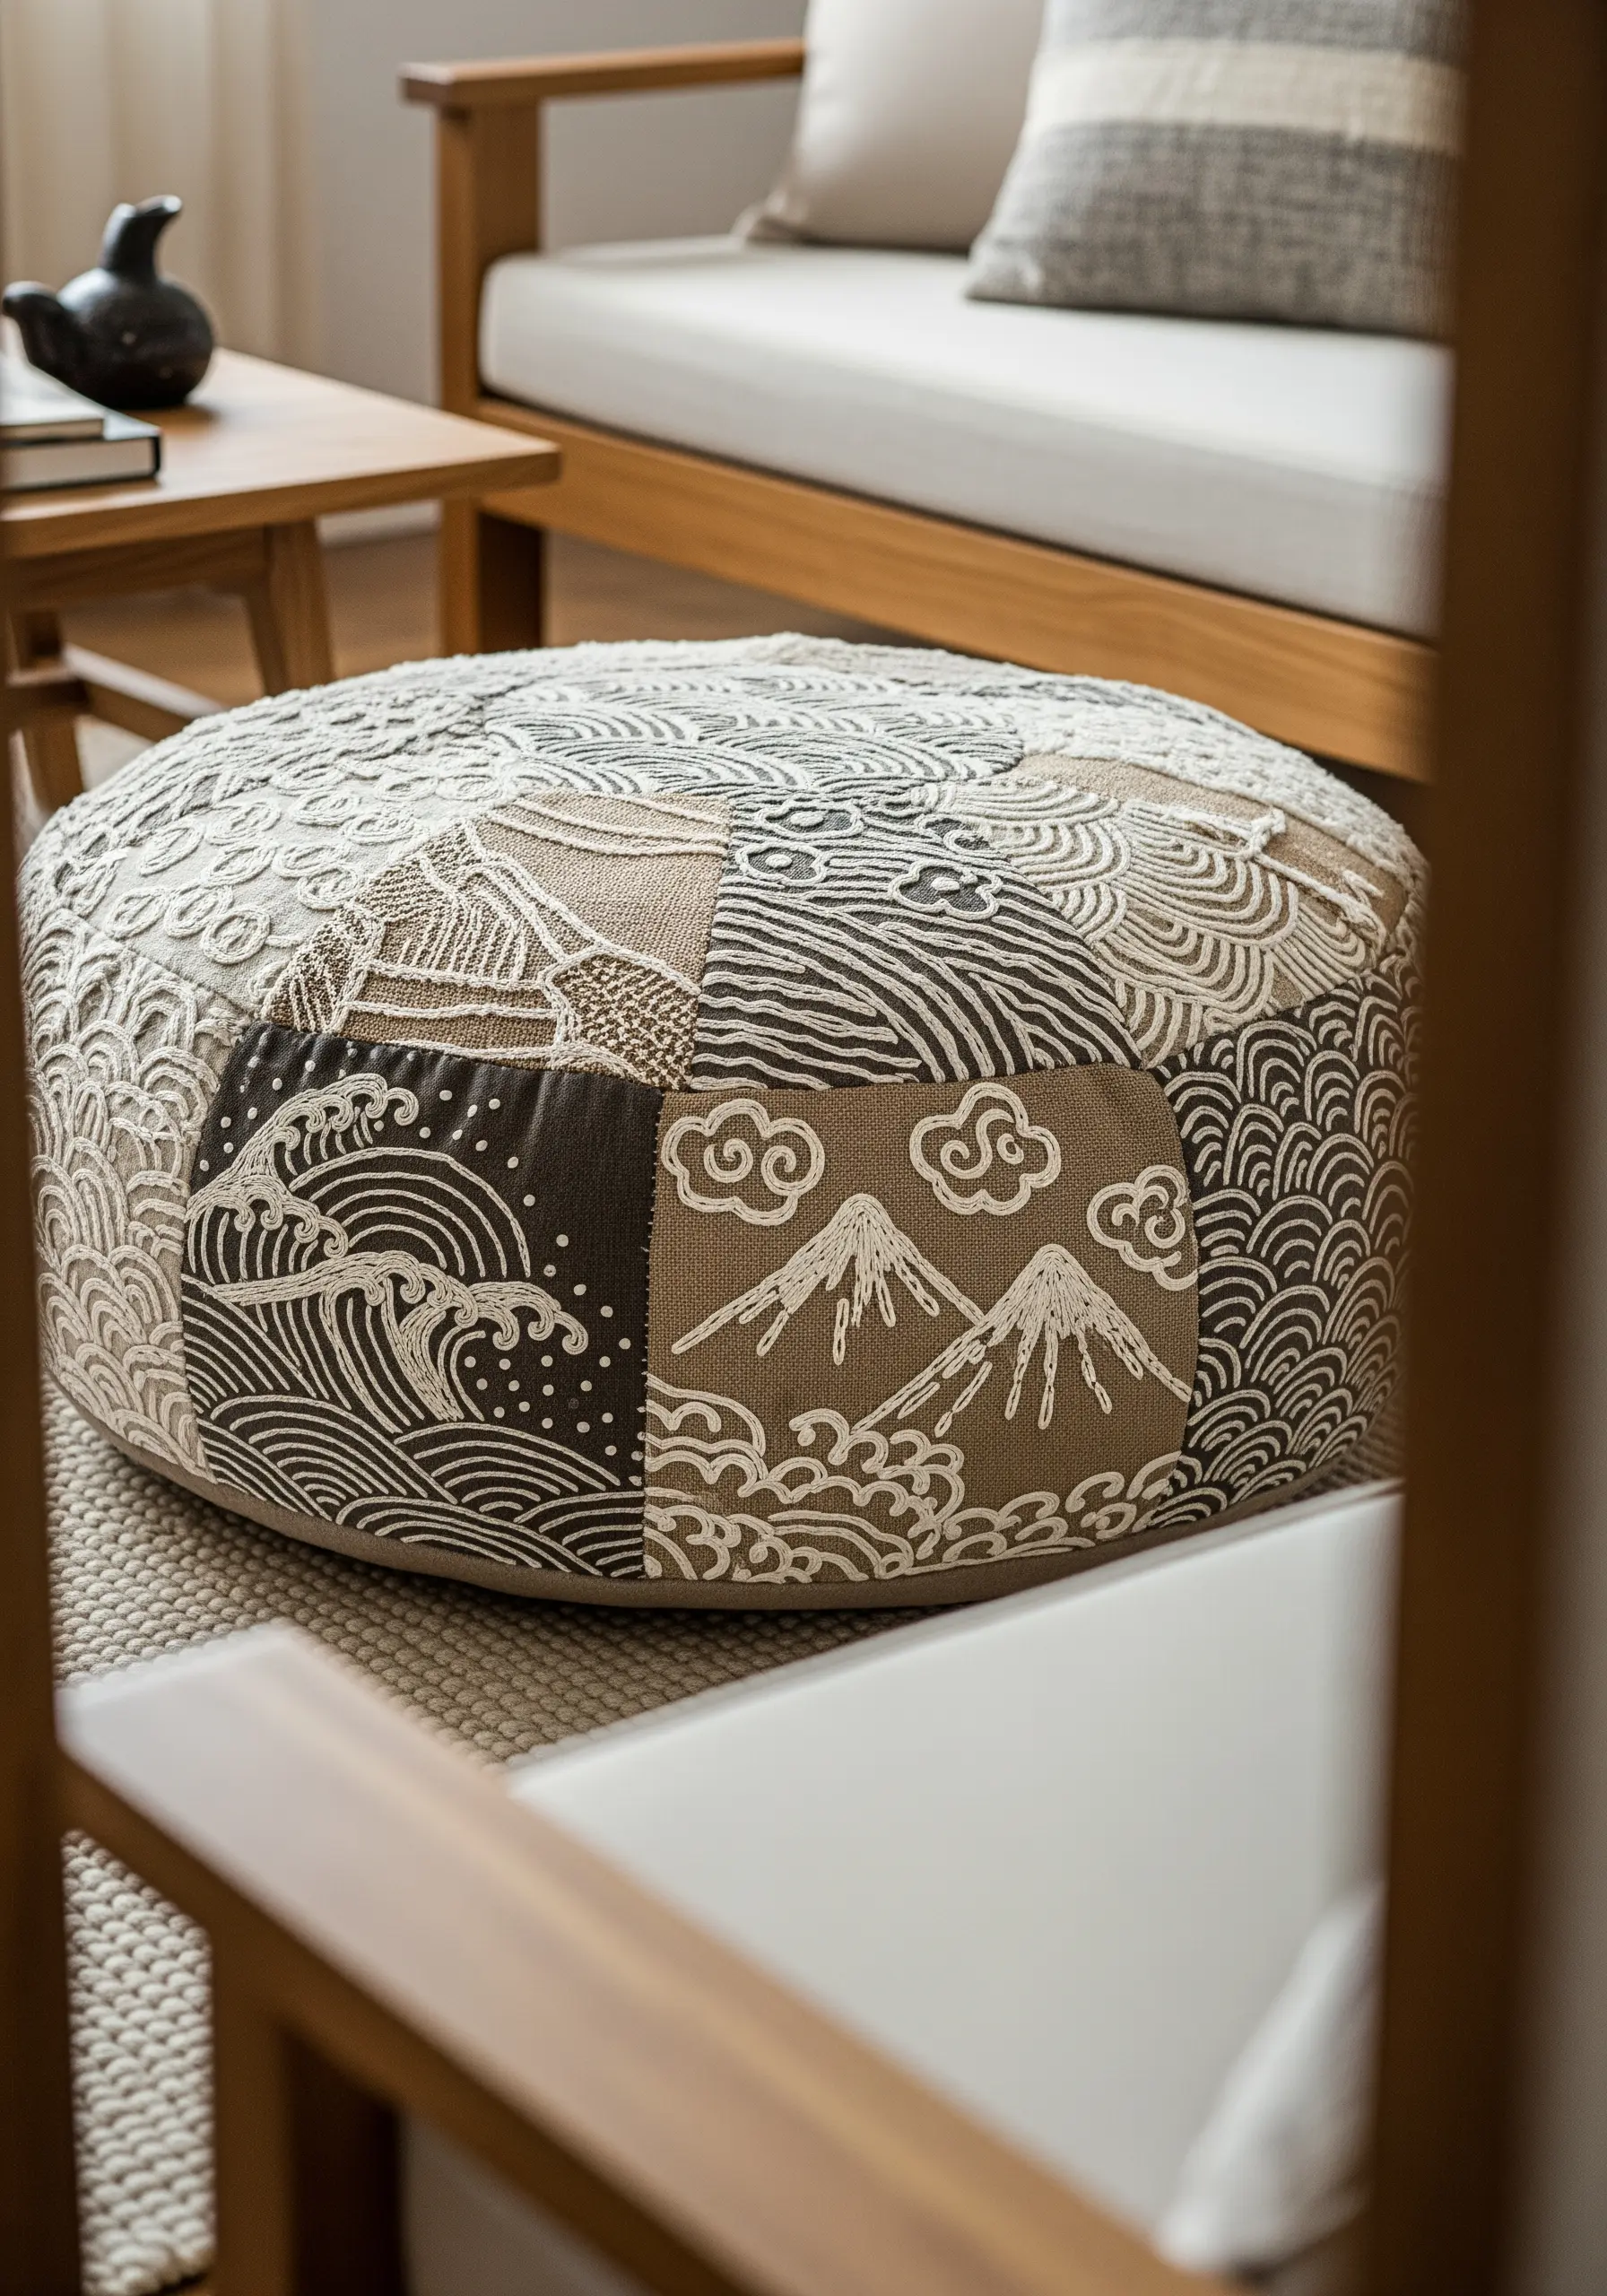
To create a patchwork design that feels artistic and cohesive rather than chaotic, the secret is a disciplined color palette.
Even though each patch features a different motif—waves, mountains, clouds—using the same three or four neutral thread colors throughout ties the entire piece together.
Further unify the design by varying stitch density: make some patches with dense satin stitch fills, others with open line work, and some with simple appliqué.
This creates a rich visual texture that encourages the eye to travel across the surface.
21. Tone-on-Tone Wheat Stalks for a Subtle Border

For an understated, elegant finish on home textiles, try a tone-on-tone approach.
Choose an embroidery thread that is only two or three shades lighter or darker than your base fabric.
This creates a subtle, textured effect that reads as a whisper of detail rather than a loud pattern.
For wheat stalks, use a delicate fishbone stitch for the kernels to create a woven texture, and a simple stem stitch for the stalks. The result is sophisticated, classic, and integrates beautifully into a neutral space.
22. Combining Line Art with Floral Accents
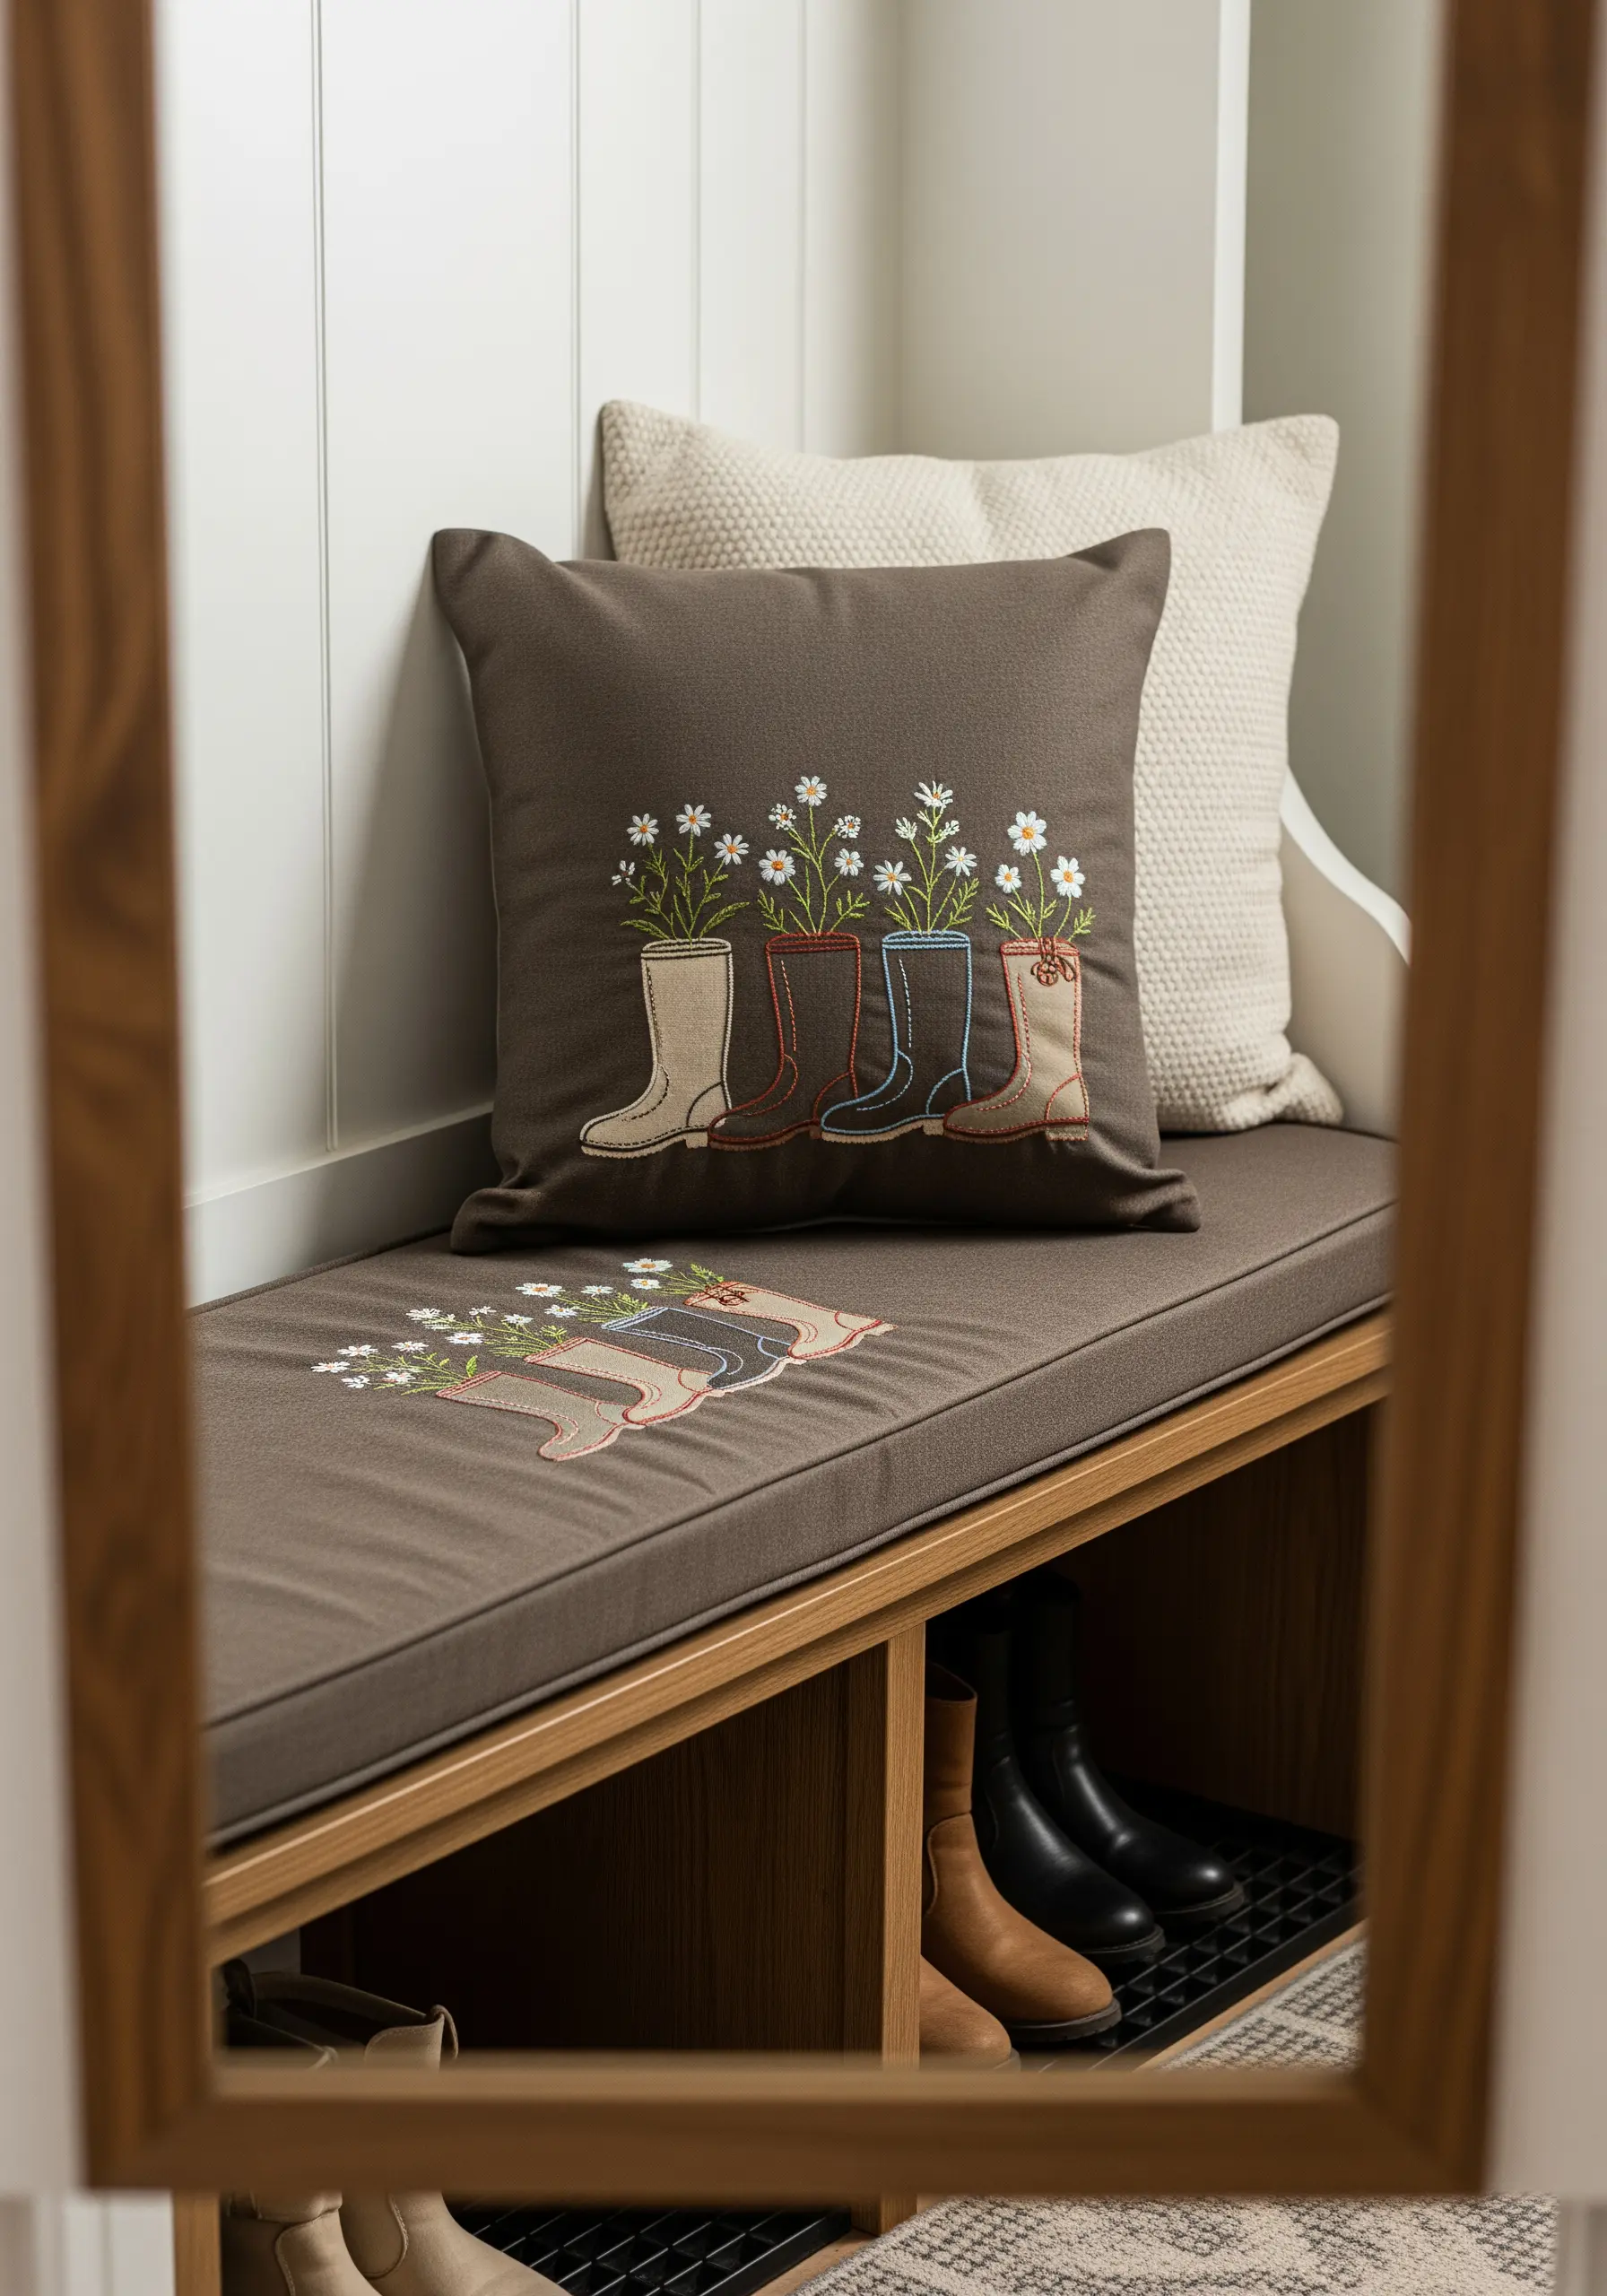
Create a playful and charming design by contrasting simple line art with small pops of filled color.
Stitch the main outlines—like these rain boots—using a clean backstitch in a dark, neutral color.
Then, bring the design to life by filling the small floral elements with classic, textured stitches.
Lazy daisy stitches make perfect petals, and a cluster of French knots adds a bright, cheerful center. This technique guides the viewer’s eye and adds a touch of whimsy.
23. Scattered Botanicals for an Organic Feel
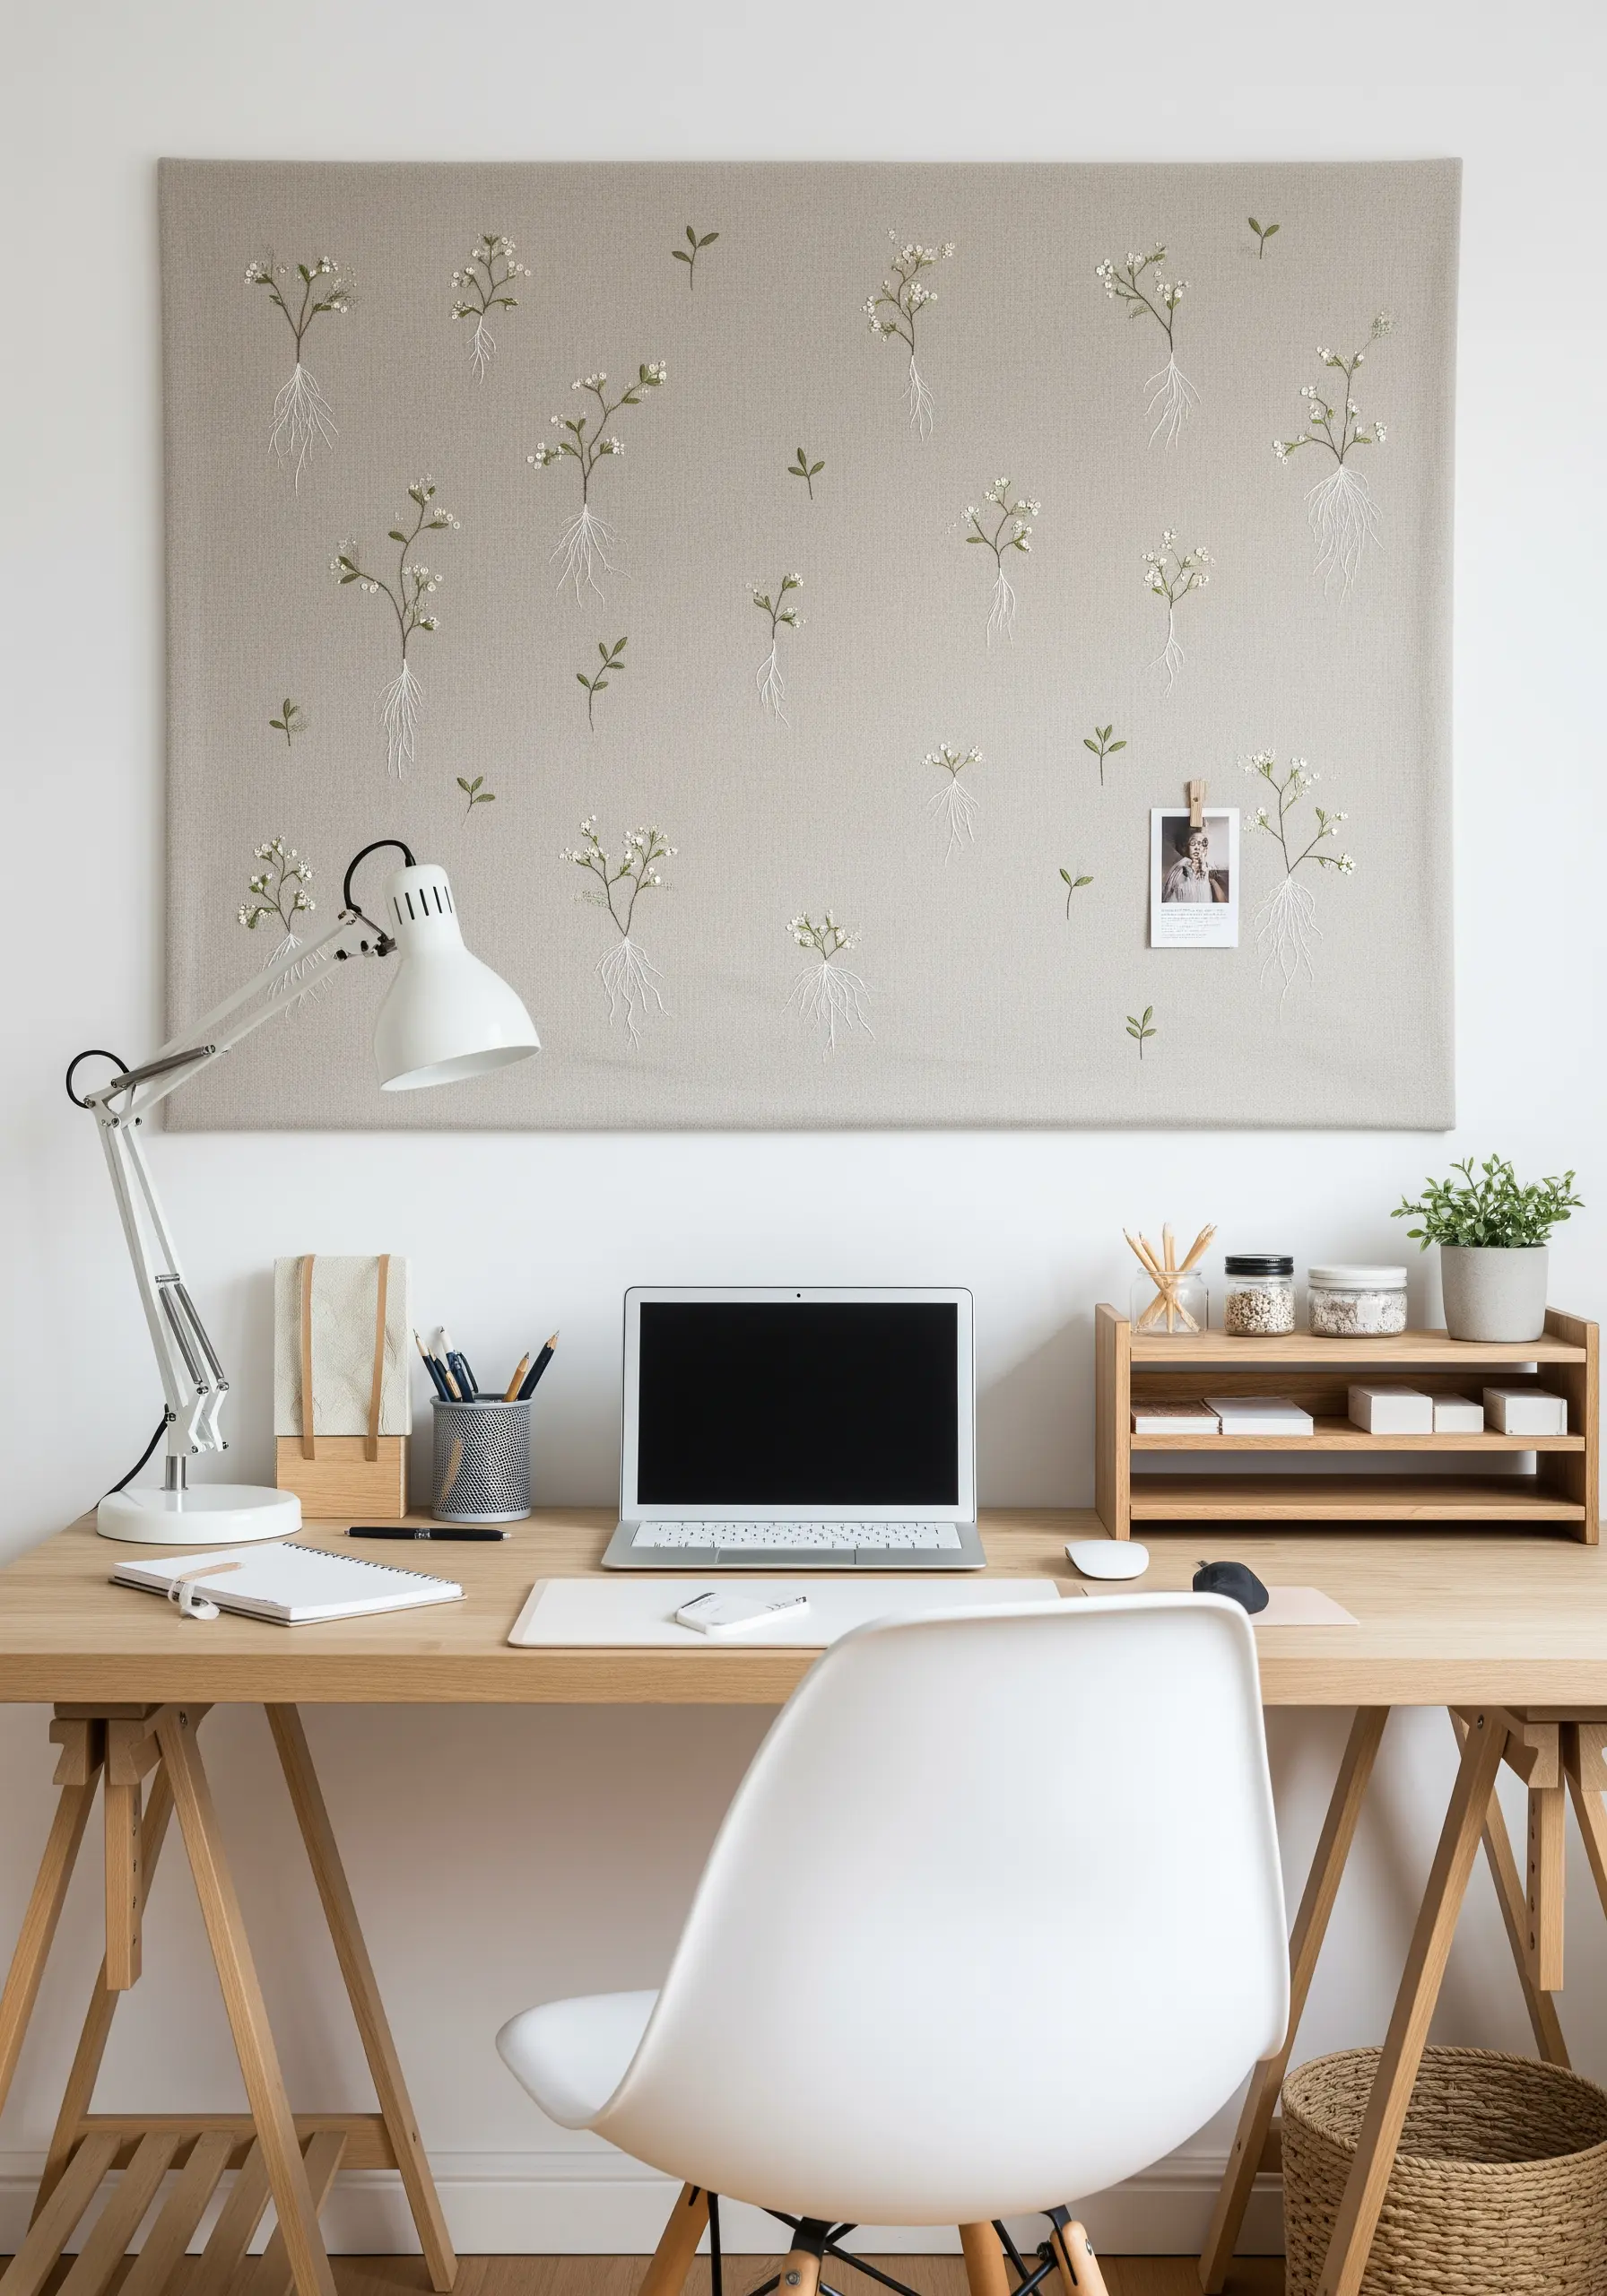
To create a pattern that feels naturally scattered, like seedlings in a field, you must resist the urge to place your motifs in a perfect grid.
Vary the spacing and rotate each small botanical element slightly to avoid a repetitive, wallpaper-like effect.
Keep the motifs themselves simple and delicate—stem stitch for the stems and roots, and a few French knots or lazy daisy stitches for the blossoms.
This creates a light, airy composition that feels both intentional and effortlessly organic for your minimal botanical patterns.
24. Large-Scale Thread Painting for Wall Tapestries
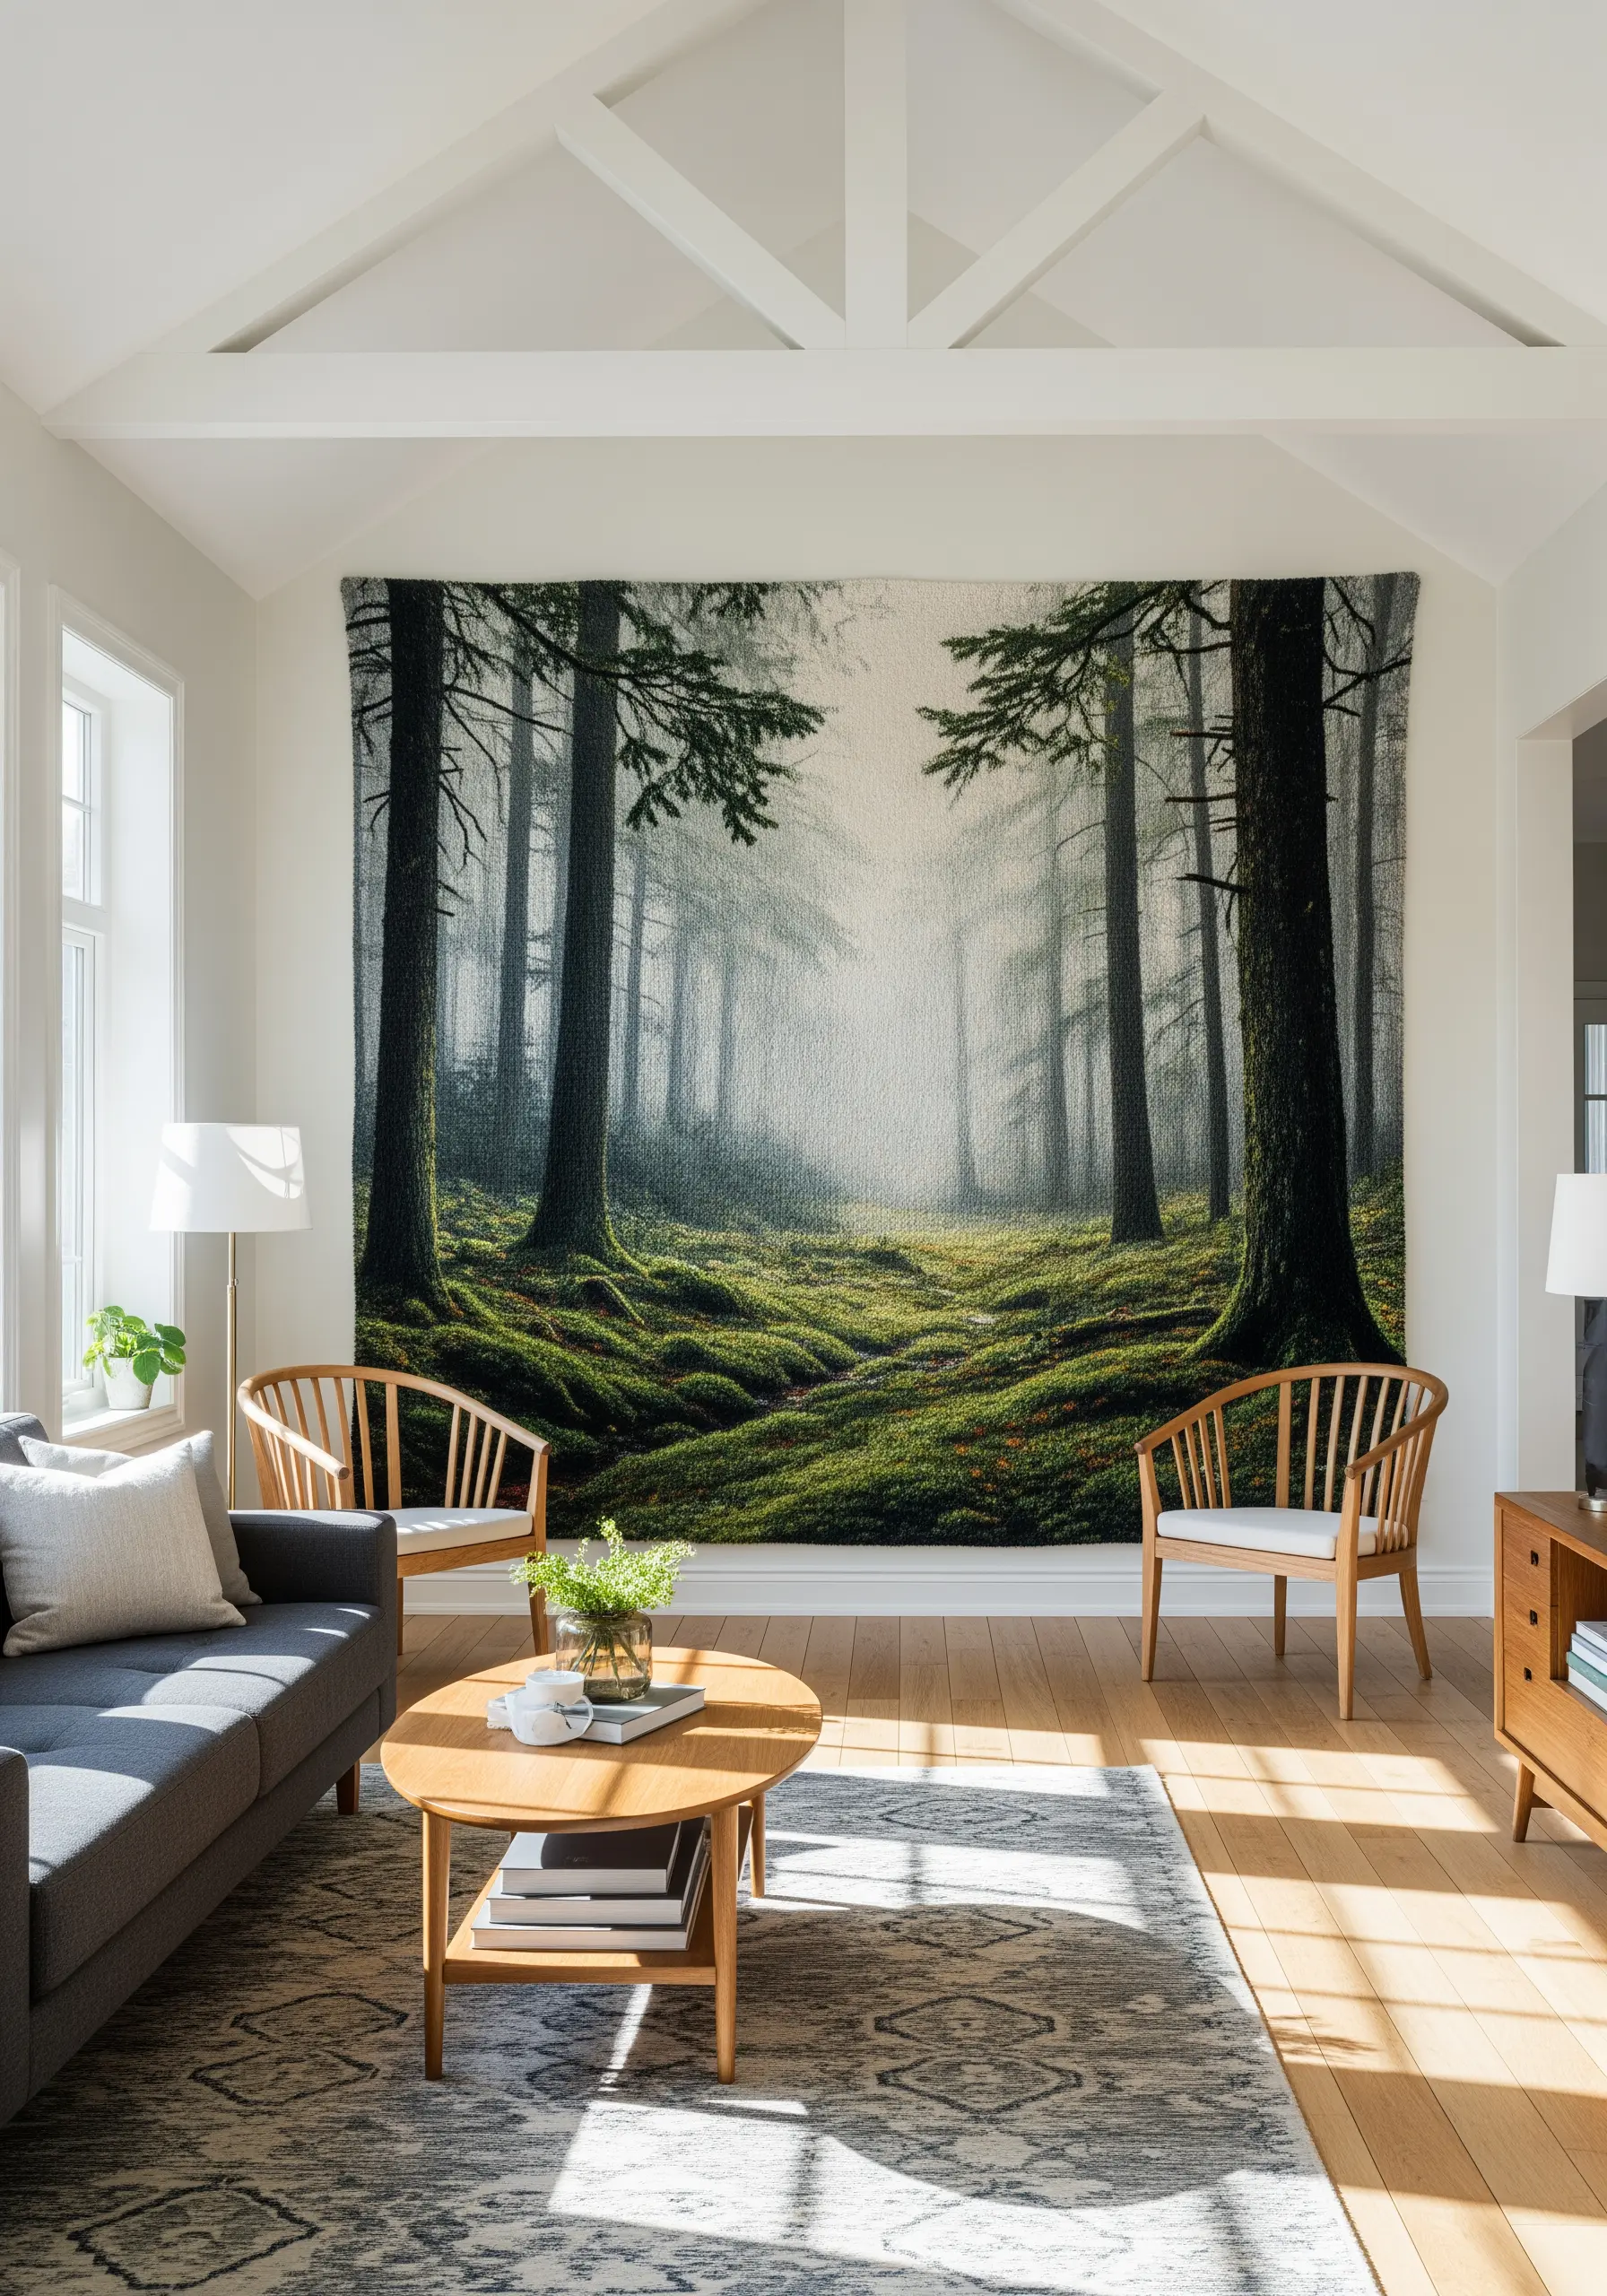
Tackling a large, scenic tapestry requires you to think like a painter, using thread to create layers of color and light.
Start by blocking in the largest areas of color with long-and-short stitch, using a single strand of floss to allow for smooth blending.
Work from background to foreground: stitch the hazy, distant trees first, then the mid-ground, and finally the detailed, textured elements like the mossy forest floor in the front.
Use French knots and straight stitches to add highlights and deep shadows, giving your threaded landscape incredible depth.
25. Bold Appliqué for Children’s Decor
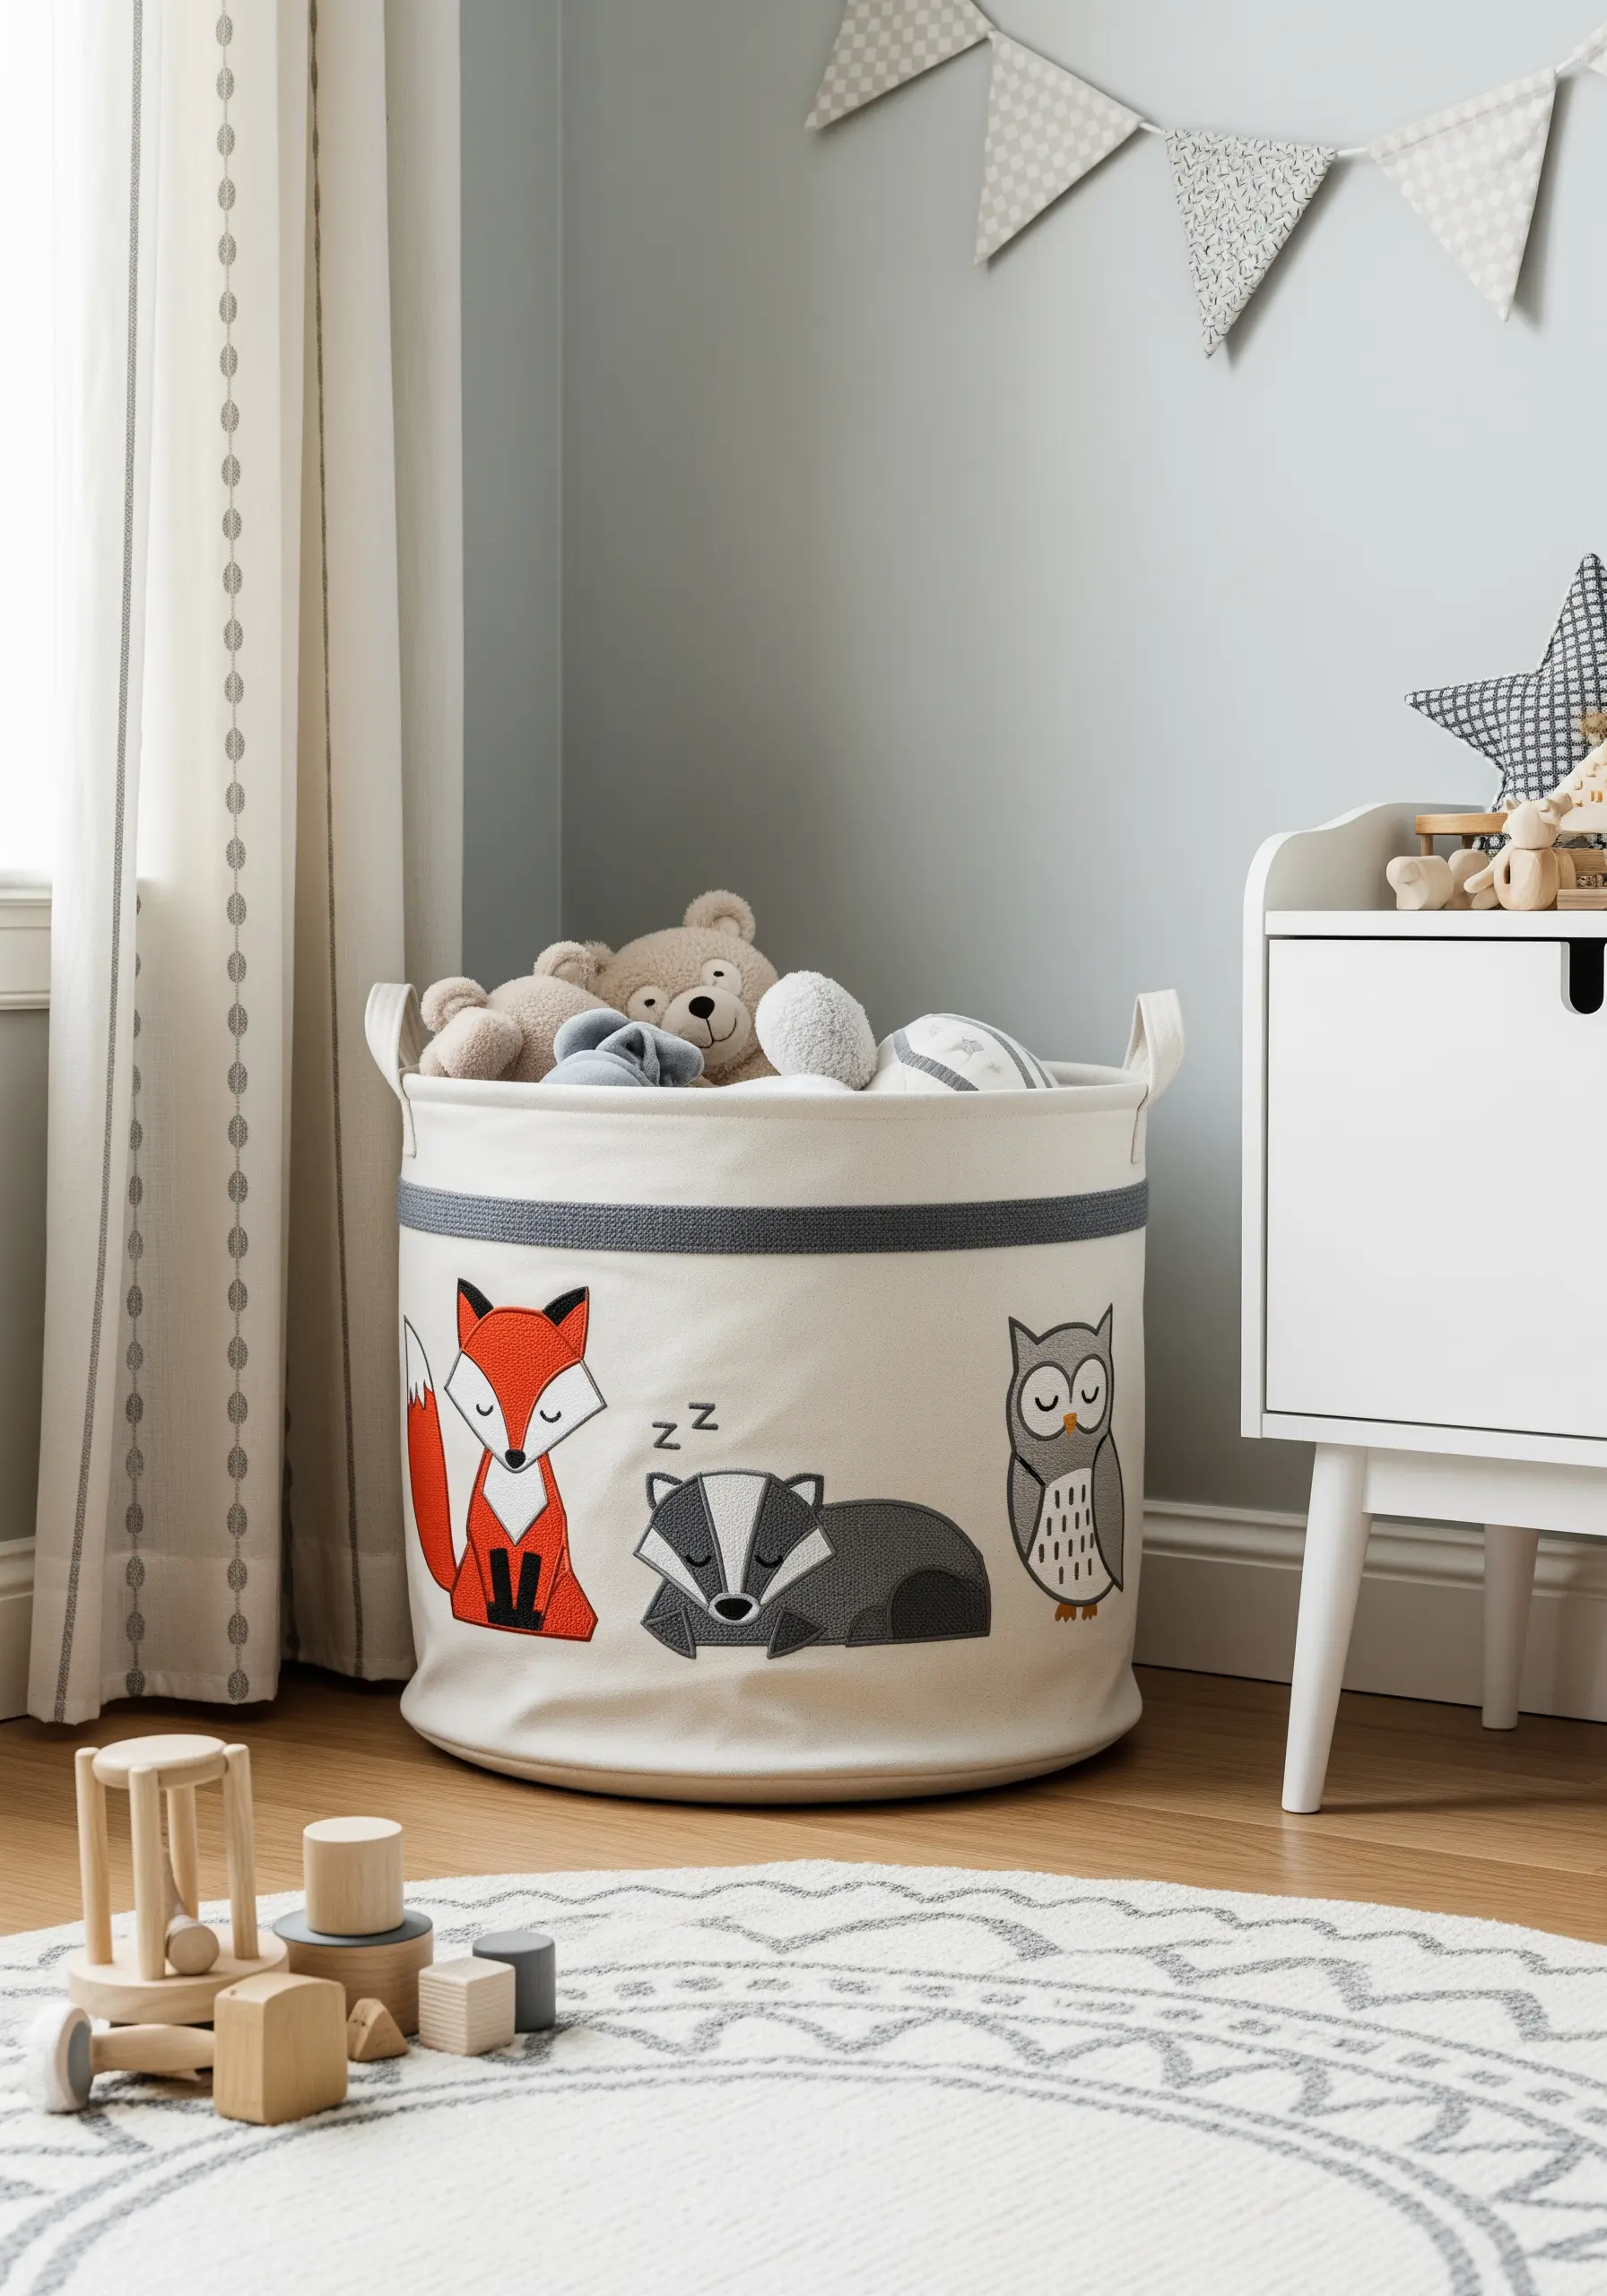
For decor items that need to be both visually bold and durable, appliqué is the ideal technique.
Trace your animal shapes onto fusible webbing and iron them onto your felt or cotton fabric.
Cut out the shapes and iron them onto the base fabric of your toy basket.
Secure the edges with a tight, clean satin stitch or a blanket stitch using a contrasting thread color. This not only adds a decorative outline but also ensures the appliqué holds up to daily use.
26. Negative Space Leaf Motifs
Create a striking design by embroidering the background instead of the motif itself.
Lightly trace your leaf shape onto the fabric. Then, using a dense fill stitch like satin stitch or brick stitch, fill the area *around* the leaf outline.
The unstitched fabric becomes the positive space, forming the leaf shape.
This reverse-embroidery technique creates a modern, high-contrast look and is particularly effective when using a textured fabric like linen, as the fabric’s natural weave becomes a key part of the design.
27. Textural French Knots for Moon Surfaces
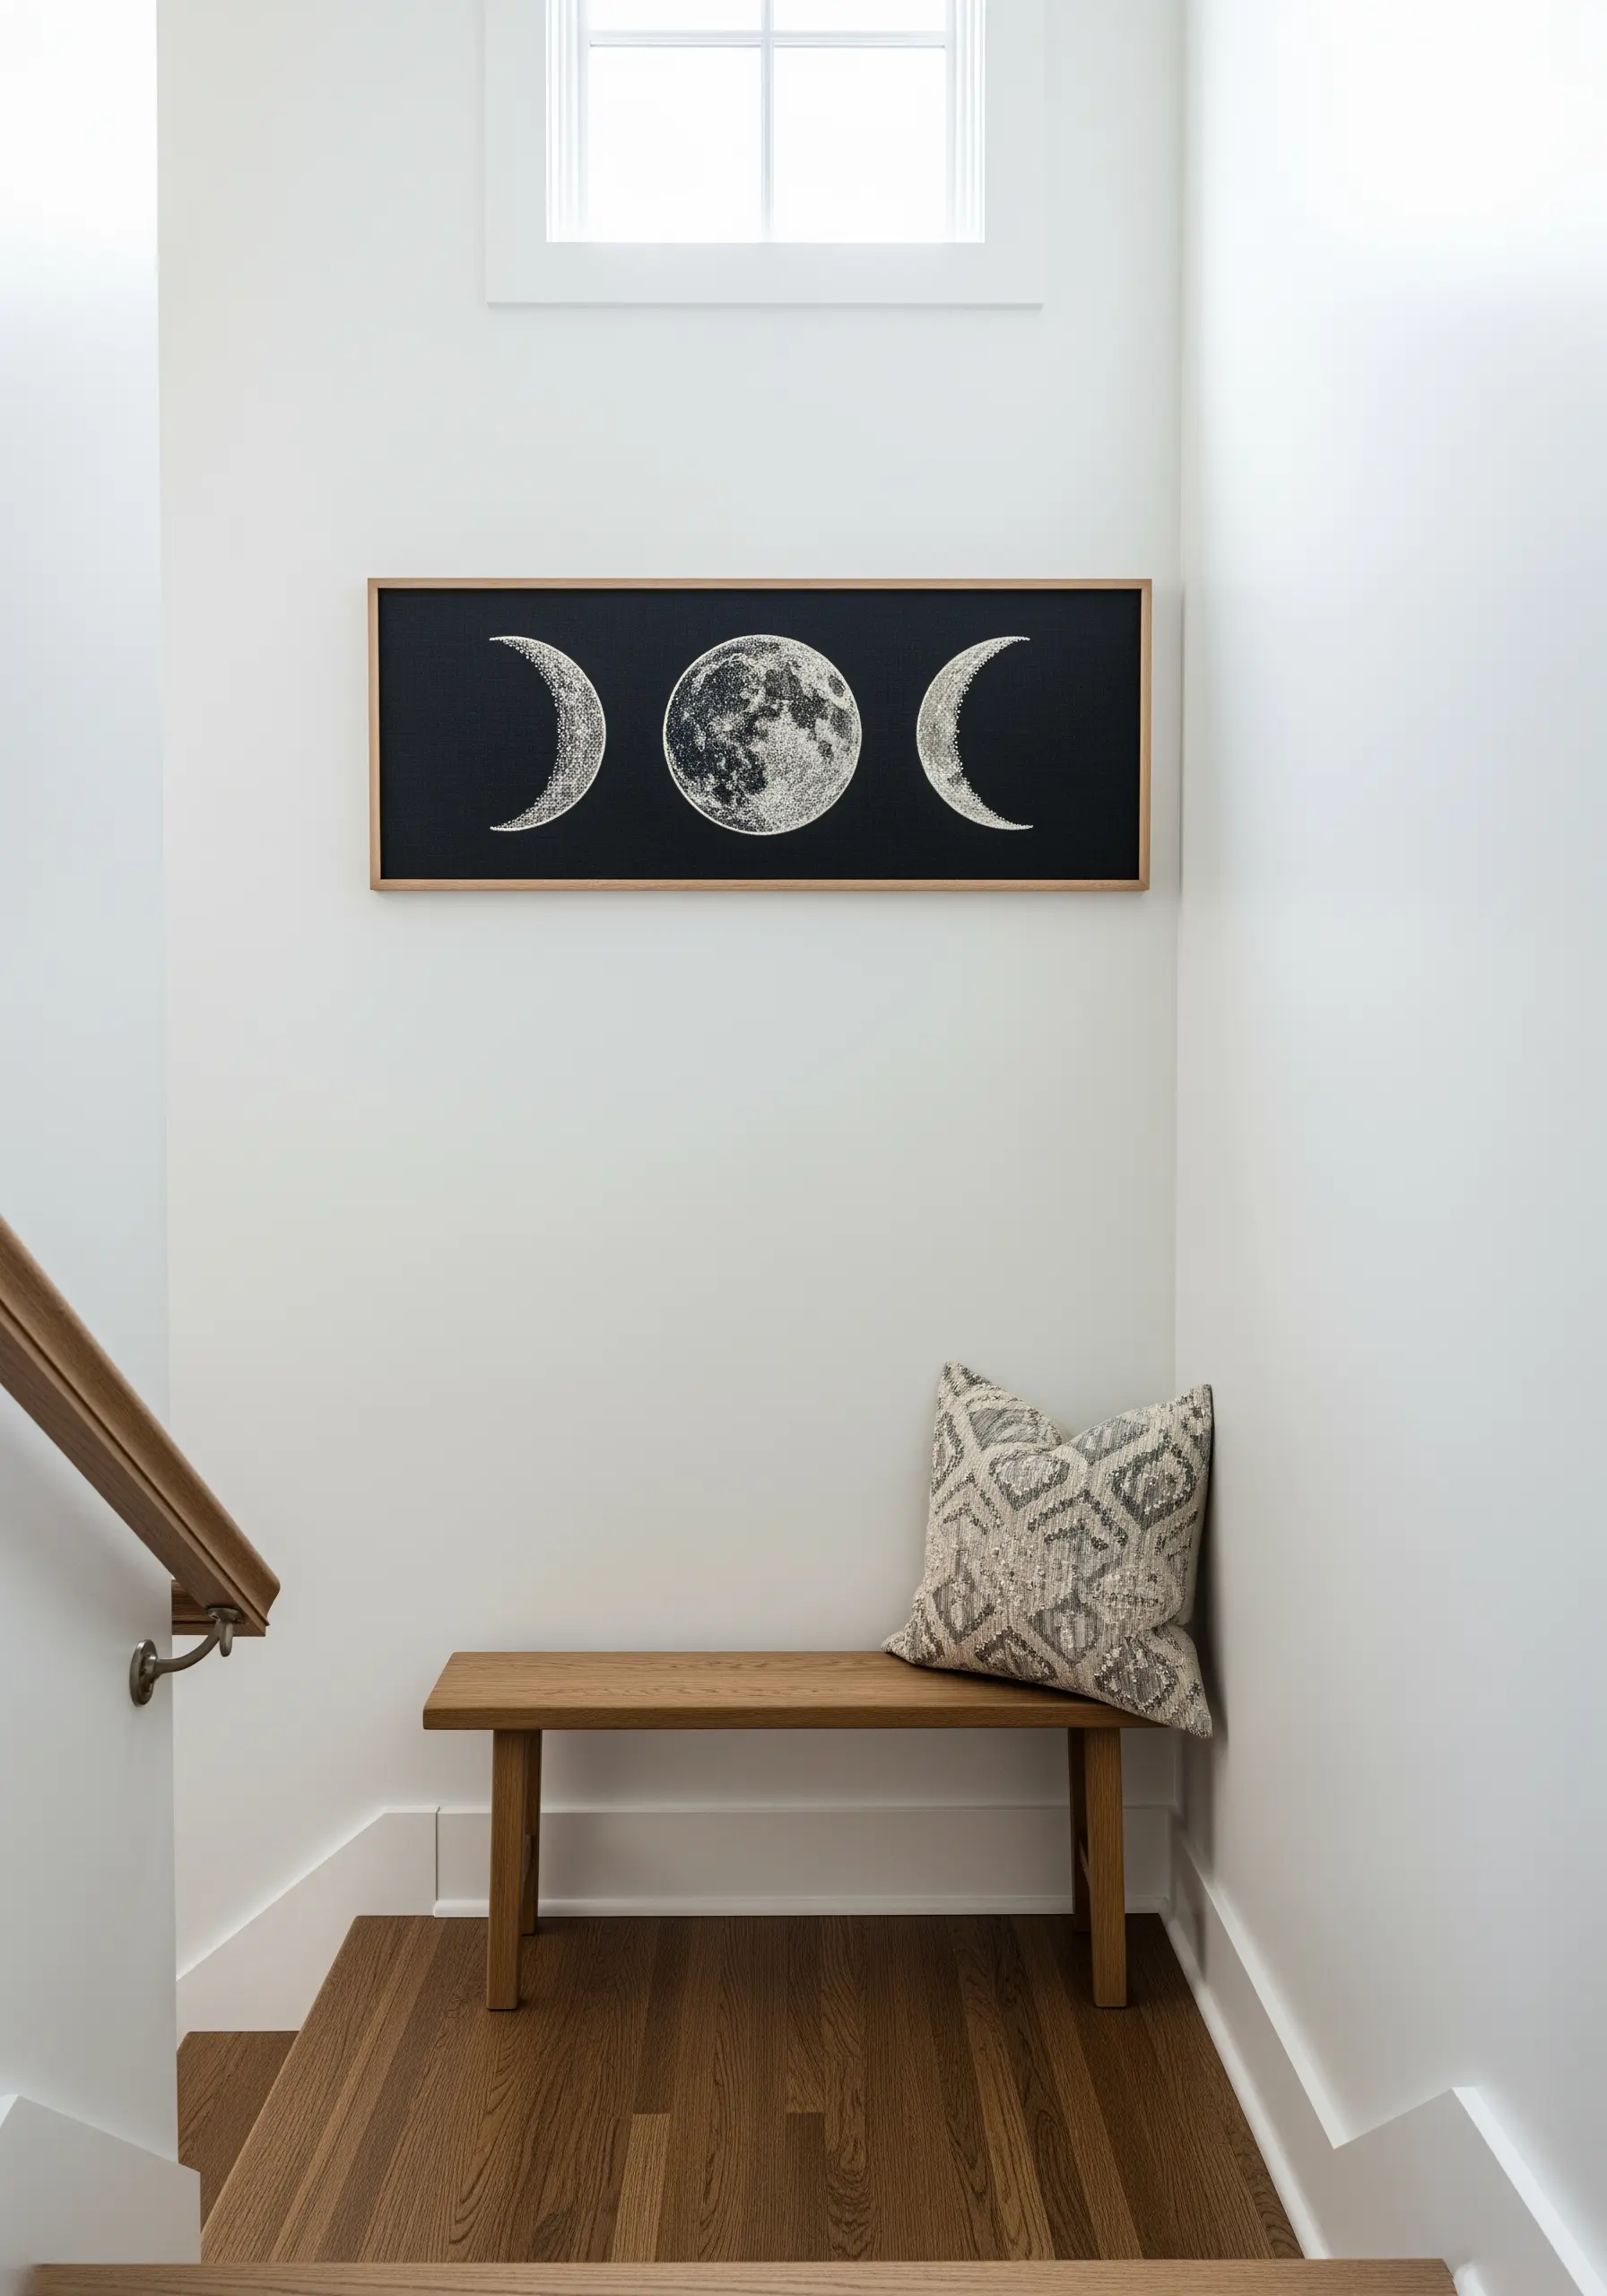
The moon’s cratered, varied surface is perfectly suited for the texture of French knots.
To create a realistic lunar effect, fill your circular shape with a dense field of knots, varying both their size and color.
Use three strands of floss for larger knots and one or two for smaller ones. Blend shades of white, cream, and pale grey to mimic areas of light and shadow.
This meticulous process builds a rich, tactile surface that is far more compelling than a flat satin stitch fill, perfect for moon and stars embroidery ideas.
28. Padded Satin Stitch for Raised Branches
To make your embroidered branches or vines physically stand out from the fabric, use a padded satin stitch.
First, create a foundation of small, straight stitches or seed stitches within the outline of your branch shape. This is your padding.
Then, work your final satin stitches over the top, perpendicular to the padding stitches.
This underlying layer of thread lifts the satin stitch, creating a smooth, raised, and sculptural effect that adds subtle dimension and a high-end finish to your work.
29. Felt Appliqué for a Pebble Effect
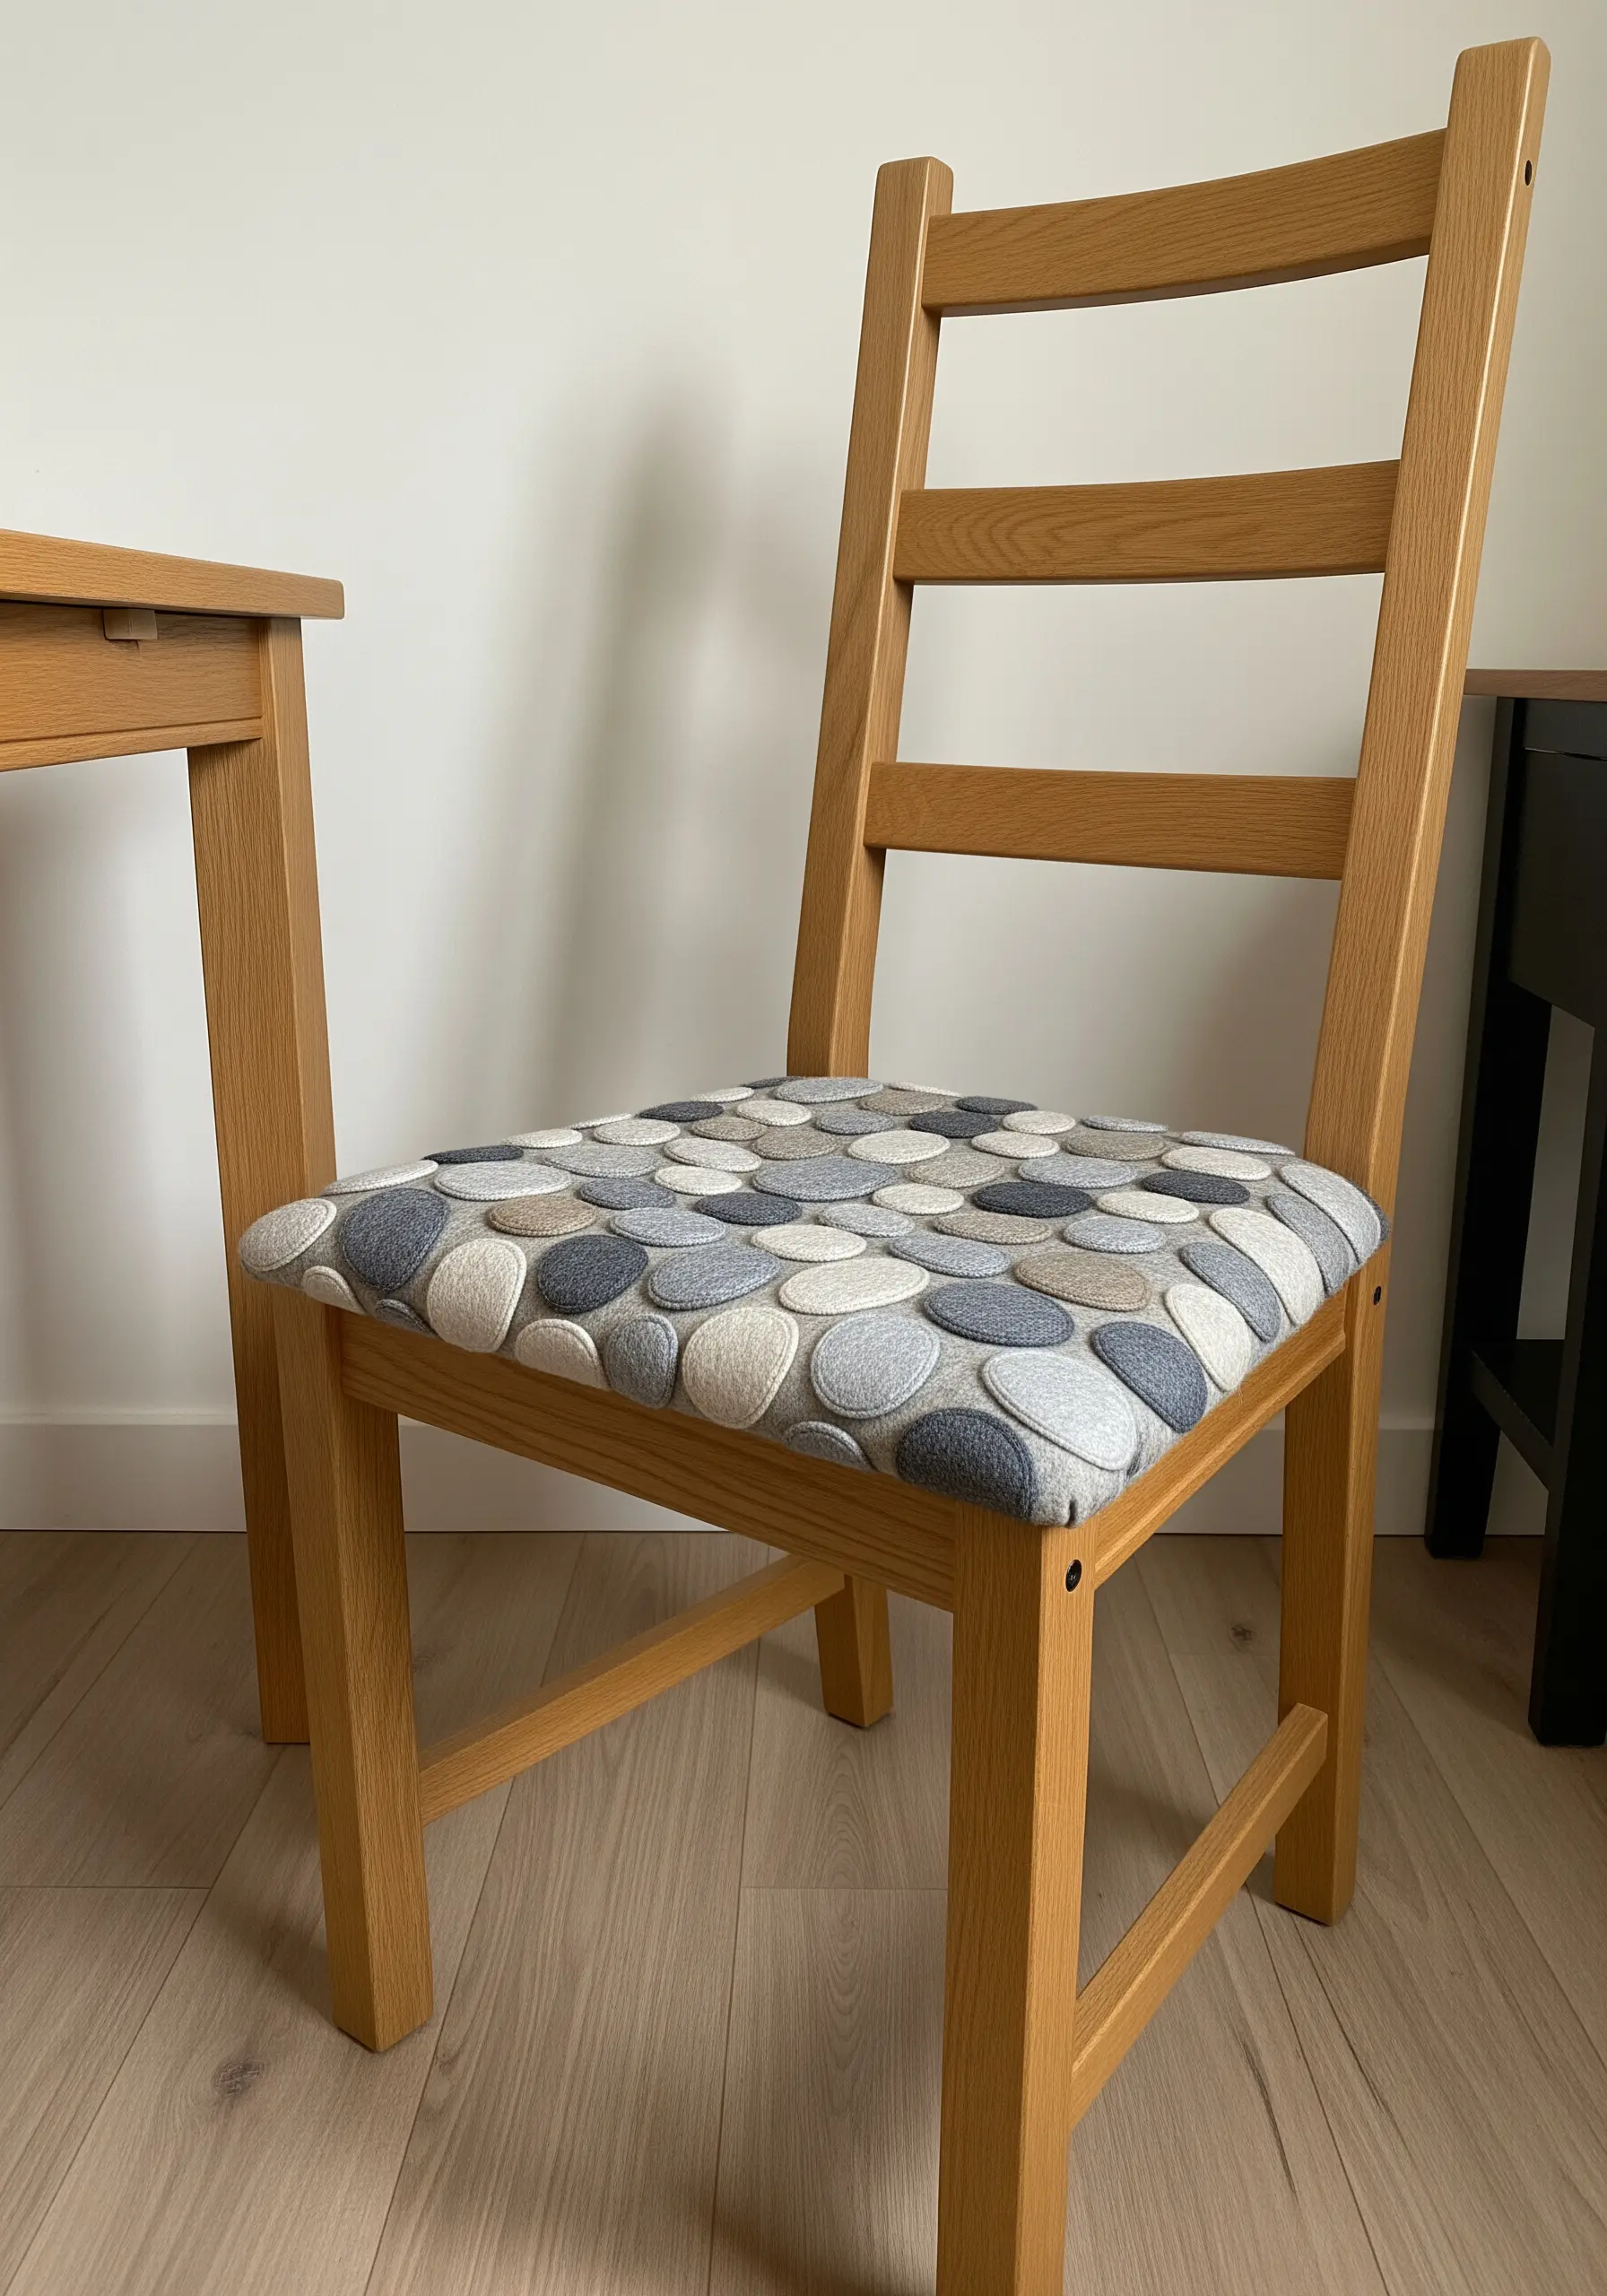
Recreate the organic, smooth feel of river stones with wool felt appliqué.
Cut rounded, irregular pebble shapes from felt in a range of harmonious neutral colors—stone, grey, cream, and charcoal.
Arrange the felt pieces on your base fabric, slightly overlapping them to create a natural, dense pattern.
Secure each piece with a small, nearly invisible whipstitch around the edge using a matching thread. This technique is both visually effective and durable enough for upholstery projects.
30. Overlapping Stitches for Realistic Ivy
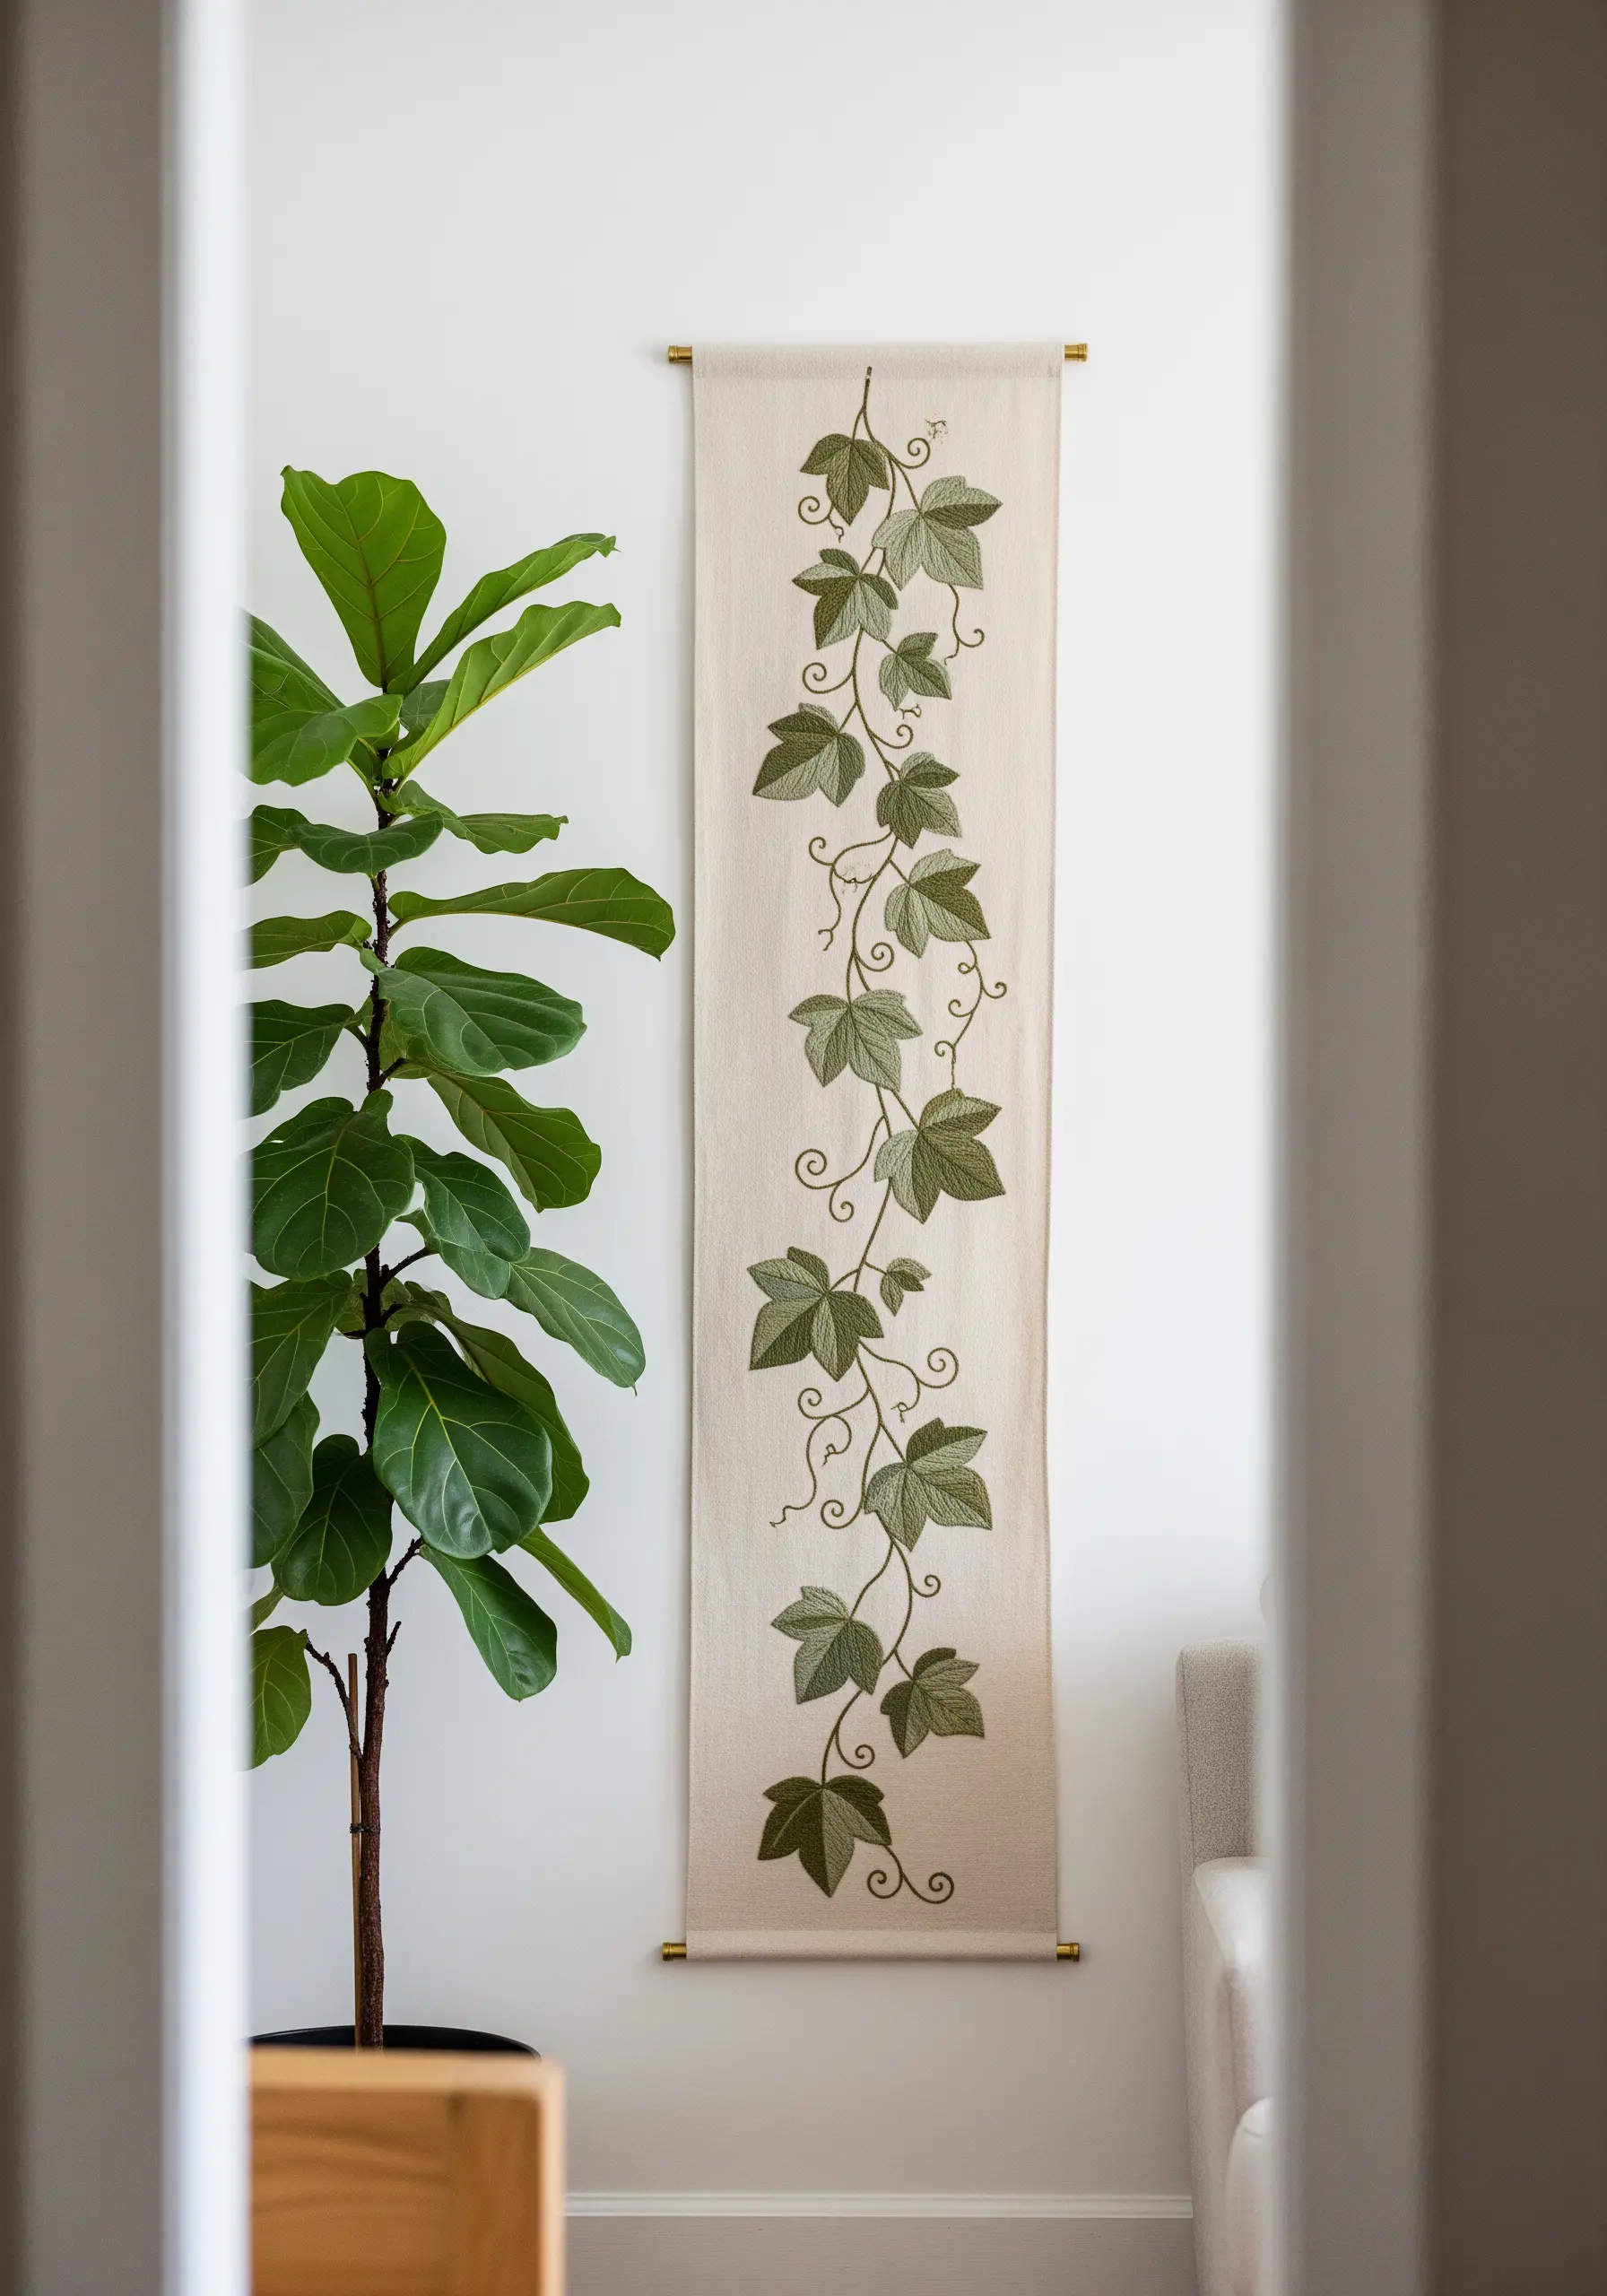
To make climbing plants like ivy feel realistic and three-dimensional, you must create layers.
Always stitch the elements that are furthest away first. Embroider the leaves in the background, and then stitch the foreground leaves so that their edges slightly cover the ones behind them.
Use a fishbone stitch or a satin stitch with a central split stitch to give each leaf a defined central vein.
This simple trick of overlapping your stitches adds instant depth and life to your botanical designs.


