
A well-chosen border does more than just decorate an edge; it frames the entire piece, giving it structure, intention, and a finished look. If you’ve ever felt your embroidery projects were missing that final touch of polish, the answer often lies in how you treat the borders. It’s where the eye begins and ends its journey.
But a beautiful border doesn’t require weeks of dense, complicated stitching. Instead, modern elegance is found in thoughtful simplicity—a perfectly executed line, a rhythm of repeating shapes, or a subtle play on texture. These designs are about leveraging the right stitch for the right effect, whether you’re working on delicate chiffon, crisp linen, or a cozy wool scarf.
Here, you’ll find eighteen ways to approach border design with confidence. Forget overwhelming patterns. We’ll focus on clean lines, smart color choices, and techniques that create maximum impact with minimal fuss, transforming your textiles into wearable art.
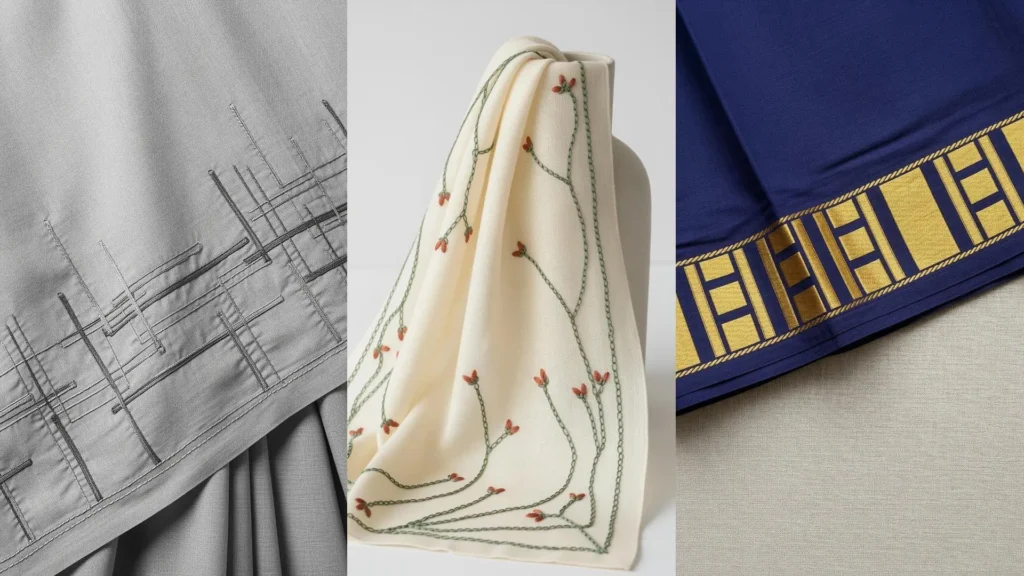
1. The Graphic Contrast Border
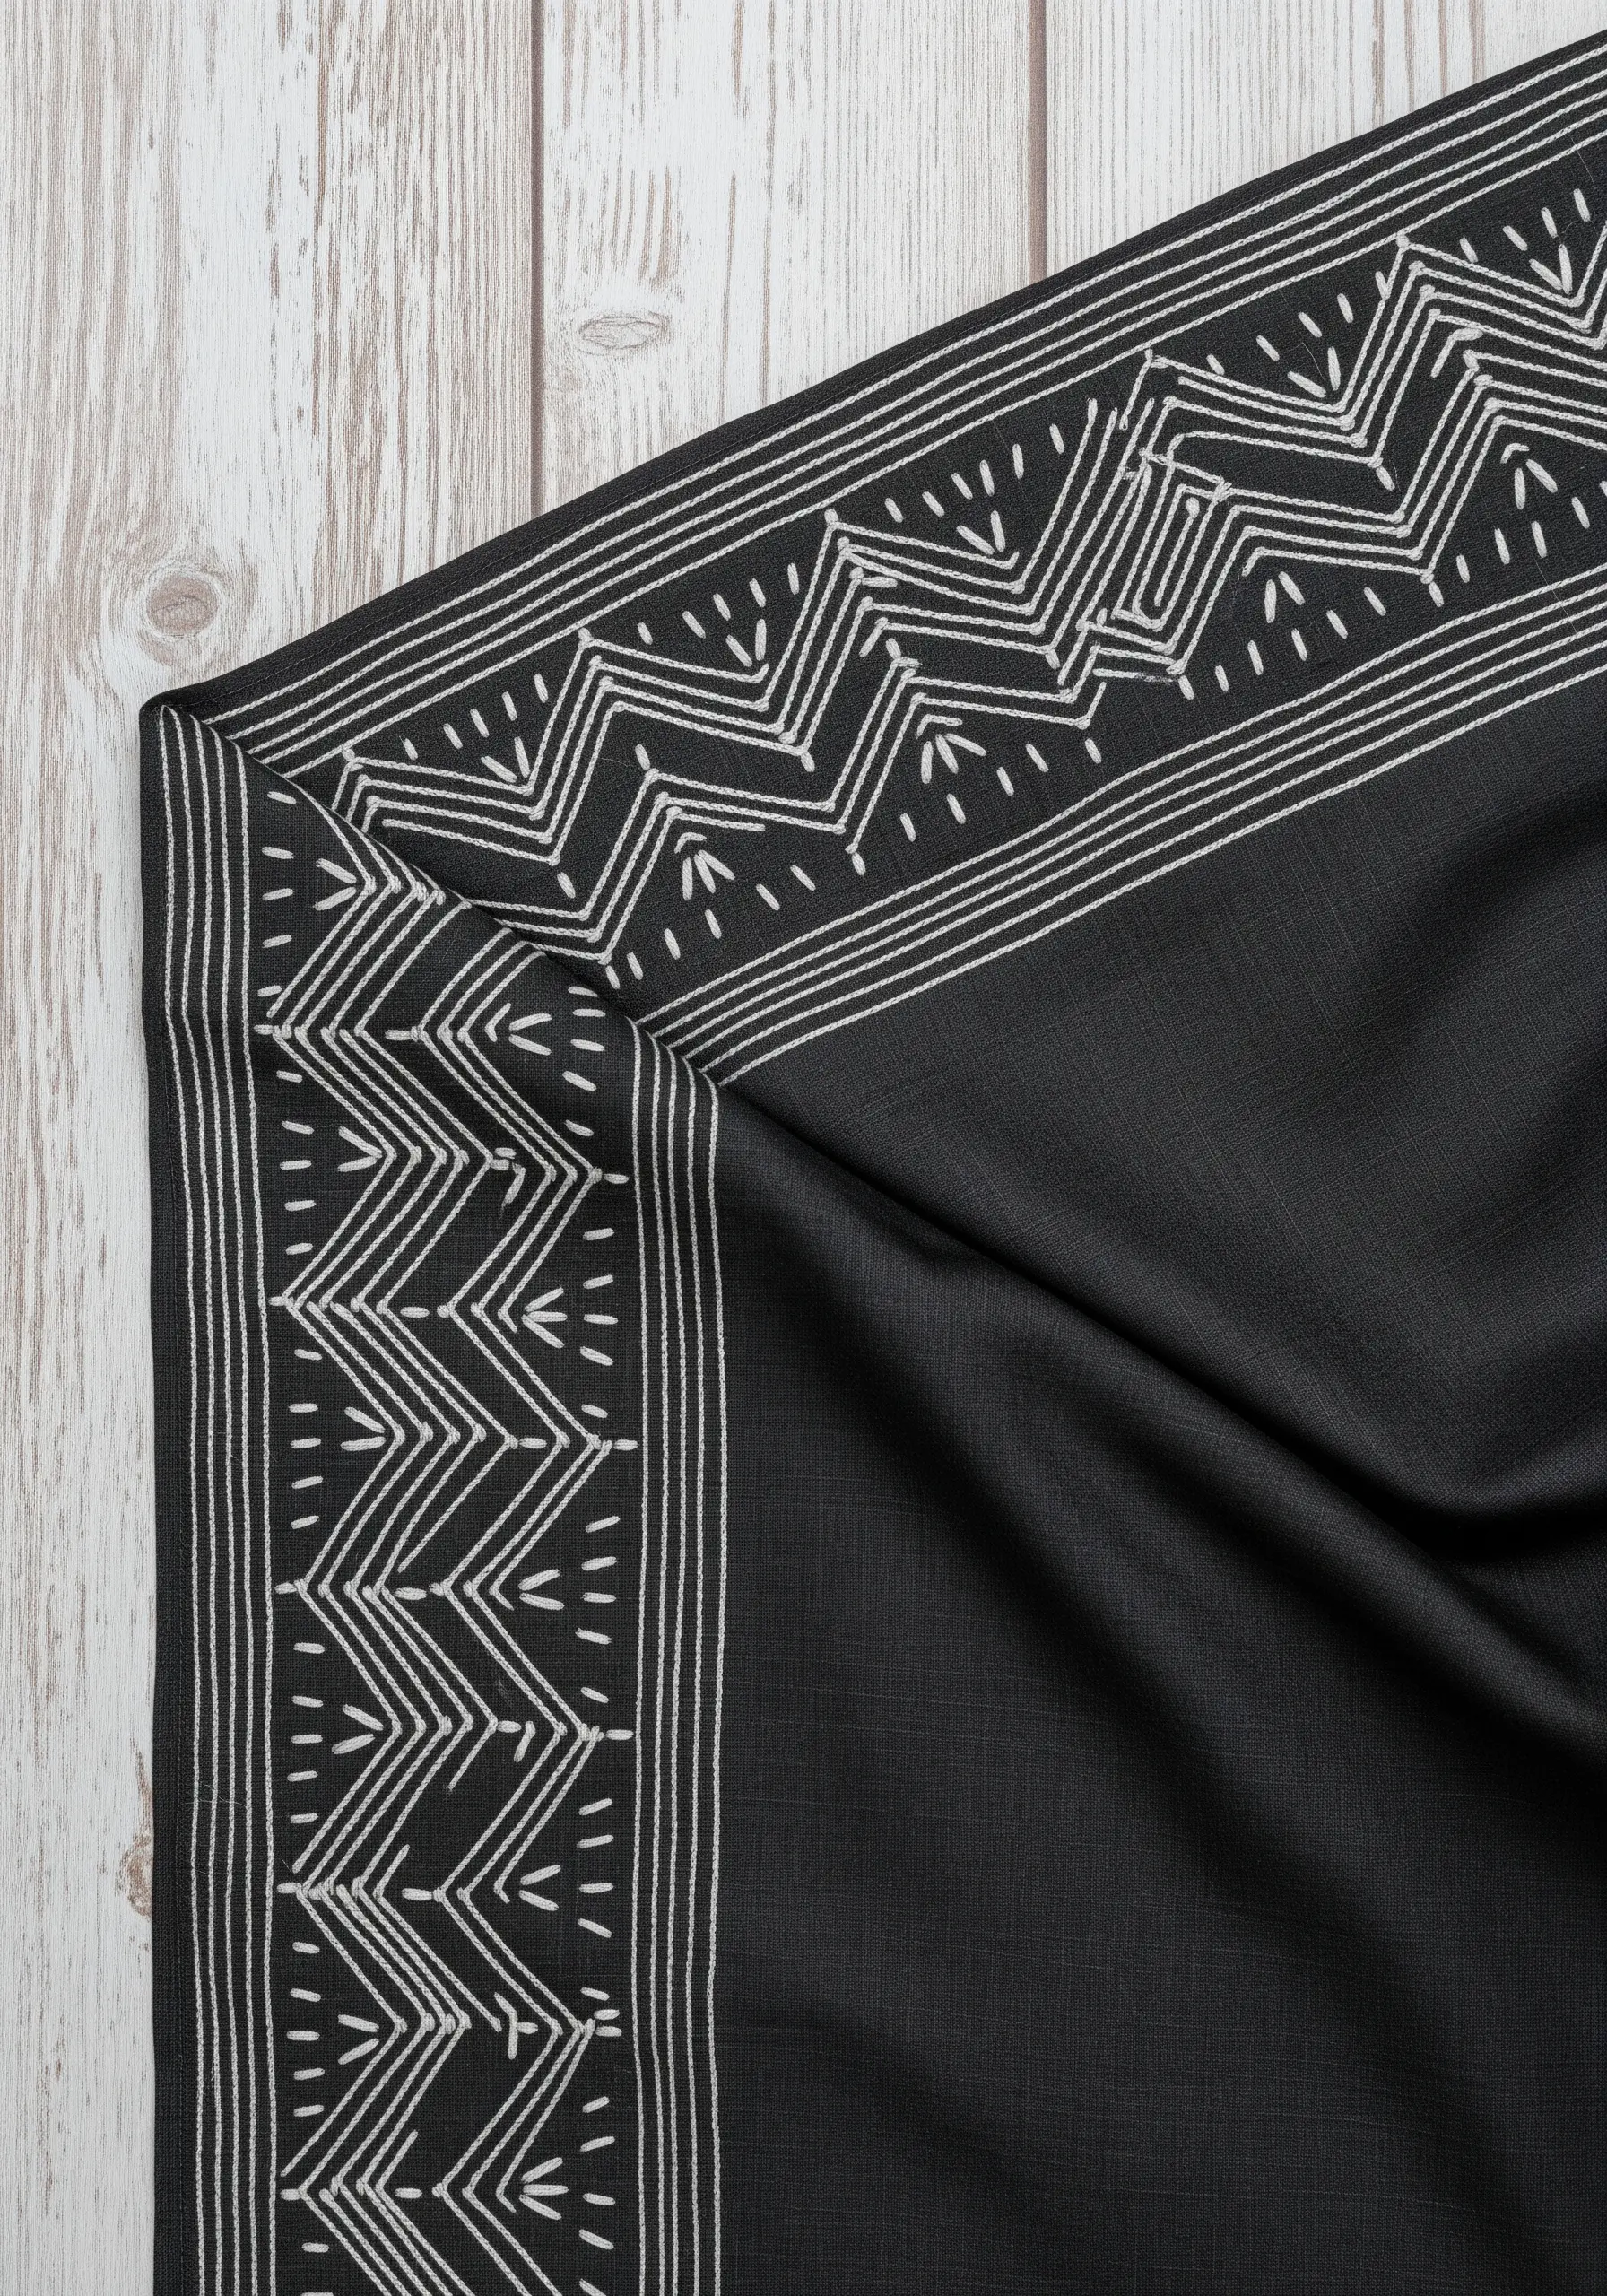
This design relies on high contrast and clean lines. Use a single strand of pearl cotton for a raised, defined outline that stands out against dark fabric.
To keep your zig-zags sharp, mark your turning points with a disappearing ink pen and pivot precisely.
The small straight stitches scattered within add rhythm; vary their length slightly to create a hand-drawn, organic feel instead of a machine-made look.
This technique works best on stable fabrics like cotton or linen blends that won’t pucker.
2. The Wandering Vine Border
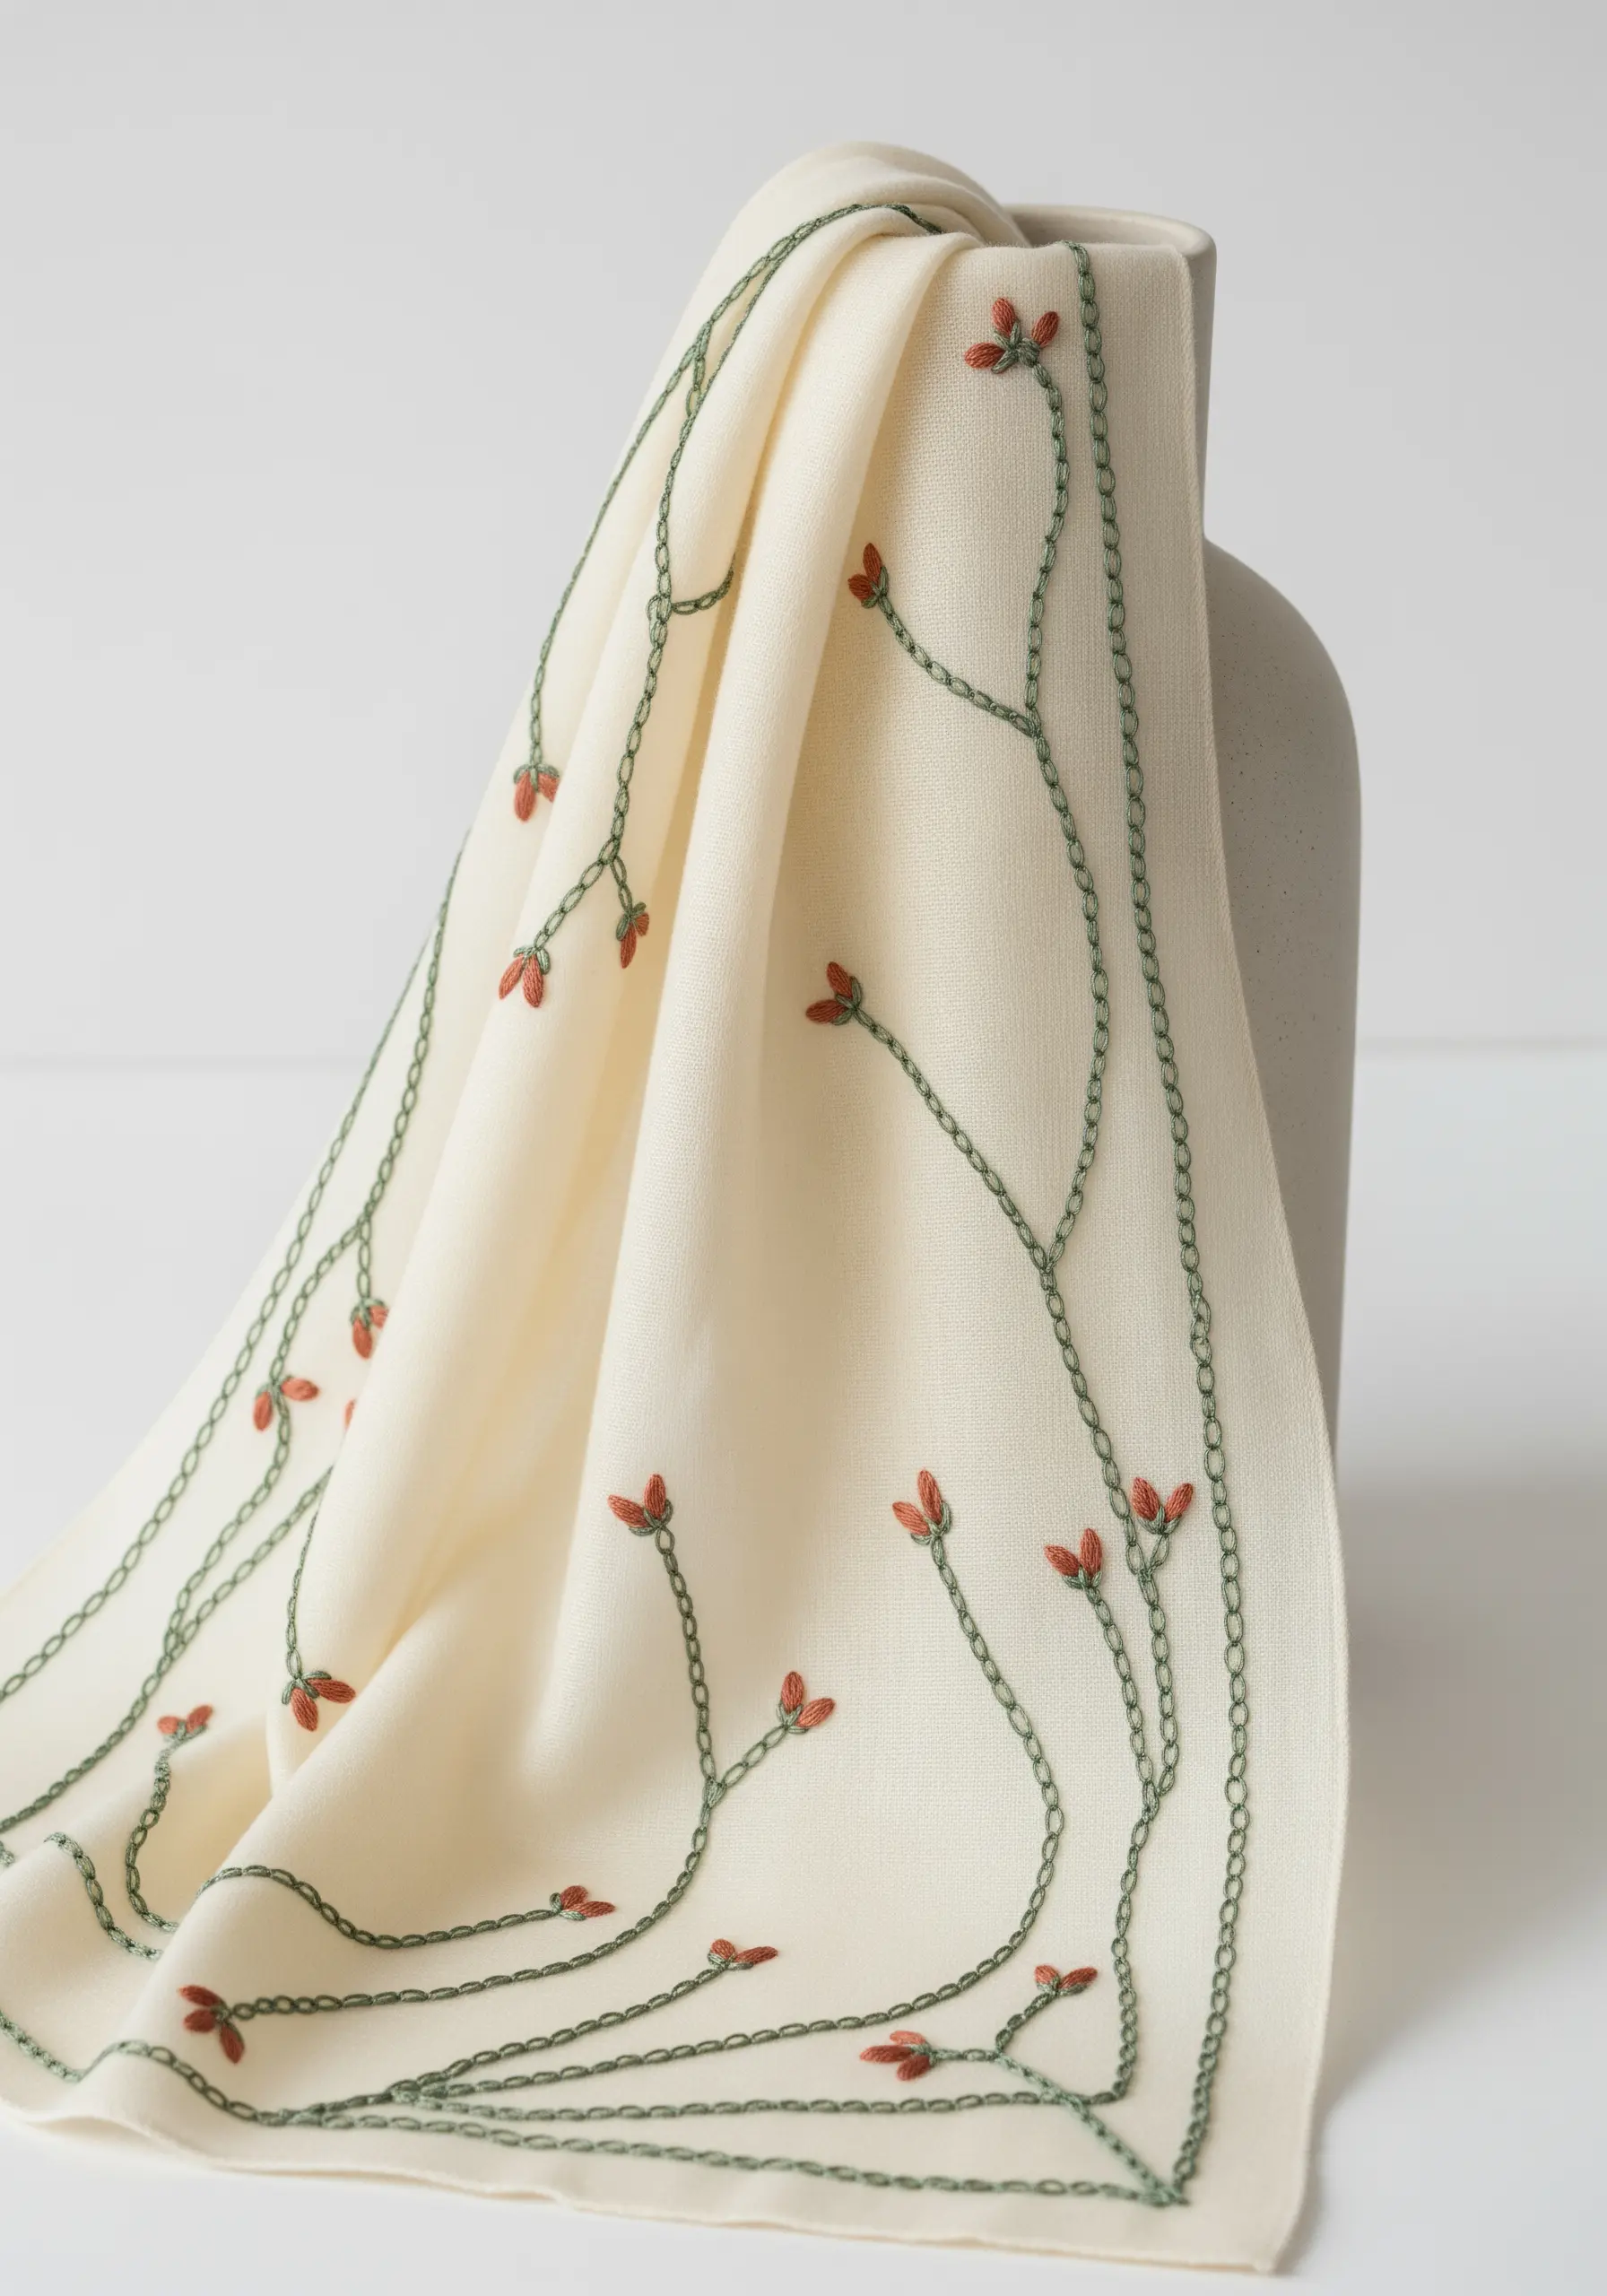
Create an organic, flowing border by avoiding perfect symmetry. Use a simple chain stitch for the stems, allowing them to meander naturally along the edge.
For the buds, use a satin stitch or a few tightly packed French knots in a contrasting color to create a pop of texture.
The key is to vary the spacing and direction of the vines, making the design feel like it grew there.
This approach adds movement and a delicate, botanical energy to lightweight fabrics like chiffon or silk.
3. The Architectural Satin Stitch Block
Achieve this bold, woven look with dense satin stitch blocks. The trick to flawless satin stitches on a large scale is to first outline each block with a split stitch.
This raised edge acts as a guide and prevents the satin stitches from becoming uneven.
Use a metallic or high-sheen rayon thread for that liquid-gold effect.
To ensure your blocks are perfectly geometric, use a water-soluble stabilizer on the fabric to draw a precise grid before you begin stitching.
4. The Scattered Geometric Edge
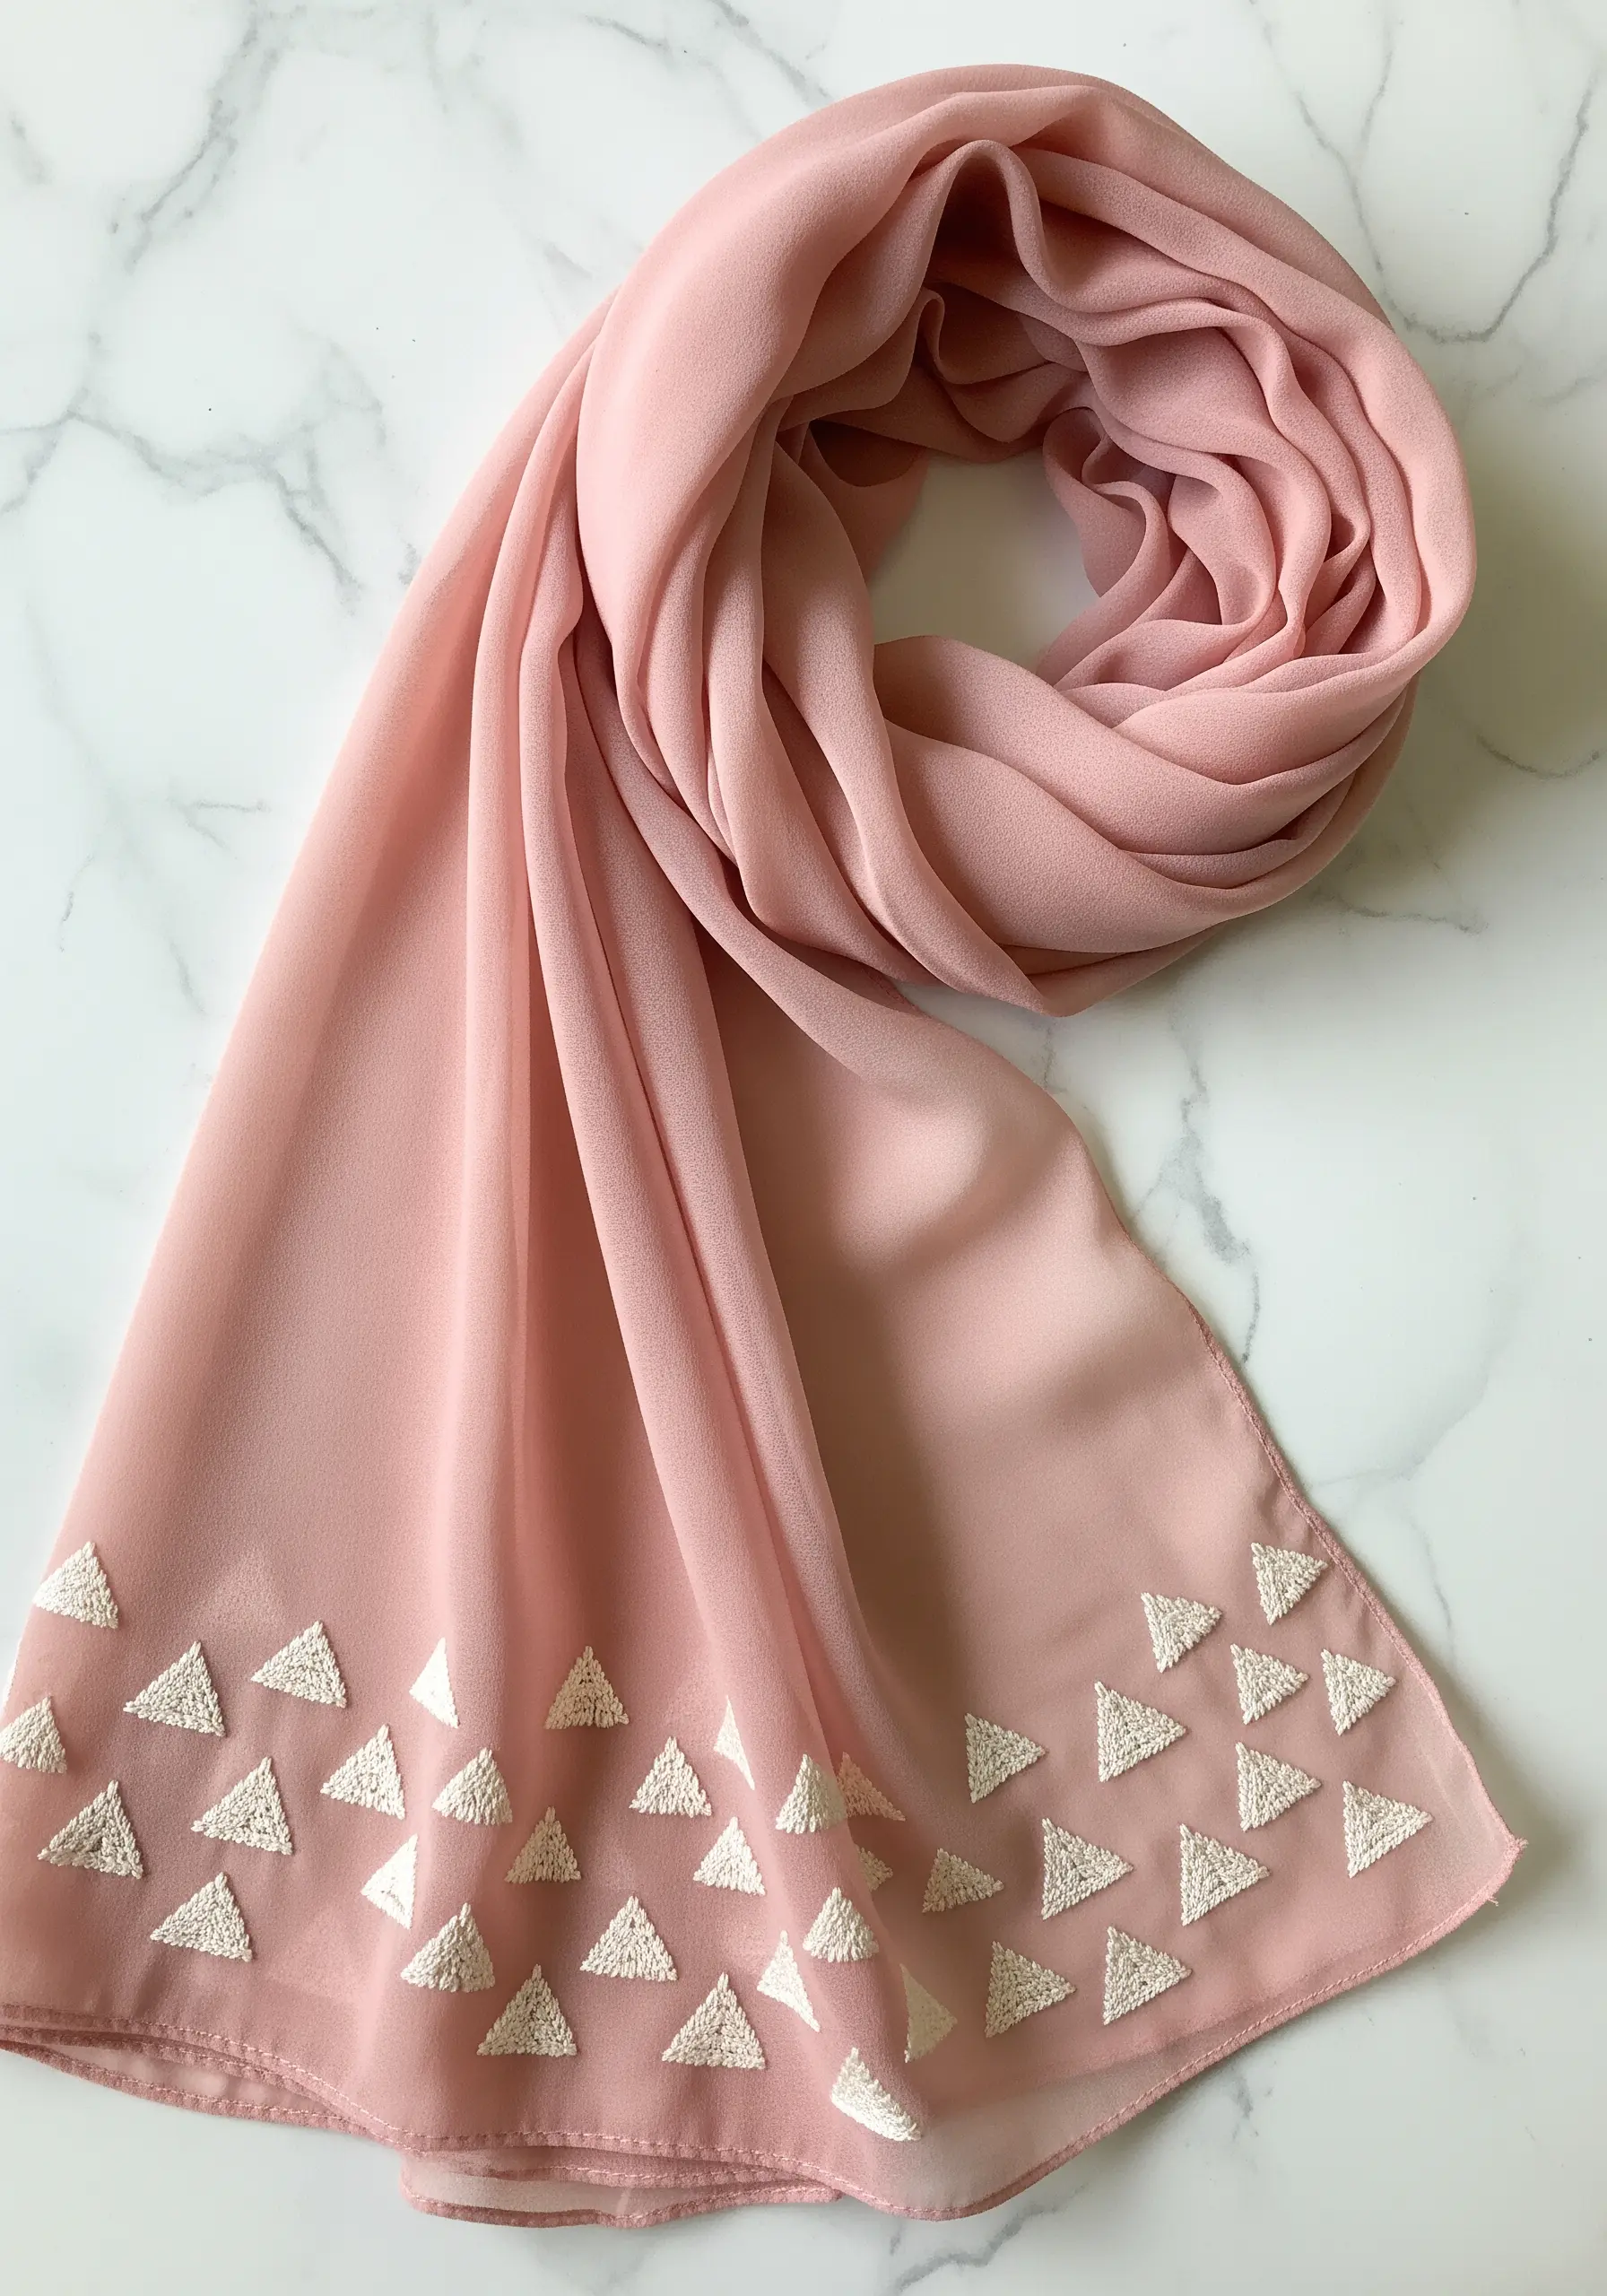
This design creates impact through repetition and negative space. Instead of a solid line, scatter filled geometric shapes along the border.
Use a dense satin stitch for the triangles, ensuring all stitches lie in the same direction for a smooth, light-catching surface.
To prevent puckering on delicate fabrics like chiffon, use a lightweight tear-away stabilizer.
The scattered placement feels modern and prevents the border from looking too heavy or formal.
5. The Rhythmic Wave Border
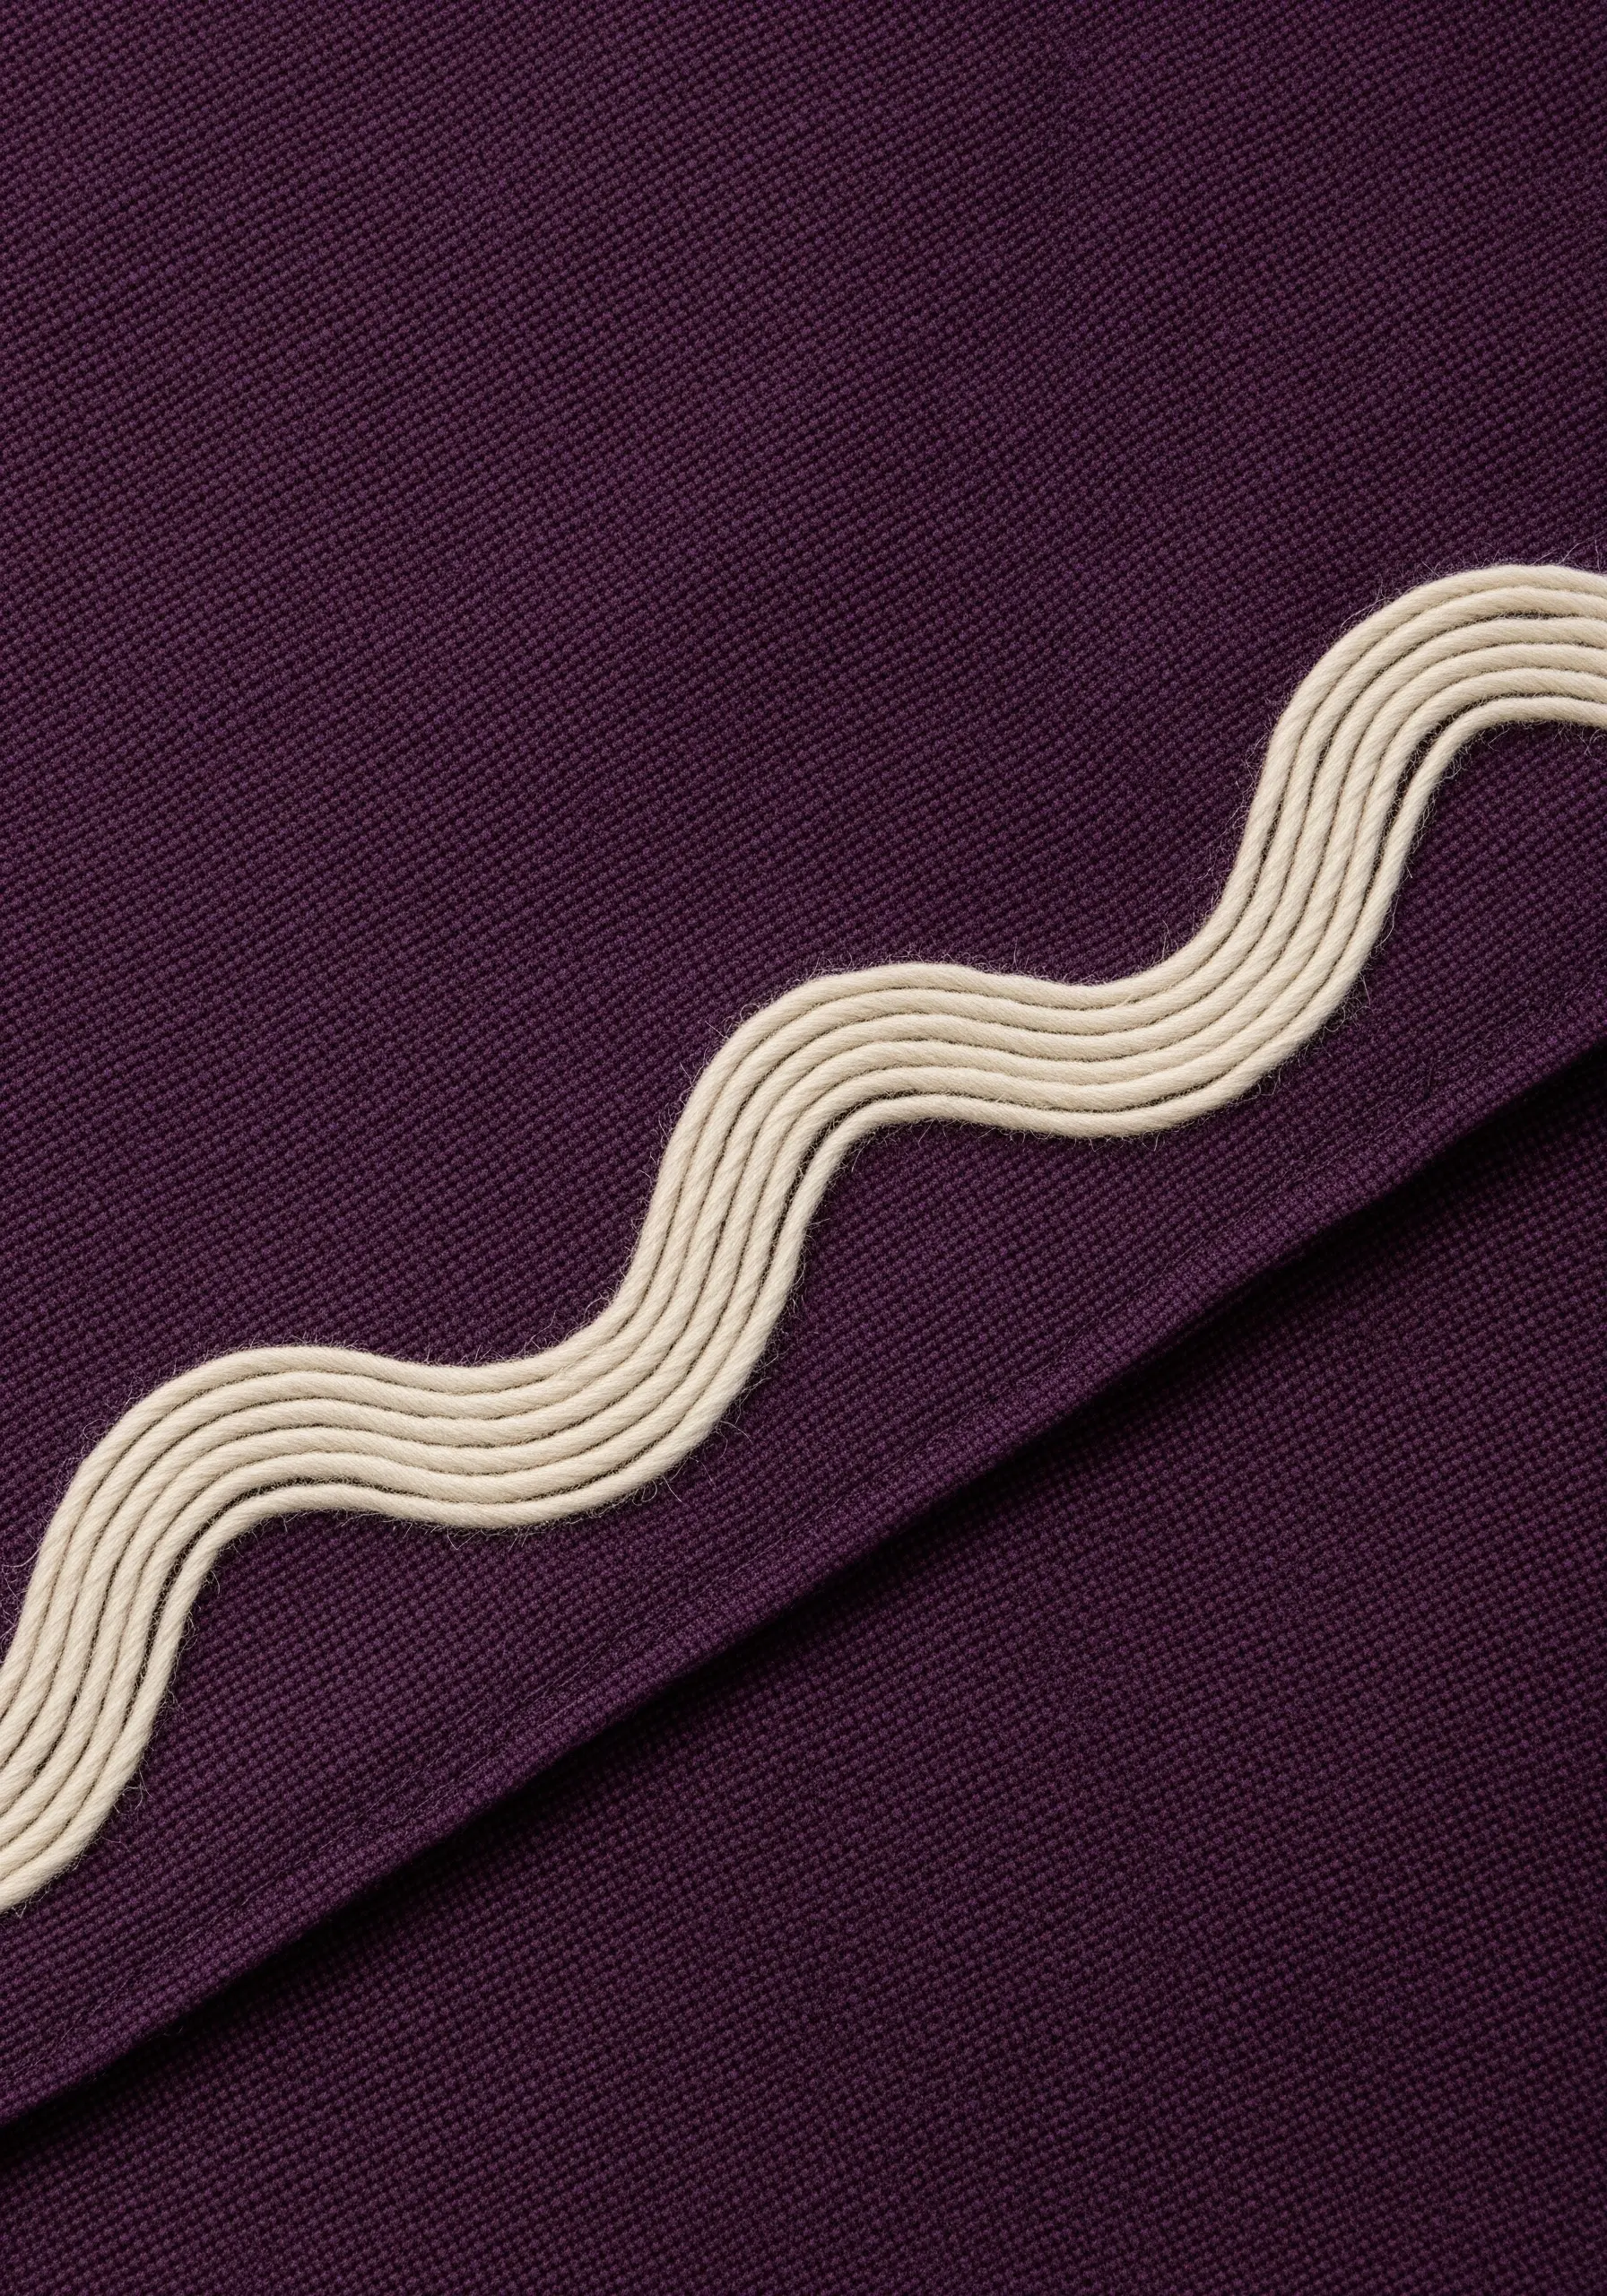
Create this fluid, undulating border using parallel lines of whipped backstitch or stem stitch.
Using a thicker thread, like a pearl cotton #8, will give the lines dimension and a corded appearance.
To ensure your waves are uniform, draw the first line with a fabric marker and then use it as a guide for the subsequent rows, maintaining a consistent distance between each line.
This technique adds texture and movement without overwhelming the fabric.
6. The Art Deco Scallop
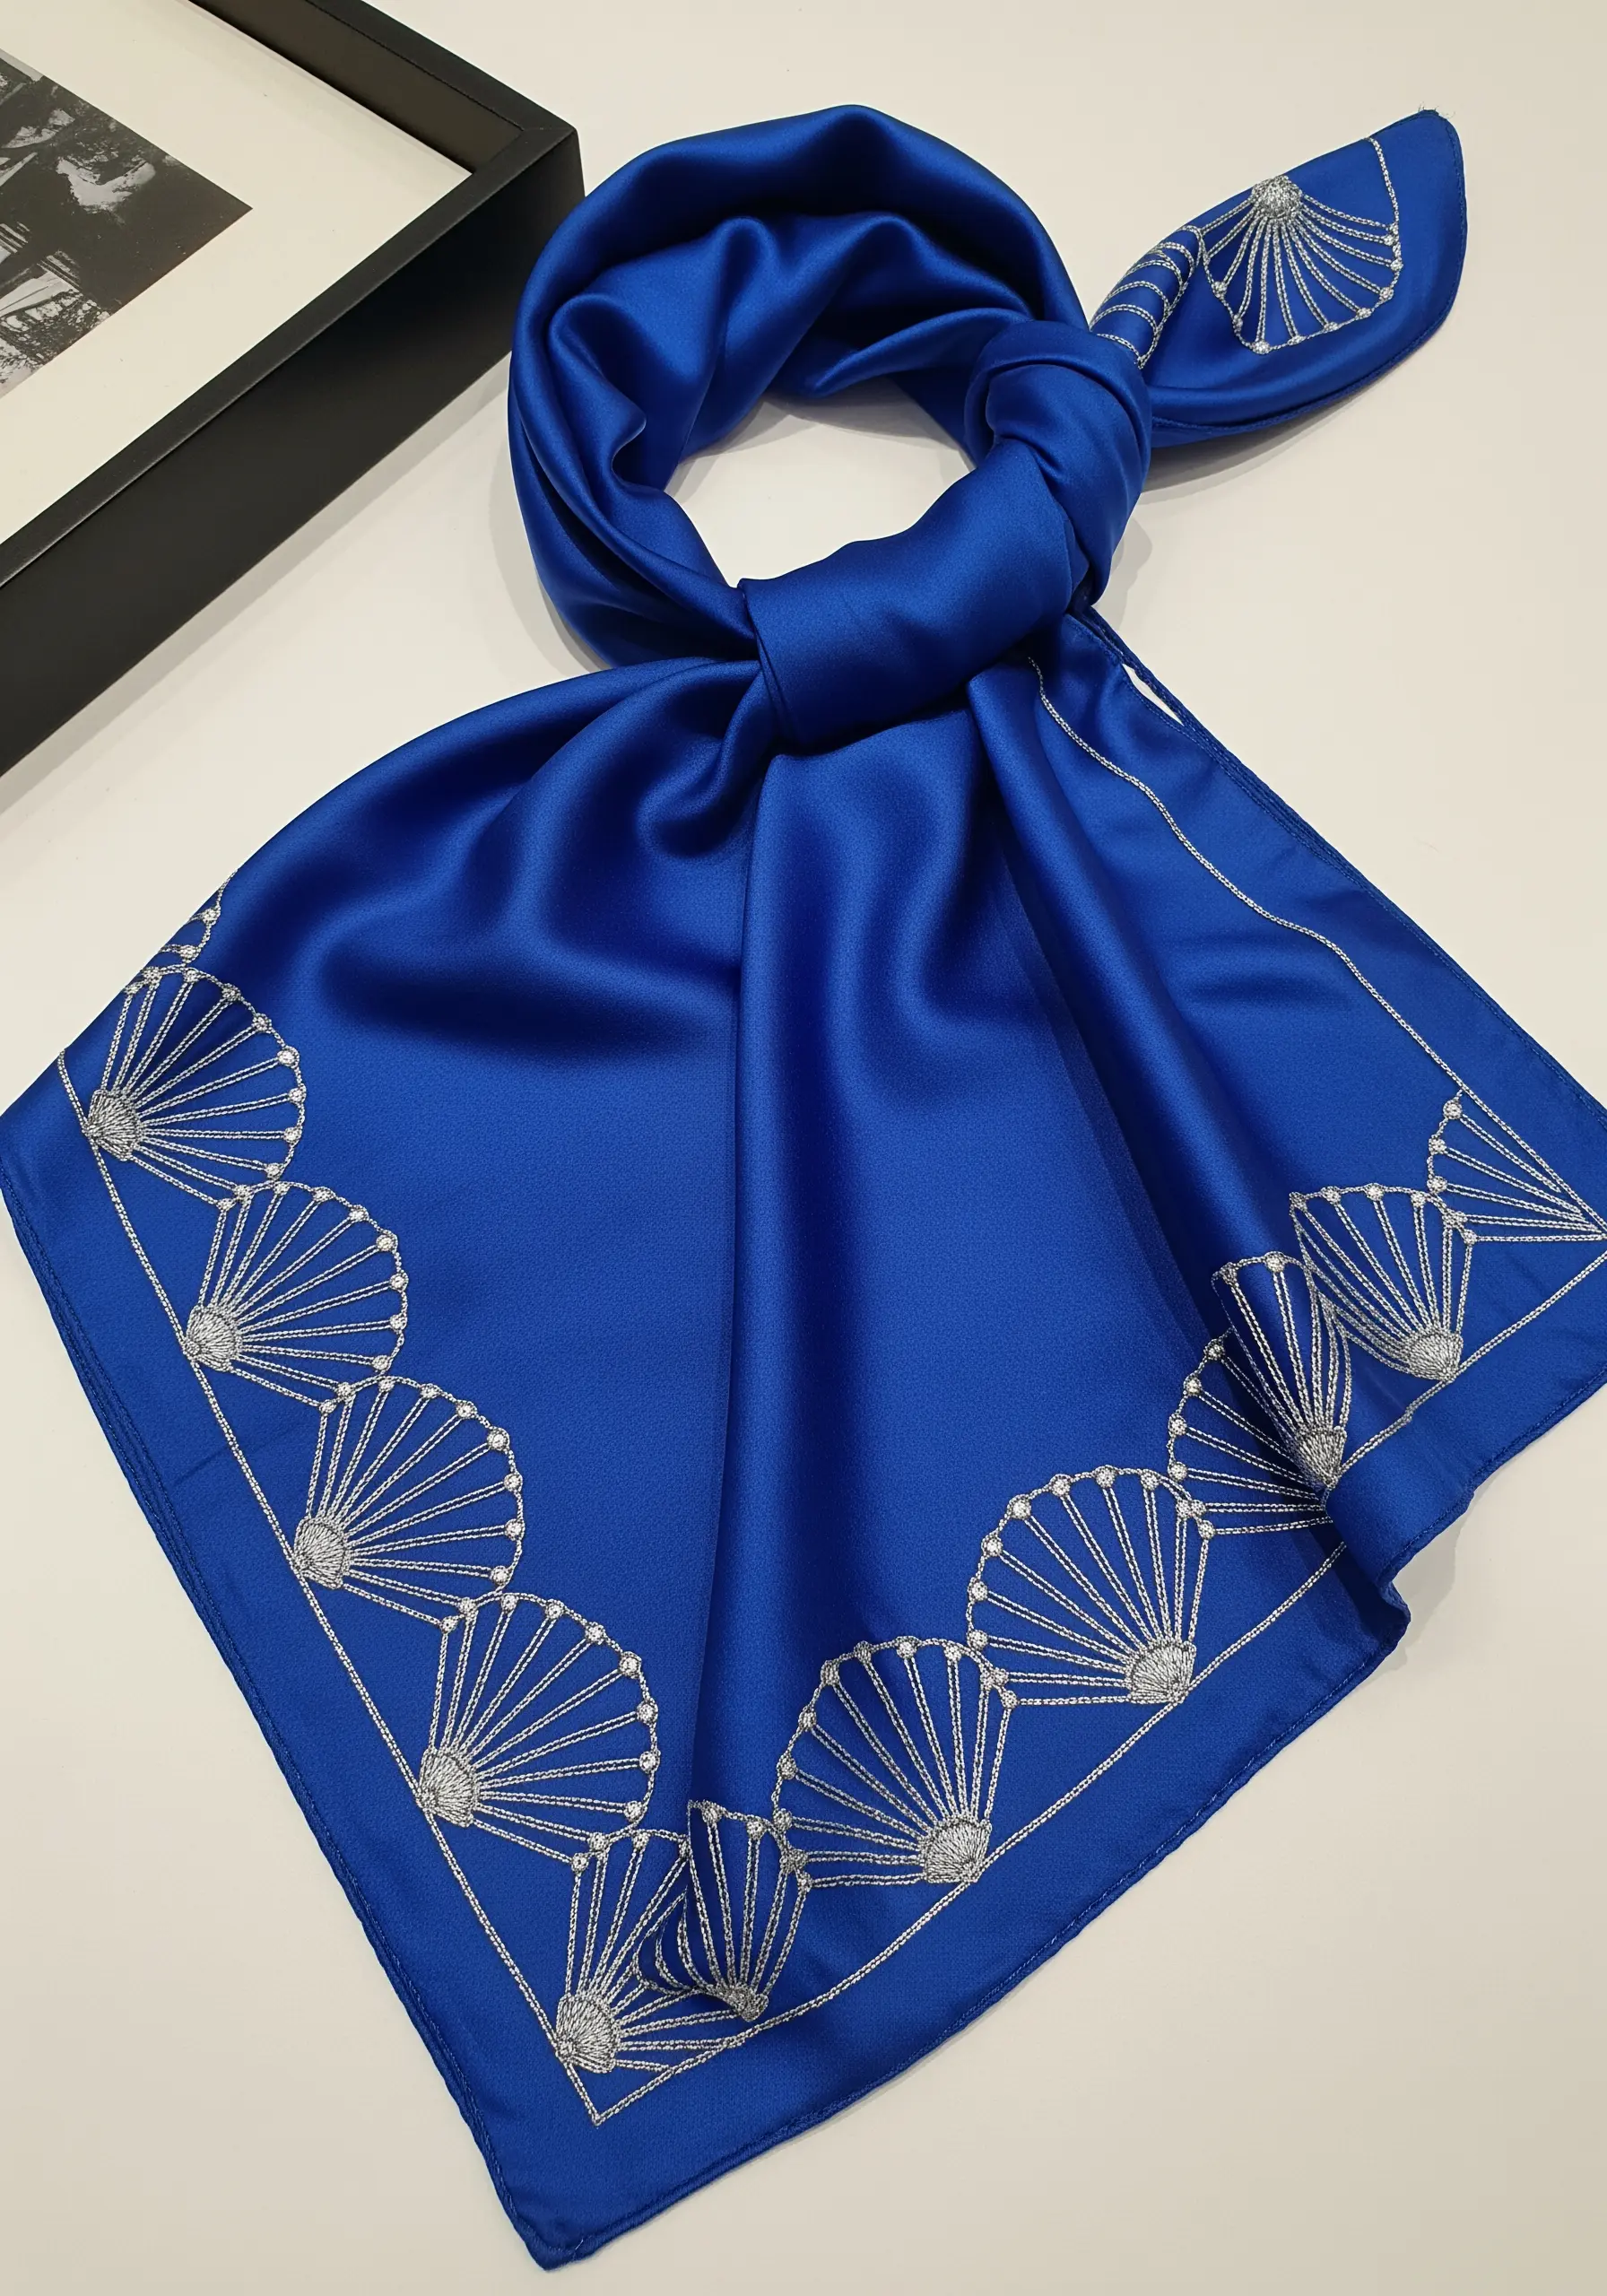
Evoke Art Deco elegance by combining straight stitches and French knots.
Use a bright silver metallic thread for the fan rays—a single long strand for each line will keep them sharp.
To manage metallic thread, use shorter lengths to prevent fraying and a thread conditioner like beeswax.
Anchor the design with a delicate backstitch outline and add tiny seed beads or French knots at the intersections for a touch of sparkle. This method works beautifully on high-sheen fabrics like silk or satin.
7. The Abstract Architectural Grid
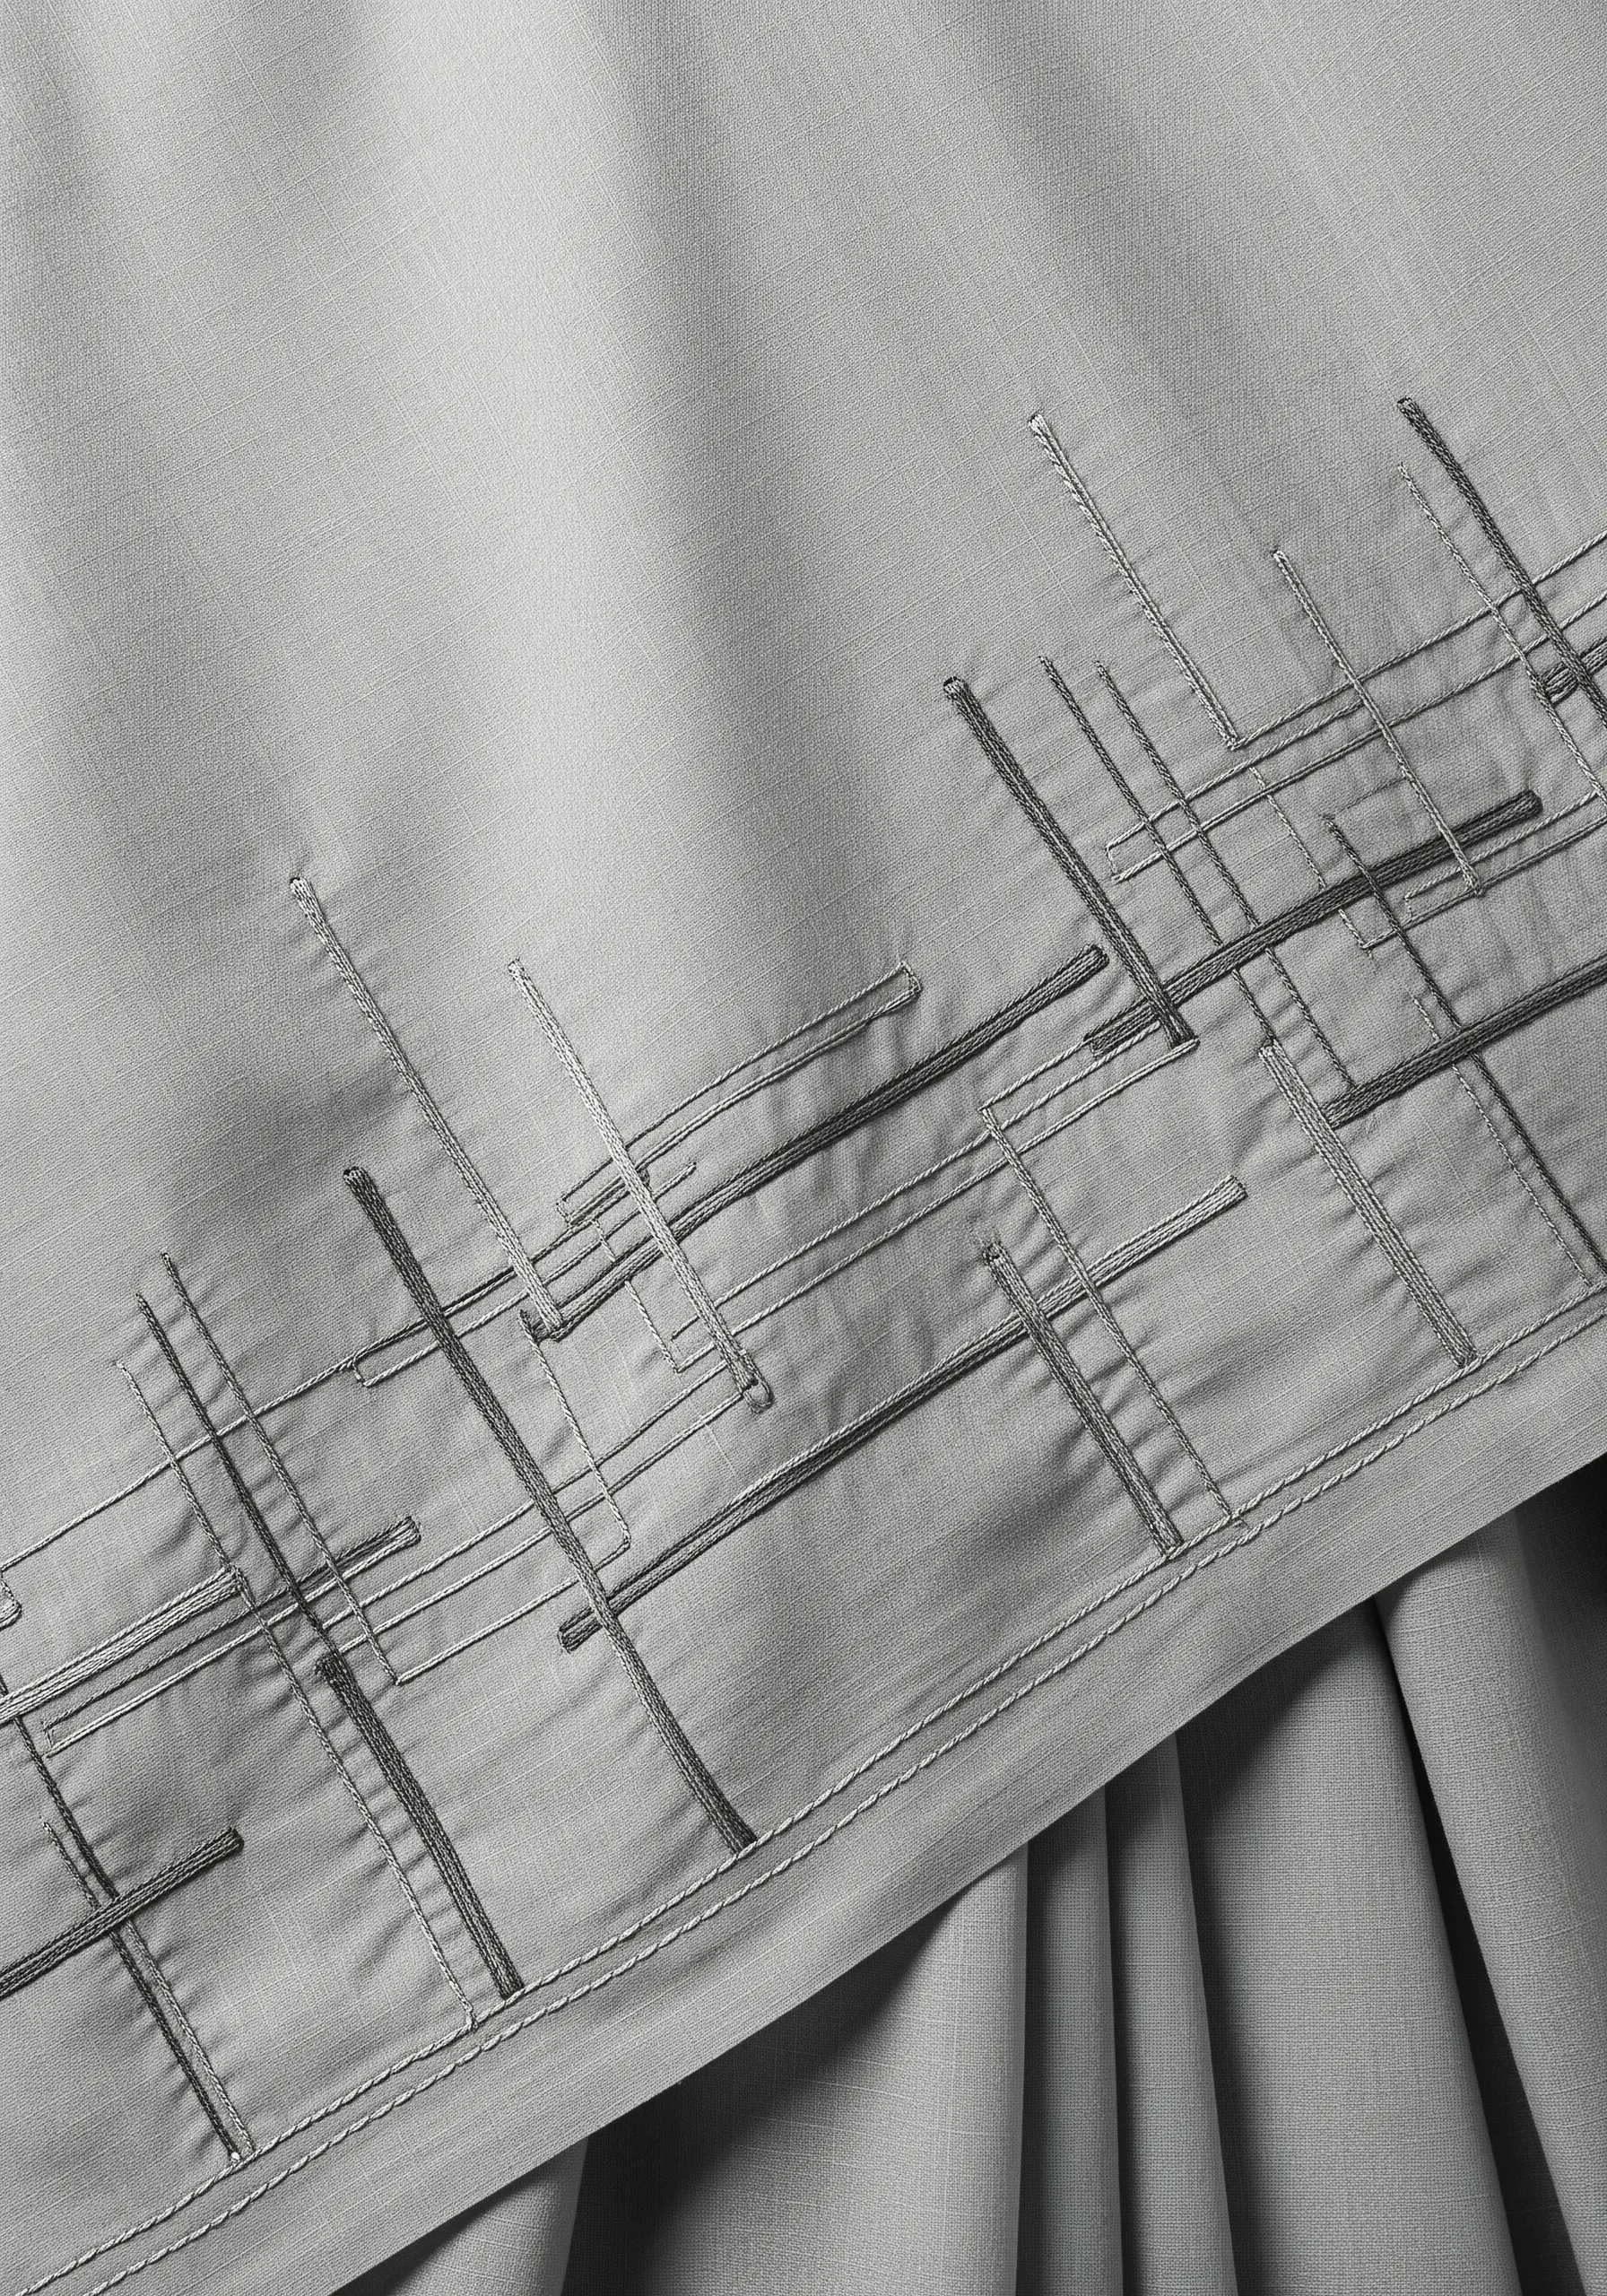
This border is about creating visual interest with intersecting lines rather than a repeating pattern.
Use a simple running stitch or backstitch in varying thread weights—a two-strand floss for delicate lines and a four-strand for bolder ones.
The key is to overlap the lines at sharp angles to create a sense of depth and structure.
A monochrome palette with one slightly darker accent color adds sophistication. This is a perfect way to practice stitch tension on a stable cotton or linen.
8. The Asymmetrical Constellation
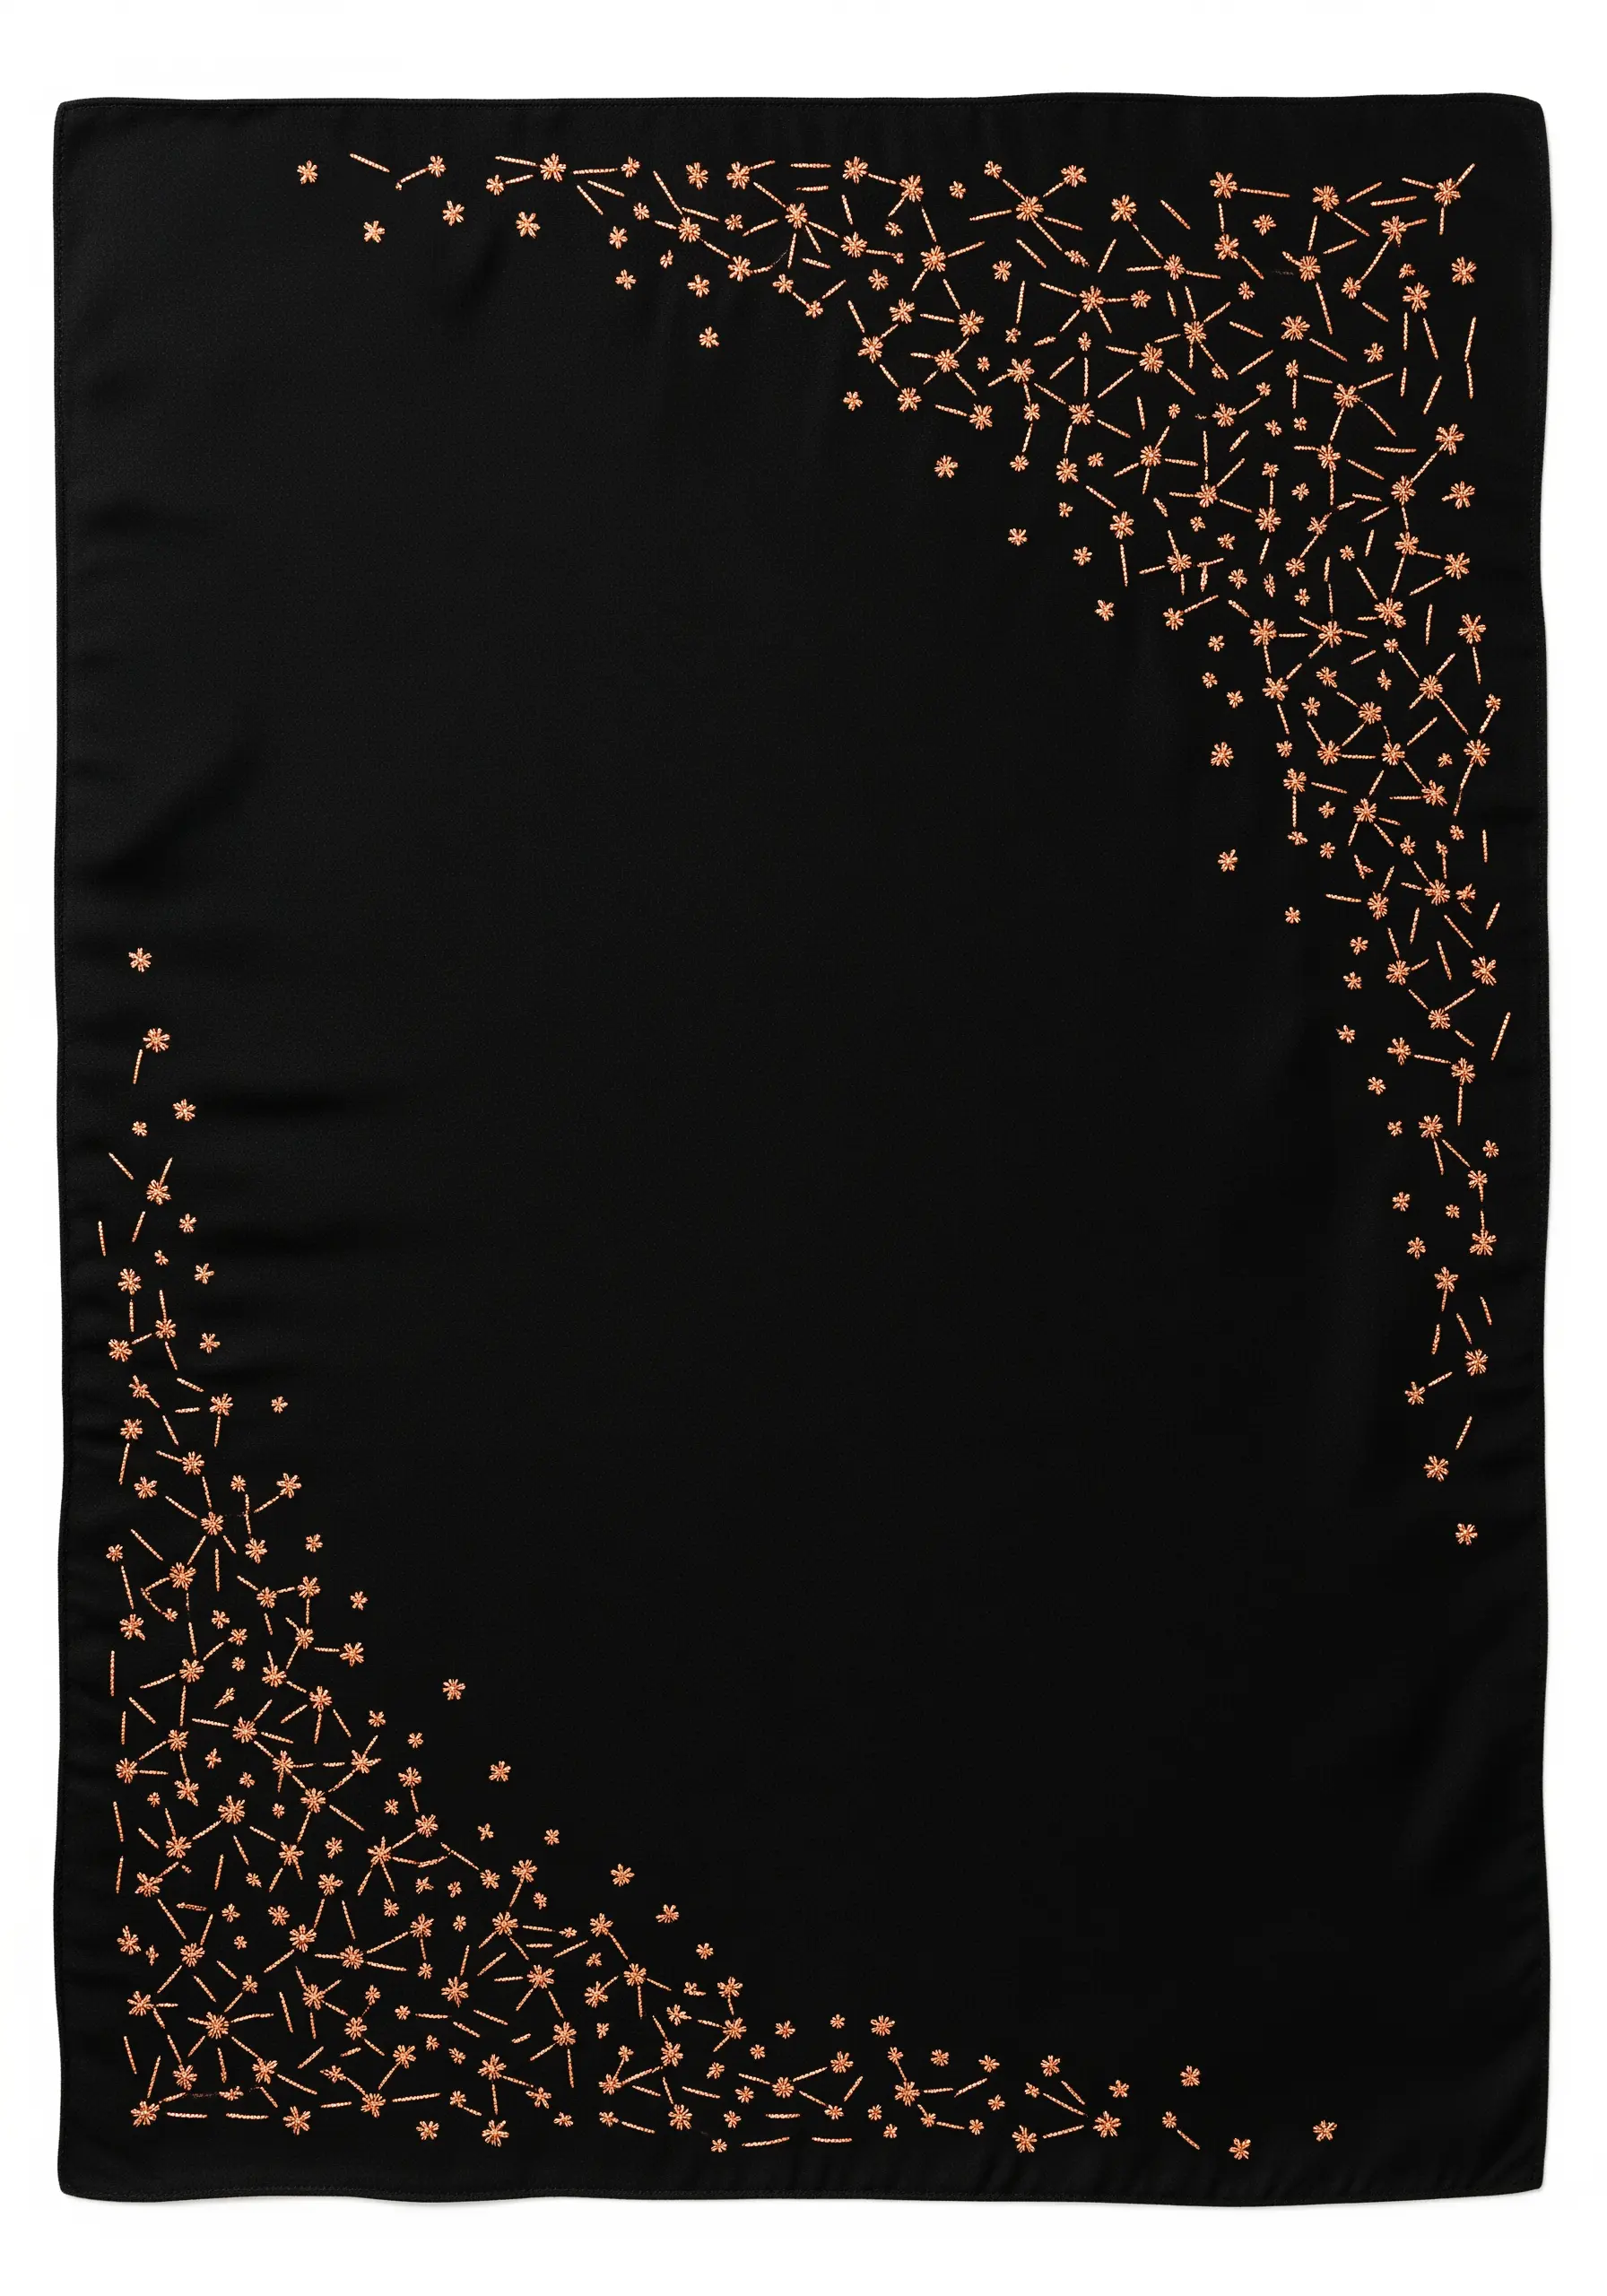
Frame a scarf or saree with an asymmetrical cascade of simple motifs.
Use a detached chain stitch for the petals and a single straight stitch for the stems, creating tiny starbursts.
Cluster them densely at the corners and let them dissipate towards the center of the fabric. This ‘fade’ effect draws the eye and feels more dynamic than a uniform border.
Using a metallic or silk thread in a warm copper tone against black fabric creates a stunning, cosmic effect.
9. The Polished Polka Dot Border
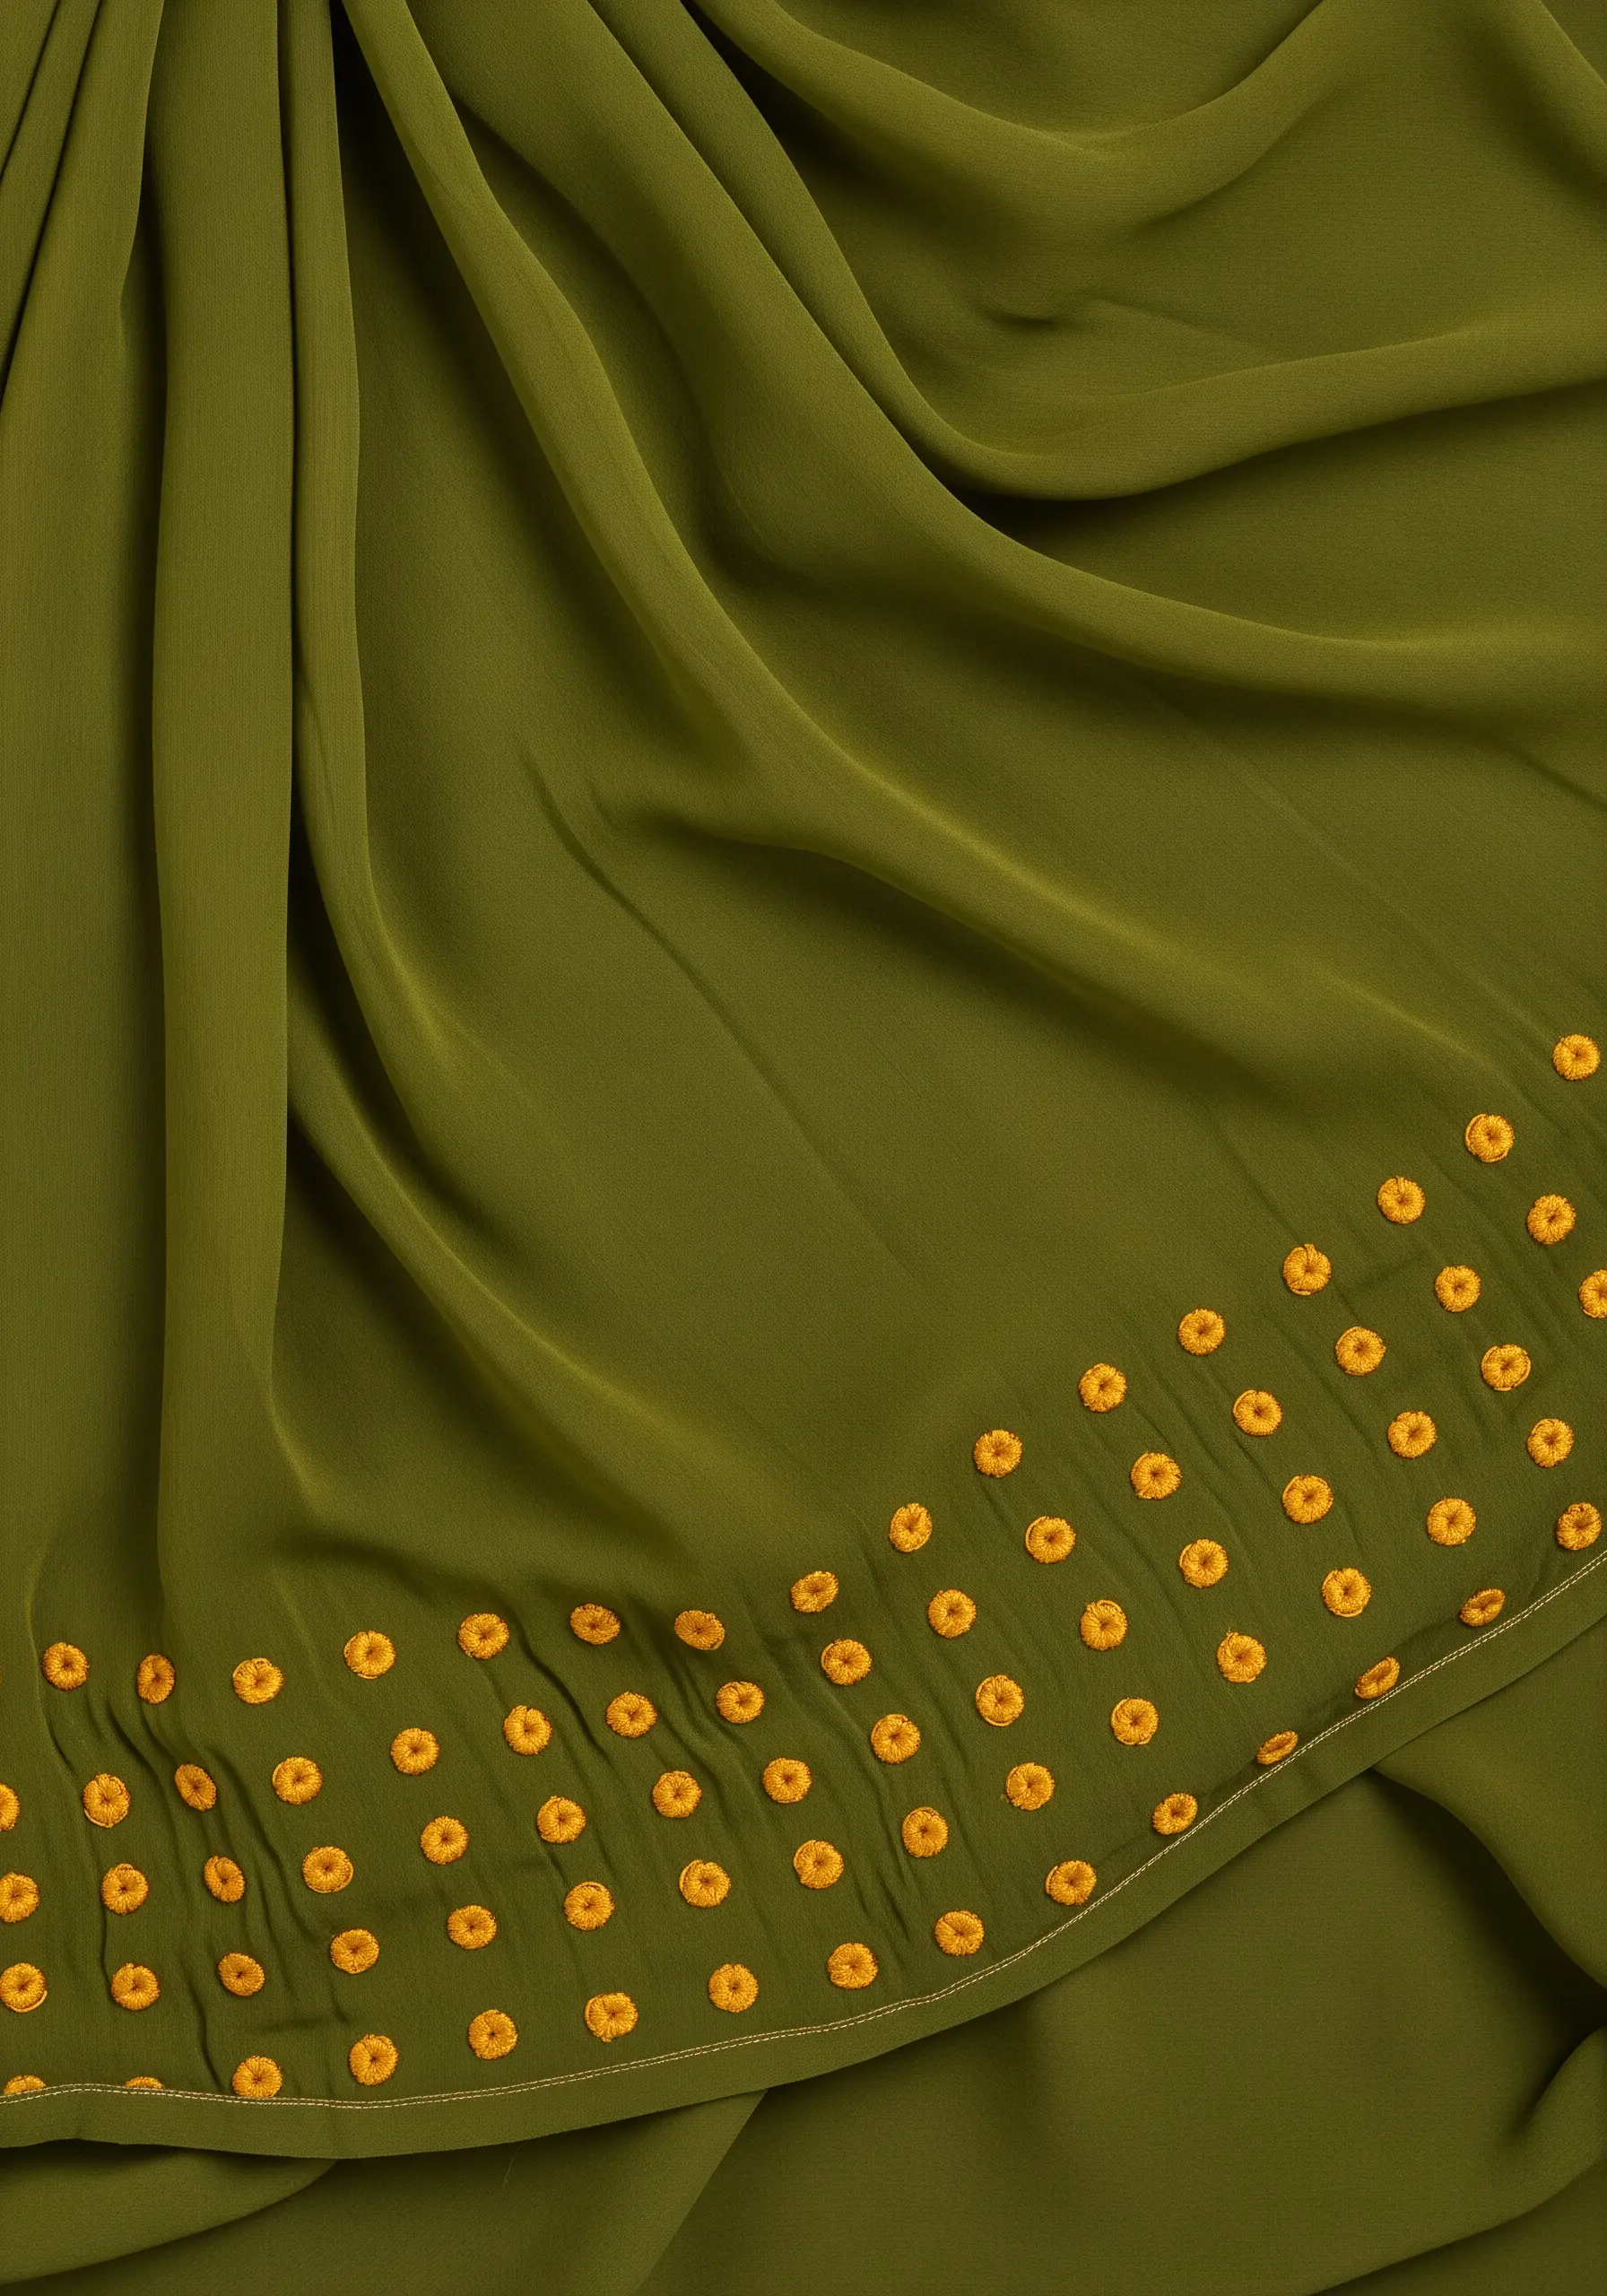
Elevate a simple dot pattern by using a whipped circle stitch or a tightly worked eyelet stitch.
This creates a raised, textural circle that looks more refined than a basic satin stitch fill.
To keep the circles perfectly round and evenly spaced, use a circle template and a chalk pencil to mark your guidelines.
The contrast between the matte fabric and the slight sheen of the embroidery floss gives this simple design a luxurious feel.
10. The Triple Line Border
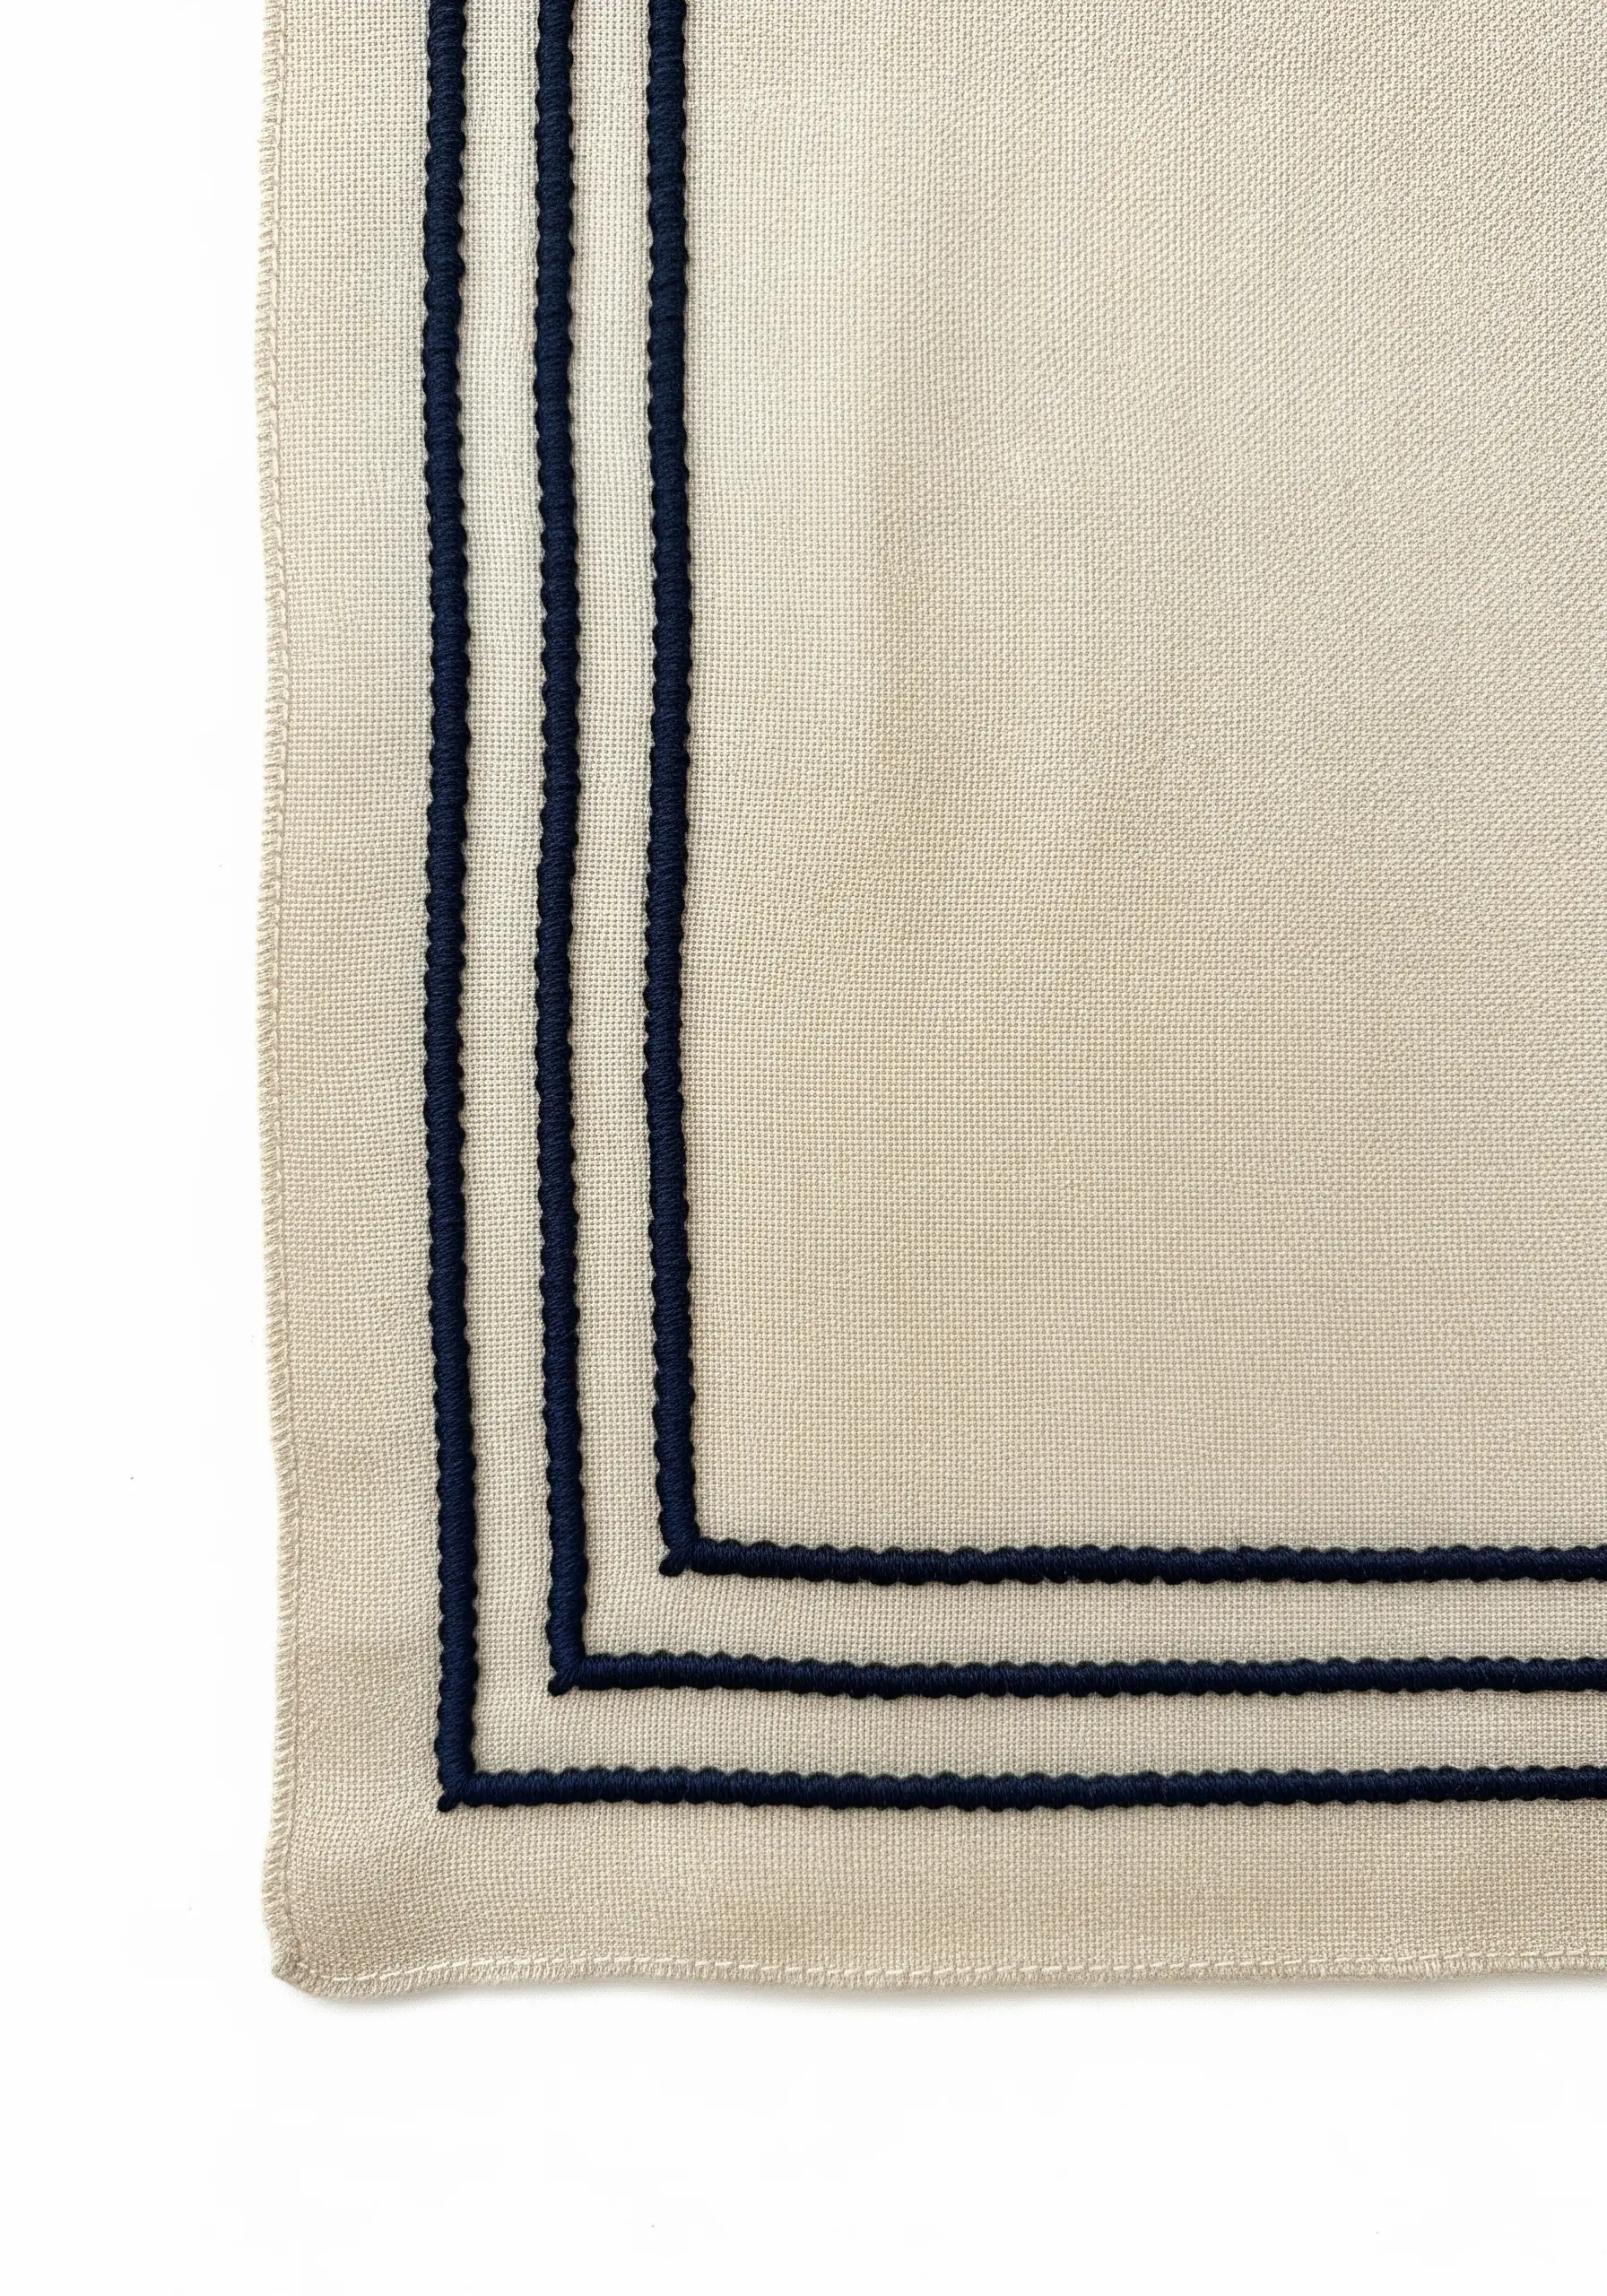
This design proves that less is more. The elegance comes from the precision of the parallel lines.
Use a heavy, non-divisible thread like pearl cotton and a whipped backstitch to create a smooth, cord-like effect.
The whipping motion covers the individual backstitches, resulting in a seamless line.
To achieve perfectly mitered corners, stop stitching just before the corner, bring your needle to the back, and start a new line on the perpendicular edge, later filling the tiny gap with one or two small satin stitches.
11. The Layered Ginkgo Fan
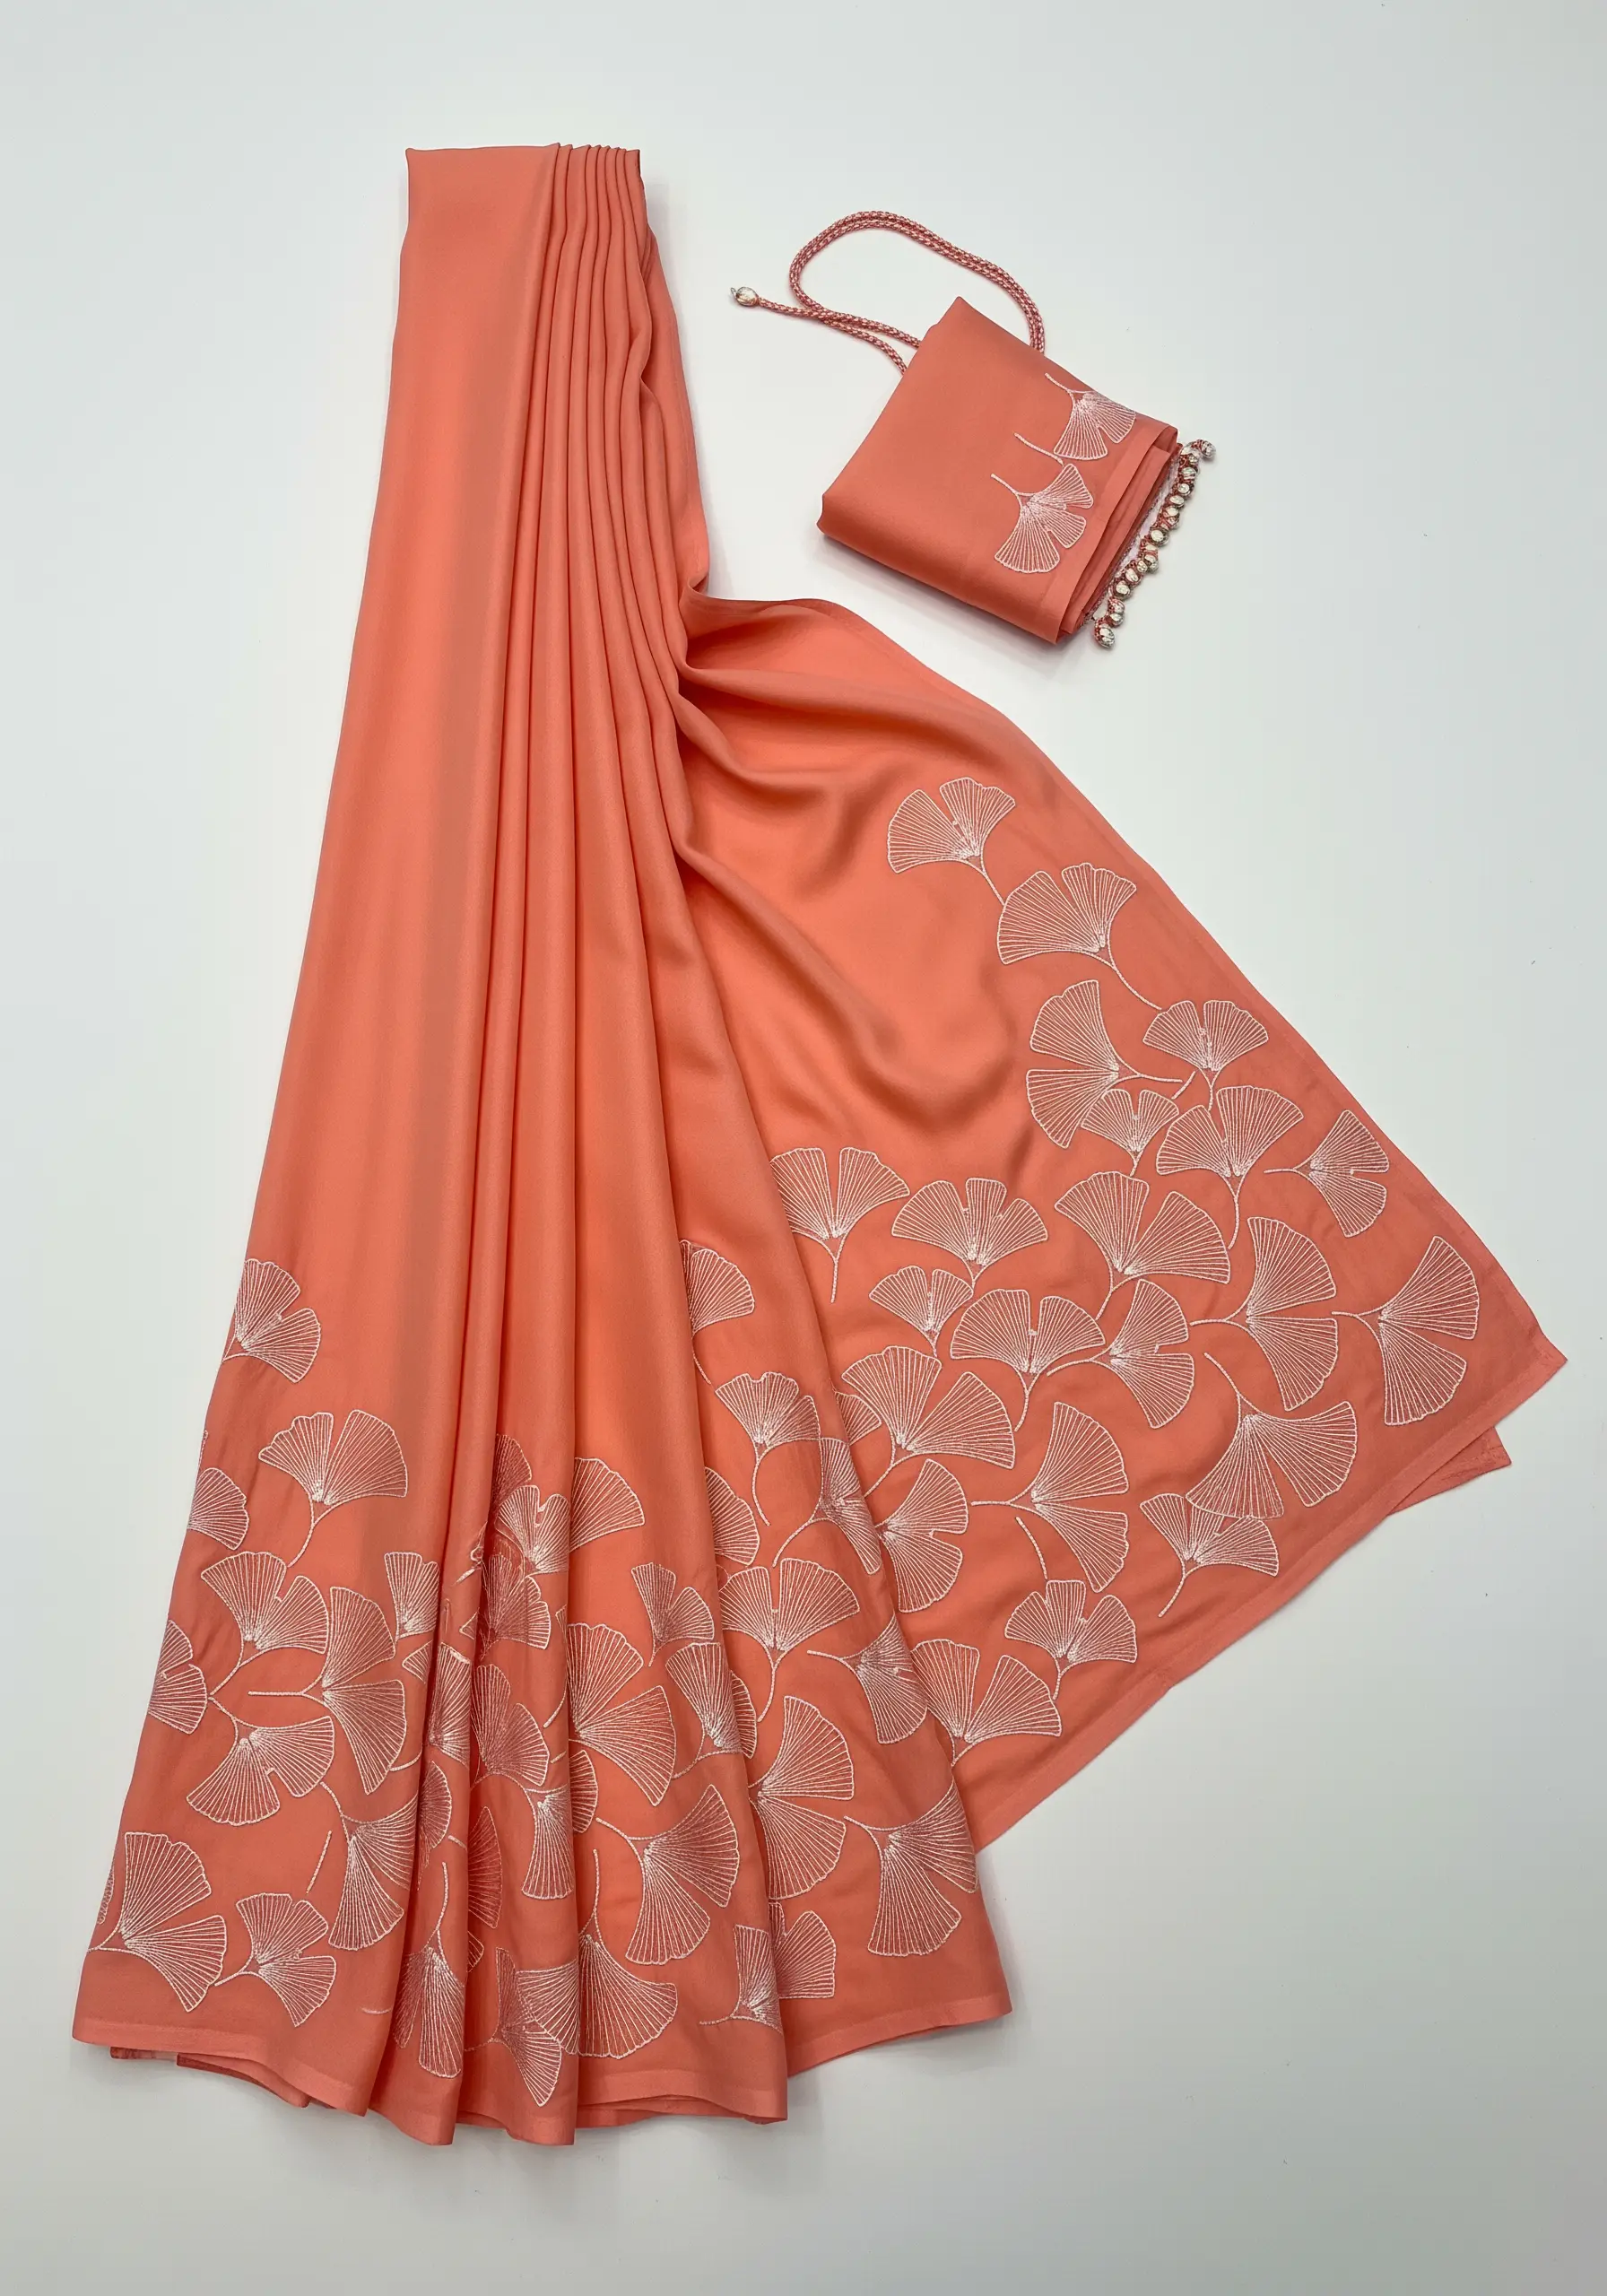
Create a sense of depth by overlapping delicate line-art motifs.
Use a fine, single strand of white floss and a simple backstitch to outline the ginkgo leaves.
The artistry is in the placement—layer the motifs so they appear to be tumbling or growing up the fabric’s edge. This creates a border that feels airy and organic.
On a soft, drapey fabric, this design adds elegance without stiffness. These kinds of botanical line art embroidery patterns are incredibly versatile.
12. The Structural Scallop
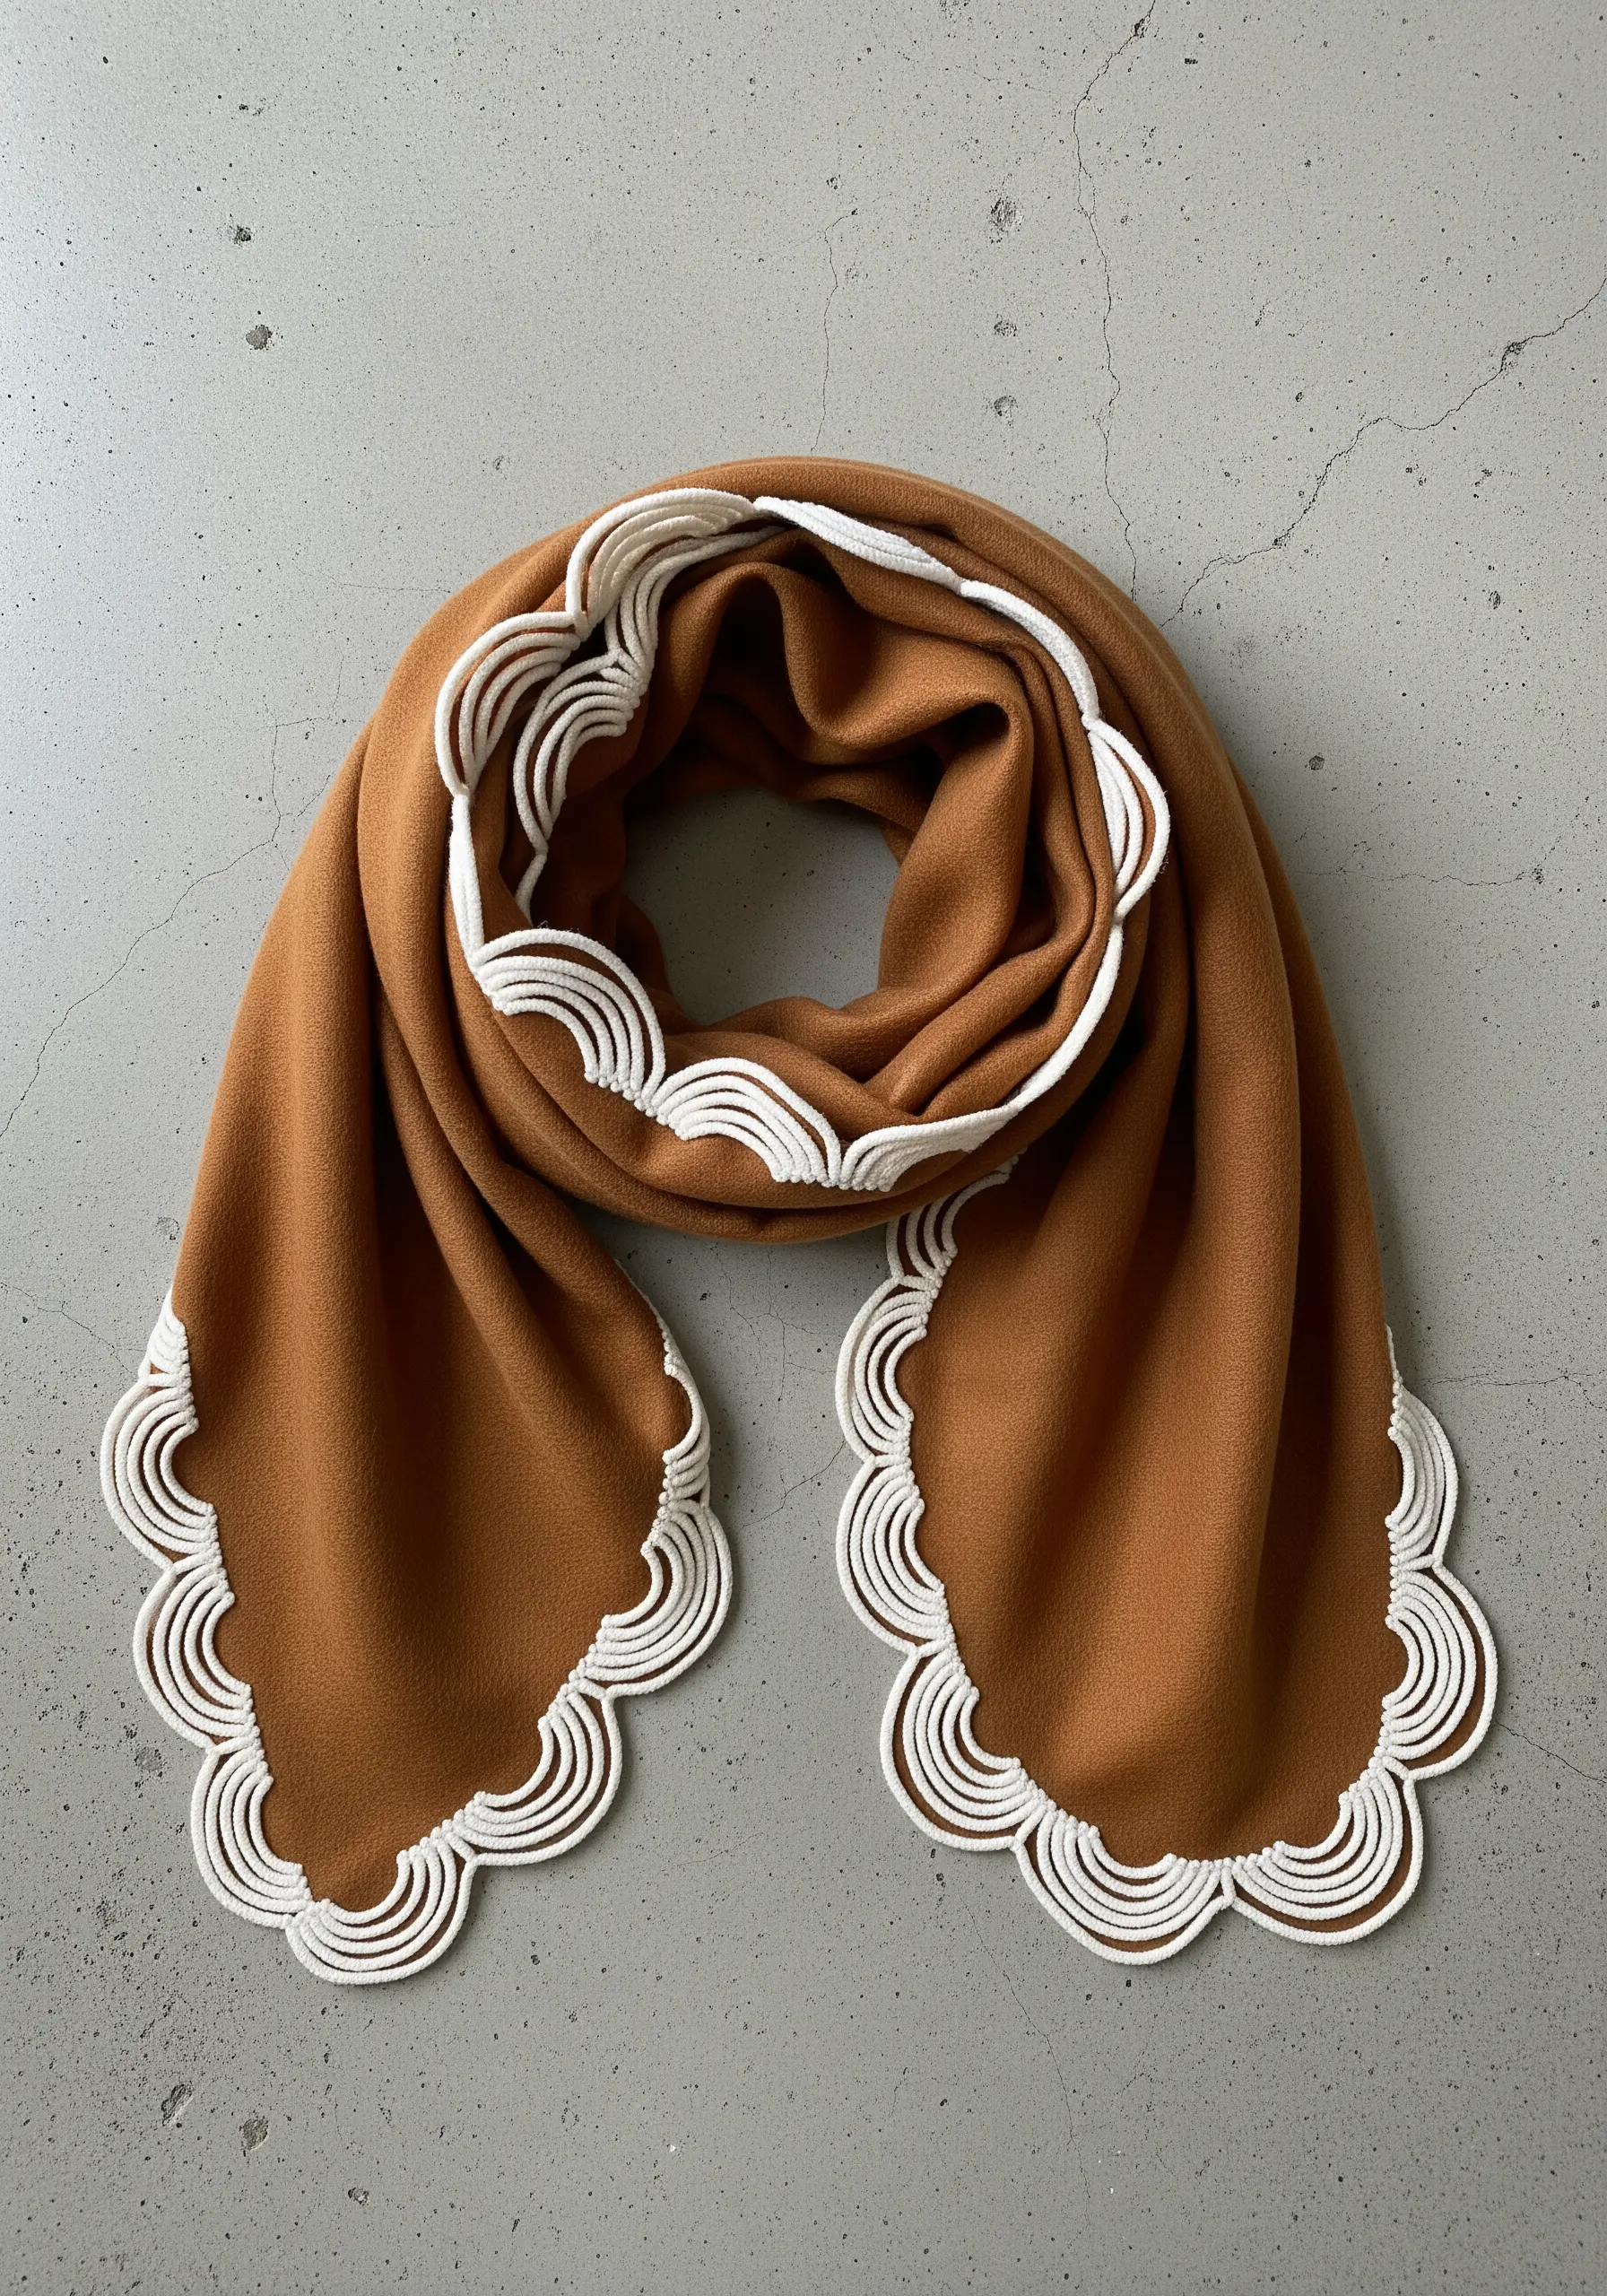
This is more than just a decorative edge; it’s a structural one.
Create this effect with parallel rows of heavy chain stitch or couching, where you lay down a thick cord and tack it in place with smaller stitches.
To achieve the perfect scallop shape, trace your design onto a wash-away stabilizer.
Once the embroidery is complete, you can carefully trim the excess fabric from behind the stitching for a true scalloped finish. This works best on non-fraying fabrics like wool or felt blends.
13. The Single-Line Labyrinth
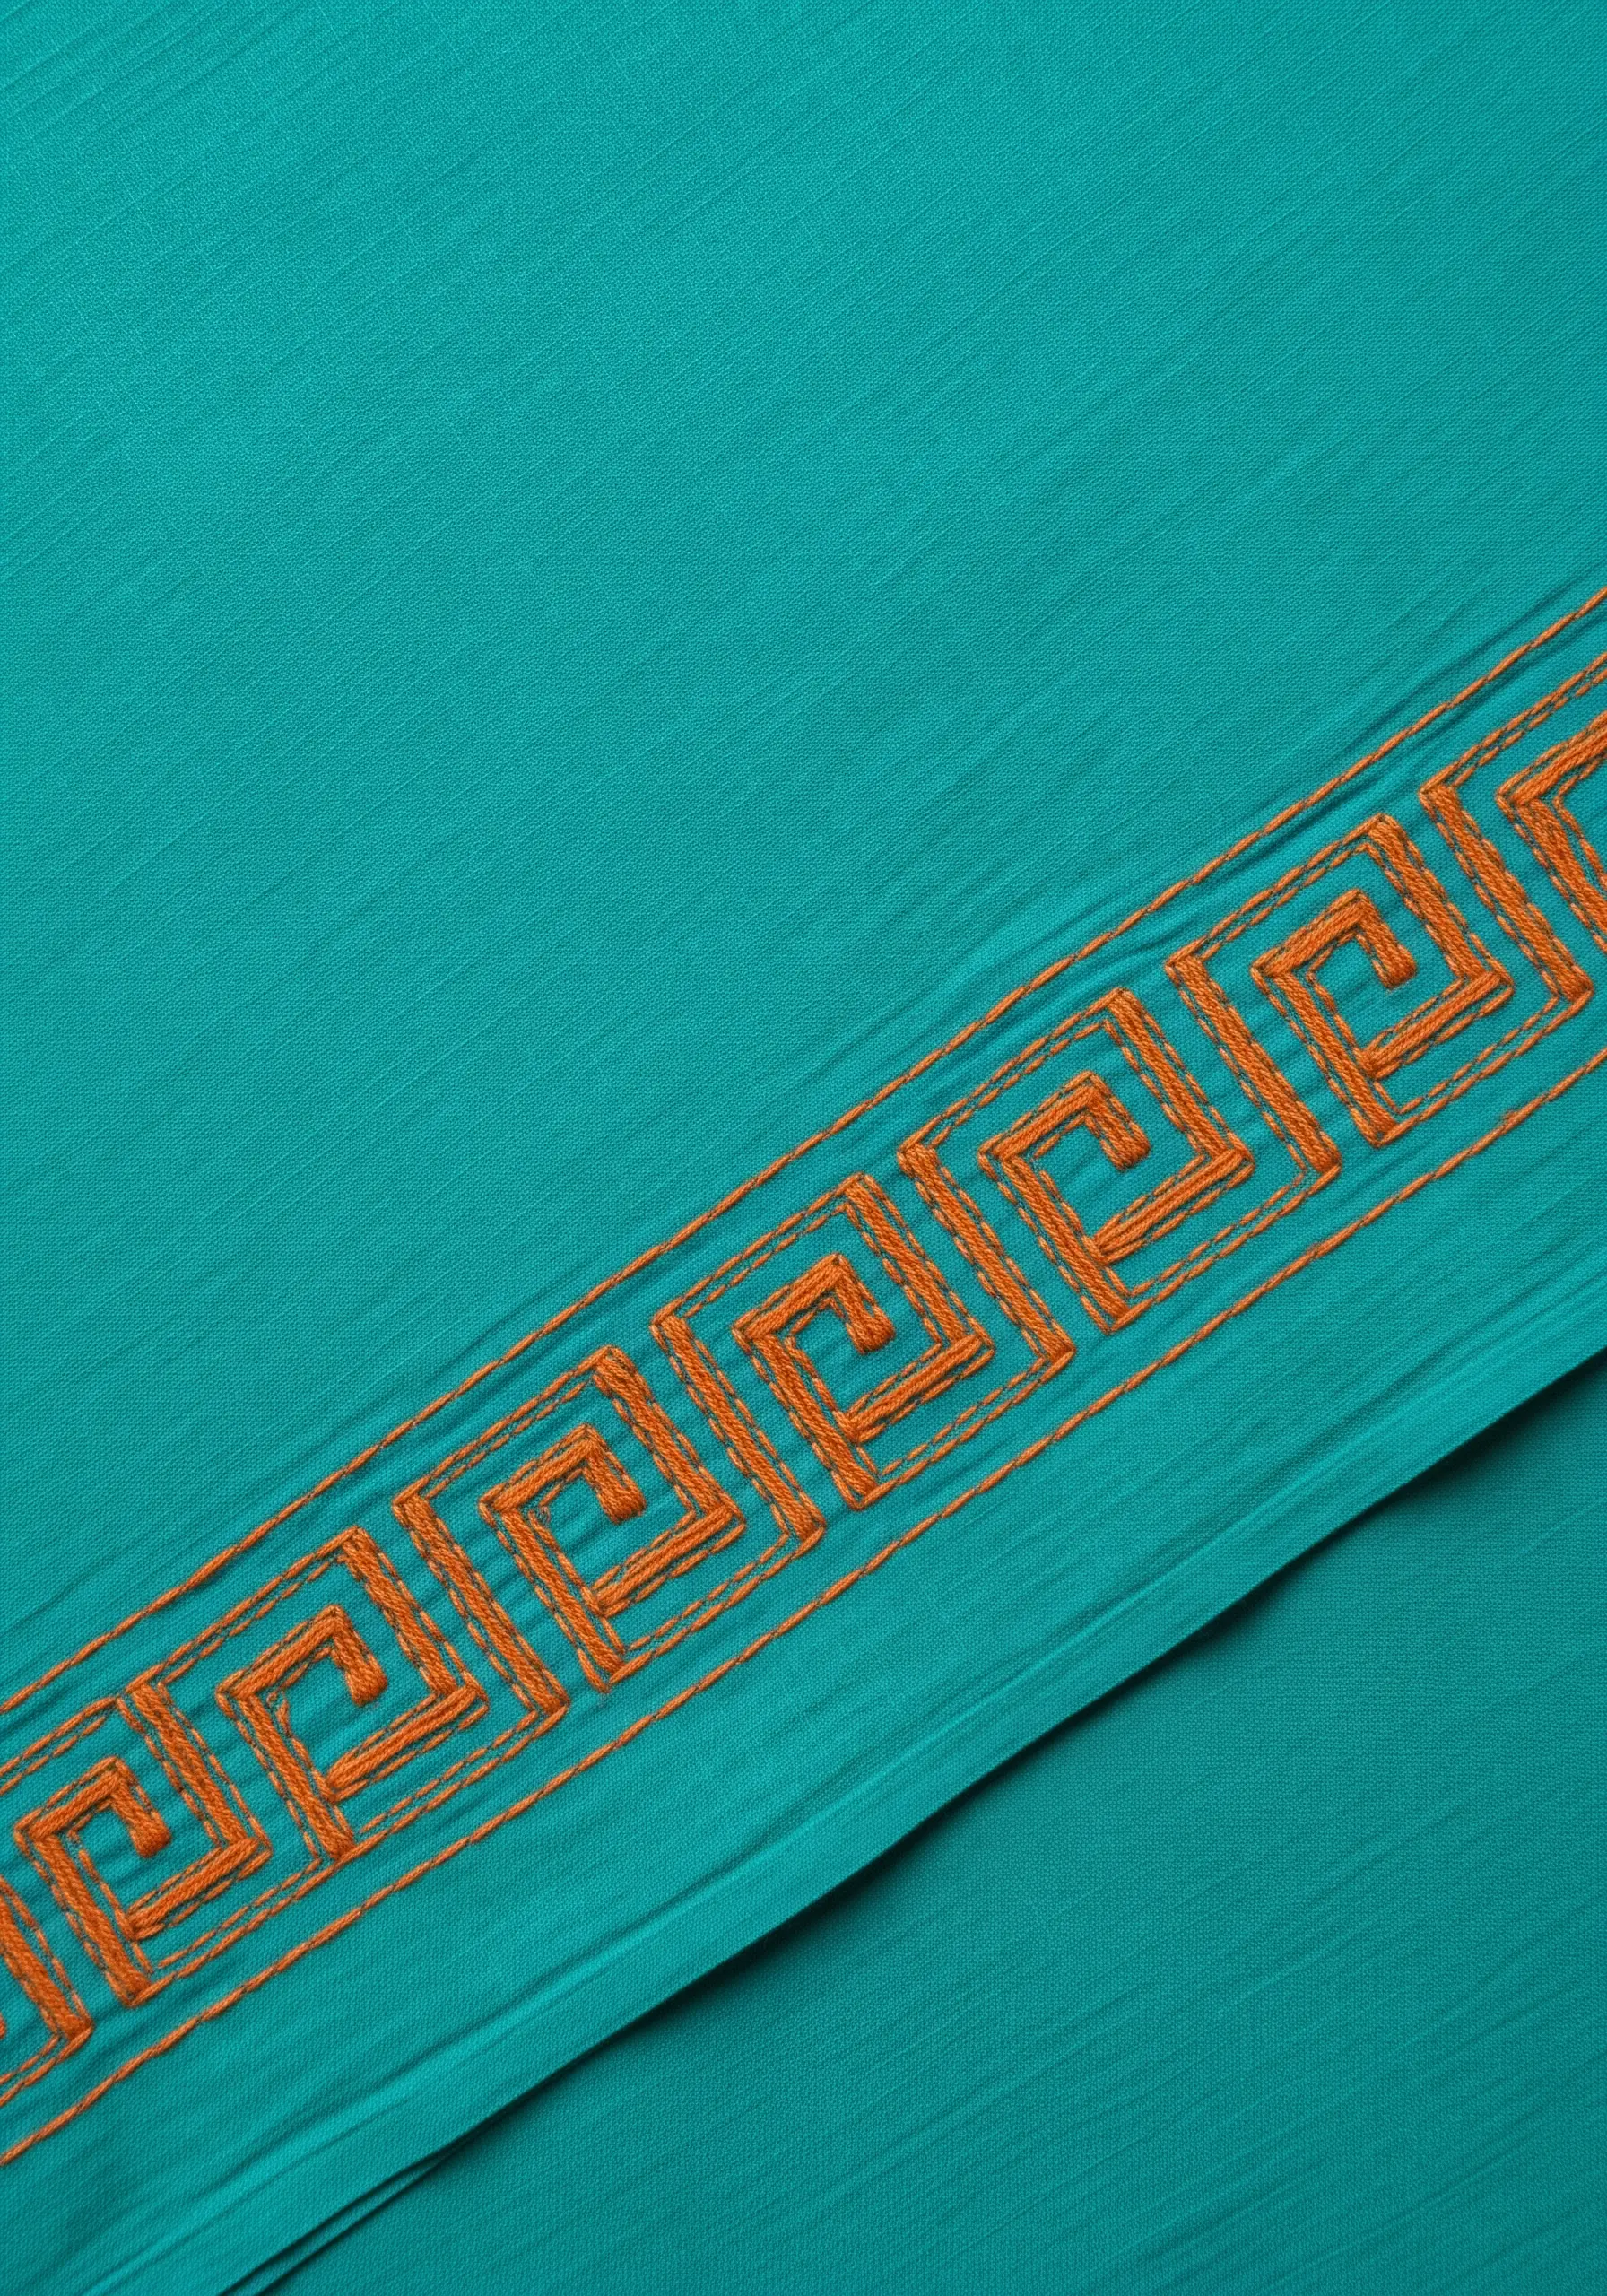
Recreate this classic Greek key motif using a single, continuous line of backstitch or stem stitch.
The key is to map out the path with a removable marker to avoid having to start and stop your thread, which maintains a clean look.
Using a high-contrast color combination, like orange on teal, makes the geometric pattern pop.
A two-strand floss is enough to create definition without making the design bulky on a lightweight, textured fabric.
14. The Stardust Scatter
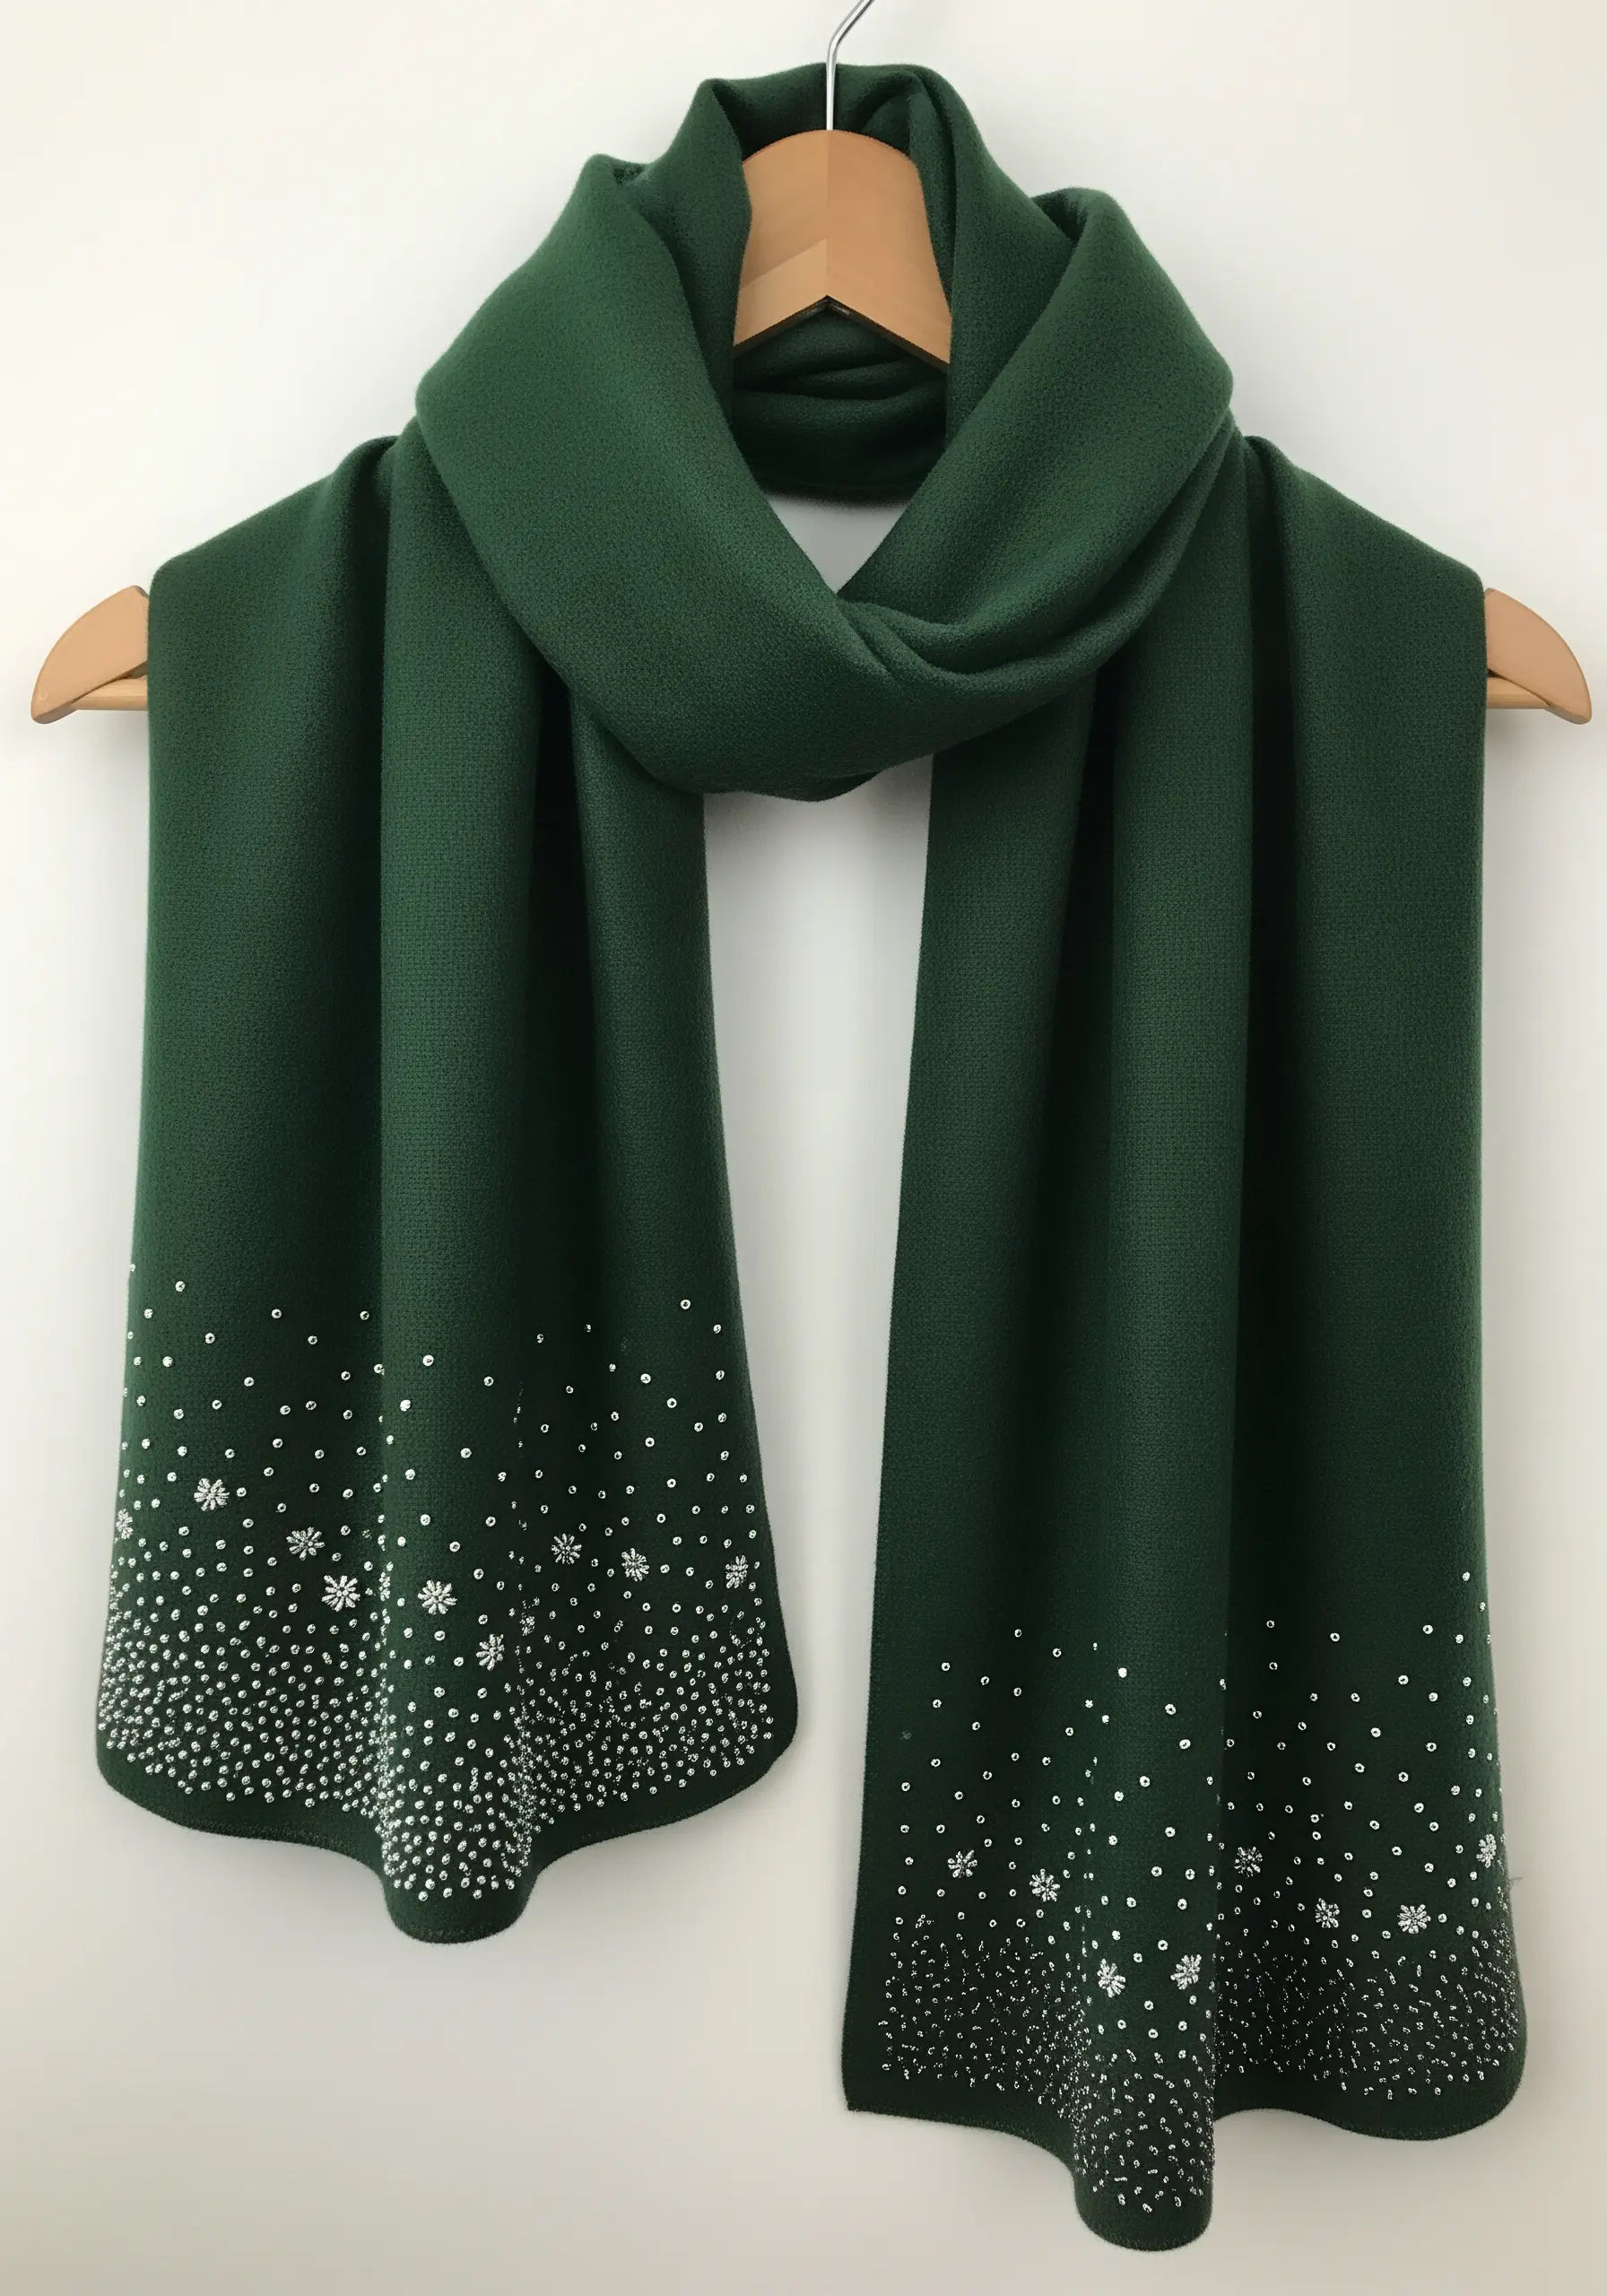
For a border that shimmers without heavy embroidery, use a scatter of beads or sequins.
Create a gradient effect by placing them densely at the hem and gradually spacing them further apart as you move up the fabric.
Anchor each sequin with a tiny seed bead in the center—this not only secures it better but also adds another point of light.
Mix in a few embroidered French knots or star stitches using a silver metallic thread to add textural variety. This gives the feel of a starry sky.
15. The Woven Geometric Band
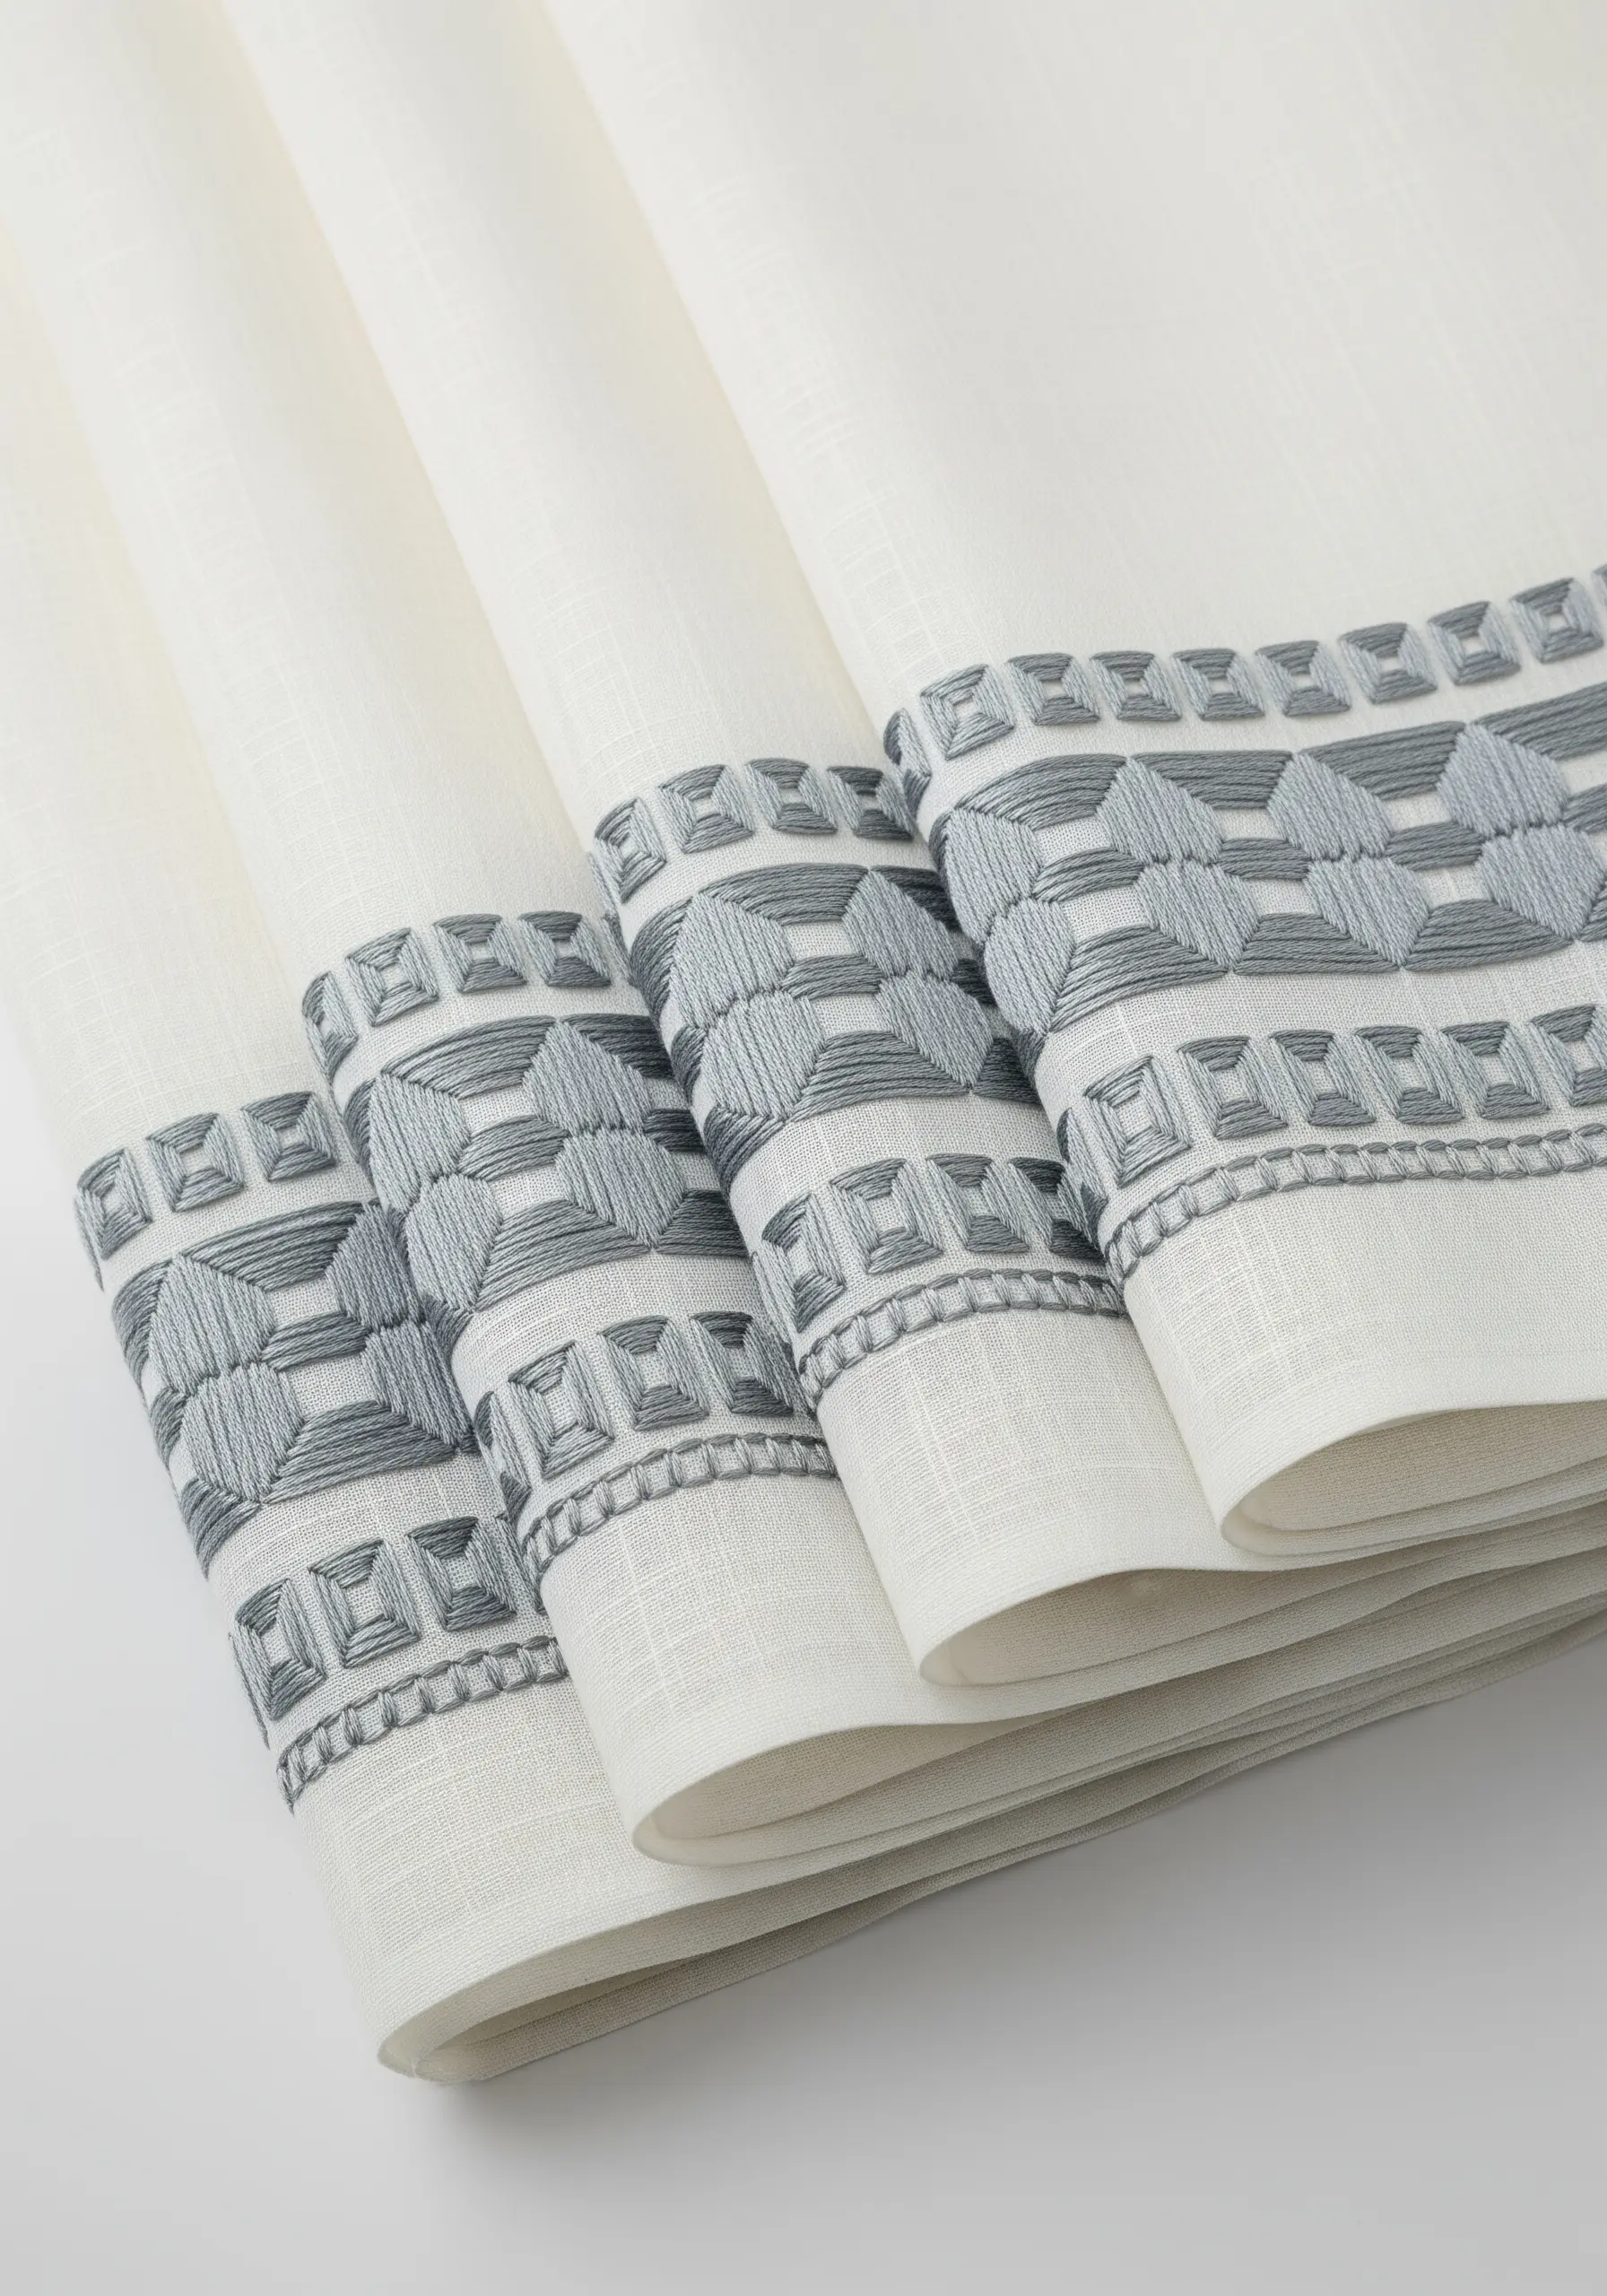
This intricate look is achieved with a technique called satin weaving or long-and-short stitch worked in blocks.
Alternate the direction of your stitches—vertical for some blocks, horizontal for others—to create a woven, basket-like texture that catches the light differently.
Work the entire design in a single color for a subtle, textural effect, or use two closely related shades of grey for more depth.
This technique adds substantial weight and a luxurious feel, perfect for the border of a linen saree or table runner.
16. The Abstract Bubble Border
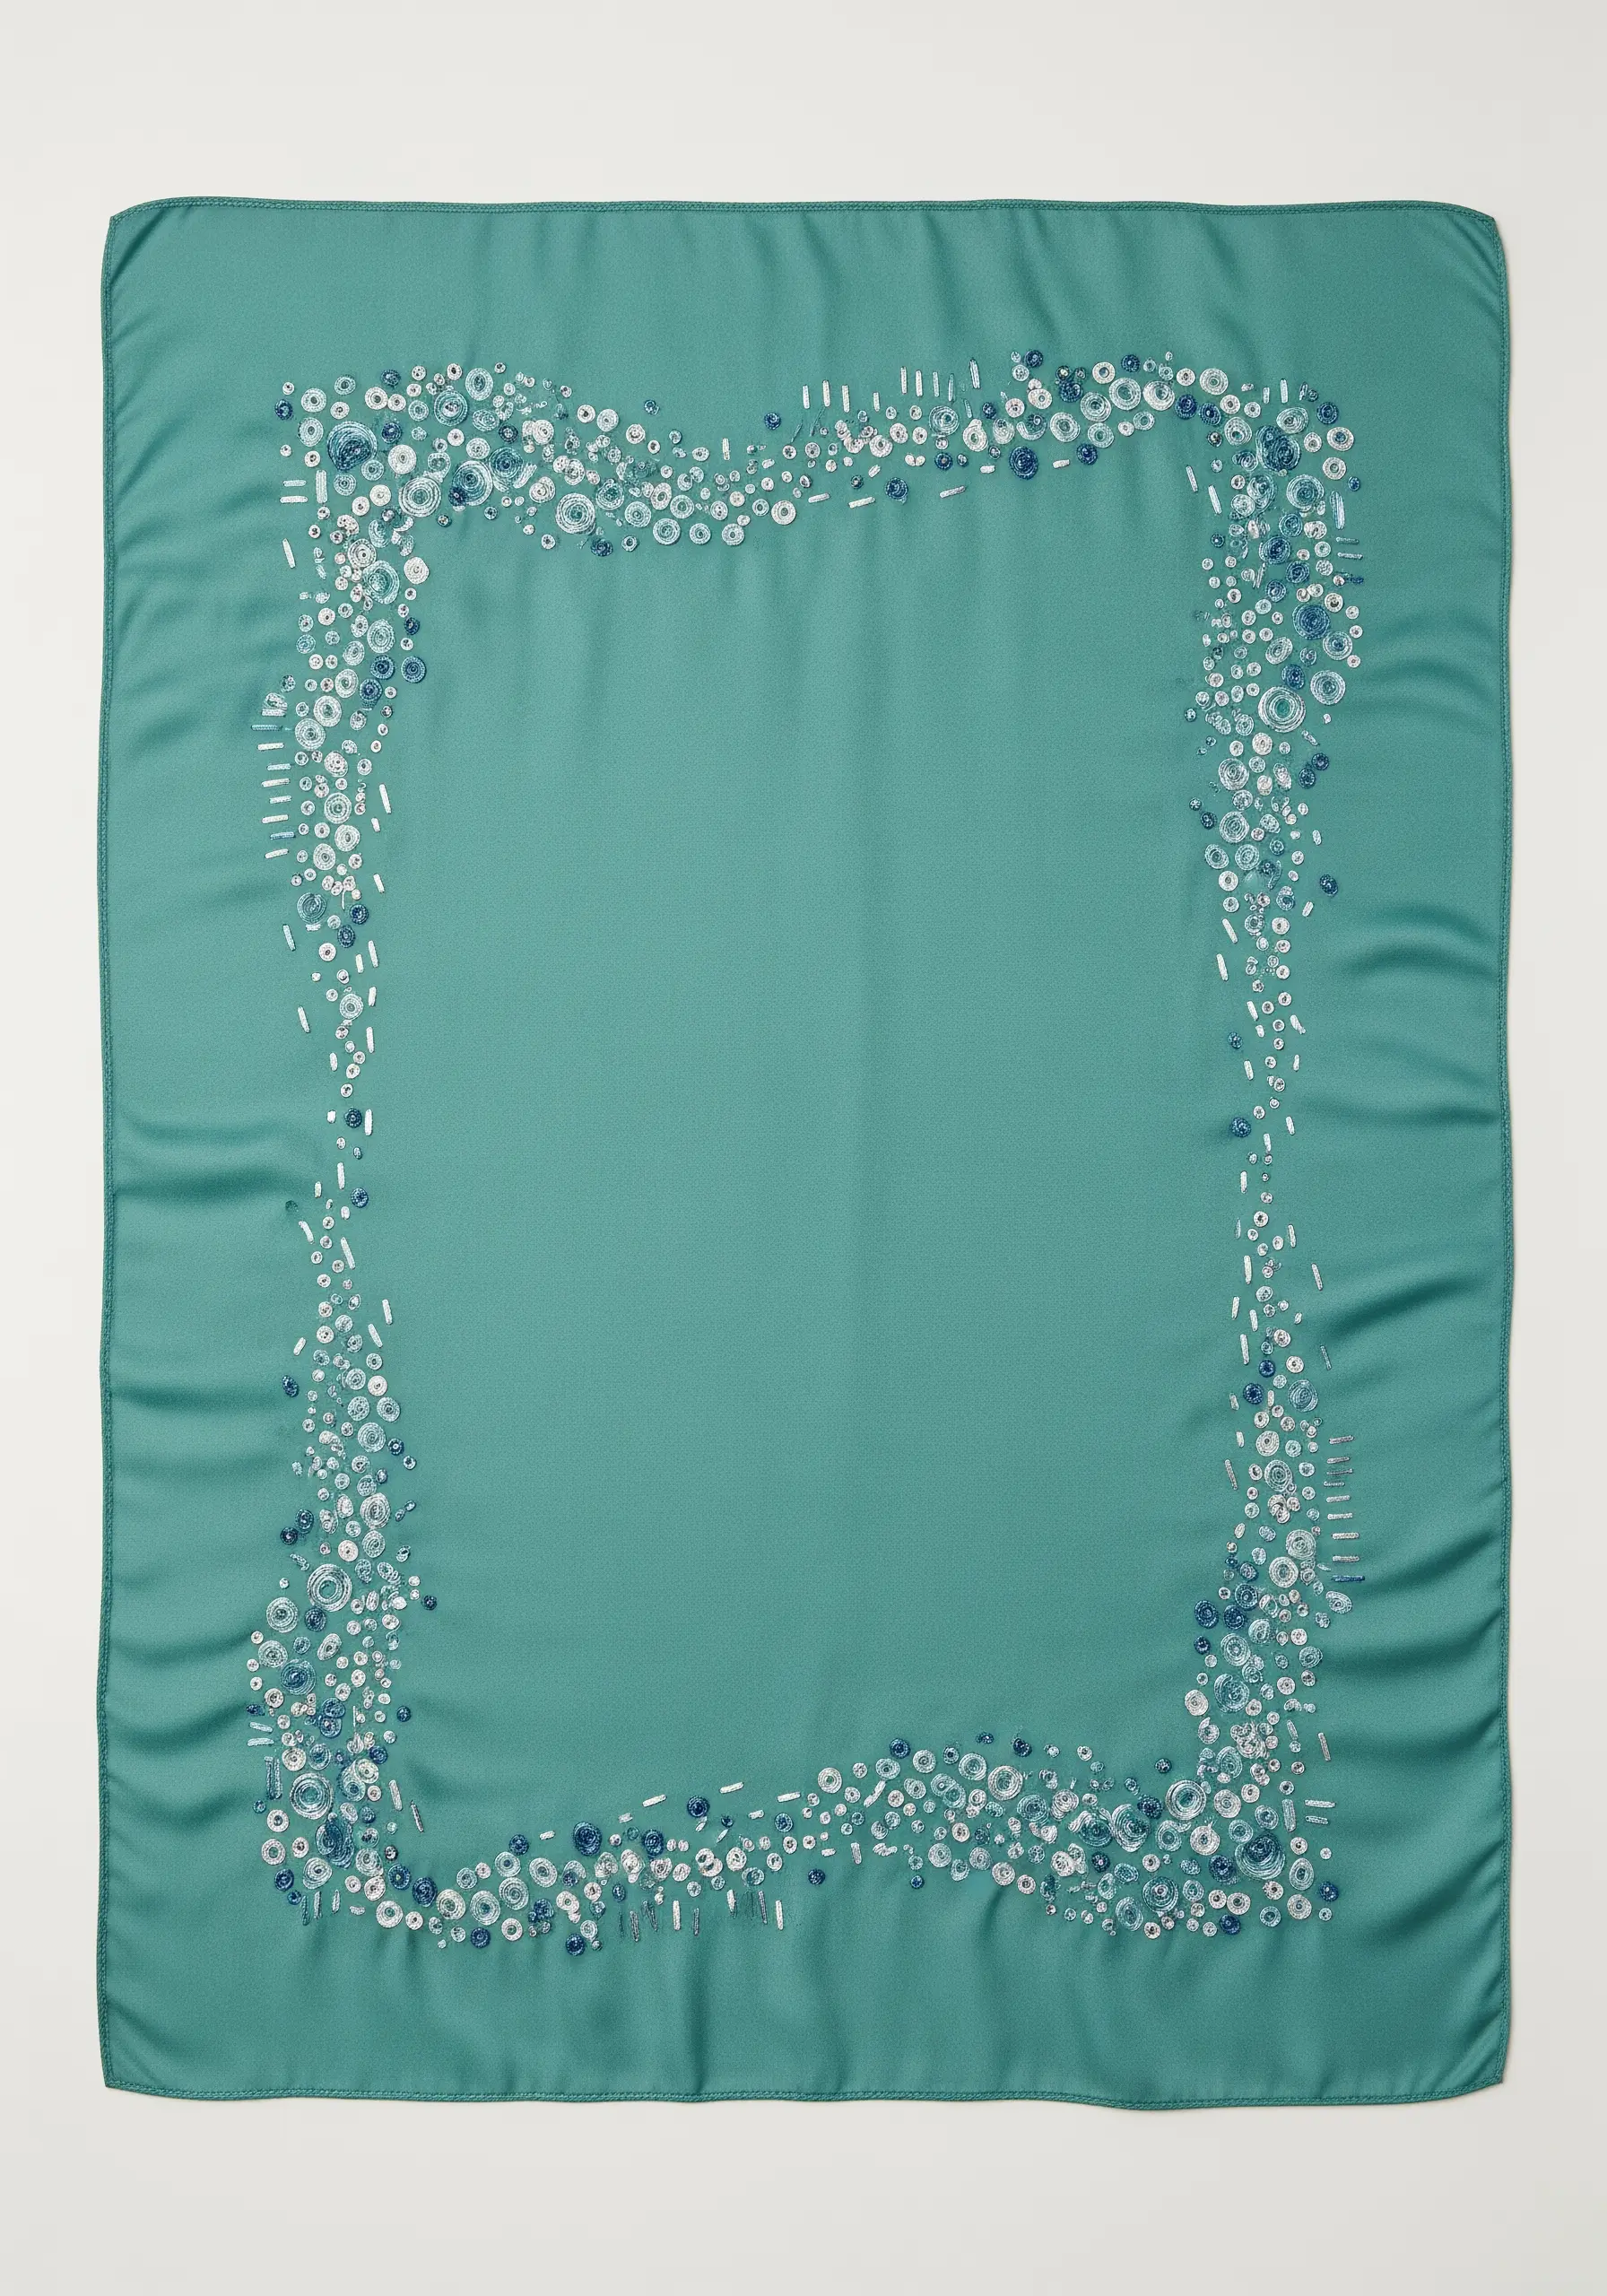
Move beyond traditional lines with a playful, organic border.
Use a combination of stitches: satin stitch for the filled circles, backstitch for the outlines, and straight stitches for the dashes.
Vary the size and placement of the ‘bubbles’ to create a sense of spontaneous movement.
Using multiple shades of a single color family (here, blues and whites) keeps the design cohesive yet dynamic. These kinds of abstract concept art embroidery ideas add a unique personality to silk scarves.
17. The Piped Edge Frame
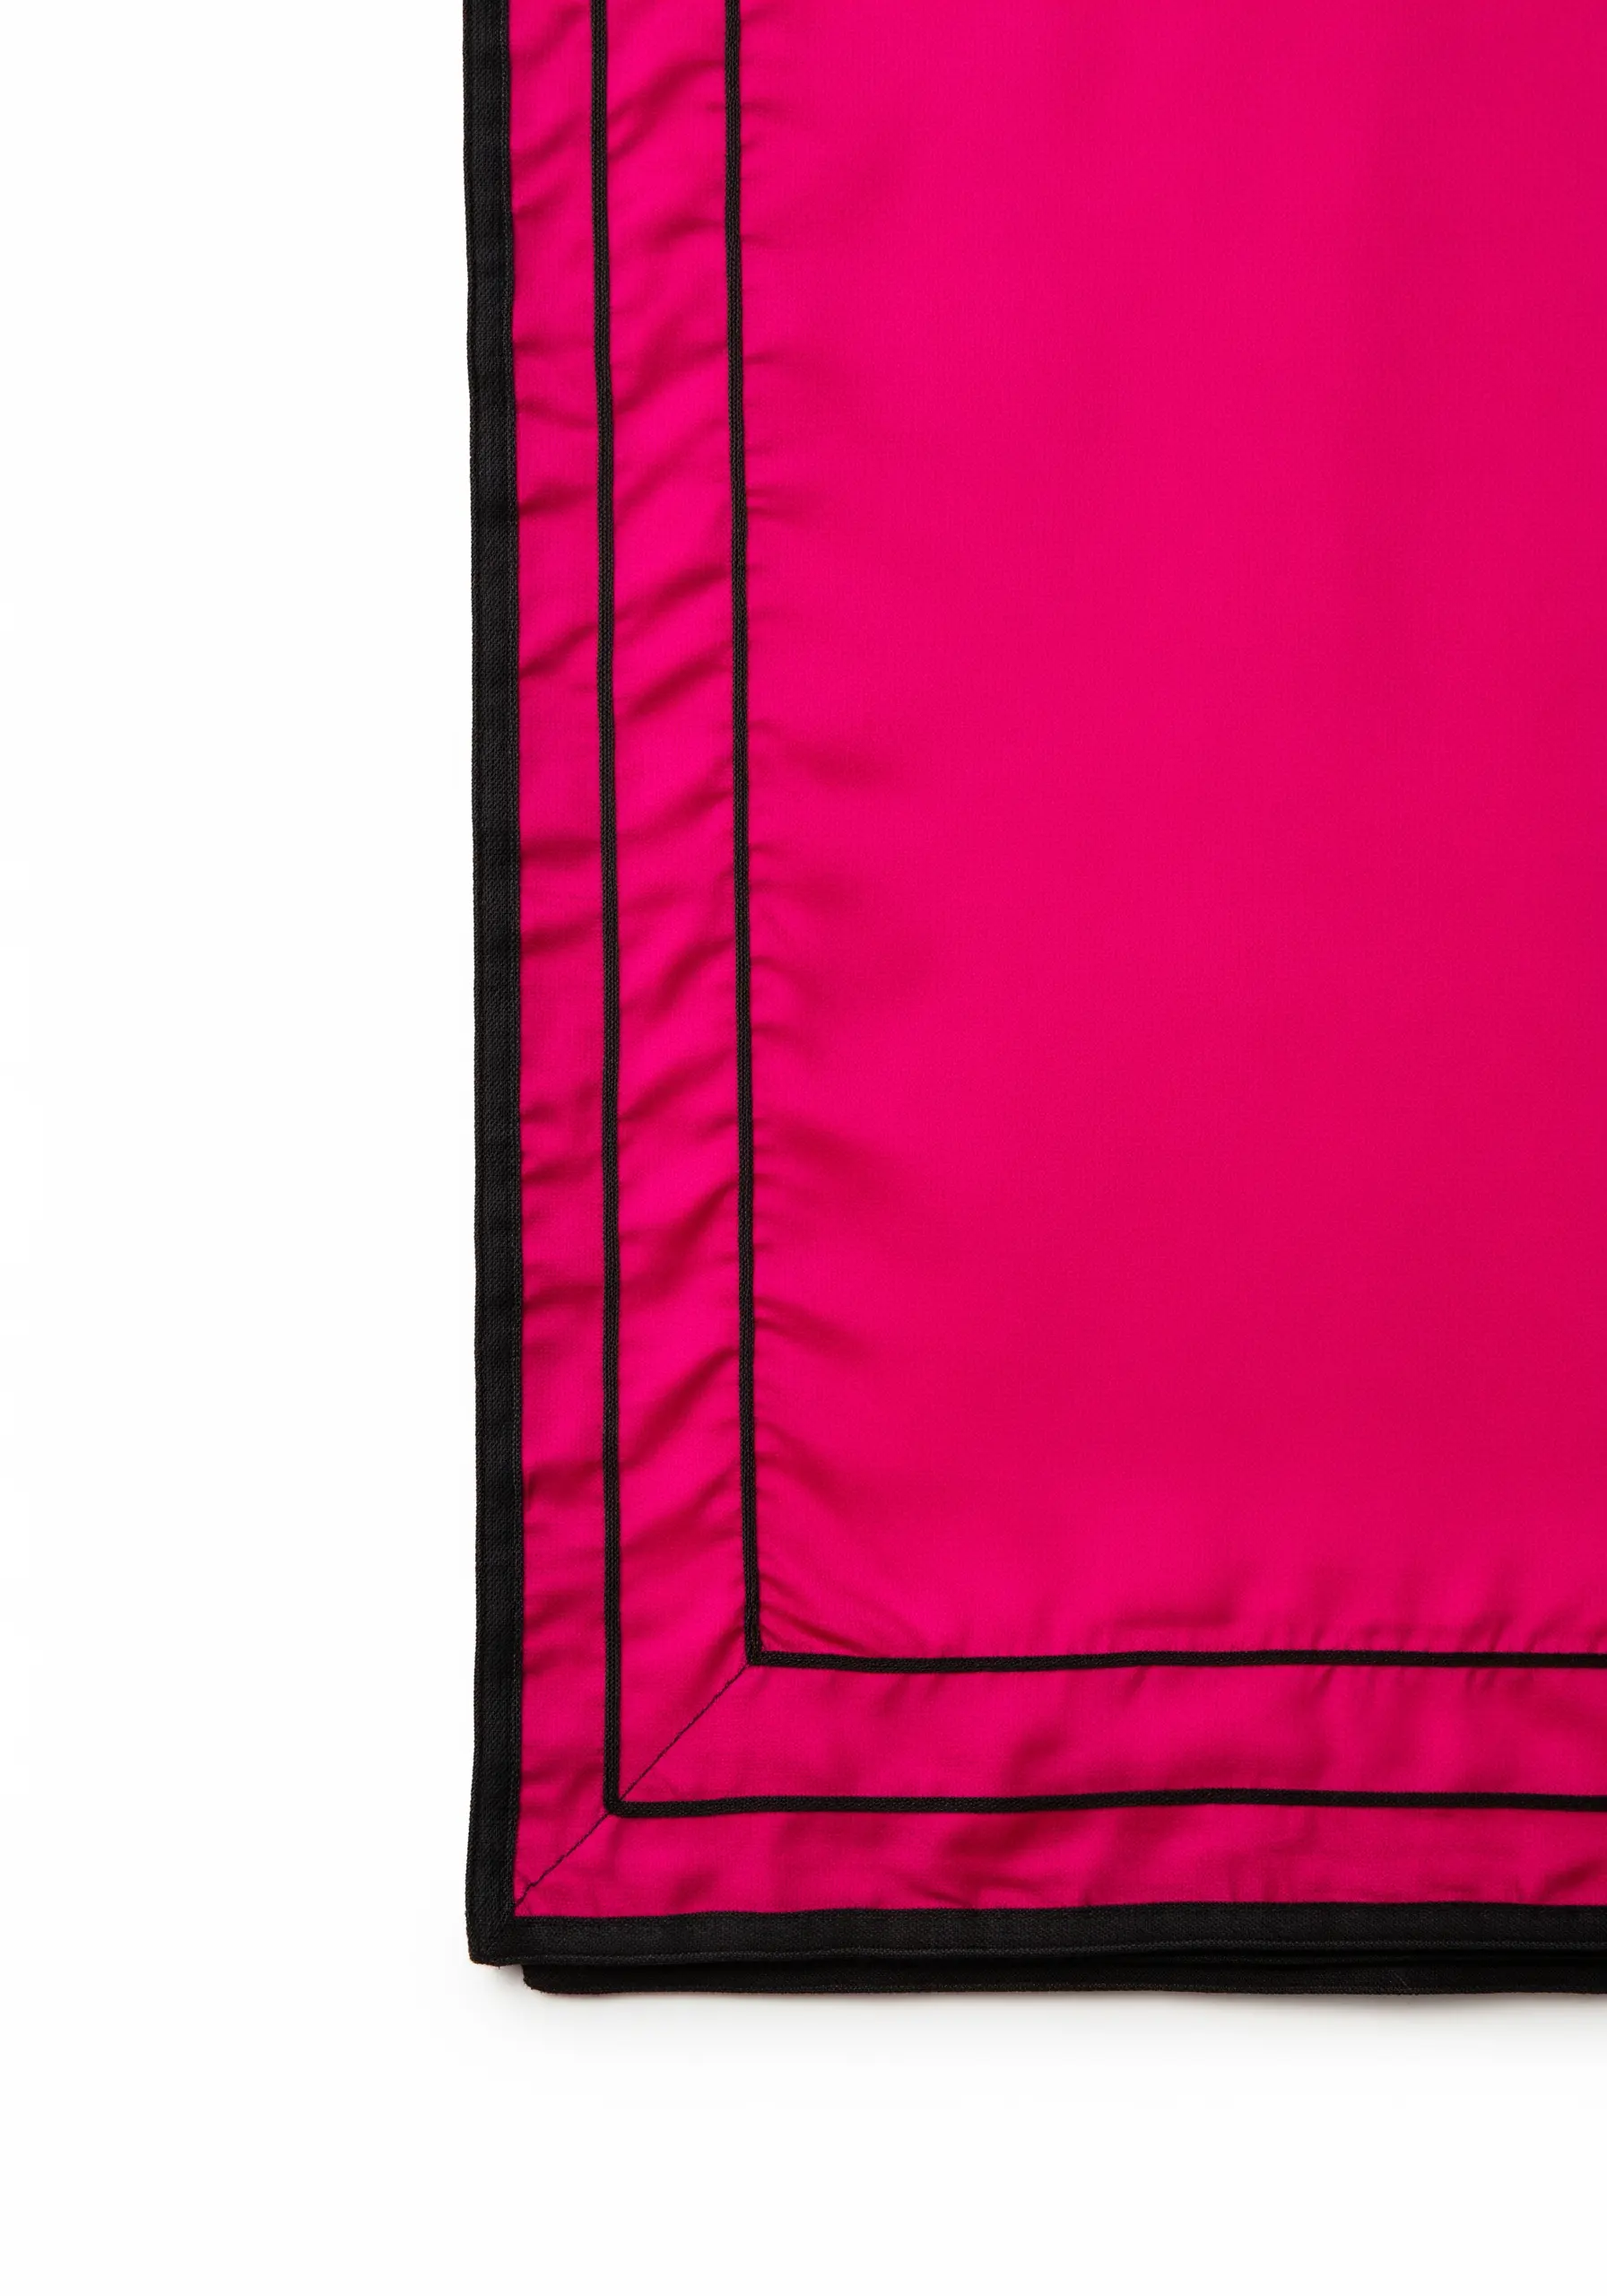
Achieve this crisp, graphic frame by using appliqué rather than traditional embroidery.
Cut thin strips of black bias tape and carefully pin them along the edge.
Stitch them down with a tiny, nearly invisible slip stitch by hand, or use an edge-stitching foot on your machine for perfect precision.
At the corners, fold the tape to create a sharp mitered angle. This technique gives you a bold, clean line that’s much faster to execute than a satin stitch border and provides a professional finish.
18. The Half-Moon Satin Stitch
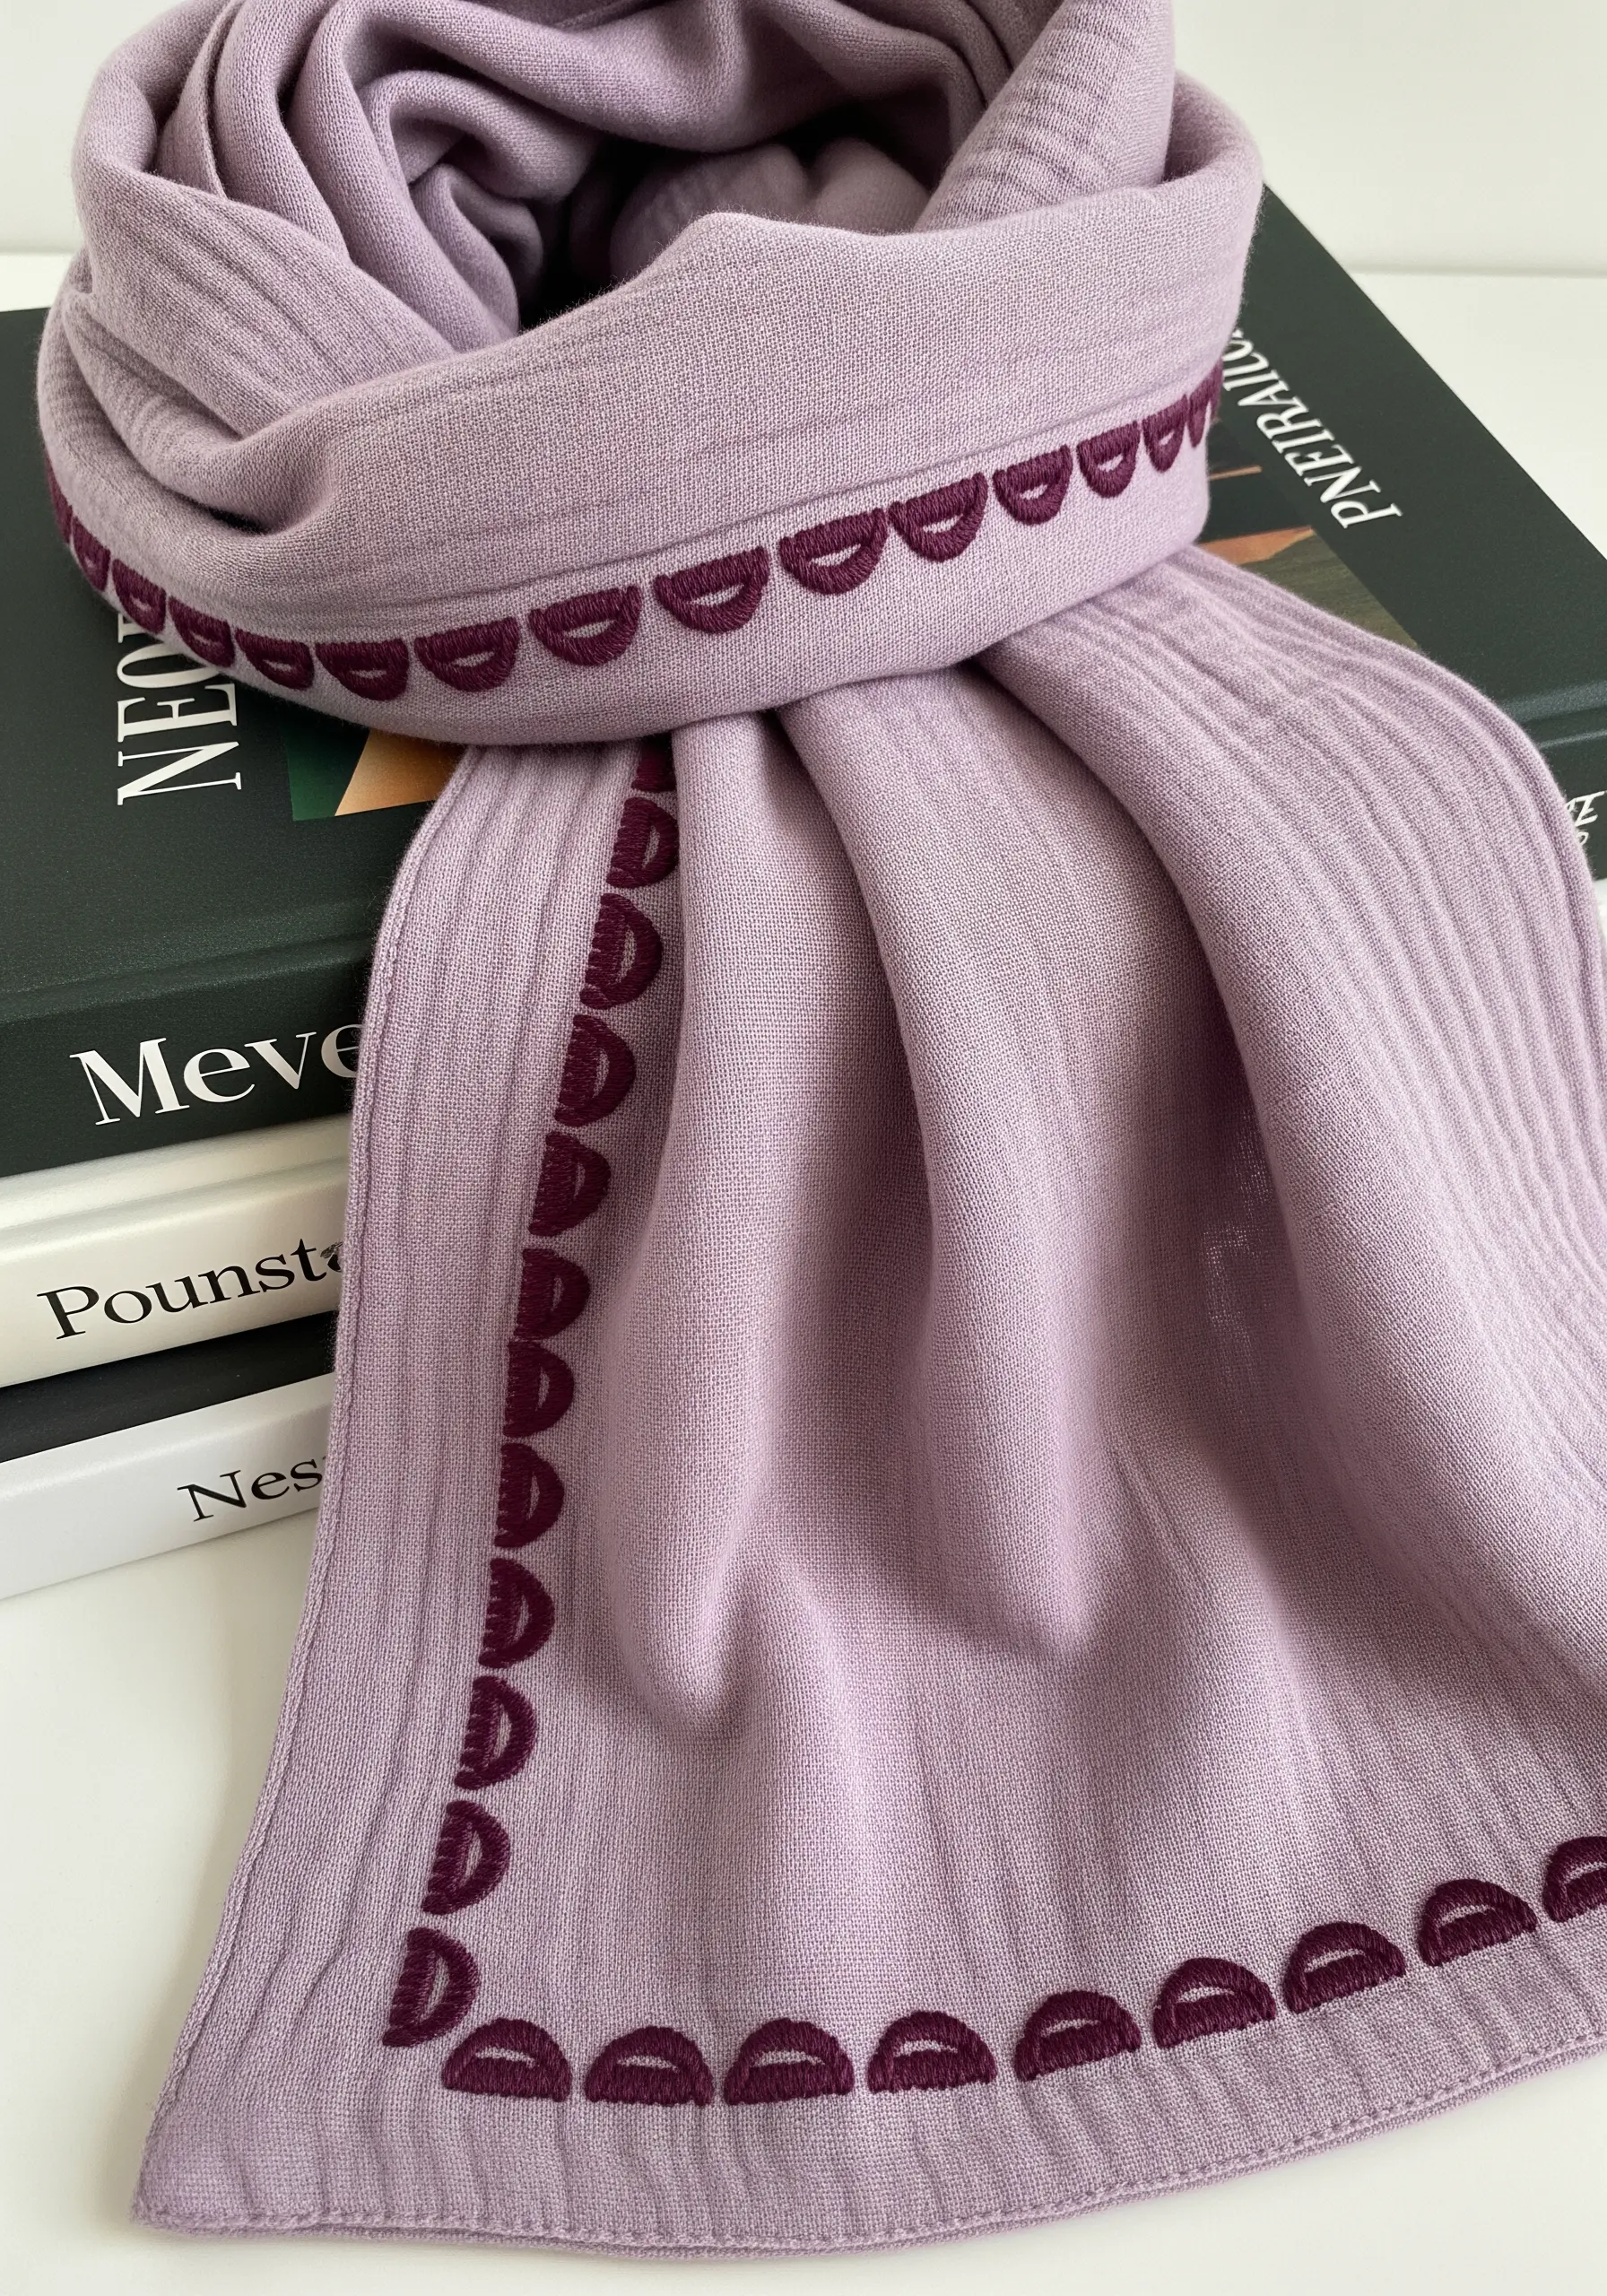
Create this simple, repeating scallop with a well-executed satin stitch.
To get perfectly uniform half-moons, use a water-soluble sticker pattern or draw your guide directly onto the fabric.
The key to a smooth curve is to slightly angle your stitches as you work around the arc, like the rays of a fan.
Use a contrasting, darker thread color to make the simple shape feel intentional and bold. This is a timeless finish for knit or woven scarves.


