

That plain white t-shirt in your closet is not just a basic piece of clothing; it’s a blank canvas waiting for your story. Before you reach for a complex, all-over pattern, I want you to consider the power of a single, well-placed line—the quiet confidence of a motif that knows exactly where it belongs.
Transforming your apparel isn’t about covering every inch in thread. It’s about intention. It’s about understanding how a sprig of lavender resting on your collarbone, or a fern unfolding down your sleeve, can change the way a garment feels and moves with you. It’s about making a mark that is both personal and beautifully crafted.
These ideas are more than just patterns; they are exercises in composition, texture, and restraint. They will teach you how to make your stitches speak with clarity and elegance. So, take a deep breath, choose a design that resonates with you, and let’s turn that simple tee into a piece of wearable art, together.
1. Add a Touch of Gold with Metallic Thread

When working with metallic floss, which can be prone to fraying, cut your thread into shorter lengths—around 12 inches—to reduce friction as it passes through the fabric.
A thread conditioner like beeswax can also make stitching smoother, ensuring your satin stitches lay flat and catch the light beautifully.
This technique turns a simple line-art design into a piece of wearable jewelry, perfect for a subtle accent on a pocket or collar.
2. Create Depth with Tonal Lavender Shades
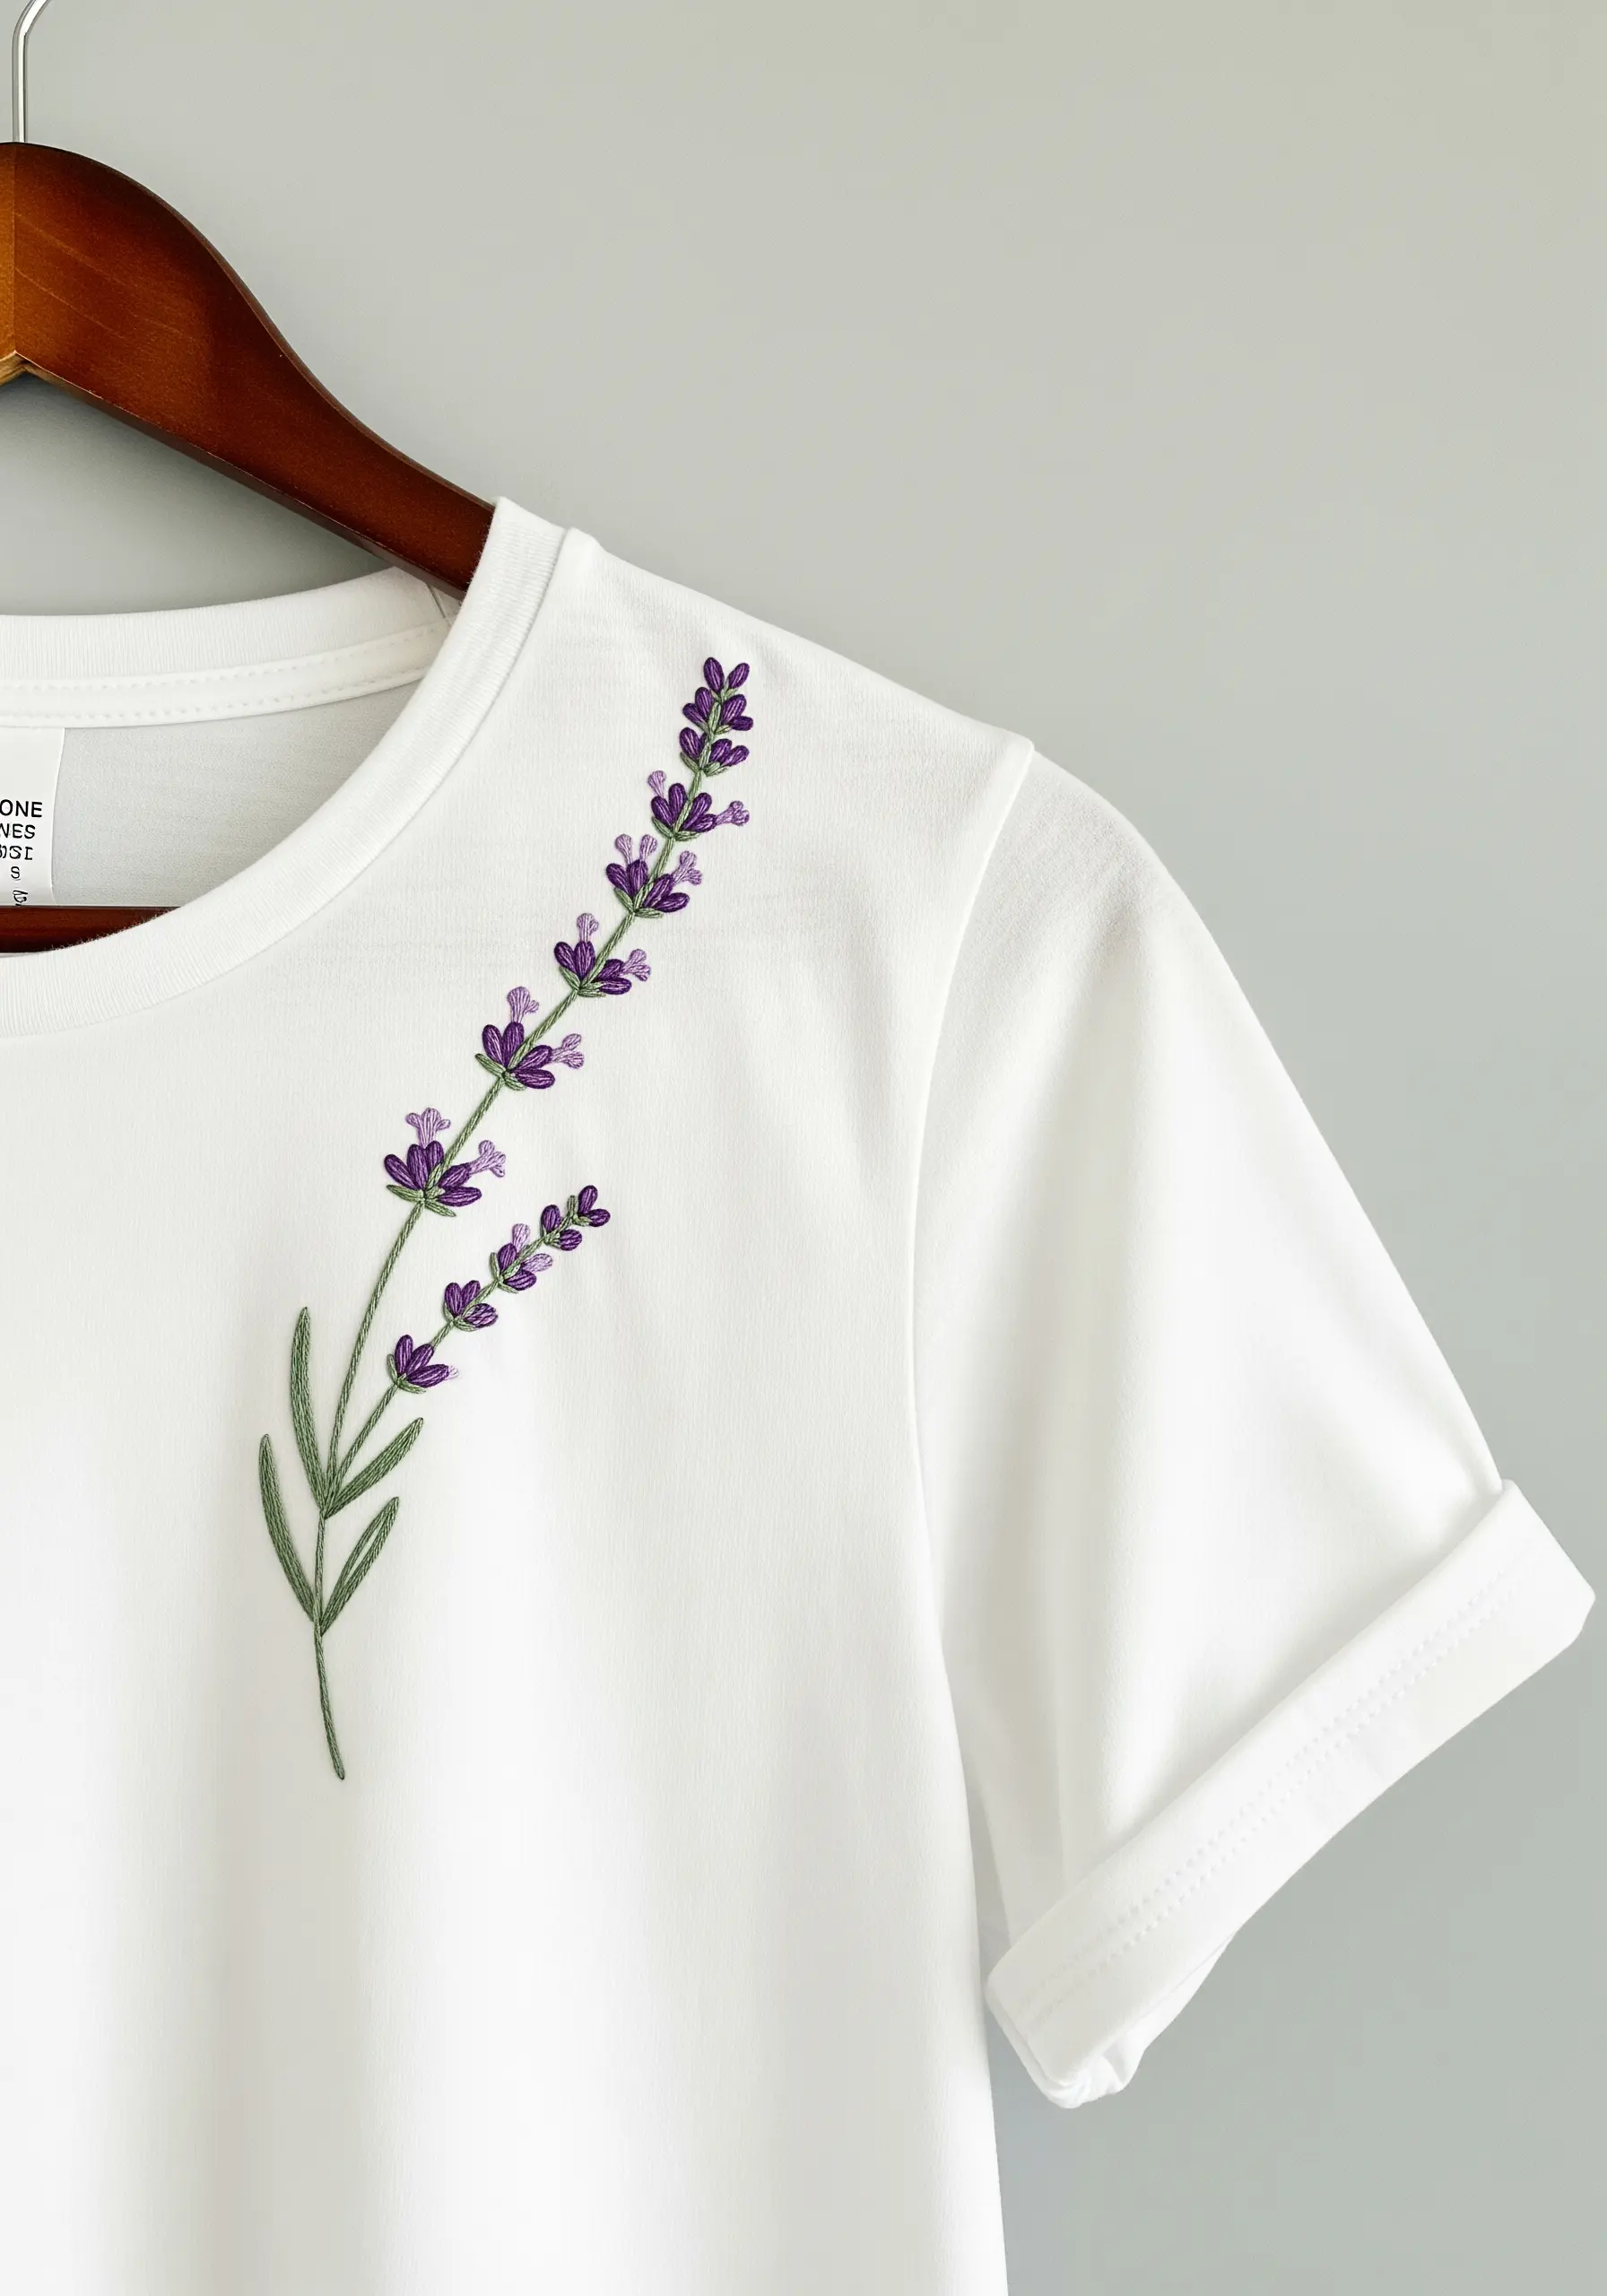
To give florals like lavender realistic dimension, work with three shades of the same color—a light, medium, and dark violet.
Use French knots for the tiny buds at the top, transitioning to small, angled satin stitches for the larger blossoms below.
This subtle color shift mimics how light hits the plant, giving your embroidery a natural, painterly quality without complex shading techniques.
3. Embrace Elegance with Open Outline Stitches
Instead of filling in the leaves completely, use an open backstitch to define their shape.
This creates a light, airy design that won’t make the t-shirt fabric pucker or feel stiff, which is especially important around a flexible area like the neckline.
The negative space becomes part of the art, resulting in a sophisticated, minimalist design that feels intentional and modern.
4. Make a Statement with Bold, Graphic Lines
For a clean, high-impact look, use all six strands of your embroidery floss to create a thick, substantial outline.
A whipped backstitch is an excellent choice here; first, you create a standard backstitch line, then you whip a second thread around it without piercing the fabric.
This technique smooths out the segmented look of backstitch, resulting in a single, fluid line that gives your design graphic authority.
5. Add an Unexpected Detail to a Sleeve Cuff

Placing a small, detailed bouquet on the cuff of a sleeve adds a discreet and personal touch that feels like a hidden secret.
Because you’re working on a smaller area, you can afford to be more detailed with tiny satin stitches and French knots.
Use a smaller 3- or 4-inch hoop to keep the fabric taut, ensuring your stitches remain precise and the composition tight.
6. Harness the Power of a Single, Continuous Line

A large-scale design stitched in a single, vibrant color creates an immediate and powerful focal point.
To achieve perfectly smooth curves for the stem and petals, use a split stitch or a stem stitch.
Both stitches are ideal for creating fluid lines that flow without interruption, giving the design a graceful, calligraphic quality.
7. Capture Ephemeral Movement with Detached Stitches
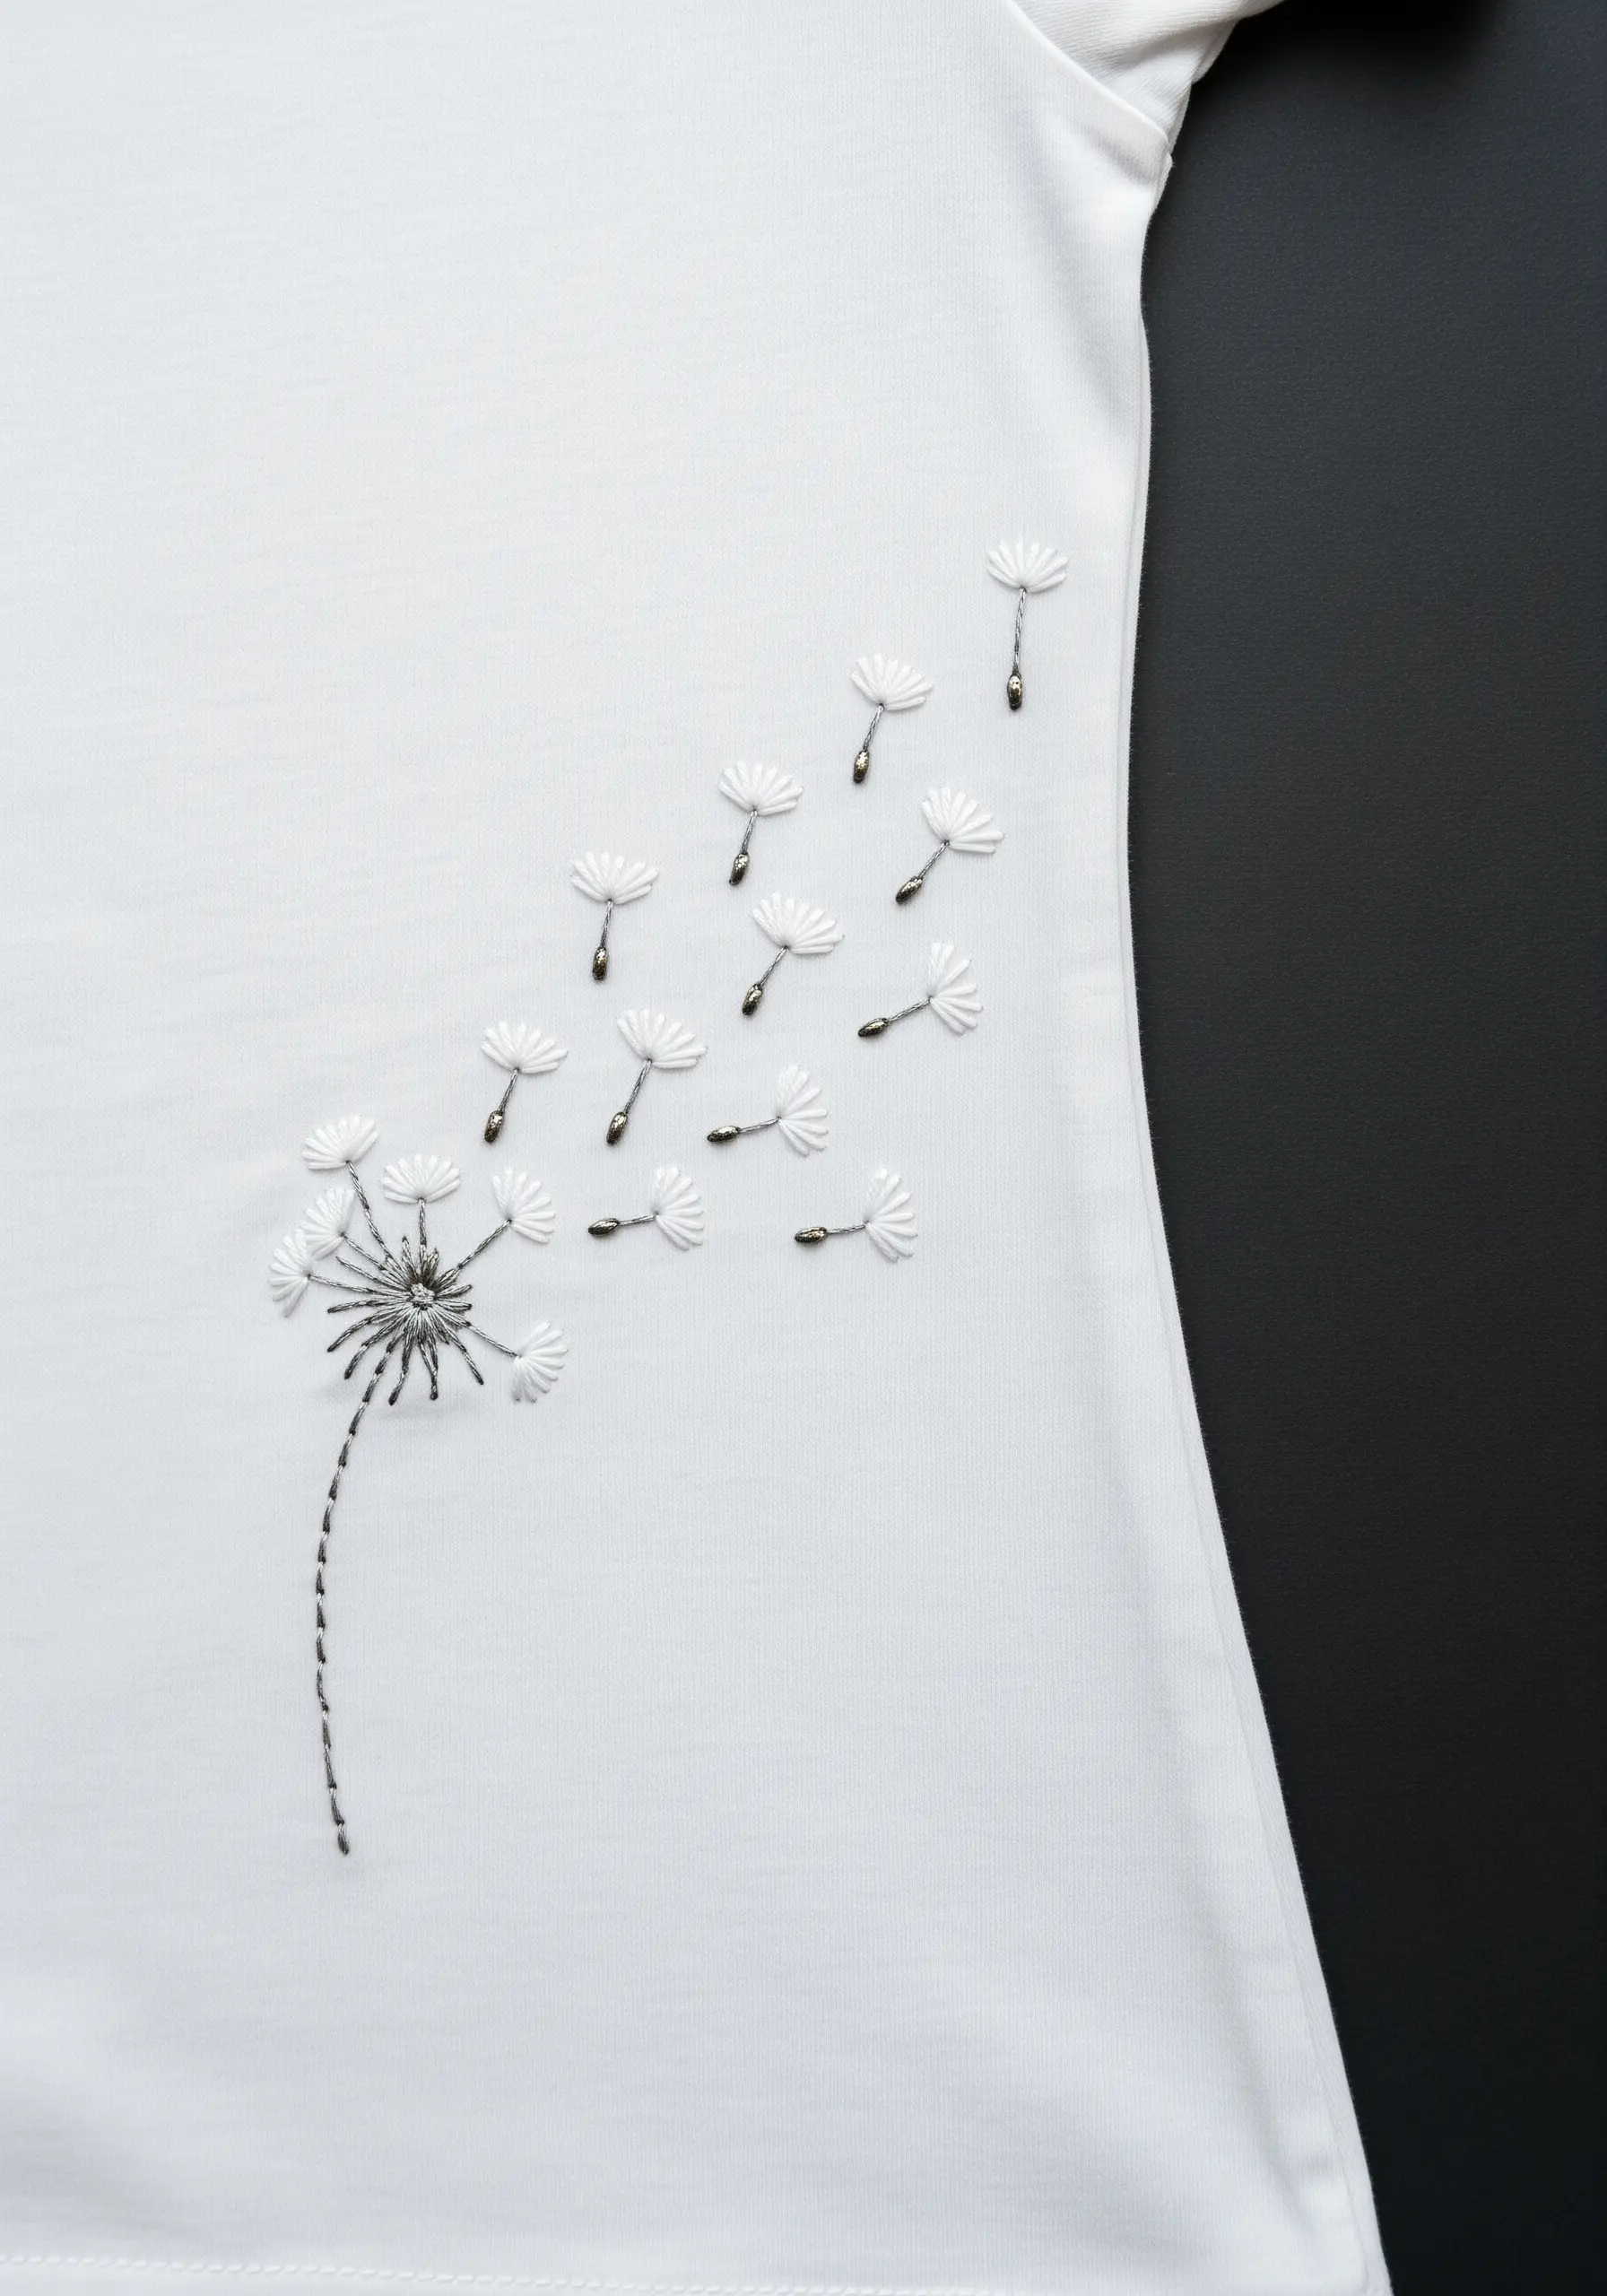
To convey the feeling of dandelion seeds floating on the wind, use detached chain stitches (also known as lazy daisy stitches) for the individual parachutes.
Stitch them at varying angles and distances from the main flower head to create a natural sense of motion and dispersal.
Combine this with a whipped backstitch for the stem to ground the delicate composition with a solid, textured line.
8. Build Lush Texture with Layered Succulents
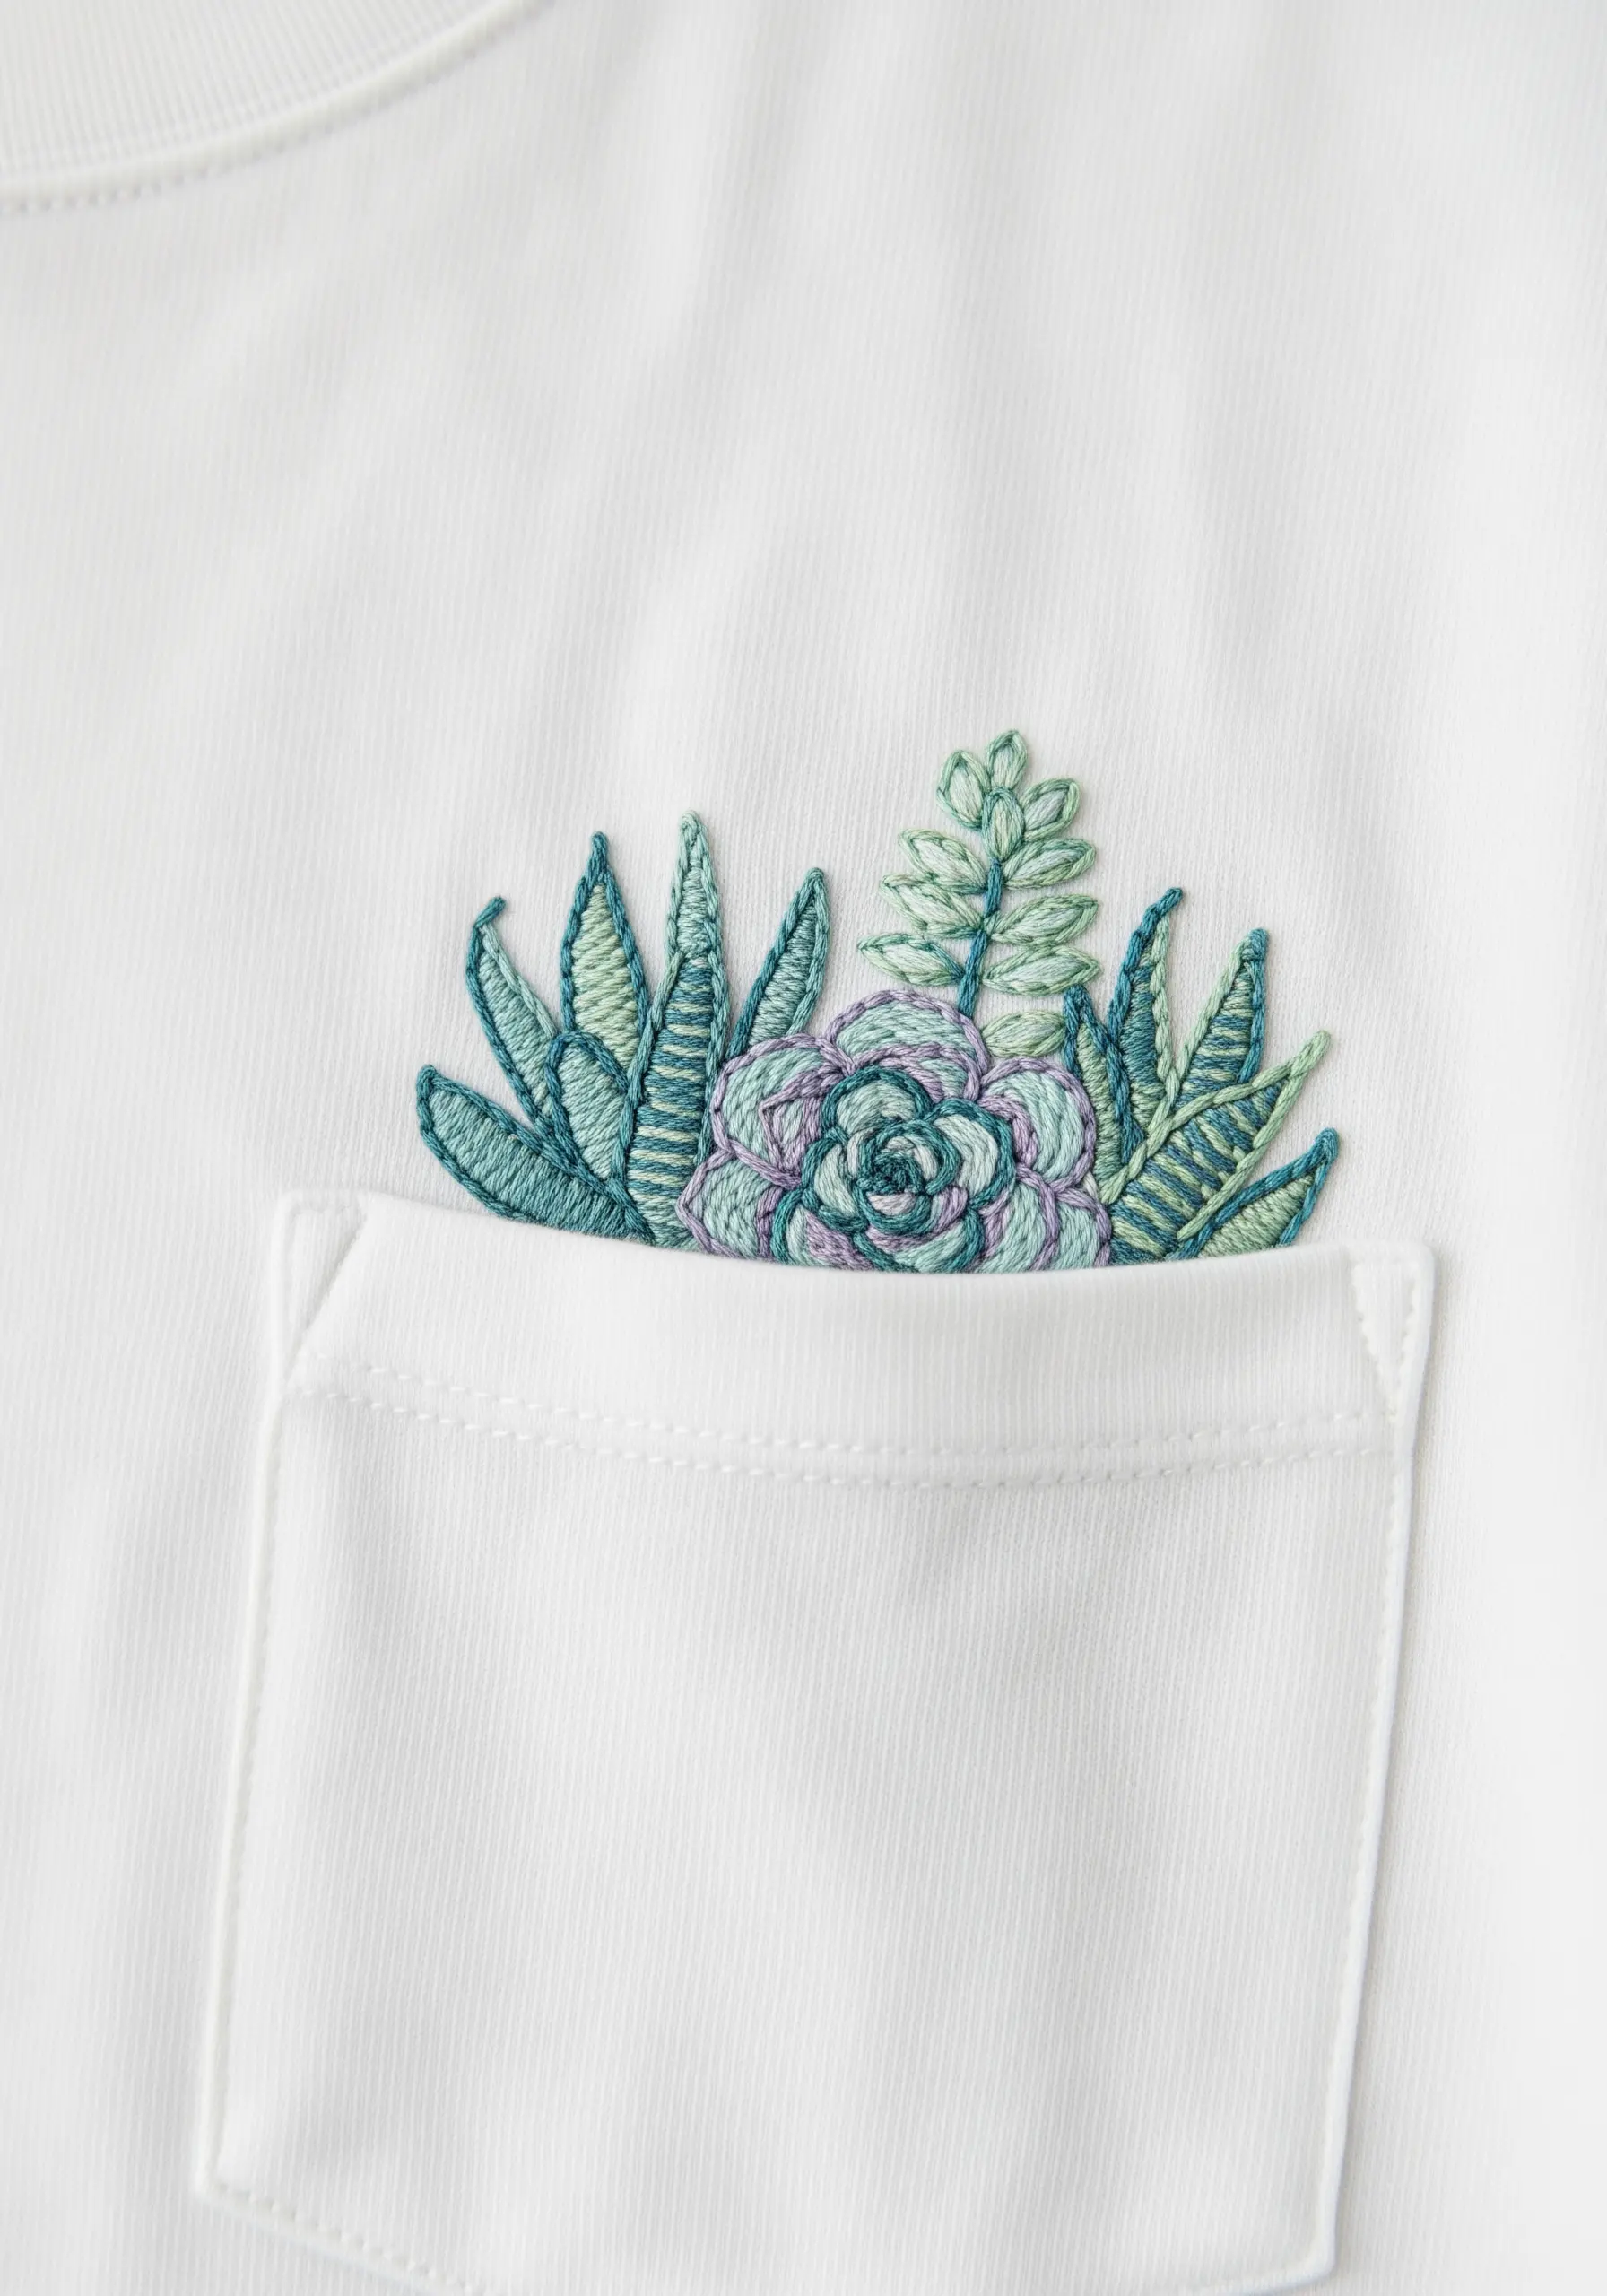
Mimic the dense, fleshy leaves of succulents by layering satin stitches and straight stitches in a cool-toned palette of teals, mints, and soft purples.
Vary the direction of your stitches for each leaf to create texture and the illusion of overlapping forms.
Subtle ombre effects created by blending two similar shades within a single leaf will add an incredible layer of realism and depth.
9. Transform a Silhouette with Asymmetrical Placement
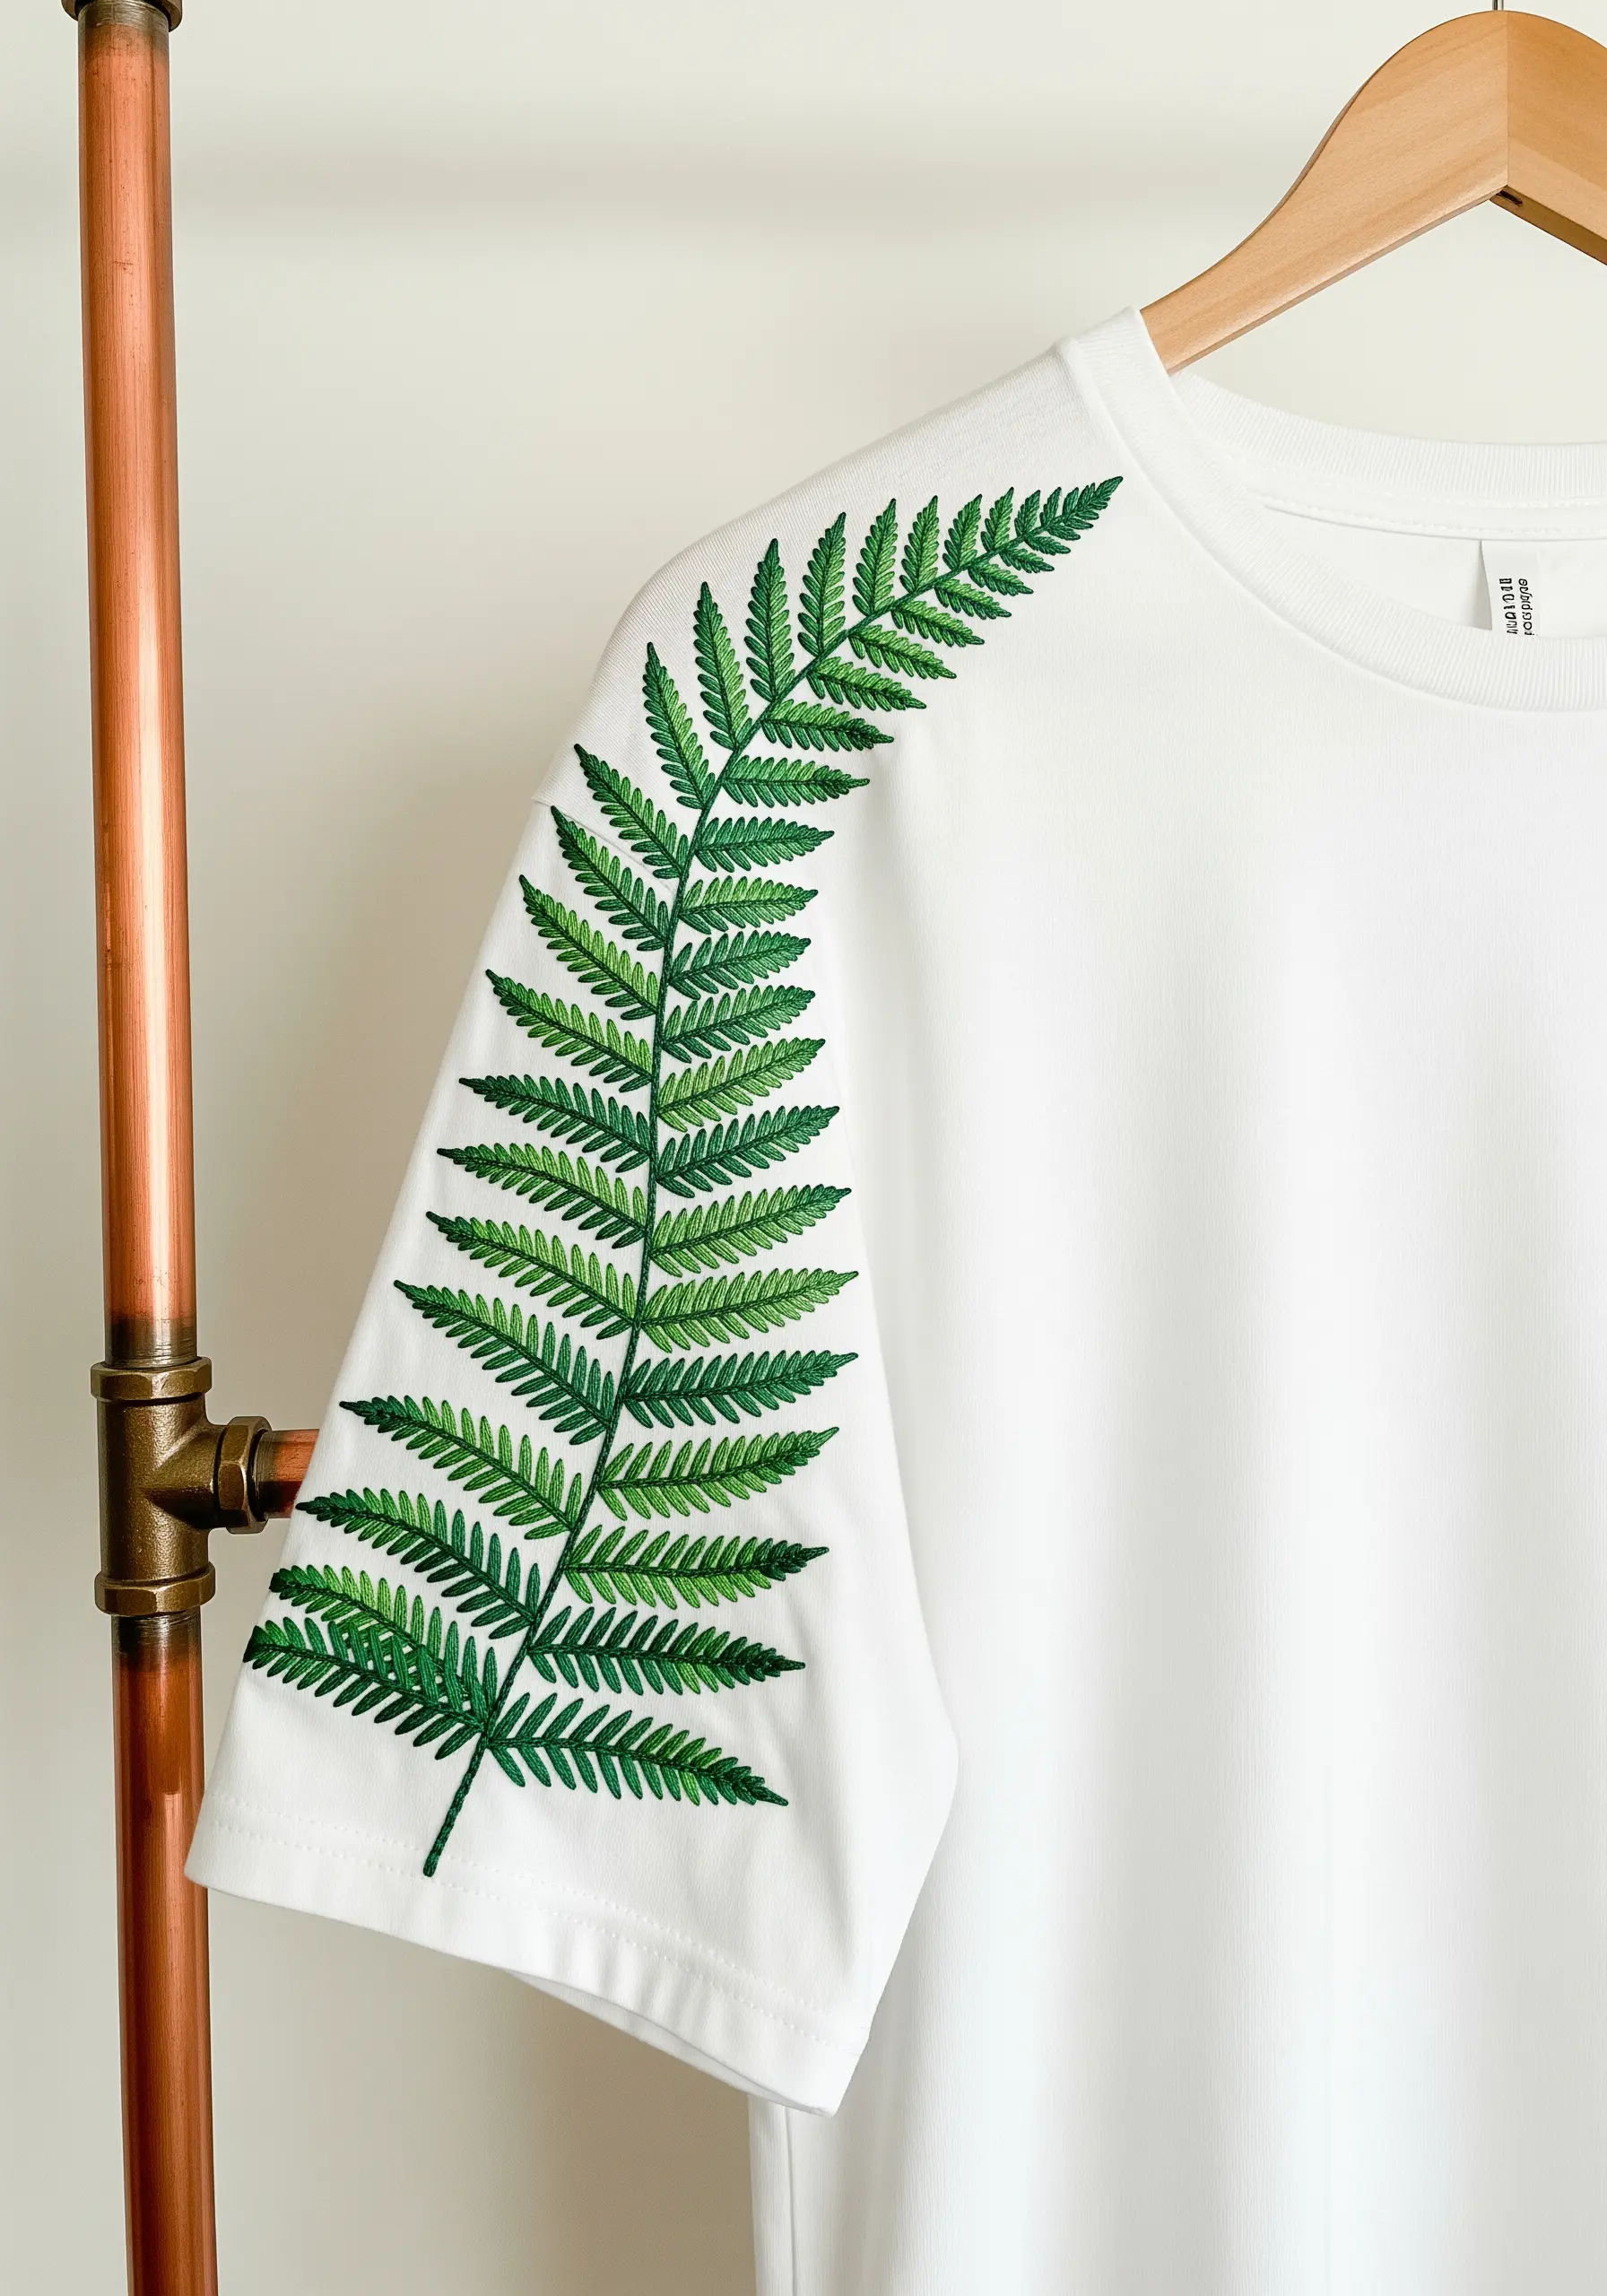
Placing a large botanical motif, like this fern, down the entire length of a sleeve is a bold compositional choice that elevates a simple t-shirt into a designer piece.
This asymmetrical placement draws the eye along the arm, creating a dynamic and flattering line.
Use fishbone stitch for the individual fern leaves; it automatically creates a central vein, adding realistic detail with a single, efficient stitch.
10. Create a Subtle Surprise Across the Shoulders
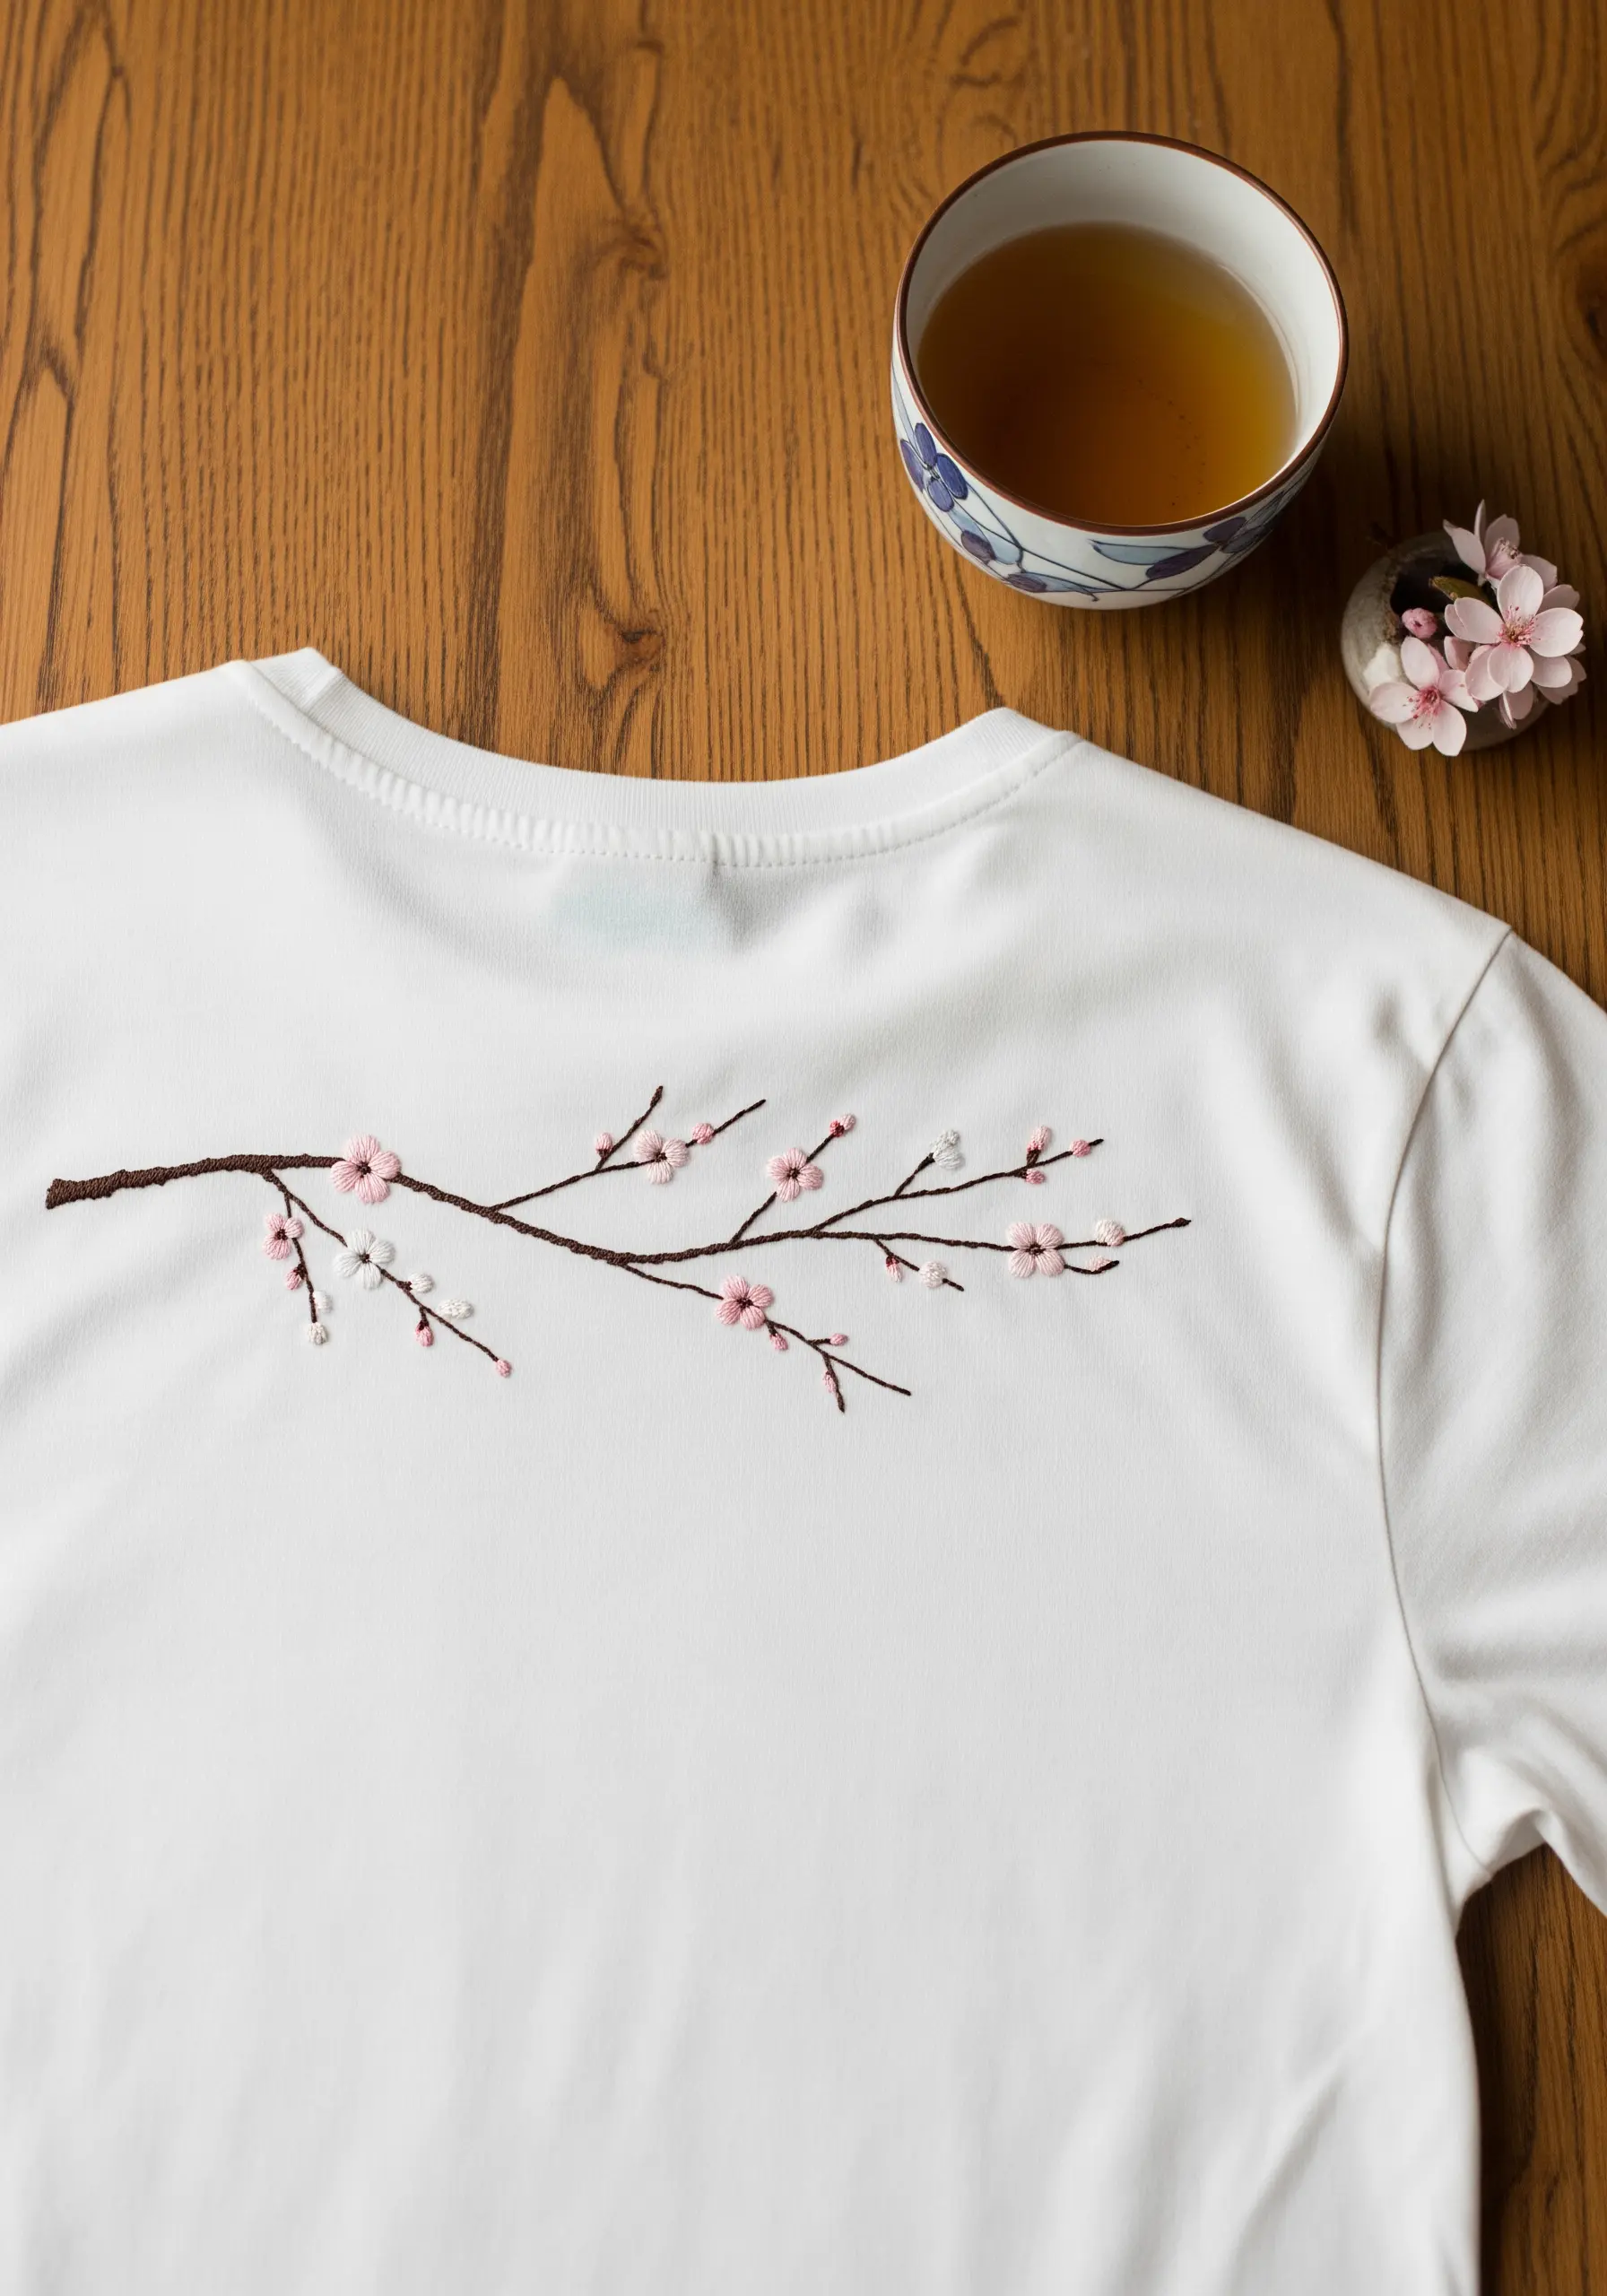
A delicate design placed across the back yoke—the area just below the collar—is an elegant and unexpected detail.
For these tiny cherry blossoms, use single, detached chain stitches for the petals and a French knot for the center.
Keep the branch itself fine and graceful by using a simple backstitch with only two strands of brown floss.
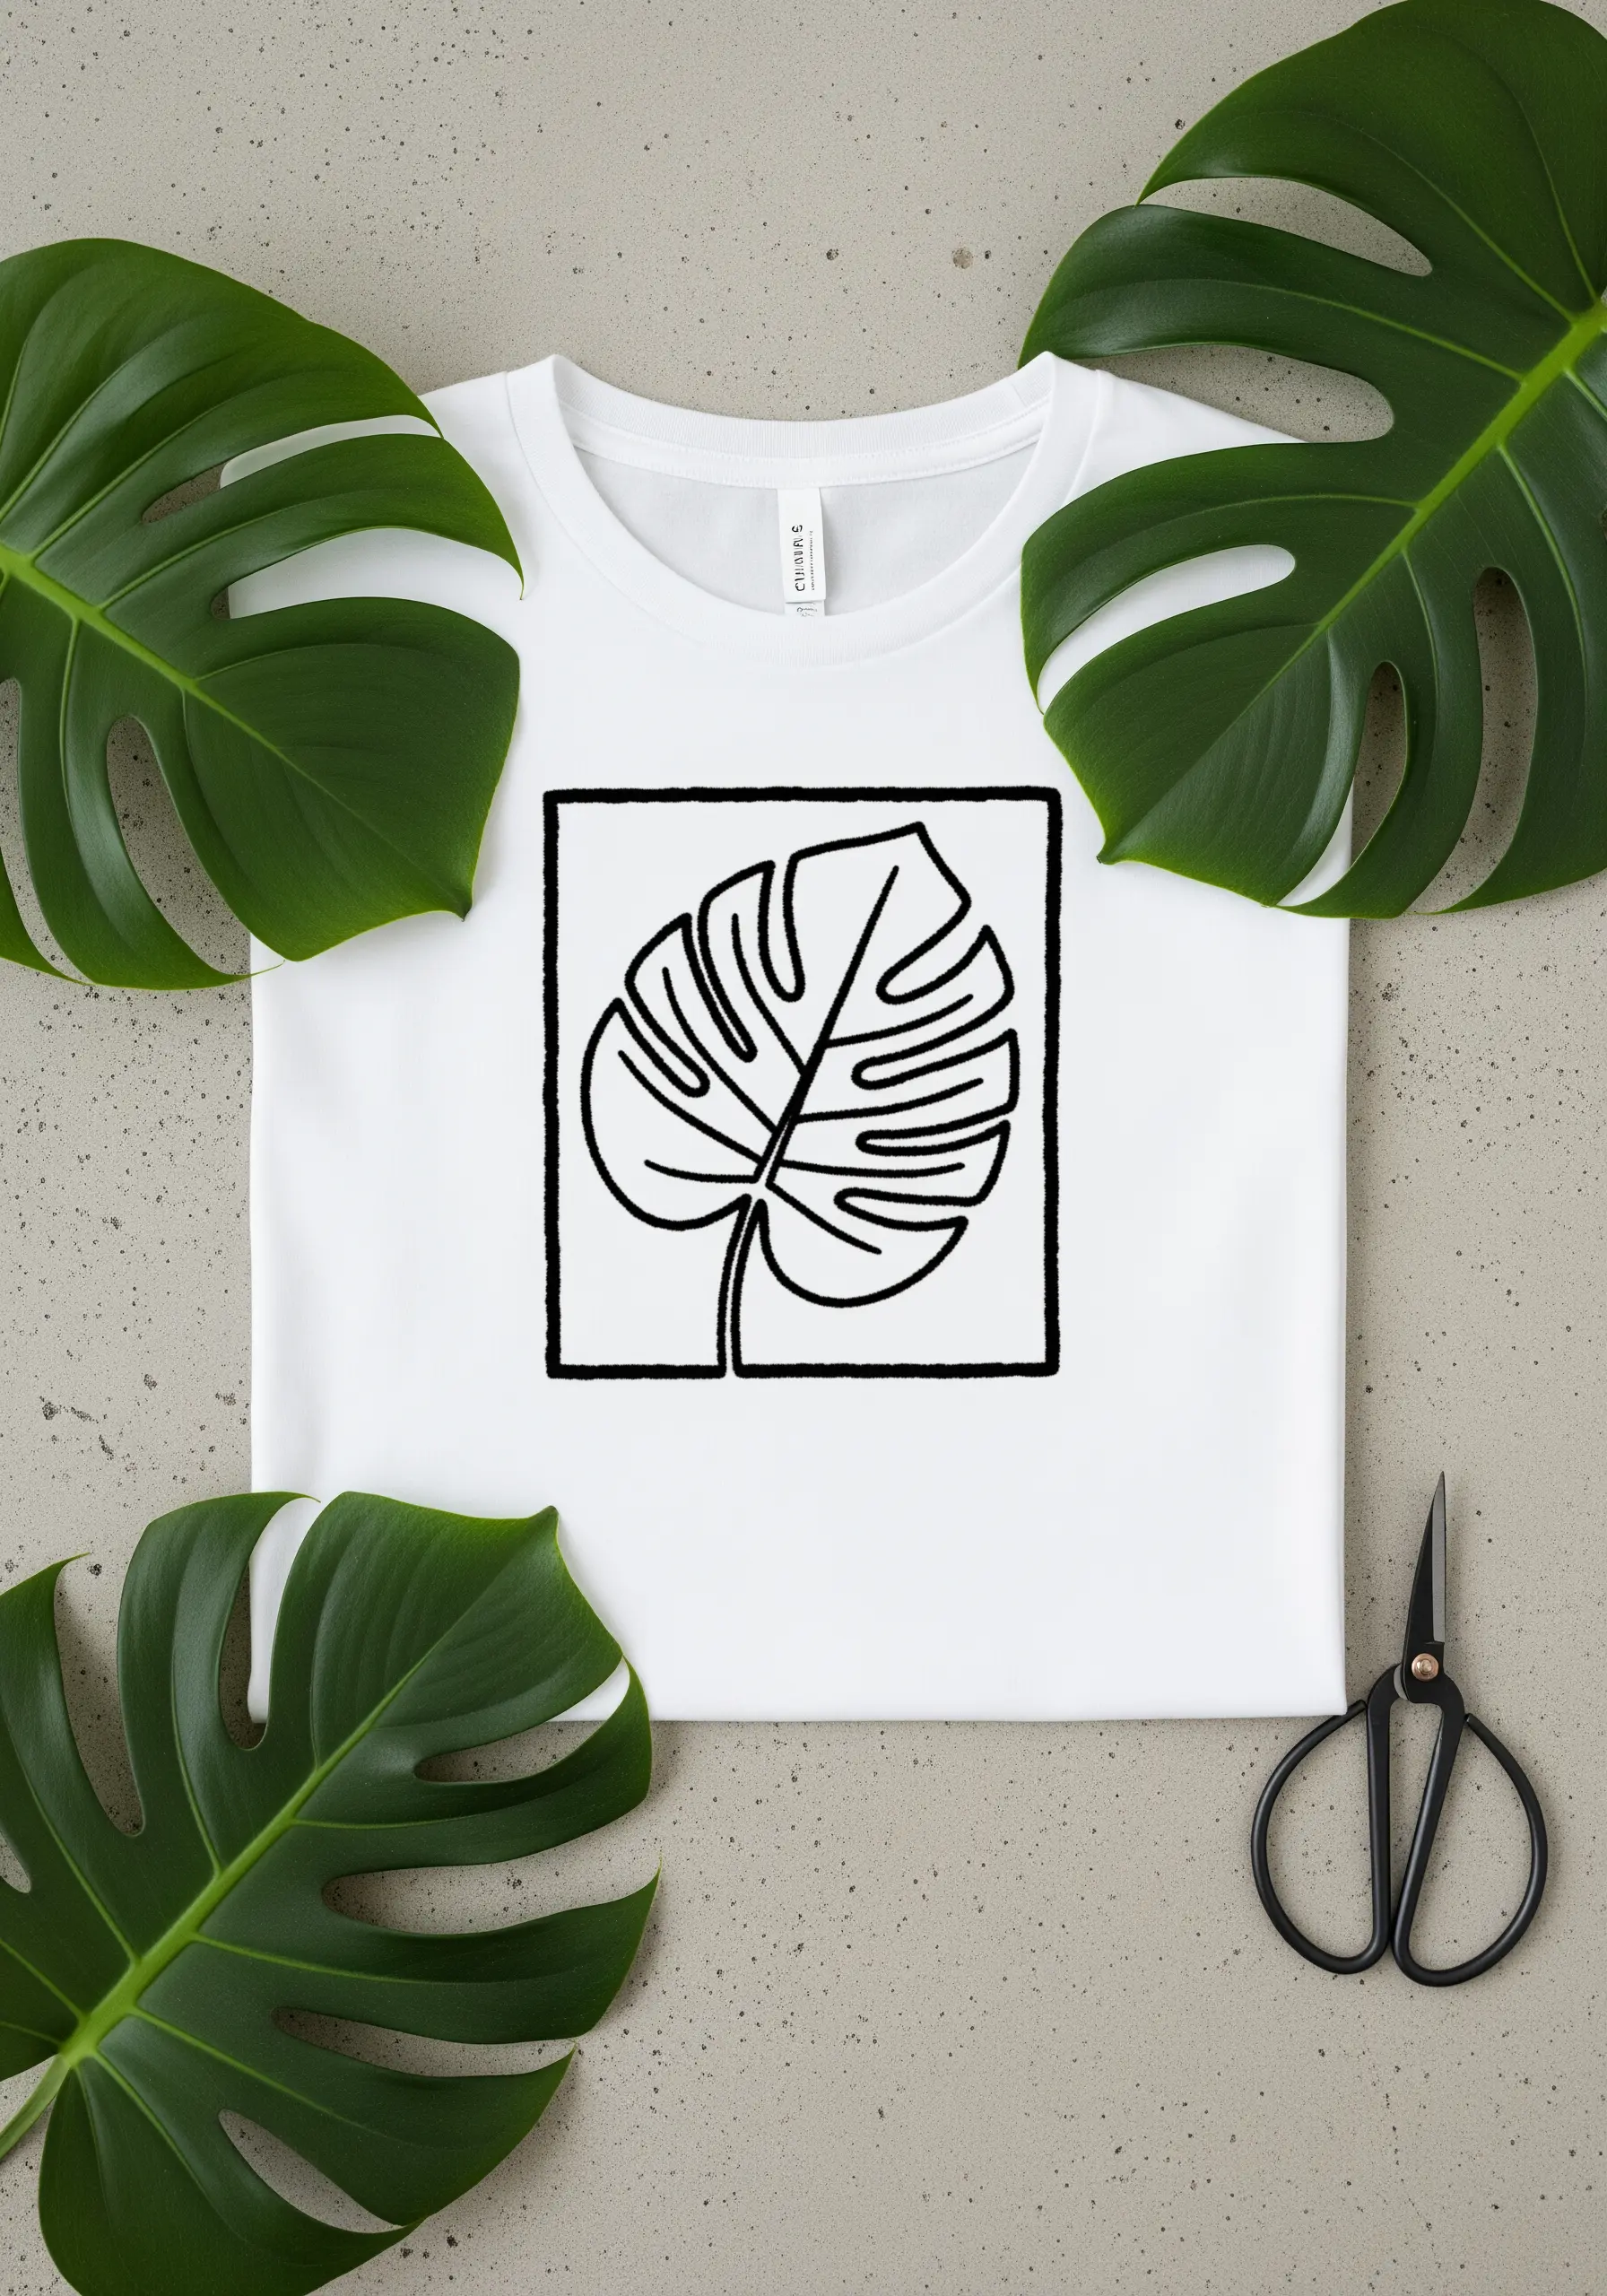
11. Achieve a Timeless Look with Minimalist Linework
Channel the clean aesthetic of botanical illustrations or fine-line tattoos by using only black thread on a white background.
A simple stem stitch or backstitch is all you need to create this classic look.
The key to success is consistency in your stitch length and tension, which ensures the lines look deliberate and polished rather than sketched.
12. Blend Colors Seamlessly with Thread Painting
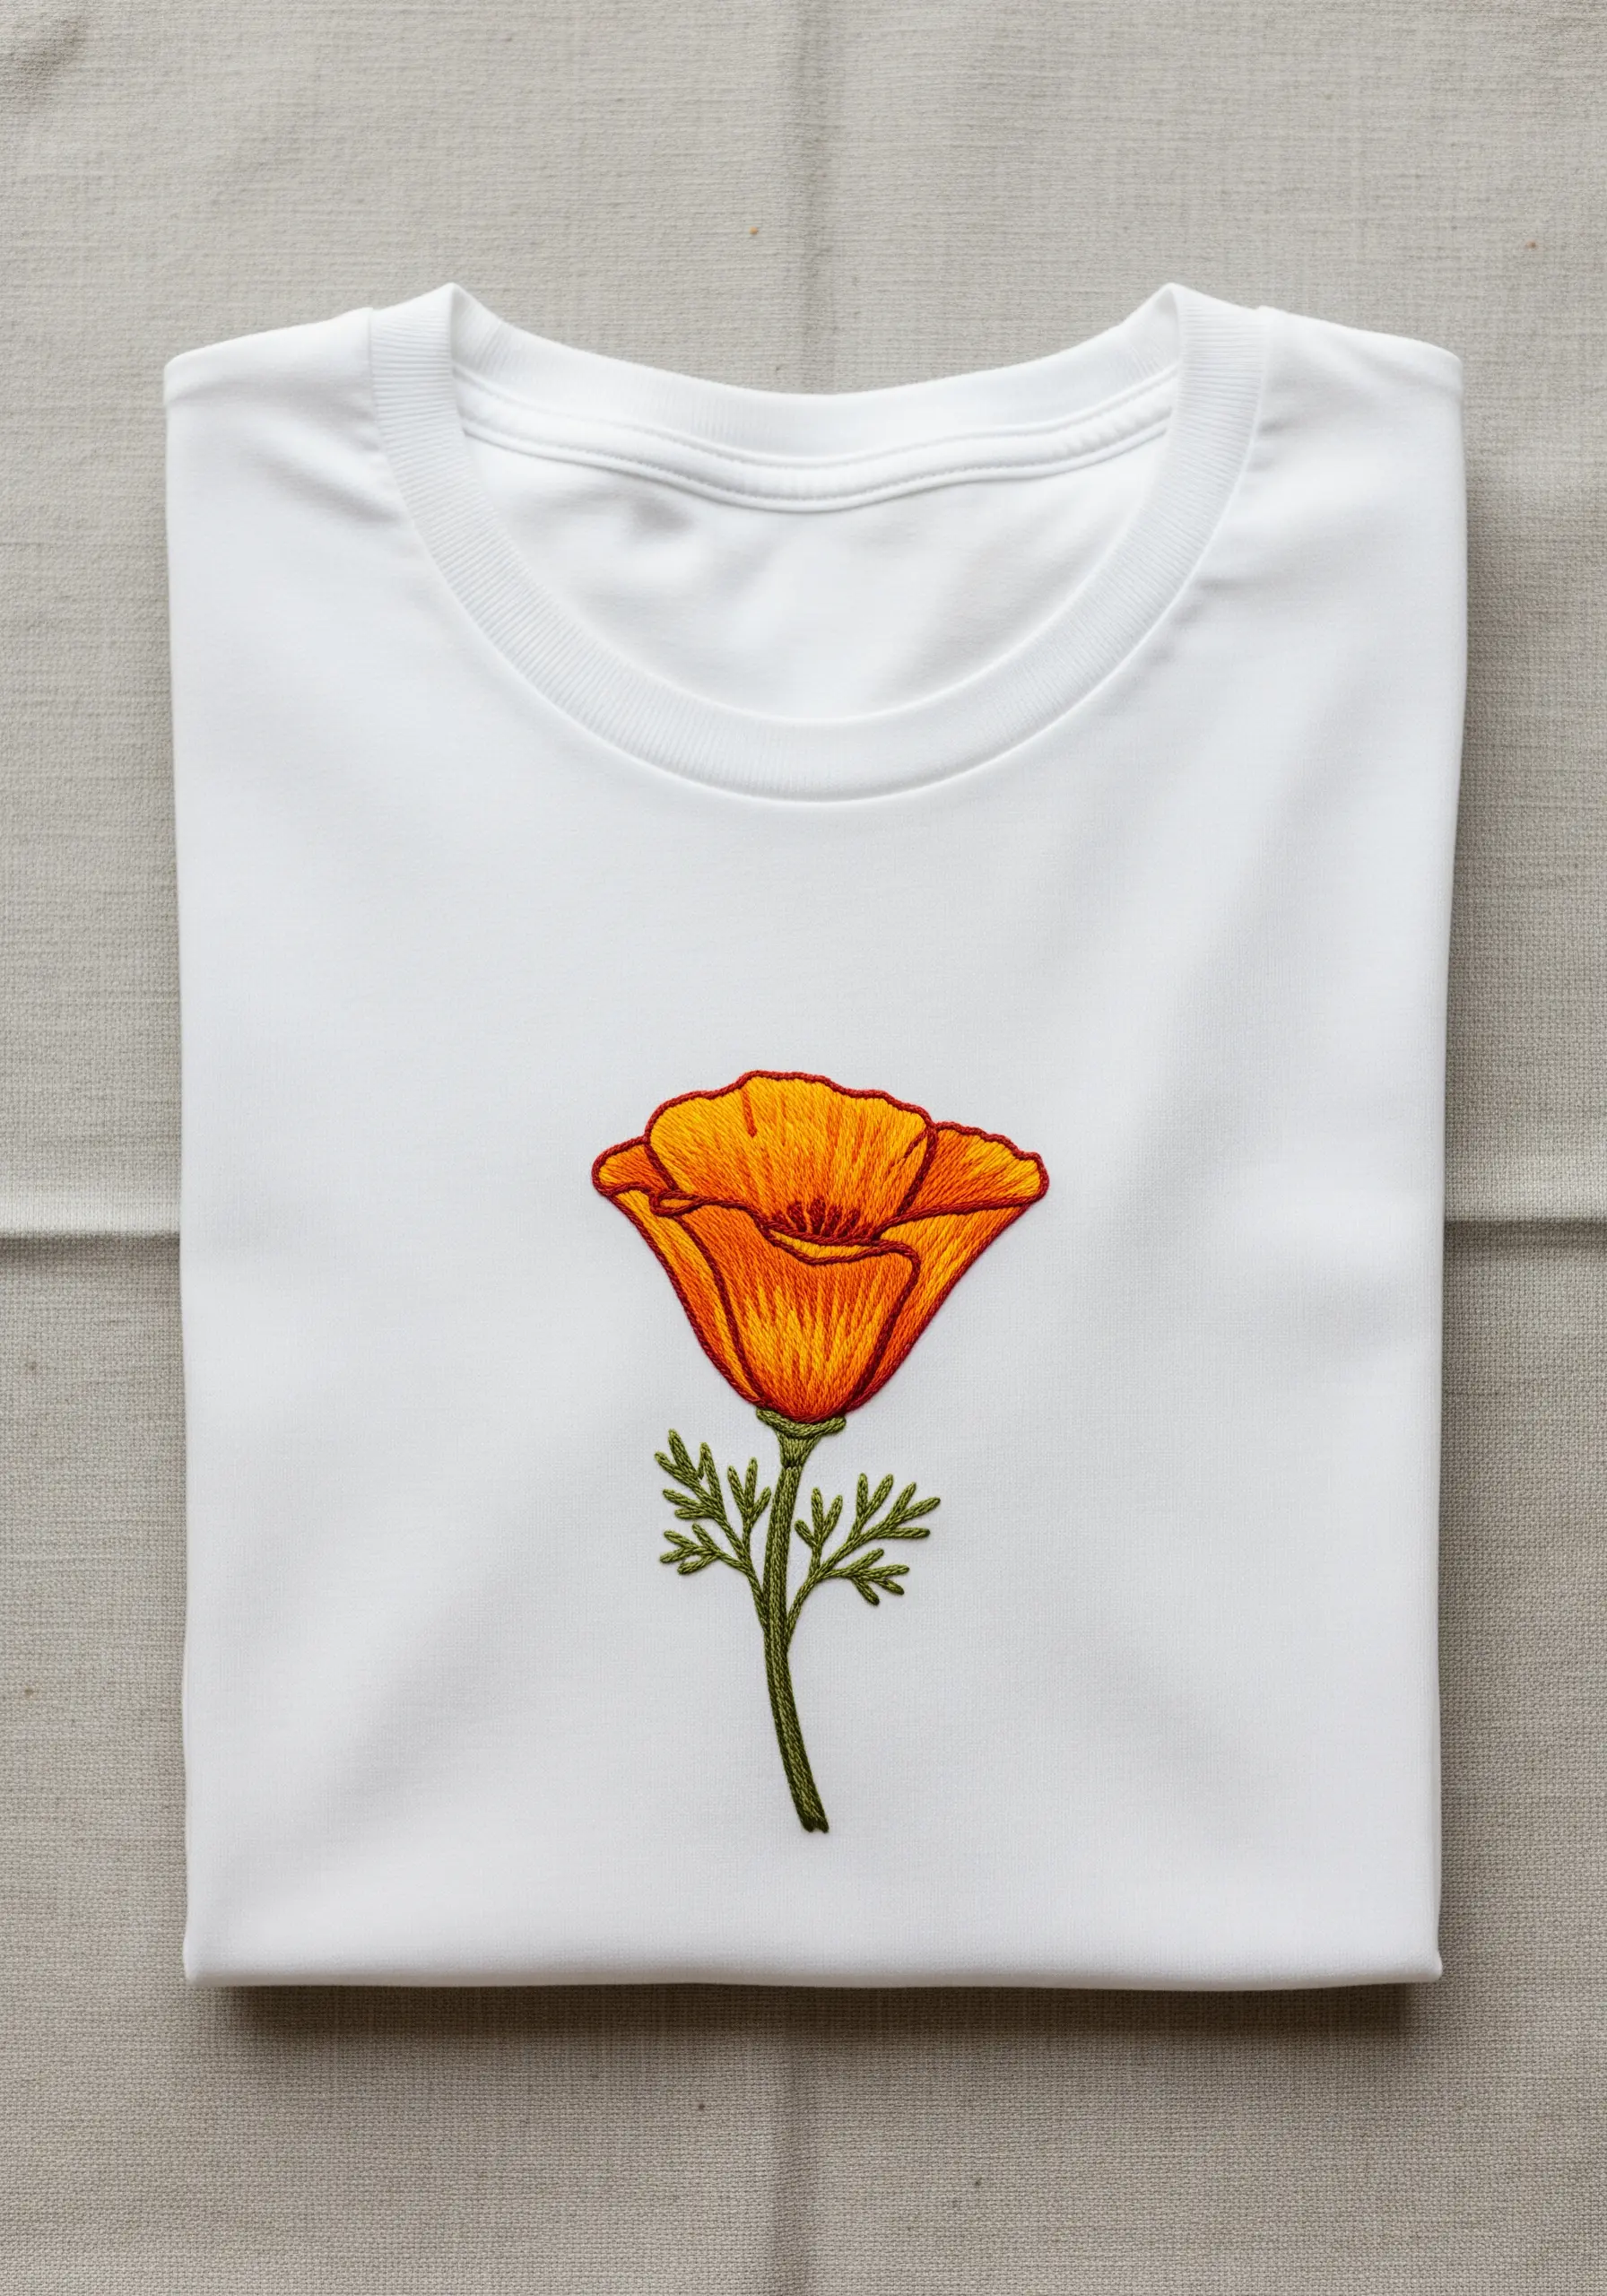
For a realistic, gradient effect on petals, use the long-and-short stitch technique, often called thread painting.
Work with two or three closely related shades of orange and yellow, blending them together with stitches of varying lengths.
This method eliminates harsh lines between colors, creating a soft, painterly transition that gives the flower lifelike volume and dimension.
13. Guide the Eye with a Flowing Diagonal Composition
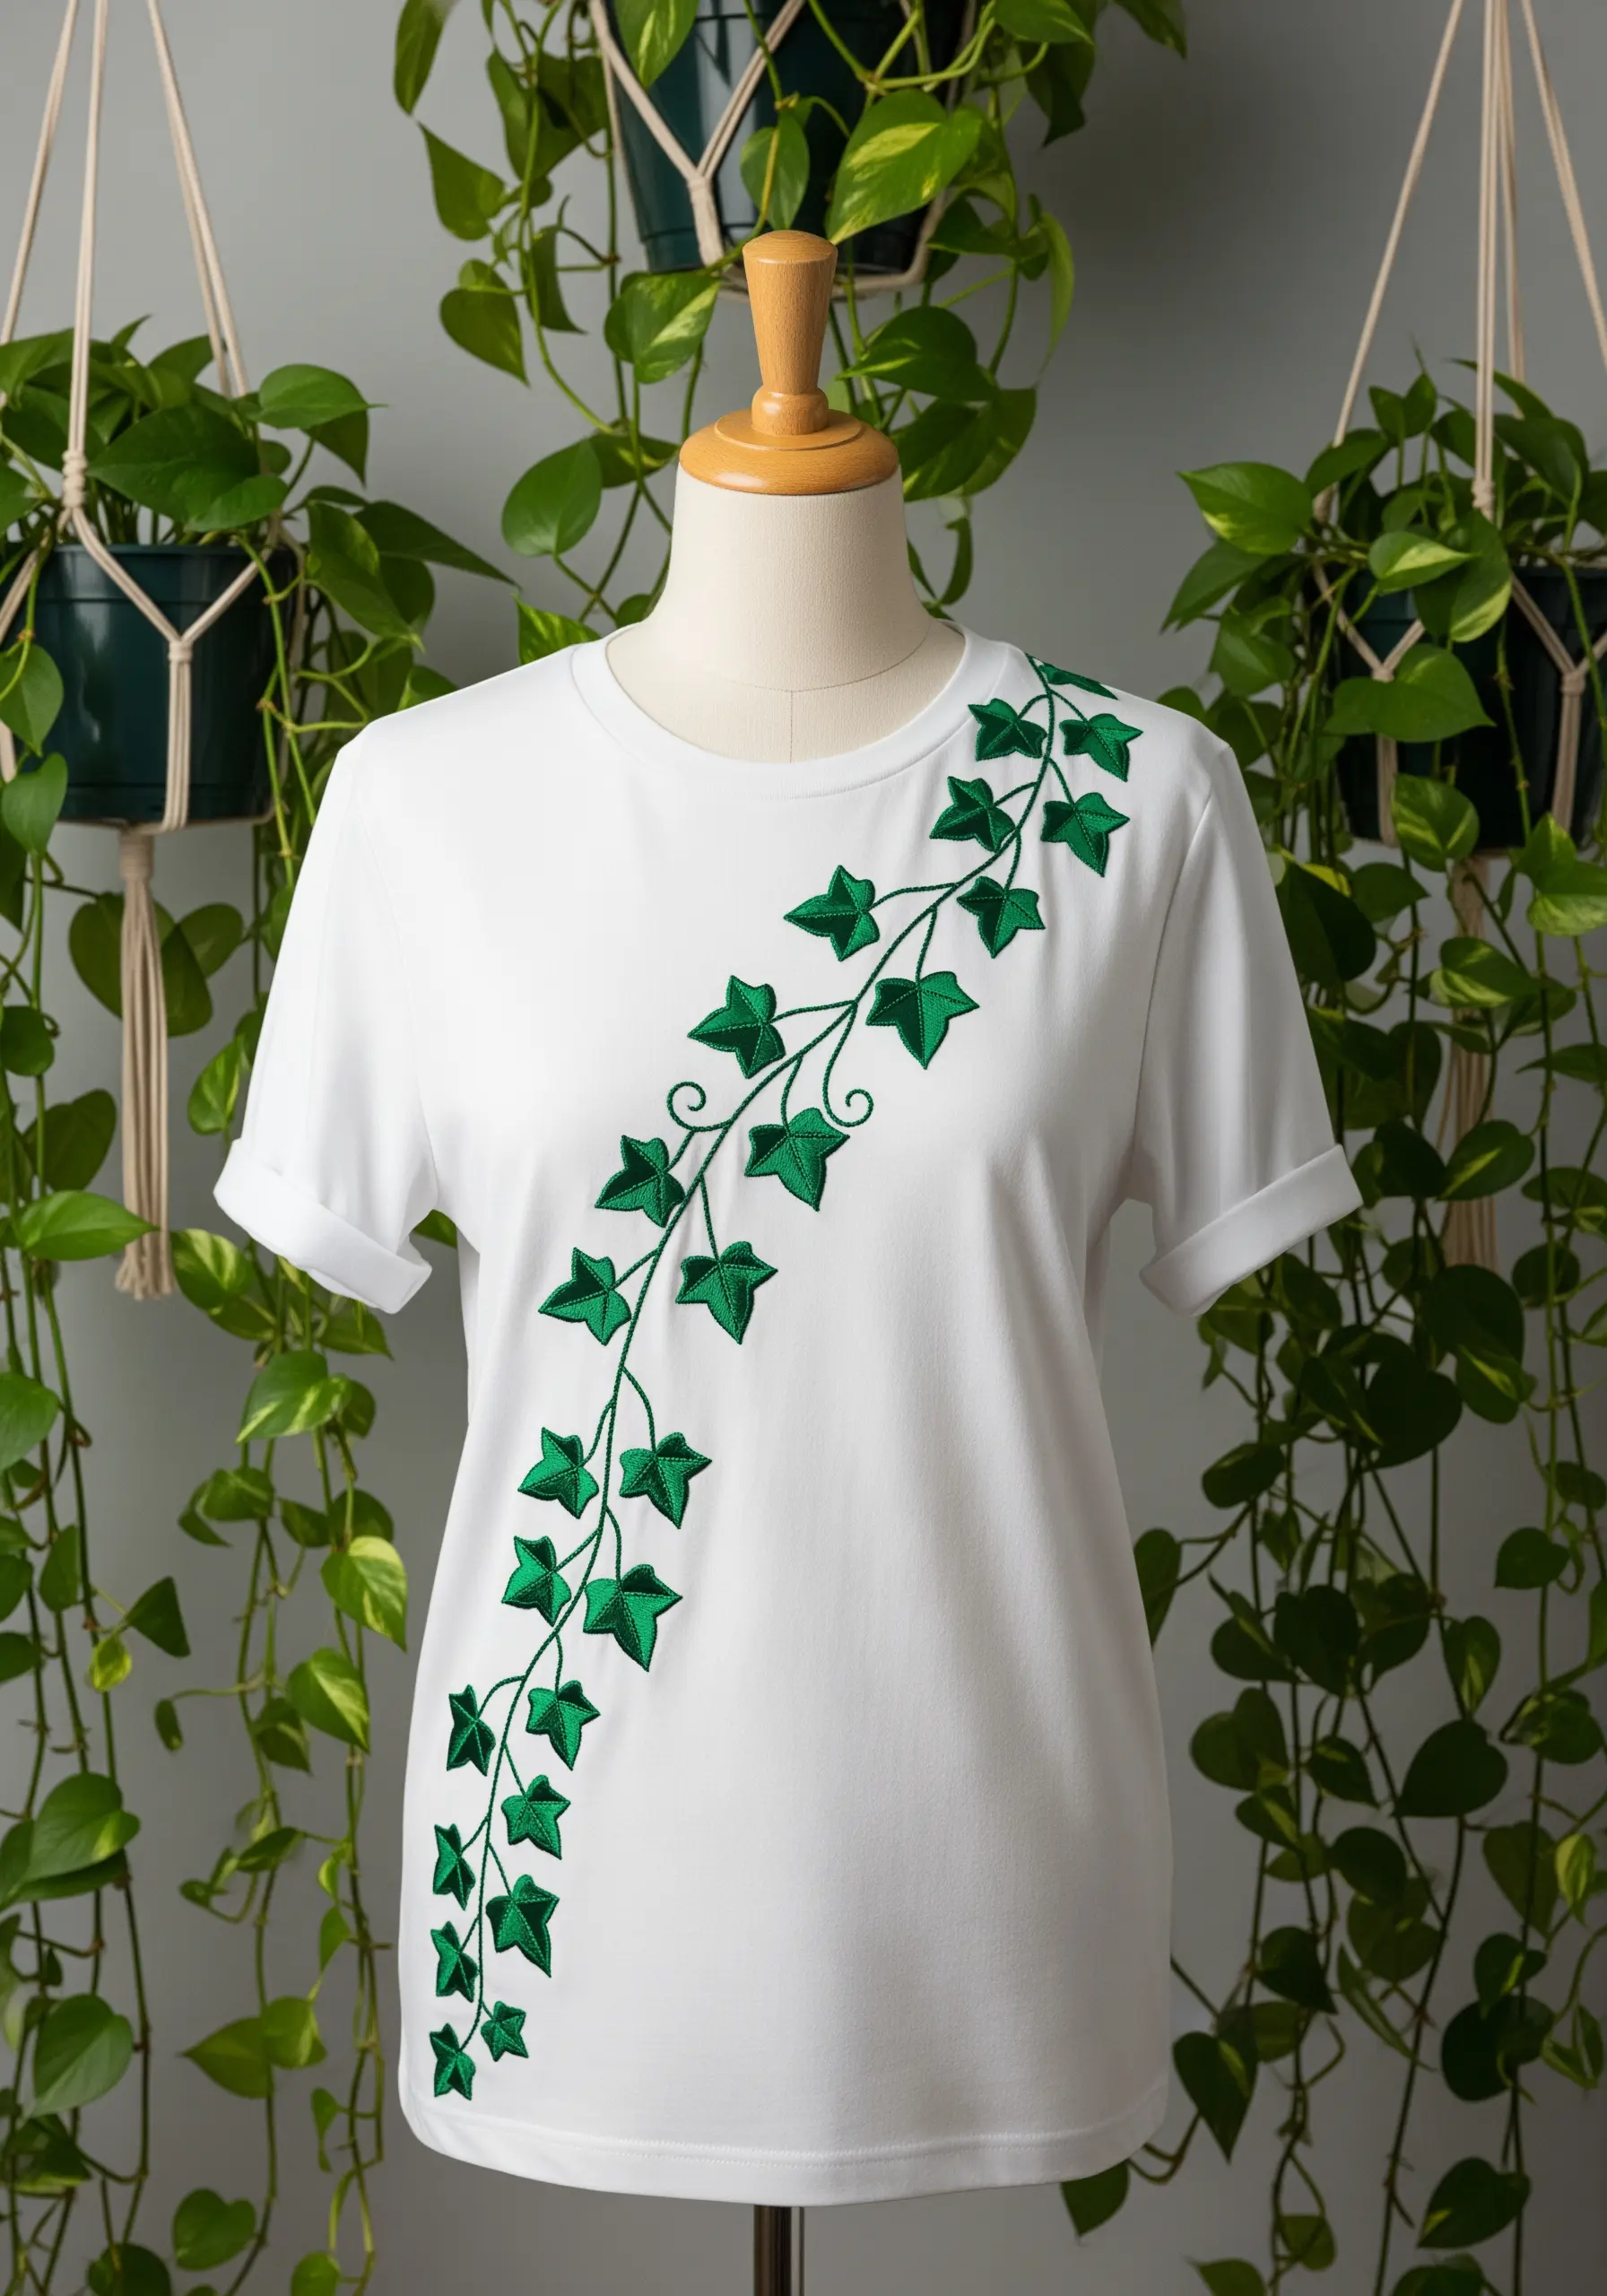
An embroidered vine that sweeps diagonally across the front of the shirt creates a sense of graceful movement and is incredibly flattering.
This dynamic placement guides the viewer’s eye across the garment, turning the entire t-shirt into a cohesive canvas.
Use a stem stitch for the main vine to give it a rope-like, rounded quality, and a simple satin stitch for the leaves.
14. Contrast Solid Fills with Open Outlines
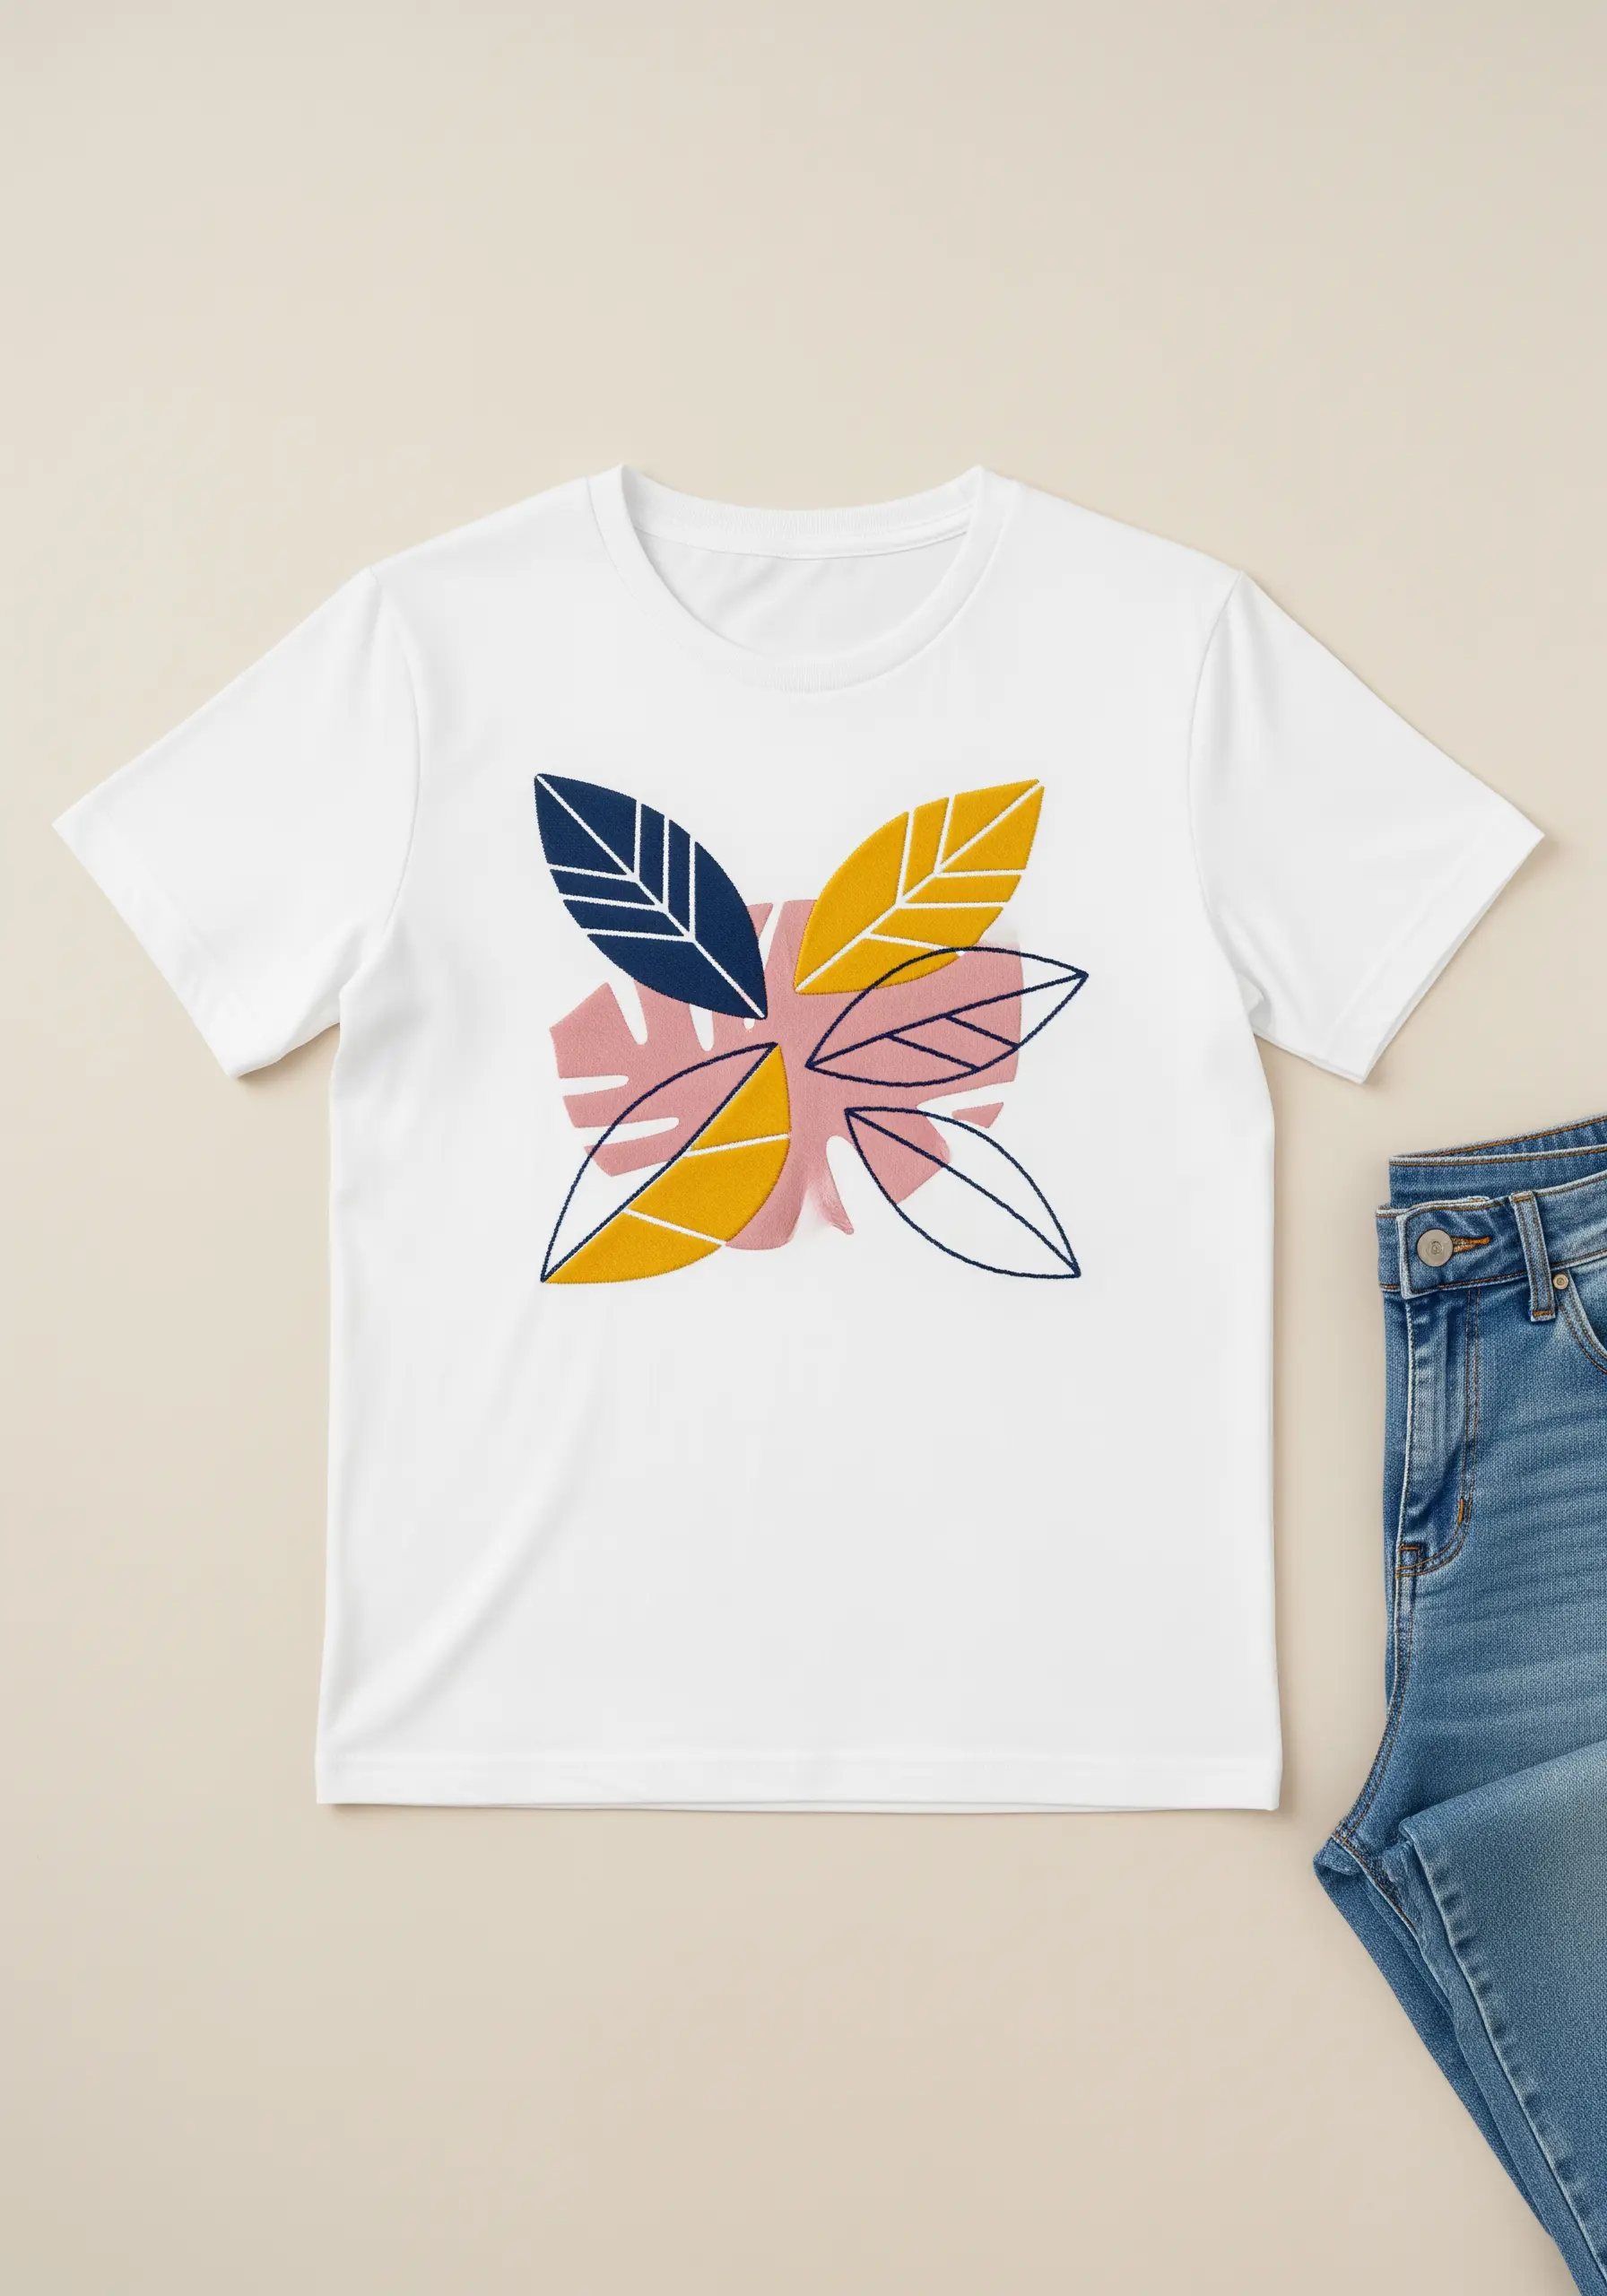
Create a modern, abstract botanical design by playing with contrast. Fill some leaf shapes with a dense, smooth satin stitch while leaving others as simple outlines.
This technique creates visual balance and rhythm, preventing the design from feeling too heavy.
Choose a contemporary color palette—like navy, ochre, and blush—to enhance the graphic, collage-like effect.
15. Mimic Nature by Varying Stitch Direction

To create a realistic sprig of rosemary, pay close attention to the direction of your stitches.
Use short, angled straight stitches for the needles, ensuring they radiate from the central stem just as they would in nature.
For the woody stem, use a whipped backstitch in a contrasting brown to give it a solid, rounded appearance that stands out from the delicate green needles.
16. Capture Unique Forms with Combined Textures
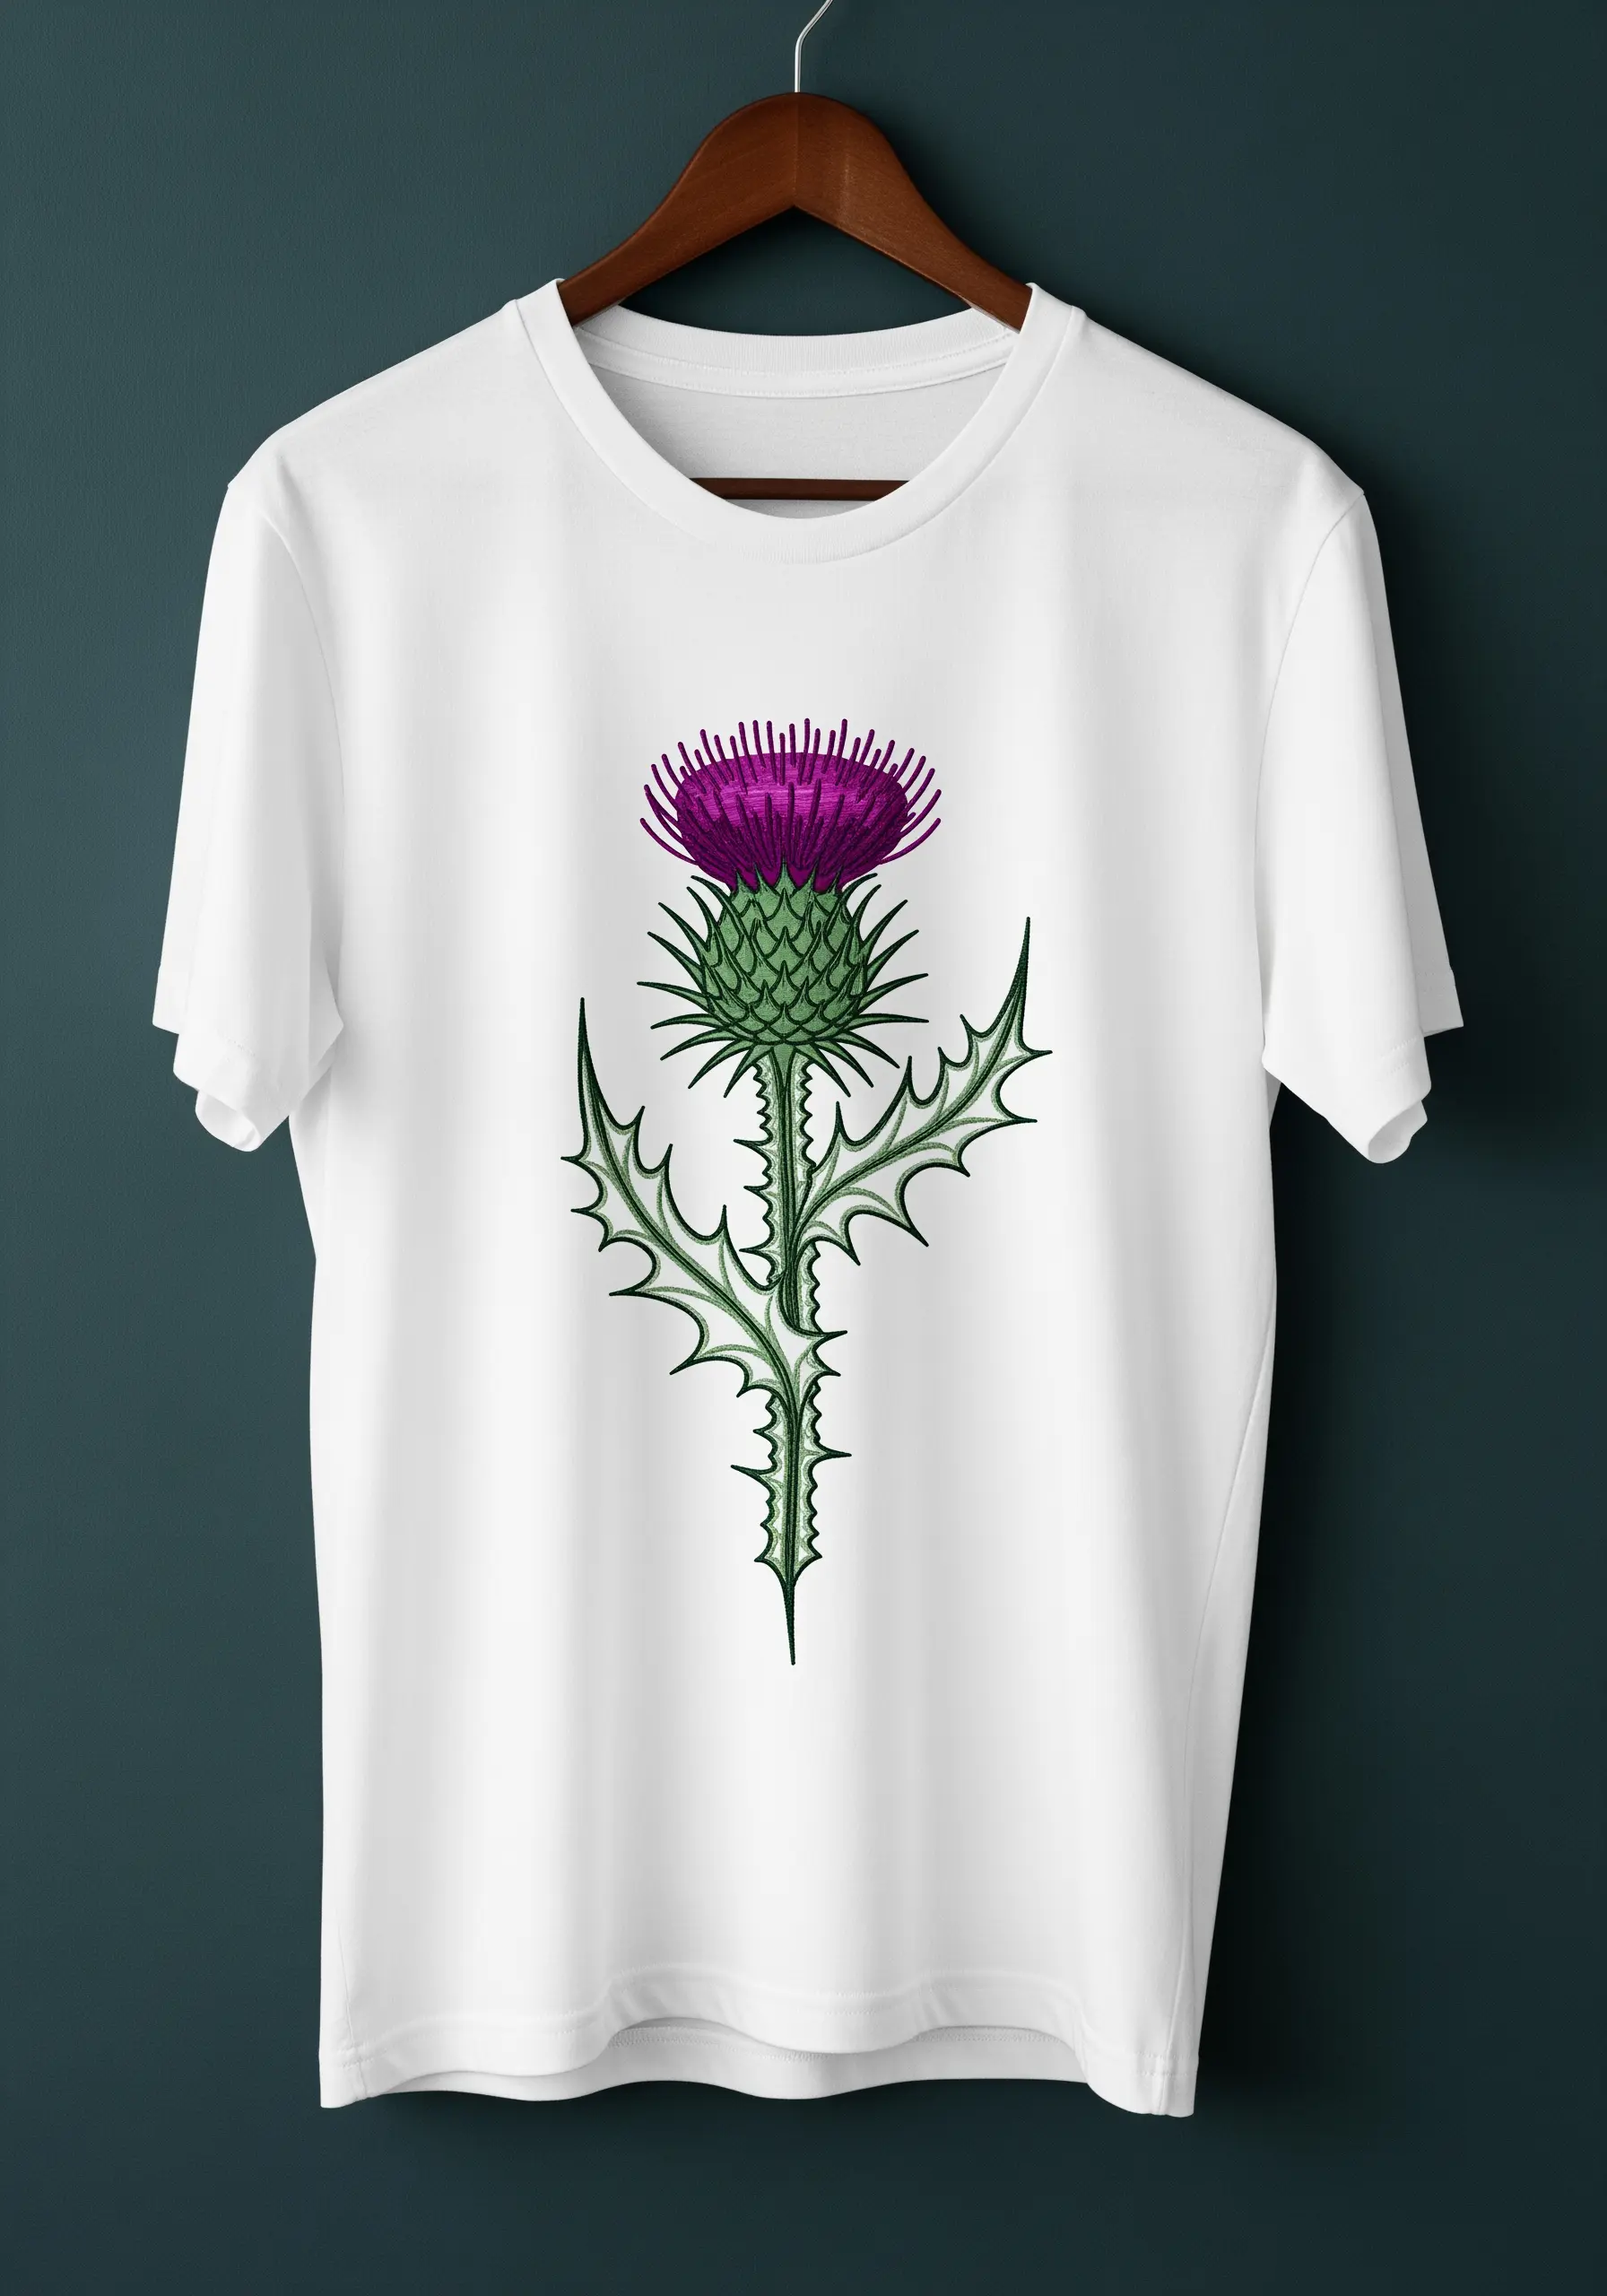
To replicate a plant with distinct parts, like a thistle, use different stitches to highlight its unique textures.
Render the sharp, spiky leaves with a precise satin stitch outlined in backstitch for crisp edges.
For the soft, tufted flower head, use a dense cluster of French knots or a series of upright turkey stitches that you can trim for a fluffy effect.
17. Tell a Story with Continuous Line Art

This design uses a single, unbroken thread to form both a peony and the heart that frames it, creating a beautiful and clever piece of visual storytelling.
A split stitch is perfect for this, as it creates a solid, chain-like line that can navigate tight curves smoothly.
The continuous line adds a layer of conceptual depth, suggesting a seamless connection between love and nature.
18. Add a Personal Signature Below the Collar
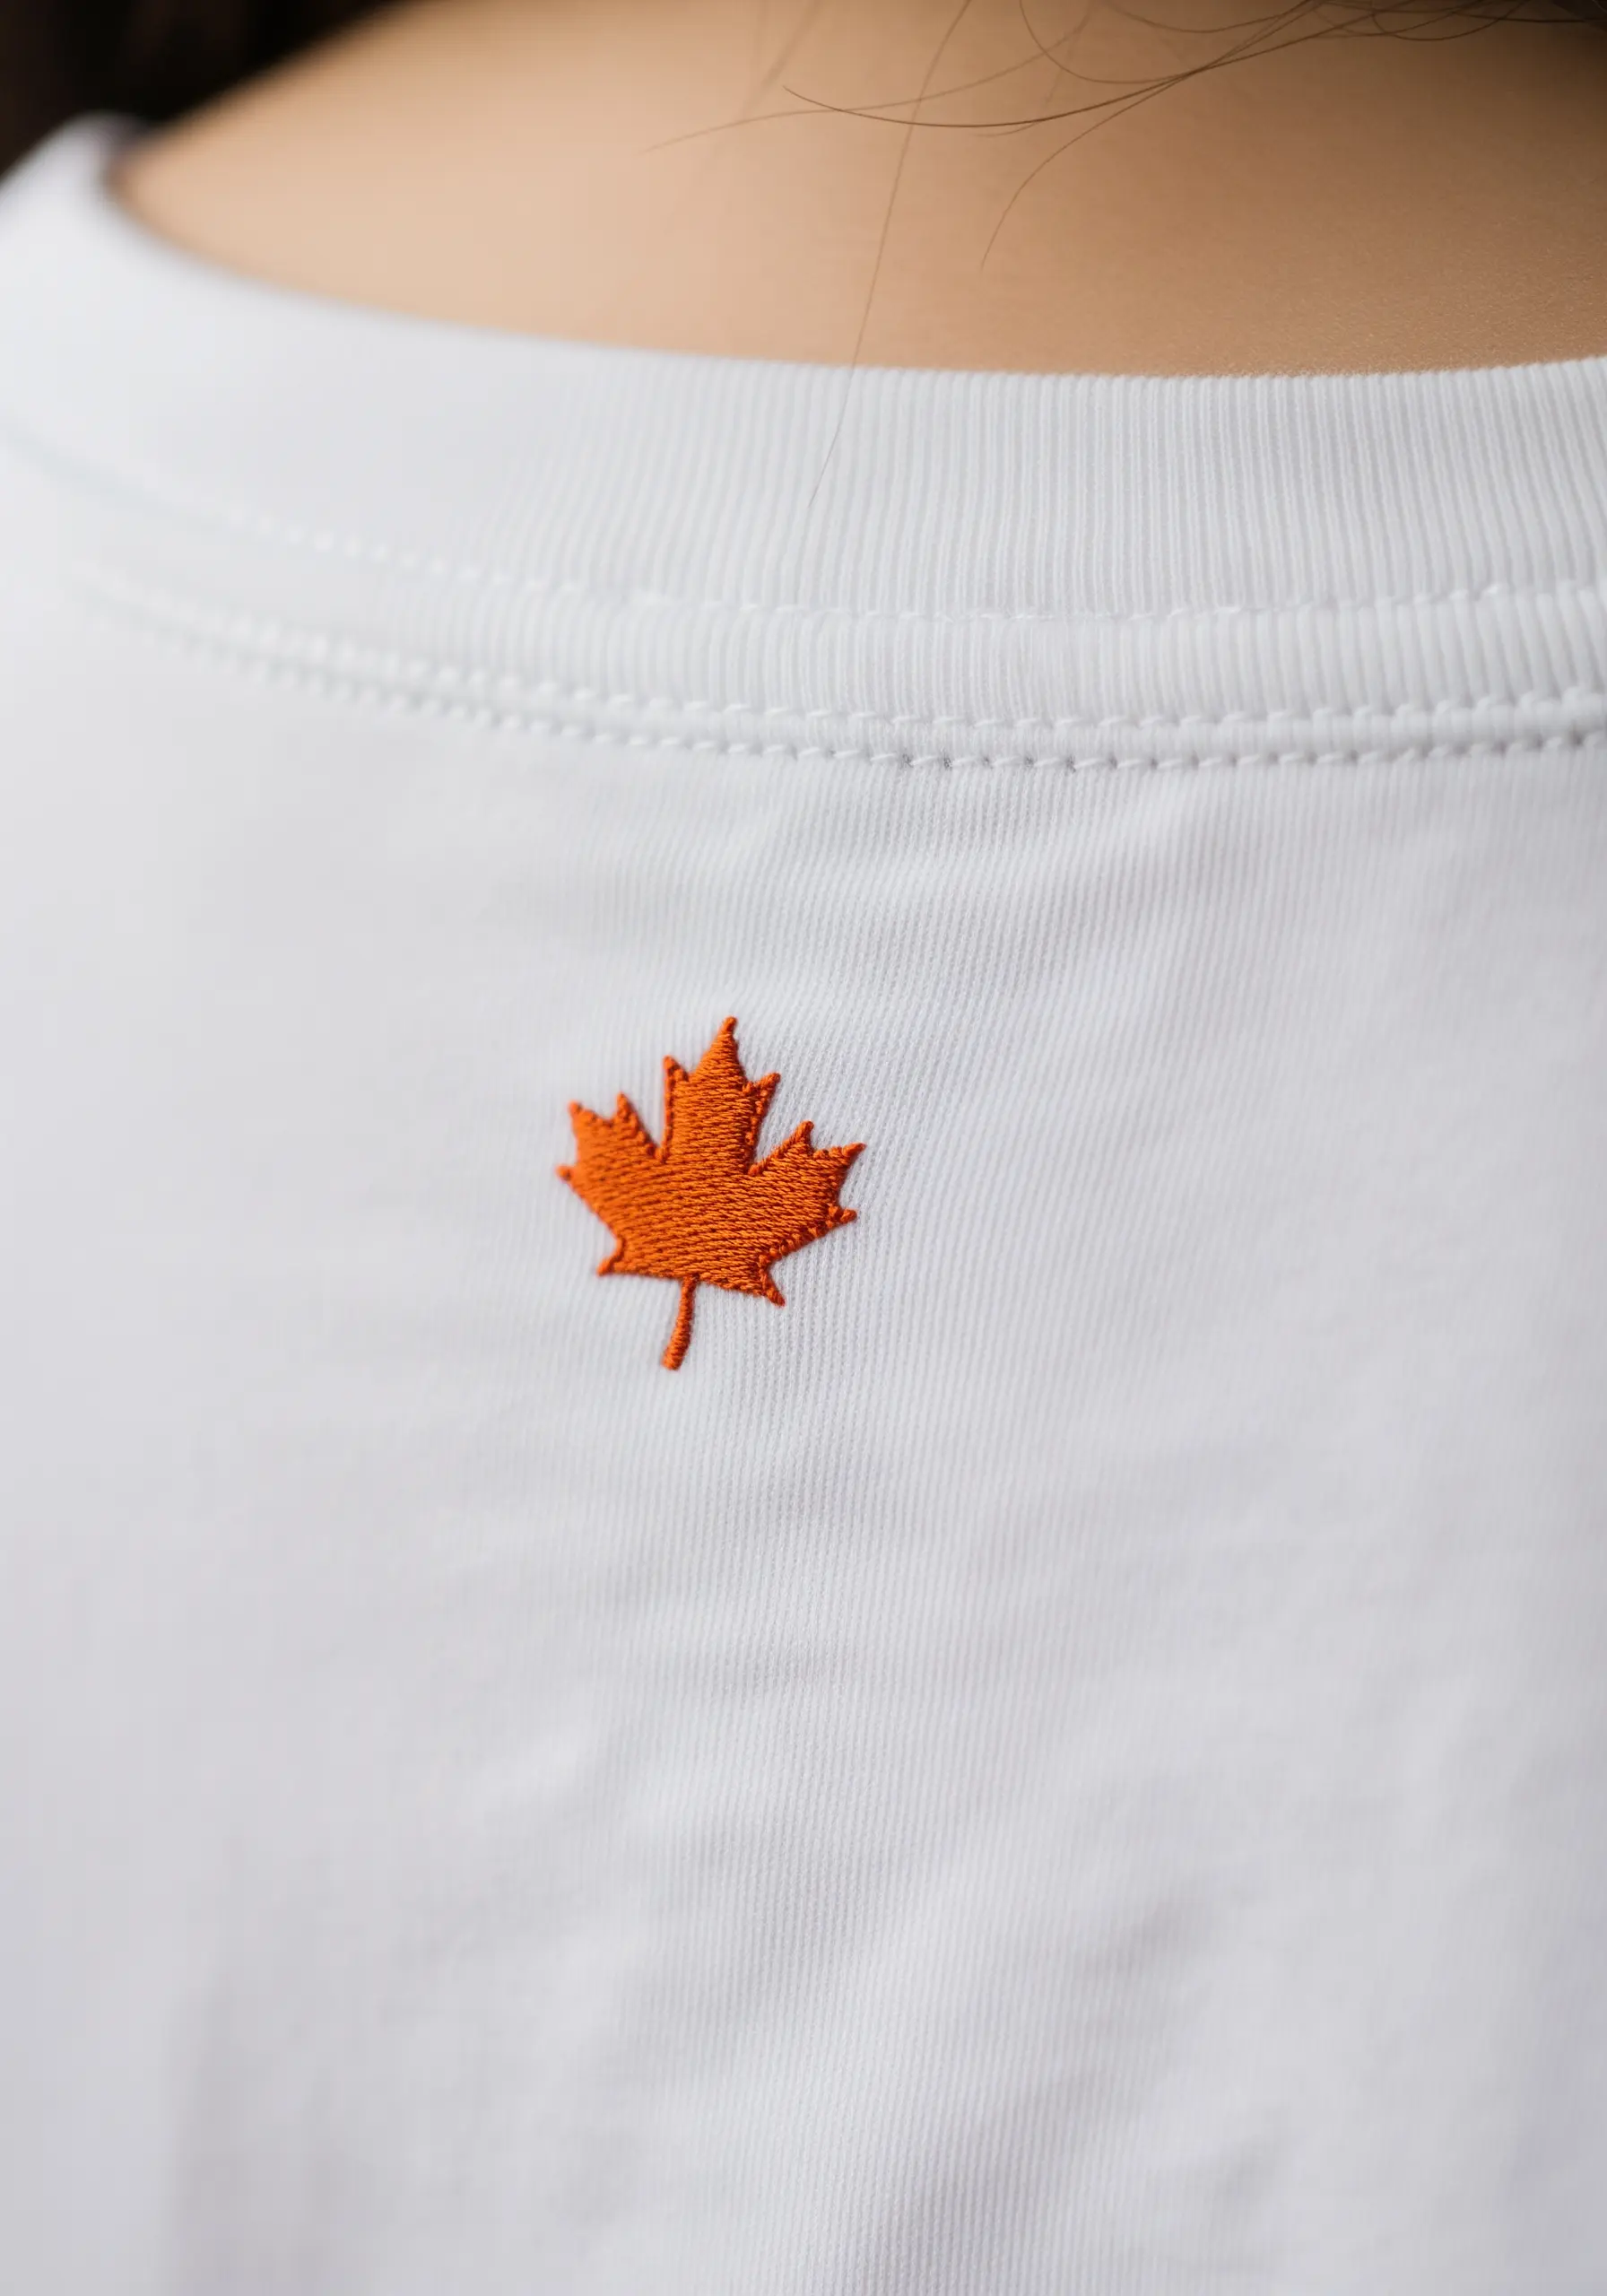
Placing a very small, impeccably stitched motif on the back of the neck is the embroidery equivalent of a designer’s label.
It’s a subtle, personal detail that is more for you than for anyone else.
For a tiny design like this maple leaf, ensure your satin stitches are dense and uniform to create a solid, gem-like accent.
19. Create Balance with a Paired Motif

Instead of a single large design, consider breaking your idea into two smaller, complementary elements, like an oak leaf and an acorn.
This approach allows you to play with composition and balance, creating a thoughtful, curated look.
Use a simple backstitch in a warm brown to give the pair a rustic, hand-drawn feel that complements the natural theme.
20. Design Your Own Fabric with Scattered Motifs

Turn a plain white tee into a custom-printed garment by scattering small, repeating motifs across the fabric.
Daisies are perfect for this: use five simple lazy daisy stitches for the petals and a single French knot for the center.
By varying the placement and orientation of each flower, you can create a playful, organic pattern that feels completely unique.
21. Emphasize Structure with Geometric Botanicals

When your design is based on clean, geometric lines, your stitch choice should reinforce that structure.
A chain stitch or a whipped backstitch will create a bold, uniform line that emphasizes the symmetry and precision of the lotus flower.
Using a single, muted color like this dusty blue allows the form itself, rather than color, to be the main focus of the design.
22. Use Directional Stitching to Capture Light
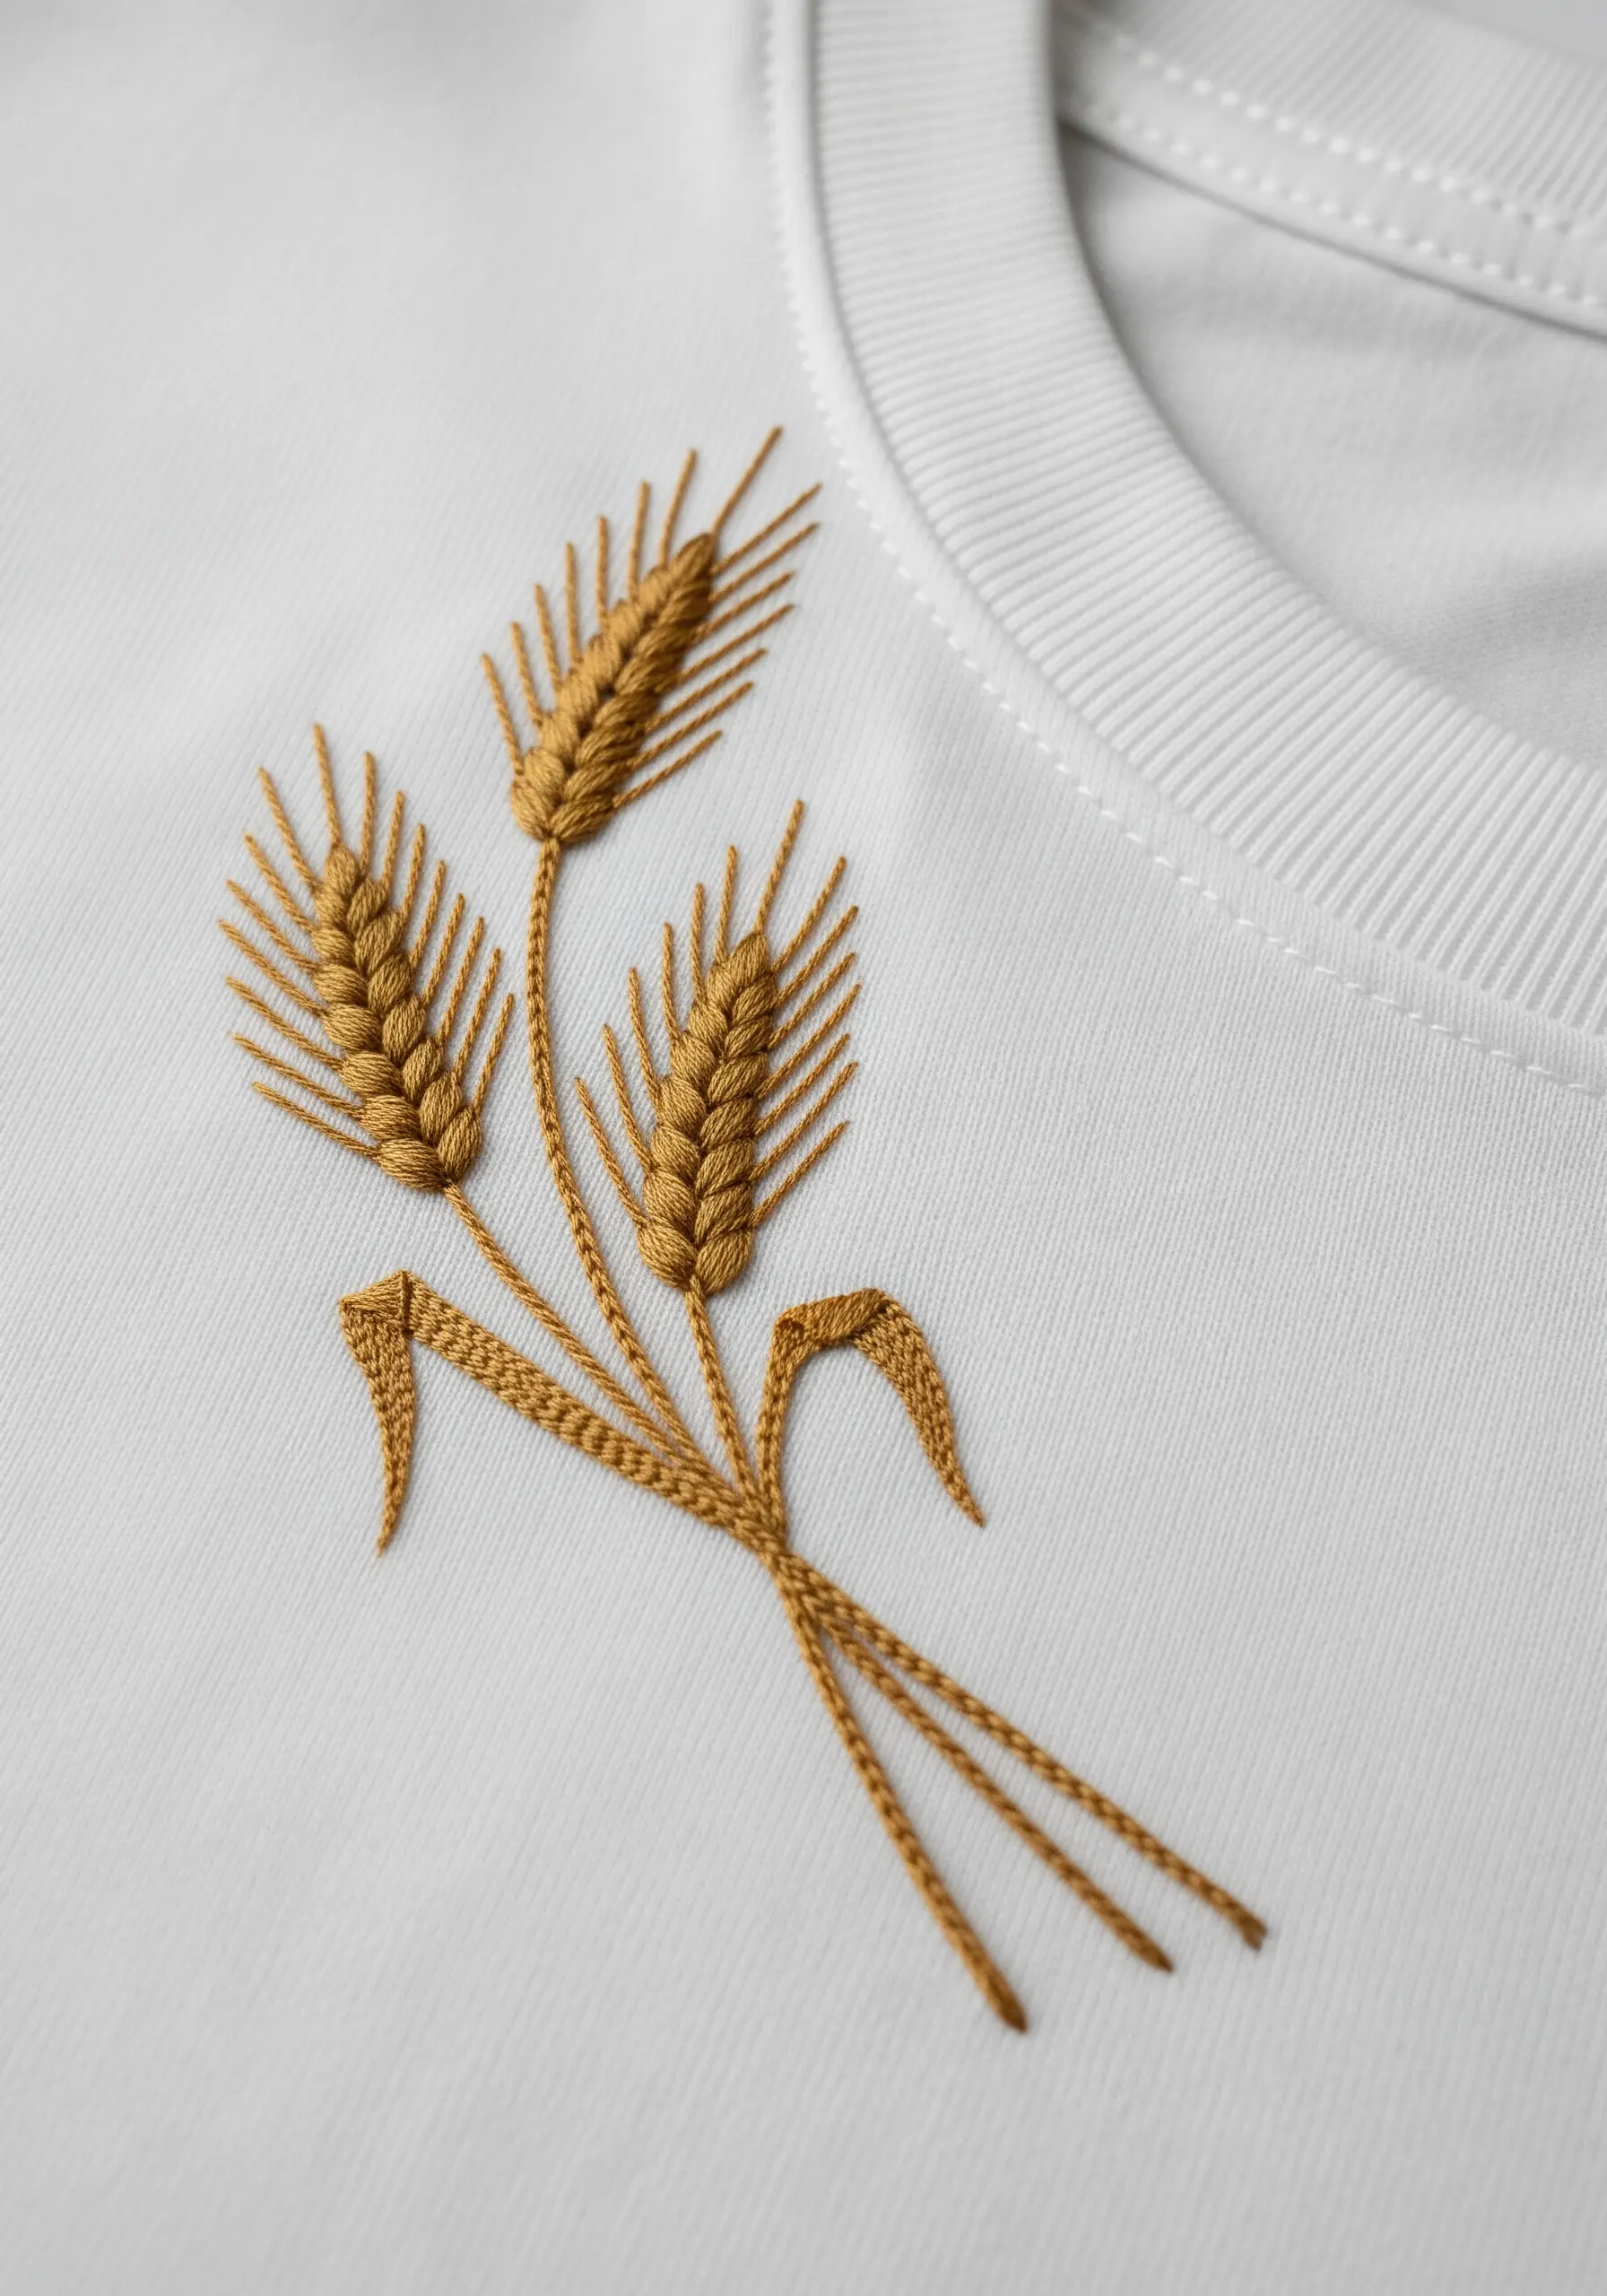
For the grains on these wheat stalks, use a fishbone stitch. This creates a central line and forces the stitches to angle outwards, perfectly mimicking the natural form.
This directional stitching is not just for realism; it also creates subtle highlights and shadows as the threads catch the light from different angles.
The result is a design with beautiful dimension and a soft, golden sheen.
23. Suggest Texture with Open Fill Stitches
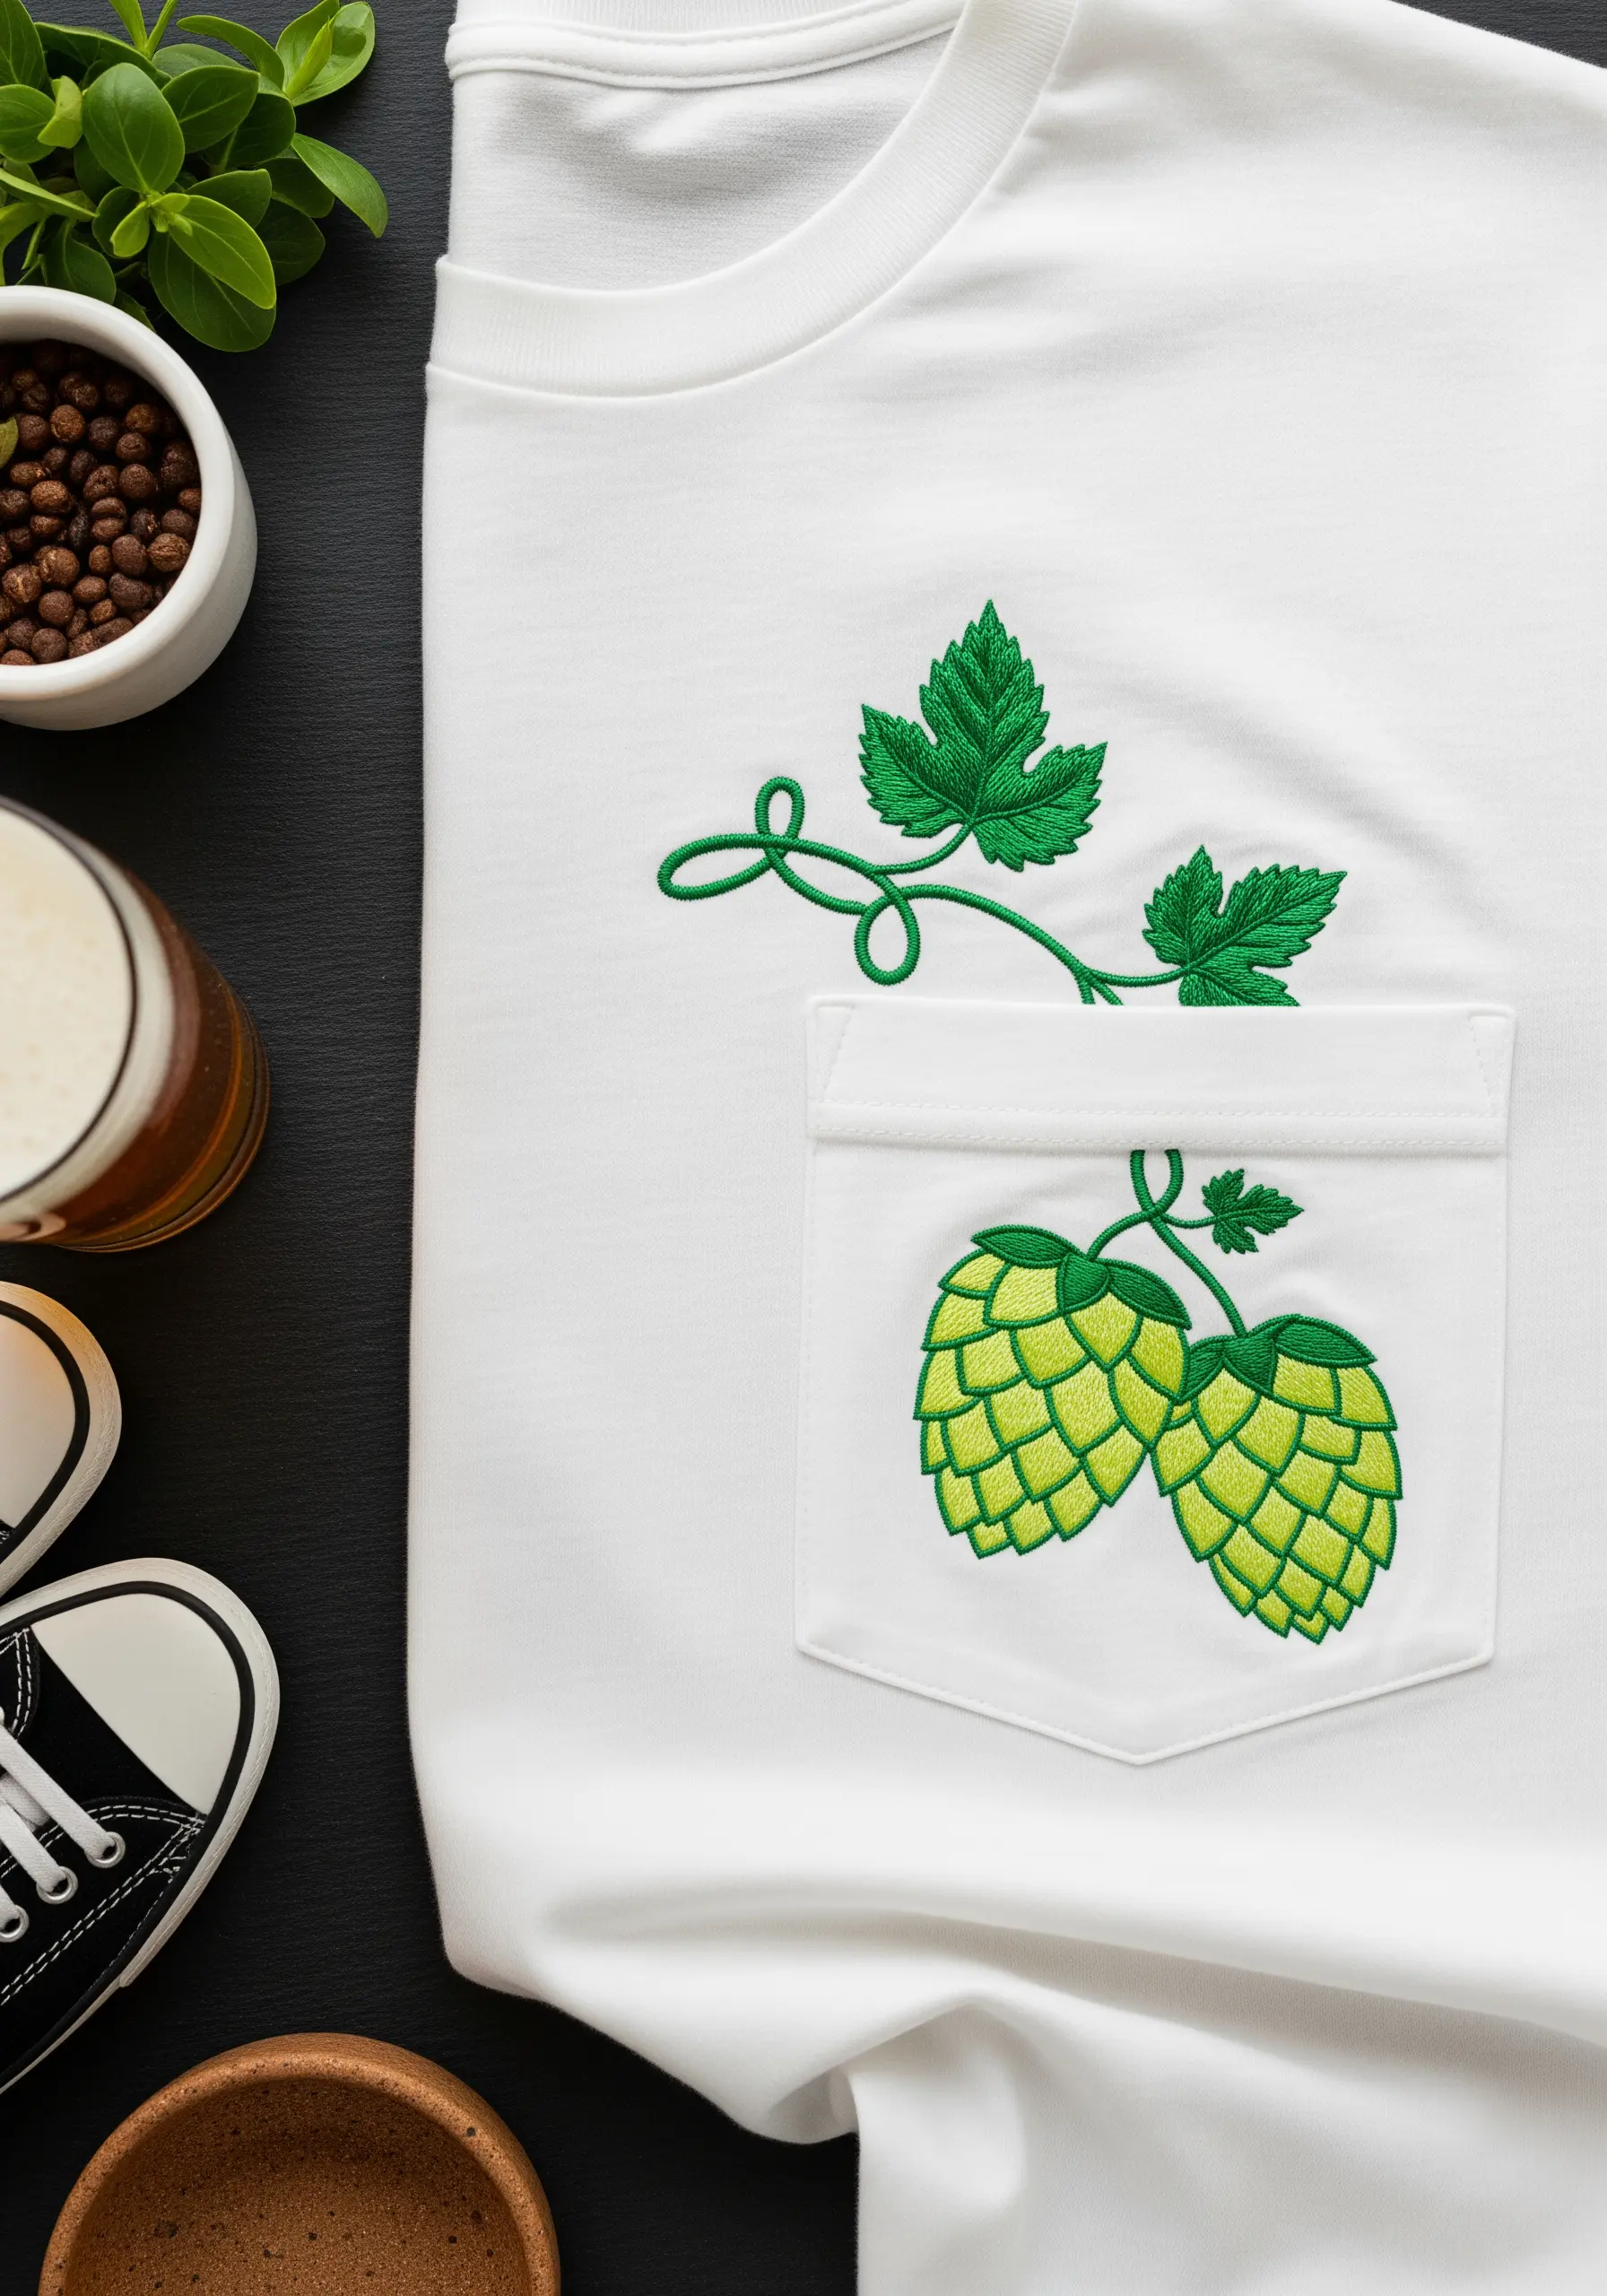
Instead of filling the hops with a dense satin stitch, which can make the fabric stiff, use an open fill to suggest their scaly texture.
A series of interlocking V-shapes, similar to a fishbone stitch, creates the necessary pattern without adding bulk.
This technique allows the fabric to drape naturally while still conveying the intricate detail of the botanical subject.
24. Recreate Airy Florals with Tiny French Knots
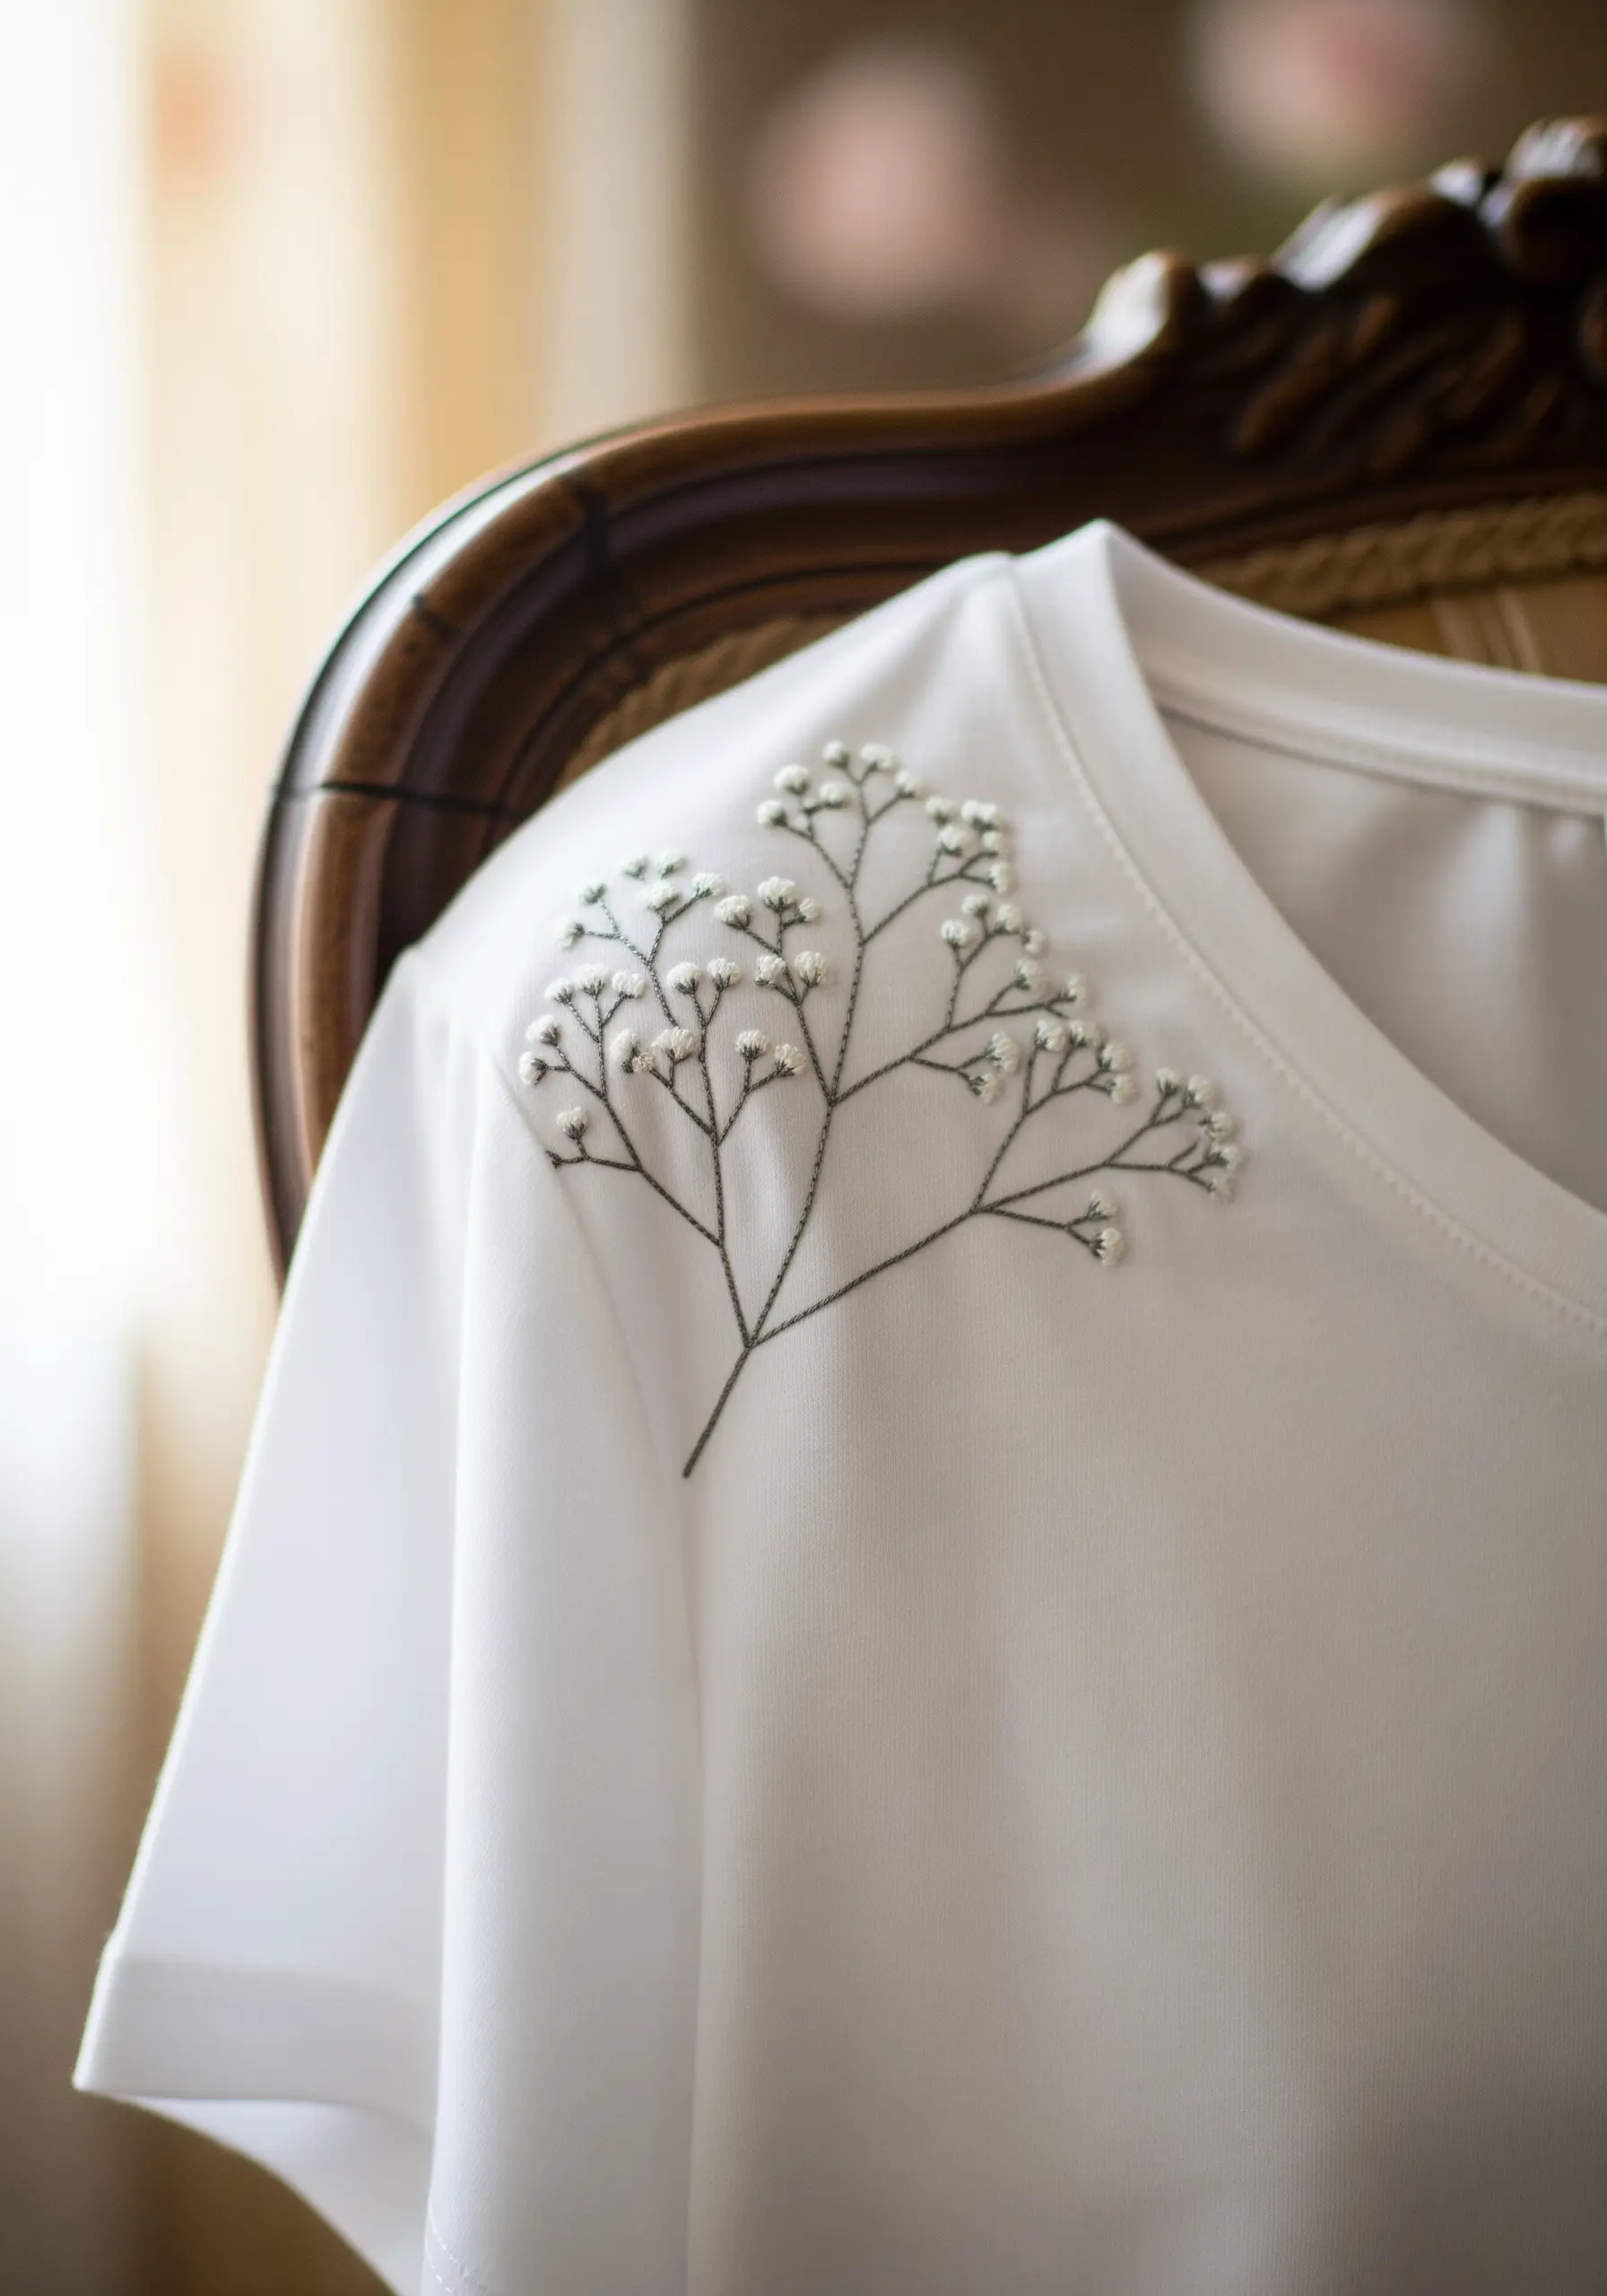
The key to capturing the delicate essence of baby’s breath is to use tiny, tightly clustered French knots for the blossoms.
Work with only one or two strands of floss to keep the knots small and dainty.
Place them at the ends of very fine, branching stems worked in a single-thread backstitch to achieve that signature light-as-air quality.
25. Master the Art of the Subtle Sleeve Accent

A small cluster of forget-me-nots on the sleeve hem is a perfect example of how a minimal amount of embroidery can make a maximum impact.
This placement is understated and chic, adding a touch of color and personality without overwhelming the entire garment.
It’s an ideal project for practicing your lazy daisy stitches and French knots on a small, manageable scale.
26. Achieve Sophistication with a Muted Monochromatic Palette

Using a single, sophisticated color like sage green for an entire design creates a cohesive and calming effect.
This monochromatic approach feels modern and understated, allowing the beauty of the stitches and the form of the olive branch to take center stage.
The fishbone stitch is ideal for these leaves, as it creates a beautiful, textured central vein with minimal effort.
27. Add Interest to Large Shapes with Decorative Fills

When embroidering a large, open shape like a palm frond, you don’t have to fill it completely.
Instead, break up the space with decorative fill patterns. Here, woven bars and seed stitches are used within some of the sections.
This adds texture and visual interest while keeping the overall embroidery lightweight and flexible, so it moves with the fabric.
28. Create a Focal Point with Hyper-Realistic Detail
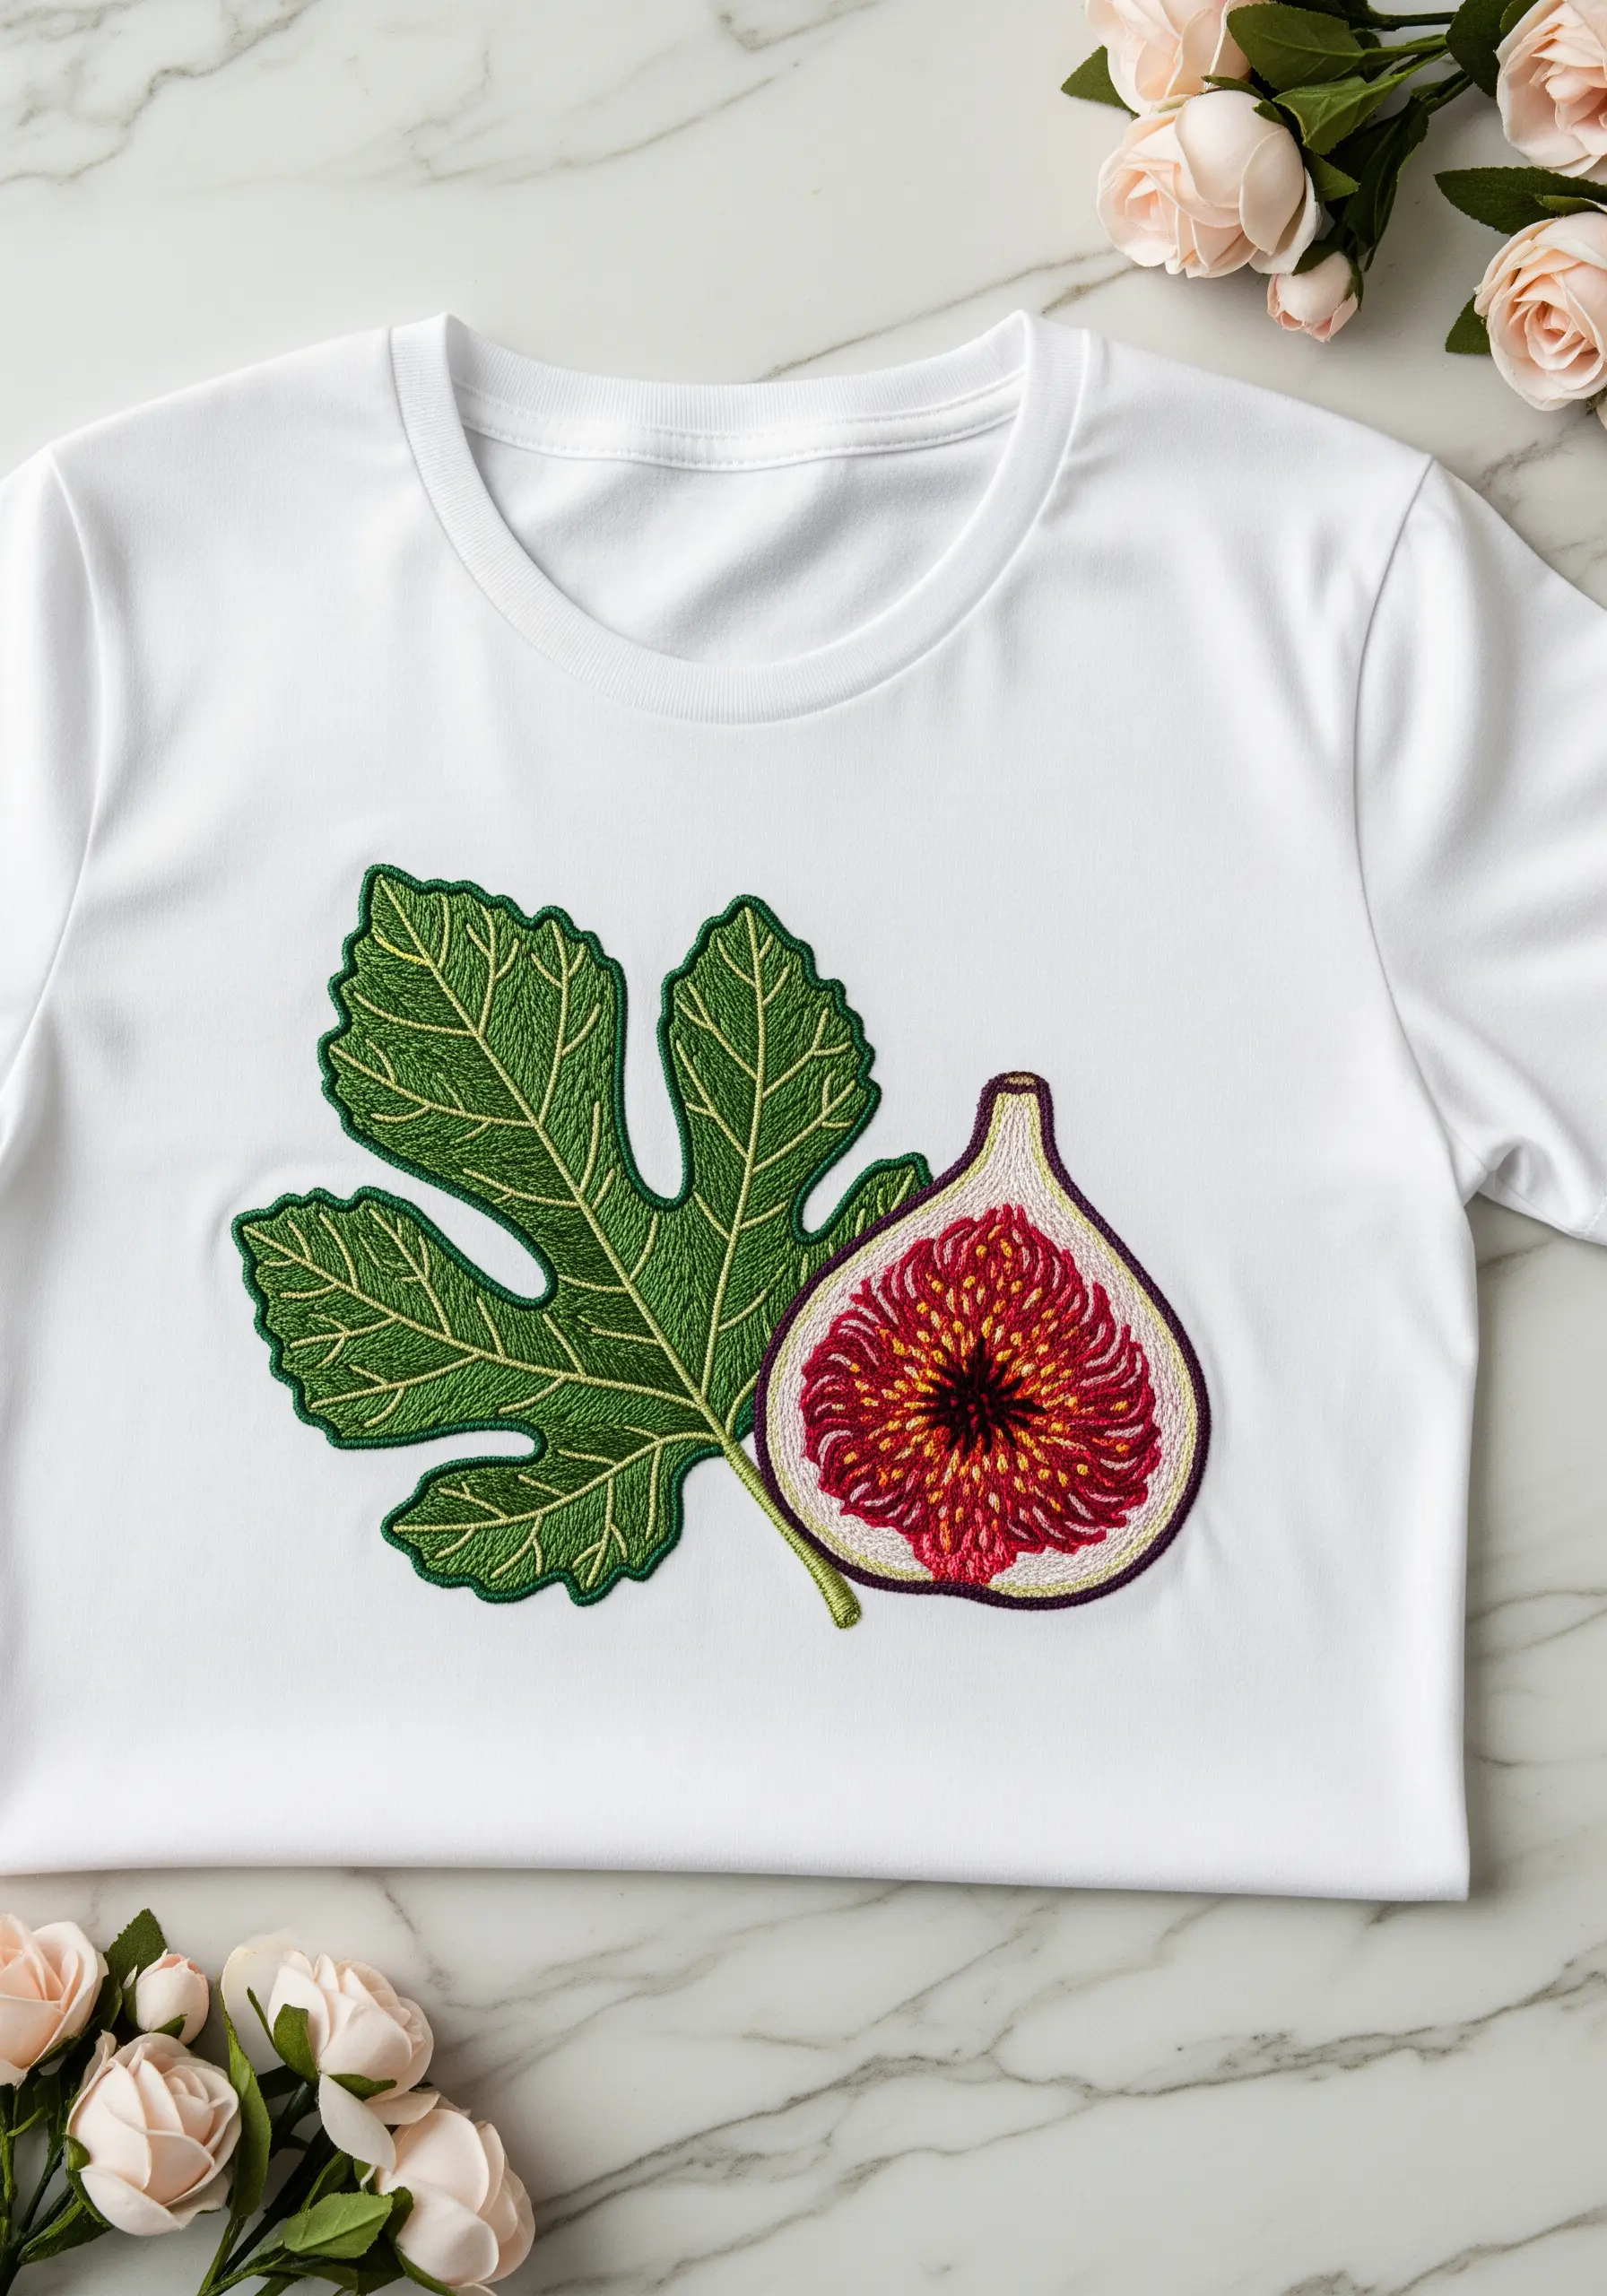
Turn a simple subject into a work of art by focusing on intricate details. The interior of this fig is a masterclass in texture.
Use a radial satin stitch for the flesh, with stitches radiating out from the center. Then, add tiny French knots or seed stitches in contrasting colors to represent the seeds.
This level of detail creates a stunning focal point that draws the viewer in.
29. Create Depth by Varying Your Line Weight
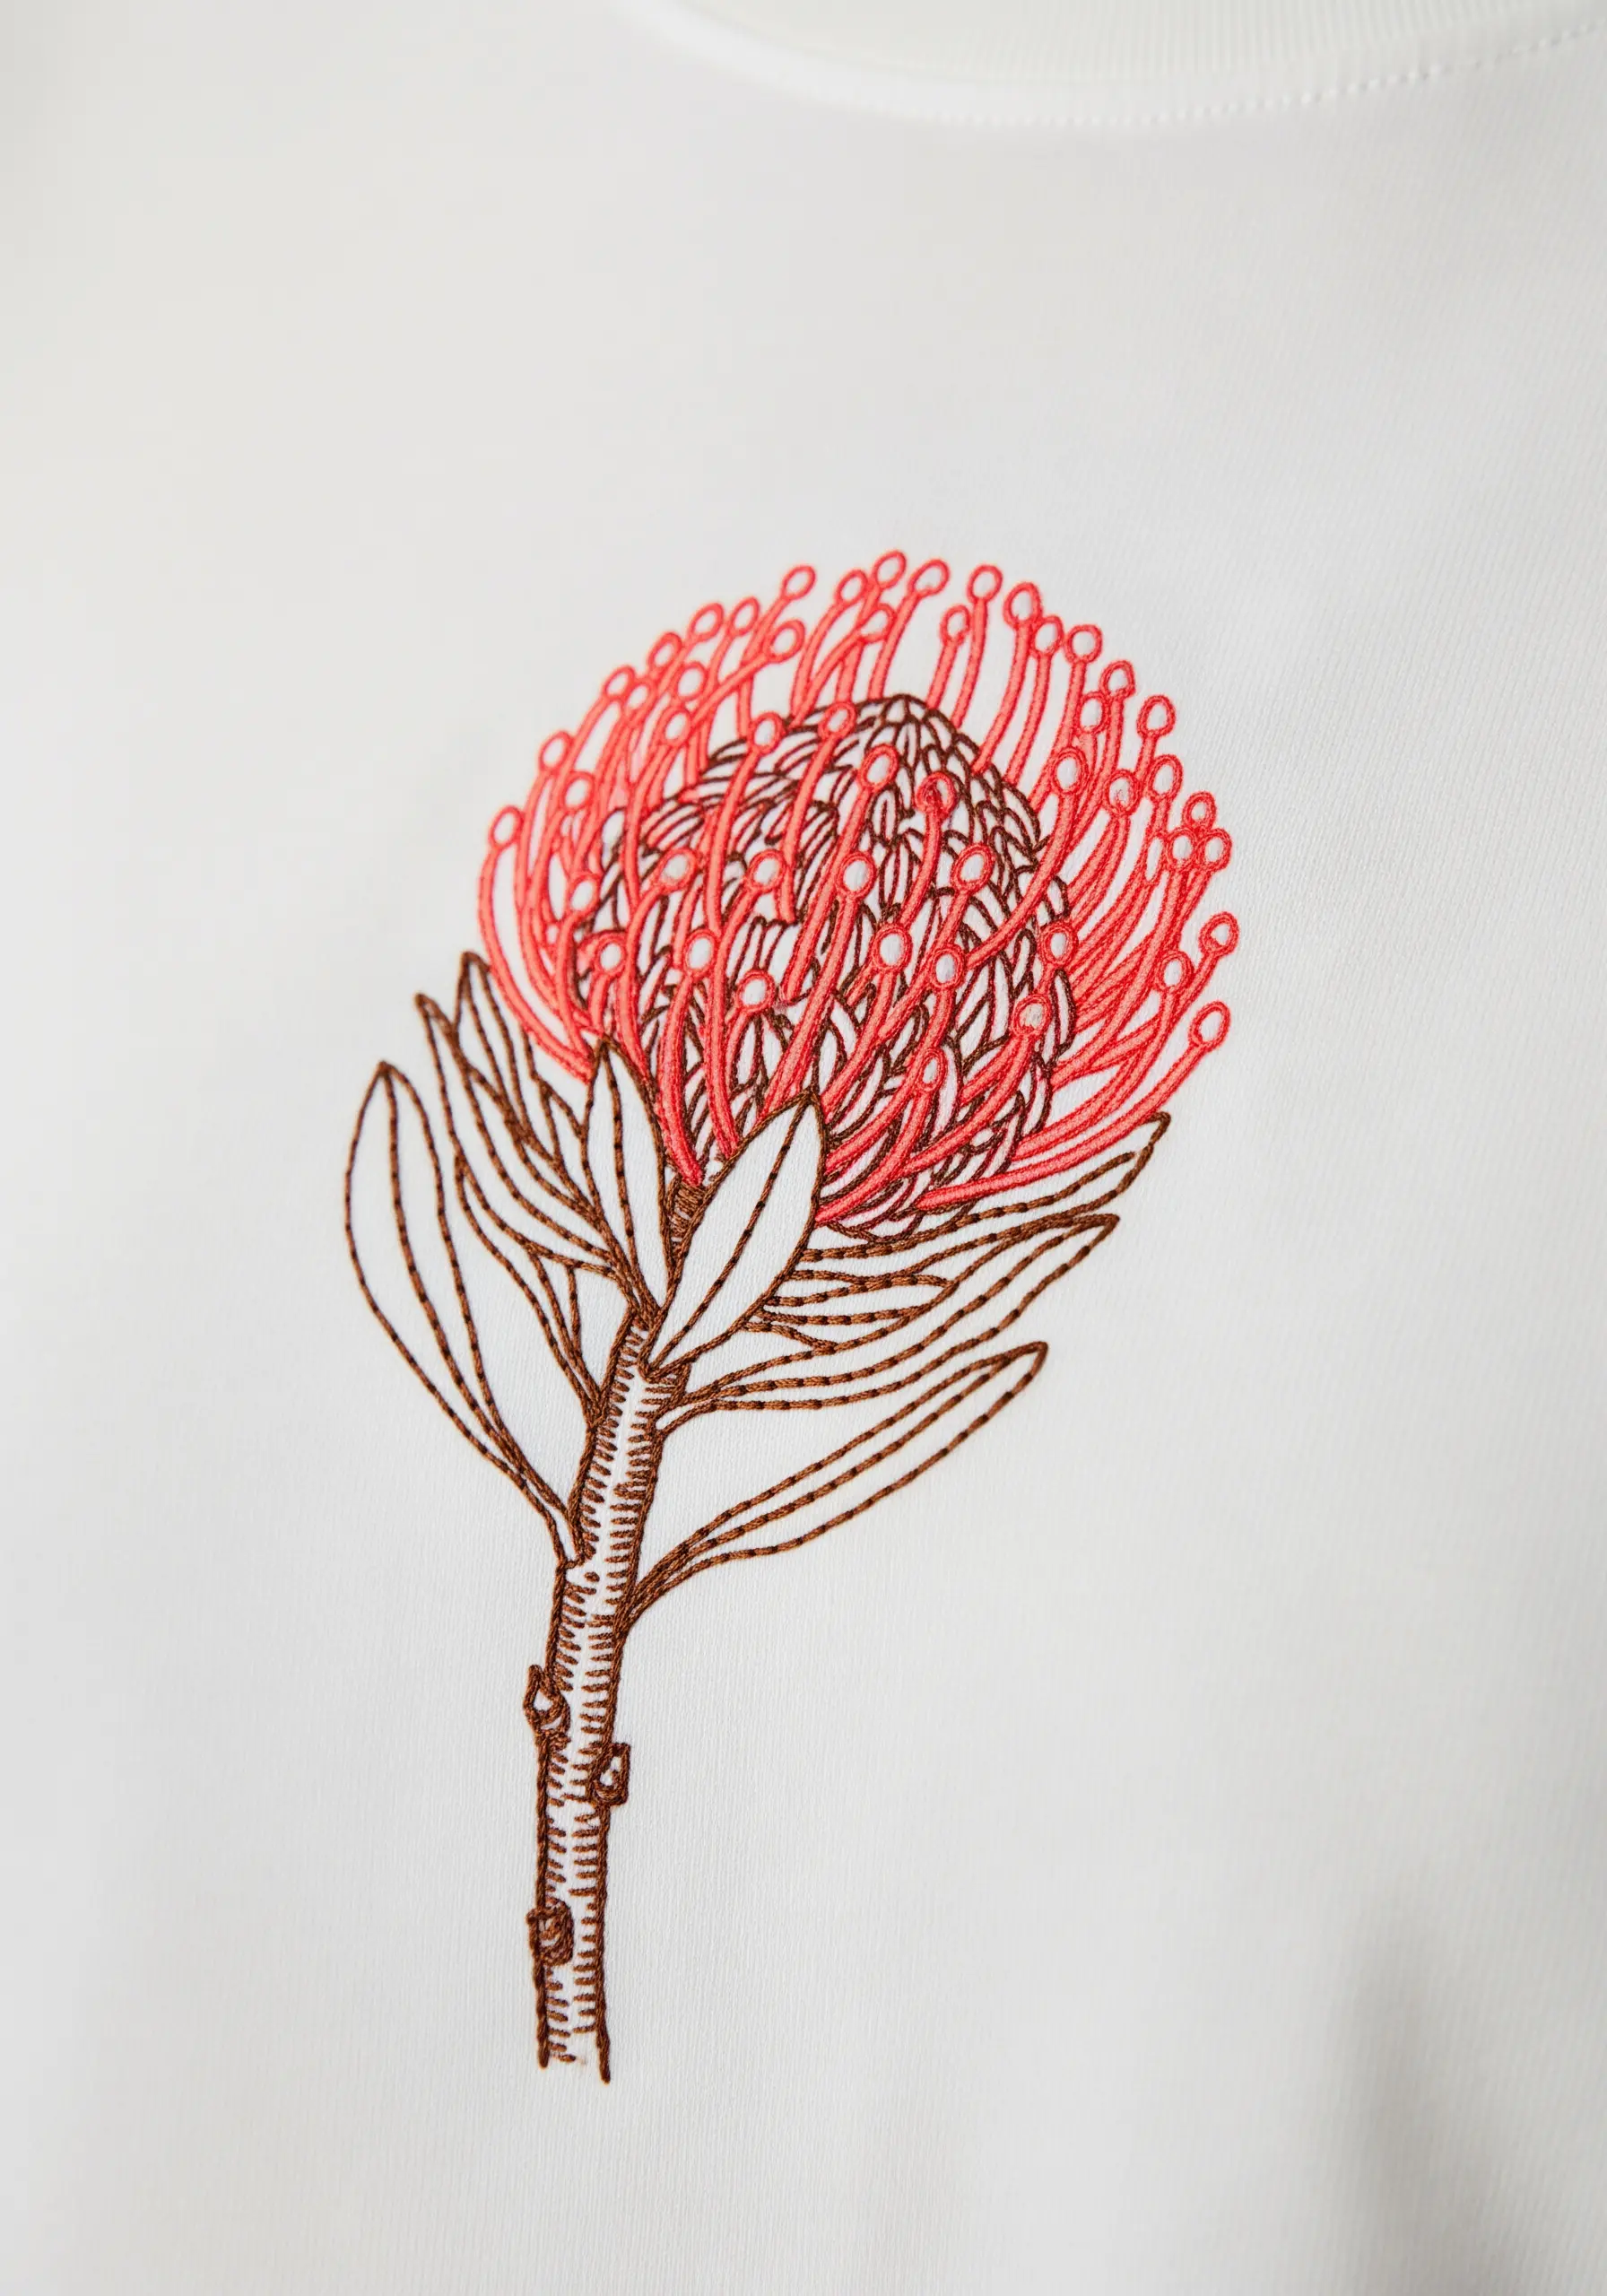
To give your line art dimension, stitch different elements with a varying number of floss strands.
Use a delicate, single strand of thread for fine details like the stamens of this protea flower.
For the more structural outlines of the leaves and stem, switch to two or three strands. This subtle shift in line weight creates an immediate sense of depth and visual hierarchy.
30. Achieve Graphic Impact with High-Contrast Stitching

For a bold, illustrative style, pair clean black outlines with a densely filled black center.
This high-contrast technique makes the white of the petals—defined by the negative space of the t-shirt—pop dramatically.
Use a tight, smooth satin stitch for the center and a crisp backstitch for the outlines to ensure the edges are sharp and defined.
31. Use Color Blocking for Bold, Graphic Florals
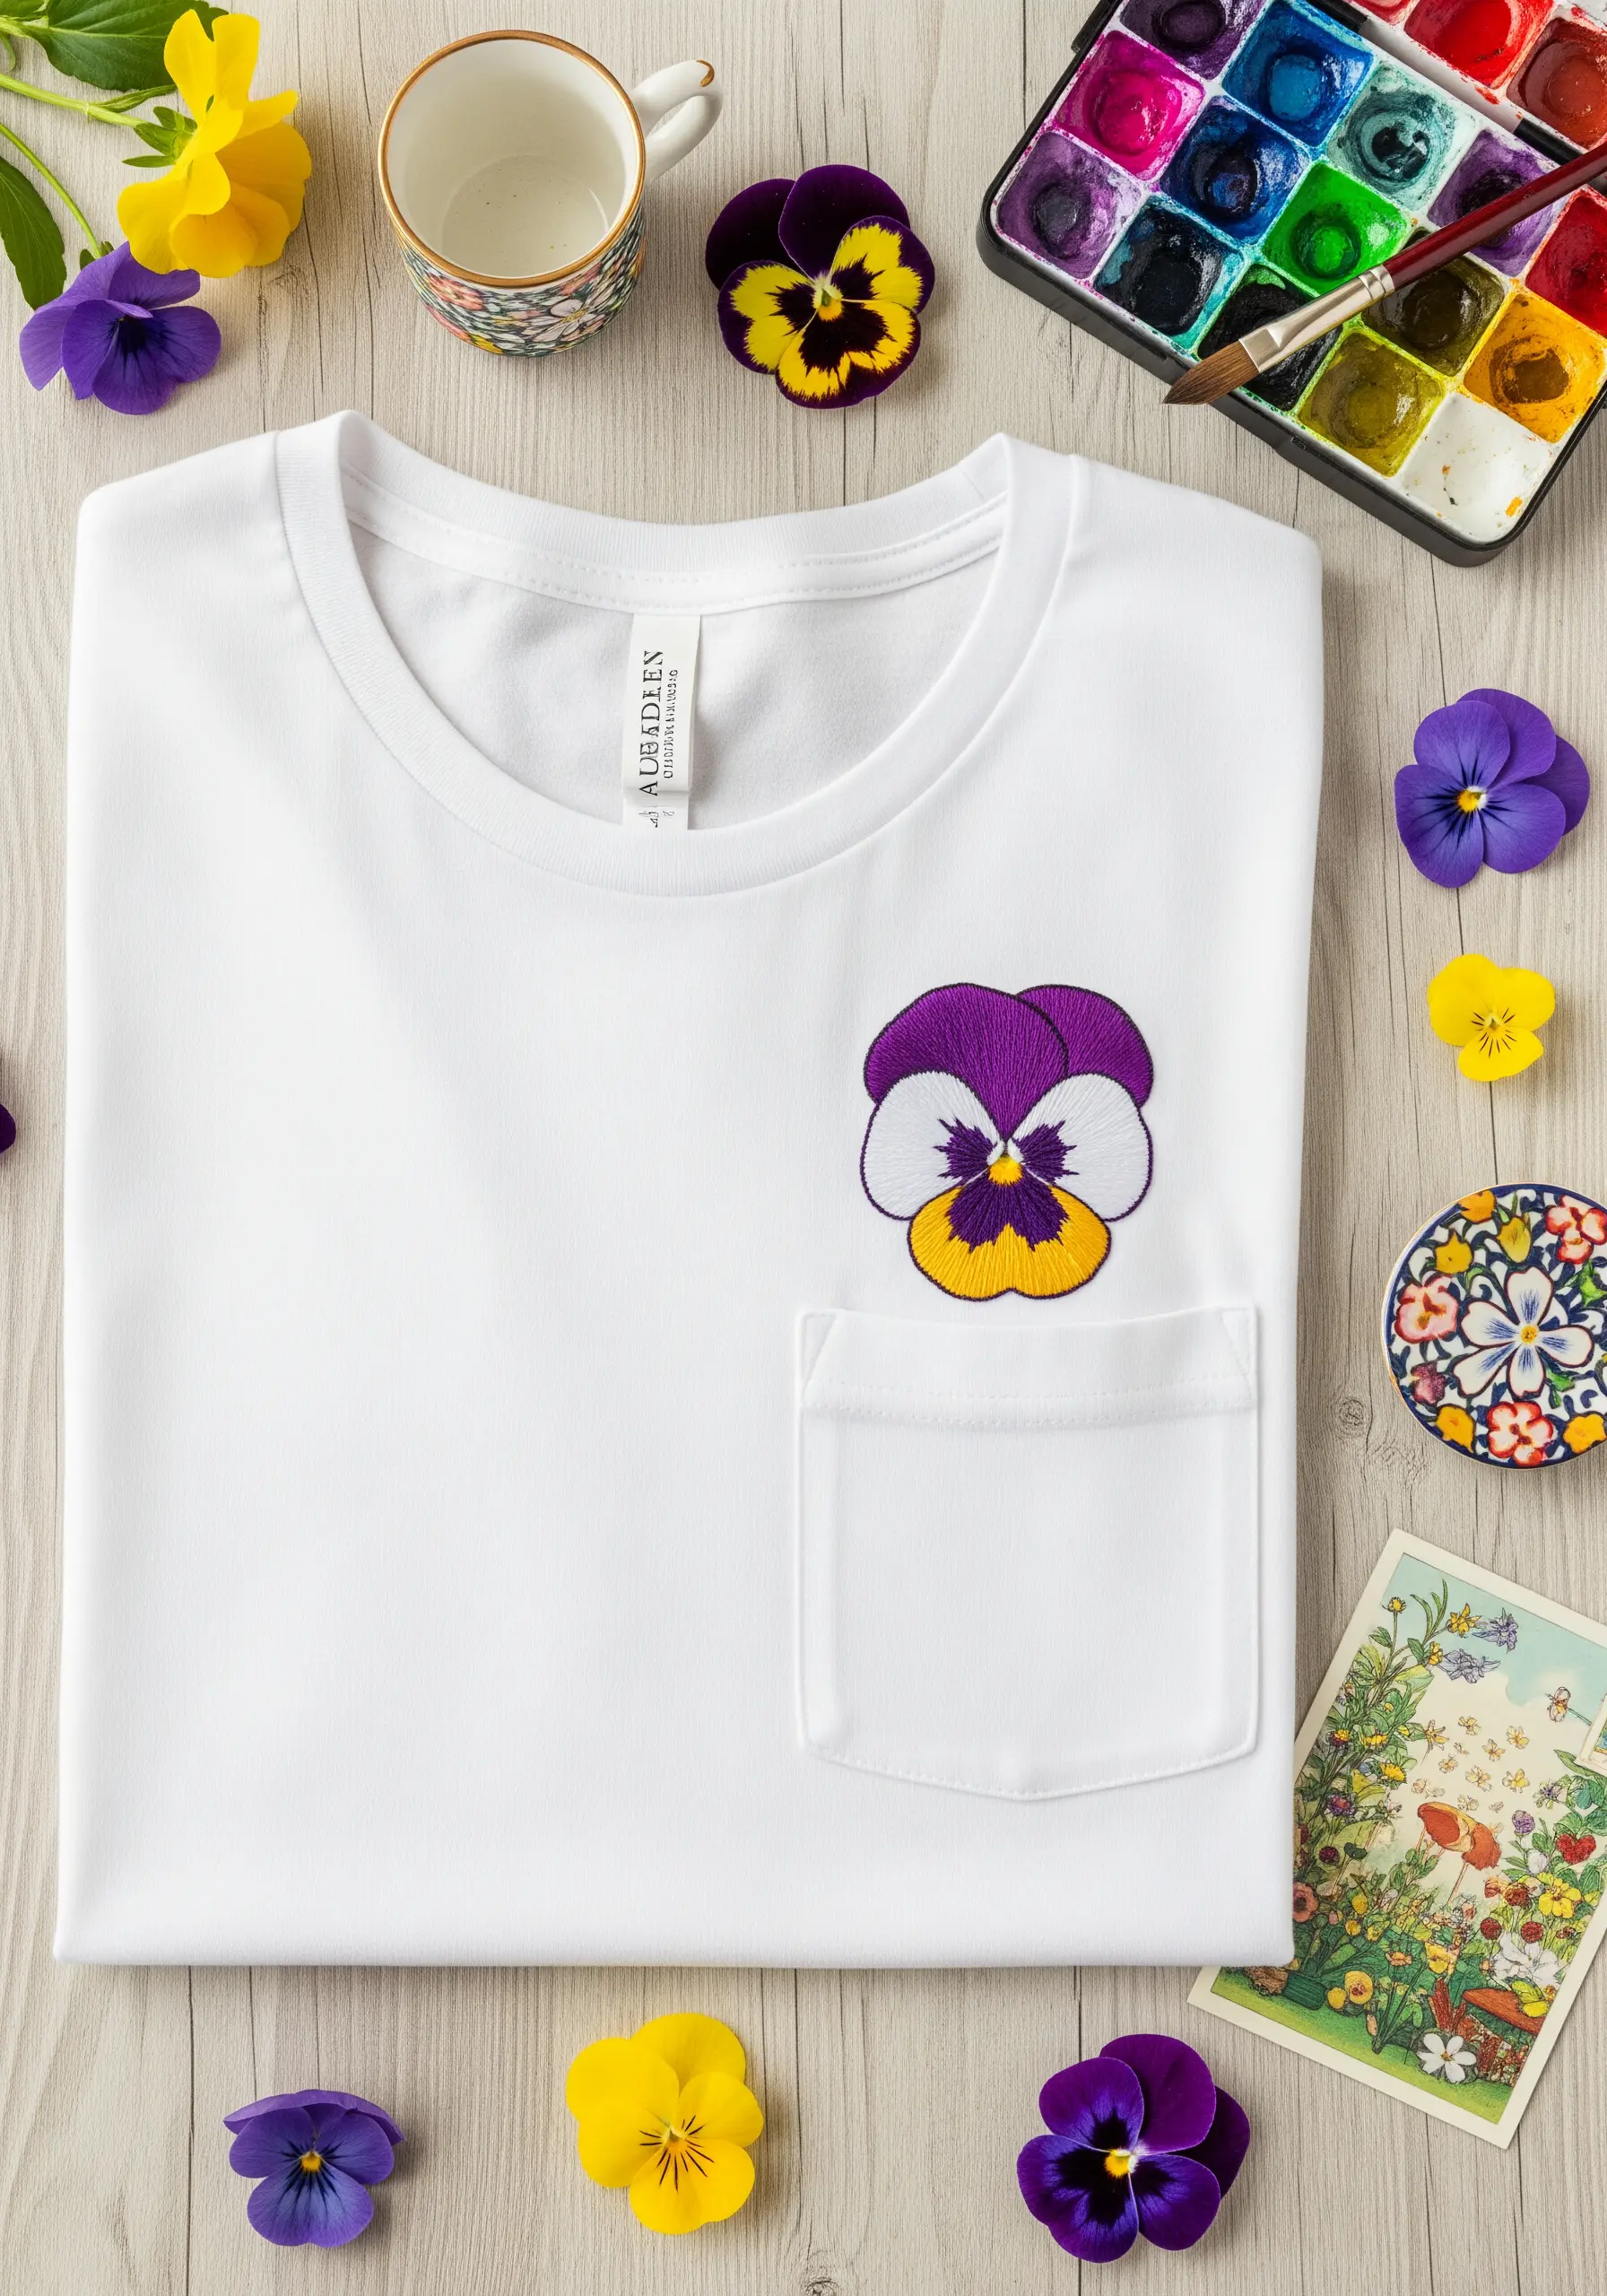
The distinct, velvety petals of a pansy are perfectly suited to a color-blocking approach.
To achieve those crisp, clean edges between colors, first outline each section with a split stitch. Then, fill the shape with a dense satin stitch, ensuring your stitches always lay in the same direction.
This method results in a bold, clean design that feels both graphic and charming.
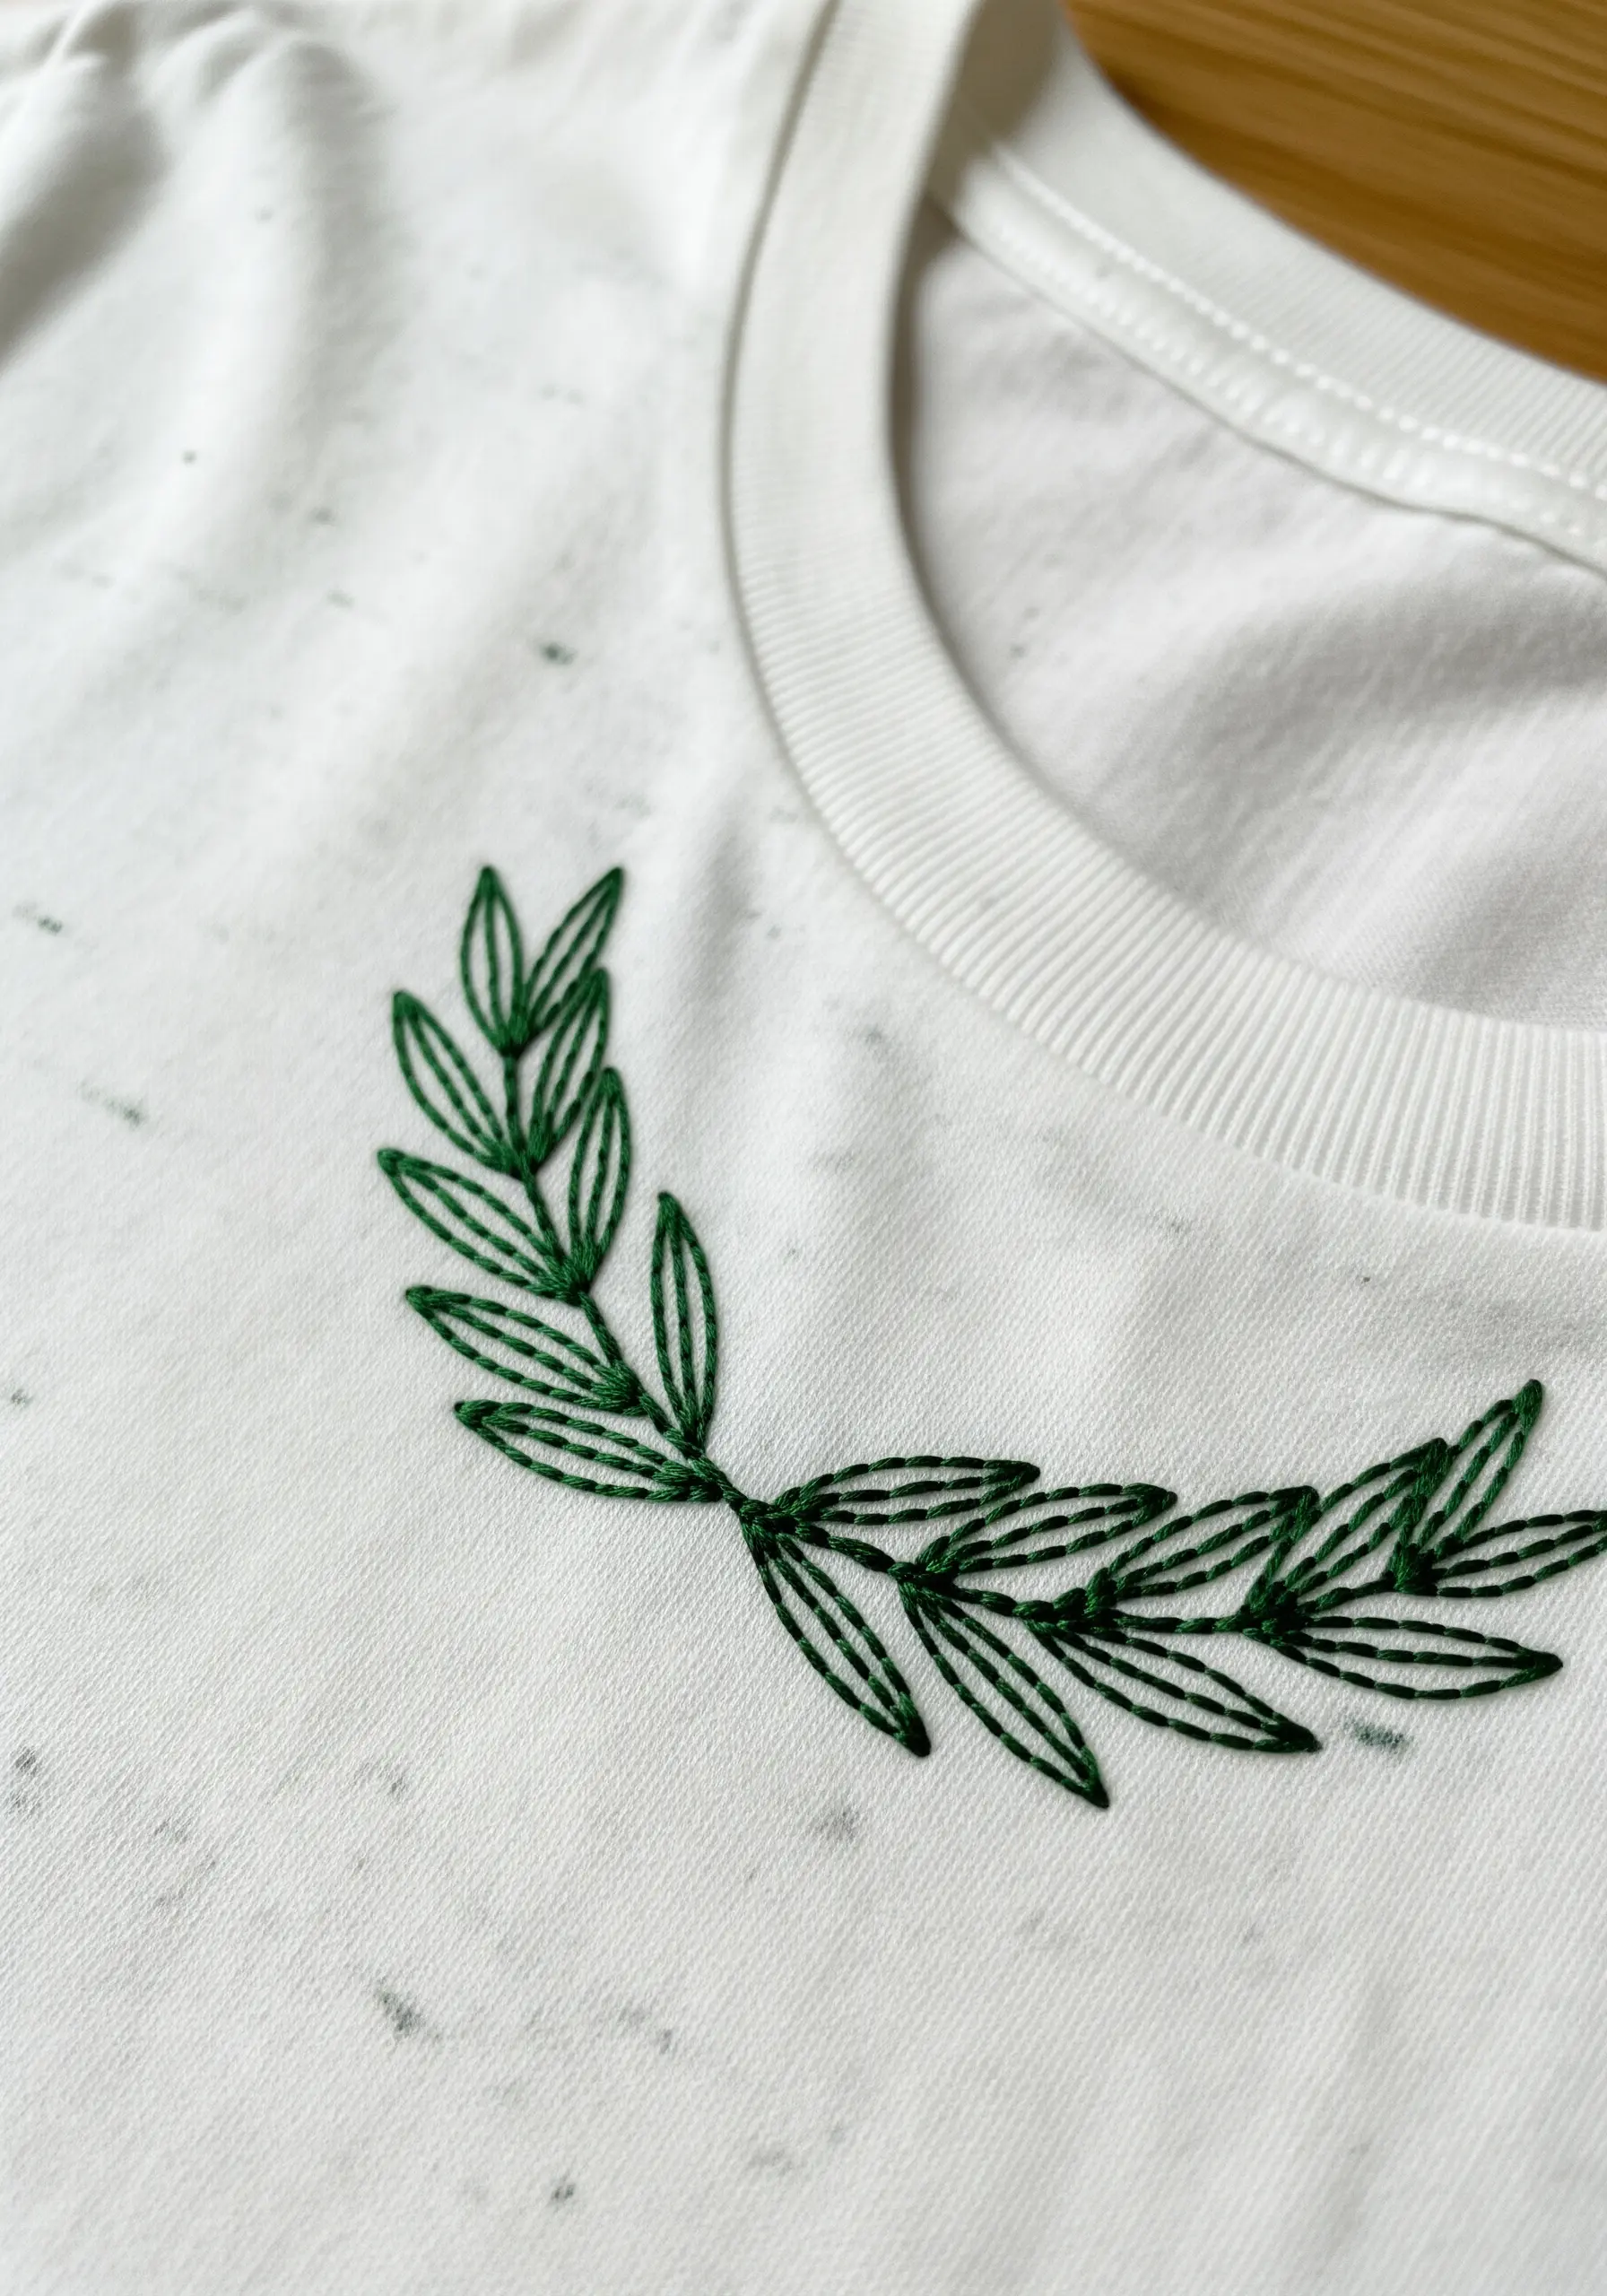
32. Frame the Neckline with a Delicate Wreath

A circular motif like a wreath is a beautiful way to frame a t-shirt’s collar, turning a simple garment into a thoughtfully designed piece.
Keep the stitching light and airy by using a simple stem stitch for the vines and lazy daisy stitches for the leaves and flowers.
This approach integrates the embroidery with the shirt itself, creating a harmonious and flattering composition.
33. Contrast Geometric Lines with Organic Textures
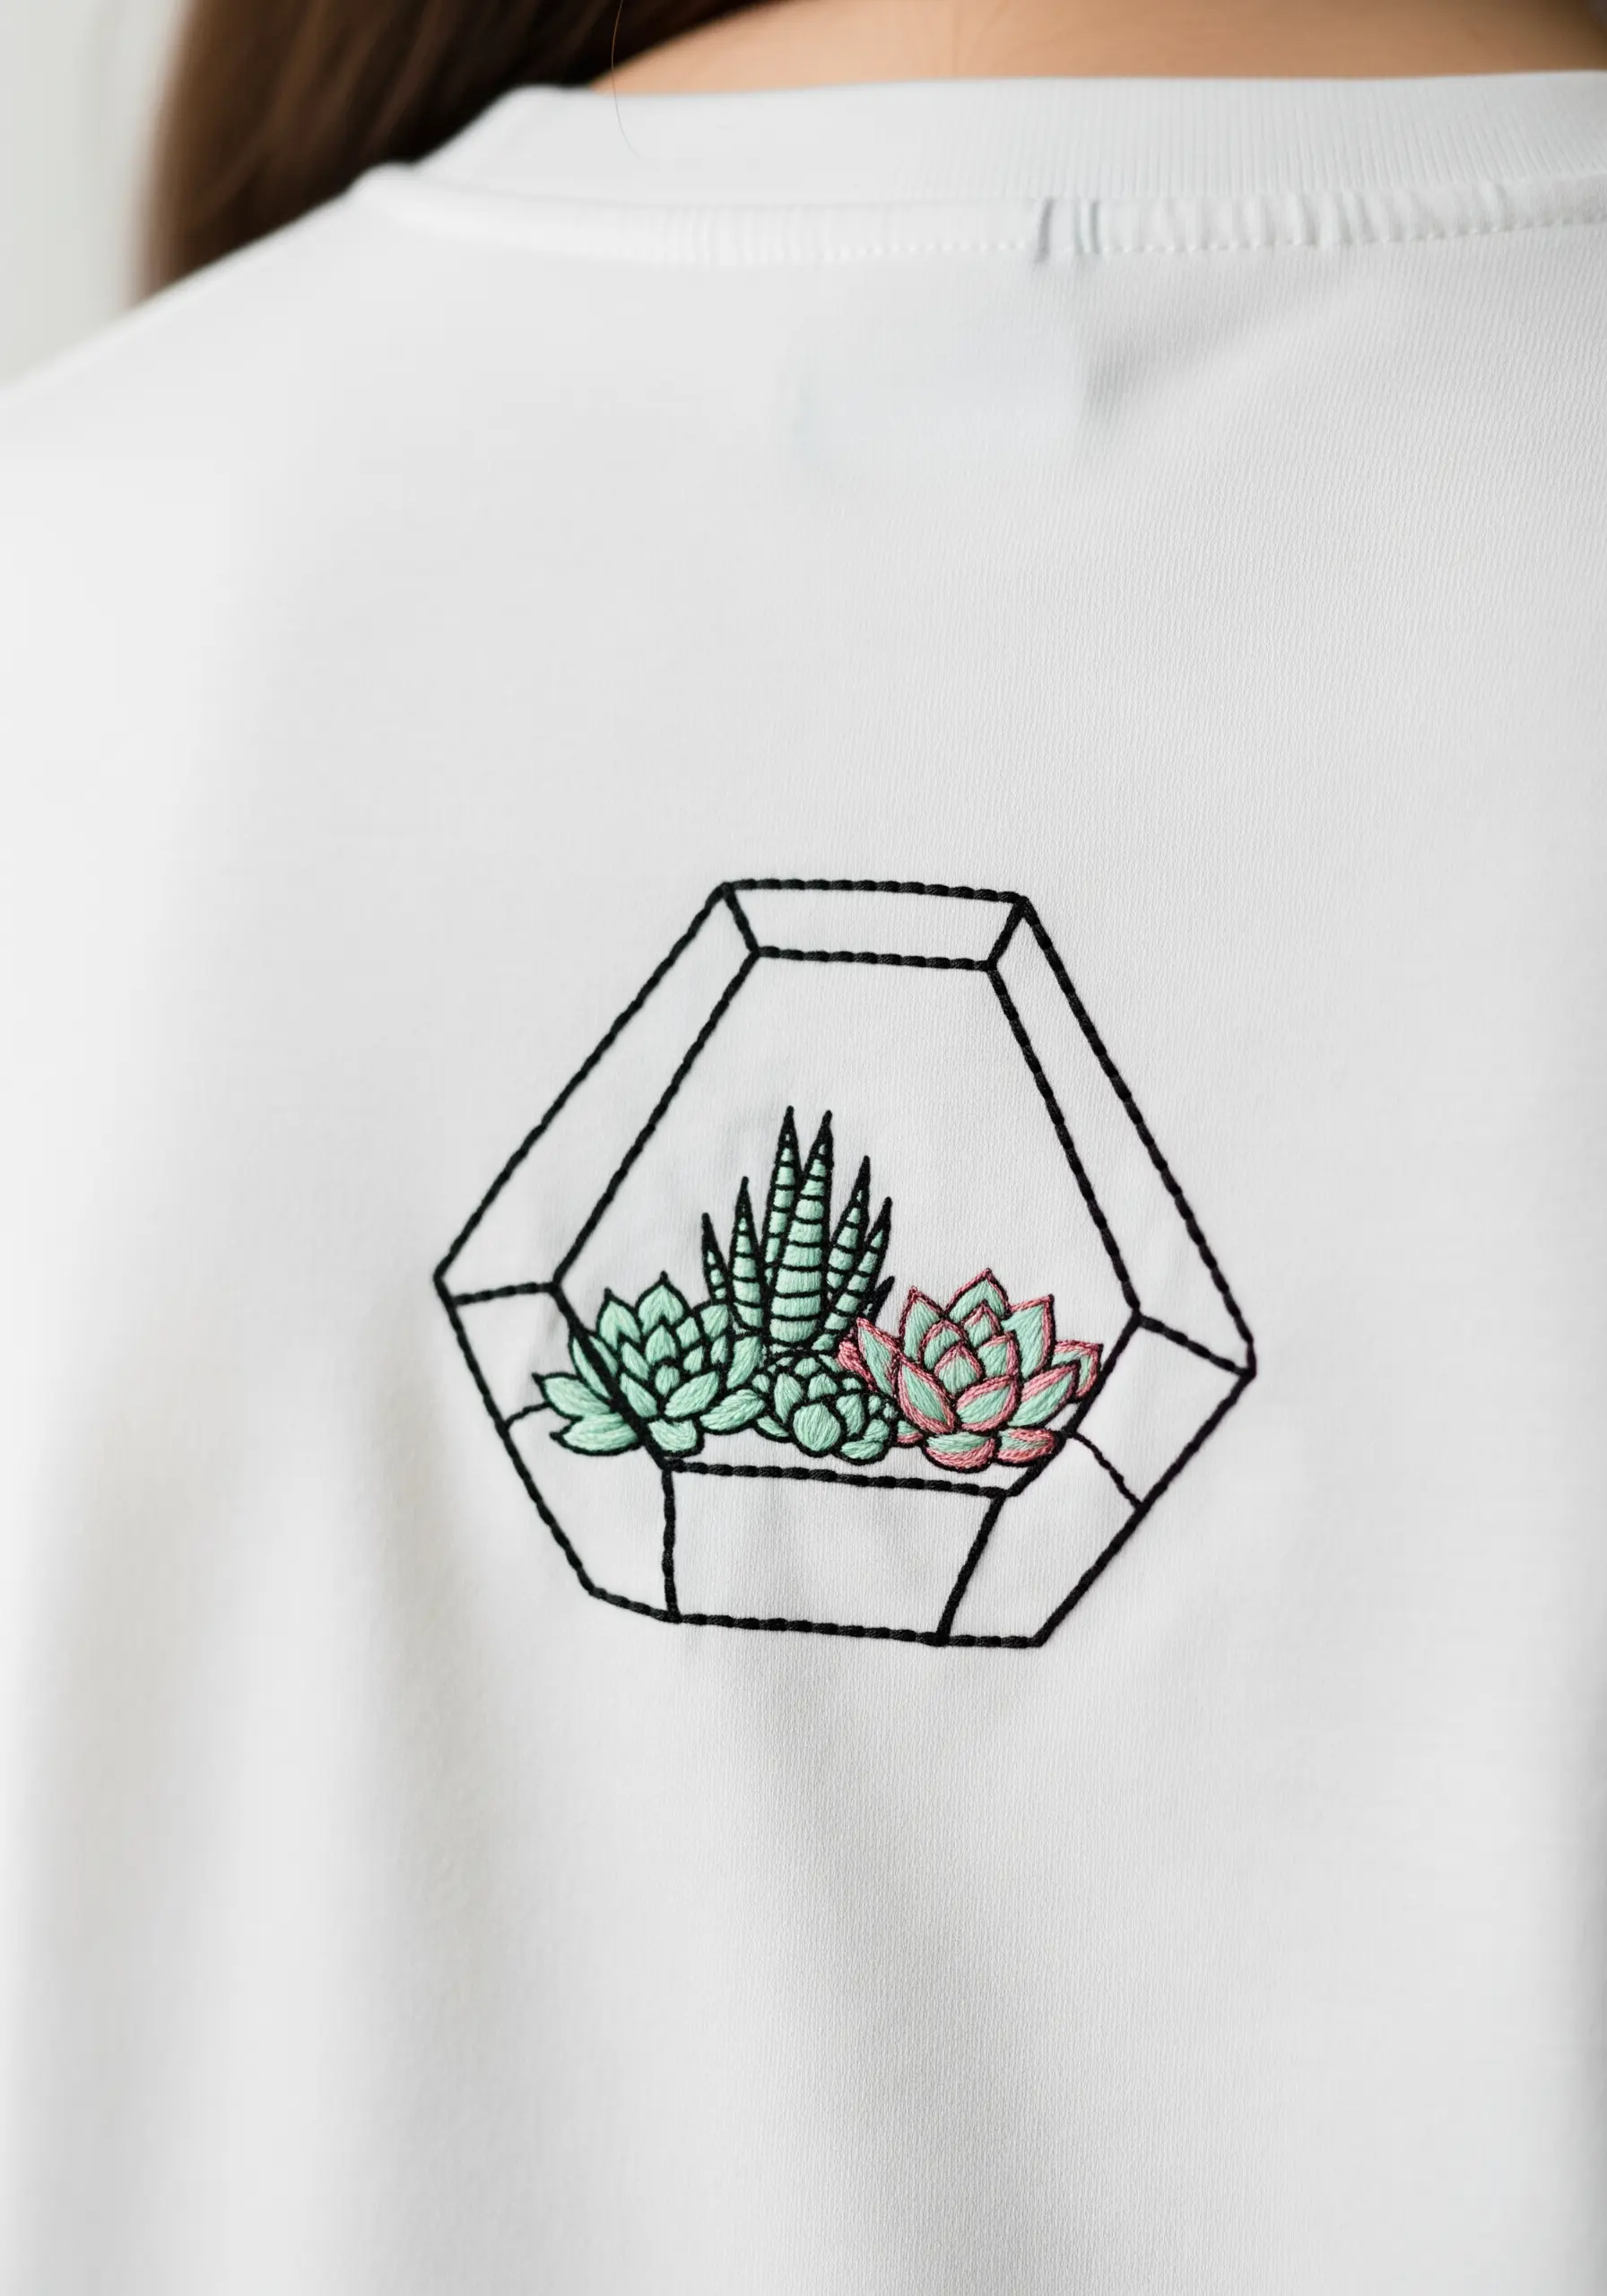
Create a compelling modern design by combining sharp, man-made shapes with soft, natural forms.
Use a crisp, precise backstitch in black thread to define the geometric lines of the terrarium.
Inside, stitch the succulents with soft satin stitches and French knots in gentle greens and pinks. This textural contrast is what makes the composition so visually engaging.
34. Give Your Embroidery Dimension with Padding
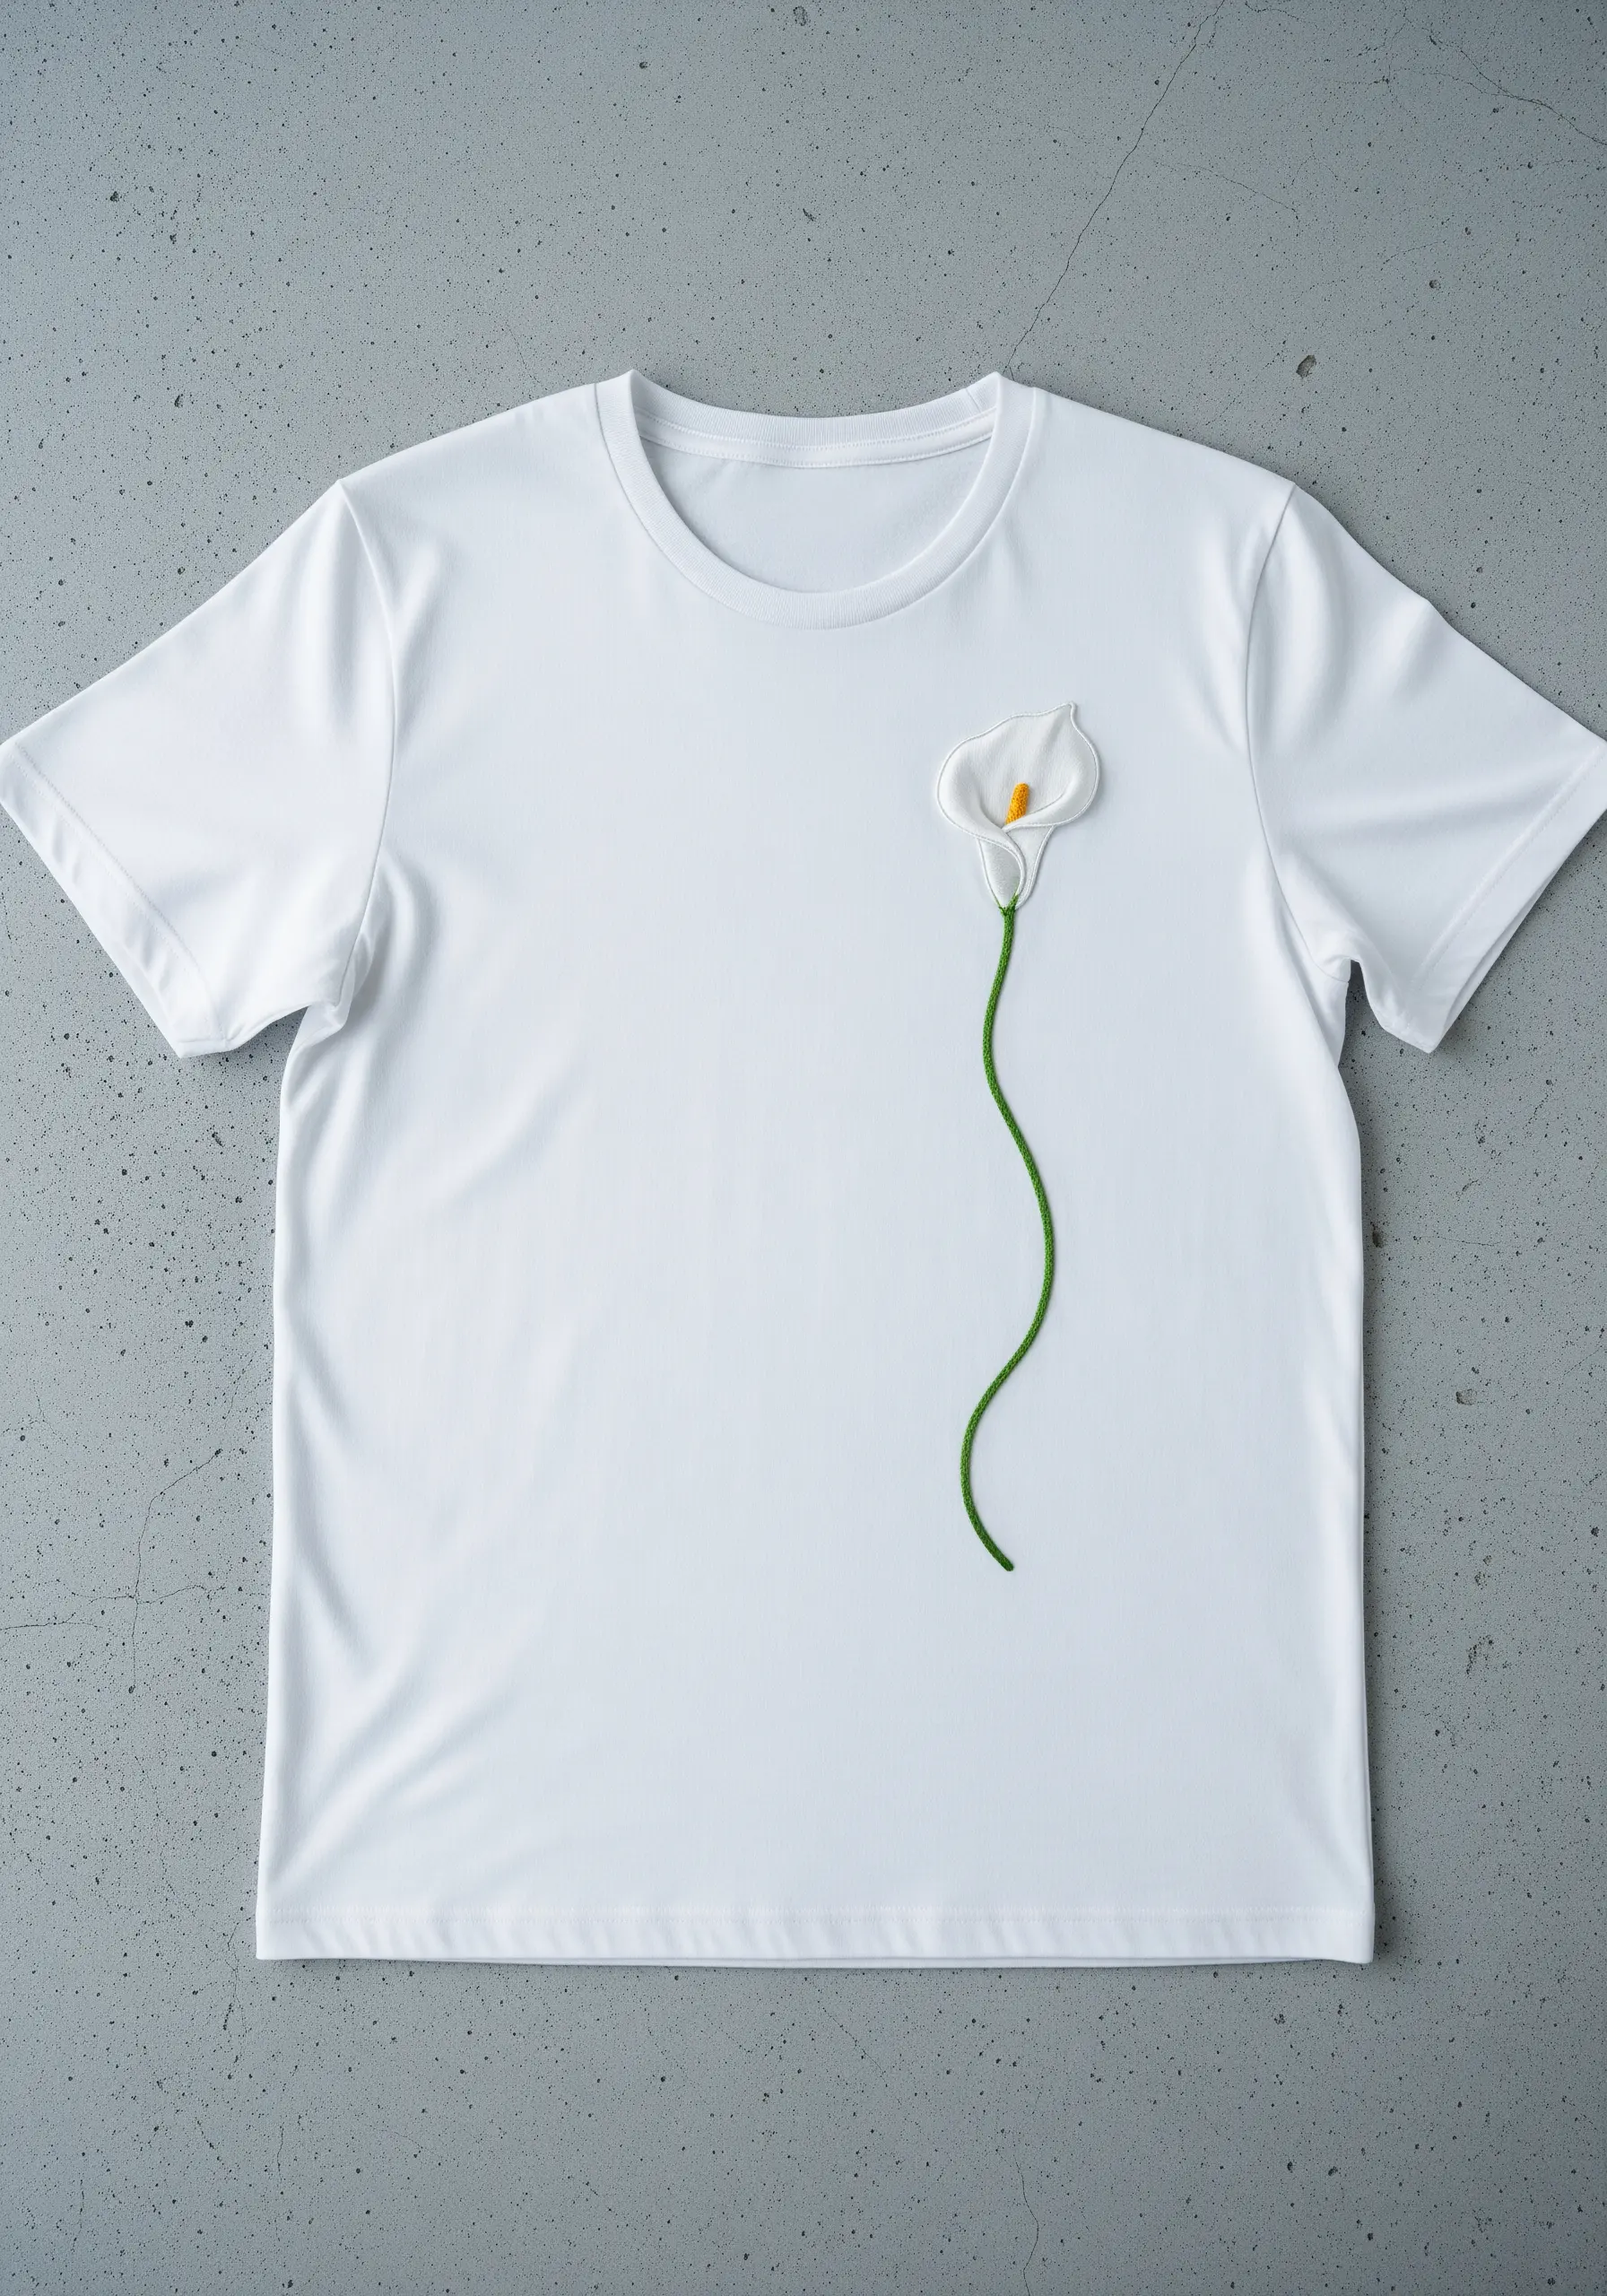
To make a motif physically stand out from the fabric, use a technique called padded satin stitch.
First, fill the shape with a base layer of small, underlying stitches (like seed stitches). Then, cover this padding with your final satin stitches, working in the opposite direction.
This raises the surface of the embroidery, giving the calla lily a subtle, sculptural quality that catches the light beautifully.
35. Build Feathery Texture with Layered Stitches
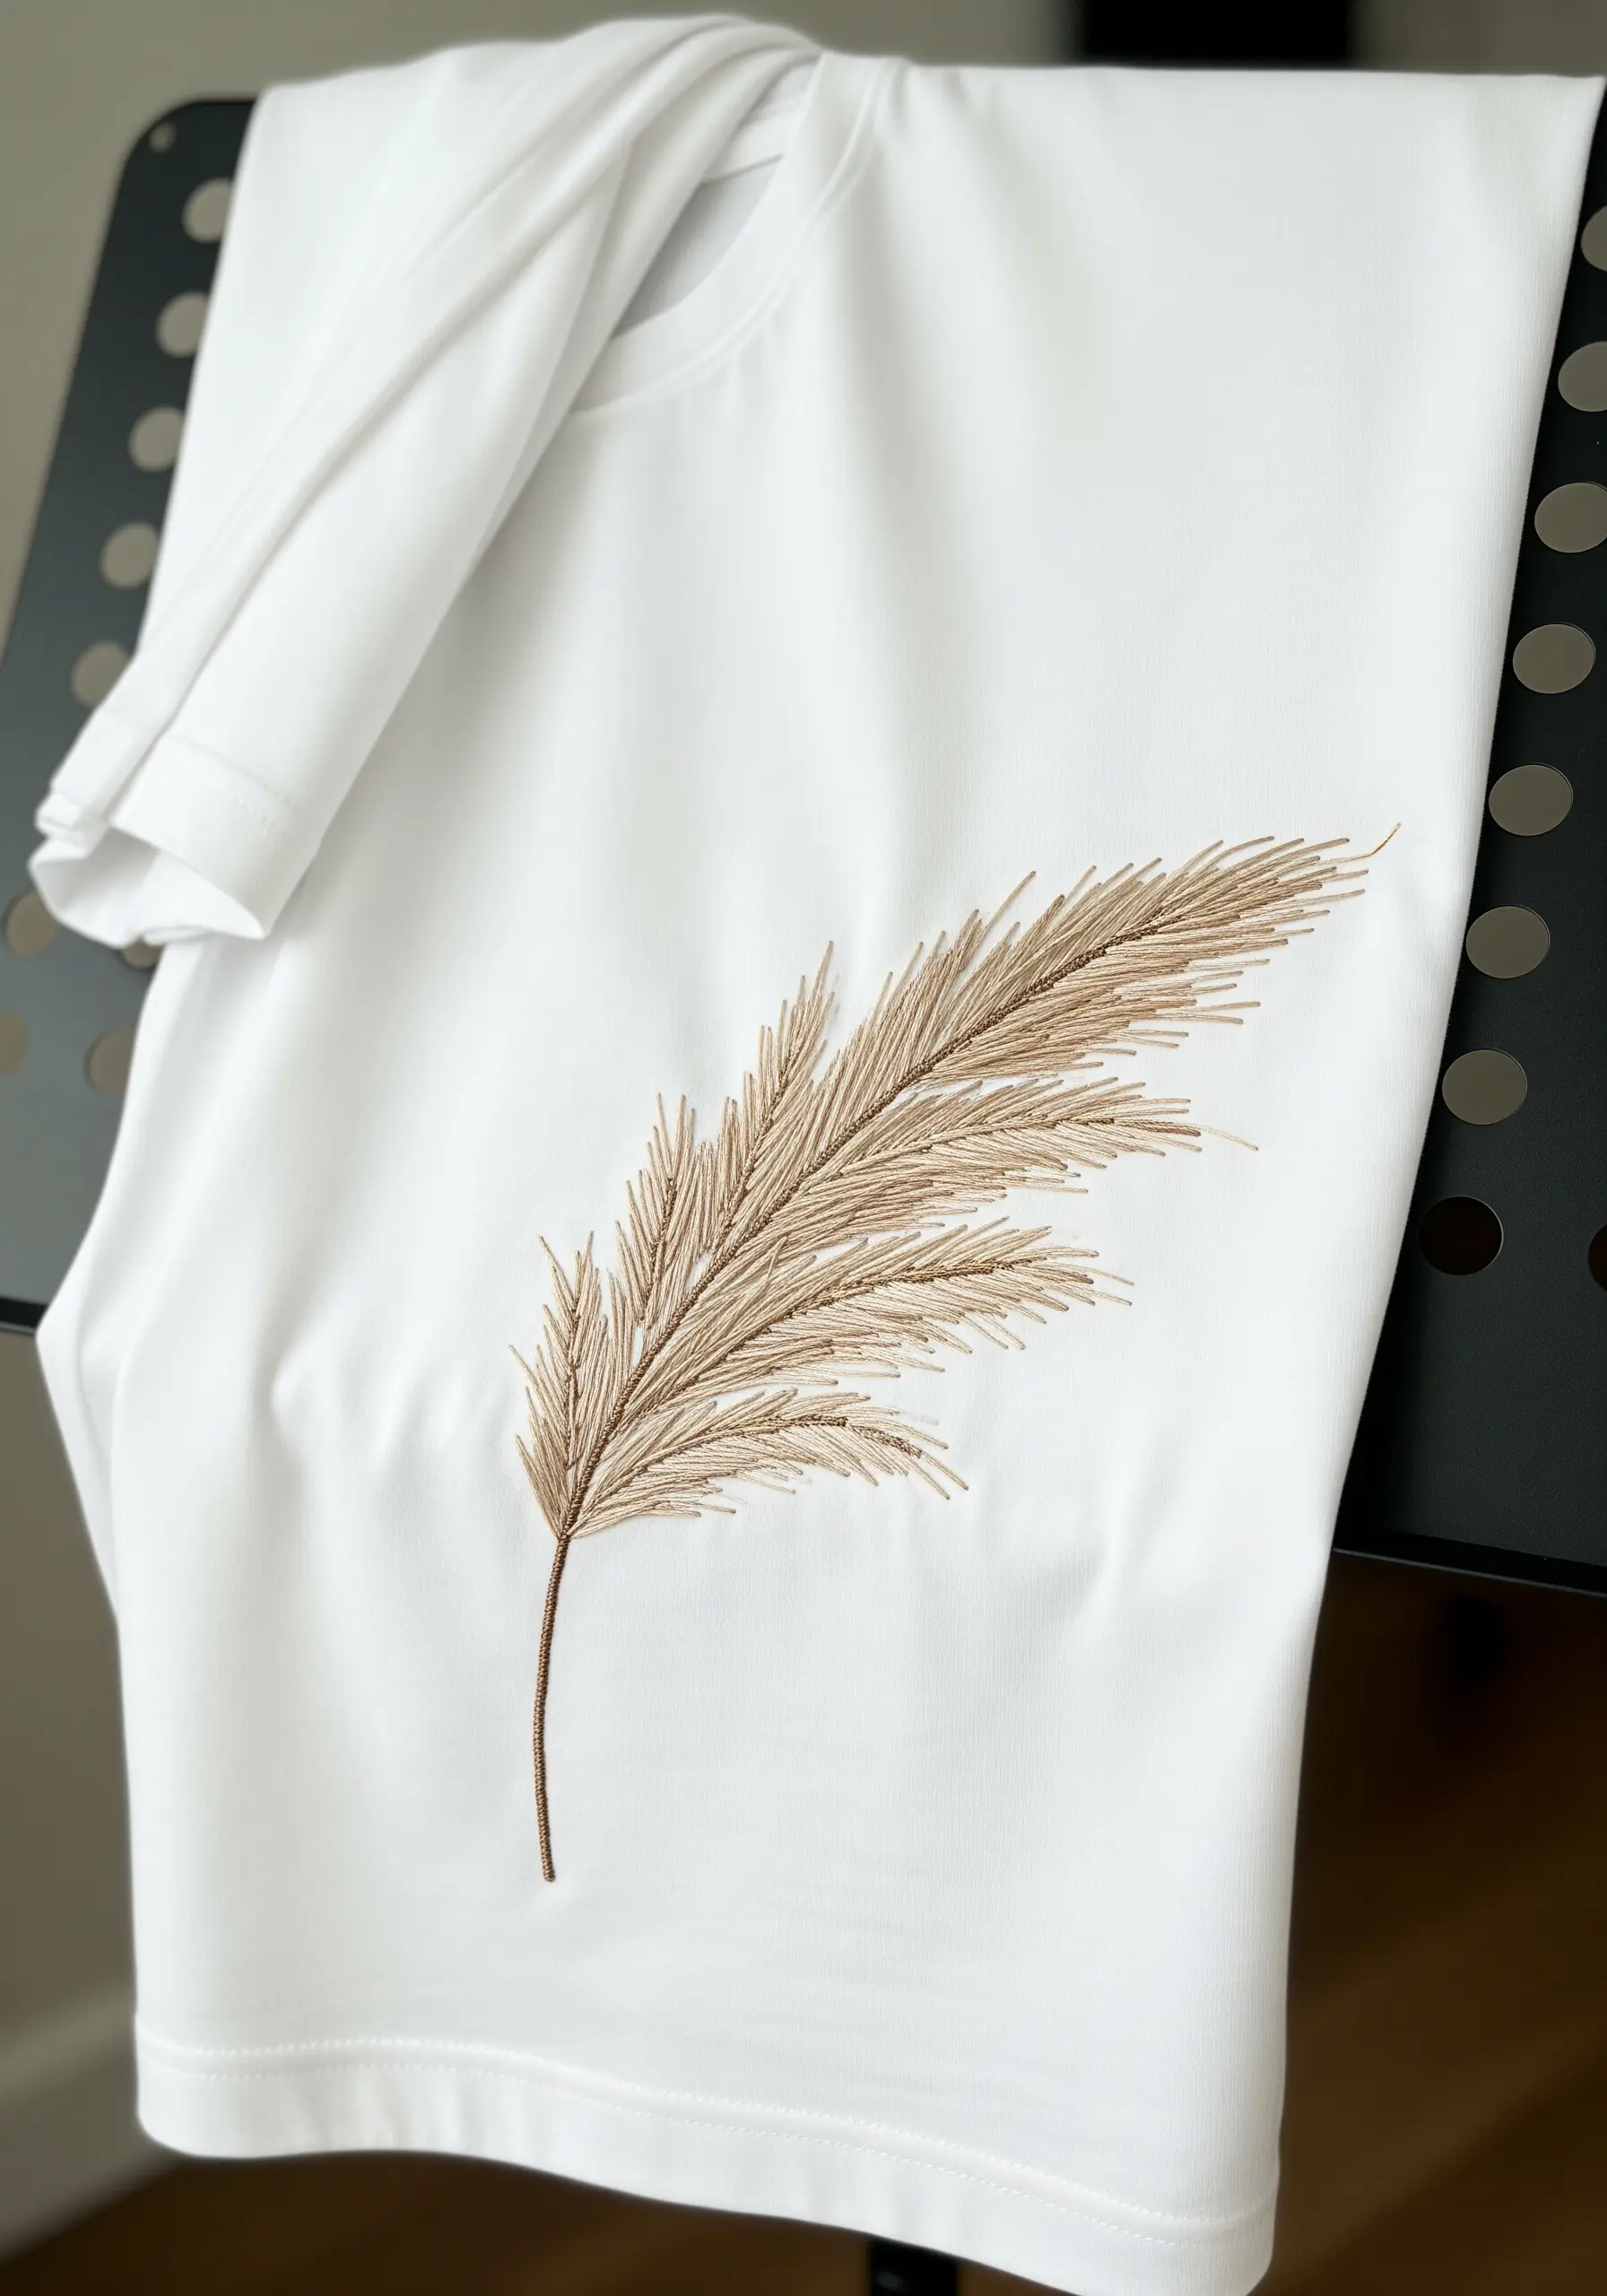
To capture the soft, airy texture of pampas grass, rely on long, layered straight stitches.
Start from the bottom of the plume and work your way up, angling your stitches outwards from the central stem.
By overlapping the layers and using a few closely related shades of beige and cream, you can build a feathery, three-dimensional effect that looks remarkably realistic.
36. Finish a Sleeve with a Custom-Stitched Border

Elevate the finish of your t-shirt by adding a decorative border stitch around the sleeve hem.
A simple, repeating pattern like the fern stitch or feather stitch creates a beautiful, custom trim that looks incredibly polished.
This small detail demonstrates an attention to craft that transforms a simple garment into a truly bespoke piece.


