

When you sit down to stitch, you’re doing more than just making marks with thread. You’re trying to capture a feeling—the crisp air, the rhythmic sound of waves, the texture of sand and shells. But sometimes, translating that feeling into a finished piece can feel just out of reach.
Let’s shift our focus from merely copying coastal motifs to truly understanding how to build them with intention. We’ll explore how a simple change in thread weight can create perspective, how contrasting textures can make a wave crash right off the fabric, and how a well-placed metallic glint can mimic sunlight on water.
These are not complex secrets, but rather thoughtful adjustments in technique that yield immediate, visible results. You have the skill; this is about refining your artistic eye to create ocean-inspired hoop embroidery ideas that feel as authentic and alive as the coast itself.
1. Render Wave Foam with Dimensional Knots
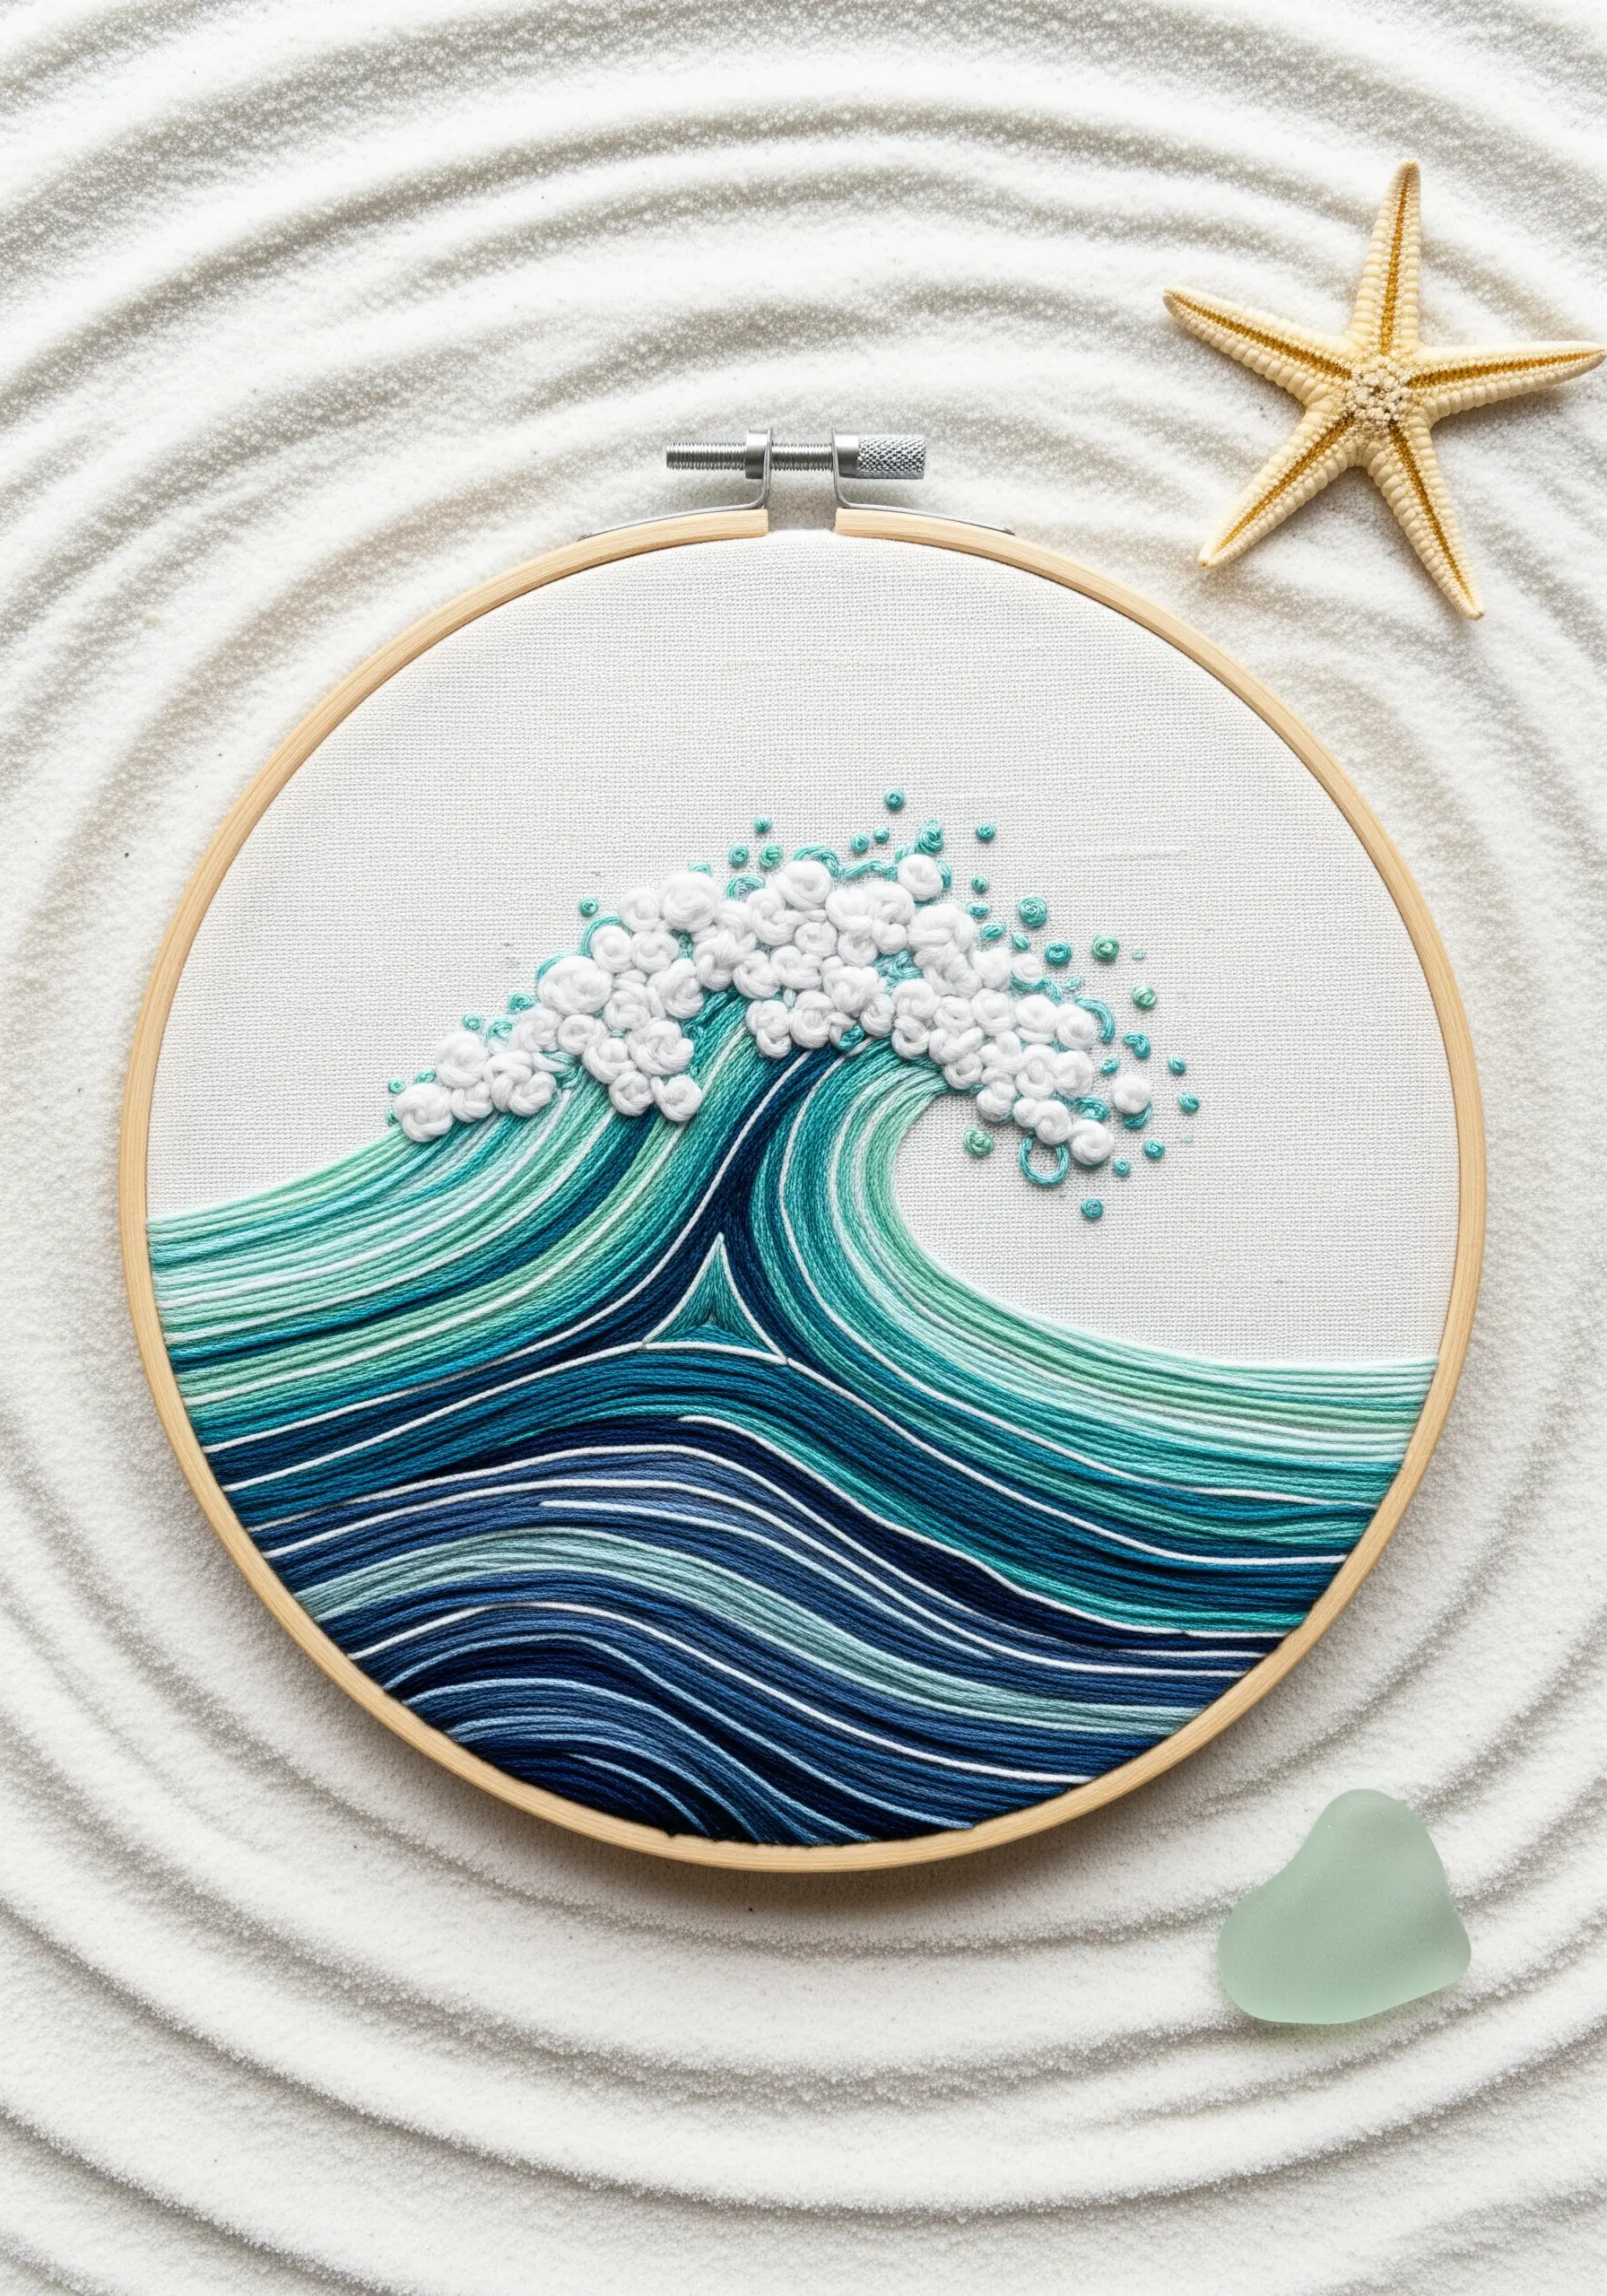
Create the illusion of crashing seafoam by combining smooth, directional stitches with high-texture knots.
Fill the body of the wave with long, straight stitches or satin stitches, ensuring they follow the curve of the water to suggest movement.
For the crest, use a dense cluster of French knots or colonial knots in white and off-white thread.
Vary the size of your knots—using one, two, or three wraps of floss—to give the foam a more organic, bubbly appearance. This contrast in texture makes the wave feel dynamic and alive.
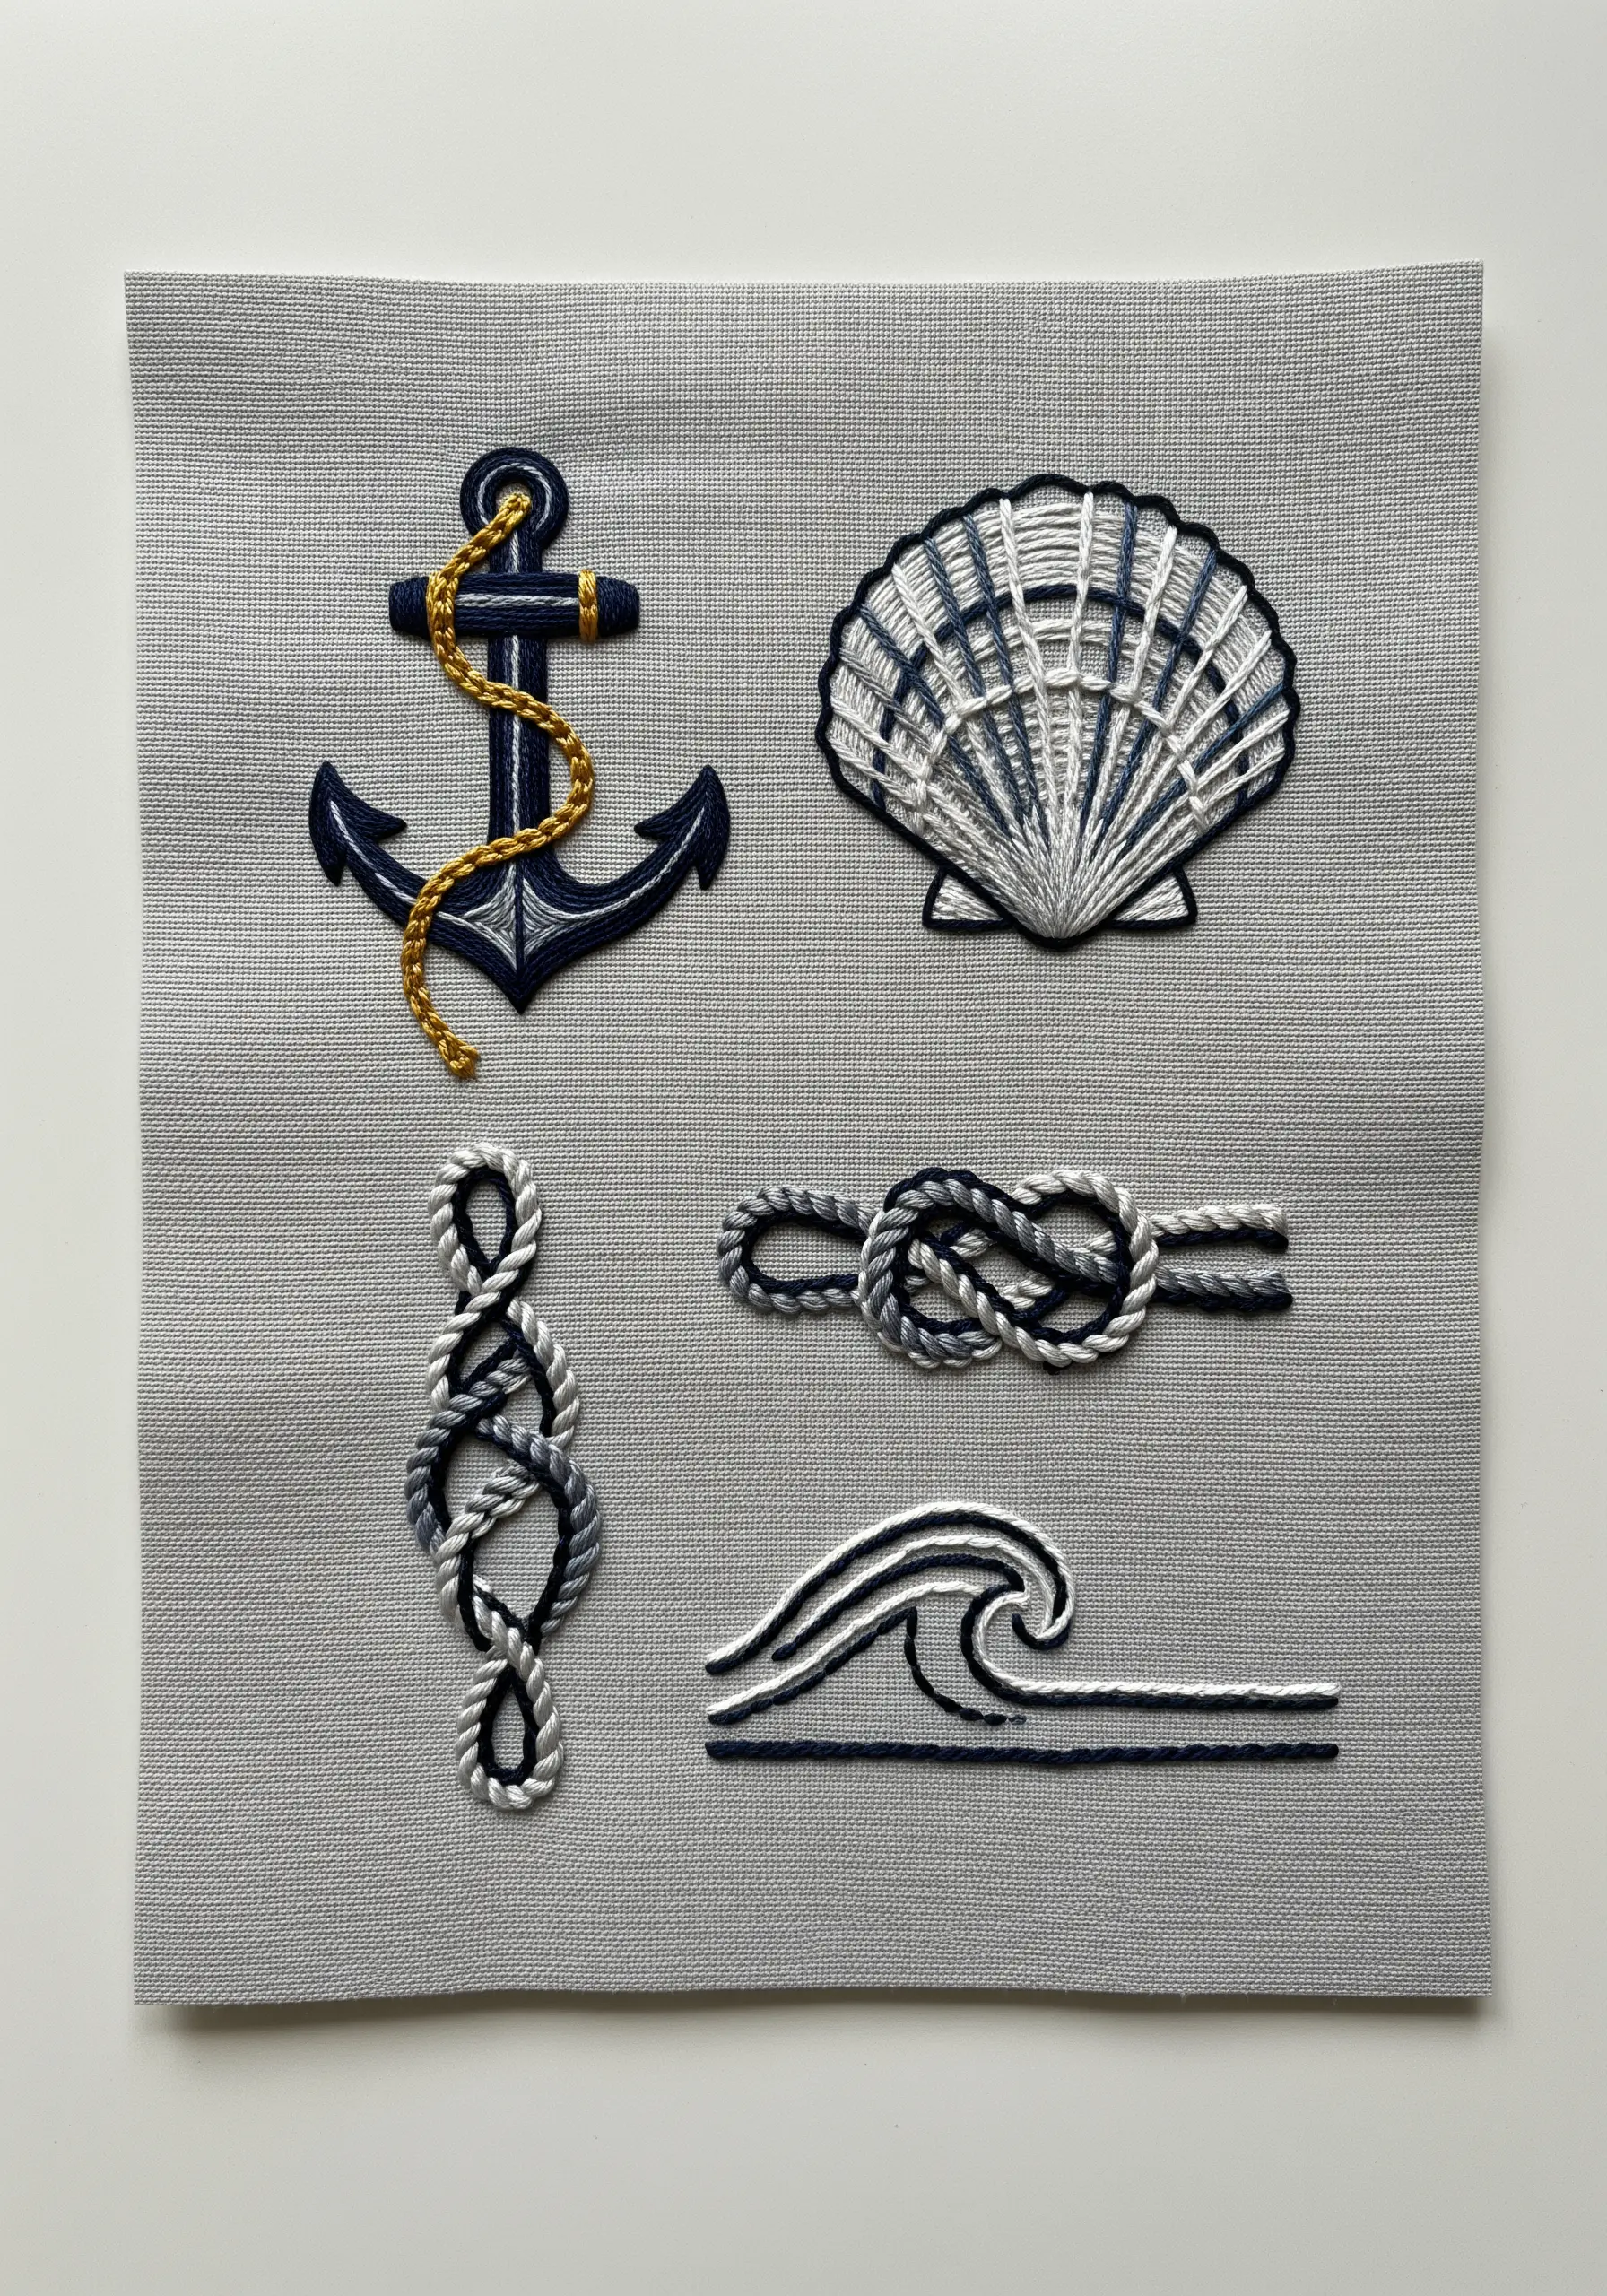
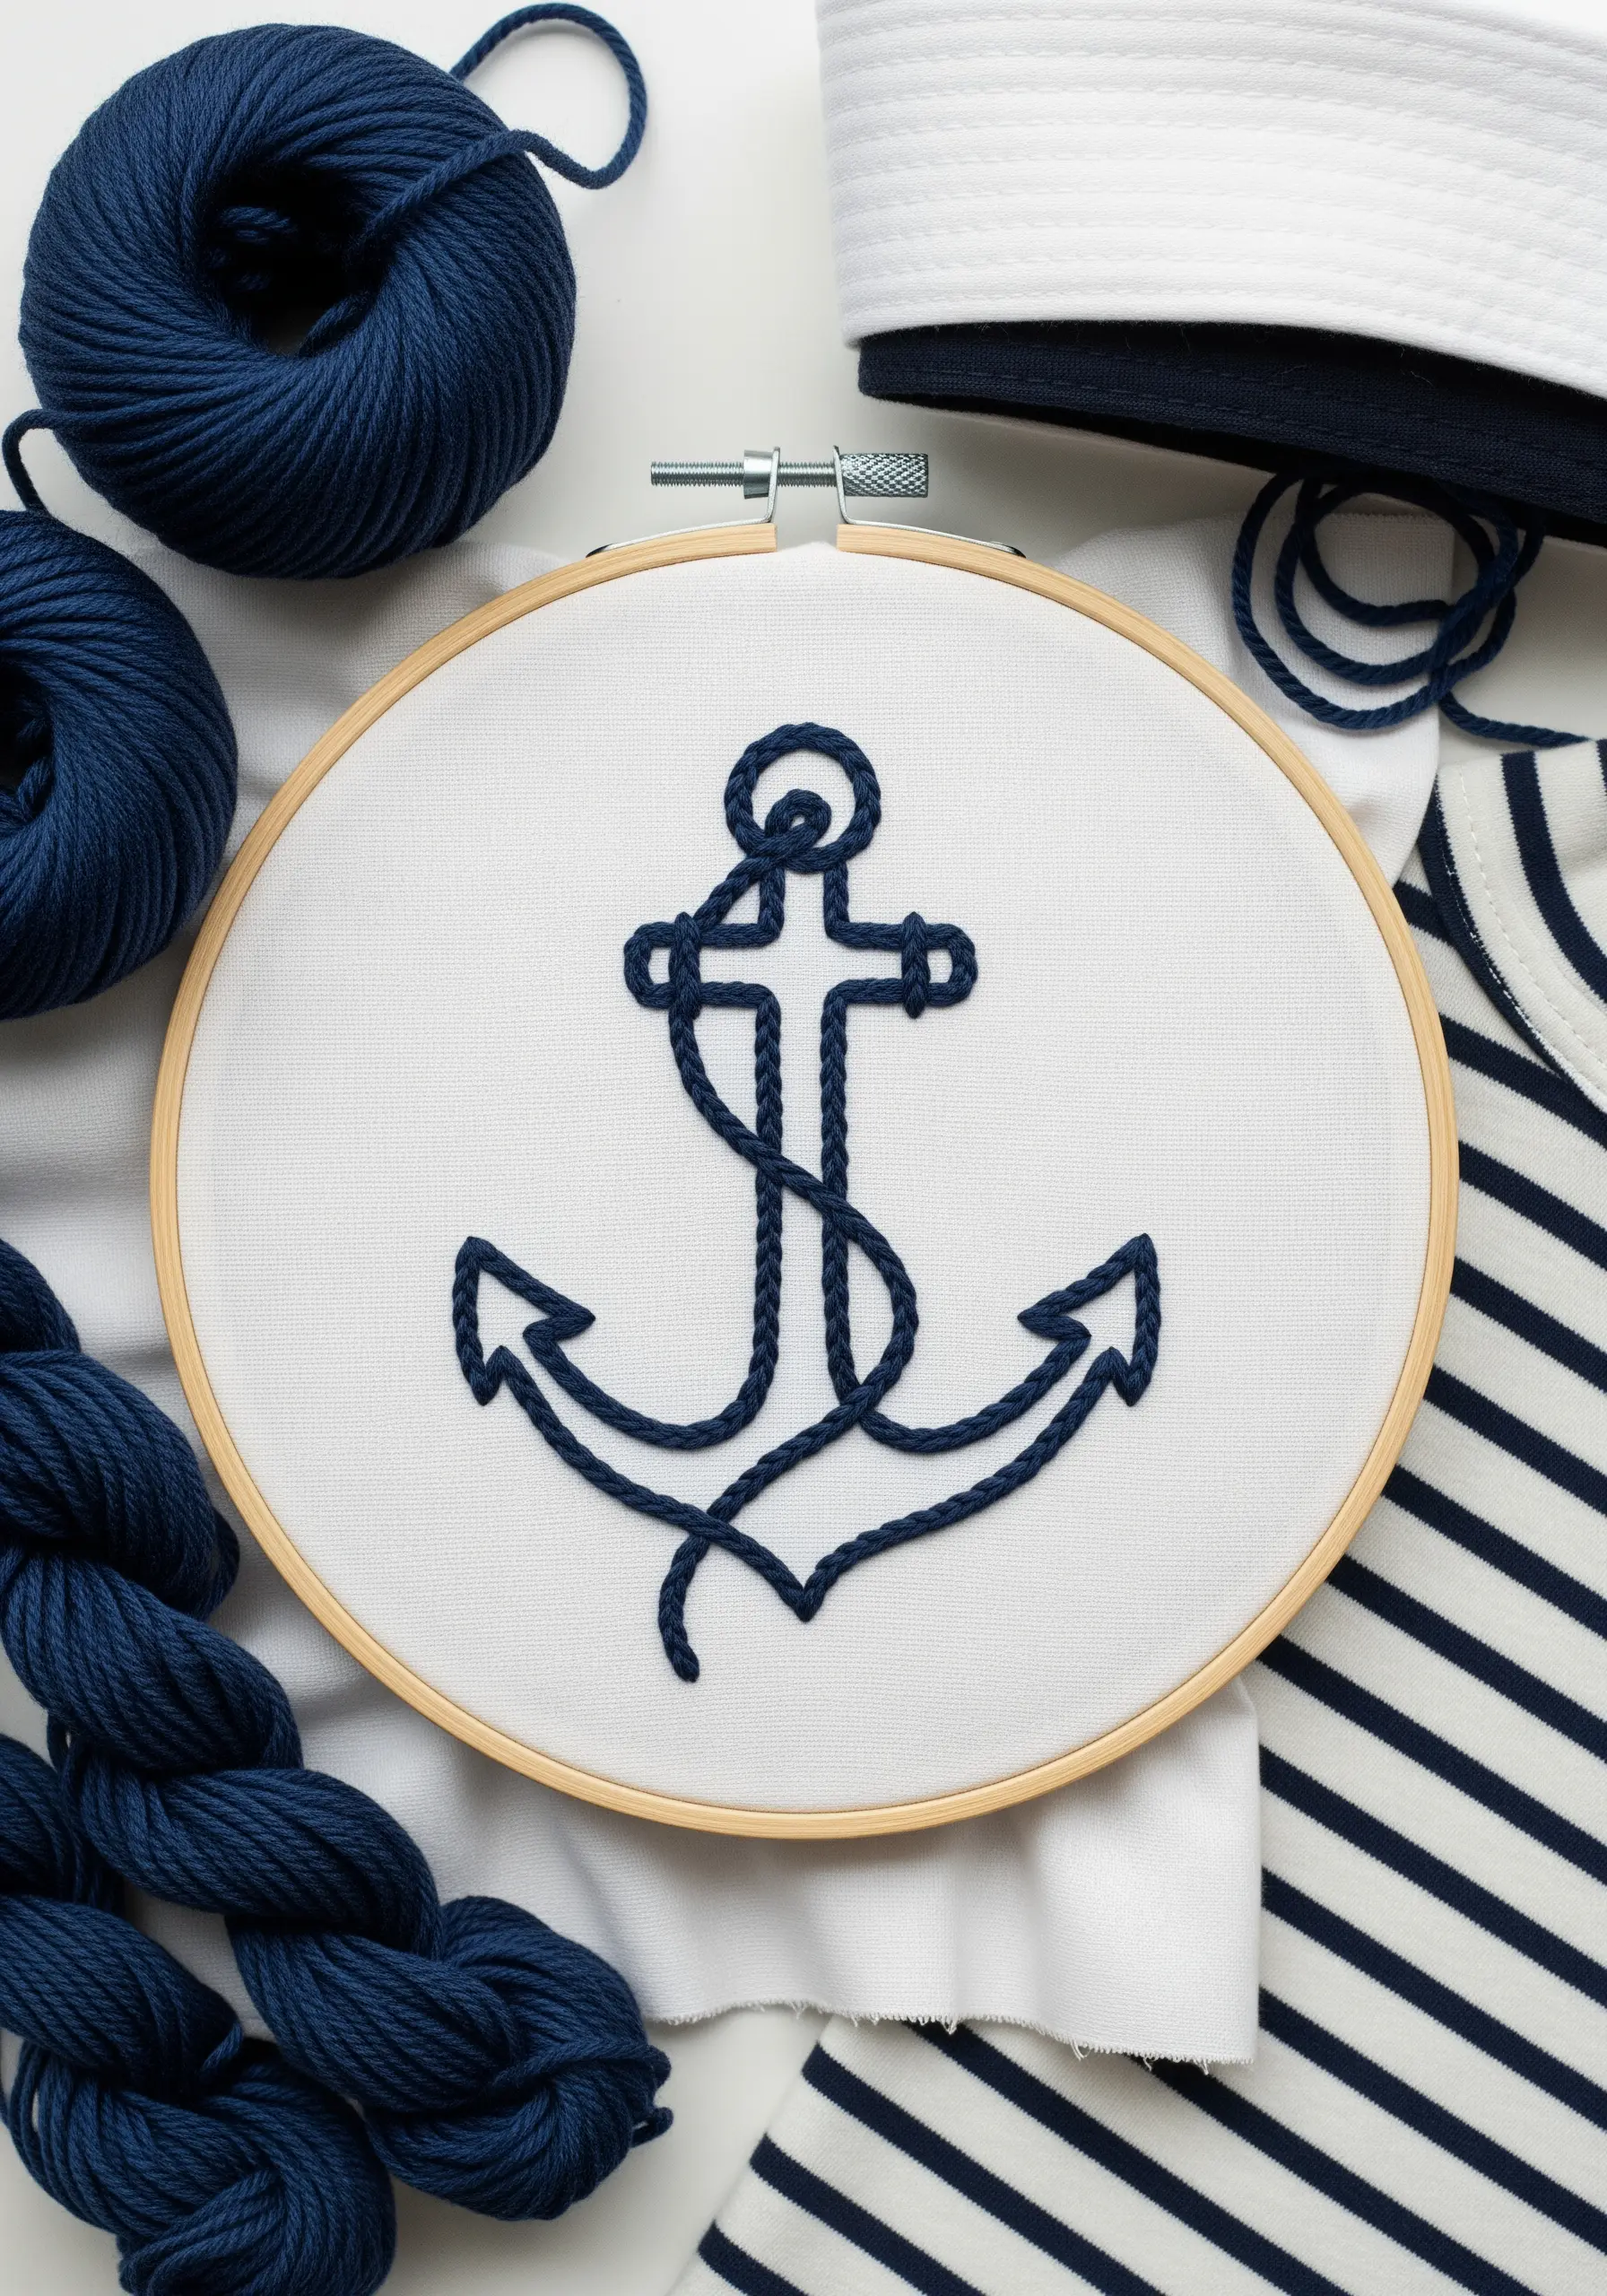
2. Translate String Art Dimension into Stitched Texture
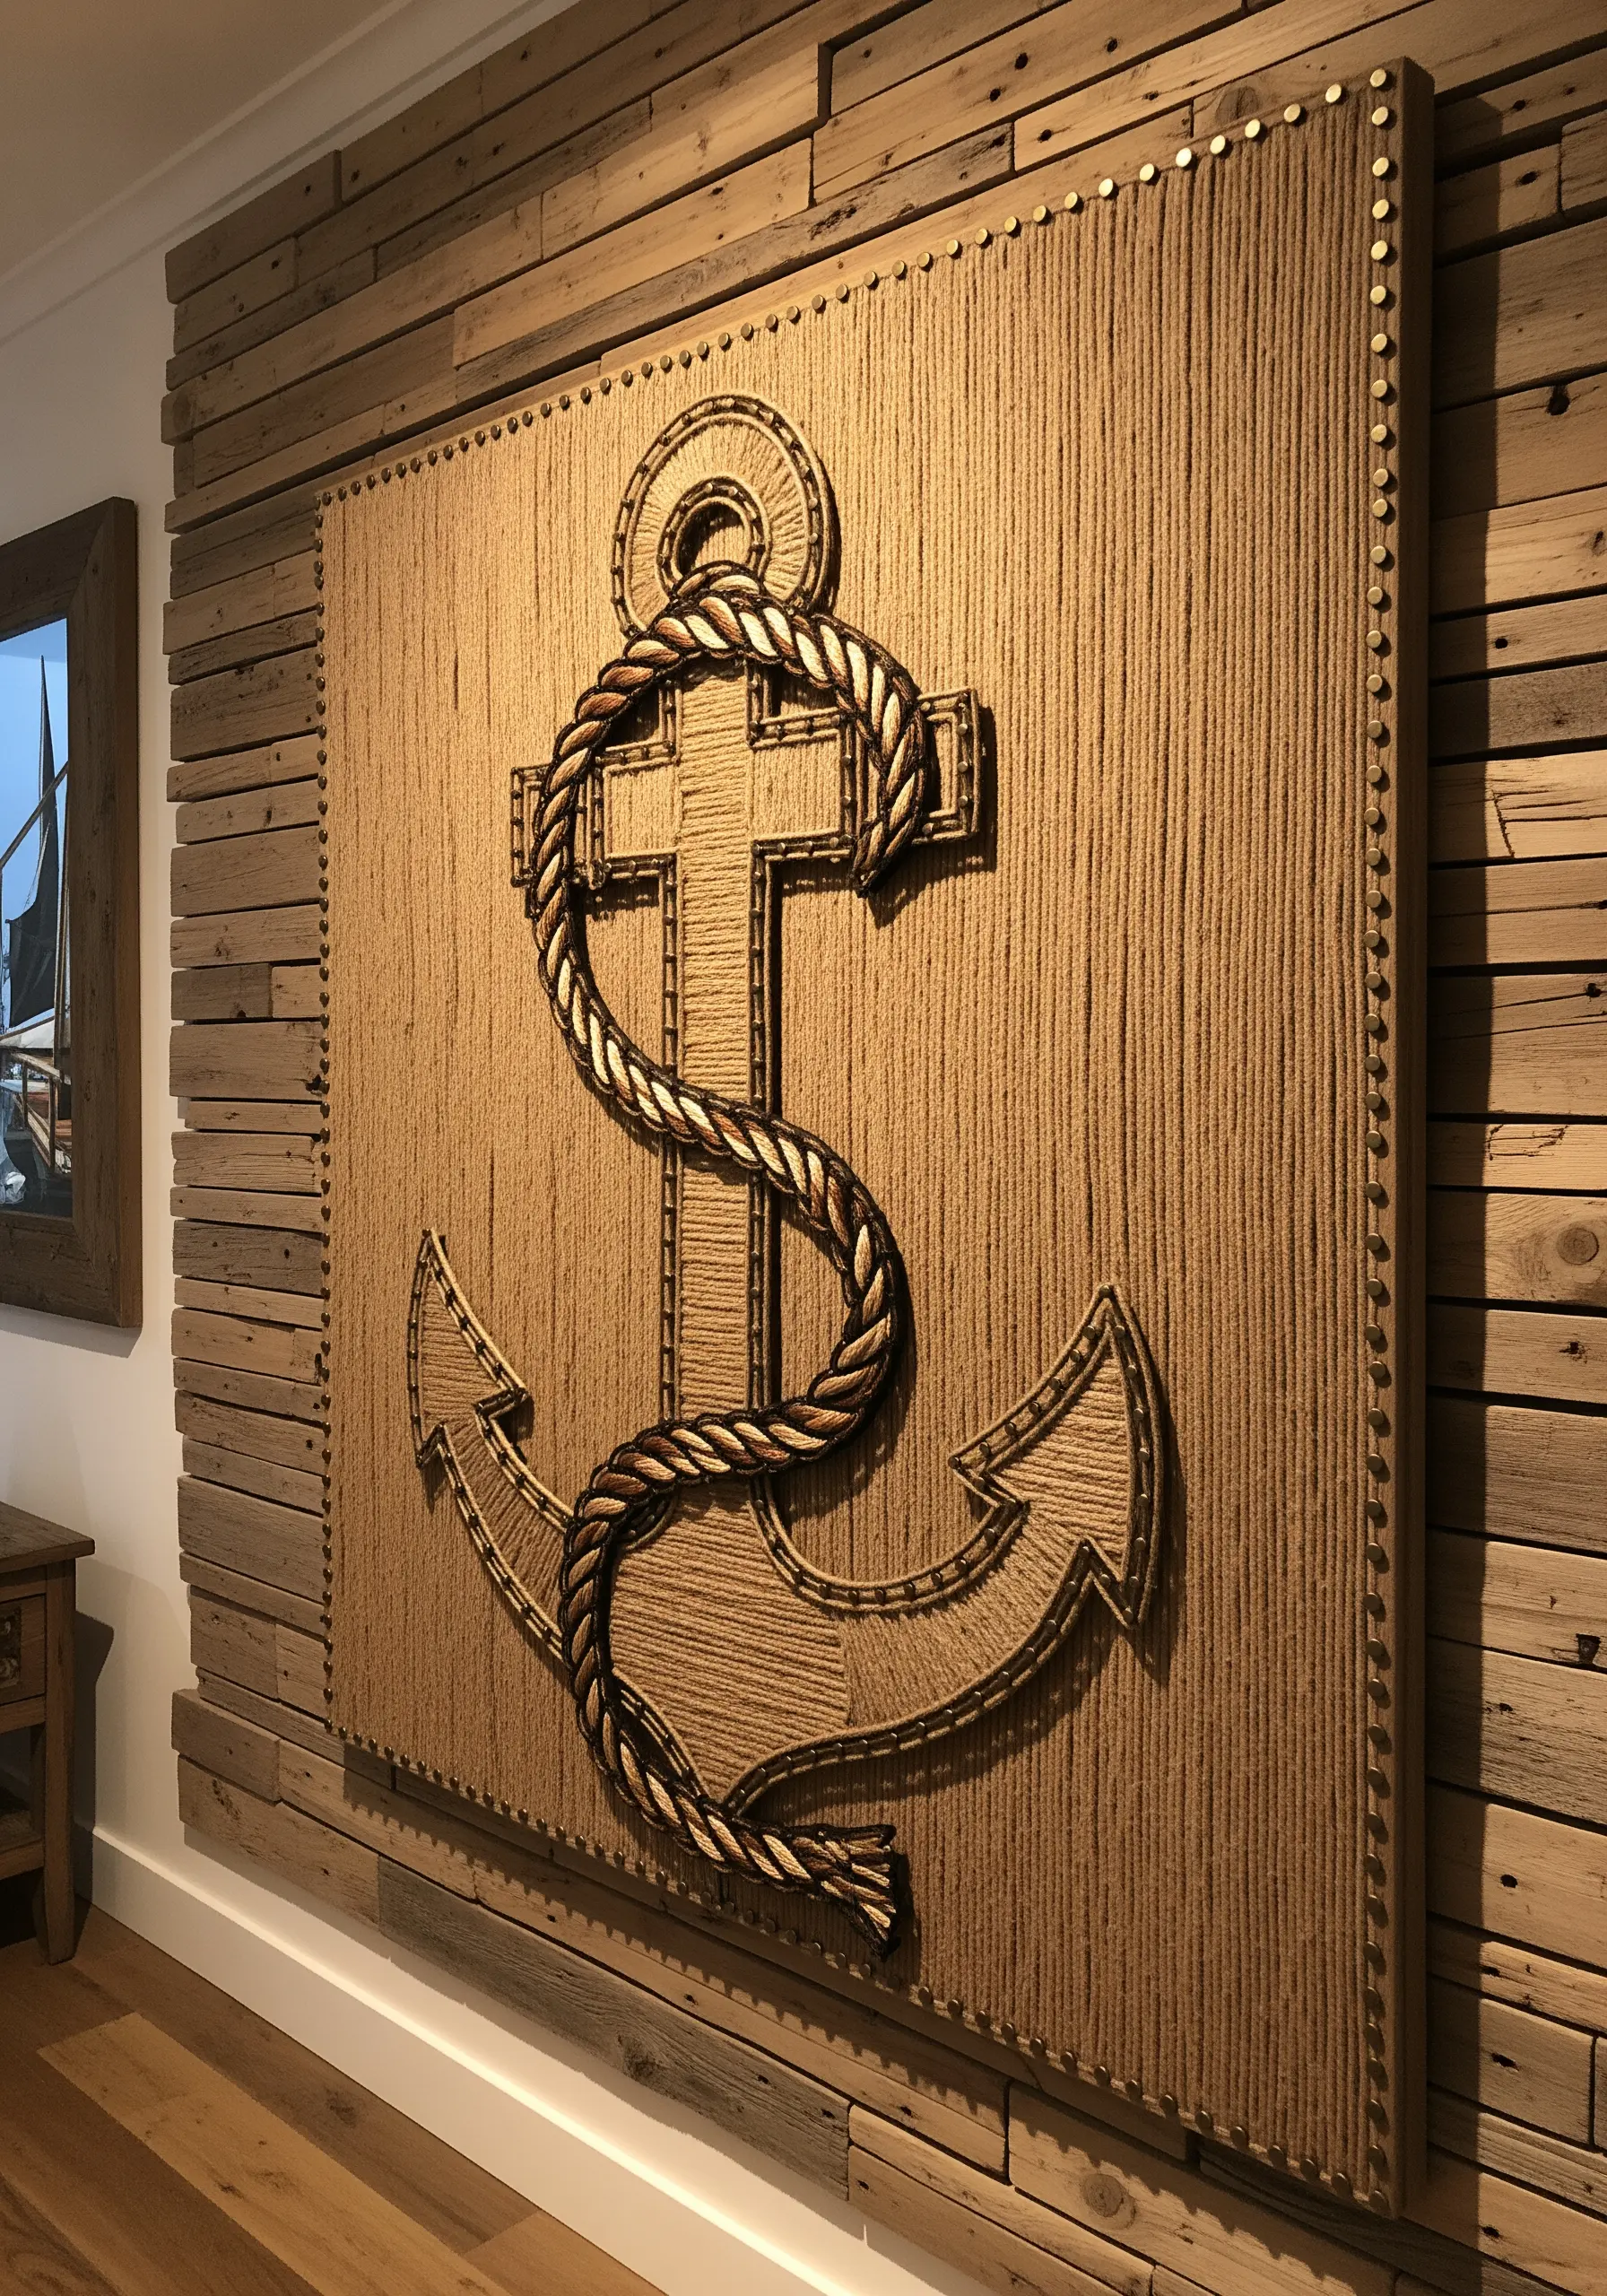
To achieve the bold, dimensional effect of string art on fabric, use couching with thick fibers like yarn or multiple strands of embroidery floss bundled together.
Lay your thick fiber along the design lines and use a thinner, matching thread to tack it down at regular intervals.
For the rope detail, twist two different colored cords together before couching them down. This creates an authentic, nautical texture that stands out from the surface.
To replicate the shadow, stitch a layer of dark grey or black satin stitch directly beneath your primary anchor shape, slightly offset. This creates depth without complex shading.
3. Add Definition to Shells with Metallic Outlines
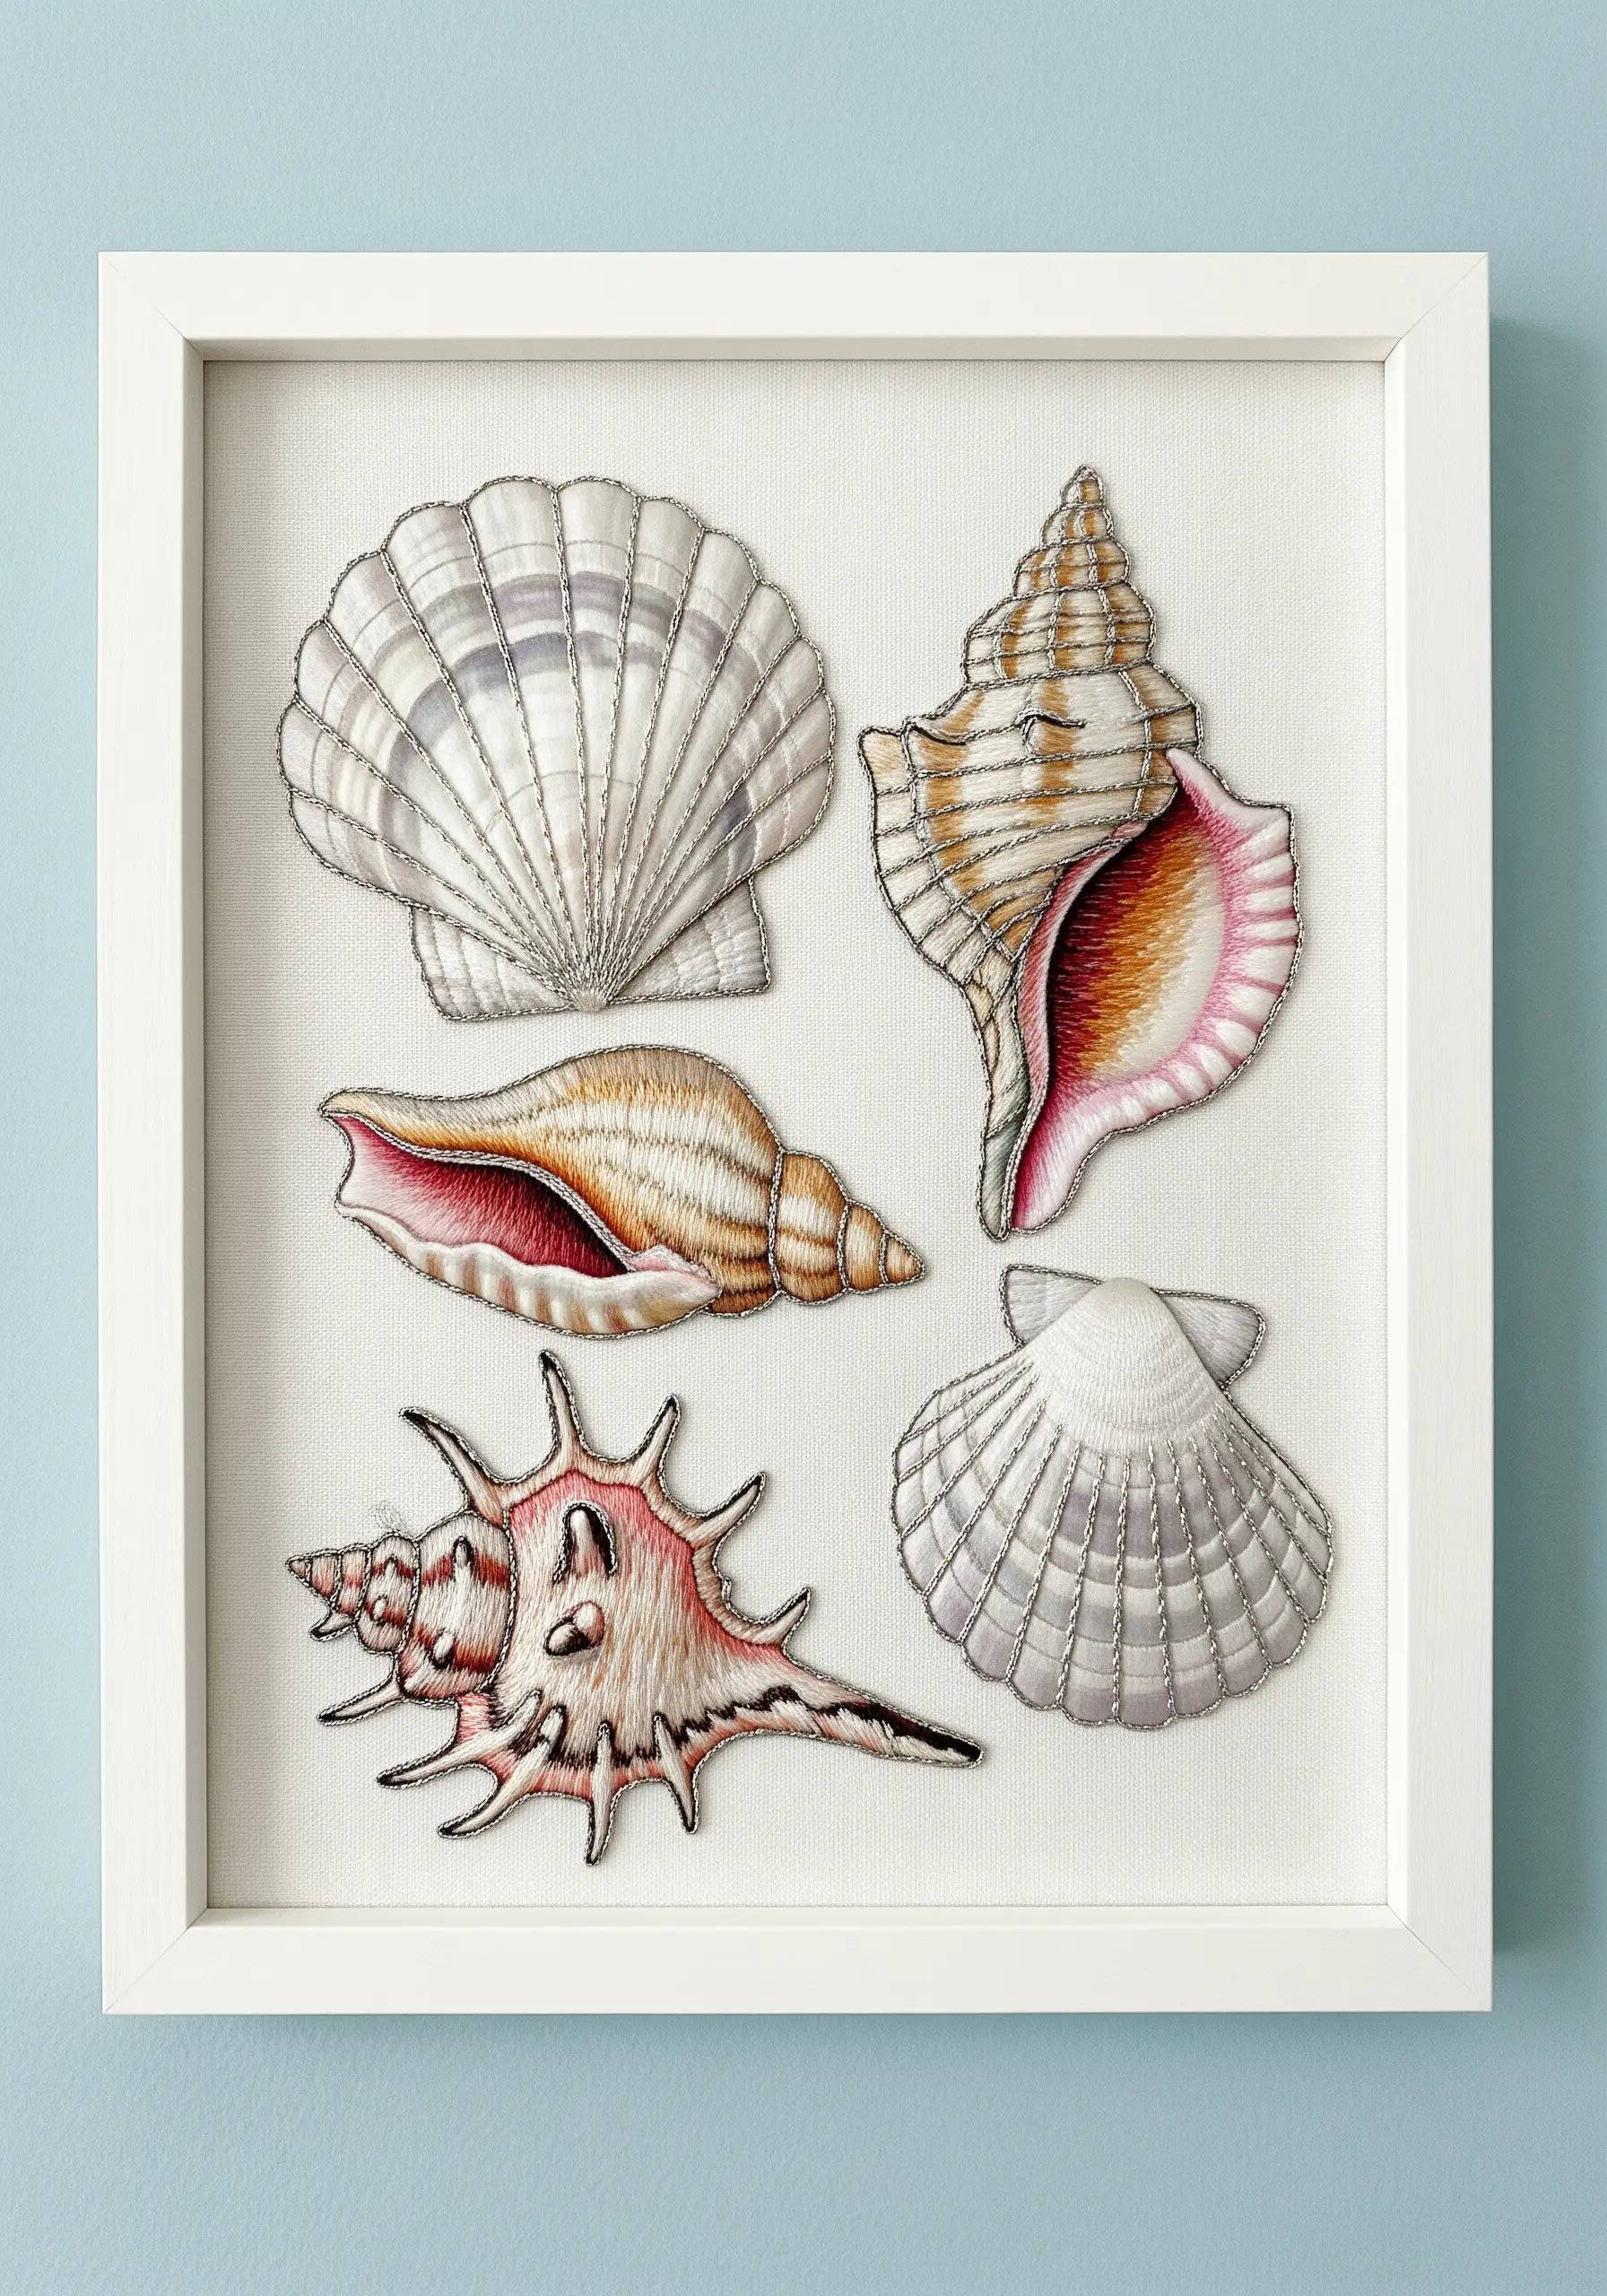
Elevate realistic seashells by framing them with a delicate metallic outline after you’ve completed the shading.
Use a single strand of six-strand floss to execute the long-and-short stitch gradients, which creates a smooth, painterly effect ideal for capturing the shell’s iridescence.
Once the color work is done, couch a fine metallic thread, like a silver blending filament, along the outer edges and main ridges.
This technique adds a subtle glint that catches the light and gives your shells a crisp, defined structure, making them pop against the fabric.
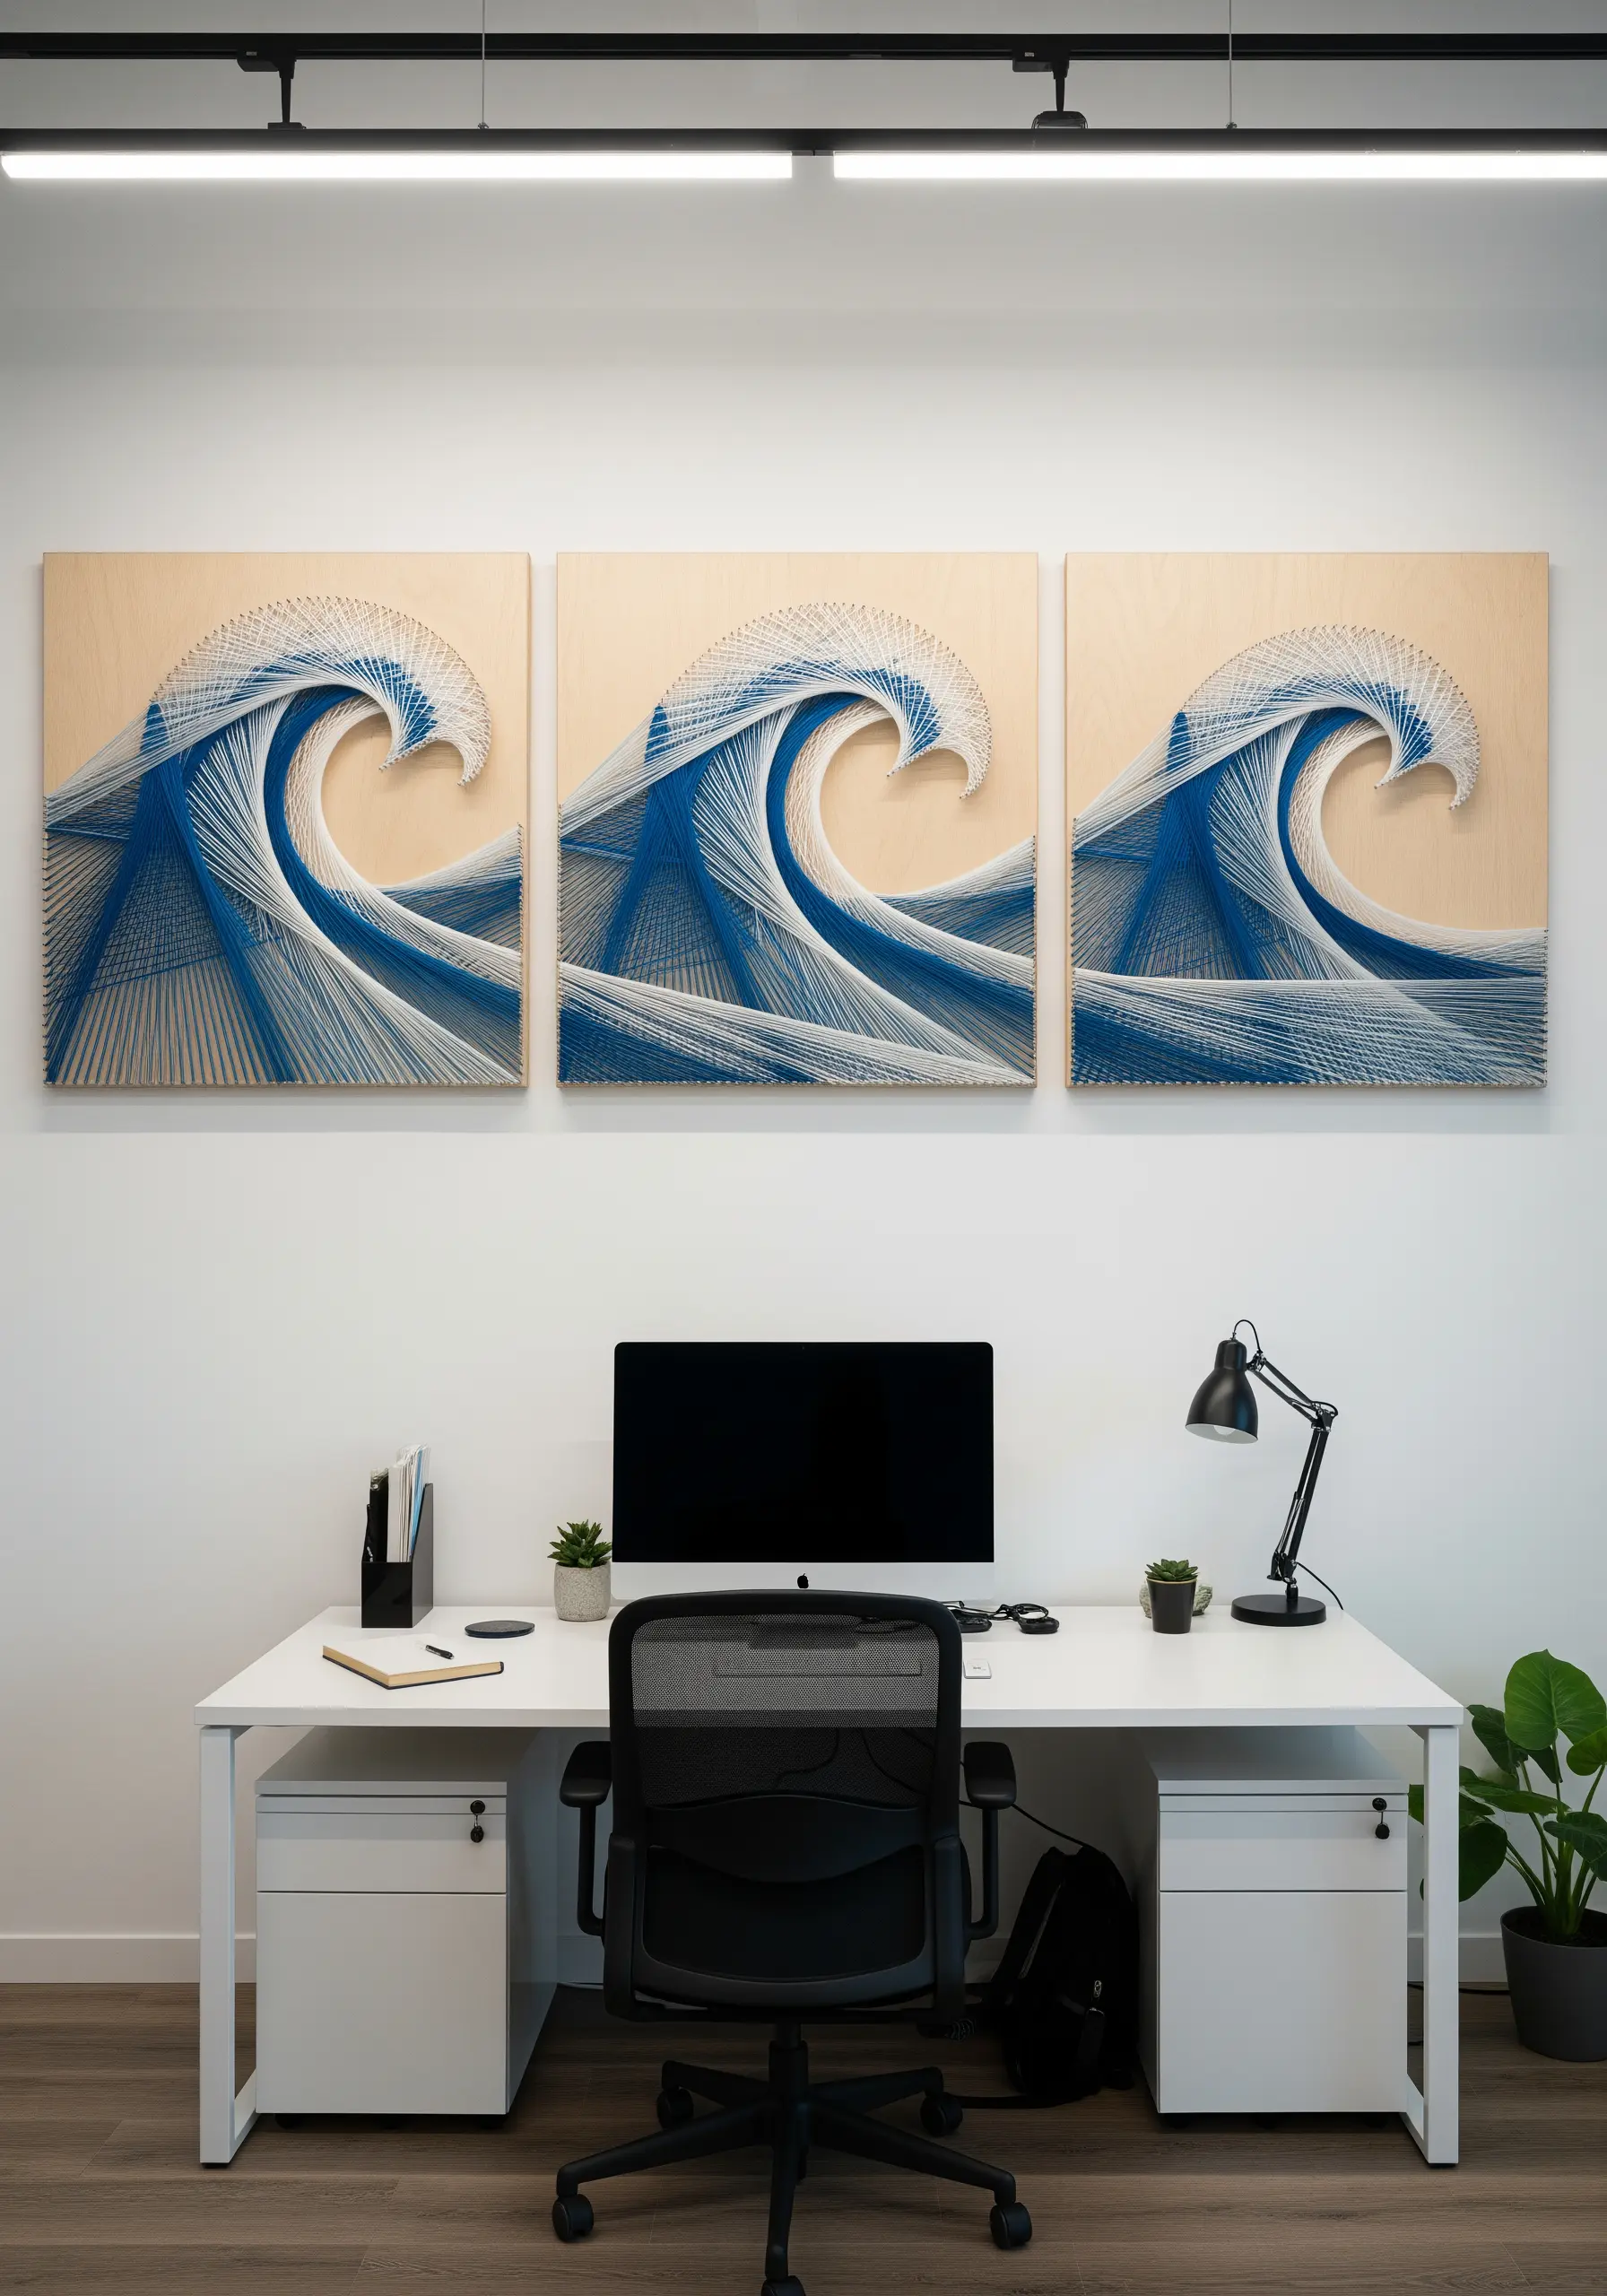
4. Tell a Story Across a Triptych of Hoops

Break down a single, dynamic scene into a series of smaller hoops to create a narrative effect.
To ensure visual continuity, let key elements of the design—like the crest of a wave or a spray of seafoam—cross the boundary from one hoop to the next.
Use a consistent color palette and stitch style across all three pieces to unify them as a single work of art.
This approach allows you to focus on detailed sections individually while building a larger, more impactful composition for your wall.
5. Weave Organic Motion with Variegated Threads

For large-scale embroidery projects like a headboard or wall hanging, variegated thread is your most valuable tool for creating fluid, natural color shifts.
Instead of switching colors manually, let the thread do the work. Long, sweeping straight stitches will showcase the gradual color changes beautifully, mimicking the light and shadow in moving water.
Introduce a metallic gold or silver thread sporadically to add subtle highlights that catch the eye and give the piece a sense of luxury and depth.
6. Combine Appliqué and Bold Stitches for Graphic Impact
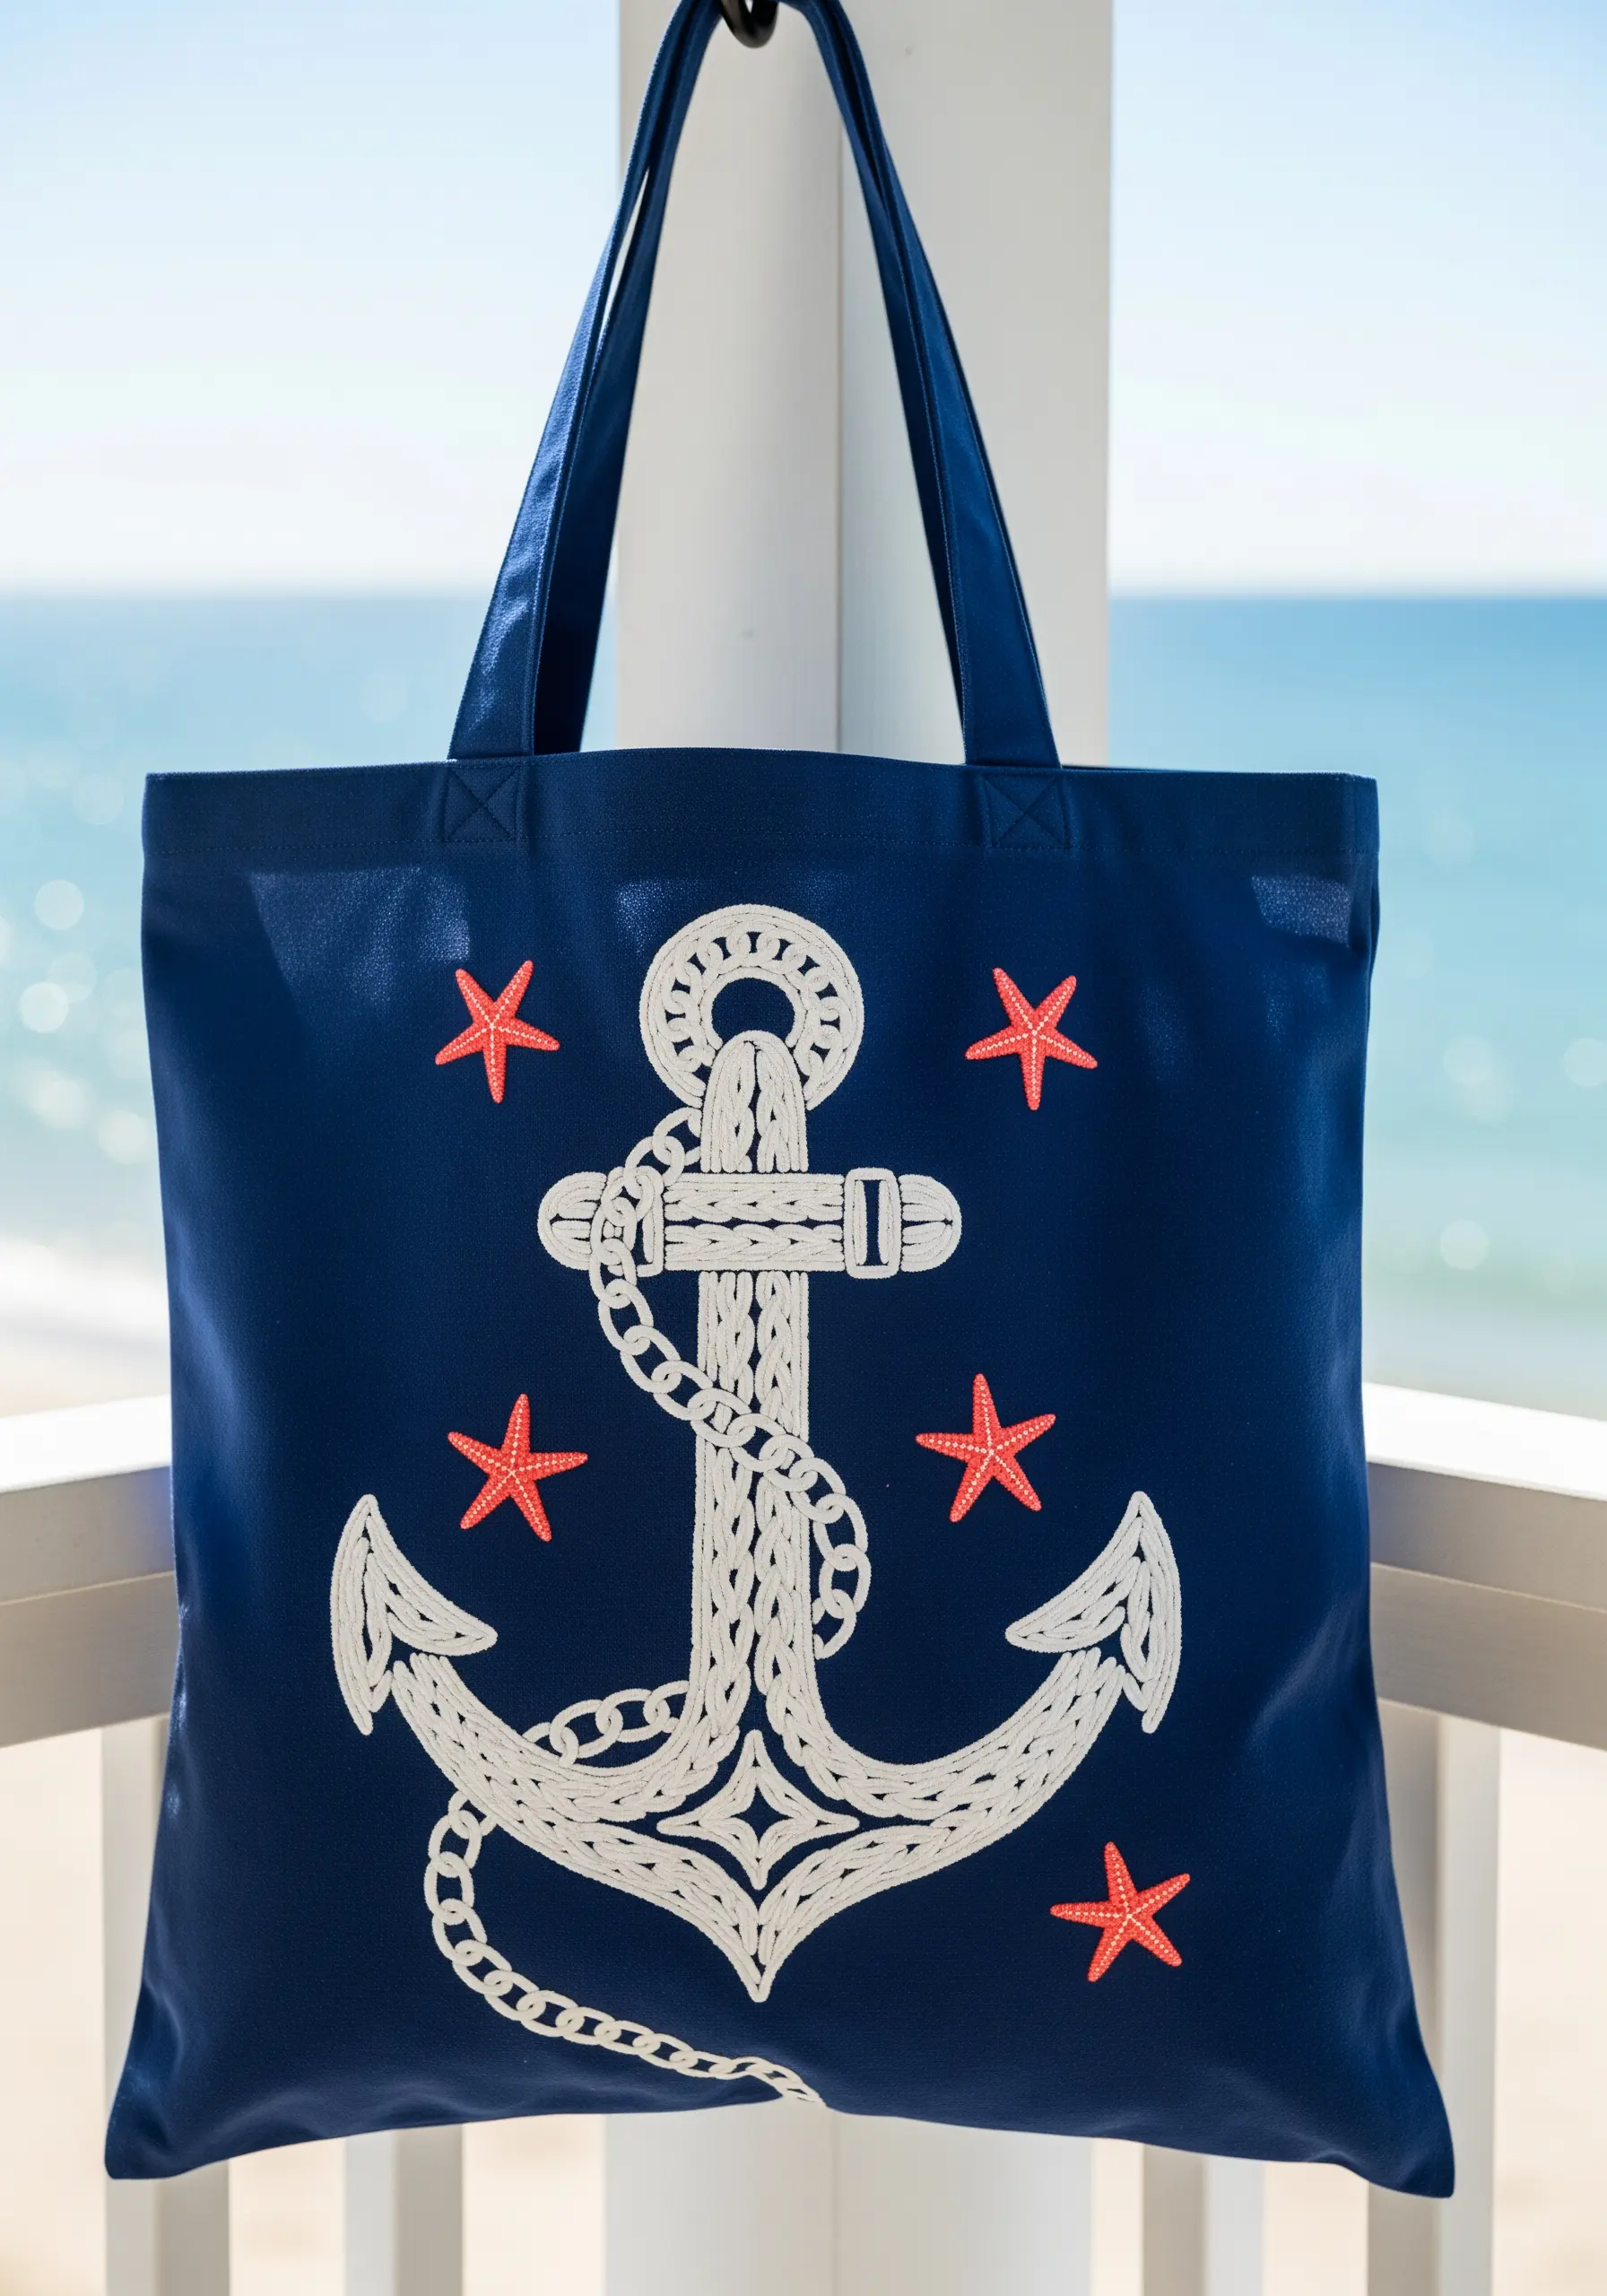
When embroidering on a durable surface like a tote bag, combine techniques for a result that is both fast and visually striking.
Cut the main anchor shape from a piece of white felt or canvas and appliqué it onto the bag first. This instantly creates a bold, solid foundation.
Then, add textural details on top using dimensional stitches. A heavy chain stitch is perfect for the rope, while a padded satin stitch will make the central elements pop.
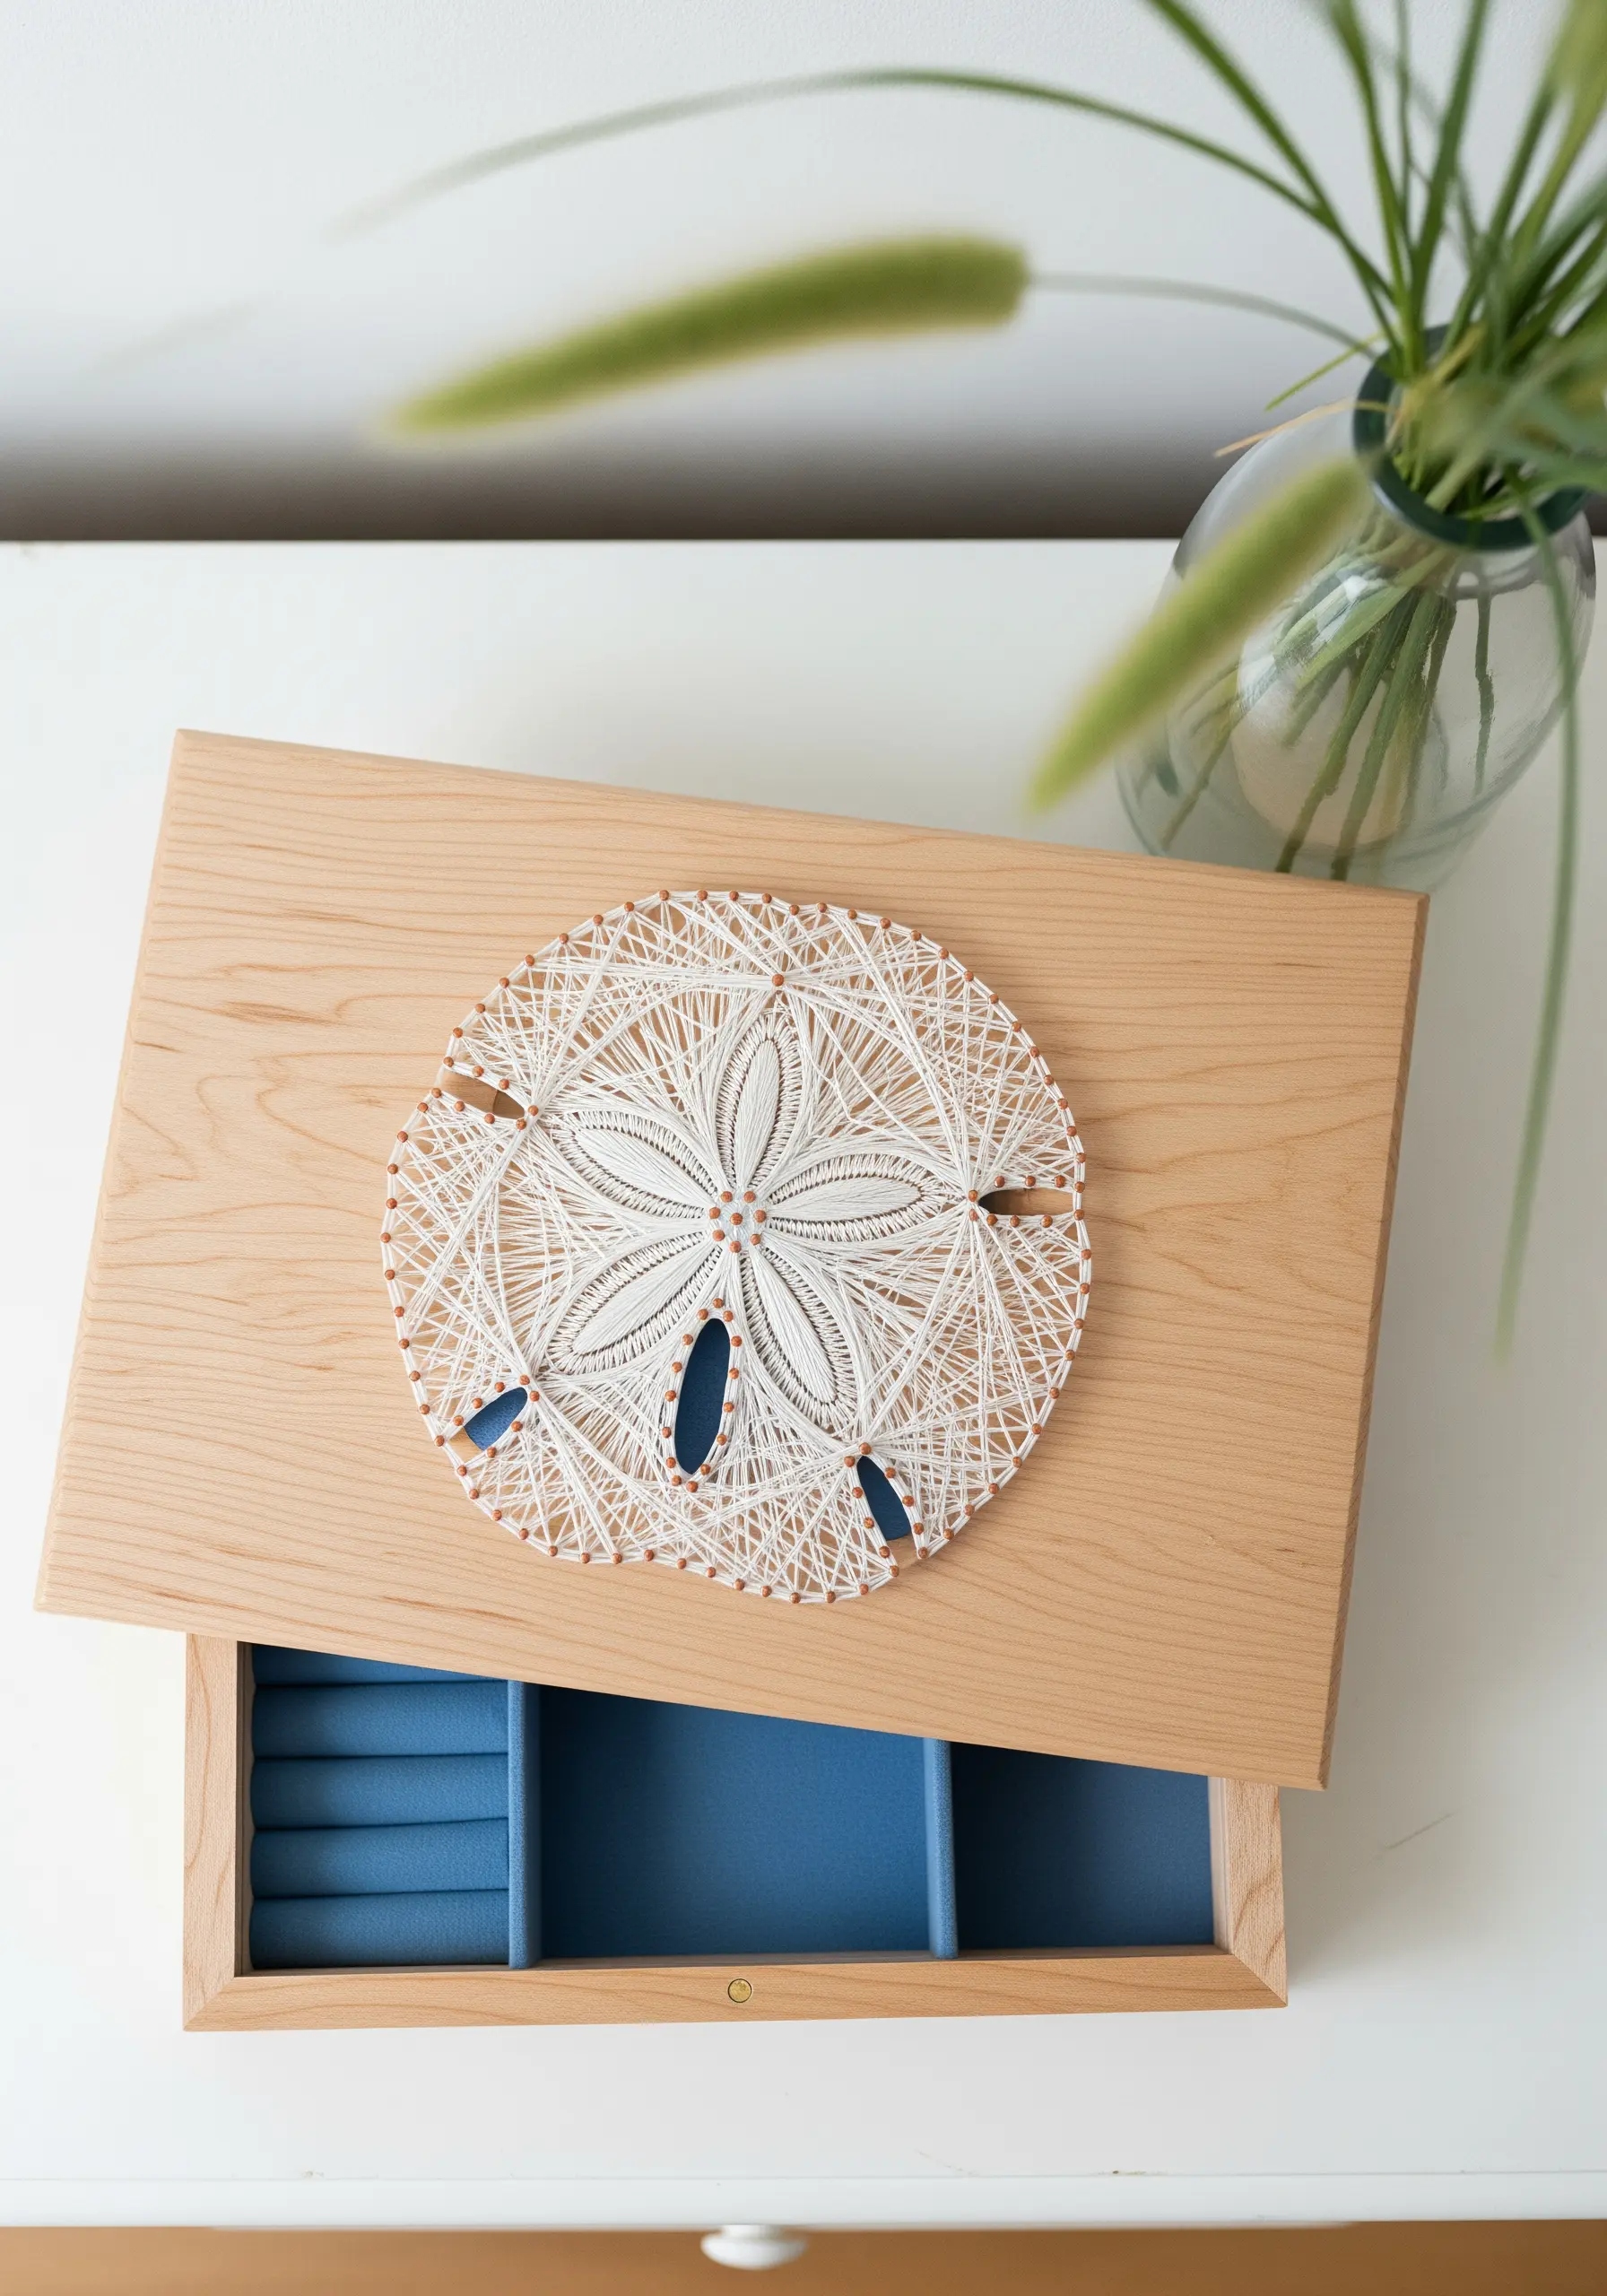
7. Create Precision with a Split-Stitch Foundation
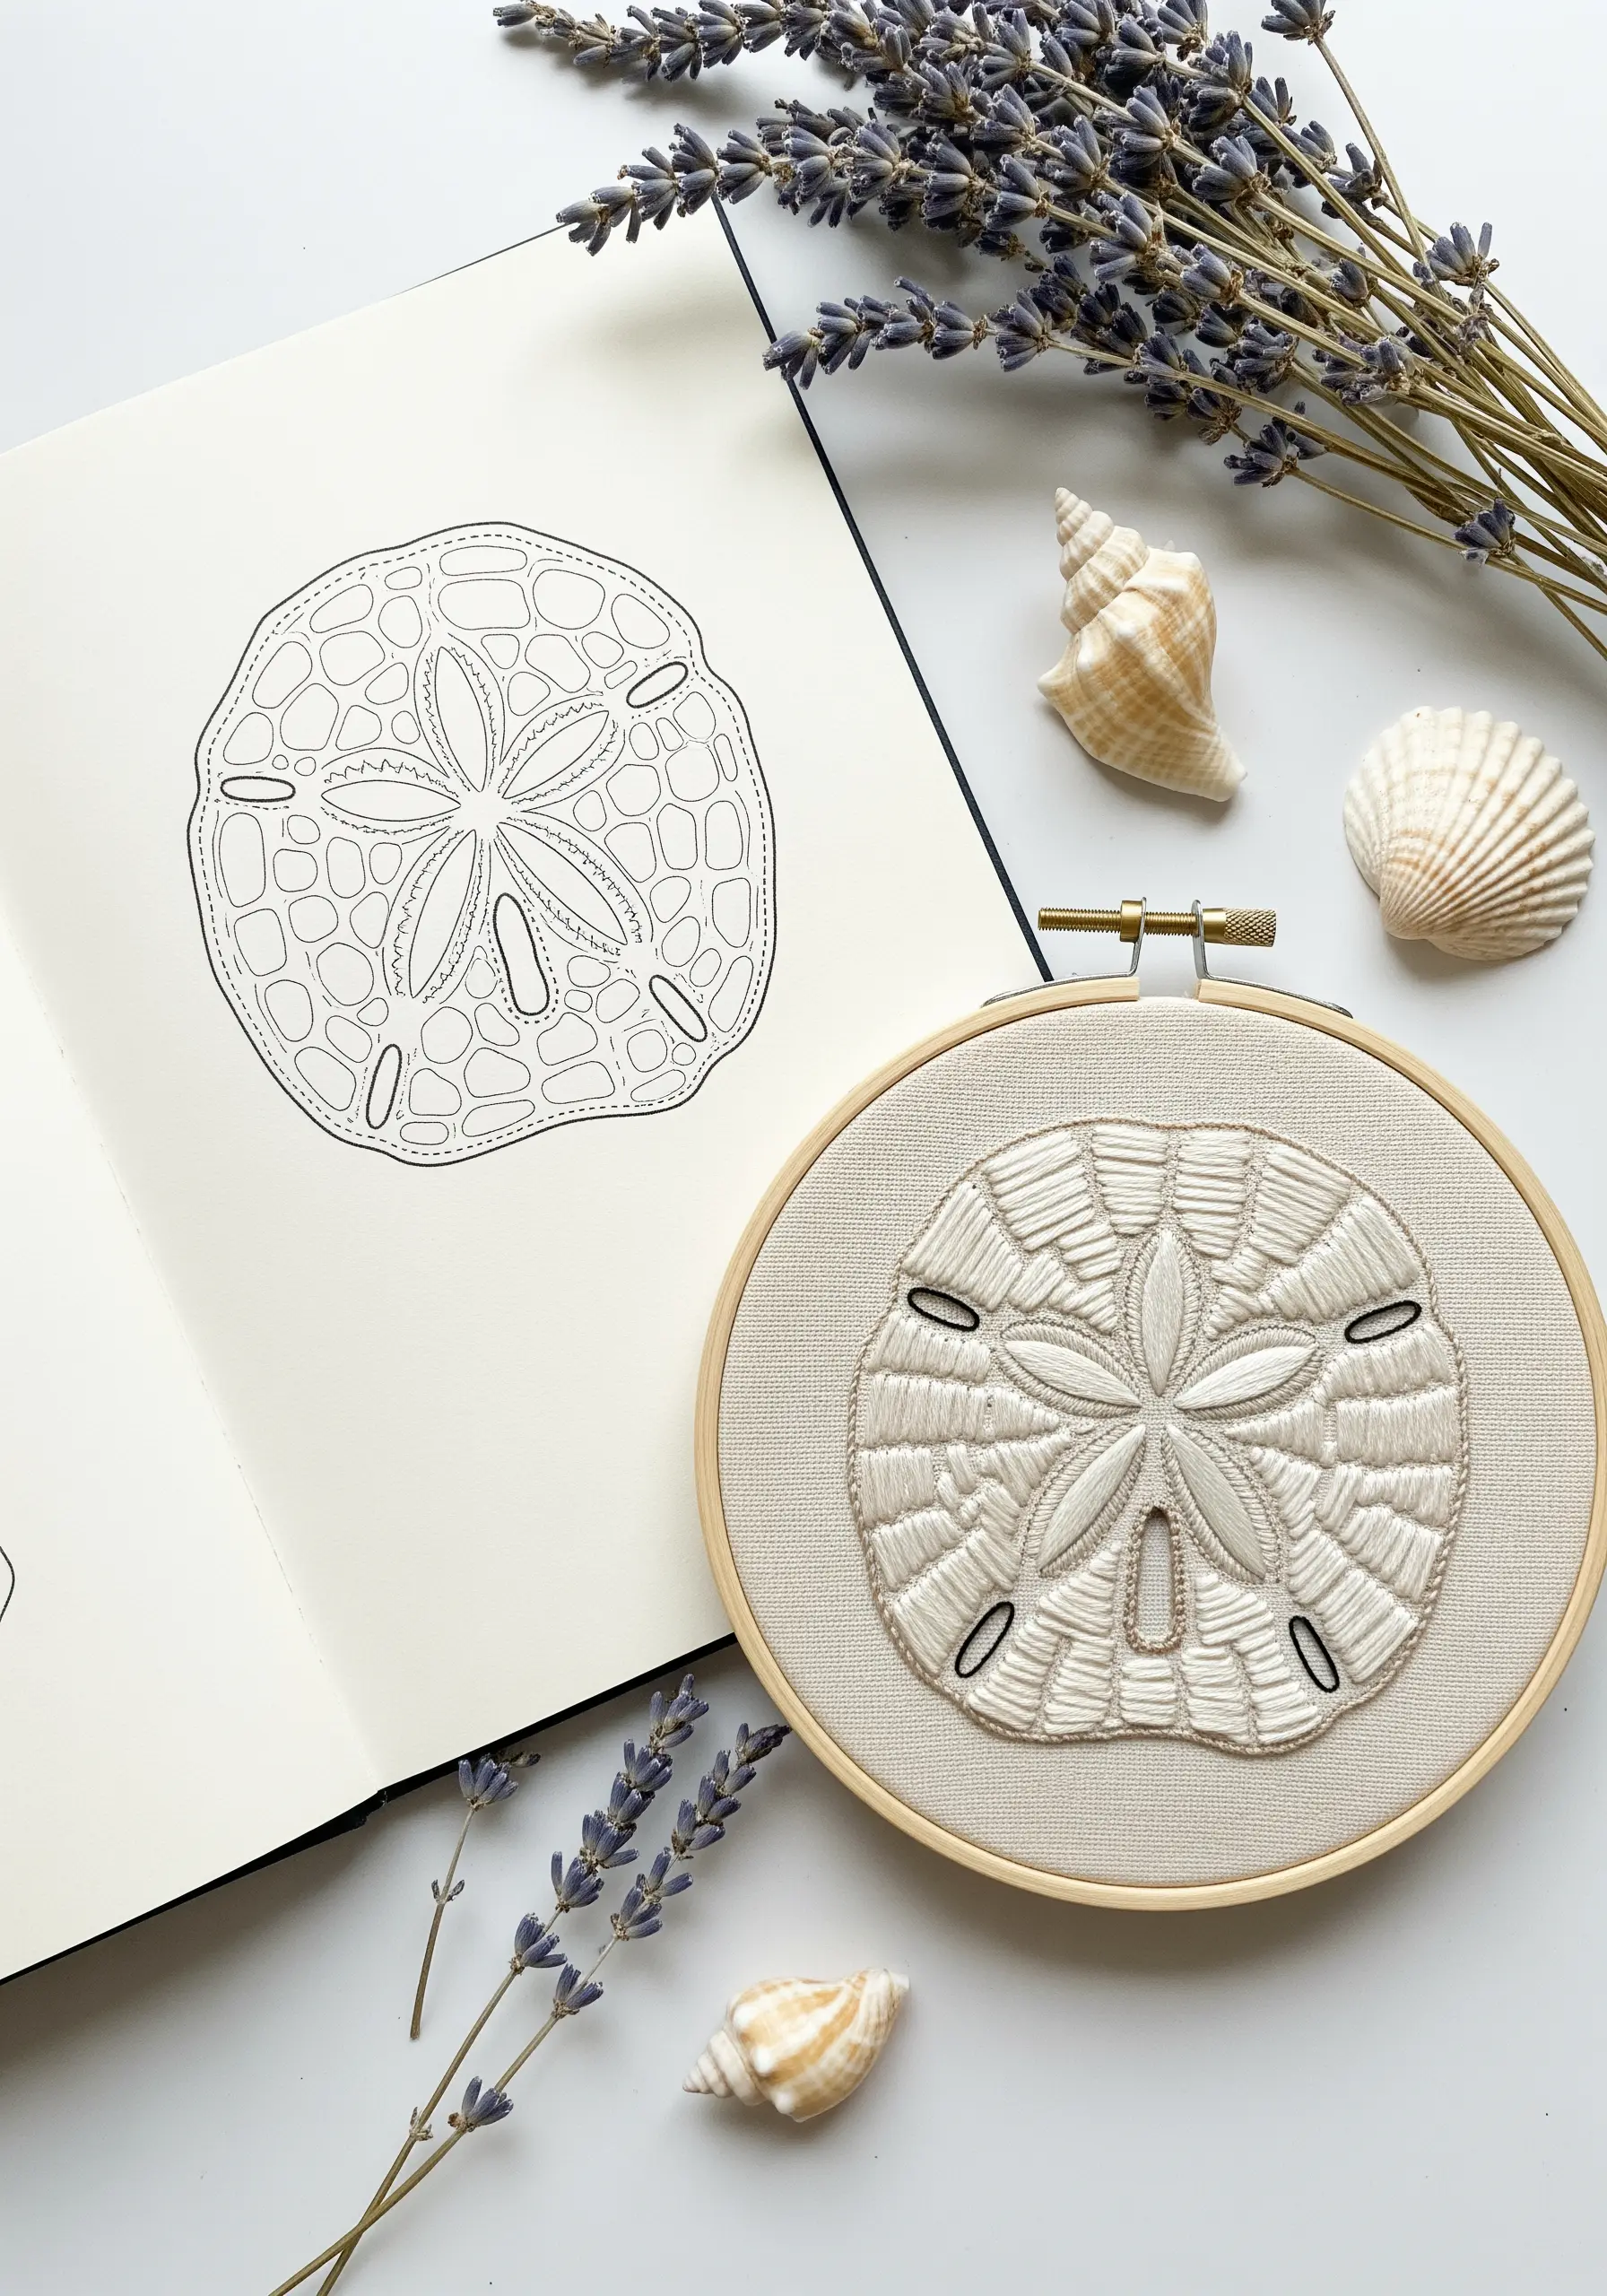
The clean, graphic quality of a sand dollar design relies on perfectly smooth satin stitches with crisp edges.
Before you begin filling any section, outline it with a precise split stitch. This creates a slightly raised, stable border for your satin stitches to rest against.
As you fill the shape, bring your needle up just outside the split stitch line and down on the inside. This technique completely hides your outline and results in a perfectly sharp, professional edge.
Use a contrasting color for the small openings to emphasize the negative space and add depth.
8. Build an Underwater World with a Mix of Textures

To create a vibrant, tactile coral reef, you must think like a sculptor and assign a different stitch to each texture.
Use the turkey work stitch (or loop stitch) for bushy corals, leaving the loops uncut for a soft texture or trimming them for a velvety finish.
Dense clusters of French knots in various colors are perfect for sea anemones, while the cast-on stitch can create raised, worm-like coral forms.
By layering these varied stitches, you can capture nature’s textures and build a scene with incredible depth and realism.
9. Mimic String Art Lines with Whipped Backstitch

To translate the clean, taut lines of string art into embroidery, a simple backstitch can sometimes look too broken.
Instead, use a whipped backstitch. First, create a standard backstitch line. Then, without piercing the fabric, slide your needle under each stitch with a contrasting or matching thread.
This wraps the initial line, creating a smooth, uninterrupted curve that looks like a single, solid piece of cord. It’s perfect for the sails and hull of a graphic sailboat design.
10. Add Substance with Heavier Perle Cotton
For designs featuring ropes and knots, standard six-strand floss can sometimes lack the necessary weight and presence.
Switch to a heavier thread like a #5 or #8 perle cotton. Its single, twisted ply has a beautiful sheen and natural roundness that perfectly mimics the look of nautical rope.
Use it for bold chain stitches or stem stitches to create knots and outlines that have a satisfying, tactile quality and stand out against the fabric.
11. Master Smooth Curves with Directional Stitching

The key to a perfect nautilus shell is ensuring your long-and-short stitches follow the curve of each chamber, creating a seamless spiral.
Lightly draw guide lines within each section to indicate the direction your stitches should travel. This prevents them from looking flat or disjointed.
Work with just one or two strands of floss to allow for subtle blending between shades of brown, gold, and white.
This careful, directional approach is what transforms a simple shape into a dynamic, three-dimensional object, making it a perfect centerpiece for a coastal-themed pillow.
12. Create Flowing Currents with Layered Stitches
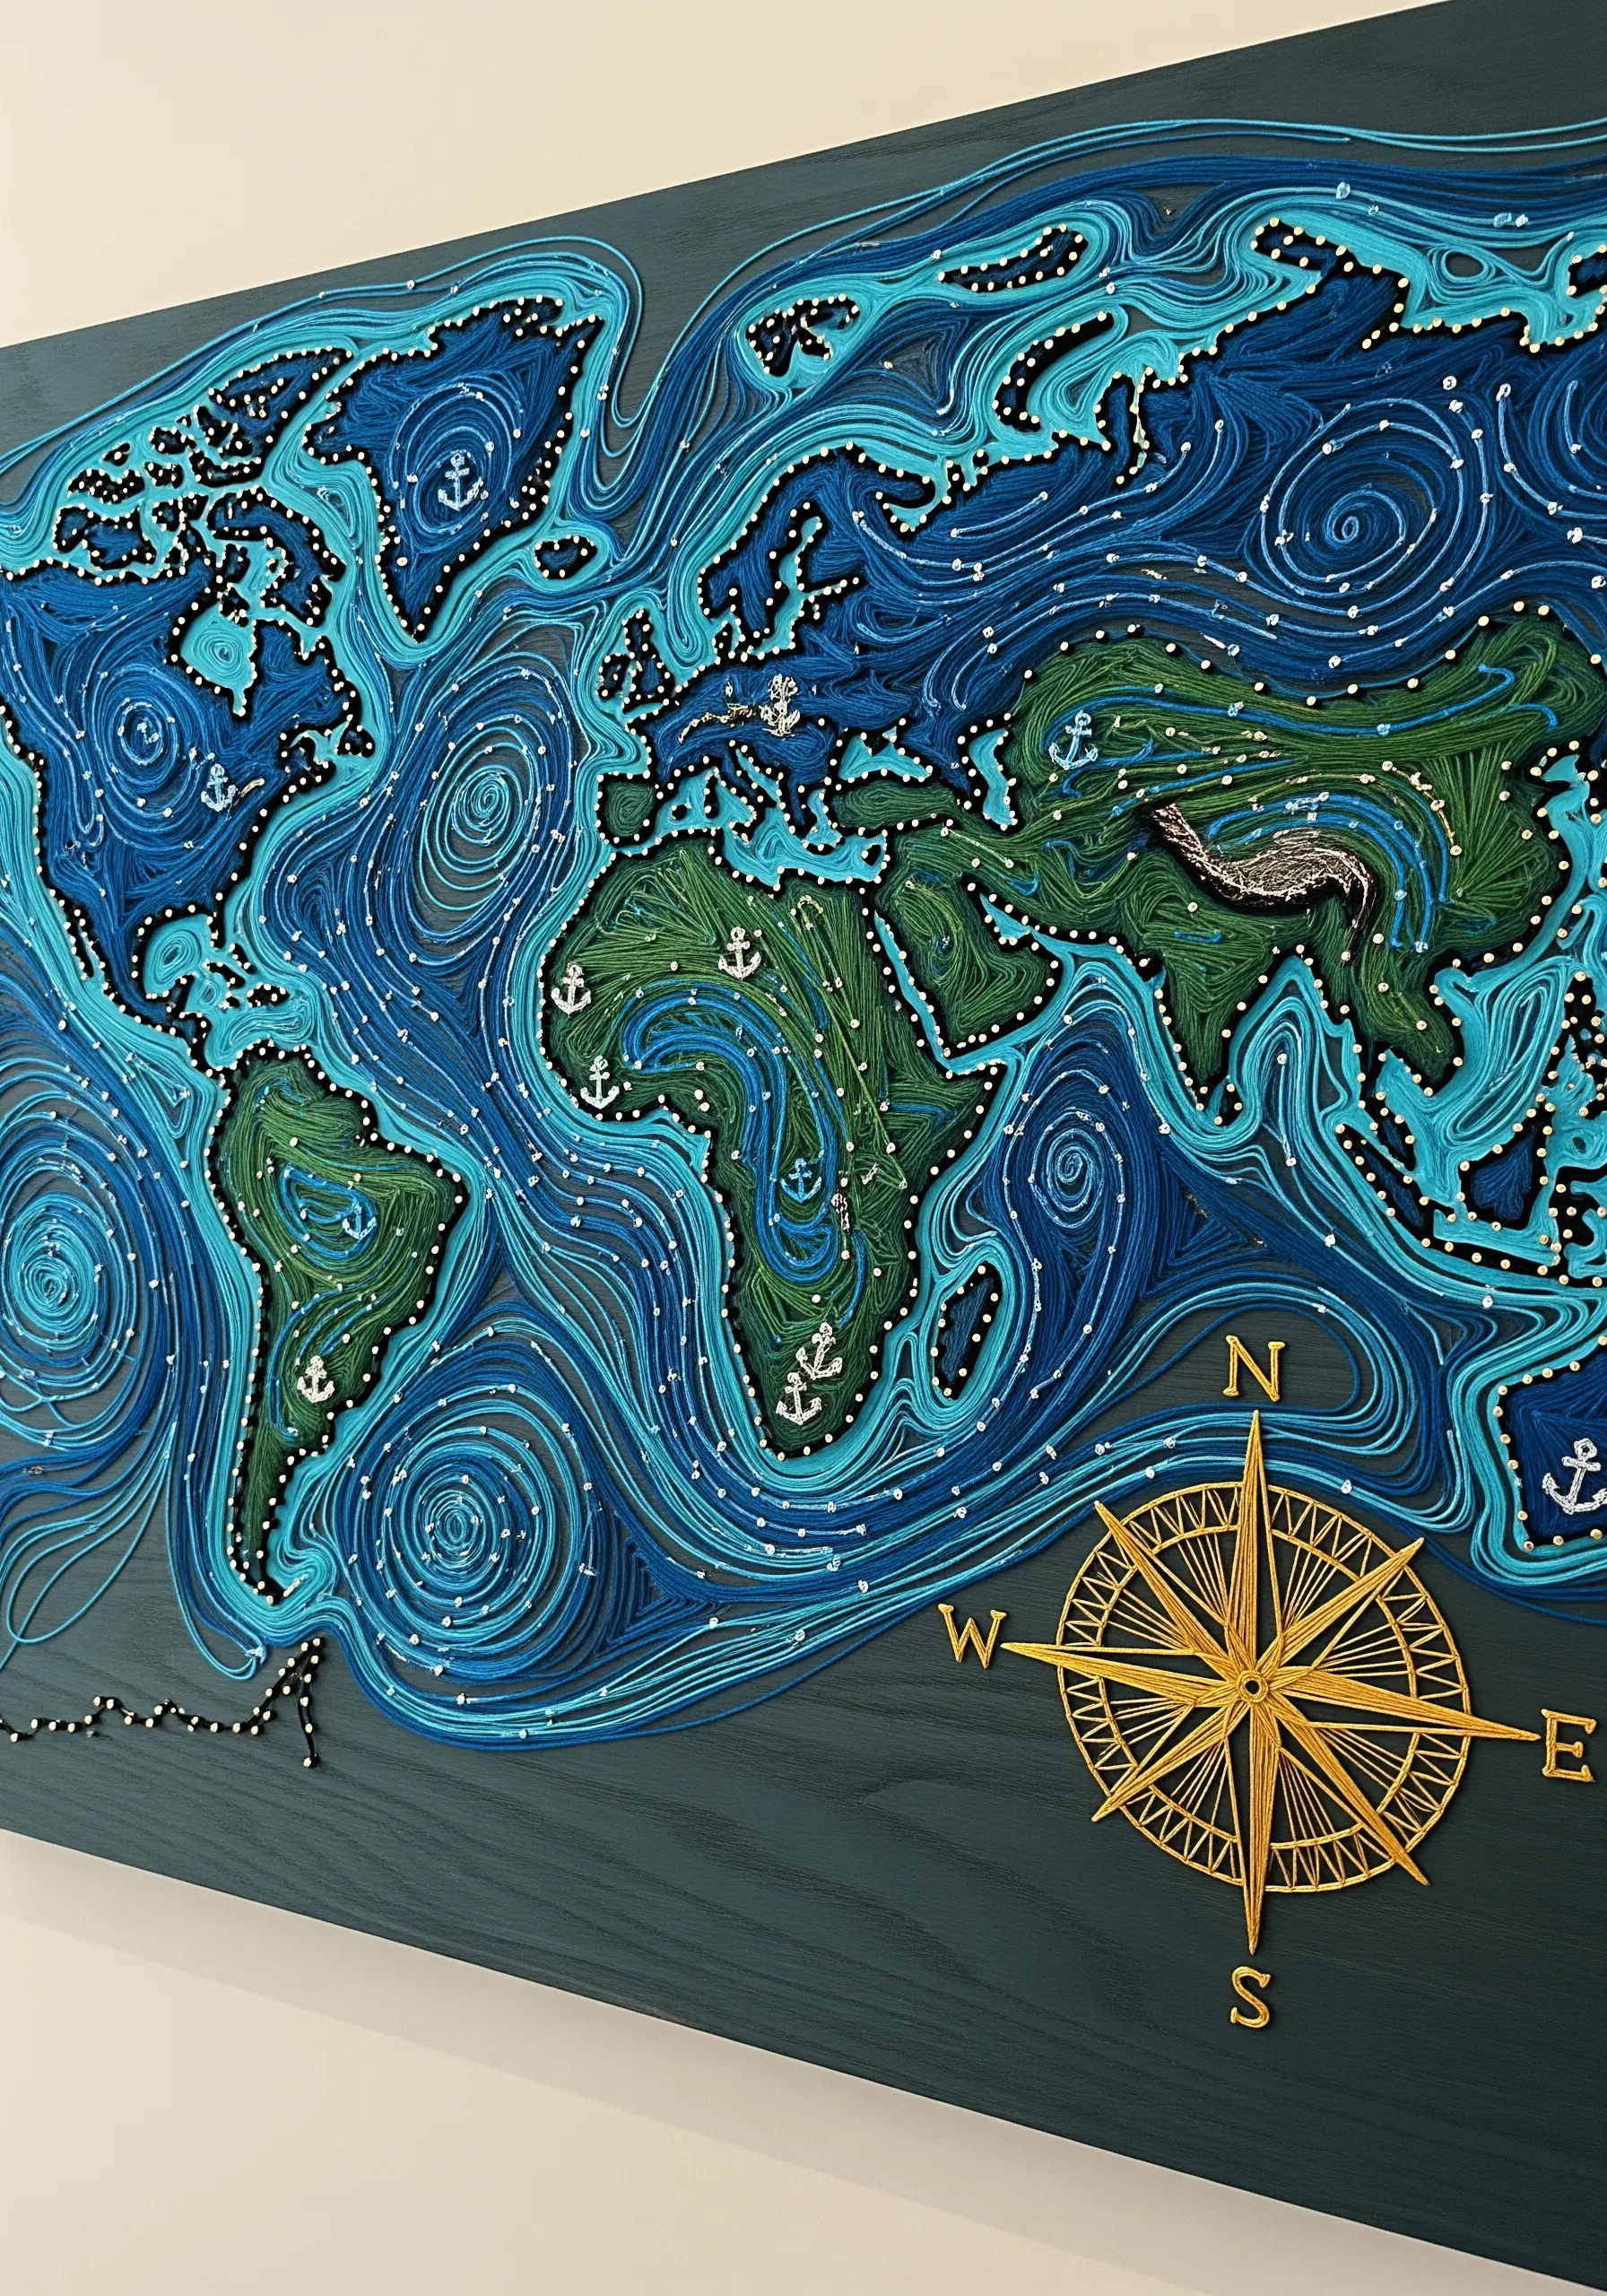
To capture the chaotic yet organized feel of ocean currents on a map, use layered, free-form stitches.
Start by filling the ocean areas with a base of long straight stitches in a medium blue. Then, layer more stitches on top in lighter and darker shades, stitching in swirling, organic patterns.
Use a single strand of thread for these top layers to keep them from looking bulky. This layering technique creates a sense of movement and depth that a single flat stitch couldn’t achieve.
Add tiny French knots or seed stitches in white to represent seafoam or points of interest.
13. Achieve Punch-Needle Texture with Loop Stitches
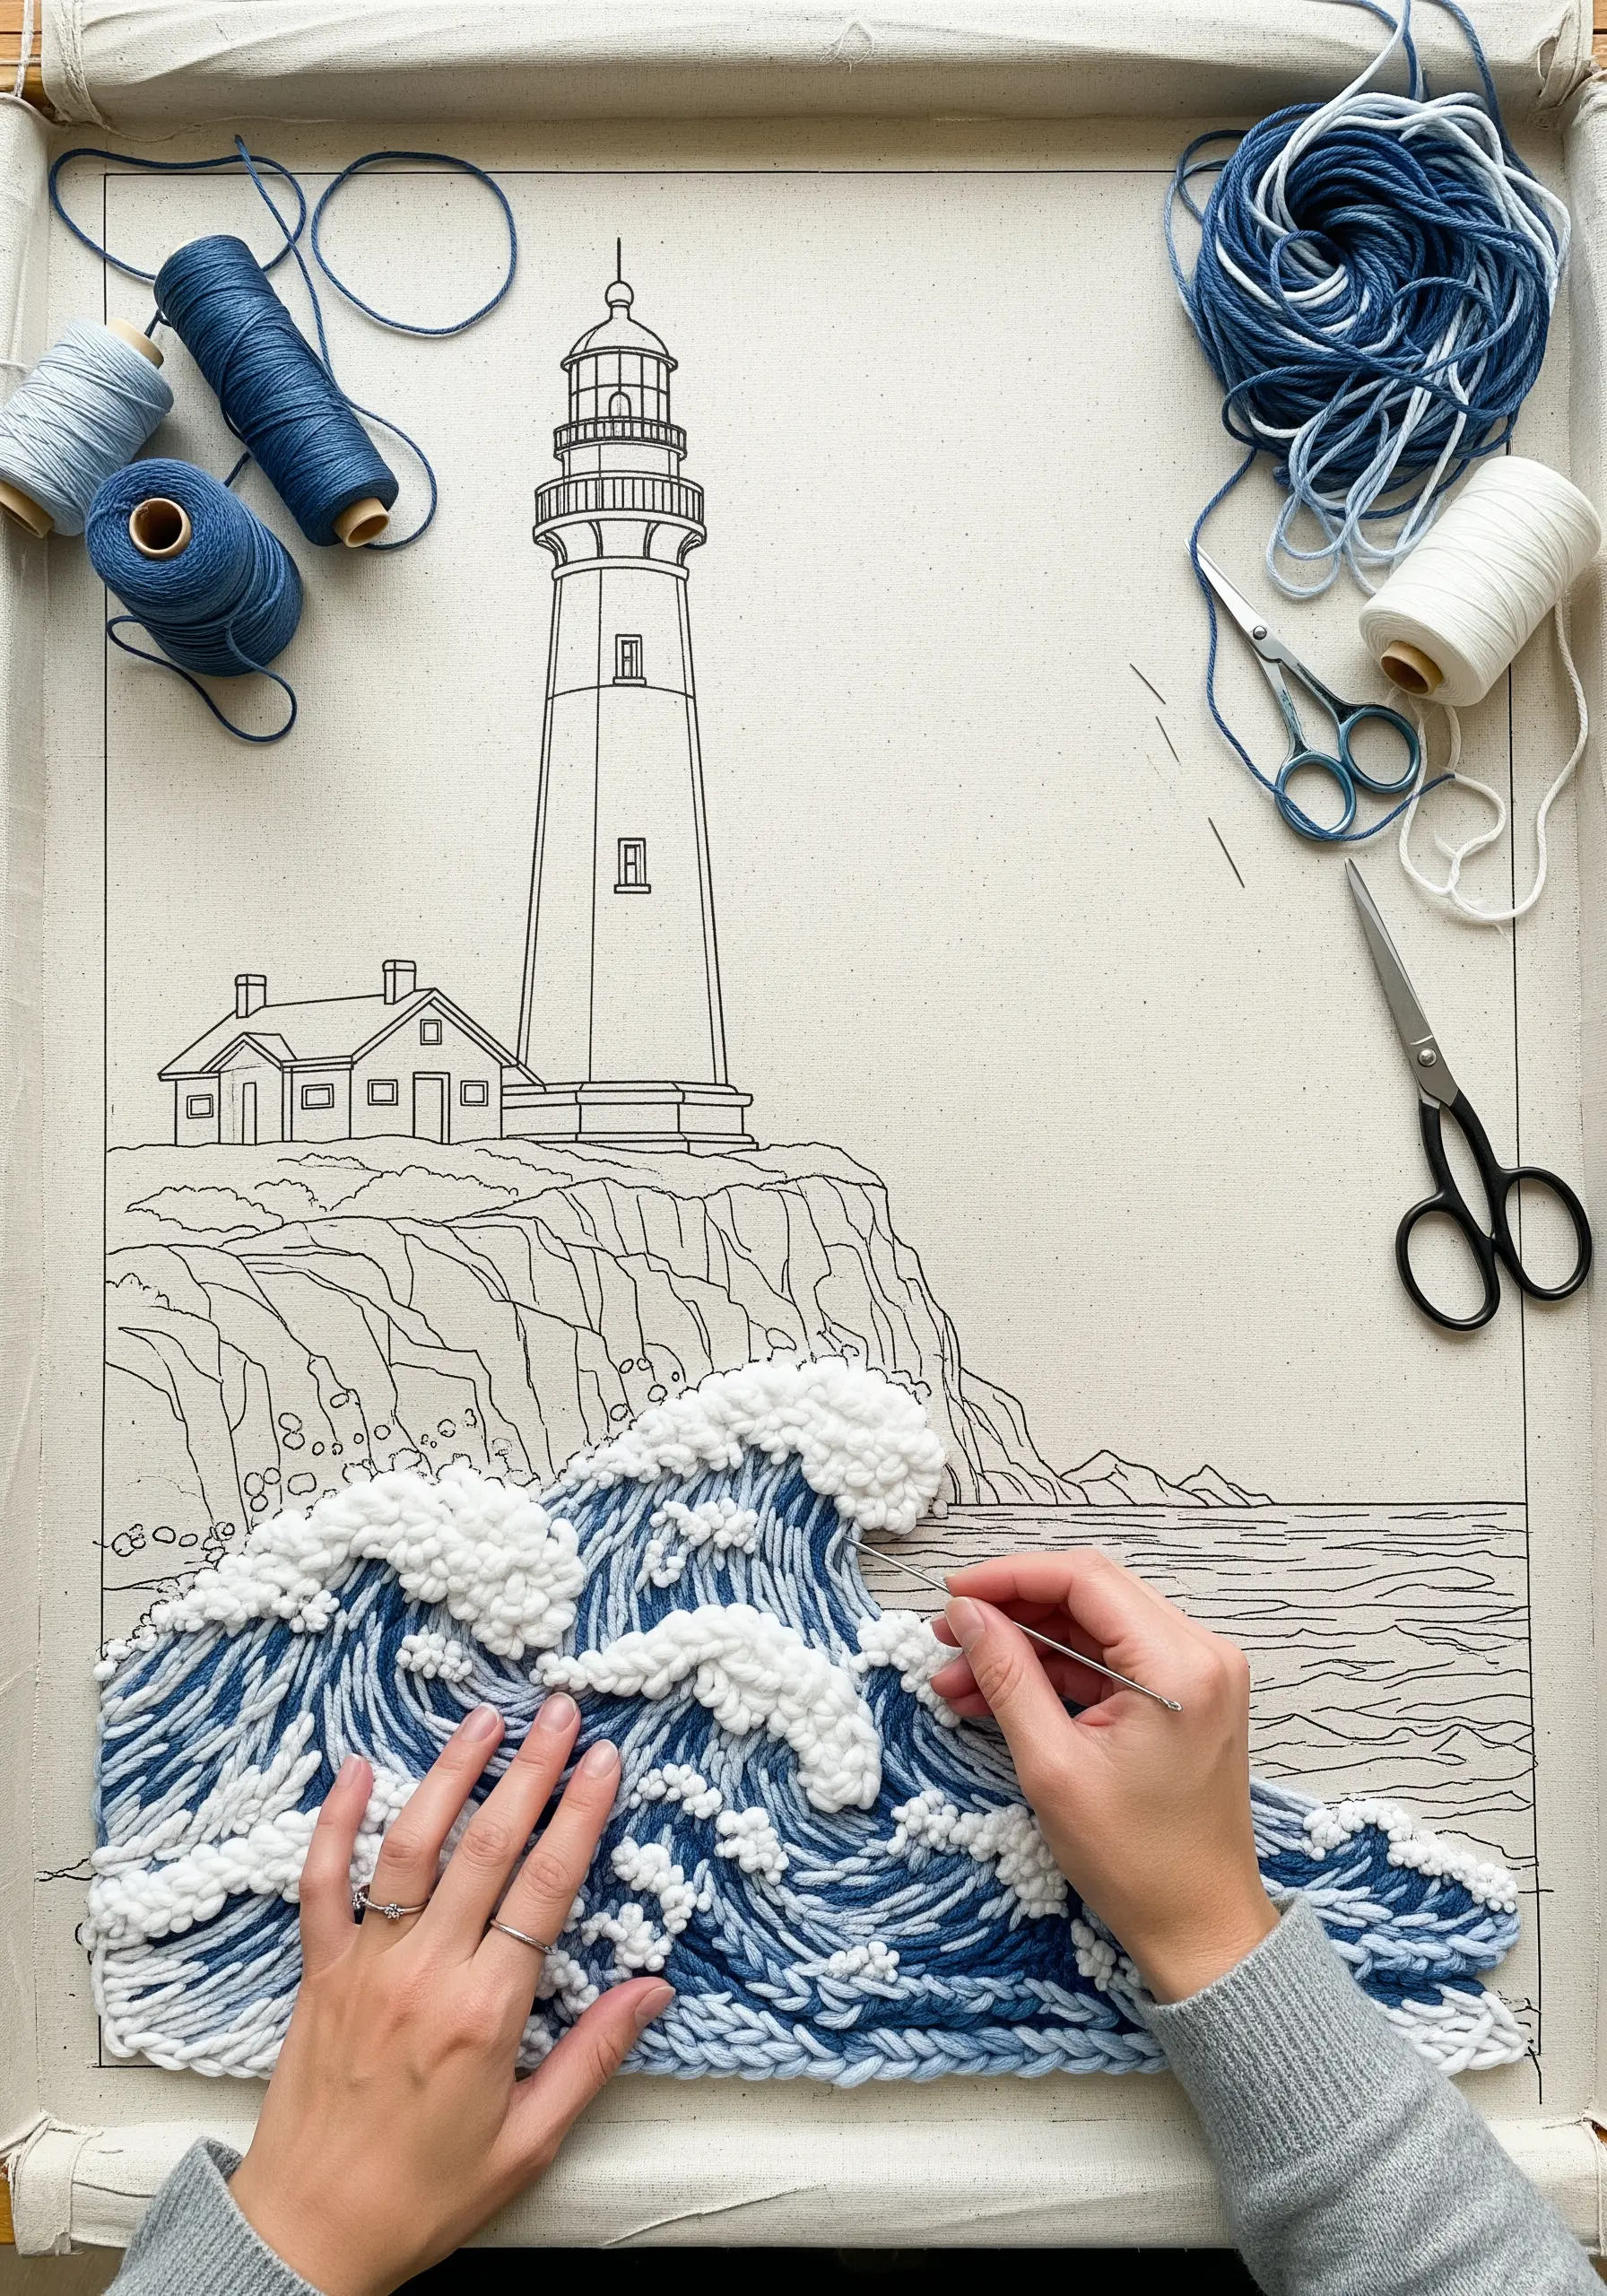
If you love the dense, high-pile look of punch needle but only have an embroidery needle, the loop stitch is your solution.
Working similarly to turkey work, this stitch creates sturdy, uncut loops on the surface of your fabric. Pack your loop stitches tightly together to build up the dense, textured foam of crashing waves.
Use a thick thread like tapestry wool or multiple strands of floss to create fuller, more substantial loops. This is an excellent way to add dramatic, touchable texture to your work.
14. Capture Bioluminescence with Specialty Threads

To bring deep-sea creatures to life, you need to think about light. Stitch on a dark navy or black fabric to create a deep ocean canvas.
Use glow-in-the-dark, fluorescent, or metallic threads for the jellyfish and anglerfish. These specialty threads will catch the light and create an otherworldly, glowing effect.
For the delicate tentacles, use a very fine thread and a simple backstitch or stem stitch. A few scattered French knots in iridescent thread can represent air bubbles or glowing plankton.
15. Add Personal Detail with Fabric Appliqué

A message in a bottle design offers a unique opportunity for personalization.
Instead of stitching the note, cut a tiny rectangle of contrasting fabric (like cream-colored linen) and appliqué it inside your stitched bottle outline.
Use a single strand of floss and a fine-point permanent pen to write a name, date, or a word like ‘Hope’ before you stitch it down.
This mixed-media approach adds a charming, realistic detail that makes the piece deeply personal.
16. Give Line Art Presence with Couching Stitch
A simple line art anchor needs a bold, confident line to make a statement.
Instead of a standard outline stitch, use a thick navy blue yarn or perle cotton and couch it onto your fabric. This technique involves laying the thick thread on the surface and tacking it down with a thinner, matching floss.
Couching creates a perfectly smooth, raised line with the texture of real rope, giving your minimalist design a powerful, graphic quality that a simple stitch cannot match.
17. Add Character to Felt with Minimal Stitches

When creating felt nursery decorations, you don’t need complex embroidery to make them charming.
A few well-placed, simple stitches are all it takes to bring these soft shapes to life. Use contrasting thread for visibility.
A simple backstitch can create a smile, French knots make perfect eyes, and radiating straight stitches add the classic pattern to a starfish.
This demonstrates that even the most cute and tiny embroidery ideas can have a huge impact on a finished piece.
18. Choose Durable Stitches for Functional Art

For embroidered items that will be handled regularly, like coasters, stitch choice and fabric are critical for longevity.
Opt for flat, dense stitches like satin stitch or fishbone stitch. These are less likely to snag than looped stitches like French knots or chain stitch.
Work on a sturdy, tightly woven fabric like a cotton-linen blend or canvas. This will provide a stable ground for your stitches and withstand washing and use.
A clean satin stitch border around the edge of the coaster also adds a professional, durable finish.
19. Define Geometric Shapes with Contrasting Outlines

To translate the geometric string art of a turtle’s shell into embroidery, the key is defining each segment clearly.
Outline each hexagonal shape with a dark, contrasting backstitch or stem stitch first. This creates the ‘scaffolding’ for your design.
Then, fill each segment with satin stitches. To create a faceted, light-catching effect, vary the direction of your satin stitches from one segment to the next—some vertical, some horizontal, some diagonal.
This technique gives the shell a structured, almost crystalline appearance.
20. Simplify Complex Scenes into Color Blocks
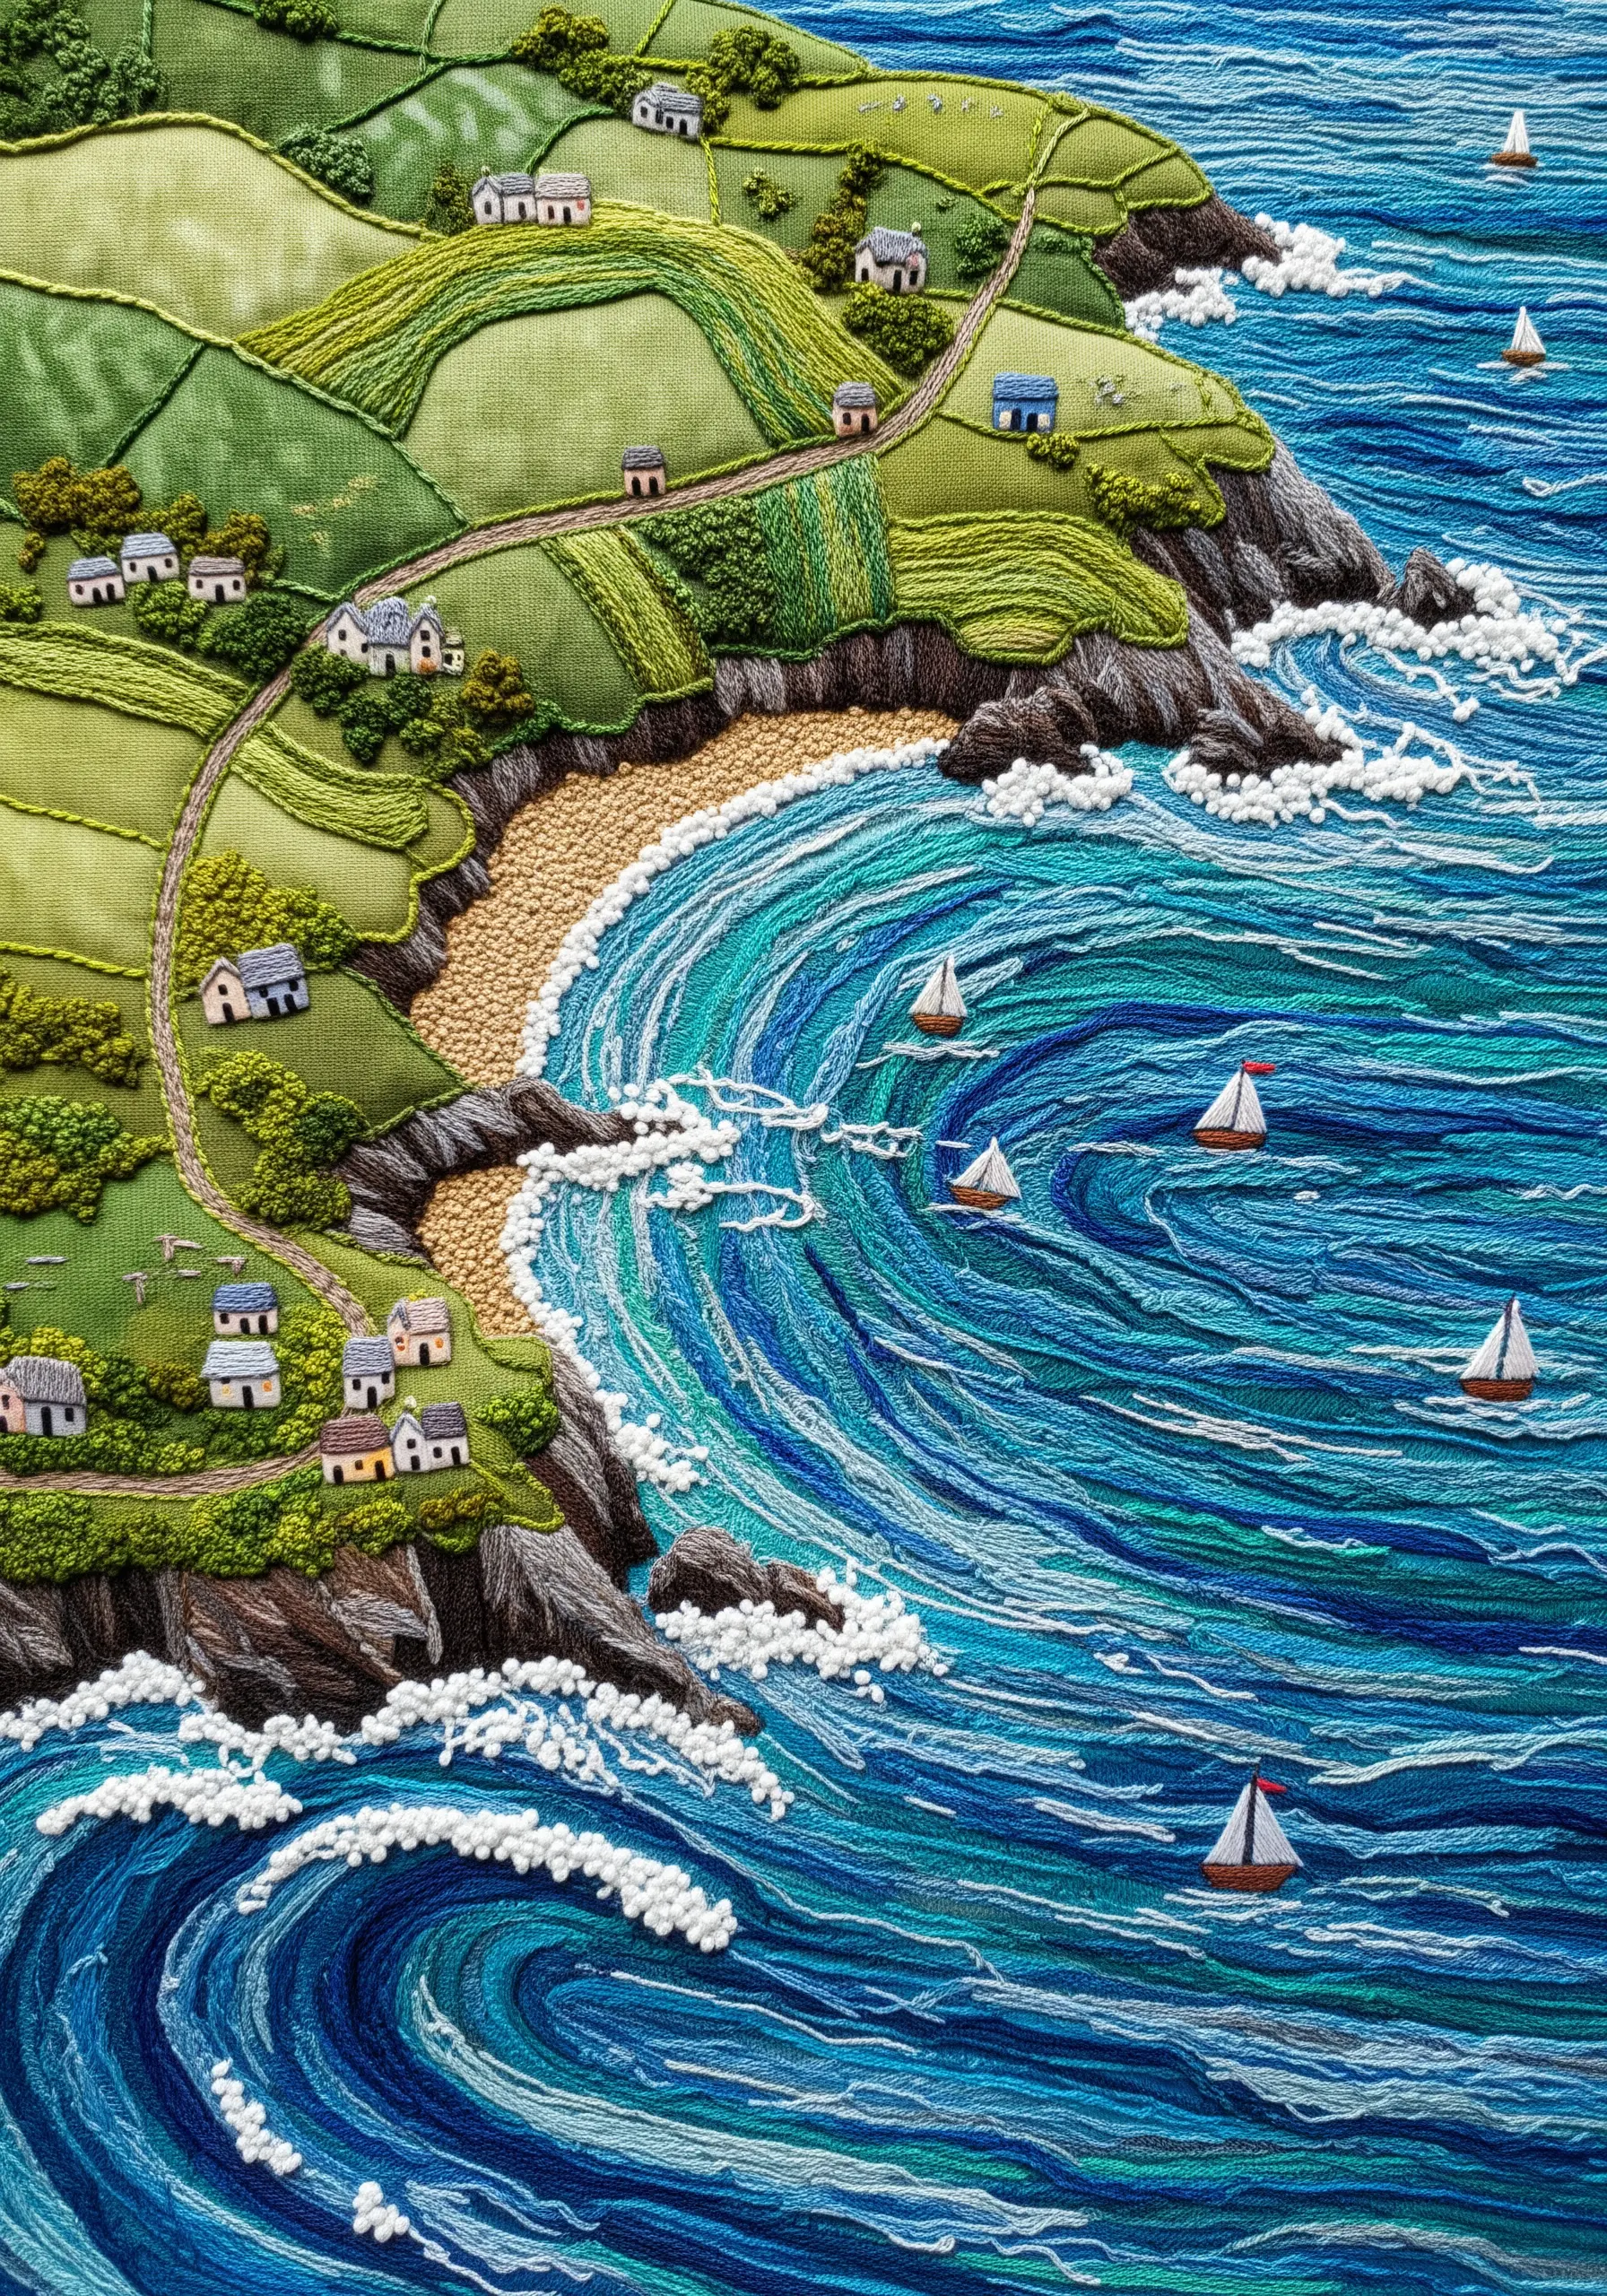
A sweeping coastal landscape can feel intimidating, but you can make it manageable by breaking it into distinct color blocks.
Think in shapes: the green hills, the sandy beach, the turquoise shallows, the deep blue sea. Fill each shape with directional long-and-short stitches.
Don’t worry about perfect blending at first; focus on capturing the main color areas. The texture and direction of your stitches will imply detail.
You can add fine details like houses and sails with simple straight stitches at the very end.
21. Use Padded Satin Stitch for Raised Insignia

To give an embroidered emblem on a hat or jacket a professional, three-dimensional look, use padded satin stitch.
First, fill the shape of the anchor with a base layer of small, underlying stitches (like seed stitches or straight stitches). Keep these stitches within the outline.
Then, work your final layer of satin stitches over this padding, extending them just past the padding to cover it completely.
This technique physically raises the embroidery from the fabric surface, creating a crisp, embossed effect that looks incredibly polished, especially when using a metallic gold thread.
22. Stitch a Gradient Sky with Color Blocking

The secret to a vibrant, non-muddy embroidered sunset is to work in distinct horizontal bands of color.
Instead of trying to blend every stitch, fill a band with one color of satin stitch, then start the next band of color directly below it. Let the tension of the stitches pull them together.
For the sun’s reflection on the water, use short, horizontal satin stitches—often called ‘gobelin stitch’—in the same colors you used in the sky. This creates a shimmering, pixelated effect that perfectly mimics light on water.
23. Create a Flawless Foundation with a Paper Template

Whether you’re making string art or a complex embroidery piece, a precise template is the most crucial first step.
Draw or print your design on paper and temporarily affix it to your surface—be it wood or fabric. For string art, you’ll hammer nails along the lines; for embroidery, you’ll transfer the design.
To transfer onto fabric, place your fabric over the template and trace it against a light source, or use carbon paper. A clear, accurate guide ensures your final stitches are perfectly placed.
24. Unify a Gallery Wall with a Cohesive Theme
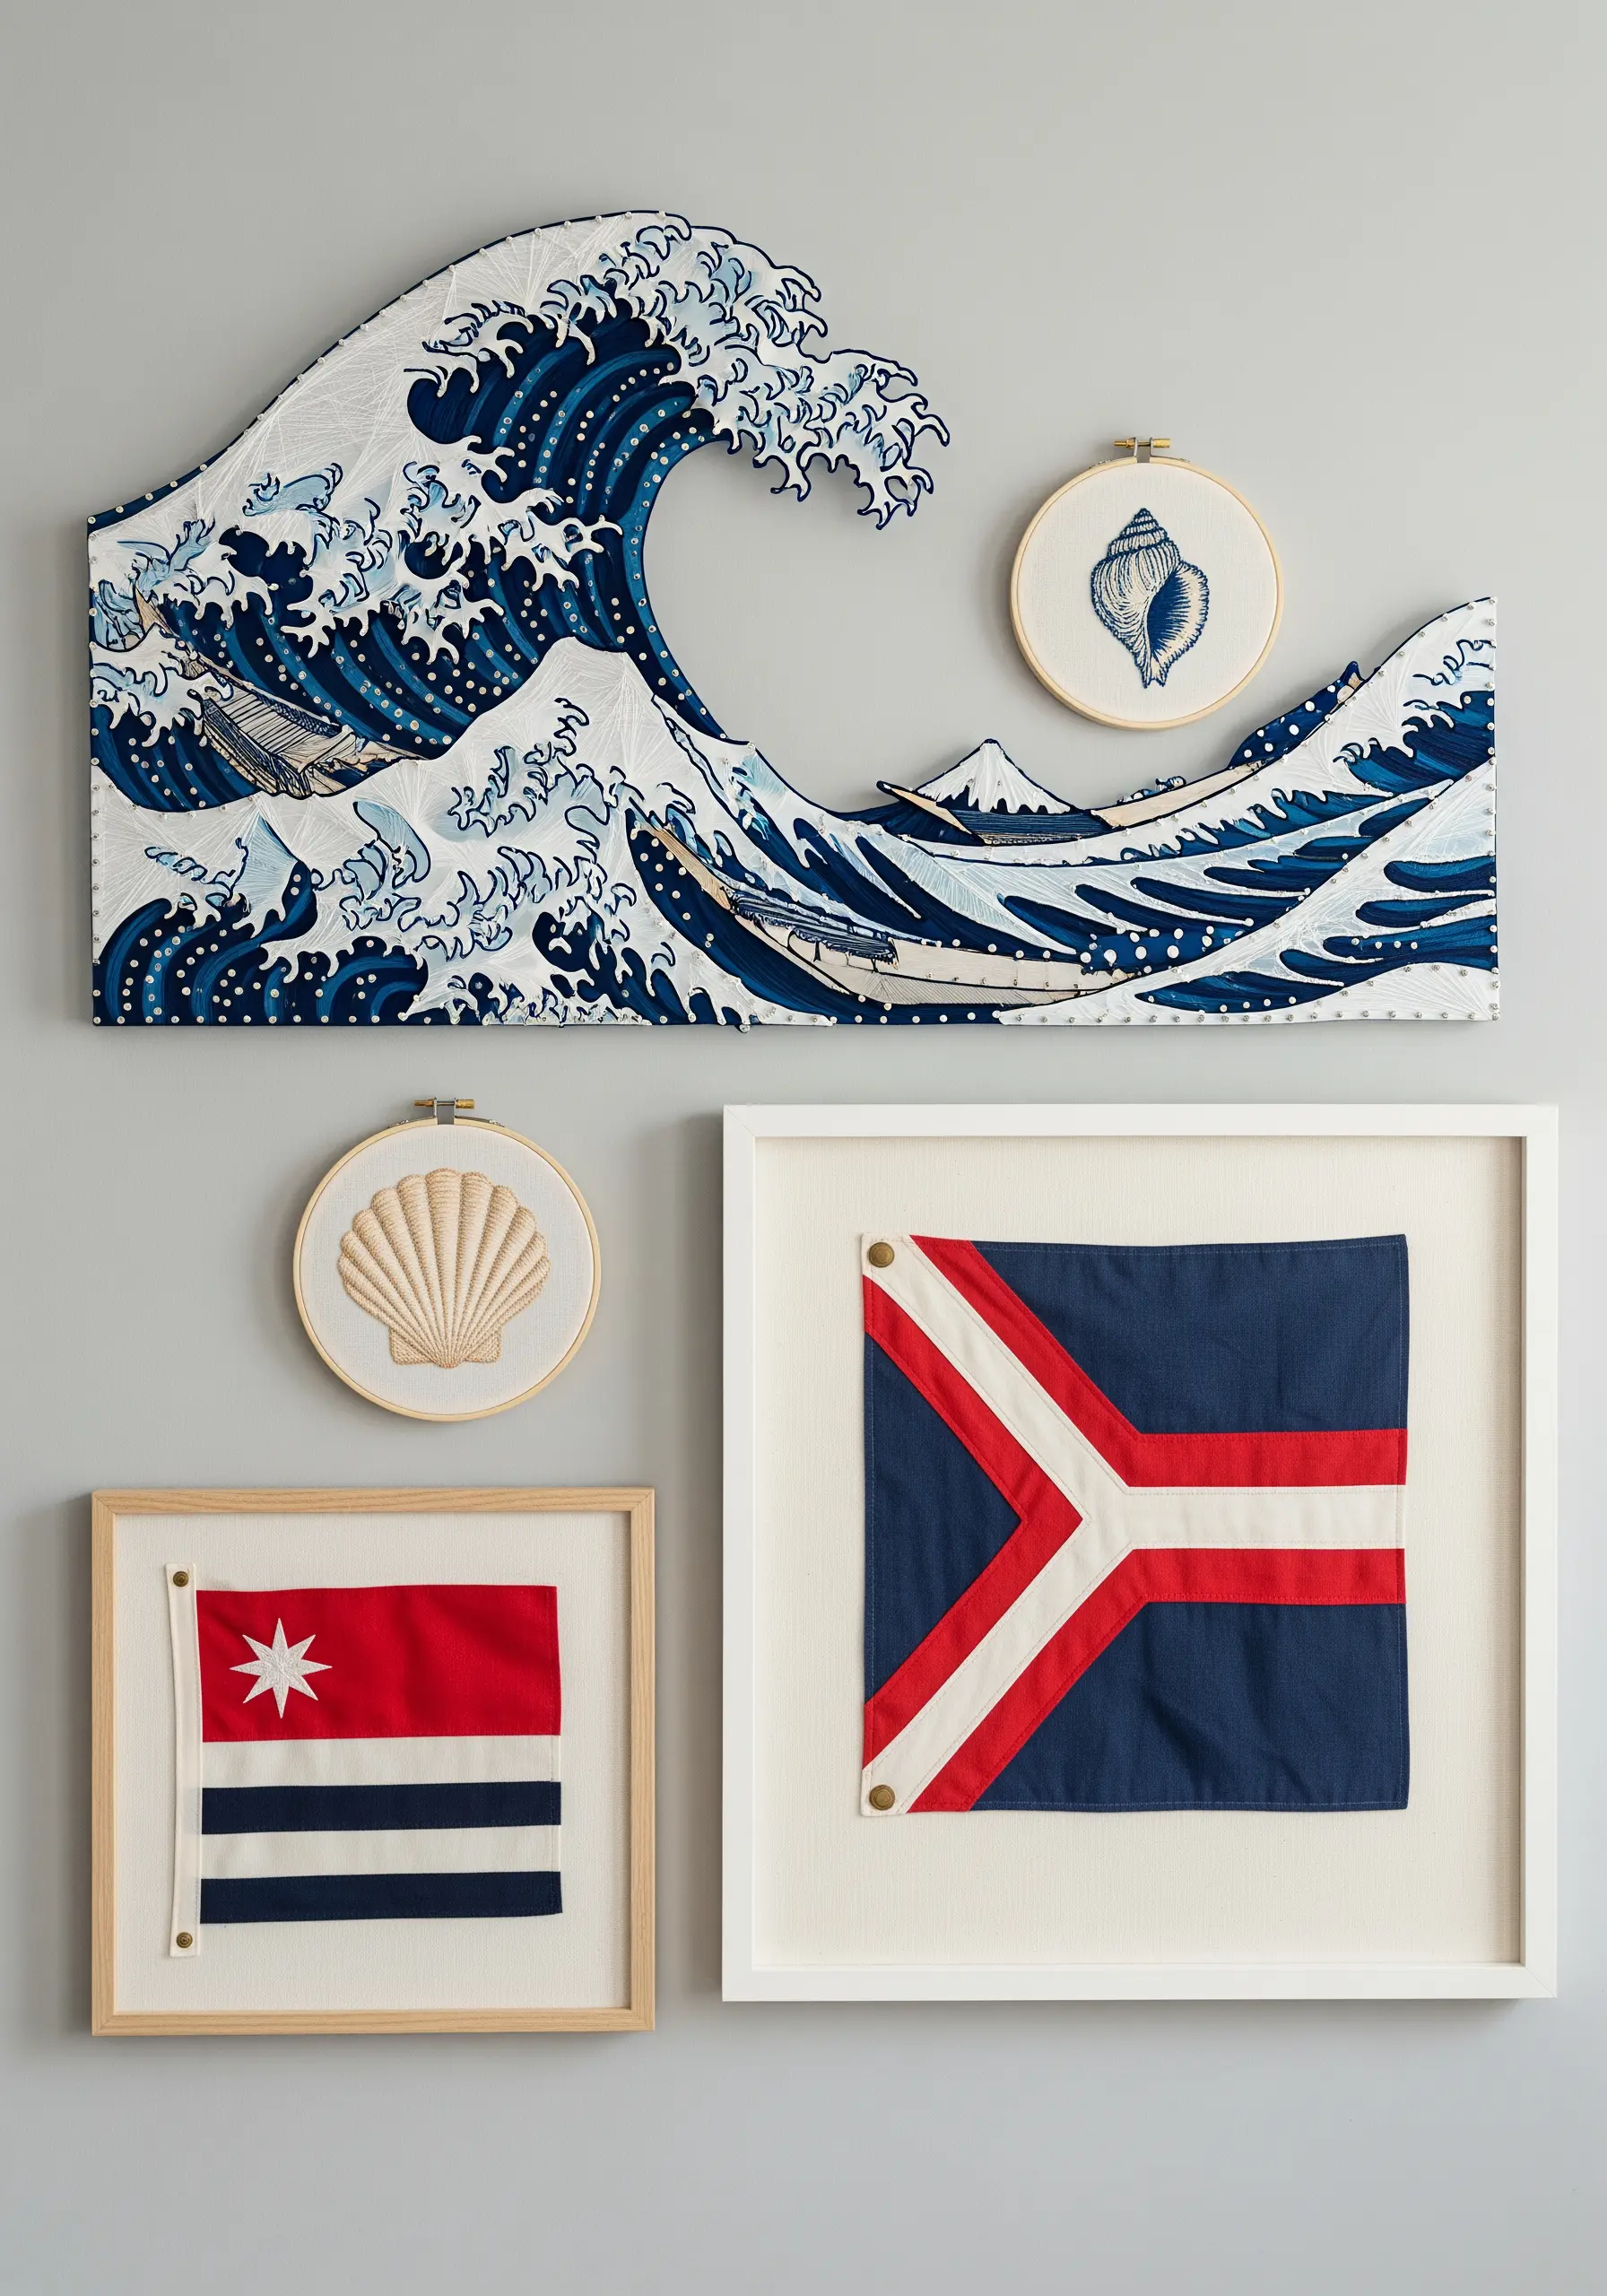
Creating a sophisticated gallery wall is less about matching and more about creating a conversation between the pieces.
Combine different mediums—like a shaped fabric appliqué, round wall hoop art ideas, and framed textiles—to add visual interest.
The key to making the collection feel cohesive is a unified theme and color story. Here, the nautical motifs and a strict palette of navy, white, and red tie everything together, even with varying shapes and textures.
25. Sculpt with Thread Using Padded Stitches
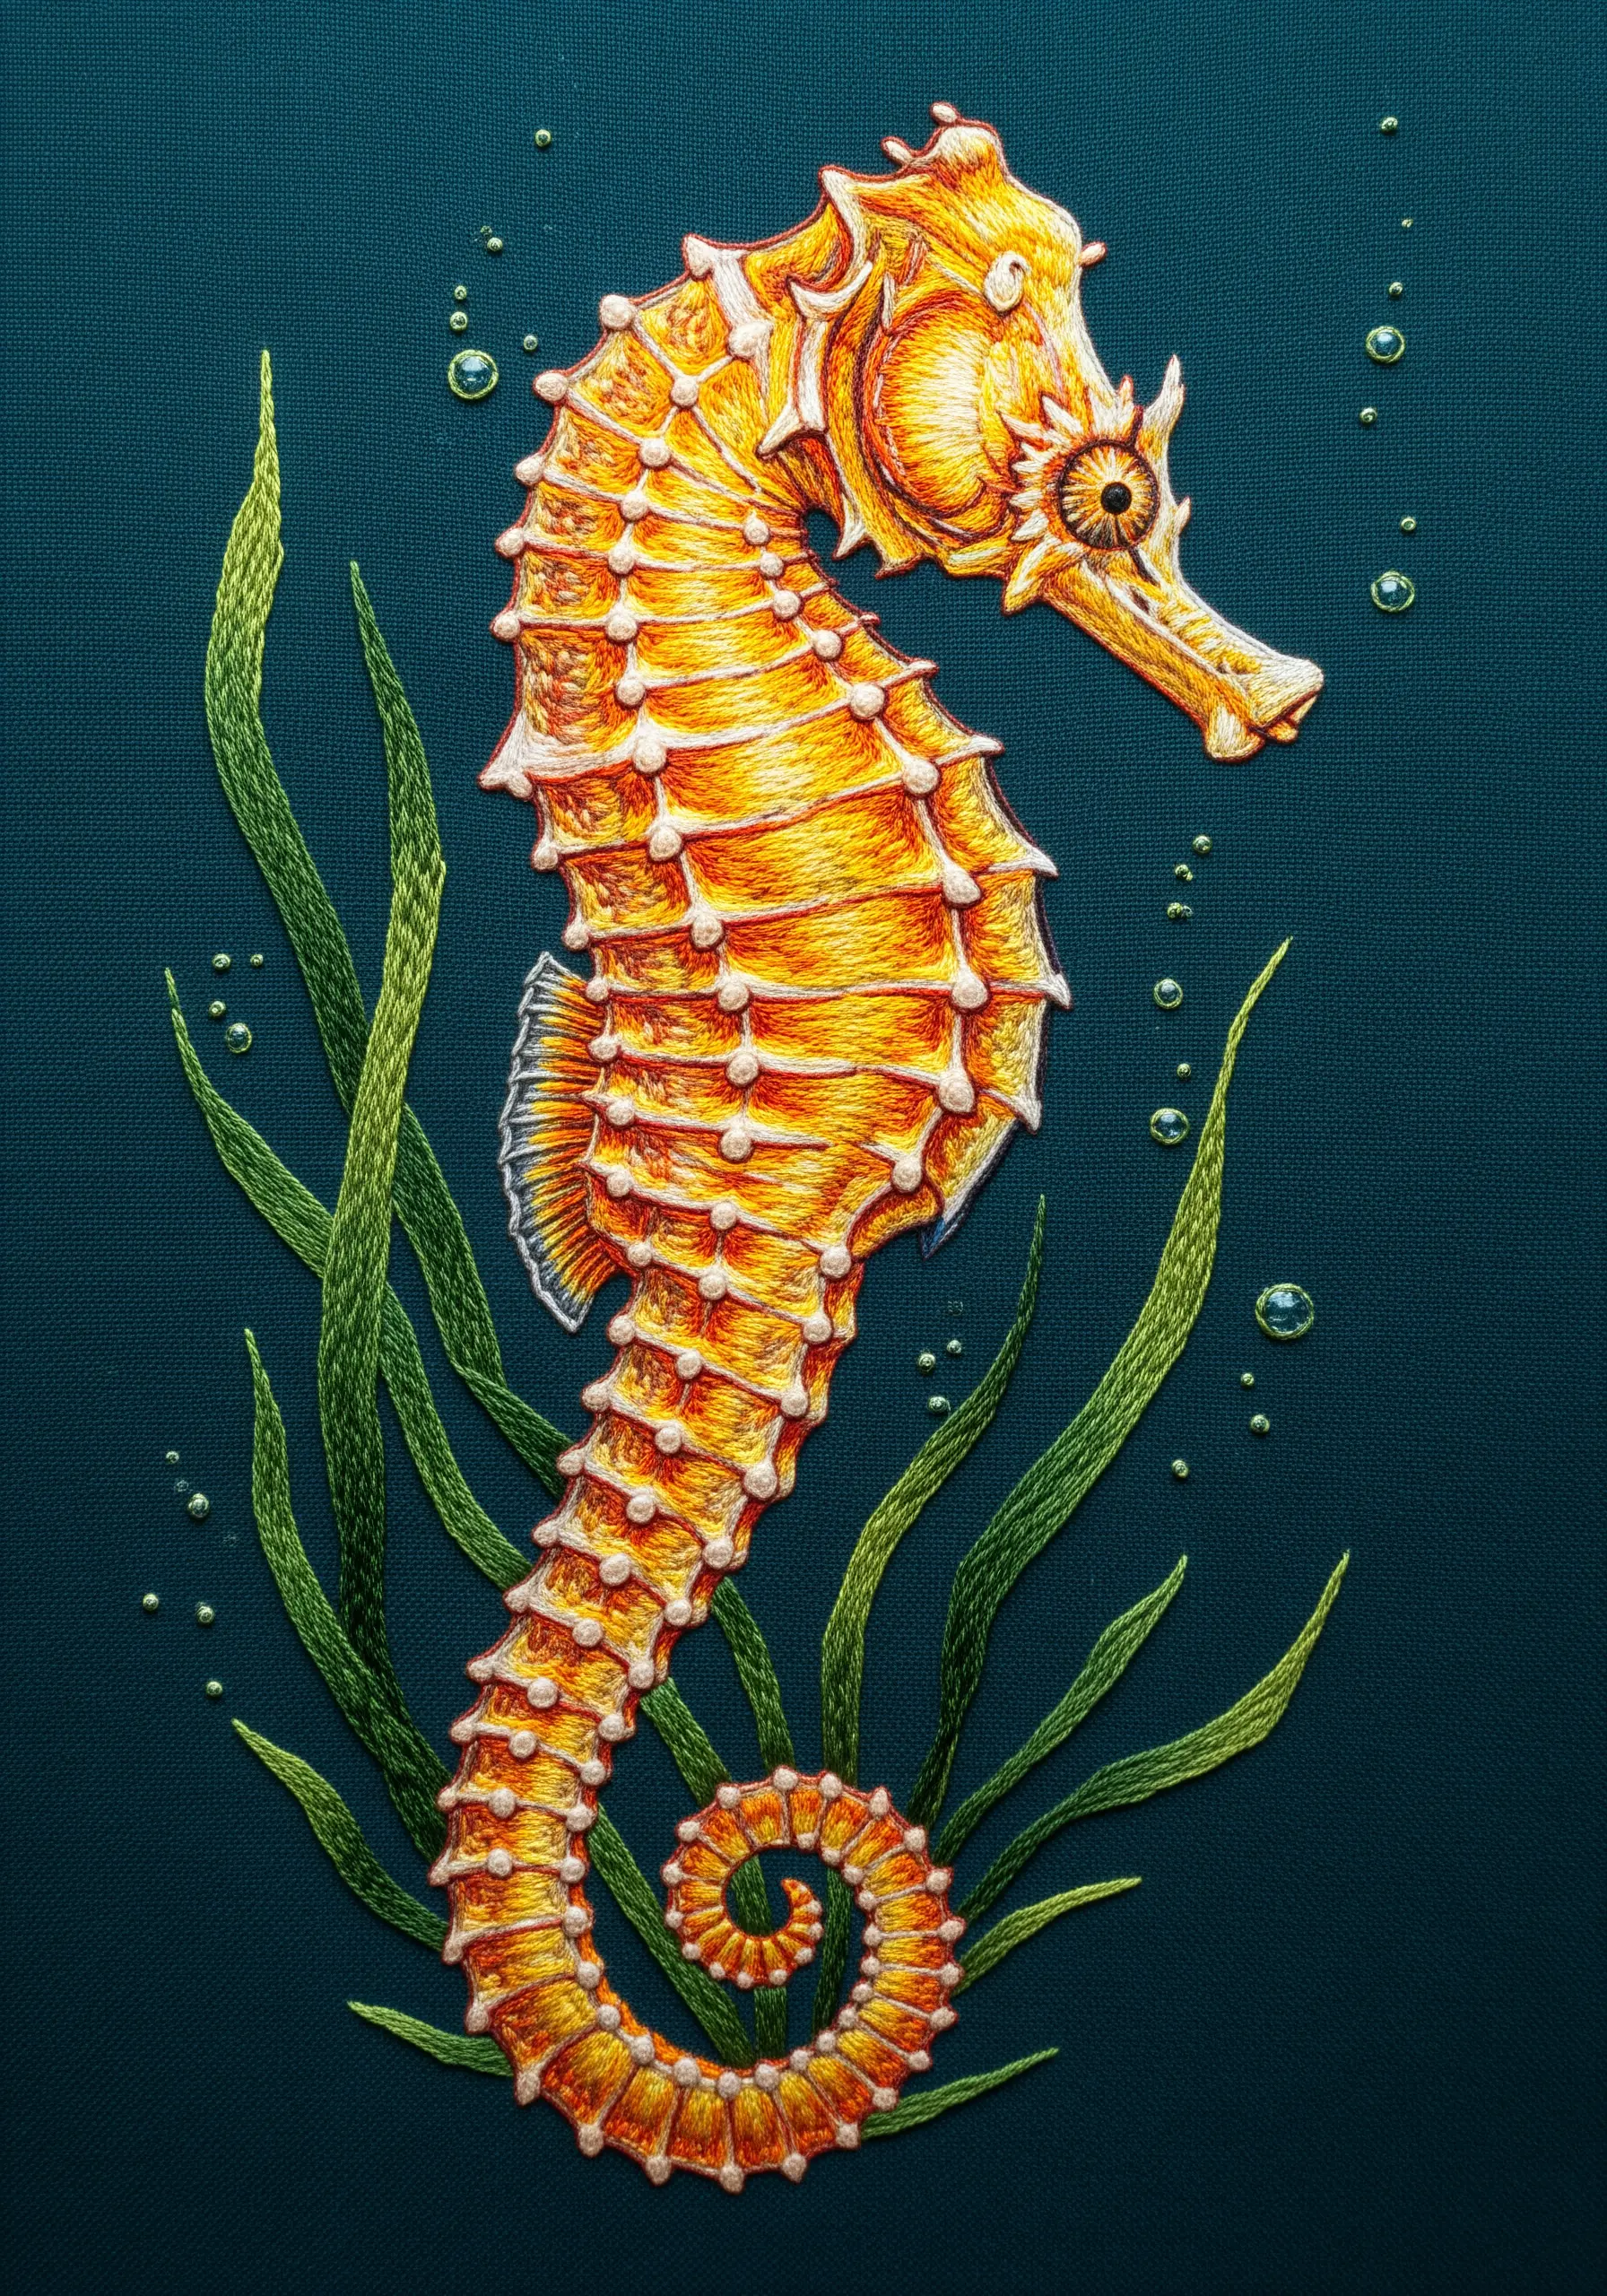
For a hyper-realistic, three-dimensional seahorse, you need to build up layers of thread to create physical depth.
Before stitching the final color, add layers of padding stitches (small straight stitches) in the areas you want to be most raised, like the bony plates along the seahorse’s back.
Then, cover this padding with your final long-and-short stitches. The underlying bulk will push the top layer forward, creating realistic contours.
Use a single strand of floss for the top layer to achieve the finest possible shading and detail.
26. Combine Soft Embroidery with Hard Surfaces
Elevate a simple wooden object, like a jewelry box, by adding a soft, textural embroidered panel.
Complete your embroidery design on a piece of high-quality linen or canvas, leaving several inches of extra fabric around the edges.
Stretch the finished embroidery over the lid of the box, securing it tightly on the underside with strong glue or staples. This juxtaposition of soft thread against hard wood creates a beautiful, unexpected contrast.
27. Create Rounded Forms with Curved Long-and-Short Stitch
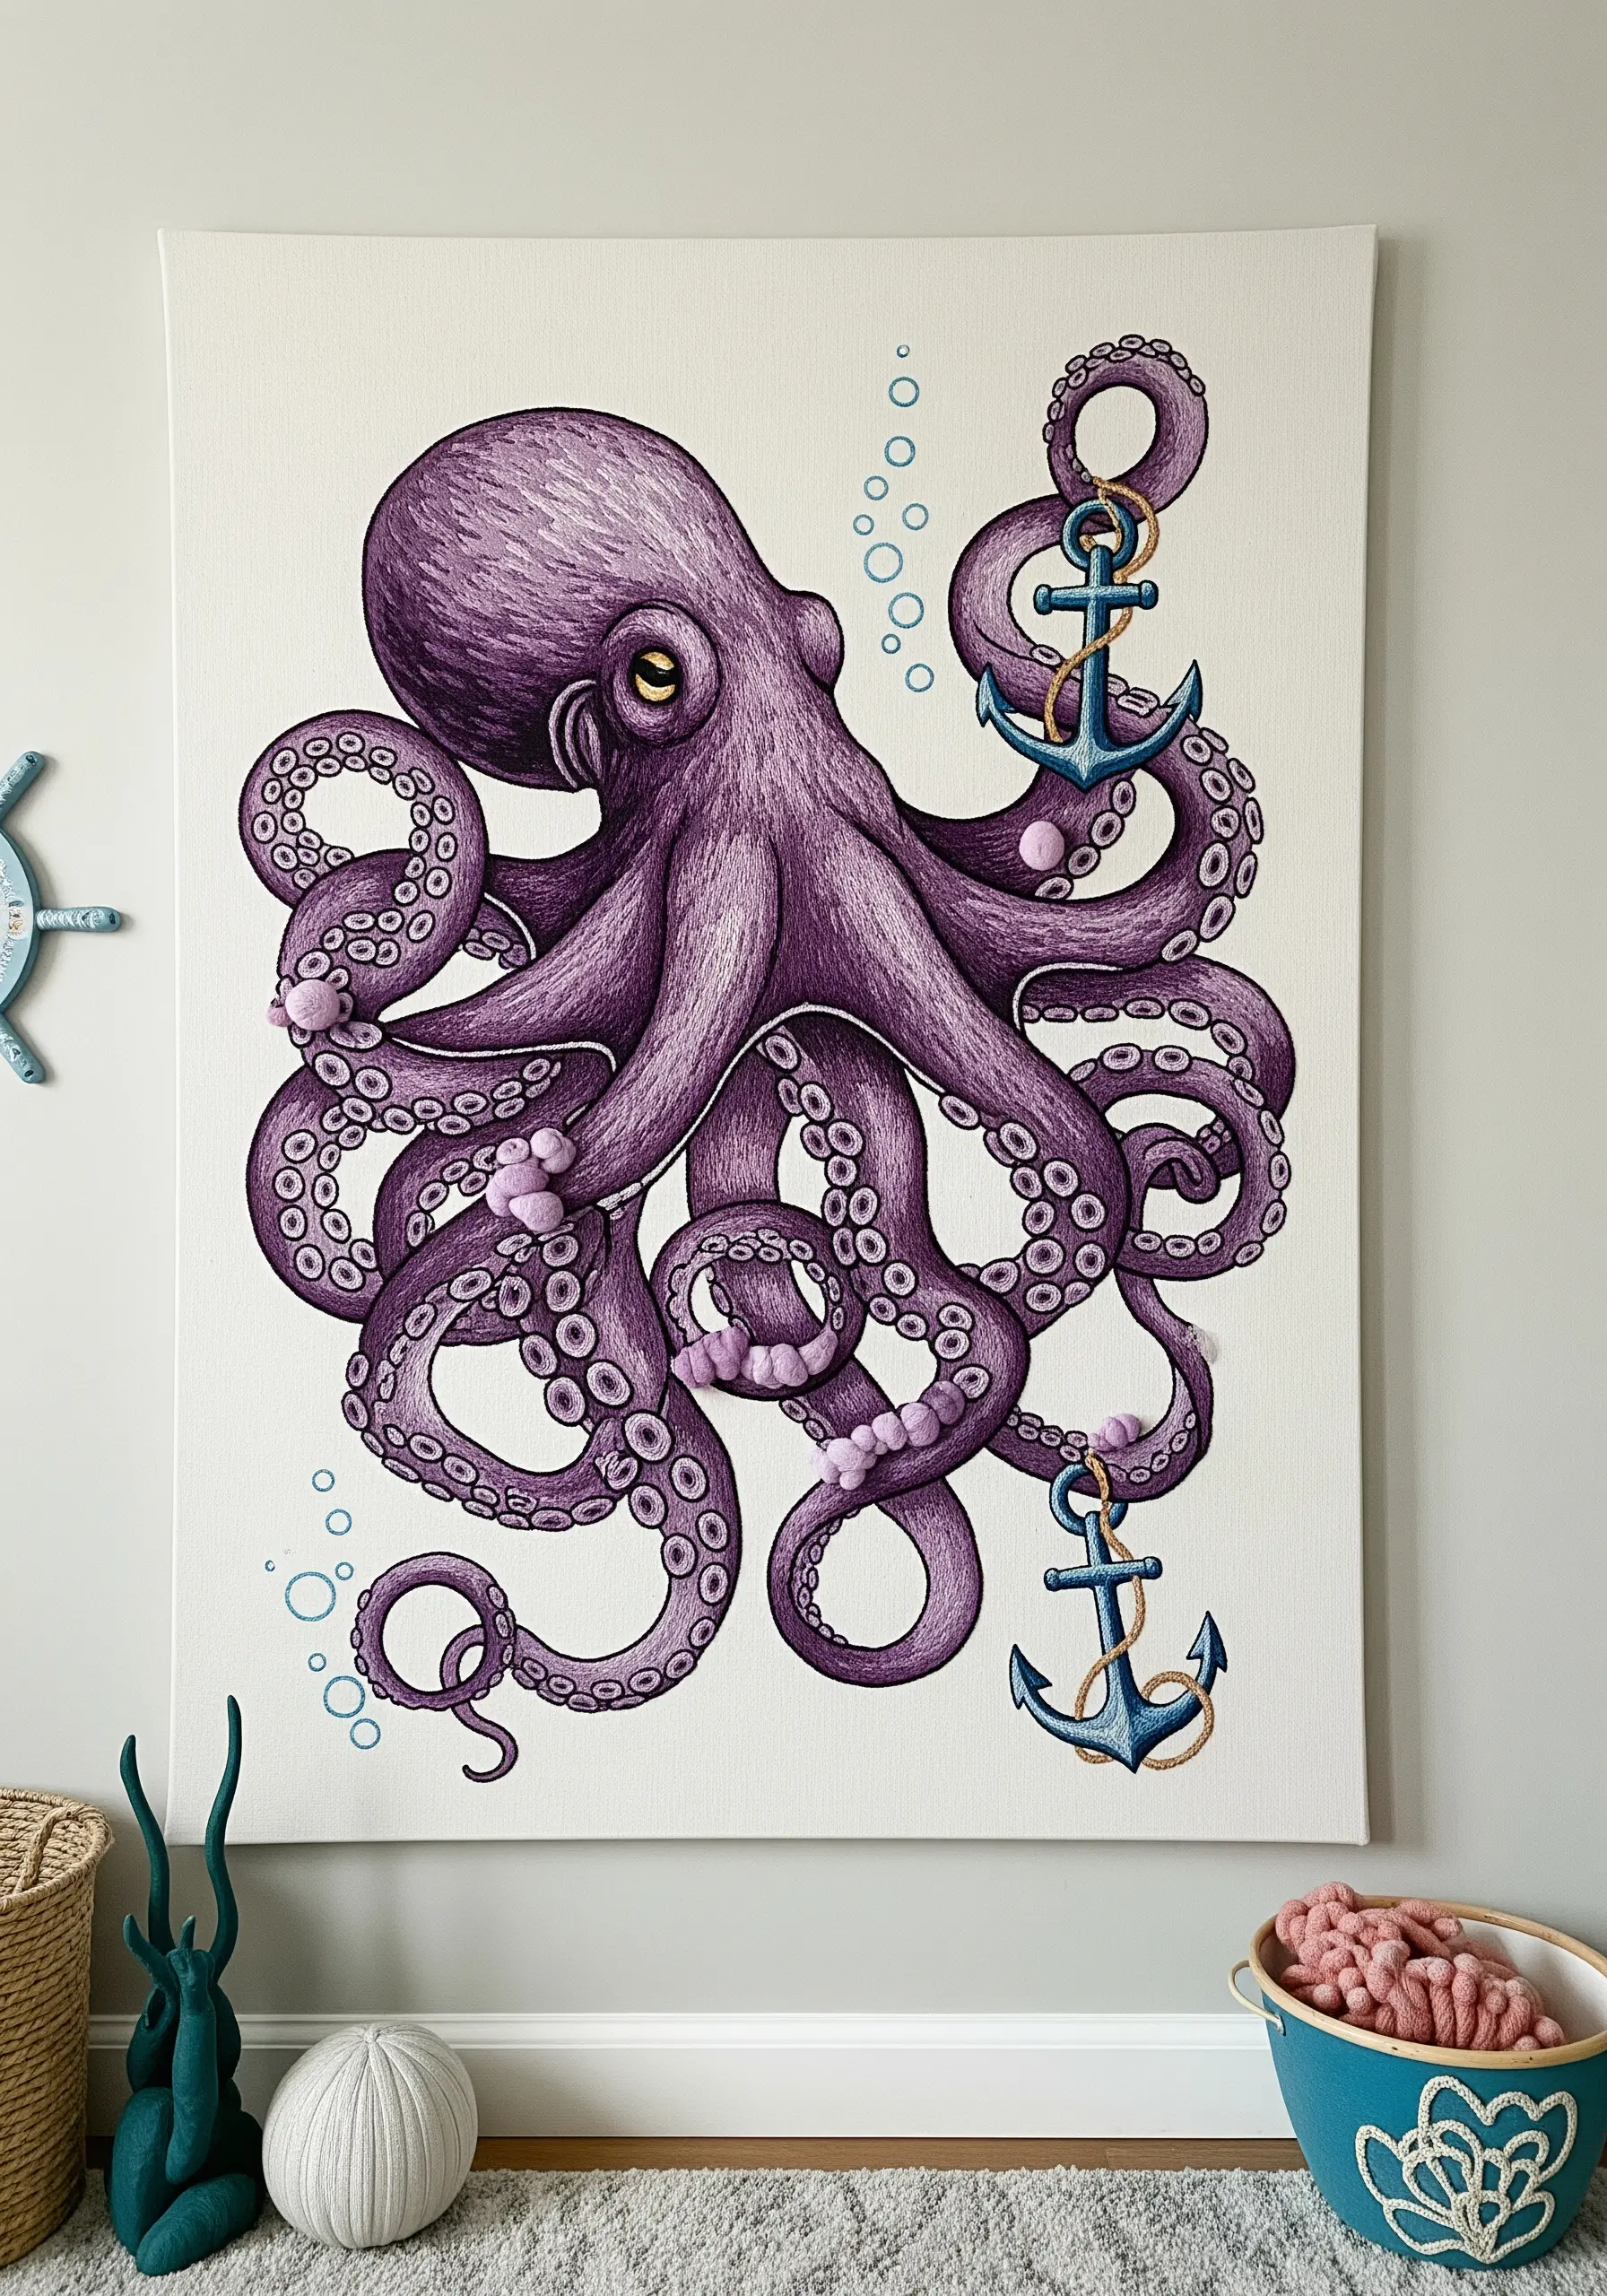
To prevent the tentacles of an octopus from looking flat, your stitches must follow their curved shape.
Use the long-and-short stitch, but instead of working in straight lines, angle your stitches to follow the contour of the tentacle. This is often called contoured or circular long-and-short stitch.
Lightly draw curved guidelines on your fabric to help you maintain the correct angle as you work. This technique creates a sense of volume and makes the tentacles appear truly rounded and lifelike.
28. Suggest Depth with Thread Weight
In a monochromatic string art or embroidery piece, you can create a sense of depth and perspective by varying the thickness of your thread.
Use a heavier thread or more strands of floss for the parts of the wave that are closest to the viewer—the foreground crest.
For the parts of the wave that are further in the background, switch to a finer thread or fewer strands.
This subtle shift in line weight tricks the eye into seeing distance, adding dimension to an otherwise flat design.
29. Frame a Motif with a Simple Stitched Border

Adding a simple border to an embroidered motif on table linens instantly elevates the design and gives it a finished, intentional look.
A simple running stitch or backstitch is all you need. Use a color that complements the main design to create a visual frame.
This technique grounds the motif, preventing it from looking like it’s floating randomly on the fabric. It adds a touch of classic elegance and structure to items like napkins and placemats.
30. Create Ethereal Designs on Sheer Fabric

Stitching on a sheer fabric like tulle or organza allows you to create delicate, transparent designs that appear to float in the air.
You must use a stabilizer behind the sheer fabric while you stitch to prevent it from stretching and puckering; a water-soluble stabilizer is ideal as it can be rinsed away completely.
Let the threads for the jellyfish tentacles hang loose and long, extending beyond the hoop. This adds to the ethereal, free-flowing effect of the piece when it’s hung in a window.
31. Mix Media for a Dynamic Typographic Display

Combine different techniques and materials within a single word to create a playful and visually engaging piece of art.
Instead of stitching every letter, paint or appliqué some letters onto the wooden background first. Then, add string art or embroidery to the remaining letters.
Assign a different coastal motif to each letter—a wave, the sun, an anchor. This approach turns a simple word into a sampler of textures and ideas, making it a unique statement piece.
32. Embellish Natural Textures with Found Objects
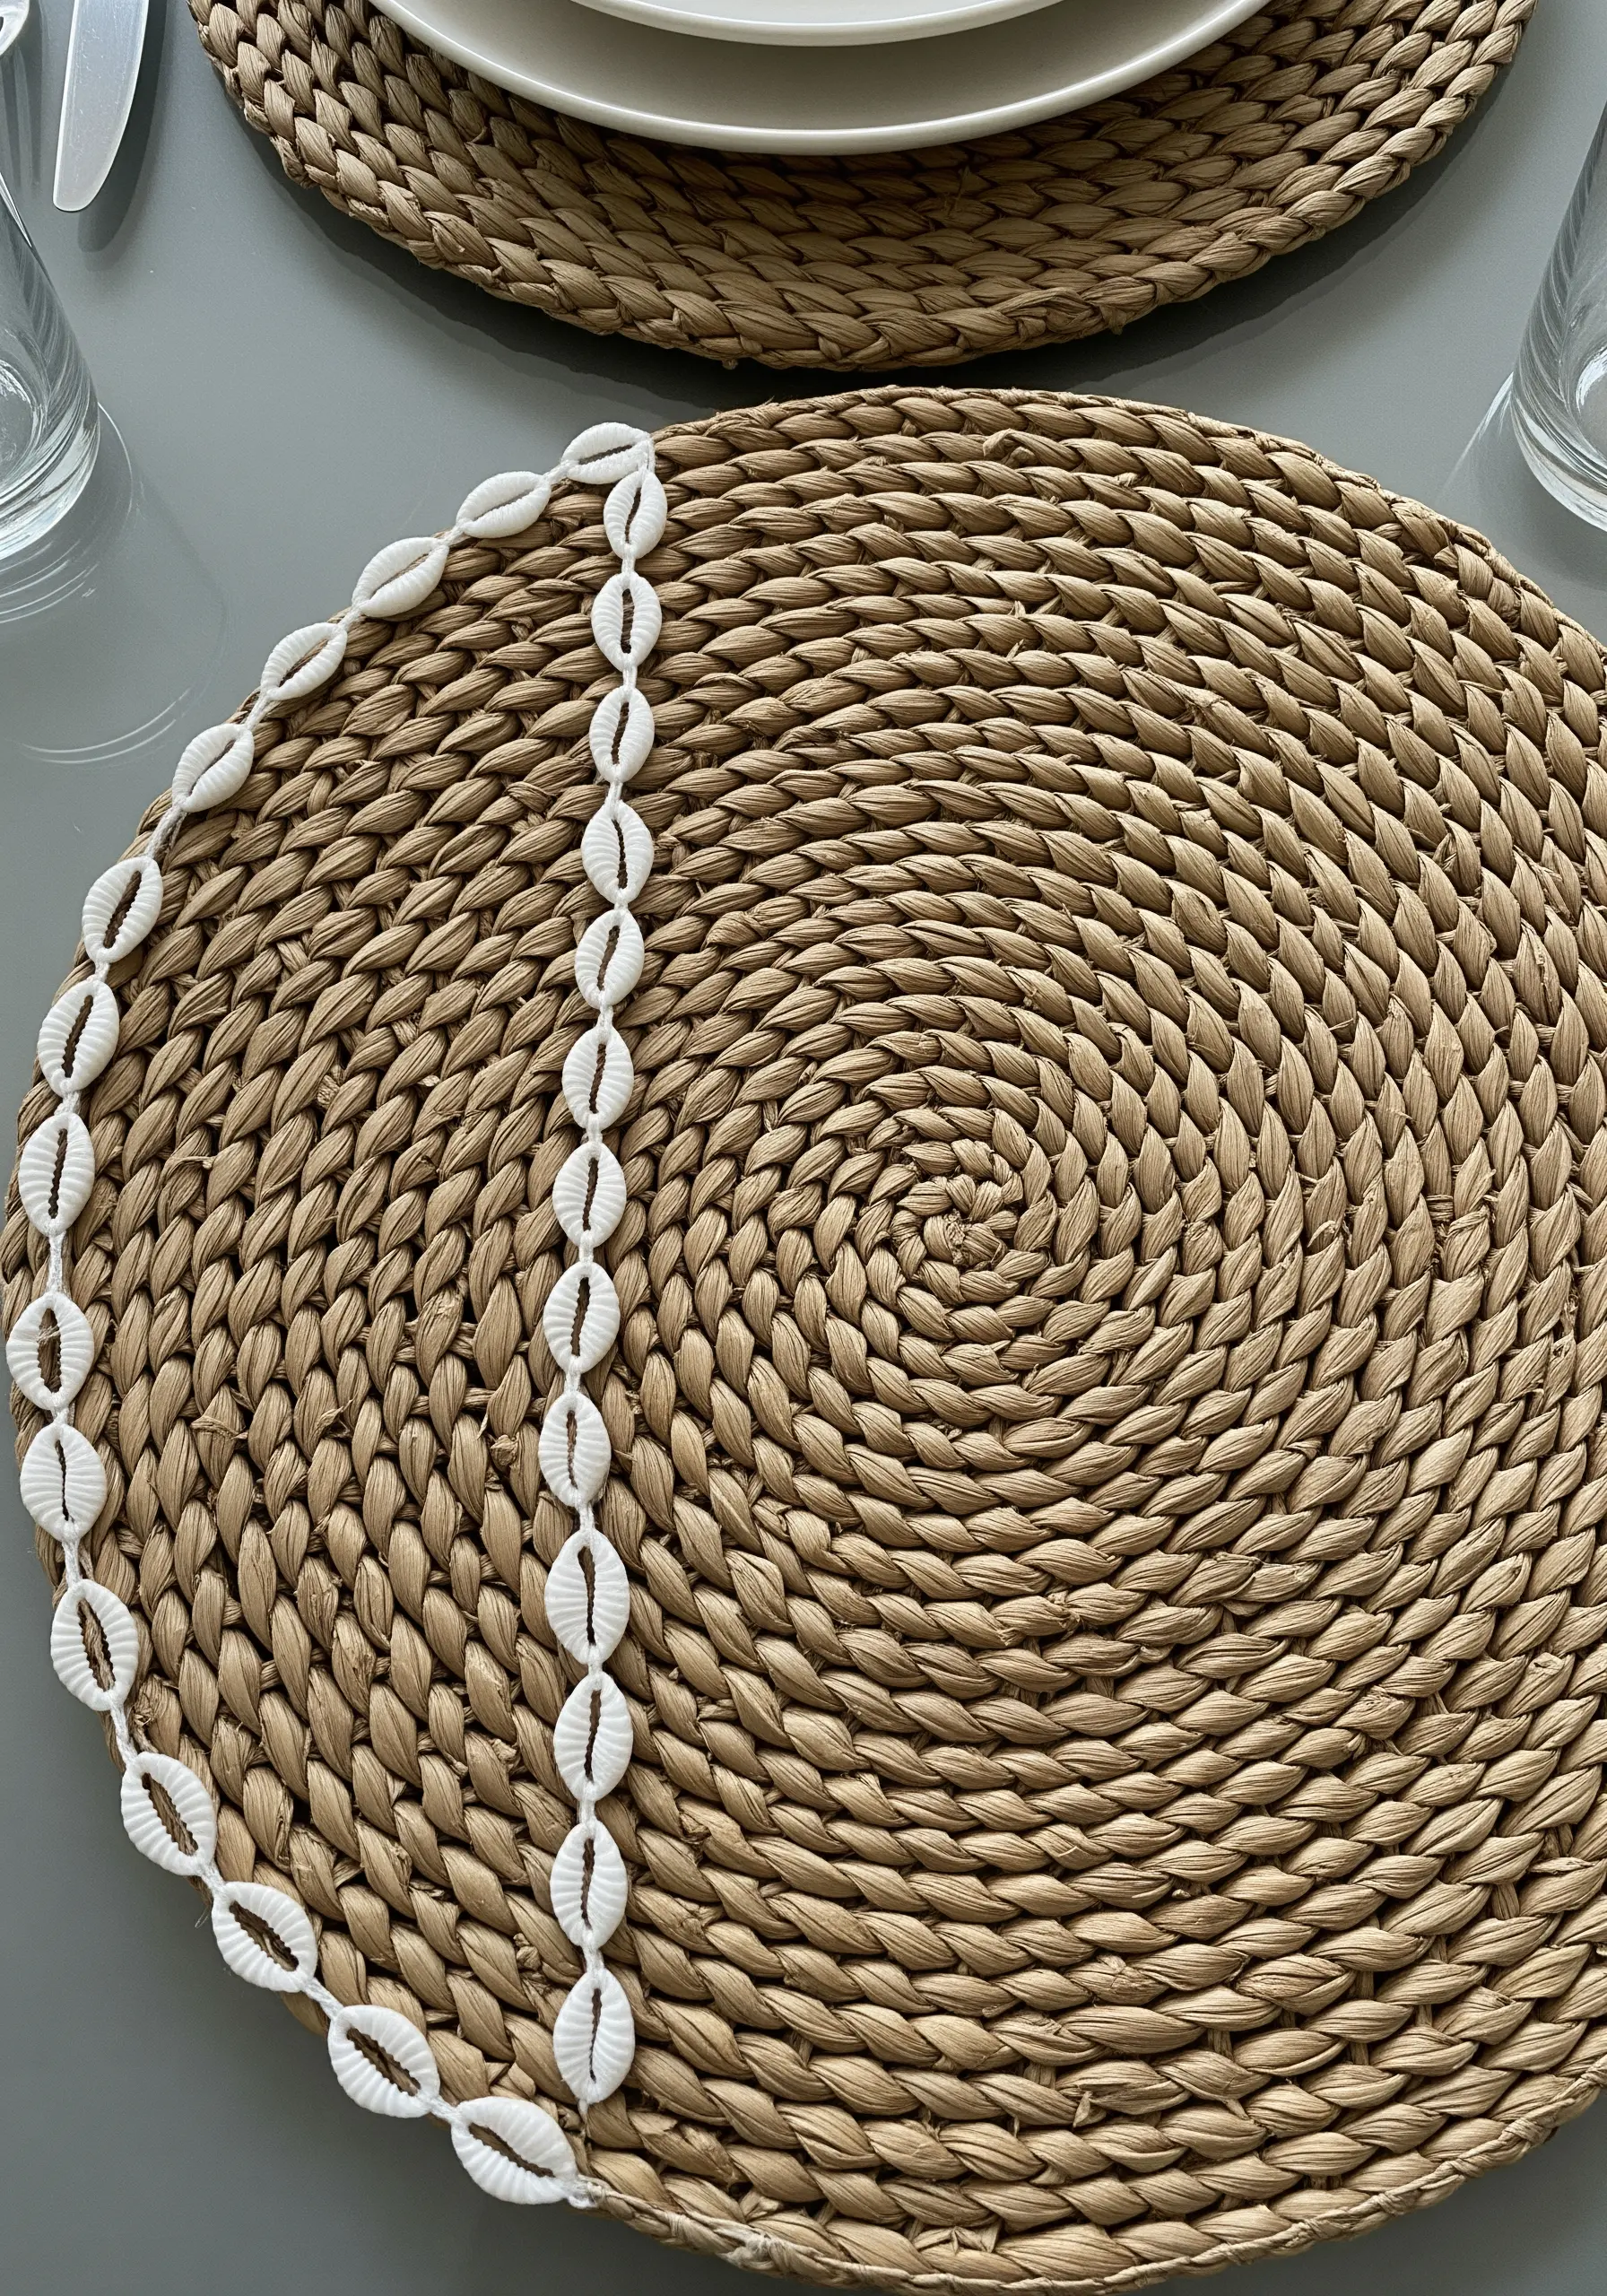
Sometimes, the most effective way to add a coastal feel is to incorporate the coast itself.
Instead of trying to embroider a shell, stitch actual shells onto your project. Use a strong thread, like a button or upholstery thread, to securely attach cowrie shells to the edge of a woven placemat or basket.
Pass the needle through the natural opening of the shell and stitch it firmly to the base material. This simple technique adds an authentic, textural border that embroidery alone cannot replicate.


