

There comes a moment in every embroiderer’s journey when you look at your work and feel a quiet desire for something more—more polish, more depth, more of your own artistic voice. You’ve mastered the stitches, but now you want to make them sing.
The secret to transforming your work often lies not in learning a dozen new complex stitches, but in mastering the art of color. Creating a smooth, intentional gradient—an ombré effect—can infuse your embroidery with light, emotion, and a sophisticated, painterly quality that elevates any design.
Here, we’ll move beyond simply filling a shape and explore how to blend threads with purpose. From subtle shifts in a single petal to bold, flowing rainbows, these techniques are your next step toward creating embroidery that feels not just crafted, but truly expressive.
1. Define Geometric Landscapes with Blocked Satin Stitch
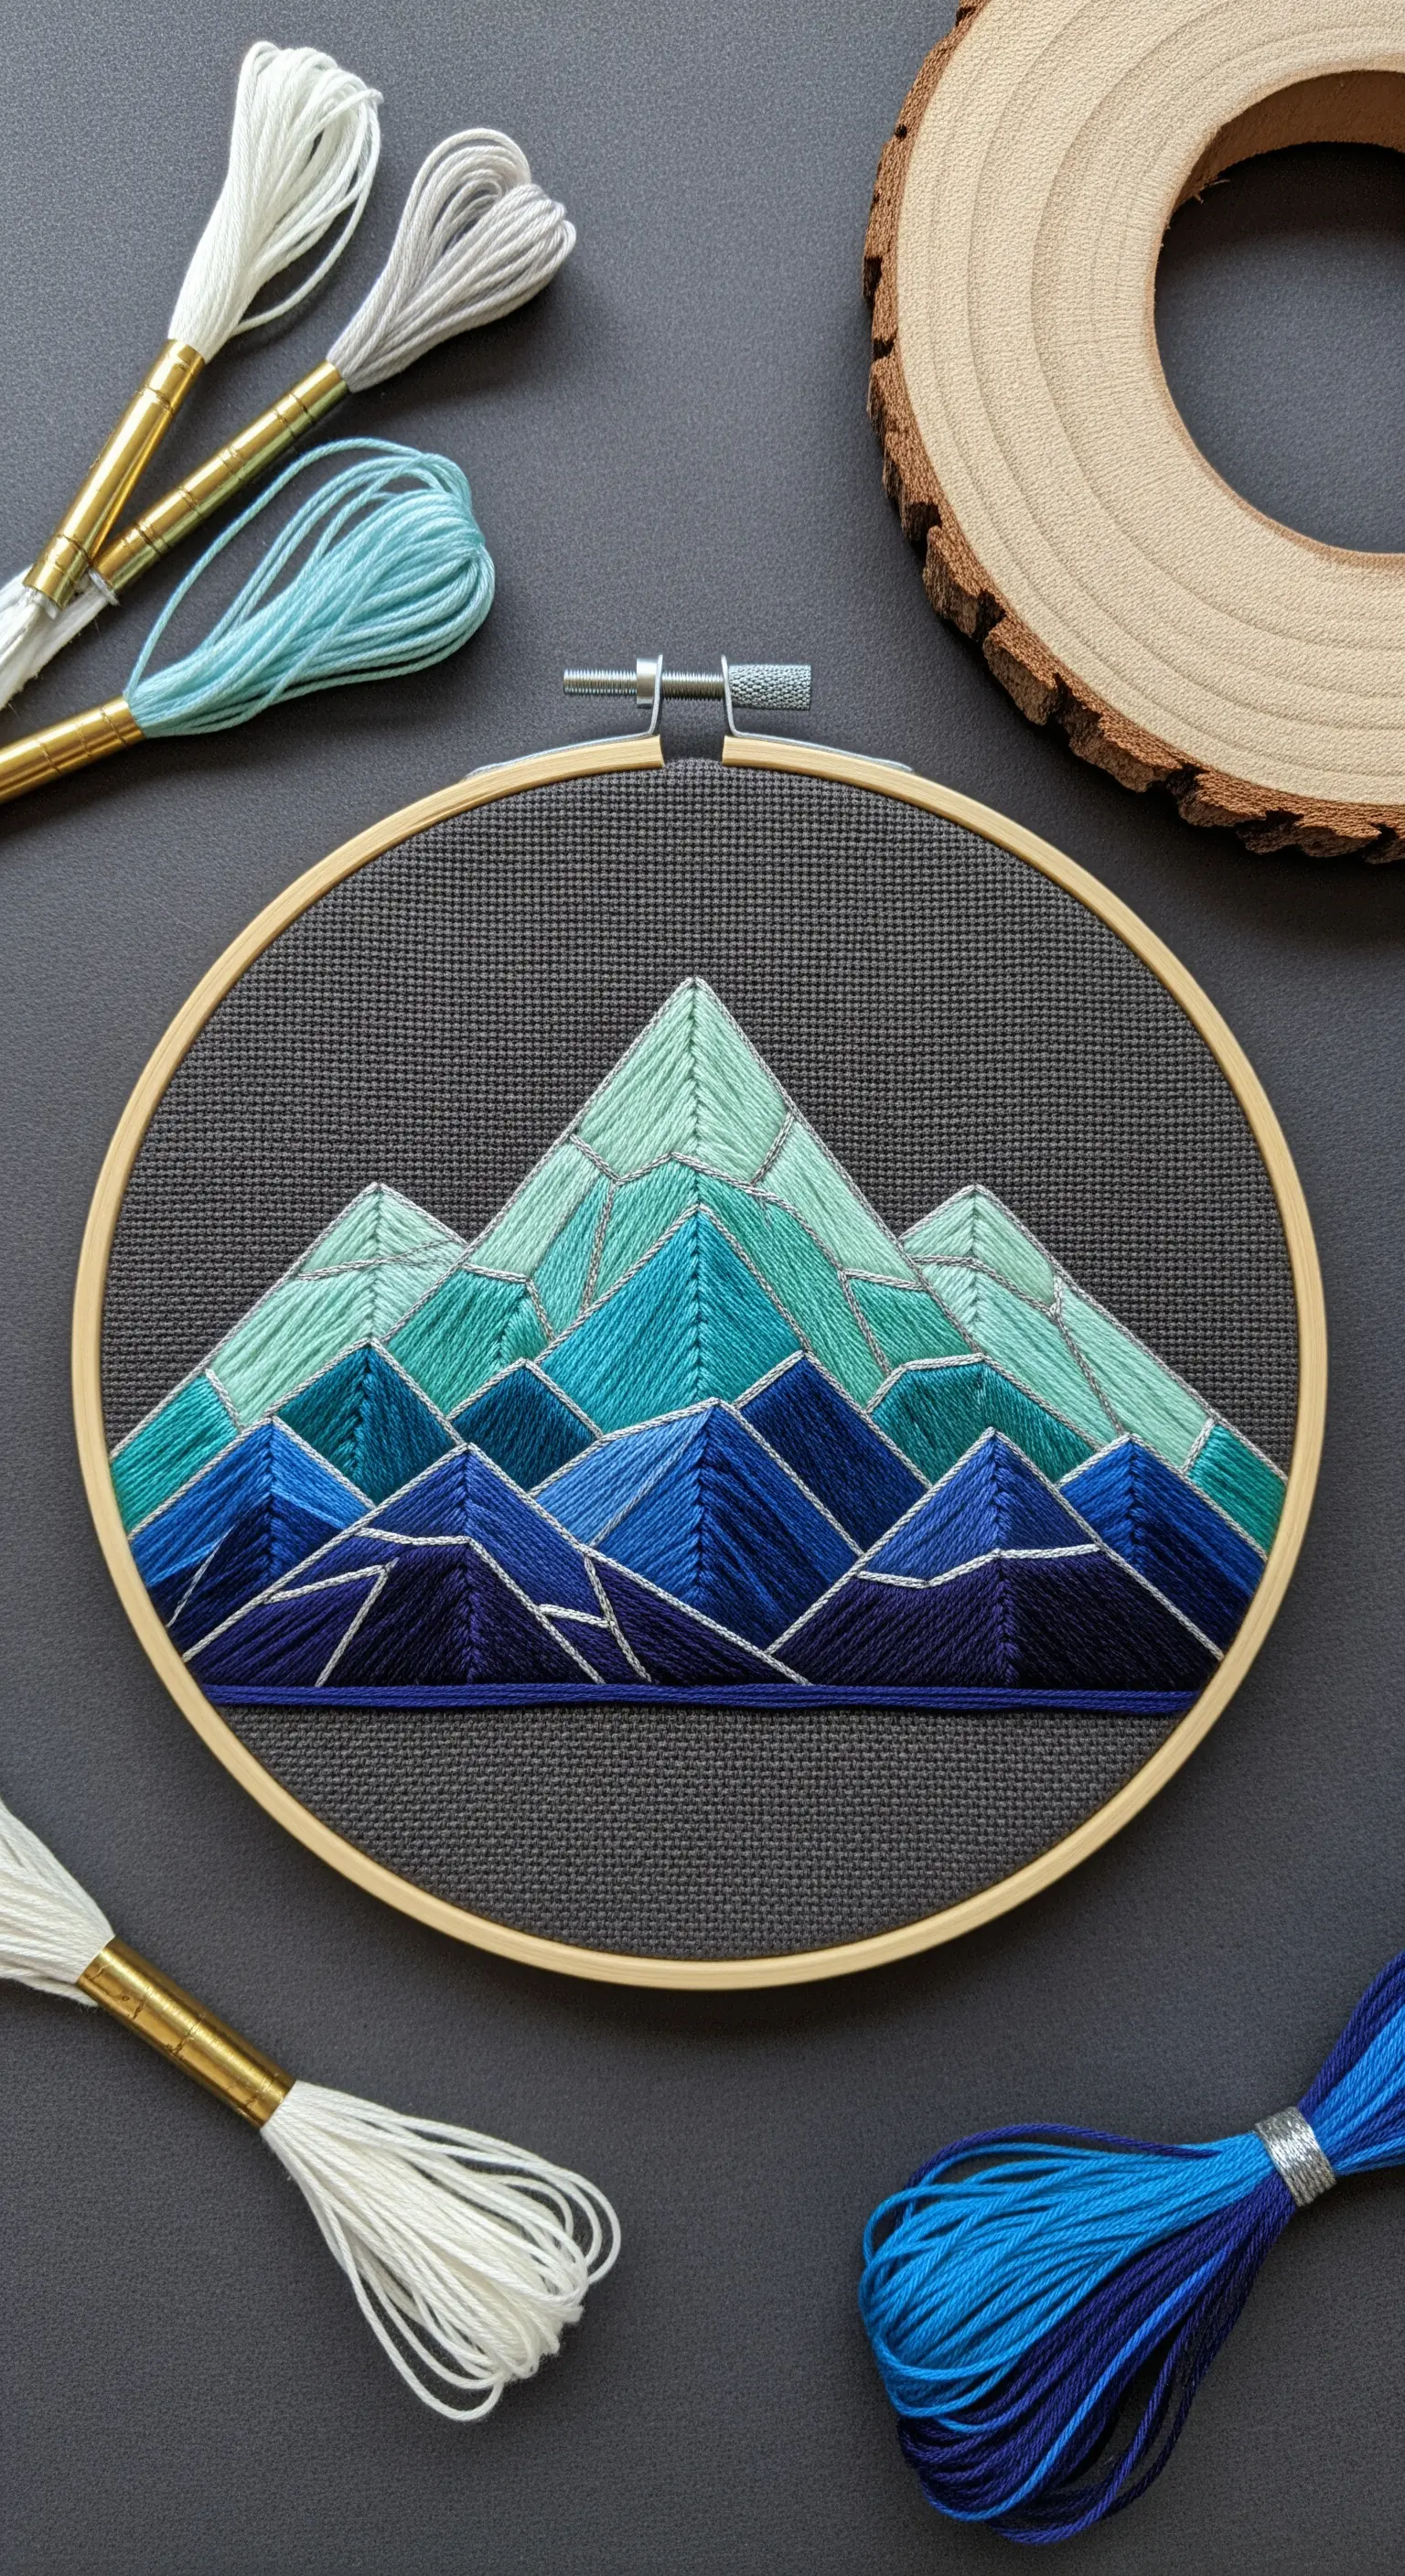
Create crisp, faceted mountains by filling each geometric section with directional satin stitch.
Vary the angle of your stitches in adjacent shapes—even if they share the same color—to make them catch the light differently, adding subtle depth and dimension.
A fine, single-strand backstitch in a contrasting color like white or silver provides a sharp outline that makes the color blocks pop, especially against dark Aida cloth or linen.
This method transforms a simple fill stitch into a sophisticated tool for modern, graphic landscapes.
2. Blend Feathers with Thread Painting and Textural Knots
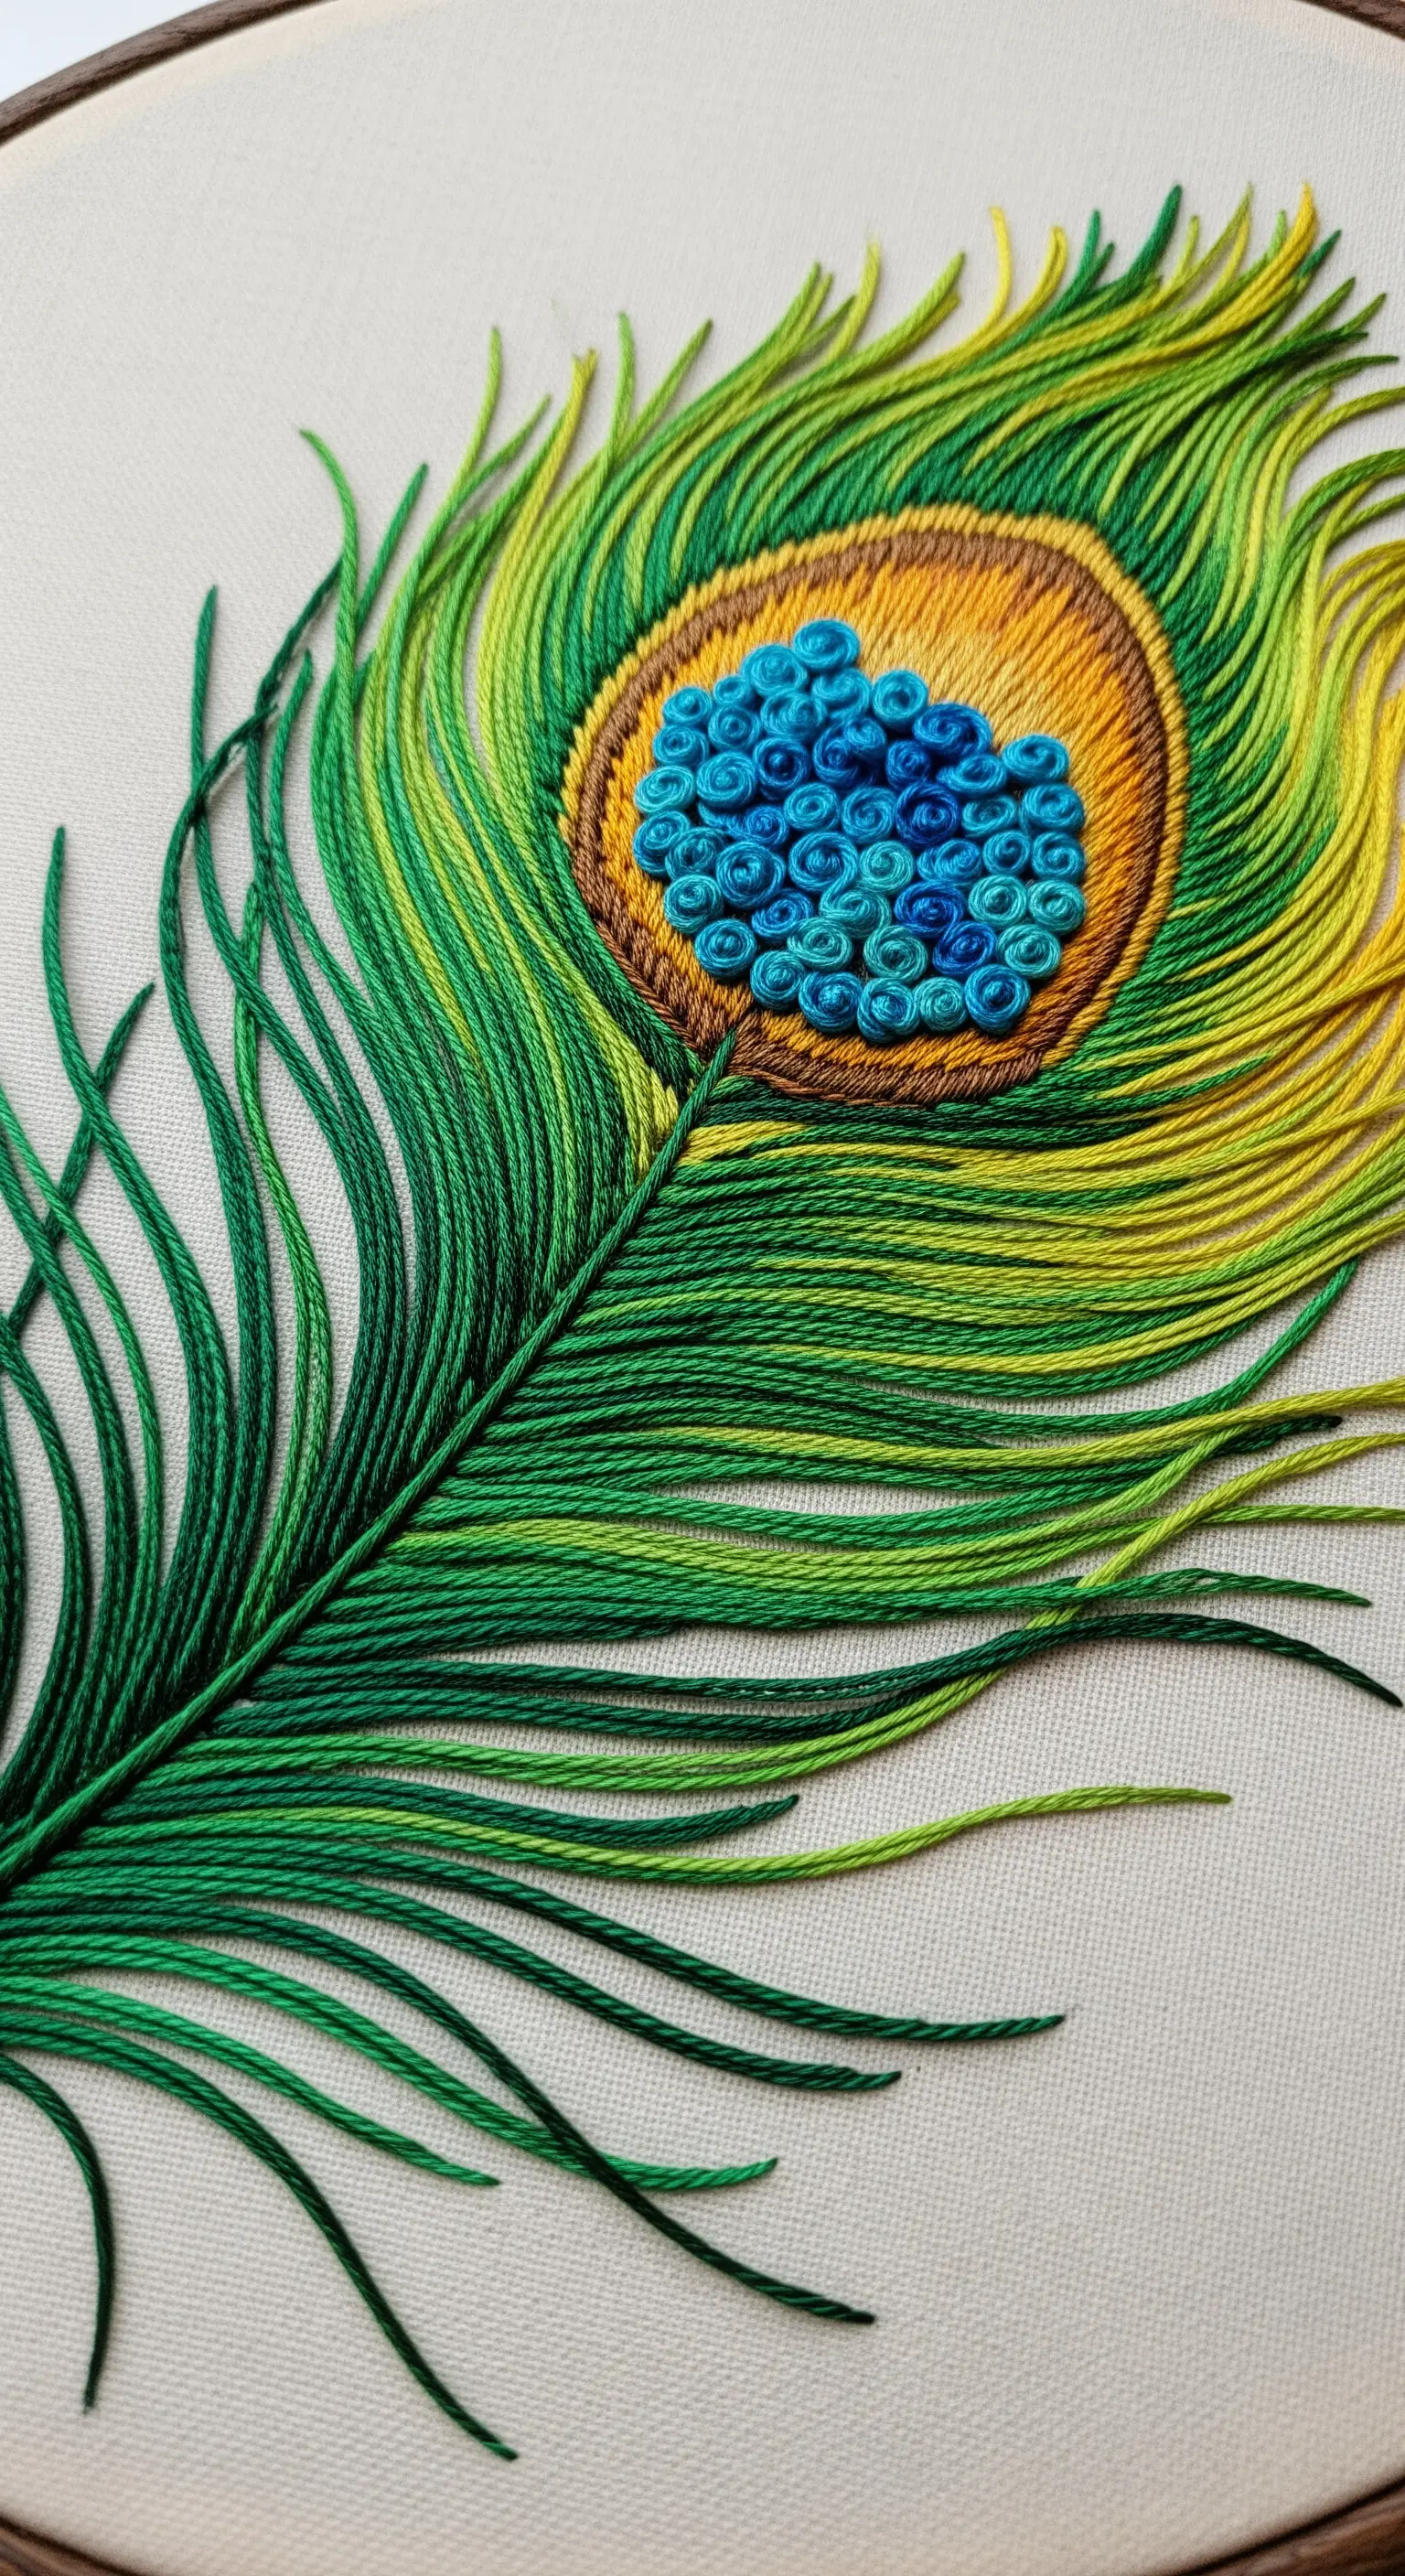
Achieve a realistic, iridescent feather effect using long-and-short stitch, also known as needle painting.
Work with a single strand of floss for the smoothest possible color transitions, layering shades of green and yellow to mimic natural light.
For the feather’s eye, switch textures completely. Fill the area with tightly packed French knots or bullion knots to create a raised, jewel-like center that contrasts beautifully with the sleek feather barbs.
This combination of smooth and rough textures is what gives the piece its lifelike energy.
3. Add Sculptural Dimension with Couched Cords
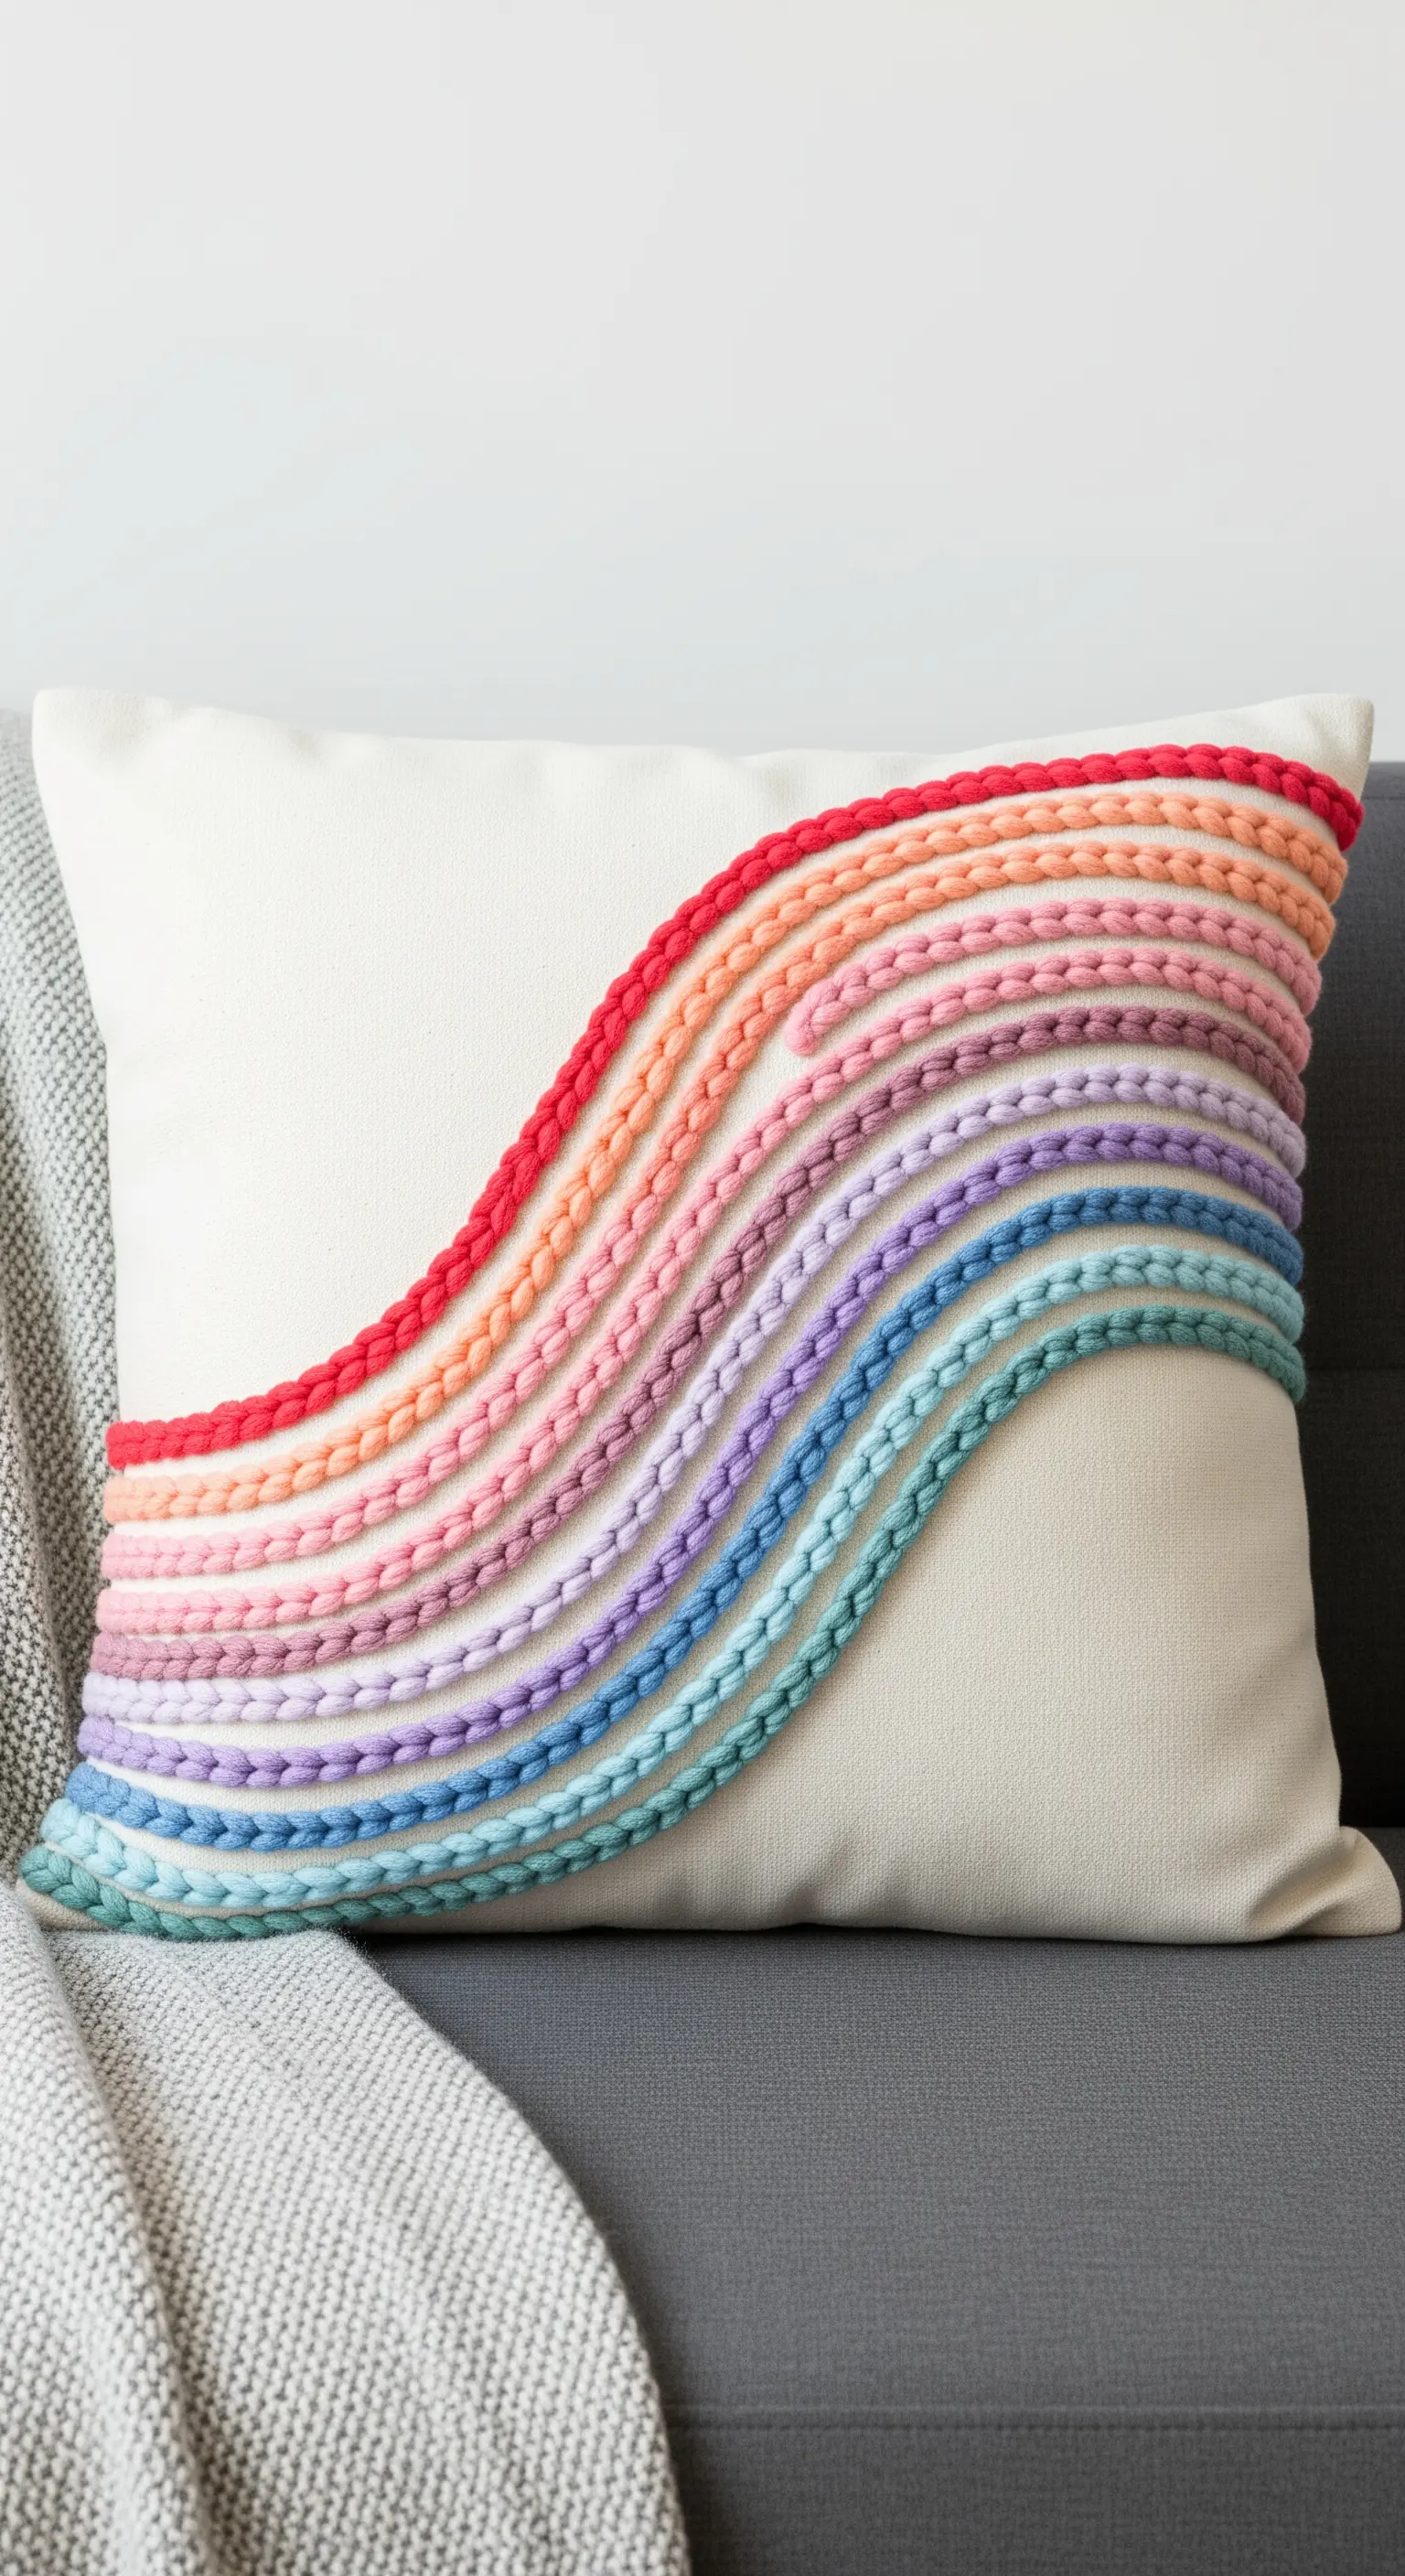
Elevate home décor projects by couching thick, braided cords or yarn onto the fabric surface.
This technique adds immediate texture and dimension that standard embroidery floss cannot achieve.
Simply lay the cord along your design line and use a matching or invisible thread to tack it down with small, evenly spaced stitches.
It’s an incredibly fast way to cover a large area with bold color and is especially effective for pillows, wall hangings, and upholstered items.
4. Create Radiant Florals with a Straight Stitch Spectrum
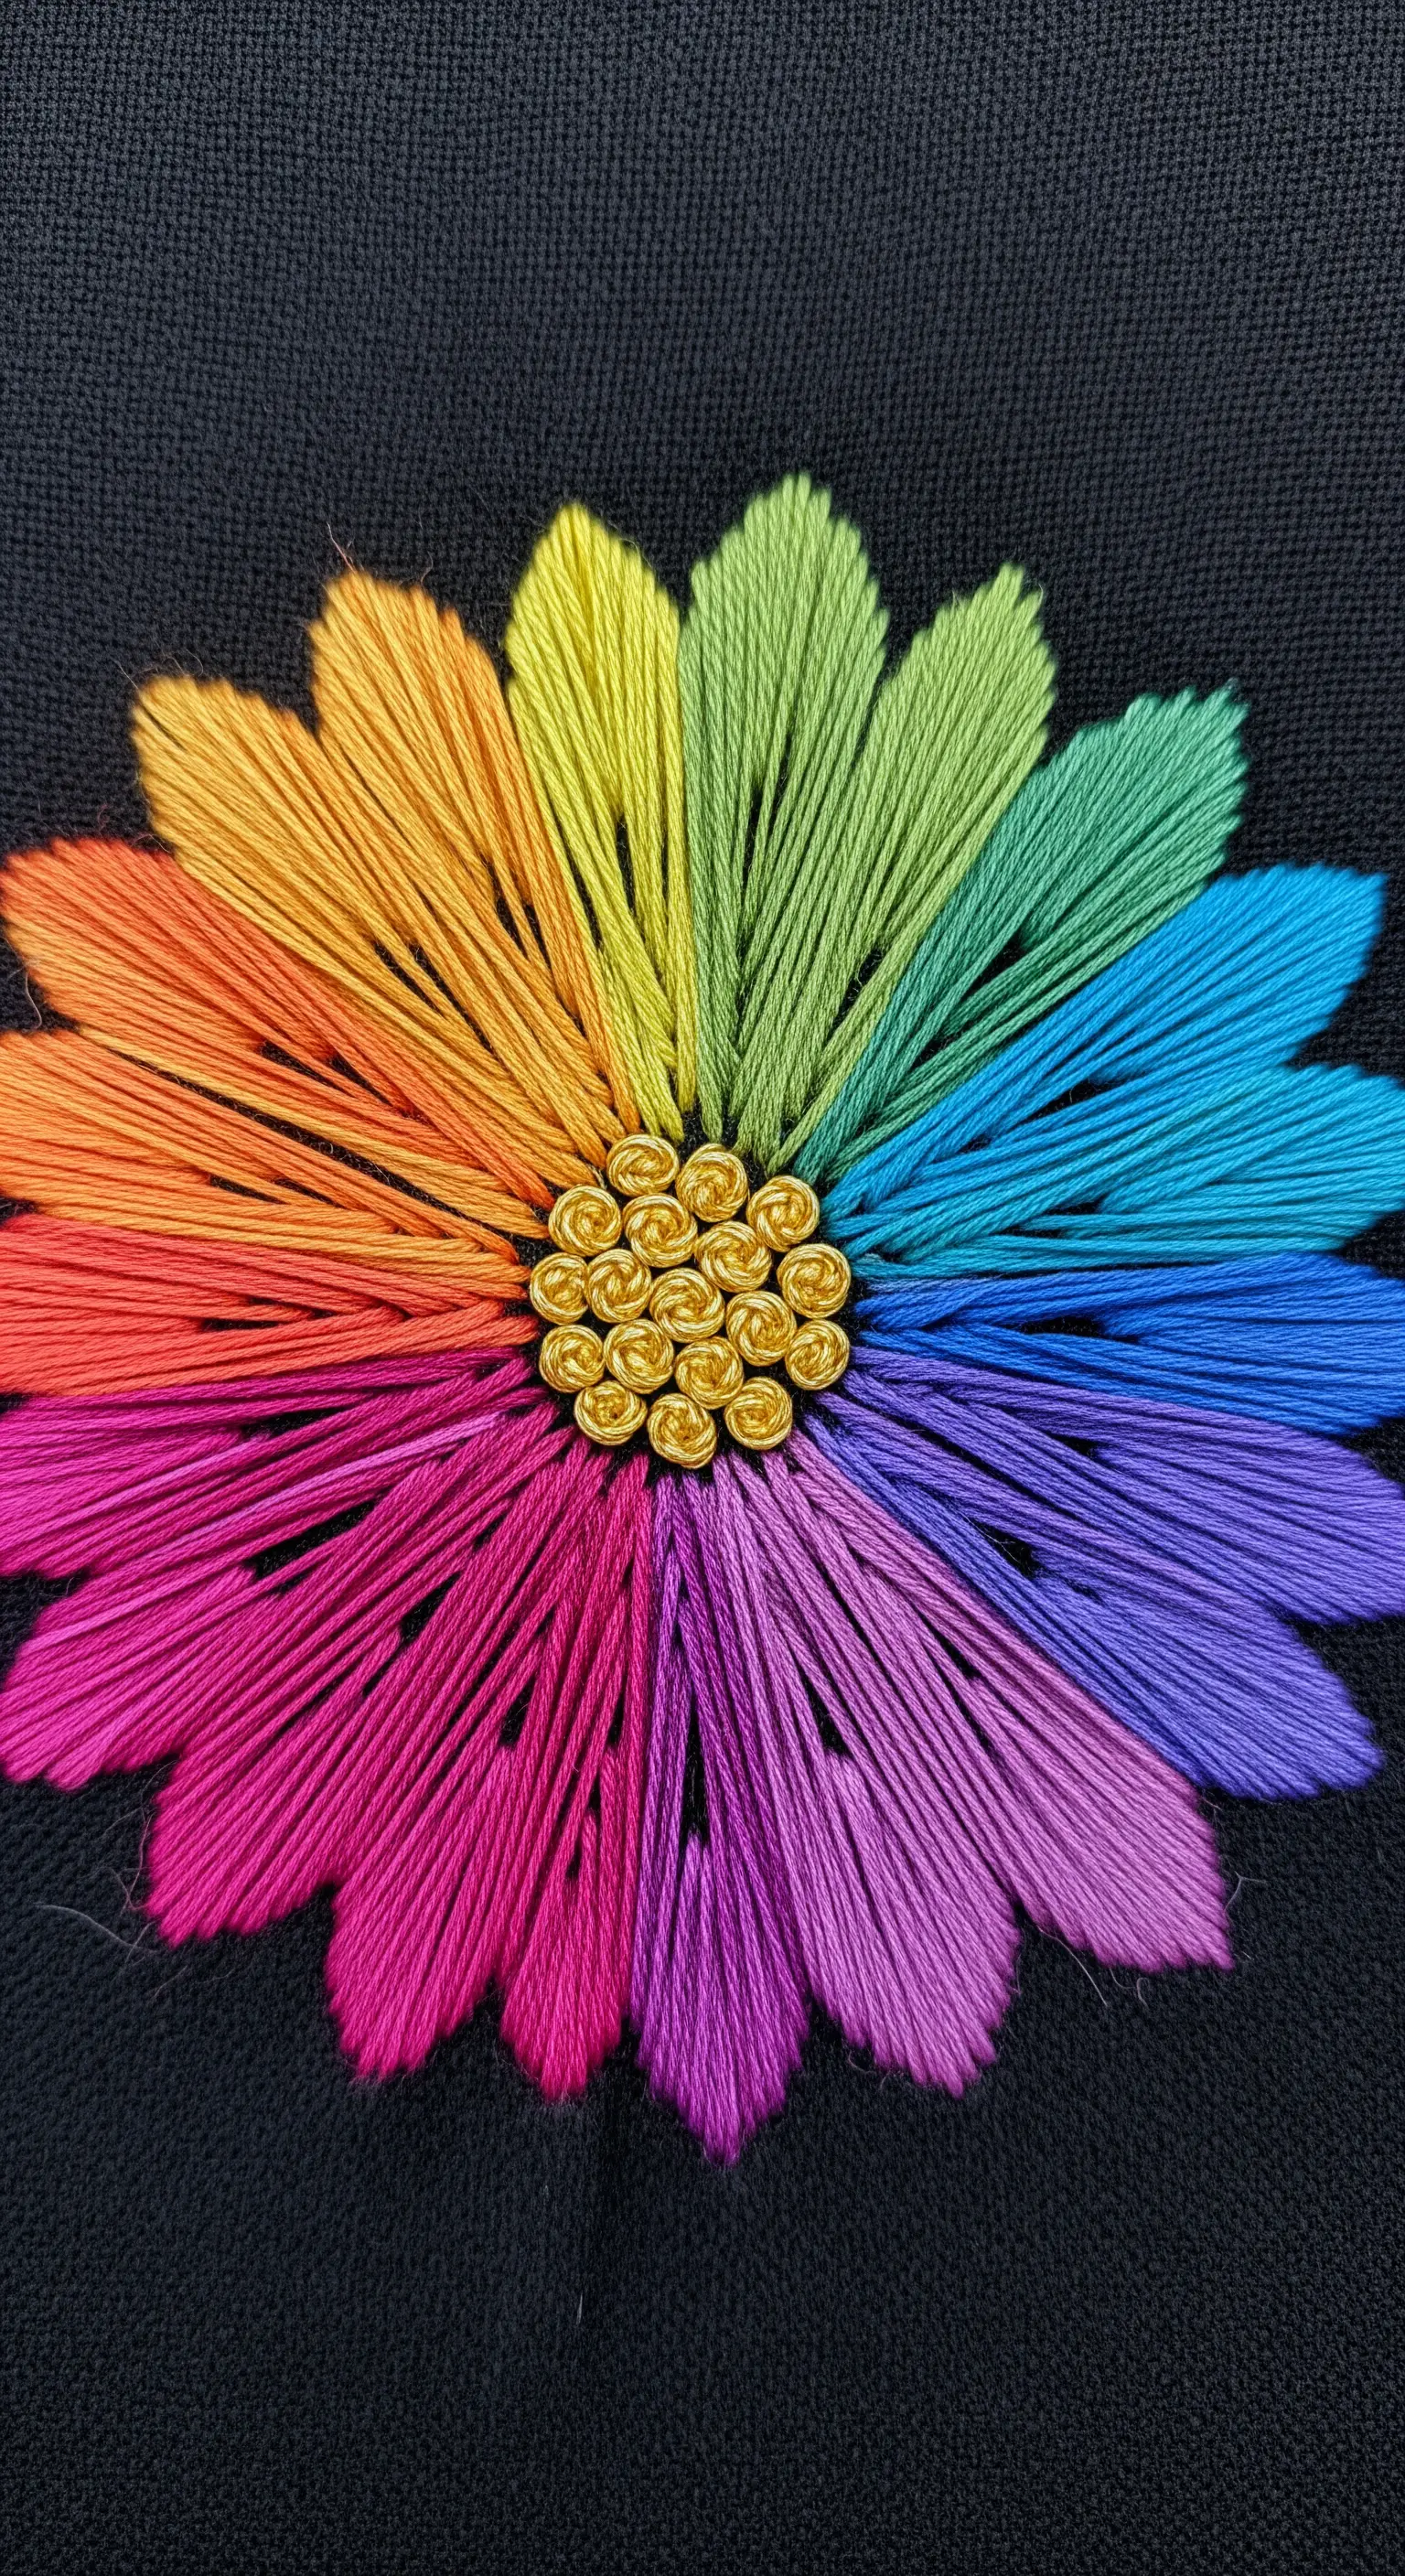
You can create a stunning, full-looking flower using only the most basic straight stitch.
The visual impact comes from precise color planning, arranging your threads in rainbow order before you begin.
Work each petal as a long, single stitch from the outer edge to the center, keeping the tension even to prevent puckering.
Fill the center with a cluster of metallic gold French knots to create a bright, reflective focal point that anchors the entire design.
5. Embellish Denim with a Water-Soluble Canvas Gradient
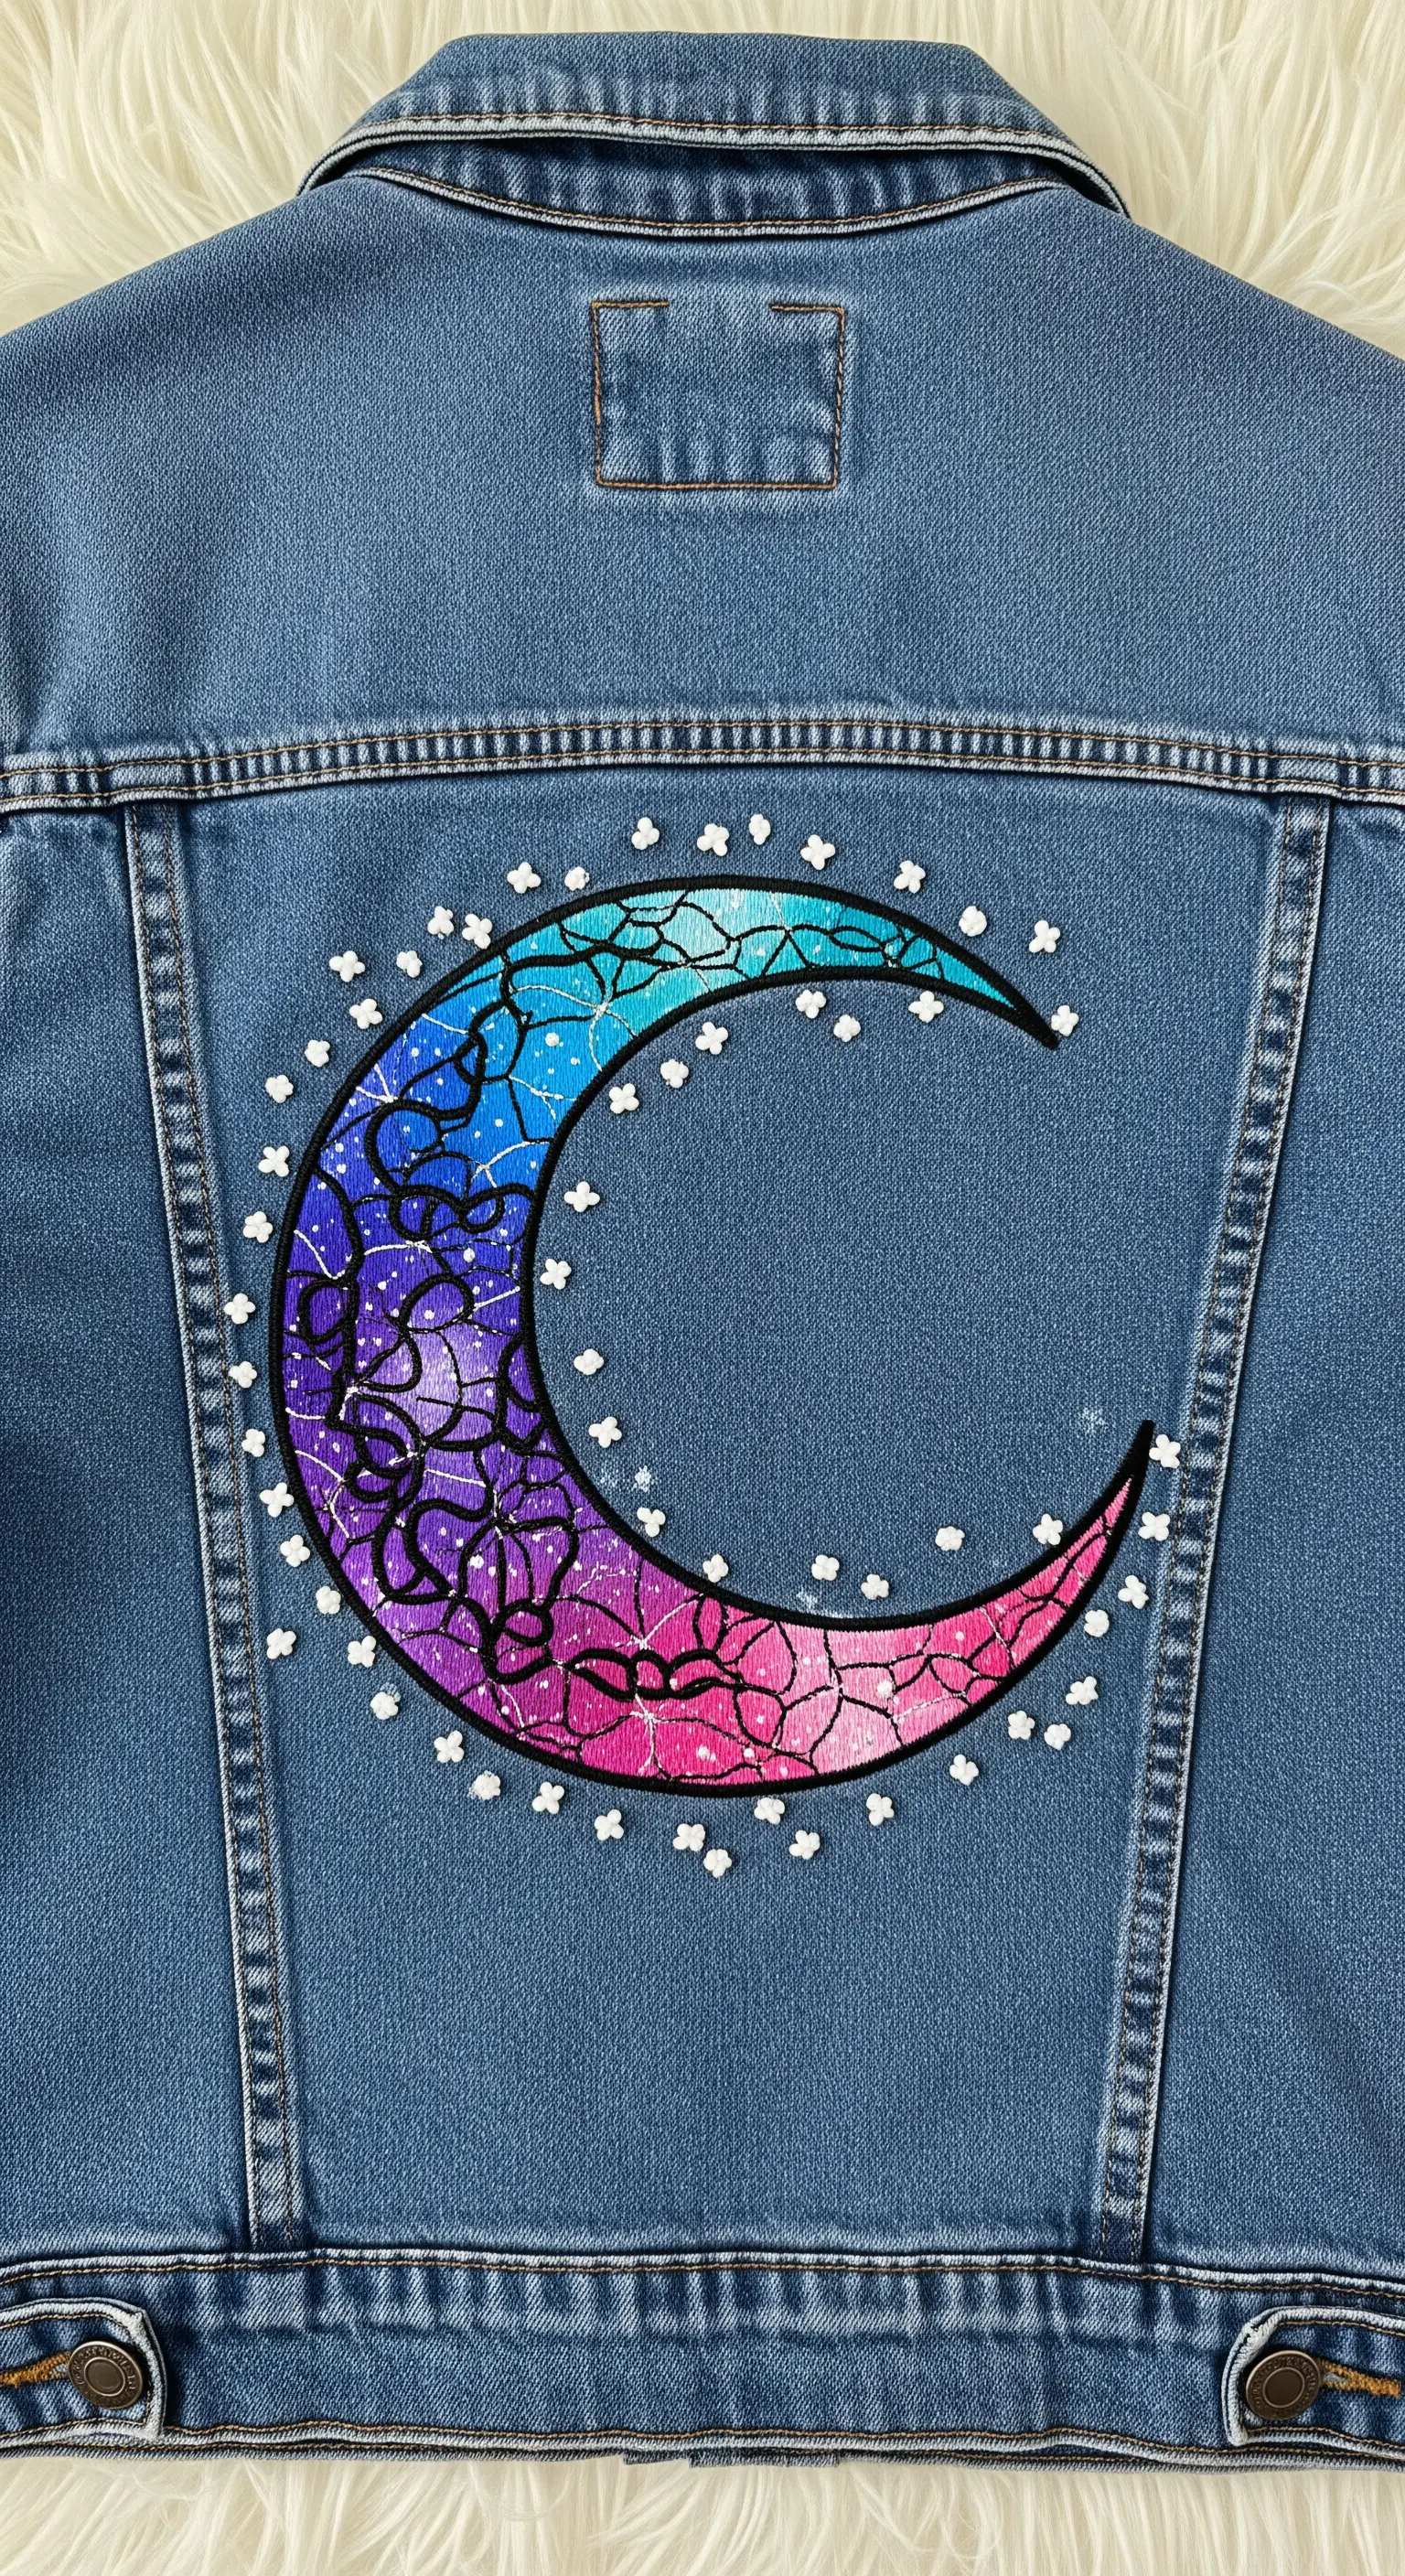
Embroidering on thick fabric like denim is made simple with a water-soluble stabilizer.
Draw your crescent moon design on the stabilizer, hoop it with your jacket, and fill the shape with a freeform blend of long-and-short stitches.
Once the color-blended fill is complete, add details like the black linework and white French-knot stars directly on top.
When you’re finished, simply wash the garment, and the stabilizer will dissolve completely, leaving behind a clean, flexible design that looks painted on.
6. Design Abstract Art with Painterly Satin Stitch Blocks
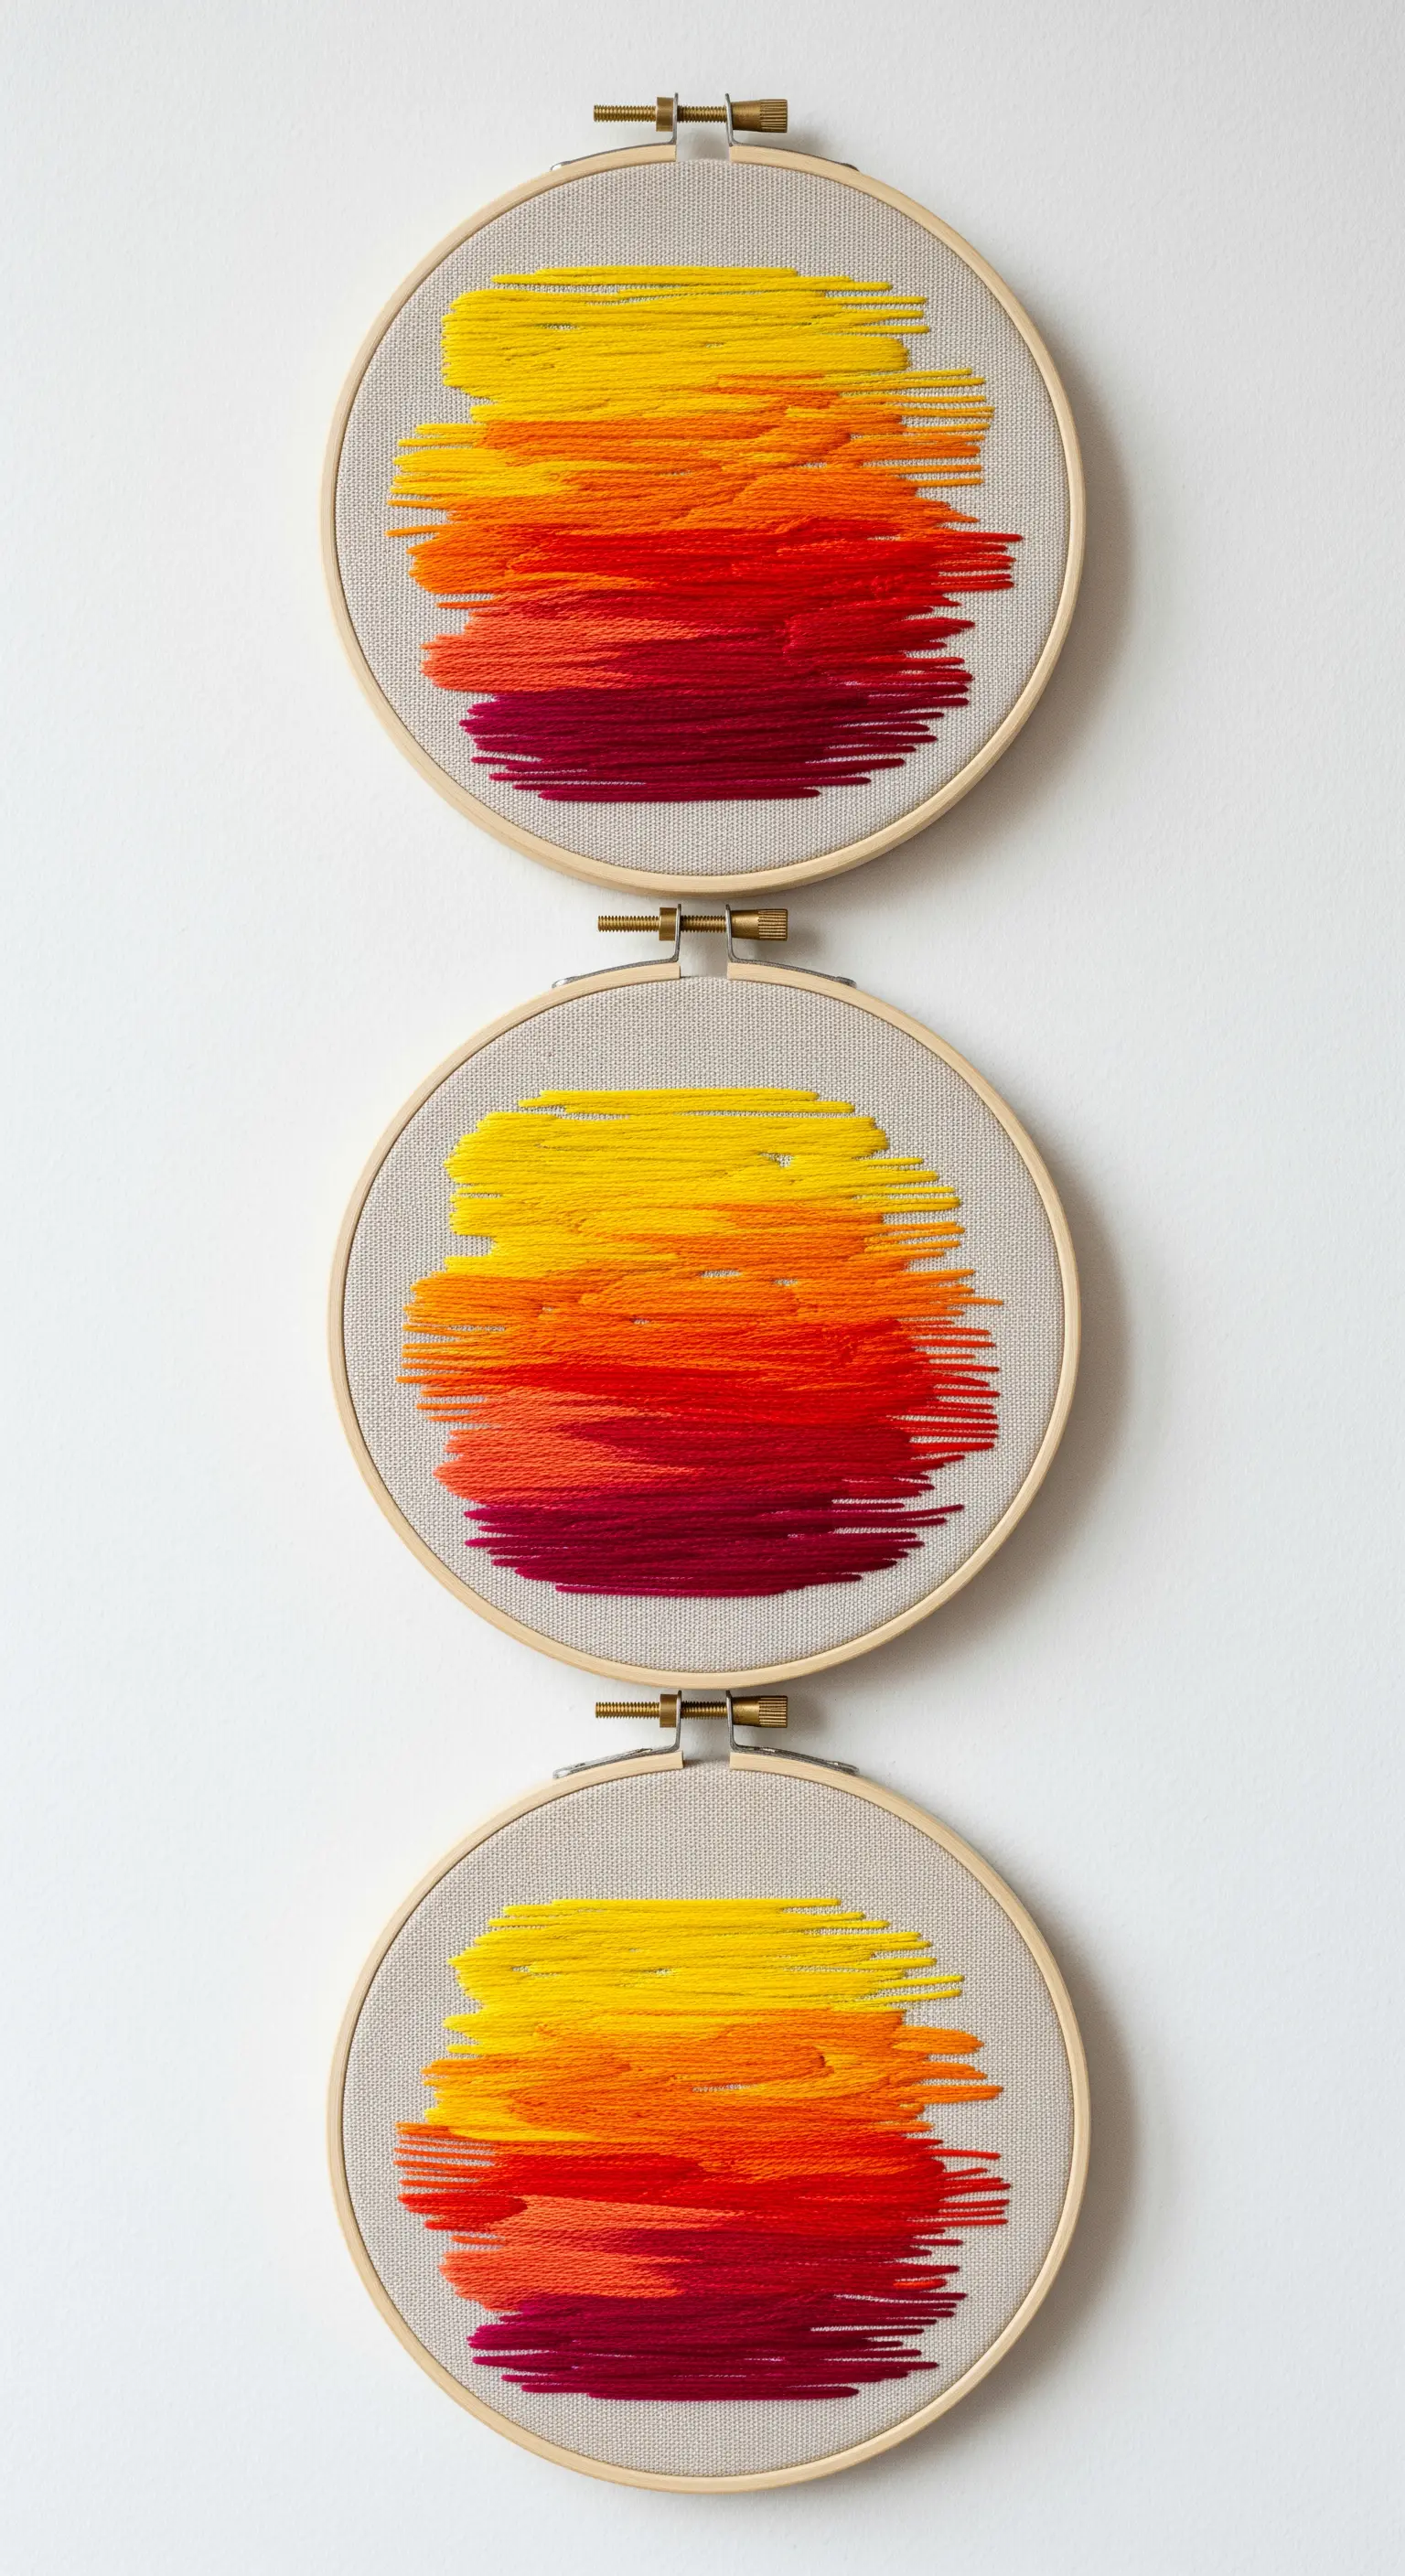
Explore color and texture by creating abstract sunset-inspired blocks using satin stitch.
Don’t aim for perfect, razor-sharp edges; instead, let the edges be slightly uneven to create a soft, painterly feel.
By varying the length and density of your stitches, you can build up layers of color that have a woven, textural quality.
Displaying them as a triptych turns simple stitch studies into a cohesive and modern piece of wall art.
7. Play with Light Using Directional Geometric Fills
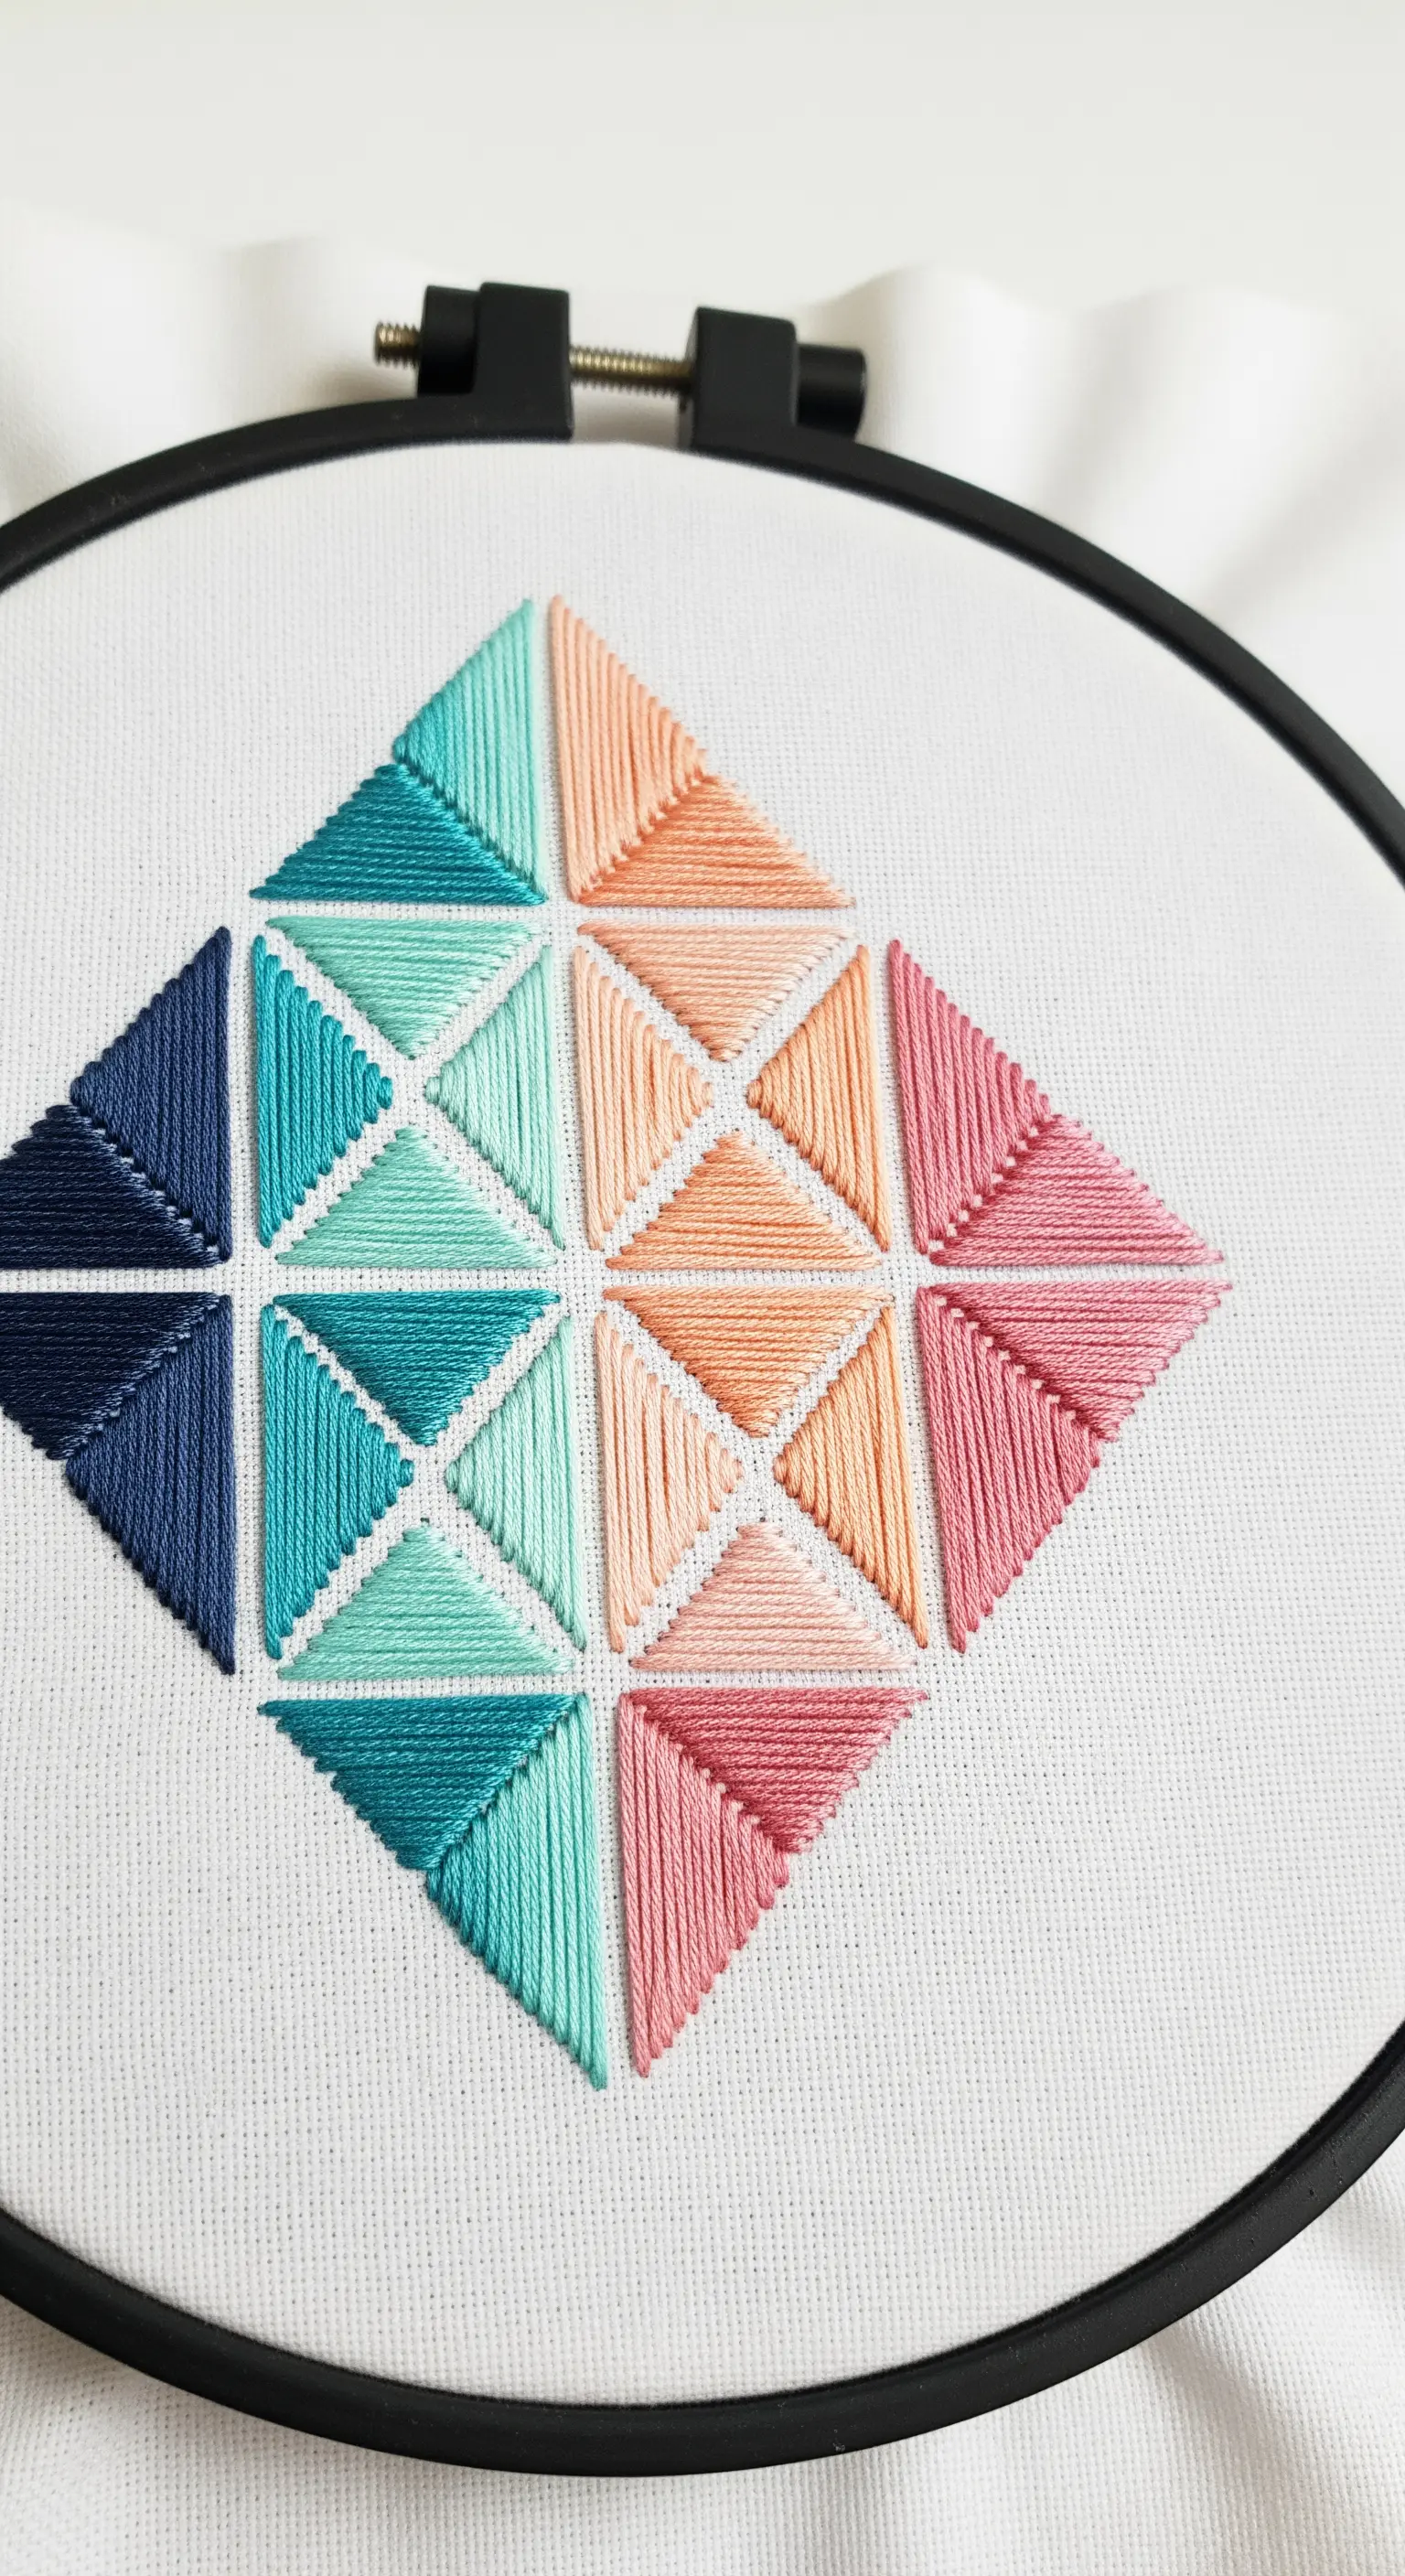
In this geometric design, the magic lies in how each small triangle is filled.
Even within a single square block, the satin stitches in the top triangle are vertical, while those in the bottom are horizontal.
This subtle shift in stitch direction causes the threads to reflect light differently, creating a dynamic, almost three-dimensional pattern without changing thread color.
This technique requires precision, so work in a well-lit space and maintain consistent tension for the cleanest results.
8. Illuminate Stitches on a Translucent Lampshade
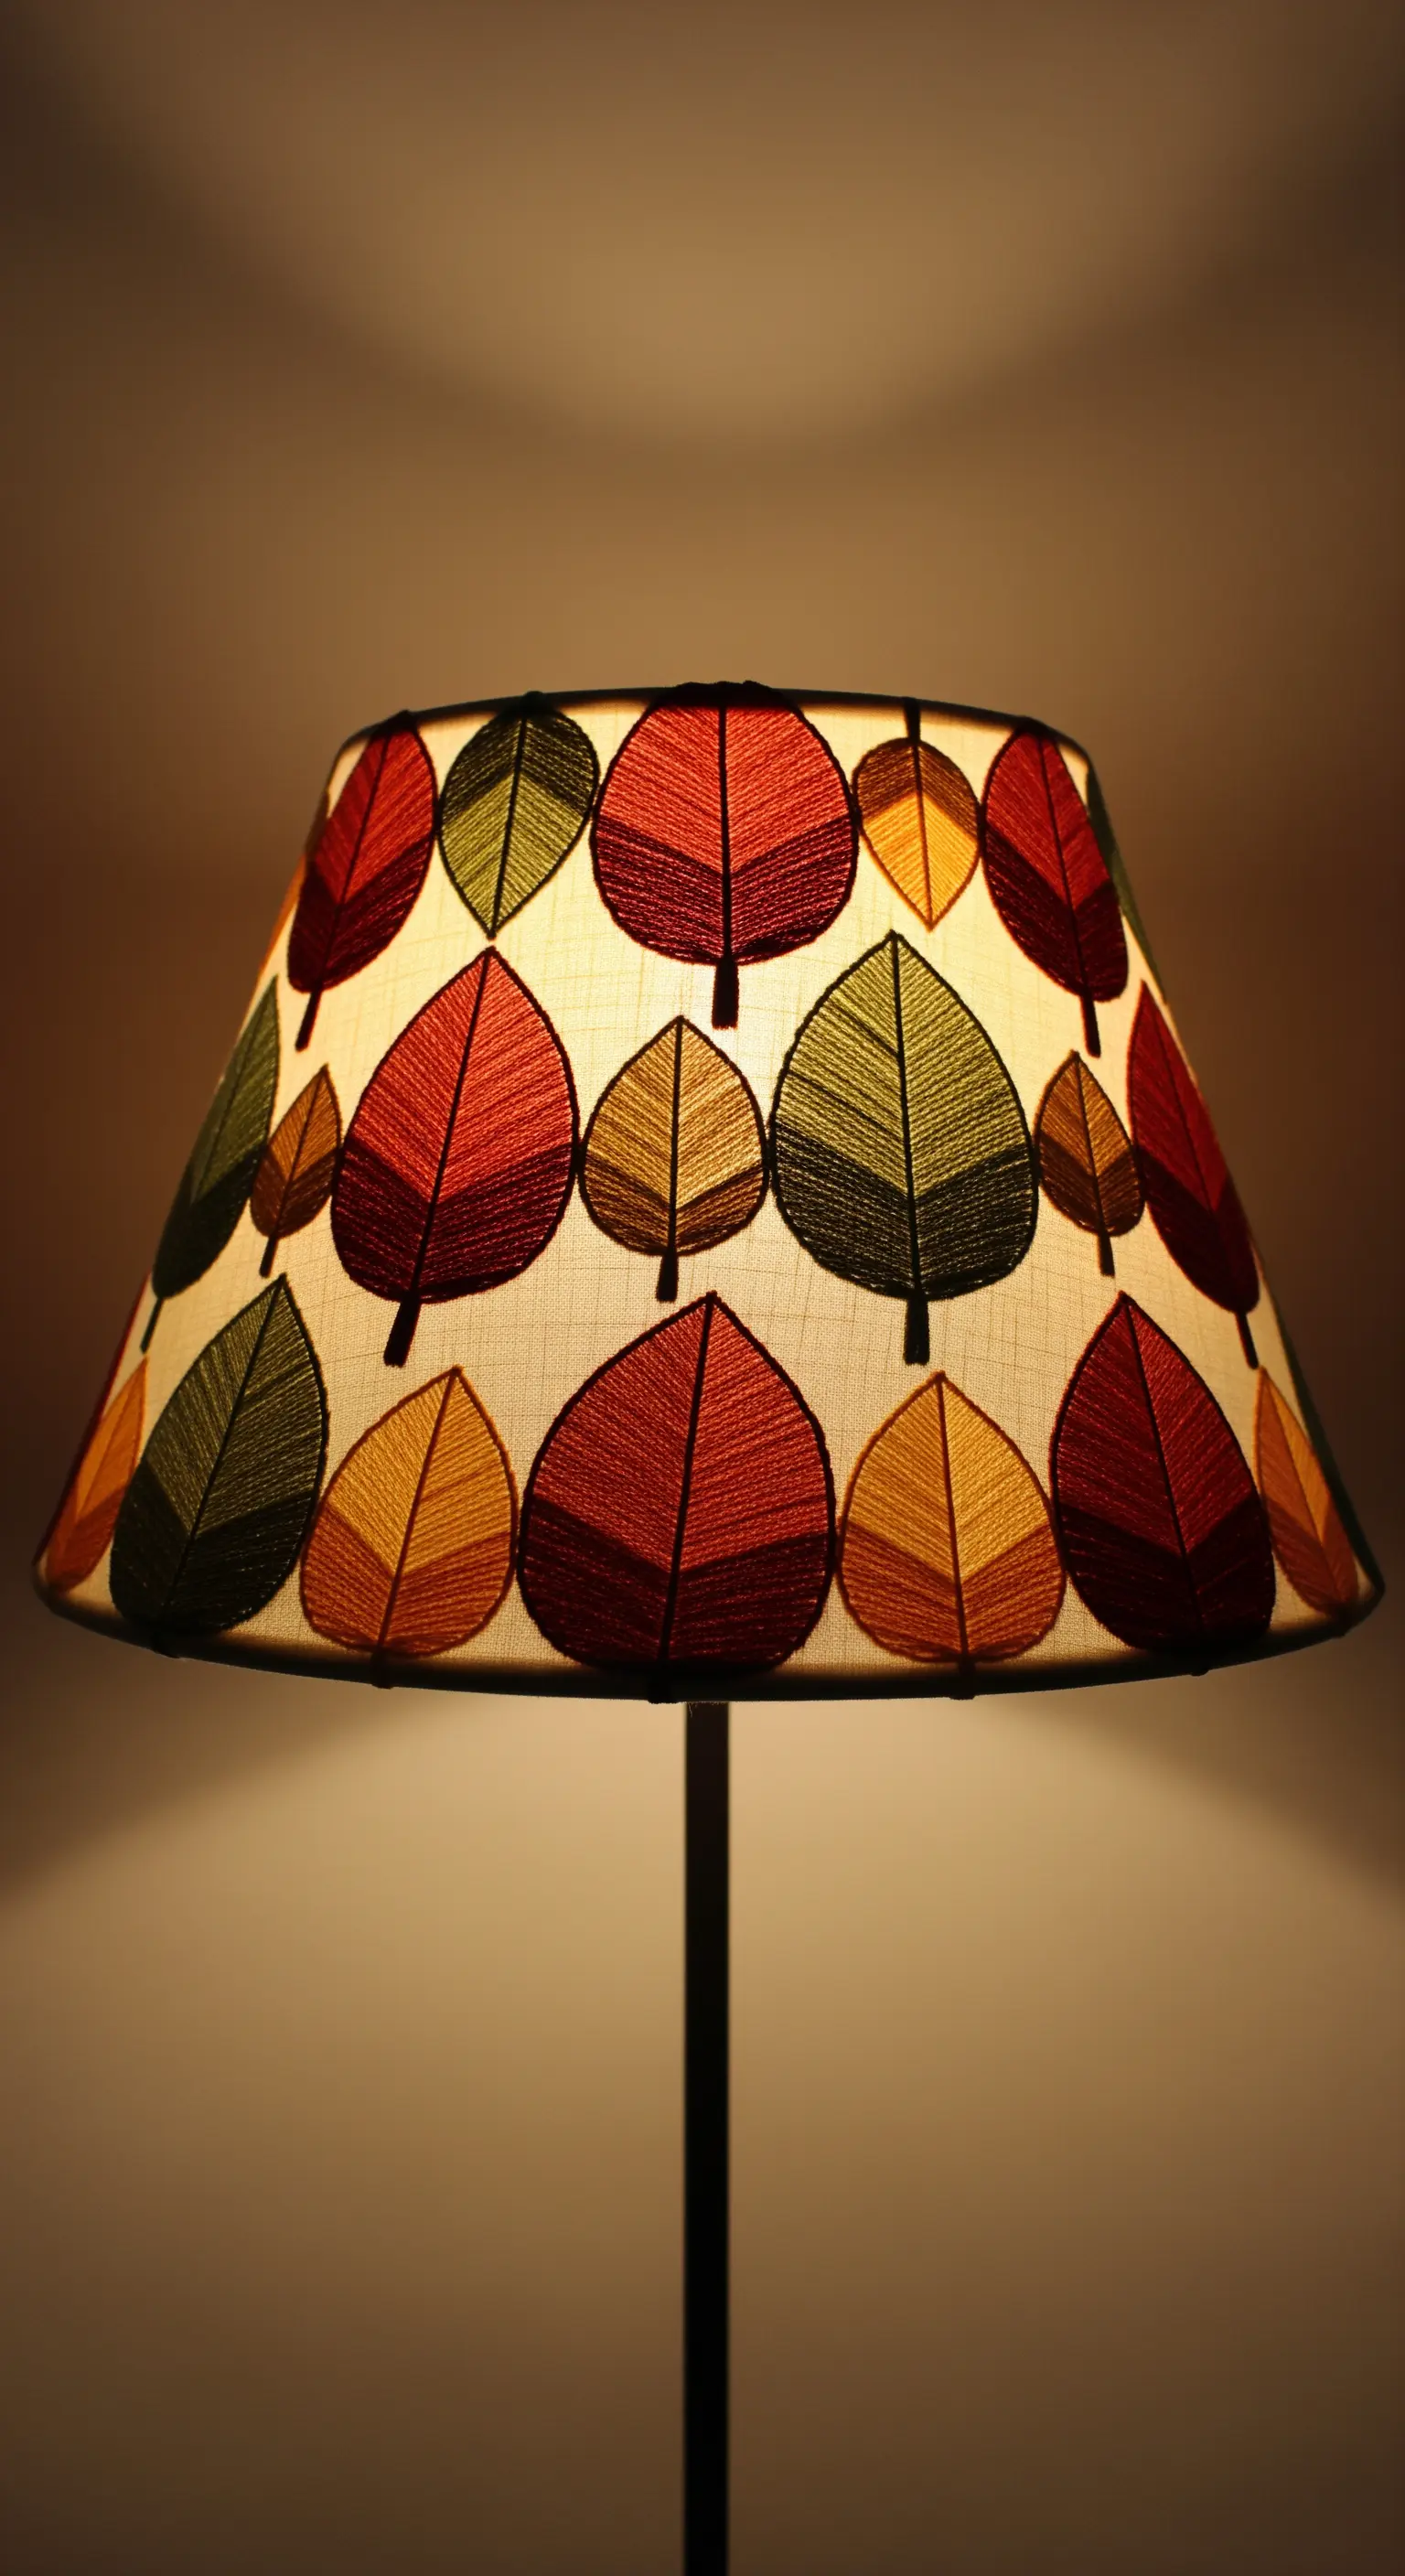
When embroidering on a surface that will be backlit, your stitch choice is critical.
Use a dense fill stitch like satin stitch or long-and-short stitch to ensure the color remains vibrant when the light is on.
A clean split stitch outline defines each shape, preventing the design from looking washed out.
The effect is magical, turning a simple embroidered piece into a functional object that glows from within.
9. Weave a Gradient with Circular Brick Stitch
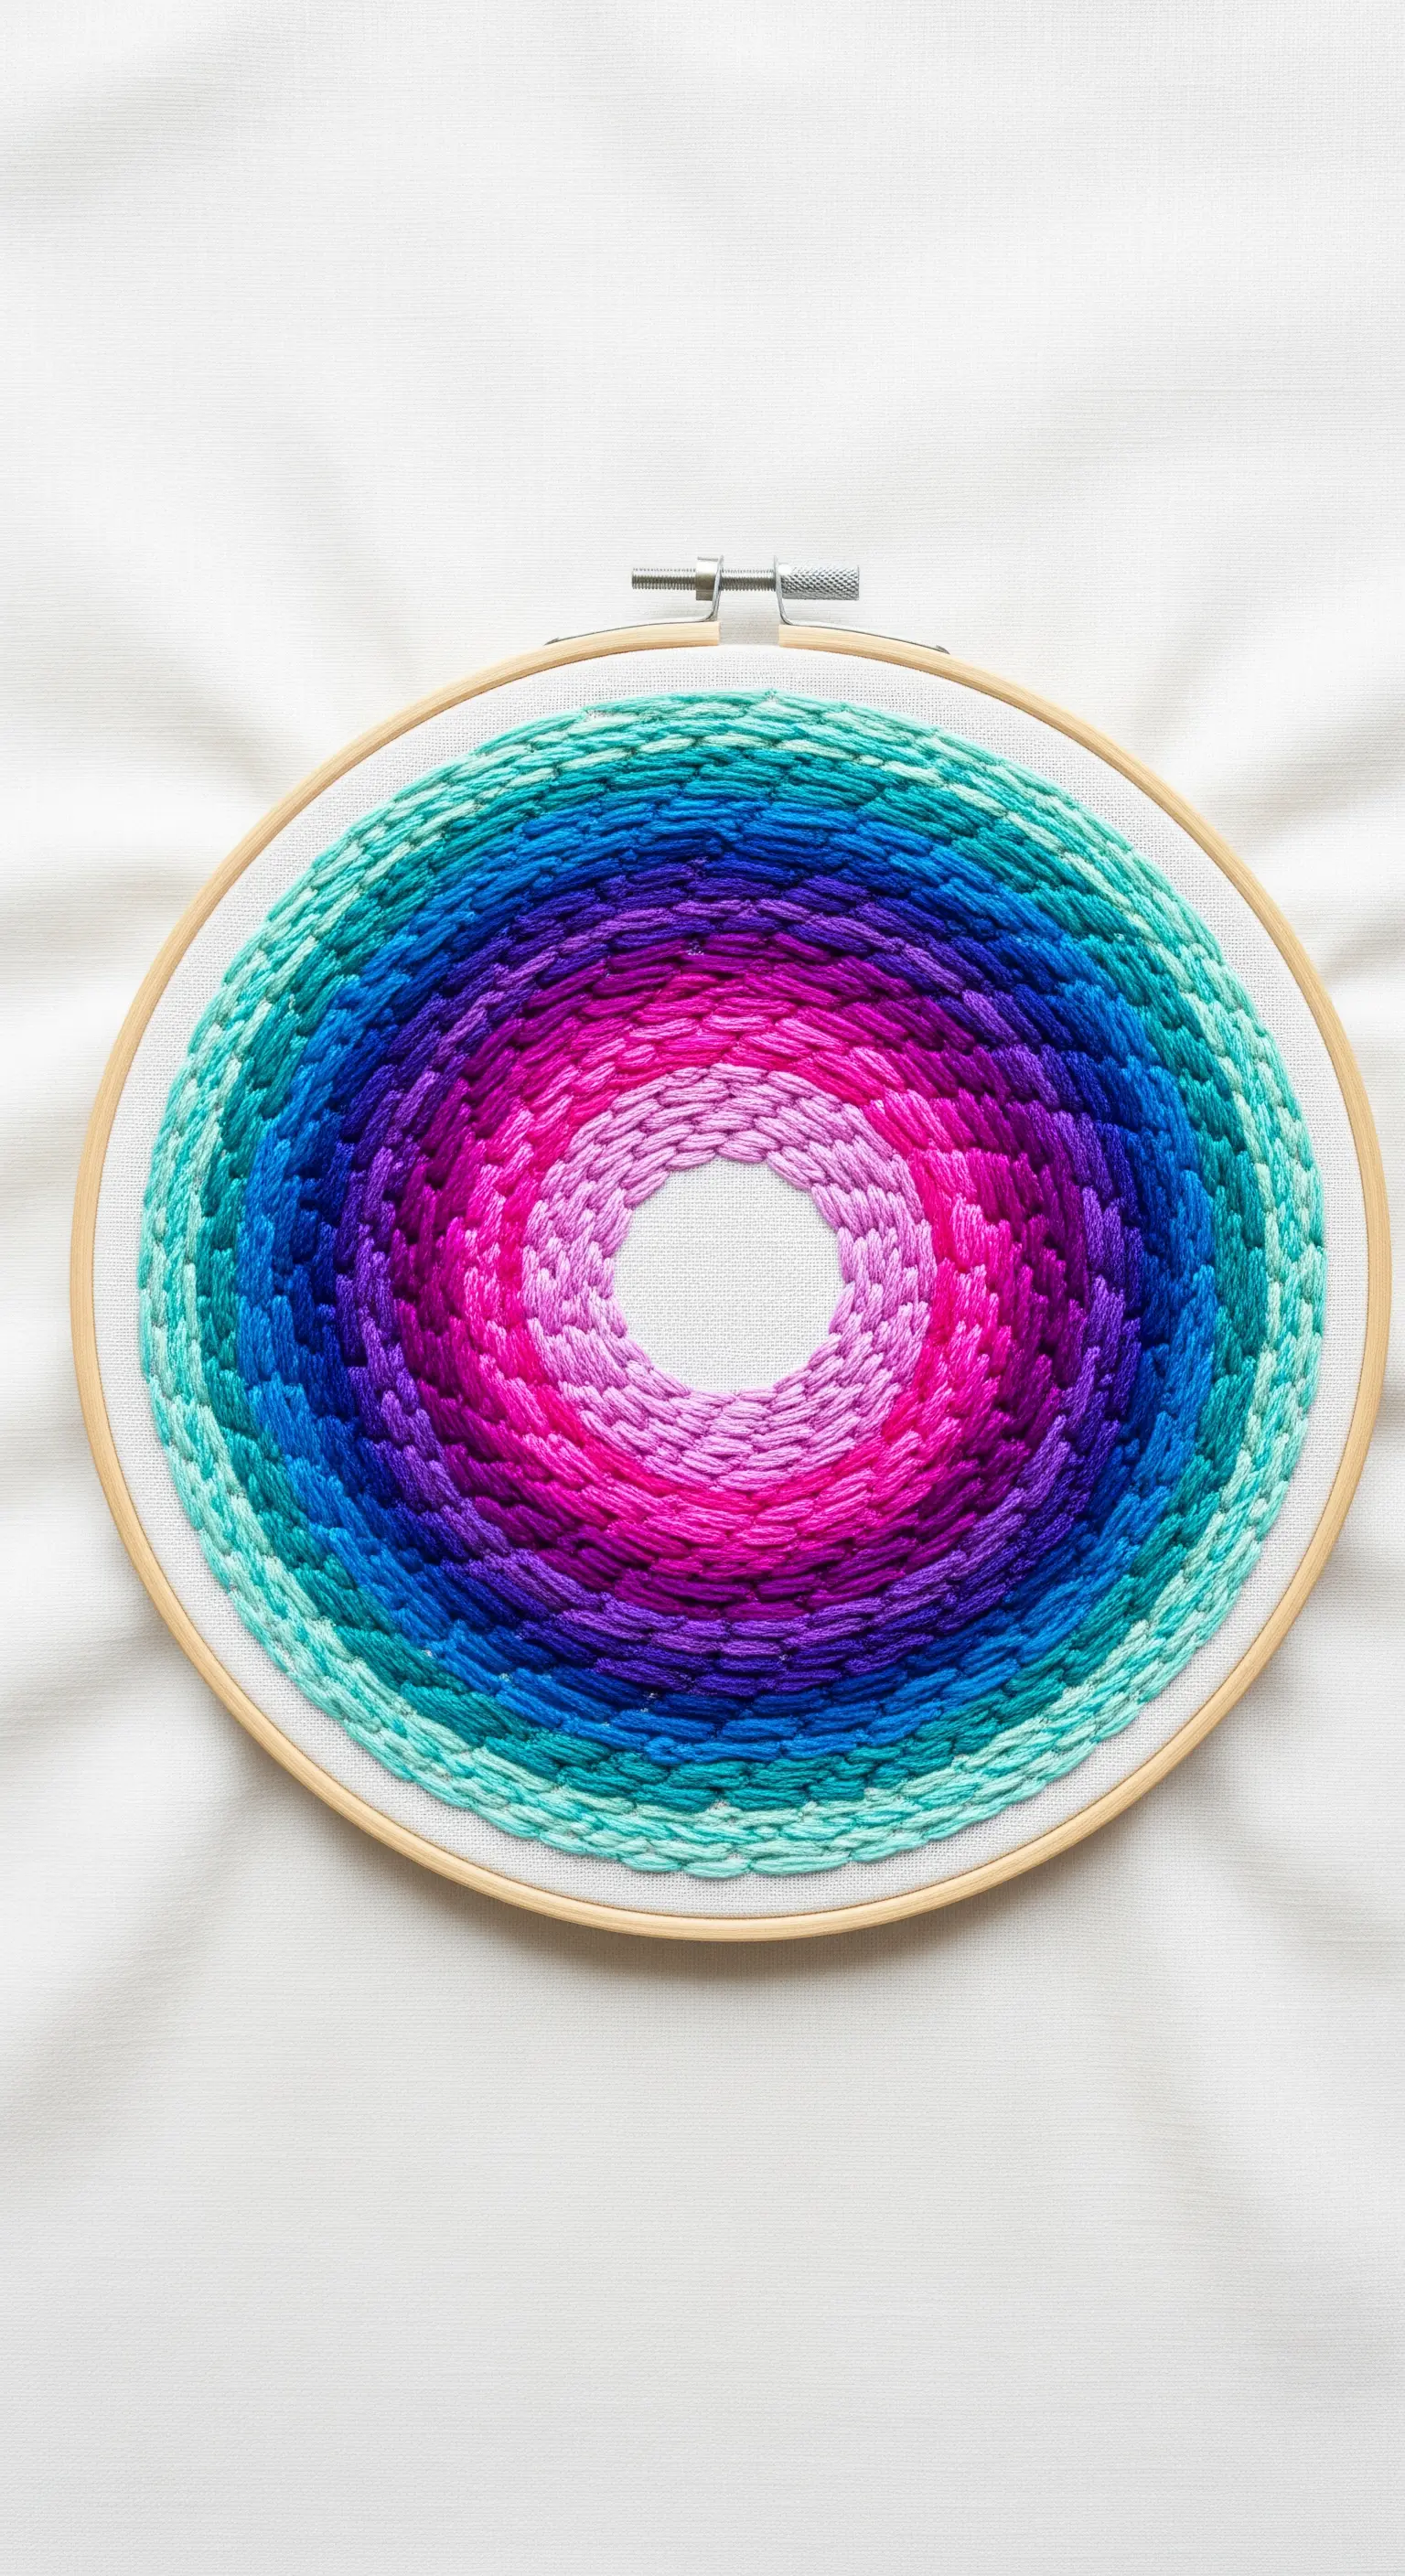
For filling large circular areas, circular brick stitch is a fantastic alternative to satin stitch.
You work in concentric rounds, staggering each stitch so it sits between two stitches from the row below, creating a texture that resembles woven bricks.
This stitch is not only visually interesting but also very forgiving, as it easily hides minor imperfections and prevents the long, loose stitches that can occur with wide satin stitch circles.
The result is a dense, textured gradient with beautiful movement.
10. Achieve Flawless Blends with Machine Embroidery
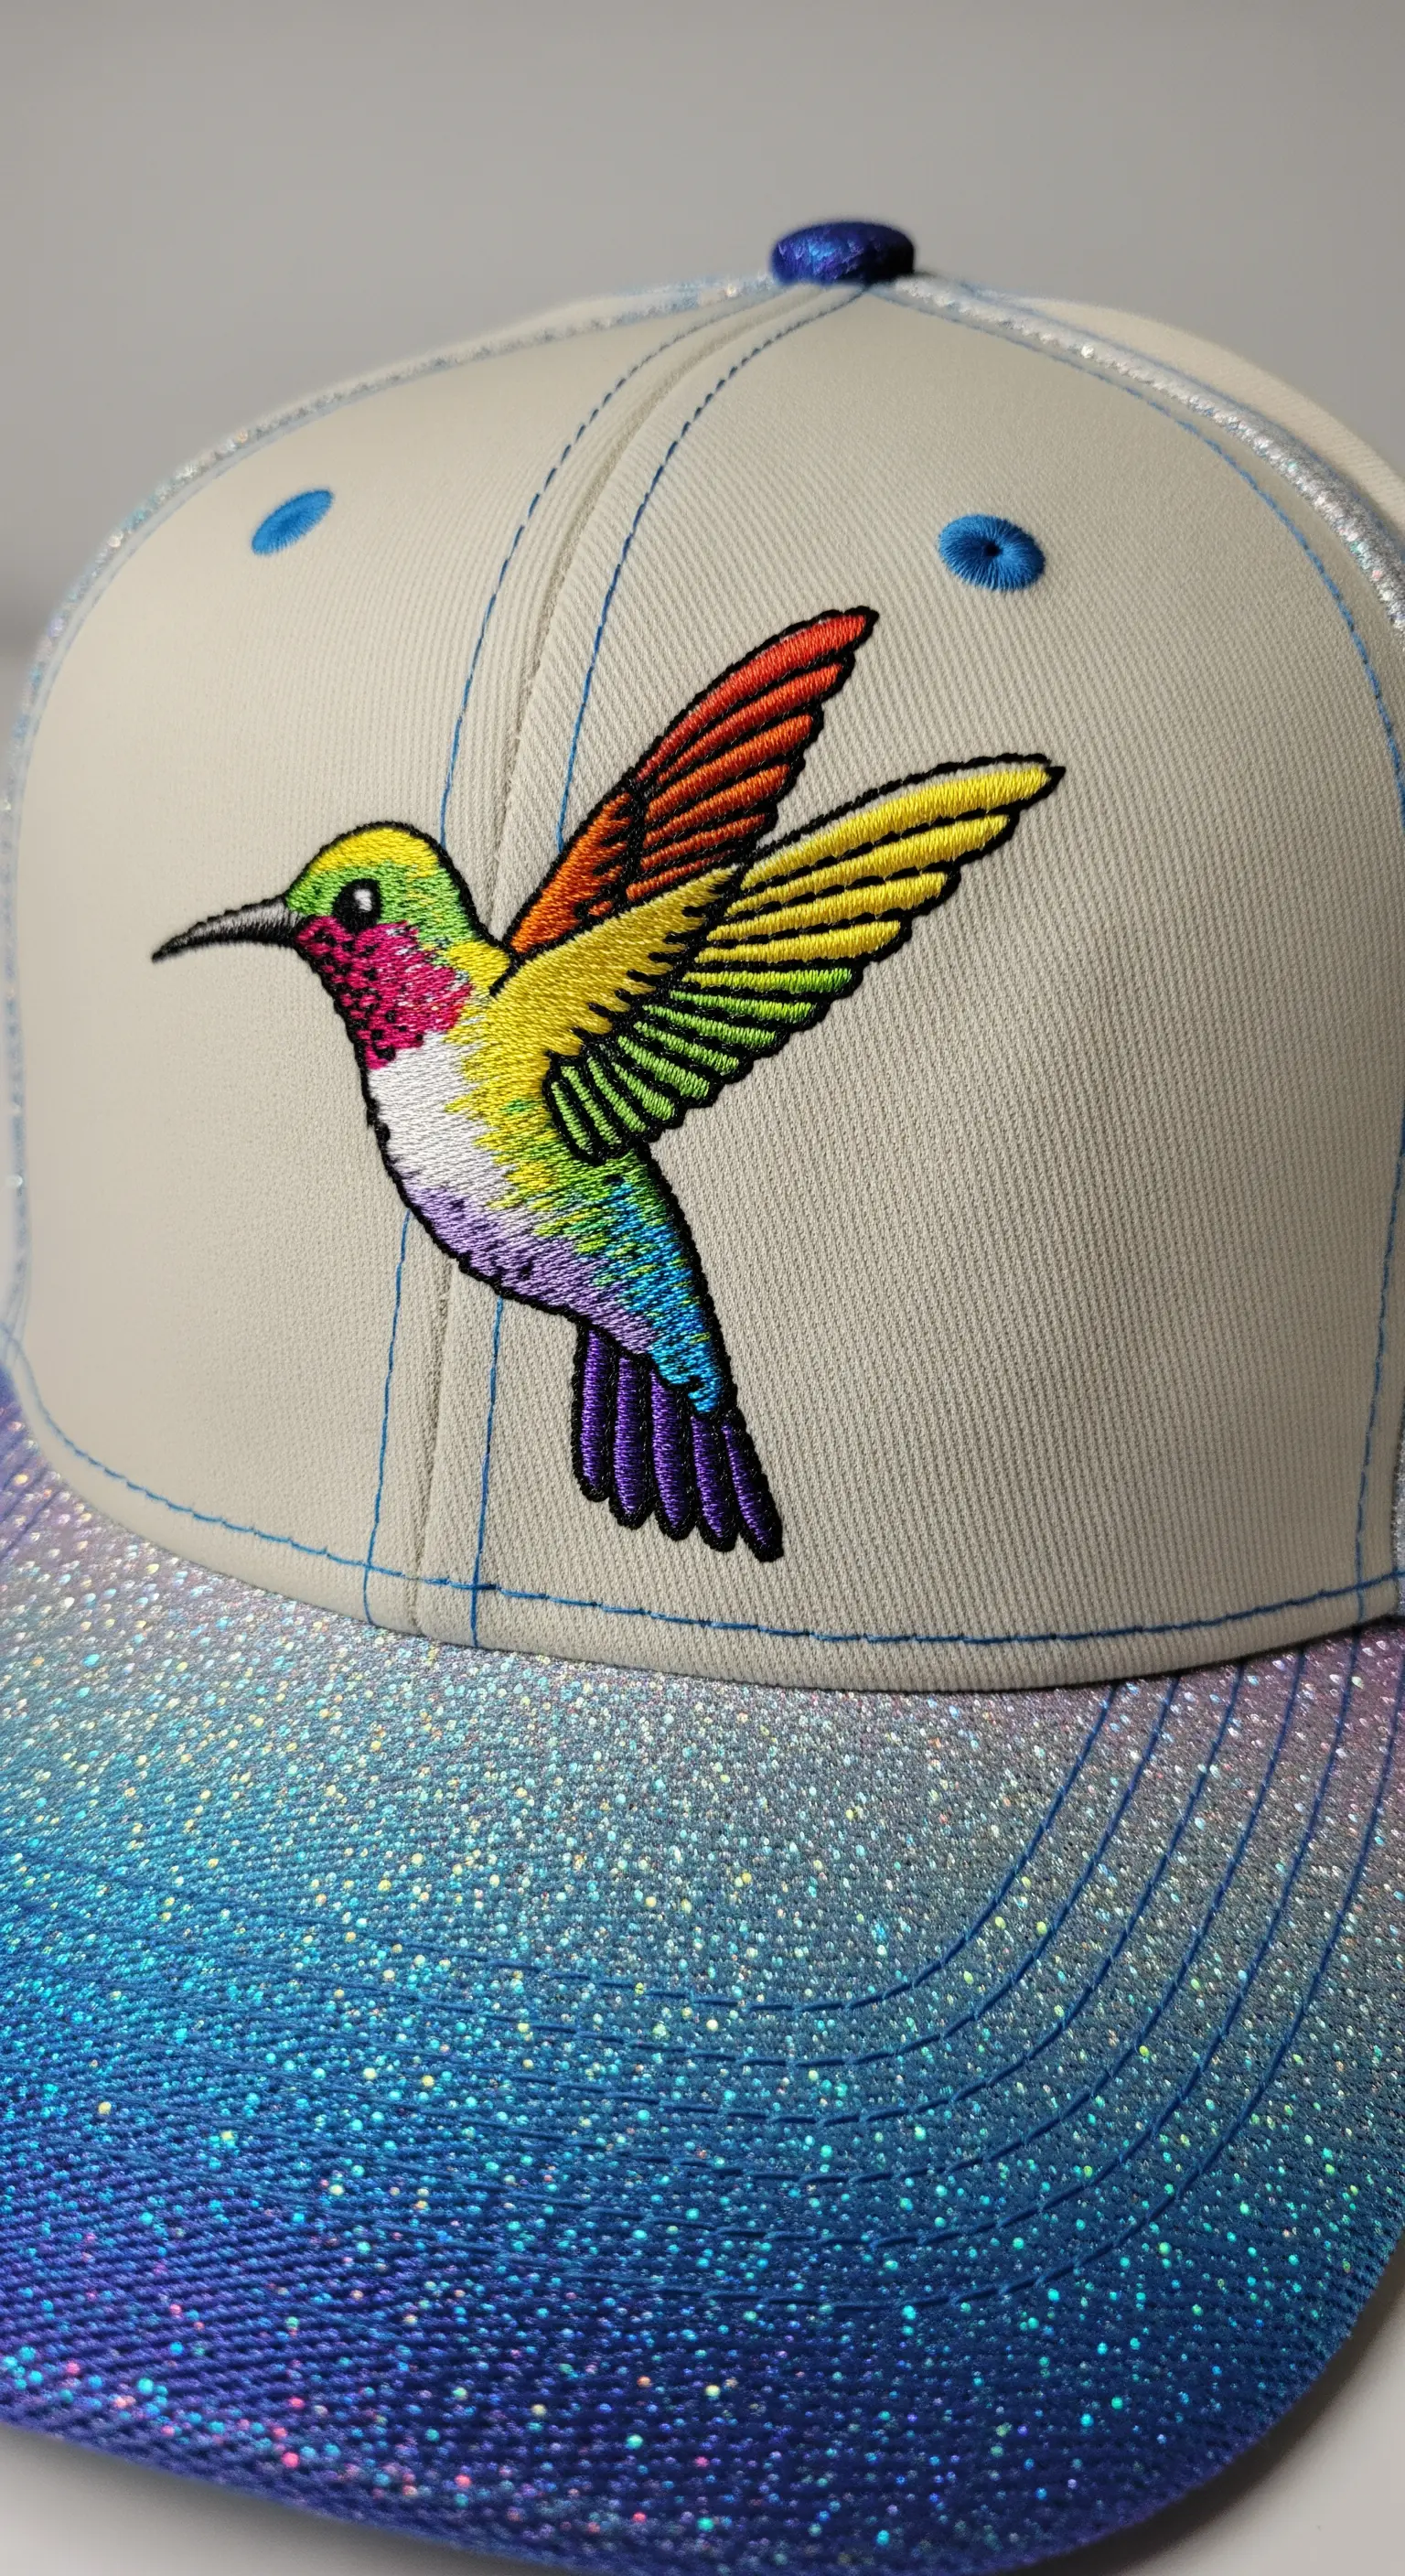
The perfectly smooth gradients on this hummingbird are the hallmark of digital machine embroidery.
The design is digitized into a file where each color transition is precisely programmed, allowing for seamless blending that would be incredibly time-consuming to achieve by hand.
This technology excels at creating detailed, durable designs on challenging items like structured hats, where maintaining even tension by hand is difficult.
11. Craft Minimalist Art with a Single Gradient Form
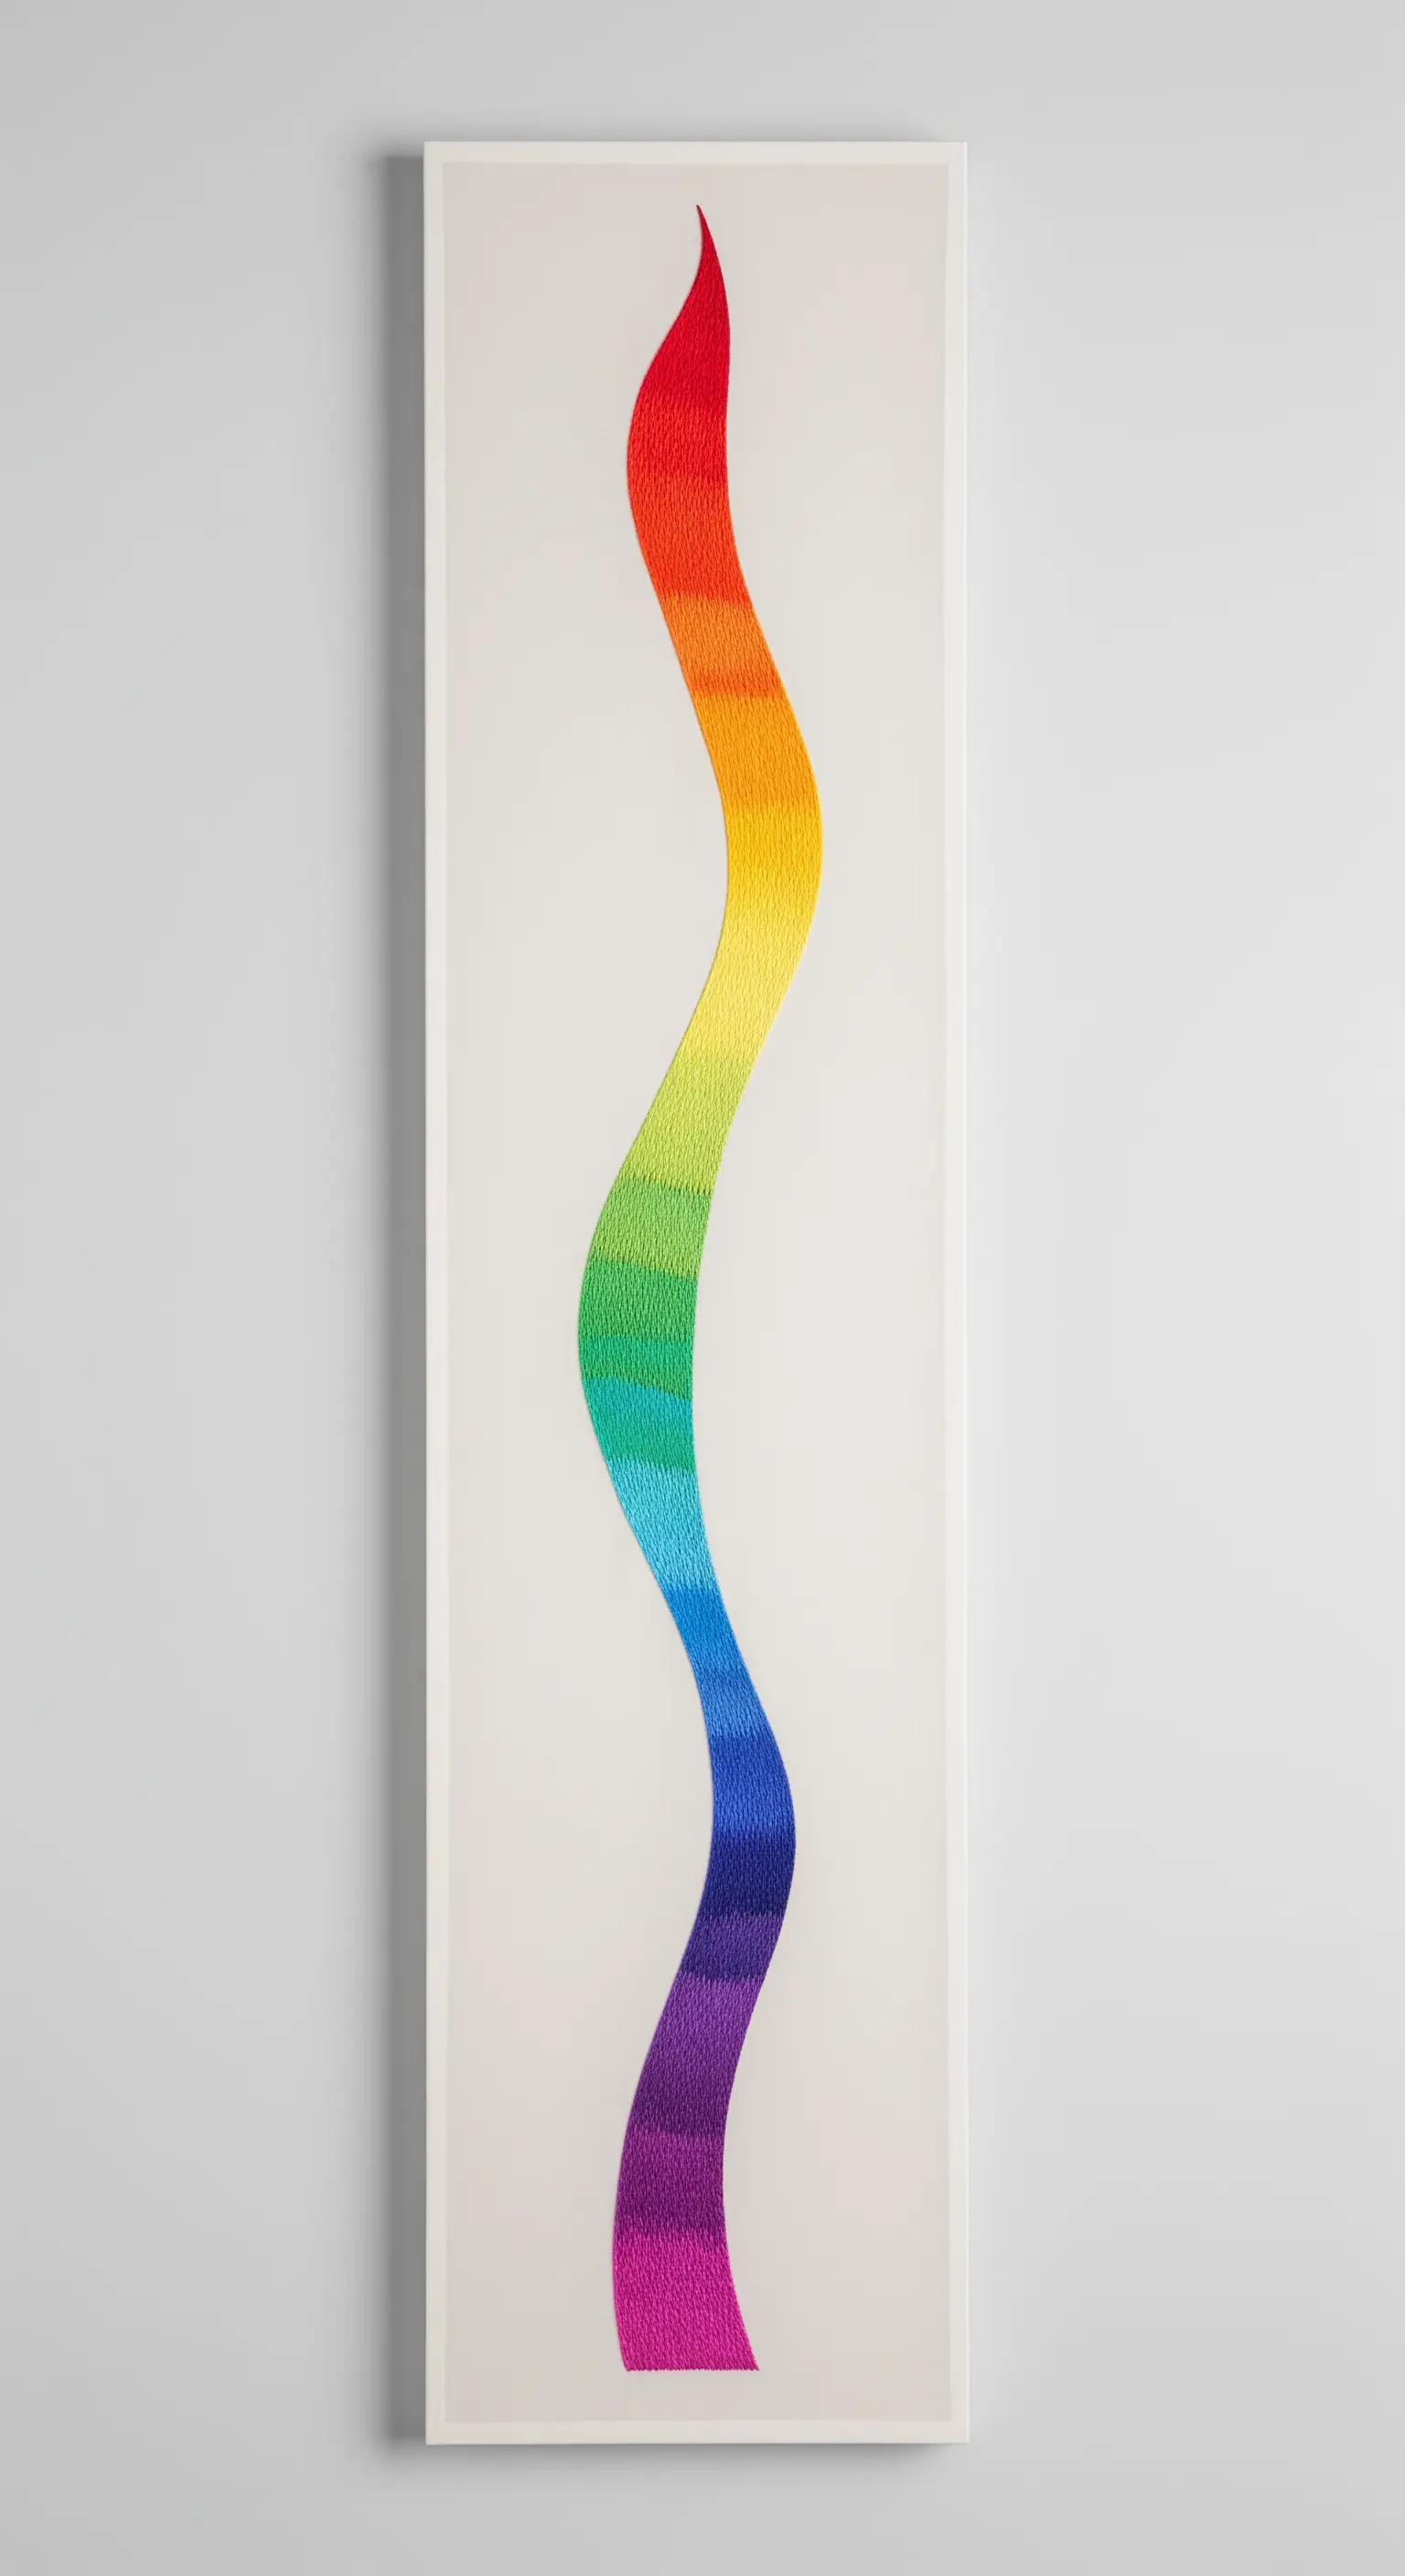
Prove that a single, elegant shape can be a powerful piece of art.
This fluid ribbon of color is created with meticulous long-and-short stitch, using a single strand of floss to achieve the smoothest possible transitions.
The key to a flawless blend is to ensure your new stitches split the stitches from the previous color row, interlocking them invisibly.
Stretching the final piece over a narrow, rectangular frame transforms it from a simple embroidery into sophisticated, minimalist wall art.
12. Add Subtle Elegance to Linens with Delicate Gradients
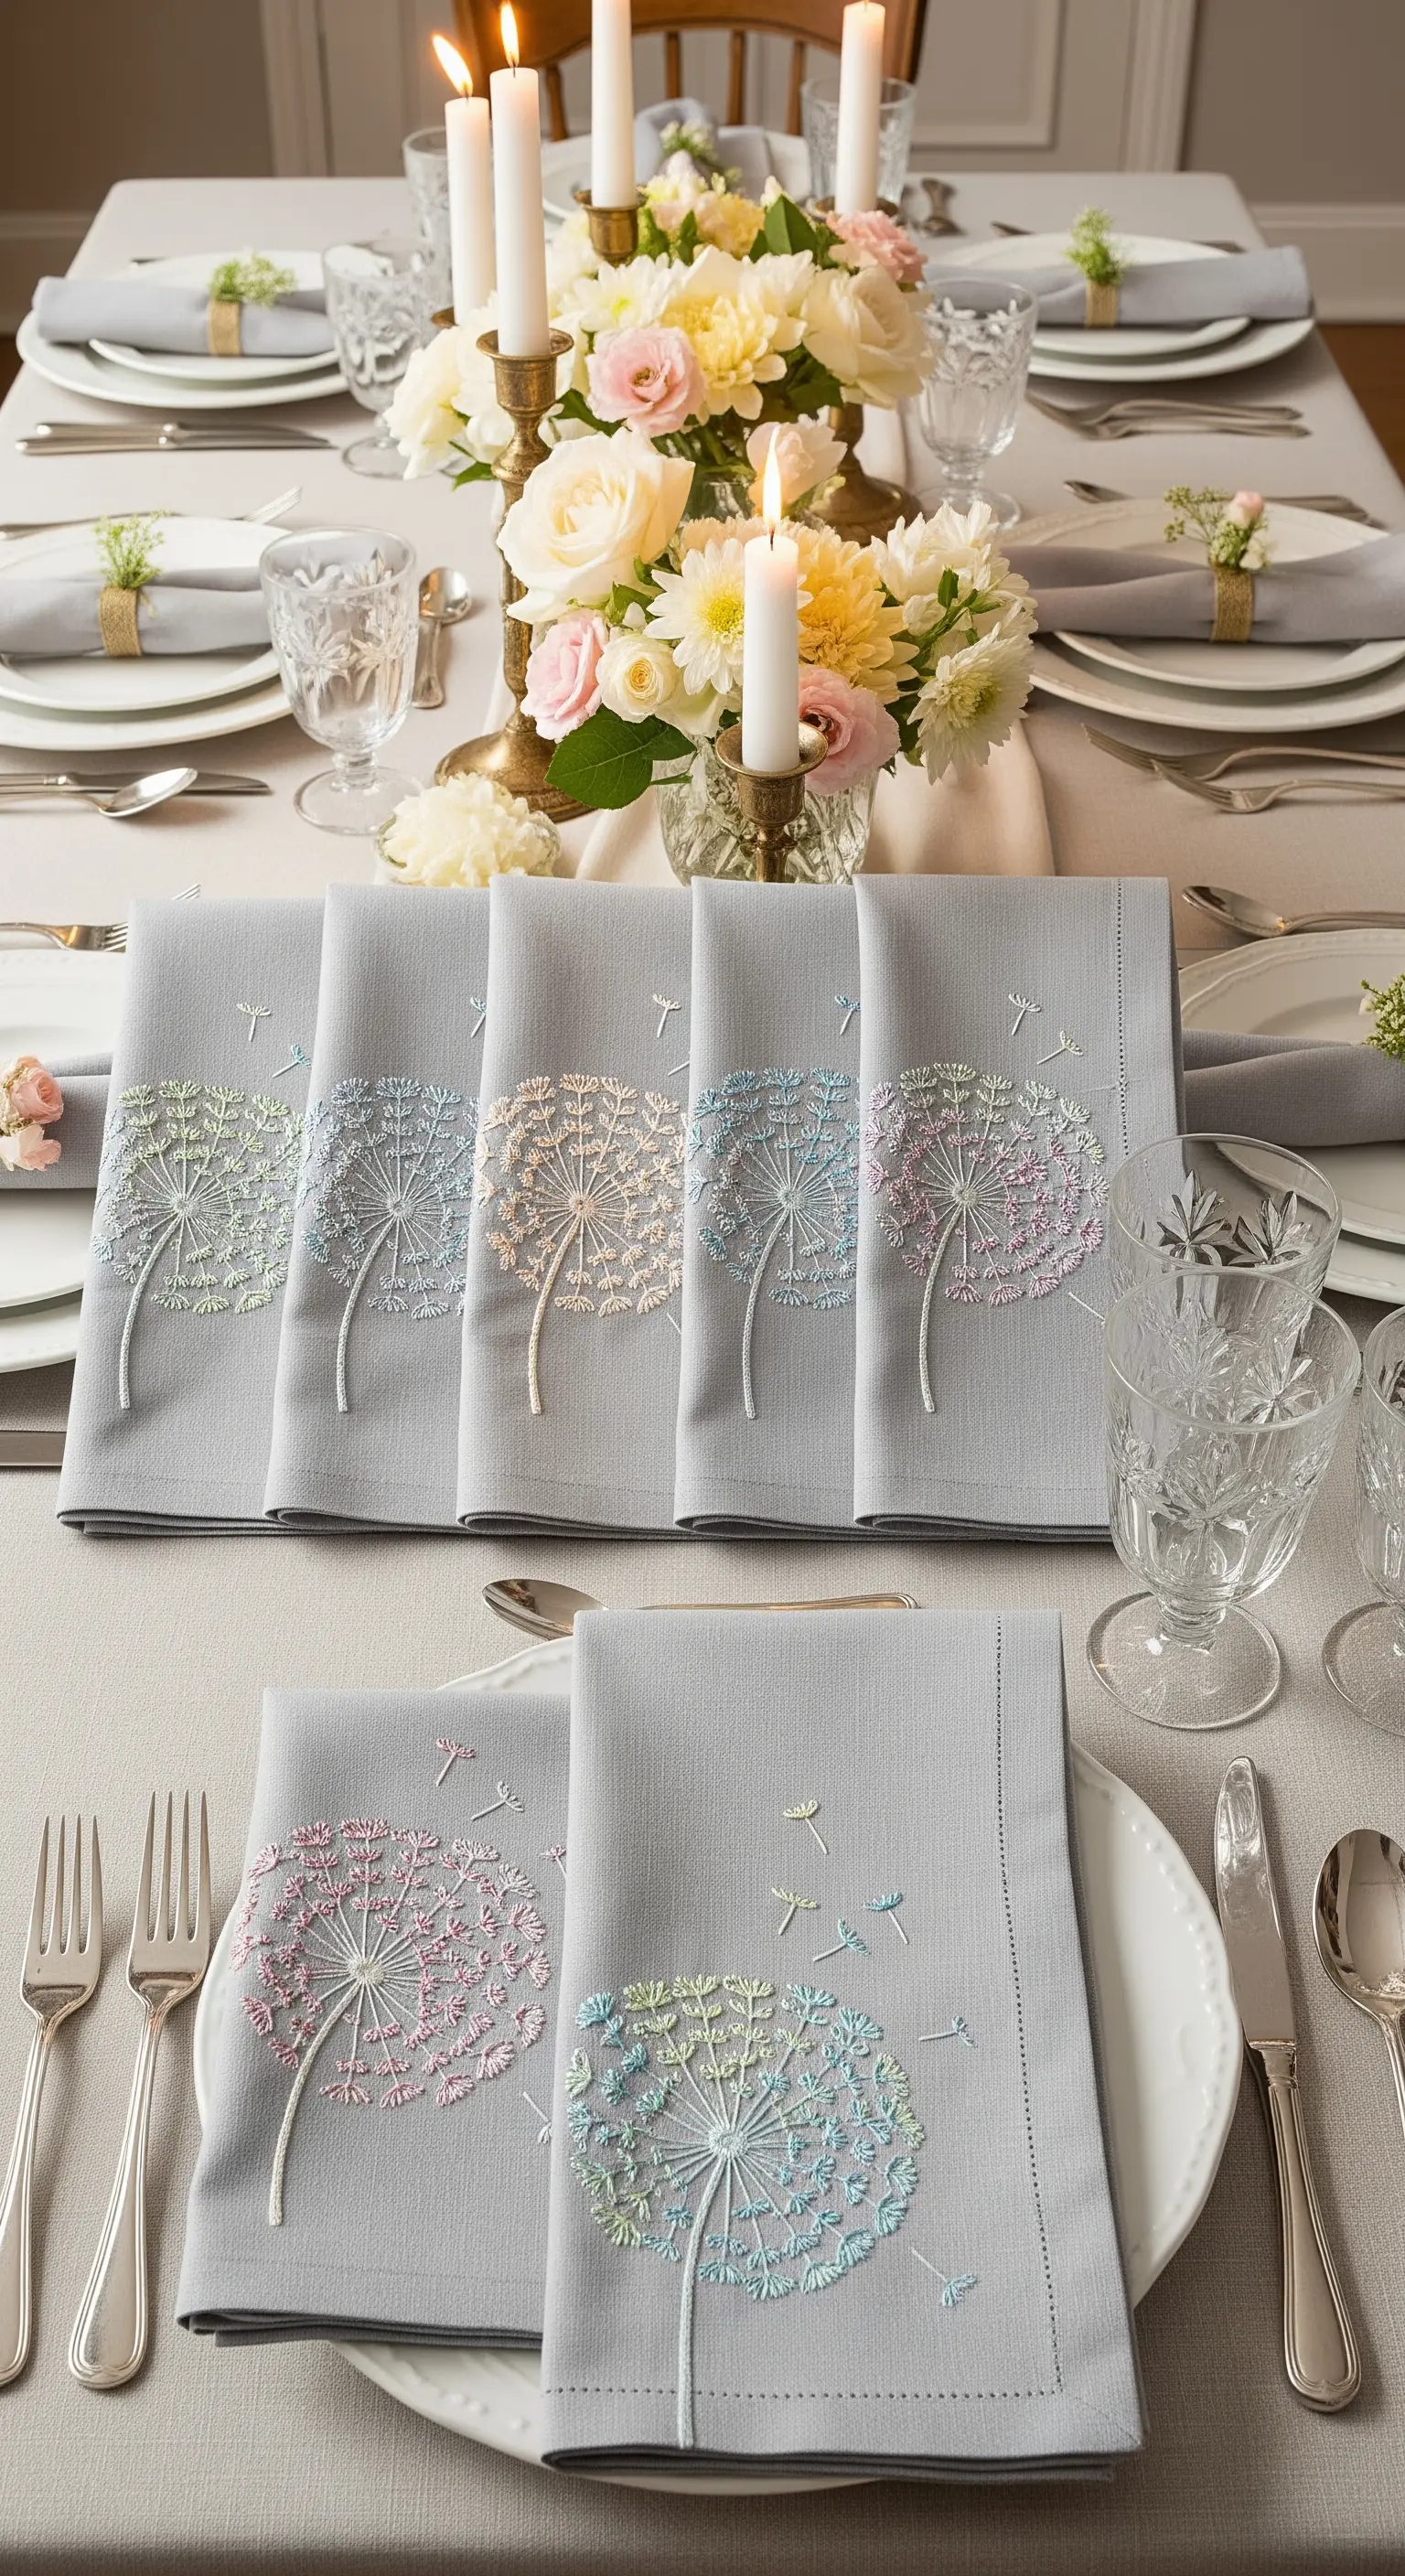
When embroidering on fine table linens, subtlety is key.
Use only one or two strands of floss to create these delicate dandelion heads, ensuring the embroidery doesn’t feel heavy or stiff.
The ombré effect is achieved by blending just two or three closely matched pastel shades within the seed head.
A few detached straight stitches for the drifting seeds add a sense of lightness and movement, completing the elegant design.
13. Tell a Story by Contrasting Textures
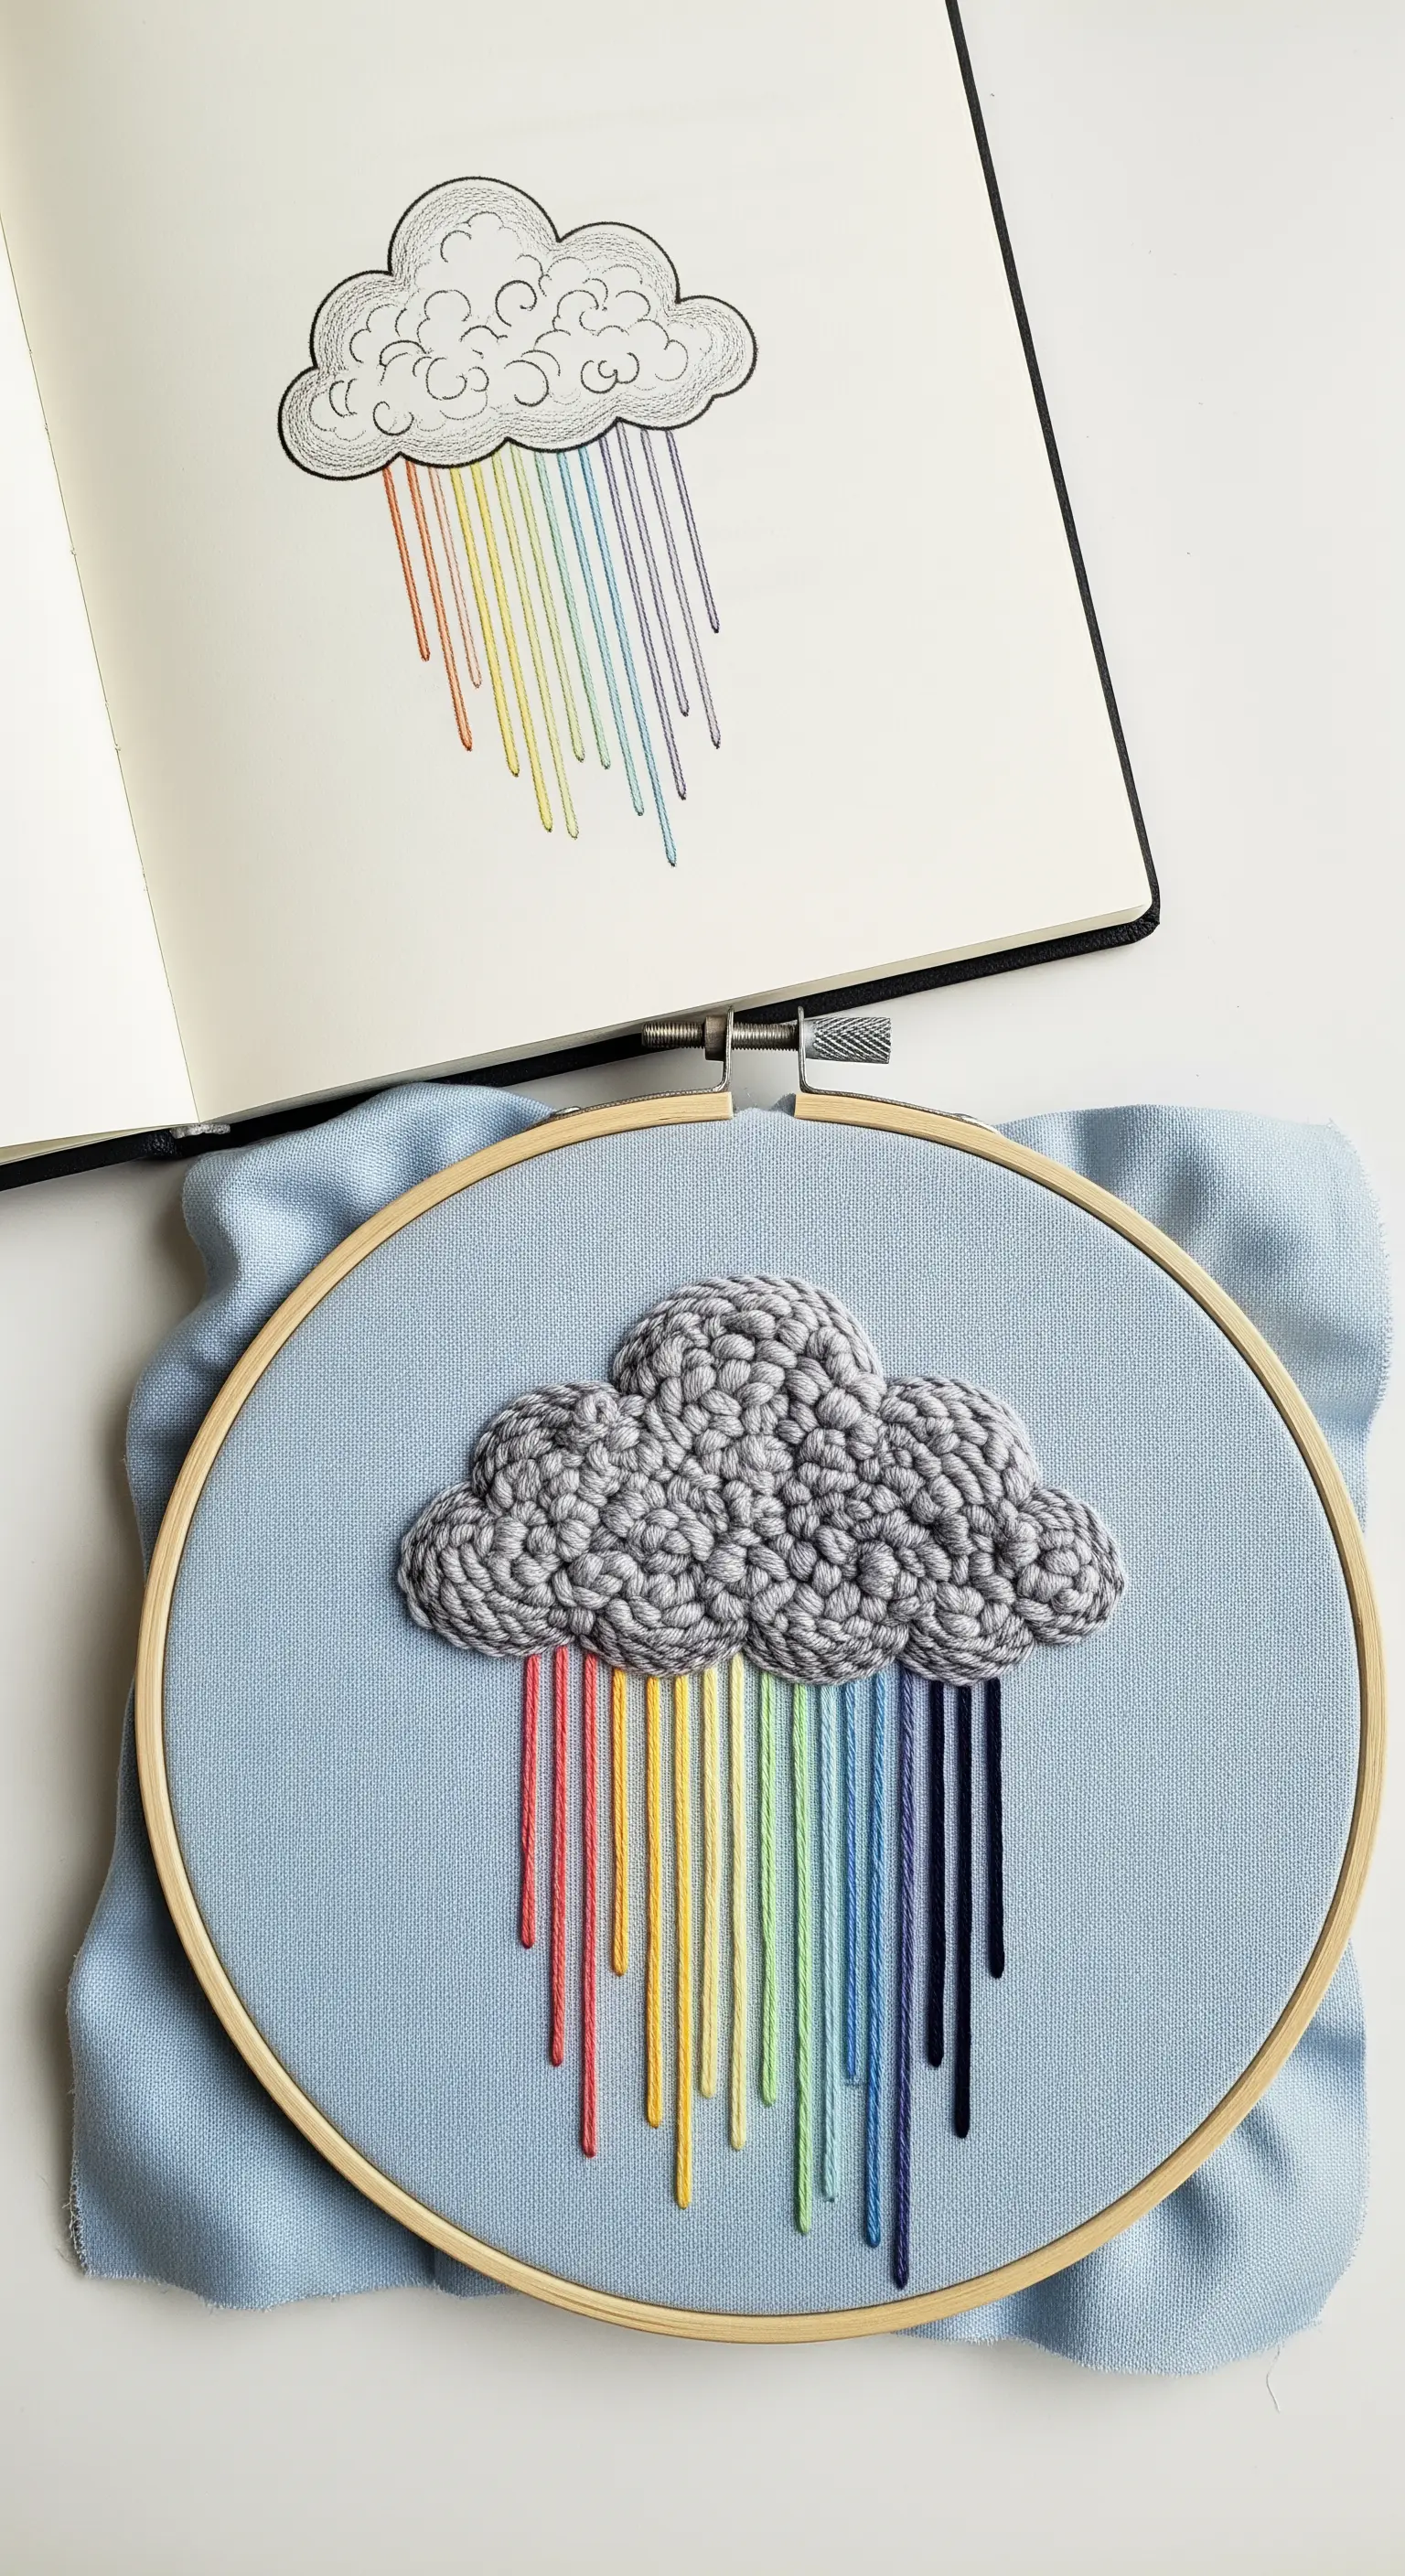
Create a compelling visual narrative by pairing two dramatically different textures.
The storm cloud is brought to life with a dense, bumpy fill of French knots in various shades of gray, giving it a puffy, three-dimensional quality.
In contrast, the rain is made of sleek, long straight stitches in a clean rainbow gradient.
This juxtaposition—the chaotic texture of the cloud and the orderly flow of the rain—makes the simple design incredibly expressive and engaging.
14. Map a Modern Constellation with a Spectrum of Stitches
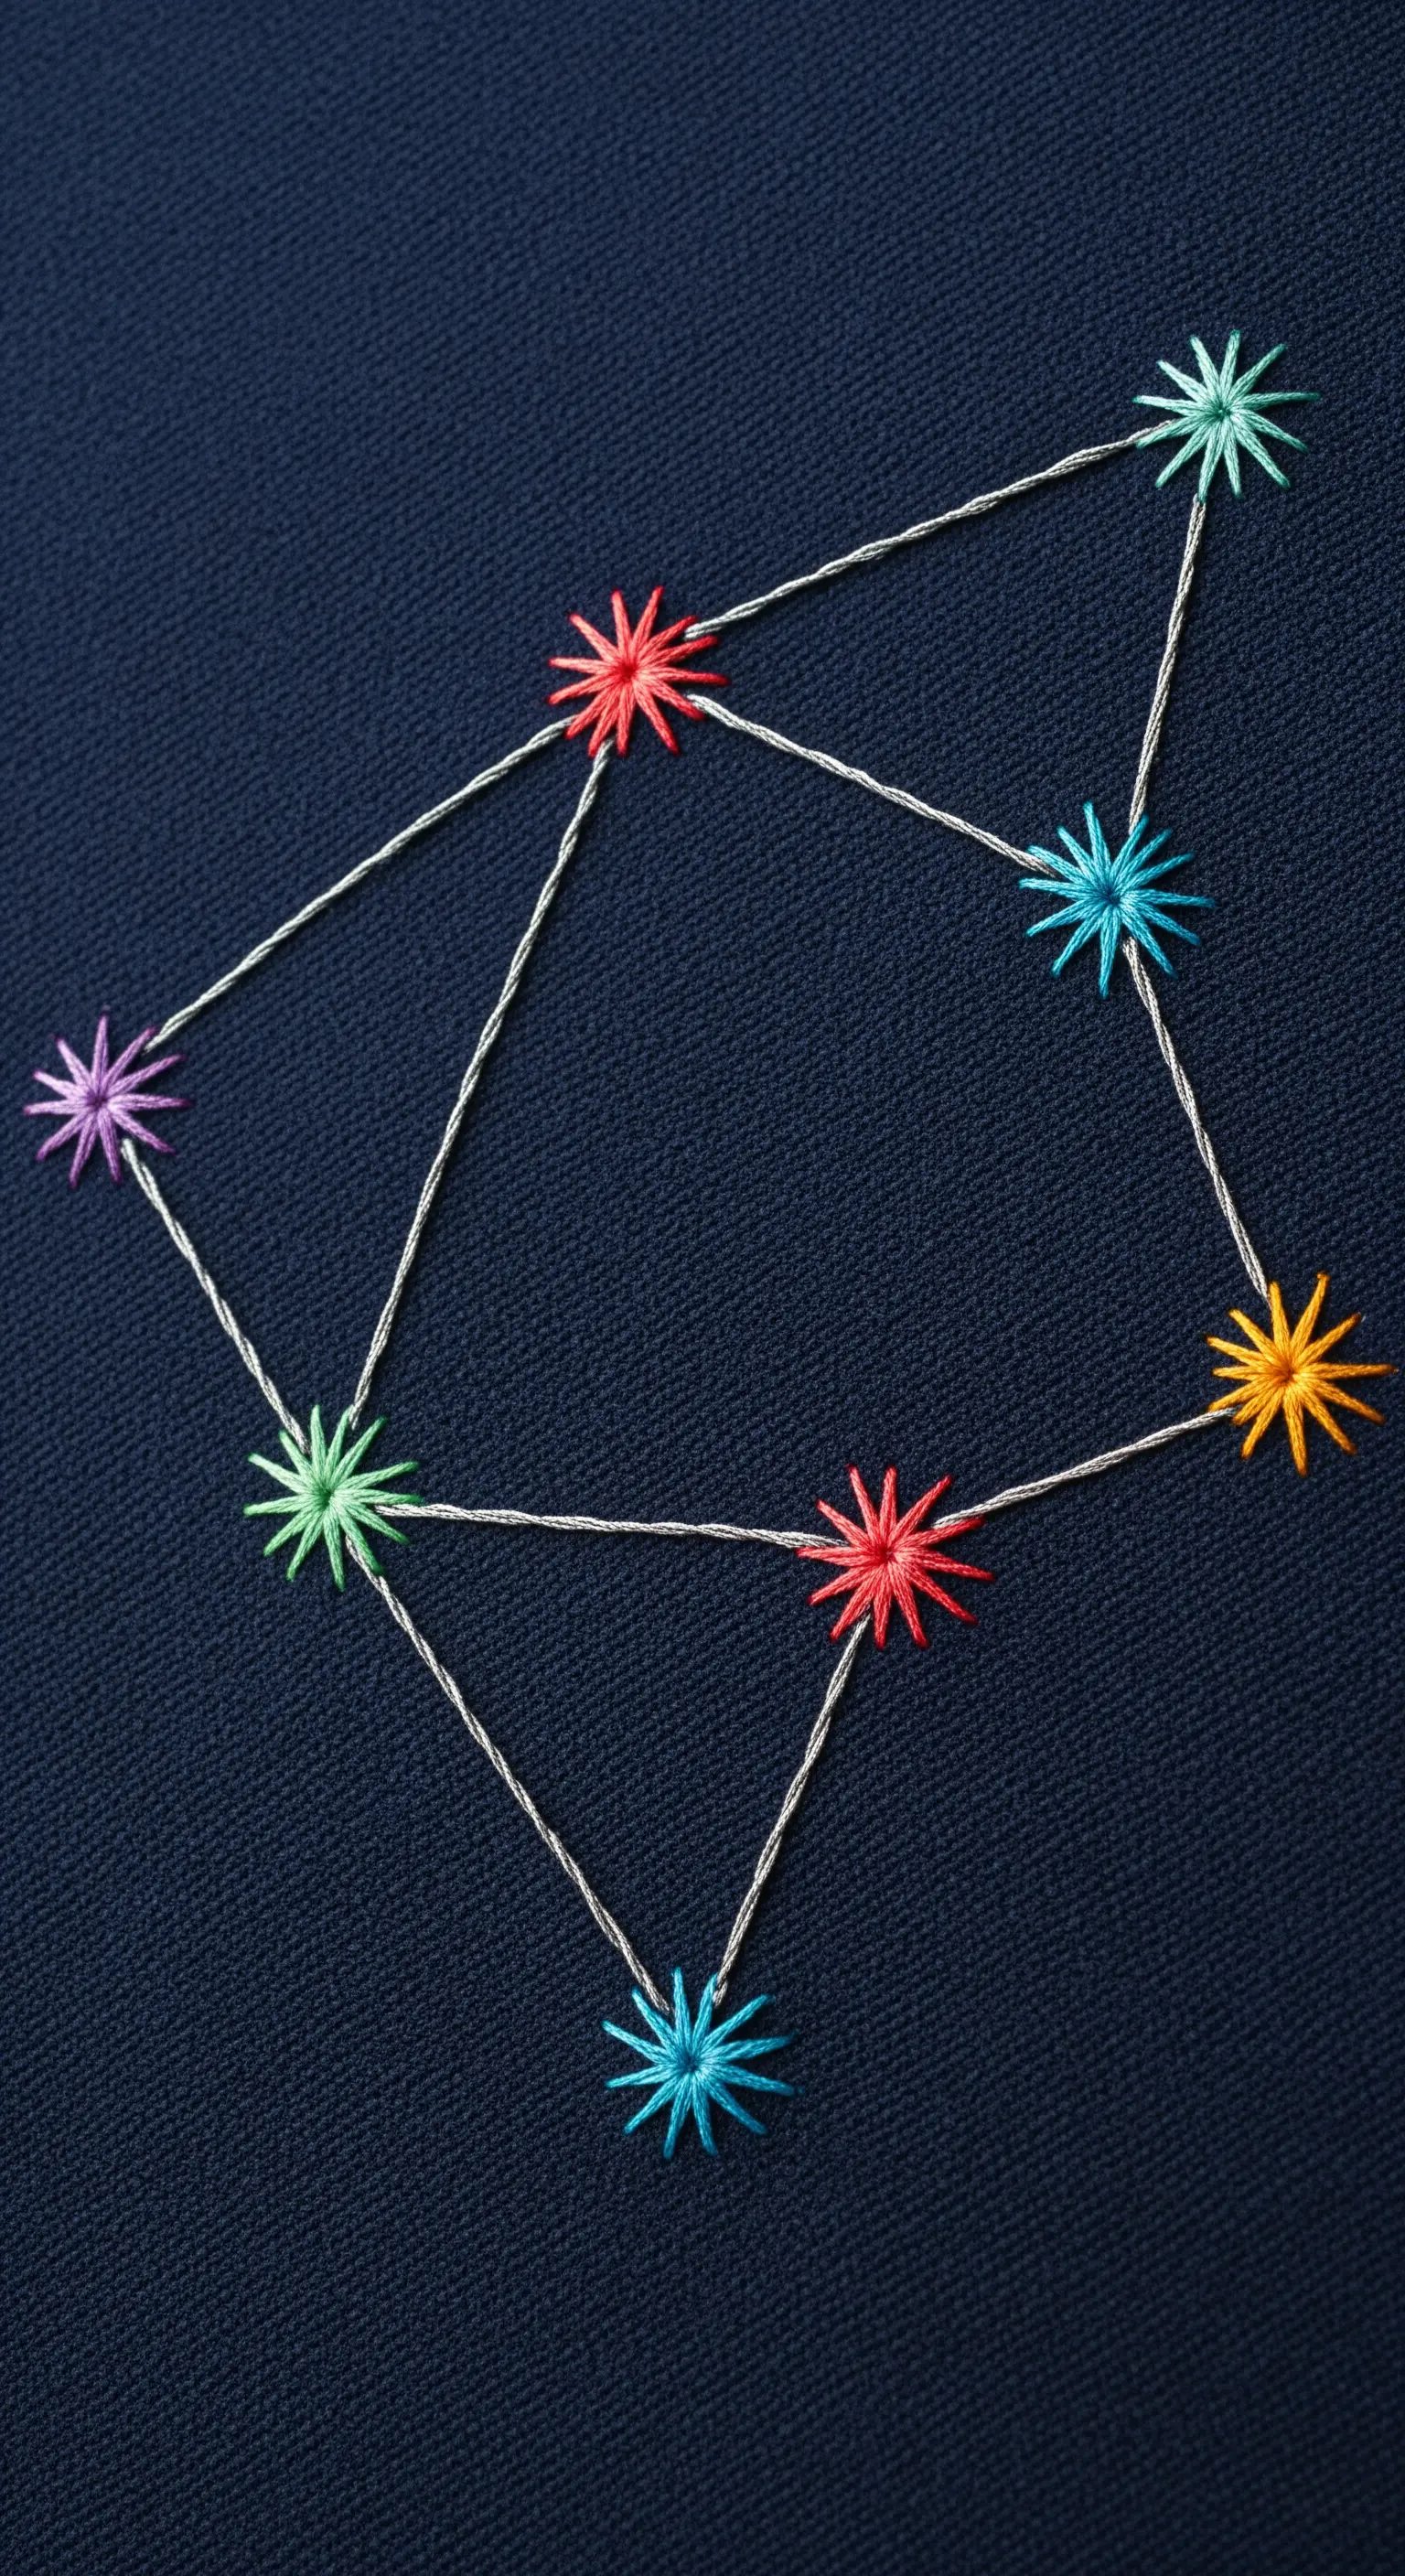
Reimagine celestial embroidery with a clean, modern aesthetic.
Each point in this constellation is a vibrant star stitch (or a small woven wheel), with each star worked in a different color of the rainbow.
Connect the points with a delicate, single-strand backstitch using a fine metallic or silver thread for a subtle shimmer.
The high-contrast navy blue fabric makes the colors appear to glow, like stars against the night sky.
15. Define Gradient Panels with Bold Outlines
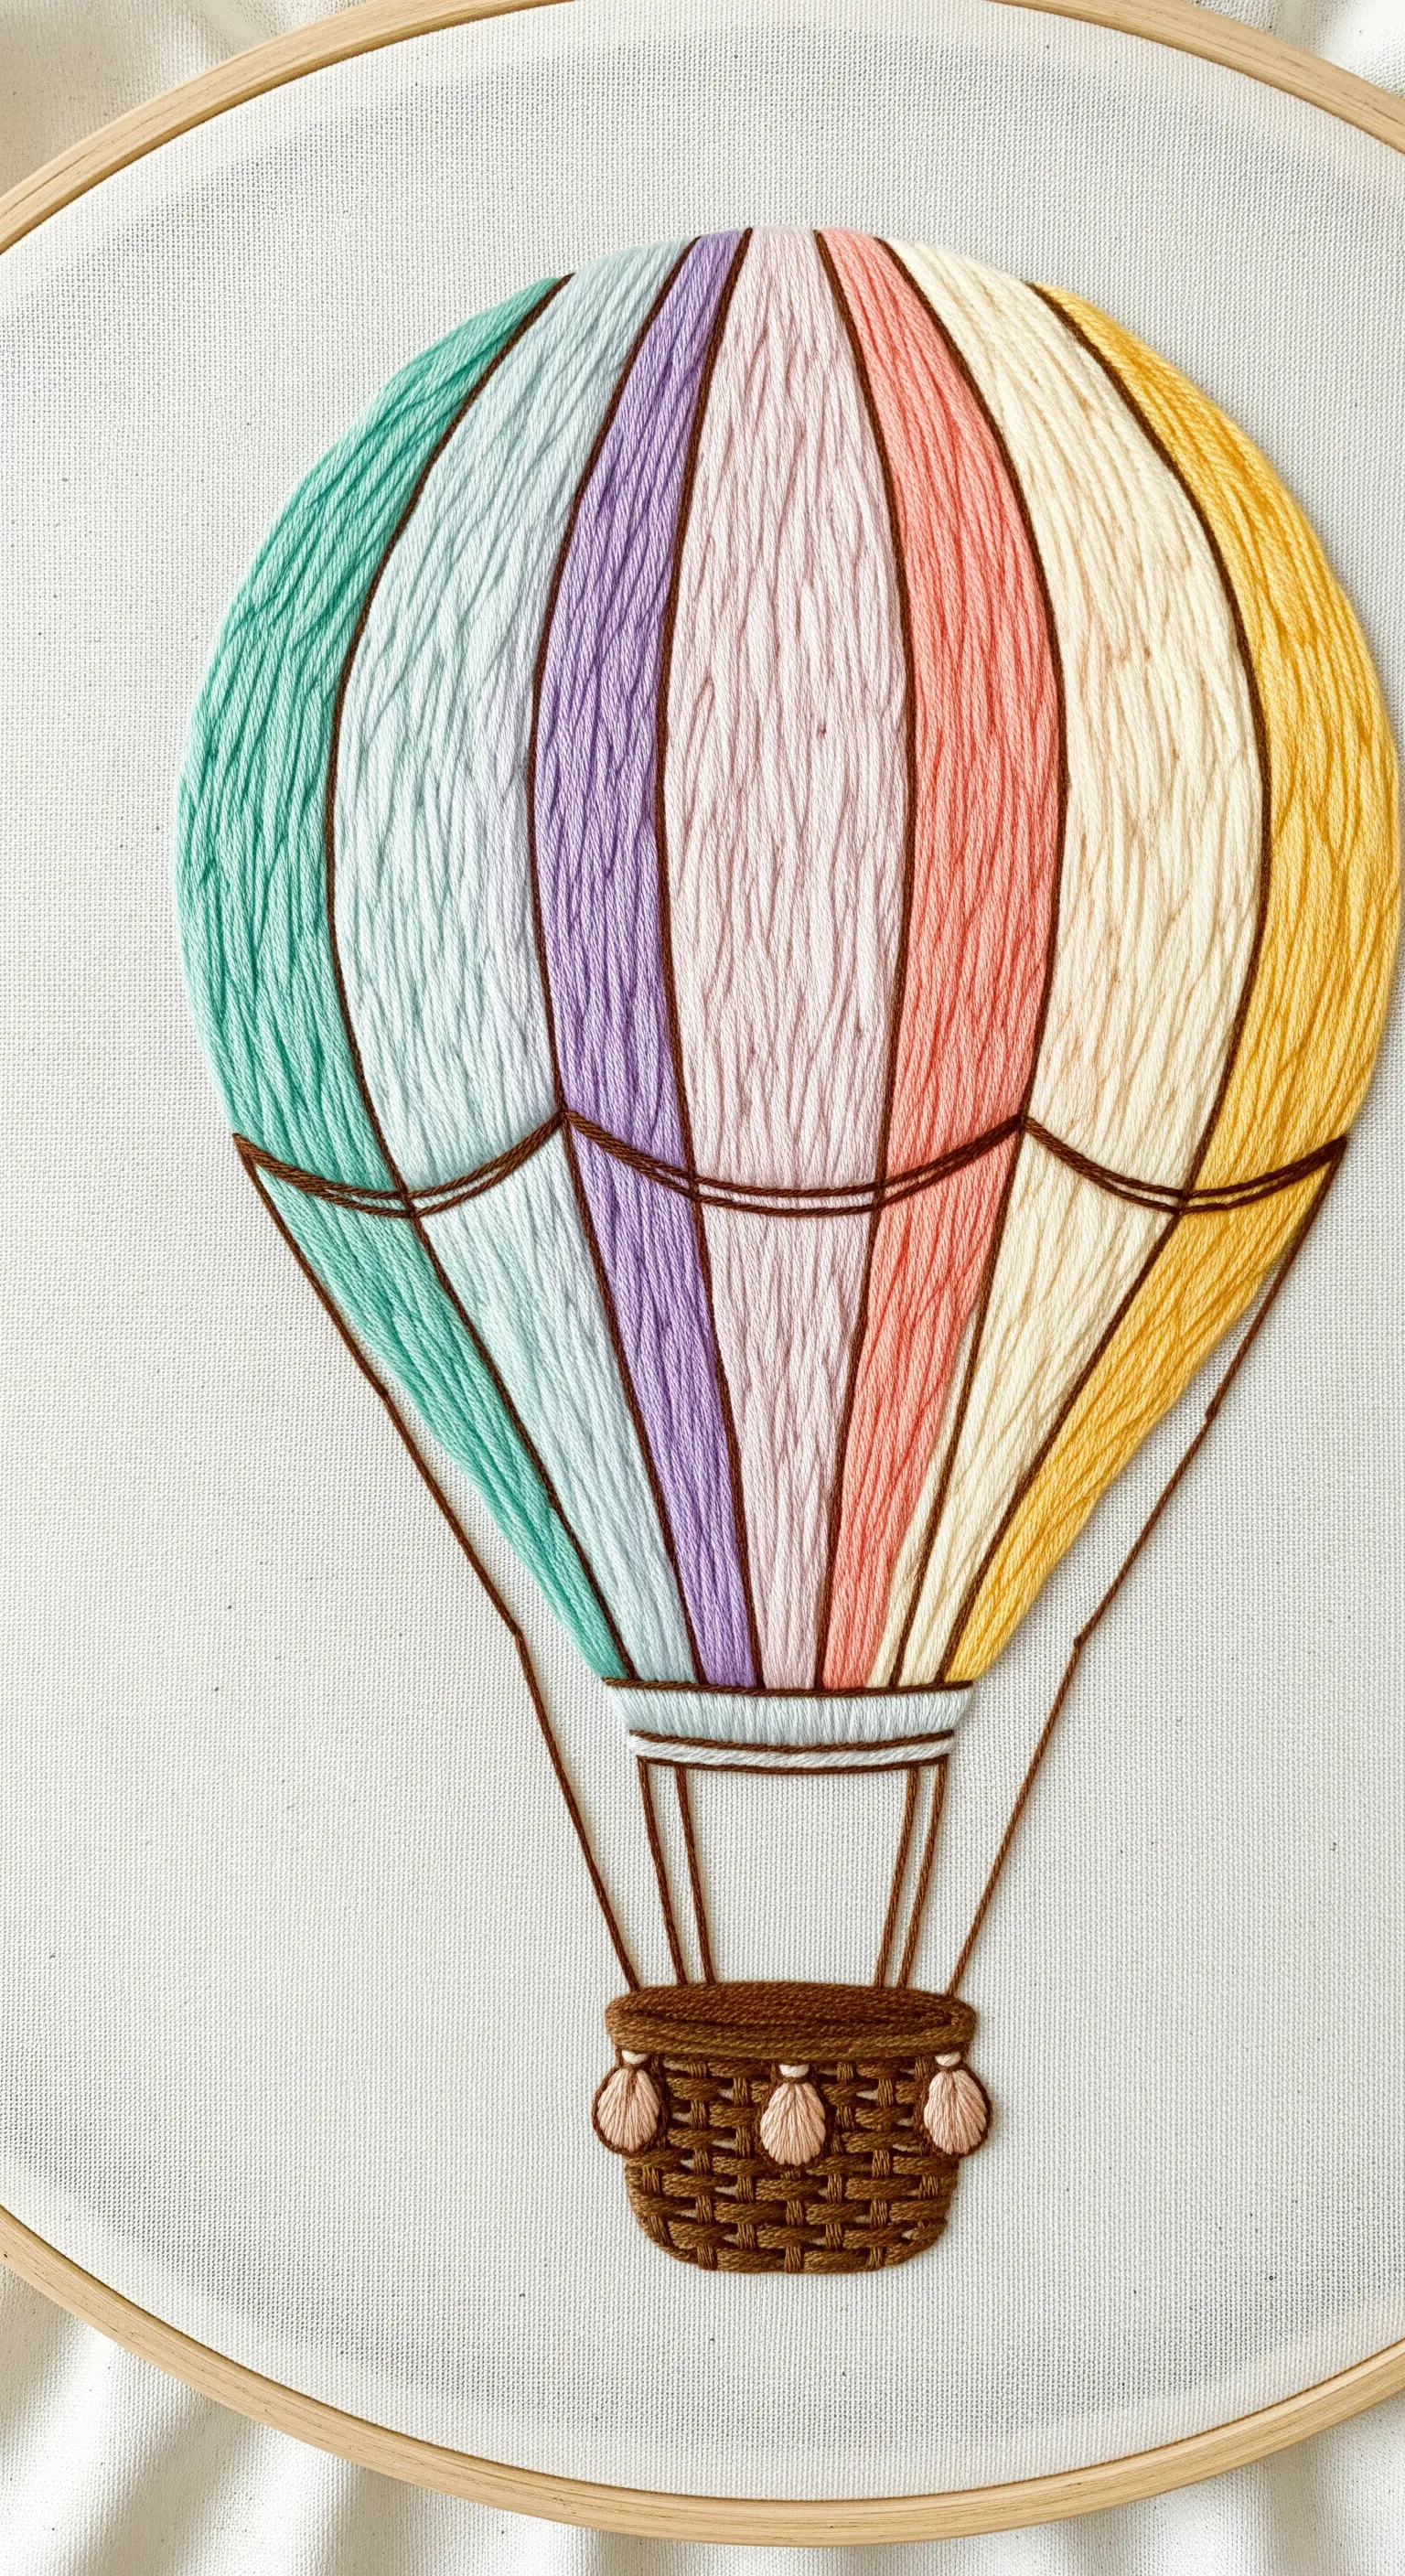
To make the soft, pastel gradients in this hot air balloon appear more defined, outline each colored panel with a strong, dark line.
Fill each vertical section with a gentle long-and-short stitch, blending two or three light shades together.
Then, go back and frame each panel with a crisp backstitch or split stitch using two strands of dark brown or black floss.
This technique contains the soft colors, giving the entire piece a clean, graphic, and illustrative quality.
16. Sculpt 3D Shapes with Padded Satin Stitch
To give your embroidery a raised, three-dimensional form, use padding underneath your satin stitch.
First, cut a piece of felt slightly smaller than your desired shape and secure it to your fabric. Alternatively, build up a base layer with foundation stitches.
Then, work your satin stitches over the padding, pulling them taut so they conform to the raised shape.
As you blend your colors across this curved surface, the gradient will enhance the illusion of depth and volume, creating wonderfully tactile ‘pebbles’ of thread.
17. Create Crisp Graphics with Counted-Stitch Gradients
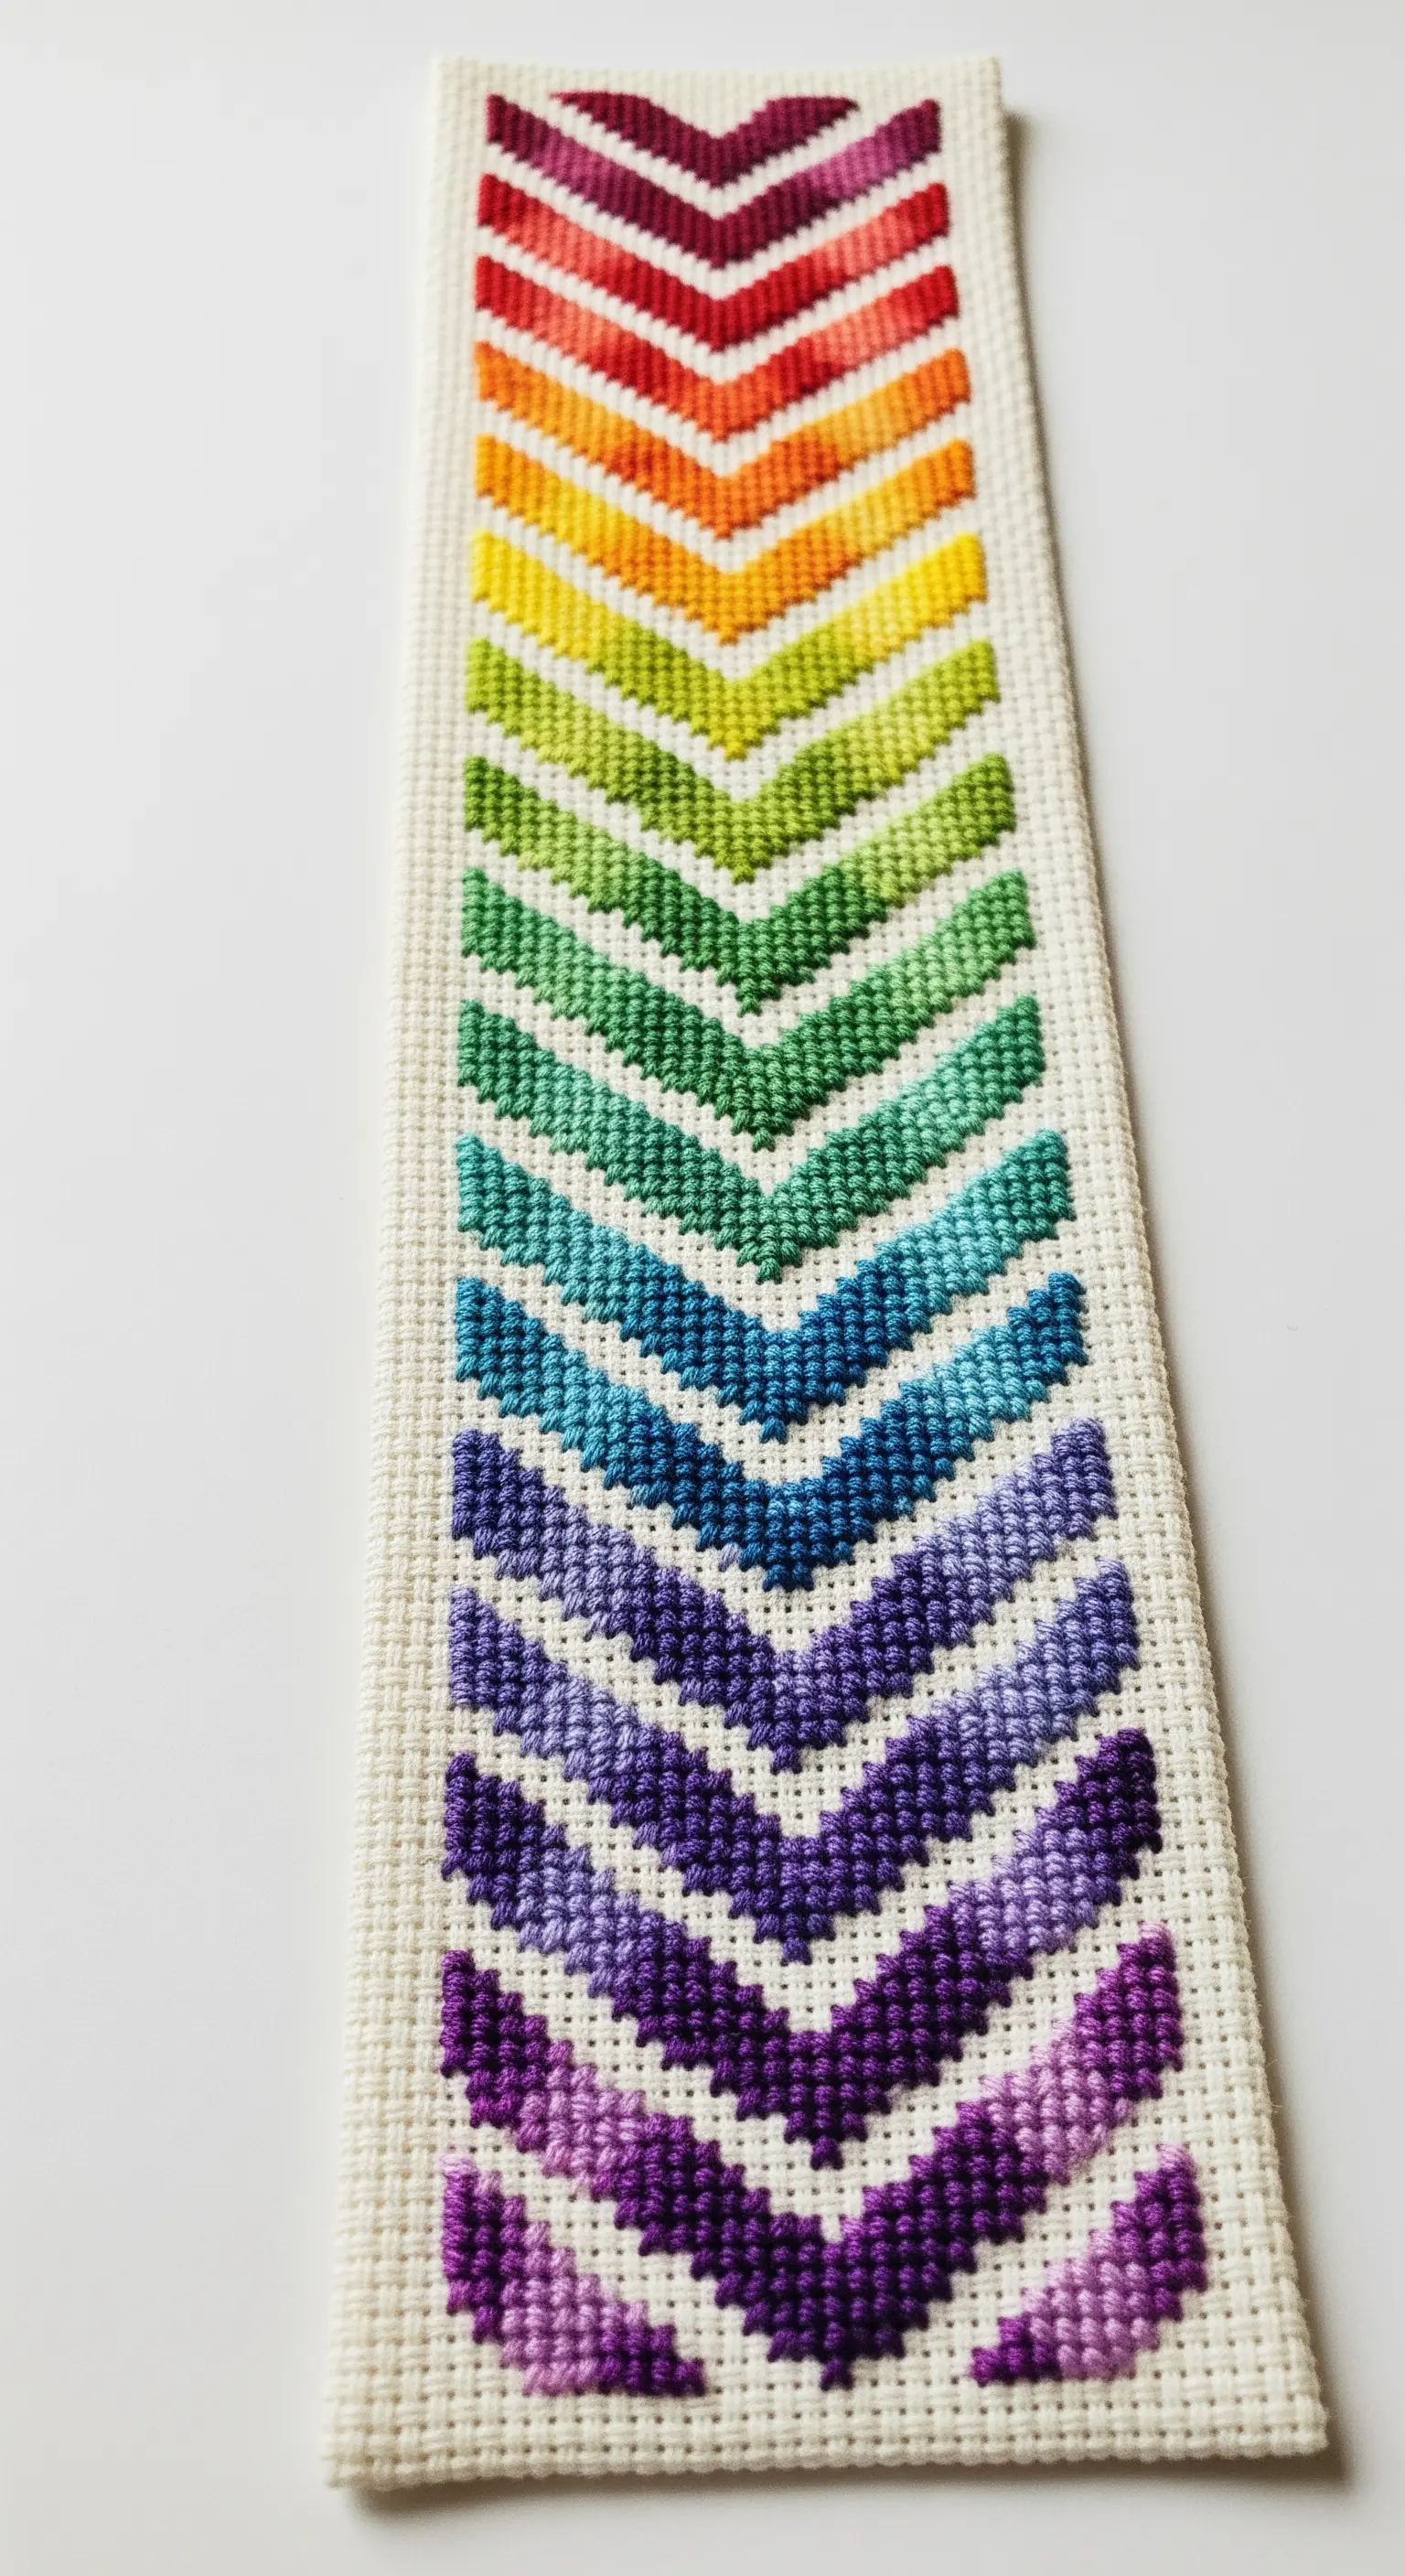
Achieve a perfectly geometric, pixelated gradient by working on counted-thread fabric like Aida or canvas.
This chevron pattern is made with simple tent stitches (half cross-stitches), where the grid of the fabric dictates the precise placement of each stitch.
Plan your color changes in blocks to create sharp, clean transitions.
This method is ideal for bookmarks, borders, and other projects where you want a structured, graphic finish.
18. Personalize Accessories with a Digital Tatami Fill

This bold monogram is another excellent example of machine embroidery’s capabilities.
The letter ‘S’ is filled with a tatami stitch, a digital fill that creates a smooth, woven texture ideal for covering large areas.
The embroidery software is programmed to automatically change thread colors at specific intervals, creating the flawless rainbow chevron pattern inside the letterform.
This ensures the design is both visually striking and durable enough for frequently used items like tote bags.
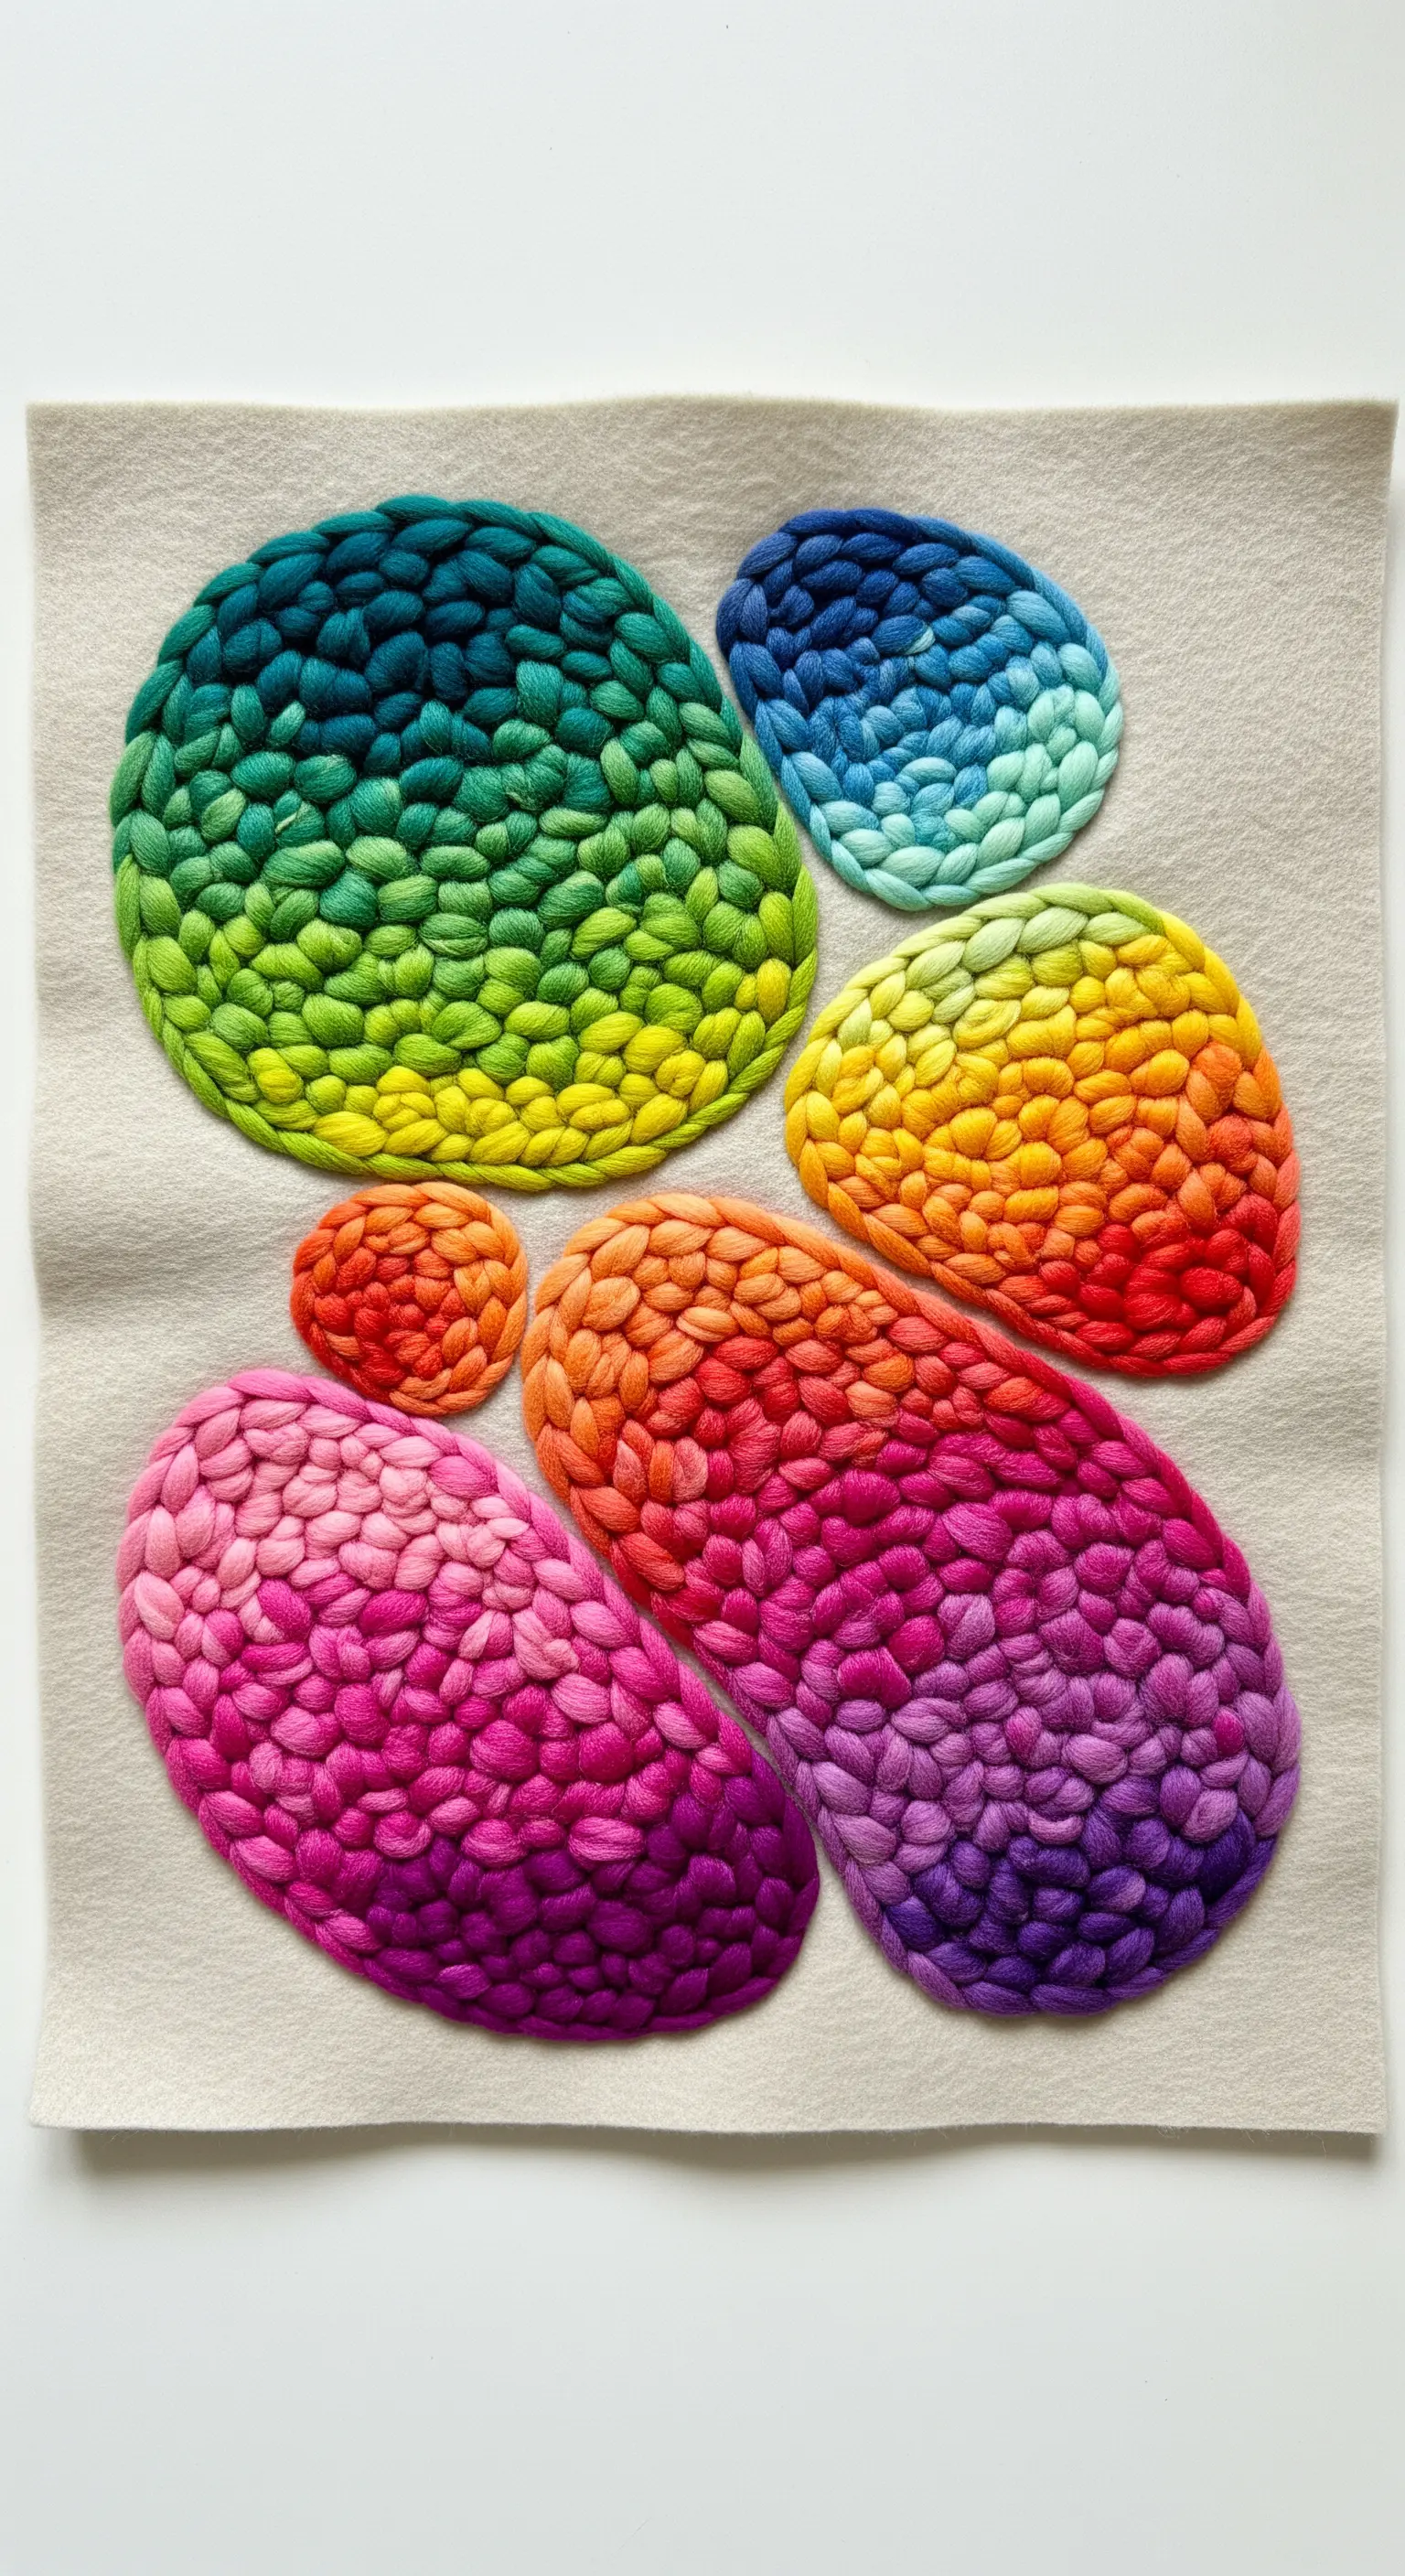
19. Explore Monochromatic Depth with Fields of Knots
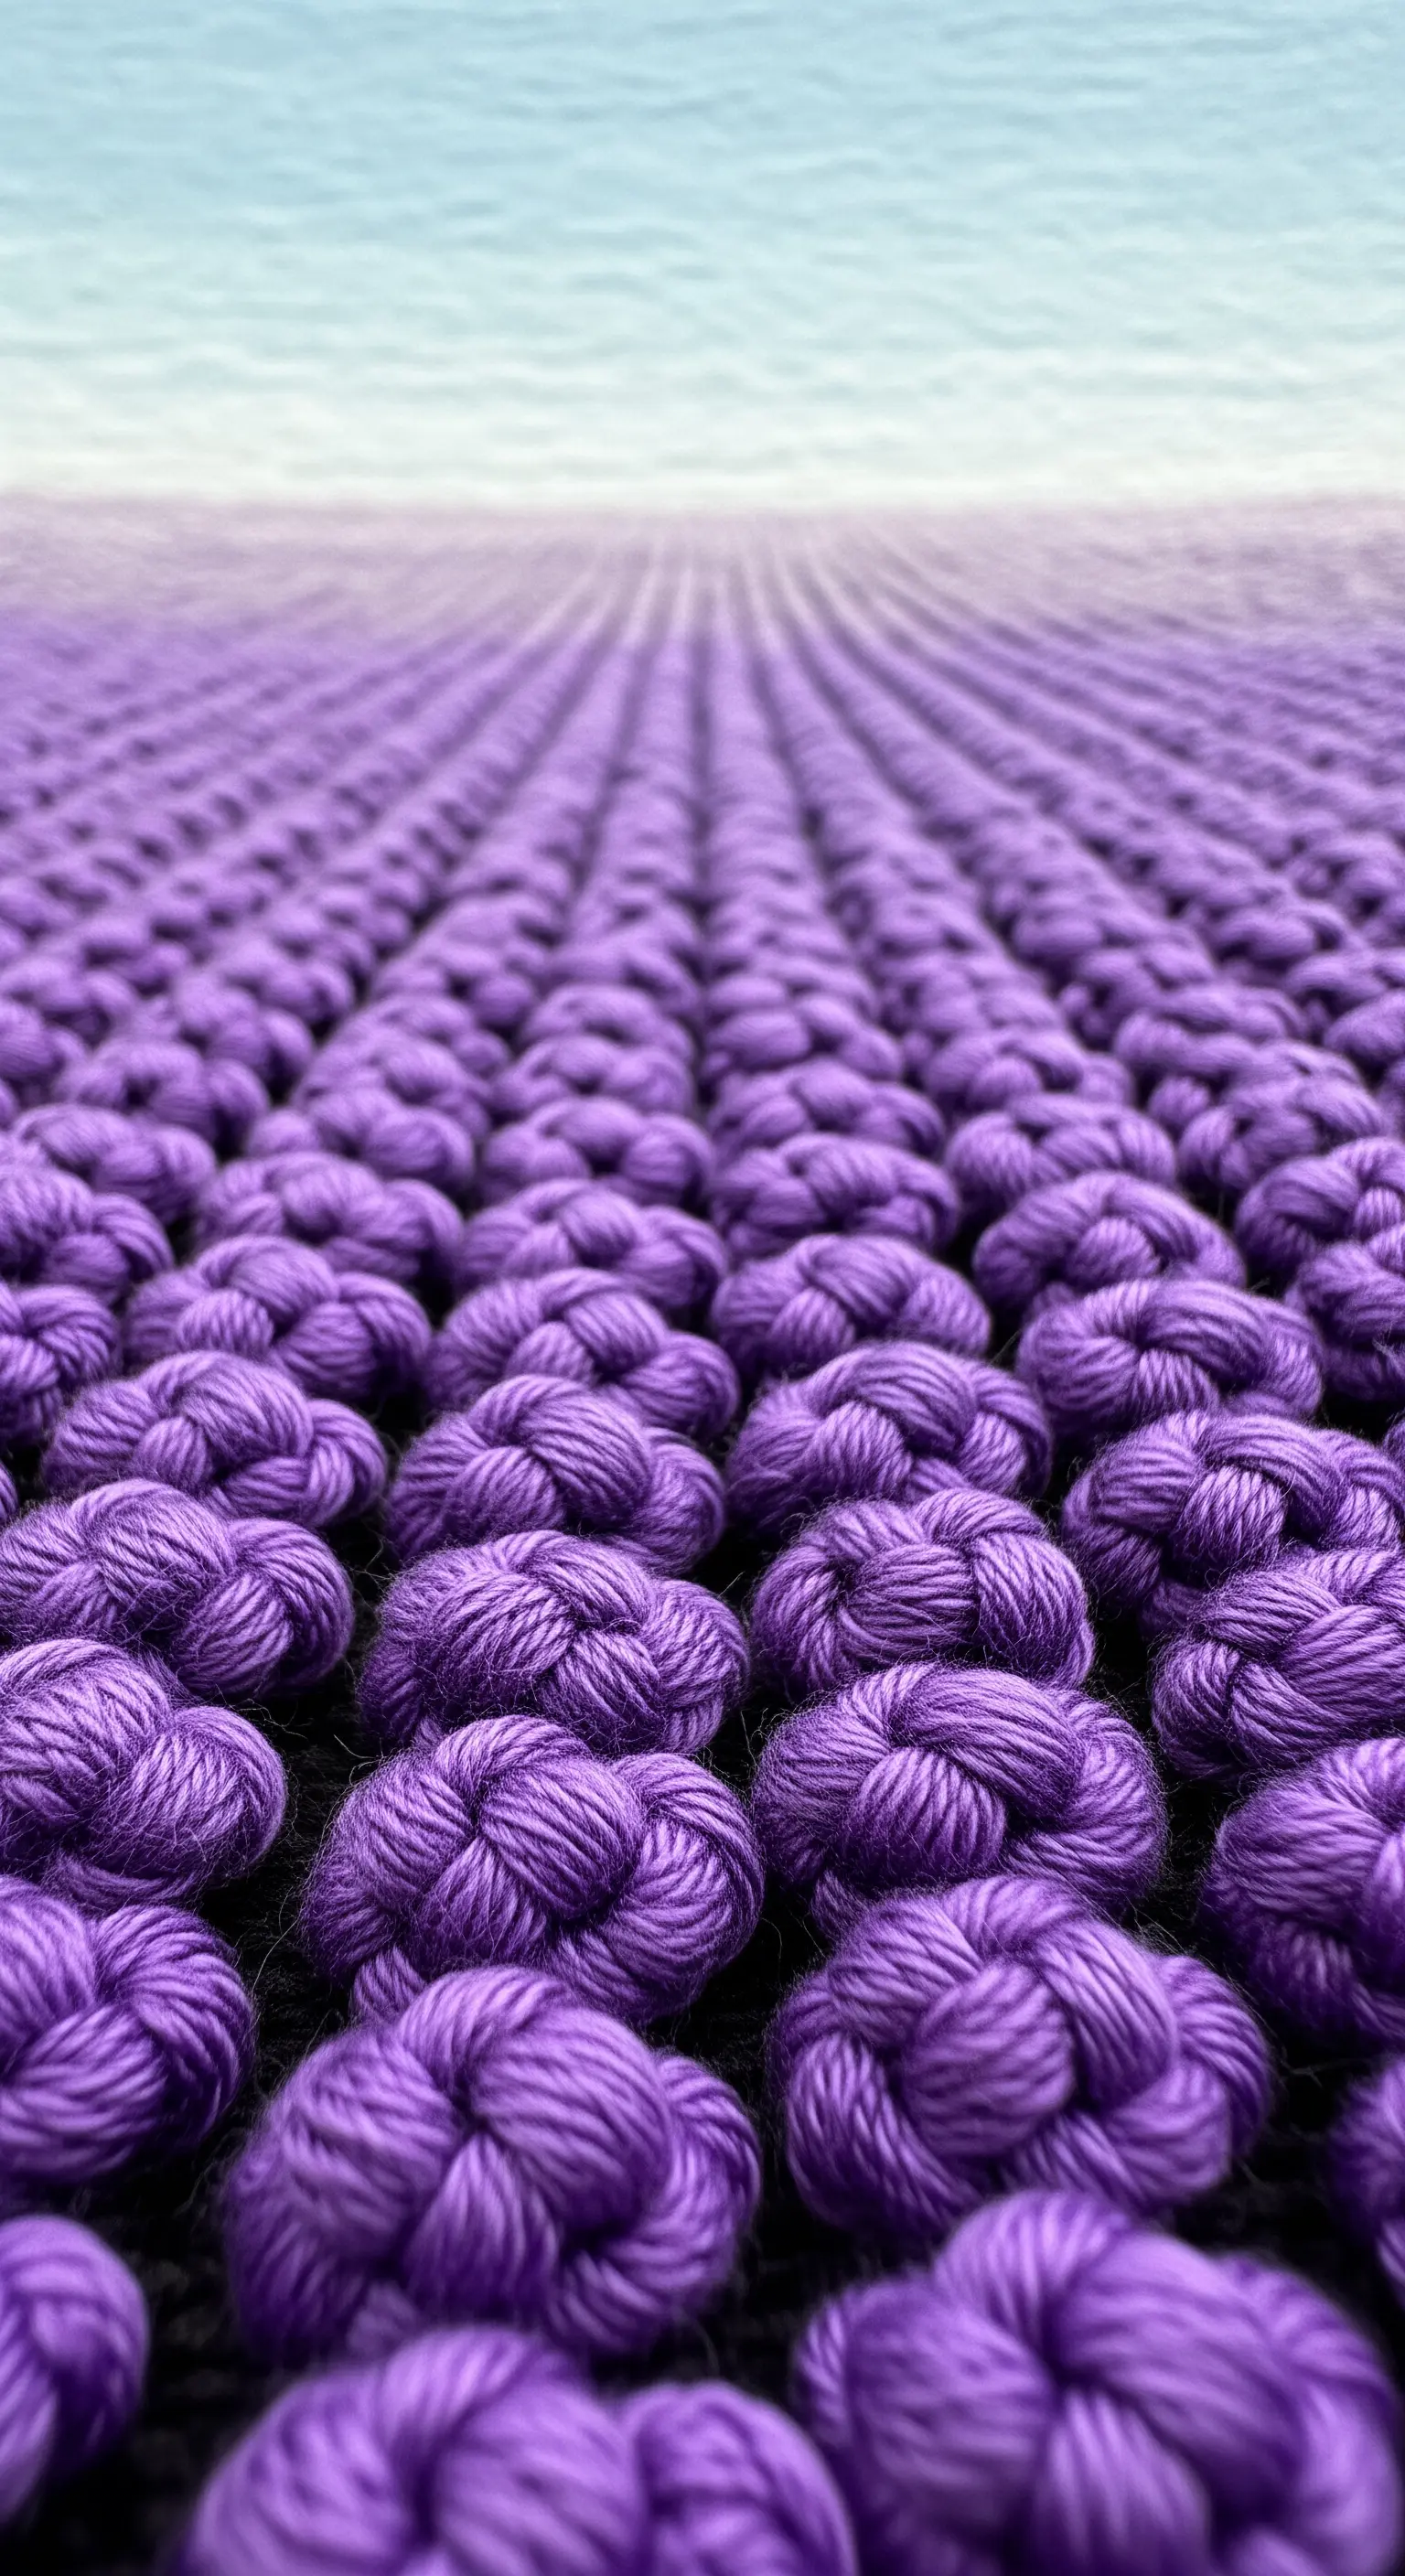
A gradient doesn’t always have to be a full rainbow; exploring the shades within a single color family can be just as impactful.
This piece creates a lush, textured surface by filling the fabric with tightly packed colonial knots (a sturdy alternative to French knots).
The color flows subtly from a lighter to a darker purple, and the uniform texture of the knots forces the eye to focus entirely on the gentle shift in tone.
This is a wonderfully meditative technique for creating abstract textile art.
20. Blend Fiery Gradients by Combining Threads
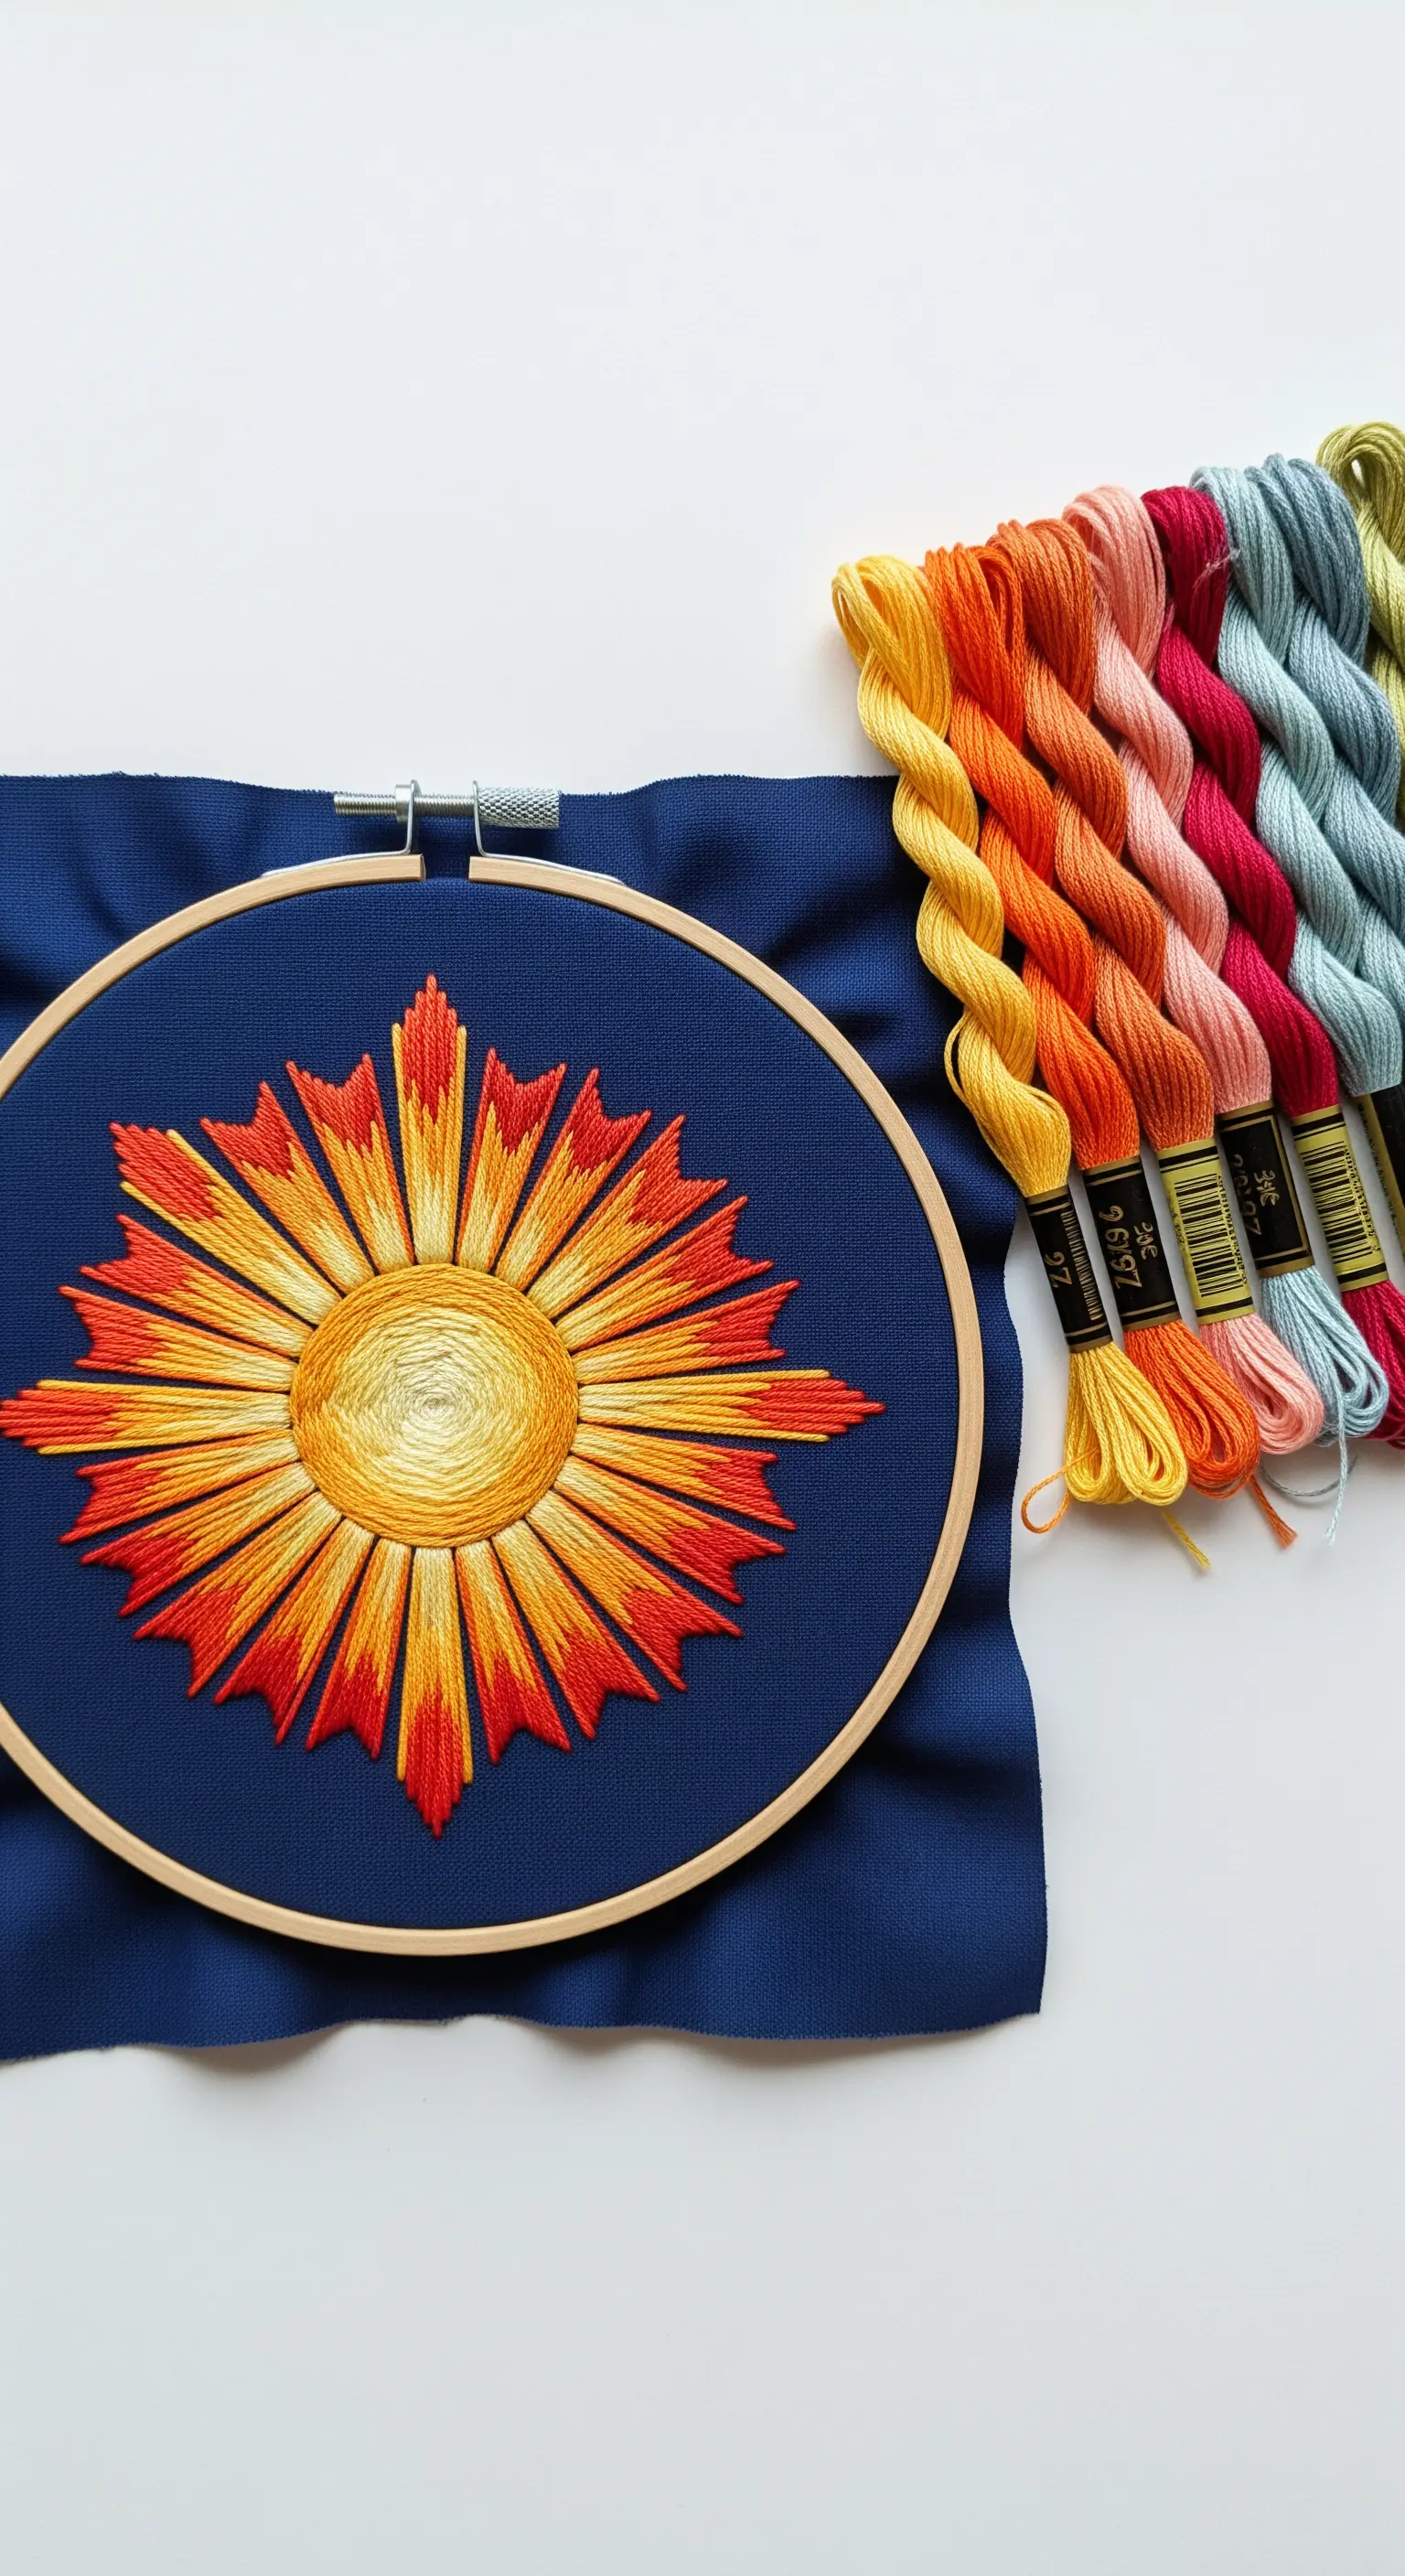
To create a truly seamless transition between two bold colors, try blending the threads directly in your needle.
In the areas where red meets orange, or orange meets yellow, thread your needle with one strand of each color and stitch with them together.
This creates a third, blended color that acts as a natural bridge, softening the transition.
The sun’s center is worked in a tight spiral of stem stitch, providing a solid anchor for the radiating, fiery rays.
21. Construct Dimensional Art with Wrapped Coils
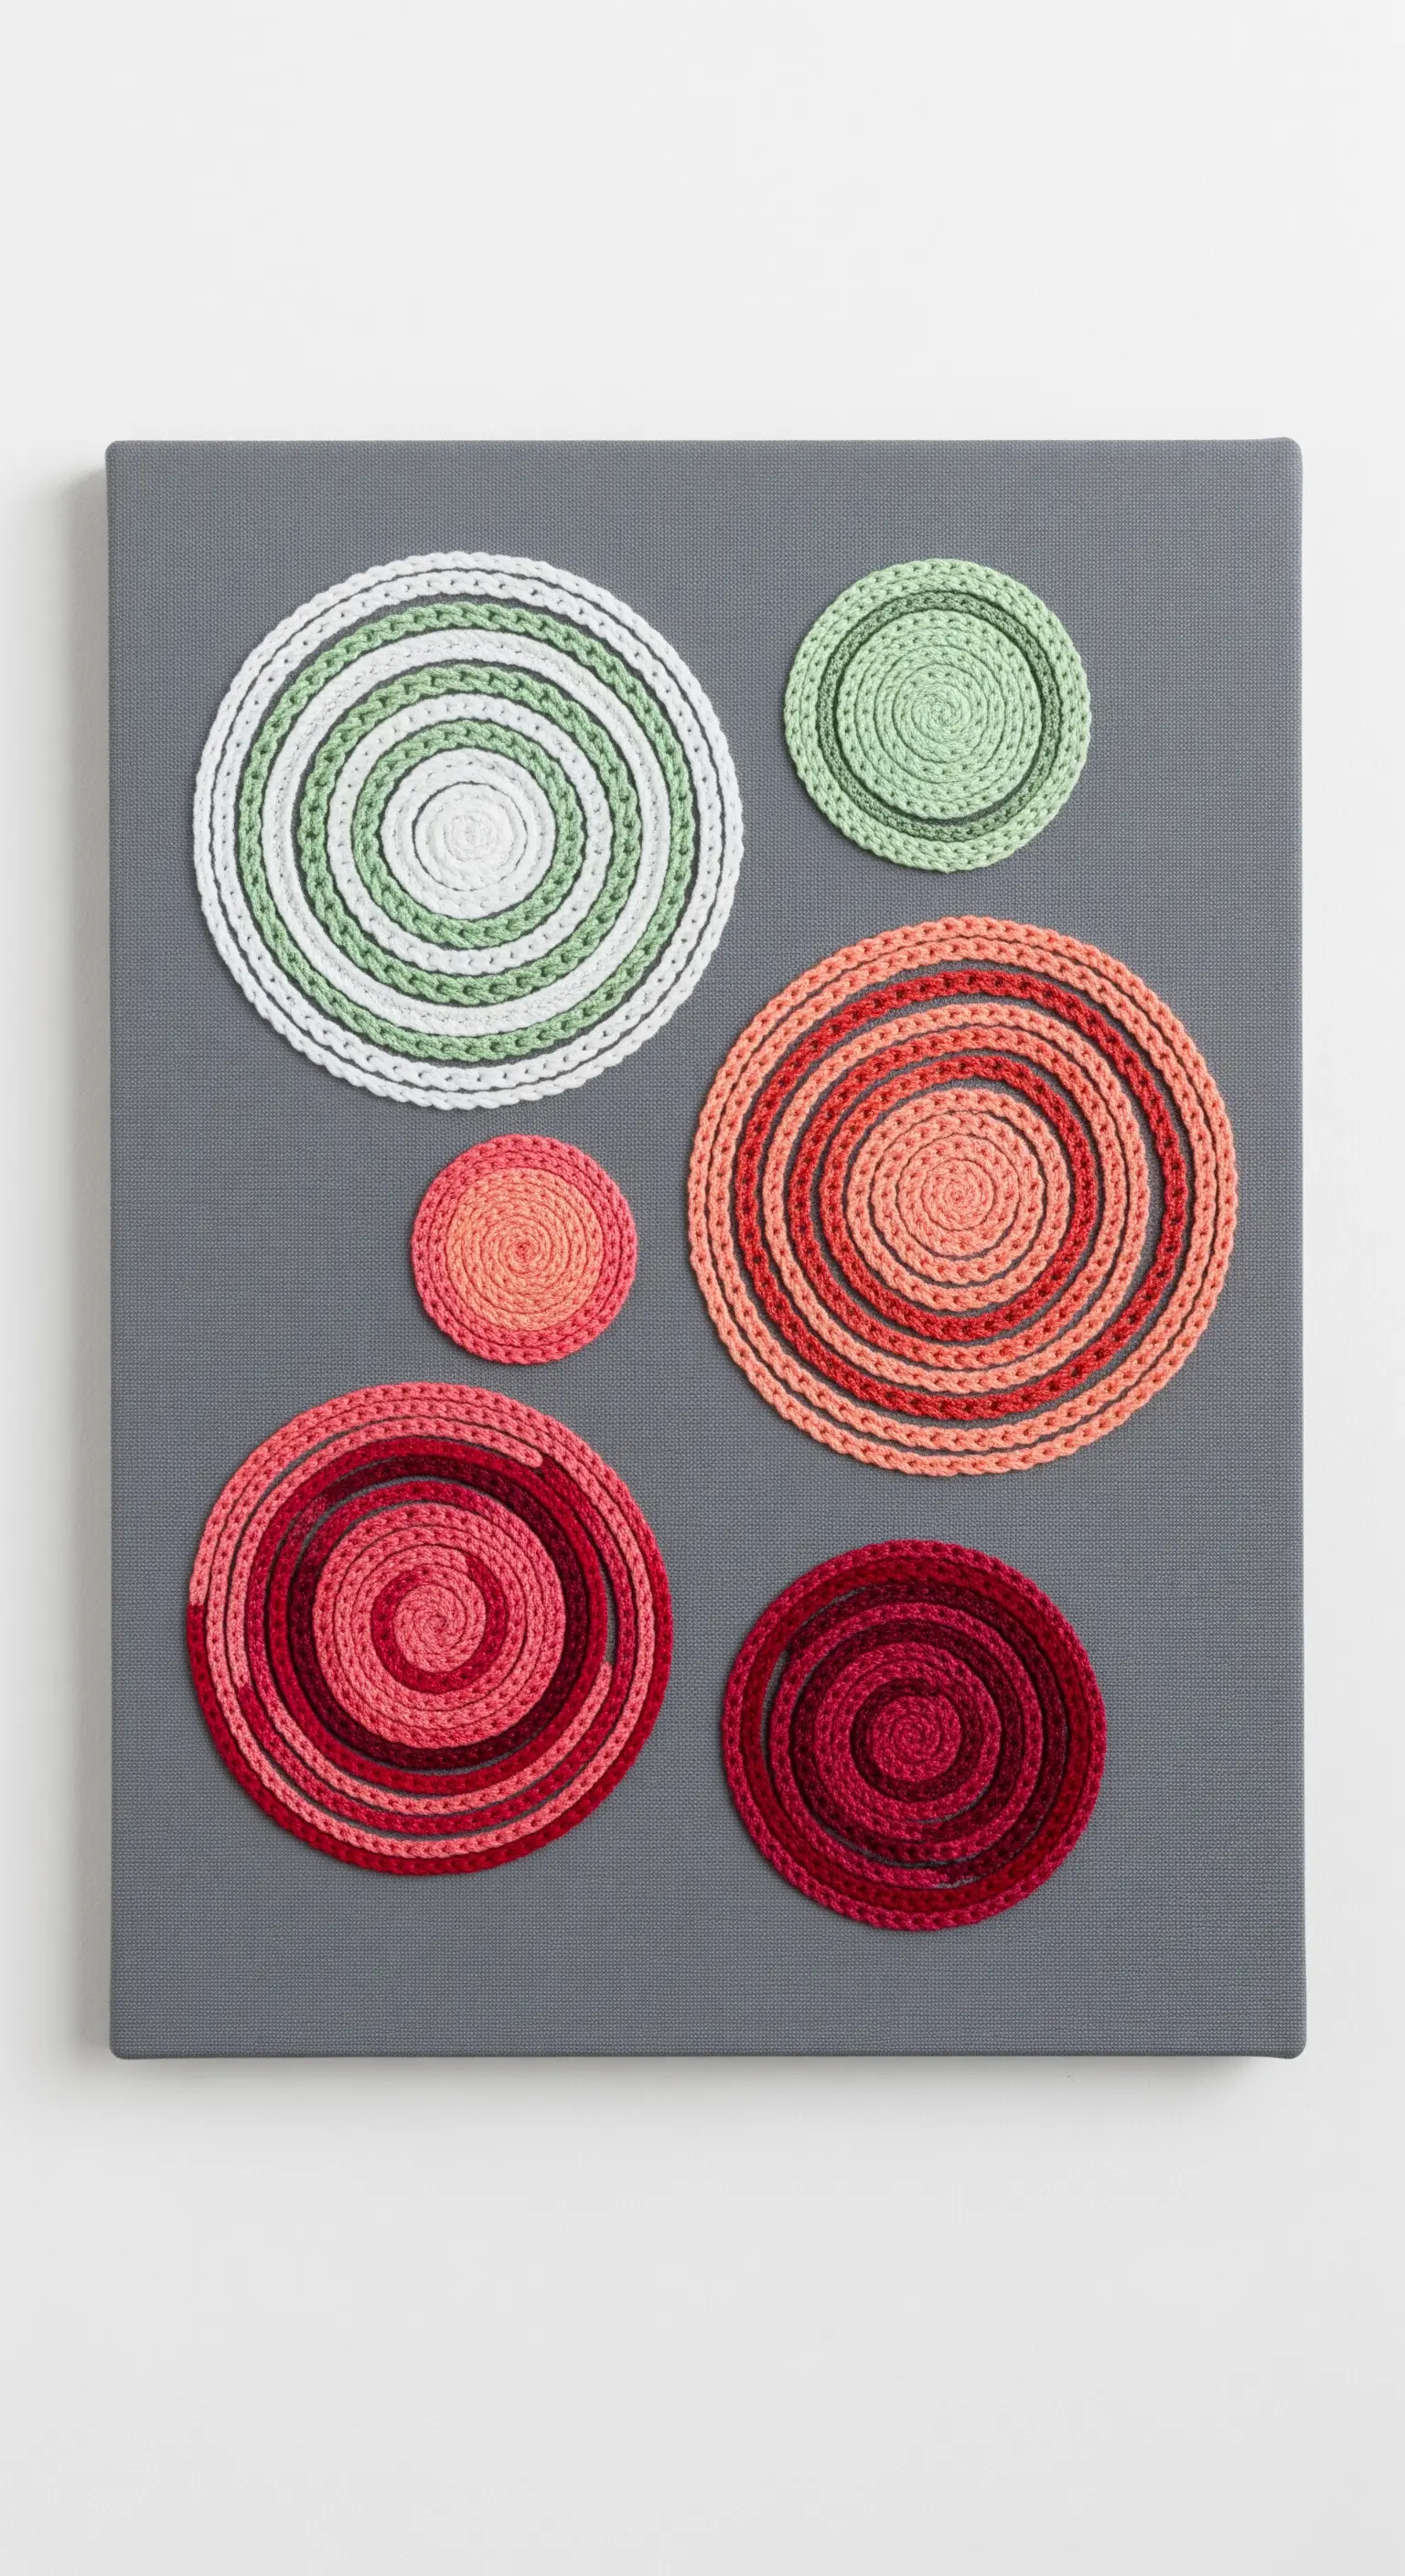
Create unique, sculptural wall art using a rope-coiling technique.
Start with a thick cotton cord or rope and tightly wrap it with embroidery floss, changing the floss color periodically to create a gradient.
As you wrap, coil the rope into a flat circle, securing it to a stretched canvas or fabric backing with small, hidden stitches.
Playing with coils of different sizes and color palettes allows you to build a dynamic and highly textural composition.
22. Fabricate Custom Patches with Geometric Fills
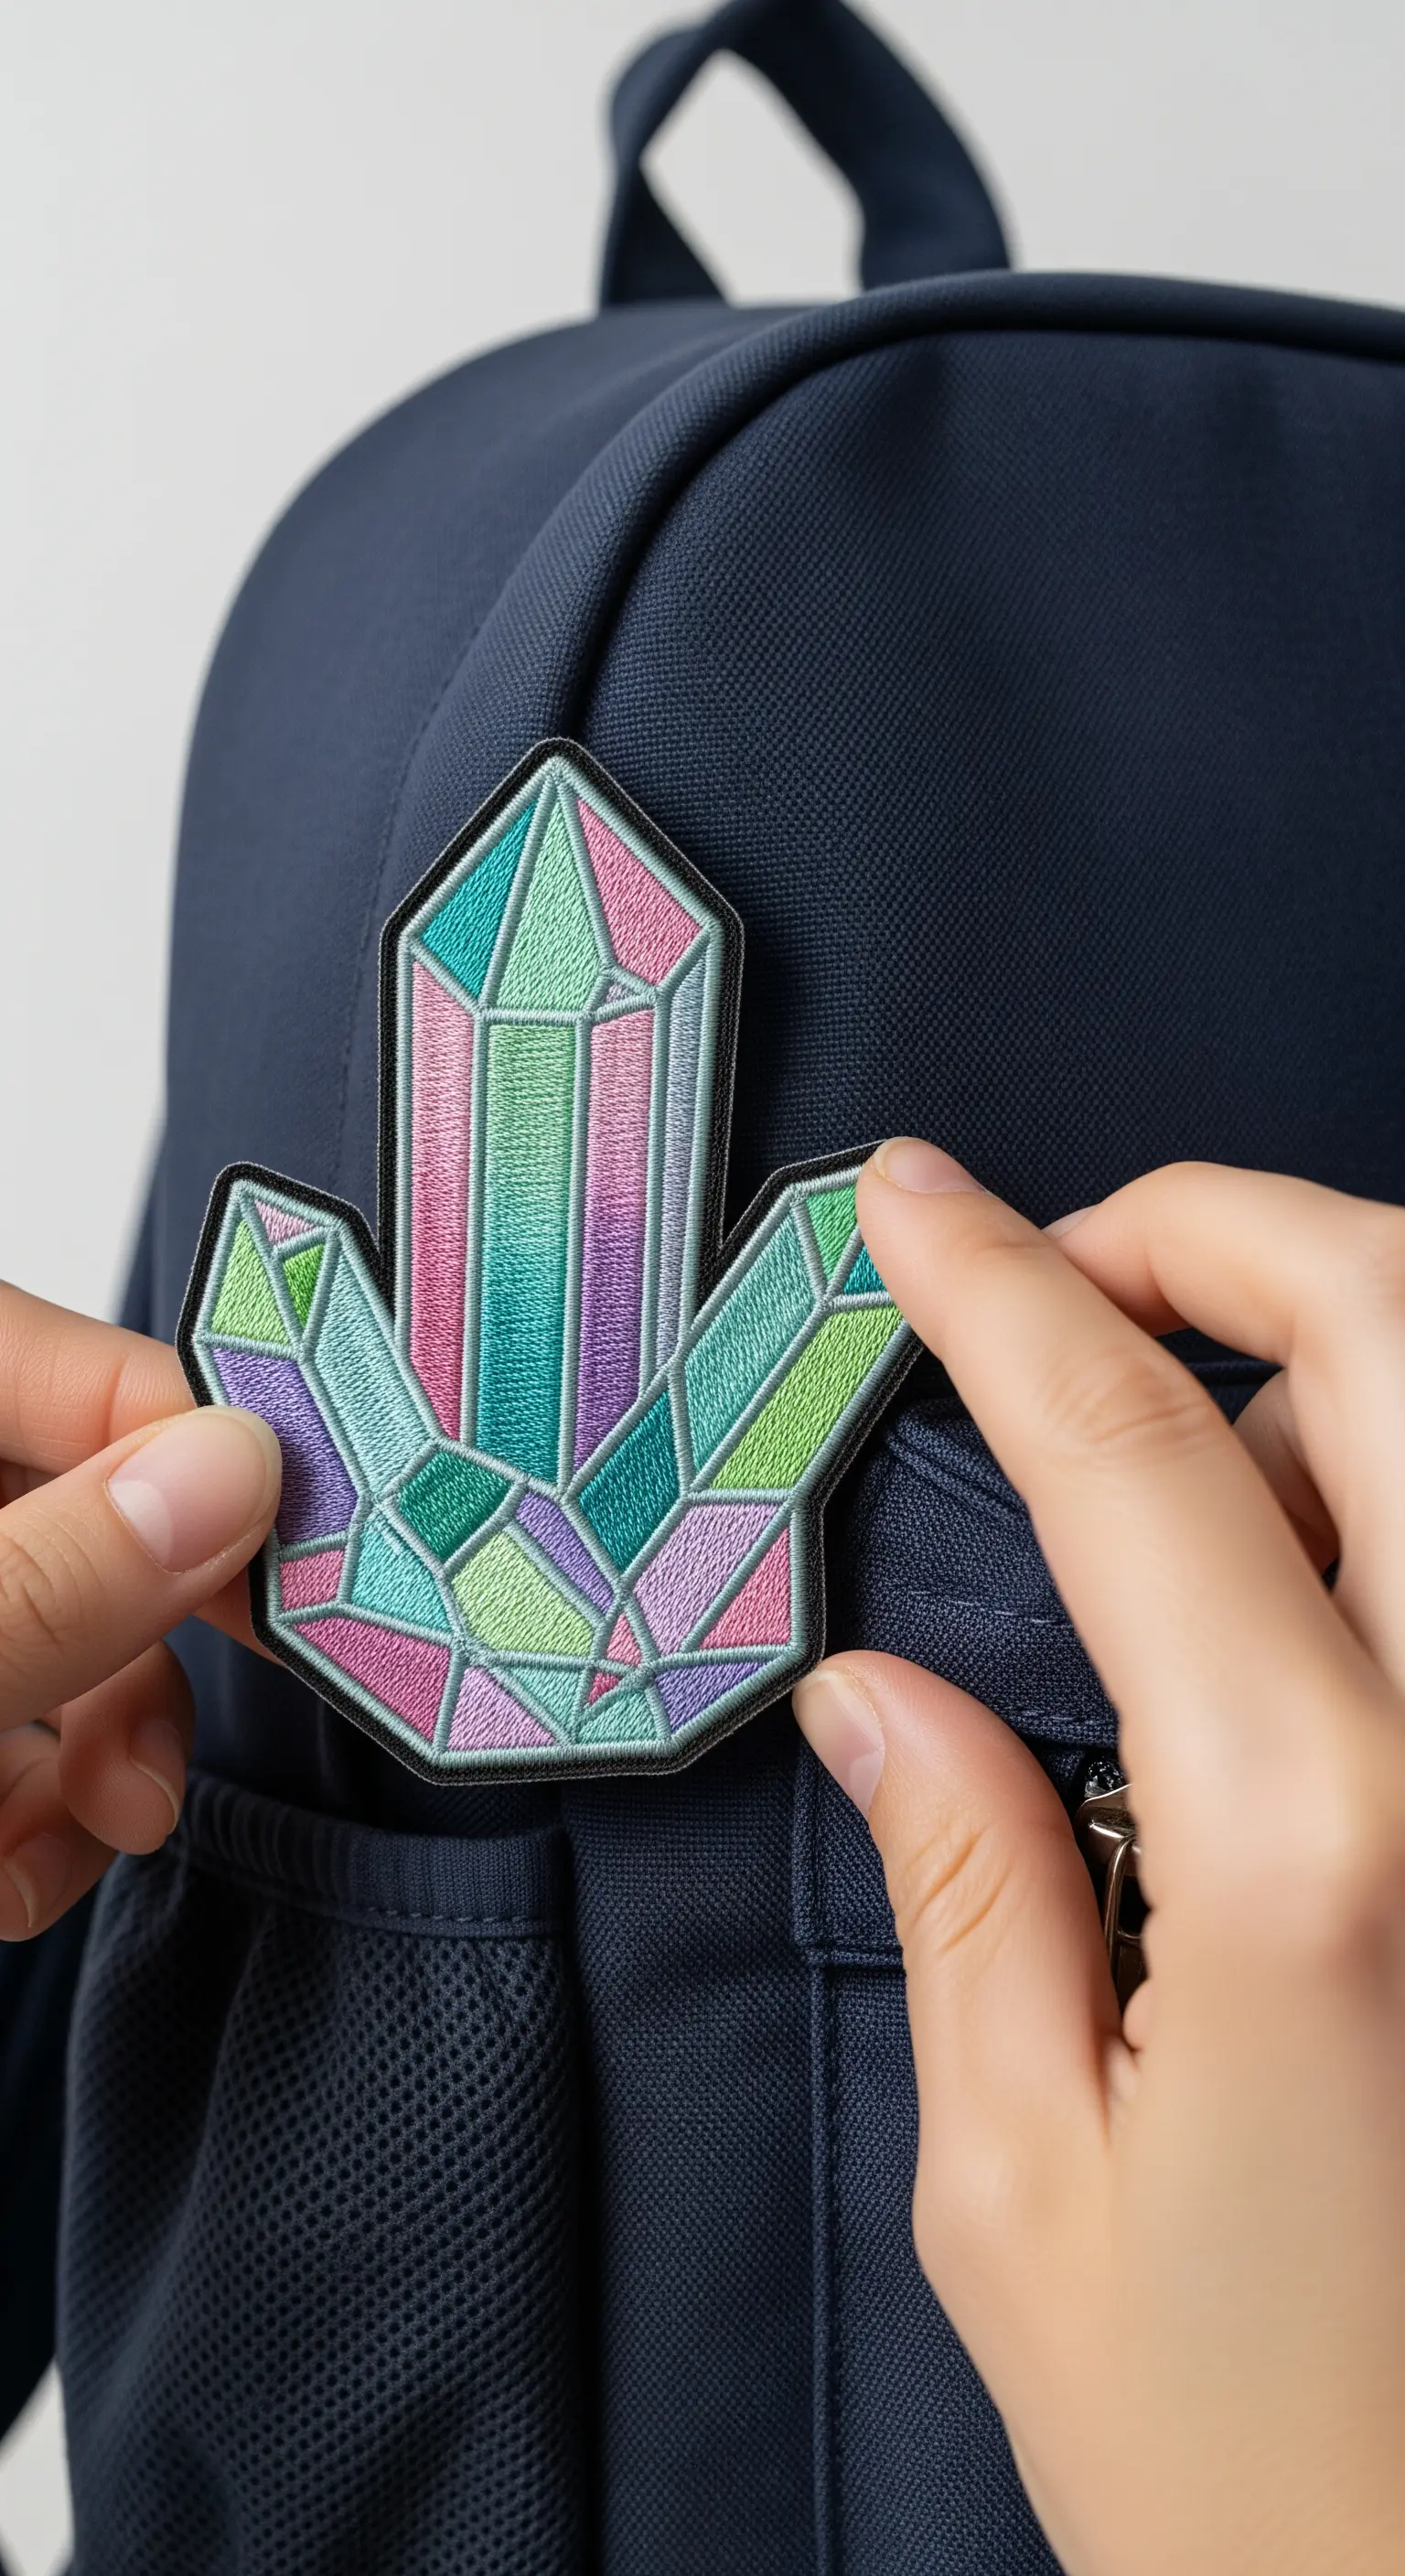
Design and create your own professional-looking patches at home.
Begin by embroidering your design onto a stiff, non-woven material like felt, which won’t fray when cut.
Fill each facet of the crystal with a clean, directional satin stitch, changing the angle of the stitches to create dimension.
Finally, create a thick satin stitch border around the entire design. This gives you a clean edge for cutting out your finished patch.
23. Capture Lifelike Motion with Curved Stitches
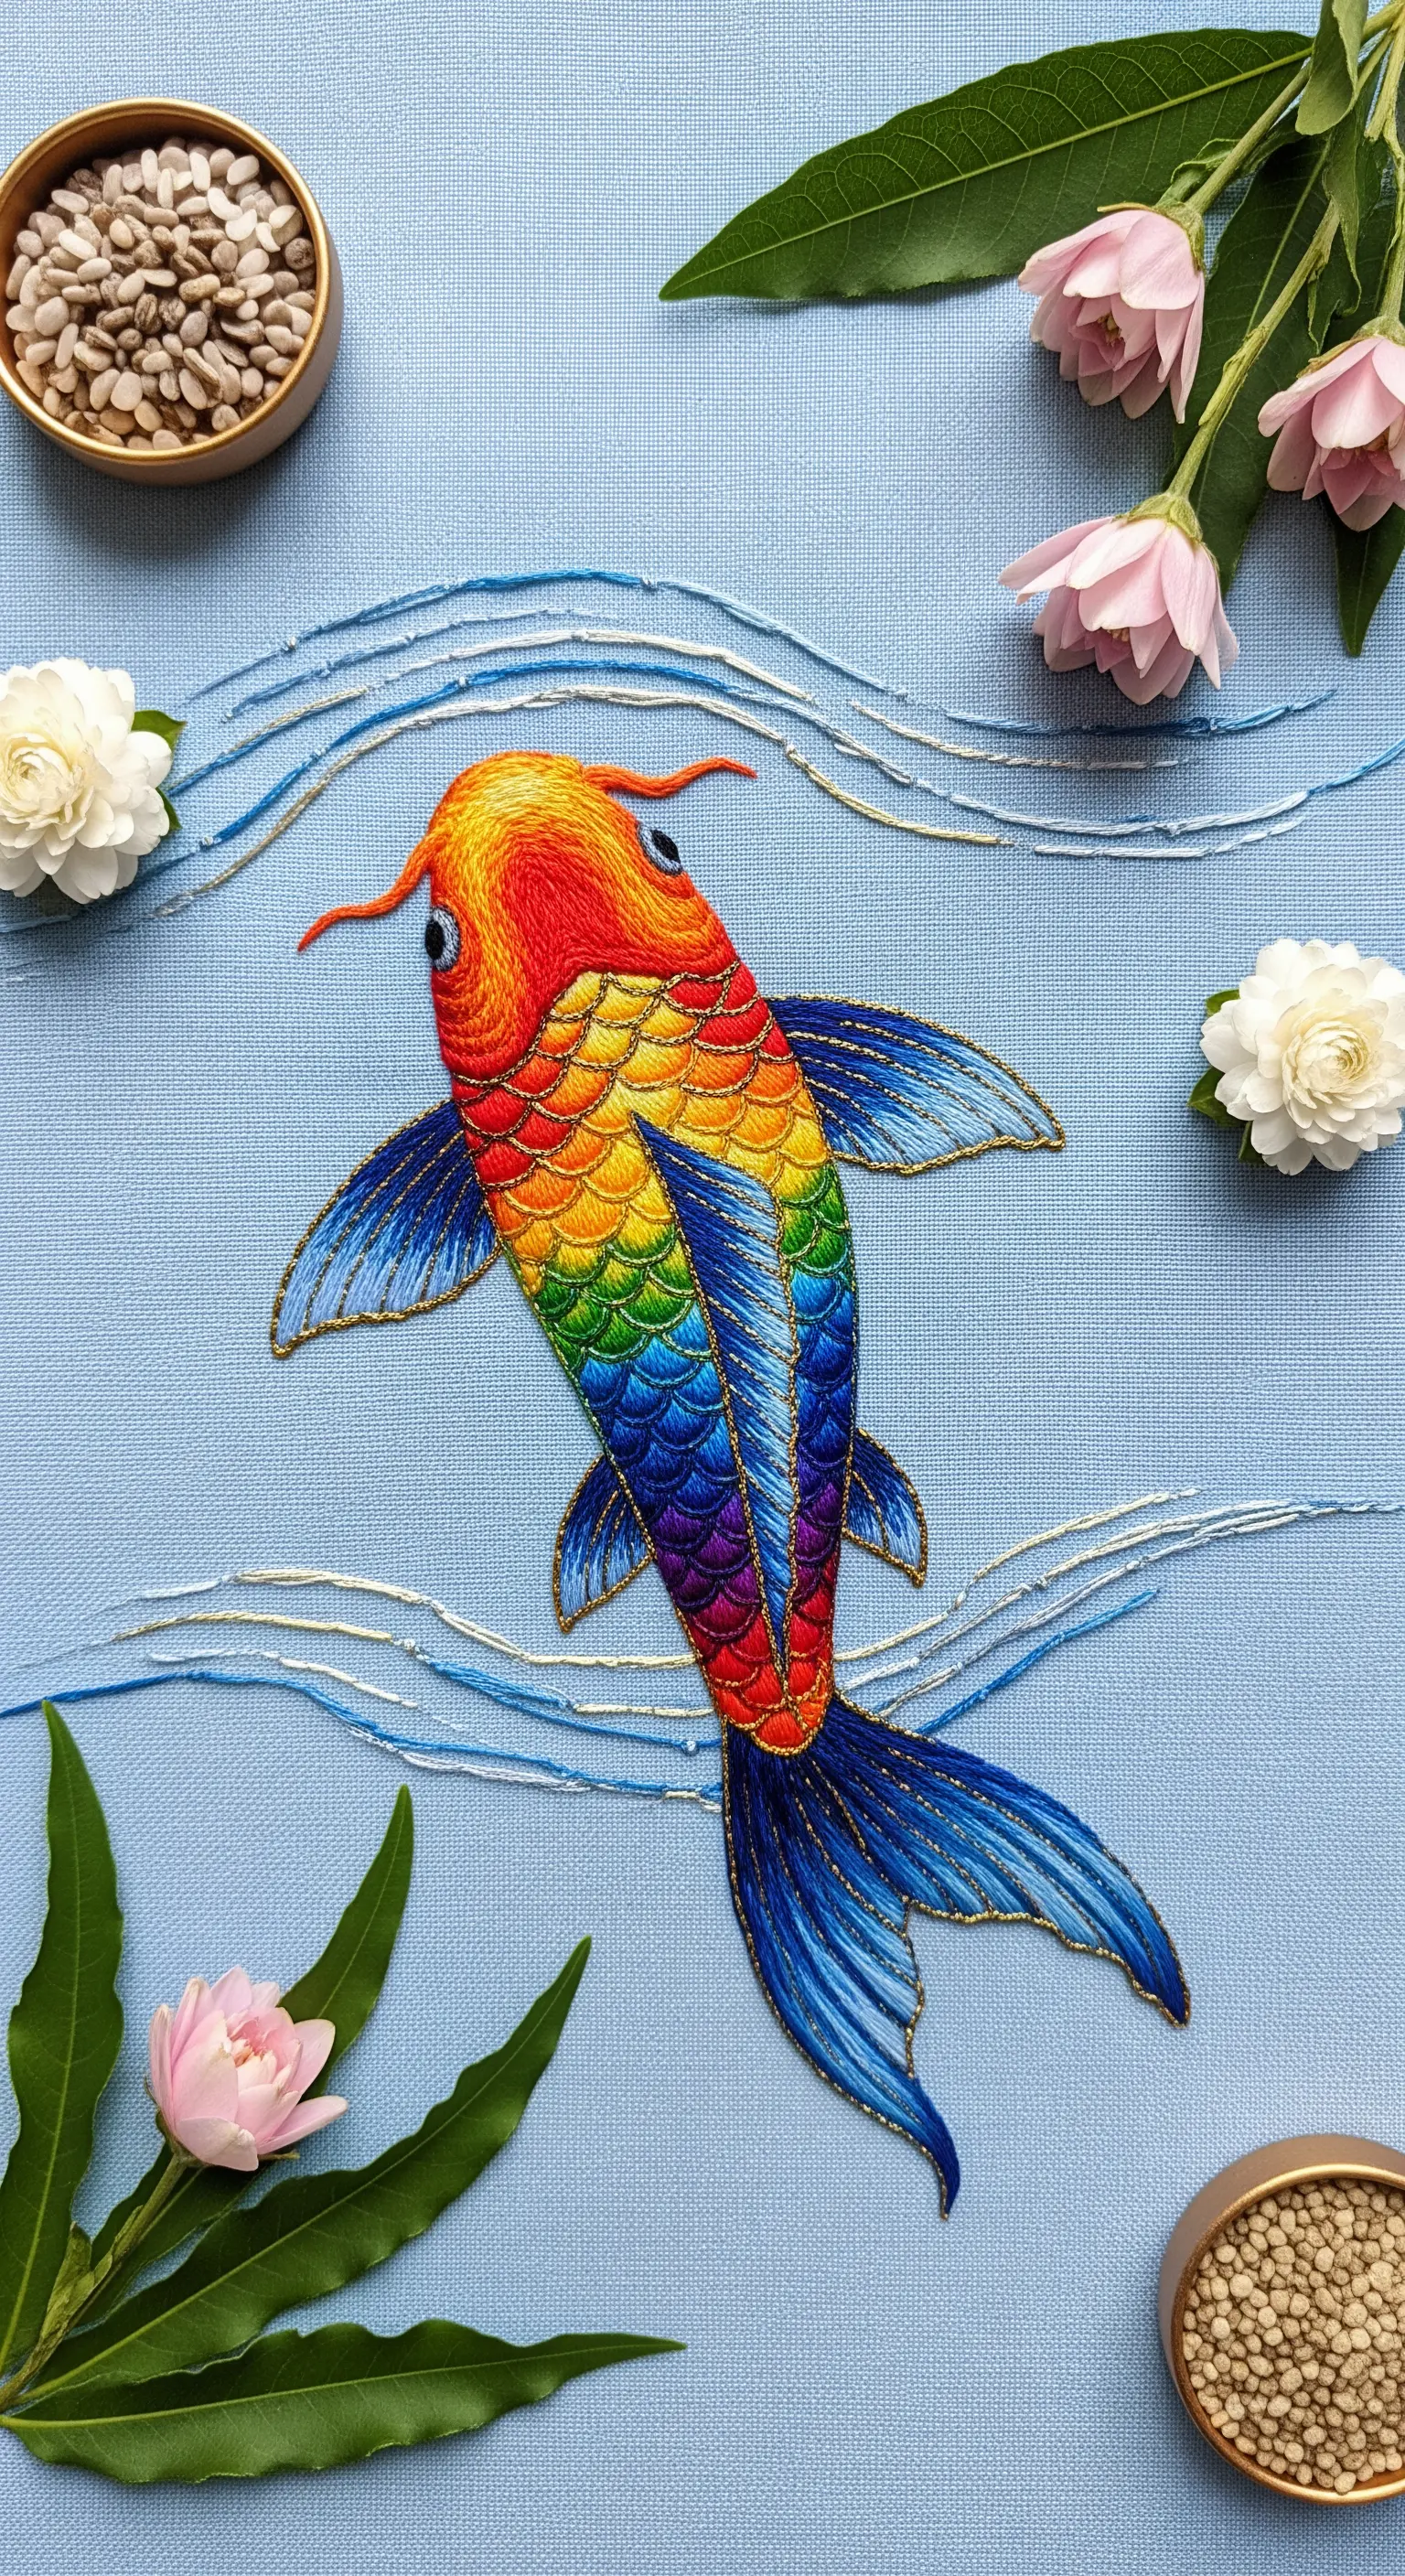
The key to making this koi fish look alive is in the direction of the stitches.
Each scale is a single, short satin stitch, but instead of being perfectly straight, each one is slightly curved and layered to follow the contours of the fish’s body.
This meticulous layering and shaping creates the illusion of form and movement, making the fish appear to shimmer and swim.
This advanced approach to thread painting truly brings a subject to life.
24. Create a Pointillist Effect with Stippled Knots
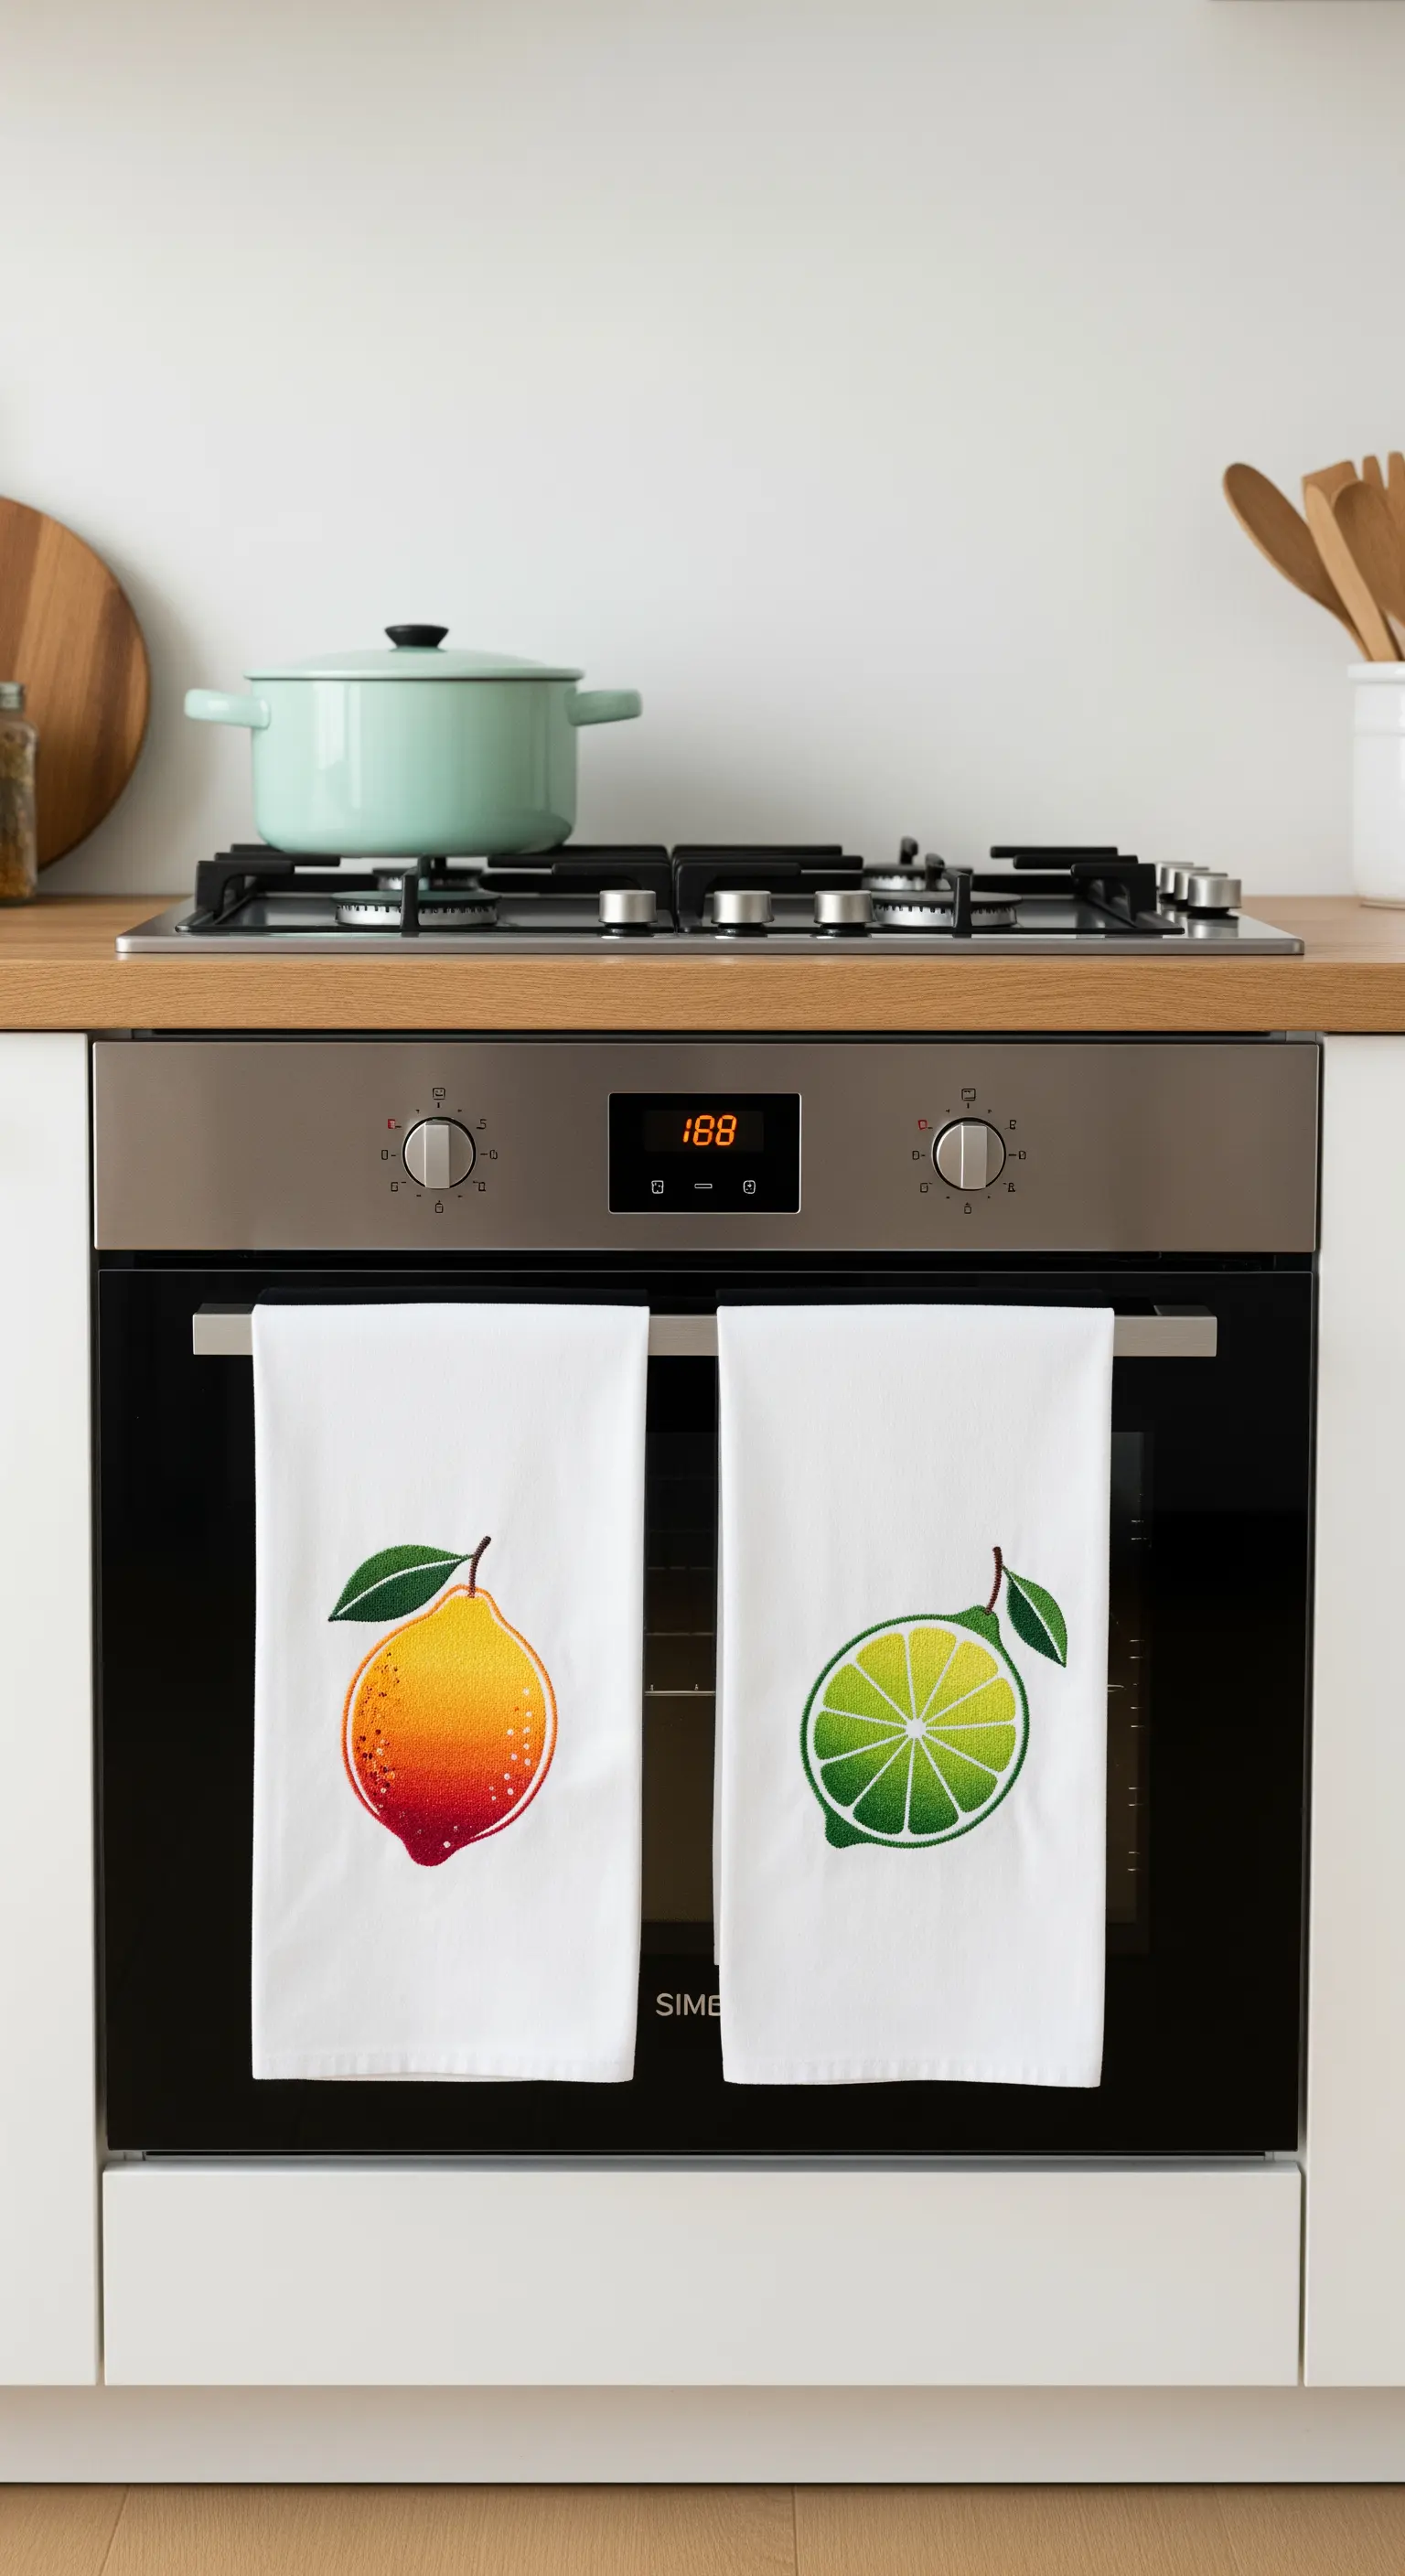
You can achieve a beautiful, soft gradient by using French knots as stipples of color.
Instead of filling the shape solidly, scatter the knots, placing them more densely in areas of shadow and more sparsely in areas you want to highlight.
Use a range of analogous colors—like yellow, orange, and red for the lemon—to create a gentle transition.
This is a fun, forgiving technique that adds wonderful texture to kitchen towels and other home goods.
25. Visualize Sound with a Straight Stitch Gradient
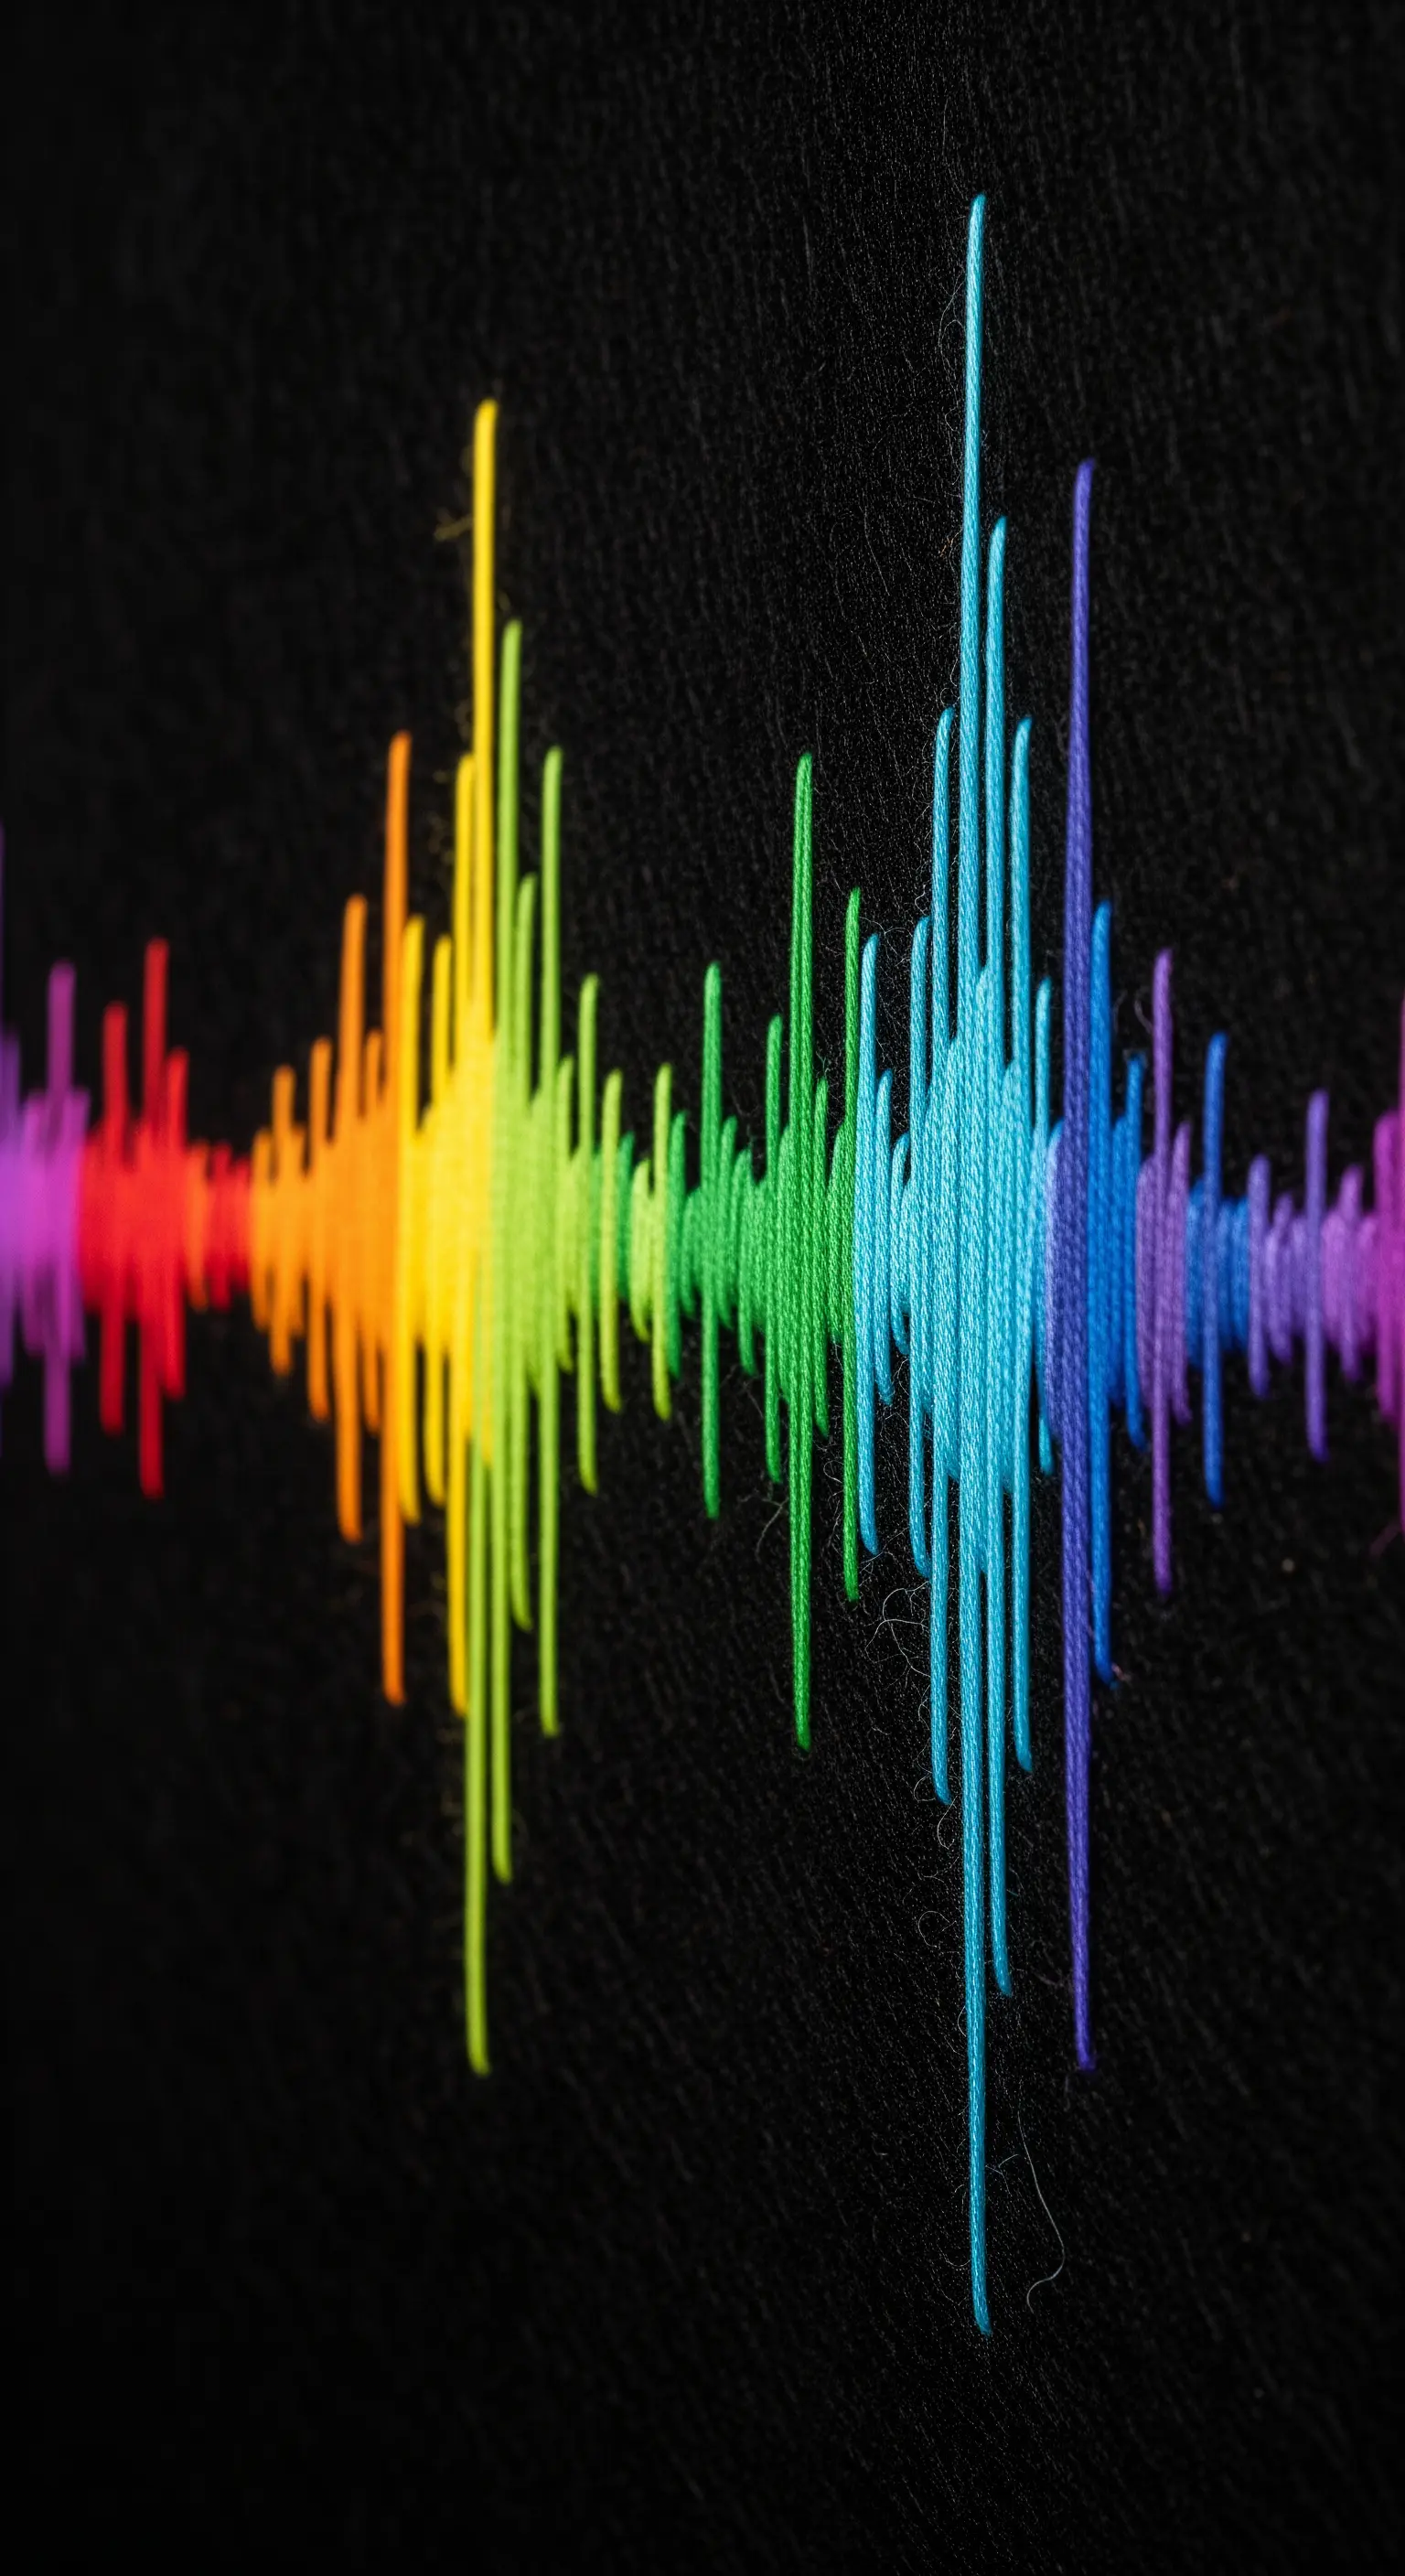
Transform a personal audio clip—like a laugh or a line from a song—into a striking piece of abstract art.
Represent the soundwave with simple vertical straight stitches, using the height of each stitch to map the waveform’s peaks and valleys.
The rainbow gradient flows horizontally across the design, adding a layer of visual energy.
Stitching on black fabric provides the highest contrast, making the colorful soundwave appear to vibrate.
26. Stitch Realistic Botanicals with Directional Needle Painting

To embroider a realistic leaf, you must stitch with its anatomy in mind.
Tackle each lobe of the maple leaf as a separate section, angling your long-and-short stitches to radiate outwards from the central vein, just as they grow in nature.
This directional stitching is what creates the leaf’s texture and form.
Use a raised stem stitch or split backstitch for the veins to give them definition and a subtle, three-dimensional quality.
27. Blend Colors Smoothly Within Chain Stitch Lettering

To create a soft gradient effect in your lettering, use a chain stitch and switch your floss color every few stitches.
Instead of ending one color and starting the next with a new knot, you can carry the unused color along the back of your work for a short distance to make the transition faster.
This technique blends the colors together seamlessly, giving your cursive letters a dreamy, watercolor-like appearance.
28. Weave Polished Gradients for Functional Textiles
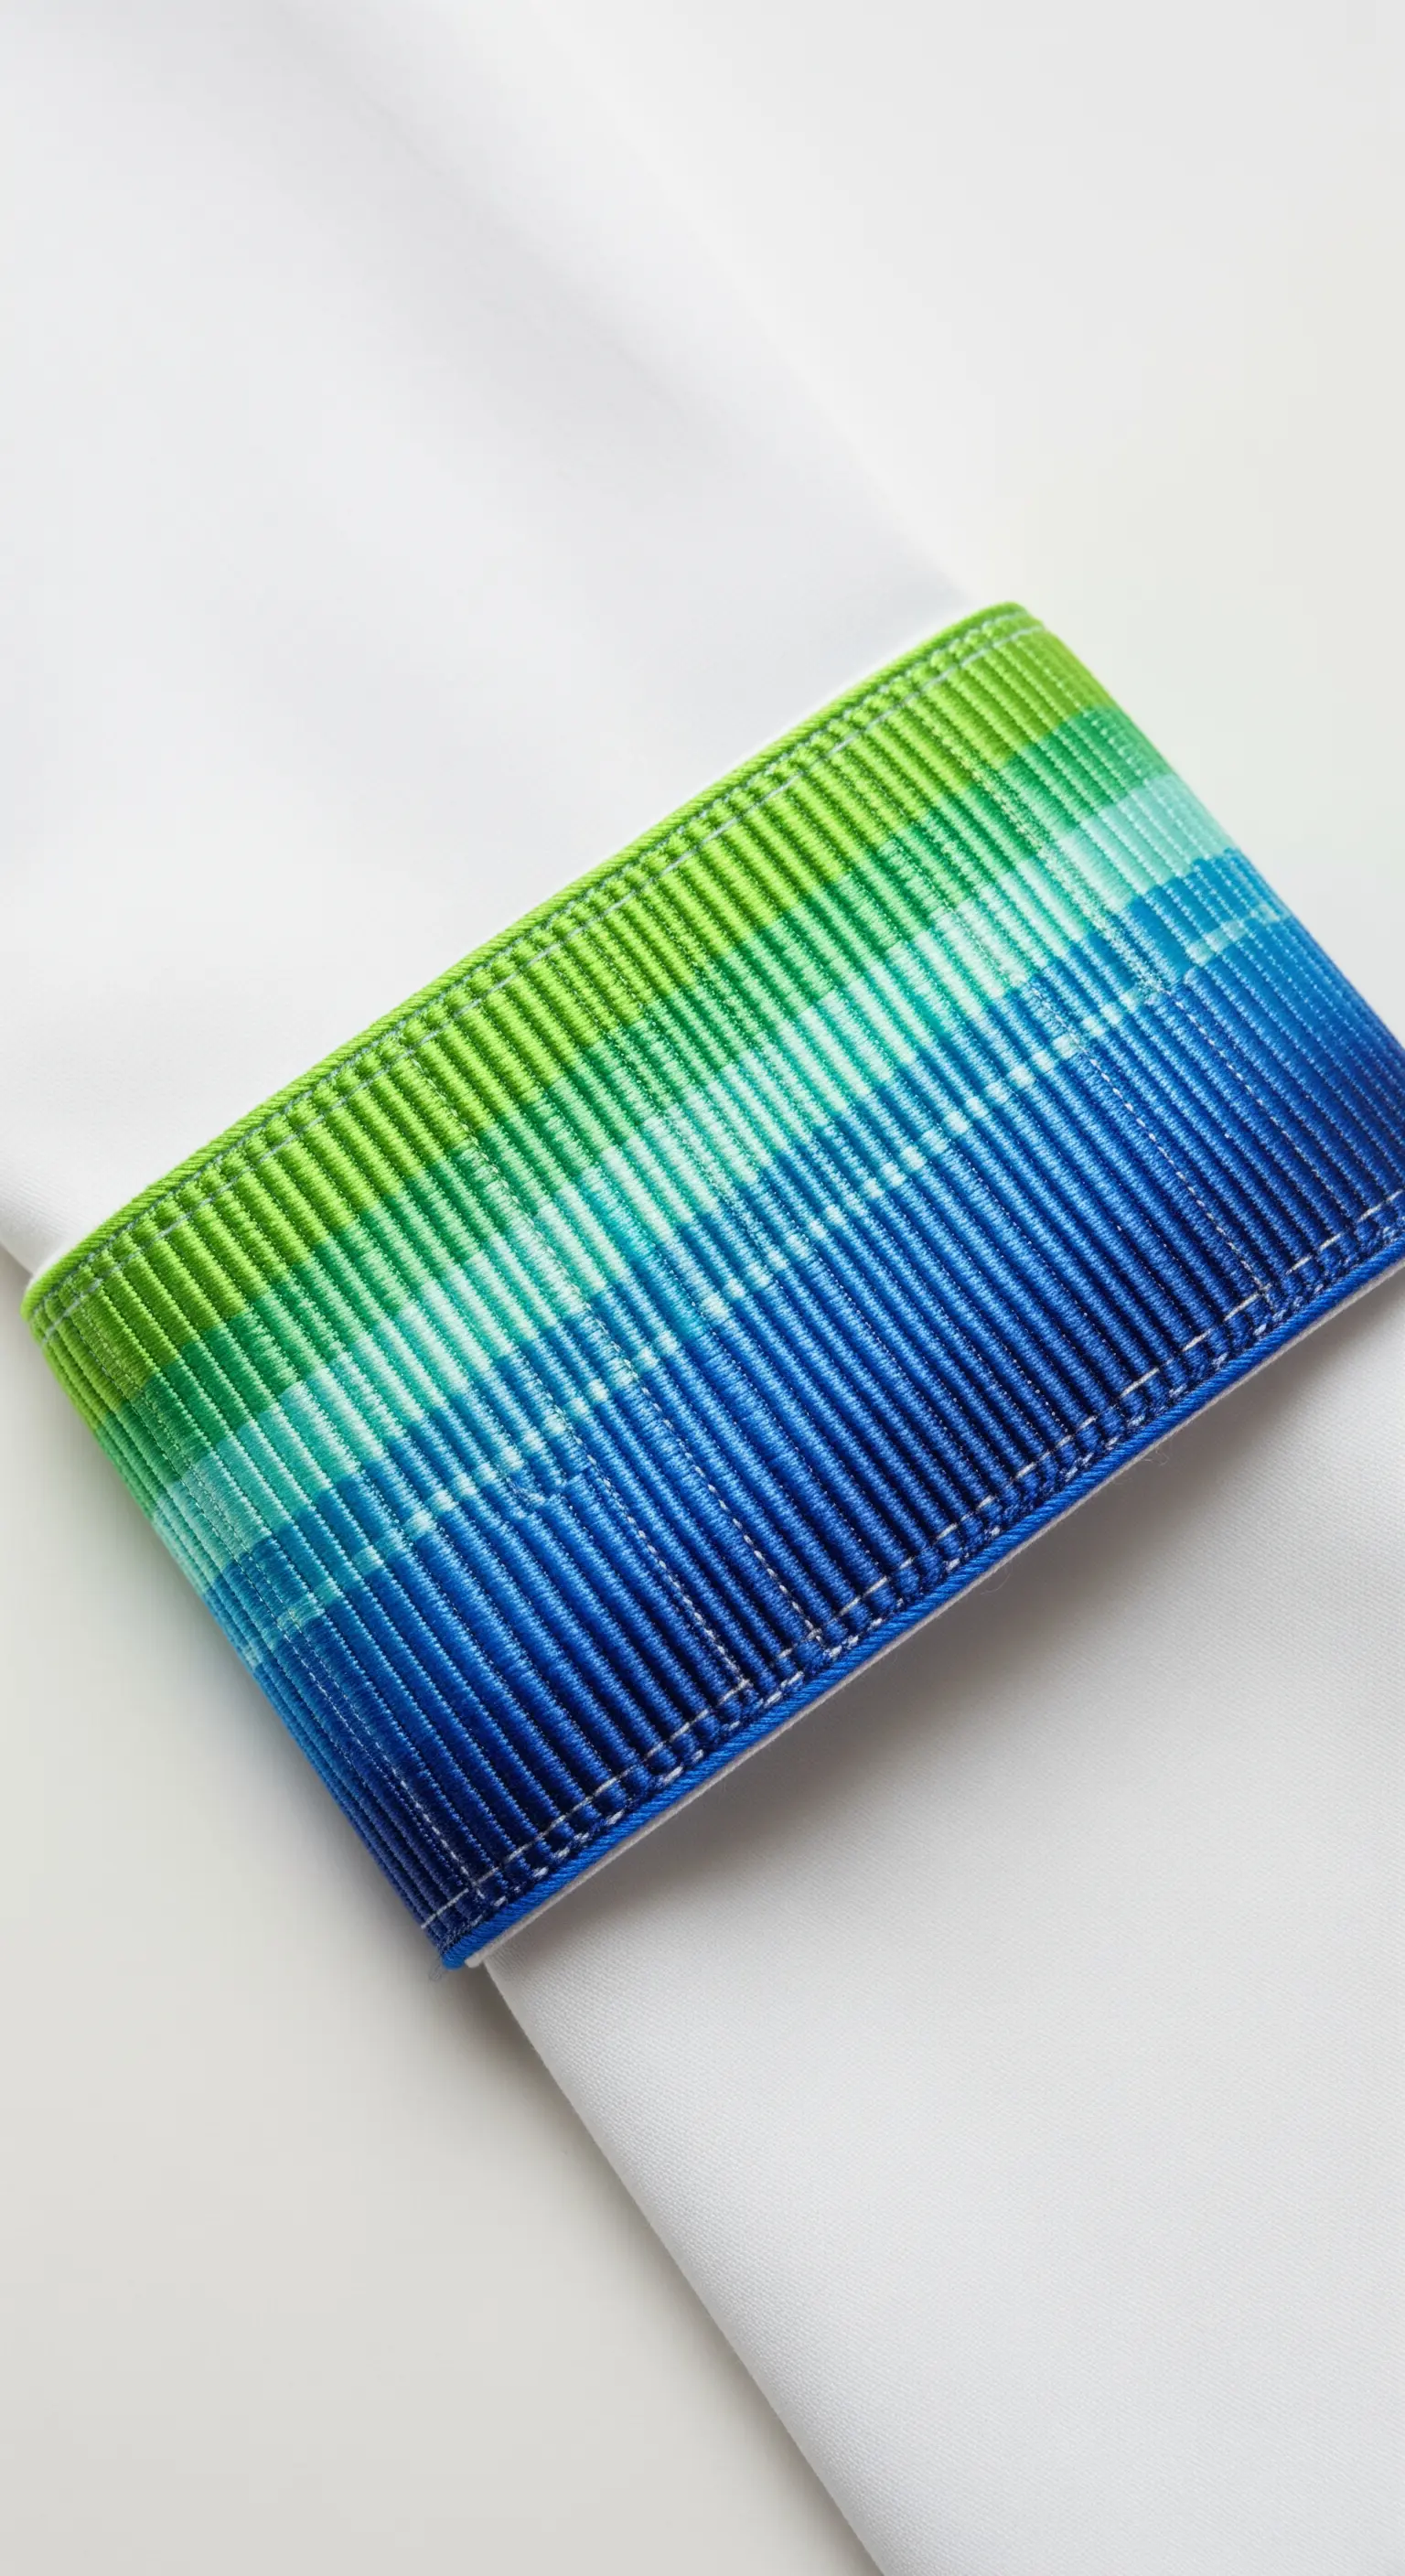
This napkin ring’s textured, ribbed effect is created by dense, horizontal satin stitches that are either woven through or stitched by a machine to mimic that effect.
To replicate this by hand, you could create a series of long, parallel foundation stitches and then weave your gradient threads over and under them.
Alternatively, a very dense, perfectly executed satin stitch can create a similar ribbed texture.
The finish is clean and durable, perfect for functional items that require a polished look.
29. Paint an Ethereal Sky with Long, Flowing Stitches
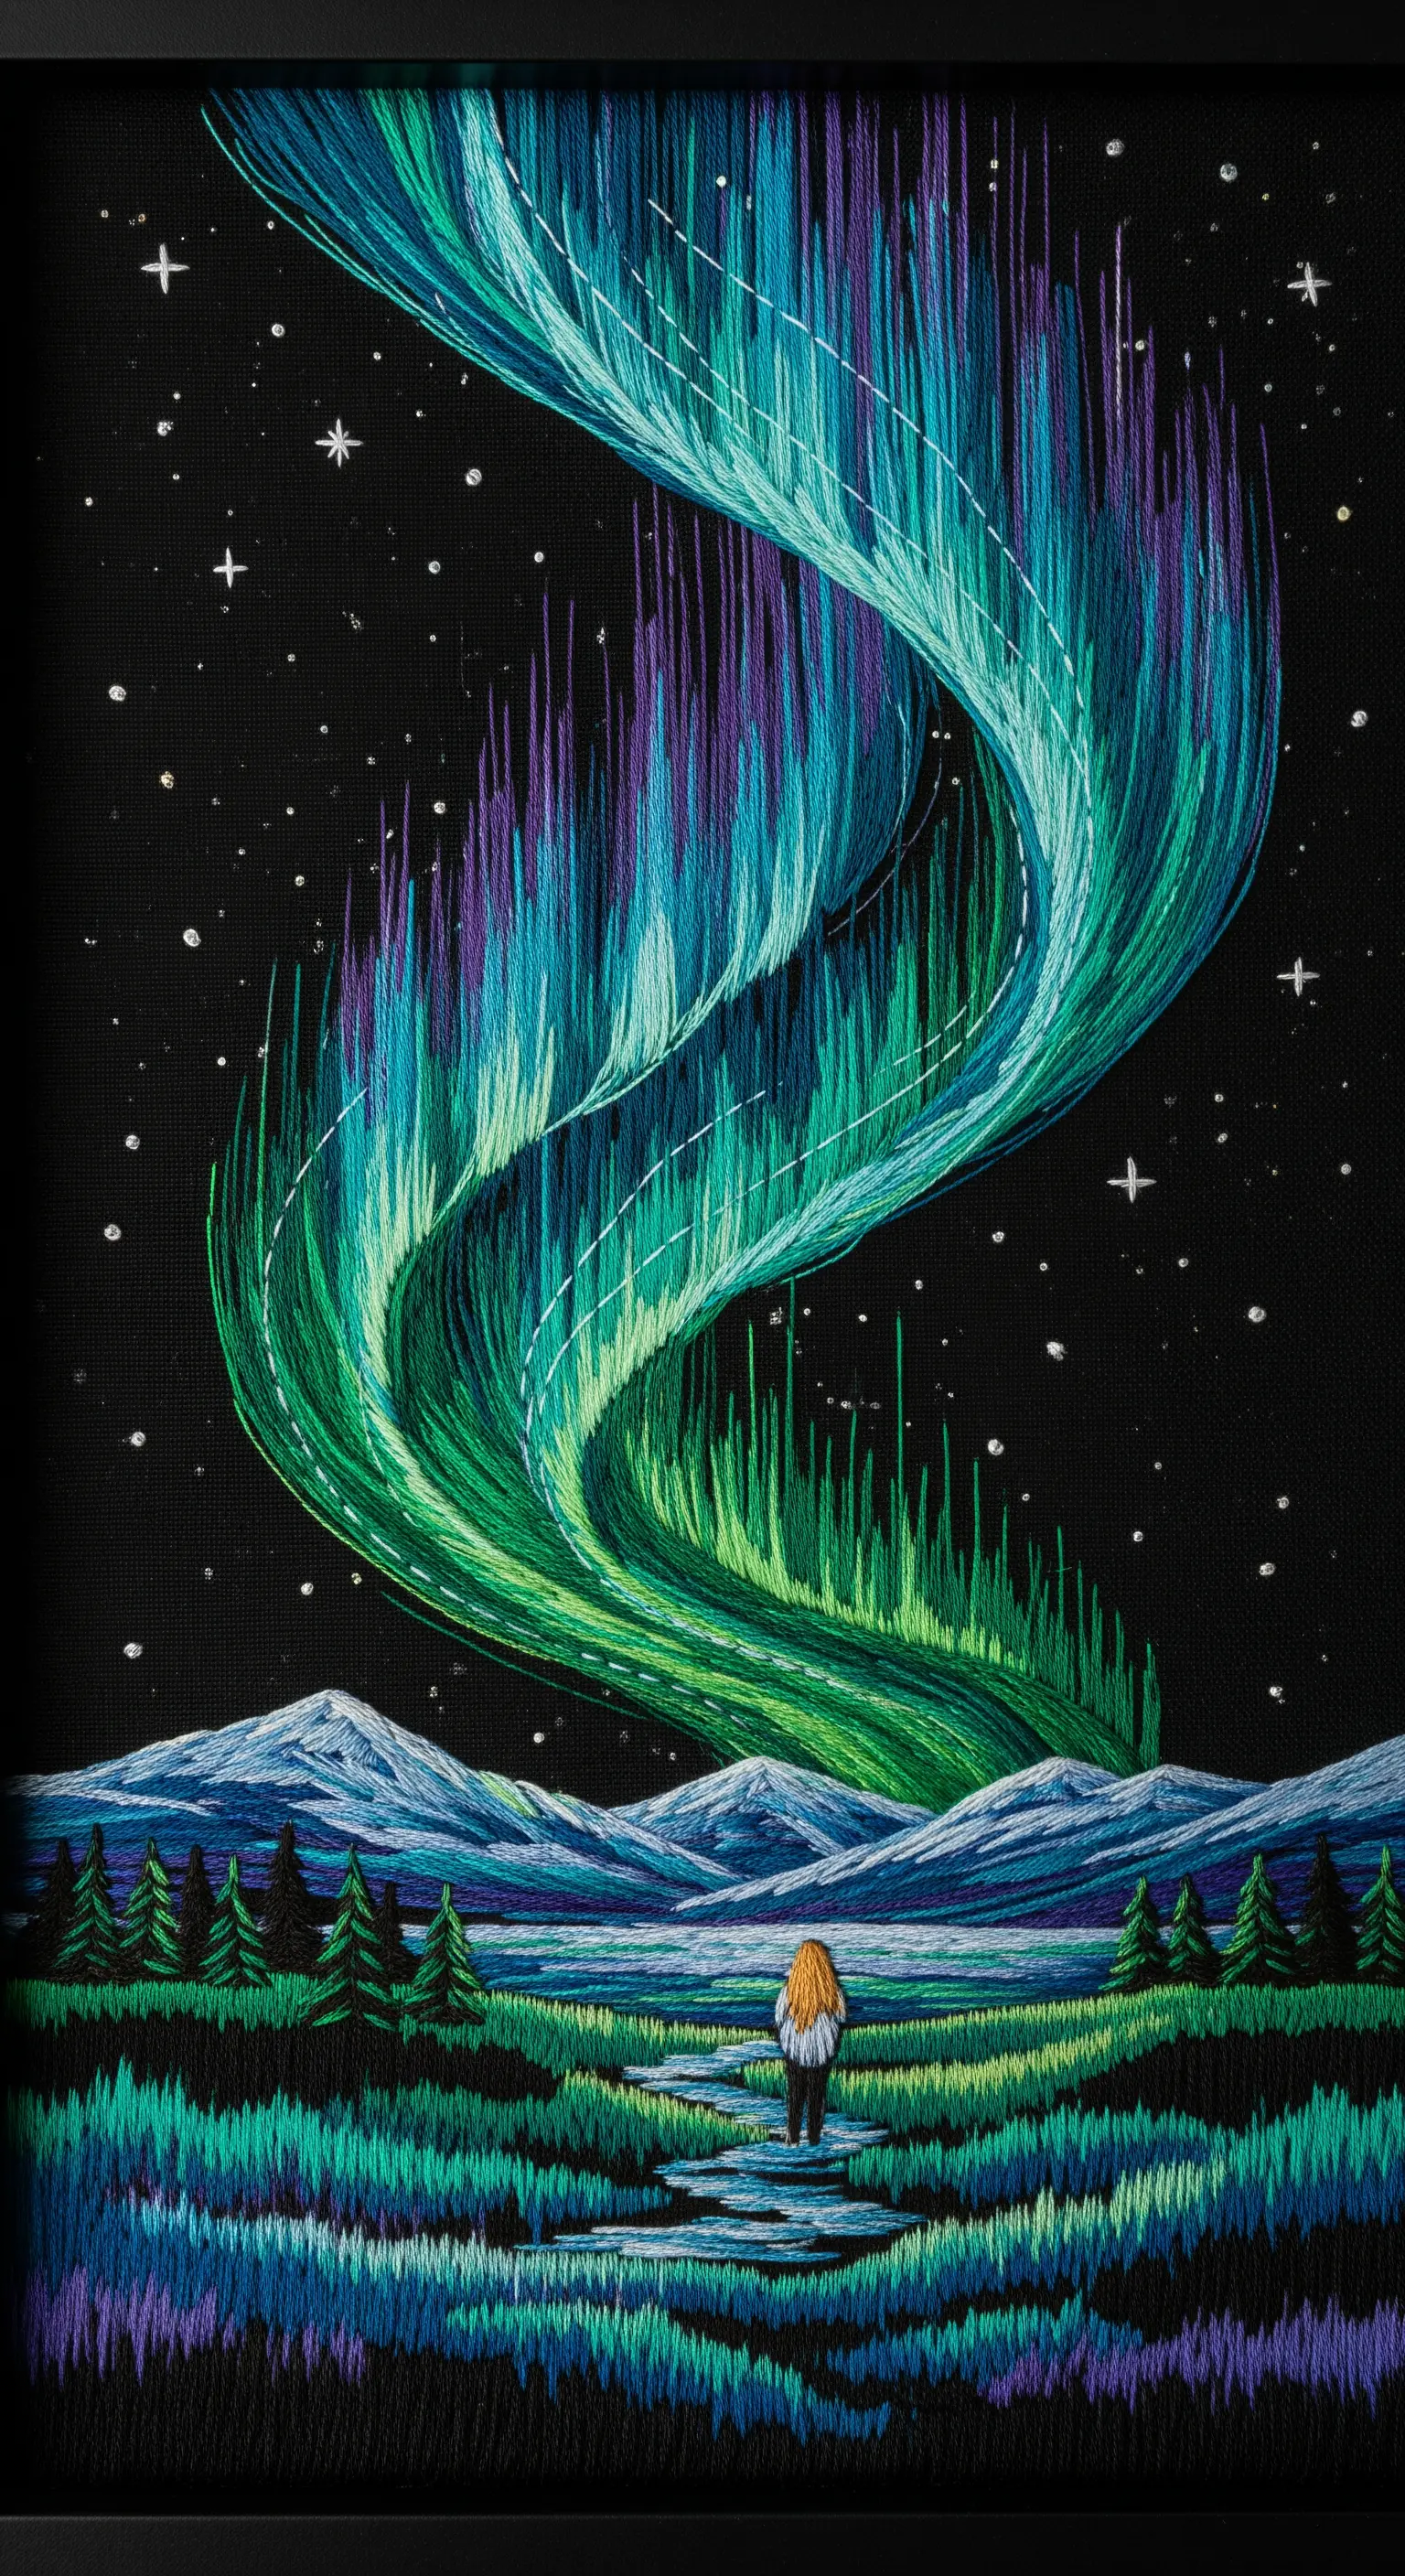
Capture the fluid, dancing light of the aurora borealis using long, vertical straight stitches.
Use a single strand of floss to keep the stitches light and ethereal, and vary their length and density to create a sense of movement and transparency.
Allow the colors to overlap and blend optically, rather than trying to blend them perfectly within the fabric.
A scattering of tiny white French knots for stars on the black fabric completes this atmospheric, celestial landscape.
30. Master Gradients with Focused Stitch Samplers
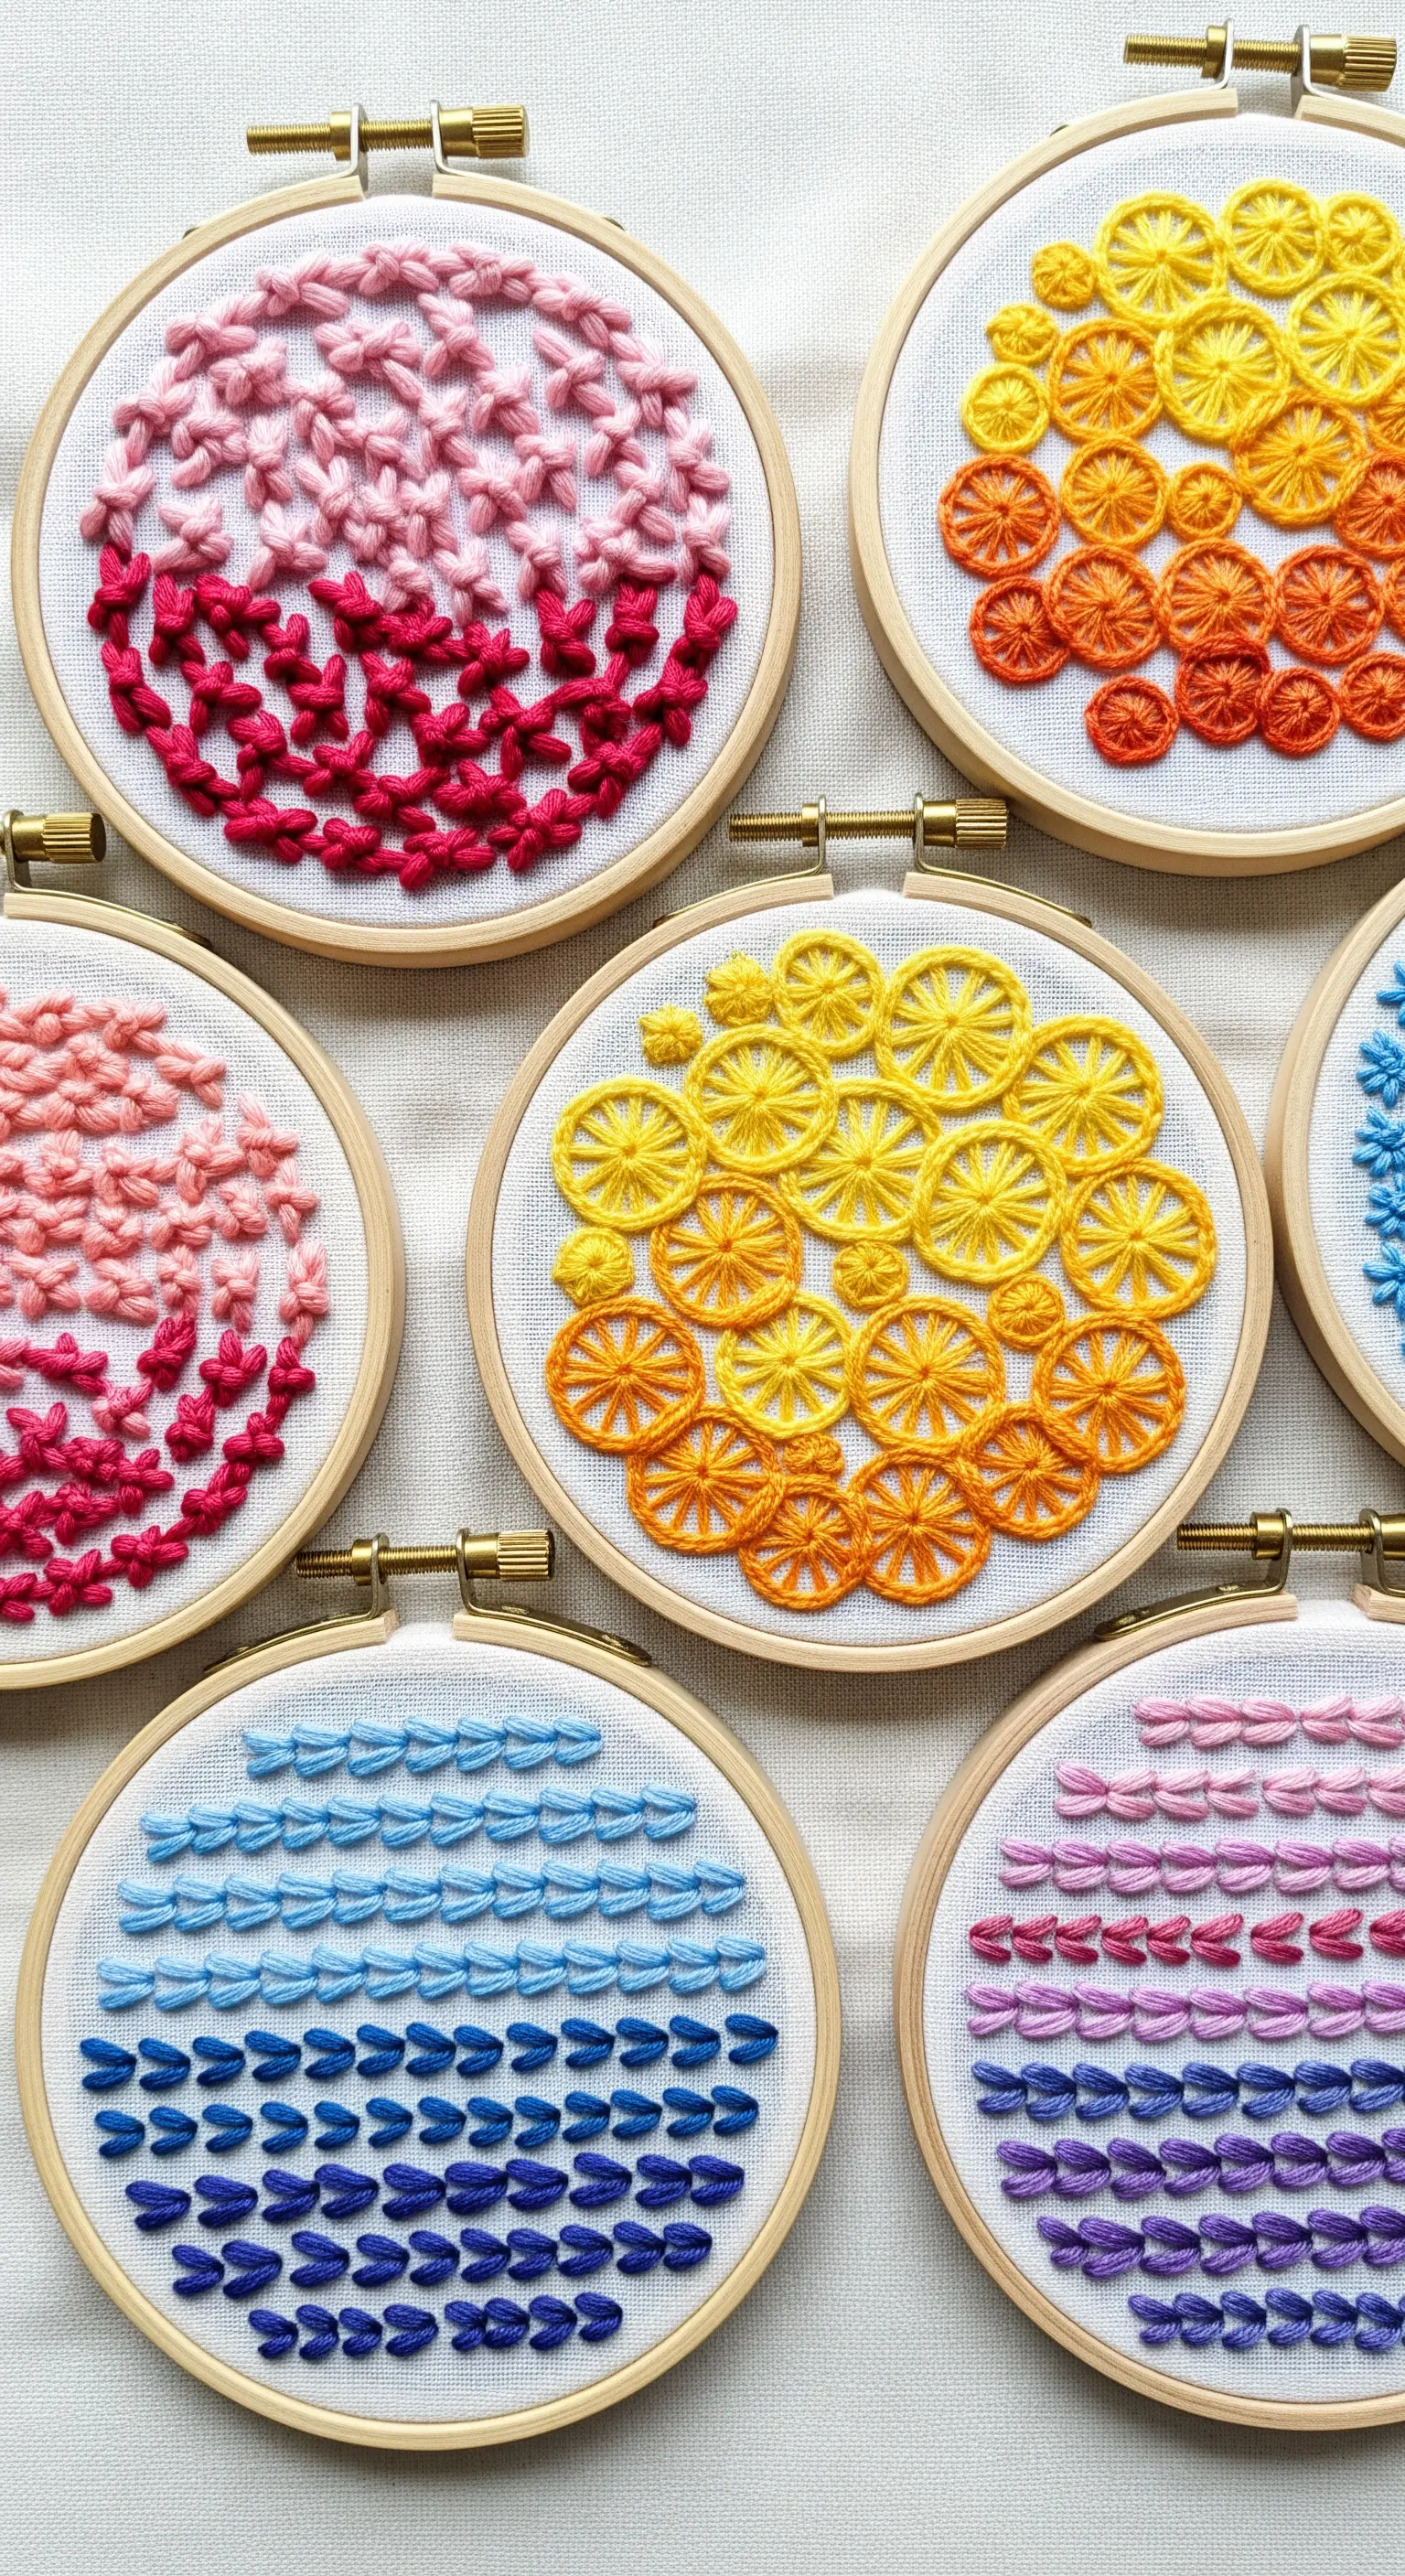
The best way to perfect your color blending is to practice.
Dedicate small, individual hoops to exploring how a single stitch—like the woven wheel, fly stitch, or lazy daisy—works in a gradient.
This focused exercise allows you to understand how different stitches build up color and texture without the pressure of a large project.
As a bonus, these colorful little “stitch sketches” look beautiful when displayed together as a collection.


