
If you’re looking to move beyond following patterns and start creating embroidered art that truly warms your home, the secret isn’t in mastering dozens of complex stitches. It’s in how you use the simple ones to build texture, tell a story, and create a feeling.
Think of your thread less like a line and more like a brushstroke. How can you blend two colors to capture the softness of an animal’s fur? How can a simple French knot, when repeated, become a field of flowers? This is where your embroidery transforms from a craft into a personal expression of comfort and style.
Here, you’ll find ideas that focus on these subtle but powerful shifts in technique. You’ll see how to arrange hoops into a cohesive gallery, how to choose fabrics that make your colors sing, and how to add small, dimensional details that bring your work to life. This is your invitation to create pieces that not only look beautiful, but feel like home.
1. Create Depth with Layered Woodland Textures
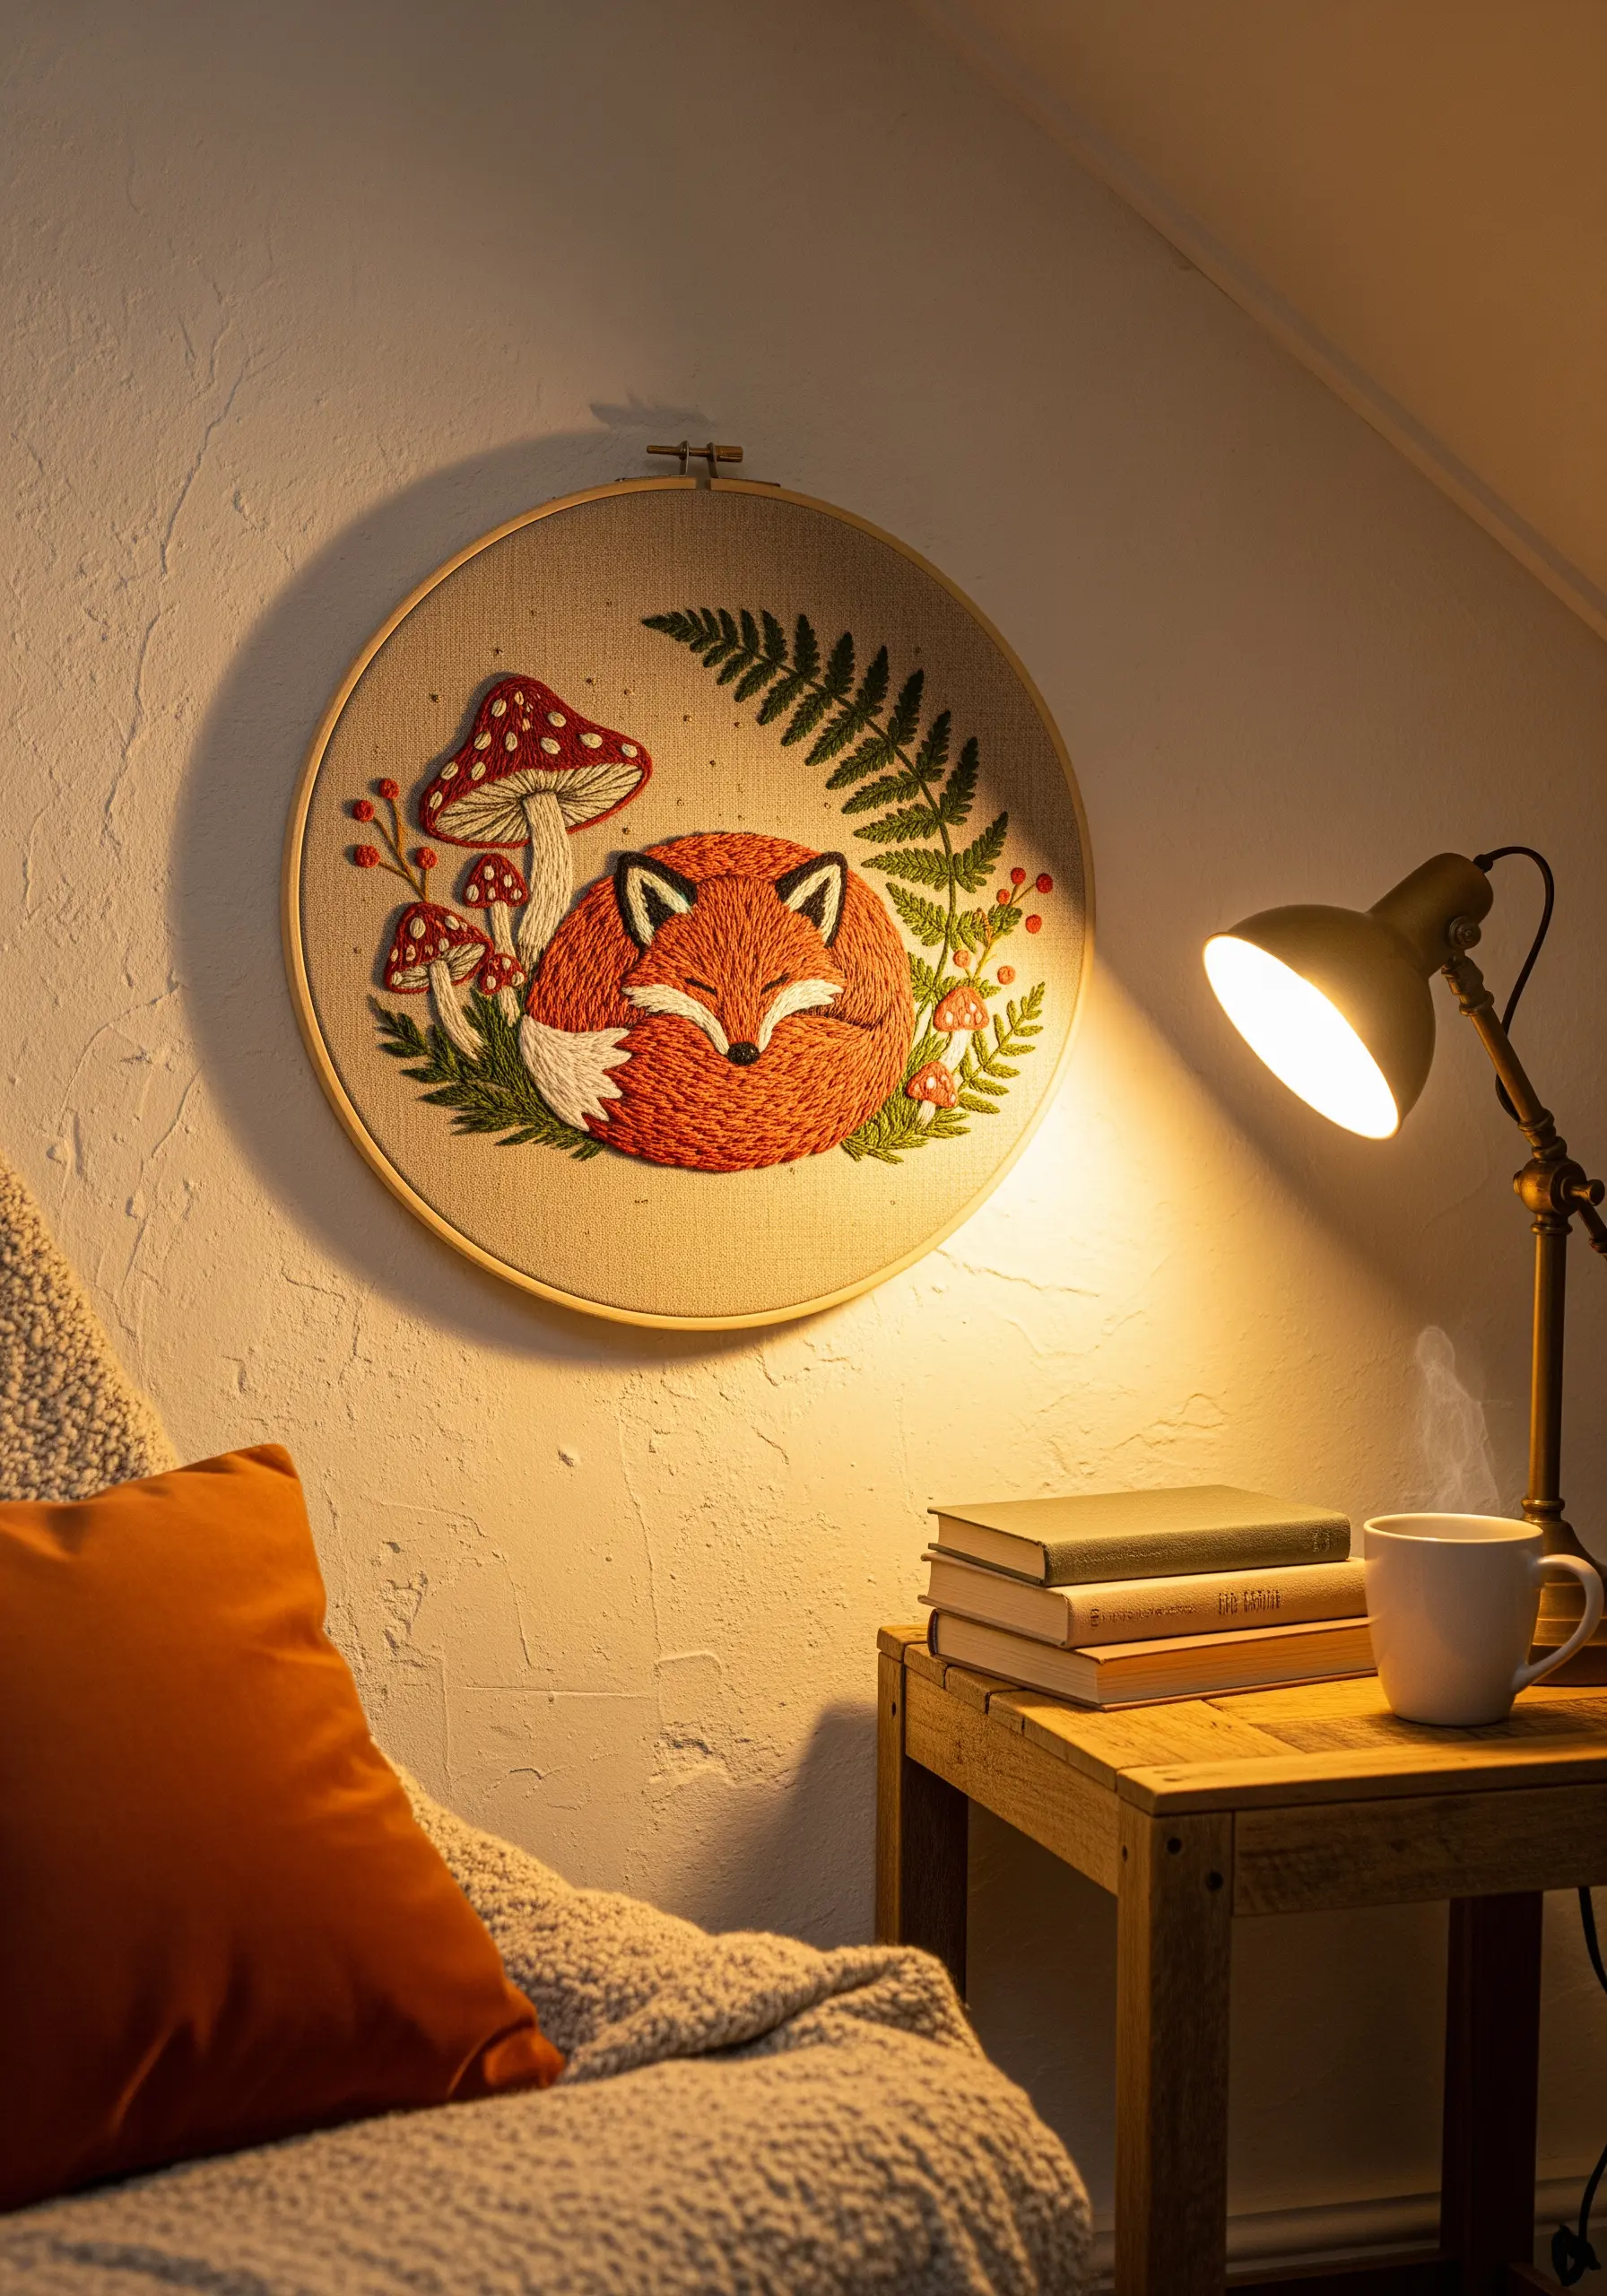
To give your woodland creatures a soft, lifelike dimension, move beyond a simple satin stitch.
Use a long-and-short stitch for the fox’s fur, blending shades of rust and cream to create natural highlights.
For the surrounding foliage, vary your textures: use a delicate fern stitch for the ferns and tight French knots for berries and smaller mushroom caps.
This contrast between soft fur and crisp botanicals makes the entire composition feel more dynamic and touchable.
2. Curate a Cohesive Kitchen Gallery Wall
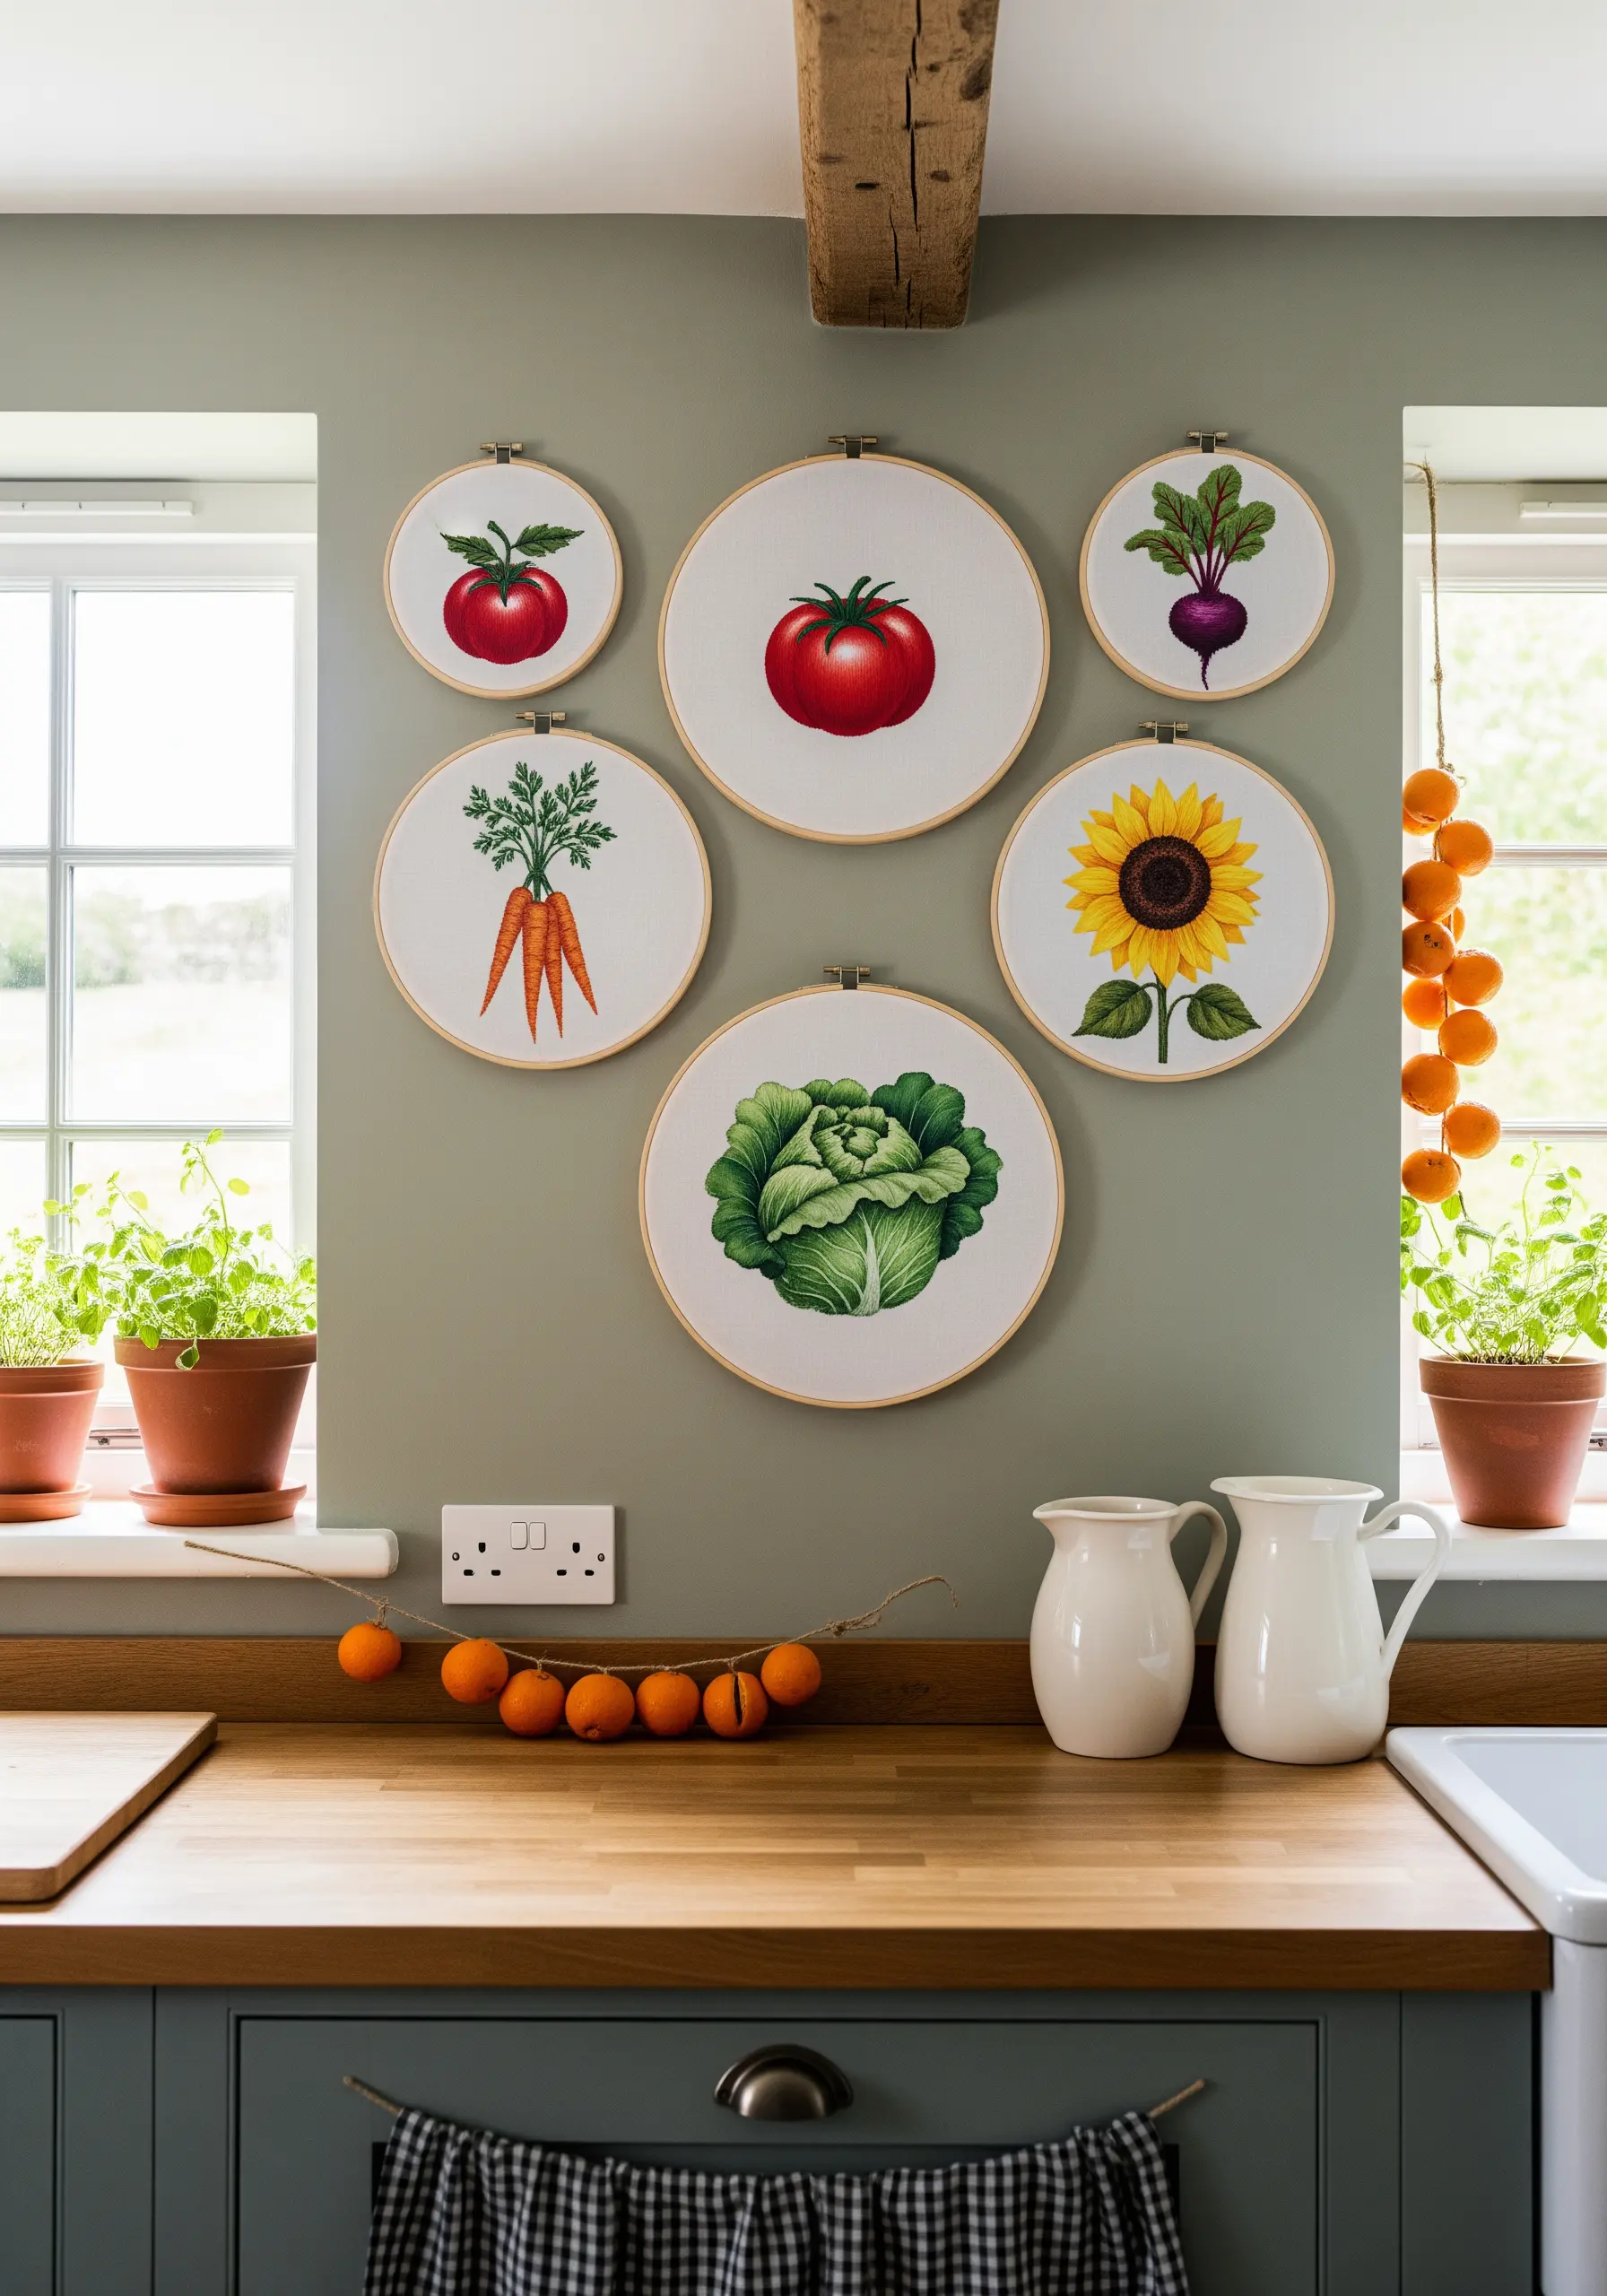
To create a polished gallery wall, unify your pieces with a consistent background fabric, like a simple off-white linen.
Vary the hoop sizes to create visual interest, but keep the wood tone the same to maintain cohesion.
For rendering realistic vegetables, use thread painting—the technique of blending colors with long-and-short stitches—to capture the subtle gradients on a ripe tomato or the leafy texture of a cabbage.
Use only one or two strands of floss for this technique to achieve a smooth, painterly finish.
3. Design a Serene Embroidered Headboard
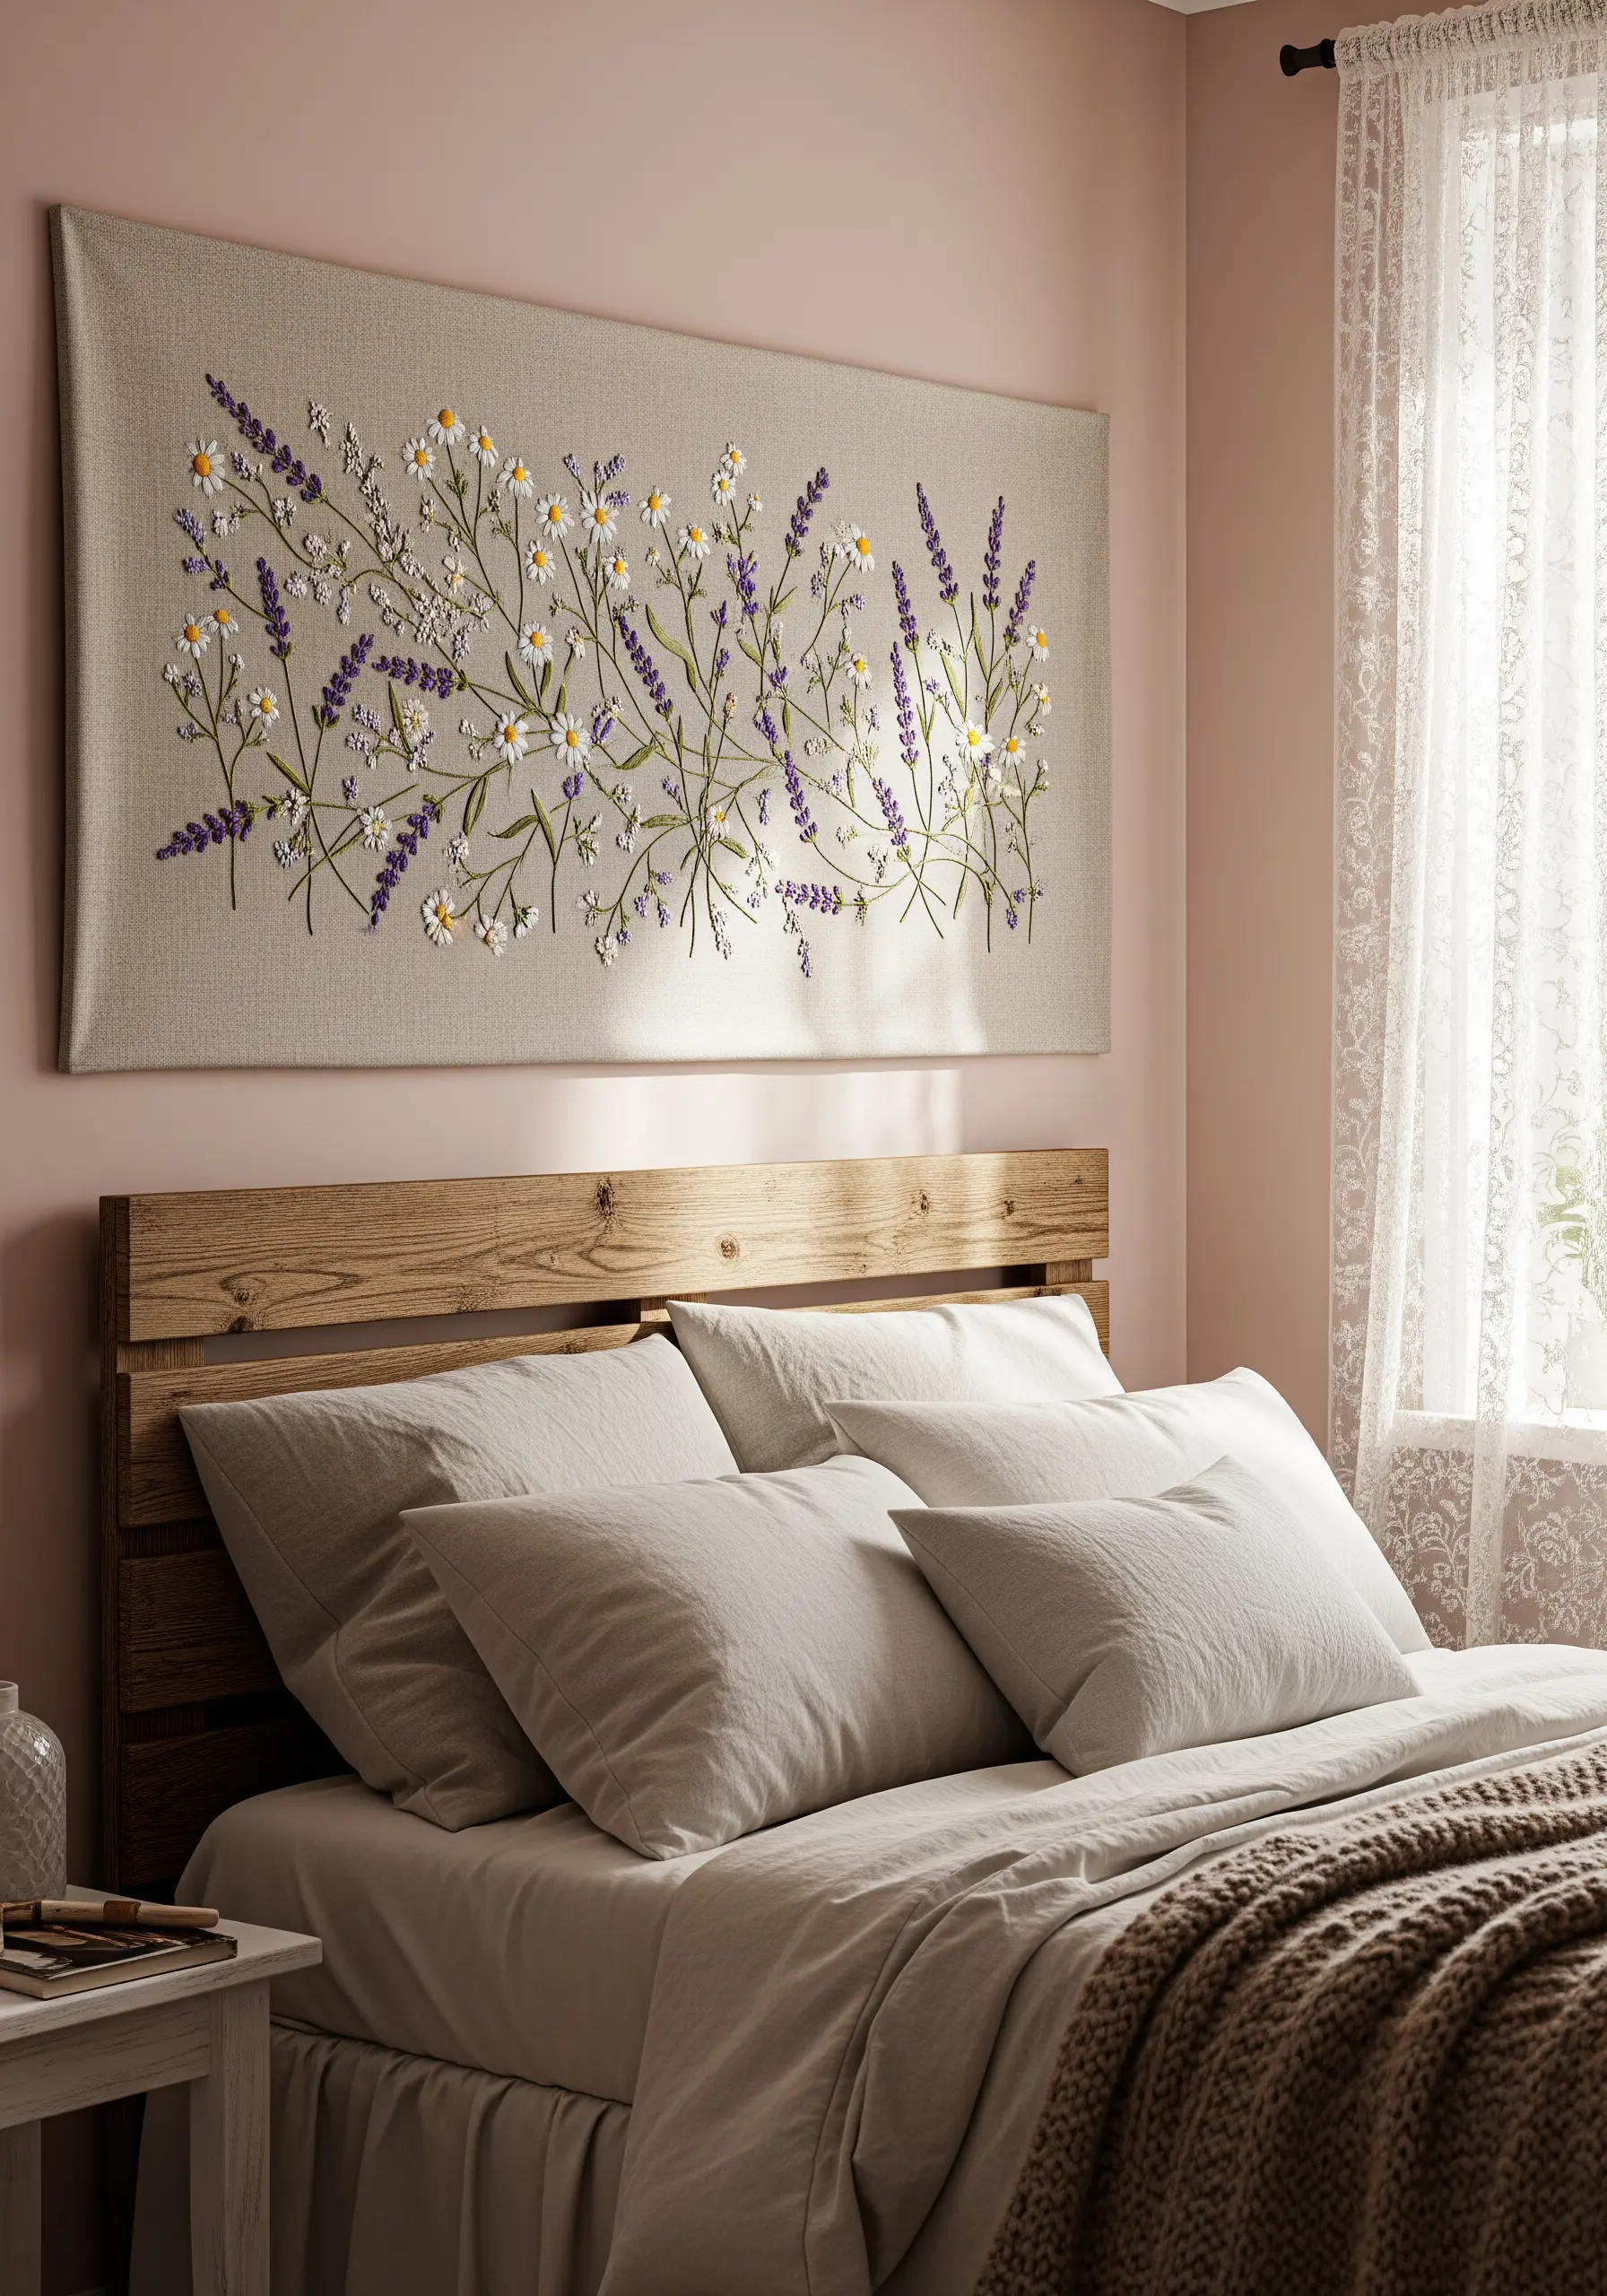
Transform a simple bedroom wall by creating a large-scale embroidered panel to hang above your bed.
Choose a calming motif like a field of lavender and chamomile, using a limited color palette of soft purples, whites, and greens.
To tackle a large canvas, use simple, repetitive stitches: straight stitches for lavender stalks, lazy daisy stitches for chamomile petals, and French knots for their centers.
This combination creates beautiful texture that adds softness to the room without overwhelming the space. These gentle botanical embroidery stitches perfect for tranquil bedroom decor will elevate the sense of calm.
4. Stitch a Triptych for Vertical Impact
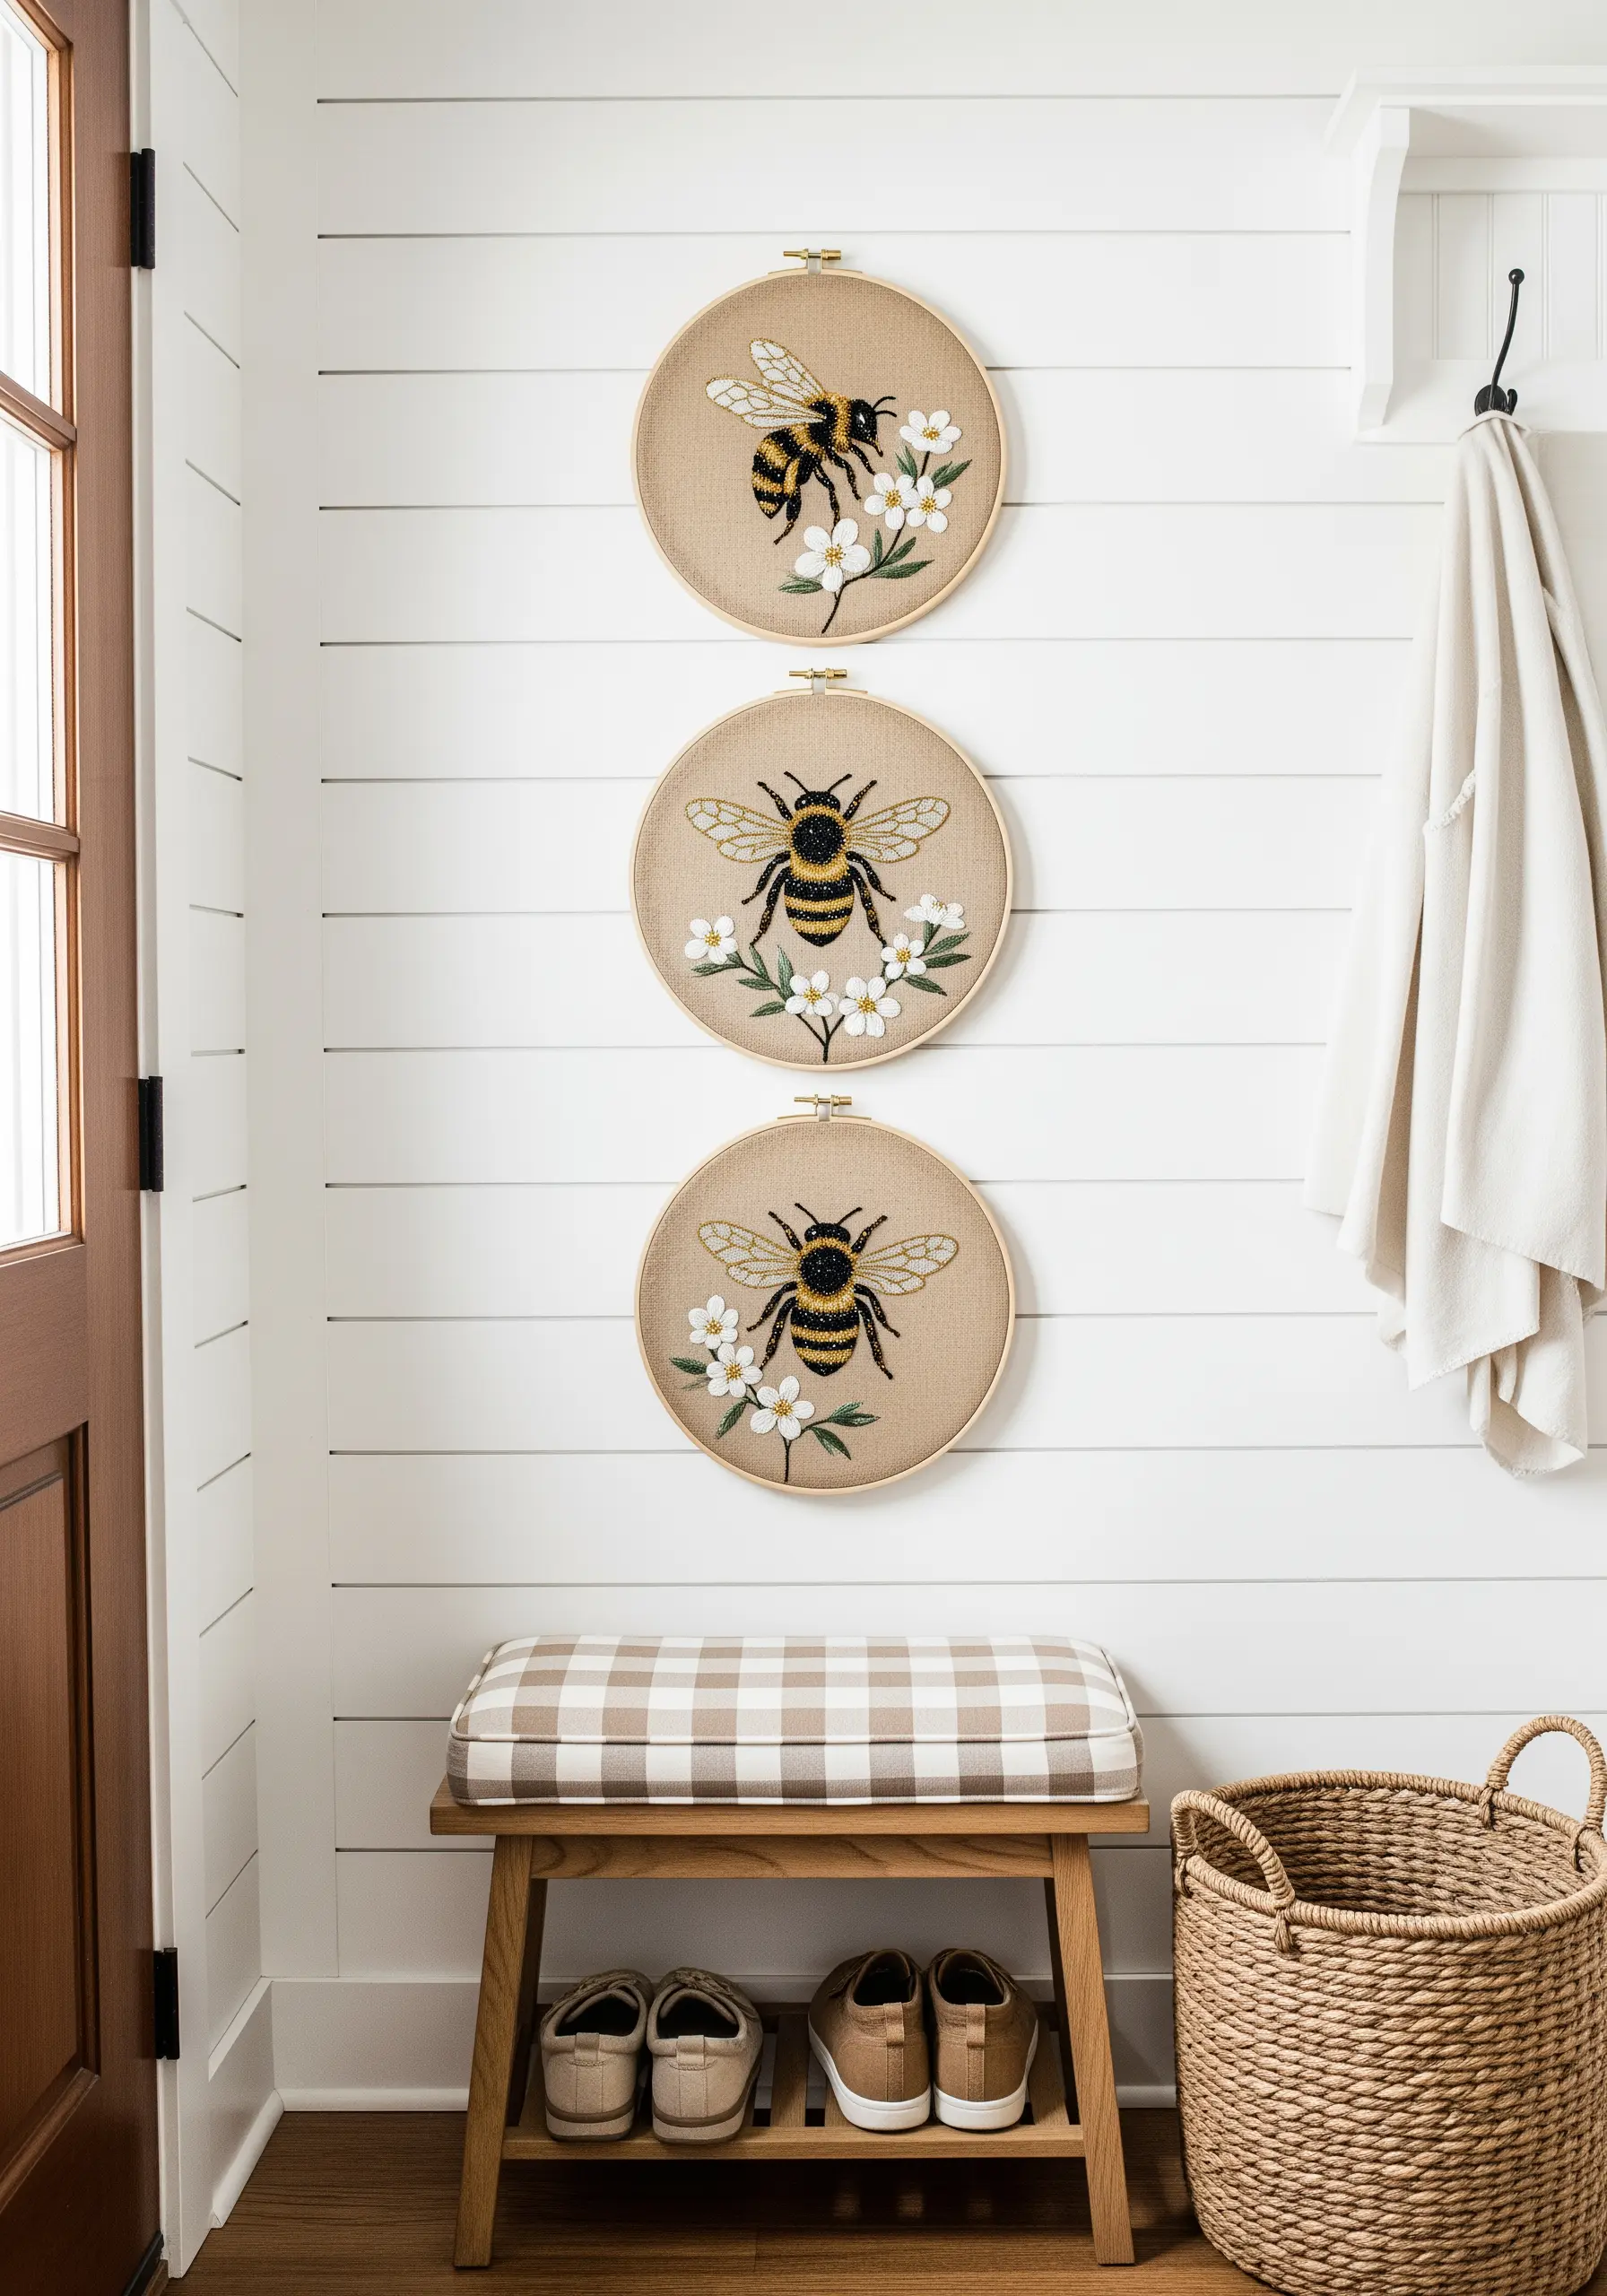
Create a strong vertical statement in an entryway or narrow space by stitching a series of three related designs.
To give the bee’s wings a delicate, translucent quality, try stitching the outlines on a small piece of sheer organza, then appliquéing it onto your main fabric.
Fill the wing area with a few sparse seed stitches using a single strand of light grey or silver thread.
This technique adds a sophisticated, mixed-media element that elevates a simple motif.
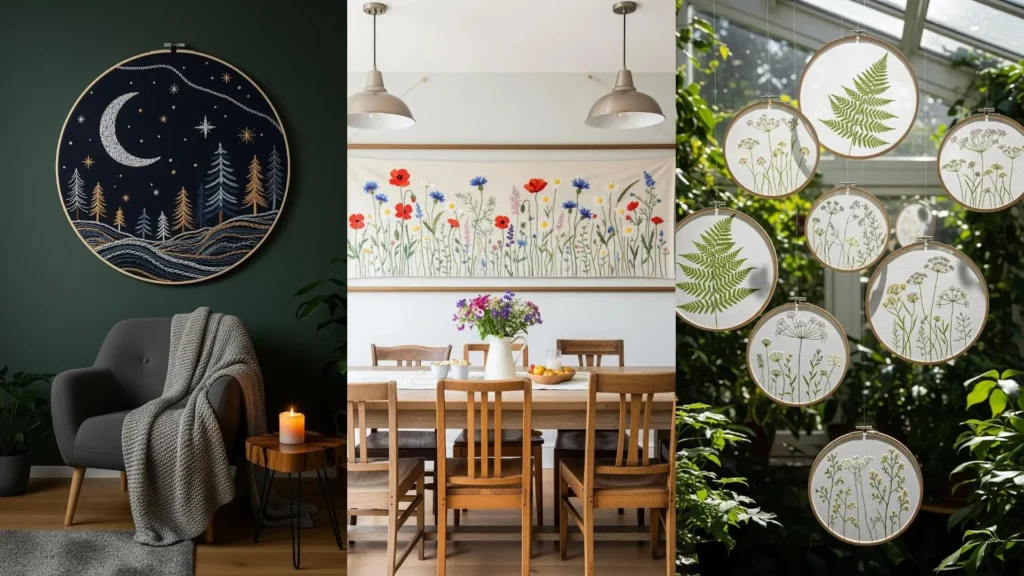
5. Illuminate a Night Scene on Dark Fabric
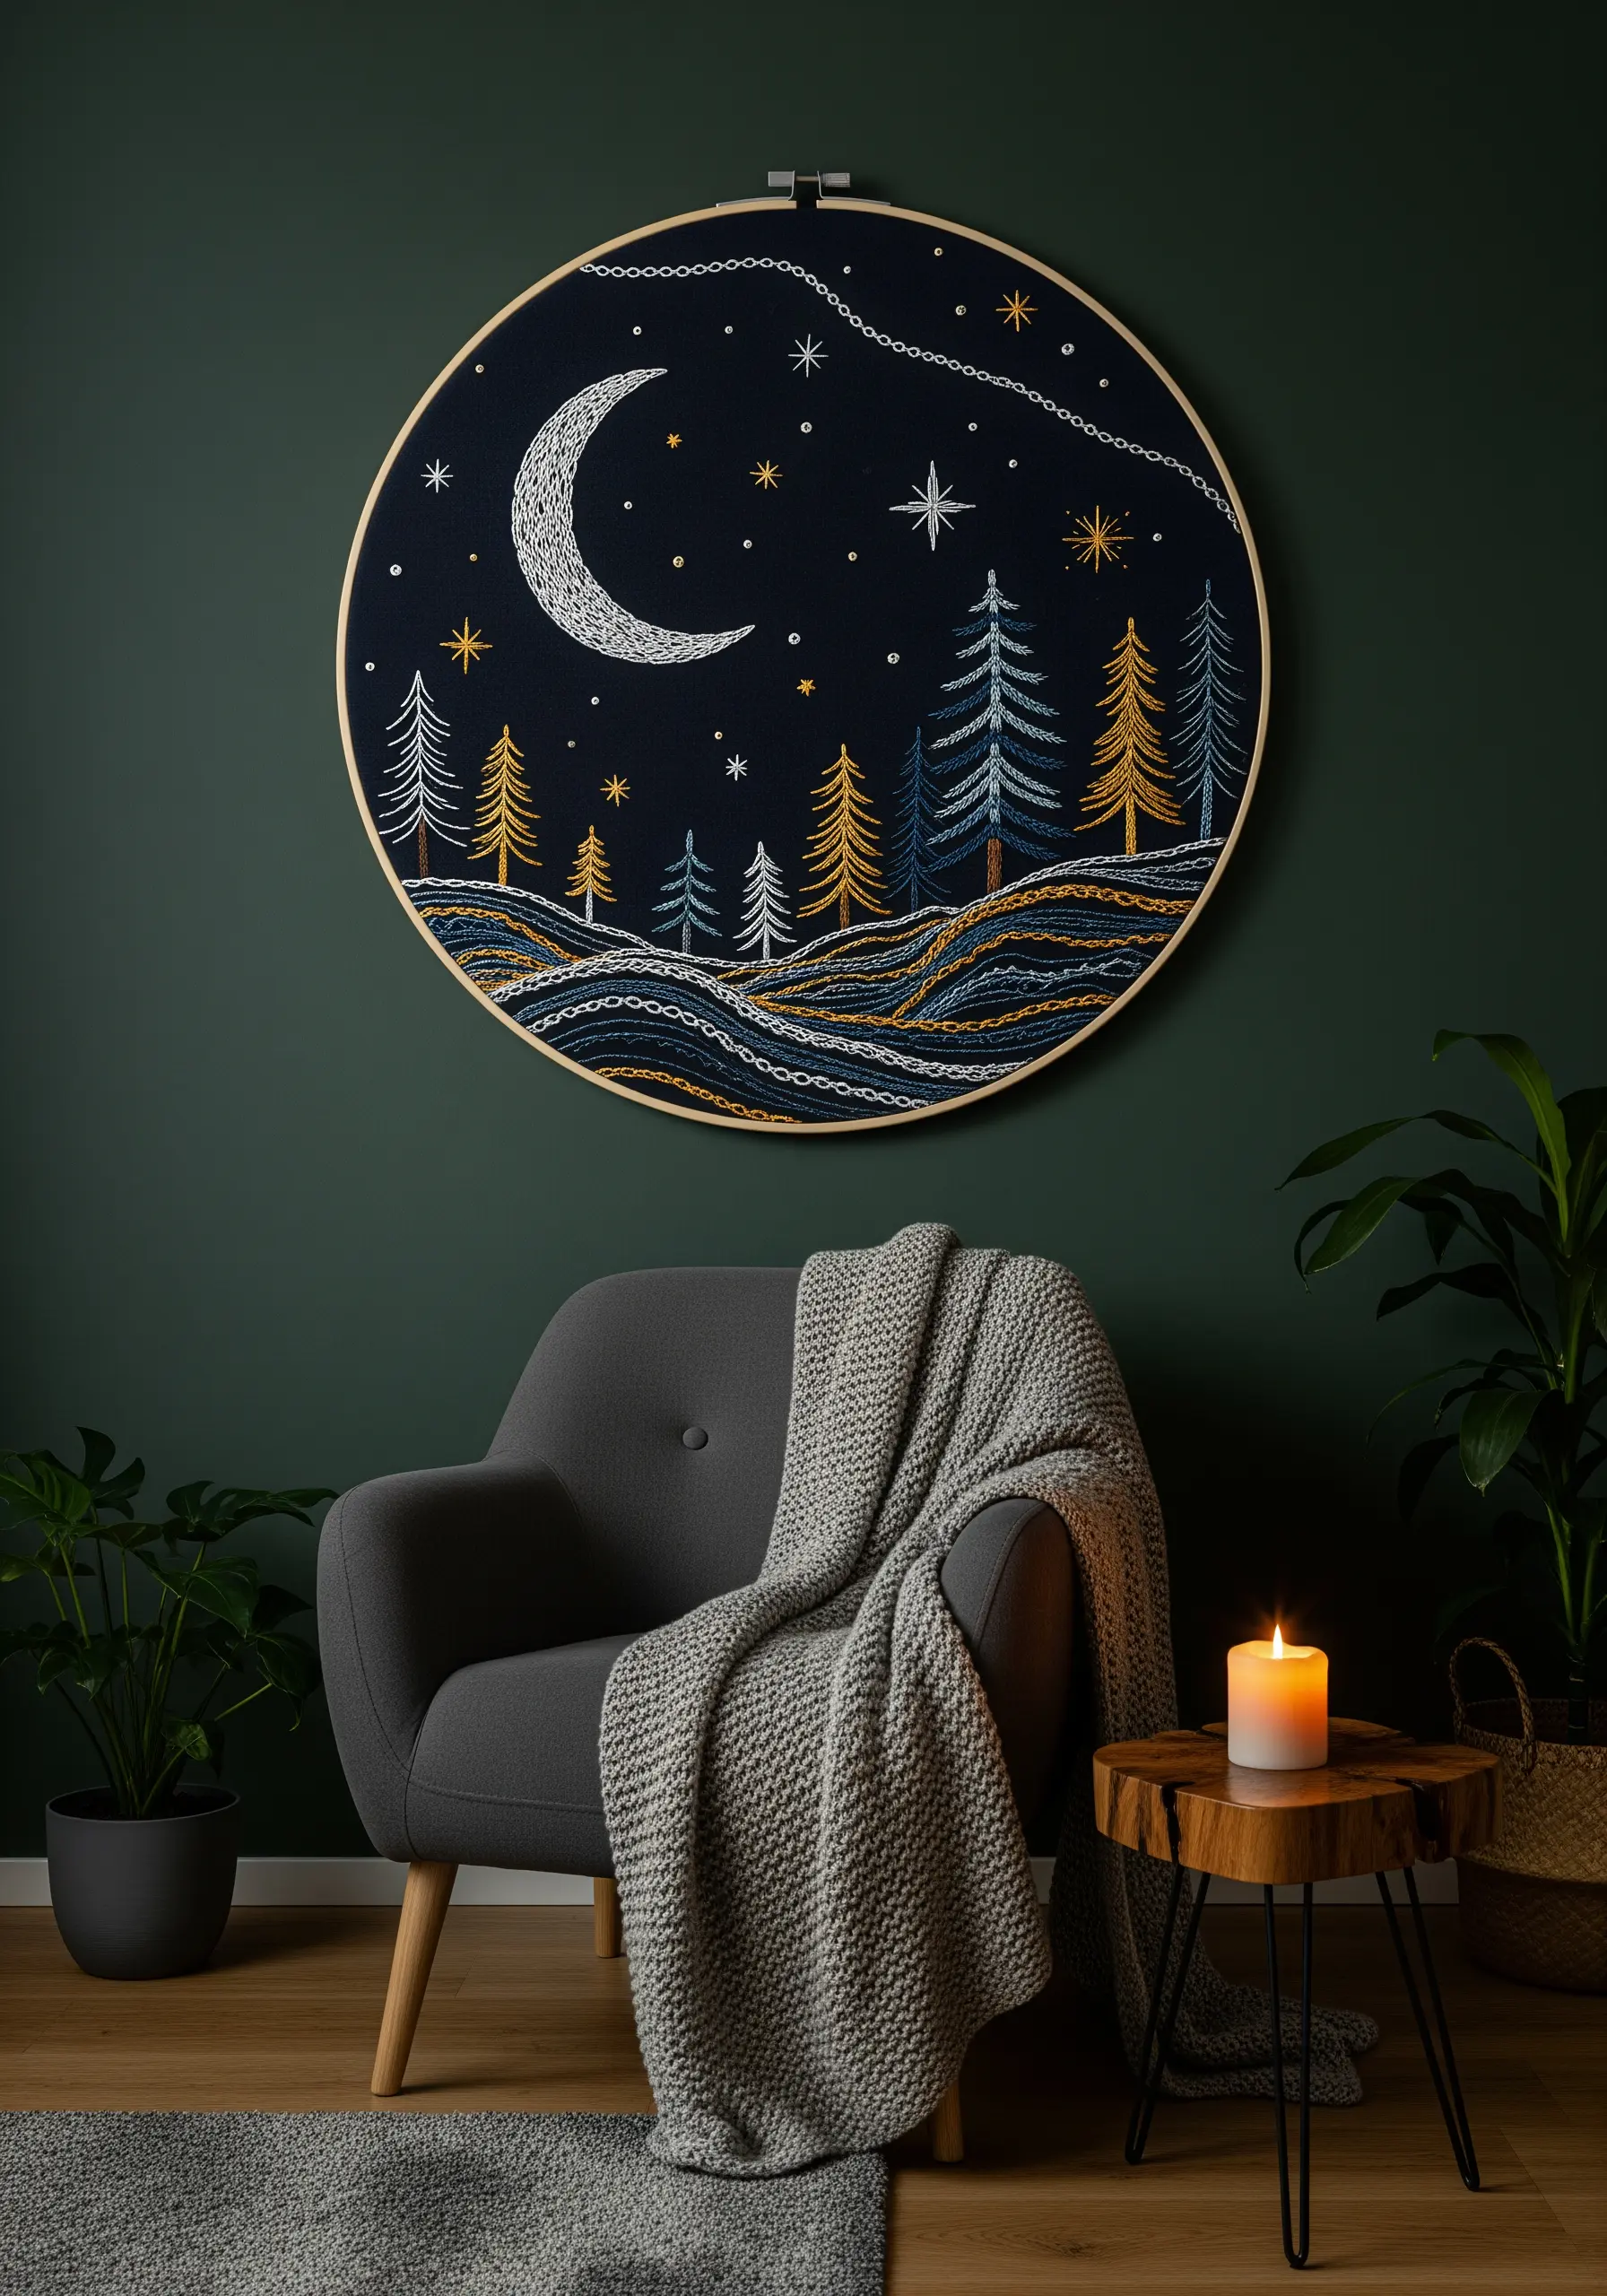
Stitching on dark fabric creates dramatic contrast and makes colors appear more vibrant.
To make your design pop, choose a high-contrast palette of metallics, whites, and bright yellows.
Use a chain stitch for the outlines of the rolling hills; it creates a solid, textured line that stands out against the dark background.
For the moon, blend white and silver metallic threads in your satin stitch to give it a subtle, realistic shimmer that catches the light.
6. Assemble a Playful Cottage-Core Mood Board
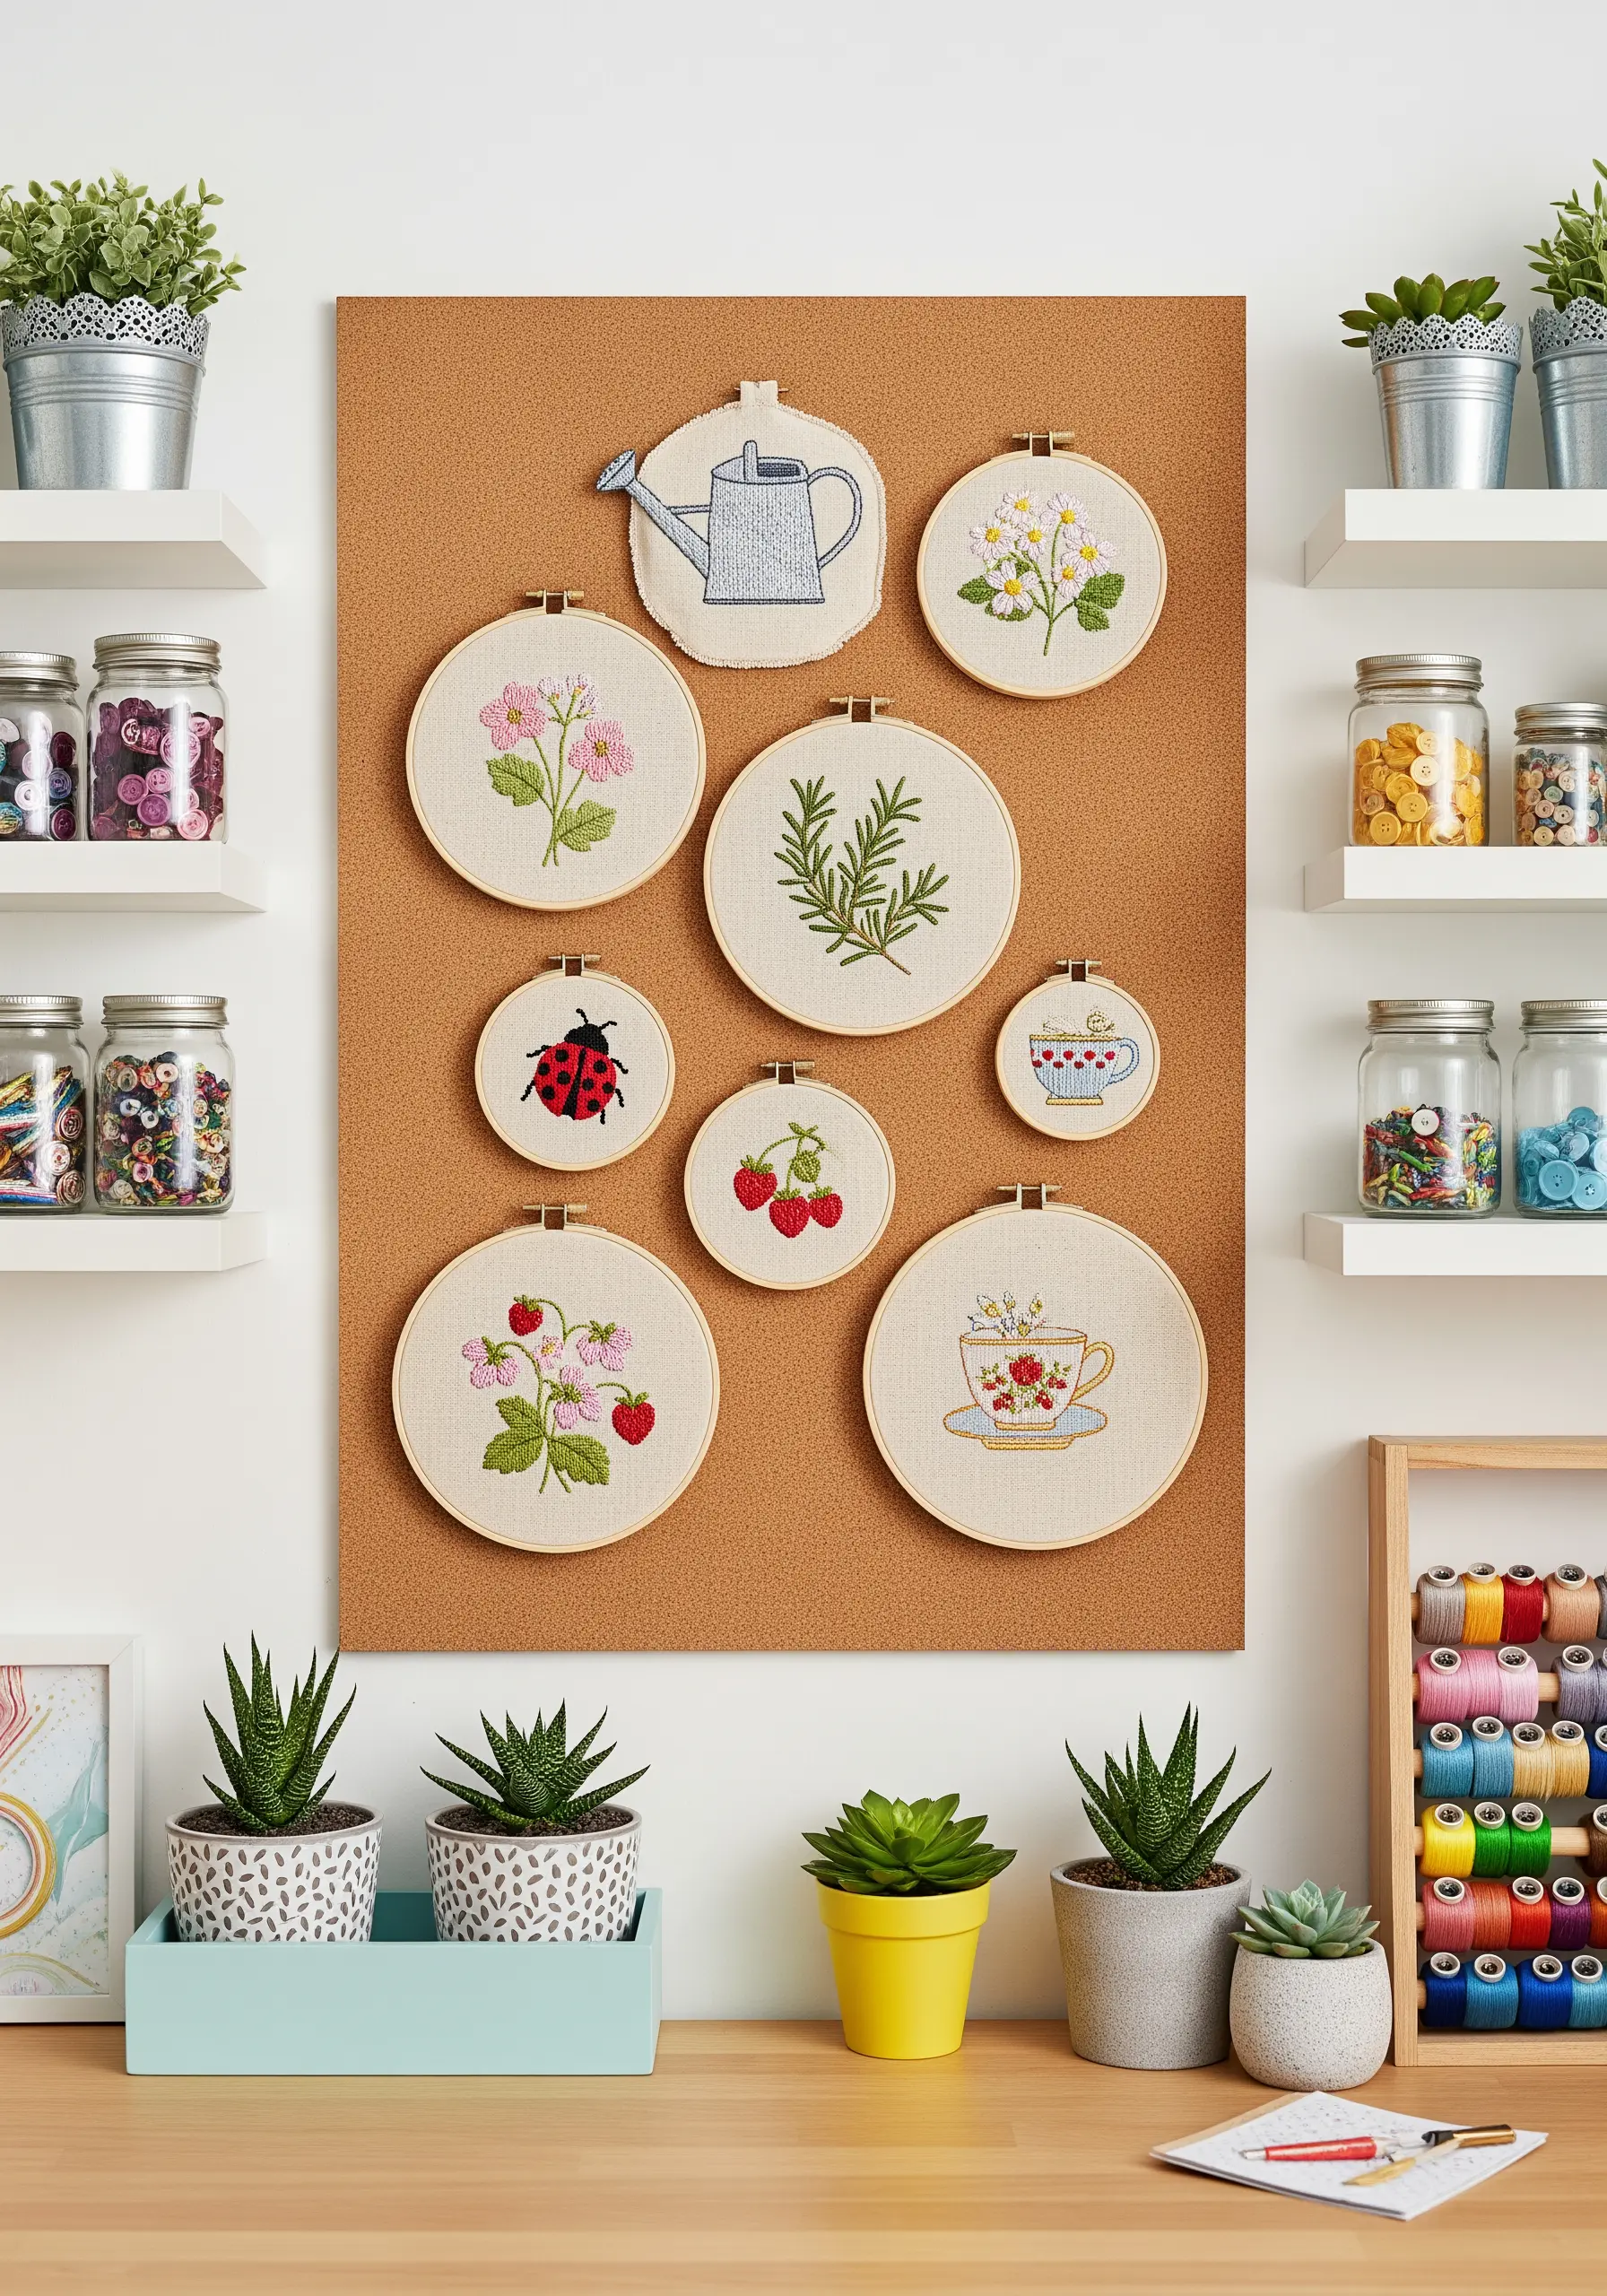
Move beyond a simple grid and arrange your hoops in a more organic, clustered composition on a corkboard.
This allows you to easily mix sizes and even incorporate non-hooped elements, like a felt appliqué watering can, for added charm.
To keep the collection from feeling chaotic, stick to a unified color story—in this case, soft pinks, reds, and greens.
This approach transforms a group of small projects into one of these inspiring hoop art projects for a creative gallery wall.
7. Embrace Elegance with Tone-on-Tone Stitching
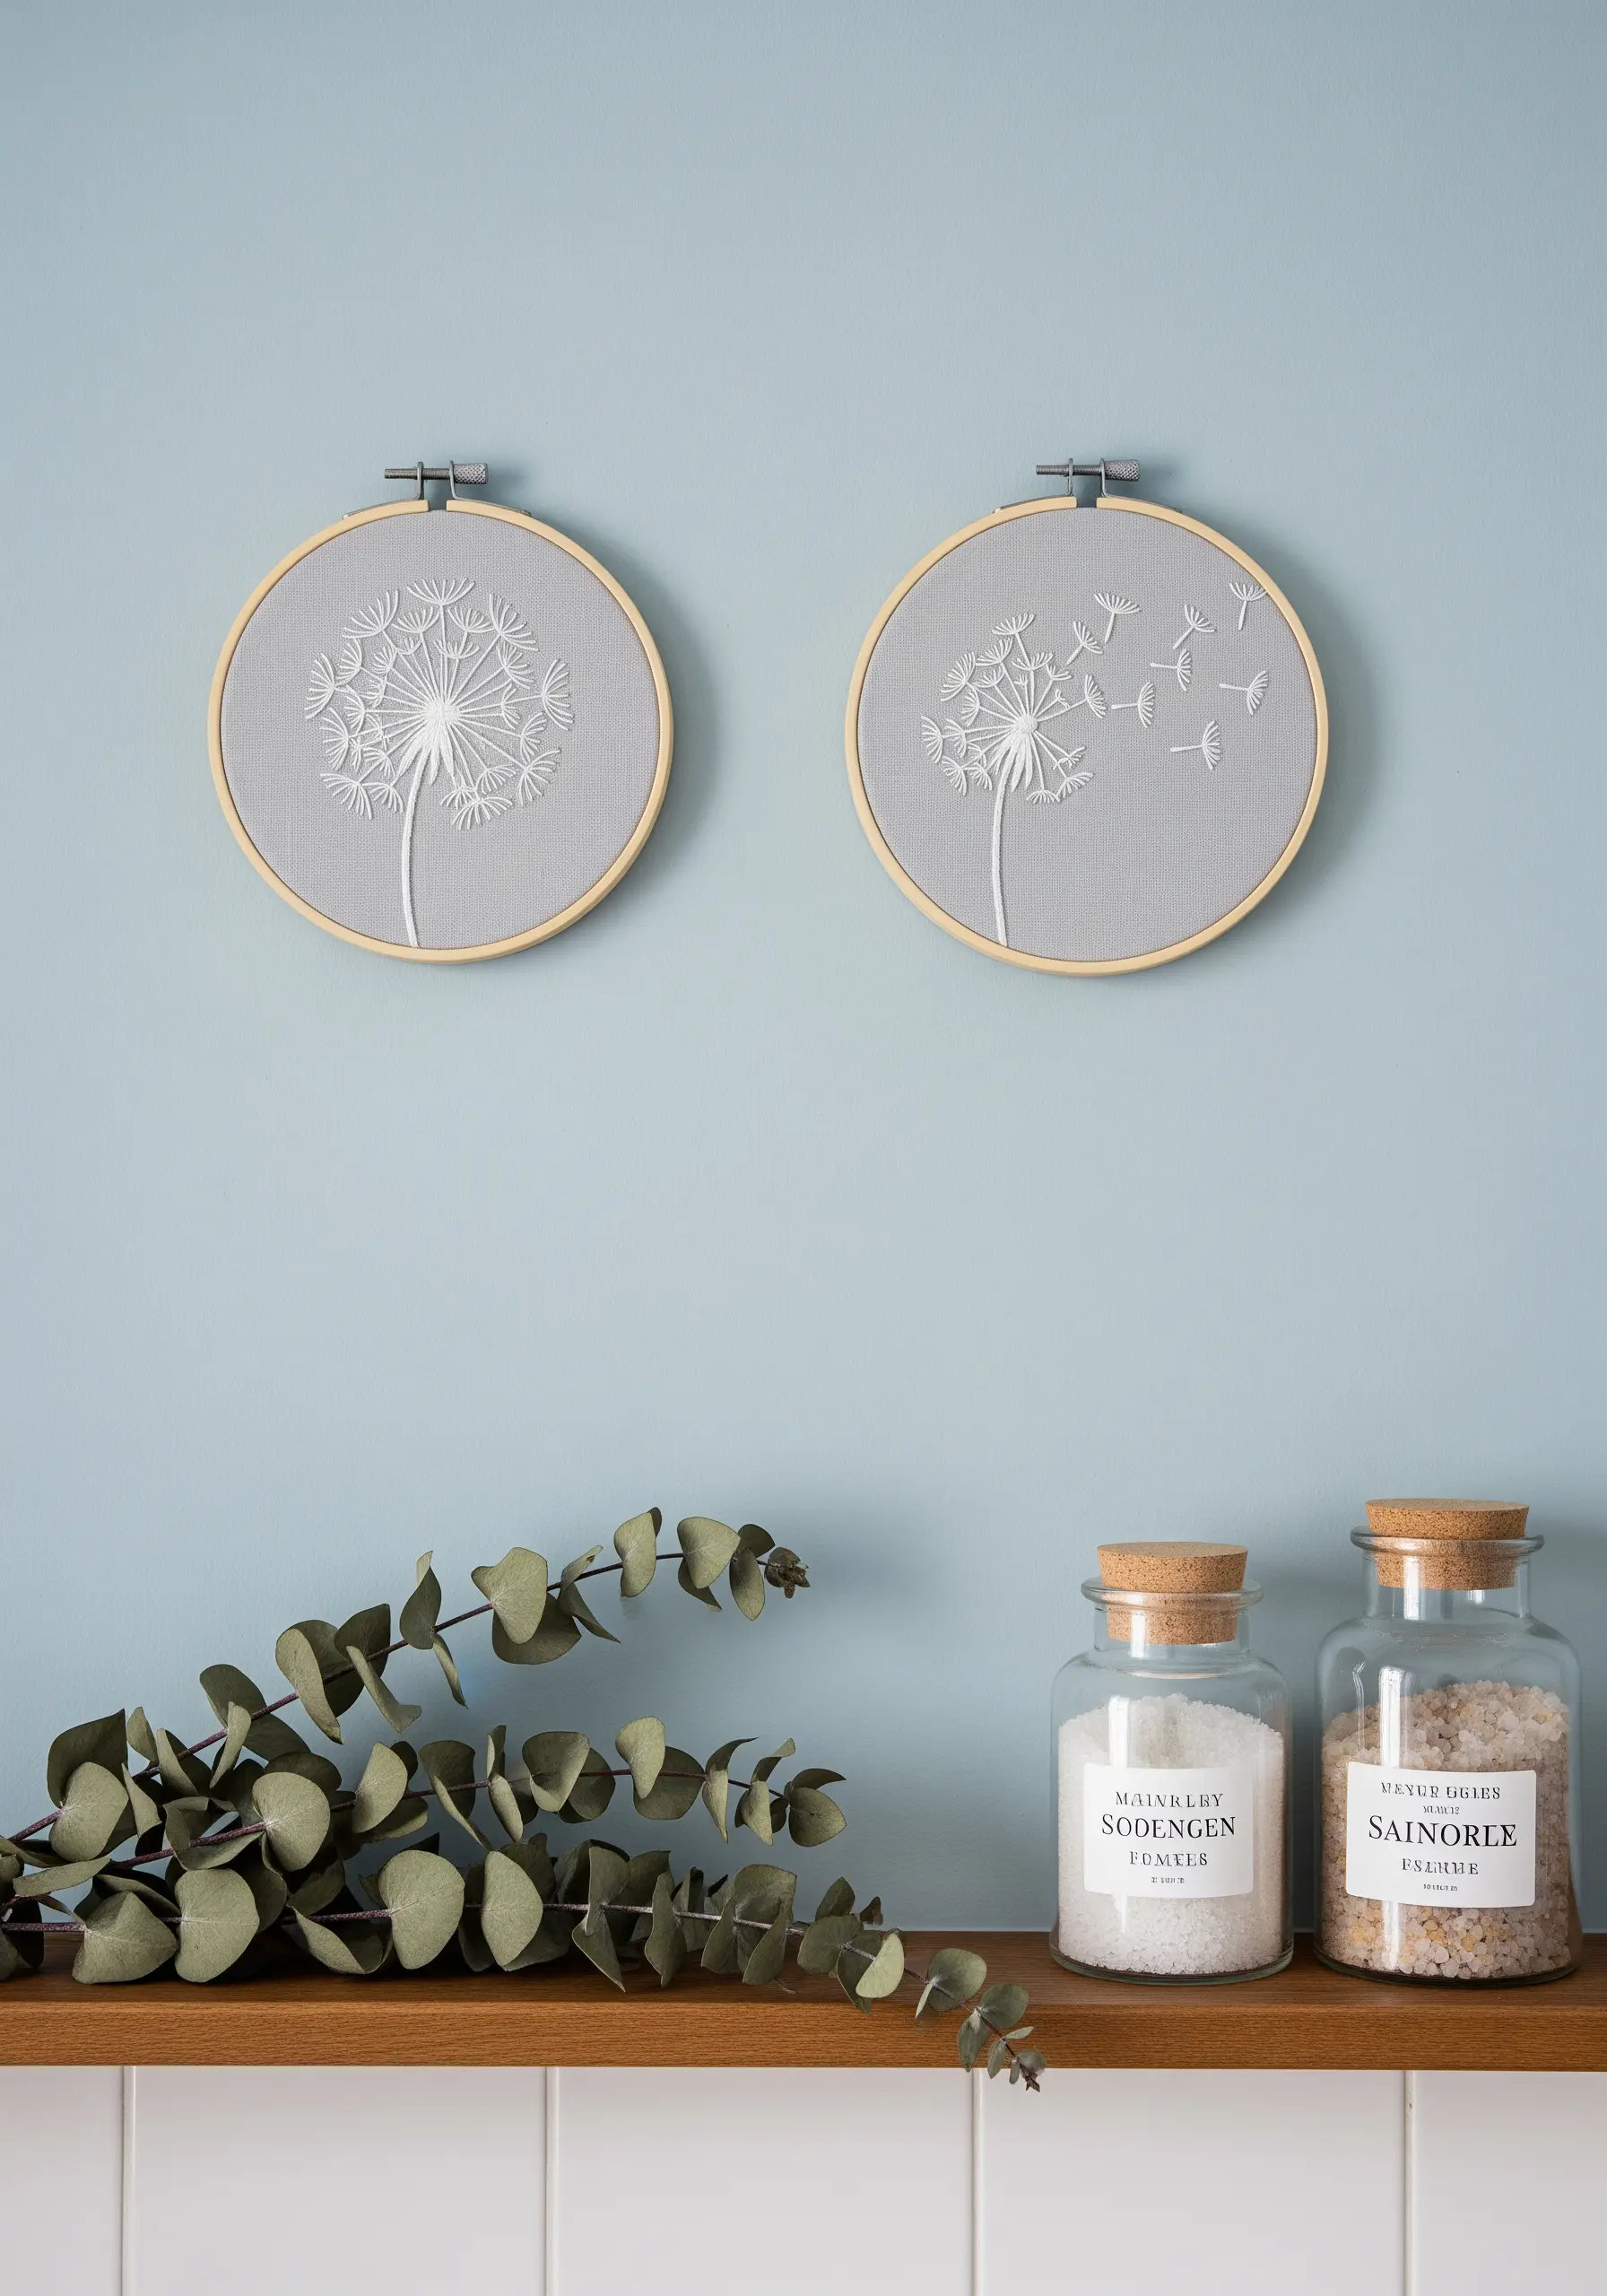
Create a subtle, high-end look by using a tone-on-tone color palette—stitching with thread that is only a few shades lighter or darker than your fabric.
On this grey linen, white thread creates a design that is all about texture and light.
For the delicate dandelion seeds, use a single strand of floss and precise straight stitches.
This minimalist approach emphasizes the beauty of the stitches themselves, resulting in a piece that feels both modern and serene.
8. Craft a Statement Wildflower Tapestry
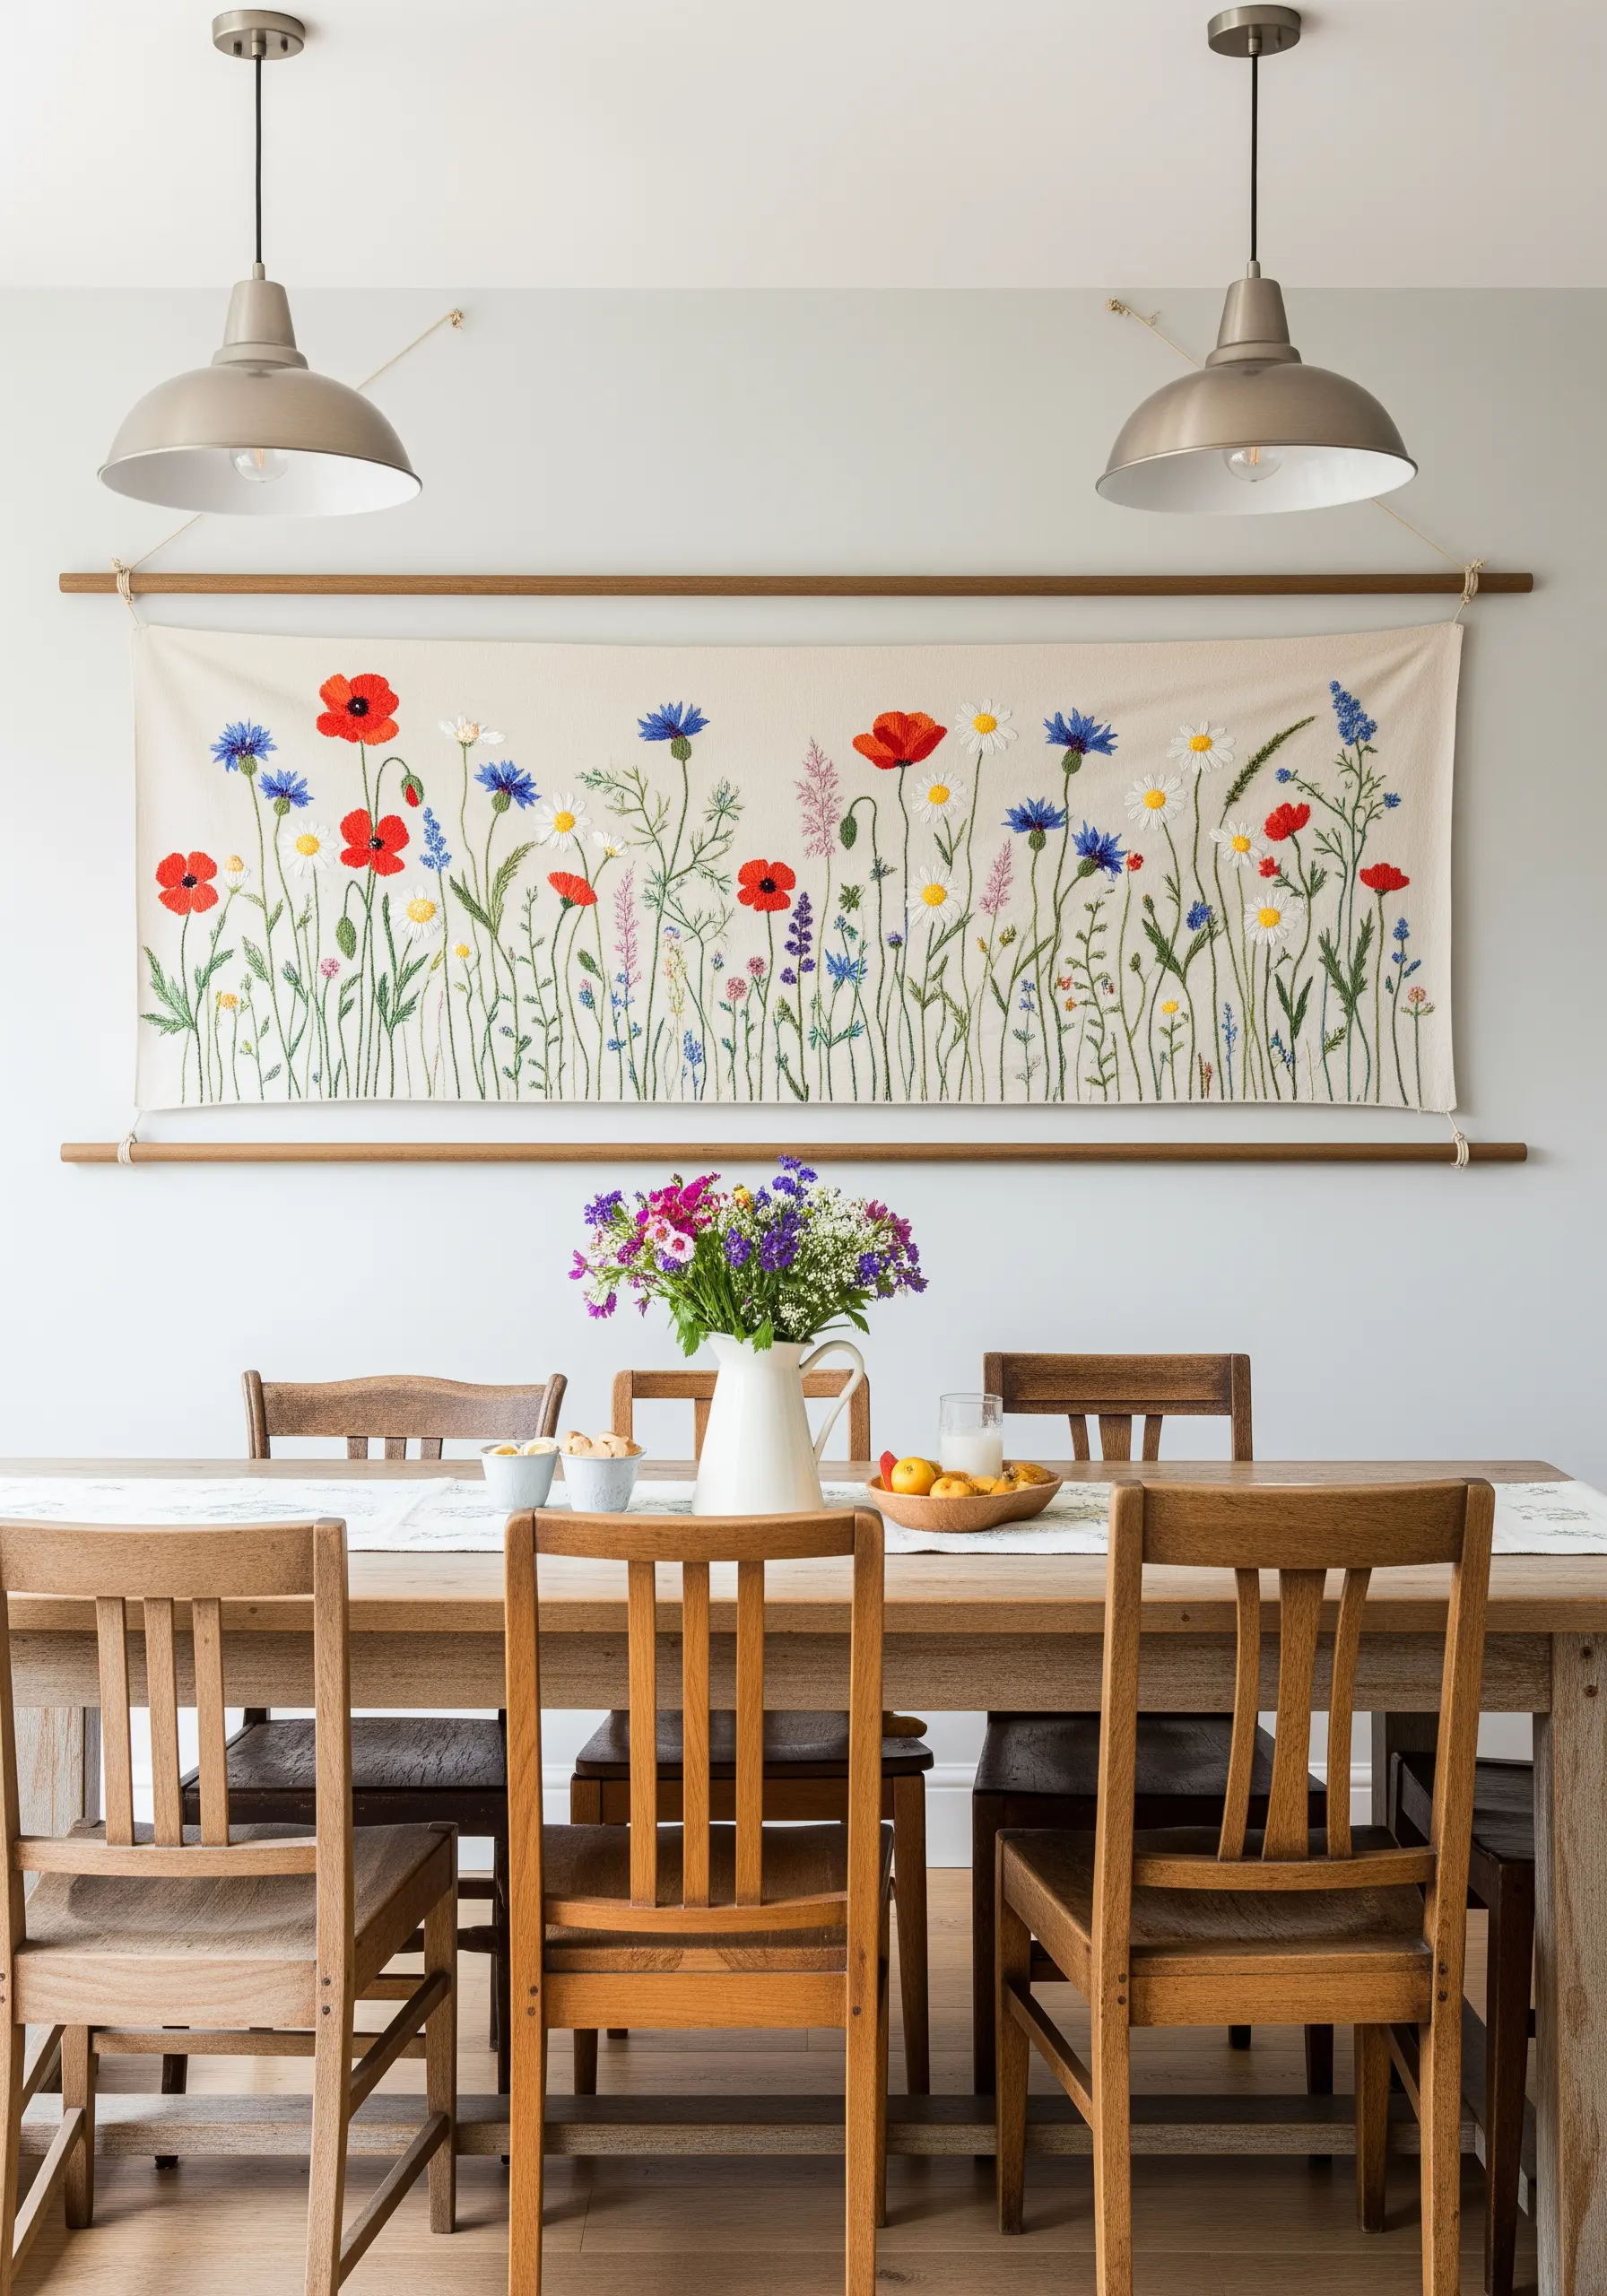
For a large piece that commands attention, move beyond the hoop and create an embroidered wall hanging.
Stretch your finished embroidery over a canvas or mount it between two wooden dowels for a clean, modern finish.
To create a vibrant meadow, use a variety of stitches to differentiate the flowers: satin stitch for bold poppy petals, French knots for cornflower centers, and detached chain stitches for smaller leaves.
This rich combination of textures will draw the eye in and make the entire piece feel lush and alive.
9. Personalize with an Ornate Botanical Monogram
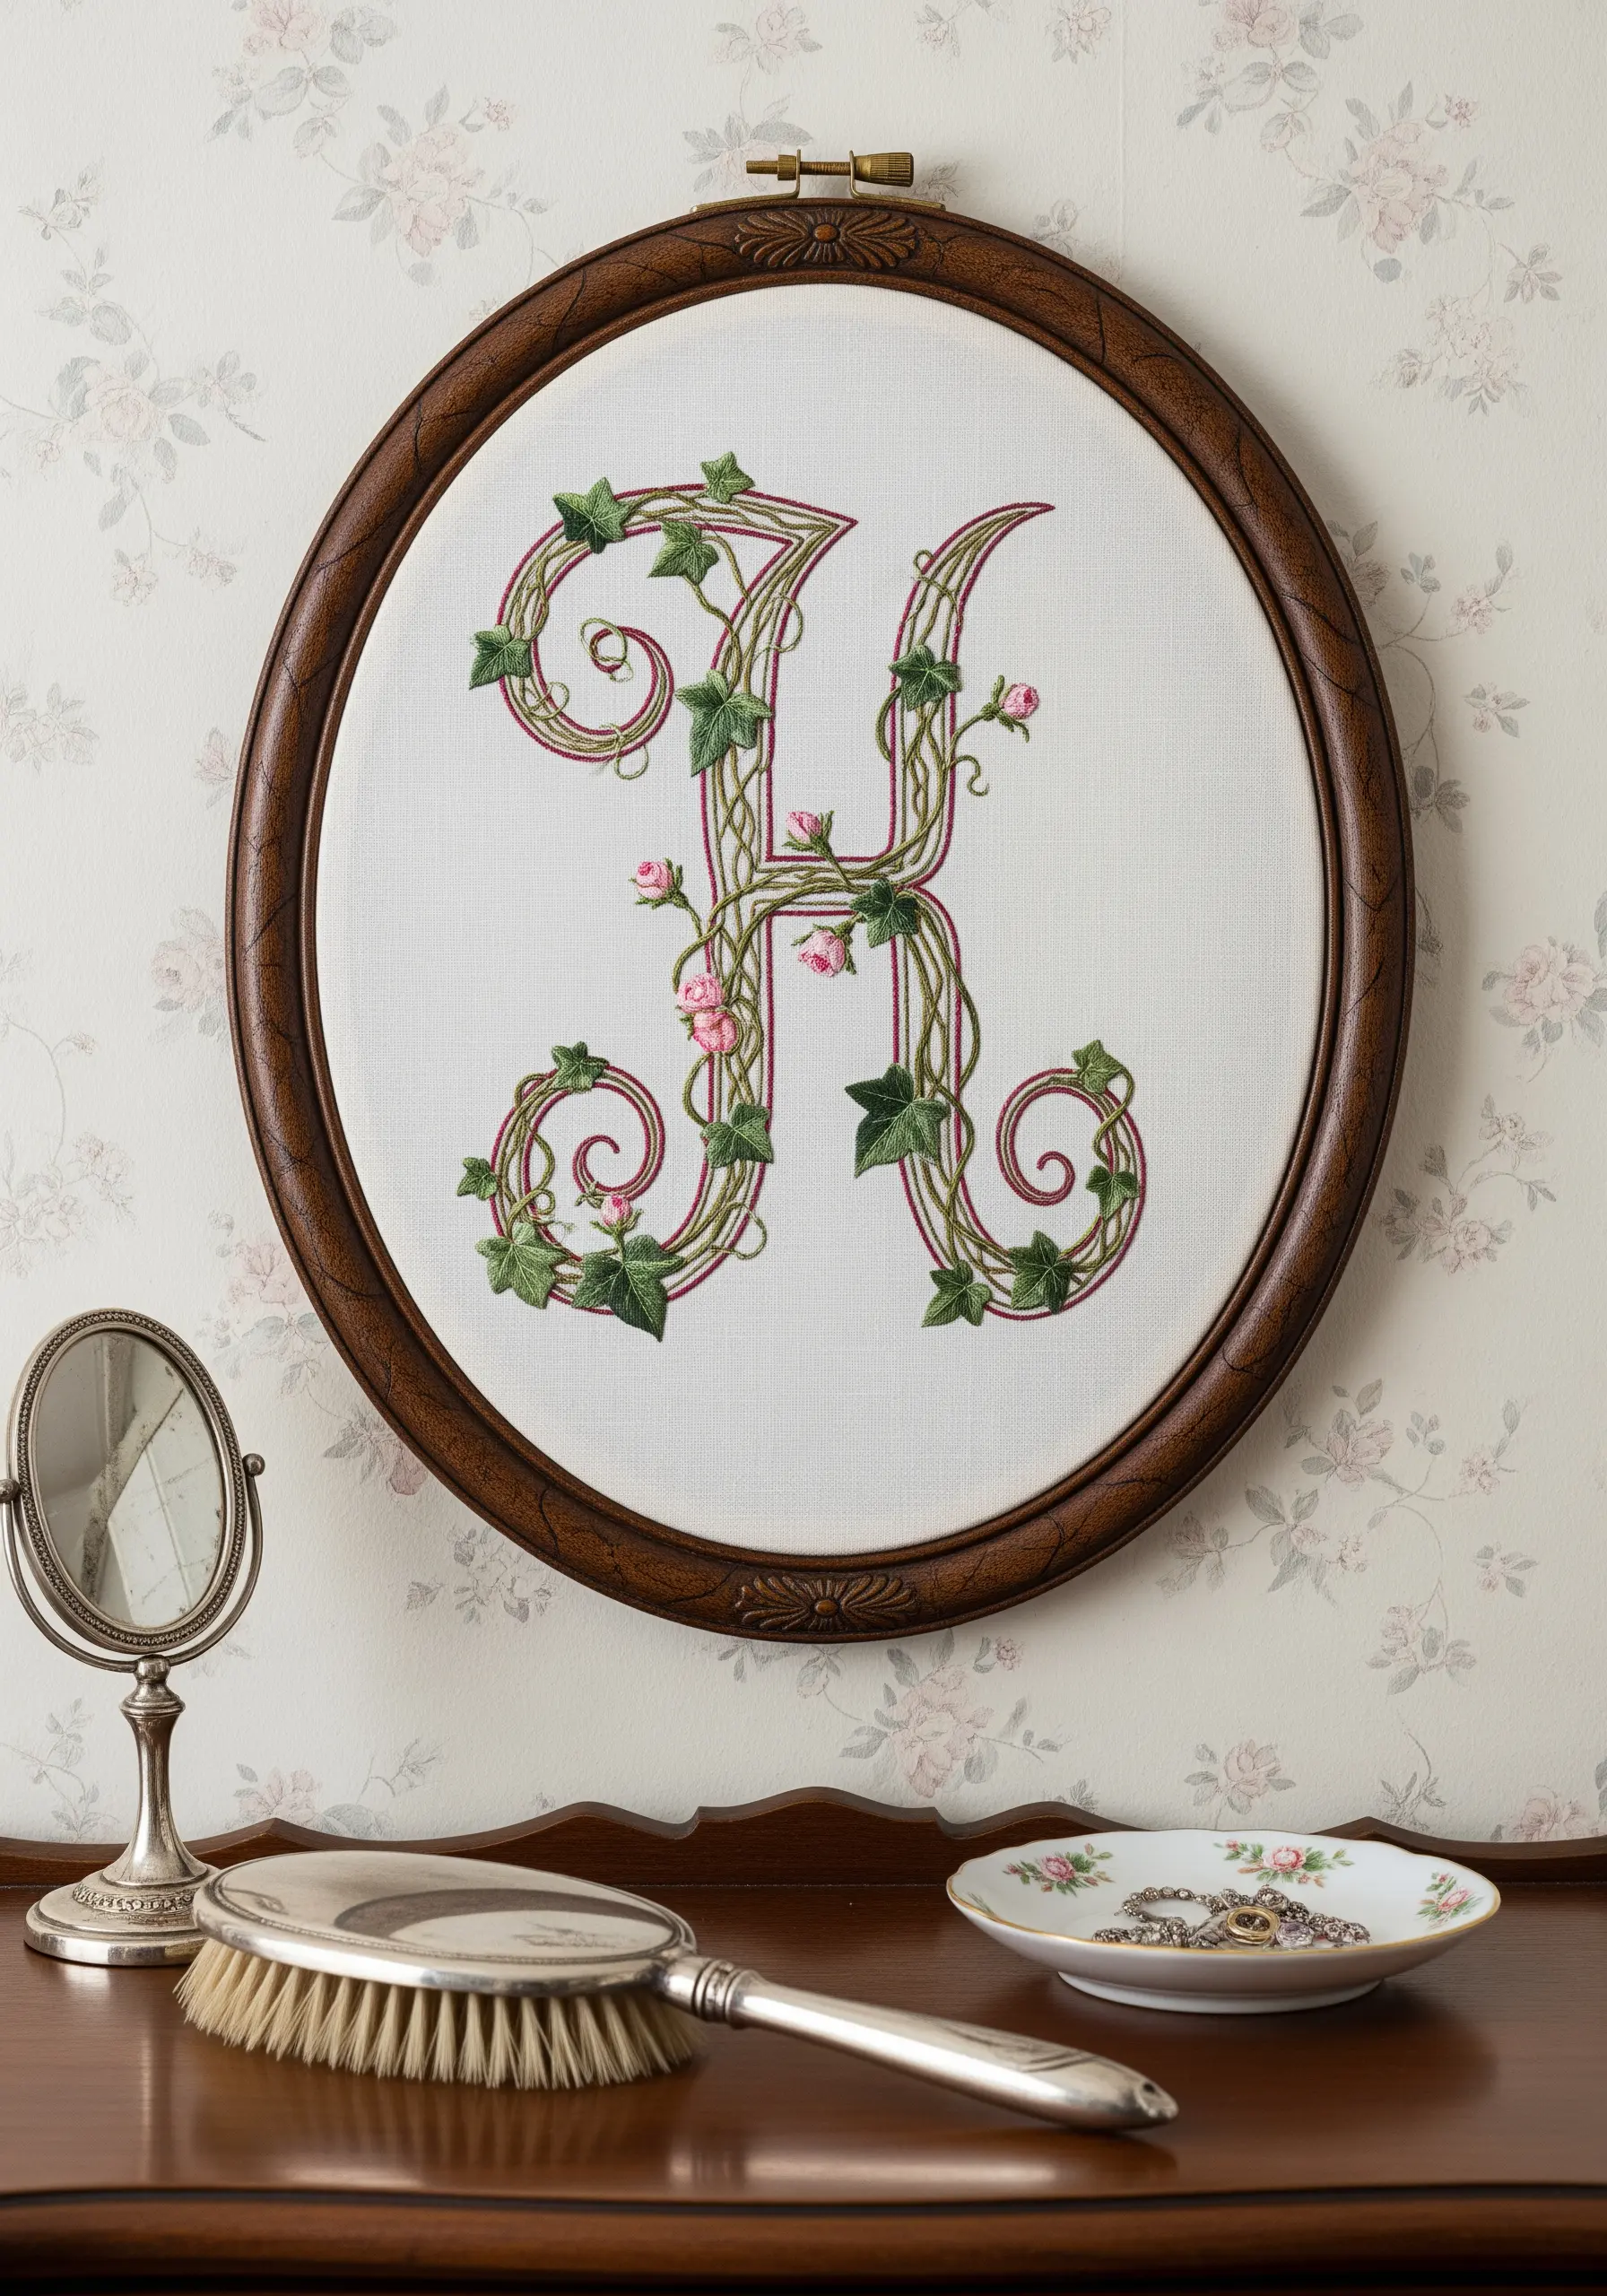
Elevate a simple monogram by intertwining it with delicate botanicals.
First, outline the main letter using a whipped backstitch—this creates a raised, cord-like line that gives the letter prominence.
Then, use a fine stem stitch with a single strand of green floss to weave vines around the letterform.
Add tiny lazy daisy stitches for leaves and bullion knots for rosebuds to complete the romantic, overgrown effect. Explore more botanical monogram embroidery ideas made with leaves, vines, & tiny blossoms for further inspiration.
10. Build a Gallery Grid of Woodland Friends
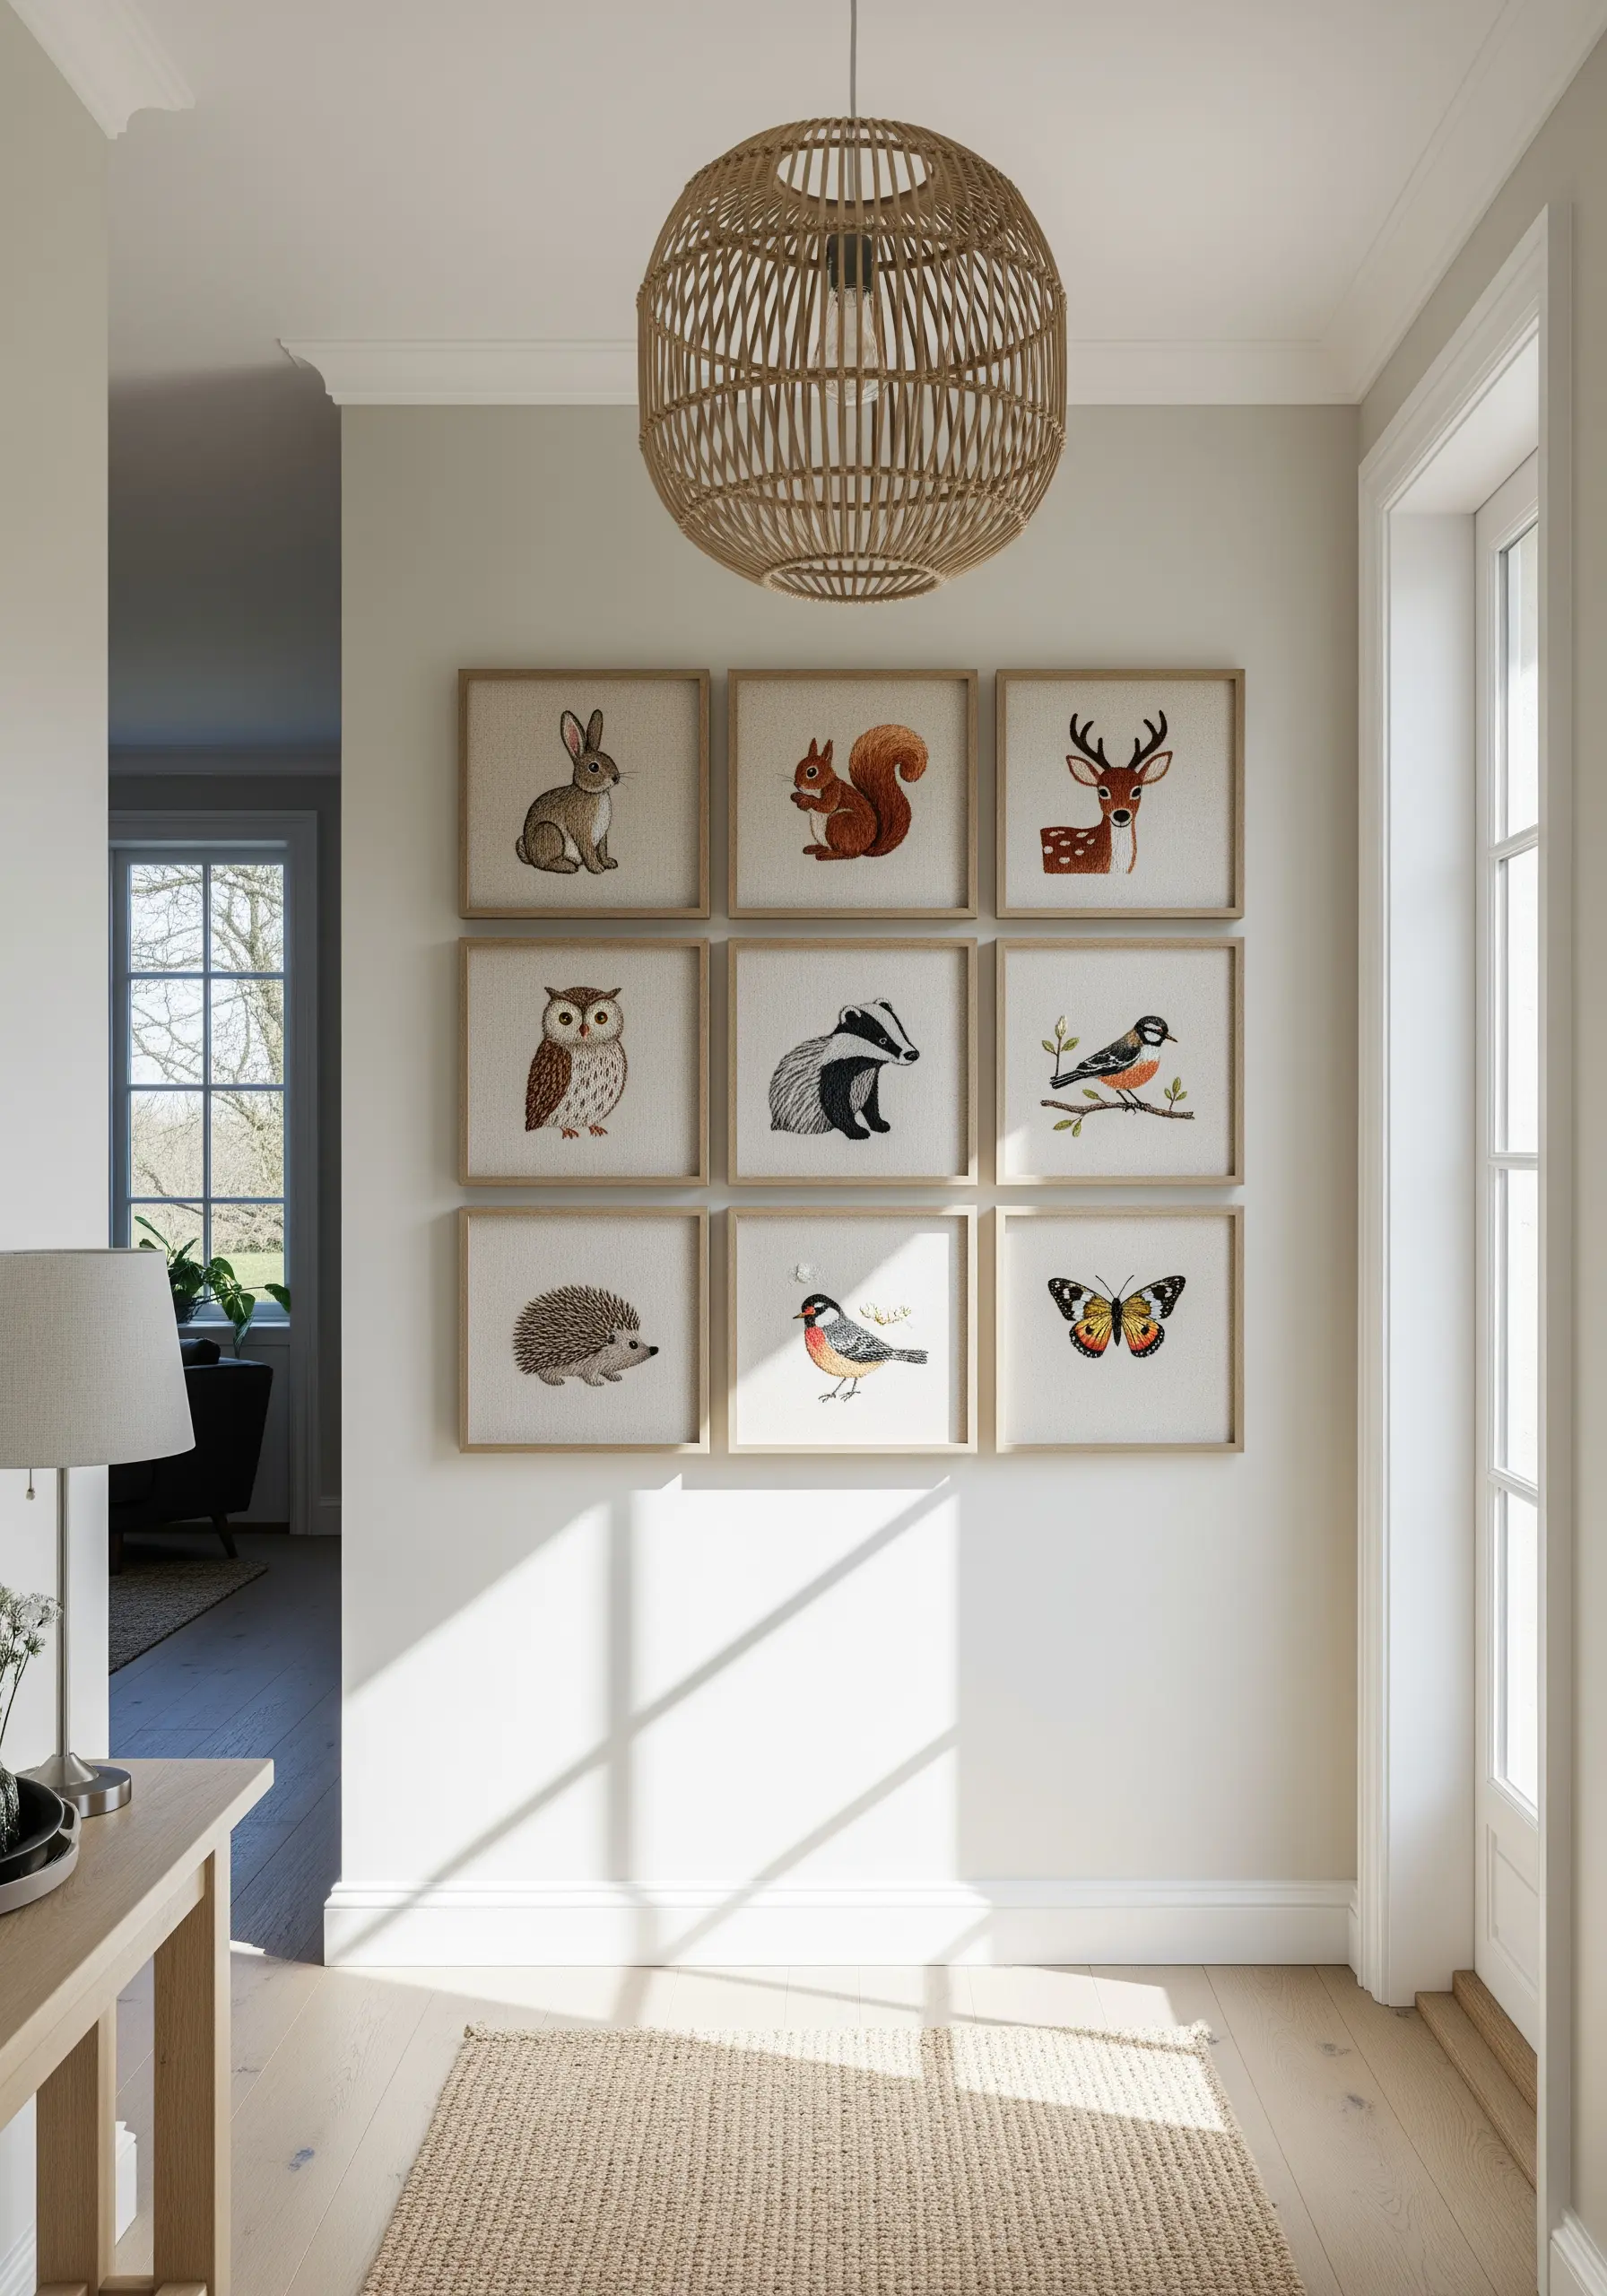
A grid layout of identically framed pieces creates an instant sense of order and sophistication.
To ensure your collection feels cohesive, use the same artistic style and color palette across all the animals.
Use a two-strand split stitch for all the outlines to maintain a consistent, clean line quality.
Fill the shapes with a soft long-and-short stitch to give each creature a gentle, storybook feel.
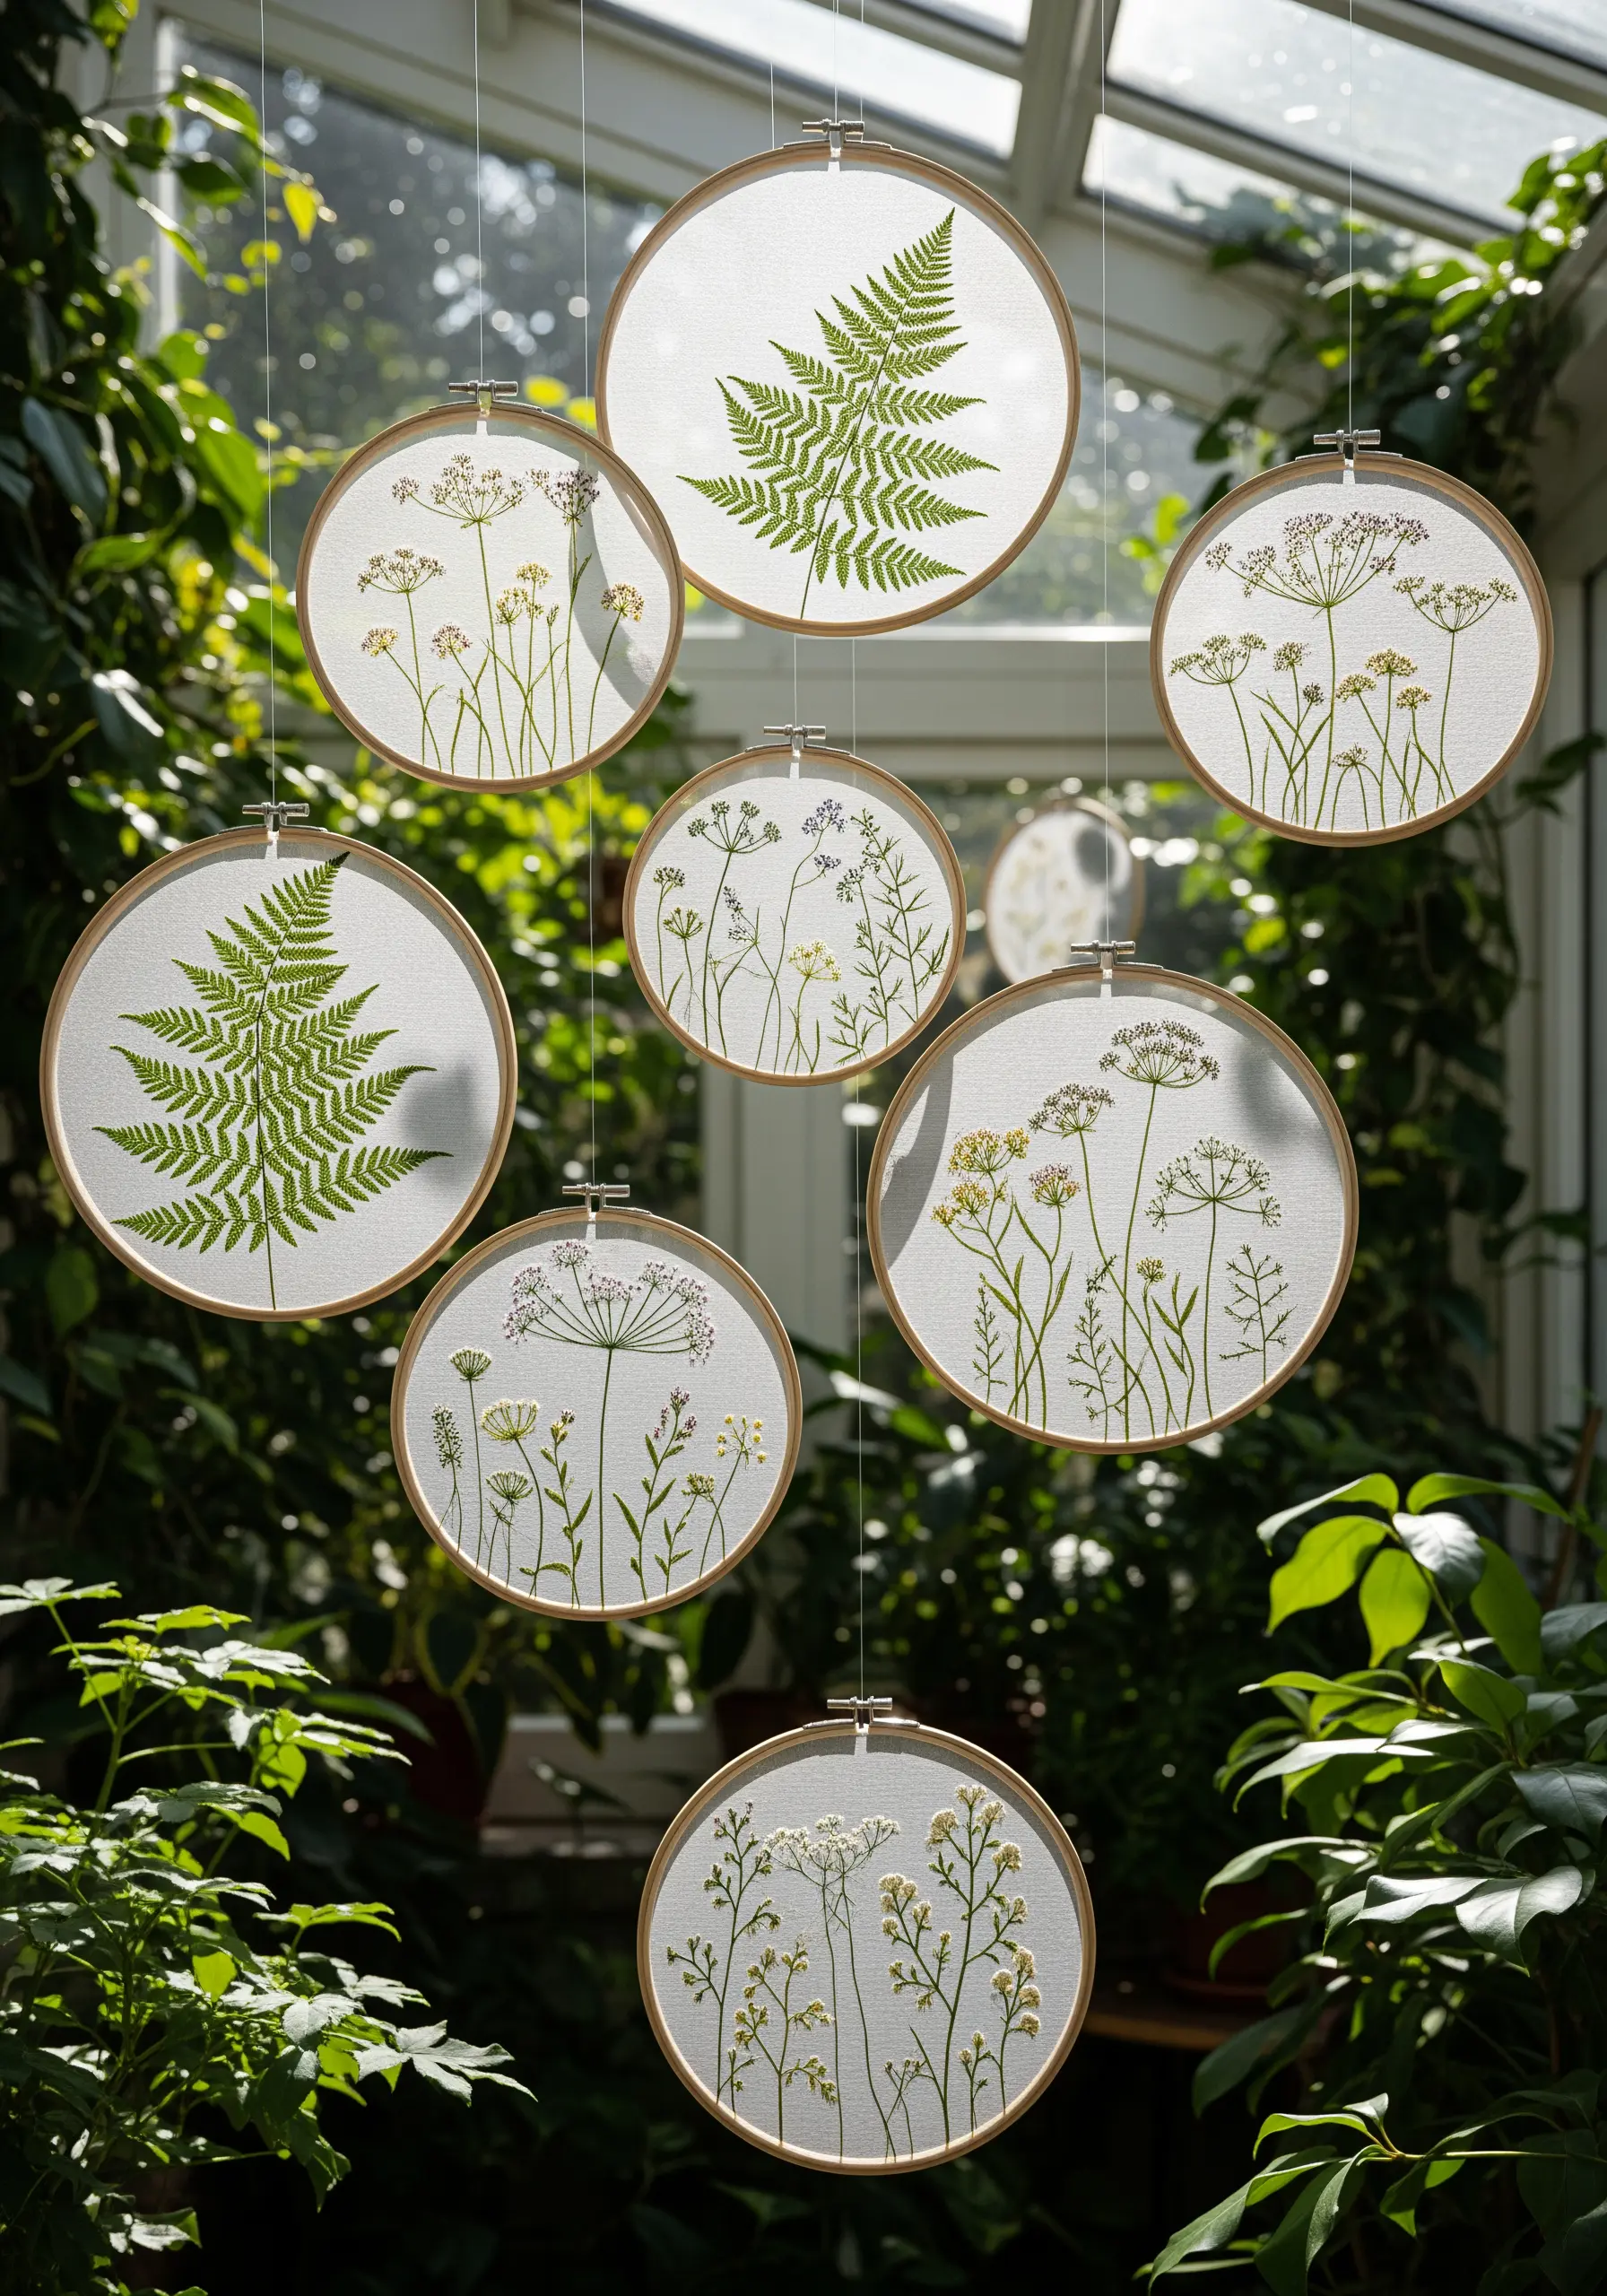
11. Map Out a World with Thread
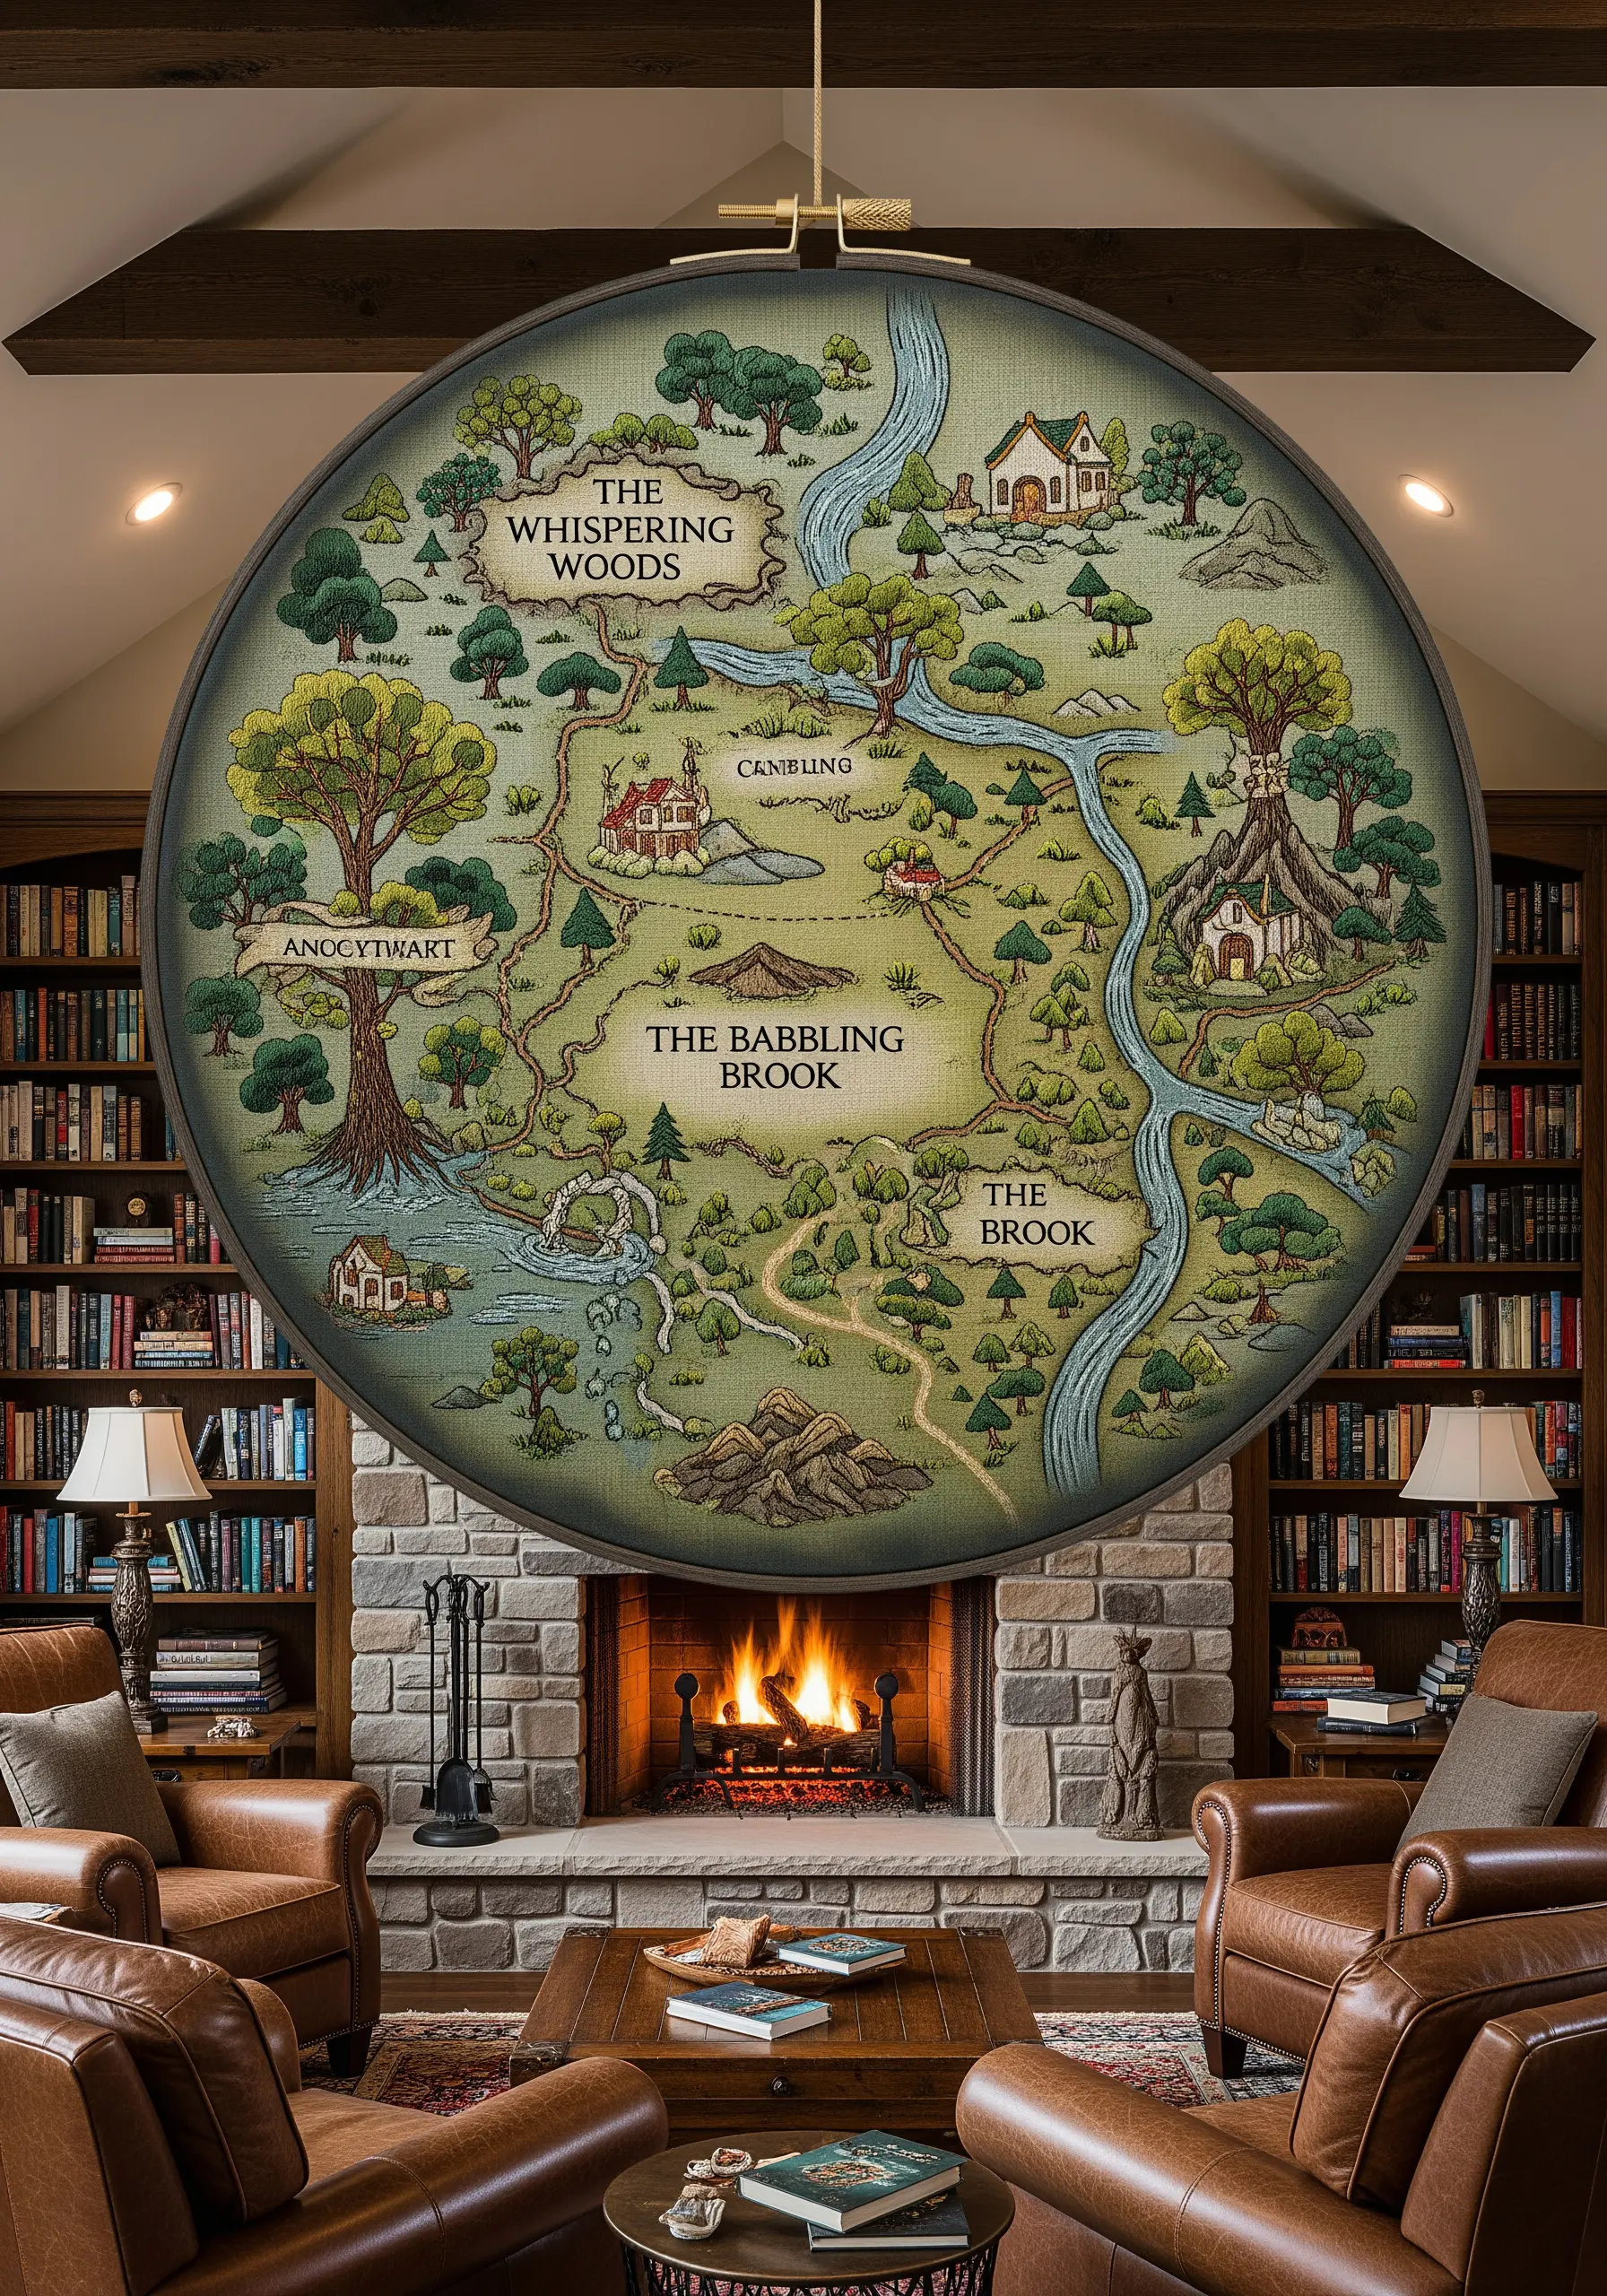
For an intricate, large-scale project like a map, a methodical approach is key.
Begin by stitching the main linear elements, like rivers and roads, using a contrasting chain stitch or whipped backstitch to make them stand out.
Next, fill in the textured areas: use dense clusters of French knots for forests and seed stitch for fields.
Save the fine lettering for last, using a single strand of dark floss and a tiny backstitch for maximum clarity.
12. Add Whimsy with Three-Dimensional Details
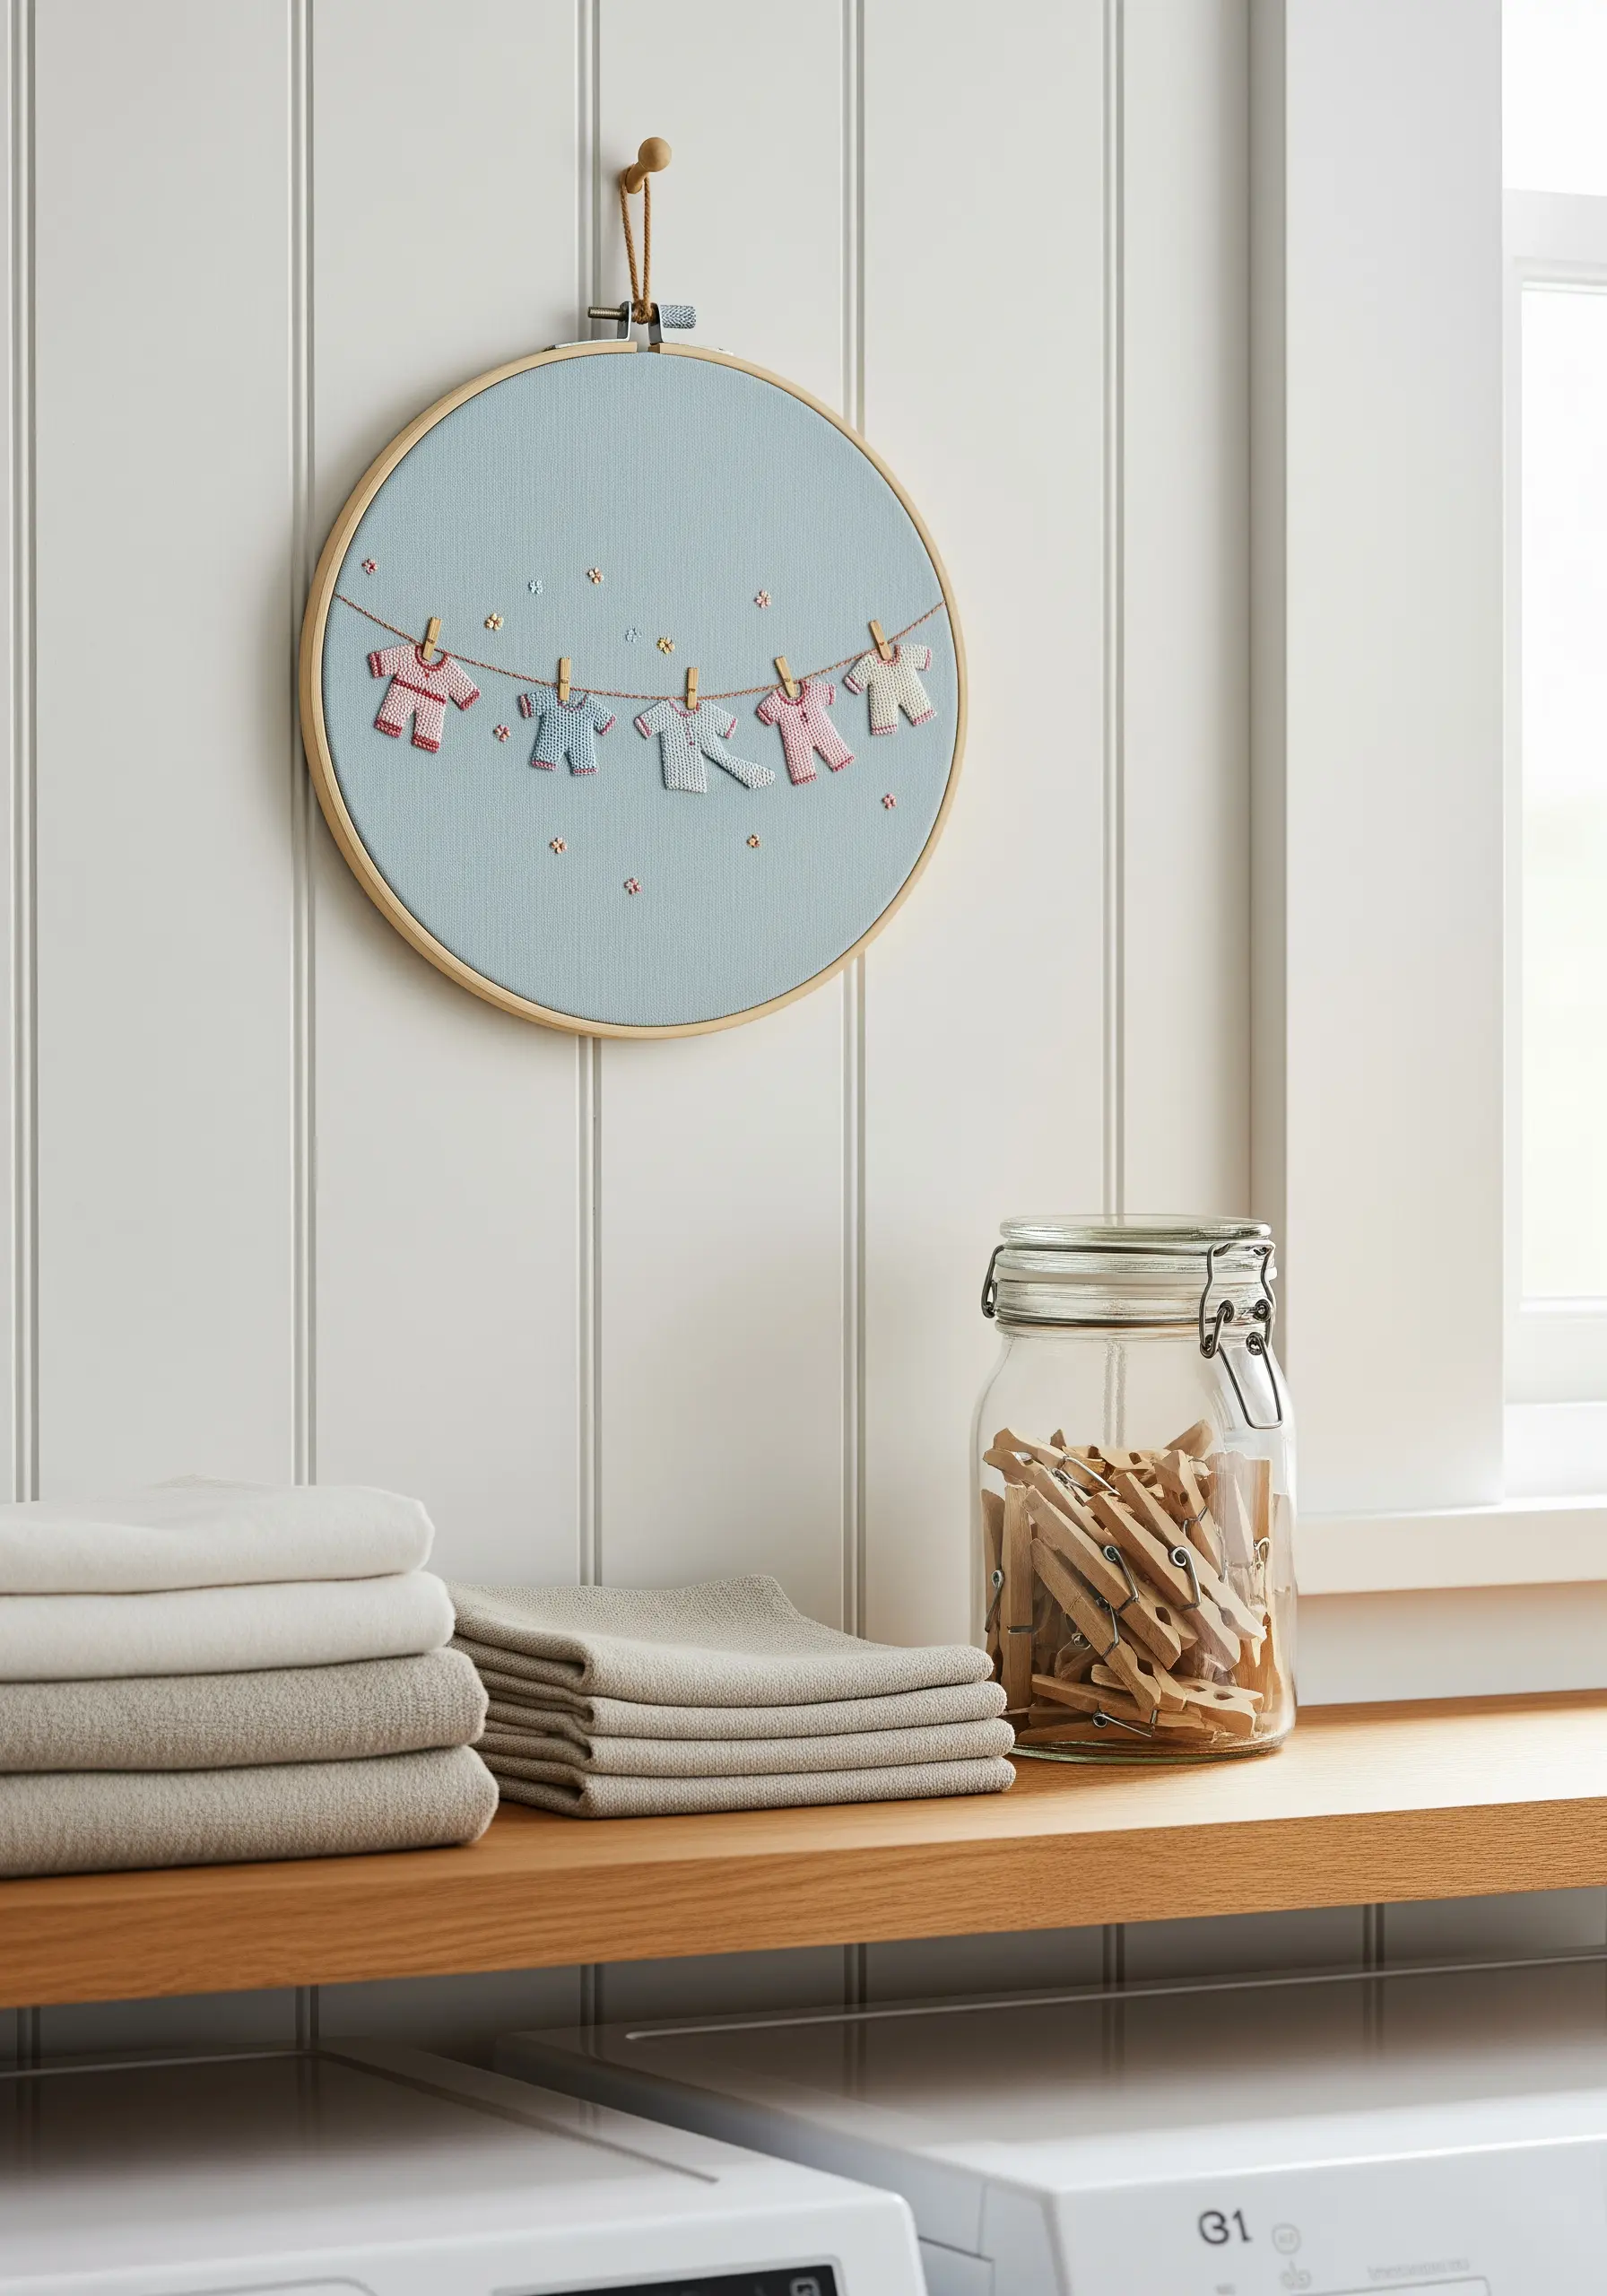
Introduce a playful, three-dimensional element to your hoop art by incorporating tiny appliqués or found objects.
Here, the miniature clothes are cut from patterned fabric scraps and lightly stitched onto the background, allowing them to hang freely.
A simple backstitched clothesline connects them, and you could even add miniature wooden clothespins for an extra layer of charm.
This technique turns a simple design into a delightful, narrative scene.
13. Capture Light with Sheer Fabric Botanicals
Create an ethereal, floating effect by stitching on a sheer fabric like tulle or organza.
To transfer your pattern, use a water-soluble stabilizer; it provides support during stitching and dissolves completely afterward.
Use lightweight stitches, such as stem stitch for the stalks and fishbone stitch for the leaves, to prevent the delicate fabric from puckering.
When hung in a window, the light will filter through the sheer fabric, beautifully illuminating your stitches and showing how you’re ways to layer leaf stitching for three-dimensional botanical texture that pops.
14. Design a Gentle Nursery Triptych
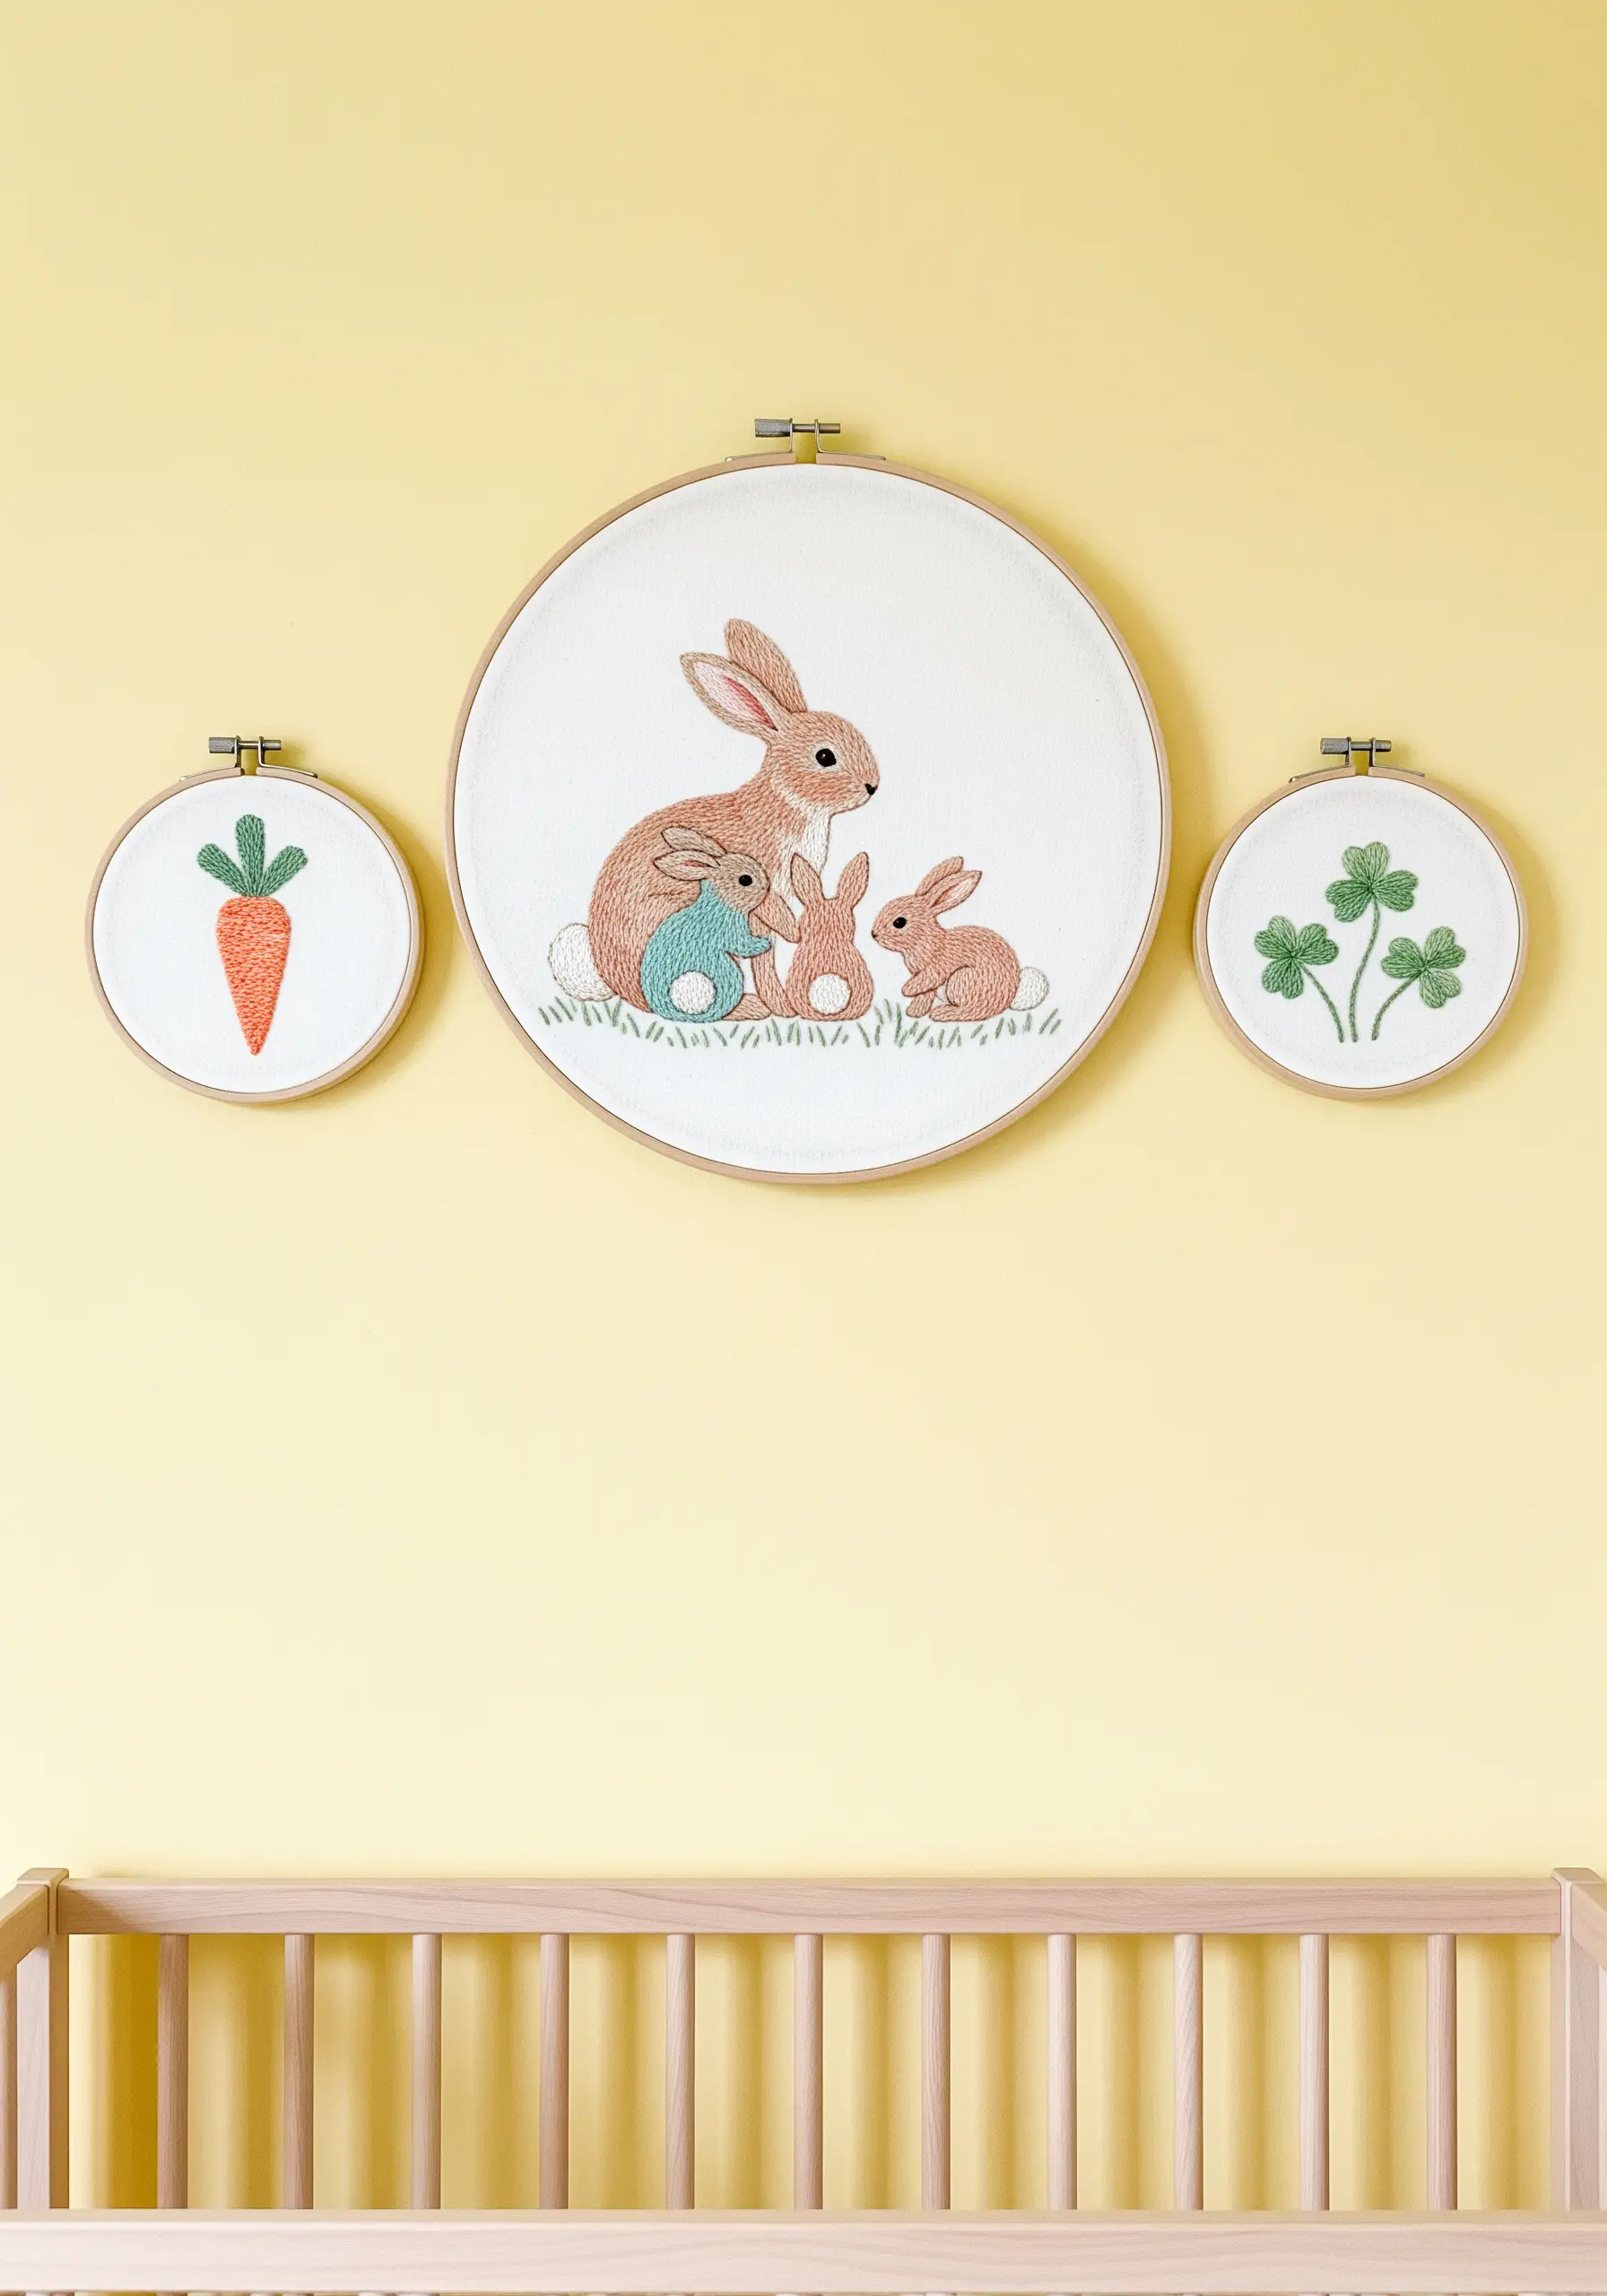
When creating decor for a nursery, focus on soft textures and a calming color palette.
Group a central, larger hoop with two smaller, complementary designs to create a balanced focal point over a crib.
Use a simple split stitch for outlines to keep them soft, and fill with a smooth satin stitch.
For an extra tactile touch, consider using a fuzzy or chenille thread for the bunny tails, adding an interactive element for little hands.
15. Evoke Nature with Minimalist Tree Trunks
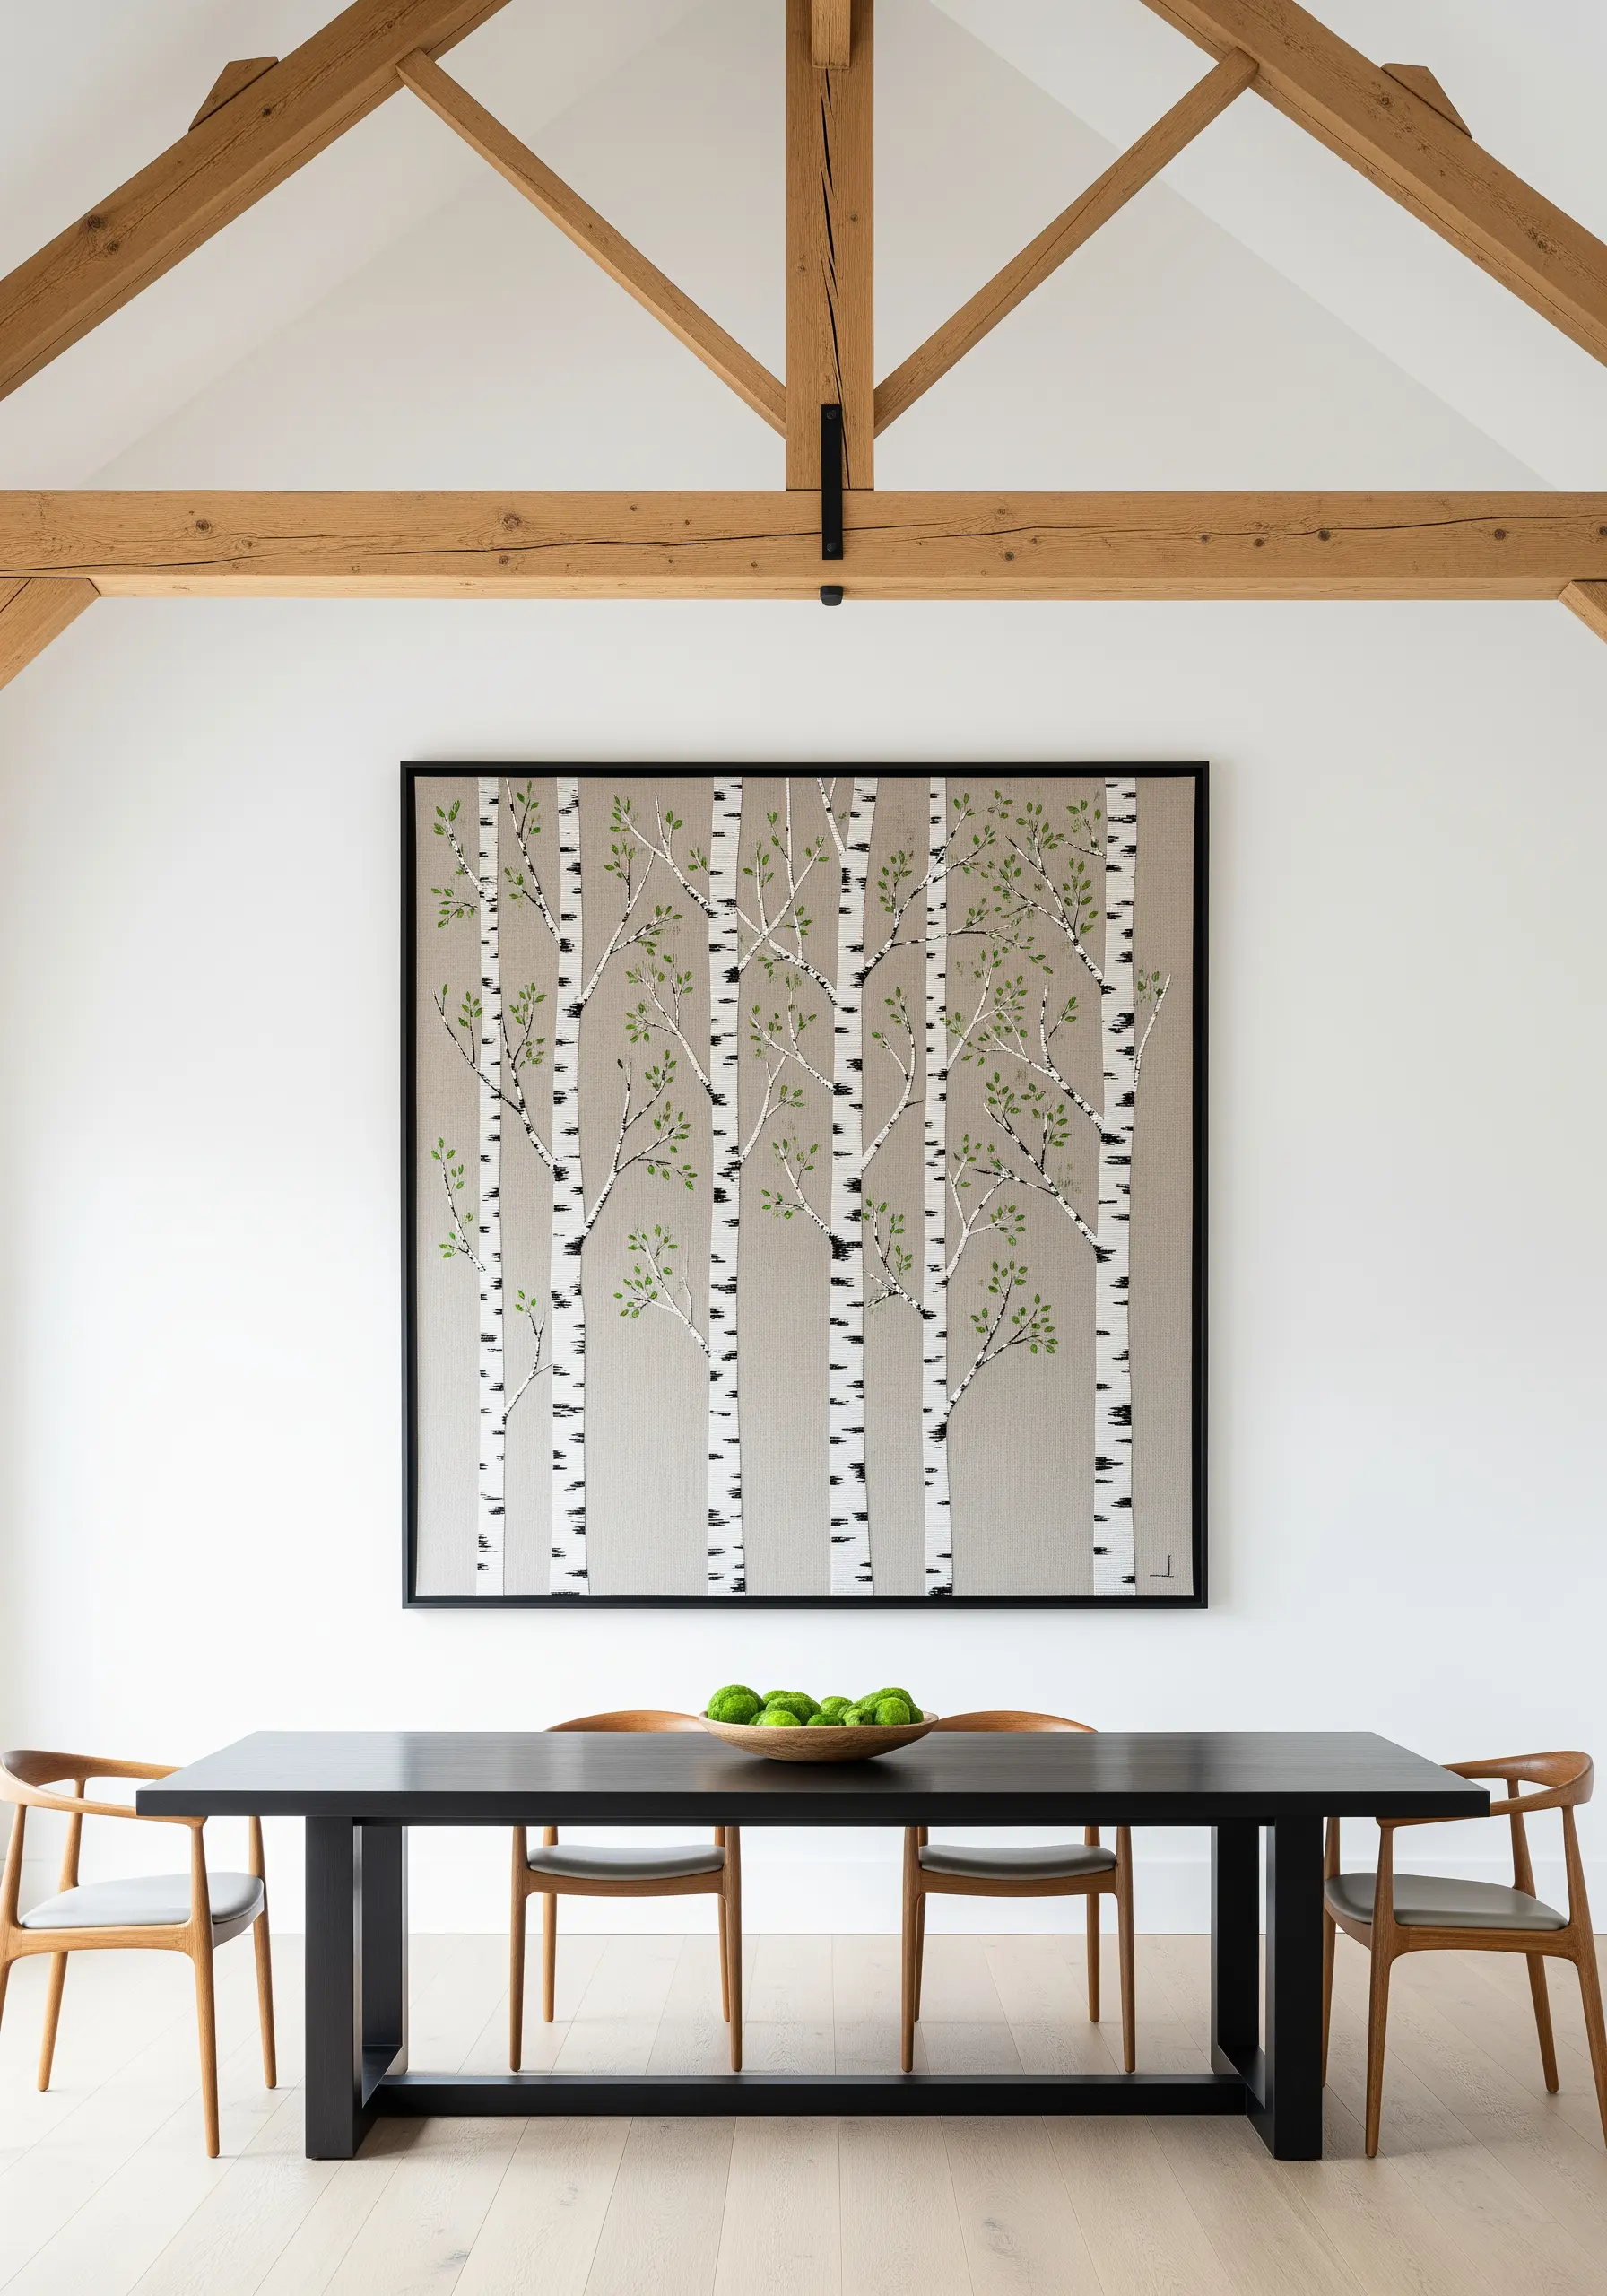
You don’t need complex stitches to create realistic texture.
To capture the essence of birch trees, use long, vertical satin stitches in an off-white or light grey for the trunks.
Then, switch to a single strand of black or dark brown thread and add small, sporadic horizontal stitches to mimic the distinct markings on the bark.
This simple yet effective combination creates a piece with clean lines and a strong graphic impact, perfect for modern decor.
16. Stitch a Delectable, Textured Dessert
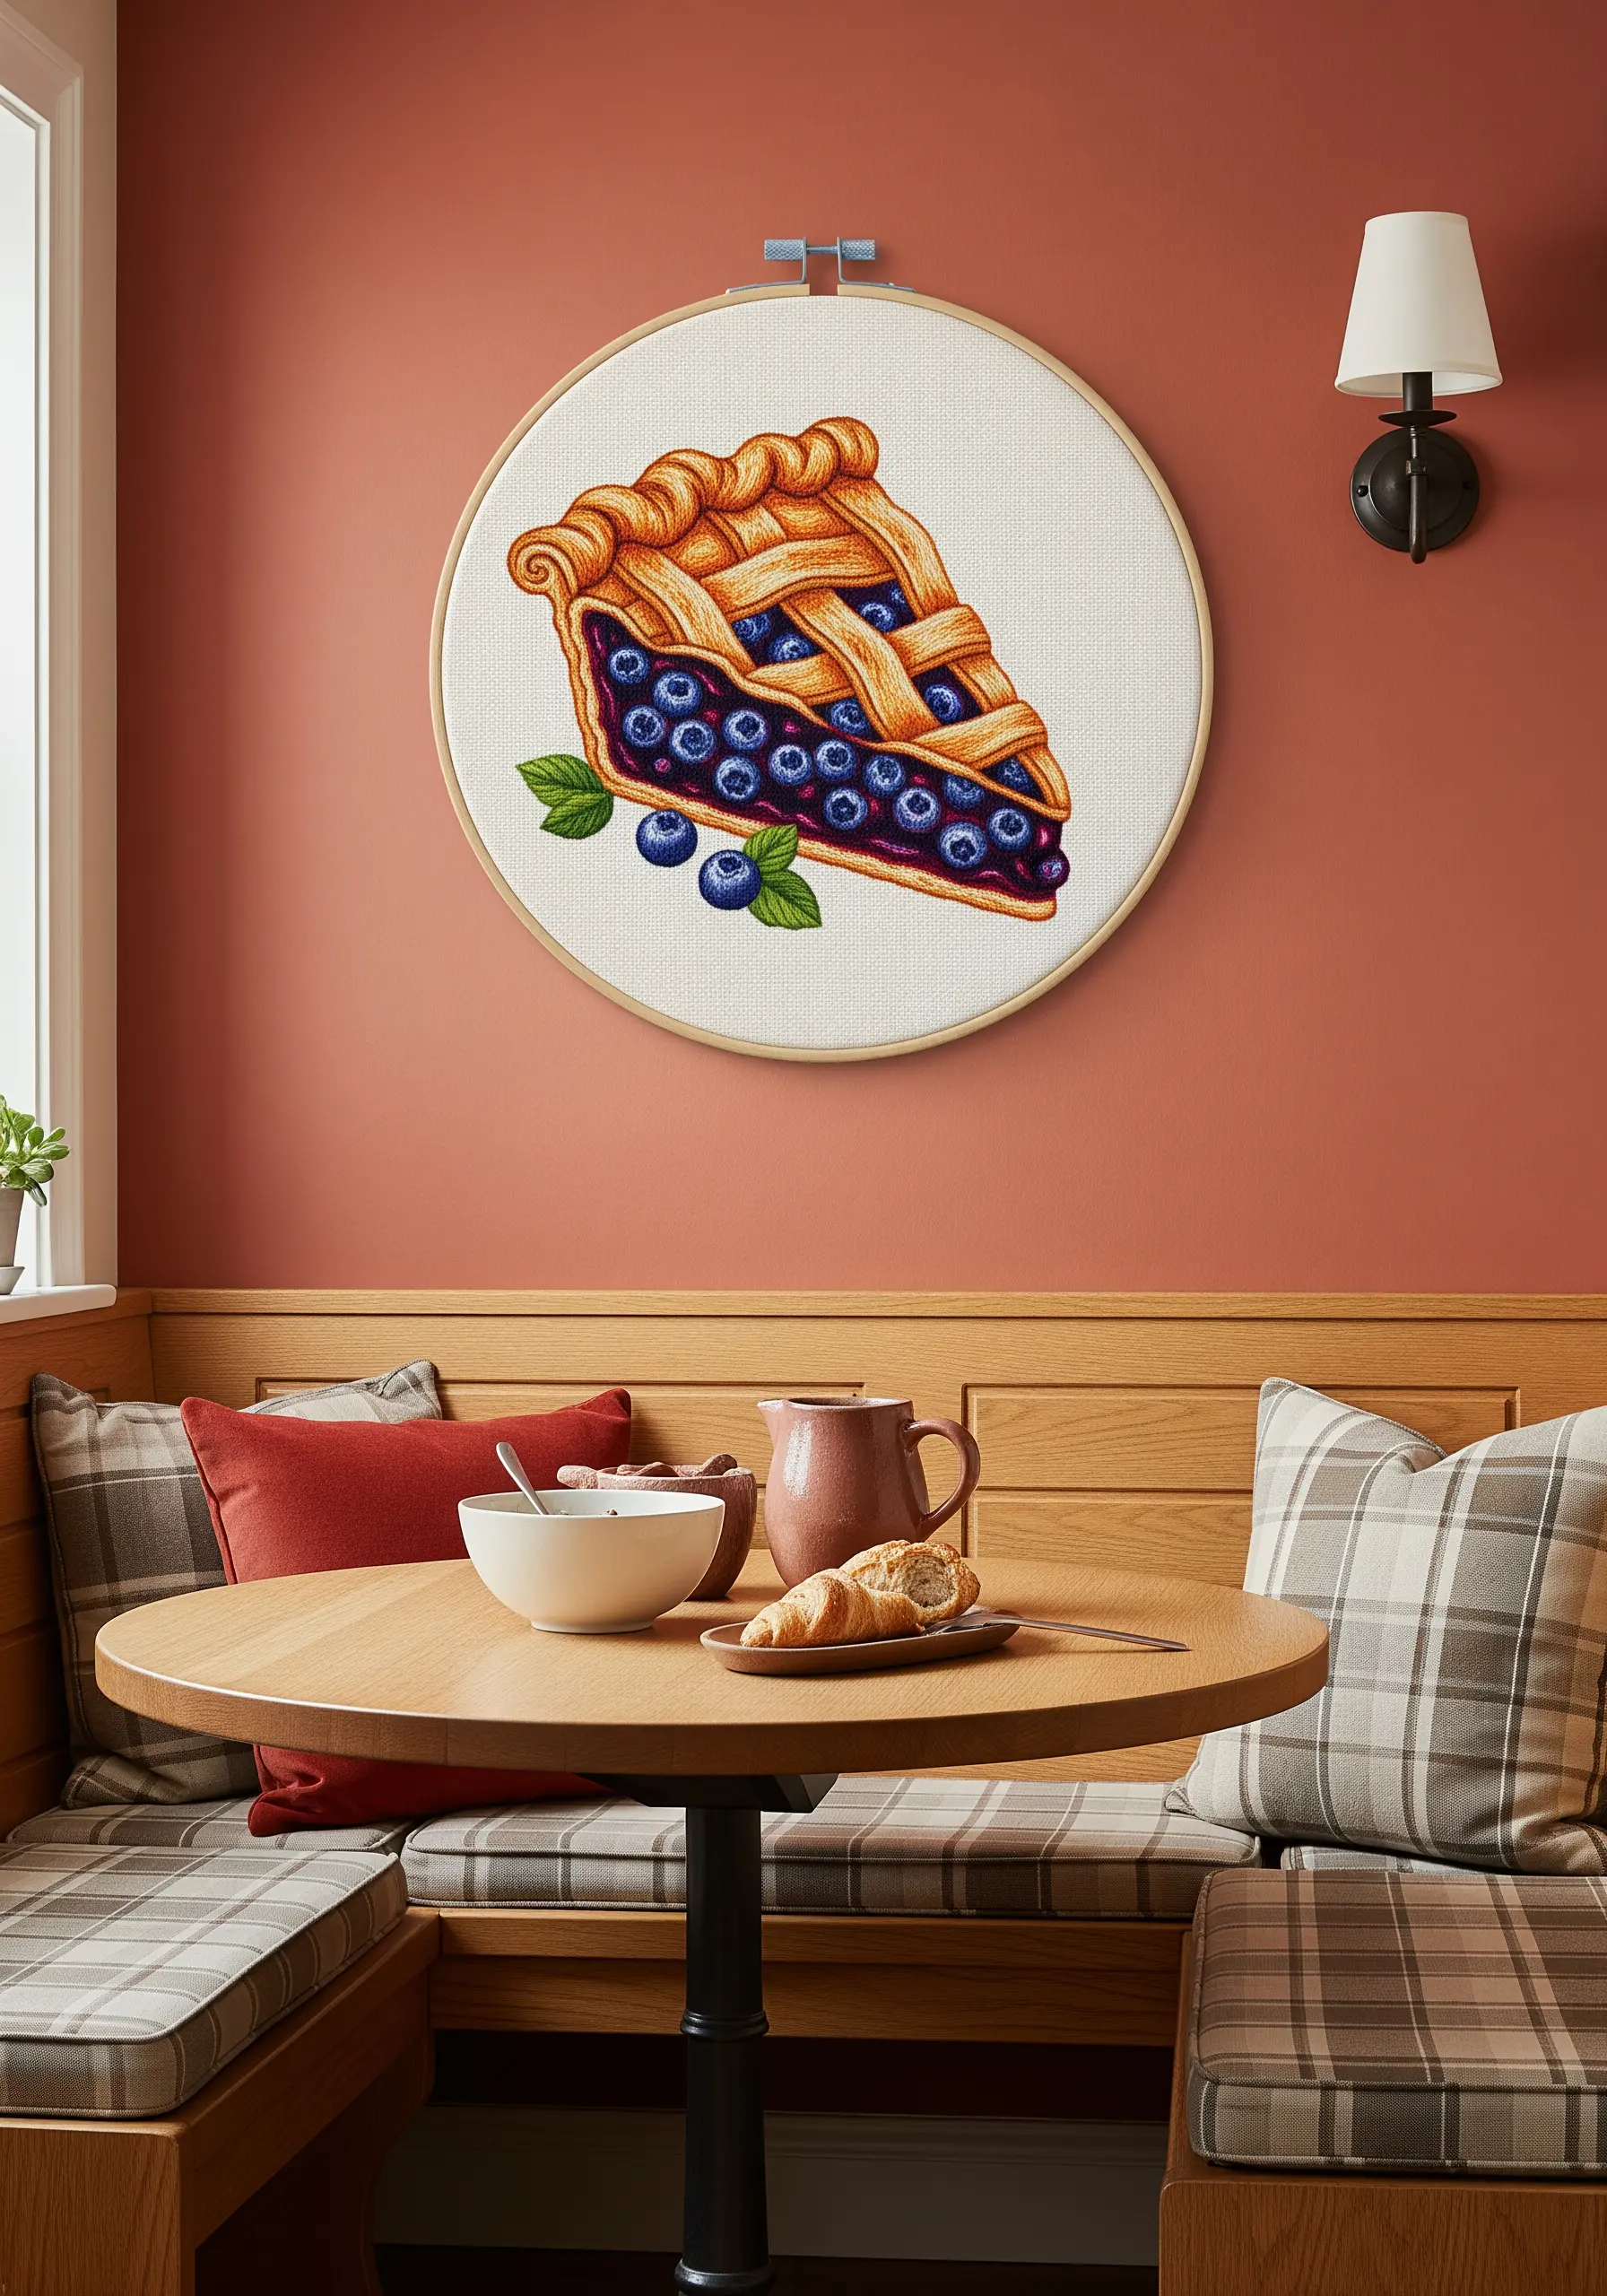
Make your embroidered food look good enough to eat by focusing on texture and highlights.
For the latticed pie crust, use a woven picot stitch or couch a thicker, textured thread (like a pearl cotton) onto the surface to give it realistic dimension.
Create plump, juicy blueberries by using a satin stitch and adding a single French knot in a lighter blue or white on top of each one to act as a light-reflecting highlight.
17. Chart the Moon in a Vertical Tapestry
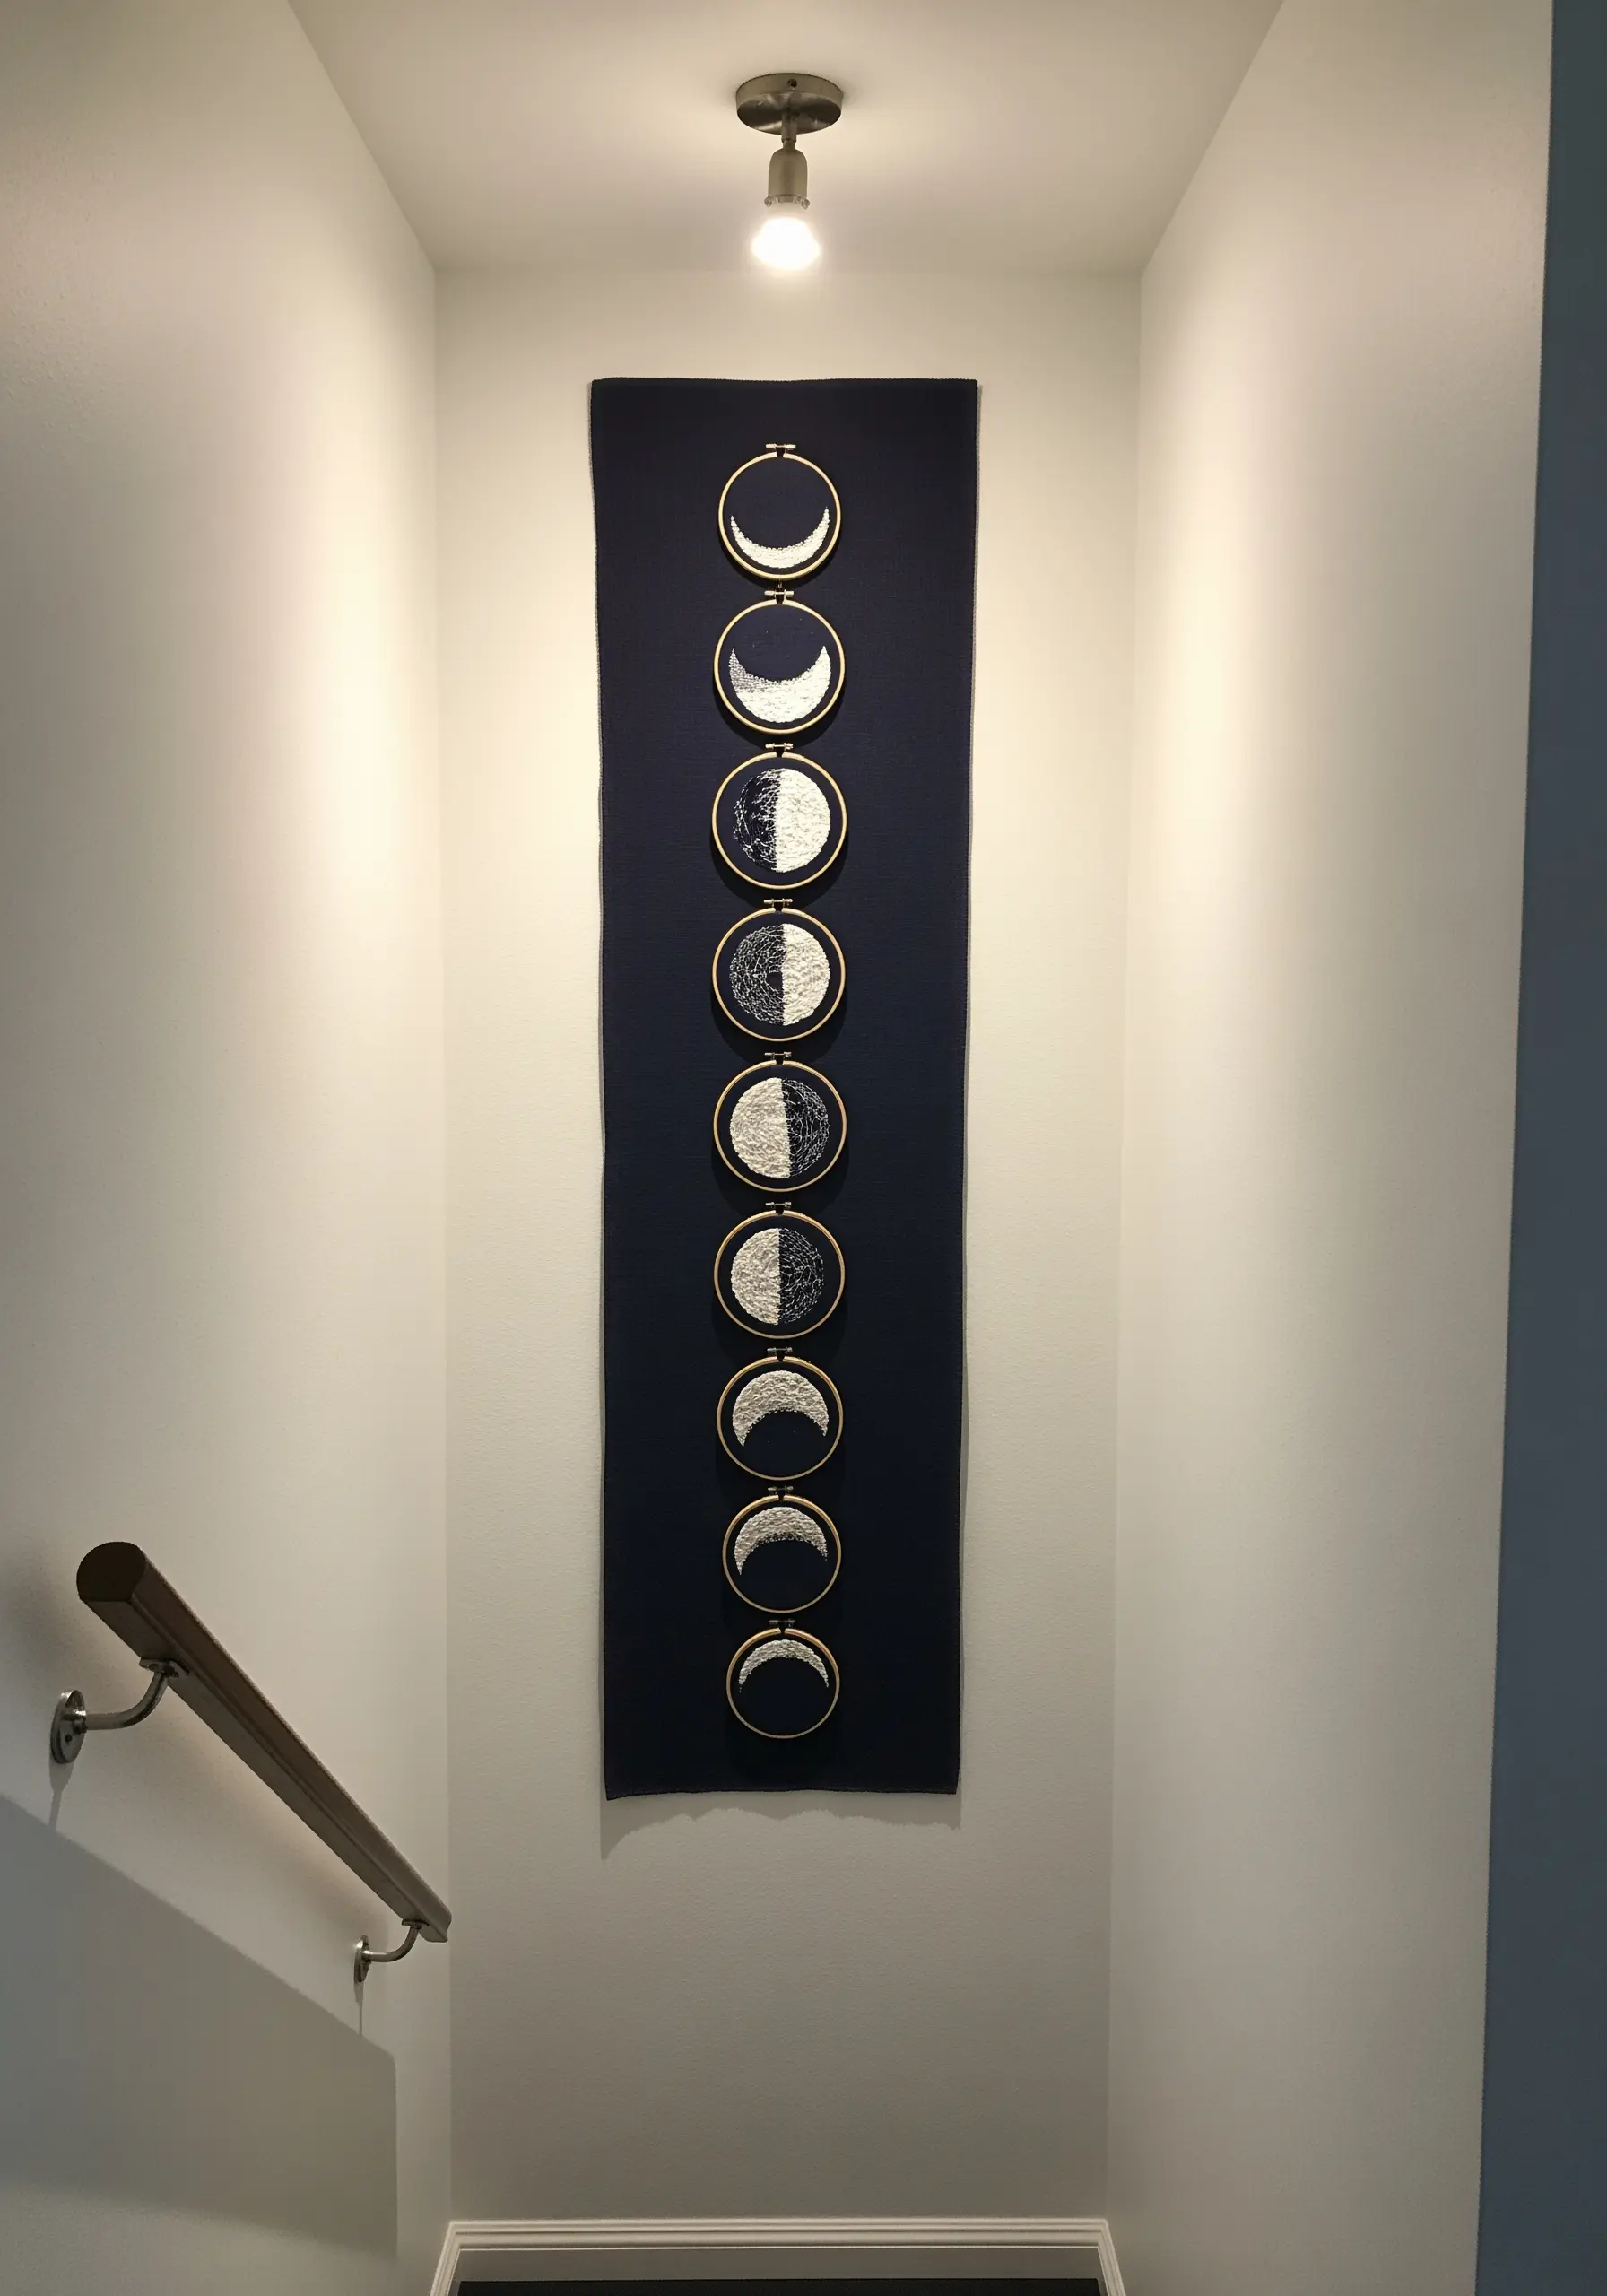
Create a dramatic vertical wall hanging by mounting a series of small hoops onto a long, narrow panel of fabric.
To give the moons a cratered, tactile surface, fill each one with a dense collection of French knots in varying sizes.
Use a blend of white, light grey, and silver metallic threads to build up the texture and create a subtle shimmer that changes as the light hits it.
This is a powerful way to fill a narrow space like a hallway or stairwell.
18. Paint the Seasons with Thread Blending

Tell a story across multiple panels by keeping the composition consistent while dramatically changing the color palette.
This triptych captures the essence of spring, summer, and autumn in the same landscape.
Use a thread painting technique, blending floss colors as if they were paint to transition from the soft pinks of spring blossoms to the fiery oranges and reds of fall foliage.
This approach turns your embroidery into a powerful narrative about the passage of time.
19. Create a Meditative Mandala
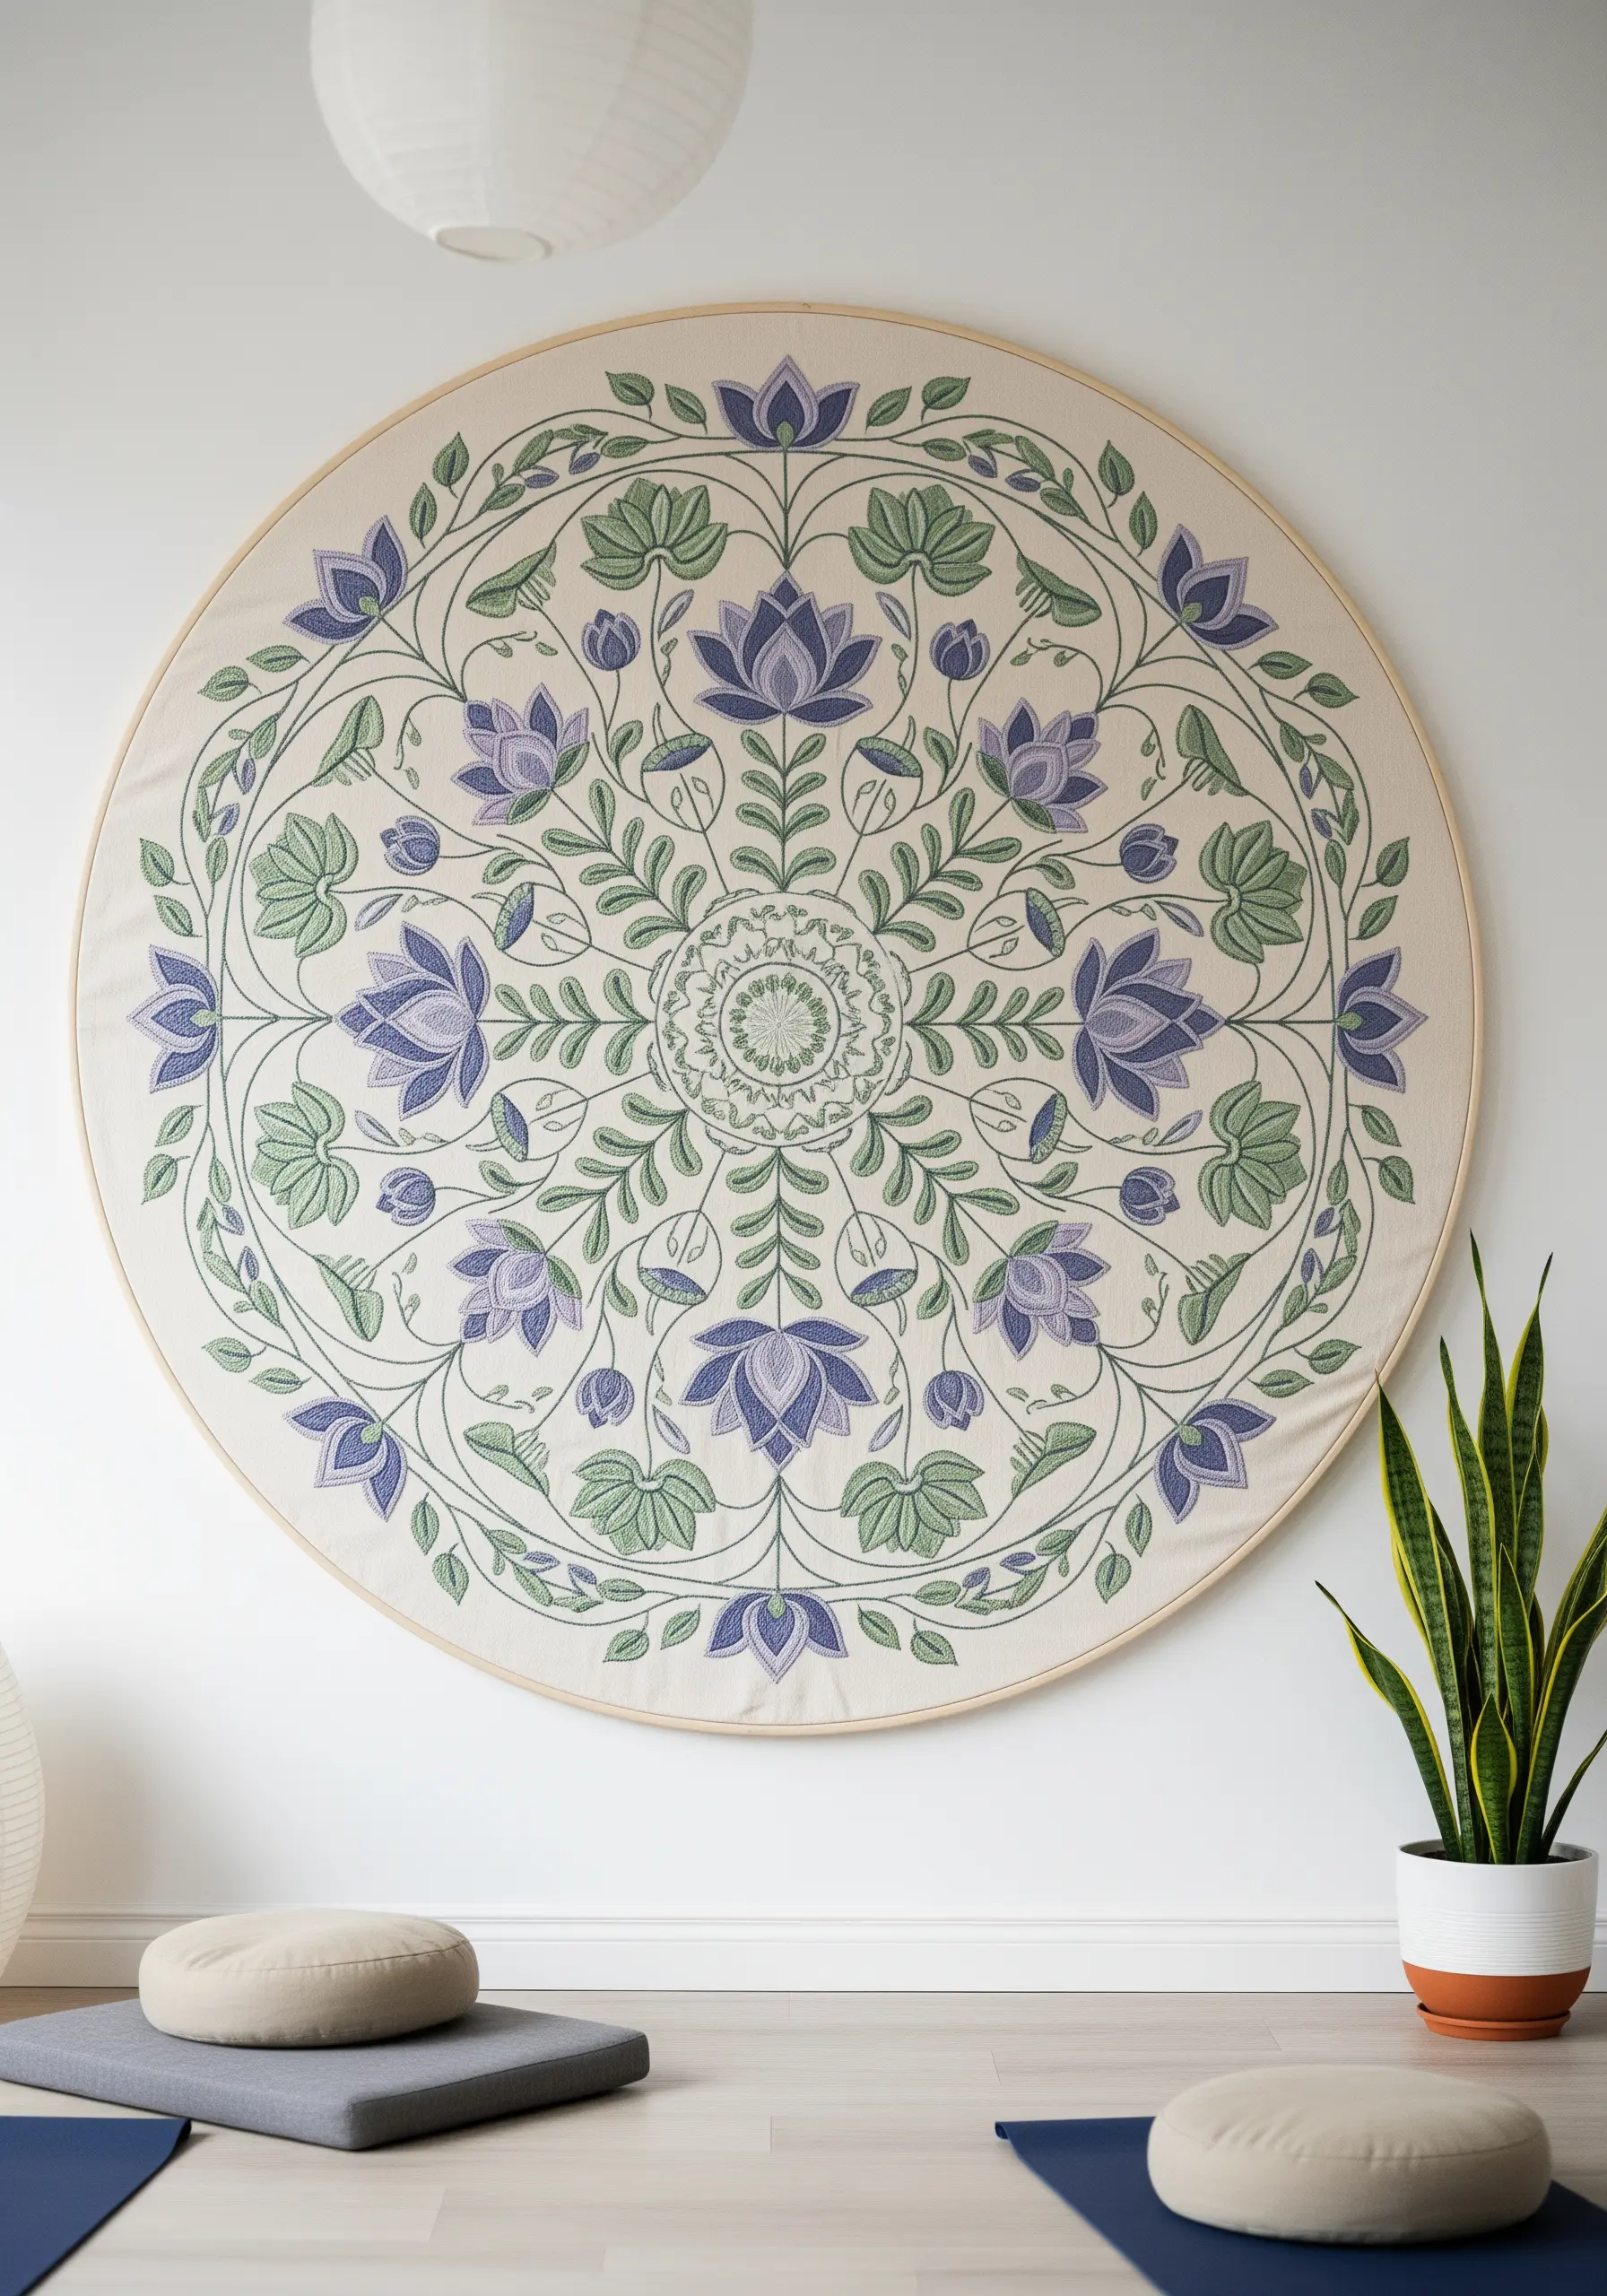
A large, symmetrical mandala can bring a sense of calm and focus to a space, making it perfect for a reading nook or meditation corner.
Use a water-soluble fabric pen to carefully draw your geometric guidelines before you begin stitching.
To create visual interest and texture, assign a different stitch to each ring of the design—alternate between satin stitch, chain stitch, seed stitch, and French knots.
This methodical process is as calming to create as the finished piece is to look at. Find more patterns in our collection of soft-tone embroidery mandalas perfect for calm bedtime routines.


