

I know that feeling of looking at your finished embroidery and thinking, “It’s nice, but it could be more.” Often, the key to elevating your work isn’t learning dozens of complex new stitches, but learning to see the world around you with a stitcher’s eye. The next time you’re outside, look closely at the bark of a tree—not just its color, but its texture, its rhythm, the way moss grows in its crevices.
This is where your artistry deepens. The roughness of pine bark can be translated through chaotic seed stitches; the smooth, peeling surface of a birch can be captured with fabric appliqué and delicate straight stitches. The subtle color shift in a single autumn leaf is an invitation to practice your long-and-short stitch, blending threads like a painter.
Think of these ideas not as strict patterns to be copied, but as a series of techniques and observational skills. This is your invitation to move beyond simply filling in shapes and start building texture, creating dimension, and telling a story with your thread. The refinement you’re seeking is right there, waiting in the details.
1. Abstract Birch Bark with Fabric Appliqué
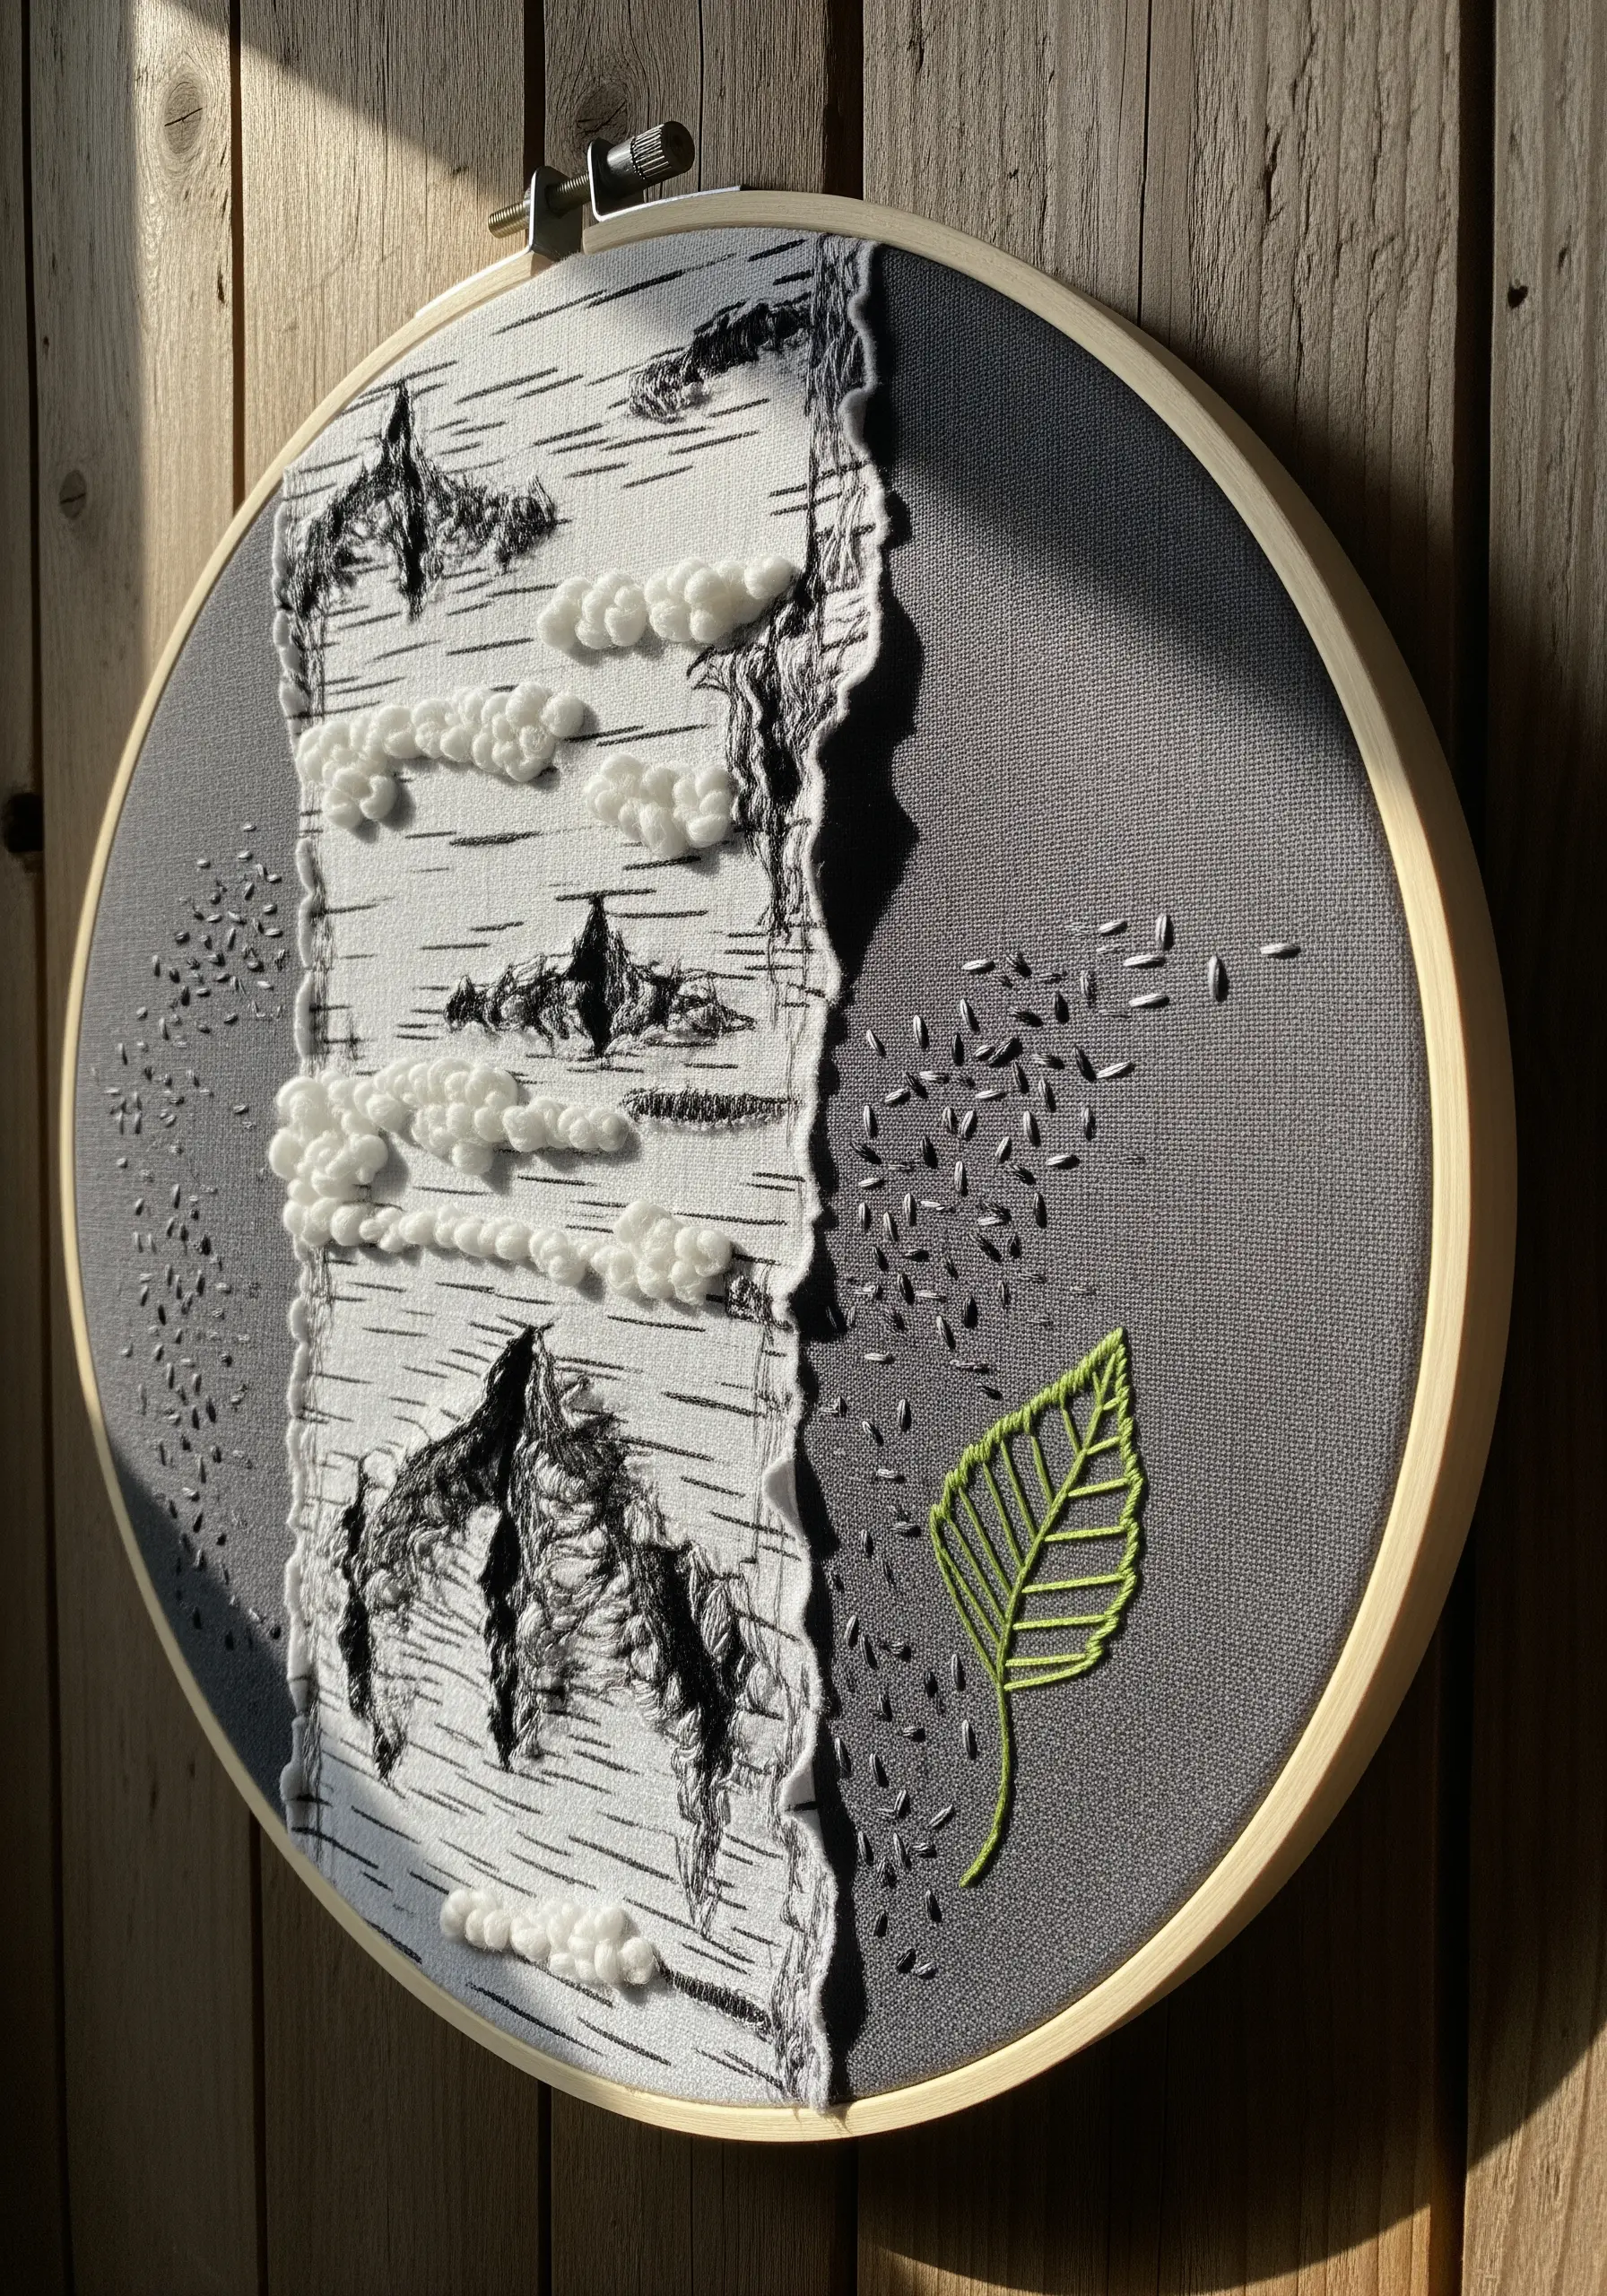
Create dynamic texture by combining flat stitching with fabric appliqué.
Start by tearing a strip of white fabric, leaving the ragged edge exposed to mimic peeling birch bark, and stitch it onto your background fabric.
Use short, dark straight stitches for the characteristic bark markings and dense clusters of white French knots to add soft, puffy dimension.
This contrast between the flat appliqué, linear stitches, and raised knots is what gives the piece its compelling tactile quality.
2. A Seasonal Study in Botanical Stitching
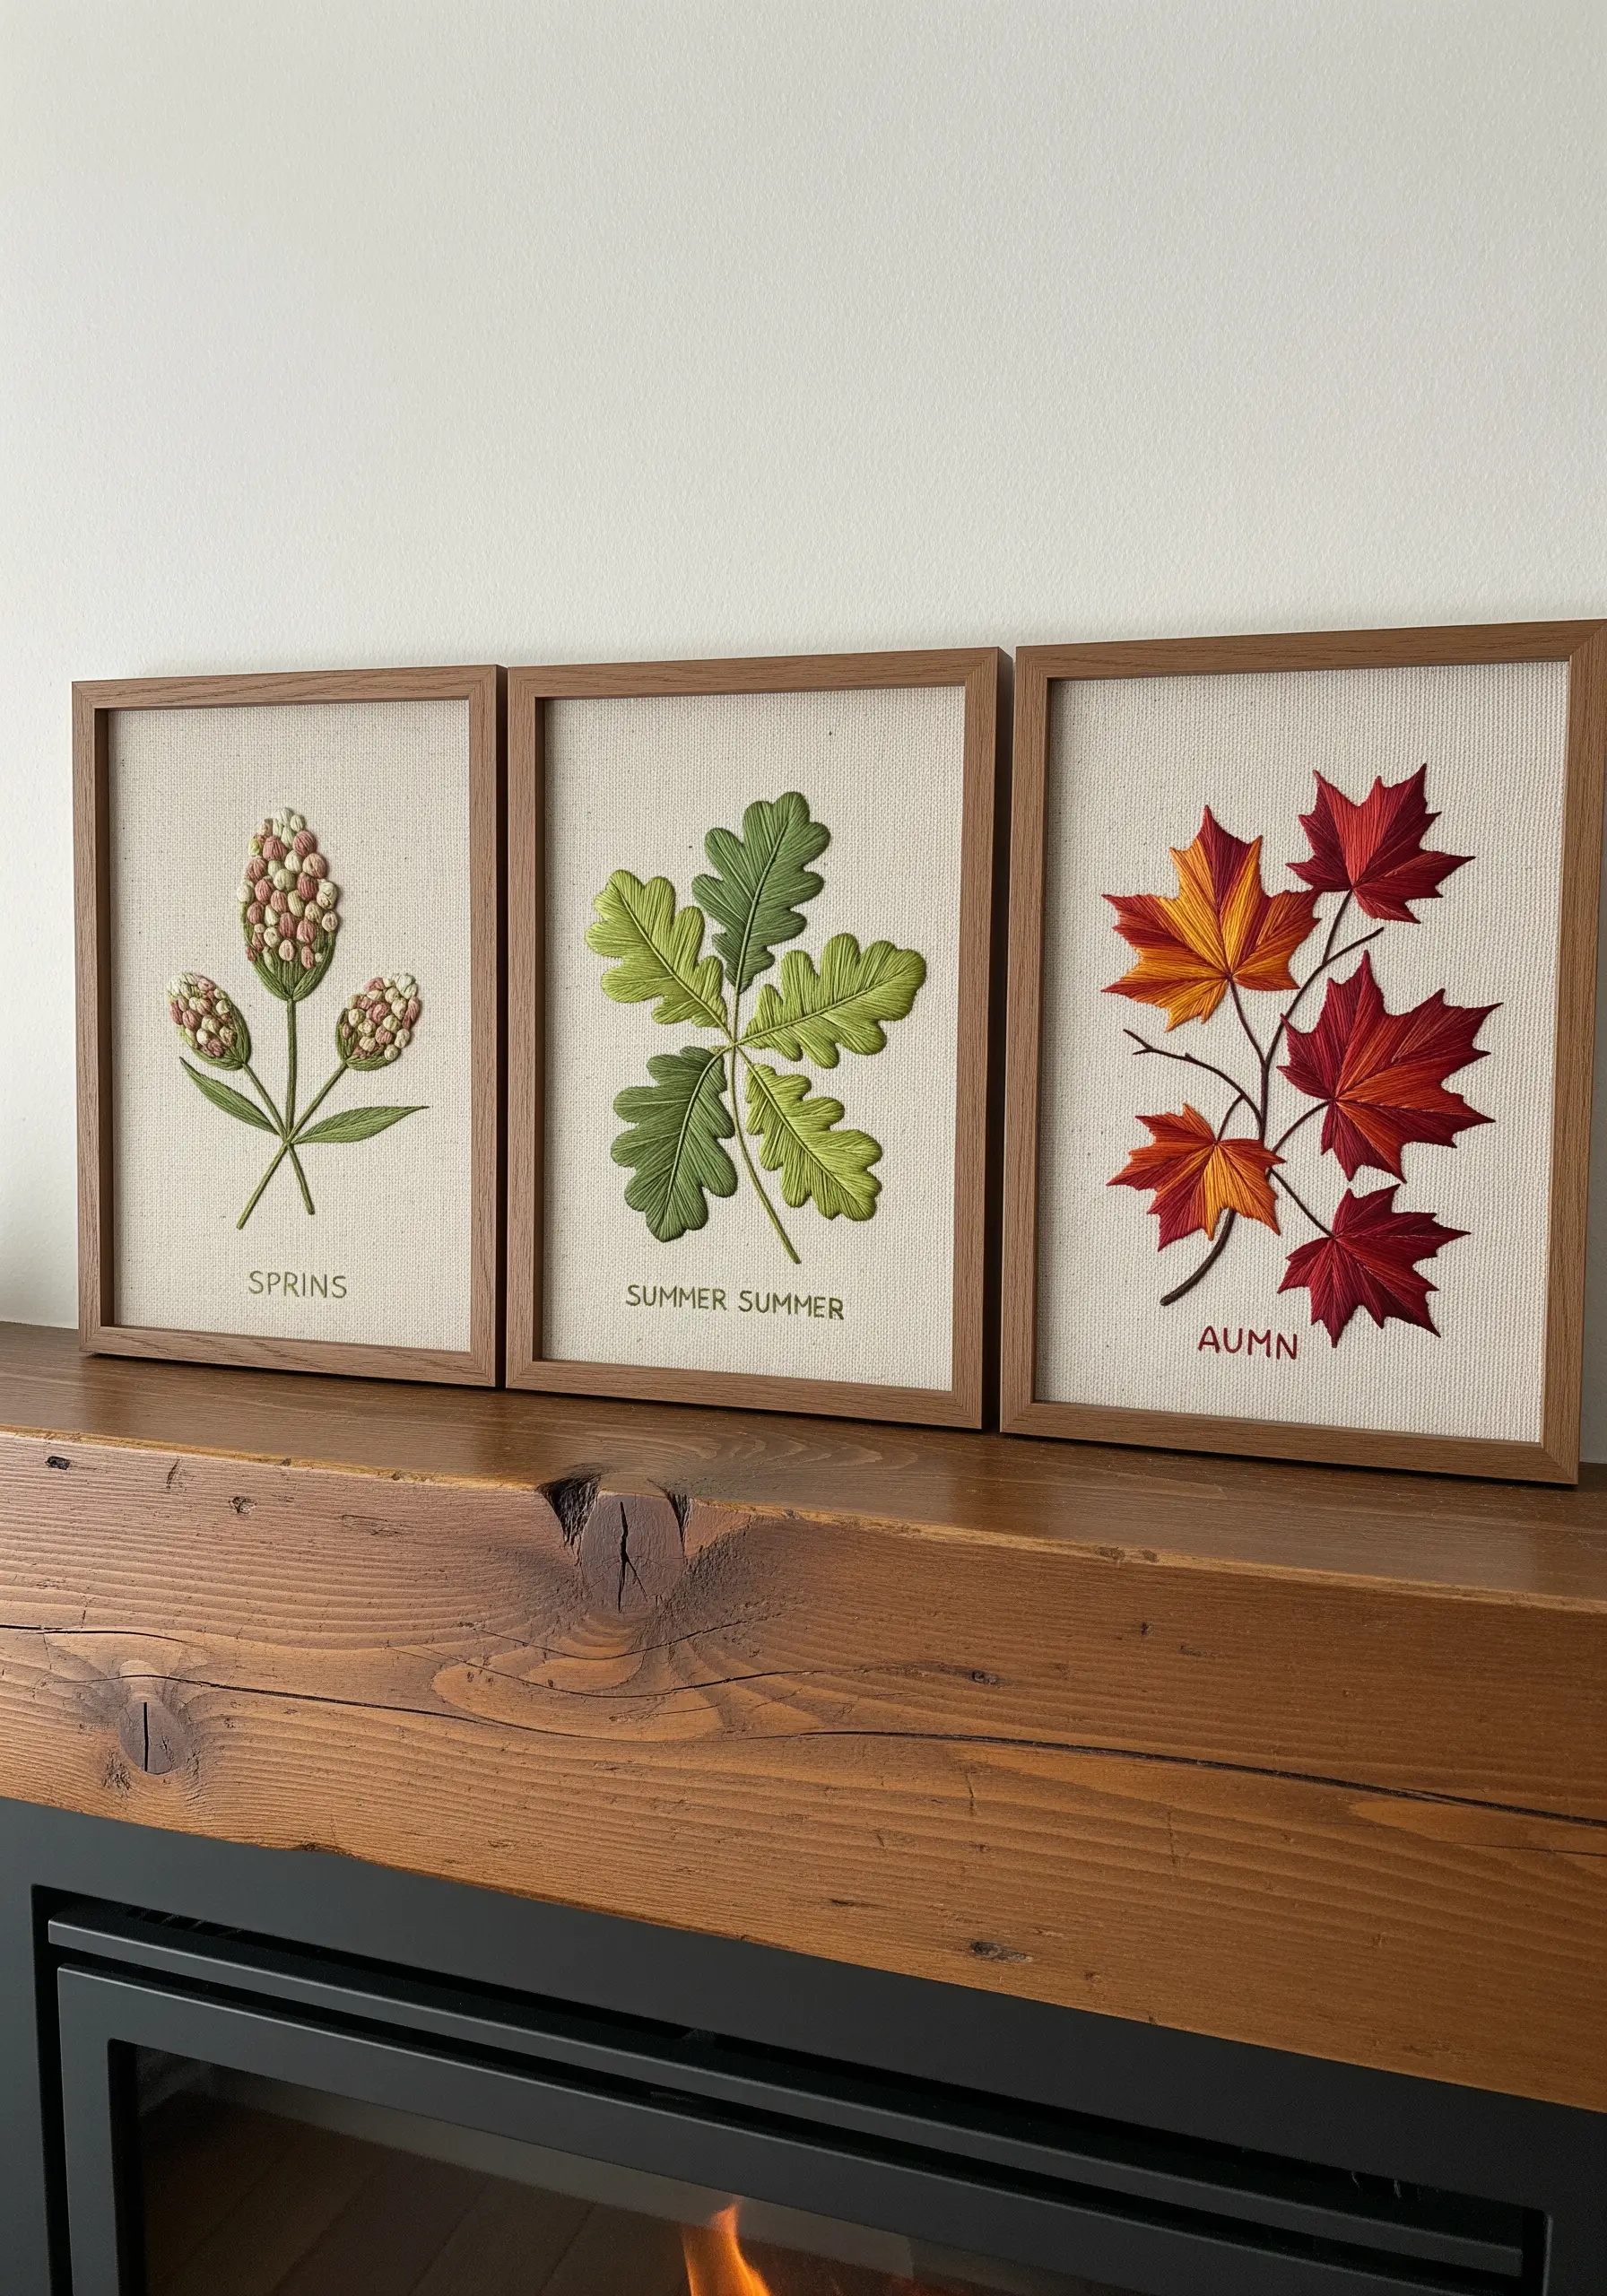
Tell a cohesive story by creating a triptych of seasonal botanicals.
By keeping the fabric, composition style, and framing consistent, you allow the focus to remain on the subtle shifts in color and form through the seasons.
Use long-and-short stitch to achieve the smooth color gradients in the leaves, which gives them a soft, realistic appearance.
This approach transforms individual pieces into a curated collection, showing your ability to build a narrative with thread.
3. Dynamic Patterning with Directional Satin Stitch
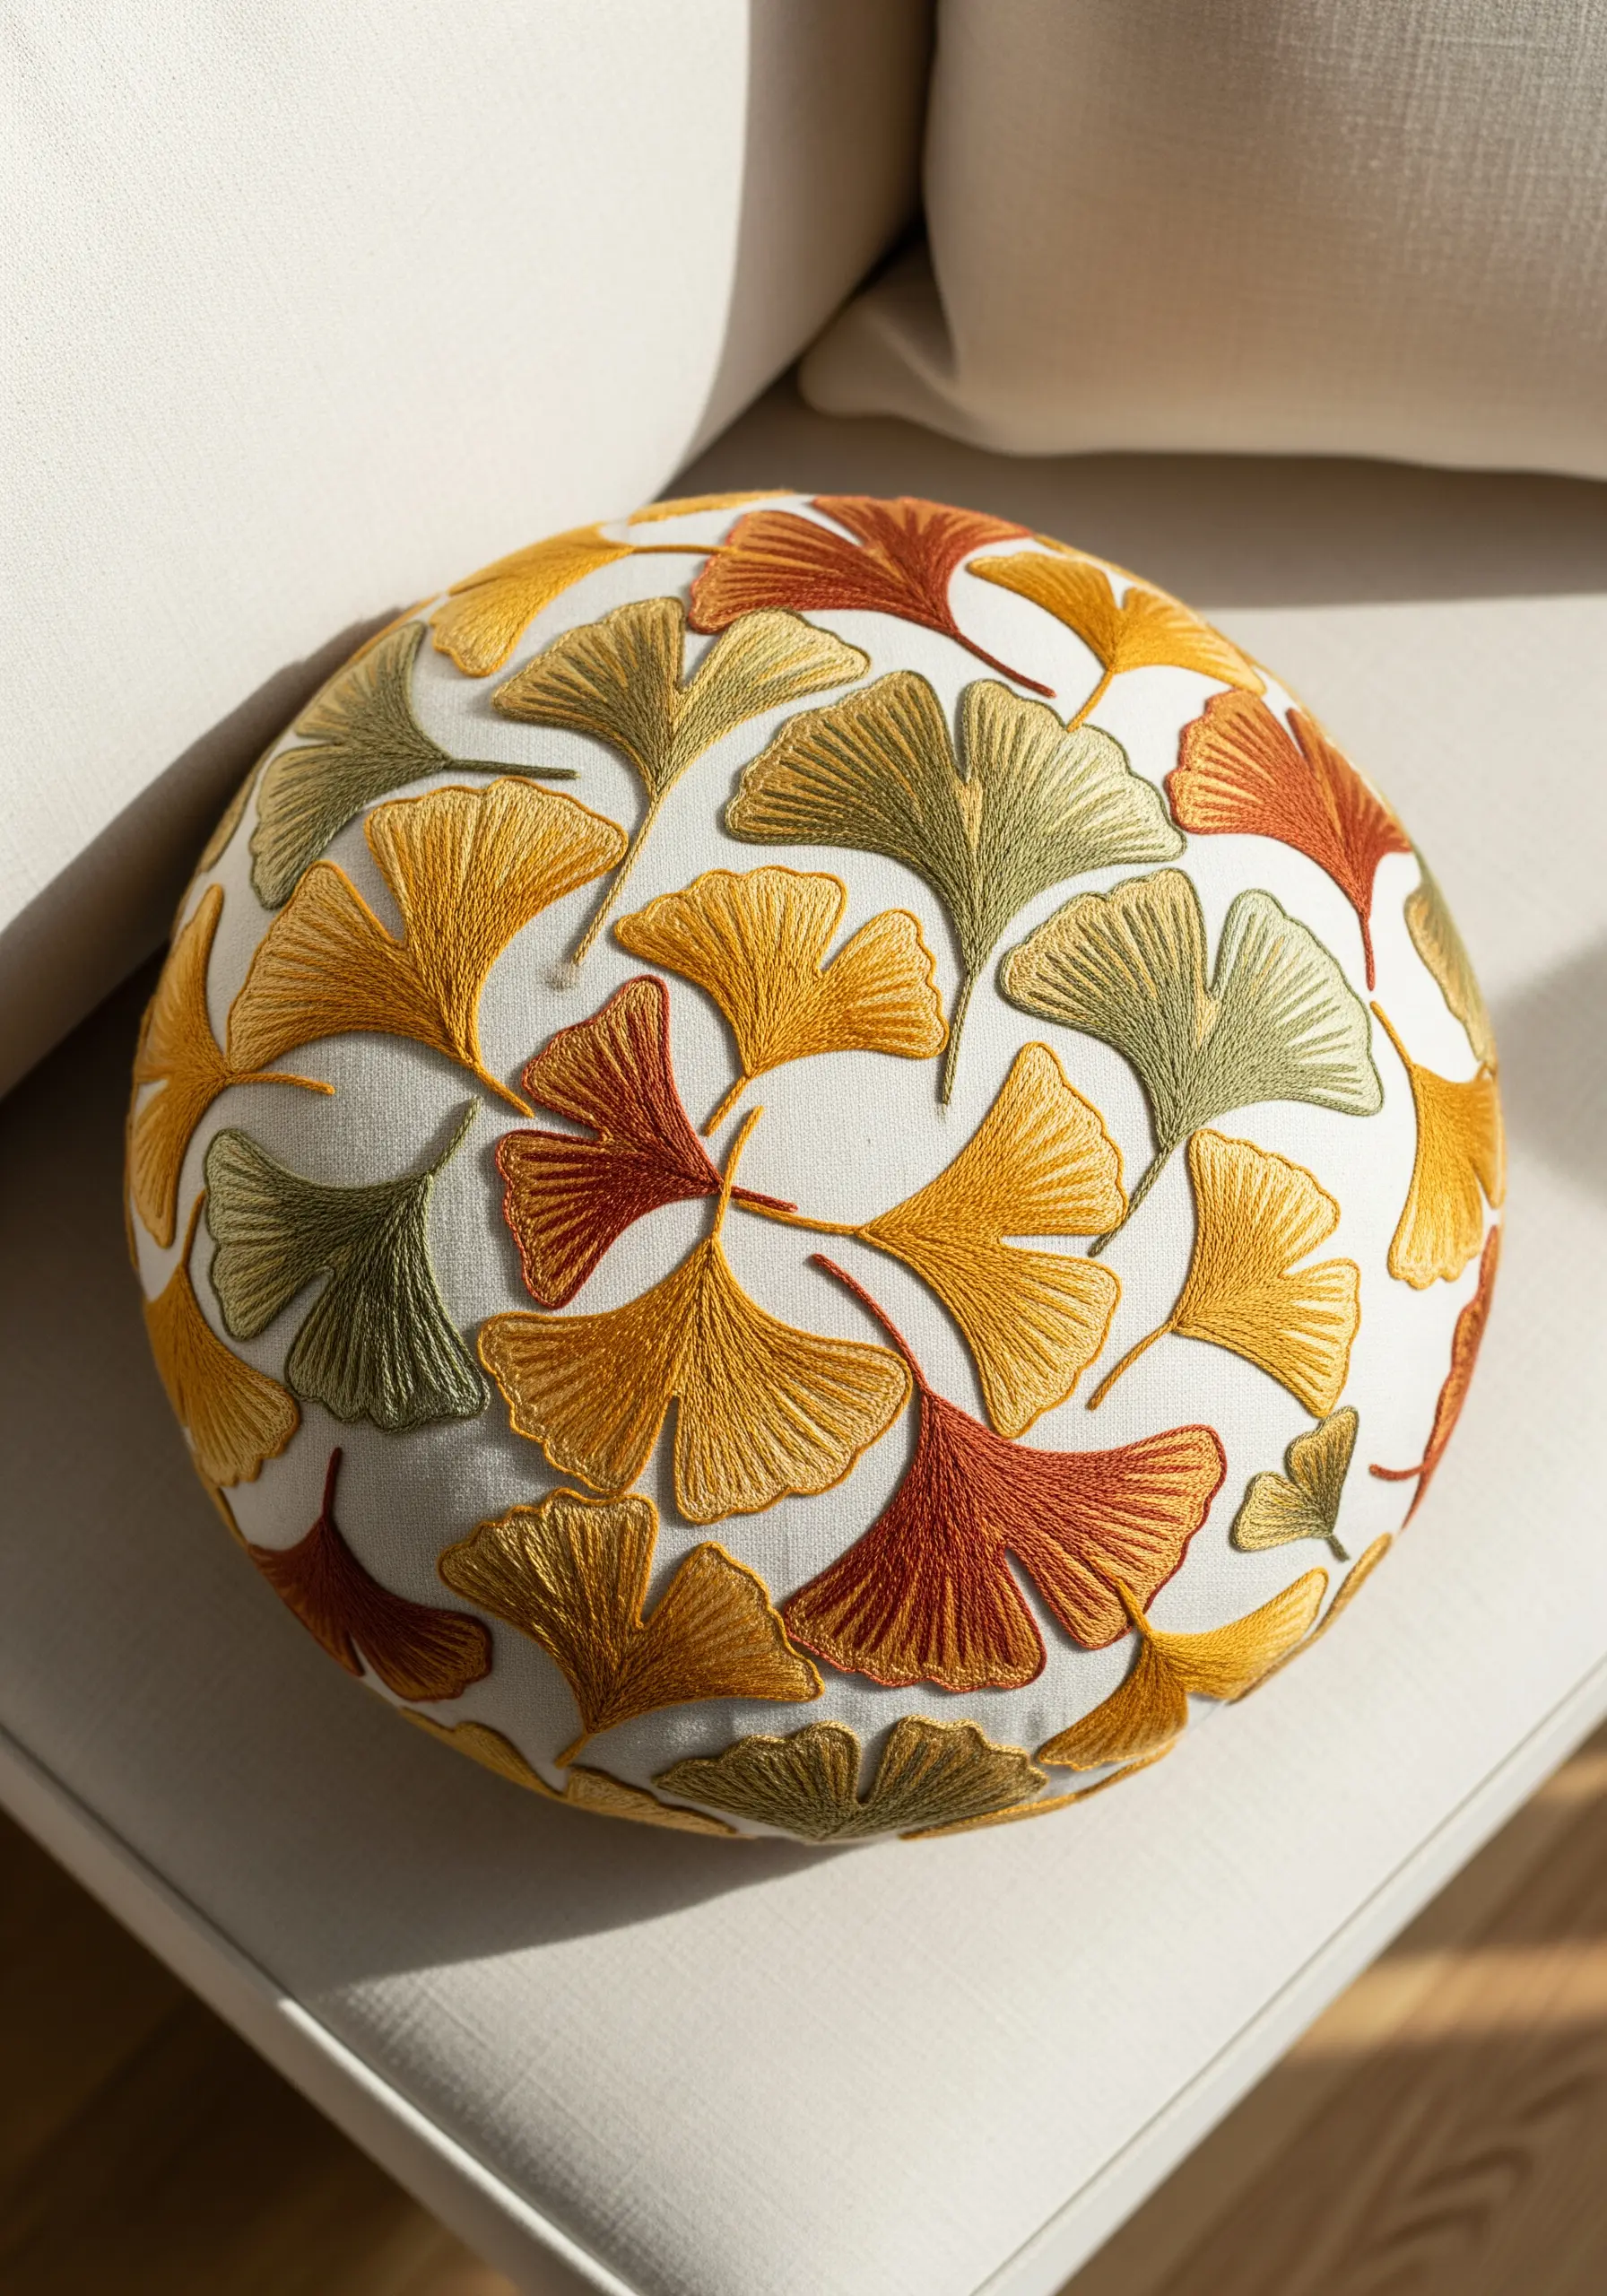
Transform a simple repeating pattern into a vibrant, moving design by focusing on the direction of your satin stitch.
For each ginkgo leaf, angle your stitches to radiate from the stem, which creates a natural, fan-like effect that catches the light differently.
Stitching the leaves so they overlap and face different directions adds to this sense of gentle motion.
This technique turns a static pattern into something that feels alive, making it perfect for embroidered cushions and other home décor.
4. Sculptural Moss Effects with Varied Knots

To build hyper-realistic moss and lichen, move beyond the standard French knot.
Vary the number of times you wrap the thread and use different thread weights—from single-strand floss to thick wool yarn—to create a diverse, bumpy texture.
Cluster your knots tightly in organic patches, blending shades of green, yellow, and cream to mimic natural growth.
The dense, sculptural quality of the knots contrasts beautifully with the flatter stitches used for the bark, making the entire piece pop.
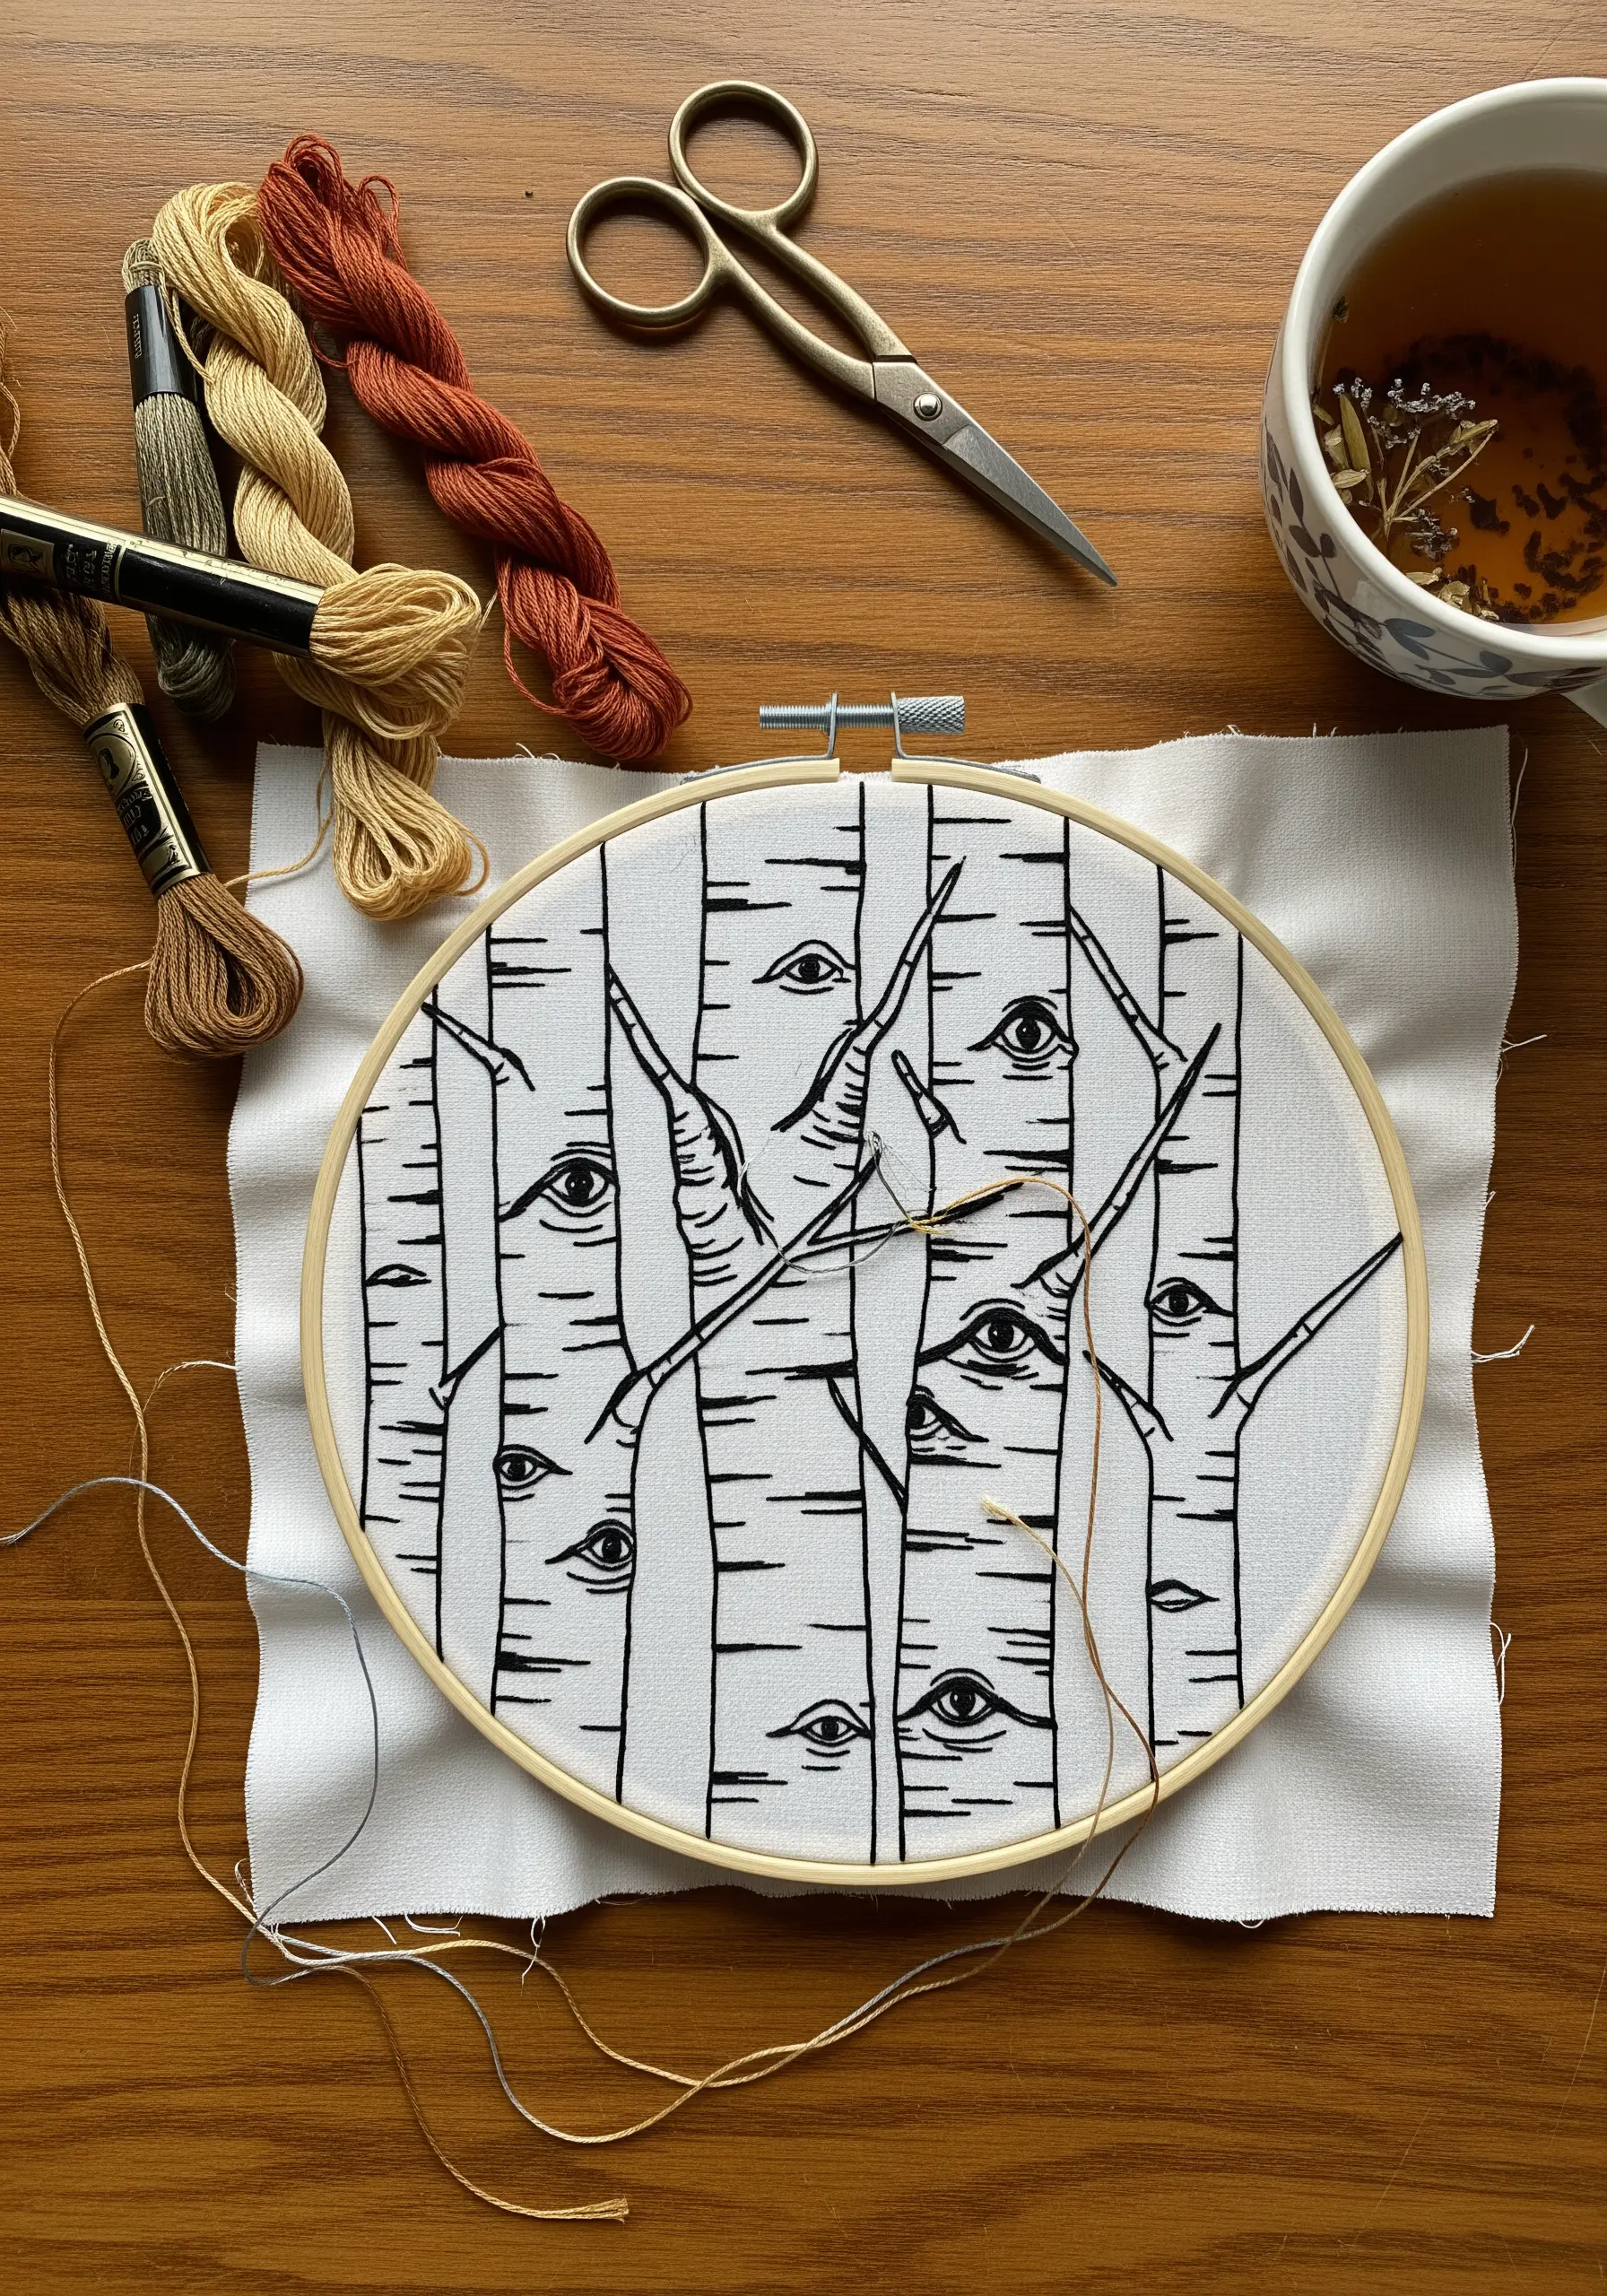
5. Capturing Delicate Veins with Single-Thread Backstitch
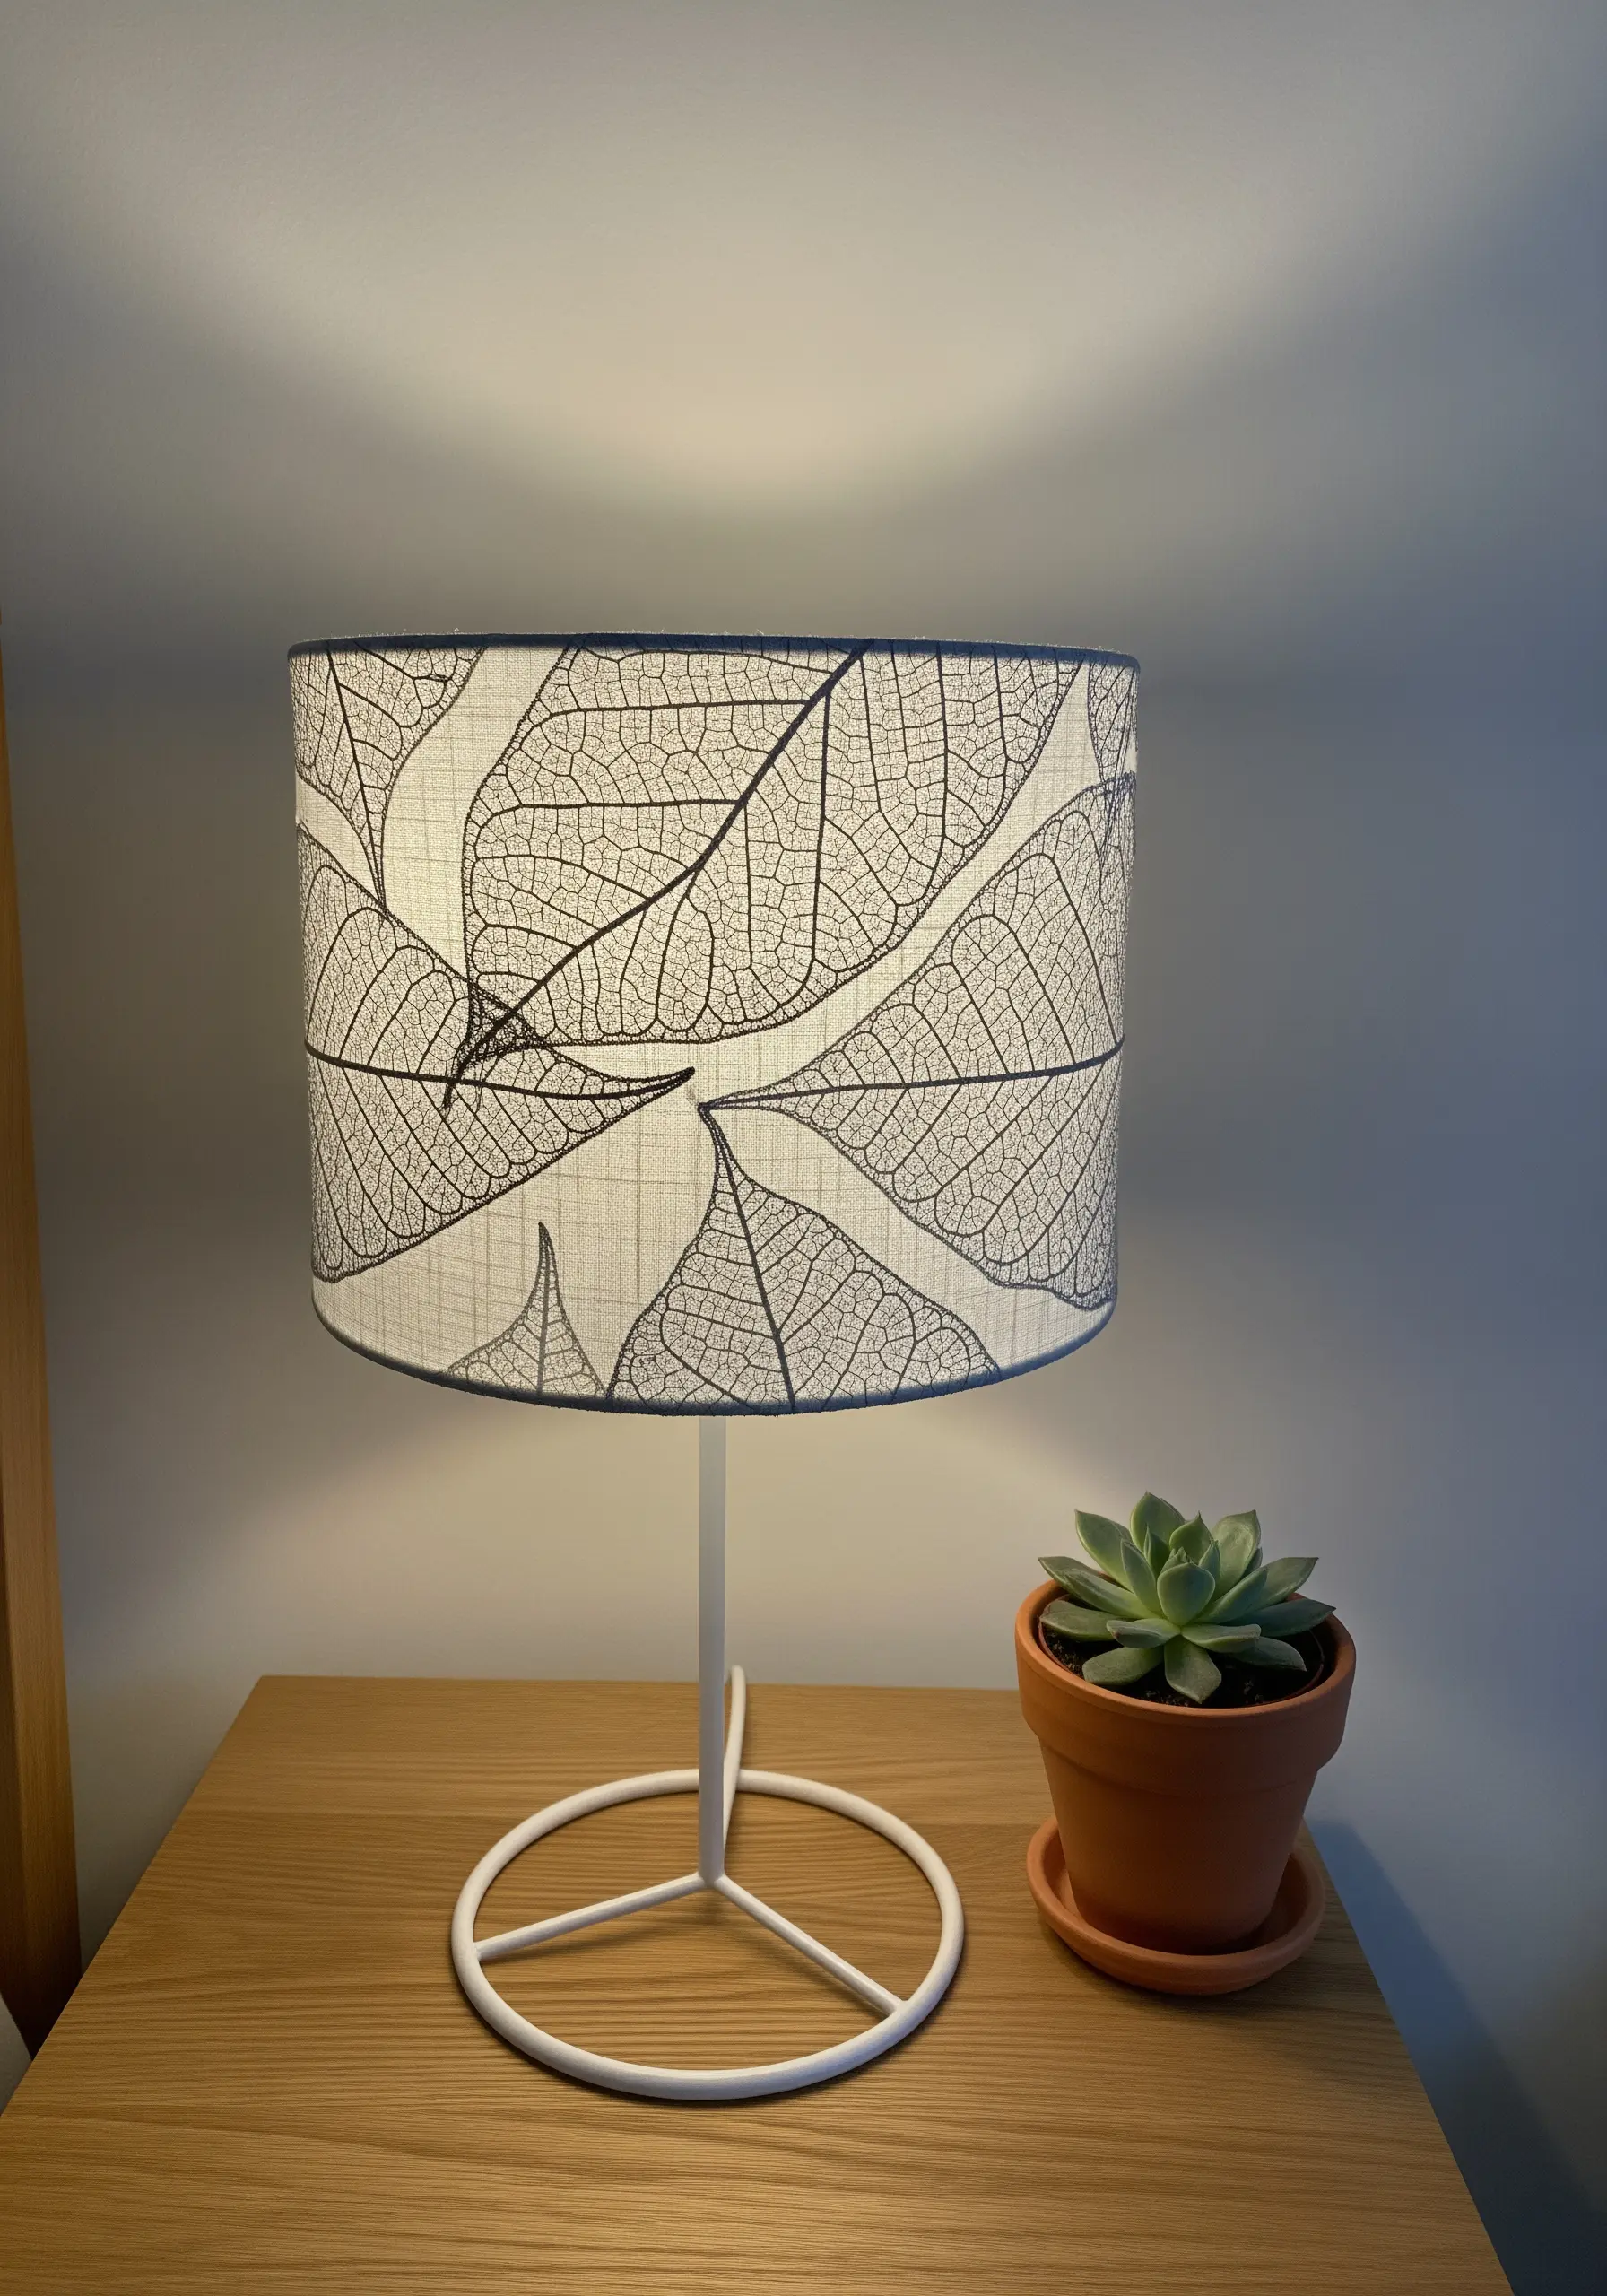
Embody the elegance of a leaf skeleton by paring your technique back to the essentials: a single strand of thread and a precise backstitch.
Working on a light, semi-translucent fabric enhances the design’s delicate, X-ray quality, especially when illuminated on a lampshade.
Your precision is paramount here; focus on maintaining consistent stitch length to ensure the lines are crisp and clean, allowing the intricate structure of the leaf to be the hero.
6. Monumental Bark Texture with Thick Fibers
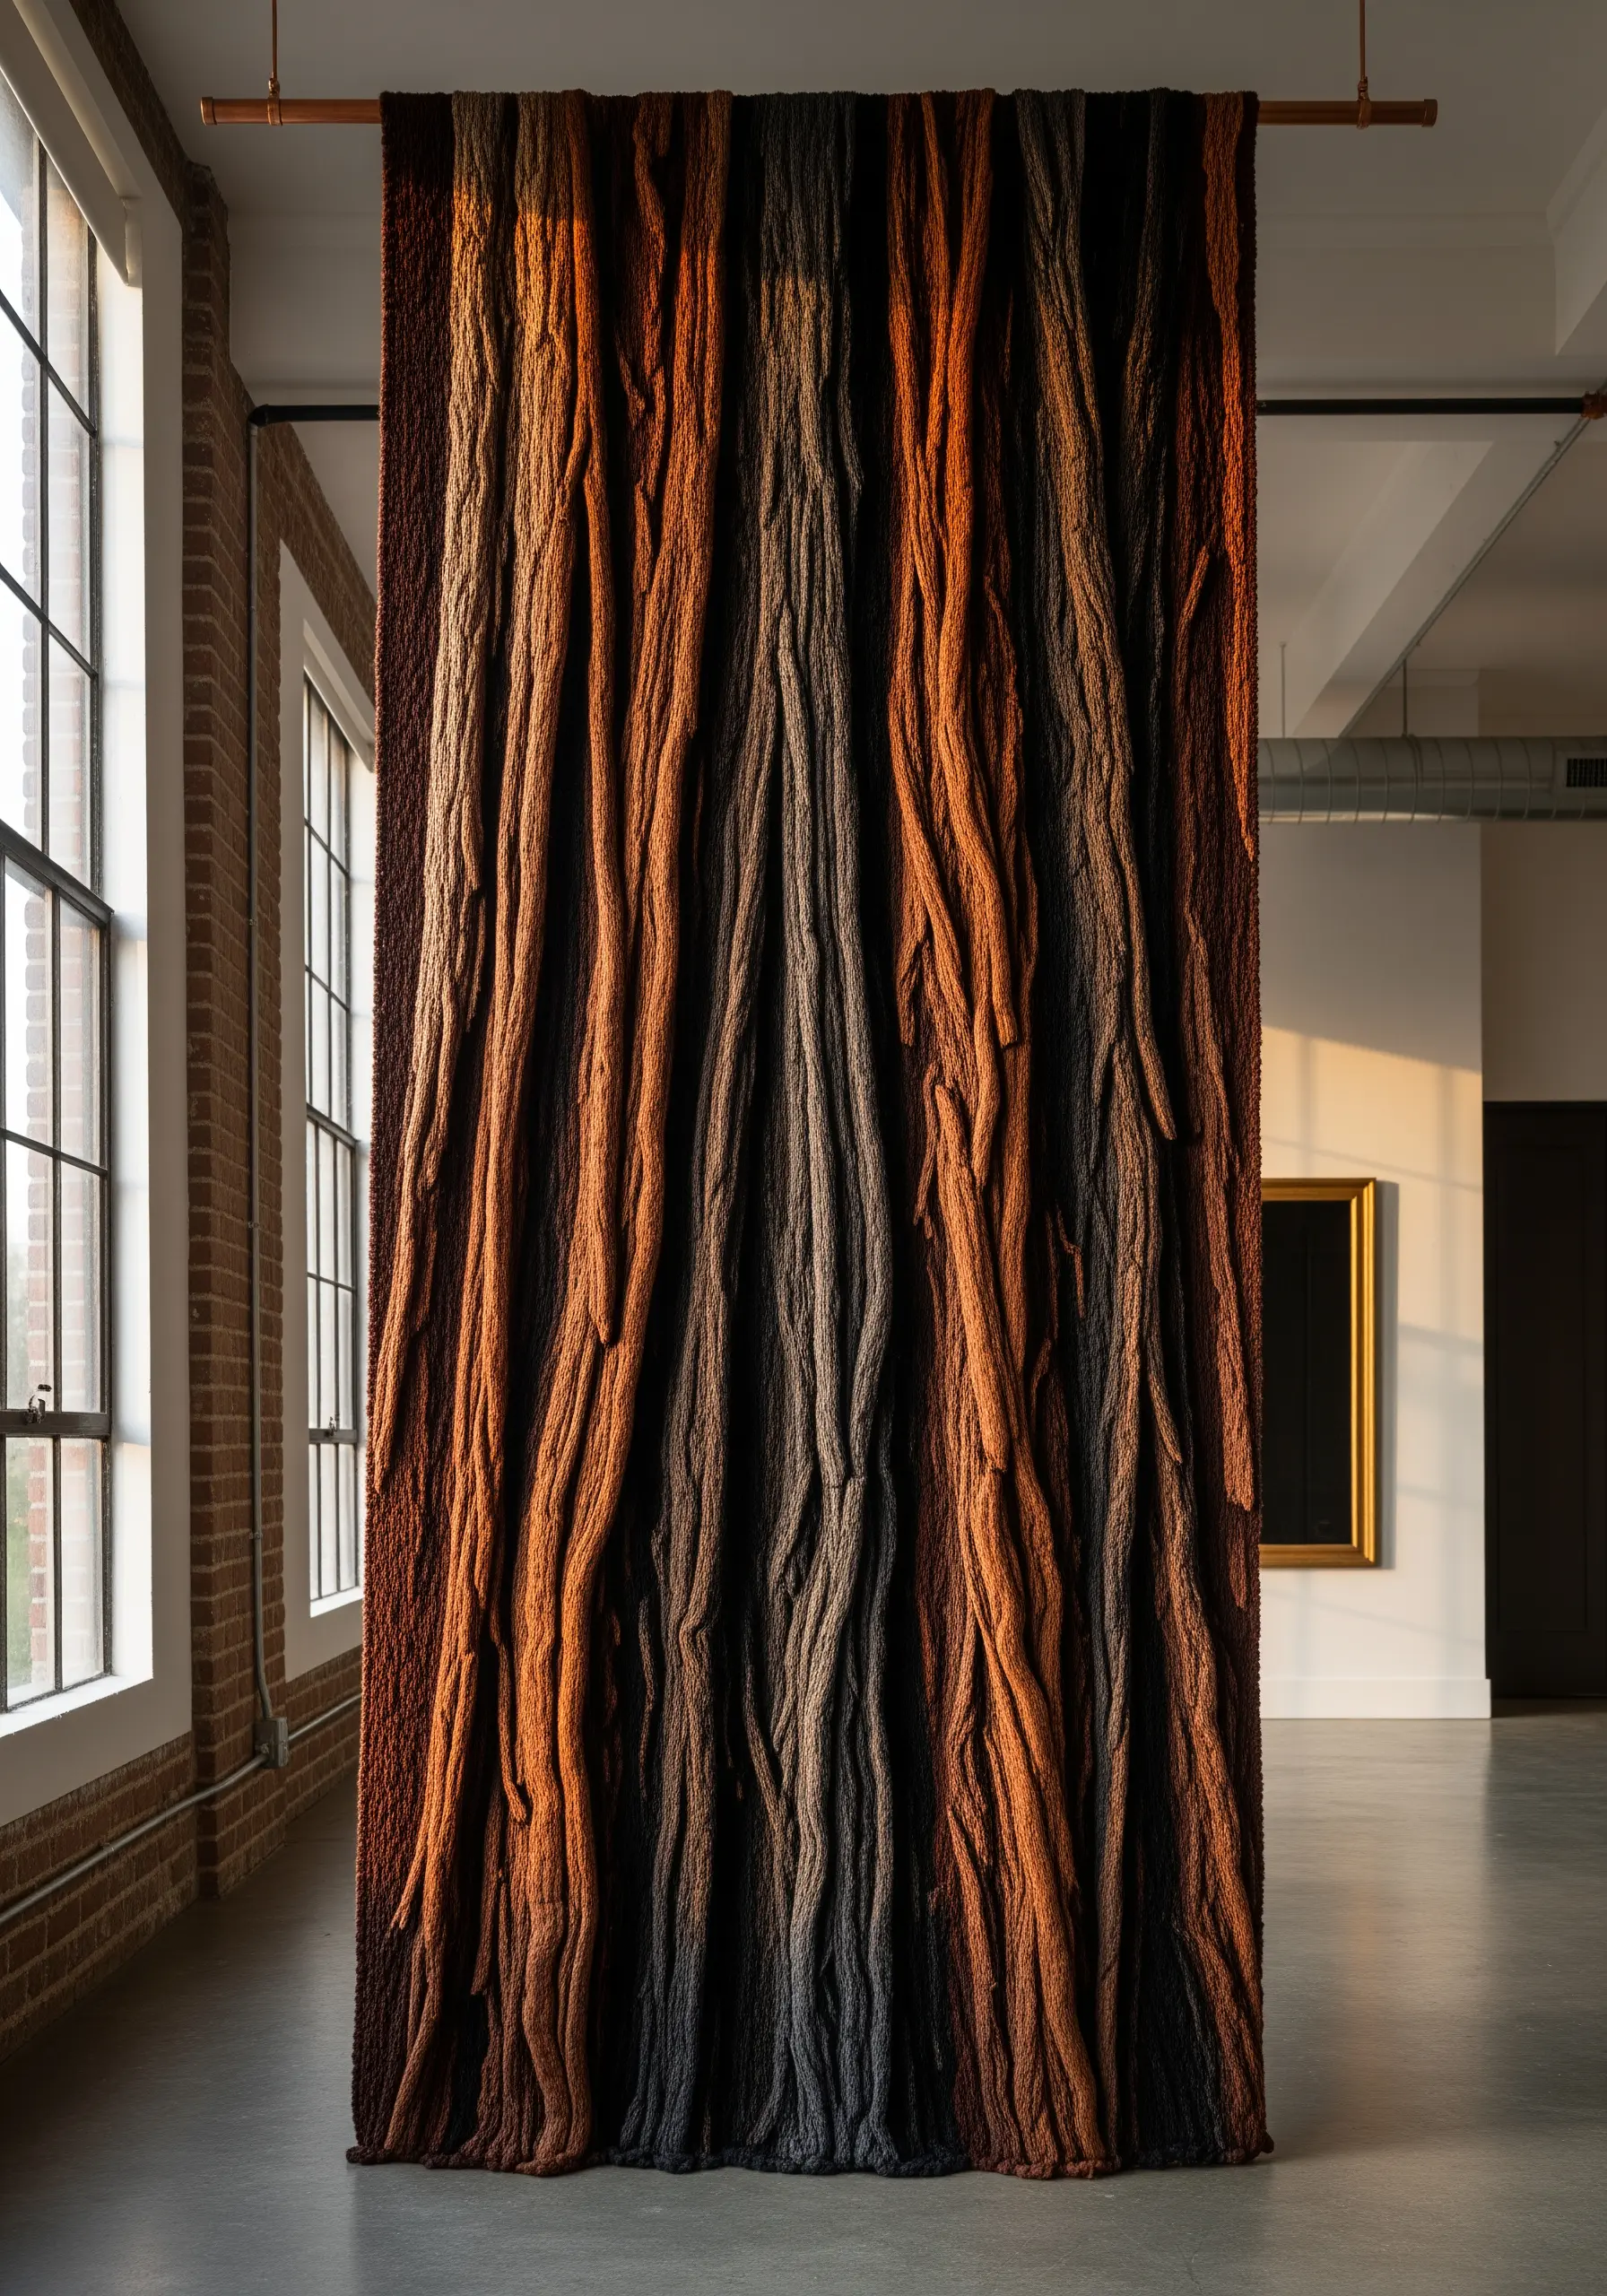
For large-scale pieces that command attention, swap standard embroidery floss for unconventional, thick fibers like yarn, wool roving, or even fabric strips.
Use couching—tacking down the thick fiber with a thinner, discreet thread—to create dramatic, flowing lines that mimic deep bark crevices.
This method allows you to build texture much faster than with traditional stitches and results in breathtaking, tactile yarn wall art creations inspired by nature.
7. The Grace of a Fern with Fishbone Stitch
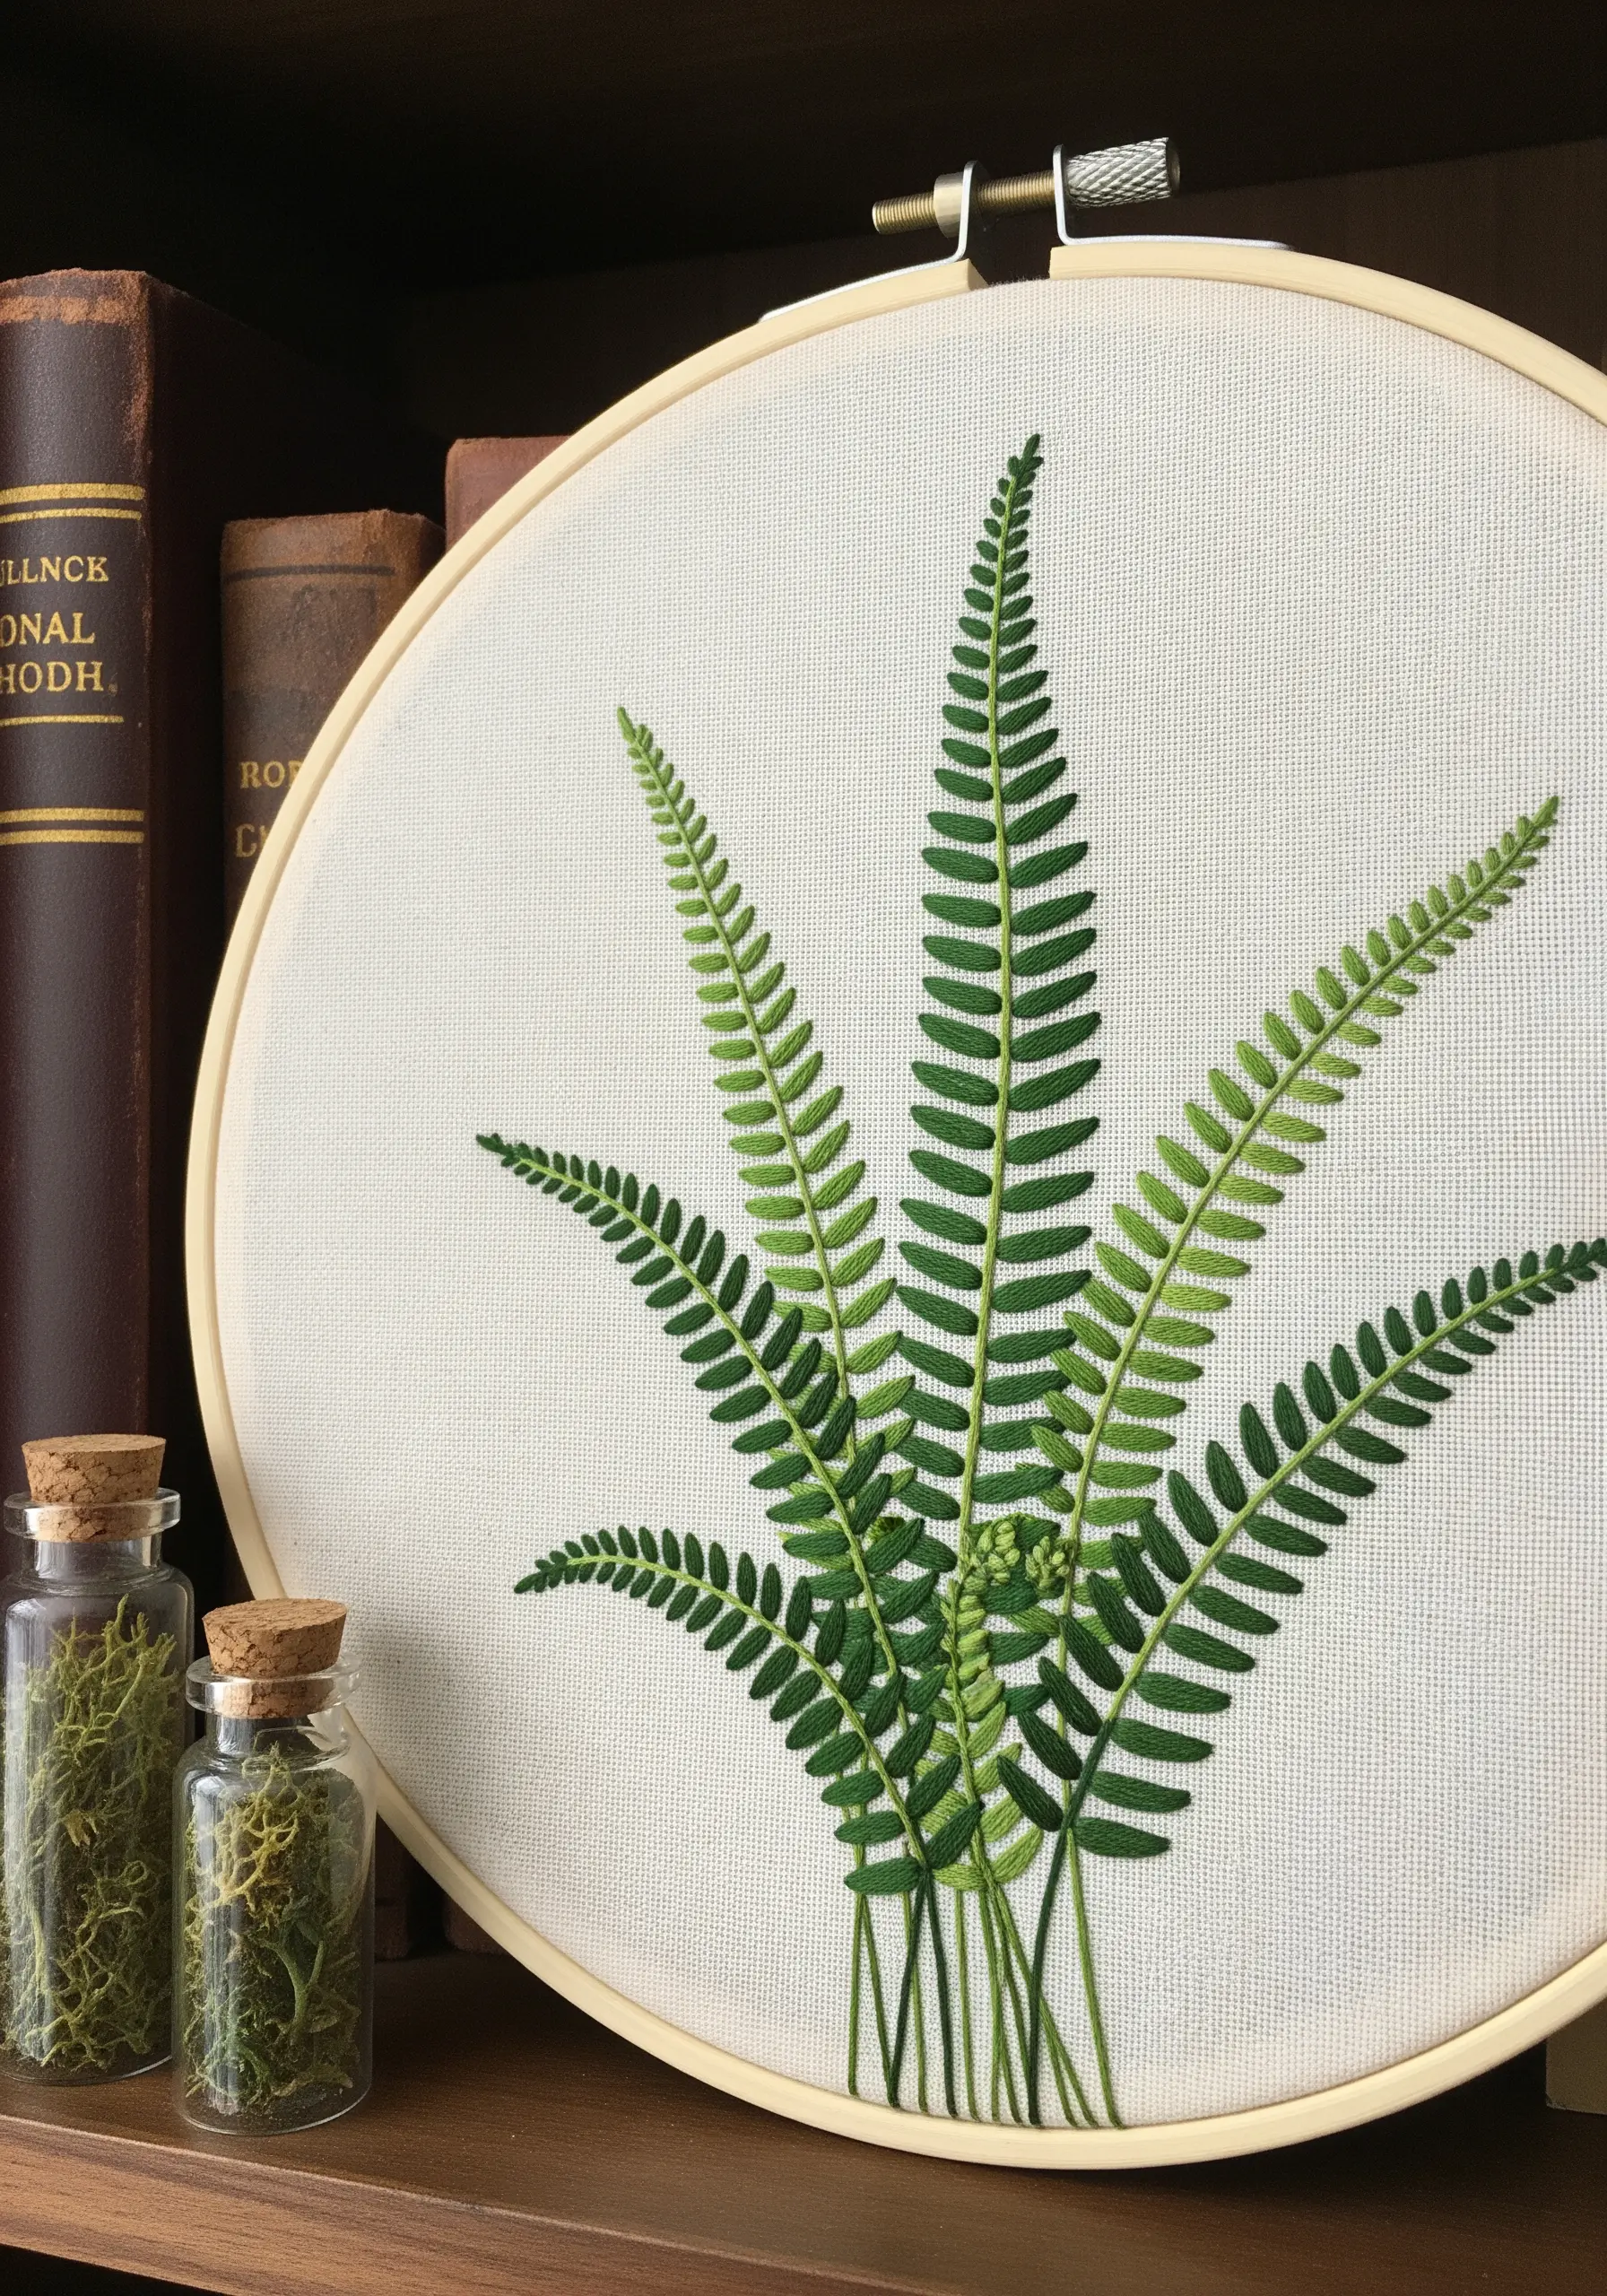
The fishbone stitch is your best tool for capturing the delicate structure of fern fronds and other complex leaves.
This single stitch creates a central vein and angled leaflets simultaneously, resulting in a naturally dimensional and realistic appearance.
To add subtle depth, use two closely related shades of green, using the slightly darker one for the leaflets closer to the main stem. It’s one of those rare leaf patterns you’ve probably never tried but will use forever.
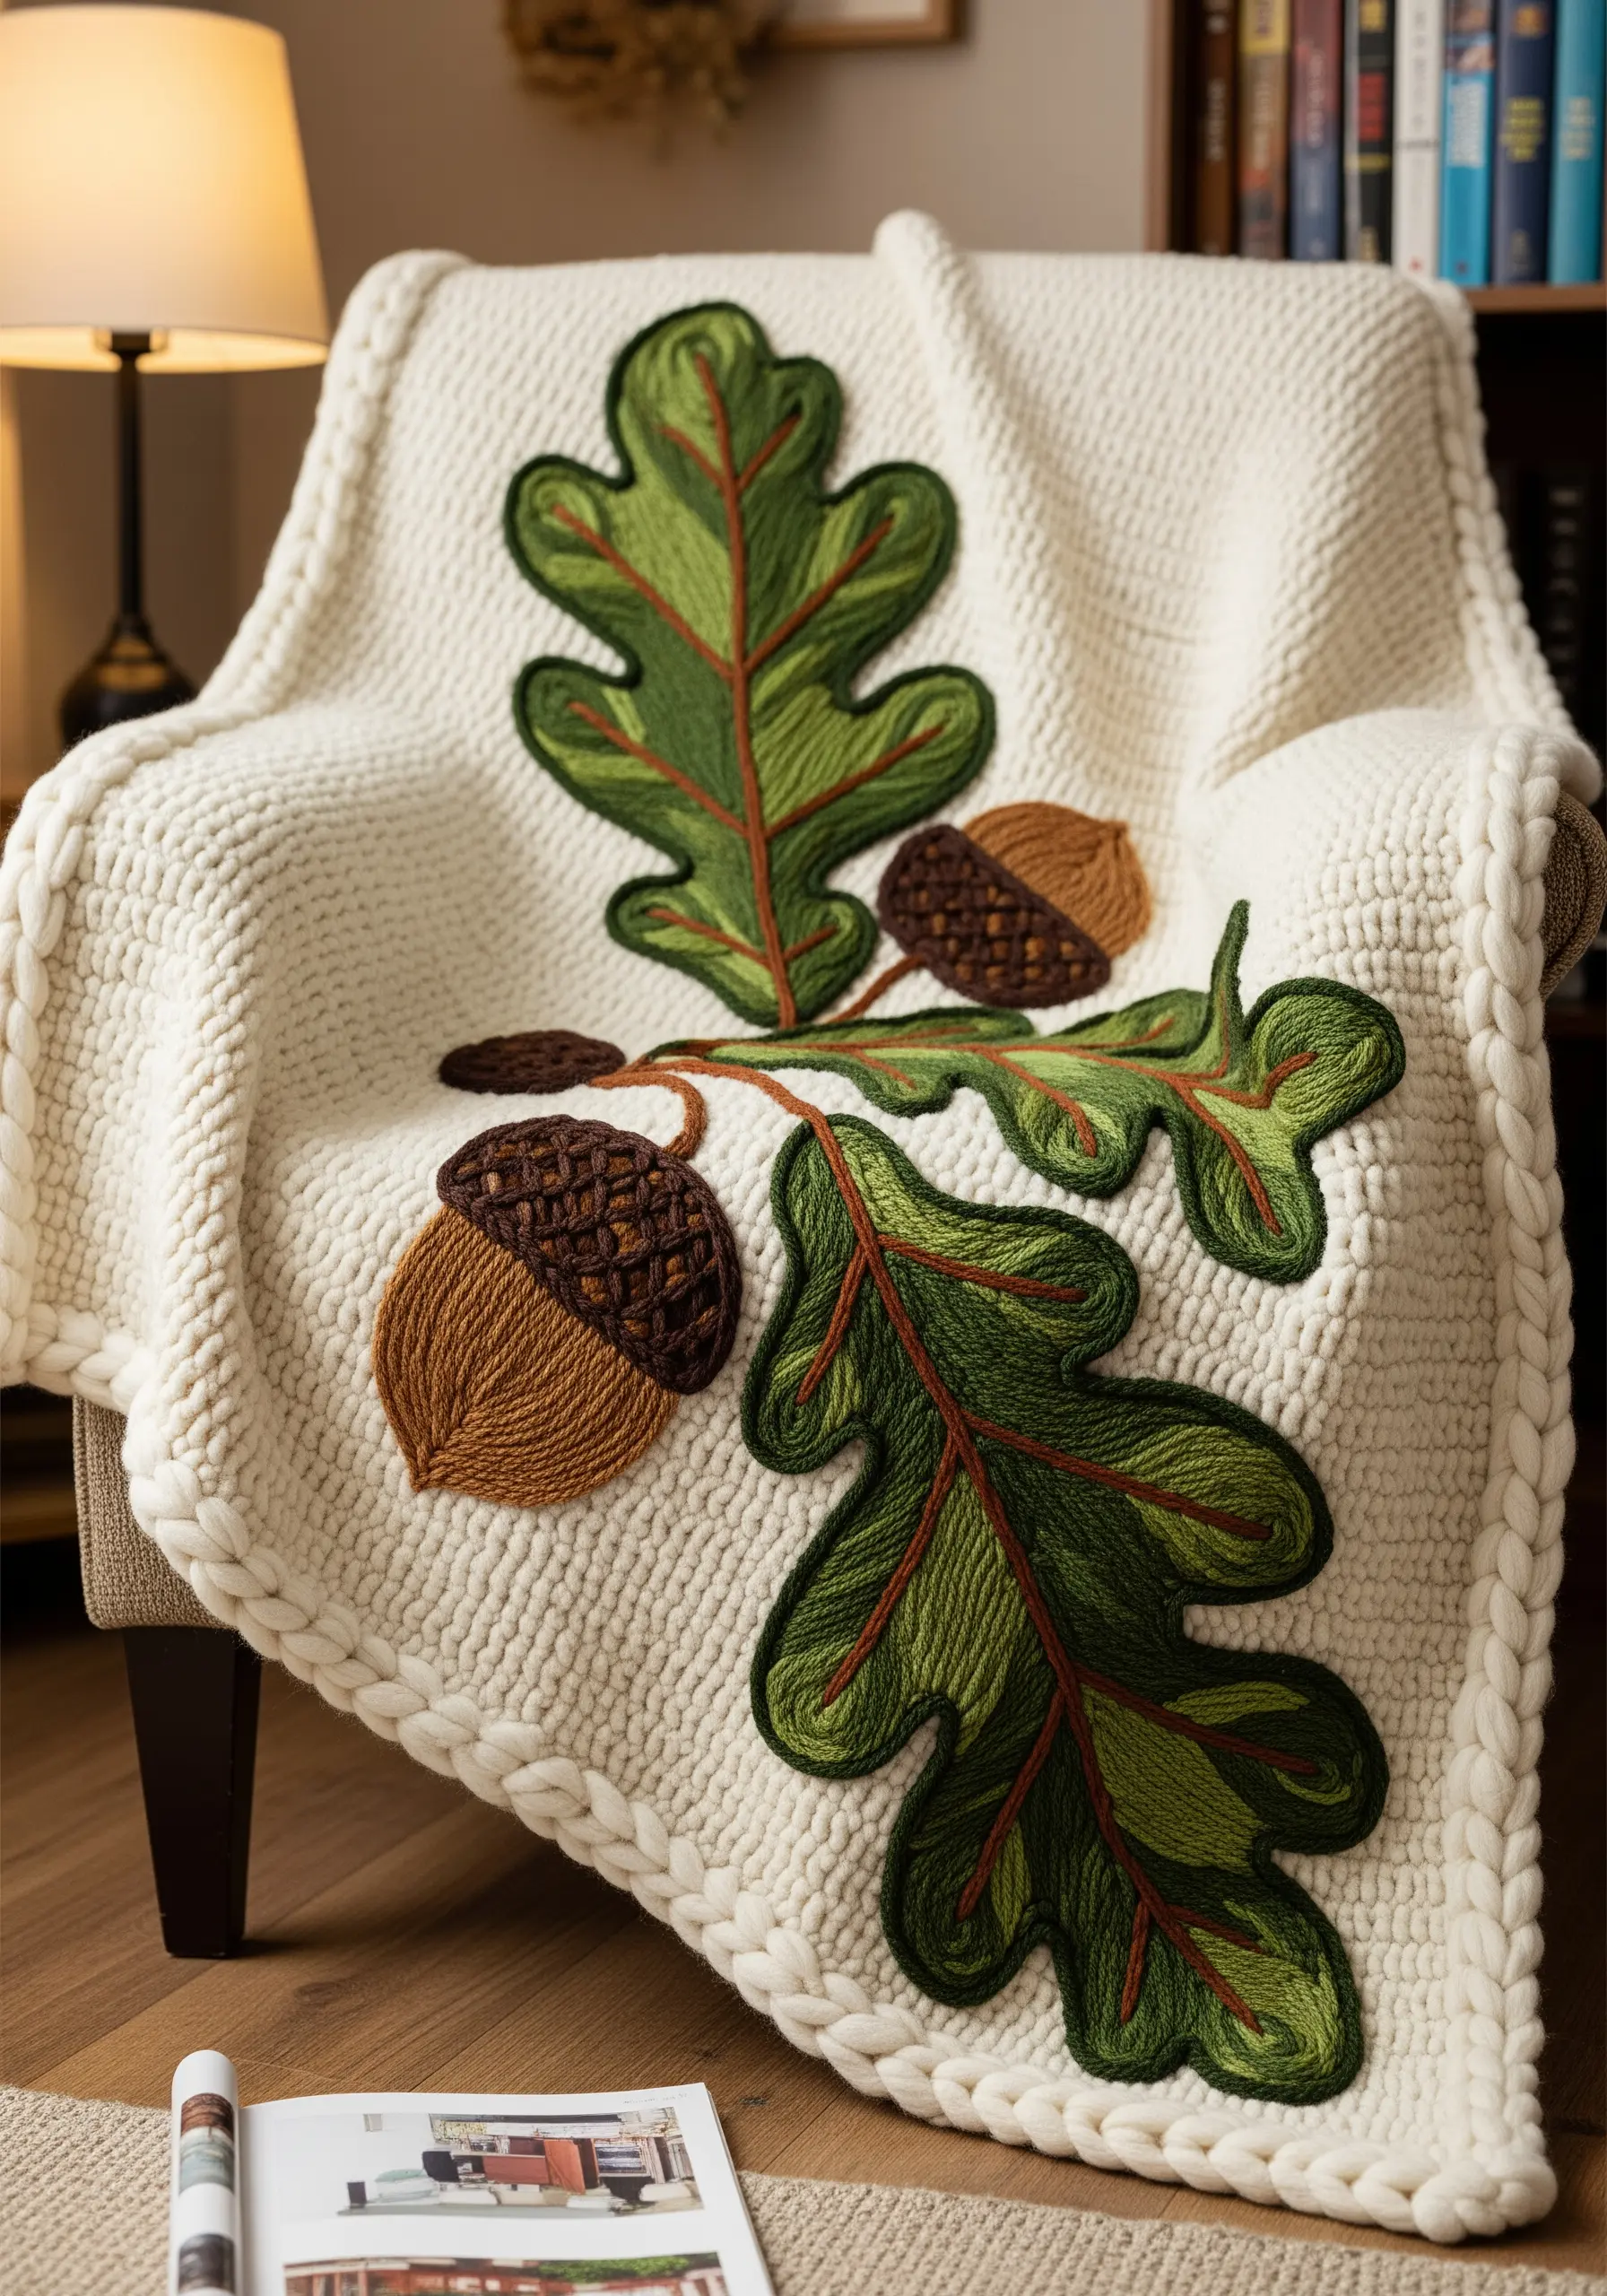
8. An Elegant Border with Rhythmic Repetition

A successful border design relies on balance and rhythm, not complexity.
Create a simple, repeating pattern of two or three motifs, like leaves and acorns, and maintain consistent spacing between them.
This repetition guides the eye smoothly along the edge of the fabric.
By using a limited, warm autumn palette and a clean backstitch outline, you ensure the design feels intentional and sophisticated, never cluttered.
9. Integrating Natural Objects with Abstract Stitches
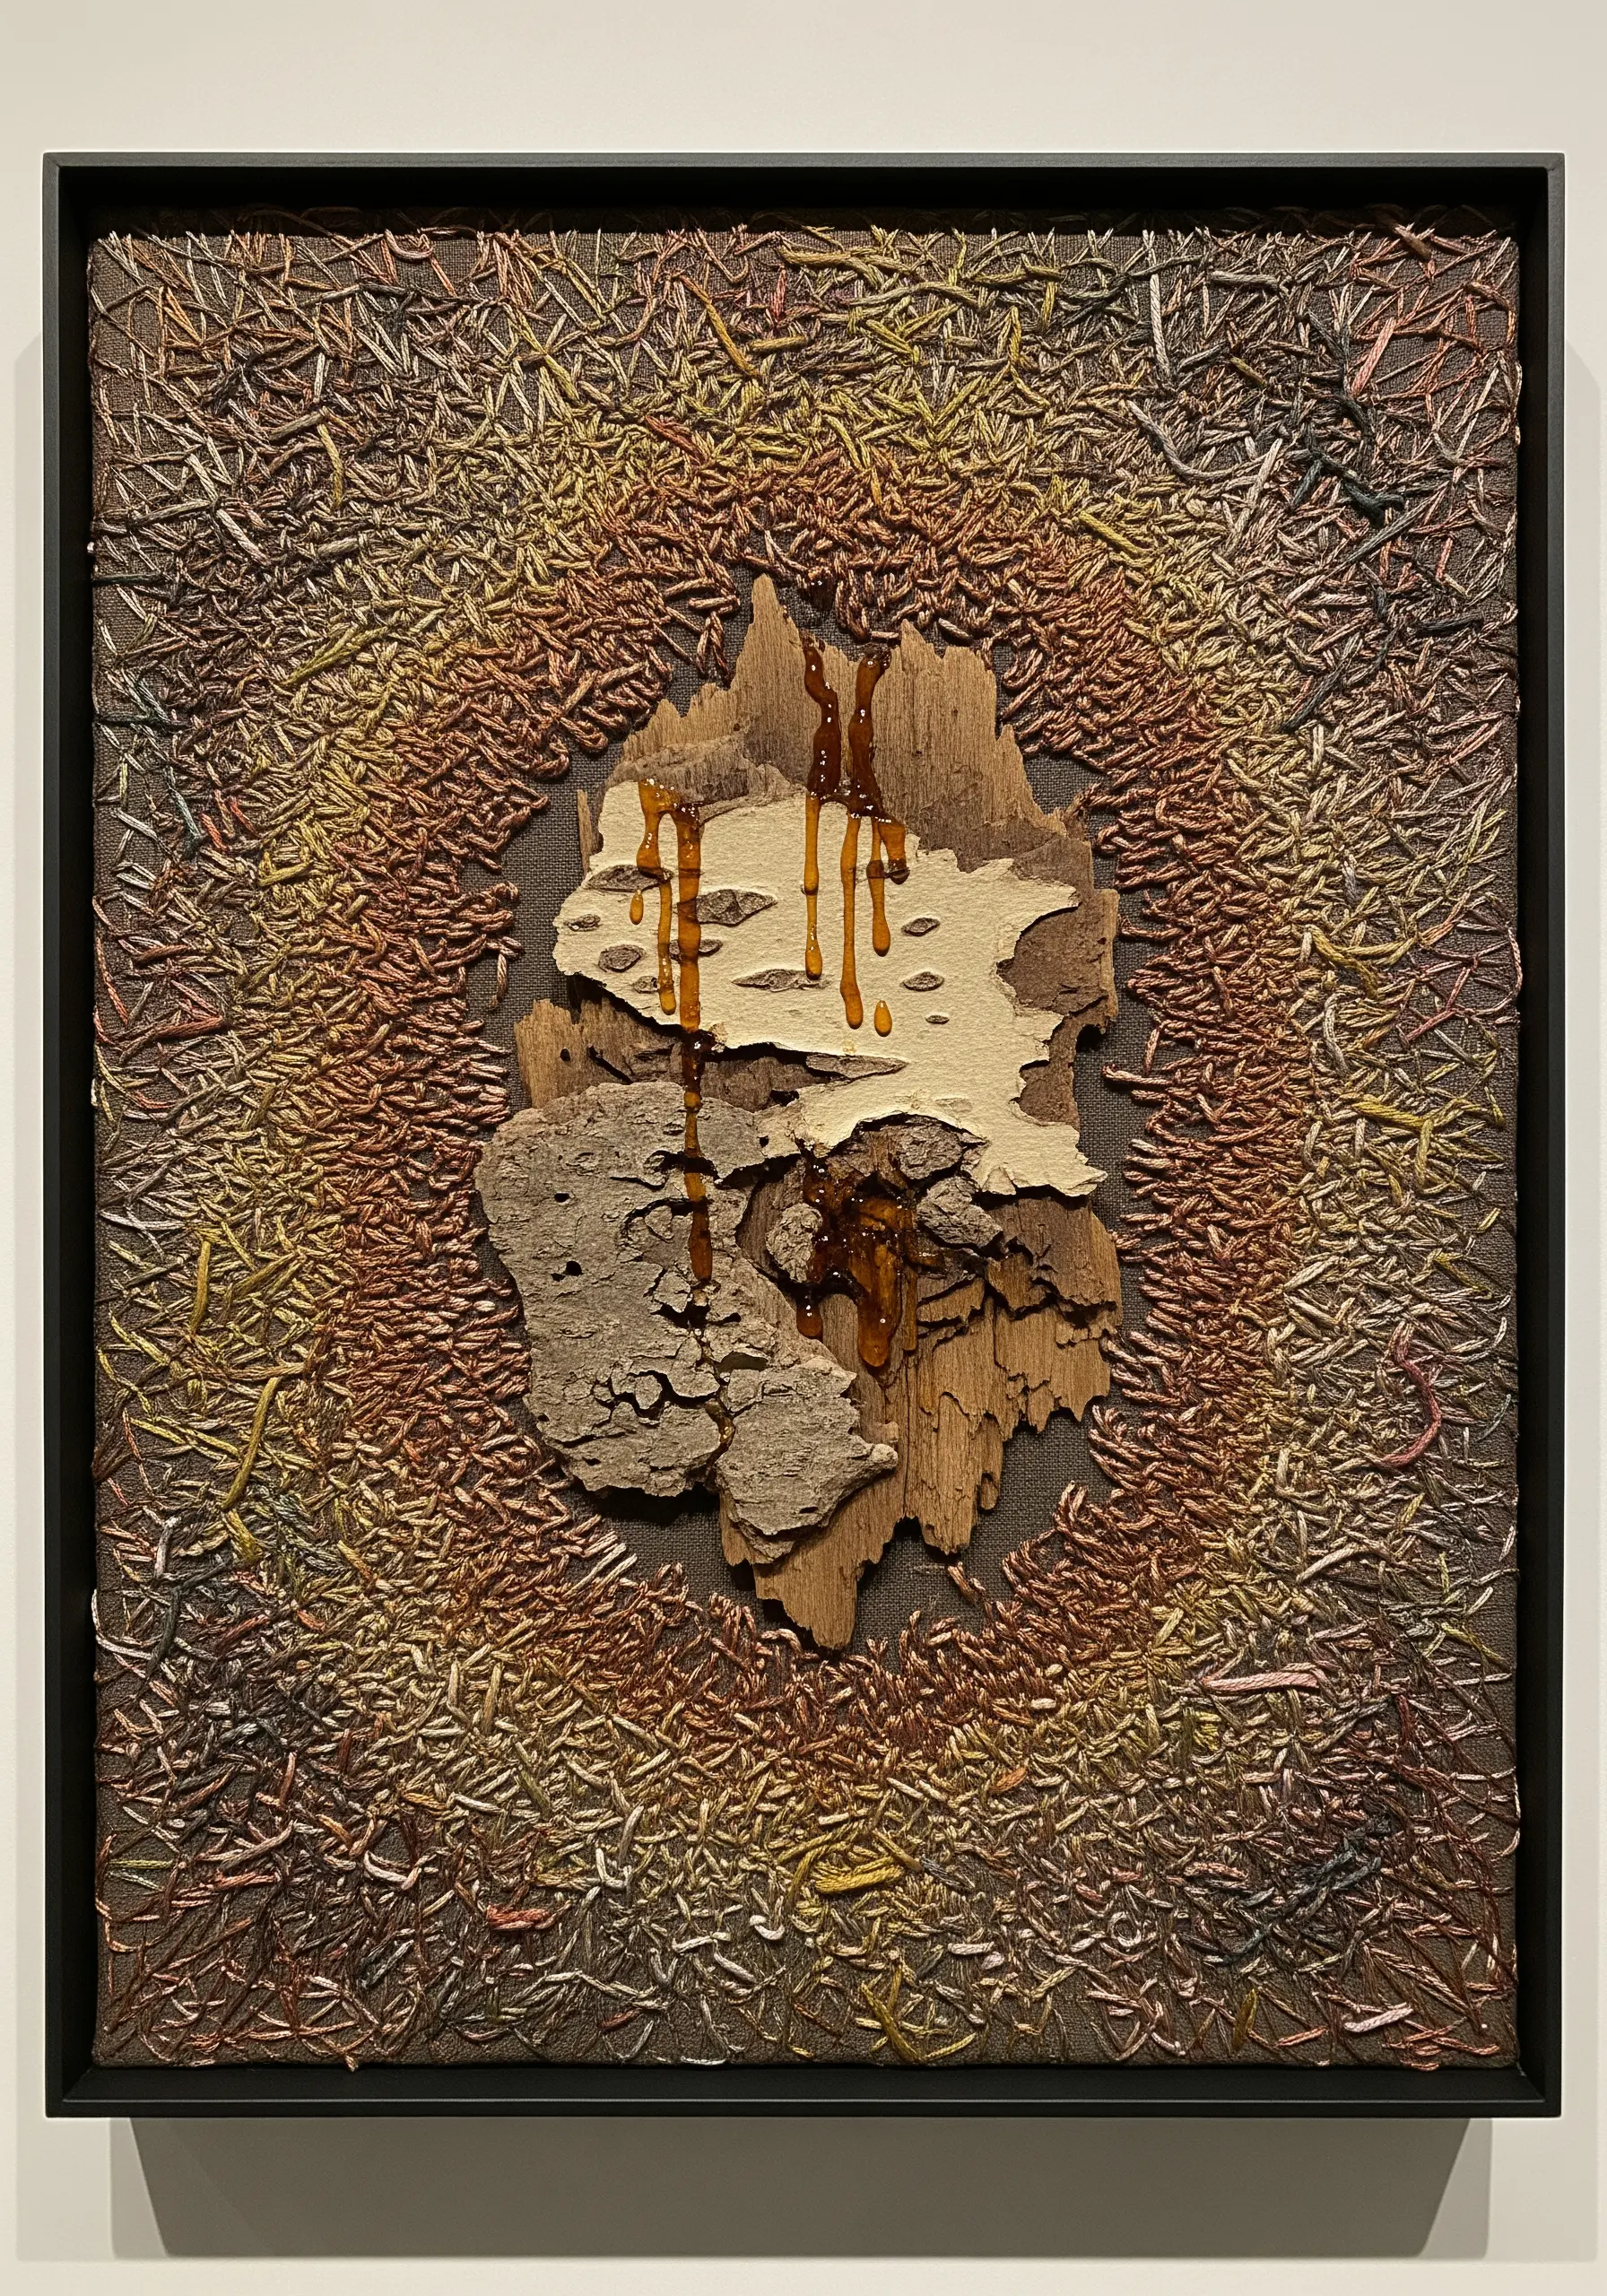
Bridge the gap between your craft and the natural world by incorporating found objects like bark or pressed leaves directly into your work.
Secure the central element firmly, then let its shape and texture dictate your stitching.
Radiate stitches outward from the object, using varied lengths and colors to create a halo effect that integrates it into the fabric.
These high-texture fabric collage embroidery projects feel deeply personal and grounded.
10. Realistic Leaves Through Thread Painting

Achieve a painterly, photorealistic effect with the long-and-short stitch, often called thread painting.
The key is to work with at least three or four shades of a single color, blending them seamlessly to create smooth, natural gradients that mimic how light hits a leaf’s surface.
Always use a single strand of floss for the finest detail, allowing you to build up color with incredible precision.
These stunning framed embroidery patterns make for an impressive gallery wall.
11. Sculptural Dimension with Fabric Manipulation
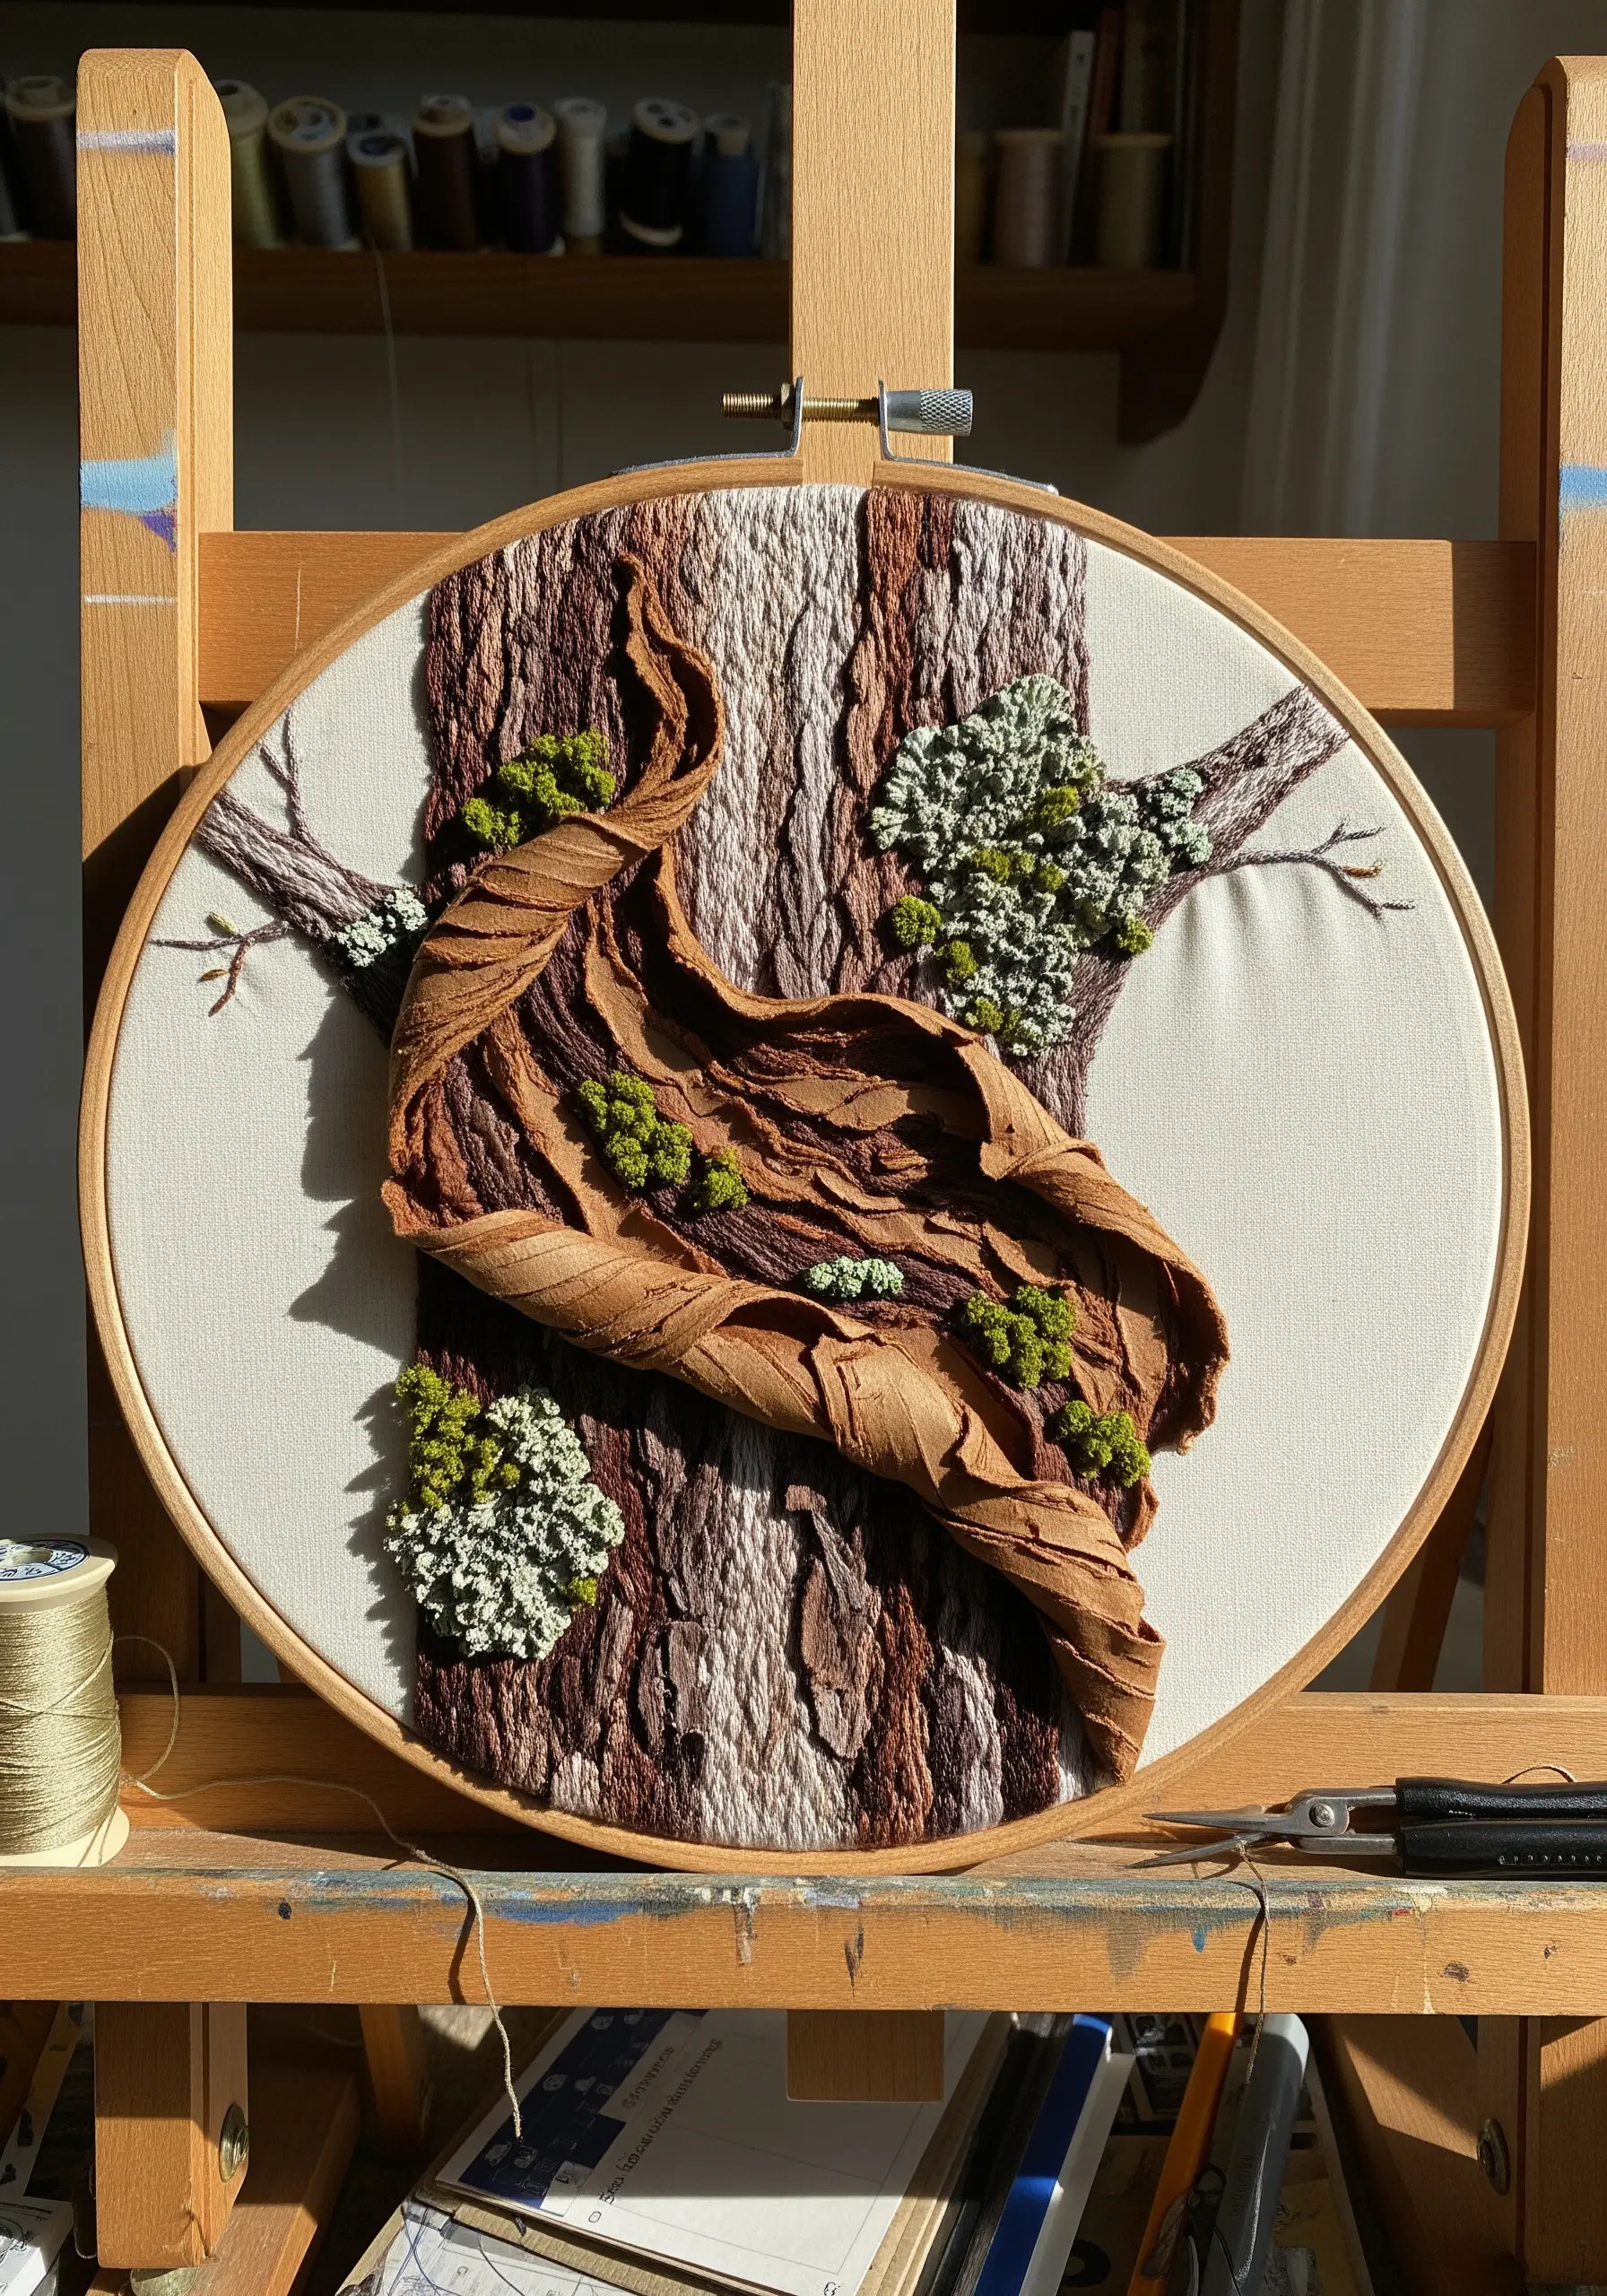
Take your texture into the third dimension by manipulating fabric before you stitch.
To create this peeling bark effect, gather, twist, and fold a piece of fabric, securing it to your background with hidden stitches to create deep shadows and highlights.
Once the sculpted element is in place, build up surrounding textures with dense French knots or turkey work to represent moss, creating a piece with incredible physical depth.
12. Elegant Linework on Sheer Fabric
When you stitch on a sheer fabric like linen or voile, your design appears to float in the air, interacting beautifully with light.
For this effect, choose a simple line stitch like a stem or backstitch to keep the design clean and graphic.
The most important tool here is a wash-away or tear-away stabilizer; it will prevent the delicate fabric from puckering and stretching as you stitch, ensuring your lines remain graceful and crisp.
13. Bold Appliqué on Highly Textured Surfaces
Don’t let your embroidery get lost on a busy surface like a chunky knit blanket.
Instead of stitching directly, switch to appliqué. Cut your leaf and acorn shapes from a non-fraying fabric like felt or wool.
Then, use a contrasting color of yarn and a decorative blanket stitch to attach them.
This method ensures your design is bold, graphic, and remains the focal point against the textured background.
14. Geometric Abstraction of Natural Forms
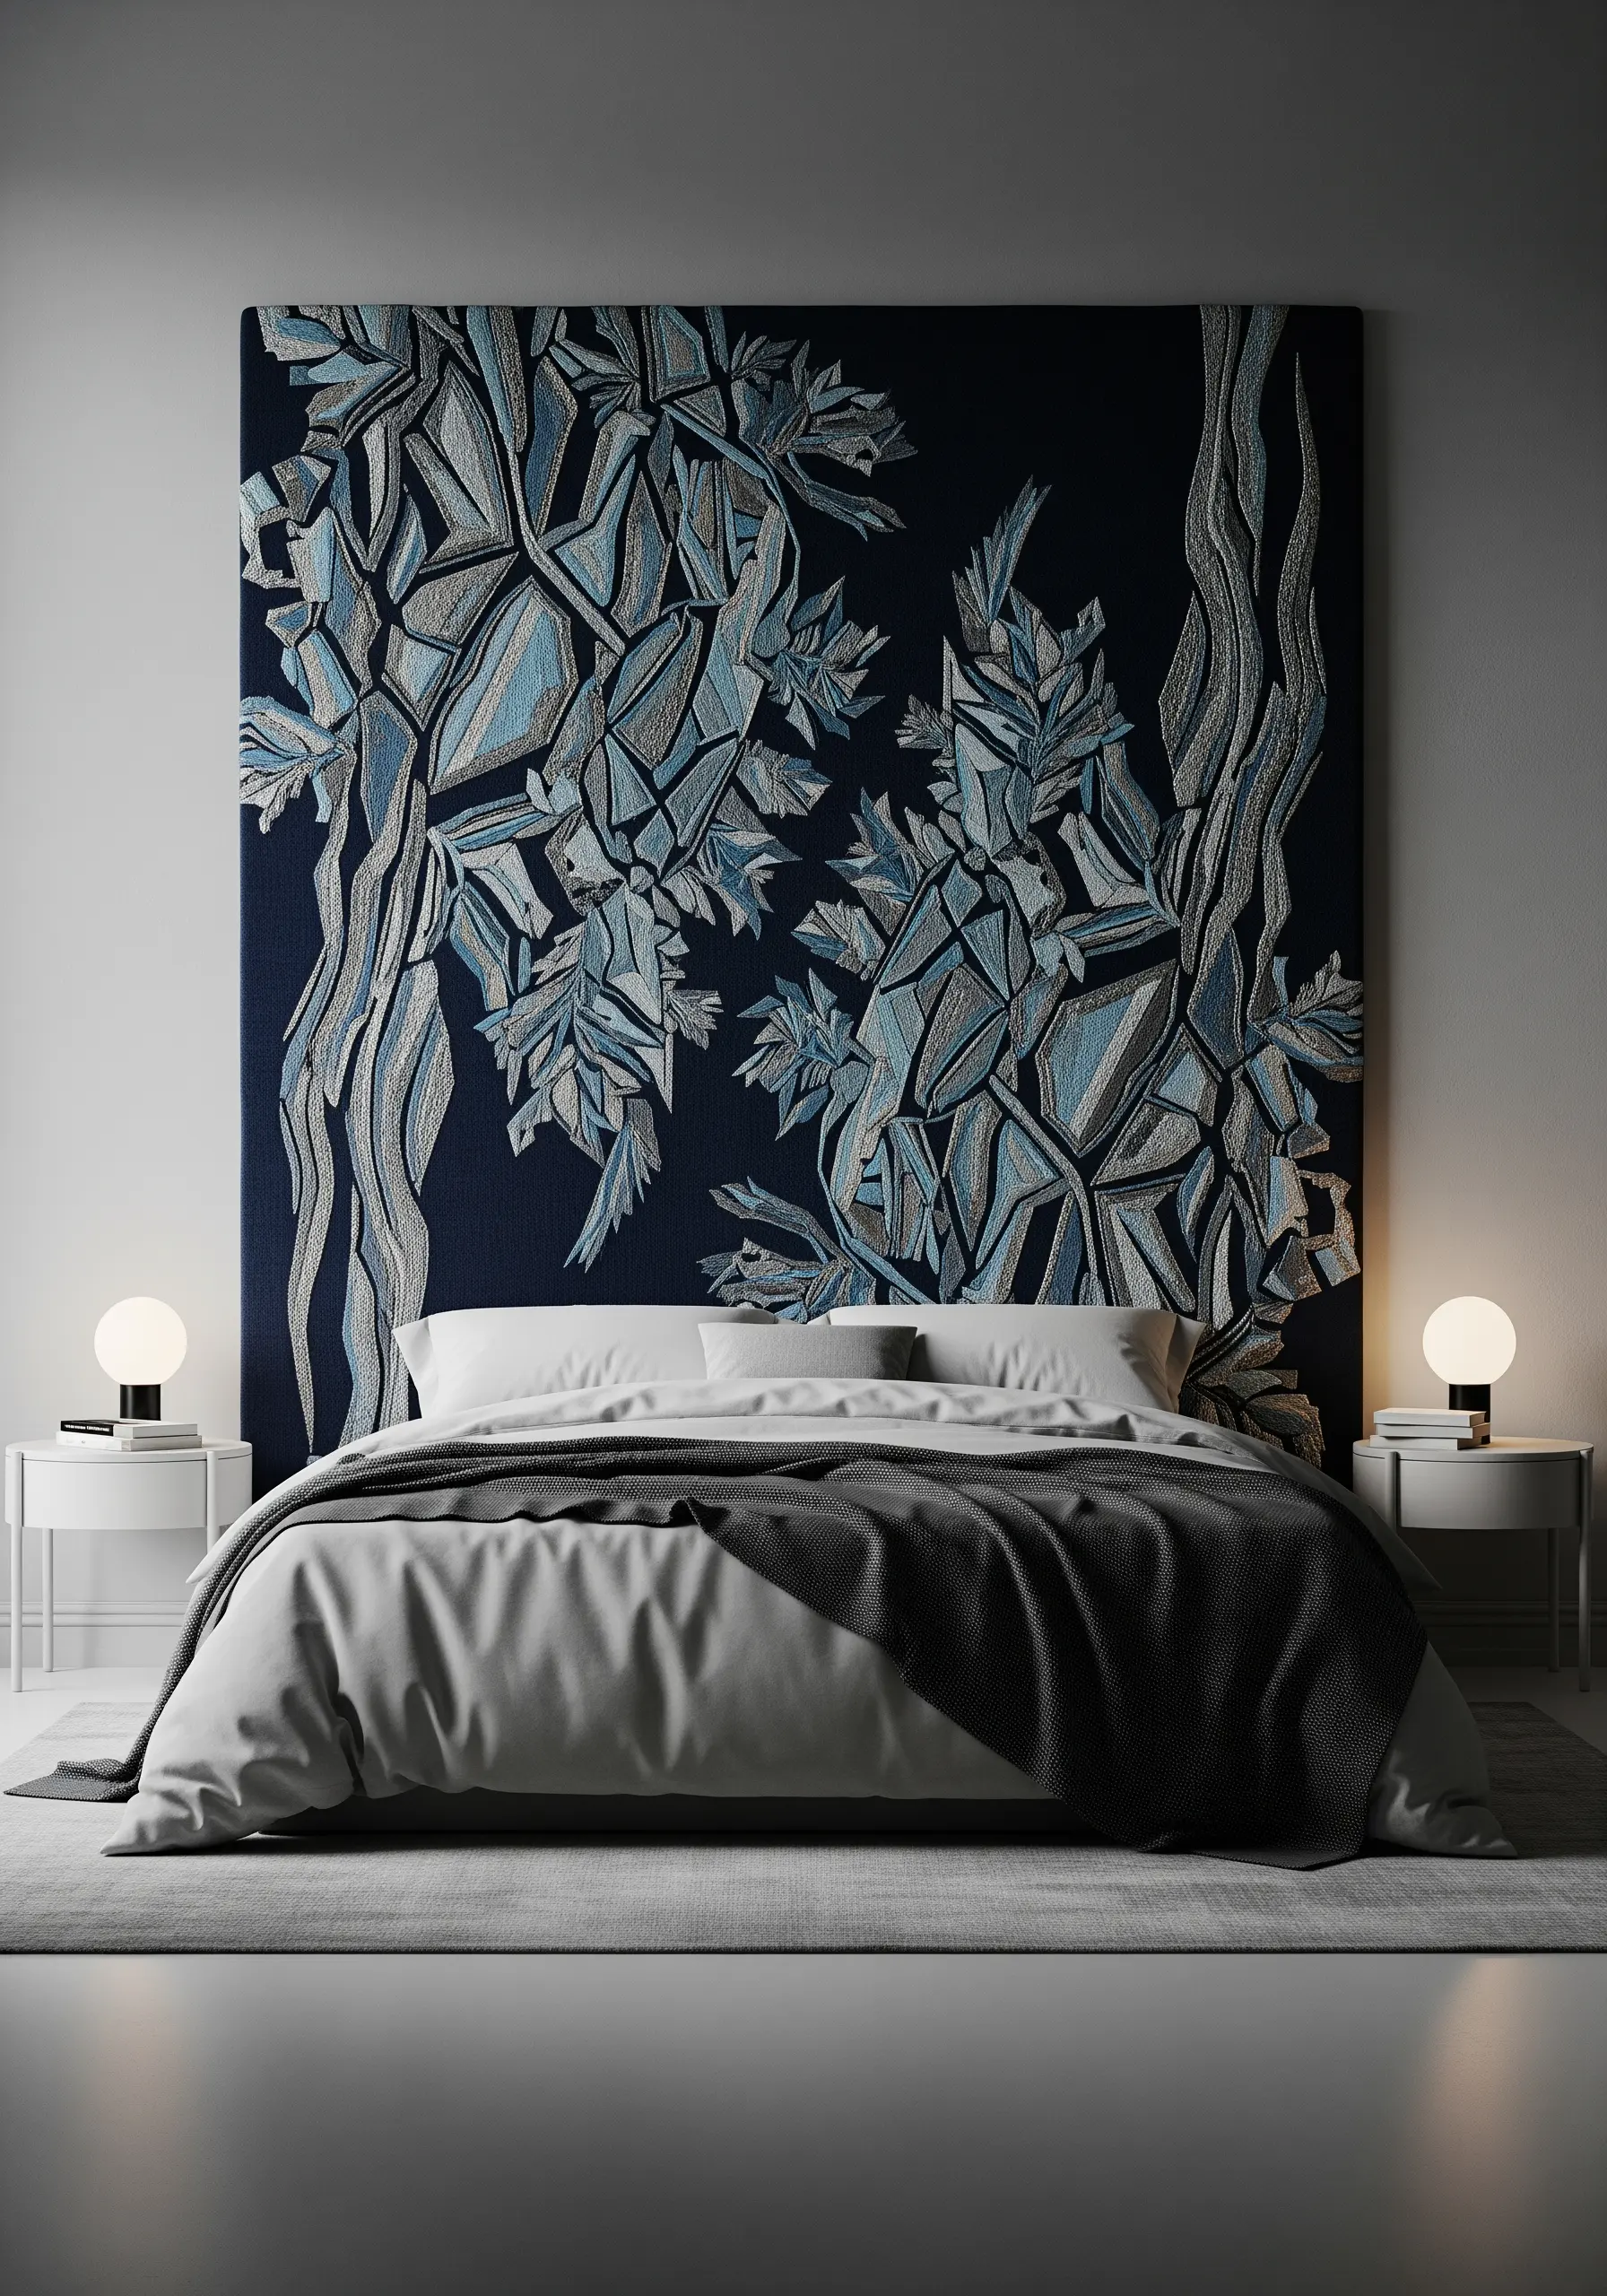
For a contemporary take on nature, deconstruct organic shapes like leaves and branches into geometric facets.
Fill these new shapes with satin stitch, but vary the angle of your stitches in adjacent sections. This simple shift creates different planes that catch the light, adding depth and an architectural quality.
This technique is perfect for large-scale statement pieces, like a custom embroidered headboard.
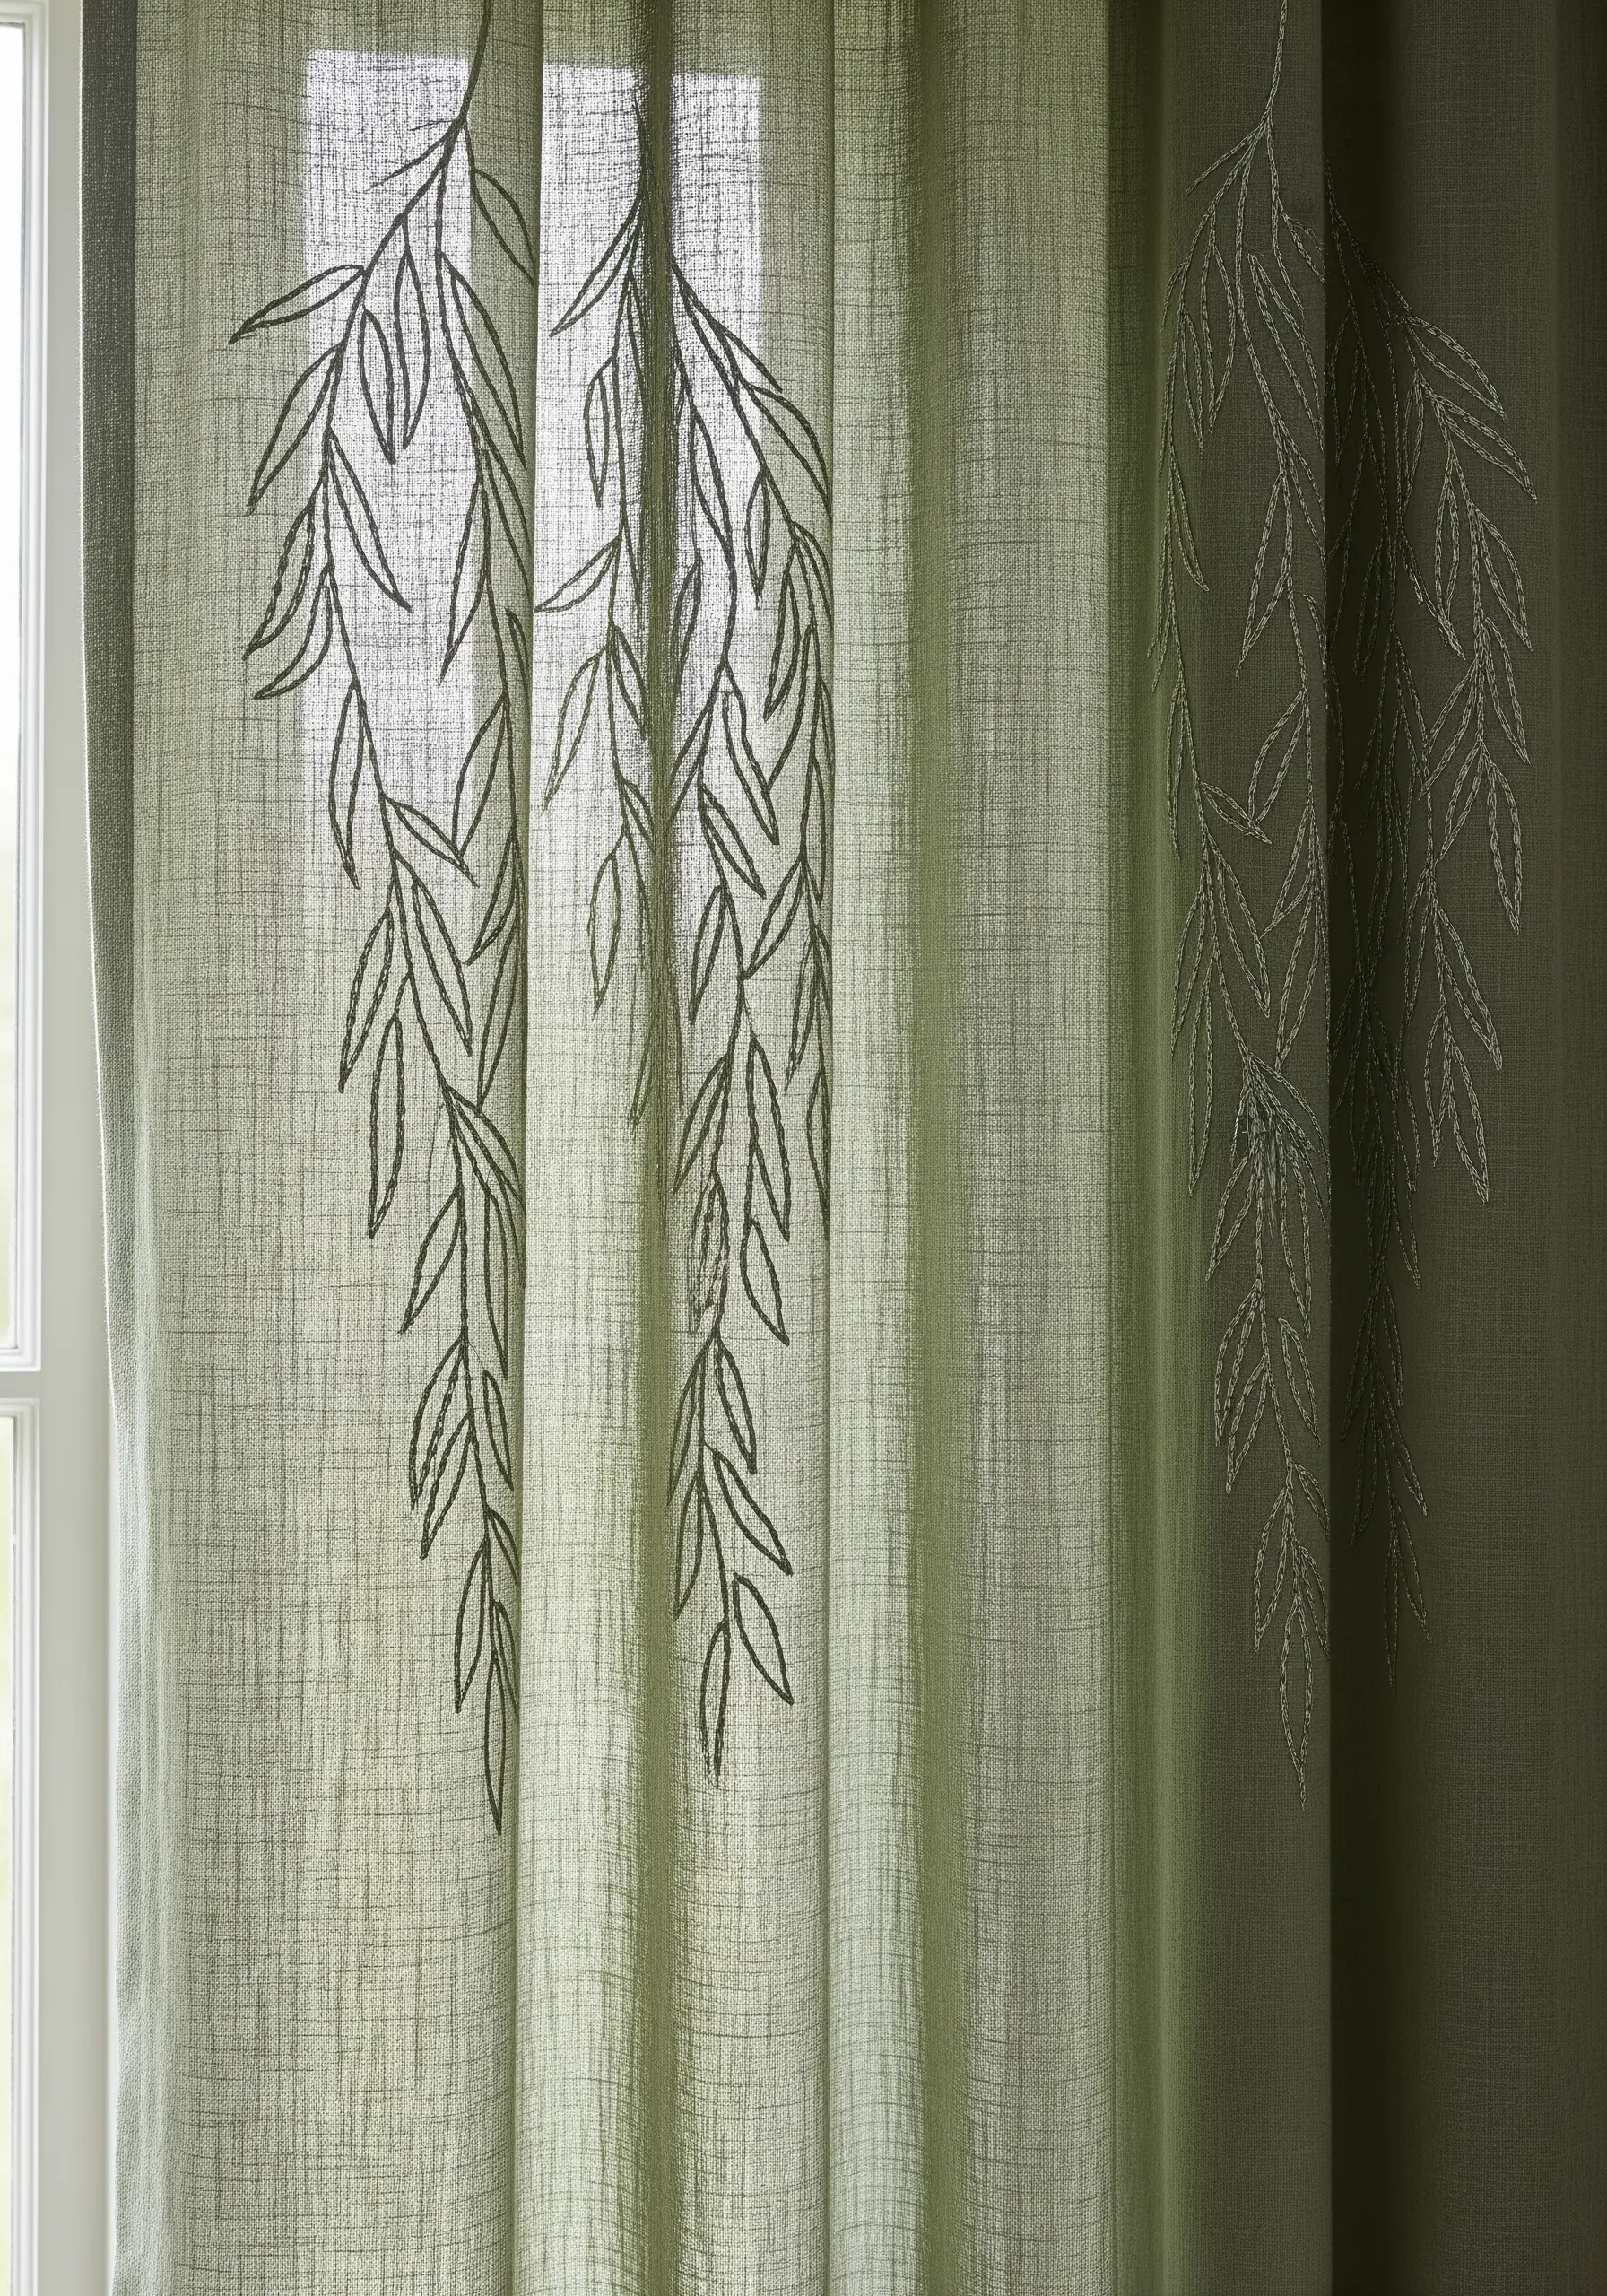
15. Graphic Storytelling with Minimal Linework
You can create a powerful, illustrative design using only the most basic backstitch.
The artistry comes from your control over line weight. Use two or three strands of floss for the main outlines of the birch trunks to give them presence, then switch to a single strand for finer details like small branches and the delicate eyes.
This intentional variation adds visual hierarchy and sophistication to a simple drawing.
16. Concentric Tree Rings with Couched Cord

To create the perfect, organic circles of a tree’s cross-section, abandon traditional stitches for couching.
This technique involves laying down a thick cord or yarn onto your fabric and tacking it in place with a thinner, contrasting thread.
It allows you to achieve flawless curves and build up a raised, tactile surface that beautifully mimics the texture of tree rings, making for beautiful rustic embroidery art.
17. A Climbing Vine with Detached Chain Stitch
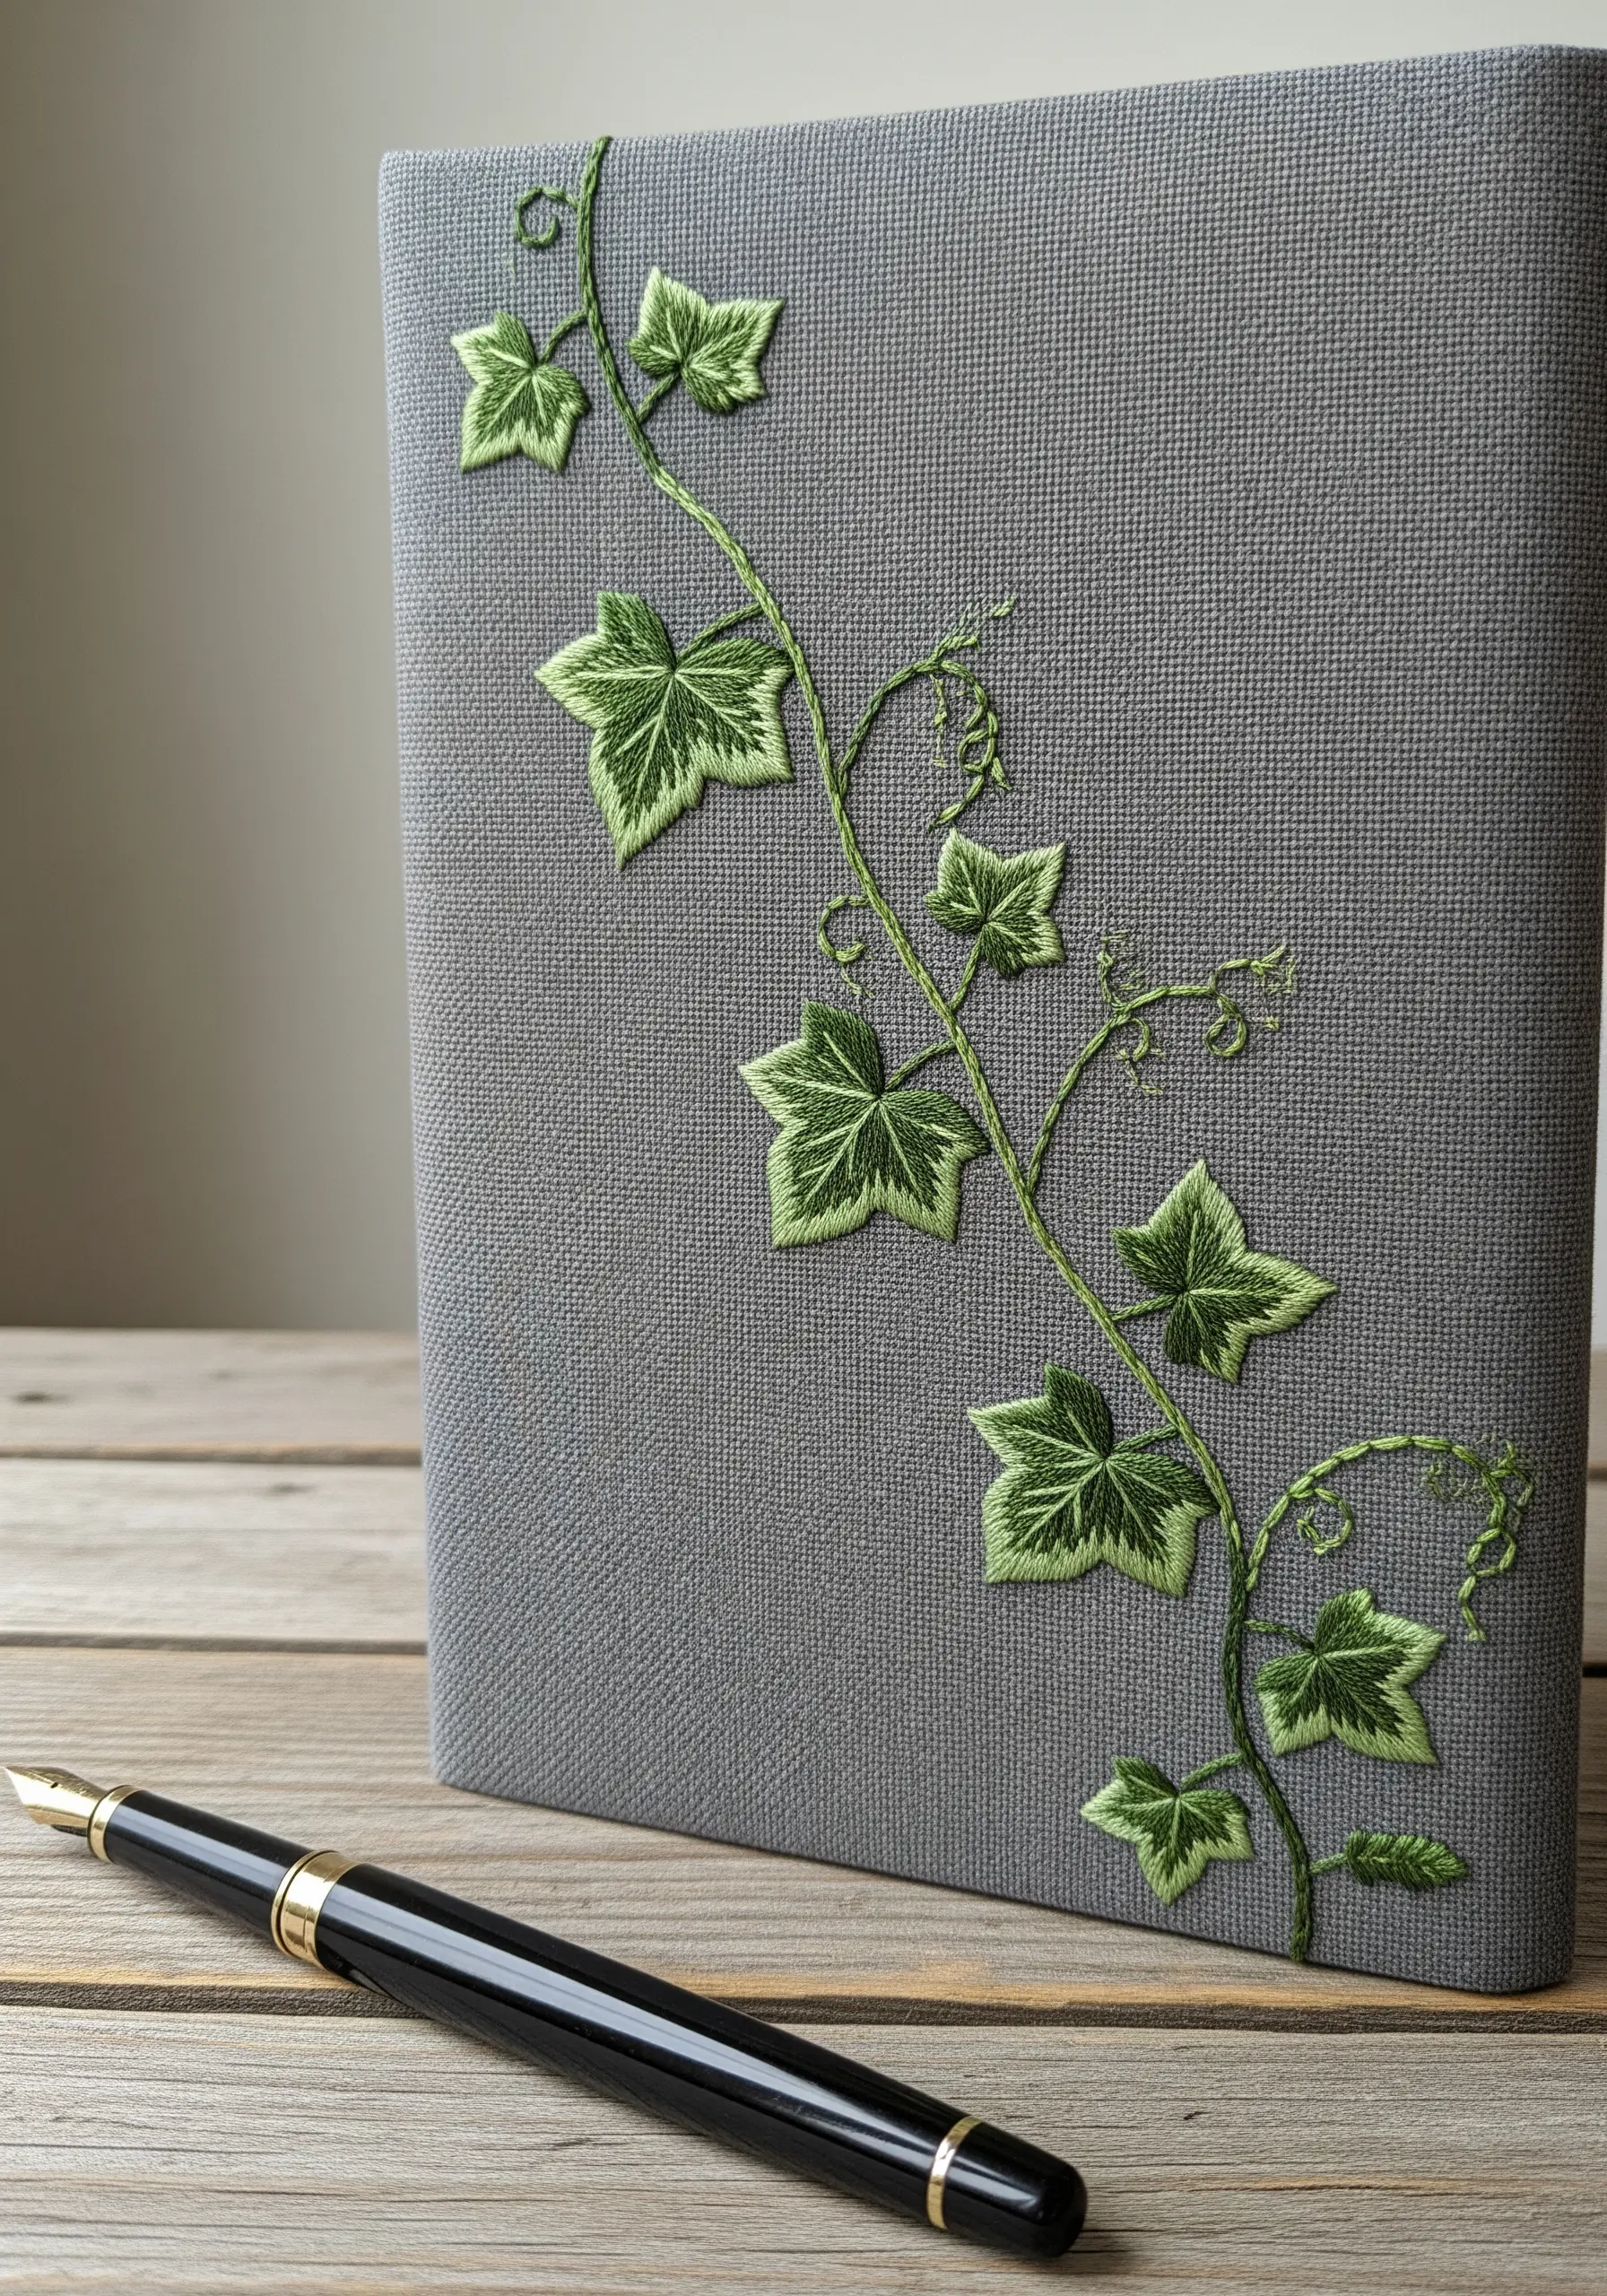
Bring your embroidered botanicals to life by choosing stitches that enhance their form.
Use a stem stitch for the main vine to give it a smooth, rope-like quality. For the ivy leaves, use detached chain stitches (lazy daisies) to create their distinctive lobes.
This combination of a flowing line stitch with a looped leaf stitch makes the plant feel like it’s actively growing across the surface, which is ideal when you want to create hand-embroidery leaf patterns to personalize journals.
18. Botanical Specimens on Small Canvases

Use small projects like coasters as your personal stitch library to master different leaf shapes.
Working on a small scale forces you to be precise. To get those perfectly sharp leaf tips, especially on oak or maple leaves, make the final stitch at the point a single, tiny straight stitch.
This anchors the shape much more effectively than trying to pull a satin stitch into a sharp point.
19. A Dramatic Silhouette on Sheer Fabric

Create a striking visual statement by filling a large, bold silhouette with dense satin stitch.
To prevent a large filled area from looking uneven, break the shape down mentally into smaller sections and stitch each one before moving to the next, ensuring all your stitches lie at the same angle.
Placing this dark, solid form on a lightweight, sheer fabric creates a captivating interplay between opacity and transparency, especially when hung in a window.
20. Abstract Bark Contours with Color Blocking
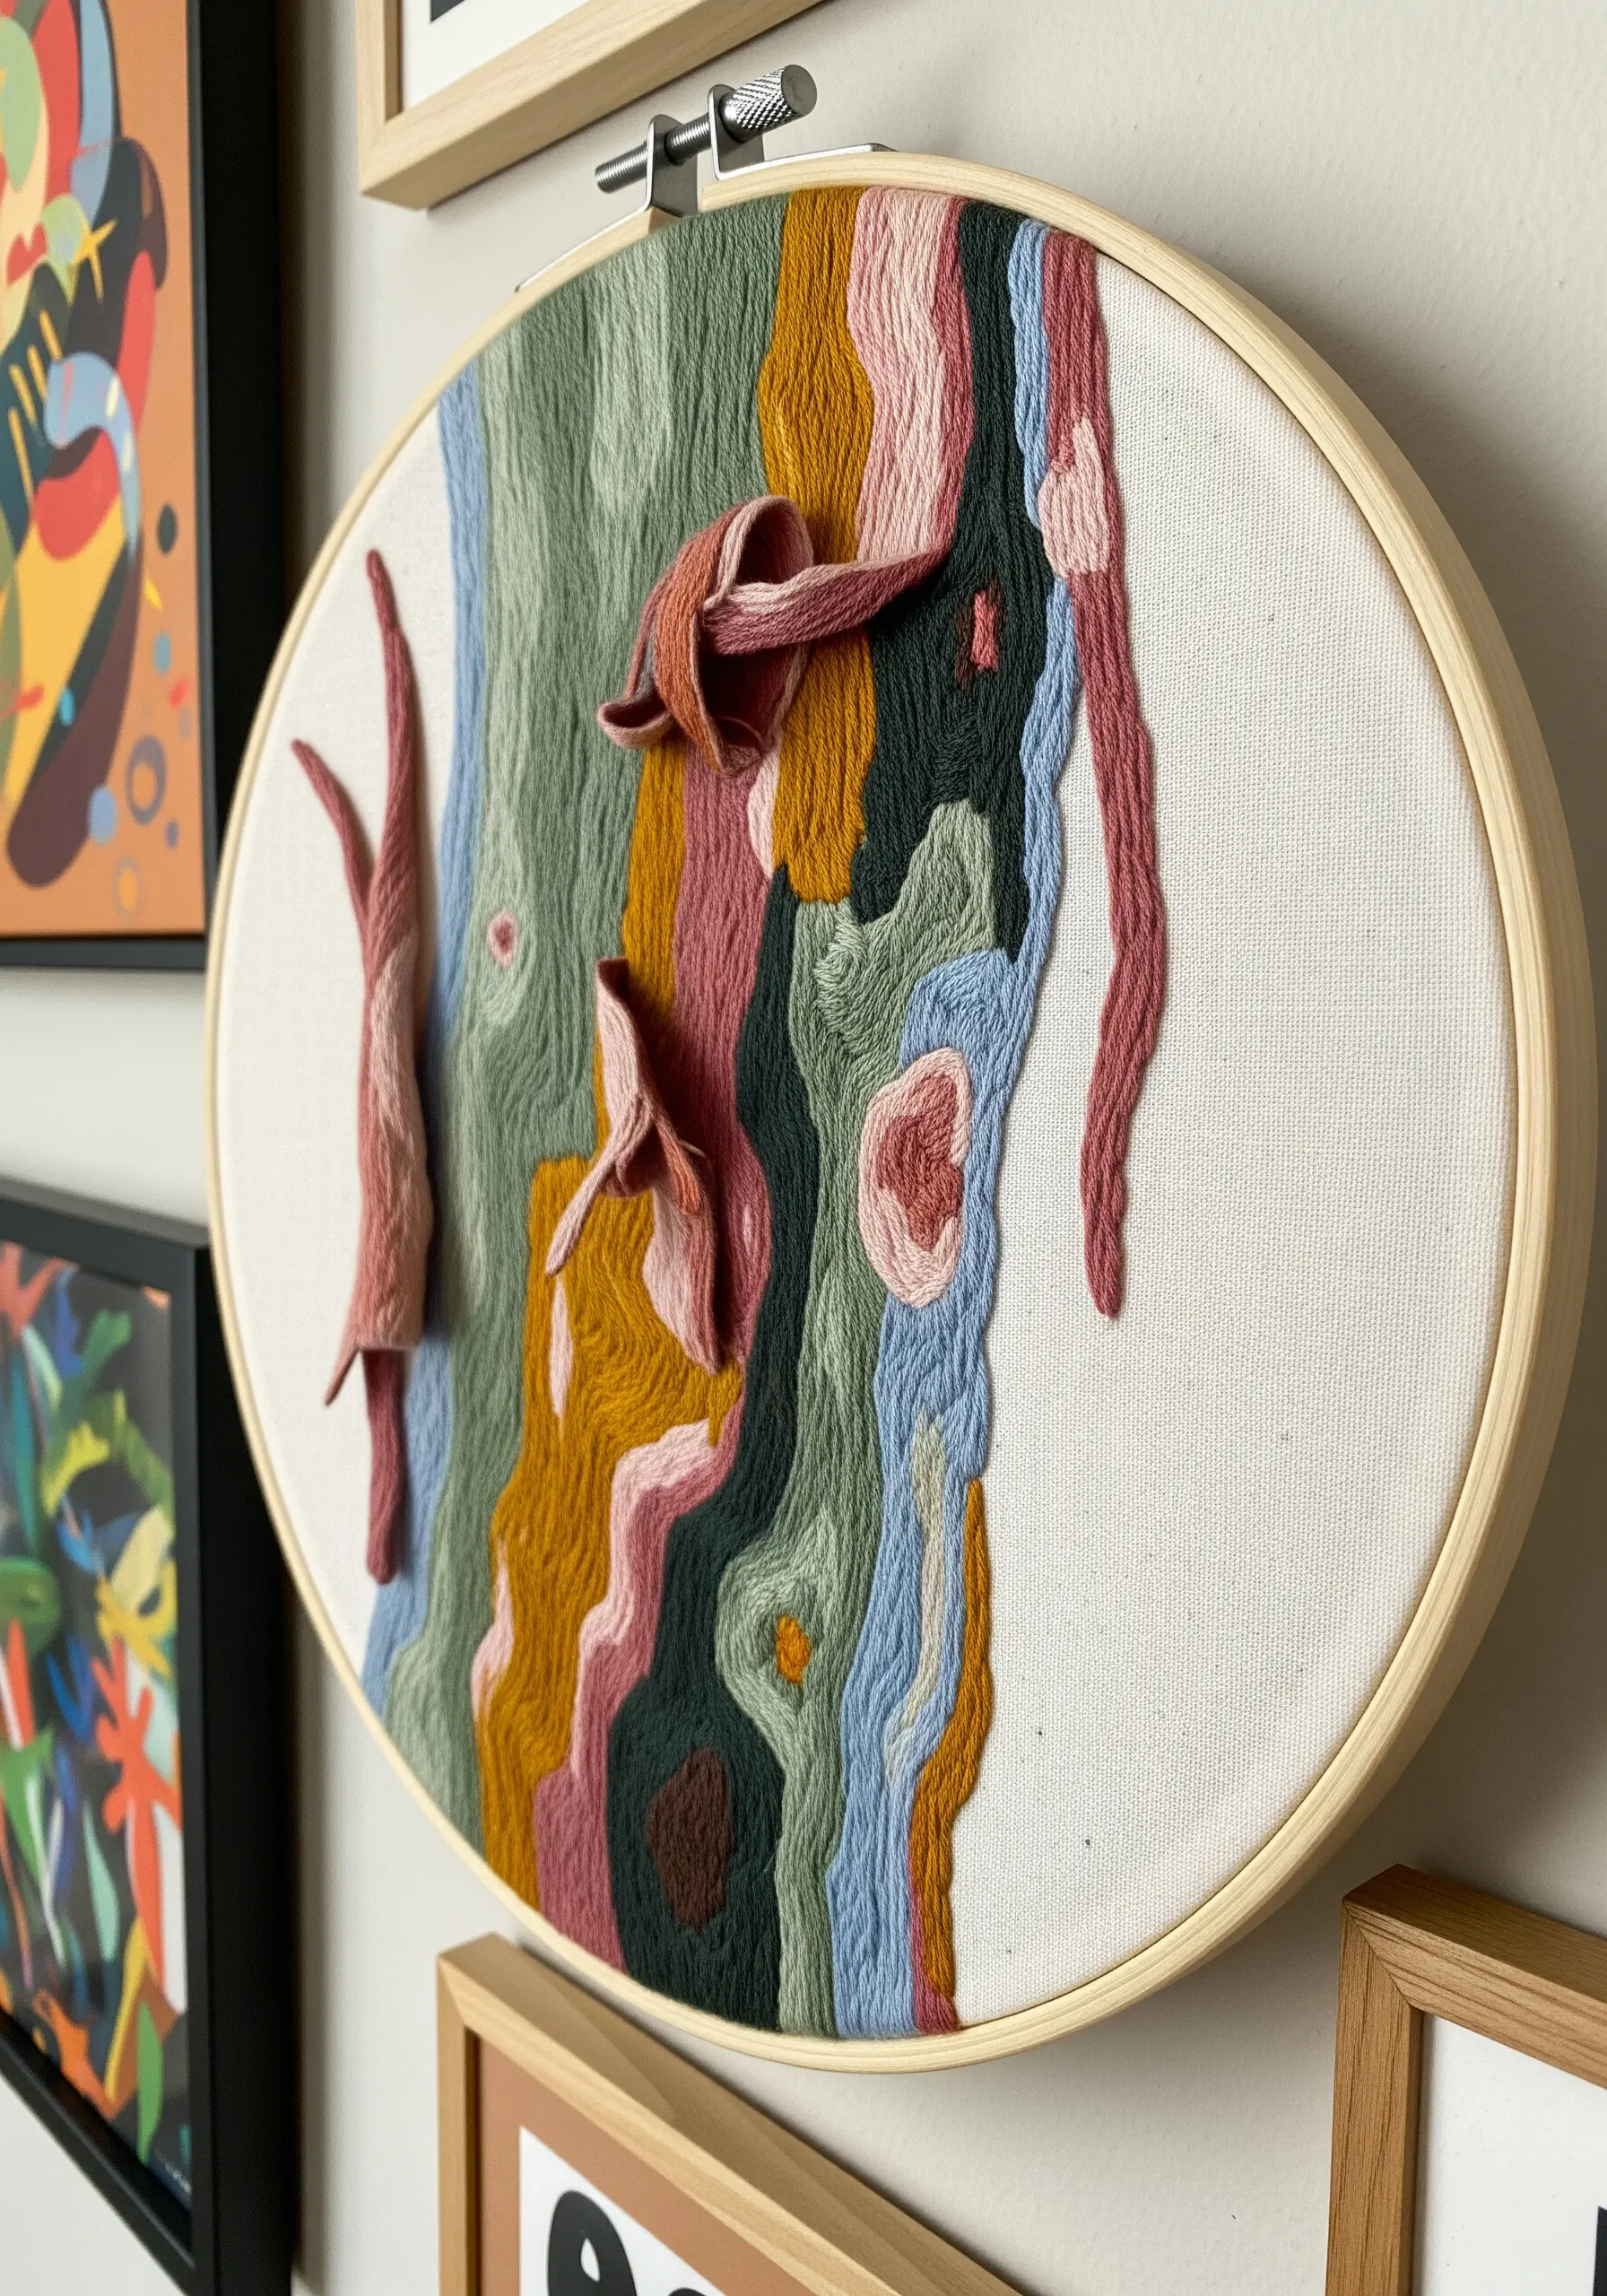
Look beyond literal interpretations and translate bark into an abstract landscape of color and texture.
Map out organic, flowing shapes and fill them with blocks of color using a simple vertical satin stitch.
The magic happens when you introduce unexpected textures, like the raised, looped forms, which break up the flat surface and add sculptural interest.
This is a wonderful opportunity to use abstract color psychology stitch ideas to convey a mood.
21. Miniature Texture Samplers
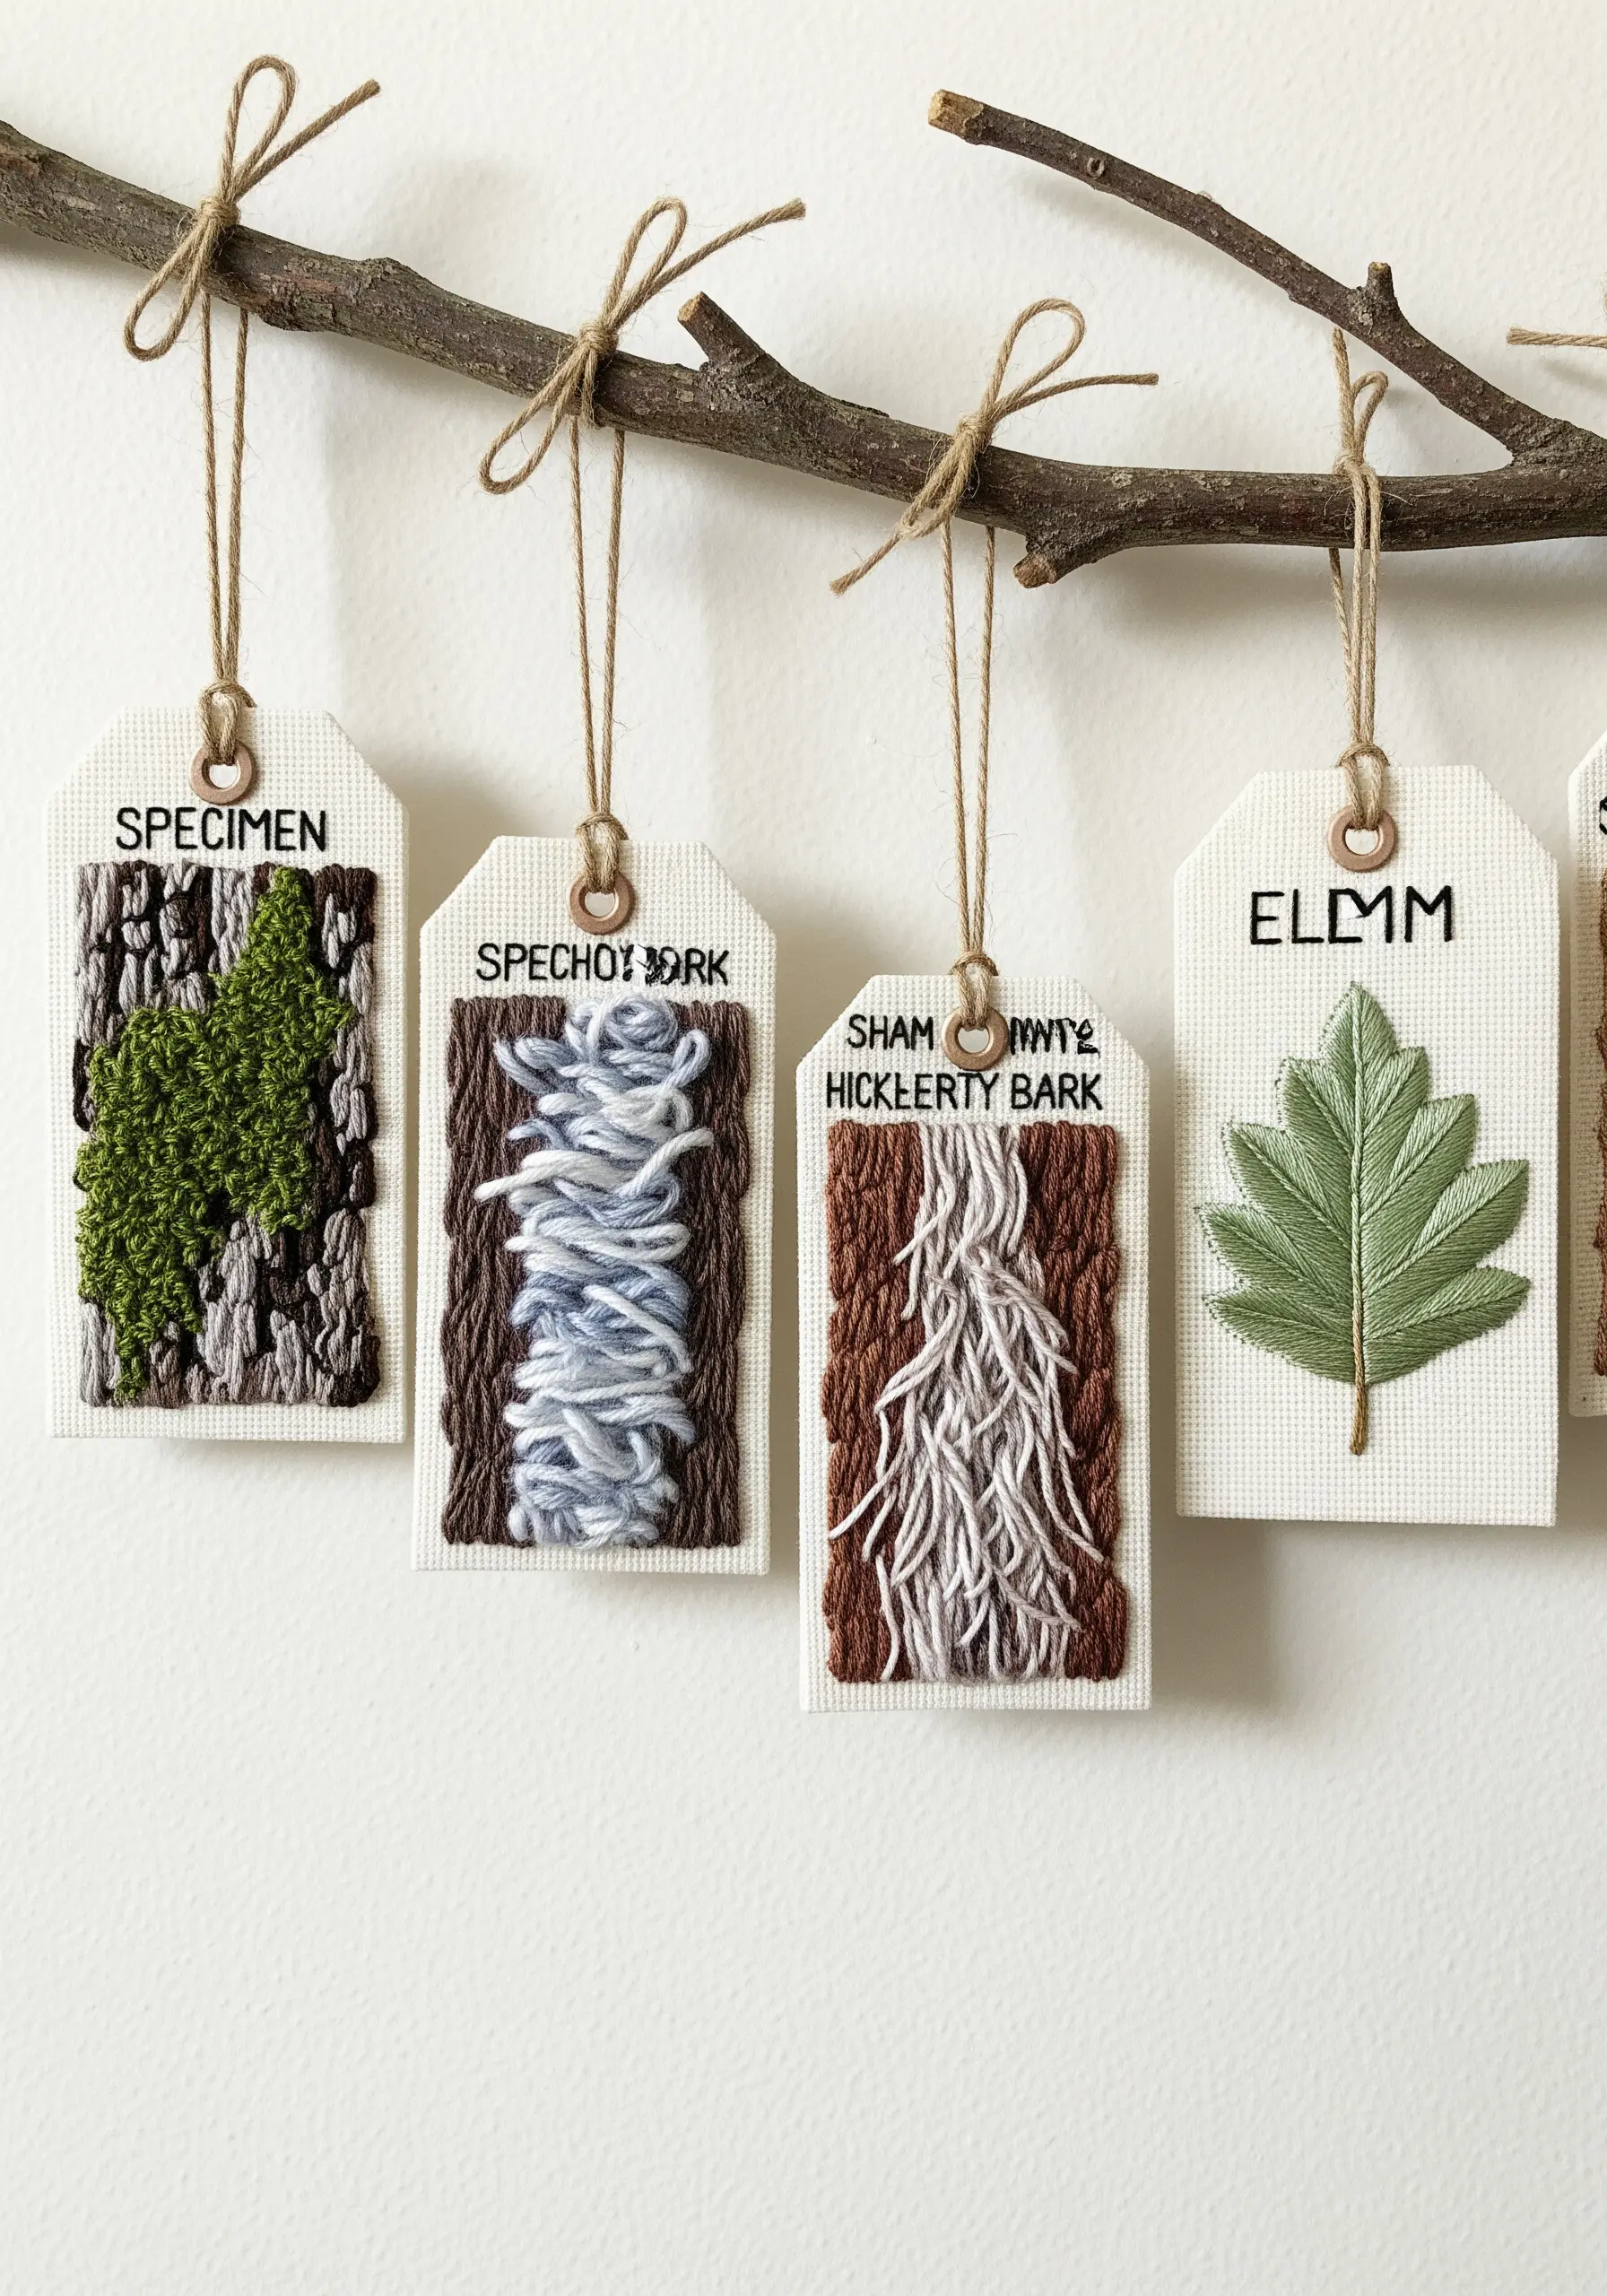
Think of these tags not as finished pieces, but as a stitch dictionary you create yourself.
Dedicate each small canvas to exploring one specific texture: shaggy bark using turkey work, smooth bark with couched yarn, or lichen with dense French knots.
This low-pressure format encourages experimentation and builds your technical confidence. Plus, these samplers become beautiful small handmade projects that double as thoughtful gifts or ornaments.


