
So often, you finish a piece of embroidery you love, only to feel it’s not quite… complete. You place it in a standard hoop or a simple frame, and while it’s beautiful, it doesn’t yet feel like a finished work of art. The secret to bridging that gap doesn’t lie in more complex stitching, but in how you choose to present it.
Think of the frame not as a container, but as an extension of your creative voice. By combining your embroidery with the texture, color, and dimension of paper, you can build a cohesive world around your stitches. It’s about creating a dialogue between two mediums—the softness of thread and the structure of paper—to tell a more compelling story.
Here, you’ll find techniques that transform your embroidery from a lovely motif into an intentional, gallery-worthy piece. These are not just framing ideas; they are ways to integrate your needlework into a larger artistic vision, giving it the presence and polish it truly deserves.
1. Create a Diorama Effect with Layered Paper
Build captivating depth by framing your embroidery in a paper-cut diorama.
Use a craft knife to cut multiple layers of cardstock in varying shades of a single color family, like deep teals and forest greens.
Each subsequent layer should have a slightly smaller central opening, creating a tunnel effect that draws the eye inward.
Place small foam spacers between each paper layer to enhance the shadows and amplify the sense of three-dimensional space, turning a simple hoop into a miniature world.
2. Frame with Sculptural Paper Quilling
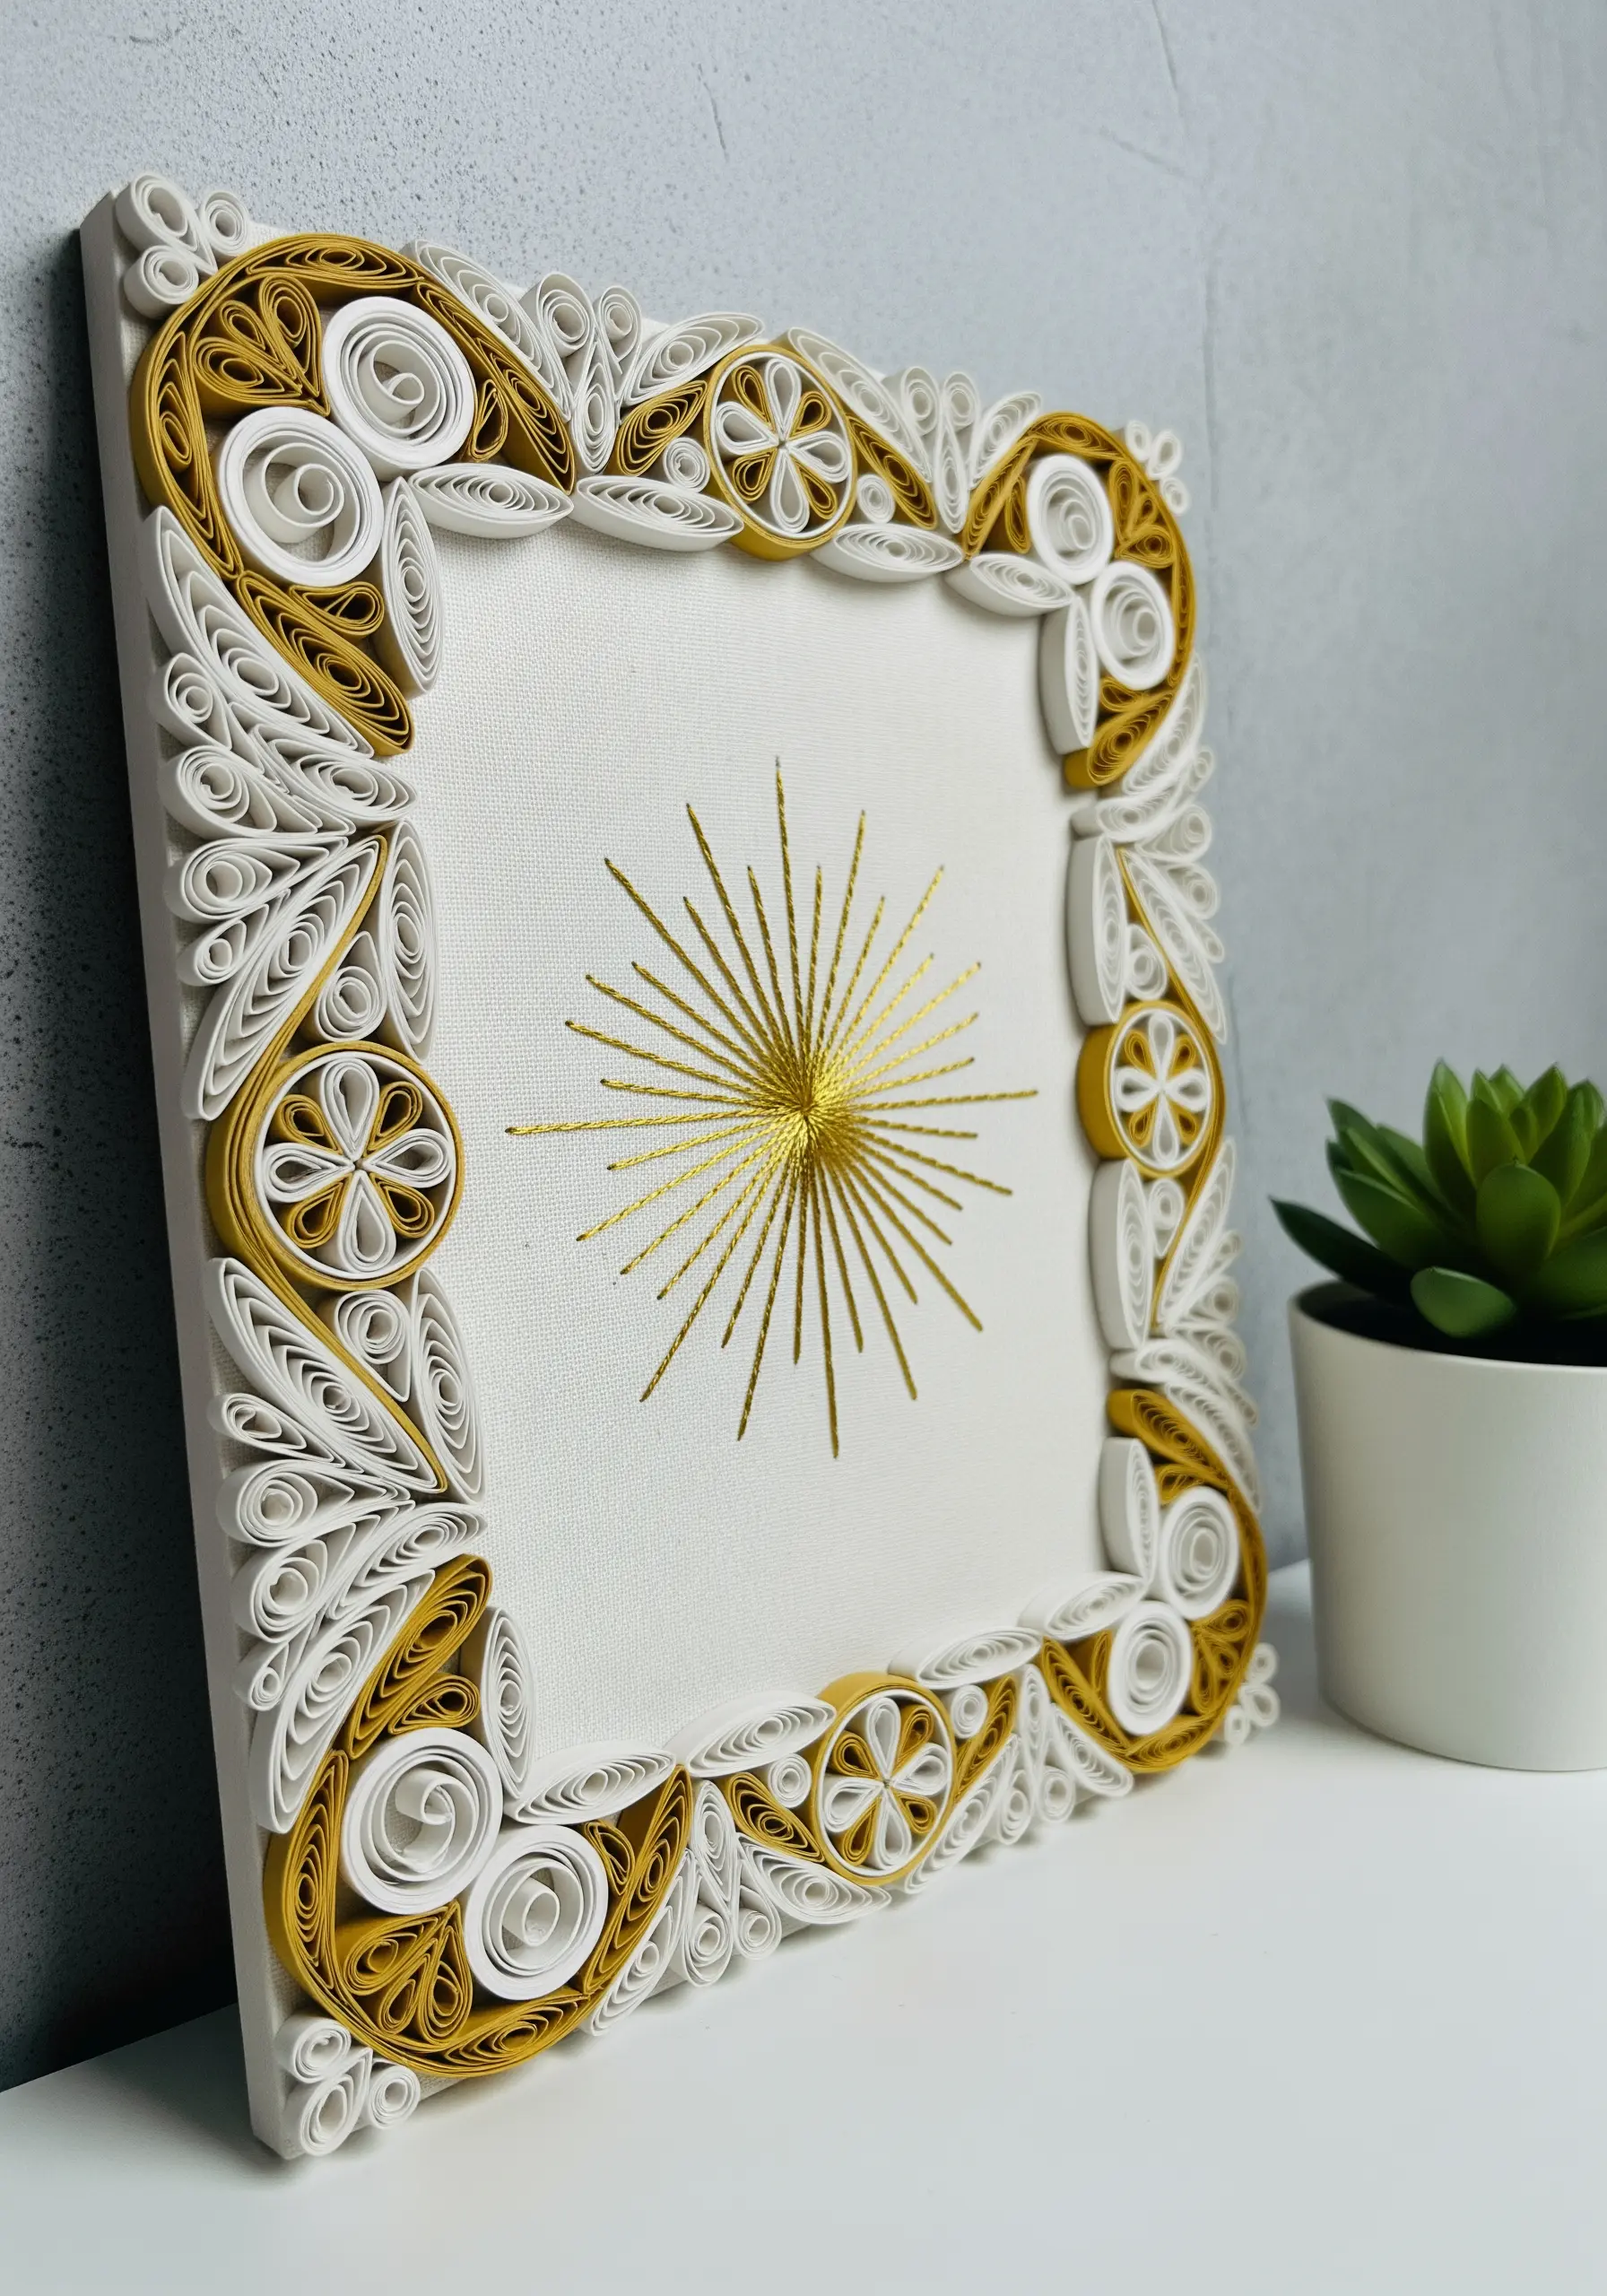
Elevate a minimal metallic design with an ornate, three-dimensional paper-quilled border.
Using strips of high-quality white and gold cardstock, create tight coils, teardrops, and scrolls, then glue them directly onto a stretched canvas, building the pattern outward from the corners.
The tight repetition of the quilled shapes creates a rich texture that contrasts beautifully with the smooth, open fabric, making a simple stitched motif feel exceptionally luxurious and intentional.
3. Build a Narrative with a Collage Mount
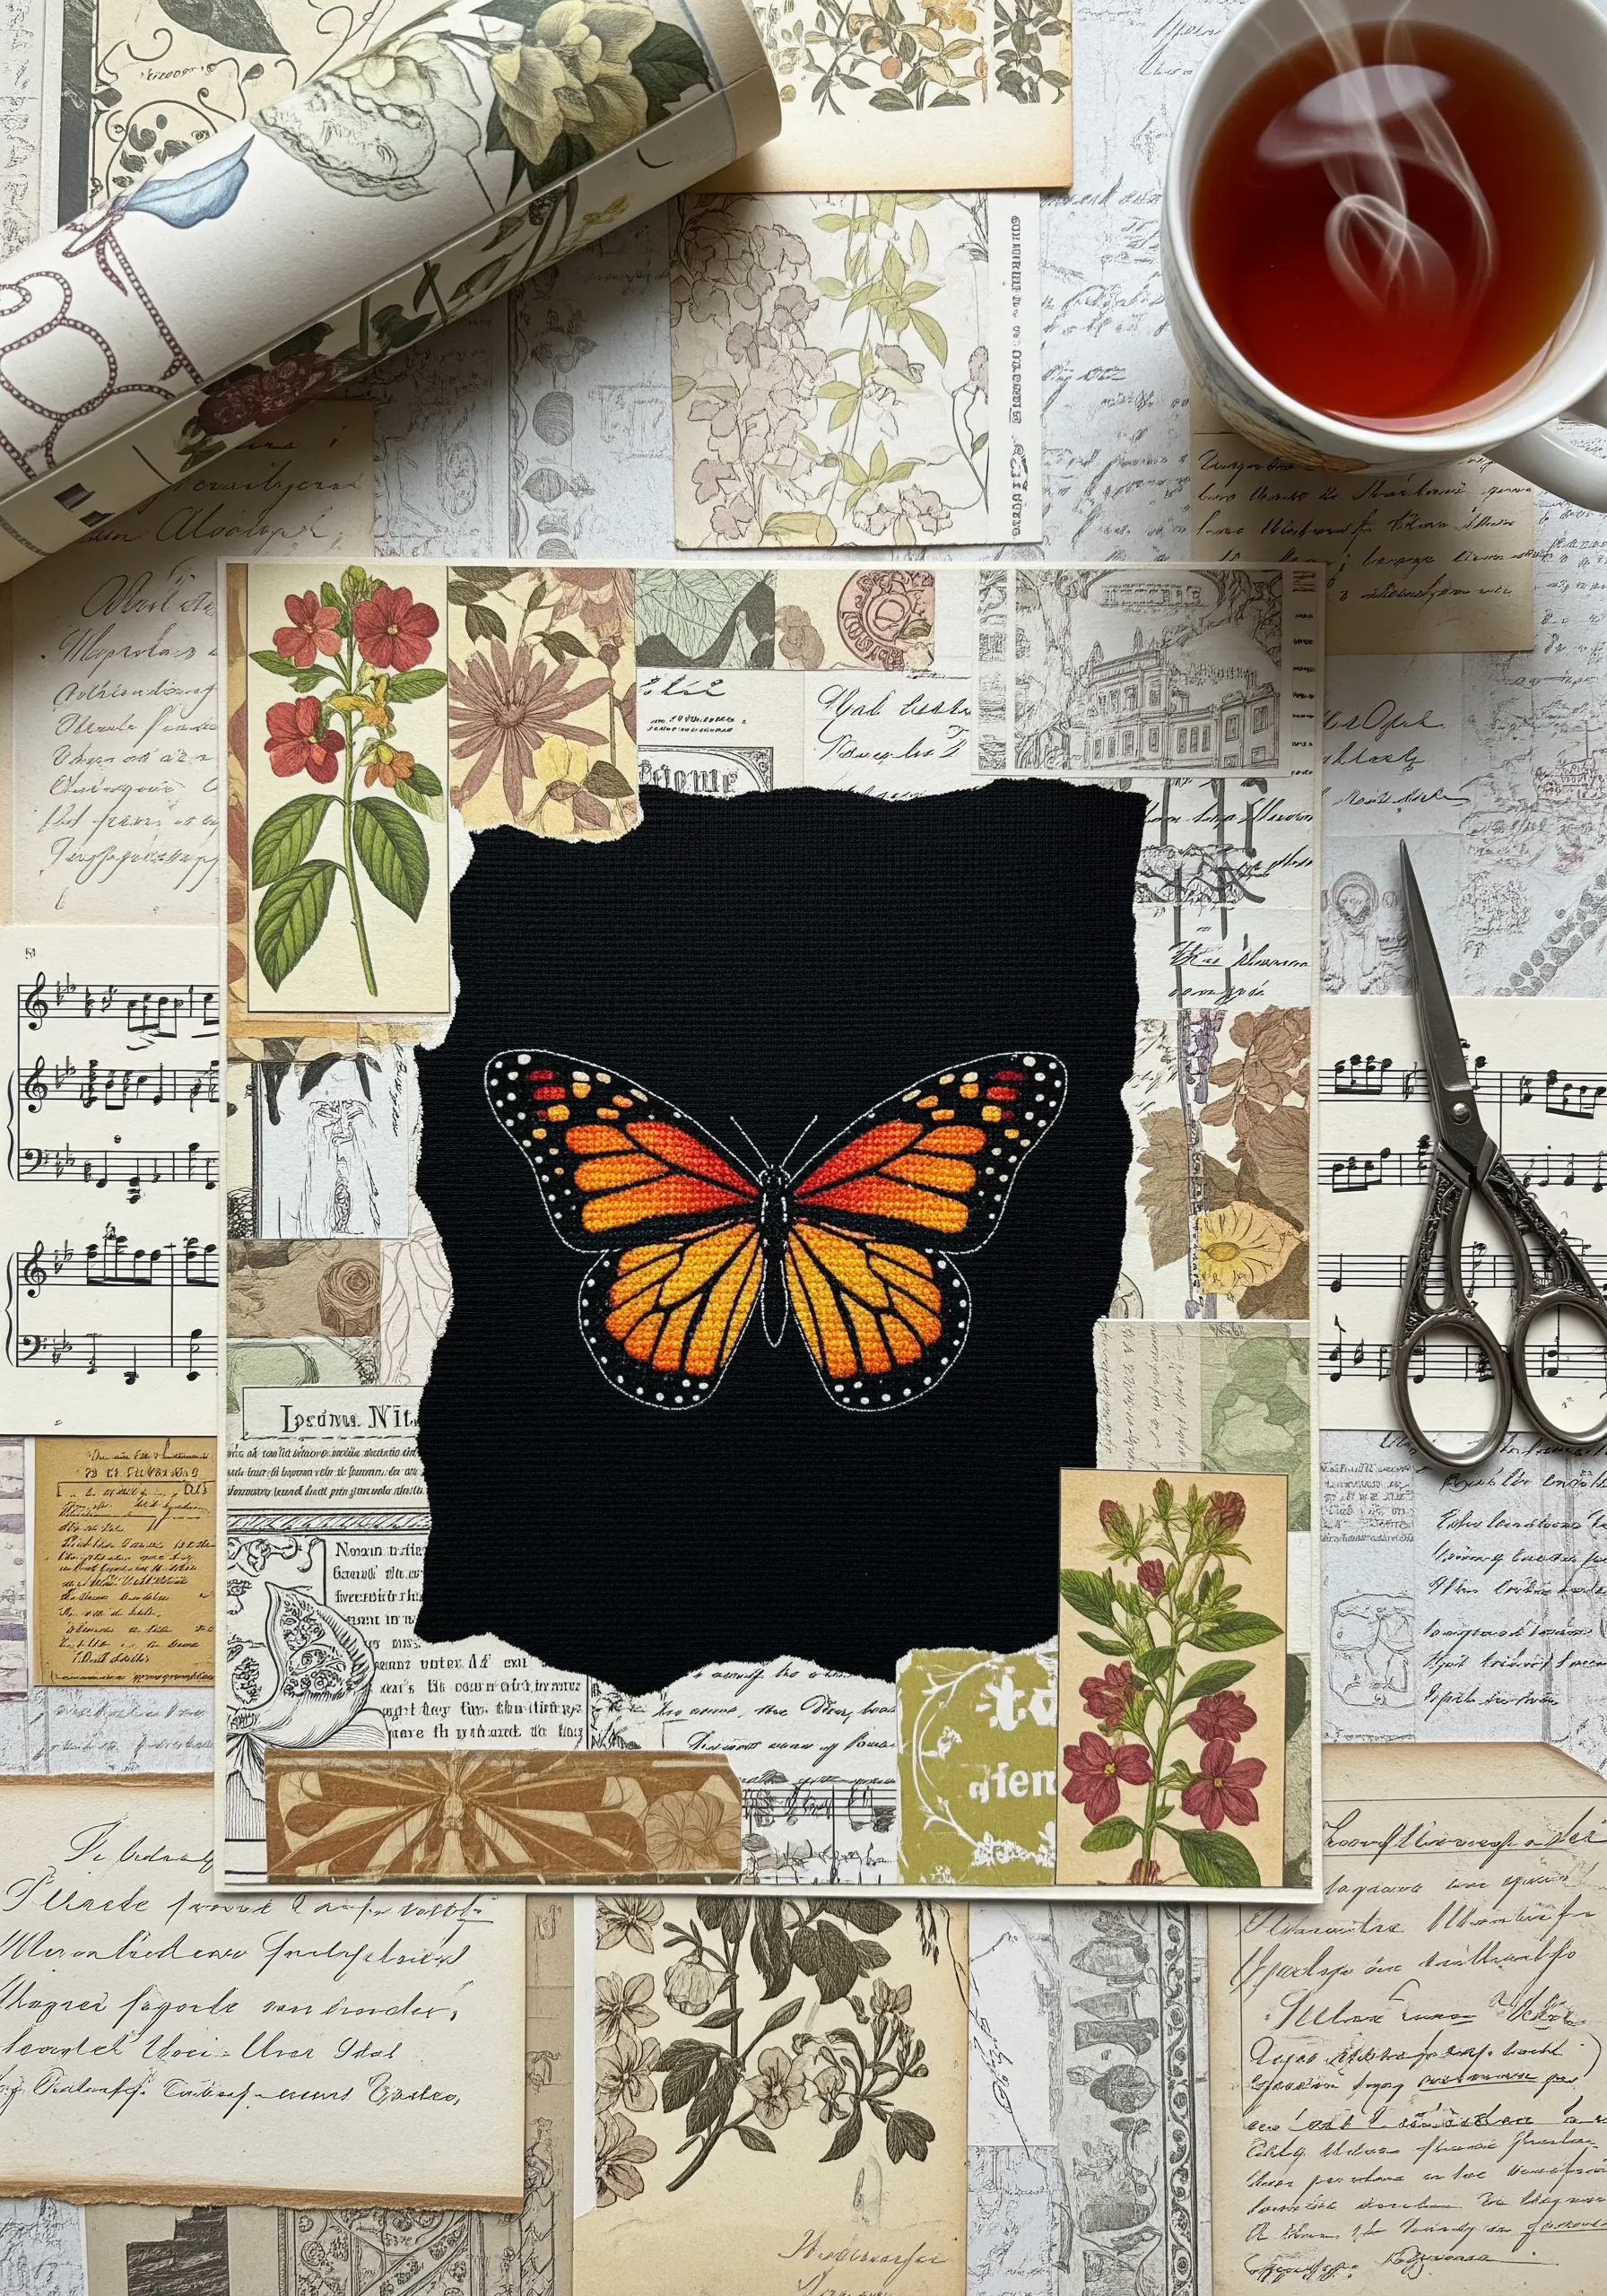
Give your embroidery deeper context by mounting it on a thoughtful paper collage.
Select ephemera—like vintage book pages, sheet music, and botanical illustrations—that share a color story or theme with your stitched piece.
Arrange them on a sturdy cardstock base, overlapping the edges to create visual interest and texture.
Mount your trimmed embroidery in the center, leaving a raw edge to add character. This technique transforms your stitch work from a simple motif into part of a larger story.
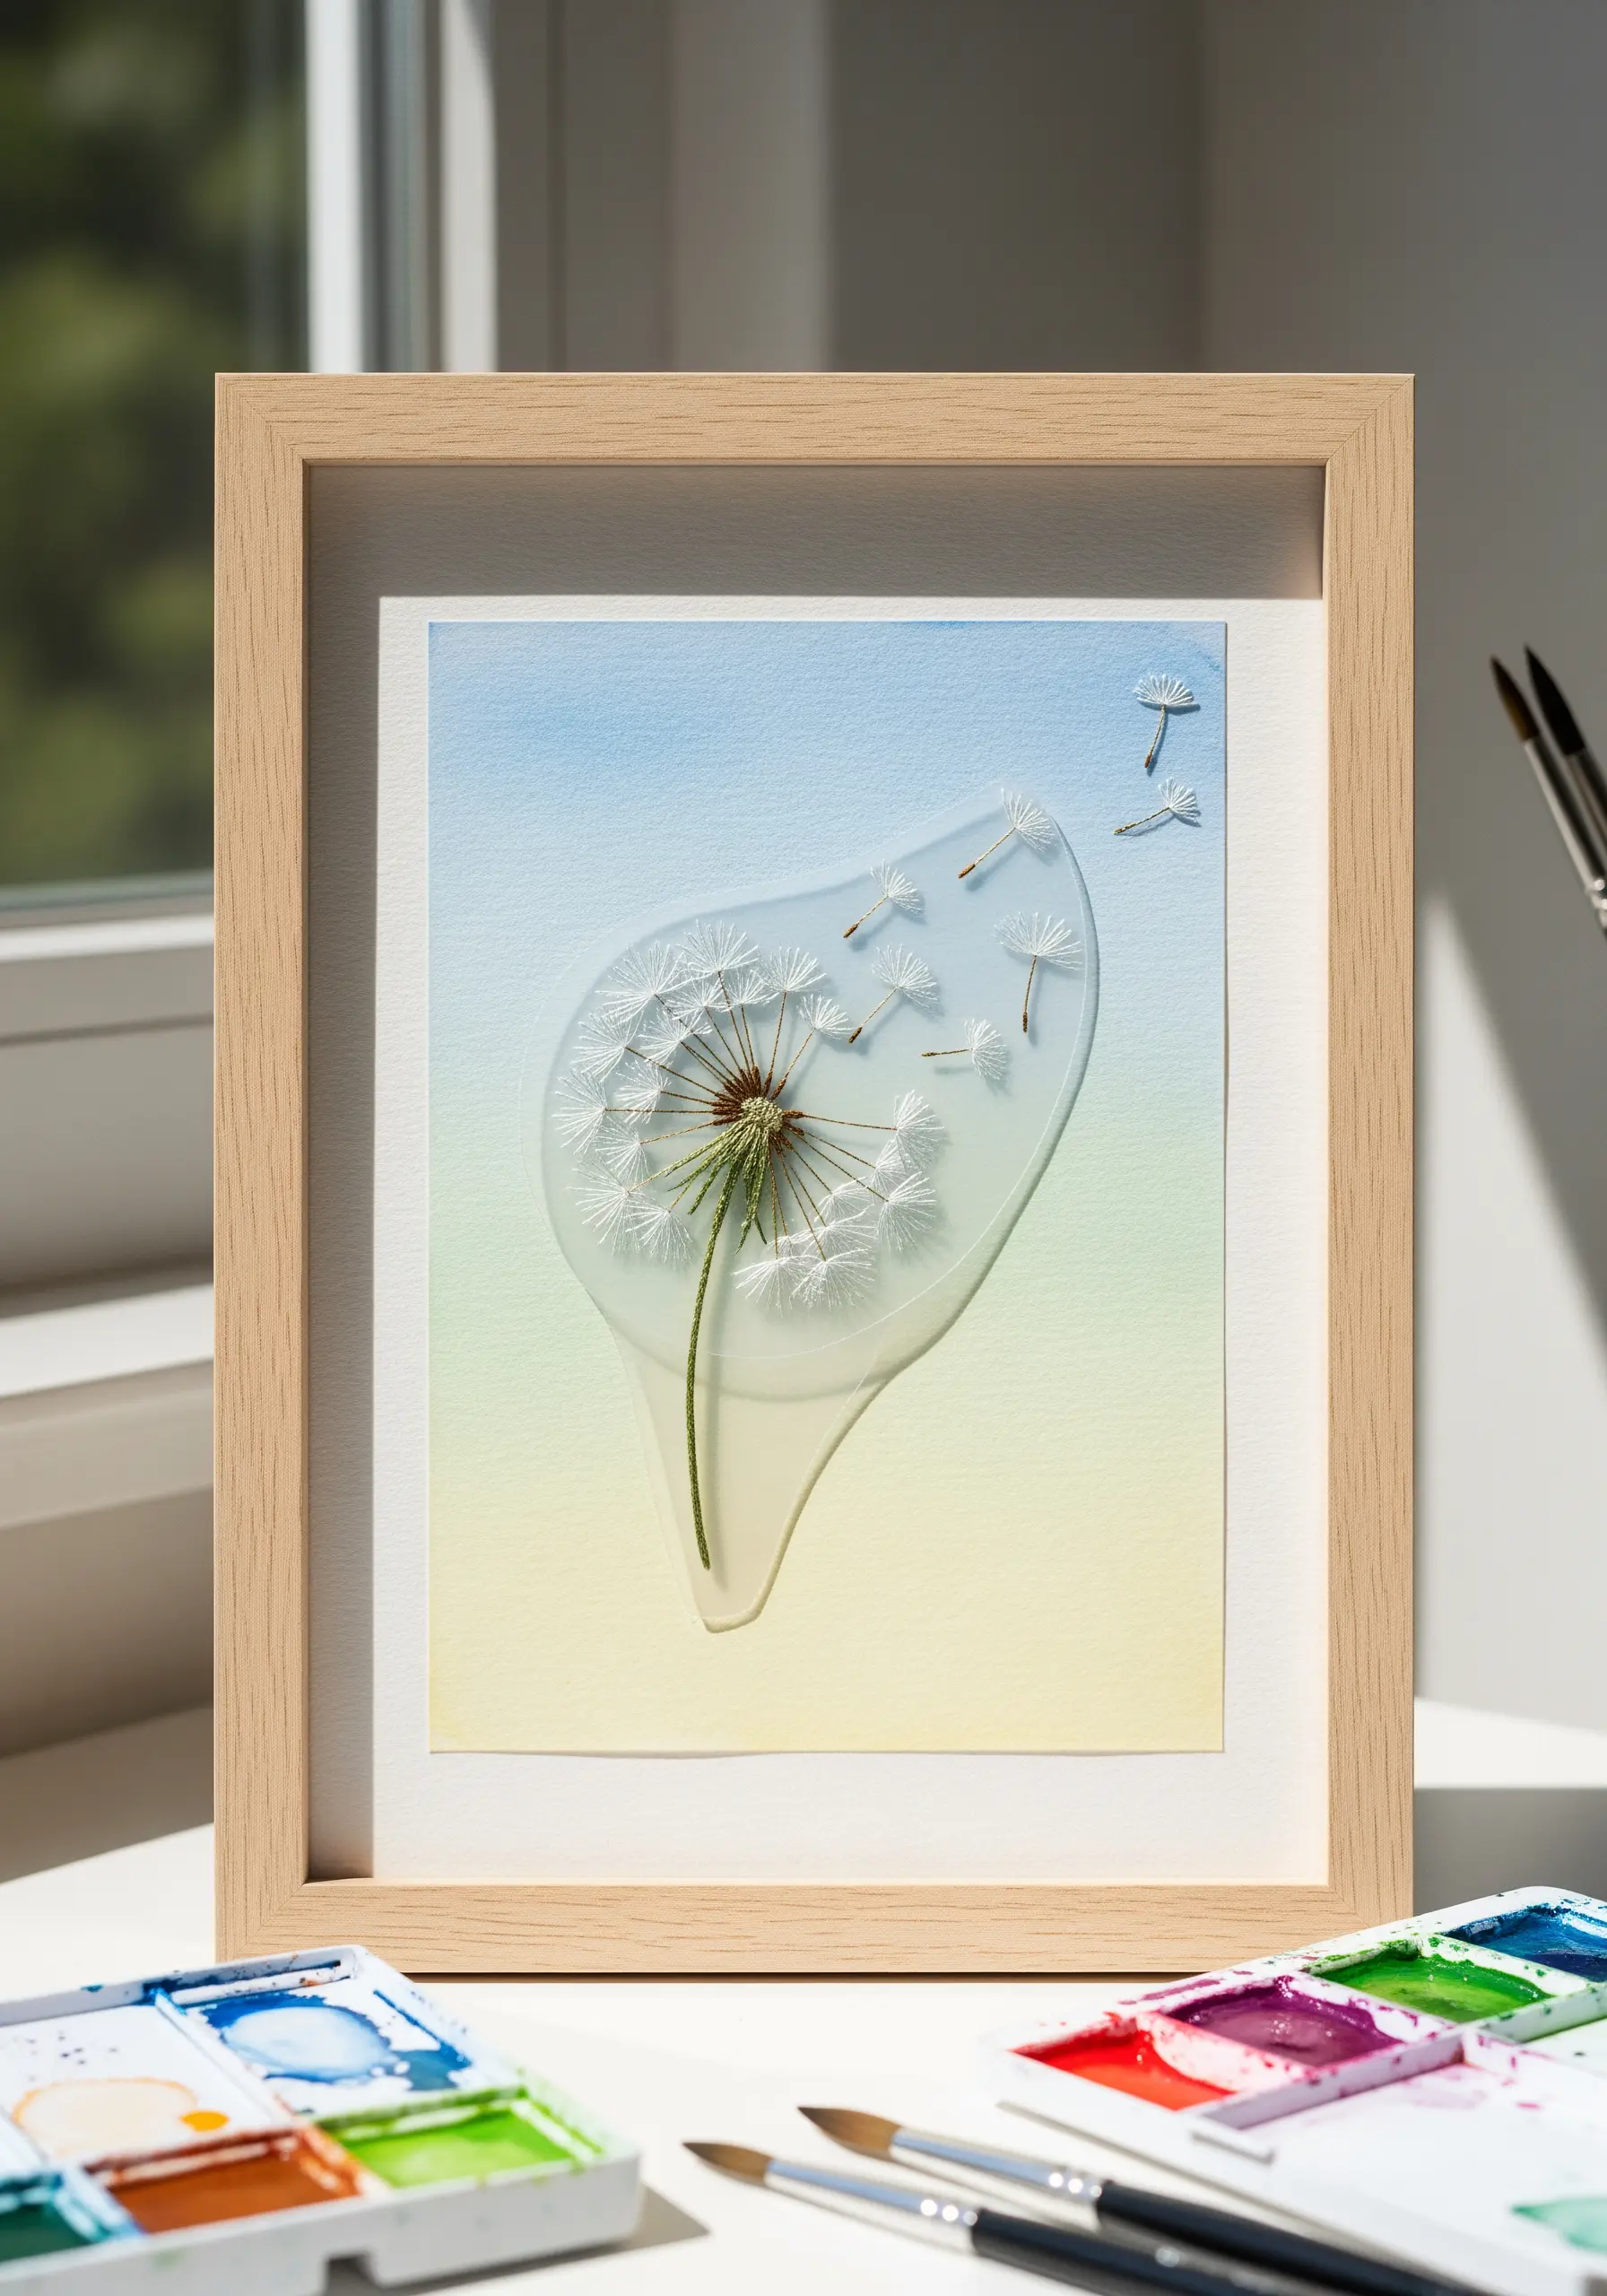
4. Stitch Directly onto Marbled Paper
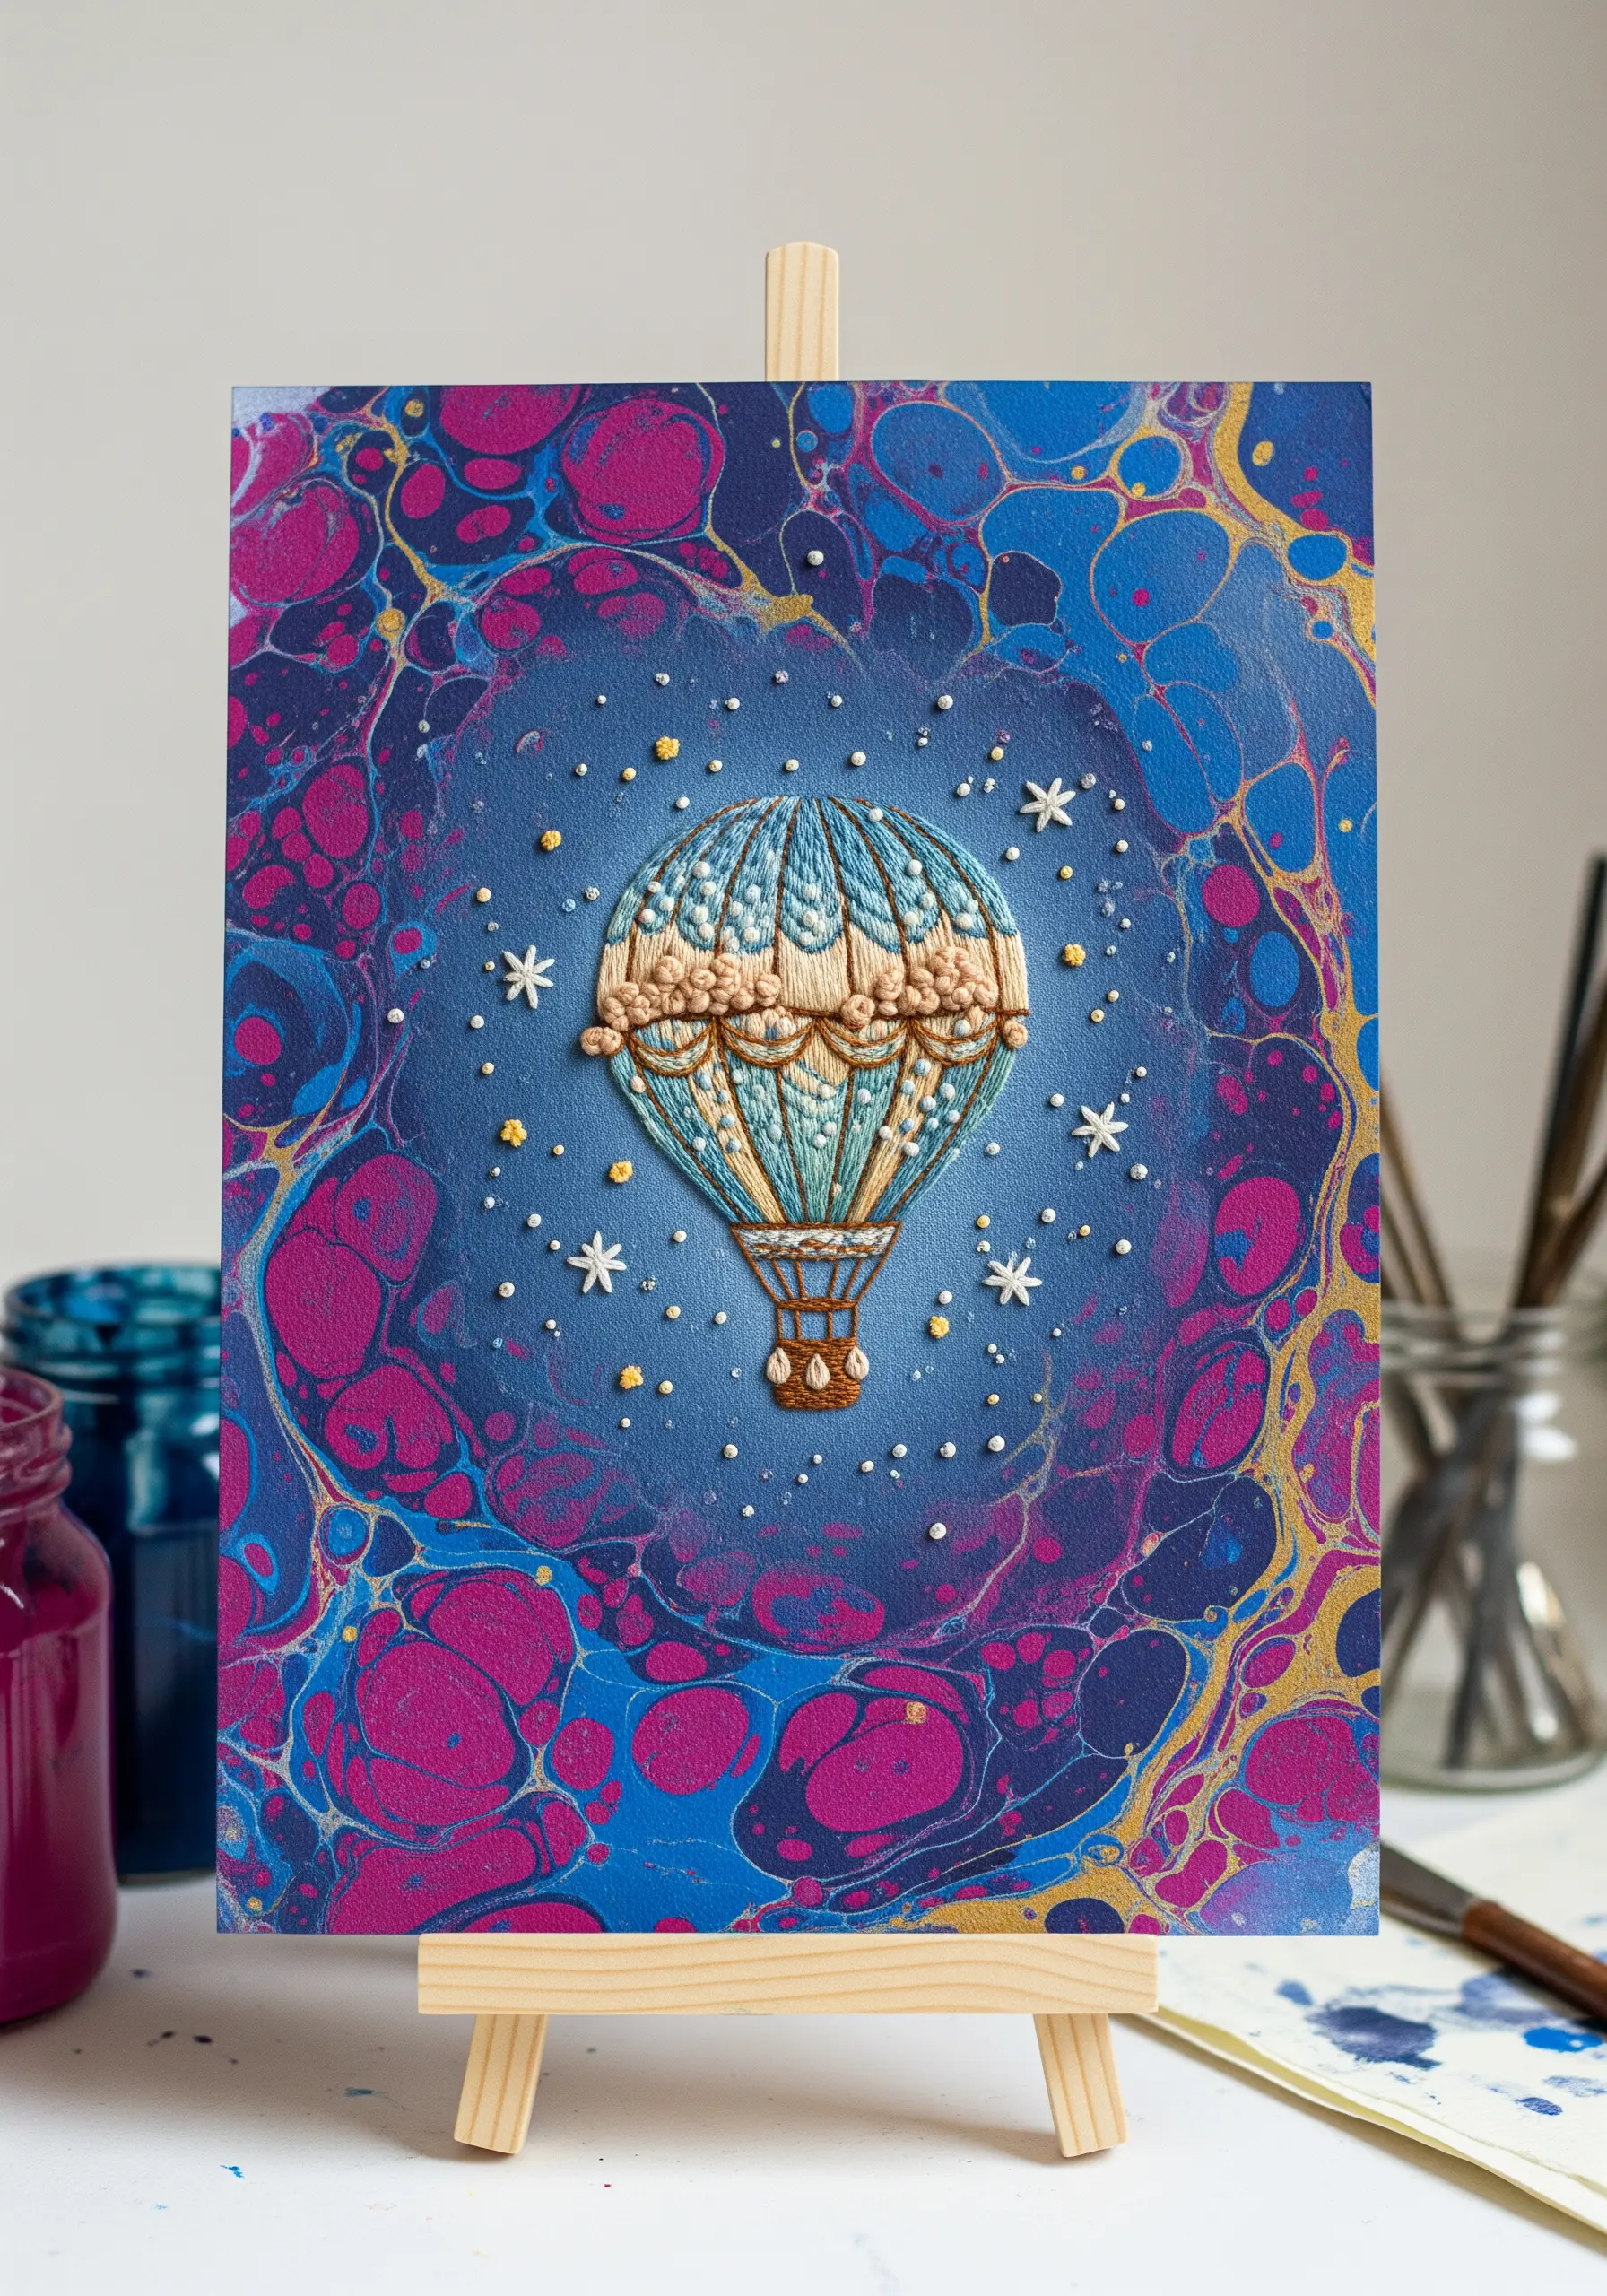
For a truly integrated piece, use heavy watercolor paper as your “fabric.”
Create a dynamic background using a paper marbling technique with acrylic inks, allowing the colors to swirl organically.
Once the paper is fully dry, gently pre-pierce your stitching holes with a fine awl or a thick needle before you begin sewing to prevent tearing and ensure clean stitches.
The fluid, abstract pattern of the marbled paper provides a vibrant contrast to the precise, controlled lines of your threadwork.
5. Integrate 3D Paper Florals with Line Art
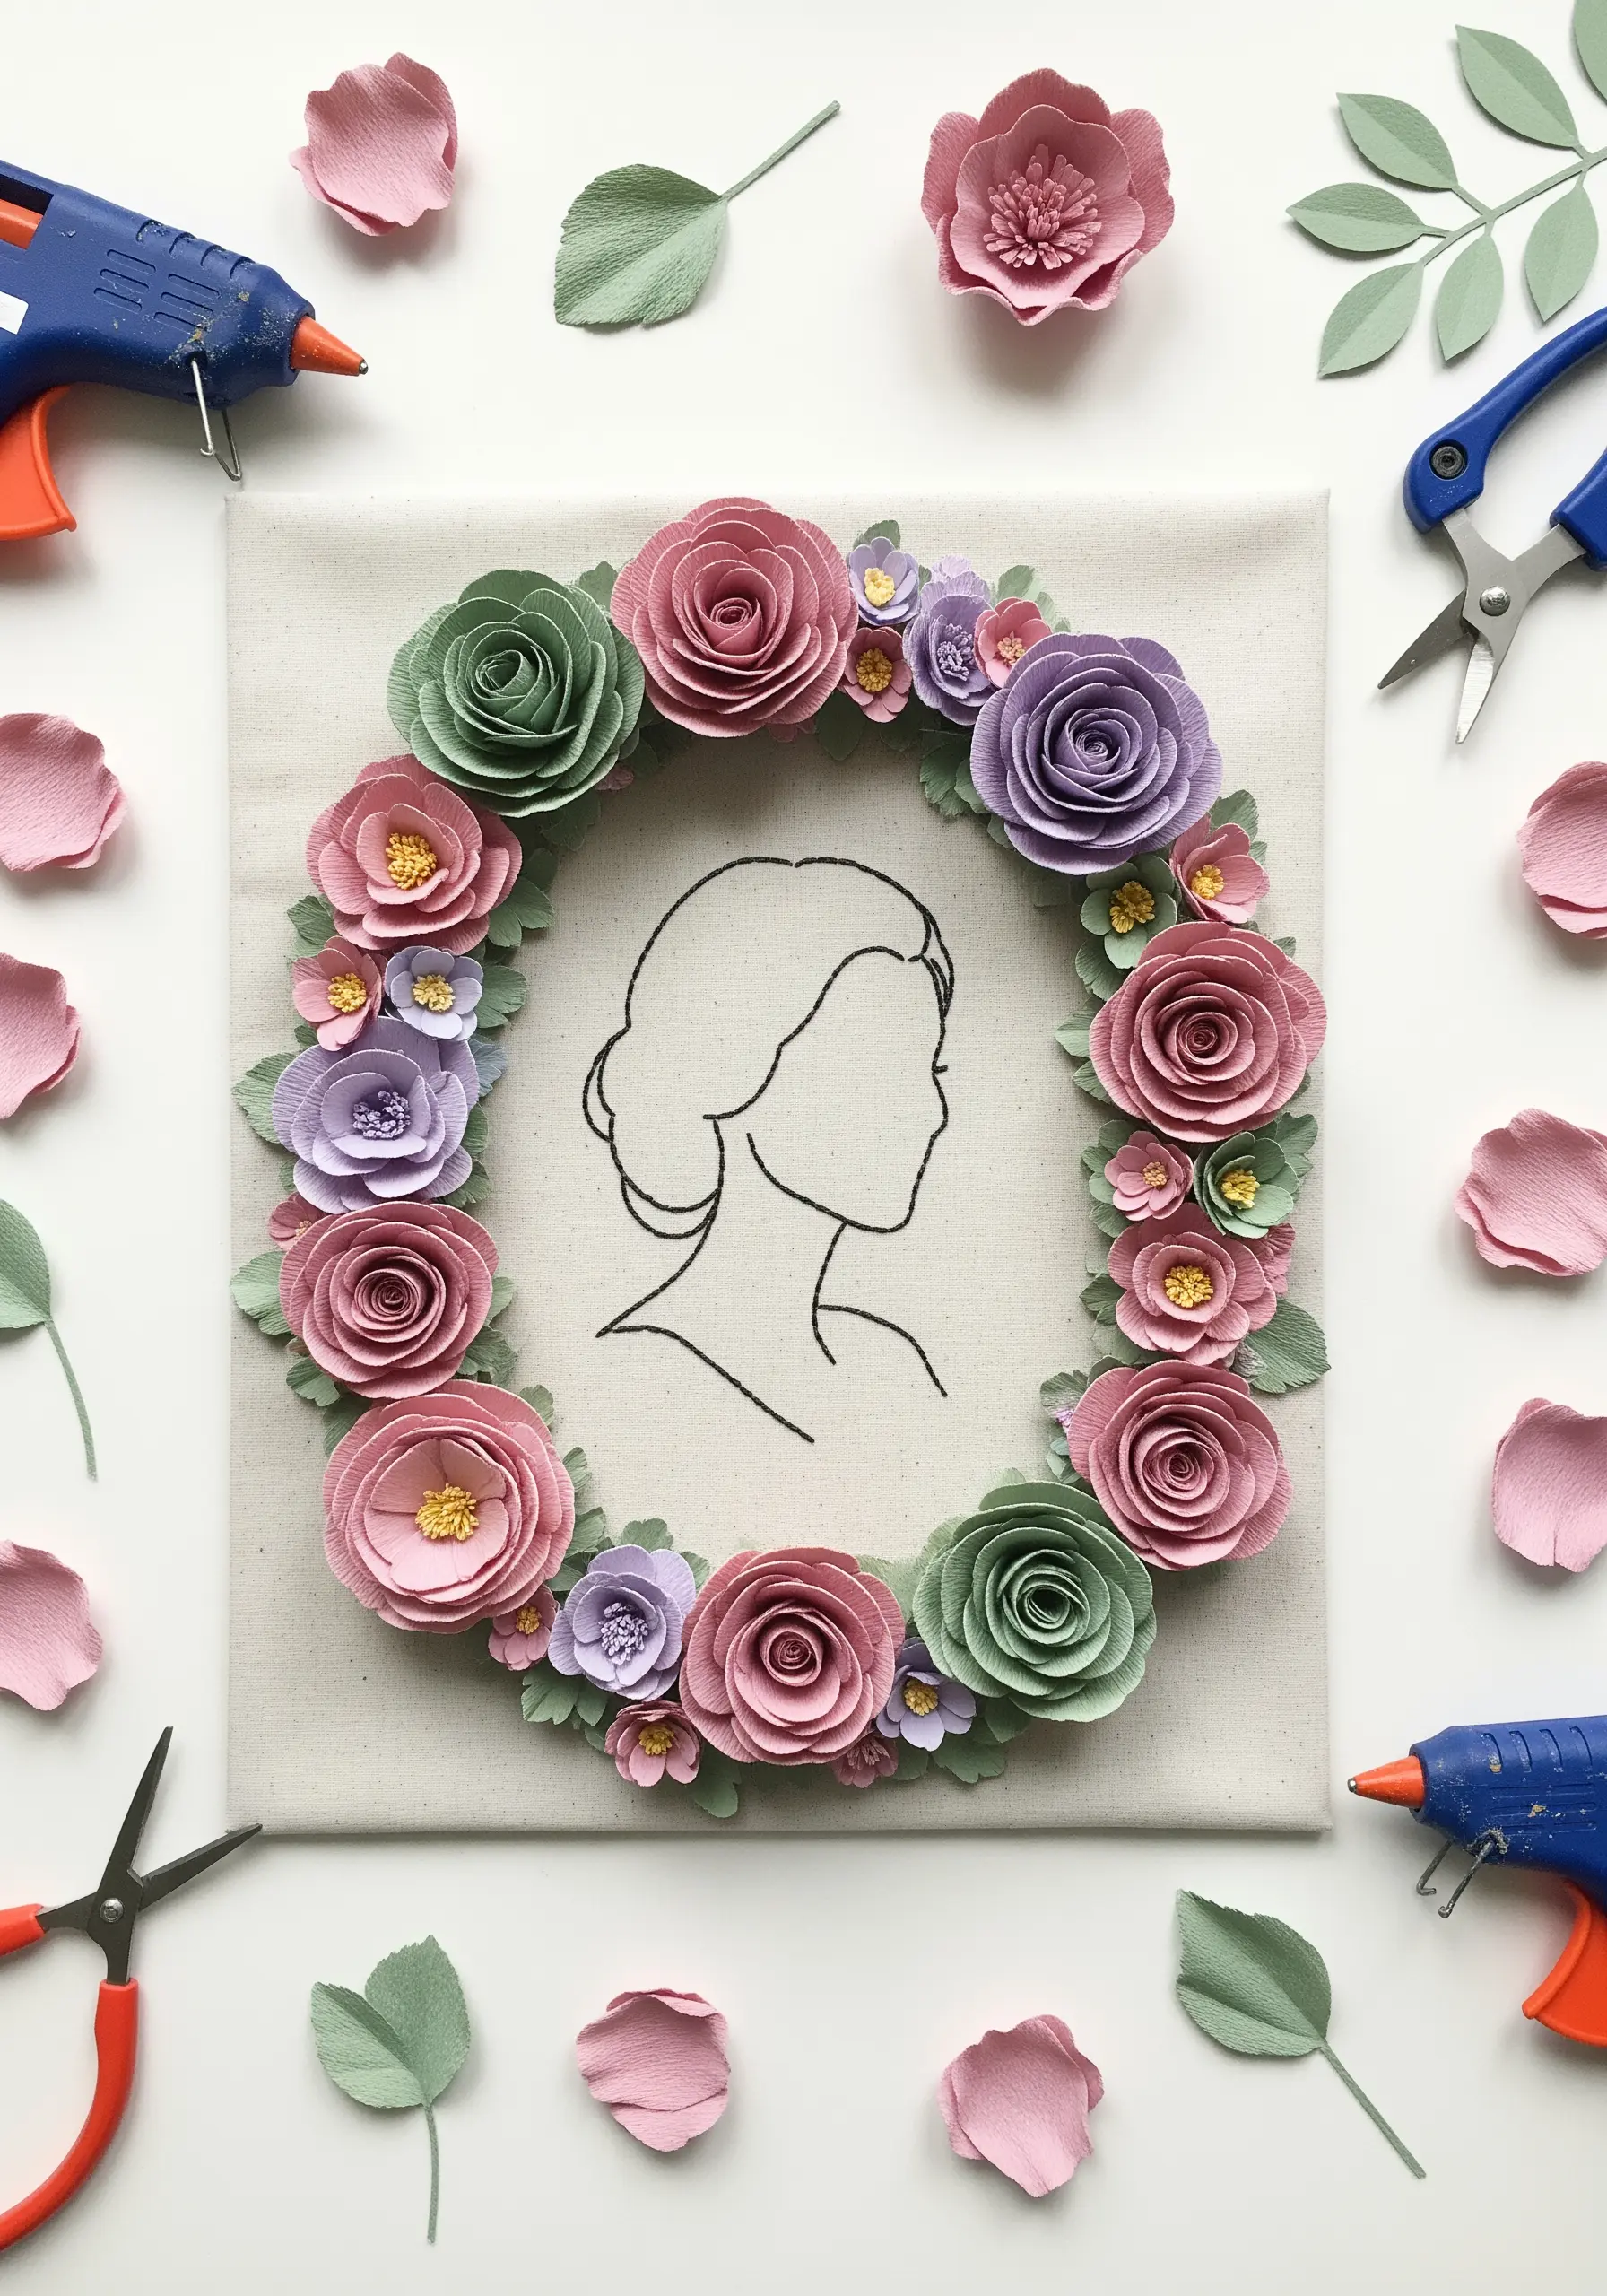
Combine the clean simplicity of embroidered line art with the lush texture of handmade paper flowers.
Begin by stitching a minimal portrait or silhouette onto canvas using a simple backstitch or stem stitch.
Next, create rolled paper roses and simple die-cut blossoms from colored cardstock, varying their sizes and shades to build rhythm and depth.
Arrange the flowers around your stitching to form a wreath, securing them with a hot glue gun for a romantic, dimensional finish.
6. Weave a Frame with Textured Yarn
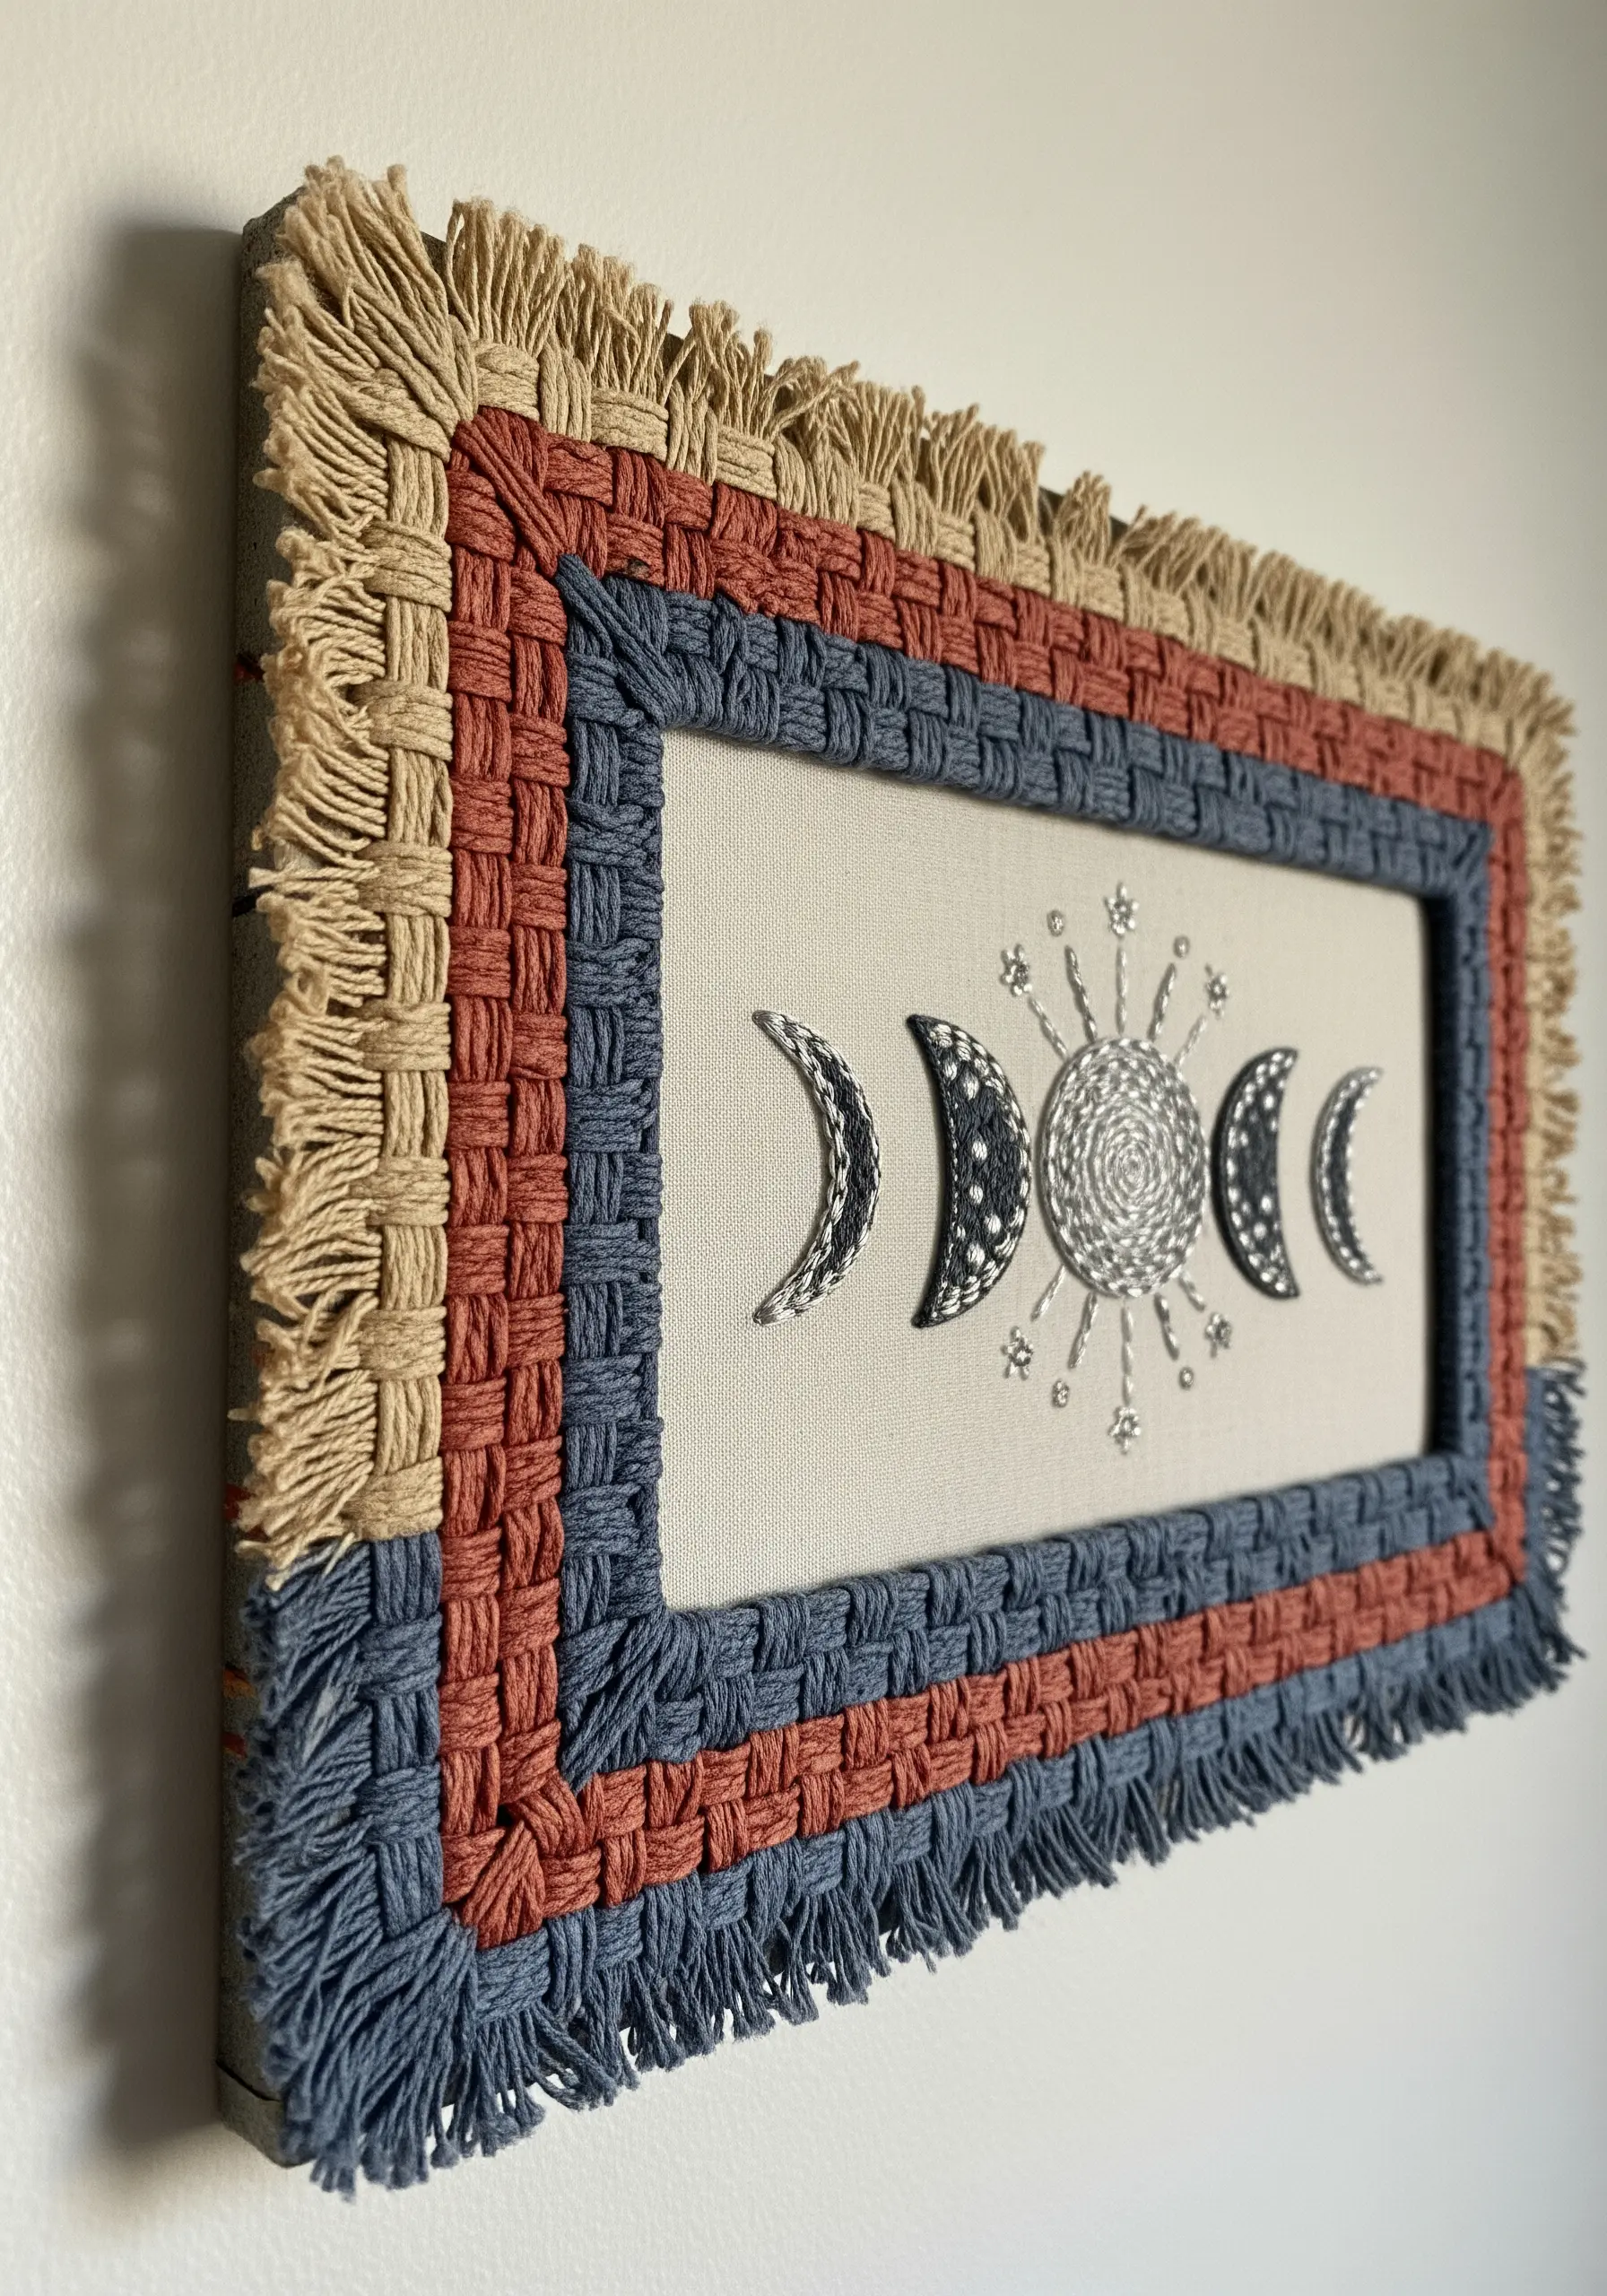
Add a soft, tactile border by weaving yarn around the edges of a stretched canvas.
Choose a sturdy cotton or wool yarn in colors that complement your embroidery, and create a simple over-under pattern for a clean, modern look.
For a bohemian effect, leave the ends loose to create a fringe.
This technique introduces a completely different textile texture that makes the entire piece feel cozy and elevates it into one of the most unique modern yarn wall art designs that will wow your guests.
7. Complement Stitches with Geometric Paper Piecing
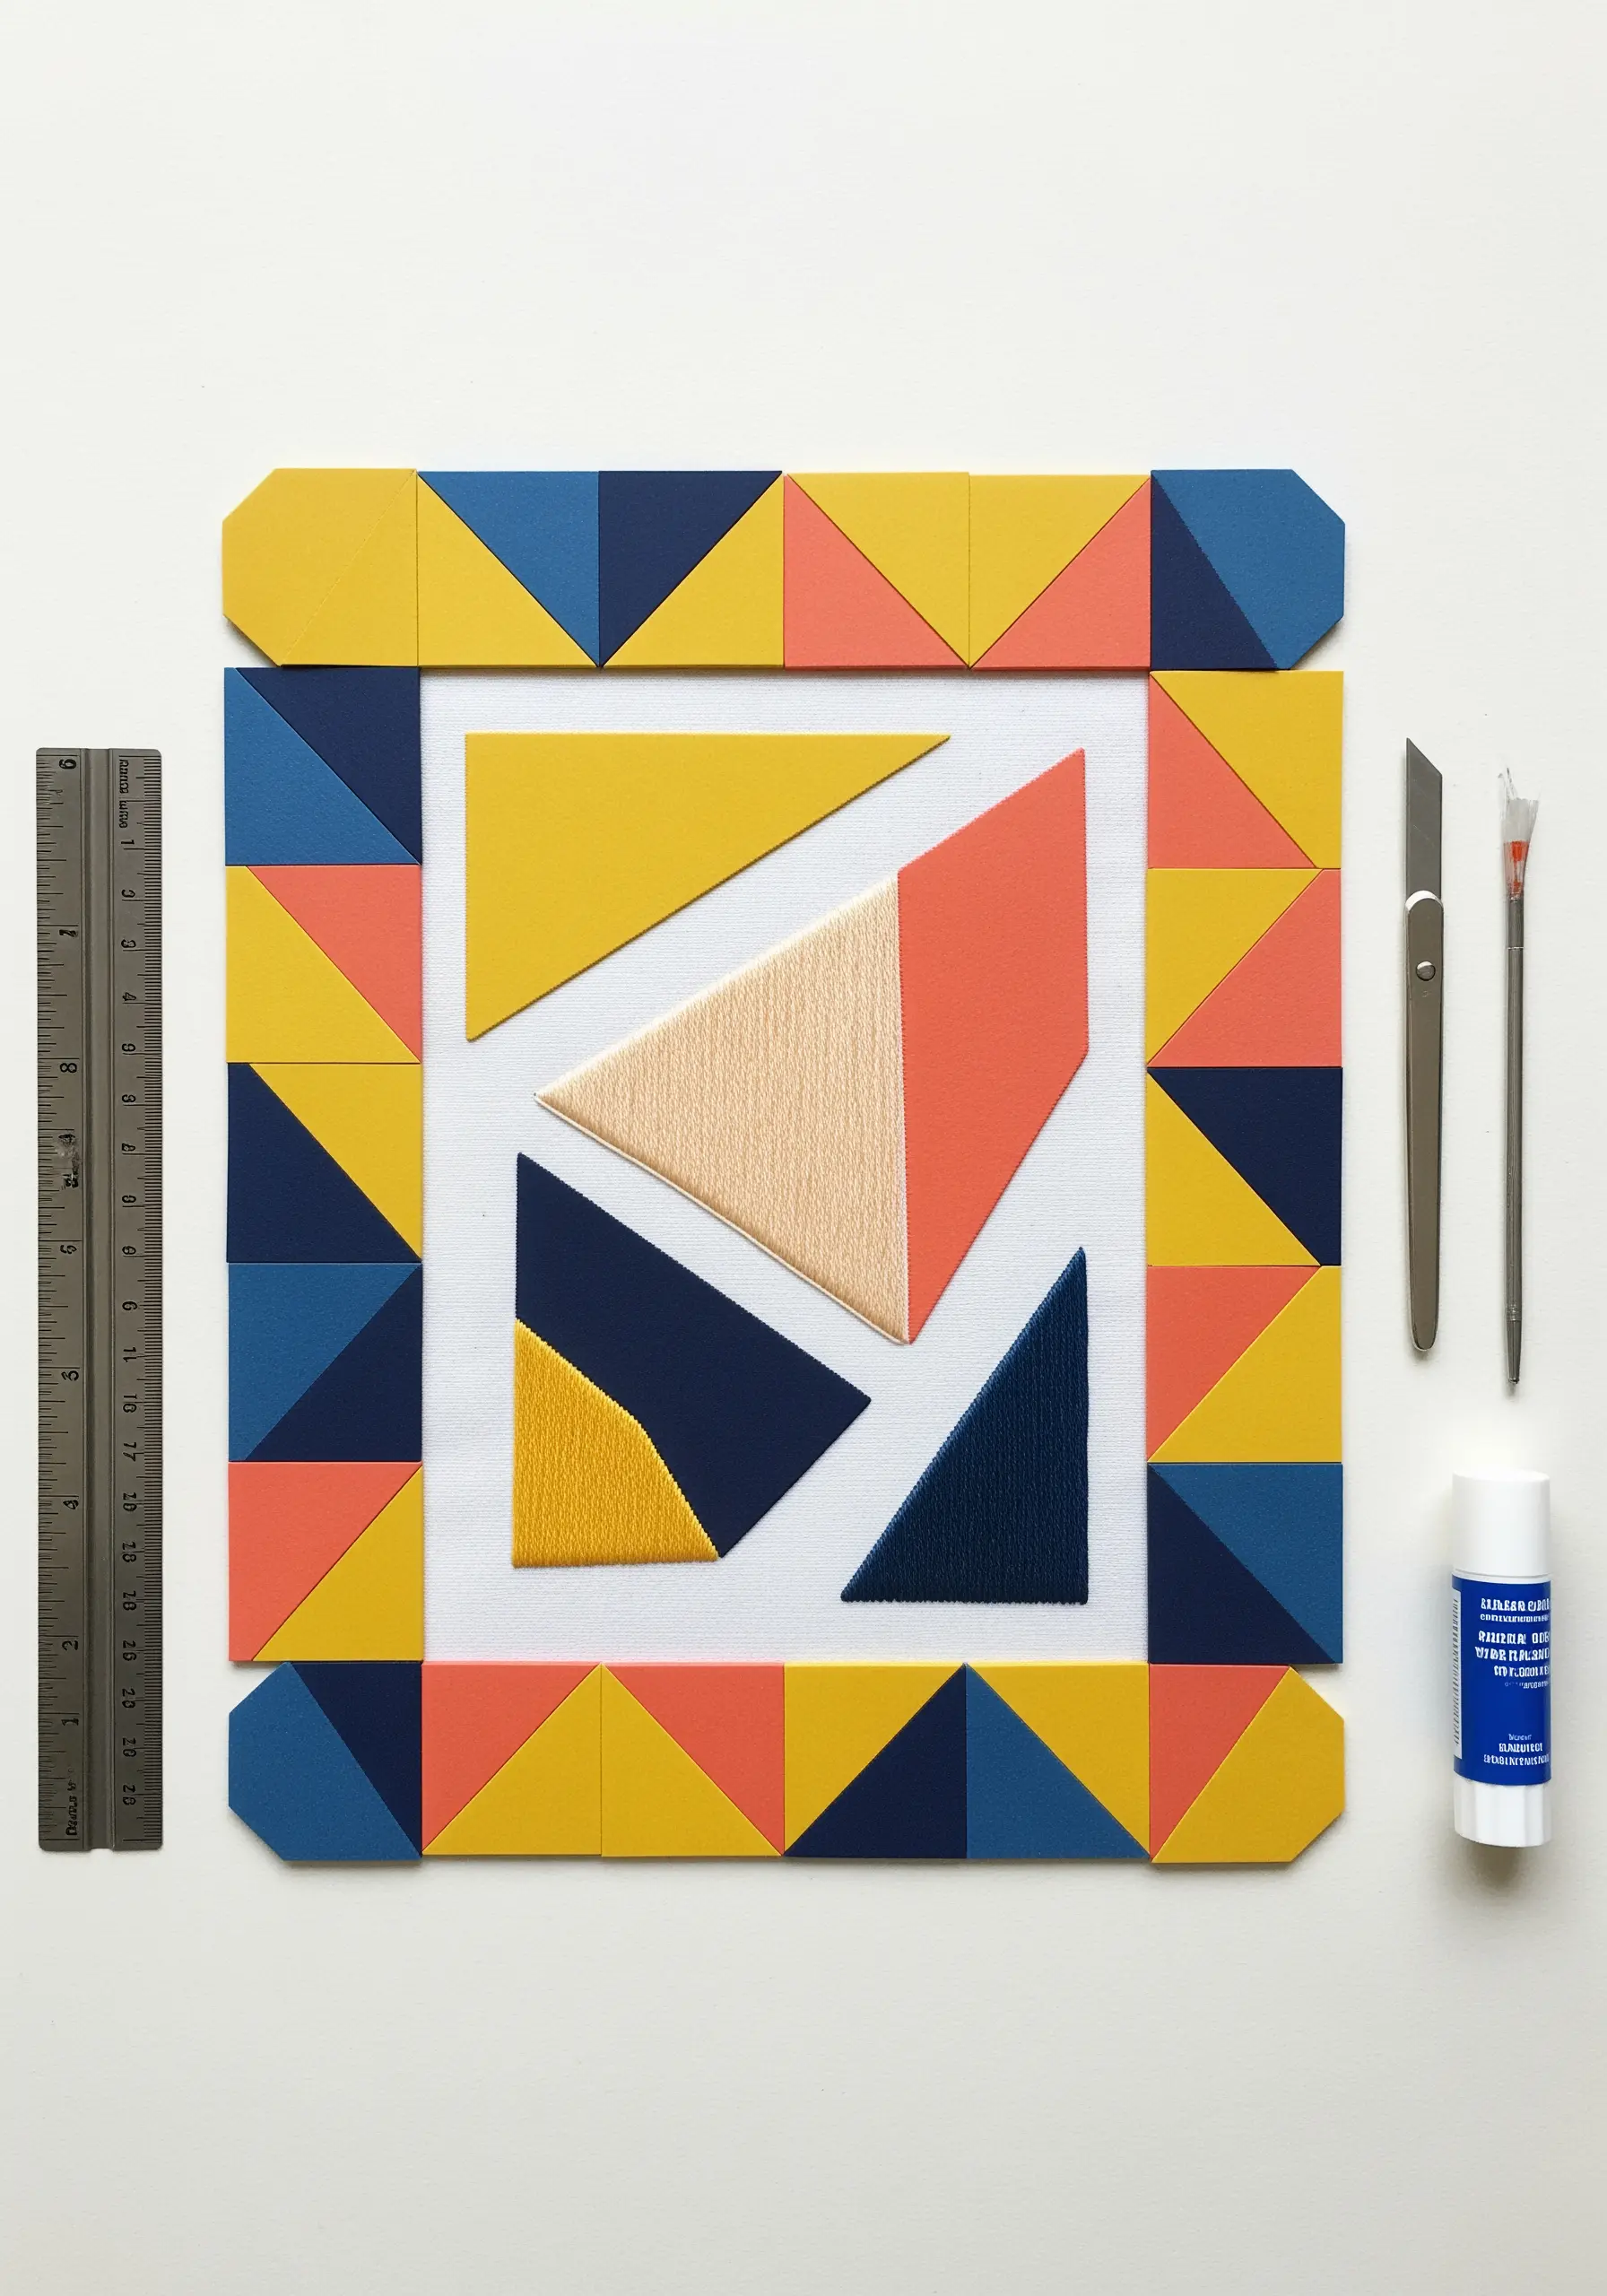
Echo the shapes within your embroidery by adding precisely cut paper accents.
First, stitch one or two of the geometric shapes completely with a dense satin stitch for a block of pure texture.
Then, use a craft knife and ruler to cut the remaining forms from colored cardstock that matches your thread palette, gluing them into place.
This clean, graphic approach allows you to play with texture versus solid color, creating a balanced and modern composition.
8. Create a Glossy Focal Point with Resin
Add an unexpected, modern finish by applying a layer of clear epoxy resin over a specific part of your design.
Stitch your motif on heavy paper, then create a “well” around the area you want to highlight using masking fluid or a temporary barrier.
Carefully pour a small amount of resin to create a glossy, glass-like effect that magnifies the stitch detail beneath.
This technique creates a stunning textural contrast against the matte paper background.
9. Craft a Frame from Handmade Paper and Botanicals
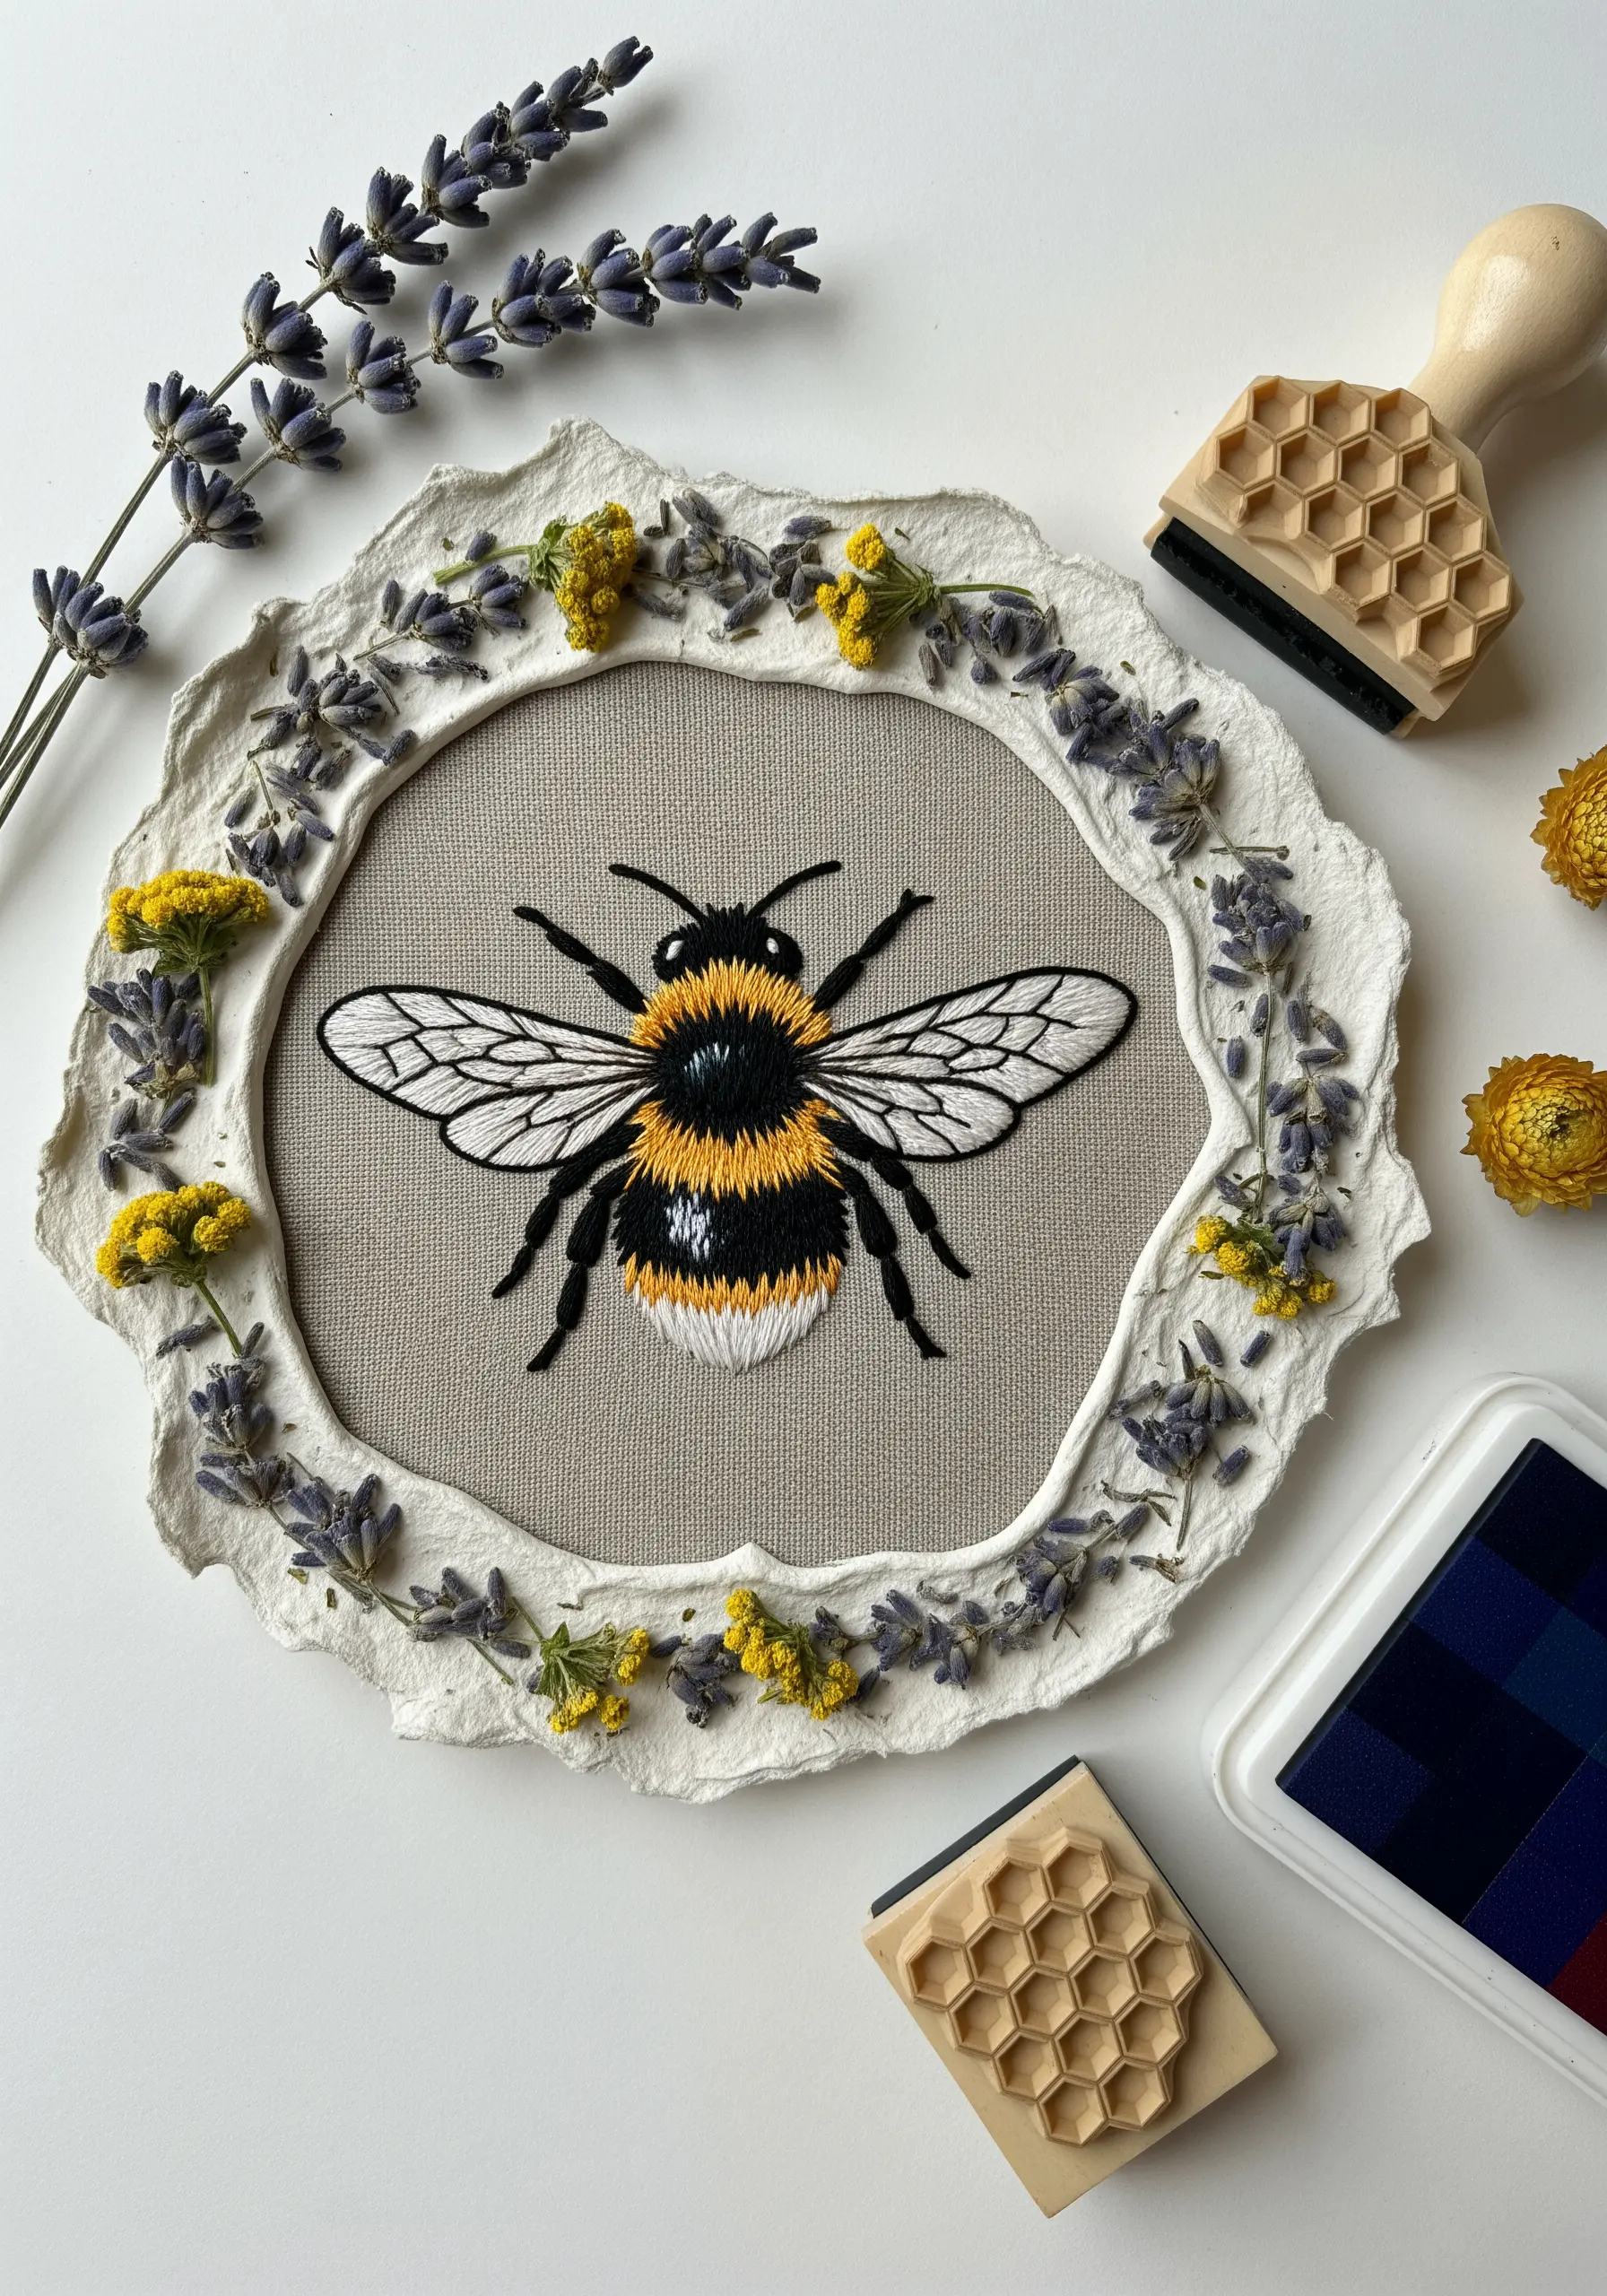
Make your frame as meaningful as your stitching by creating your own handmade paper.
Blend recycled paper pulp with water, and just before pressing, embed tiny dried flowers and herbs—like lavender and tansy—into the mixture.
Once the paper is dry, its organic, deckled edge and embedded botanicals create a rustic frame that beautifully complements any nature-inspired embroidery.
These are the handmade organic embroidery pieces that double as wall art you’ll treasure.
10. Add Crystalline Texture with Salt Embellishments
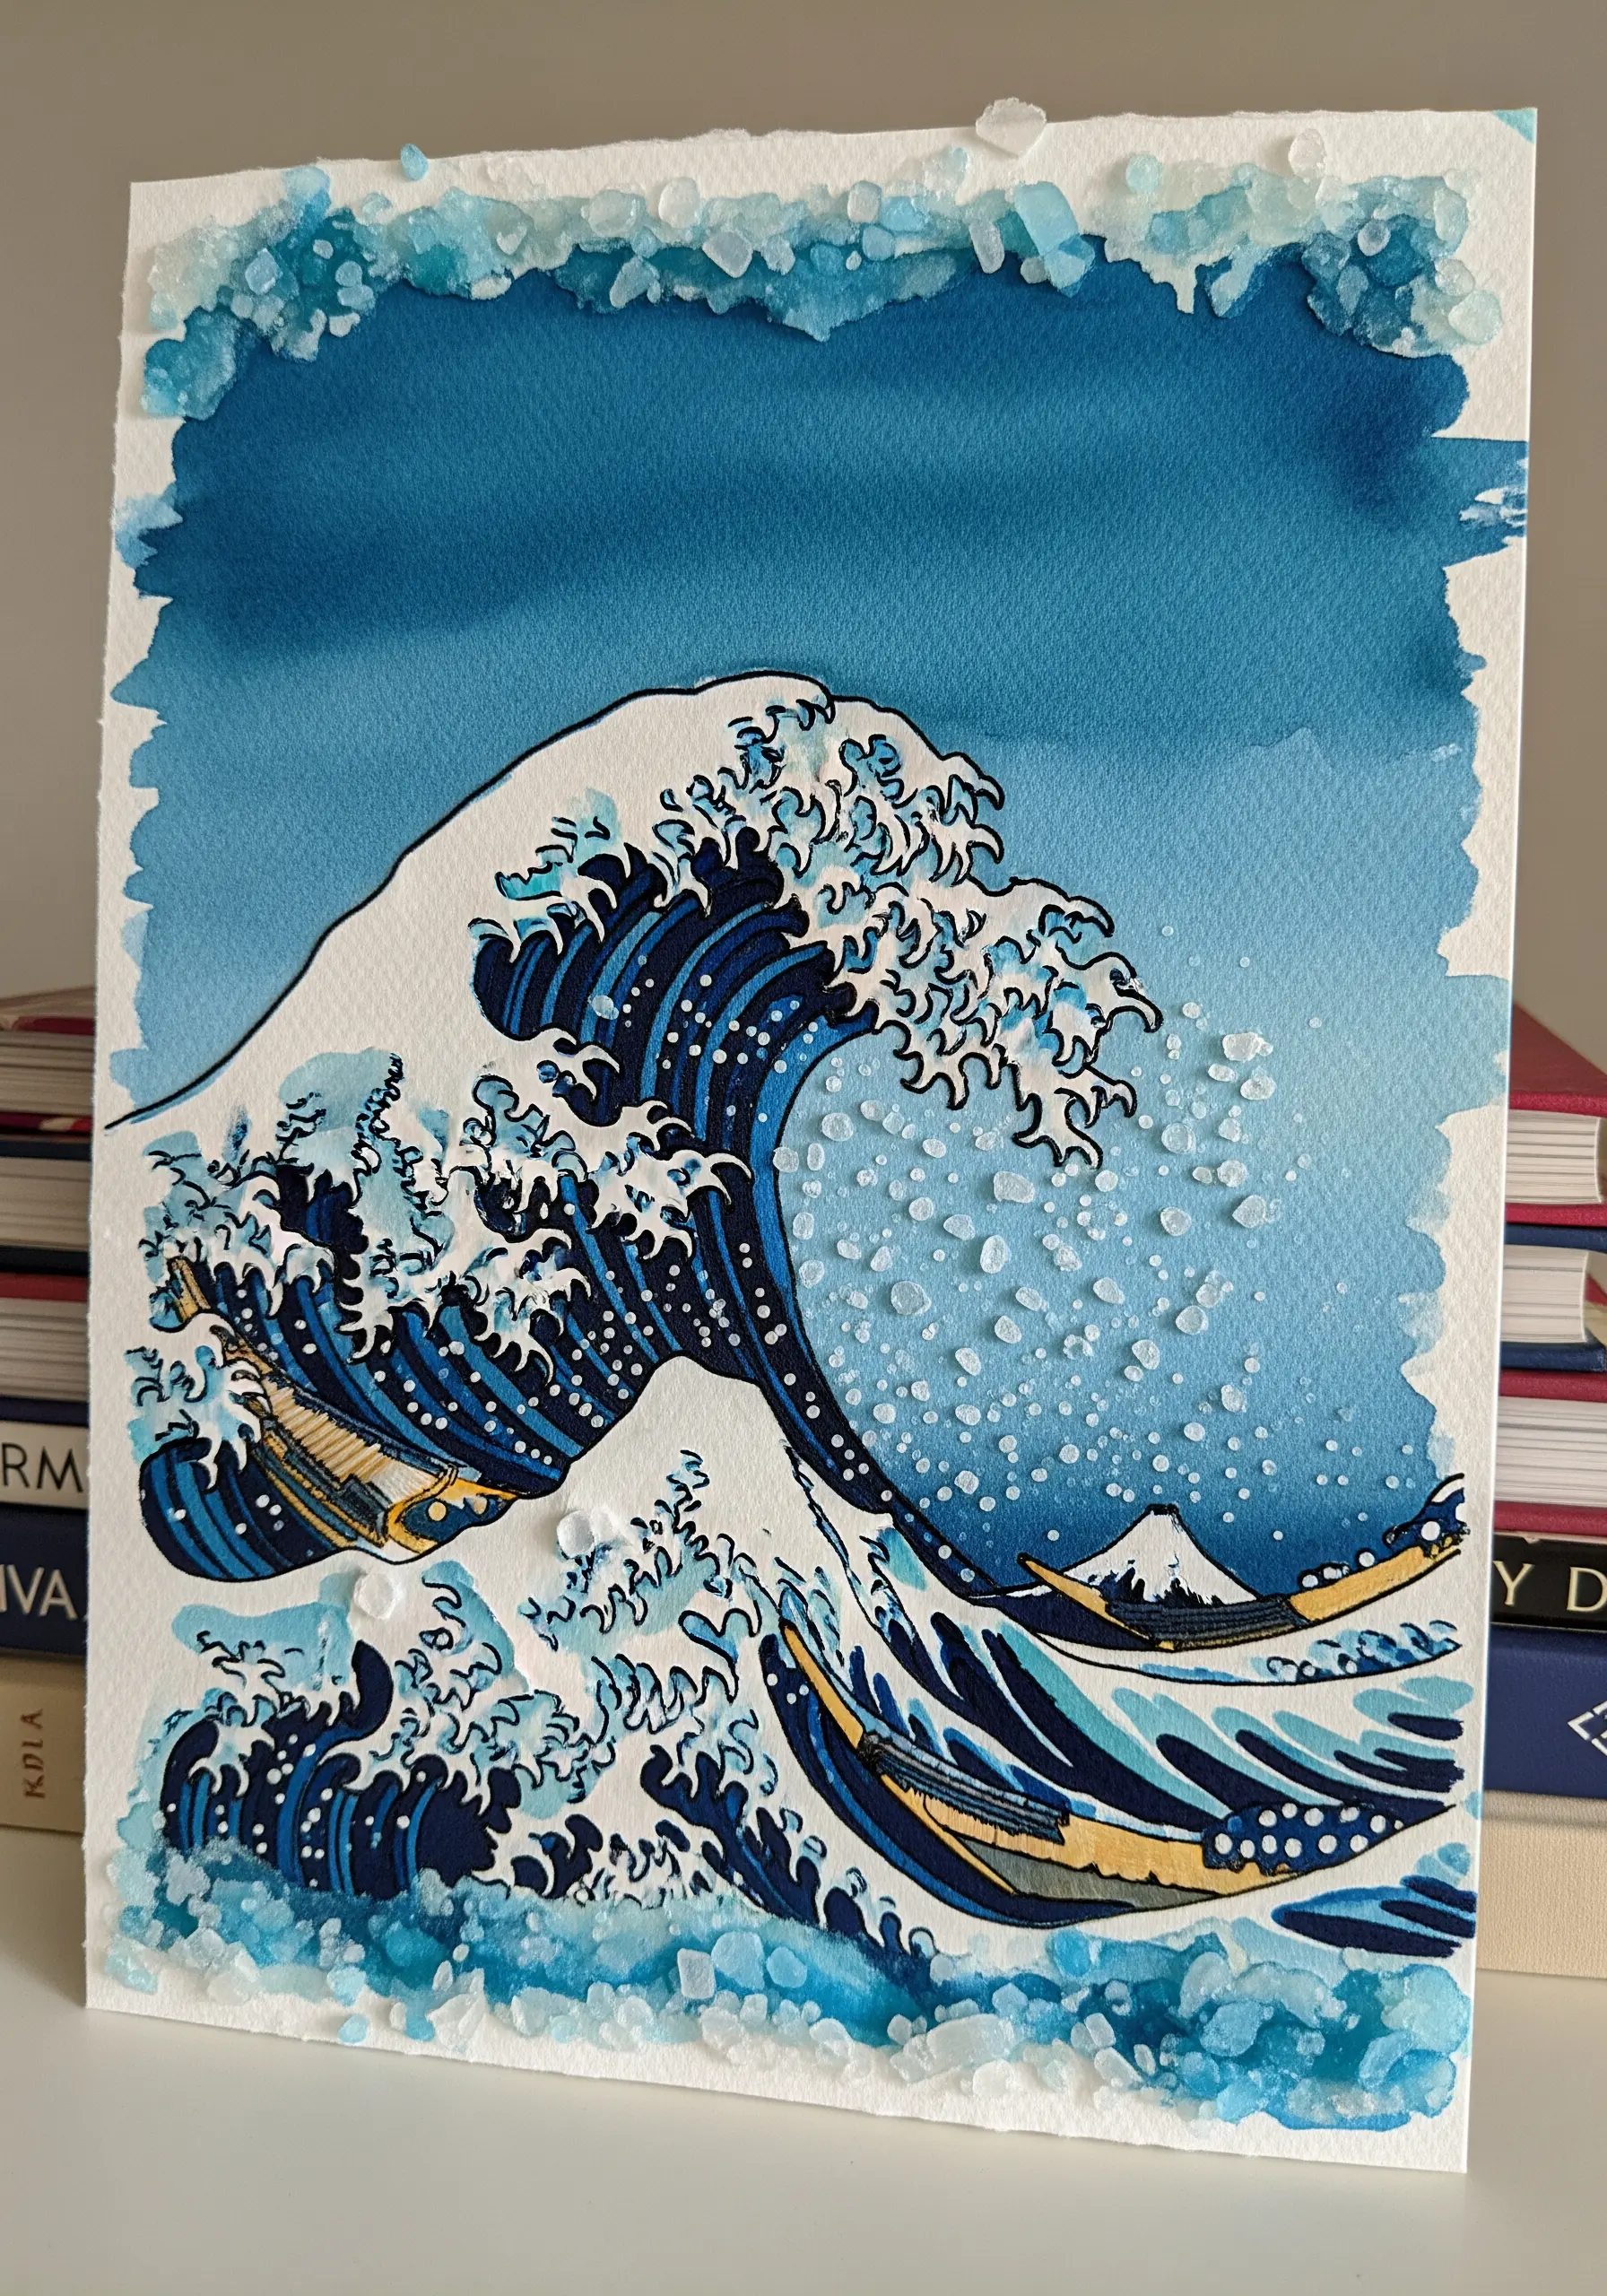
Mimic the effervescent texture of sea spray by incorporating salt crystals into your artwork.
Begin by painting a background wash onto heavy watercolor paper.
While the paint is still damp, sprinkle coarse sea salt over the areas you want to texturize, such as the foam of a wave.
Once dry, brush off the excess salt to reveal a subtle, crystalline pattern. For more dimension, adhere larger salt crystals with clear craft glue.
11. Layer Deckle-Edge Paper with Gold Leaf Accents
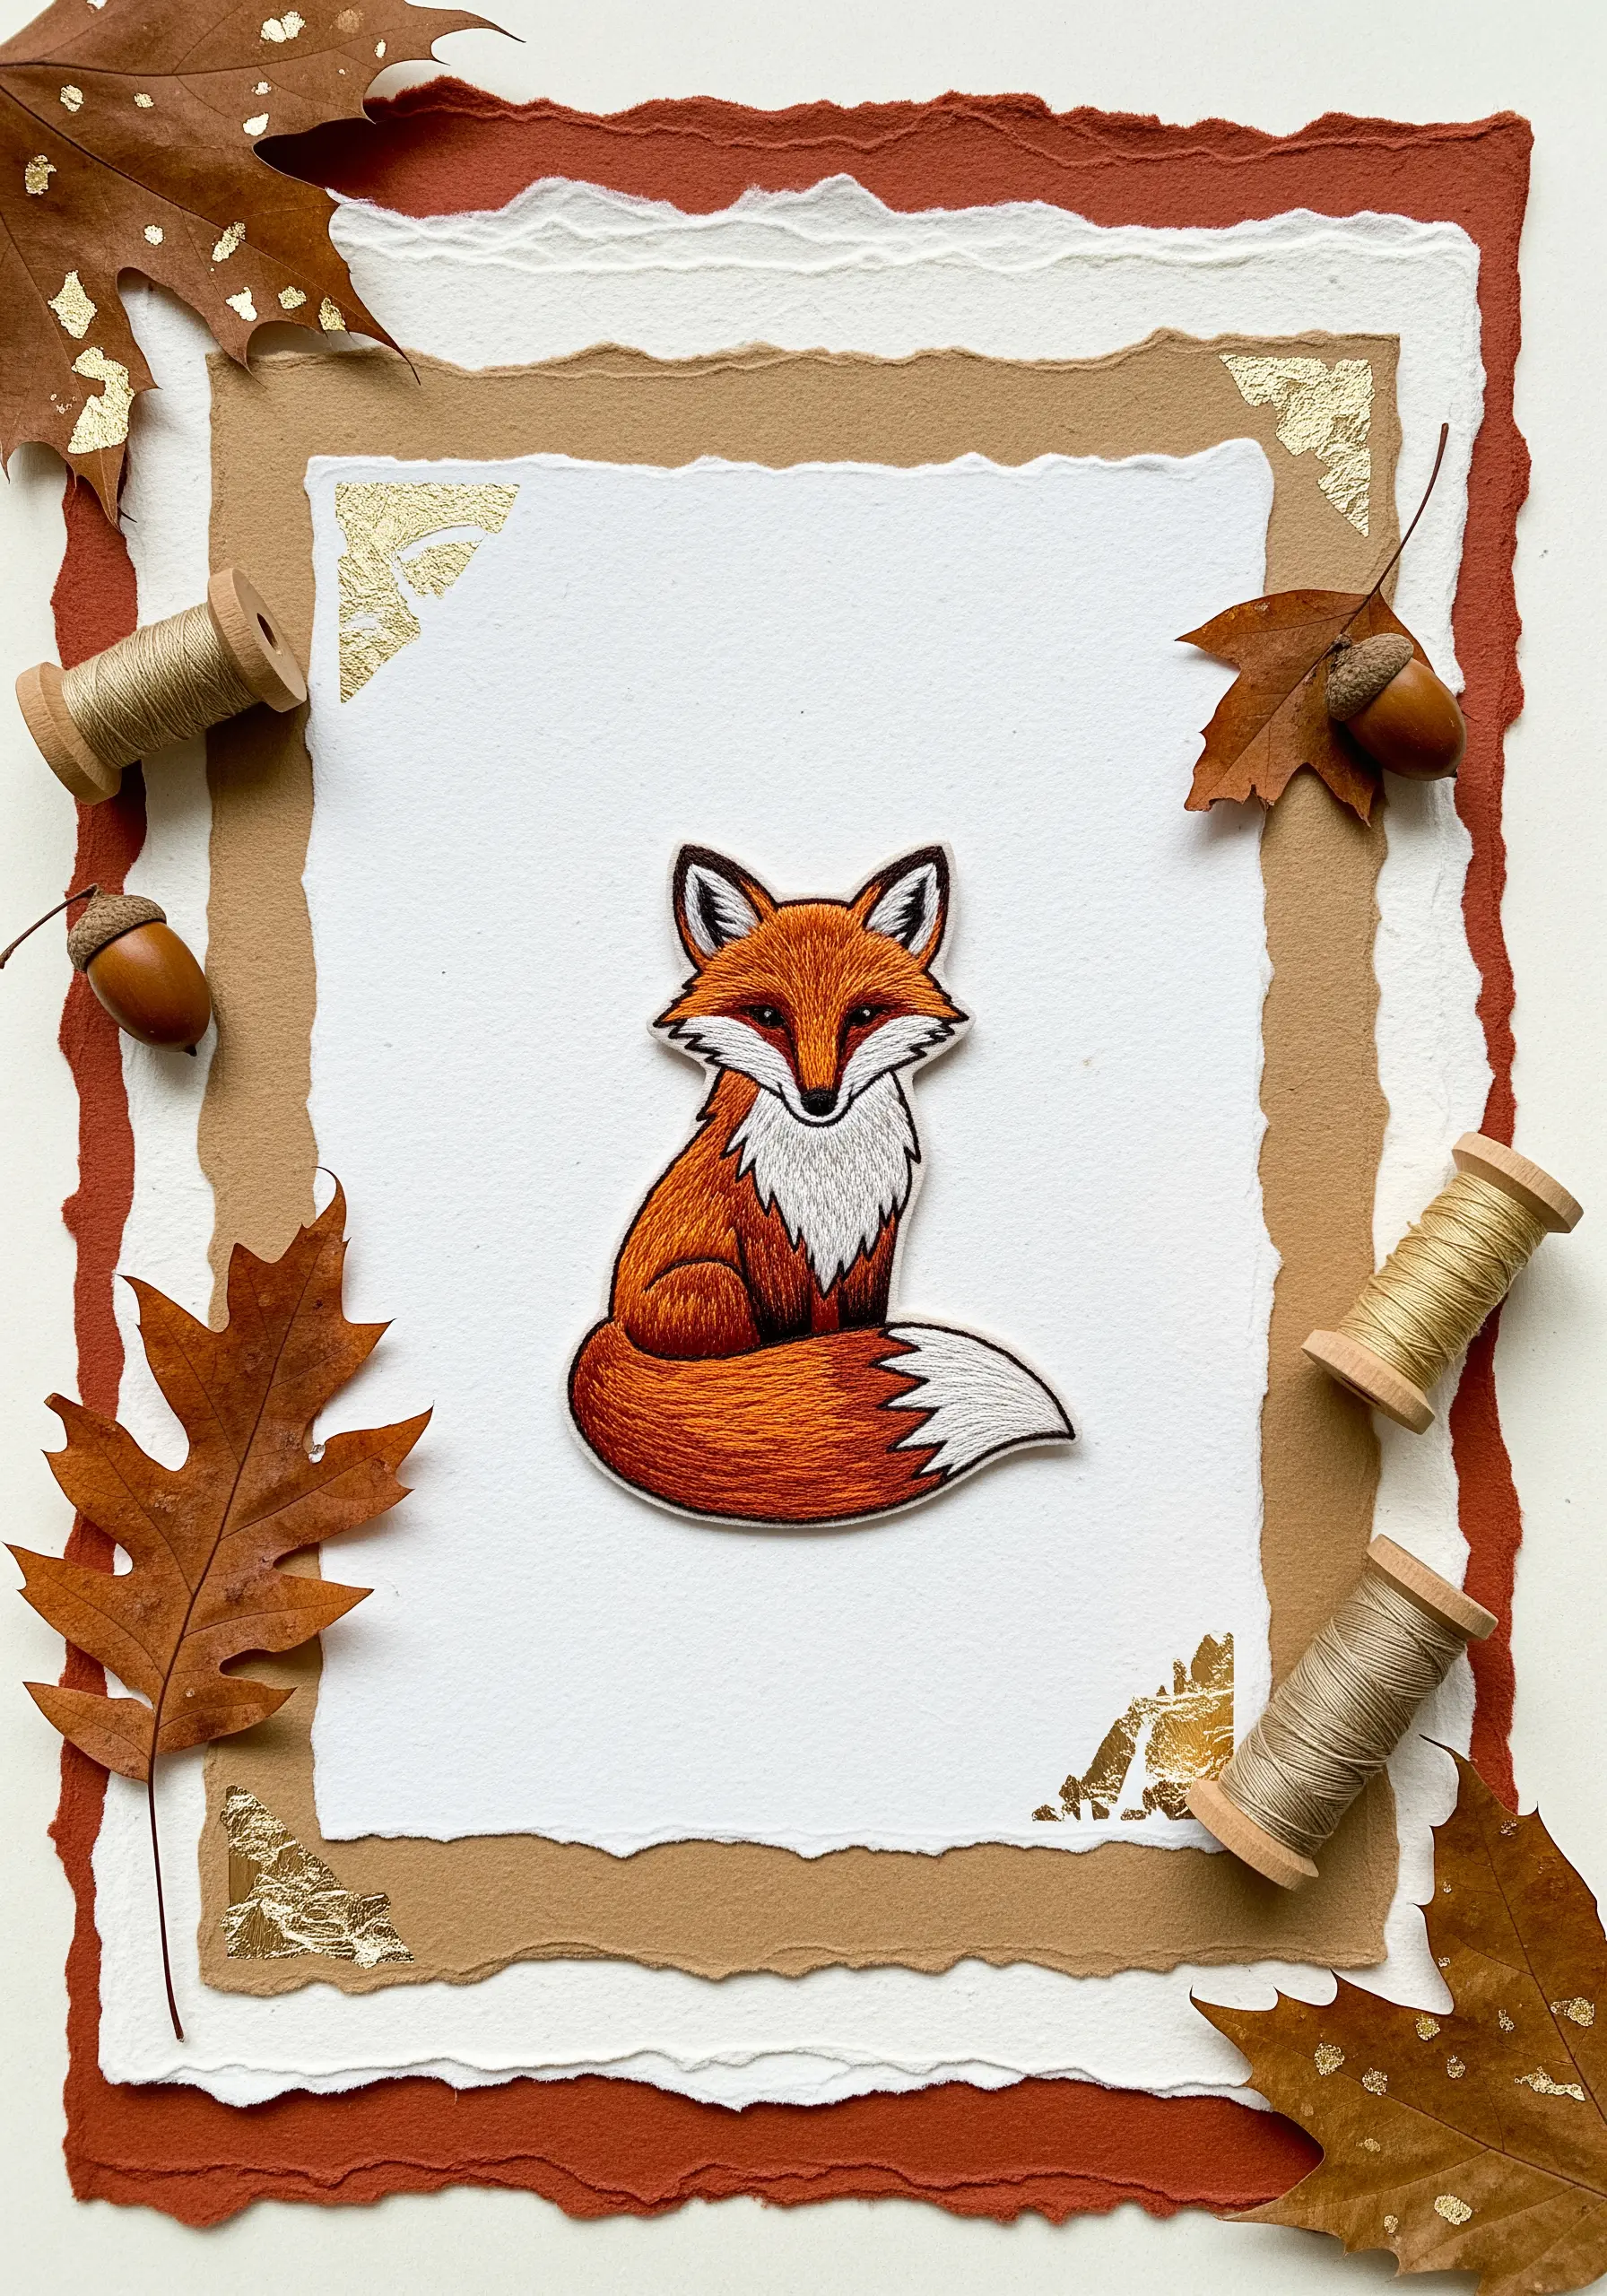
Create an elegant, gallery-worthy presentation by layering your finished embroidery patch.
Use several sheets of high-quality, deckle-edge paper in complementary earthy tones, tearing them carefully for a soft, organic feel.
Mount your stitched patch onto the top layer, then add delicate accents of gold leaf to the corners of the paper beneath.
This simple touch catches the light and adds a sense of luxury, elevating the entire composition.
12. Juxtapose Detail with an Intricate Cut-Paper Frame
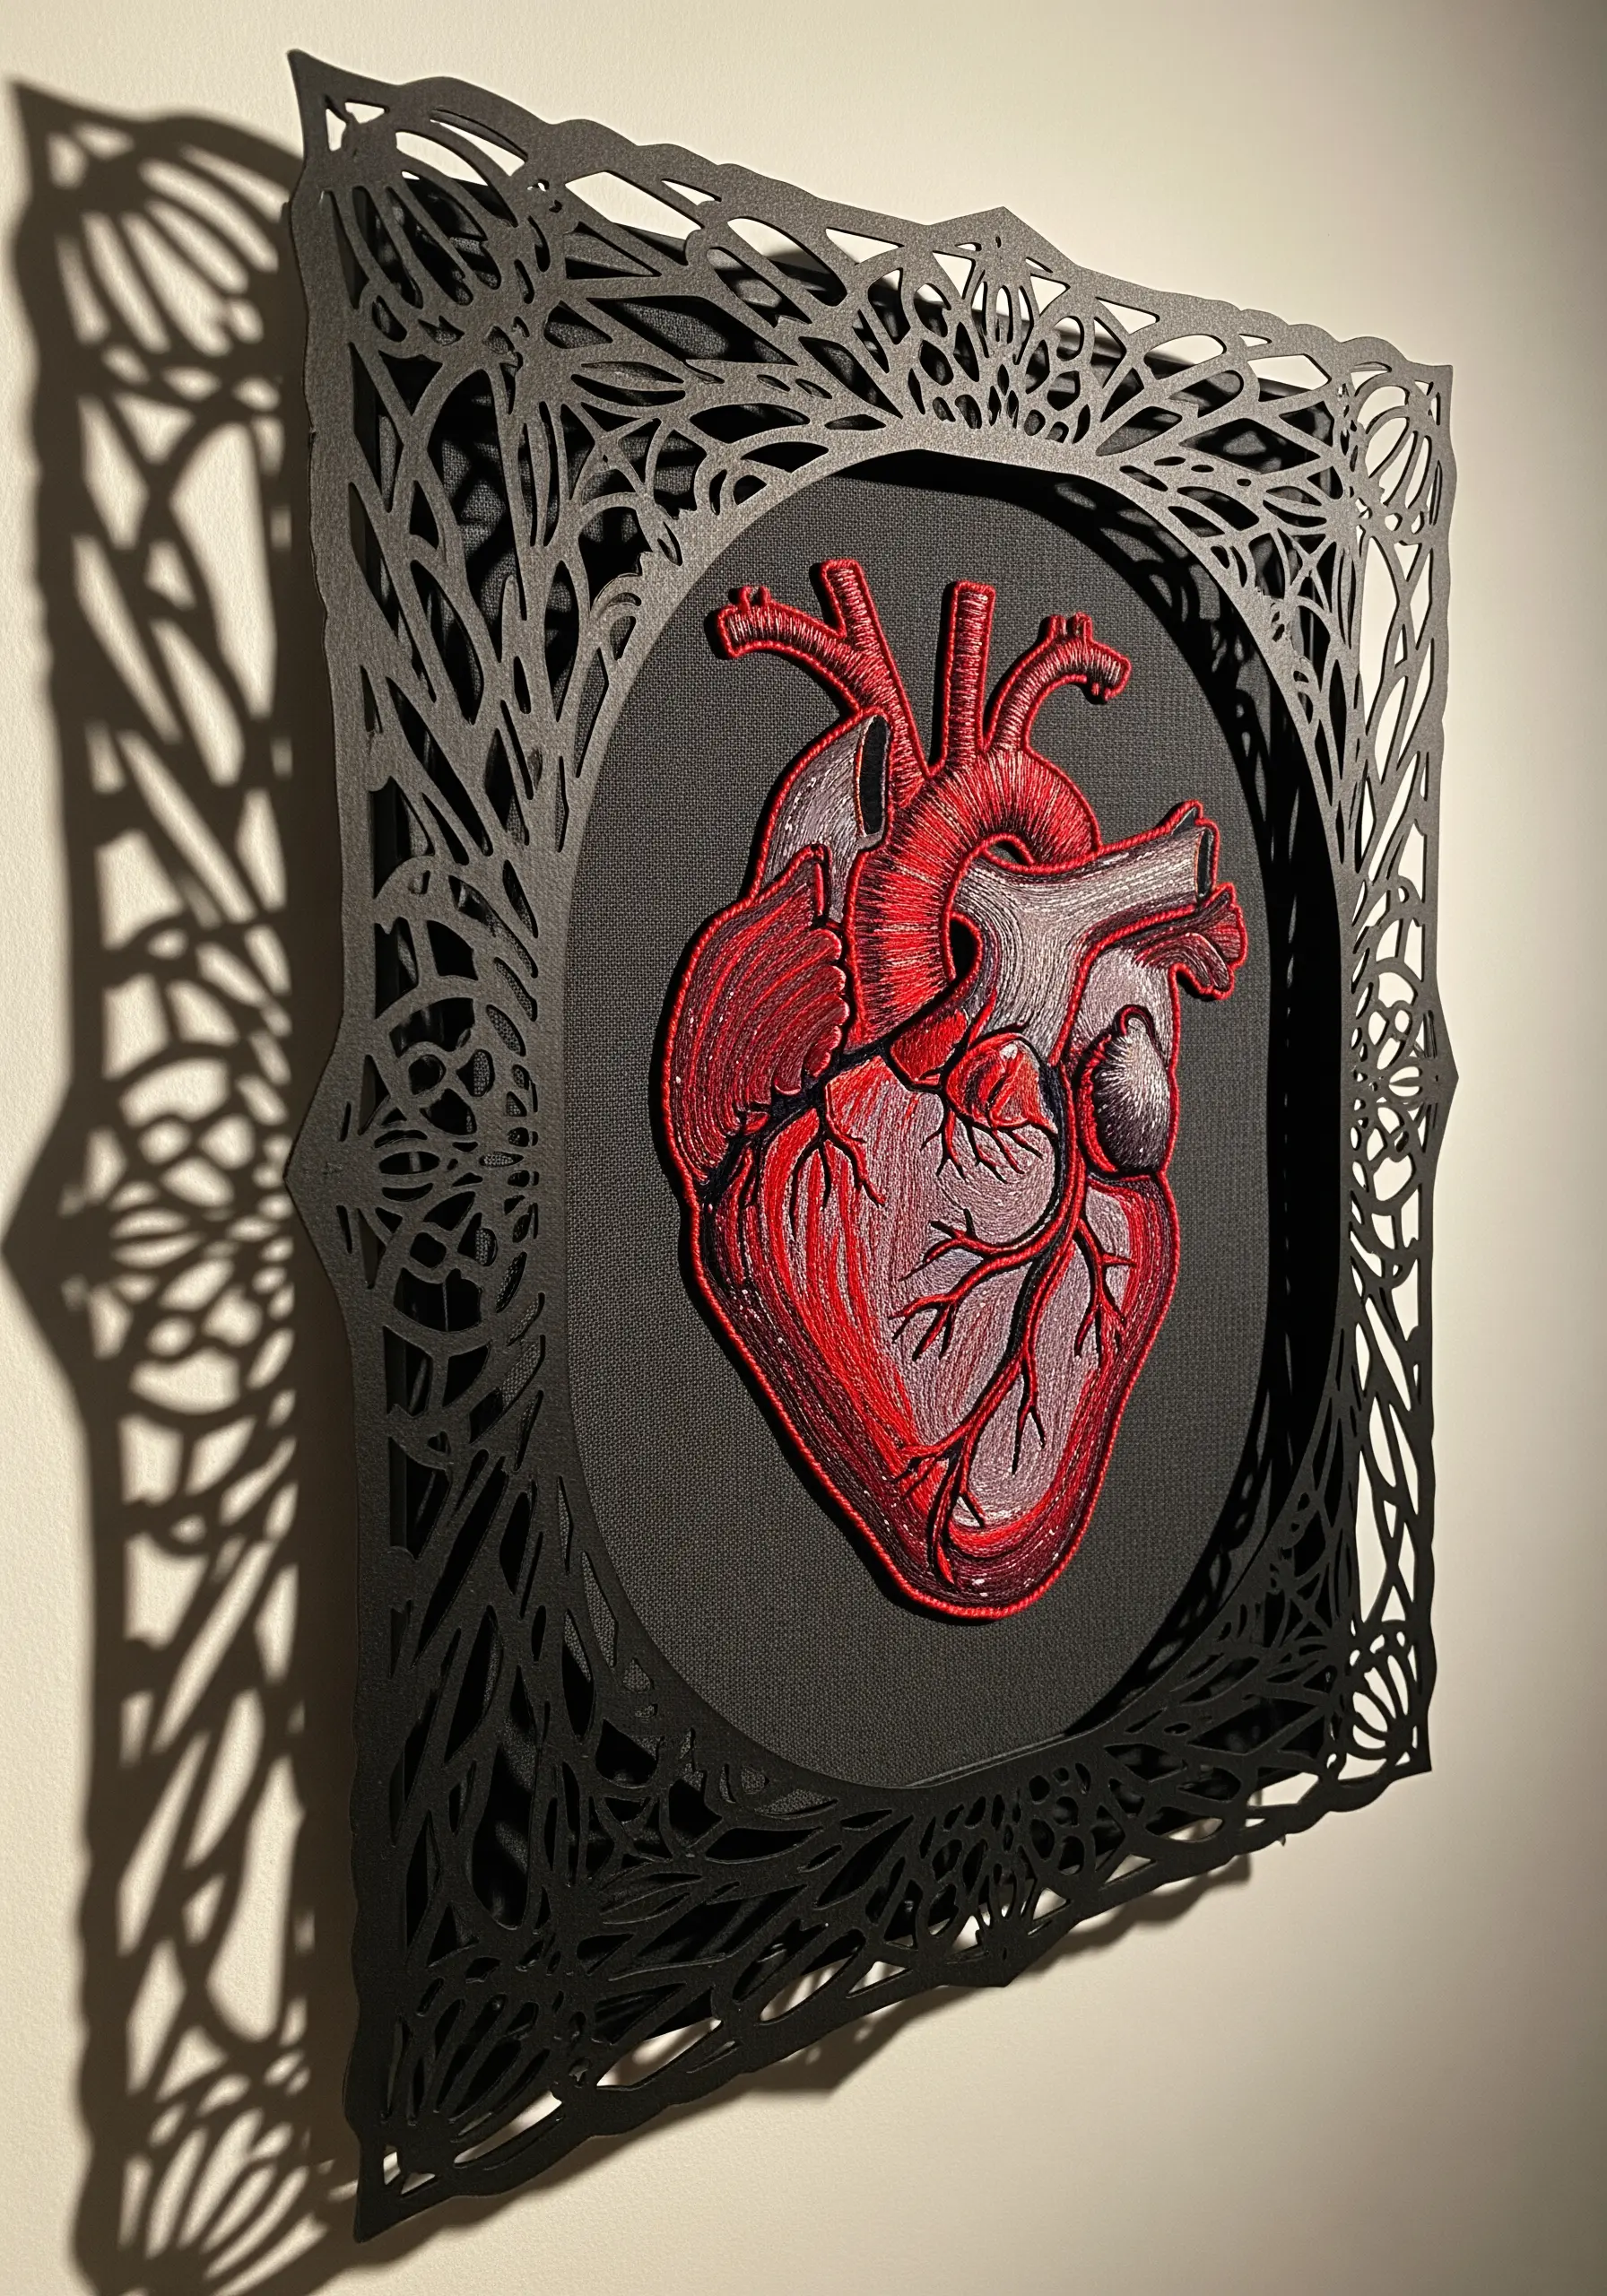
Contrast the soft texture of your threadwork with the sharp precision of a cut-paper frame.
You can find intricate SVG cut files online or design your own abstract or organic pattern to use with a cutting machine.
Choose a dark, heavy cardstock for maximum impact and dramatic shadows.
The complex, lace-like silhouette draws the viewer’s eye inward, perfectly highlighting your meticulously stitched centerpiece.
13. Build a Vibrant Frame with Accordion-Folded Paper
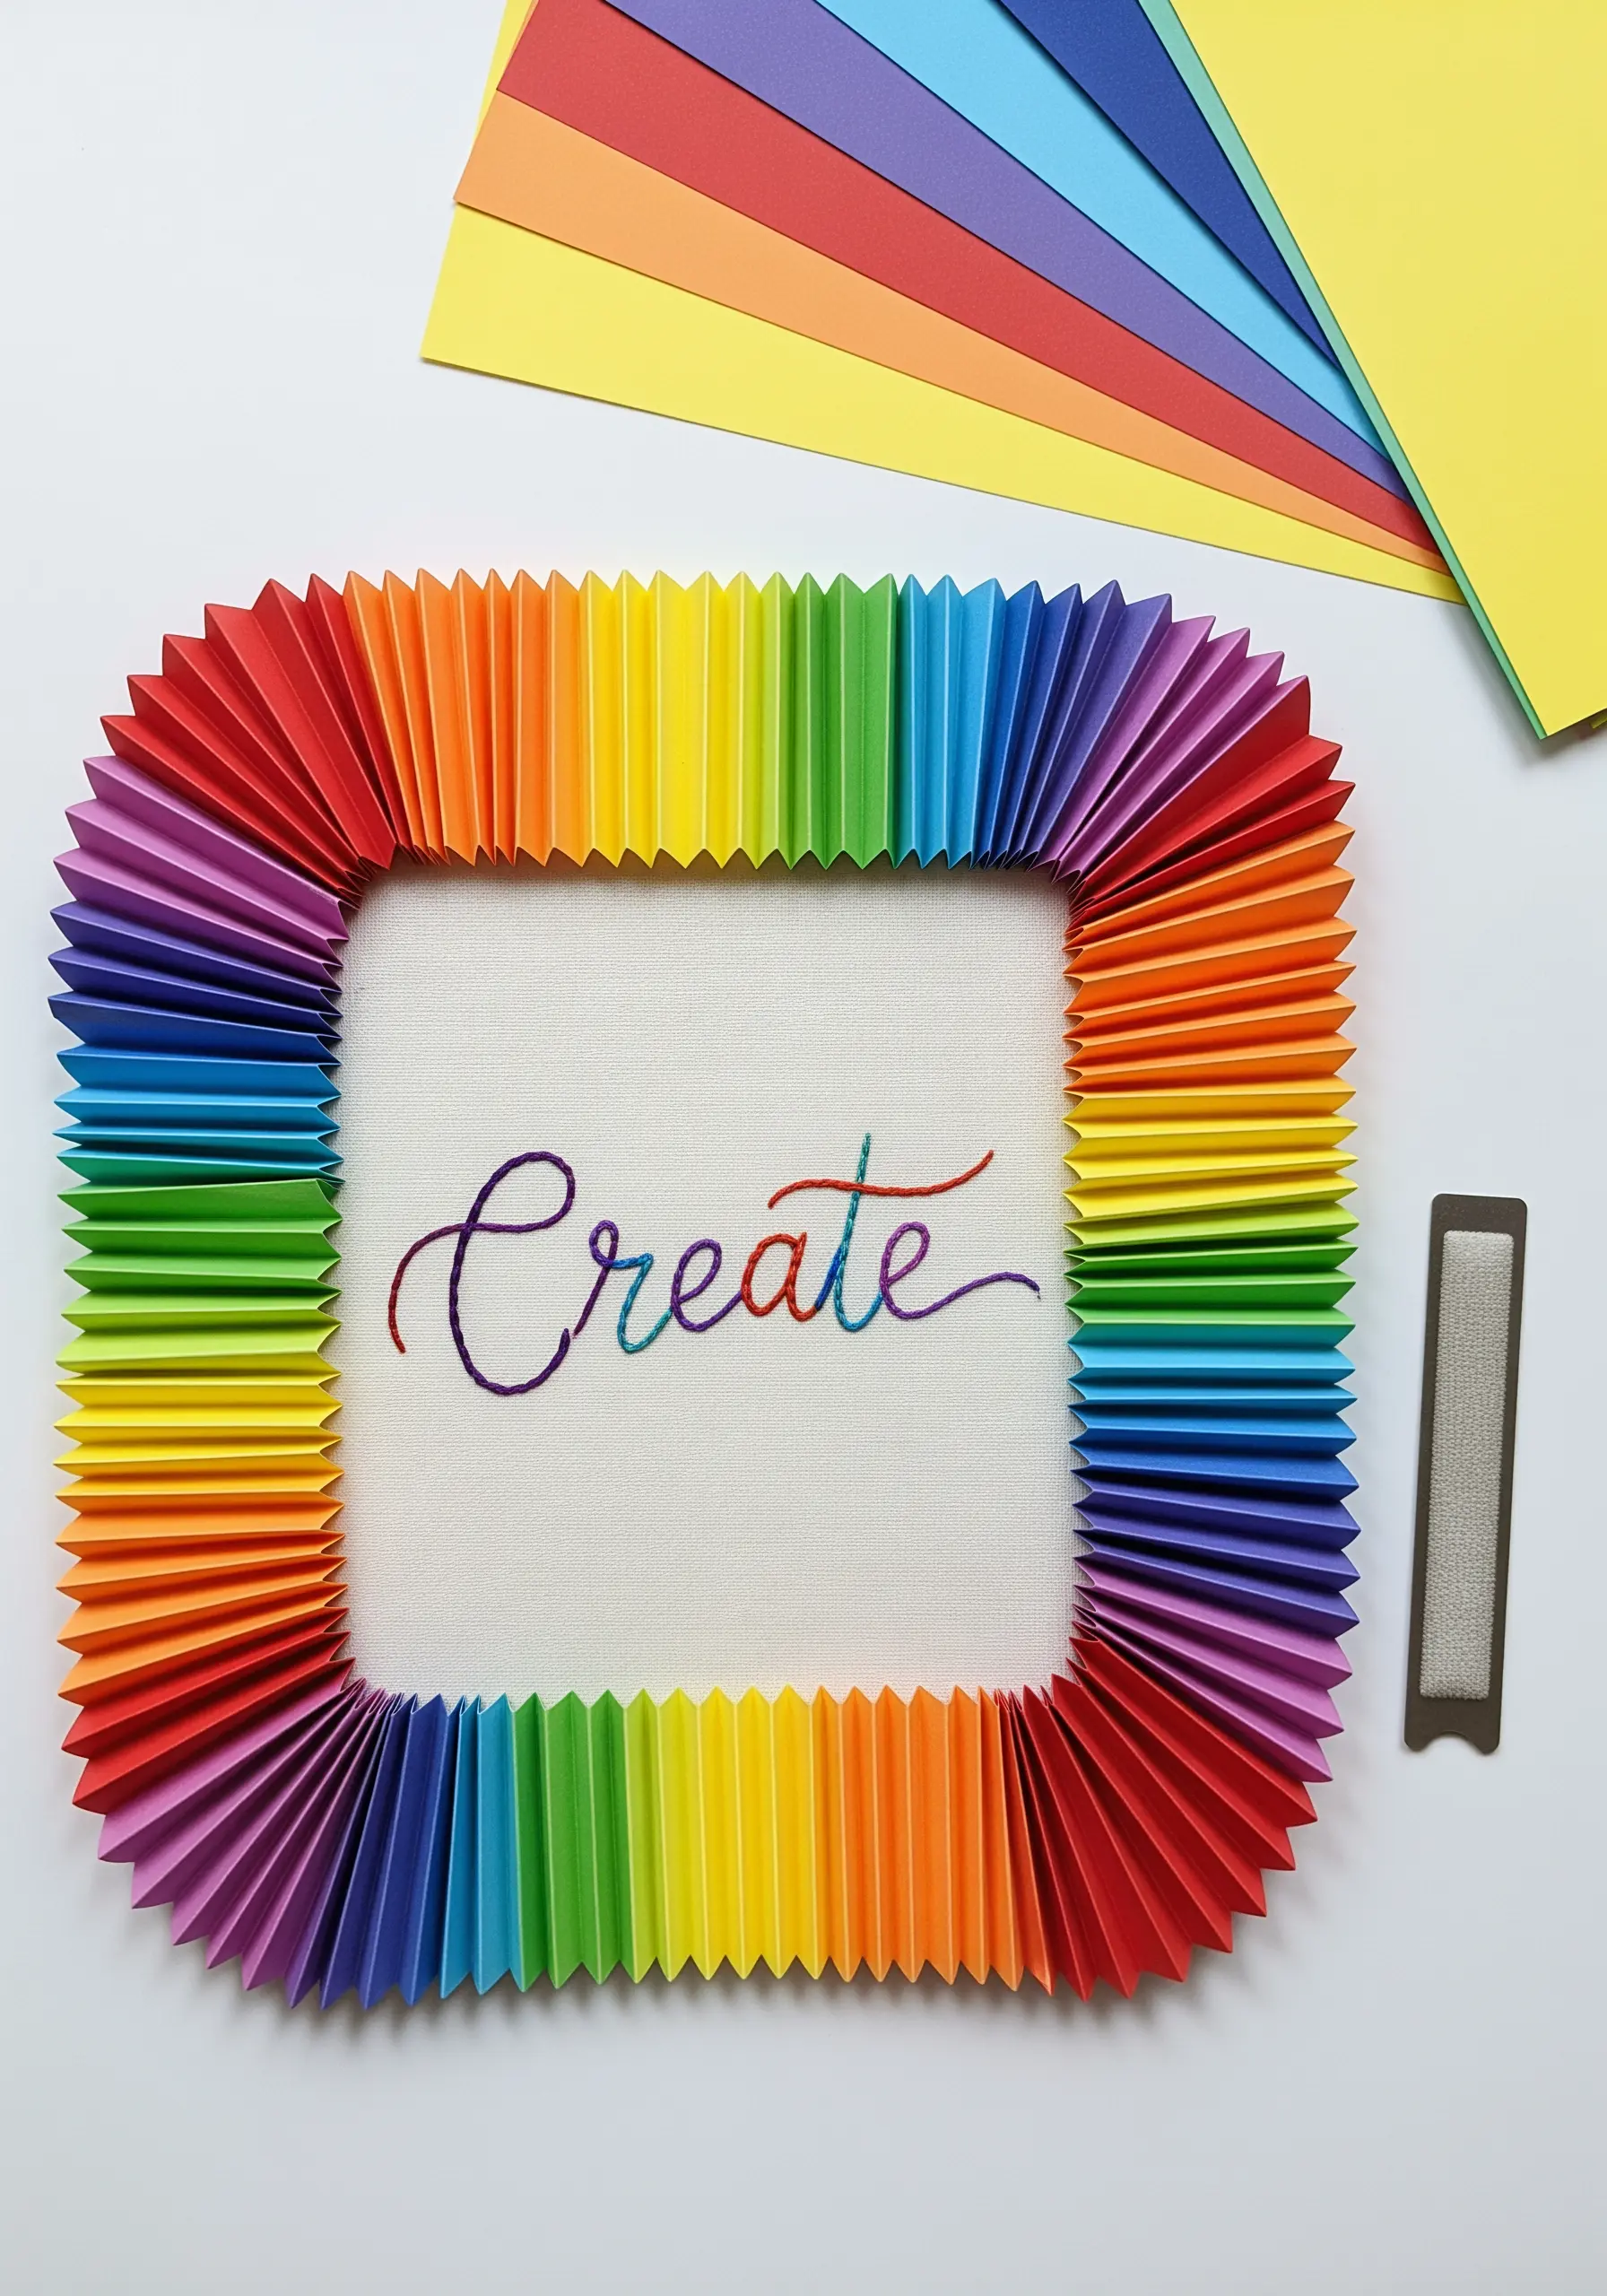
Create a burst of color and texture with a dynamic, pleated paper frame.
Cut even strips of colored paper from a rainbow palette and use a scoring board to create crisp accordion folds.
Glue the folded strips end-to-end to form a continuous pleated ribbon, then attach it to the edge of your stretched canvas.
This technique adds playful dimension and energy, making it perfect for framing uplifting words or simple, joyful motifs. It’s one of the best easy paper art hacks to showcase your handmade embroidery.
14. Create a Custom Background with Paper Stamping
Instead of stitching on plain fabric, design a custom-patterned background for your appliqué.
First, embroider your main subject onto a separate piece of fabric and trim around the shape.
Next, use a rubber stamp and ink to create a repeating pattern on a sheet of heavy paper.
Finally, mount your embroidered patch onto the stamped background for a cohesive, two-tone design that feels layered and professionally designed.
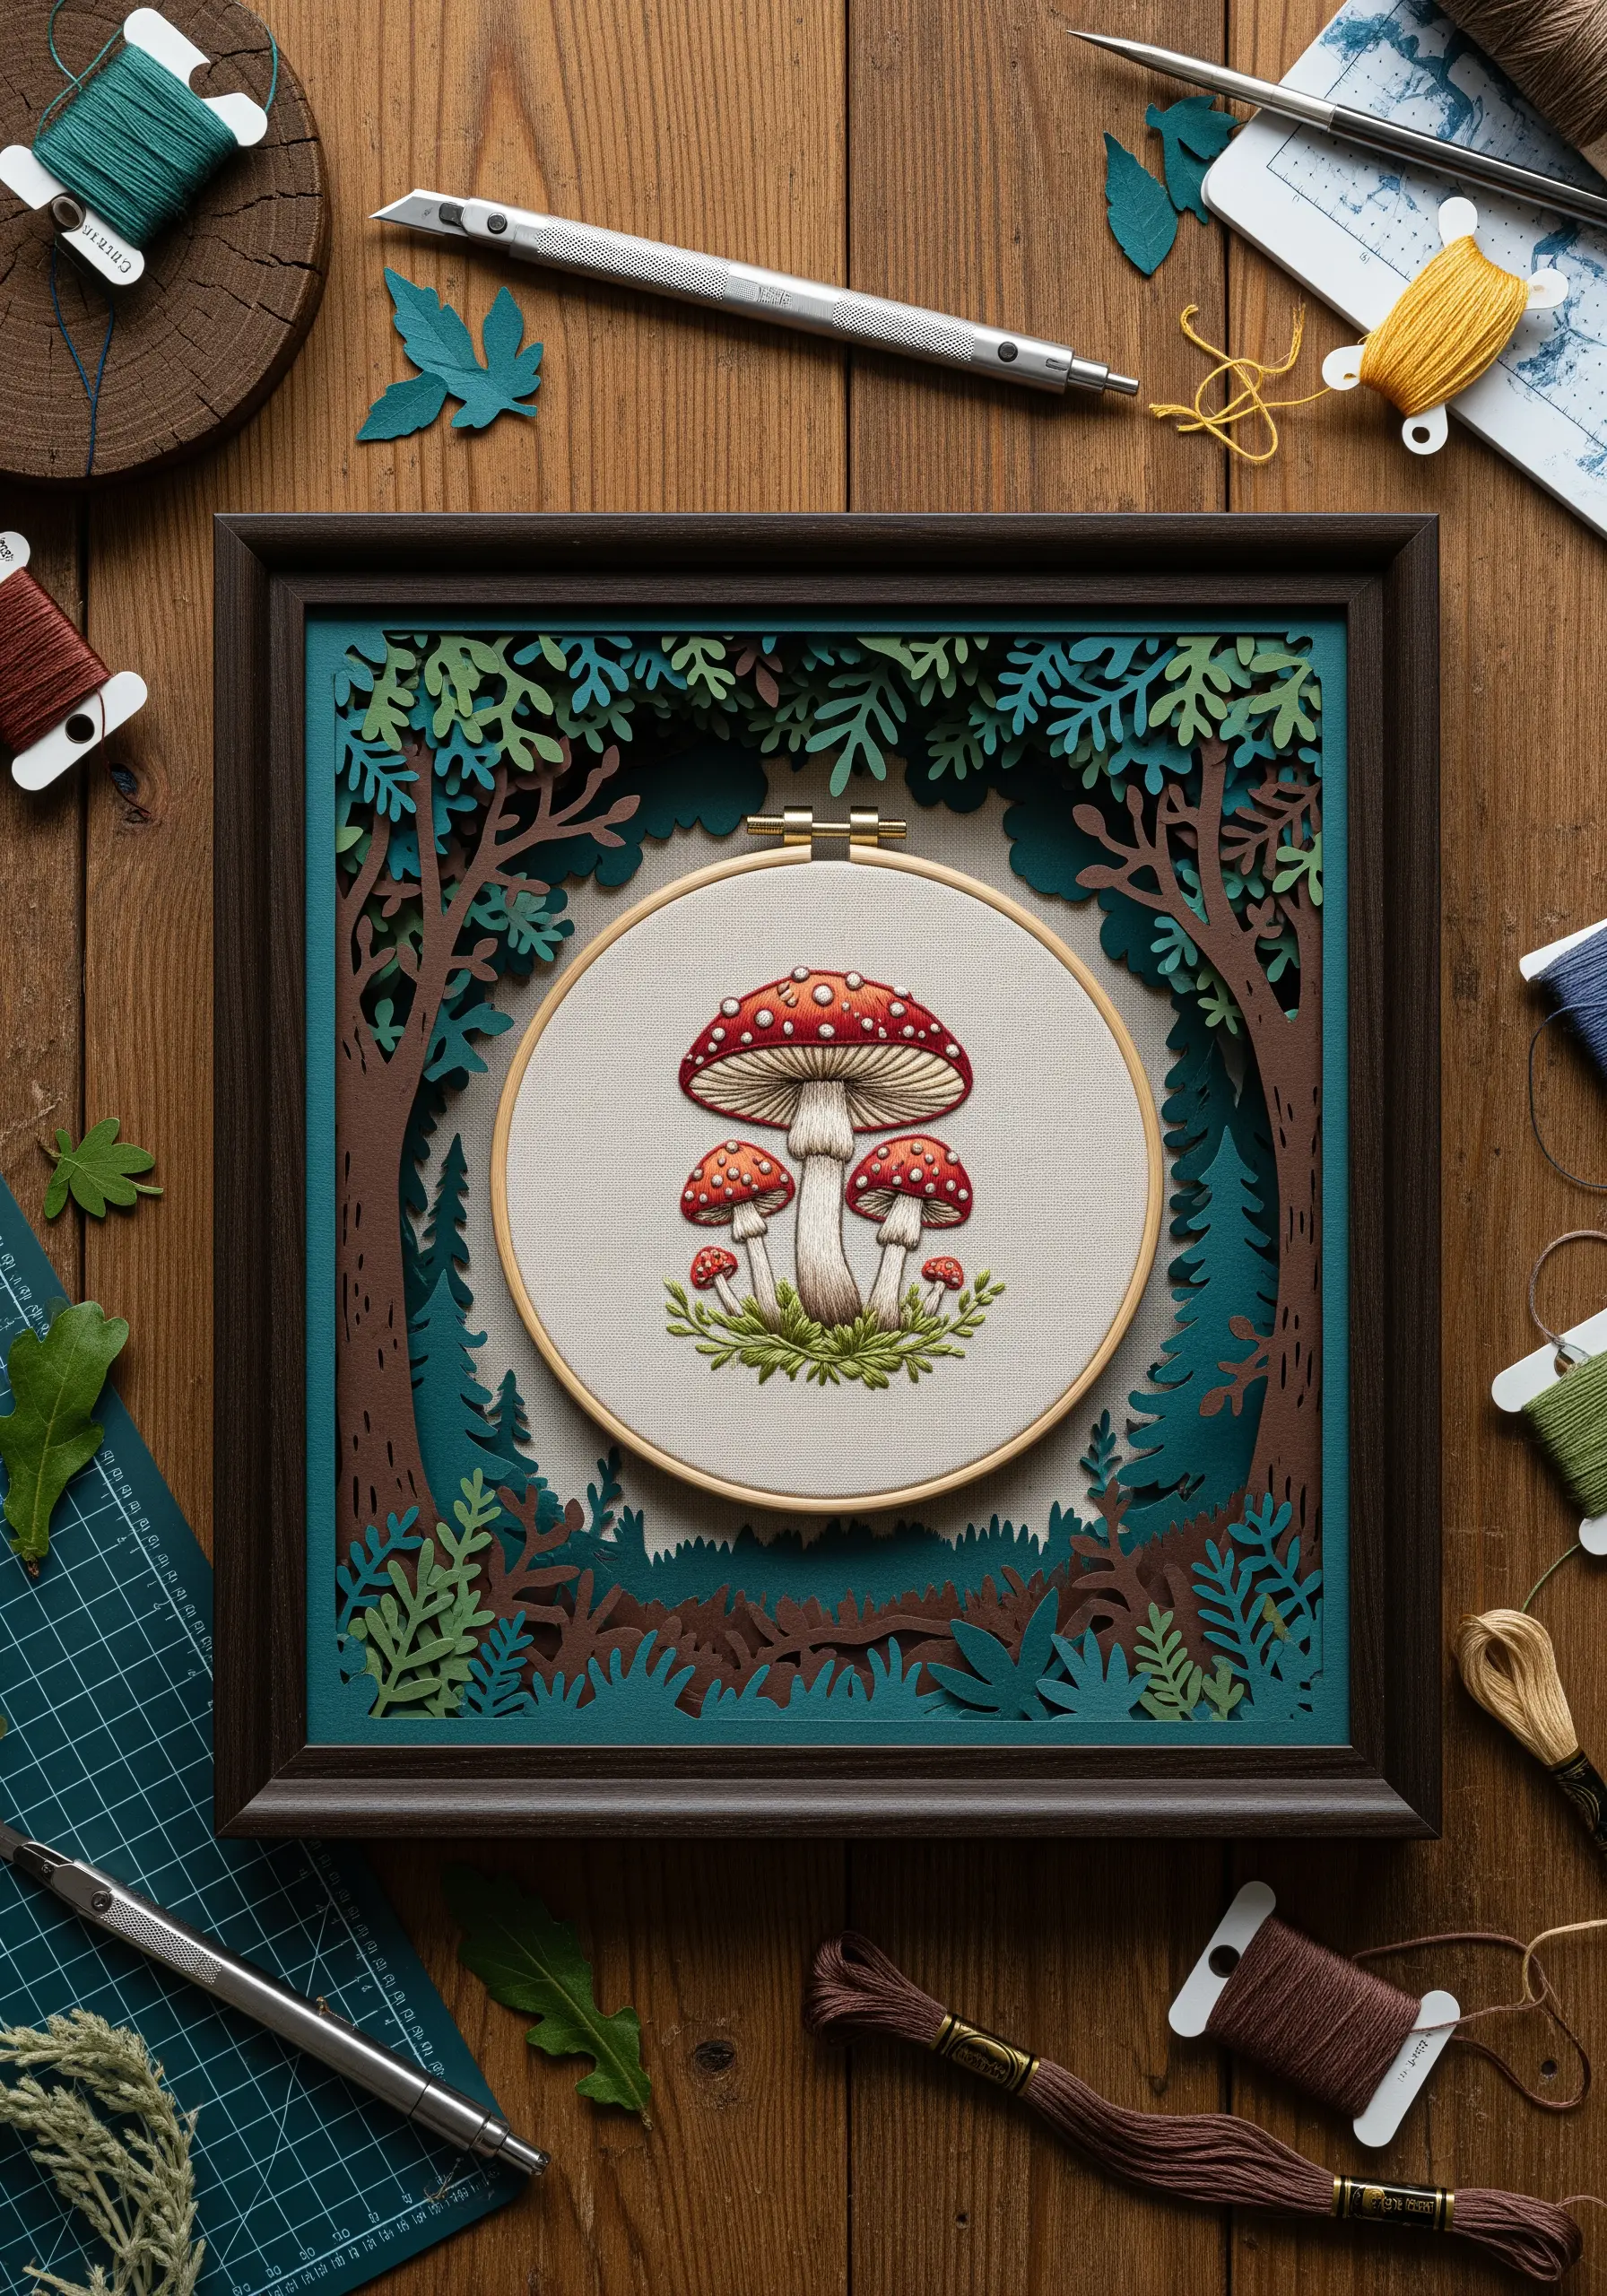
15. Tell a Story with a Paper-Cut Landscape
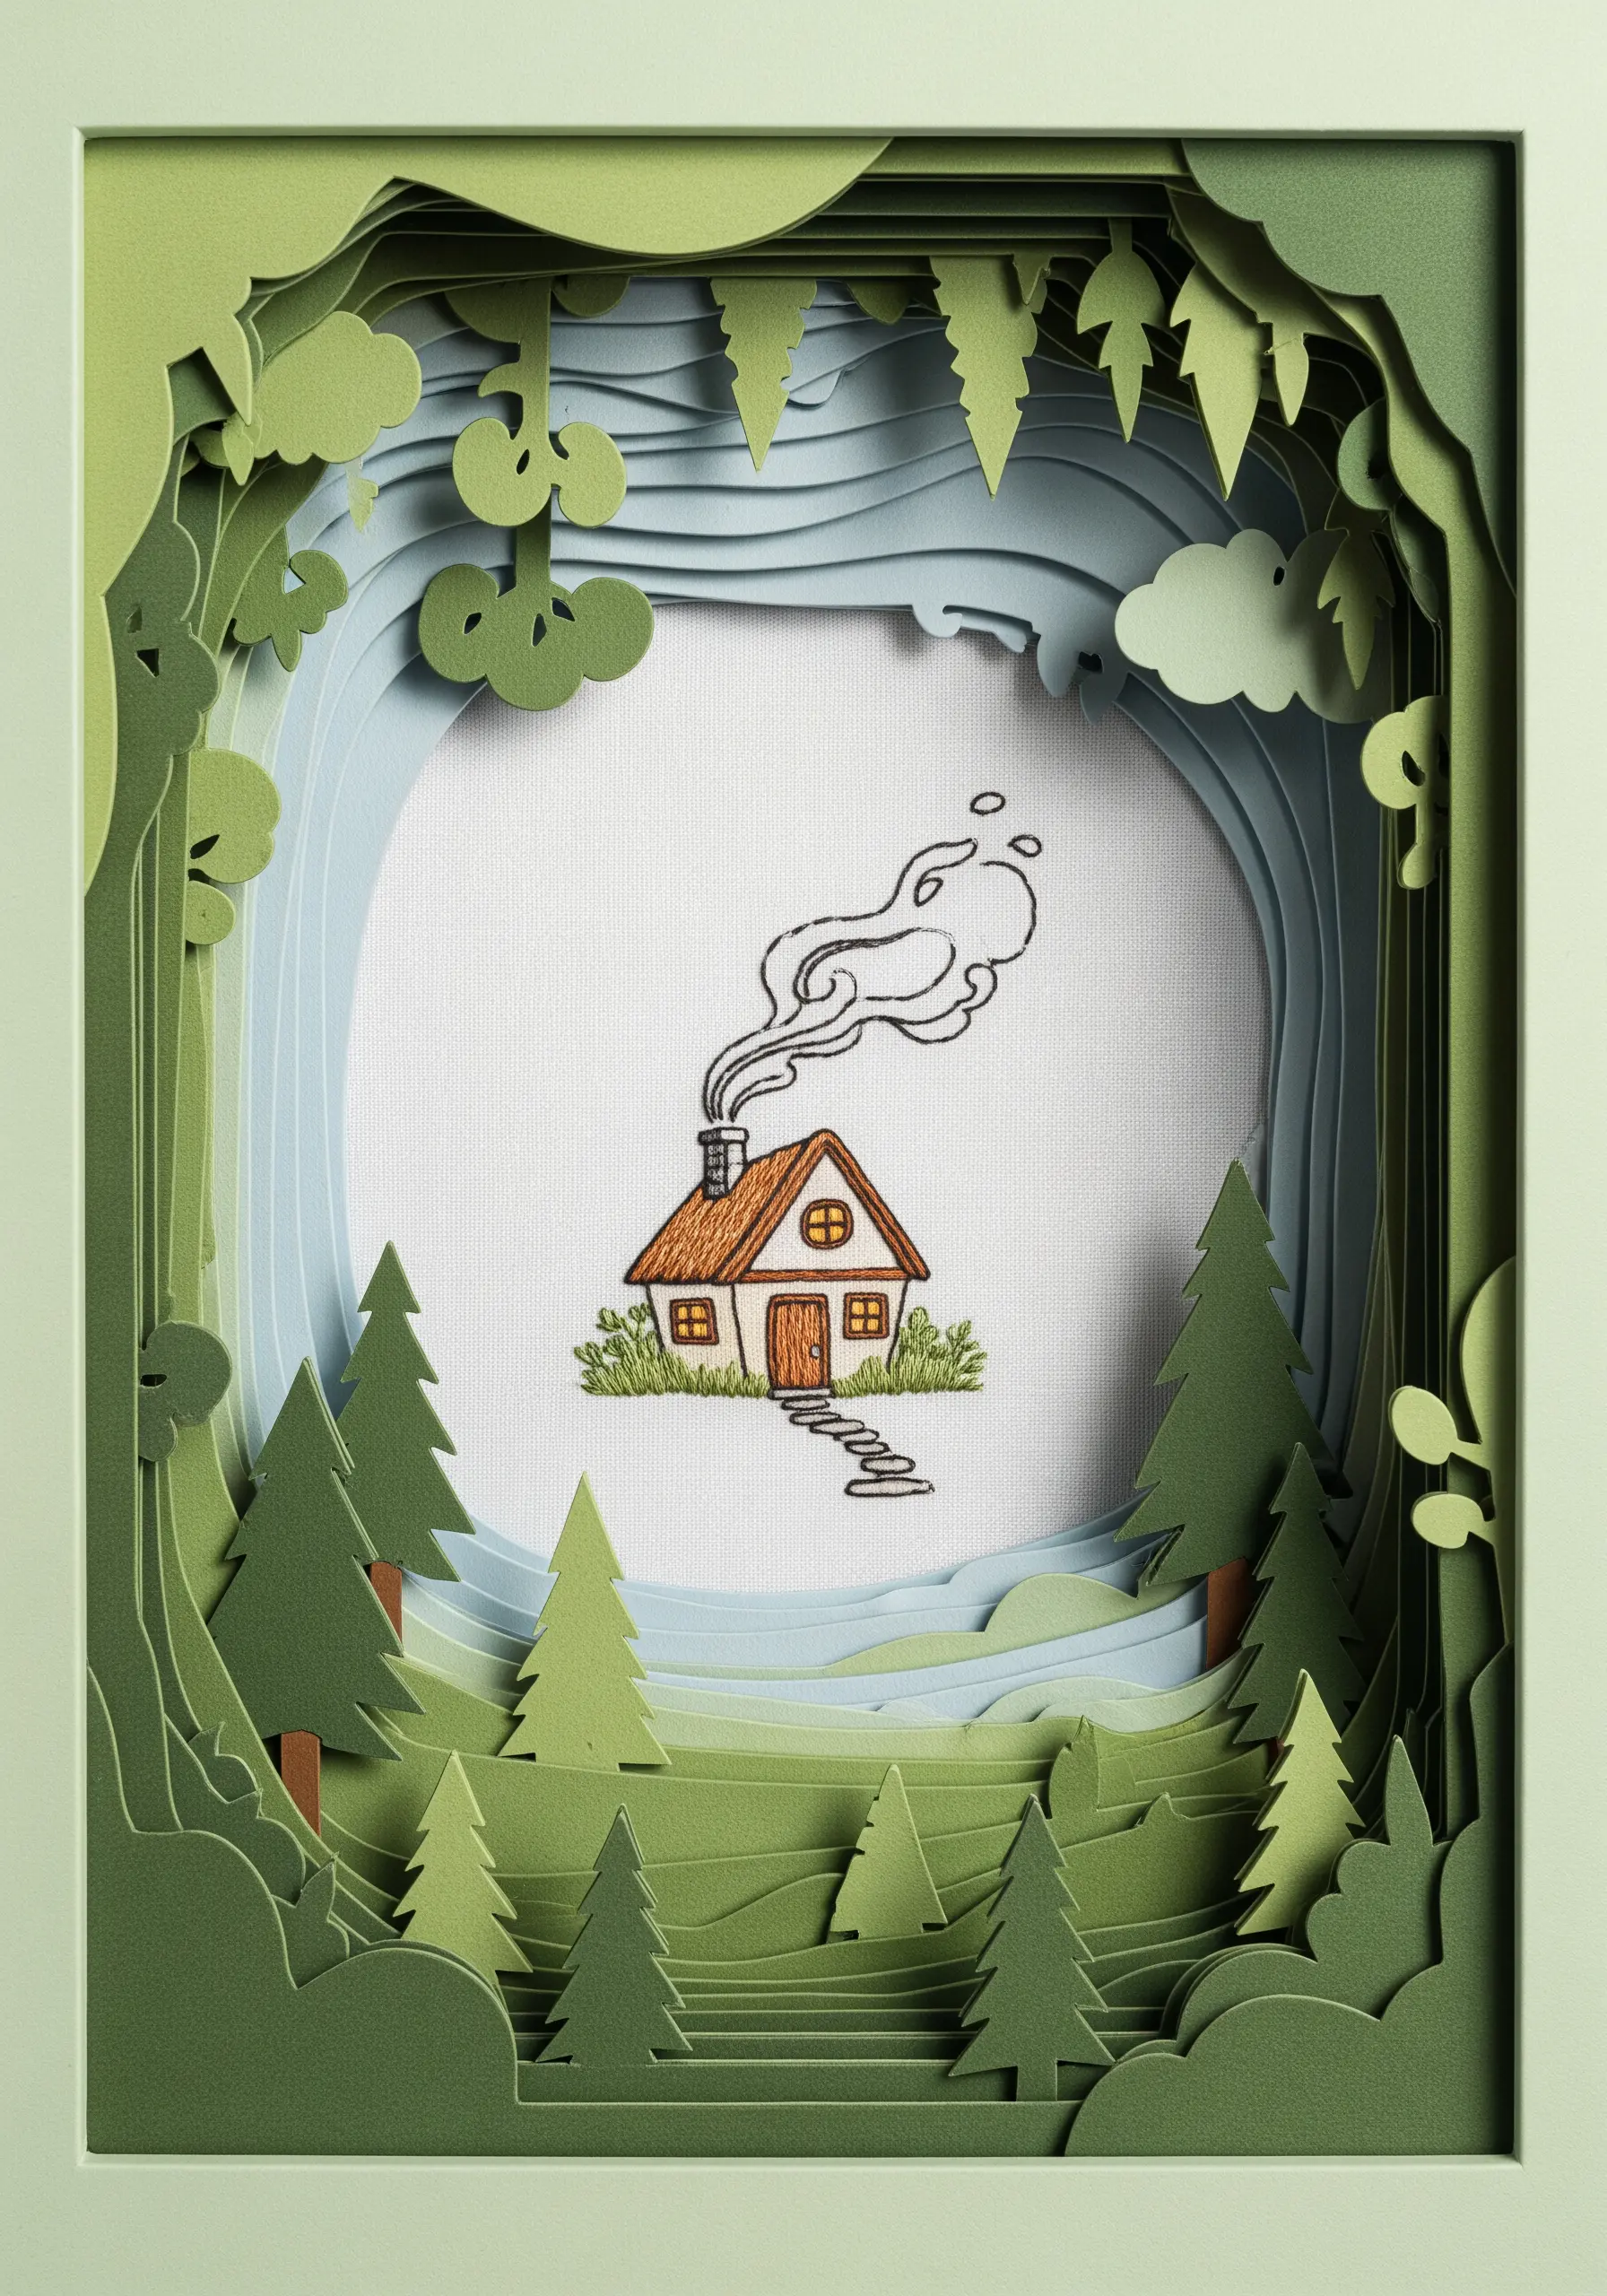
Expand the world of your embroidery by building a complete paper scene around it.
For a small motif like a cozy cabin, use layers of green and blue cardstock to create rolling hills, pine trees, and a distant sky.
By varying the tones and using foam spacers between layers, you create an atmospheric perspective that makes the scene feel vast.
The simple line-work of the embroidery becomes the charming heart of a much larger narrative, showing how paper art projects that turn simple stitches into stunning decor can truly elevate your work.
16. Add Elegance with an Embossed Paper Frame
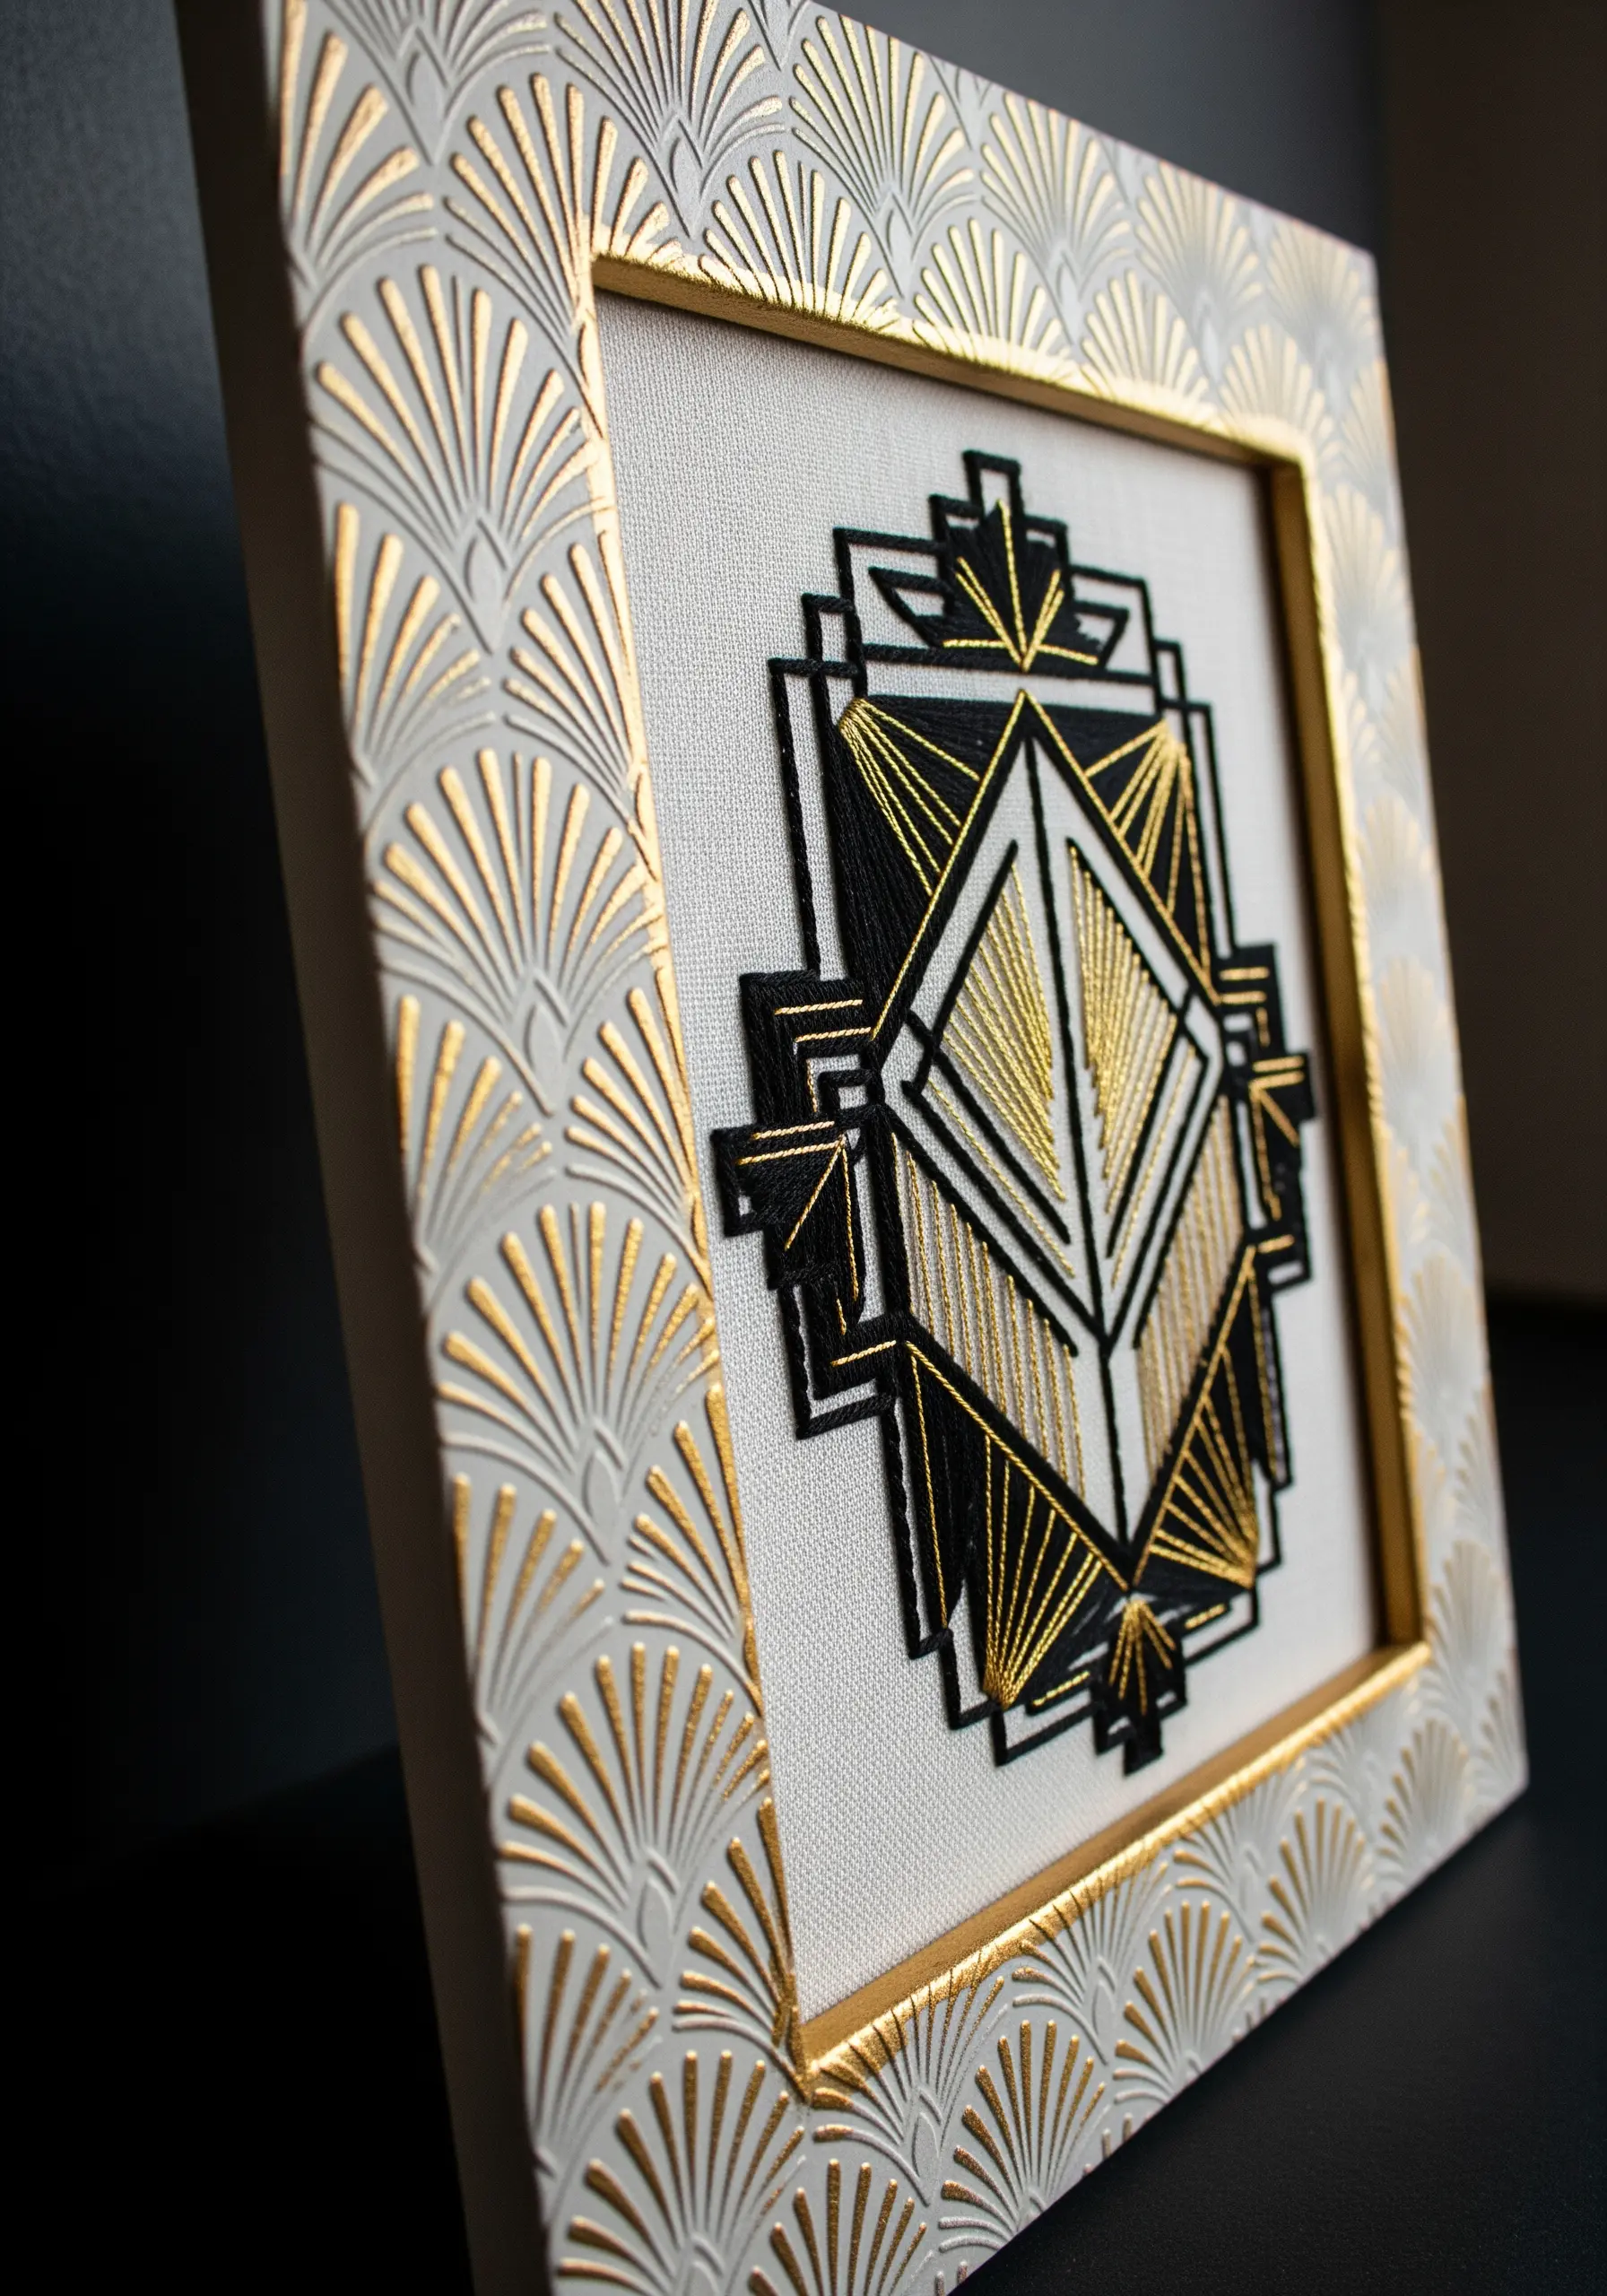
Complement a geometric or Art Deco design with the subtle texture of an embossed paper frame.
Use an embossing machine with a patterned folder, or try a simpler stencil-and-stylus method on sturdy cardstock.
For a refined finish, choose a pearlescent or metallic paper and gently highlight the raised portions of the design with a gold leaf pen.
This adds an architectural texture that feels incredibly sophisticated and cohesive with your stitched art.
17. Create a Galactic Scene with Spray Paint
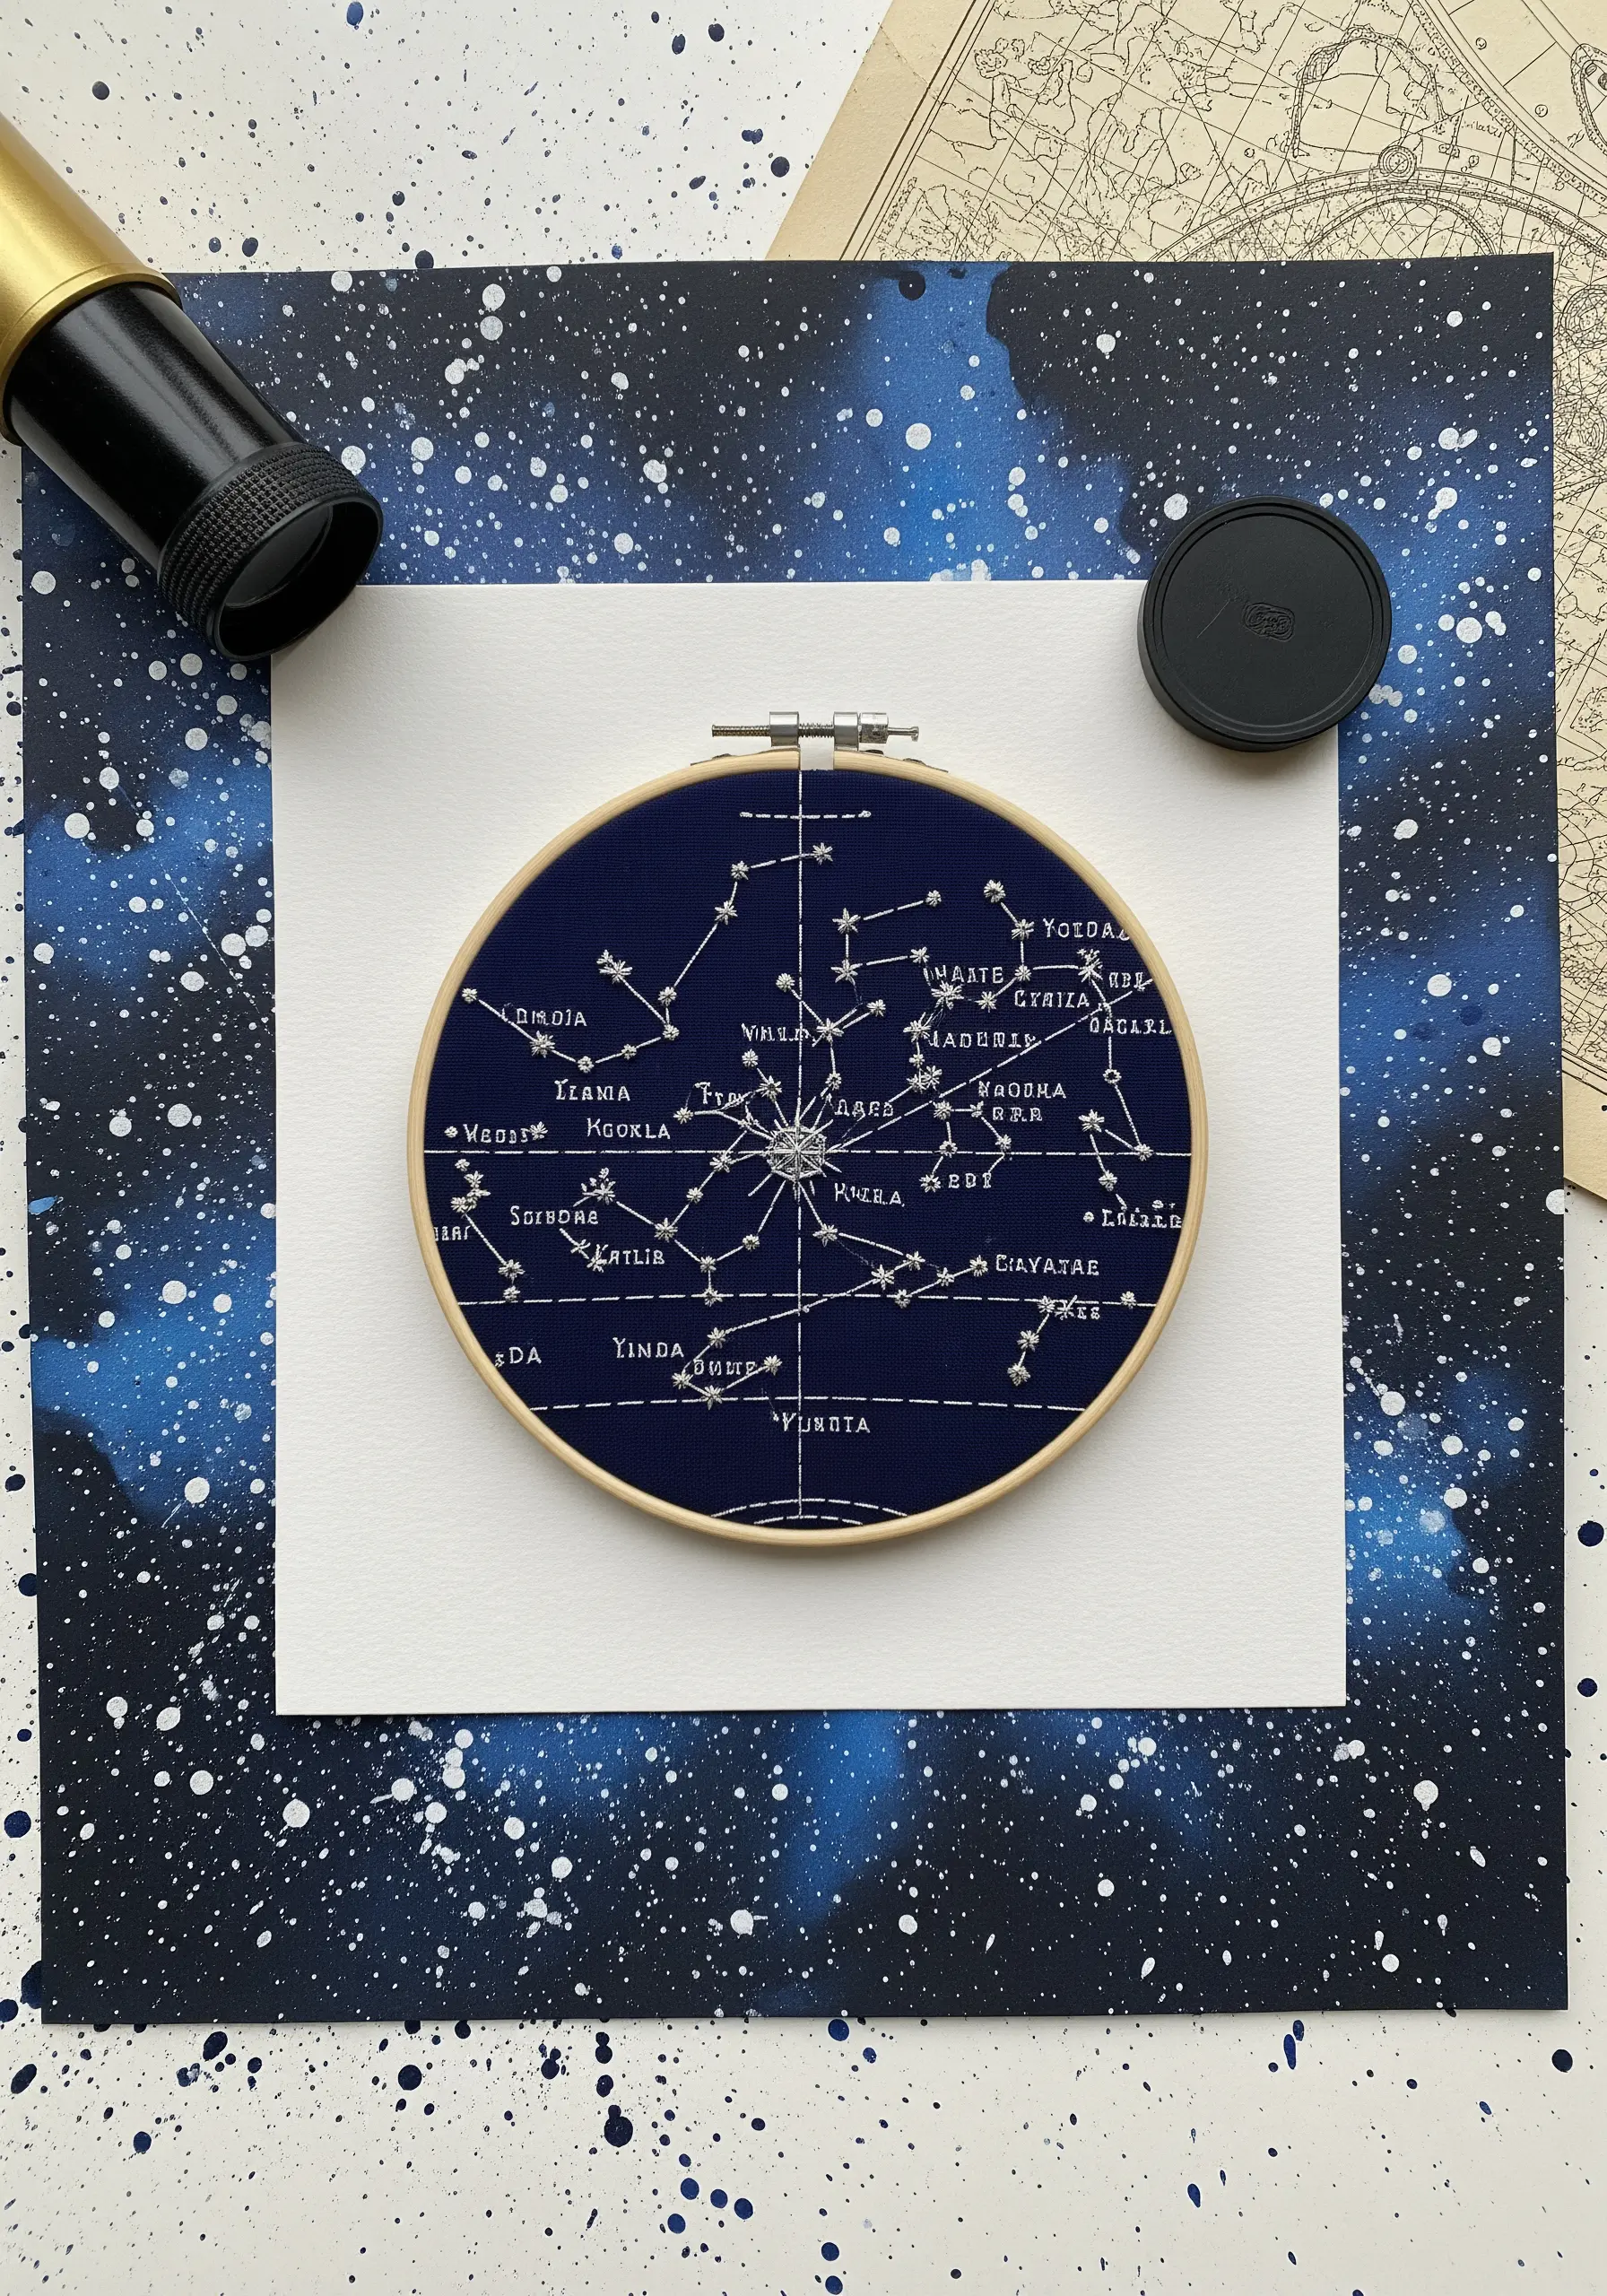
Give your celestial embroidery an atmospheric backdrop by transforming paper with spray paint.
On a large sheet of cardstock, layer black, blue, and white spray paint to create a nebula effect.
To add stars, spray a small amount of white paint onto a stiff brush and flick the bristles with your thumb.
The random, misty quality of the background provides the perfect contrast for the precise, linear stitches of a constellation map.
18. Add Character with Stained and Crinkled Paper
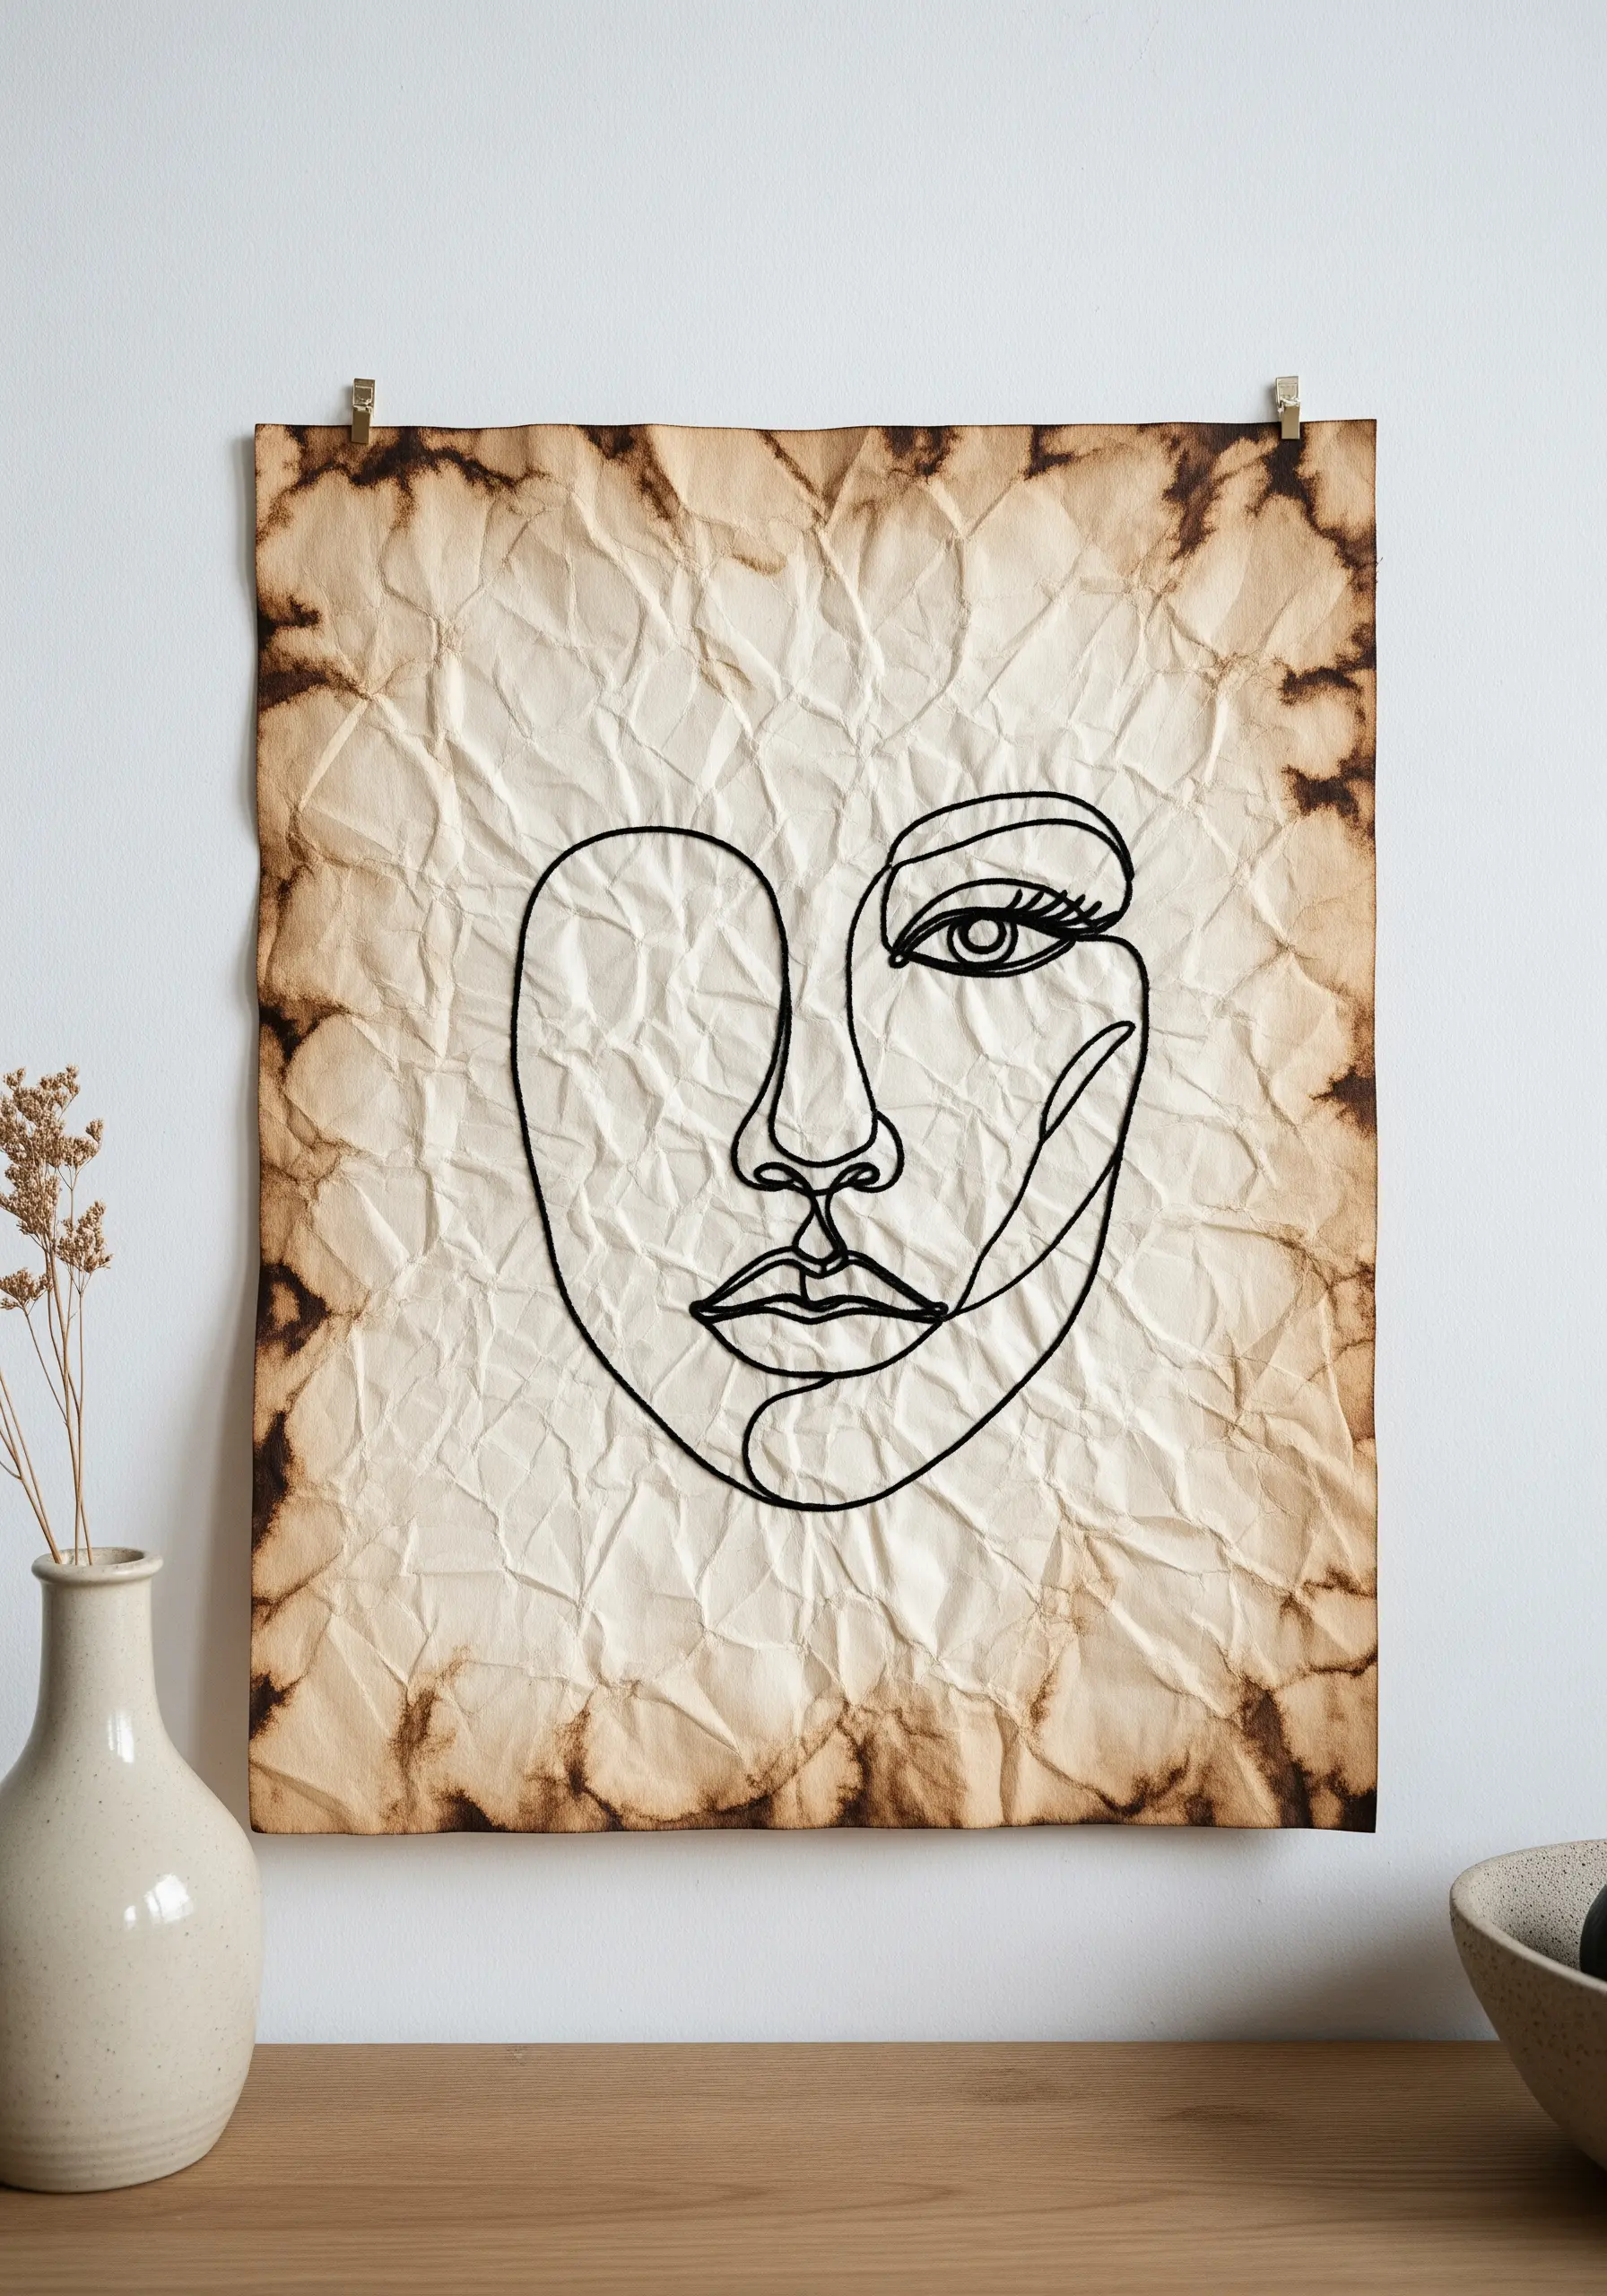
Instead of fabric, use heavy-duty paper as your canvas to achieve a weathered, vintage look.
After completing your line-art embroidery, carefully crumple the paper and then flatten it out again.
To create the aged effect, brew strong tea or coffee, let it cool, and use a sponge to dab the liquid onto the paper, concentrating it around the edges and creases.
This process adds instant history and emotional weight to even the simplest design.
19. Construct a Mosaic Frame from Paper Tiles
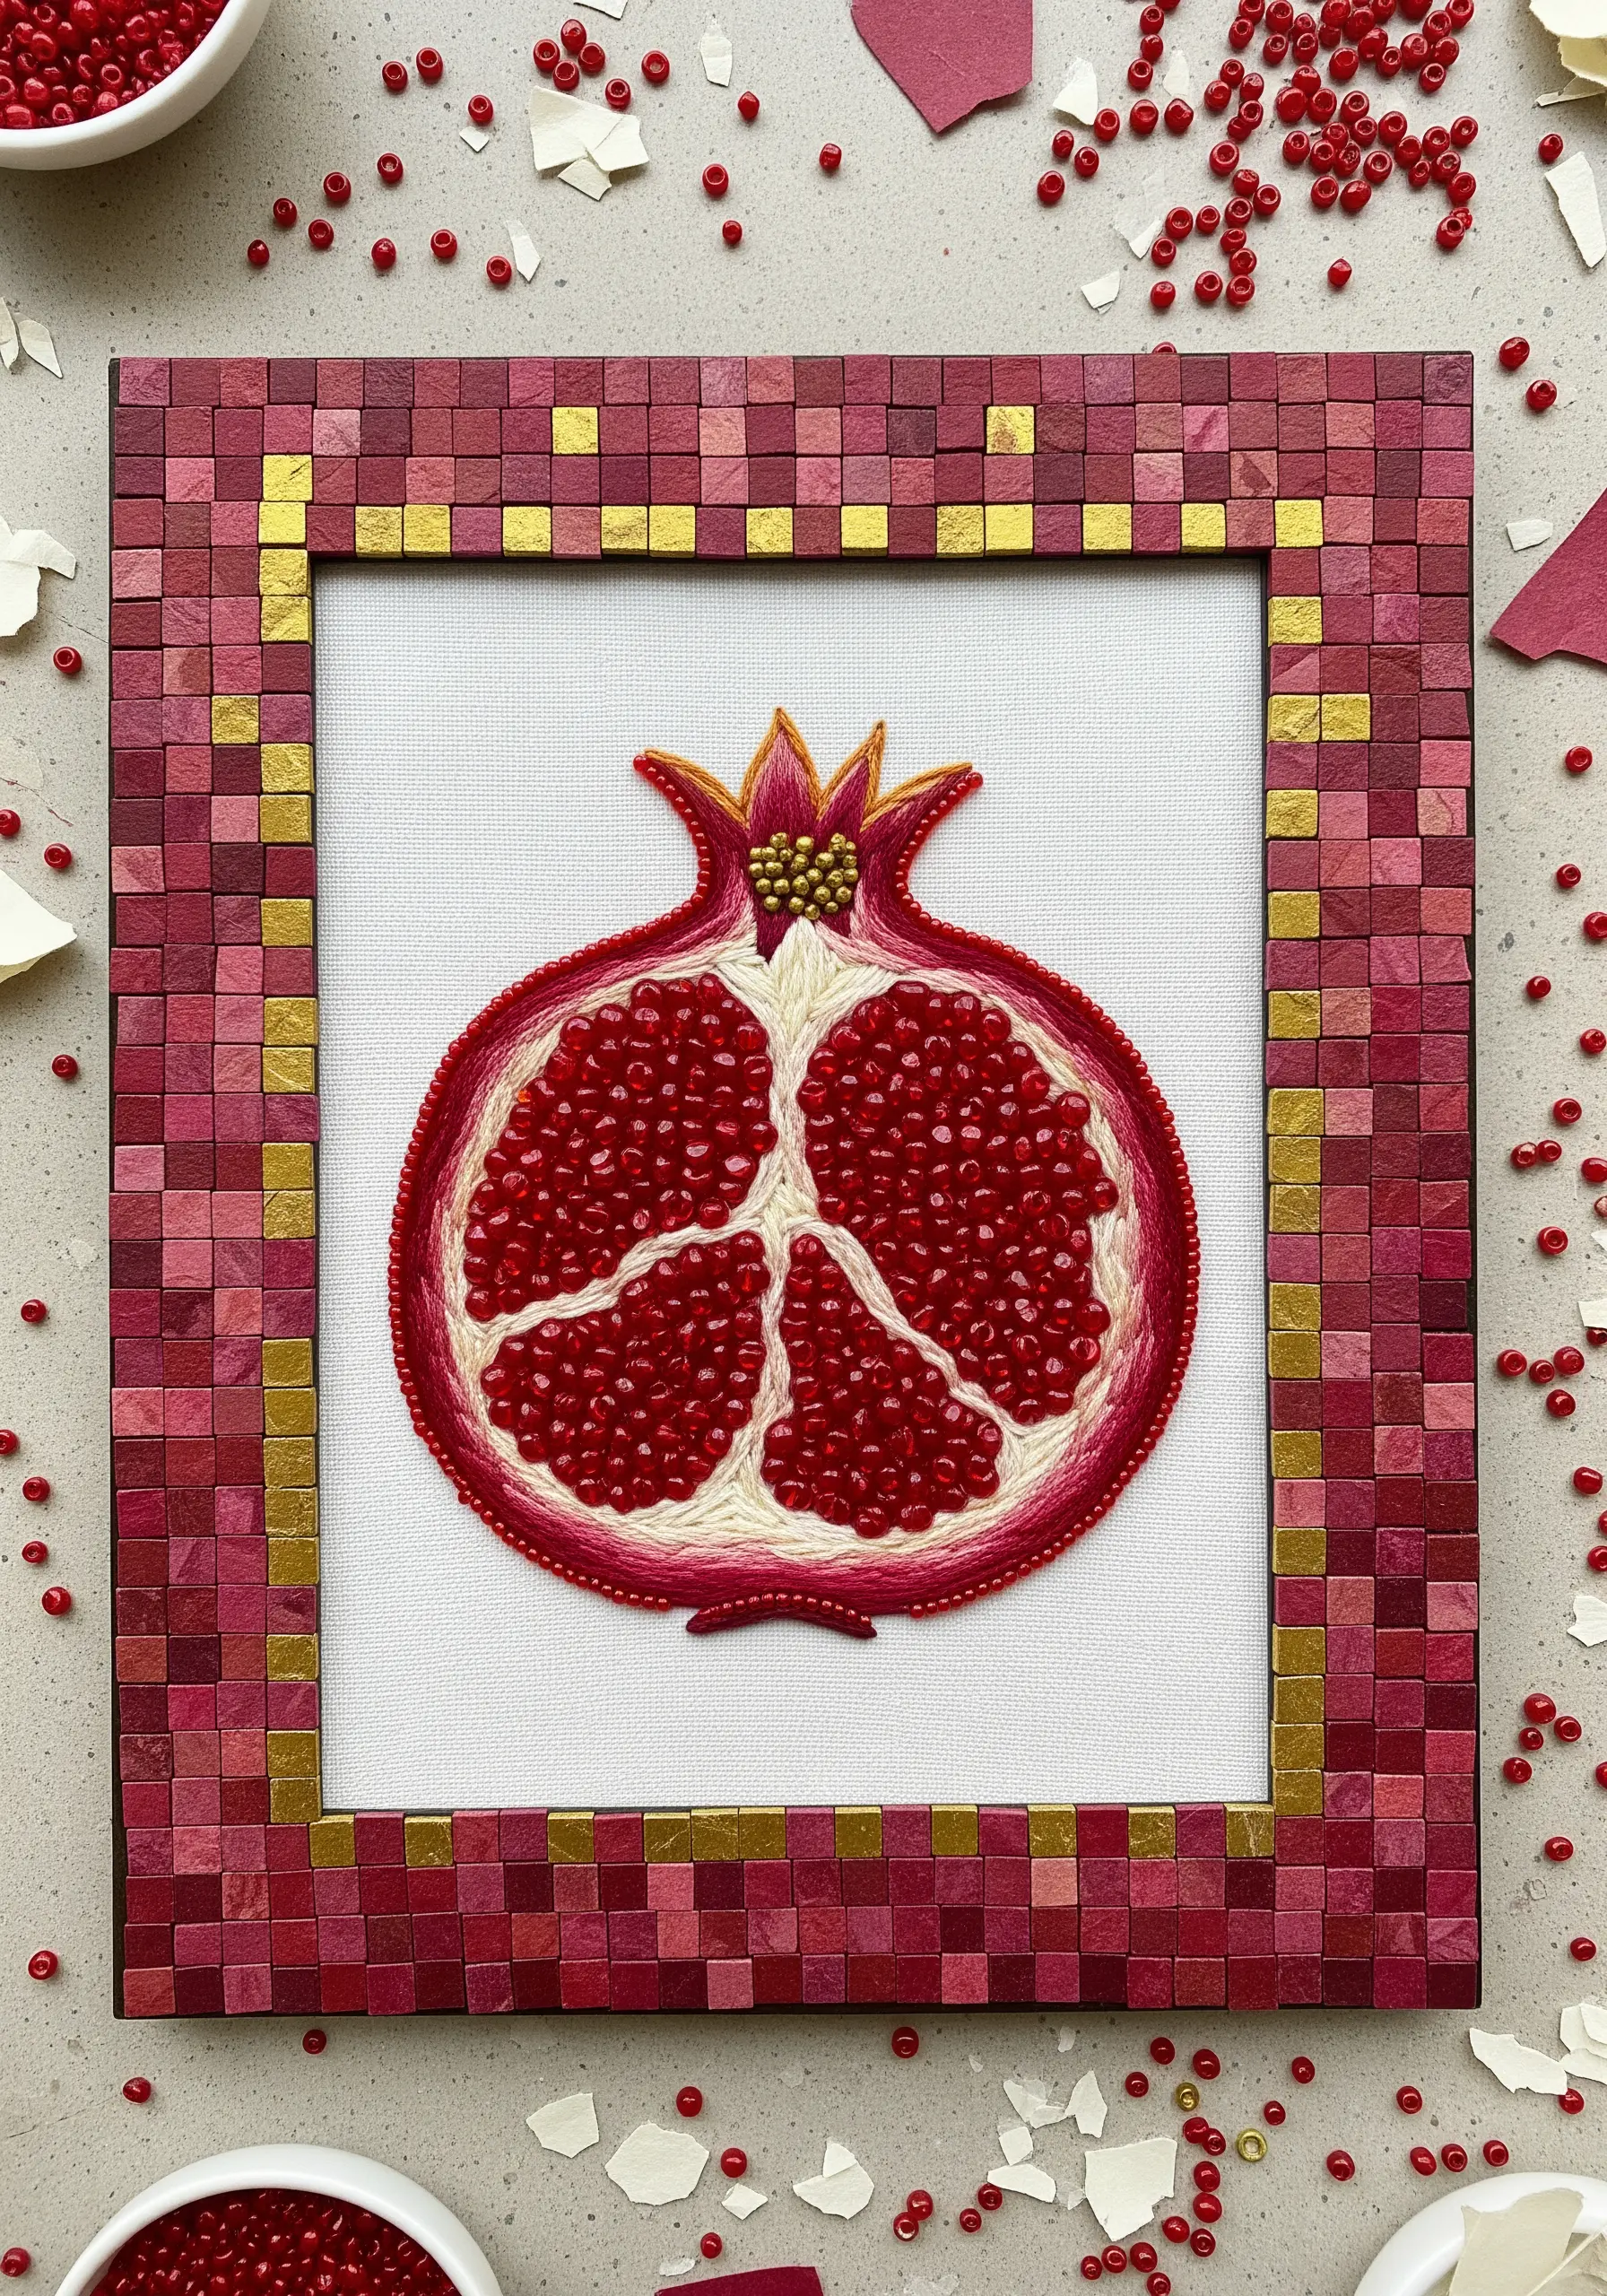
Mimic the intricate look of tilework using only small squares of paper.
Cut tiny tiles from cardstock in shades of red, pink, and metallic gold.
Glue them one by one around the border of your stretched canvas, creating a rich mosaic pattern.
The slight variations in placement and the texture of the paper give the frame a handcrafted feel that enhances the detailed beadwork and stitching of your central motif.
20. Sculpt an Organic Frame with Paper Clay
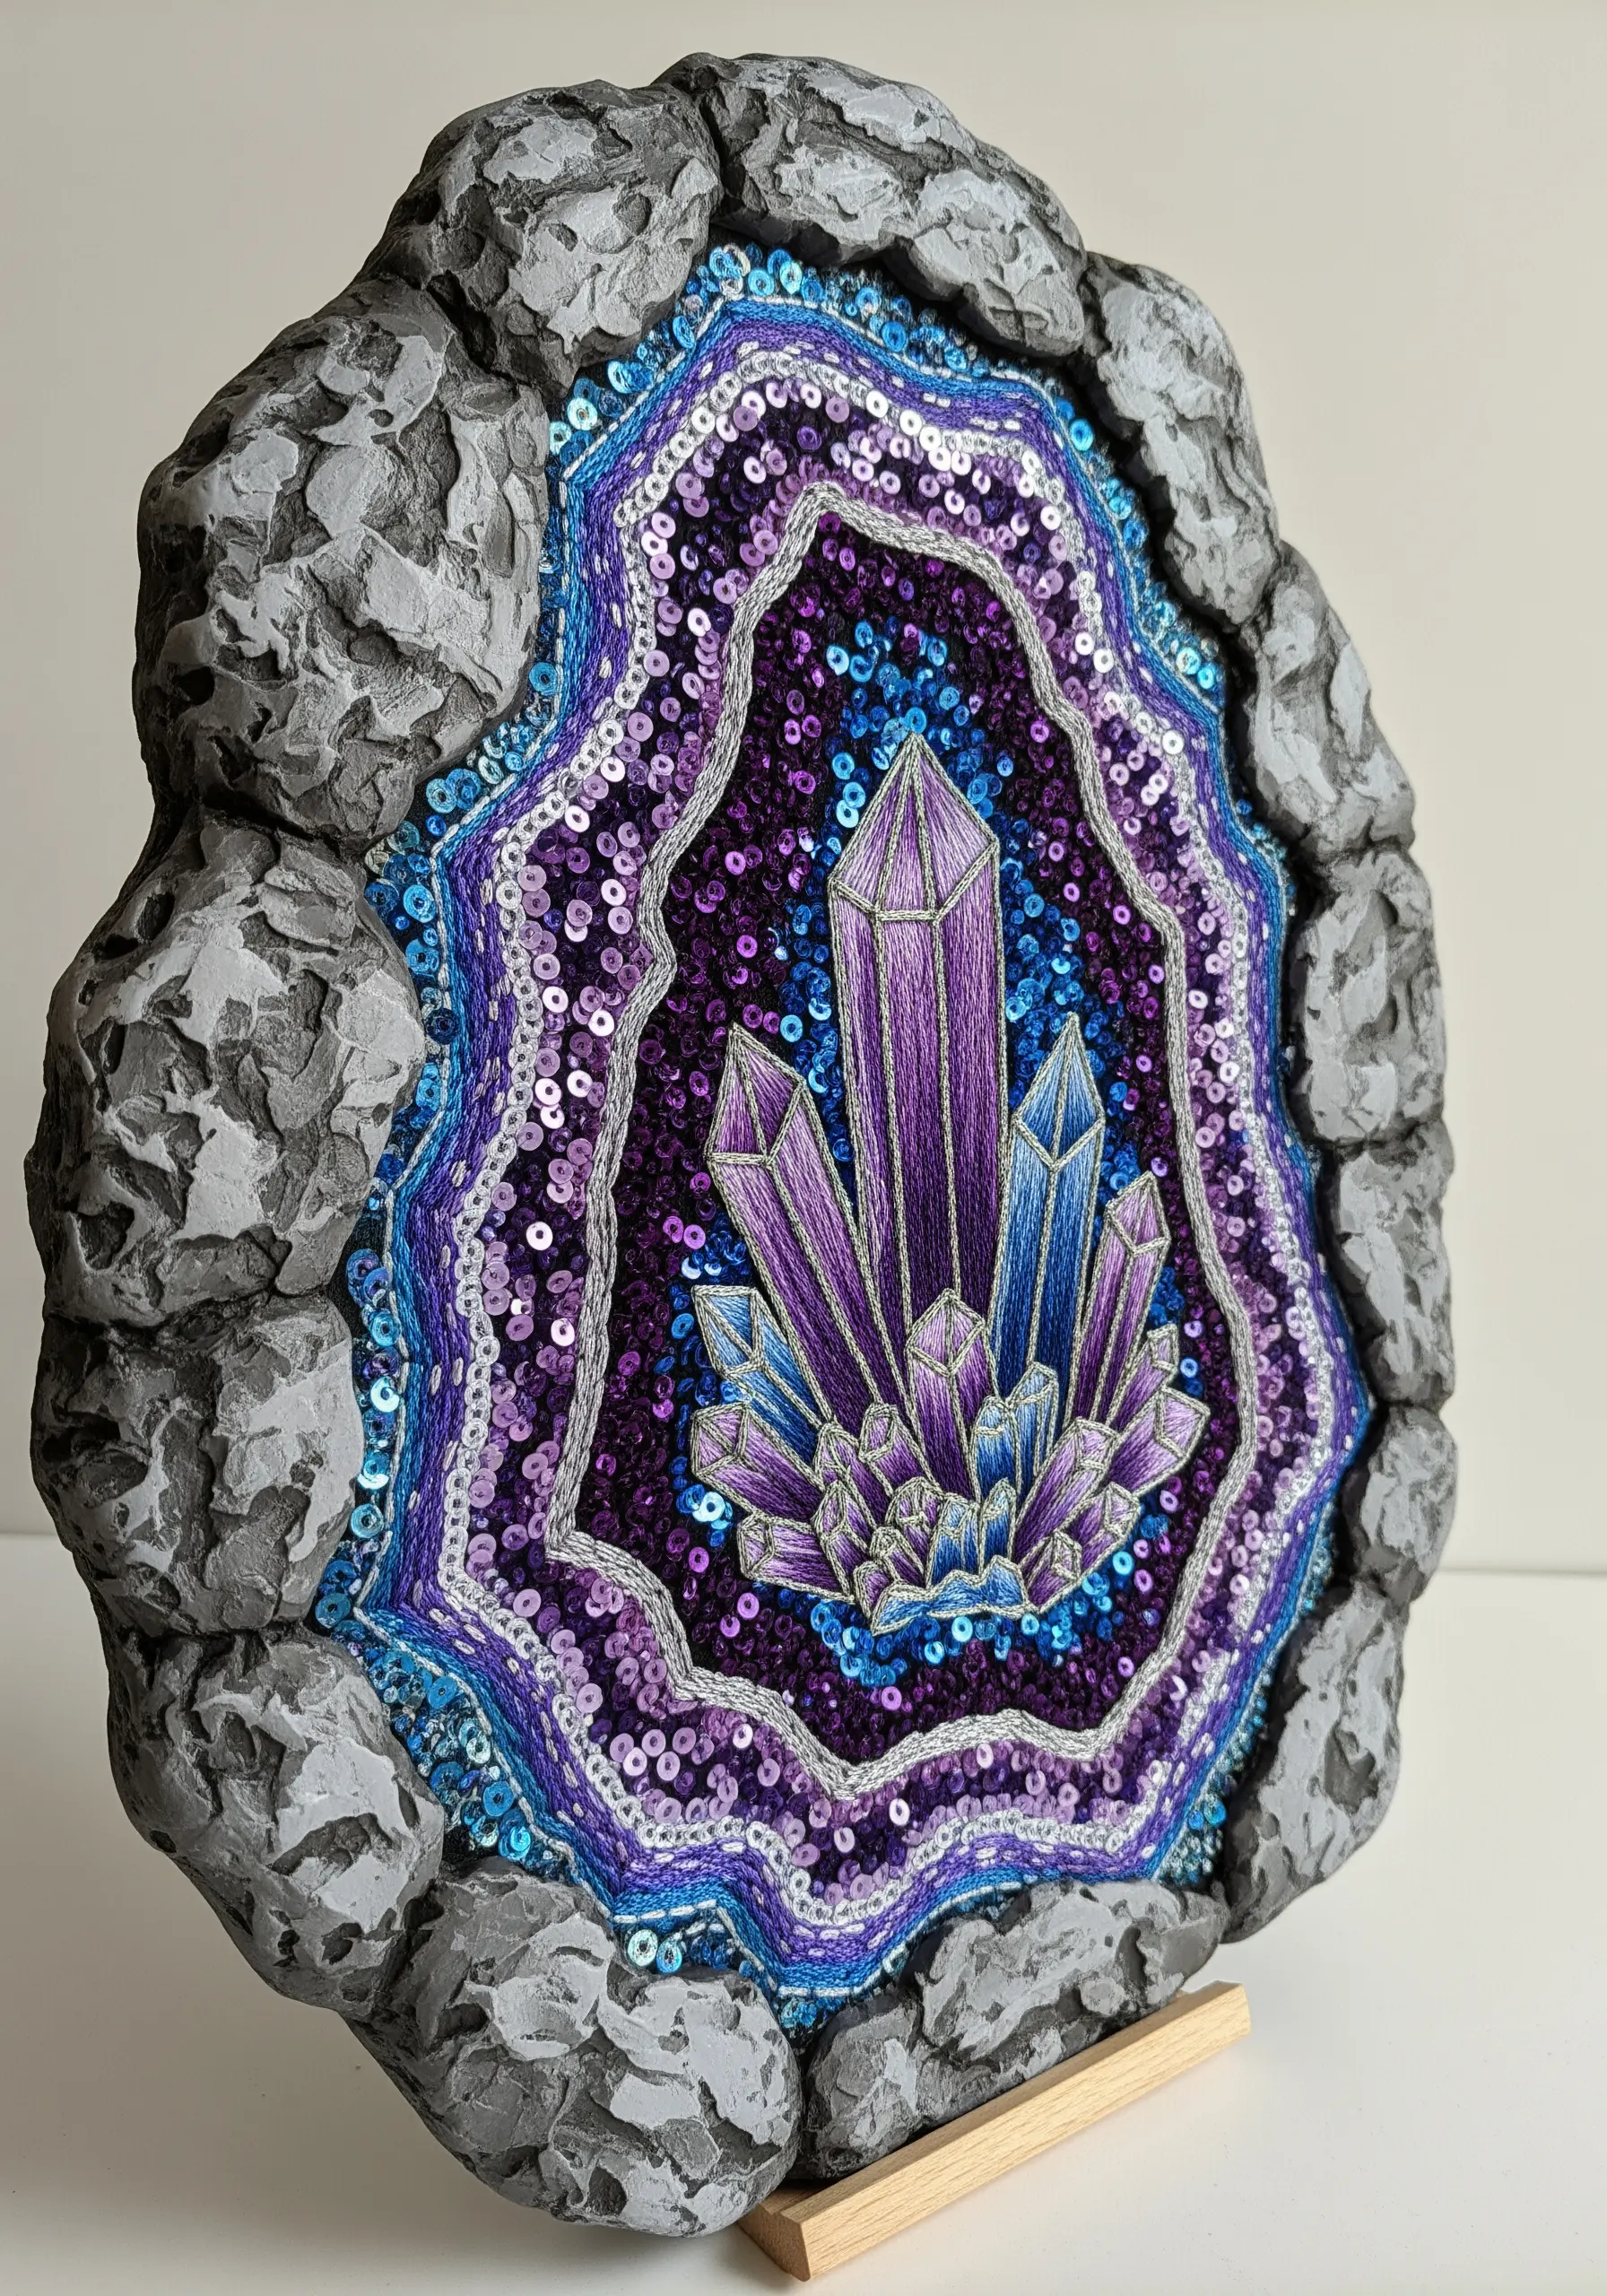
For a truly unique, three-dimensional finish, sculpt a custom frame from paper clay.
This lightweight, air-dry material can be molded into any shape, like the rough, rocky exterior of a geode.
Once dry, paint the clay with acrylics to add depth and shadow, creating a powerful contrast with the sparkling sequins and neat stitches inside.
This method transforms your embroidery into one of those abstract thread sculpt designs that stand off the canvas like miniature art.
21. Use Translucent Vellum for a Soft, Layered Look
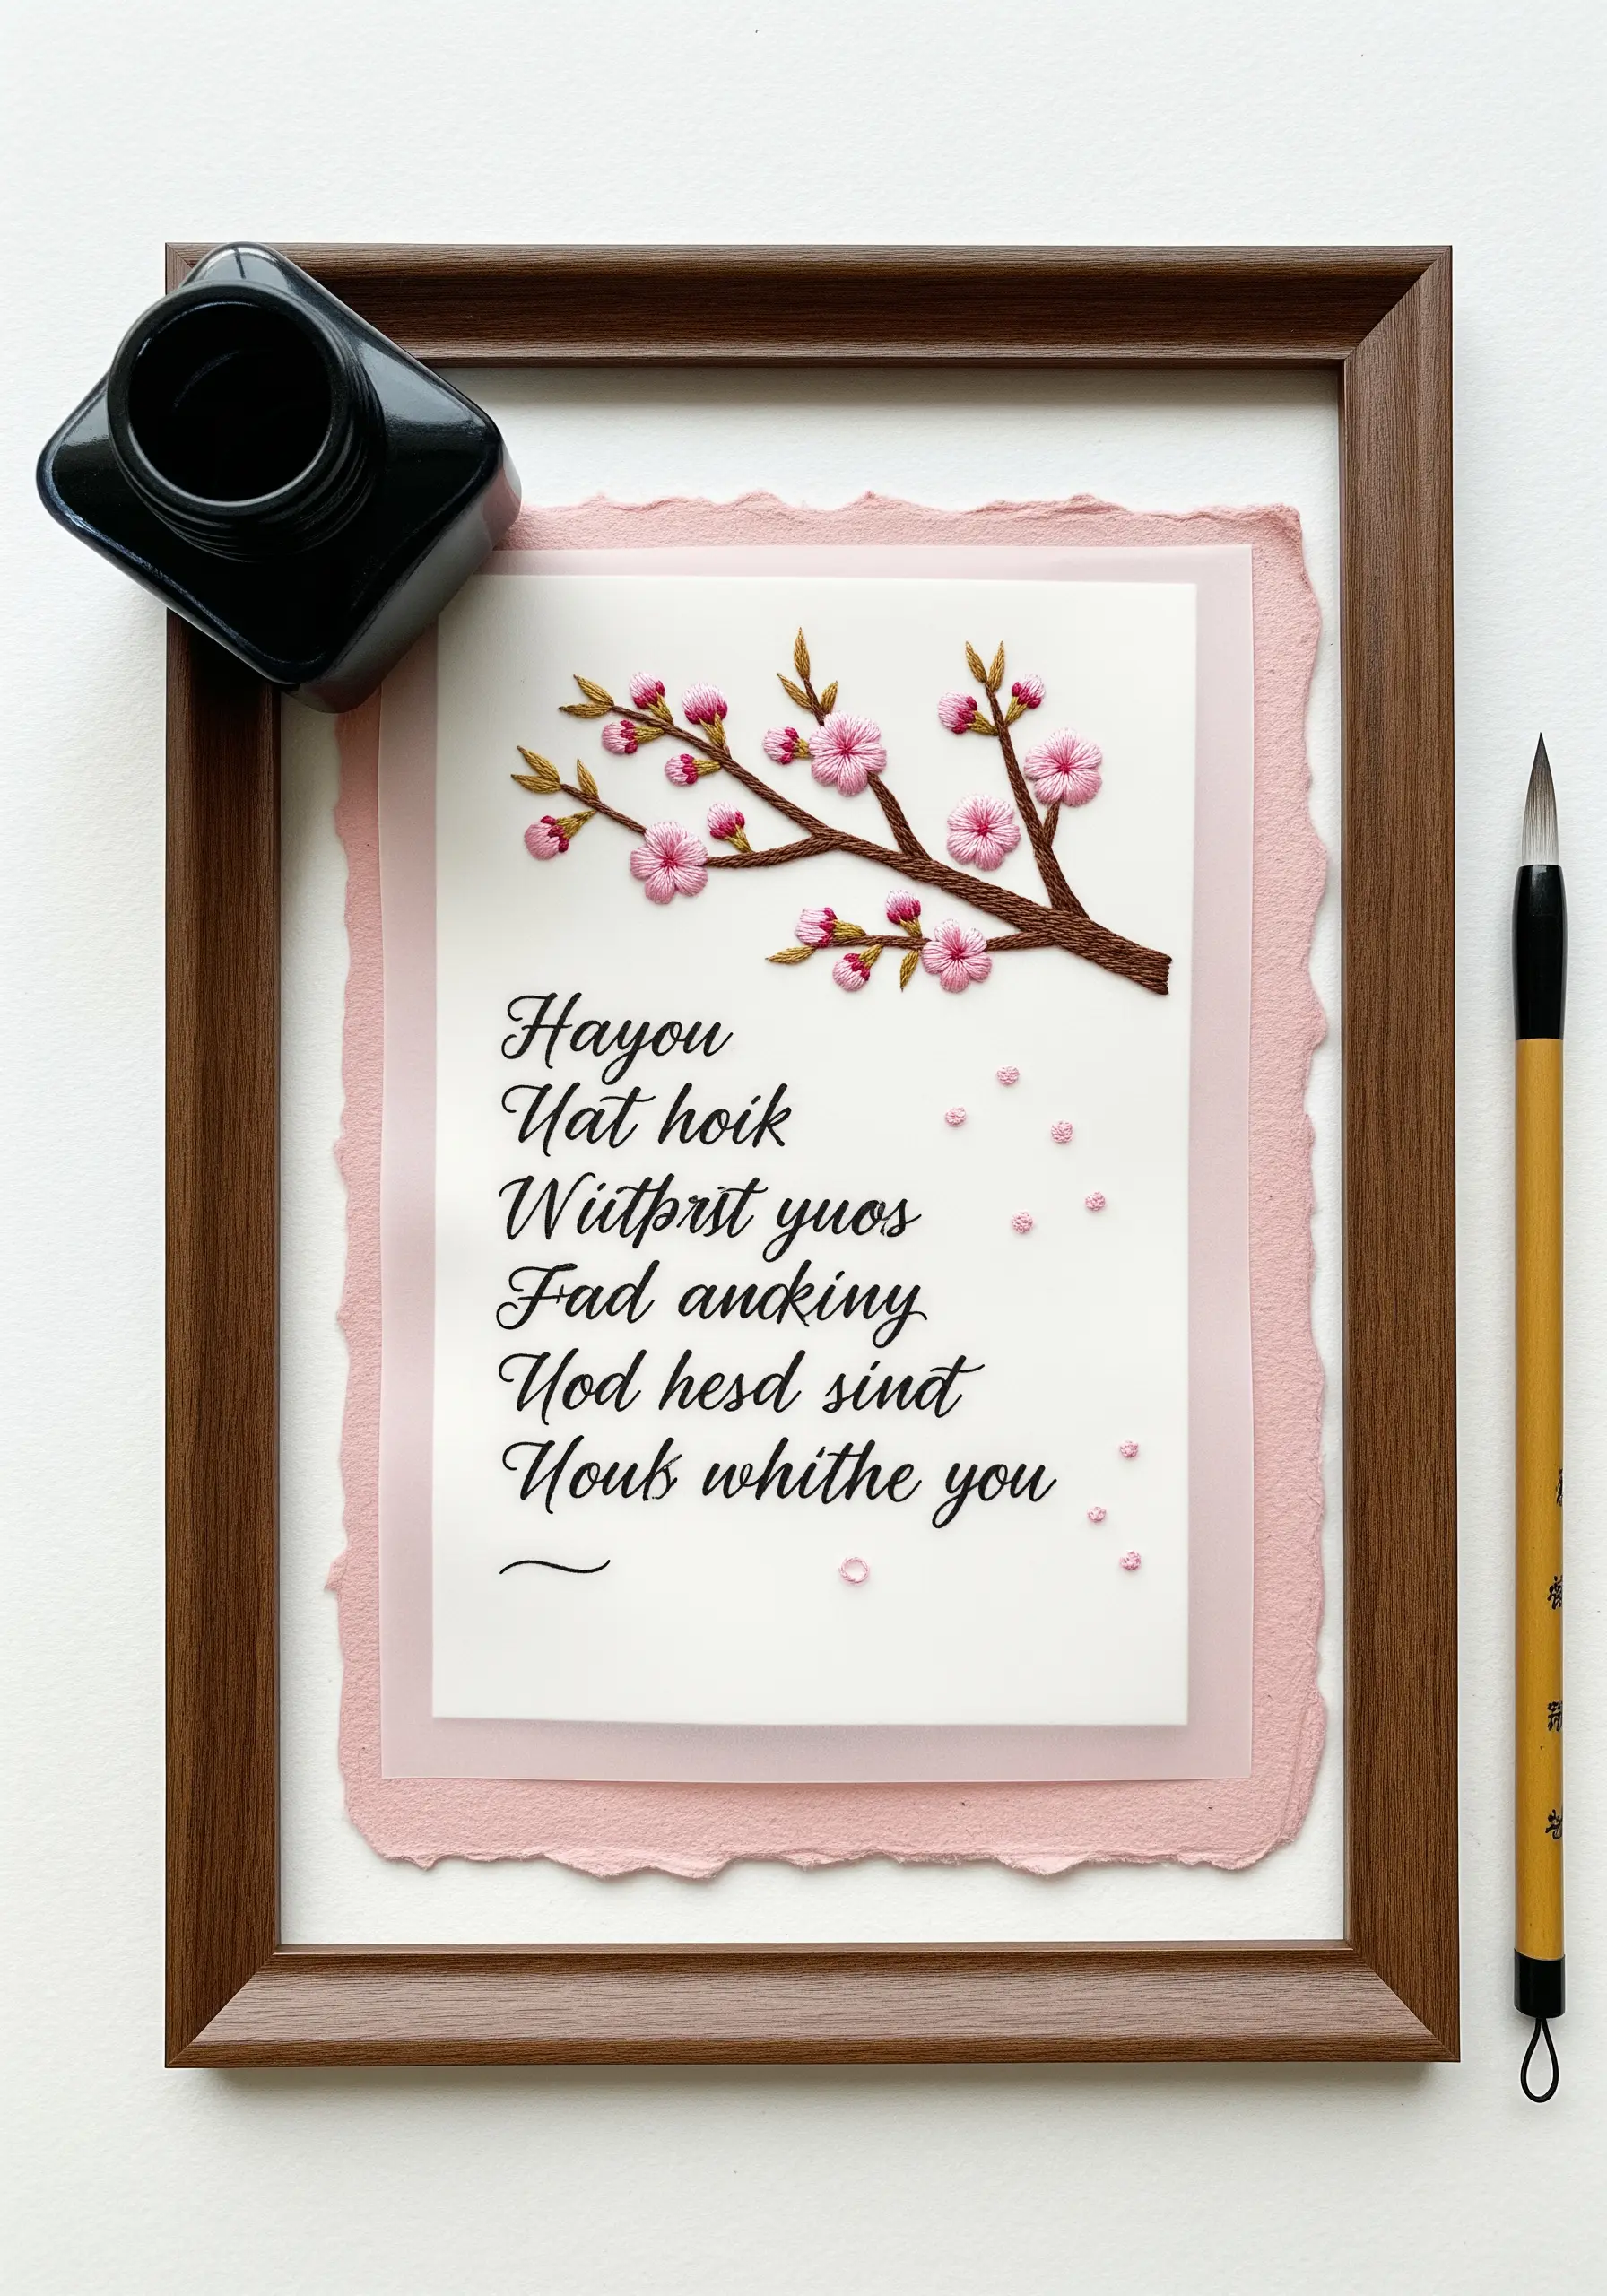
Add a layer of softness and depth by mounting your embroidery behind a sheet of high-quality vellum.
This translucent paper diffuses the background color and creates a gentle, ethereal effect, which is perfect for delicate subjects like cherry blossoms or calligraphy.
Layer the vellum over a sheet of handmade paper in a complementary color for a subtle, sophisticated finish that feels both modern and timeless.
22. Weave a Frame from Distressed Paper Strips
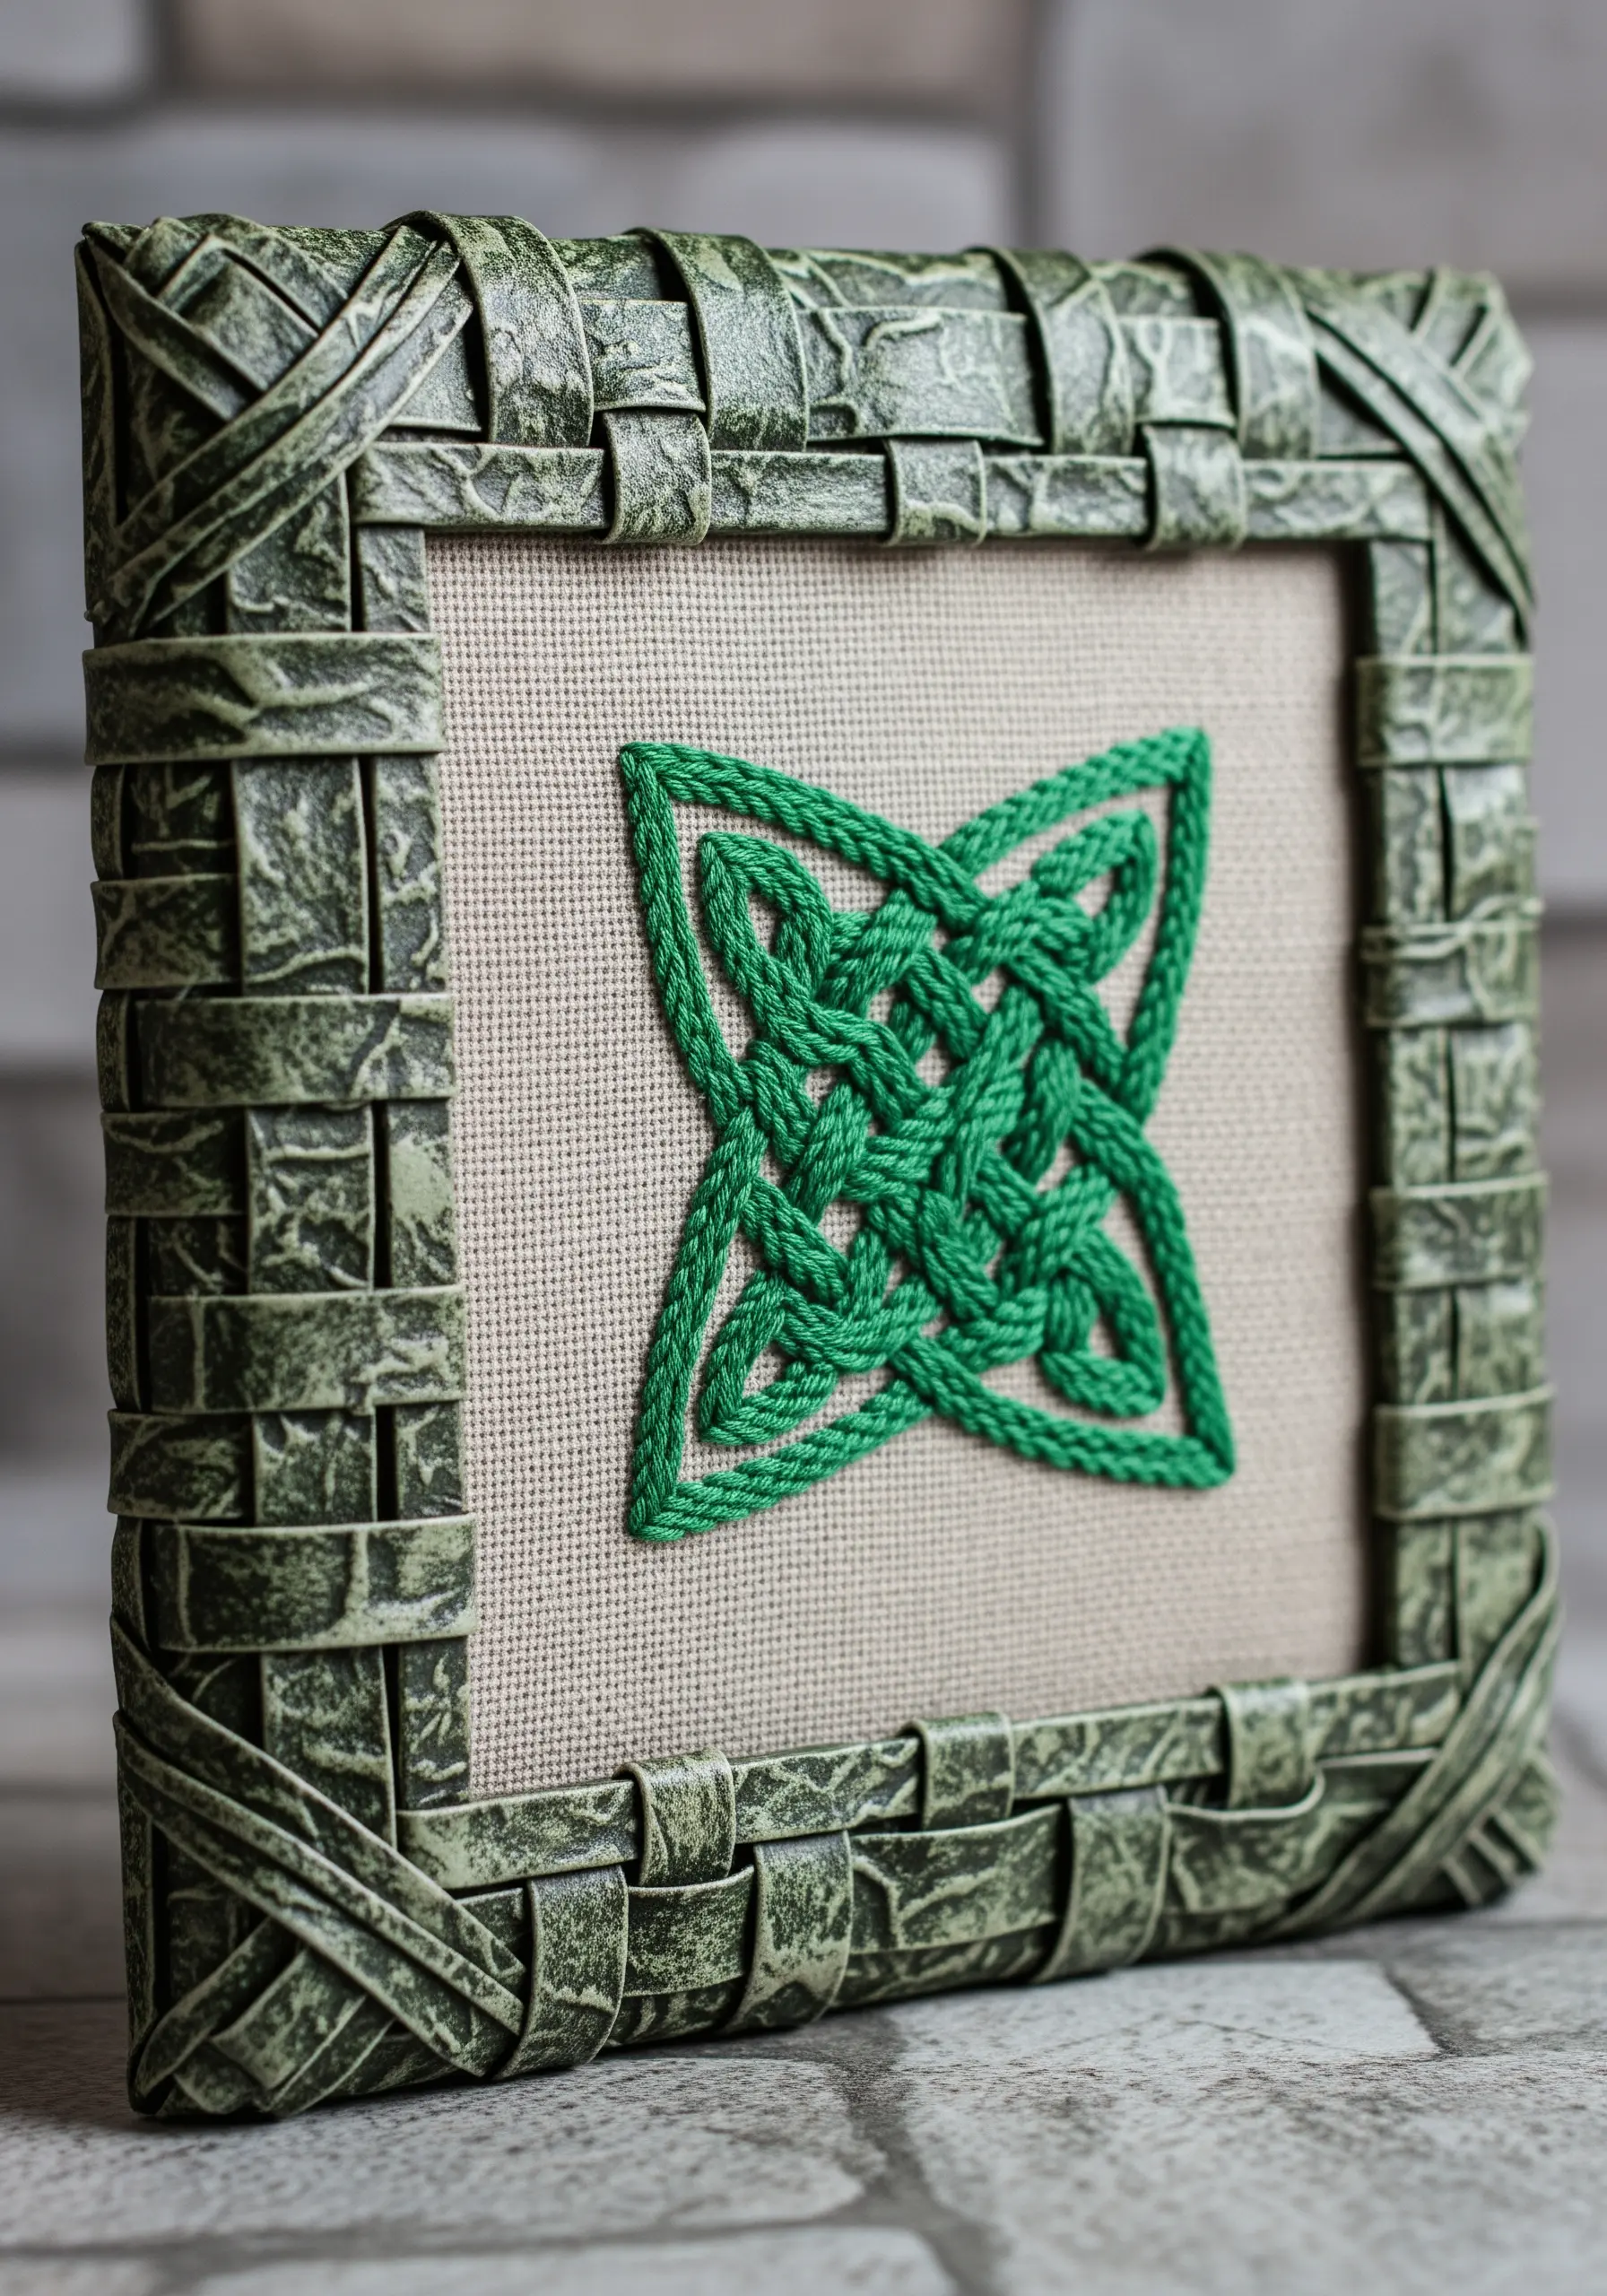
Echo the interwoven lines of a Celtic knot or geometric pattern by creating a woven paper frame.
Cut strips of heavy paper and paint them with a wash of color, adding darker tones to create a distressed, aged look.
Once dry, weave the strips together in a simple over-under pattern, securing the ends at the back of your canvas.
The resulting texture is rustic and robust, perfectly complementing the bold, graphic nature of the stitched design.
23. Unify Your Art with a Watercolor-Washed Frame
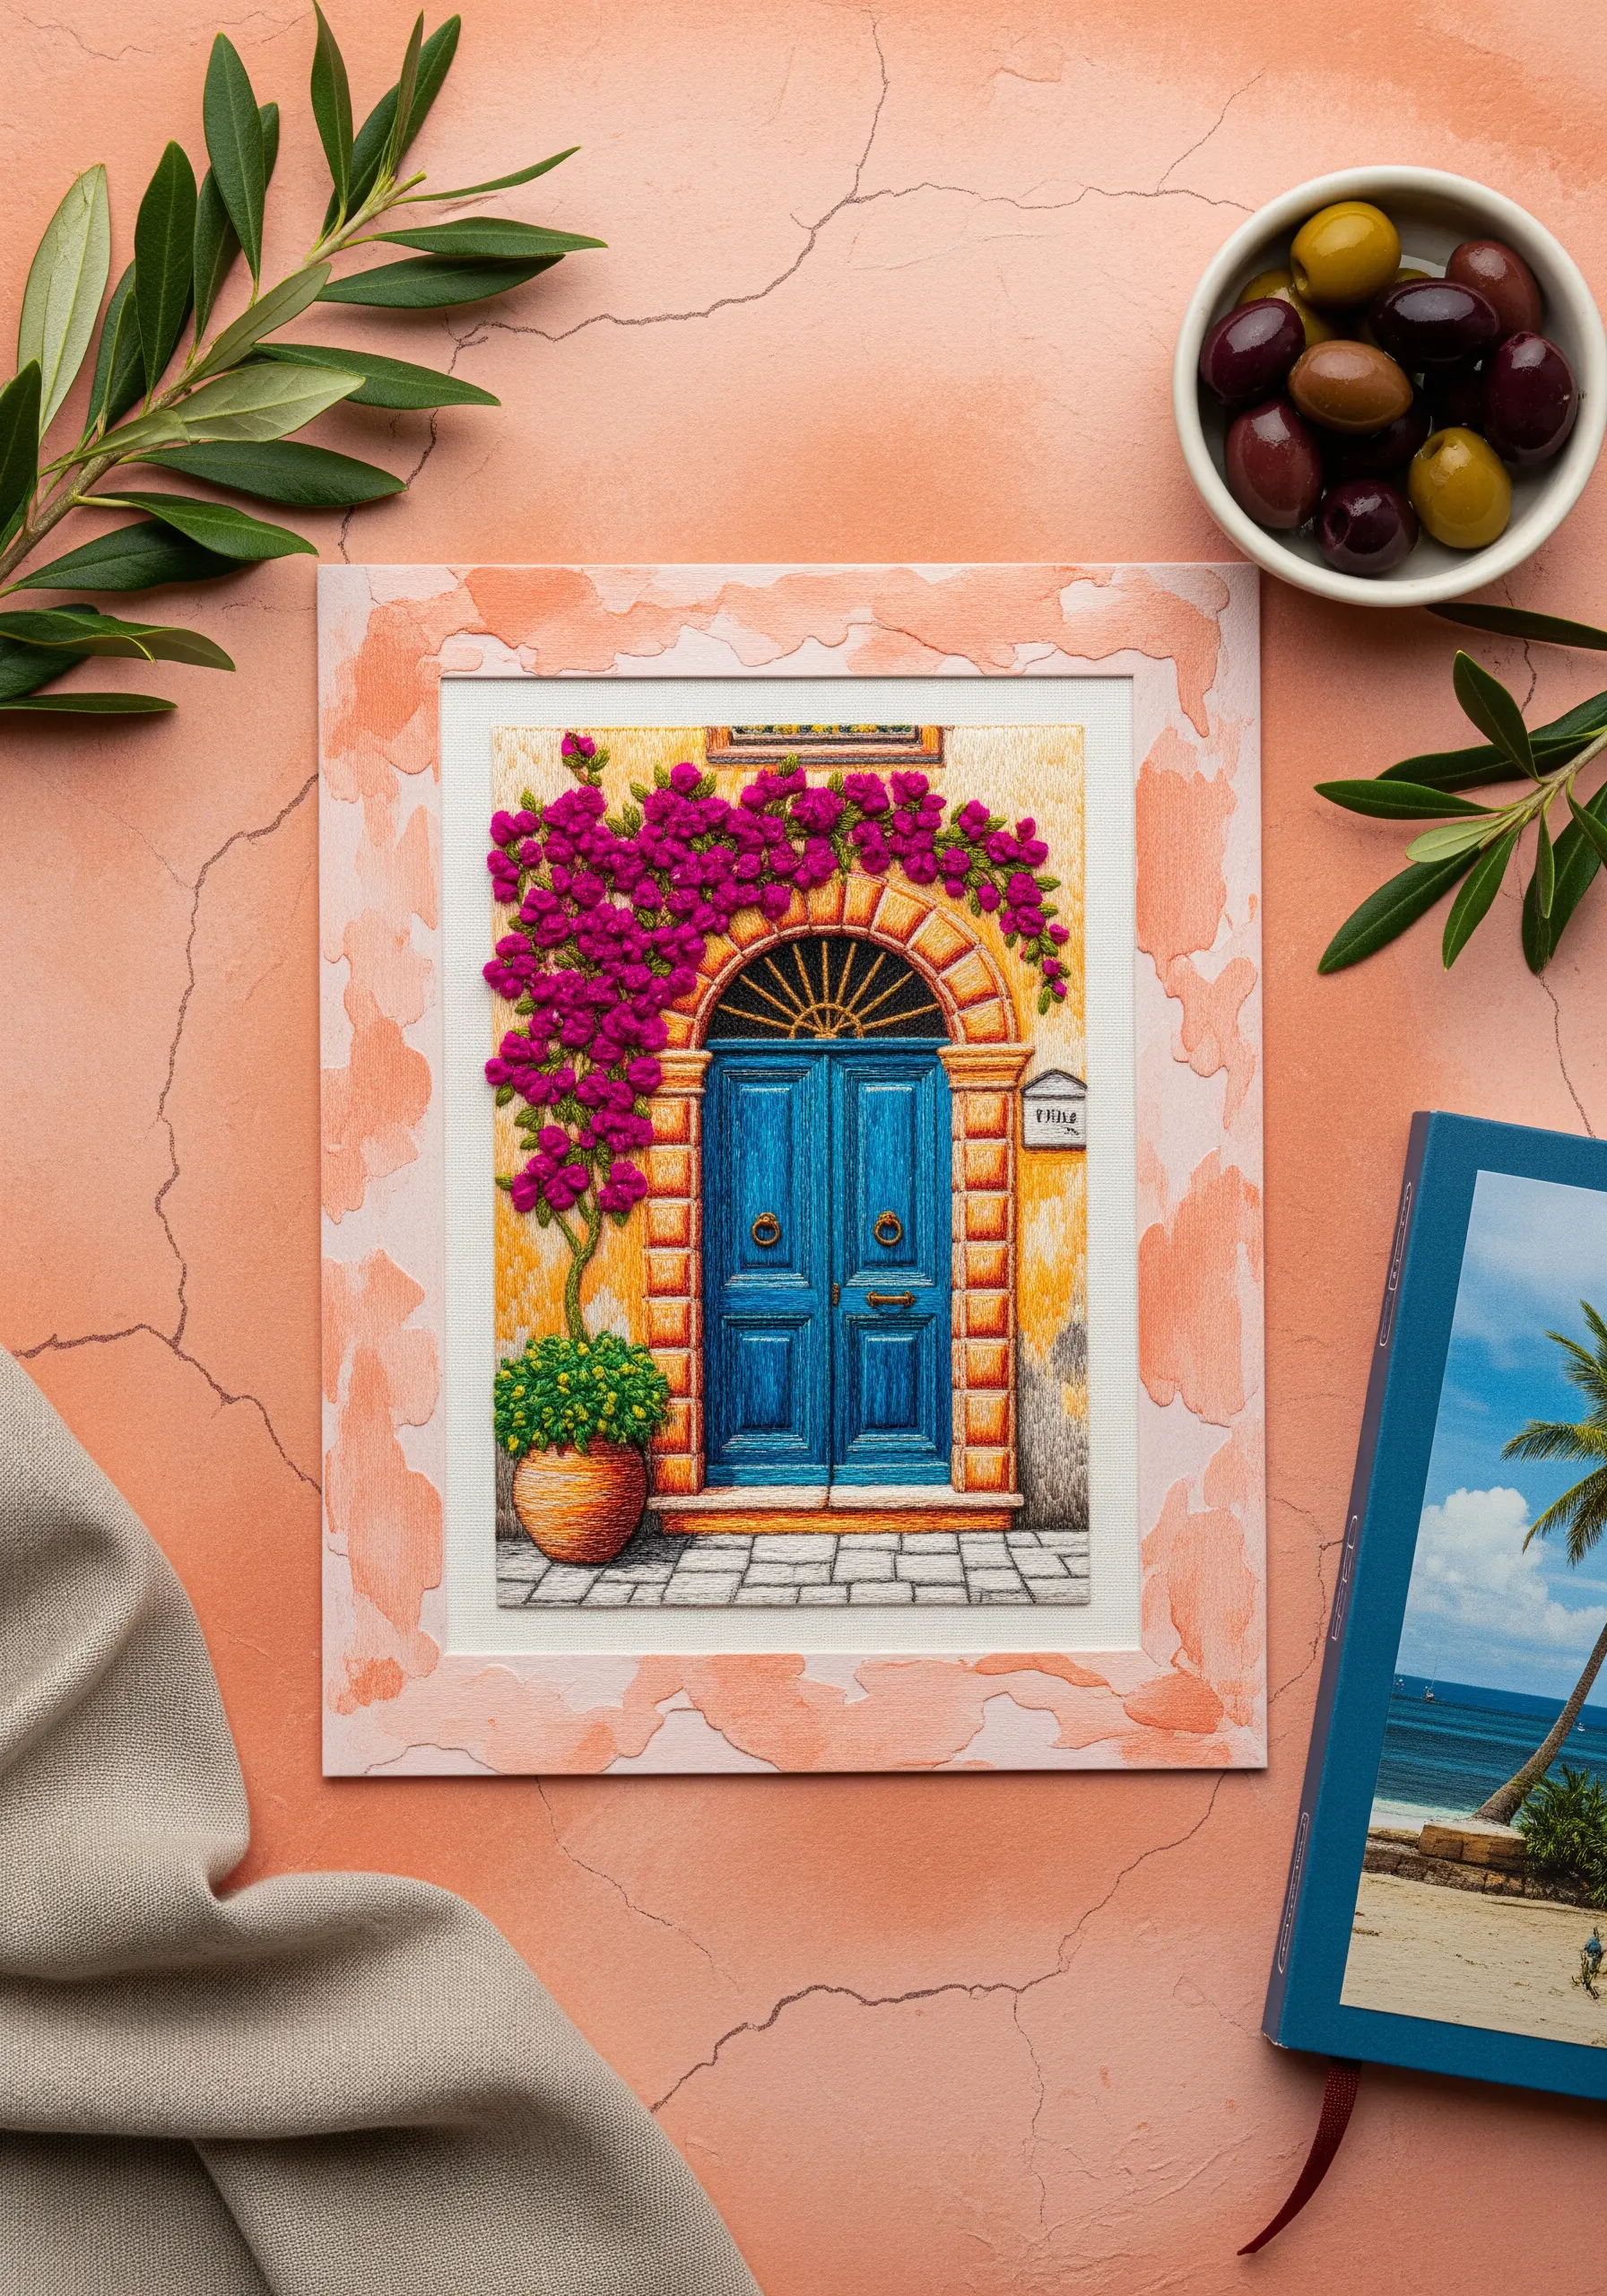
Instead of leaving a simple wooden frame plain, integrate it into your artwork with a custom paint finish.
Apply a light, uneven wash of watercolor paint that picks up a secondary color from your embroidery—in this case, the soft terracotta of the stonework.
This simple step makes the entire piece feel cohesive and intentional.
The transparent quality of the watercolor allows the wood grain to show through, adding another layer of subtle texture.
24. Build an Immersive Underwater Diorama
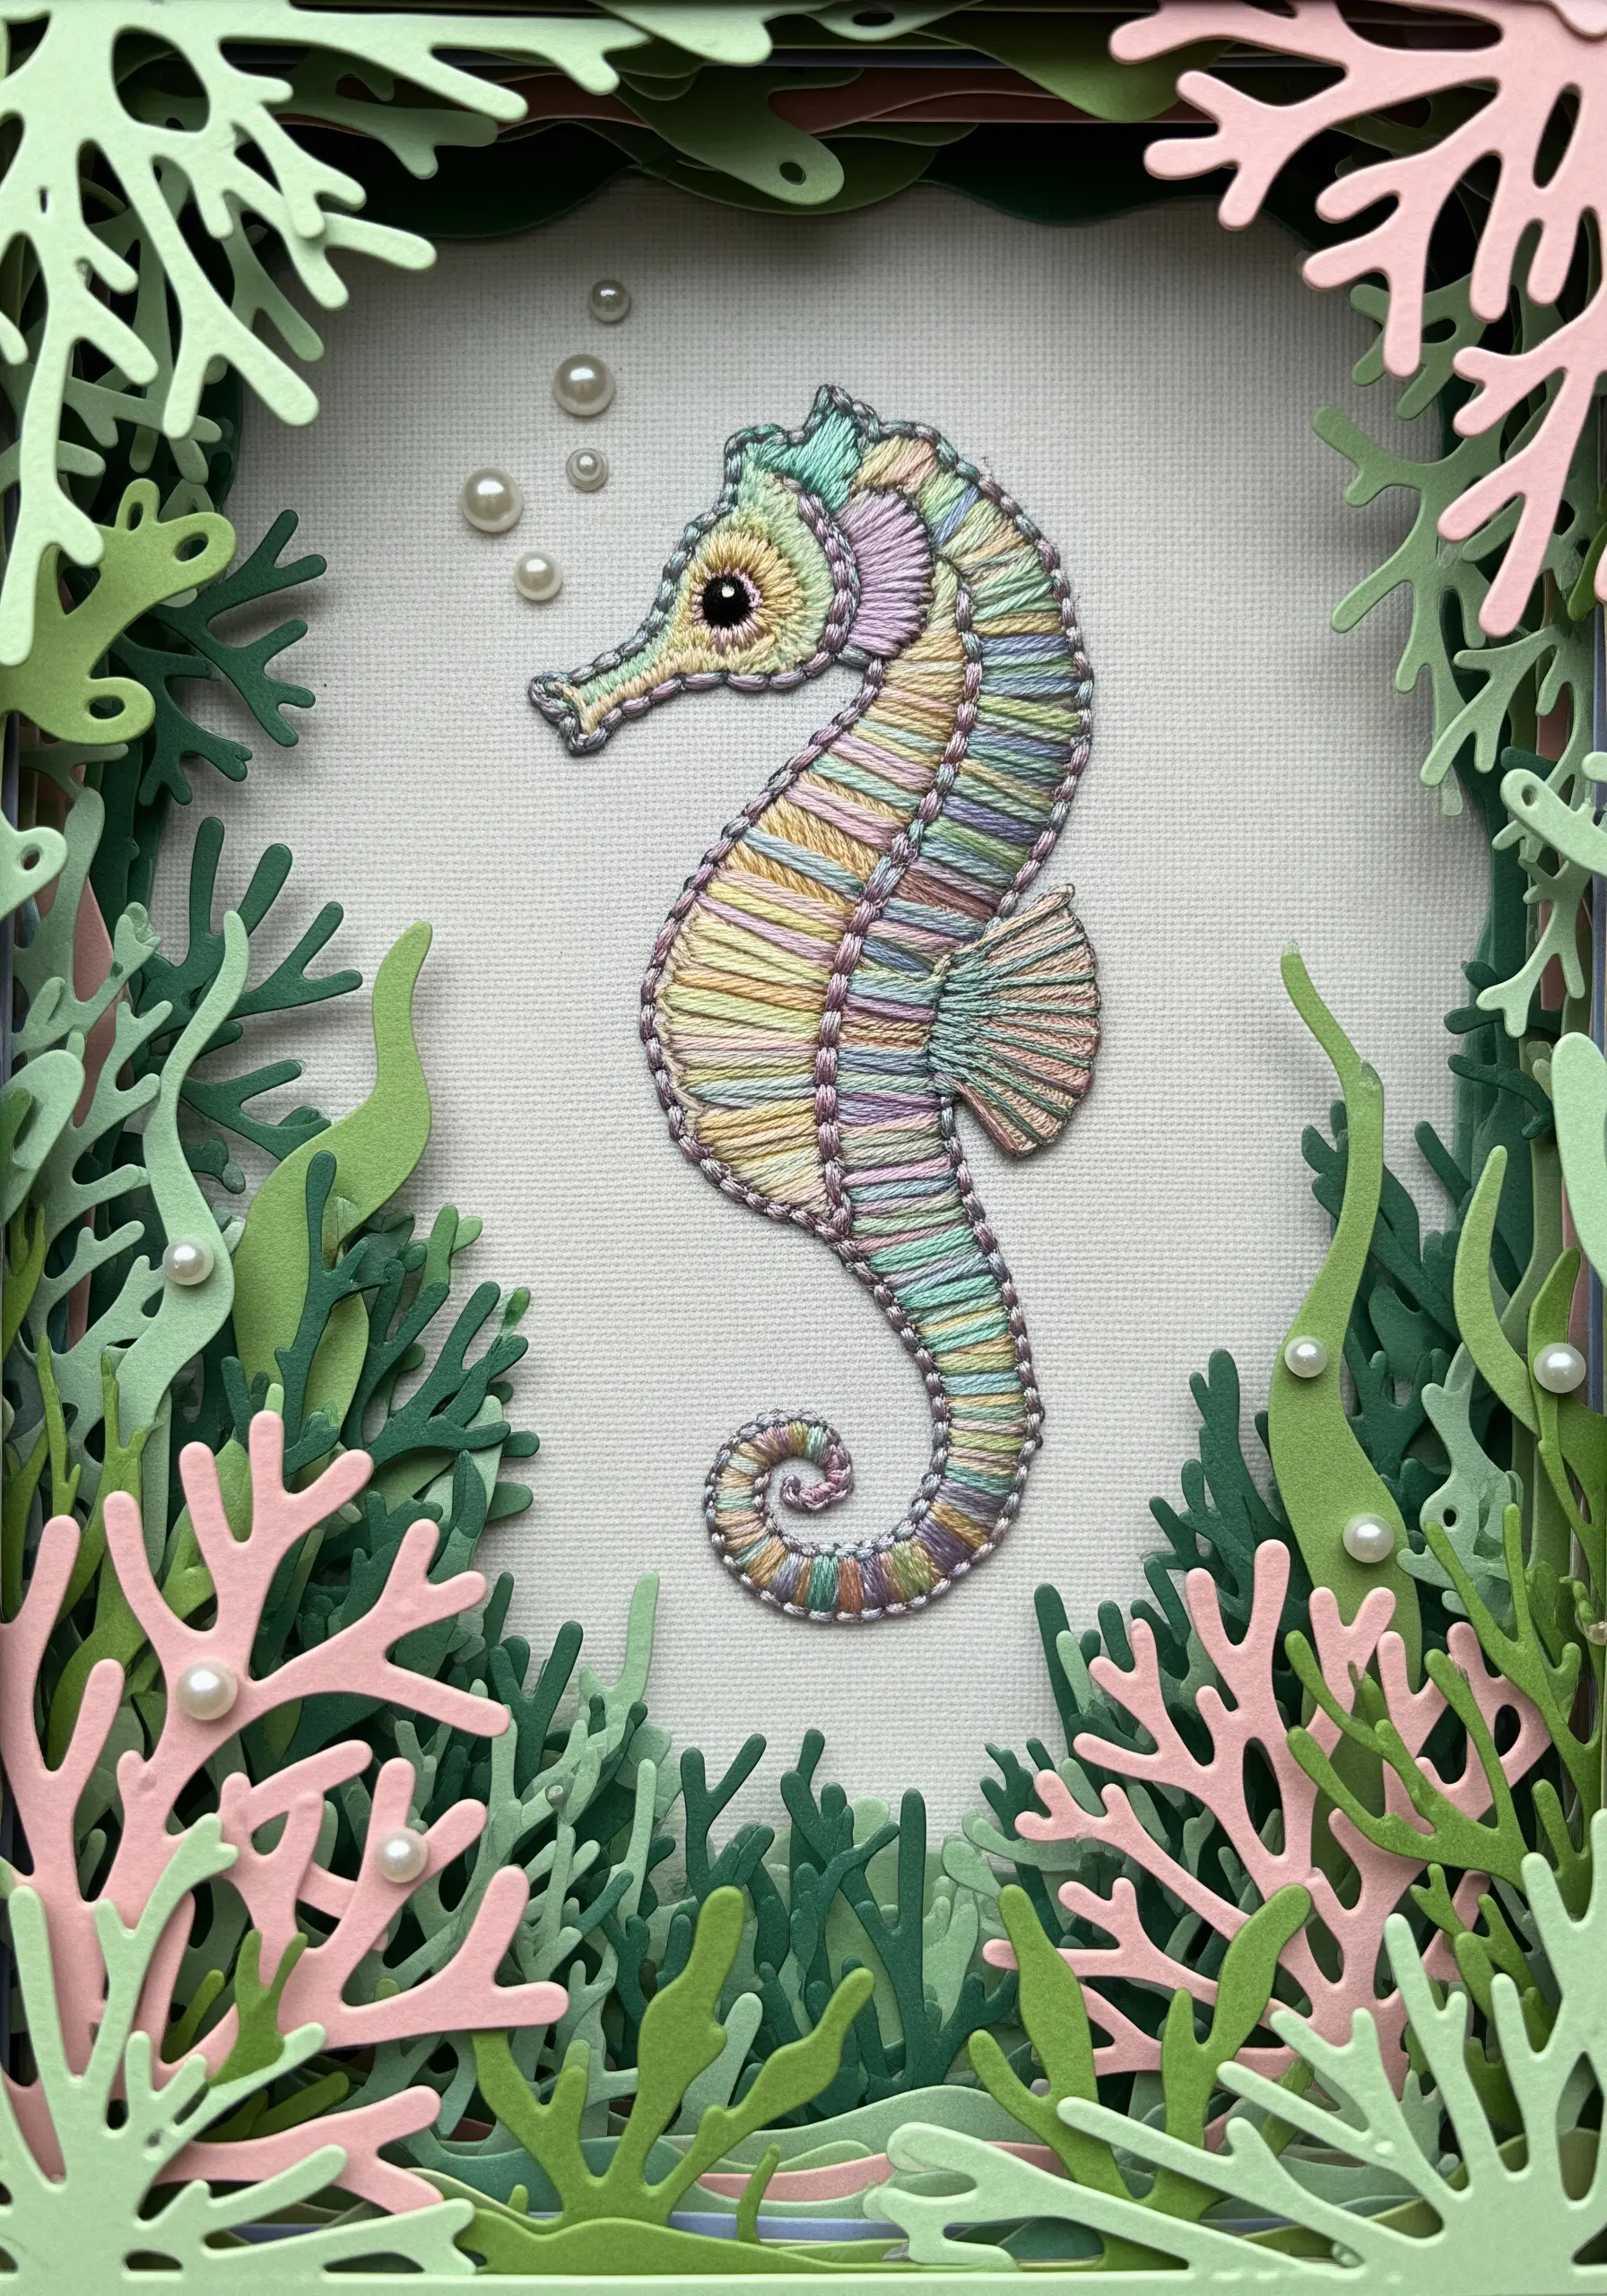
Create a final, enchanting scene that tells a complete story with your embroidery at its heart.
After stitching your seahorse, design and cut various forms of coral and seaweed from colored cardstock in a range of greens, pinks, and teals.
Assemble the paper elements in layers within a shadowbox frame, placing some in front of and some behind your embroidery.
These paper art techniques that make your embroidery pop in unique ways add incredible depth and transform your work into a magical, captured moment.


