
Have you ever looked at the texture of a mossy stone or the intricate veins of a leaf and wished you could translate that feeling into thread? Your stitches have the power to do more than just create an image; they can evoke the tactile memory of the natural world.
Capturing these textures isn’t about learning hundreds of complex stitches. Instead, it’s about shifting your perspective. It’s about seeing how a simple French knot, when clustered, becomes lichen. It’s understanding how the direction of a satin stitch can mimic the sheen on a petal, or how couching a thick yarn can build the rugged surface of bark.
Here, you’ll find ways to think like a sculptor, a painter, and a naturalist—all with a needle and thread. These techniques are designed to help you move beyond flat color-blocking and into a world of dimensional, touchable art. Let’s begin to stitch the world as you feel it.
1. Render Tree Bark with Sculptural Yarn Couching
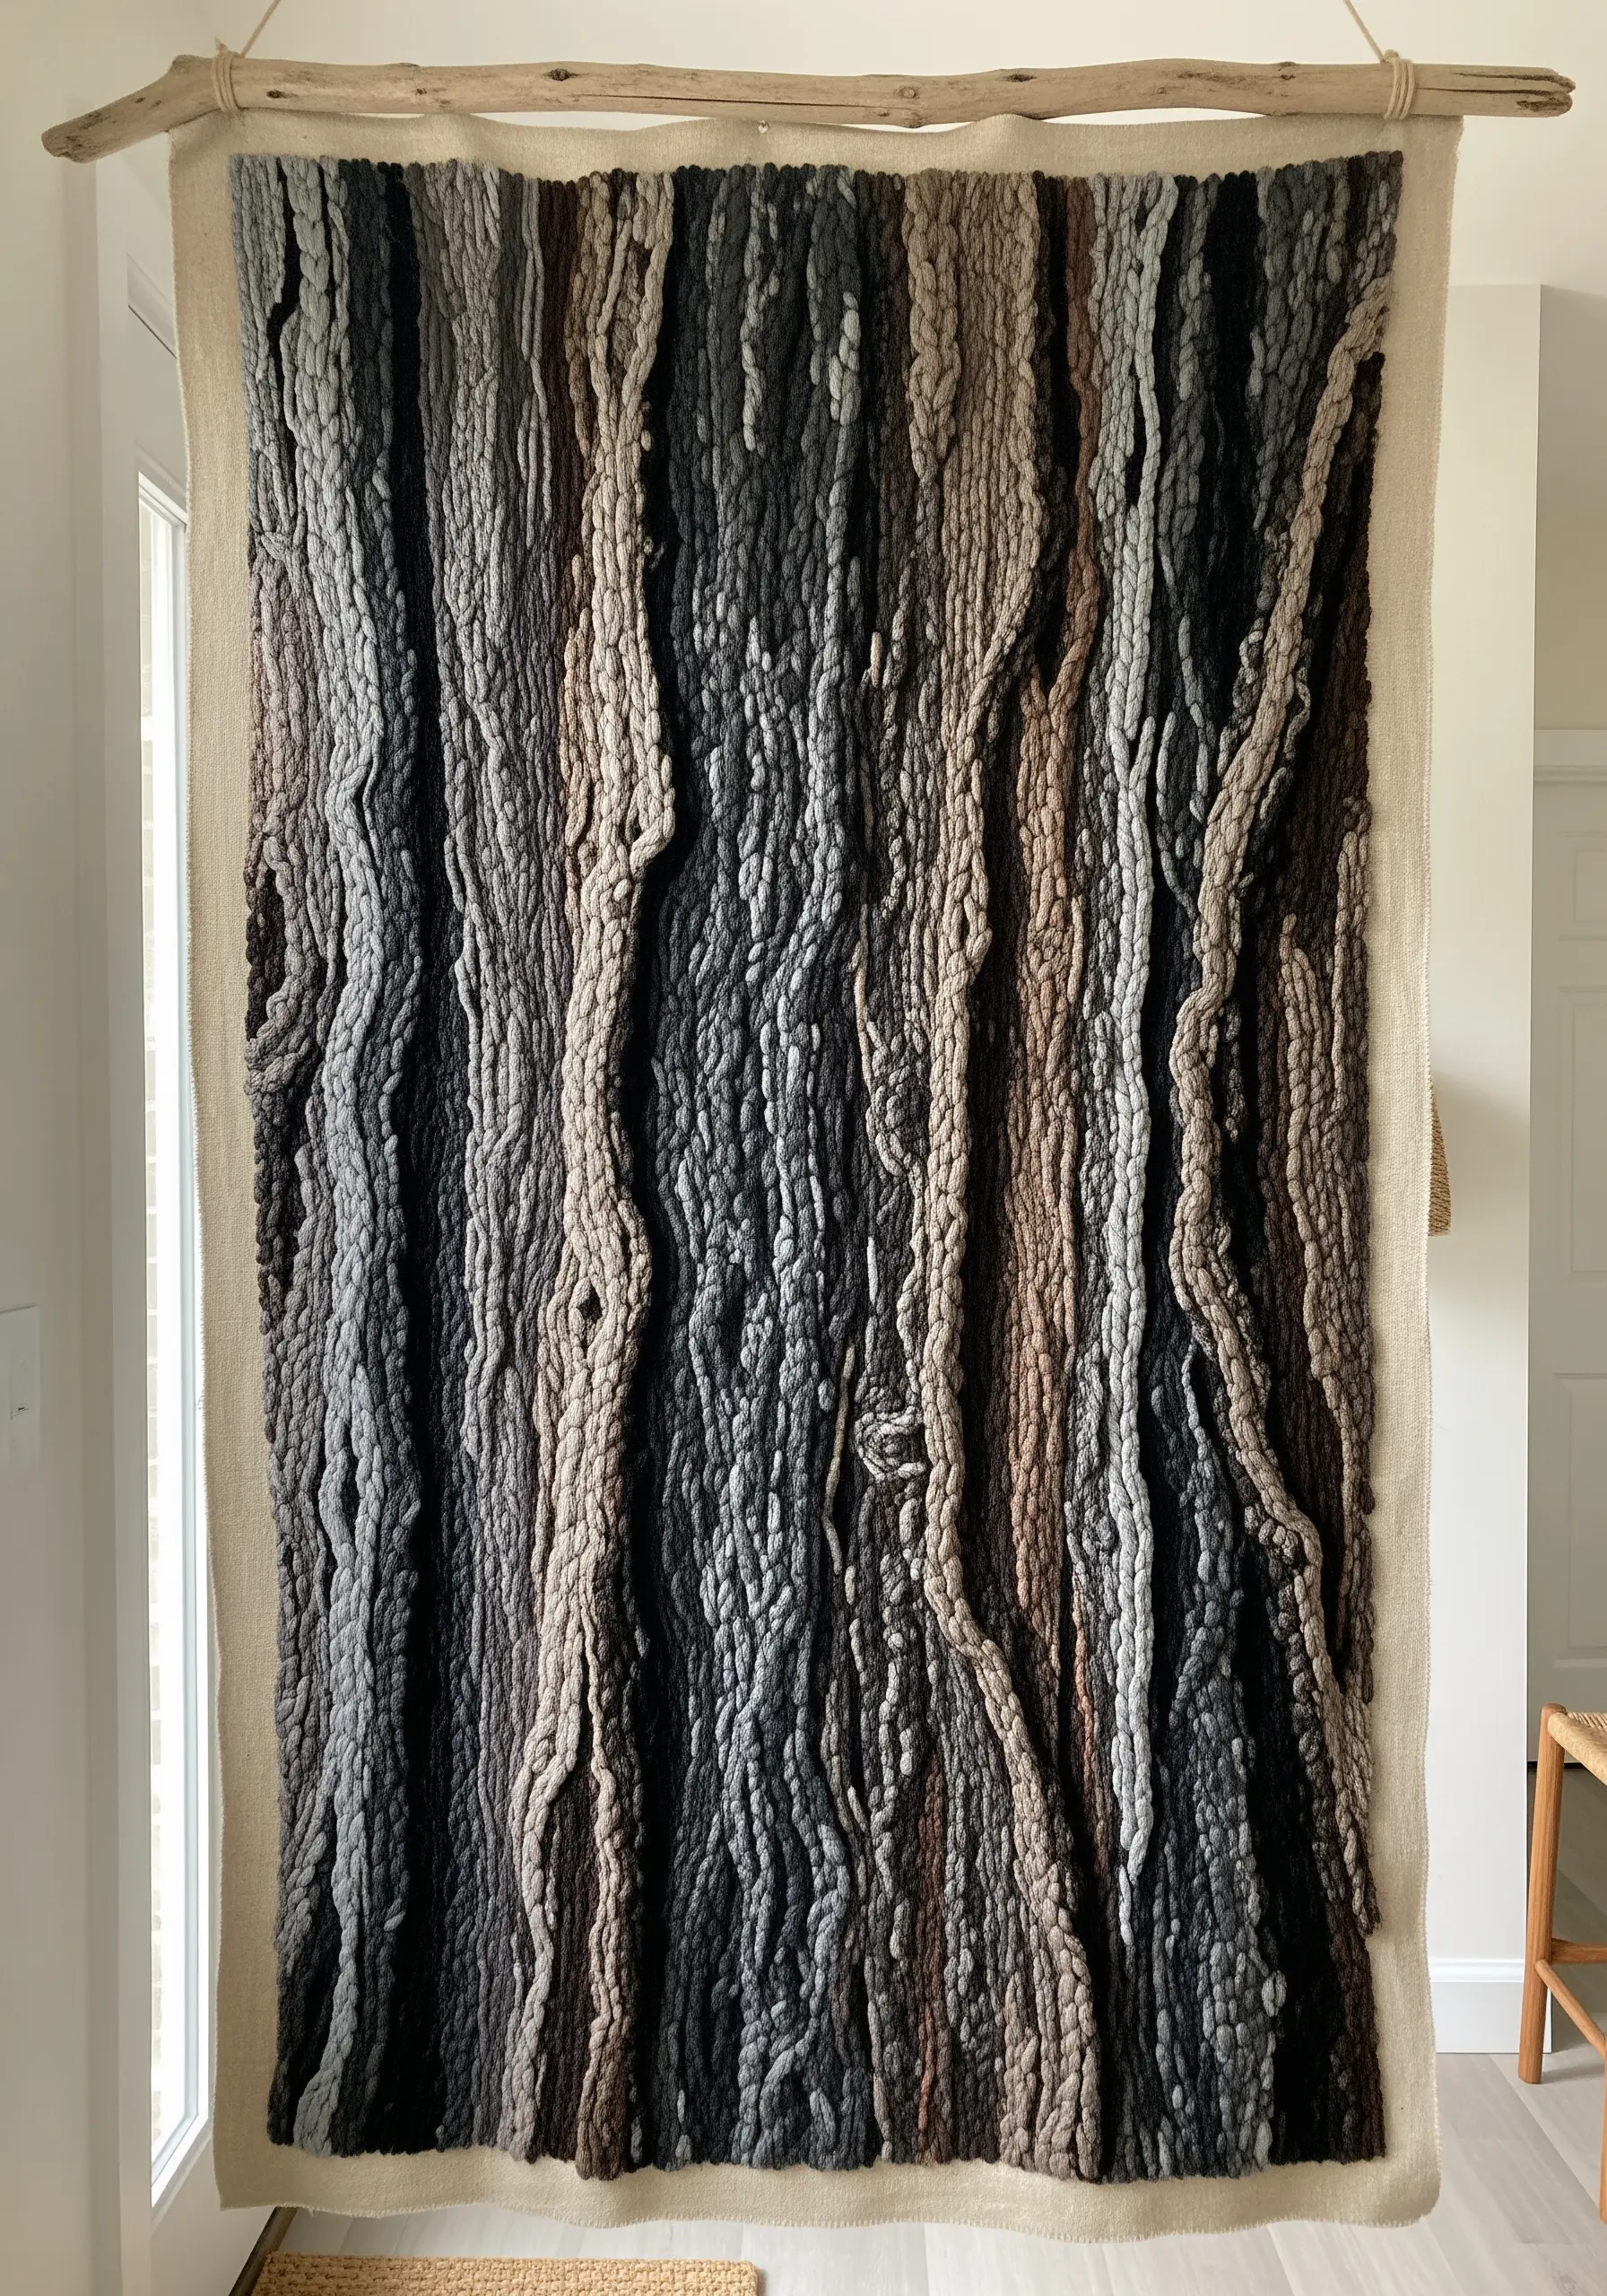
To achieve the deep, organic grooves of tree bark, work with thick, hand-spun, or roving wool yarn instead of standard floss.
Lay the thick yarn onto your backing fabric in vertical, undulating lines, then use a thinner, matching thread to couch it down with small, discreet tacking stitches.
Vary the tension of your couching stitches; pull tighter to create deeper crevices and leave them looser for softer ridges.
This technique allows you to build a highly tactile surface that is more like a low-relief sculpture, perfect for large-scale embroidery tapestries and wall hangings.
2. Create a Mossy Landscape with Dimensional Knots

Move beyond flat surfaces by dedicating entire sections of your hoop to dimensional stitches like French knots, colonial knots, and bullion knots.
For a dense, mossy effect, pack French knots tightly together using all six strands of floss, varying the number of wraps to create subtle changes in height.
Incorporate woven wheel stitches (or bullion knots stitched in a circle) to suggest tiny rosettes or succulents, adding structure to the composition.
Grouping these stitches by color and type, as if planting a garden, creates a compelling moss and fern embroidery texture that invites touch.
3. Emulate Geode Formations with Couching and Metallic Thread

Capture the crystalline structure of a geode by couching multiple strands of thread in concentric, irregular rings.
Alternate between matte cotton floss, silky rayon, and high-sheen metallic threads to mimic the different mineral layers.
The act of couching—laying down a bundle of threads and tacking it with another—creates a raised, cord-like line that is perfect for defining each layer.
Introduce seed beads or even small polished stones at the center to create a focal point that grounds the entire design in natural texture.
4. Stitch Sand Dunes with Directional Straight Stitches
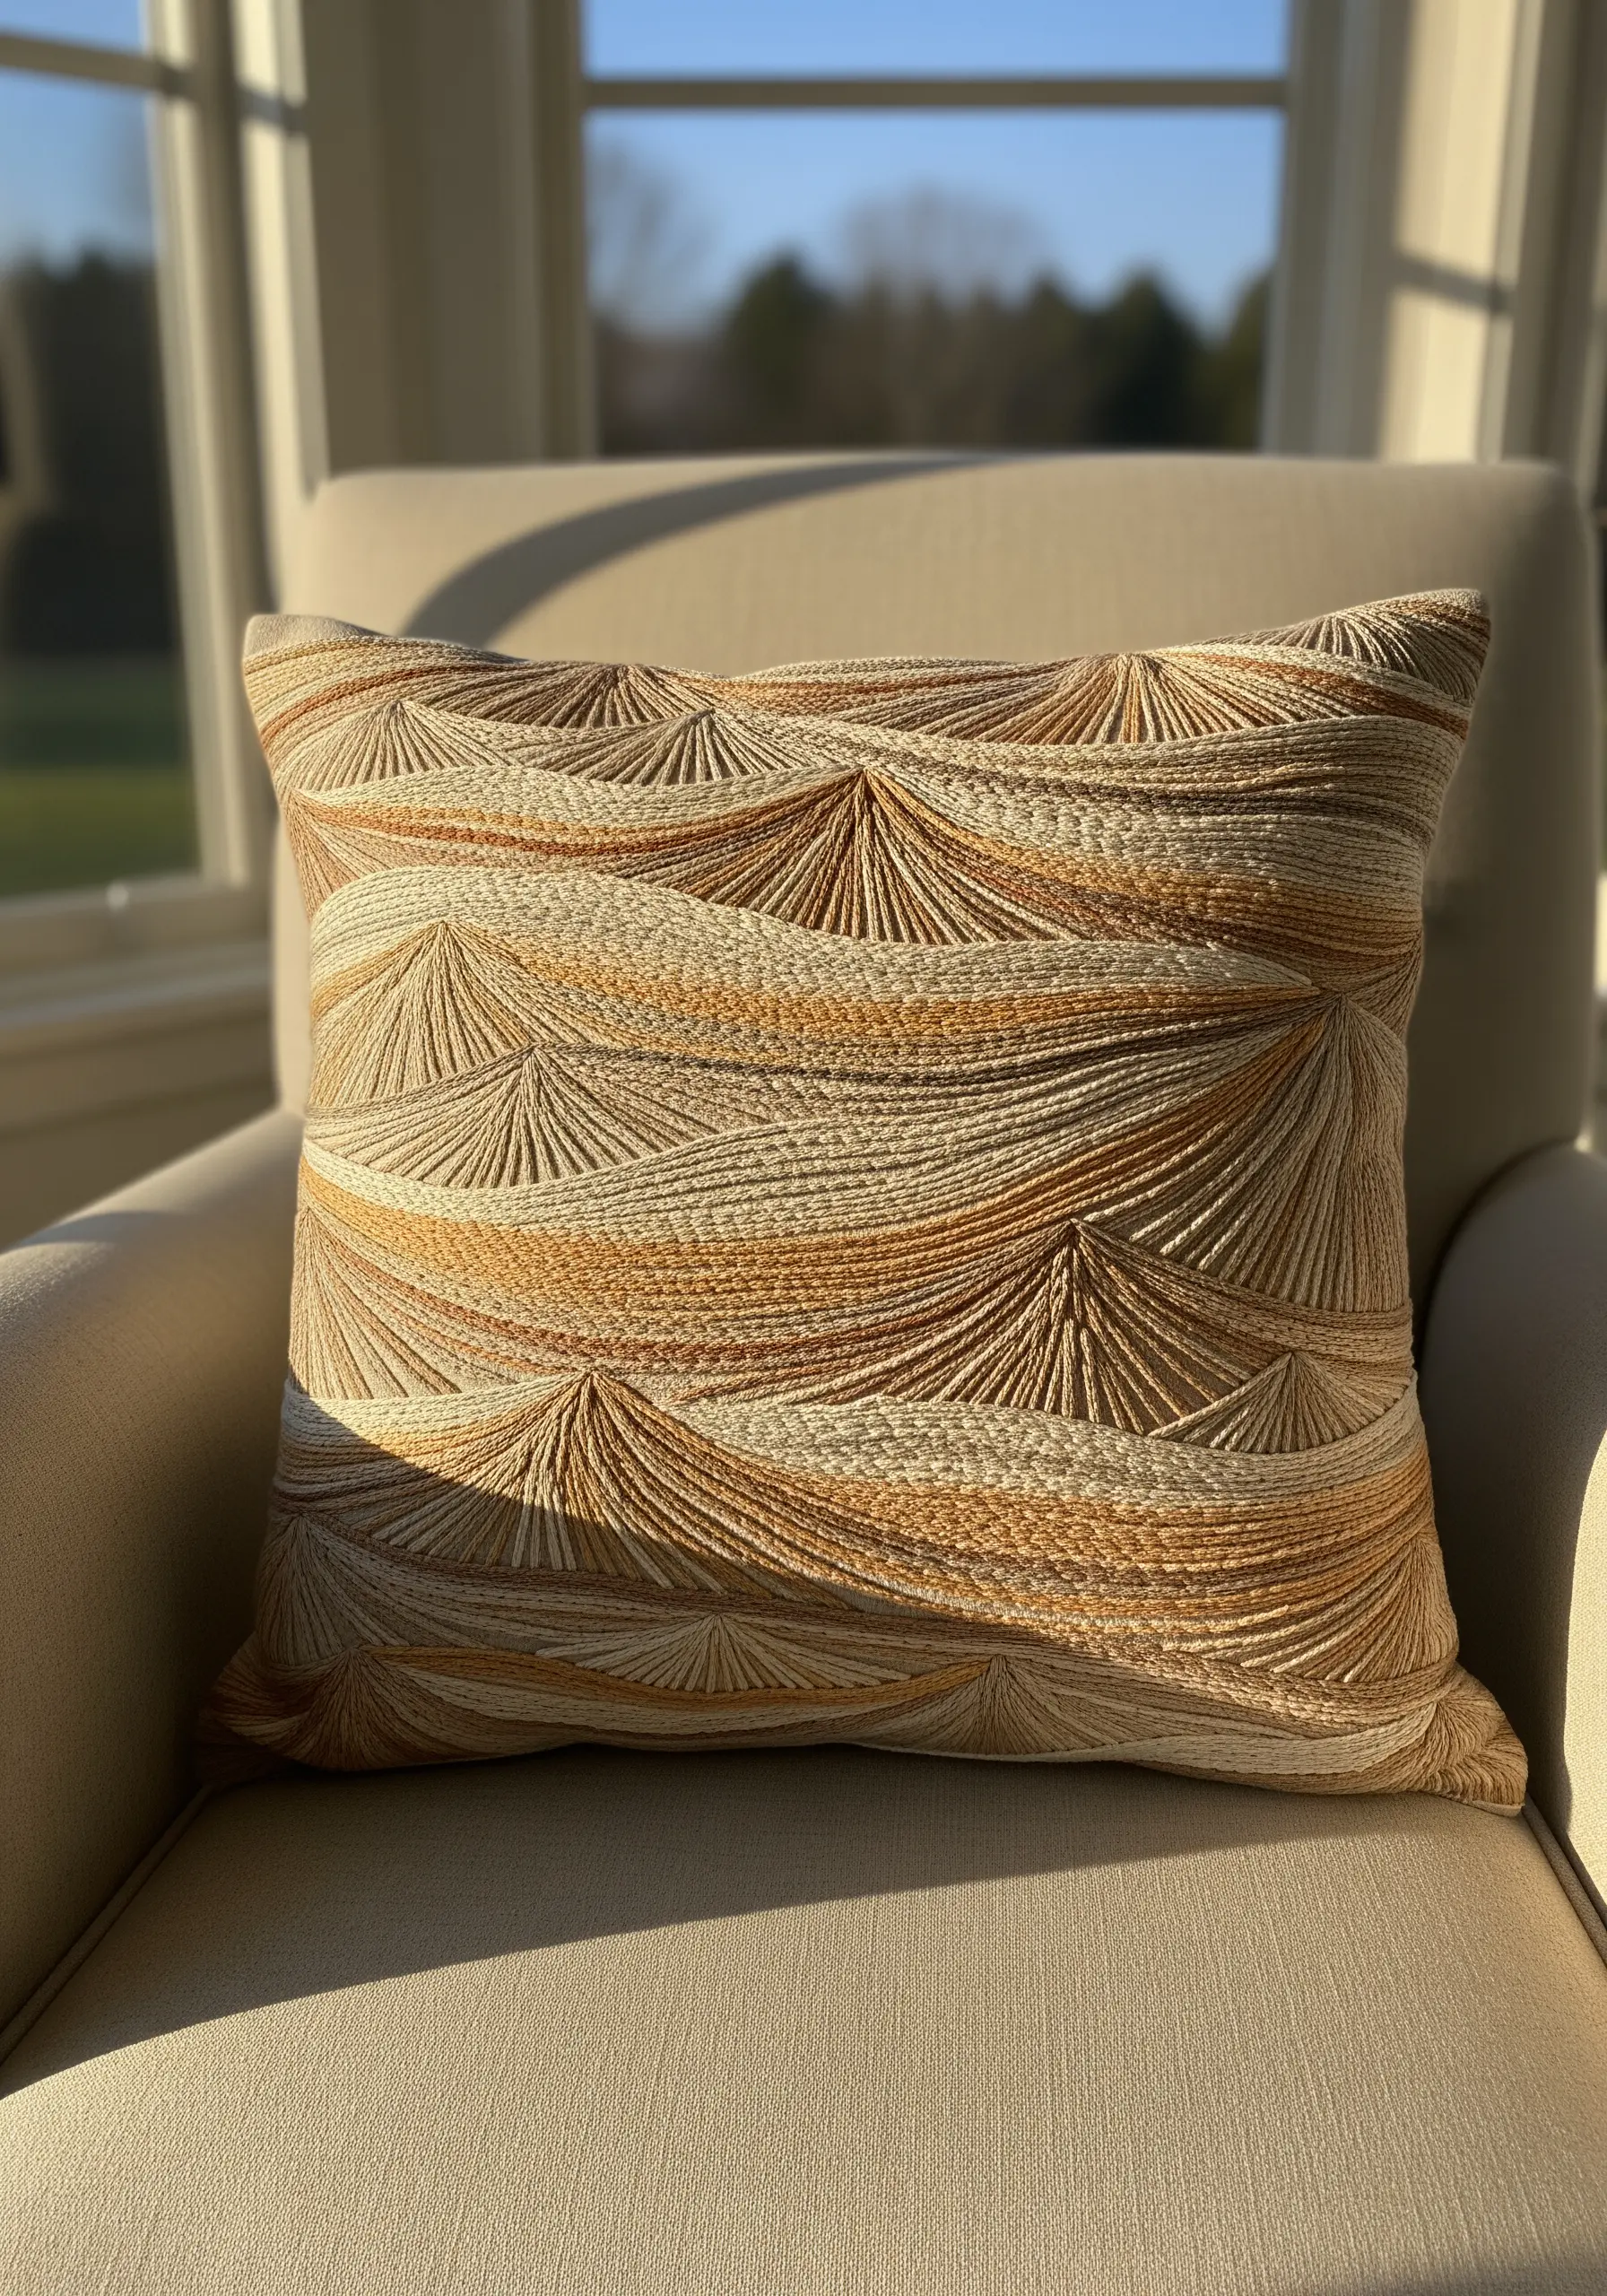
You can create the illusion of flowing, windswept sand without using any complex stitches at all.
This texture is built entirely from straight stitches, grouped into fan-like shapes using a technique often called Bokhara couching or a laid filling stitch.
Work in sections, filling each shape with long parallel stitches and then locking them down with tiny perpendicular stitches placed at intervals.
By varying the direction of your stitch groups and subtly blending shades of beige, ivory, and gold, you can create a surface with incredible movement and light, perfect for coastal-themed pillow stitching.
5. Recreate Parched Earth with Raised Outlines
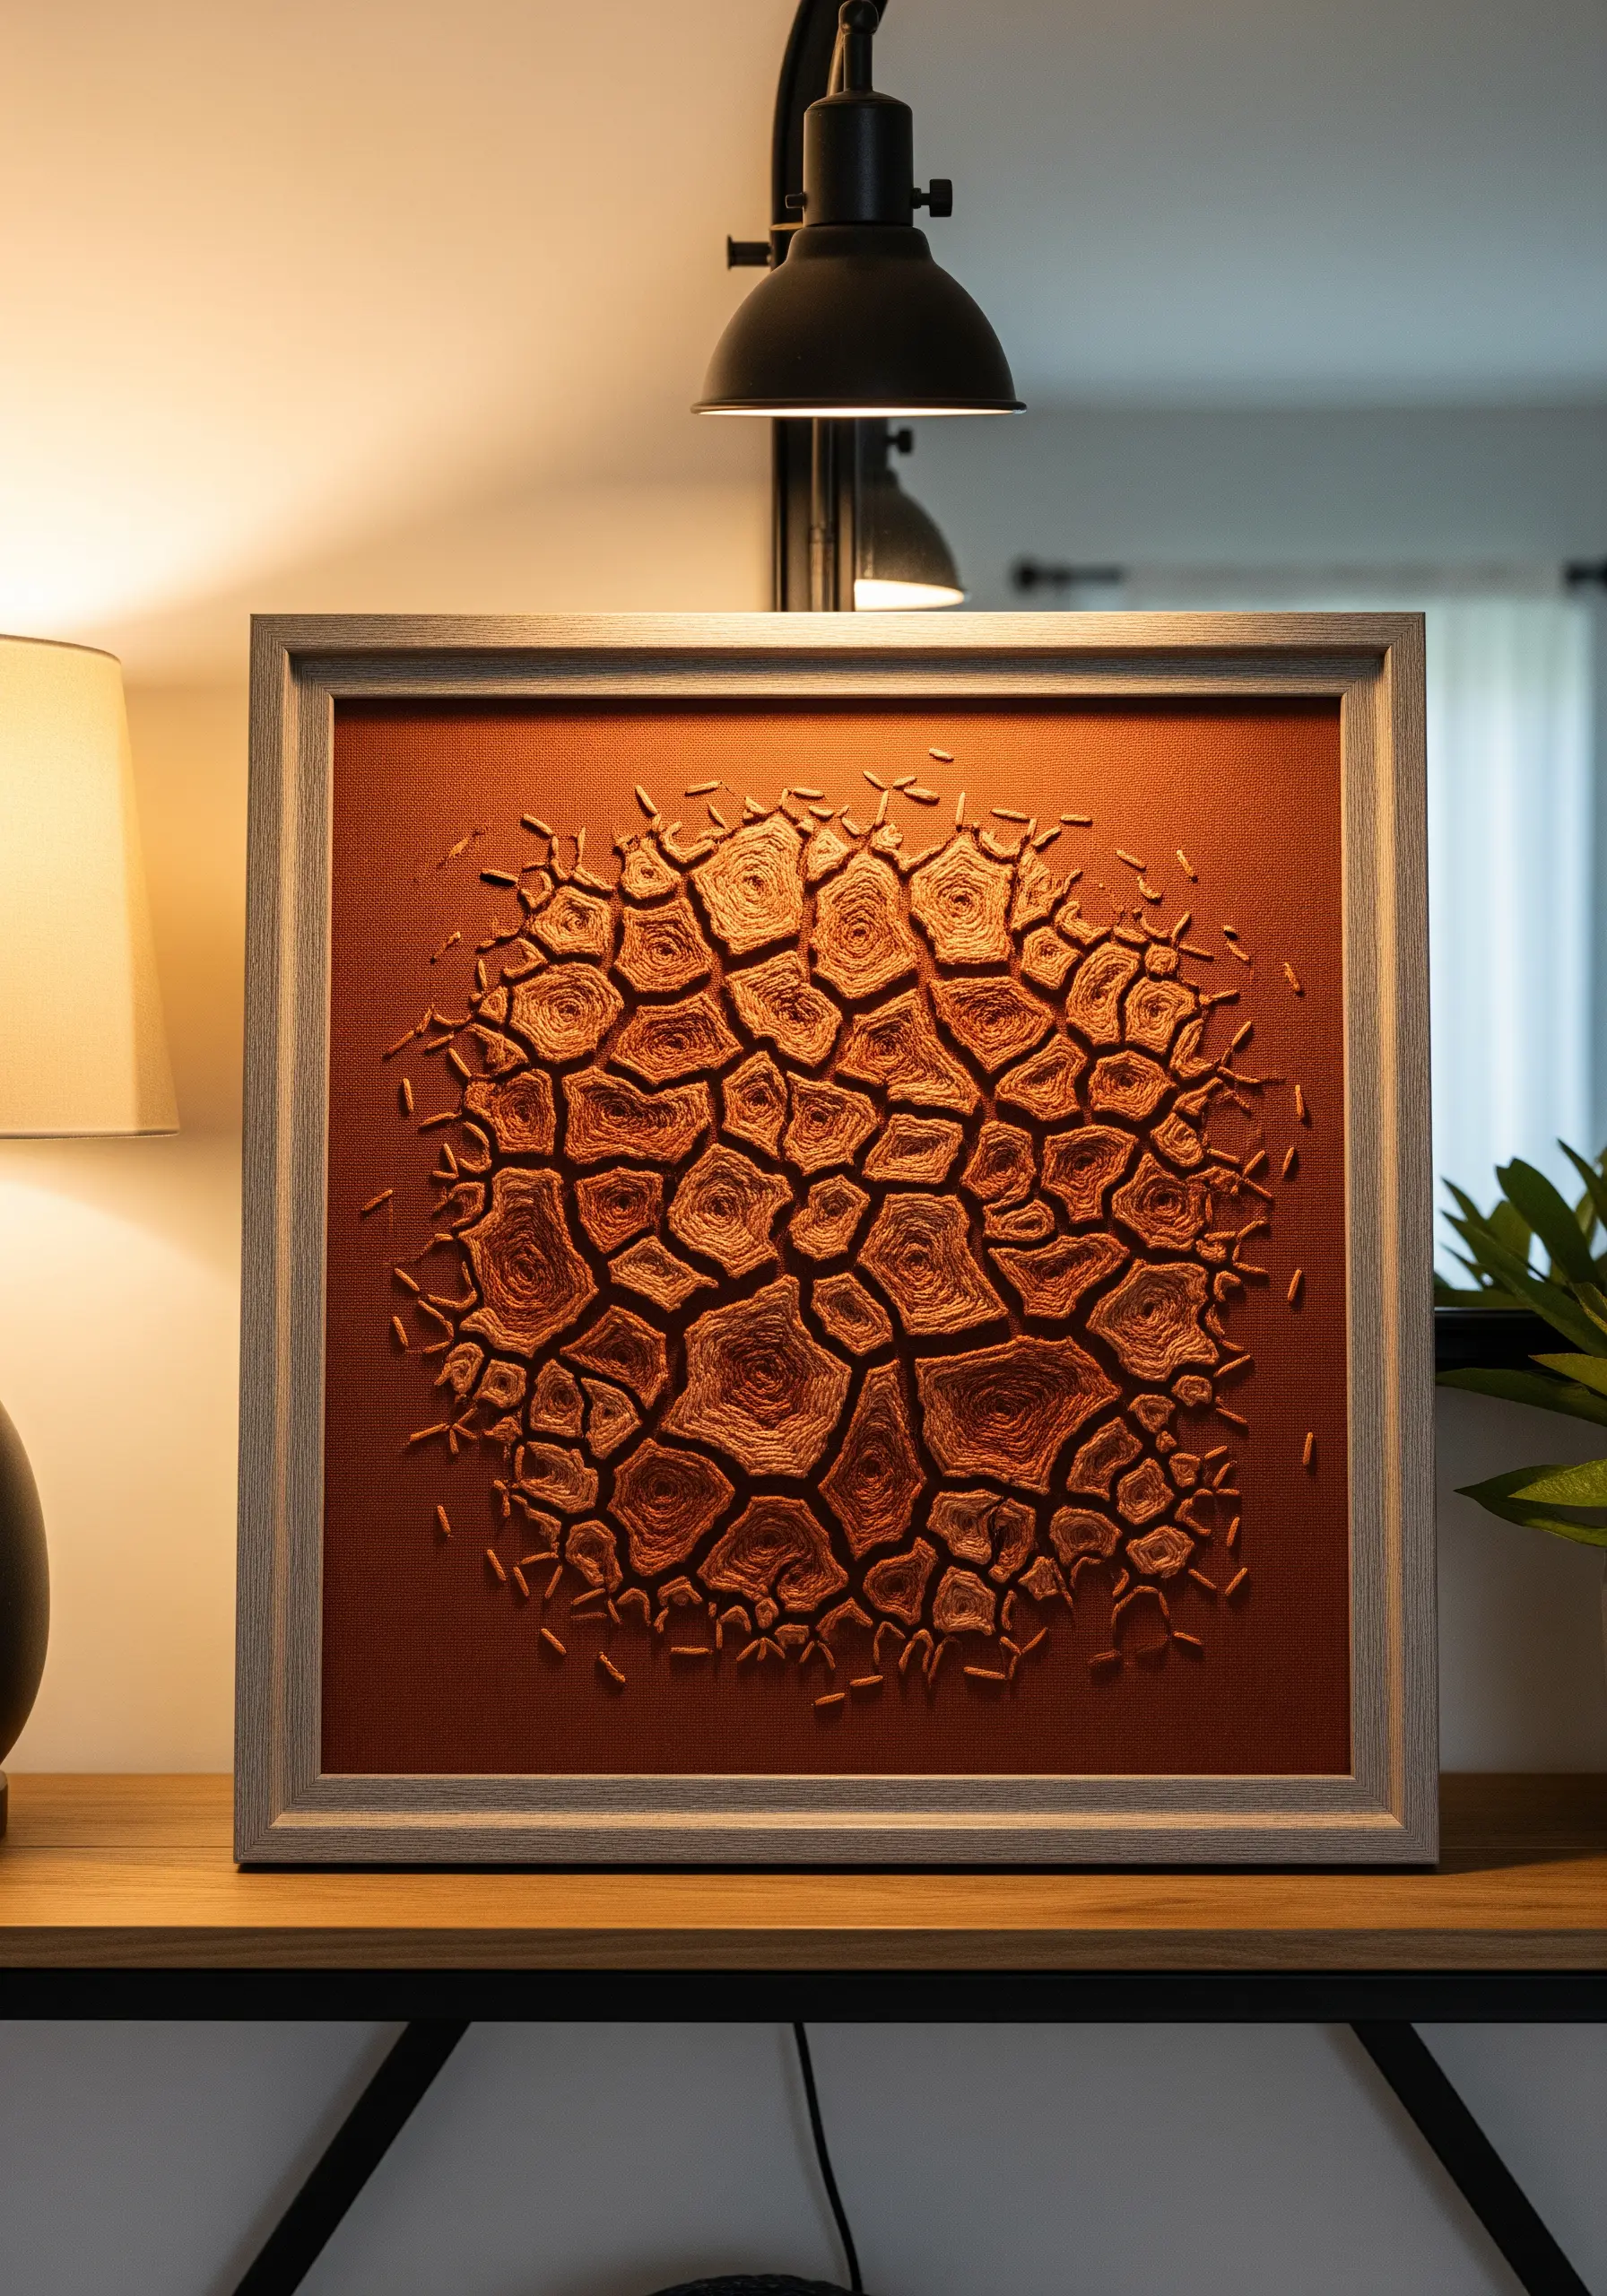
To capture the texture of cracked, dry earth, focus on building strong, dimensional outlines before filling the shapes.
Use a raised stem stitch or couch a thick cord along your pattern lines to define the individual cracked sections.
Fill each section with a dense satin stitch, changing the angle of your stitches slightly from one shape to the next to create subtle shifts in how the light reflects off the surface.
The combination of raised borders and smooth fill gives the piece a topographic quality that feels authentic and visually striking.
6. Construct a Riverbed with Padded Appliqué Stones

Combine thread painting with 3D elements to build a truly immersive waterscape.
Create the pebbles by wrapping smooth, neutral-toned fabric over small pieces of batting or felt, securing them from behind to create soft, rounded forms.
Arrange and stitch these padded appliqué “stones” onto your background fabric, clustering them densely at the shore and scattering them into the water.
Fill the surrounding areas with flowing, directional straight stitches in shades of blue and white to mimic moving water. This is one of the most effective ways to create depth in your embroidery using natural textures.
7. Stitch Bracket Fungi with Layered Satin Stitch

To capture the delicate, layered form of shelf fungi, use a padded satin stitch worked in concentric arcs.
First, create a base shape with a few layers of felt or scrap fabric, slightly smaller than your final mushroom.
Working from the outer edge inward, use a long-and-short stitch to blend shades of cream, ochre, and brown, following the curved shape of the fungus.
Each new arc of color should slightly overlap the last, creating the gentle ridges characteristic of these natural forms. This technique is ideal for creative embroidery ideas inspired by tree bark and leaves.
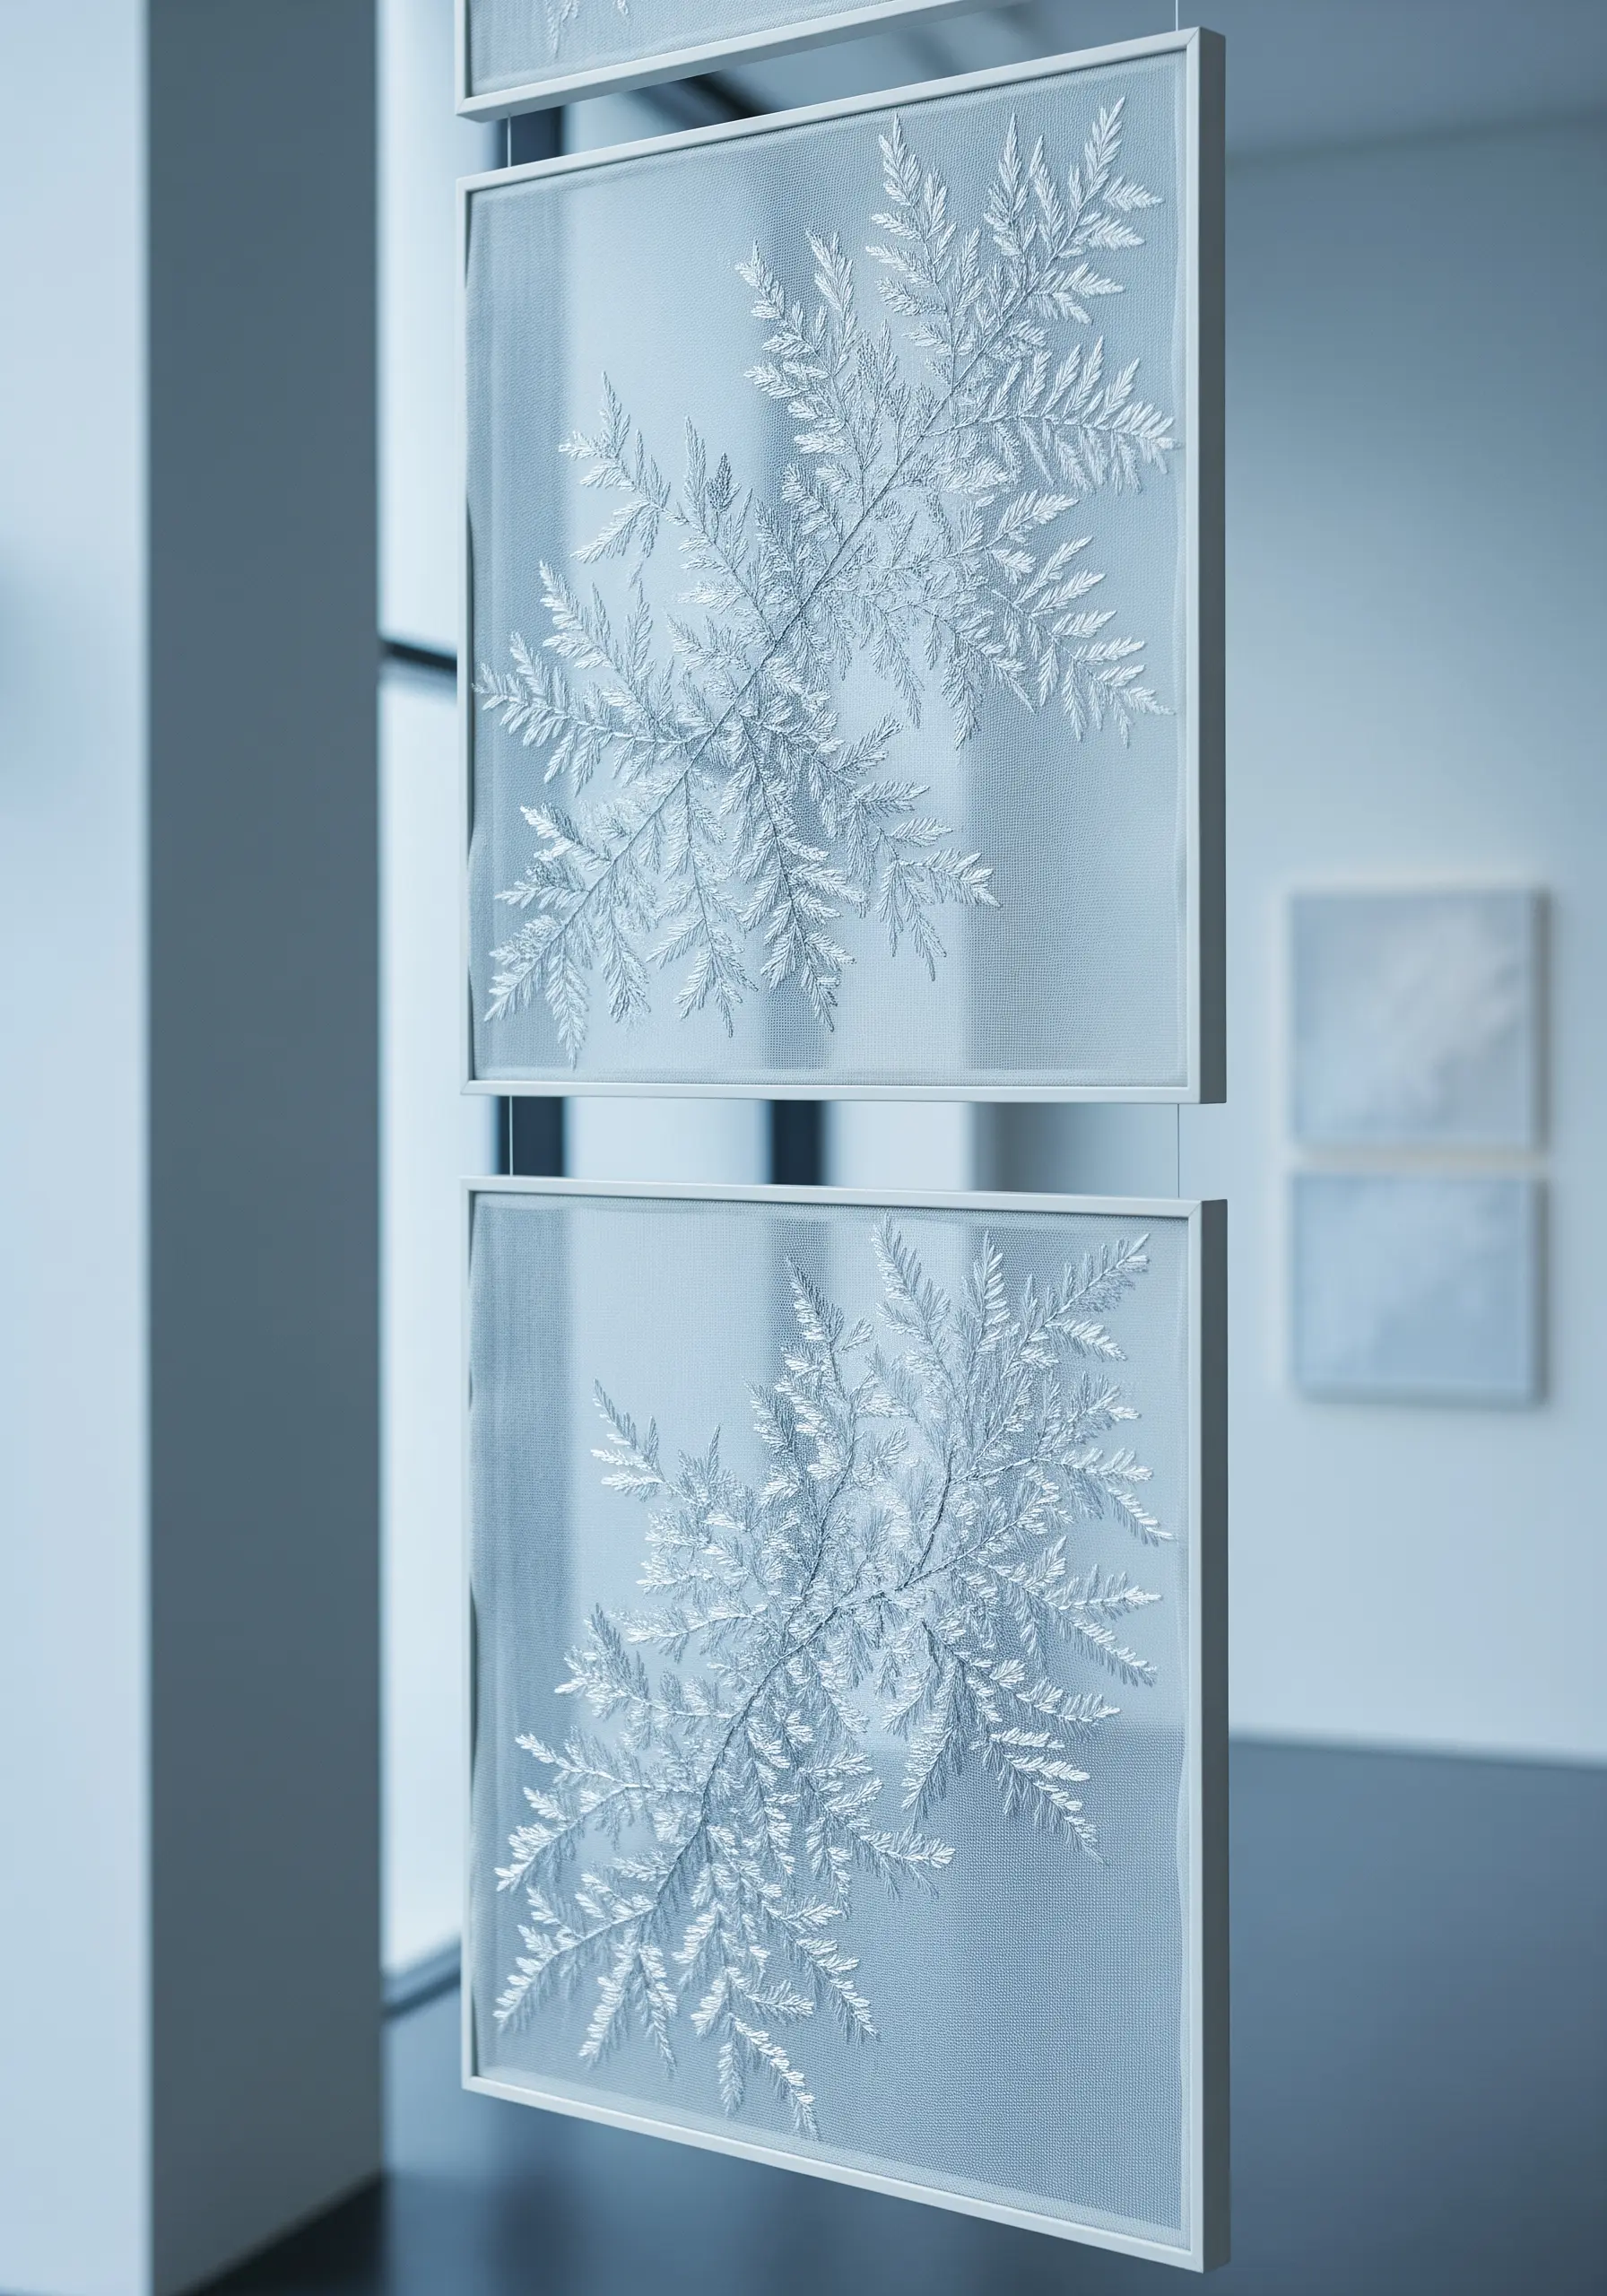
8. Render Leaf Skeletons with a Whipped Backstitch

For the fine, delicate structure of a skeletal leaf, a single backstitch can look too broken or dotted.
Instead, first create your entire vein structure with a simple backstitch using a single strand of thread.
Then, come back with the same thread and whip the stitches—pass your needle under each backstitch without piercing the fabric—to create a smooth, uninterrupted, and slightly raised line.
This technique gives the veins a refined, cord-like finish that stands out beautifully against a dark, plain-weave fabric, resulting in minimalist embroidery ideas for a modern, chic look.
9. Add Depth to Petals with Directional Satin Stitch
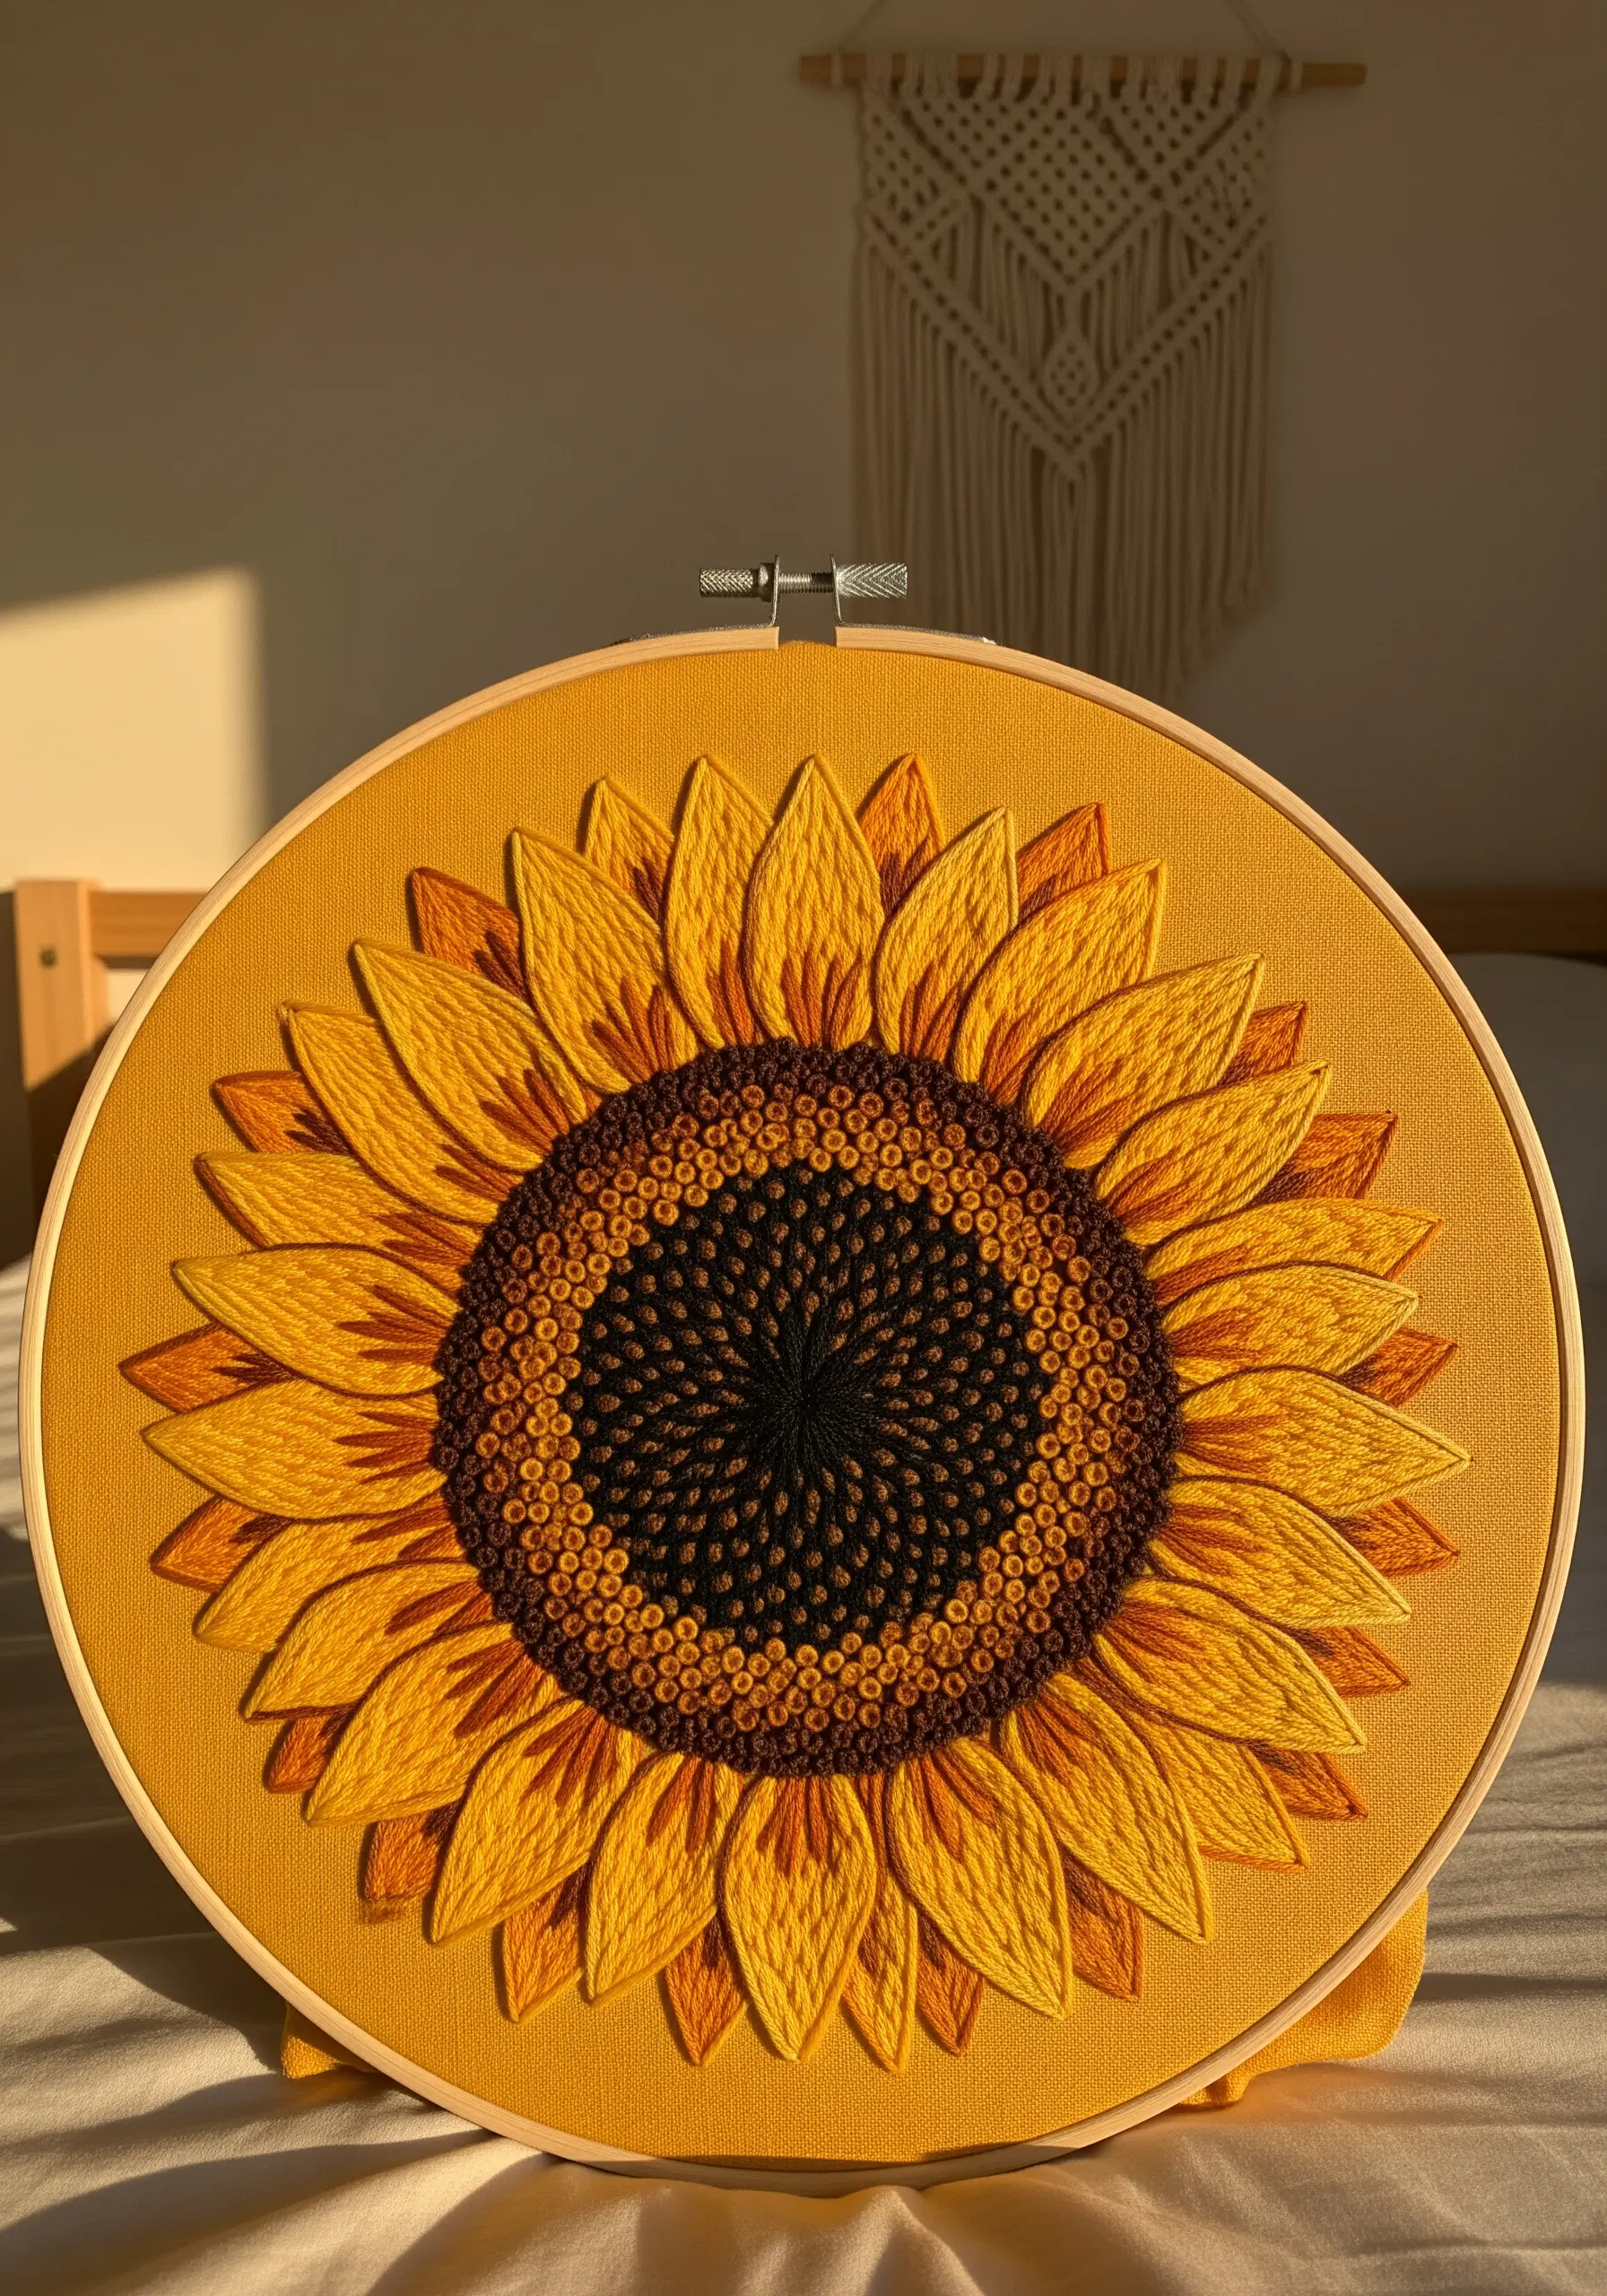
Make your floral petals look realistic by paying close attention to the direction of your satin stitches.
Instead of filling a petal with uniform vertical or horizontal stitches, angle them to follow the natural growth pattern, fanning out from the base towards the tip.
Use a split stitch to create a sharp, defined outline before you begin filling. This acts as a ‘fence’ to keep your satin stitches neat and prevents them from pulling the fabric.
This simple adjustment transforms flat shapes into dynamic, lifelike sunflower embroidery ideas.
10. Create a Cyanotype Effect with Negative Space
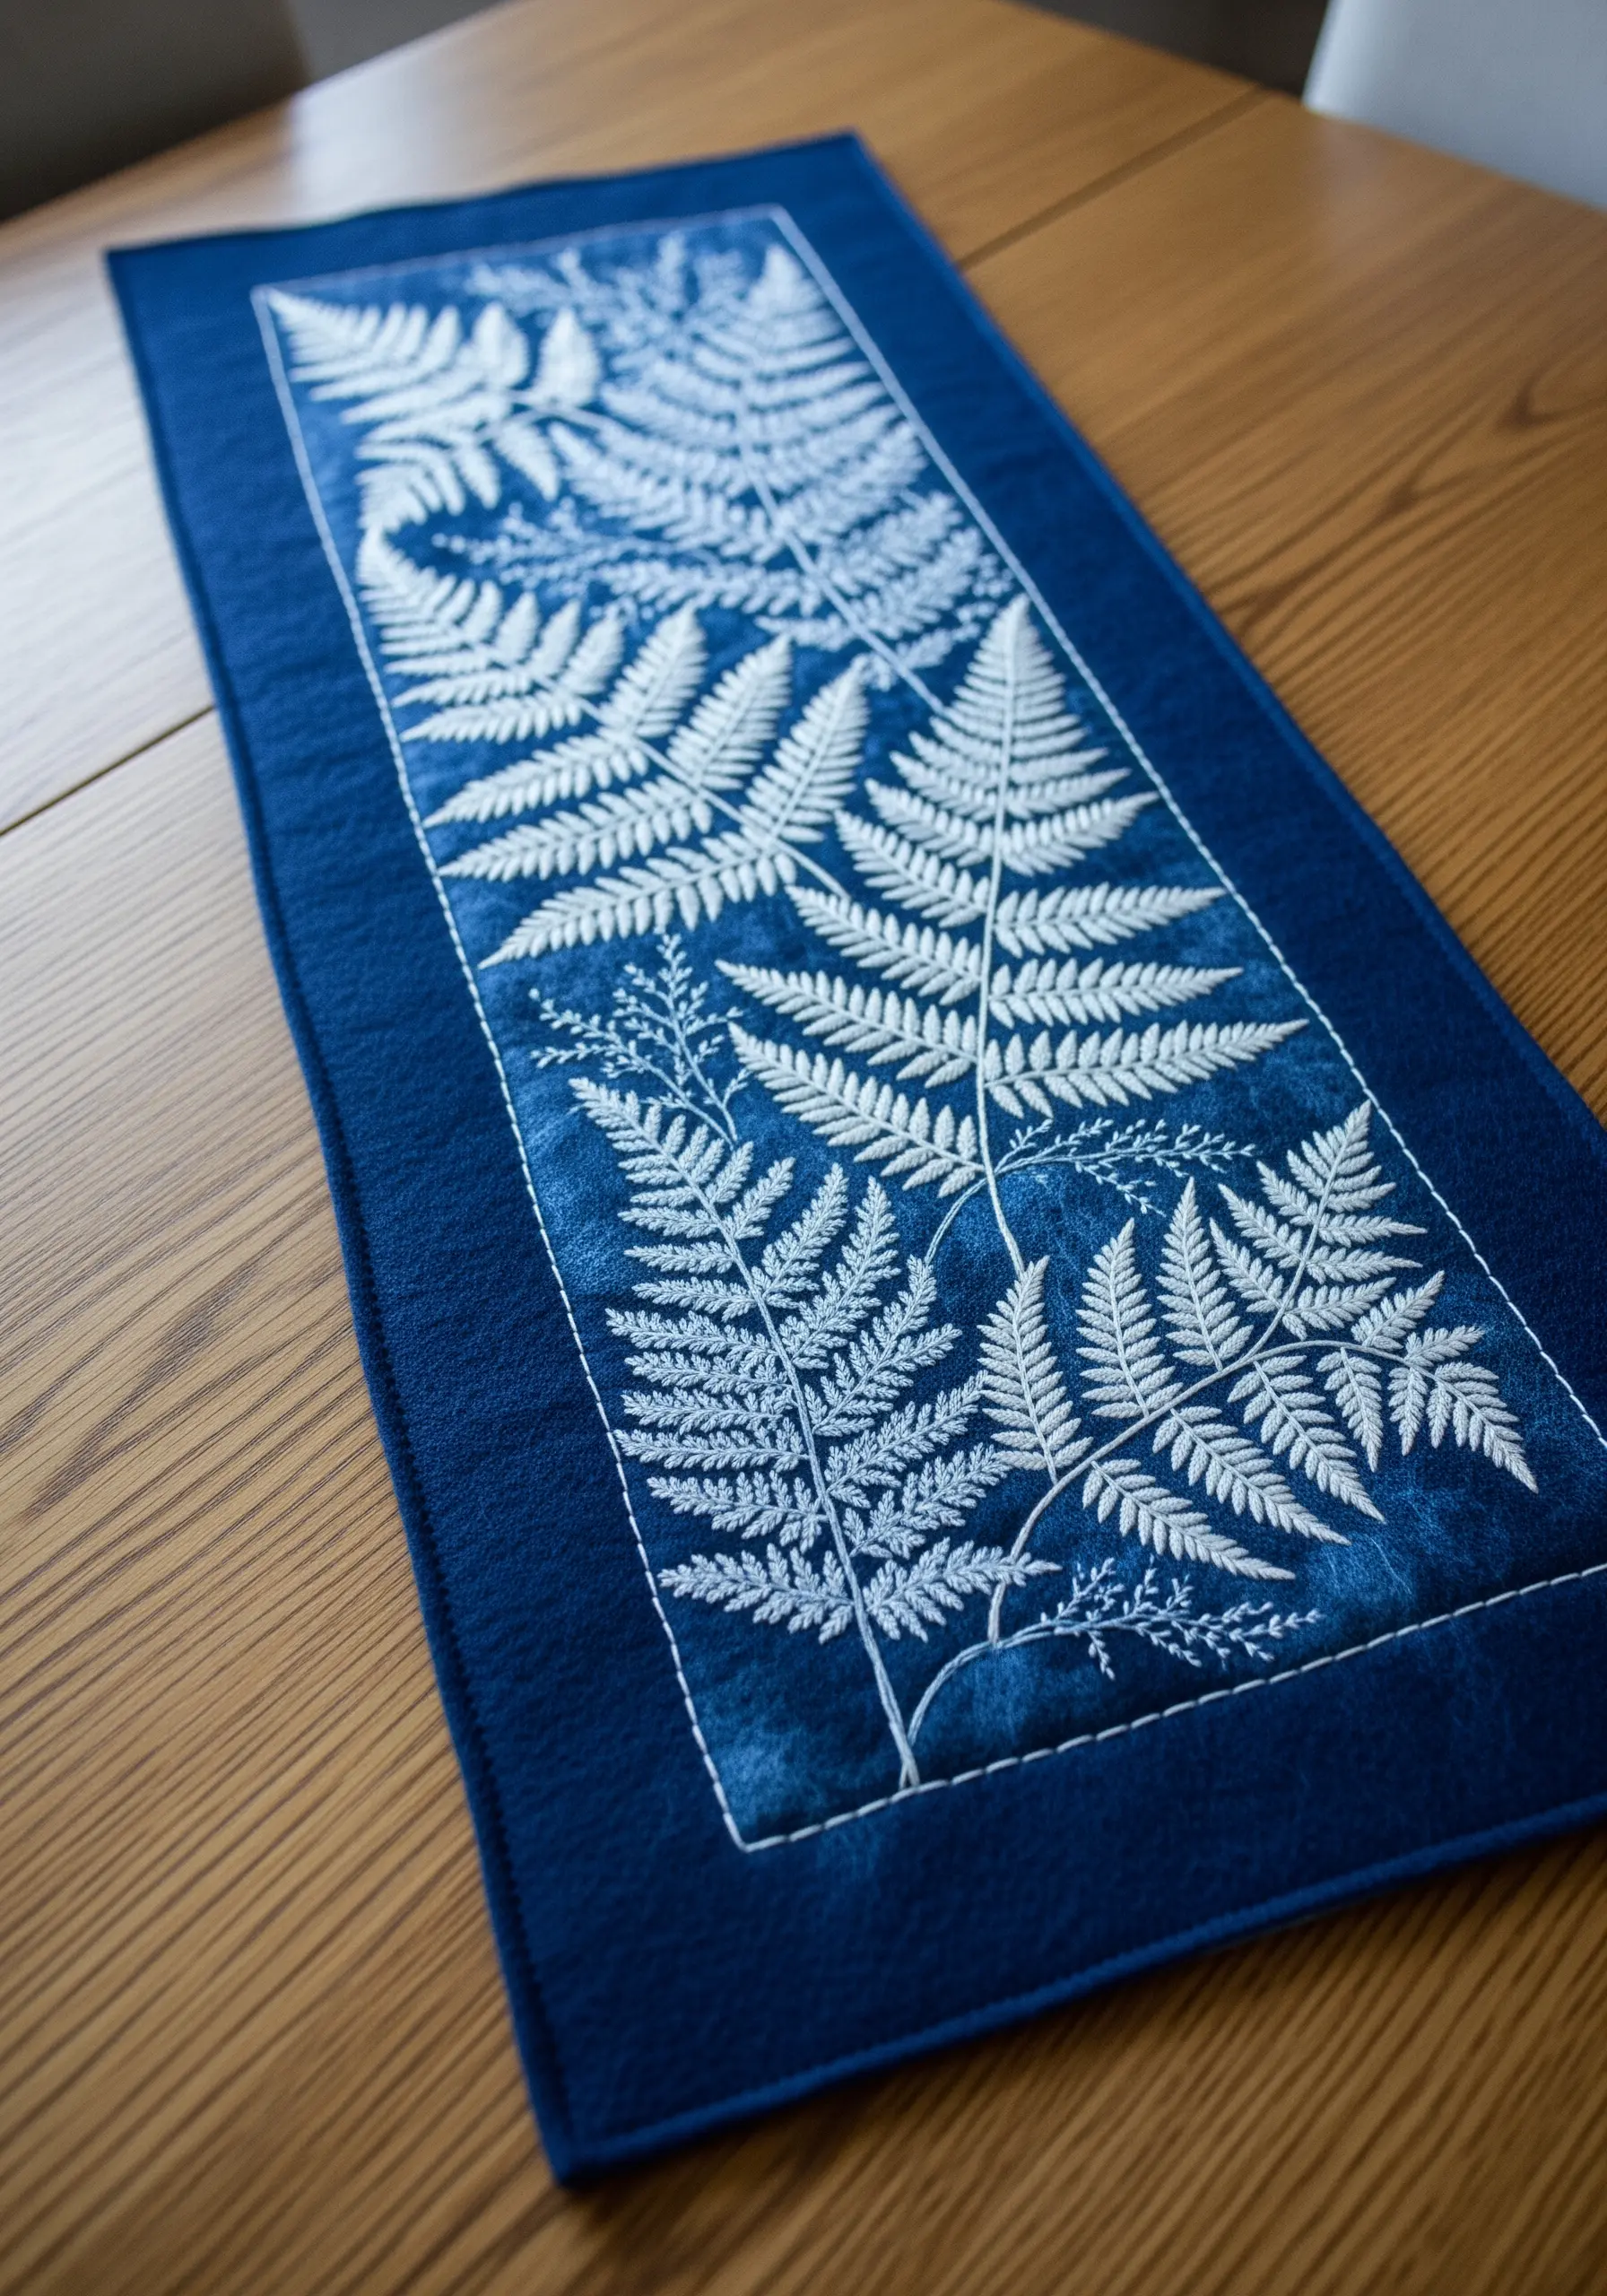
Mimic the look of a botanical sun print by focusing on the background rather than the motif itself.
Lightly trace your fern or leaf patterns onto a dark blue or indigo fabric.
Instead of stitching the ferns, fill the entire background around them with dense, varied stitches—try a mix of seed stitch and short straight stitches in shades of white and light blue.
This makes the un-stitched ferns pop, creating a stunning negative-space design that feels both classic and contemporary, perfect for hand-stitched table runner embroidery.
11. Incorporate Natural Rope for Bold Topography
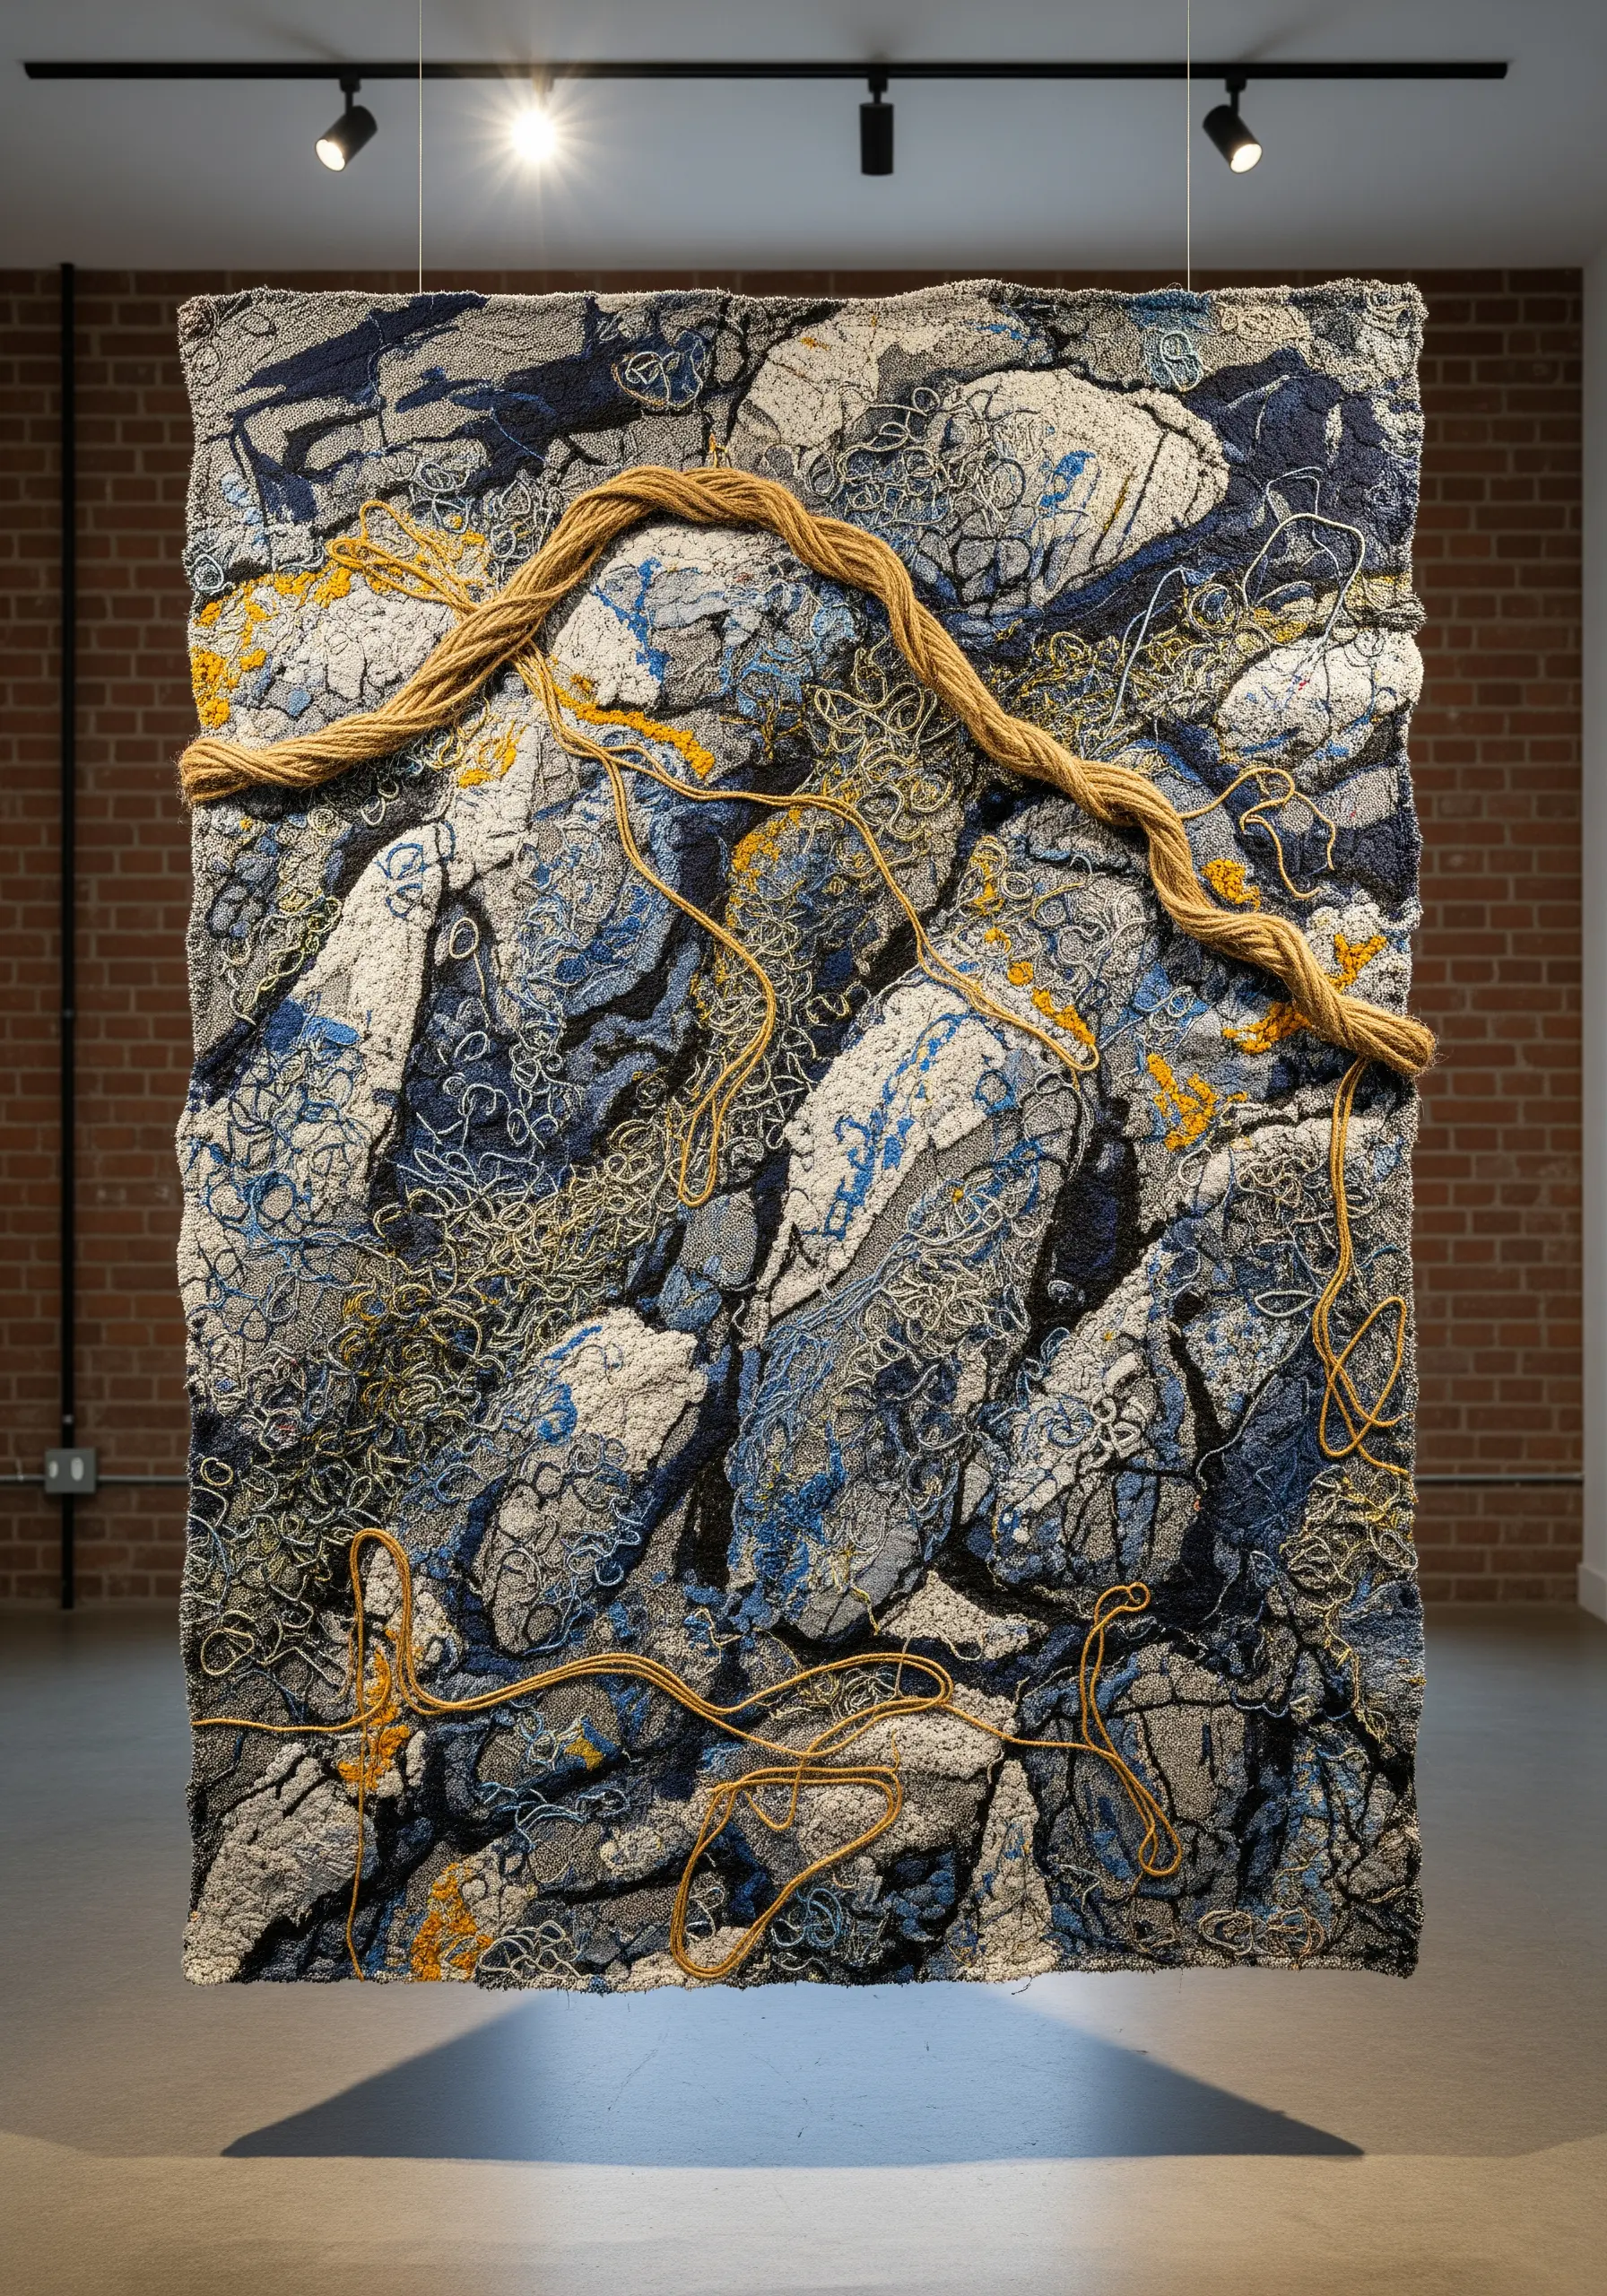
For large-scale fiber art, integrate non-traditional materials like jute or cotton rope to create dramatic, sculptural lines.
Use techniques like couching or even drilling small holes in your canvas to securely anchor the rope, allowing it to curve and wind across the surface.
The contrast between the thick, rustic rope and the finer, more detailed embroidery surrounding it creates an immediate focal point and adds incredible depth.
This method is perfect for representing paths, rivers, or geological fissures in abstract thread landscapes.
12. Weave an Open-Work Texture for Light Diffusion
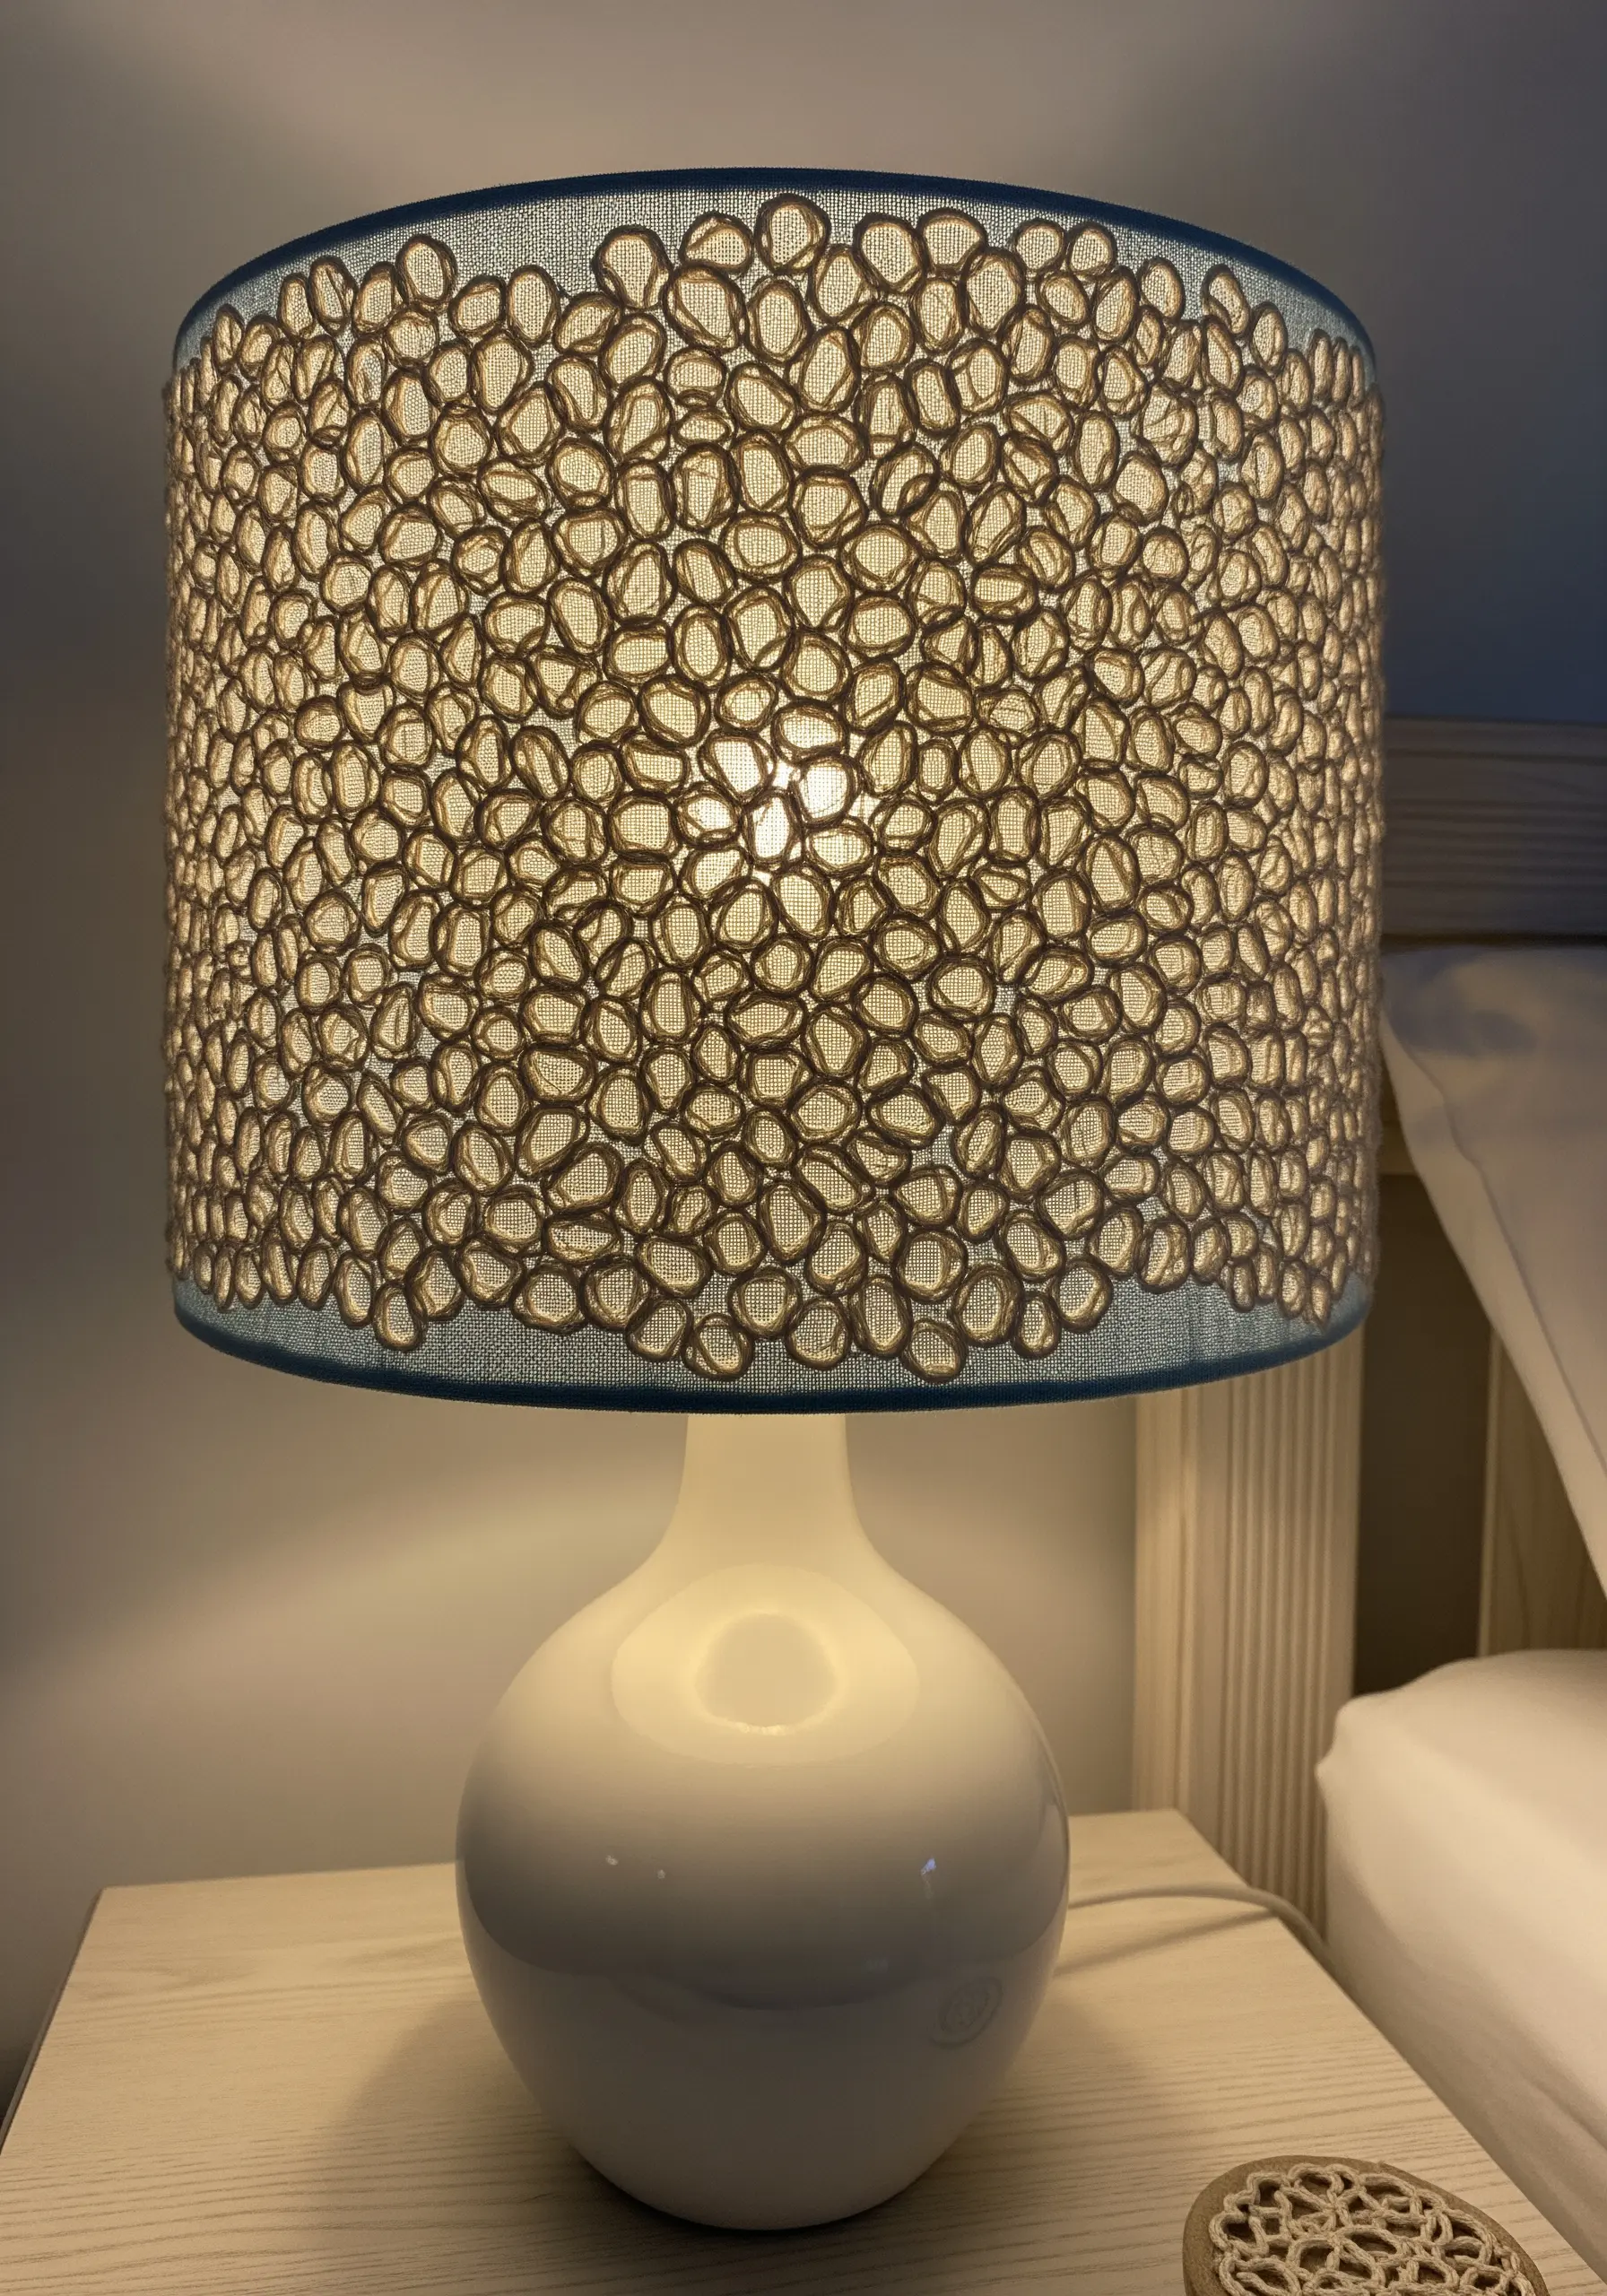
Create a functional piece of art by stitching a texture that plays with light.
On a sturdy, semi-transparent fabric like linen or burlap, use a detached stitch like the detached chain stitch or lazy daisy, but leave the loops open and large.
Arrange these open loops in a dense, repeating pattern across the fabric. When used on a lampshade, the light filters through the un-stitched spaces, casting beautiful shadows.
This technique transforms simple embroidery into an interactive element of your home decor.
13. Capture Iridescence with Blended Metallic Threads
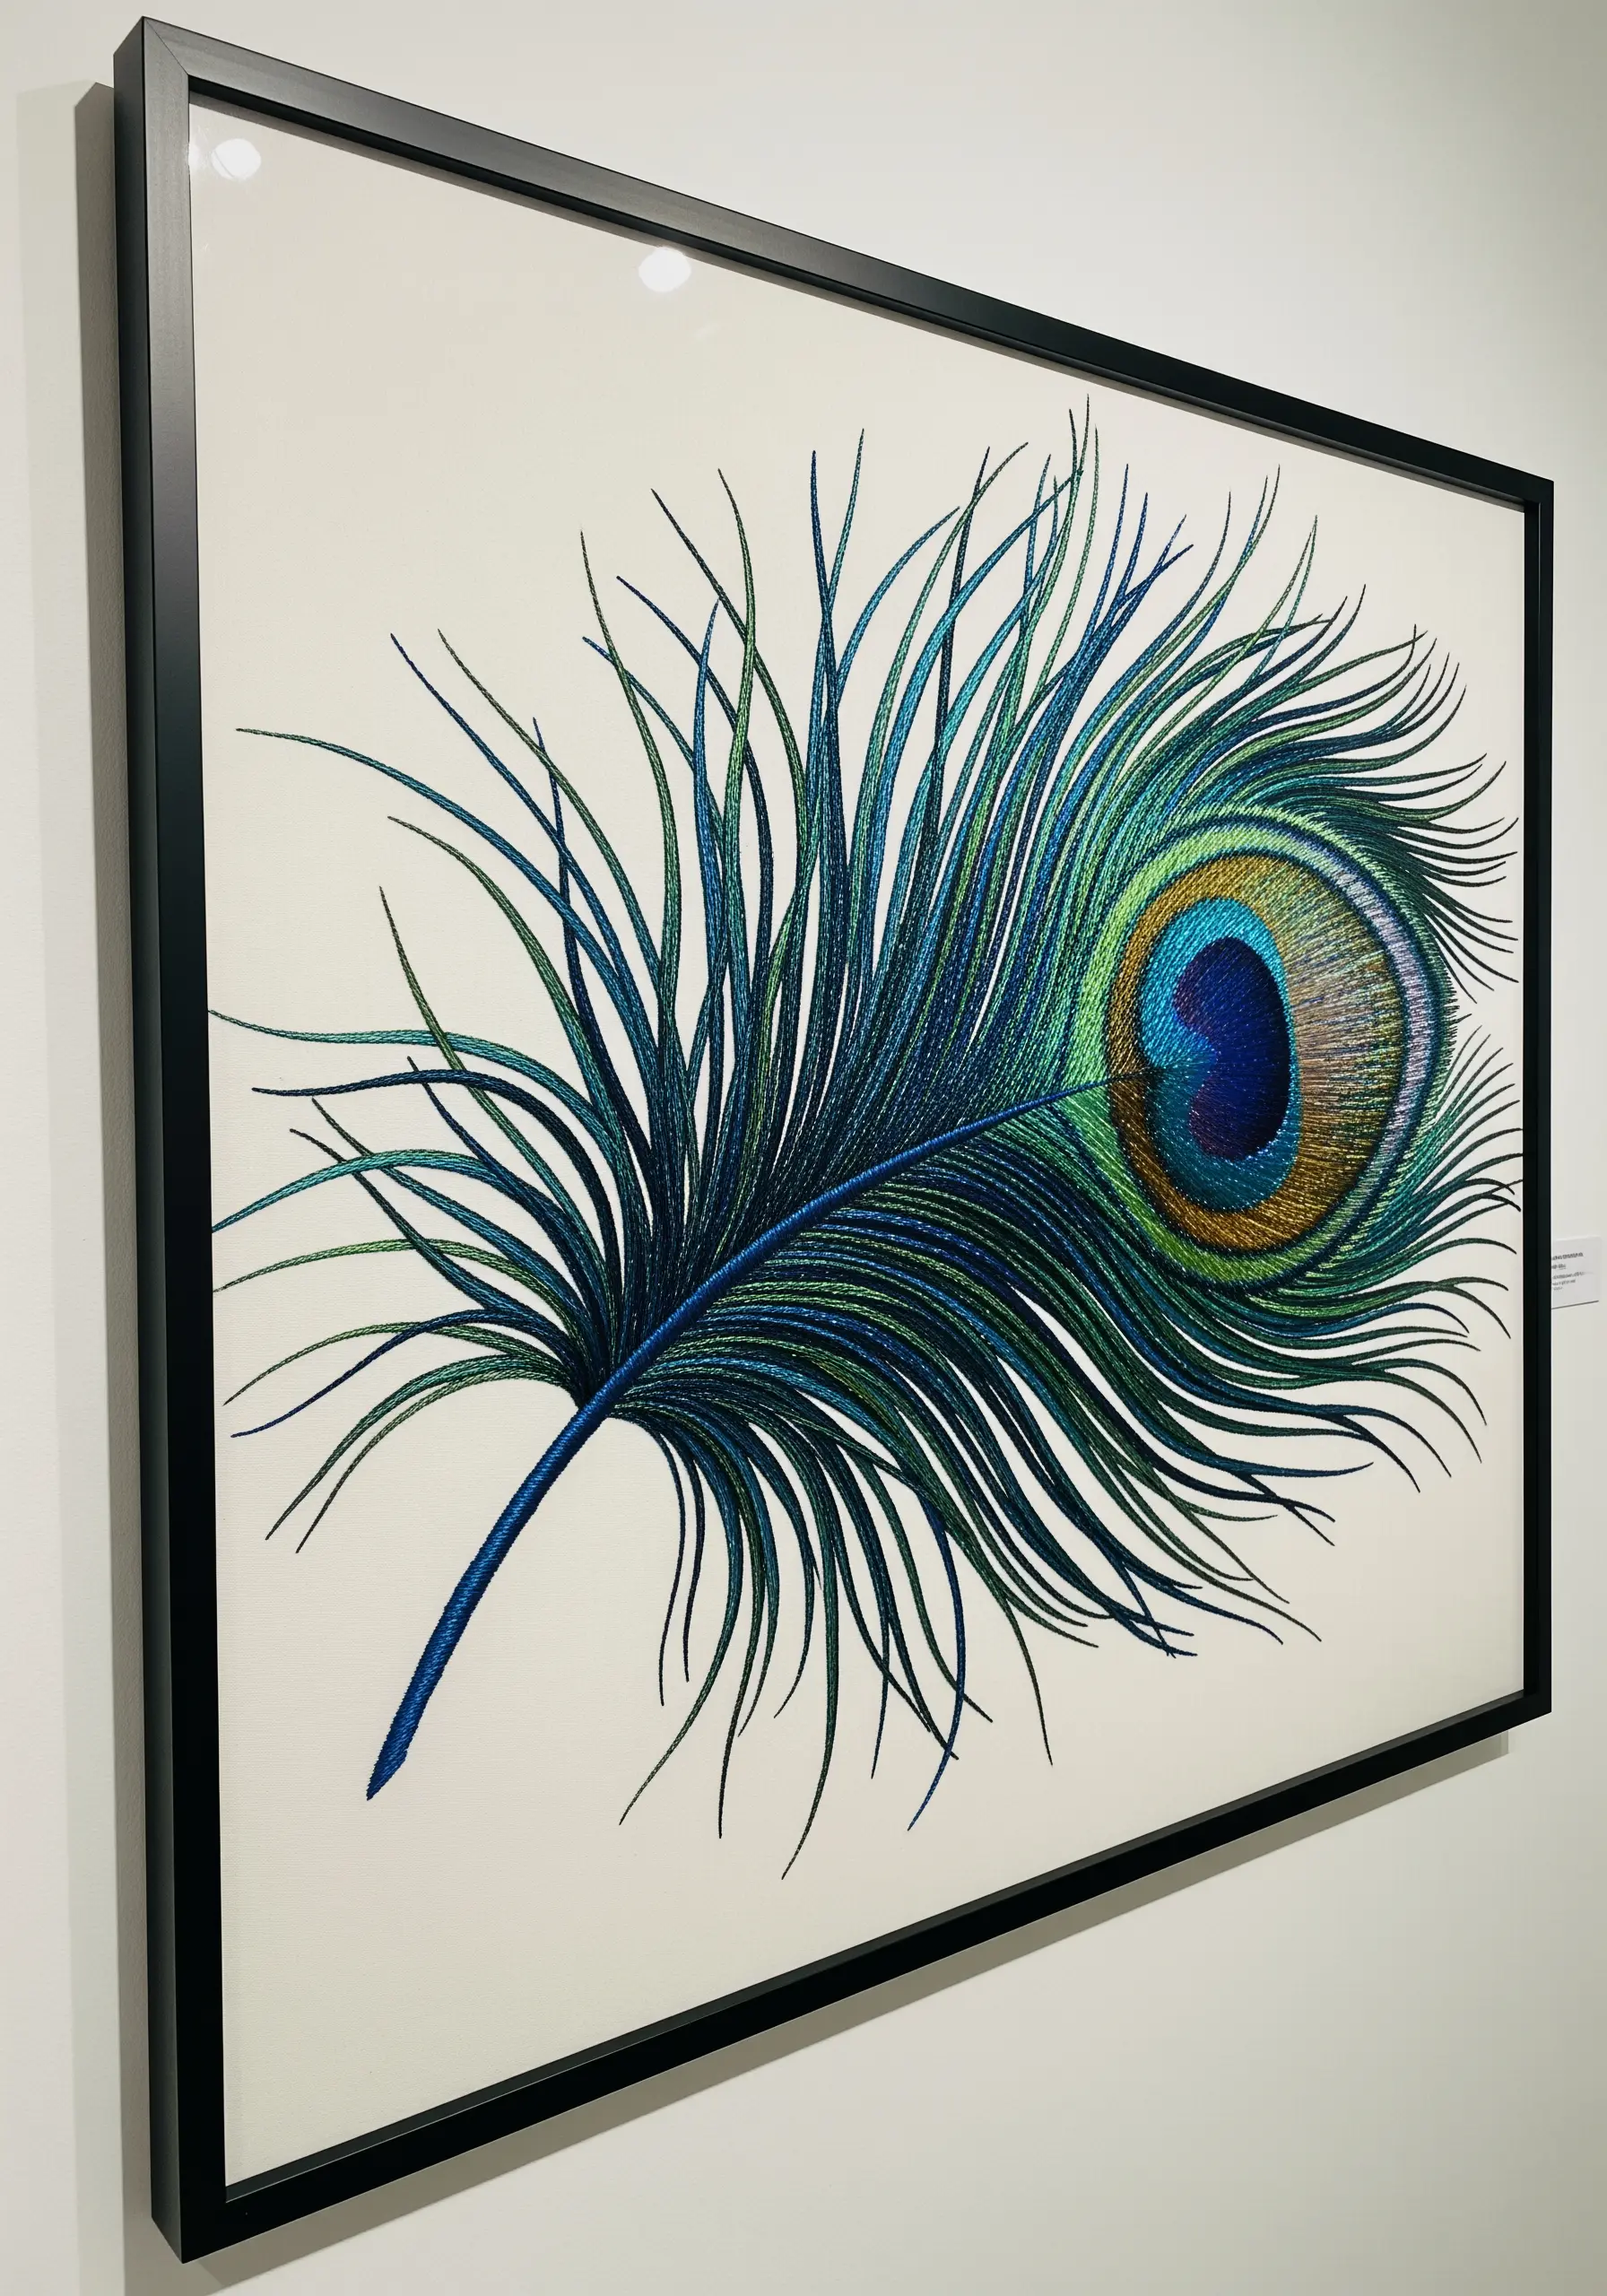
Replicating the shimmer of a peacock feather requires a careful blend of color and sheen.
Instead of using a single color, thread your needle with multiple strands of different threads—try one strand of black, two of teal, and one of a fine gold metallic.
Use long, delicate straight stitches or a split stitch to create the fine barbs of the feather, allowing the different threads to twist and turn naturally.
This thread-blending technique creates a complex, iridescent effect that shifts in the light, far more realistic than any single thread could achieve. It’s a key to contemporary thread painting techniques.
14. Build a Forest Floor with Layered Stitches
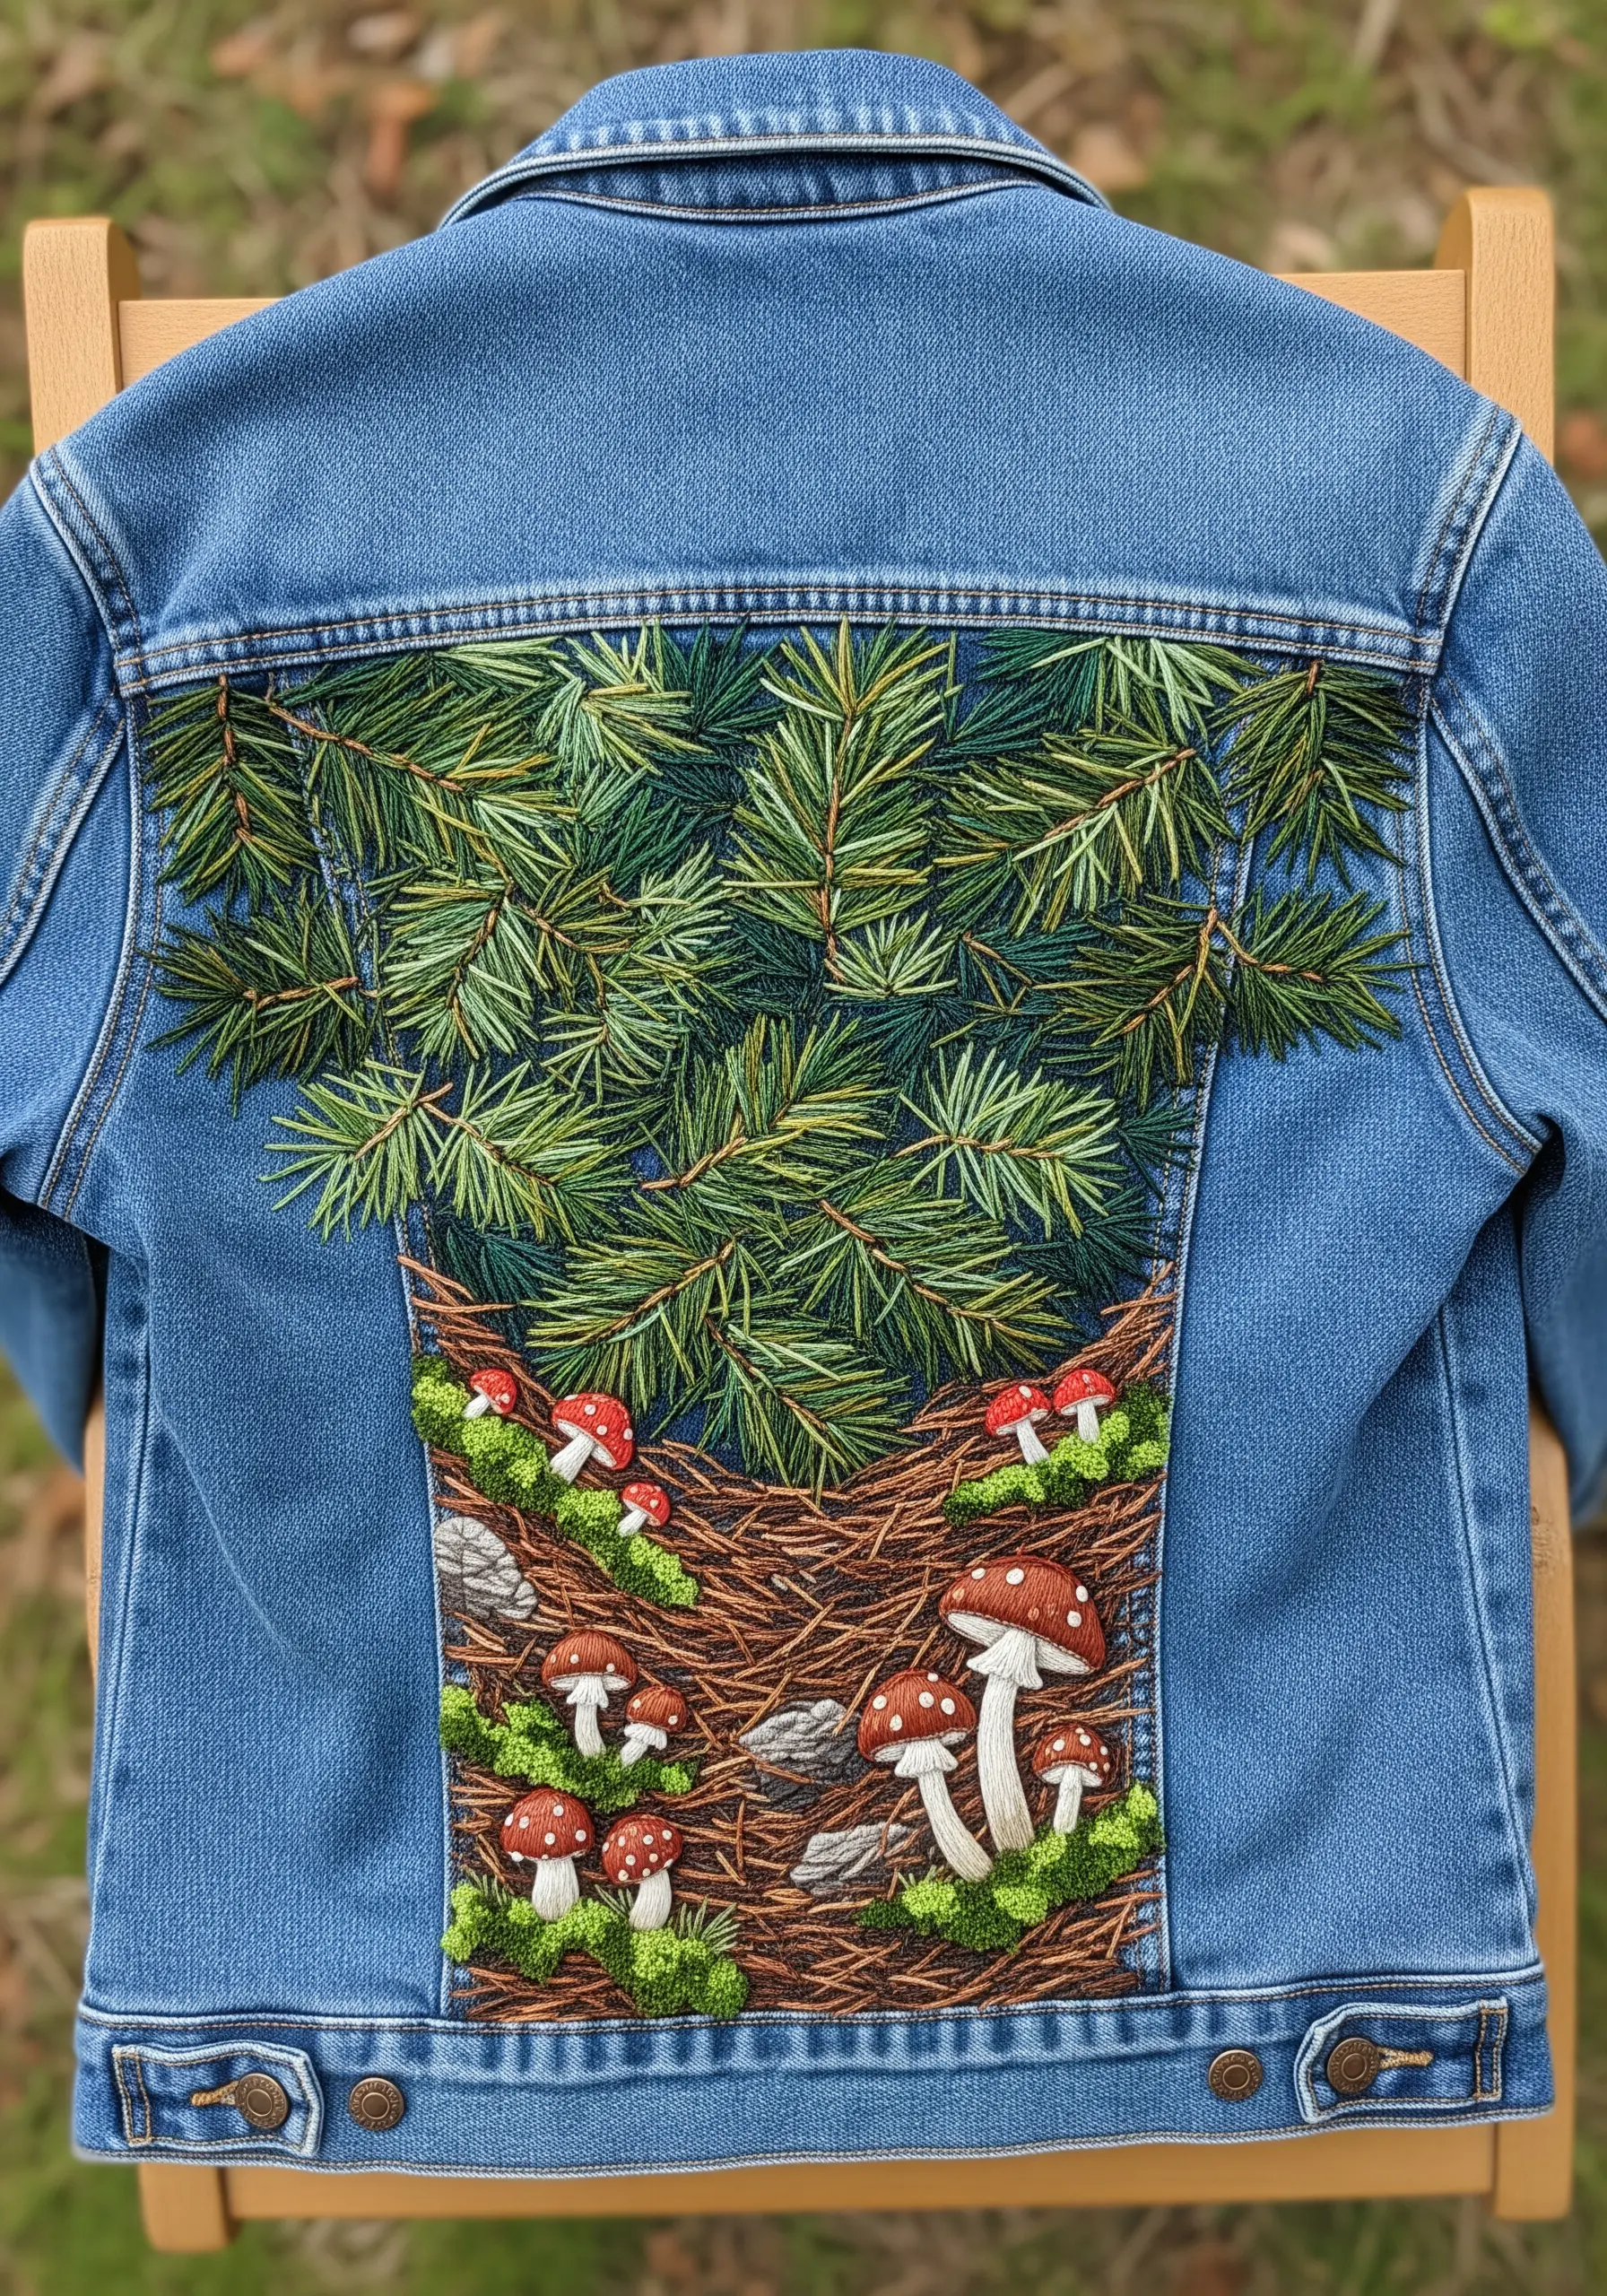
Create a sense of depth in a woodland scene by layering different textures from back to front.
Start with the background elements, like pine needles, using dense layers of short, straight stitches in dark greens and browns.
Next, stitch the mossy ground using plush French knots and Turkey work for a shaggy texture.
Finally, add the foreground elements, like mushrooms, using a padded satin stitch to make them stand out physically from the surface. This layering gives your apparel art a dynamic, 3D quality.
15. Channel Kintsugi with Gold Thread on Felt
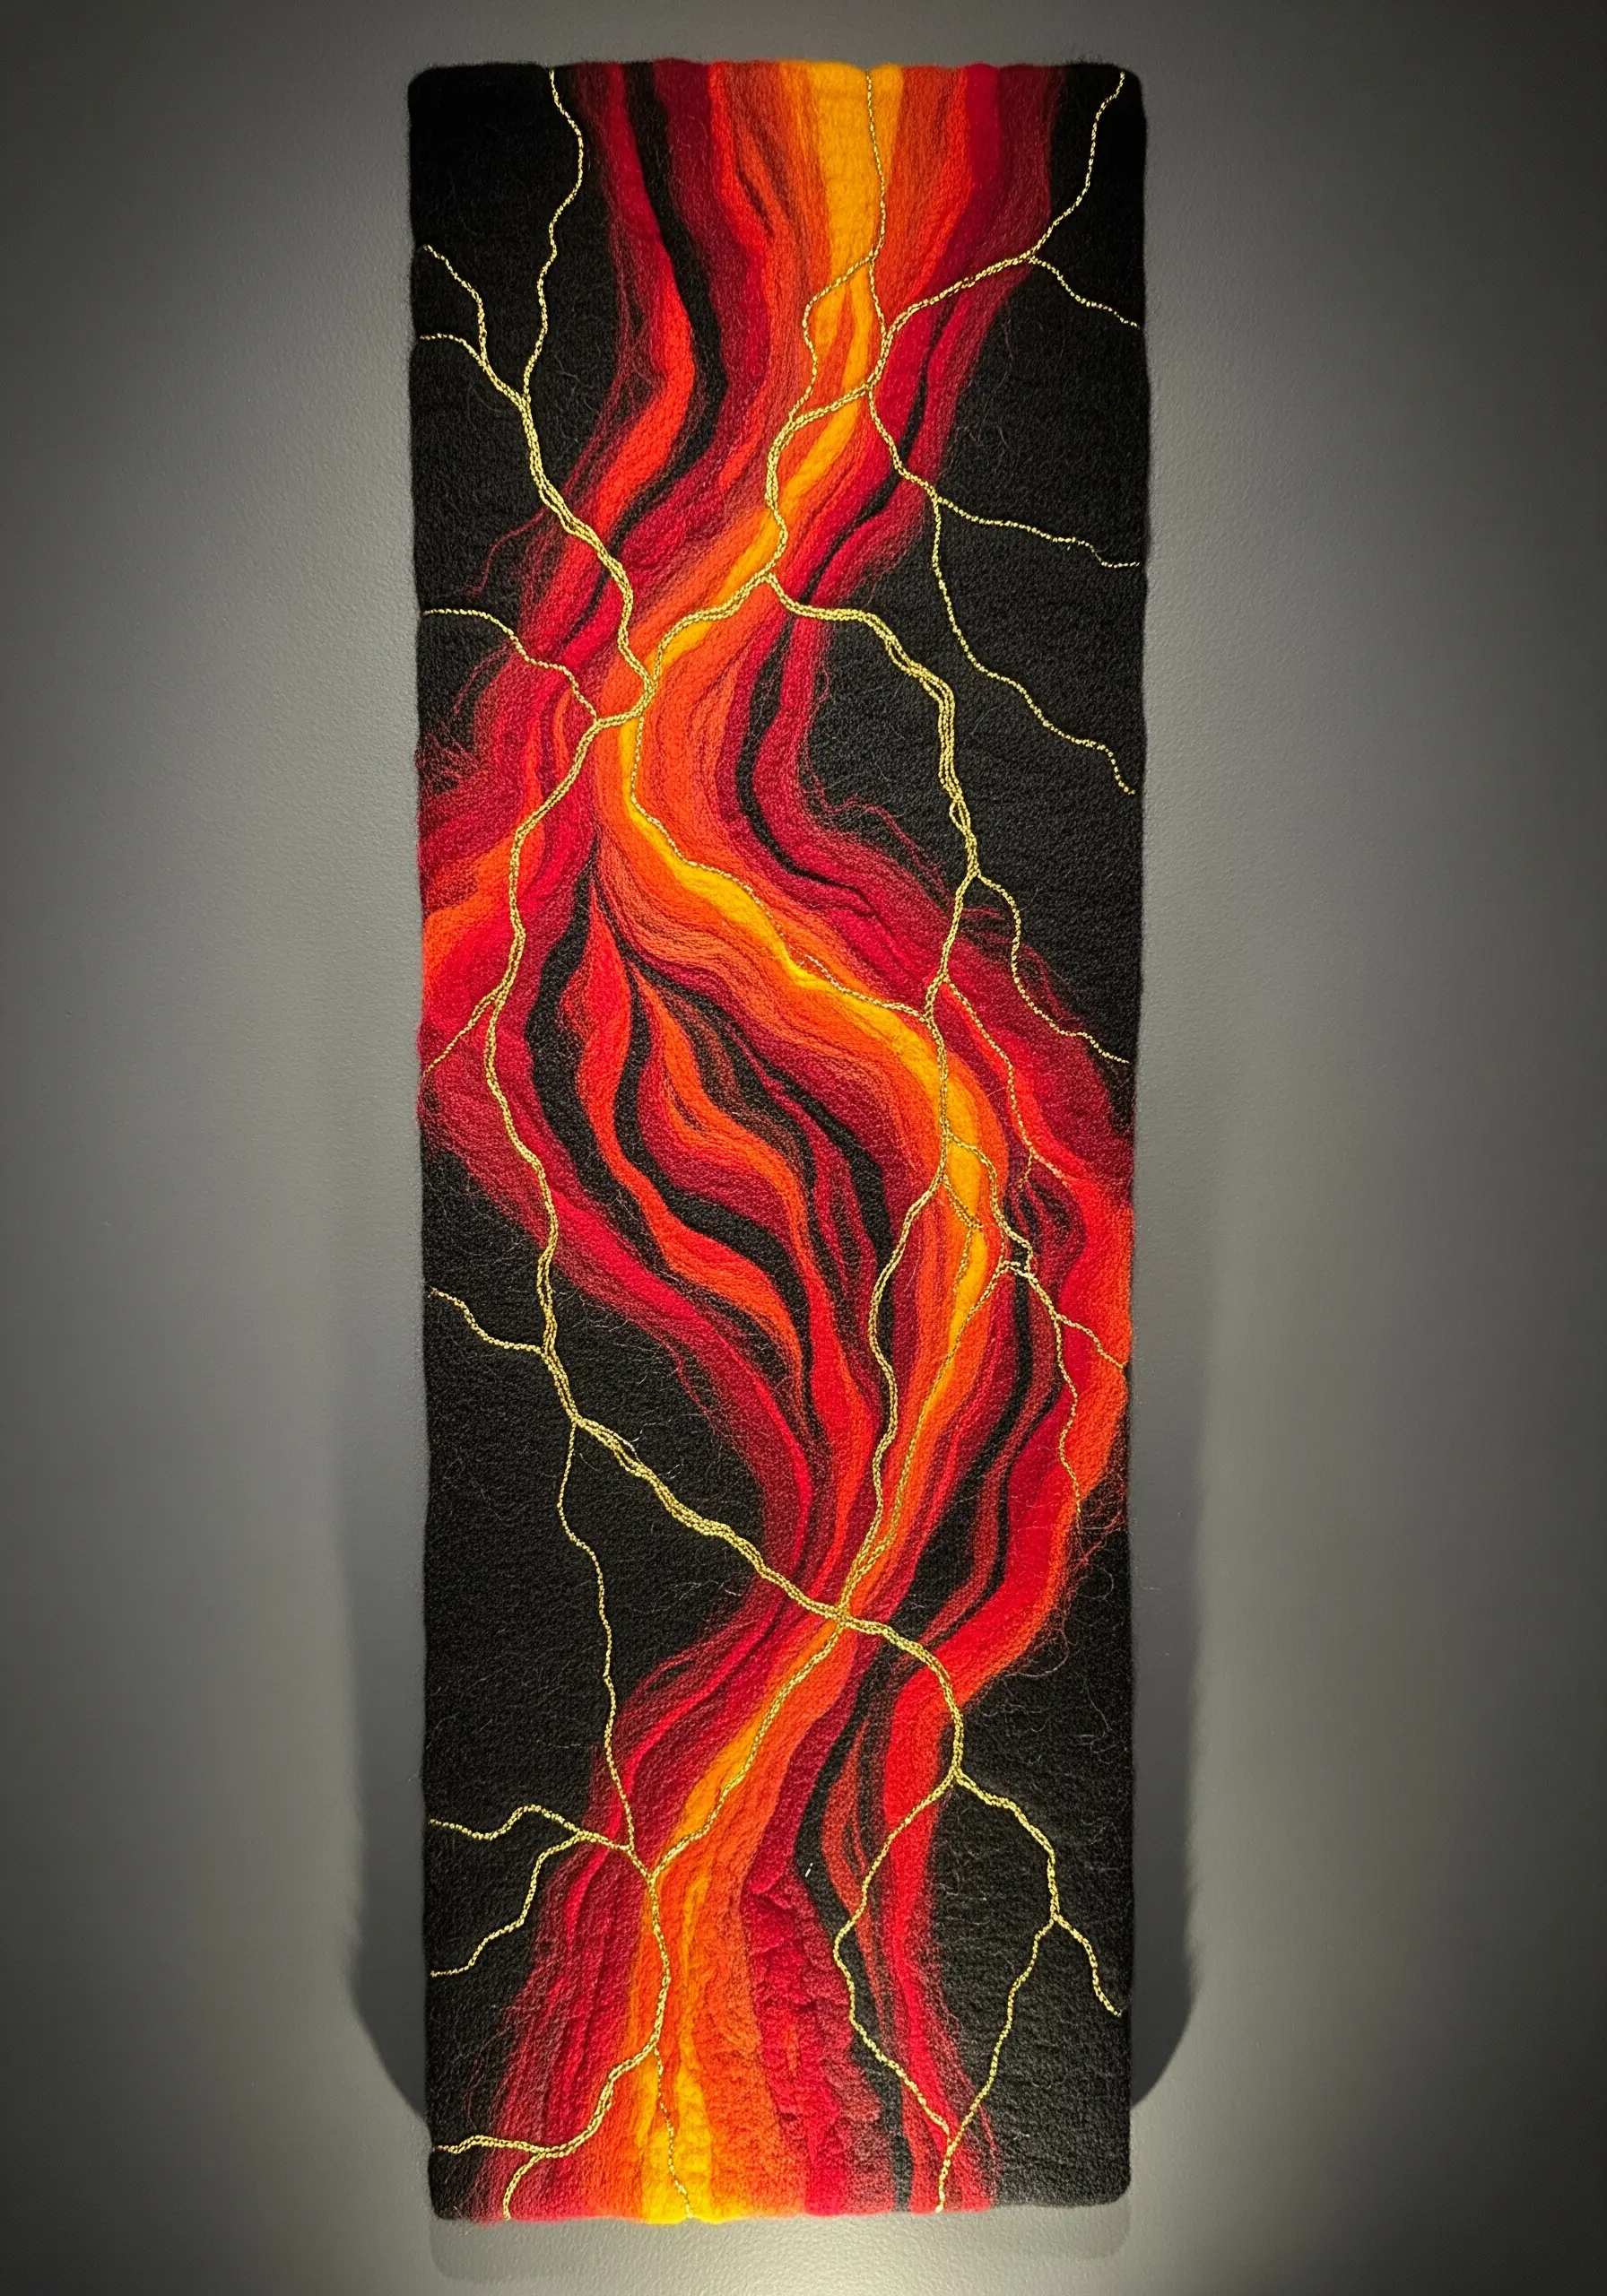
Translate the Japanese art of kintsugi—repairing broken pottery with gold—into fiber art for a stunning effect.
Start with a base of needle-felted wool, blending colors to create a fluid, lava-like background.
Then, using a bright gold metallic thread, stitch jagged, crack-like lines across the surface using a simple backstitch or stem stitch.
The contrast between the soft, matte wool and the sharp, shimmering lines creates a powerful visual statement about resilience and beauty, perfect for abstract concept art embroidery.
16. Construct Coral Reefs with Cast-On and Bullion Stitches
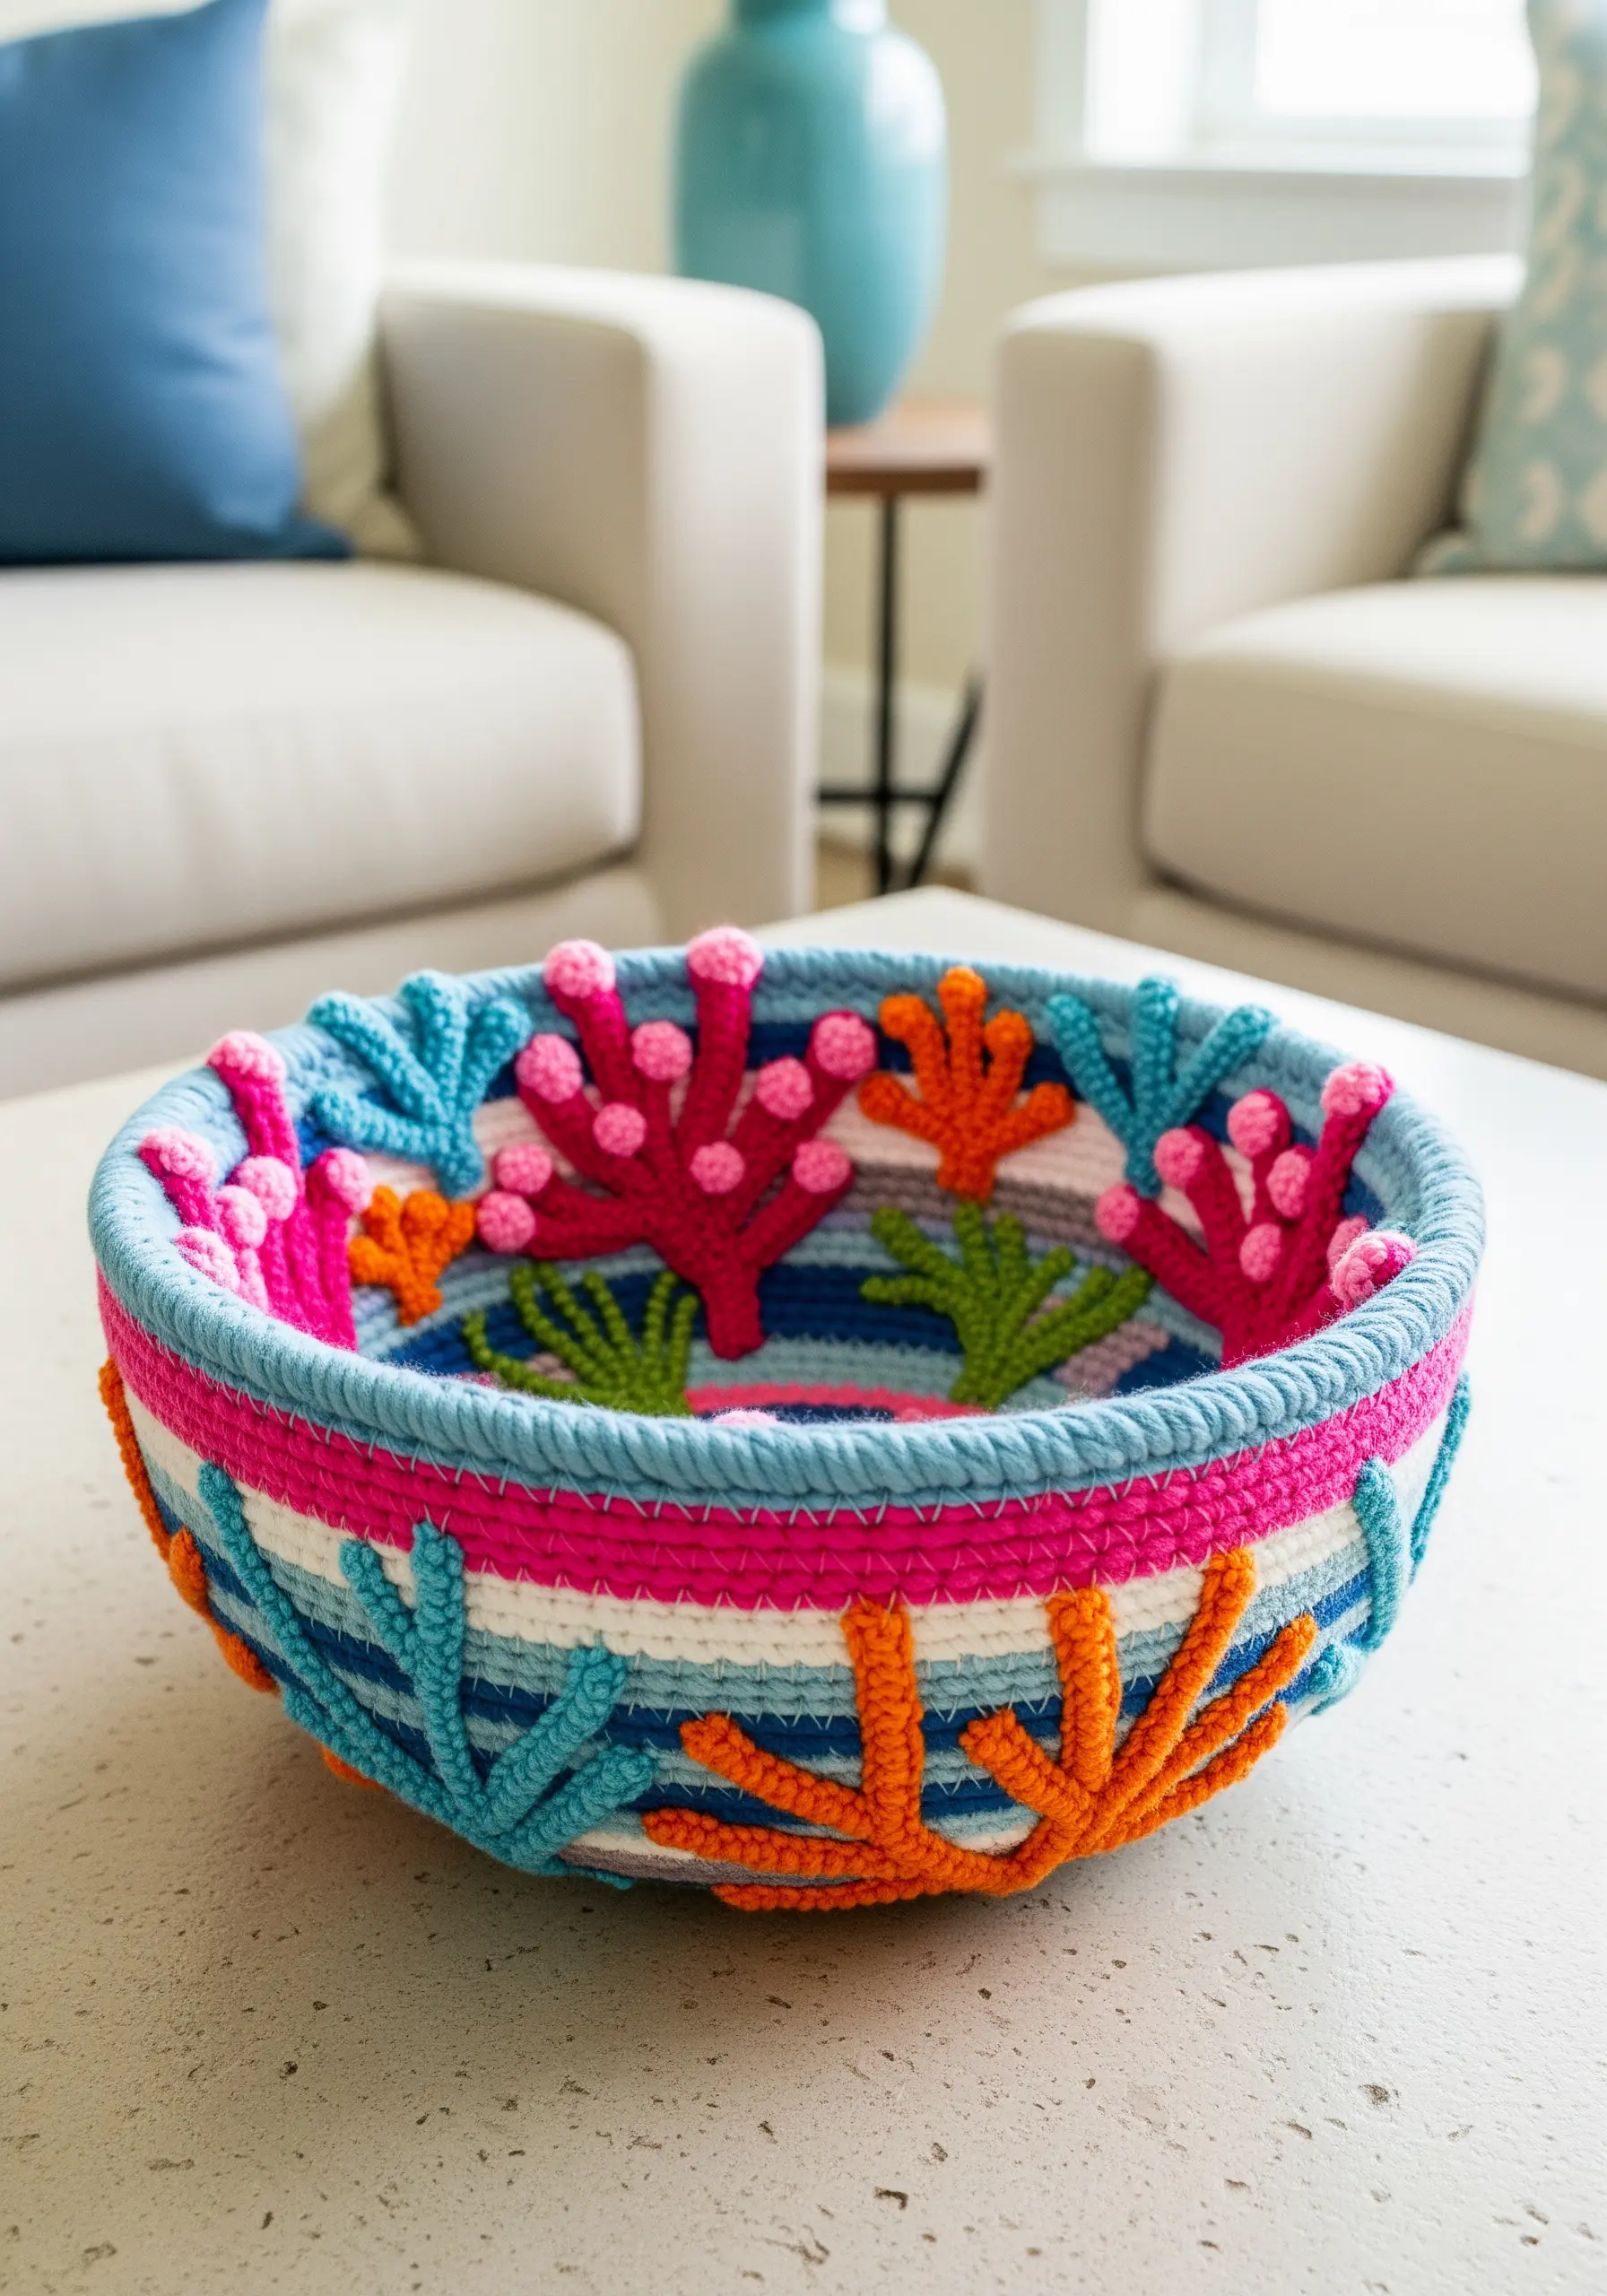
To create the branching, finger-like structures of coral, you need stitches that build outwards from the fabric.
The cast-on stitch and the bullion knot are perfect for this. Both involve wrapping thread around the needle multiple times to create a raised, worm-like stitch that can be shaped into curves.
For branching coral, work a series of cast-on stitches that radiate from a central point. For brain coral, arrange shorter bullion knots in tight, maze-like patterns.
This turns a simple decorative bowl into a vibrant, tactile underwater scene.
17. Simulate Birch Bark with Appliqué and Stitching

Achieve the unique texture of peeling birch bark by combining fabric appliqué with minimal stitching.
Use a dark, textured fabric for the under-layer and a smooth white or off-white fabric for the top layer.
Carefully cut and peel back sections of the top fabric, securing the rolled edges with tiny, hidden stitches to create a 3D peeling effect.
Add the characteristic horizontal lines of birch bark with simple, short straight stitches in a dark grey or black thread. This mixed-media approach offers unmatched realism.
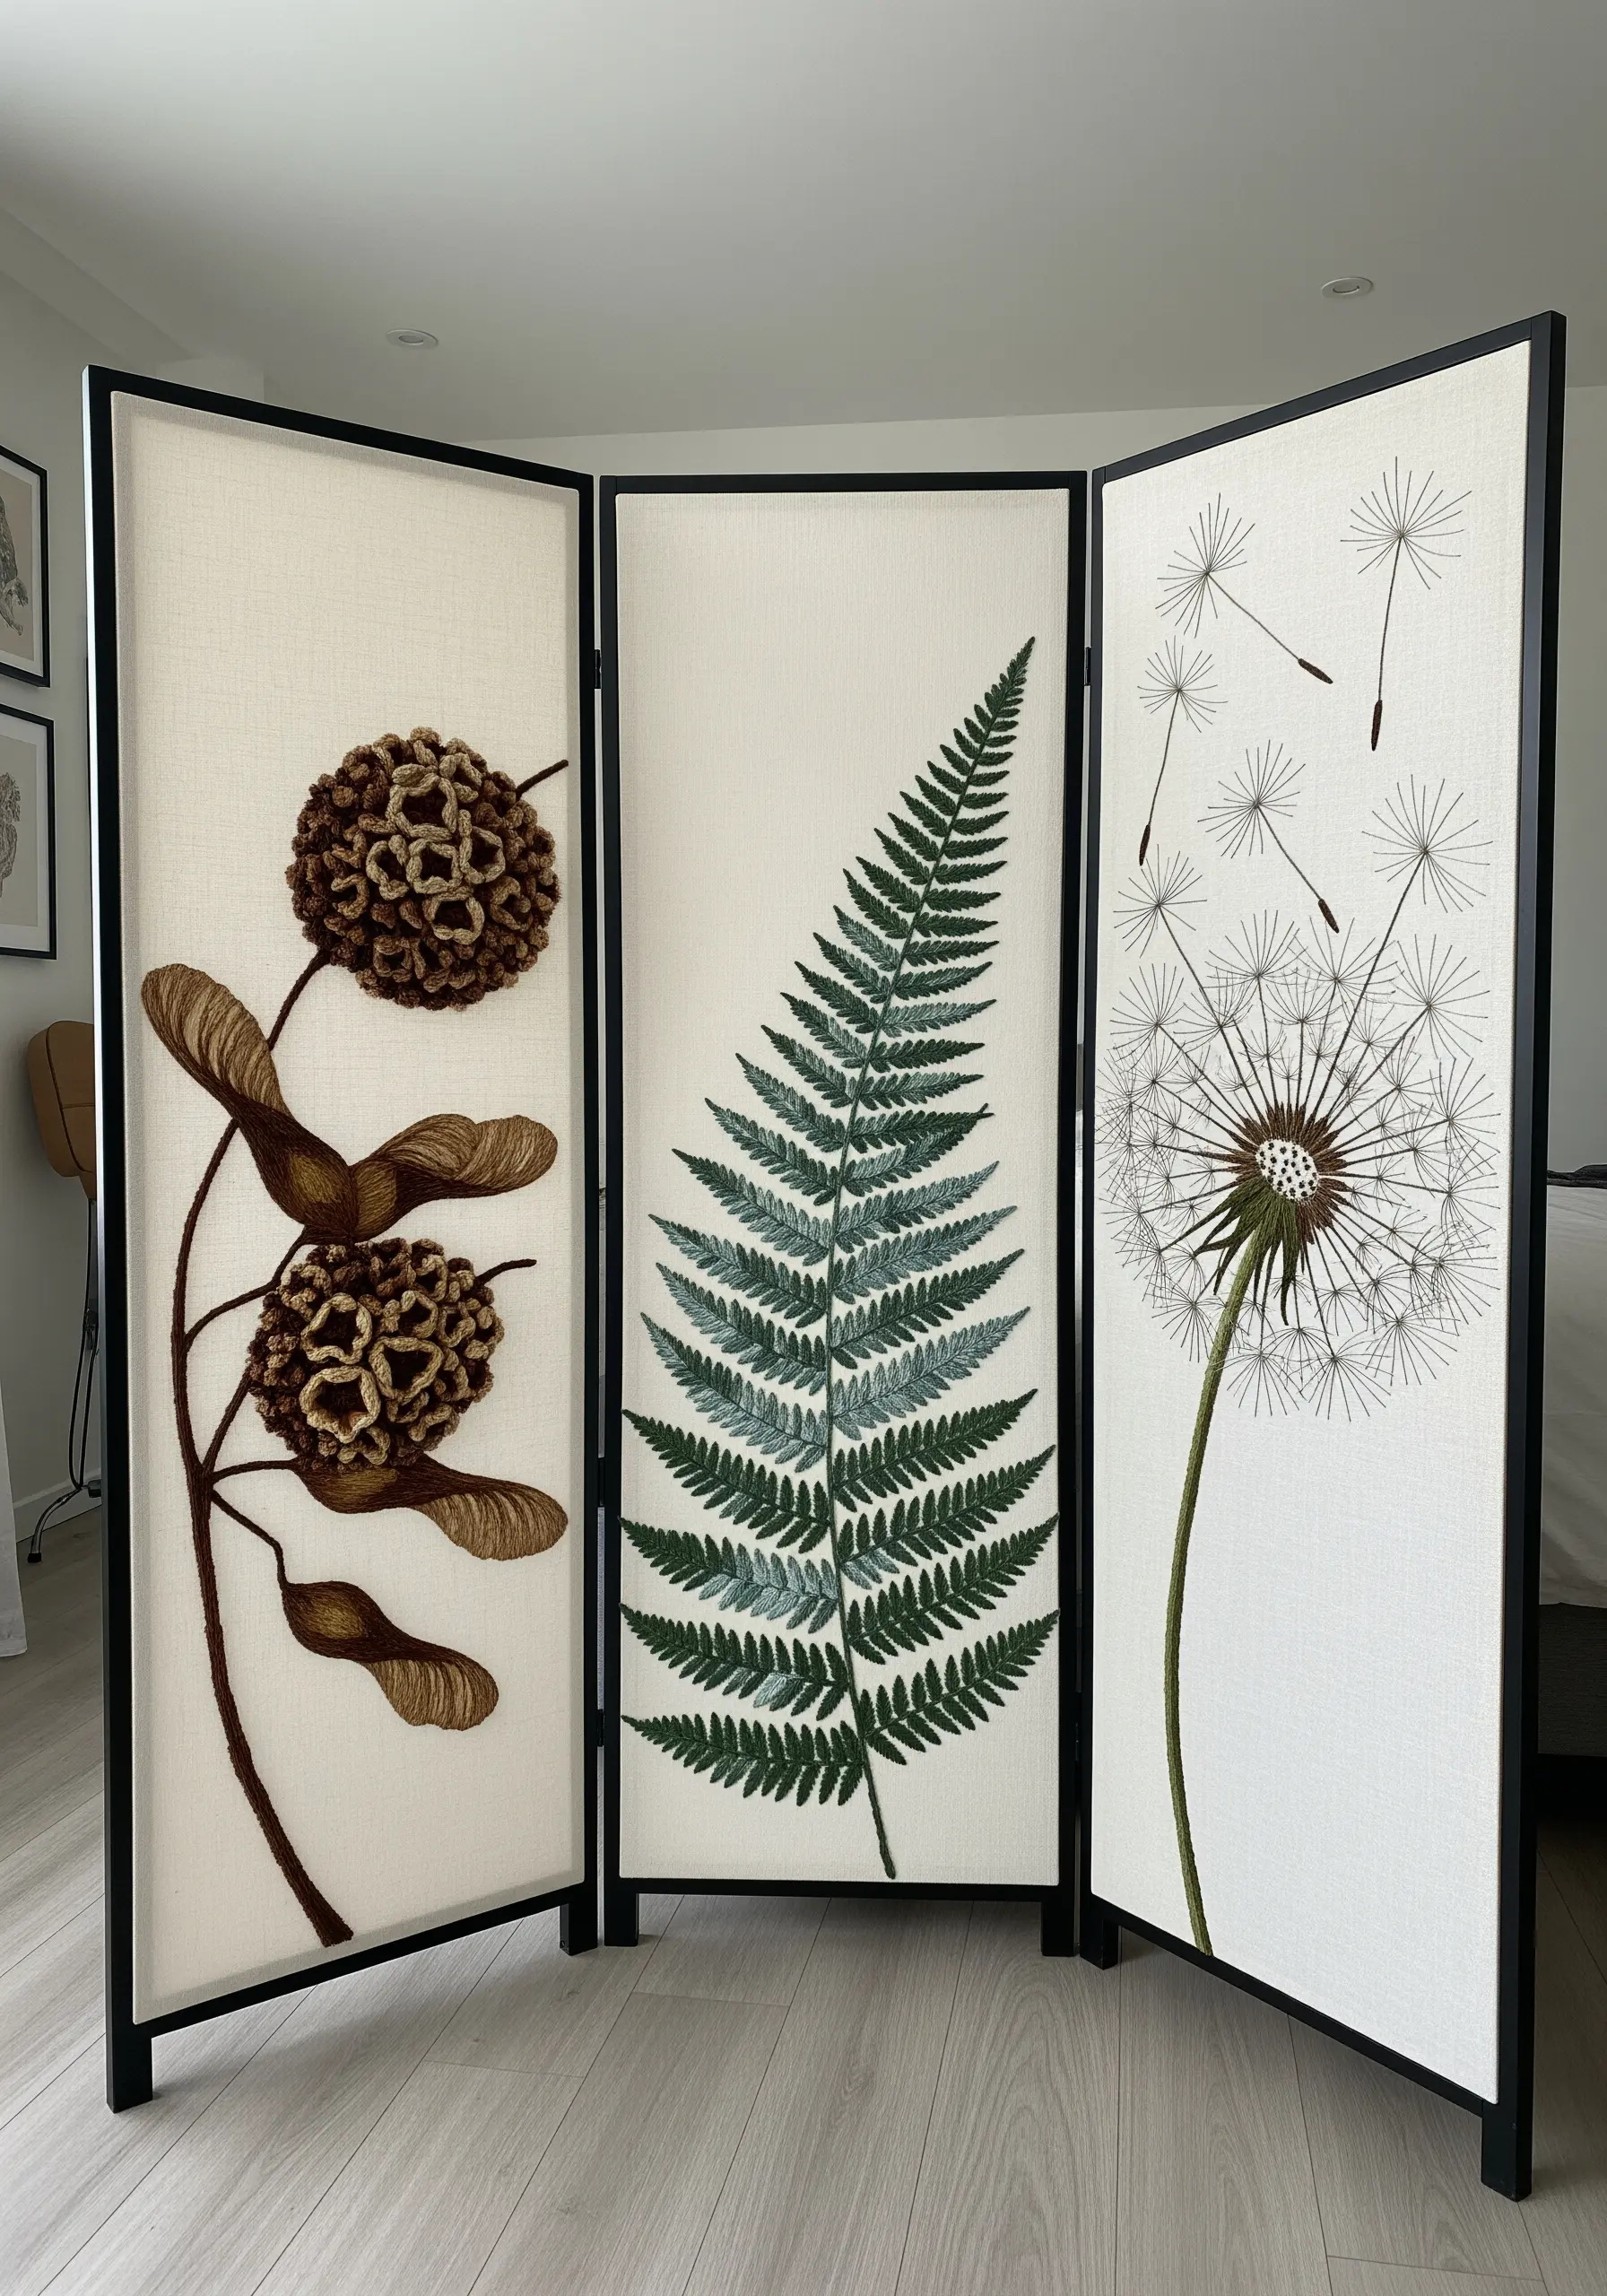
18. Stitch on Sheer Fabric for Ethereal Botanicals
Create a sense of weightlessness and delicacy by embroidering on sheer fabric like organza or tulle.
When stitching botanical motifs like ferns or seed heads, the transparent background makes the threadwork appear to float in mid-air.
Use a stabilizer (like a water-soluble one) to prevent puckering, and choose a simple color palette, like all-white or silver, to enhance the ethereal quality.
Framing these pieces in a way that allows light to pass through, such as in a floating frame or as a room divider, maximizes their delicate beauty.
19. Weave Patterns for Upholstery-Grade Texture
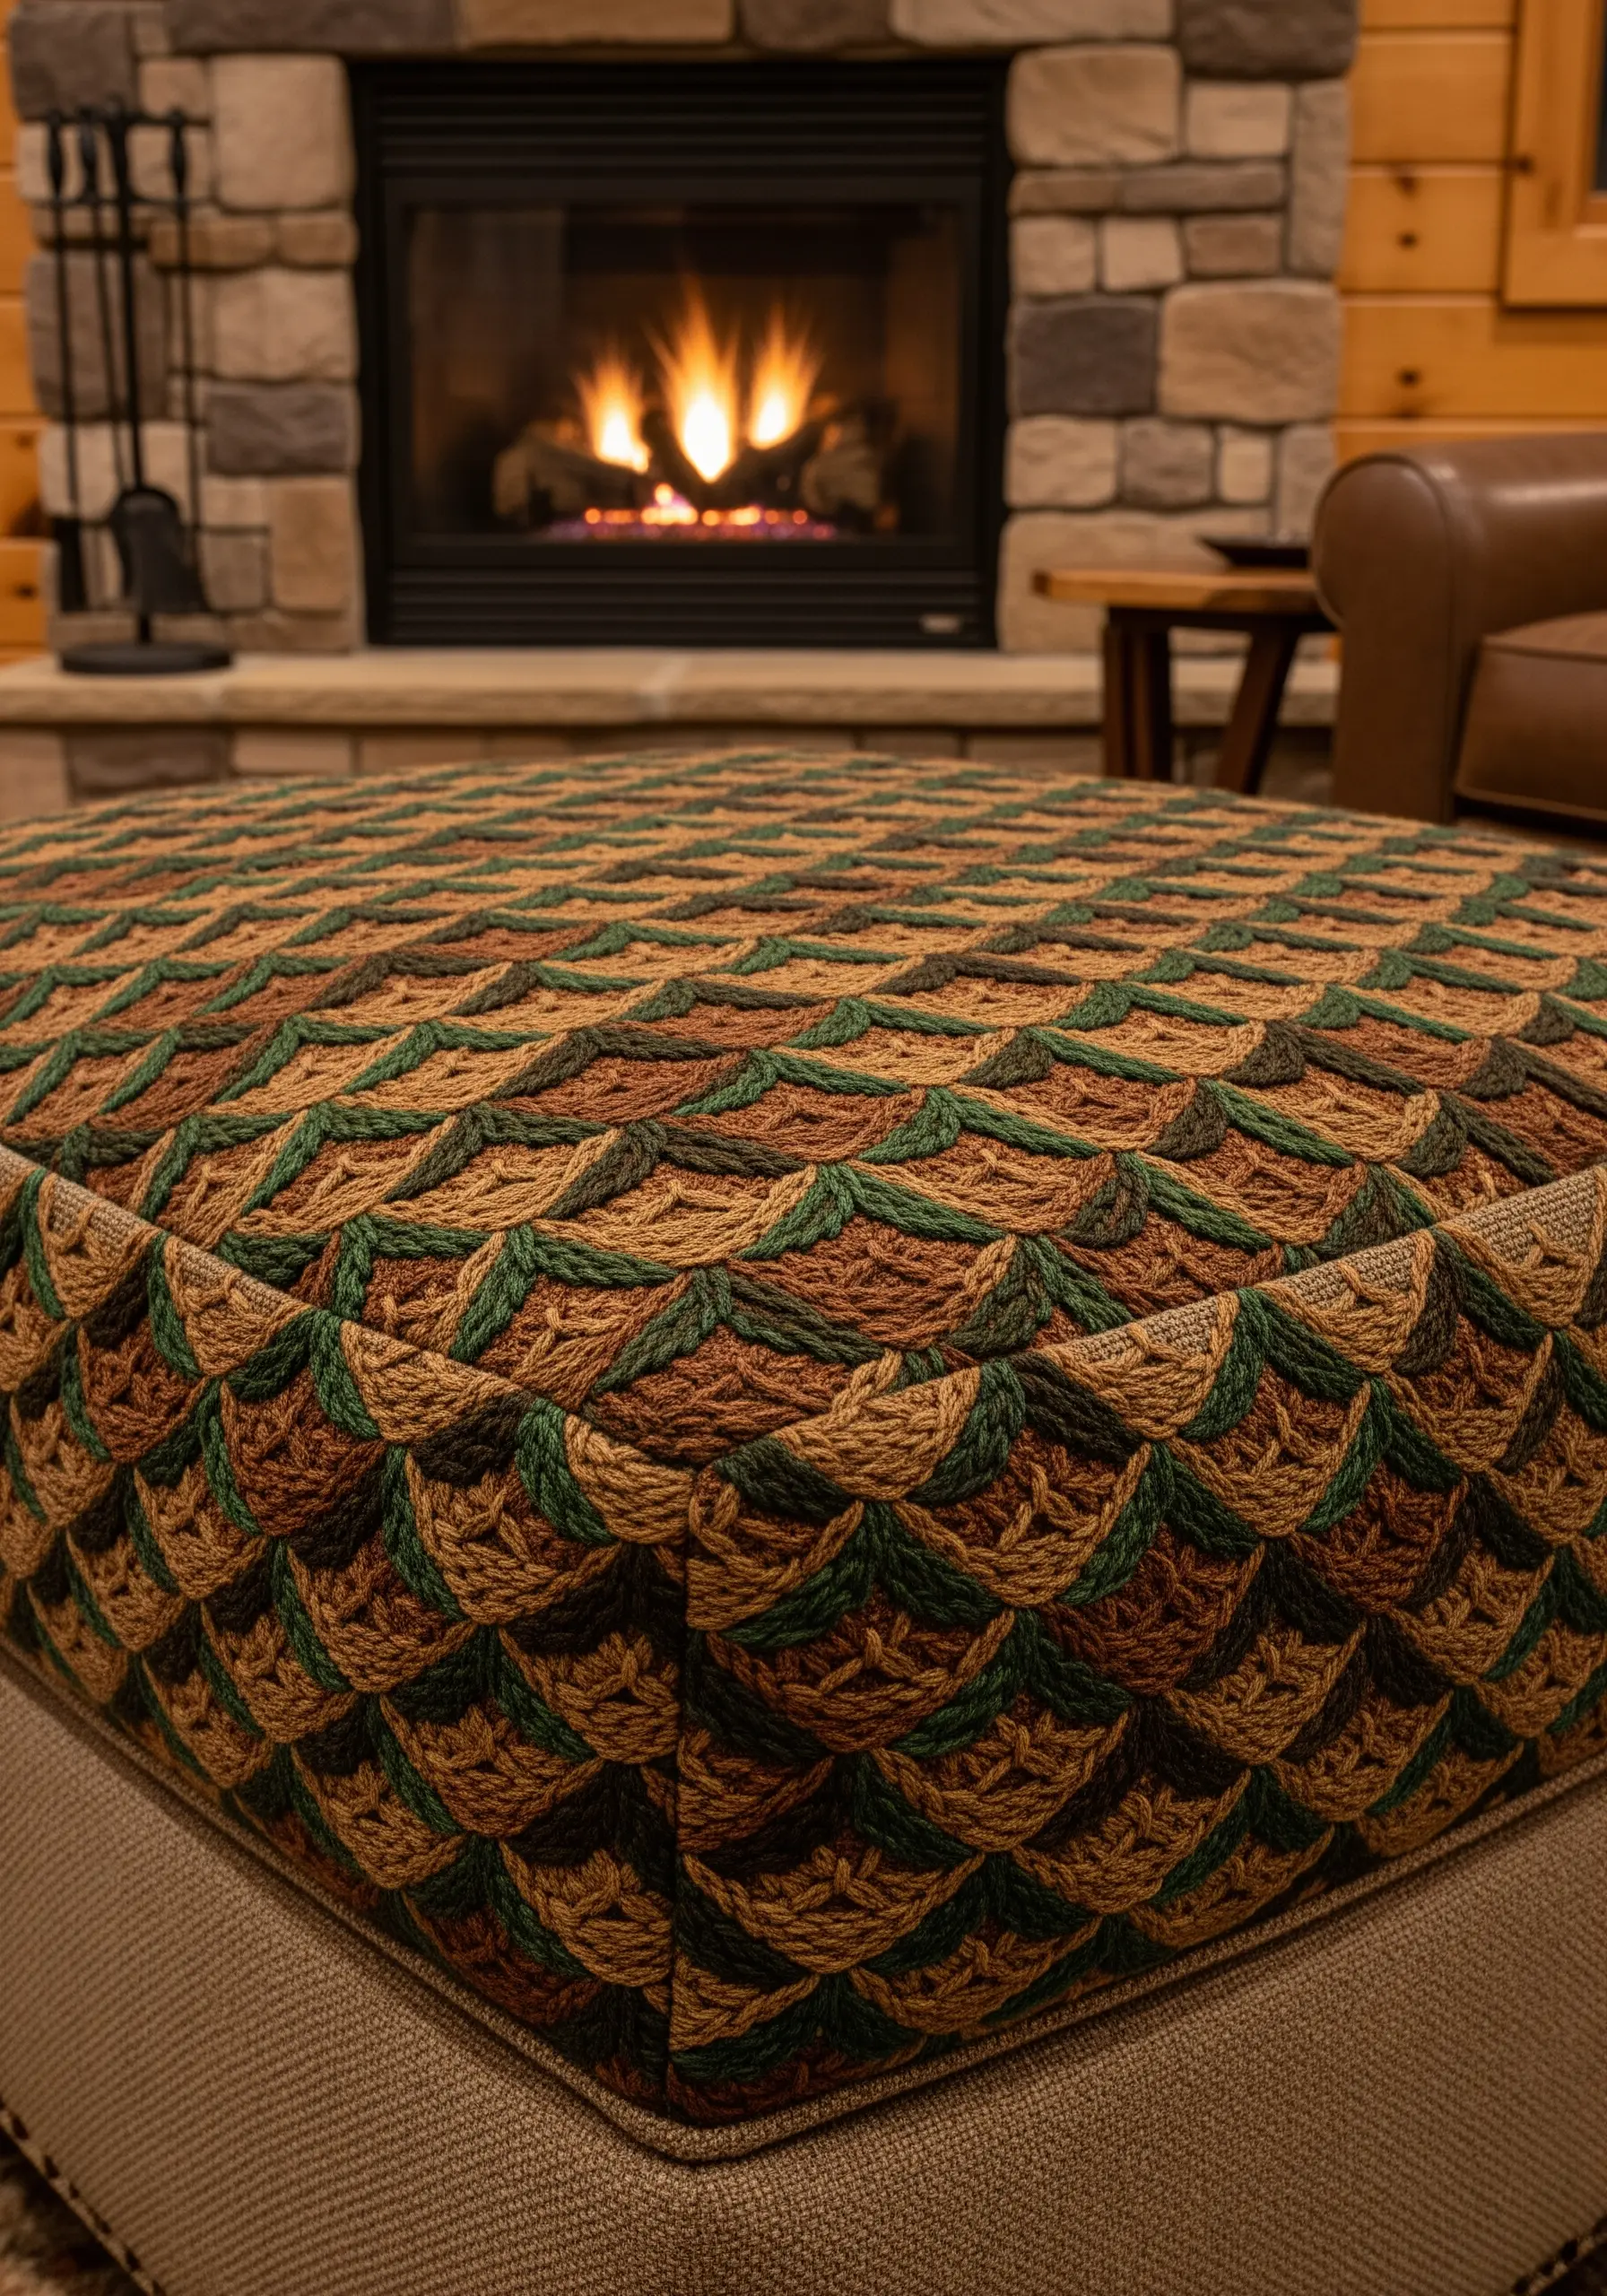
For home decor projects that require durability, like this ottoman, use weaving or needle-weaving techniques directly on the fabric.
Create a grid of foundation stitches (long straight stitches) and then weave your working thread over and under them, packing the rows tightly together.
This creates a dense, hard-wearing surface similar to tapestry, which is far more robust than satin stitch for high-traffic items.
By using different colors for the warp (foundation) and weft (weaving) threads, you can create intricate, interlocking patterns like these scales.
20. Create Water Ripples with Coiled and Couched Cord

For a clean, graphic representation of water ripples, couch a thick cord or yarn onto your fabric in a continuous spiral.
Start from the center and work your way out, using a thinner, matching thread to tack the cord down every few millimeters.
Varying the colors of the cord as you spiral outwards creates a beautiful gradient effect, mimicking the way light hits the water.
Add separately stitched elements, like the lily pads, on top of the corded base to complete the multi-layered, serene scene.
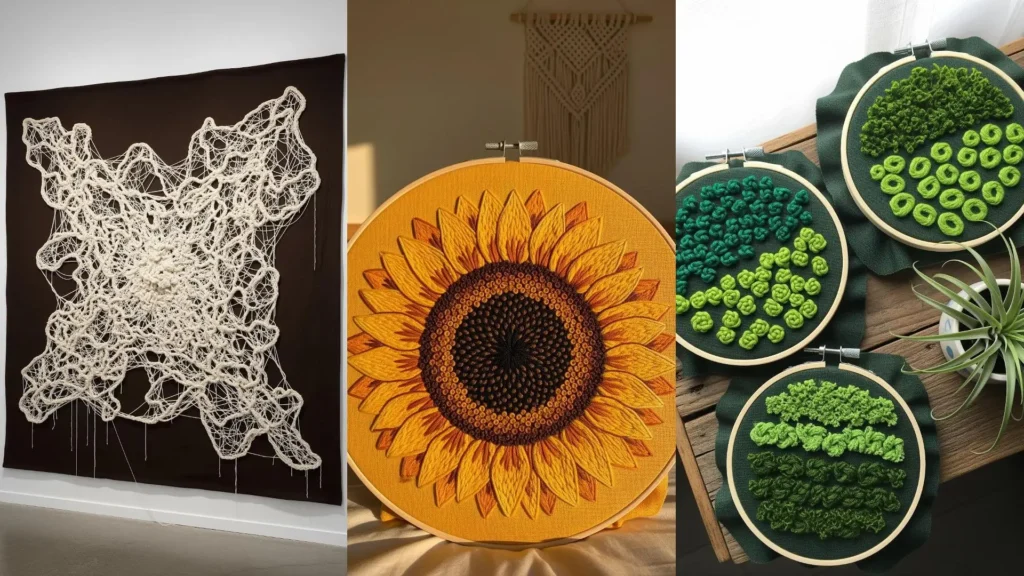
21. Explore Organic Forms with Freeform Lace Techniques
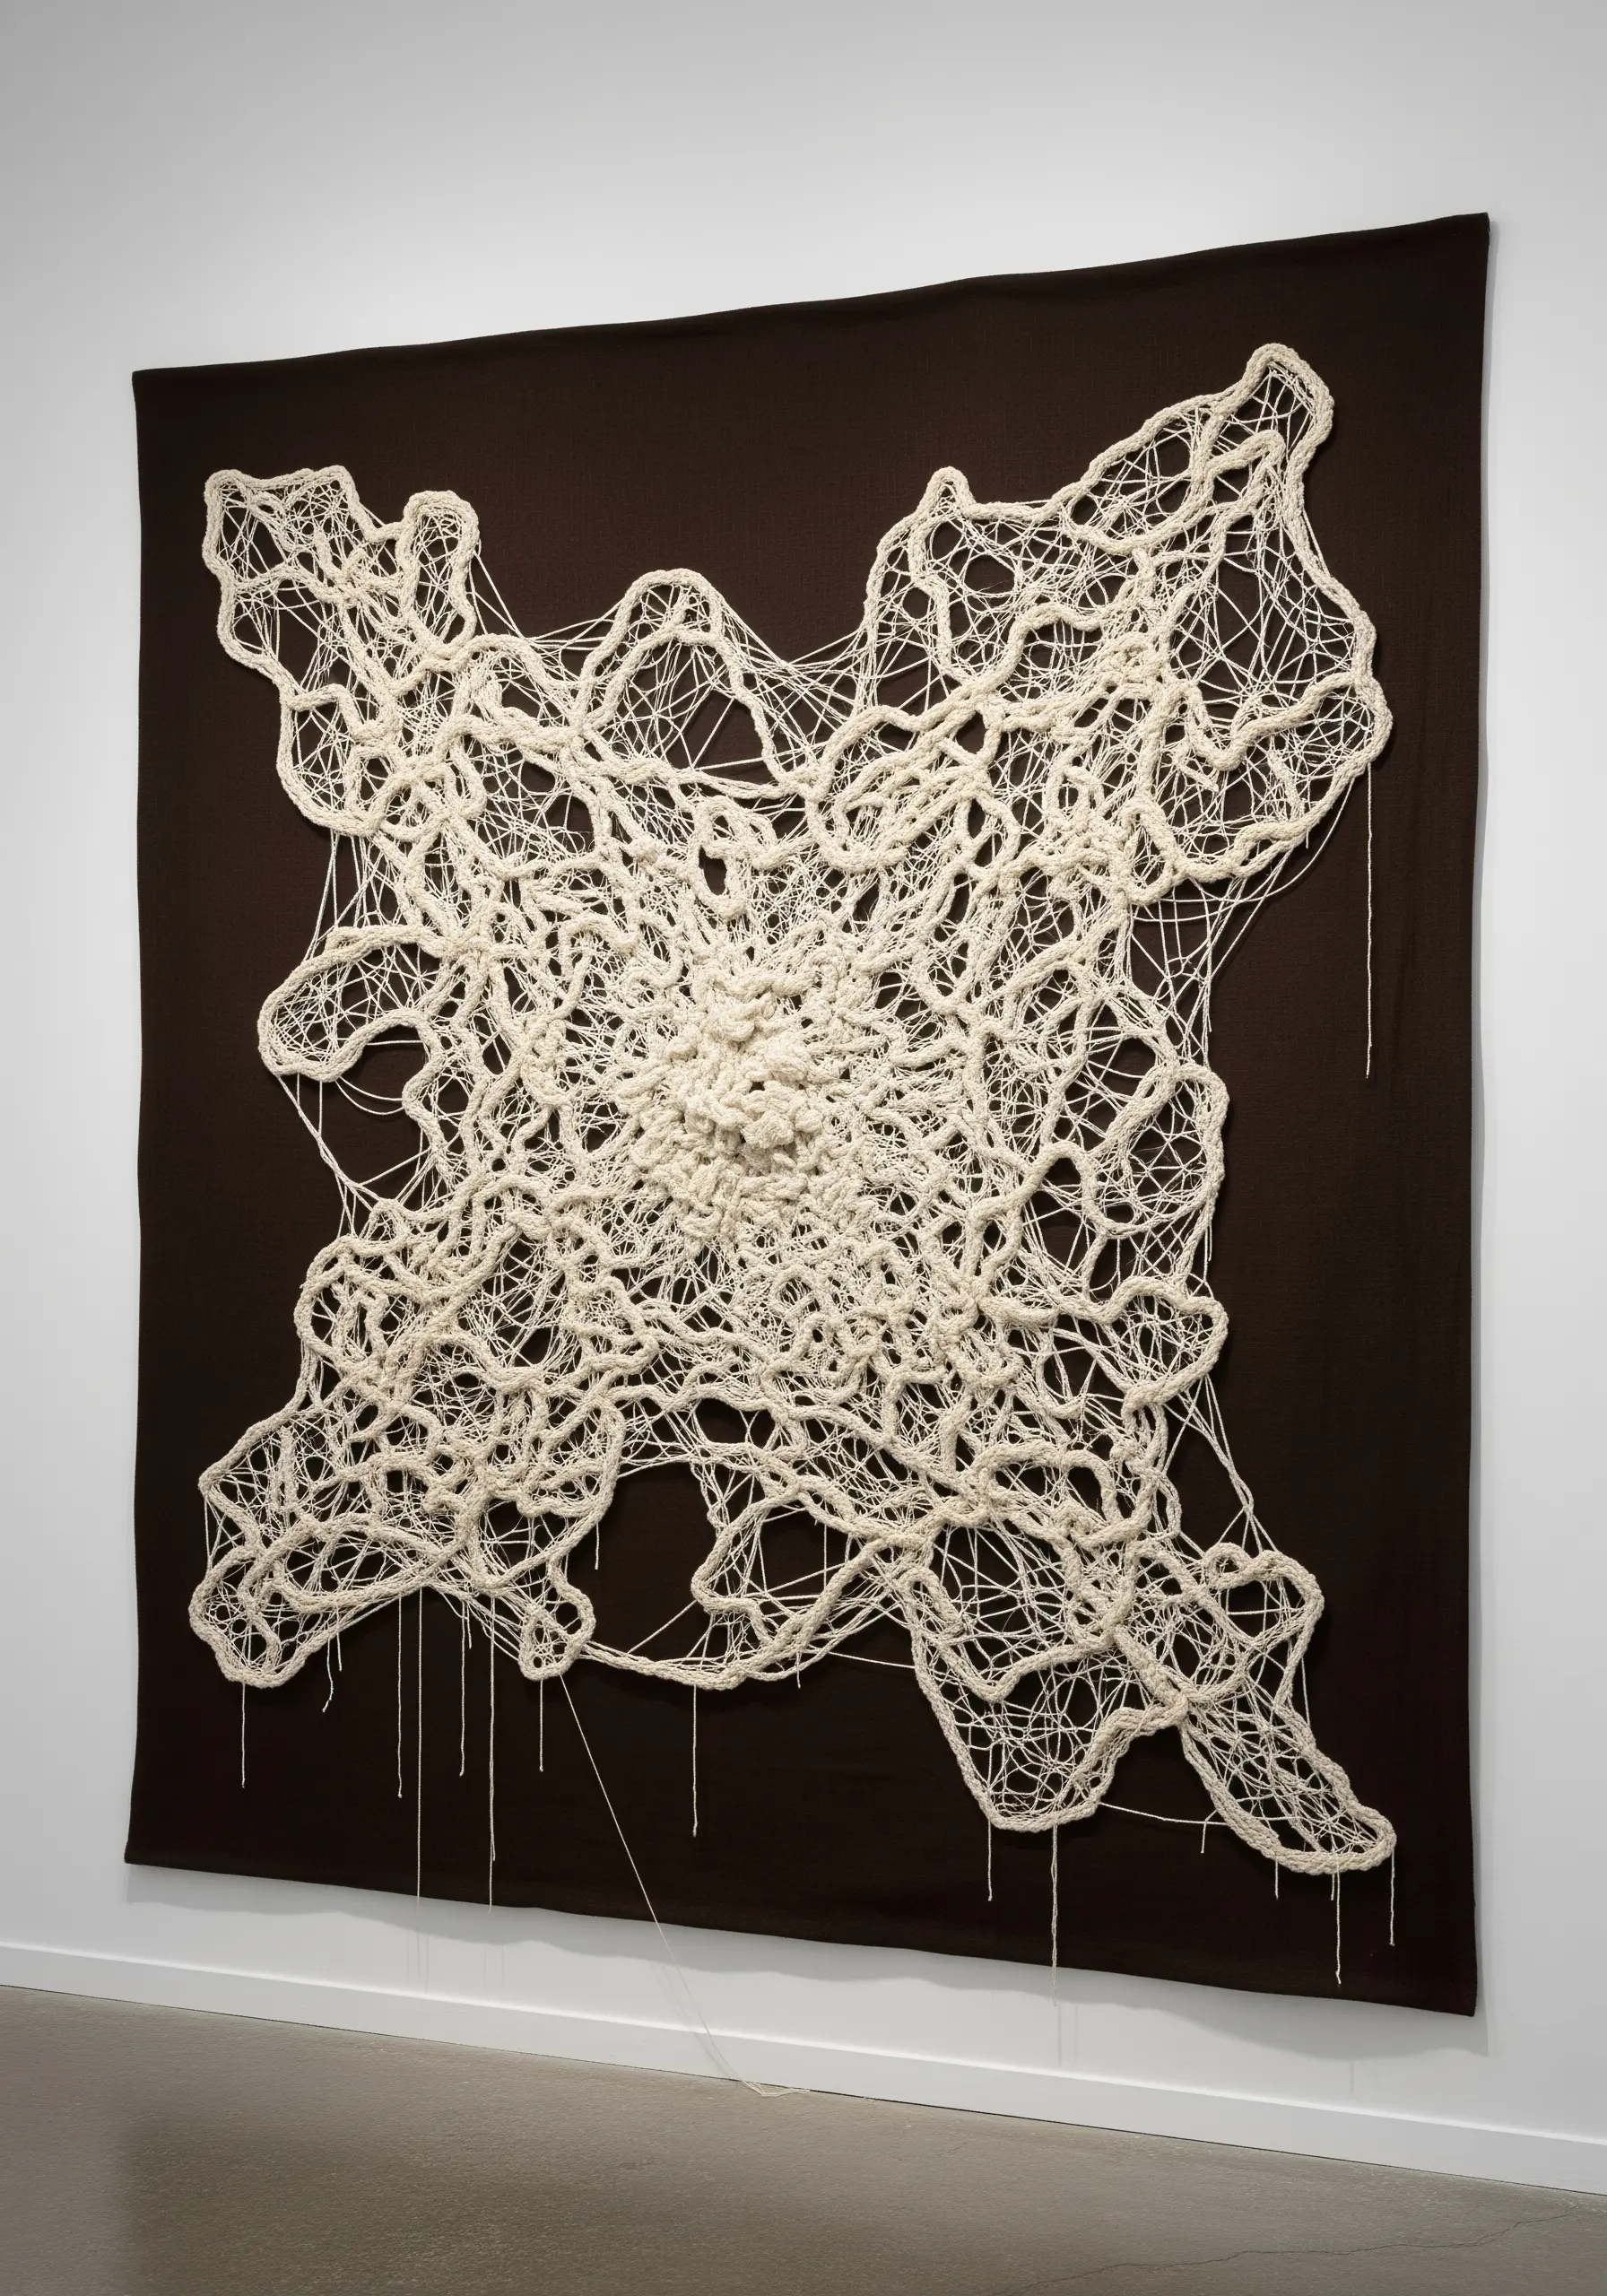
Build textures that resemble lichen or neural networks by moving beyond the fabric base.
Use a water-soluble stabilizer as your canvas. Stitch a dense, interlocking network of threads—try chain stitch, buttonhole stitch, or simply free-motion machine stitching—ensuring all parts of the design are connected.
When you dissolve the stabilizer, you are left with a standalone thread sculpture, or ‘freeform lace’.
Mounting this delicate, organic web against a dark, solid background creates a dramatic, high-contrast piece of fiber art.
22. Achieve a Woven Look with a Simple Two-Color Braid
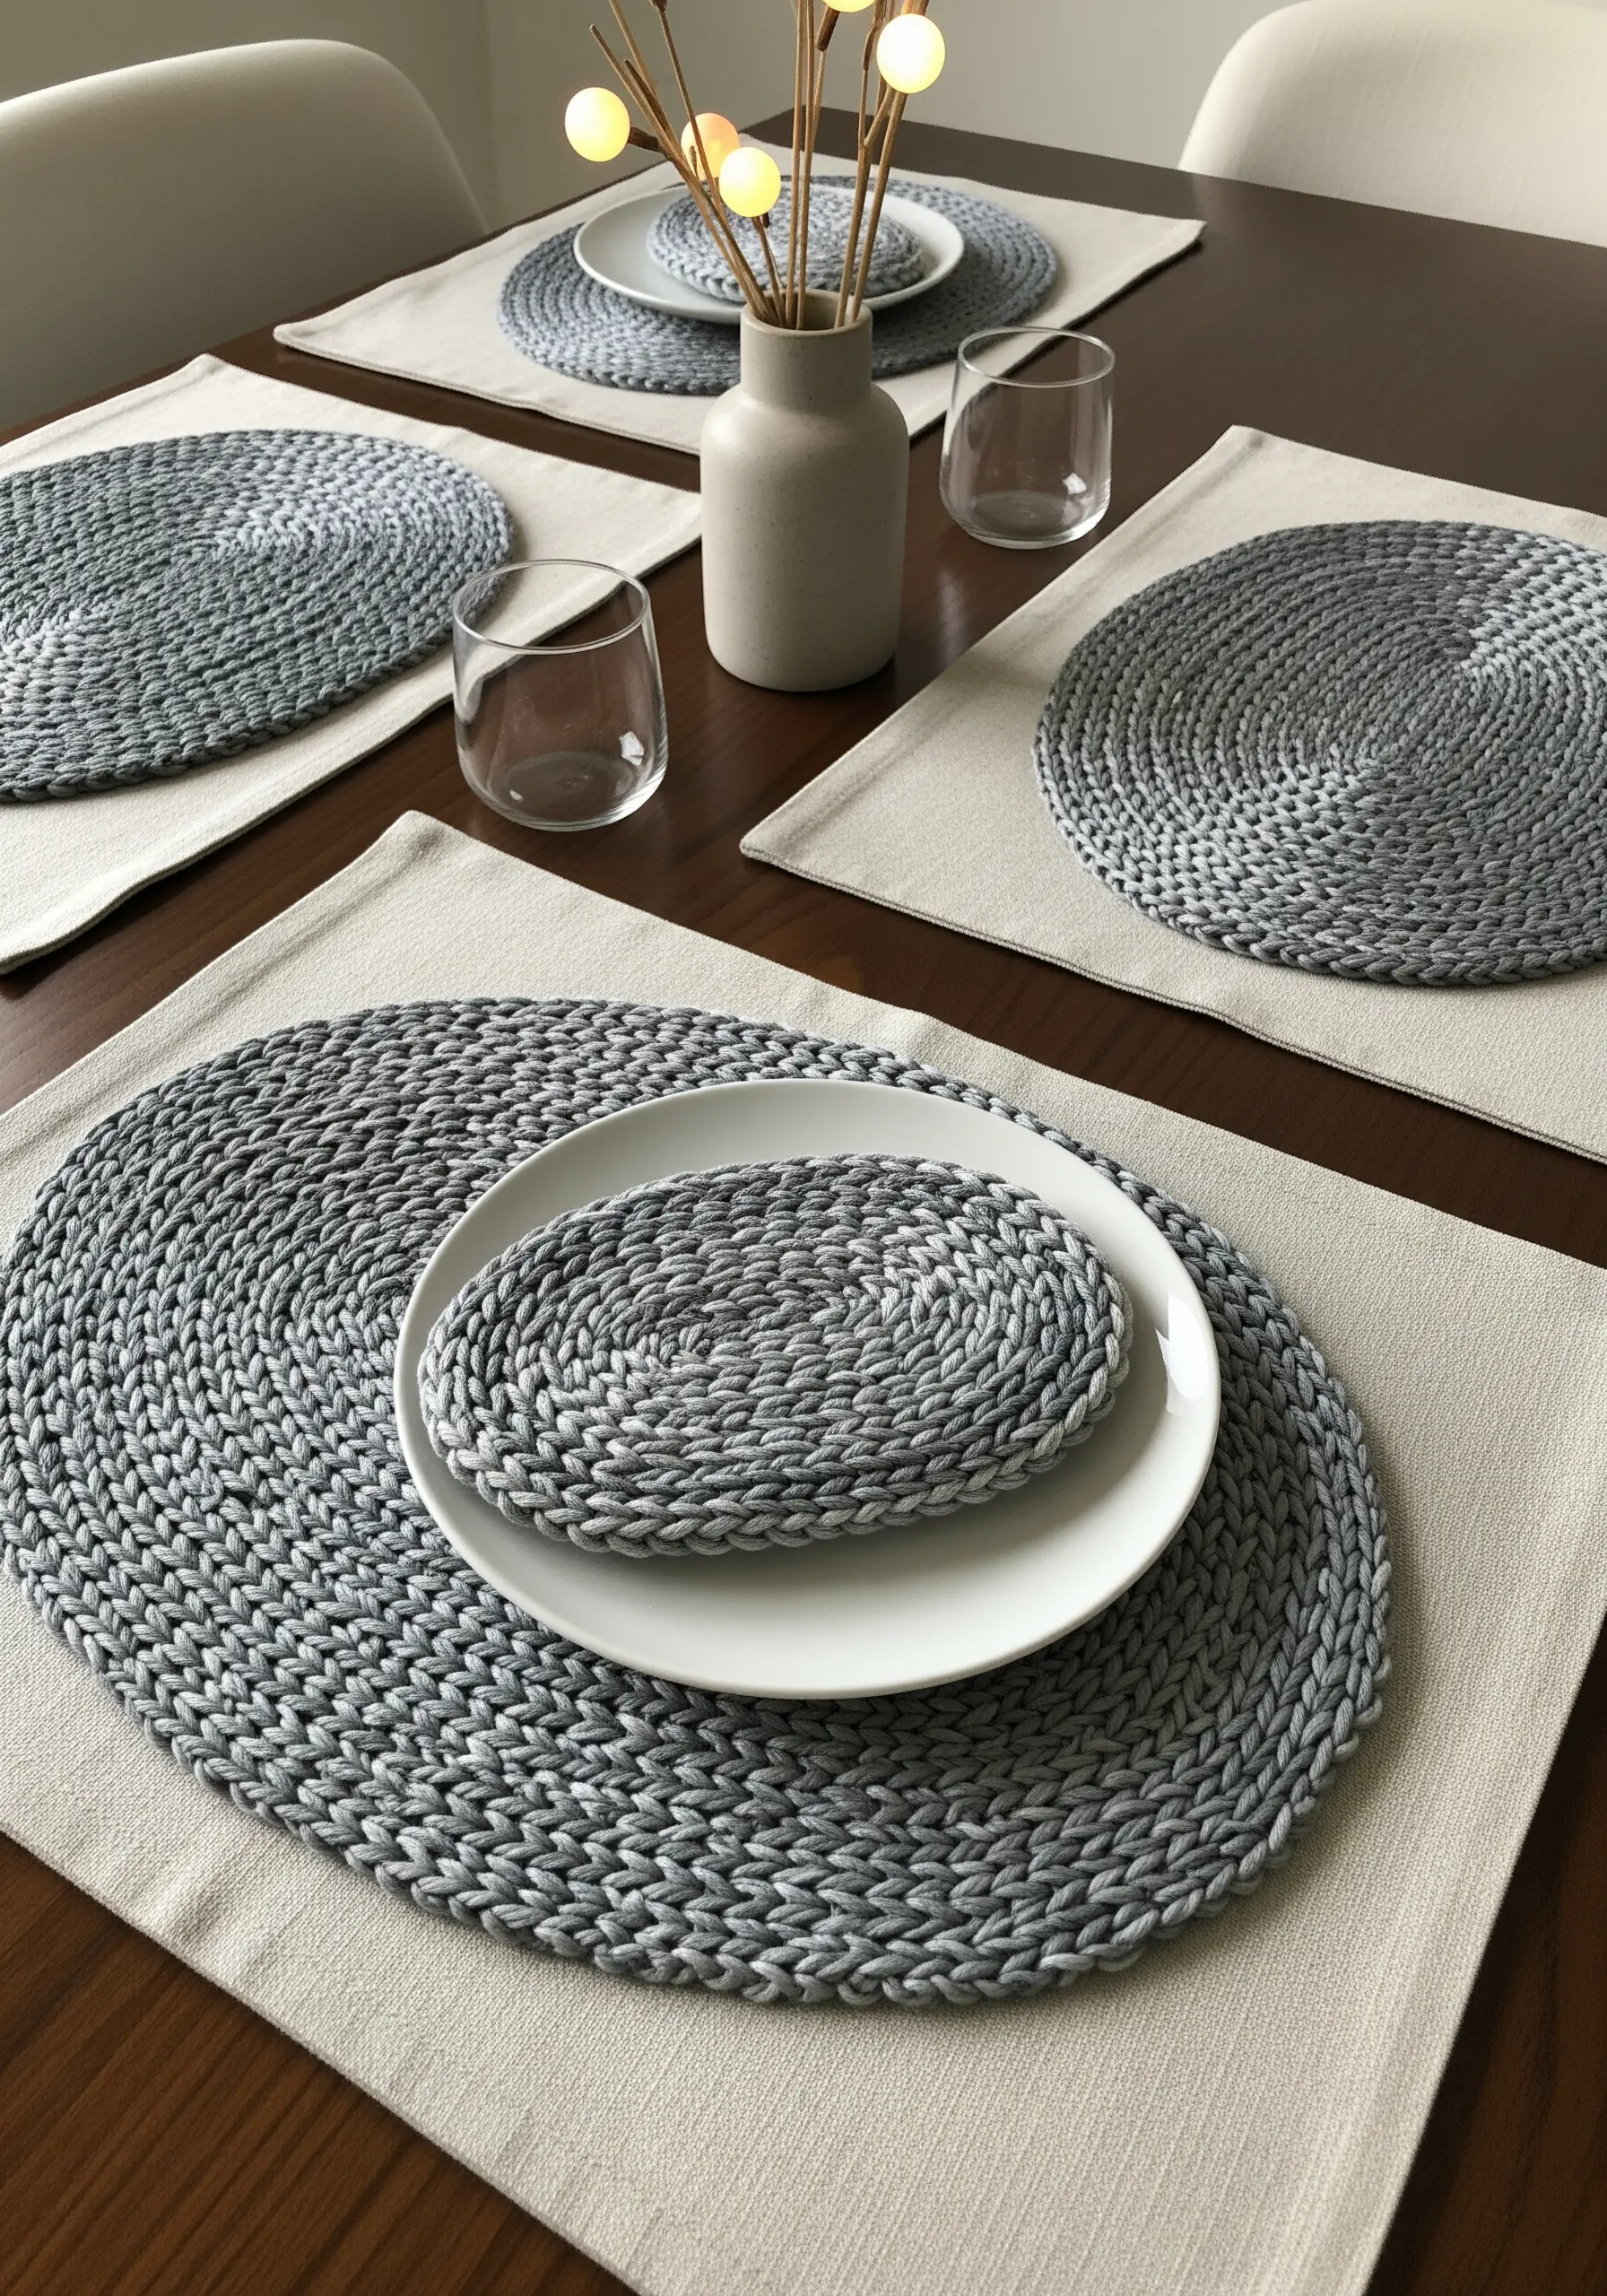
You can create the appearance of a complex woven textile with a very simple stitching method.
Using a thick, soft yarn or cord, stitch a series of concentric ovals with a basic chain stitch.
The key is to use a variegated or two-toned cord. As you stitch, the colors will naturally alternate, creating a pattern that looks like two separate cords have been intricately braided or woven together.
This technique is fast, effective, and perfect for creating coordinating items like these placemats and coasters.
23. Sculpt a Zen Garden with Raised Cord and French Knots

Evoke the tranquility of a Japanese rock garden by combining raised lines and subtle textural fills.
Couch a natural fiber cord, like jute or thick cotton, in concentric, raked patterns onto a neutral linen or canvas base.
Create the ‘rocks’ separately as small, padded appliqué forms, or build them up directly on the cushion with dense clusters of French knots in shades of grey.
The contrast between the smooth, flowing lines of the ‘sand’ and the clustered texture of the ‘rocks’ creates a balanced and meditative design.
24. Add Soft Texture to Felt with French Knots and Seed Stitch

Elevate simple felt shapes by adding subtle, tone-on-tone embroidery.
For nursery decor, where softness is key, use gentle textures that add detail without being overwhelming. French knots are perfect for creating a dotted, fluffy texture on a cloud or moon.
Use a simple seed stitch—tiny, scattered straight stitches—to add a delicate, shimmering texture to a sun or star.
Using thread that is only a shade or two different from the felt color creates a sophisticated, high-end look for nursery walls.
25. Integrate Found Objects for Root-Like Structures
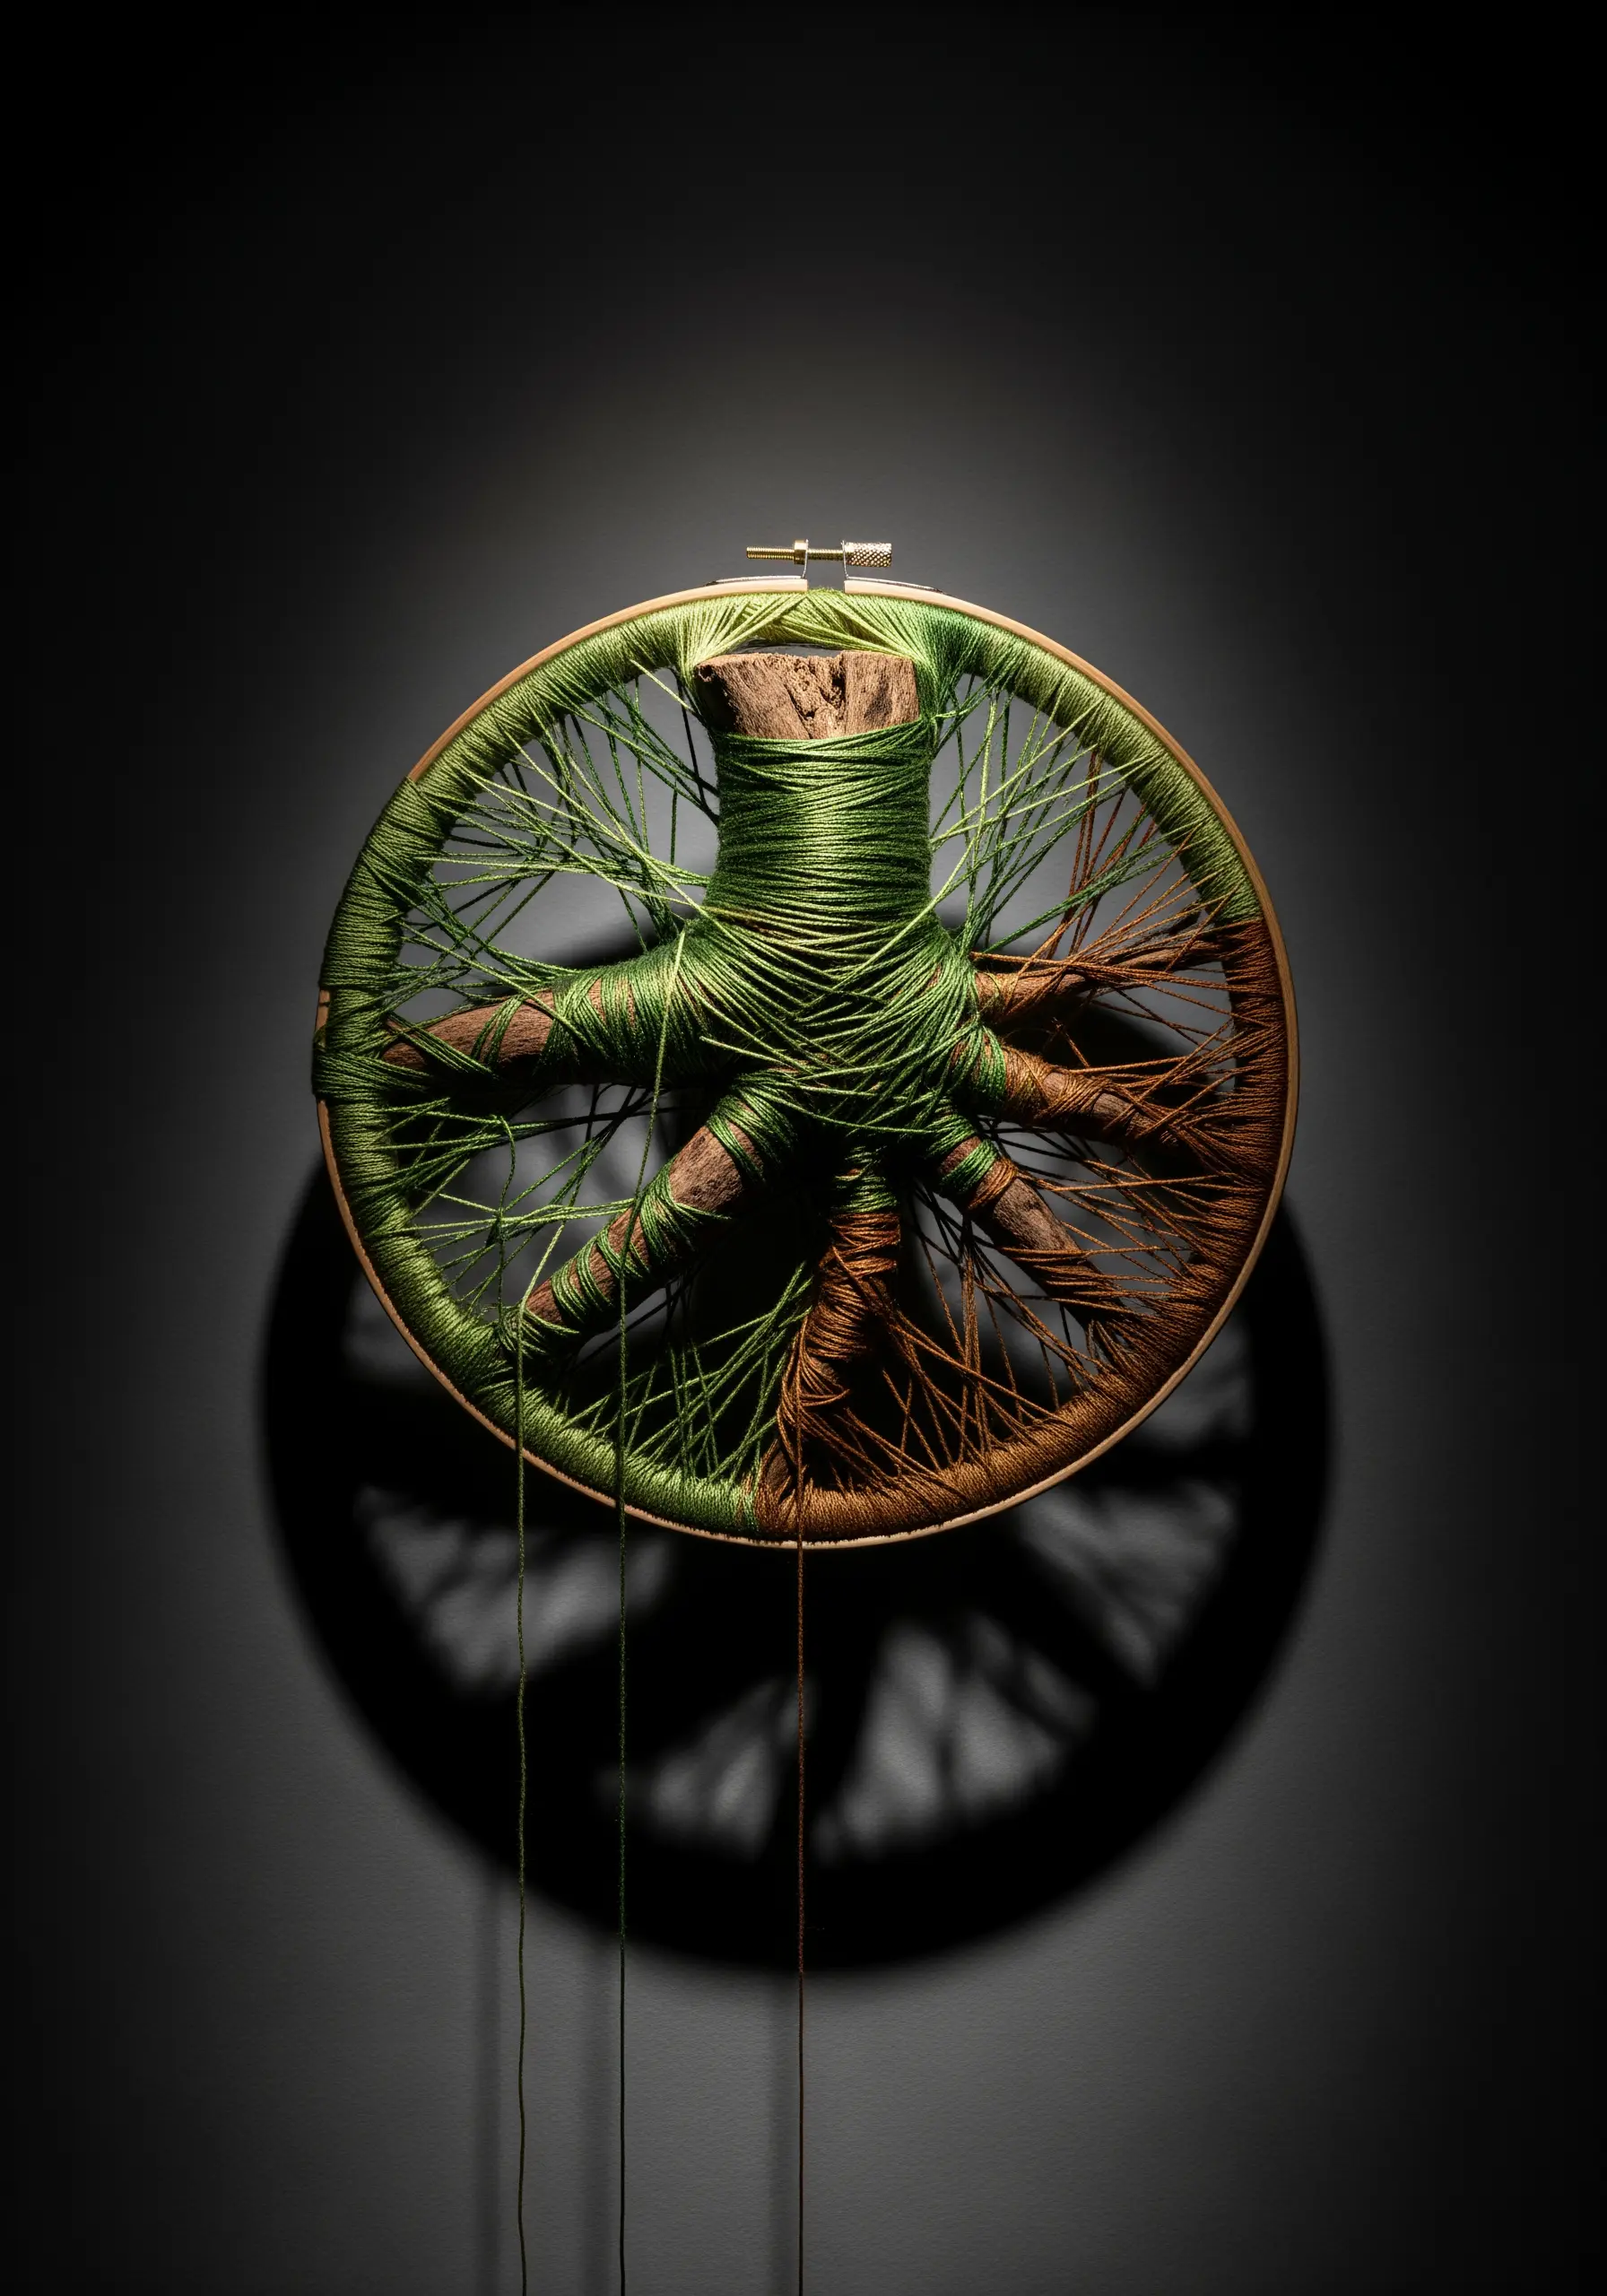
Merge your embroidery with the natural world by incorporating found objects like twigs or driftwood directly into your hoop art.
Secure the object firmly to the hoop or backing fabric using a strong, clear thread or wire.
Then, use the object as an anchor point for your stitching. Wrap threads around it, letting them radiate outwards to create designs that mimic root systems, tree branches, or fungal mycelium.
This technique breaks the two-dimensional plane and creates a powerful, sculptural piece that tells a story.
26. Mimic Honeycomb with Padded Appliqué and Knots
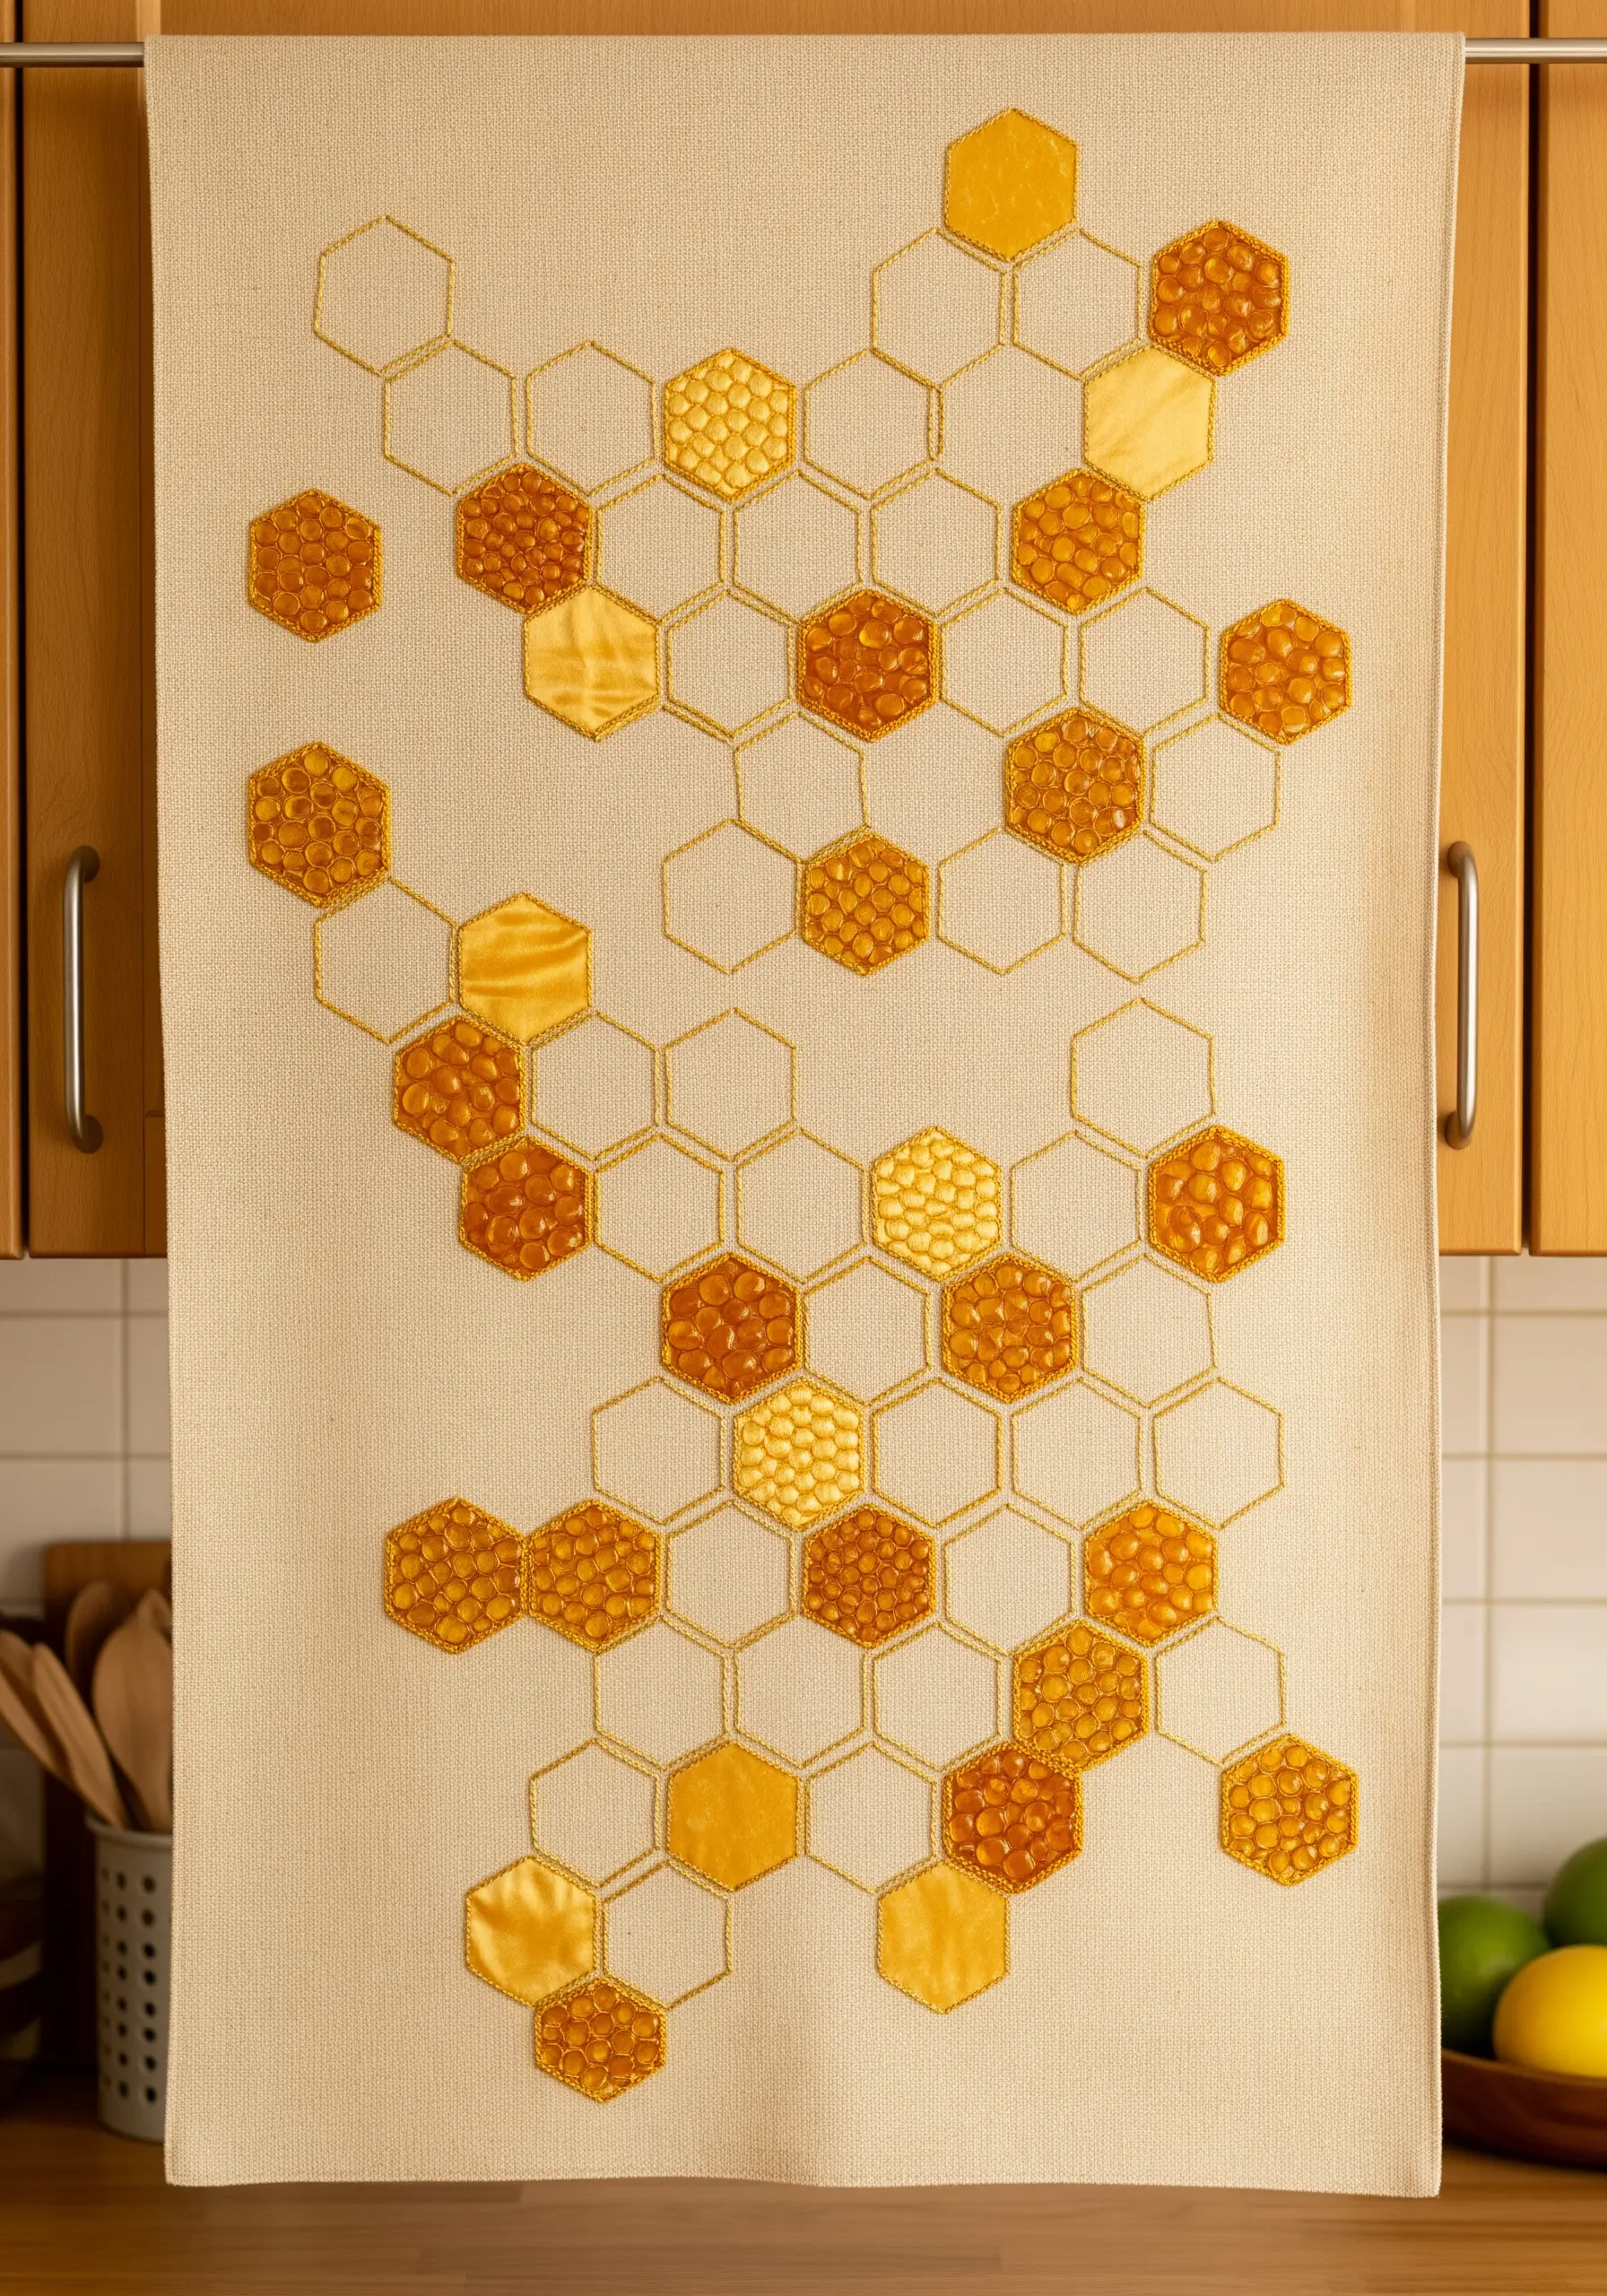
Create a visually rich honeycomb pattern by assigning a different texture to each cell.
Outline the hexagonal grid with a sharp backstitch or stem stitch in a metallic gold thread.
Fill some cells with golden satin fabric, cut to shape and appliquéd with a small layer of batting underneath for a puffy effect.
Fill other cells with dense French knots or seed beads to represent crystallized honey or pollen. This variety of textures makes the simple geometric pattern come alive.
27. Give Lavender Sprigs Dimension with Bullion Knots
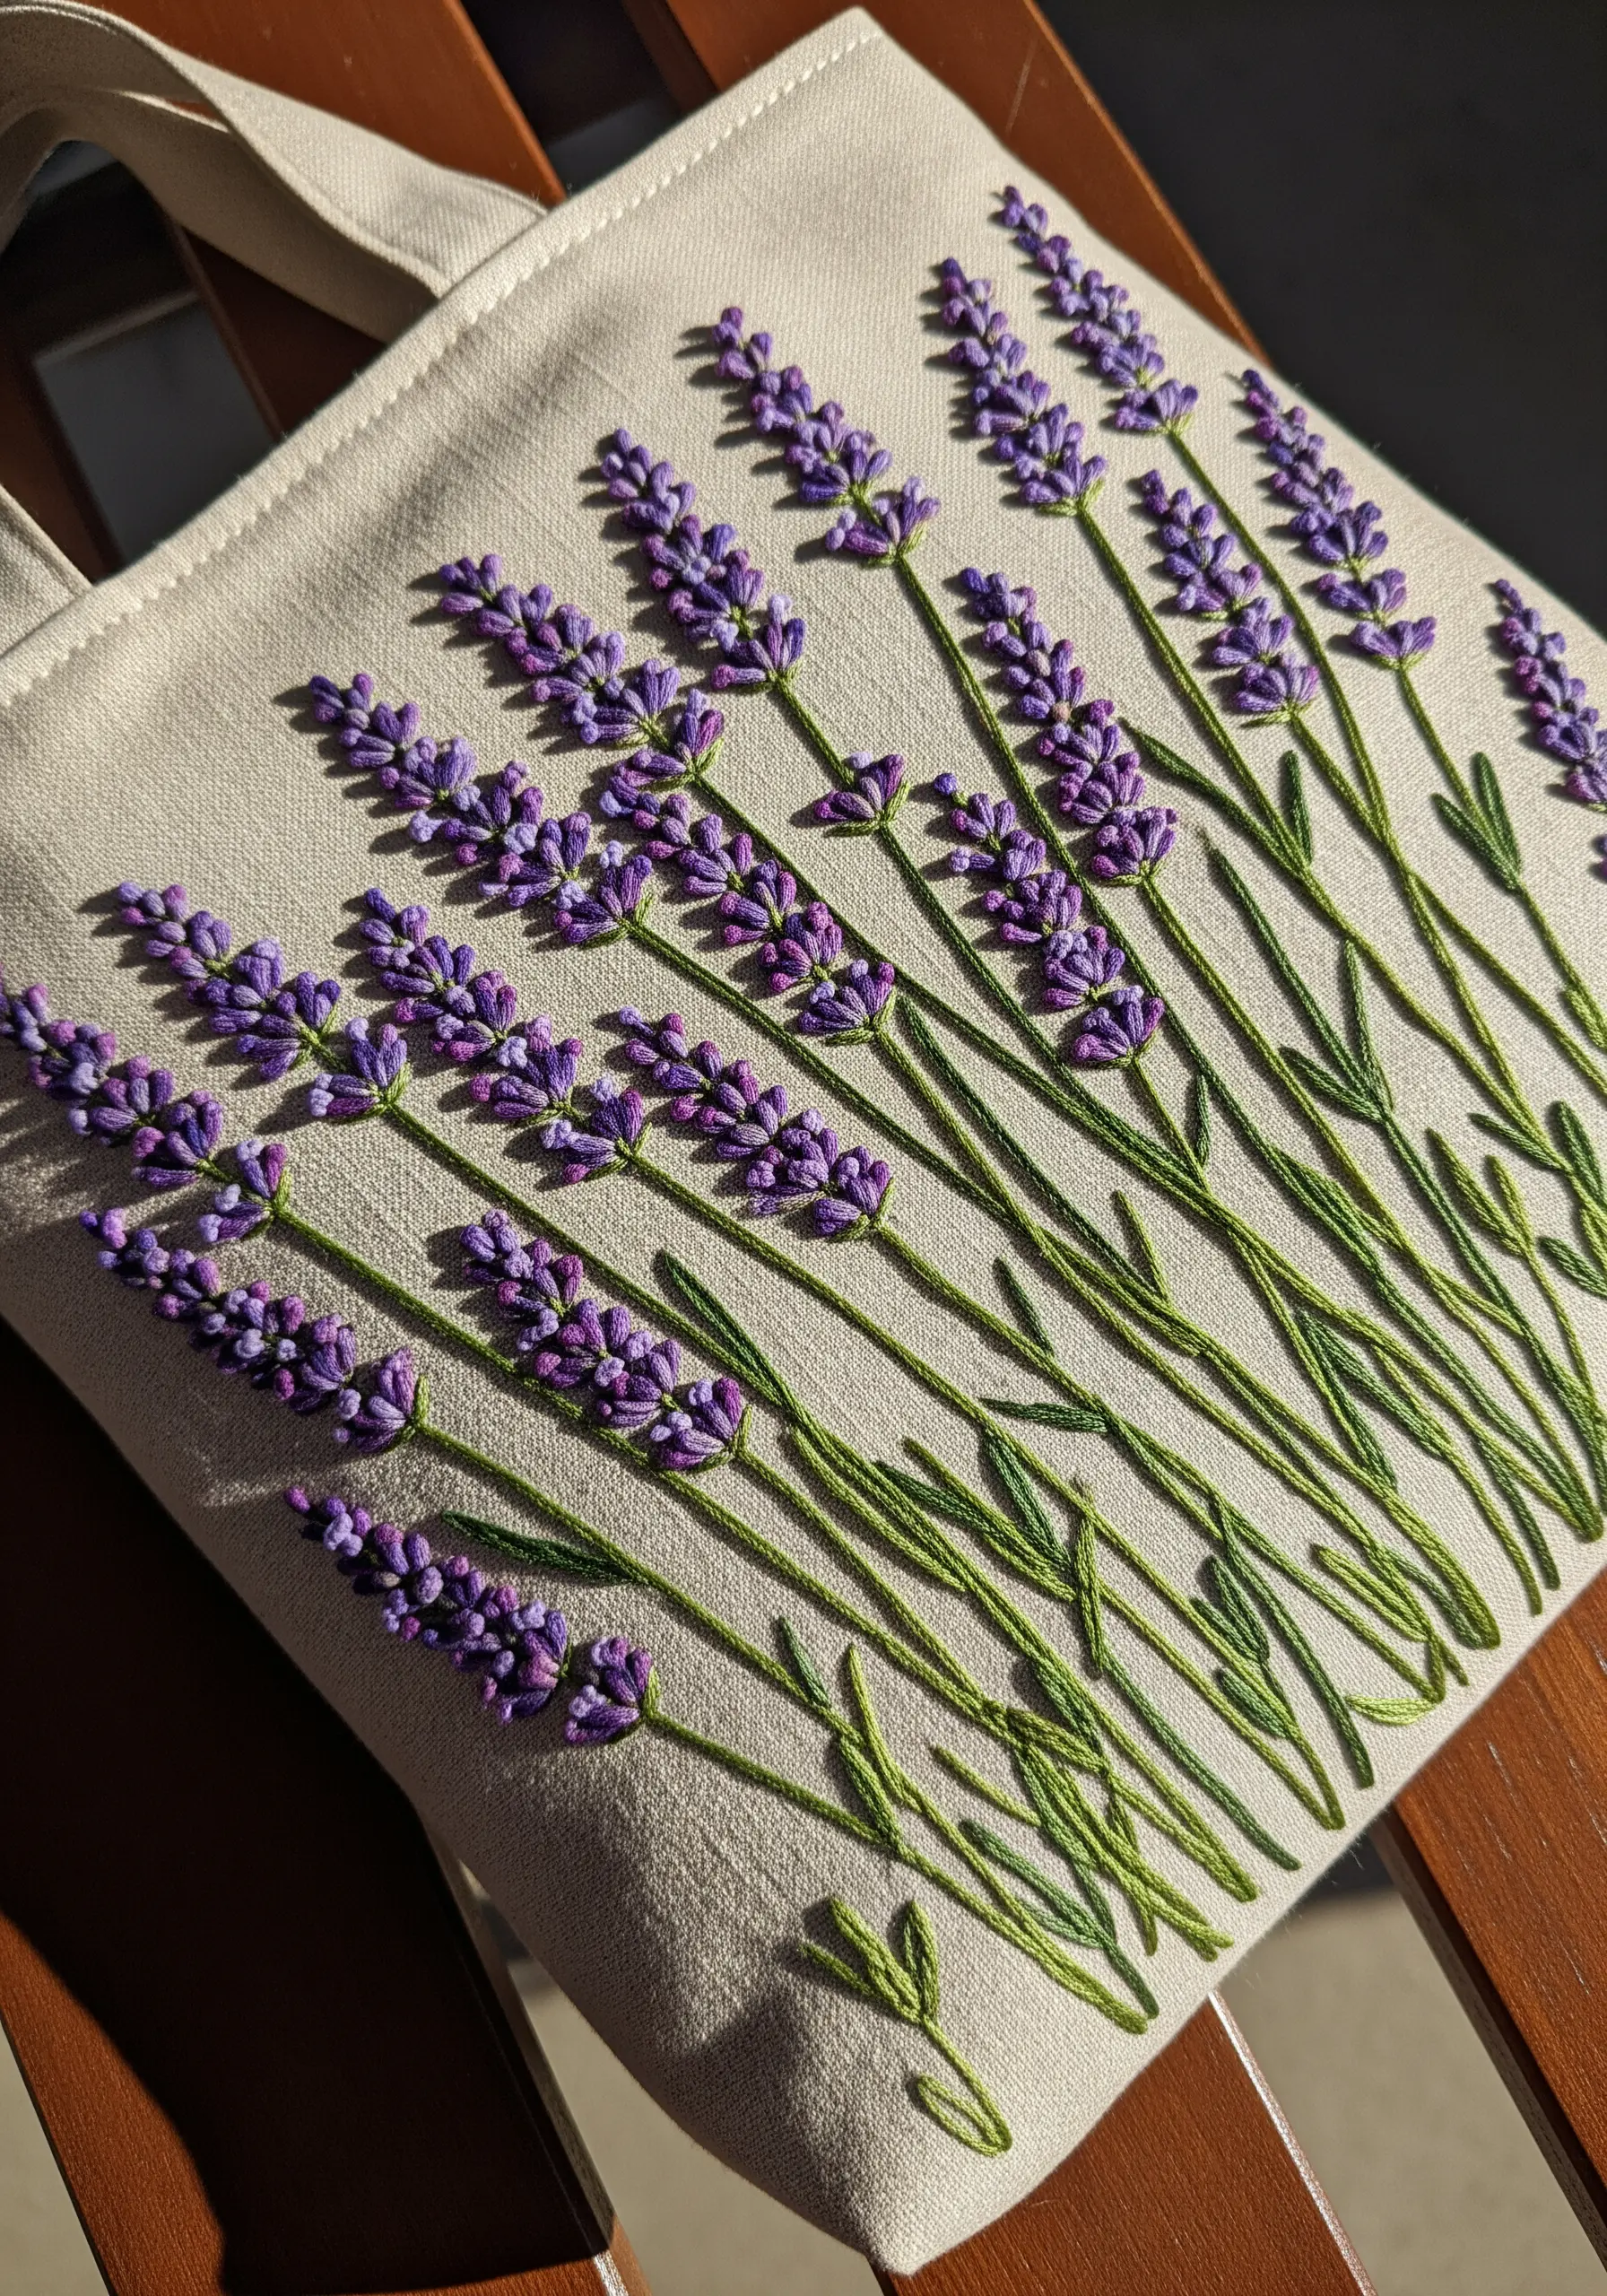
To prevent your lavender blossoms from looking flat, use bullion knots instead of satin stitch or French knots.
The elongated shape of a bullion knot perfectly mimics the tiny individual flowers on a lavender stalk.
Work the stems first with a simple stem stitch. Then, cluster short bullion knots of varying lengths and shades of purple and violet around the top of each stem.
This small change in stitch choice adds instant realism and dimension to your delicate lavender stitch ideas, making them pop off the fabric.
28. Stitch Flowing Seagrass with a Darning Stitch

To create the effect of tall, flowing grasses on a sheer curtain, a machine-based darning or free-motion embroidery stitch is ideal.
This technique allows you to ‘draw’ with the thread, creating long, organic, and slightly irregular lines that mimic the natural sway of seagrass.
Use a variegated thread in shades of green and teal to add depth and prevent the design from looking flat.
The transparency of the curtain fabric allows the stitched grasses to interact with the light, creating a beautiful, layered effect that brings the outdoors in.
29. Replicate Seashell Ridges with Padded Satin Stitch

Capture the sculptural form of seashells by using padding to create a three-dimensional base.
Cut layers of felt in successively smaller shapes to build up the highest points of the shell, then cover the entire area with long, precise satin stitches.
To create the fine ridges of a scallop or conch shell, couch a single strand of a contrasting or darker thread over the top of your satin stitch base.
This combination of volumetric padding and fine surface detail results in stunningly realistic ocean-inspired hoop embroidery.
30. Create Texture with Abstract Whipped Stitches

Develop an abstract texture that mimics worm castings or intricate root systems using a whipped running stitch.
First, lay down a meandering path of long running stitches across your canvas.
Then, with a thicker or contrasting thread, whip these stitches by passing your needle under each running stitch without entering the fabric.
Unlike a whipped backstitch, whipping a running stitch creates a more open, loopy, and irregular line that has a wonderfully organic and slightly chaotic feel, perfect for abstract texture play.
31. Achieve a Pointillist Effect with French Knots

Instead of blending colors with thread painting, use dense clusters of French knots to create a vibrant, pointillist texture.
Break your design down into areas of color and light, just as you would for a painting.
Fill each area with tightly packed French knots, using slightly different shades within a single section to create depth and highlights.
This technique is particularly effective for subjects with a naturally dotted or juicy texture, like this watermelon, and turns a simple motif into a rich, tactile experience.
32. Build Ethereal Clouds with Turkey Work and Sheer Fabric

Create dreamy, three-dimensional clouds by combining the fluffy texture of Turkey work with the delicacy of sheer fabric.
Work your Turkey stitch loops on organza or tulle, leaving the loops uncut for a bubbly, cumulus effect or snipping and fluffing them for a softer, cirrus feel.
The transparent background makes your clouds appear to float, and layering multiple pieces of stitched organza can create incredible depth.
Backlighting the finished piece enhances the ethereal quality, turning it into a luminous fiber art installation.
33. Master Botanical Realism with Long-and-Short Stitch
For photorealistic leaves and petals, the long-and-short stitch is your most powerful tool.
It allows you to blend colors seamlessly, creating the subtle gradients found in nature without any harsh lines.
Break the leaf or petal into smaller sections and fill each with staggered rows of straight stitches, varying their lengths.
As you introduce a new color, the first row of stitches should interlock with the previous row, like teeth on a zipper. This is the secret to professional-level fern and foliage stitch variations.


