
Your embroidery hoop is more than just a tool—it’s a frame for a moment of calm, a canvas for color, and a way to bring a little more warmth into your home. But sometimes, you might feel like your stitches aren’t quite capturing the vision you have in your mind.
The secret to elevating your work often lies in small, intentional adjustments. It’s in choosing the right stitch to create a specific texture, understanding how a single strand of thread can convey delicacy, or seeing how a consistent color palette can turn separate pieces into a unified collection.
Here, you’ll find ideas designed to help you make those subtle shifts. We’ll move beyond just patterns and explore the techniques that give your embroidery a polished, thoughtful, and deeply personal finish. It’s time to stitch with renewed confidence and create pieces you’re truly proud to display.
1. Curate a Cohesive Woodland Gallery
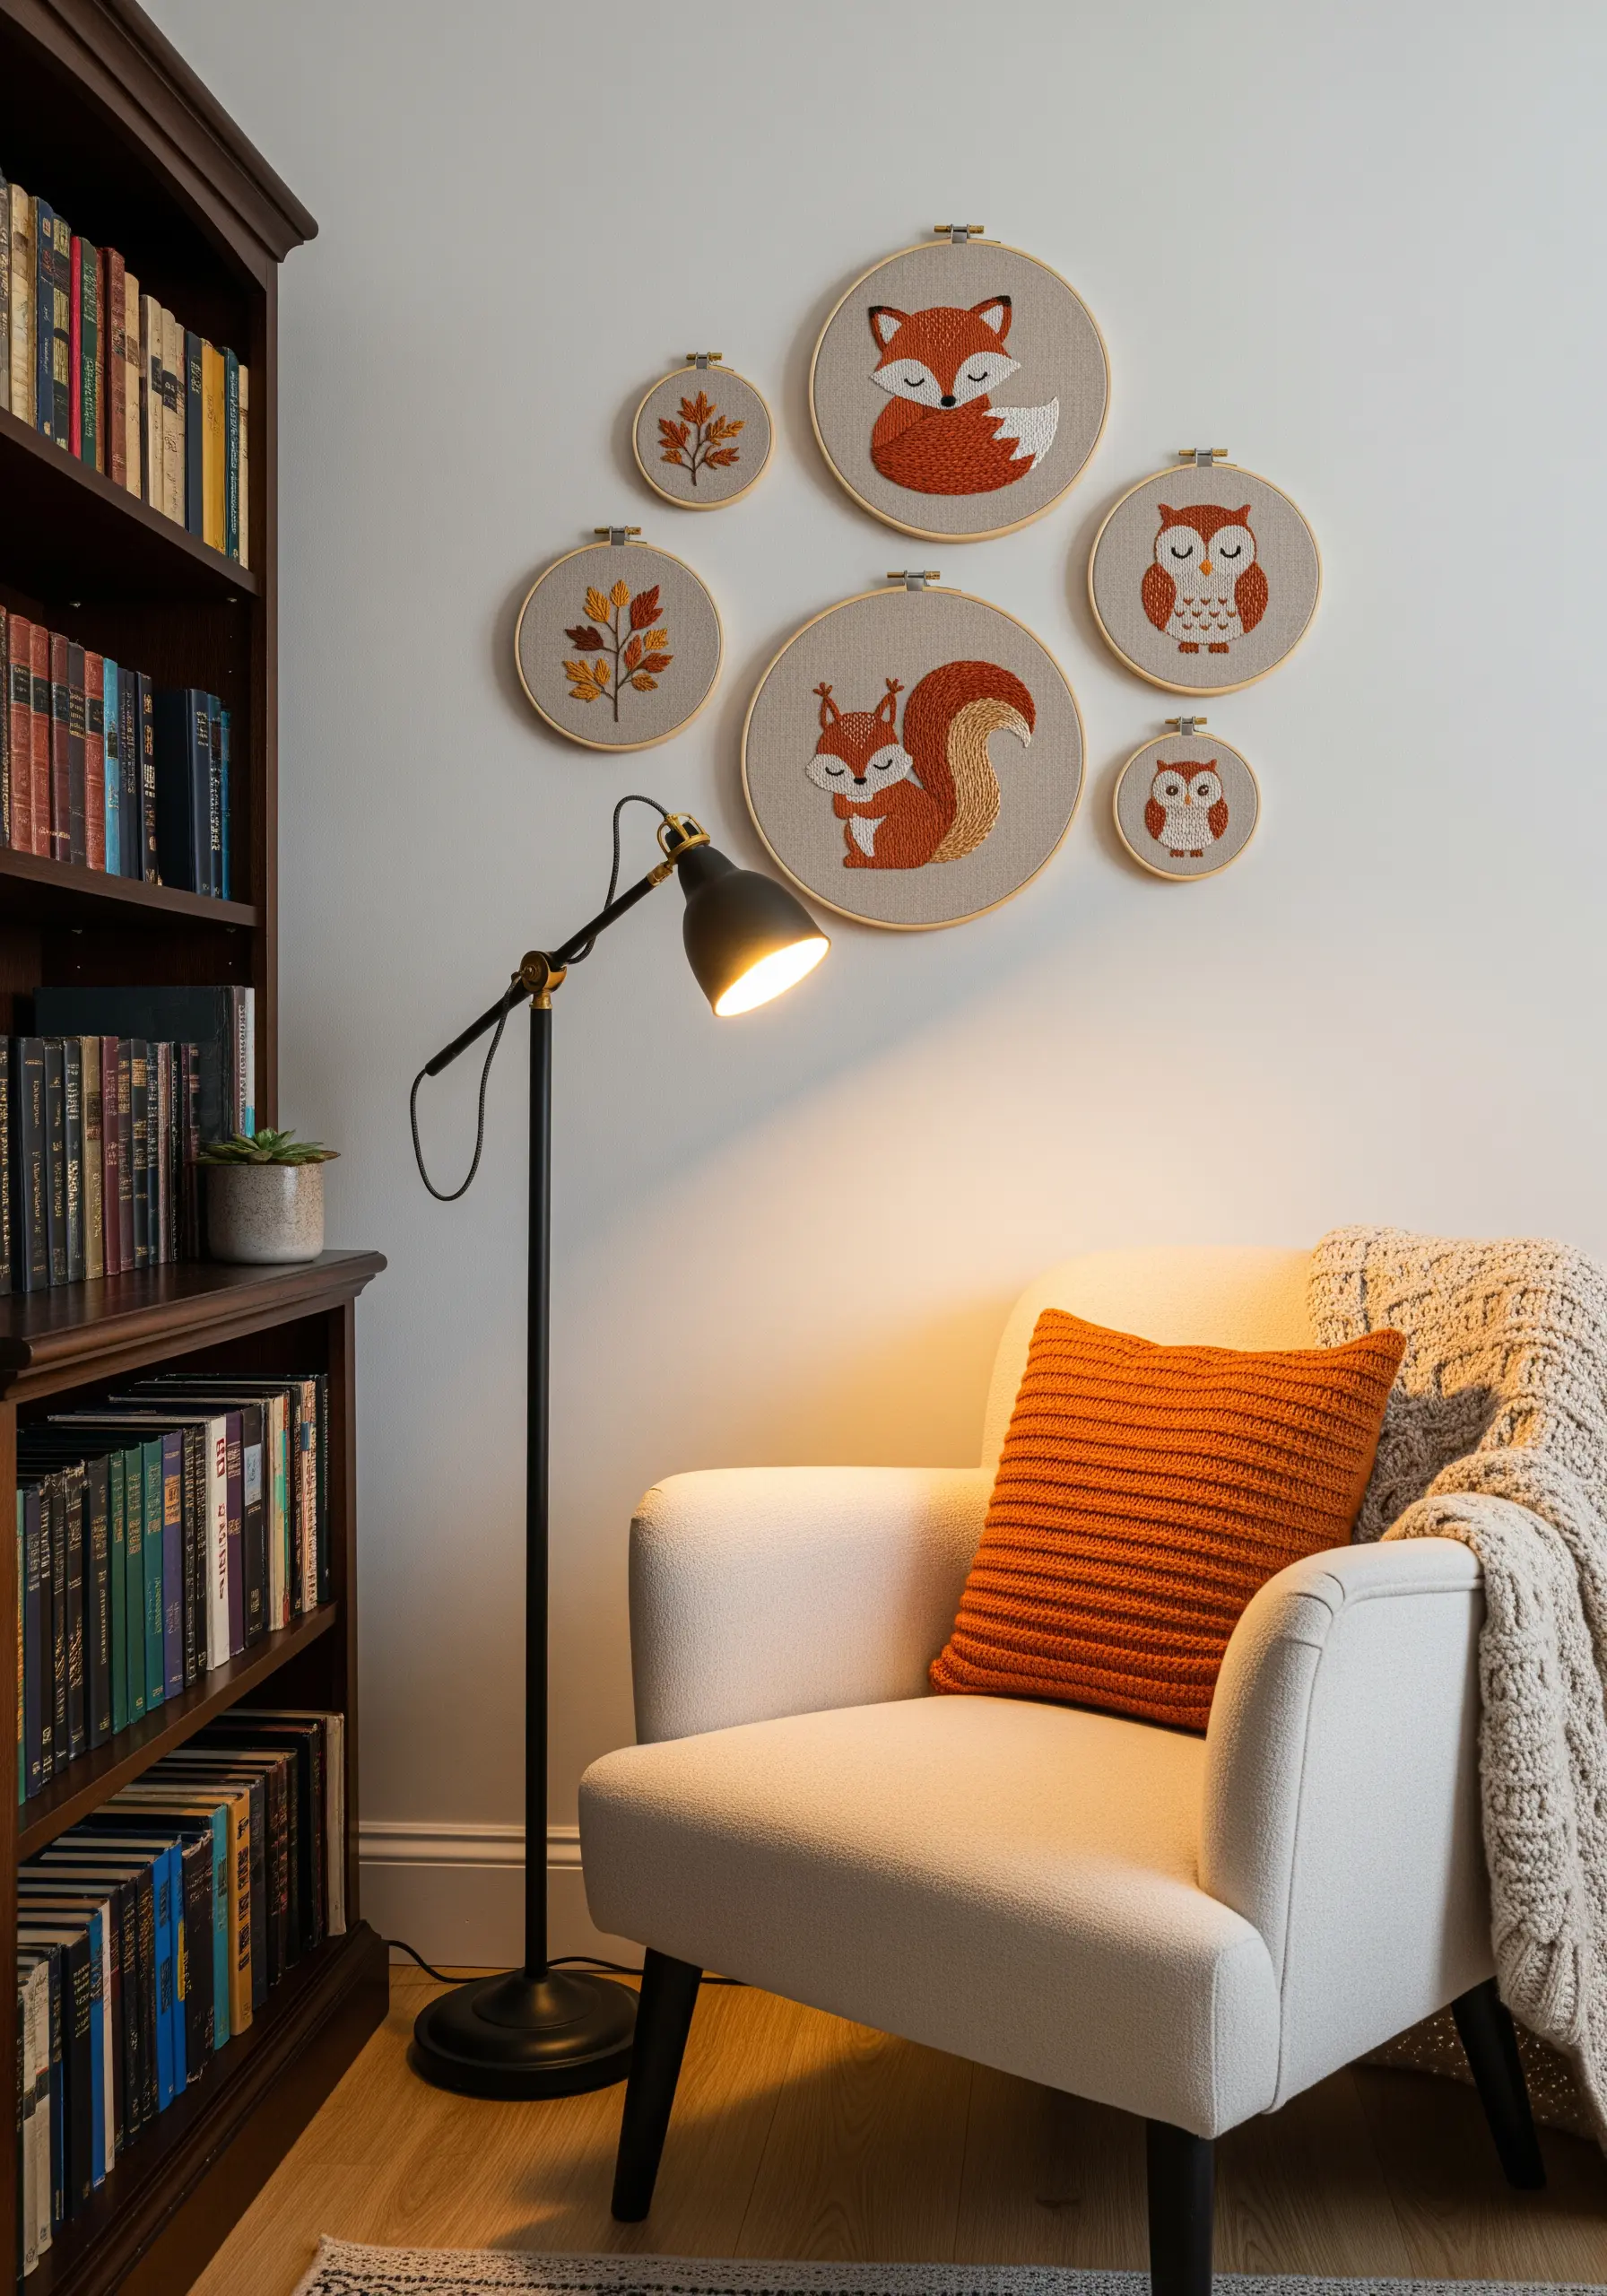
To create a harmonious collection, unify your designs with a consistent fabric choice, like a warm oatmeal linen or neutral cotton.
Vary the hoop sizes to create visual interest, arranging the largest piece off-center as your focal point.
For the animals’ fur, use a long-and-short stitch to blend shades of orange and brown, which adds softness and dimension.
Keep the outlines crisp and clean with a simple backstitch using two strands of floss.
This thoughtful approach turns individual pieces into a cohesive story, perfect for a cozy reading nook.
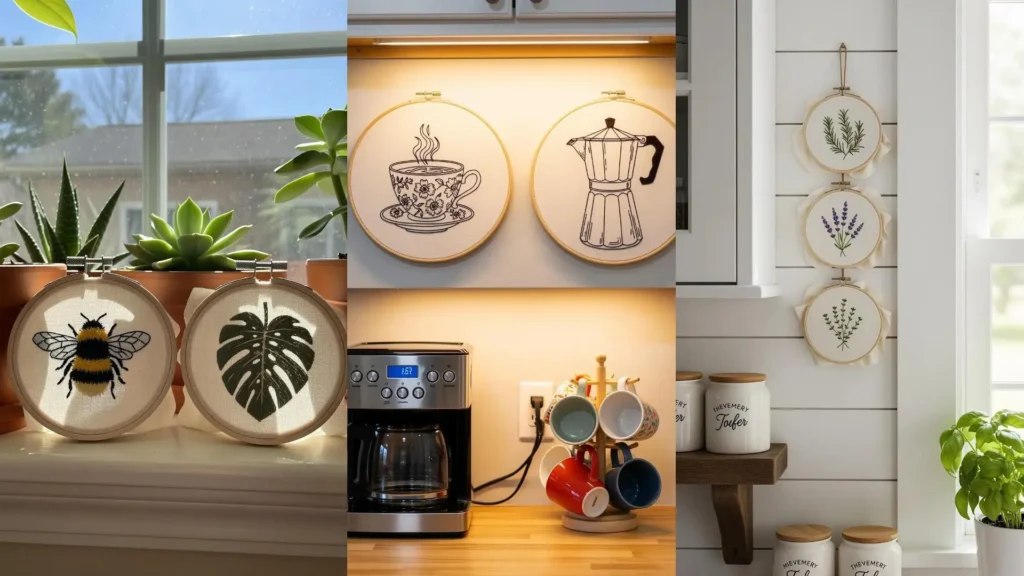
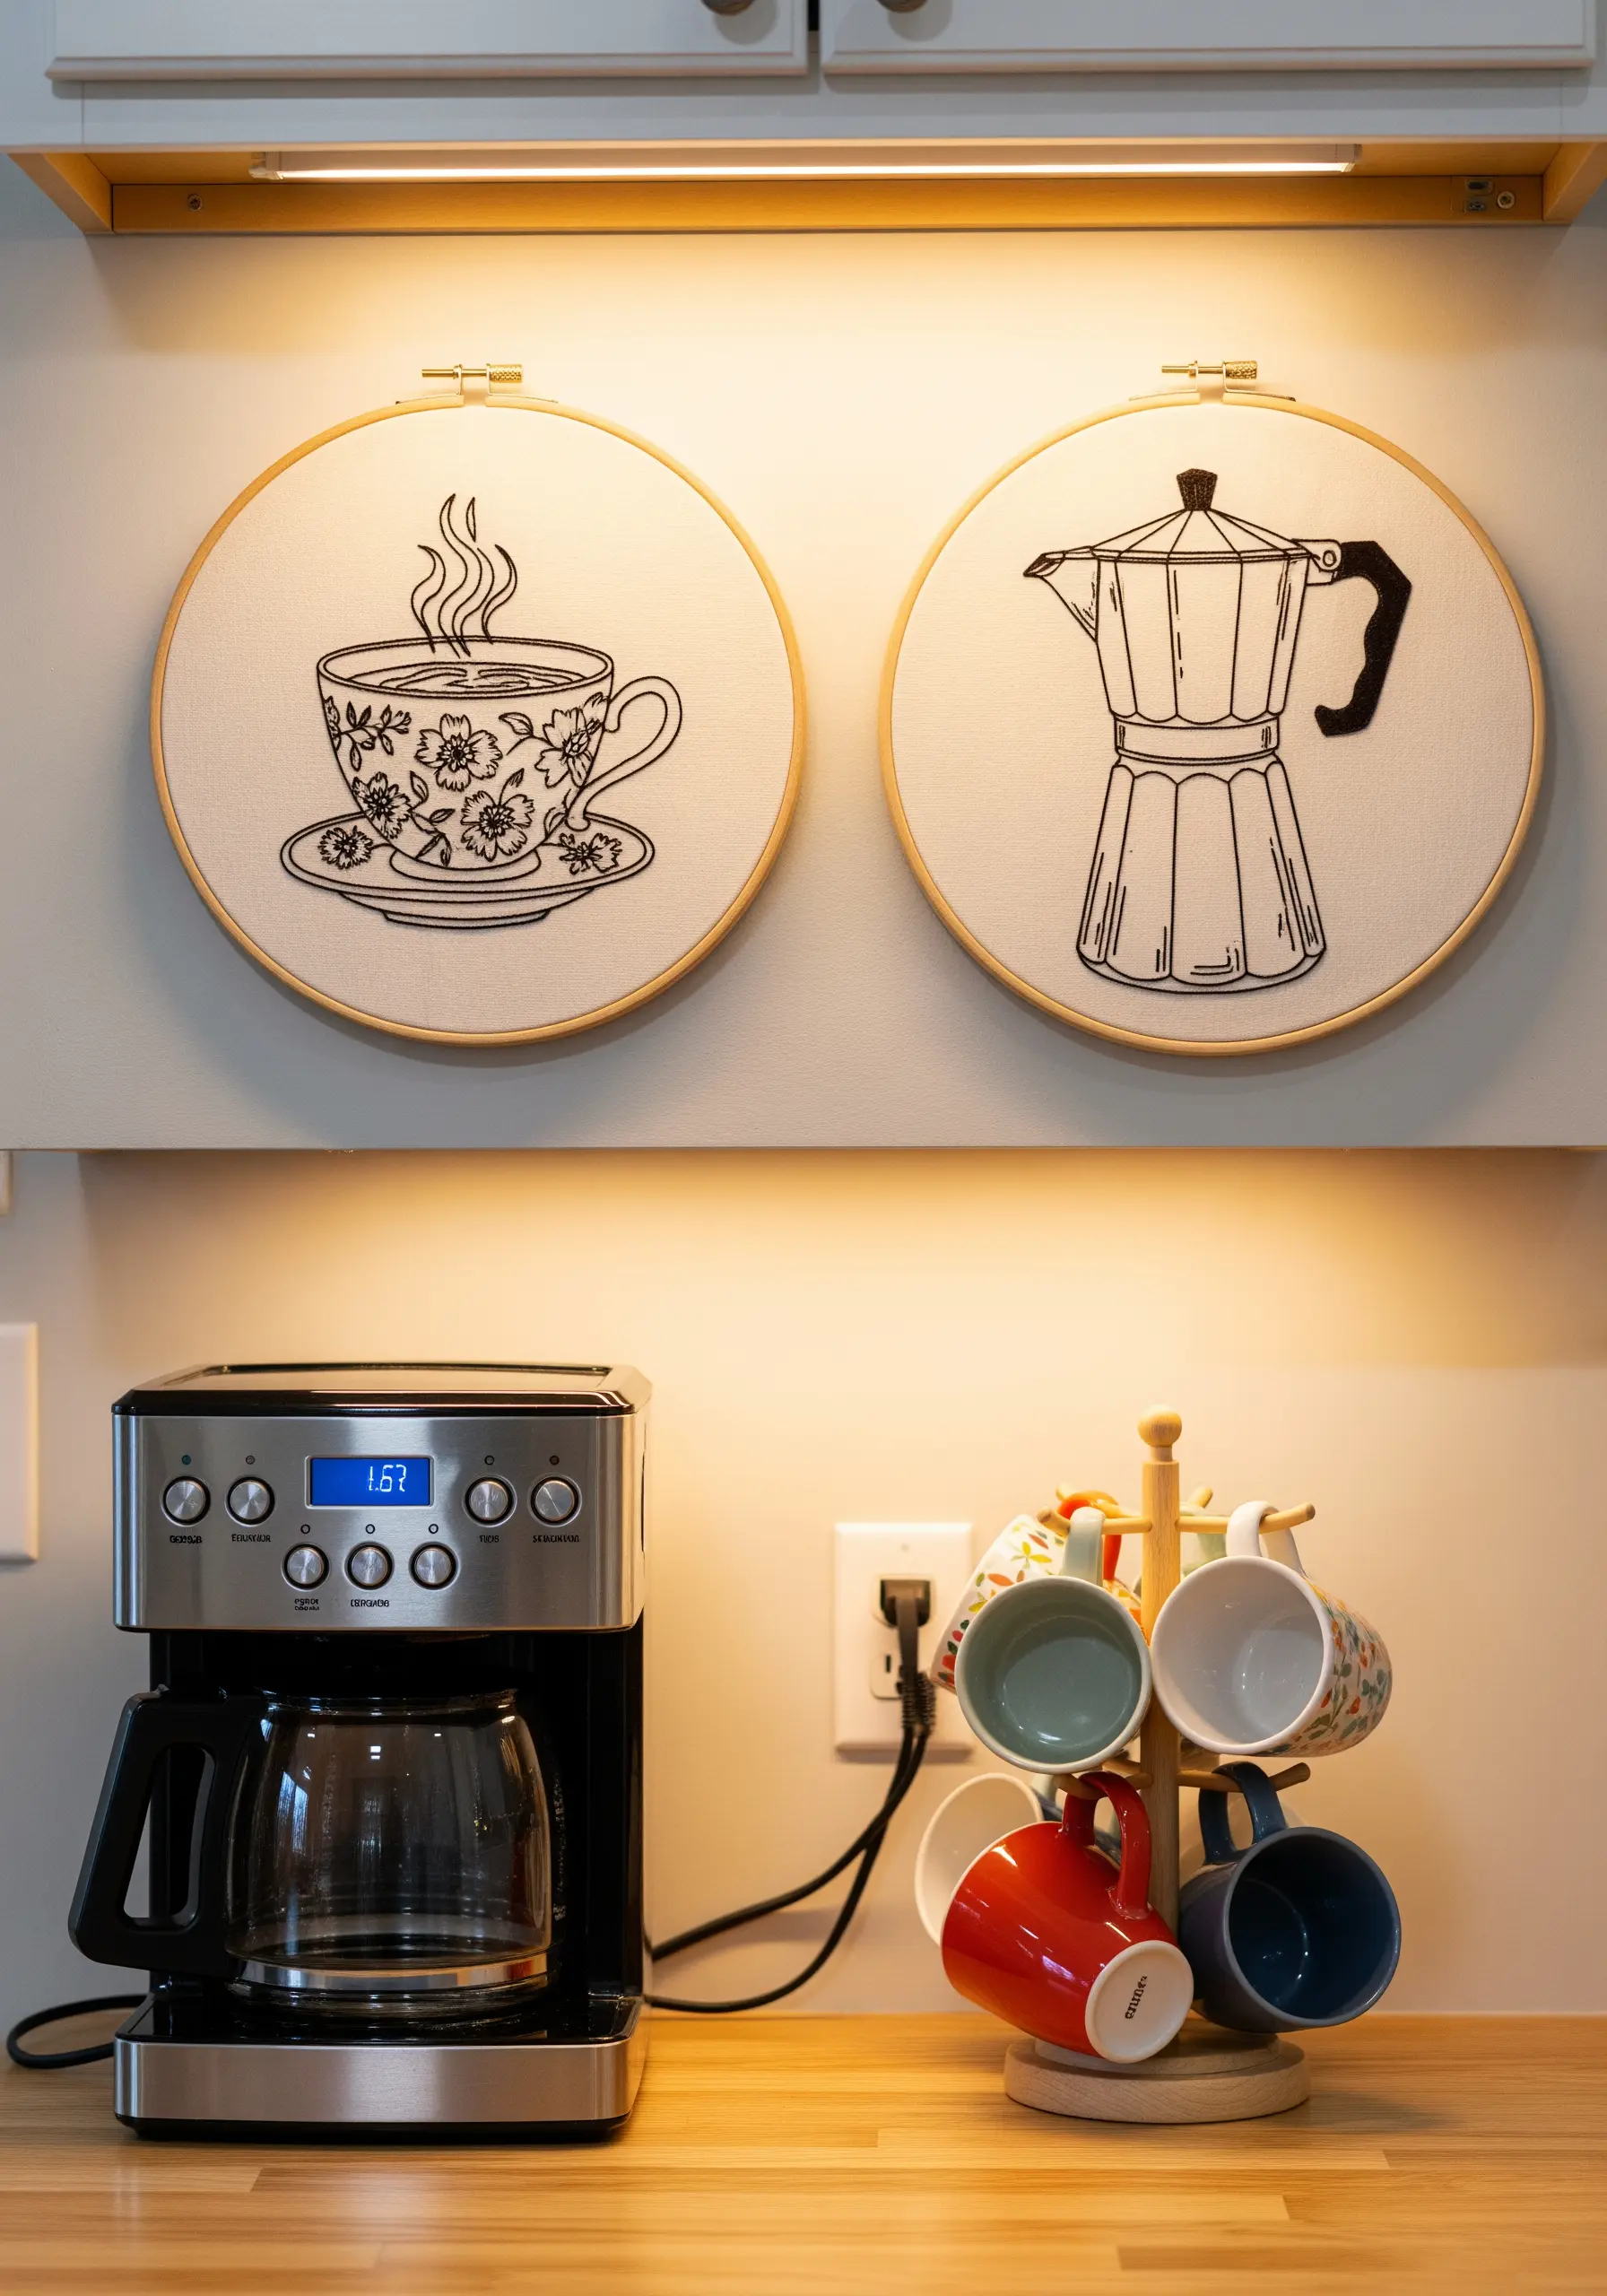
2. Arrange a Vertical Herb Garden
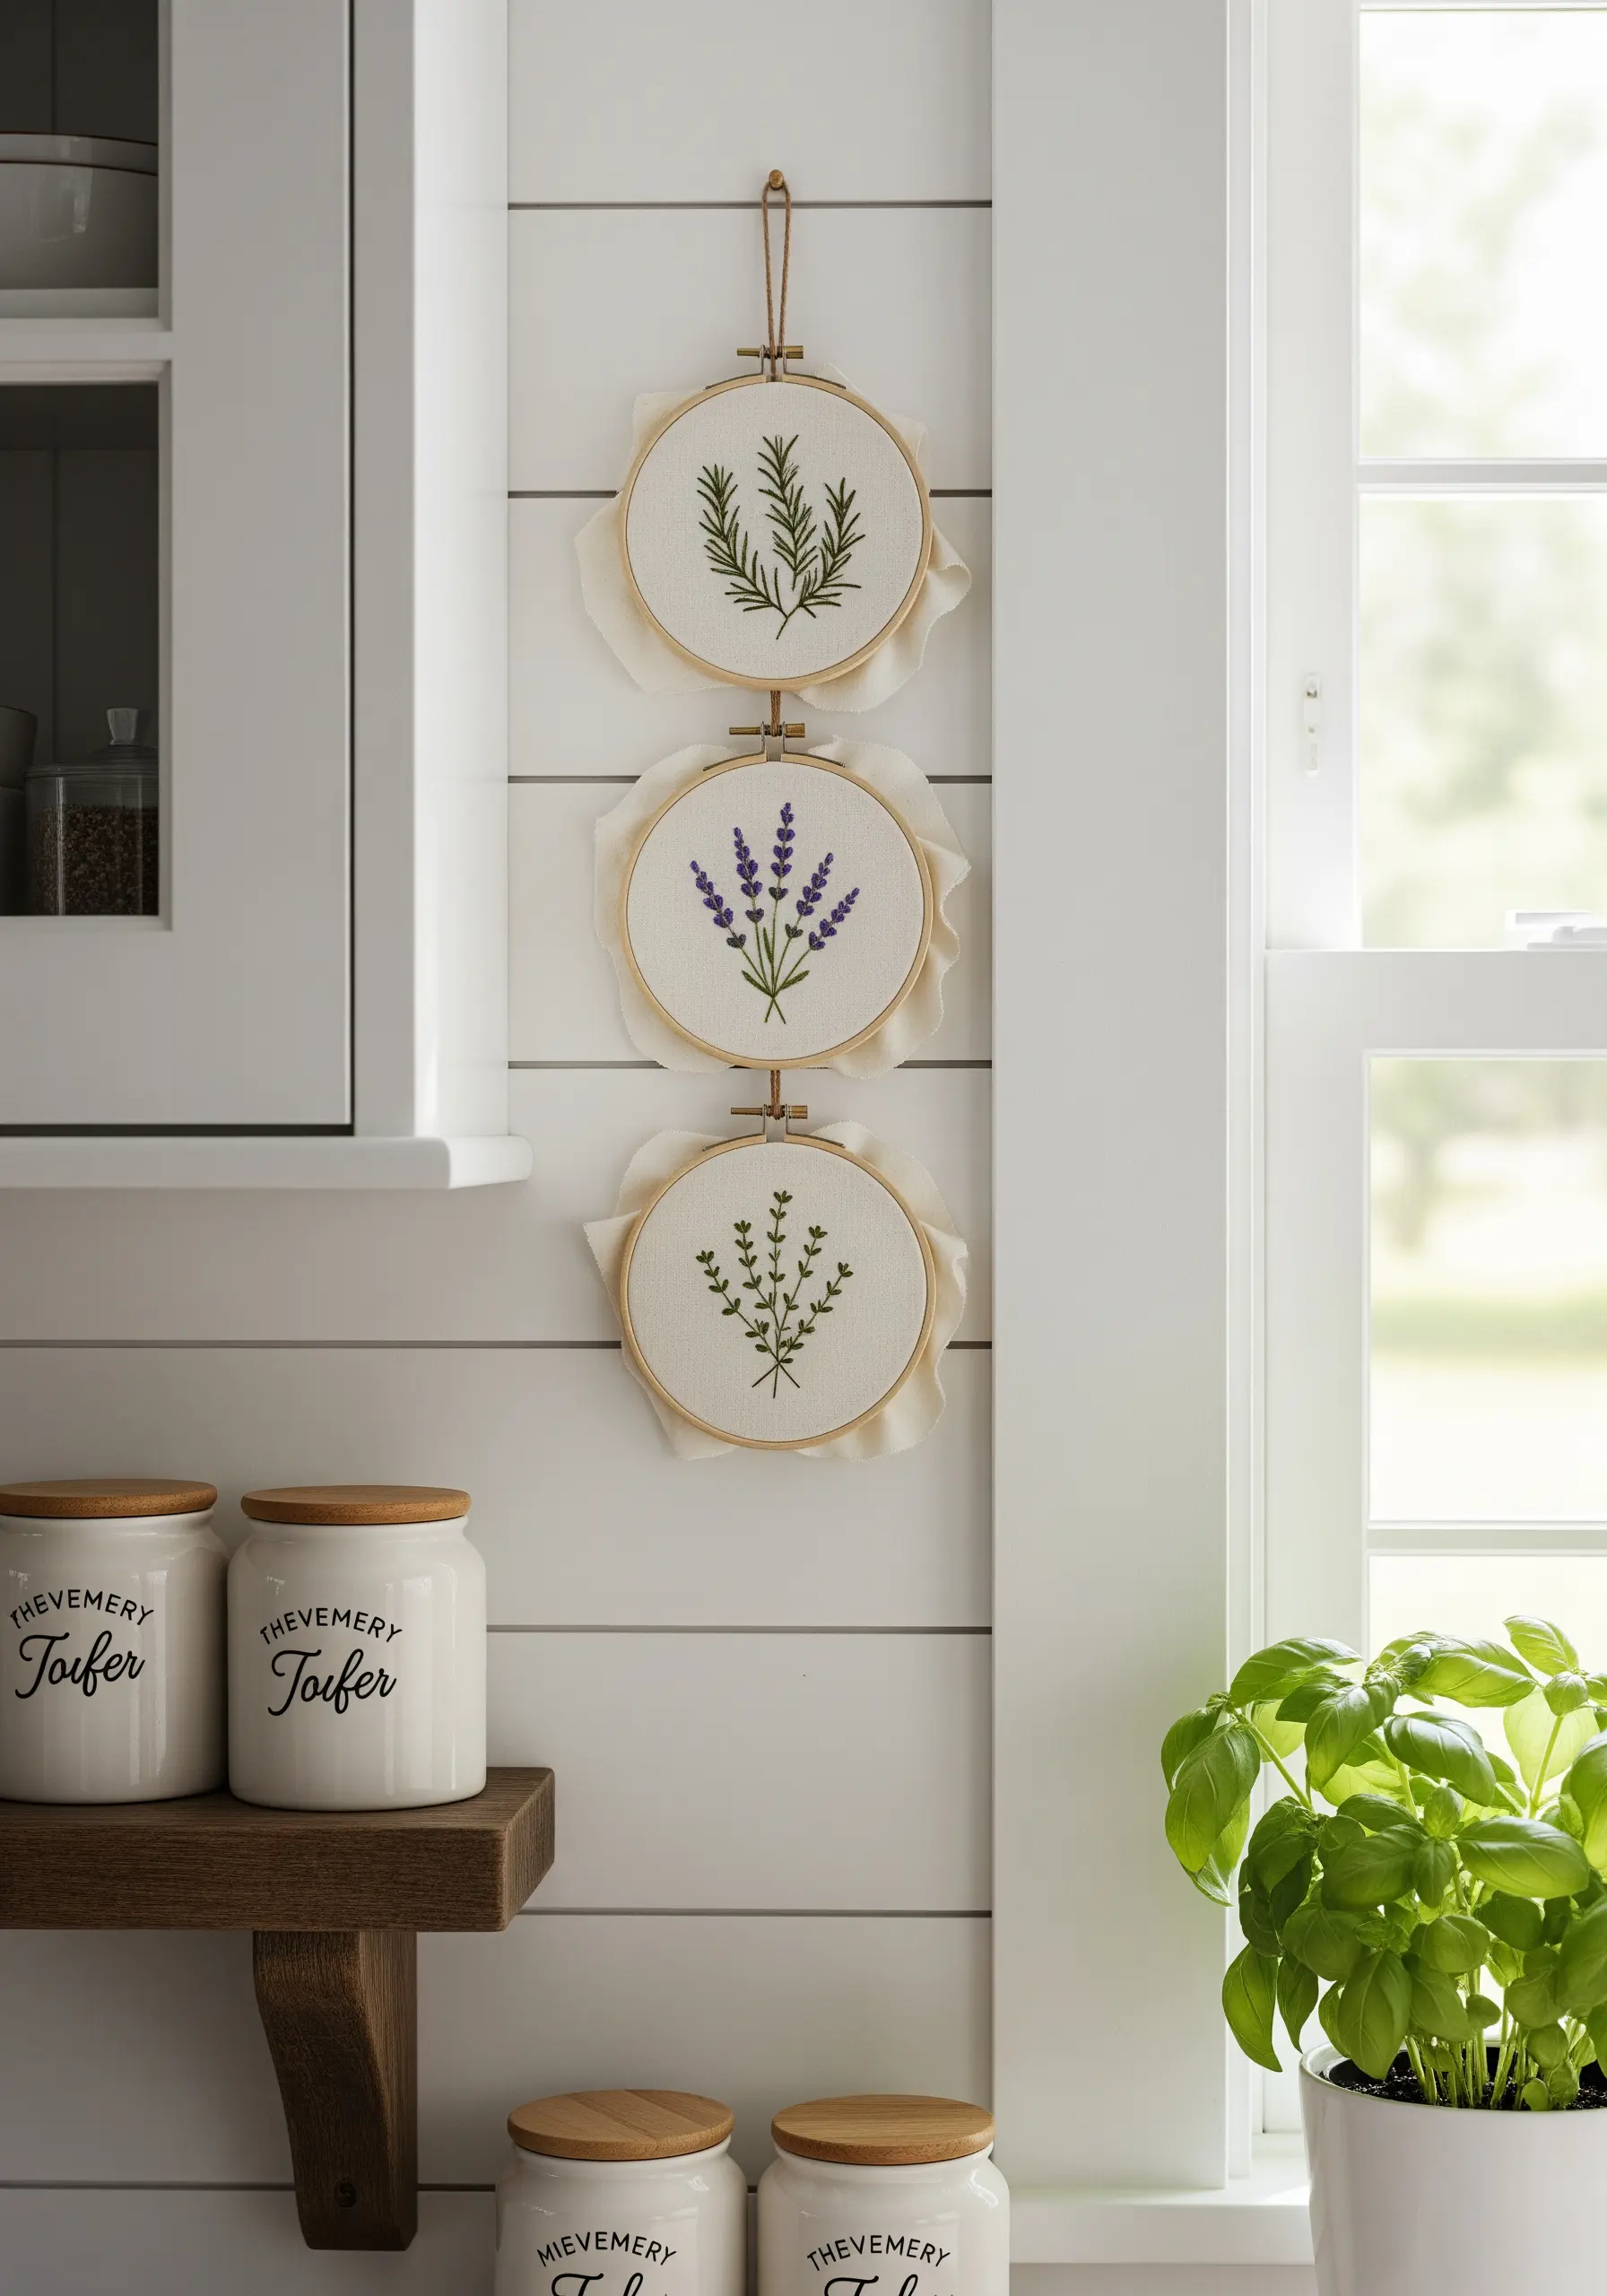
For narrow wall spaces, like in a kitchen or entryway, a vertical arrangement of small hoops is incredibly effective.
Stitch delicate herbs using just two or three shades of green to maintain a fresh, minimalist aesthetic.
Use a fine stem stitch for the stalks and lazy daisy stitches for leaves to give each sprig a light, airy quality.
To achieve the soft, gathered fabric finish, leave about two inches of excess fabric around the hoop and secure it with a running stitch at the back.
This technique adds a touch of handmade elegance to an often-overlooked space.
3. Compose a Statement Floral Bouquet
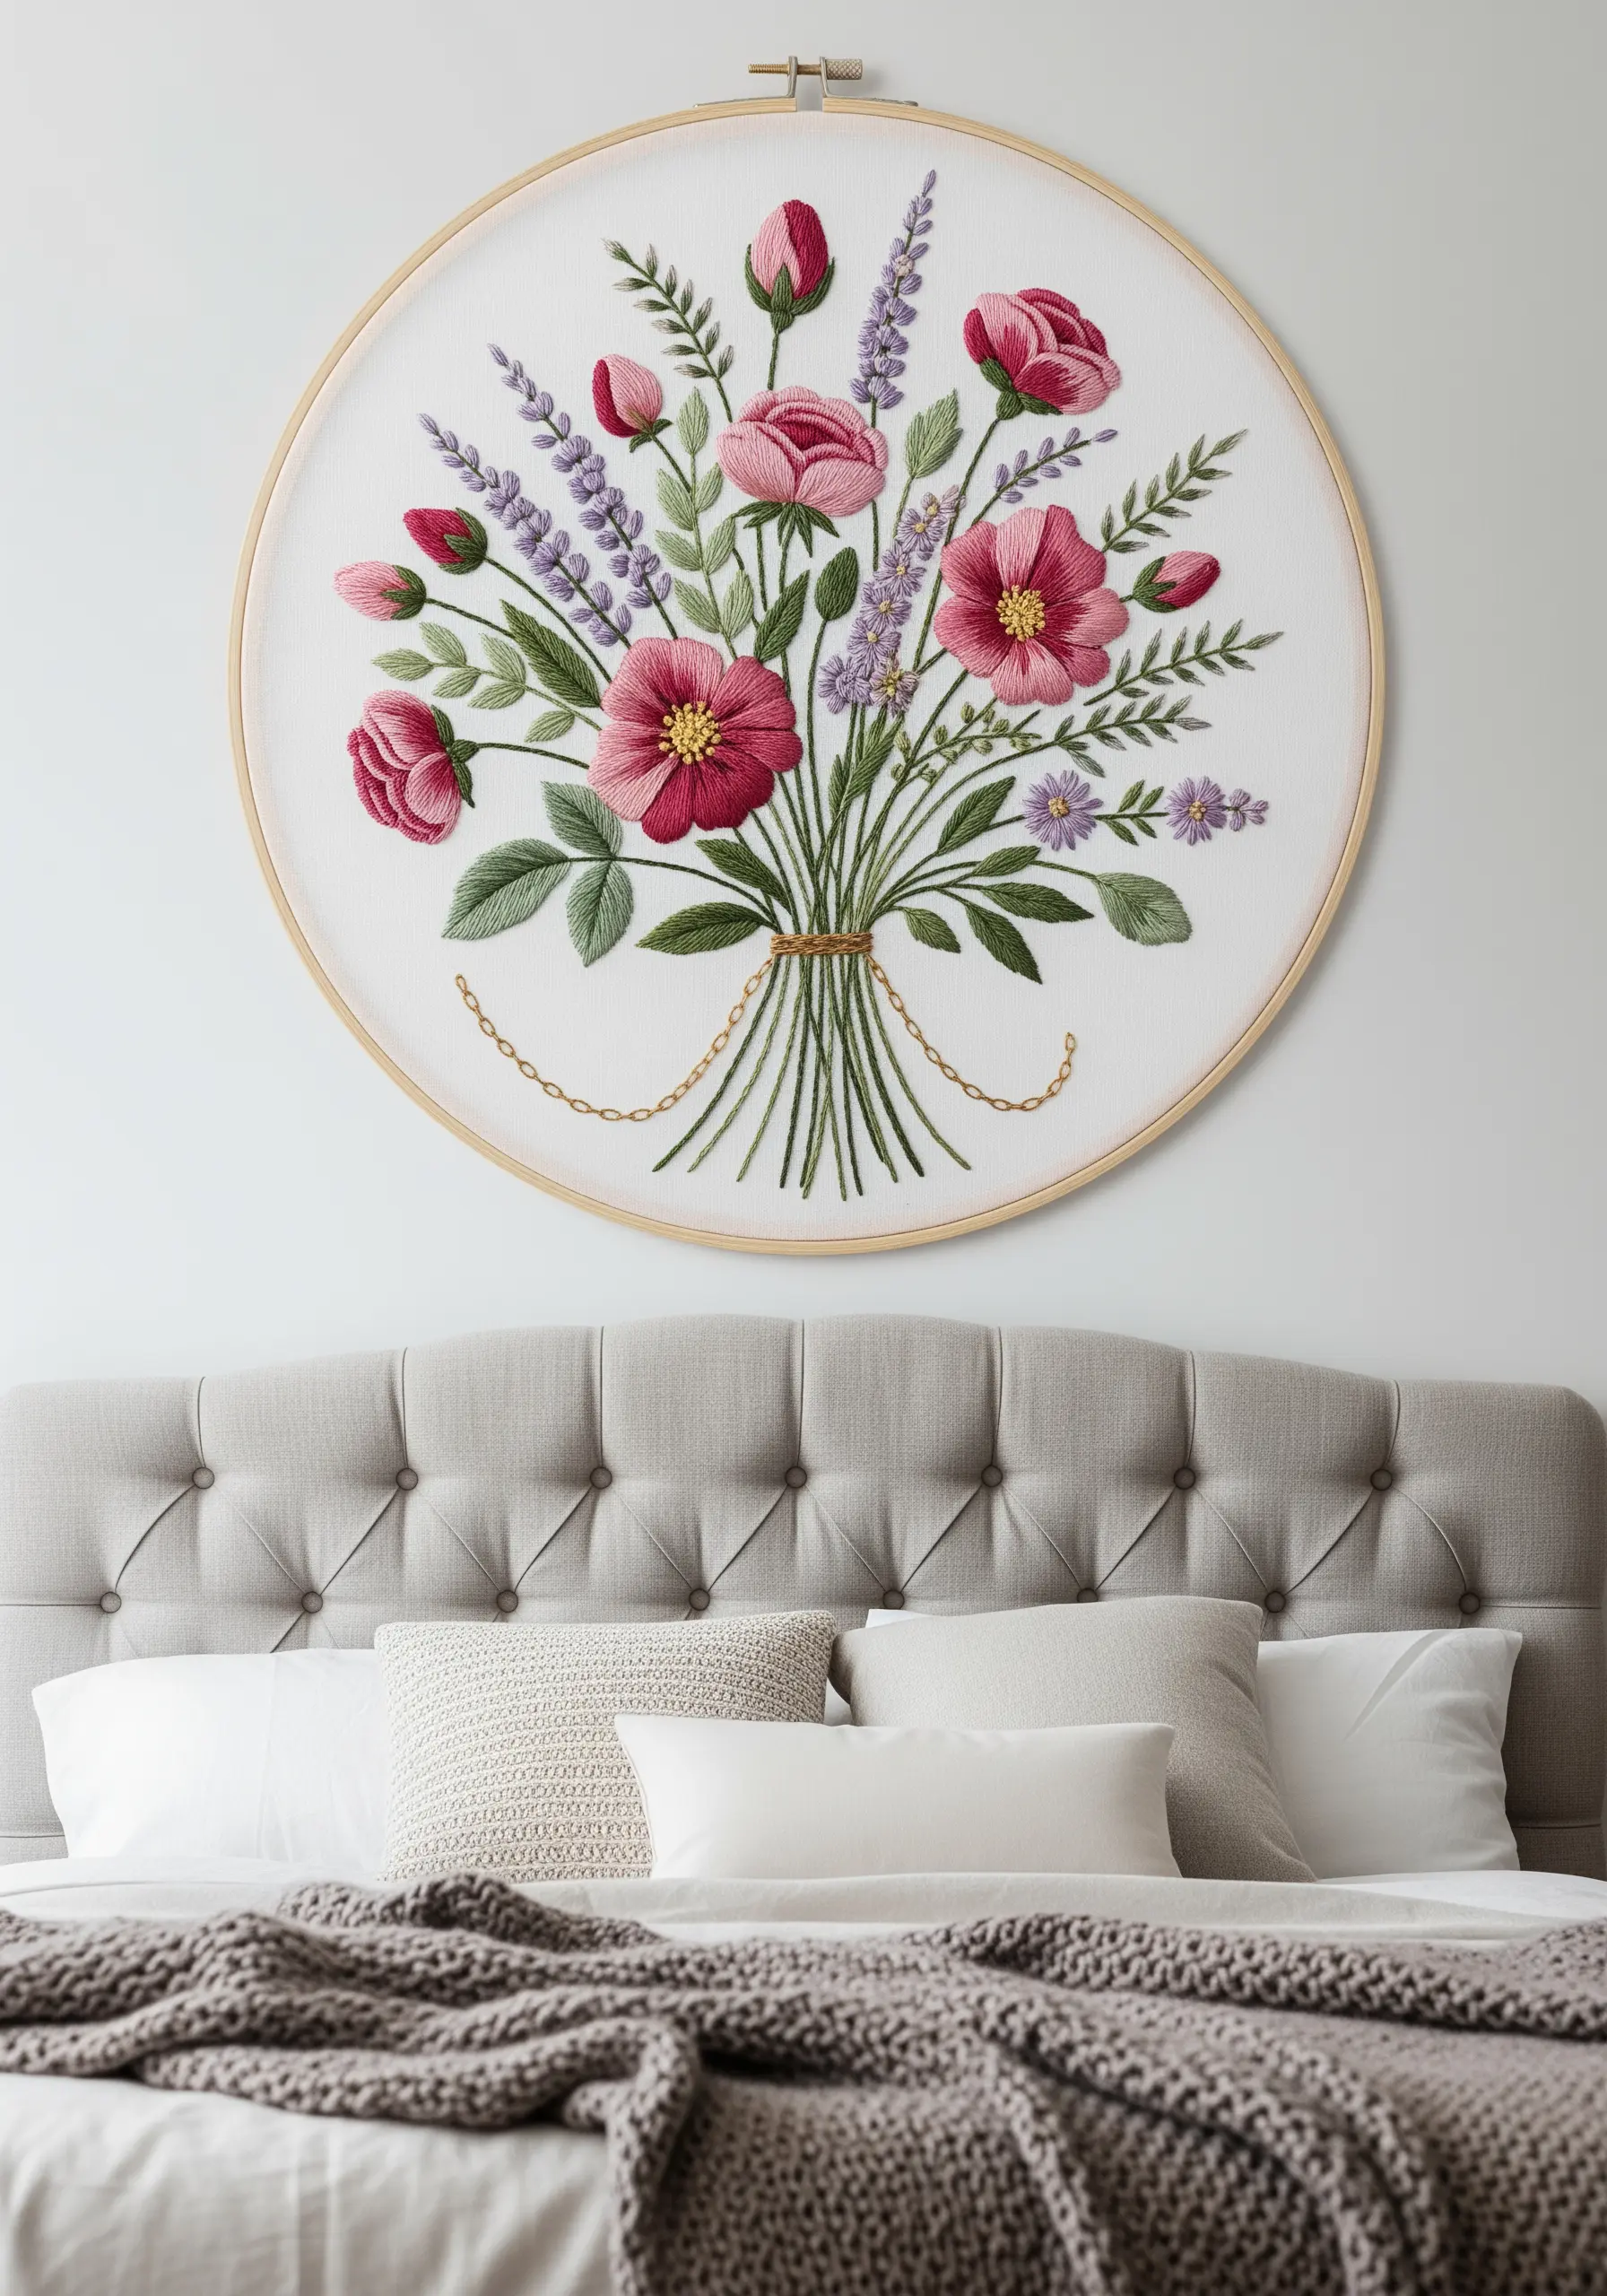
To create a dramatic focal point above a bed or sofa, work in a large 10- or 12-inch hoop.
Build textural depth by layering different stitches: use a smooth satin stitch for bold rose petals and French knots for the fuzzy centers of smaller blossoms.
For a realistic, blended look on the lavender, use single detached chain stitches in varying shades of purple.
Anchor the composition by stitching the stems first, then fill in with flowers, overlapping them slightly to create a lush, abundant feel.
The scale and detail in these intricate embroidery designs make them feel like true works of art.
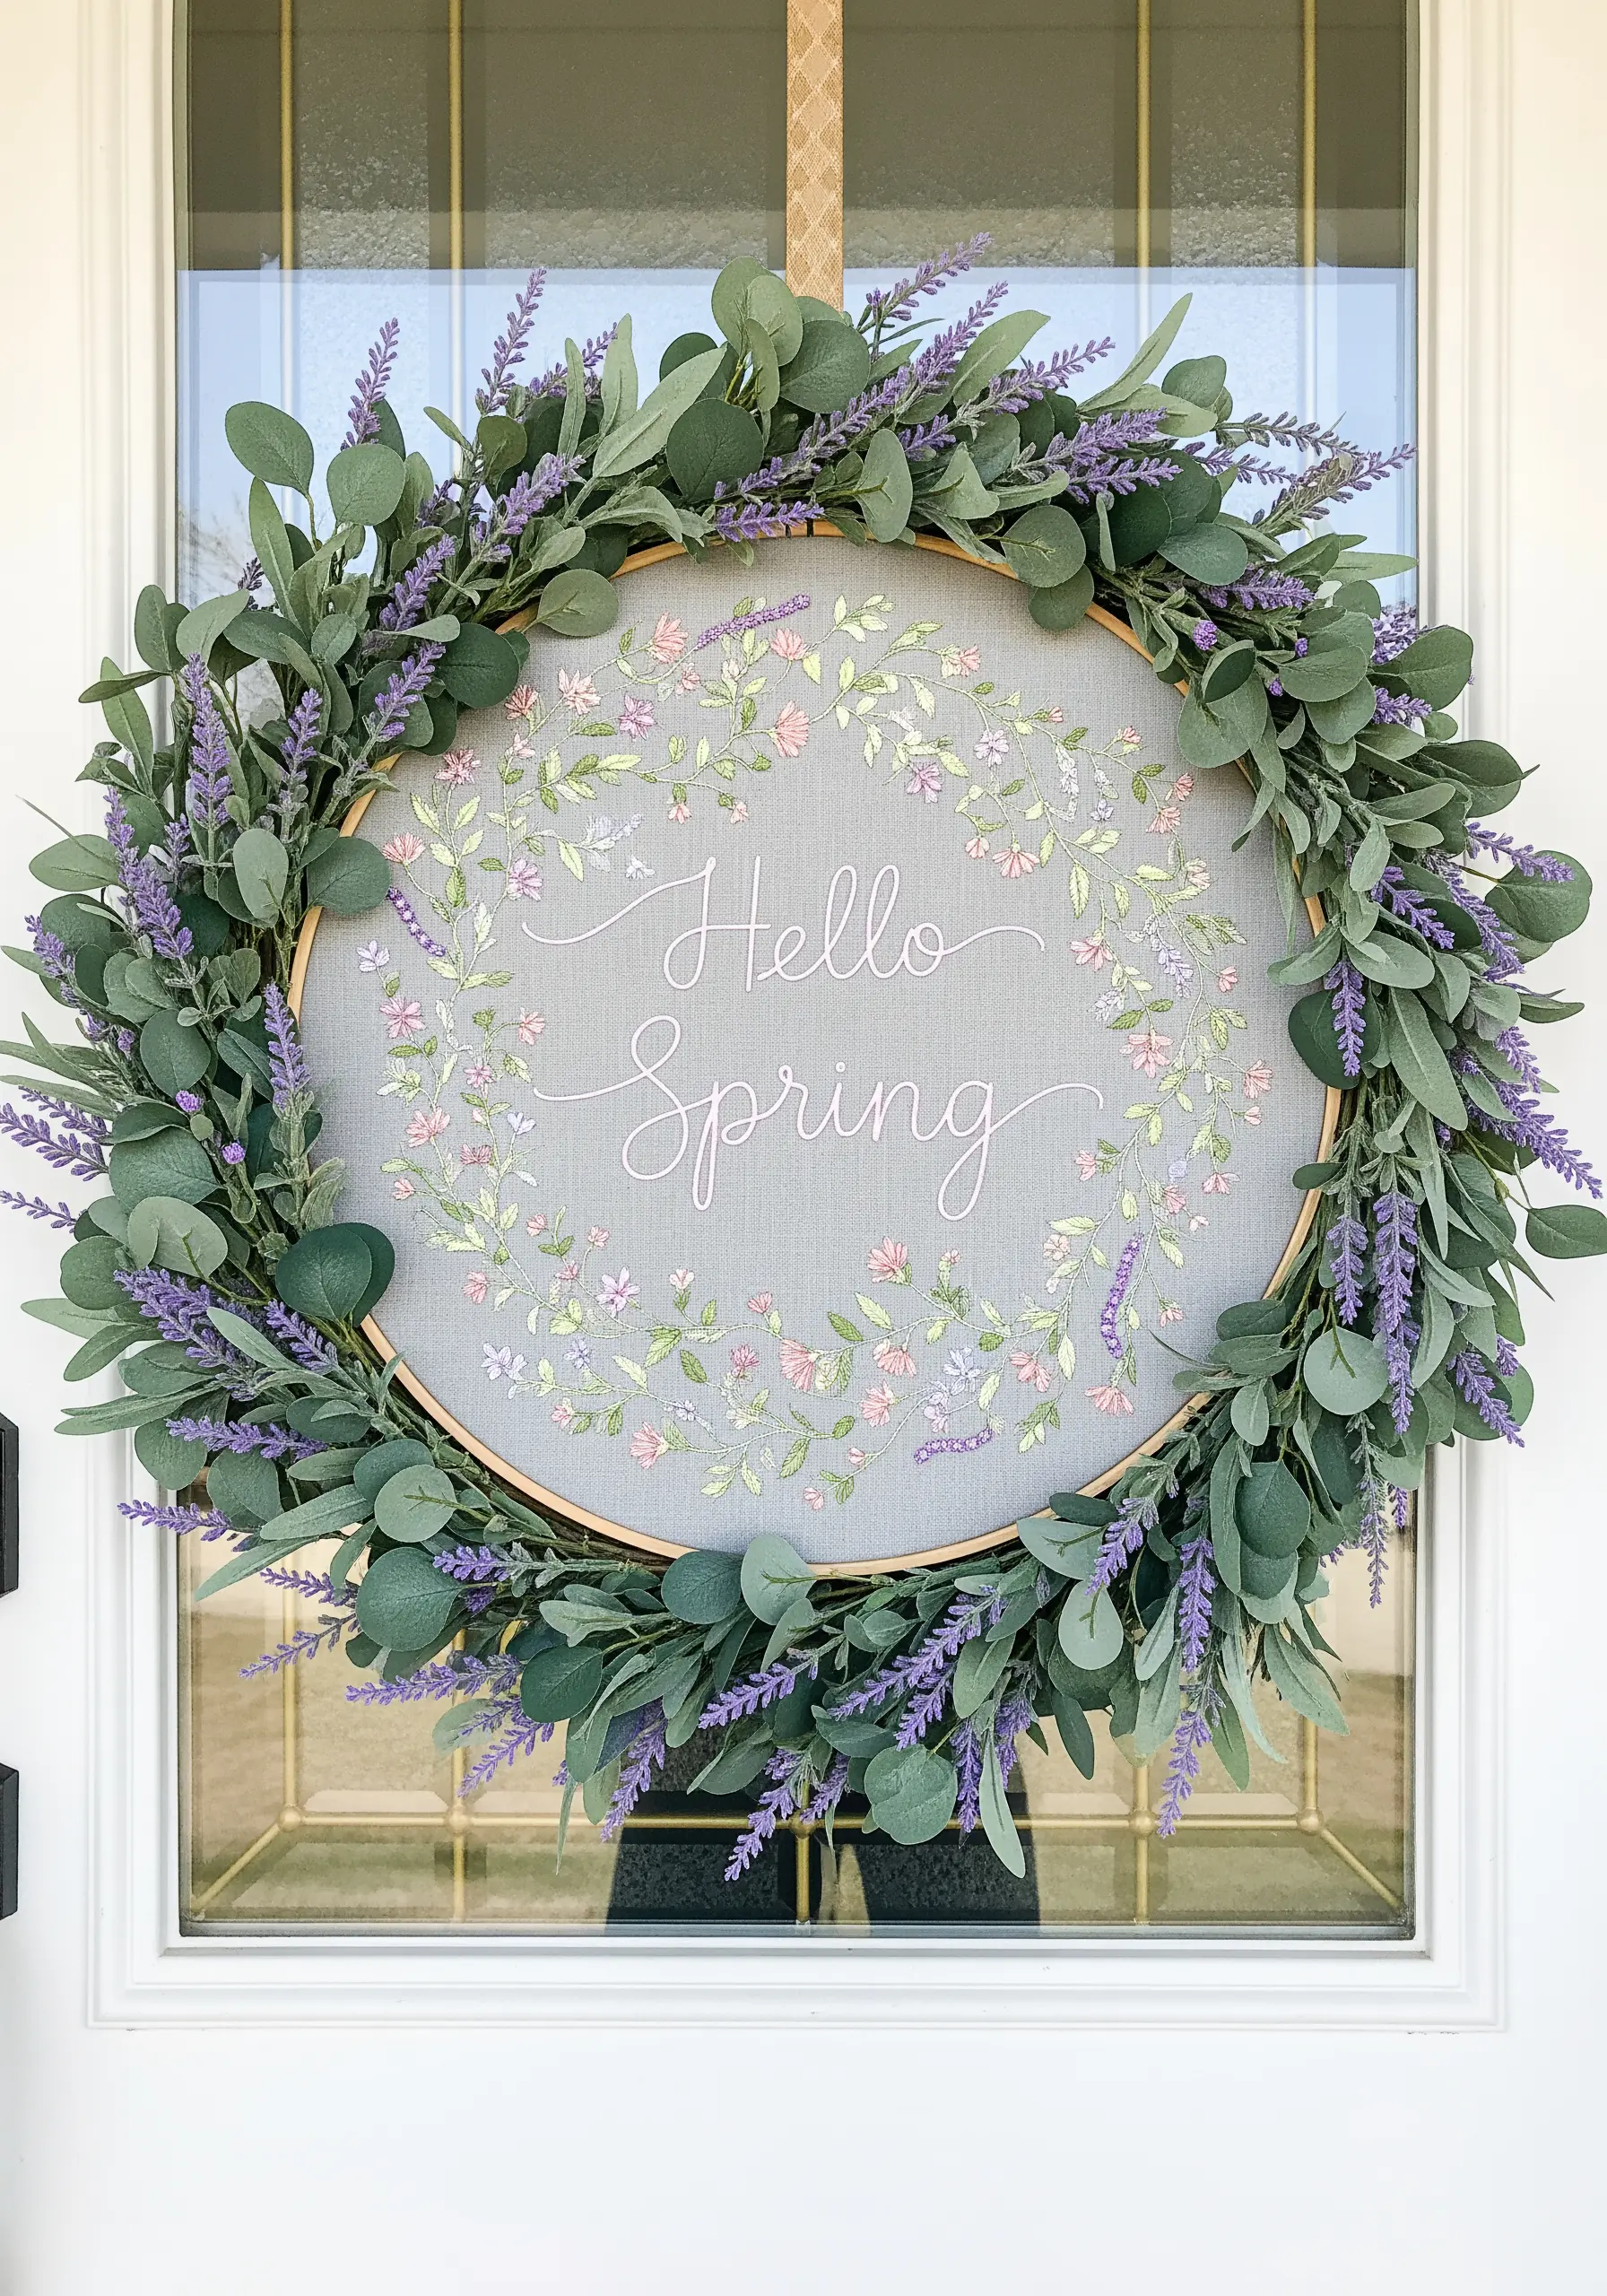
4. Stitch a Charming Welcome Wreath
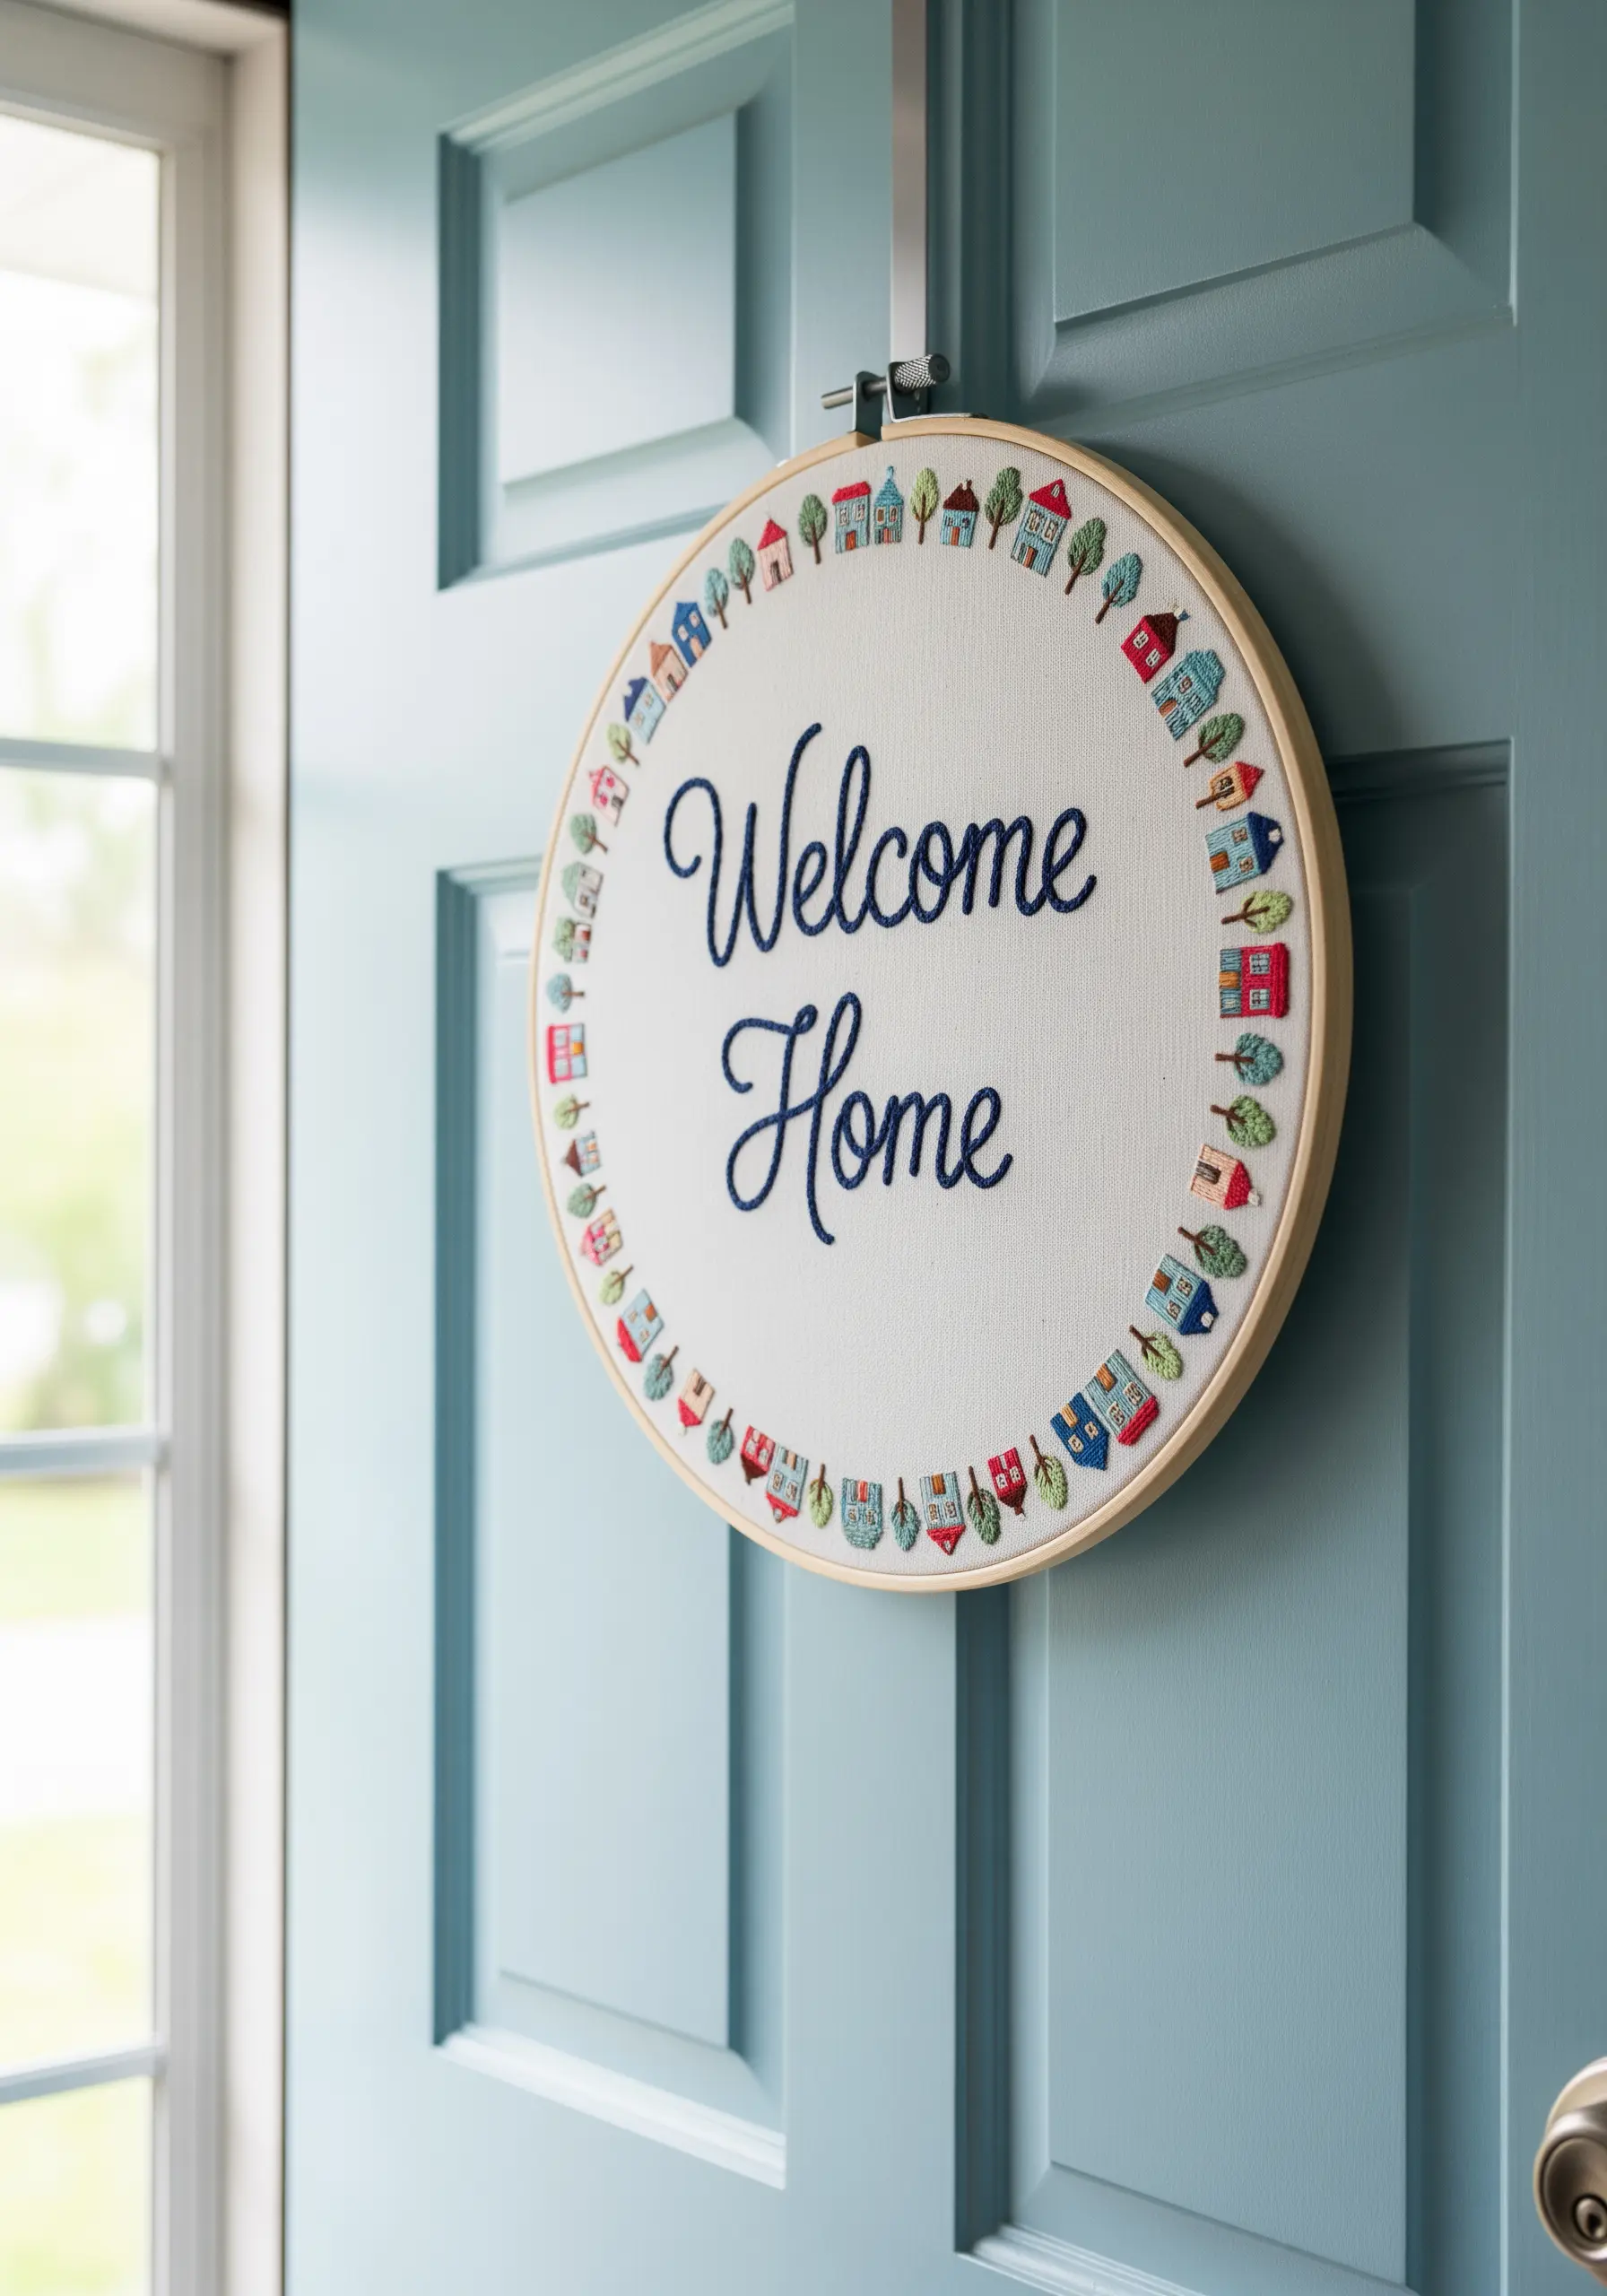
Transform a simple hoop into a welcoming sign for your front door or entryway.
For clean, elegant lettering, outline your text with a split stitch and then fill it with satin stitch, ensuring all stitches lie in the same direction.
The miniature house border requires precision; use a single strand of floss for details like windows and doors to keep them from looking bulky.
Plan your spacing carefully so the border feels balanced and doesn’t crowd the central message.
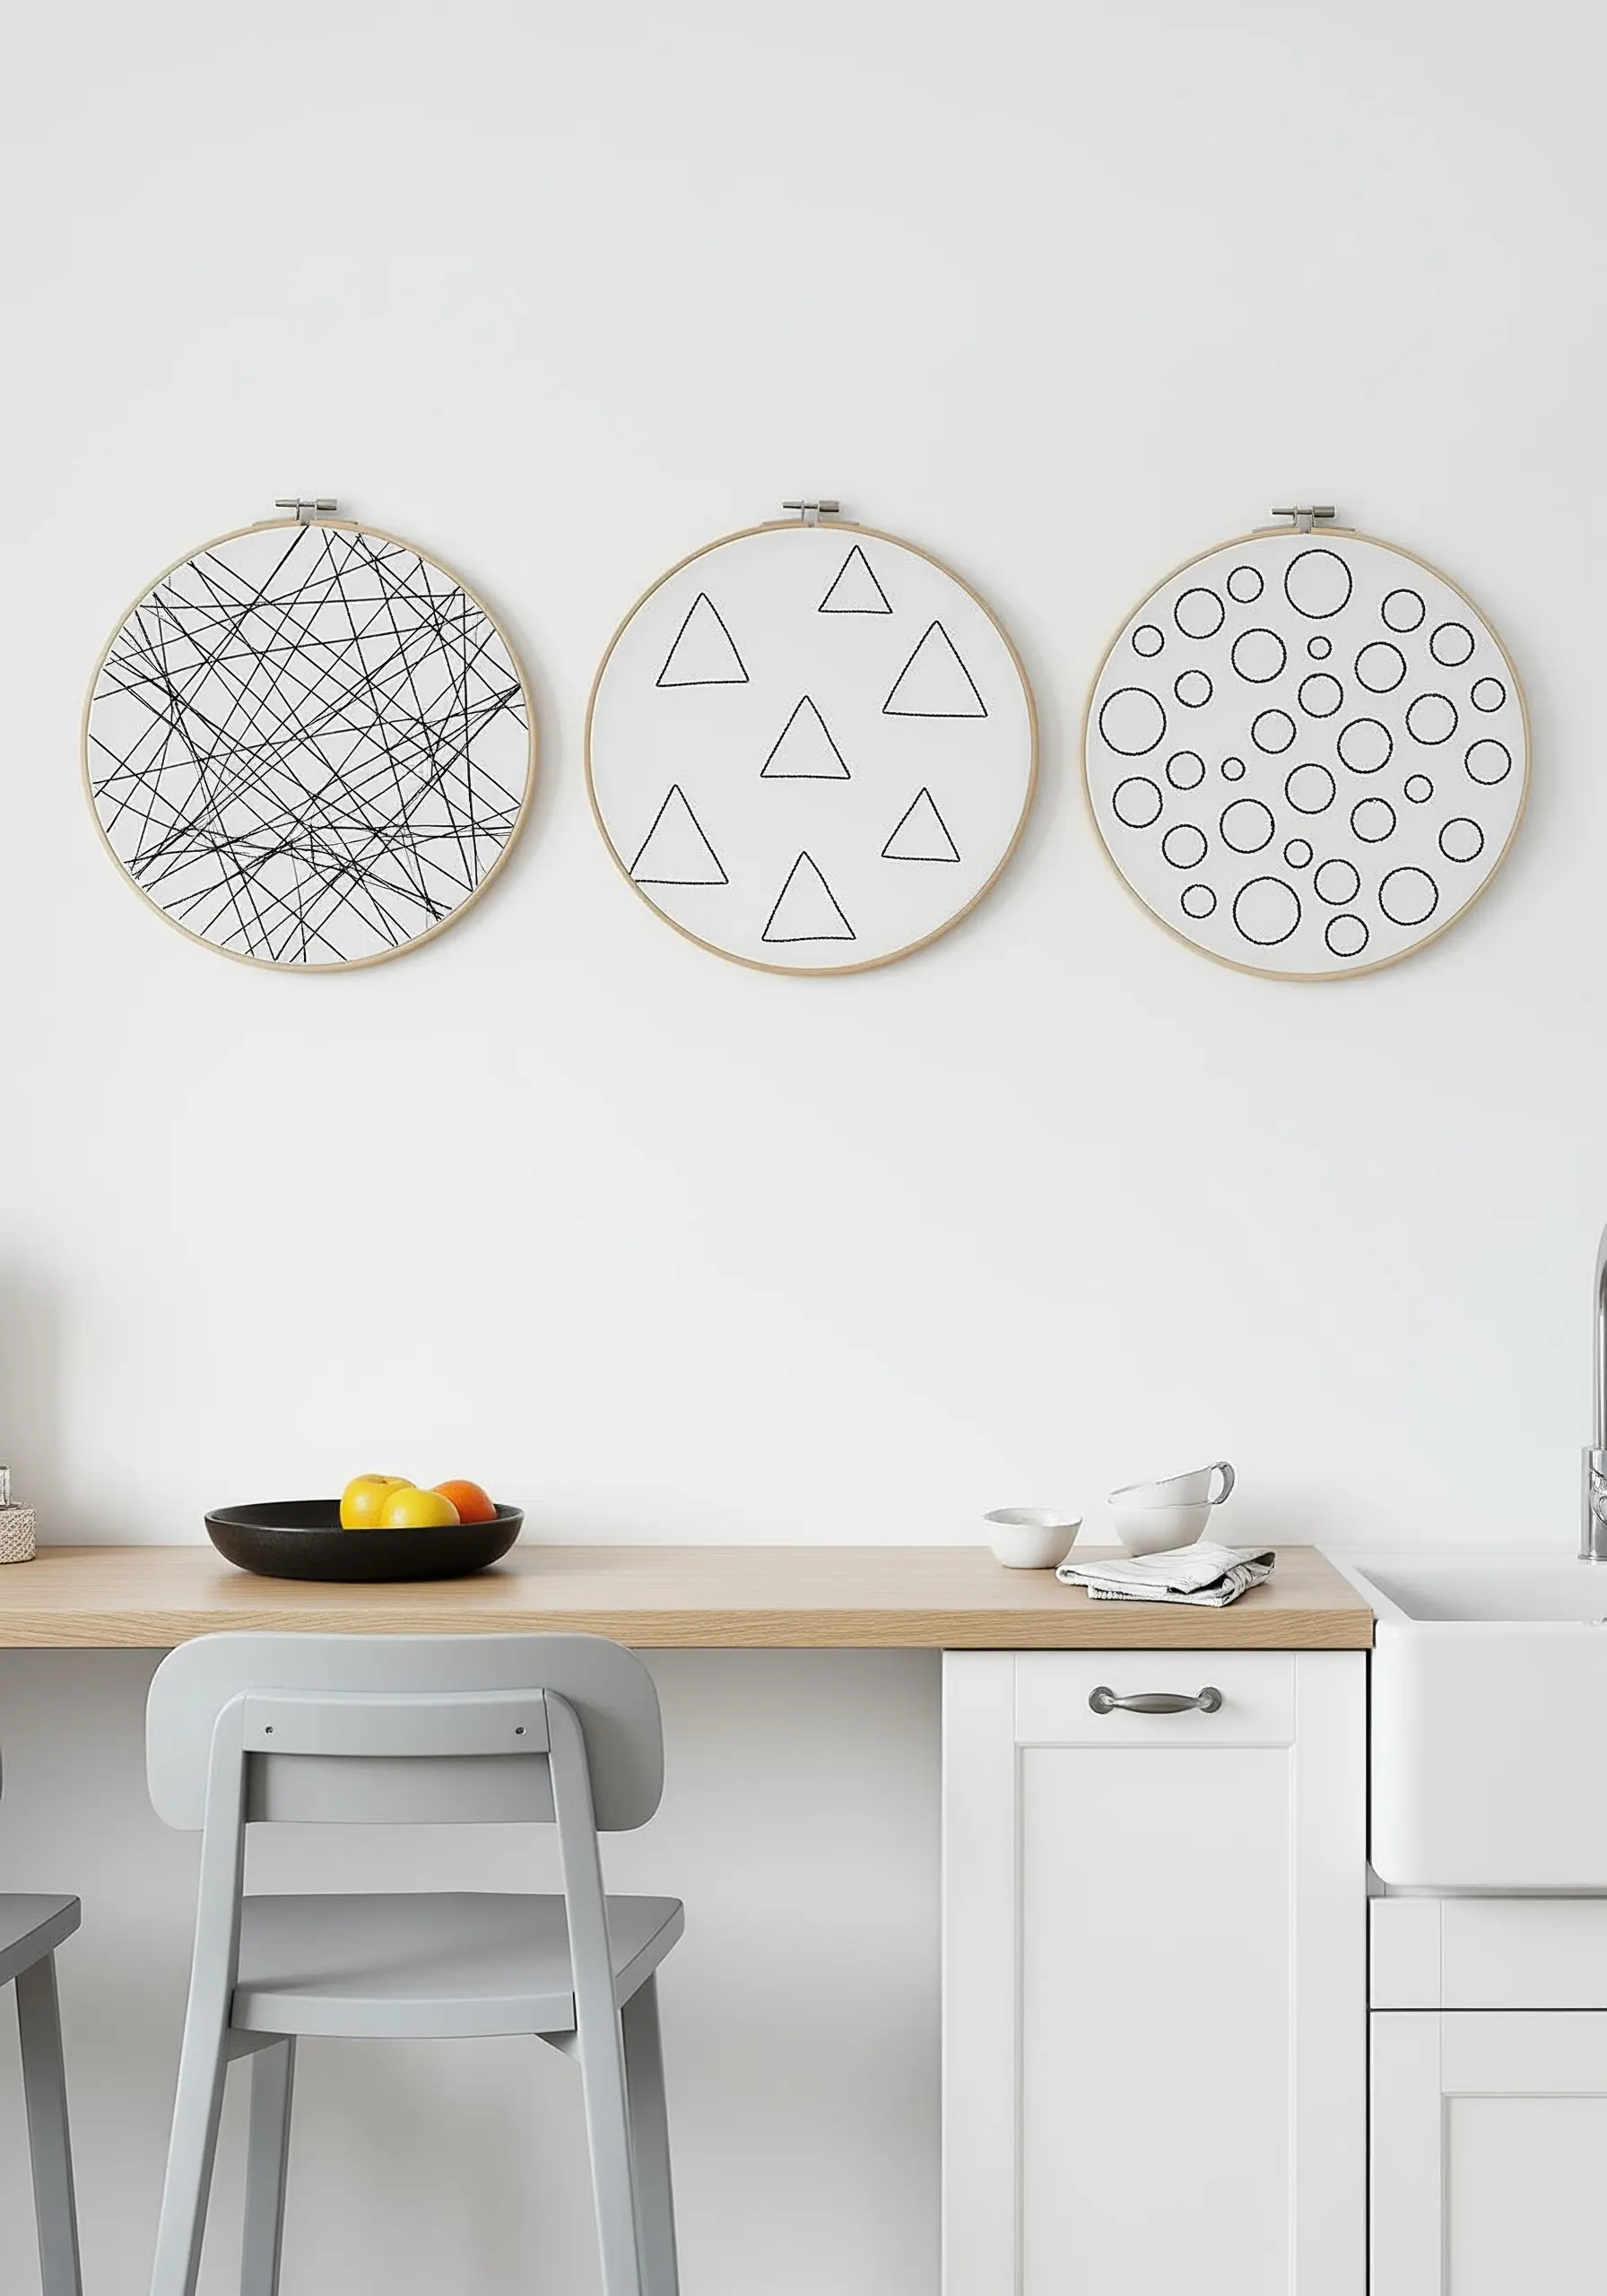
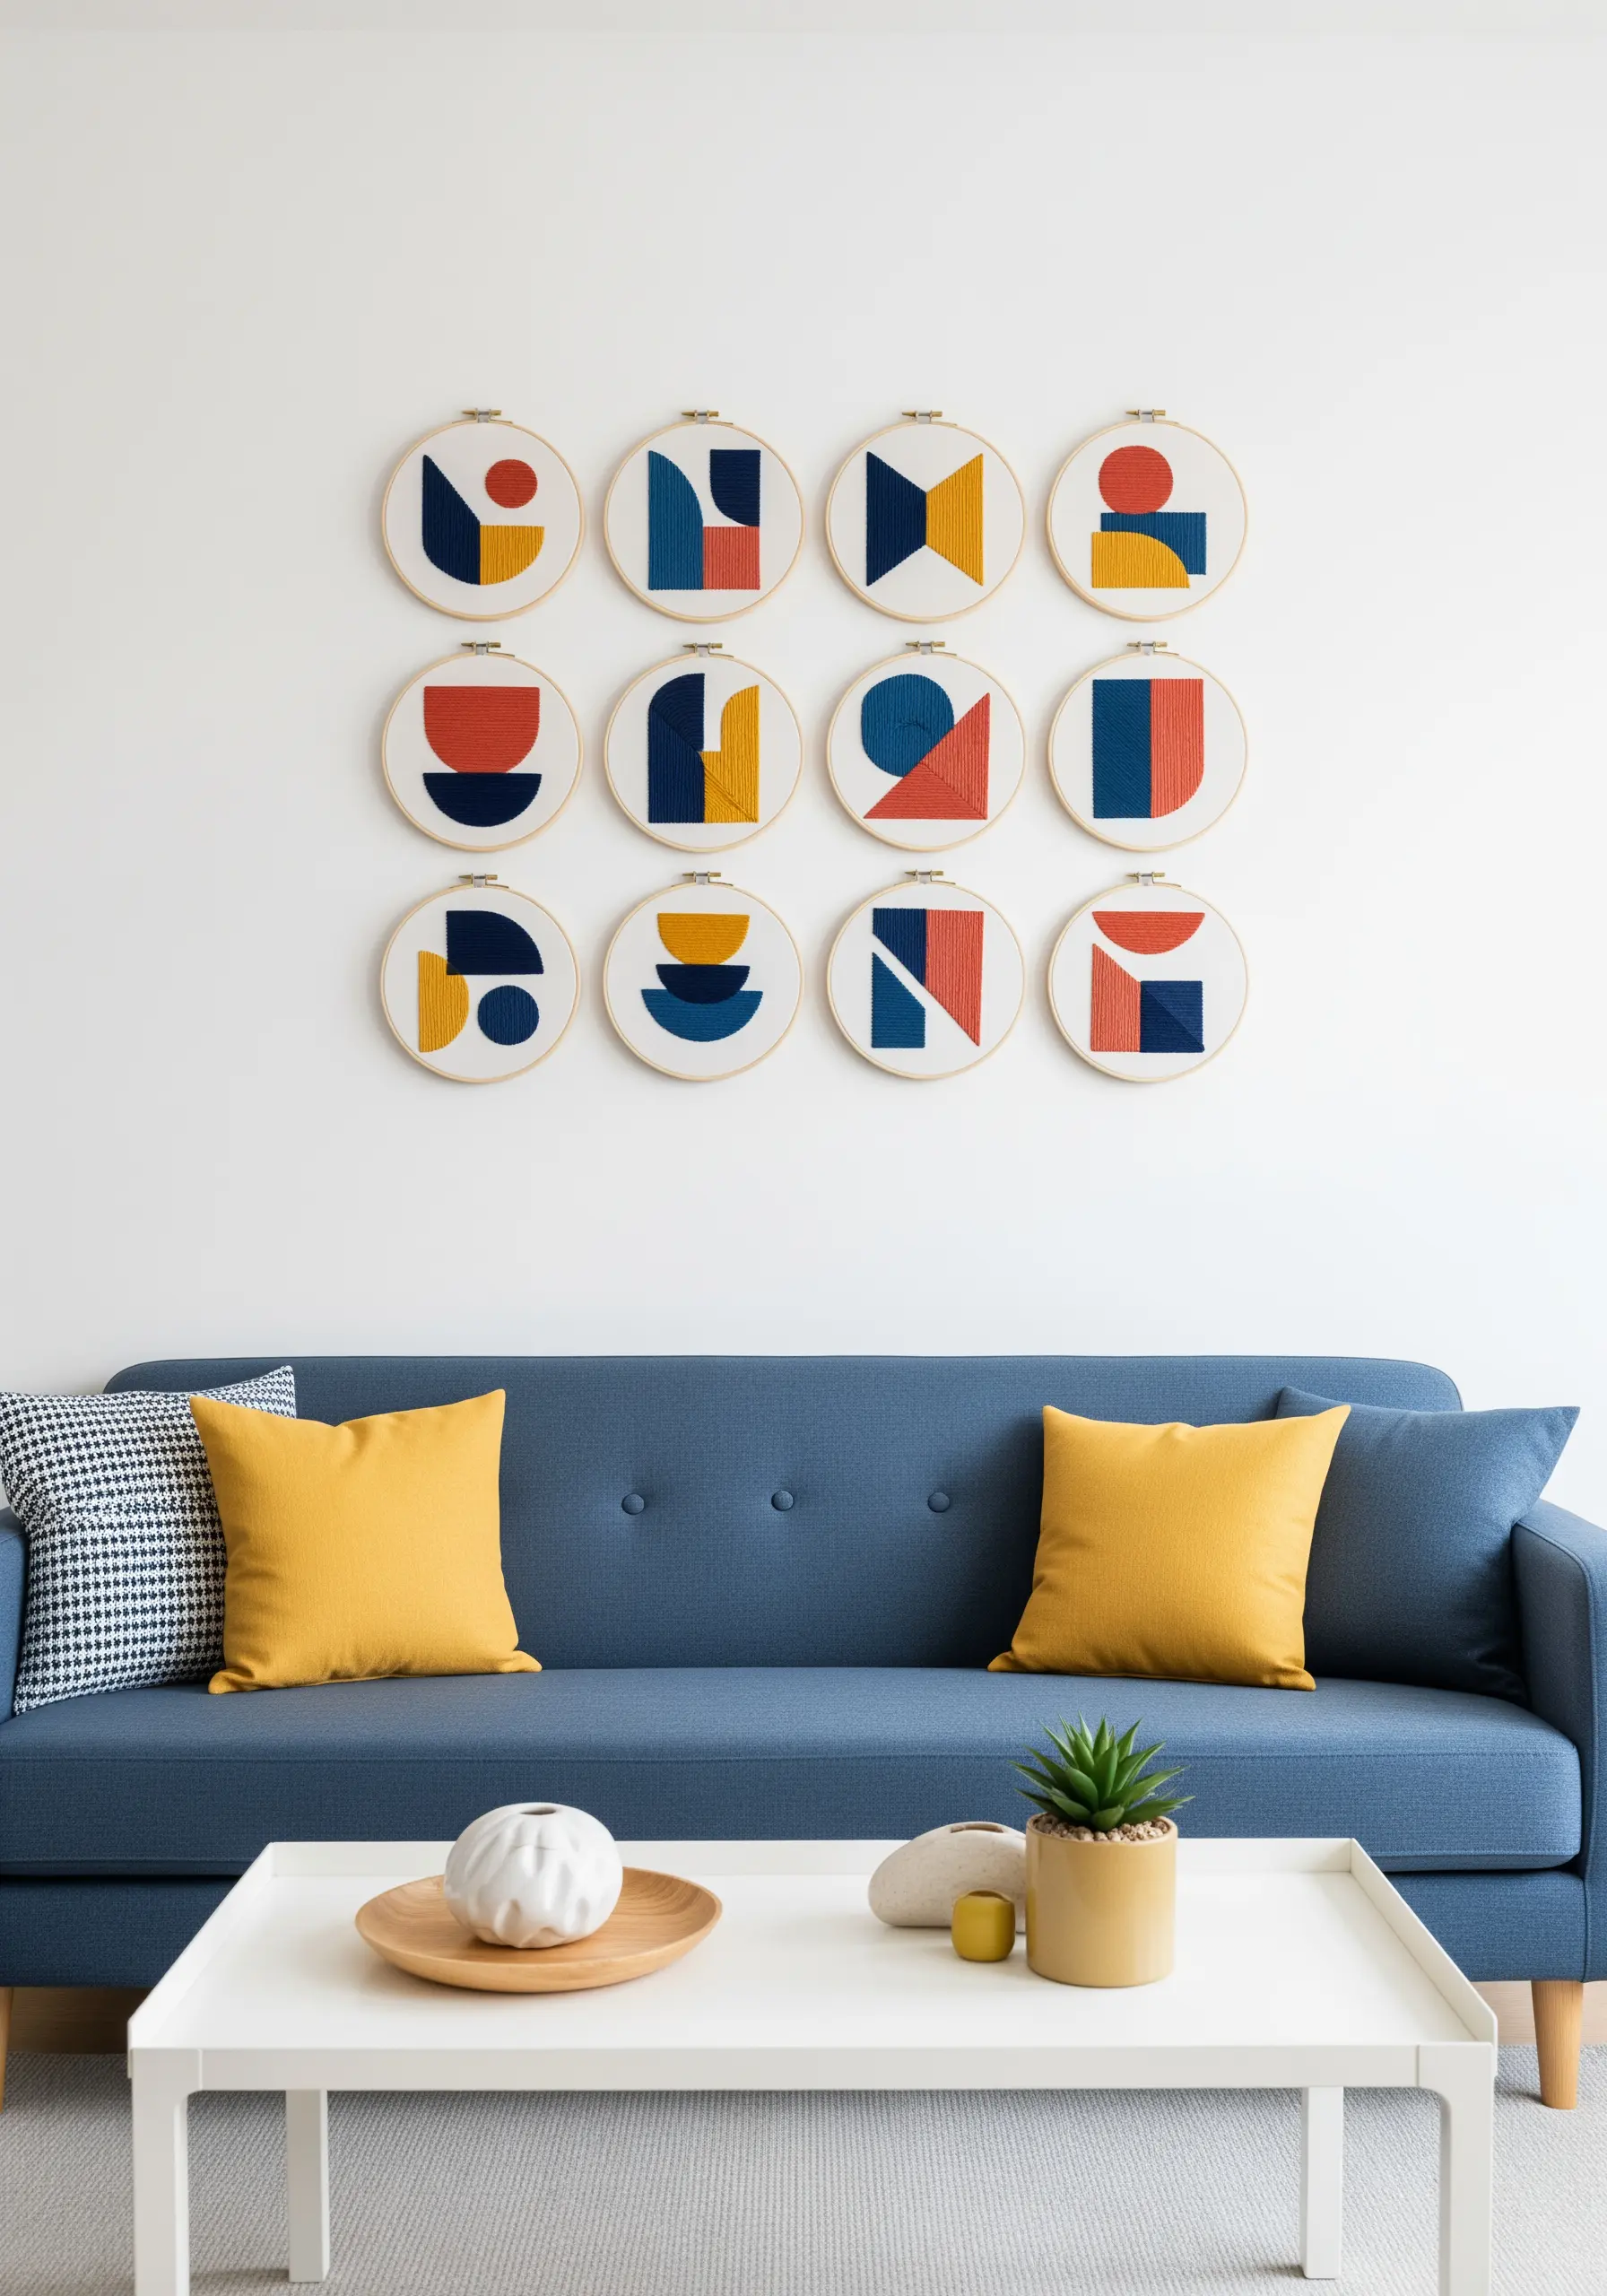
5. Build an Abstract Color-Block Collection
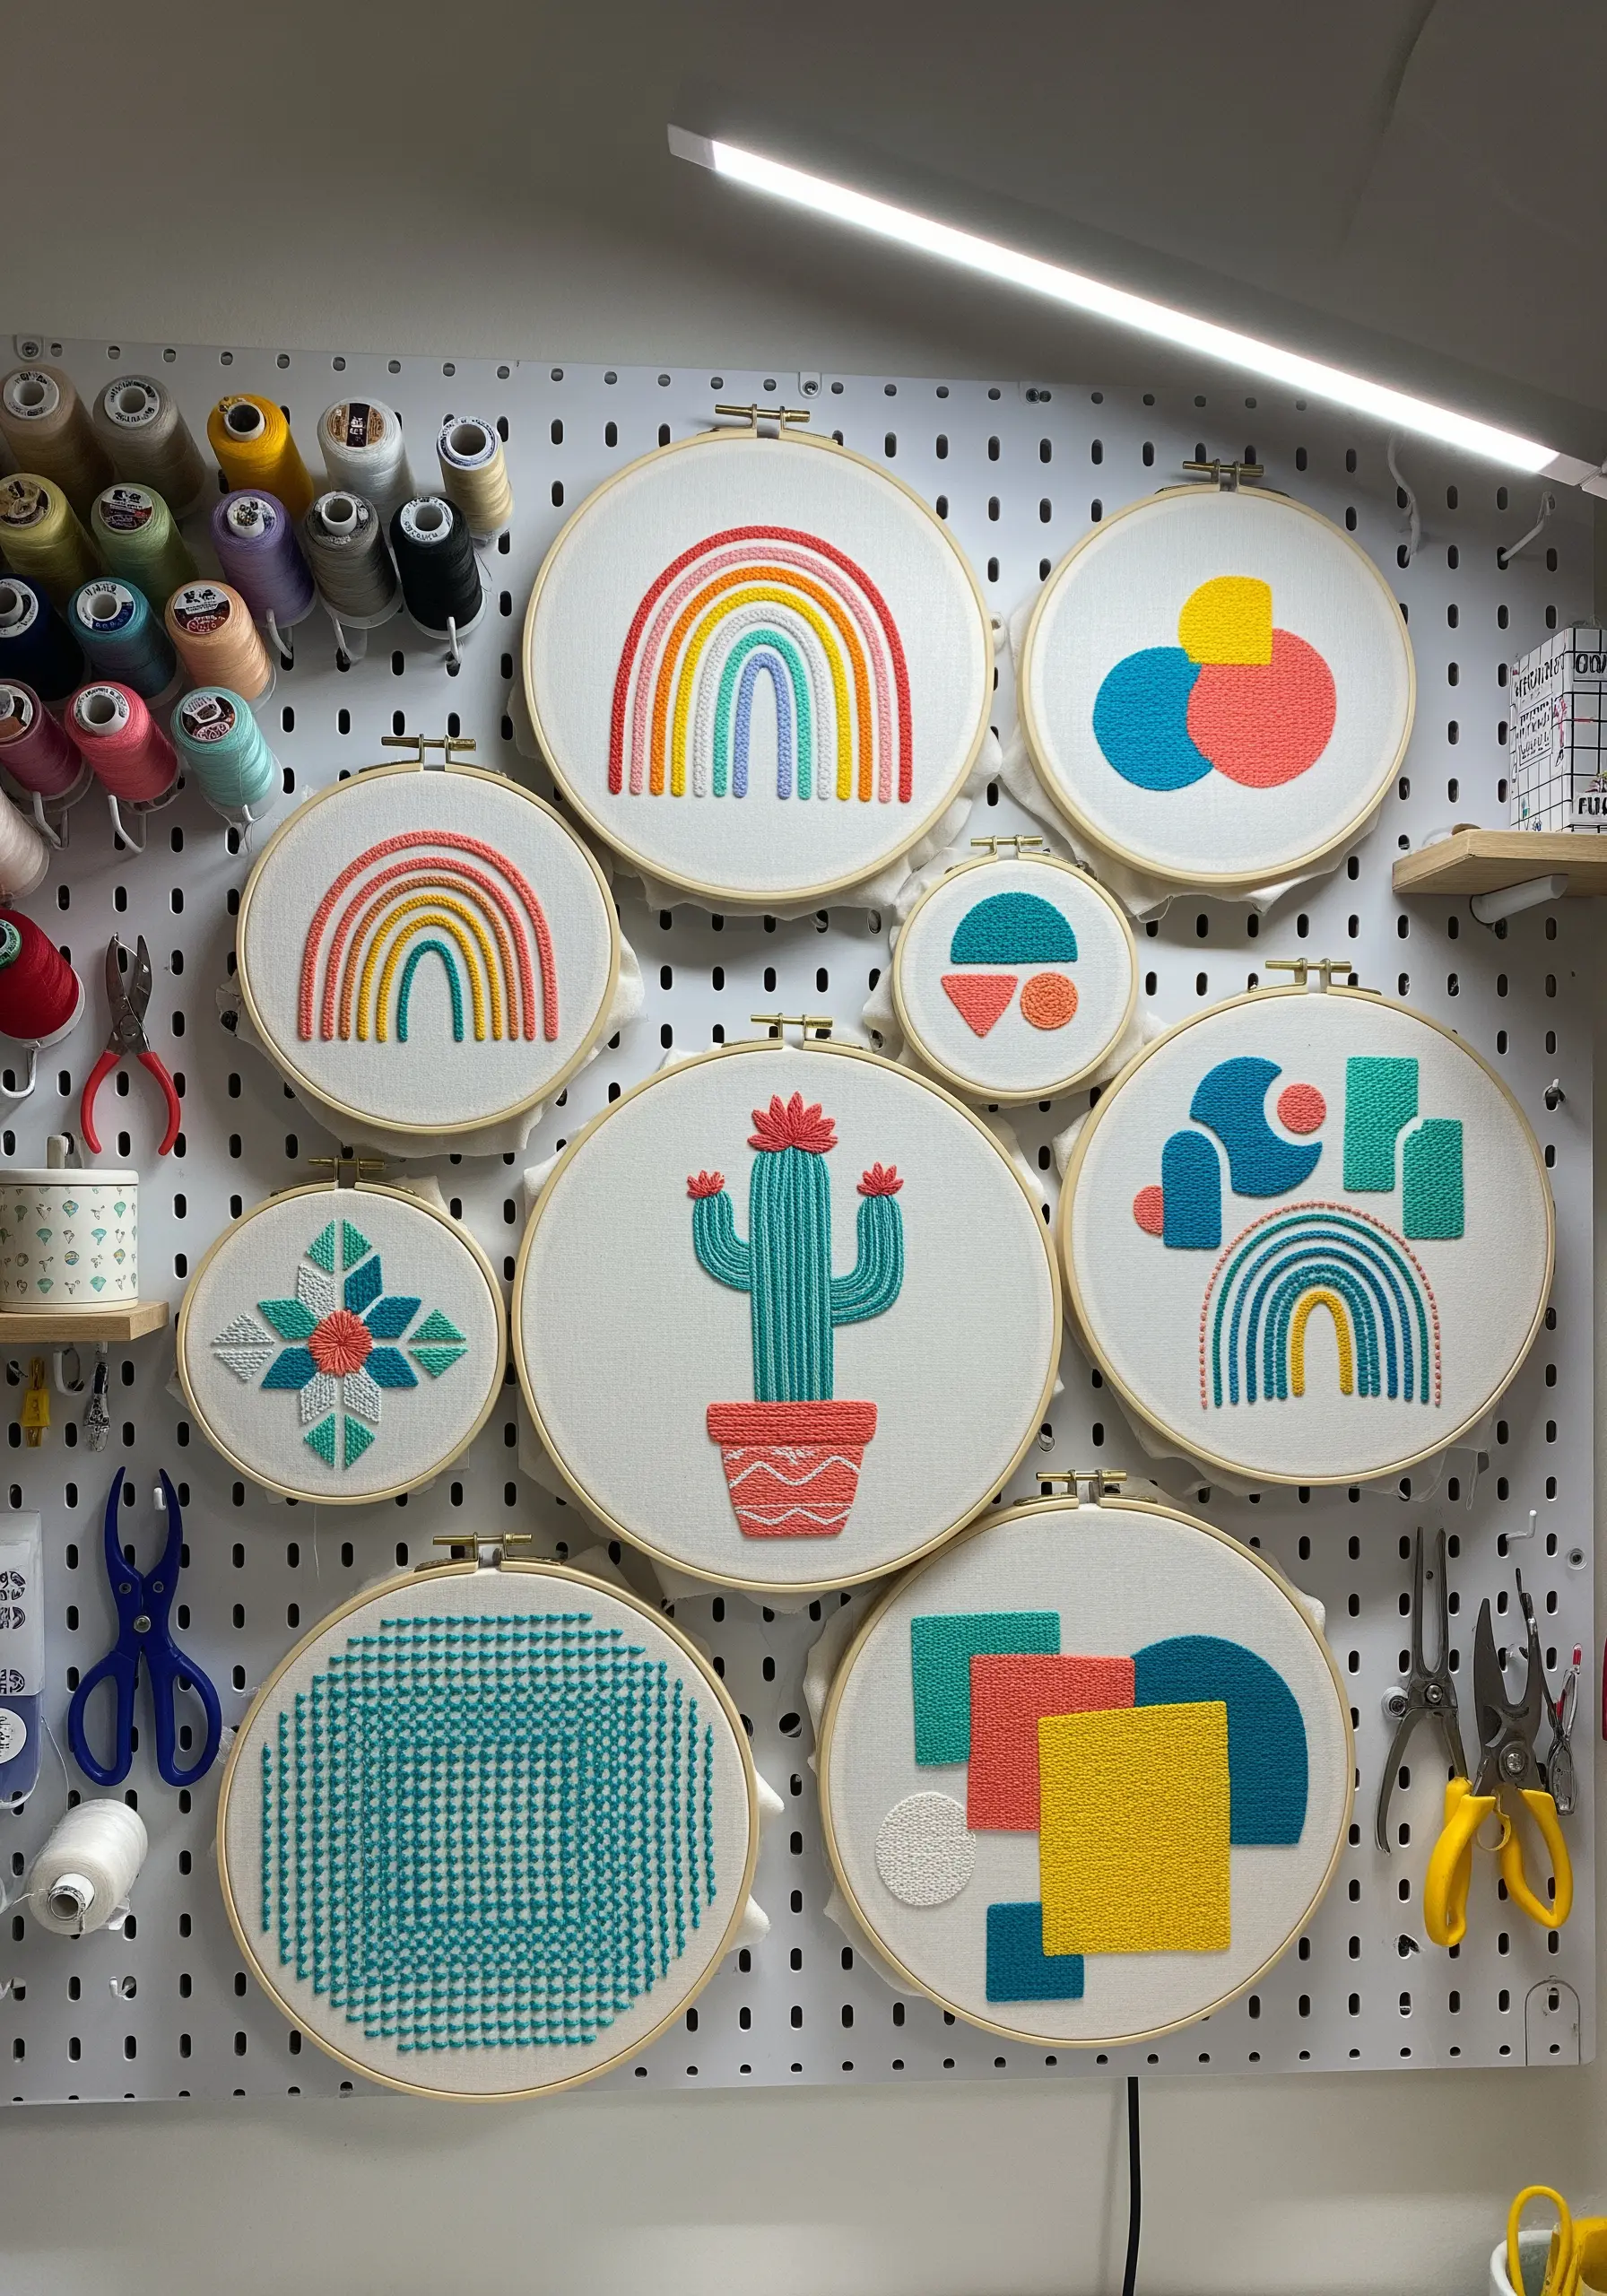
Experiment with pure color and shape by creating a gallery of abstract designs.
To achieve perfectly sharp edges on your geometric shapes, first outline the area with a split stitch before filling it with a dense, smooth satin stitch.
This tiny border acts as a ‘wall,’ preventing the fill stitches from shifting and creating a much cleaner finish.
Unify the collection by sticking to a limited, high-contrast color palette—like teal, coral, and mustard—which makes even disparate patterns feel connected.
These modern geometric thread art ideas are perfect for a creative studio or office wall.
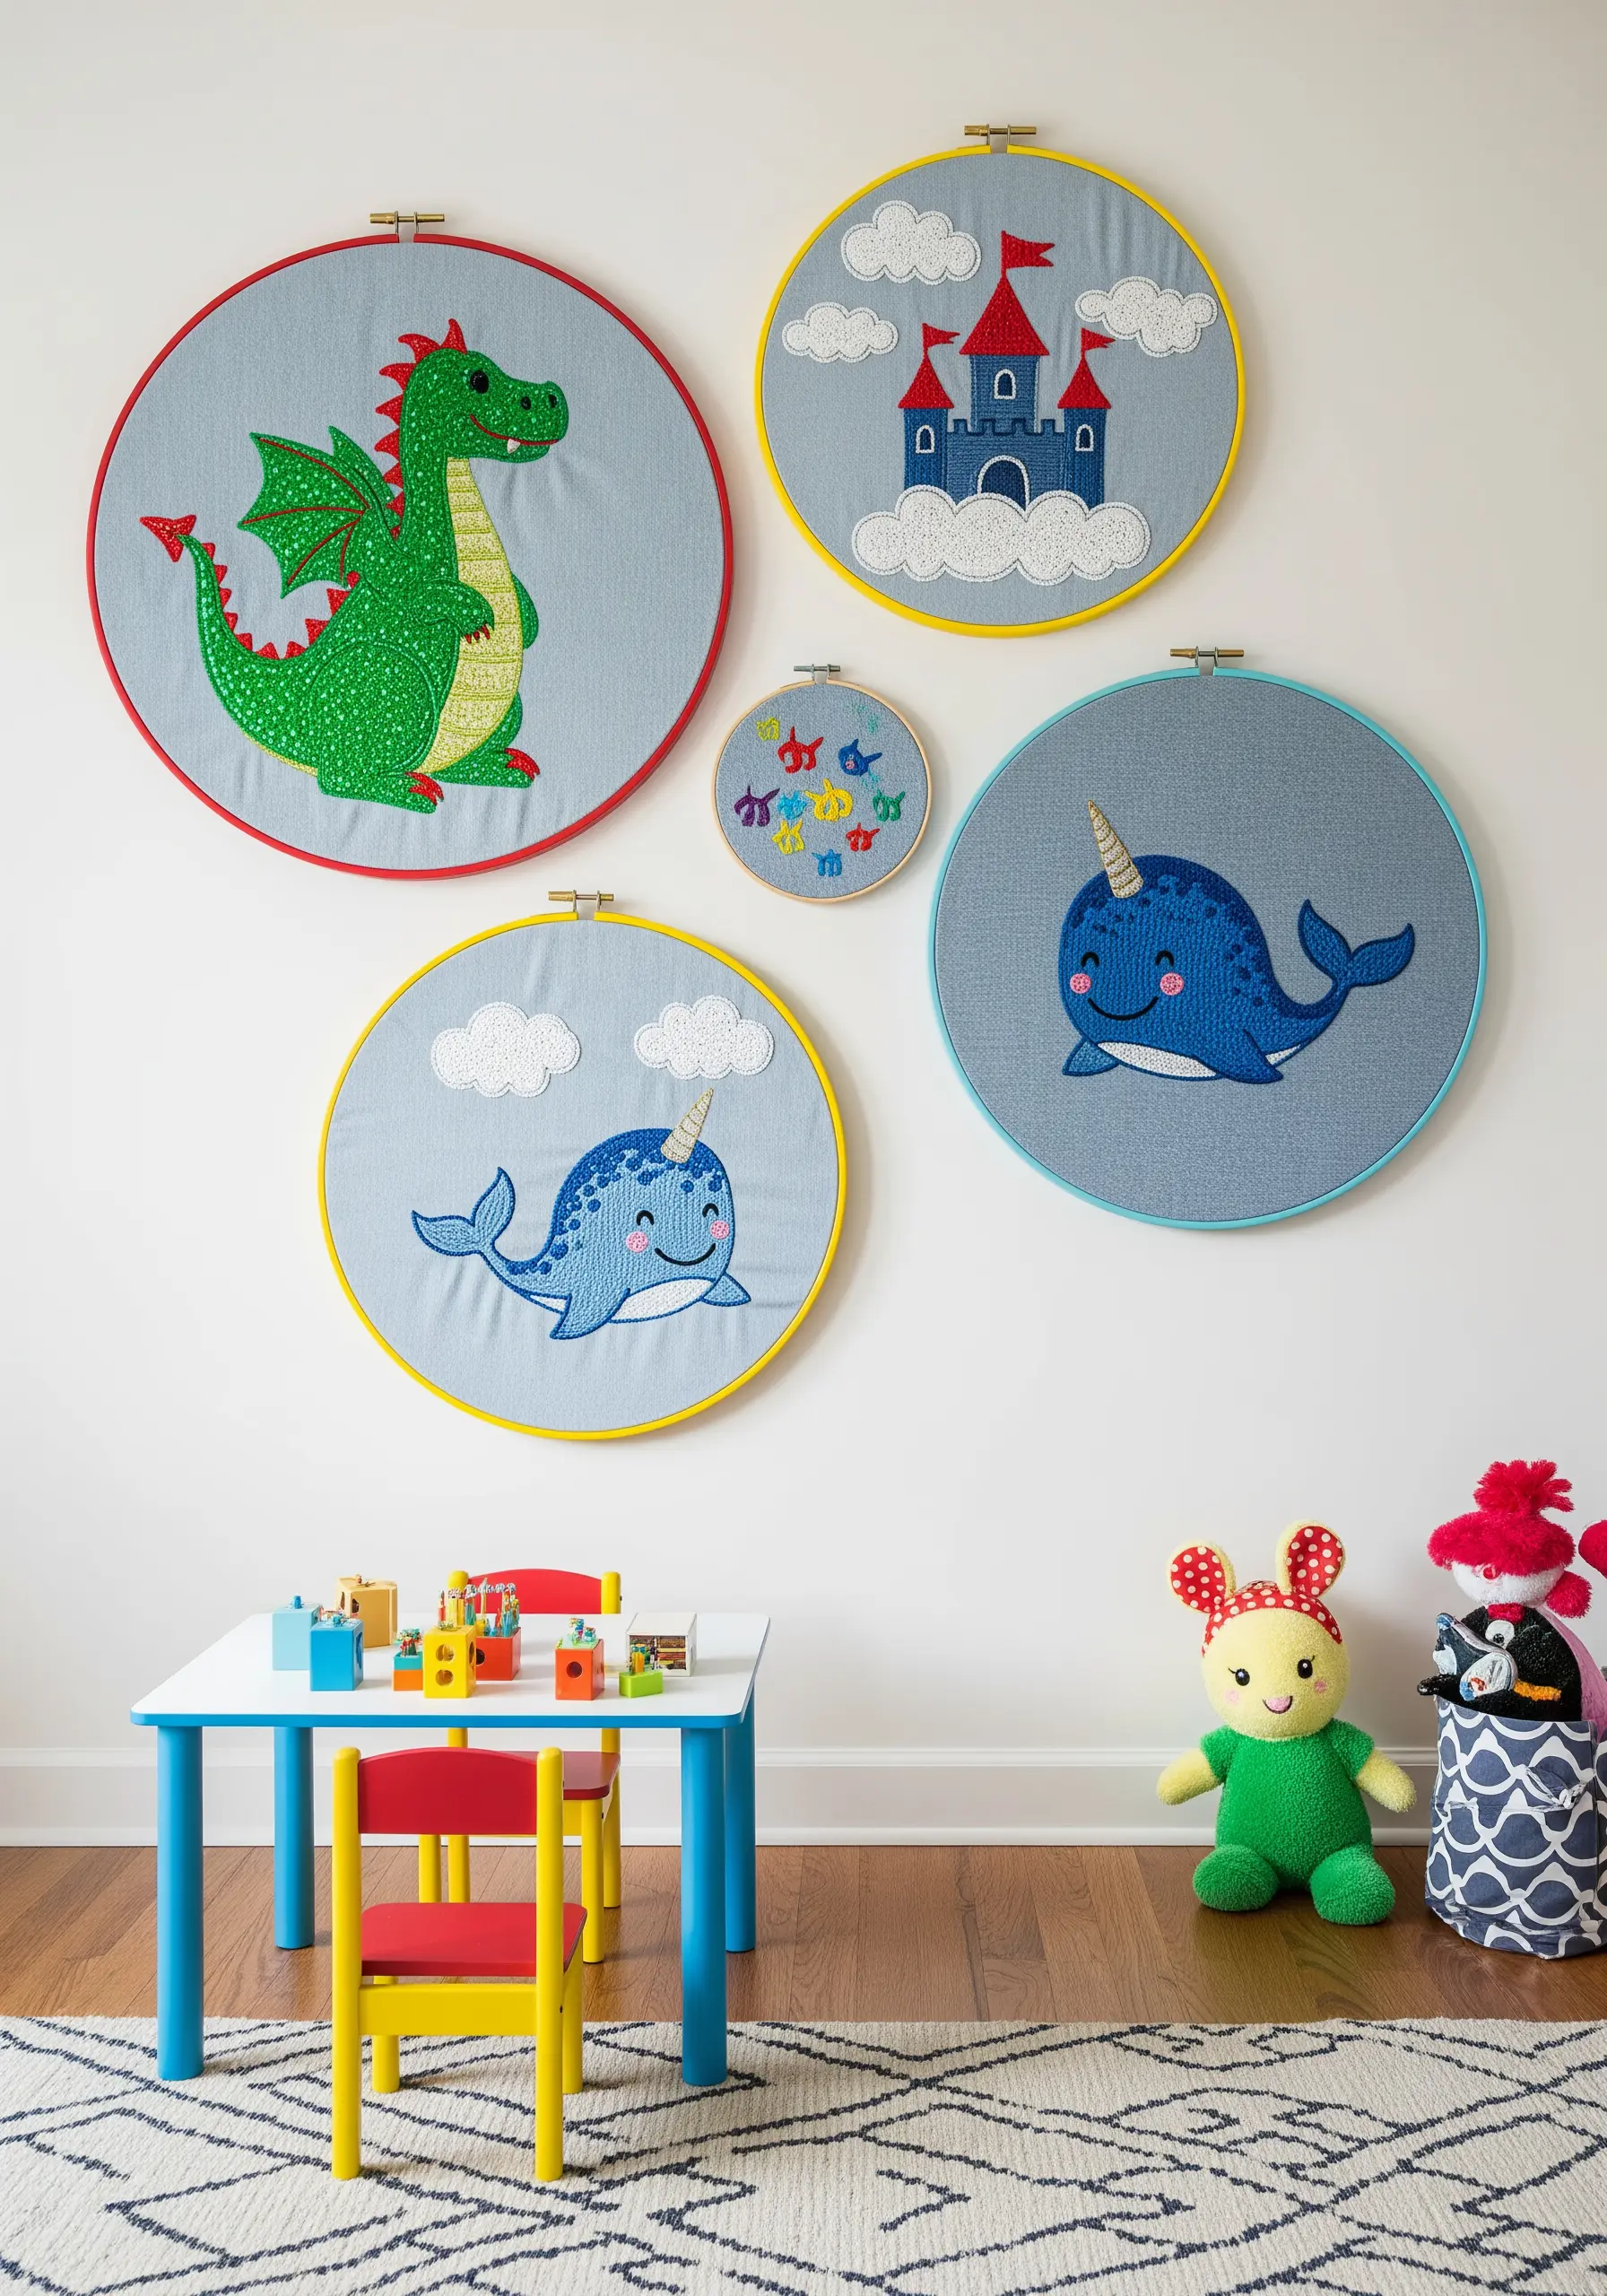
6. Add Soft Textures to Nursery Decor
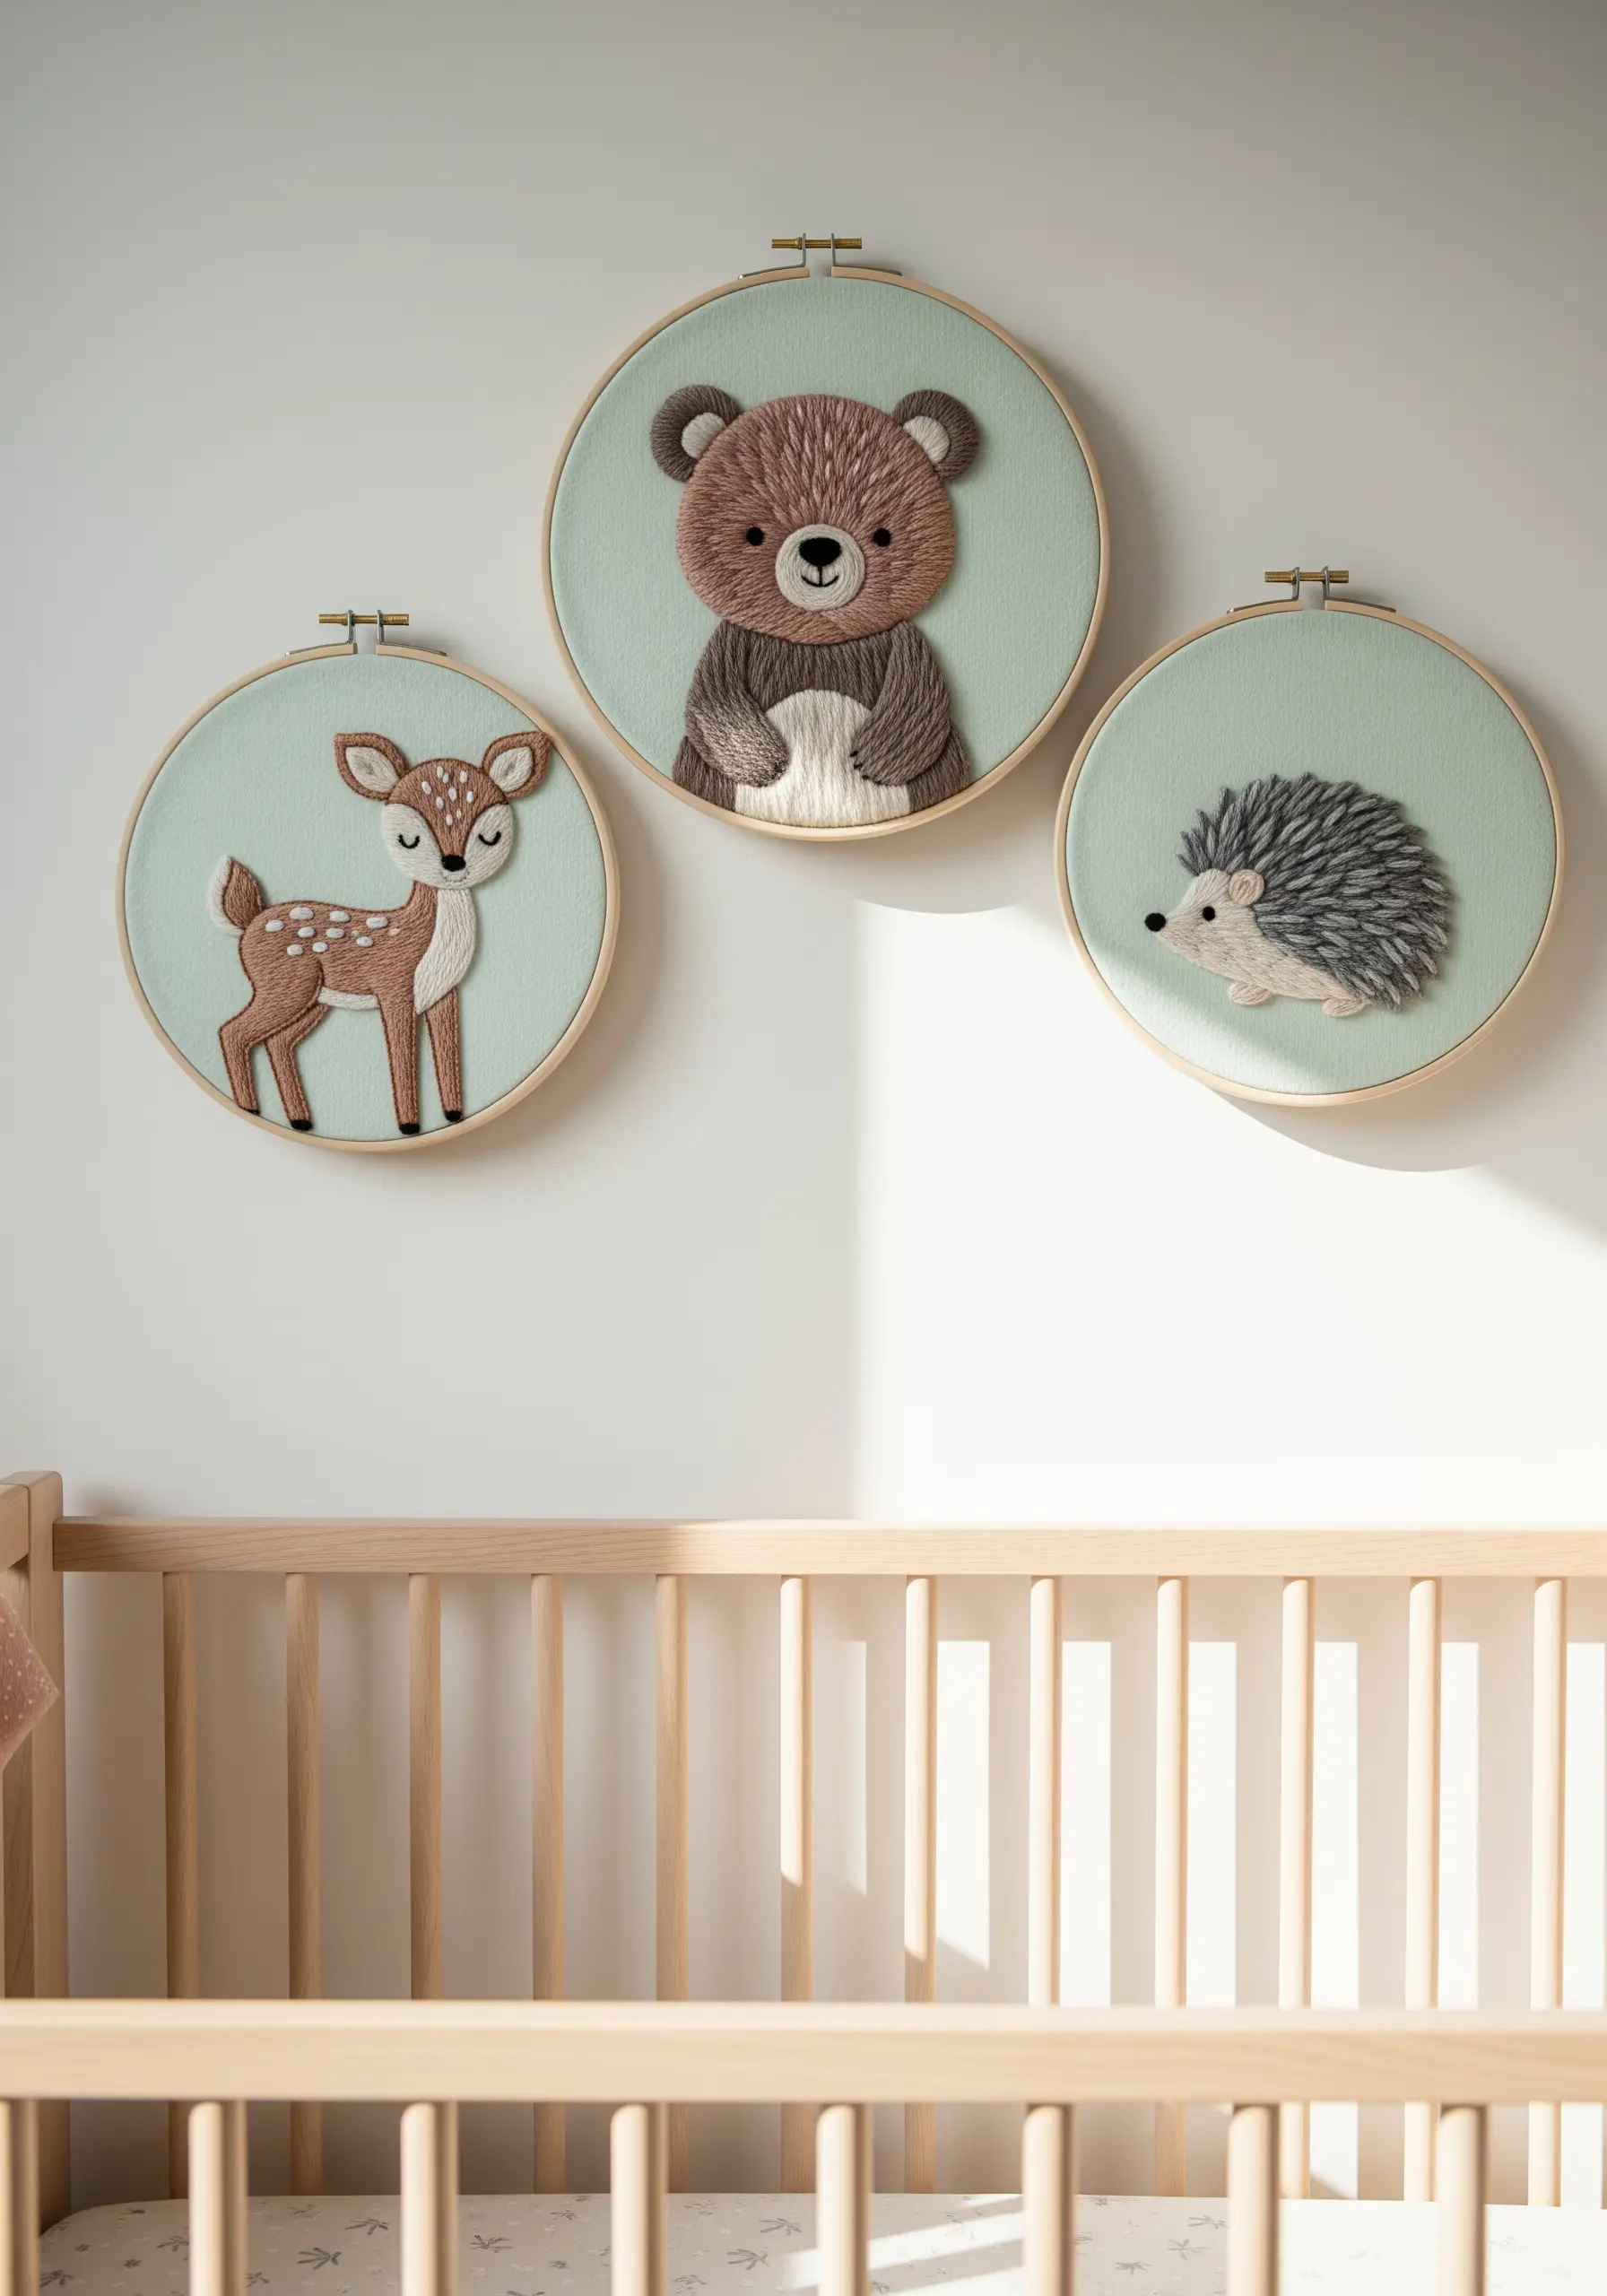
For children’s decor, incorporating touchable textures adds a delightful sensory element.
Create the hedgehog’s fluffy spines with the turkey stitch—make loops of thread and then snip them for a soft, brush-like effect.
For the bear’s fuzzy belly, try couching thick yarn or wool roving onto the fabric for a raised, 3D finish.
Using a soft, muted fabric like a mint green or dusty blue provides a calming backdrop that makes the animal figures stand out gently.
These adorable forest animal embroidery ideas are perfect for a serene and playful nursery.
7. Achieve Botanical Realism with High Contrast
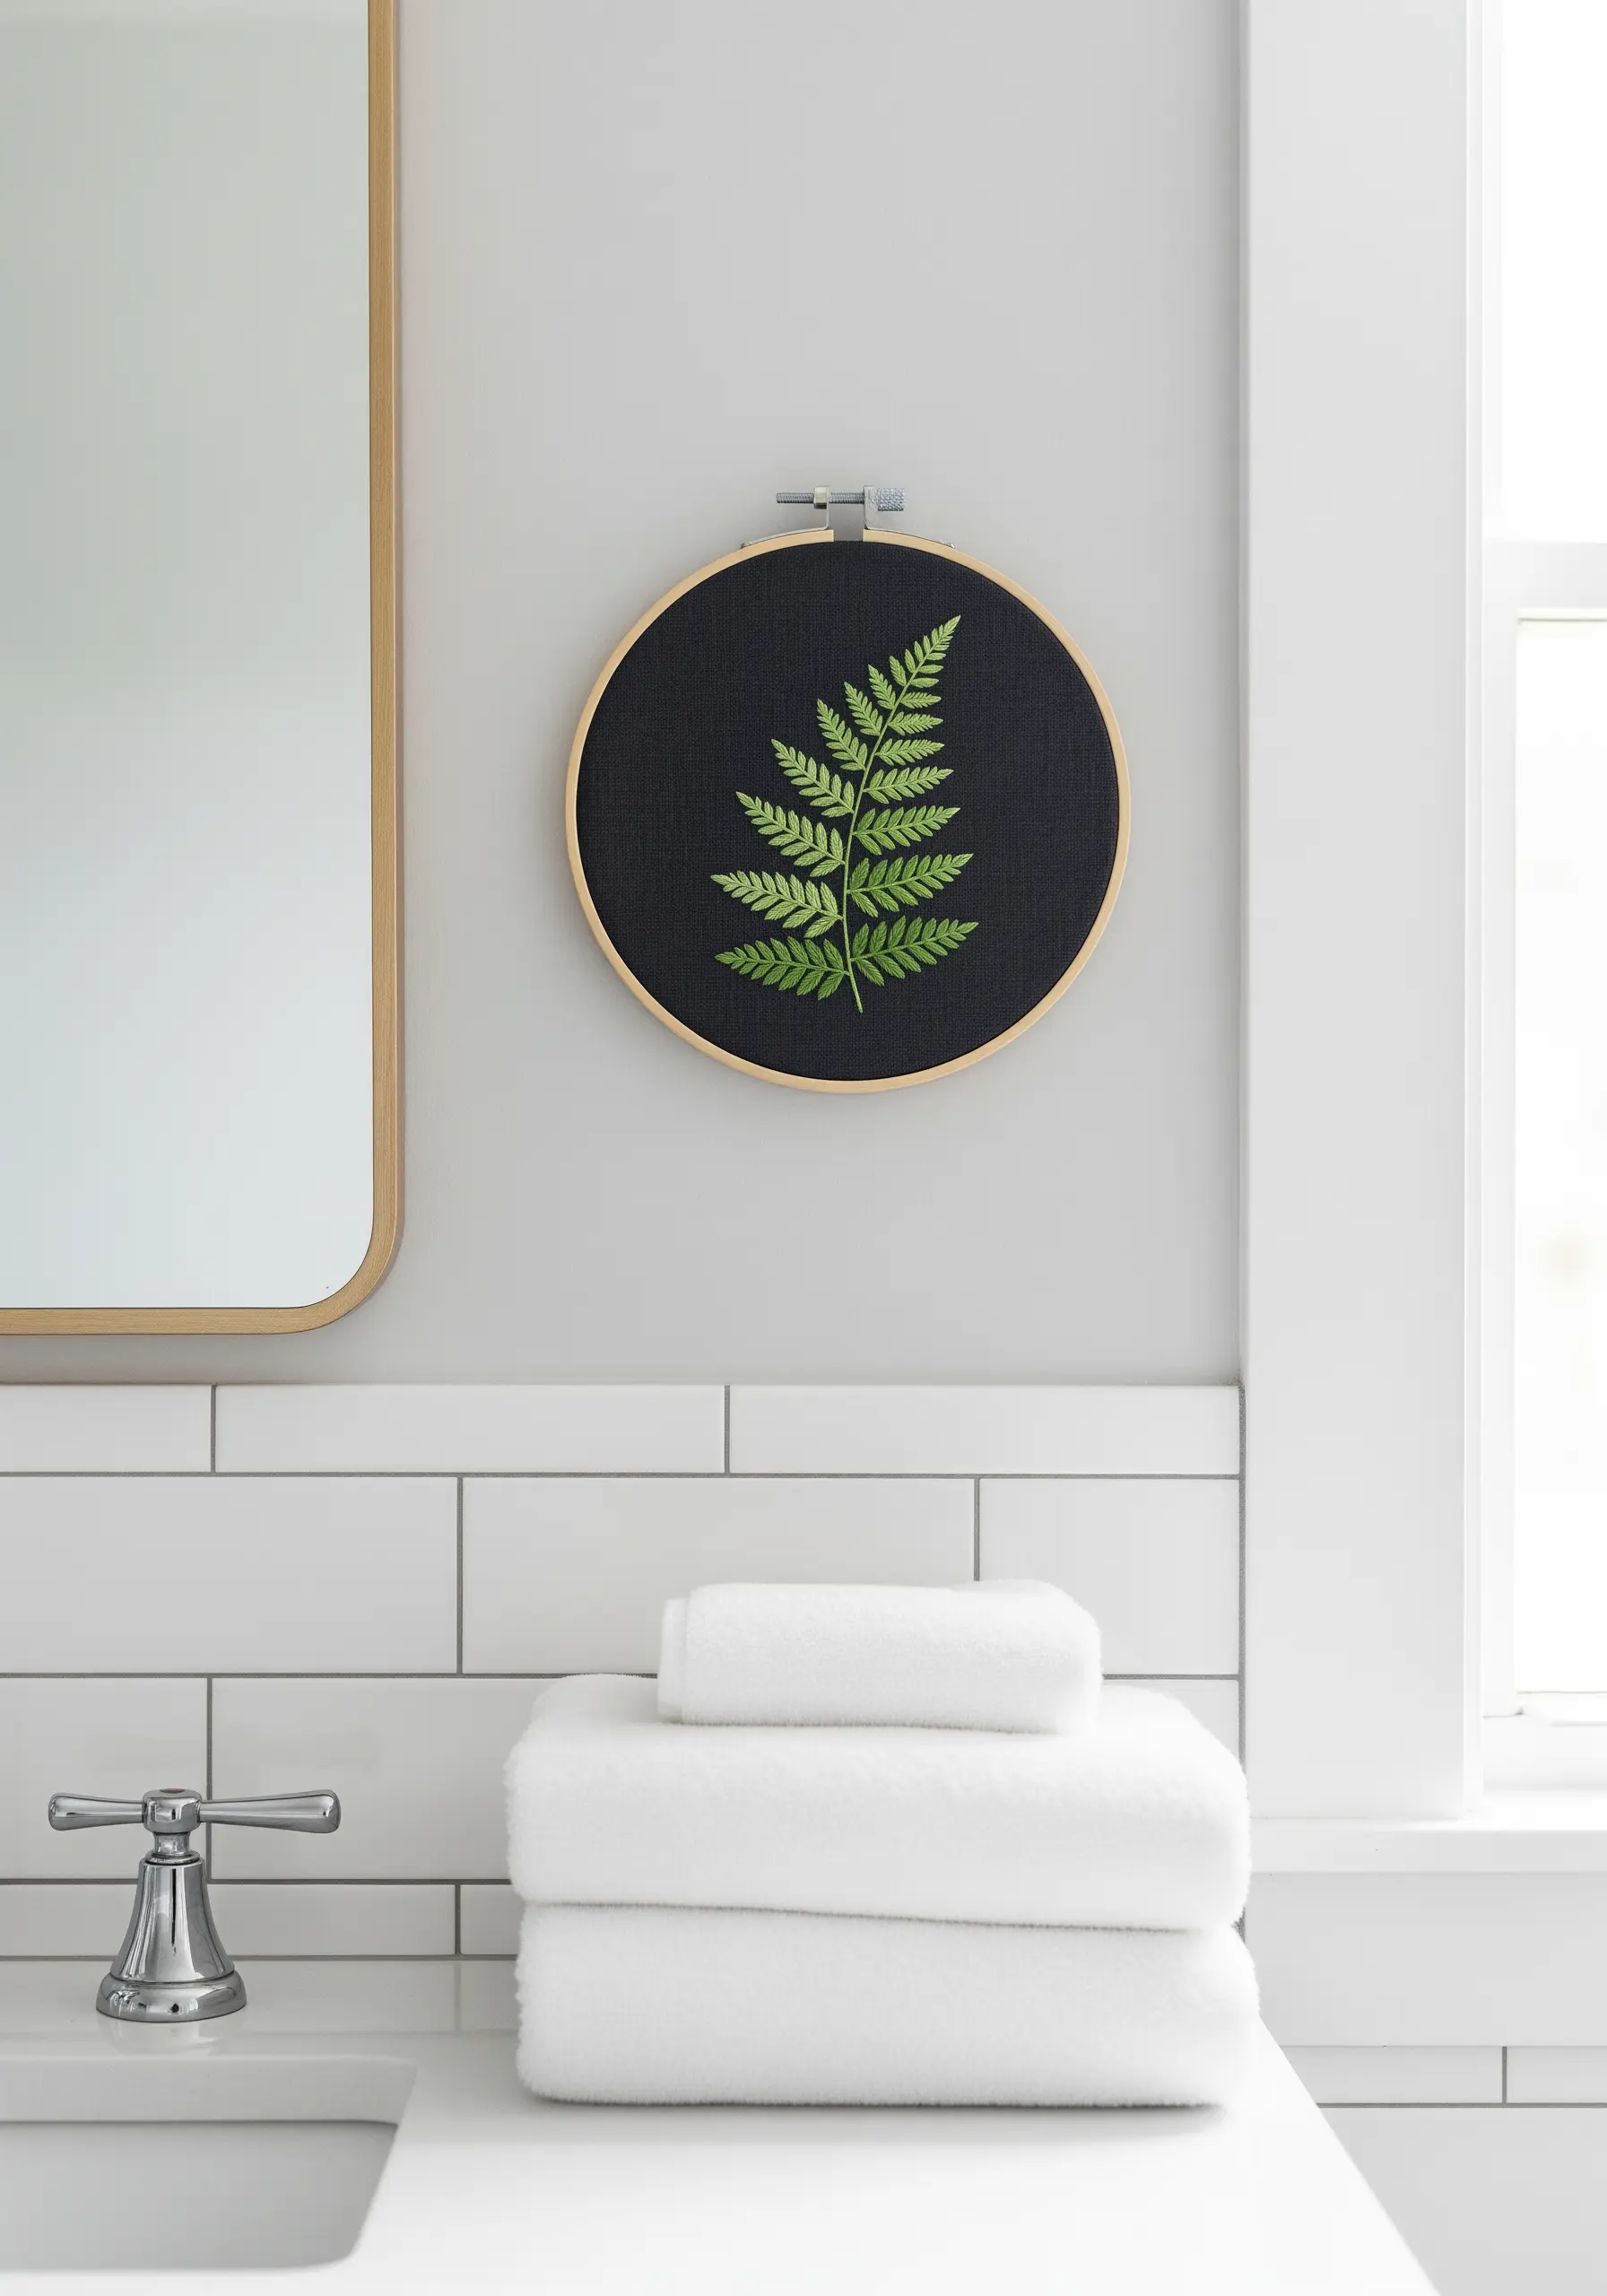
Stitching on black or dark navy fabric instantly makes your colors appear more vibrant and dramatic.
To give the fern a realistic, three-dimensional look, use a fishbone stitch for the leaves.
Incorporate at least three to four shades of green, moving from dark to light, to mimic how light hits the foliage.
Slightly varying the angle of your stitches on each leaflet will create natural-looking movement and prevent the design from feeling flat.
These fern foliage stitch variations are key to creating lifelike texture.
8. Layer Hoops for a Seasonal Mantelpiece
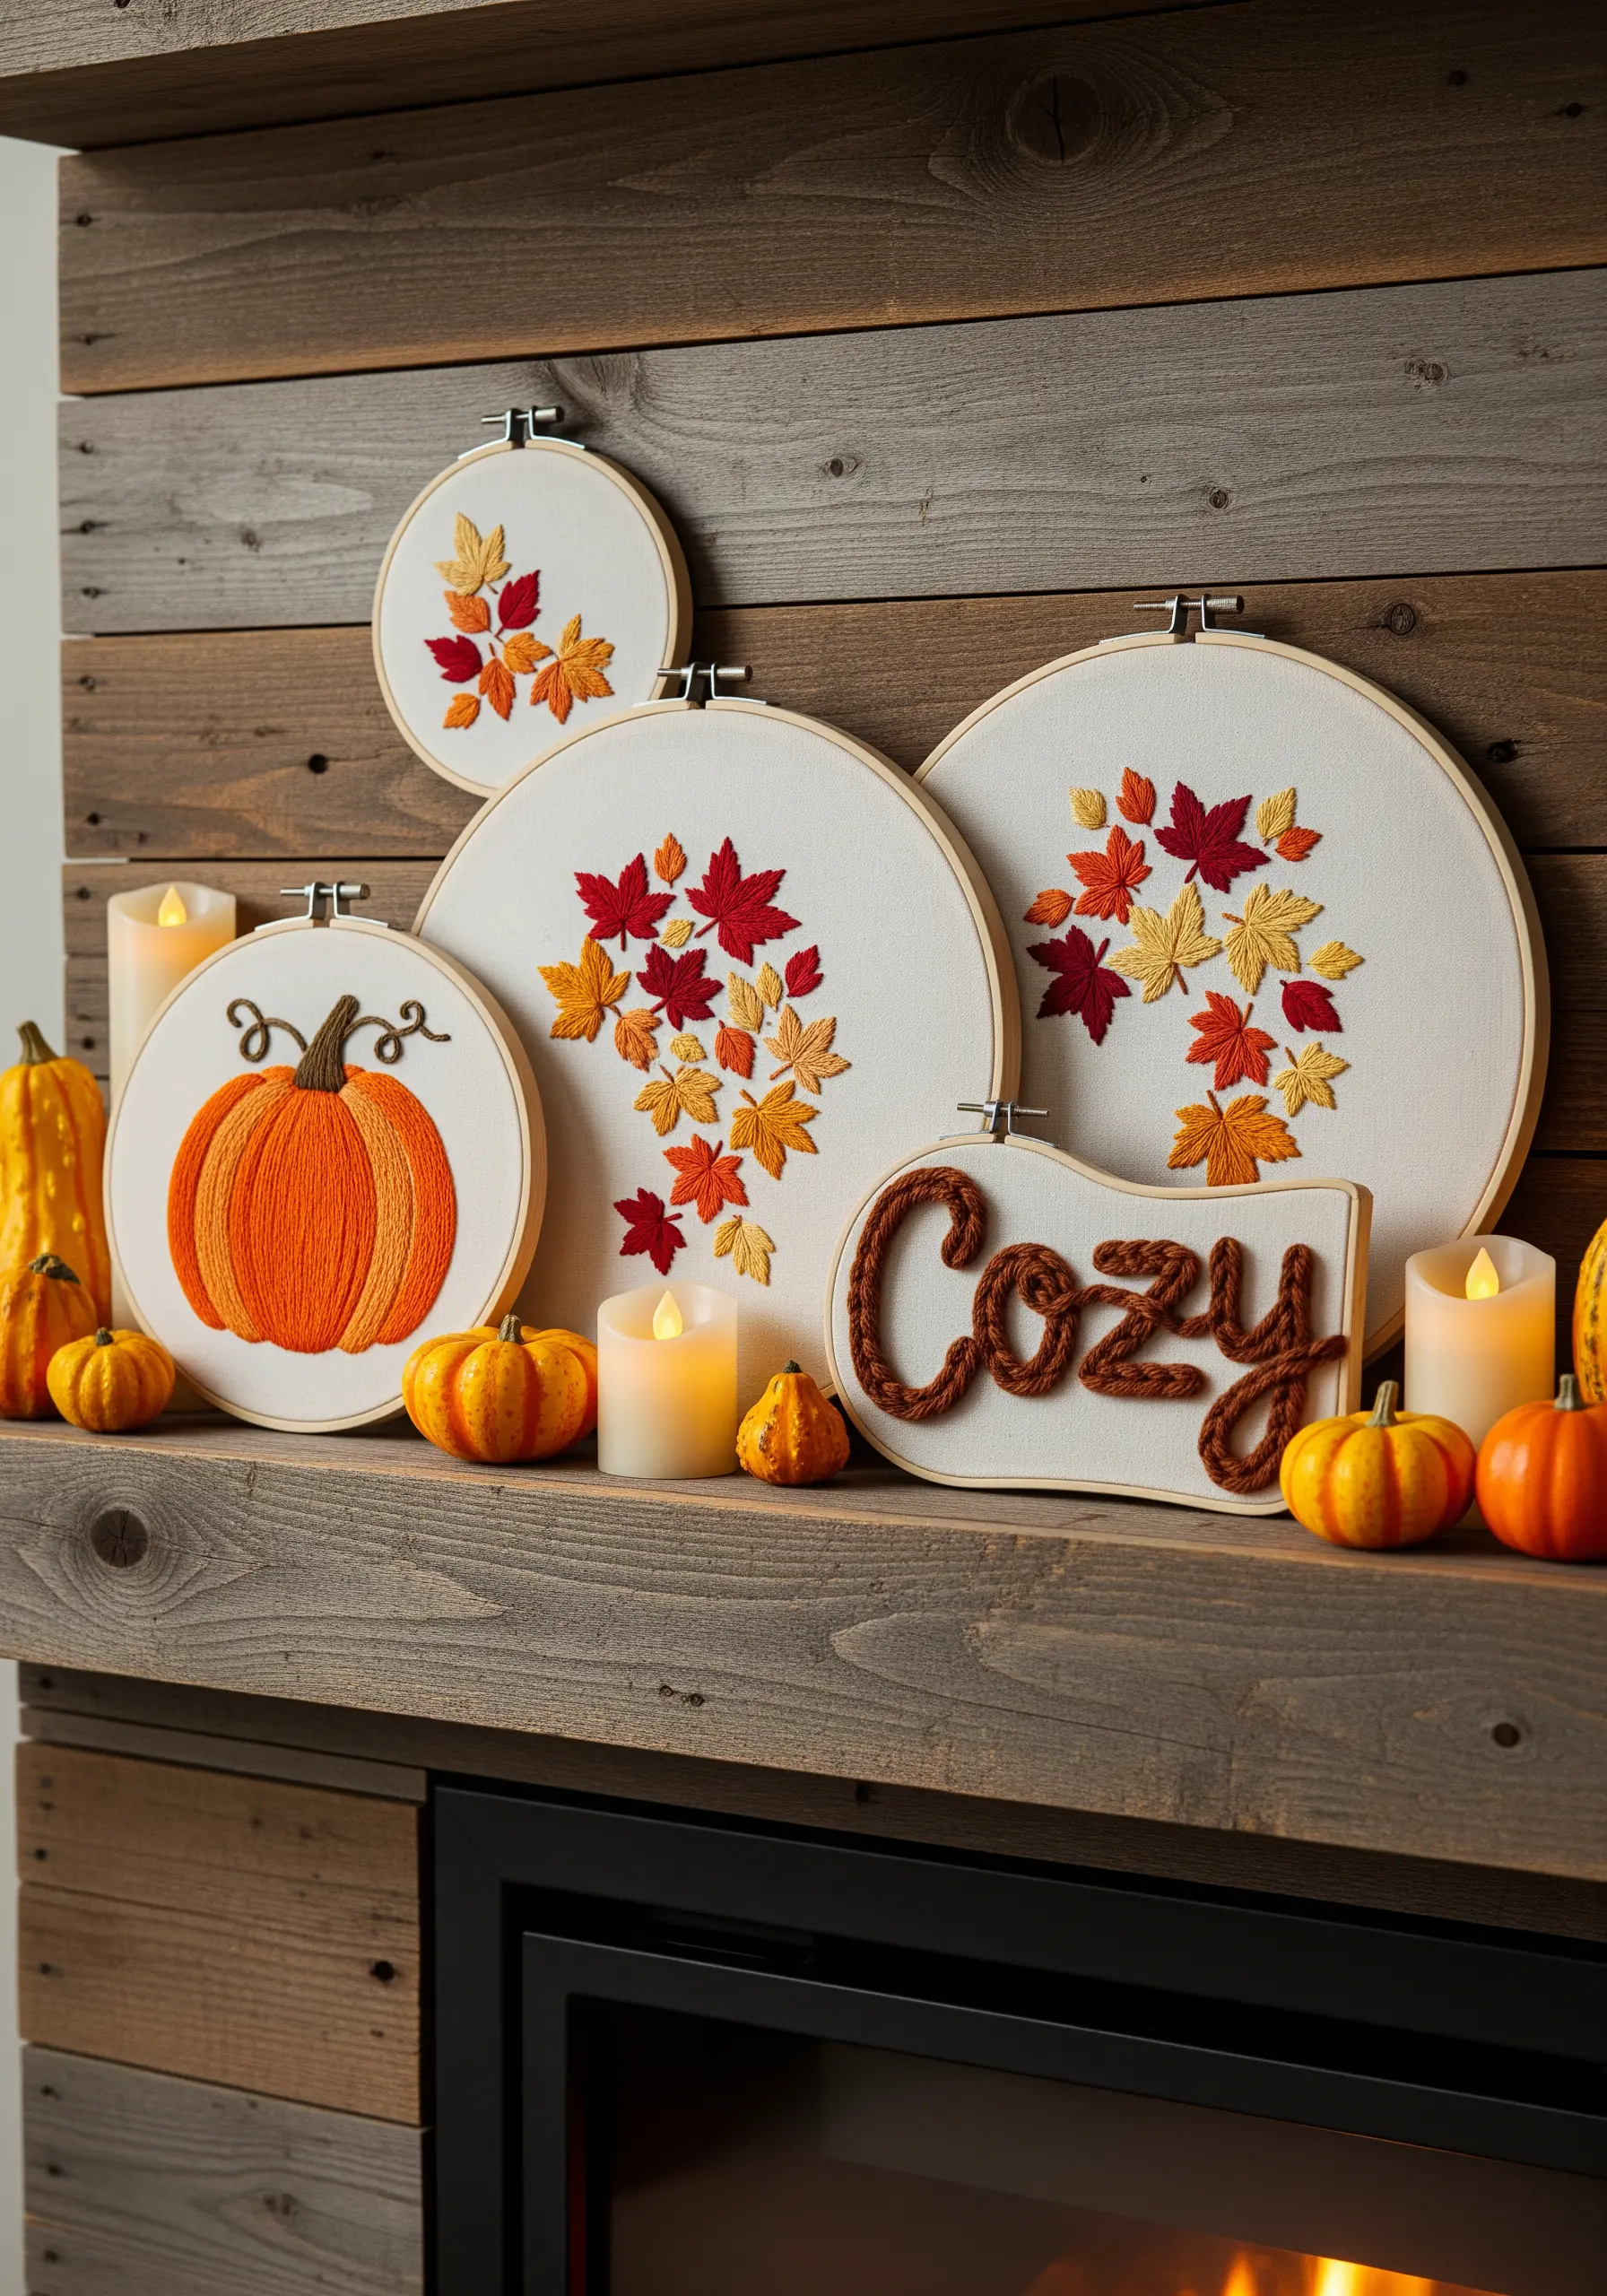
Create a dynamic seasonal display by grouping and layering hoops of different sizes.
For the pumpkin, use a directional satin stitch, angling your stitches to follow the curve of each segment to create a rounded, 3D illusion.
Introduce another texture by using chunky yarn and a punch needle or couching technique for the ‘Cozy’ lettering, which adds wonderful tactile depth.
This mix-and-match approach allows you to build a rich, visually interesting vignette that you can update with the seasons.
9. Design a Rhythmic Staircase Gallery
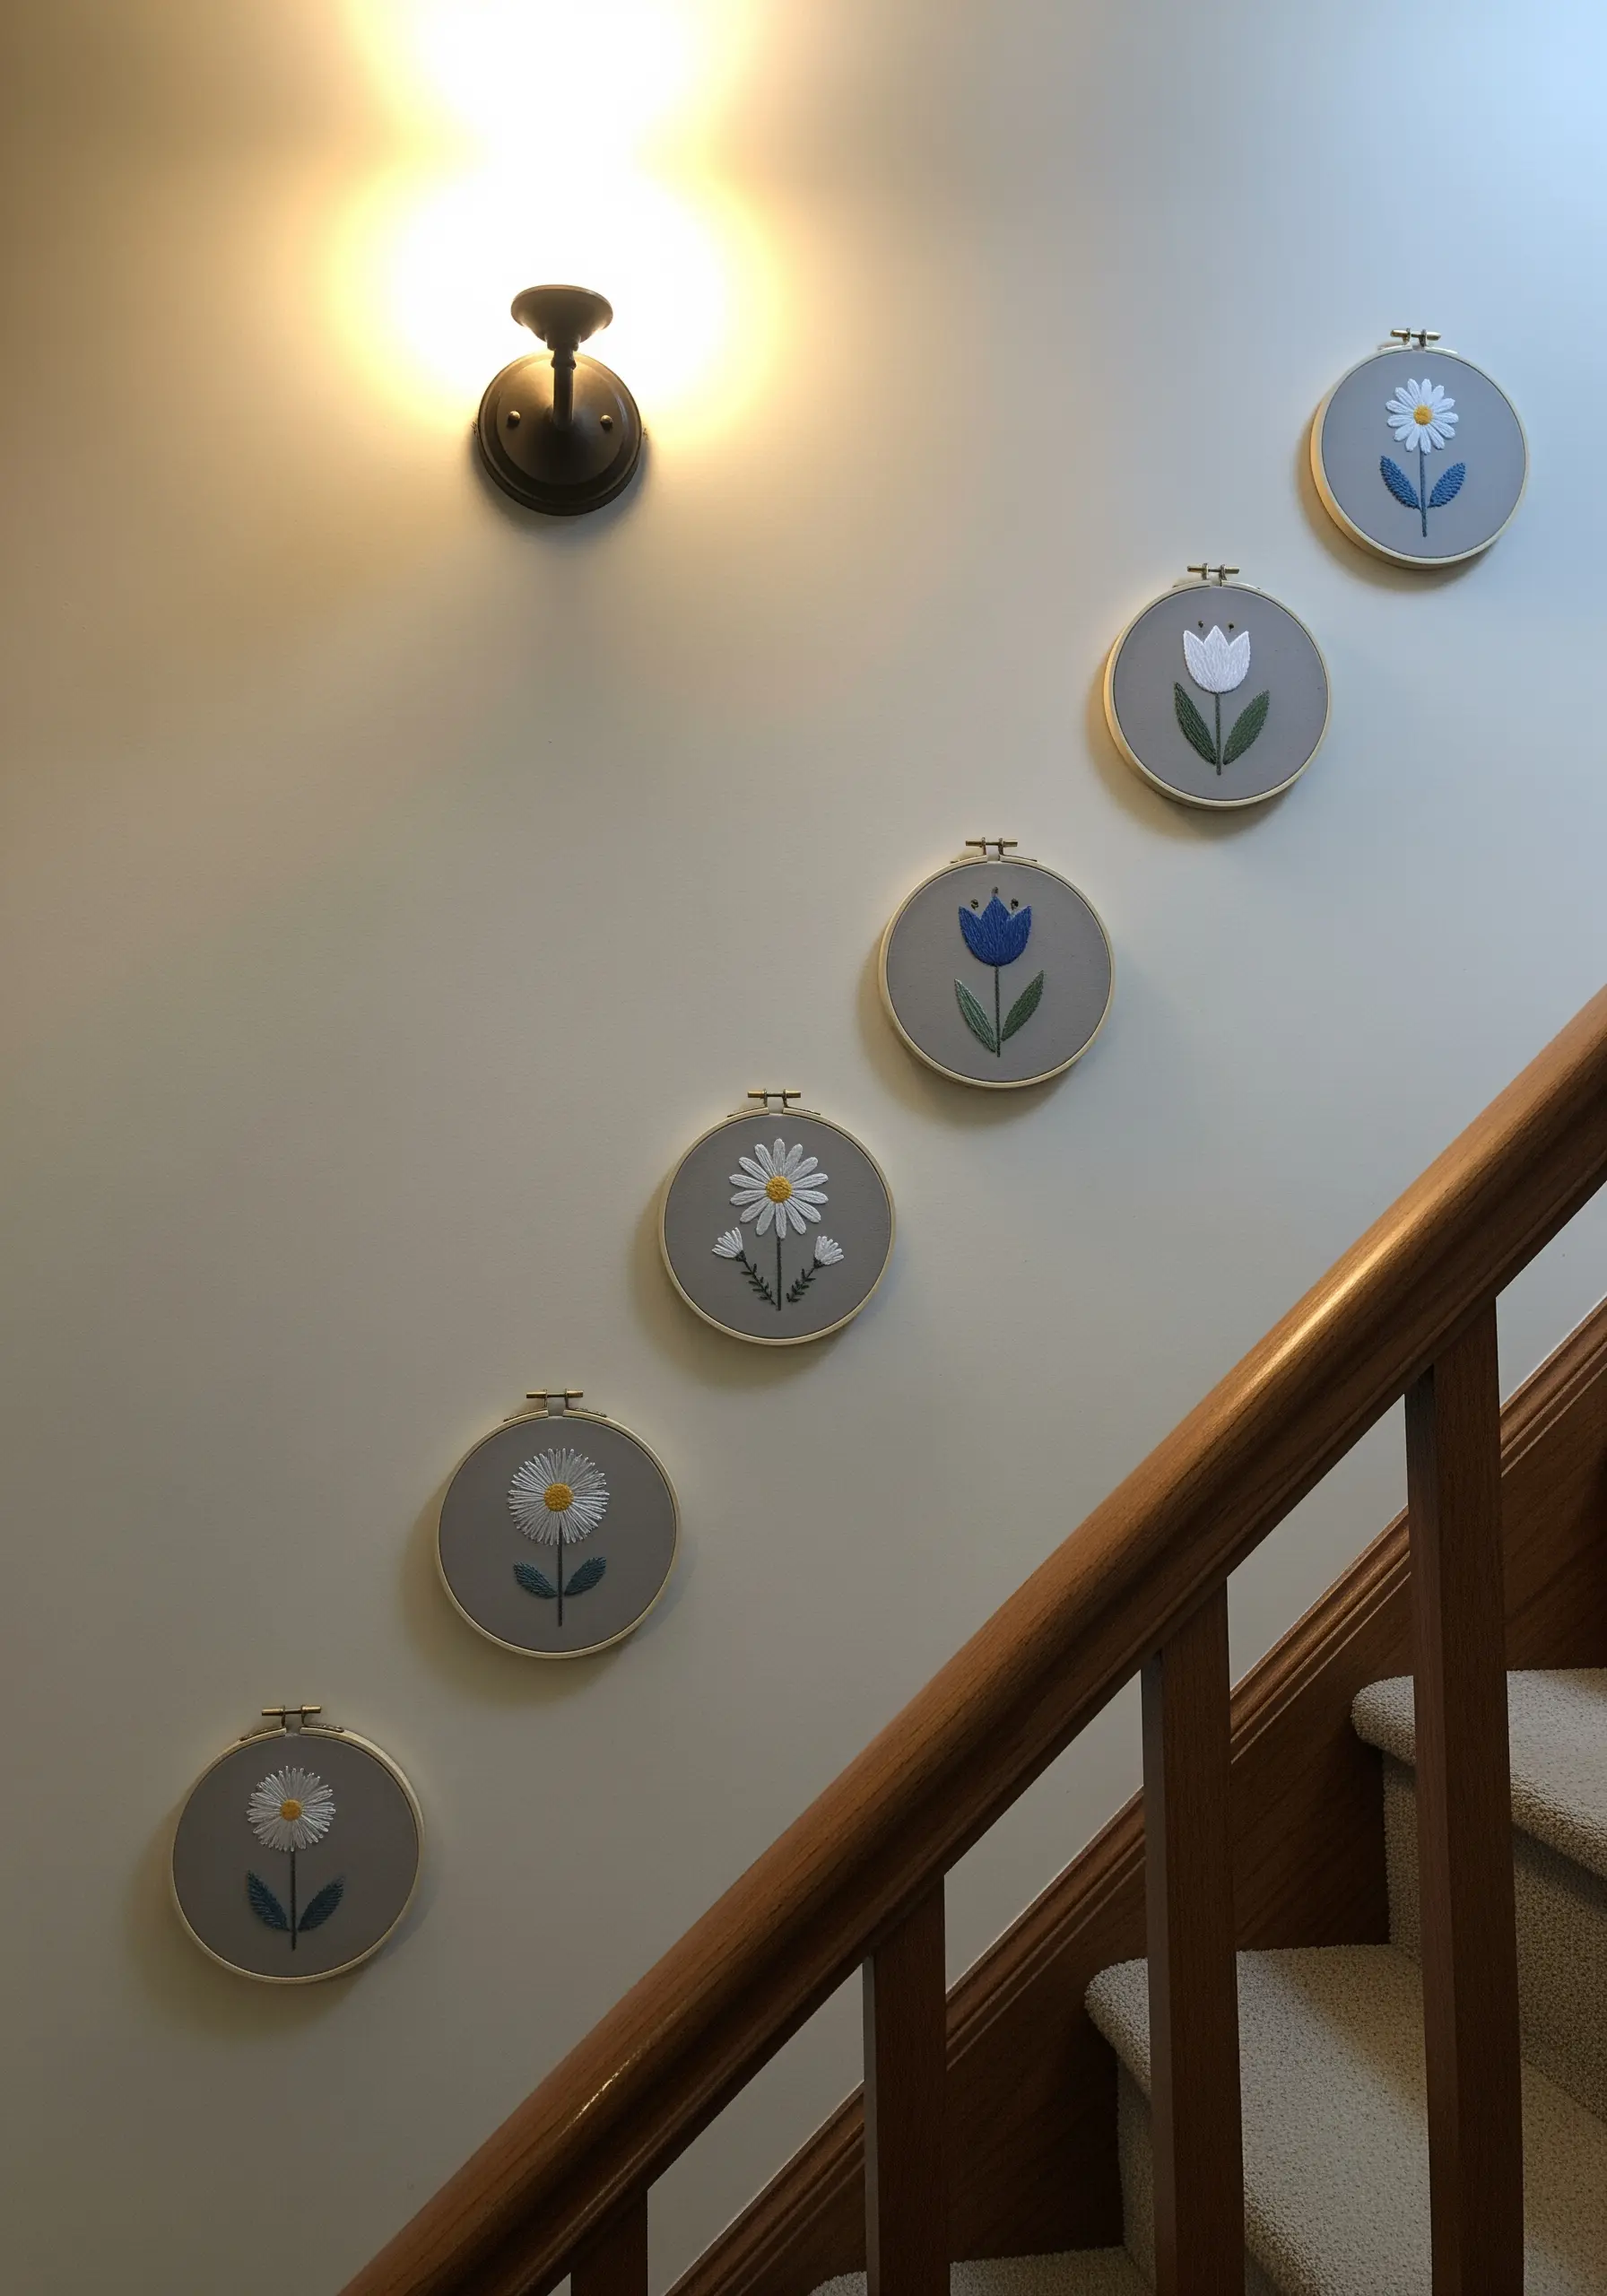
An ascending wall, like a staircase, is the perfect canvas for a series of repeating motifs.
Create a sense of calm and cohesion by using the same neutral fabric for every hoop.
Keep the floral designs minimal and stylized, using simple stitches like lazy daisies for petals and a single French knot for the centers.
The beauty of this display lies in its repetition and restraint, proving that you can make a significant impact with minimalist embroidery DIYs.
10. Capture Nature’s Details in a Windowsill Display
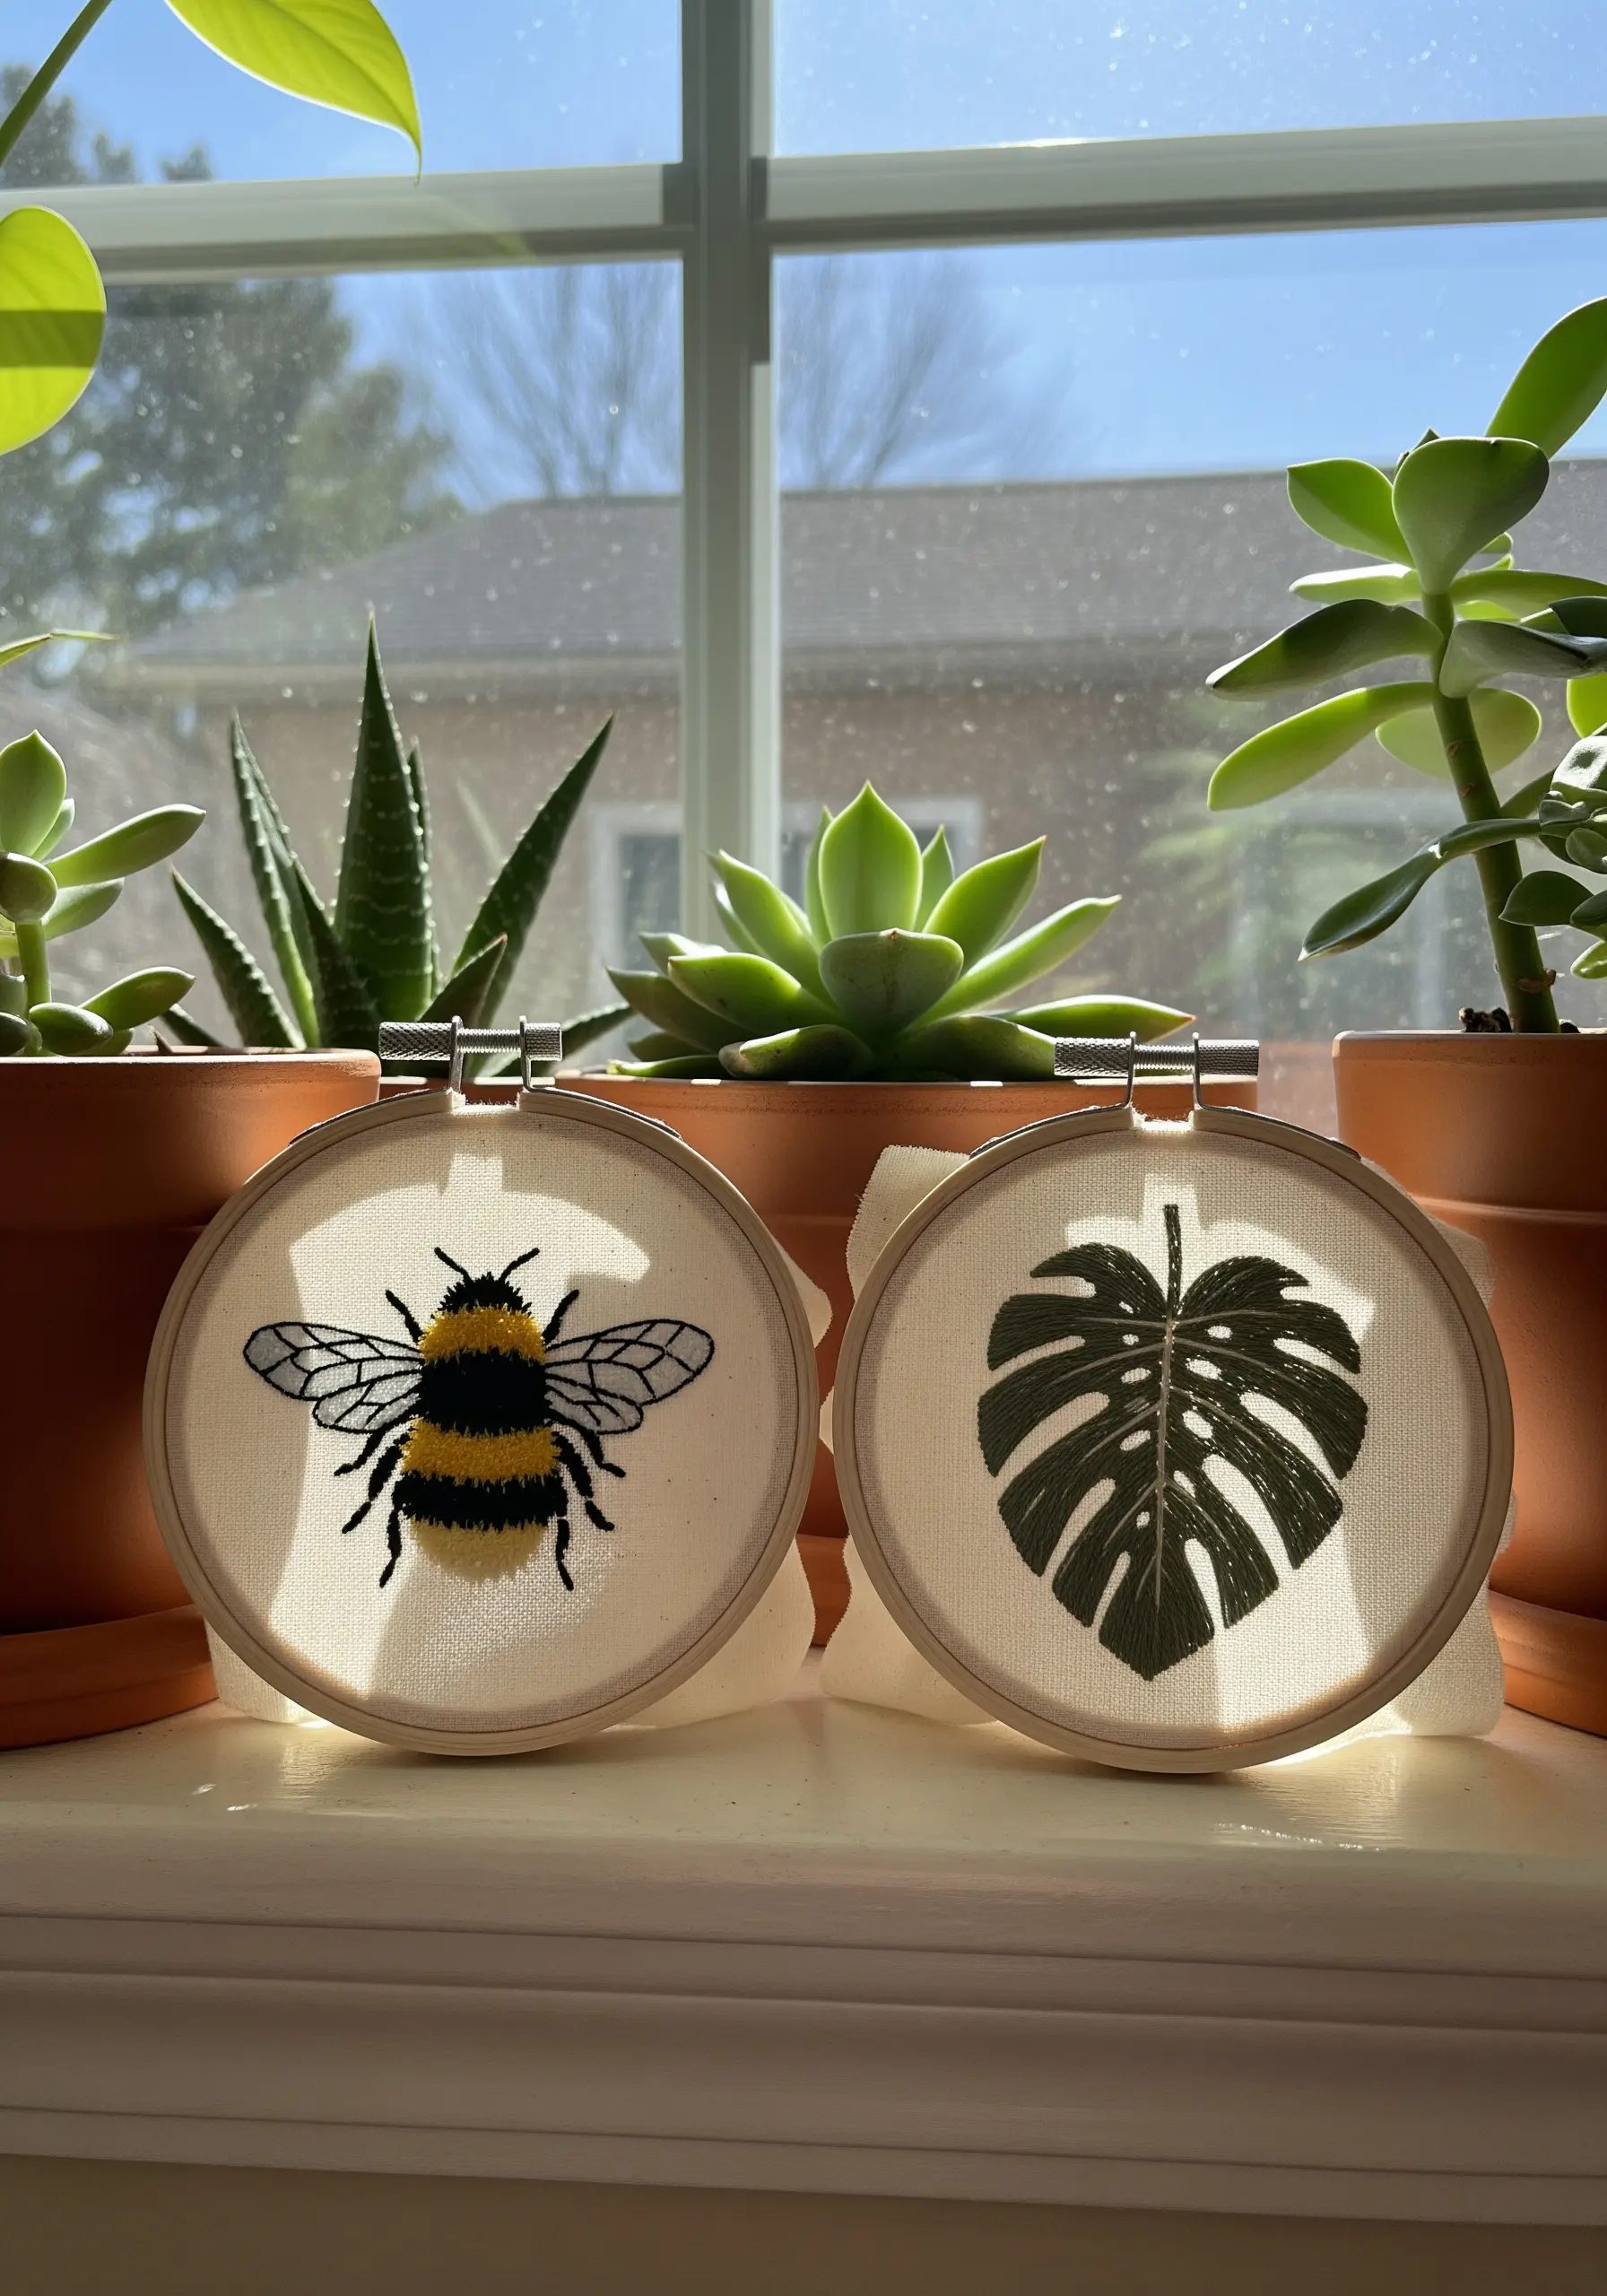
Let your embroidery interact with its environment by placing it where it can catch natural light.
To create the bee’s fuzzy texture, use densely packed French knots or the turkey stitch, which you can trim to create a velvety pile.
For the monstera leaf, define the iconic holes with negative space—outline the entire leaf shape with a split stitch, then fill in the green areas with satin stitch, leaving the holes empty.
This technique is more effective than trying to outline the inner cuts and results in a much cleaner design.
11. Fuse Embroidery with Macrame for a Bohemian Vibe
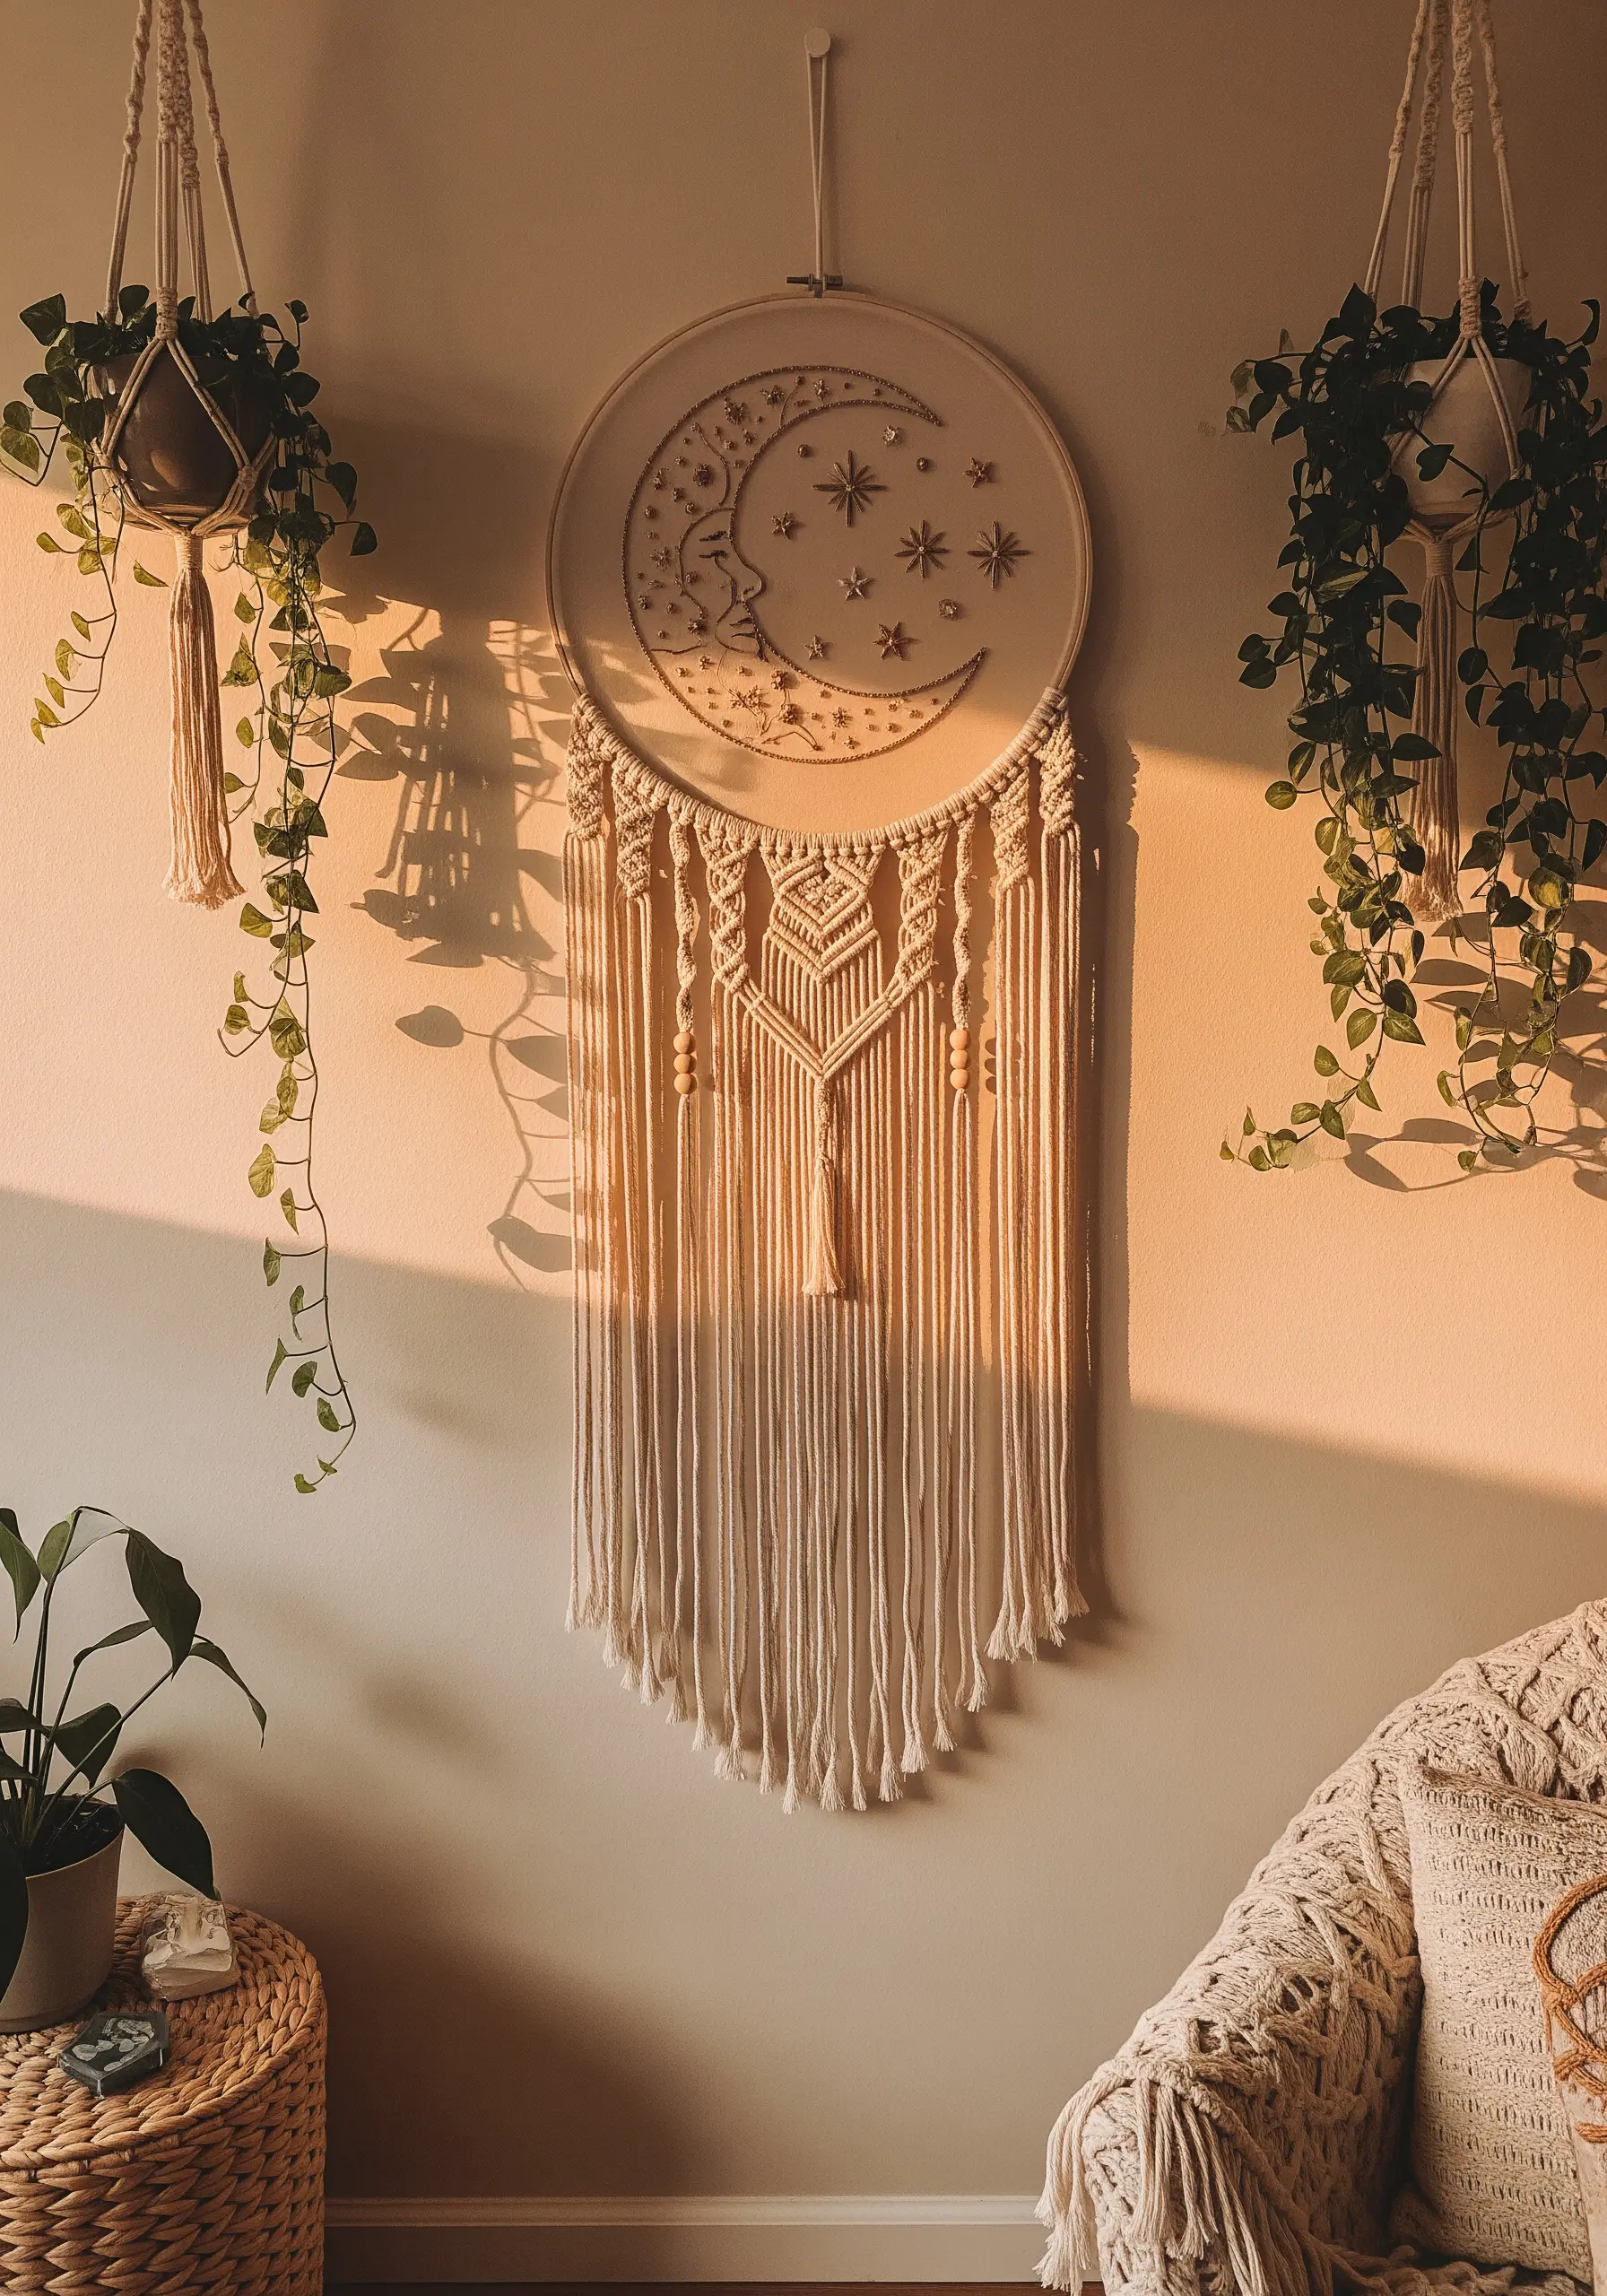
Elevate your hoop art by combining it with another fiber craft like macrame.
First, complete your embroidery—a celestial theme works beautifully. Use a metallic silver thread for the stars to add a subtle shimmer.
Once stitched, remove the inner hoop. Attach your macrame cords to the outer hoop with lark’s head knots, then reinsert the embroidered fabric and inner hoop, tightening everything securely.
This is one of the most beautiful ways to combine embroidery and mixed media for a stunning wall hanging.
12. Embrace Bold Simplicity with Line Art
You can make a powerful statement with just a single color of thread and clean, confident lines.
Choose a high-contrast combination, like black thread on white linen, for a modern, graphic effect.
Use a simple backstitch or stem stitch for your lines, focusing on keeping your stitch length and tension consistent for a polished look.
This style of minimalist line art nature embroidery is quick to execute and fits perfectly into contemporary interiors.
13. Create a Cozy Winter Scene with Cross-Stitch
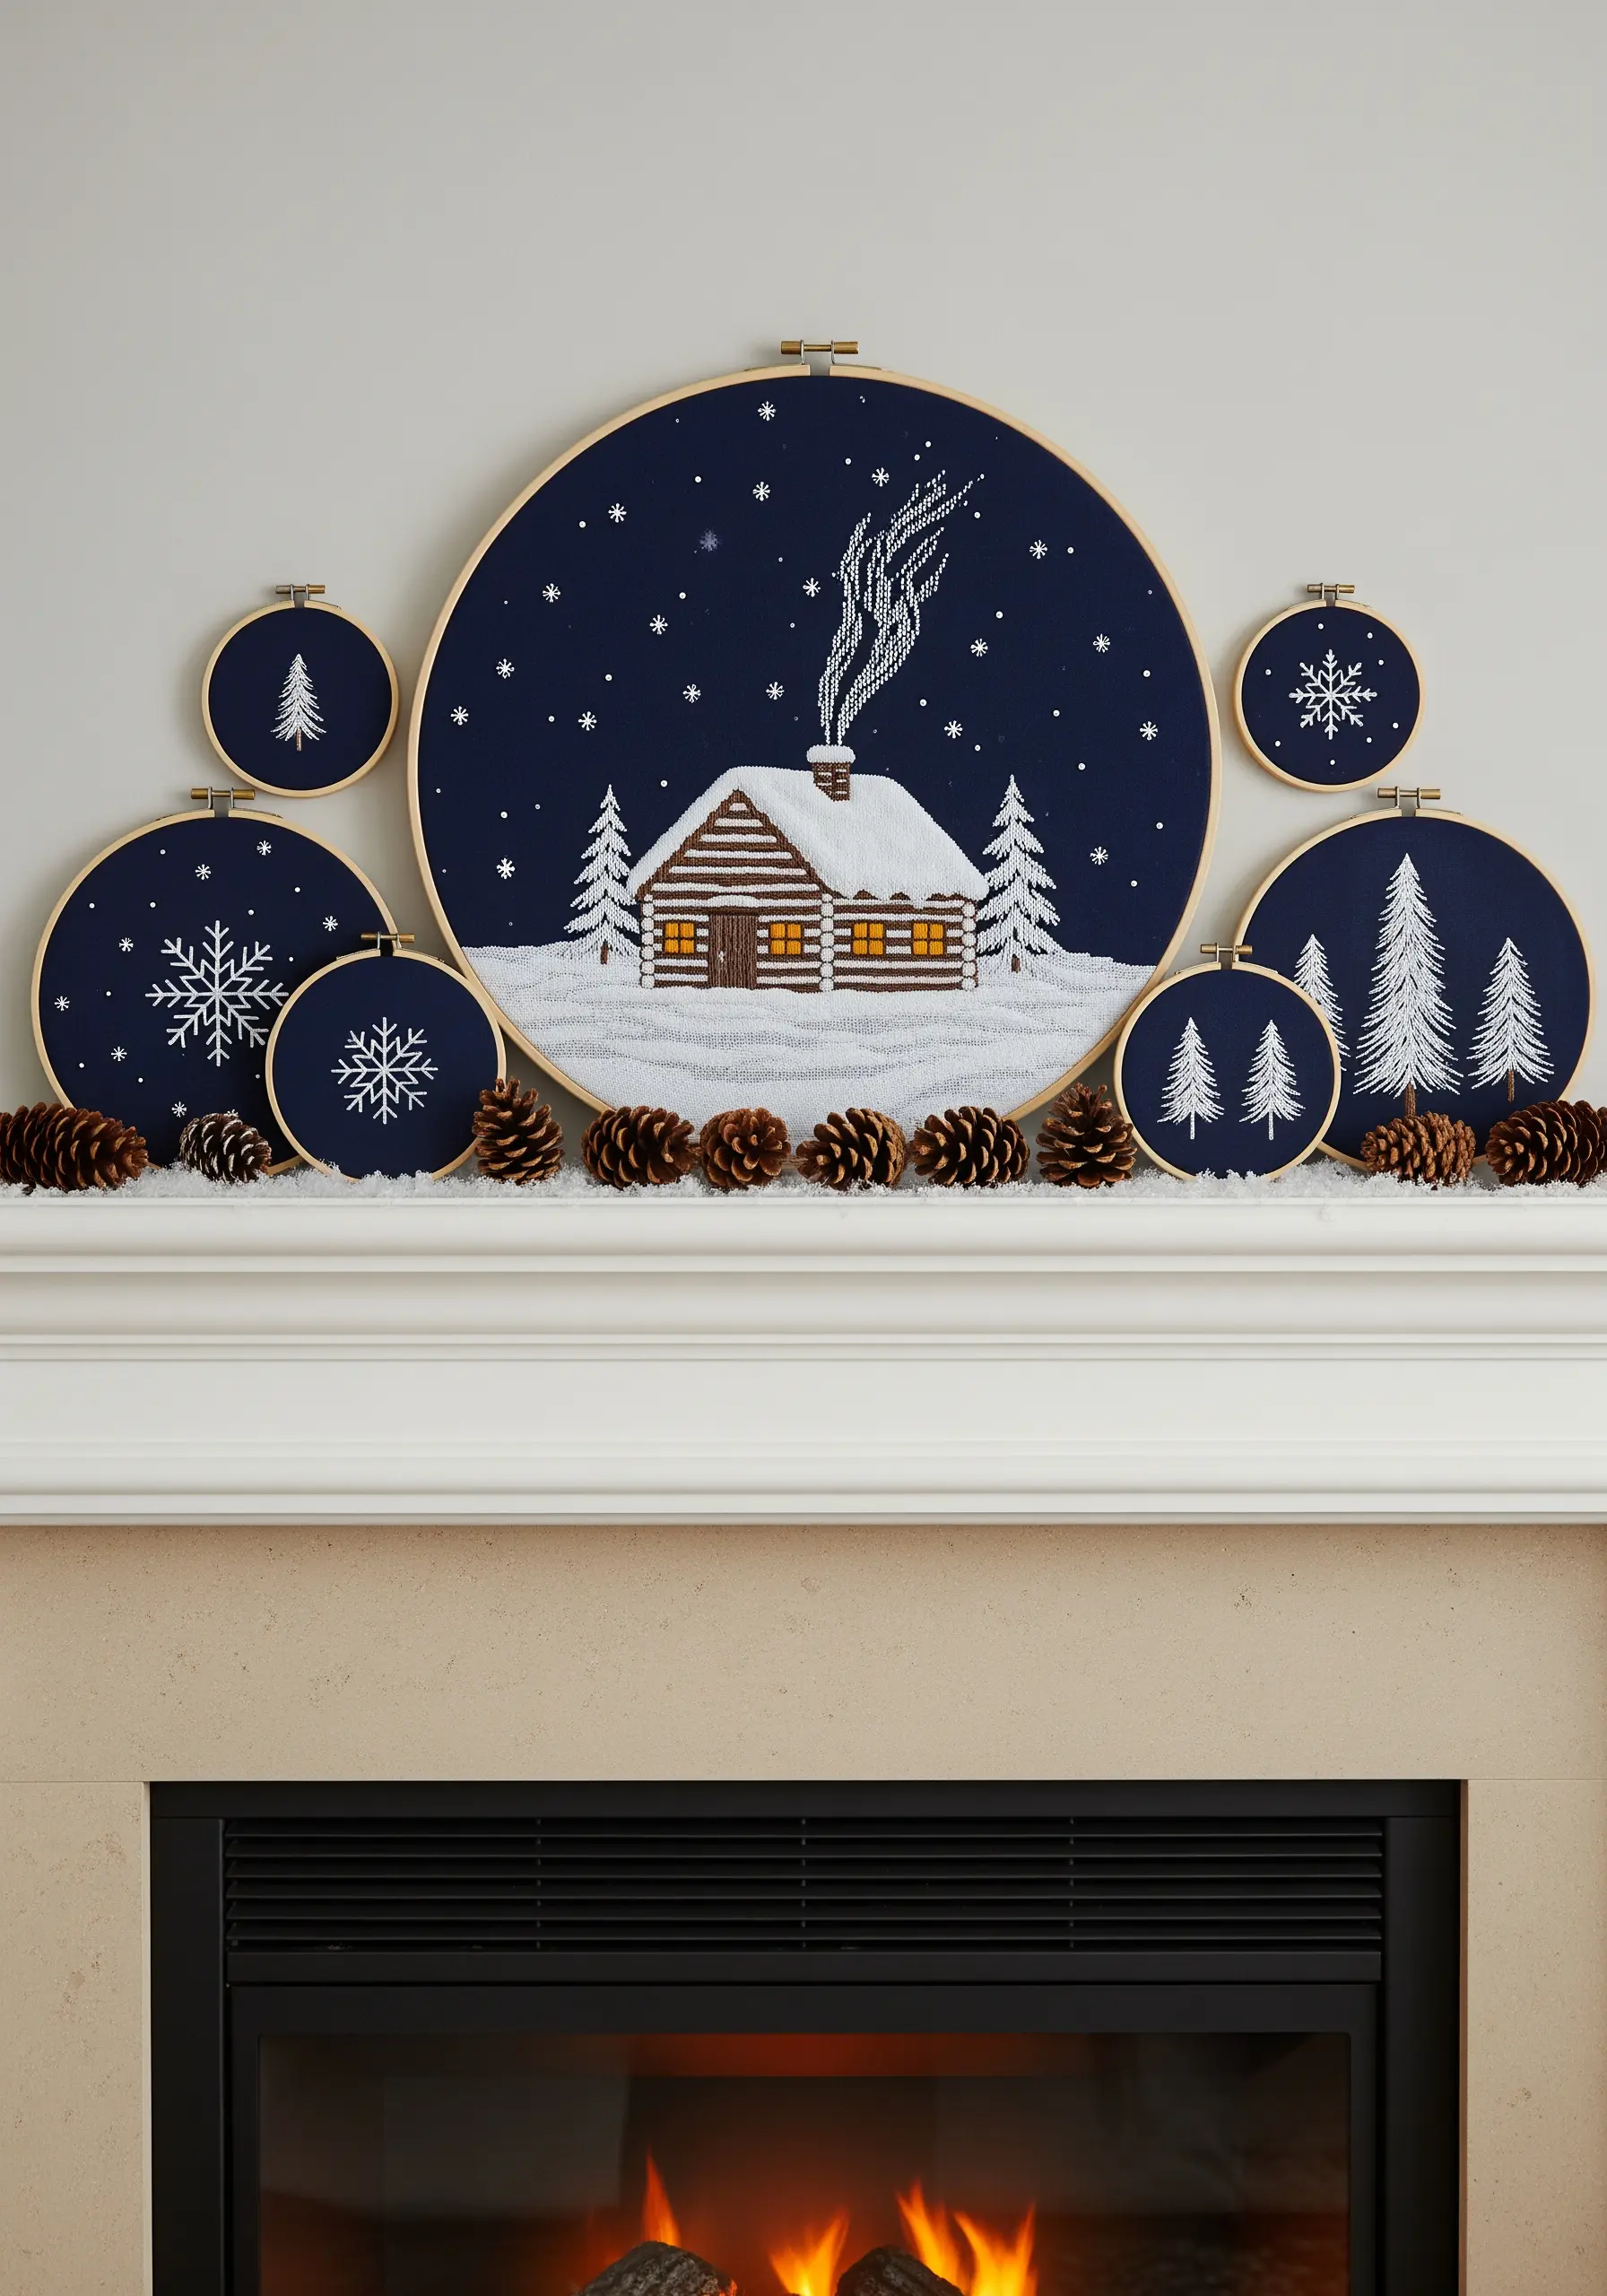
Combine traditional cross-stitch with embroidery for a charming, textured winter landscape.
Use a dark navy Aida cloth or linen as your base to represent the night sky, which makes the white and light-colored threads pop.
The blocky nature of cross-stitch is perfect for creating the log cabin, while simple straight stitches work beautifully for delicate snowflakes and wisps of smoke.
This mix of textures—the grid-like crosses and freeform stitches—adds wonderful visual depth.
14. Add Dimension to Stitched Lettering and Motifs
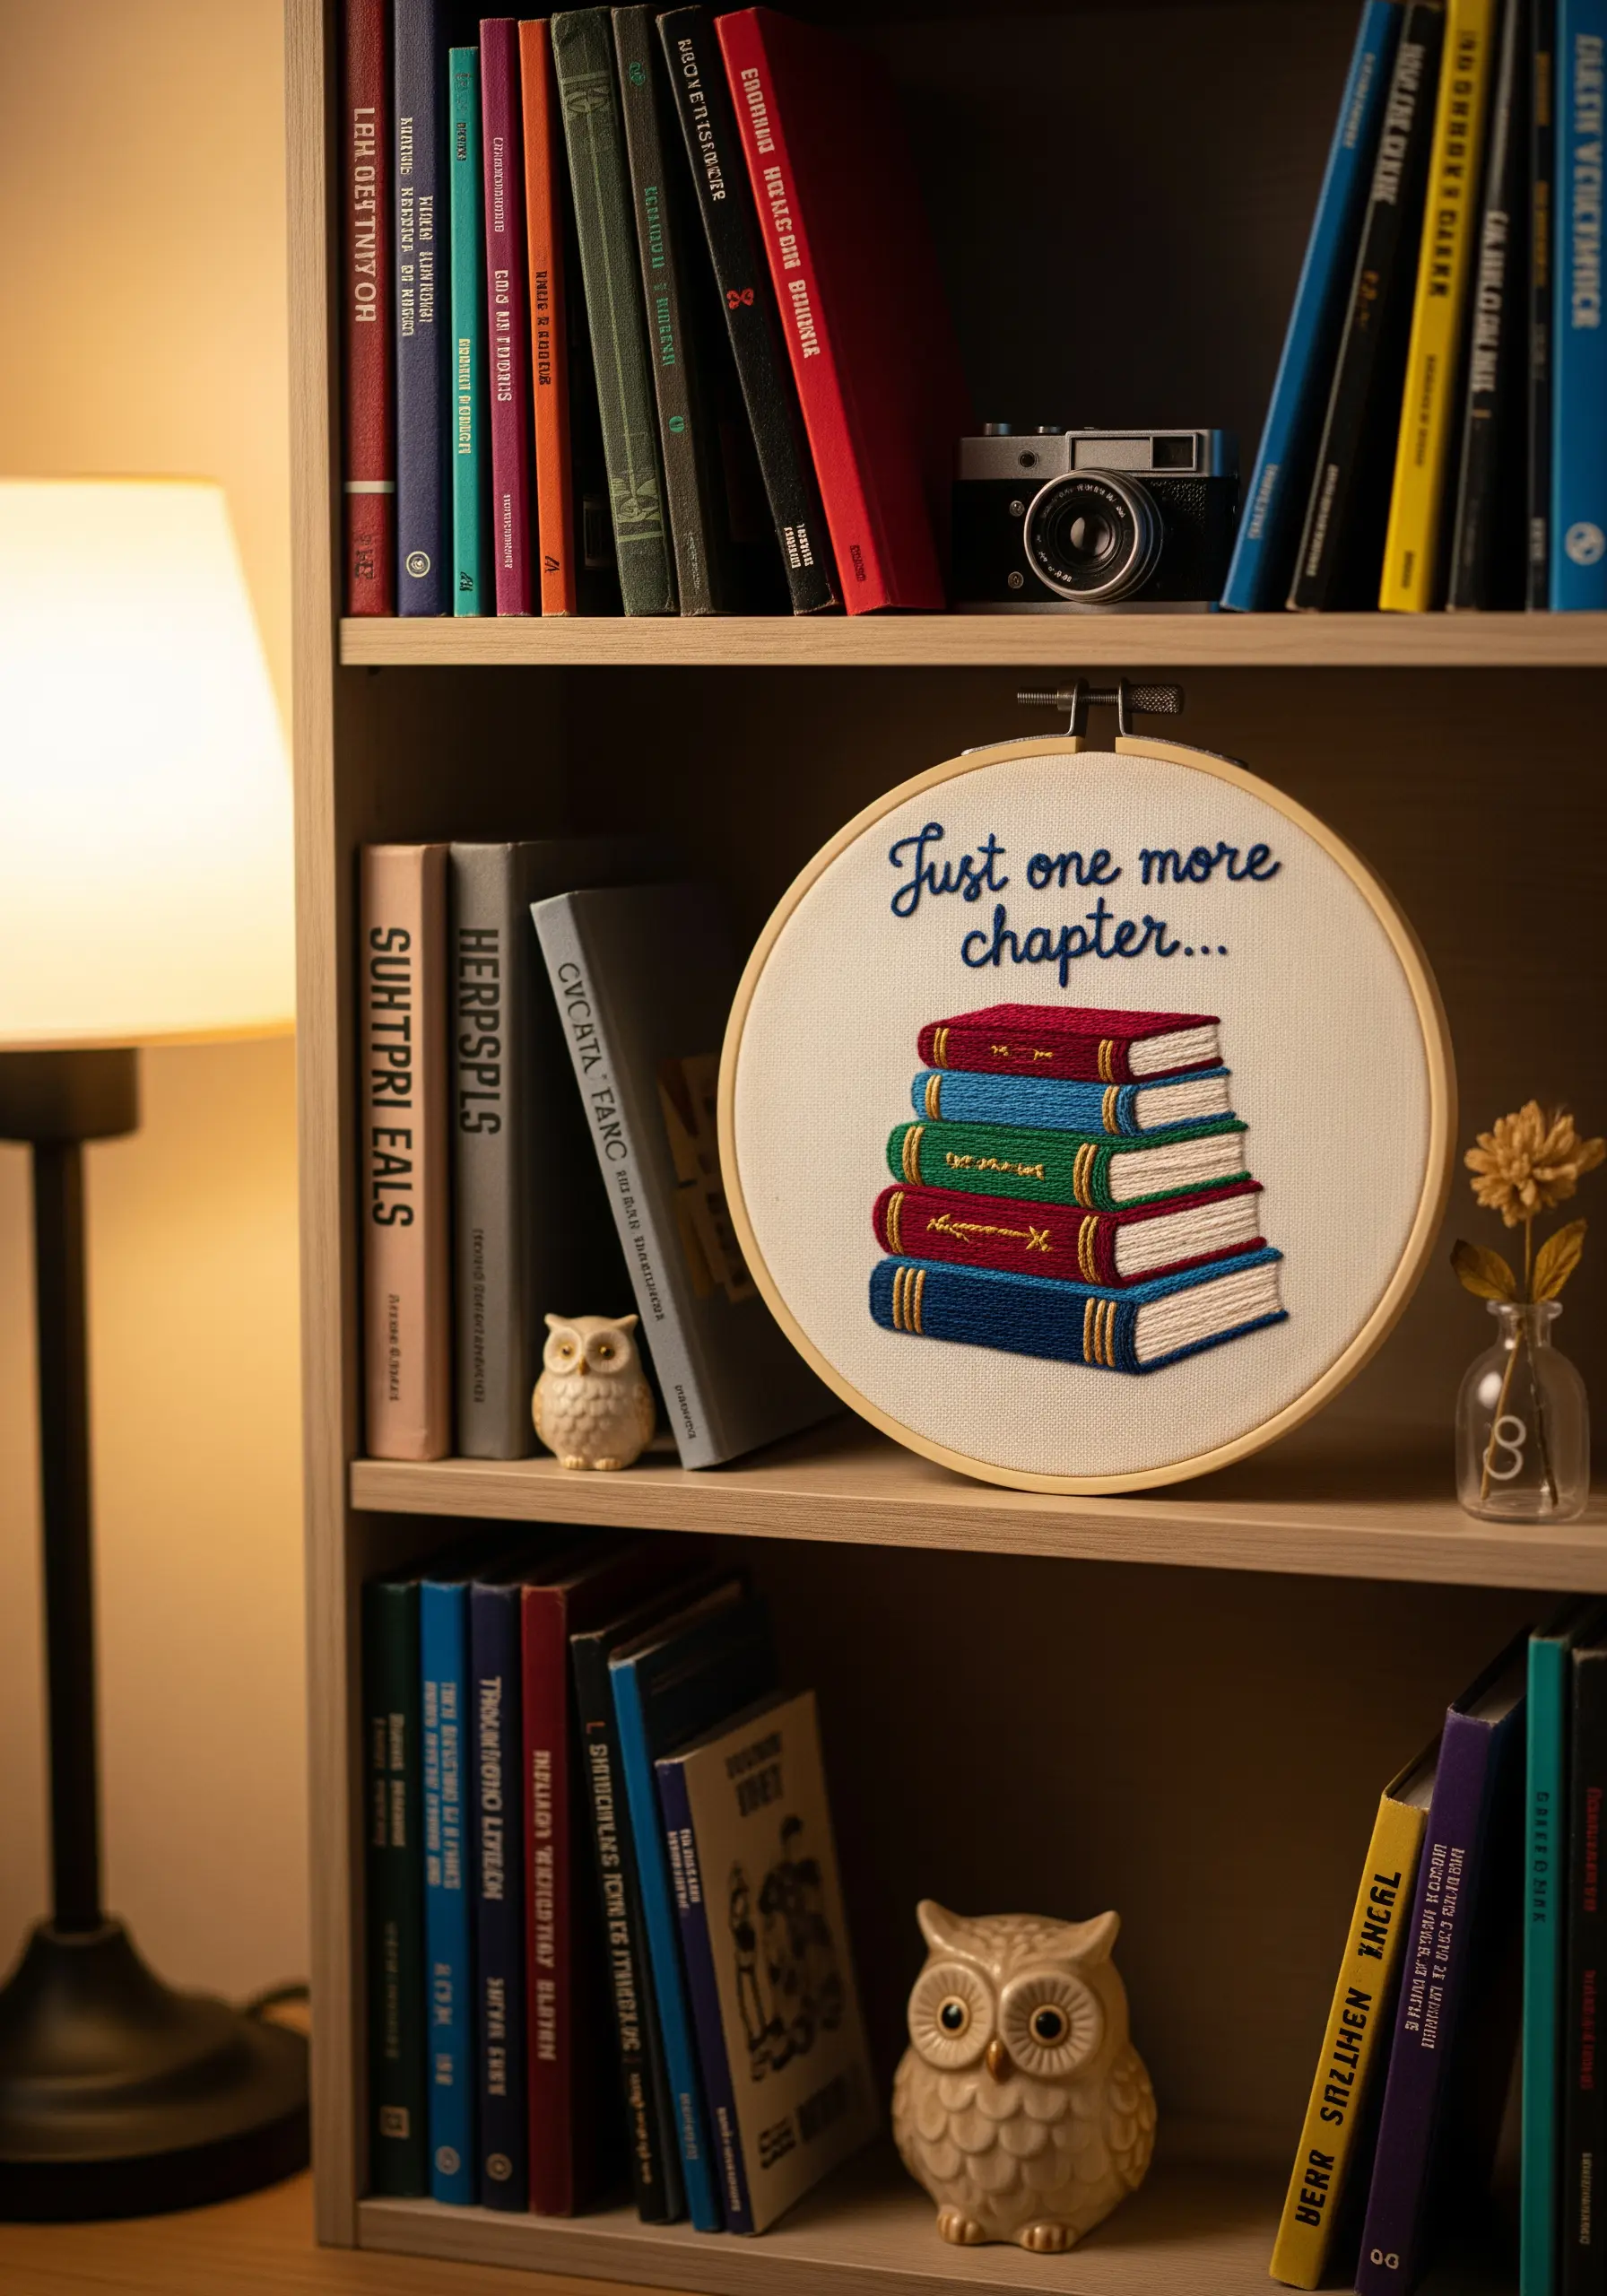
Give your embroidered objects a subtle 3D effect with padded satin stitch.
Before you stitch the top layer of the book covers, fill the area with a base of seed stitches or a small piece of felt cut to shape.
Then, work your satin stitch over this padding. The raised surface catches the light beautifully and makes the objects feel more tangible.
For any metallic details, use a high-quality gold thread and work with shorter lengths to prevent tangling.
15. Weave a Sculptural Hoop with Chunky Yarn
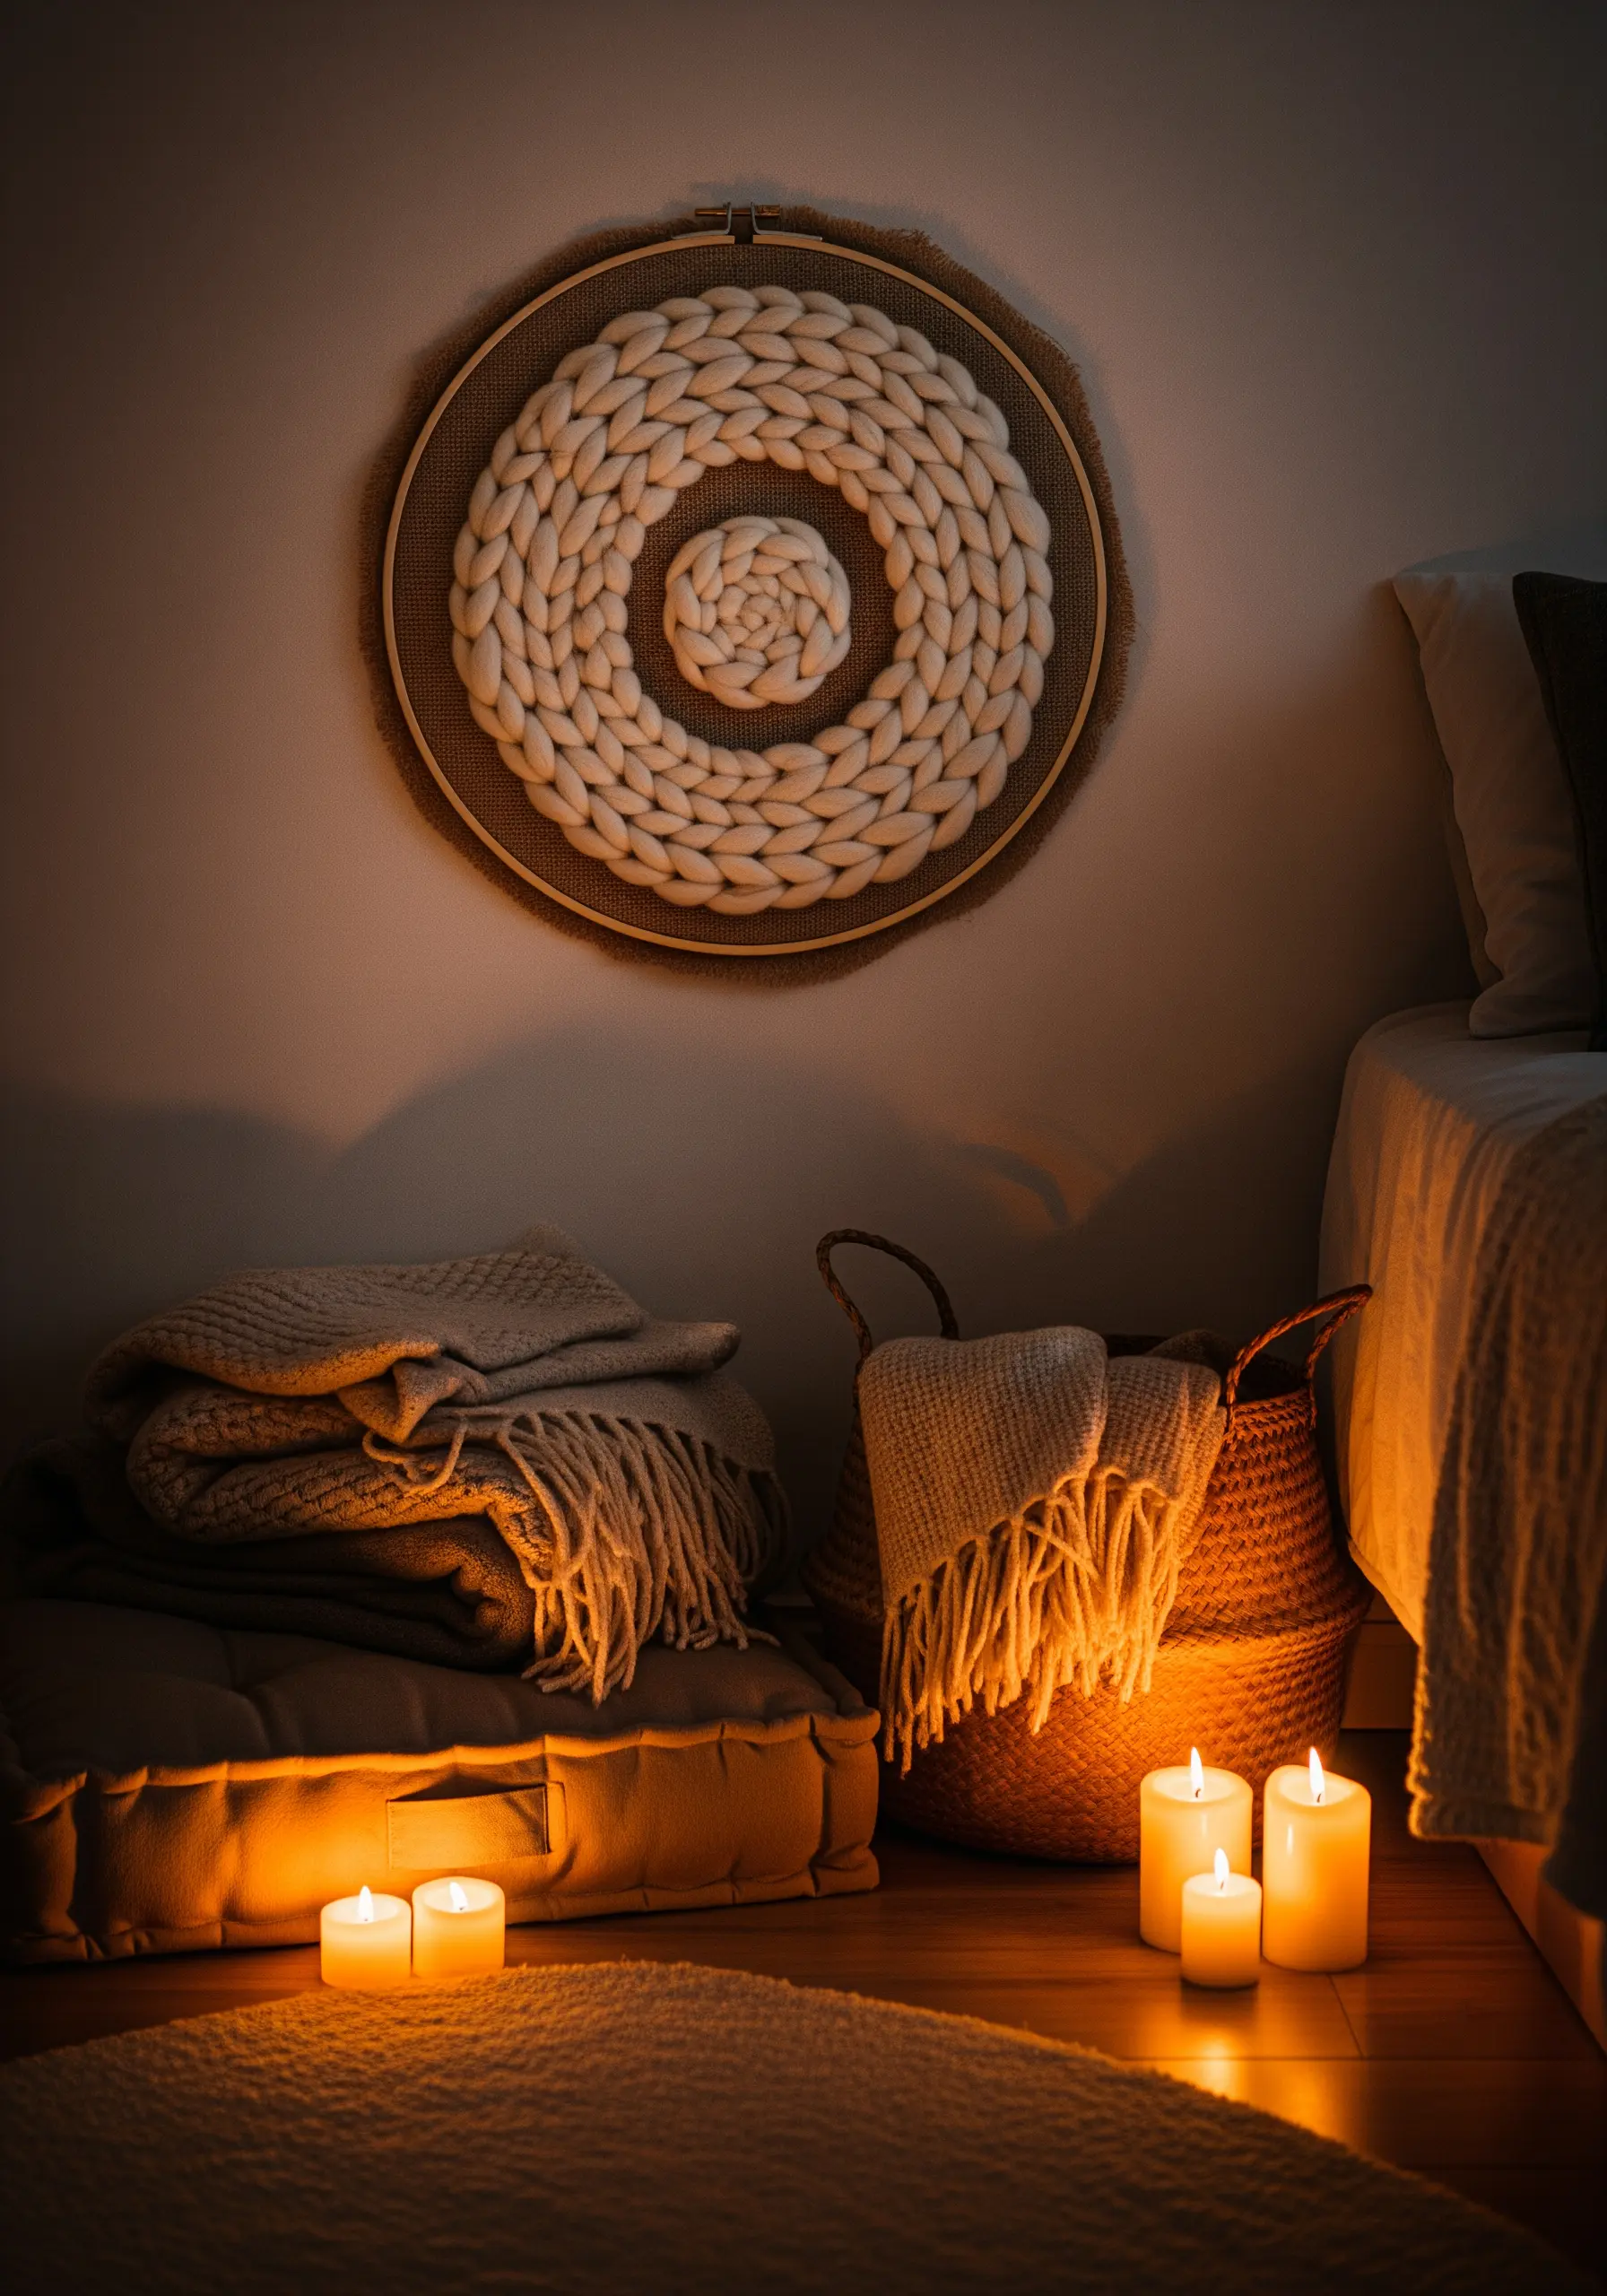
Explore the world of hoop art beyond traditional embroidery by trying circular weaving.
First, create a ‘warp’ by wrapping a strong cotton string across the hoop like the spokes of a wheel.
Then, weave chunky wool roving or thick yarn over and under the warp threads, starting from the center and working your way out.
This technique produces wonderfully tactile layered yarn wall art projects that add softness and warmth to any room.
16. Frame Your Stitches with Faux Greenery
Create an embroidery wreath that blends stitched art with physical dimension.
Complete your embroidery first, using a delicate backstitch for the cursive lettering to ensure it remains legible and elegant.
Then, carefully attach faux greenery and florals like eucalyptus and lavender around the wooden frame of the hoop with a hot glue gun or fine floral wire.
This technique beautifully frames your work and transforms a simple hoop into a stunning piece of door decor.
17. Craft a Celestial Mobile for a Dreamy Nursery
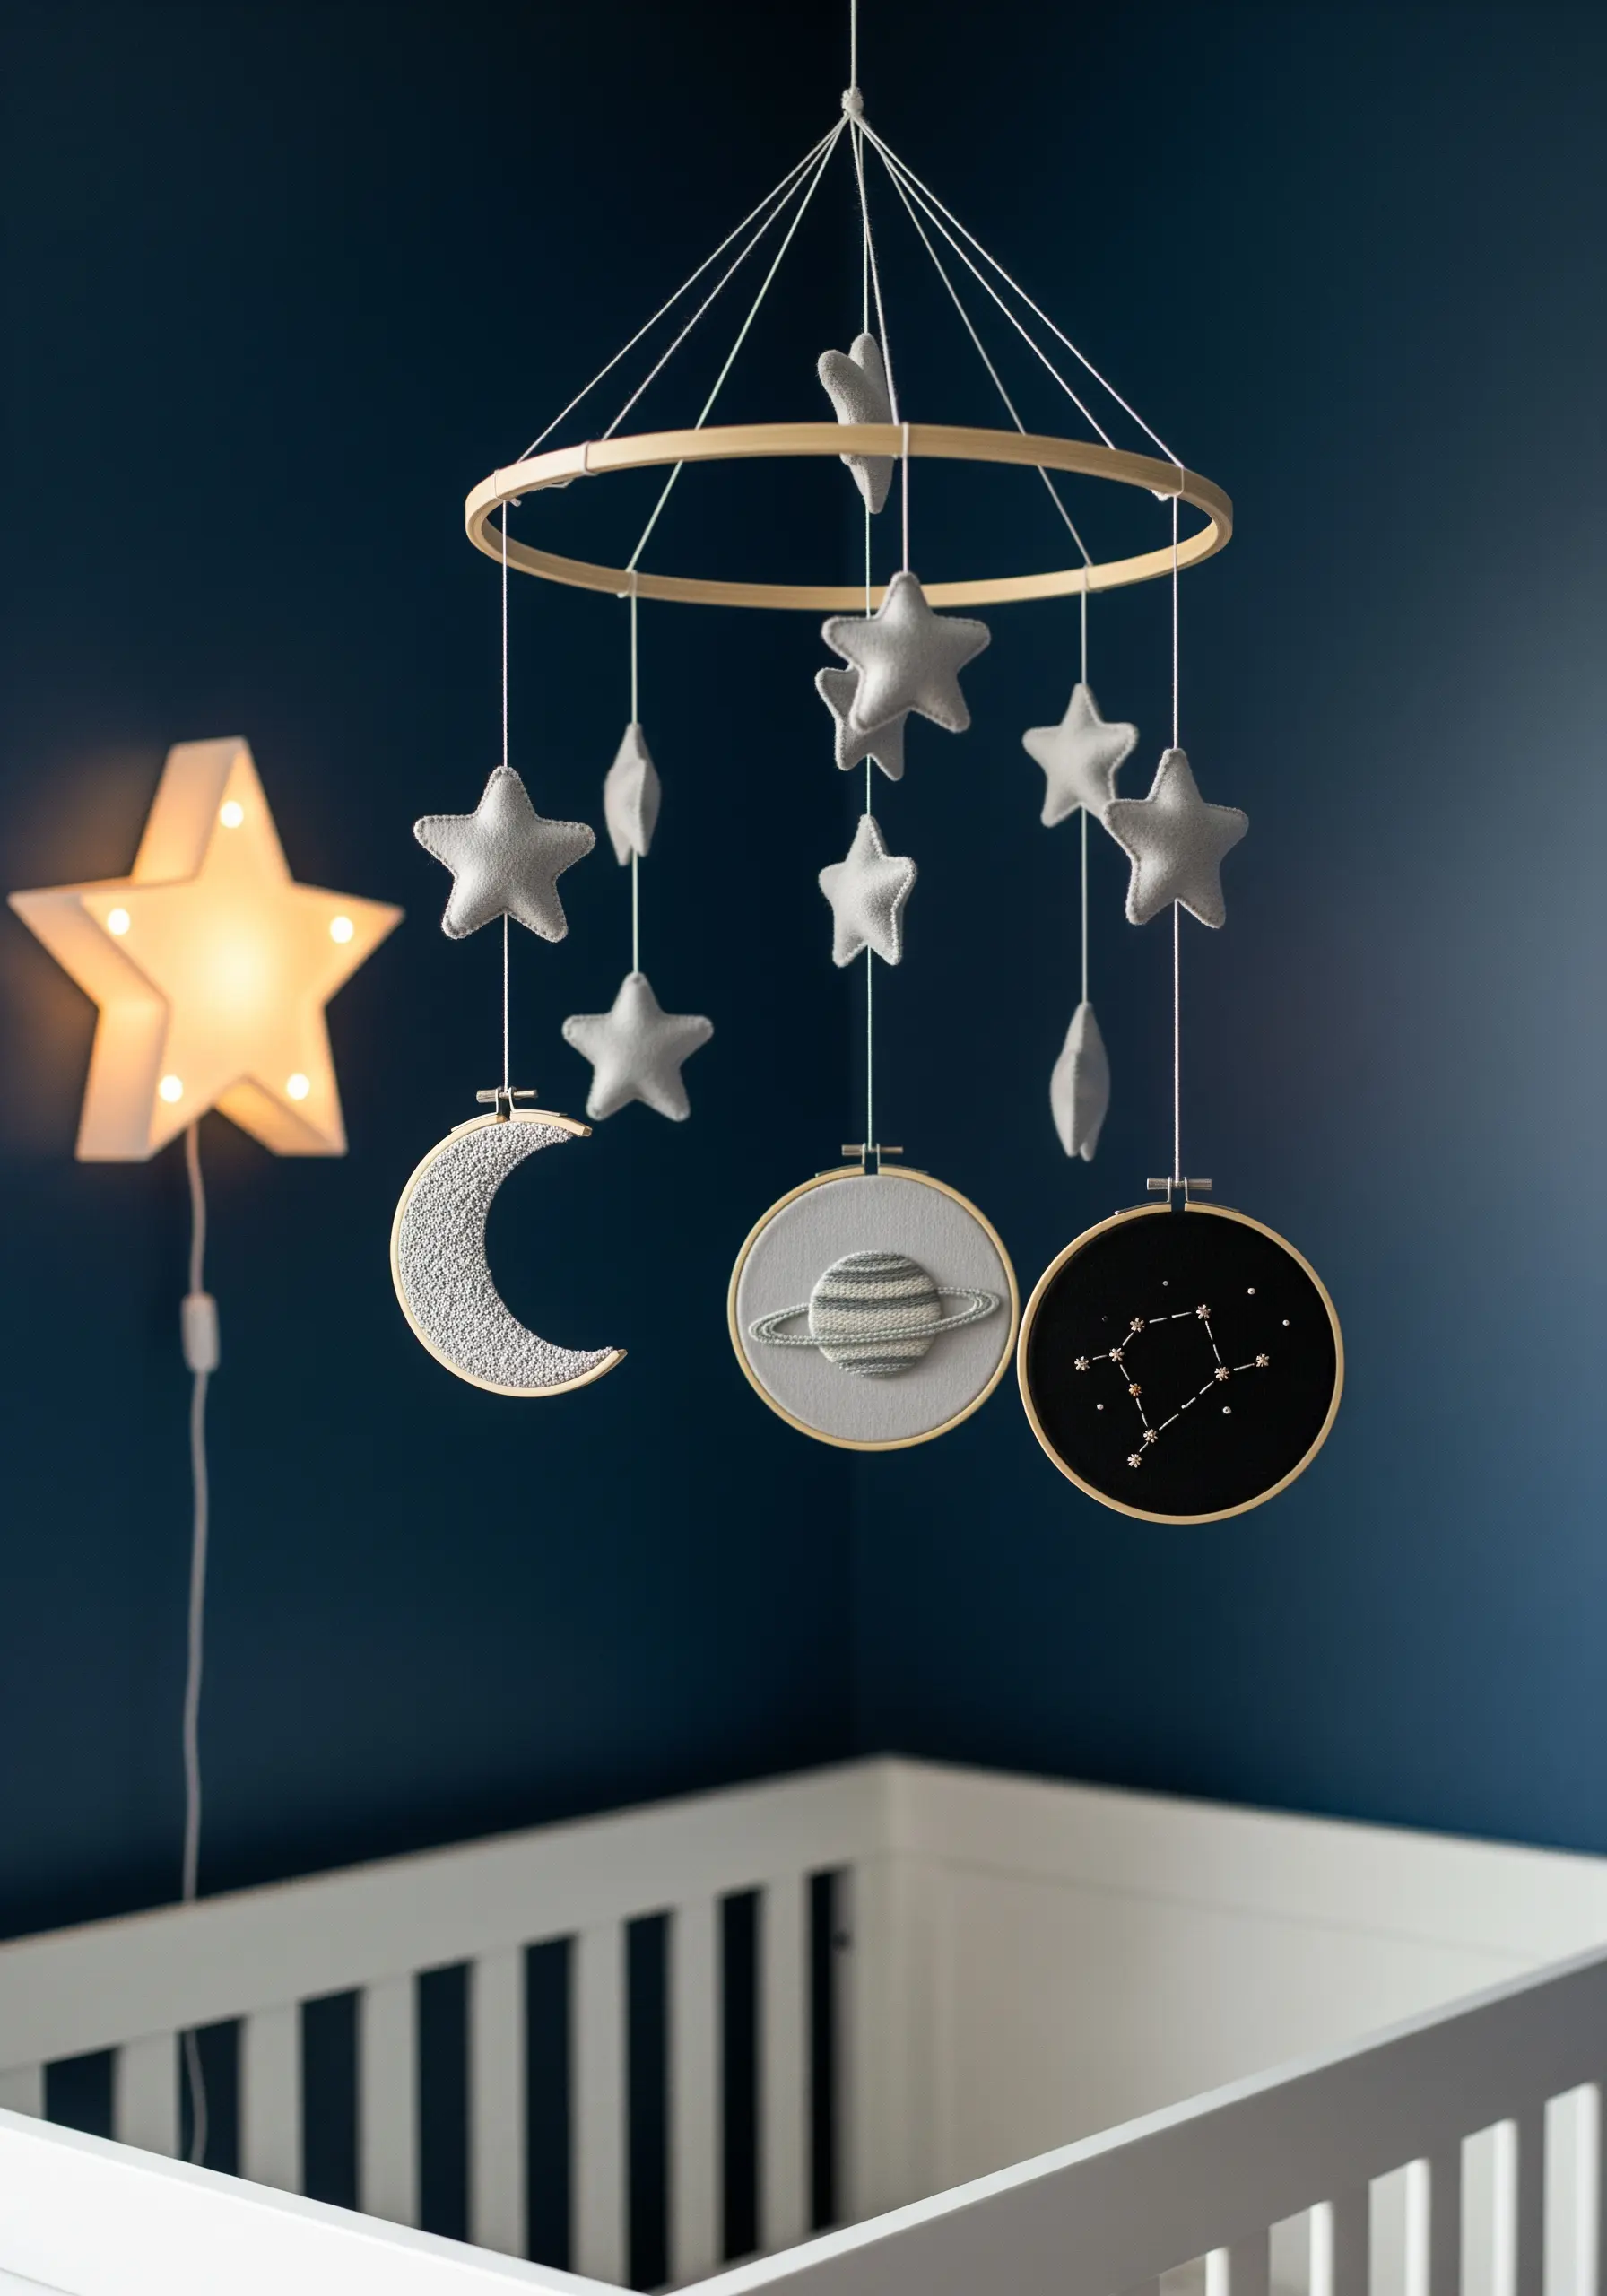
Combine small embroidered hoops with soft, handmade felt elements to create a magical nursery mobile.
In one hoop, stitch a planet using satin stitch in two tones to create a shadow. In another, use silver metallic thread to embroider a constellation on dark fabric.
Cut star and moon shapes from felt, stitch them together with a blanket stitch, and stuff them lightly with poly-fil.
Assemble all your pieces by hanging them at varying lengths from a larger 10- or 12-inch hoop.
18. Brighten Your Workspace with a Motivational Message
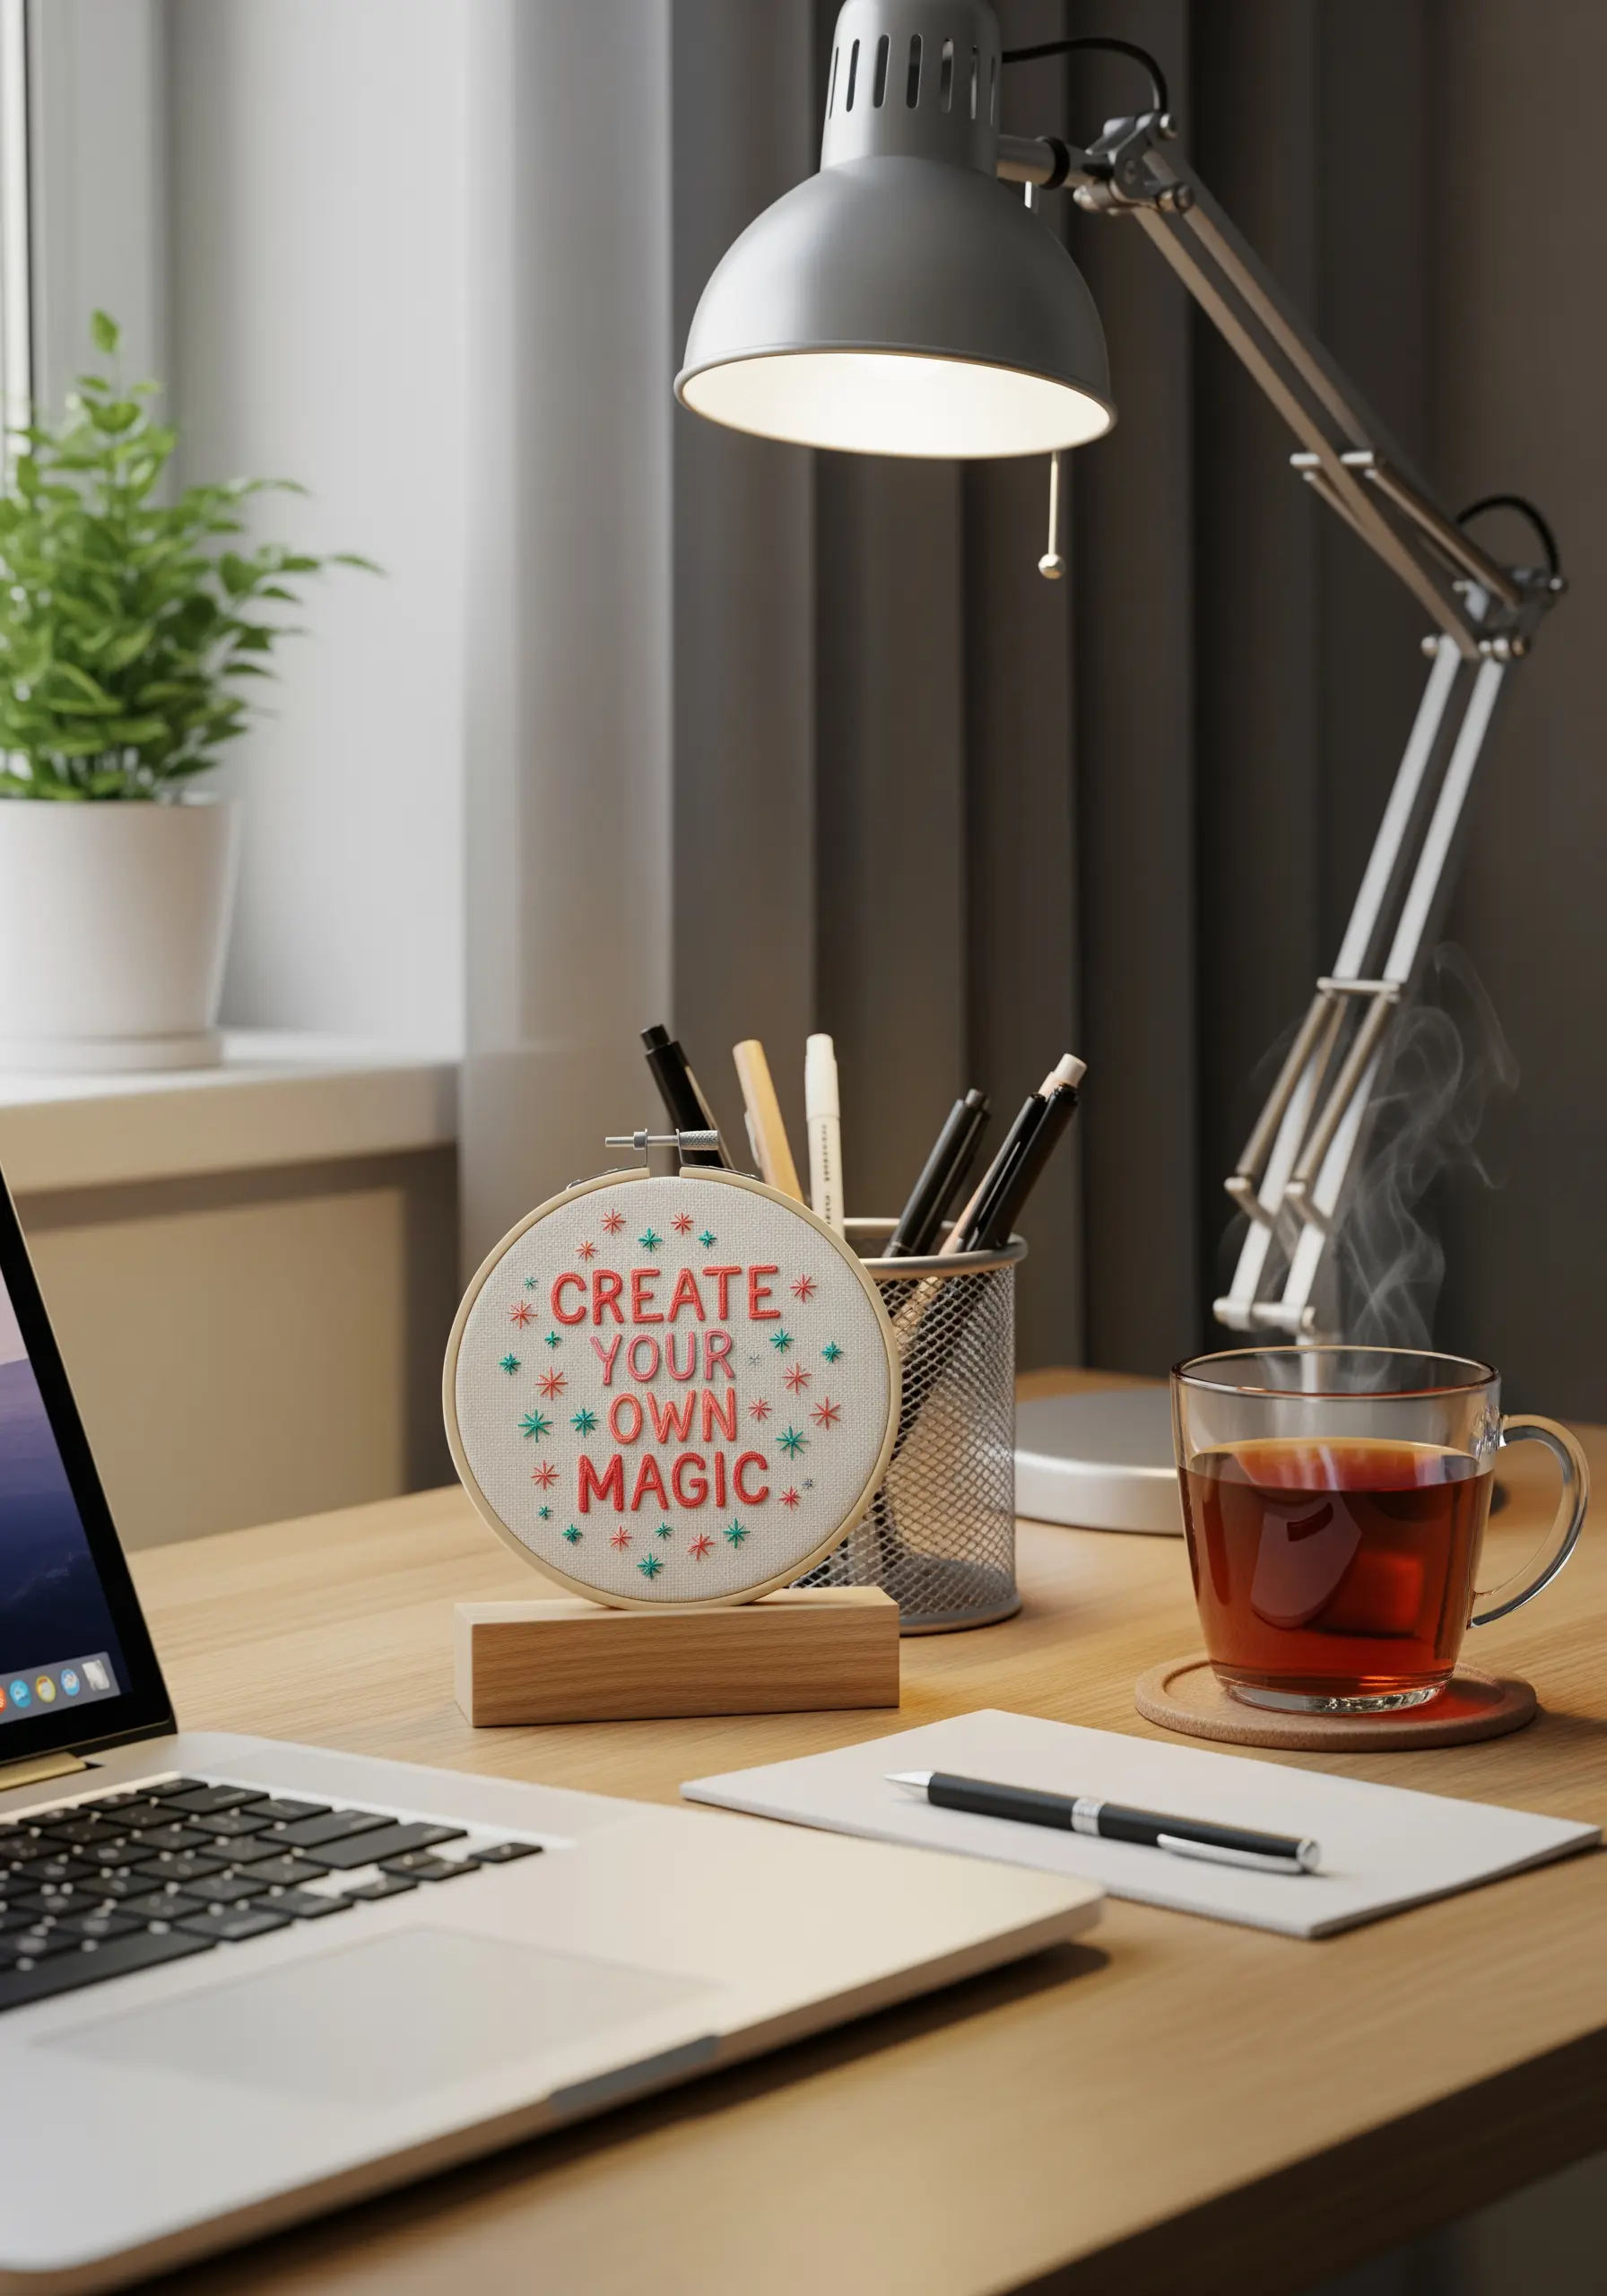
A small, cheerful hoop is the perfect accessory to personalize your desk and keep you inspired.
Cross-stitch on Aida cloth is ideal for creating bold, legible text with a clean, graphic quality.
Add visual sparkle by stitching tiny starbursts between the words. Simply create these with eight small straight stitches radiating from a central point.
Displaying your work in a small wooden block stand is a simple way to make it look polished and intentional.
19. Cultivate a Kitchen Garden Gallery
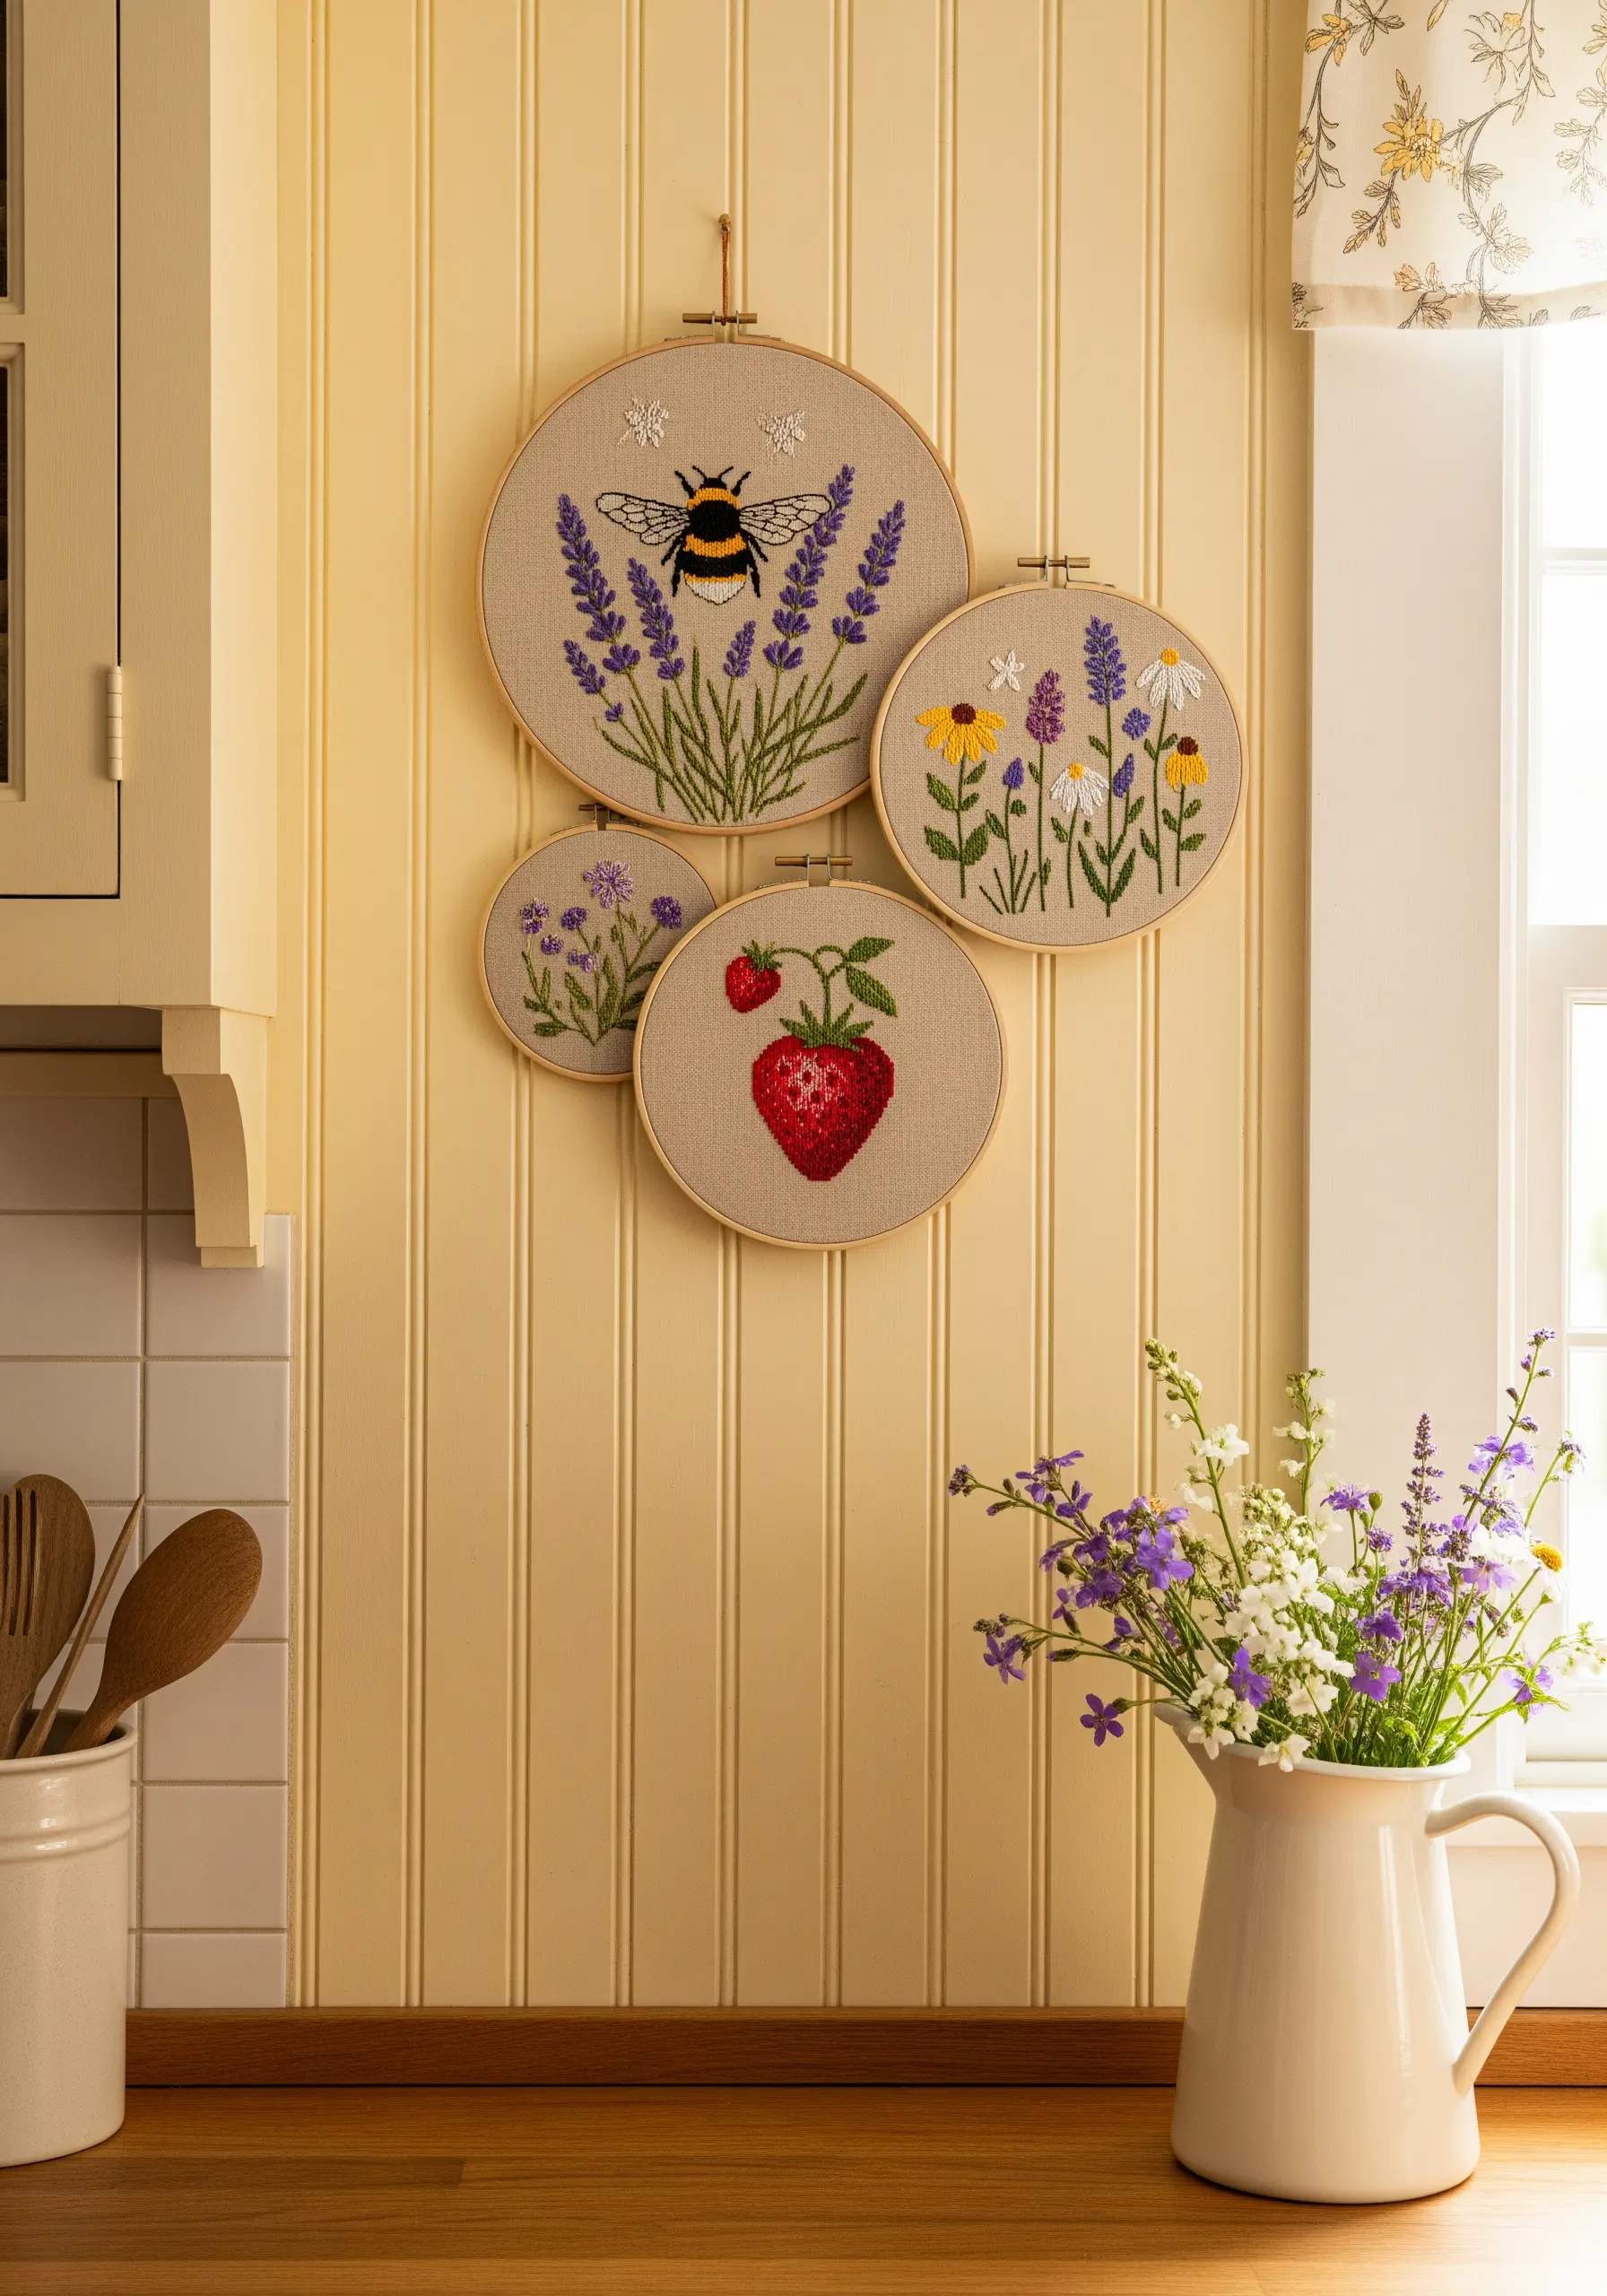
Brighten your kitchen walls with a cheerful collection of garden-themed embroidery.
To make the strawberry seeds pop, first complete the red body with satin stitch, then add yellow or white French knots on top.
For the bee’s wings, create a delicate, transparent effect by using a single strand of light grey thread in an open fishbone stitch.
Grouping these varied nature motifs together creates the feeling of a vibrant, hand-stitched garden patch.
20. Paint with Thread for Vibrant Landscapes
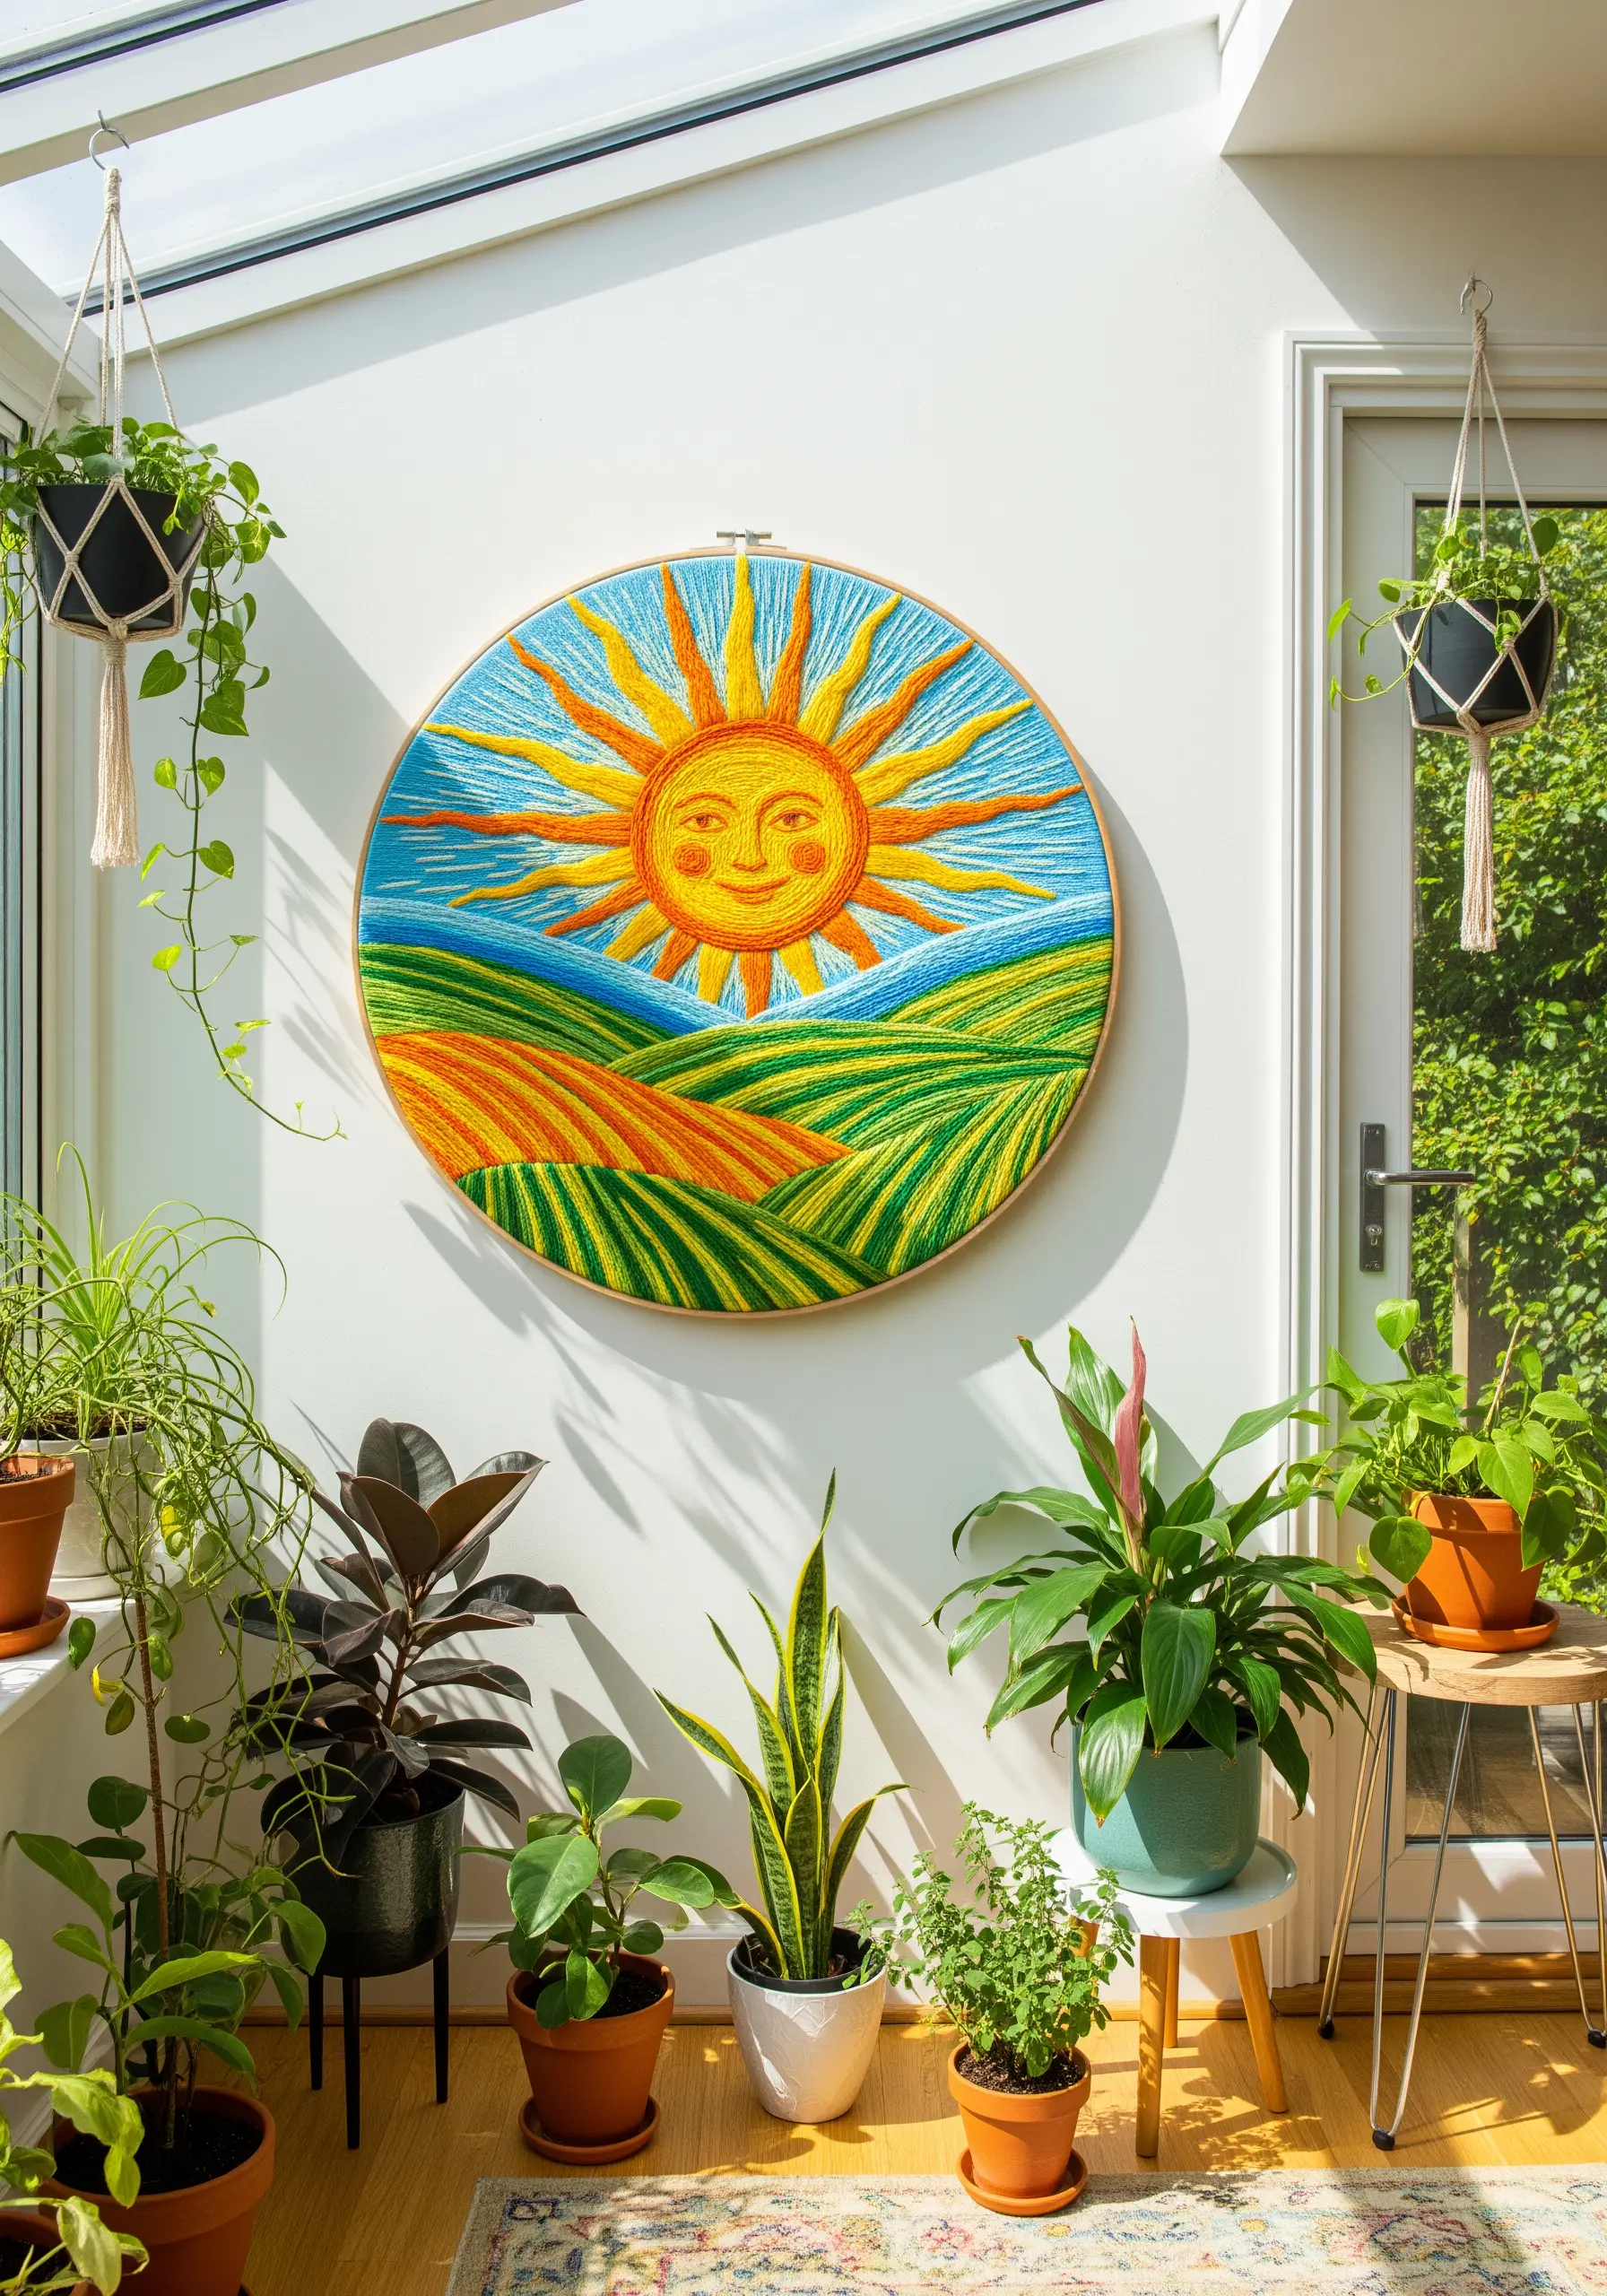
To create a design with so much movement and color, you’ll want to use thread painting techniques.
Use the long-and-short stitch to seamlessly blend different shades of yellow and orange for the sun’s rays, creating a radiant gradient.
For the rolling hills, alternate the direction of your satin stitches for each field. This simple shift in angle will define the landscape and create a beautiful, quilt-like texture.
This approach transforms floss into paint, allowing you to create rich, dynamic scenes.
21. Set a Tone of Tranquility with Minimalist Botanicals
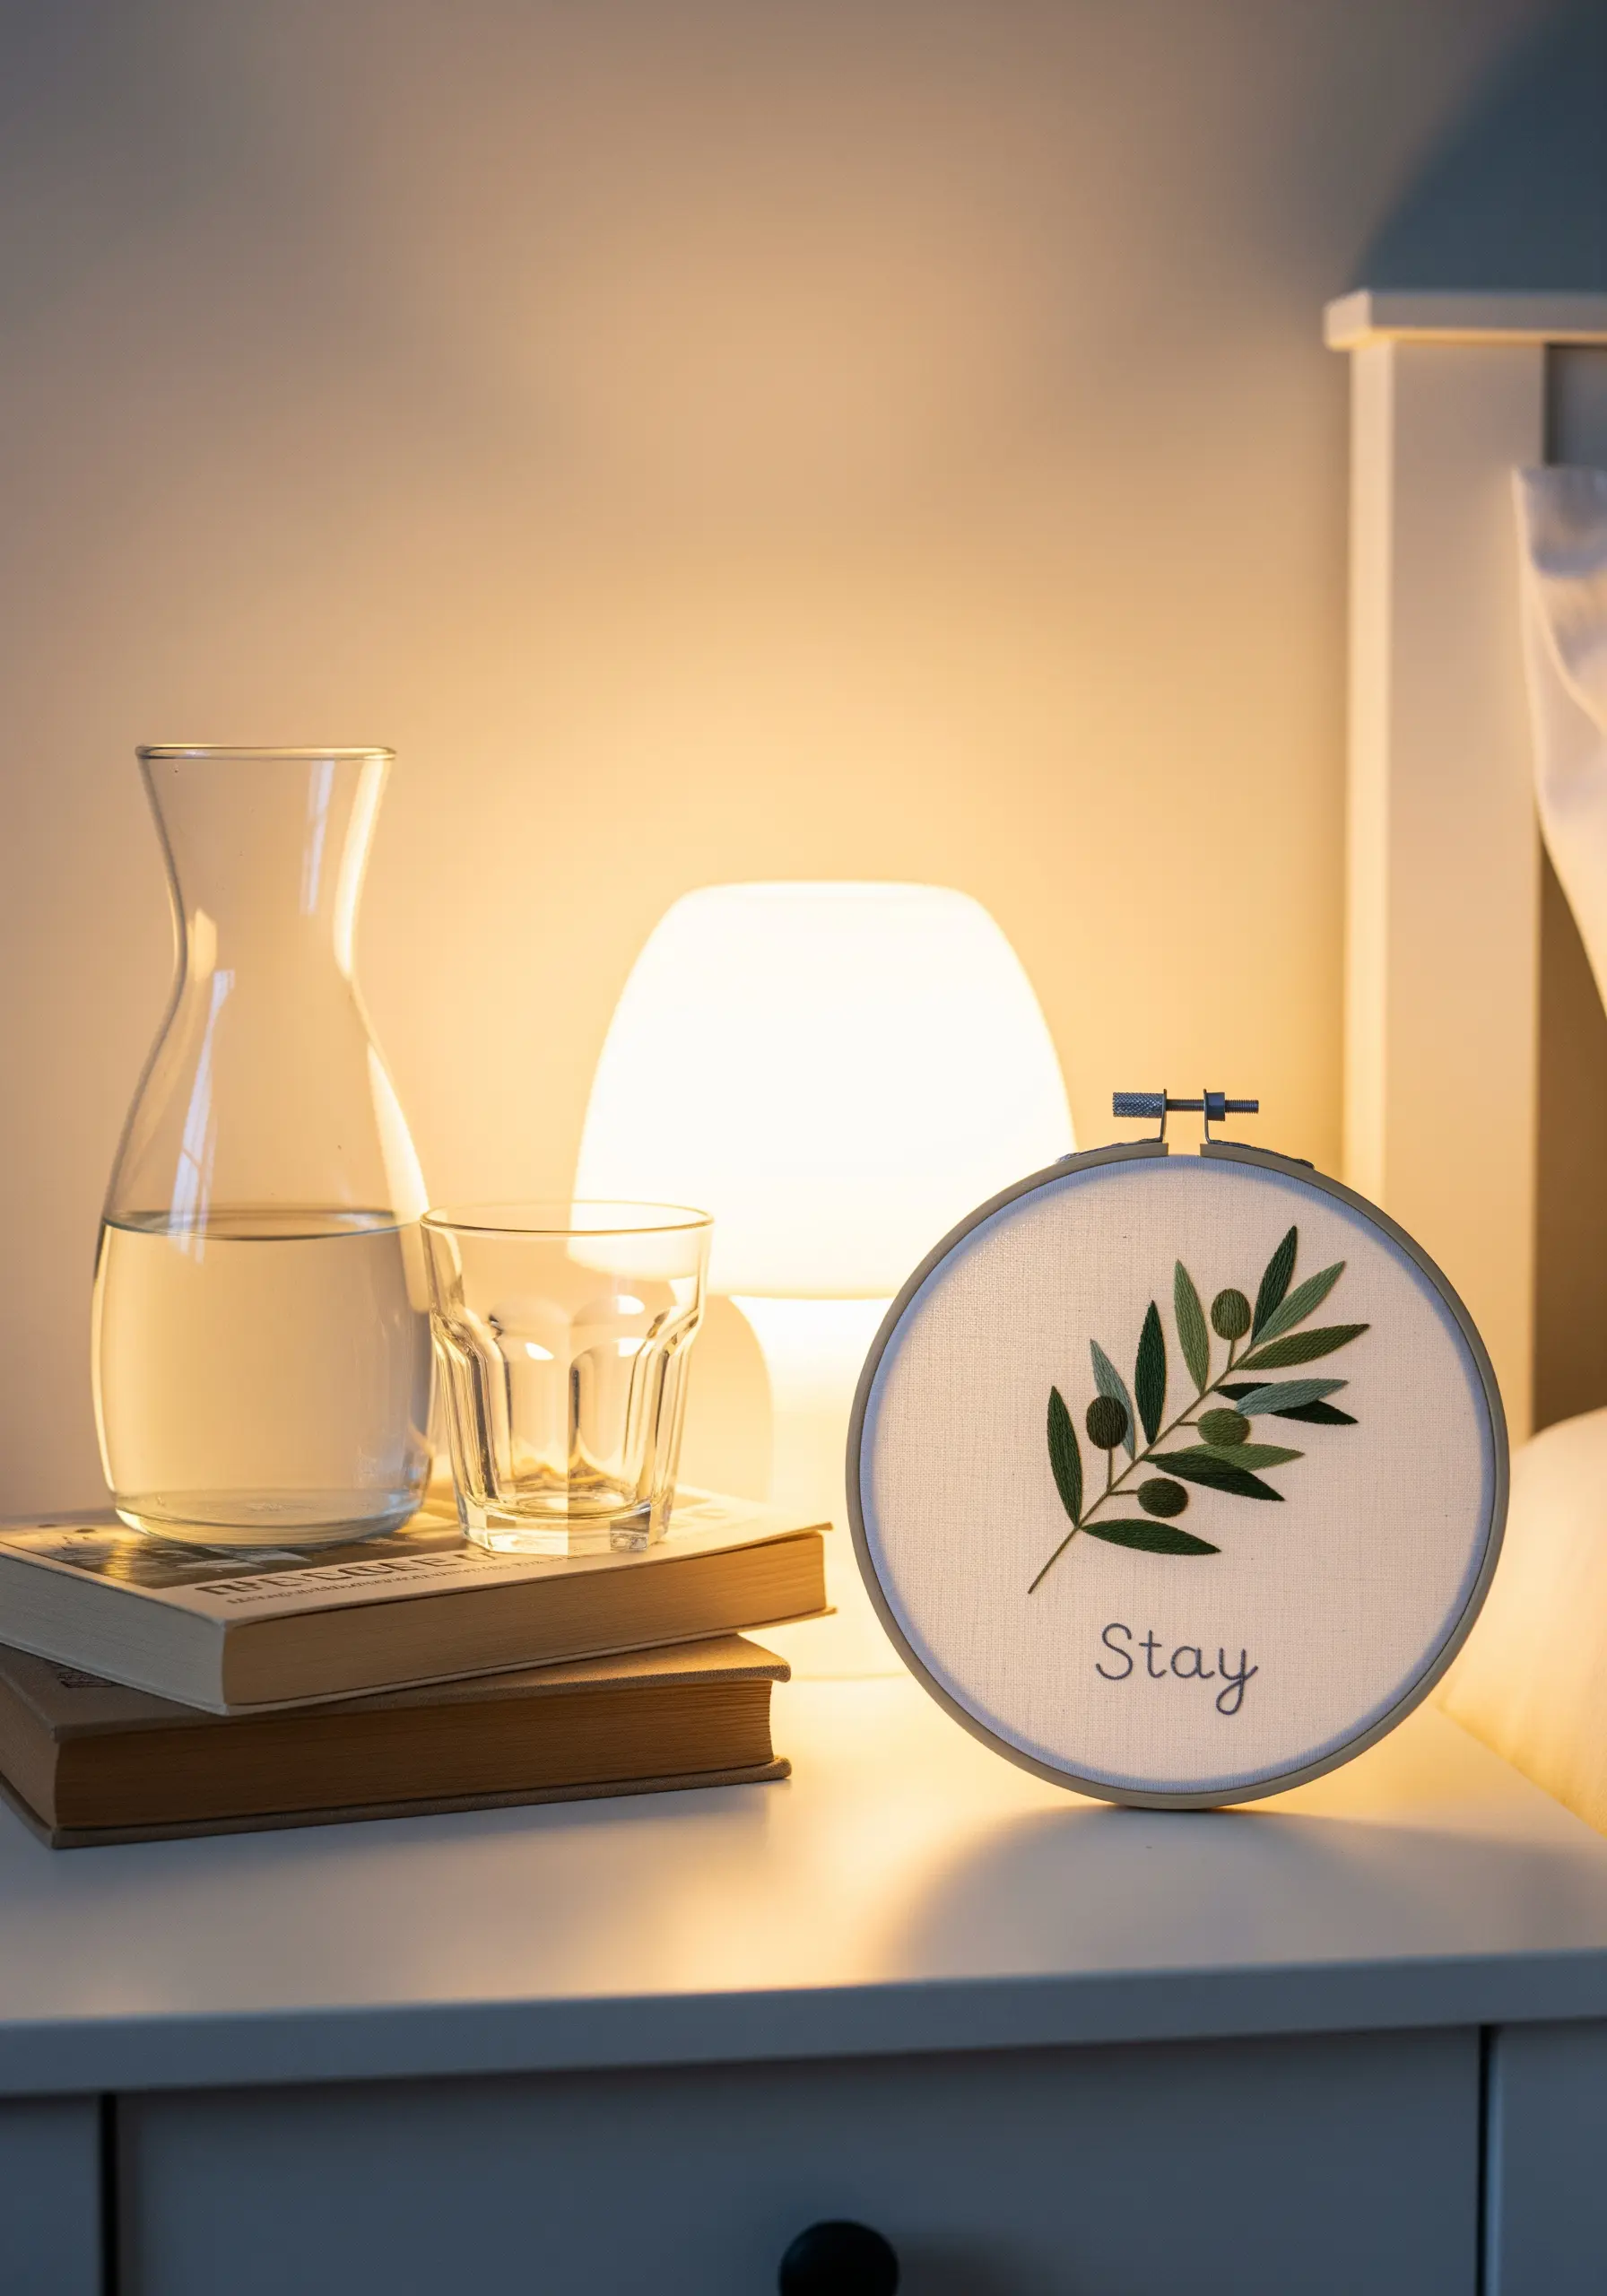
A simple design can have a profound impact, especially in a space meant for rest.
For the olive leaves, use a fishbone stitch. By using two slightly different shades of green floss in your needle at once, you can create subtle, natural-looking variegation with every stitch.
Keep the single word of text clean and understated with a simple backstitch. Its purpose is to support the calming visual, not dominate it.
These gentle botanical embroidery stitches are perfect for creating a serene atmosphere.
22. Use an Oval Hoop to Emphasize Height
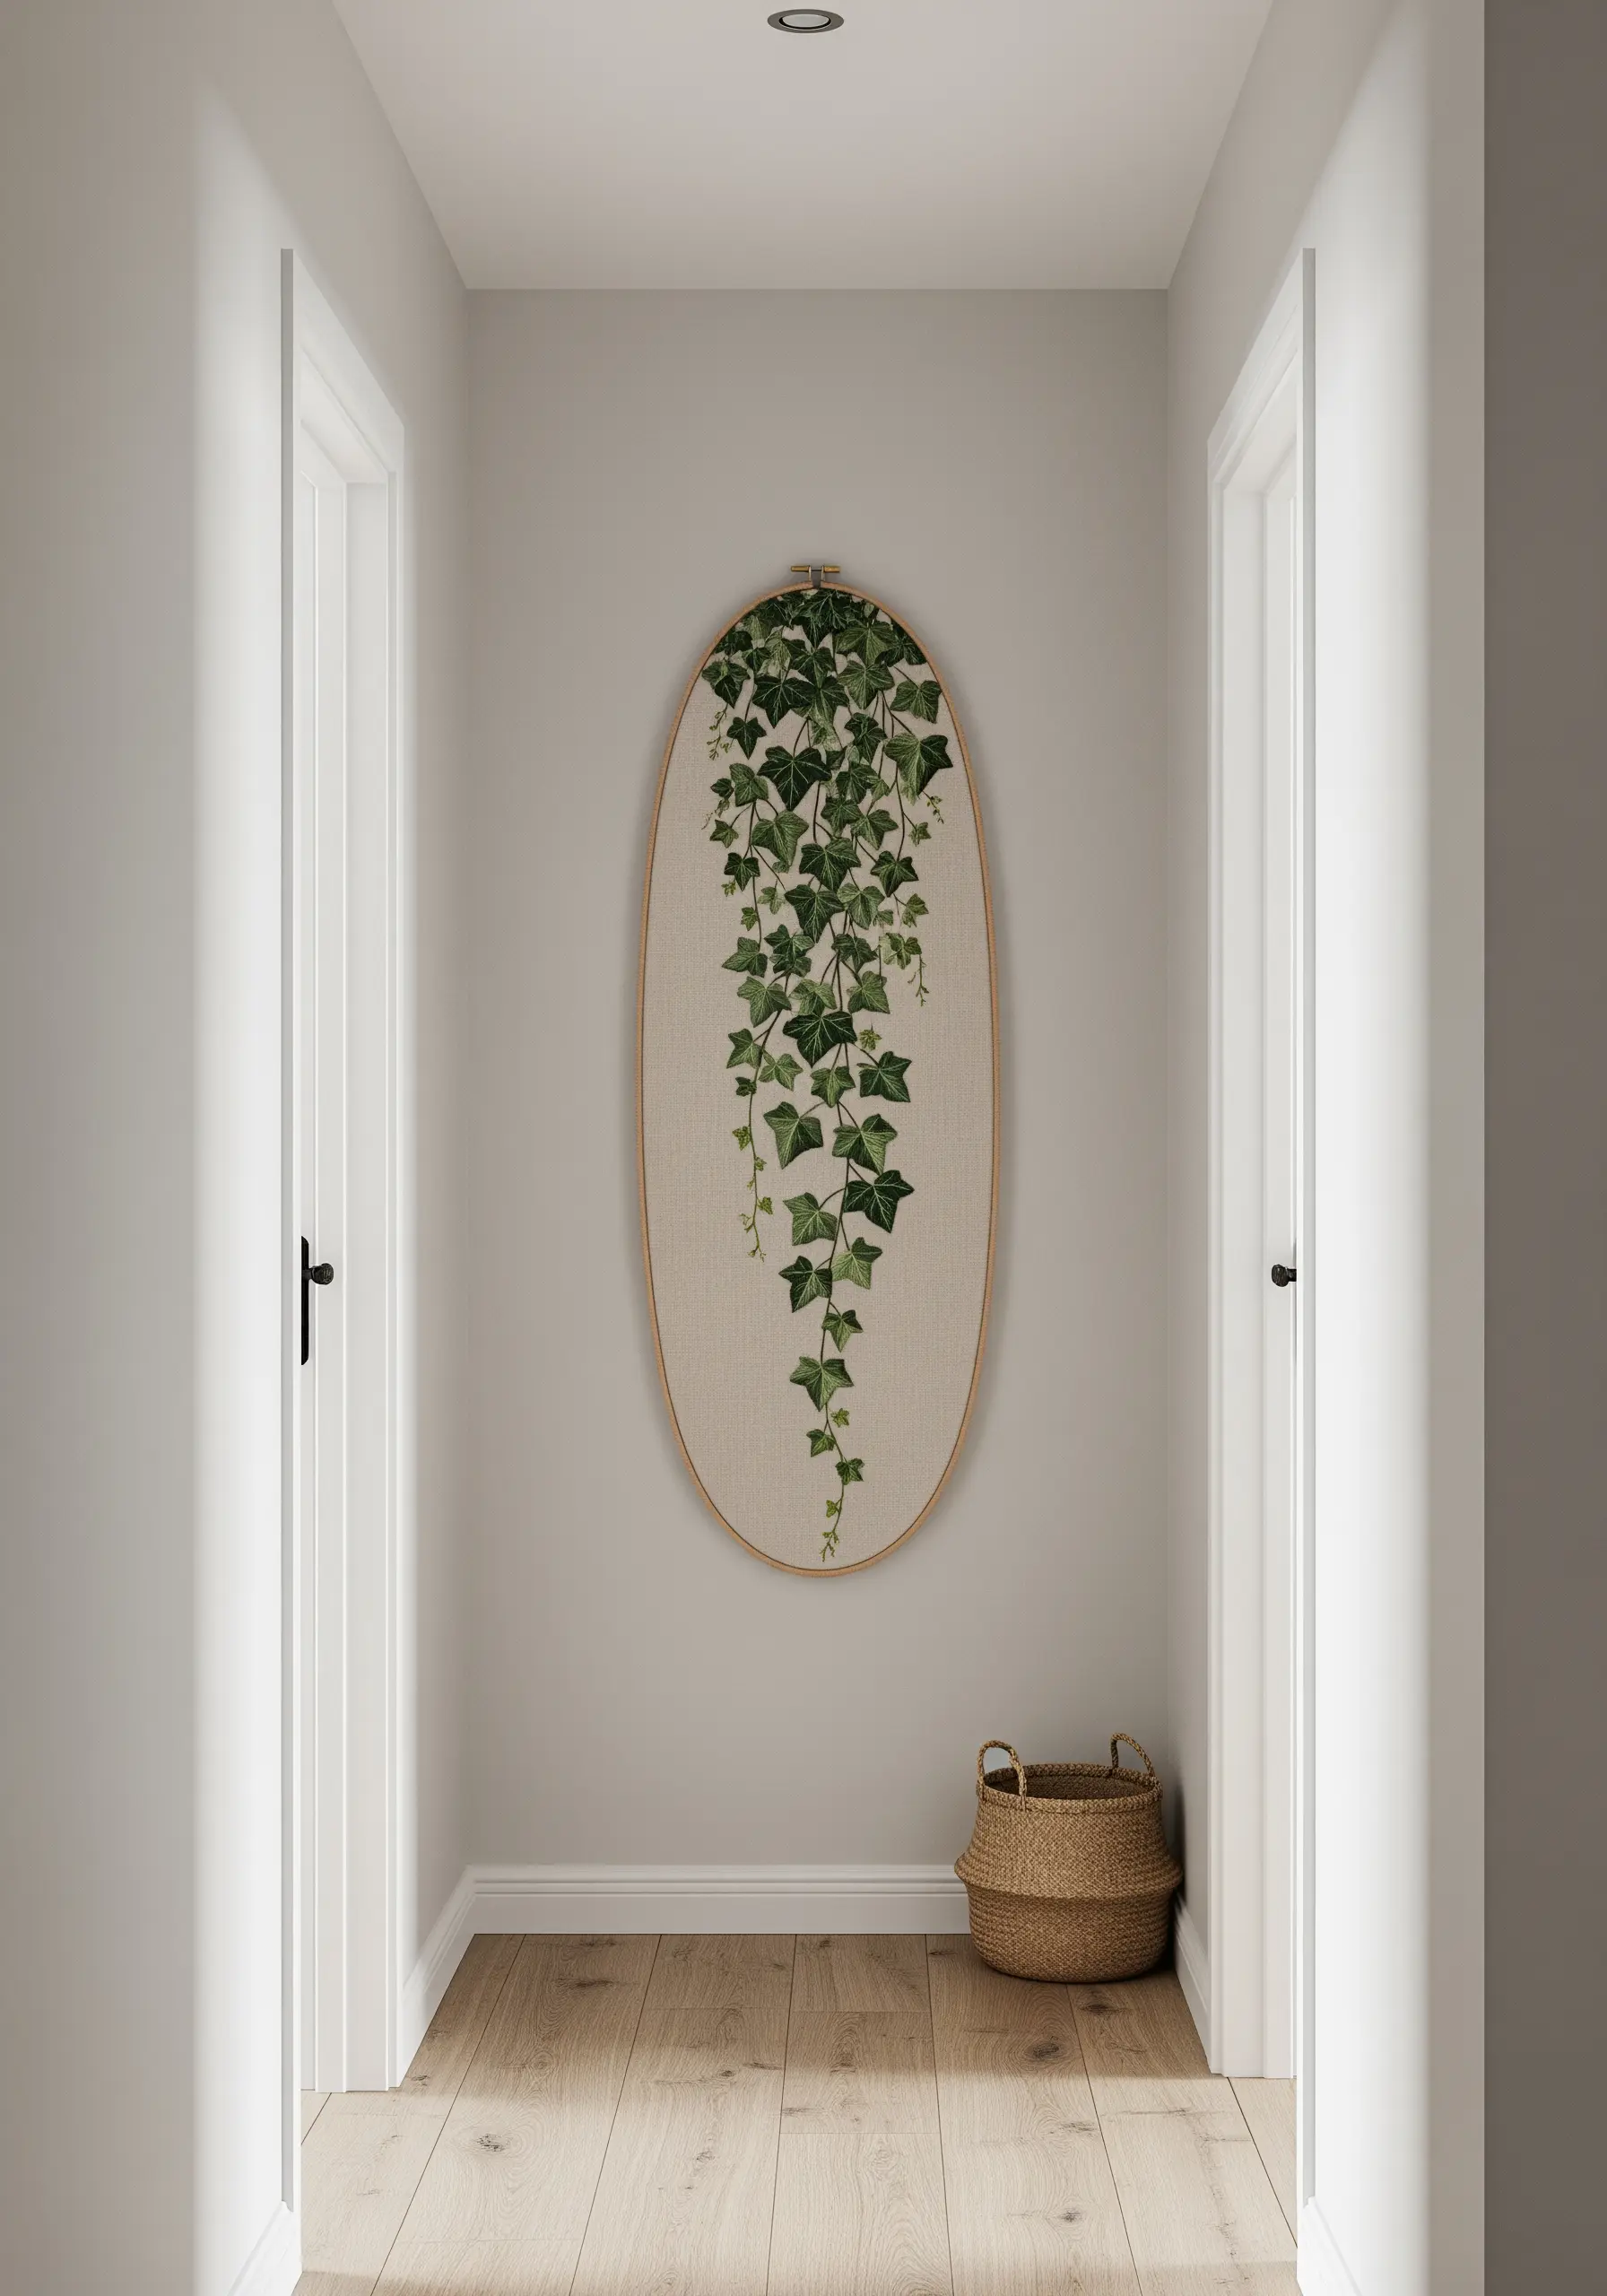
An oval or elliptical hoop is a fantastic choice for designs that have a strong vertical orientation, like a trailing vine or a tall flower.
To make the ivy look realistic, avoid using just one shade of green. Instead, use three or four different tones and stitch each leaf in a single color to mimic natural variation.
Create a sense of movement by stitching the central vine with a slightly wandering stem stitch, rather than a perfectly straight line.
These botanical embroidery wall pieces can make a narrow hallway feel taller and more alive.
23. Create a Lifelike Pet Portrait with Thread Painting
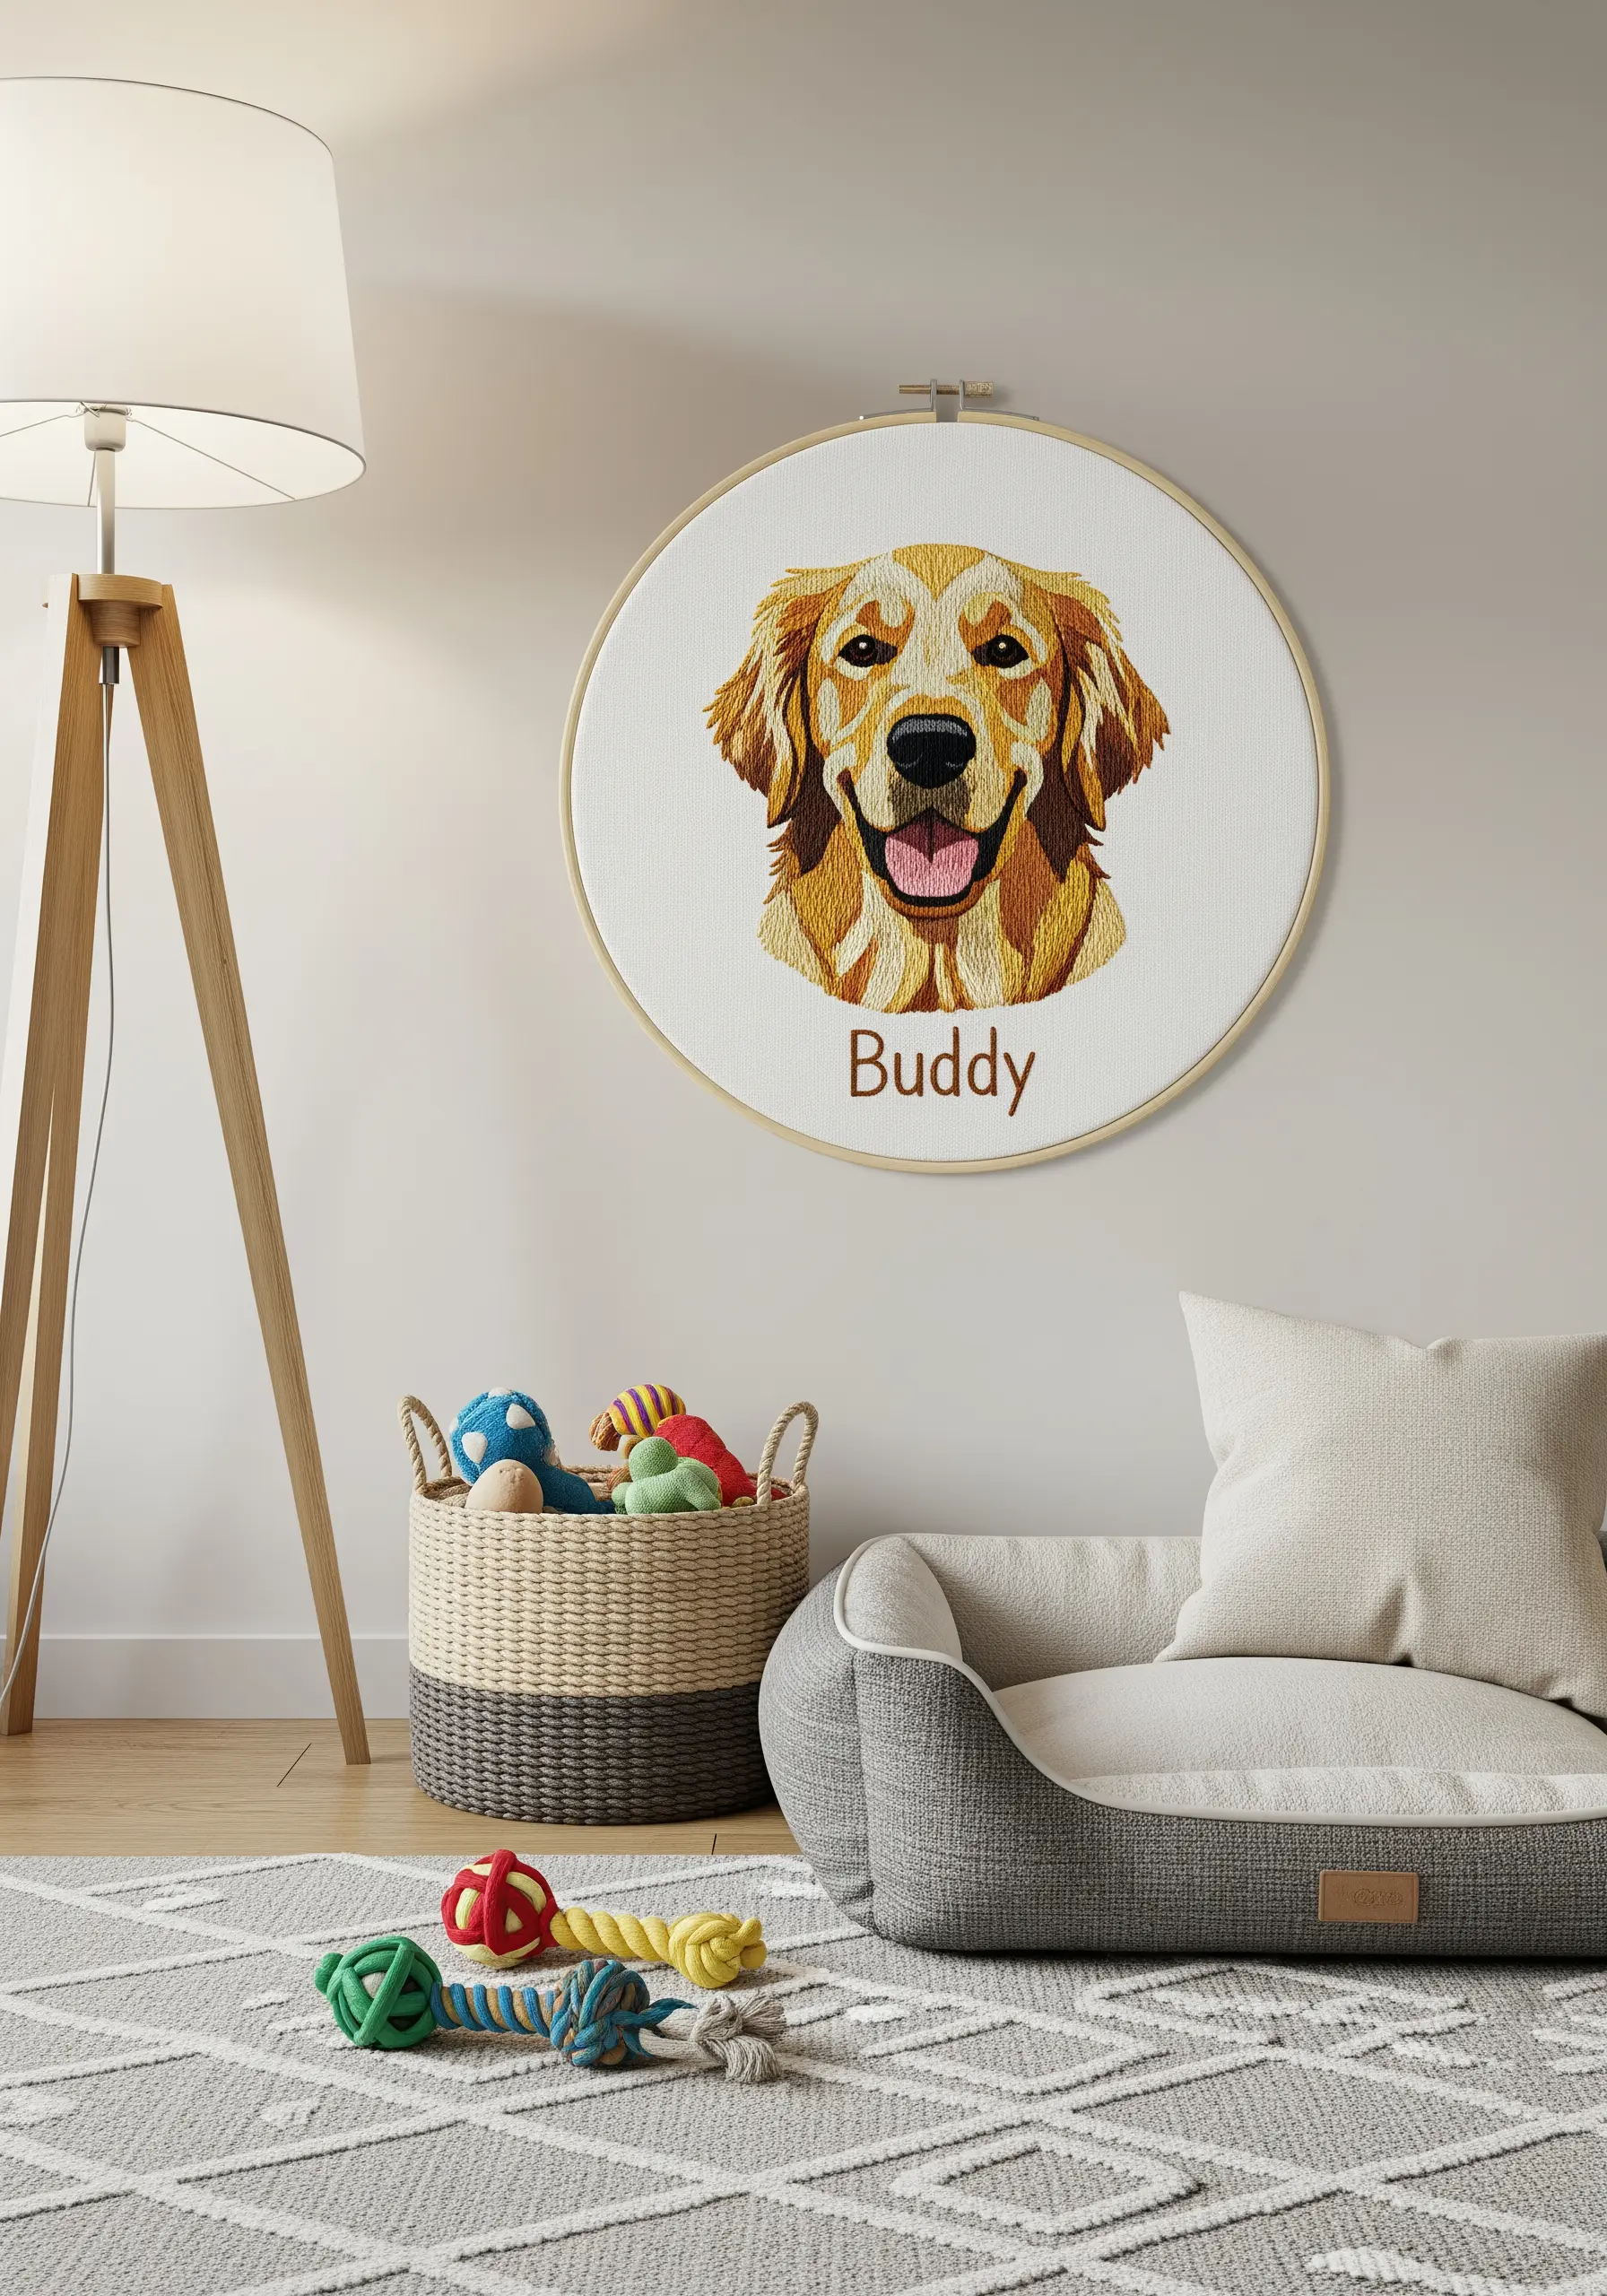
Capturing a beloved pet in thread is all about layering and direction.
Work with a single strand of floss at a time, using short, directional stitches that mimic the natural growth pattern of your pet’s fur.
The key to realism is using a wide palette of similar colors—at least 5-7 shades of gold, cream, and brown for a golden retriever.
Bring the portrait to life by adding a tiny white French knot or a single straight stitch in the eye to create a catchlight.
24. Achieve a Clean, Graphic Look with Blackwork
For a modern, illustration-style effect, you can’t go wrong with simple black thread on a light background.
Use two or three strands of black floss to give your lines a confident weight.
A stem stitch or a whipped backstitch will create a smoother, more solid line than a standard backstitch, which can sometimes look dotted.
The success of these monochrome black thread designs depends on neat, consistent stitching.
25. Stitch a Miniature Holiday Garland
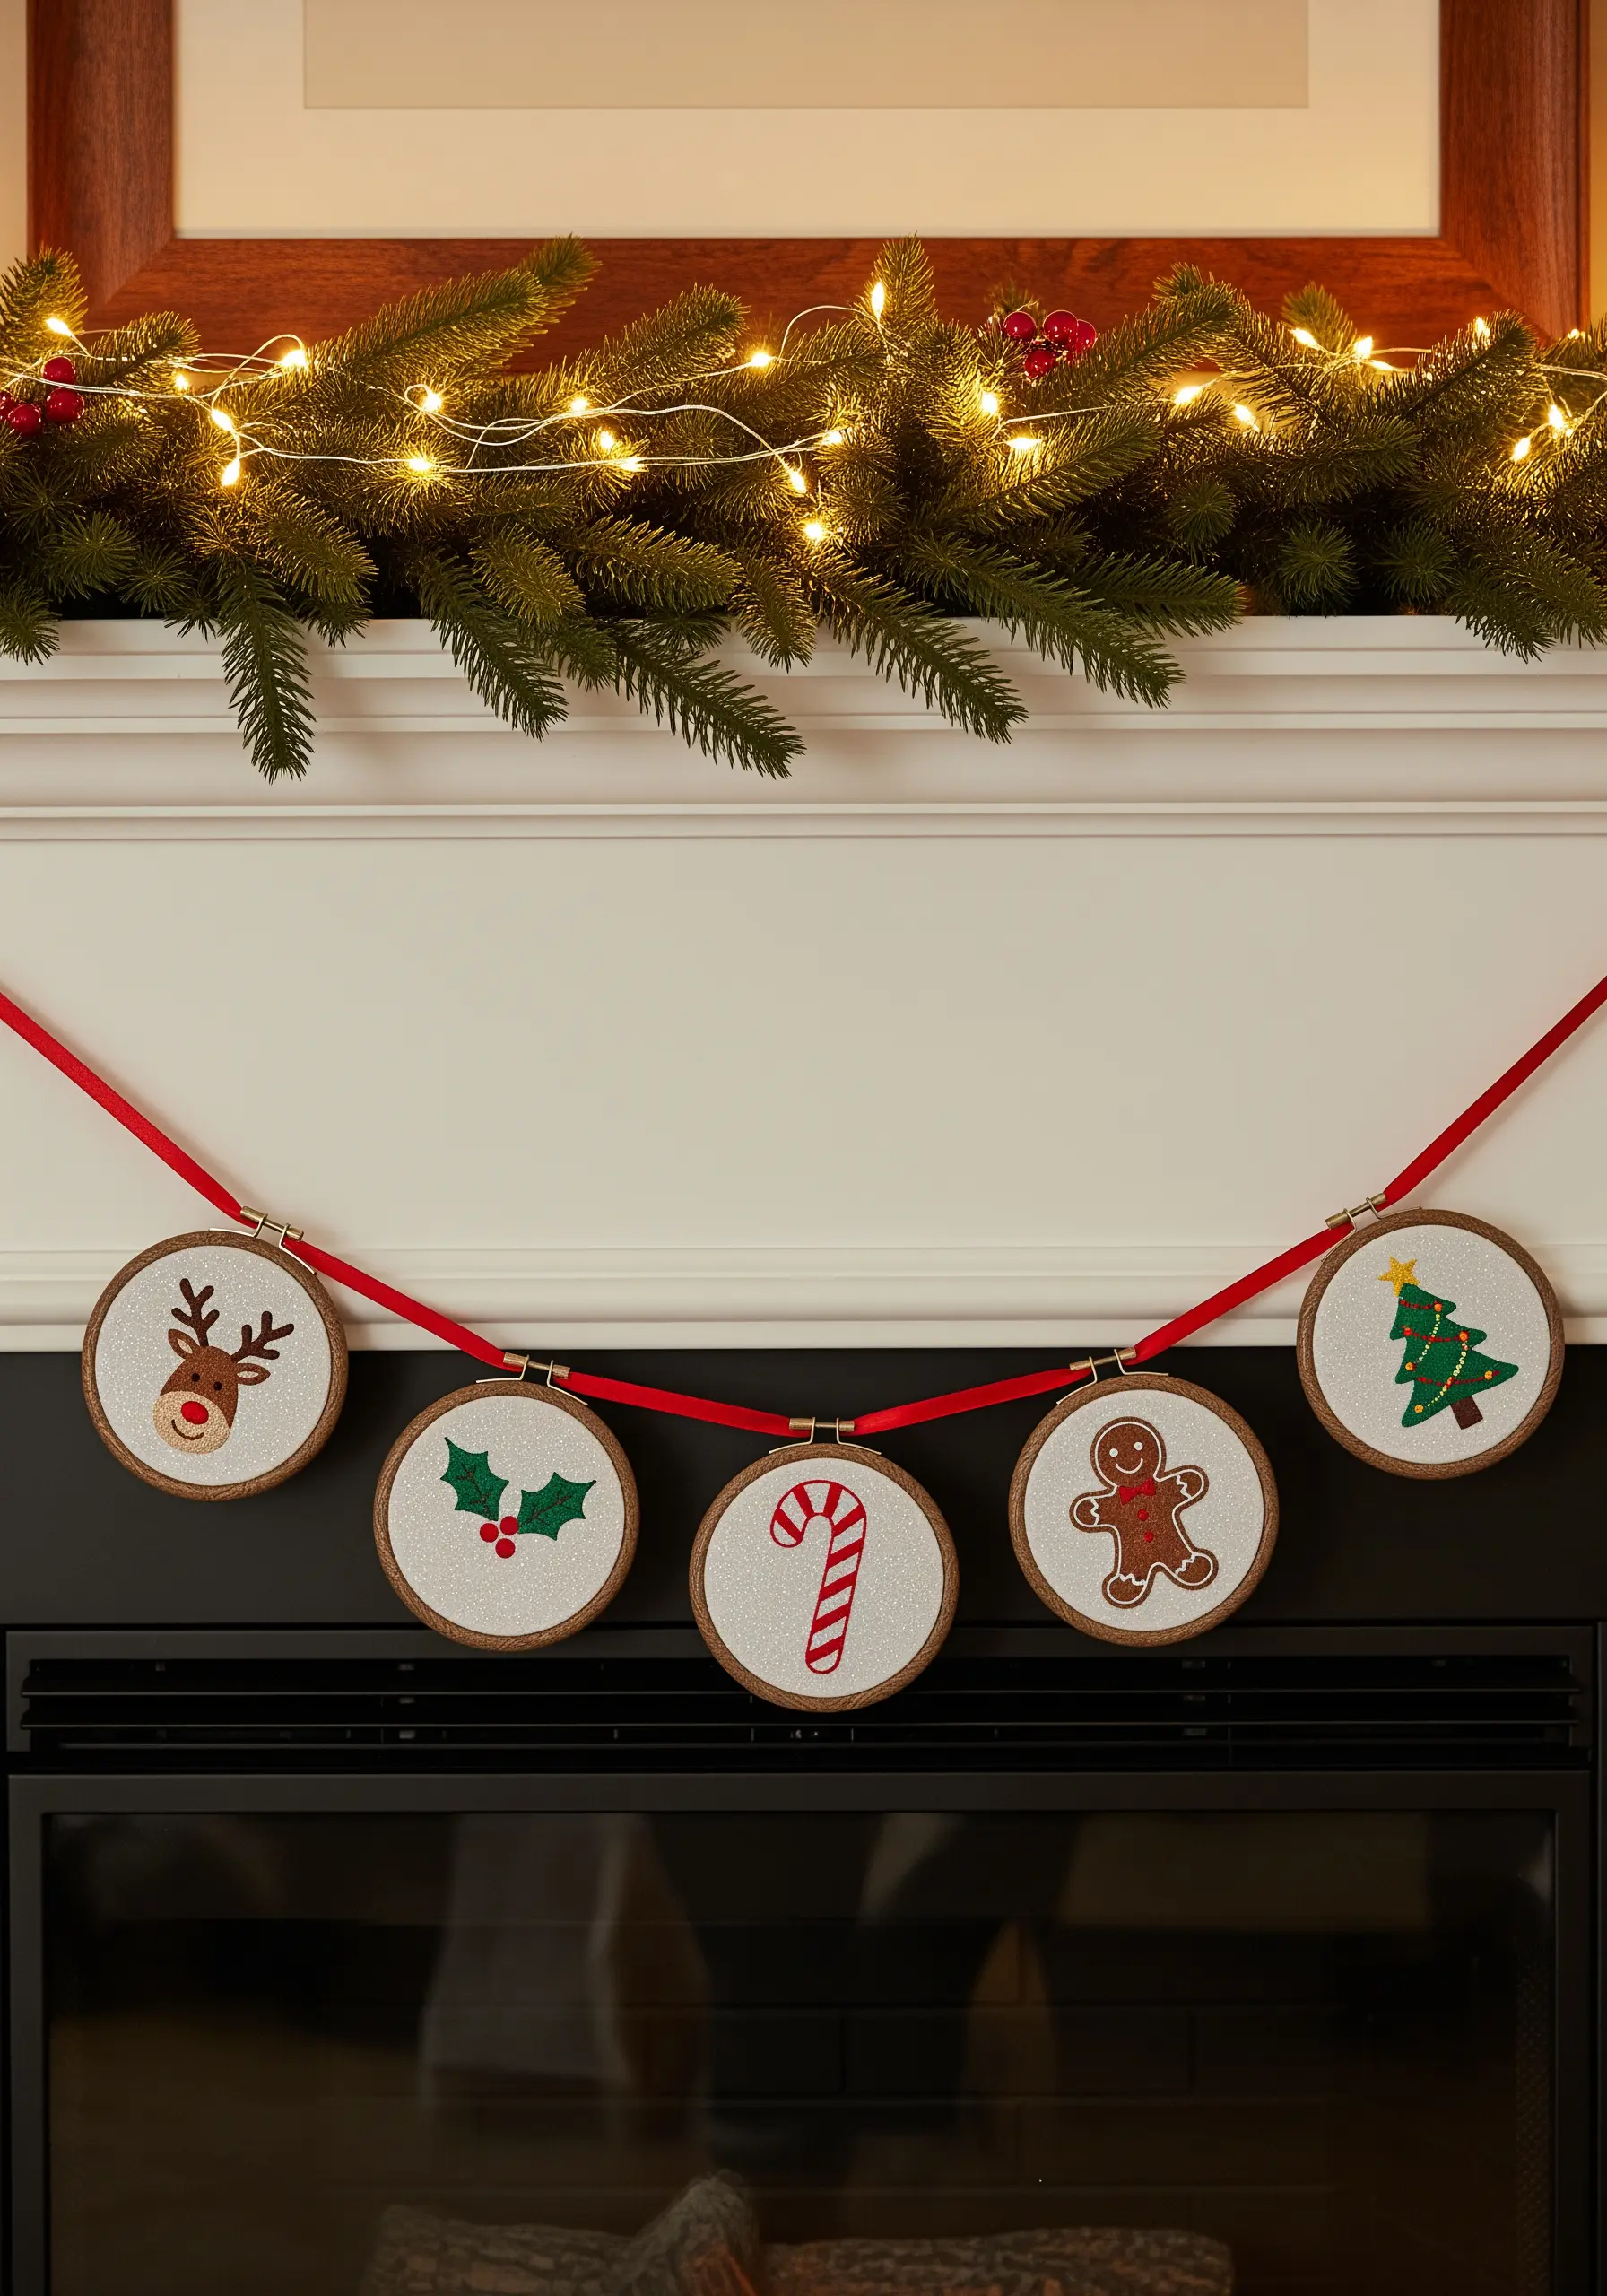
Tiny 3-inch hoops are perfect for creating a festive garland that is both charming and reusable.
Choose simple, iconic motifs that are easy to recognize even on a small scale.
Use basic, beginner-friendly stitches: fill the candy cane with alternating red and white satin stitch, and use French knots for the holly berries.
Once all your mini hoops are stitched and finished, simply thread a festive ribbon through the top screw of each one to string them together.
These adorable mini embroidery ideas are perfect for adding a touch of handmade holiday cheer.
26. Design a Modular Geometric Gallery Wall
Create a large-scale impact by arranging small, simple designs in a structured grid.
The power of this display comes from its consistency: use the same size hoop for every piece and a strictly limited color palette.
Before you begin, sketch out all your designs to ensure they feel balanced as a set. Treat negative space as a key design element.
This is a perfect project for using up leftover thread, as each shape requires only a small amount of color.
27. Combine Appliqué and Embroidery for Playful Designs
For bold, cartoon-style characters, felt appliqué is a fantastic time-saver that adds dimension.
Cut the main body shapes of your characters from colored felt and tack them onto your background fabric.
Secure the edges with a neat, decorative blanket stitch in a matching or contrasting color.
Then, add all the finer details—like eyes, smiles, and decorative patterns—with traditional embroidery stitches on top of the felt.
These playful hoop art ideas are perfect for bringing a child’s imaginative world to life.


