
Creating a piece of embroidery for a baby’s room is more than just a craft; it’s a way of stitching love and personality into the very fabric of their first space. But how do you move beyond simple patterns to create something that feels truly special, polished, and full of life?
The secret often lies in the small details—the direction of a stitch, the number of threads you use, or the way you combine different textures. It’s about learning to see your thread not just as color, but as a tool for sculpting fur, creating light, and building a world your stitches can live in.
Here, we’ll explore techniques that add that professional touch. You’ll discover how to make fur look soft and touchable, how to create depth with simple layering, and how a single, well-placed knot can bring an animal’s expression to life. These are the skills that transform a sweet idea into a treasured keepsake.
1. Sculpting Fur with Directional Satin Stitch
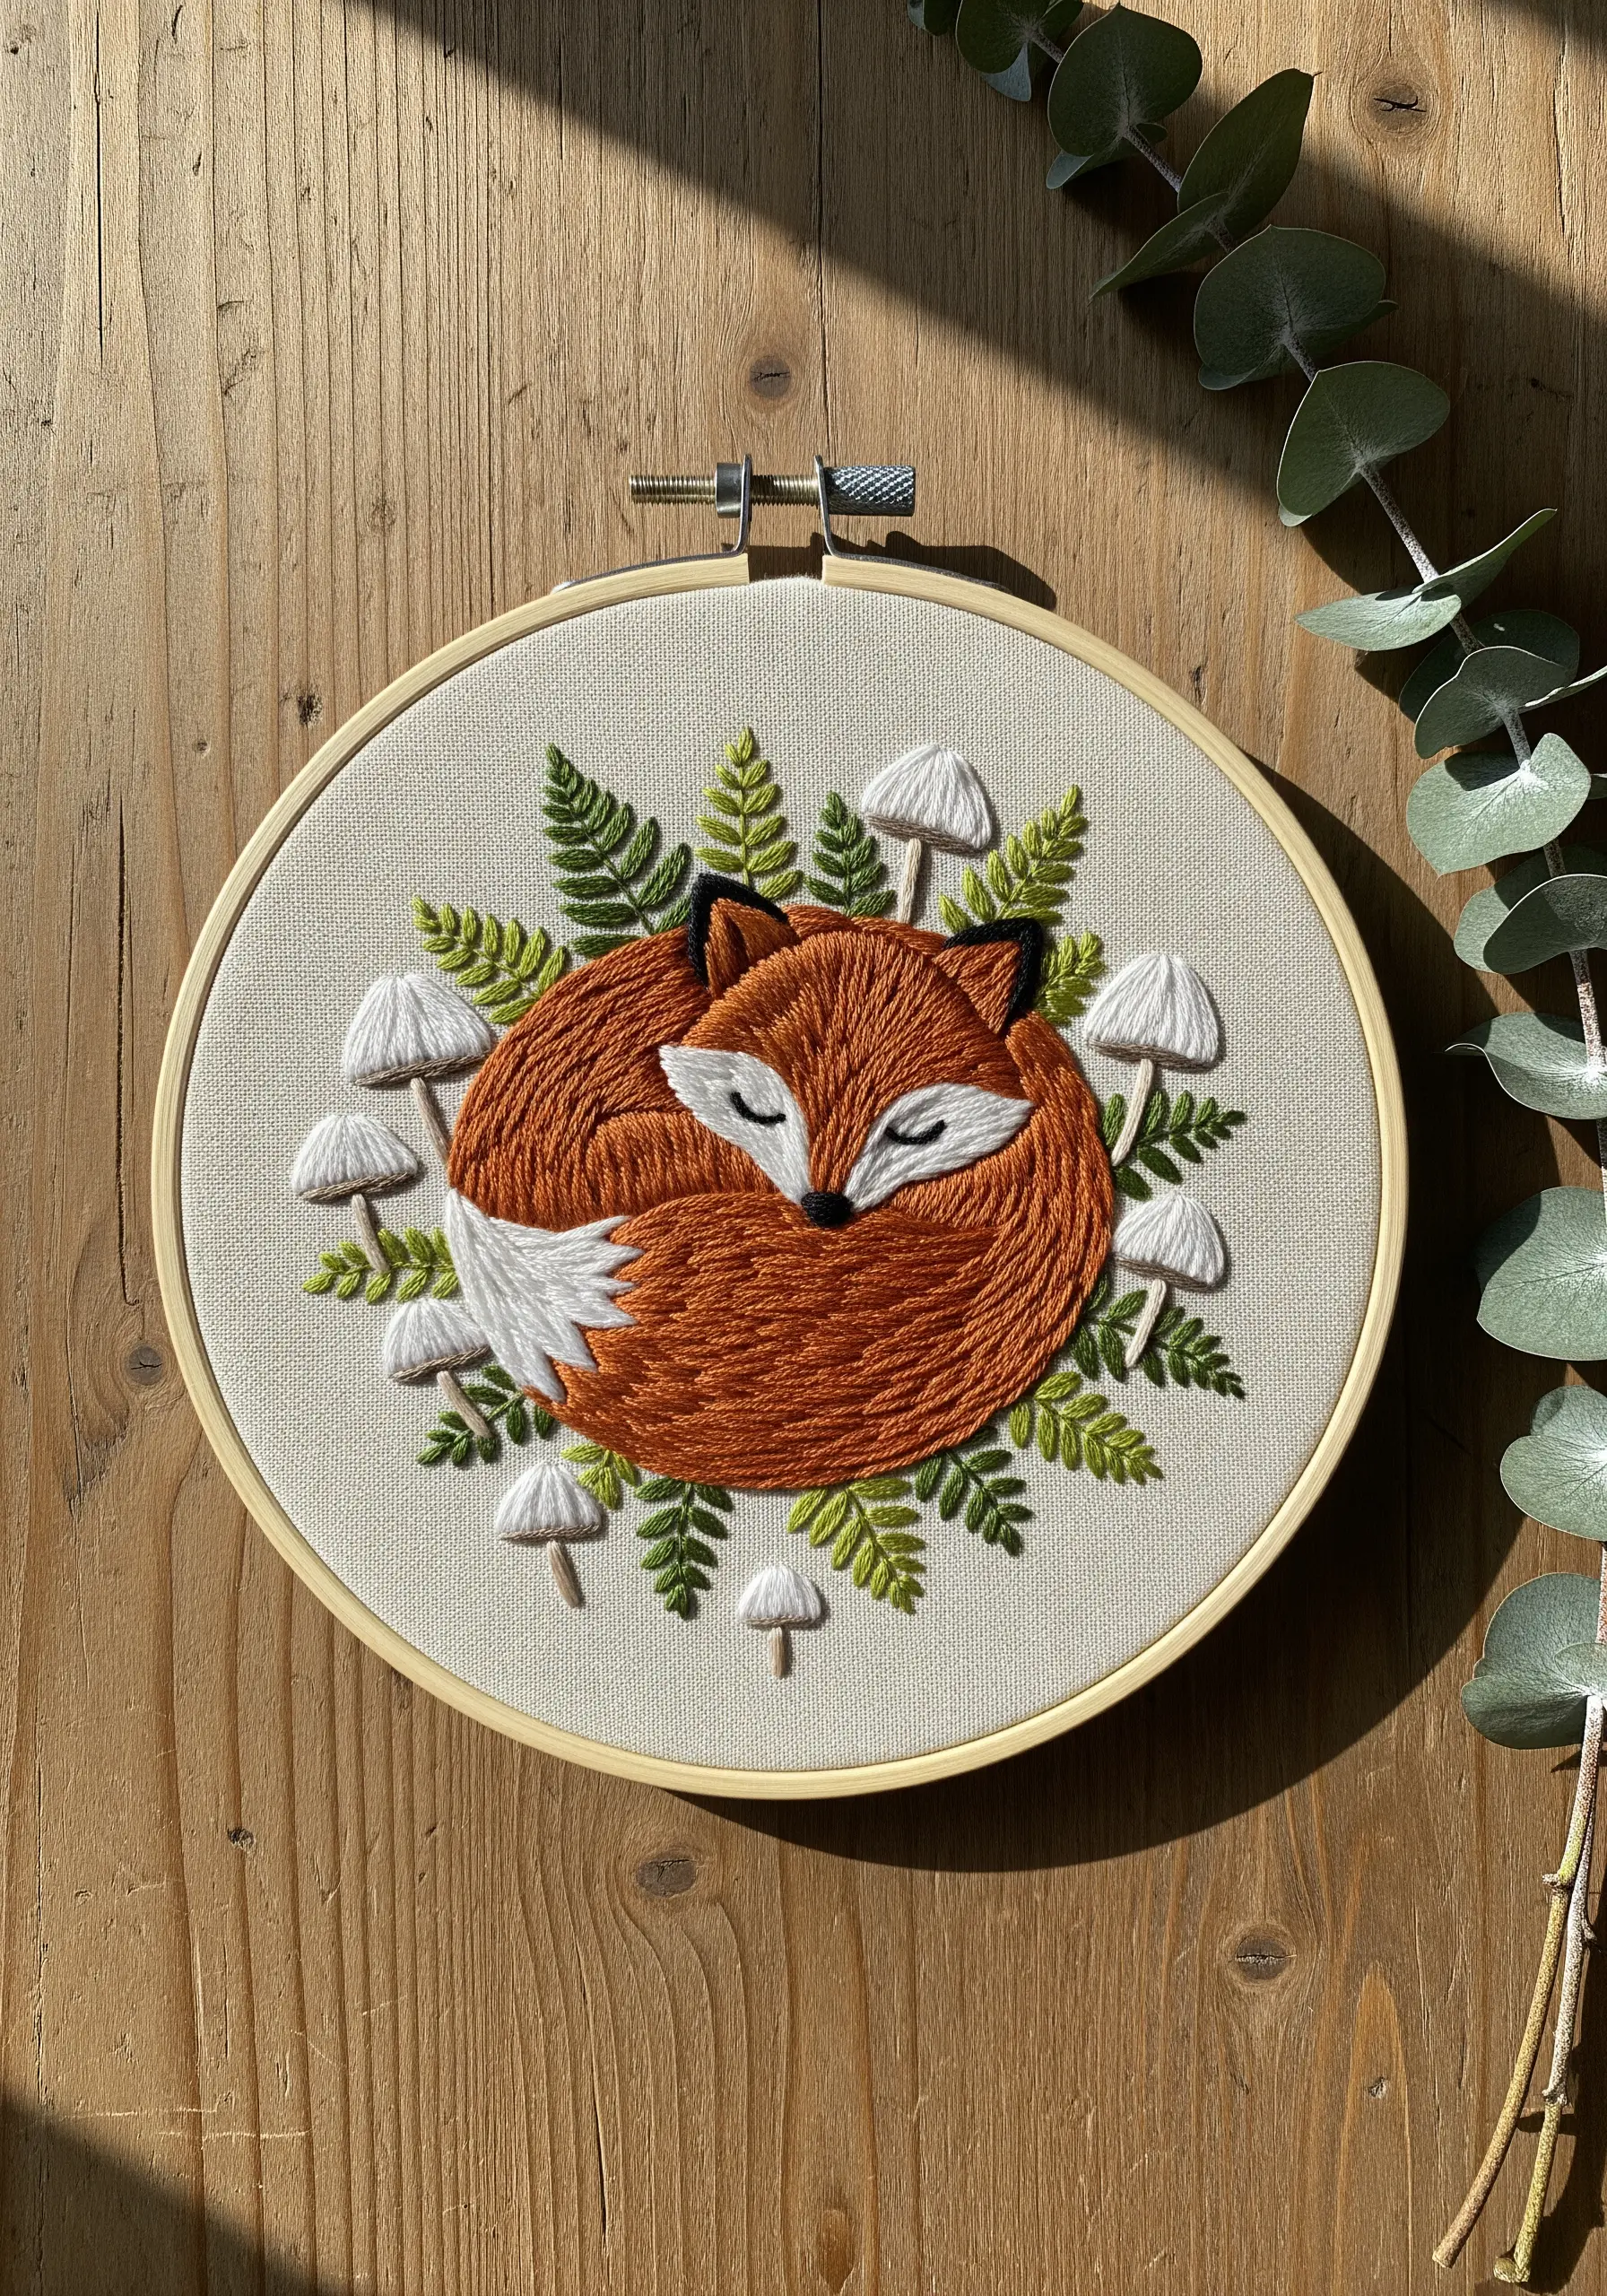
Create the illusion of a curved, sleeping form by carefully angling your satin stitches to follow the animal’s contours.
Use a dense, smooth satin stitch for the main body, ensuring each stitch lies flat against the one before it.
For sharp details like the nose and closed eyes, switch to a single strand of black floss; this prevents the features from looking bulky and maintains a delicate expression.
Contrast the smooth fur with more textured stitches for the surrounding foliage, like fishbone stitch for ferns and padded satin stitch for rounded mushroom caps.
2. Creating Lunar Texture and Feathered Gradients
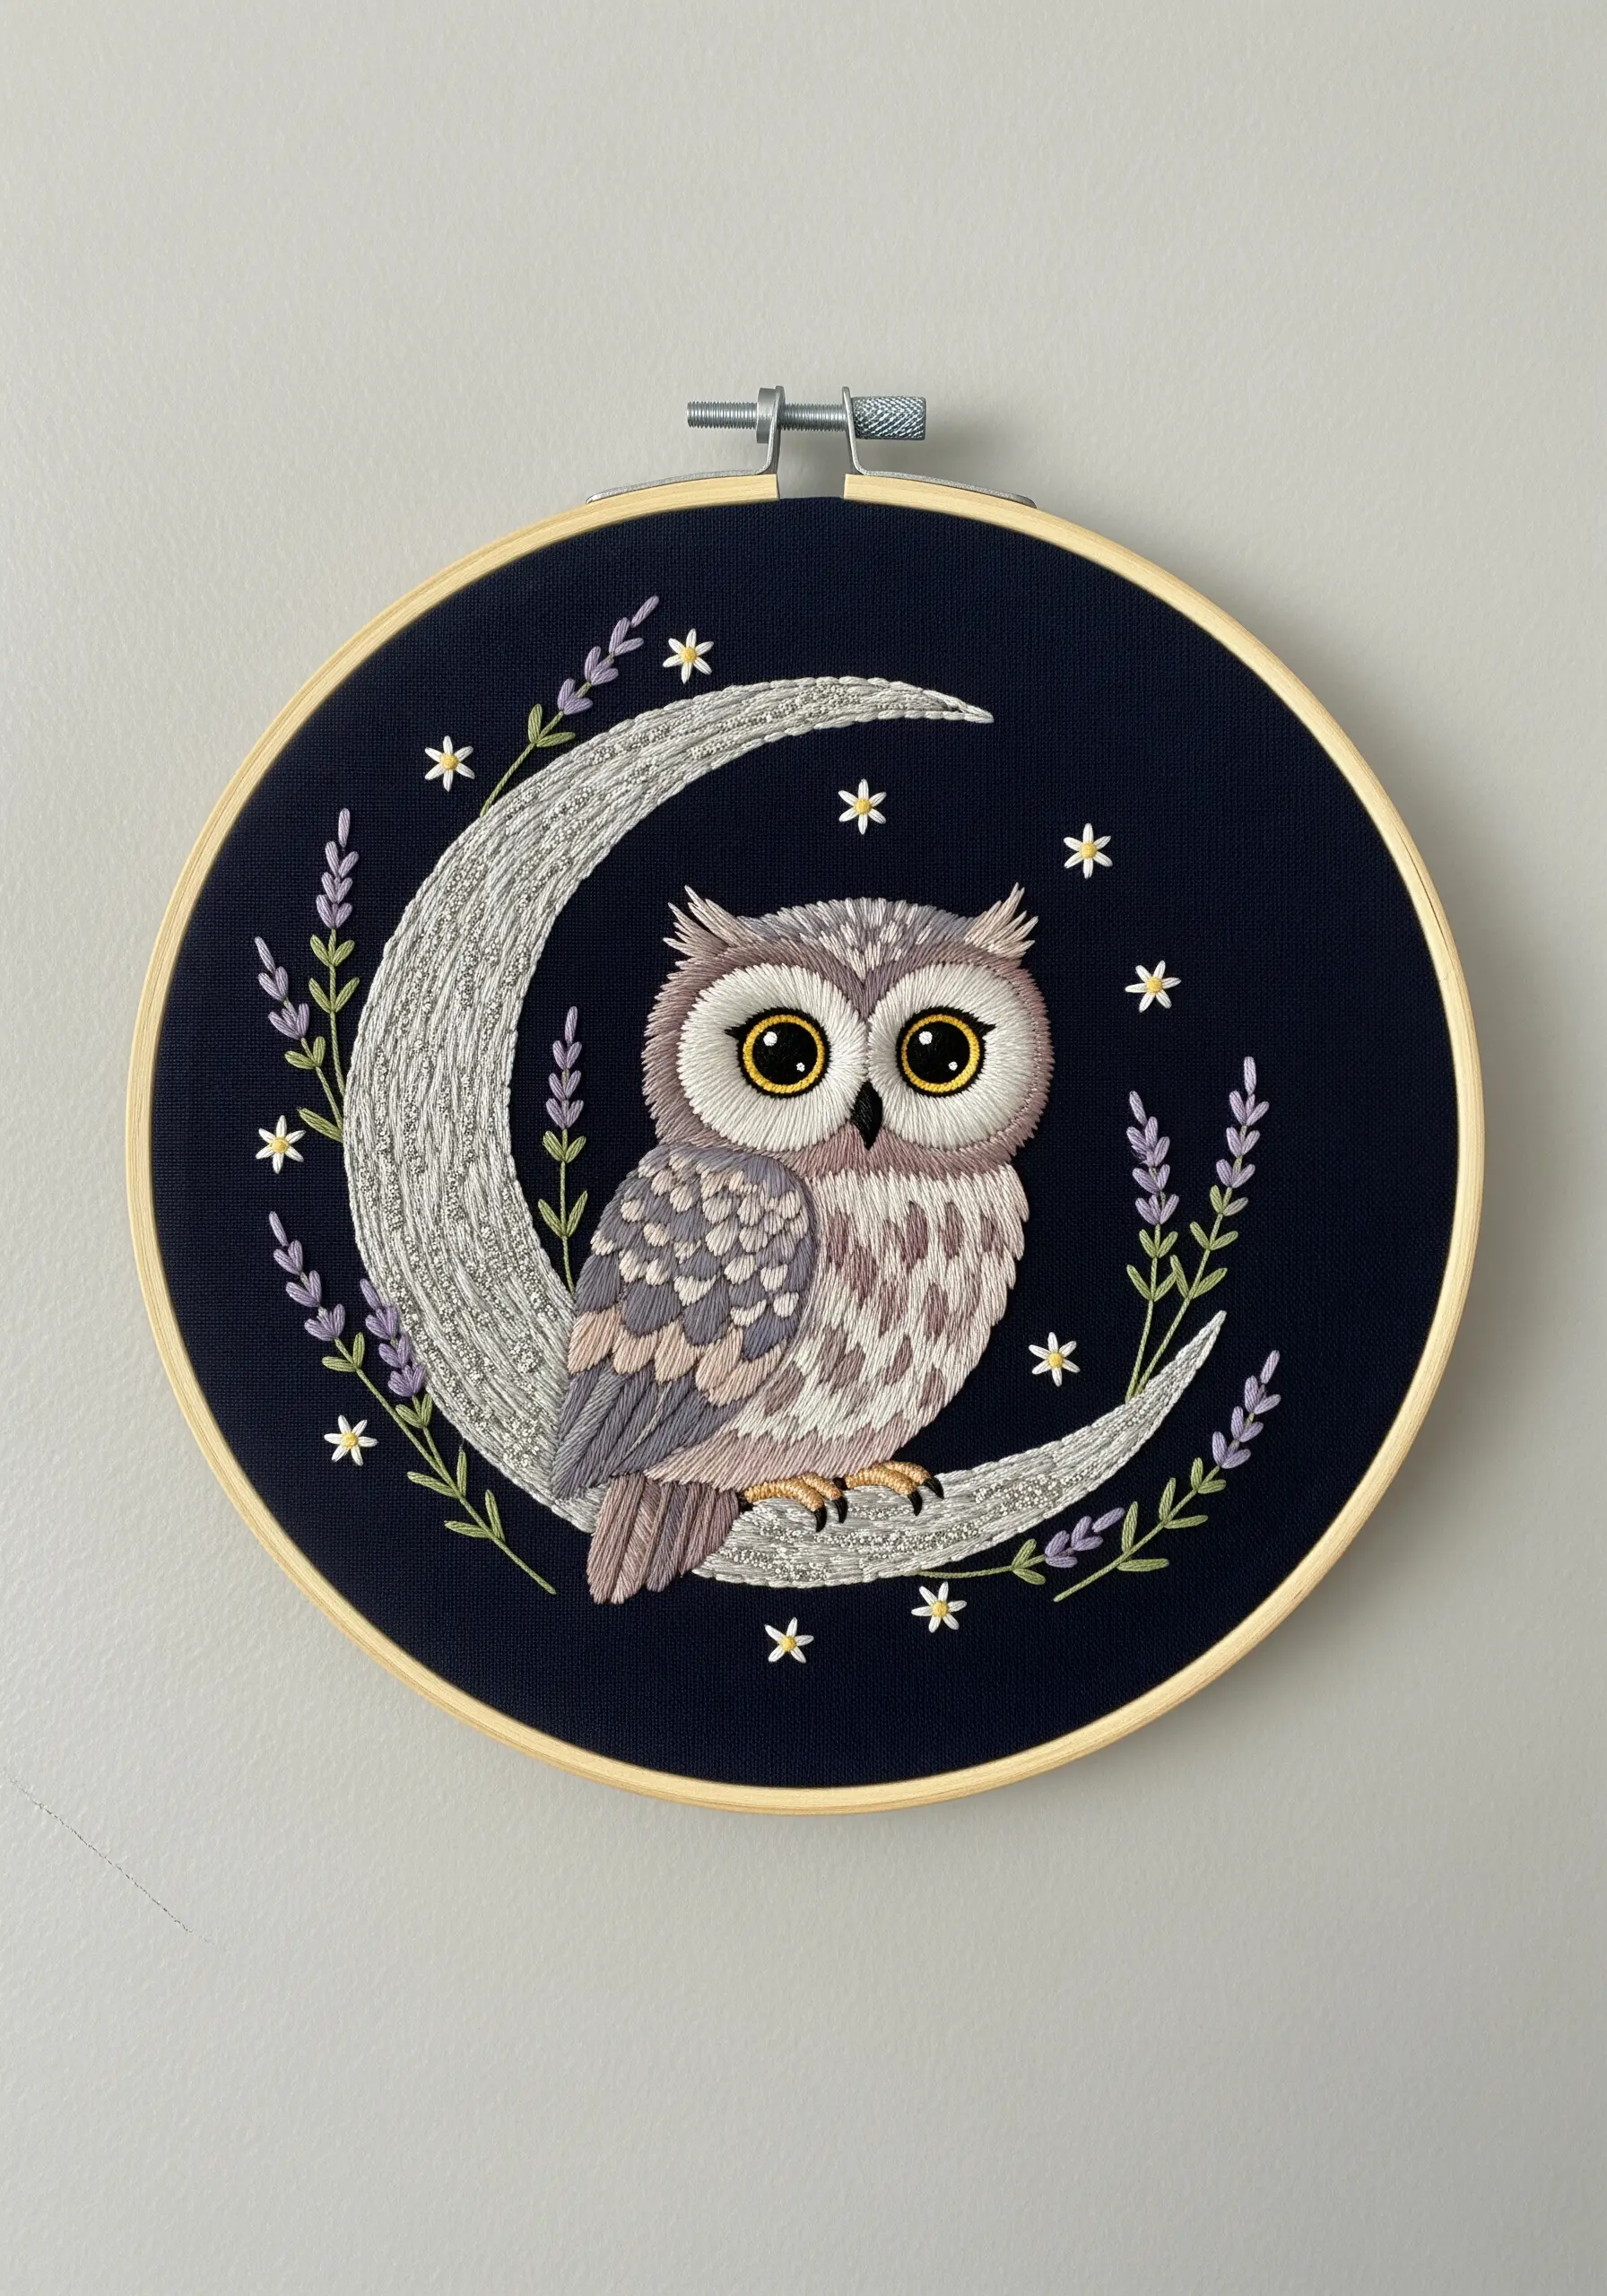
Stitch the crescent moon using varied long-and-short stitches in shades of grey, silver, and white to build a cratered, uneven texture.
Don’t lay the stitches perfectly flat; slight variations in angle and length will enhance the moon’s realistic surface.
For the owl’s feathers, blend three or four tones of a single color family—like mauve and grey—to create soft, natural gradients on the wings and body.
Working on dark navy or black fabric makes your lighter threads appear more luminous and is perfect for nocturnal scenes.
3. Achieving a Plush Fill with Flawless Satin Stitch
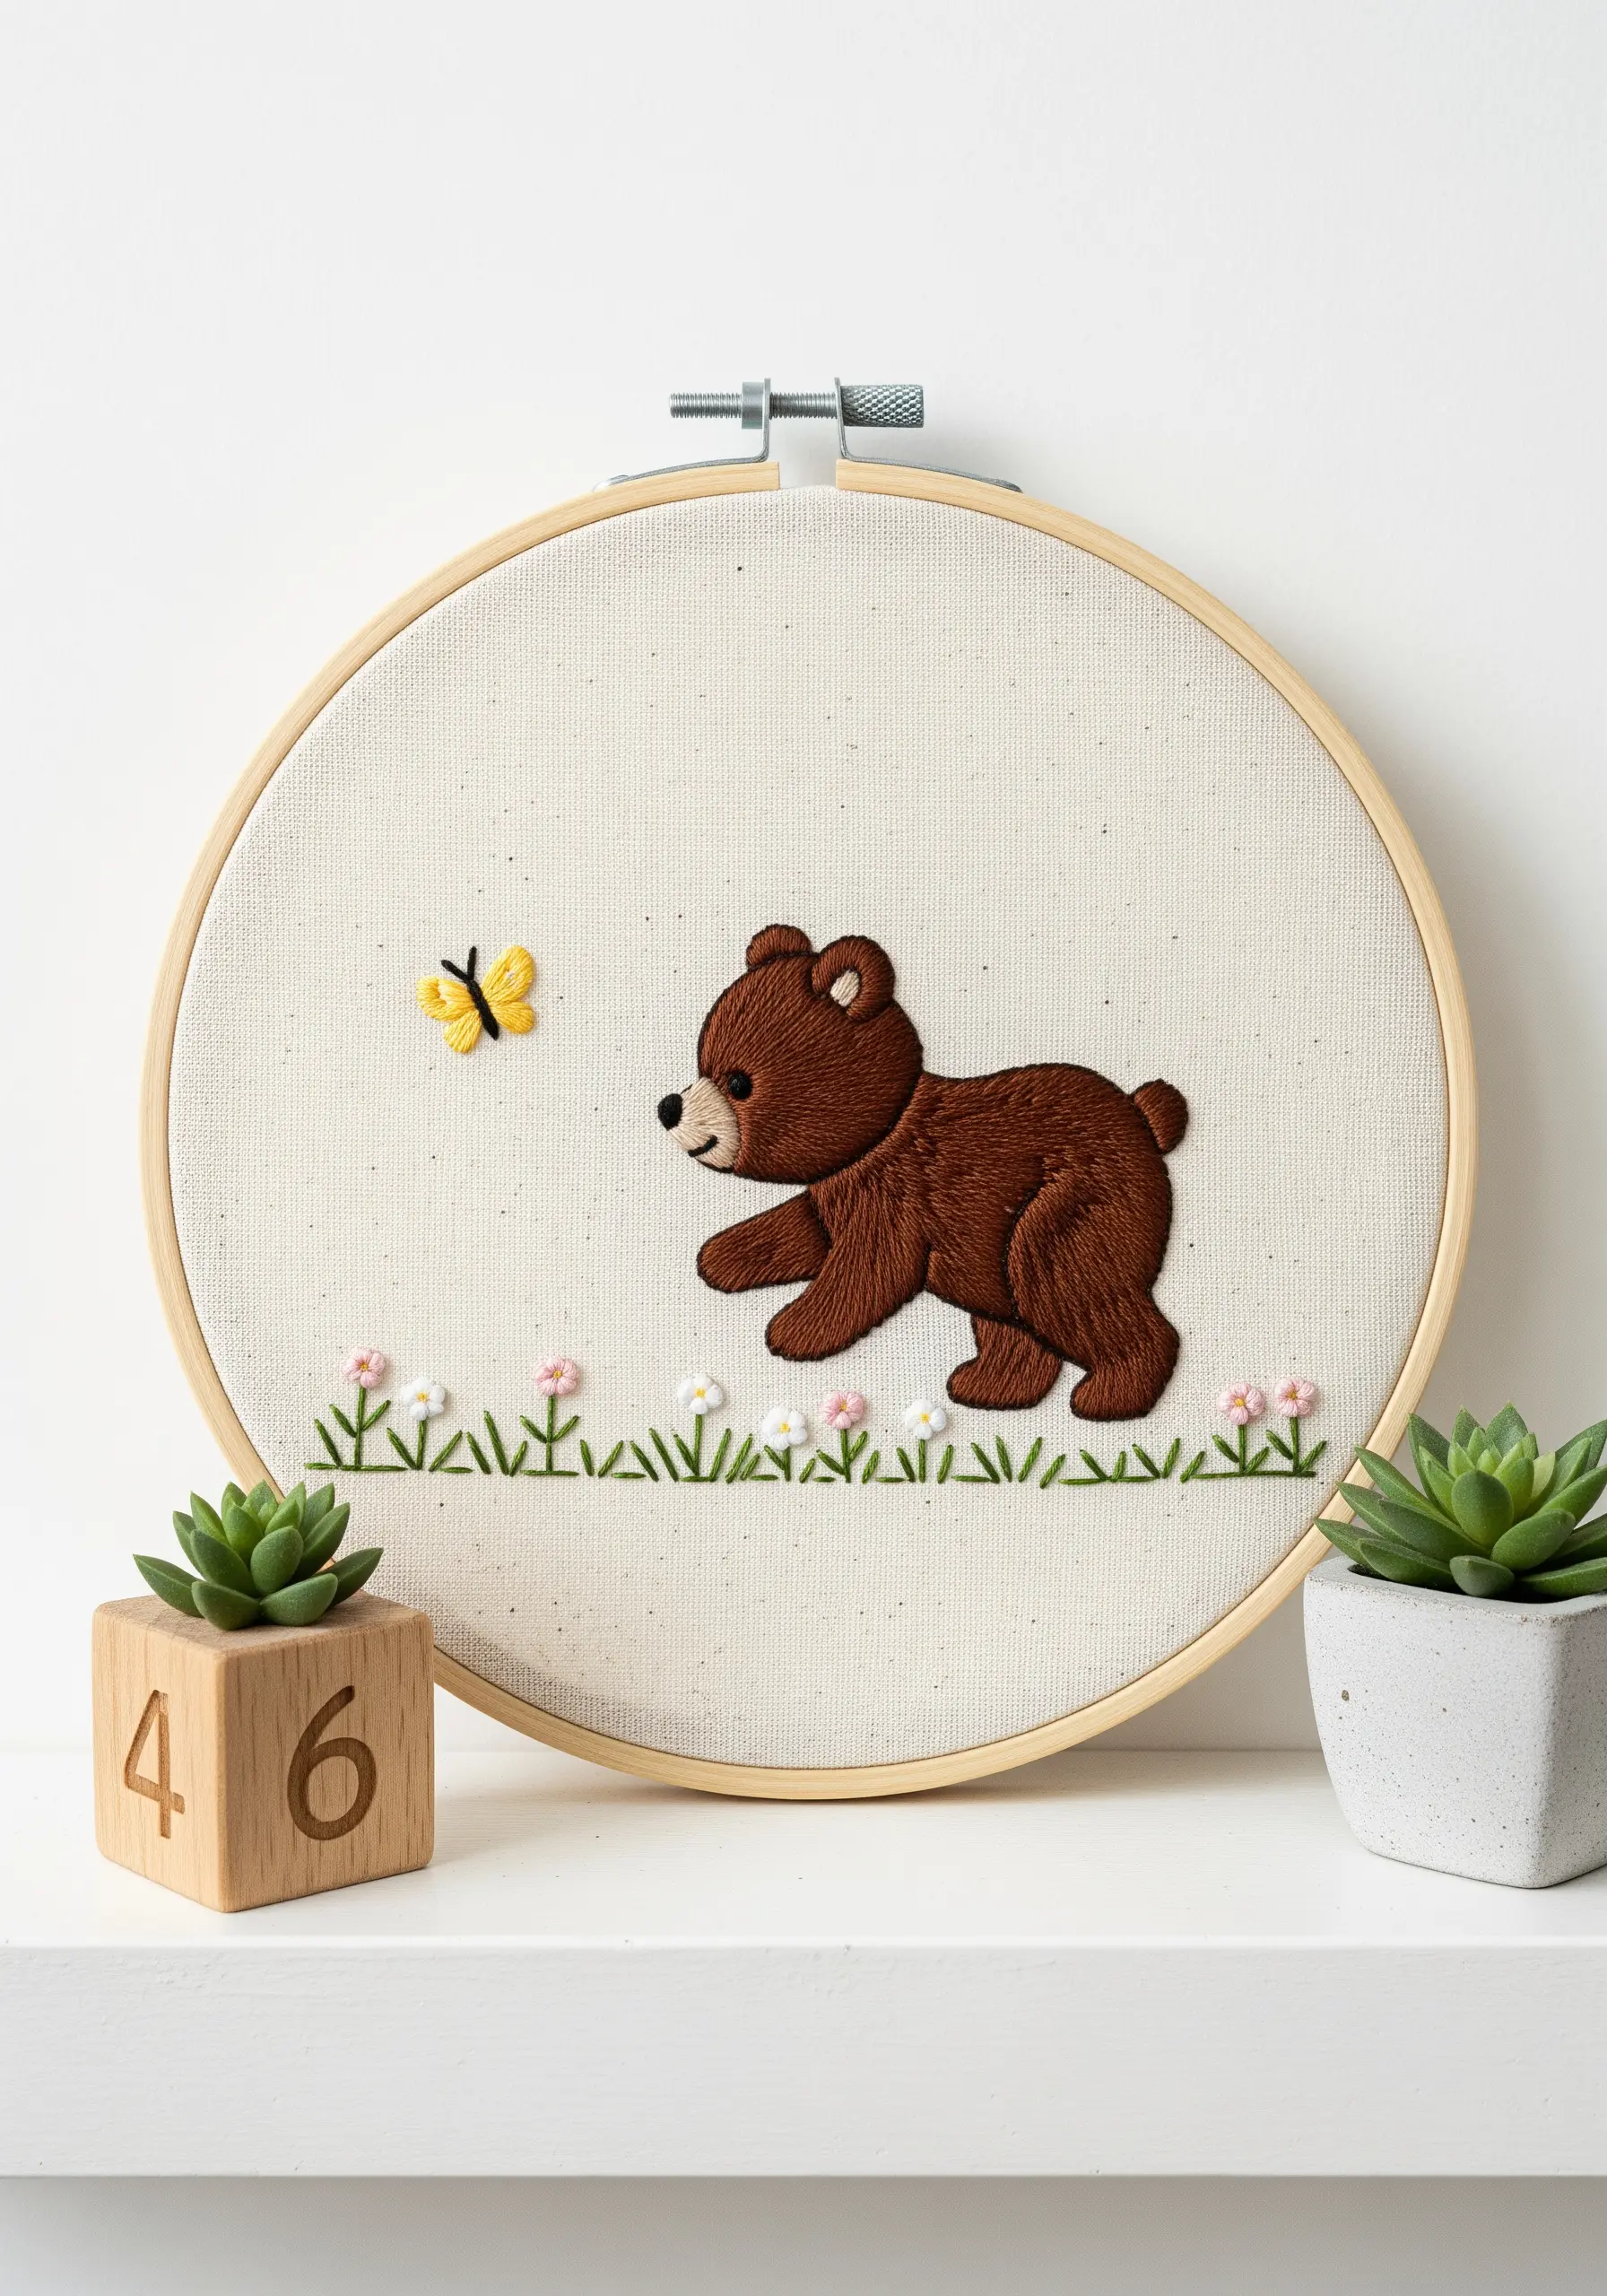
For a perfectly smooth, raised satin stitch surface, first create a foundation with a split stitch outline around your shape.
This simple preparation step acts as a bumper, guiding your fill stitches and preventing uneven edges.
Use two or three strands of floss for the fill—enough for good coverage without adding unnecessary bulk.
Lay your satin stitches closely together, running parallel to each other to create a seamless, plush texture that looks incredibly professional.
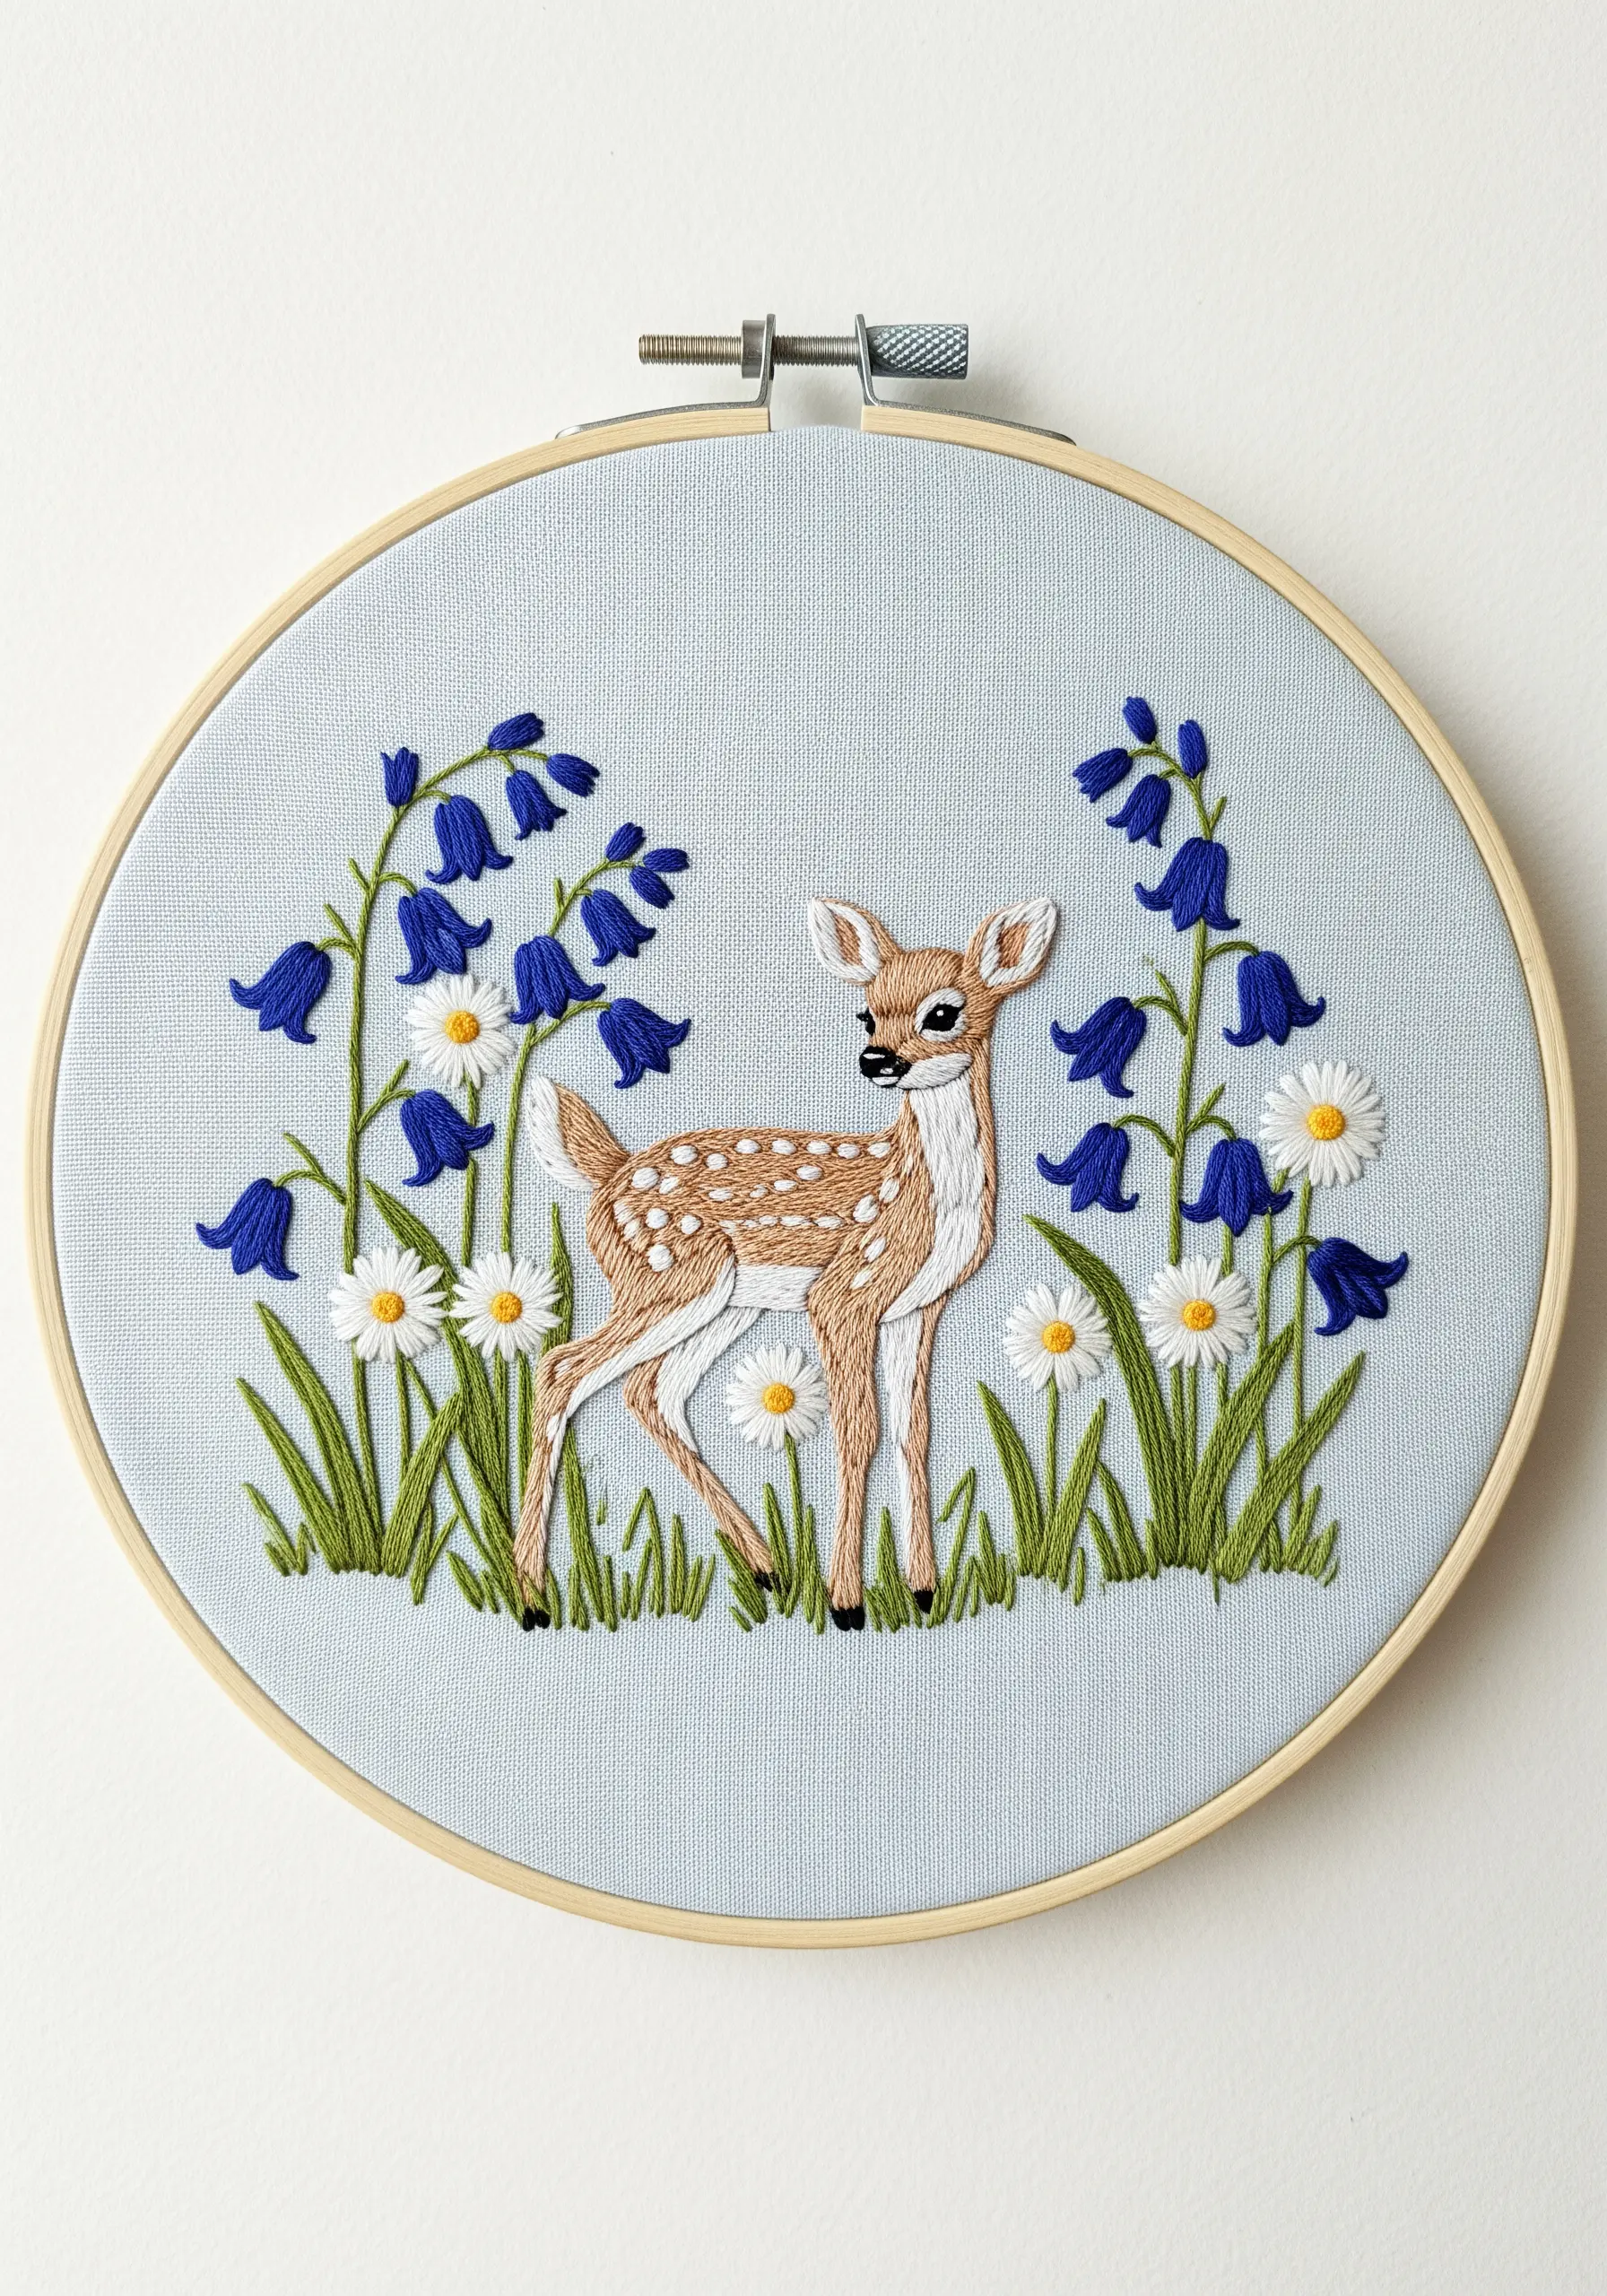
4. Mastering Delicate Details with Micro-Florals
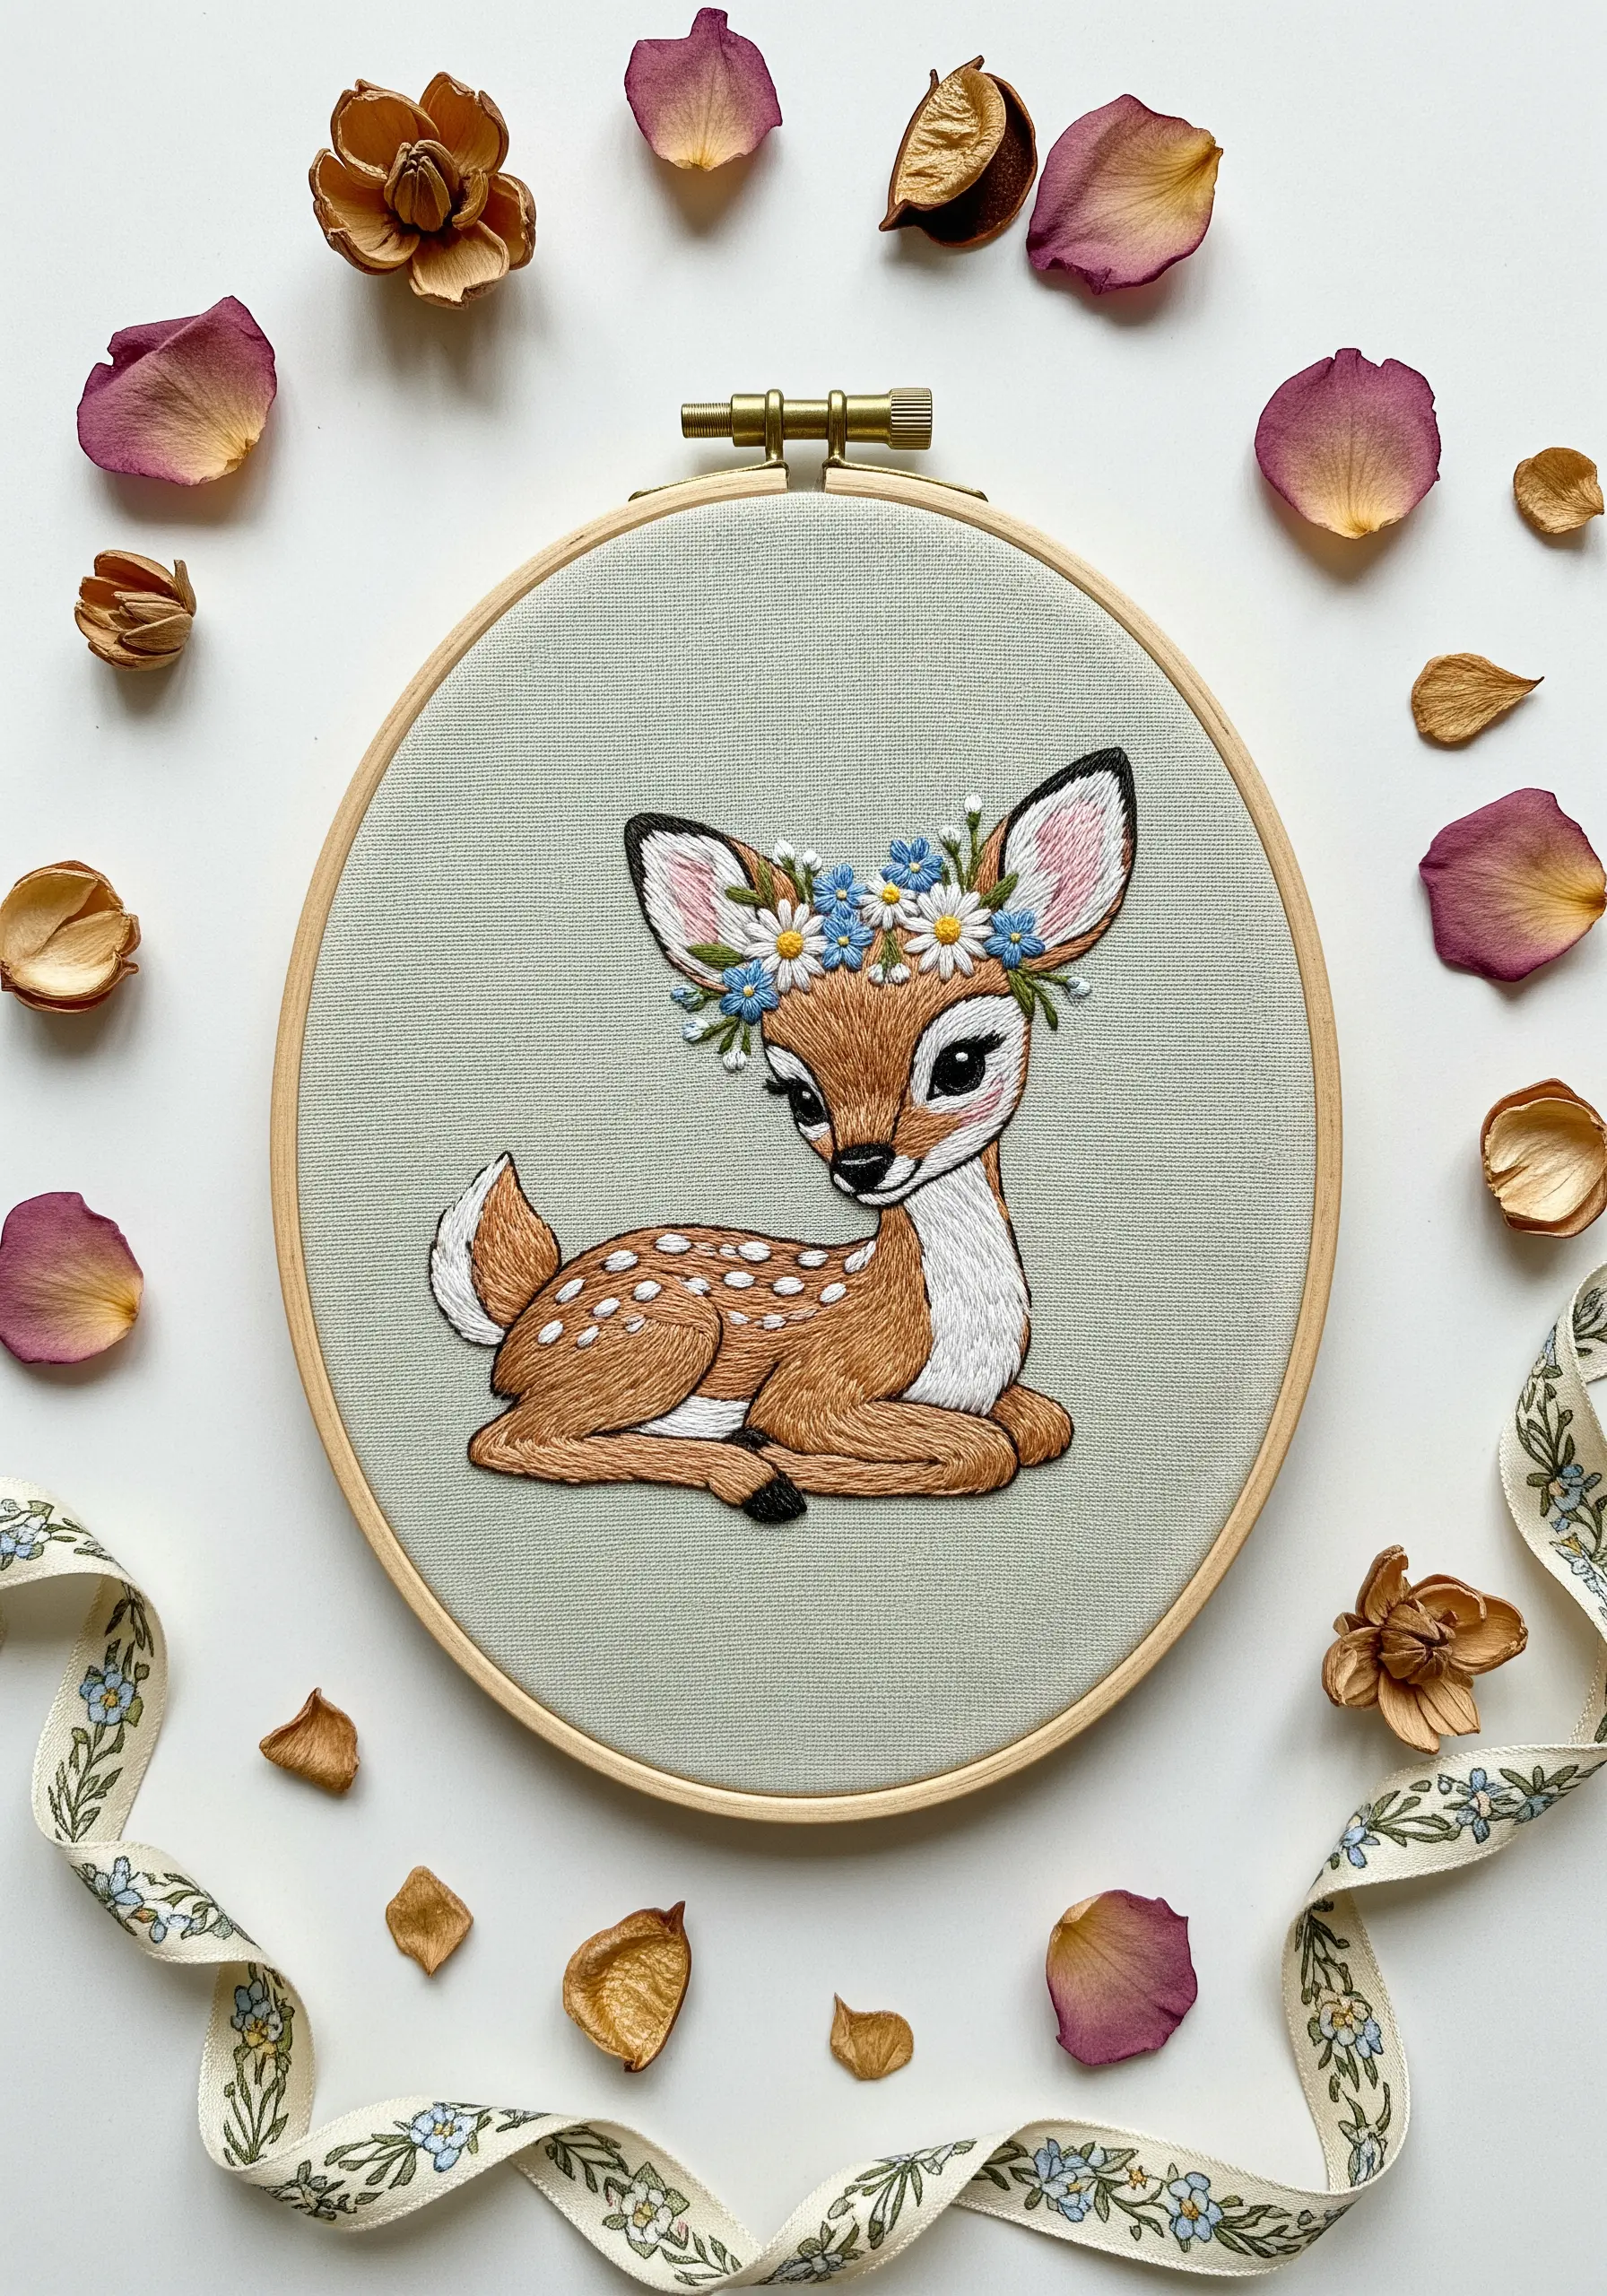
The key to stitching exquisitely fine details, like the flowers in this deer’s crown, is to use a single strand of embroidery floss.
Form tiny petals with individual lazy daisy stitches and create flower centers with small French knots.
Bring your animal’s eyes to life with one carefully placed white stitch—this tiny detail creates a glint of light and an instant focal point.
Fill the body with a soft long-and-short stitch to mimic fur, providing a gentle contrast to the crisp floral details.
5. Building Depth with Layered Embroidery
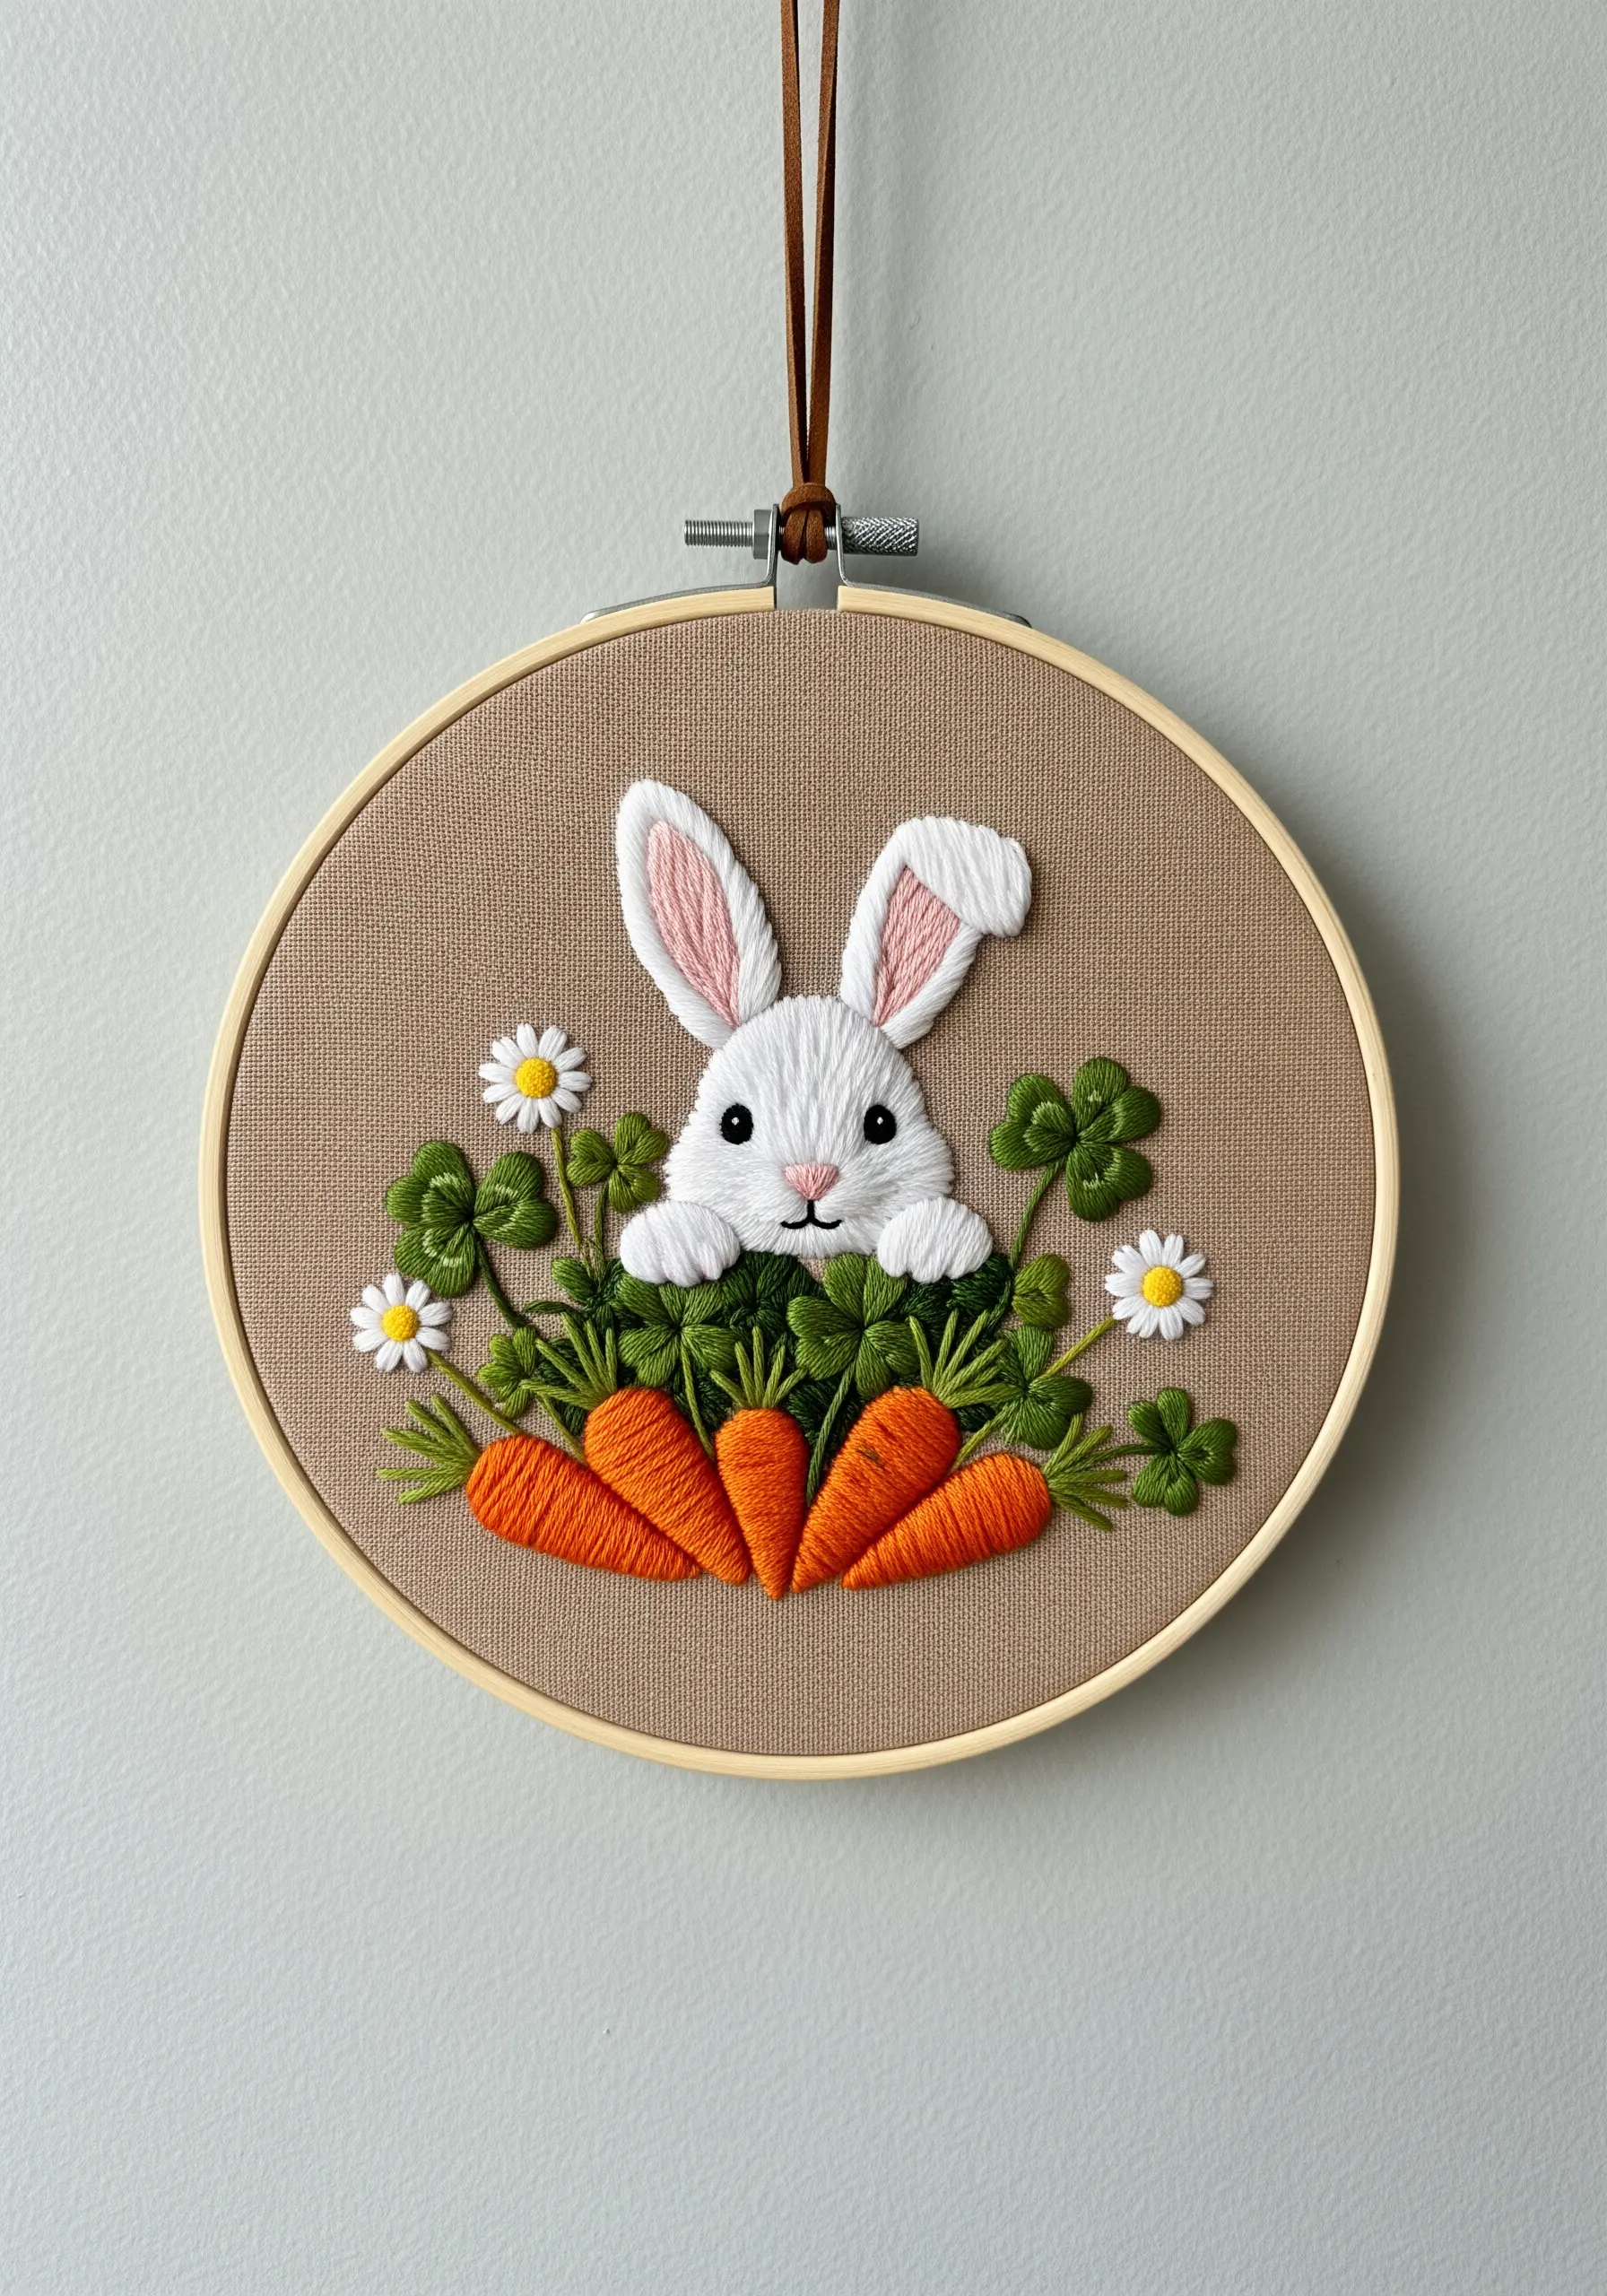
Create a convincing sense of perspective by stitching your background elements before your foreground subjects.
In this piece, the clover and daisies are stitched first, followed by the carrots, and finally the bunny’s paws are layered on top.
This technique makes the bunny appear to be genuinely nestled within the patch, rather than simply sitting on it.
Use a padded satin stitch for the carrots—by adding a base of small straight stitches underneath—to give them a plump, three-dimensional shape.
6. Capturing Realistic Fur with Thread Painting
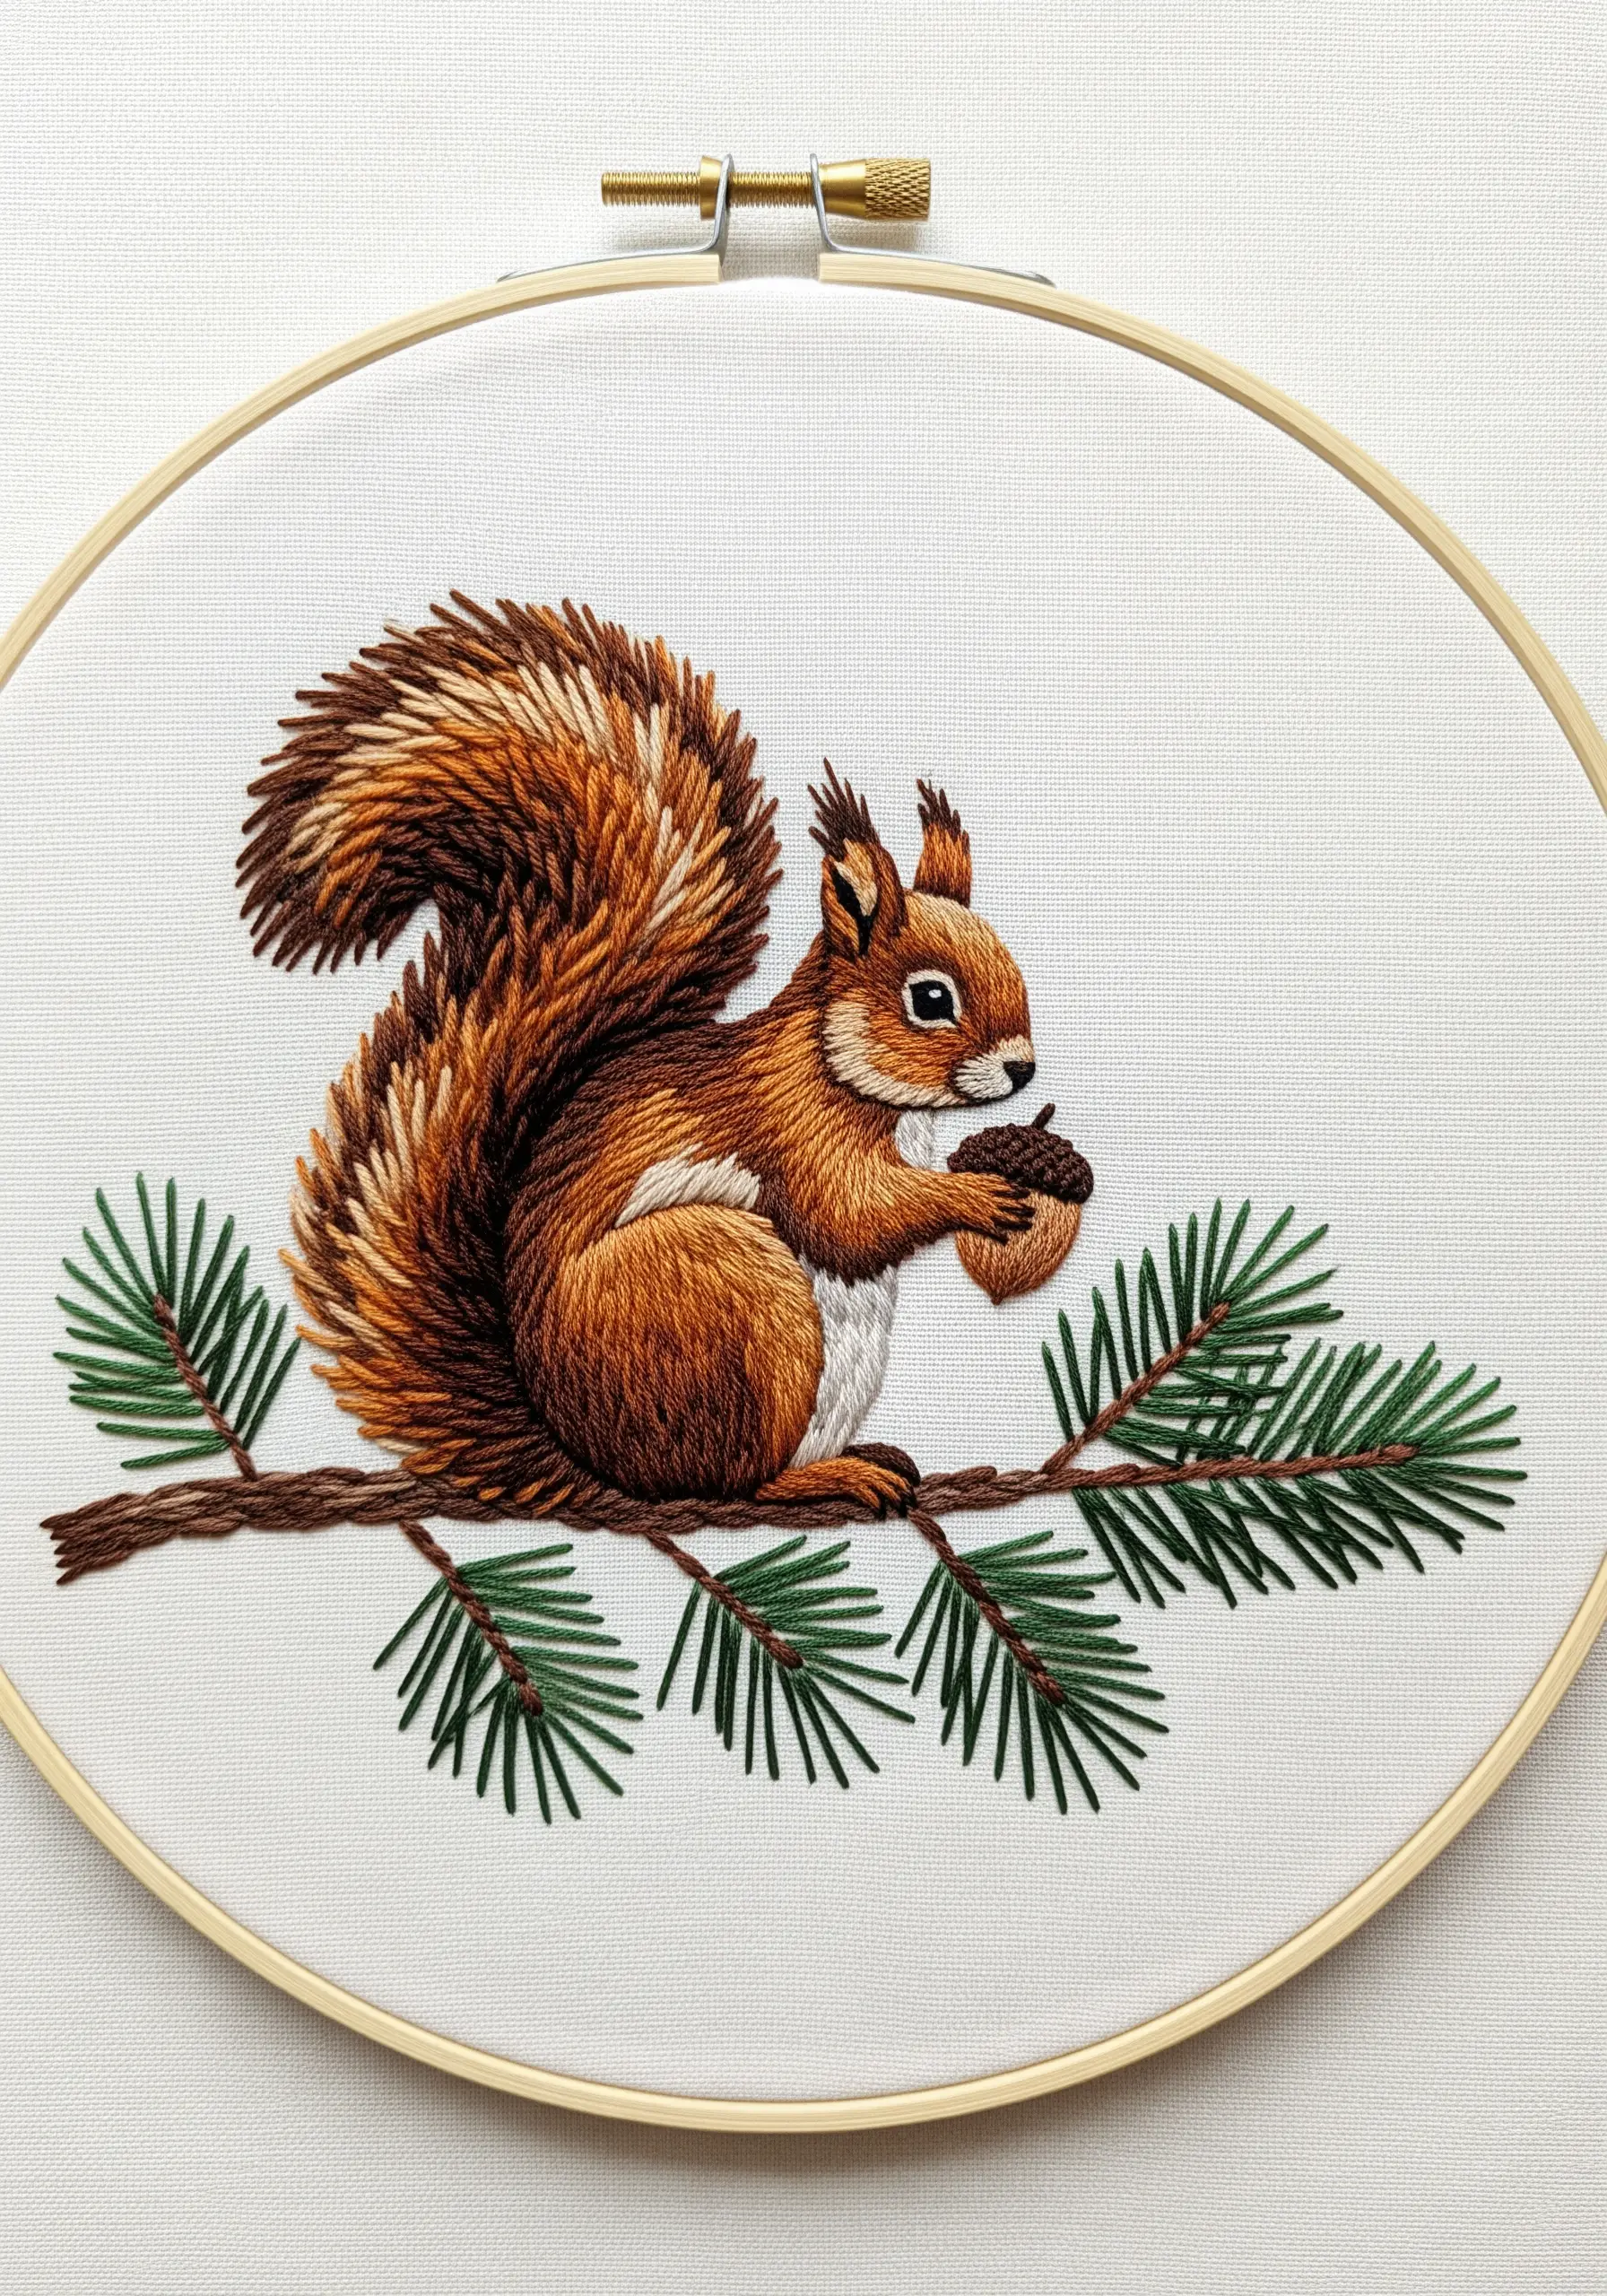
Achieve lifelike fur by using the long-and-short stitch technique, also known as thread painting.
Work with a palette of at least four to five closely related shades of brown, tan, and auburn to create natural highlights and shadows.
For the bushy tail, use slightly longer, more sparsely placed stitches to mimic a fluffier texture, allowing hints of the shades underneath to show through.
This detailed texture works best when contrasted against simpler elements, like the straight-stitch pine needles.
7. Translating Hoop Art to Functional Home Décor
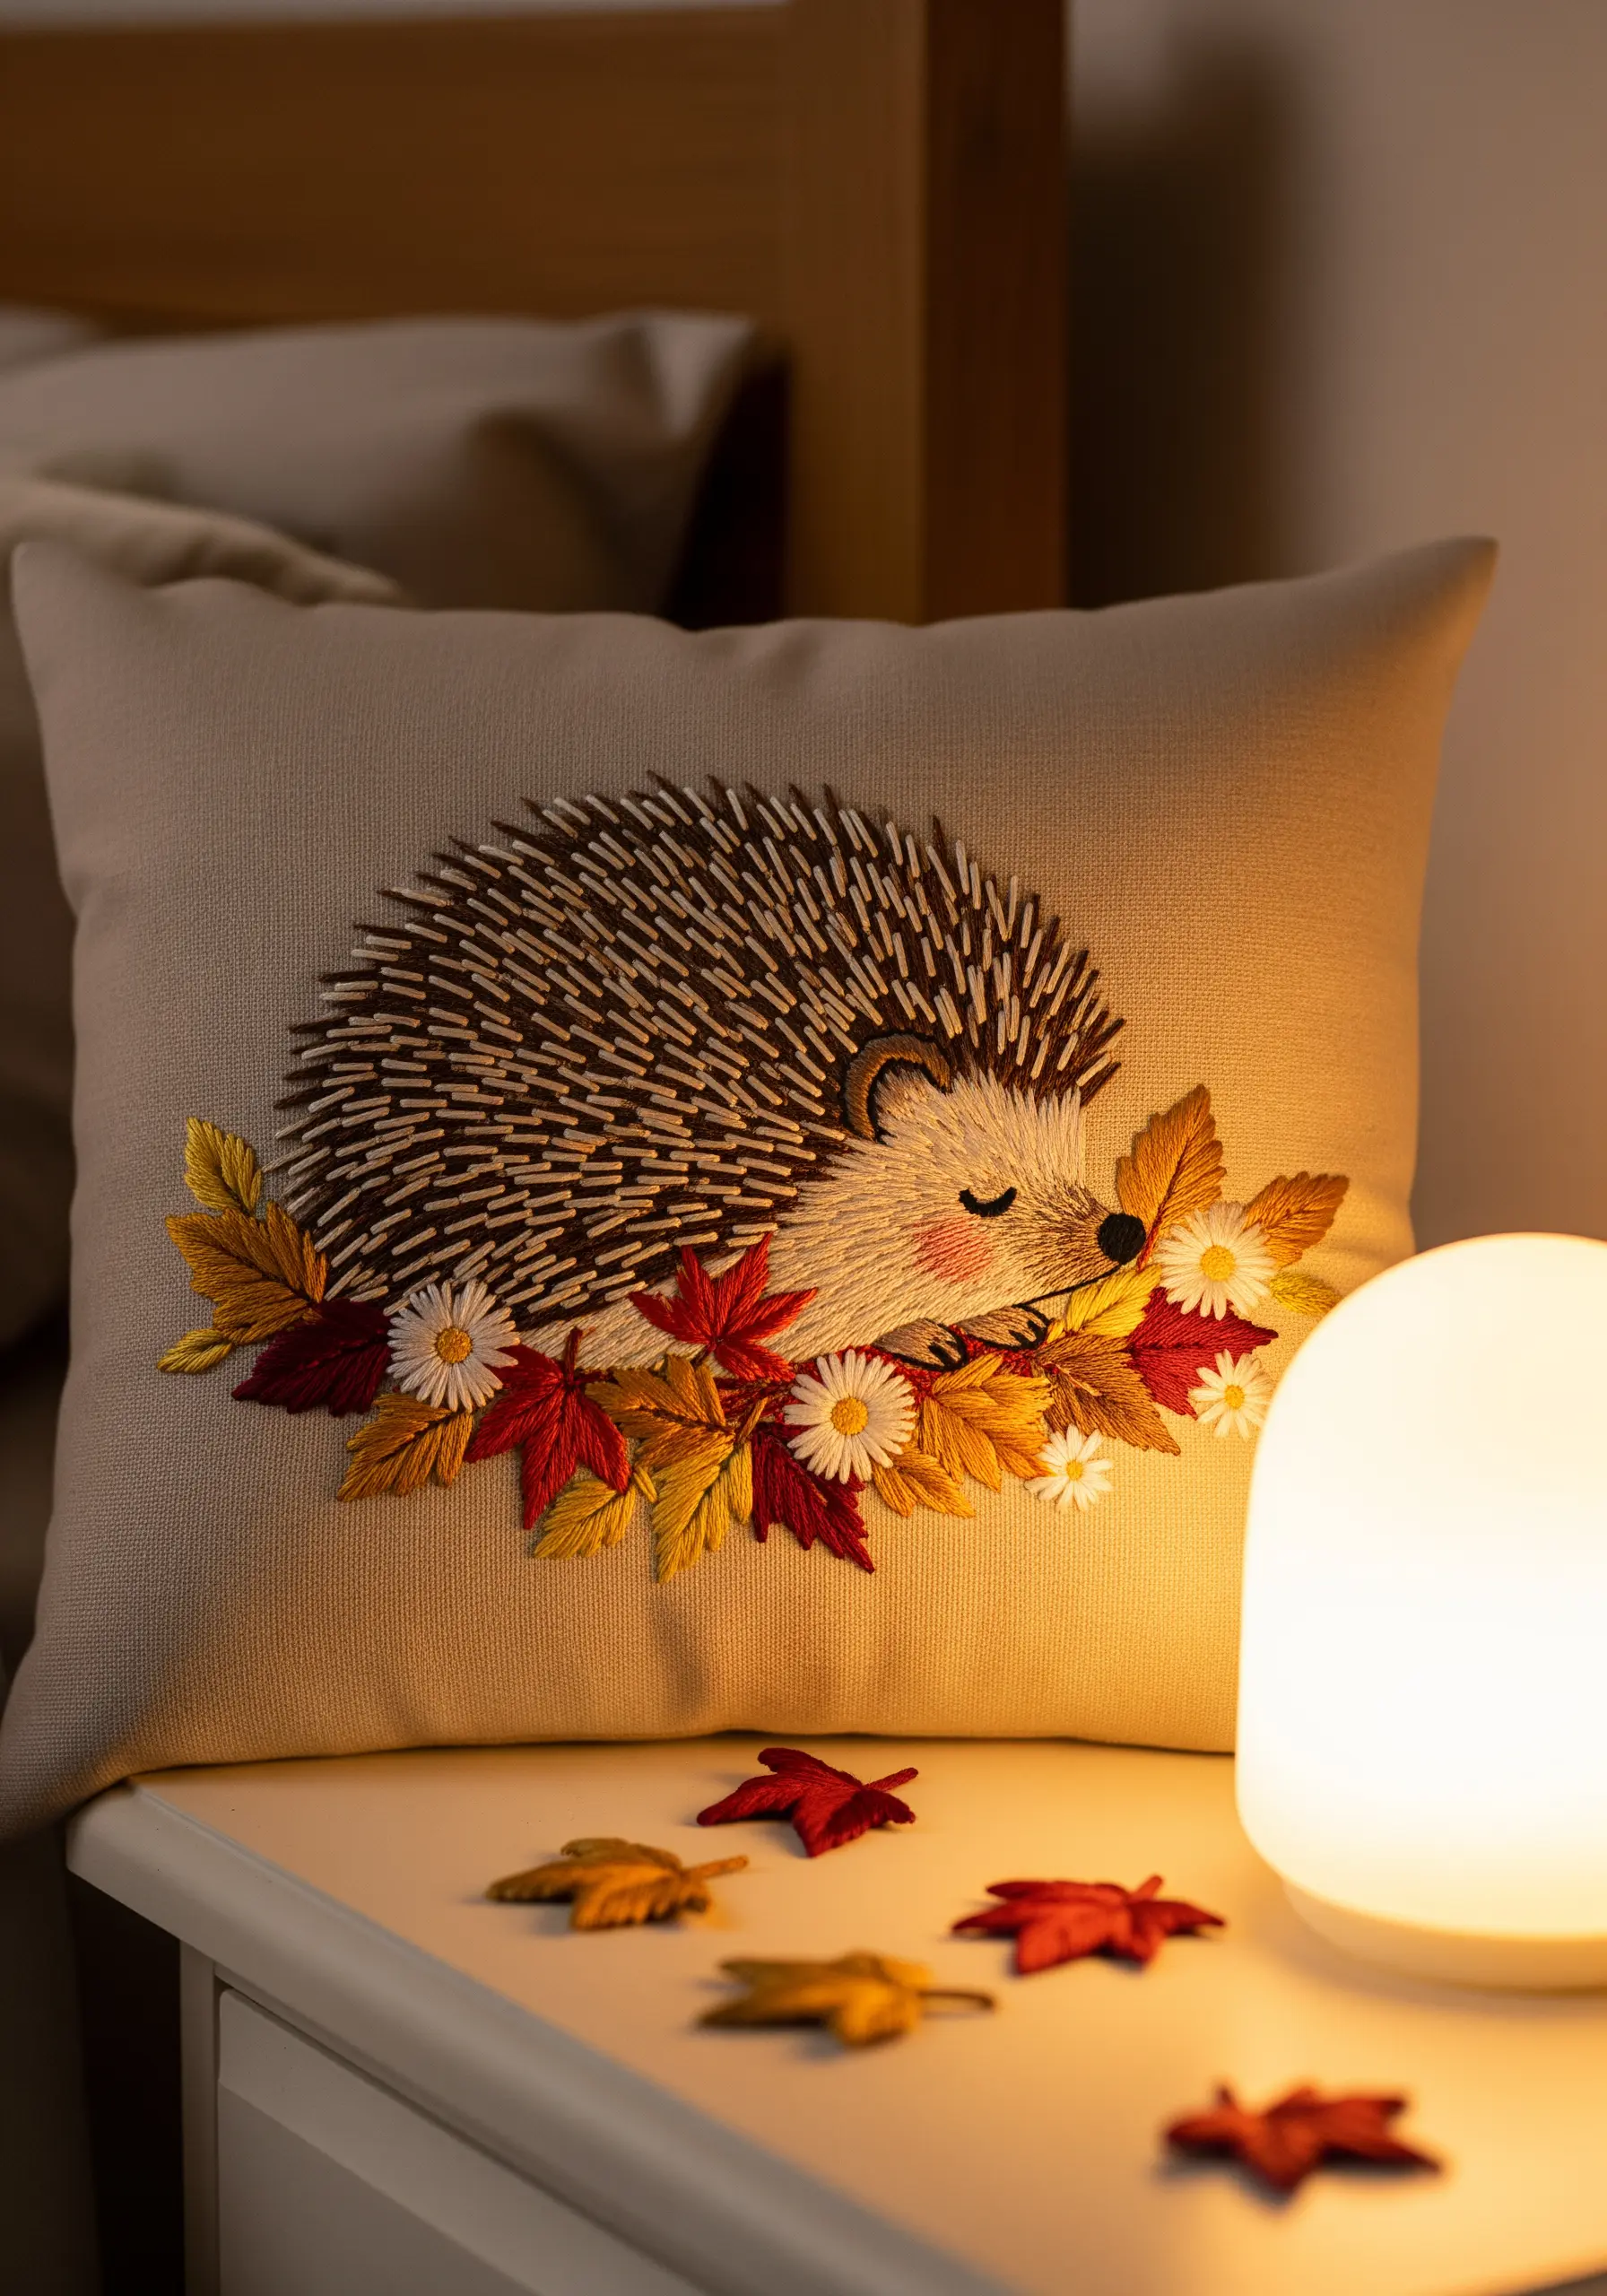
When embroidering on functional items like a pillow, always use a fusible interfacing on the back of your fabric before you begin stitching.
This stabilizer prevents the fabric from puckering under the tension of the stitches, ensuring your finished design remains smooth and flat.
Create the hedgehog’s quills with a dynamic mix of straight stitches and seed stitches, varying the length and angle of each one for a lively, textured effect.
This tactile design is perfect for handmade pillow cushion embroidery patterns that invite touch.
8. Combining Felt Appliqué and Stitching
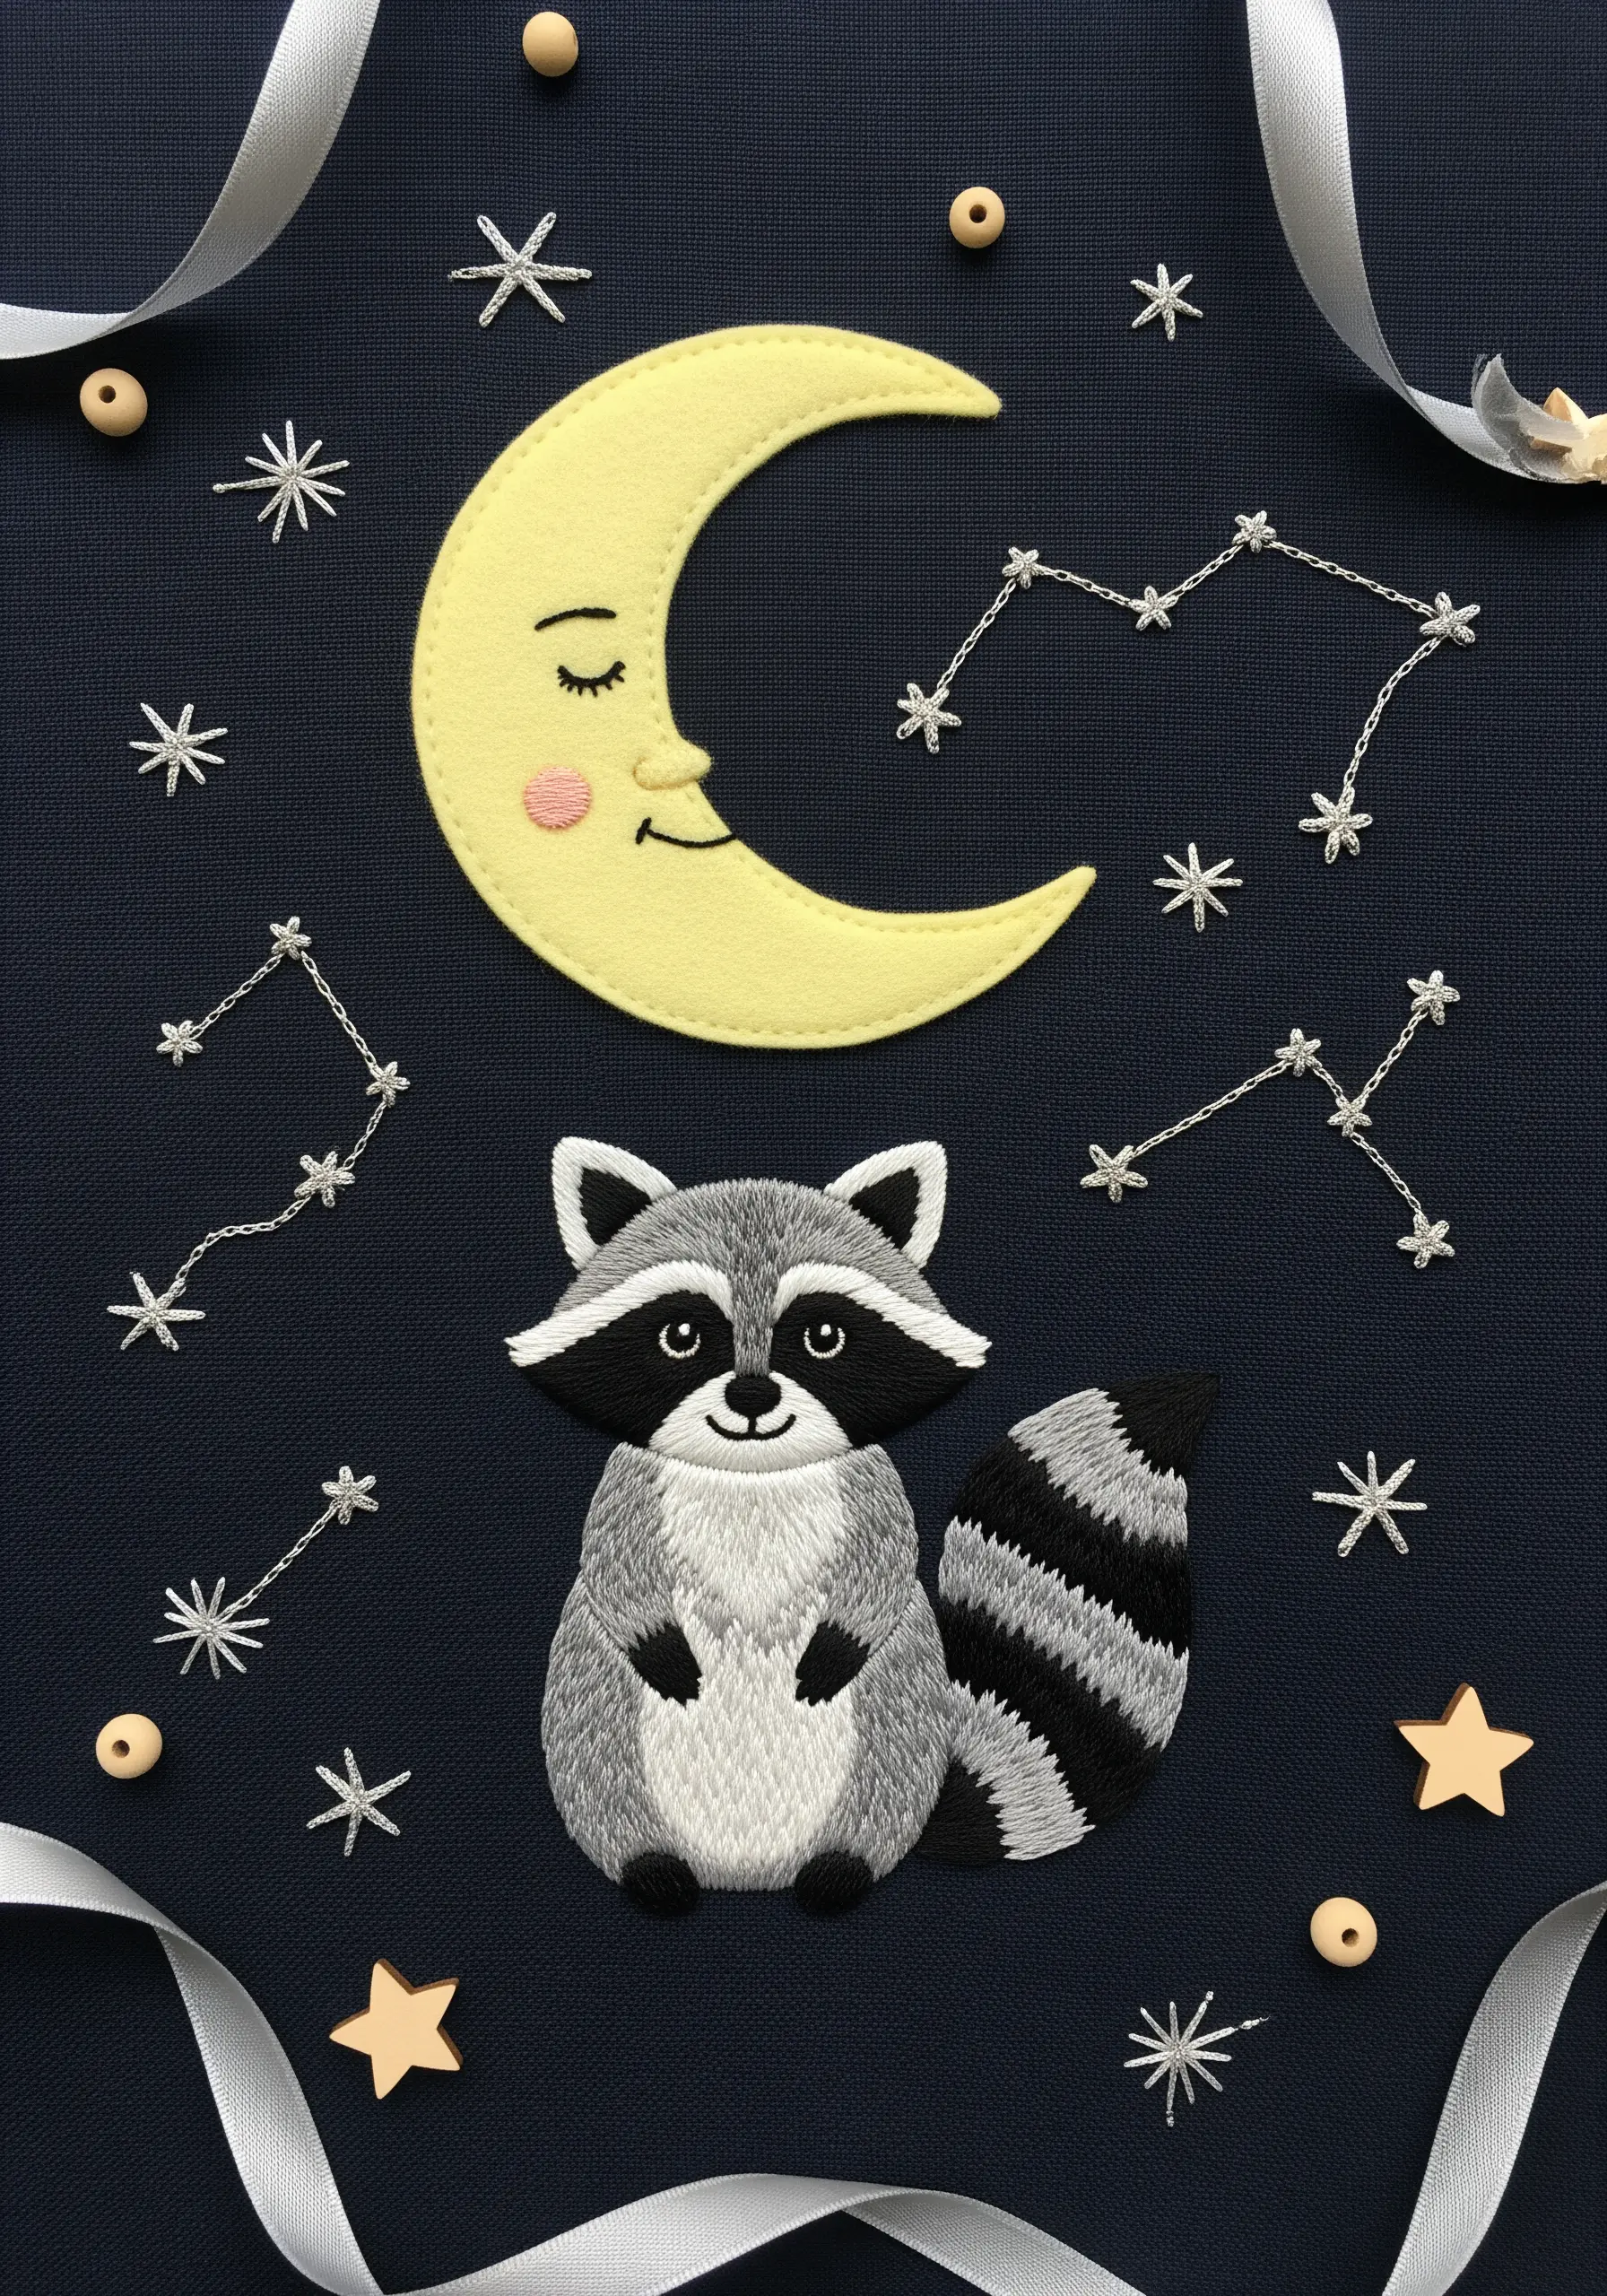
Introduce a new texture and bold shapes by incorporating felt appliqué into your embroidery.
Cut the moon shape from soft yellow felt, secure it to your background fabric with a few tiny stitches, and then add embroidered details on top.
The soft, matte finish of the felt provides a beautiful contrast to the slight sheen of the embroidery floss in the raccoon’s fur.
Finish the scene with simple starburst stitches and backstitched constellations to create a magical night sky with minimal effort.
9. Pairing Minimalist Lines with High-Impact Texture
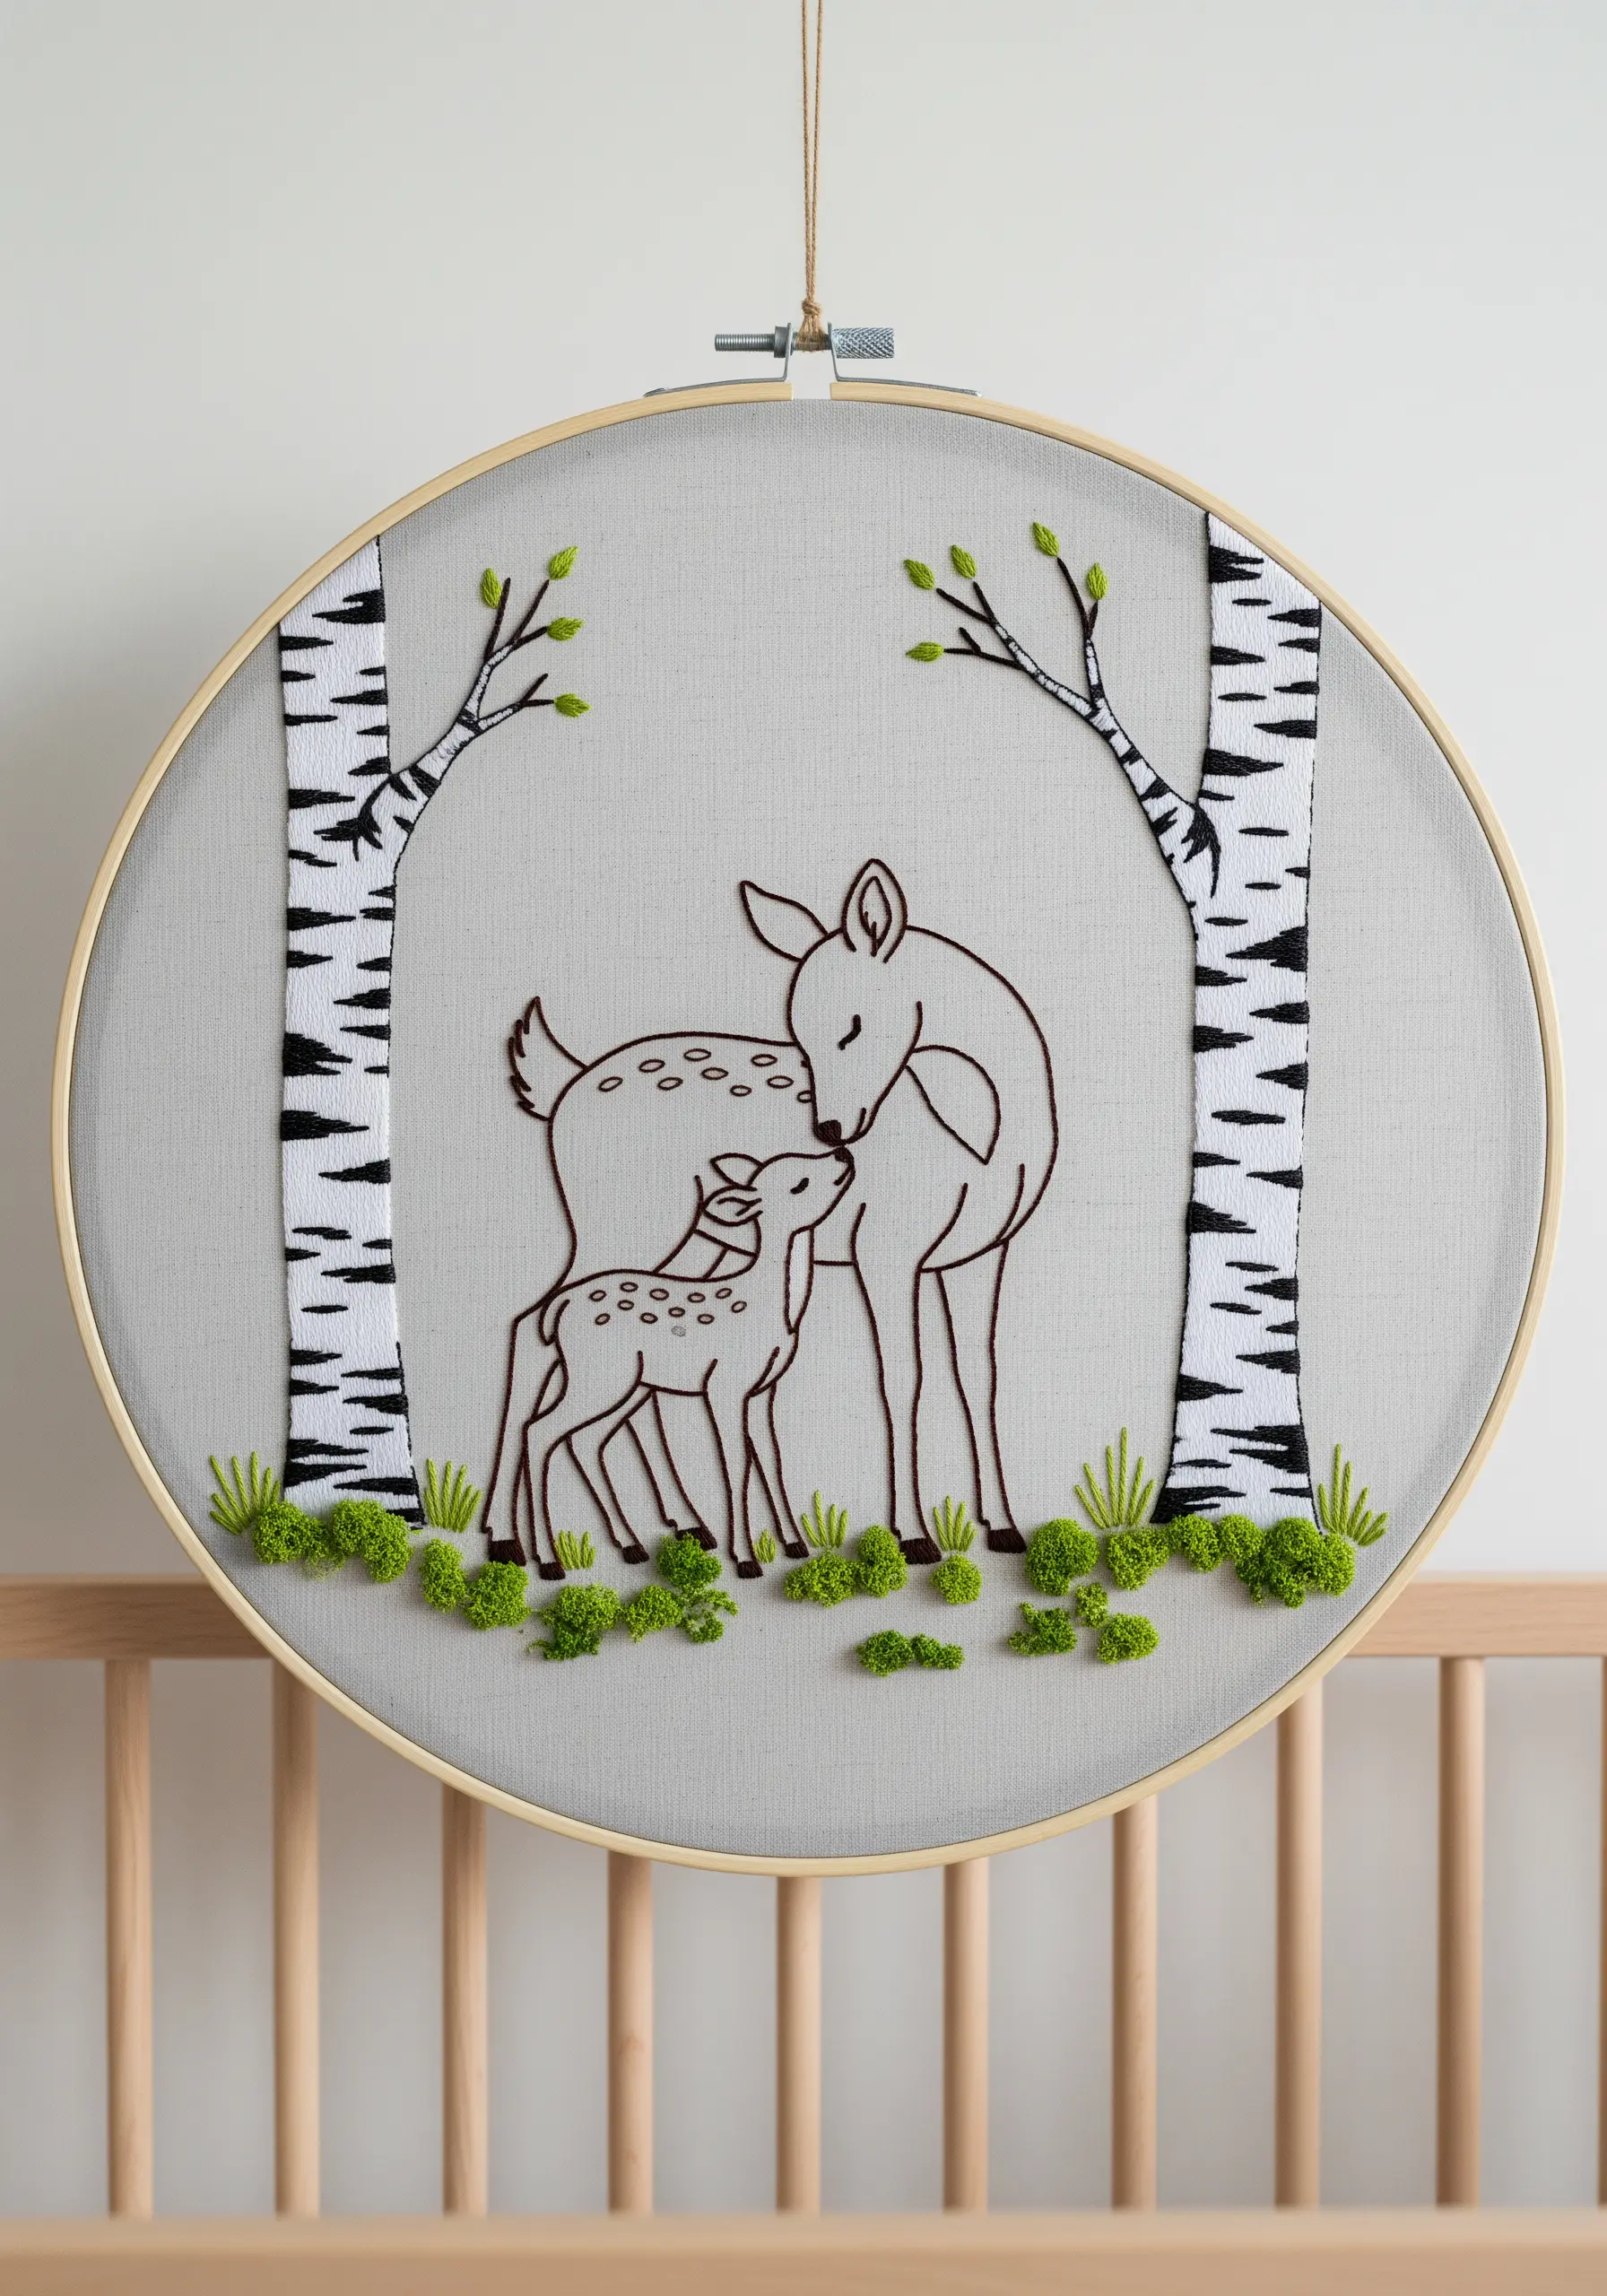
Create a sophisticated design by contrasting clean, simple line art with a small area of intense texture.
Use a neat backstitch or stem stitch in a dark color to outline the deer, keeping the forms elegant and minimal.
For the mossy ground, stitch dense clusters of French knots using a variegated green thread. This adds natural color variation and a lush, tactile quality that draws the eye immediately.
The birch tree bark is cleverly suggested with short, horizontal satin stitch bars in black.
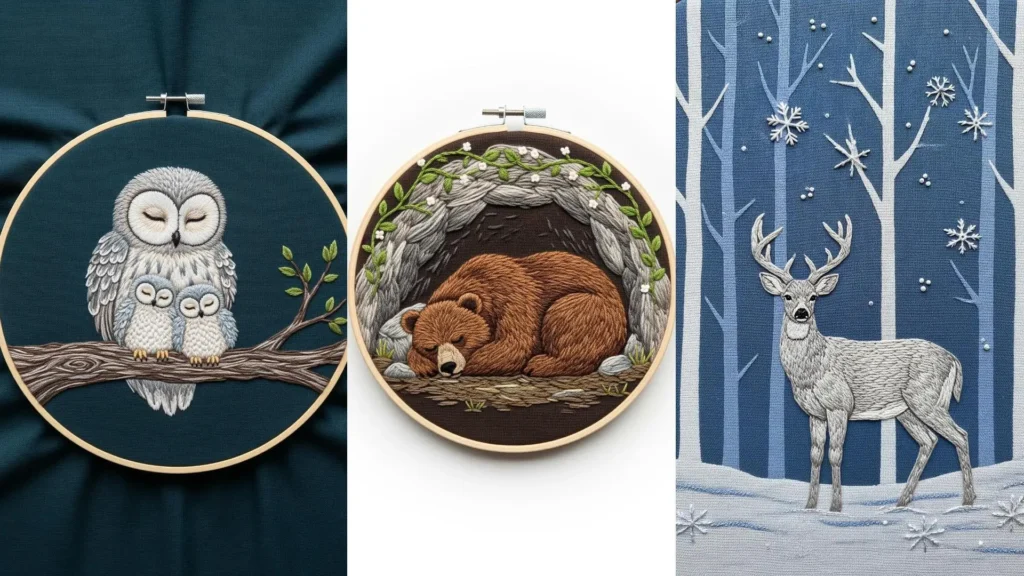
10. Conveying Fluffiness with French Knots
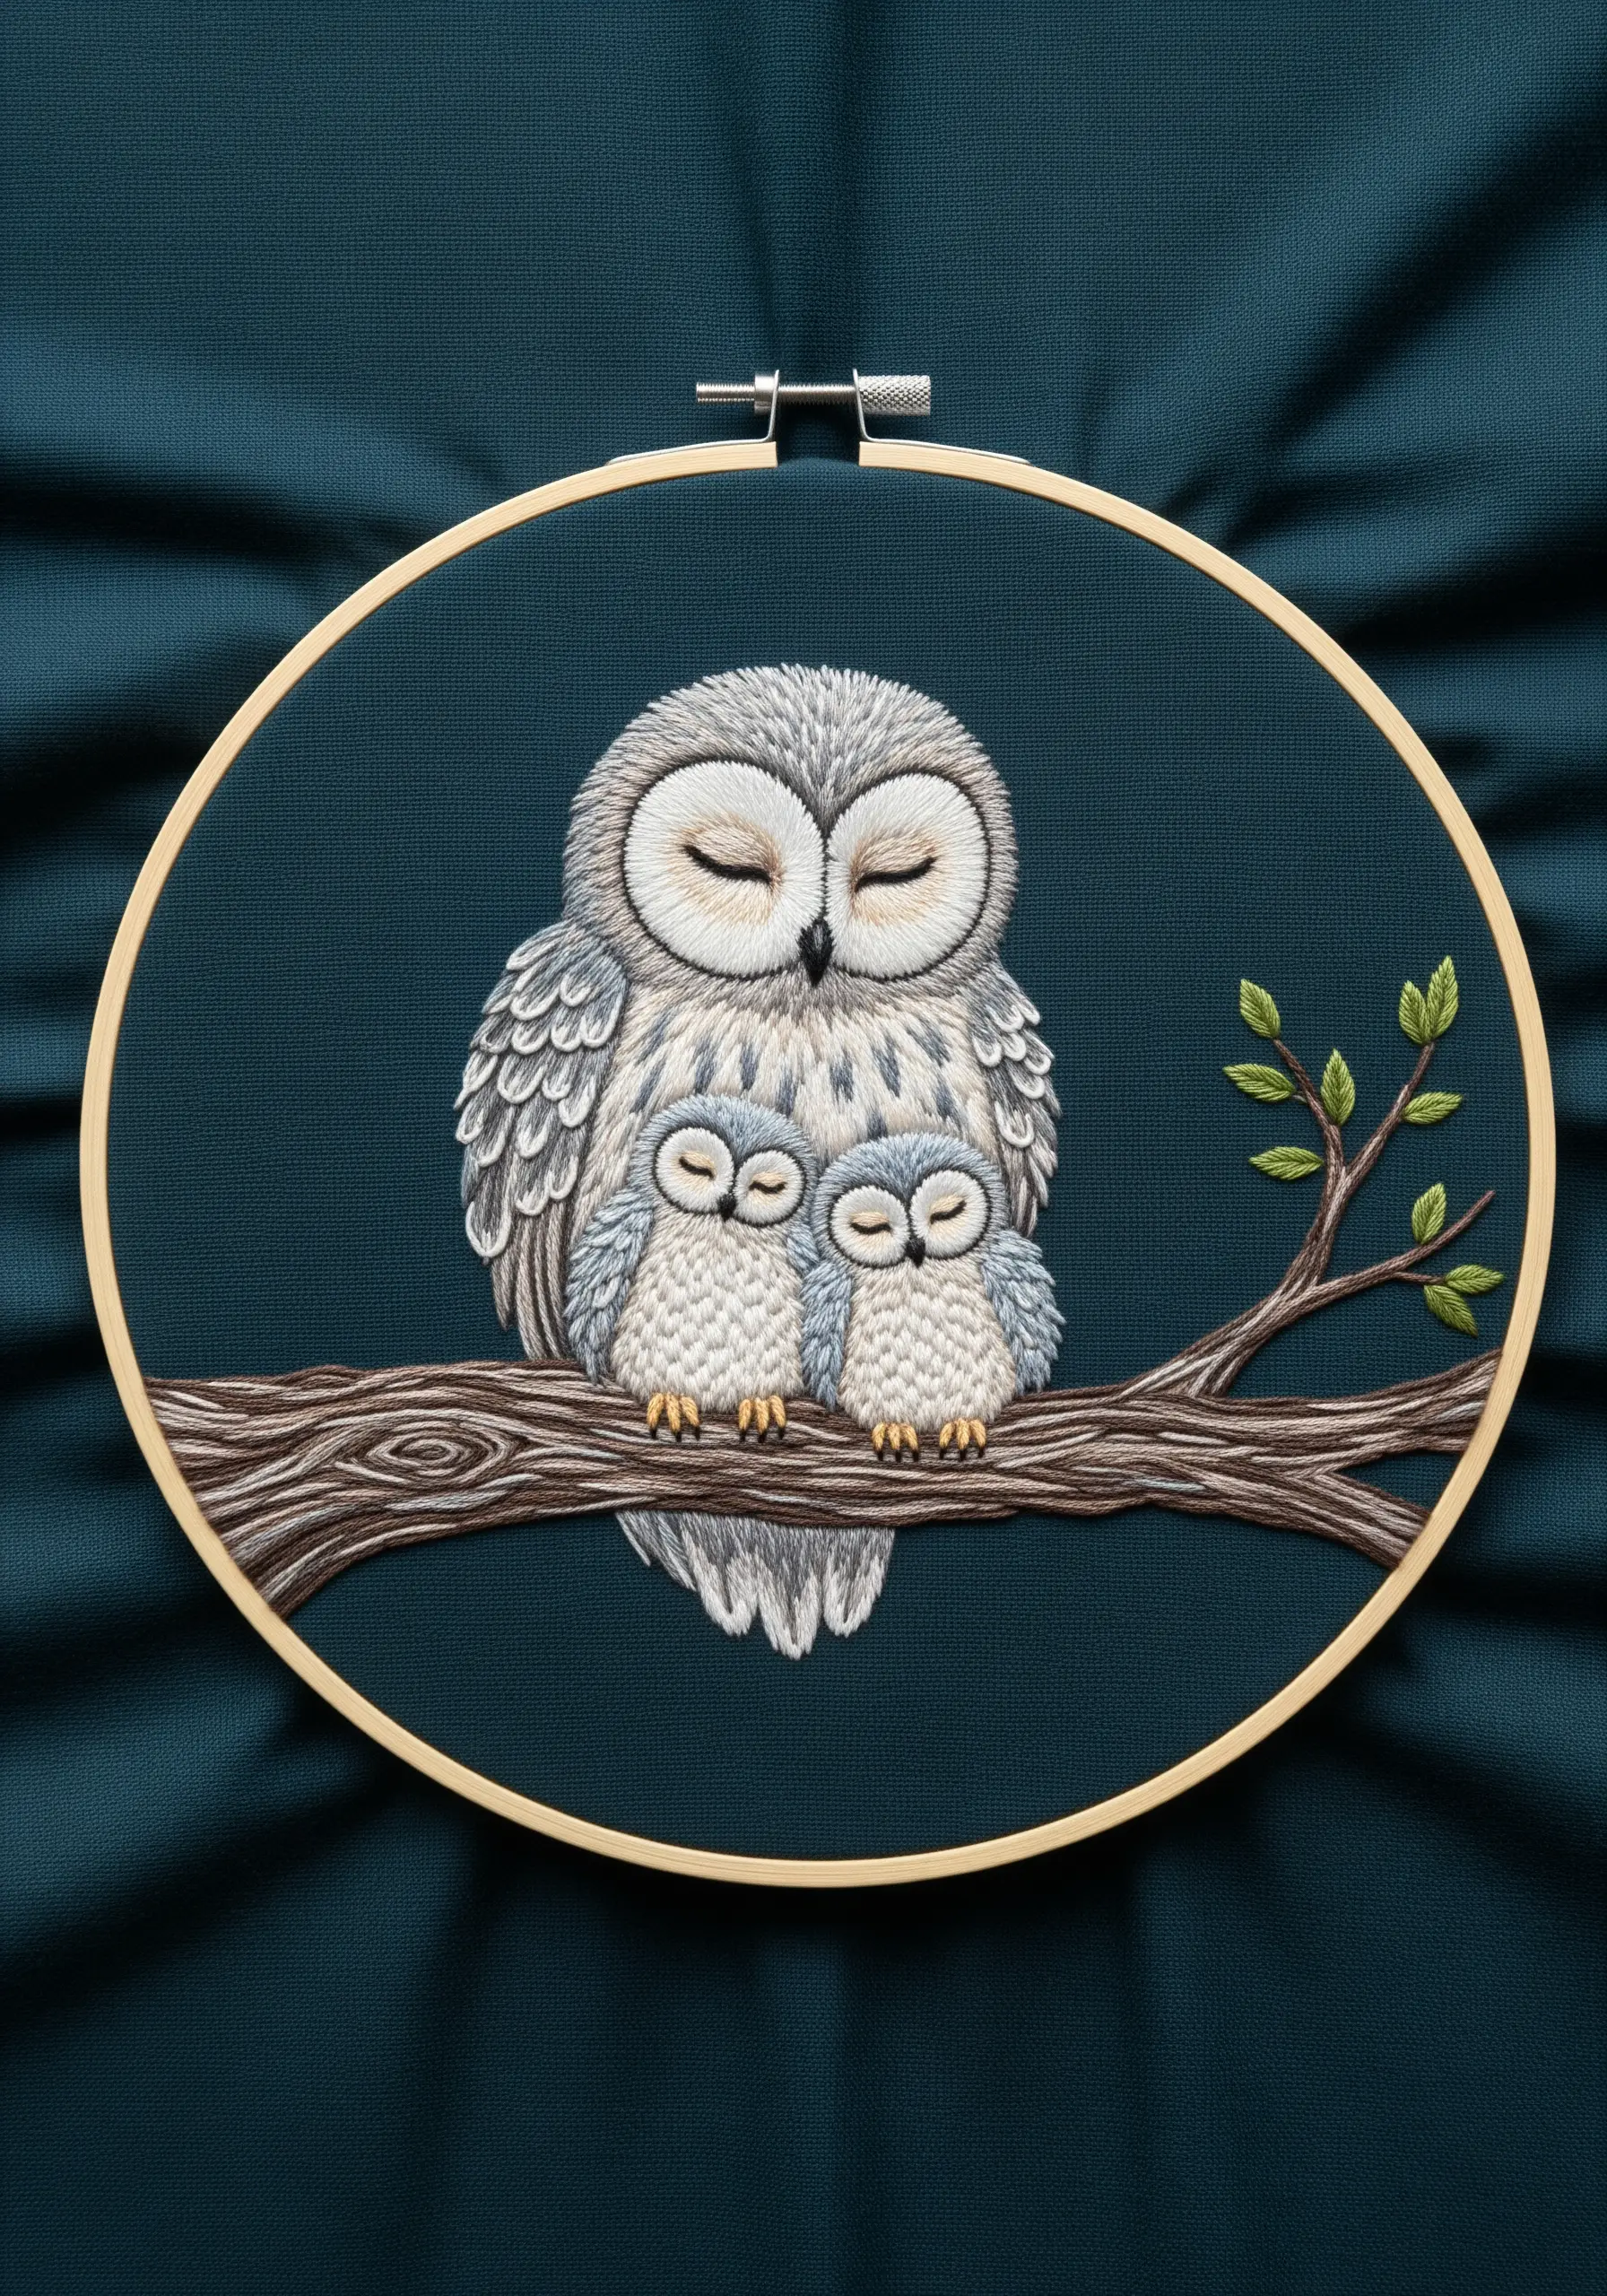
Instead of using satin stitch, fill the bodies of the baby owls with tightly packed French knots.
This technique creates a wonderfully soft, bumpy texture that perfectly mimics the look of downy feathers.
For the mother owl, use short, layered fishbone stitches to suggest sleek, mature plumage, creating a textural difference between her and her owlets.
The deep teal fabric provides a rich, elegant backdrop that makes the whites and greys of the owls stand out beautifully.
11. Stitching a Knitted Texture for Cozy Accessories
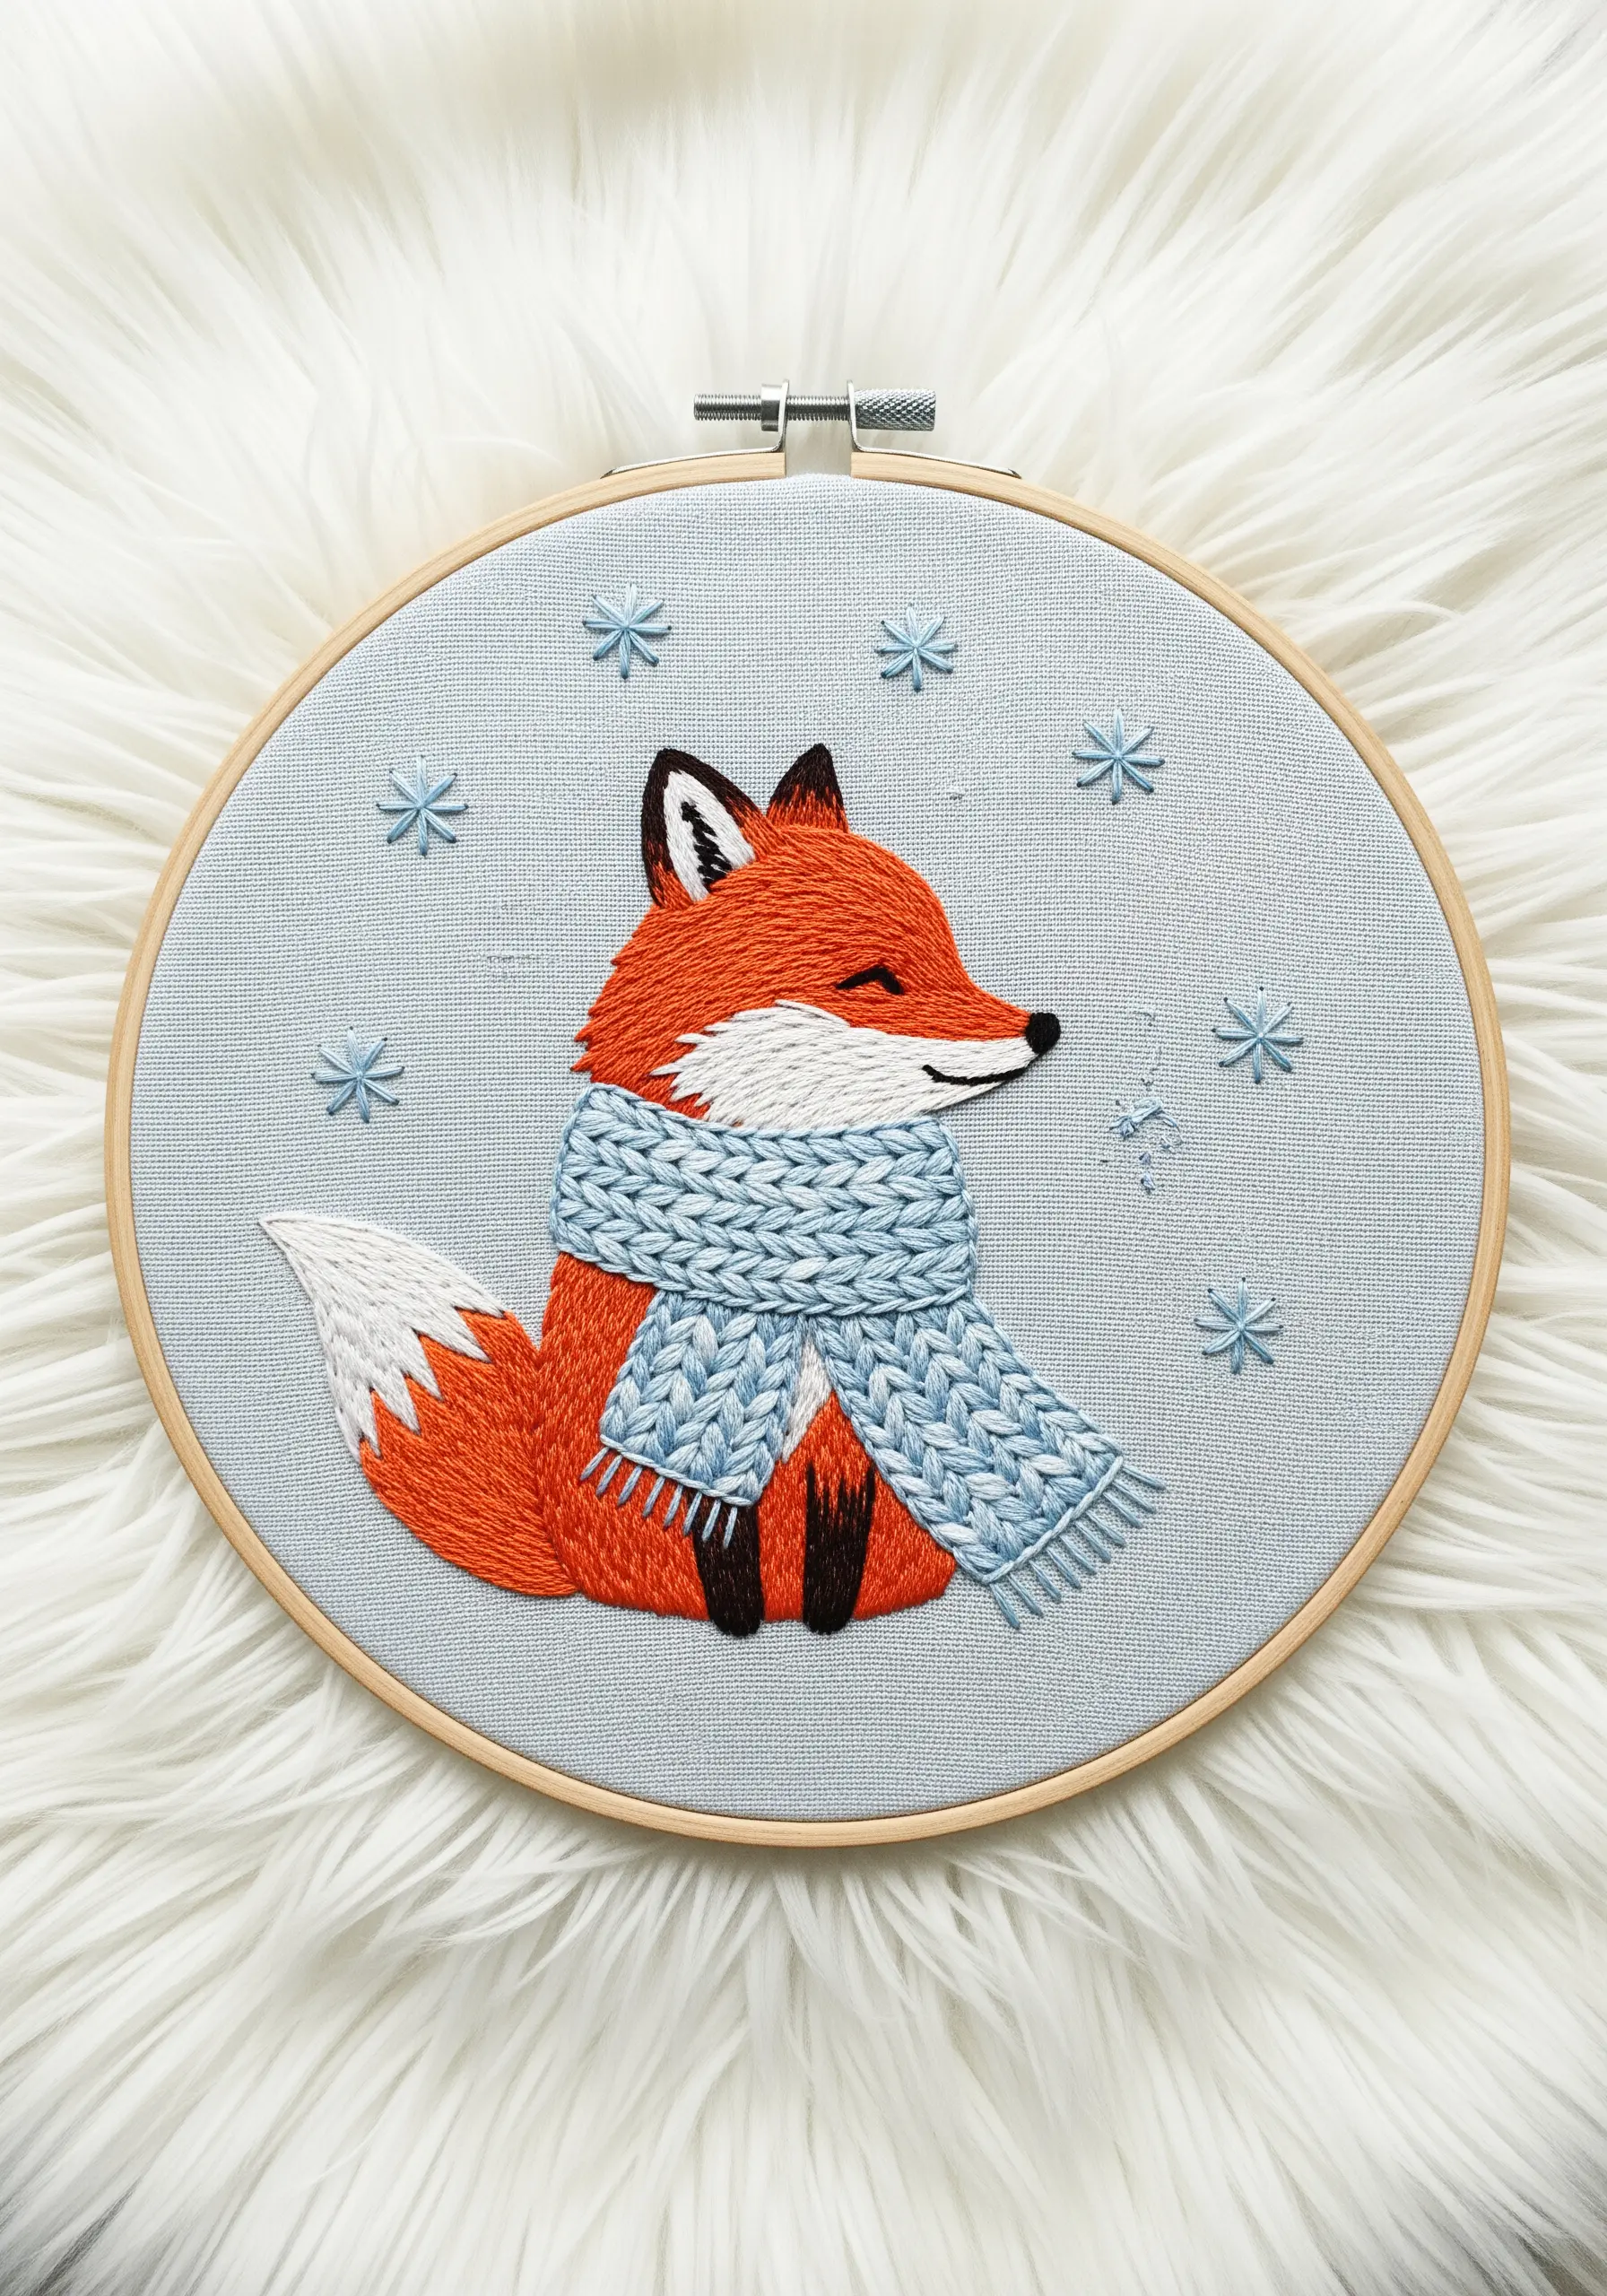
Mimic the look of a cozy knit scarf by using a woven basket stitch or a series of interlocking long stitches.
Use a slightly thicker thread—or increase your strand count to four or five—to enhance the chunky, woven effect.
Finish the scarf with a simple fringe made from short, loose straight stitches at the ends.
This delightful textural element makes the smooth satin stitch of the fox’s fur appear even sleeker by comparison.
12. The Power of a Single Pop of Color
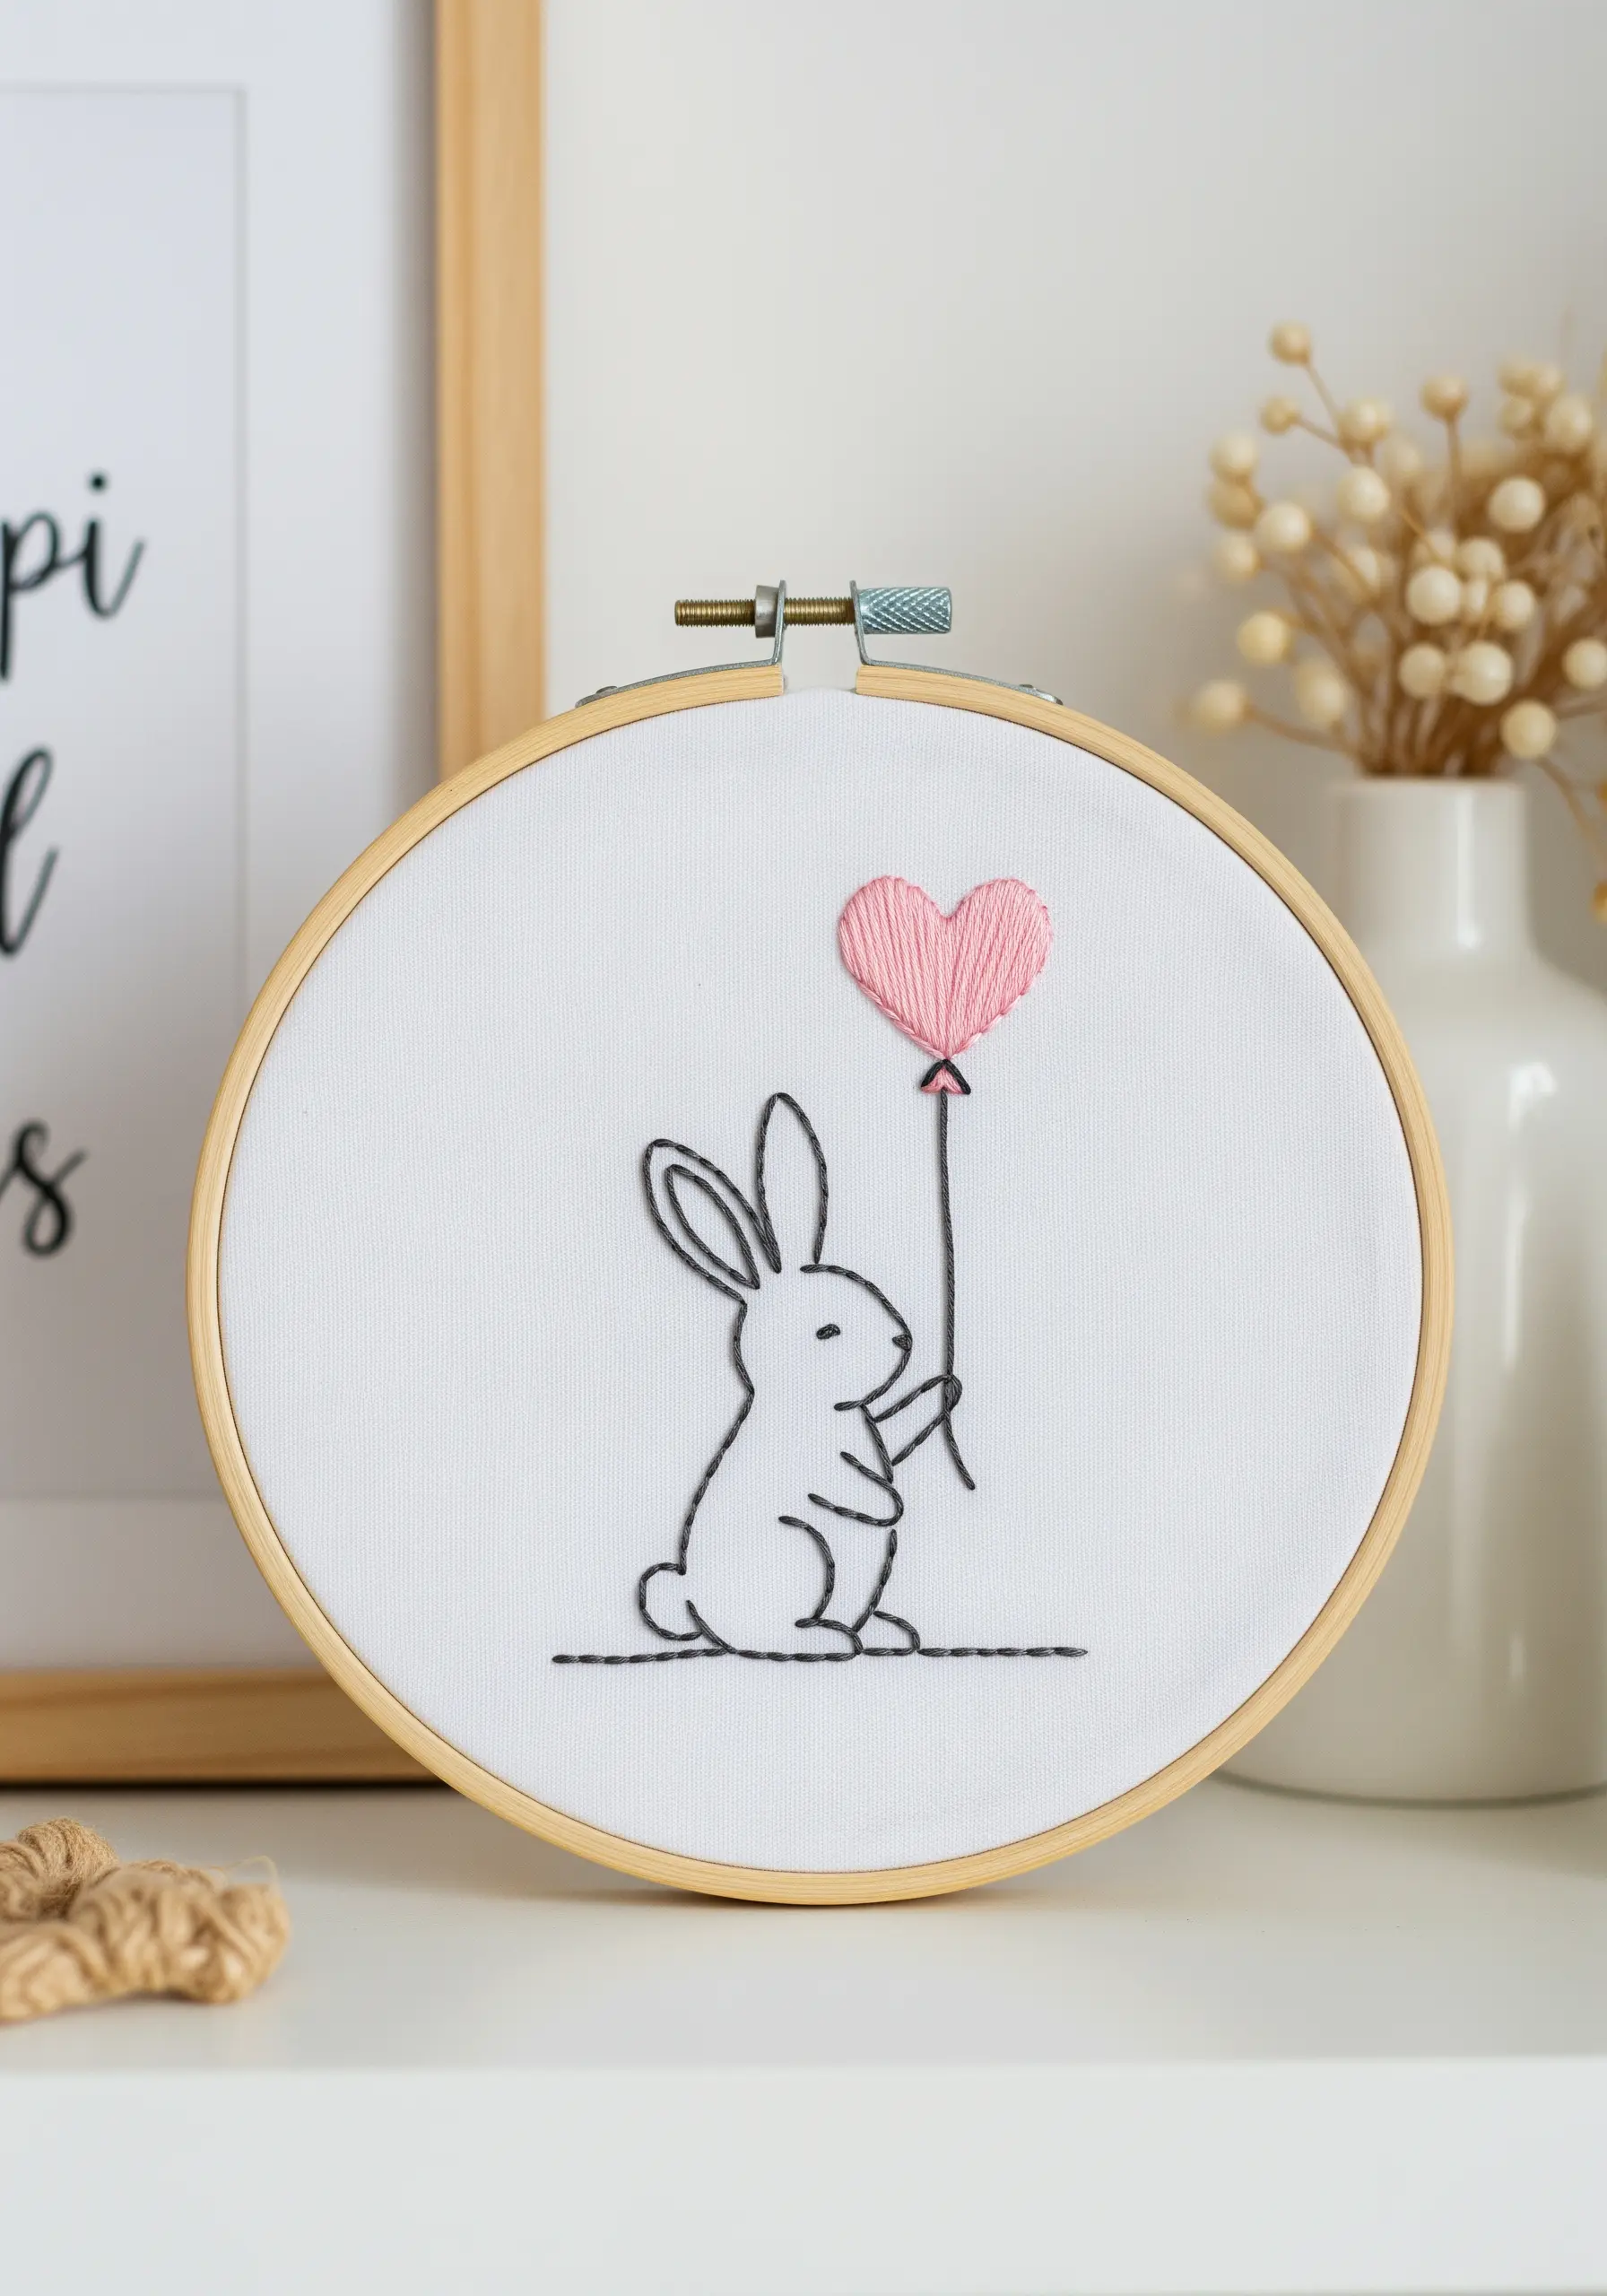
Embrace minimalist design by telling a story with clean lines and a single, impactful burst of color.
Use a simple backstitch for the rabbit’s outline, focusing on achieving smooth curves and a clear silhouette.
The power of this design lies in its use of negative space; the unstitched areas are just as important as the stitched lines.
Fill the heart-shaped balloon with a diagonal satin stitch. This pop of color draws the eye instantly and adds a touch of sweetness to the composition.
13. Creating a Starry Sky with Varied Knots
Craft a dynamic and magical night sky by using more than just one type of stitch.
Create stars of different sizes by varying your French knots—wrap the thread once for tiny stars, and two or three times for larger ones.
Intersperse the knots with tiny straight stitches for shooting stars and small starburst stitches for the brightest constellations.
This variety transforms a simple background into a captivating galaxy and helps to create mood-enhancing home decor.
14. Integrating Embroidery into Appliqué Lettering
Combine appliqué and embroidery for a beautiful, personalized name monogram.
First, cut your chosen letter from felt or cotton fabric and secure it to your base fabric. You can outline the appliqué with a neat blanket stitch for a classic finish.
The cross-hatch fill on the letter adds a traditional texture that feels comforting and timeless.
Finally, embroider your sleepy animal motif directly onto the appliqué, making the design feel layered and fully integrated.
15. Charming Illustrations with Simple Stitches
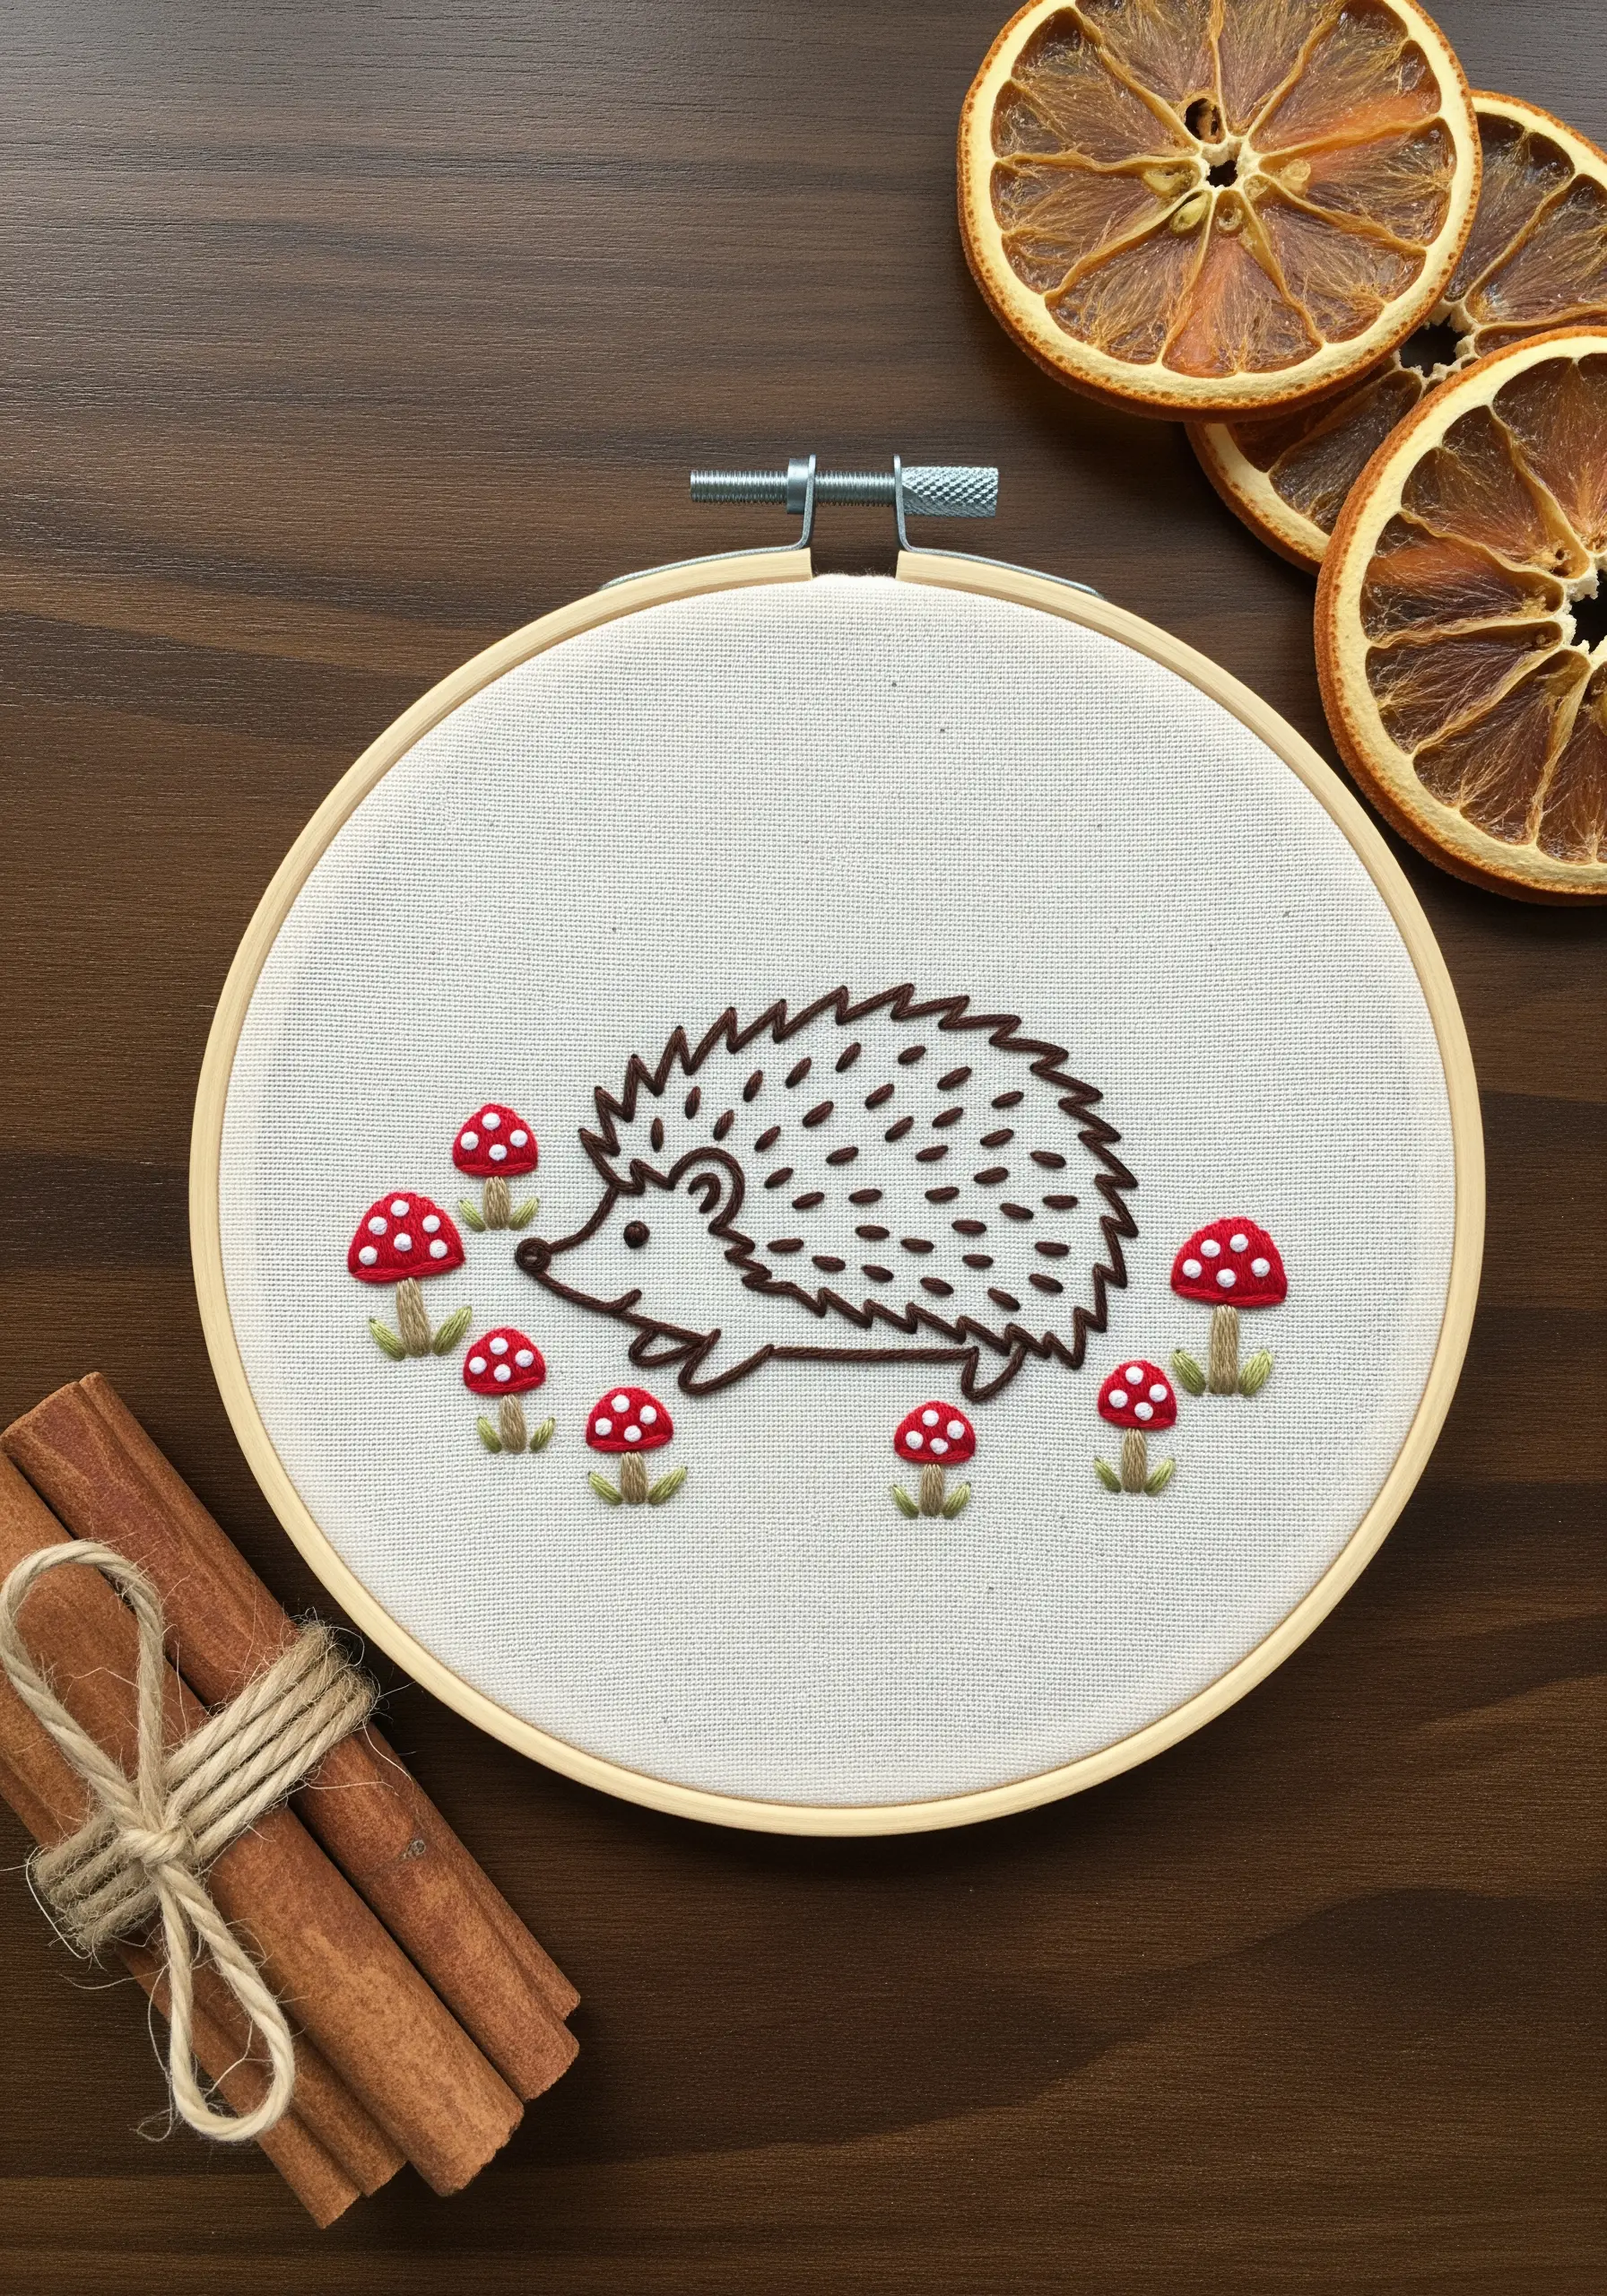
You don’t need complex techniques to create an utterly charming piece. This design relies on the clean execution of basic stitches.
The hedgehog’s body is a simple satin stitch, while the quills are quick, sharp straight stitches in a contrasting dark brown.
Give the mushrooms a cute, cartoonish feel by using a padded satin stitch for the caps, which makes them look plump and round.
This illustrative style is perfect for beginners and adds a playful touch to nursery decor.
16. Composing a Scene with Floral Framing
Create a sense of depth and place your animal within a scene by strategically framing it with botanical elements.
Stitch the fawn first, then add the flowers and grass around it, layering some stems in front of its hooves to ground it in the meadow.
For the bell-shaped flowers, use a single detached chain stitch (a lazy daisy stitch) to form each bloom.
The soft blue of the fabric serves as a perfect sky, completing the gentle, pastoral composition.
17. Achieving High Texture with Uncut Loops
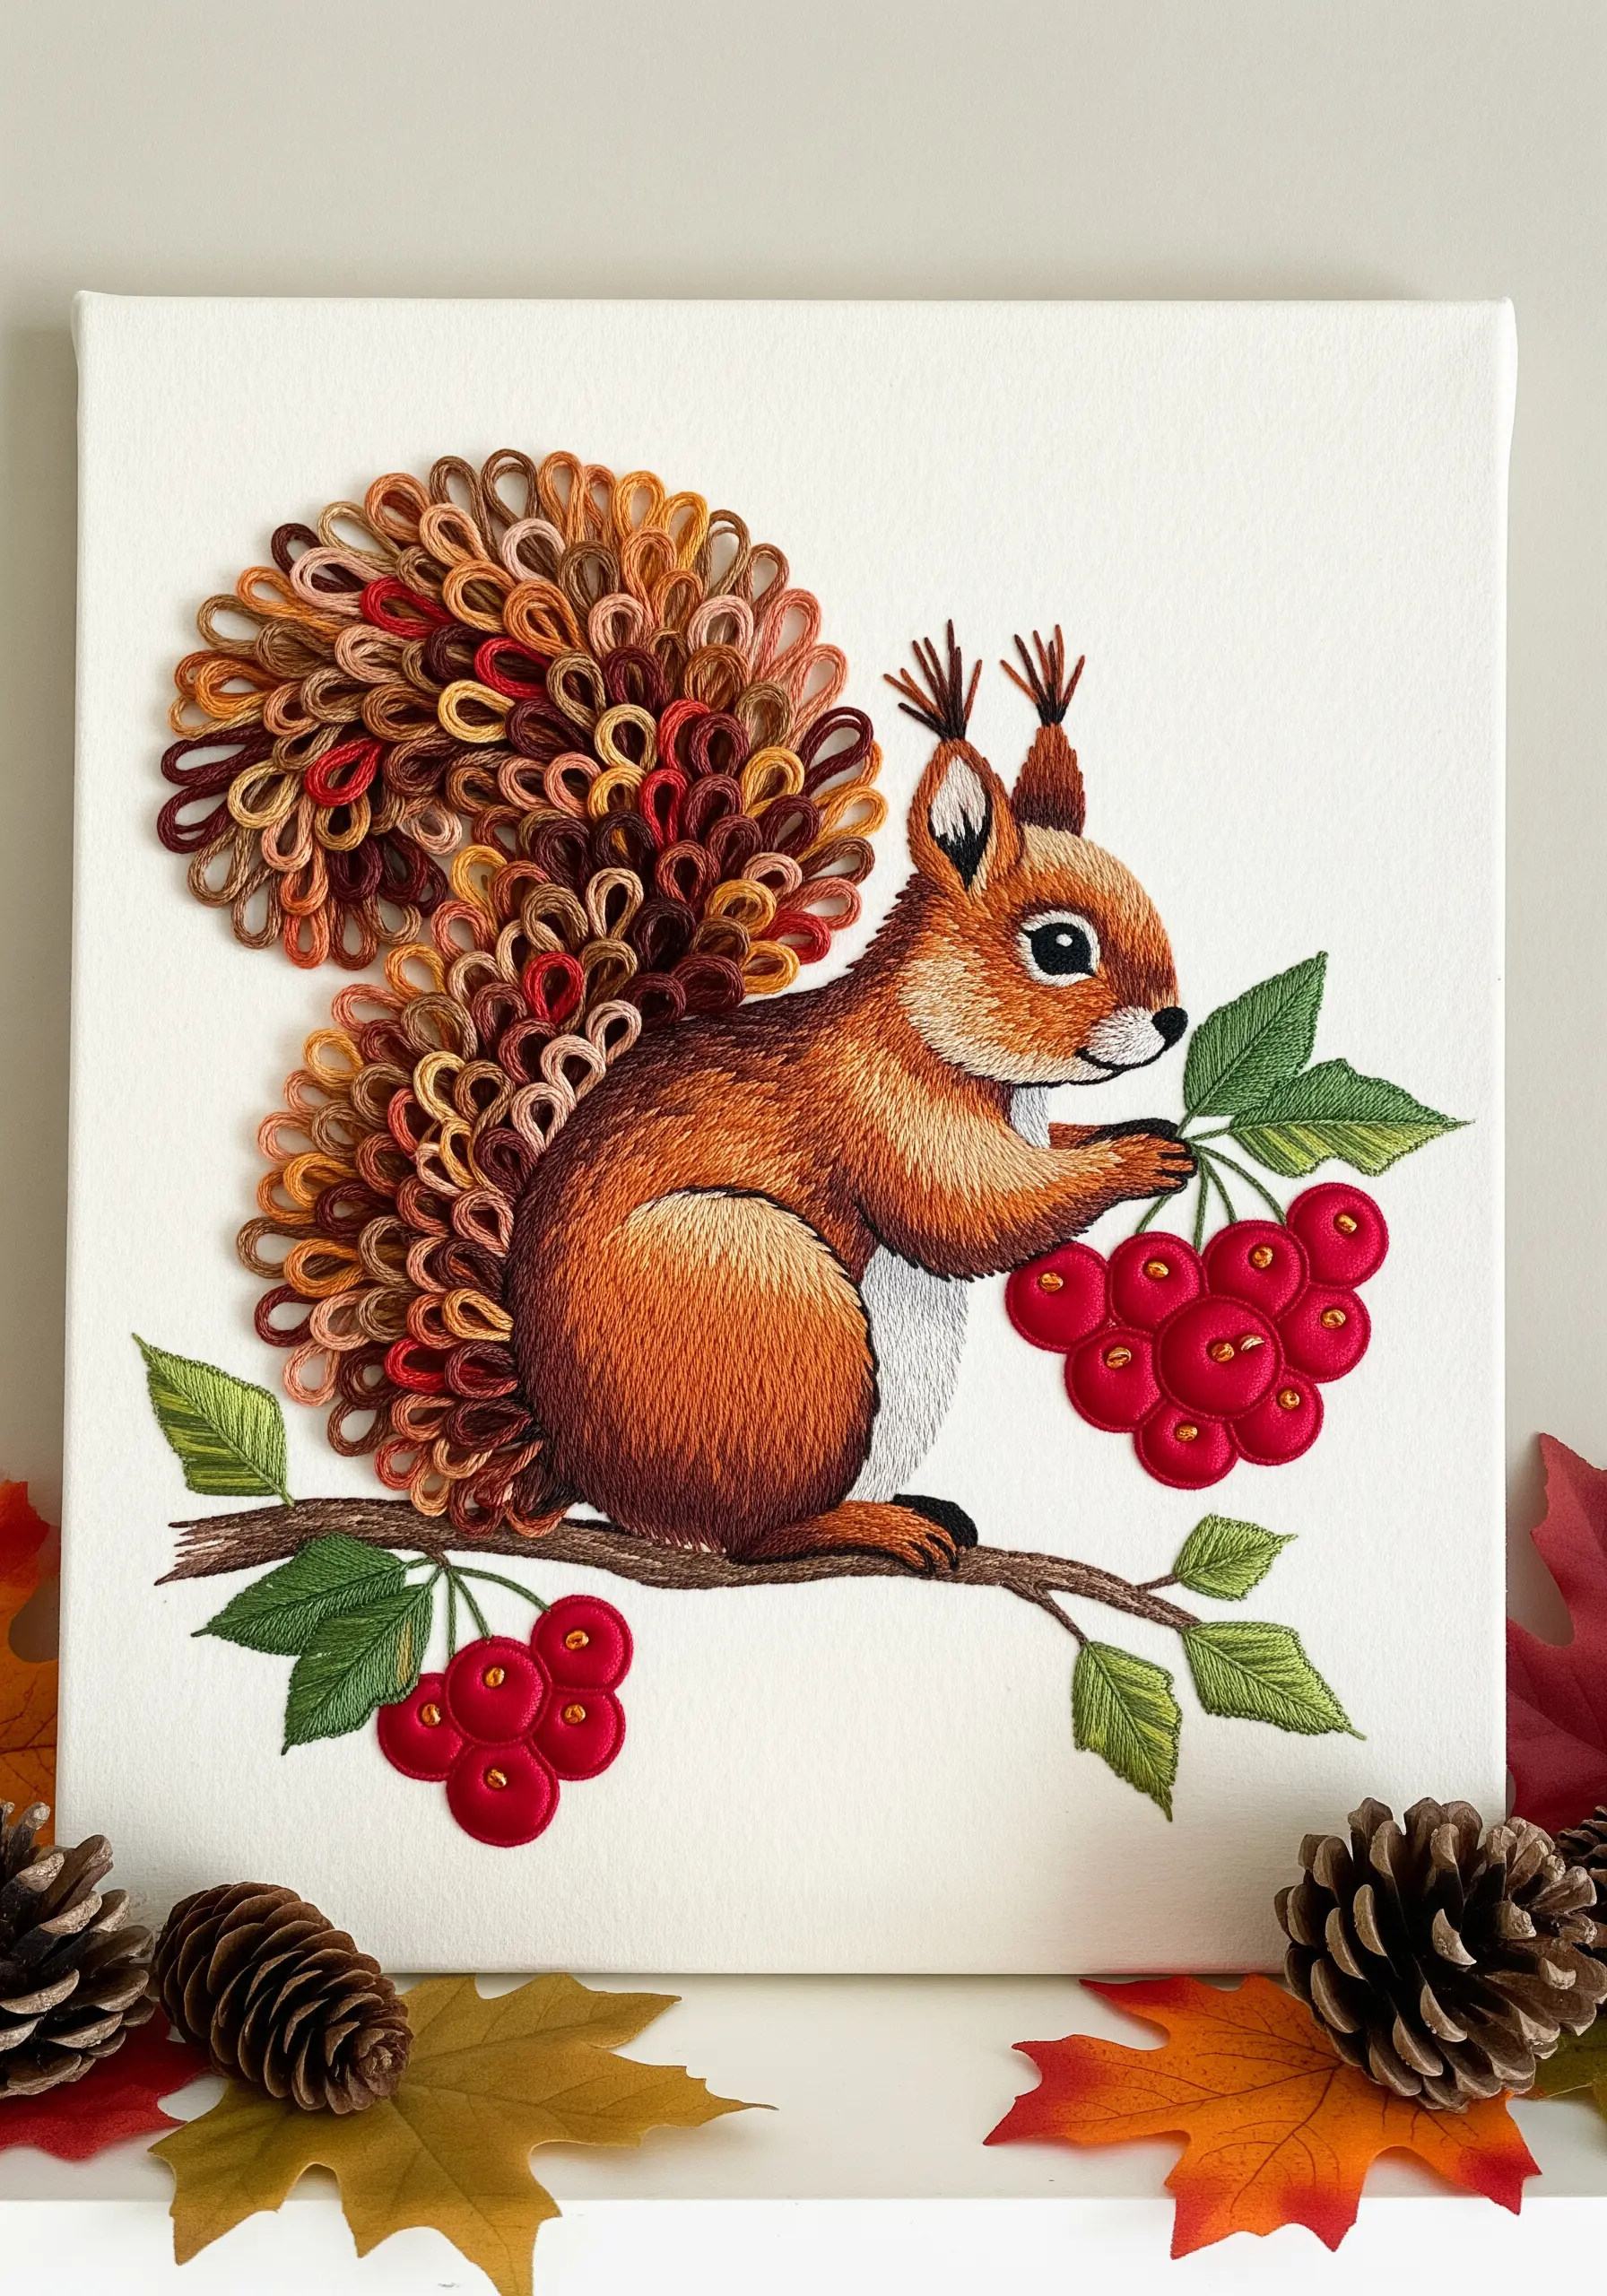
Create an incredibly tactile and three-dimensional effect by using a looped stitch for the squirrel’s tail.
This technique, similar to turkey work, involves creating loops of thread that are secured at the base but left uncut.
Using a variegated thread for the loops adds instant color variation and depth, mimicking the natural look of fur.
This high-texture element provides a stunning contrast to the flat, smooth satin stitch used for the squirrel’s body.
18. Defining Features with Crisp Color Blocking
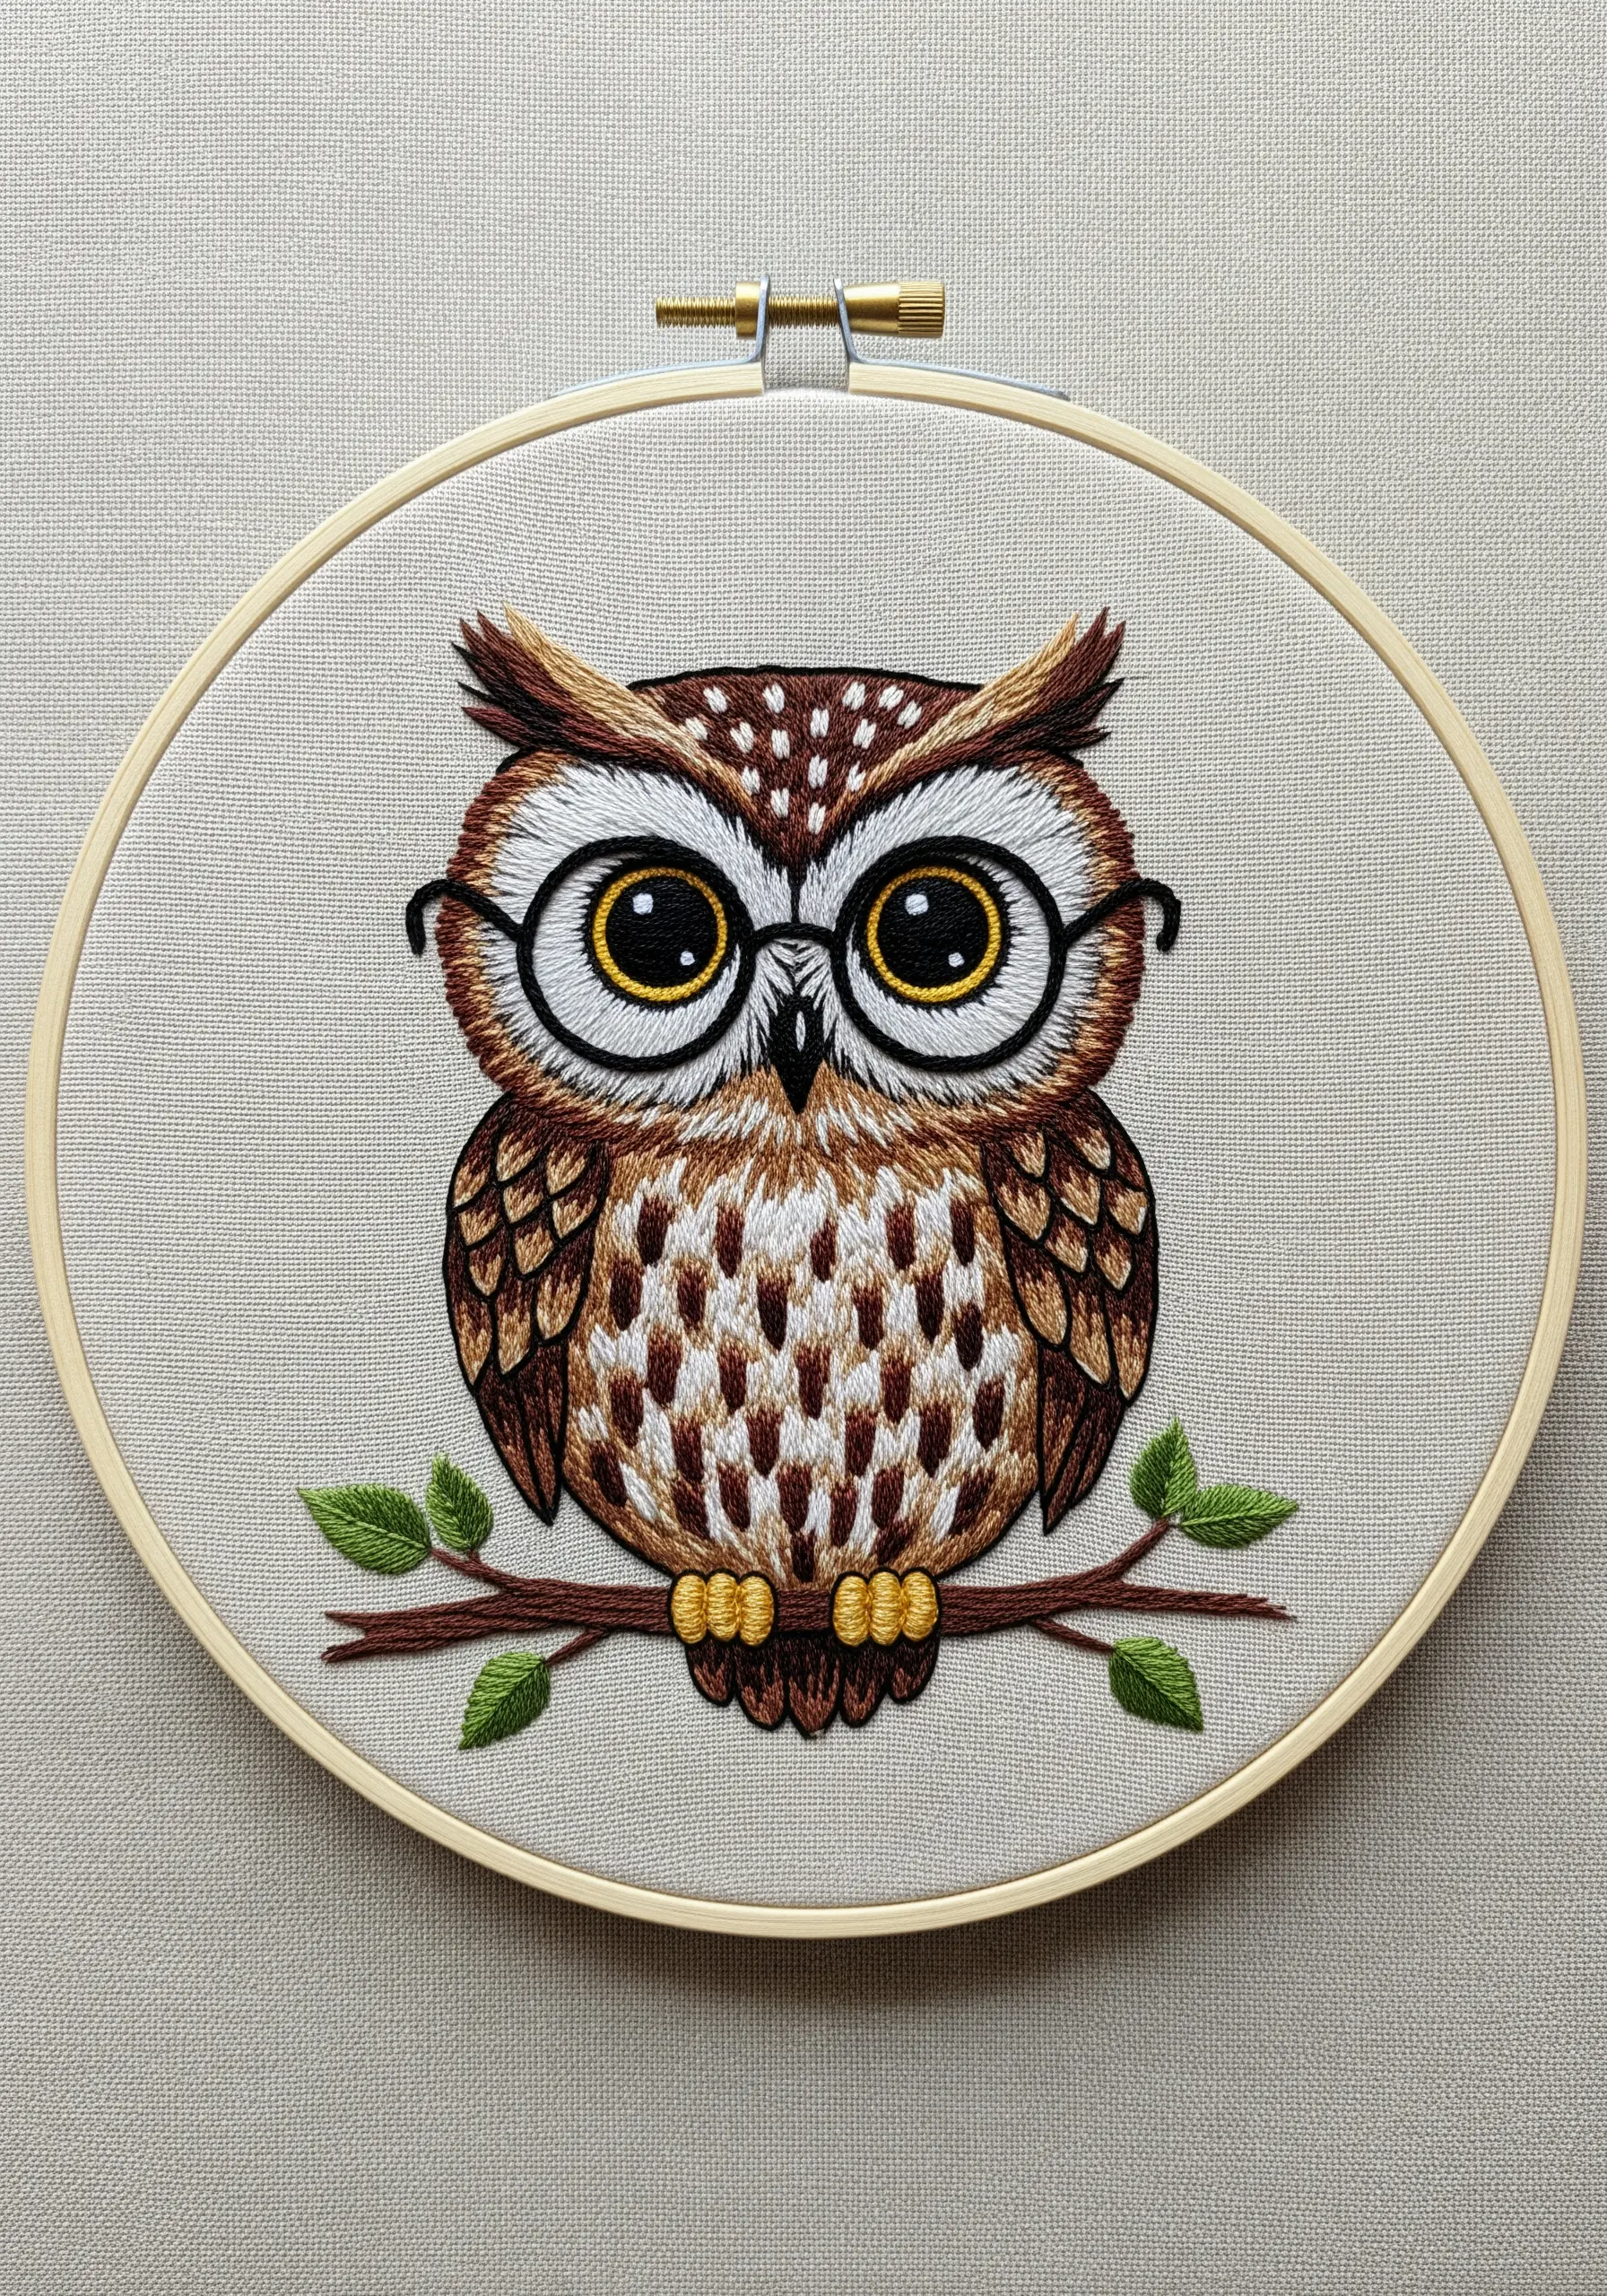
Give your animal a clean, graphic look by outlining each color section with a precise backstitch or split stitch before filling it in.
This technique creates sharp divisions between colors and makes the entire design pop, almost like a storybook illustration.
For the owl’s chest feathers, use short satin stitches arranged in an alternating, brick-like pattern to create visual interest.
The glasses are rendered with a simple, fine backstitch, proving that even the smallest details can define a character’s personality.
19. Creating Fluffy Dandelions with Turkey Work
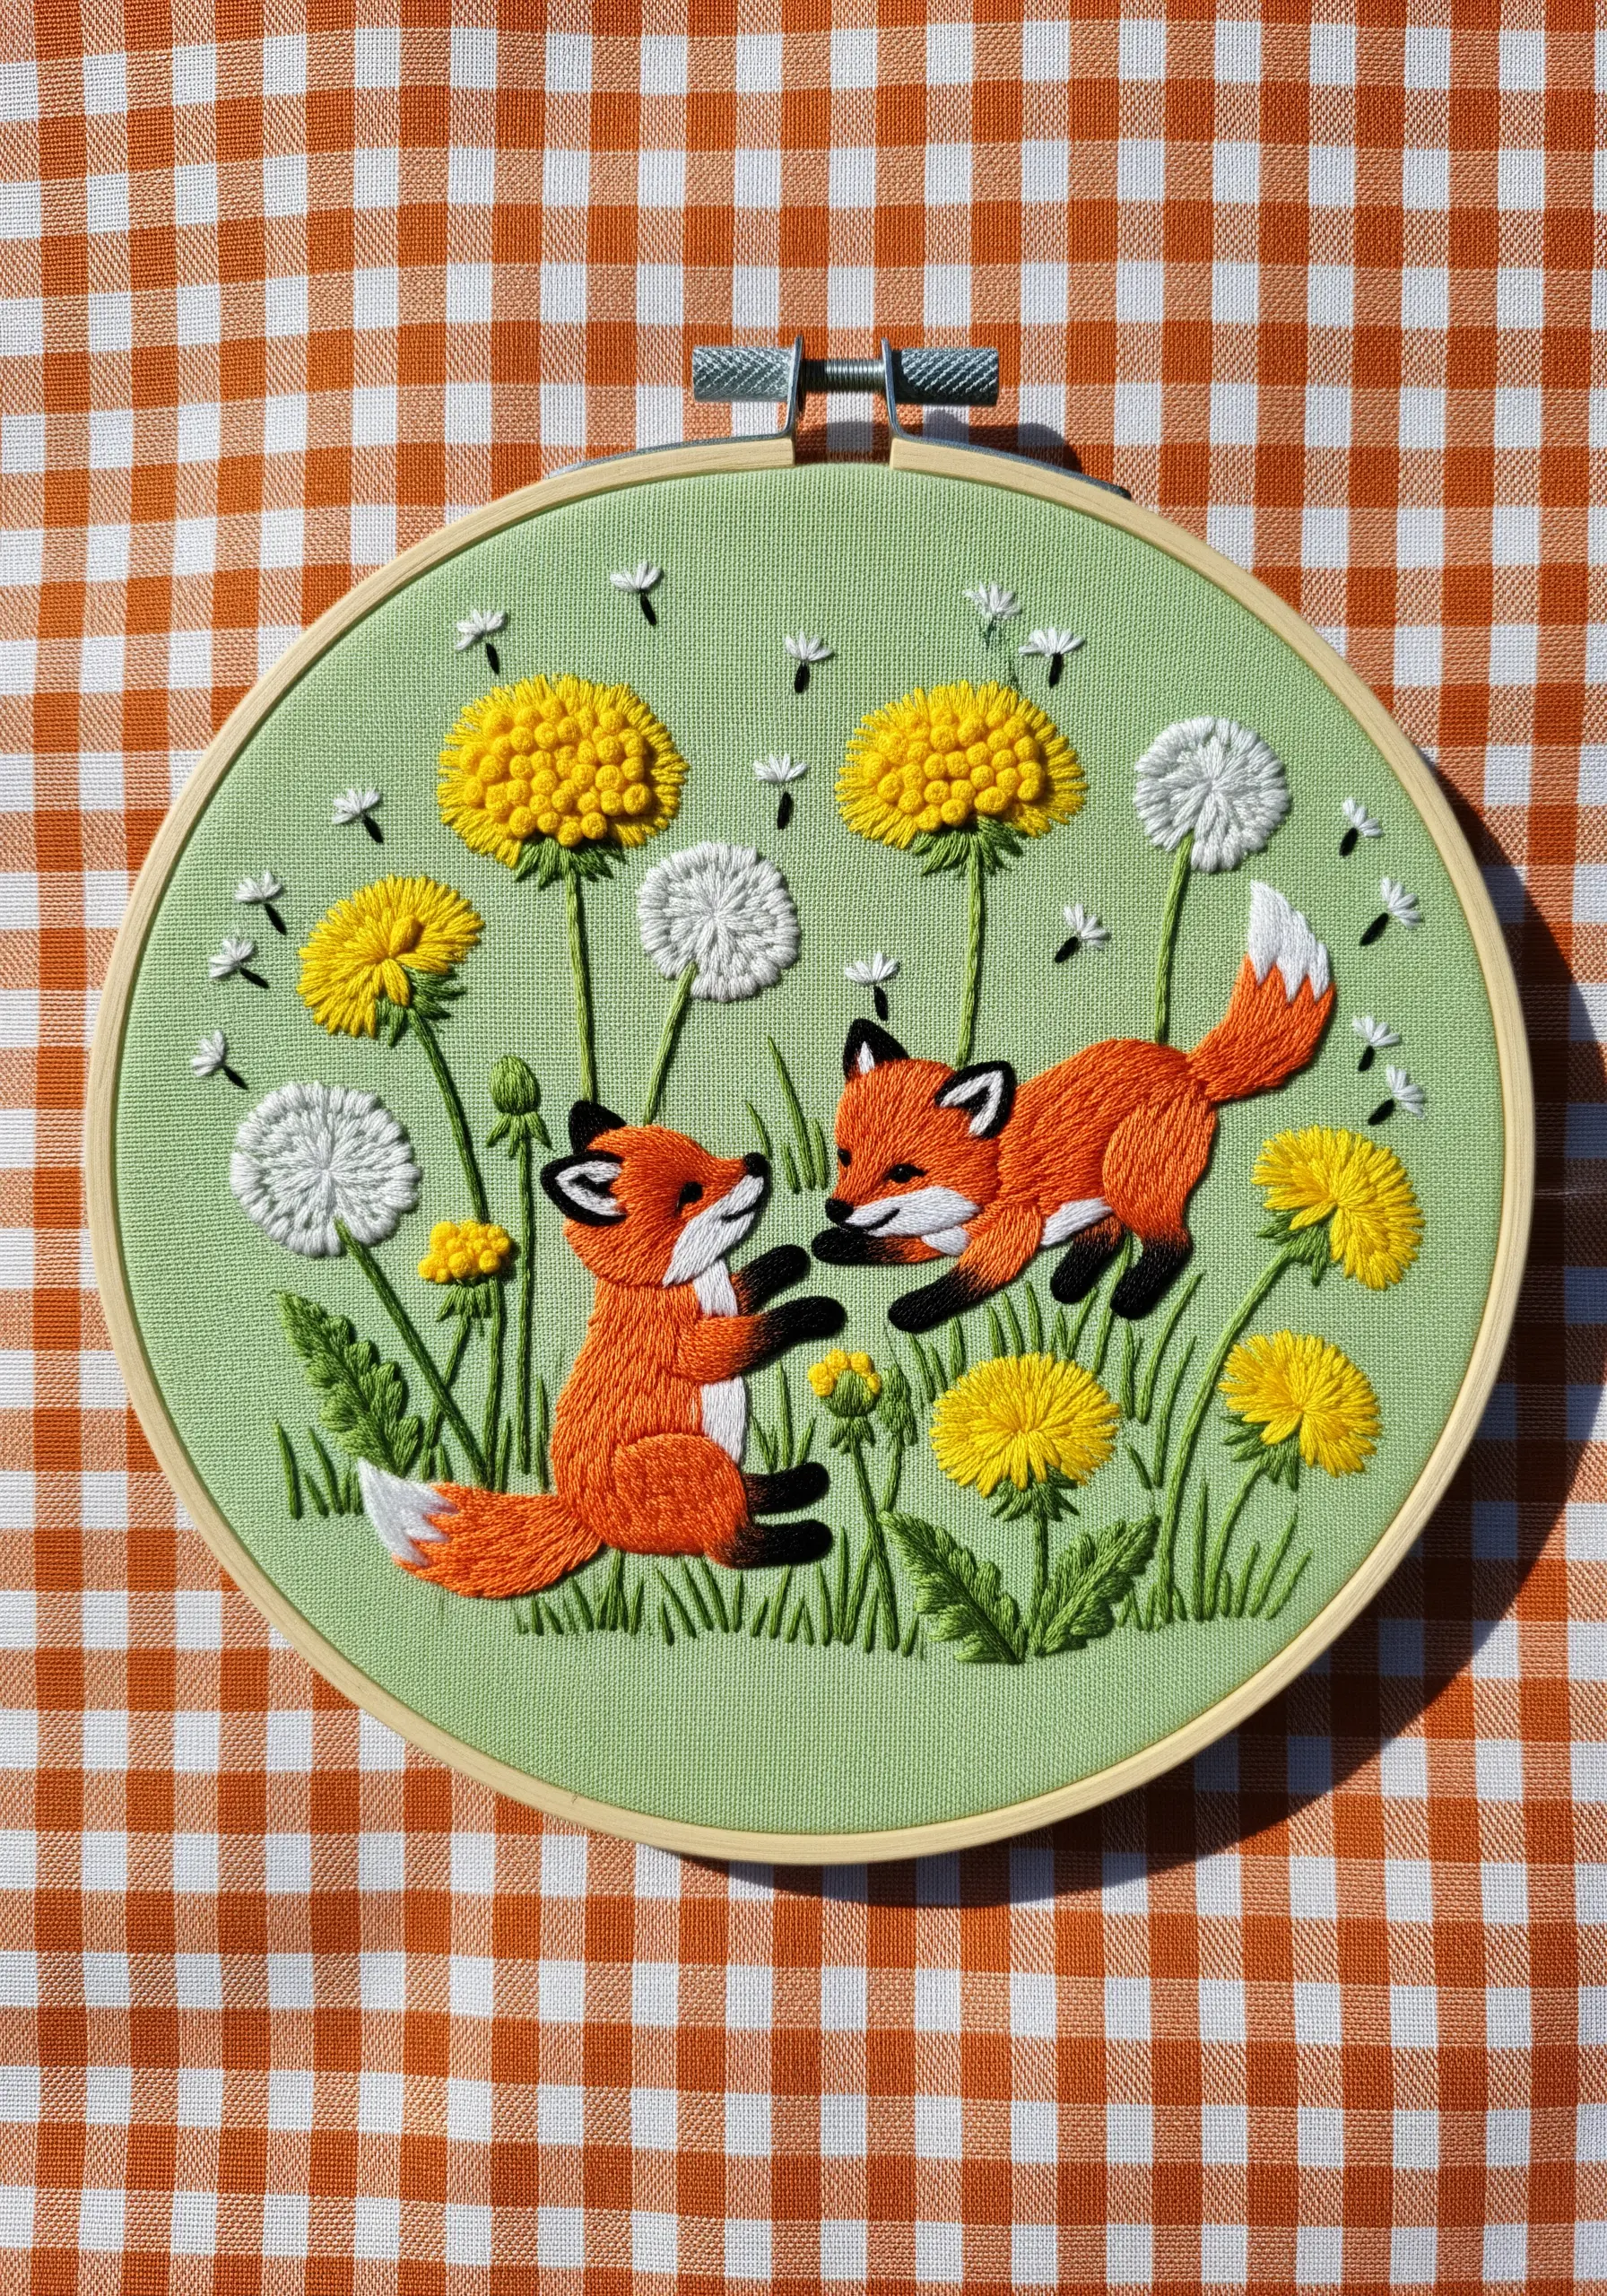
Bring your embroidery to life with the wonderfully fluffy texture of trimmed turkey work.
To create the dandelion seed heads, stitch a dense area of loops using the turkey work stitch.
Once the area is filled, carefully trim the tops of the loops with sharp scissors to create a soft, pom-pom-like effect.
Contrast this airy texture with the dense, bumpy surface of French knots for the yellow dandelions, creating a field rich in tactile detail.
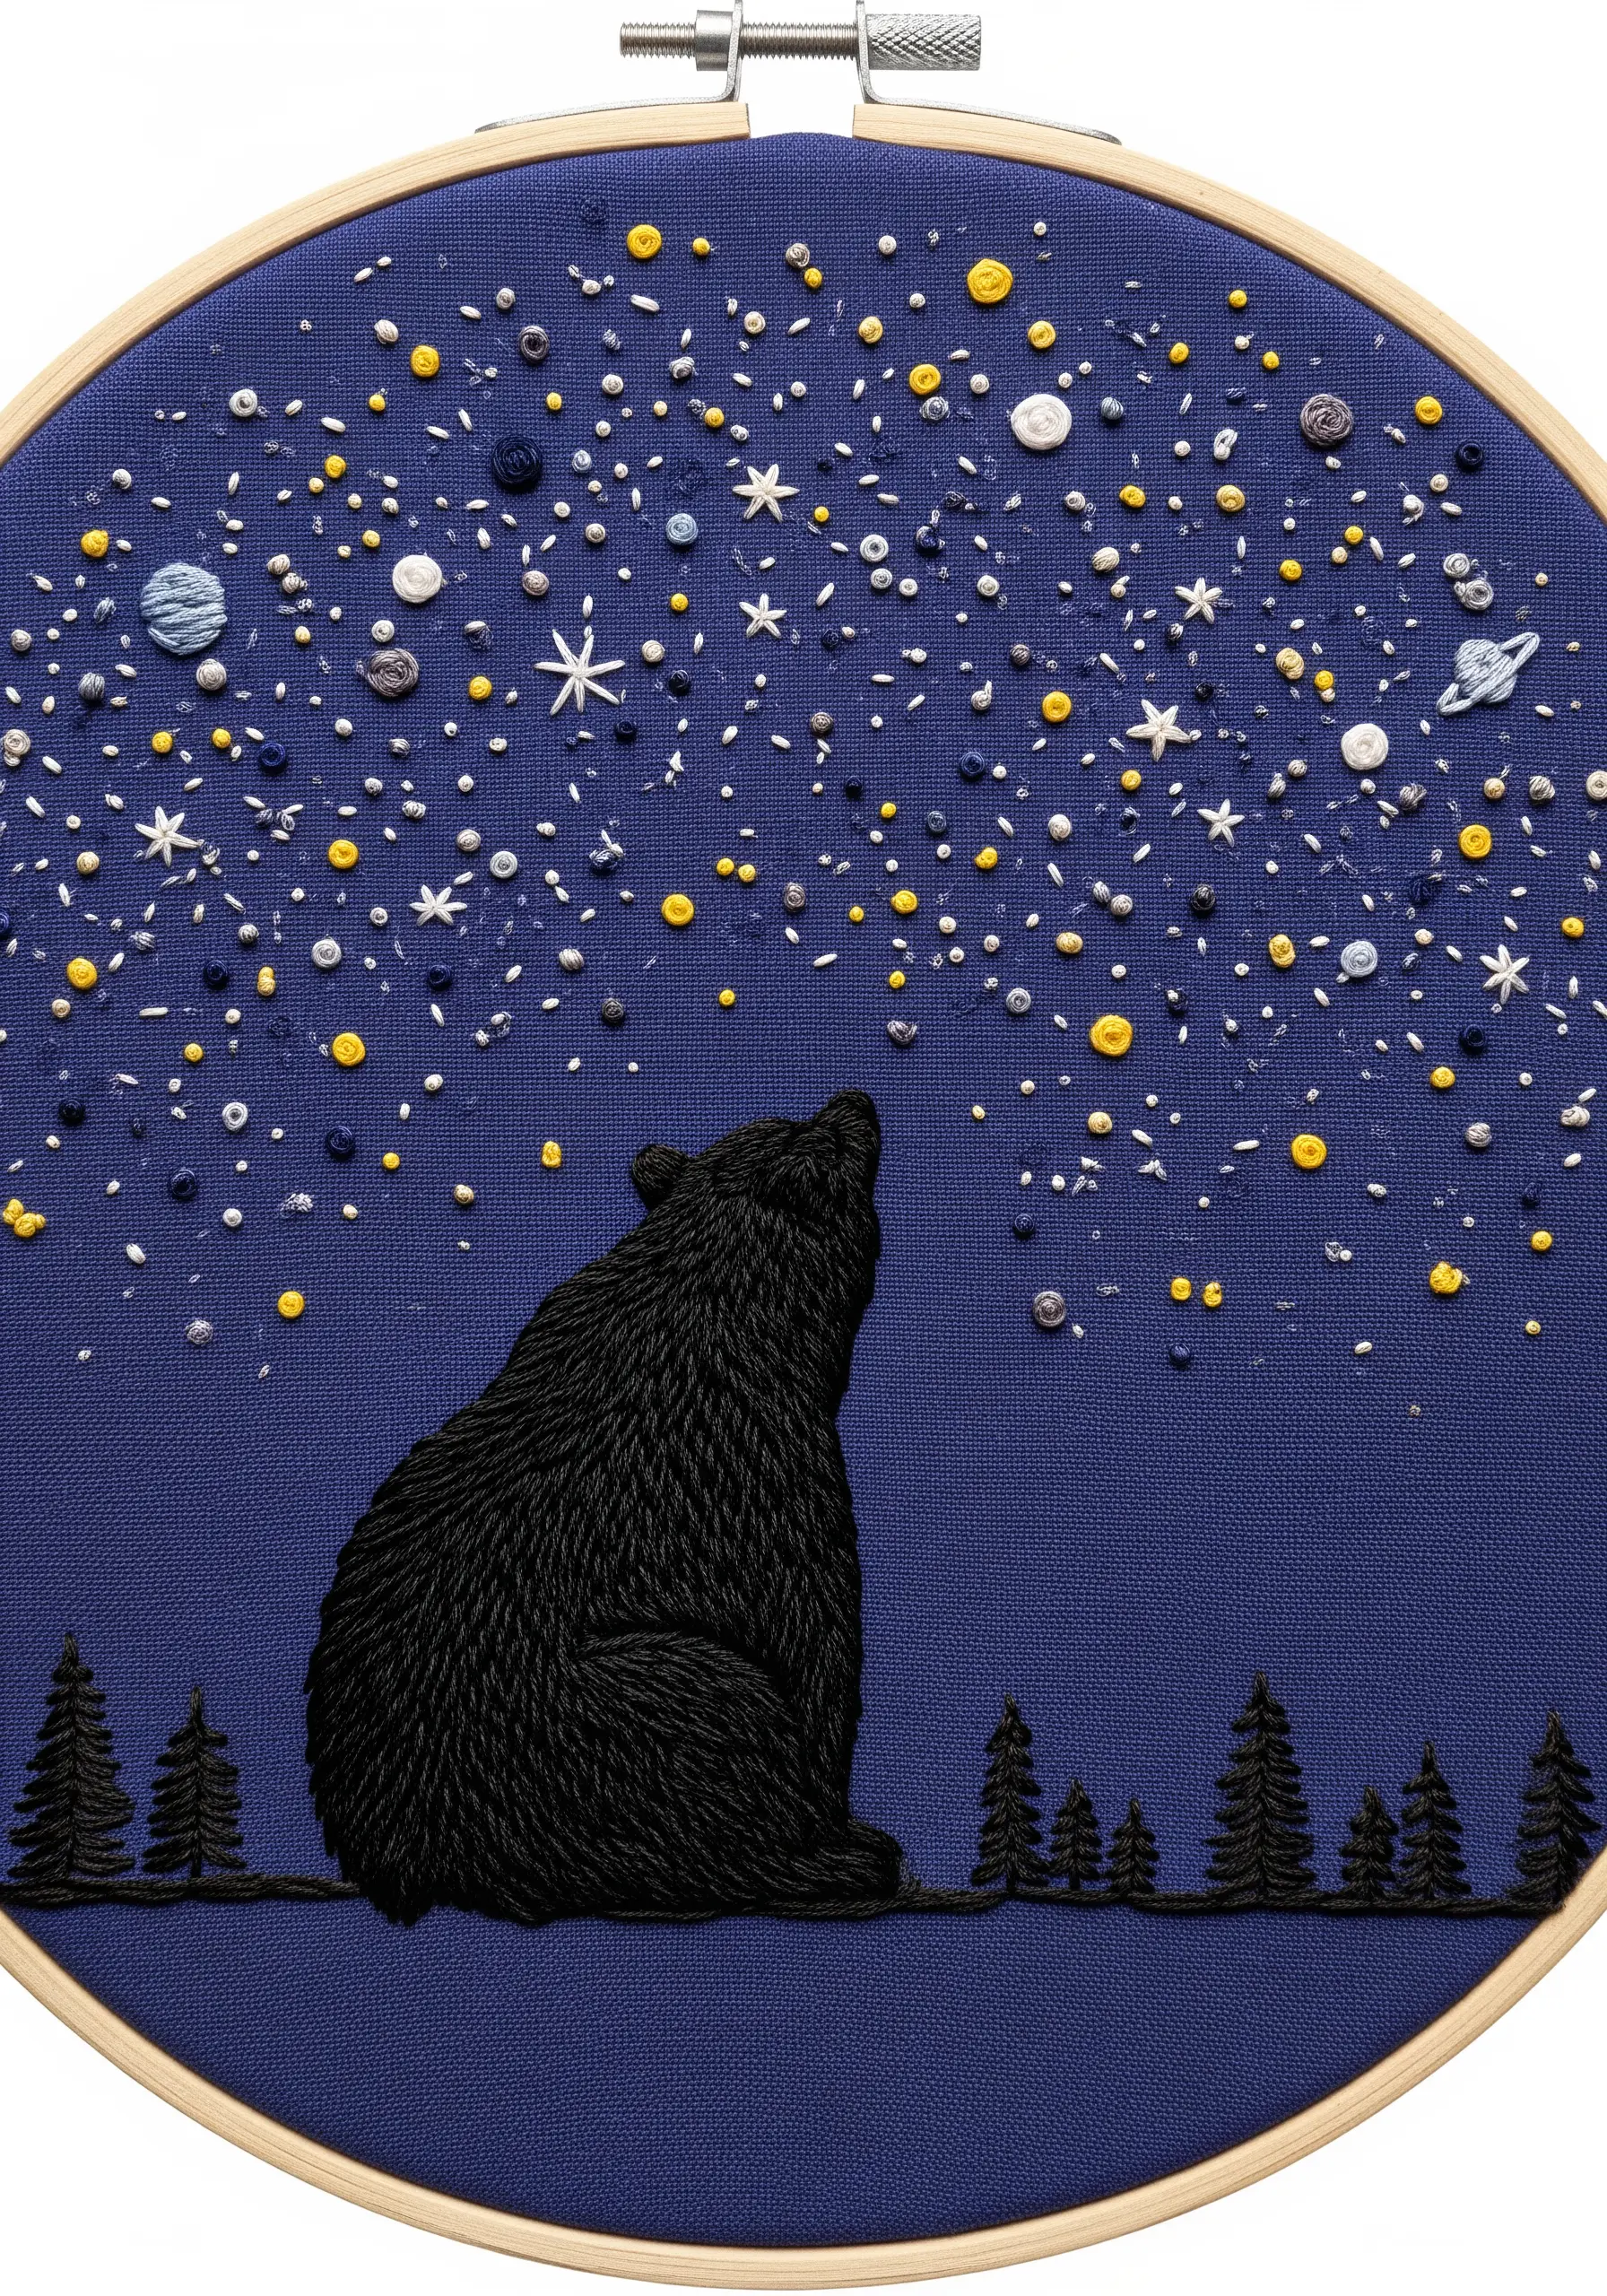
20. Stitching Stone and Earth for a Cozy Den
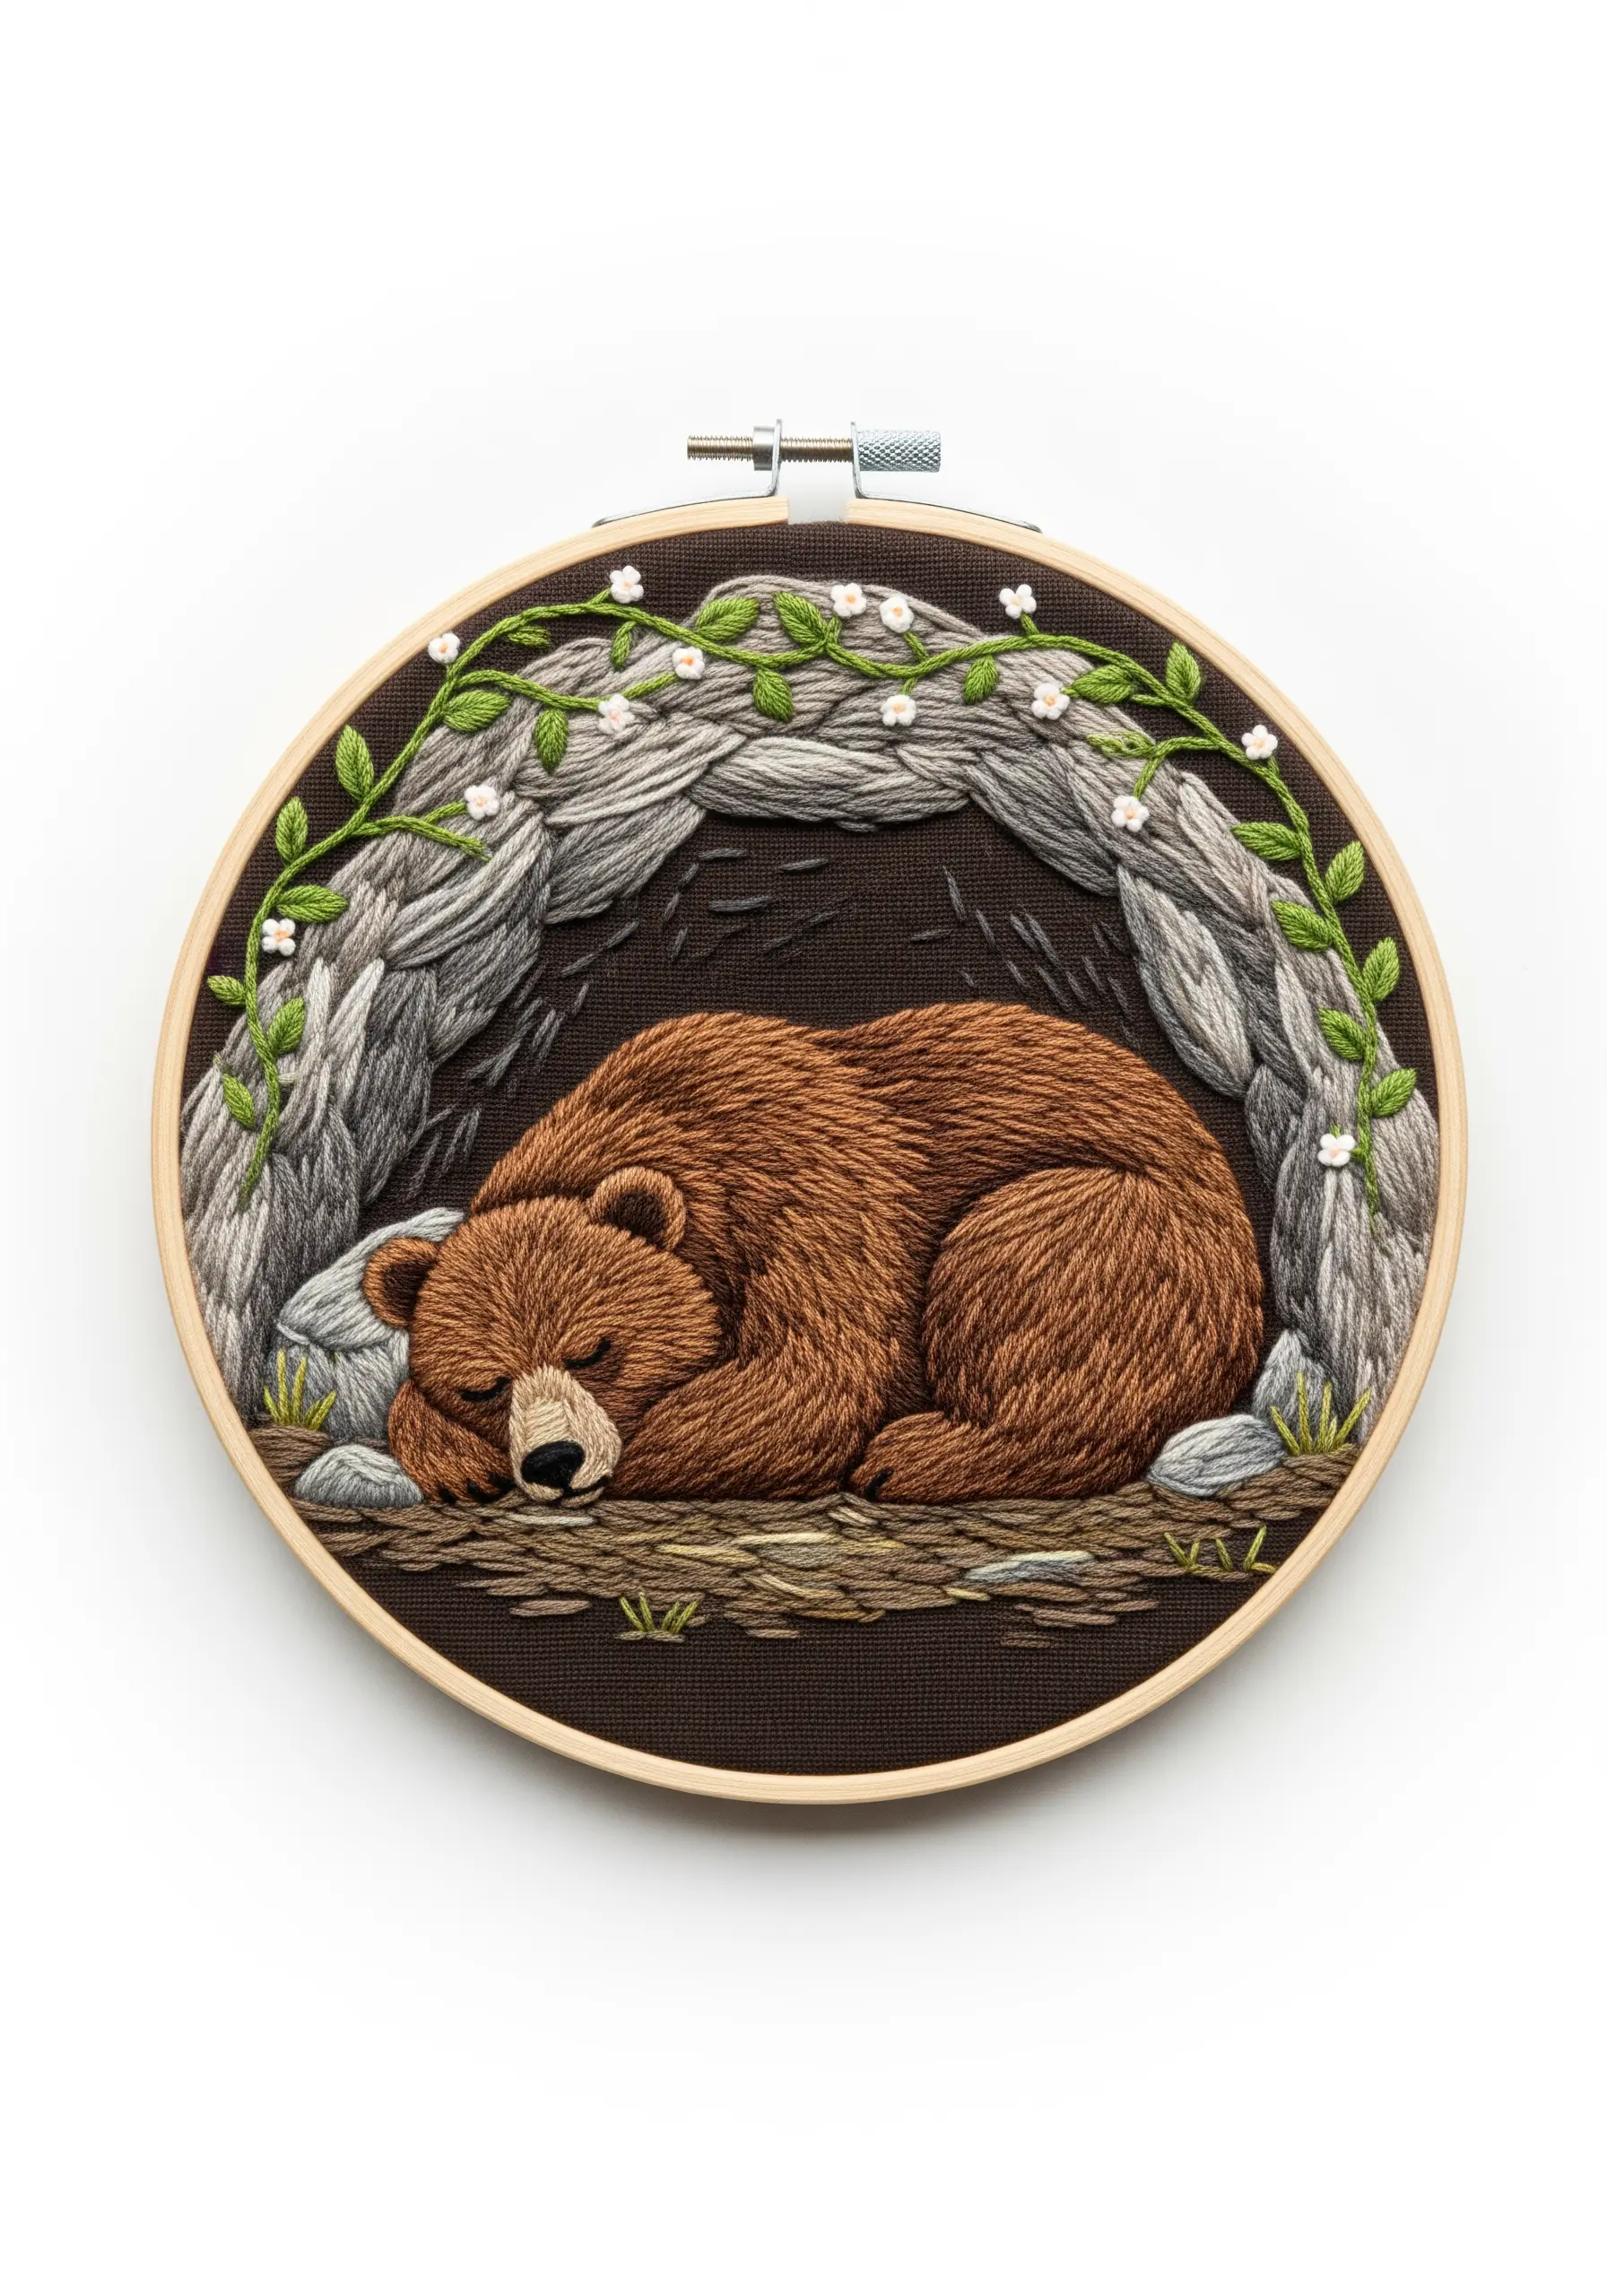
Create a convincing rock texture for the bear’s cave by using long-and-short stitches in multiple shades of grey, taupe, and white.
Angle your stitches to follow the imagined curves and cracks of the stone, which gives the formation a sense of solidity and depth.
For the earthy ground, use a mix of tiny seed stitches and short straight stitches in various browns to create a soft, uneven surface.
This highly textured frame makes the smooth, satin-stitched bear appear even more sheltered and peaceful in its den.


