
You have a love for embroidery, a feel for thread and fabric, but perhaps you sense there’s another level to your work waiting to be unlocked. It’s not about learning hundreds of new stitches or buying expensive tools. It’s about learning to see differently.
True artistry in textiles comes from intentional choices—the way a chunky yarn sits against a fine thread, how negative space can make a single line feel powerful, or how layering textures can tell a story without a single word. It’s about creating something that doesn’t just look beautiful, but feels resonant and alive.
Here, you’ll find ideas that invite you to play with texture, to blend techniques, and to build pieces that add more than just color to a room. They add your unique touch, your quiet confidence, and a sense of calm, handcrafted beauty.
1. Weave with Roving for Sculptural Texture
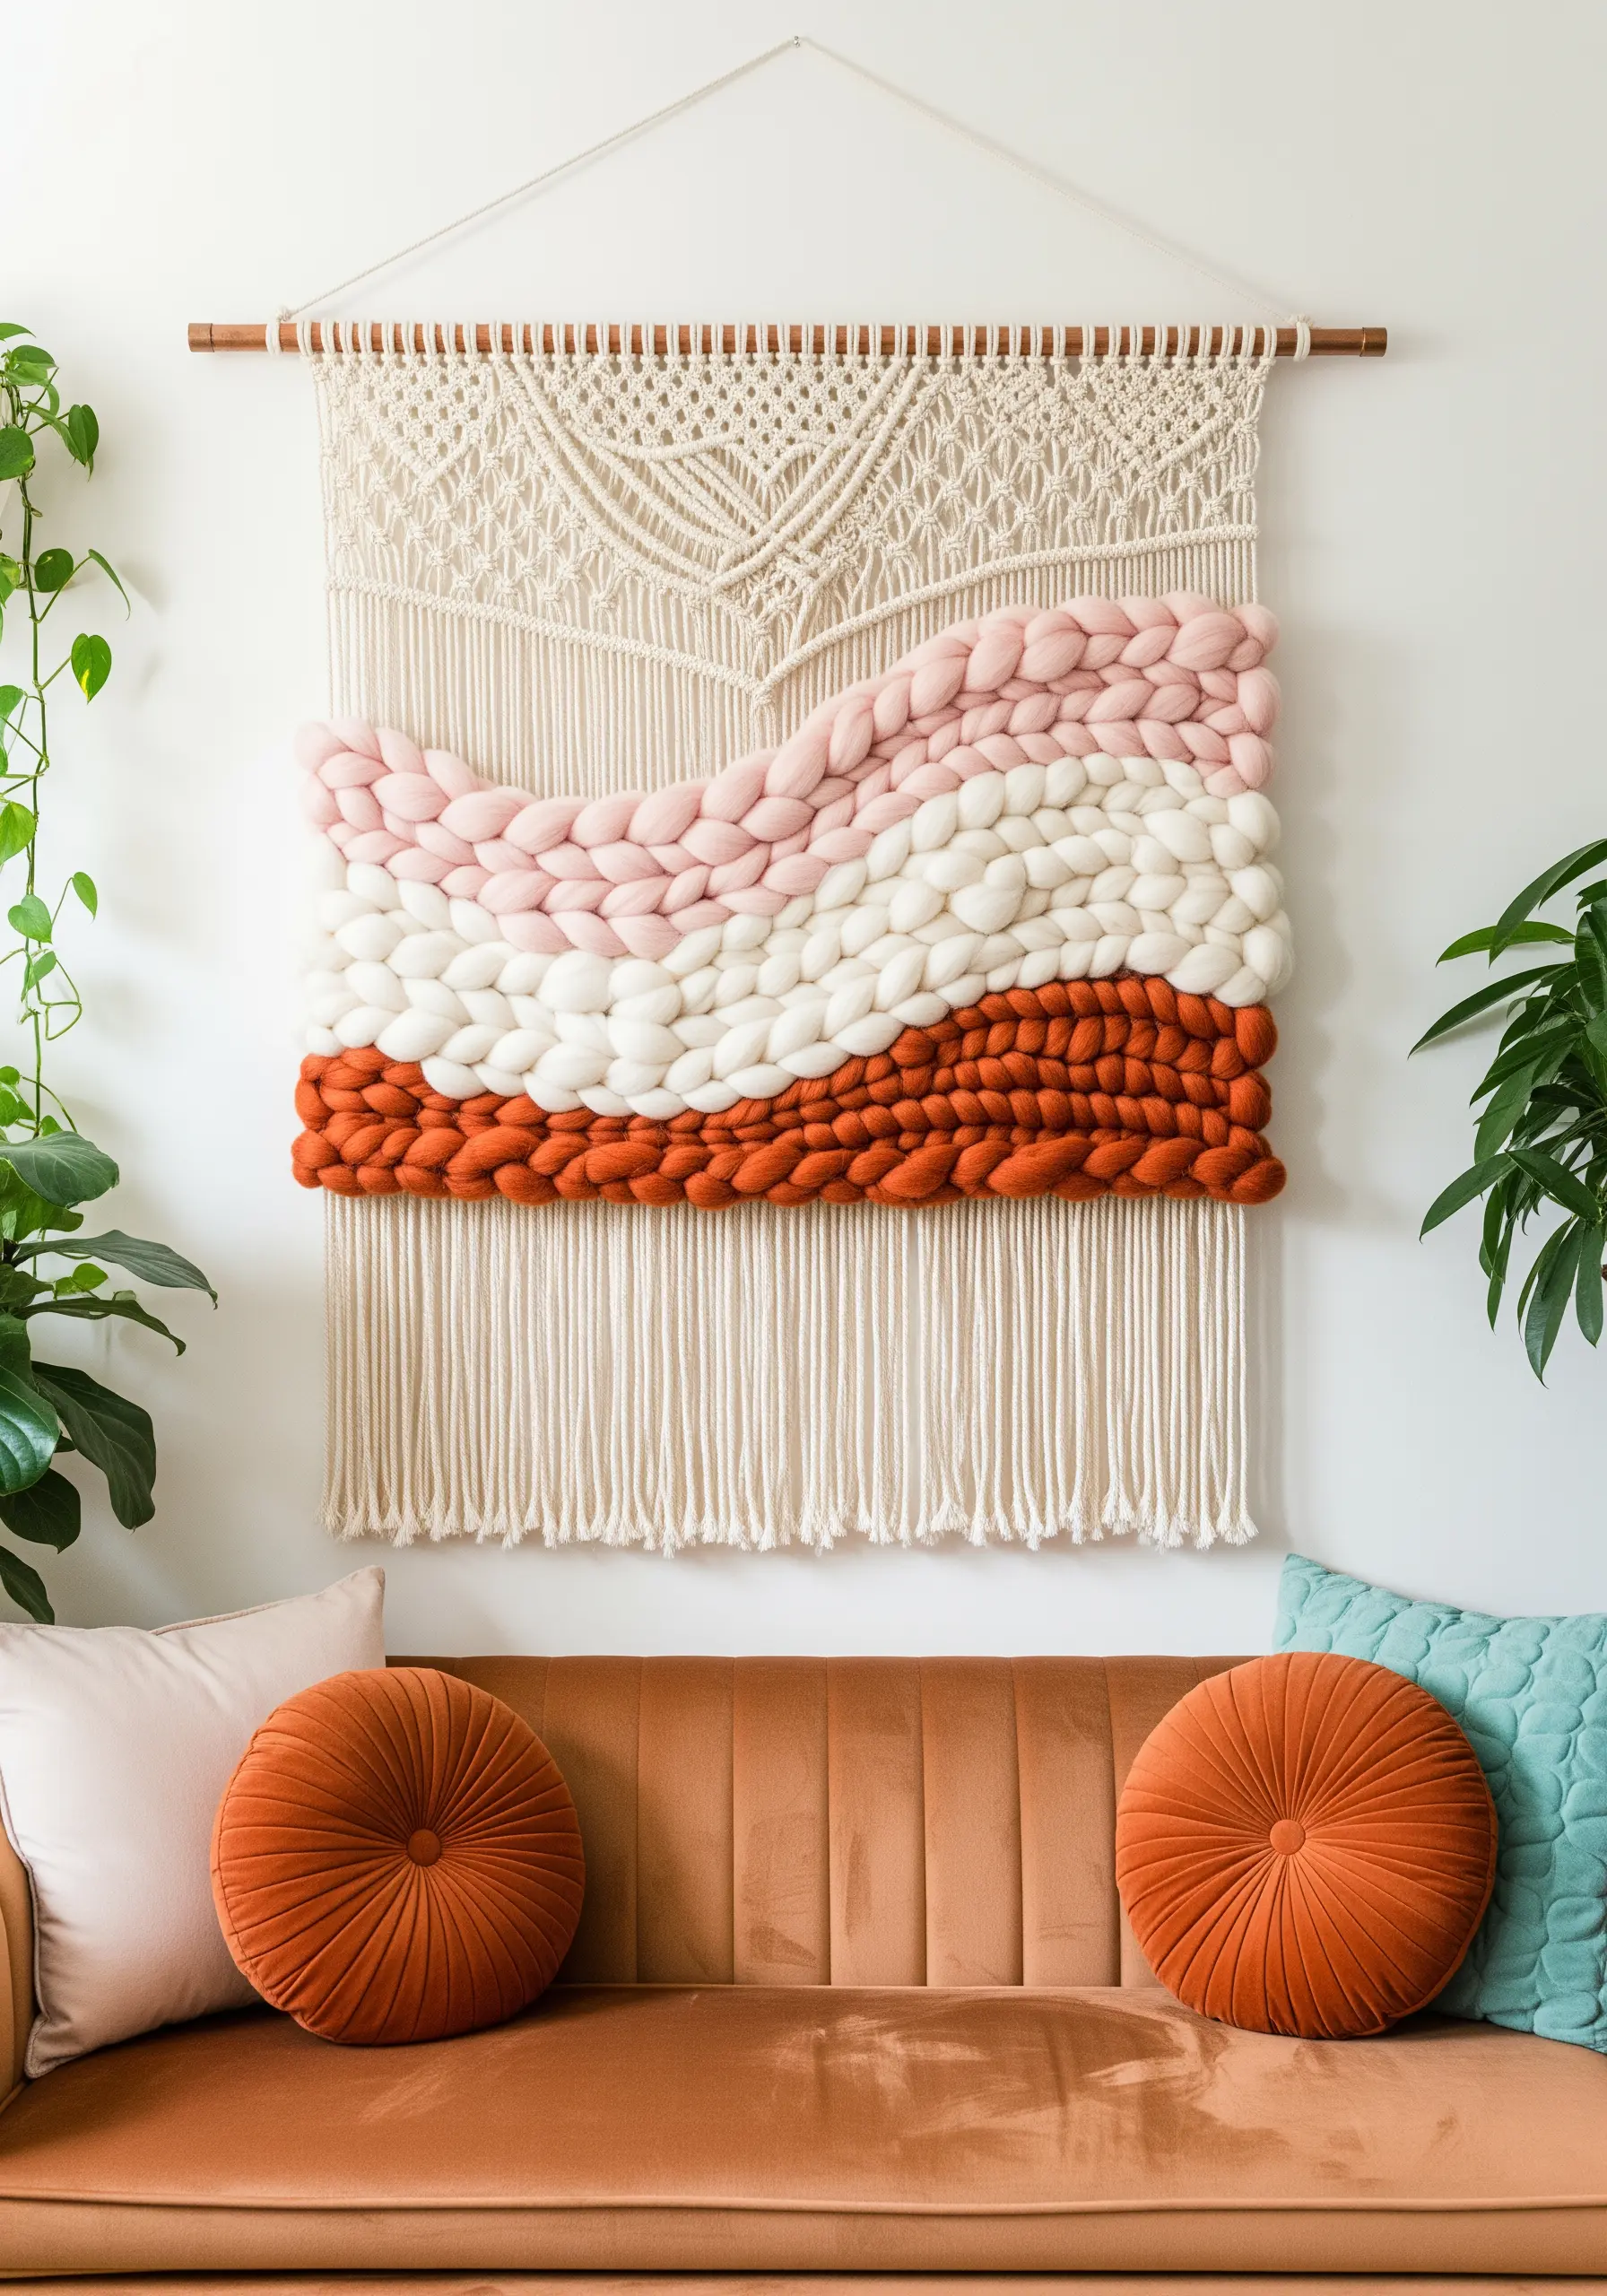
To achieve this soft, sculptural look, integrate chunky wool roving directly into a macrame or woven wall hanging.
Instead of traditional yarn, you’ll gently guide the thick, unspun fibers over and under the warp threads.
This technique creates dramatic, cloud-like volume that contrasts beautifully with the tighter knots of the macrame base.
Work in organic, undulating blocks of color—like soft pinks against a bold rust—to create a composition that feels both gentle and grounded.
This is one of the quickest ways to add high-impact mixed-fiber wall hangings to your space.
2. Design a Geometric Punch Needle Triptych
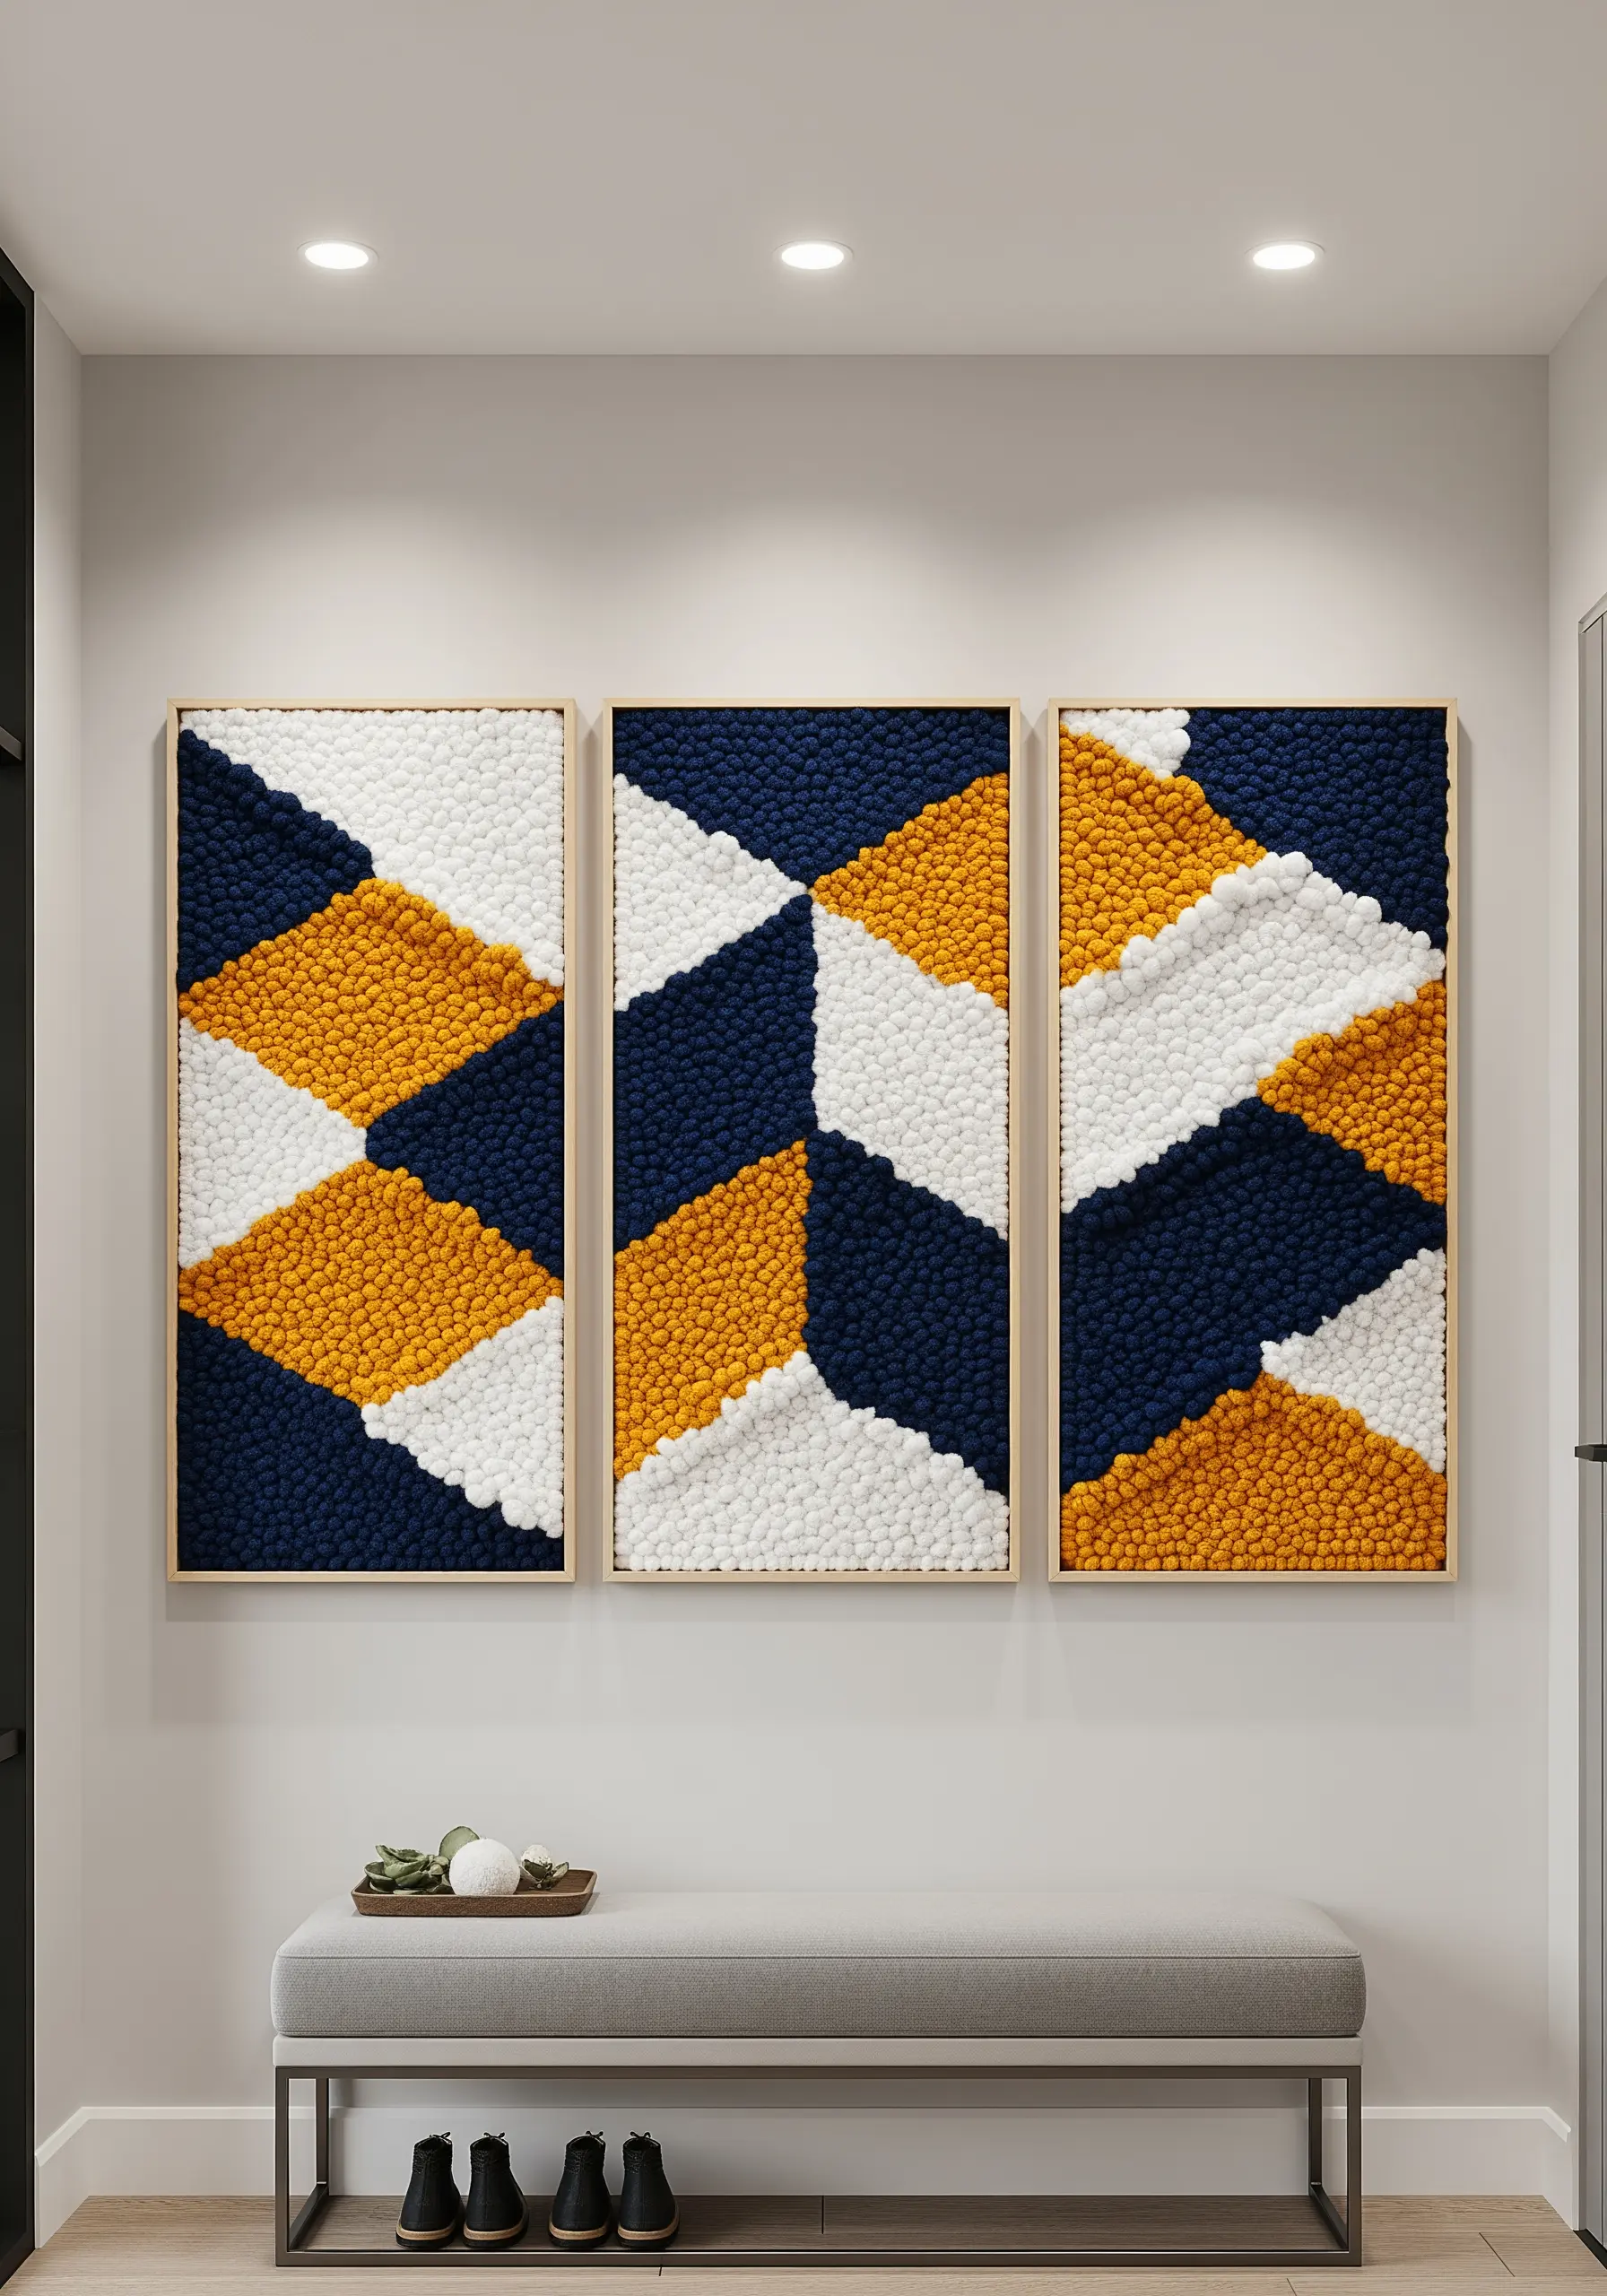
Elevate a simple geometric pattern by transforming it into a three-panel art piece, or triptych.
Using a punch needle with thick yarn creates a dense, uniform texture that gives bold shapes a satisfying, tactile quality.
The key to a polished finish is maintaining a consistent loop height across all three panels, creating a seamless, carpet-like surface.
Choose a high-contrast palette—like navy, mustard, and crisp white—to make the graphic shapes pop and command attention in a modern entryway or living room.
3. Layer Stitches for Topographical Depth
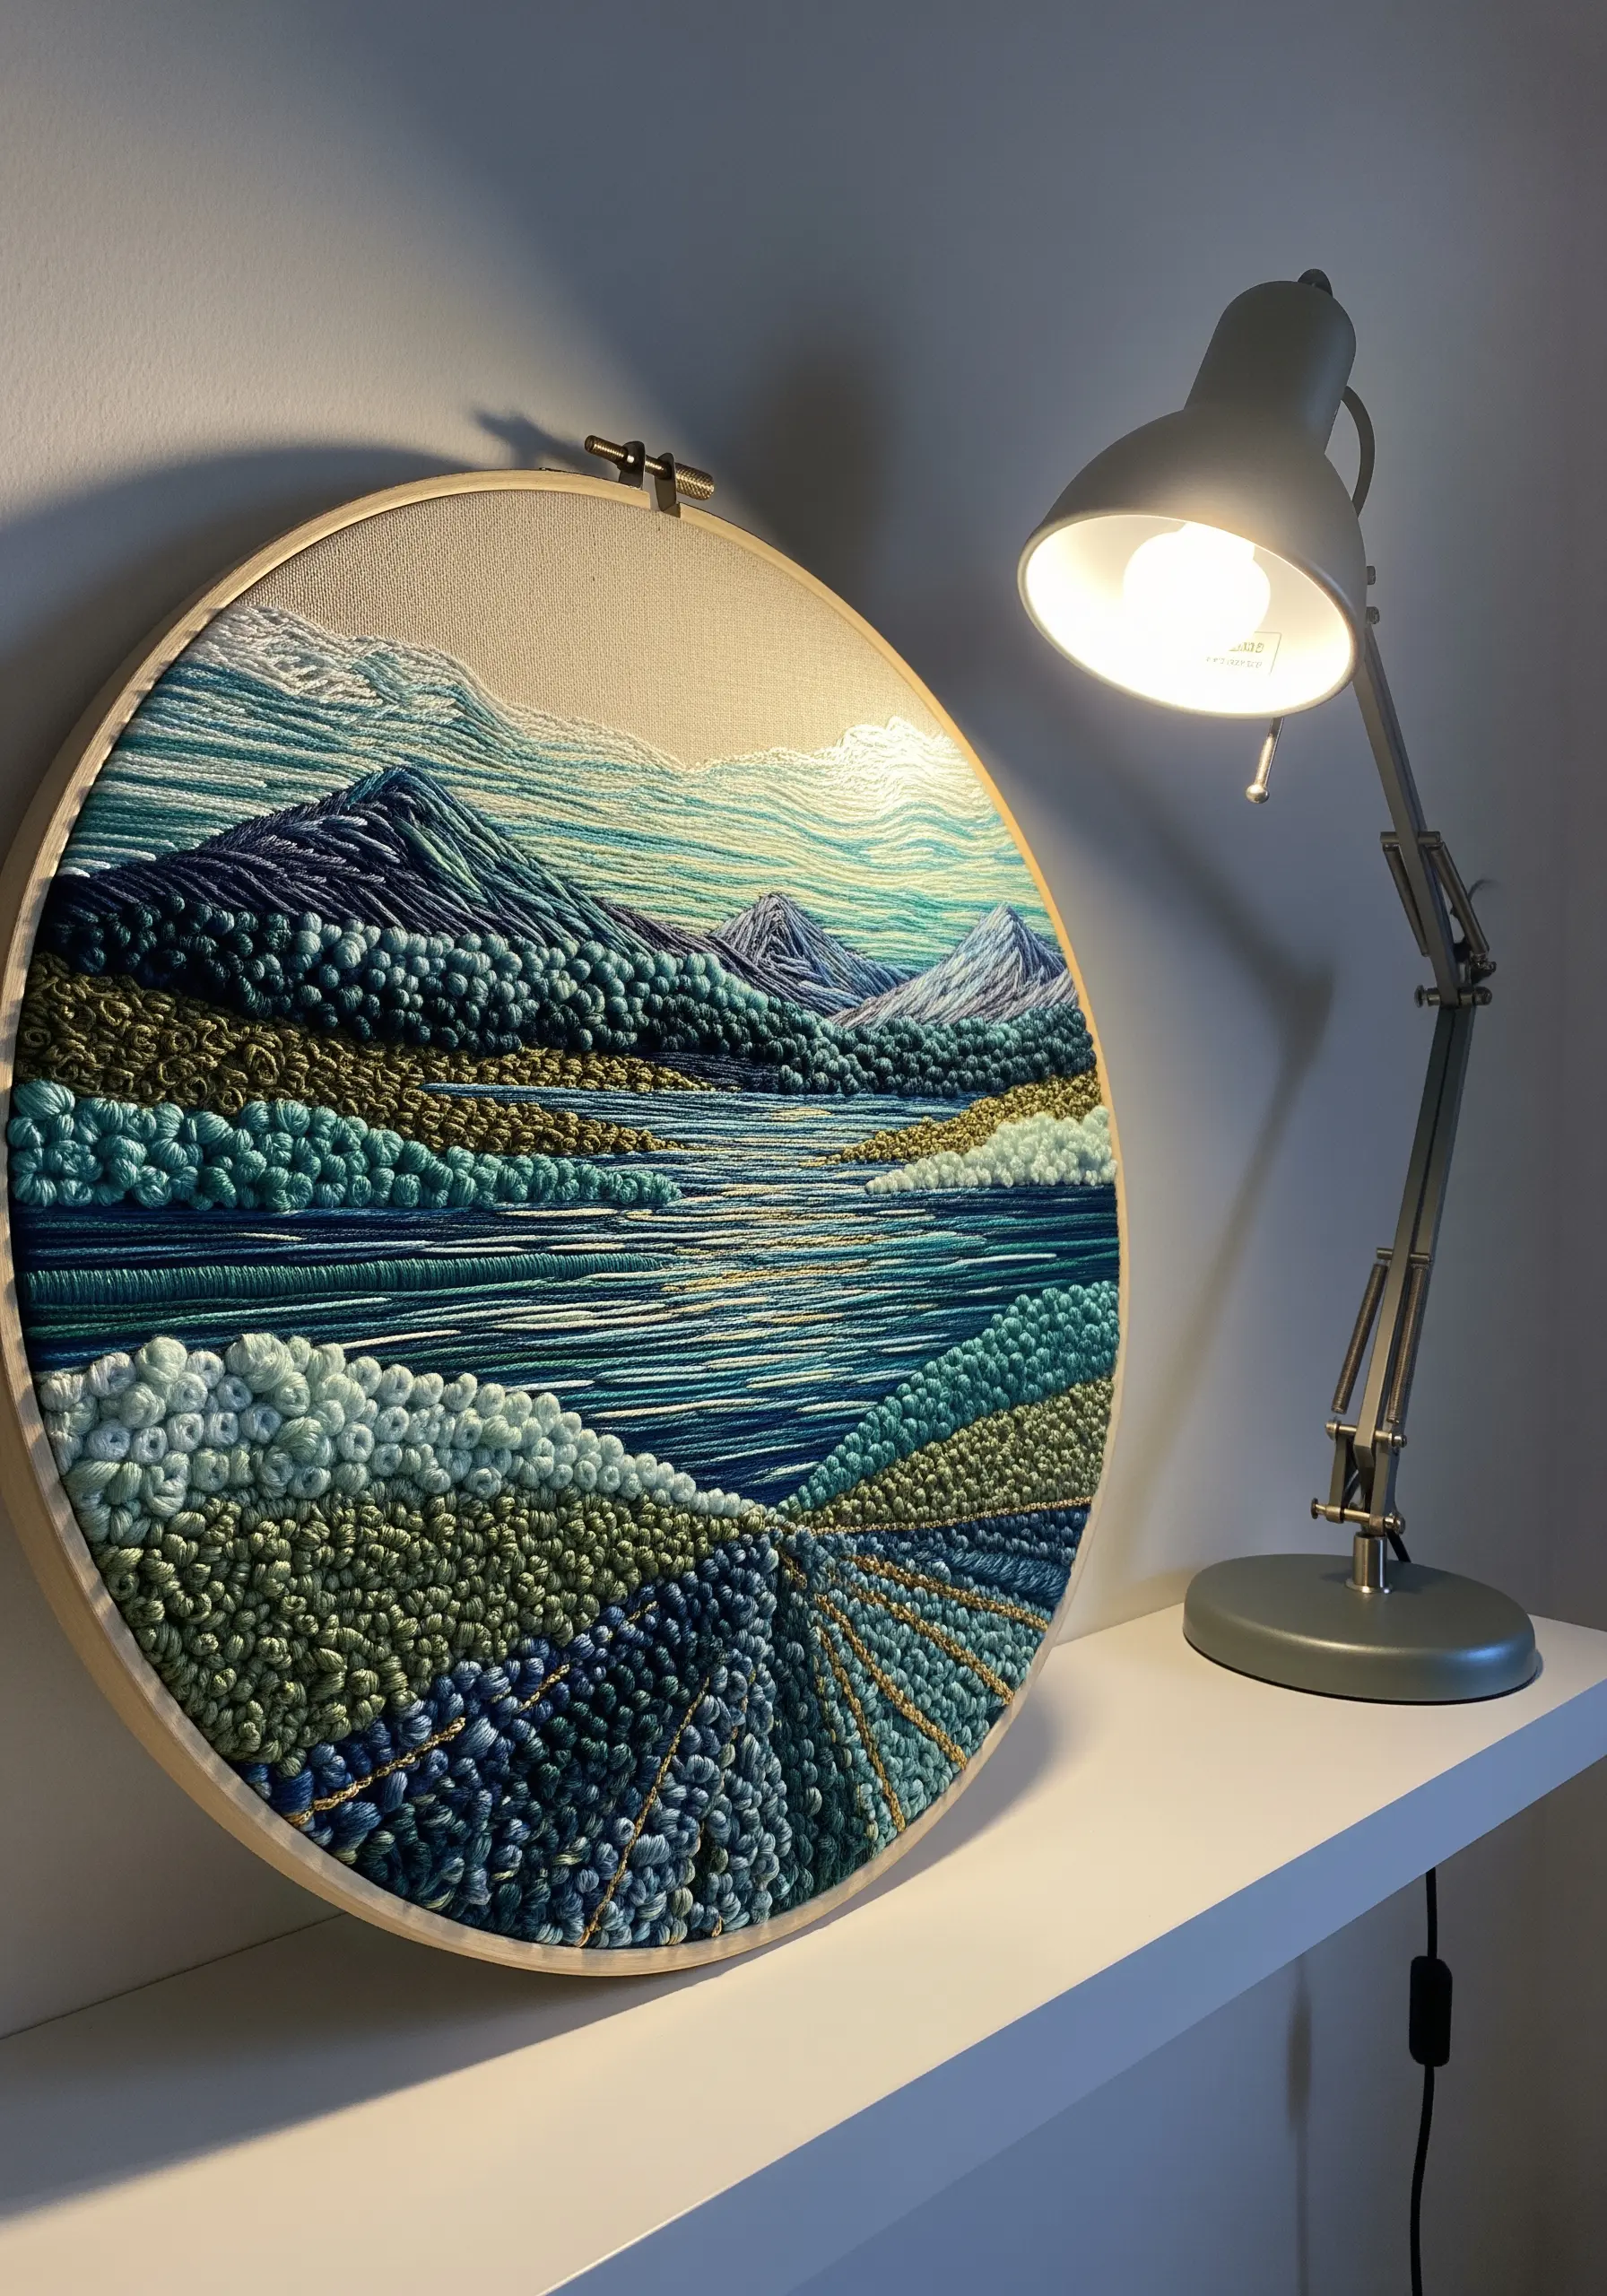
To make an embroidered landscape feel truly three-dimensional, you need to think like a mapmaker, using different stitches to represent different terrains.
Use dense French knots for textured foreground foliage, long-and-short stitch for the smooth surface of water, and flat satin stitch for distant, hazy mountains.
Vary your thread count to create perspective: use all six strands for chunky textures up close, and taper to just one or two strands for delicate details in the background.
This layering of both stitch and thread weight is what turns a flat image into a vibrant, tactile world.
4. Create Graphic Botanicals with Felt Appliqué
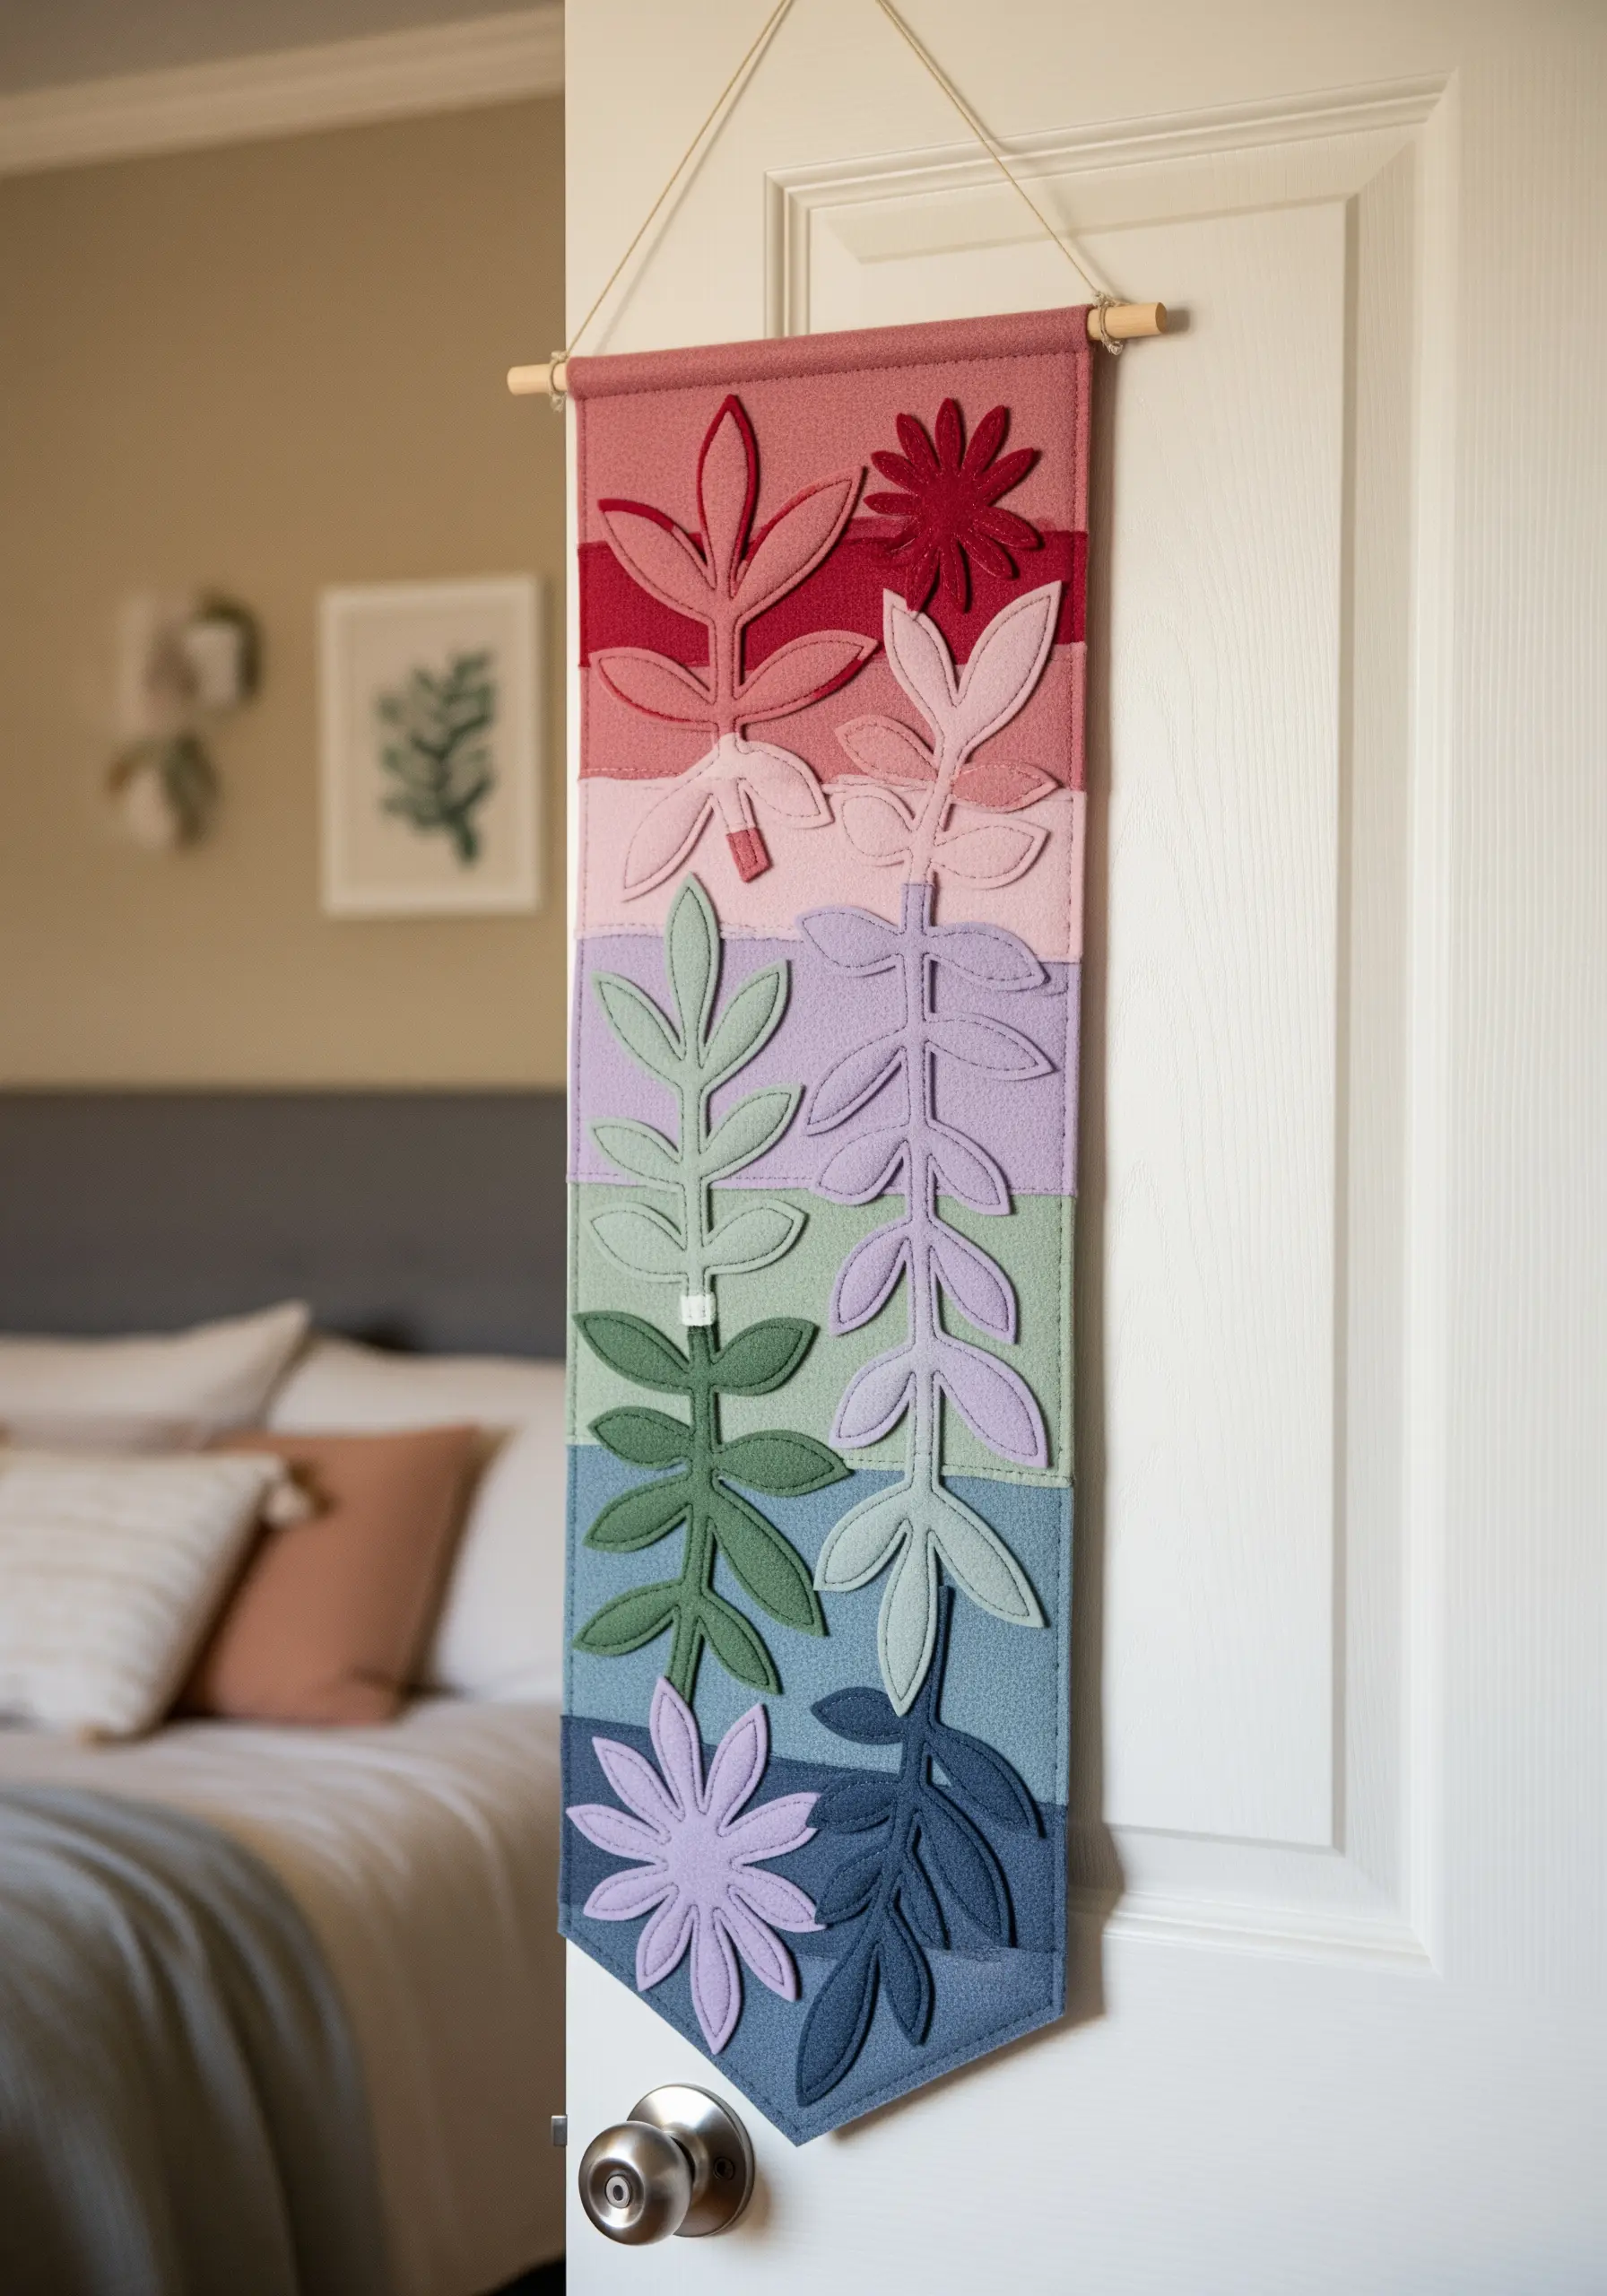
For a project with immediate graphic impact, step away from thread and work with felt.
Cut bold, simplified leaf and flower shapes from felt sheets and arrange them on a fabric banner.
Secure each piece with a simple, visible running stitch around the edge in a matching or contrasting thread—this adds a charming, handmade detail.
Organizing the felt pieces in a tonal gradient, moving from light to dark, gives the finished banner a cohesive and intentionally designed feel.
5. Add Luminous Detail with Couture Beading
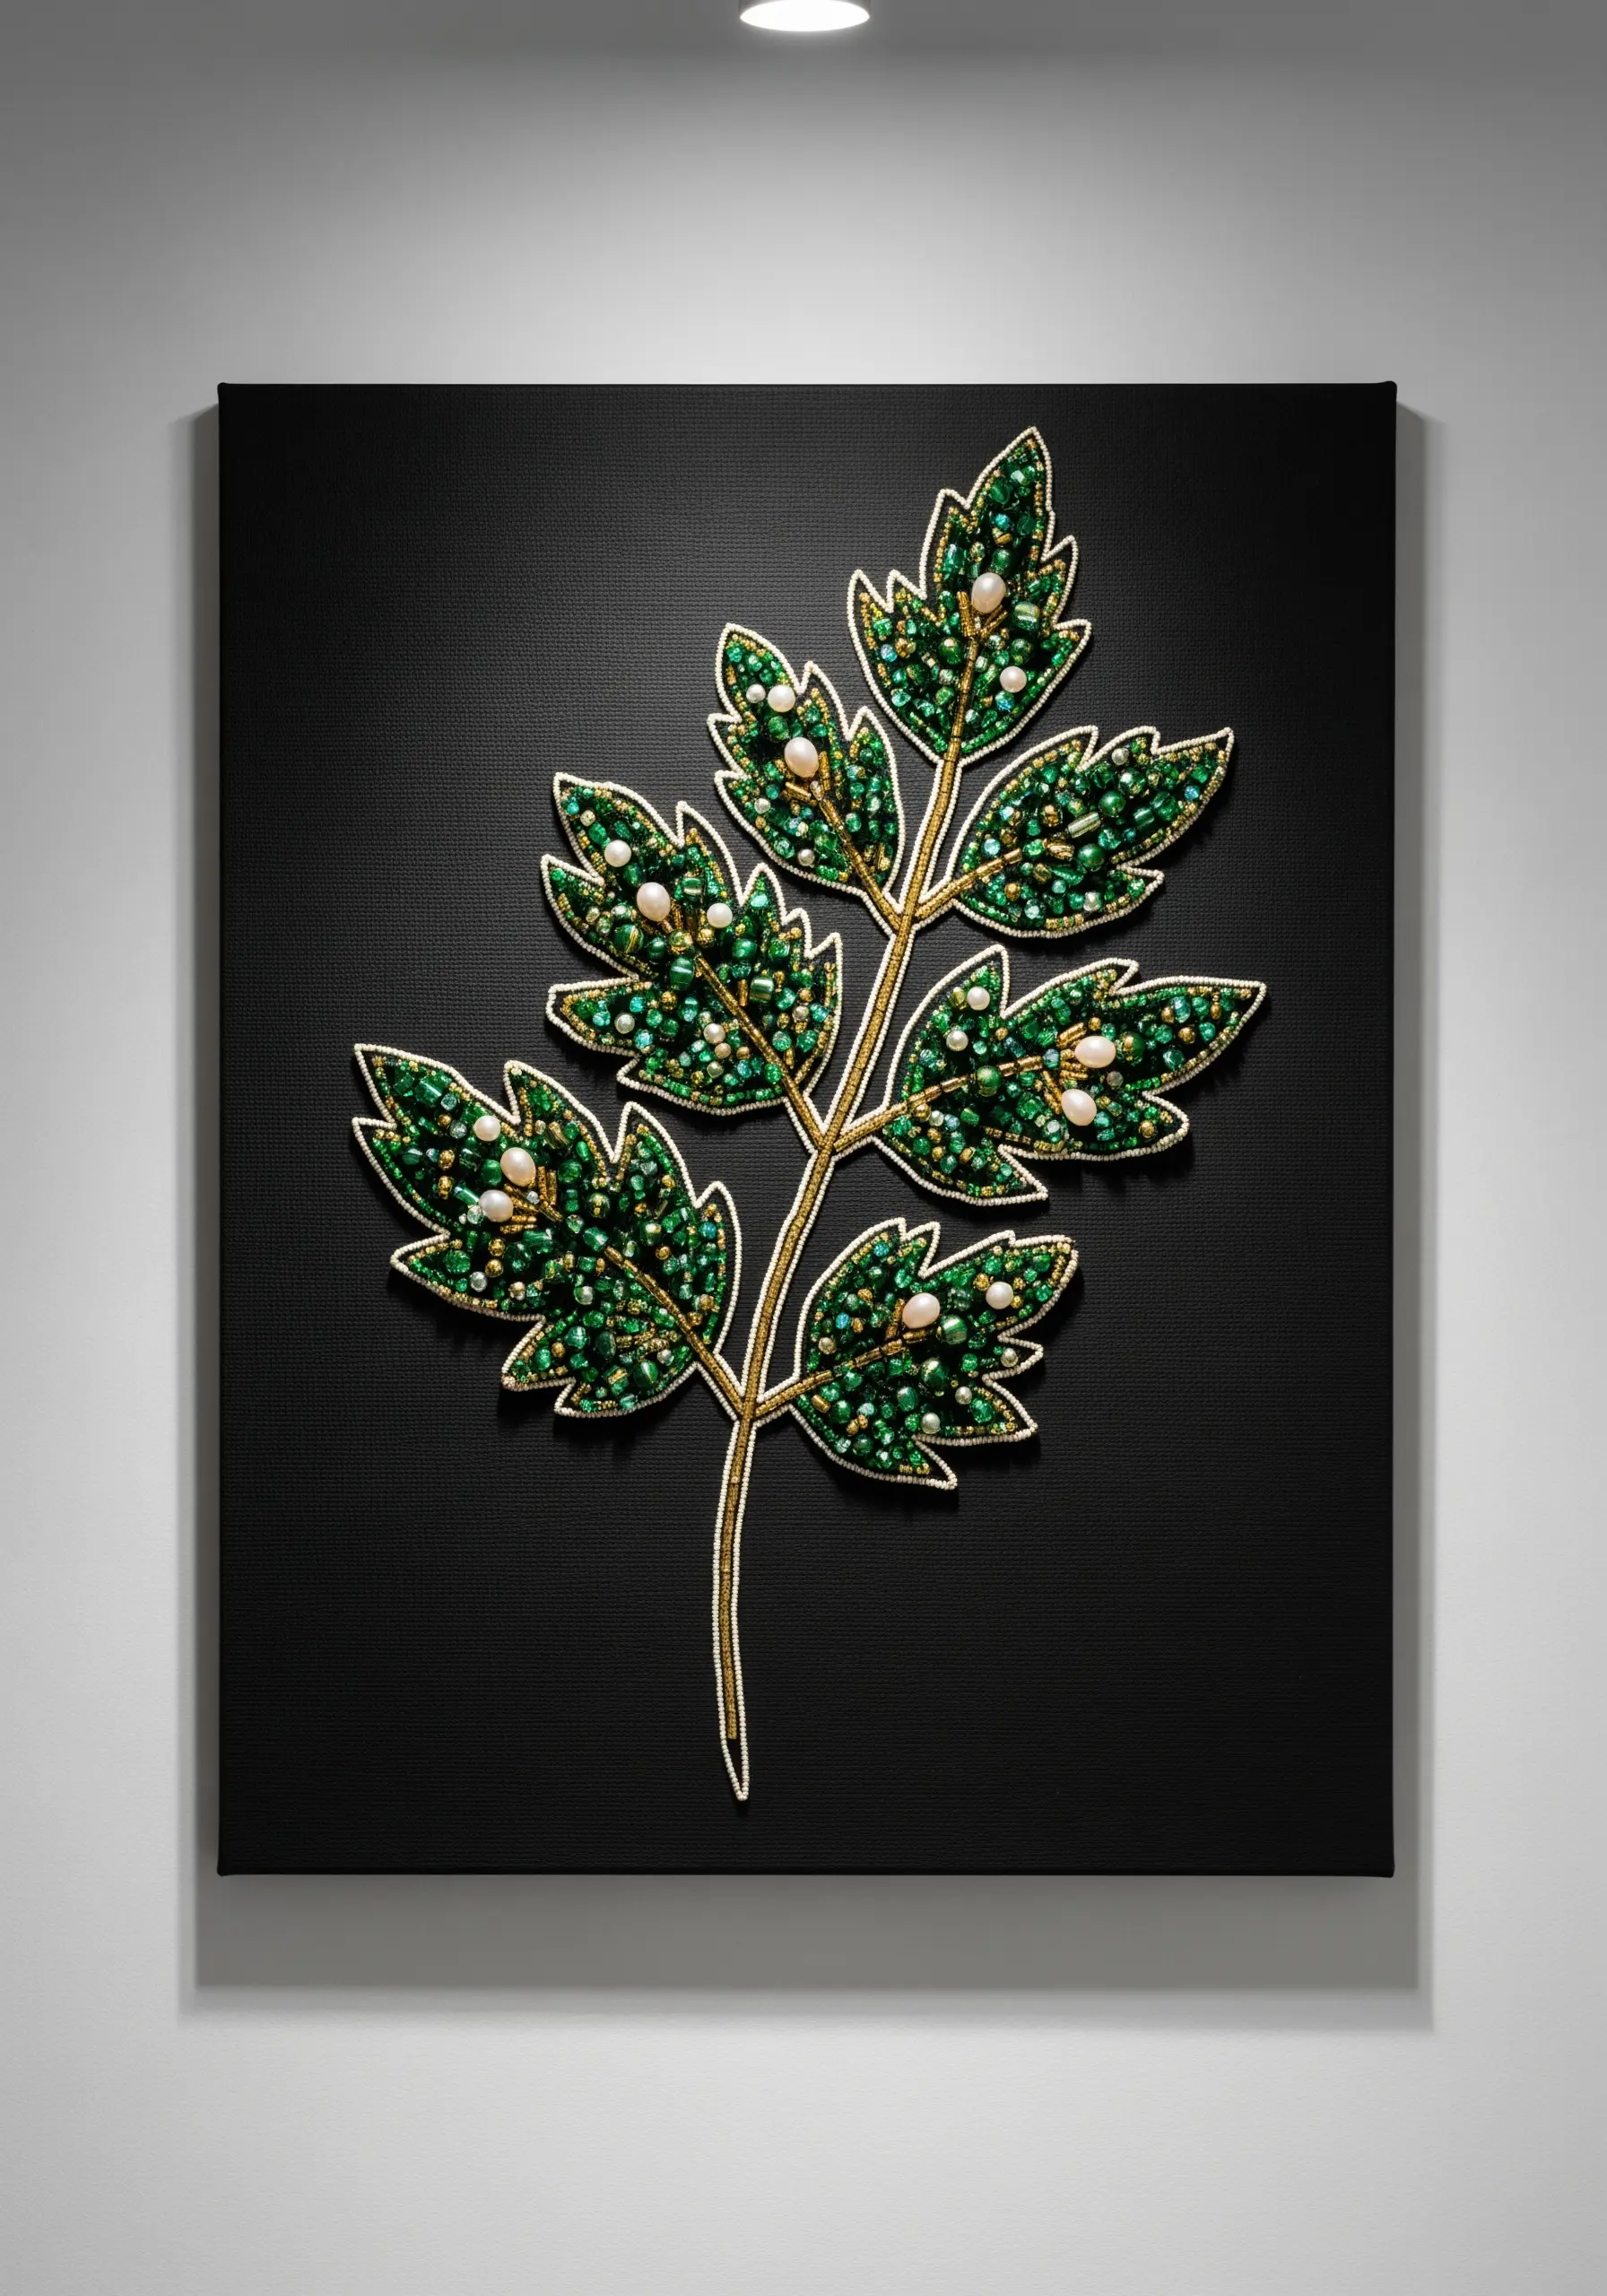
Transform a simple botanical illustration into a piece of jewelry for your wall by incorporating beads.
Start by outlining your leaf shape with a couched metallic thread to create a defined, shimmering edge.
Fill the inner sections with a mix of seed beads, small pearls, and bugle beads to create a rich, varied texture that catches the light from every angle.
Stitching onto a stark black canvas provides the perfect dramatic backdrop, making every single bead and stitch stand out with brilliant clarity.
6. Explore Dynamic Forms with Circular Weaving
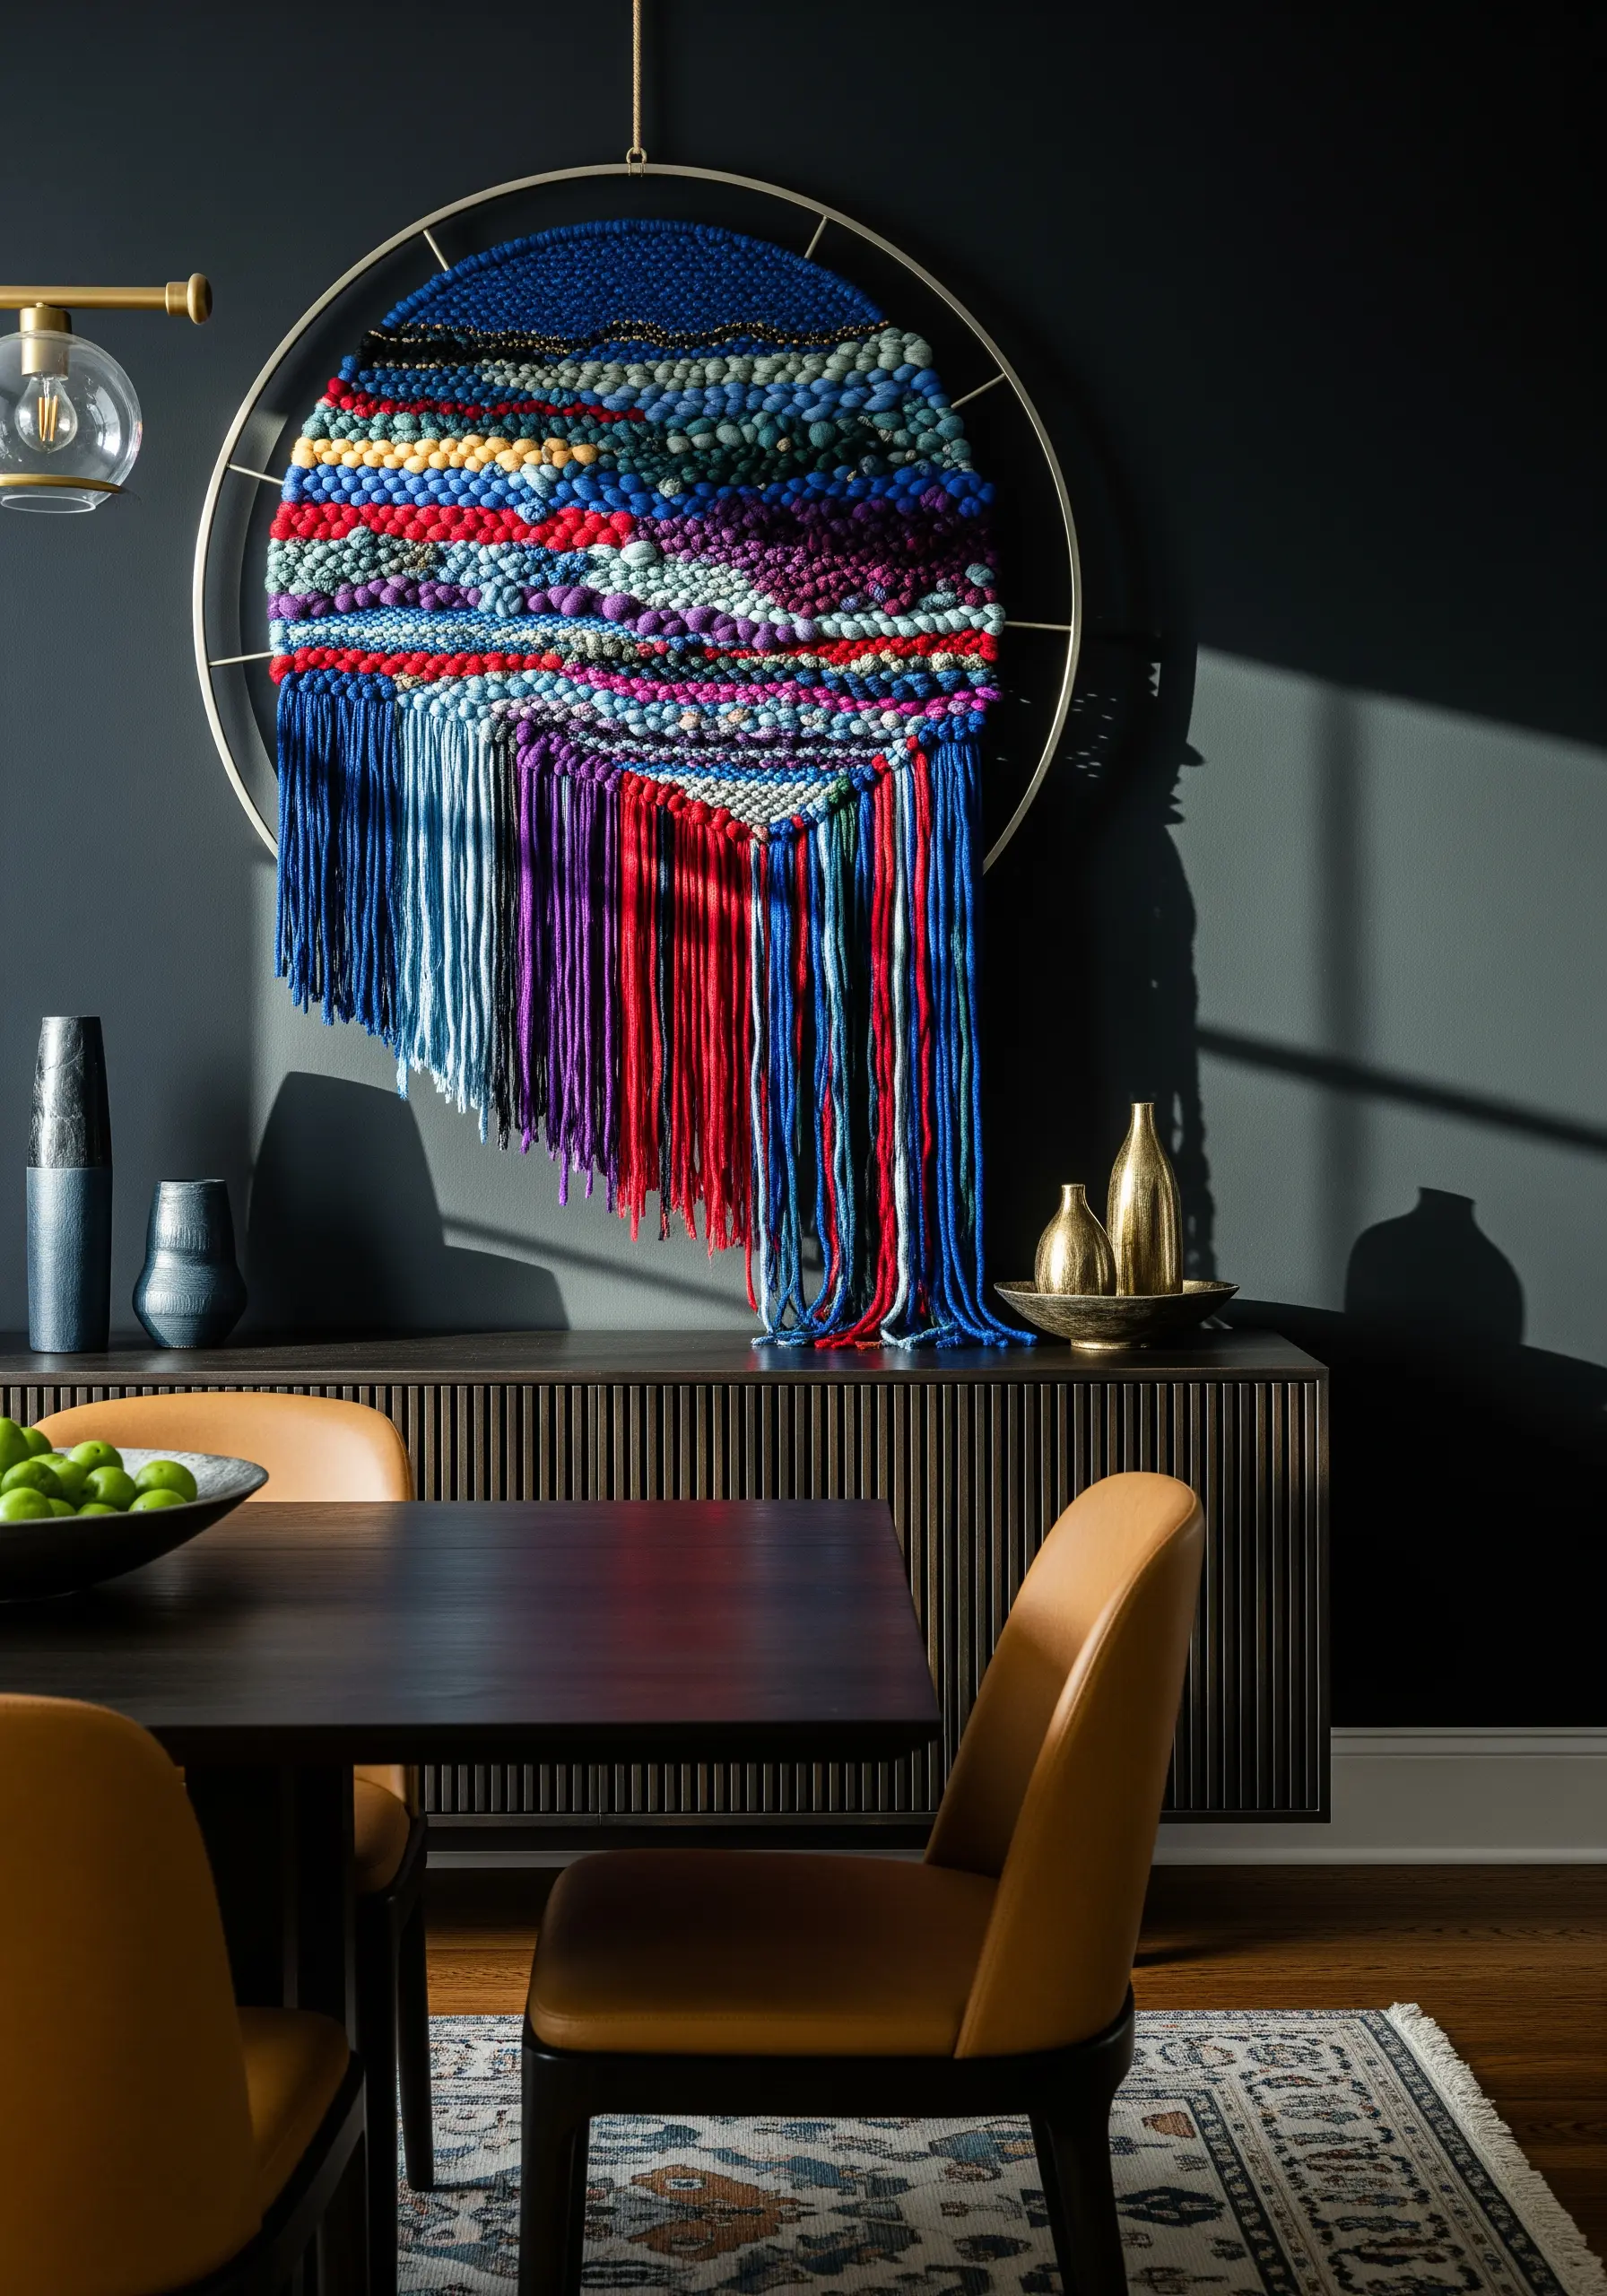
Break free from the traditional rectangular loom and explore the organic flow of circular weaving.
You can use a specialized round loom or even a sturdy metal craft hoop as your base.
Create visual interest by weaving with a variety of yarn weights and textures, from fine cotton to chunky wool, in concentric rings of color.
Allow the fringe to hang asymmetrically for a final piece that feels dynamic, modern, and full of movement.
7. Turn Denim Scraps into Sashiko-Inspired Art
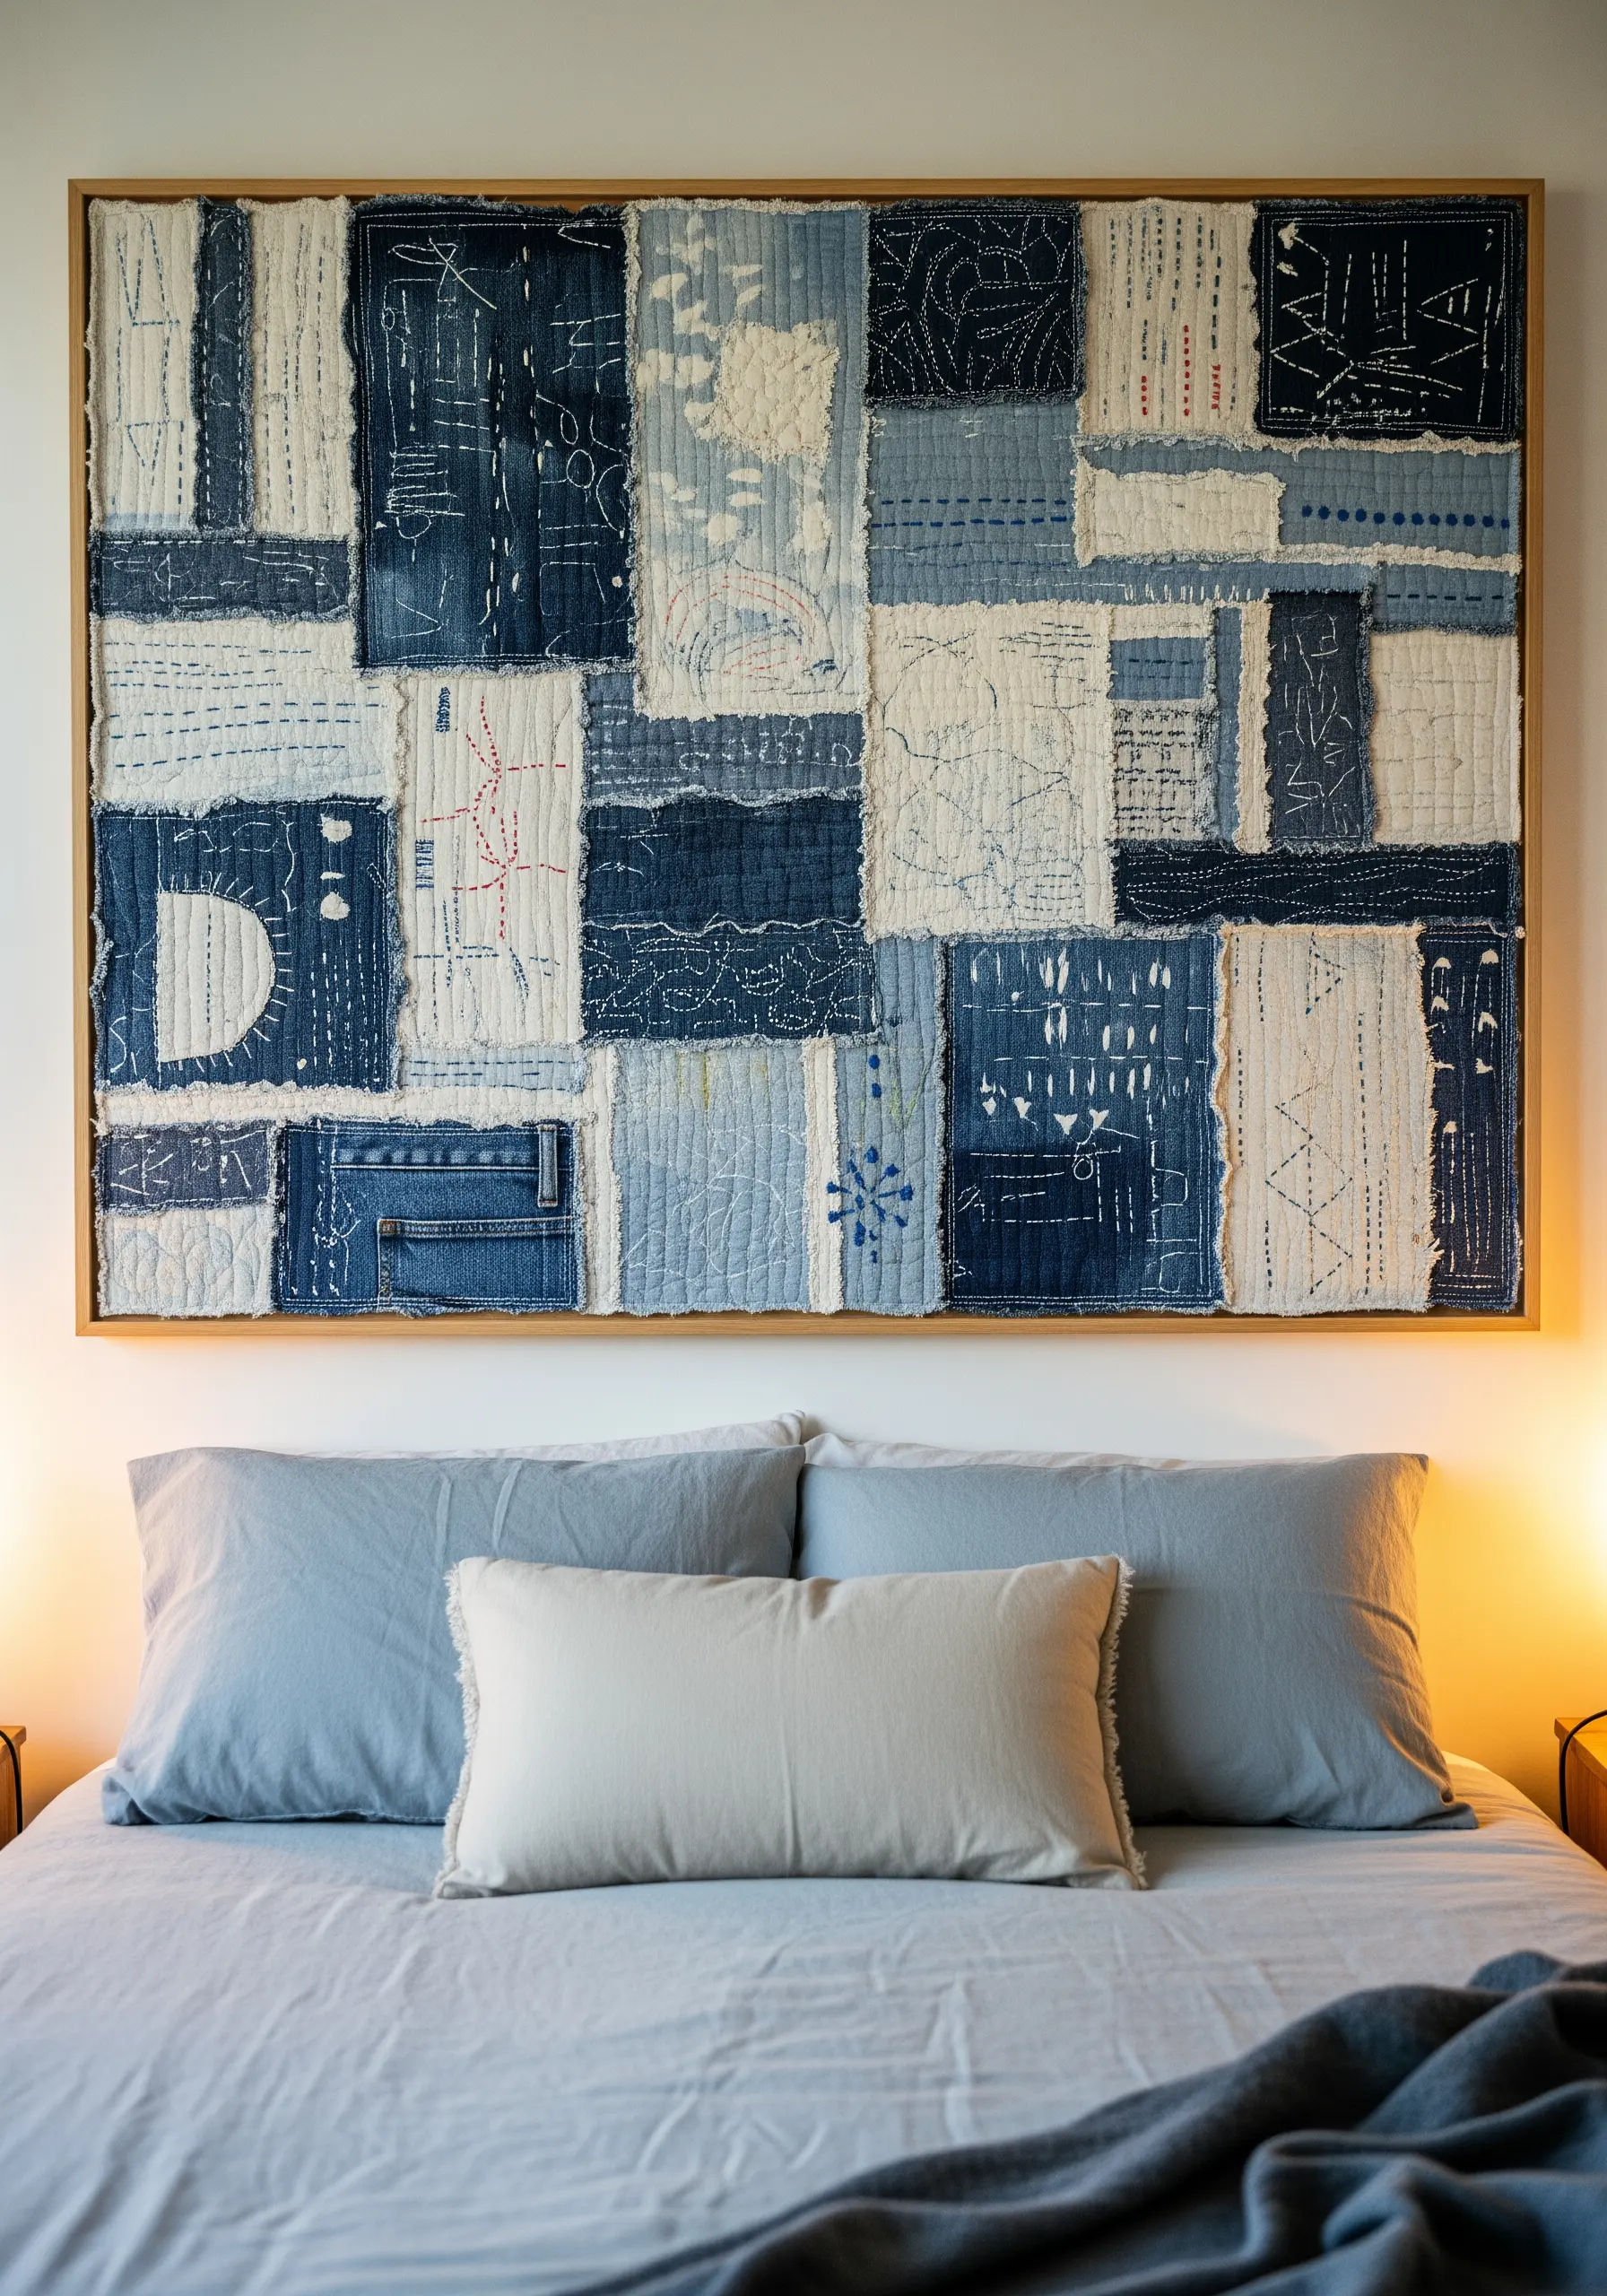
Give old jeans a new, artistic life by creating a large-scale patchwork quilt inspired by Japanese Boro and Sashiko techniques.
Arrange different washes of denim into a pleasing collage, embracing the frayed edges for added texture.
Instead of hiding your stitches, make them a focal point by using a thick, contrasting thread (like traditional white or red) to add decorative running stitches and simple geometric patterns.
This method celebrates repair and resourcefulness, turning humble scraps into a meaningful textile artwork.
8. Sculpt Lifelike Flowers with Silk Ribbon
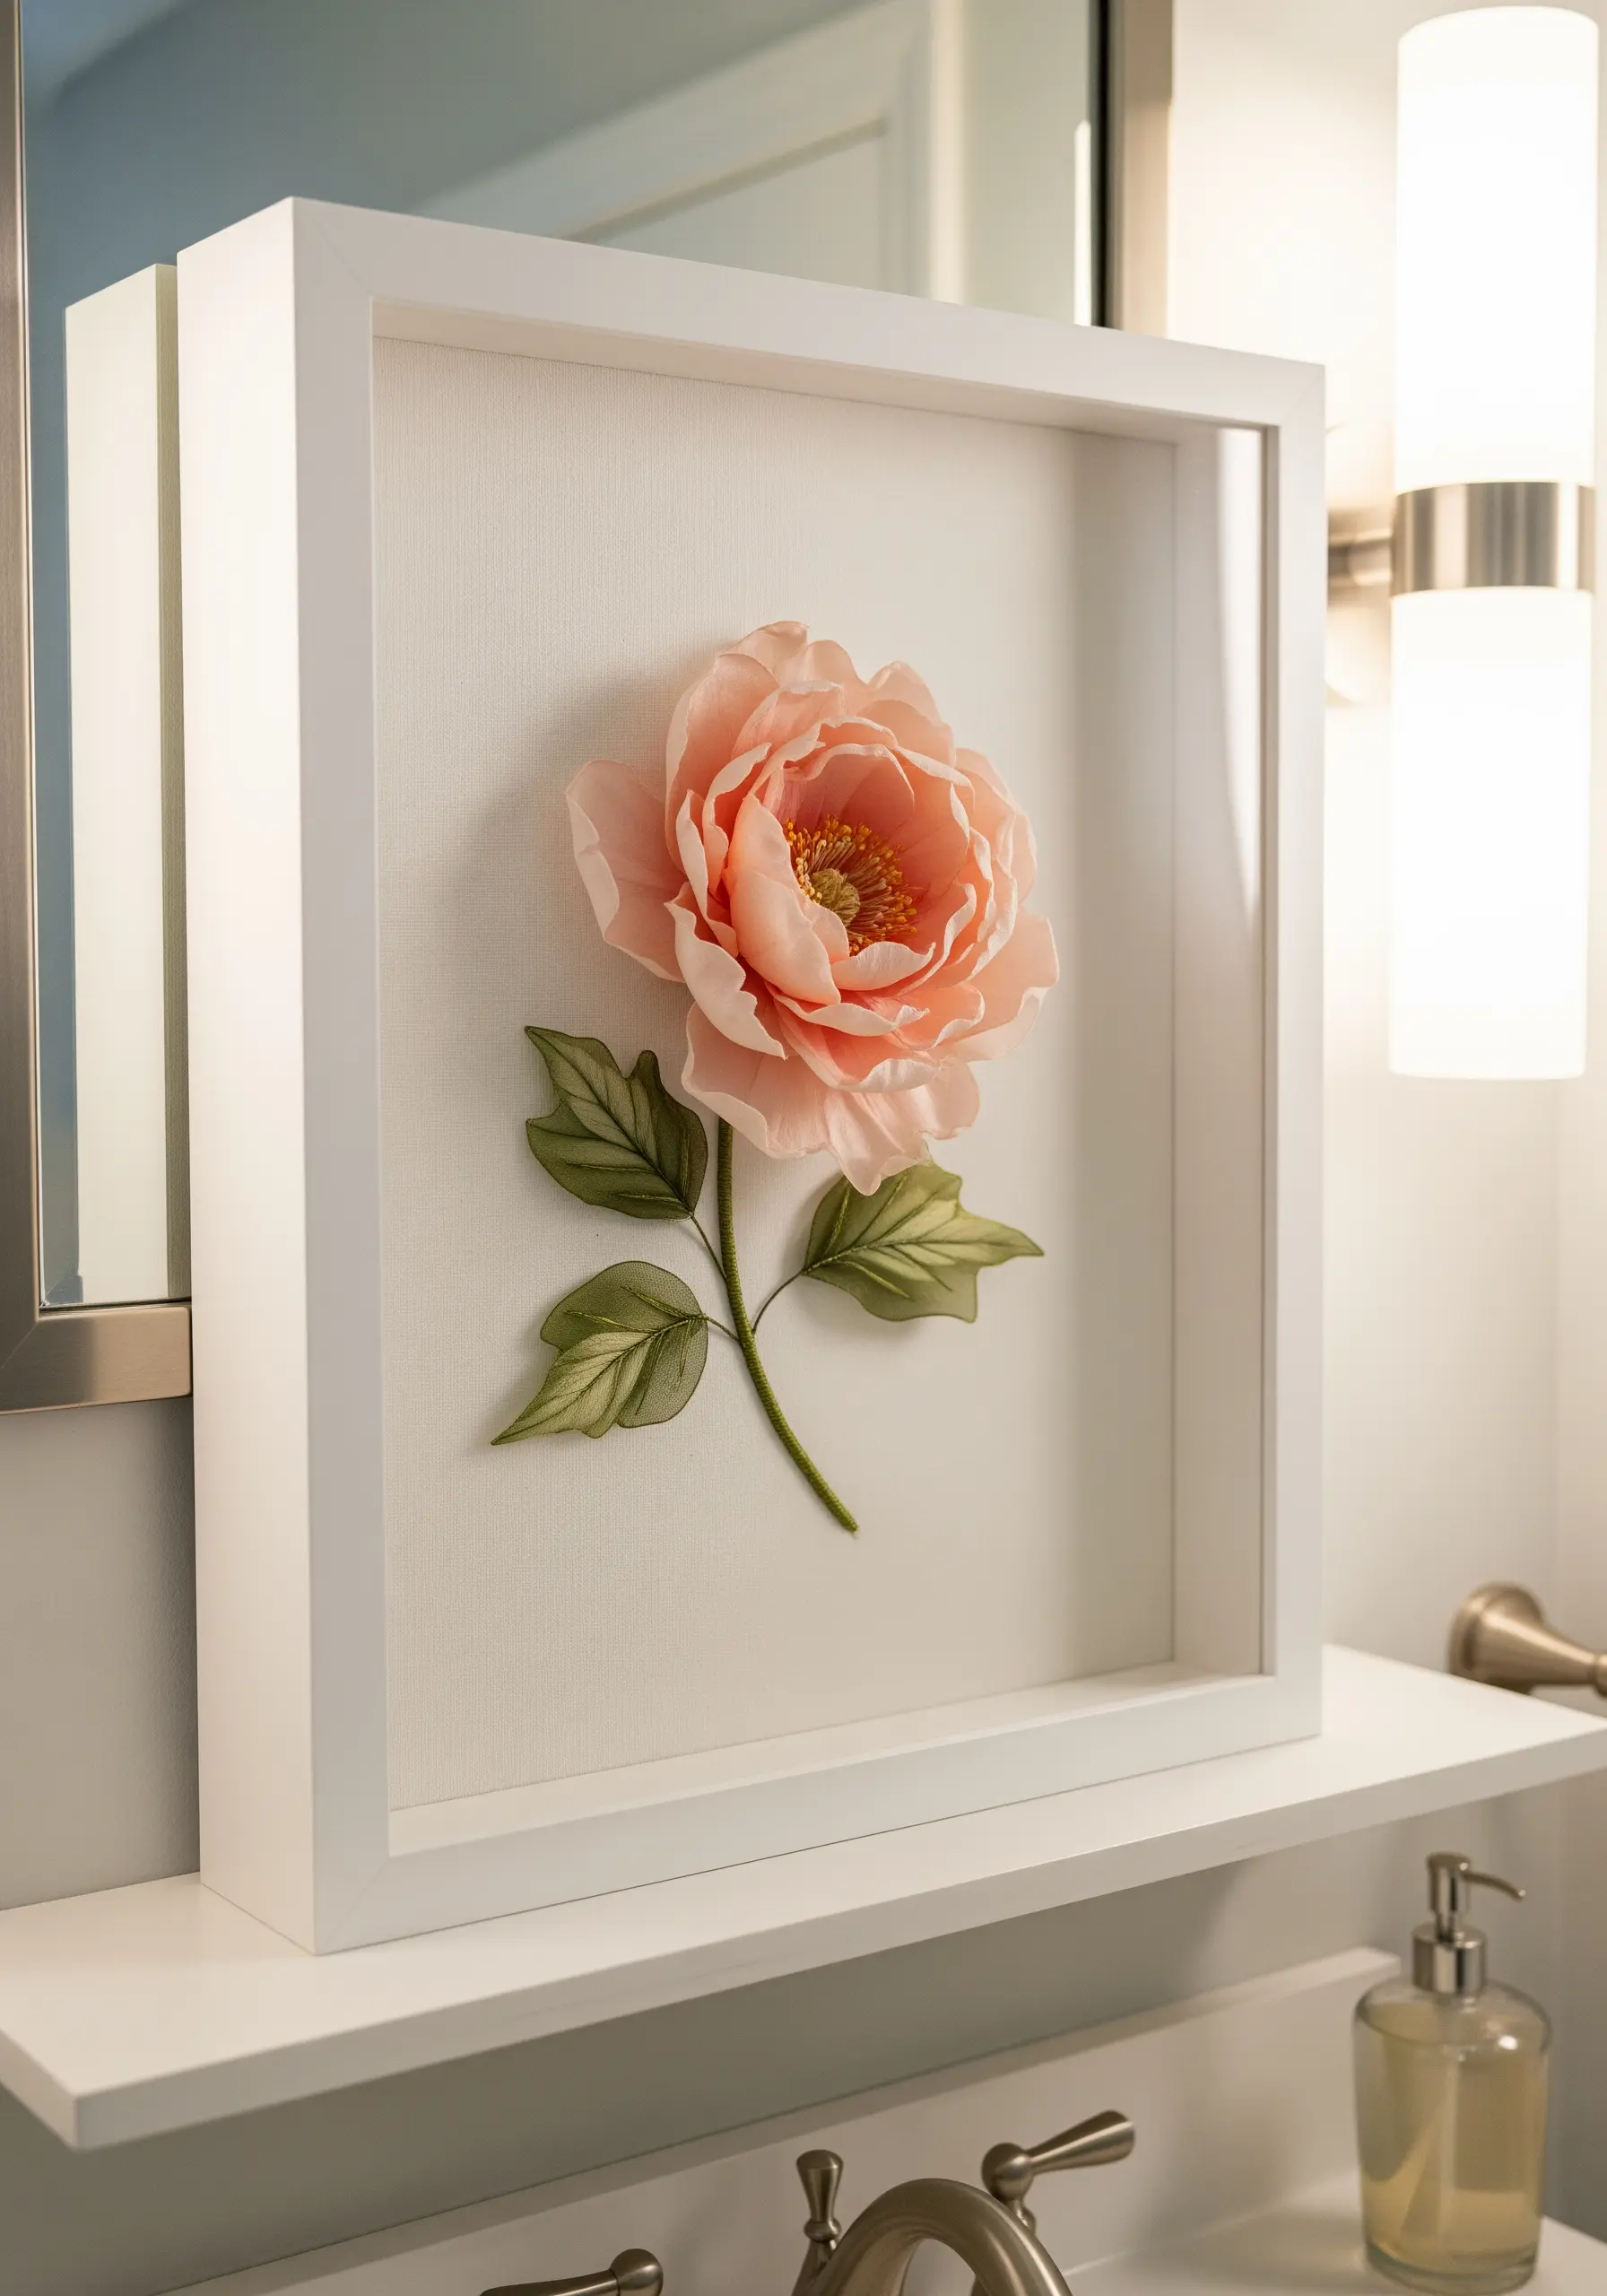
Create stunningly realistic, three-dimensional botanicals using silk ribbon embroidery.
Unlike flat thread, the width and sheen of silk ribbon allow you to build petals that have genuine volume and lift off the fabric.
Master the ribbon stitch and folded rose stitch to construct delicate, layered blooms that mimic nature.
To protect the dimensional work and elevate it to a true showpiece, mount the finished embroidery in a deep shadow box frame.
9. Capture the Essence of Single-Line Thread Portraits
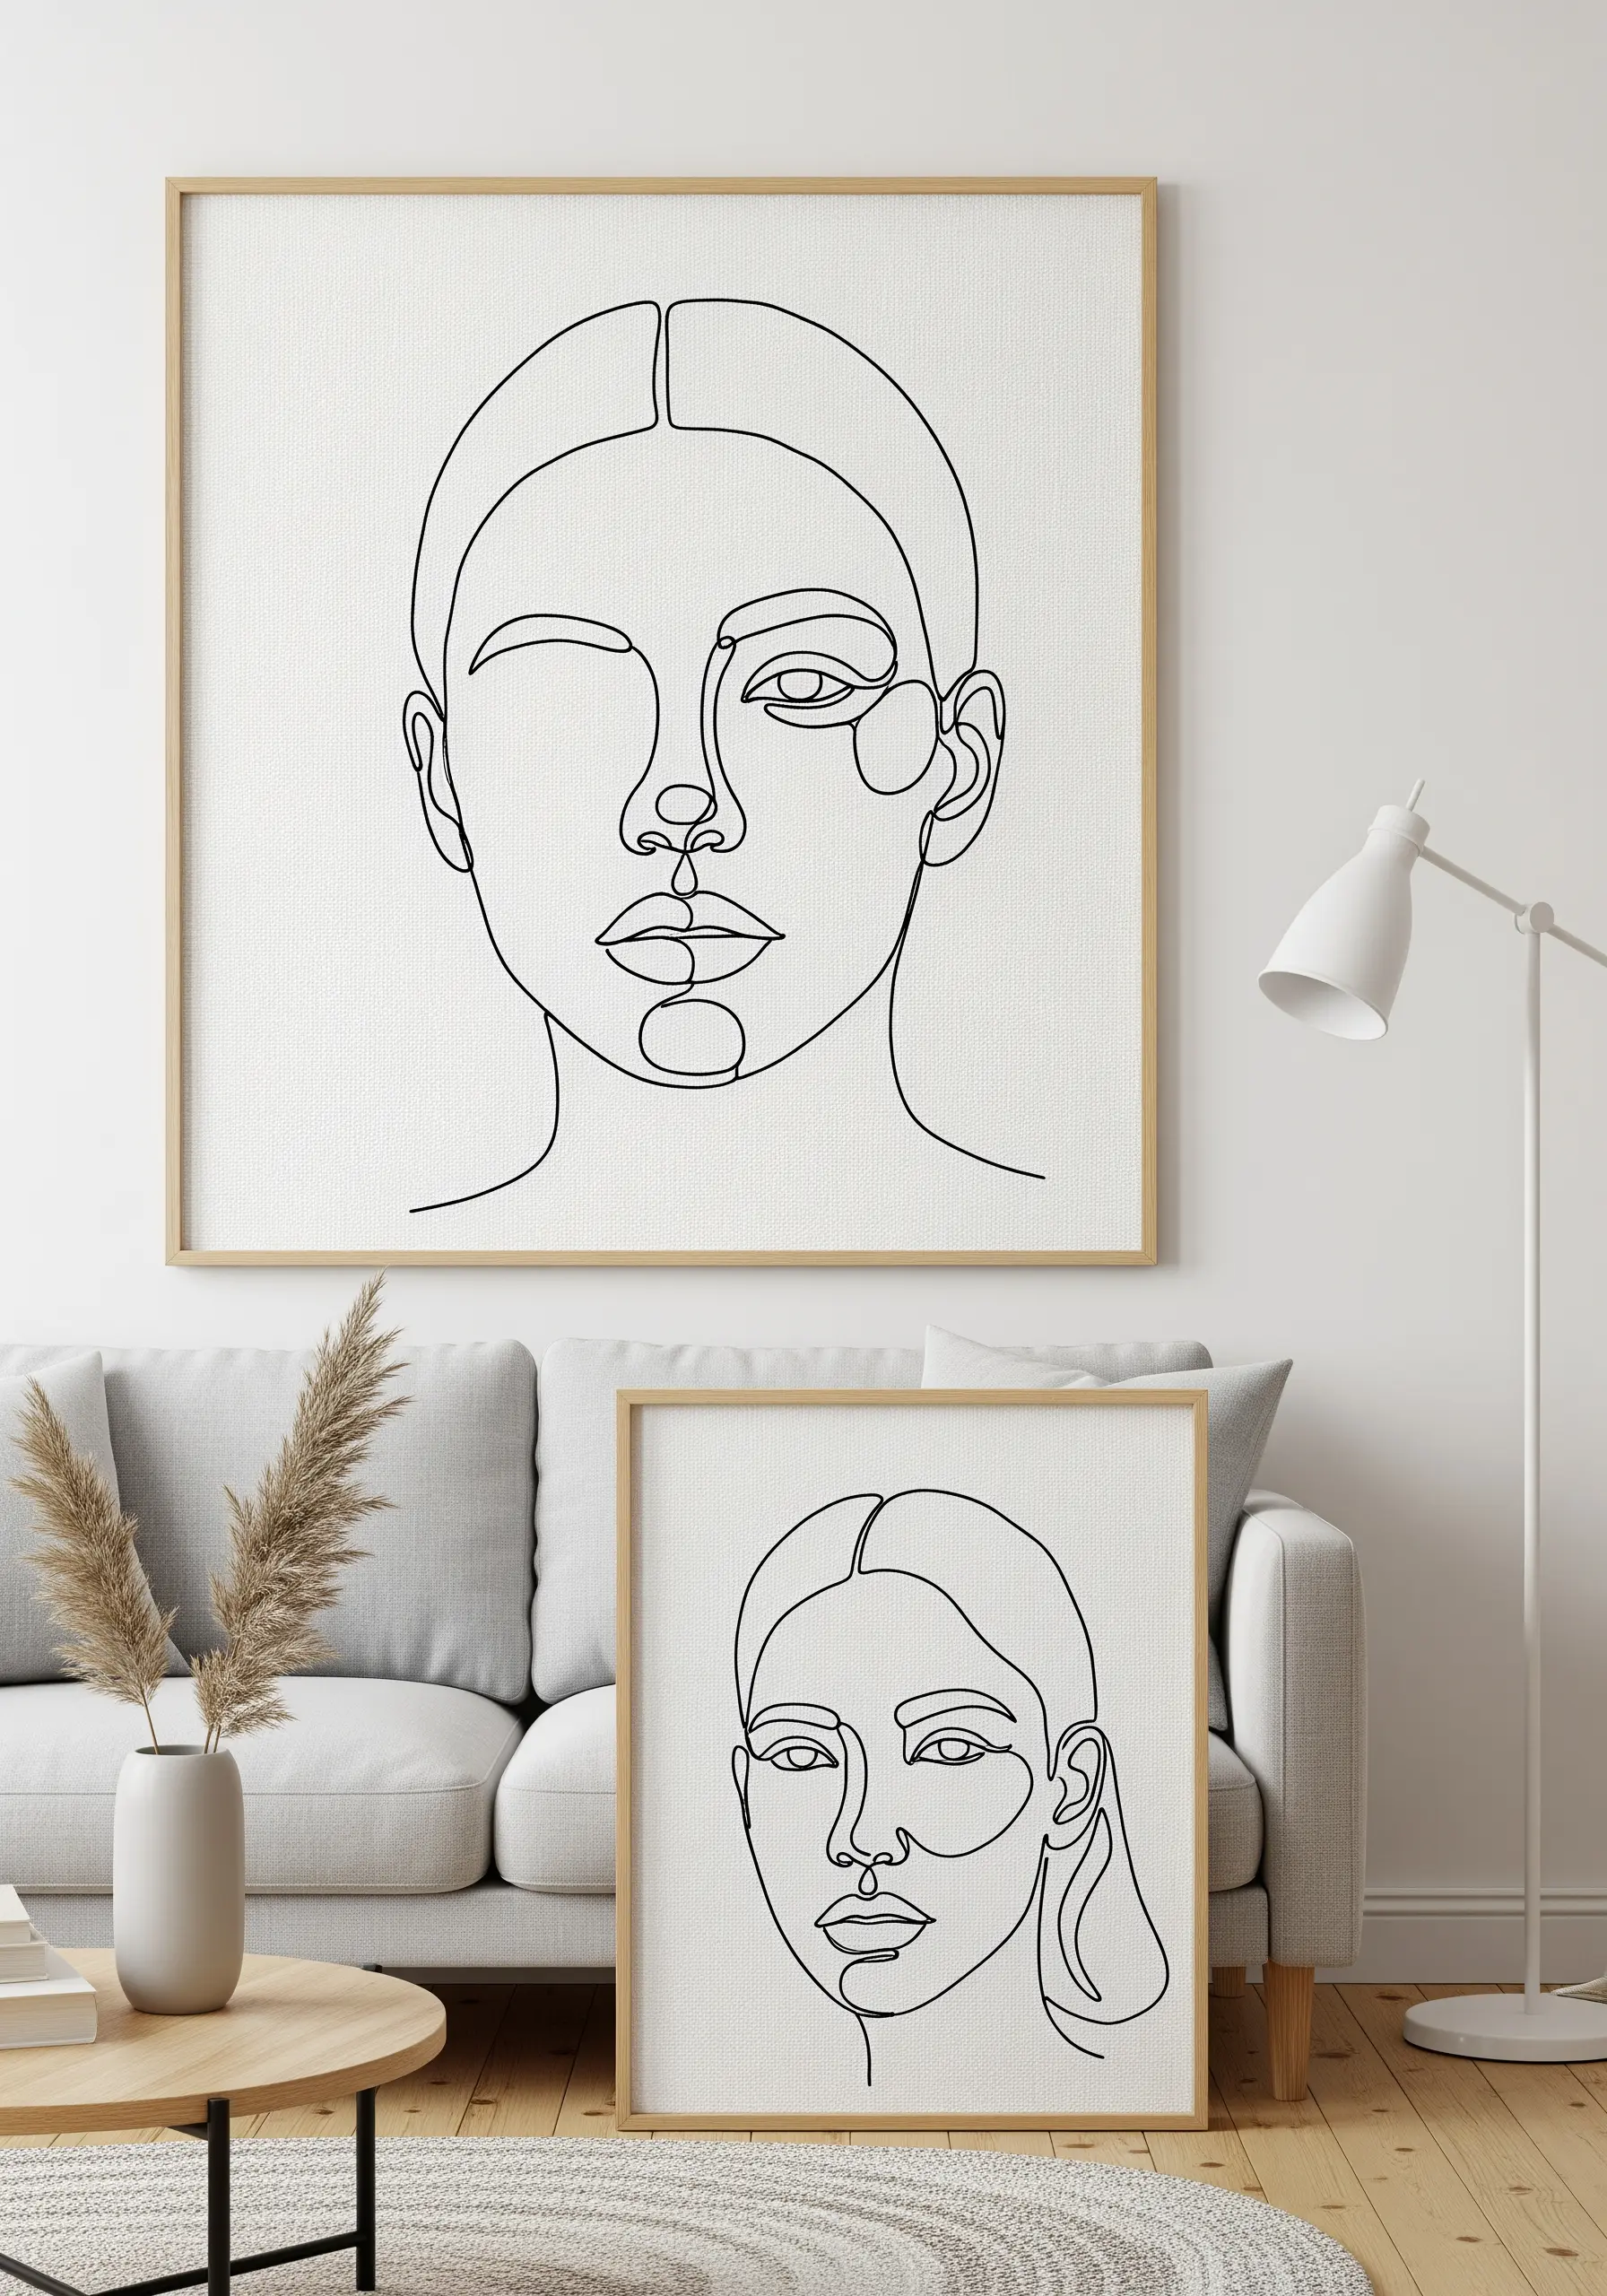
Translate the minimalist elegance of one-line drawings into thread for a modern, sophisticated art piece.
Choose a high-contrast combination, like black thread on a crisp linen or cotton canvas.
The entire portrait is stitched with a single, unbroken line, so use a smooth, consistent backstitch or stem stitch to ensure fluidity.
This technique is a powerful exercise in precision and the artful use of negative space, resulting in a piece that feels both simple and deeply expressive.
10. Craft Tactile Statement Cushions with Punch Needle
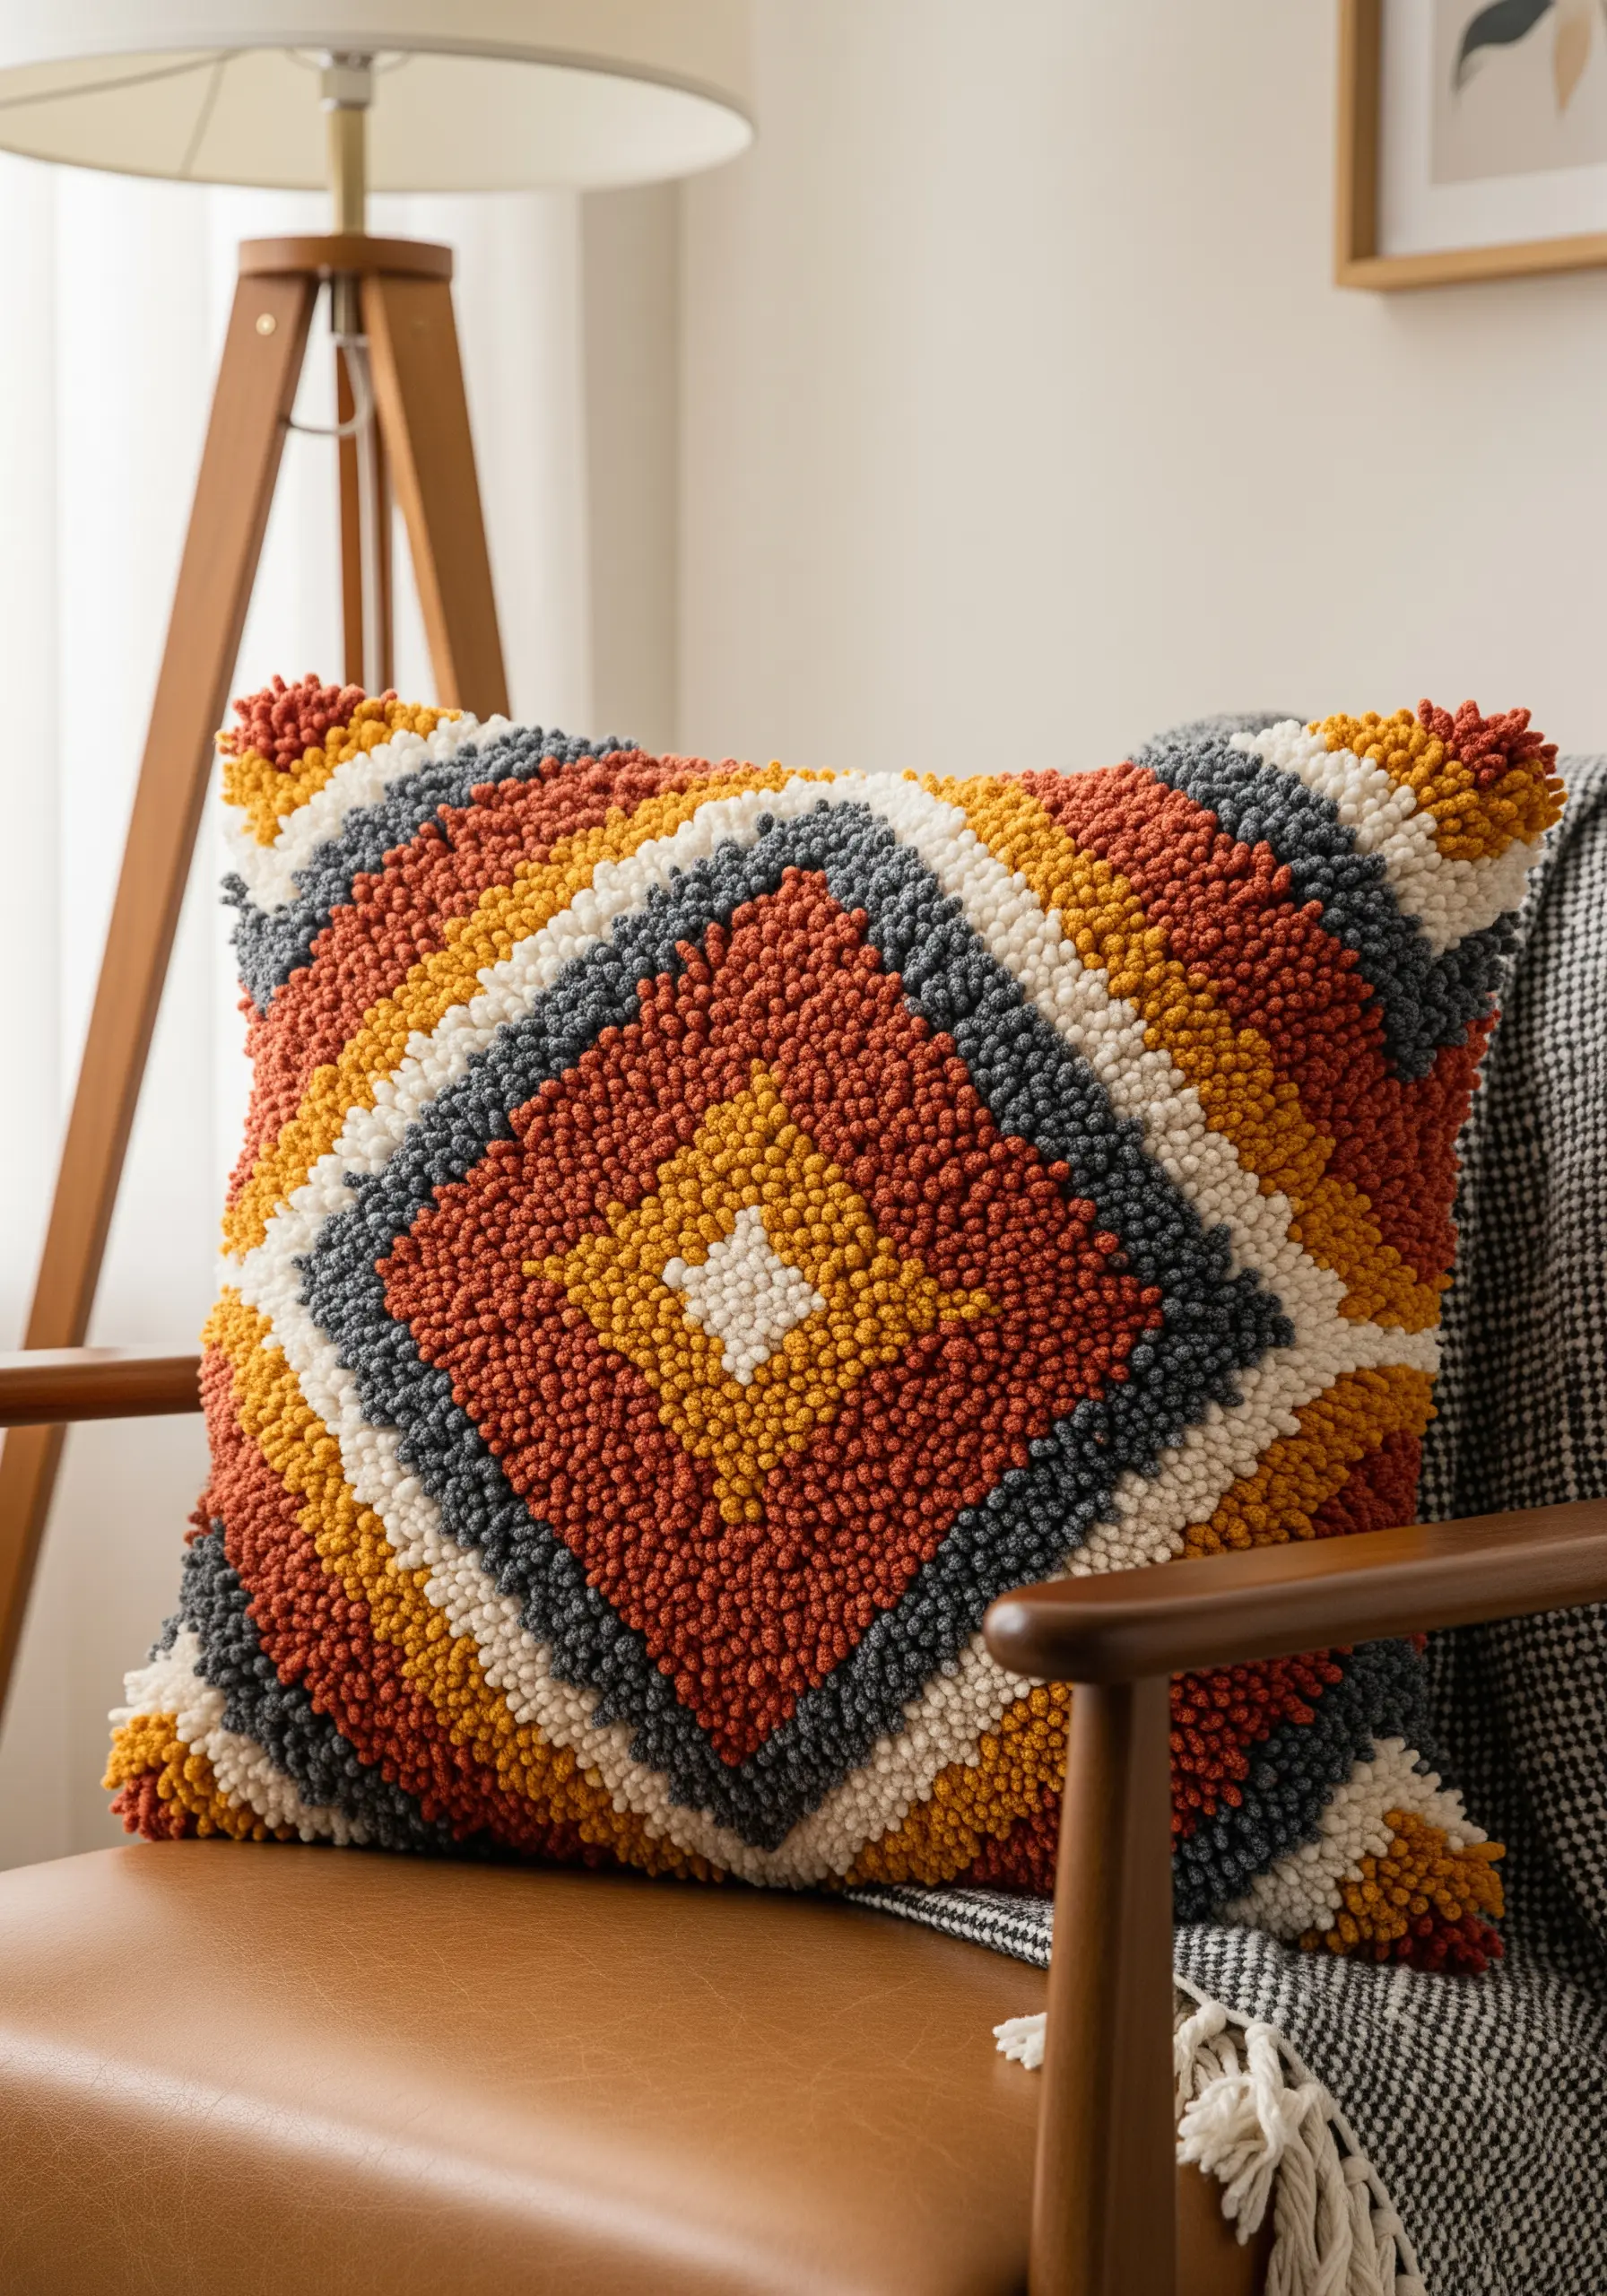
Instantly add a layer of cozy texture to your living space by creating a punch needle cushion cover.
Use a thick, chunky yarn to achieve a plush, satisfyingly dense surface that invites touch.
Play with texture by varying your loop height: use shorter, tighter loops for crisp outlines and longer, shaggier loops to fill larger color blocks.
A bold, geometric pattern is perfect for this technique, turning an everyday object into a piece of functional fiber art.
11. Find Focus with Meditative Beaded Mandalas
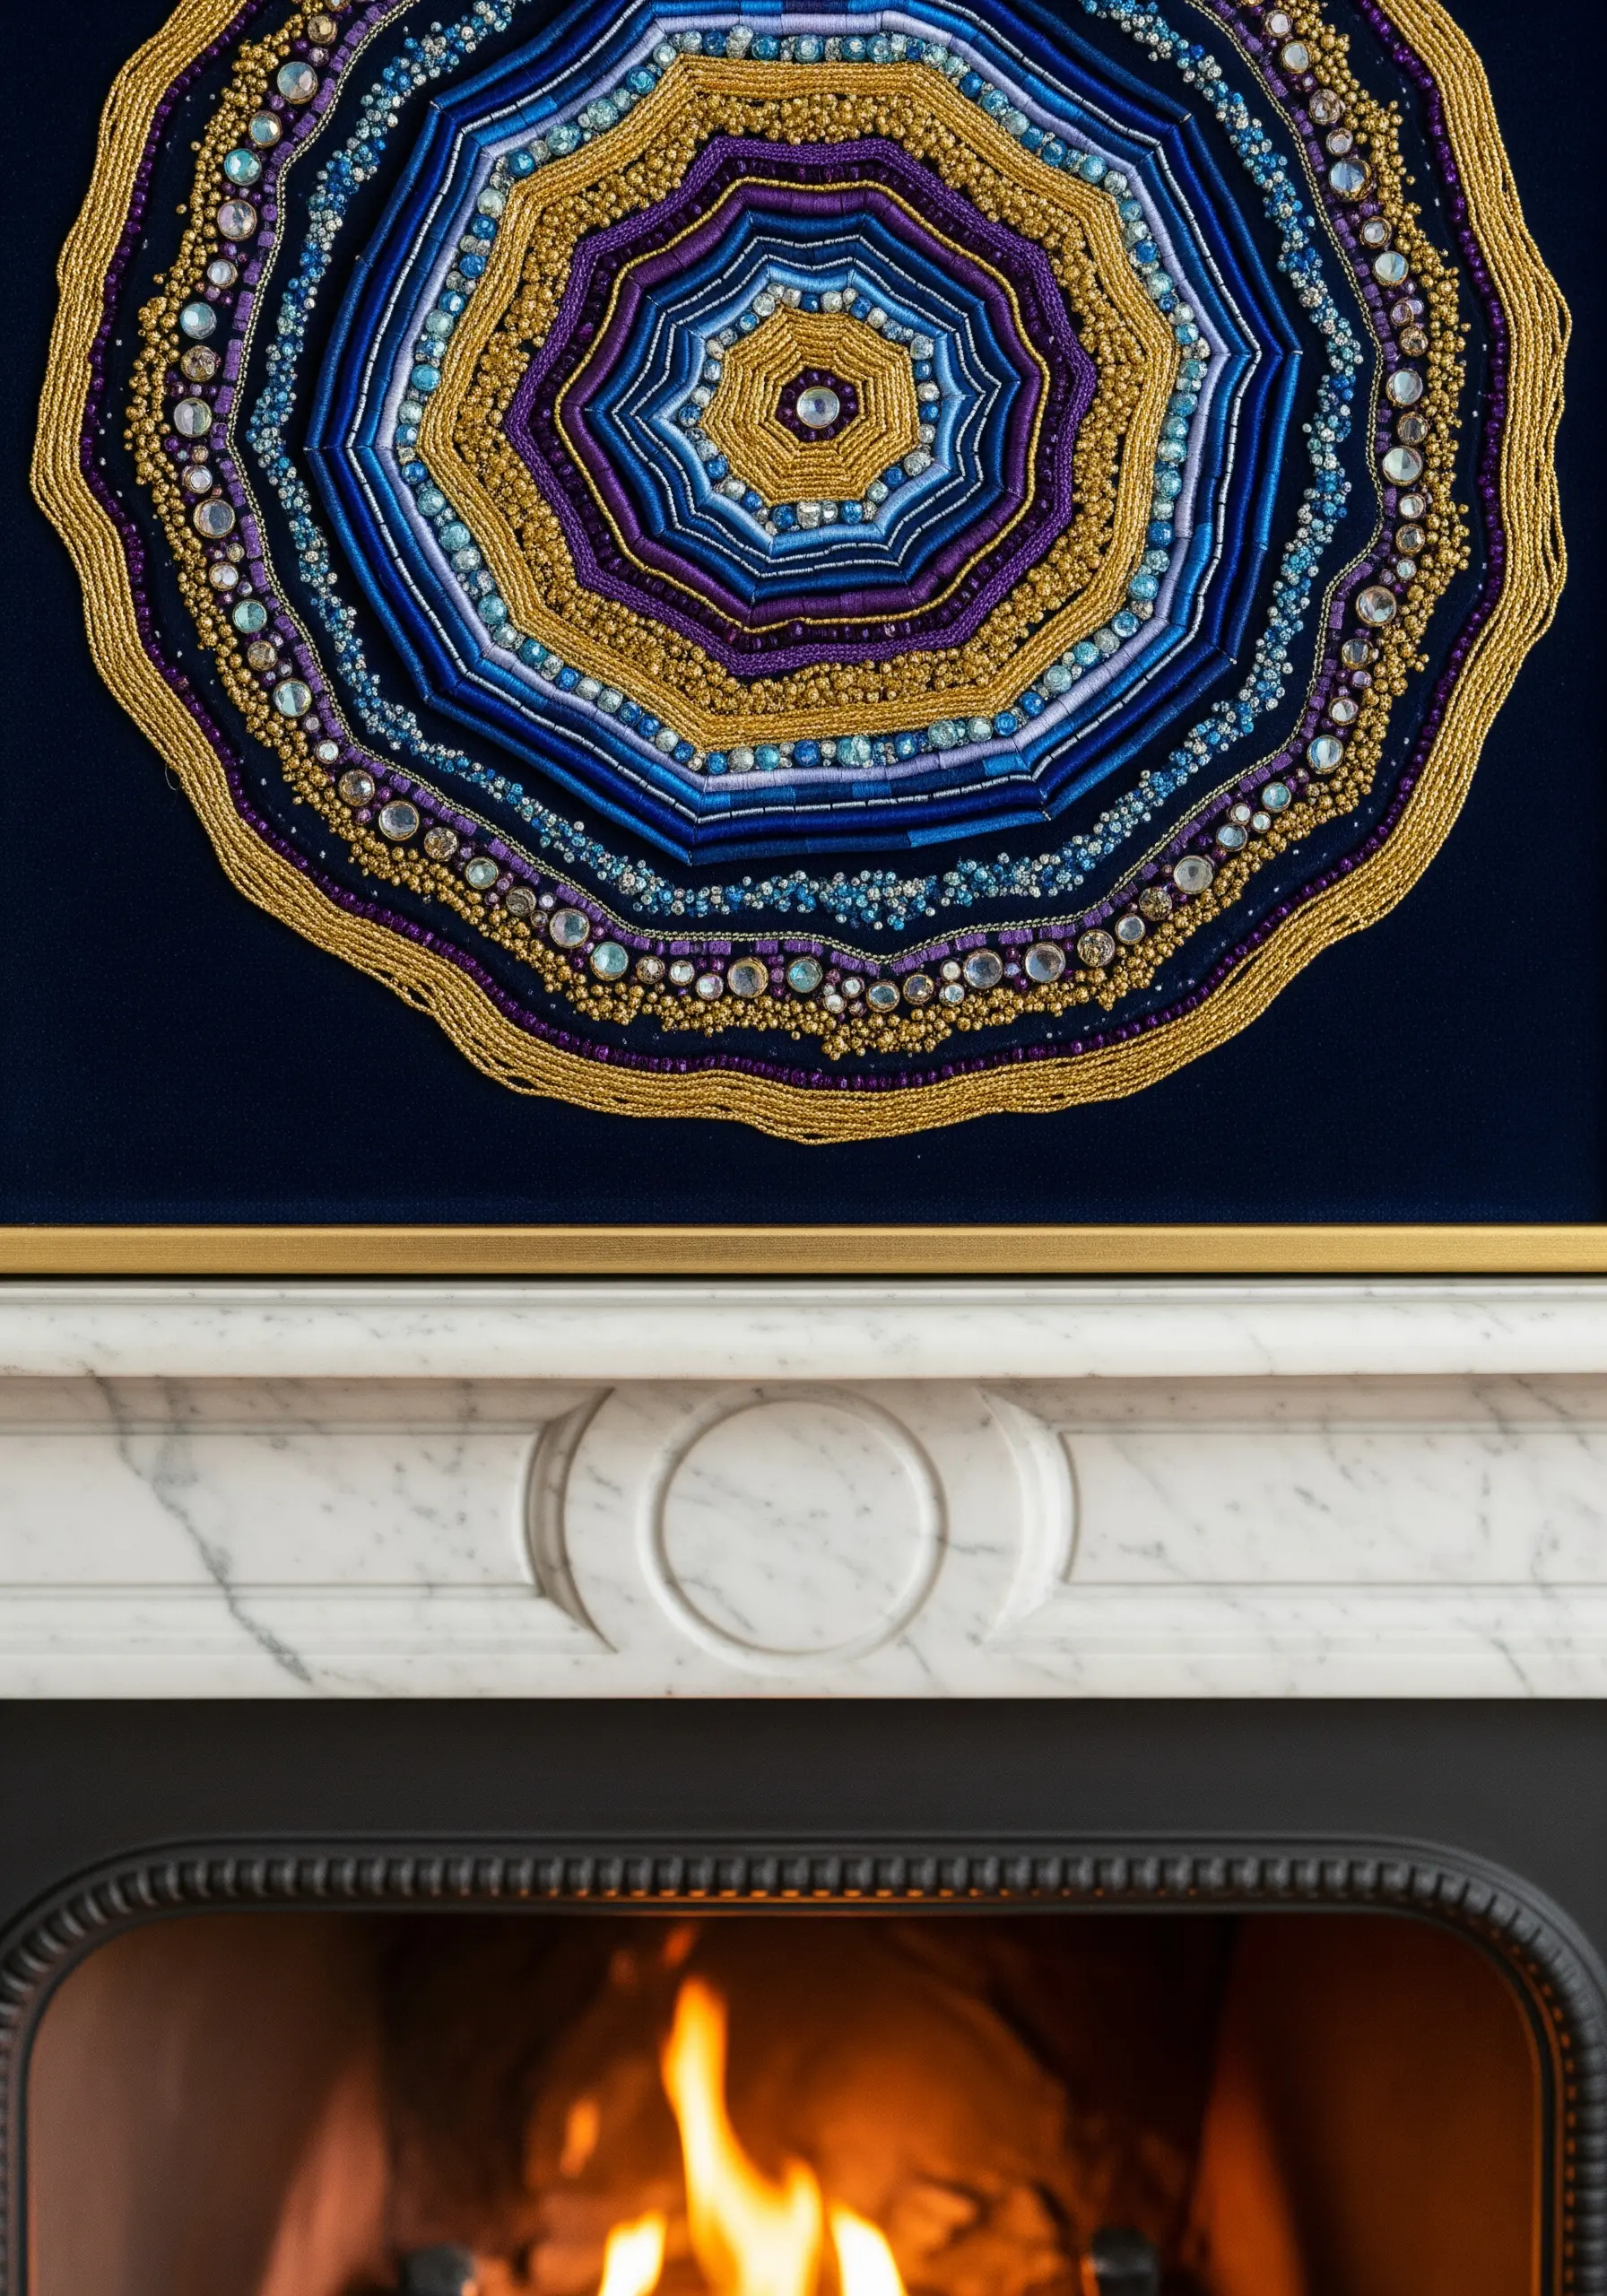
The process of creating a complex, beaded mandala is a practice in mindfulness and precision.
Build your design from the center outward, creating concentric rings with different colors and textures.
Alternate between sections of smooth satin stitch, couched metallic cords, and shimmering seed beads to give the design structure and rhythm.
Mounting the finished piece on a dark, luxurious fabric like velvet makes the metallic and crystal elements radiate with intensity.
12. Build Sculptural Vessels from Coiled Fabric
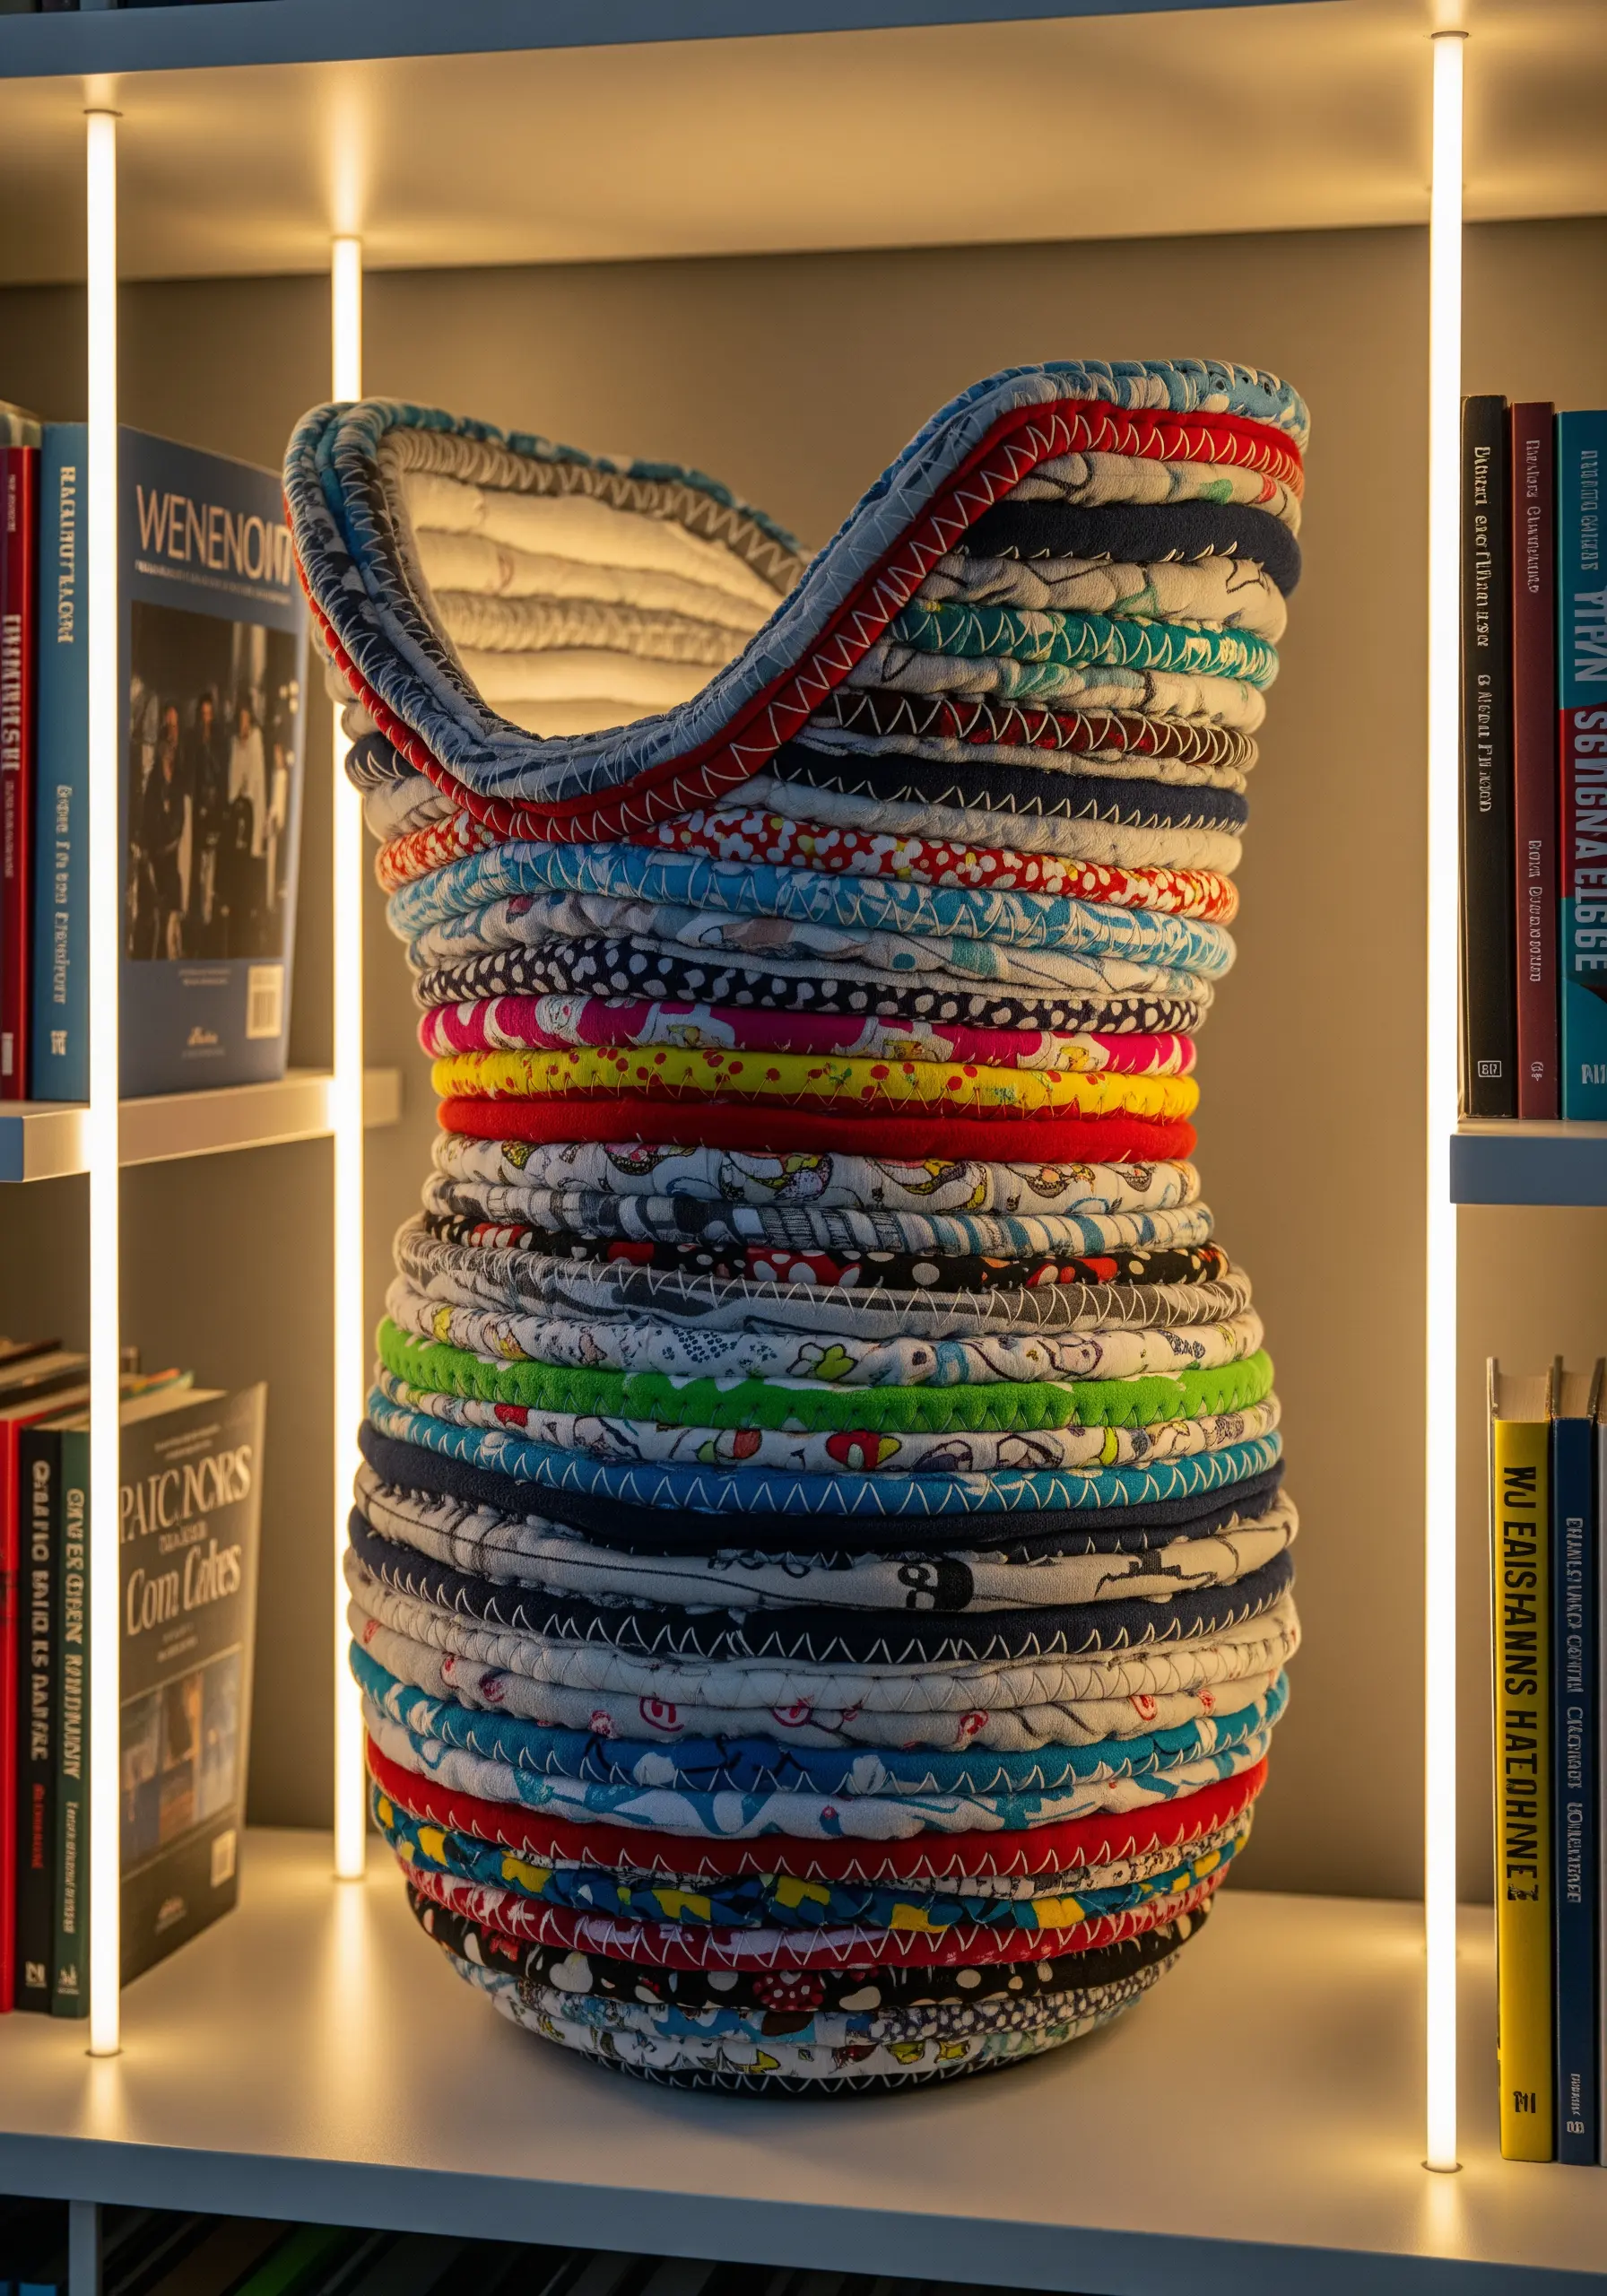
This technique transforms your fabric scraps into a sturdy, three-dimensional object without a sewing machine.
Tightly wrap strips of fabric around a cotton rope core, and then begin coiling the rope to build the walls of your vessel.
Use embroidery floss to secure the coils together with a simple whipstitch or a decorative blanket stitch.
By varying the colors of your fabric strips, you can create beautiful, organic patterns as the vessel takes shape.
13. Weave with Found Objects and Natural Textures
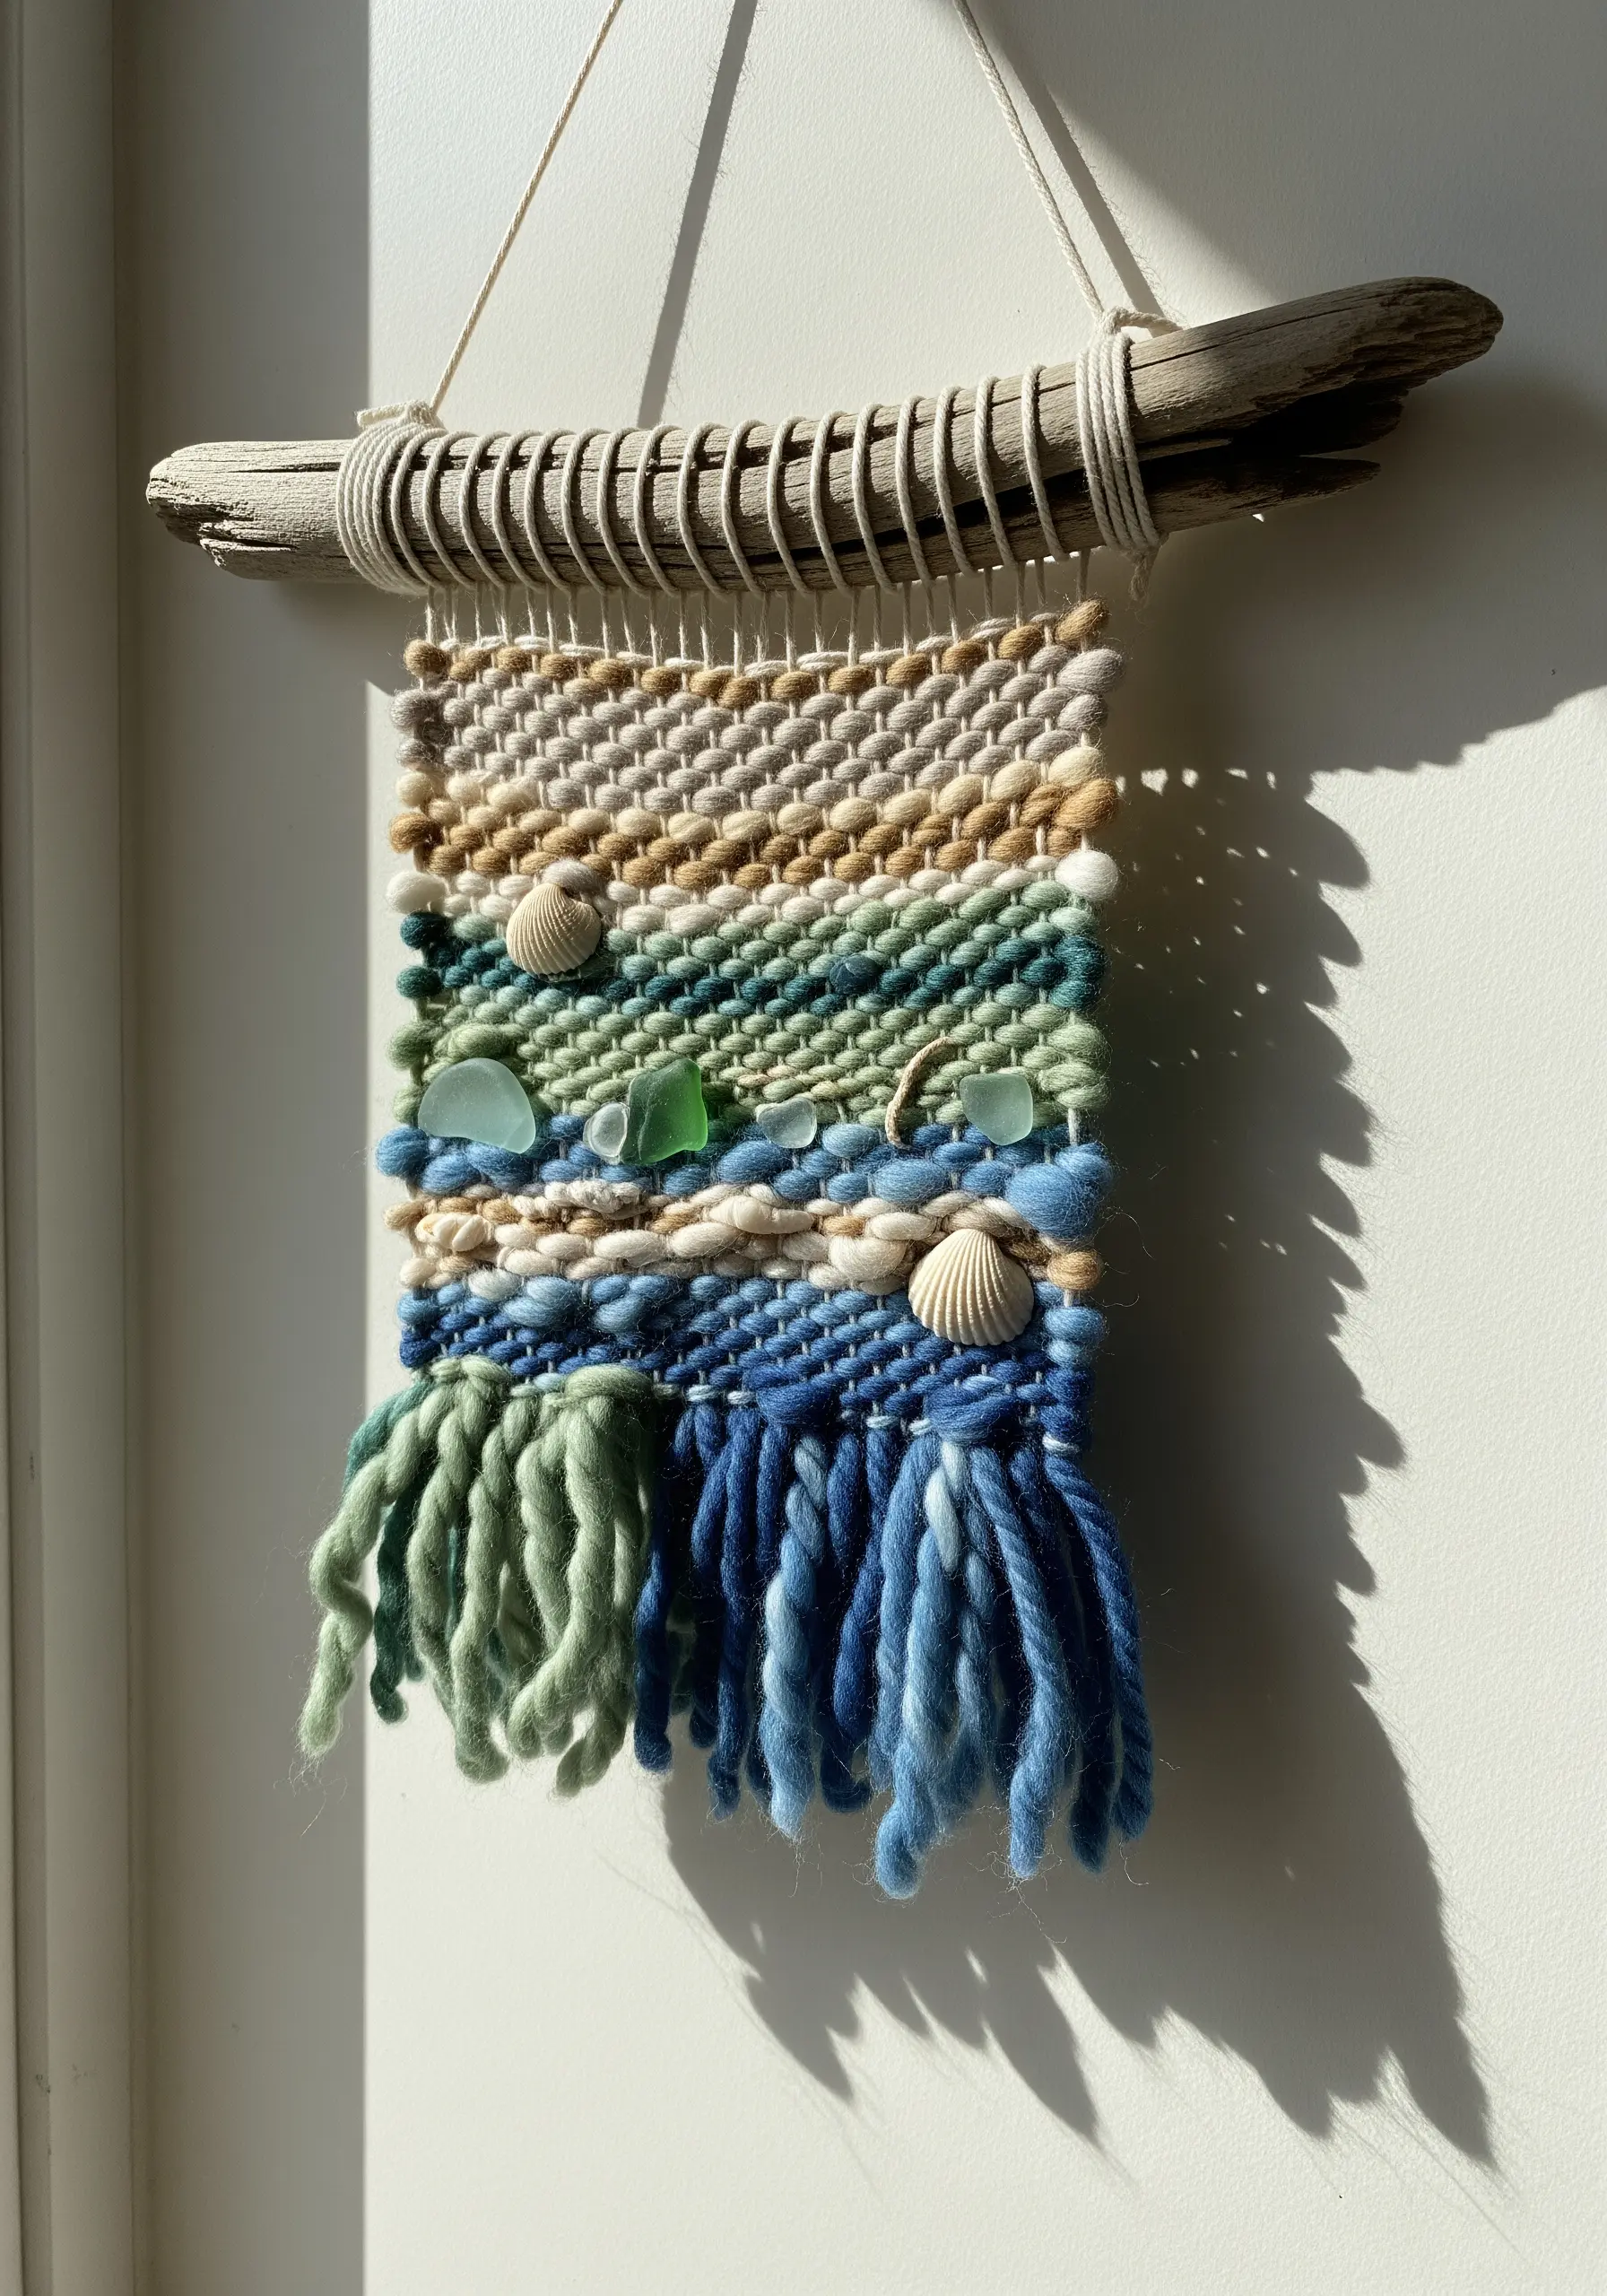
Infuse your fiber art with a sense of place by incorporating found objects from nature.
As you weave a small tapestry with coastal-colored yarns, pause to integrate treasures like sea glass, smooth pebbles, or small seashells directly into the weft.
Secure each object by tightly wrapping the yarn around it, making it a permanent part of the textile’s structure.
This method transforms a simple wall hanging into a personal, tactile memory map of a favorite landscape.
14. Embrace Joyful Chaos with Maximalist Fiber Art
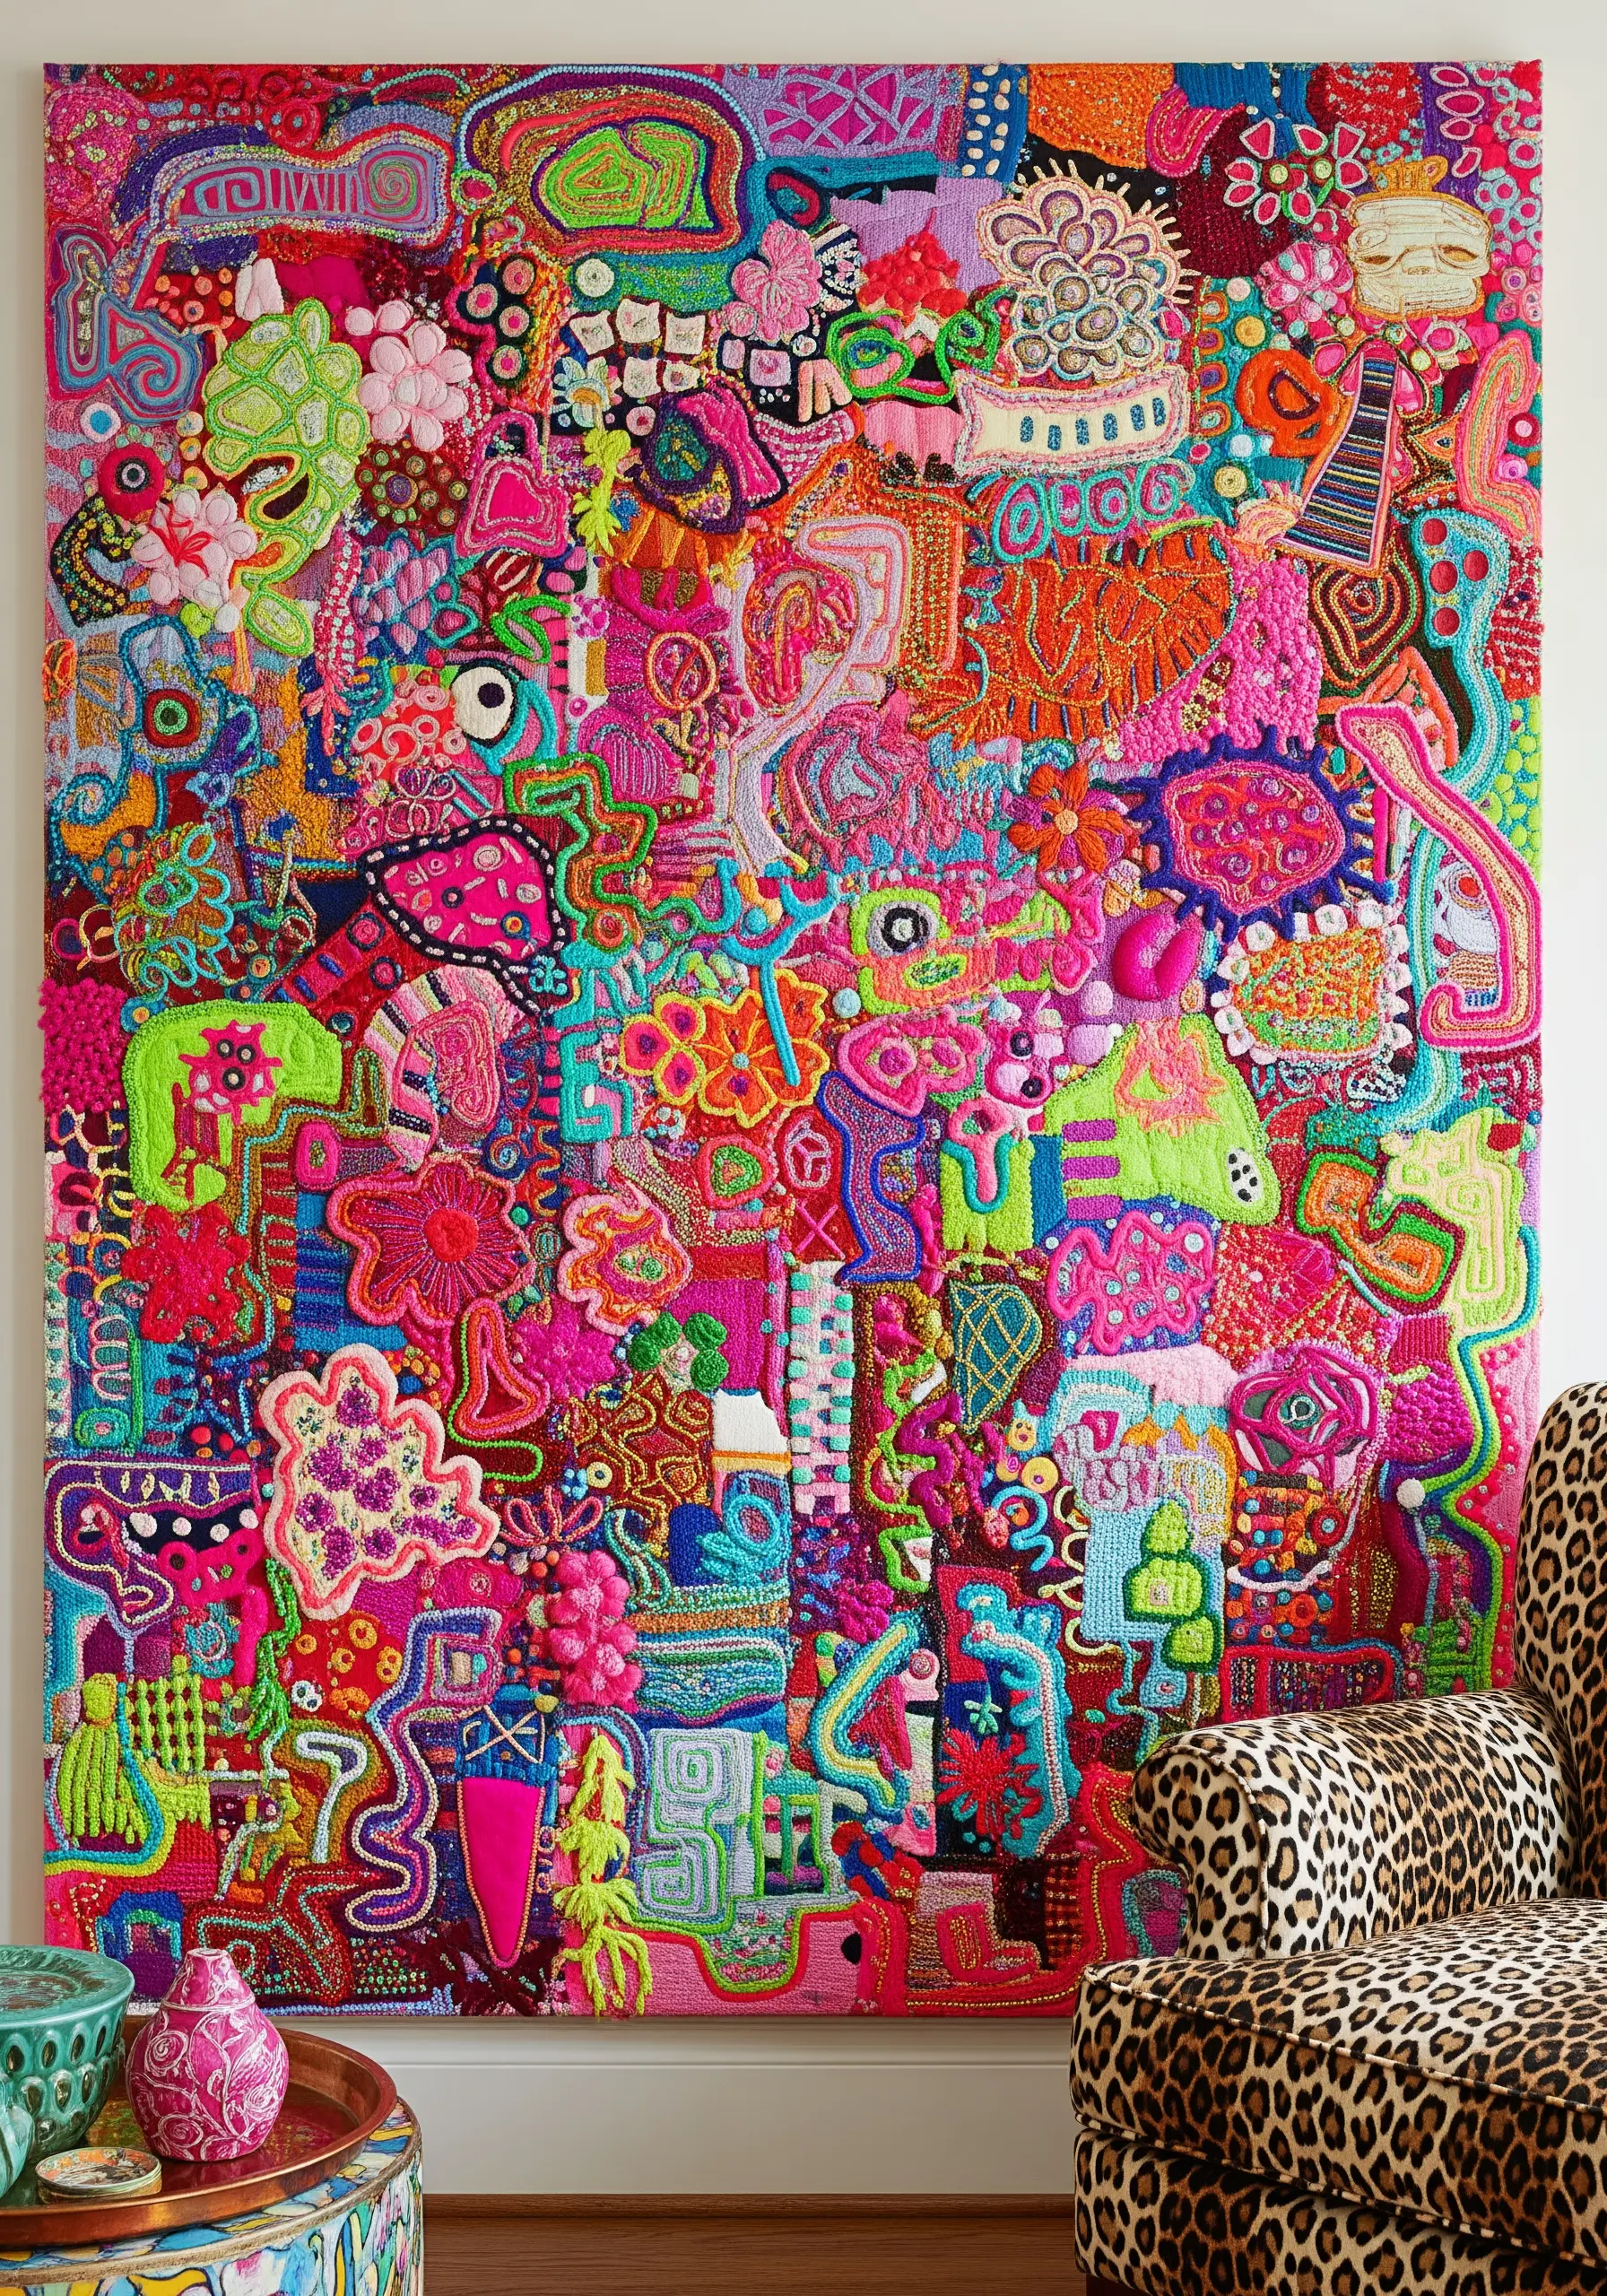
Let go of patterns and plans and create a maximalist masterpiece that celebrates texture and color.
Start with a large piece of backing fabric and simply begin filling it with a freeform collage of different fiber techniques: patches of punch needle, clusters of French knots, small woven sections, and beaded appliqué.
Use a riot of bright, clashing colors and allow one shape to organically inform the next.
This is a joyful exercise in creative freedom, resulting in a one-of-a-kind piece that bursts with energy.
15. Chart the Stars with Metallic Thread Embroidery
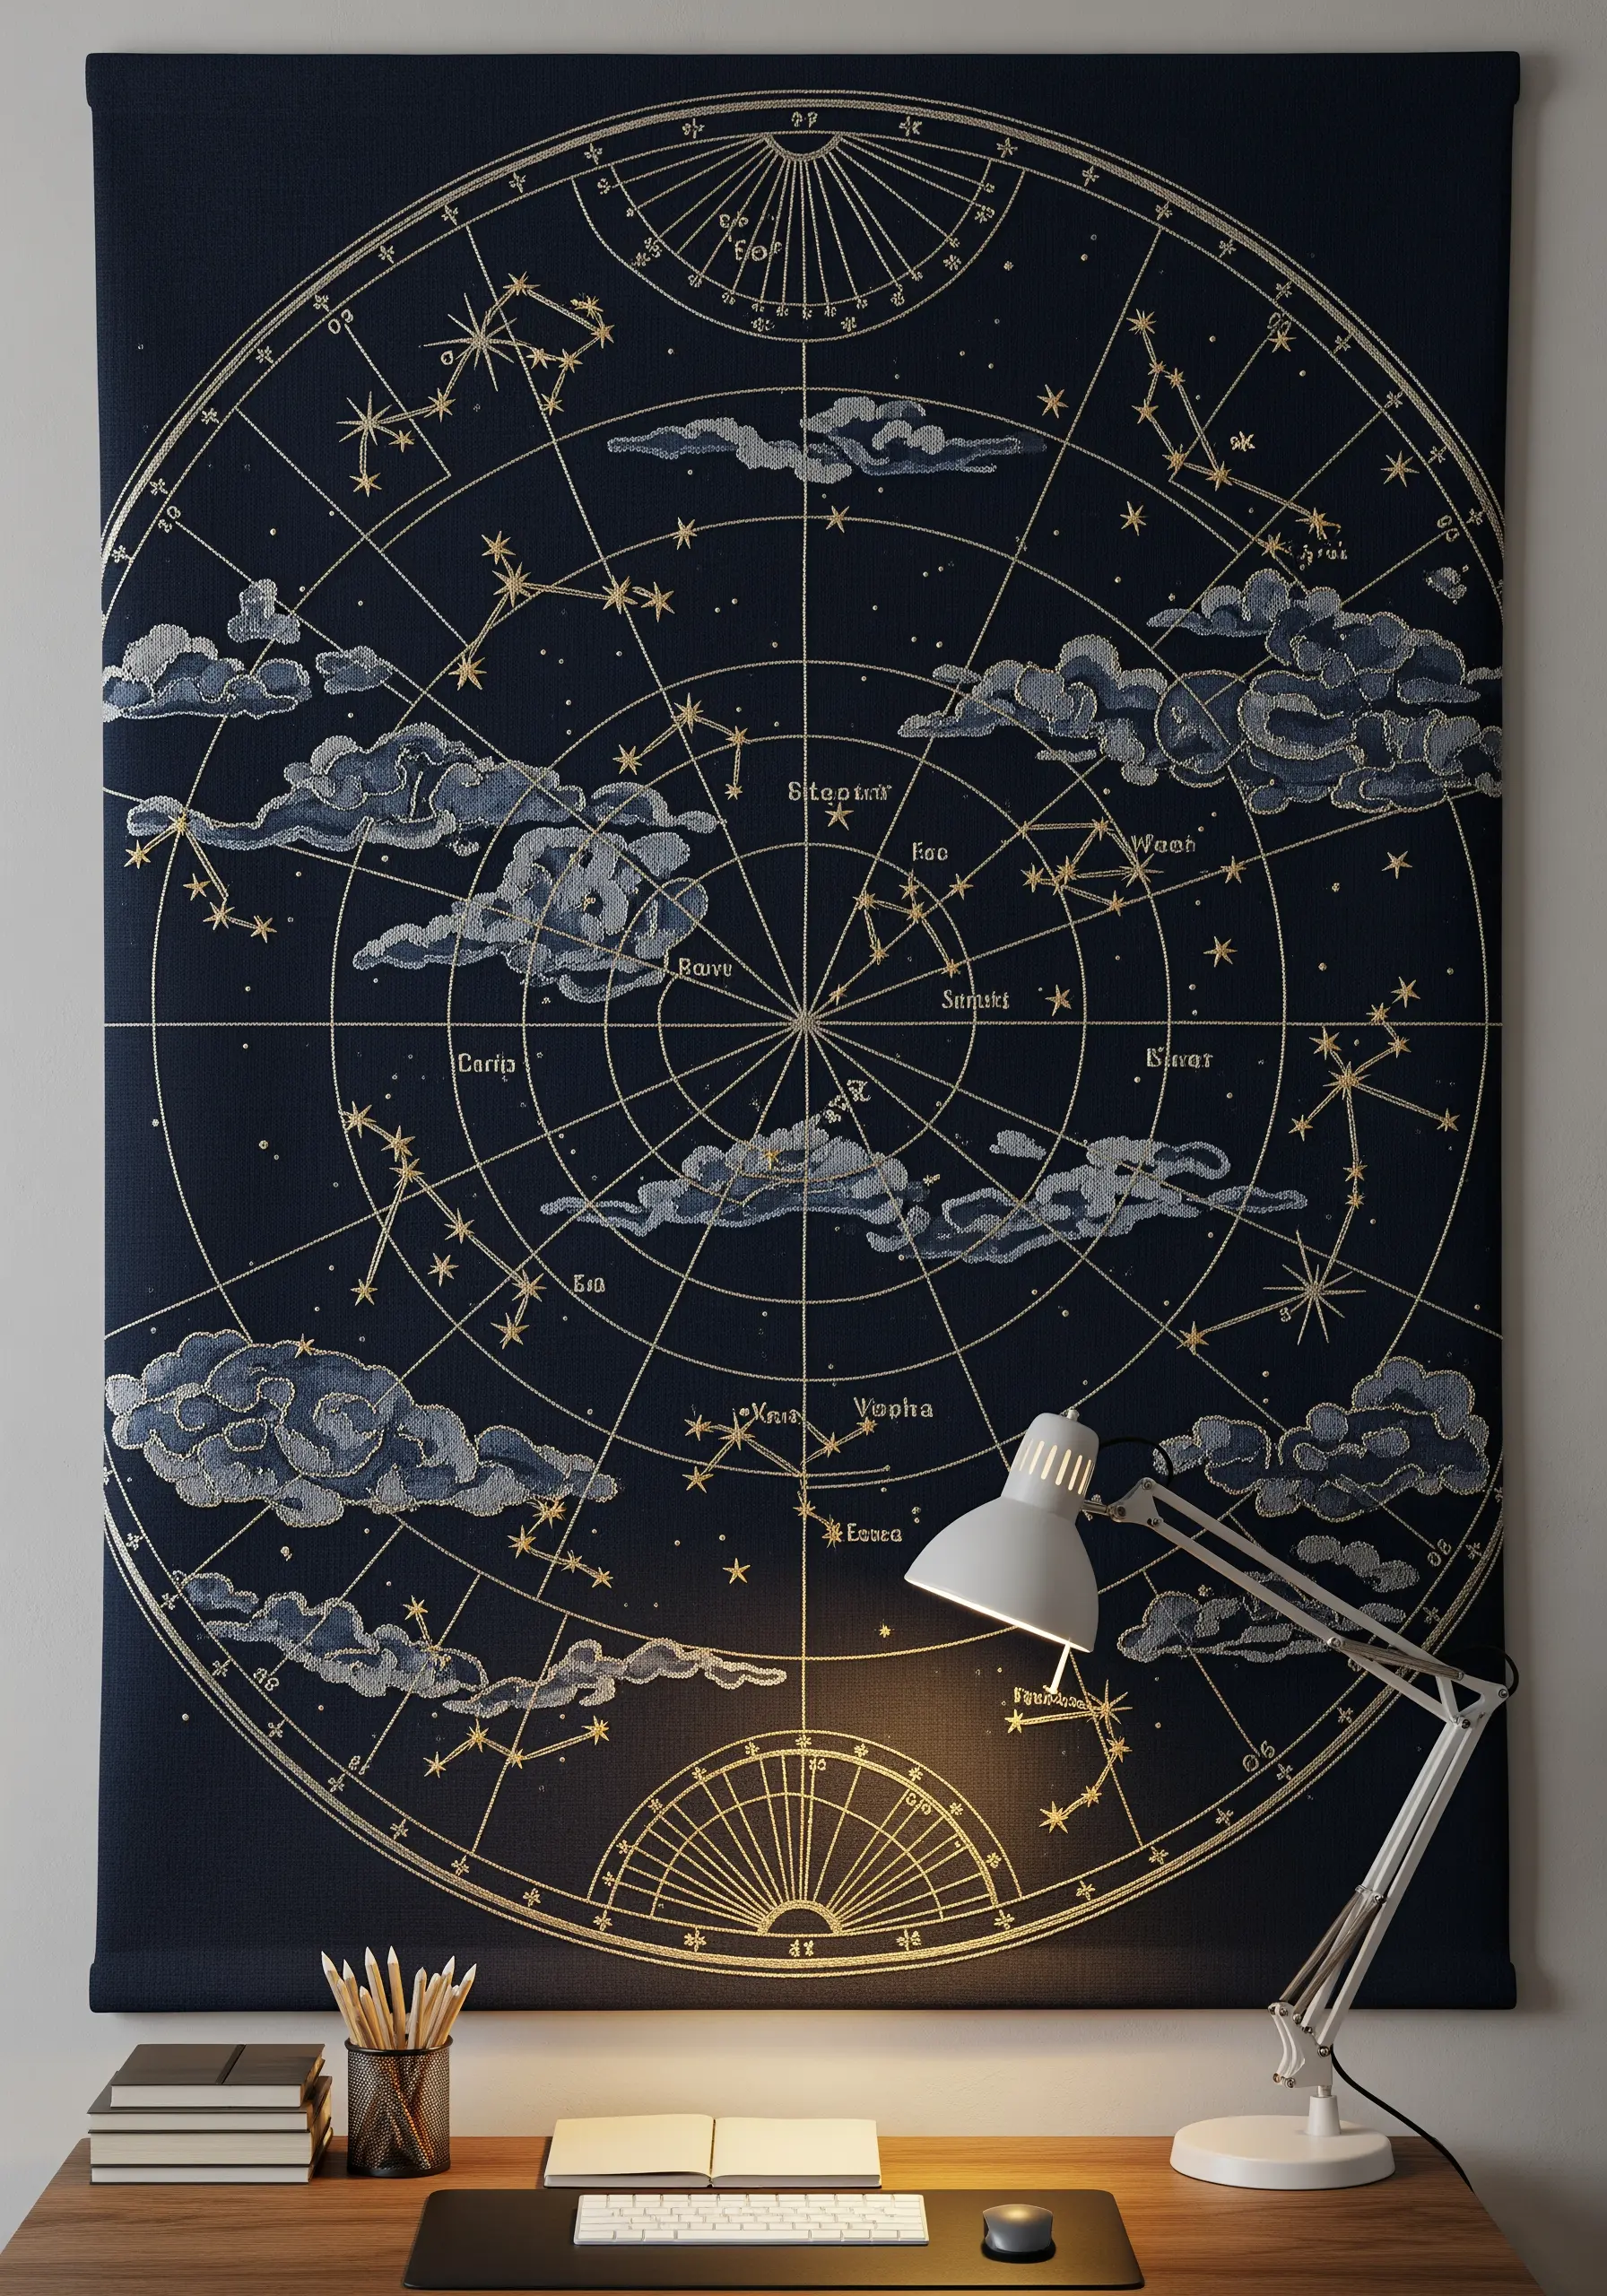
Capture the magic of the night sky by embroidering a vintage-style celestial map.
Use a deep navy blue or black linen as your canvas to provide a rich, dark background.
Stitch the delicate constellation lines and astrological grids with a fine, single strand of gold or silver metallic thread using a simple backstitch for precision.
For any clouds or nebulae, use a soft thread painting technique with grey and light blue floss to create a sense of ethereal, smoky volume against the sharp metallic lines.
16. Explore the Nuance of White-on-White Texture
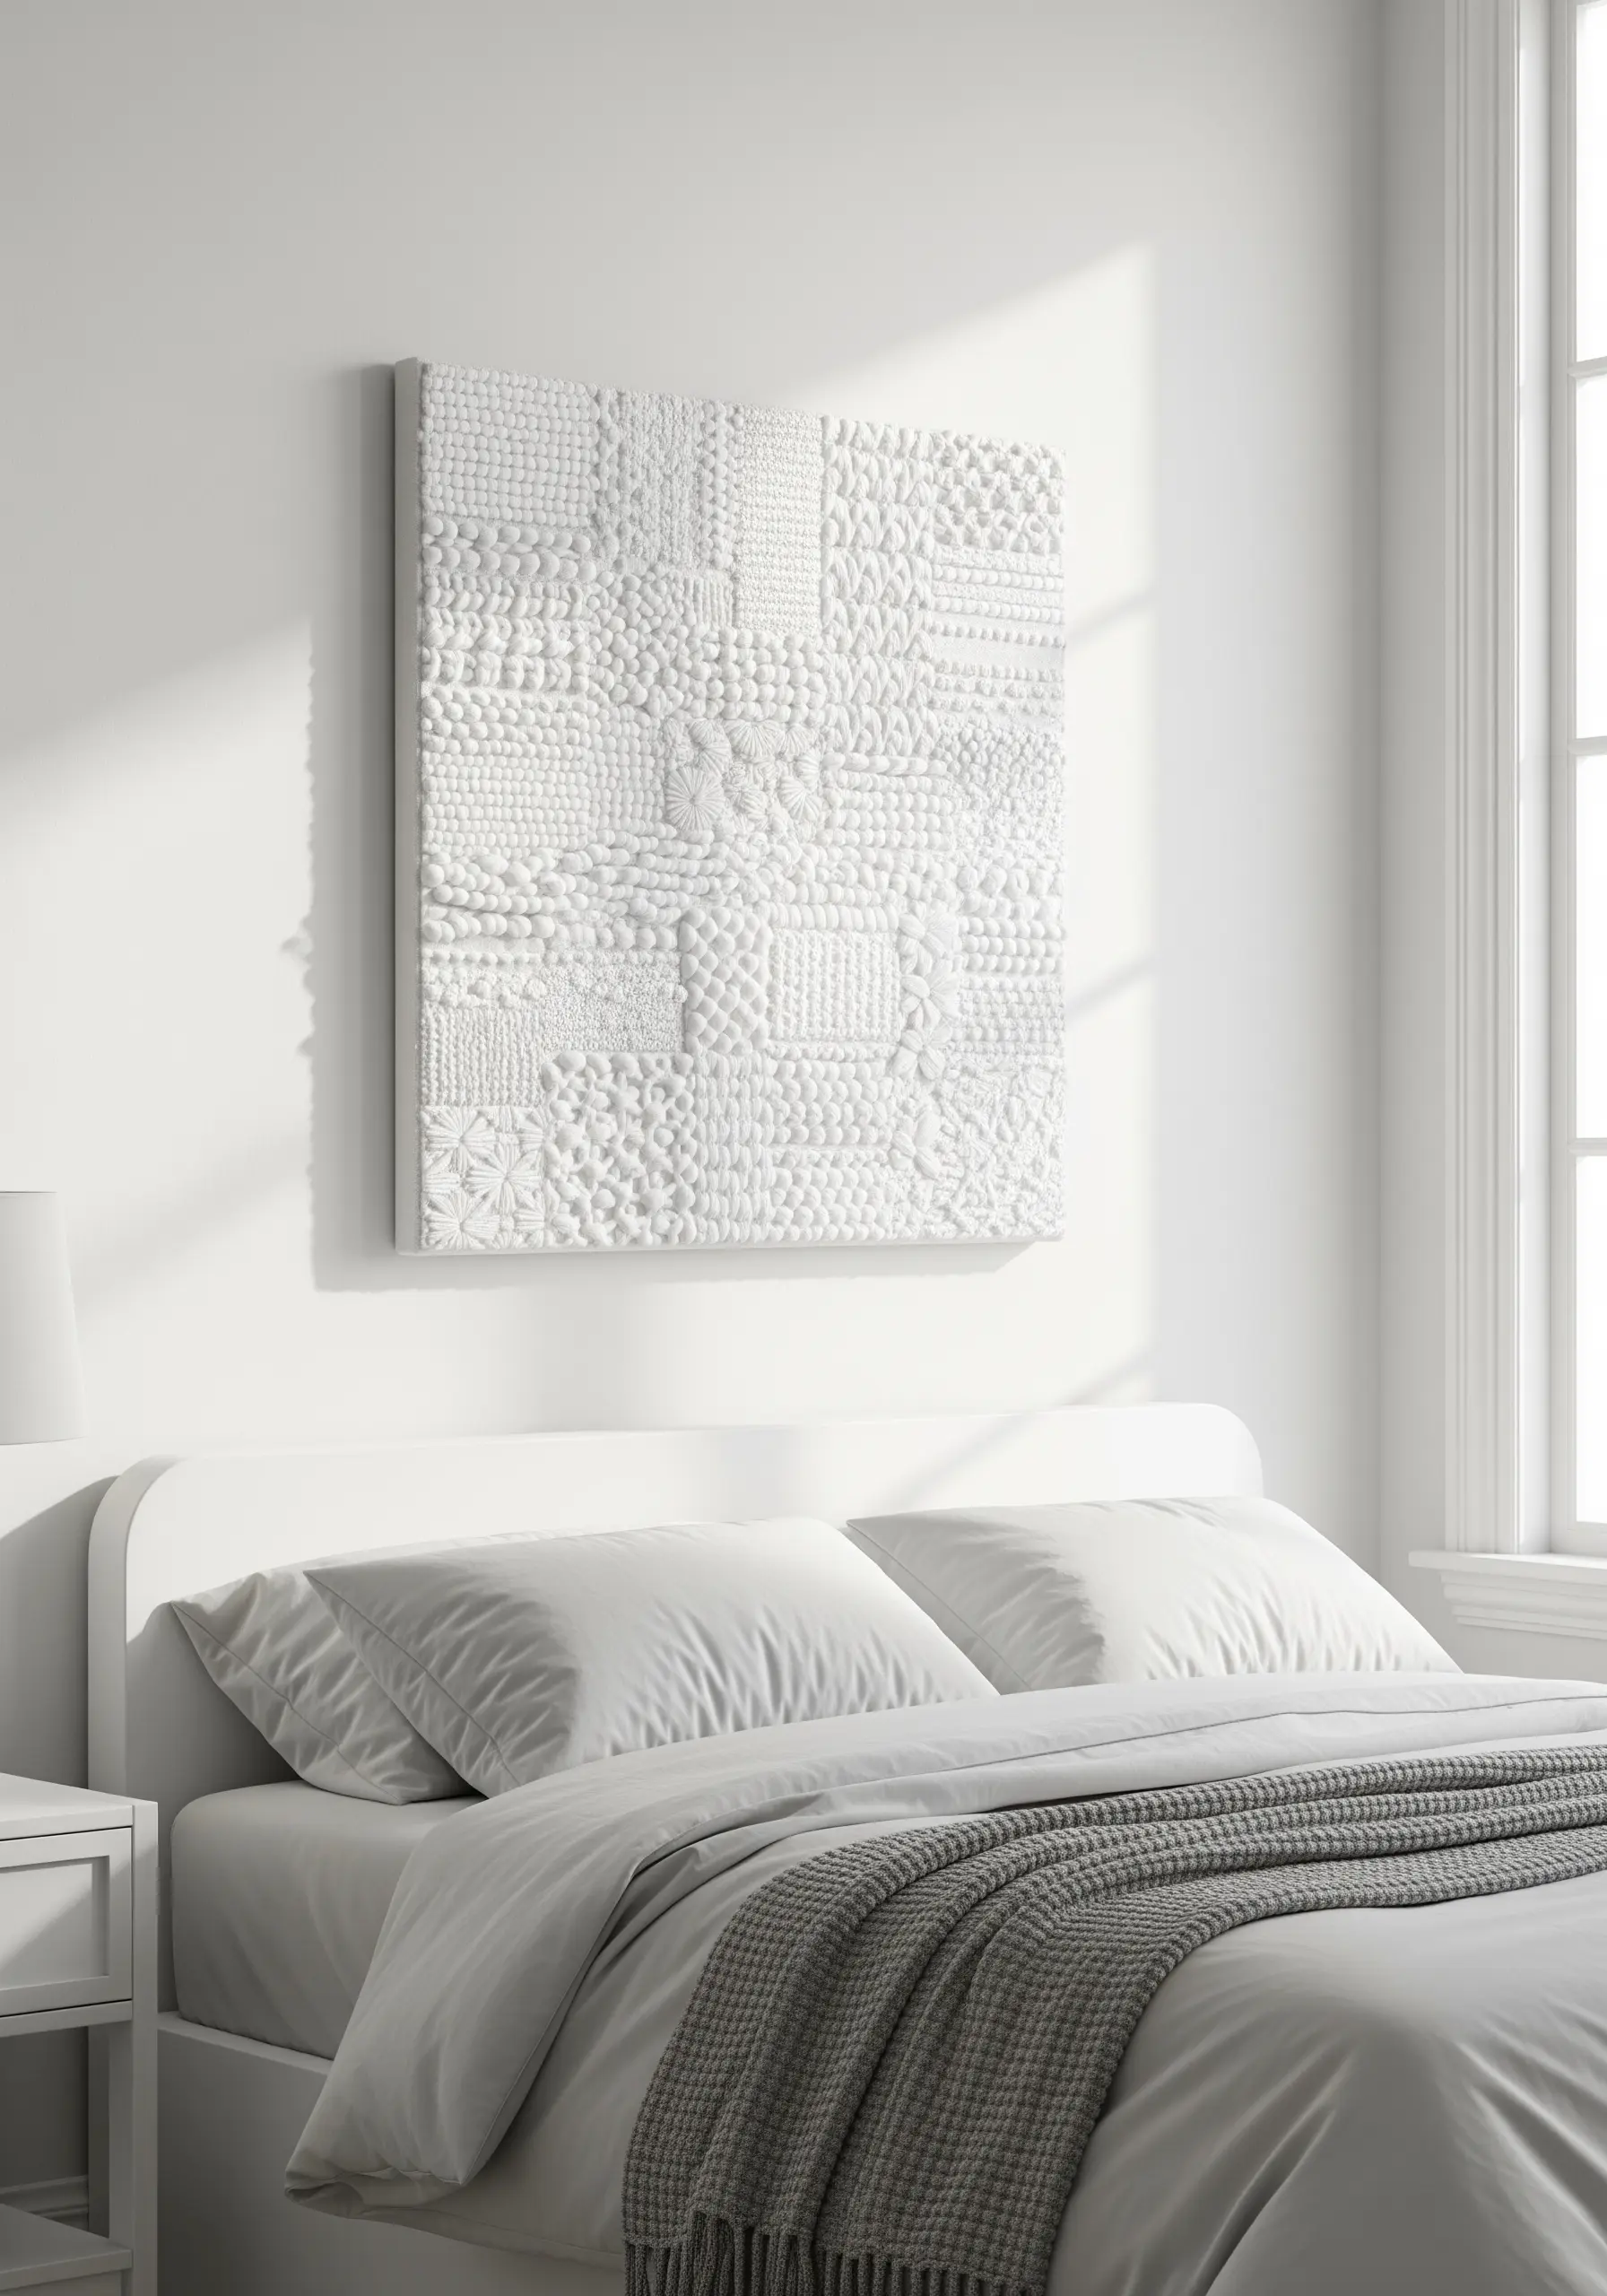
Create a stunningly sophisticated piece by removing color and focusing entirely on texture.
Using only white thread on a white fabric background, create a sampler-style grid of different stitches.
Fill each square with a unique texture: dense French knots, smooth satin stitch blocks, nubby seed stitches, and sculptural woven wheels.
The art is not in the color, but in how the light hits the varied surfaces, creating a quiet, intricate pattern of light and shadow that invites close inspection.
17. Layer Appliqué on Burlap for Rustic Charm
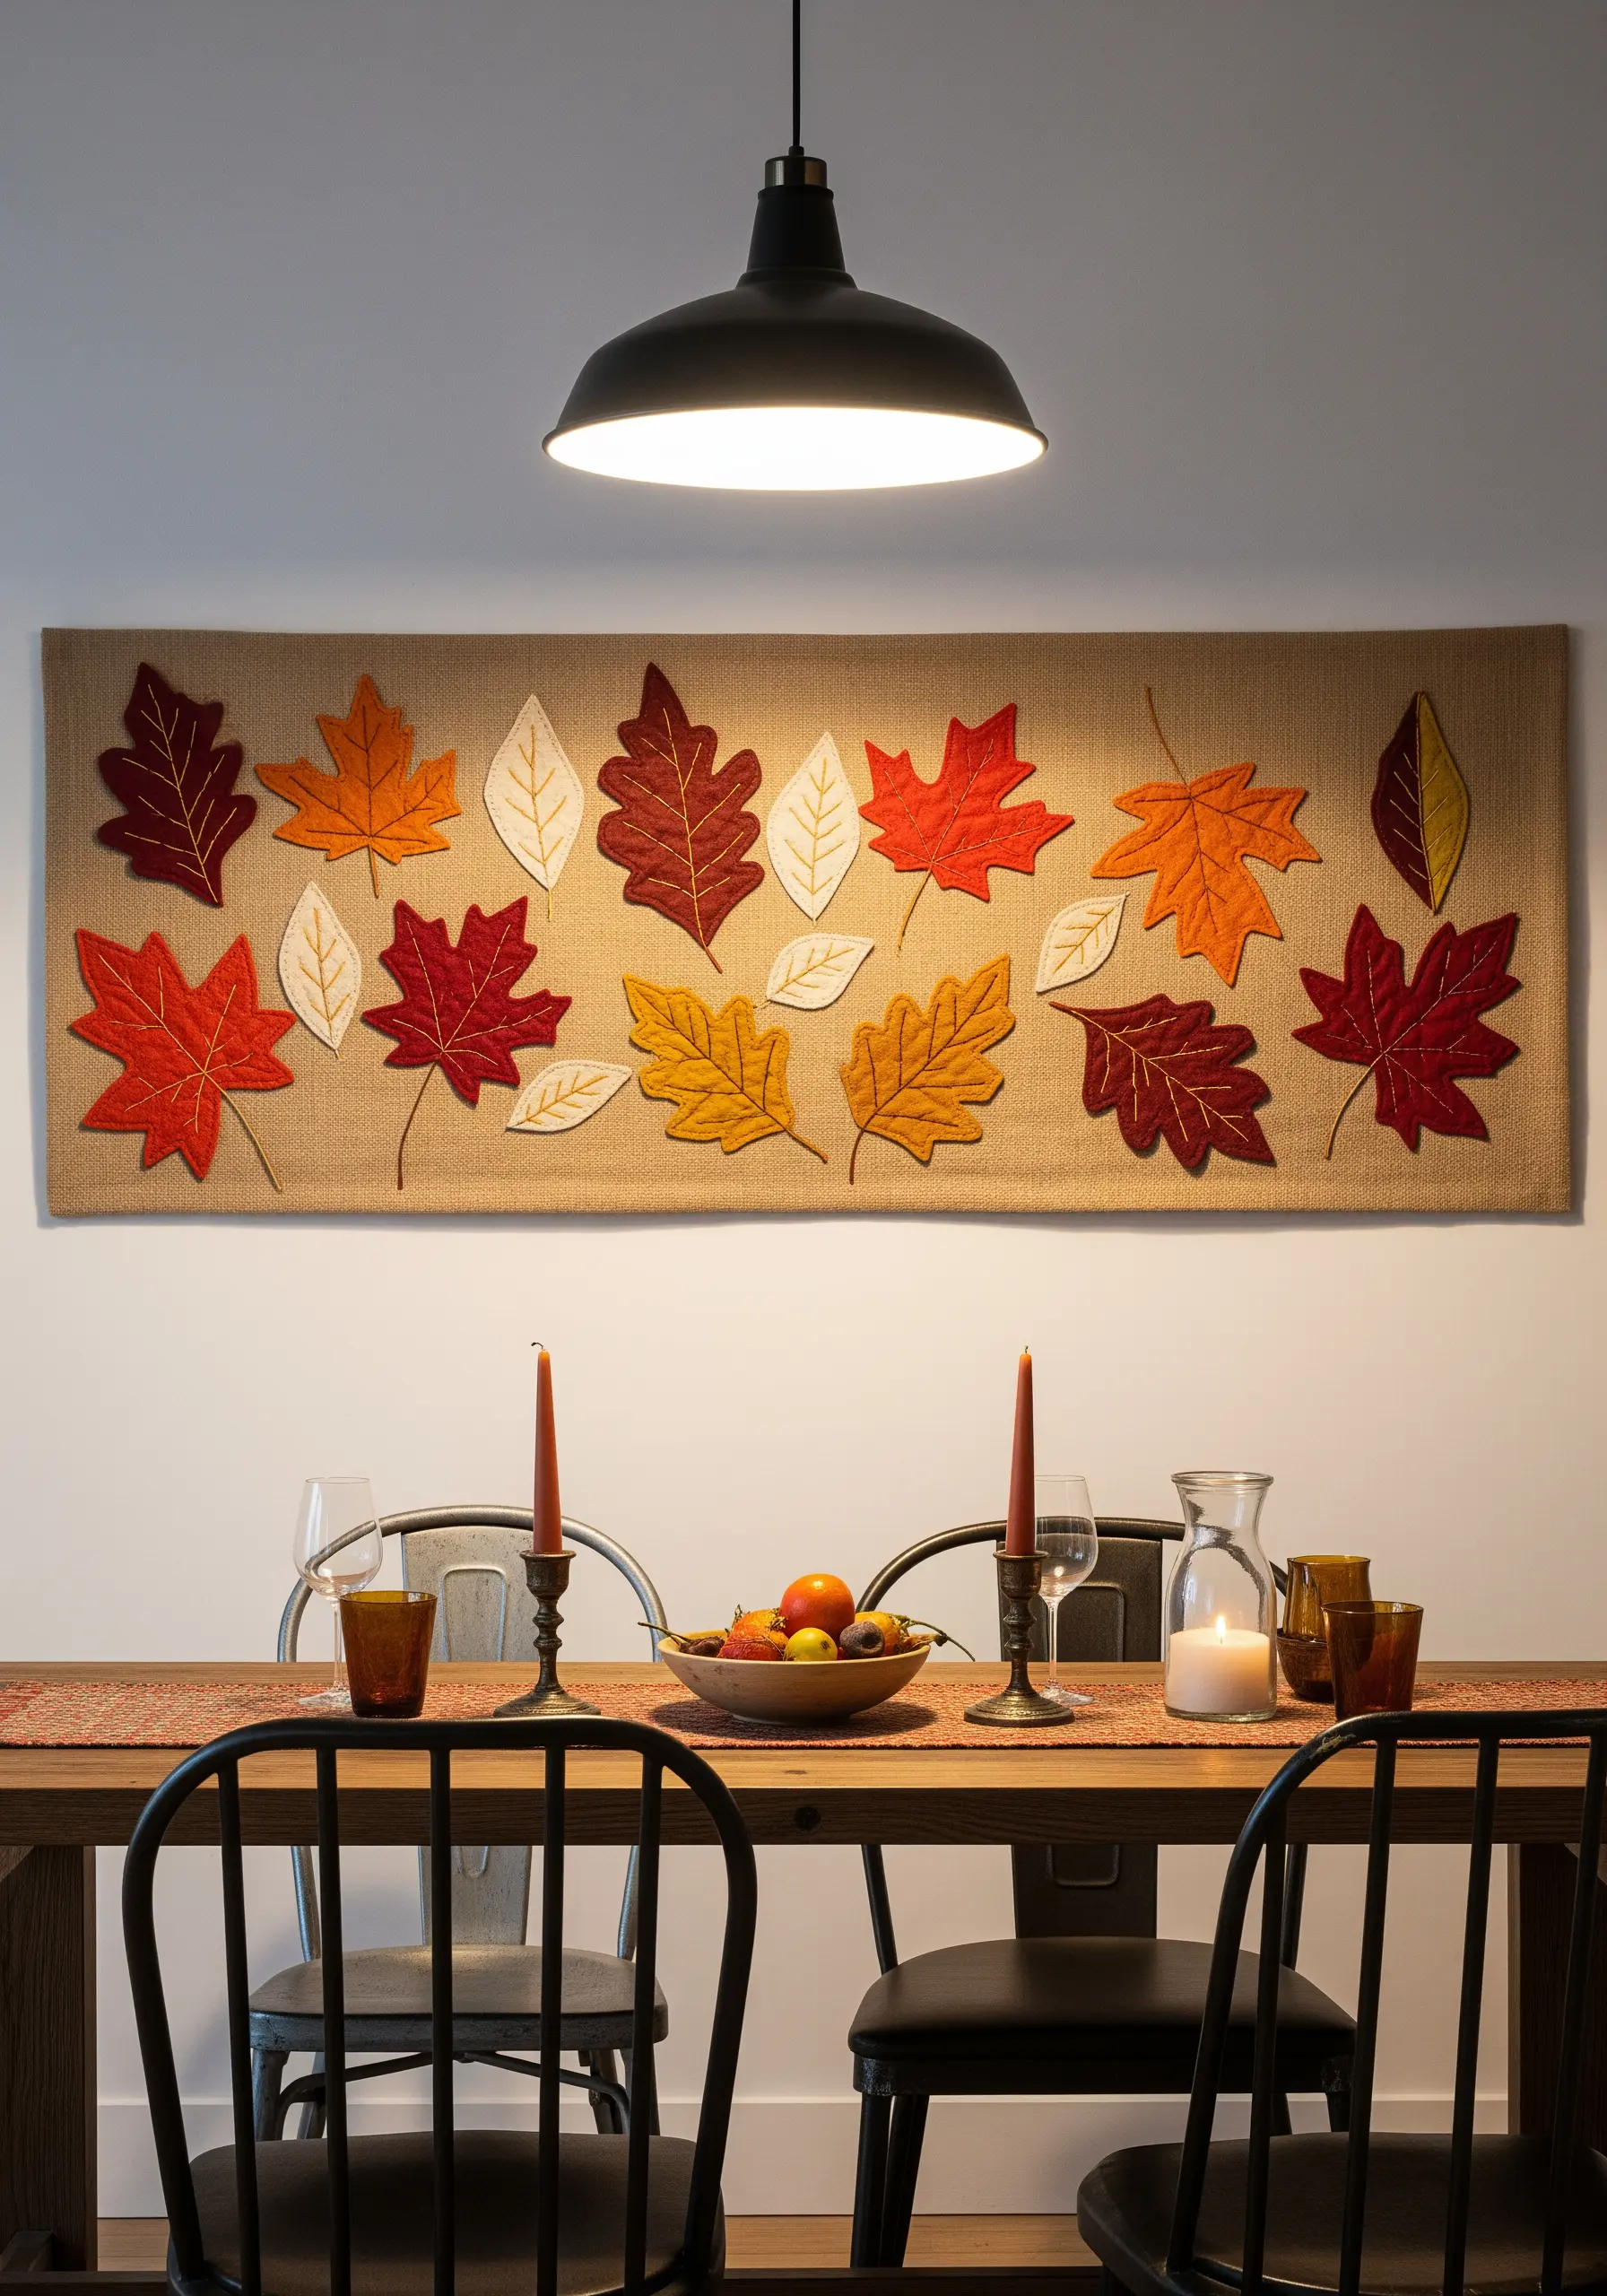
Capture the cozy essence of autumn by combining soft felt with a rustic, textural base.
Use burlap or a coarse-weave linen for your background to establish a natural, earthy feel.
Cut simplified leaf shapes from felt in a warm, autumnal palette and arrange them across the banner, overlapping some for a sense of depth.
Add delicate leaf vein details with a simple backstitch to complete the warm, handcrafted aesthetic.
18. Create Graphic Art with Geometric Yarn Wrapping
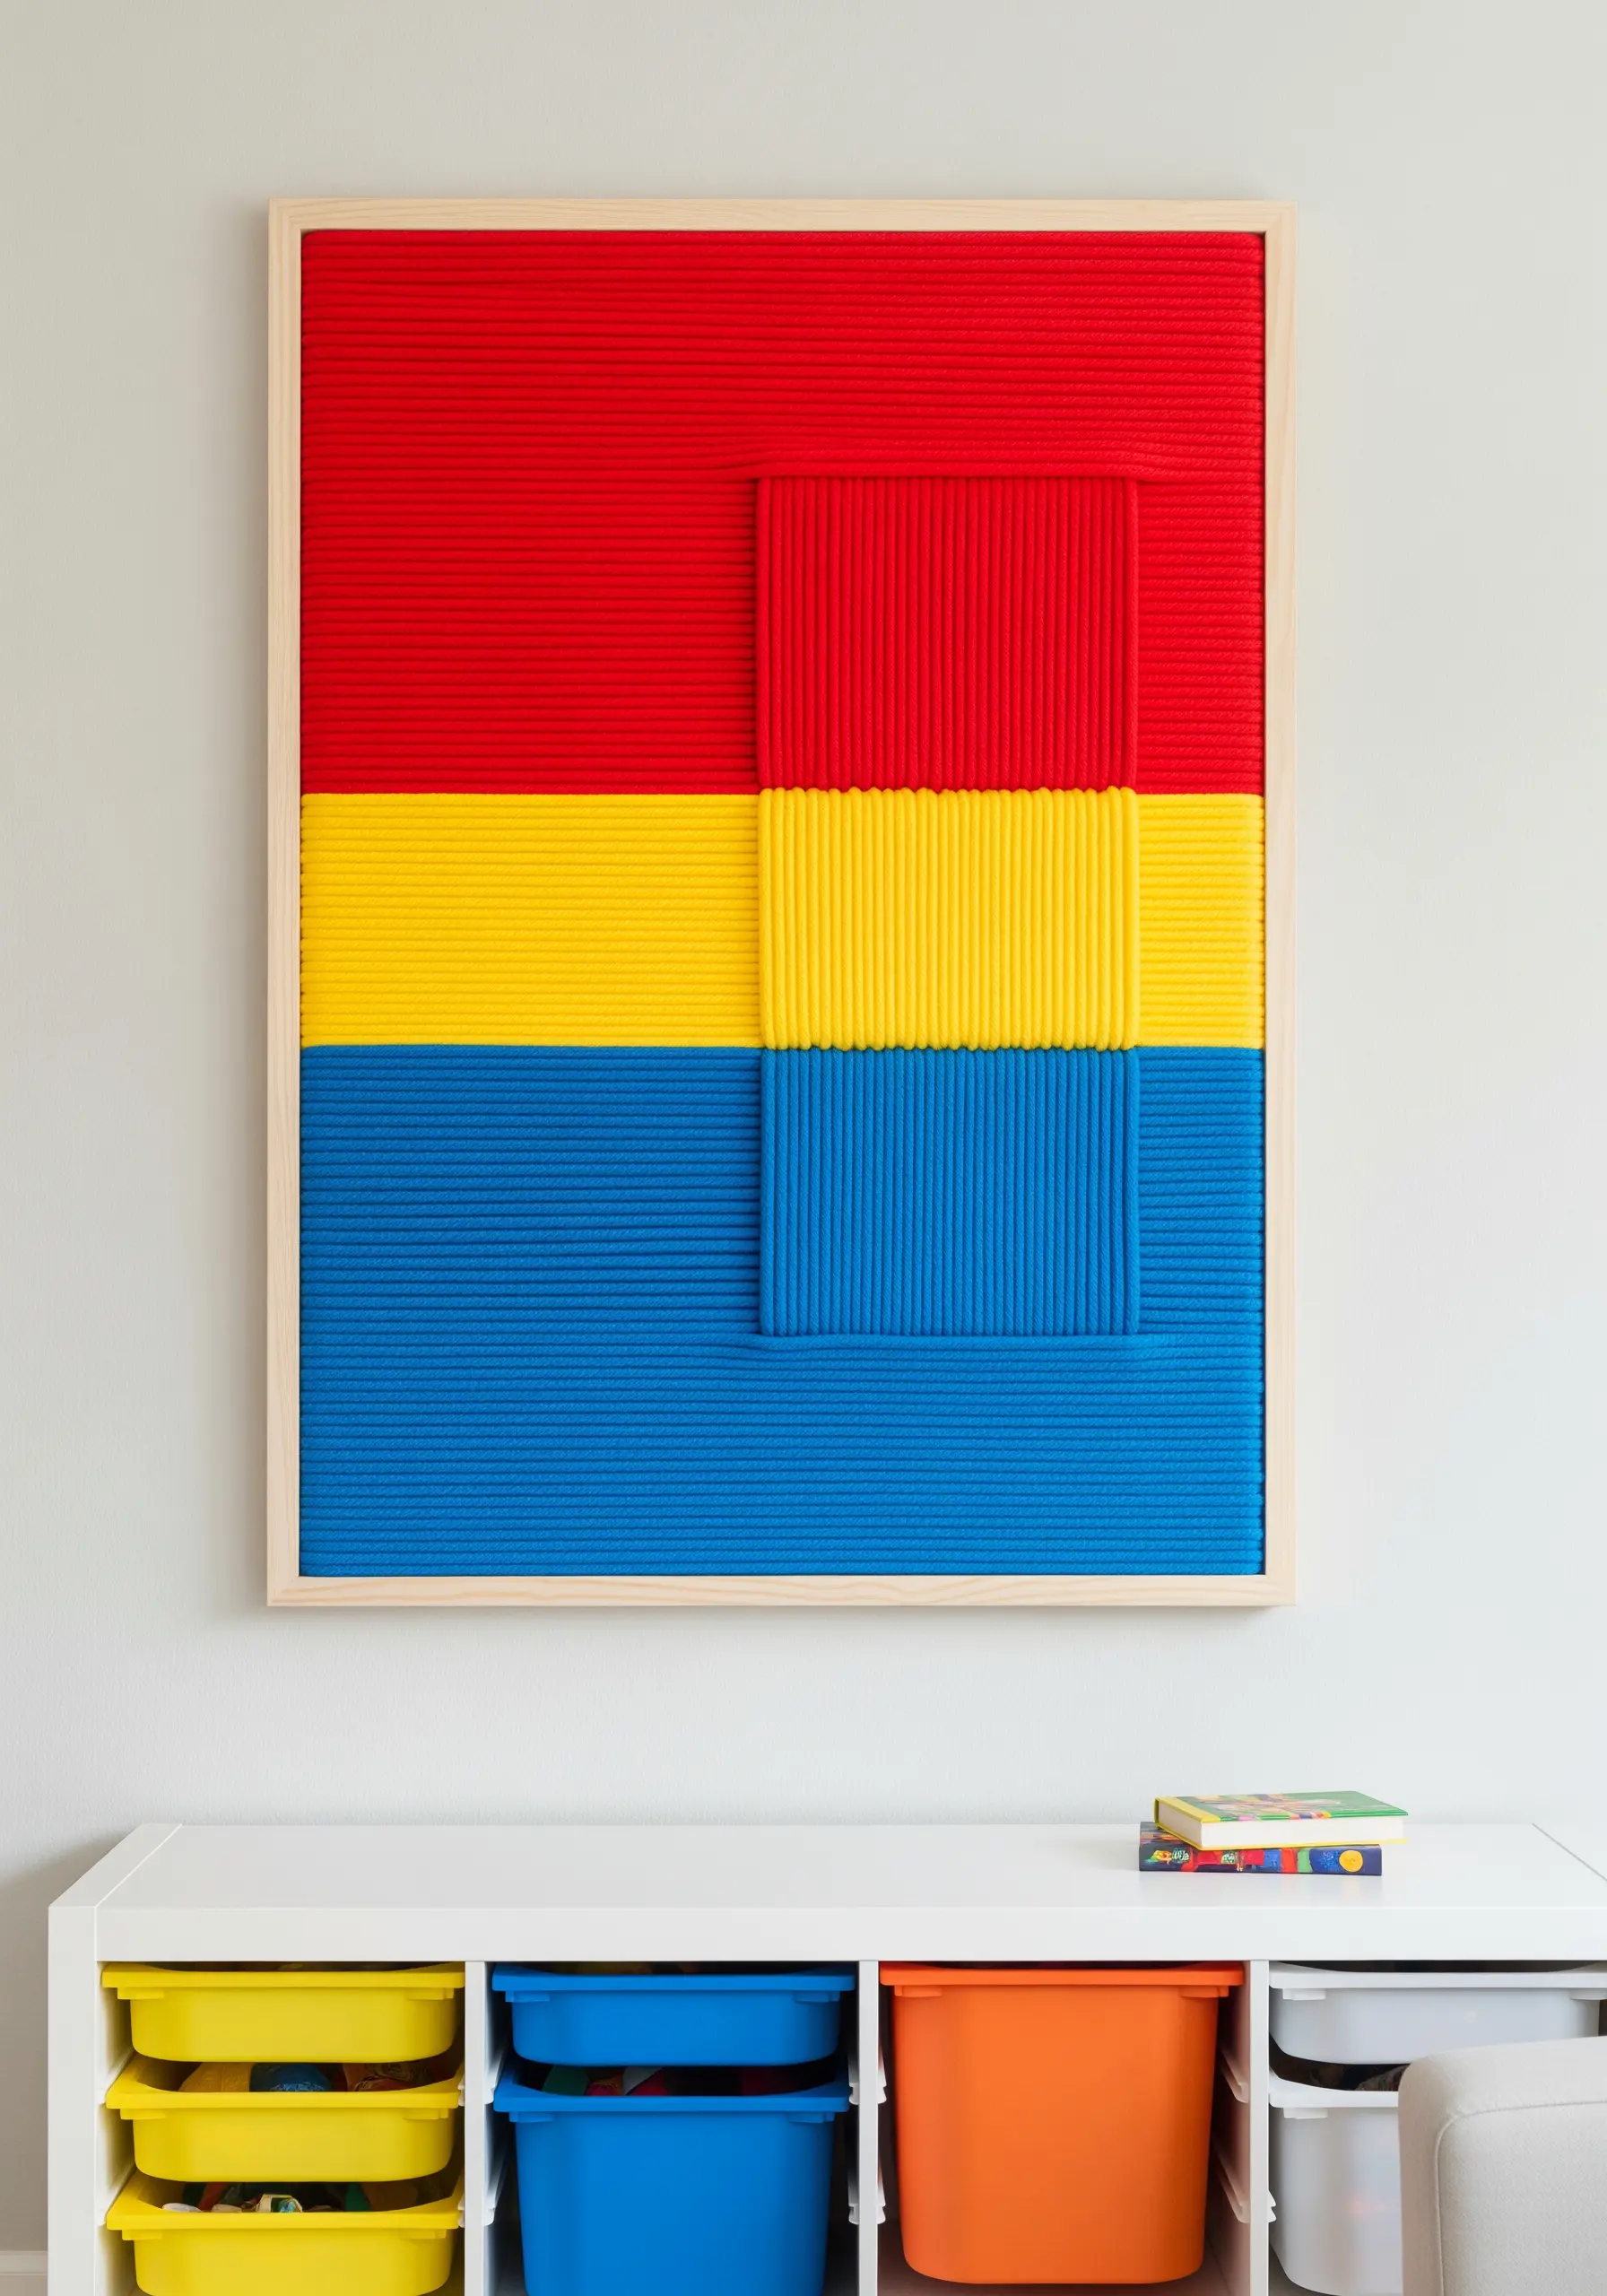
This technique allows you to create a bold, modern art piece with the clean precision of a graphic print.
Instead of stitching, you will tightly wrap yarn in solid color blocks around a sturdy board or canvas.
Map out your geometric design first, ensuring your lines are taut and your wrapping is dense and even.
You can create an extra layer of dimension by adding a smaller, raised wrapped panel on top, which creates compelling shadows and depth.
19. Blend Watercolor and Stitch for Luminous Cityscapes
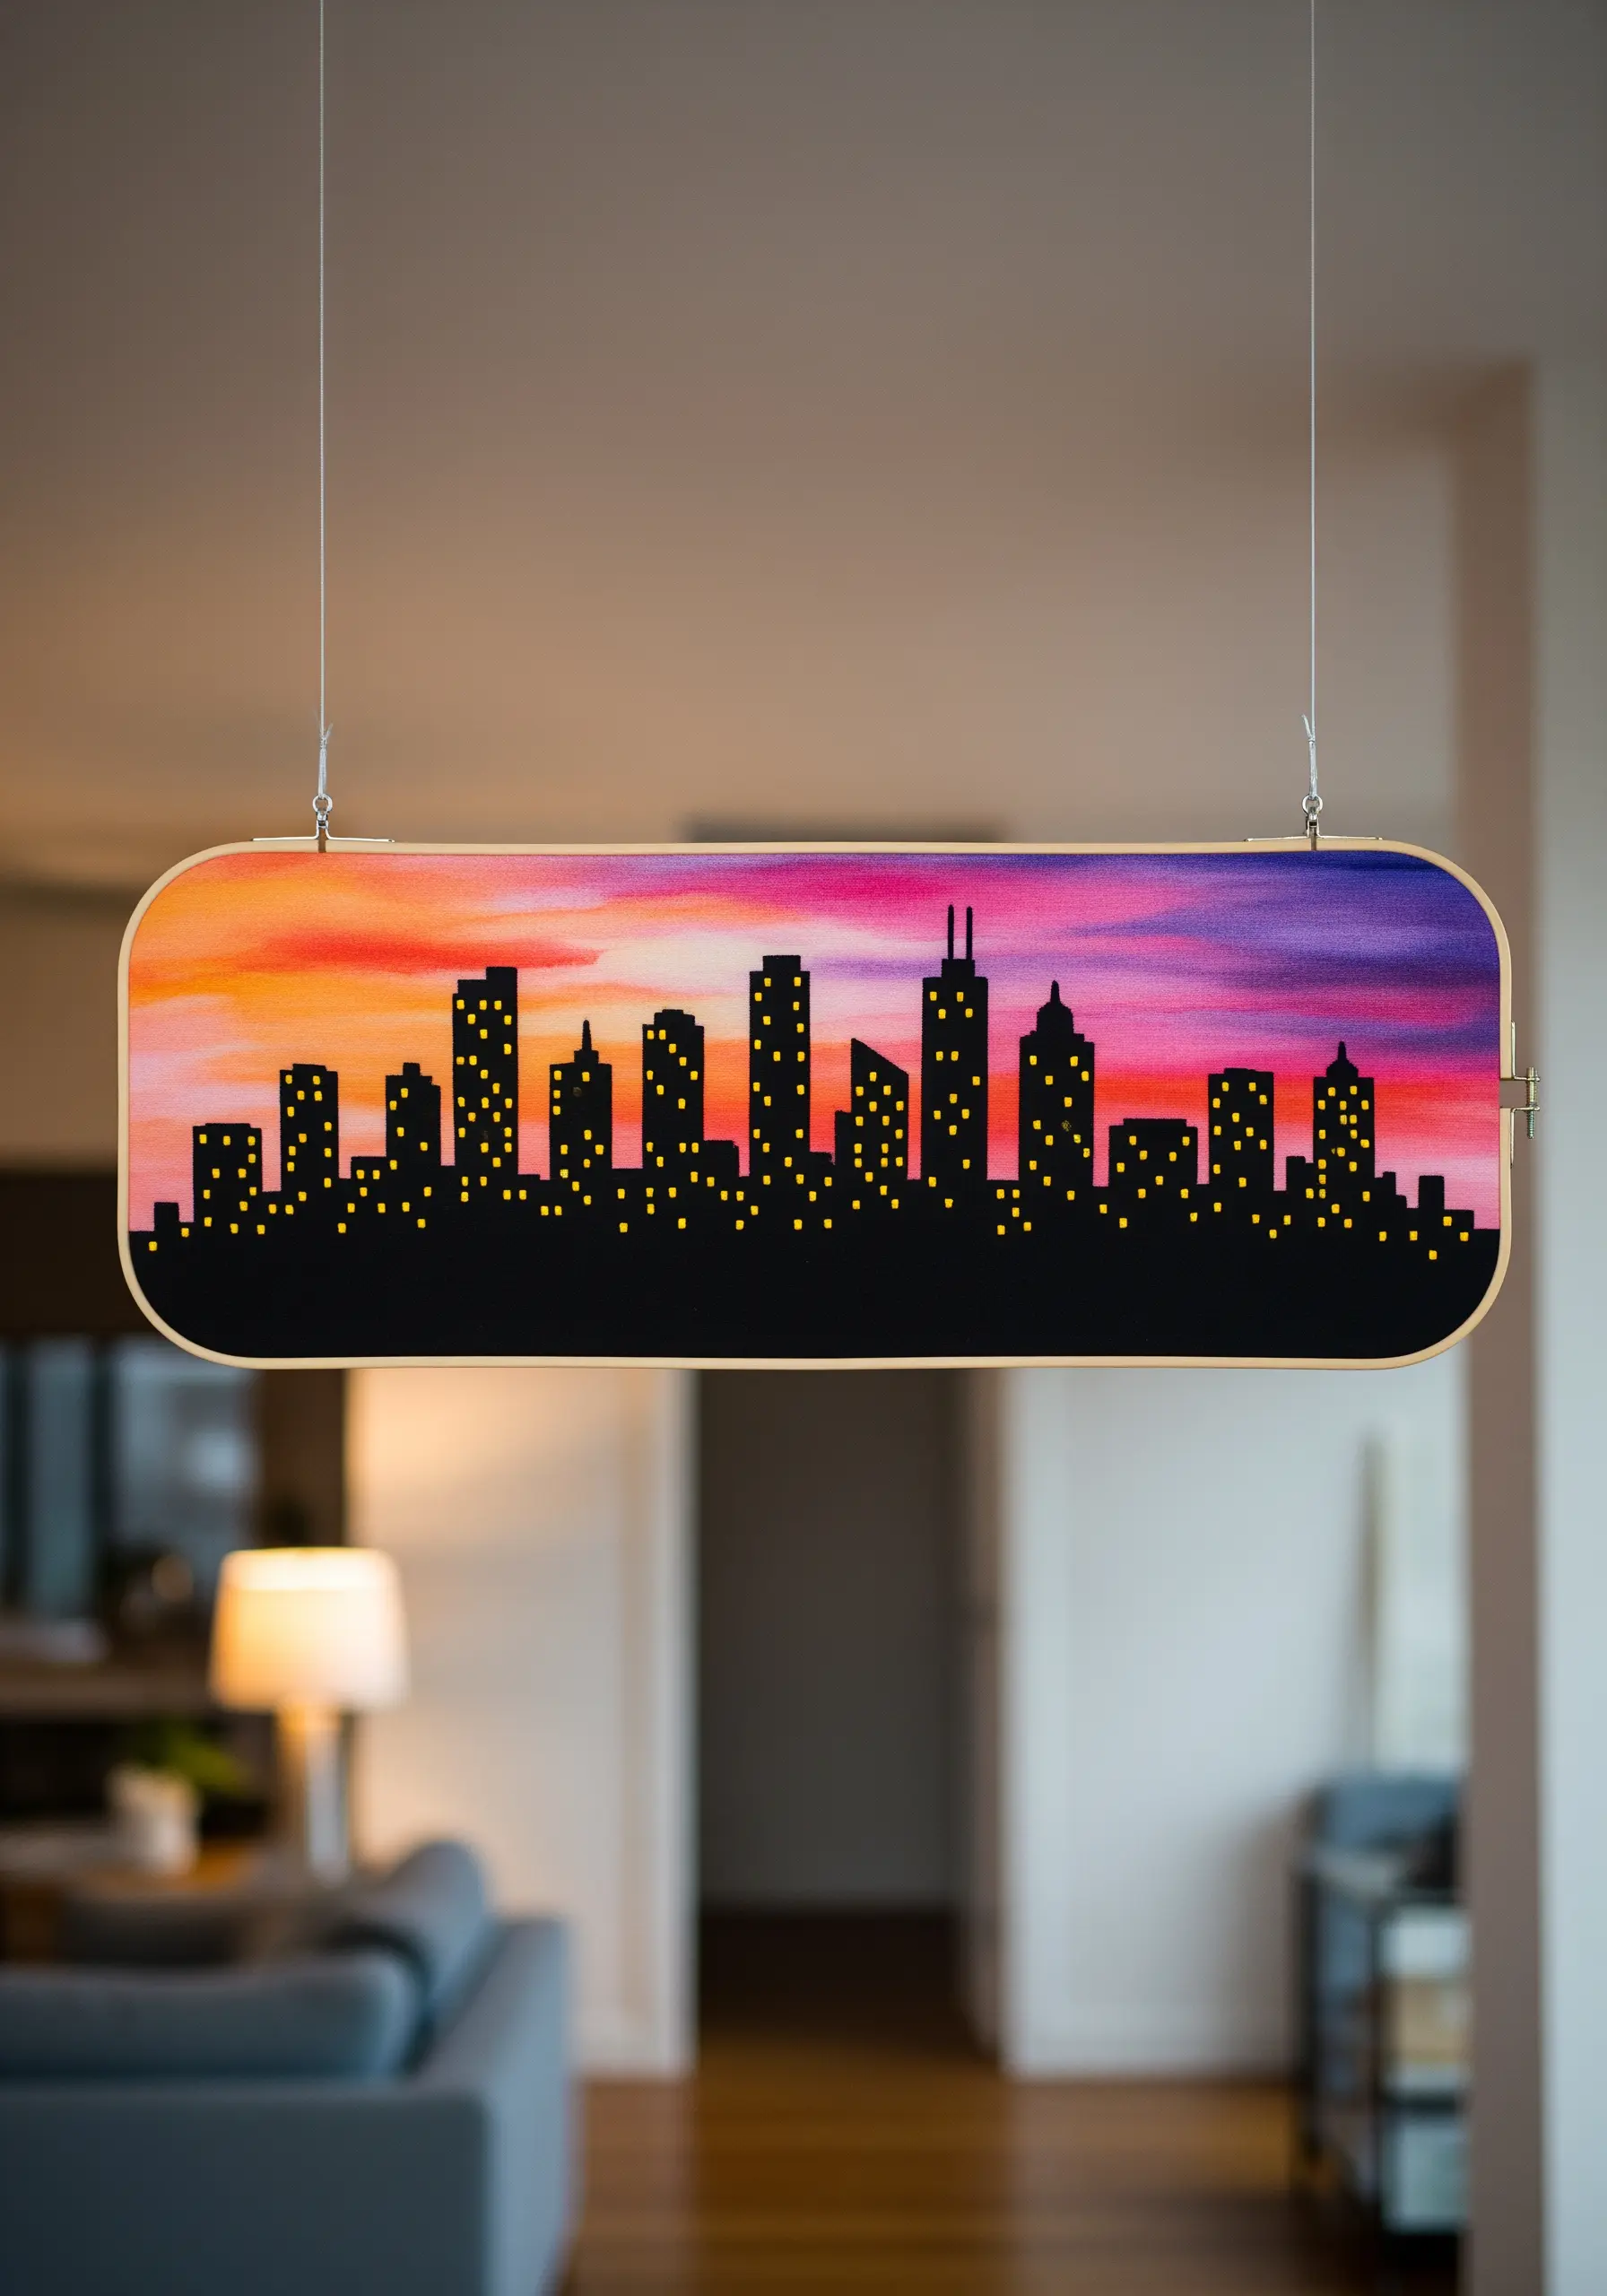
Combine the softness of paint with the definition of thread for a truly unique piece of art.
Begin by painting a vibrant sunset gradient directly onto your fabric with watercolors or fabric paint.
Once the paint is completely dry, stitch the city skyline silhouette over it using black thread and a dense satin stitch.
Finish by adding tiny, glowing windows with yellow French knots or single stitches of metallic thread. The painted background gives the entire scene a remarkable depth and glow.
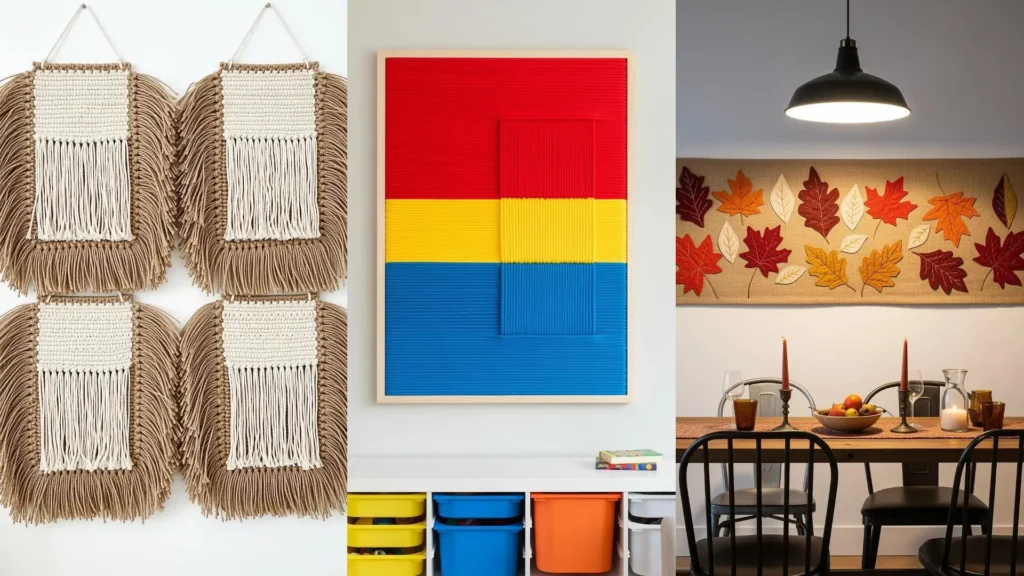
20. Design Custom Wall Art with Modular Macrame
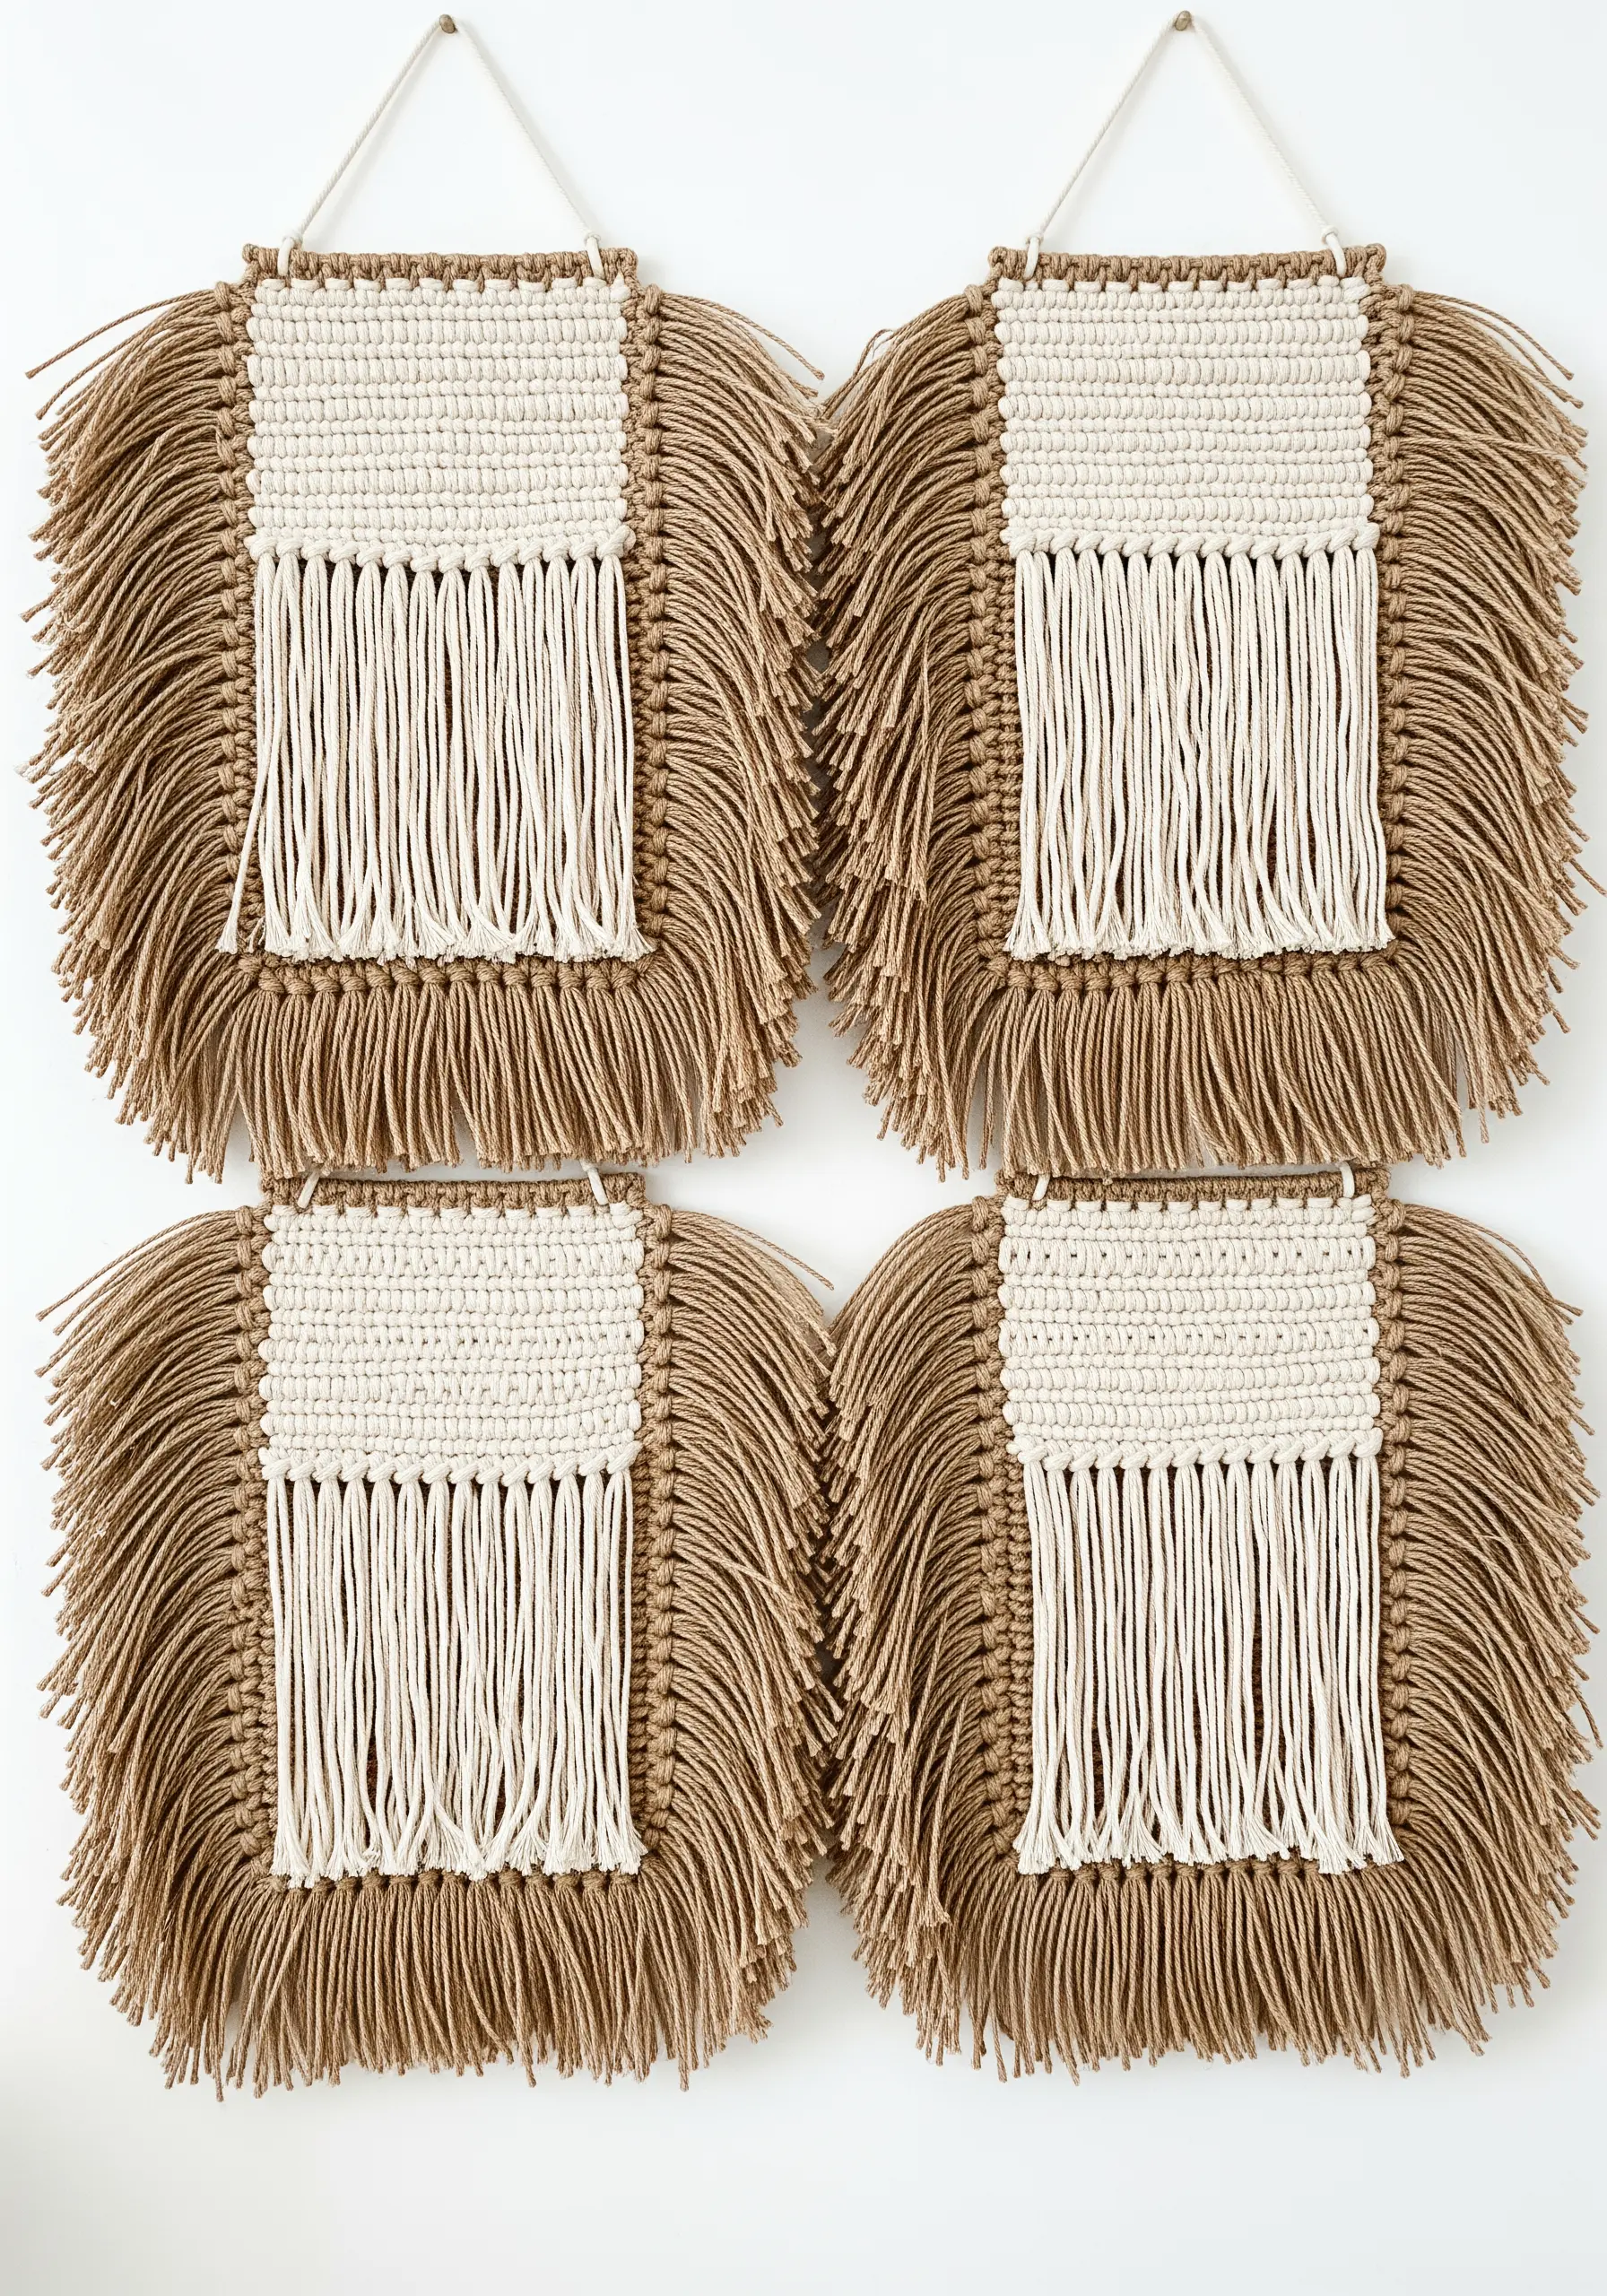
If a single, large macrame piece feels intimidating, try creating a series of smaller, modular panels instead.
This approach allows you to build a custom wall installation that perfectly fits your space.
Craft four or more identical squares, focusing on a simple design that combines a flat woven section with a soft fringed edge.
Arranging them in a clean grid creates a look that is both bohemian and modern, allowing you to scale the artwork to your wall.
21. Pair Abstract Goldwork with a Jewel-Toned Canvas
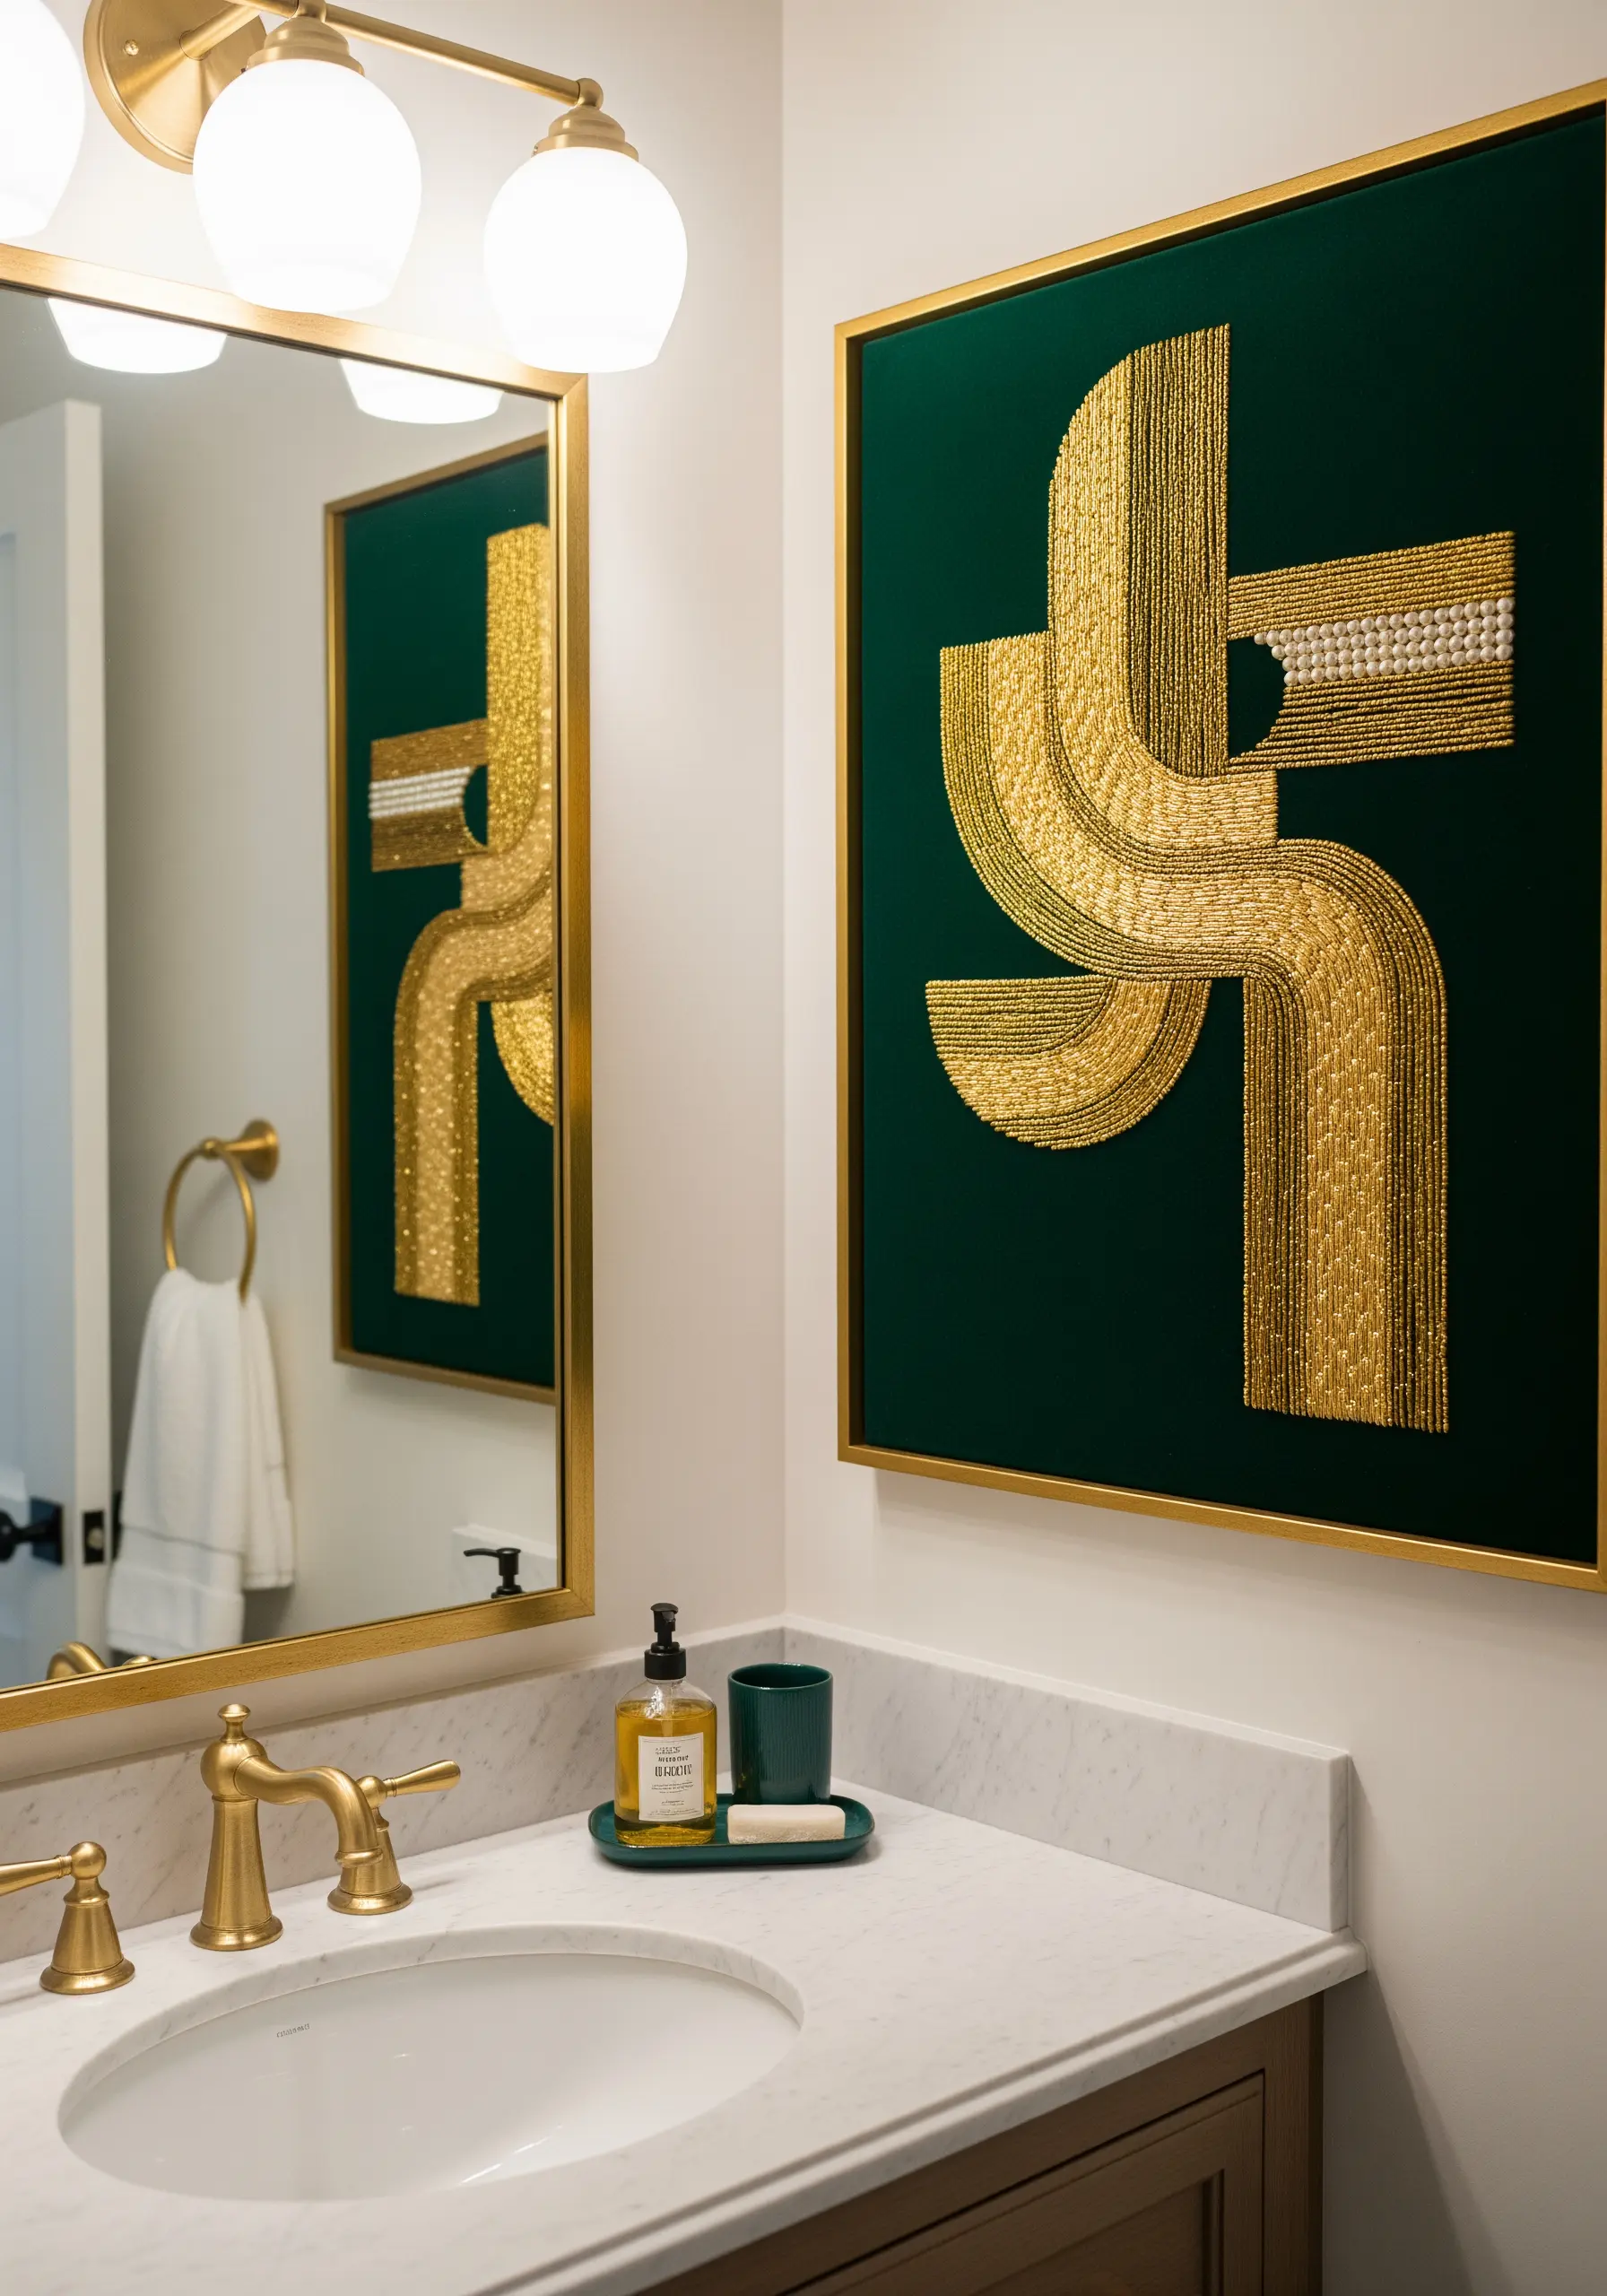
Create an abstract piece that feels as luxurious as a piece of fine jewelry.
Choose a rich, jewel-toned fabric for your background, such as emerald green velvet or deep sapphire silk.
Lightly sketch a flowing, abstract shape and fill it entirely with goldwork and beading techniques—couching metallic threads, filling with seed beads, and adding pearl accents.
The contrast between the plush, matte background and the radiant, textural gold creates an undeniably elegant statement.
22. Hang a Waterfall of Color with a Tassel Wall Hanging
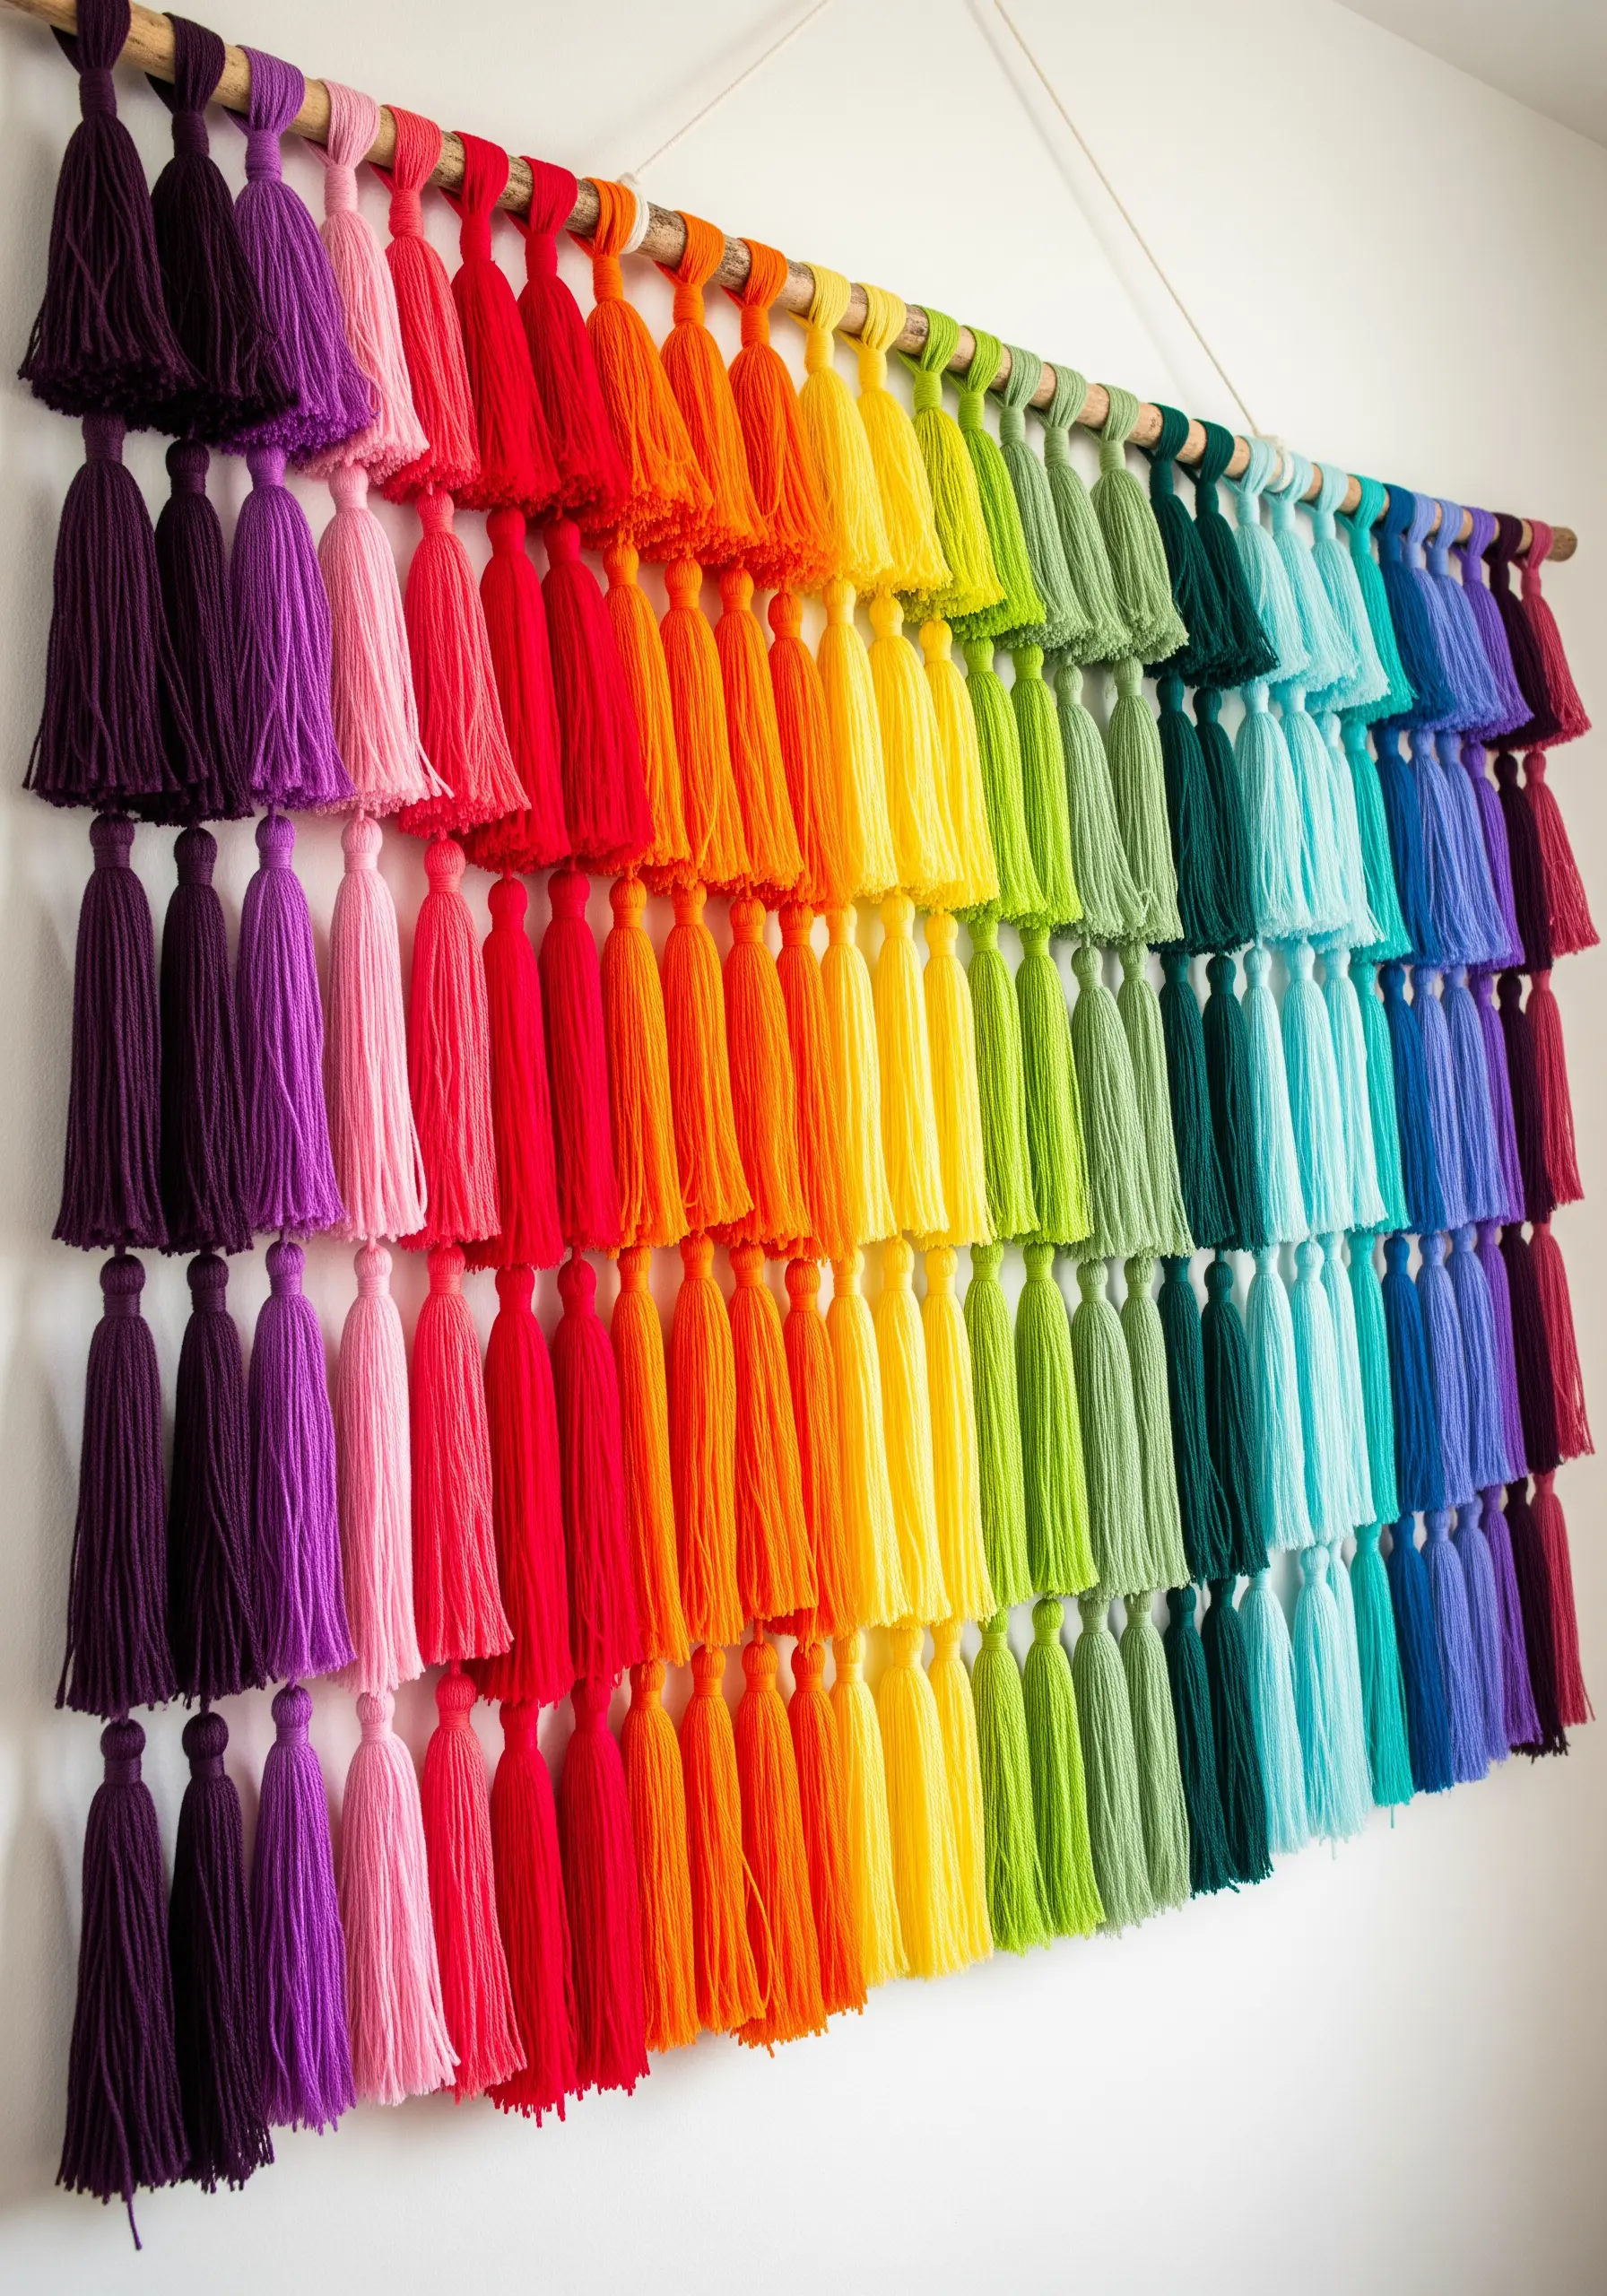
This high-impact project requires no complex stitching, only the simple, meditative process of making tassels.
Create dozens of yarn tassels in a full spectrum of colors, keeping them consistent in size.
Arrange them on a wooden dowel in a tight, dense gradient to create a stunning rainbow effect.
You can play with the final shape by trimming the tassels to different lengths, creating a flowing, waterfall-like curtain of color and texture.
23. Add Hand-Stitched Details to Botanical Prints
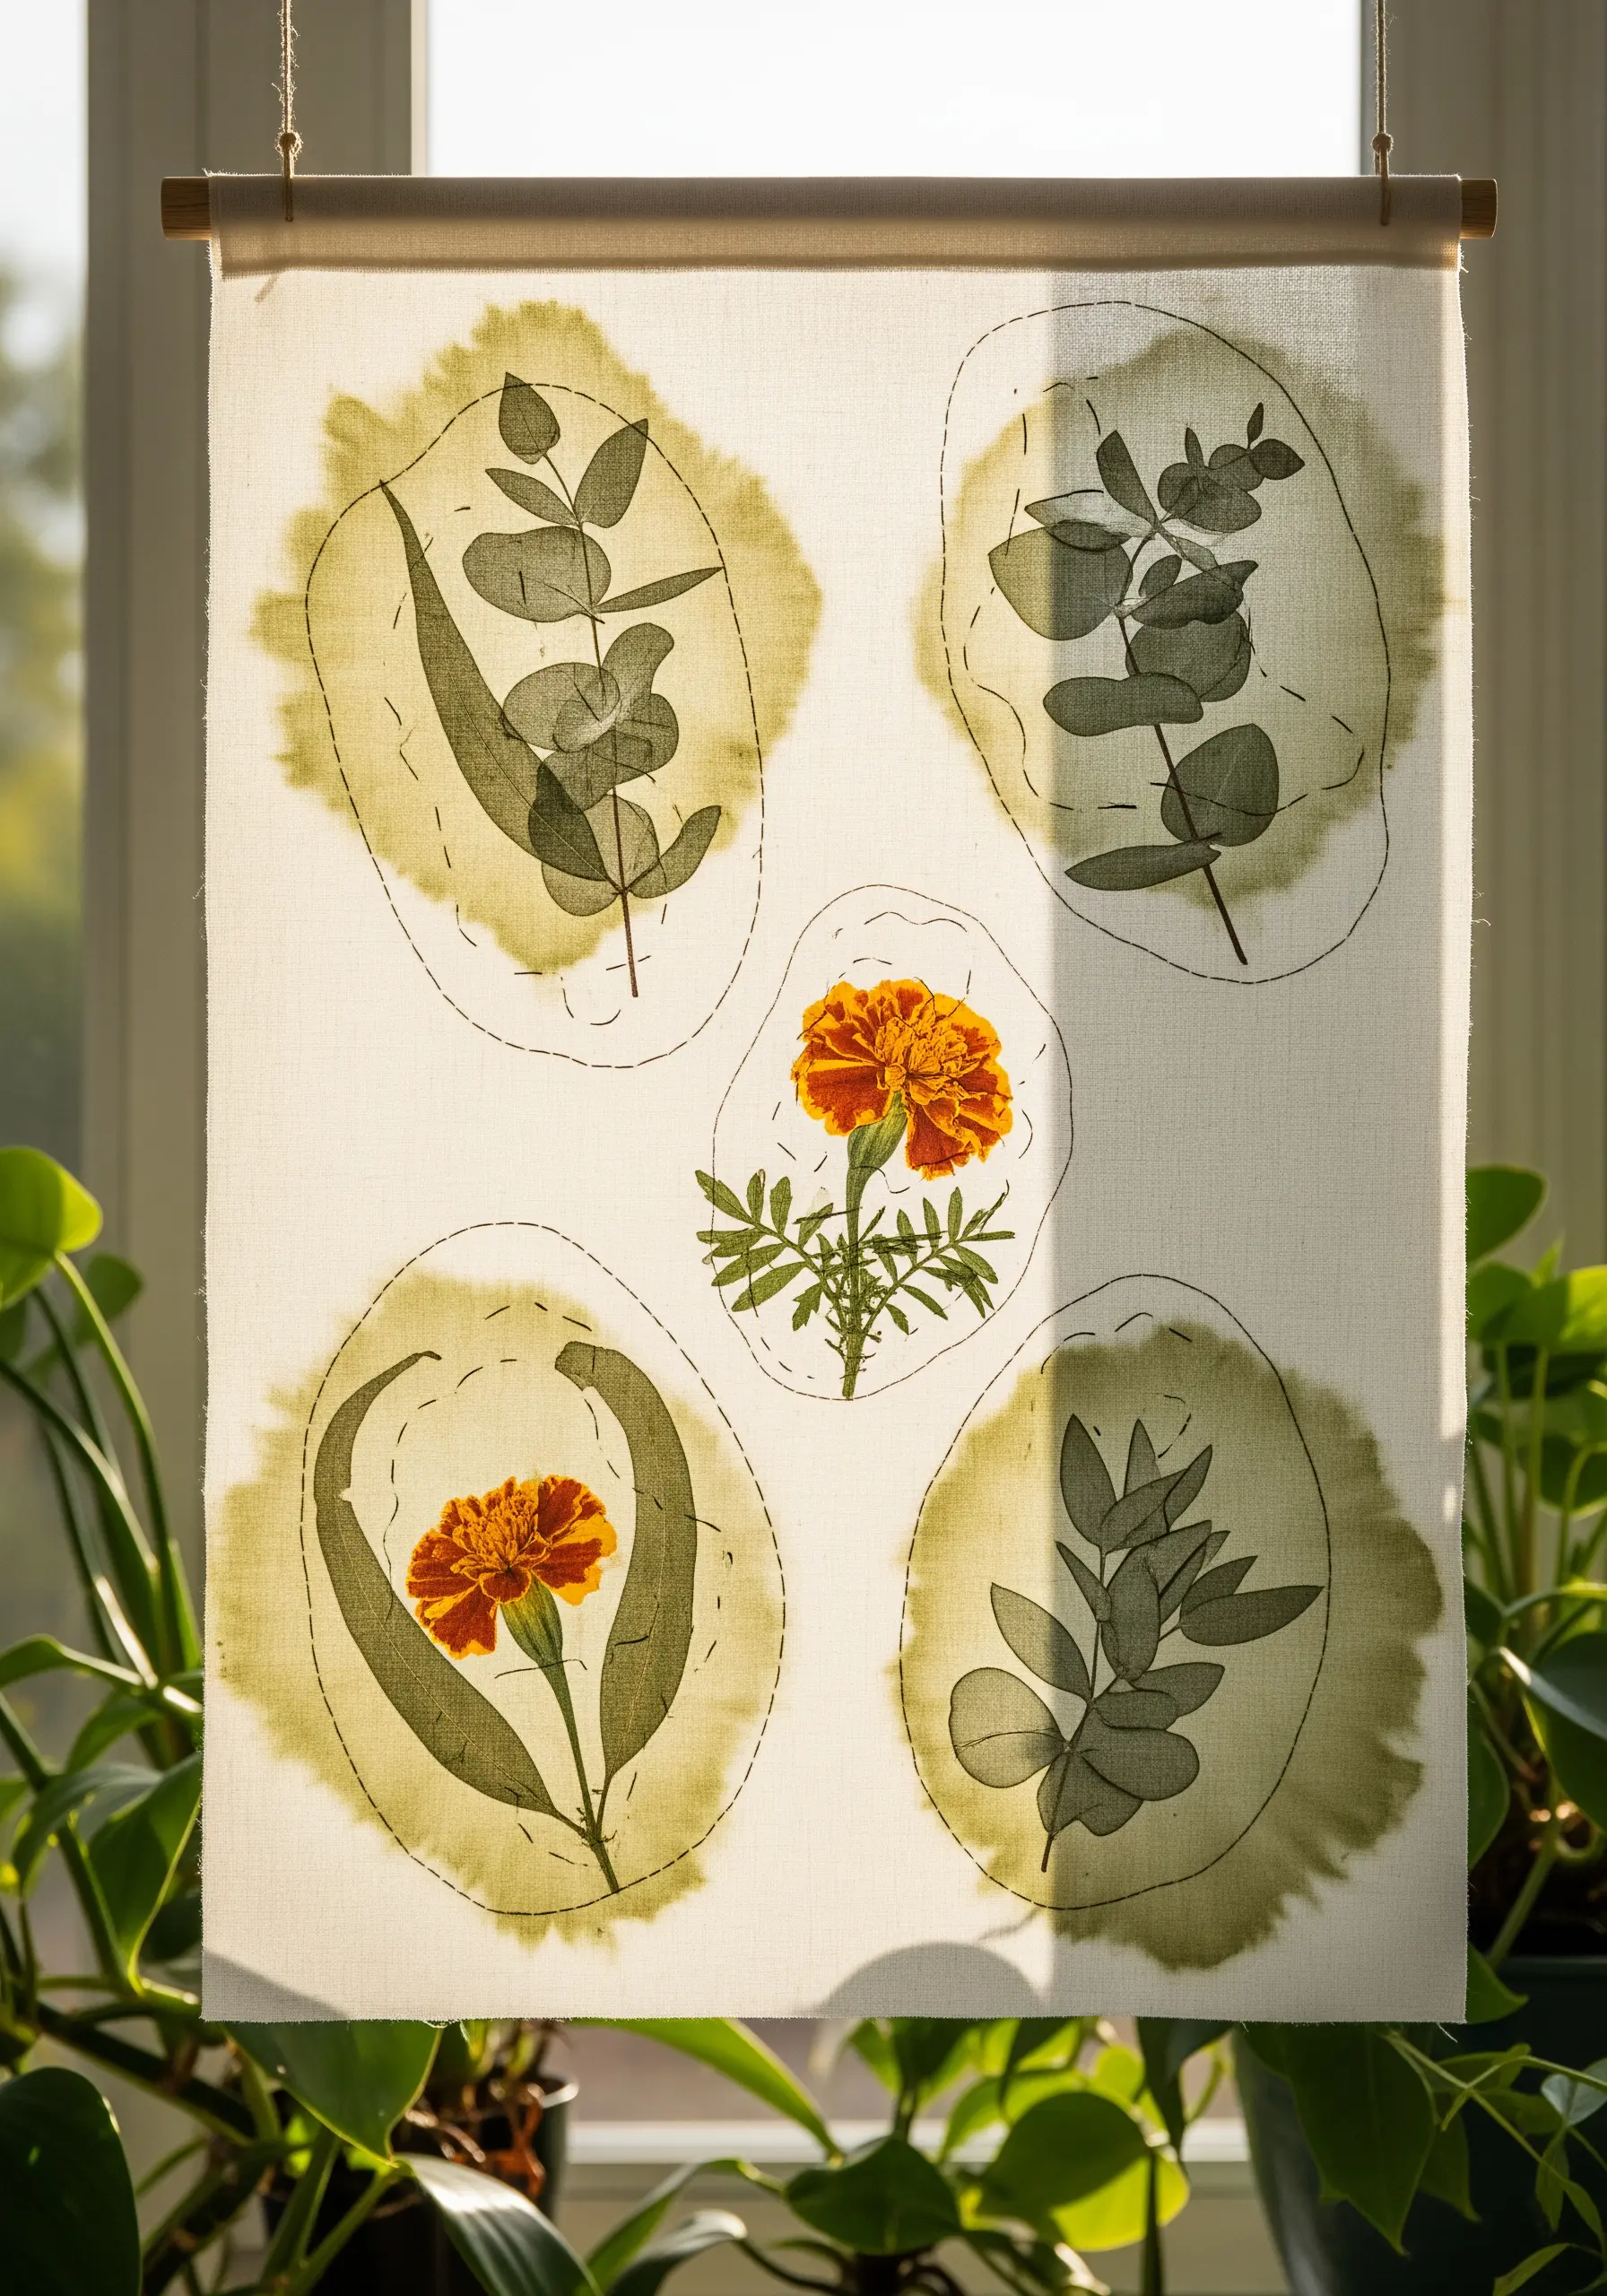
Elevate a simple fabric print by adding a subtle layer of hand-stitched texture.
Start with a piece of fabric that has been eco-printed with real leaves, or use any botanical-printed cotton or linen.
Using a single strand of embroidery floss in a complementary color, trace the outlines of the leaves and stems with a simple running stitch or backstitch.
This quiet embellishment adds a thoughtful, handmade quality that highlights the natural forms and connects you to the design.
24. Create Ethereal Depth with Layered Organza
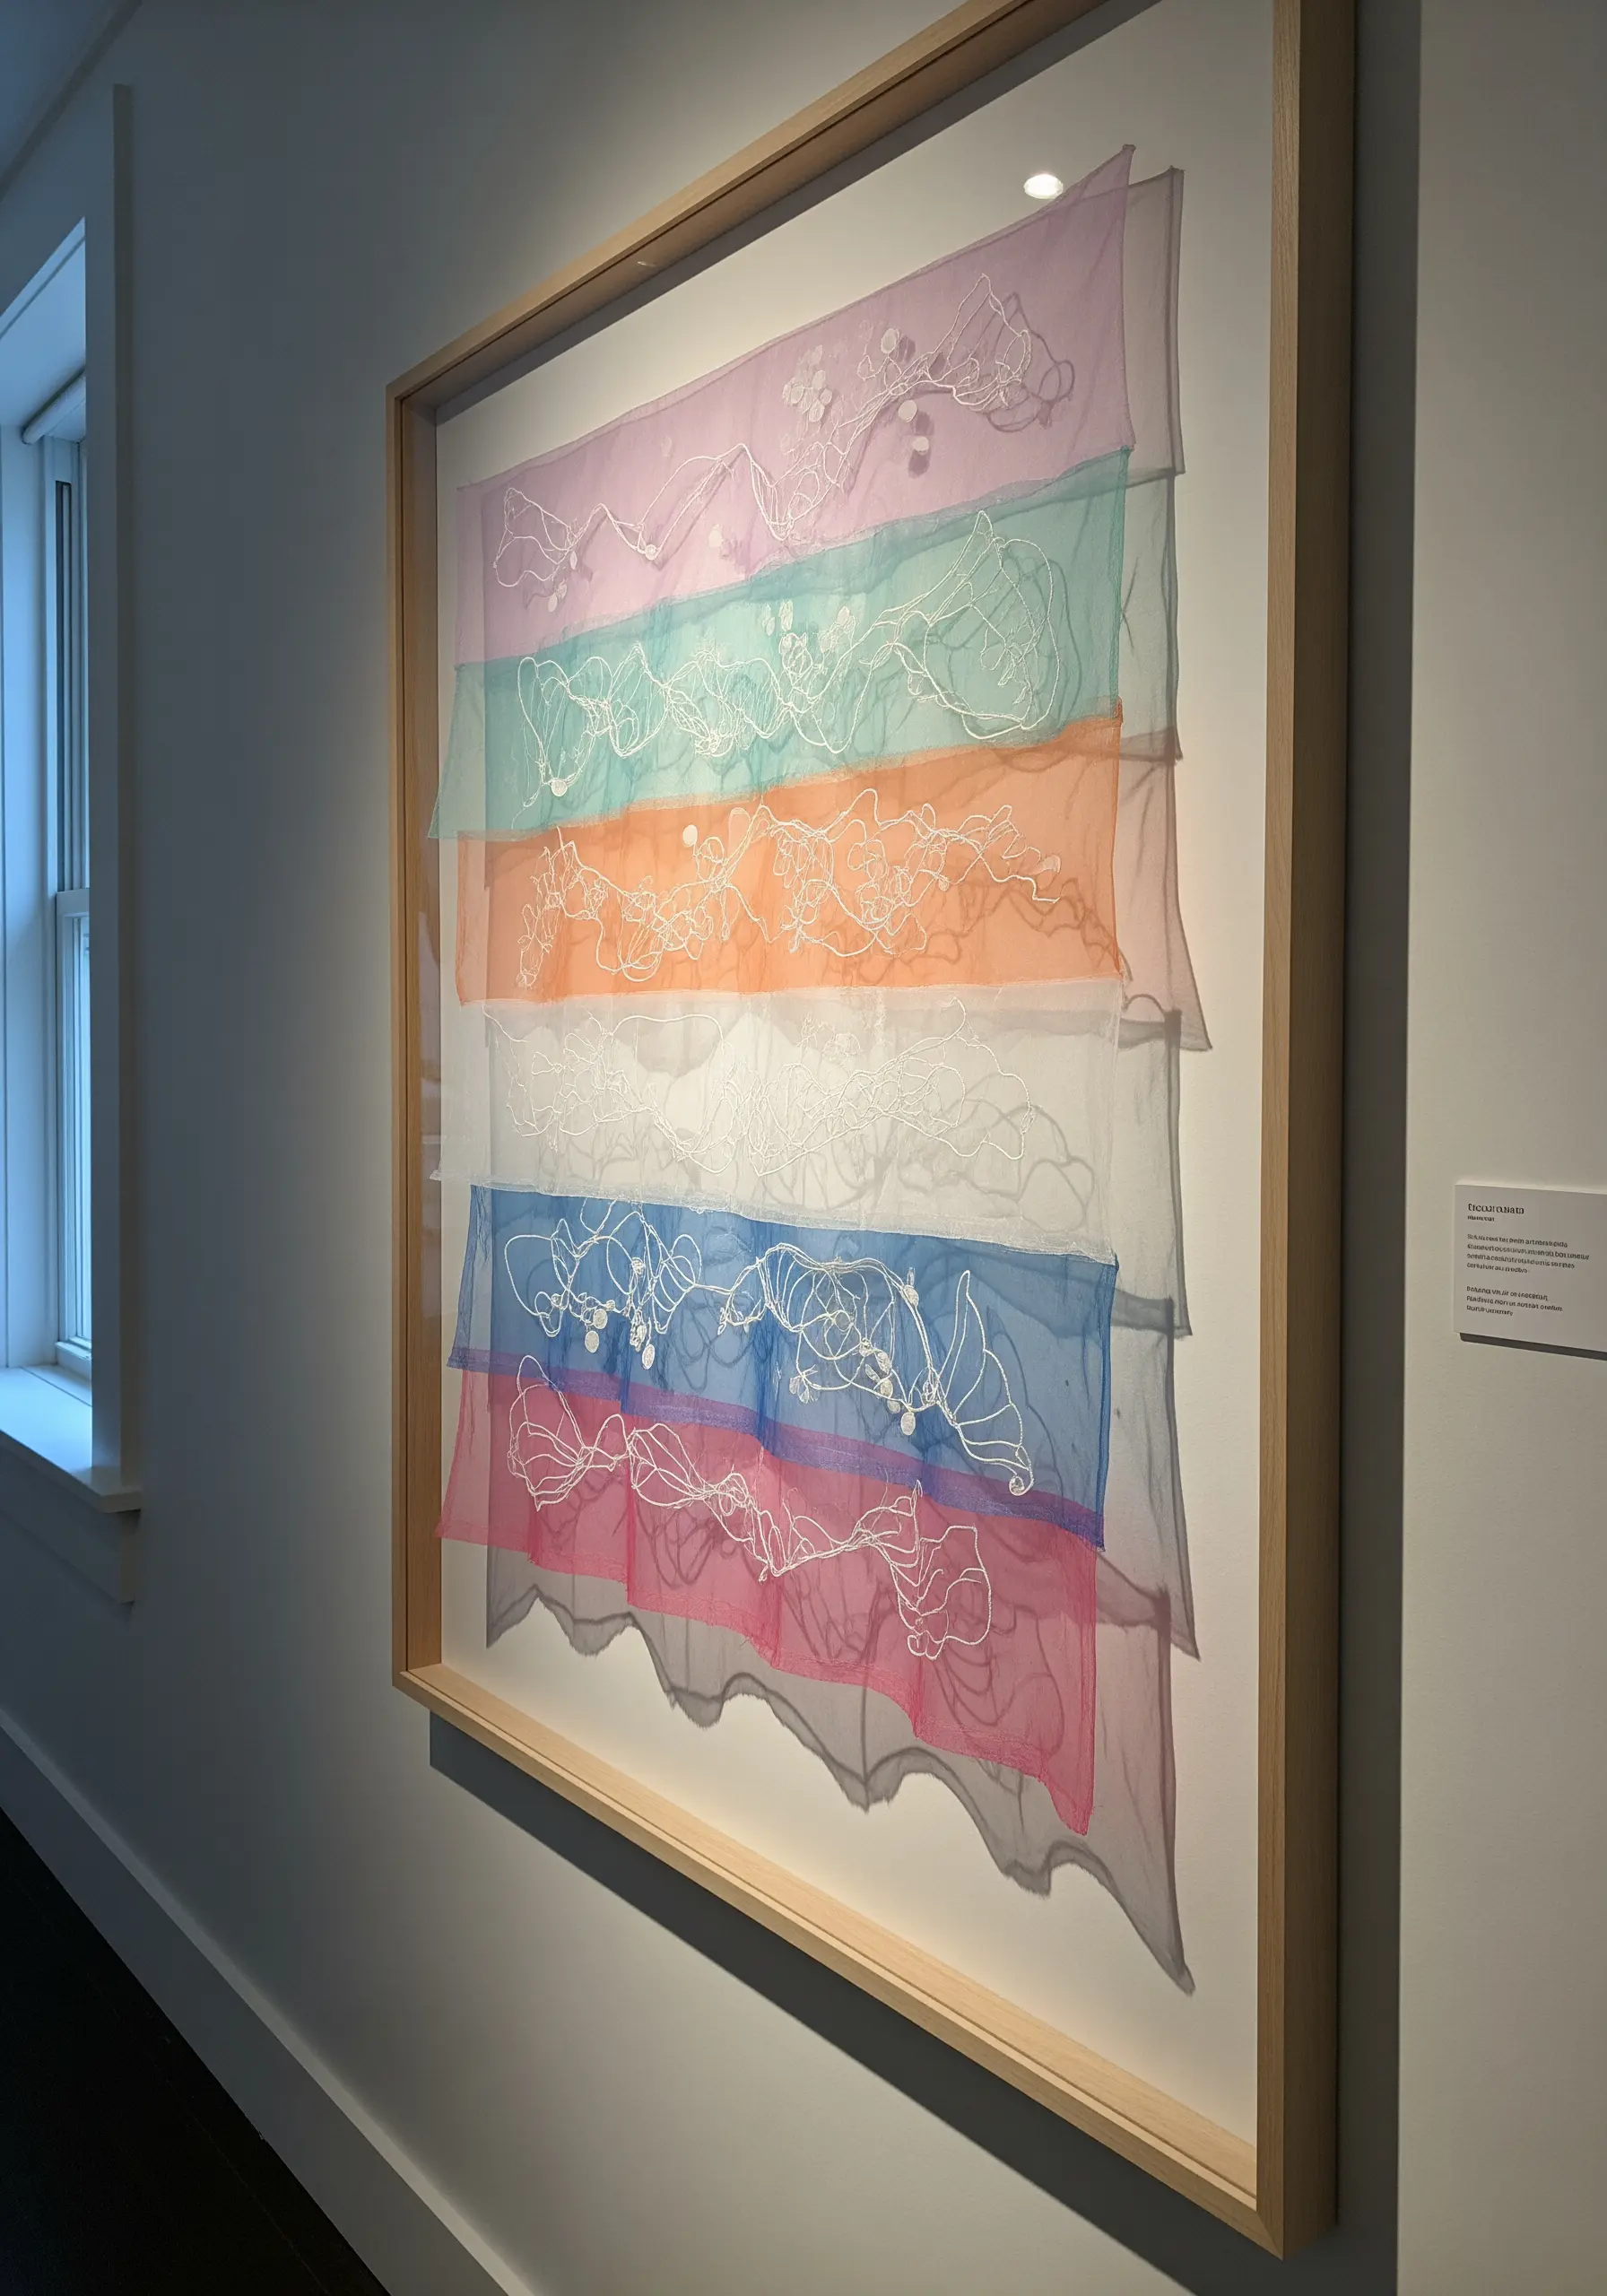
Play with transparency and light by stitching on multiple layers of sheer fabric.
Embroider simple, continuous-line motifs onto several separate pieces of silk organza using a fine, delicate thread.
When you frame the piece, use spacers to create a gap between each layer of fabric.
This allows the embroidered lines to float, overlap, and cast shadows on one another, creating a beautiful, ghost-like effect that has mesmerizing depth.
25. Weave Graphic Patterns on a Pegboard Loom
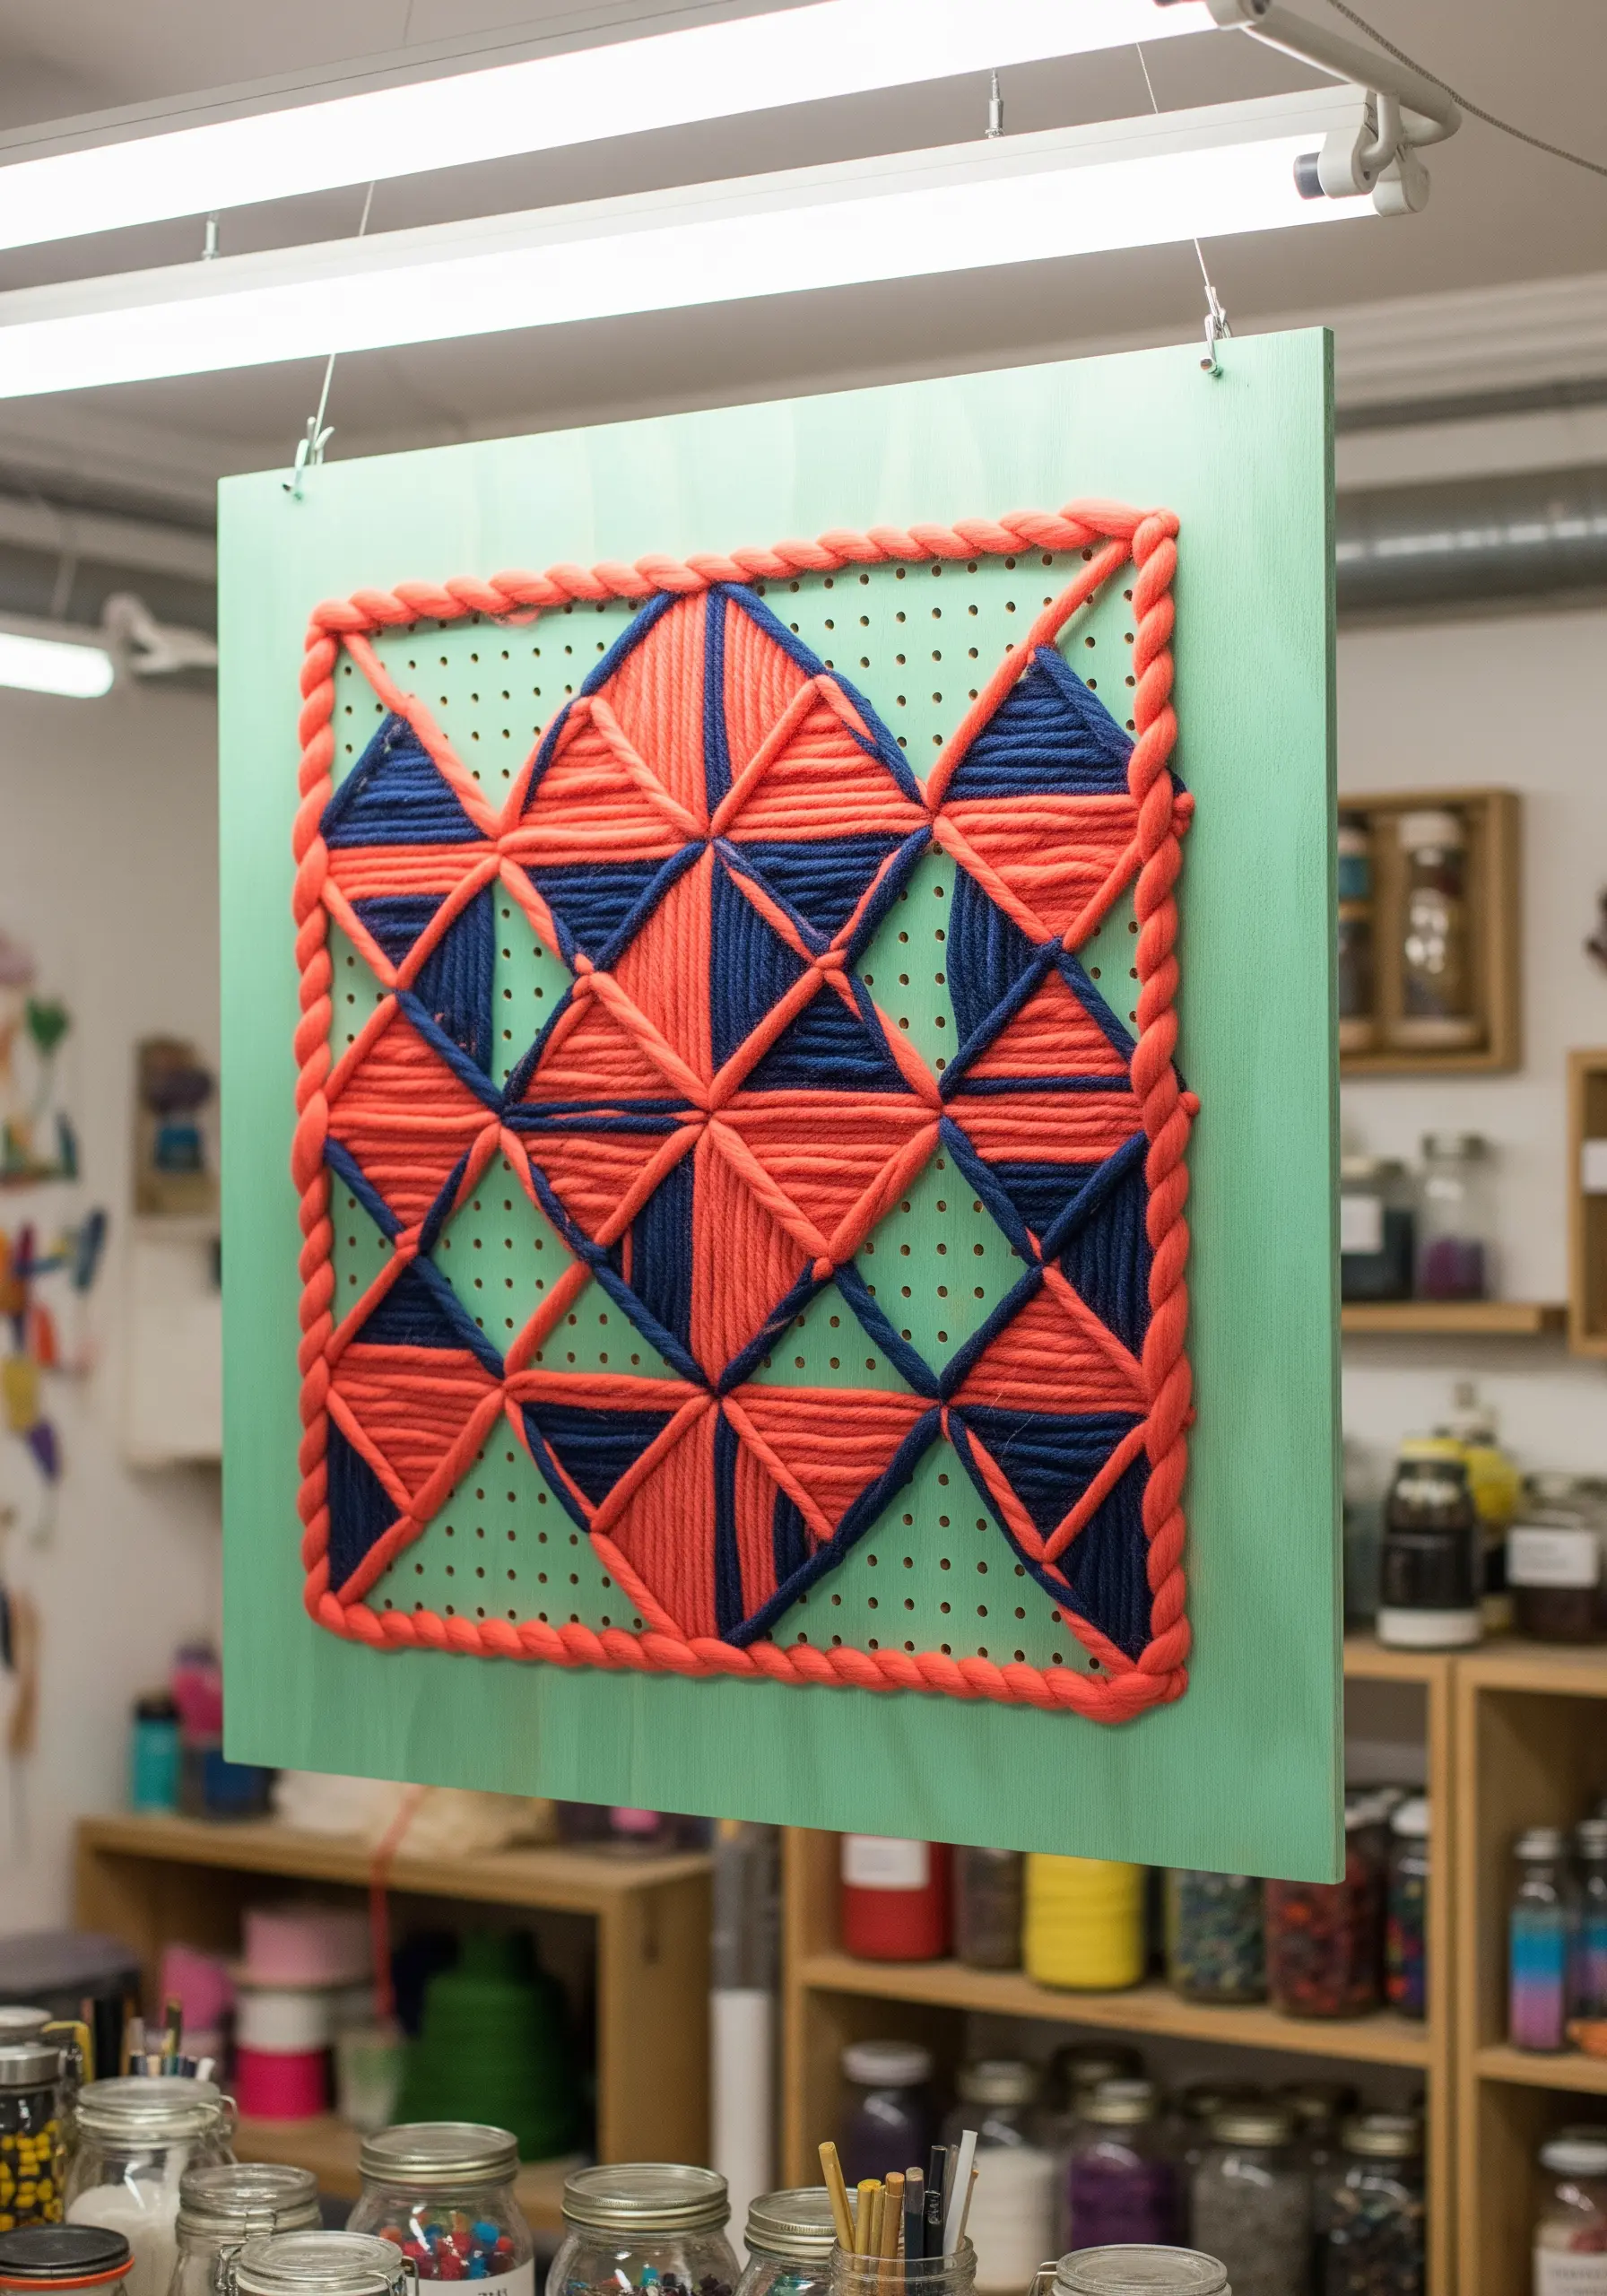
Repurpose a simple hardware store pegboard into an unconventional loom for large-scale fiber art.
The grid of holes is perfect for creating bold, sharp geometric patterns with thick yarn or even rope.
Simply thread your fiber through the holes, following a pre-planned design, to create a piece with incredible graphic impact.
This is an accessible way to experiment with large-format weaving without investing in specialized equipment.
26. Stitch a Dense Meadow with Ribbon Embroidery
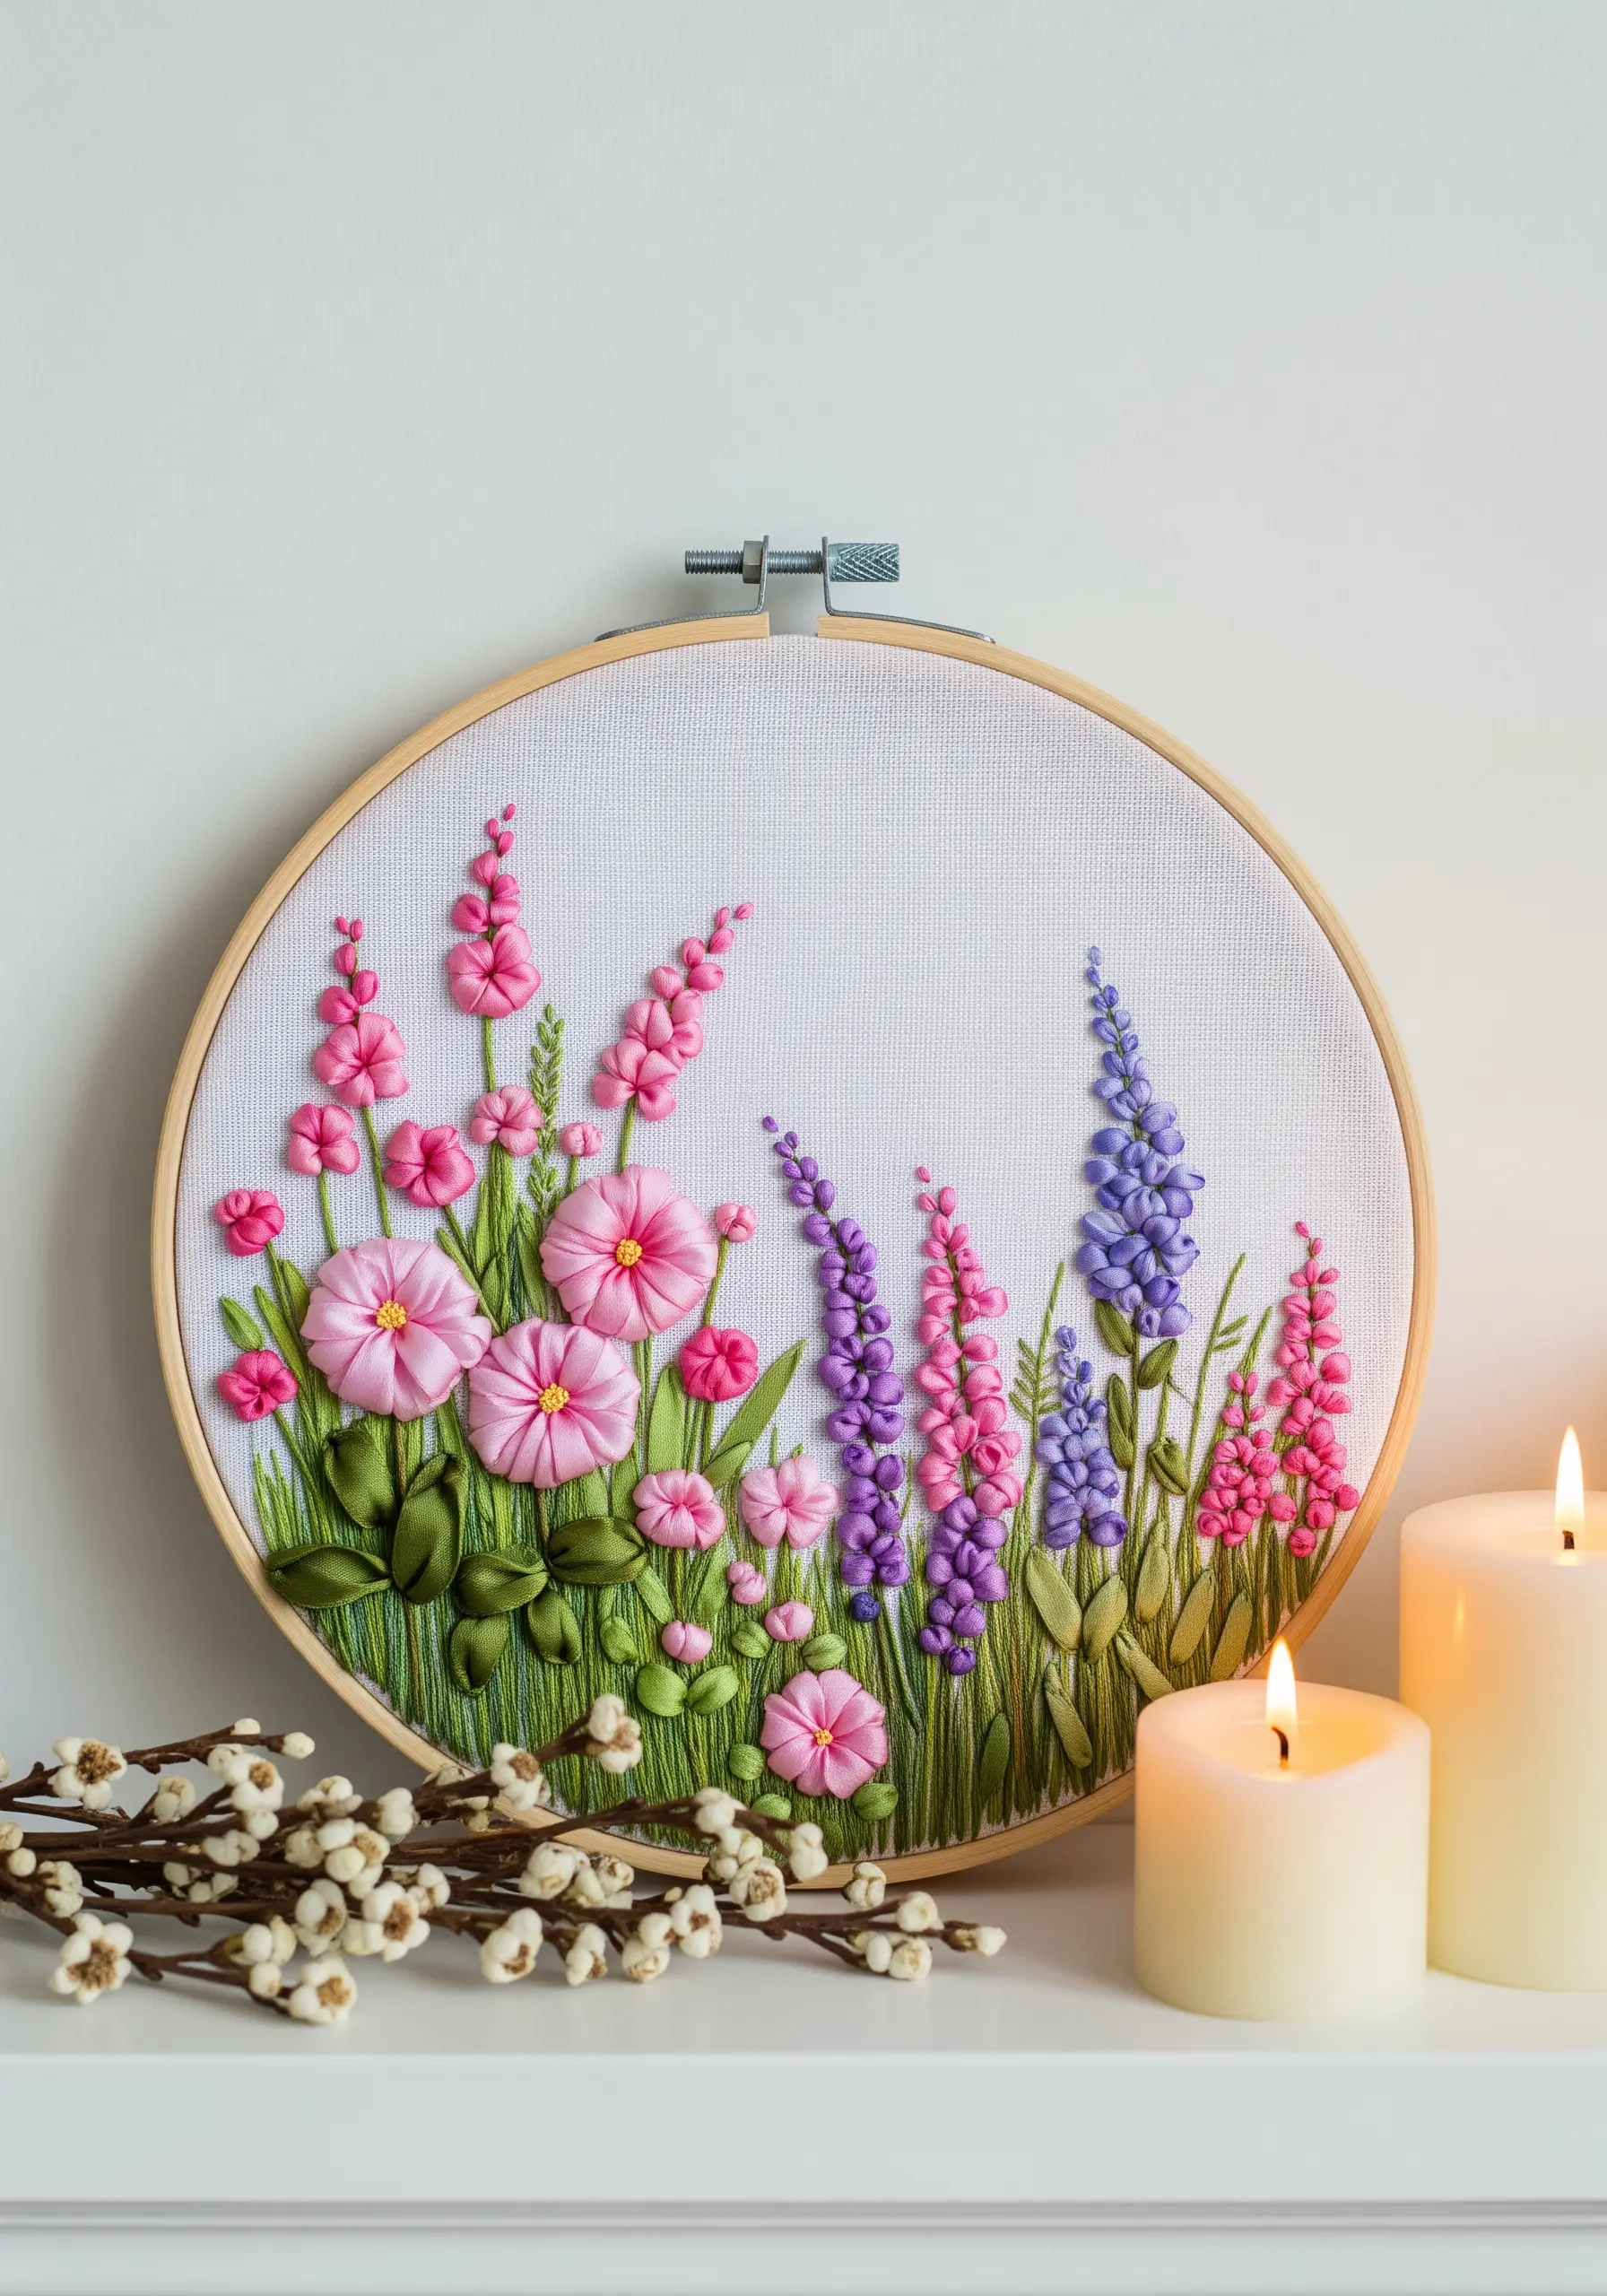
Fill an entire hoop with a lush, vibrant wildflower scene using various ribbon embroidery stitches.
The key to a rich, meadow-like feel is density: pack your stitches closely together, overlapping them to create a sense of natural, untamed growth.
Use straight ribbon stitches for tall stalks of lavender, lazy daisy stitches for petals, and French knots for tiny buds.
Combining different ribbon widths and a varied color palette will make your floral composition burst with life and texture.
27. Arrange Crocheted Mandalas as Serene Wall Art
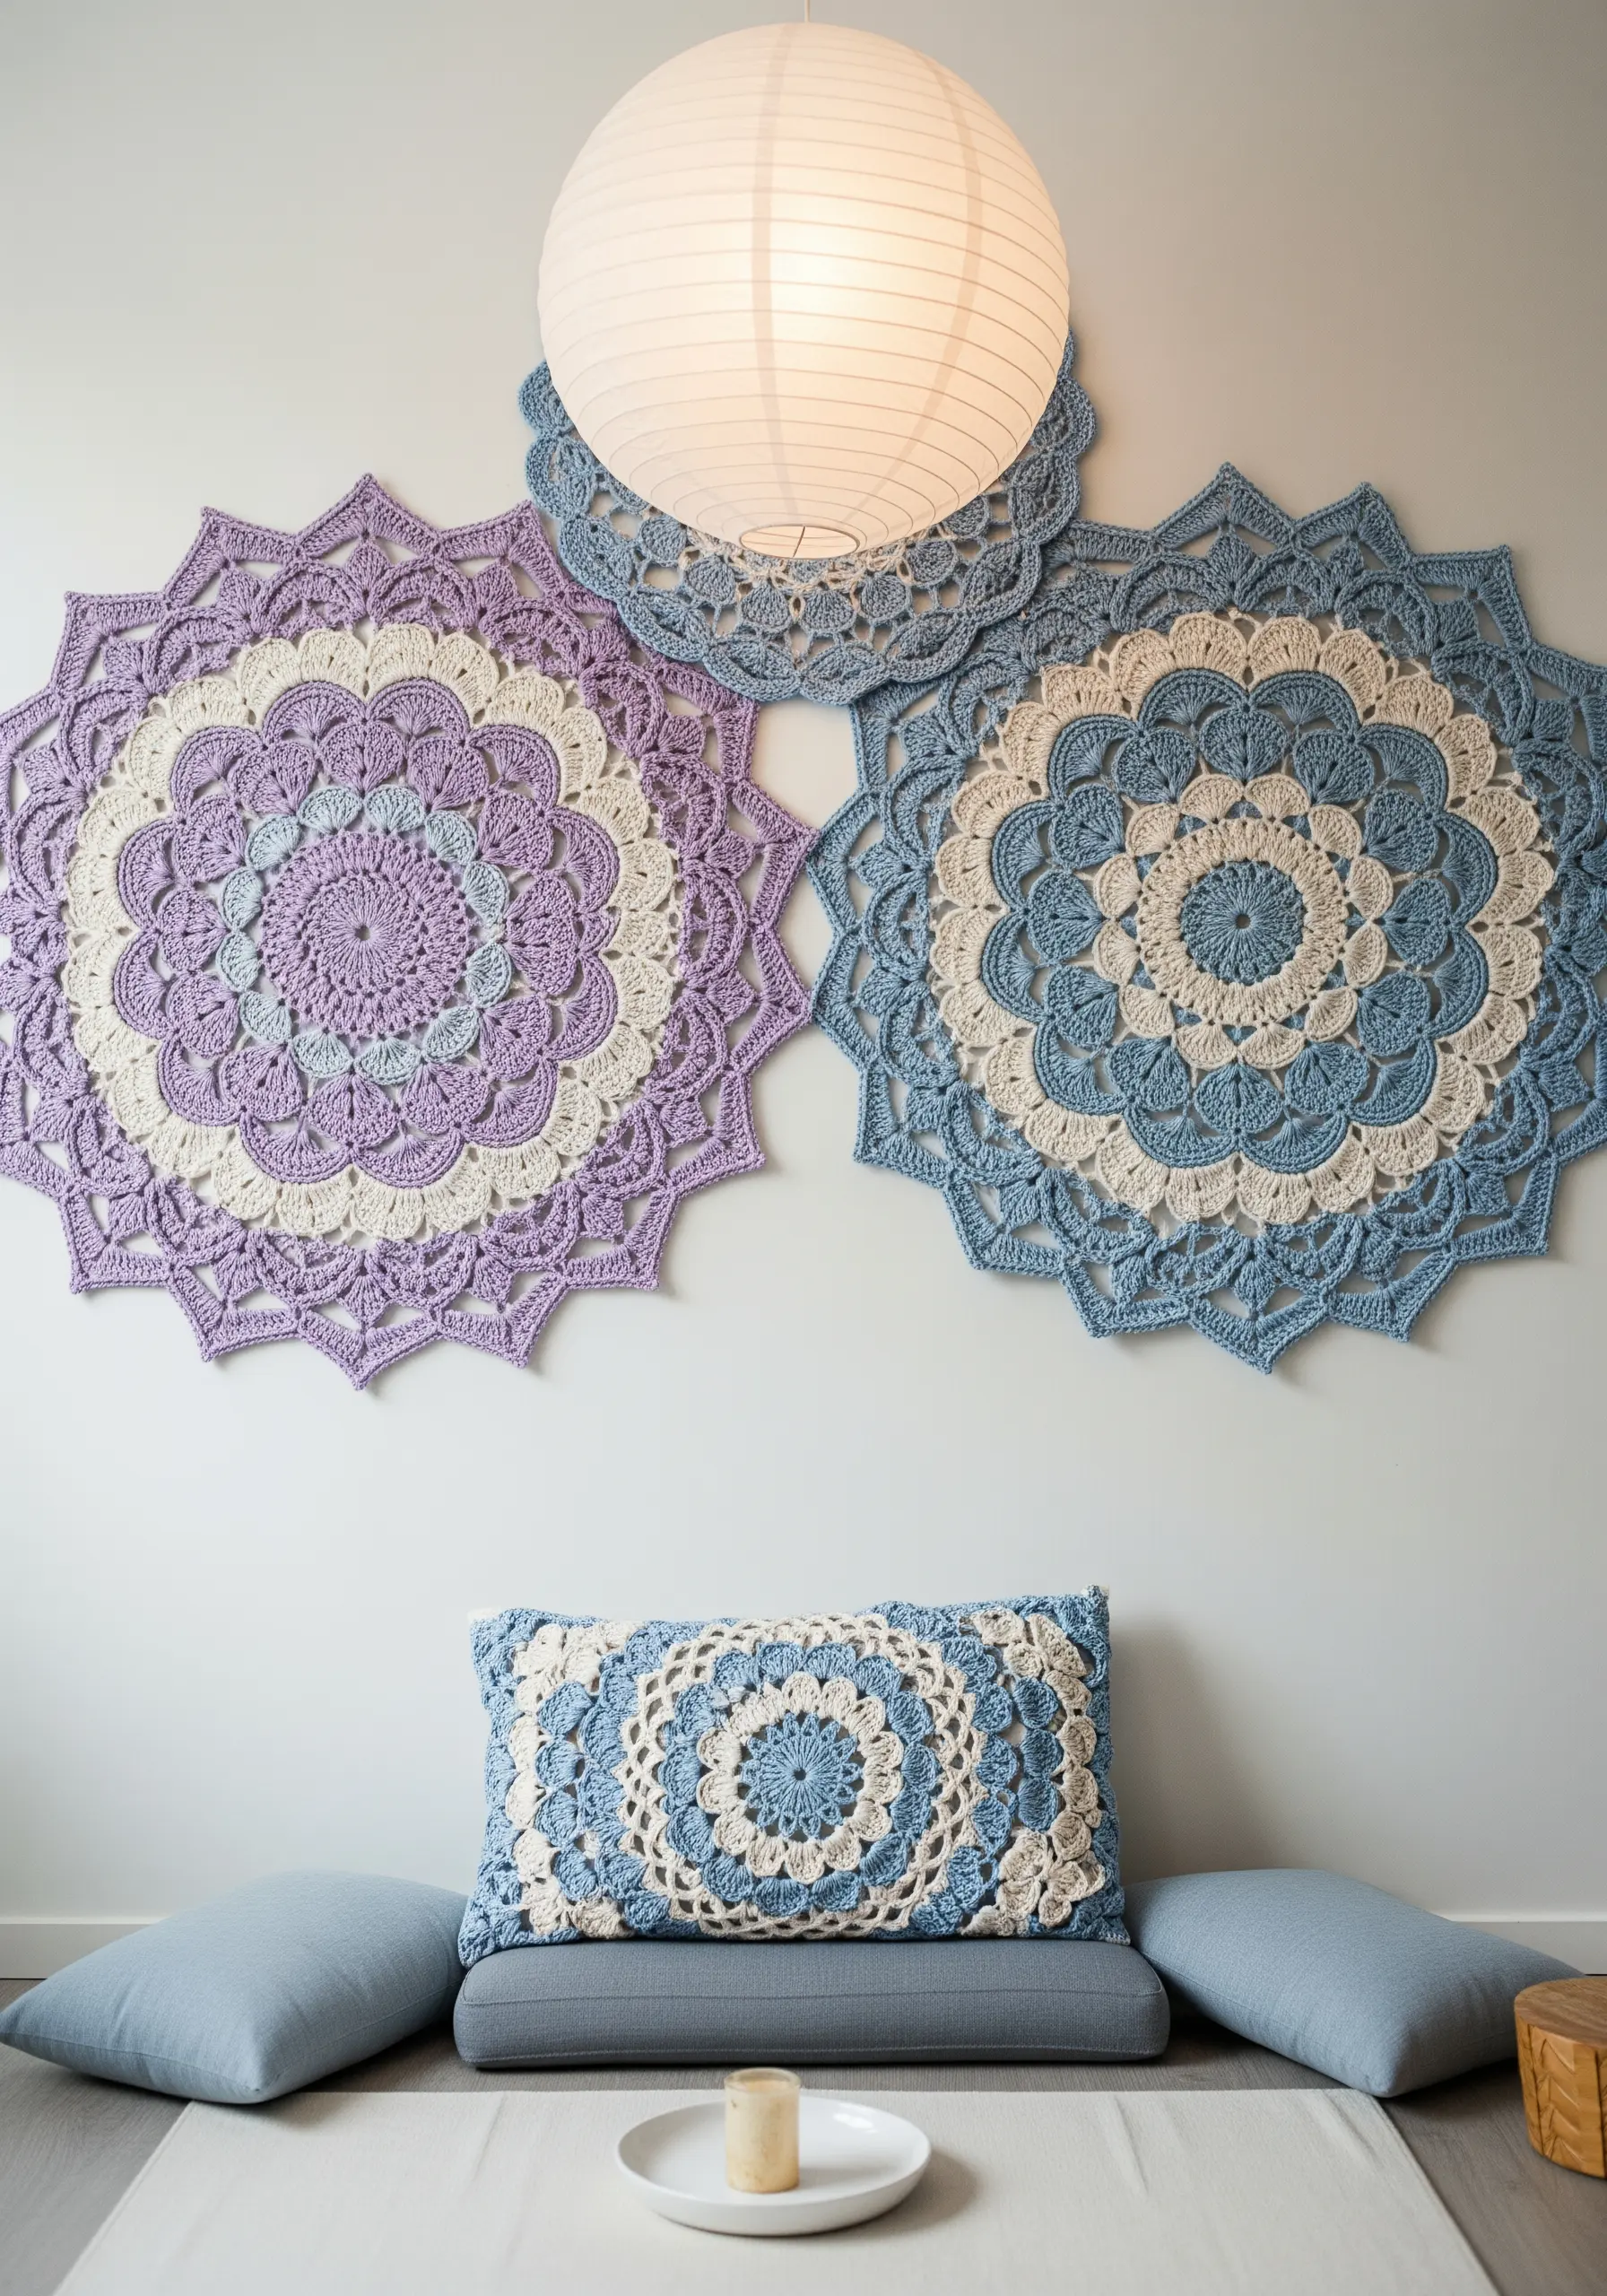
Your crochet skills can easily translate into beautiful, large-scale wall decor.
Create several large, flat mandalas using cotton yarn in a soothing, complementary color palette.
To prepare them for hanging, you can either stiffen them with starch or stretch them taut within oversized embroidery hoops.
Grouping three or more together on a wall creates a gorgeous, geometric focal point that brings a sense of calm and handcrafted beauty to any space, especially a meditation corner or bedroom.
28. Create Cosmic Designs with Punch Needle Rug Hooking
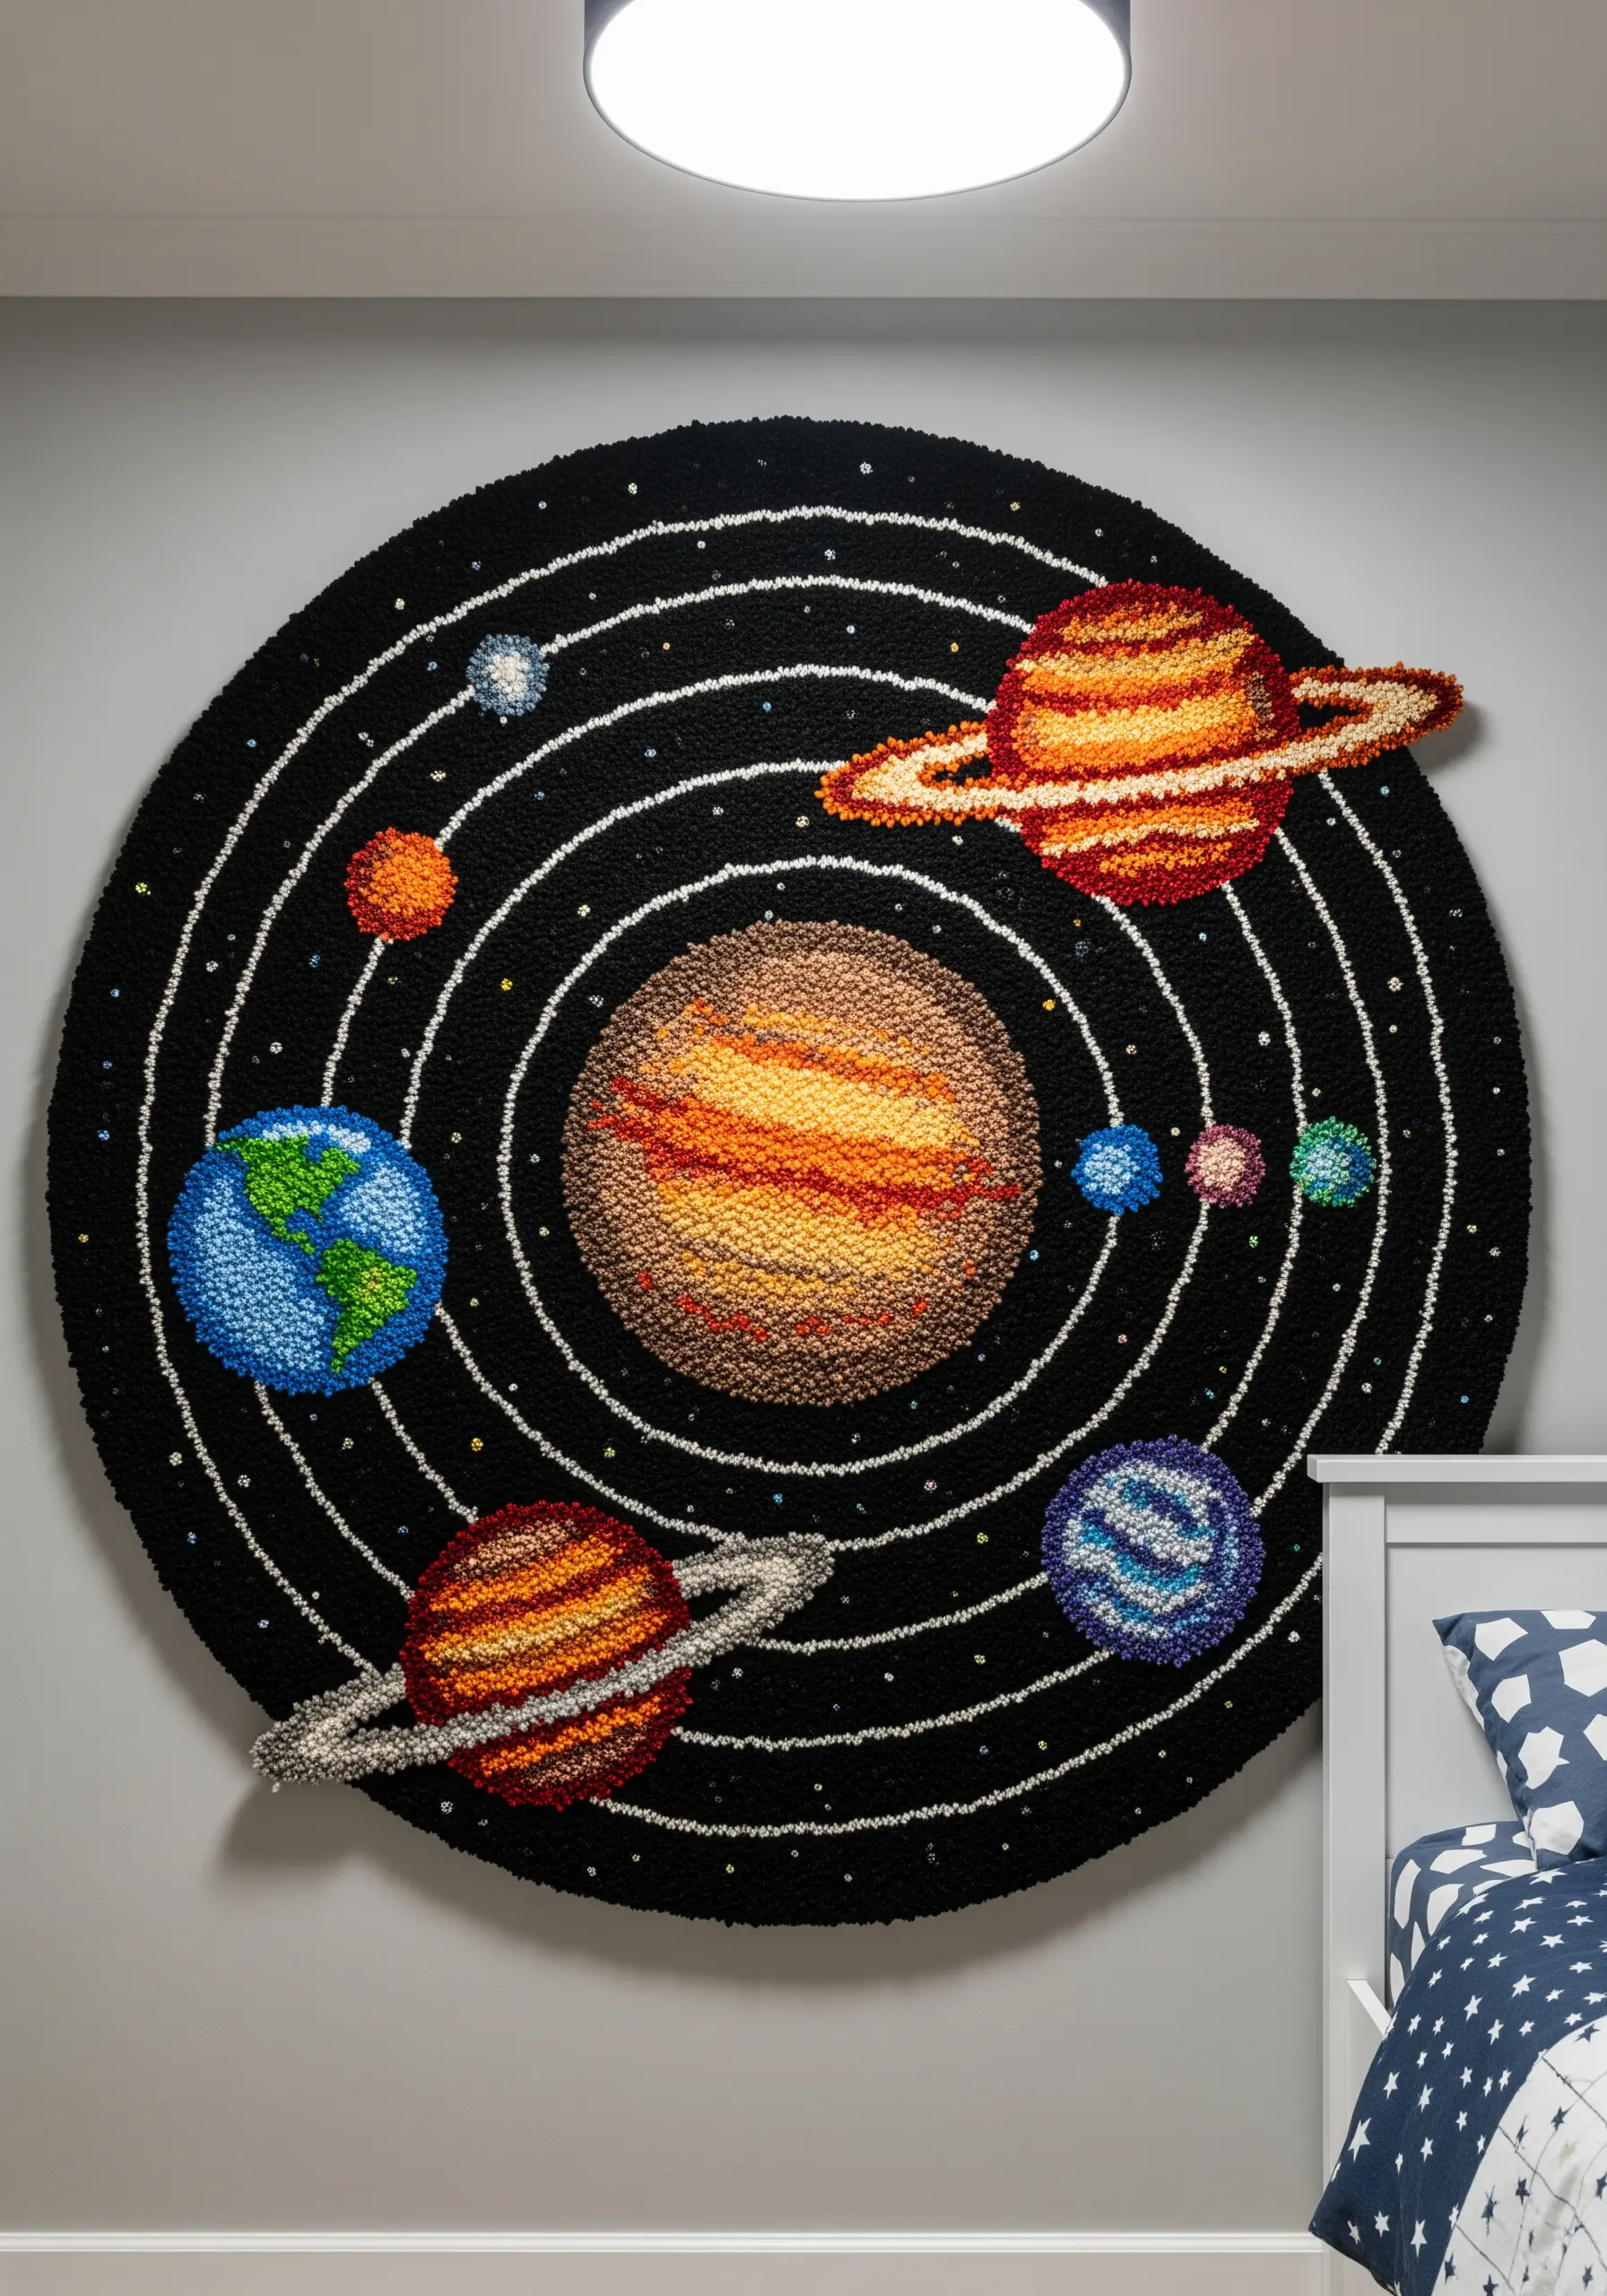
Take your punch needle skills to a larger scale by creating a small rug or a statement wall hanging.
For a project of this size, you’ll want to use a larger punch needle and durable rug yarn.
A solar system design is perfect for this medium, as it allows you to play with color blending within the circular shapes of the planets.
After punching the main elements, you can add the fine orbital lines with a simple running stitch, using a regular needle and yarn.


