
You have the threads, the fabric, and the desire to create something beautiful for your home. But perhaps you feel your work is missing that final touch of polish, that quiet confidence that turns a craft project into a piece of art.
The secret isn’t in mastering hundreds of complex stitches or buying expensive new supplies. It’s in the subtle, intentional choices you make before the needle ever touches the fabric—and in the thoughtful techniques you apply with each pull of the thread.
Here, we will move beyond simply following a pattern. You will learn to see your materials differently, to understand how stitch direction can create movement, how layering threads can build depth, and how a limited color palette can make a more powerful statement than a dozen bright hues. This is your guide to creating embroidery that feels not just finished, but truly alive.
1. Create Depth with Layered Botanicals
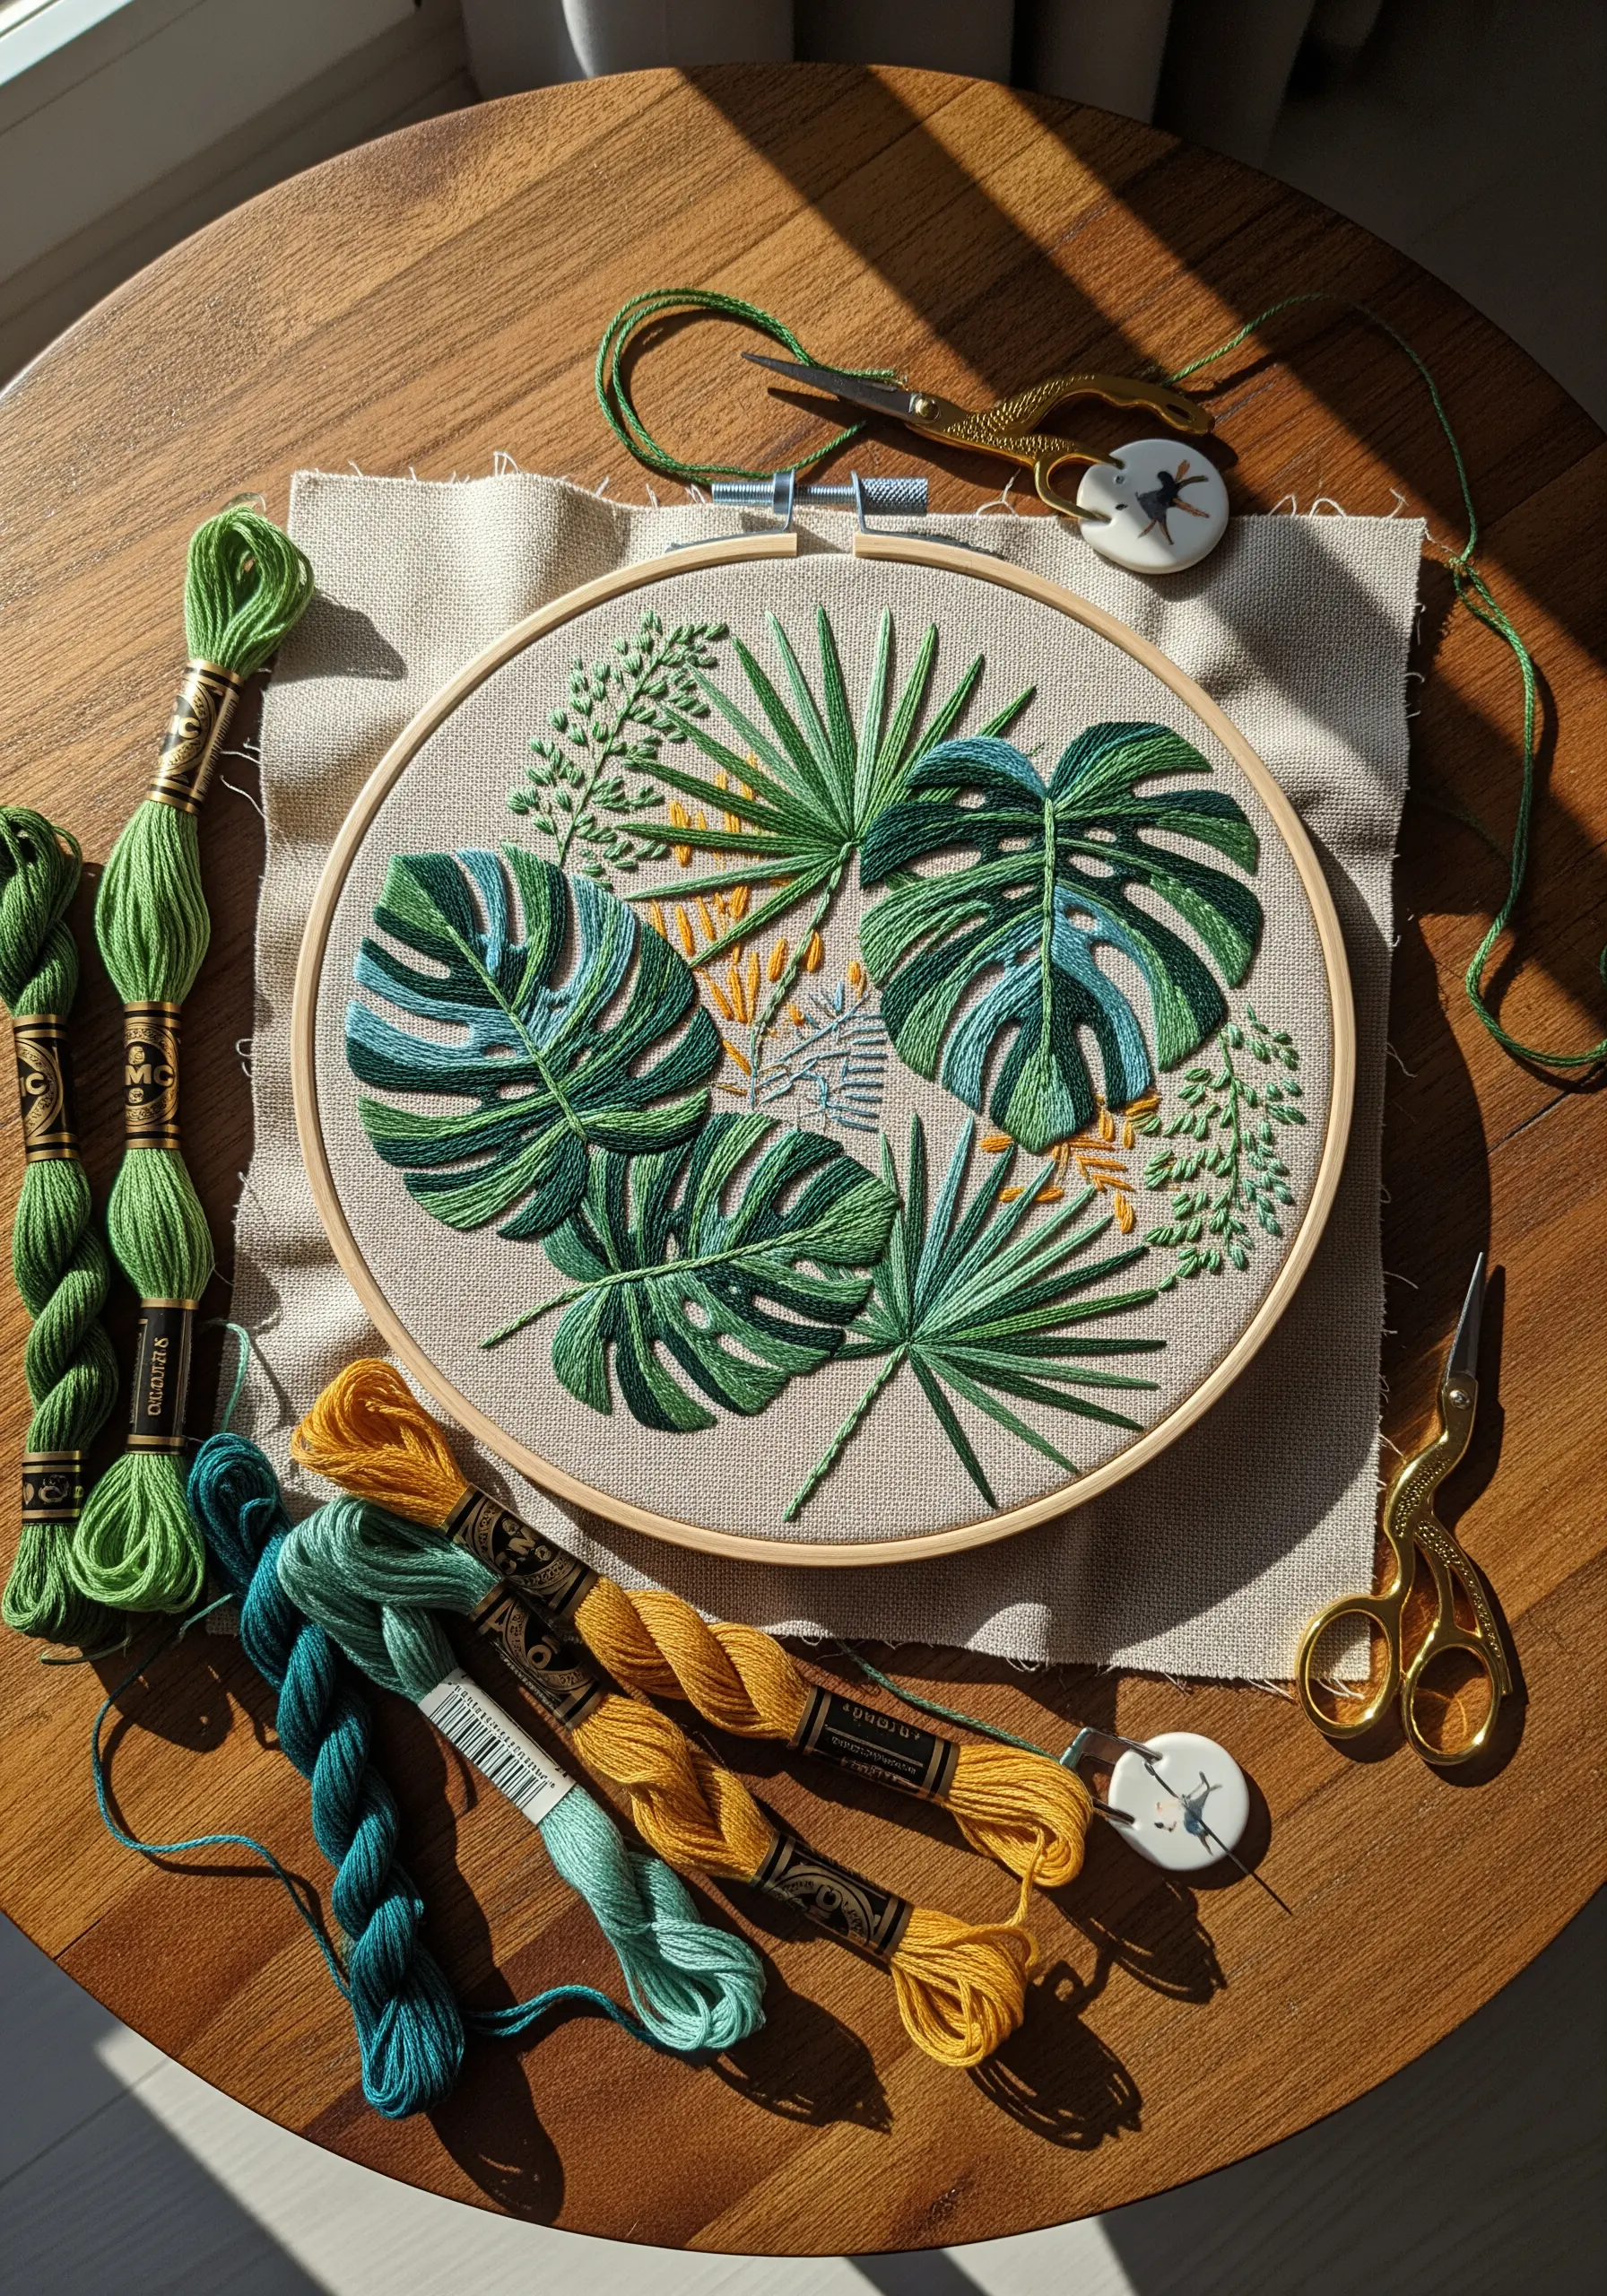
To prevent your dense foliage from looking flat, physically layer your stitches just as leaves overlap in nature.
Stitch the leaves in the background first, using slightly muted tones and simpler stitches like the seed stitch.
For the foreground leaves, like the monstera, use a vibrant long-and-short stitch and allow the edges to sit slightly on top of the background elements.
This simple sequencing trick creates realistic depth and makes your composition feel lush and alive.
You can also layer leaf stitching for three-dimensional botanical texture by using padded satin stitch for the most prominent leaves.
2. Master Precision in Geometric Compositions
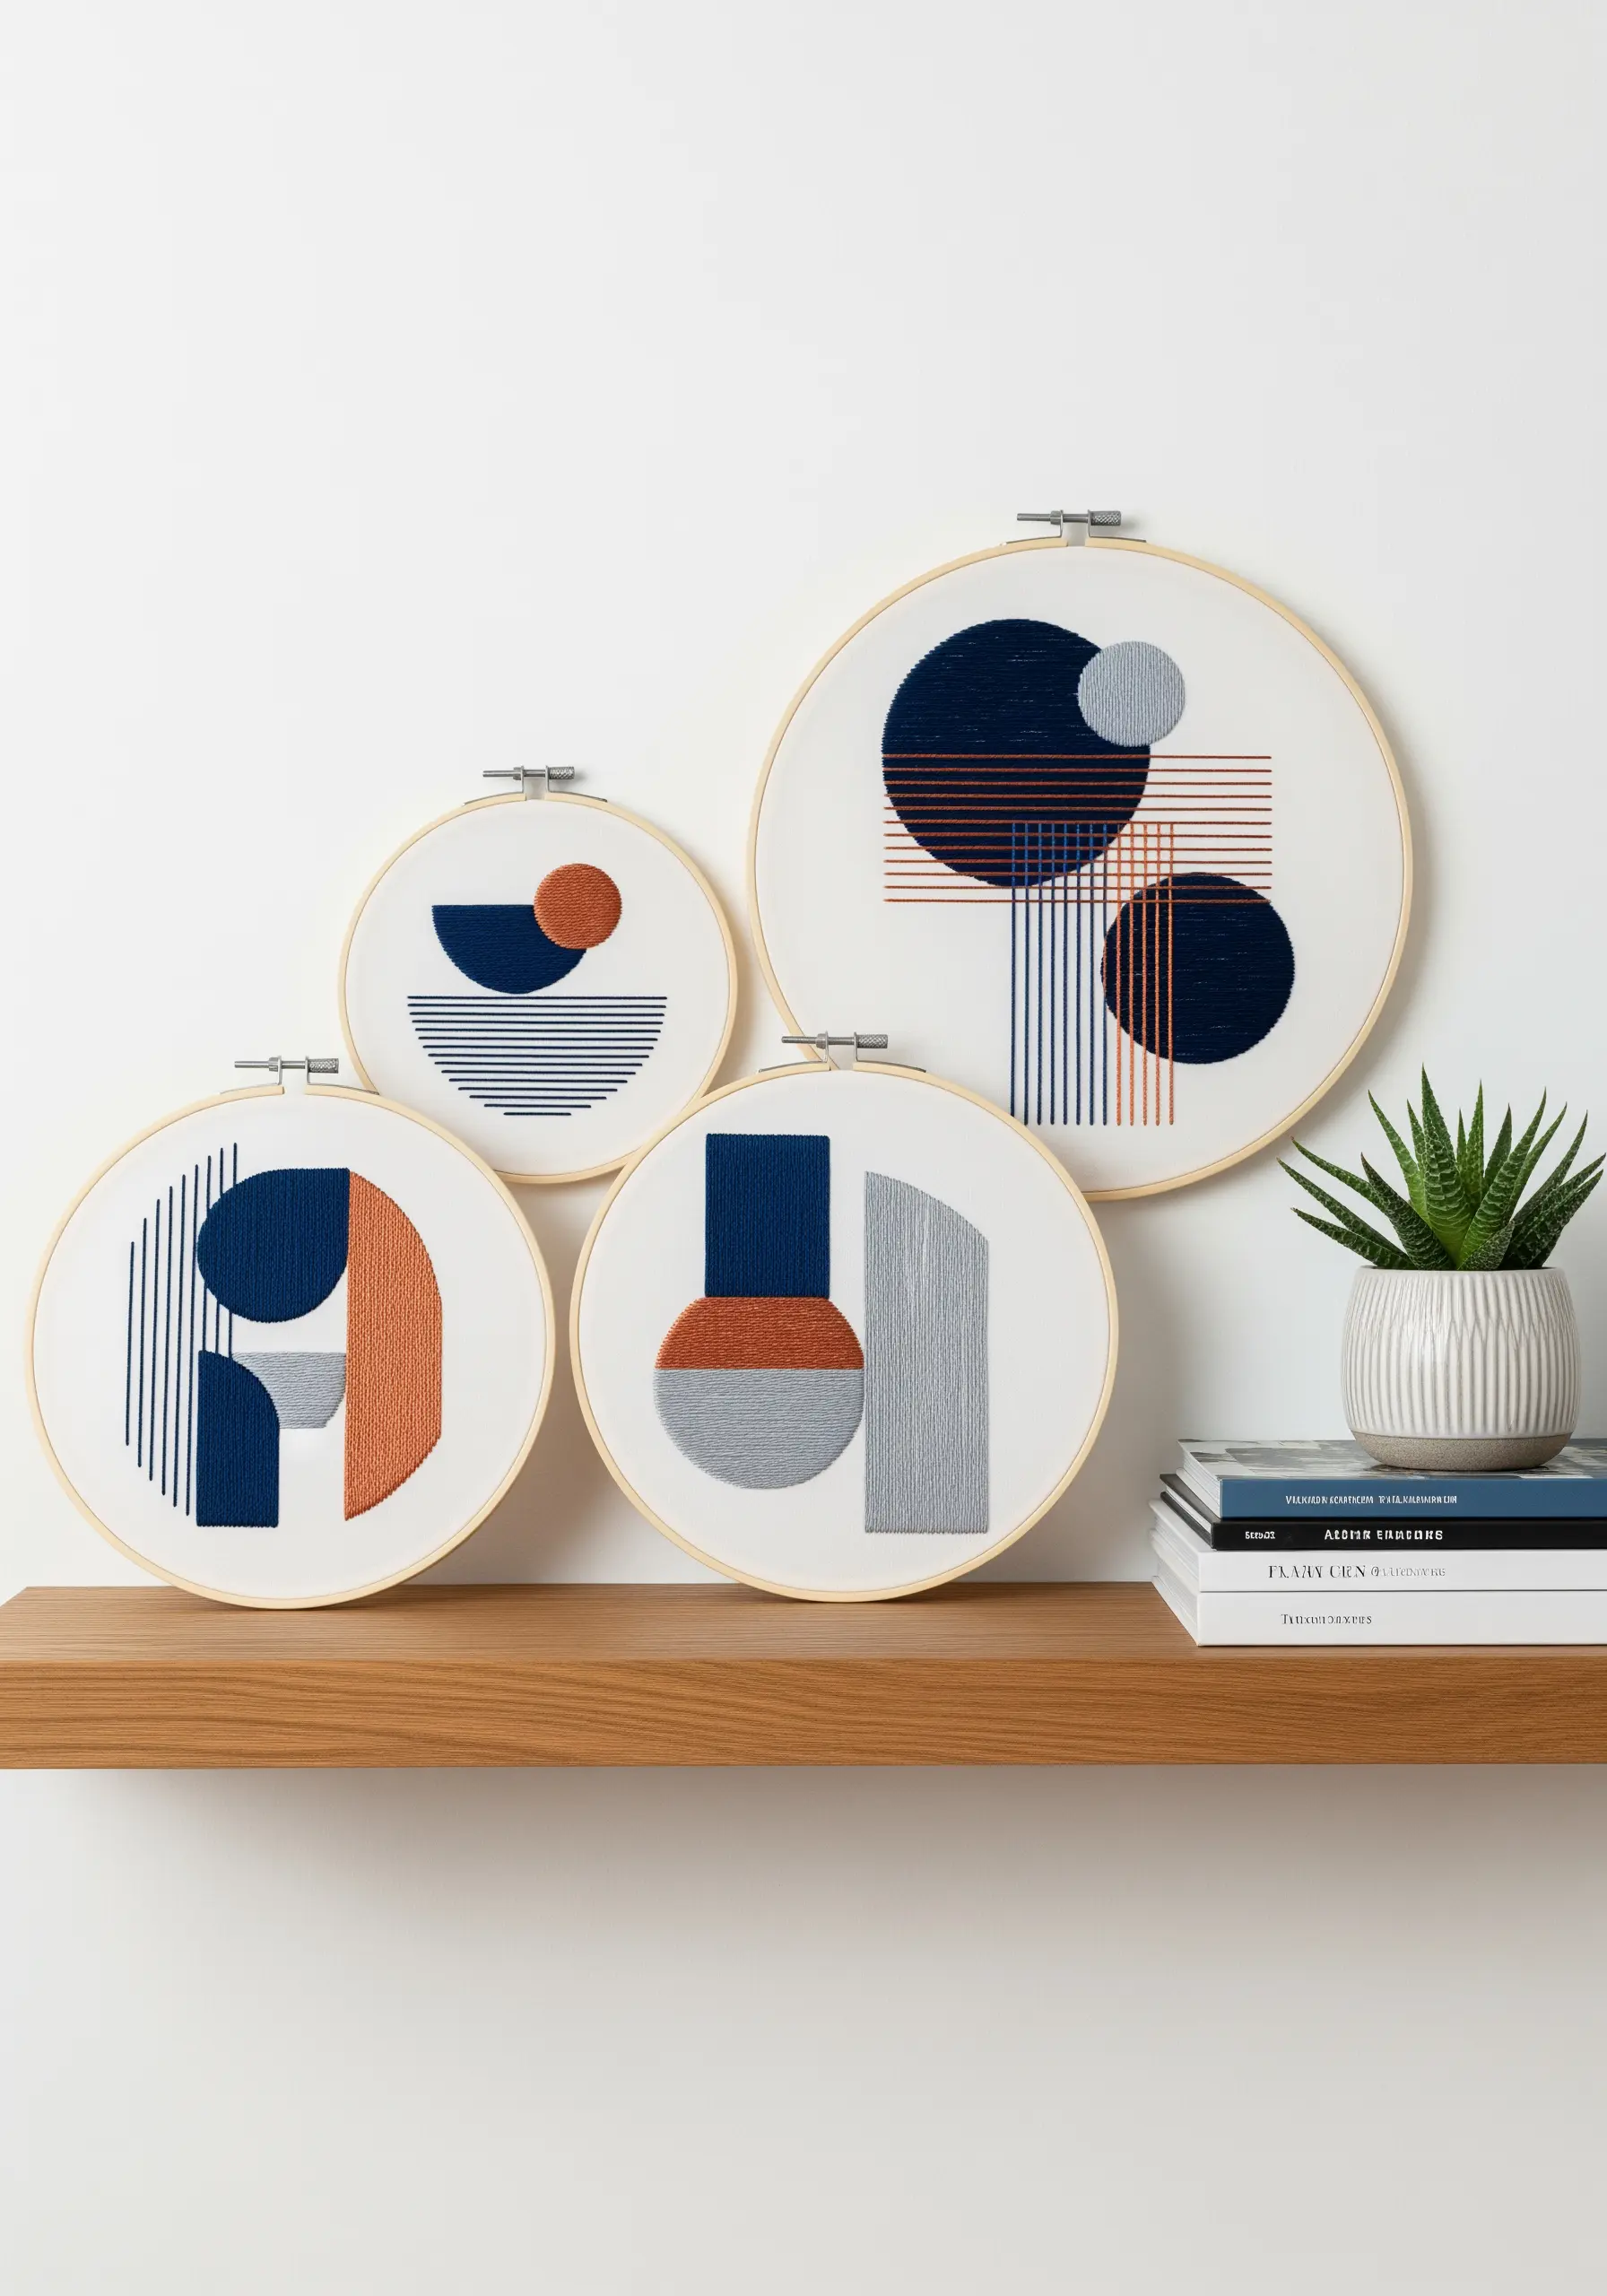
Achieve razor-sharp lines and flawless fills in your abstract work by preparing your shapes correctly.
For the fine parallel lines, use a single strand of floss and a backstitch, ensuring every stitch is the exact same length for a clean, machine-made look.
Before filling the solid circles and rectangles with satin stitch, outline them with a tiny split stitch.
This outline acts as a containing wall, preventing the satin stitch from fraying and creating a crisp, defined edge that elevates the entire piece from handmade to high-design.
These abstract thread embroidery ideas work beautifully as a triptych or gallery wall set.
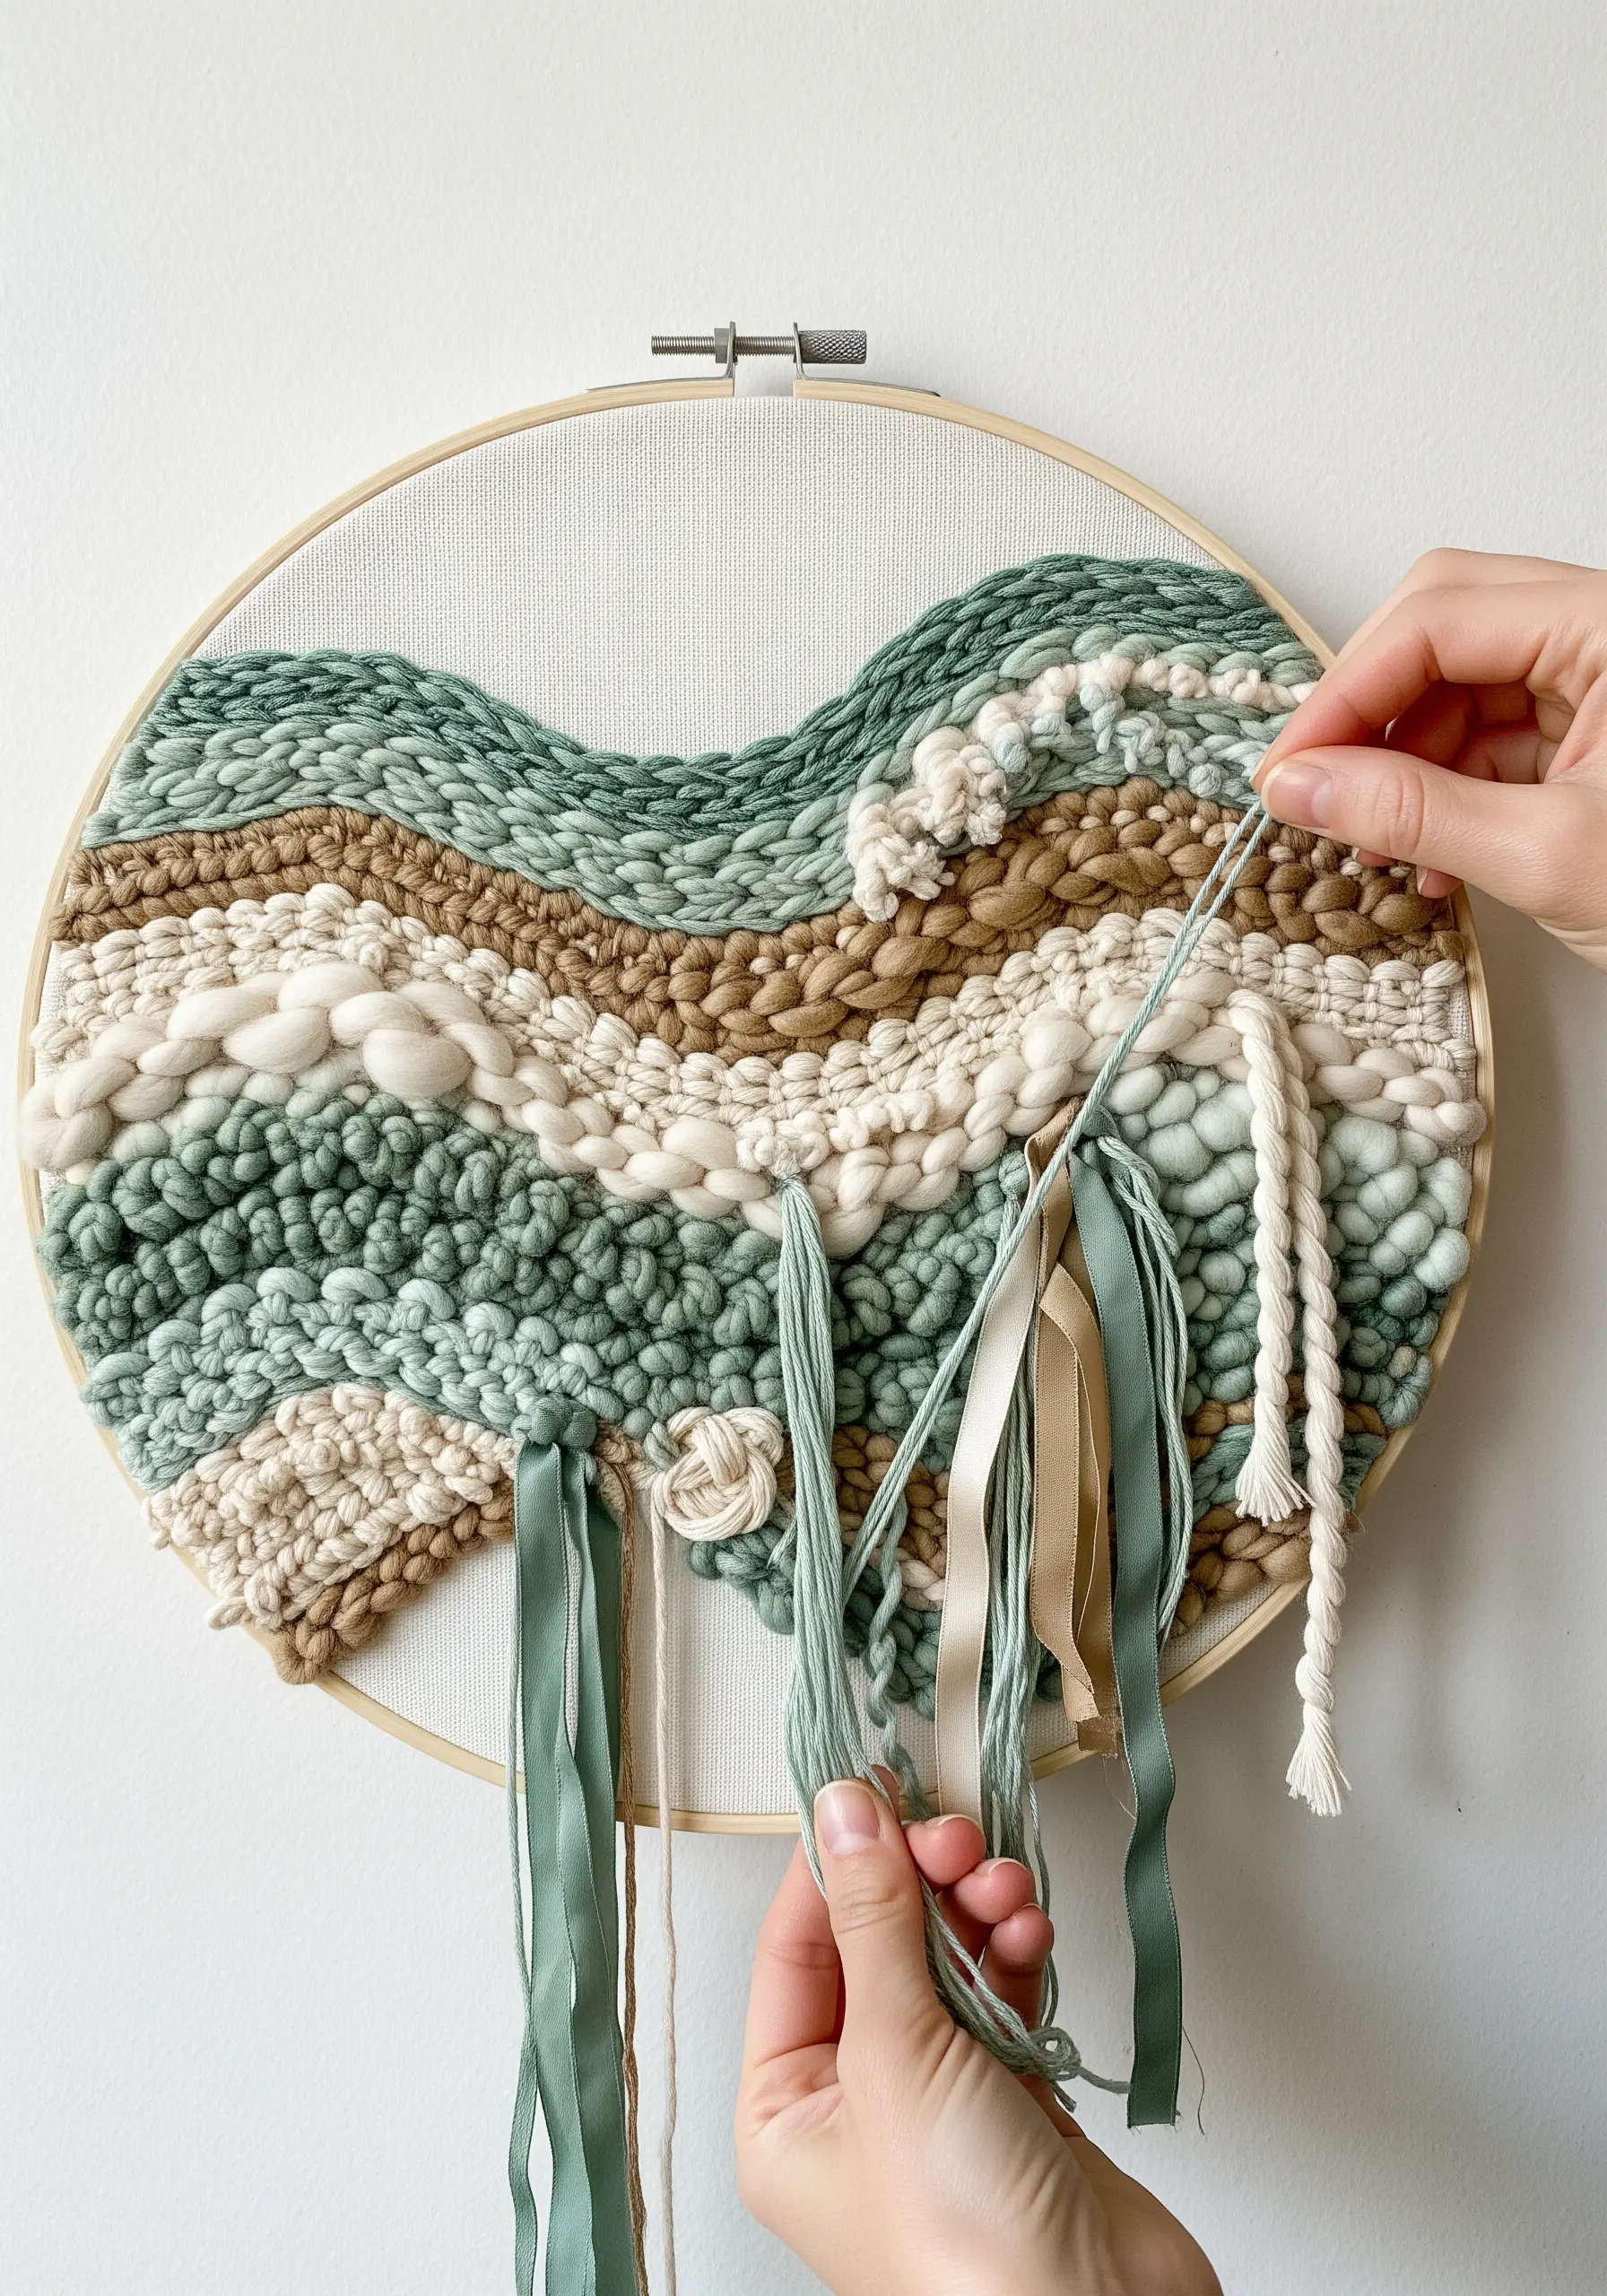
3. Sculpt Landscapes with Punch Needle Loops
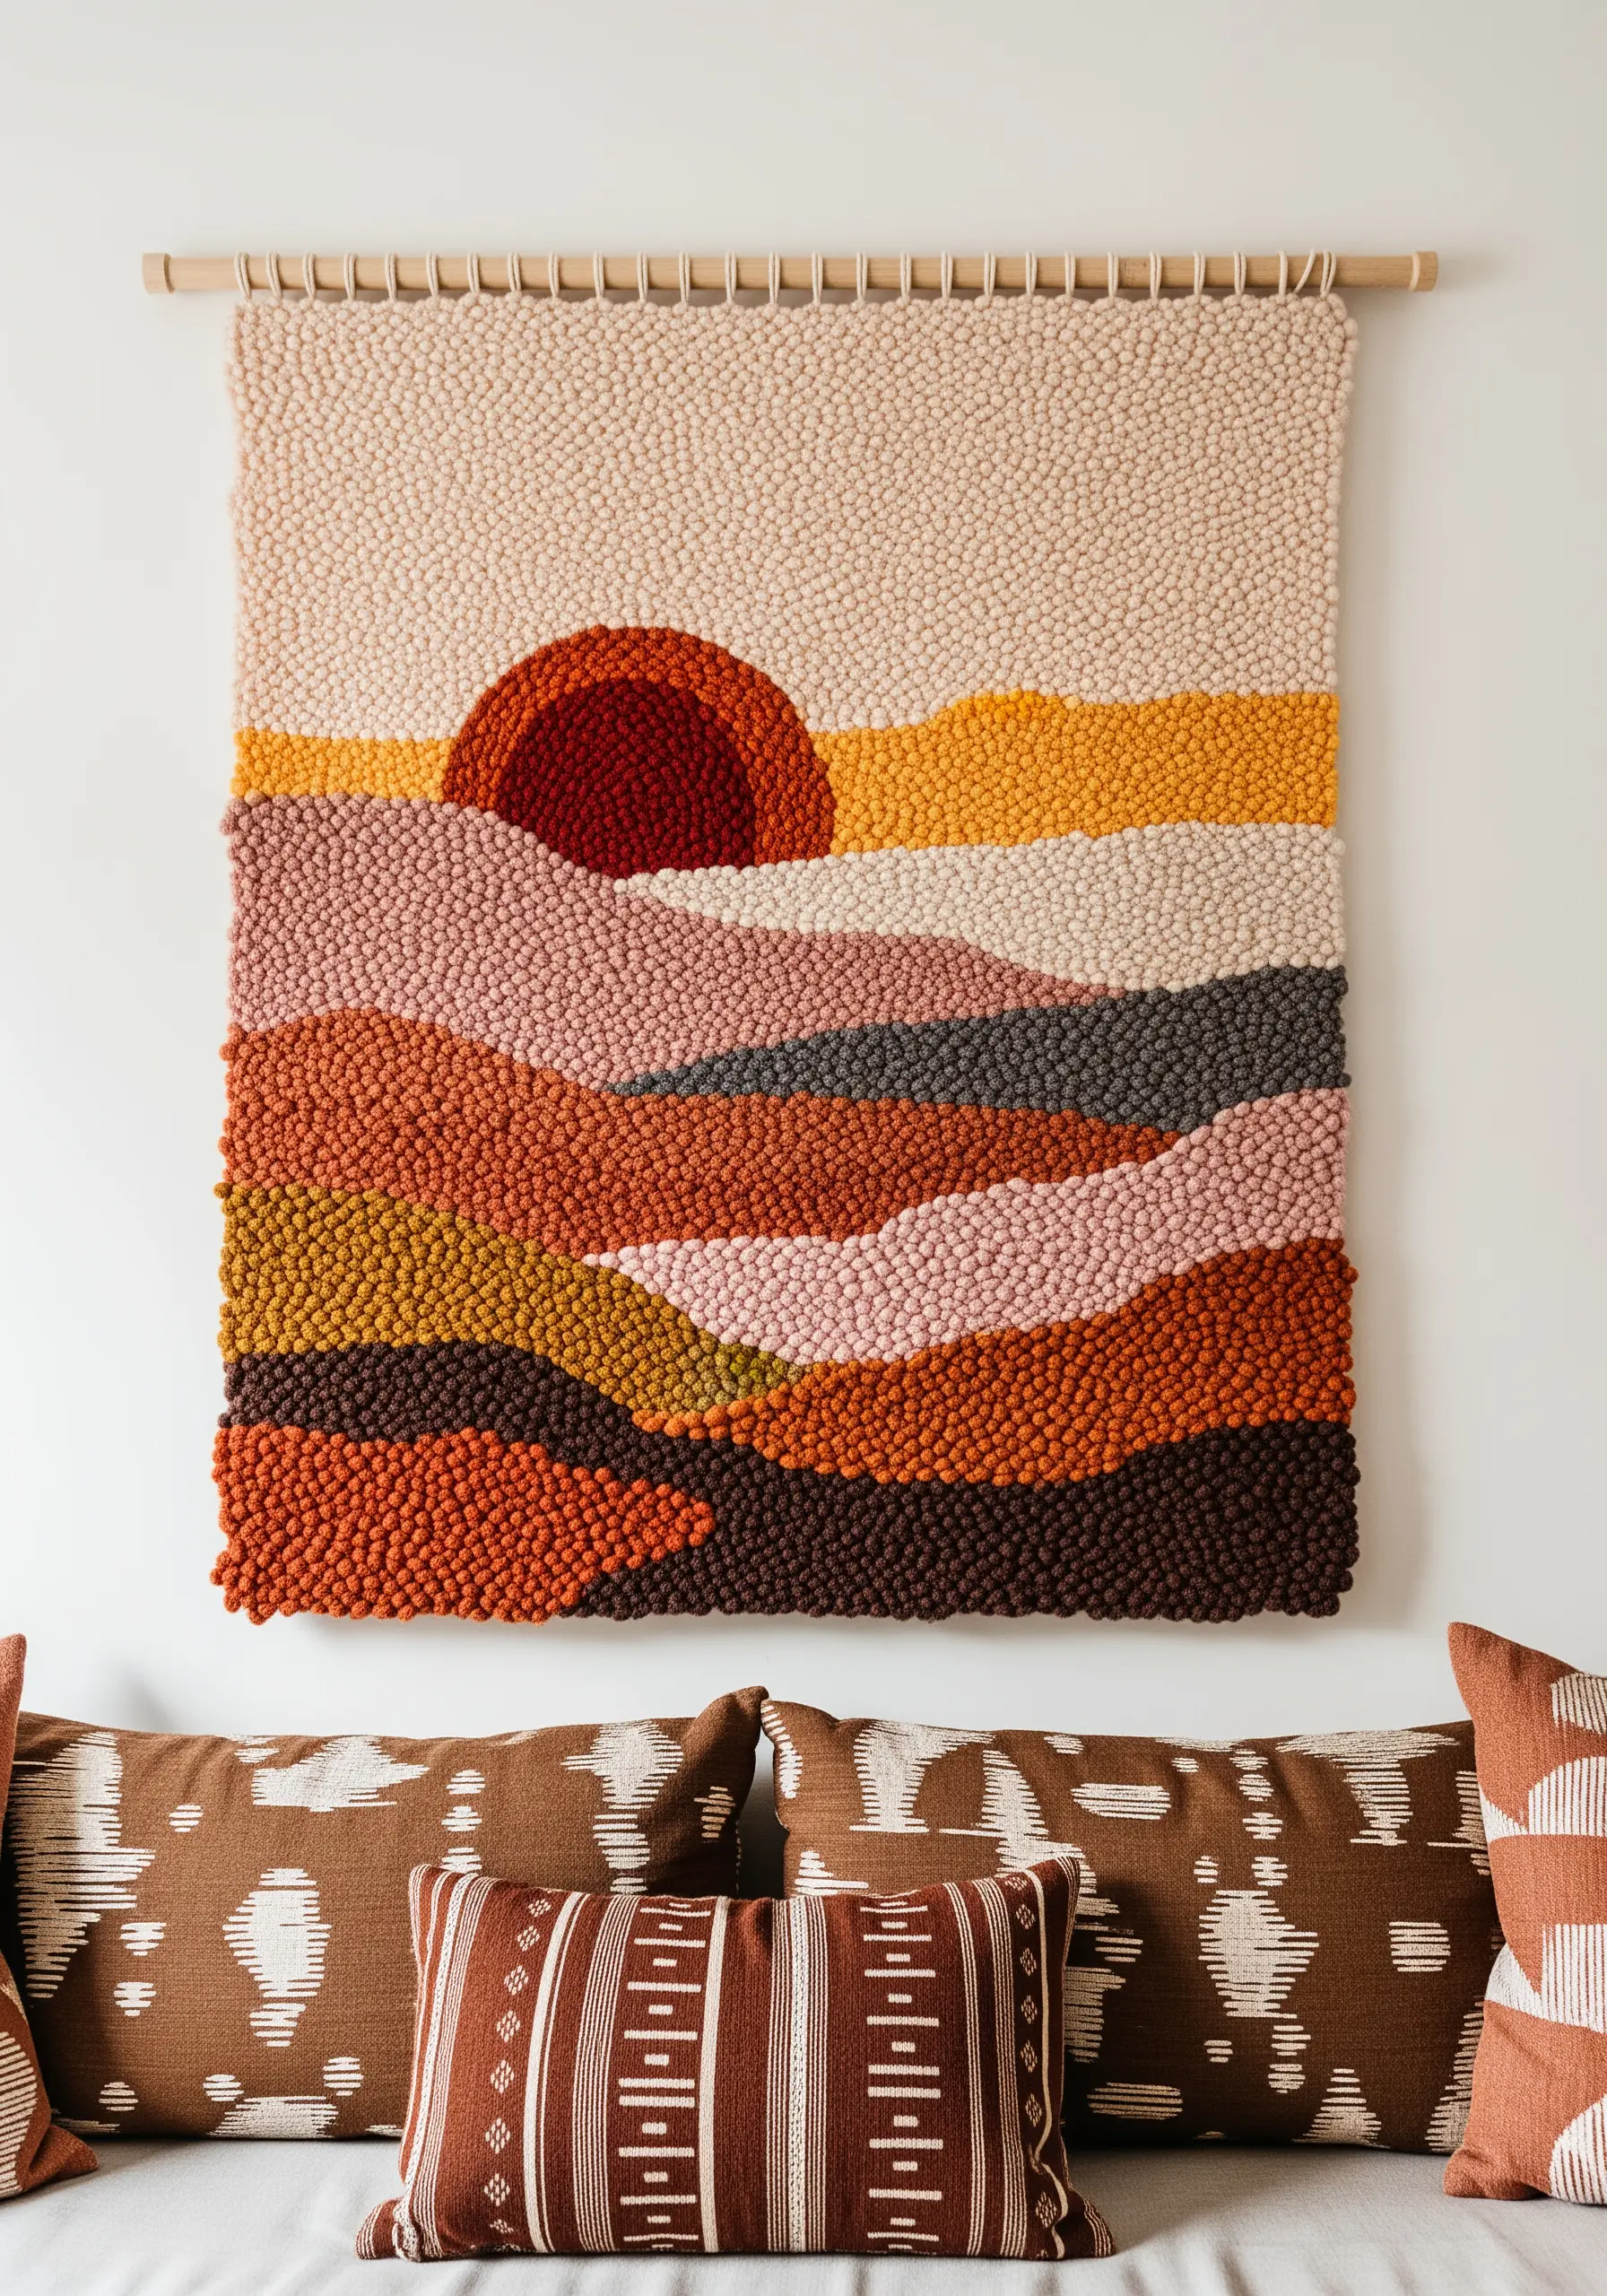
To create a tactile, three-dimensional landscape, move beyond thread to the sculptural possibilities of punch needle and yarn.
Use a punch needle with an adjustable loop height, creating shorter loops for distant hills and longer, plusher loops for the foreground to build perspective.
Work with a palette of closely related colors—like ochre, rust, and dusty rose—to achieve a gradient effect that feels blended and painterly.
The density of the loops, not intricate stitching, becomes the focus, turning your wall hanging into a piece of touchable art.
Explore these contemporary texture techniques to add even more dimension.
4. Weave a Celestial Narrative with Mixed Threads
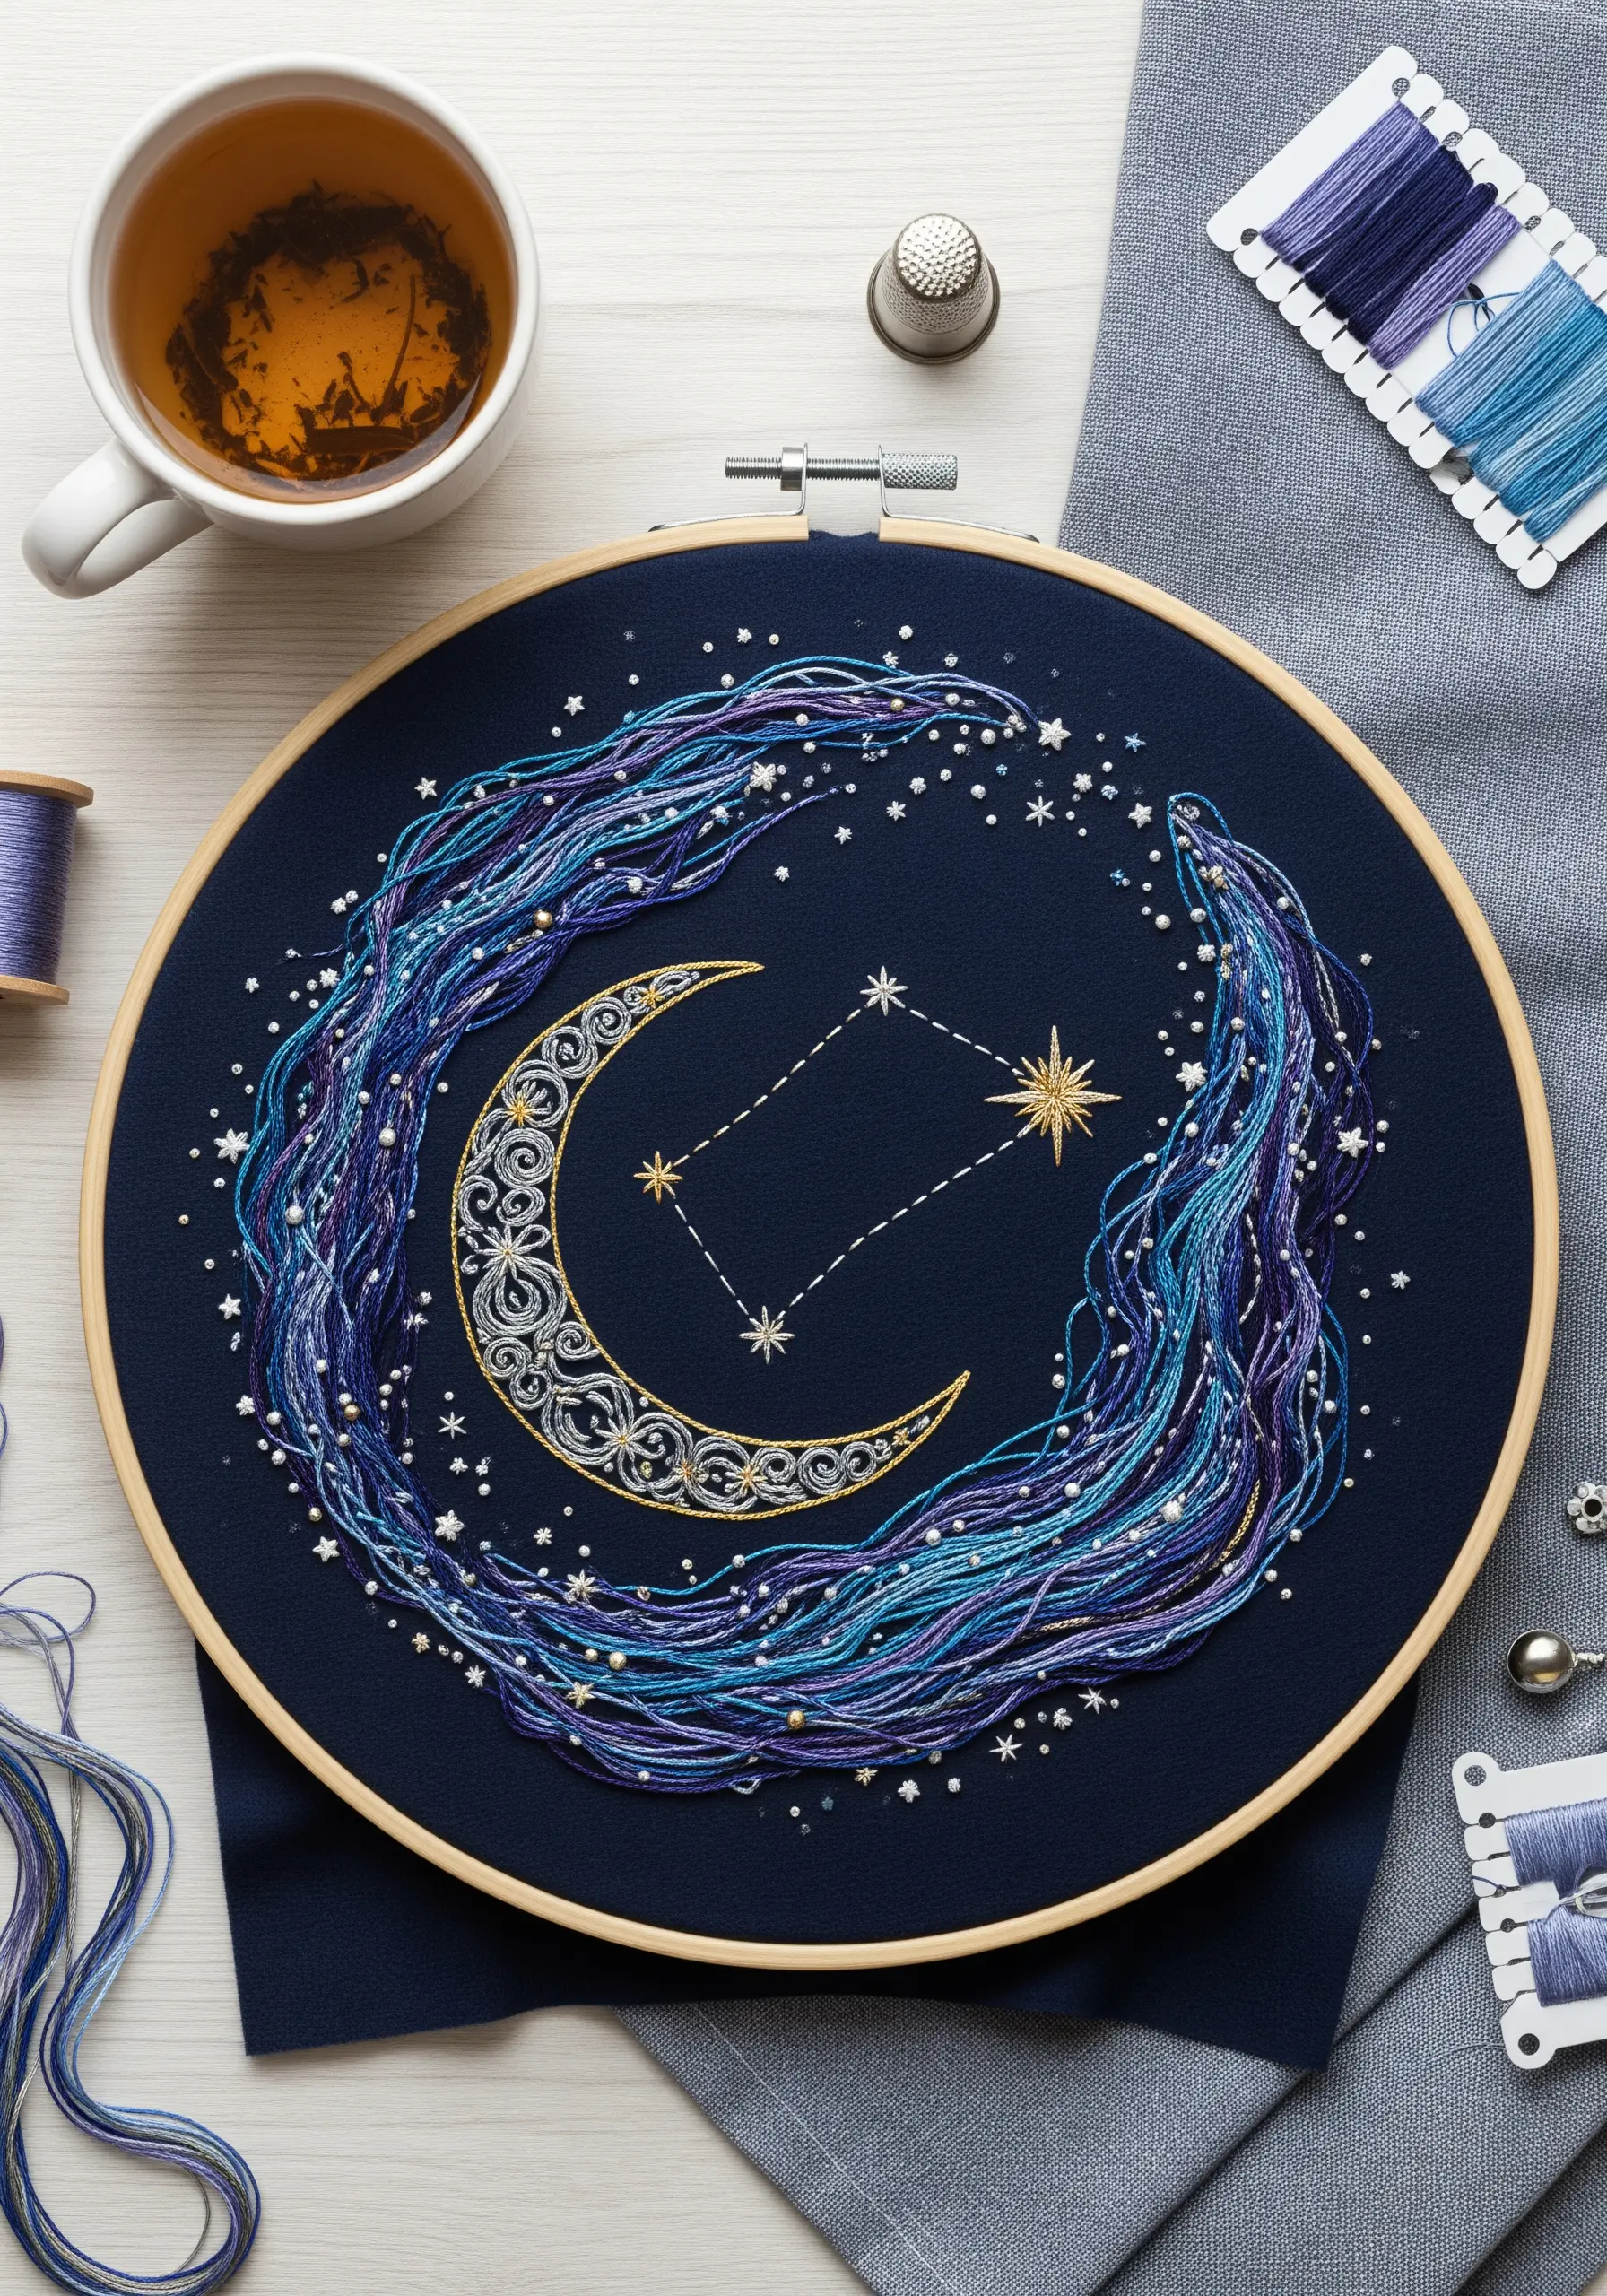
Elevate a simple cosmic design by combining threads of different finishes and weights to create a dynamic, light-catching surface.
Use a fine, single-strand metallic floss for the delicate constellation lines and stars so they glitter against the dark fabric.
For the swirling nebula, couch down multiple strands of variegated cotton, shiny rayon, and matte threads all at once.
This technique is faster than stitching individual lines and creates an organic, flowing texture that makes the piece feel ethereal and alive.
Adding abstract metallic thread projects to dark backgrounds creates a truly magical effect.
5. Embellish a Lampshade with Elegant Restraint
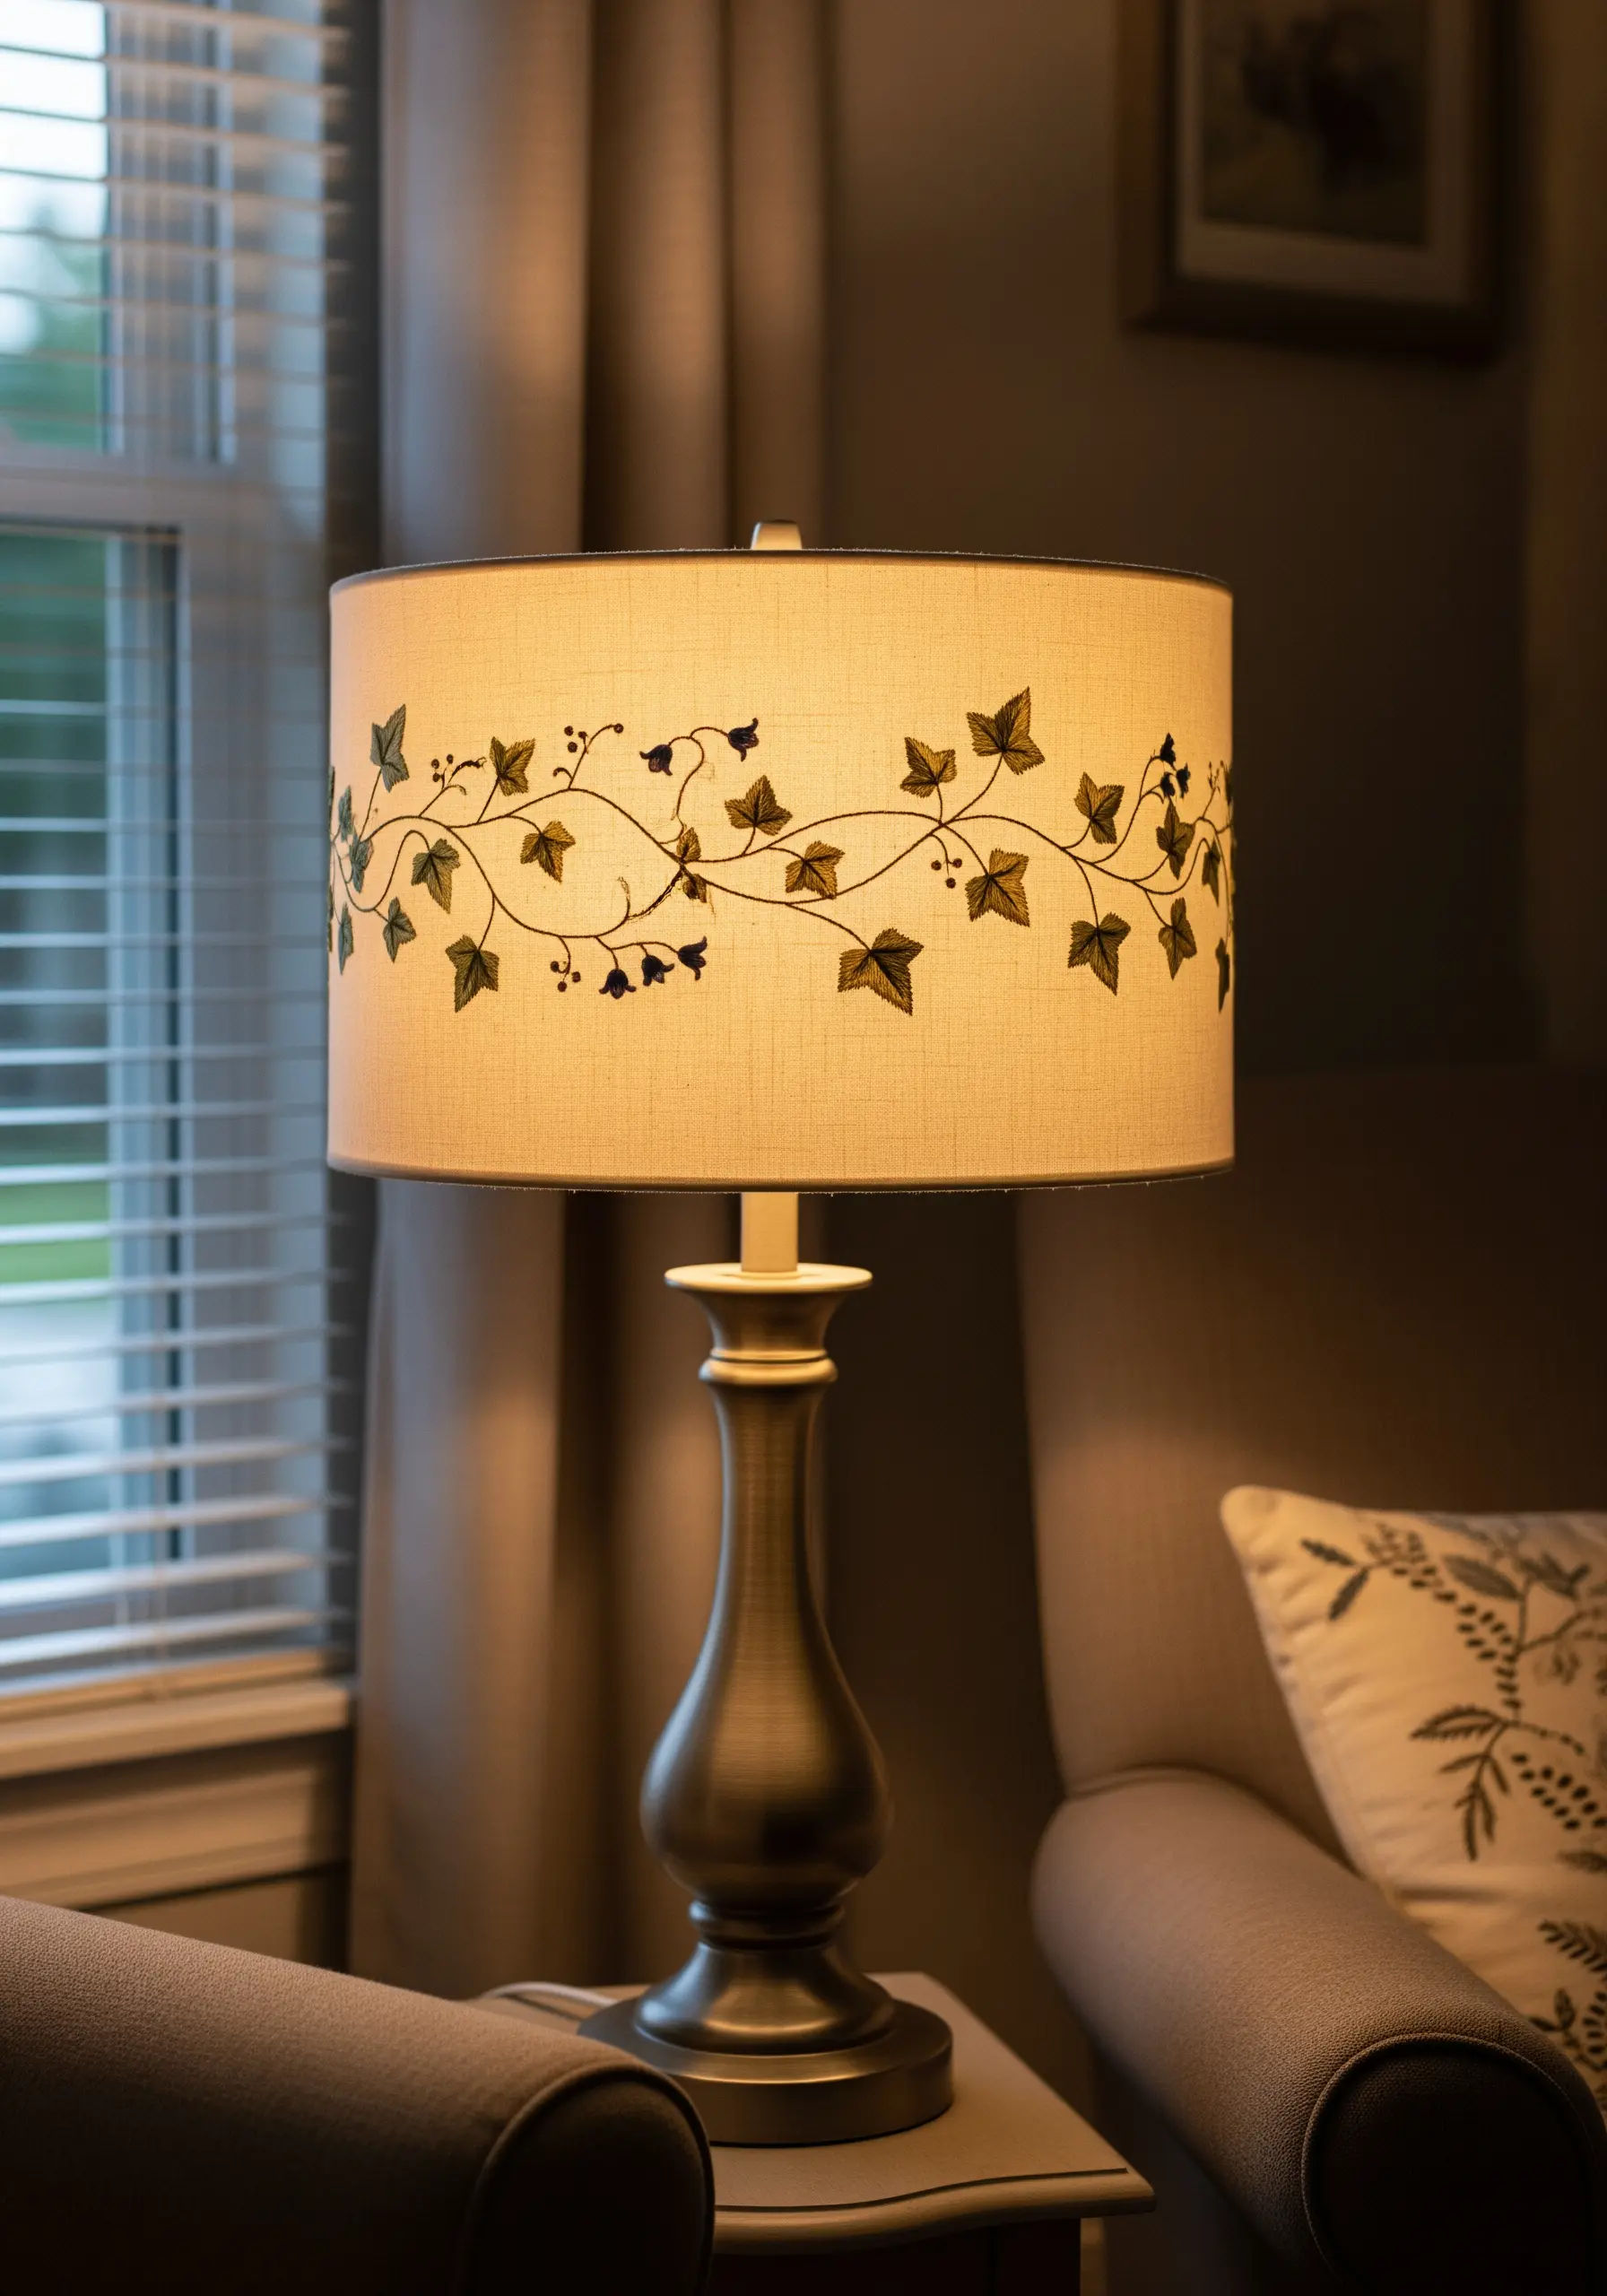
Embroidering a lampshade requires choosing stitches that work on a rigid, curved surface and won’t disrupt its structure.
Stick to simple, linear stitches like the stem stitch, running stitch, or chain stitch, as they don’t require much maneuvering on the backside of the fabric.
Trace your design lightly with a water-soluble pen and use a curved needle if you find it difficult to angle a straight one inside the shade.
The key is a light touch—a delicate, winding vine appears far more sophisticated than a dense, heavy motif.
6. Paint with Thread to Create Atmospheric Perspective
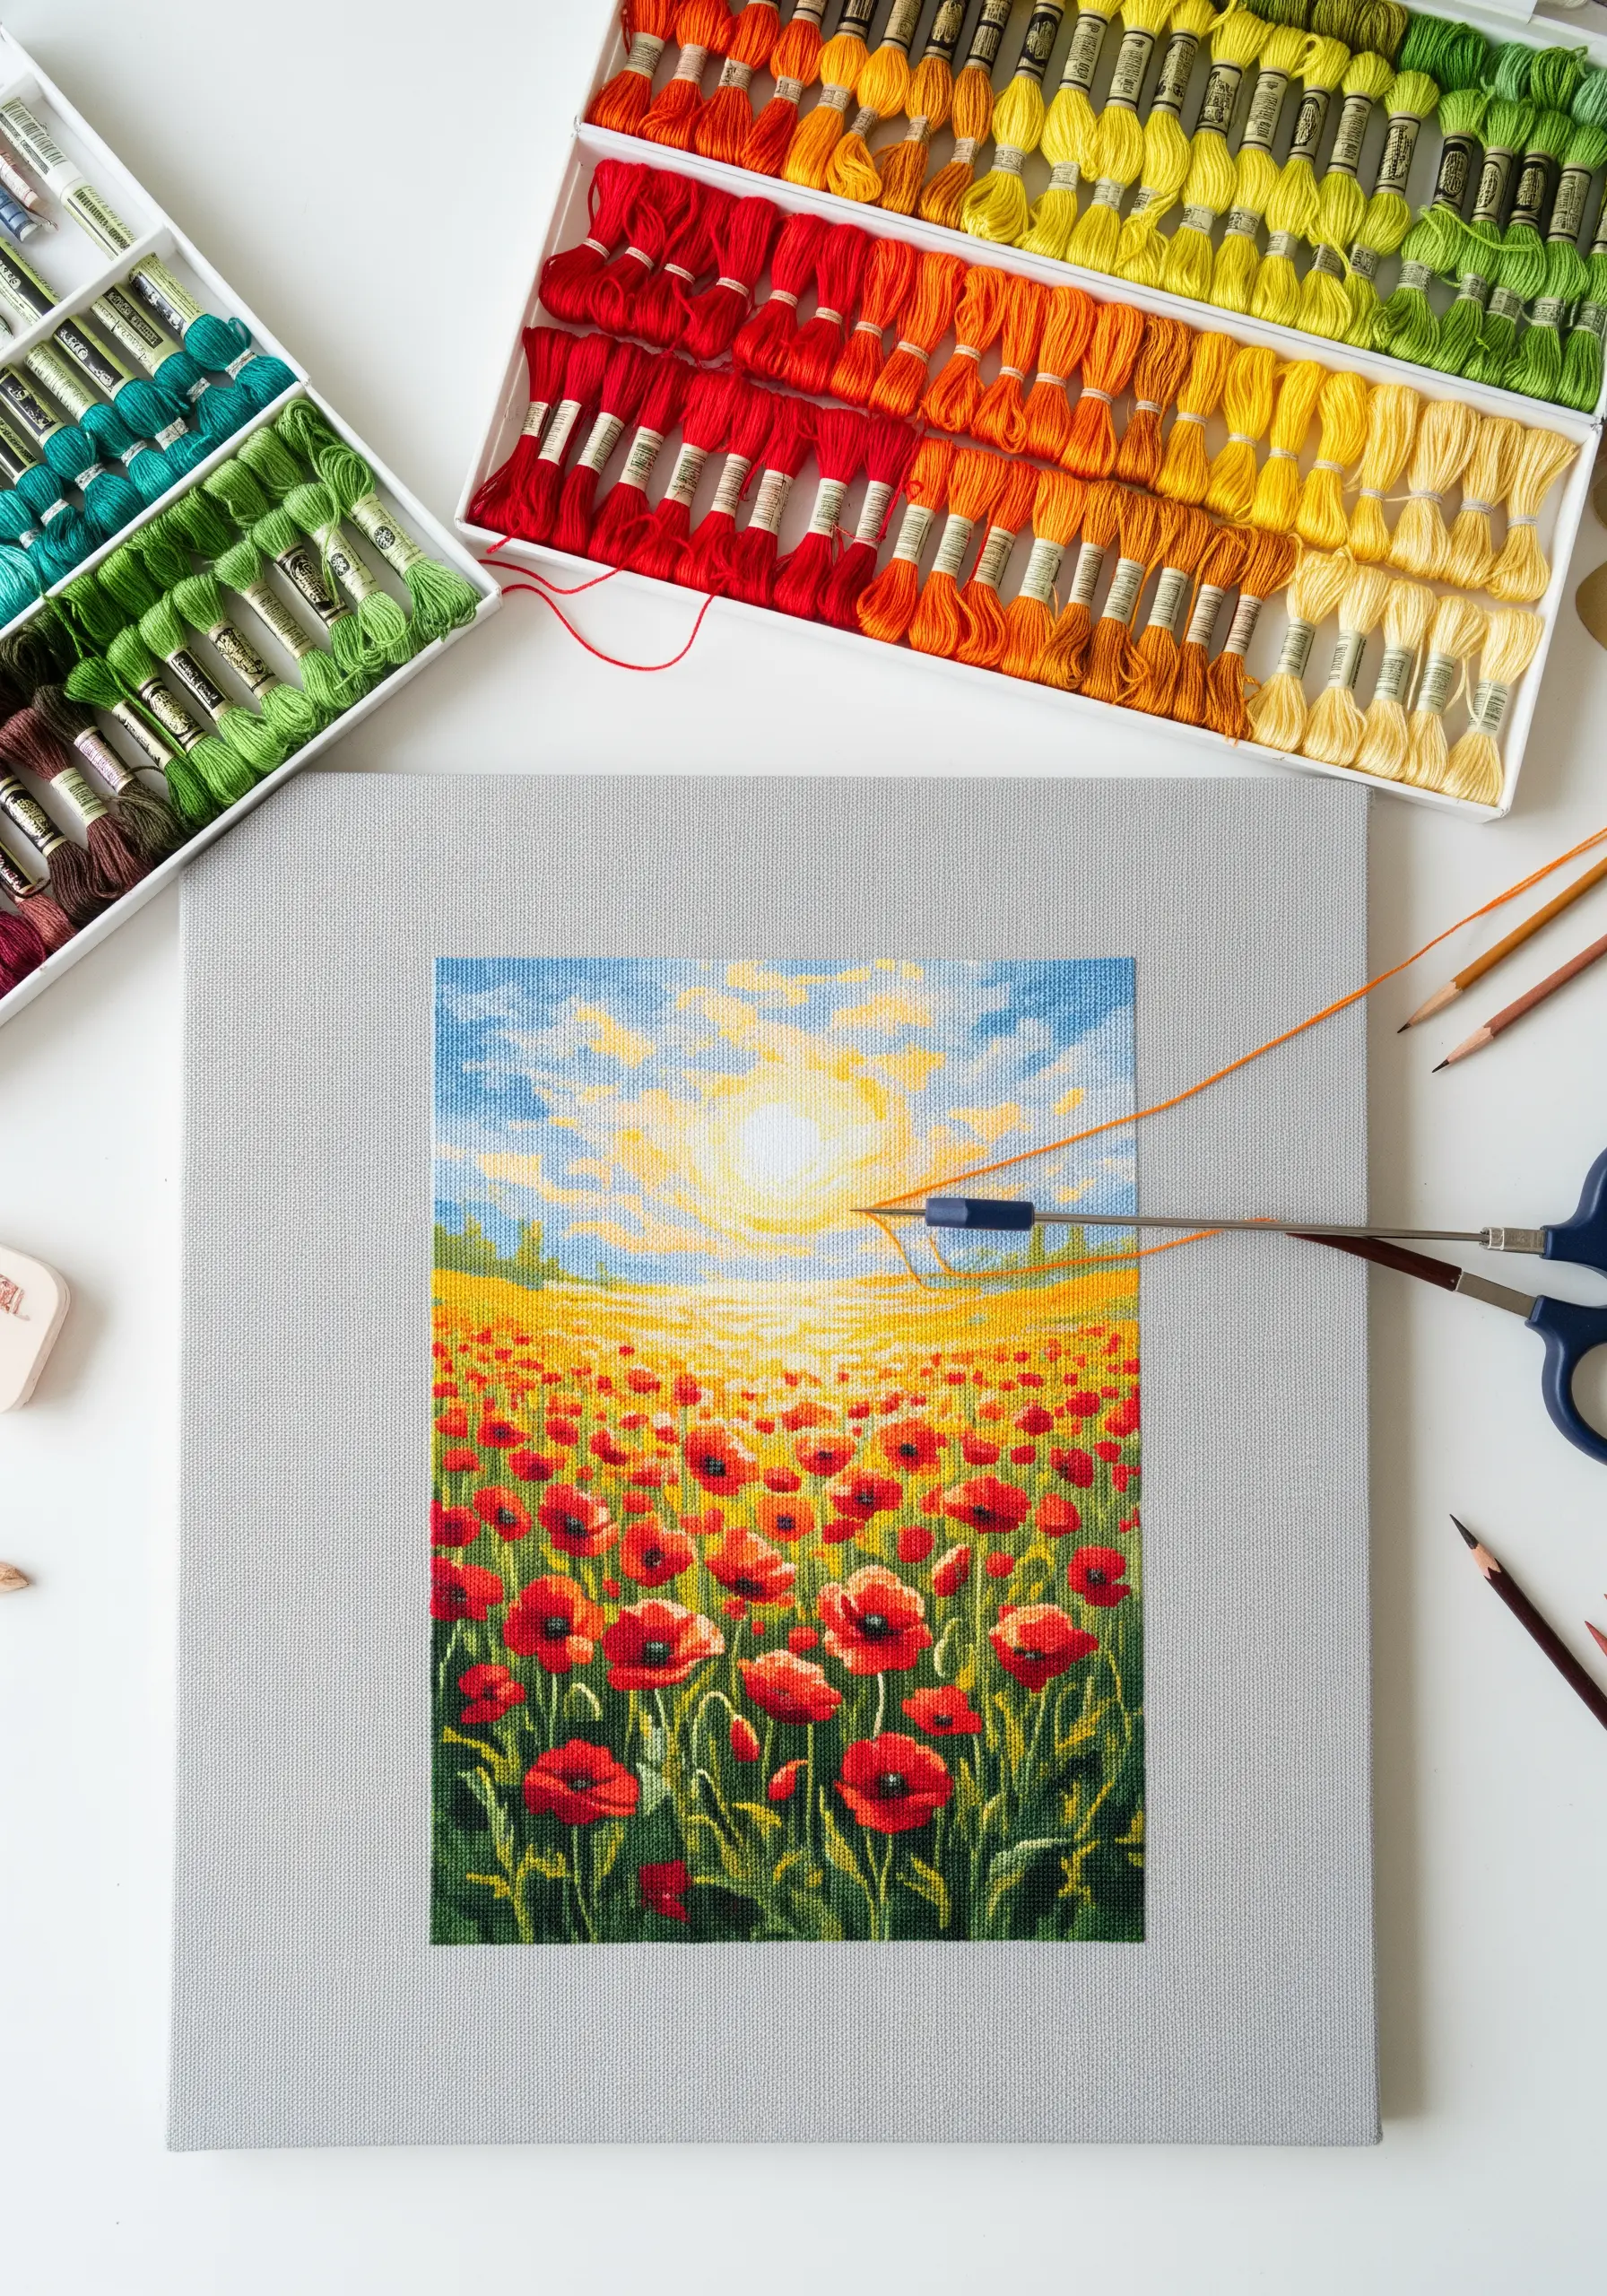
To give your embroidered landscapes a true sense of distance, you must treat your thread like paint.
For the poppies in the foreground, use three or four strands of floss and distinct stitches like French knots for the centers and lazy daisies for petals.
As you move toward the horizon, reduce to two strands, then one, and simplify the flowers into mere suggestions of color using single, straight stitches.
This methodical shift in detail and thread weight is what tricks the eye into seeing a vast, sun-drenched field rather than a flat surface.
7. Achieve Flawless Art Deco Lines with Couching
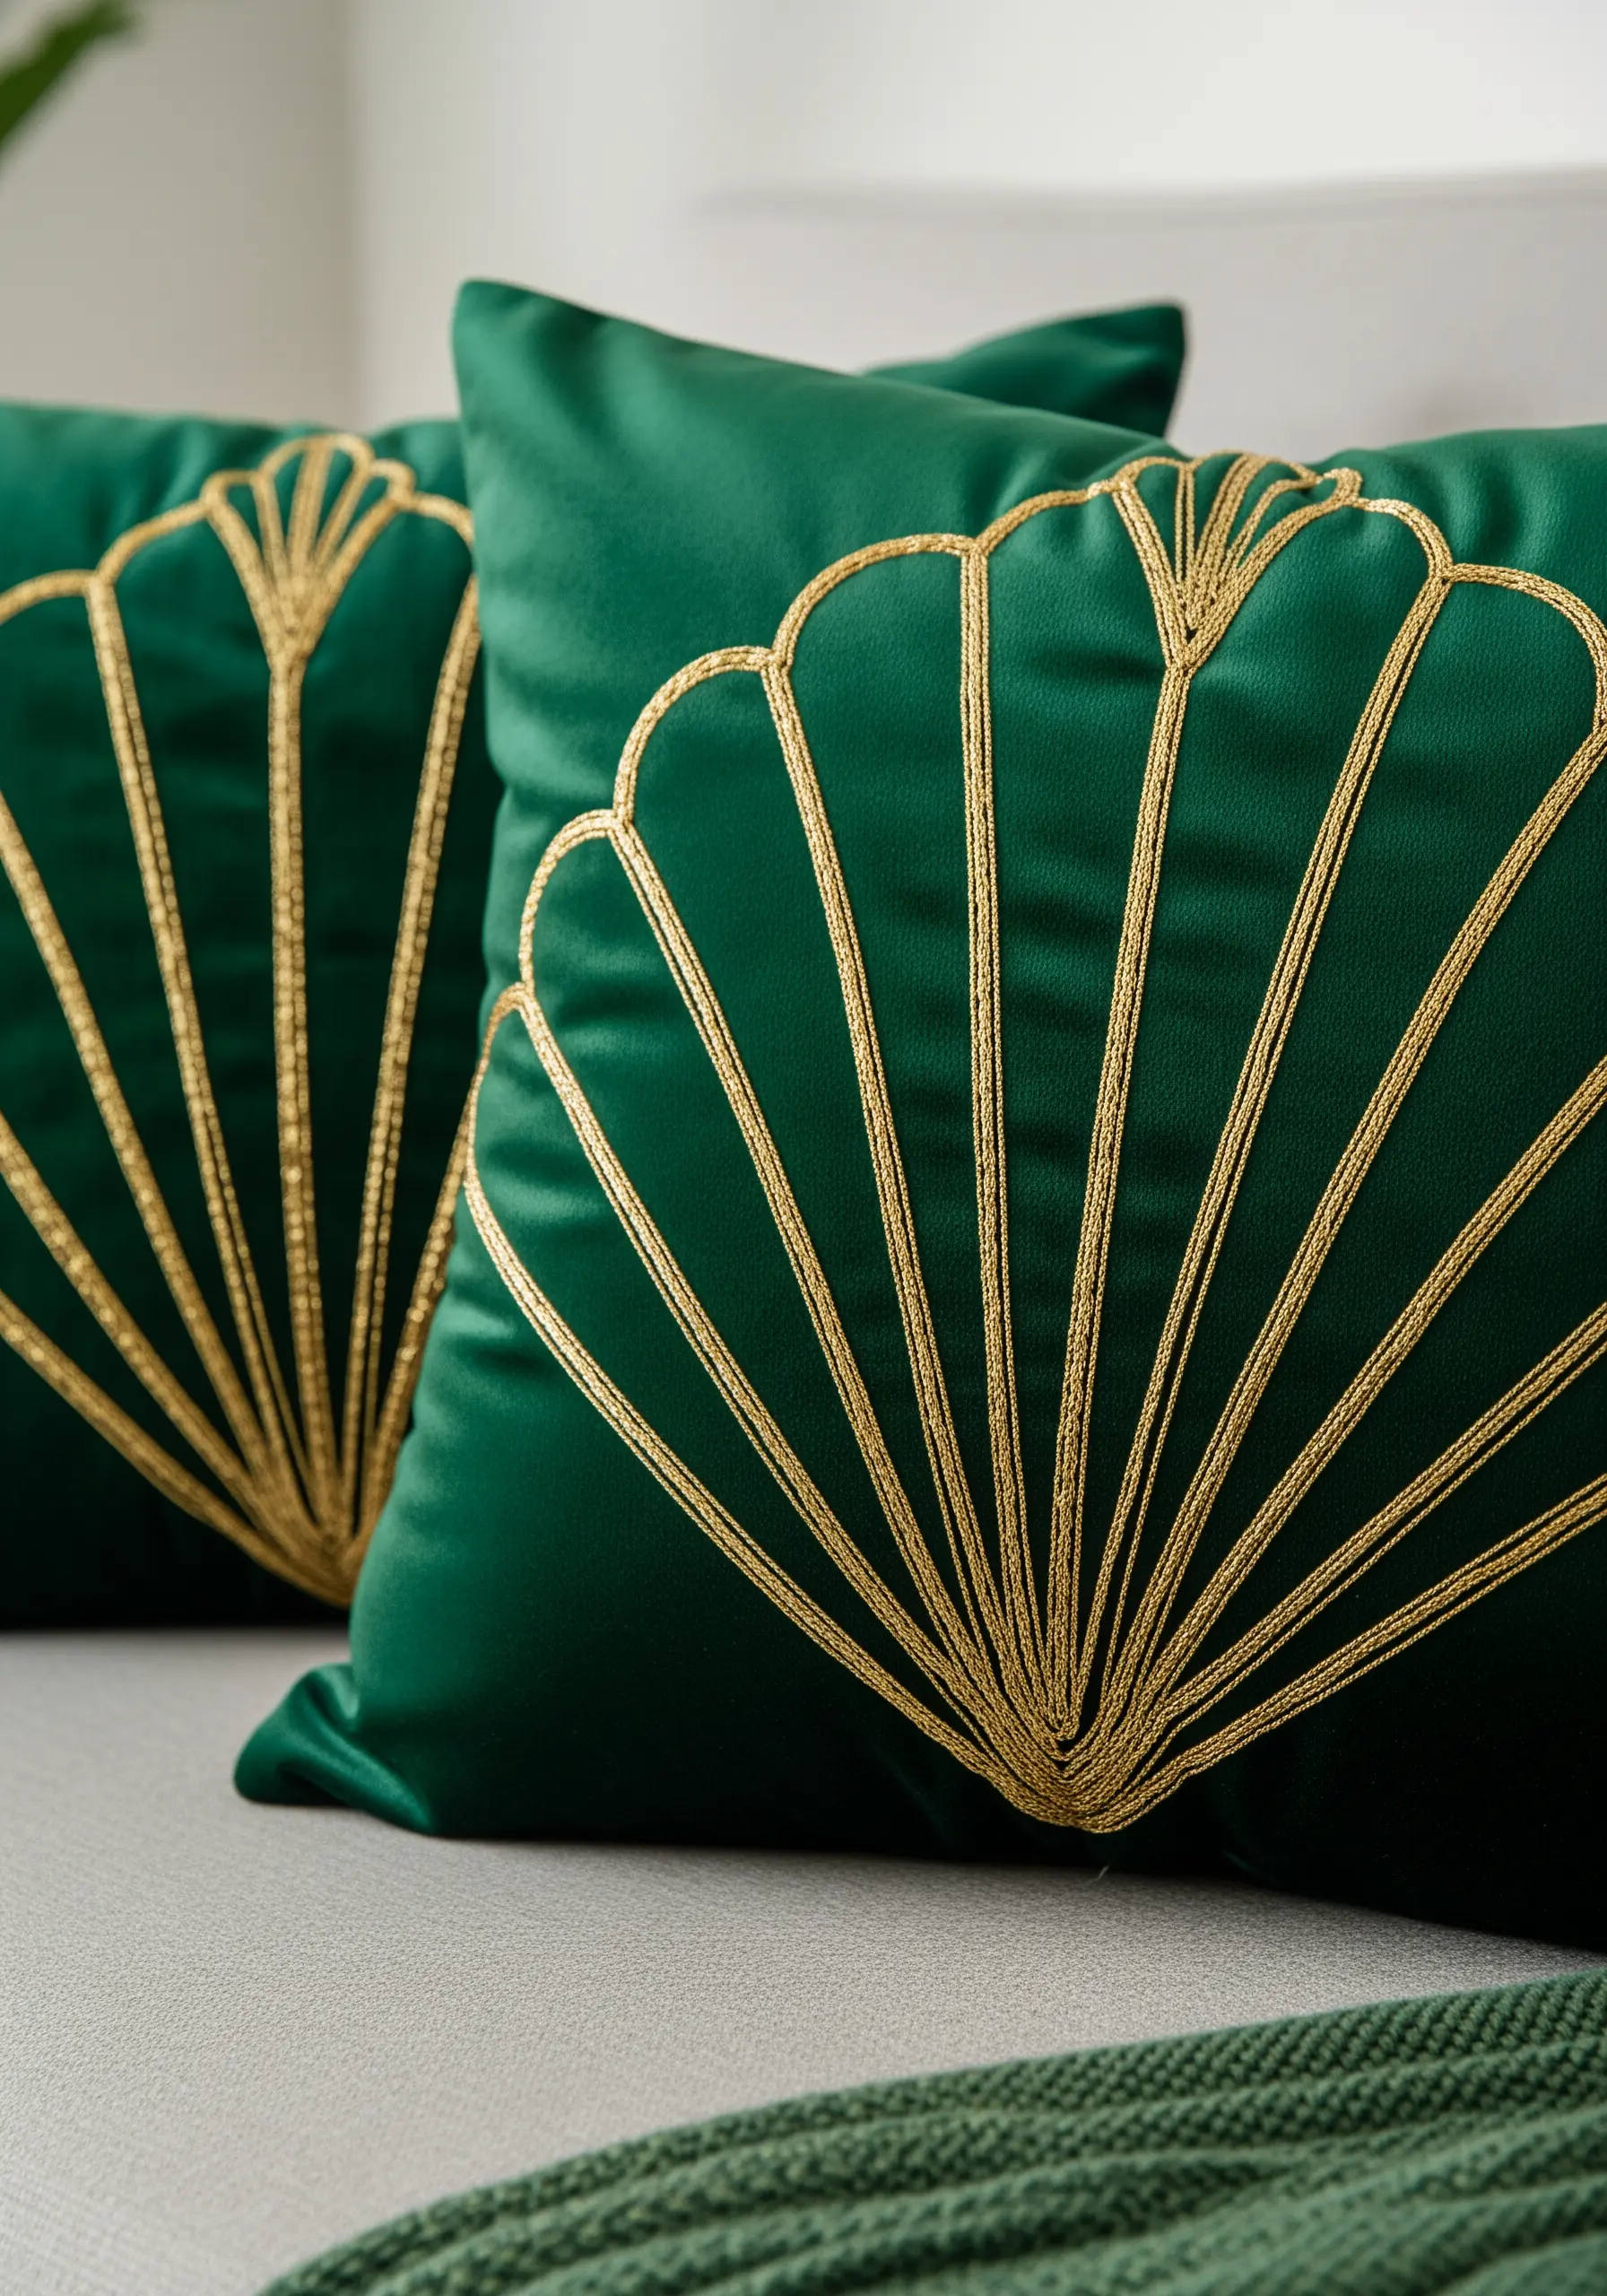
Instead of struggling with satin stitch for the long, graphic lines of an Art Deco motif, use the couching technique for a perfect finish.
Lay down a thick, lustrous cord—like a gold metallic or a smooth perle cotton—along your design lines.
Then, using a single, matching strand of regular embroidery floss, come up from the back of the fabric and make tiny, perpendicular tacking stitches over the cord to hold it in place.
This method ensures your lines are perfectly smooth, raised, and uniform, which is essential for capturing the elegance of the style on luxe fabrics like velvet.
These hand-stitched cushion borders can transform any pillow.
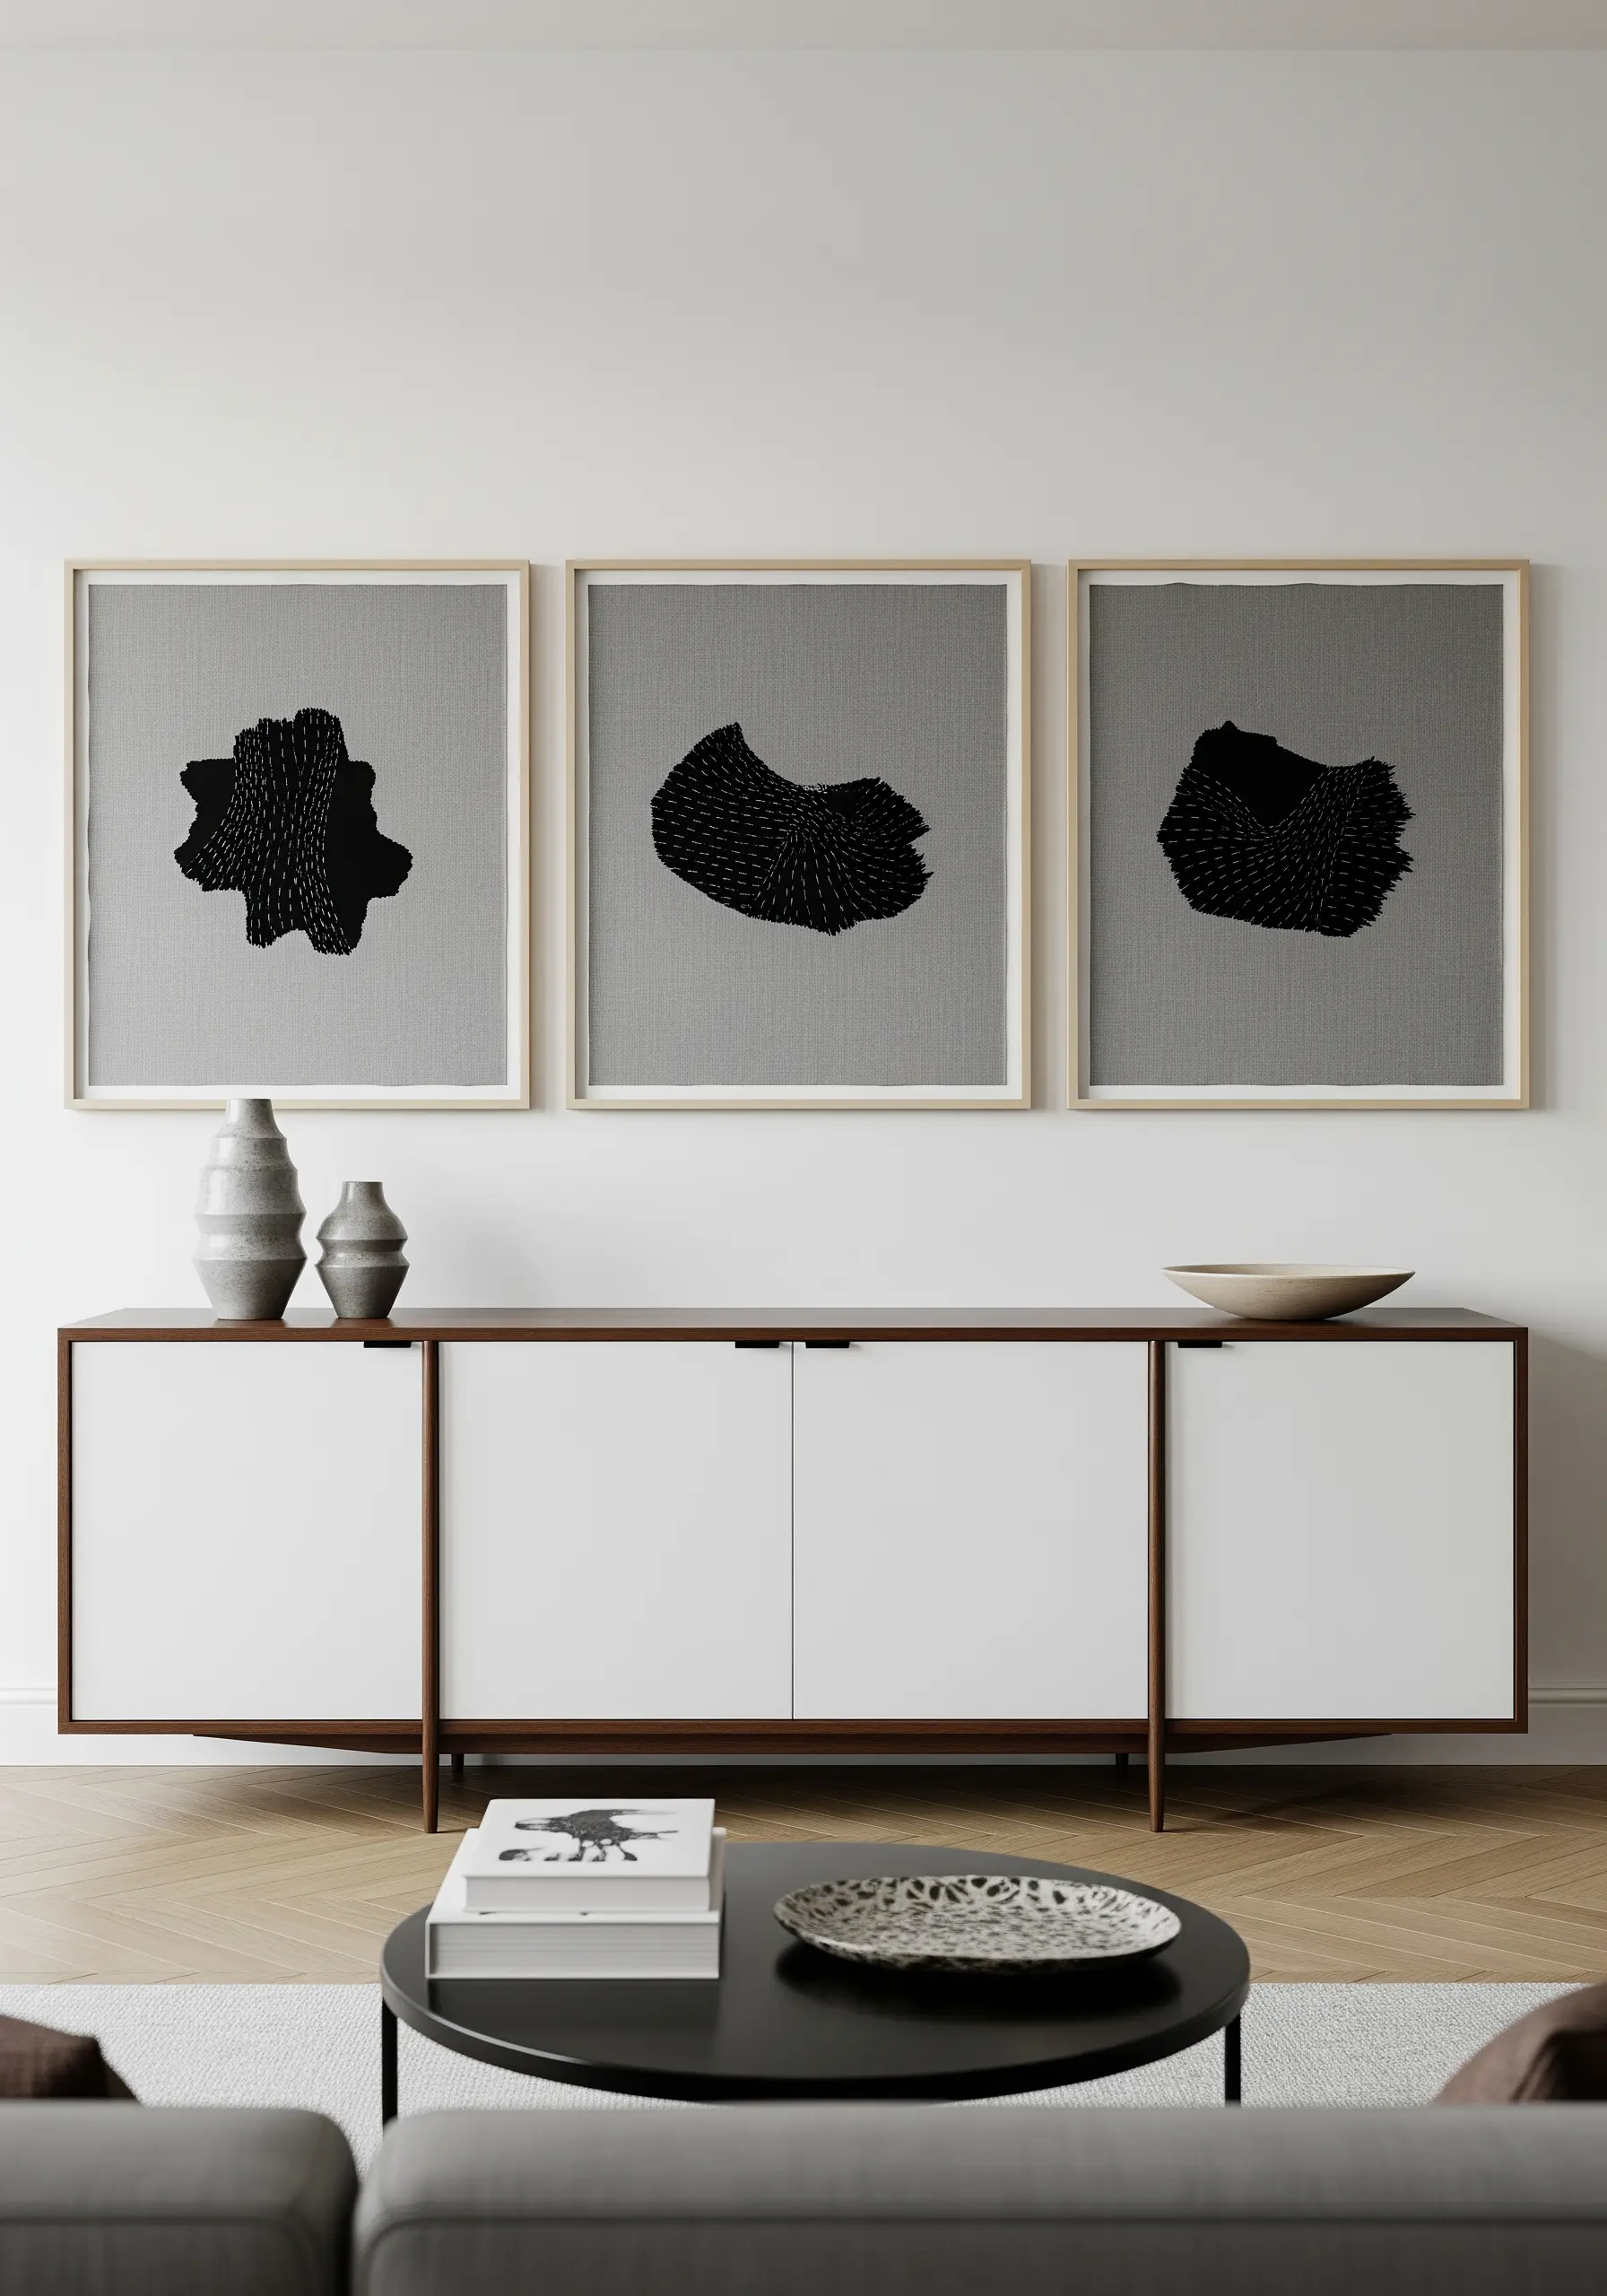
8. Embrace Negative Space in Minimalist Wall Art
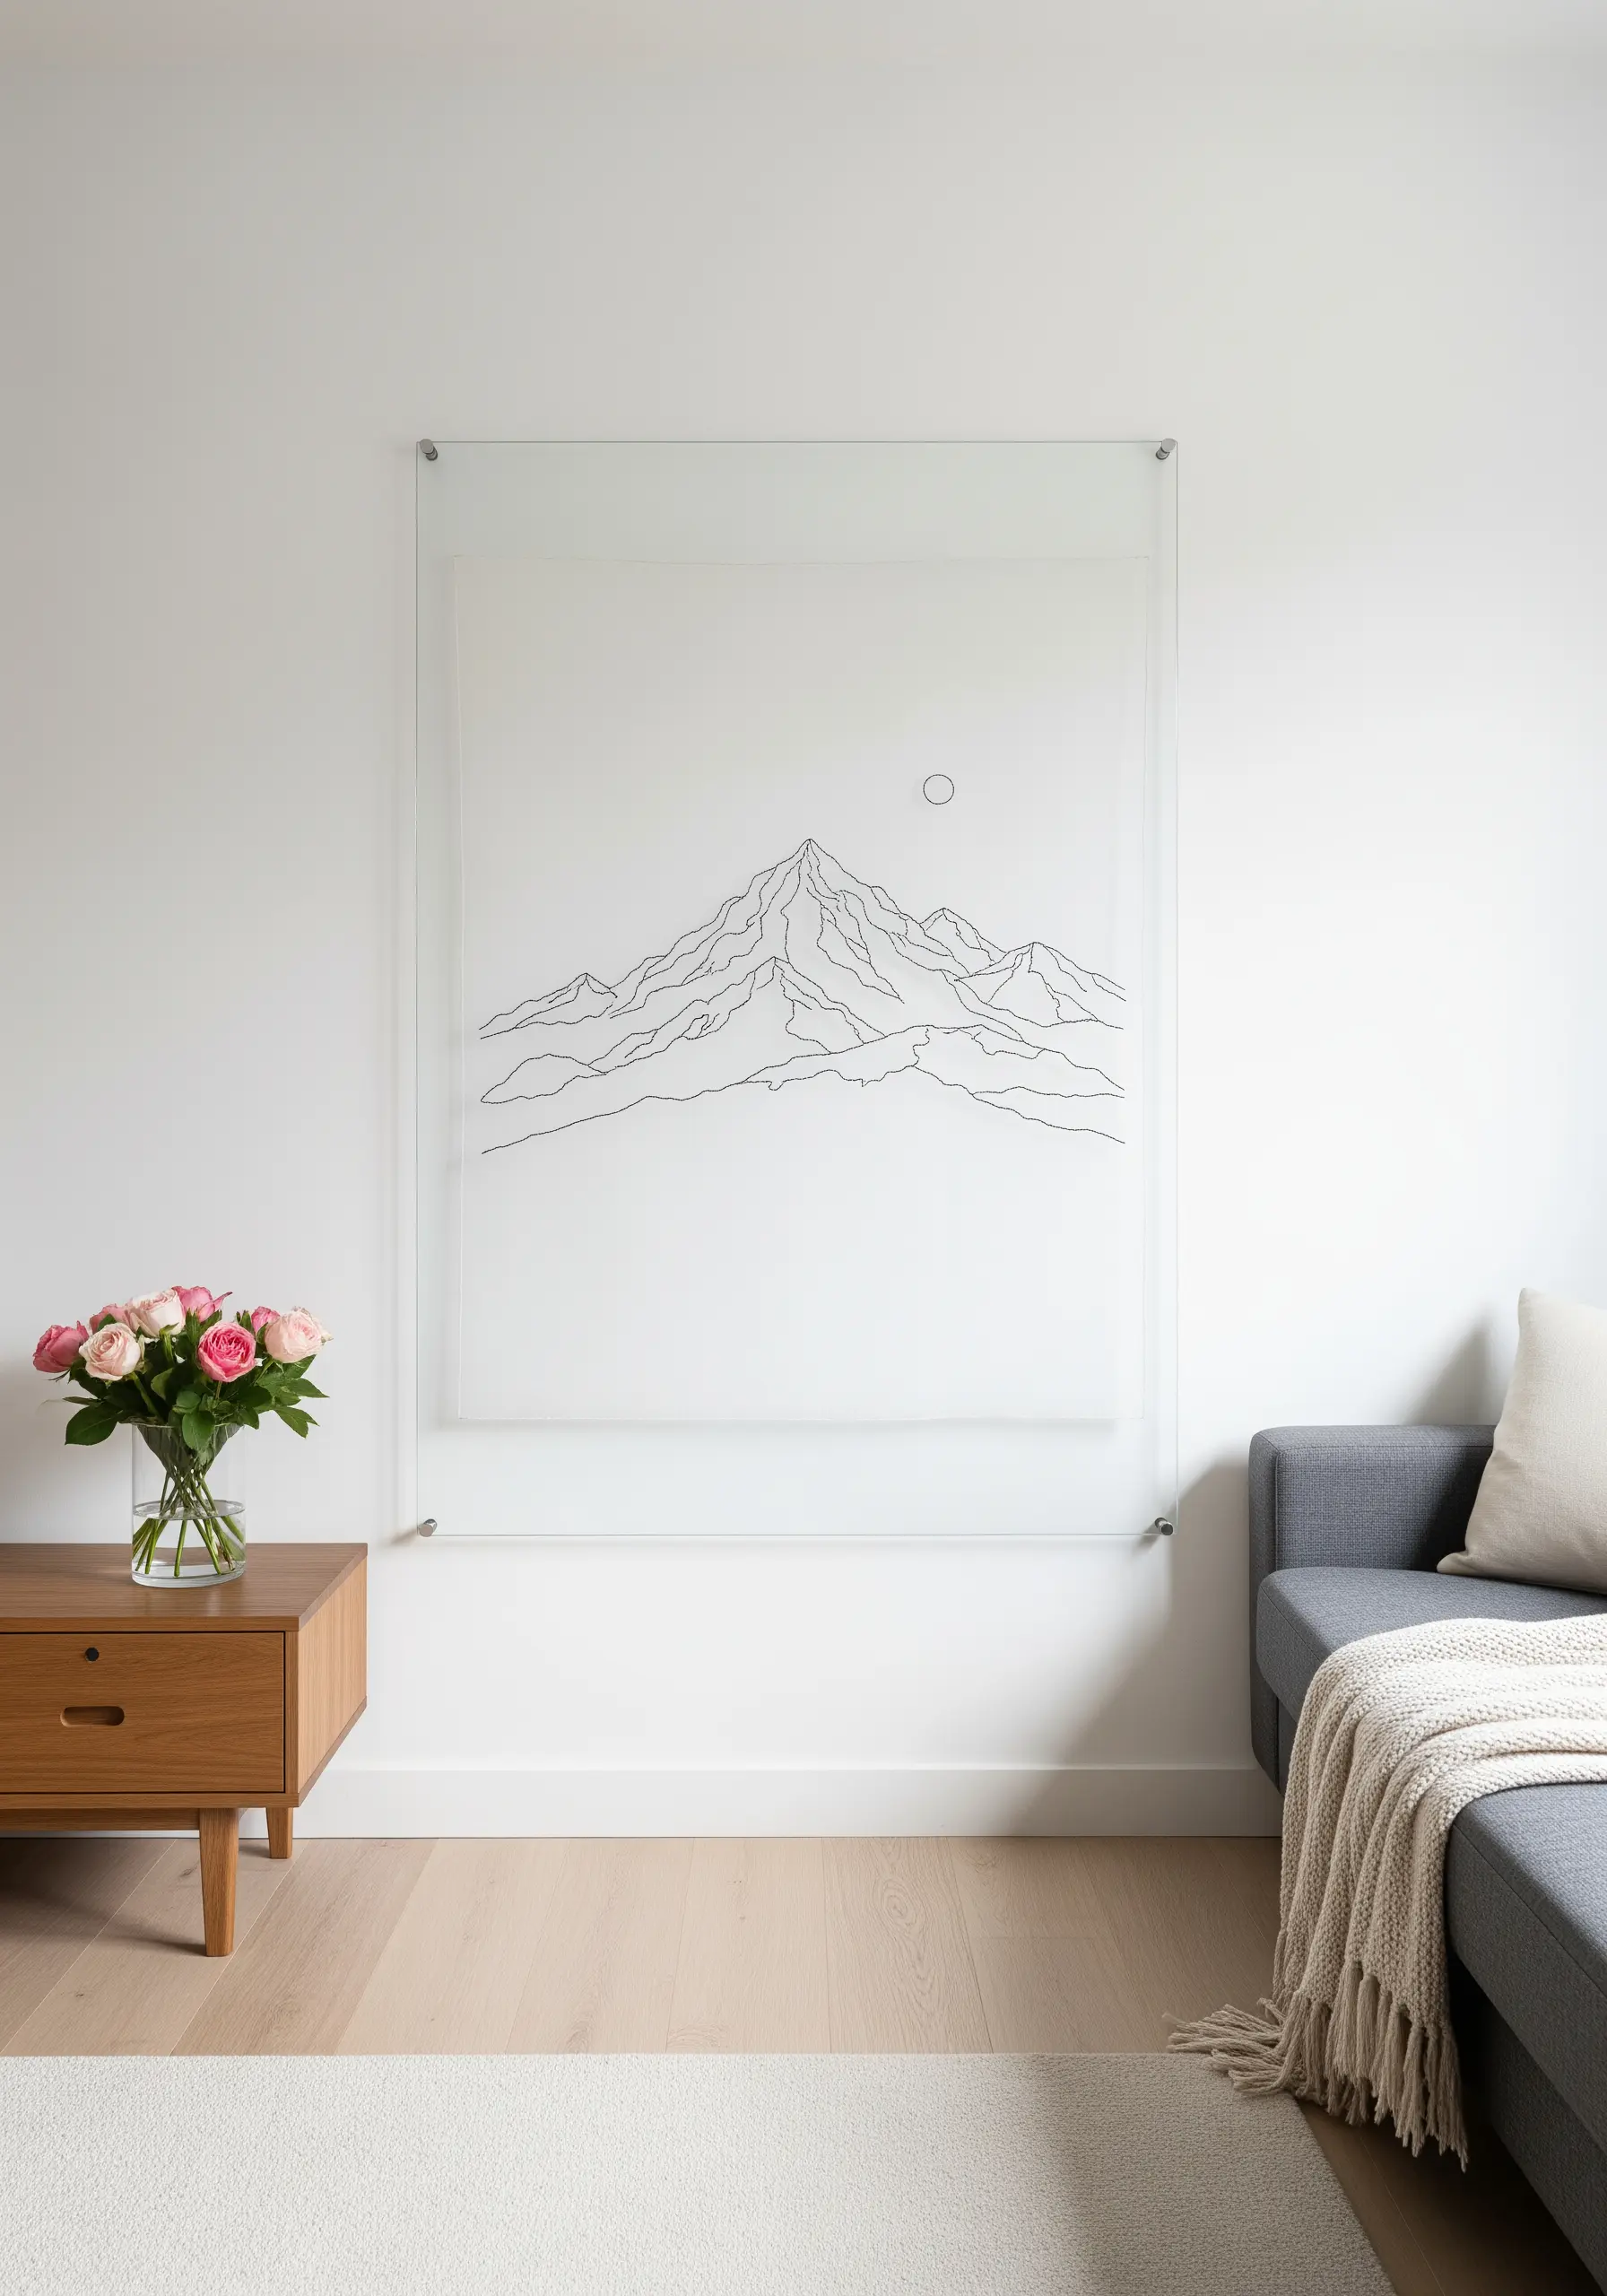
The power of a minimalist line-art piece lies in the pristine emptiness that surrounds it; your focus must be on flawless execution of the lines themselves.
Choose a high-quality, single-color thread and a simple backstitch for ultimate control and crispness.
Stretch your fabric—especially a semi-sheer one like this—drum-tight in its frame or hoop to prevent any puckering or distortion of the lines.
When displayed in a floating acrylic frame, the negative space becomes part of the art, interacting with the wall behind it and creating a light, airy focal point.
Consider large-scale embroidery tapestries to make a truly stunning statement.
9. Add Subtle Charm to Utilitarian Objects
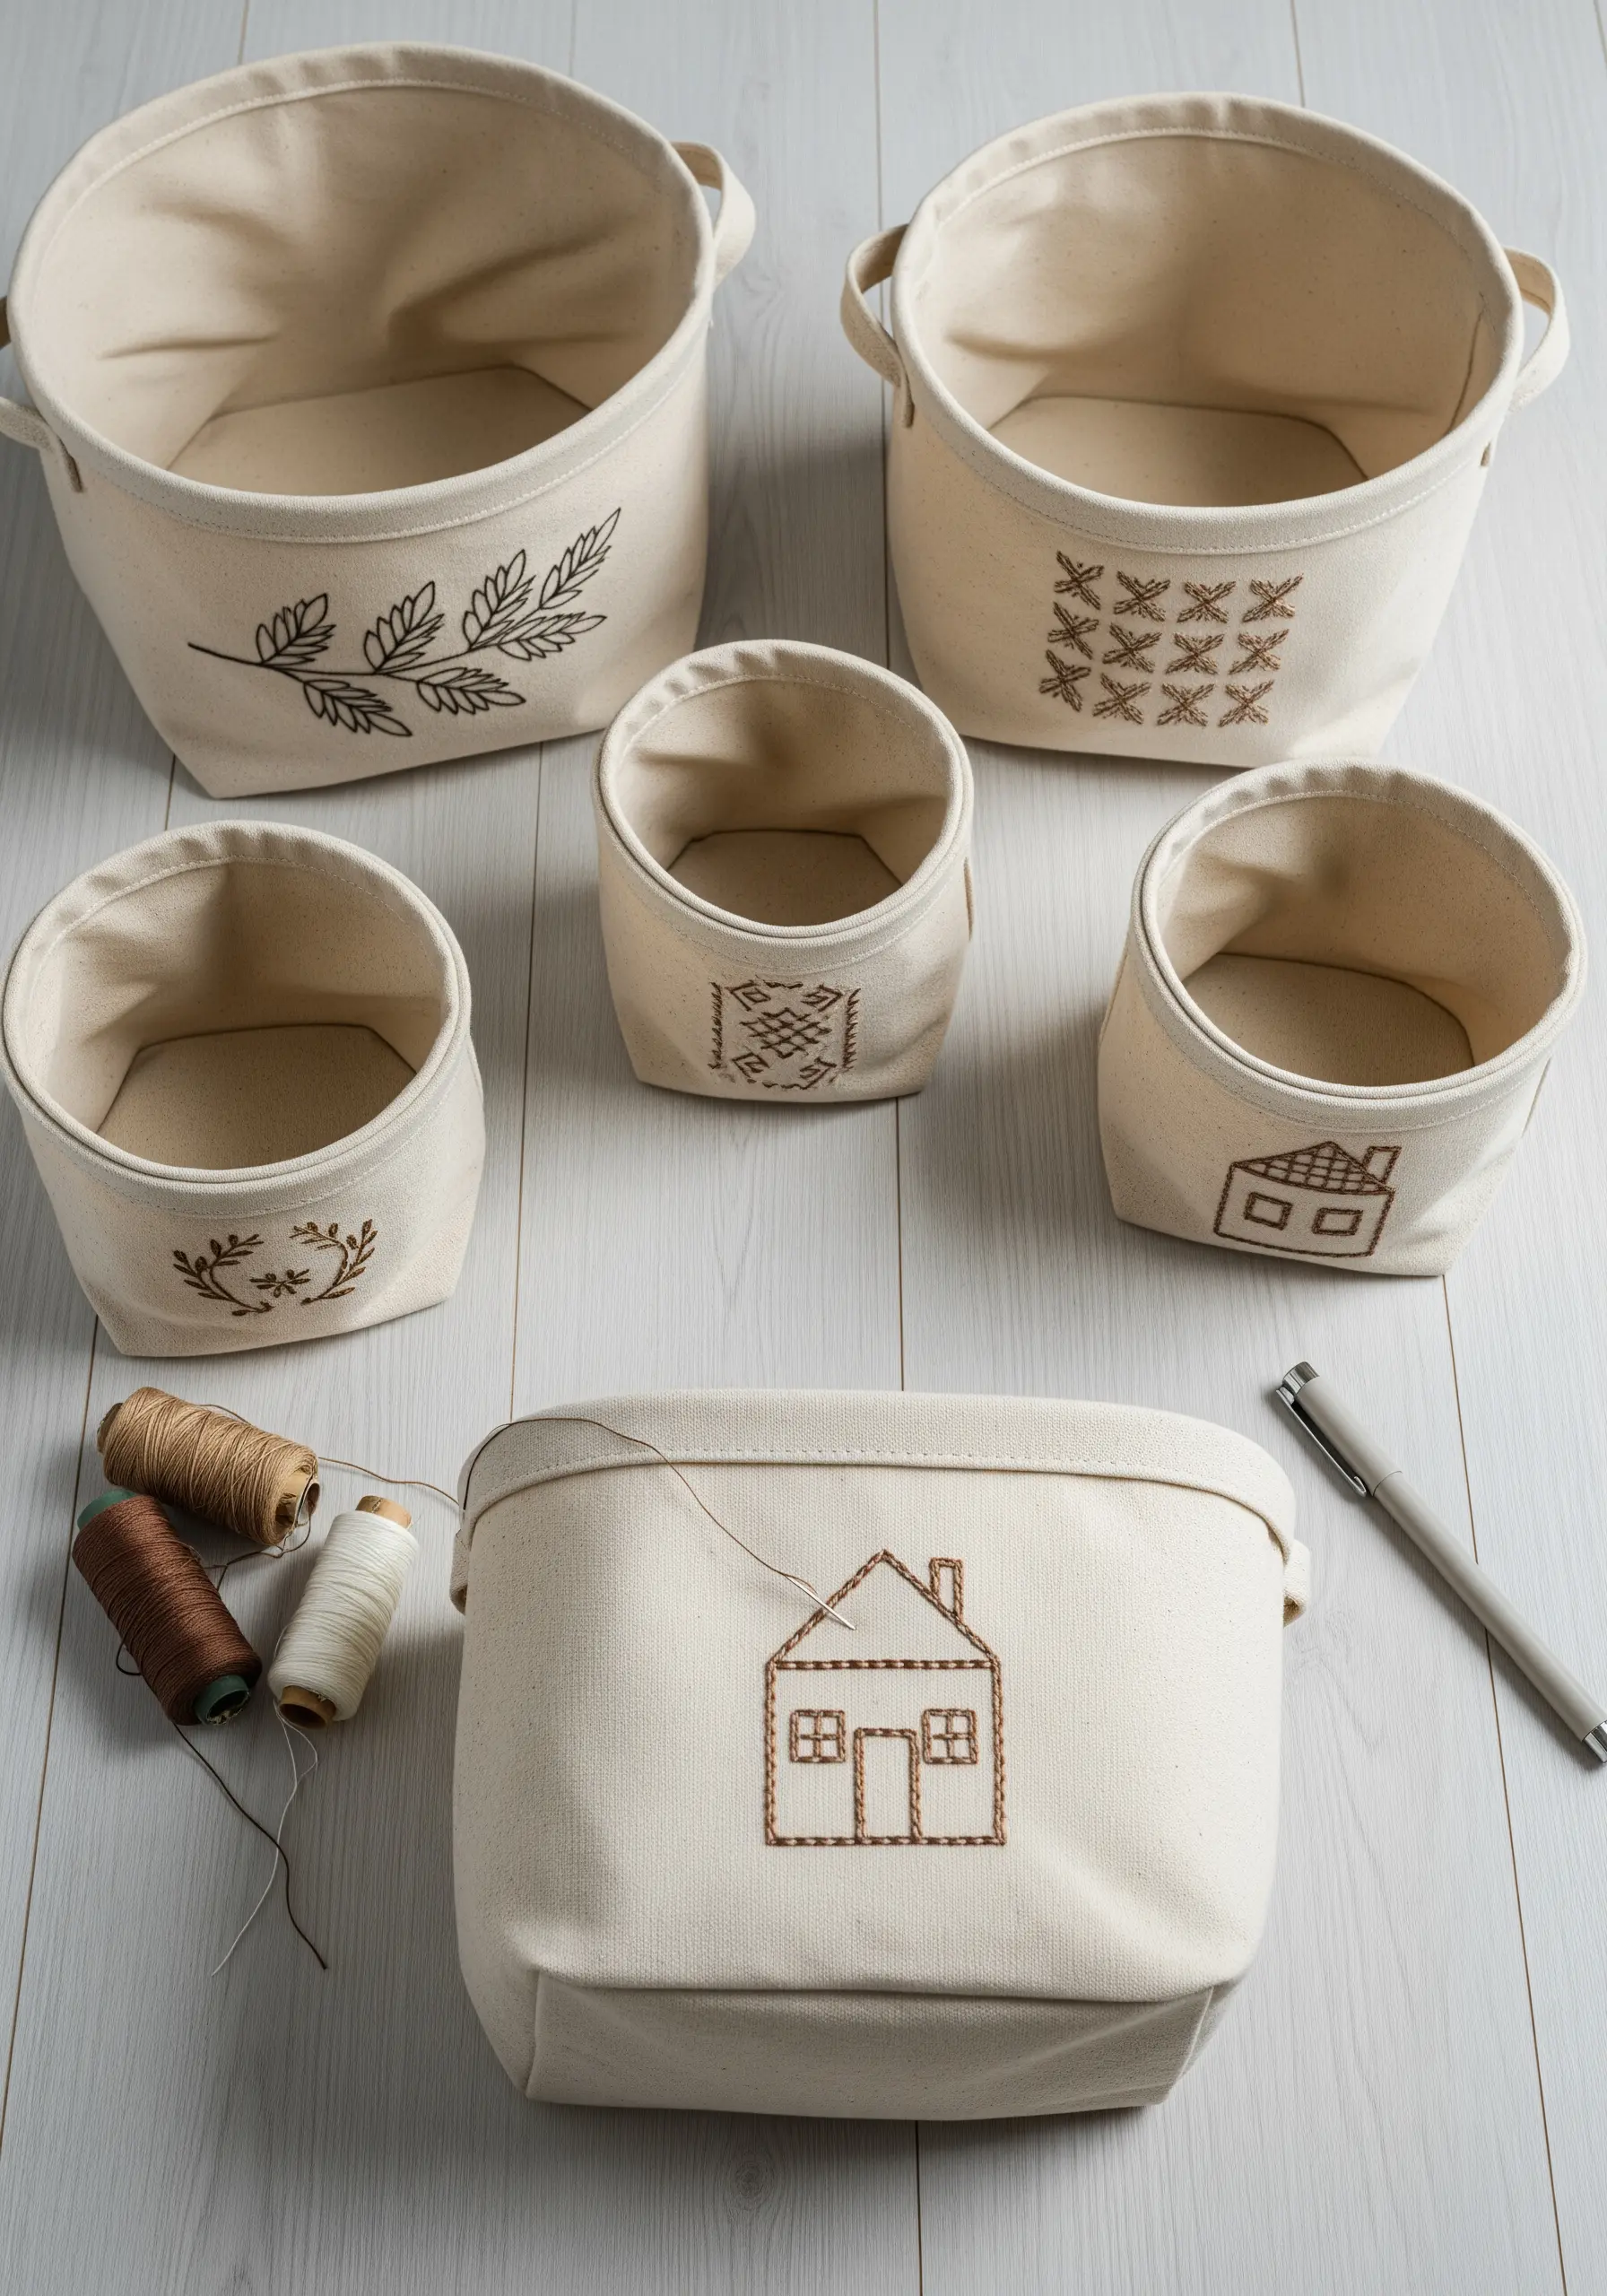
Elevate simple canvas storage baskets with discreet, hand-stitched details that add personality without compromising function.
Select simple, graphic motifs and use a basic backstitch or running stitch, which are strong enough to hold up on heavy-duty fabric.
Use a thicker thread, like a size 8 perle cotton, so the design doesn’t get lost in the texture of the canvas.
A tonal color scheme—like brown thread on natural canvas—keeps the look refined and cohesive, turning everyday storage into a thoughtful part of your decor.
These small stitches that add instant charm are perfect for functional items.
10. Build a Woodland Scene with 3D Stumpwork
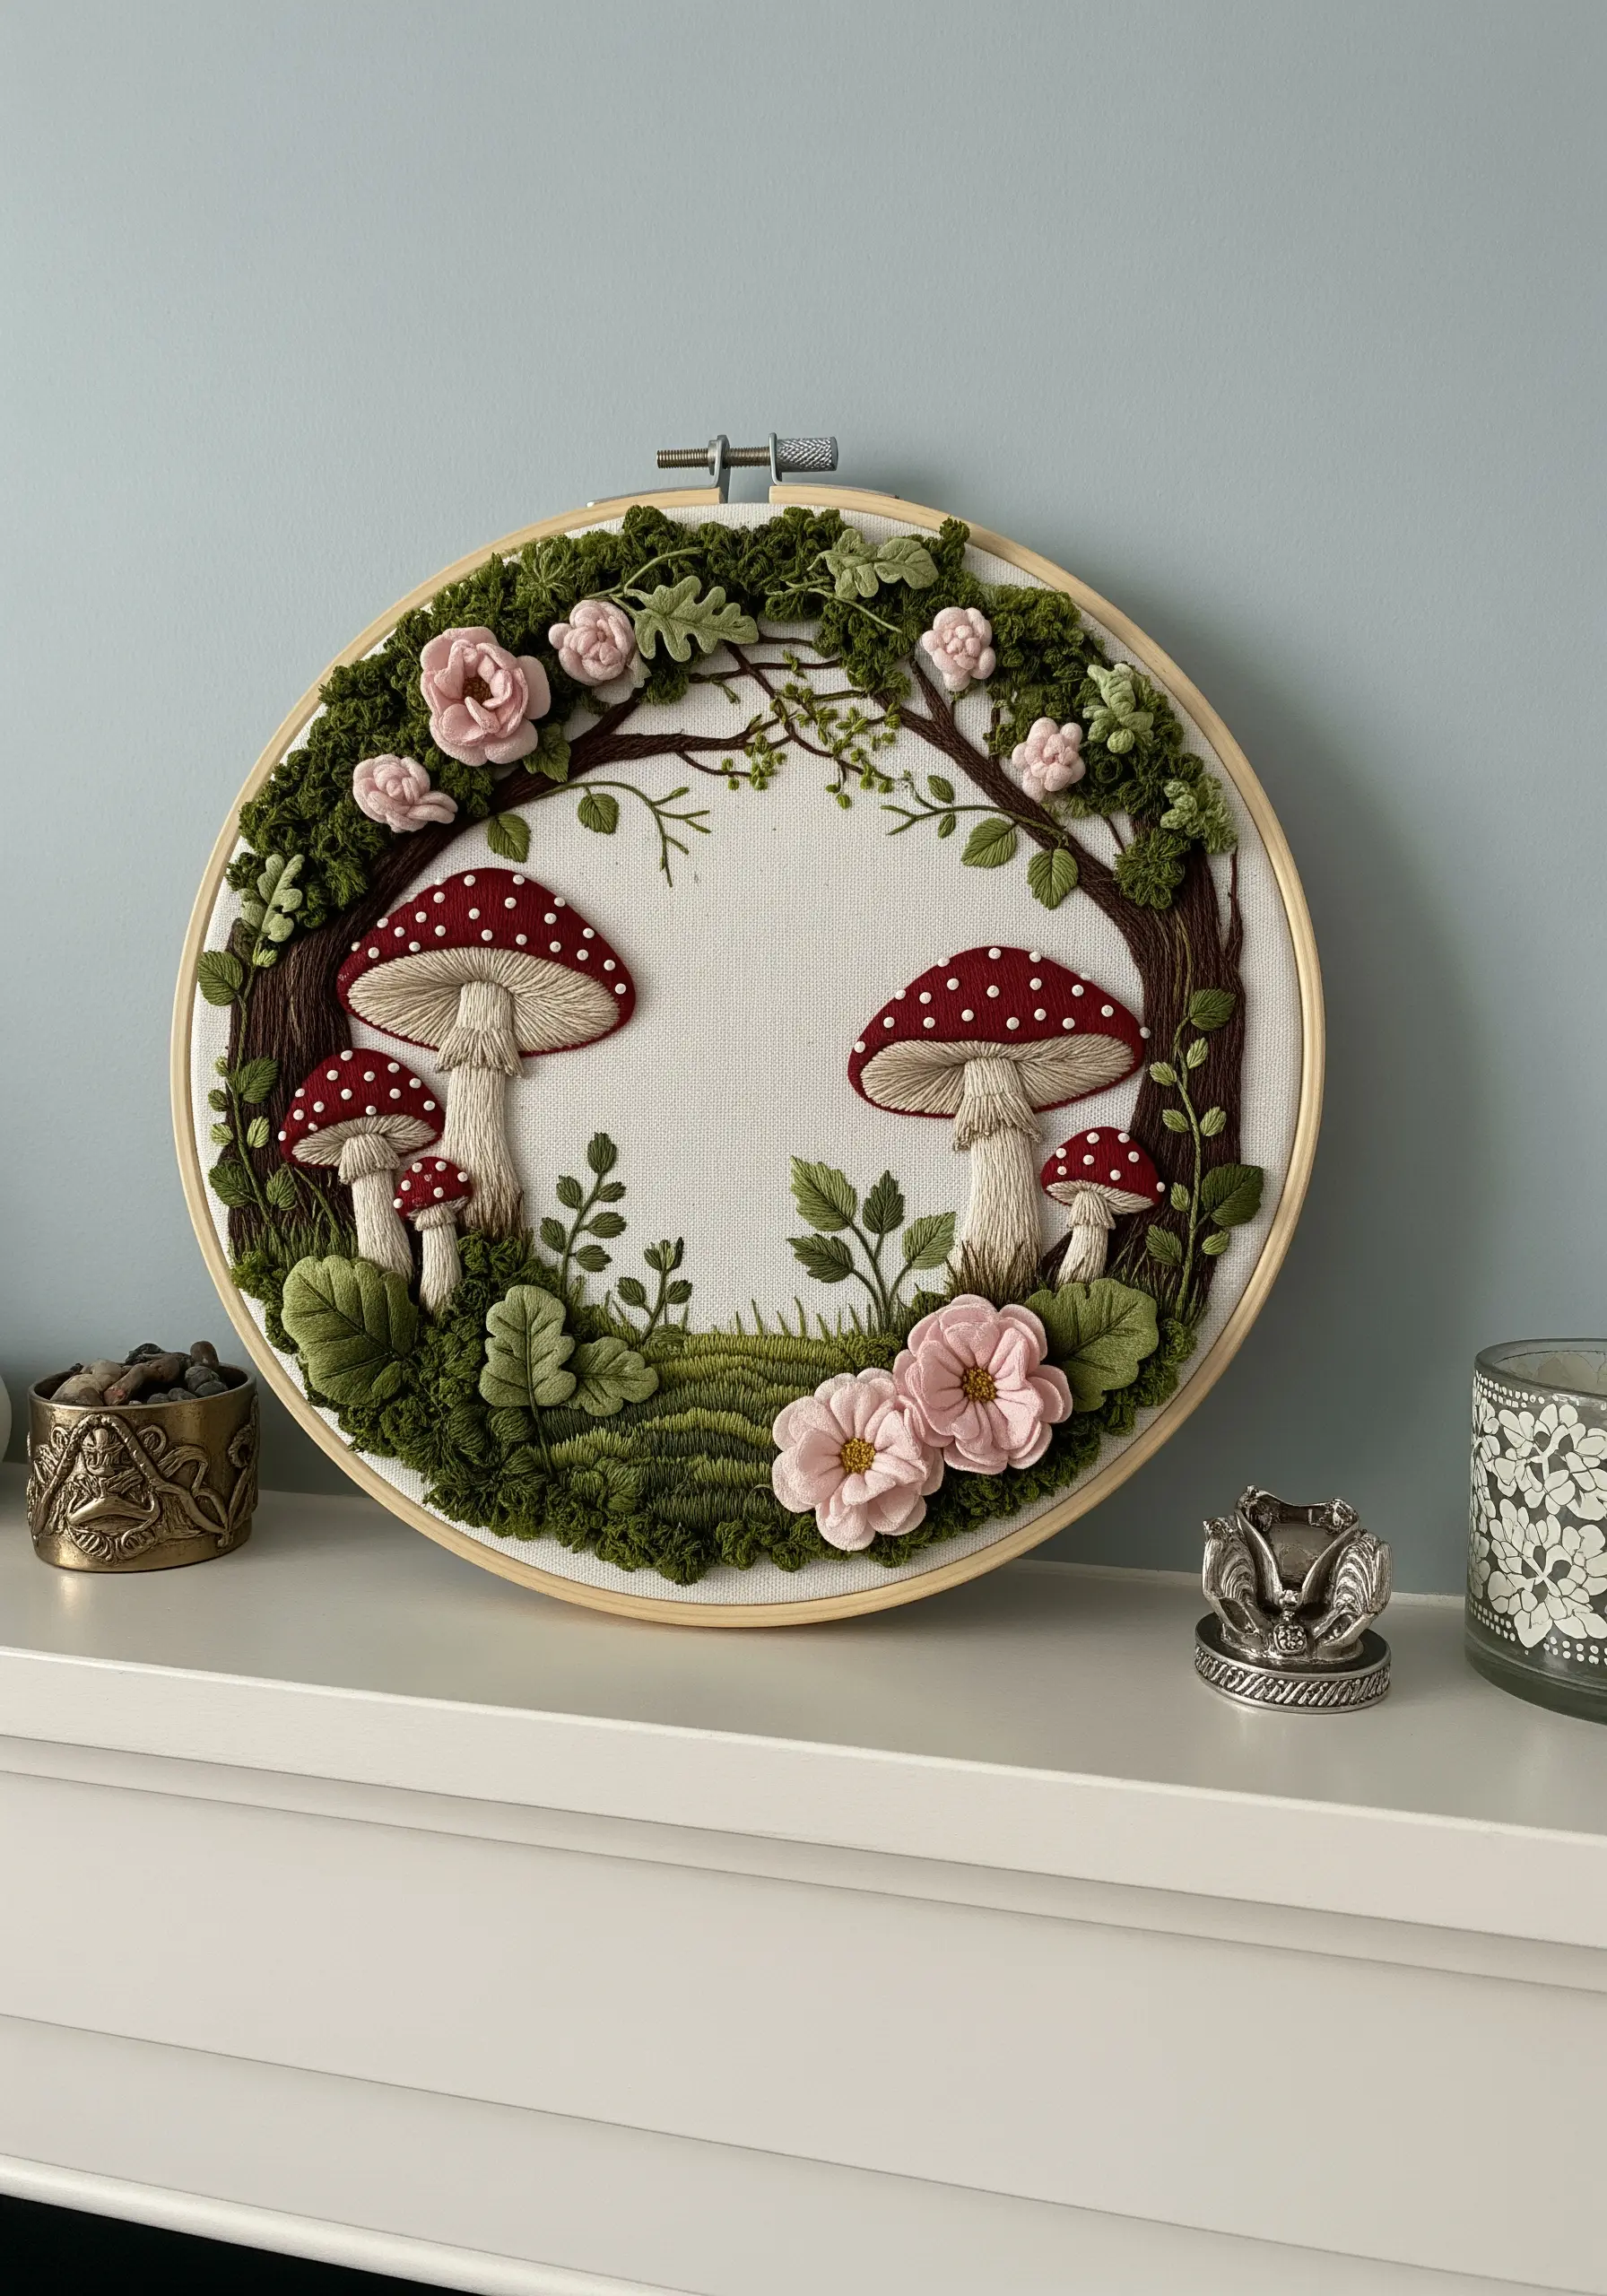
Move your embroidery off the fabric surface and into the third dimension with stumpwork techniques to create a storybook scene.
Create detached elements like mushroom caps and flower petals by stitching over a wire frame with buttonhole stitch, cutting them out, and shaping them before attaching to your background.
For the mossy ground, use a dense field of French knots in multiple shades of green and brown to build a rich, uneven texture.
This combination of raised and detached embroidery makes your piece incredibly tactile and visually captivating from every angle.
You can apply similar 3D floral embroidery techniques to other projects.
11. Harmonize Lettering and Botanicals in a Wreath
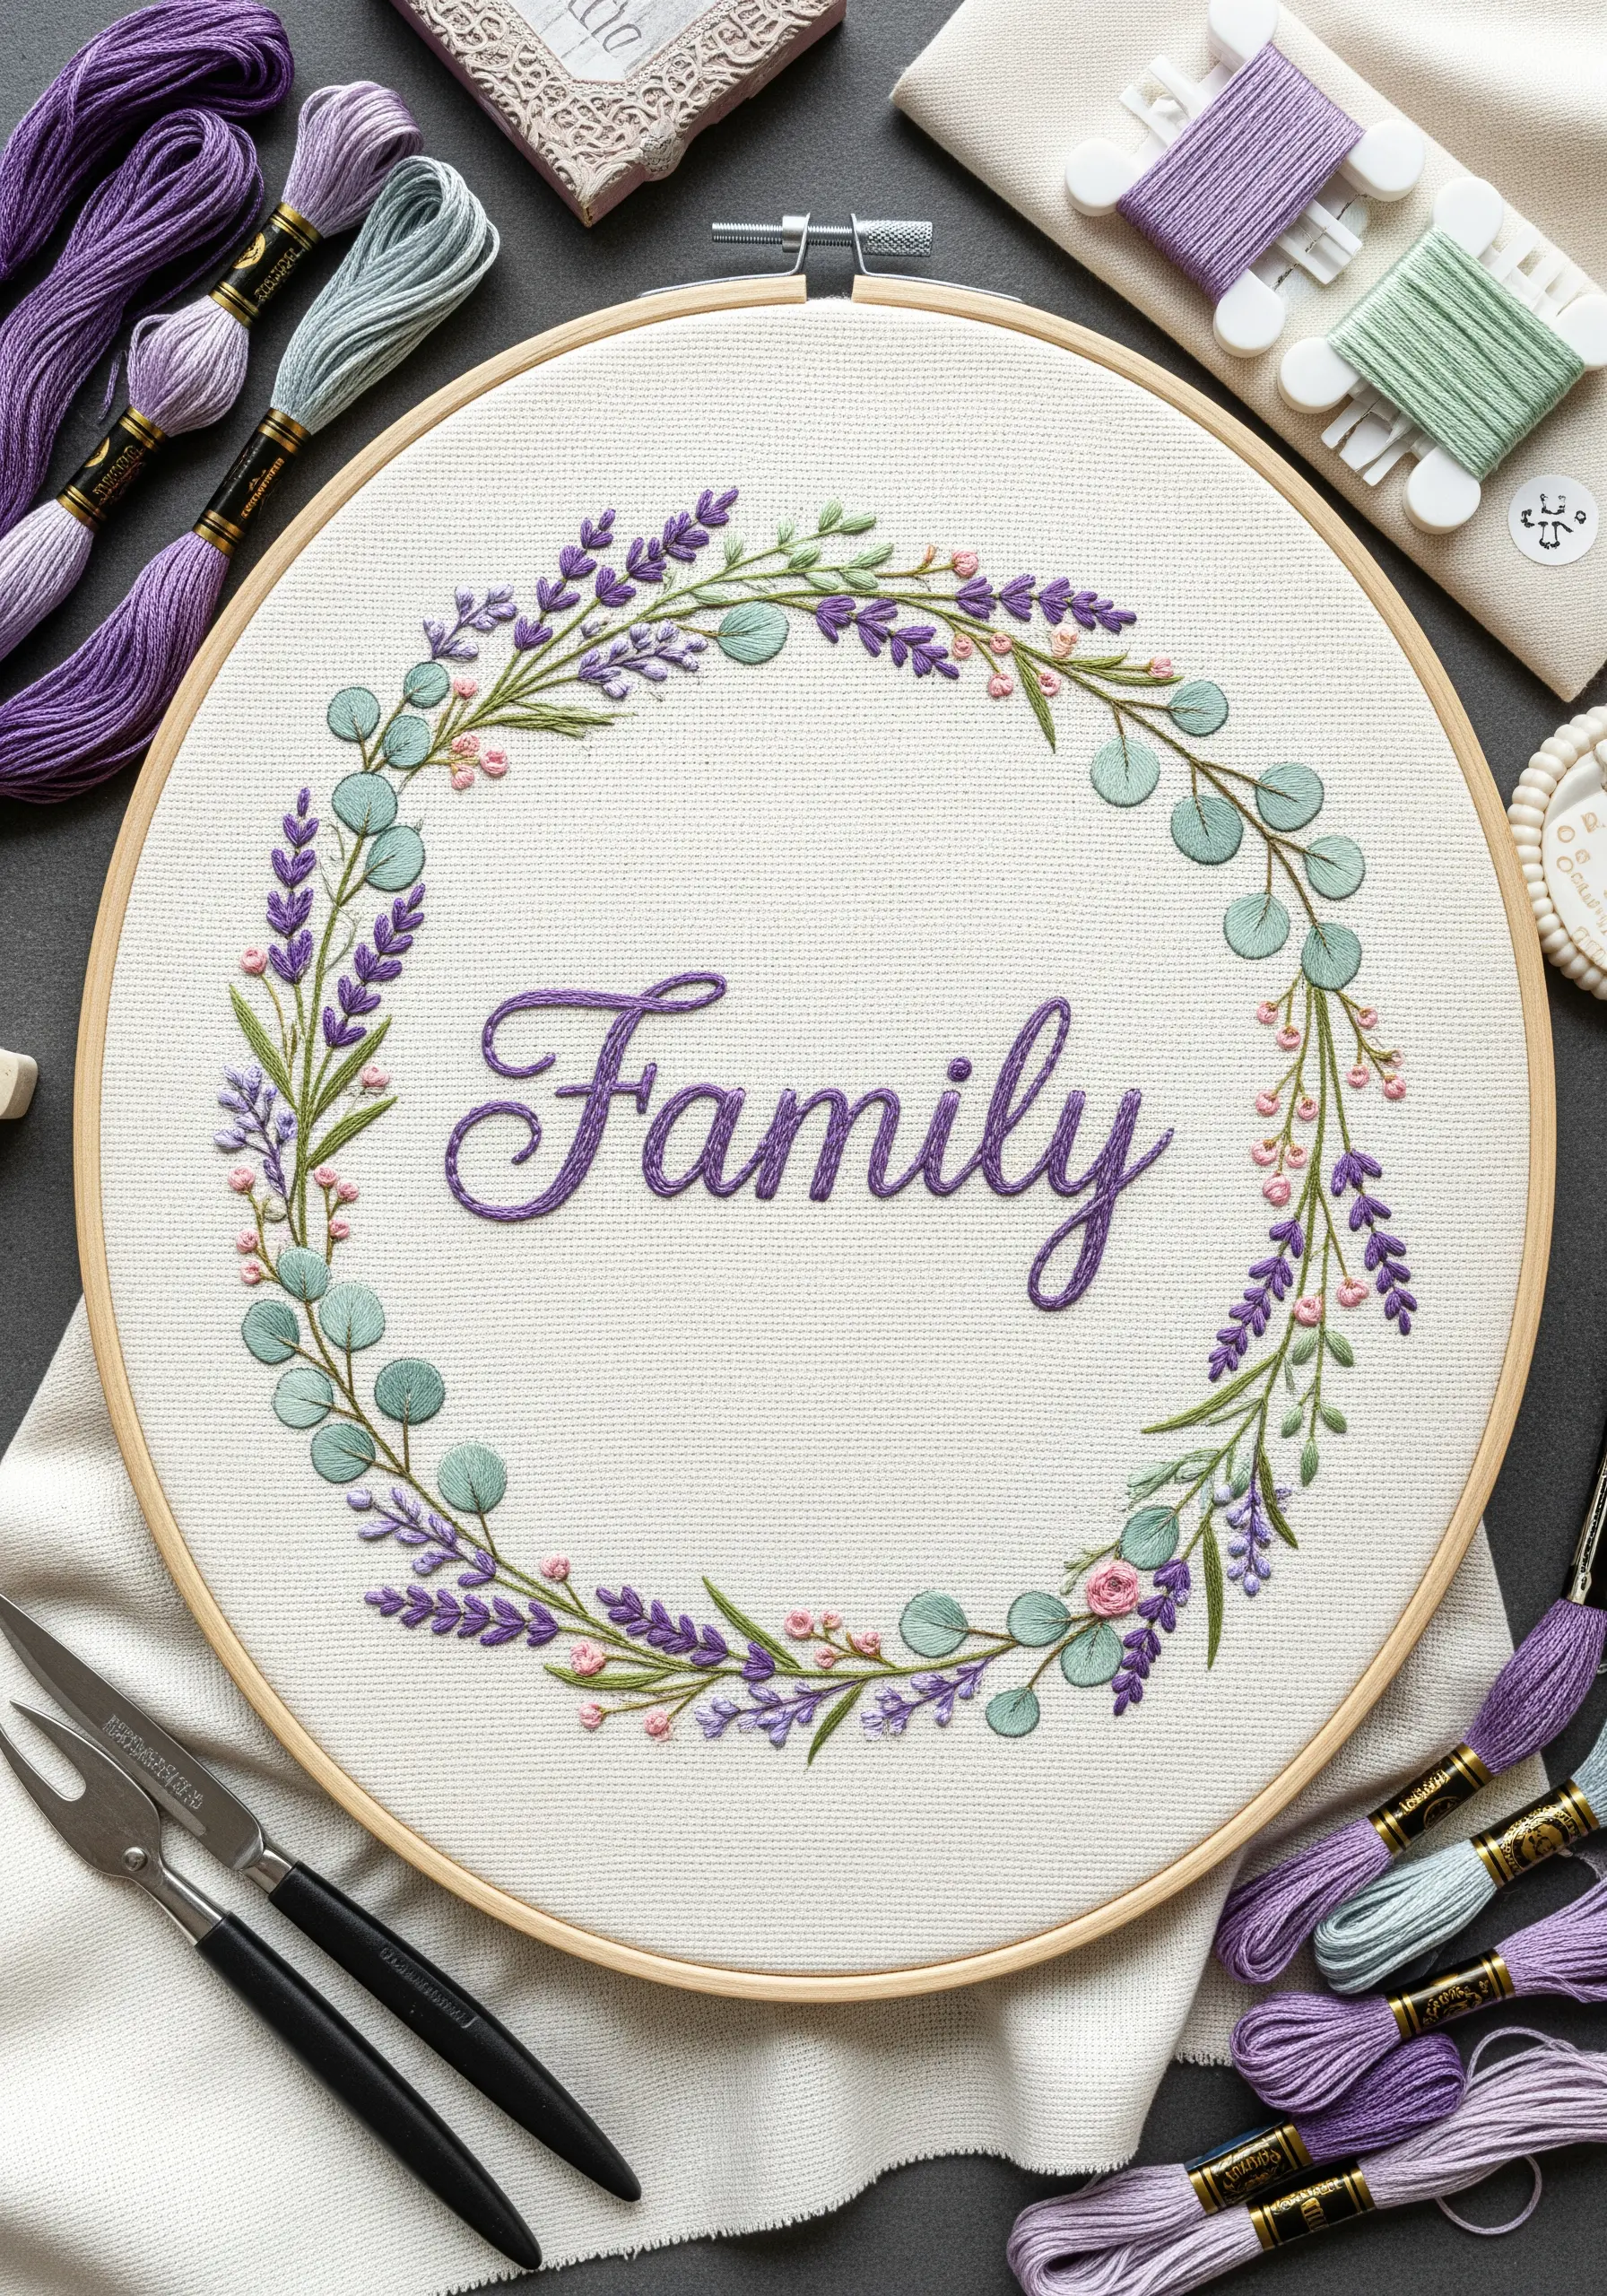
When combining text and florals, the goal is balance and legibility. Stitch your lettering first to guarantee perfect placement.
Use a whipped backstitch for the word ‘Family’ to create a smooth, rounded line that stands out cleanly from the botanical elements.
For the lavender and eucalyptus, use delicate stitches like the lazy daisy and fishbone stitch, and intentionally let some leaves overlap the edges of the letters.
This subtle layering integrates the text into the wreath, making the entire composition feel unified and organic.
These framed embroidery ideas are perfect for personalizing your space.
12. Make a Statement with Monochrome Folk Art
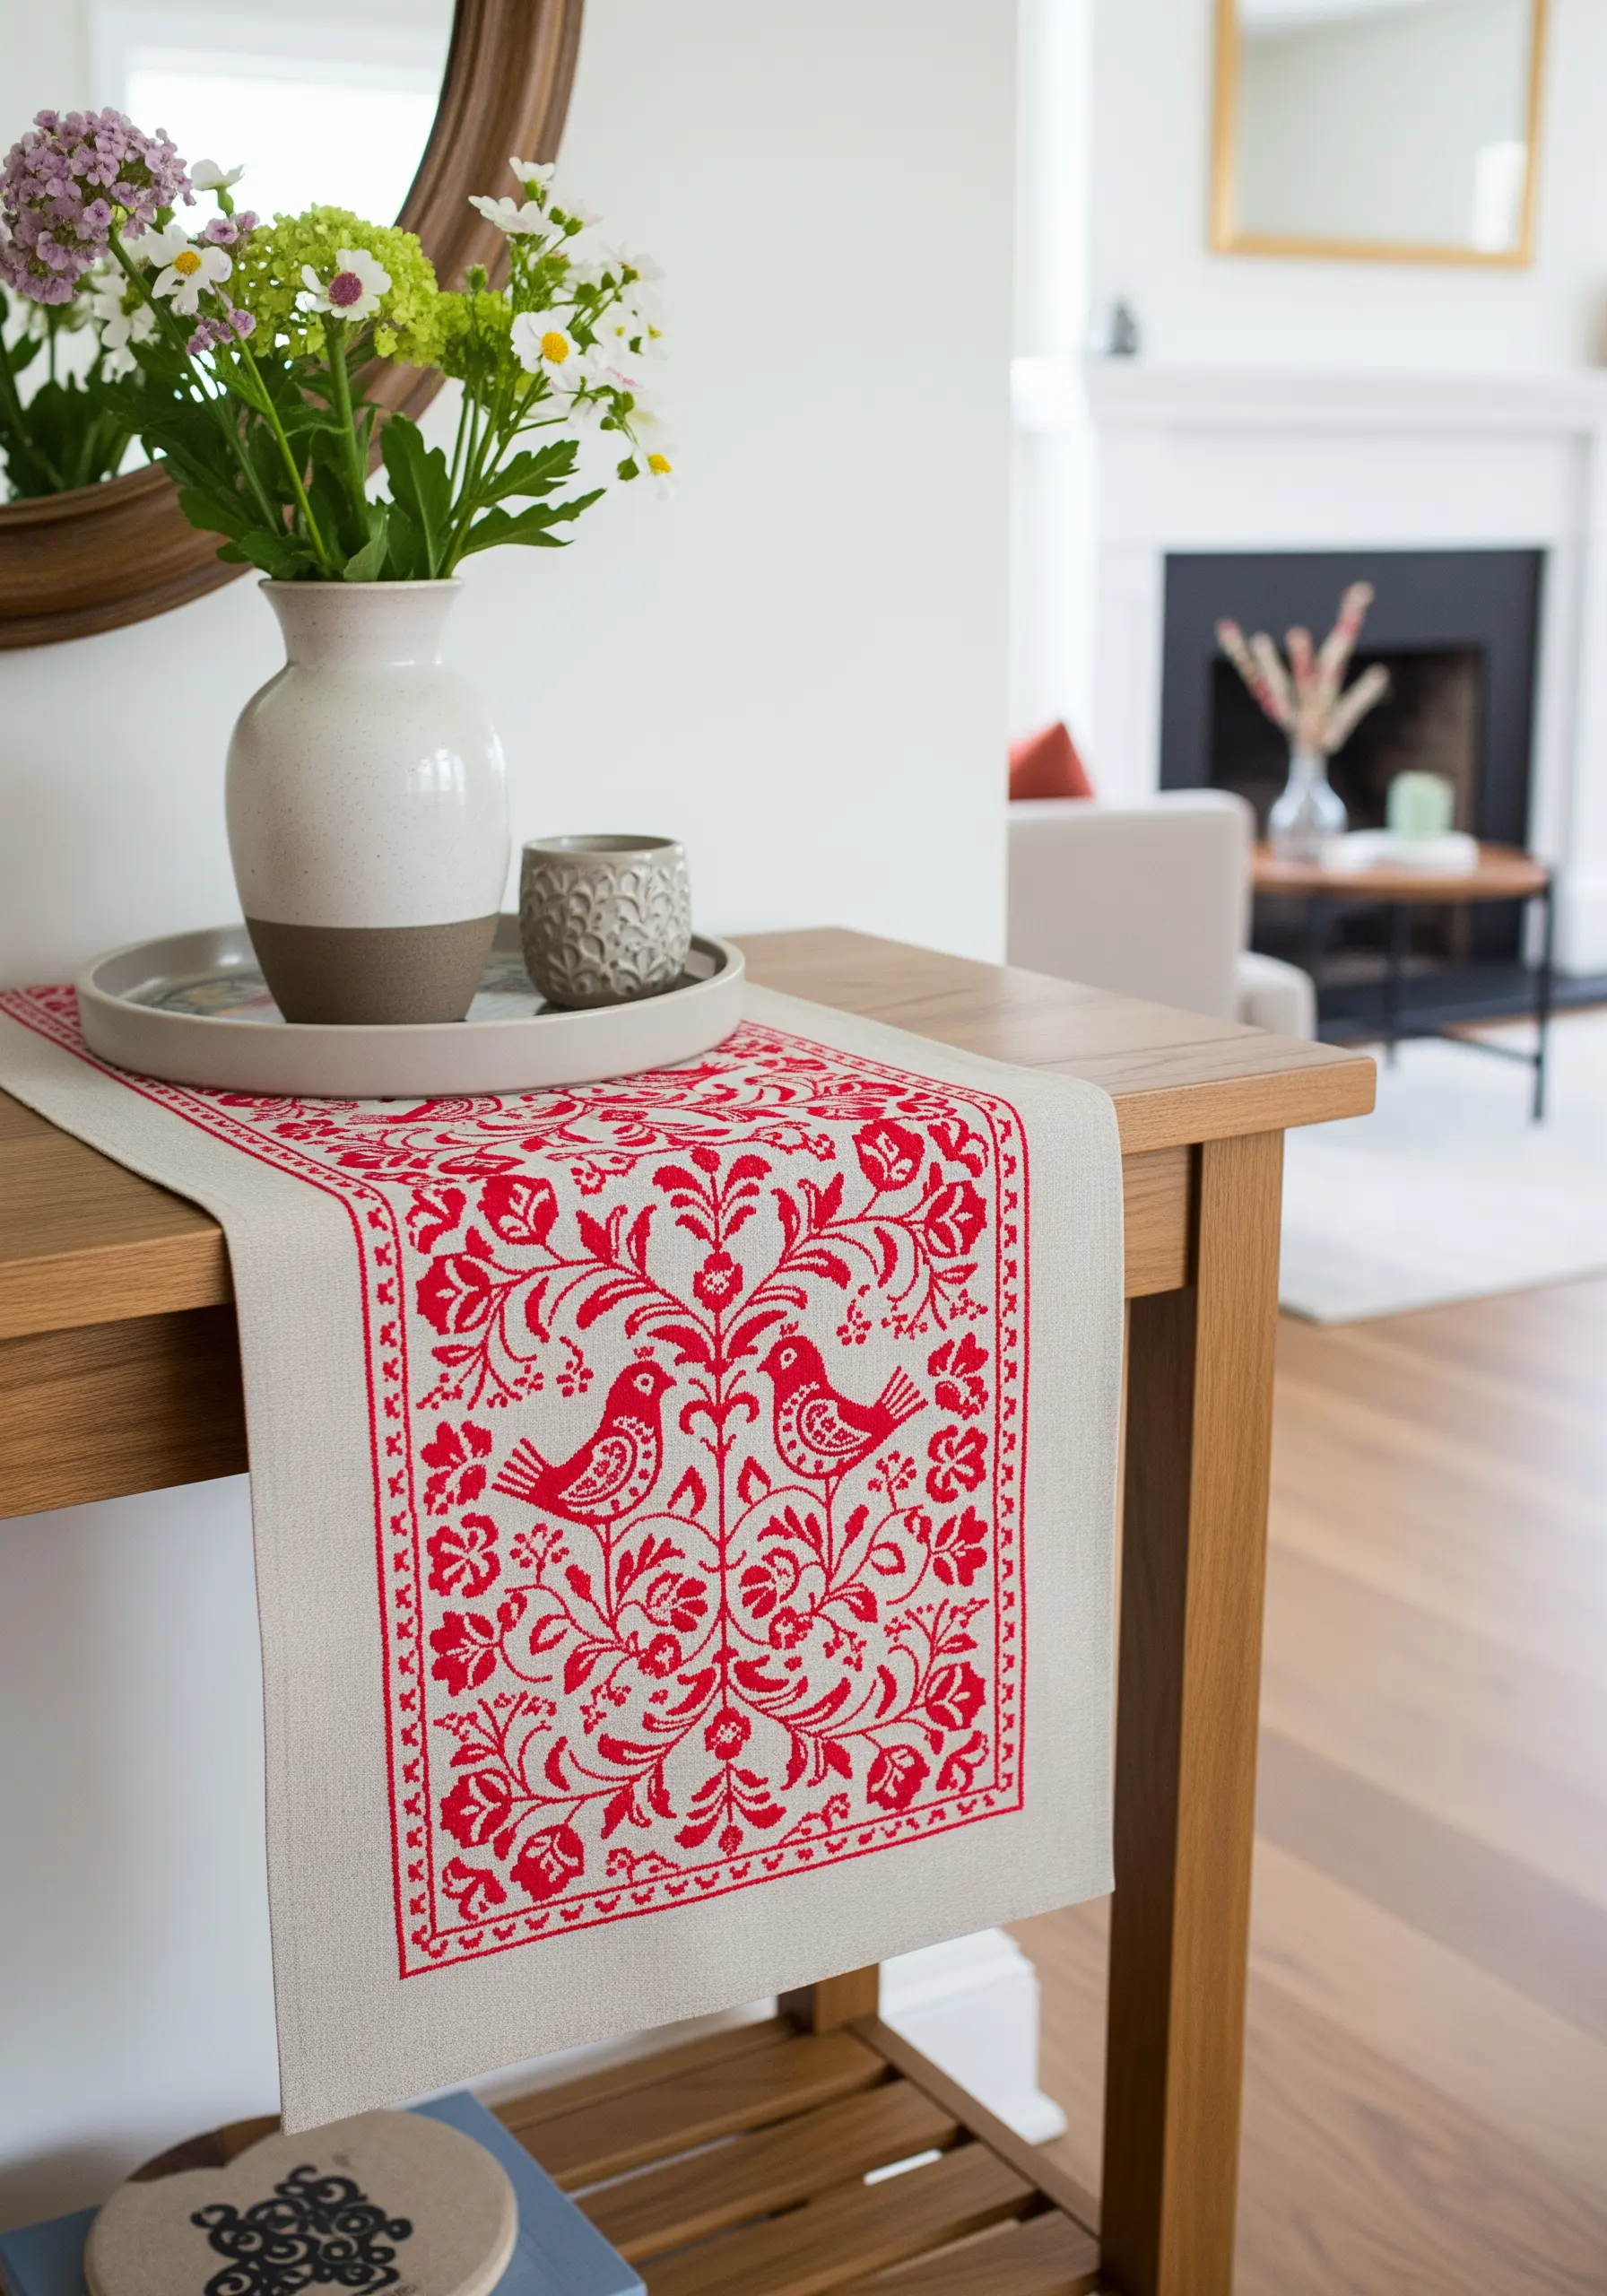
Create a powerful graphic impact by translating intricate folk-art patterns into a single, bold color on neutral linen.
This technique, reminiscent of traditional redwork, relies on the clarity of the pattern rather than a complex color palette.
Whether using cross-stitch or blackwork stitches, the key to success is absolute precision and consistency in every single stitch.
The stark contrast between the vibrant red and the natural fabric gives the piece a modern yet timeless appeal that complements both contemporary and rustic decor.
This approach works wonderfully for a hand-stitched table runner.
13. Master Maximalism with Thread Painting
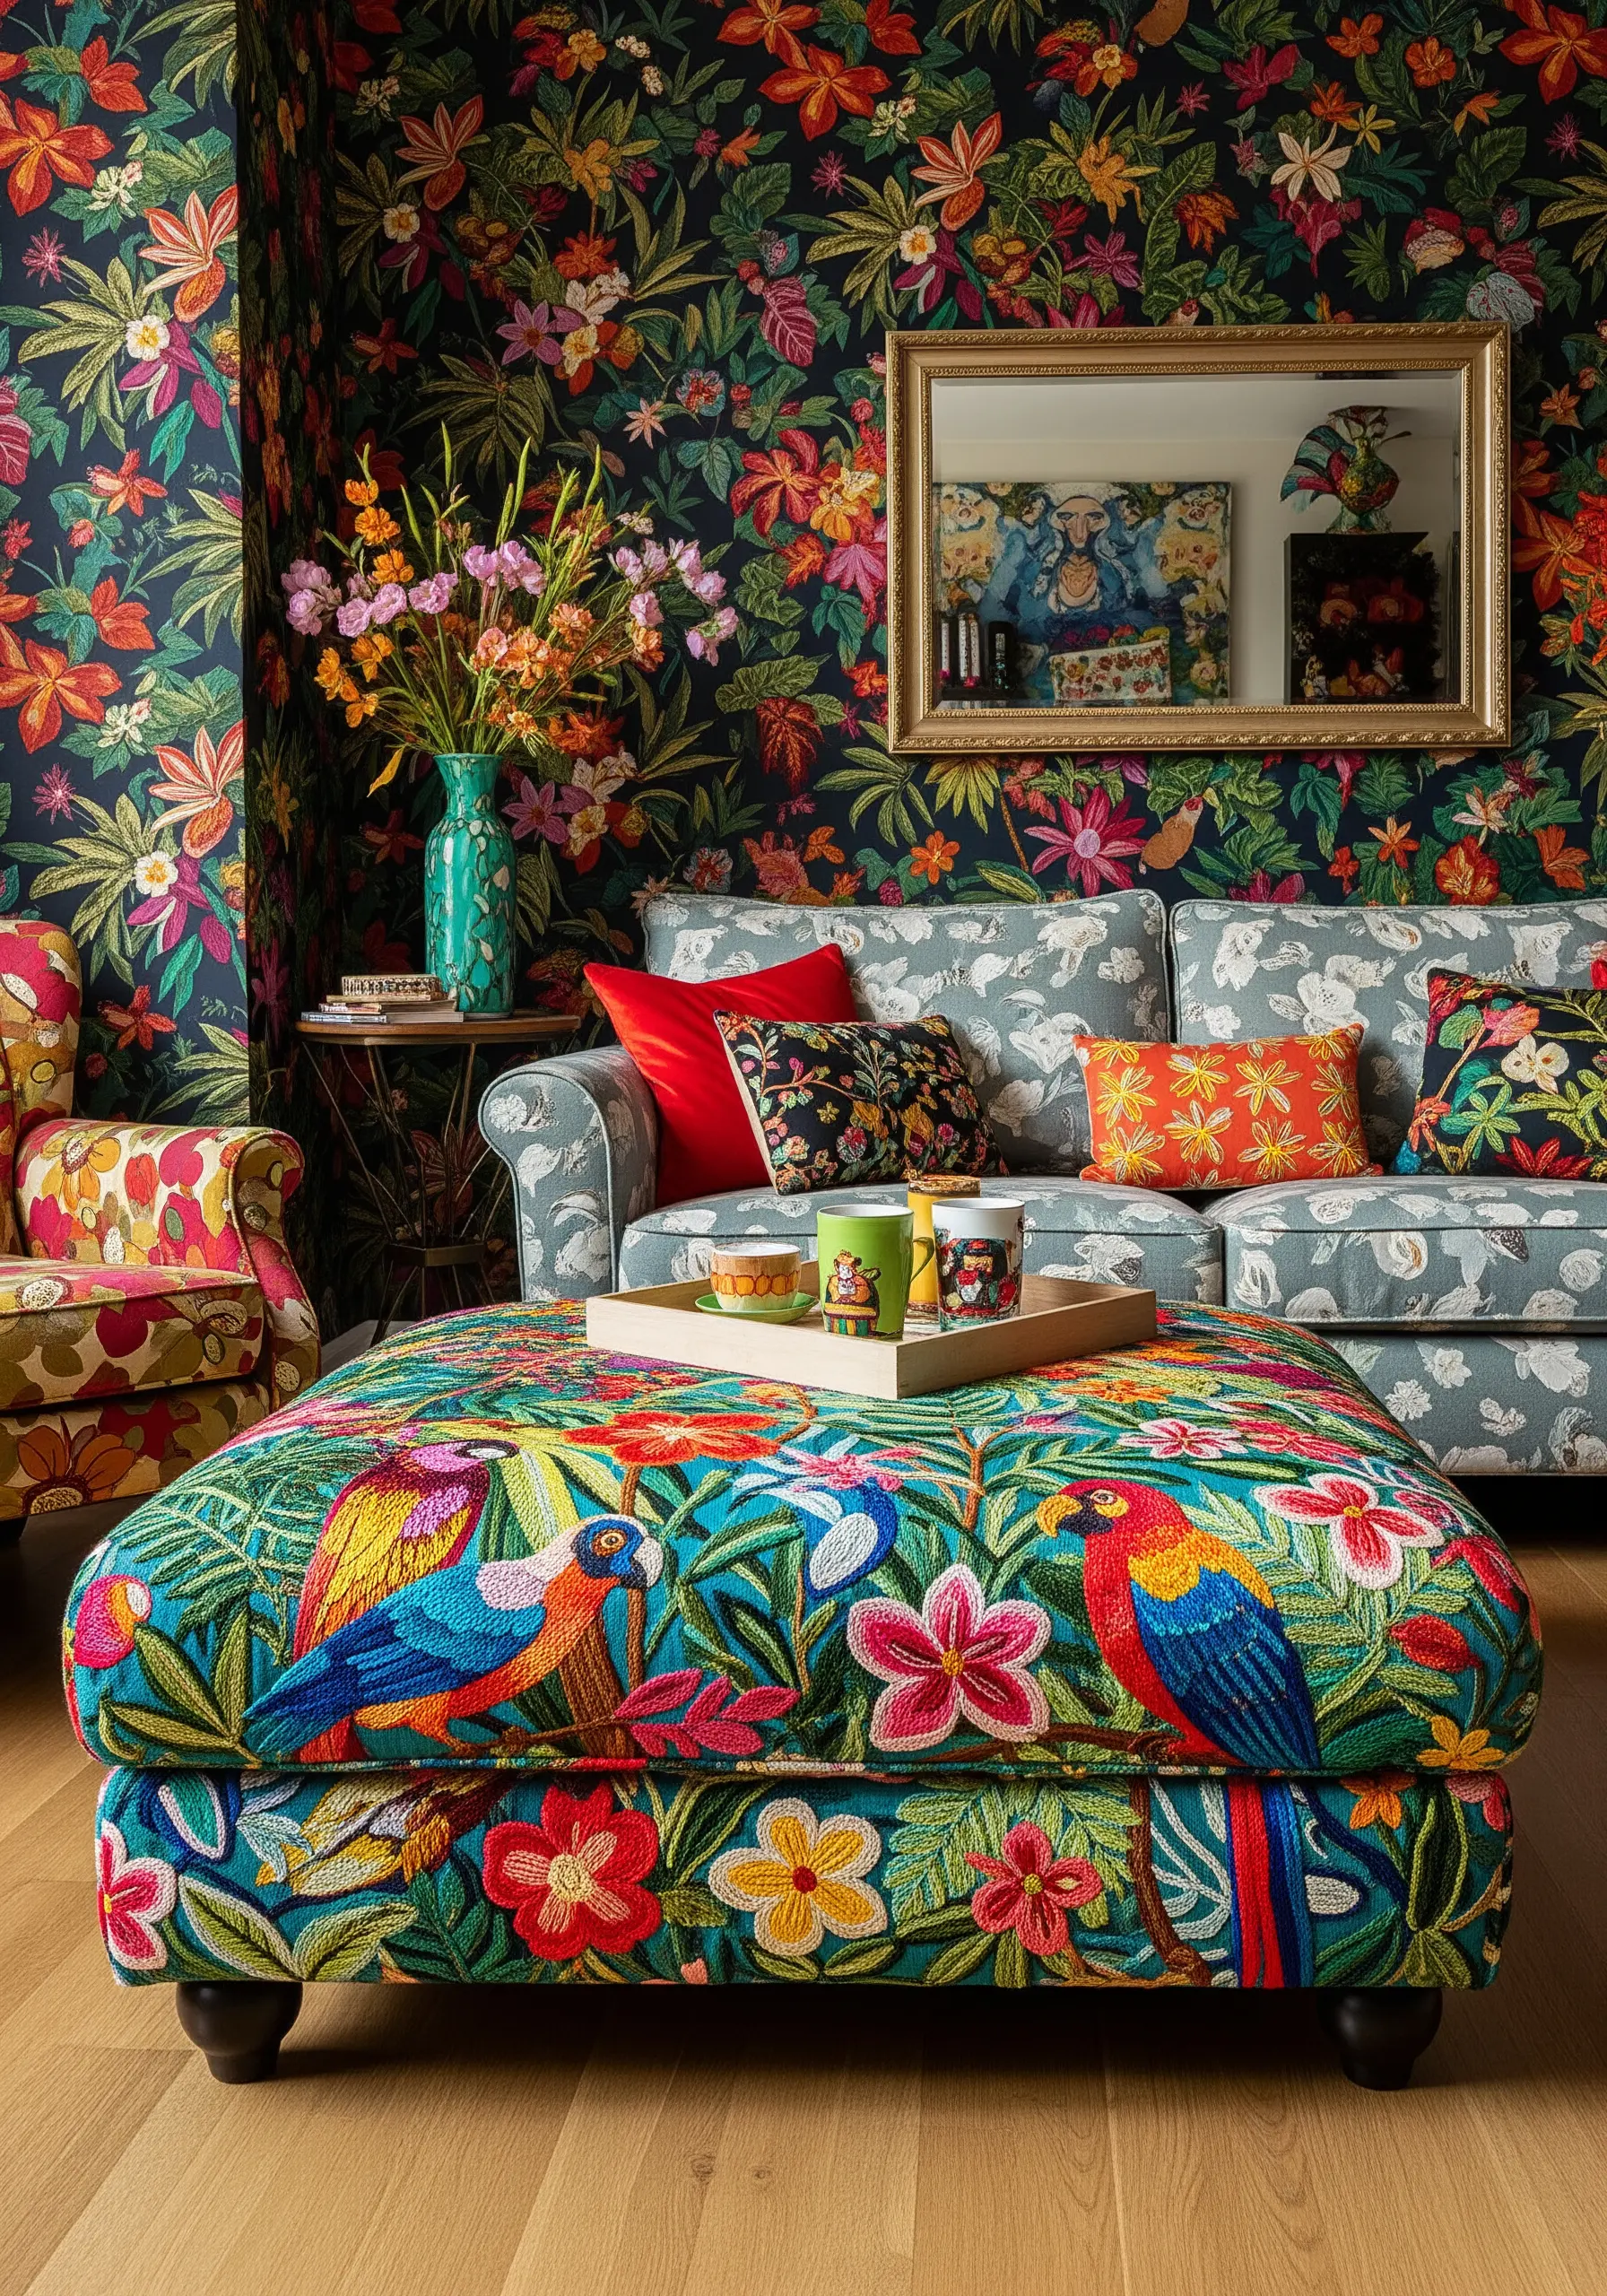
To create a lush, maximalist piece of embroidered furniture, you must approach it like a painting, using thread to blend colors seamlessly.
Rely on the long-and-short stitch as your primary tool, allowing you to create smooth gradients and fill large, irregular shapes without obvious lines.
Don’t be afraid to pack the stitches tightly; the density of the thread is what gives the piece its luxurious, tapestry-like quality.
By treating each motif—a parrot’s wing, a flower petal—as its own small painting, you can build a complex, vibrant composition that feels cohesive rather than chaotic.
14. Curate a Museum of Stitches
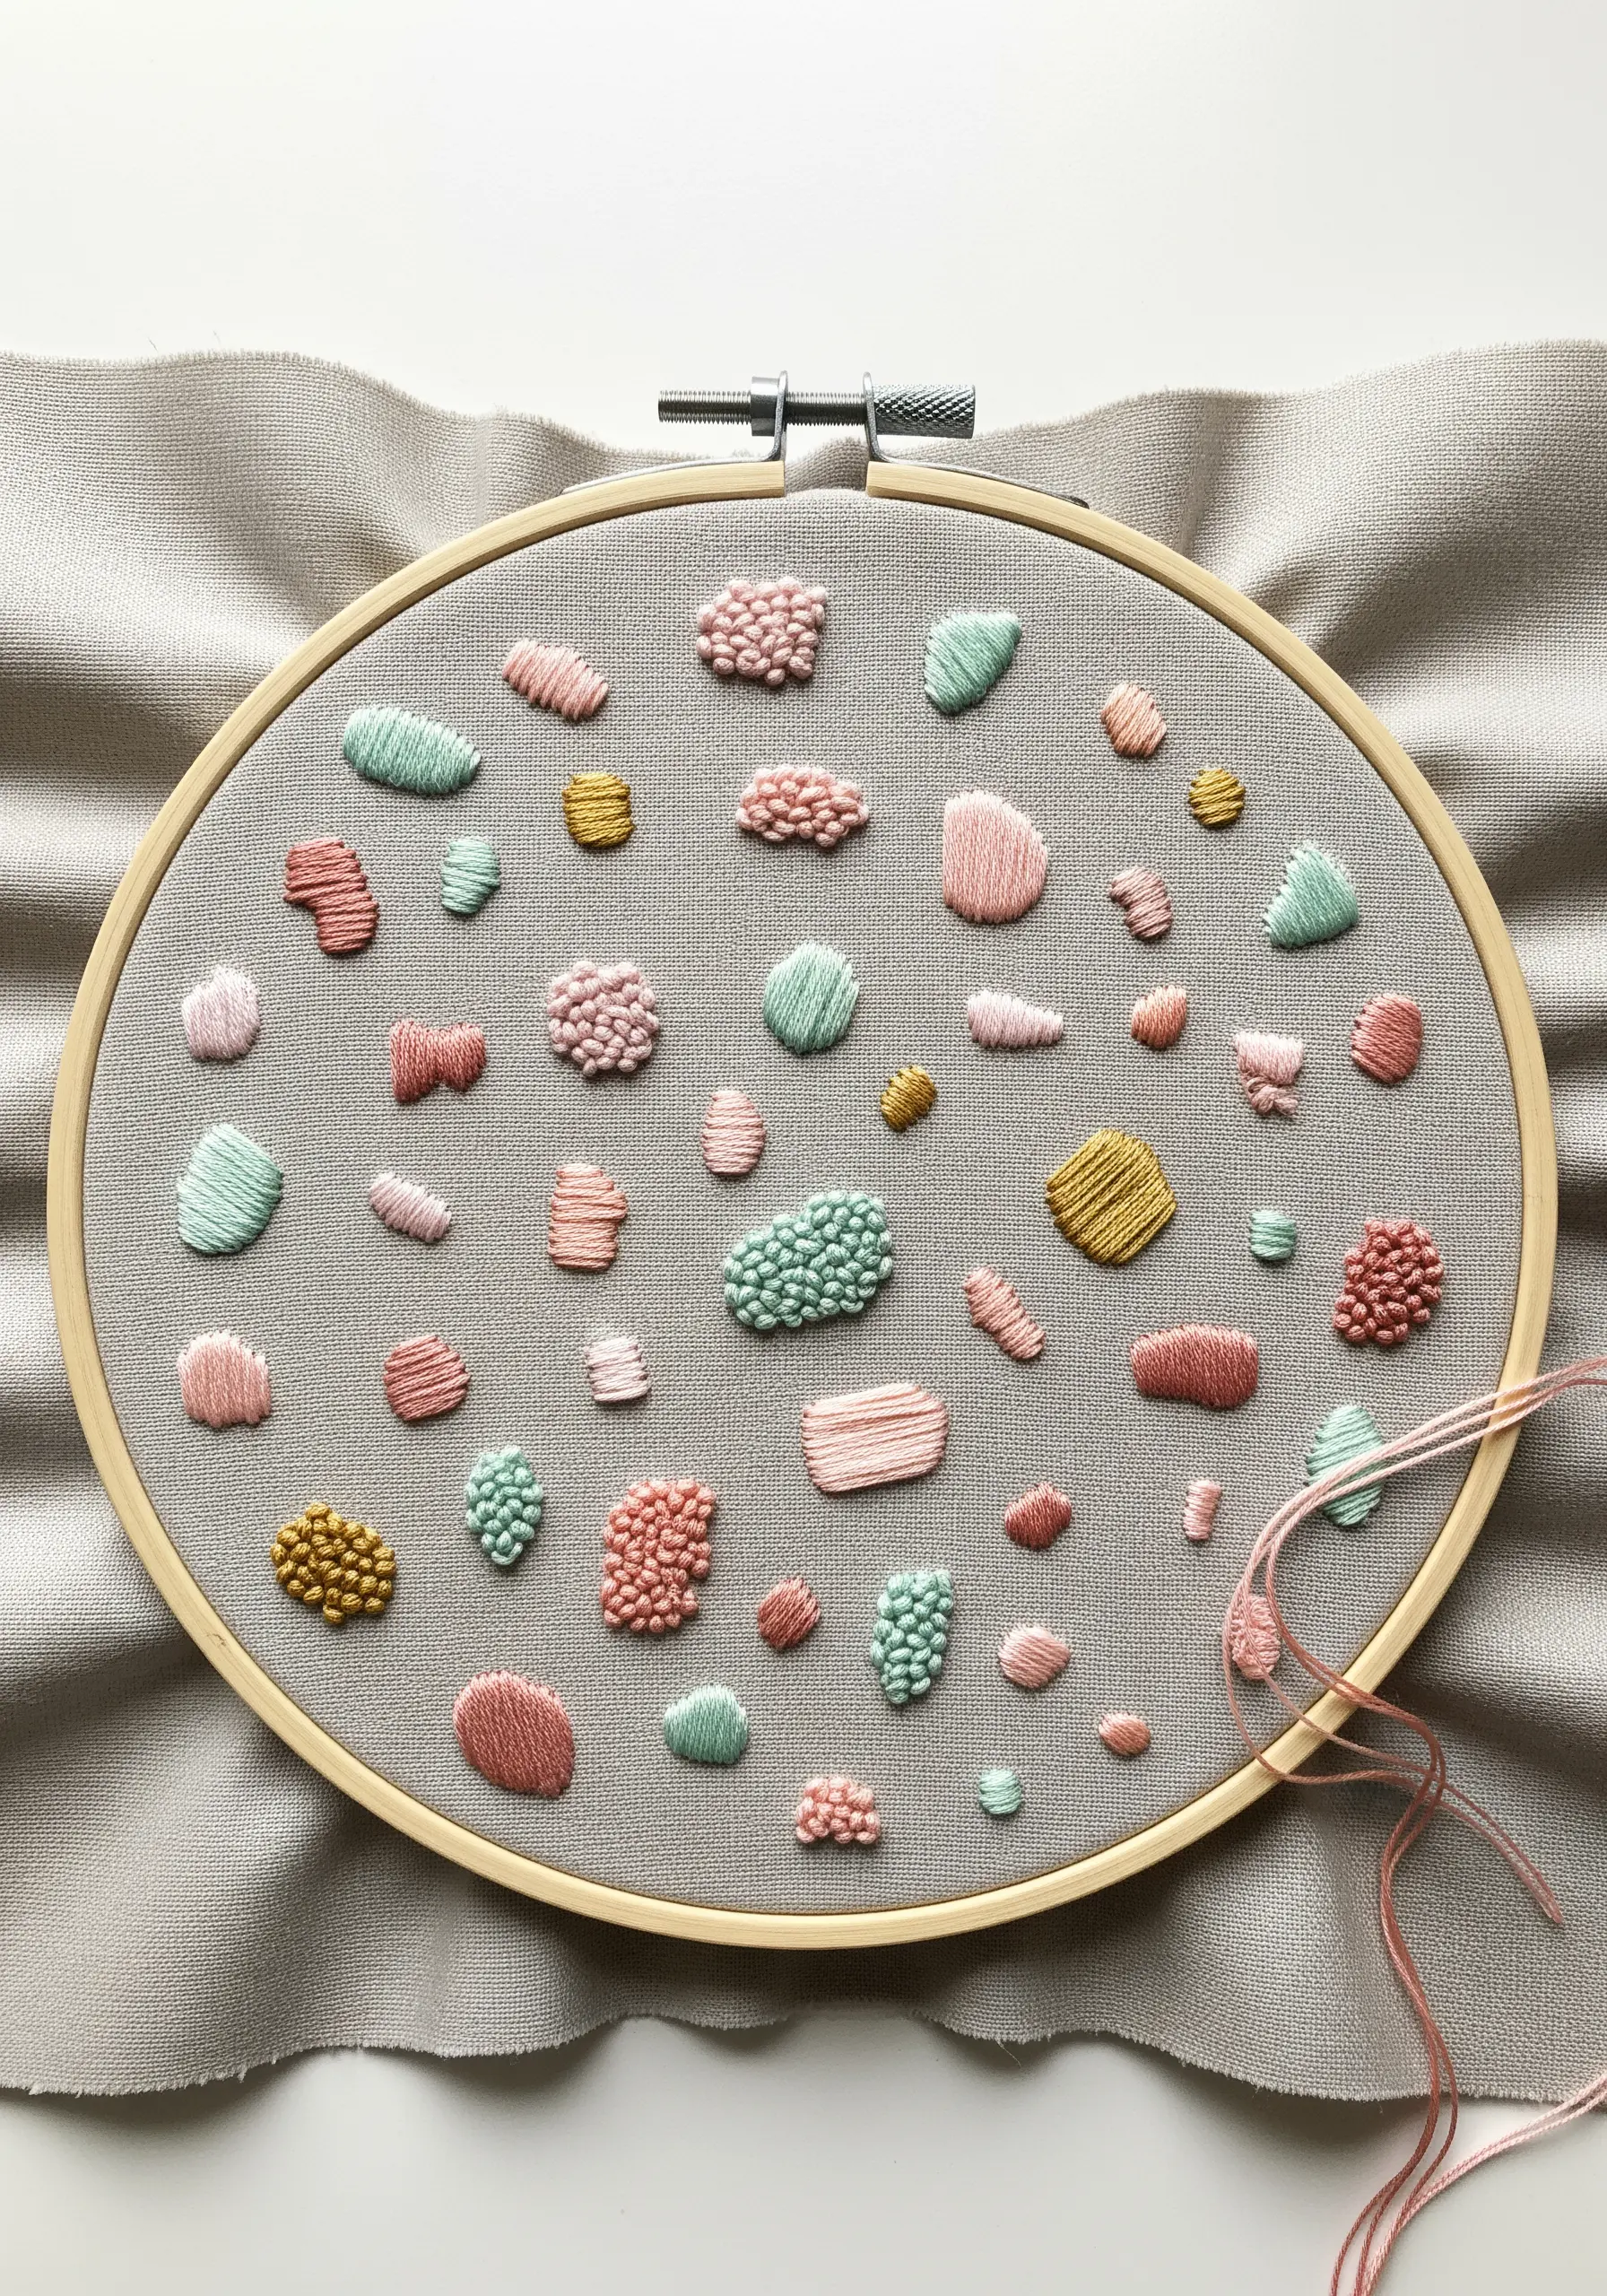
Turn simple stitch practice into a sophisticated piece of abstract art by treating each textural element as a curated specimen.
Fill small, organic shapes with a variety of raised stitches: French knots, bullion knots, woven wheels, and padded satin stitch.
Arrange these ‘pebbles’ in a scattered but balanced composition on a neutral, textured fabric like linen or cotton twill.
The result is a tactile sampler that is not only beautiful to look at but also serves as a reference for your favorite dimensional stitches. This is a perfect project for abstract texture play.
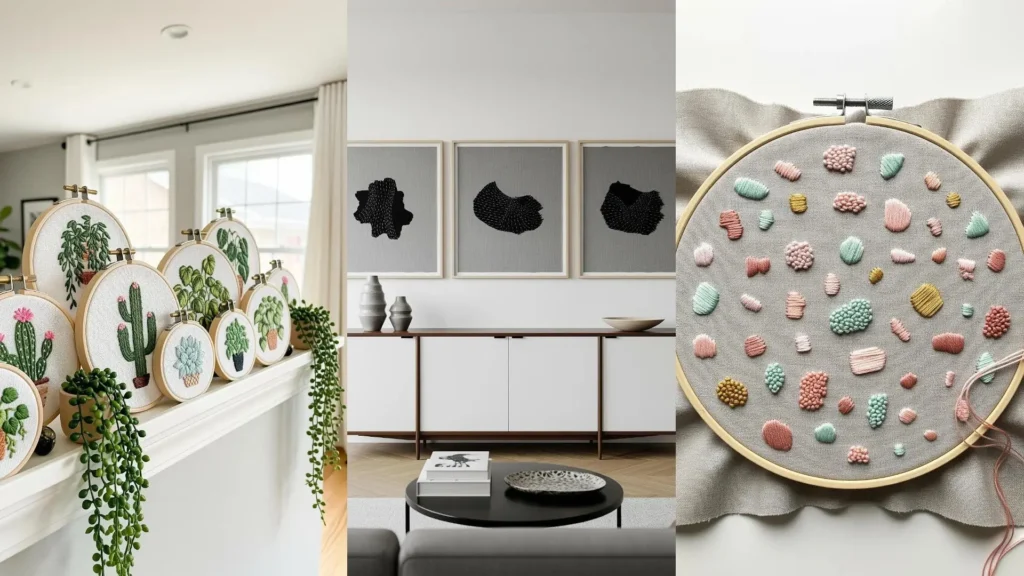
15. Build a Cohesive Hoop Art Collection
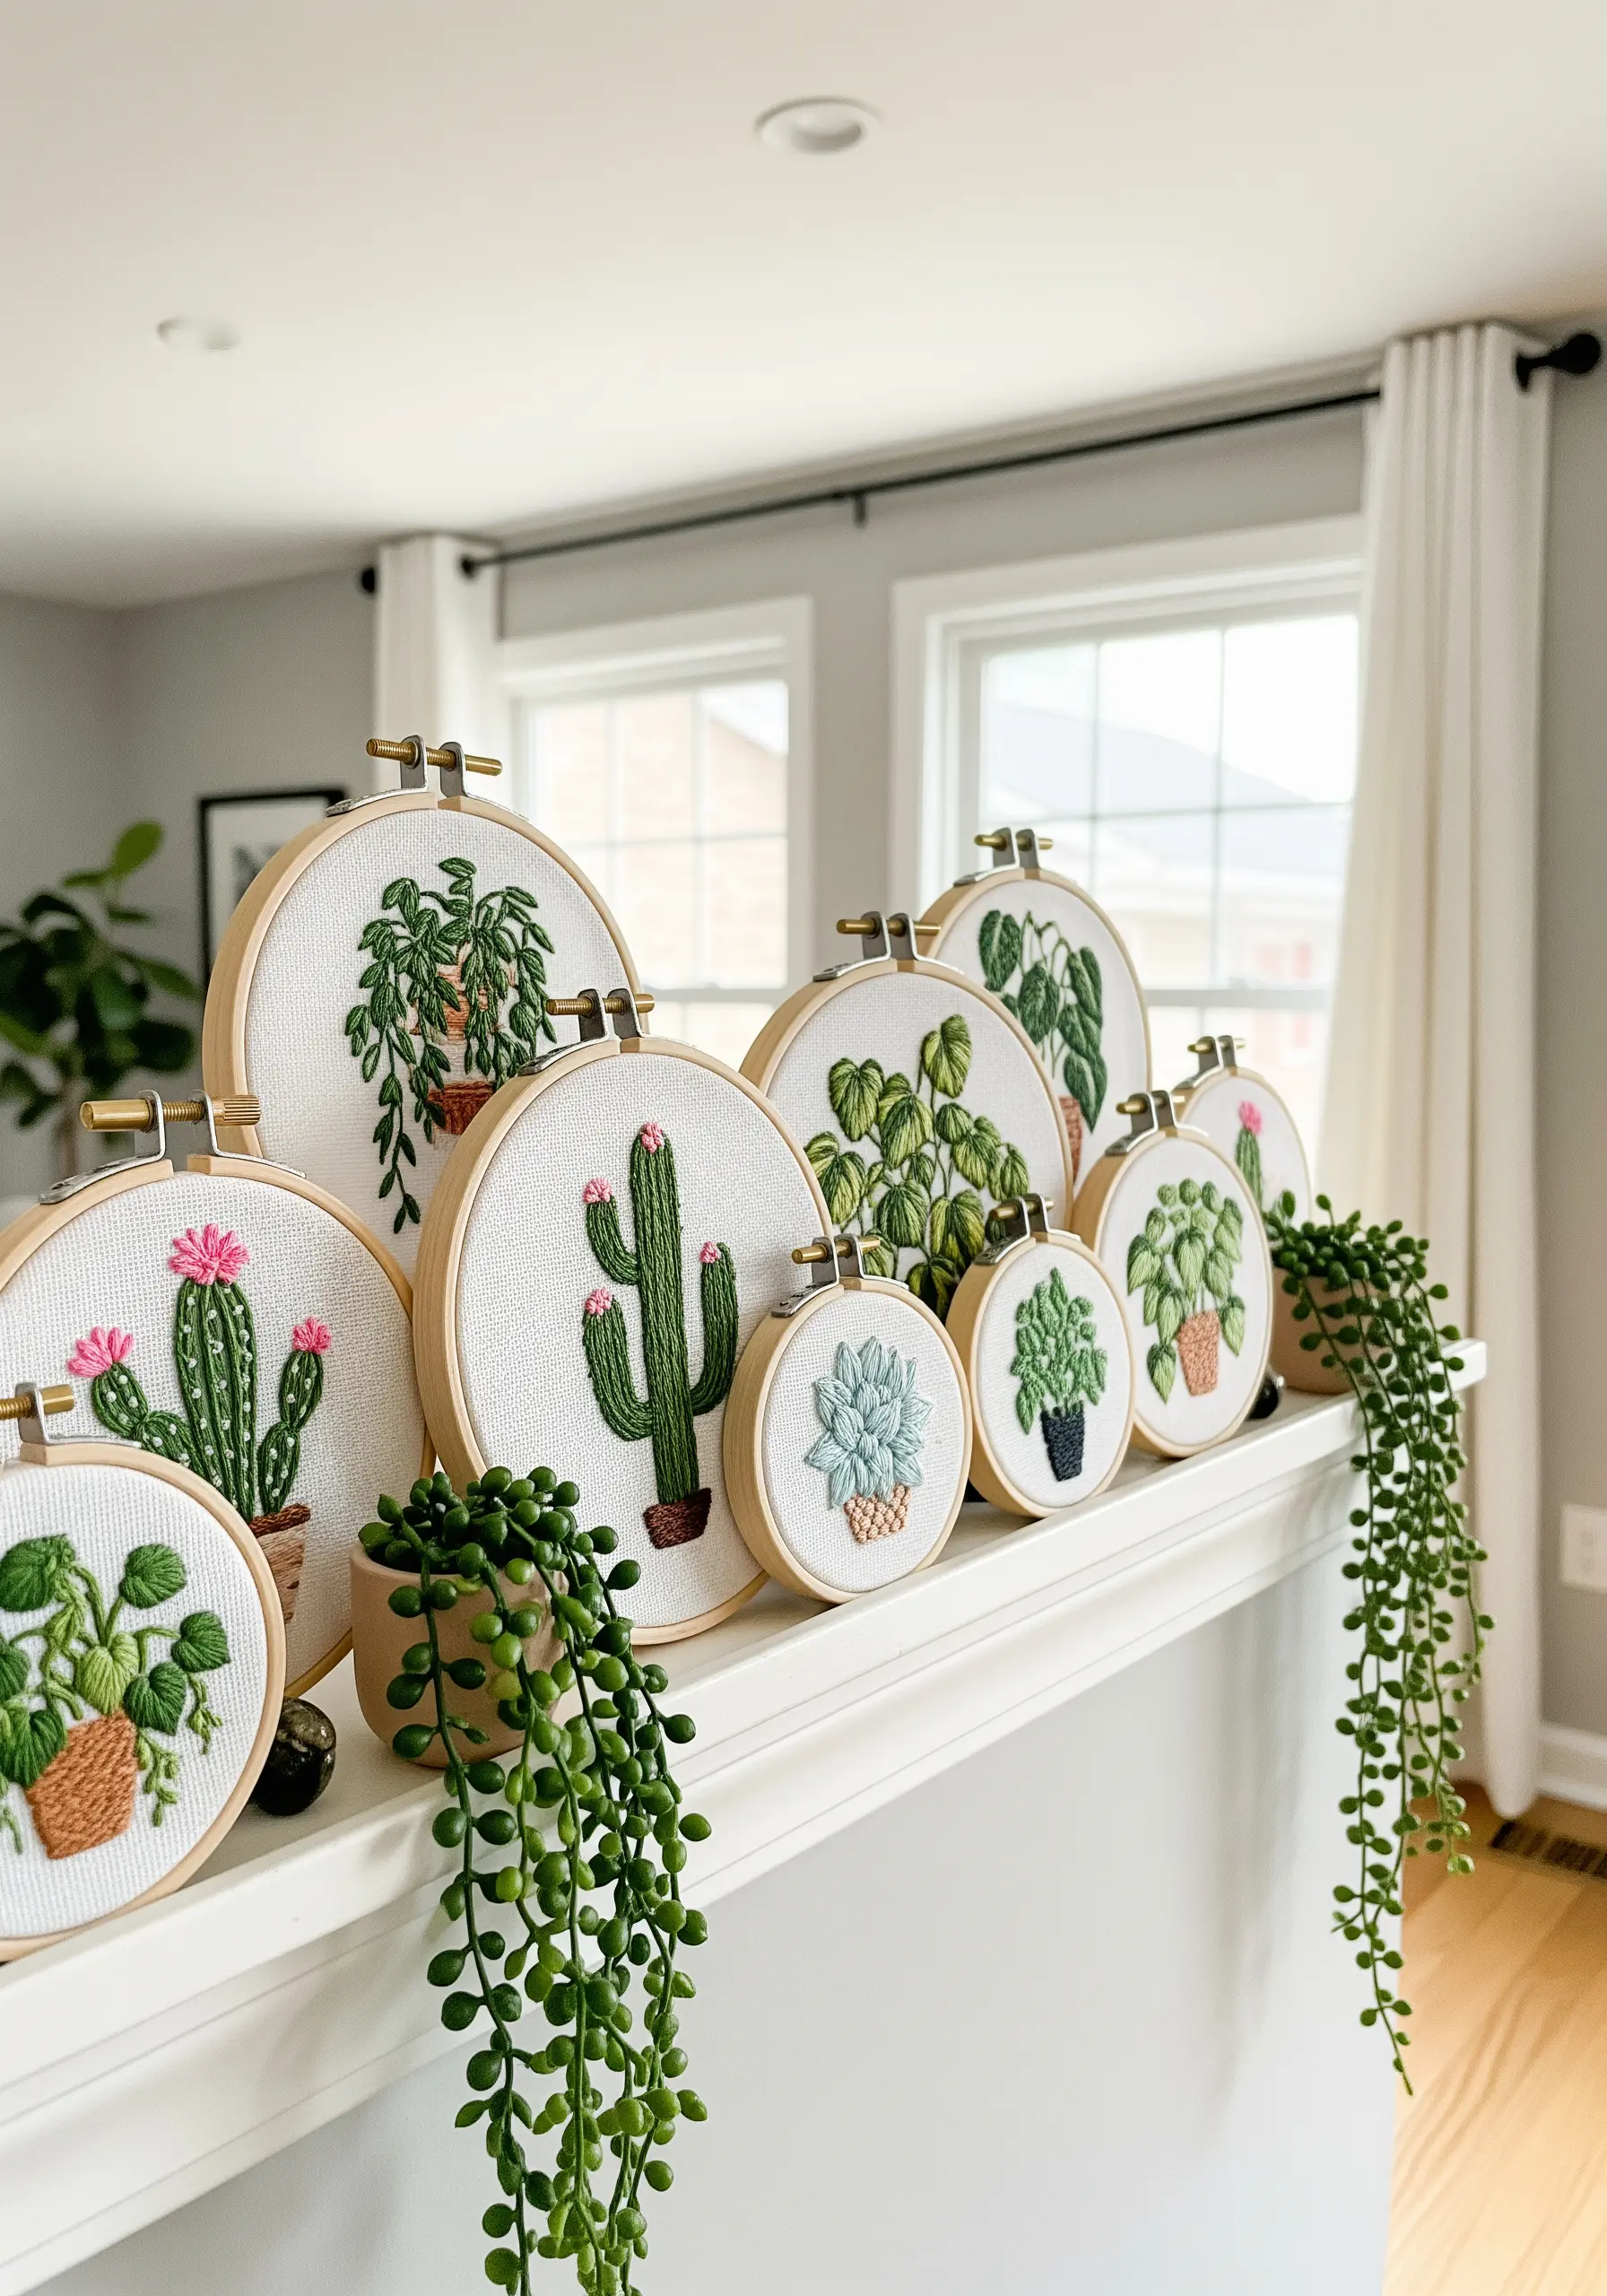
To create a stunning gallery wall with multiple hoops, establish a set of visual rules to tie the individual pieces together.
Use the same background fabric—like a simple white or natural Aida cloth—for every piece in the collection.
While the plant designs can vary, stick to a consistent color palette for the pots and foliage to create harmony.
Arranging them in varying sizes adds visual interest, but the consistent materials ensure the collection looks intentional, curated, and chic. These are fantastic wall hoop art ideas.
16. Add a Statement Border to Knitted Textiles
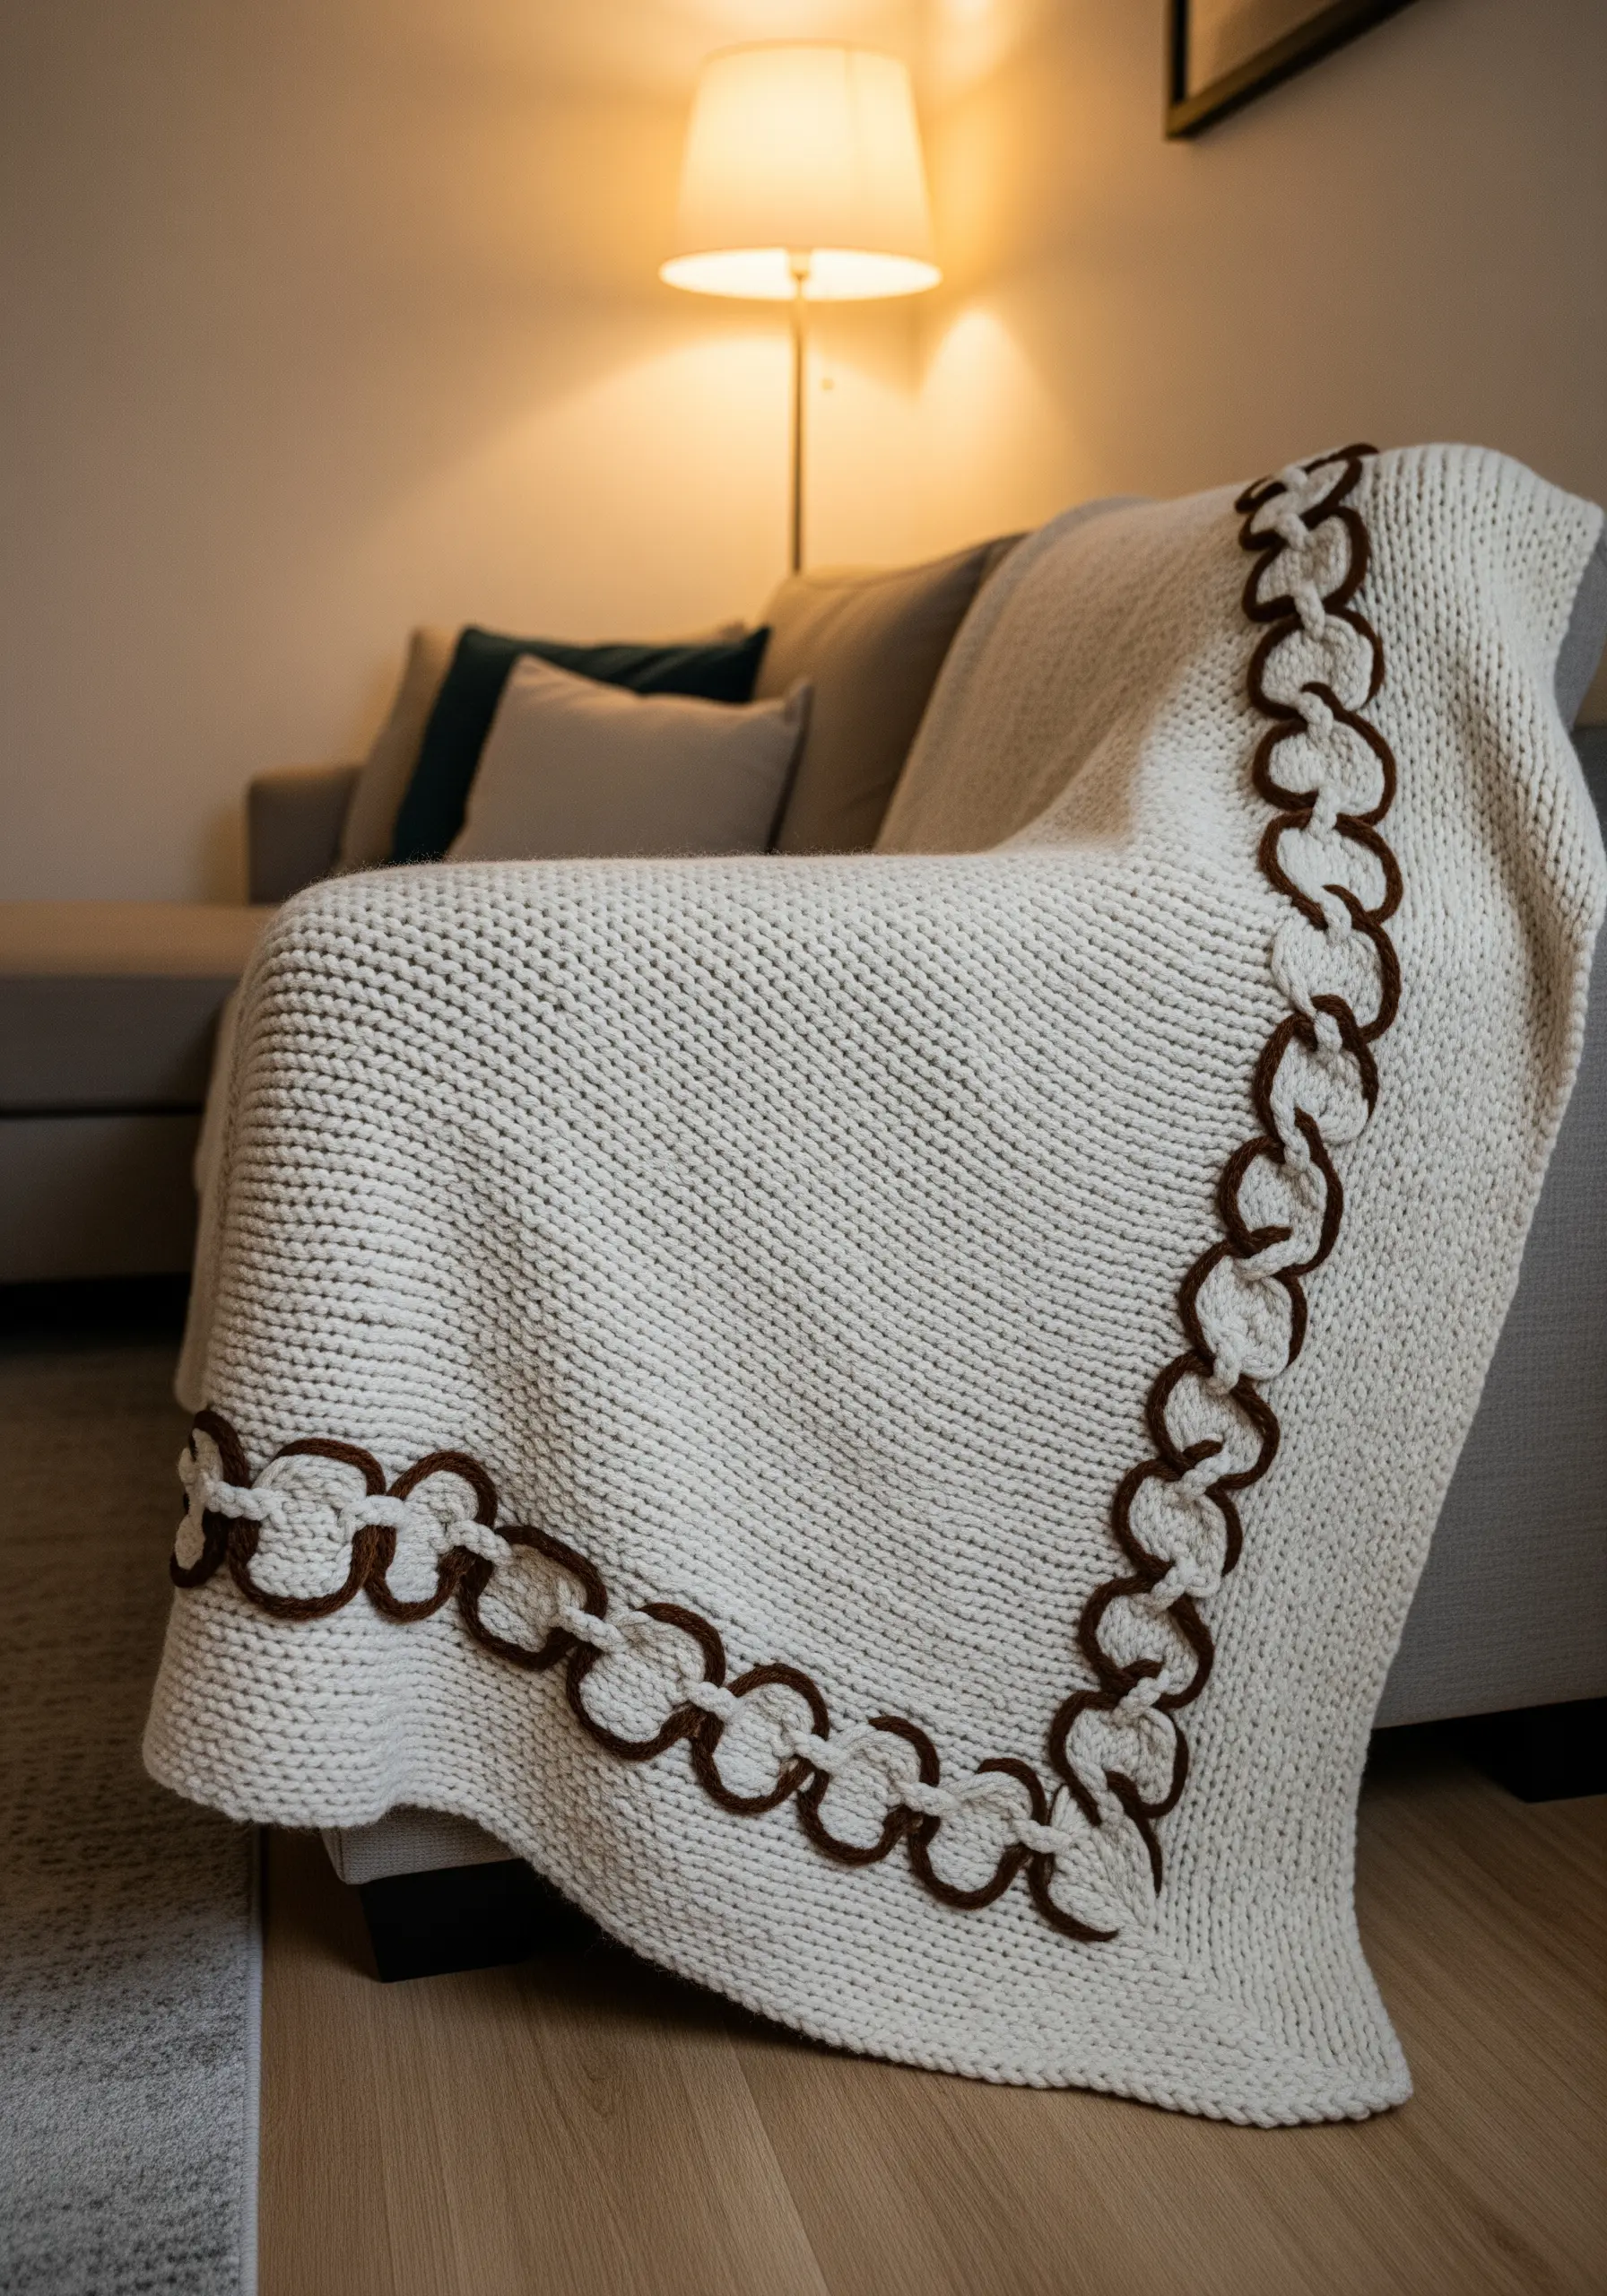
Elevate a simple knitted or woven blanket by adding a decorative border that provides both structure and visual interest.
Instead of stitching through the knit, which can cause pulling, use a crochet hook to create a chain-link or scalloped edge using a contrasting, bulky yarn.
Alternatively, you can couch a thick, braided cord around the perimeter with a tapestry needle and matching yarn.
This technique adds a handcrafted, custom finish and is an excellent way to introduce a second color or texture to a monochrome piece.
17. Transform Your Stitch Practice into Framed Art
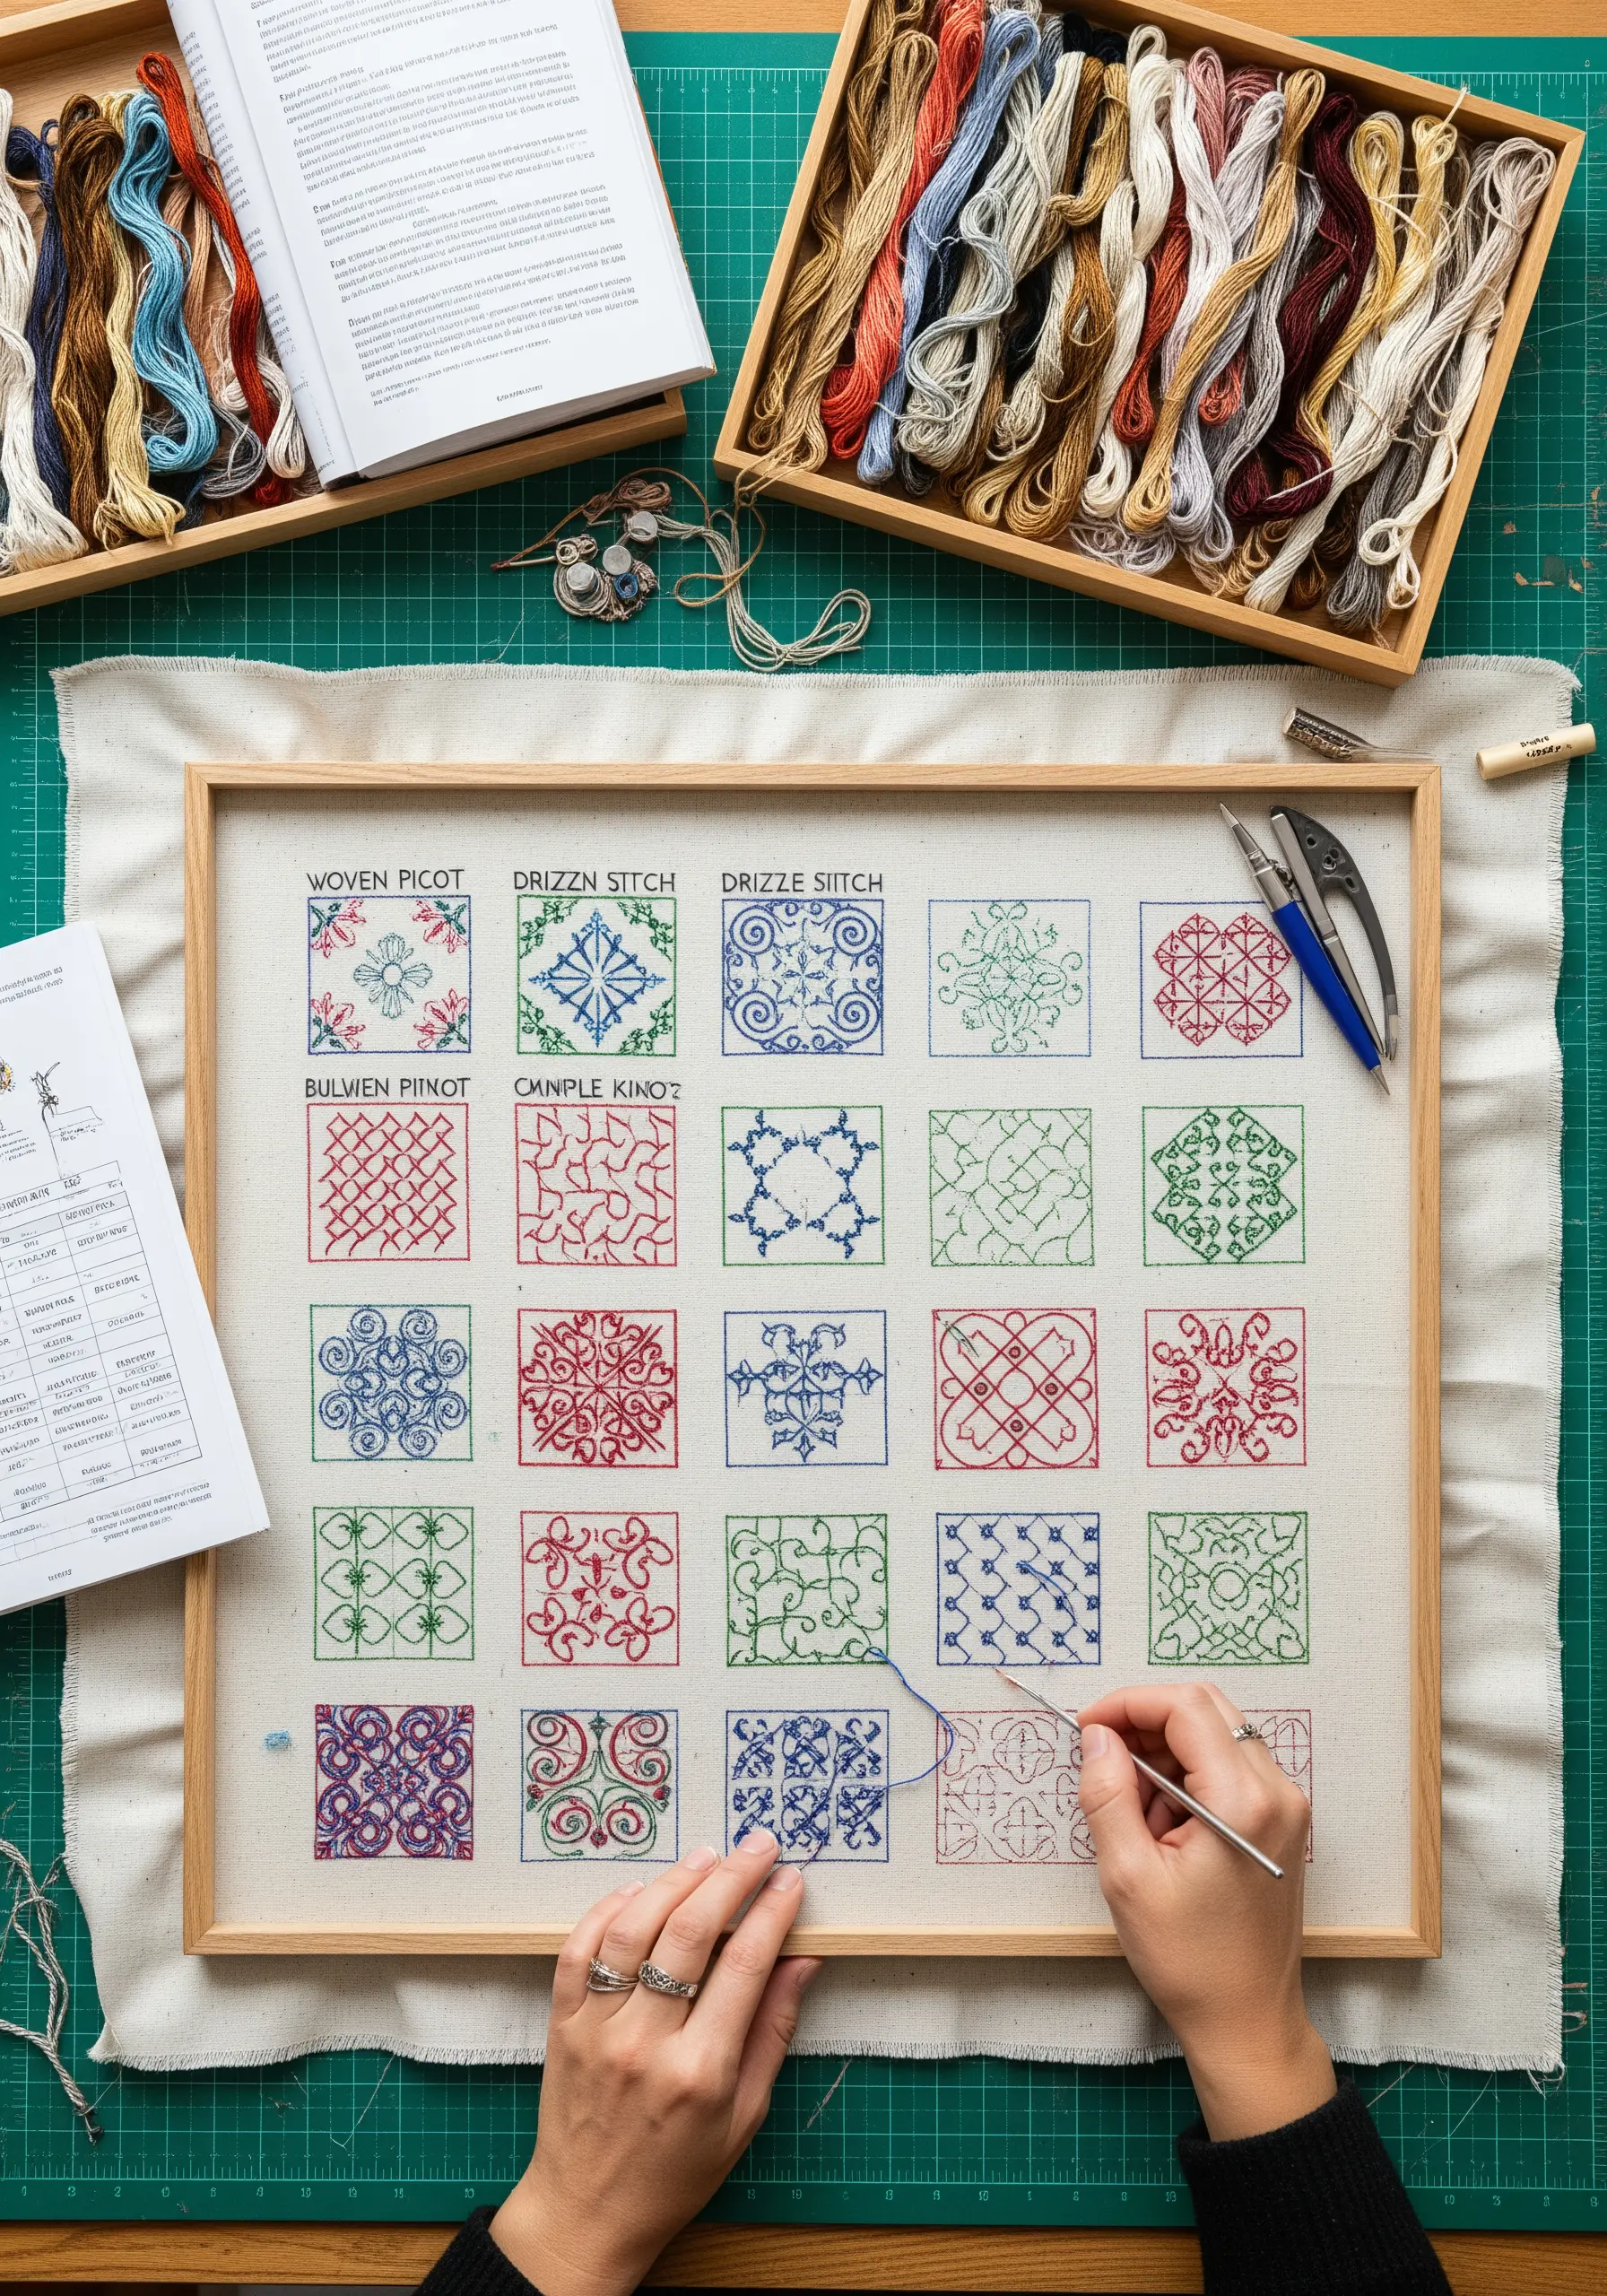
Elevate your stitch sampler from a mere practice cloth into a deliberate piece of wall art by organizing it within a grid.
Draw a precise grid on your fabric with a removable marker and dedicate each square to a different stitch or pattern variation.
Working in a controlled color palette—like primary colors plus green—gives the sampler a cohesive, graphic quality.
Once completed and framed, it becomes a beautiful, educational piece that documents your skill and serves as a unique focal point in your creative space.
18. Create Form and Movement with Stitch Direction
Even with the simplest stitch and a single color, you can create dynamic, sculptural forms by paying close attention to stitch direction.
Within a single abstract shape, change the angle of your running stitches or seed stitches to mimic how light would hit a three-dimensional object.
Arrange stitches in radiating lines from a central point, in curving waves, or in dense, packed clusters to create areas of shadow and highlight.
This thoughtful manipulation of a basic stitch turns a flat silhouette into a compelling study of texture and movement.
Try these monochrome embroidery wall art concepts for a modern aesthetic.
19. Document Your Journey with an Interactive Map
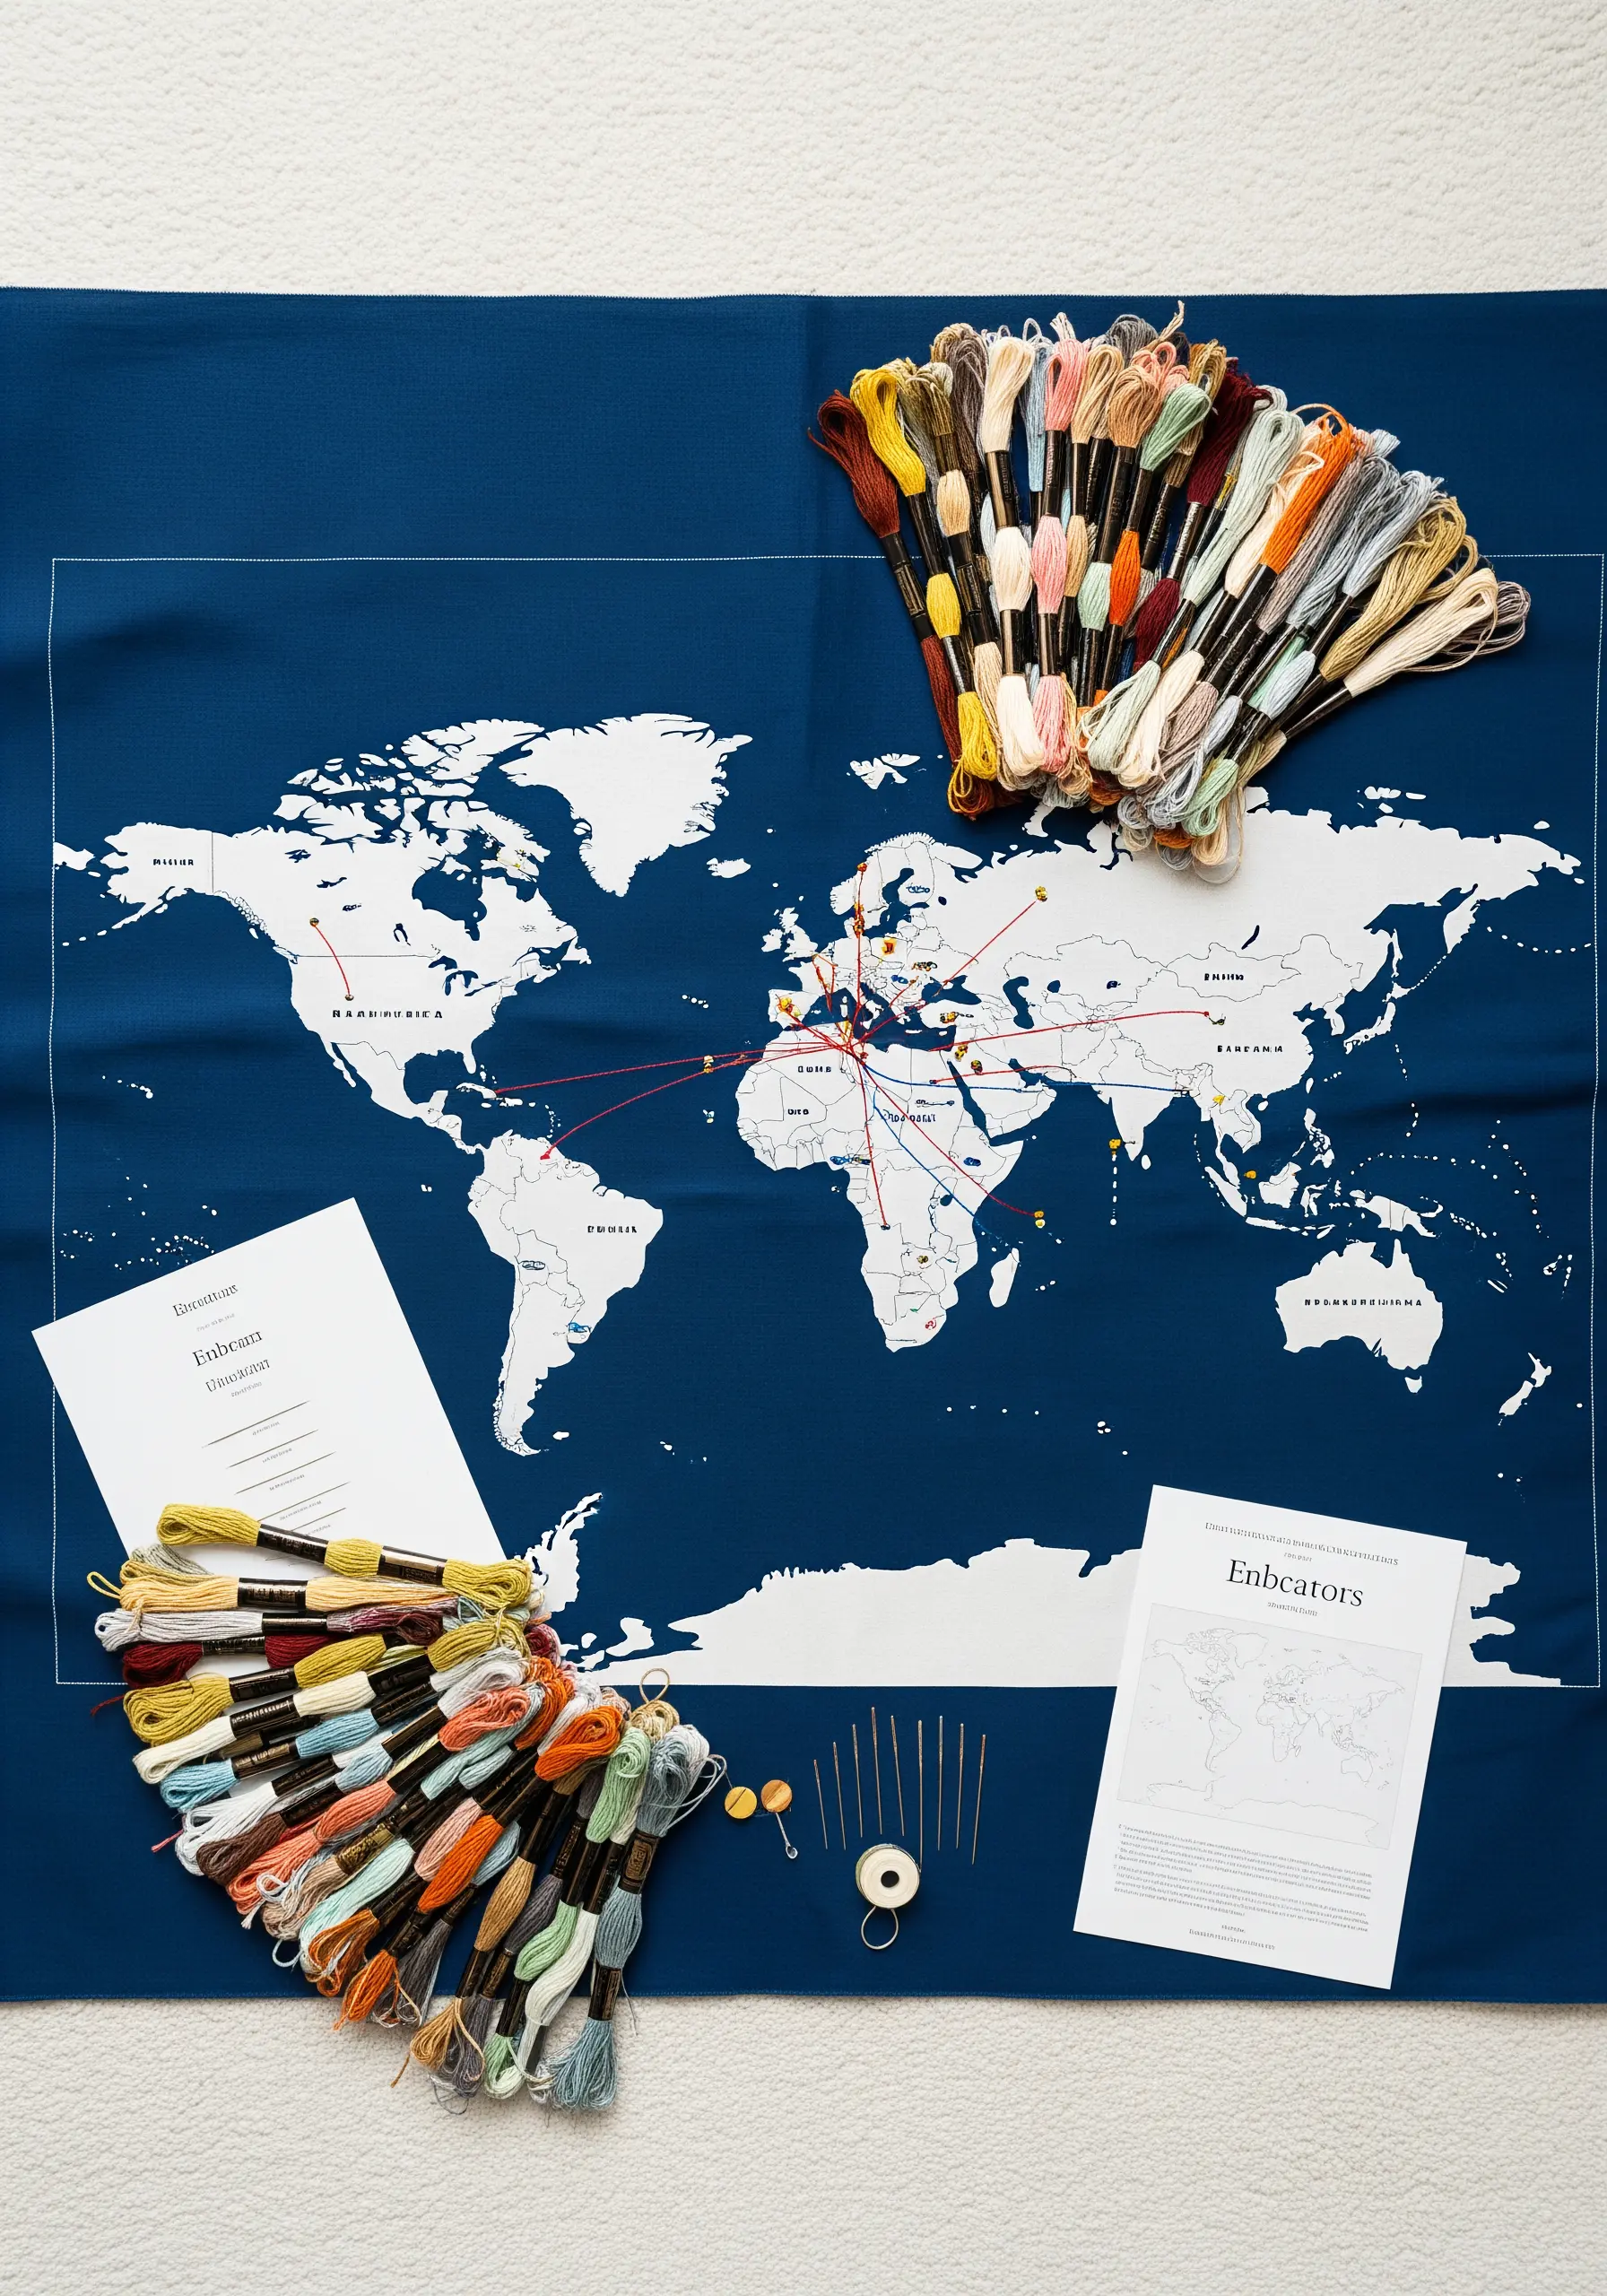
Transform a world map into a living document of your travels and connections by using it as an embroidery canvas.
Use a simple backstitch to connect places you’ve been, or French knots to mark destinations that are meaningful to you.
Assign different colors of floss to different people, trips, or types of memories to create a visual key for your life’s story.
This ongoing project becomes a deeply personal and interactive piece of wall art that evolves over time.
These travel-inspired embroidery hoops capture memories beautifully.
20. Weave a Tactile Landscape with Mixed Fibers
Create a rich, woven wall hanging by focusing on texture over intricate patterns.
Combine a variety of materials within your weaving: chunky wool roving for soft clouds, smooth silk ribbons for a reflective water-like surface, and tightly spun cotton for defined lines.
Incorporate techniques like soumak stitch or rya knots to build raised, three-dimensional areas that invite touch.
The beauty of this art form is in the interplay of different sheens, thicknesses, and textures, which creates a landscape you can feel as well as see.
Explore layered yarn wall art projects to give your walls a stunning 3D effect.


