

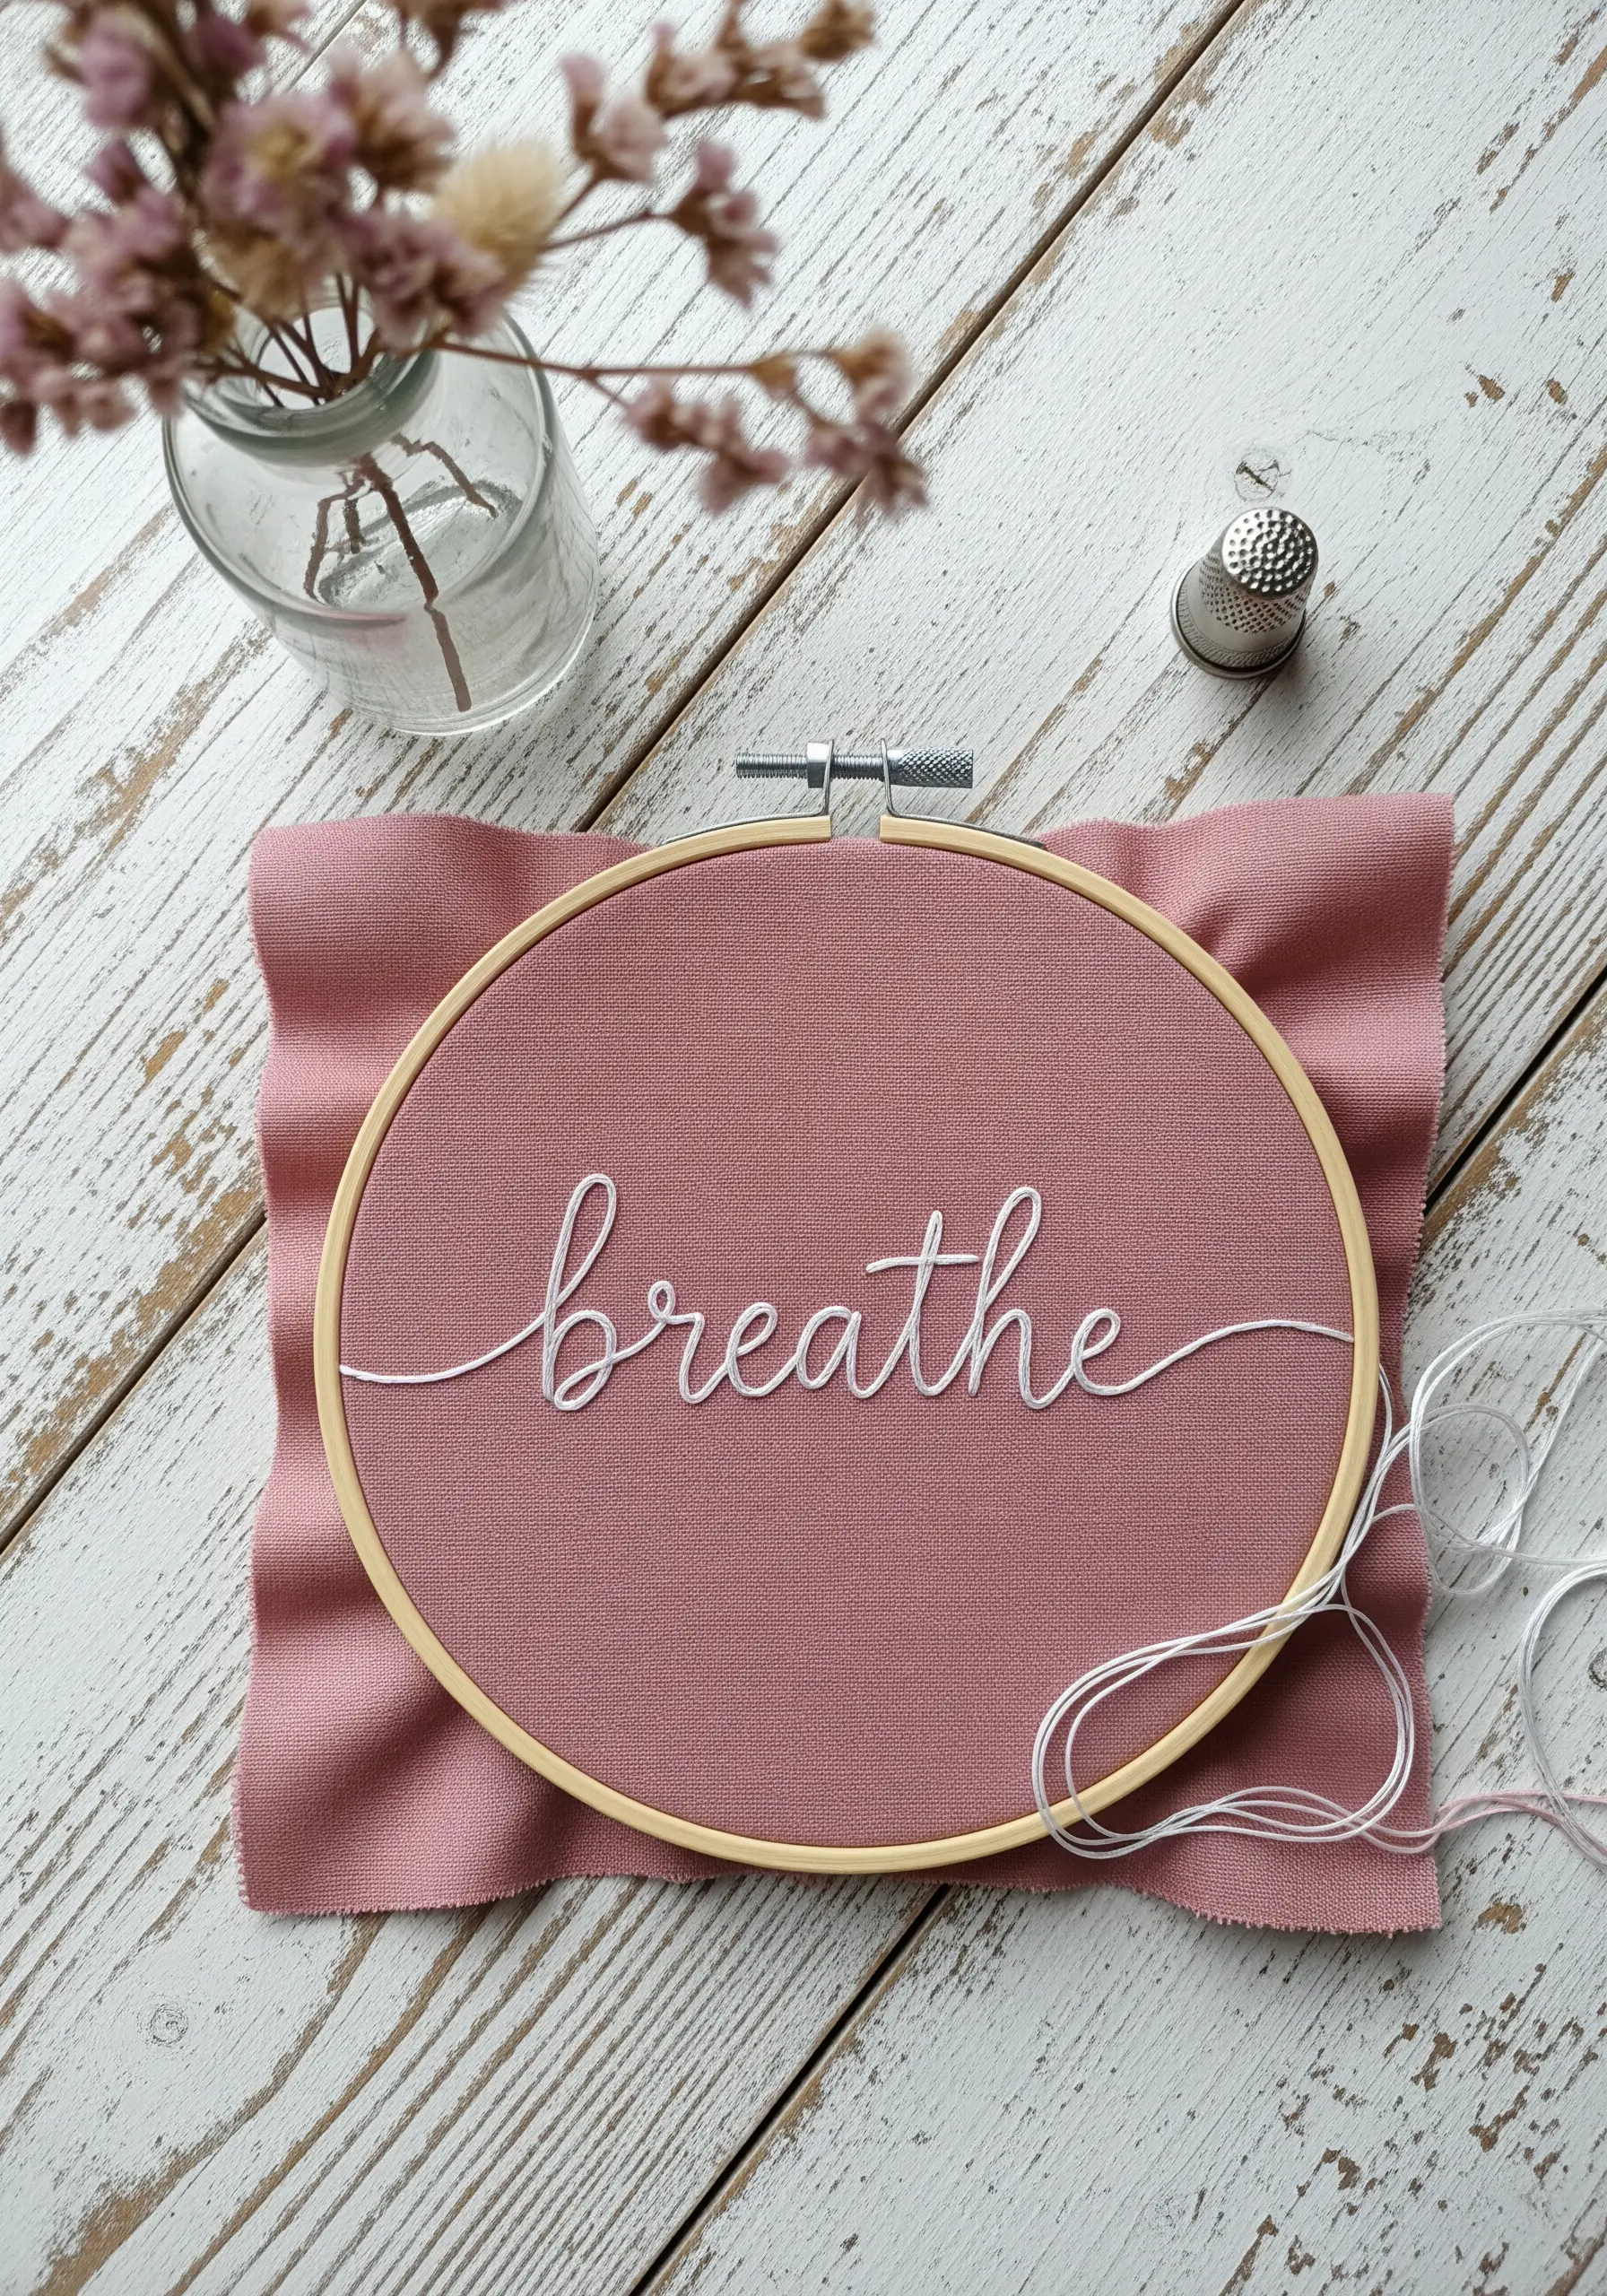
Your embroidery doesn’t need more complexity to feel more meaningful. It needs intention. Forget the pressure to create elaborate, time-consuming masterpieces and instead, focus on the quiet power of a single, well-placed stitch, a thoughtful color choice, or a clean, confident line.
Think of this not as a collection of patterns, but as a series of invitations. Each idea is designed to refine a specific skill—from achieving a perfect satin stitch to understanding the impact of negative space. These are the details that elevate a simple project into a piece of art you are genuinely proud to display.
So, take a deep breath. Pick up your needle. Let’s explore how minimal adjustments can lead to your most polished, personal, and beautiful work yet. The kind you’ll actually want to hang on your wall.
1. Mastering Botanical Texture with French Knots

Create realistic lavender buds by varying the tightness and number of wraps in your French knots—use single wraps for small buds and double for fuller blooms.
Contrast the high texture of the knots with delicate, single-strand split stitches for the stems. This juxtaposition makes the flowers appear more dimensional.
Choosing a neutral, tightly woven linen allows the subtle variations in the purple and green threads to stand out, making it one of those perfect nature-calm stitching projects.
2. Creating Celestial Glow with Metallic Thread
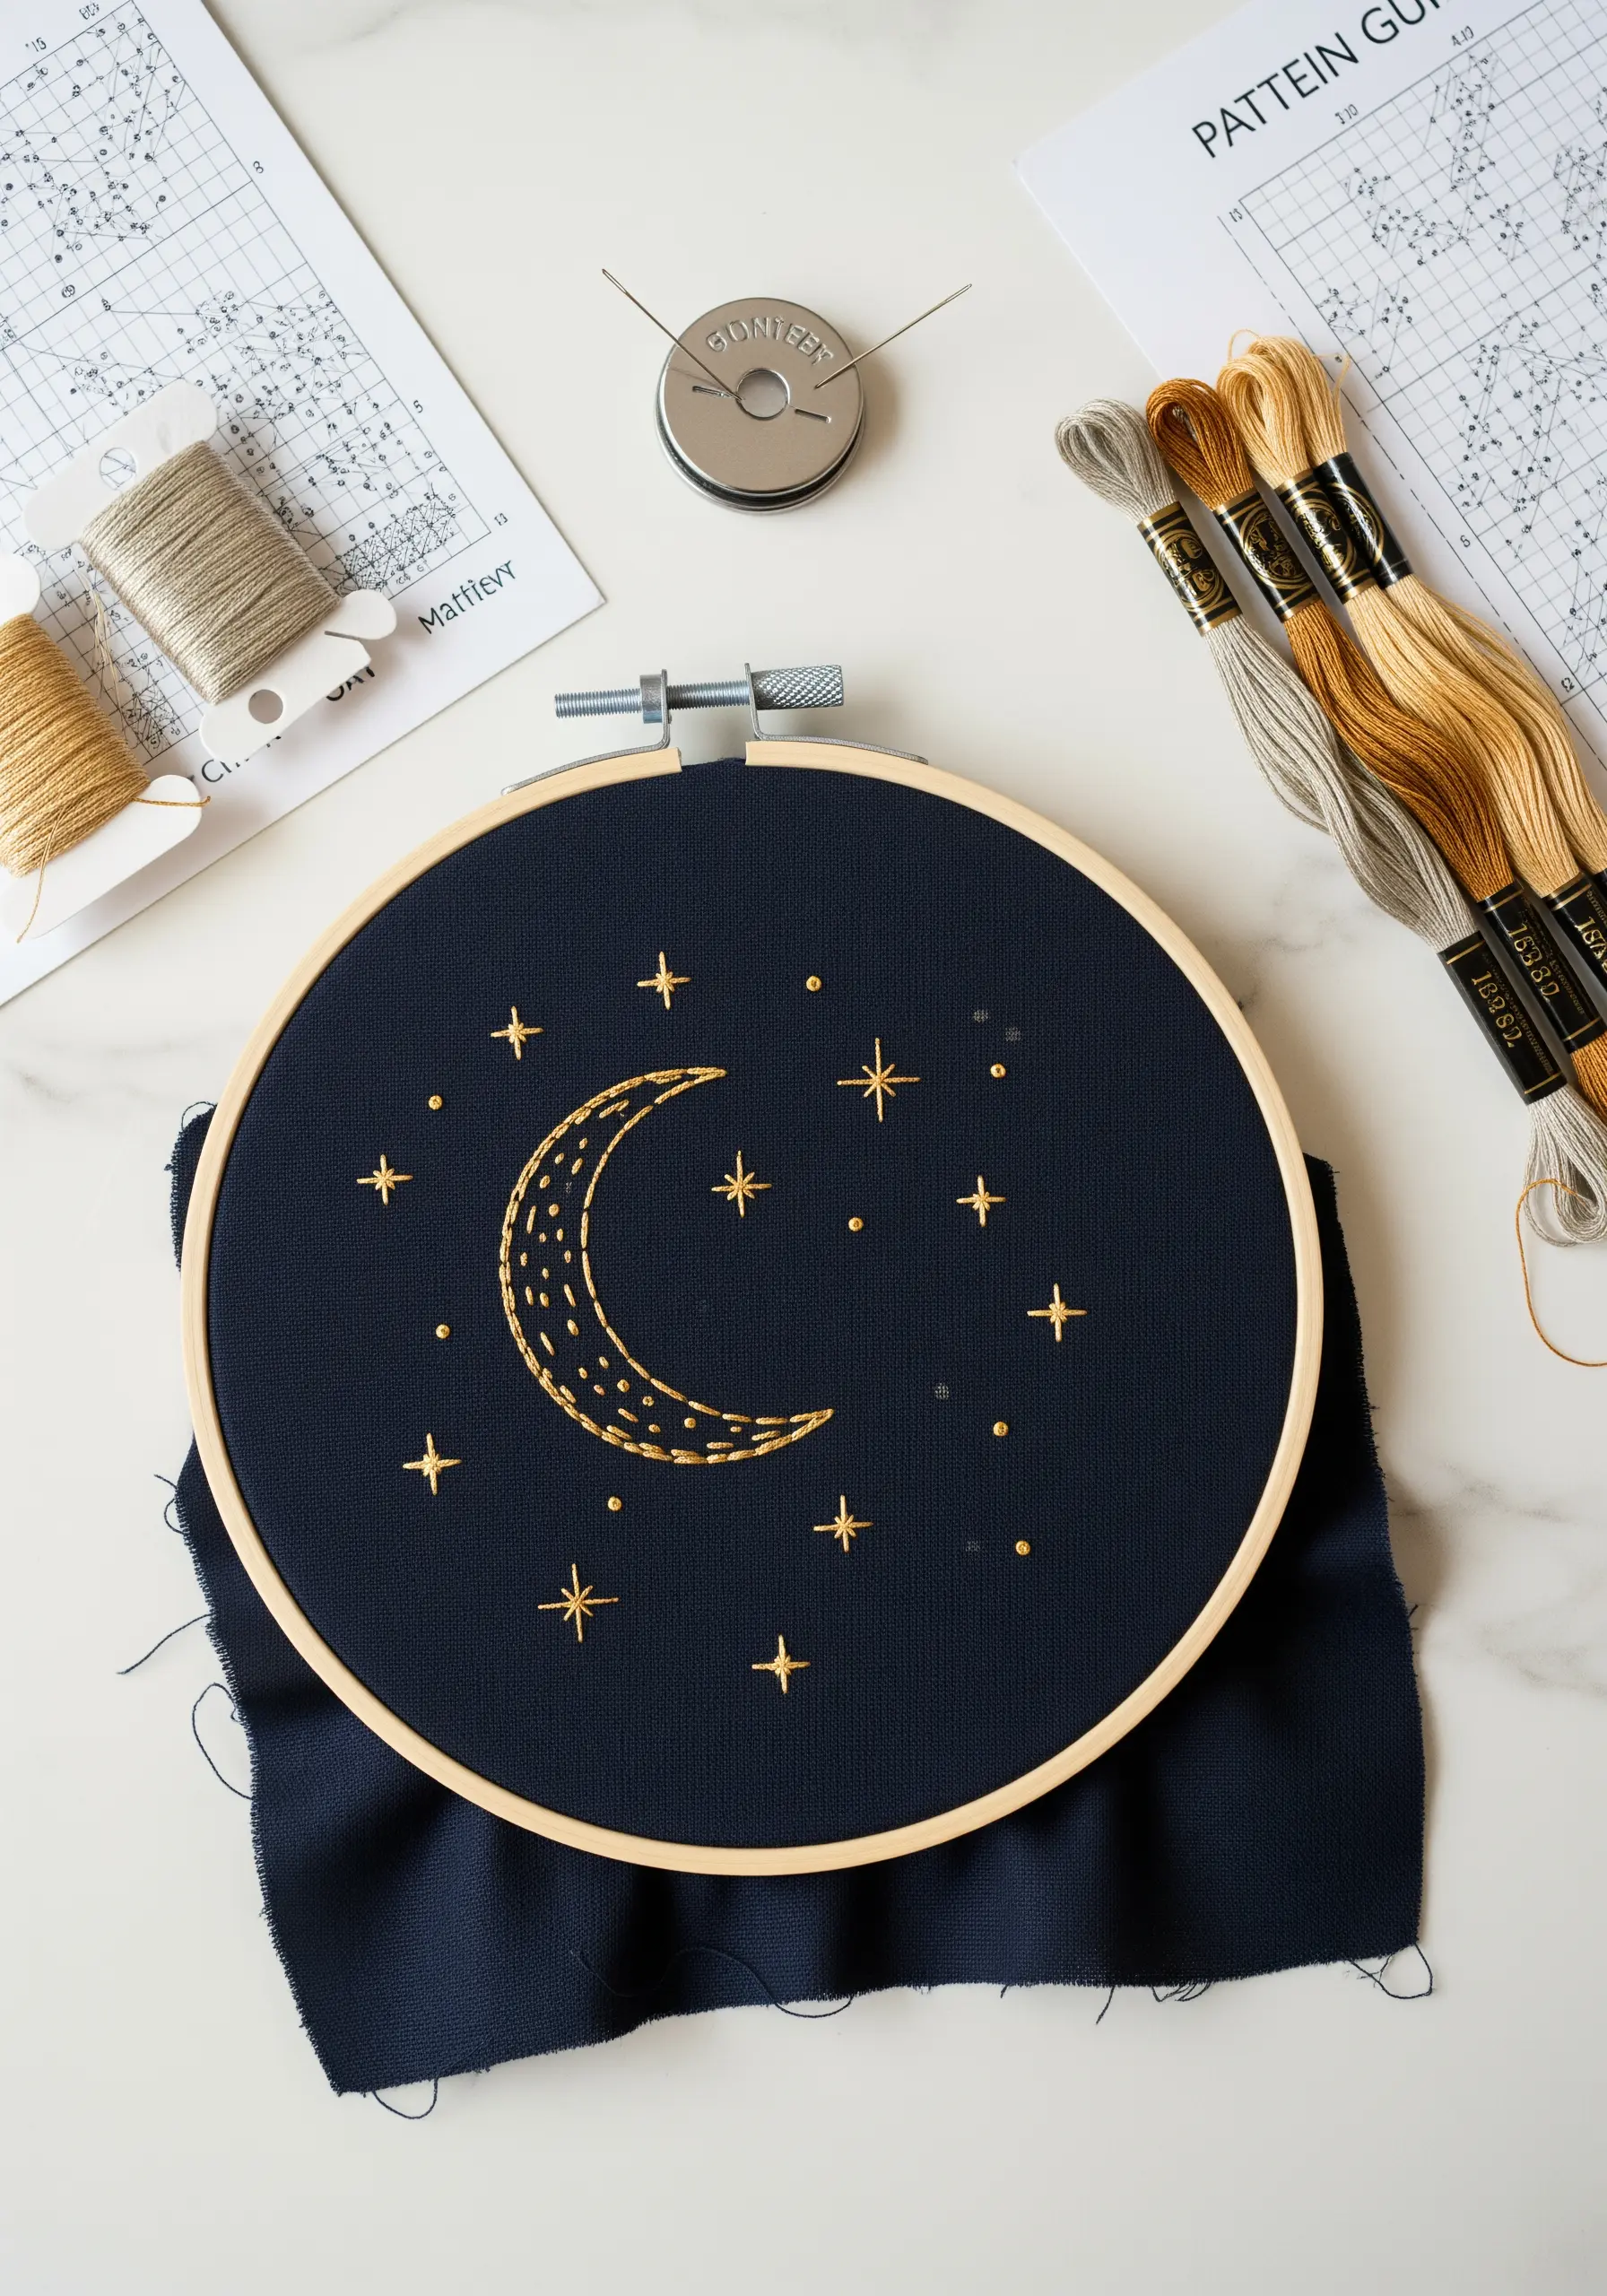
To control unruly metallic thread, outline your crescent moon with a couching stitch—it secures the metallic floss without splitting it.
Fill the moon with scattered seed stitches using a single strand of metallic thread for a gentle, non-uniform shimmer that catches the light beautifully.
The deep navy fabric is essential; it acts as a night sky, making the gold thread appear luminous and transforming the piece into one of those magical embroidered nursery decor ideas.
3. The Art of Geometric Fill and Negative Space
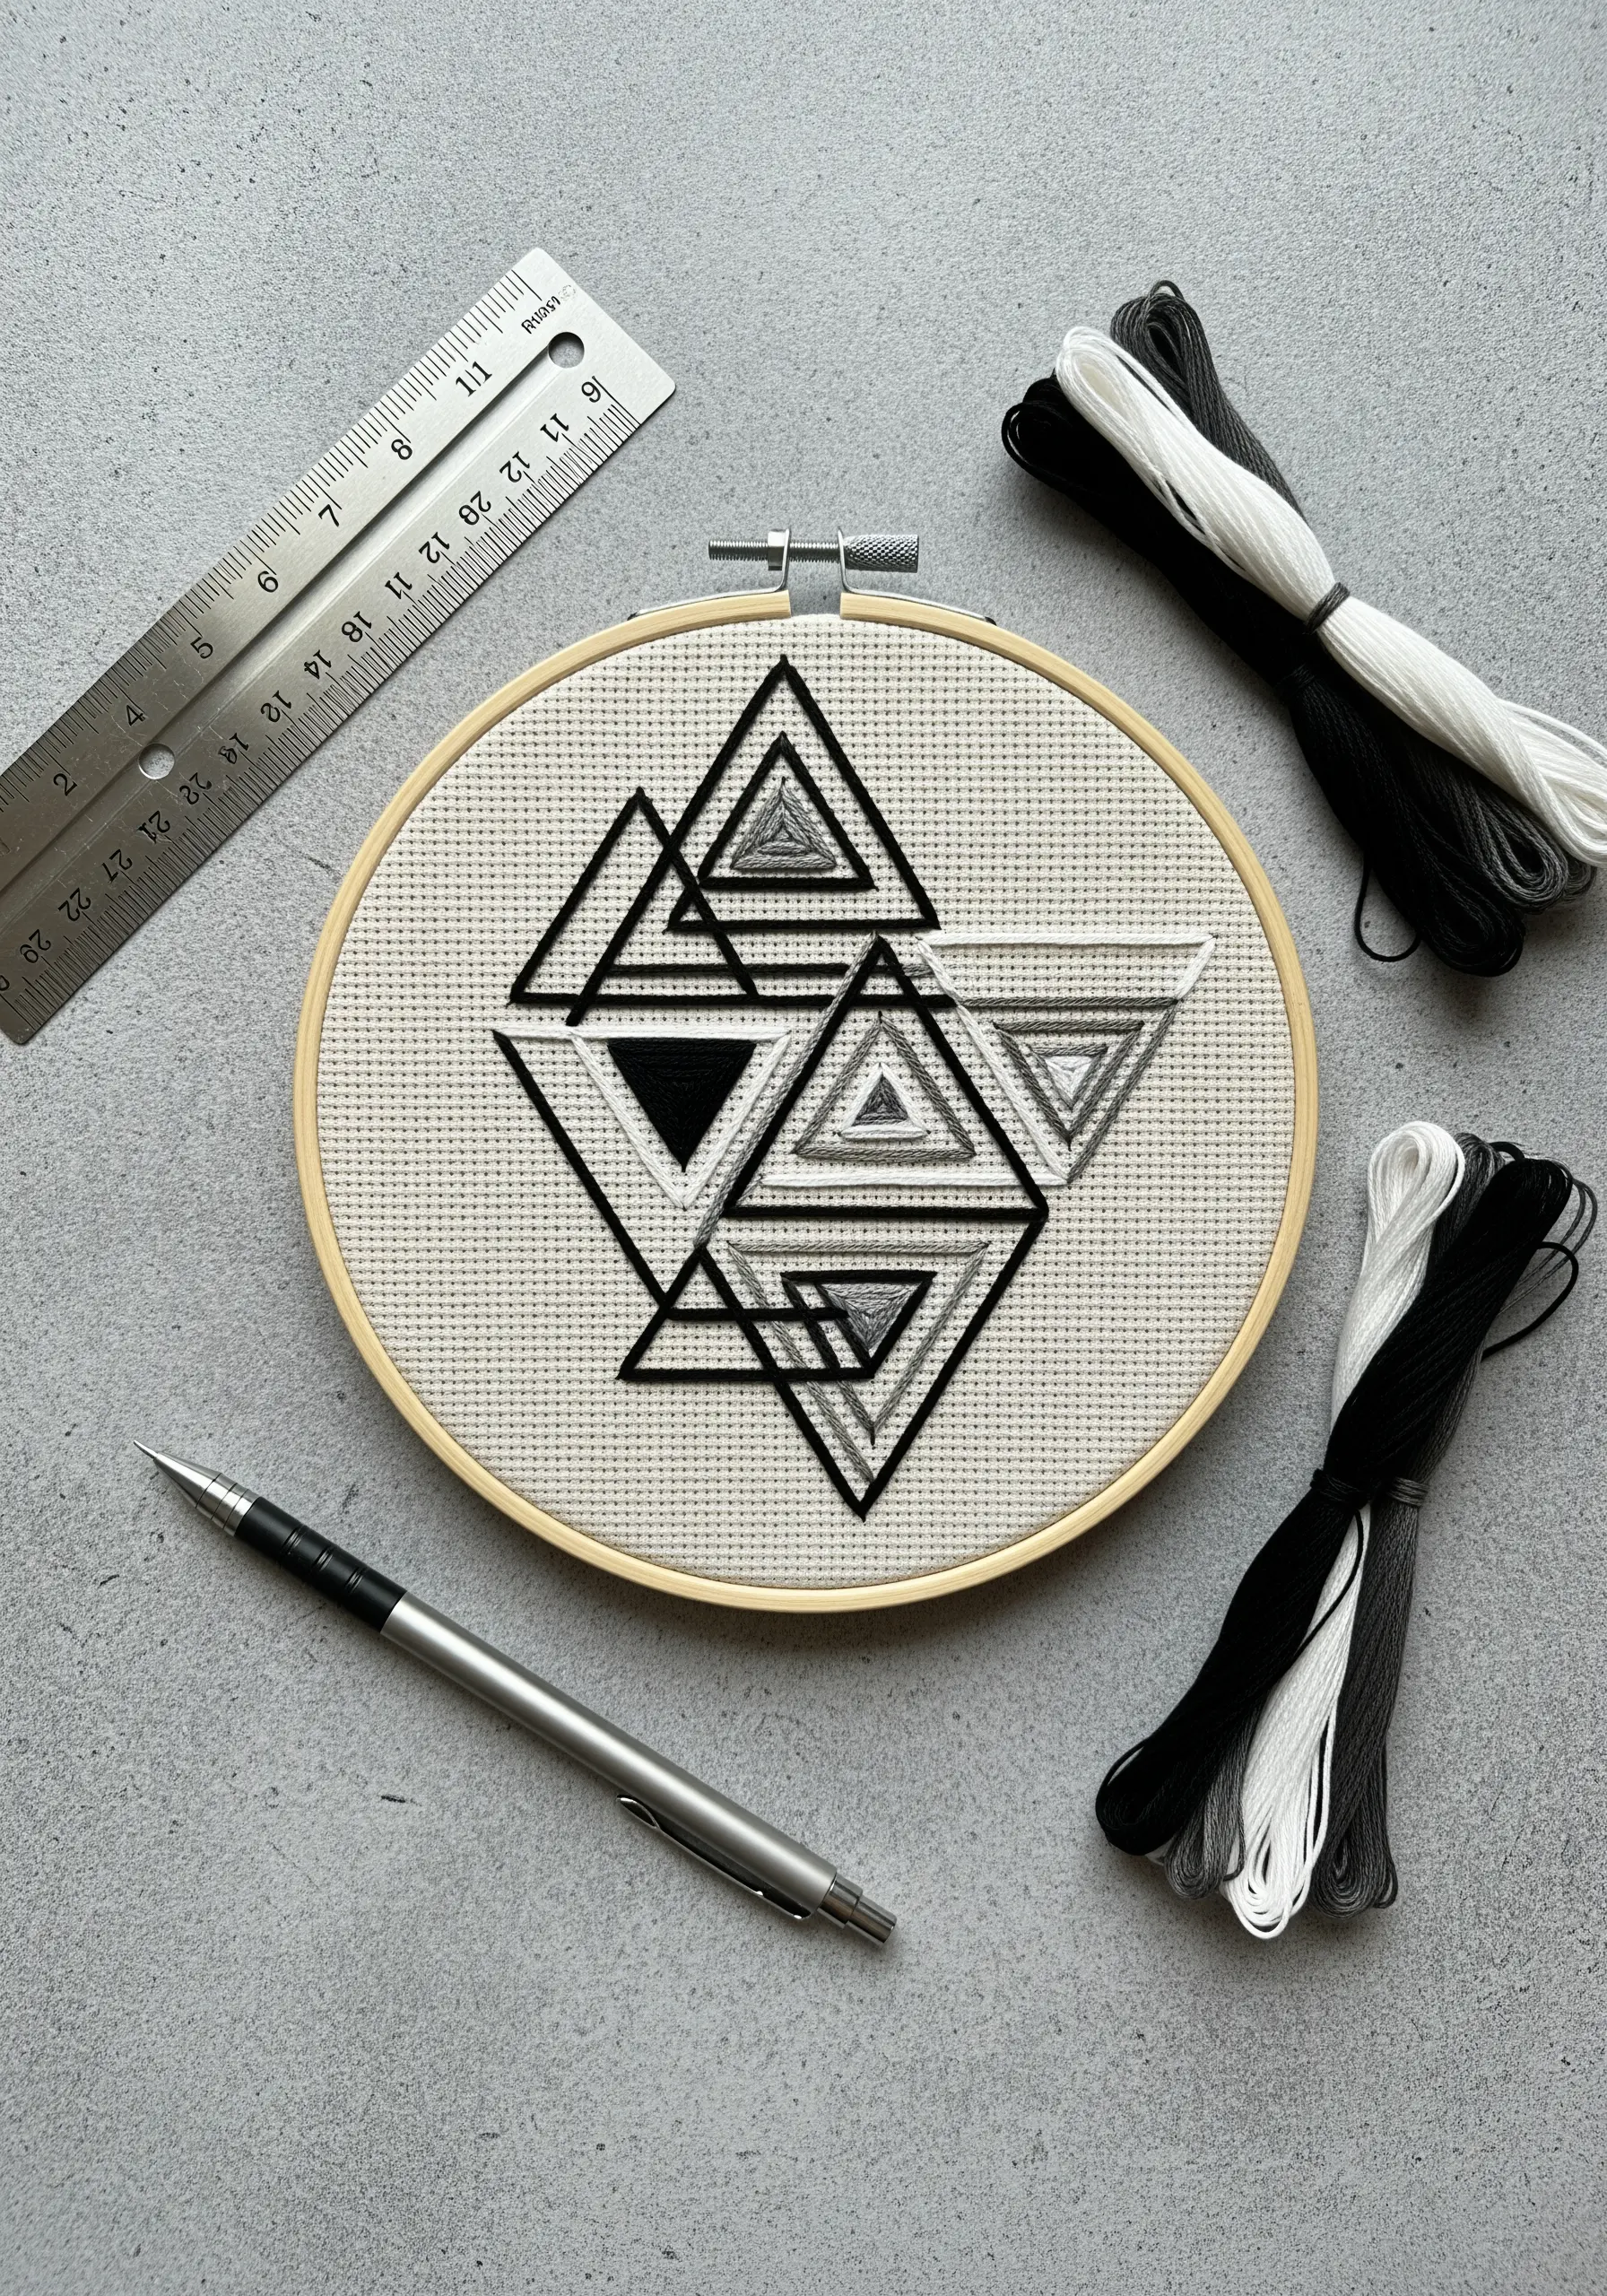
This design is a masterclass in using satin stitch direction to create visual interest. Change the angle of your stitches in adjacent sections to reflect light differently and create subtle dimension.
For impeccably sharp edges, outline each geometric shape with a split stitch before you begin filling it in. This creates a raised border for your satin stitches to rest against.
Deliberately leaving some areas open (negative space) makes the filled sections feel more impactful and prevents the design from becoming too heavy. It’s a key principle in yarn wall art projects inspired by geometric patterns.
4. The Power of a Single, Confident Line
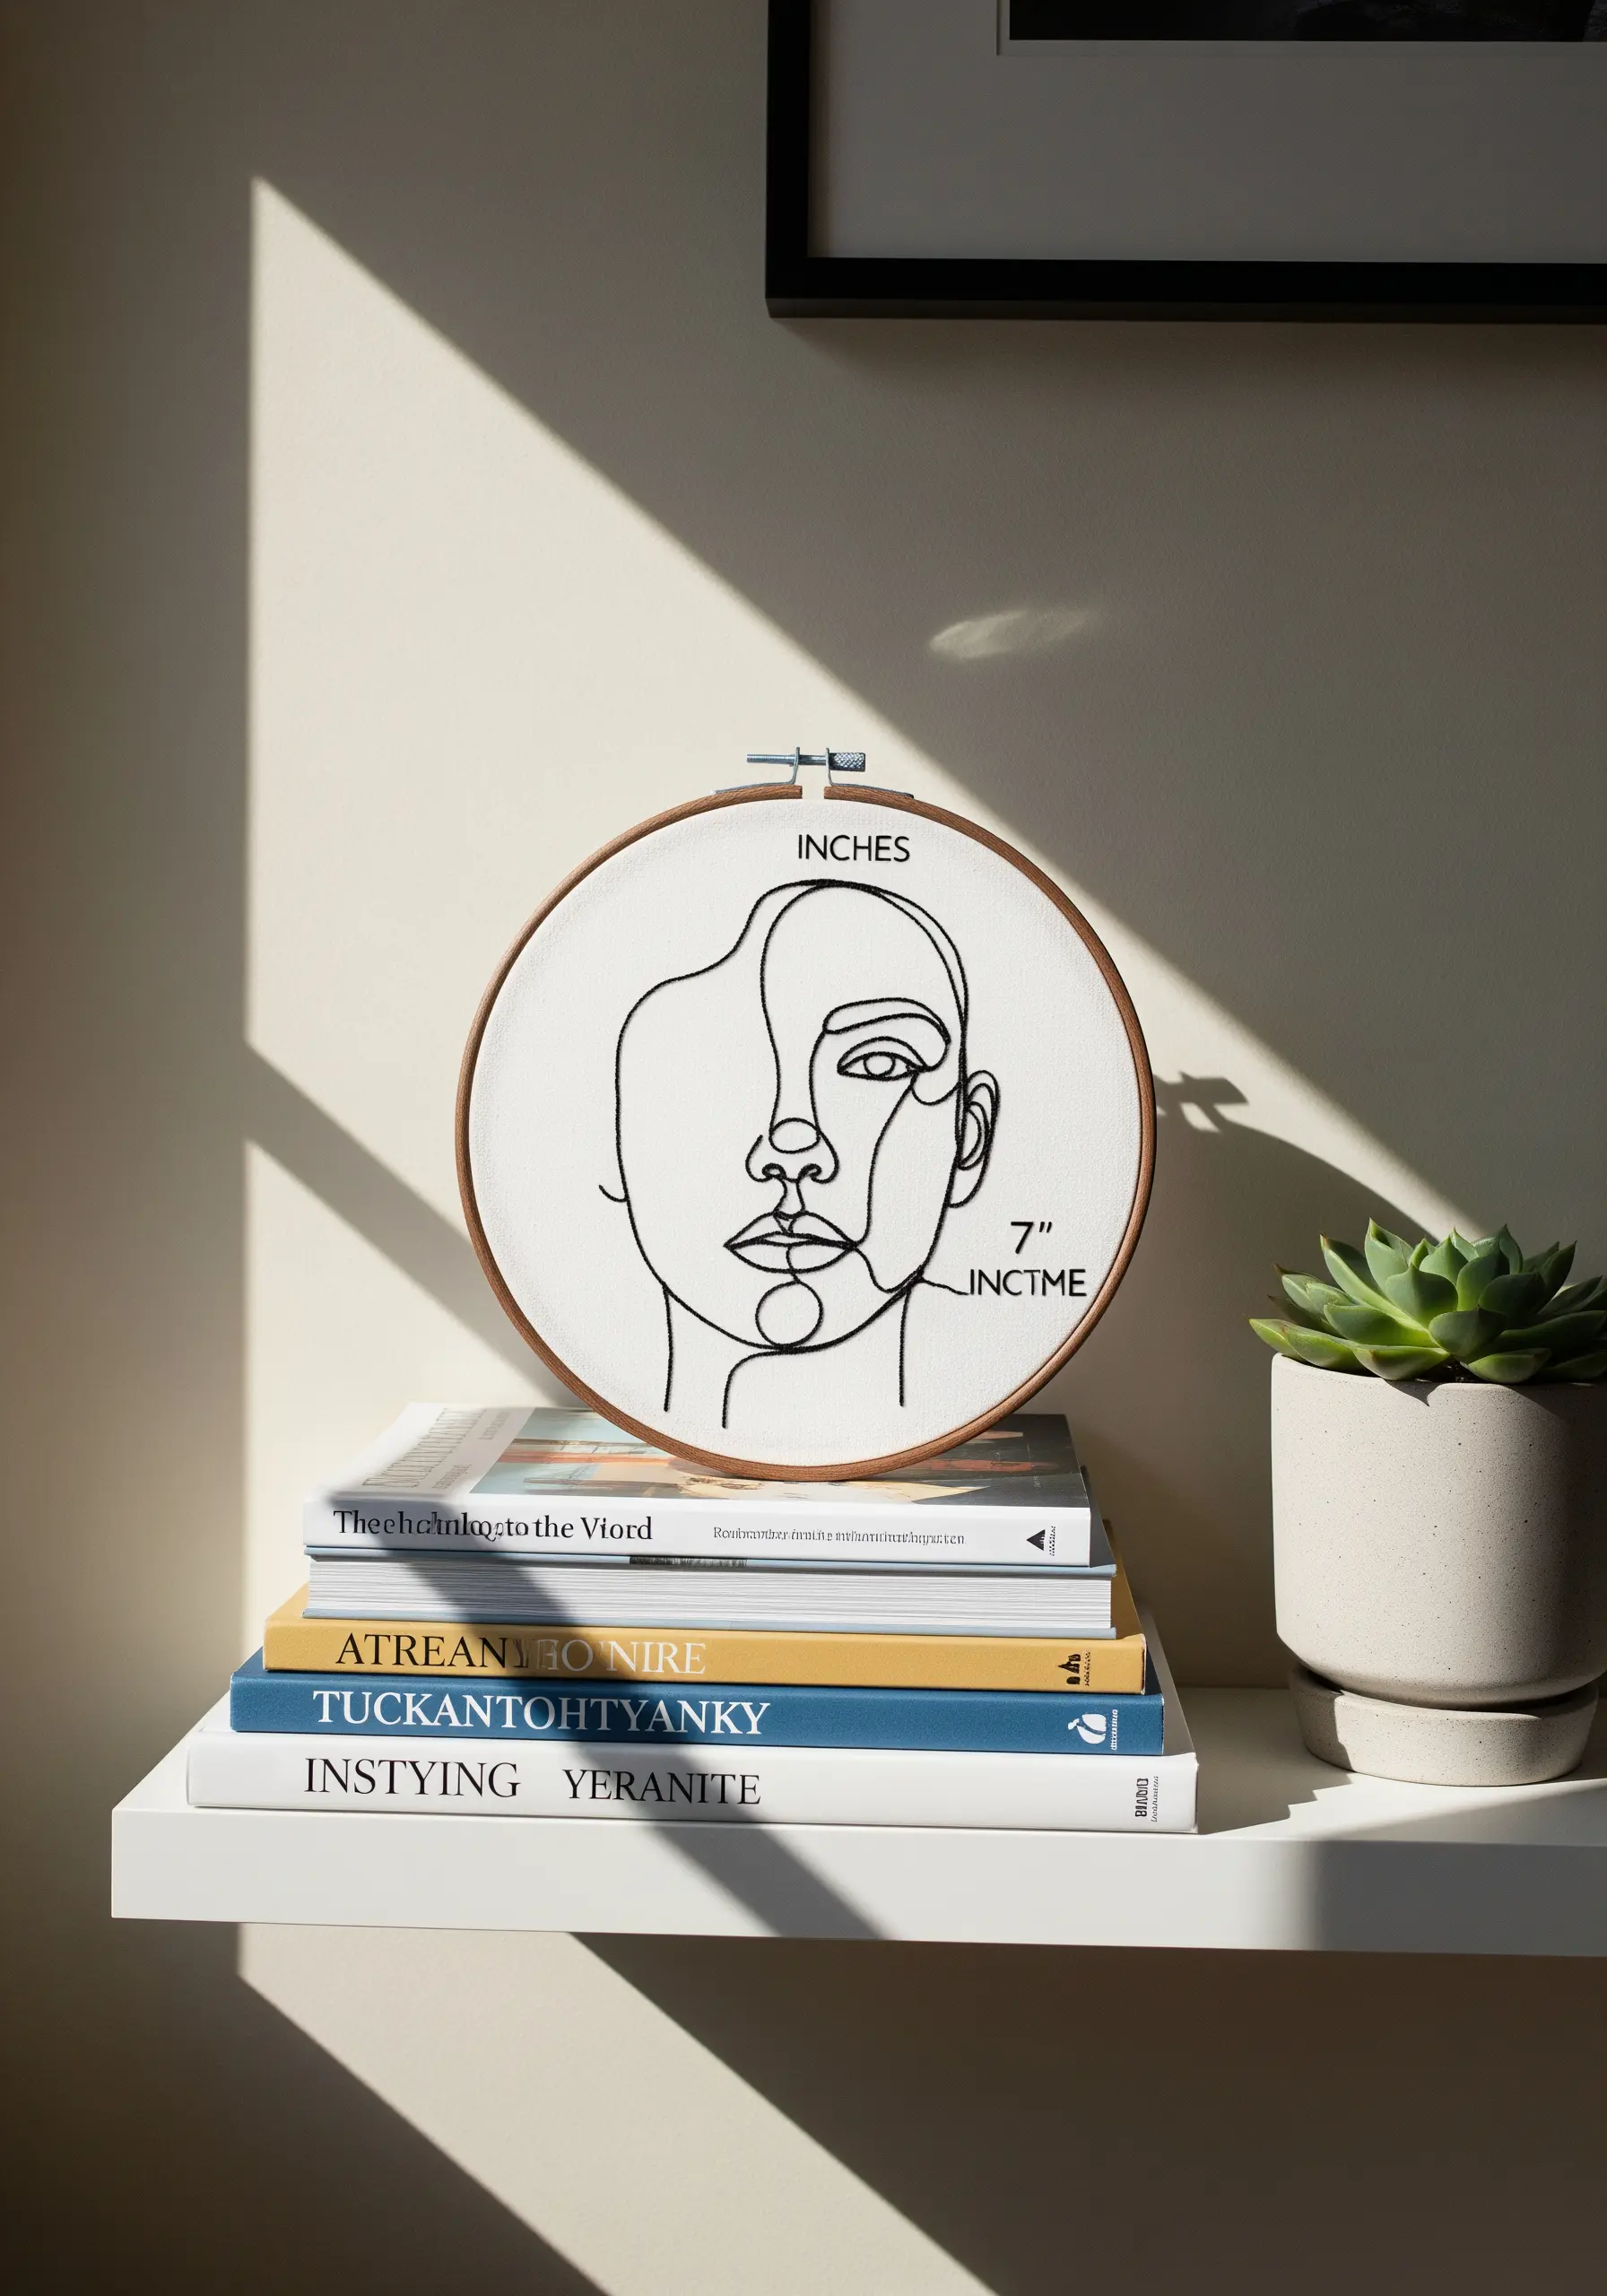
For single-line face profiles that mimic fluid ink drawings, use a whipped backstitch. This technique covers the segmented look of a standard backstitch, resulting in one smooth, unbroken line.
Use two strands of six-strand floss. This provides enough weight to give the line presence without making it appear bulky or losing its delicate quality.
The elegance of this style is its restraint. Resist the urge to add more detail; let the simplicity of the single line convey the full emotion and form of the subject.
5. Building Texture with Directional Color Blocks
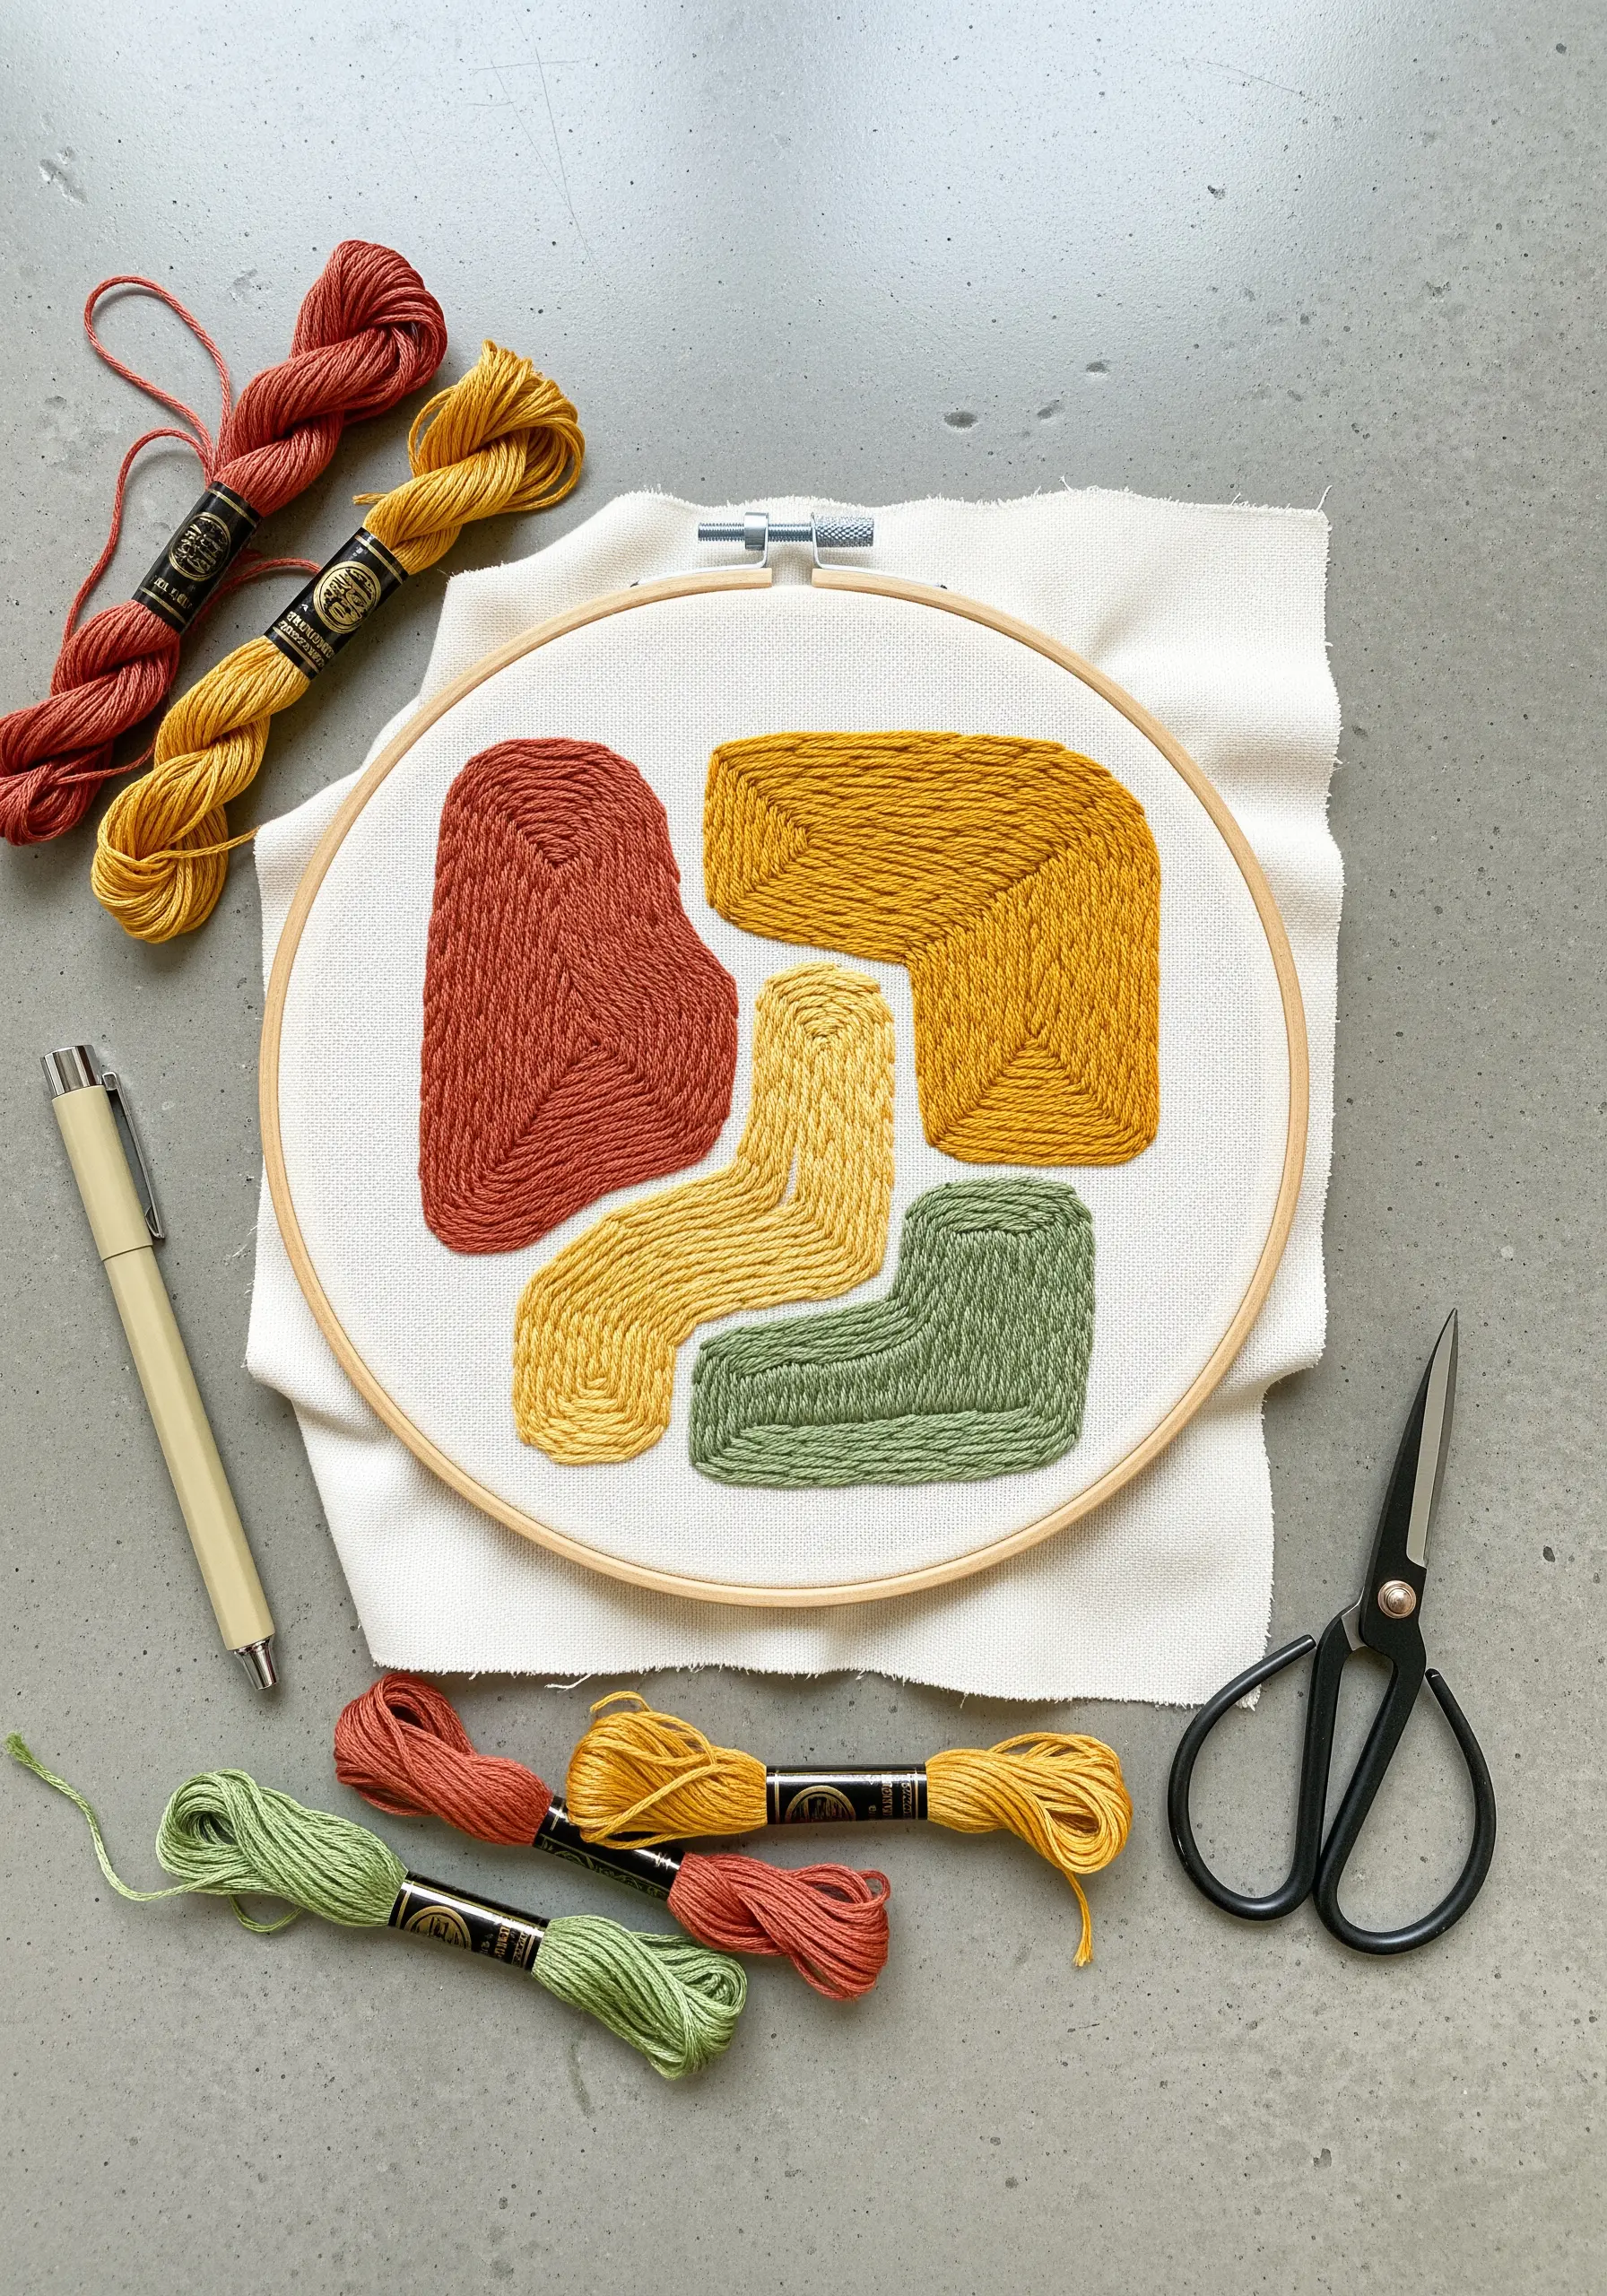
Turn simple abstract shapes into a tactile experience by varying your satin stitch direction. Stitch one block horizontally, the next vertically, and another diagonally.
This simple adjustment creates a subtle play of light and shadow, adding sophisticated depth to an otherwise flat composition. It’s a fundamental technique for many abstract mixed-media embroidery ideas.
To maintain clean edges where colors meet, use a split stitch outline first. This gives you a clear, firm boundary to stitch against, ensuring each color block is perfectly defined.
6. Elevating Script with the Whipped Backstitch
For fluid, elegant script, the whipped backstitch is your best friend. First, create a standard backstitch along your lettering as a foundation.
Then, using the same or a different color thread, slide your needle under each backstitch without piercing the fabric. This ‘whipping’ motion smooths the line into a seamless, raised curve.
This technique turns simple text into a refined focal point, making it perfect for inspirational quote string art designs that feel polished and intentional.
7. Translating Architectural Lines into Thread
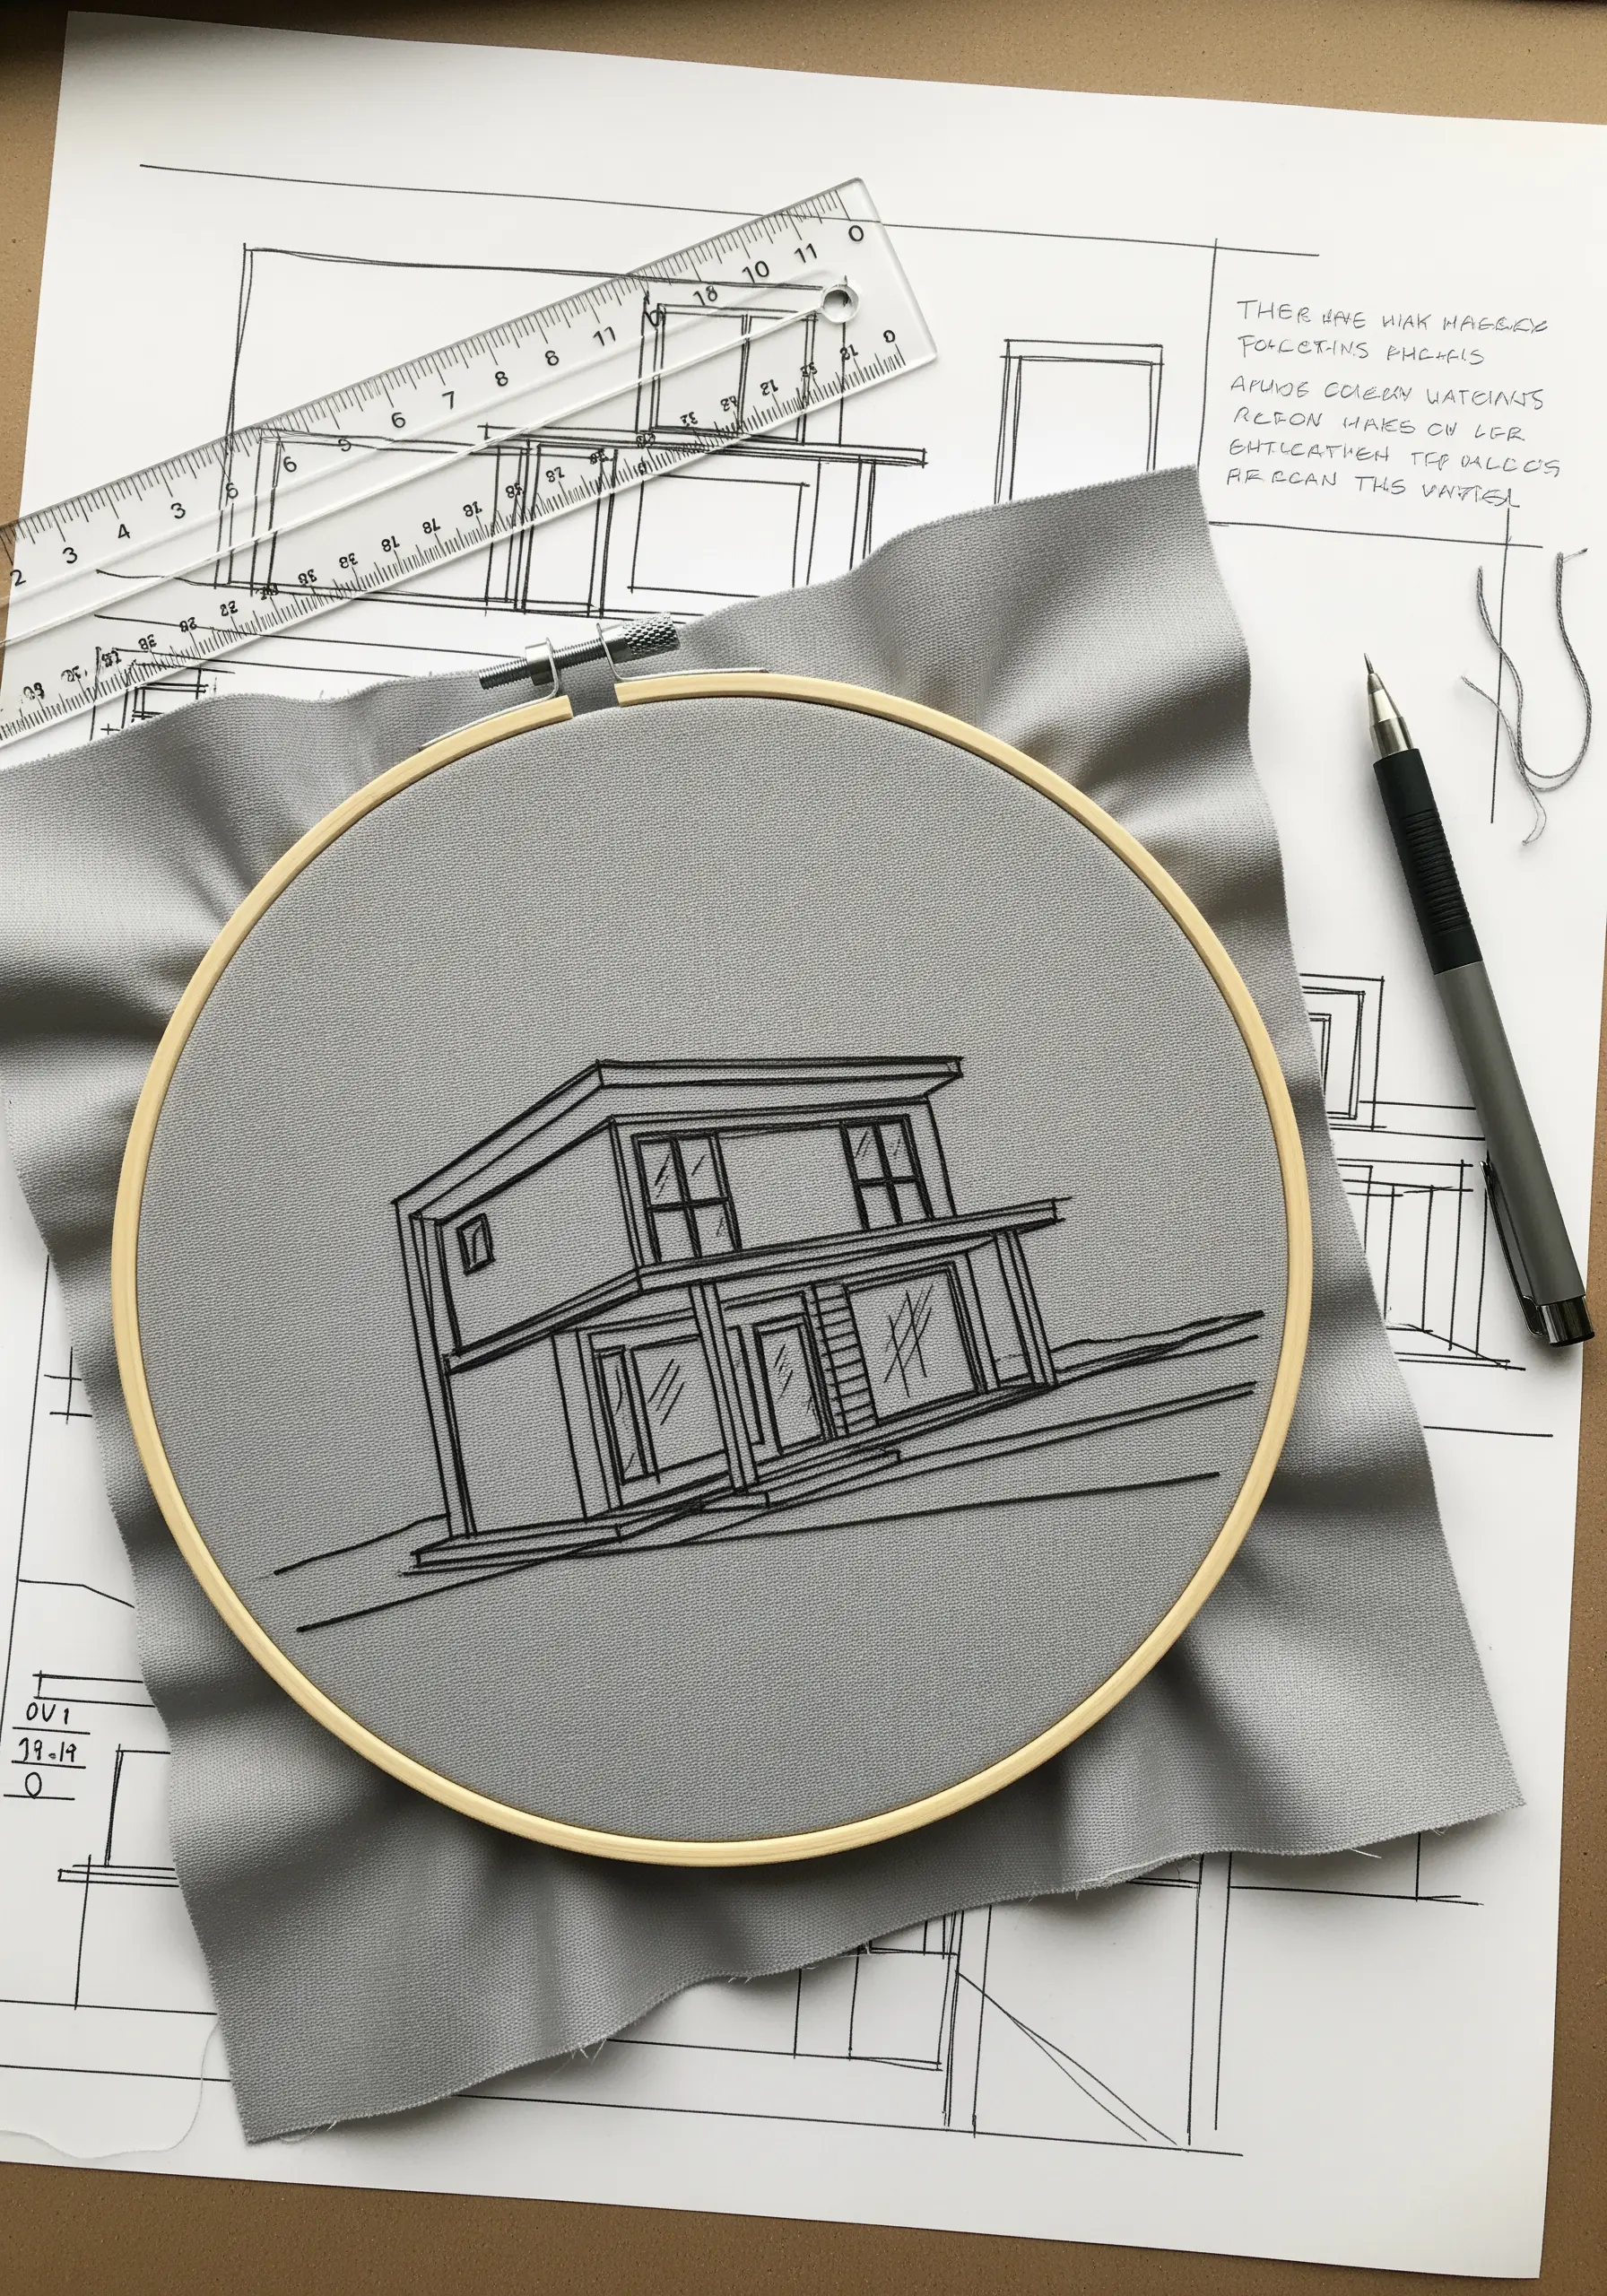
Capture the precision of a blueprint by using a single strand of black floss and a simple backstitch. This keeps the lines crisp and clean, honoring the technical nature of the subject.
Vary your stitch length to suggest line weight—use shorter stitches for fine details like window panes and longer stitches for foundational walls and rooflines.
This minimalist approach is a wonderful way to commemorate a home or favorite building, turning technical drawings into personal architectural string art designs.
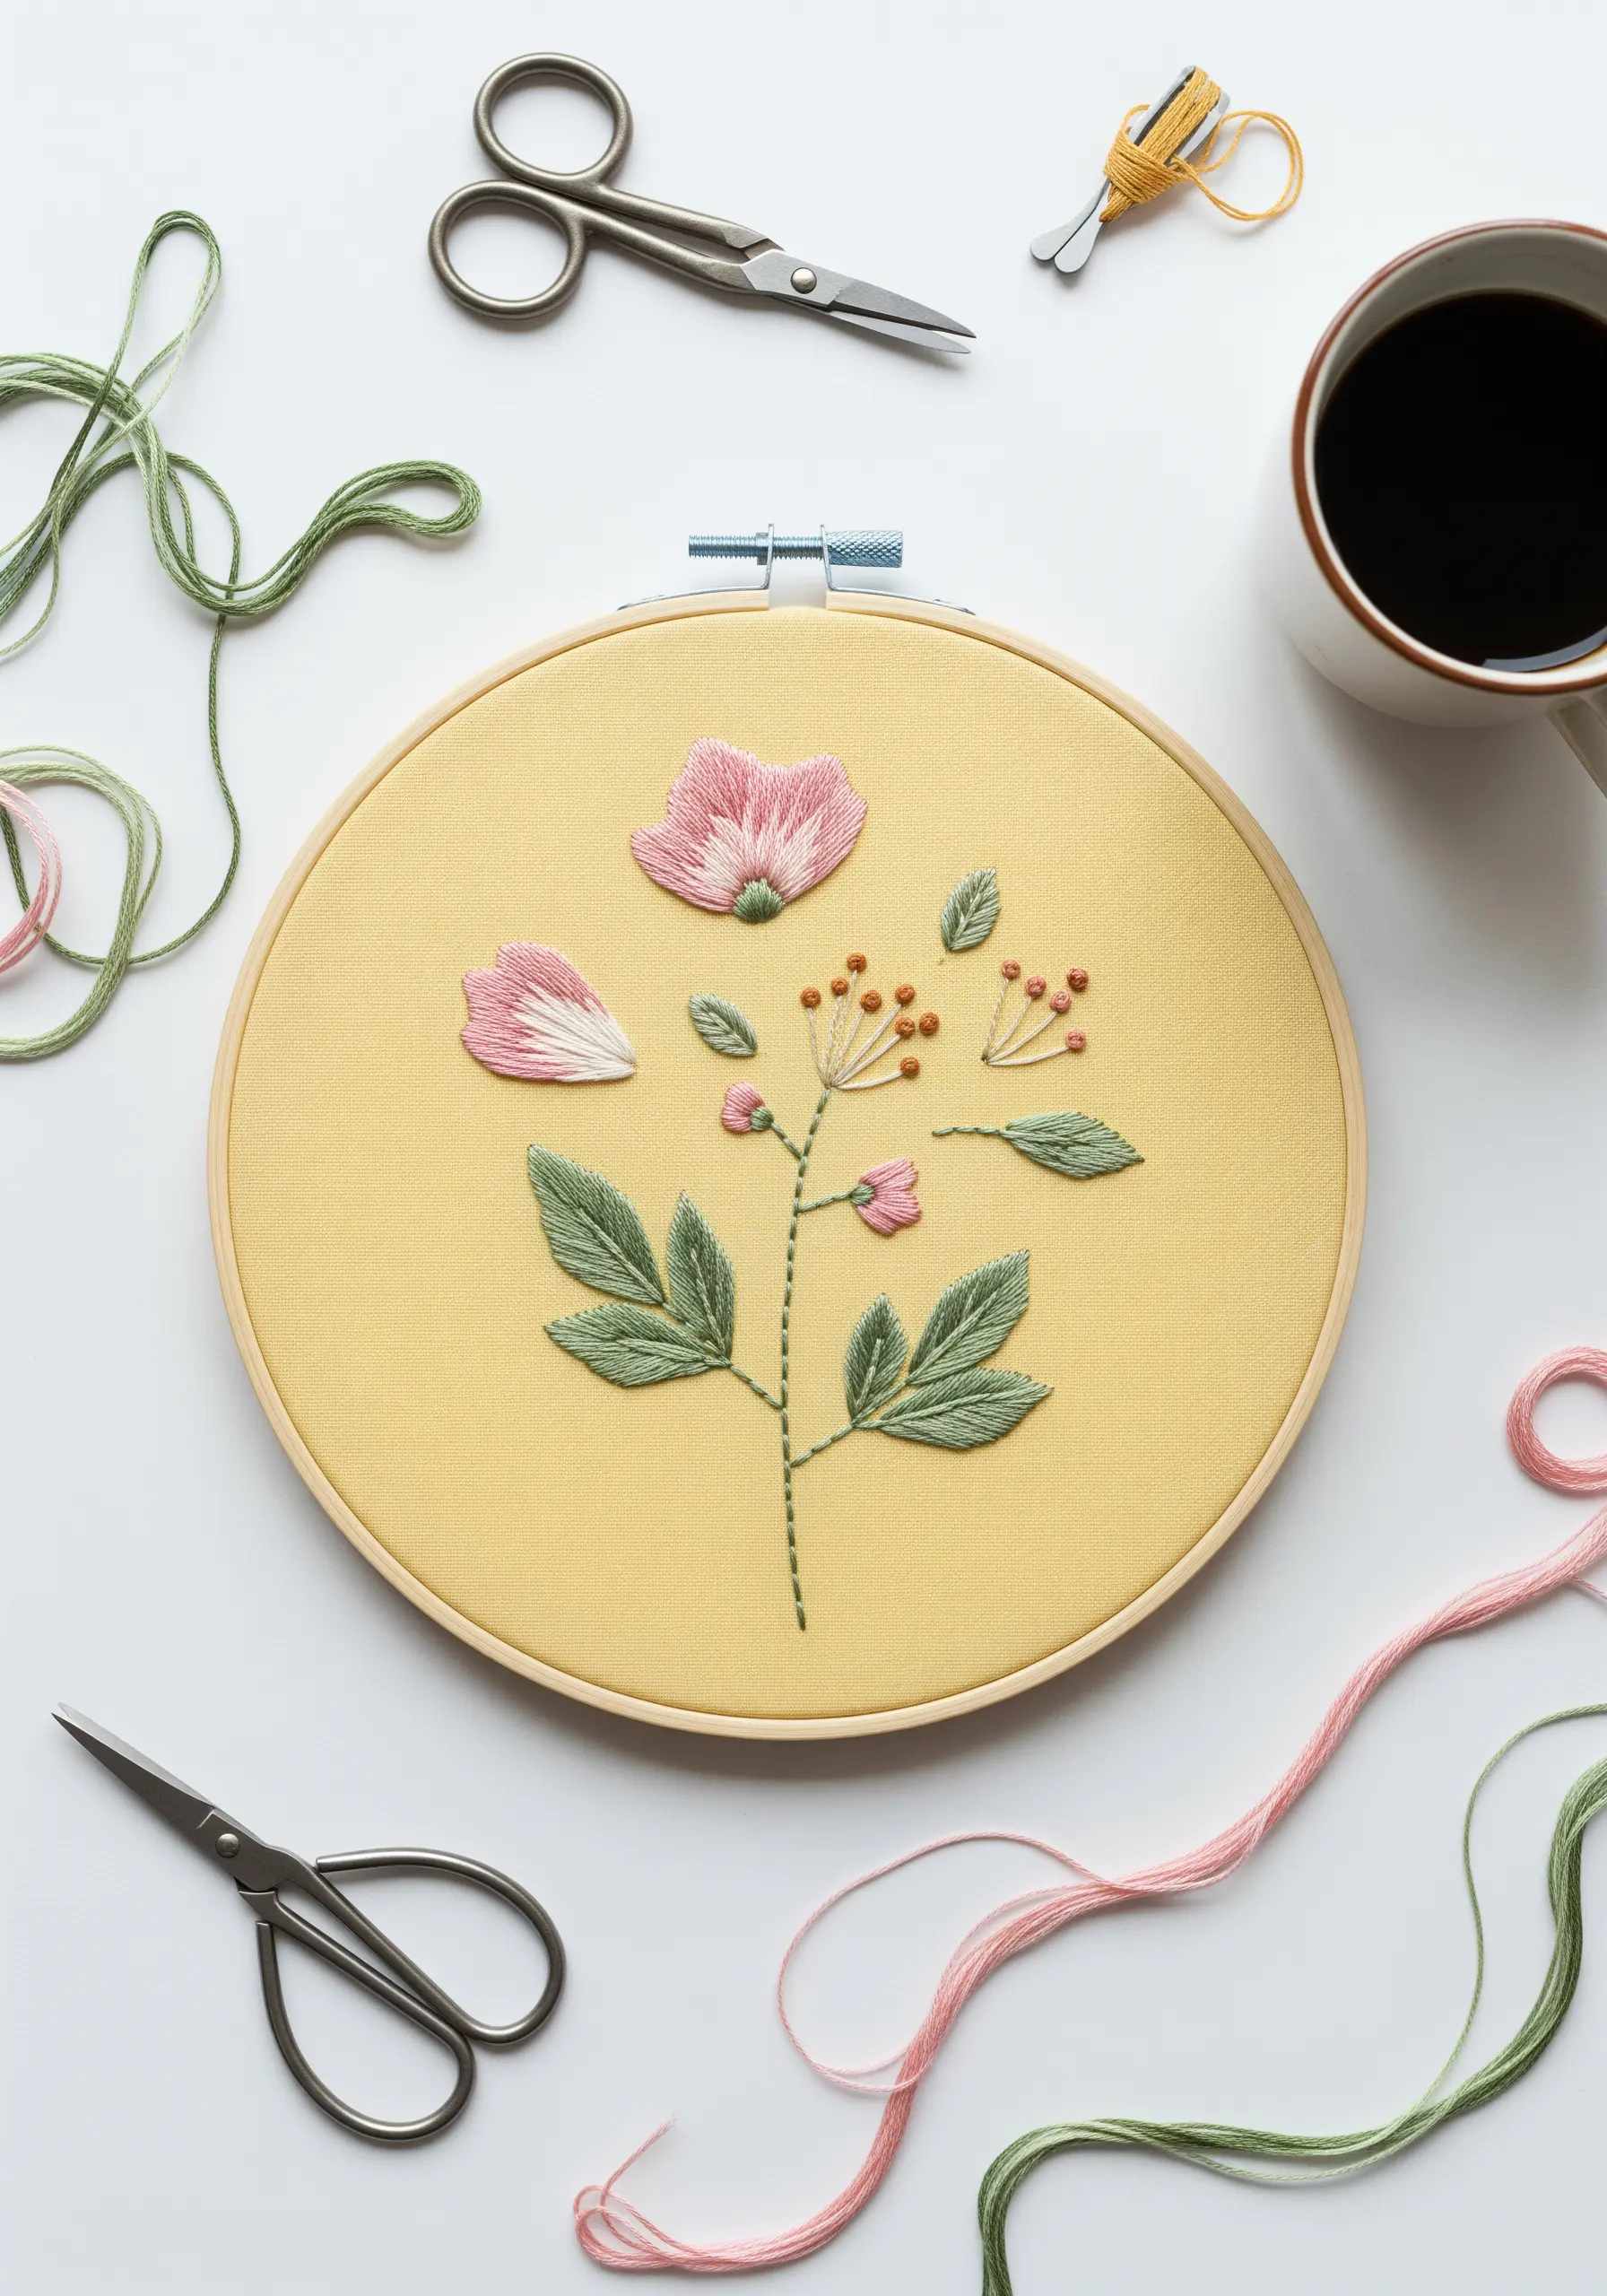
8. A Study in Minimal Botanical Outlines
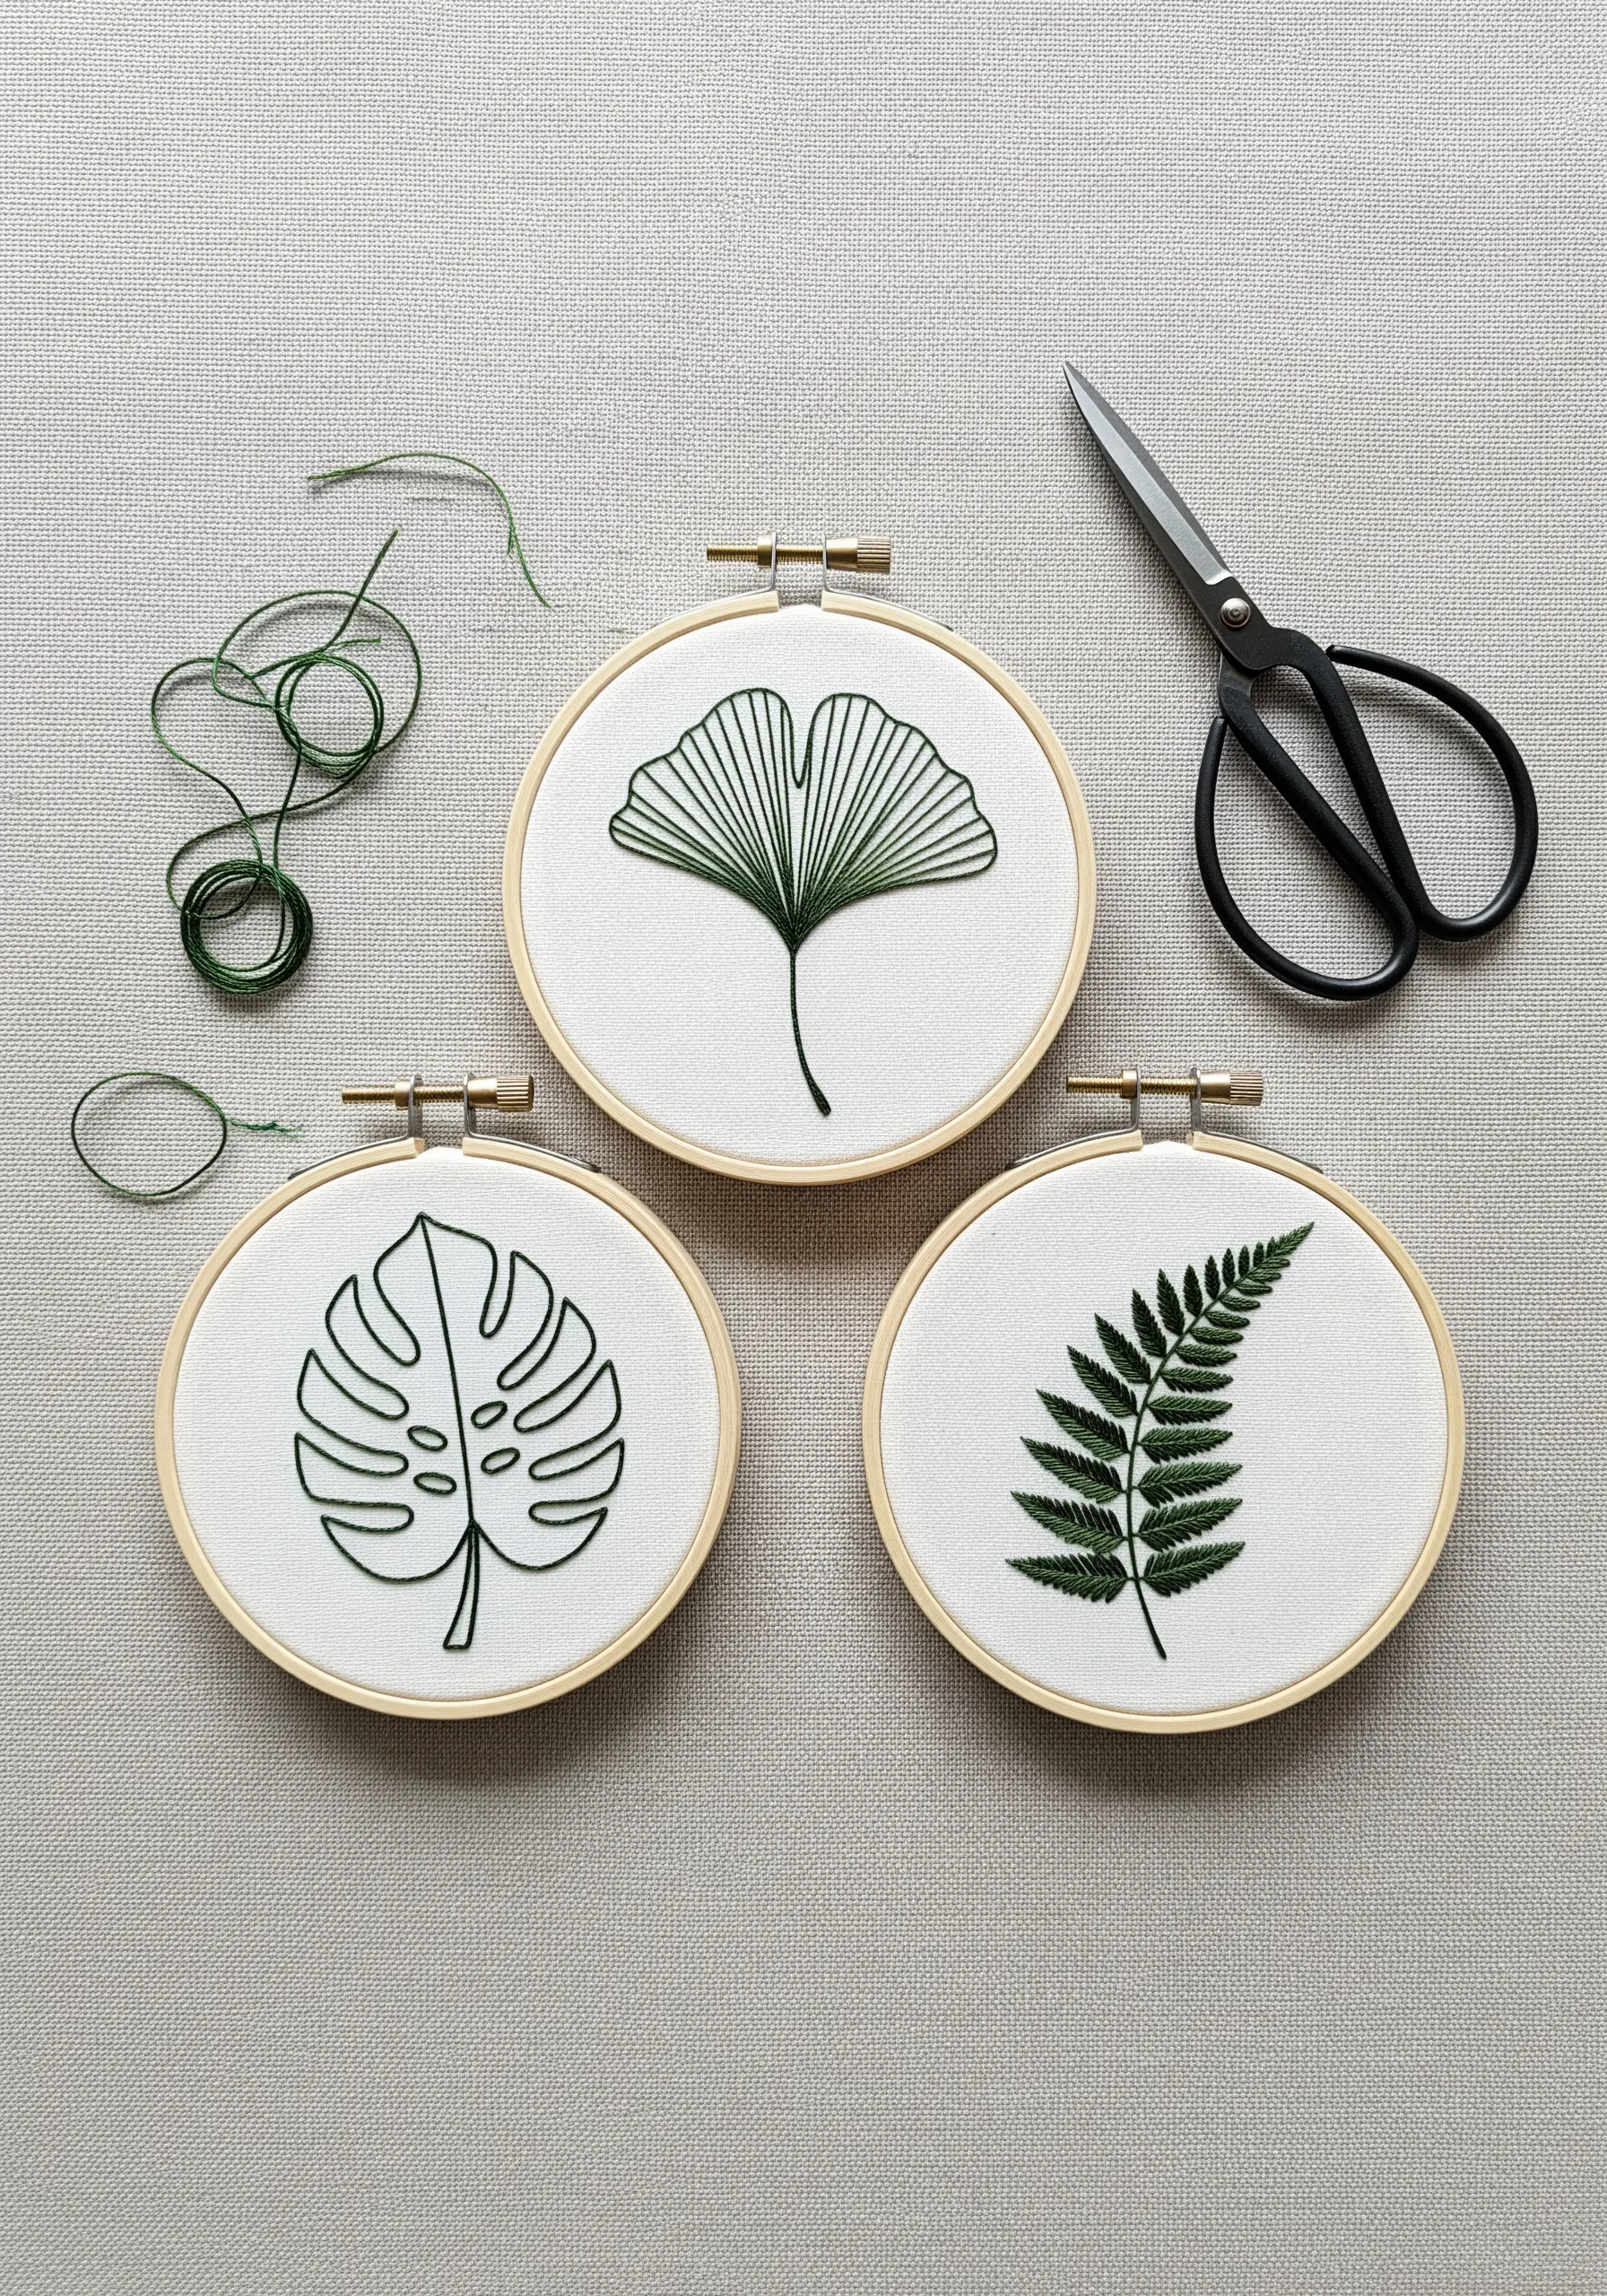
This impactful trio uses just two stitches. Use a stem stitch for the main outlines and central veins to create a slightly raised, cord-like effect.
For the finer, more delicate inner veins of the ginkgo and fern, switch to a single-strand backstitch. This subtle variation in line weight adds a layer of sophistication.
Grouping three related but distinct motifs turns simple hoops into a cohesive gallery wall, especially effective when working with botanical line art embroidery patterns.
9. Suggesting Depth with Minimal Lines and Color
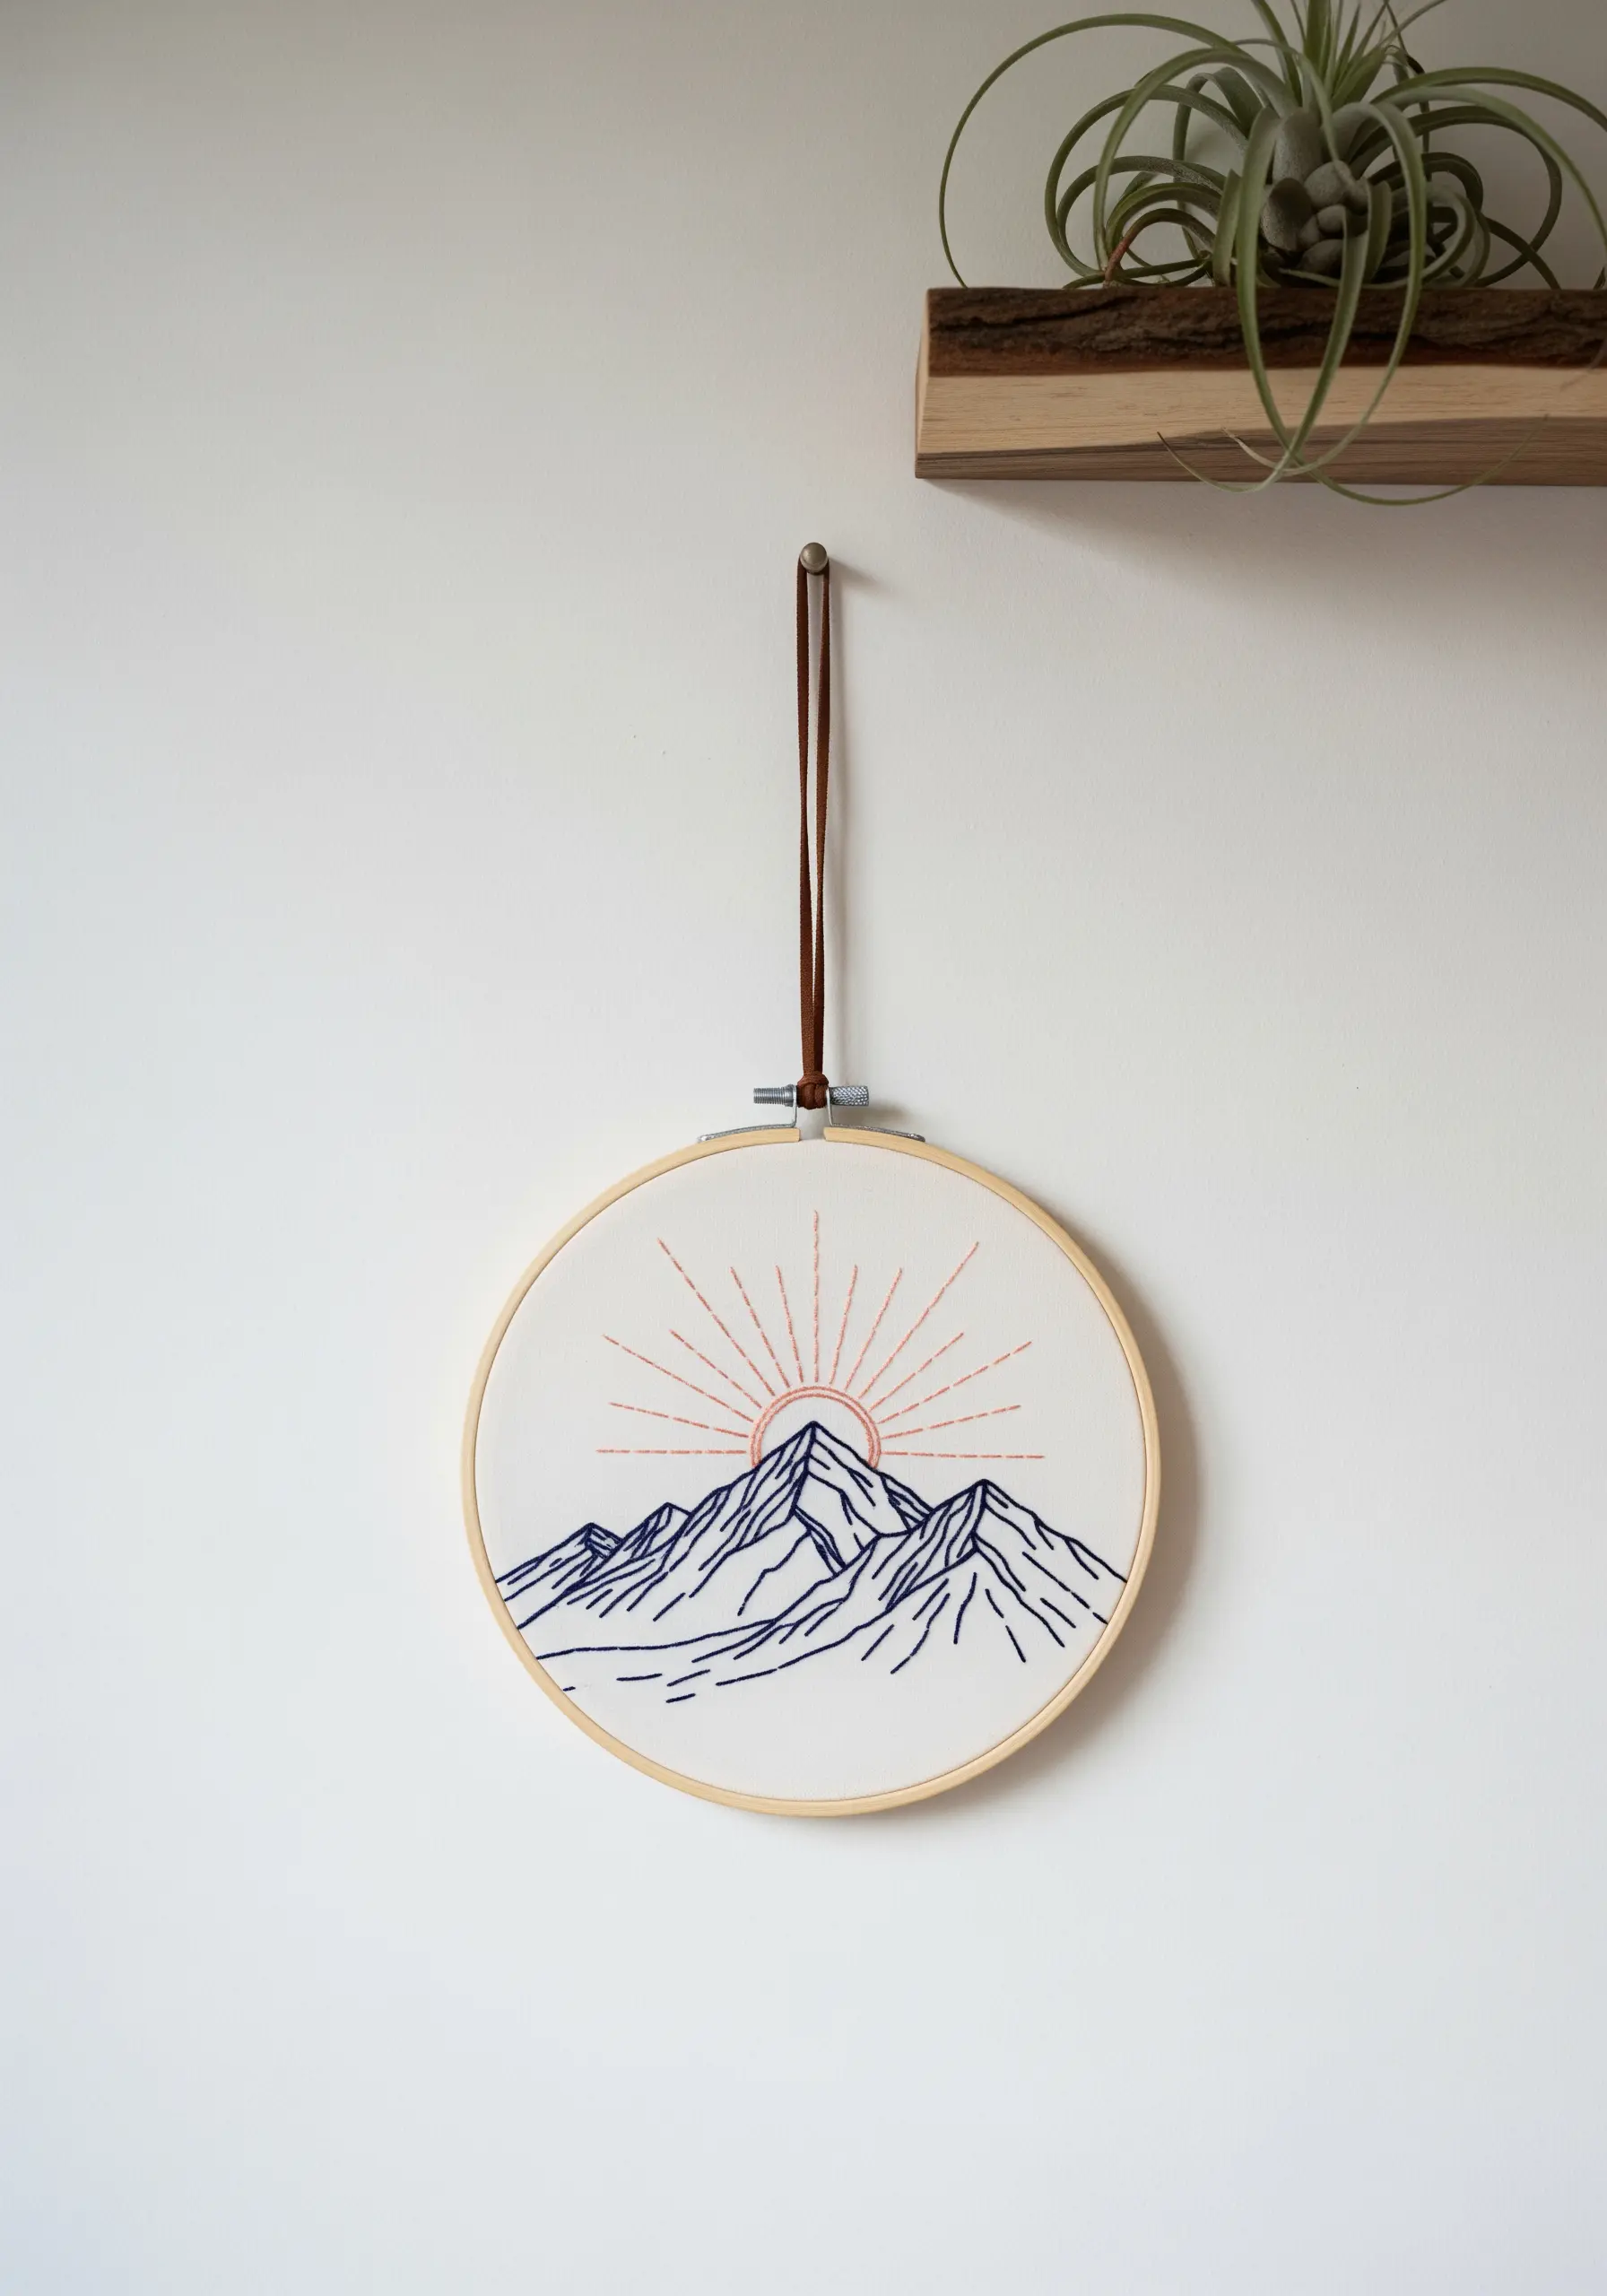
Create the illusion of a mountain range with strategic line density. Use more backstitches, placed closer together, for the foreground peaks to make them feel solid and near.
For the mountains in the distance, use fewer stitches and leave more space between them. This implies atmospheric haze and distance without adding complexity.
A single pop of color, like the coral sunburst, draws the eye and balances the composition, turning a simple sketch into one of those perfect line art travel adventure symbols.
10. Capturing Movement with Thread Painting
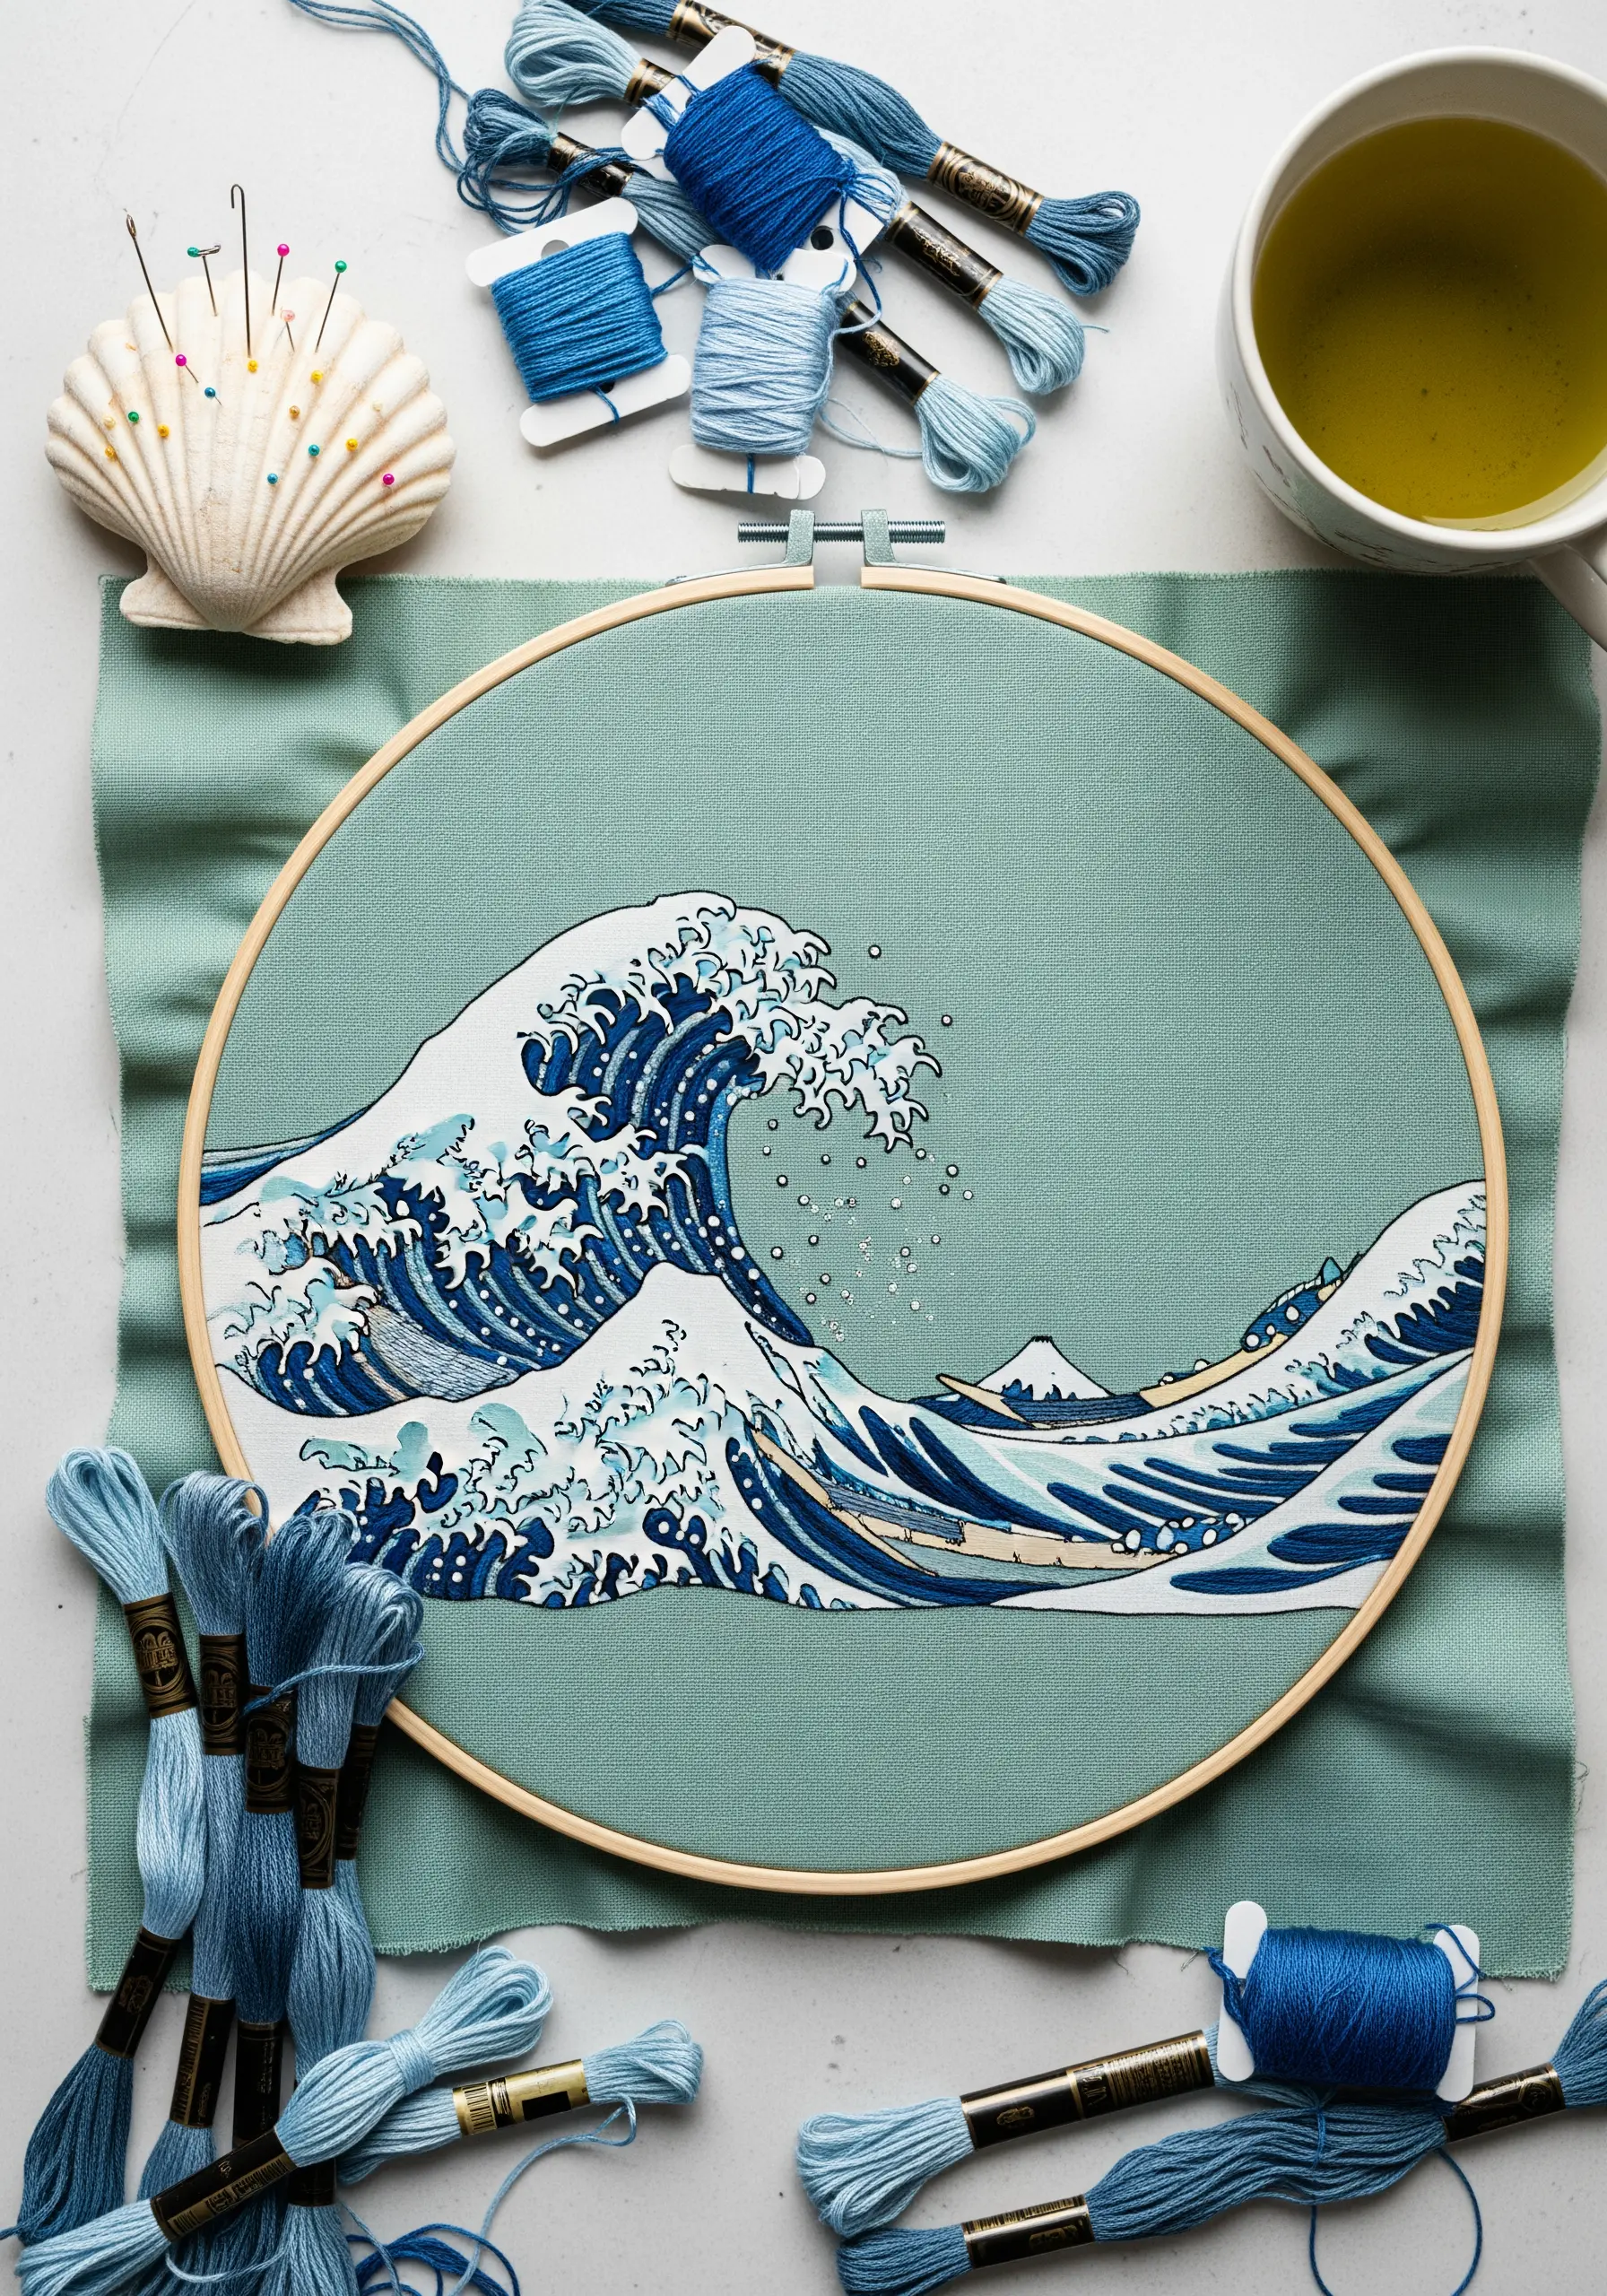
To tackle a complex design like this, break it down into small, manageable color blocks. Focus on completing one small section of color at a time using long-and-short stitches.
For the finest details, like the sea foam, switch to a single strand of floss. This allows you to create delicate, painterly strokes that blend seamlessly and mimic the spray of the water.
The success of this piece hinges on the fabric color; a muted teal-green provides a calm backdrop that allows the dynamic blues and whites of the wave to take center stage in your coastal theme tiny embroidery art.
11. The Impact of Radiating Straight Stitches
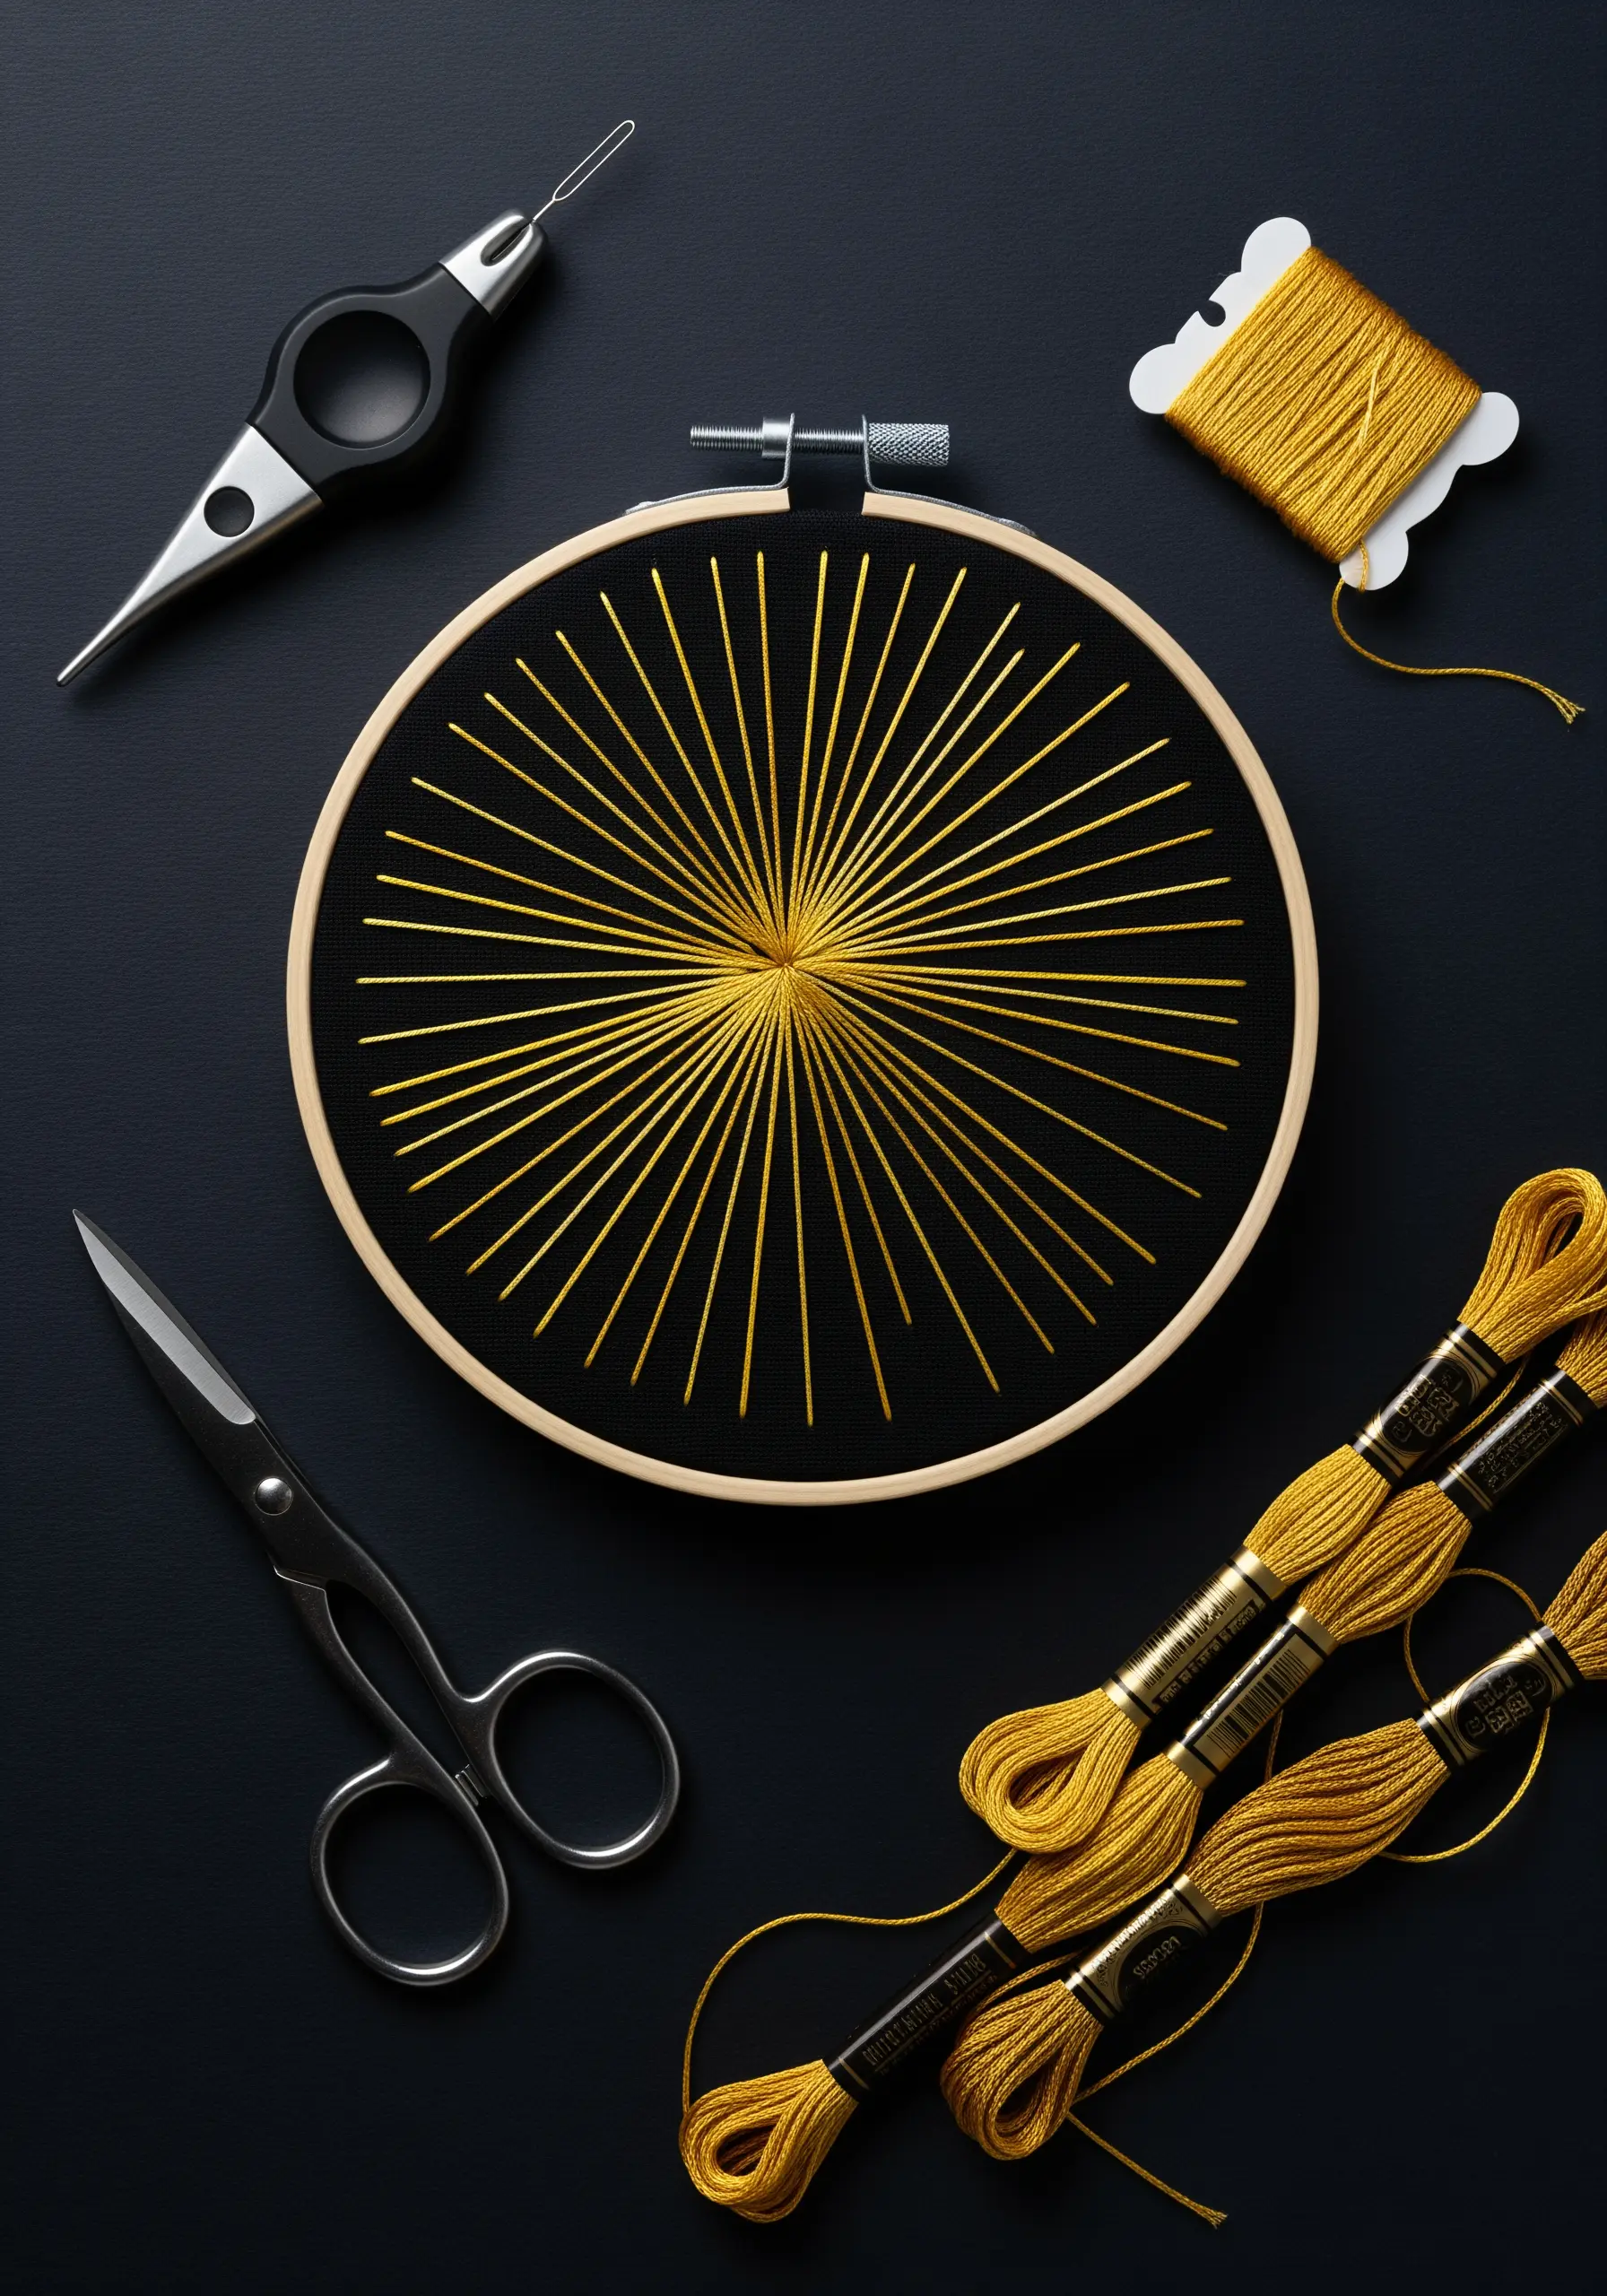
This striking design uses only one stitch: the straight stitch. Its power lies in precision and tension. Use a ruler and a fabric marker to mark evenly spaced points around the hoop’s edge and a central circle.
A high-contrast color combination, like metallic gold on matte black fabric, creates maximum visual impact and a sense of radiating energy.
This technique is a cornerstone of retro string art patterns and proves that complexity isn’t a prerequisite for a breathtaking result.
12. Personalizing Your Space with Stitched Maps
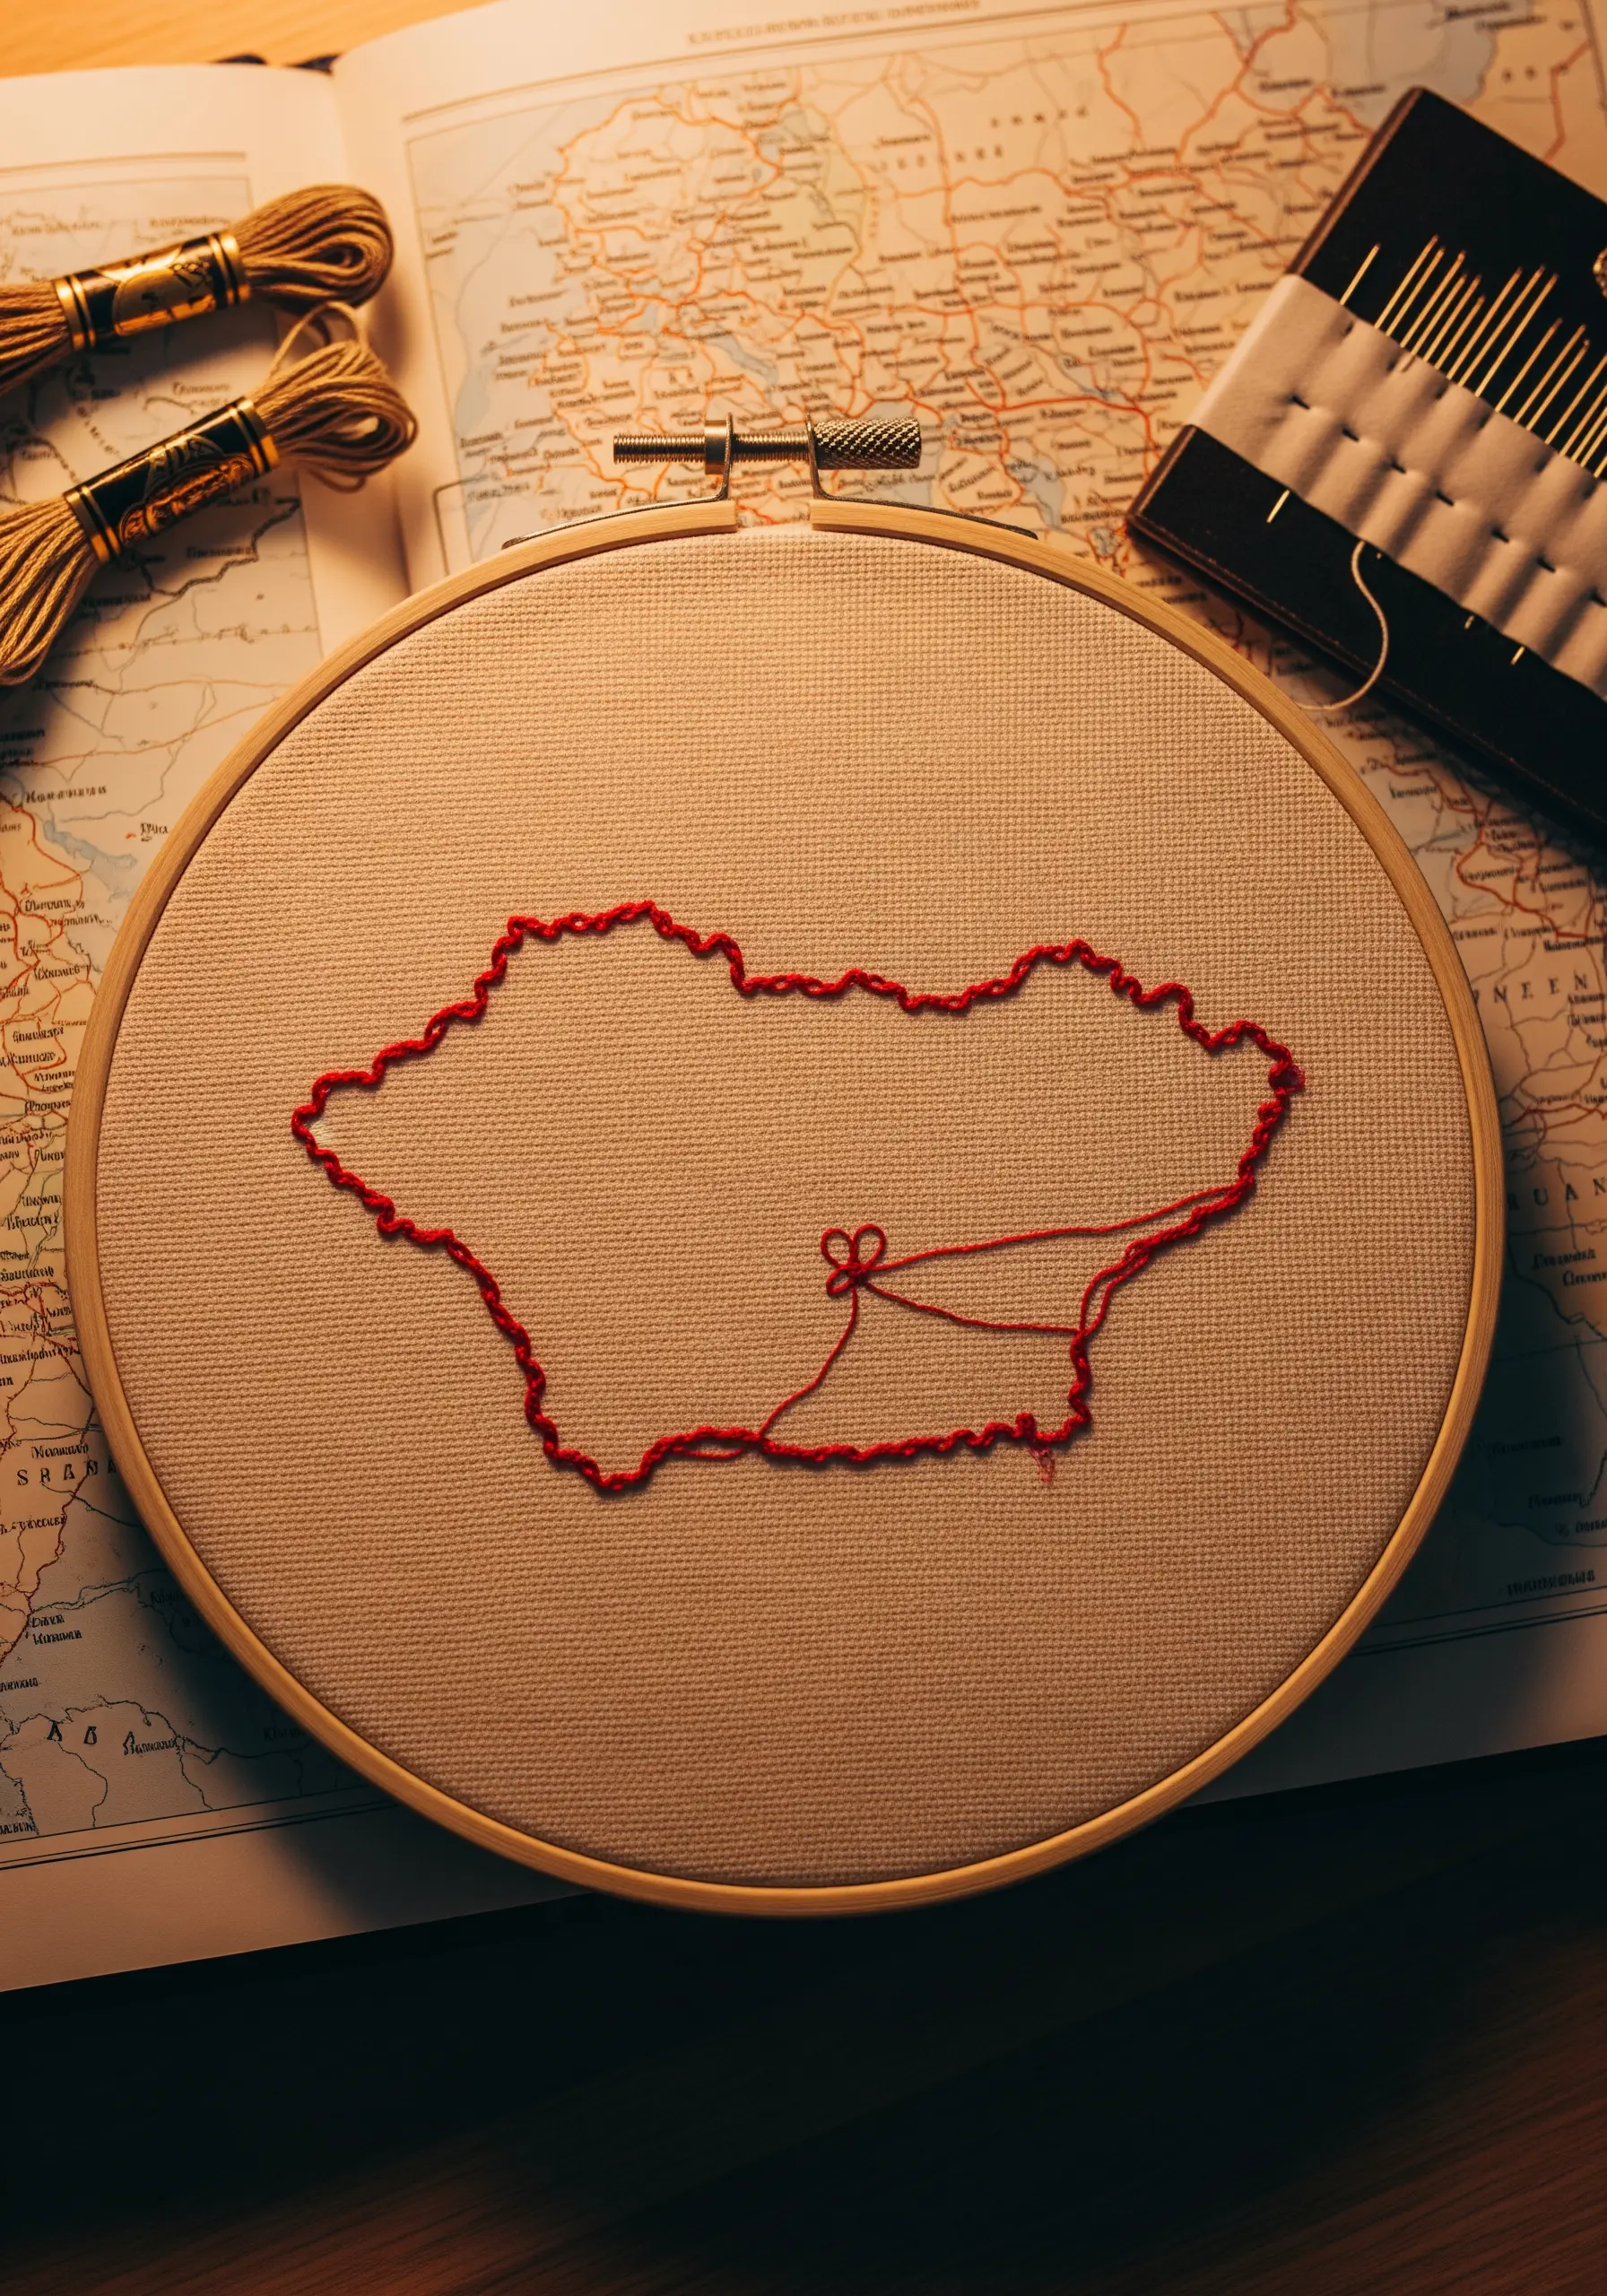
Transform a simple outline into a personal story by tracing a map of a meaningful location. Use a simple backstitch with two or three strands for a clean, visible line.
The magic is in the details. Add a single French knot or a tiny star stitch to mark a significant spot—a hometown, a university, or the place you met someone special.
This approach elevates a simple craft into a cherished keepsake, making for incredibly thoughtful travel-inspired string art maps.
13. Defining Form with Geometric Line Art
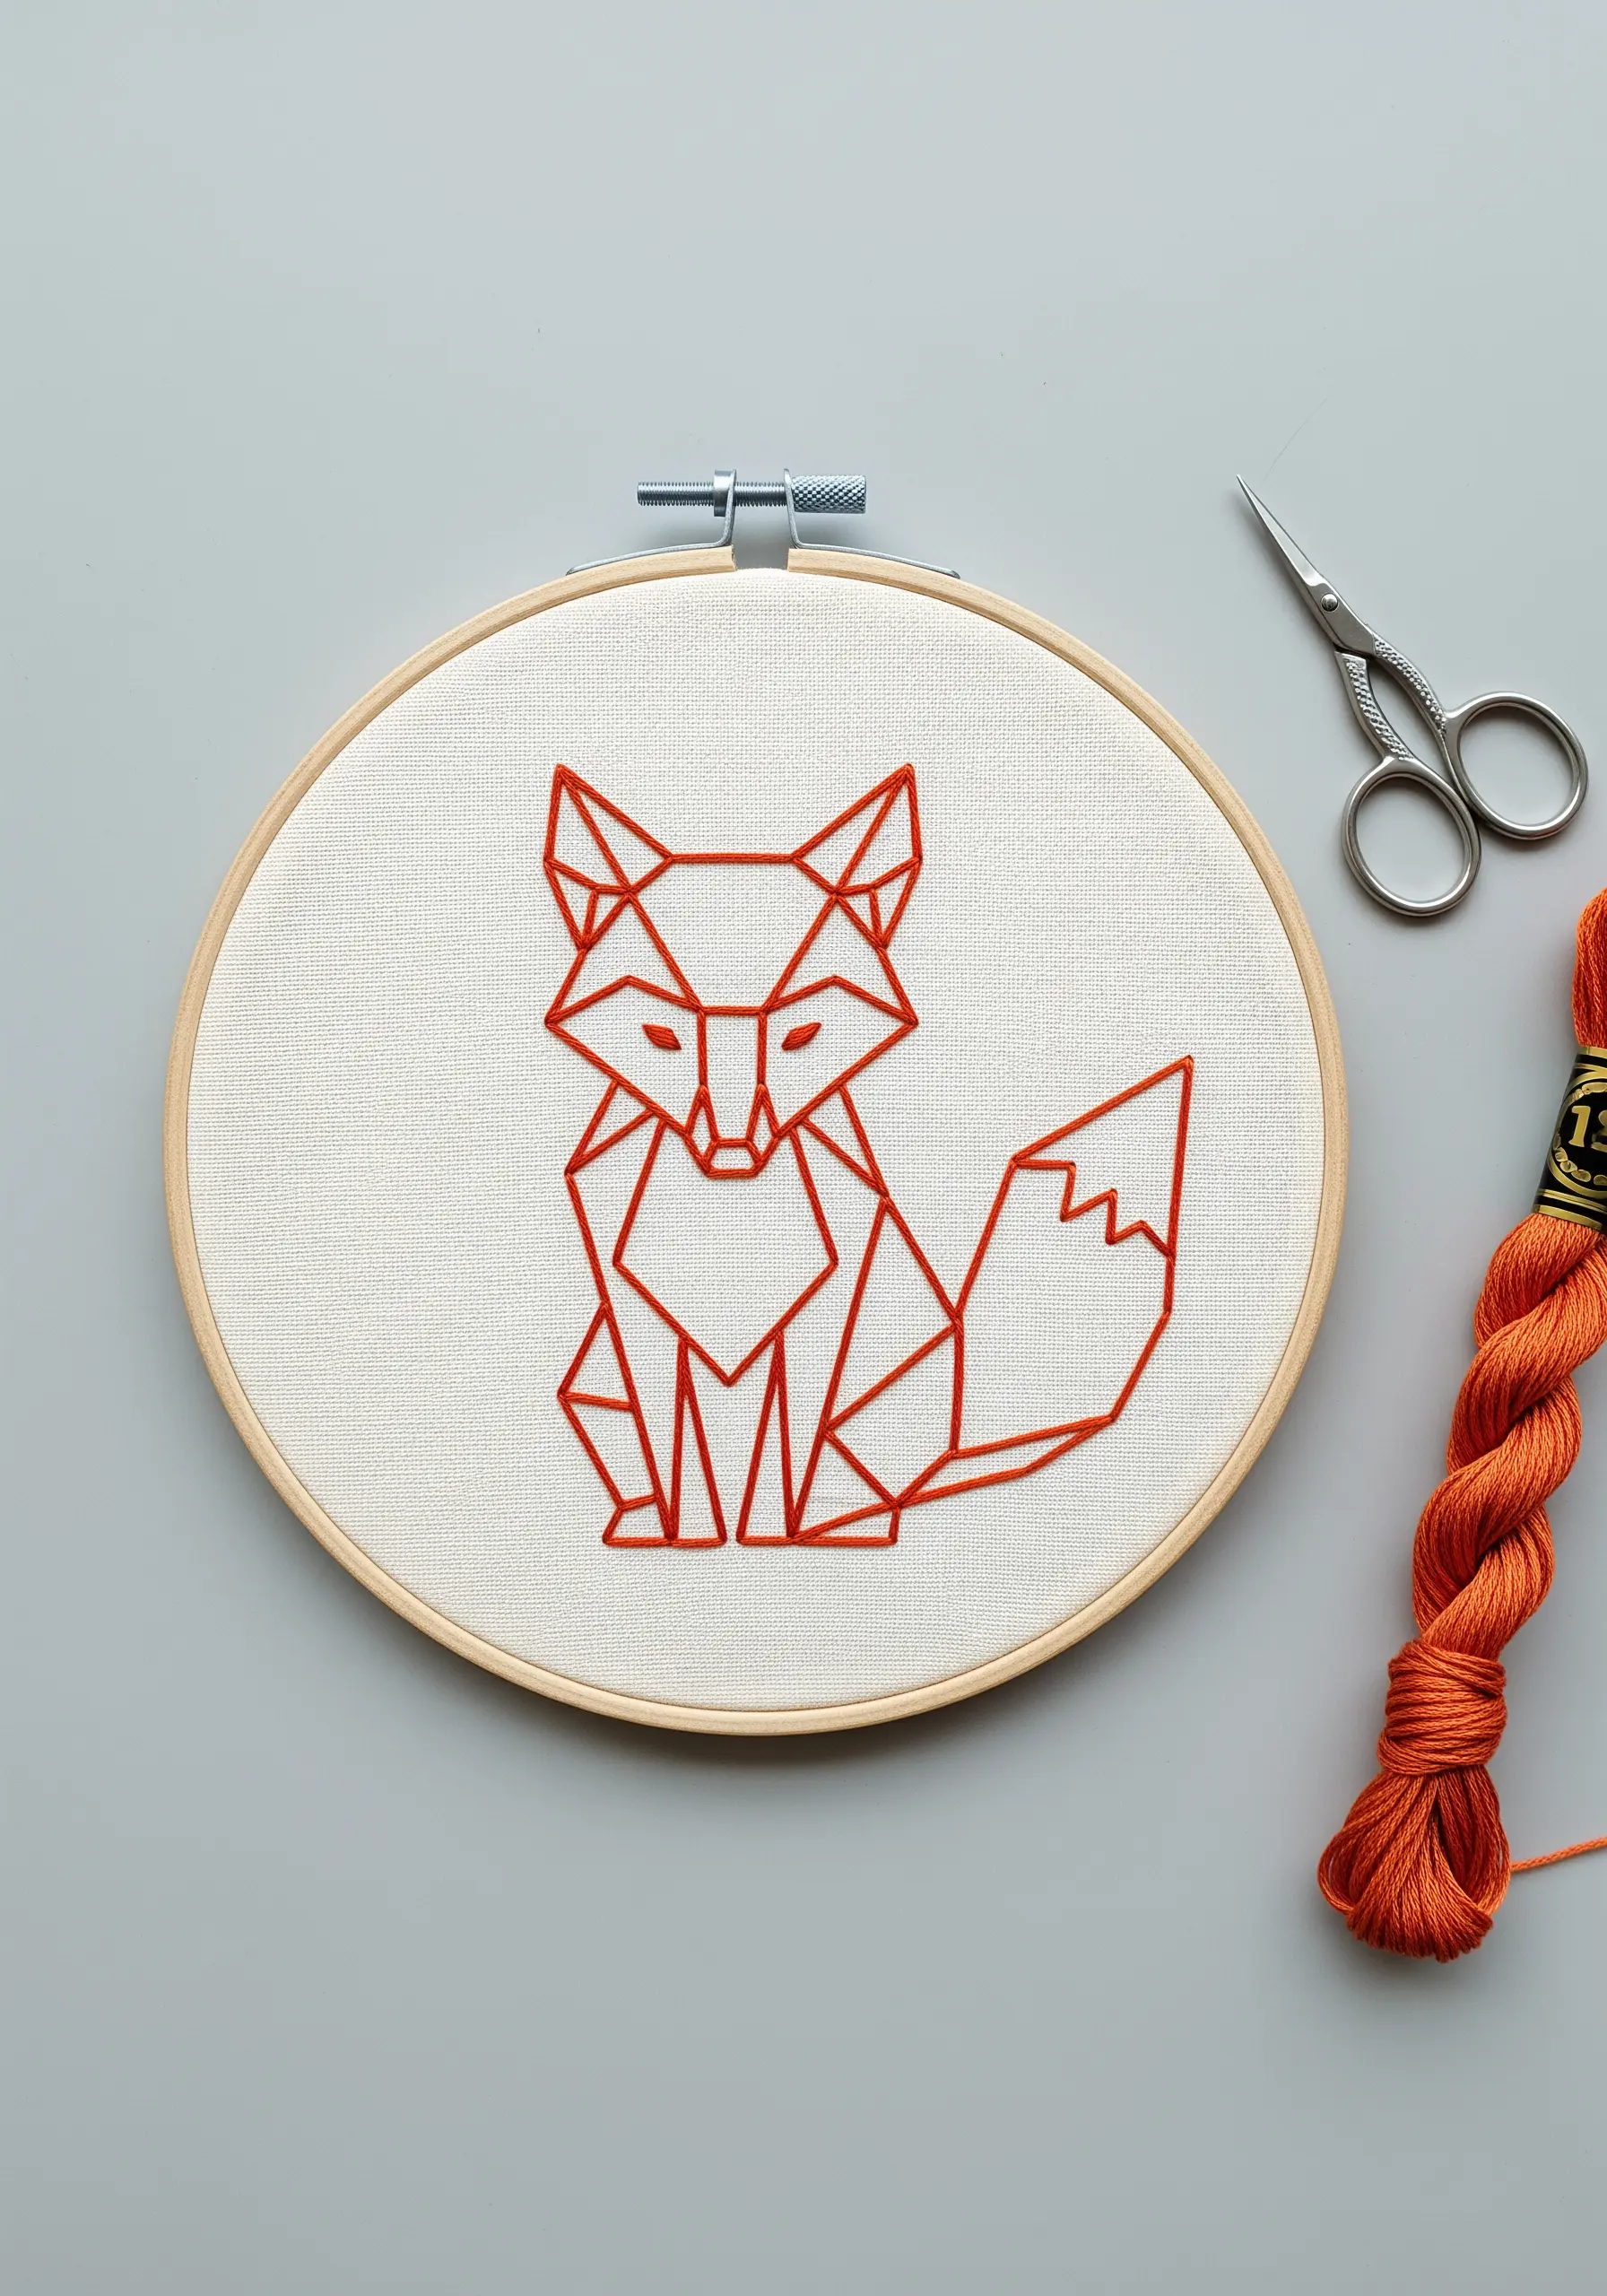
This technique creates the illusion of a three-dimensional form using only straight lines and a simple backstitch. The viewer’s eye connects the points, building the shape from the implied planes.
Choose a single, bold color that contrasts sharply with your fabric. This minimalist approach emphasizes the form and structure of the animal, making the lines the hero of the piece.
It’s a modern, graphic interpretation of nature that feels cleaner and more contemporary than traditional realistic animal & insect embroidery patterns.
14. Curating a Cohesive Hoop Art Gallery Wall
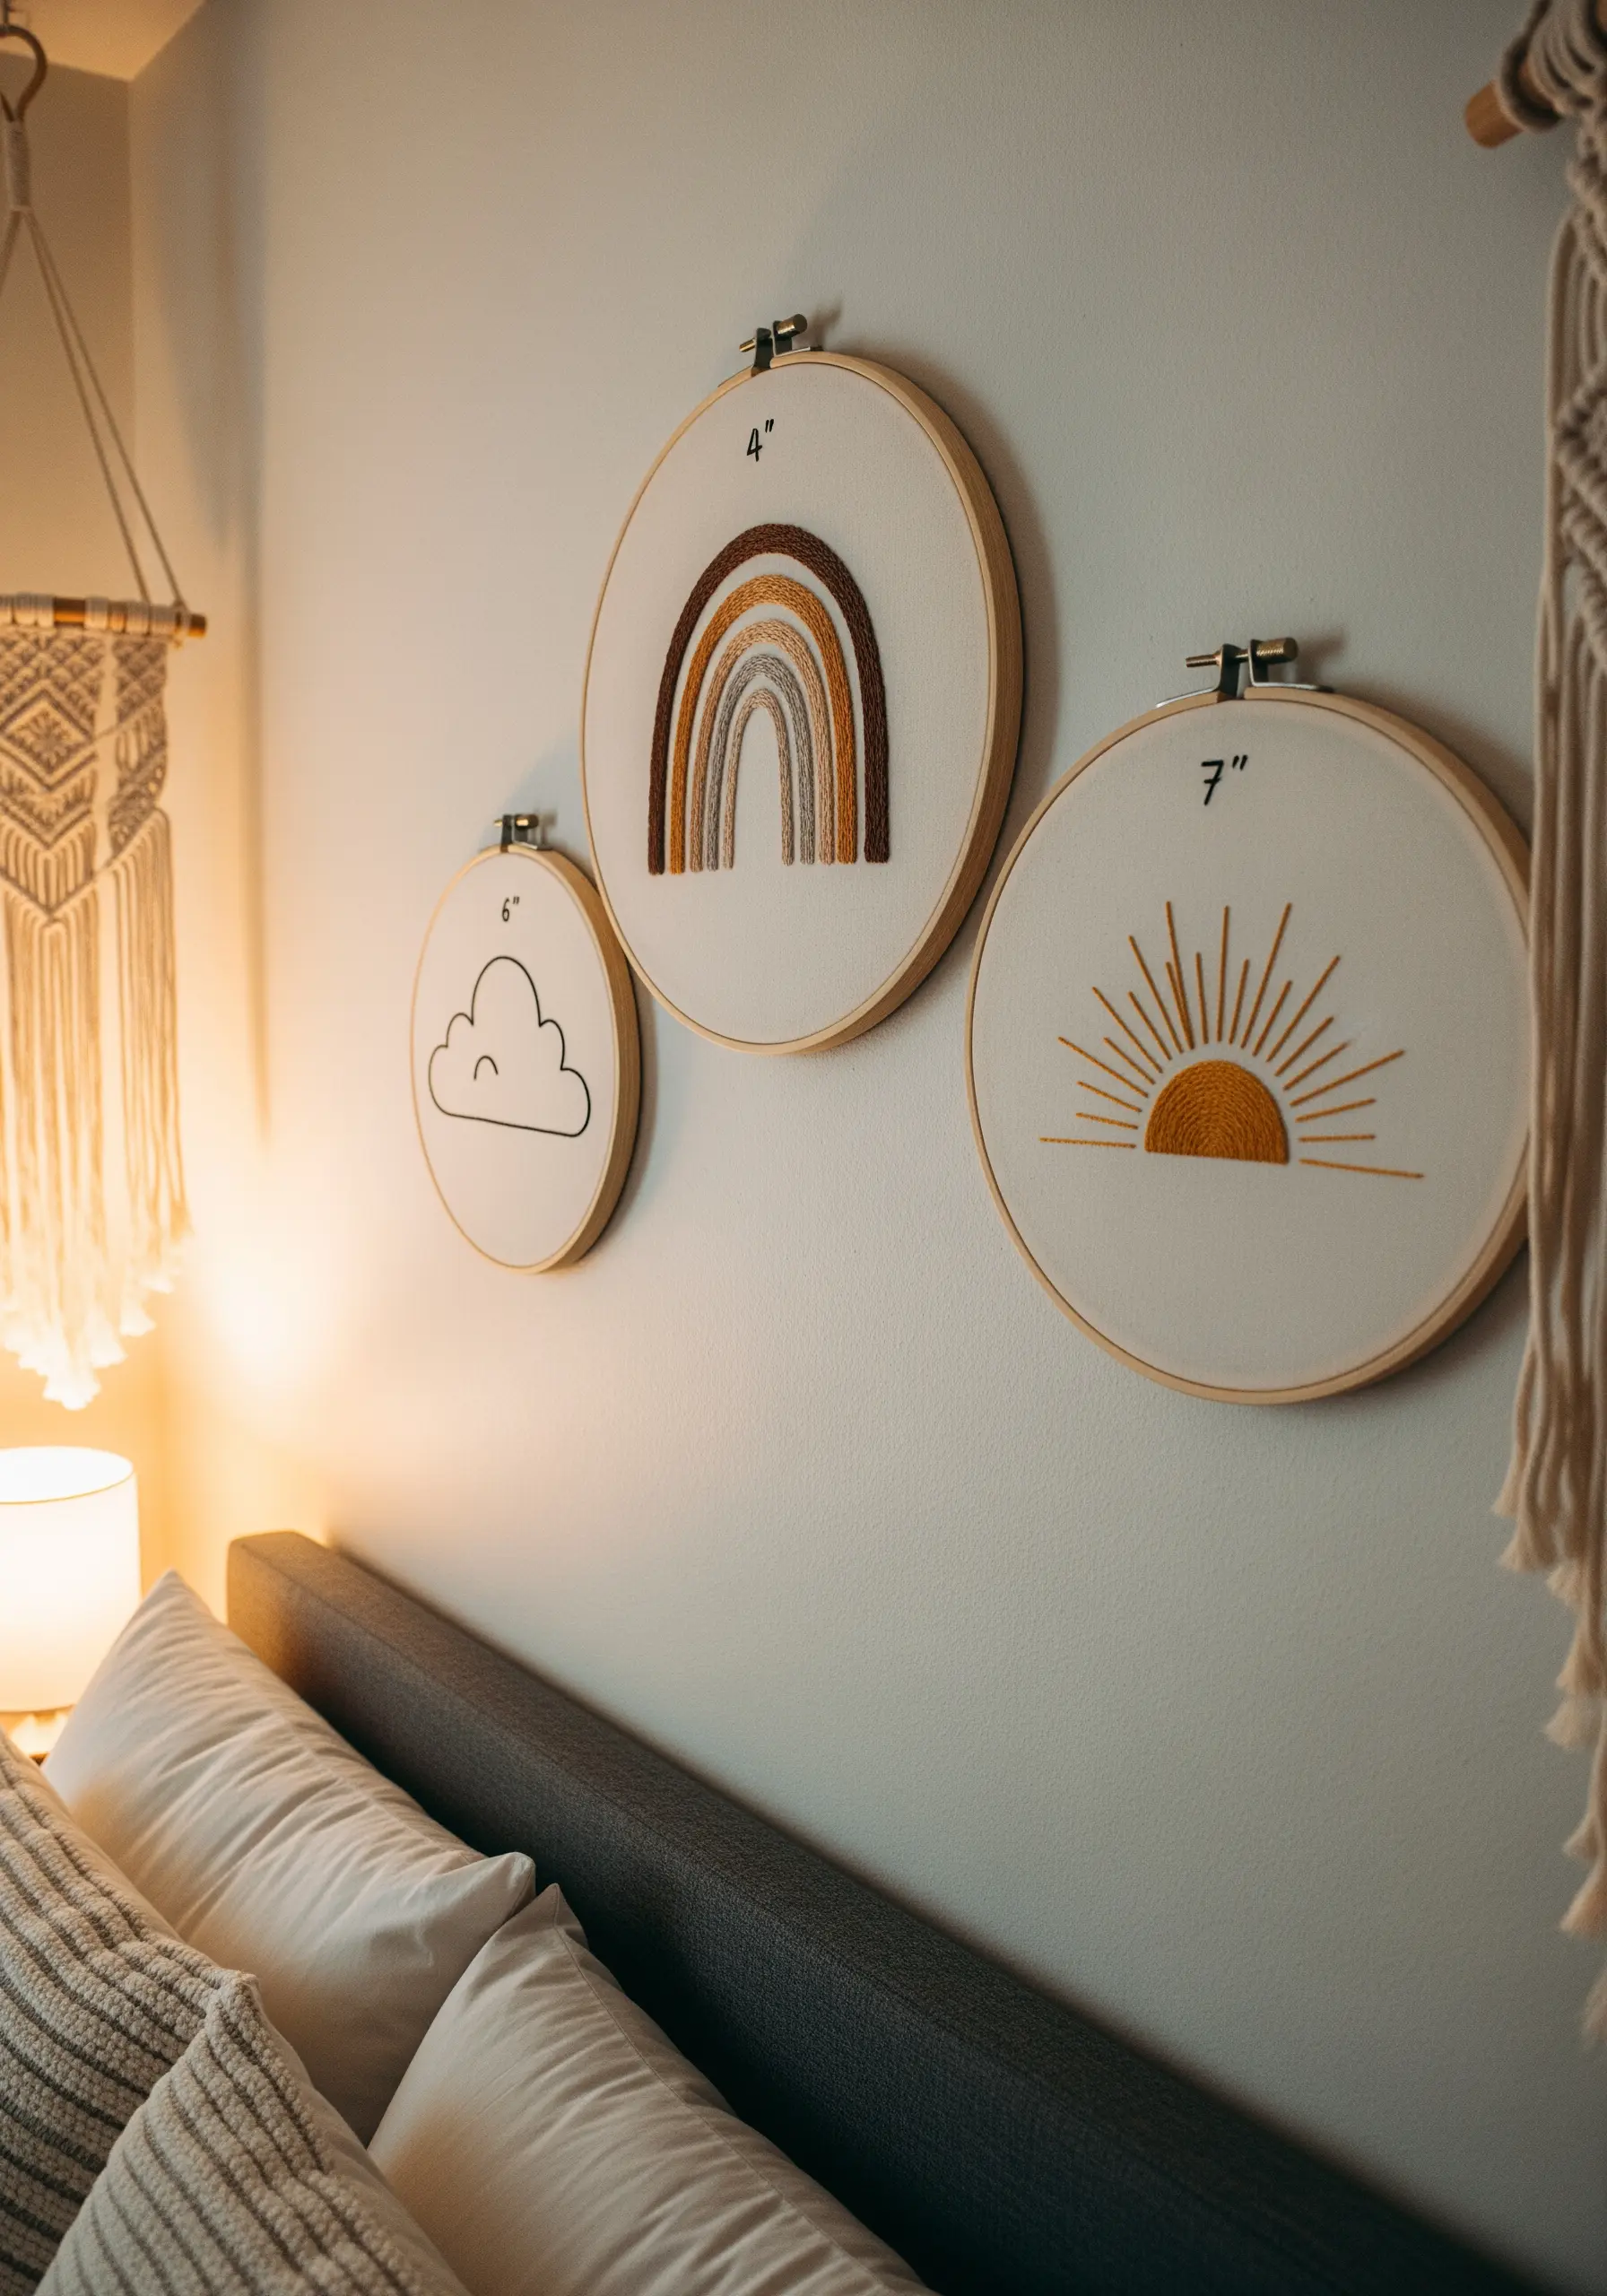
Create a unified display by connecting different motifs through a shared color palette. Here, earthy tones of brown, ochre, and warm gold tie the rainbow, cloud, and sun together into a single story.
Varying the hoop sizes (4″, 6″, and 7″) adds visual interest and creates a more dynamic, less rigid arrangement on the wall.
This thoughtful curation turns individual projects into a single, intentional art installation, elevating simple hoop wall displays into statement decor.
15. Adding Dimension with Detached Stitches
Bring your florals to life with the detached chain stitch. Instead of tacking down the end of the loop to the fabric, leave it free to create a three-dimensional petal that literally lifts off the surface.
Contrast these 3D elements with traditional flat stitches, like the satin-stitched leaves and French knot berries. This interplay between flat and raised textures creates incredible depth and realism.
This technique is perfect for turning simple abstract floral embroidery hoops into dynamic, tactile pieces of art.
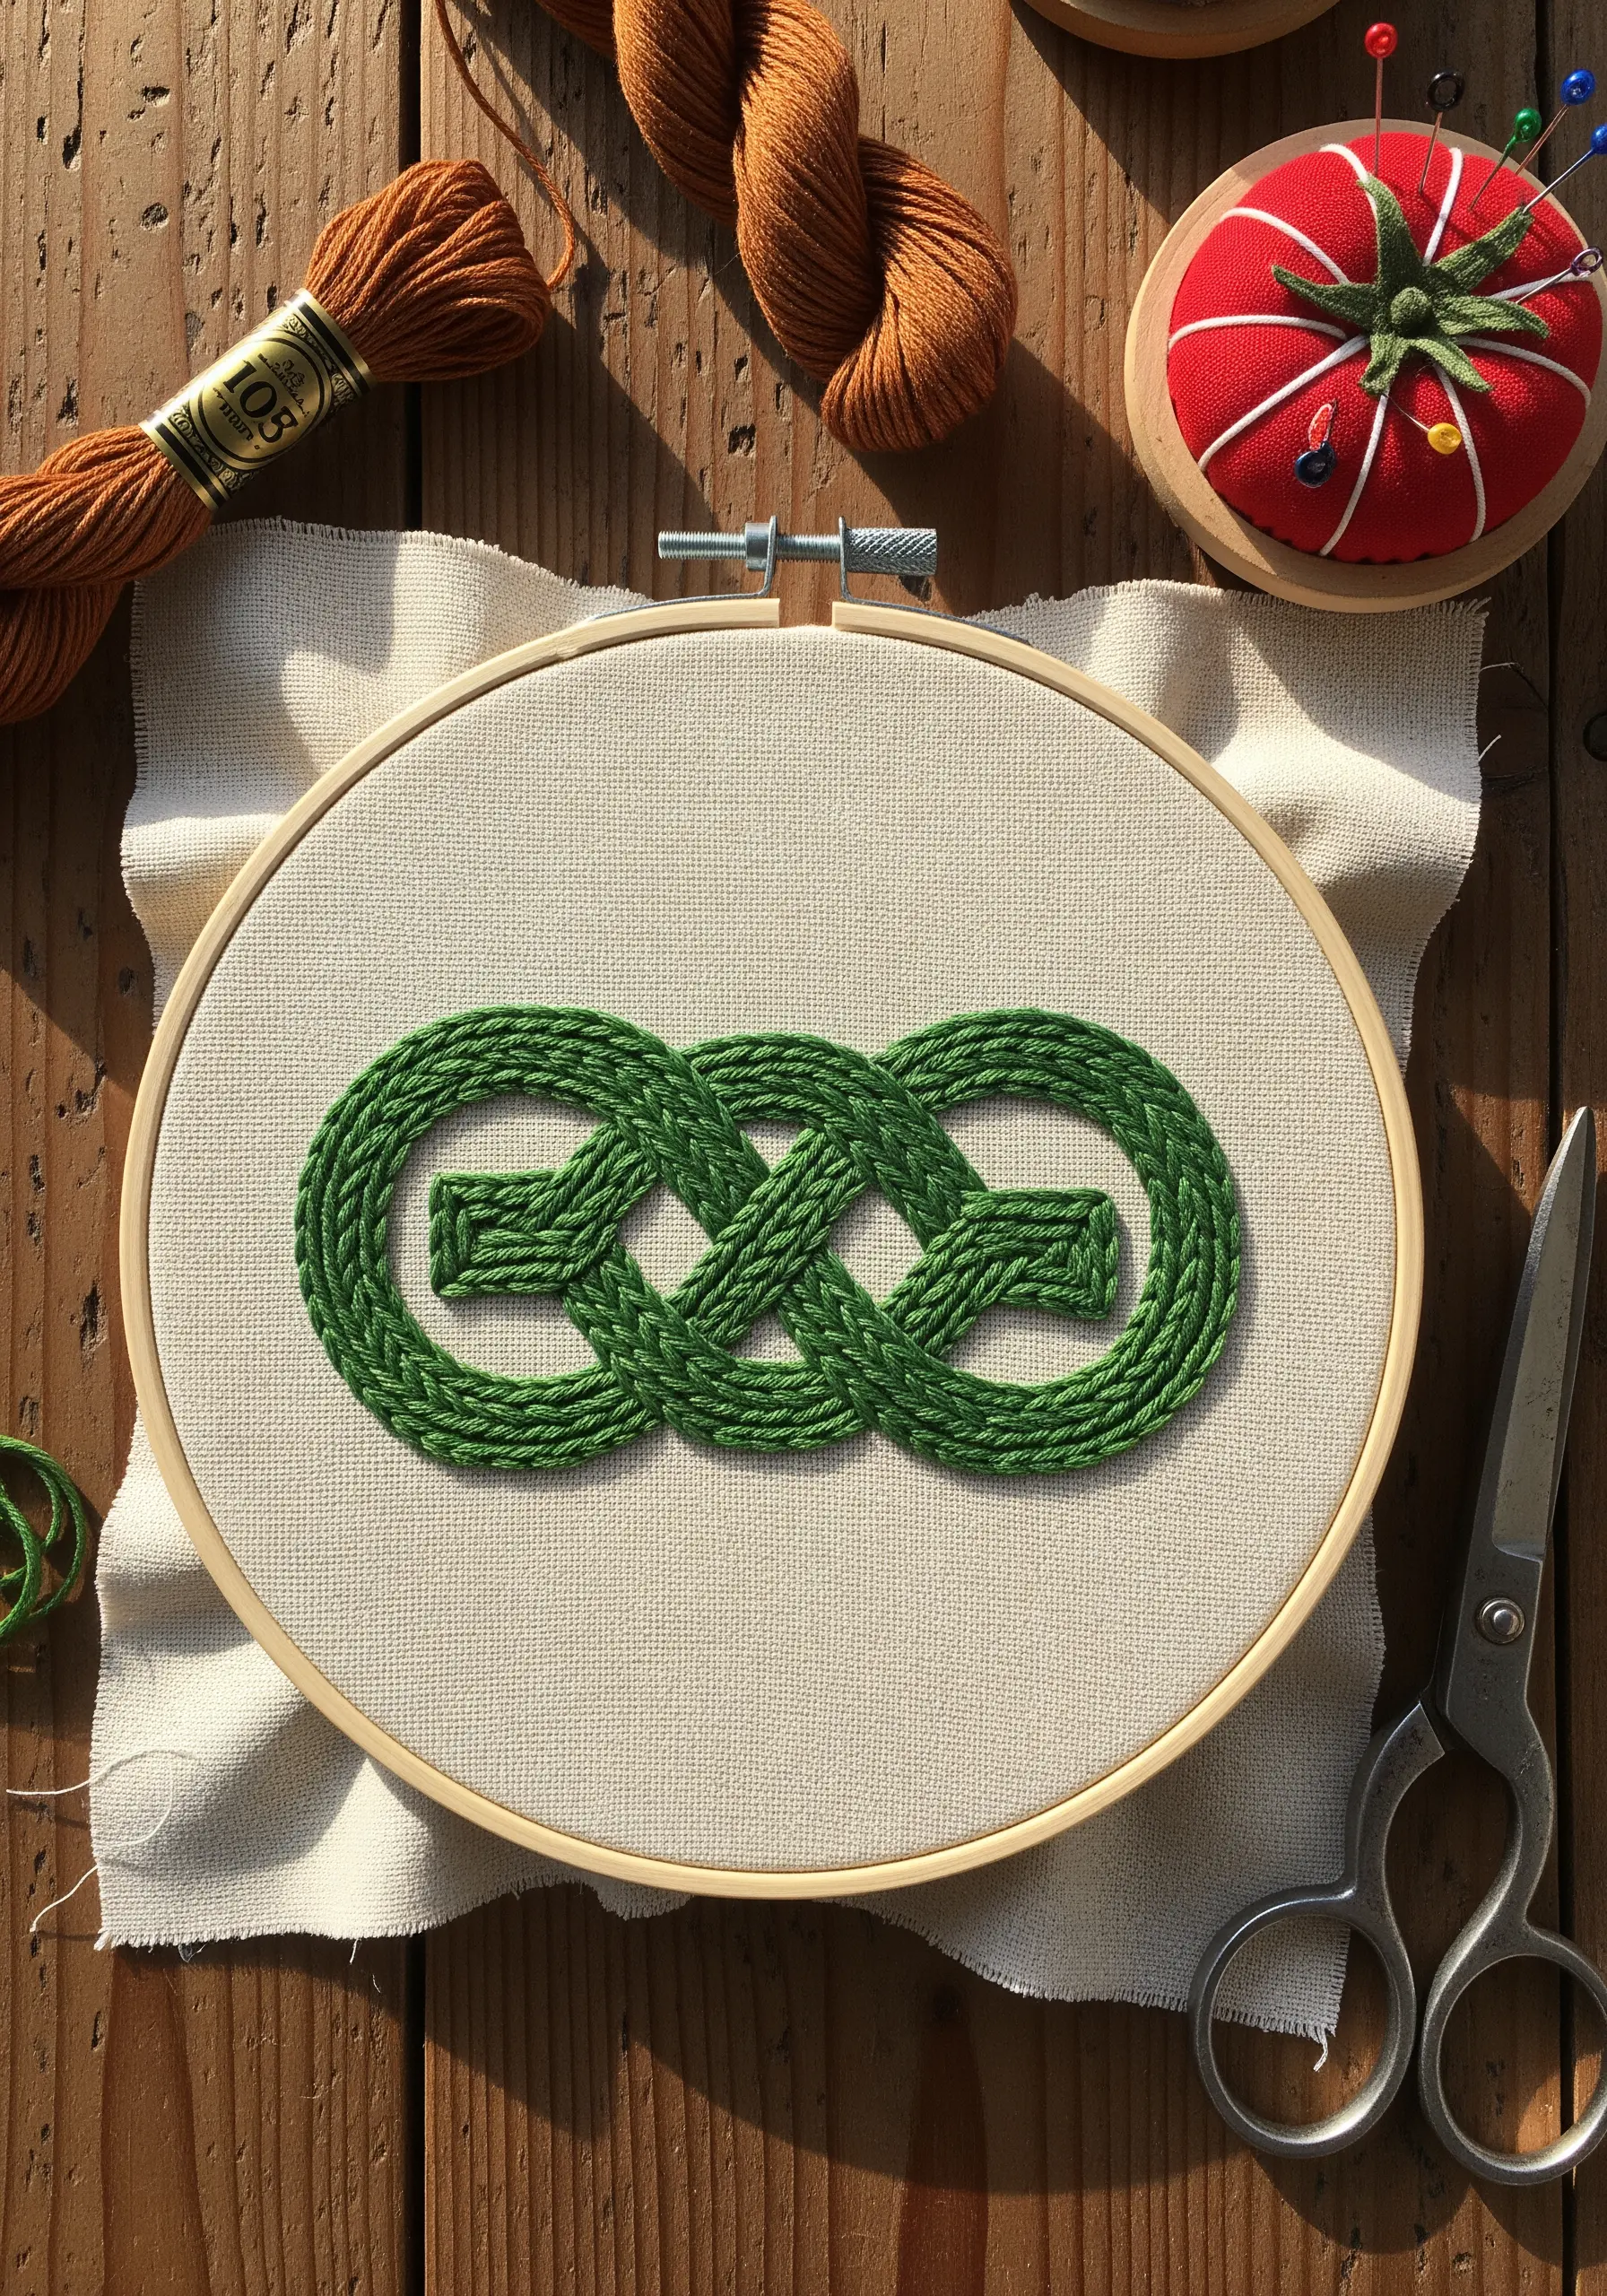
16. Exploring Monochrome Texture with Yarn
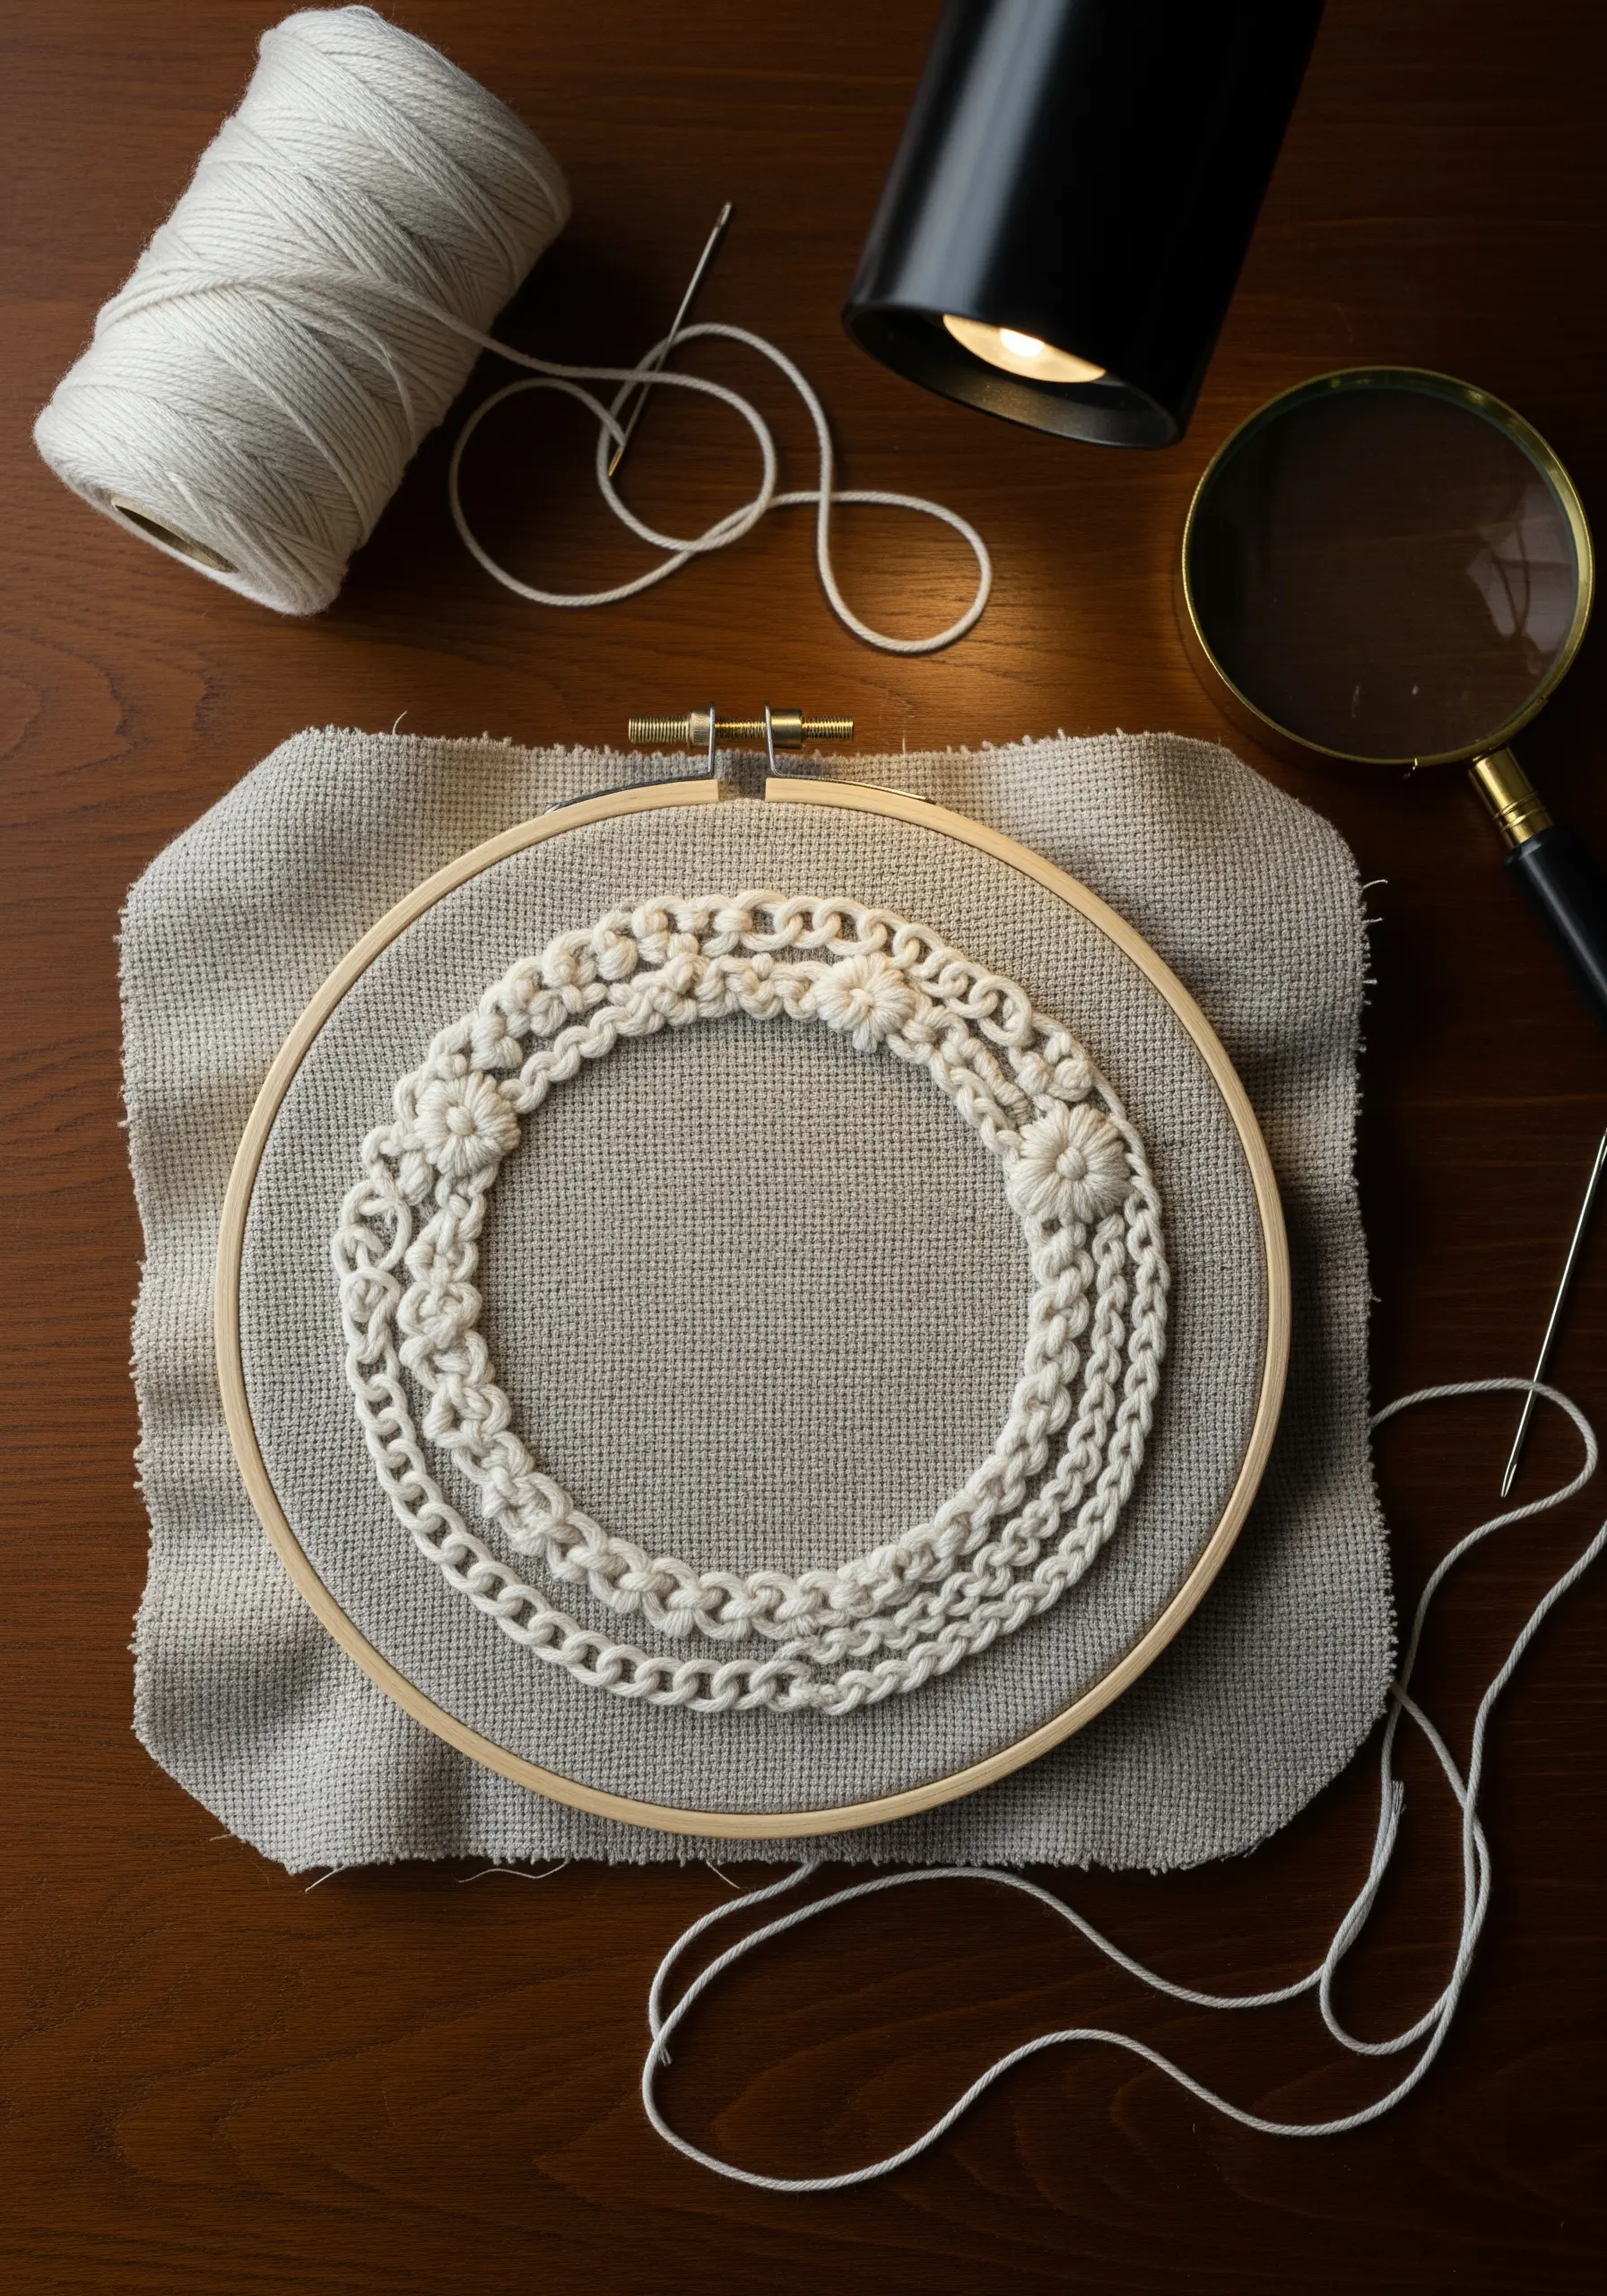
Move beyond standard floss and experiment with different fibers like fine wool yarn. Stitches like the chain stitch, bullion knot, and French knot take on a bold, sculptural quality when worked in a thicker material.
By sticking to a single color, you shift the focus entirely to the interplay of textures. The design’s beauty comes from the shadows and highlights created by the intricate loops, knots, and braids.
This is a wonderful way to create sophisticated greige & ivory embroidery art that feels both cozy and modern.
17. Achieving Flawless Fills with Satin Stitch
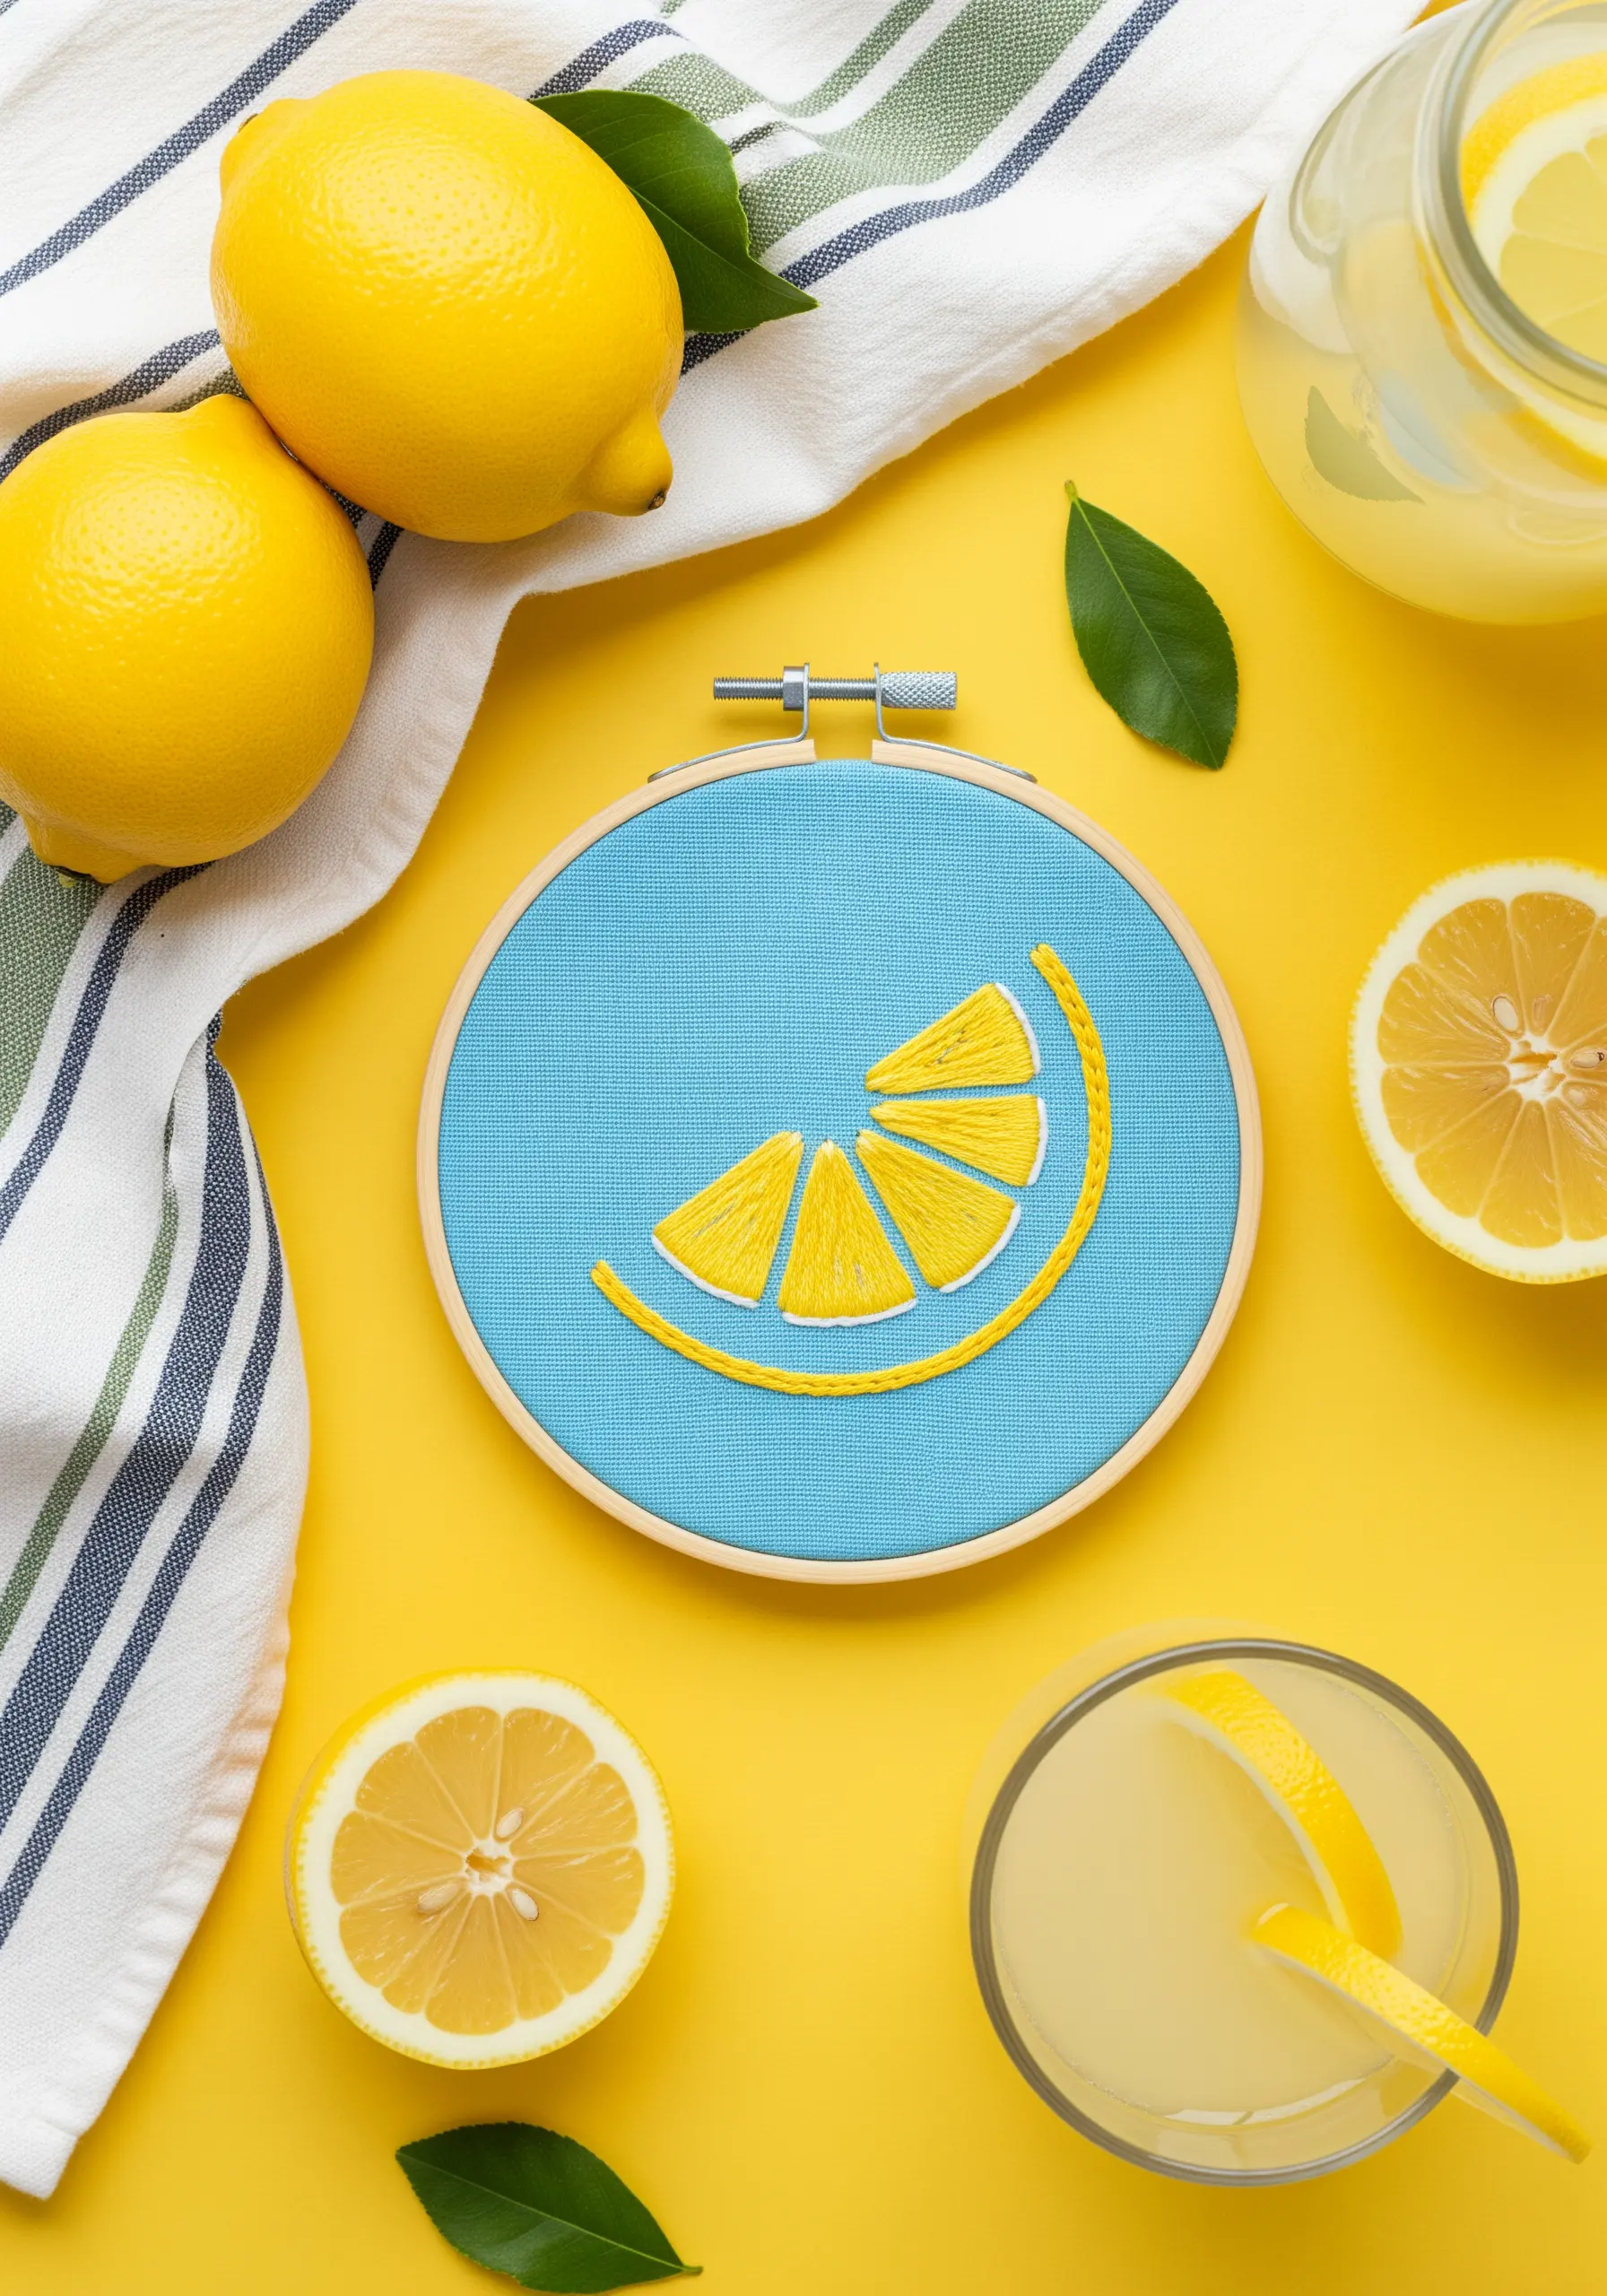
The secret to a perfectly smooth satin stitch fill is to first create a split stitch outline. This raised edge gives you a firm boundary to tuck your satin stitches under, resulting in a crisp, clean shape.
For the segments of the lemon, change the direction of your satin stitch for each one. This subtle shift mimics the fruit’s natural texture and creates a beautiful play of light across the surface.
This level of precision elevates minimal food & coffee motifs from simple shapes to polished works of art.
18. Modern Portraiture with Contour Line Stitching
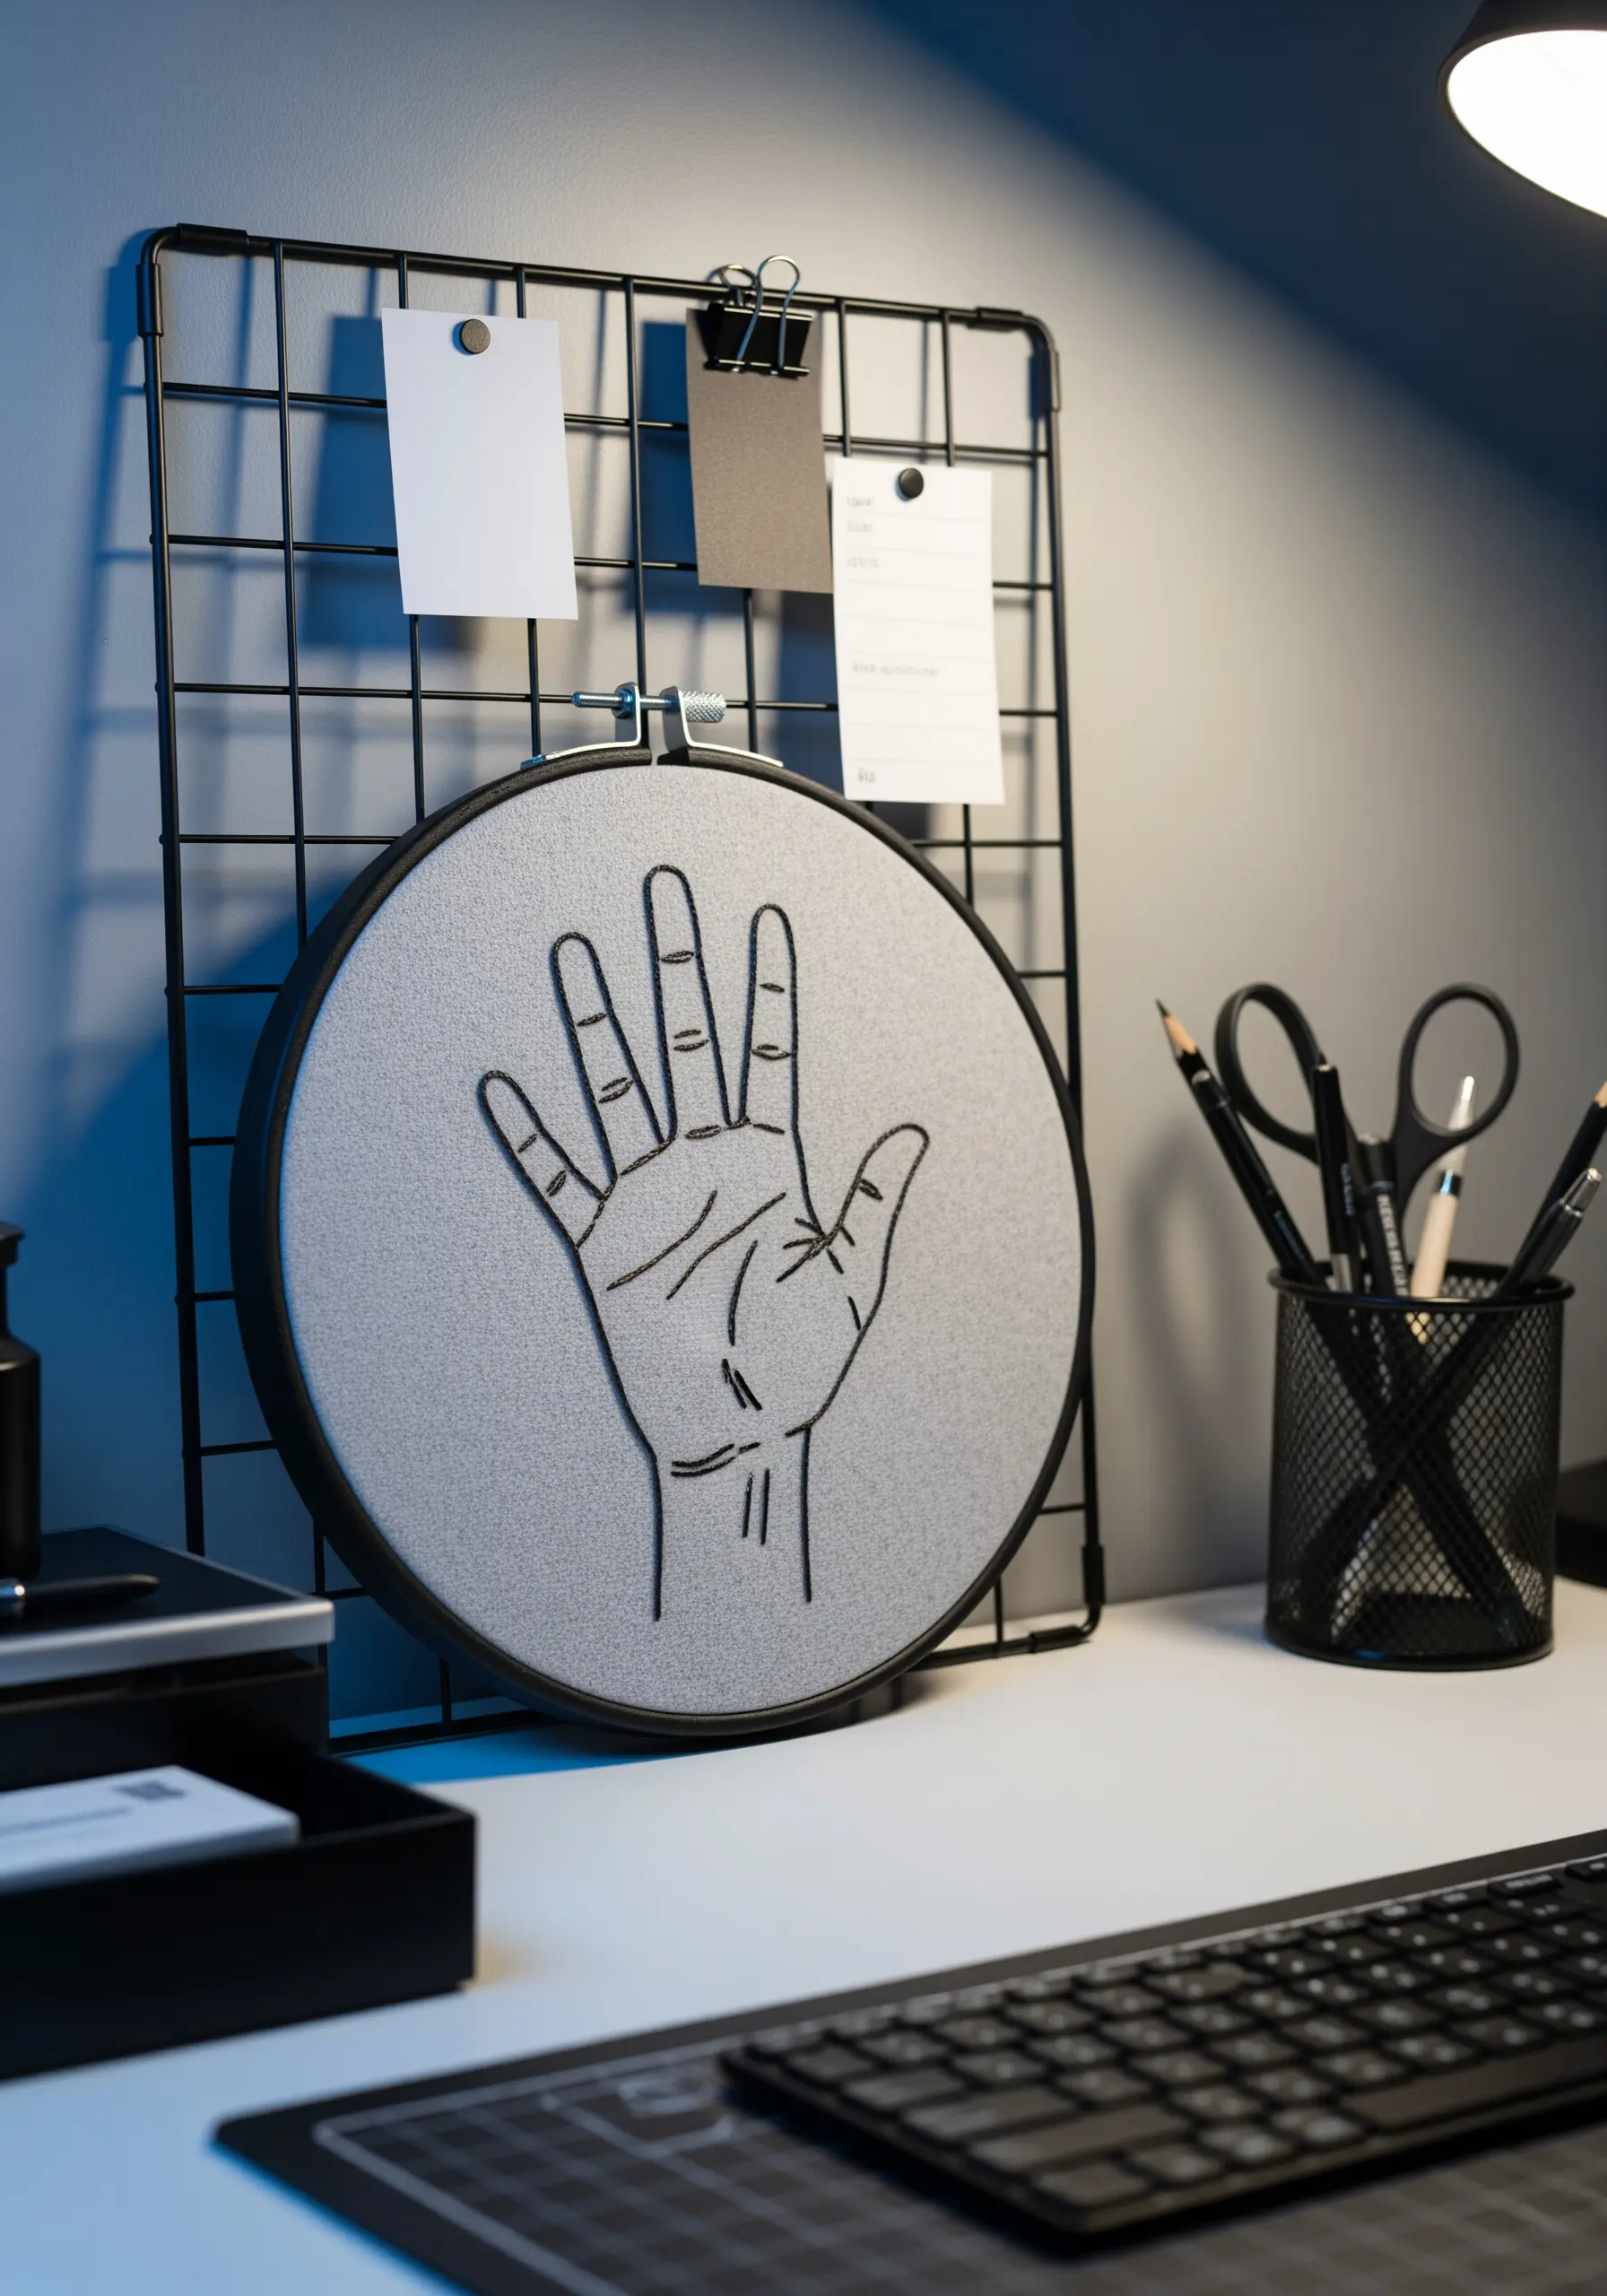
Capture the essence of a subject with a simple contour outline. A backstitch or stem stitch using two or three strands of floss provides a clean, graphic line with just enough presence.
The power of this style lies in what you choose to include and what you leave out. Focusing only on the essential lines creates a modern, illustrative piece that feels both personal and artistic.
These elegant outlines are some of the best tiny embroidery ideas that make your walls come alive with personality.
19. Creating Ethereal Designs on Sheer Tulle
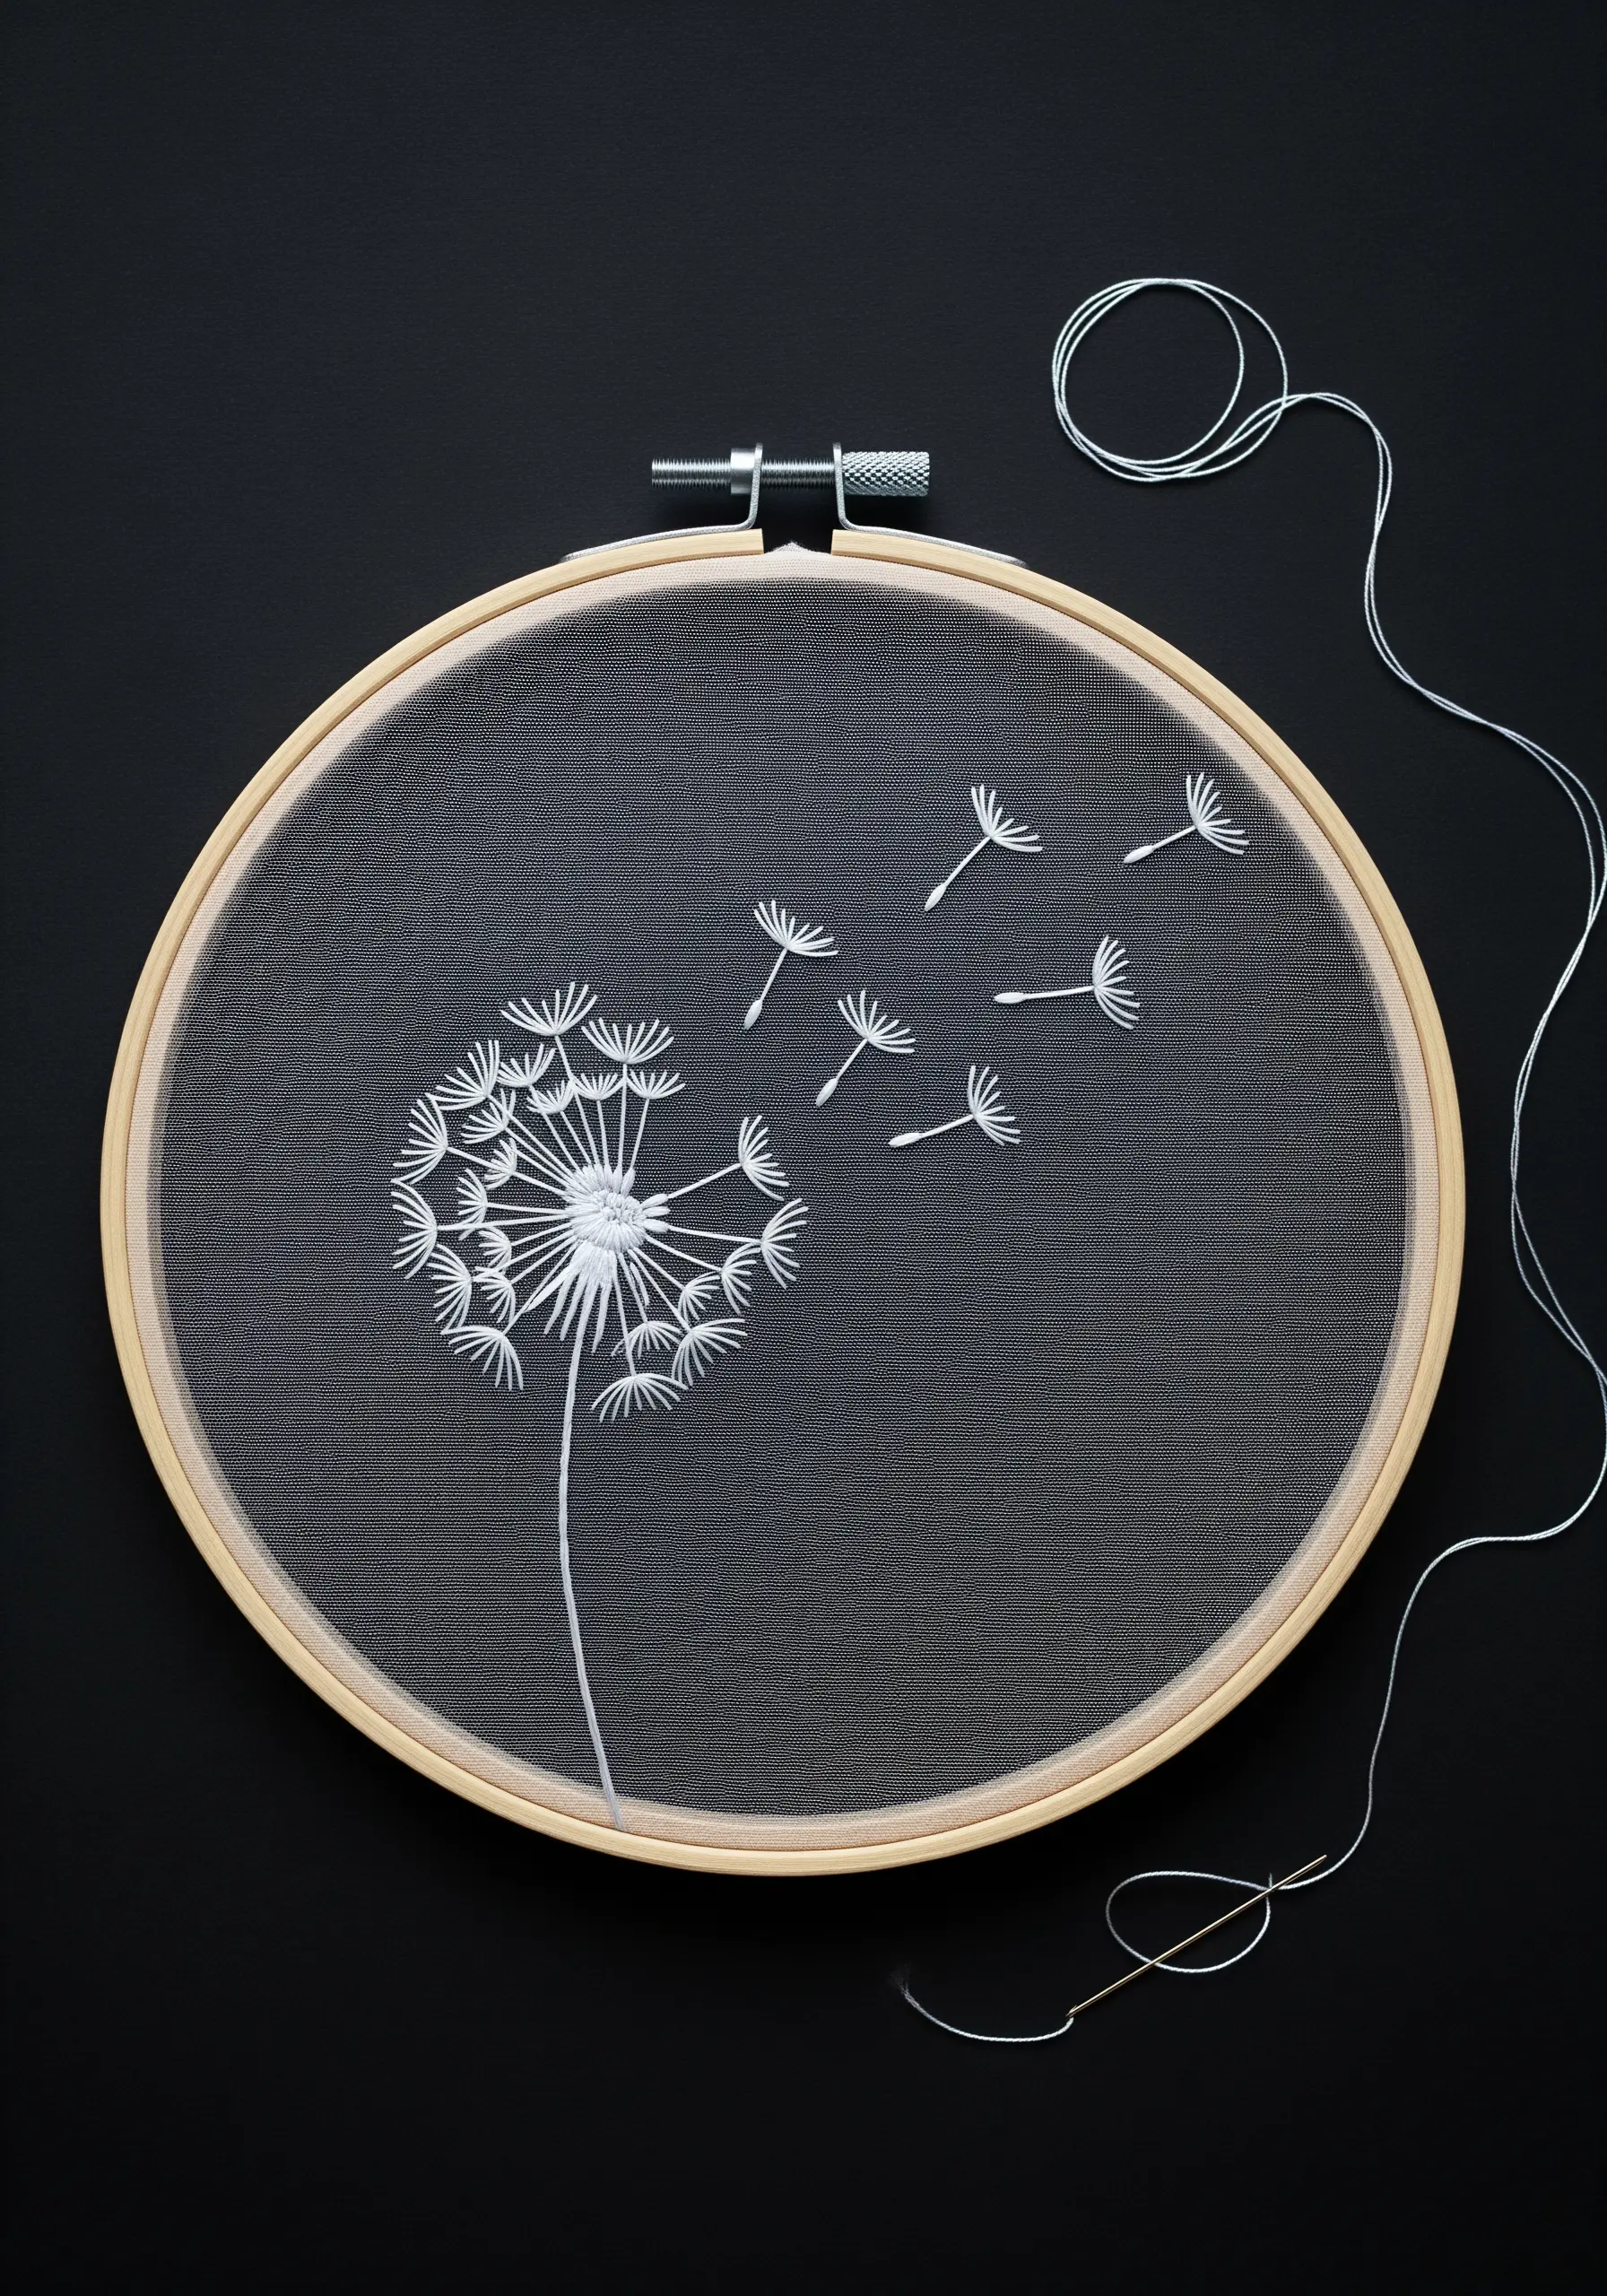
Stitching on a sheer fabric like tulle creates a magical, floating effect, as if the design is suspended in air.
To prevent puckering, use a water-soluble stabilizer on top of the tulle. It provides the necessary support for your stitches and dissolves away completely with water once you’re finished.
Keep your stitches light and airy—satin stitches for the dandelion head and delicate straight stitches for the seeds. The transparency of the fabric becomes an integral part of the art, similar to the magic of pressed flower embroidery designs.
20. The Art of Raised and Woven Stitches
Achieve this incredible three-dimensional, woven effect using a padded satin stitch. First, lay down several parallel straight stitches to create a padded base within your shape.
Then, work your satin stitches perpendicular to the padding. This lifts the final stitches off the fabric, creating dramatic shadows and a highly tactile, sculptural surface.
This technique turns a simple shape into a statement piece, making it one of the most compelling texture-rich thread art ideas you can try.
21. Finding Rhythm in Geometric Repetition
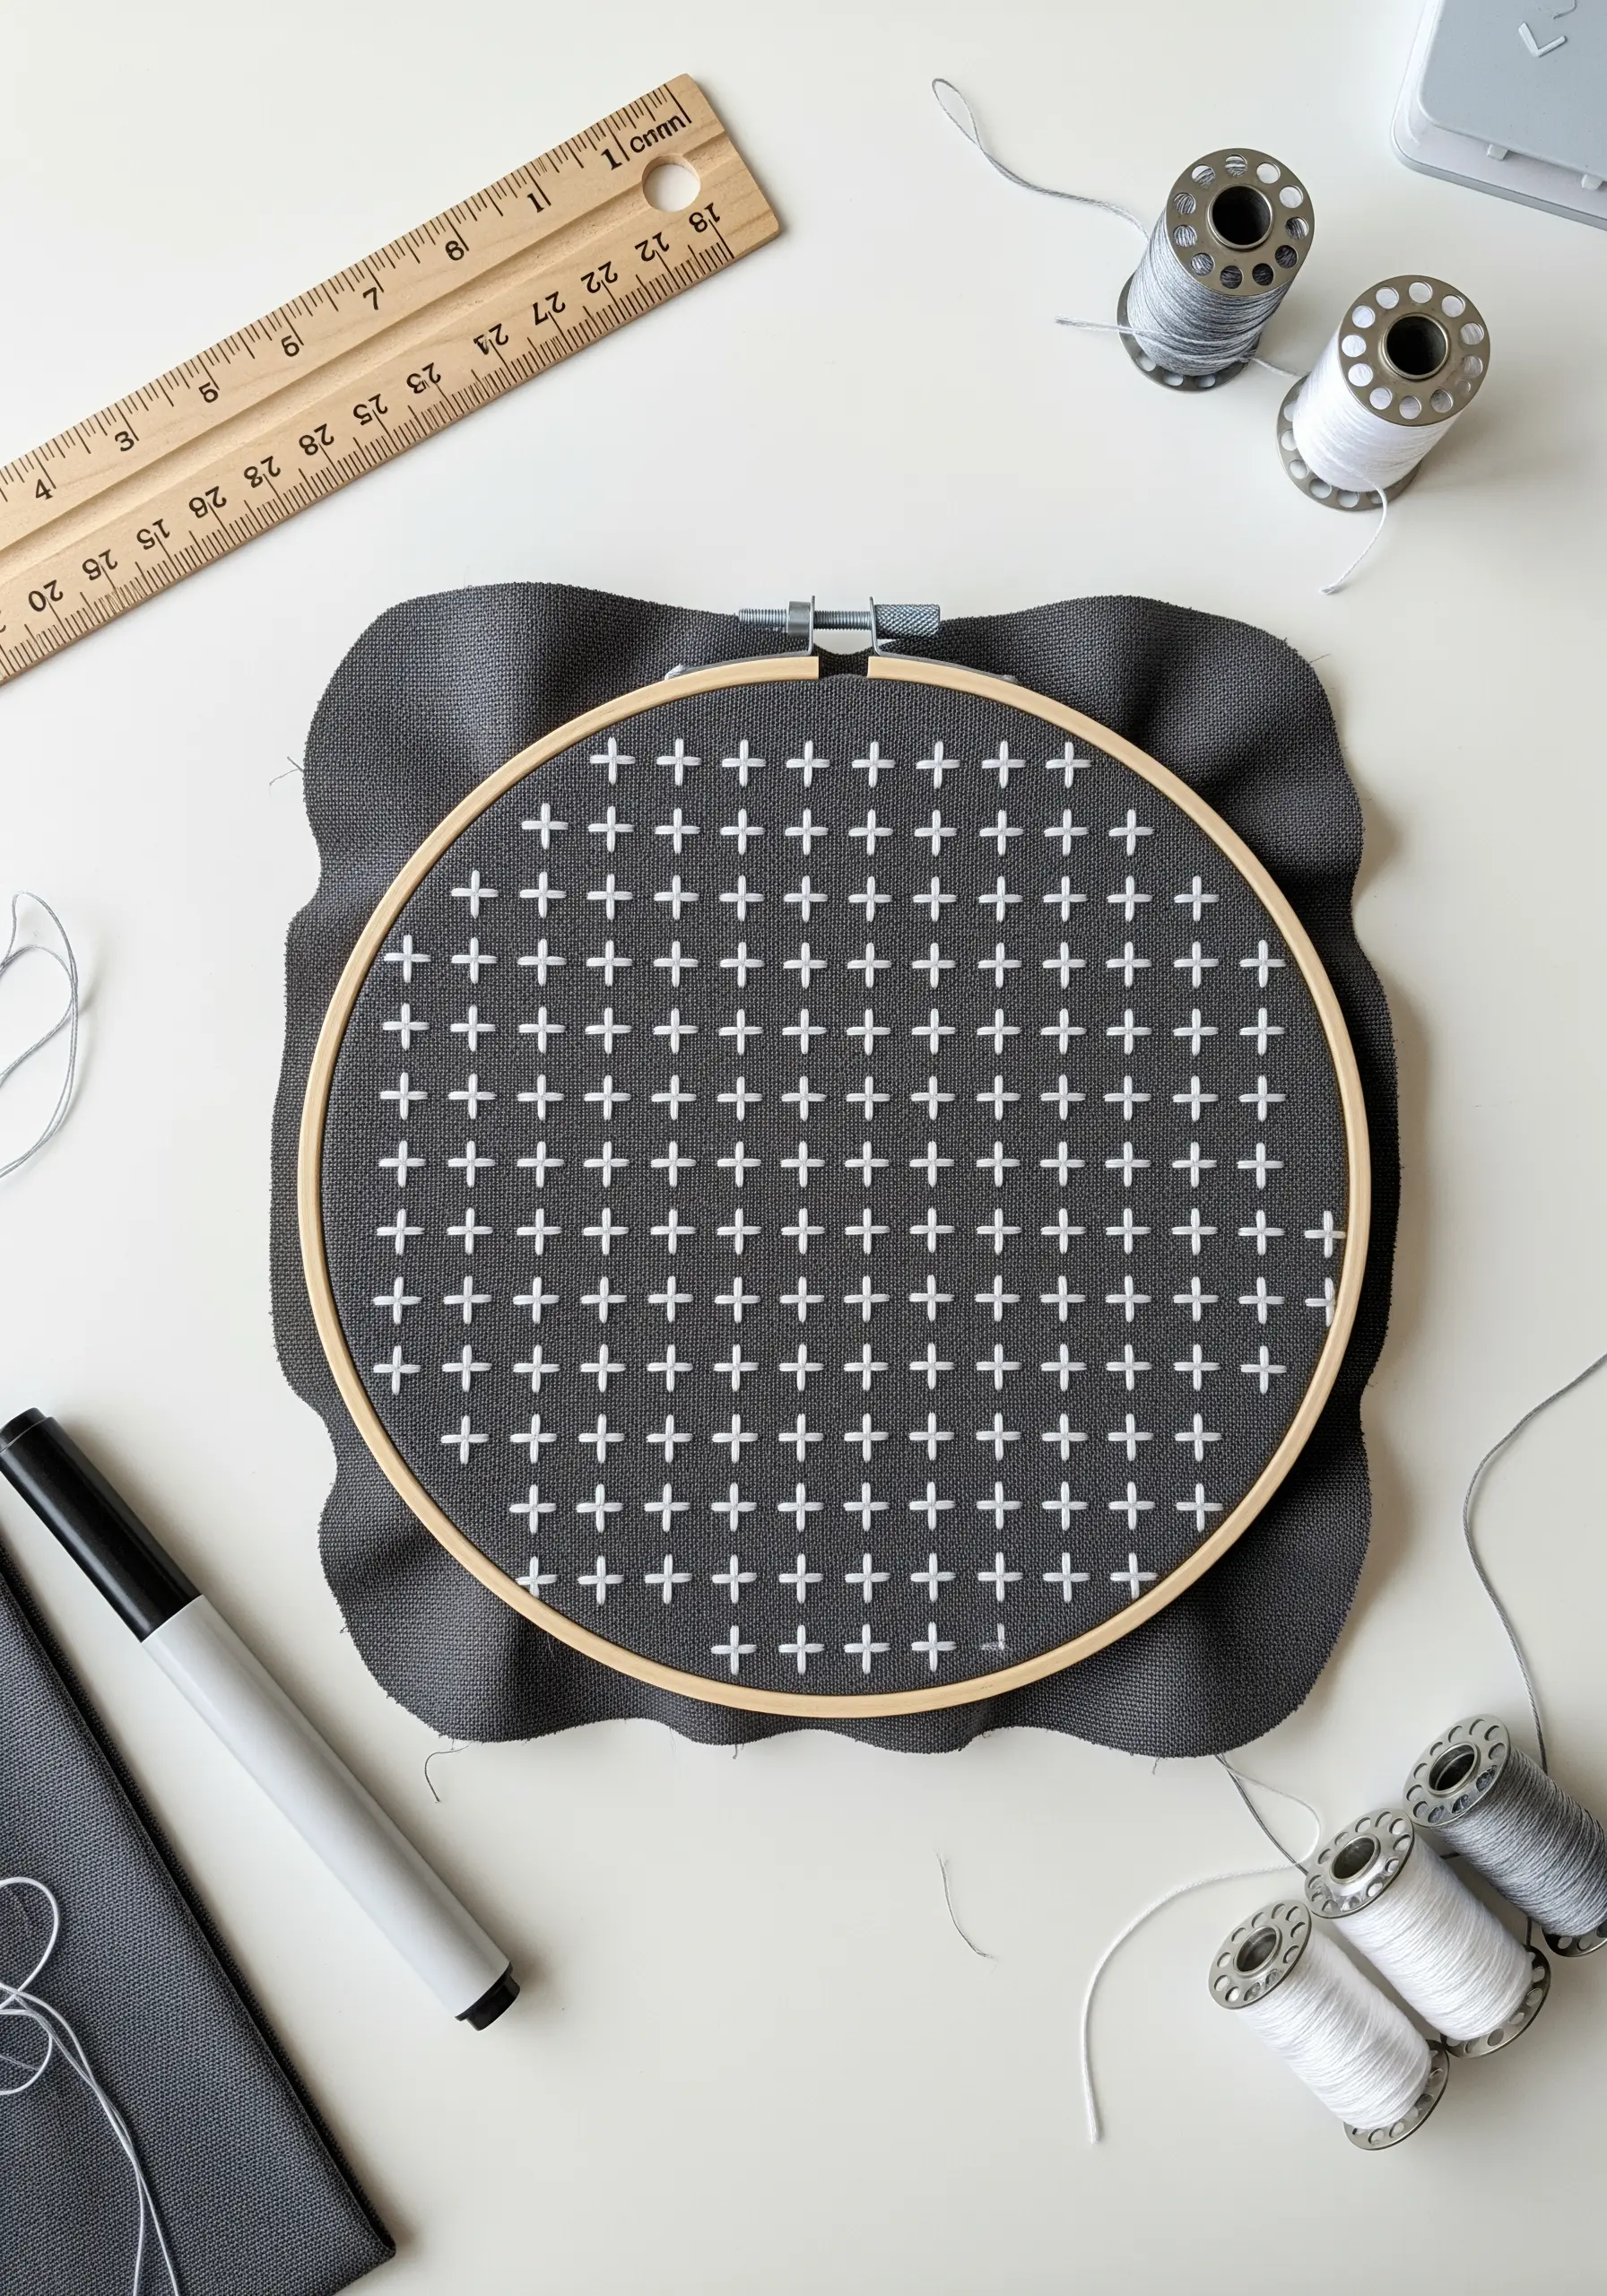
A simple, repeated motif like a plus sign can create a sophisticated and modern textile pattern. The key to its success is absolute precision.
Use an erasable fabric marker and a small ruler to create a perfect grid on your fabric before you begin stitching. This ensures every plus sign is perfectly aligned and spaced.
This disciplined, minimalist approach is one of those simple embroidery designs that transforms plain fabric into something that looks intentional and high-end.


