
You have the patterns, the thread, and the desire to create something beautiful for your home. But how do you move beyond simply filling in the lines and start making pieces that feel uniquely yours, with a touch of modern artistry?
The answer lies in reimagining texture and line. The techniques behind string art—with its taught threads, clean geometry, and layered depth—offer a brilliant source of inspiration for your embroidery. It’s not about adding more complexity, but about making more intentional choices.
These designs will guide you to think differently about how you fill a space, outline a shape, or create a focal point. You’ll learn how a simple change in stitch direction, a row of beads, or the choice to couch a thick yarn can transform a simple kitchen sign into a polished piece of textile art that adds a truly personal, homely touch.
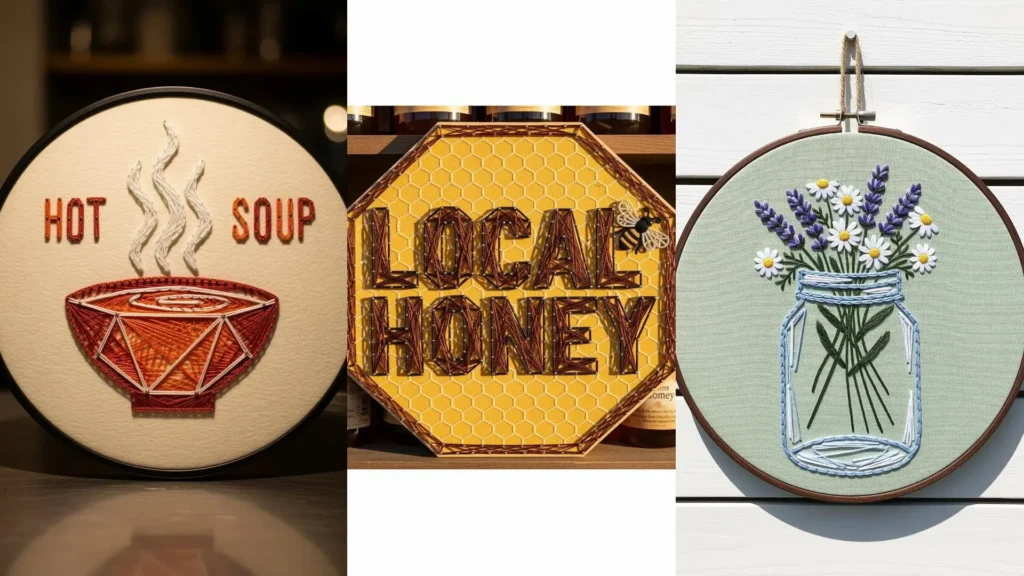
1. Sculptural Coffee Art with Beaded Outlines
To translate this string-art look into refined embroidery, use tiny bronze or copper seed beads as your anchor points instead of nails.
Outline your coffee cup design with a row of beads, sewing each one down securely, then wrap a high-sheen brown perle cotton between them to create the clean, graphic lines.
For the steam, use fewer bead anchors and a single strand of white or silver metallic floss, allowing the stitches to loop and curve more freely for an ethereal effect.
This method elevates a simple line drawing by adding a subtle, three-dimensional shimmer that catches the light.
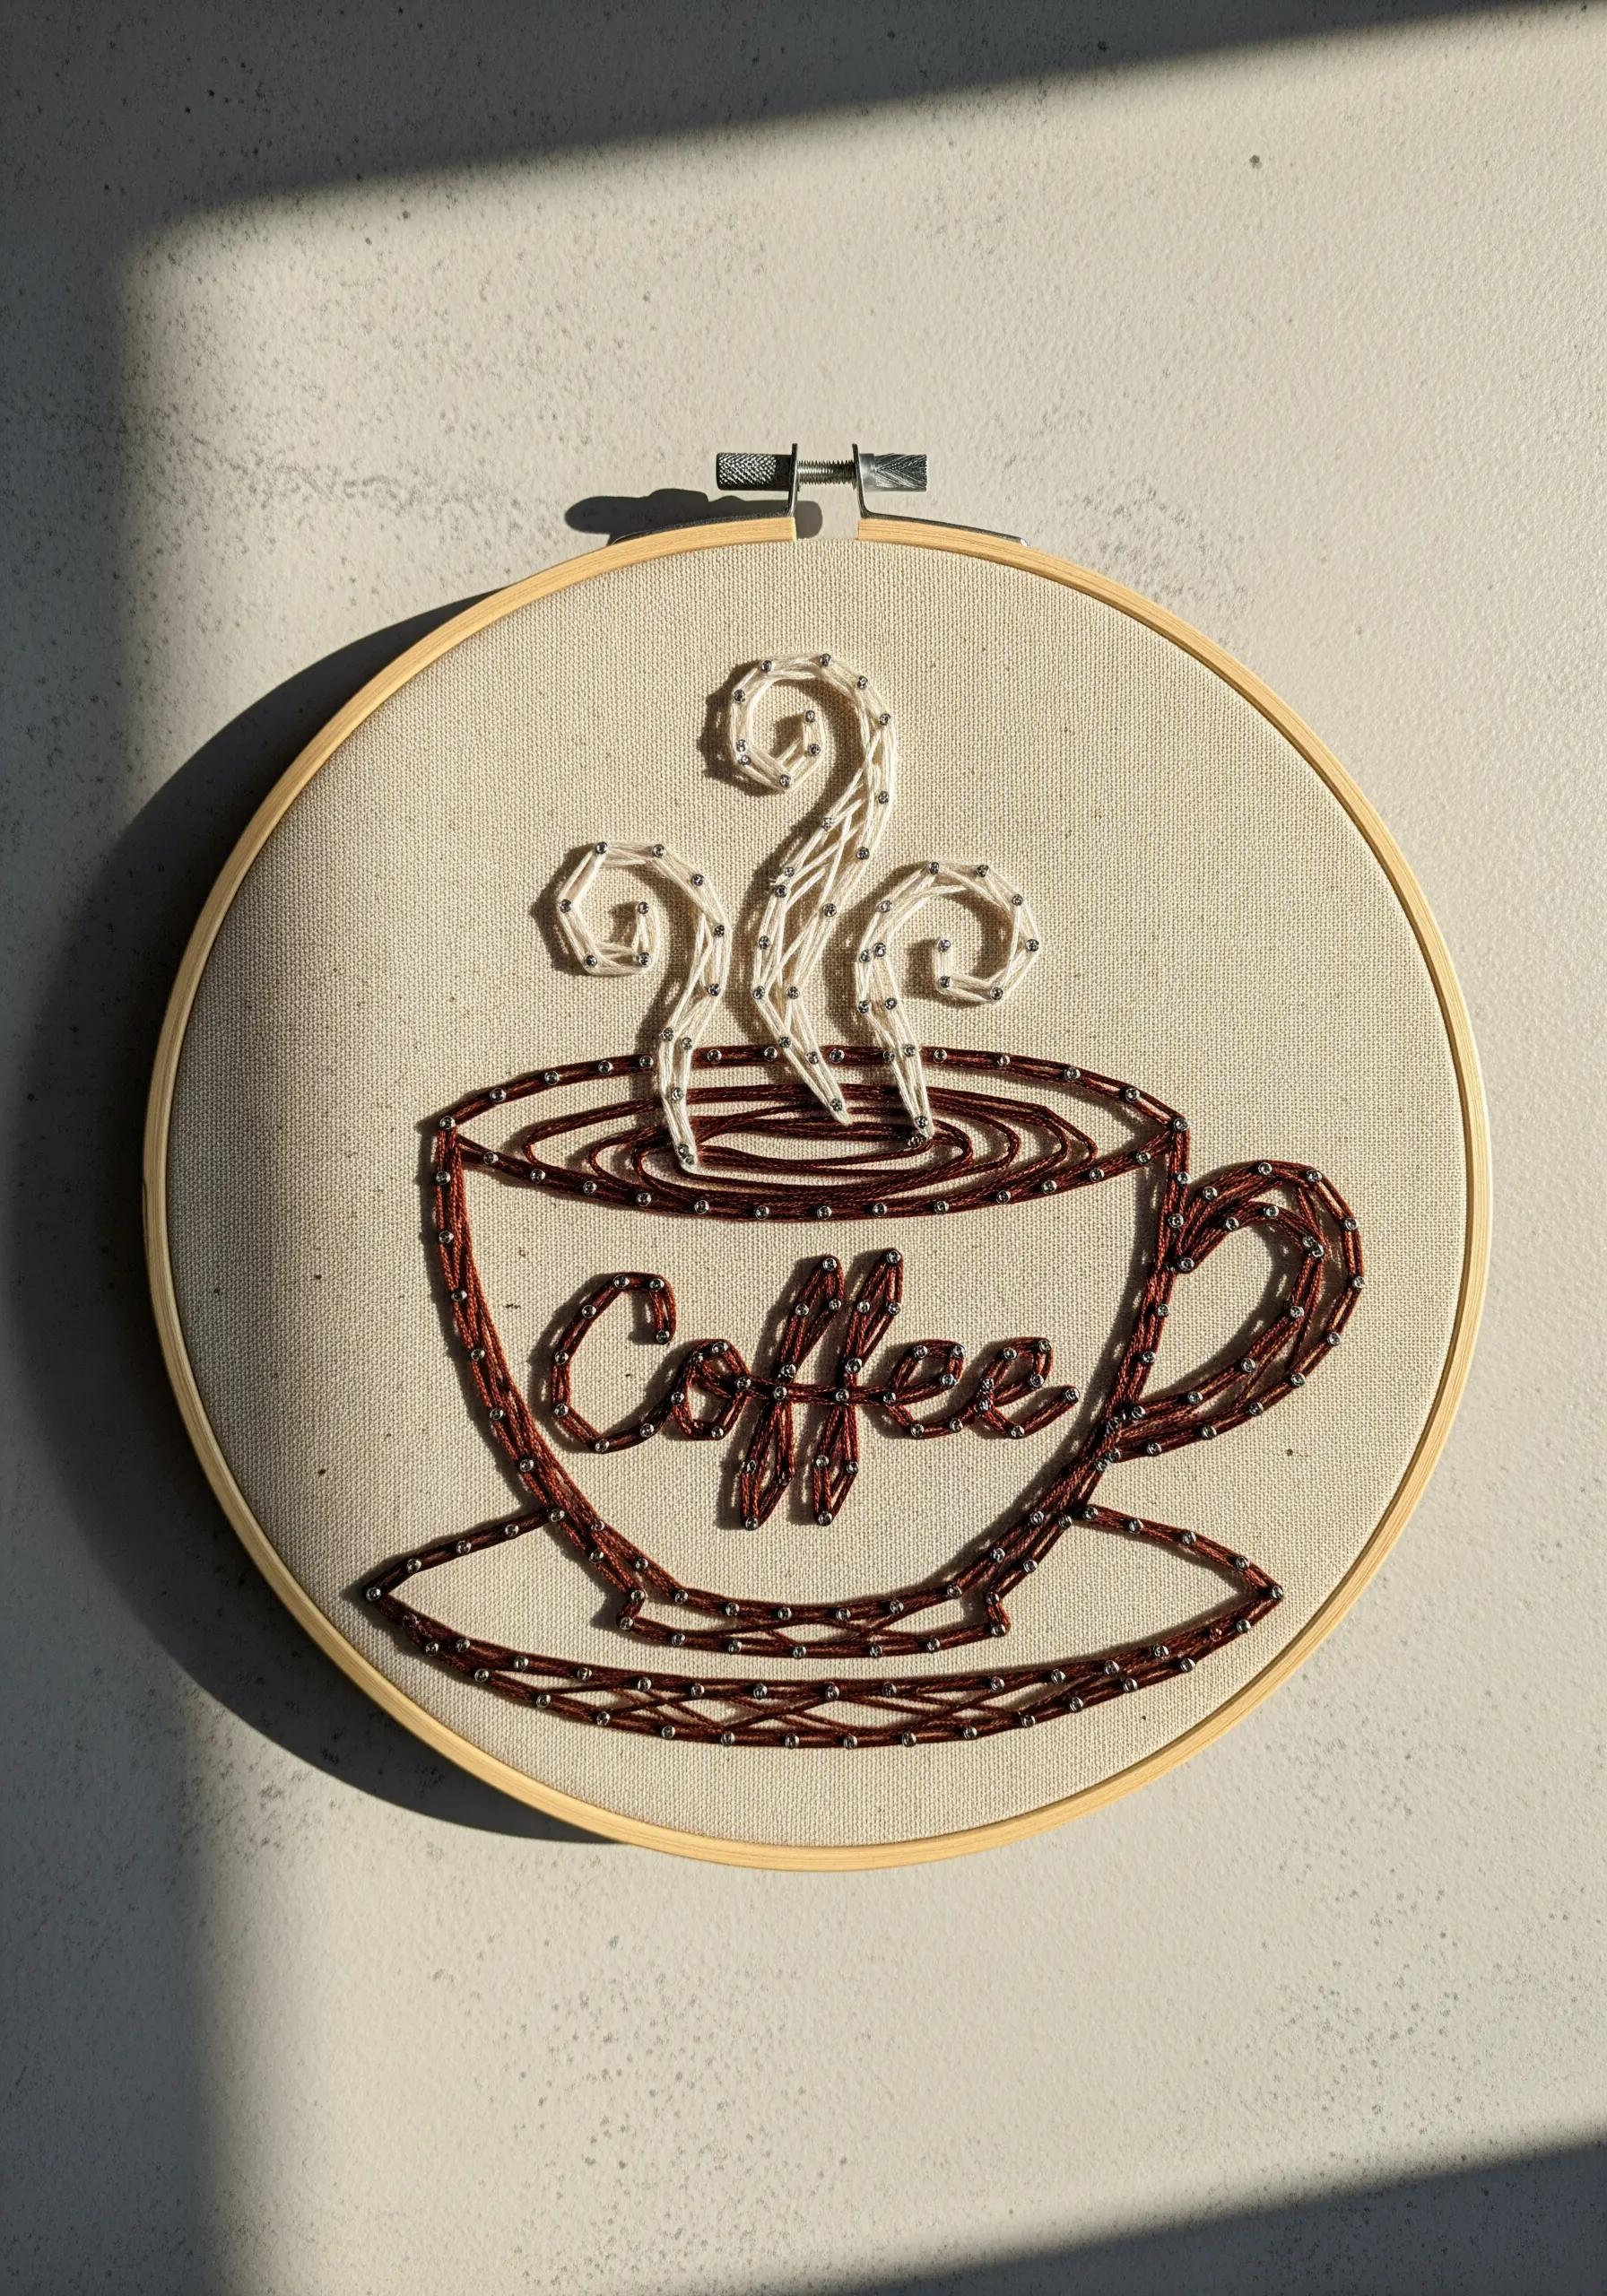
2. Create Bold 3D Lettering with Couching
Achieve this powerful, dimensional script not with bulky satin stitches, but with a technique called couching.
Lay down a thick cord or yarn along your design line, then use a thinner, matching thread to tack it to the fabric with small, perpendicular stitches.
This approach allows you to create fluid, raised lettering that stands out dramatically from the background fabric.
Choose a background with a visible weave, like a gray linen or burlap, to create a textural contrast that makes the smooth, sculptural yarn pop.
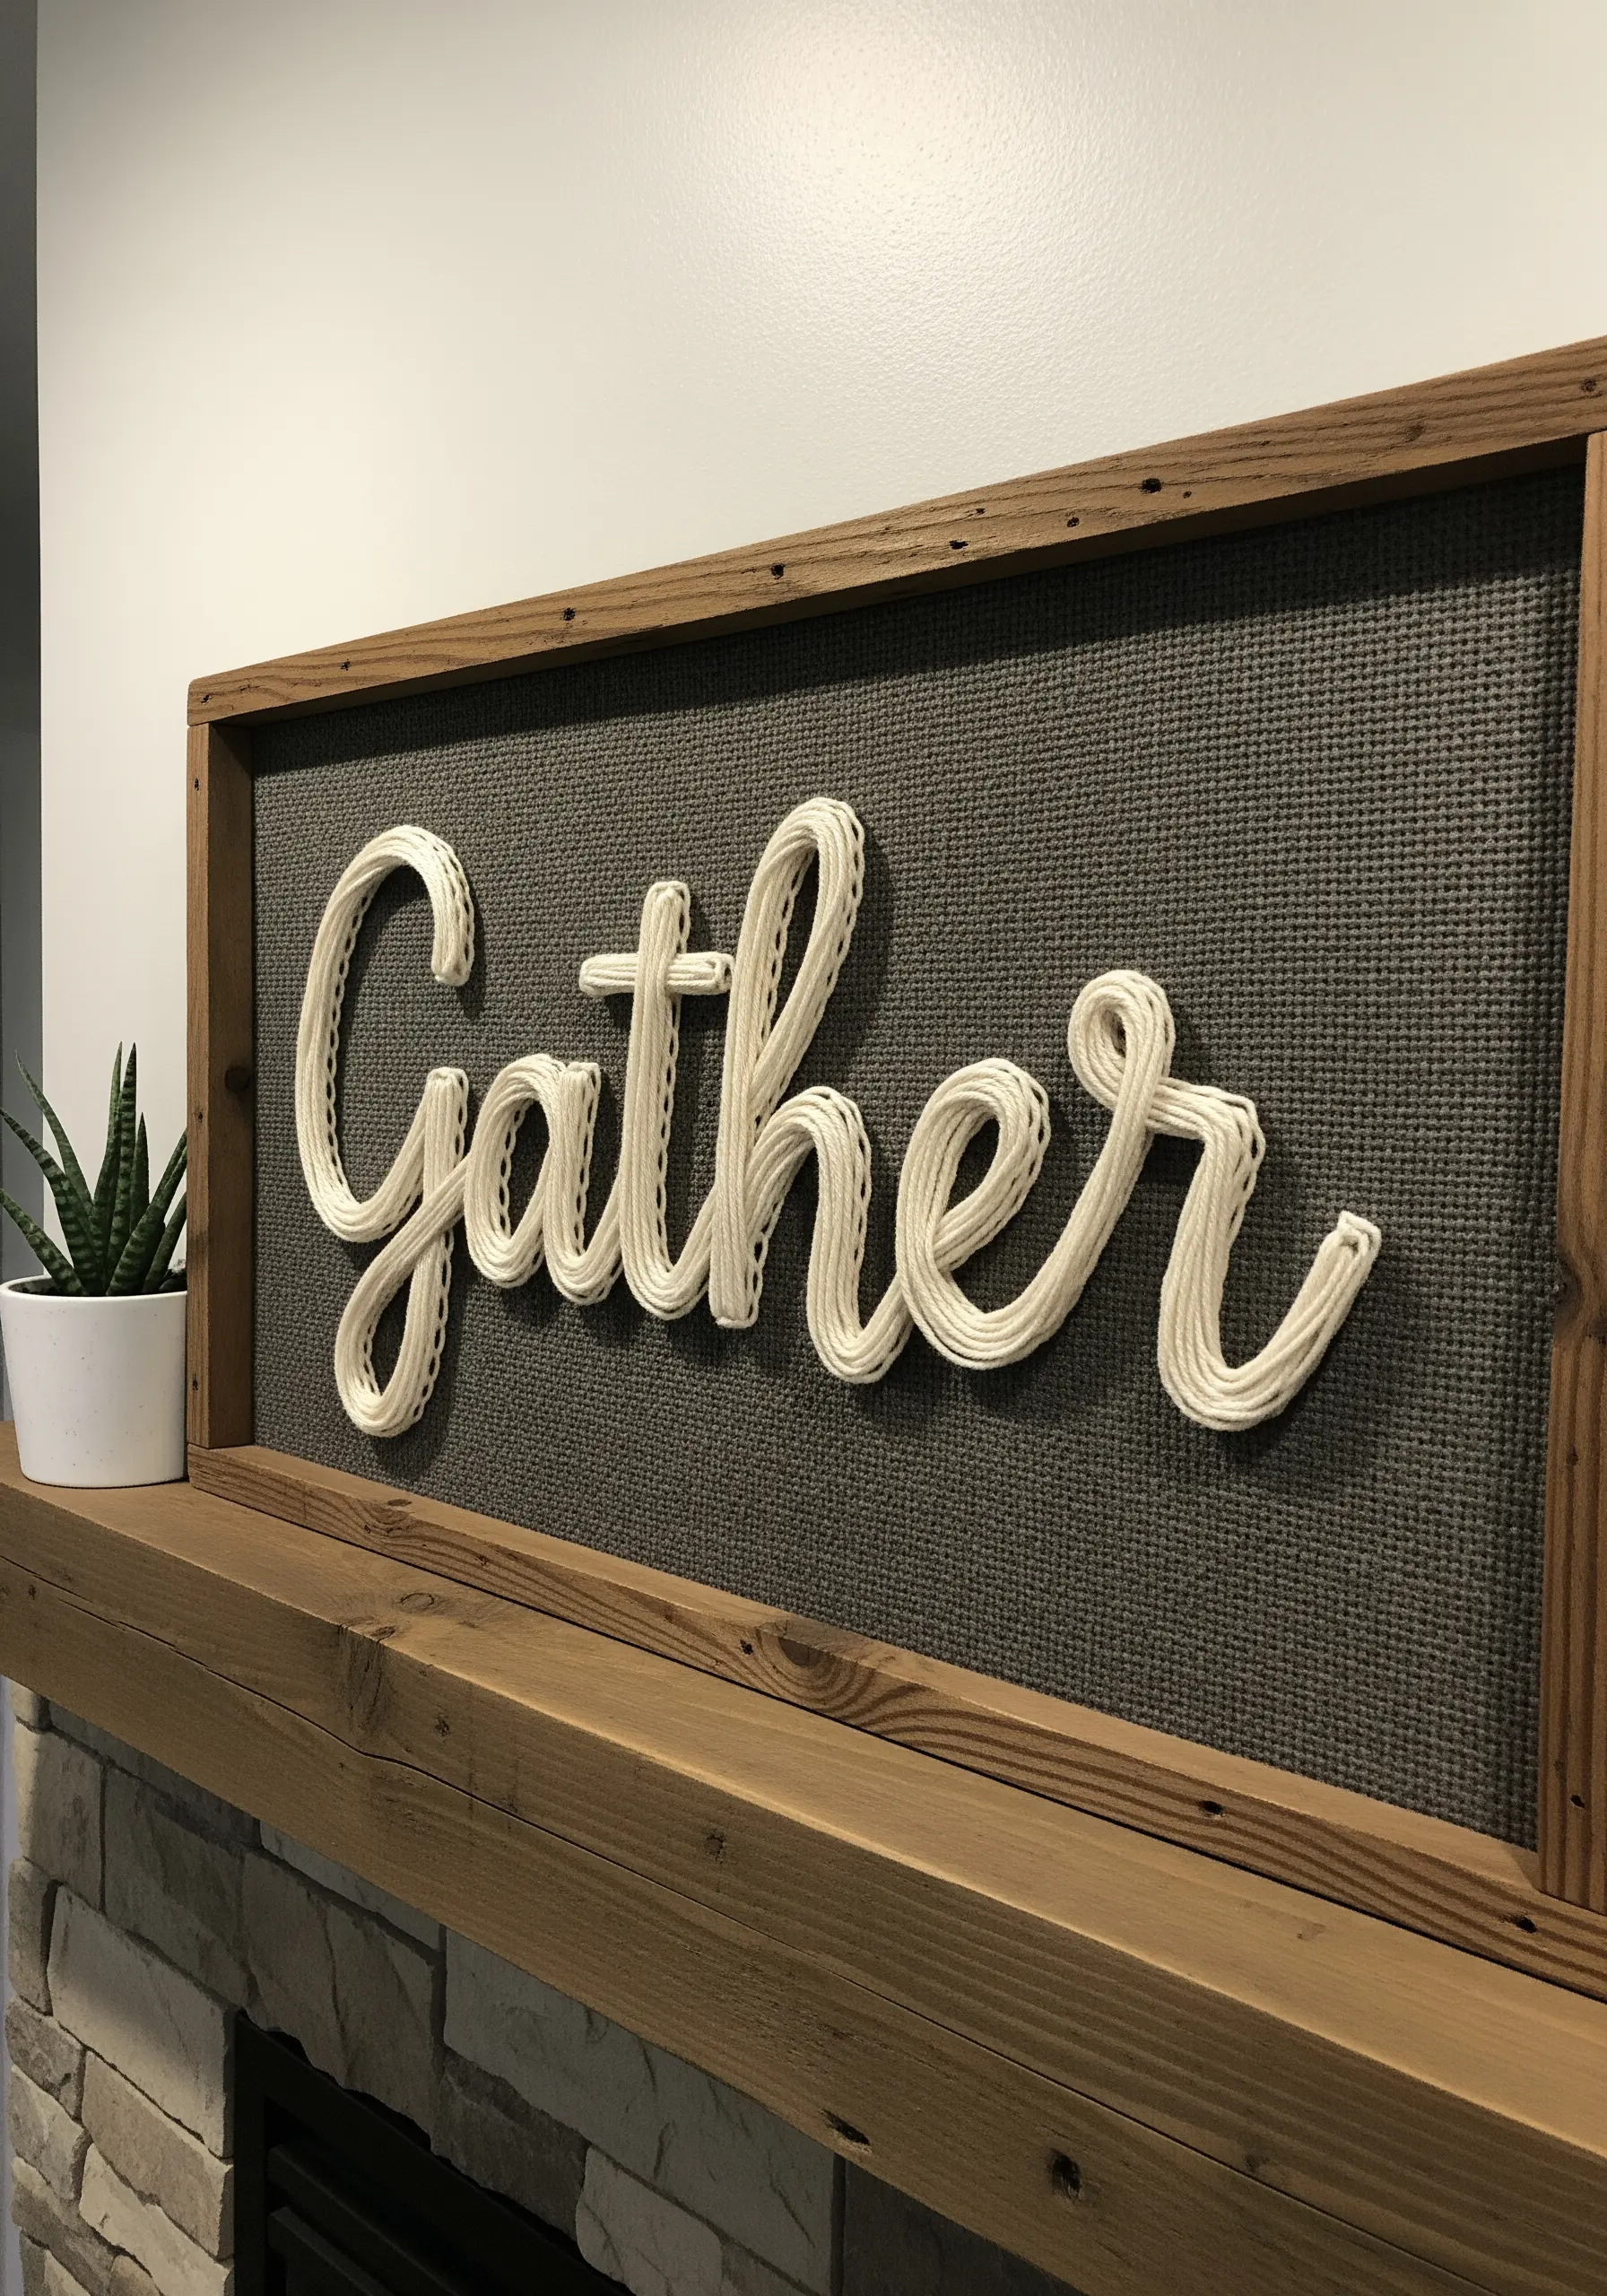
3. Illustrative Kitchen Tools with Metallic Thread
Transform simple outlines into graphic art by focusing on a disciplined fill pattern.
First, establish the shapes of the whisk and rolling pin with a clean backstitch using a silver-gray floss.
Then, fill the shapes with parallel straight stitches, keeping them taut and evenly spaced for a clean, almost architectural feel.
Working on Aida cloth provides a natural grid, ensuring your lines remain straight and your composition balanced.
The scattered French knots add a final, playful touch of texture to the negative space.
4. Rustic Texture with Directional Straight Stitch
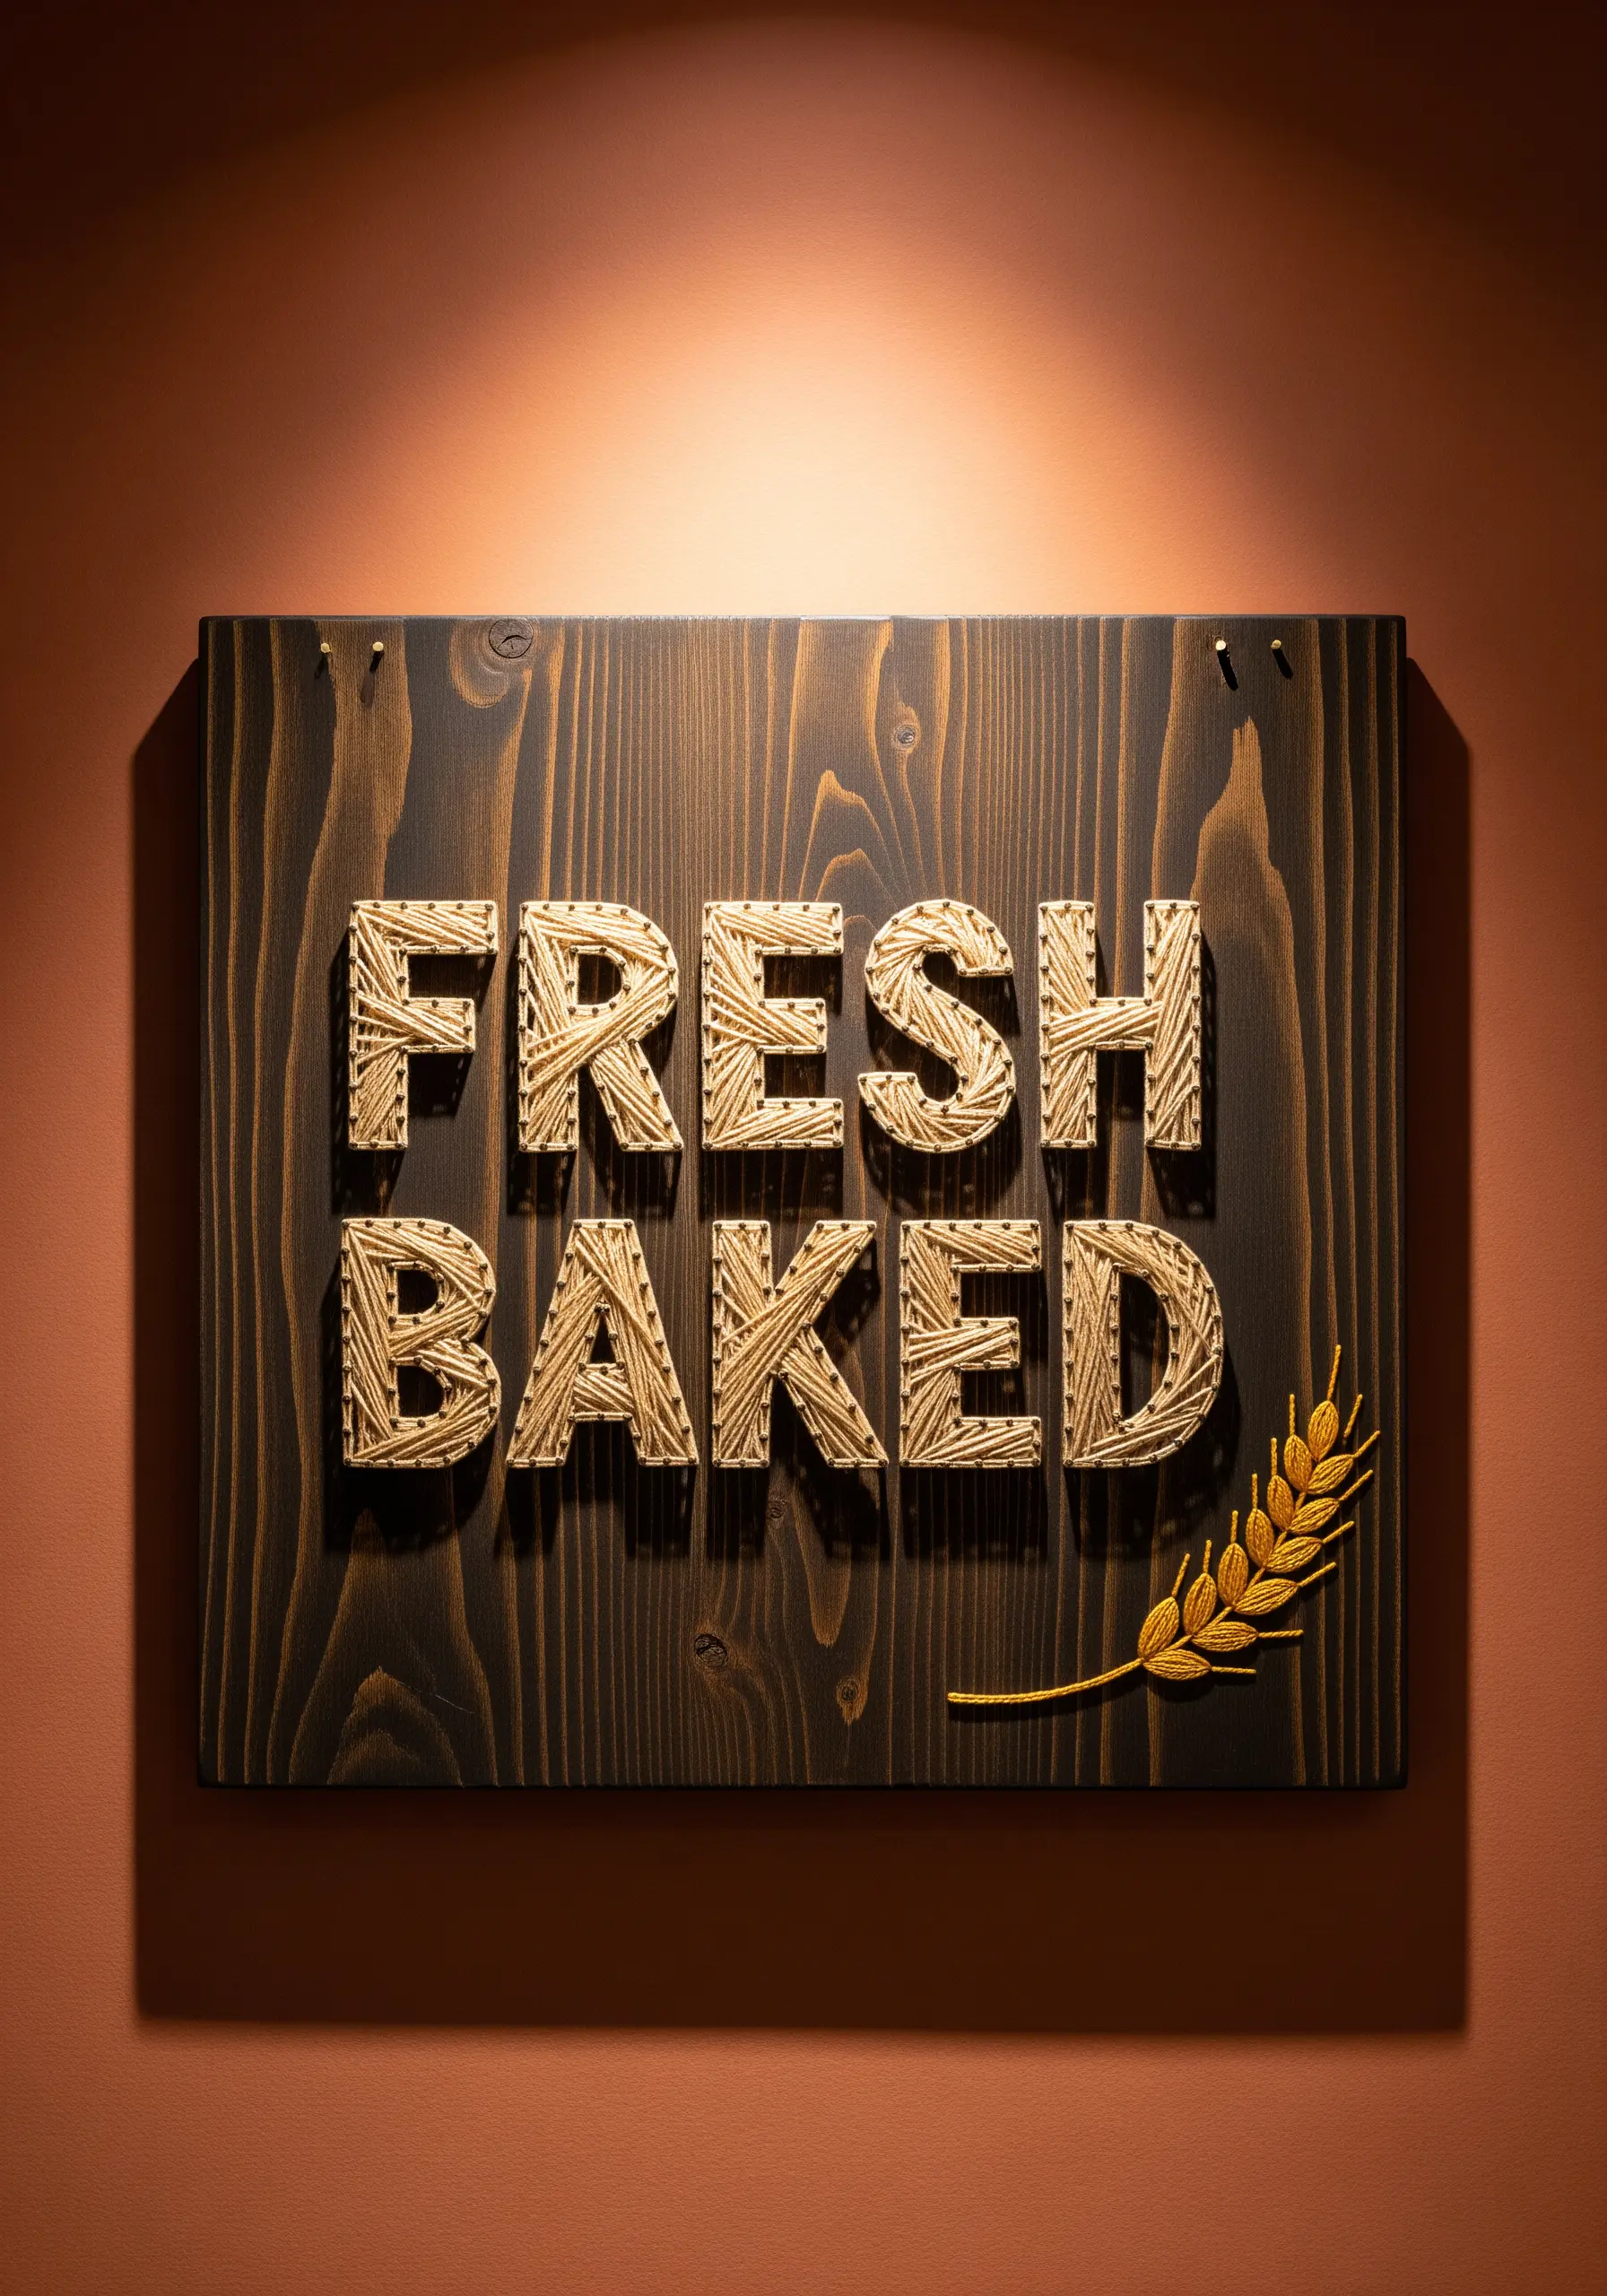
To capture the homespun feel of fresh bread, use a matte cotton floss and fill your letters with overlapping straight stitches.
Instead of a uniform satin stitch, lay your stitches down in varied, crisscrossing directions to build up a rough, tactile surface.
This technique mimics the random wrapping of string art and gives the letters a dynamic, woven texture.
For the wheat stalk, combine a delicate fishbone stitch for the leaves with a neat satin stitch for the grain, creating a sharp contrast against the rustic lettering.
5. Combining Line Art and Classic Floral Stitches
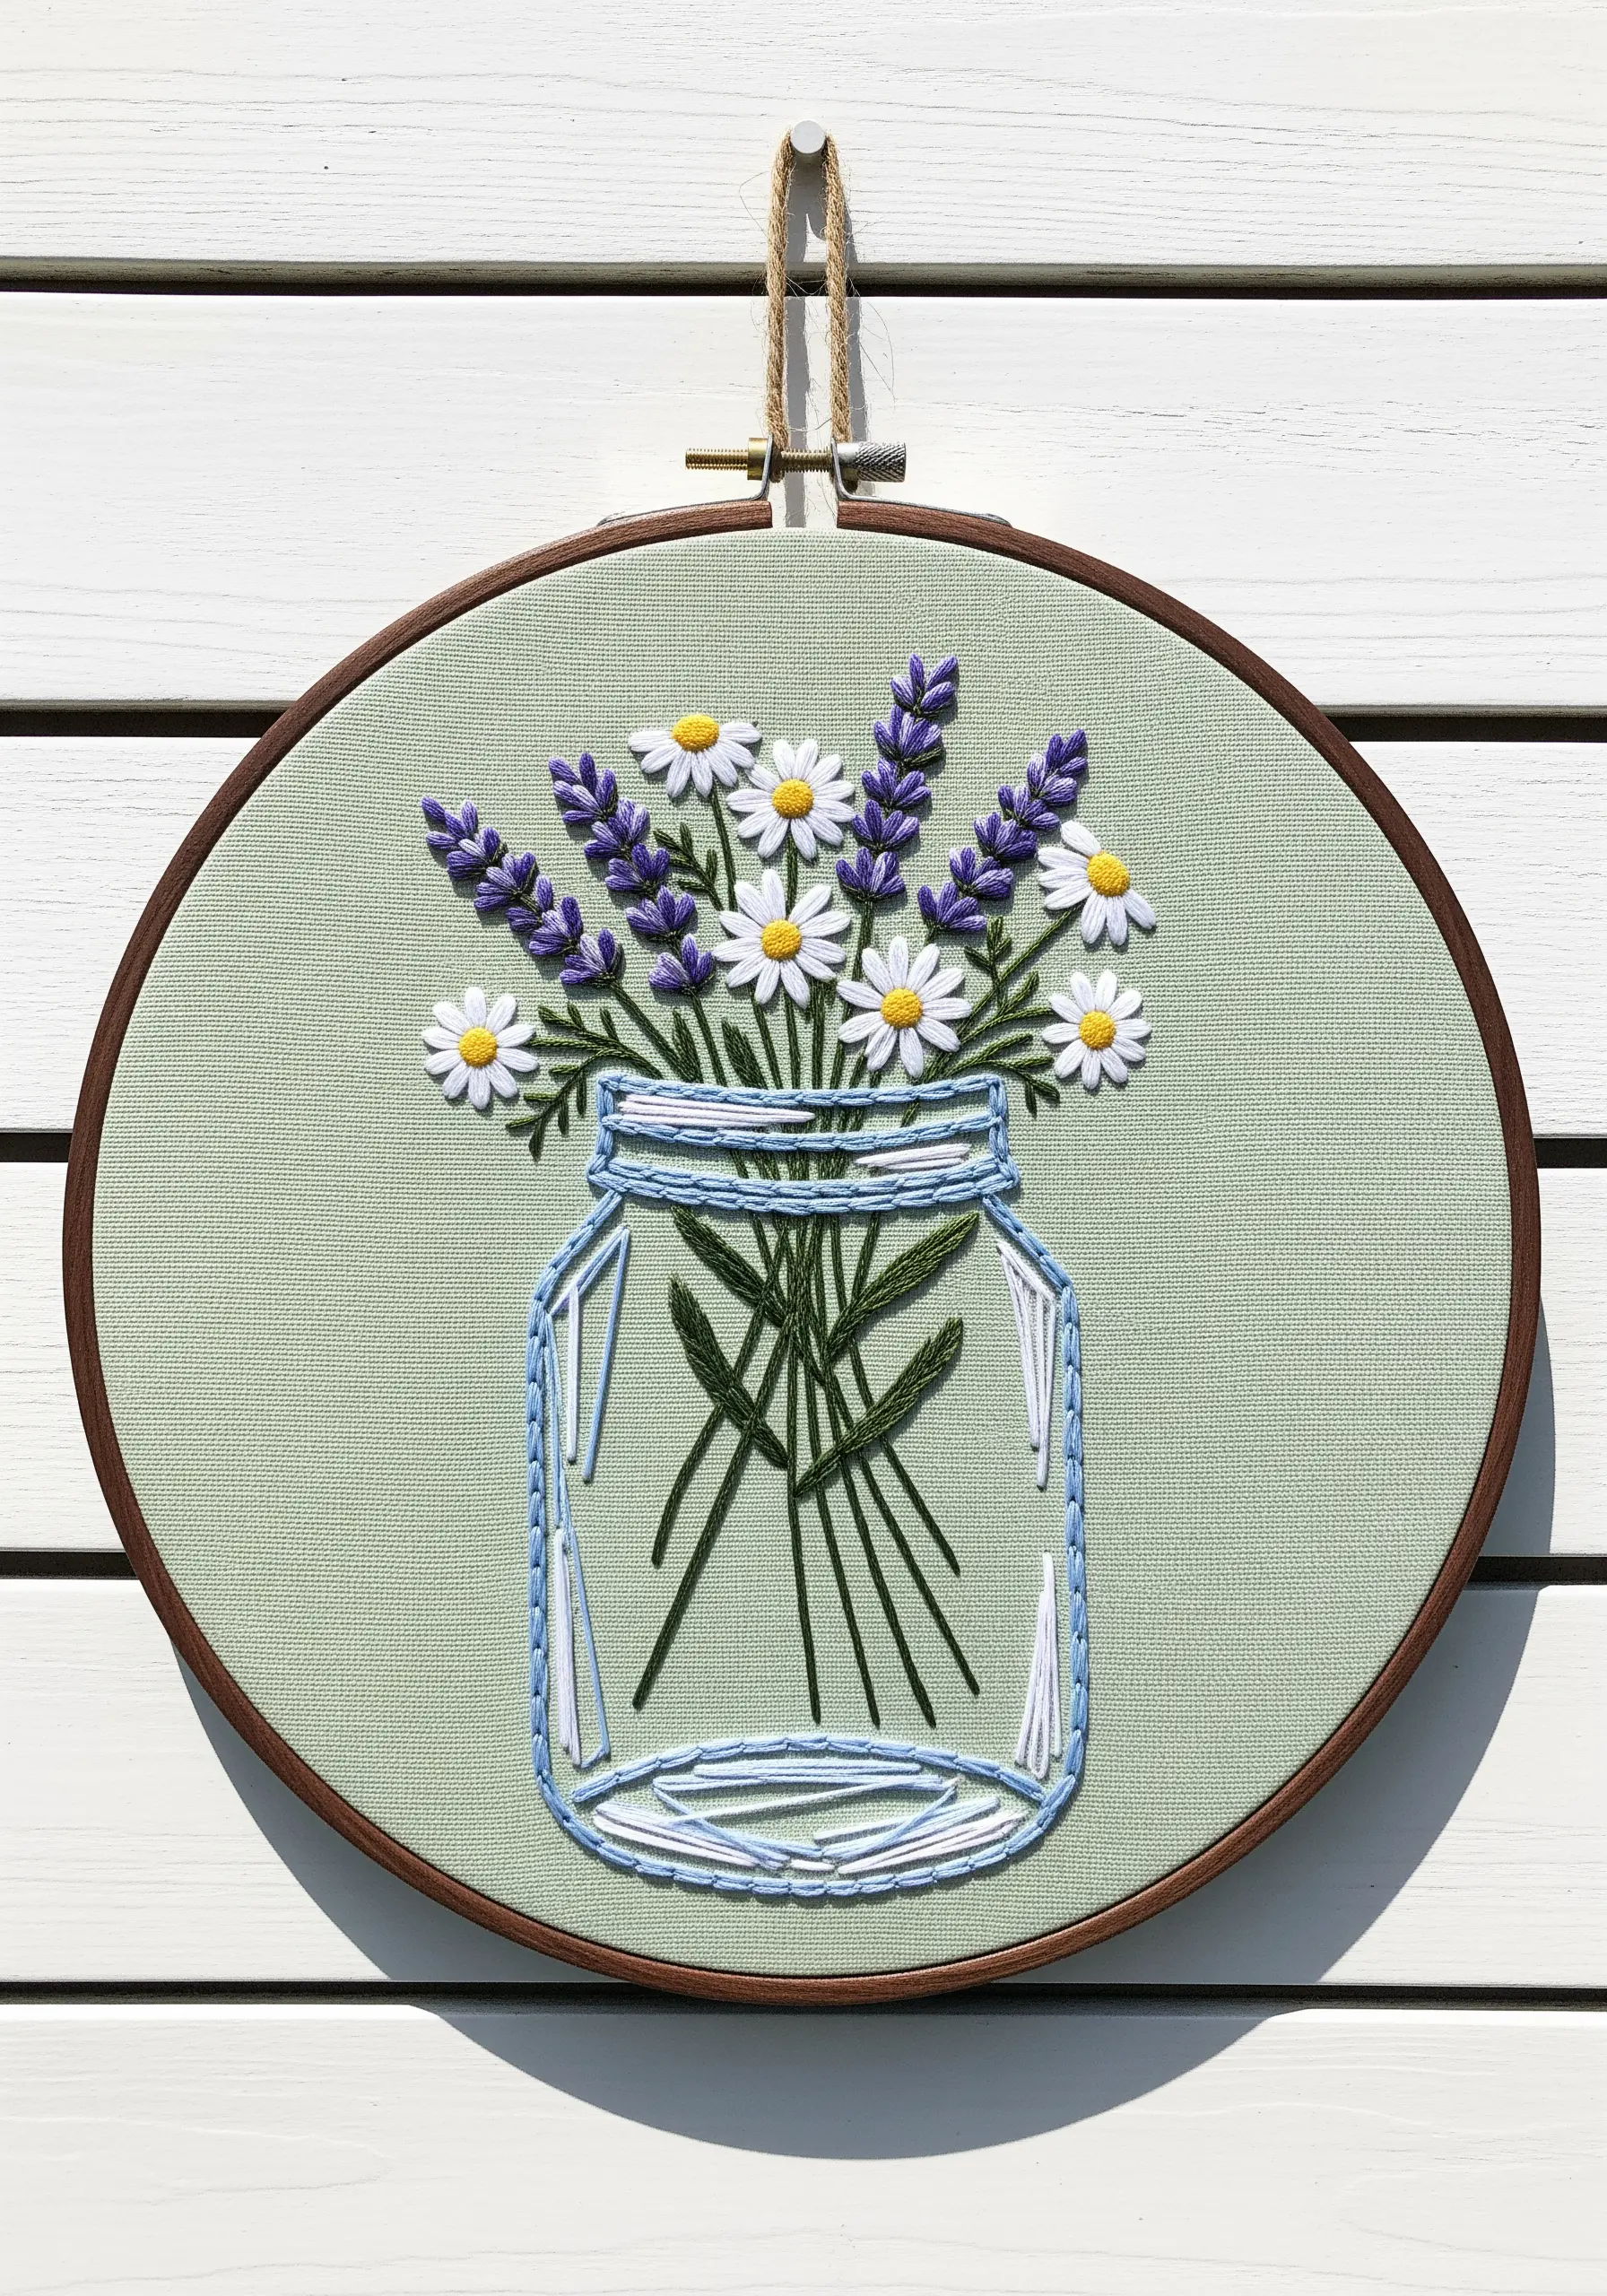
Create a beautiful tension between graphic and organic forms by pairing a simple outline with textured florals.
Use a clean backstitch or split stitch in a cool blue to draw the mason jar, suggesting the transparency of glass with minimal lines.
Inside the jar, bring the bouquet to life with classic stitches: use satin stitch for the daisy petals and dense French knots for their centers.
For the lavender, bullion knots or stacked lazy daisy stitches create a realistic, fragrant texture that spills from the clean lines of the jar.
6. Modern Typography with Graphic Line Work
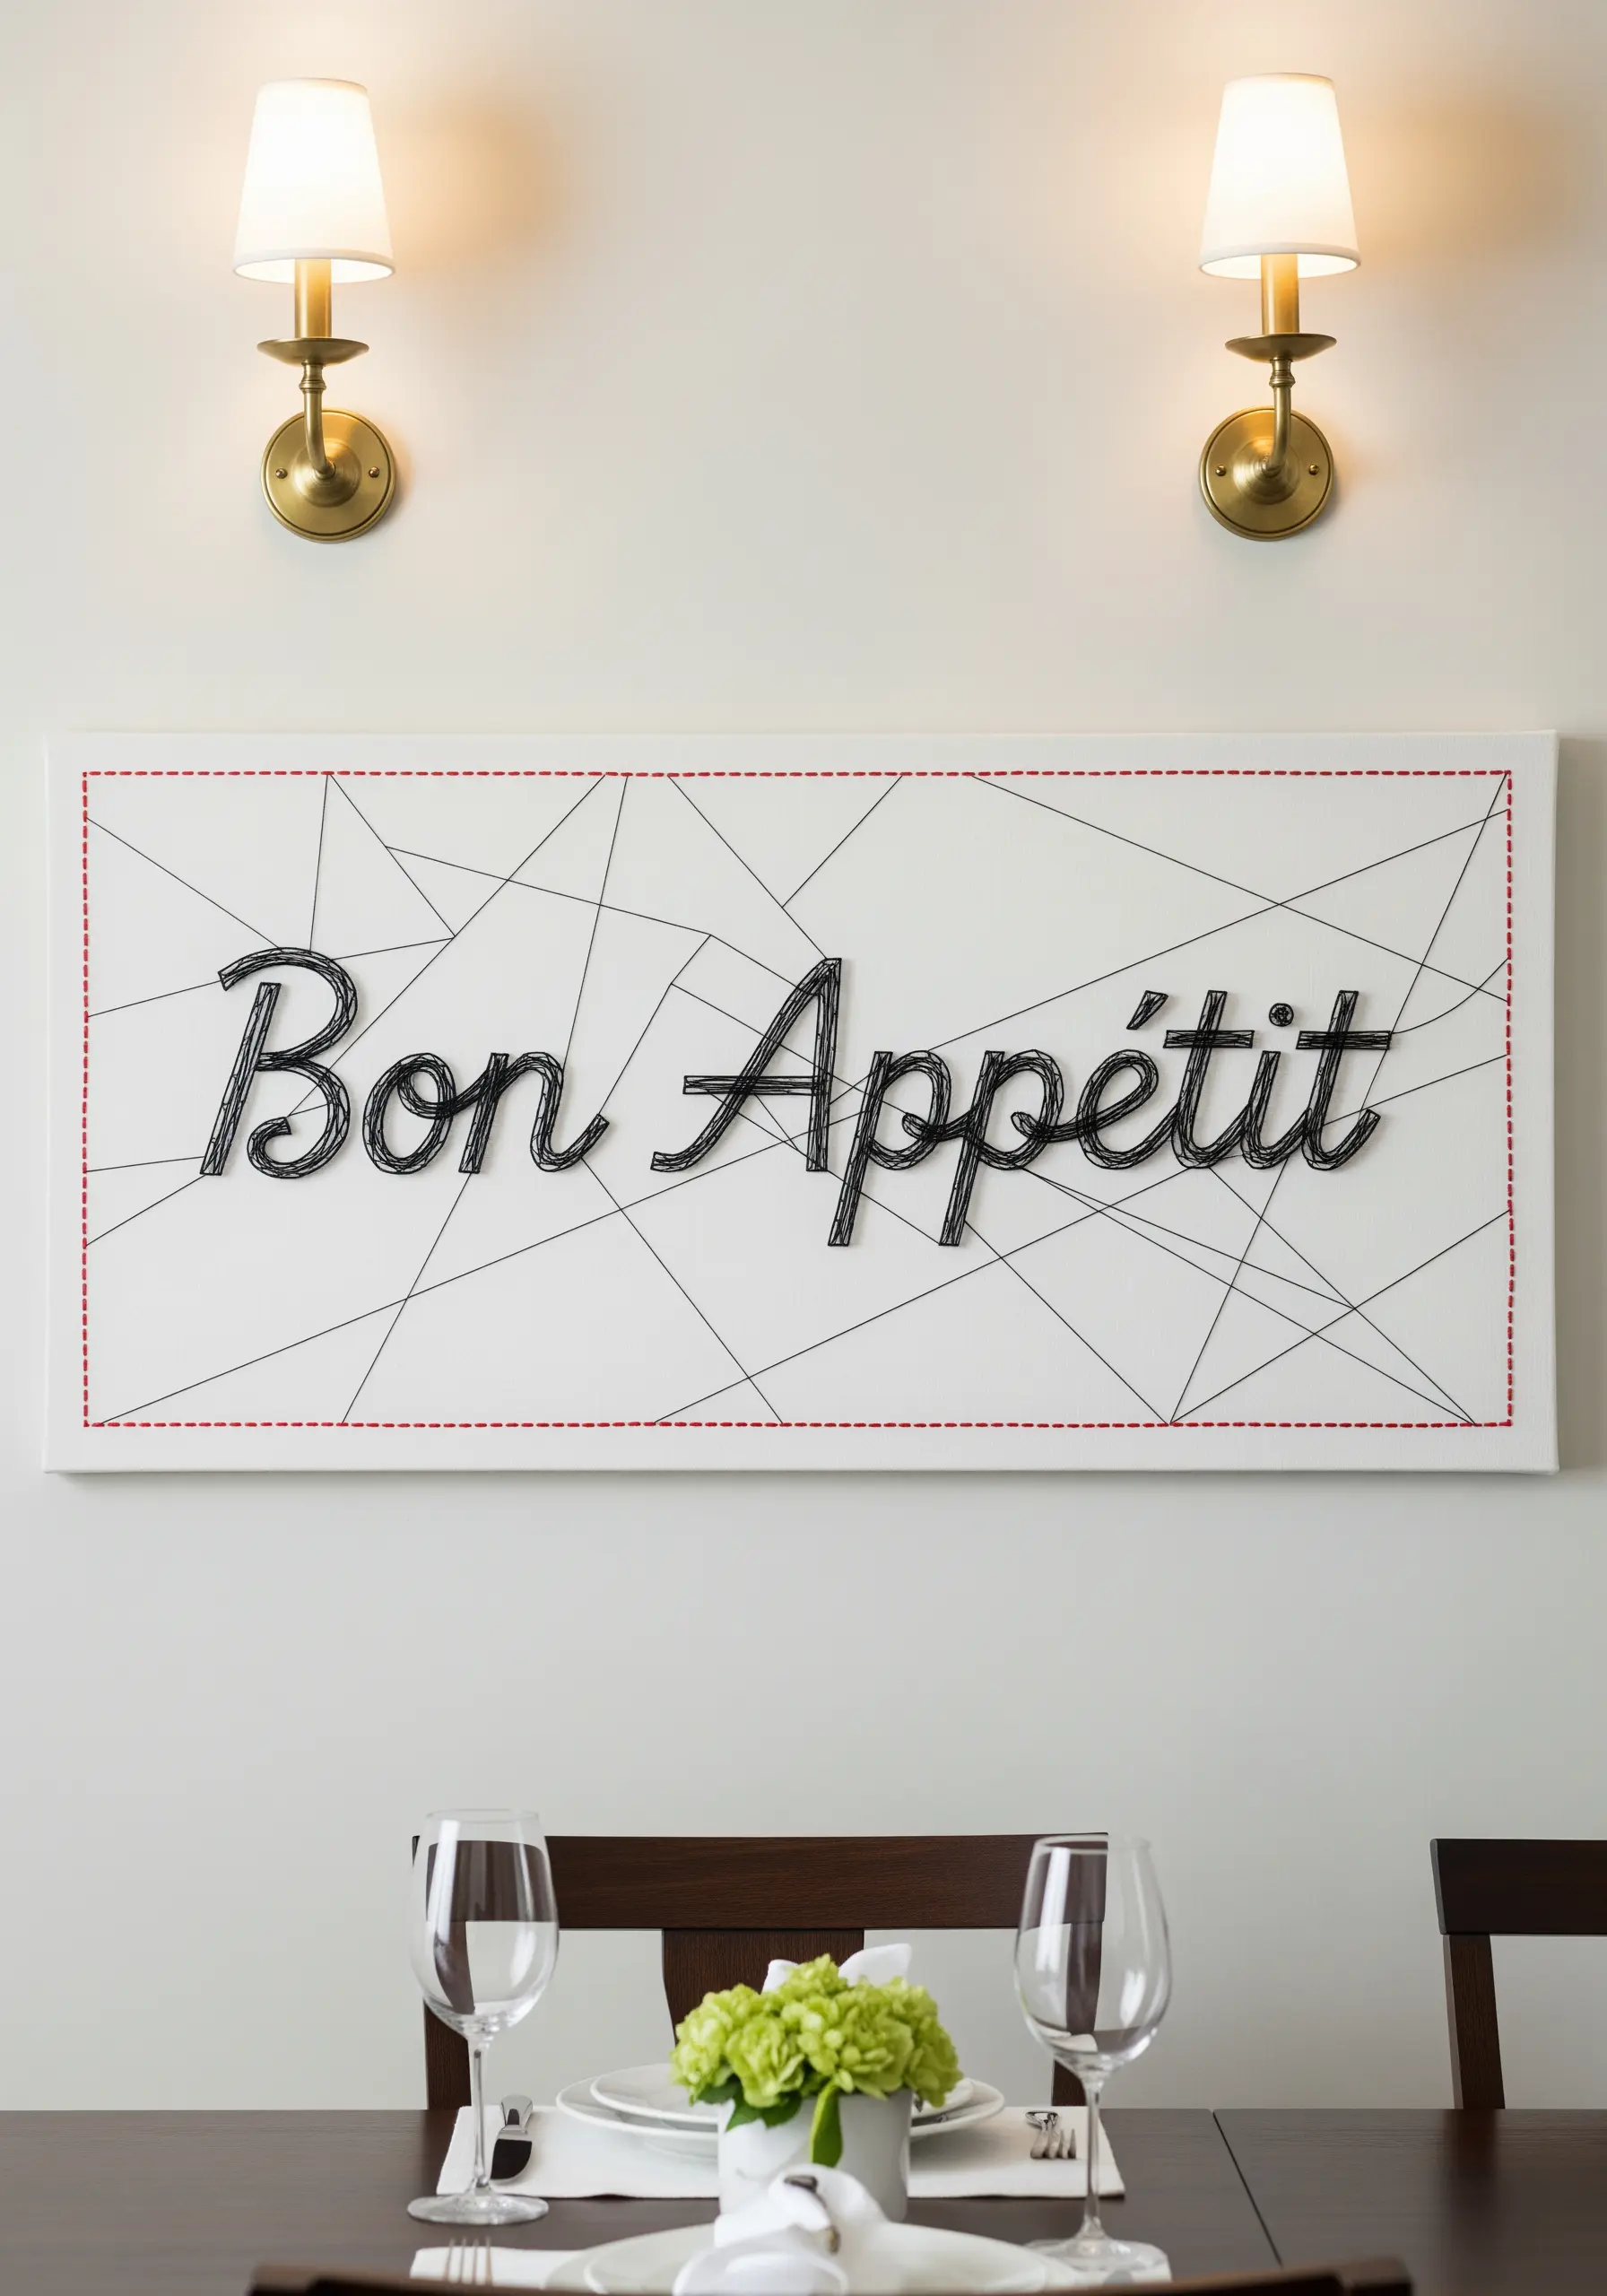
This design is an exercise in minimalist composition and relies on the elegance of couching for its sharp finish.
Select a thick black yarn or perle cotton and tack it down carefully along a flowing script to create the ‘Bon Appétit’ lettering on a stark white canvas.
Add the background’s abstract geometry using long, taut straight stitches with a single strand of black floss.
Finish with a simple running stitch in a contrasting color for the border, framing the piece with a subtle, handmade detail that ties it all together.
7. Achieve Pastry Realism with Thread Painting
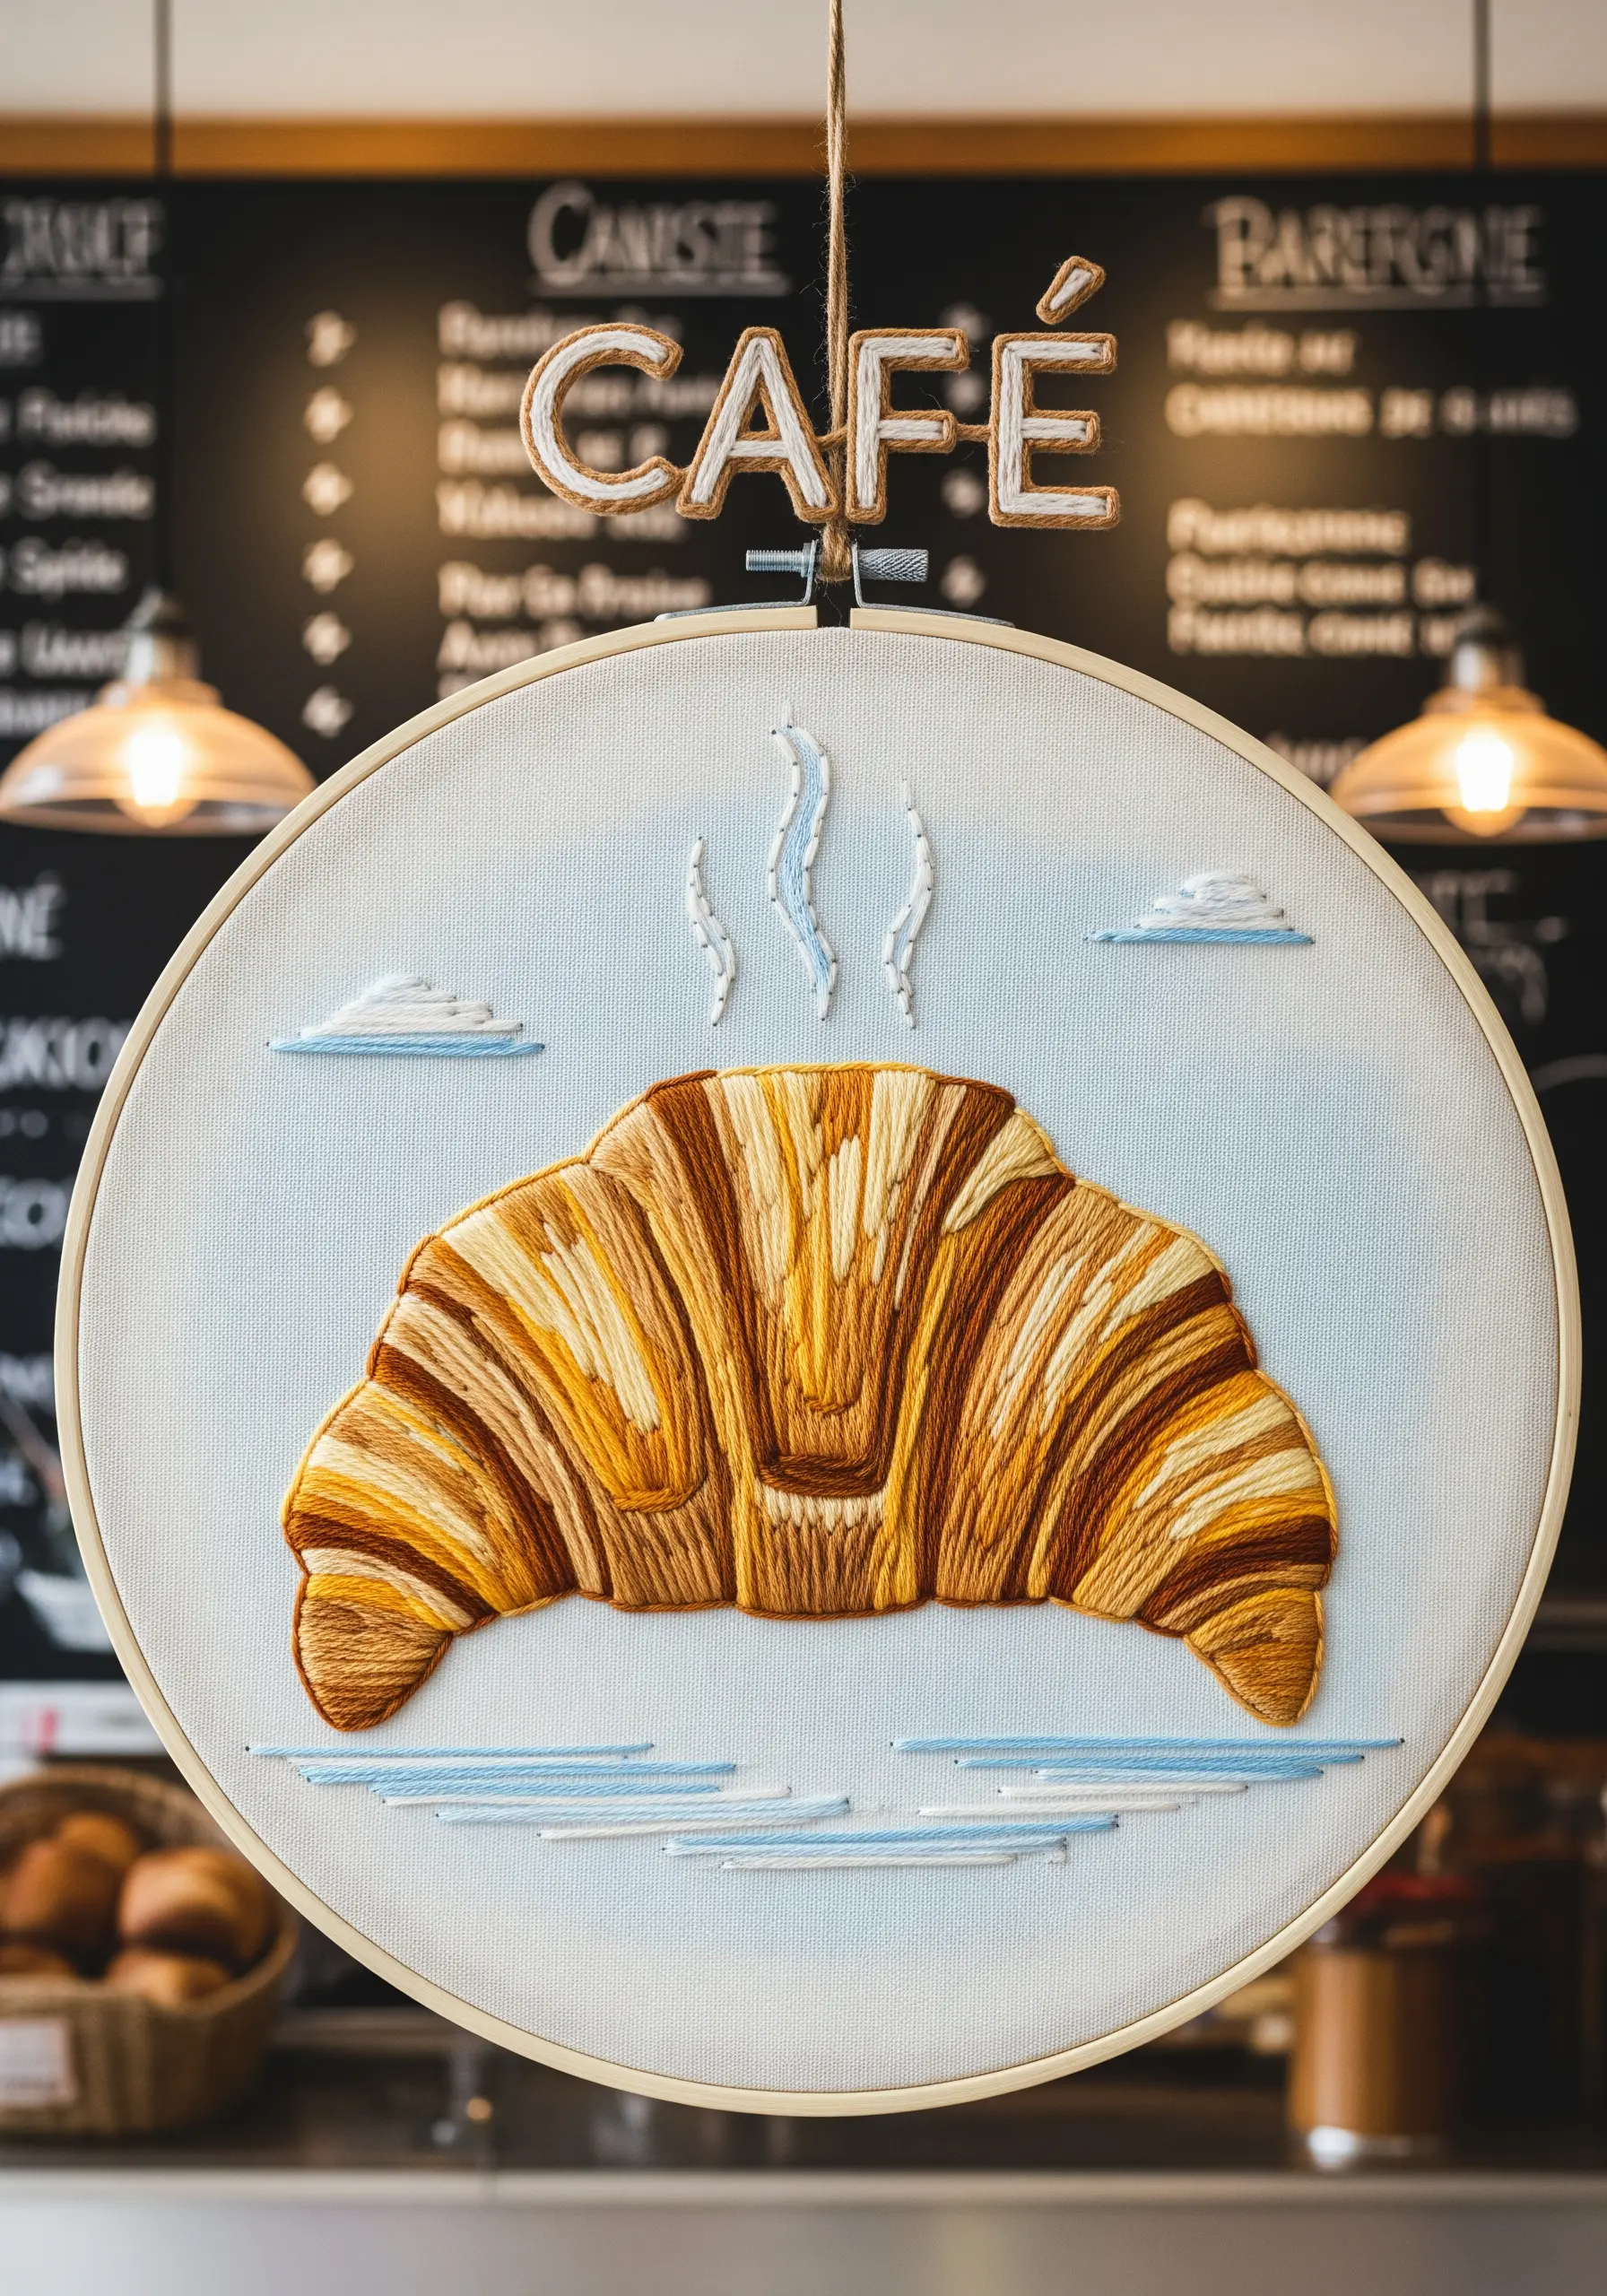
To stitch a croissant that looks genuinely flaky, you need to think like a painter.
Use the long-and-short stitch to blend at least four or five shades of gold, tan, and brown floss, creating seamless gradients that mimic a baked crust.
Pay close attention to stitch direction, ensuring your stitches follow the curved, layered structure of the pastry to enhance its form and realism.
For the ‘Café’ sign above, use a padded satin stitch to give the letters a raised, solid quality that contrasts beautifully with the croissant’s detailed texture.
8. Graphic Impact with Interior Fill Stitching
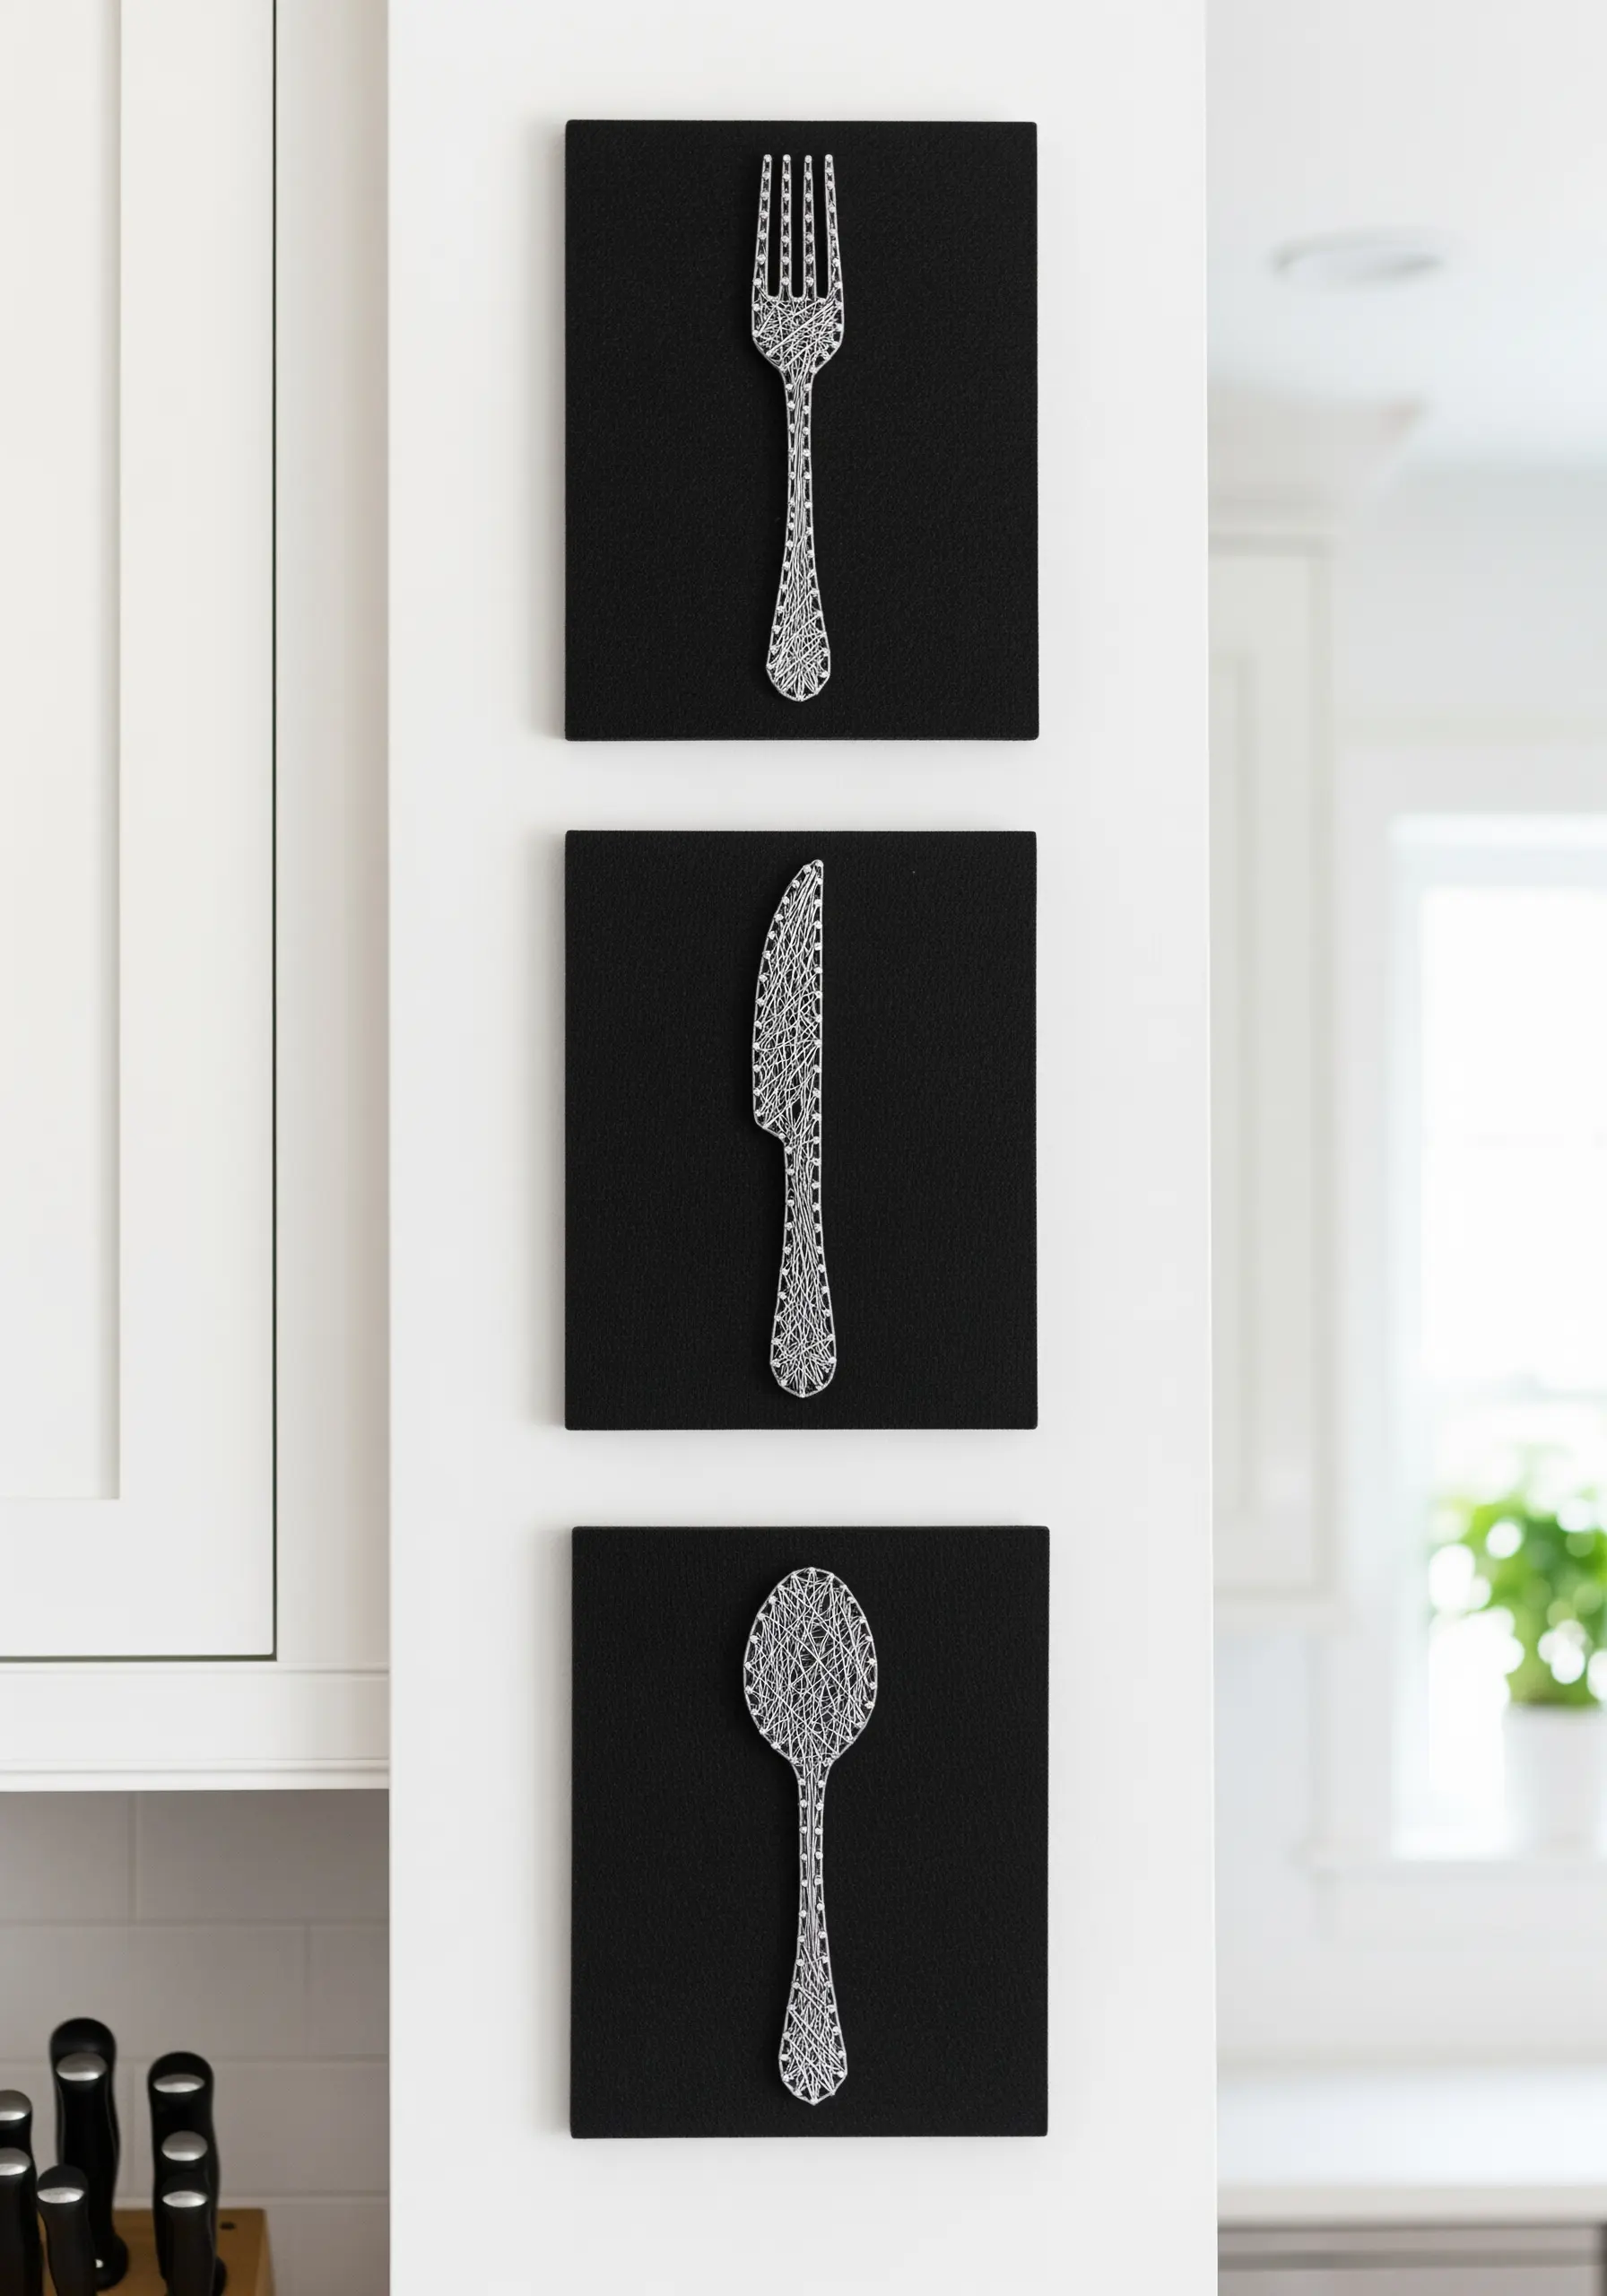
Create this striking, high-contrast look by focusing on the interior space of your motif.
Begin by outlining the cutlery silhouettes on black fabric using a crisp backstitch with white perle cotton.
Instead of filling the background, fill the *inside* of each shape with a dense, chaotic web of straight stitches, pulling the thread taut between points on the outline.
This technique creates a dynamic texture contained within a clean, recognizable form, turning everyday objects into modern art.
9. Vibrant Silhouettes with Webbed Straight Stitch
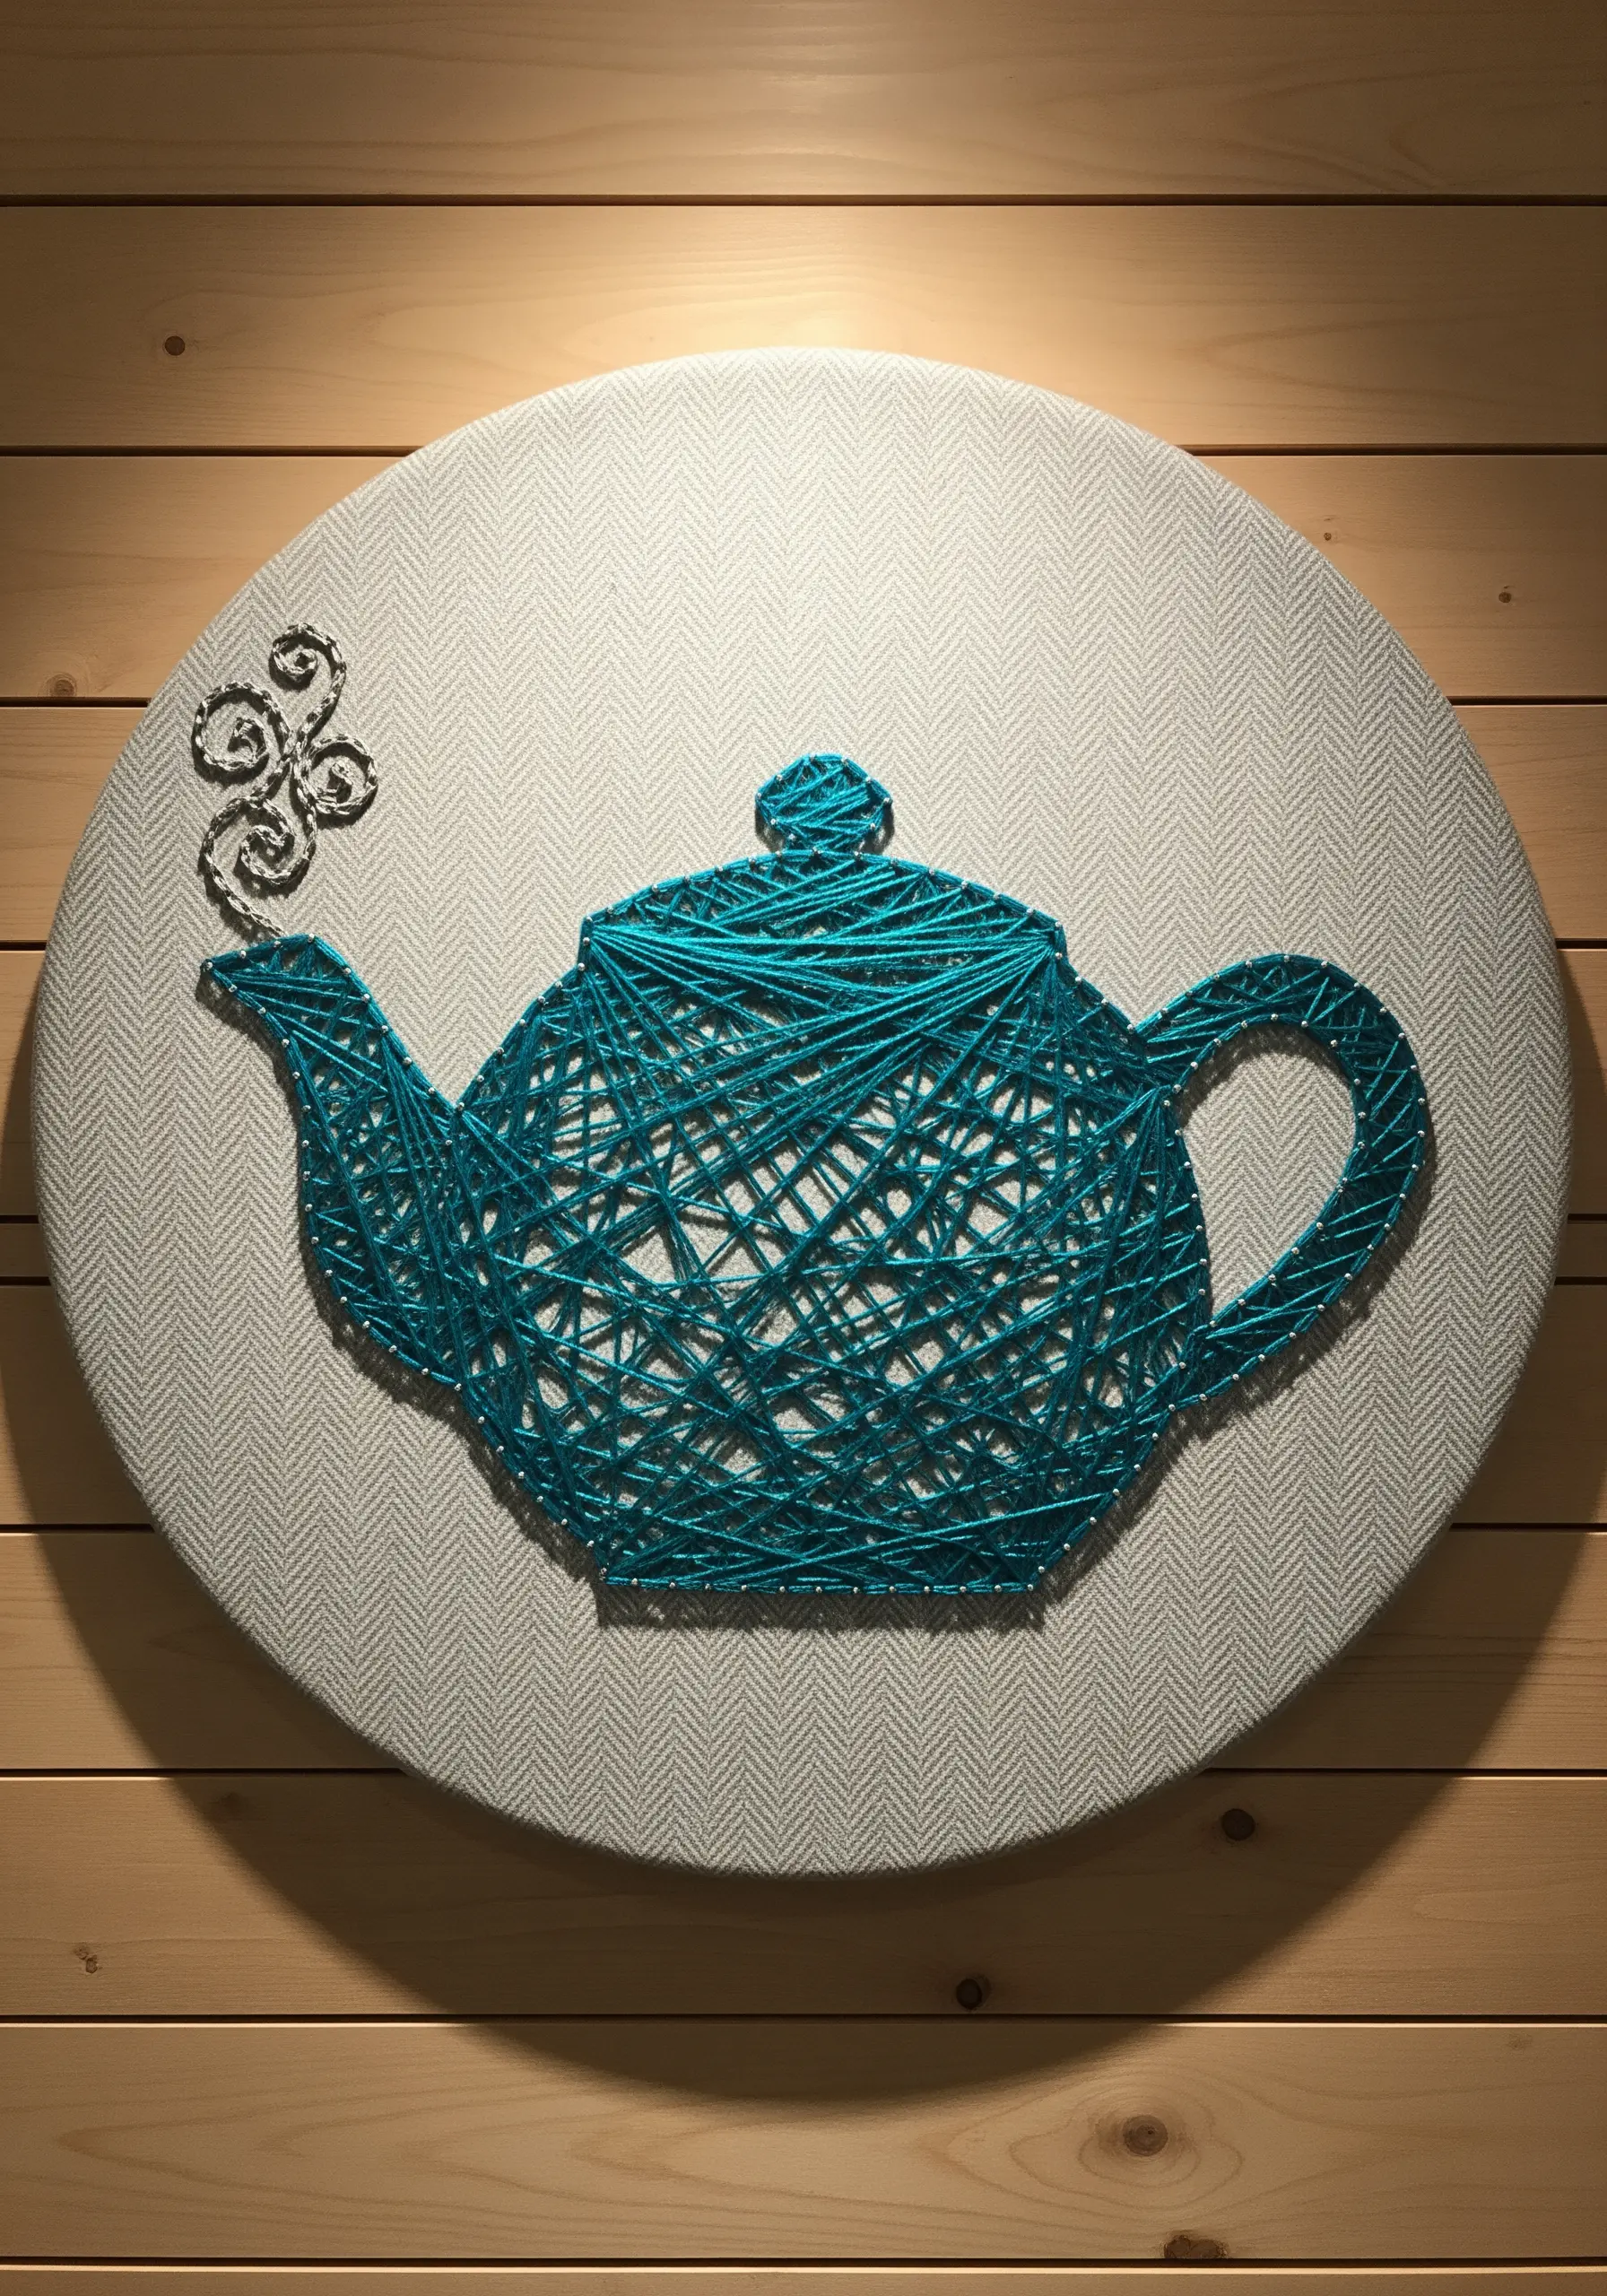
This design perfectly captures the essence of string art on fabric.
To start, outline your teapot shape with a series of tiny, evenly spaced seed stitches to act as your anchor points.
Then, using a vibrant, high-sheen thread, weave it back and forth across the shape in a random pattern, hooking it around the seed stitches as you go.
The density of the web creates the solid silhouette, while the individual threads catch the light, giving the piece a lively, energetic feel.
10. Layering Stitches for Depth and Detail
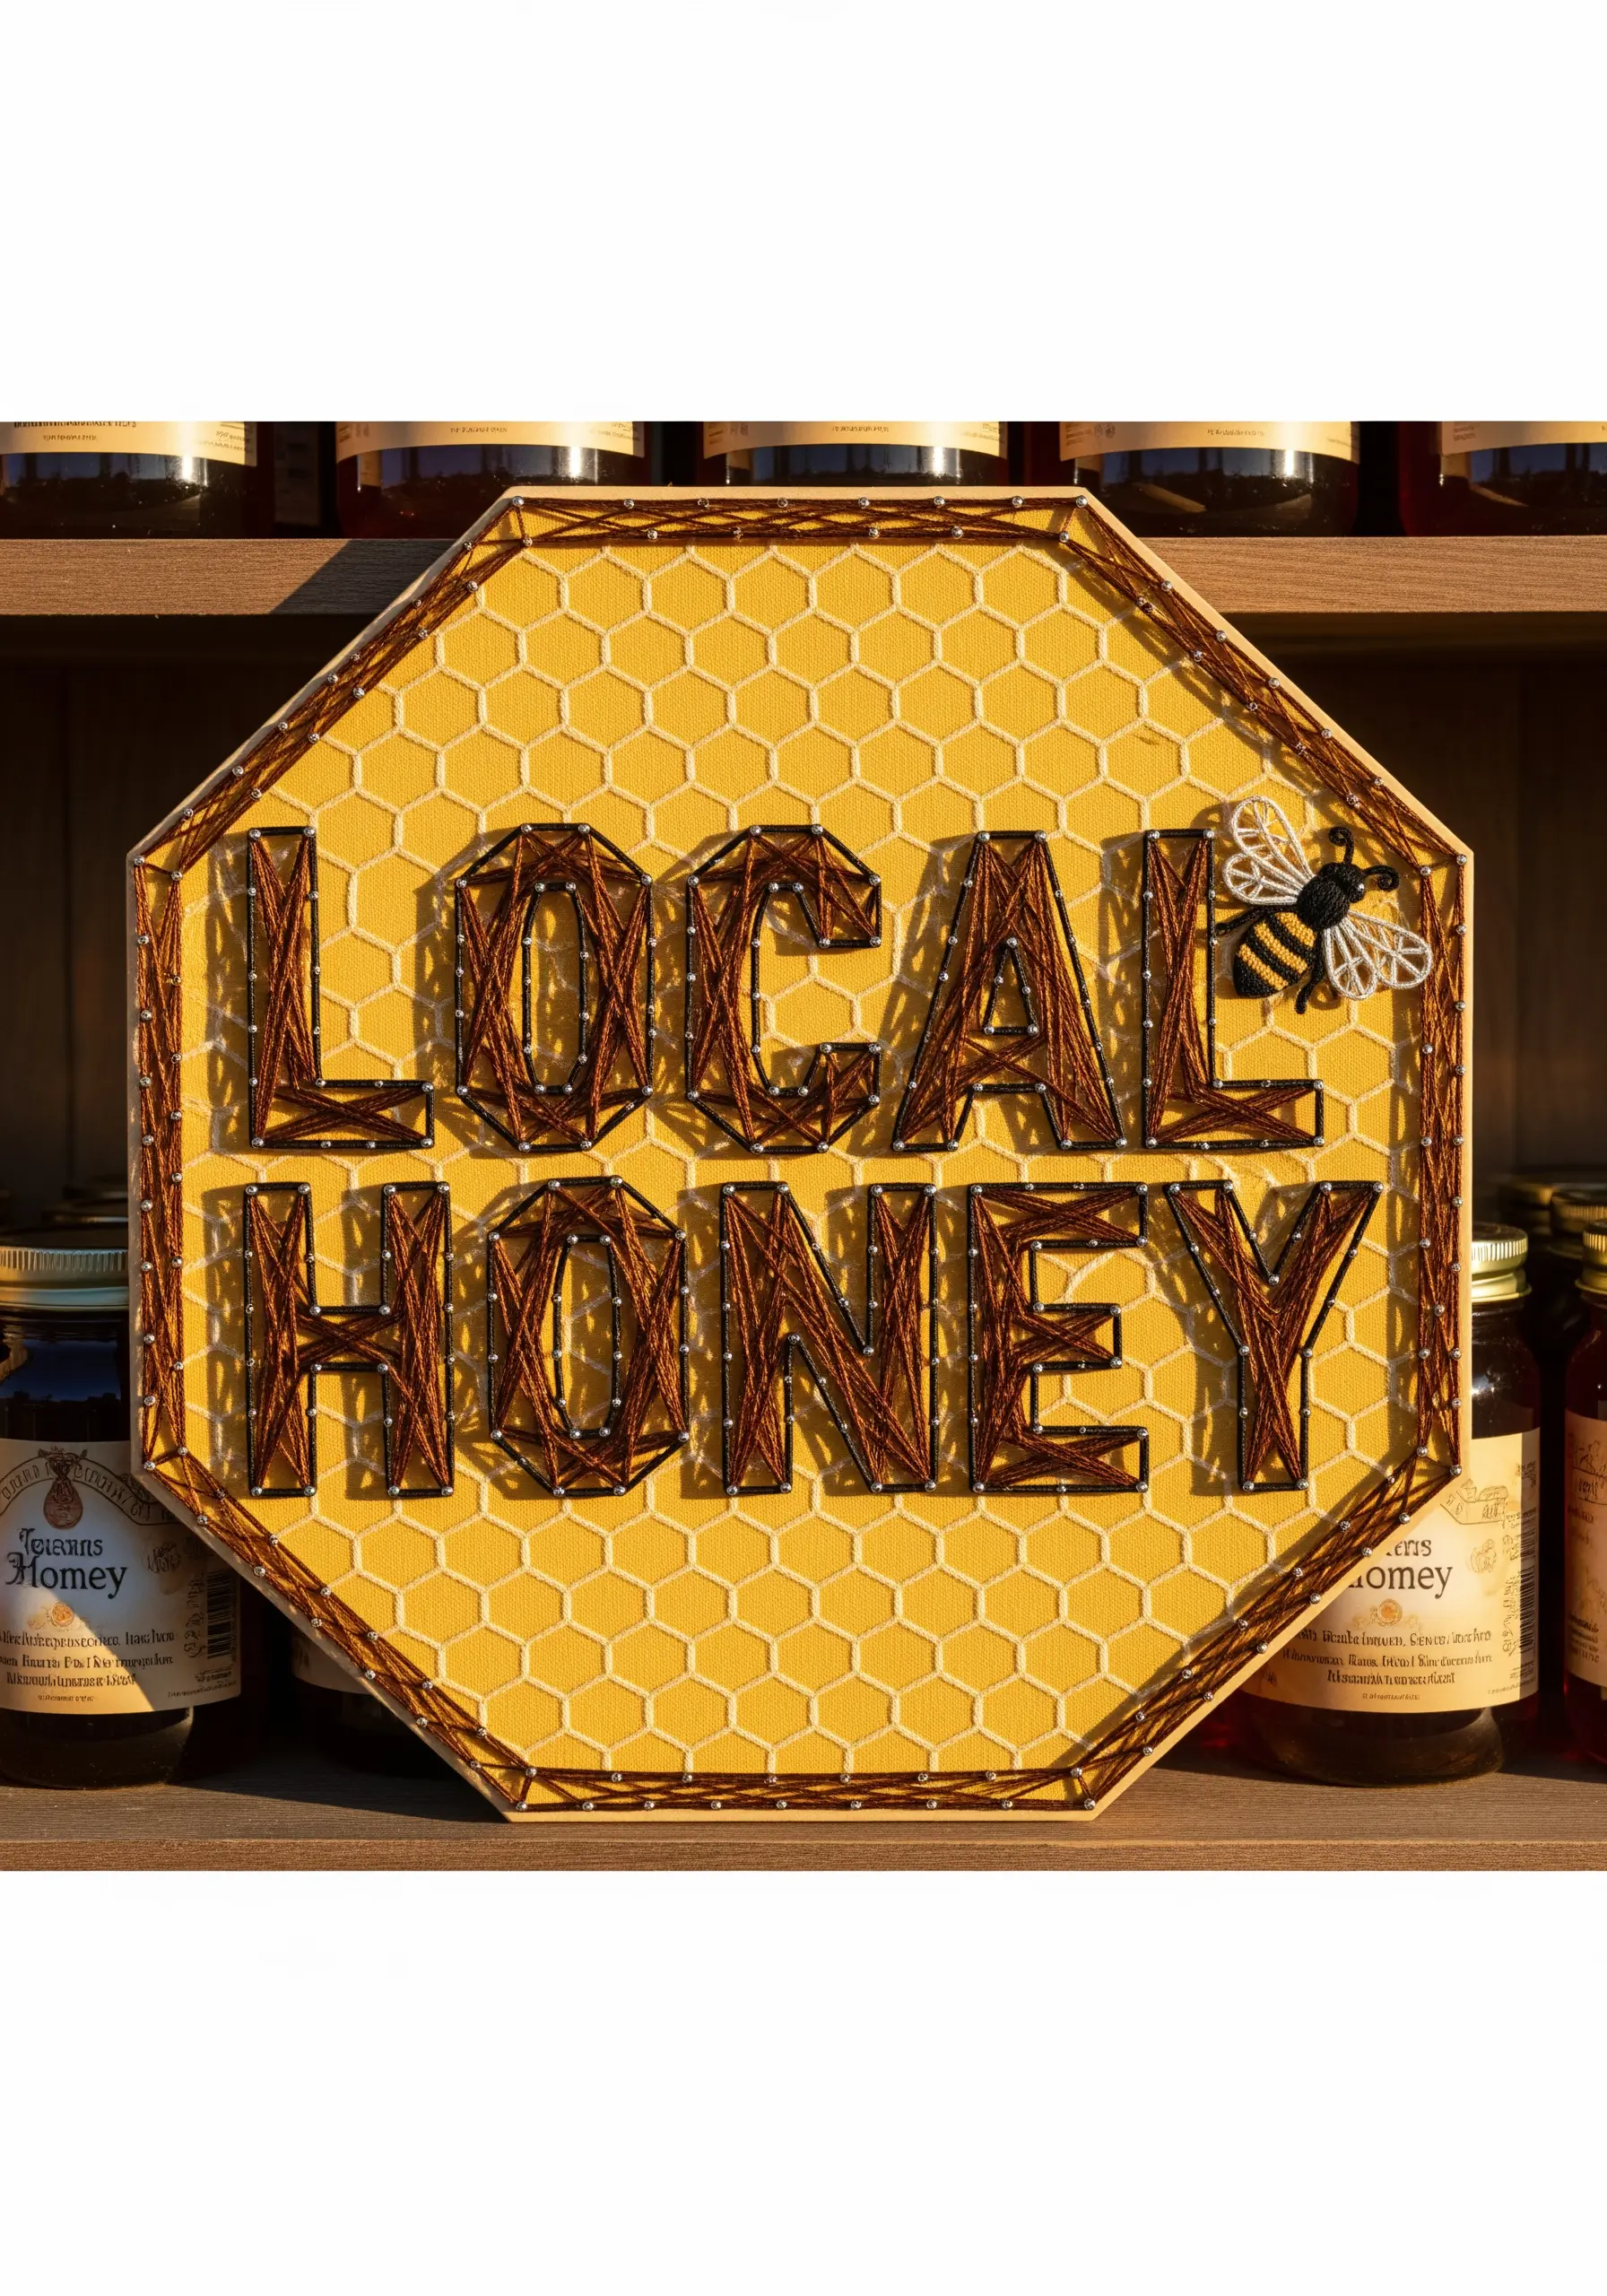
Build a design with rich visual interest by layering different textures and techniques.
First, create the background by stitching a simple honeycomb grid with a light gold thread using a backstitch.
Over this pattern, couch a thick, dark brown yarn to form the bold lettering, immediately giving the words dimension and prominence.
Finally, add the bee using satin stitch for its striped body and outline stitch with a fine, sheer thread for delicate, translucent wings.
11. Stitching Realistic Botanicals for Kitchen Art
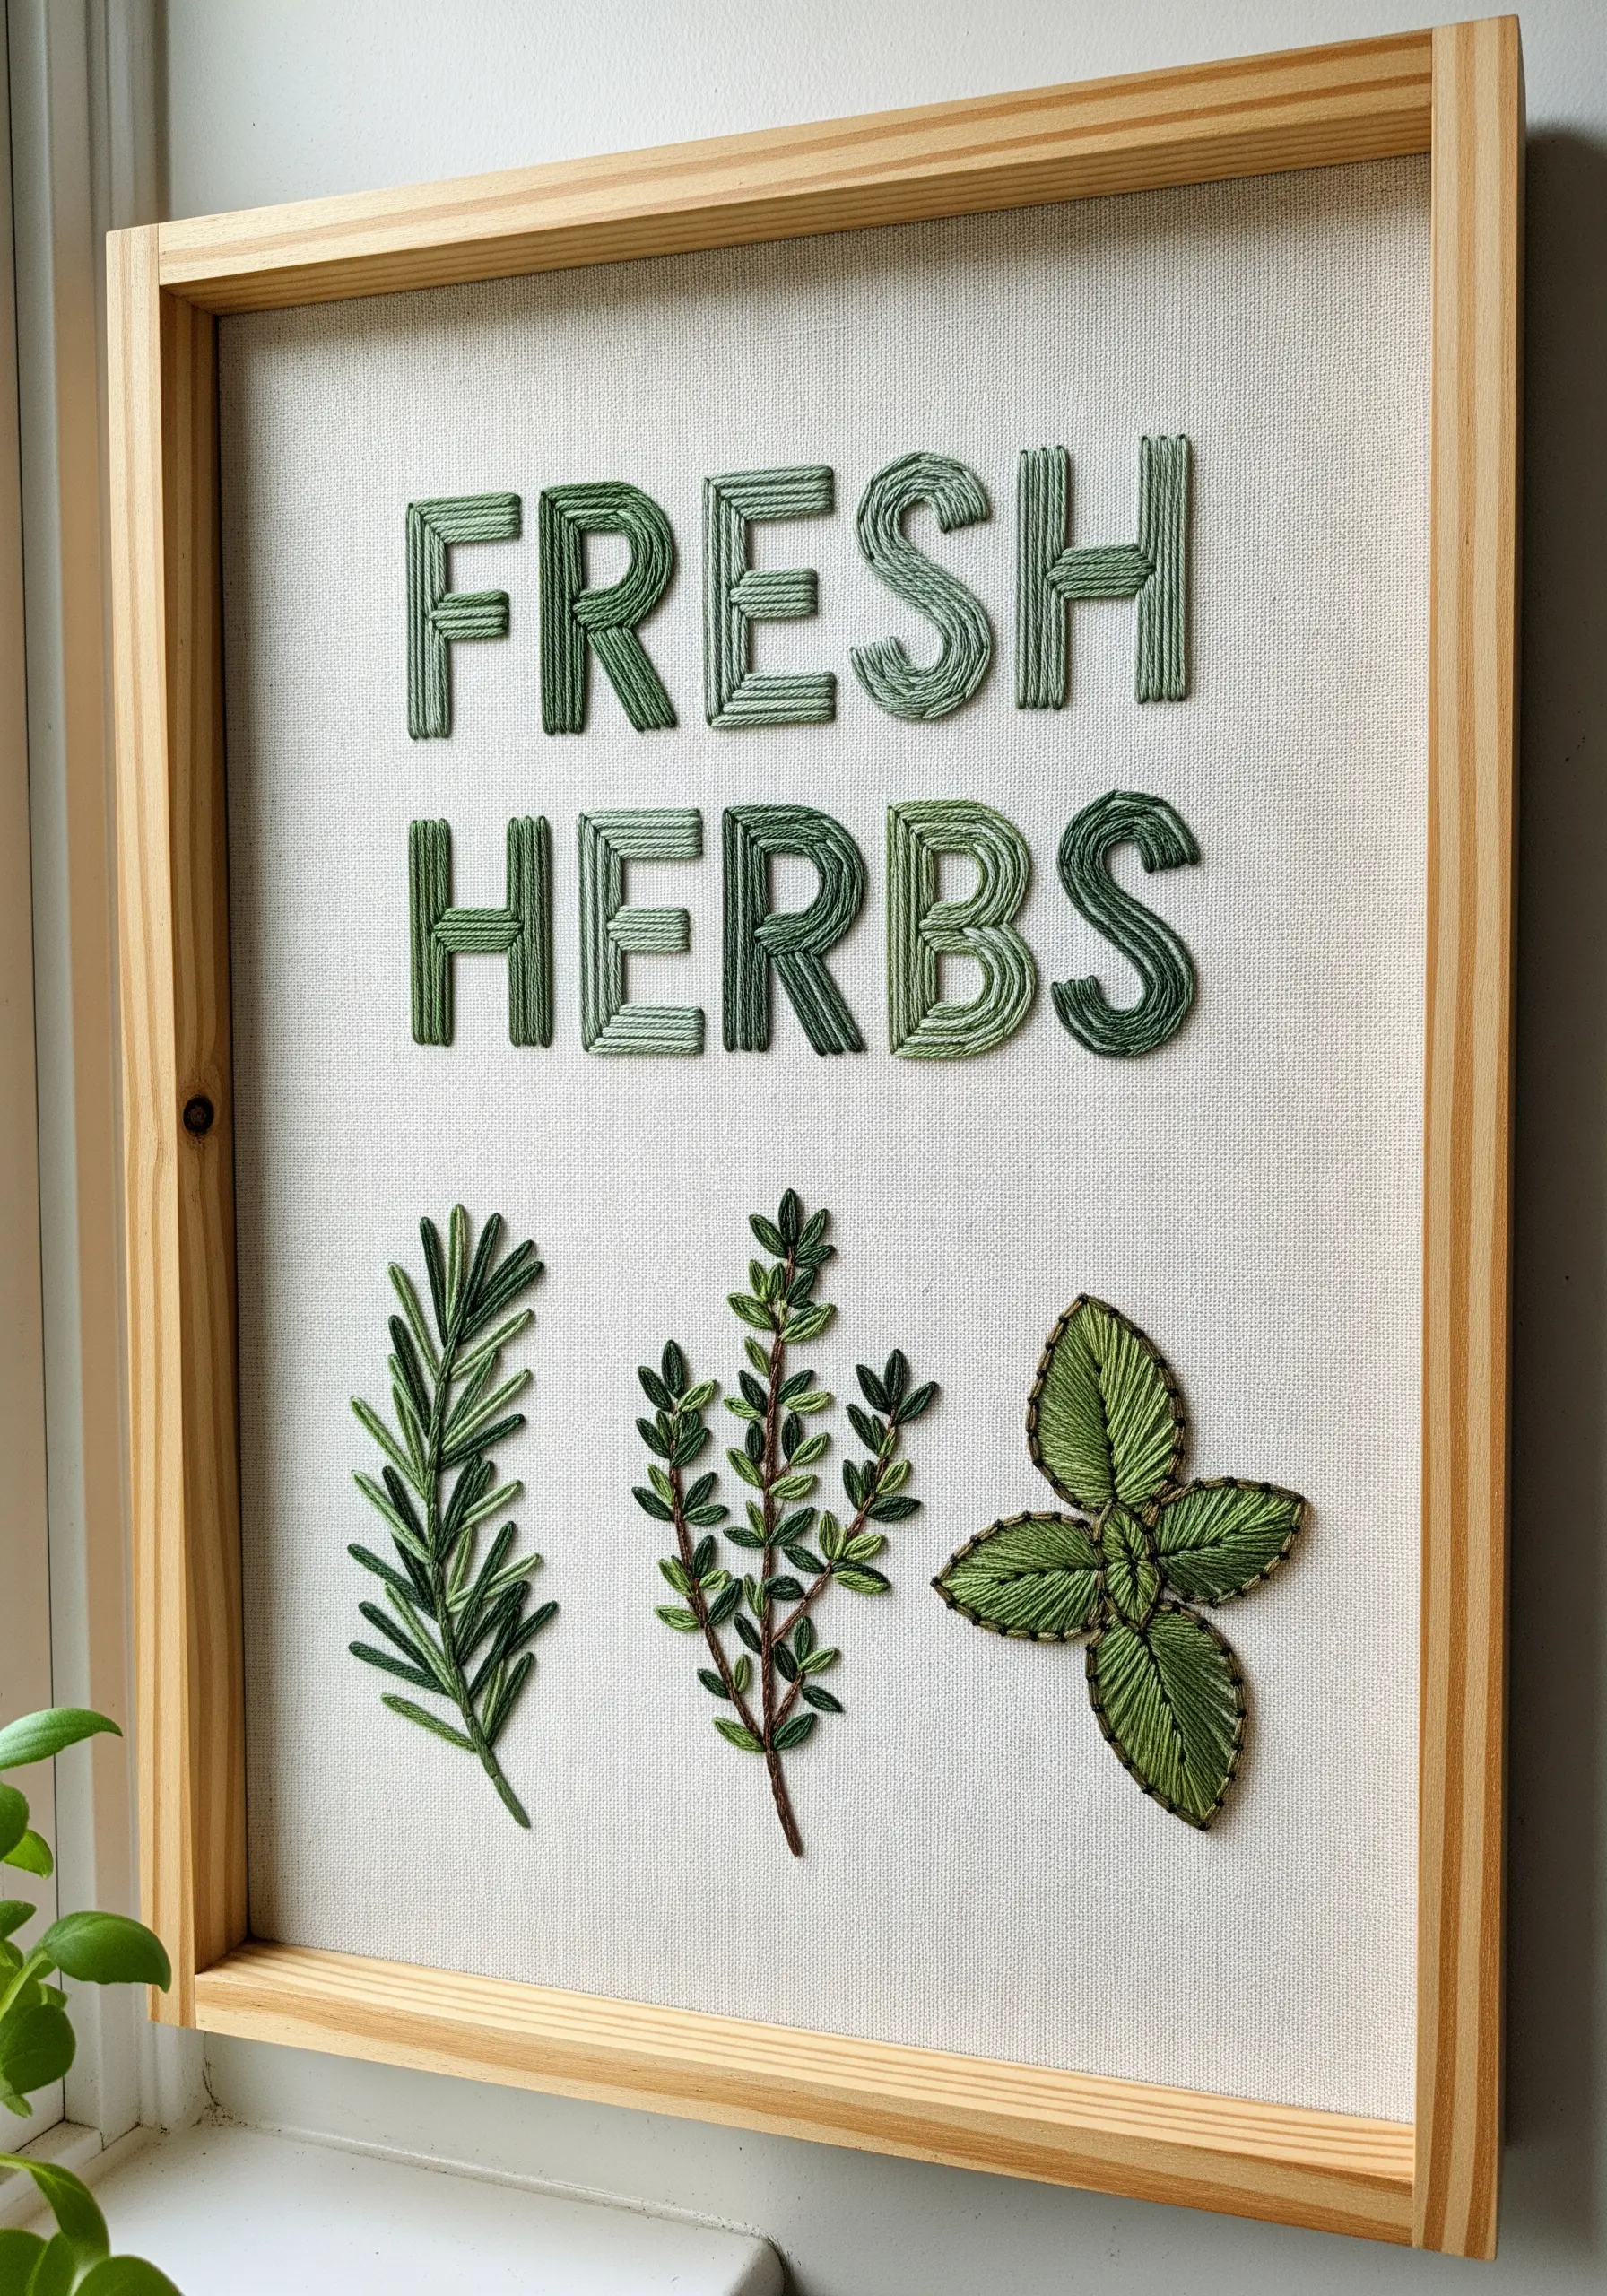
Give your embroidered herbs lifelike texture by choosing the right stitch for each plant.
Use the fishbone stitch for broad leaves like basil, as it naturally creates a central vein and a smooth, angled fill.
For rosemary, use a sturdy stem stitch for the main branch and add the needles with tiny, angled straight stitches.
Thyme’s delicate leaves are perfectly represented by small detached chain stitches (lazy daisies) scattered along the stem.
Pairing these realistic botanicals with soft, padded satin stitch lettering creates a balanced and beautiful piece.
12. Geometric Fills for a Modern Graphic Look
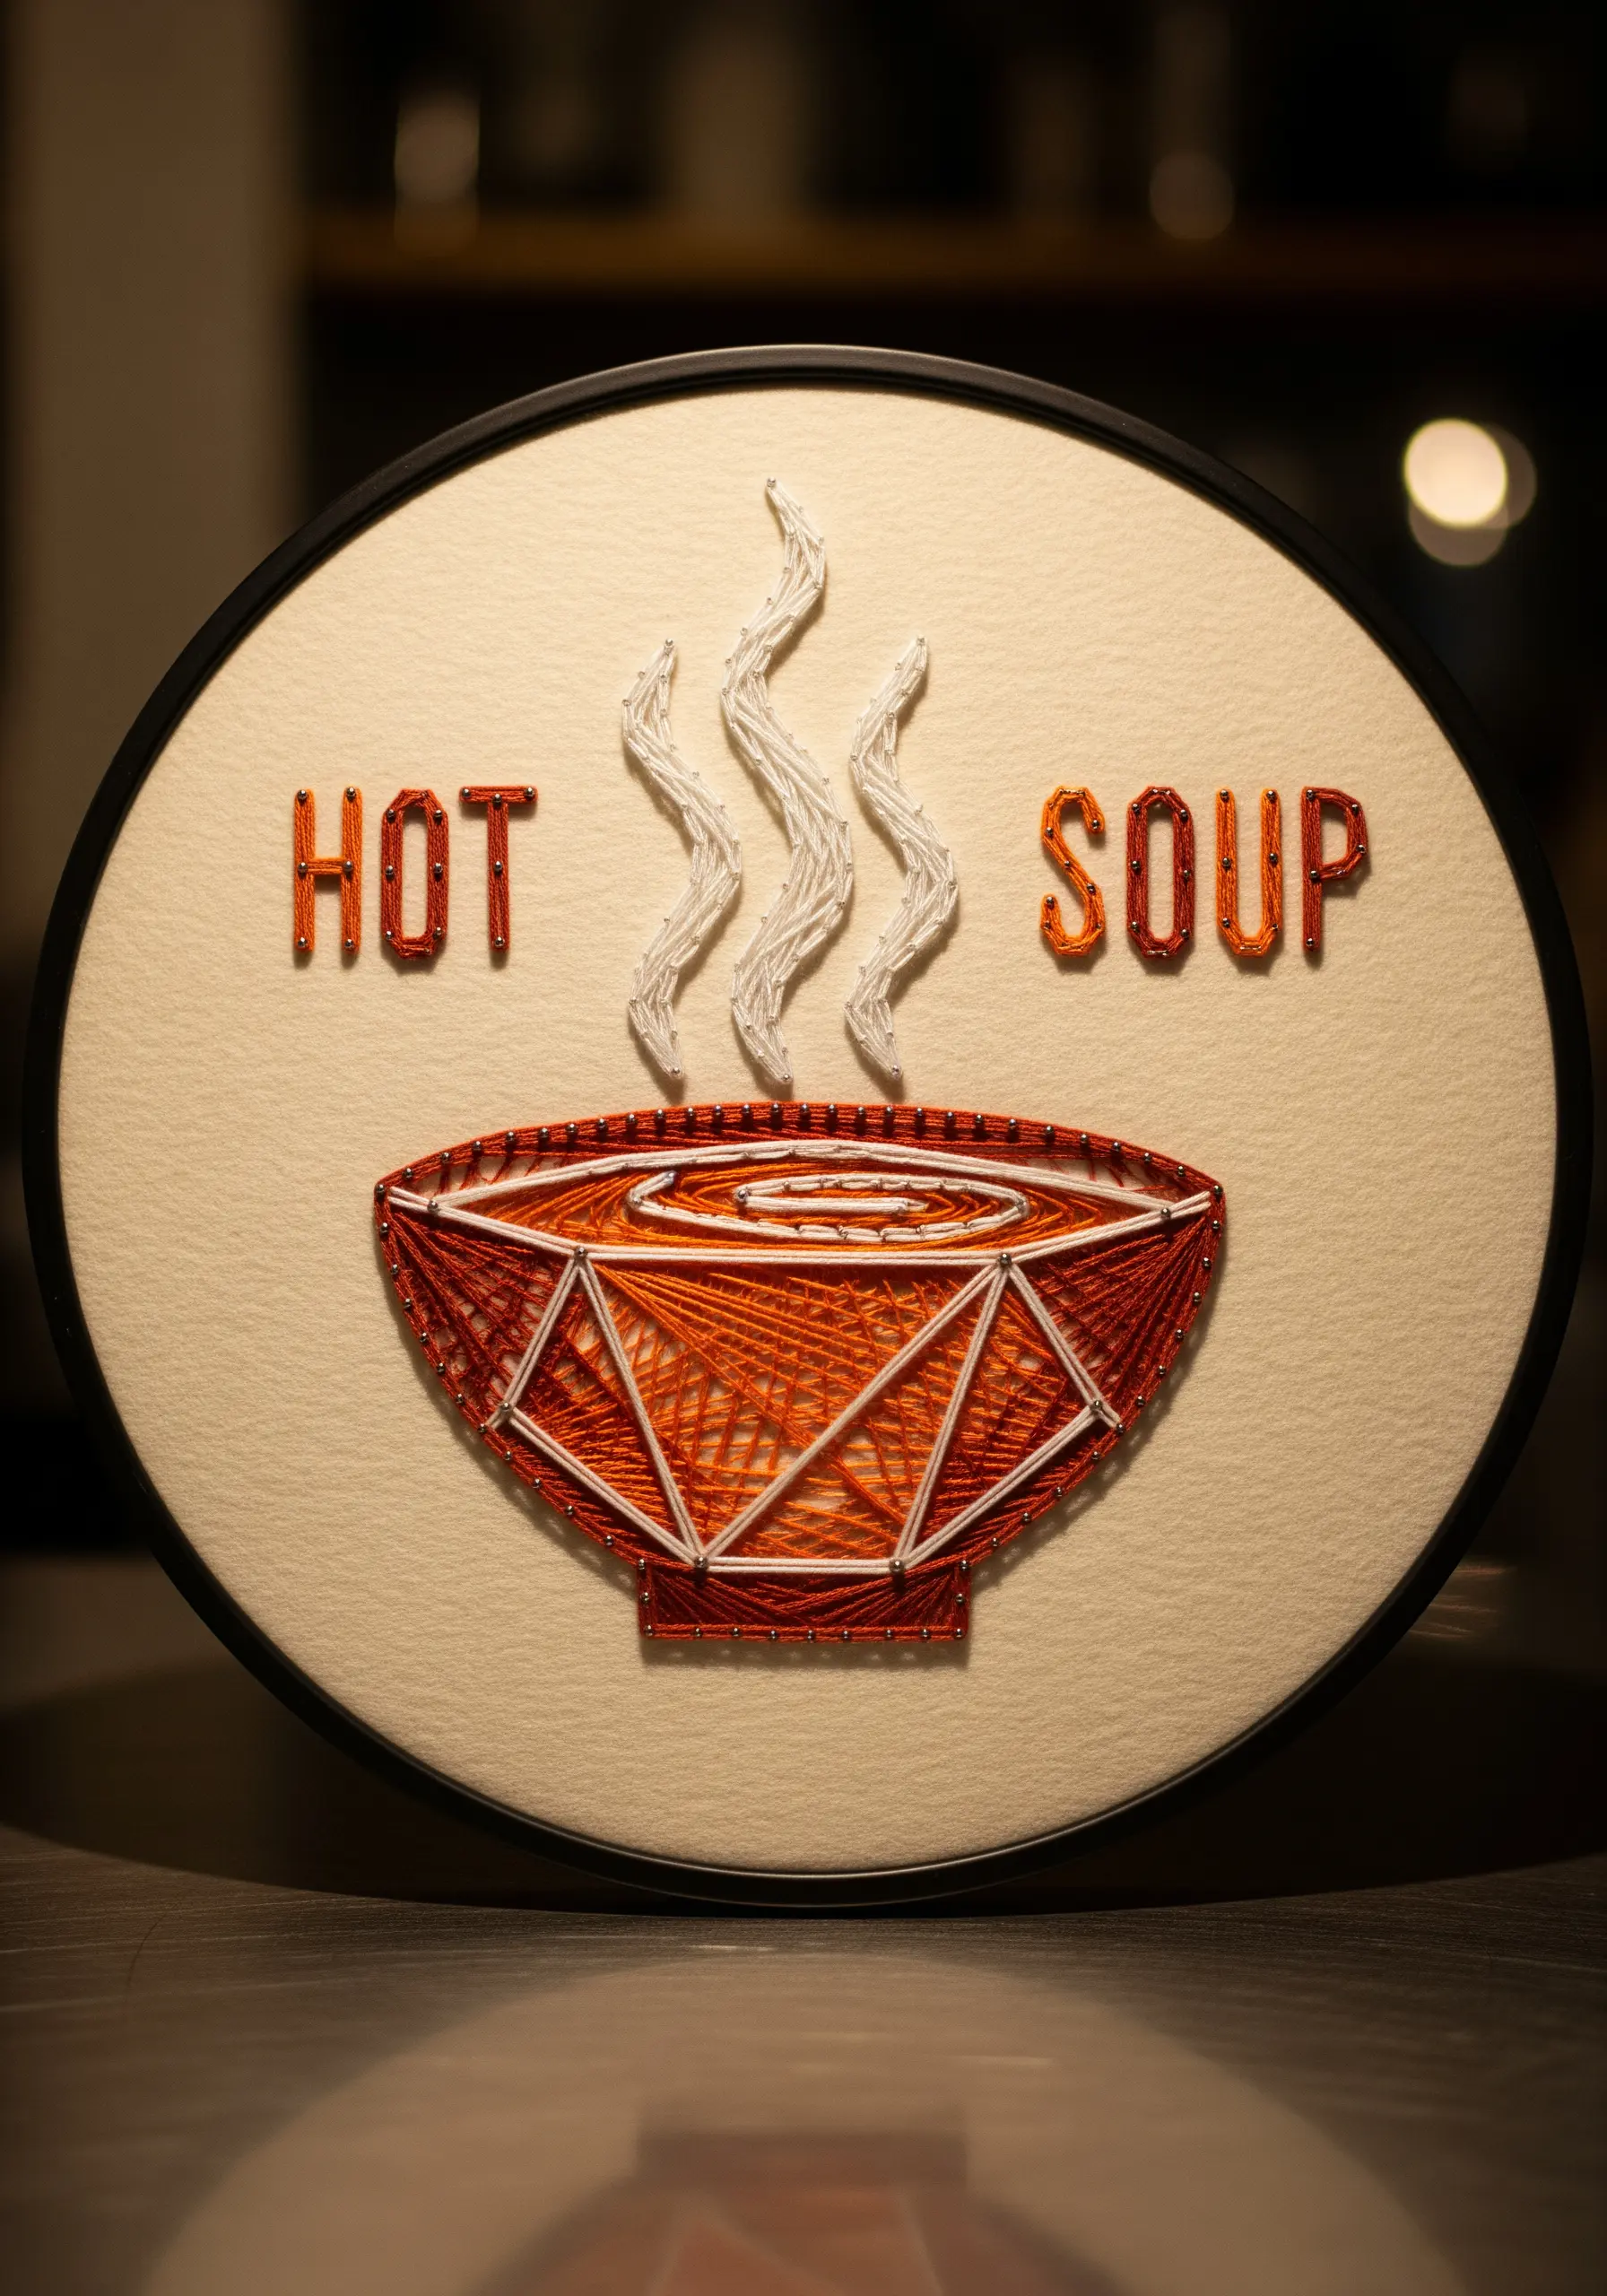
This soup bowl design uses contrasting thread and geometric lines to create a modern, stylized feel.
First, use a crisp white thread to outline the bowl’s rim and create a series of sharp, angular straight stitches that define its shape.
Then, fill the interior with a web of orange and red threads, crisscrossing them to suggest heat and movement without relying on traditional shading.
The steam is stitched with a simple, undulating split stitch, and the clean, backstitched letters complete the minimalist aesthetic.
13. Embellished Typography with Mixed Media Accents
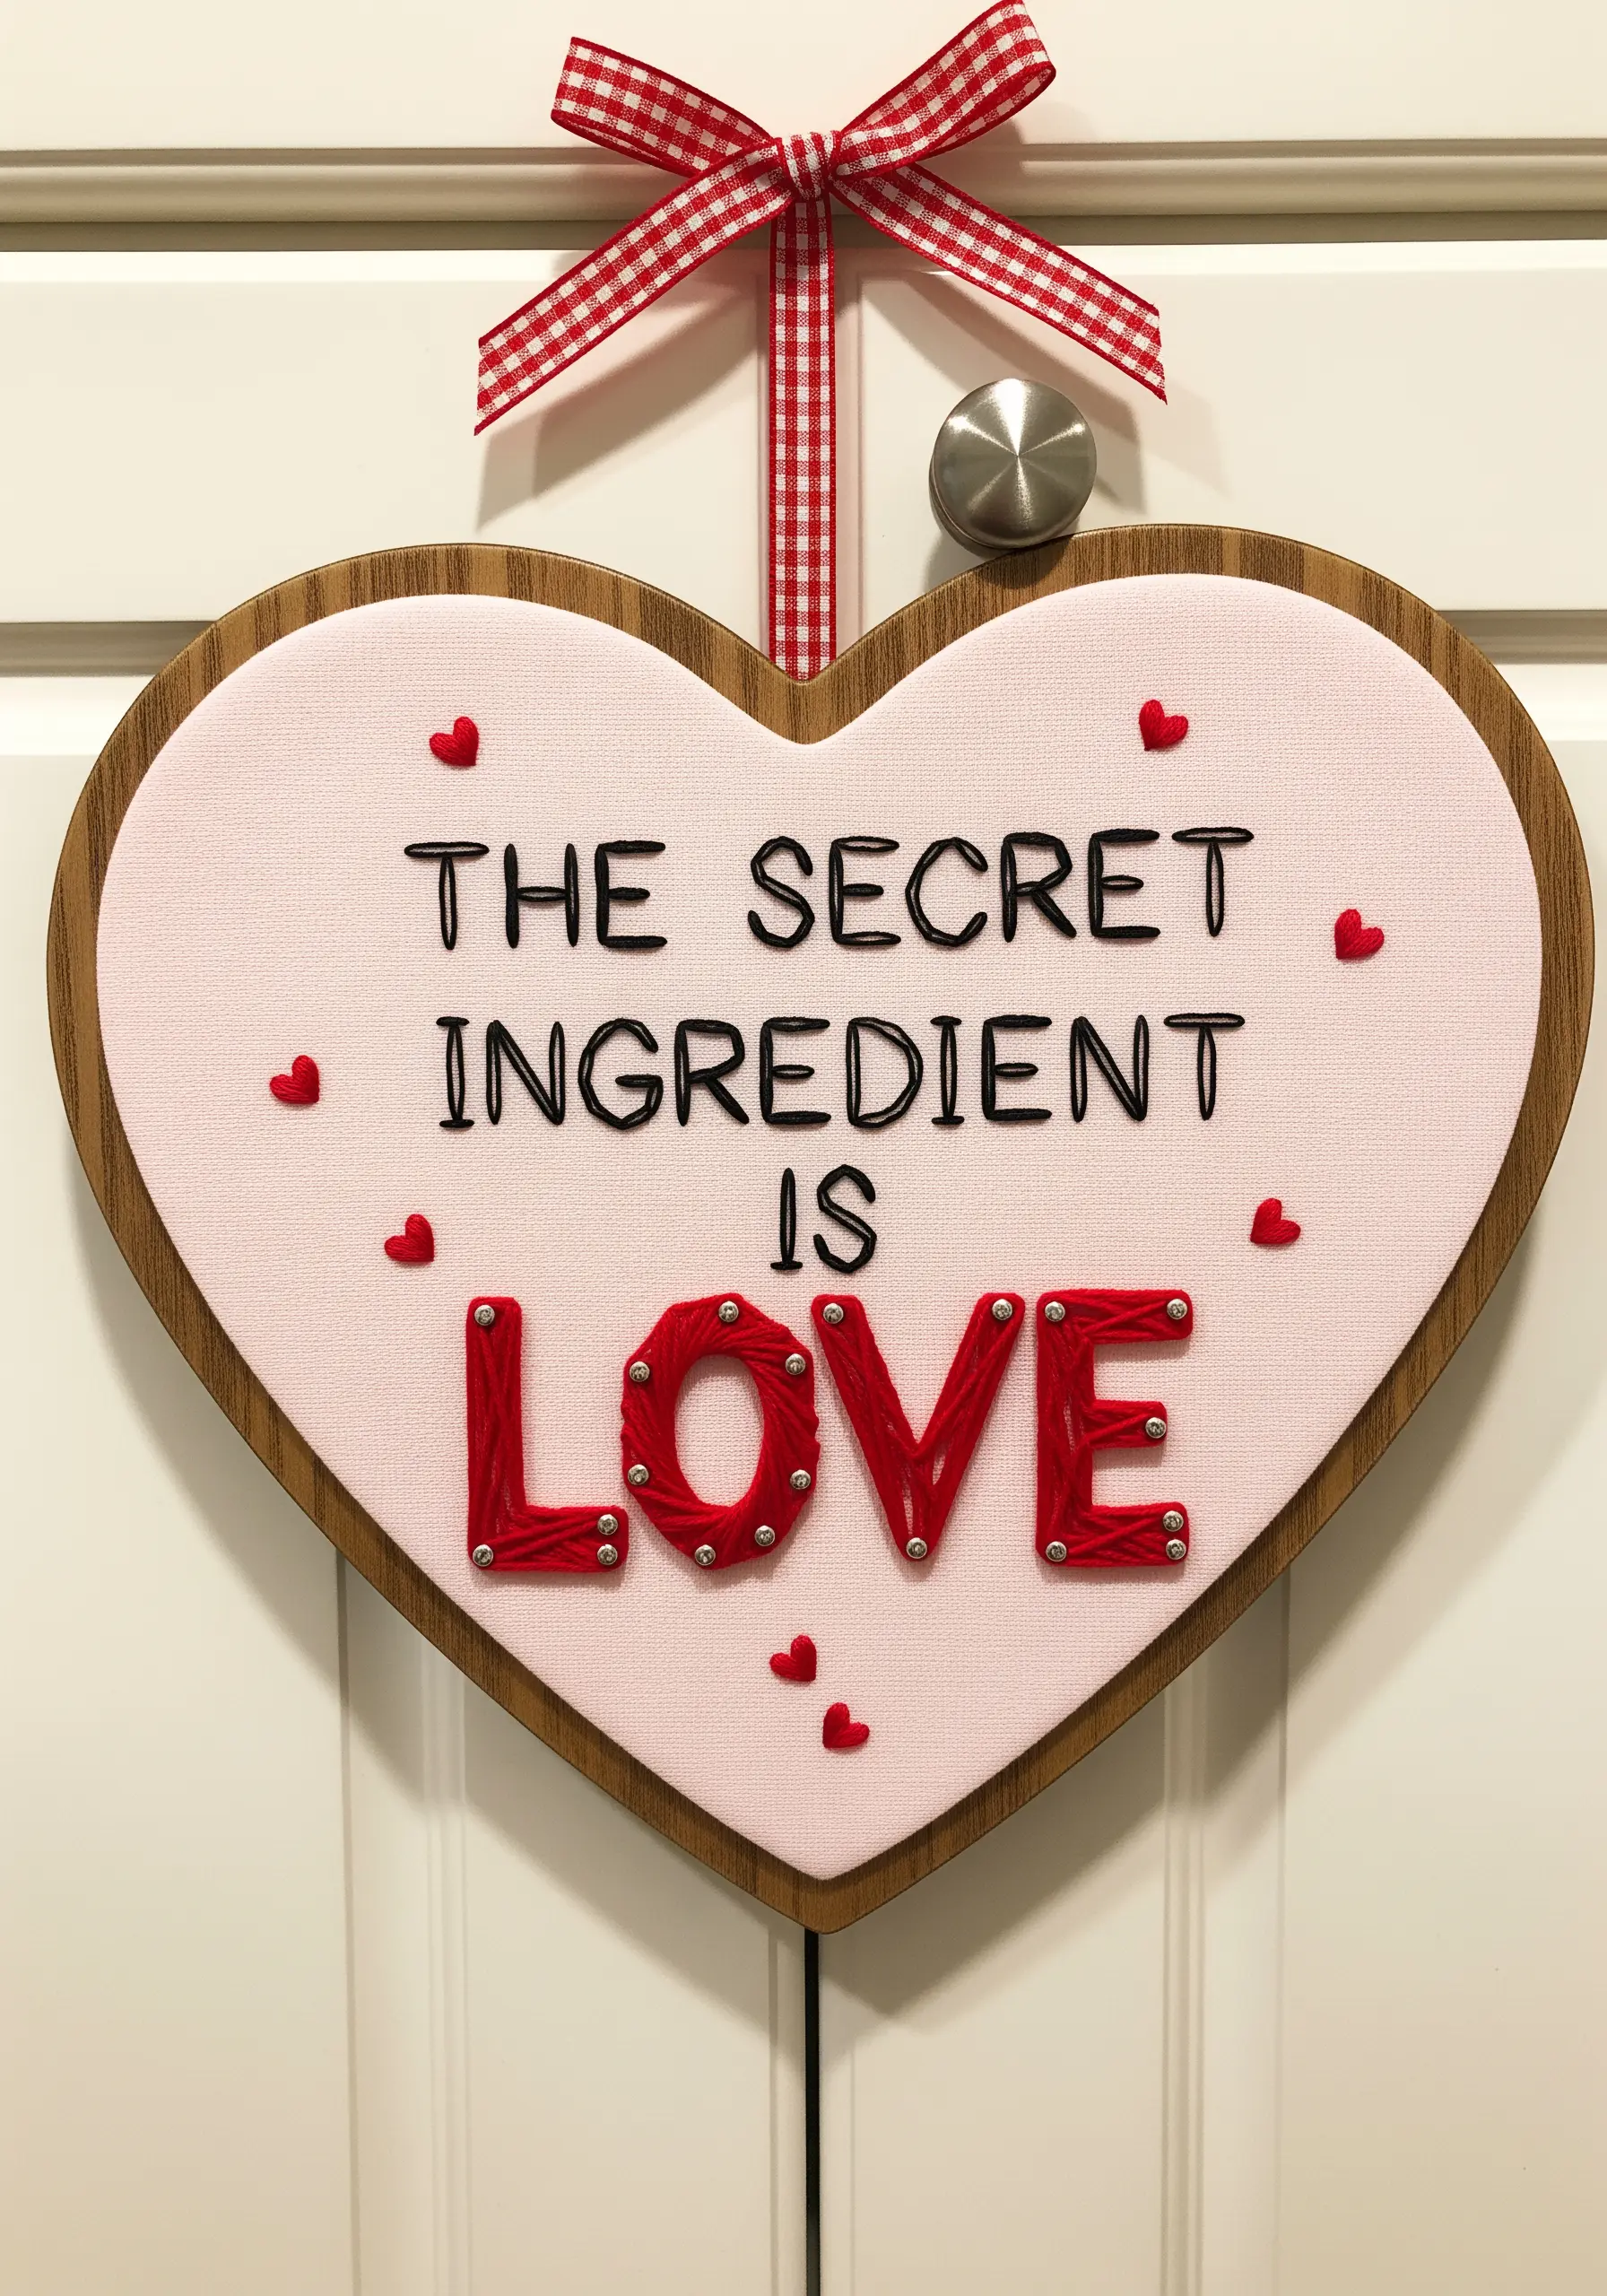
Combine different textures to make your message feel truly special.
For the simple black text, use a whipped backstitch to create a smooth, raised line that is easy to read.
Make the word ‘LOVE’ the centerpiece by first wrapping a padded satin stitch base with red floss, then securing it with evenly spaced silver beads.
This beaded wrapping technique adds a jeweled, three-dimensional quality that elevates the entire piece.
Adding small, scattered felt hearts introduces another layer of softness and handmade charm.
14. Creating Texture with Abstract Directional Fills
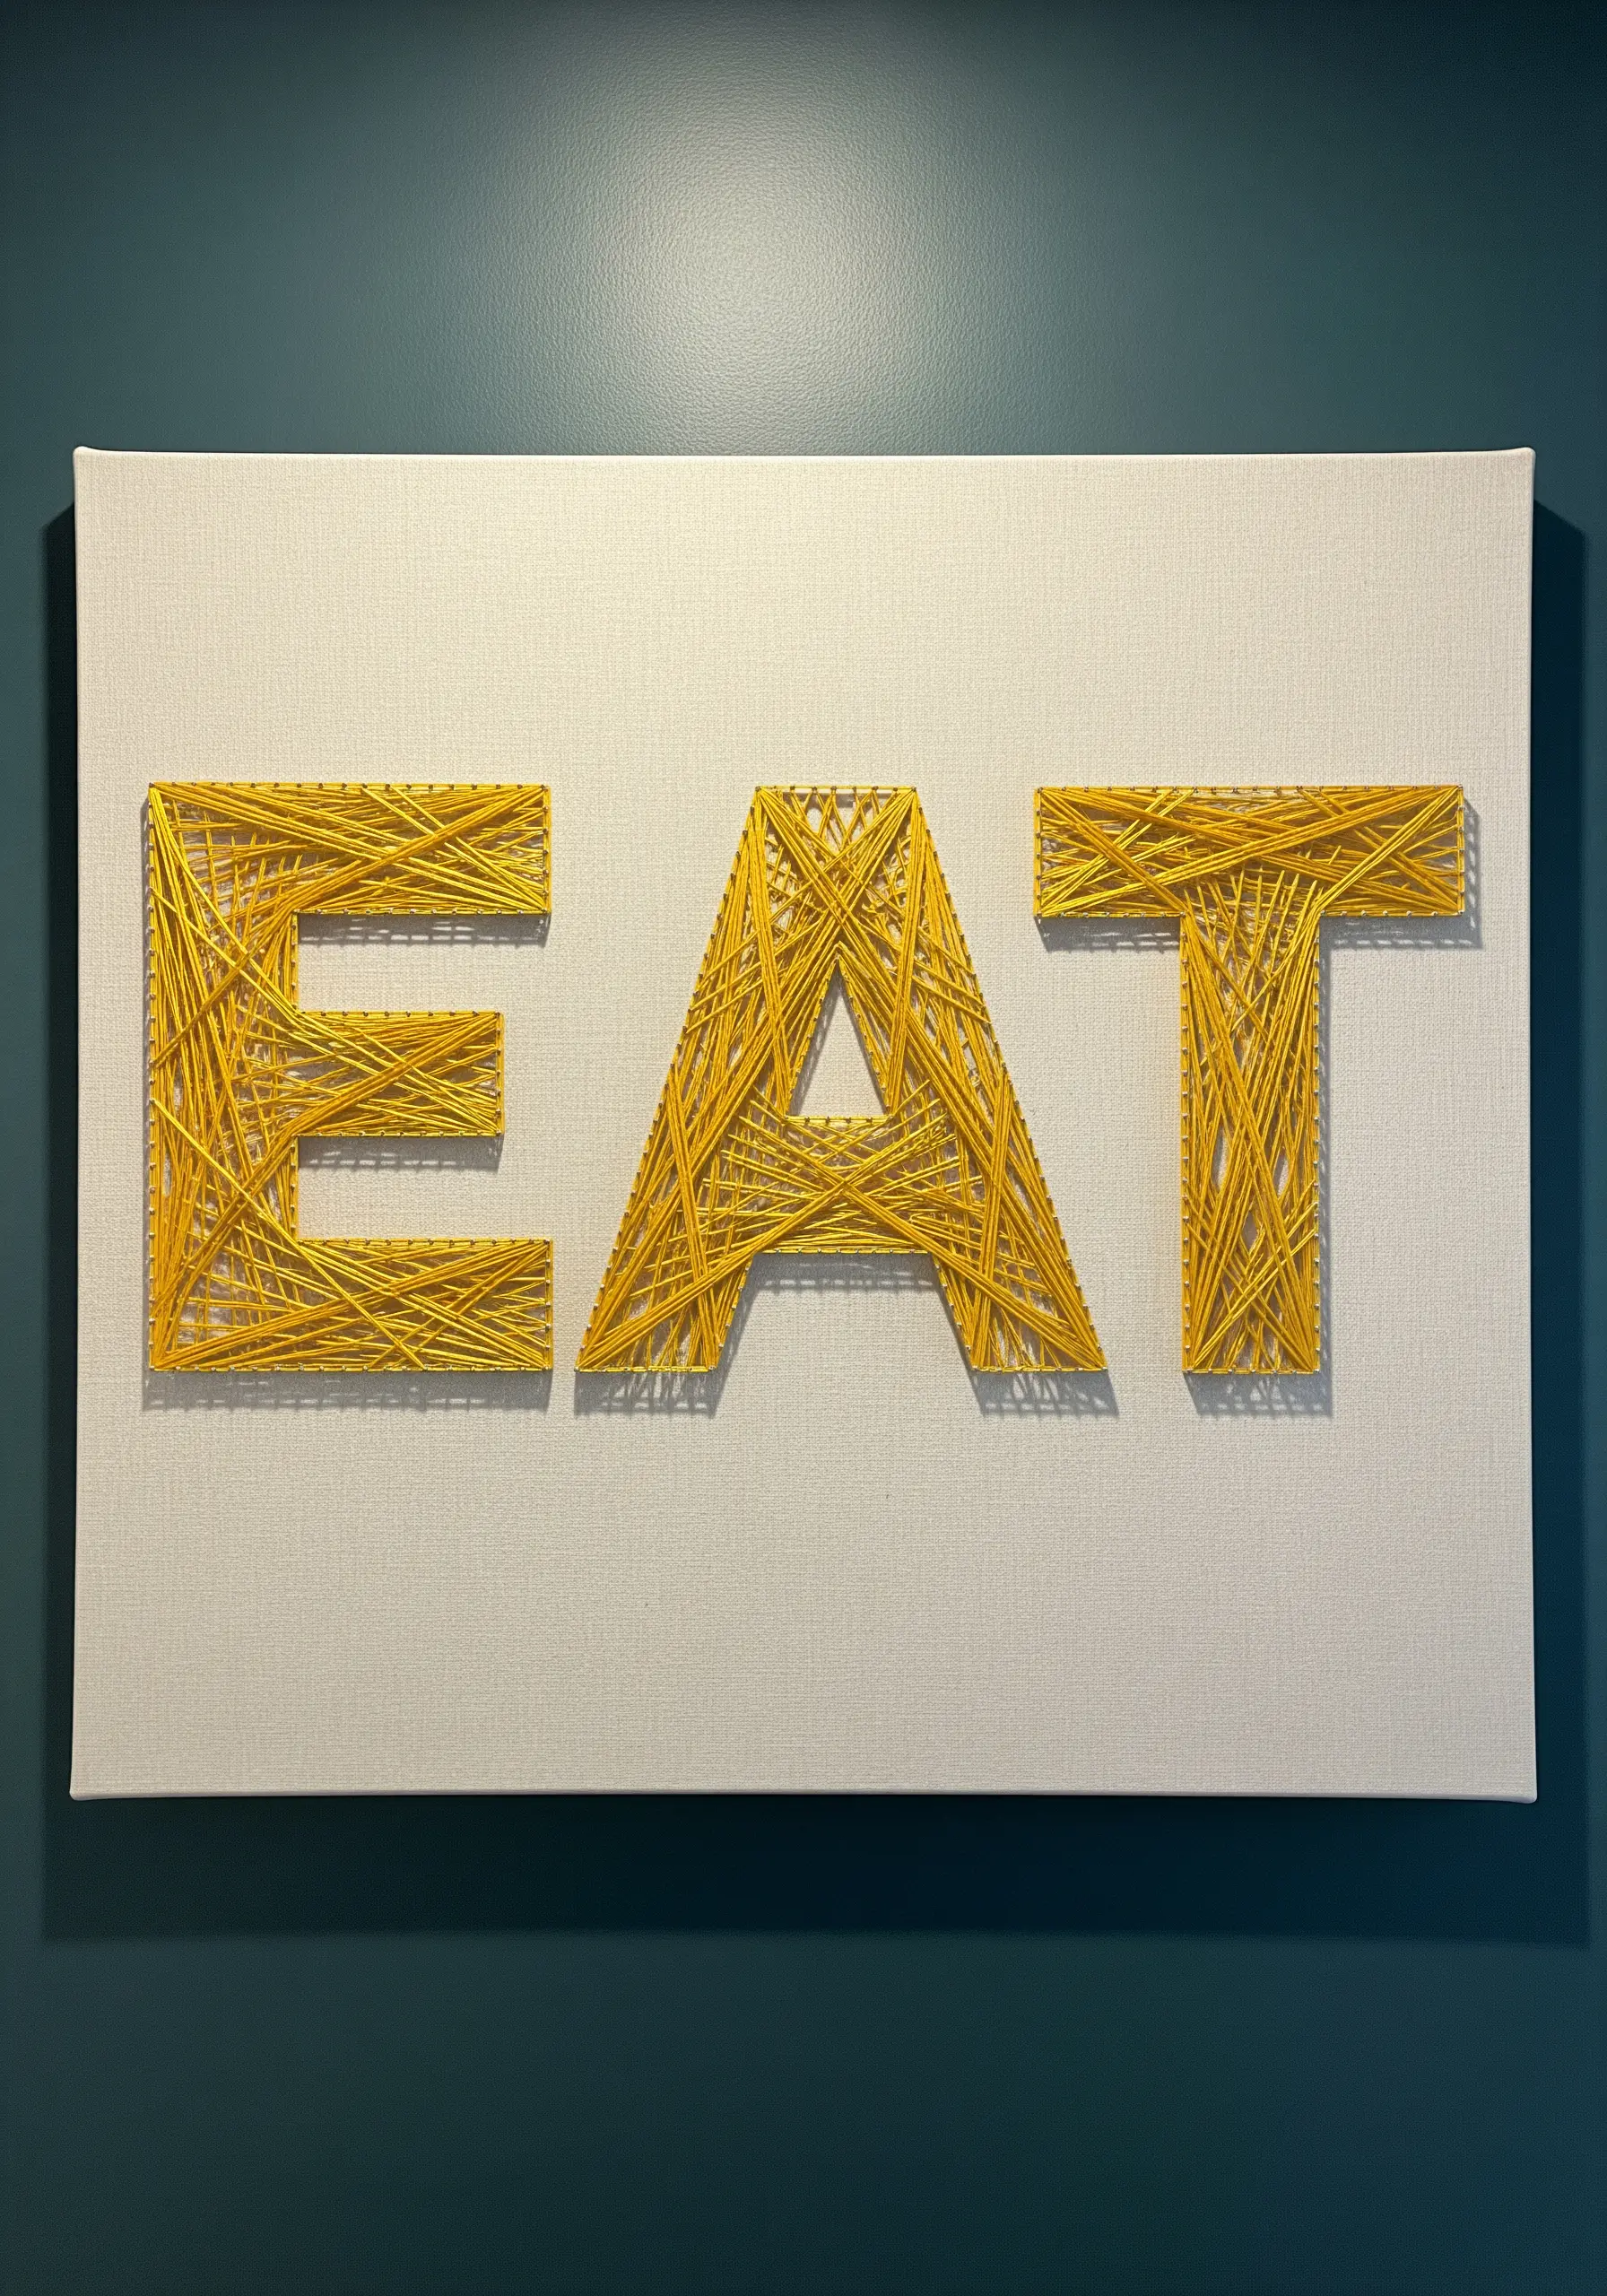
Turn simple block letters into a piece of abstract art by focusing entirely on stitch direction.
After outlining the word ‘EAT,’ fill each letter with dense layers of straight stitches in a single, bold color.
Intentionally vary the angle and direction of your stitches within different sections of each letter.
This creates fascinating internal shapes and shadow effects as the light hits the different thread textures, giving the design incredible depth and movement.
15. Stitching Over Printed Fabric for a Vintage Look
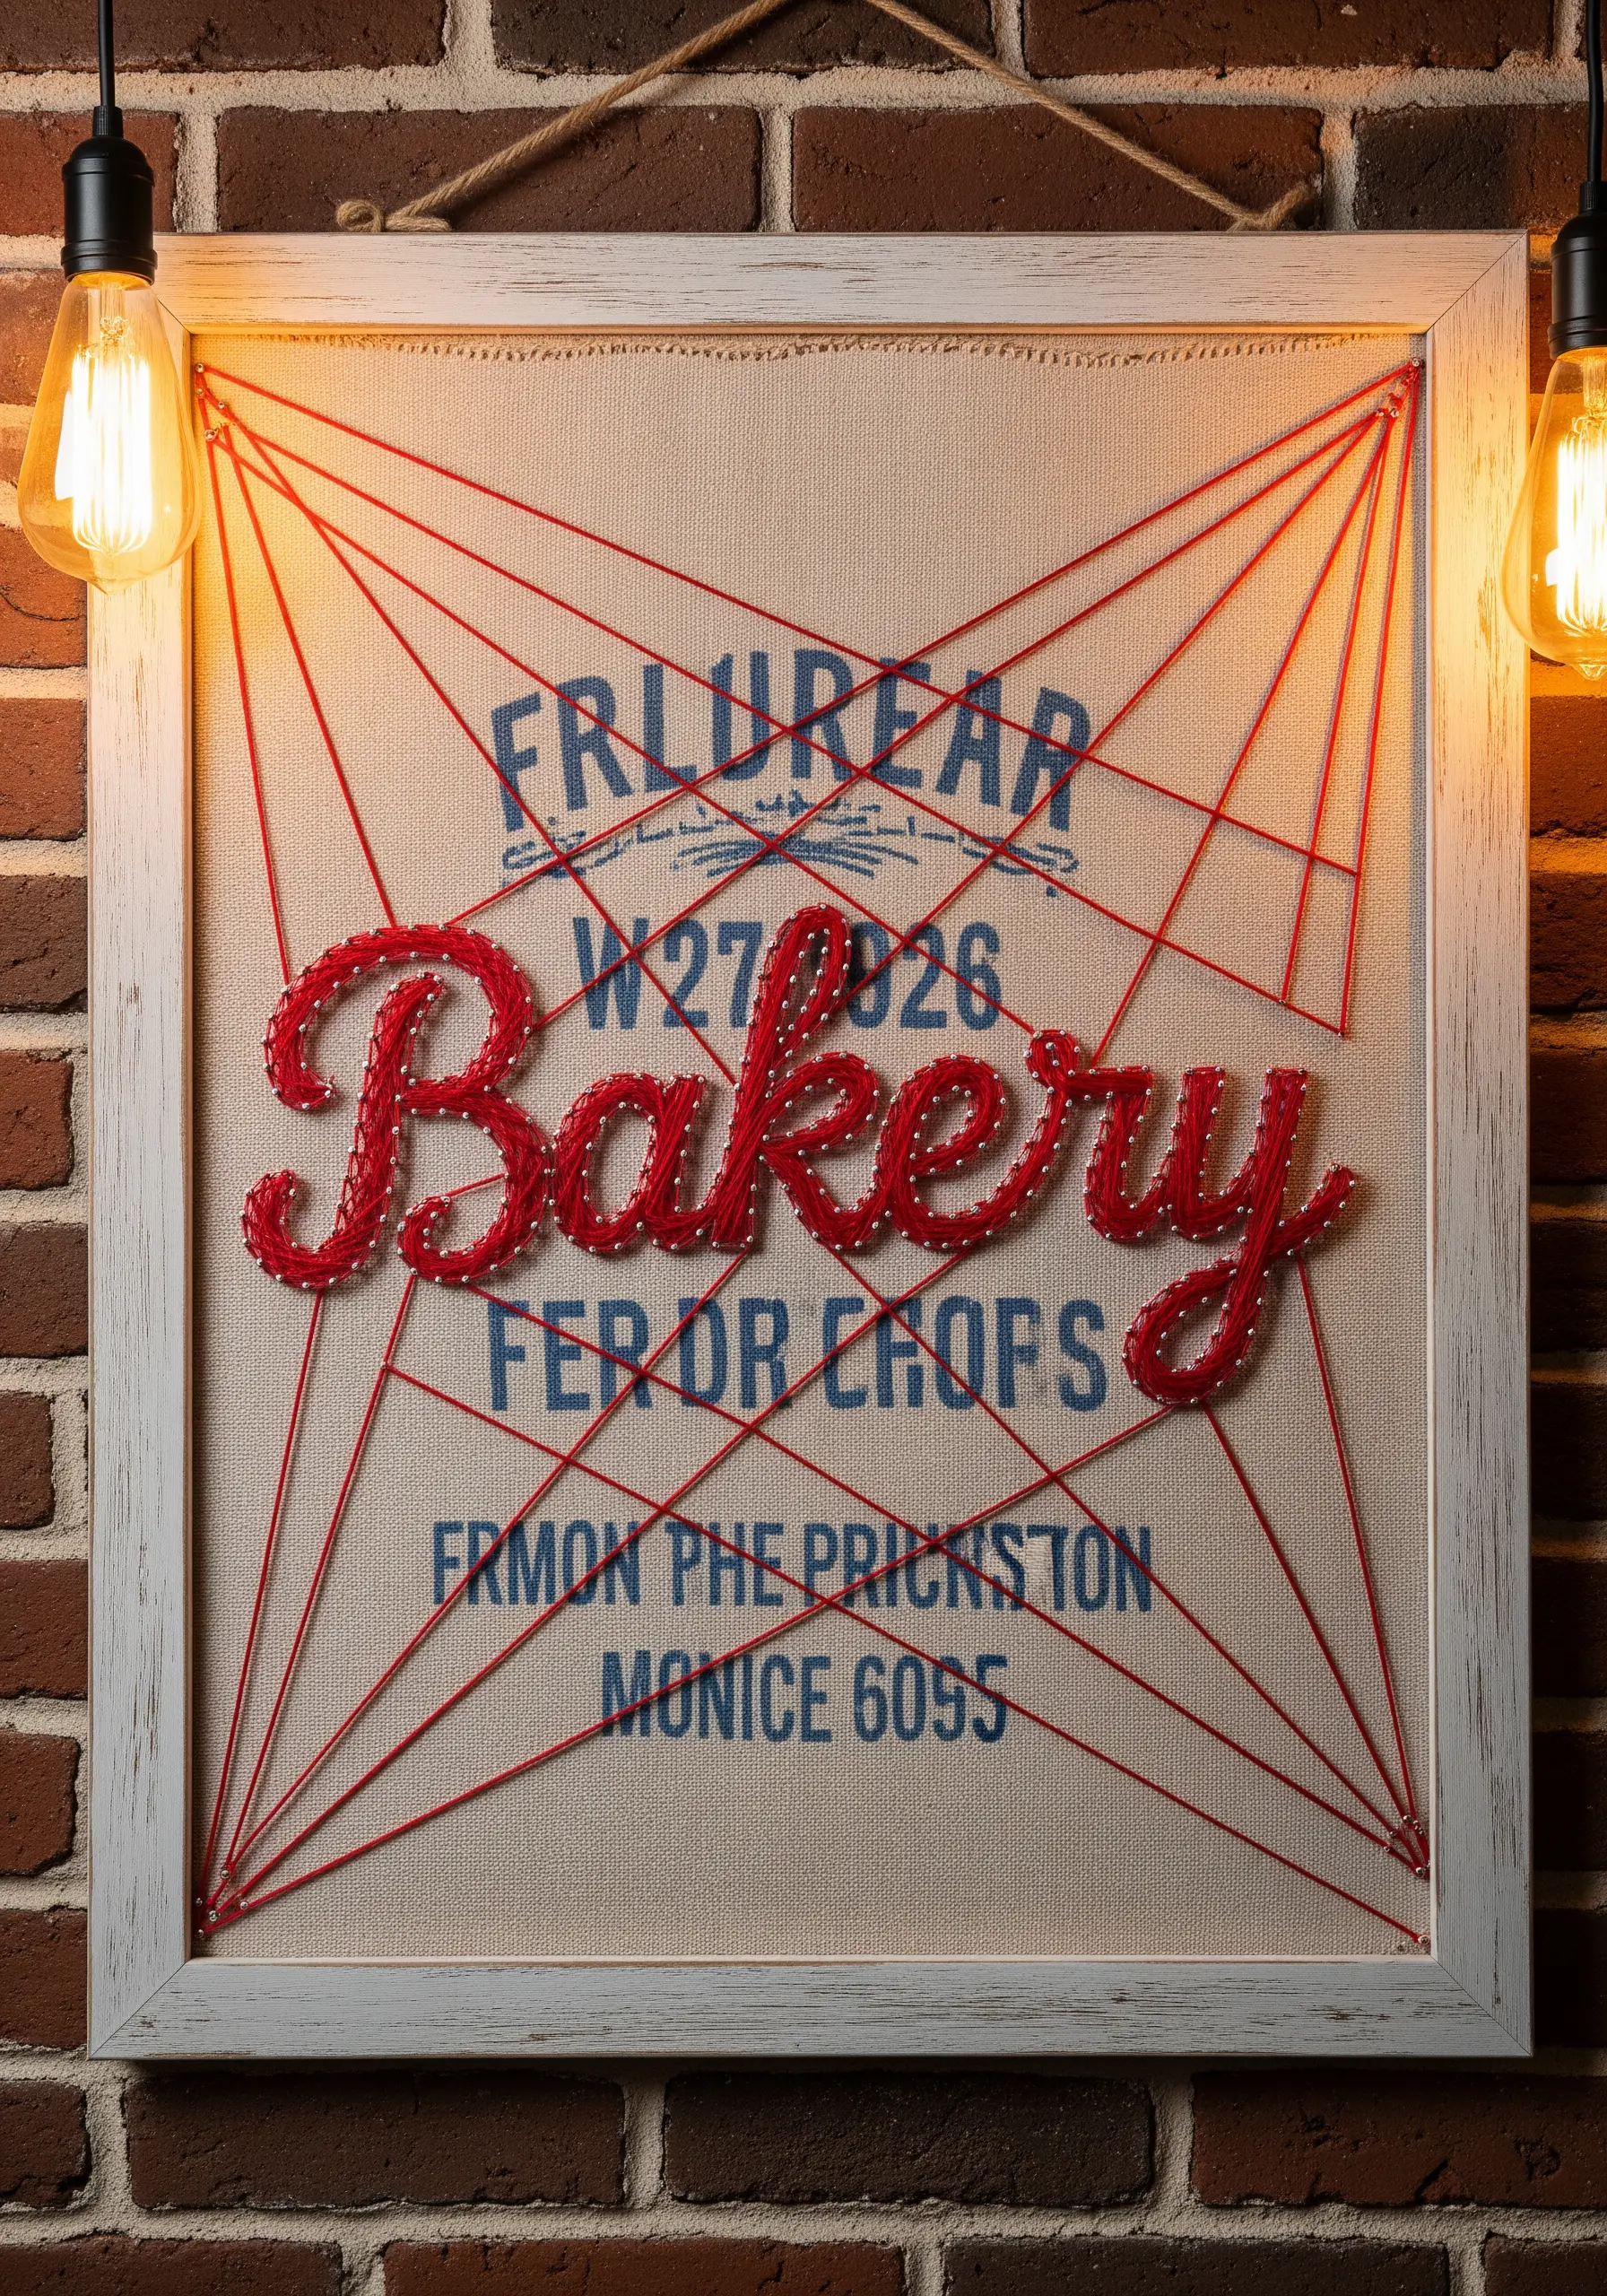
Create a layered, rustic-industrial aesthetic by embroidering directly onto pre-printed fabric.
Choose a piece of burlap or canvas with faint, vintage-style typography to serve as your base.
Stitch your main word, ‘Bakery,’ over the top using a couched red cord or thick yarn to ensure it stands out as the focal point.
Finally, add the dramatic, crisscrossing red lines with long straight stitches anchored near the frame, uniting the printed and stitched elements into a cohesive design.
16. Creating Form with Random Straight Stitches

This technique is a perfect exercise in building color and form with a free-flowing, web-like fill.
Outline your apple shape with a ring of tiny seed stitches, which will serve as the anchors for your thread.
Using two or three shades of red floss, fill the interior with a dense network of random straight stitches, wrapping the thread around the seed stitch anchors.
Contrast the airy, open fill of the apple by stitching the leaf with a solid fishbone stitch, giving it weight and a satisfyingly smooth texture.
17. Dimensional Florals as a Decorative Border
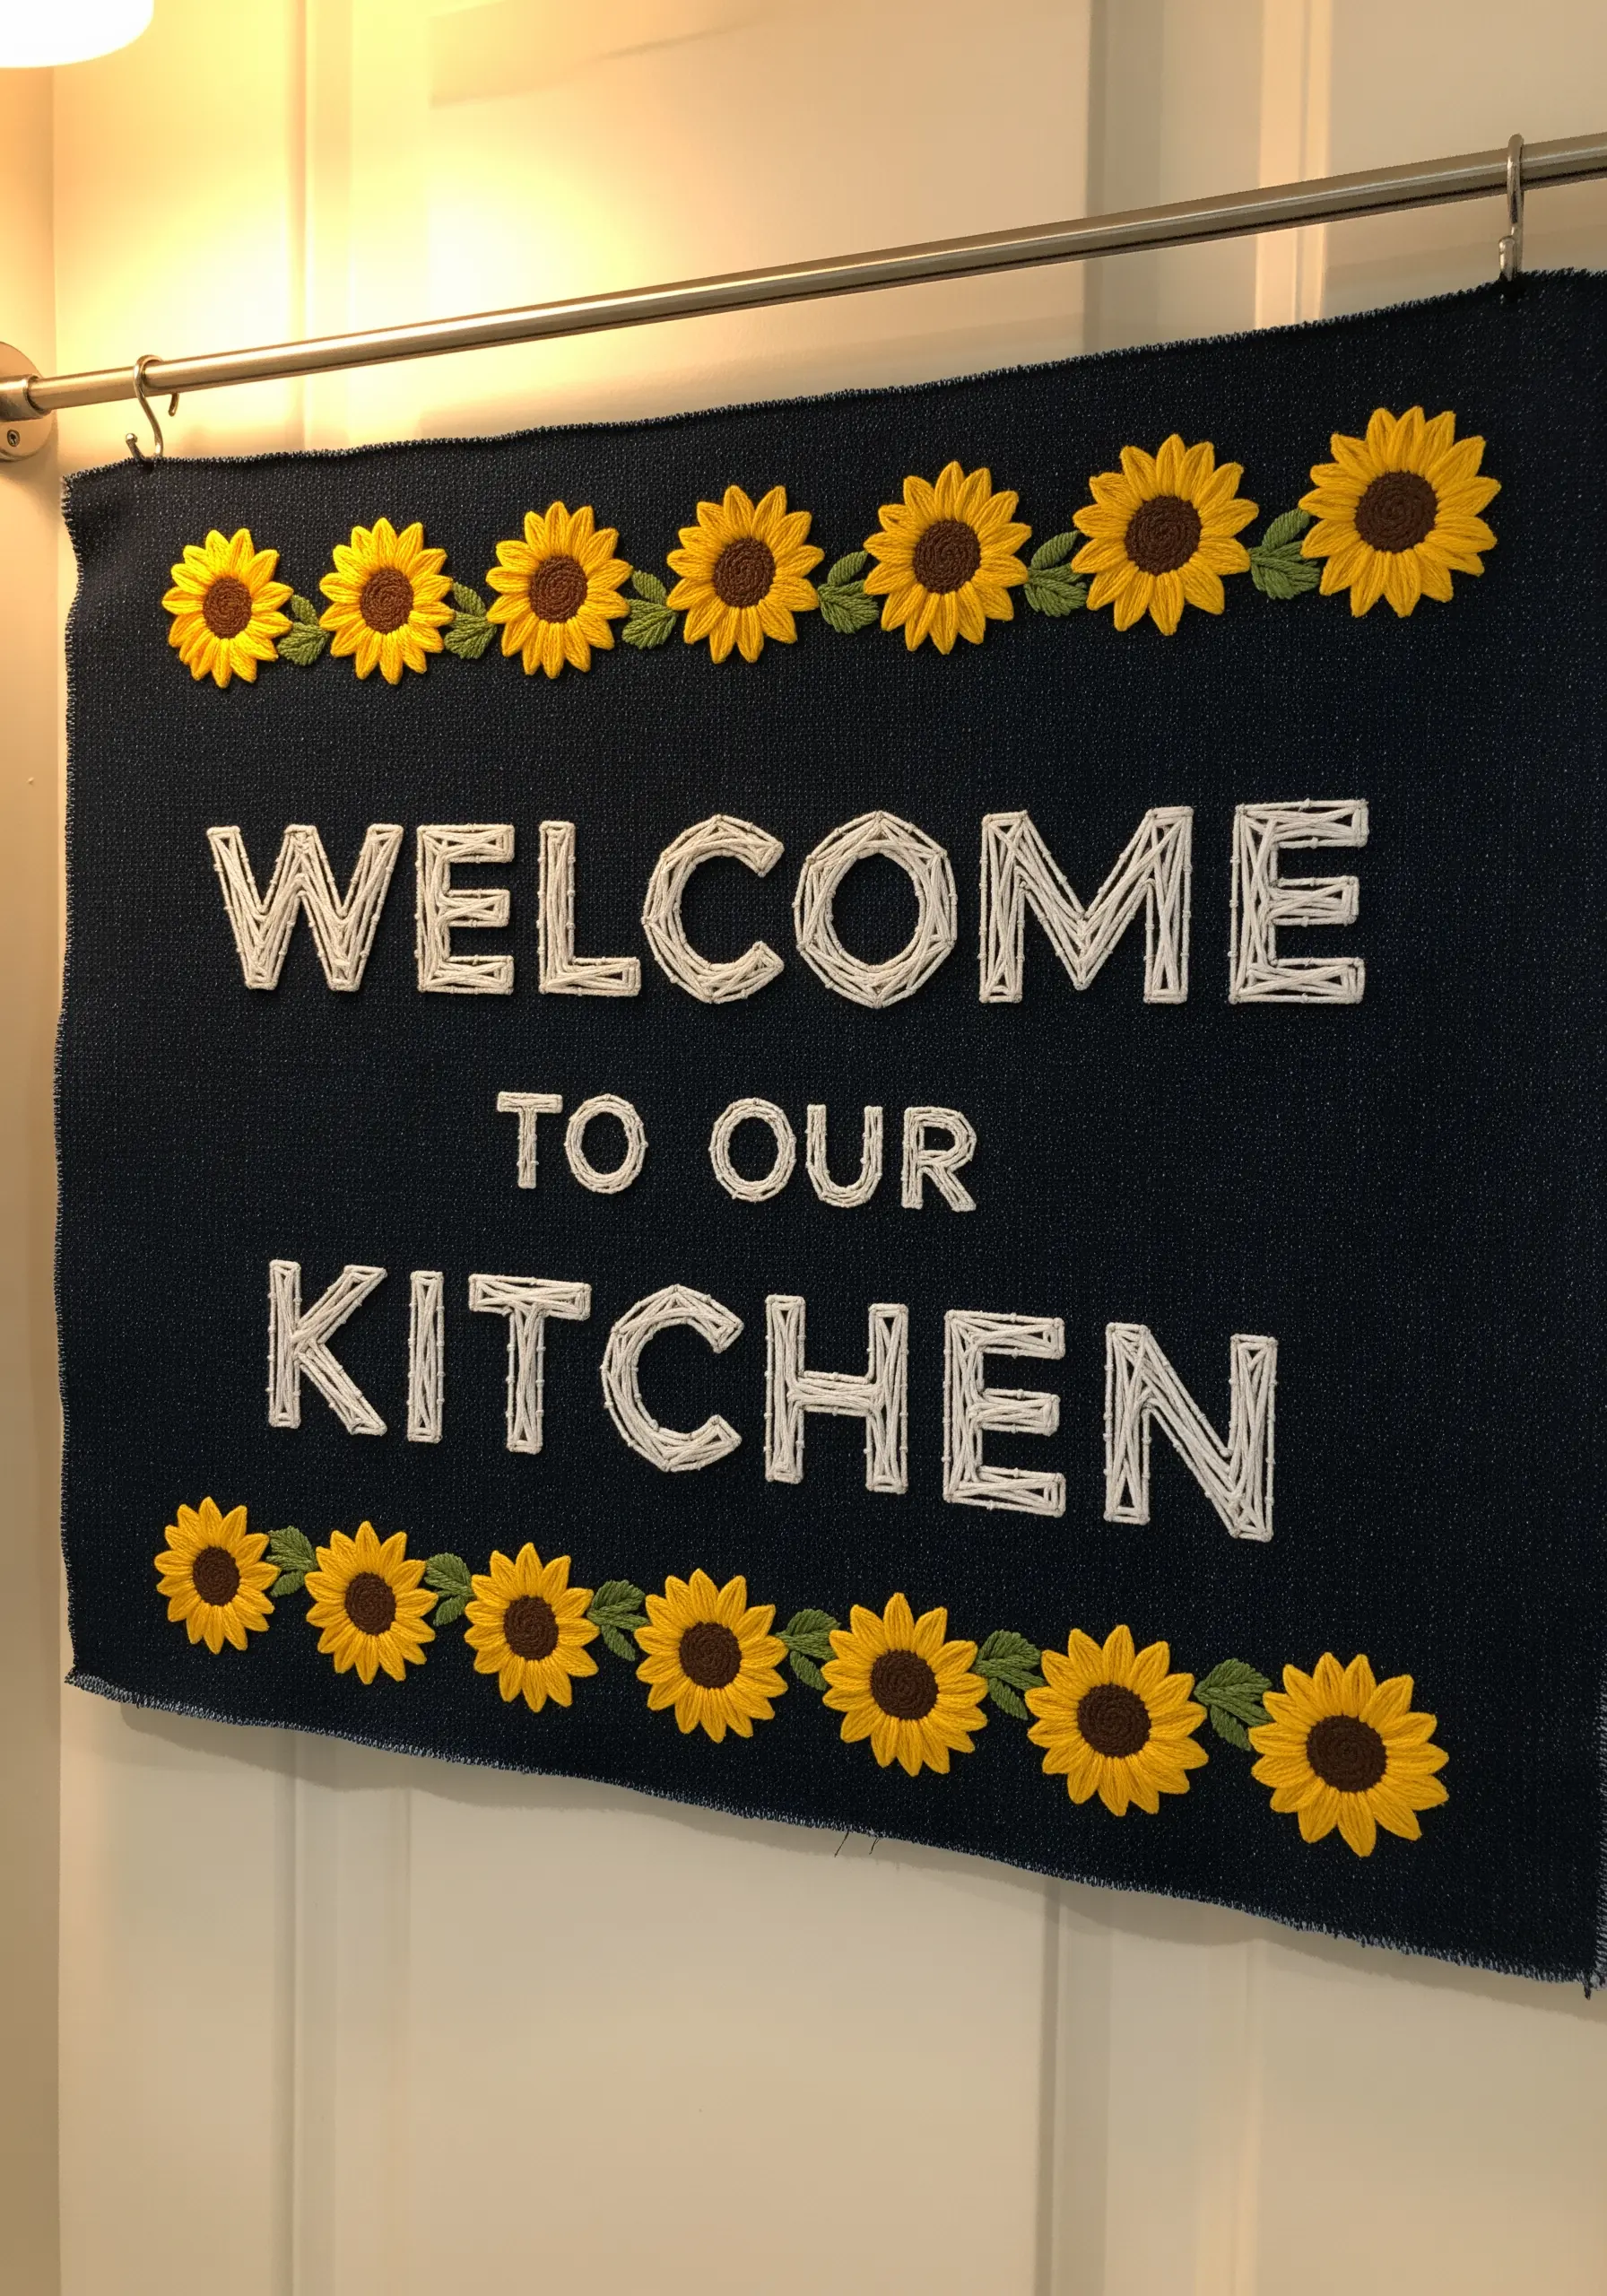
Elevate a simple welcome sign by framing it with lush, three-dimensional flowers.
While the lettering can be achieved with a simple wrapped yarn technique, the sunflowers are where you can add truly impressive detail.
Stitch the petals using a padded satin stitch to make them pop, and fill the centers with a dense cluster of French knots for a realistic, seed-like texture.
Stitching these dimensional florals onto a dark, plain-weave fabric like denim ensures they become the cheerful, eye-catching focus of the piece.


