

Framing a piece of embroidery does more than just display it—it completes it. It tells the world that this small, patient work of thread and fabric is a finished piece of art, ready to be seen.
But before you get to the frame, you must feel confident in the stitches themselves. Often, the difference between a beginner’s piece and a professional one isn’t complexity, but control. It’s the evenness of a line, the clean edge of a filled shape, or the thoughtful choice of texture.
Here, you’ll find simple, achievable ideas that focus on these foundational details. Think of each one not just as a pattern to follow, but as a specific technique to master. This is how you build an artist’s hand, one stitch at a time.
1. Master the Clean Outline with Backstitch
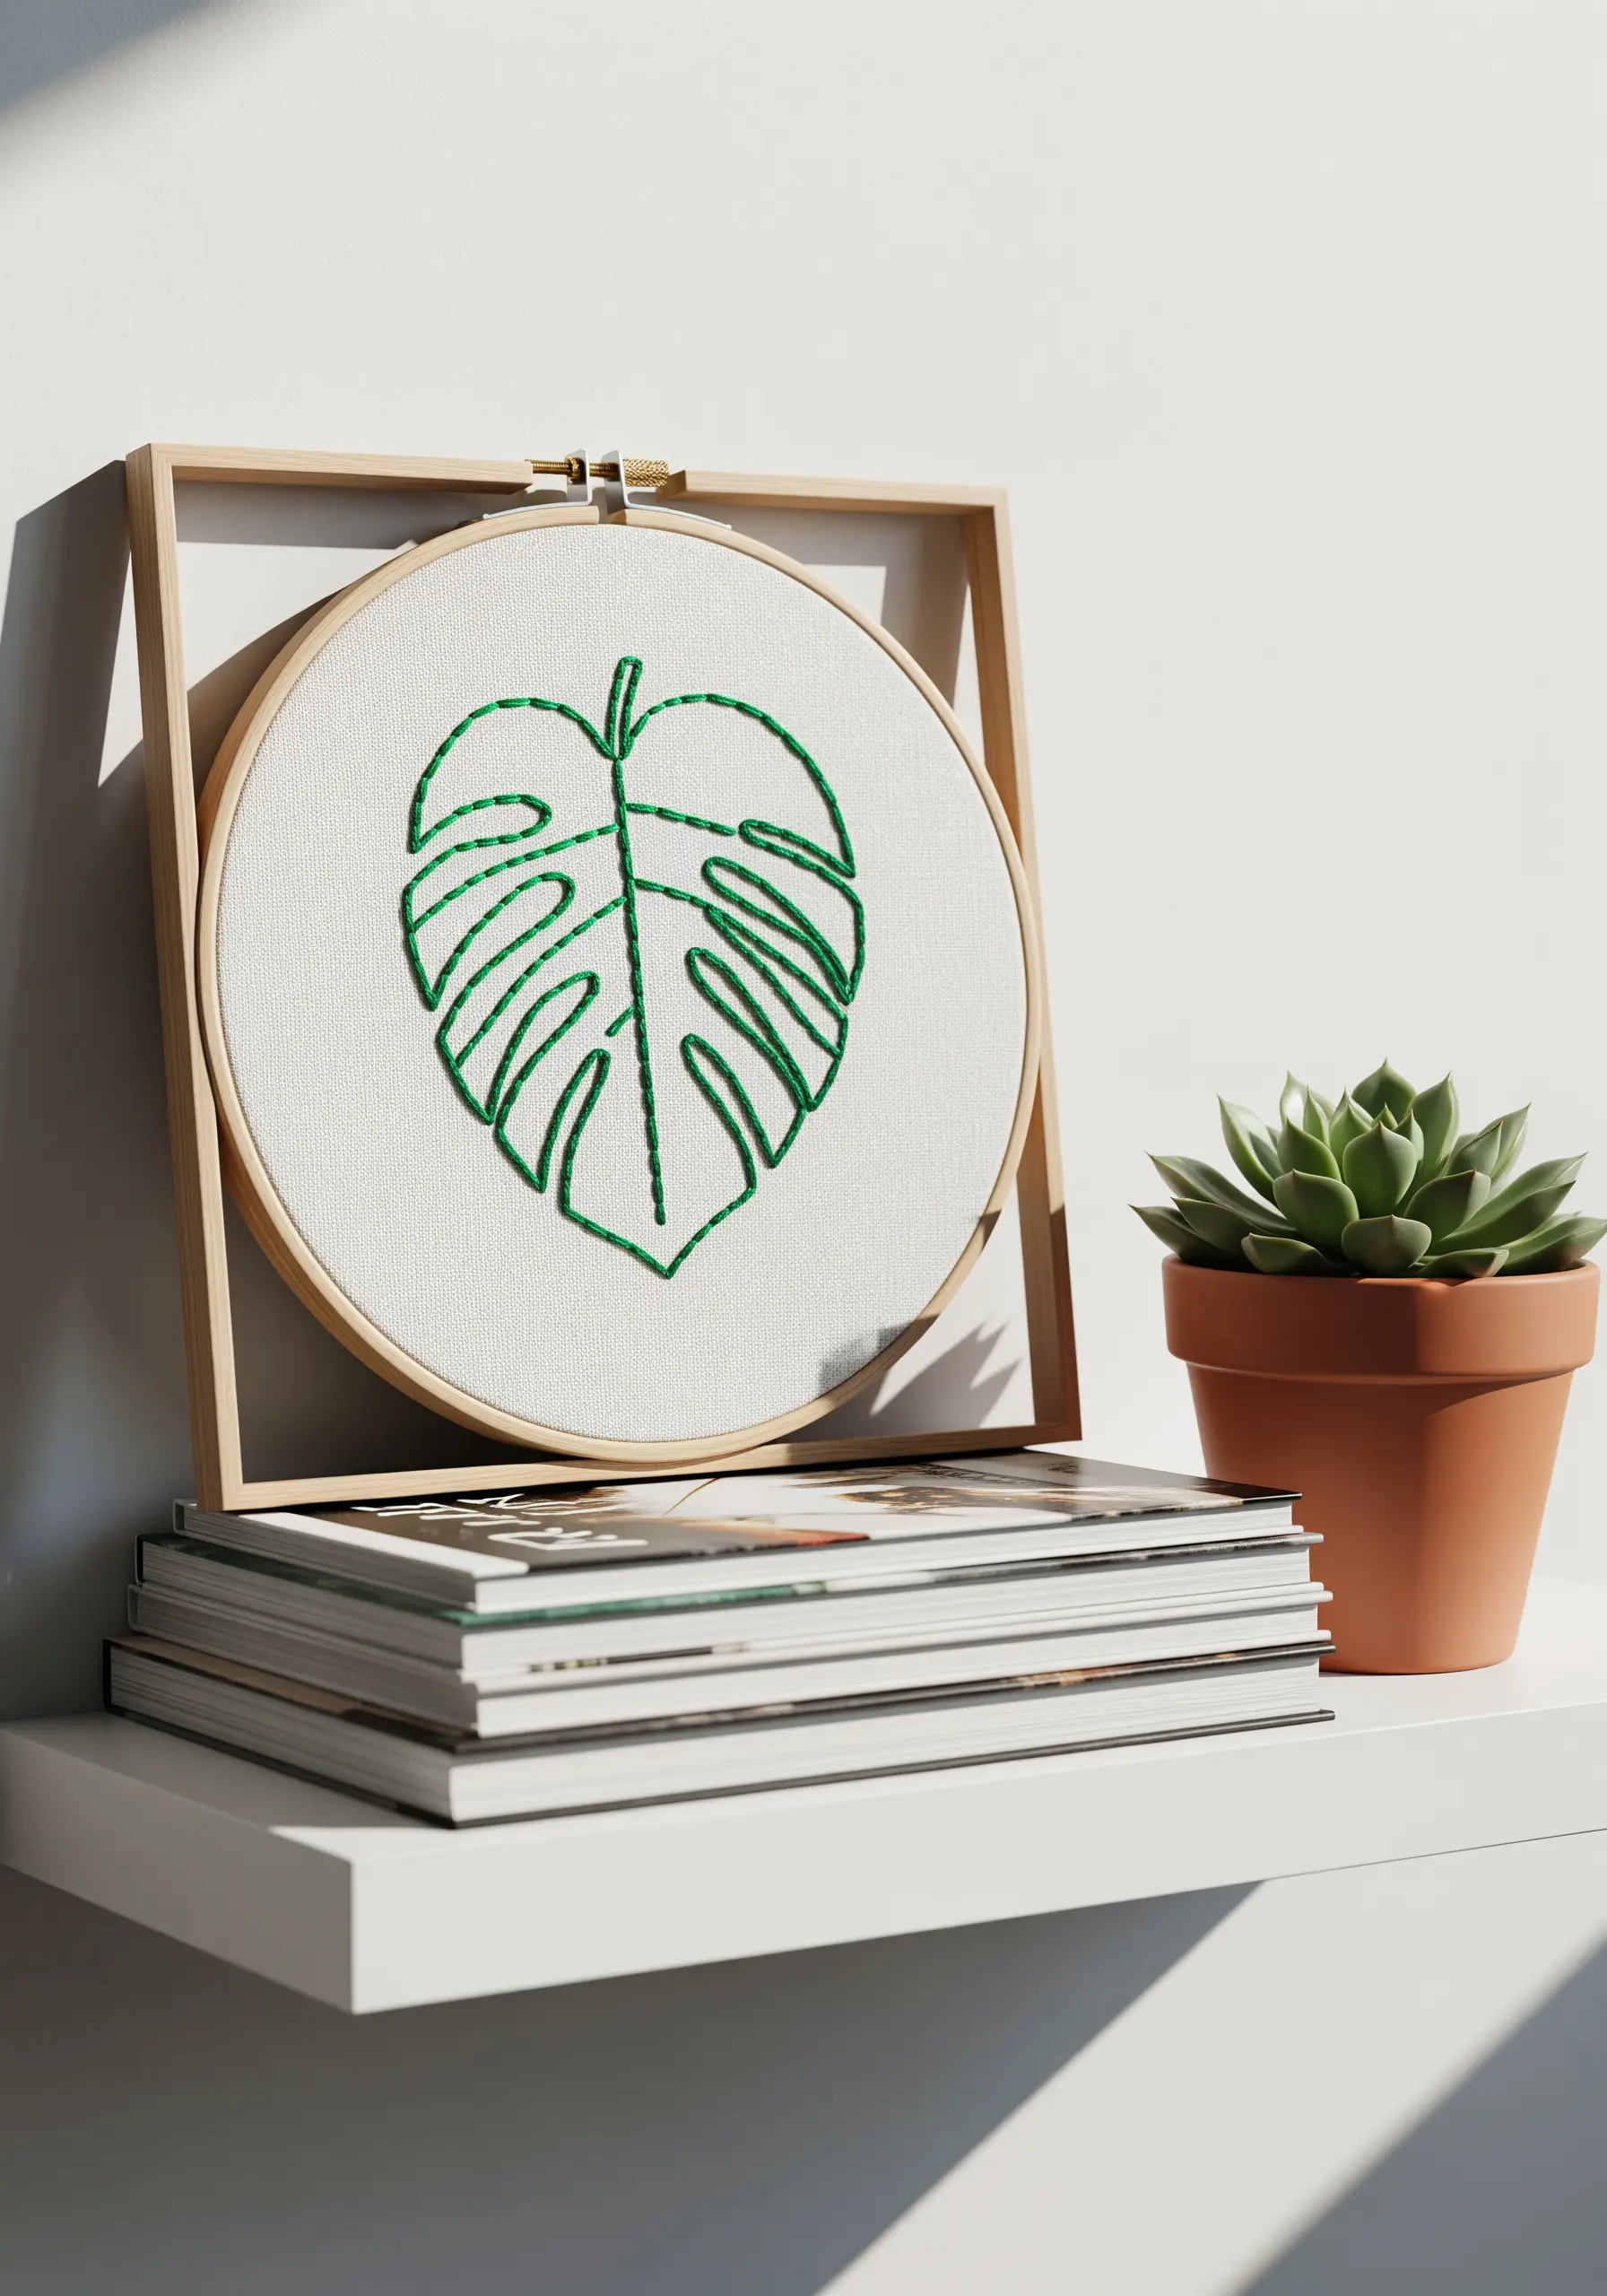
To achieve this crisp, graphic look for a simple botanical, focus entirely on the consistency of your backstitch.
Use three strands of standard embroidery floss for a line with presence that isn’t too bulky.
When stitching around curves, shorten your stitch length slightly. This prevents the line from looking jagged and creates a smoother, more organic contour.
For sharp corners, like the point of the leaf, end a stitch precisely at the apex before starting the next one. This small detail makes the entire piece look more professional and intentional.
2. Create Radiating Energy with Straight Stitches
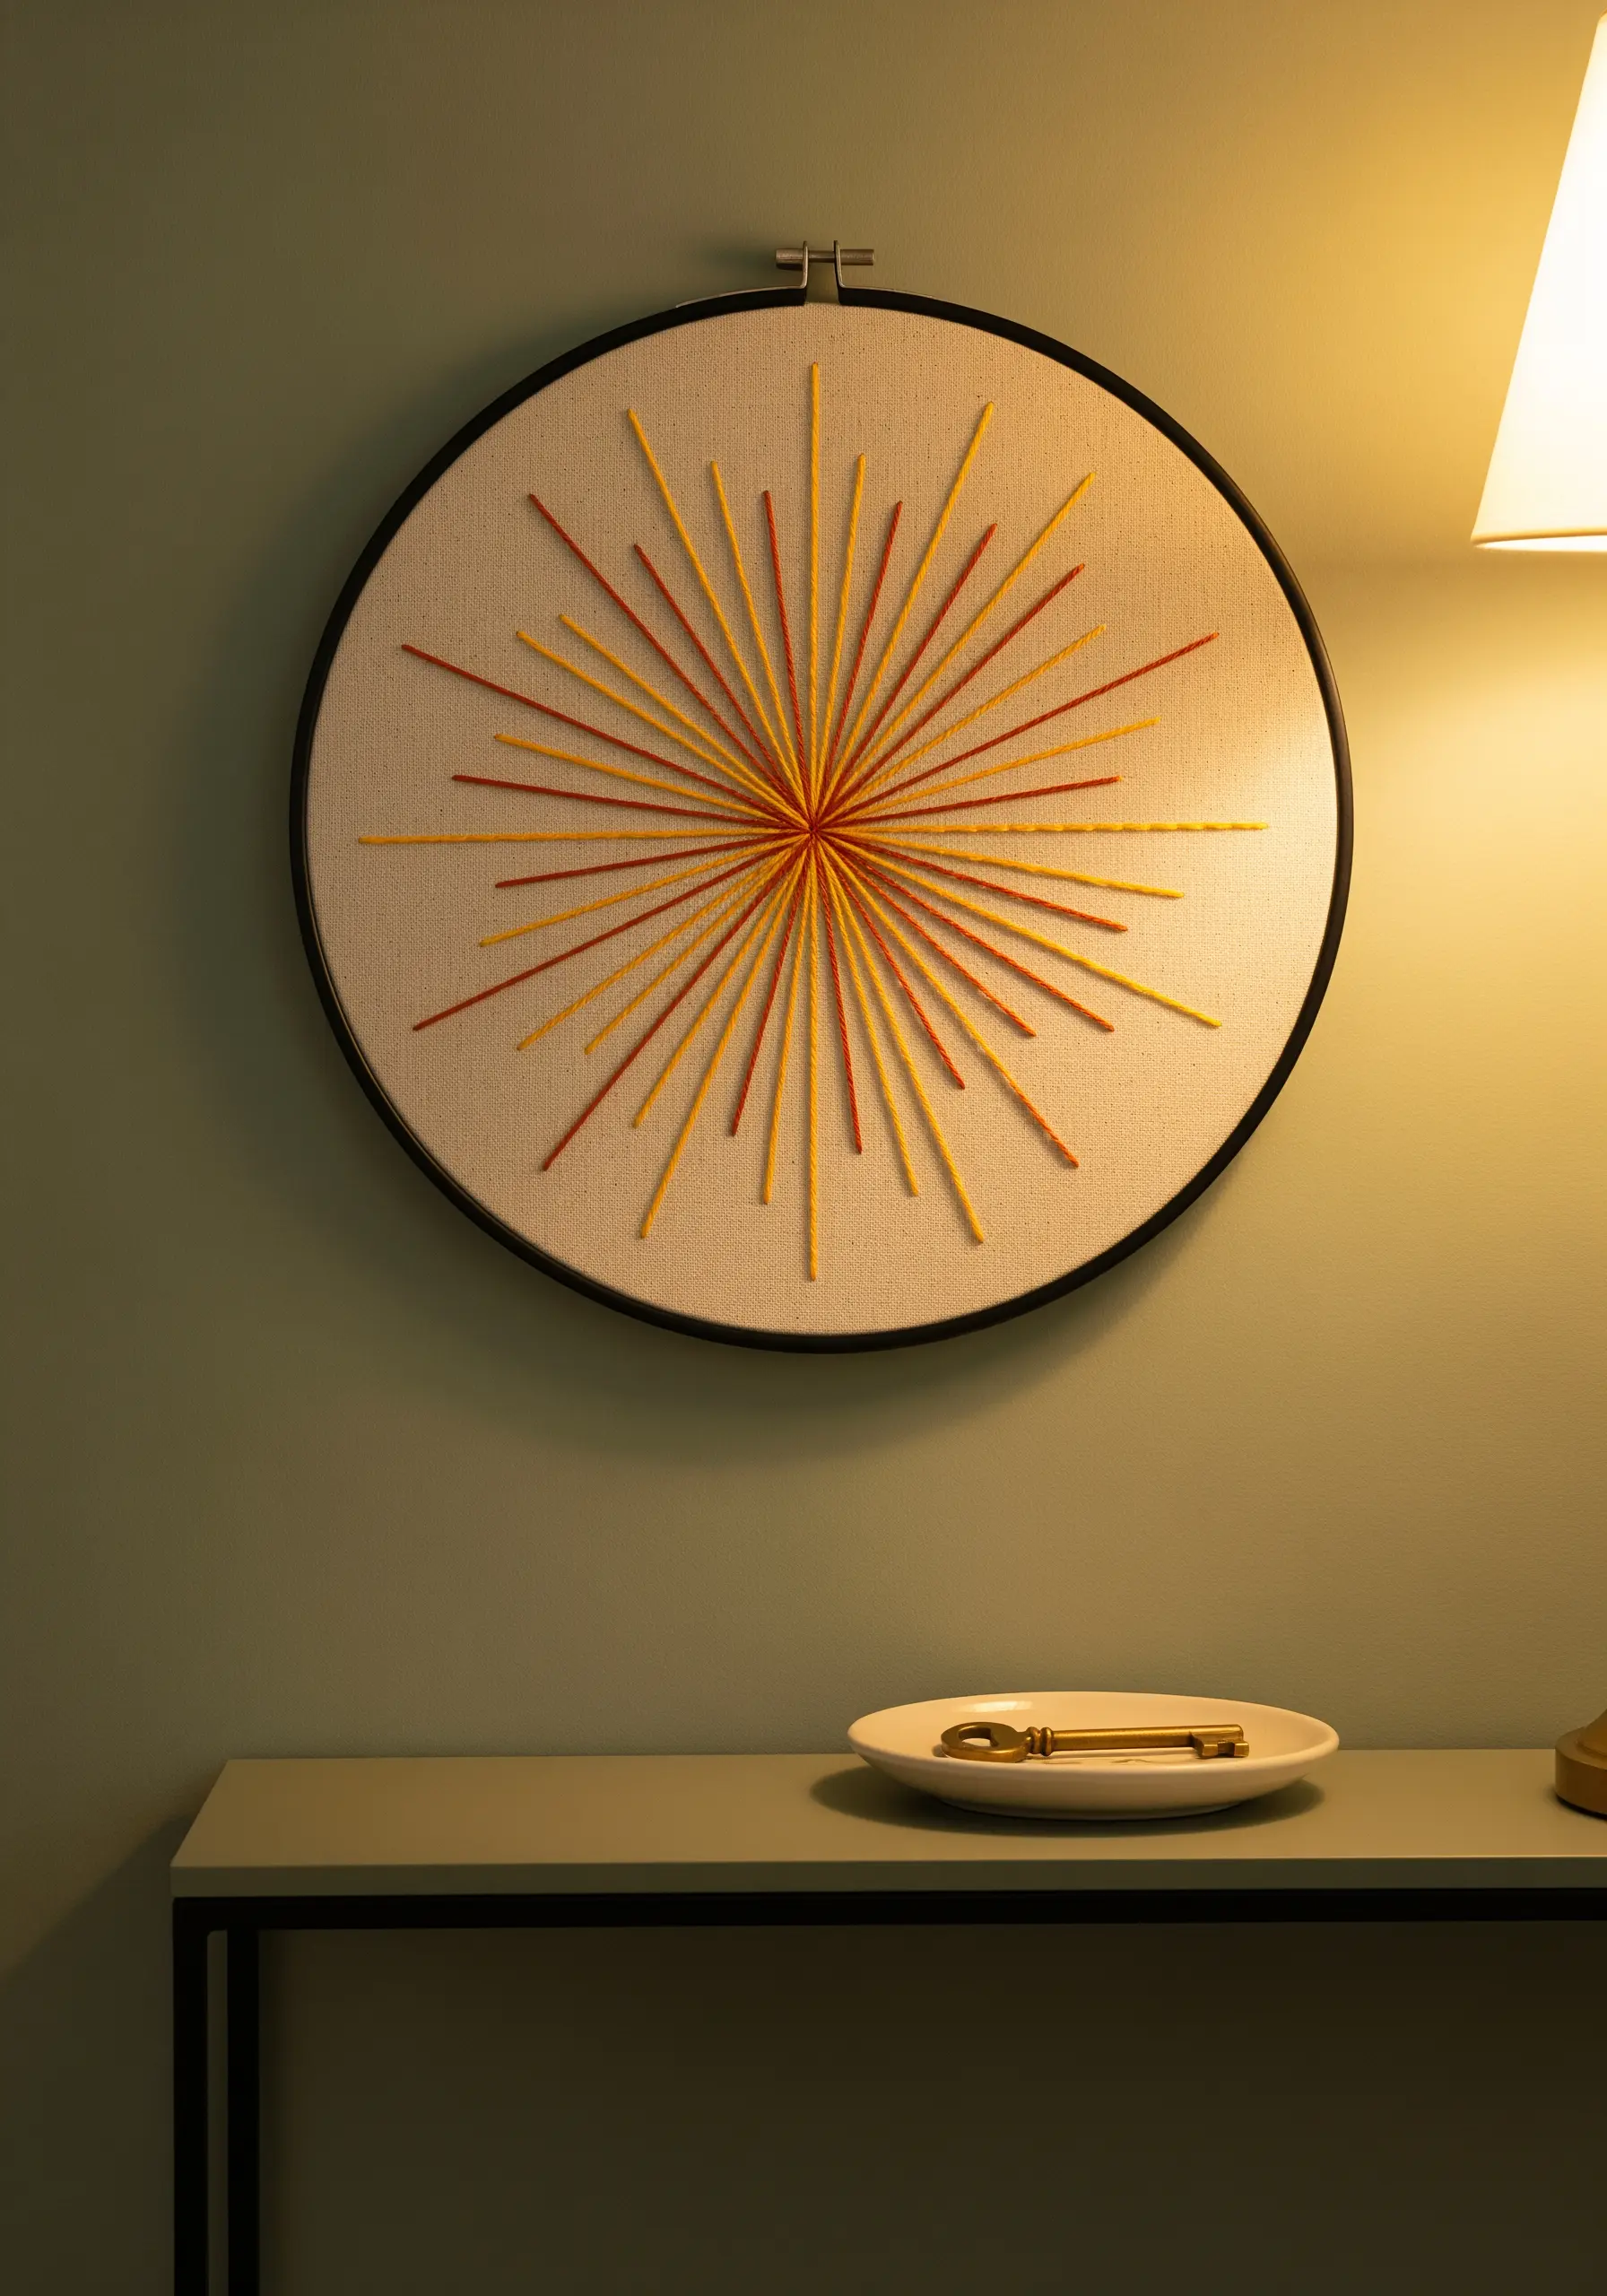
This dynamic sunburst effect is achieved with the simplest of stitches: the straight stitch.
The key to success is maintaining perfect tension from the center point to the outer edge of the hoop.
To ensure your lines are straight, mark your center and edge points lightly with a fabric pen before you begin.
Alternate two or three analogous colors, like ochre and rust, to create a design that feels warm and visually vibrant without being overwhelming. This is a perfect example of how abstract thread embroidery relies on precision and color theory.
3. Achieve Bold Graphics with a Thick Outline
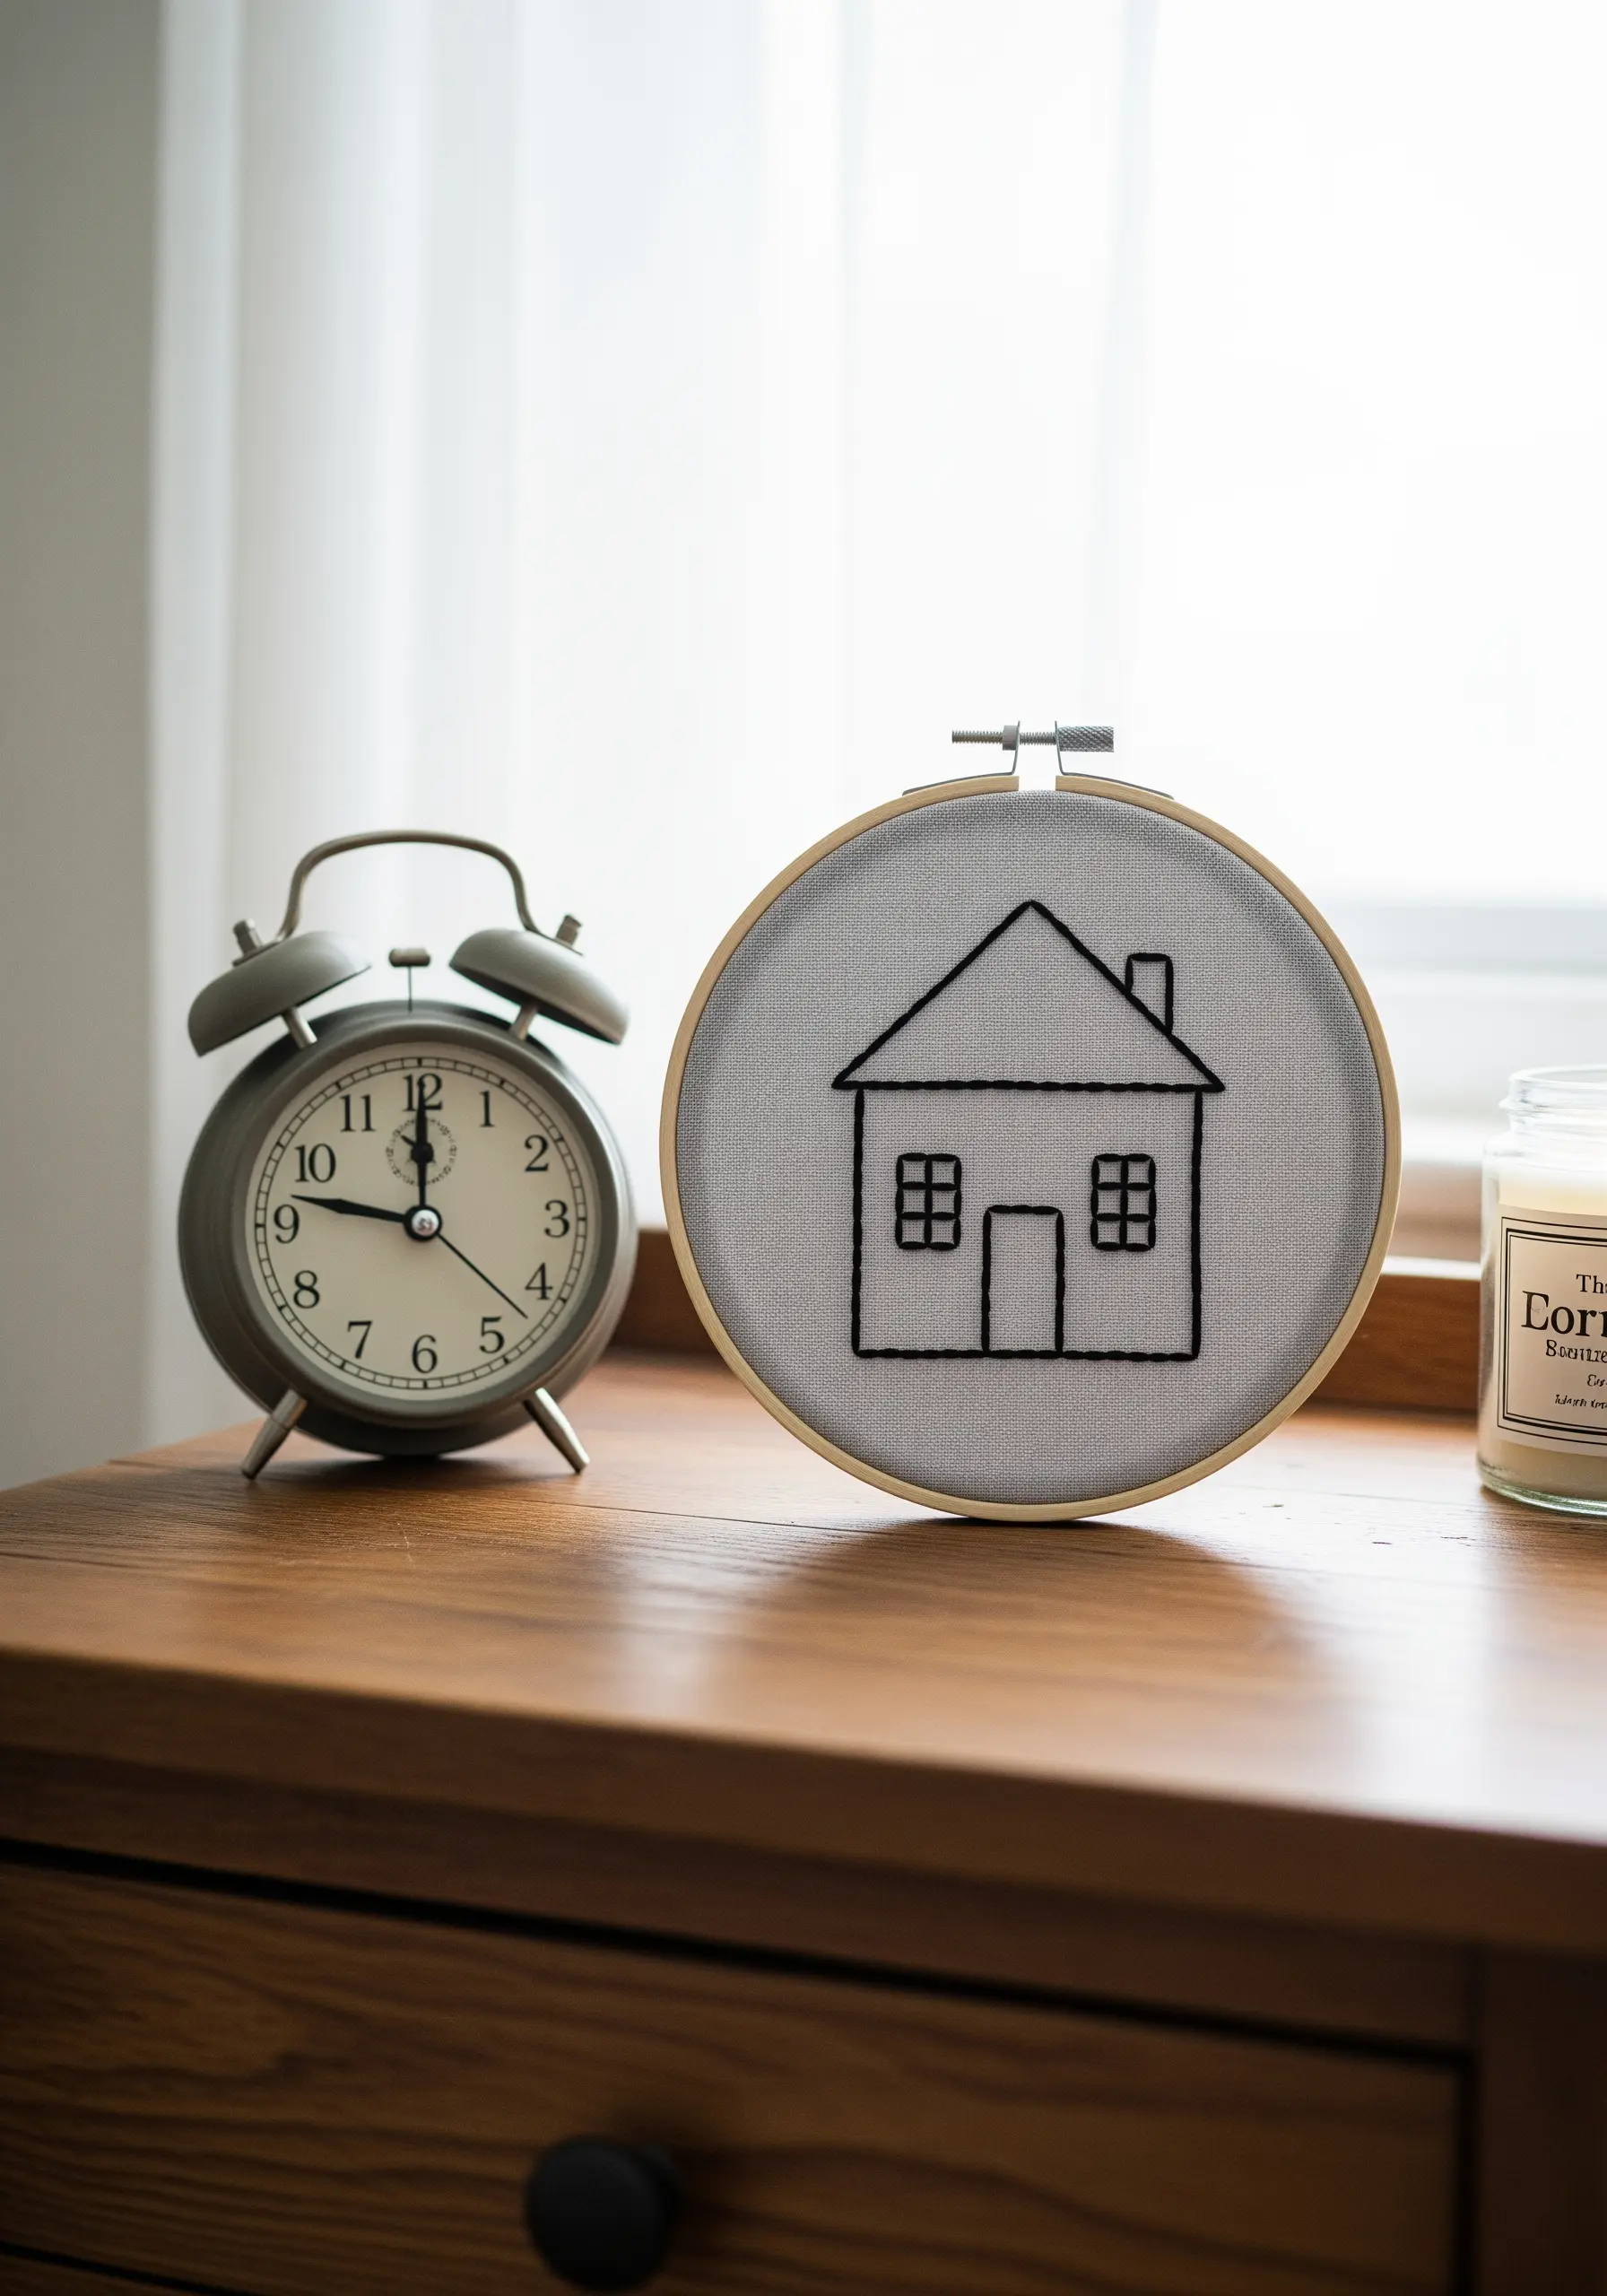
For a strong, illustrative feel, abandon single-strand work and embrace a bolder line.
Use all six strands of your embroidery floss or switch to a thicker thread like pearl cotton No. 8.
A simple backstitch or stem stitch will create a solid, almost cartoon-like outline that stands out beautifully against a neutral fabric background.
This technique works exceptionally well for simple geometric forms, where the clarity of the line is the most important design element.
4. Layer Your Lines for Visual Depth
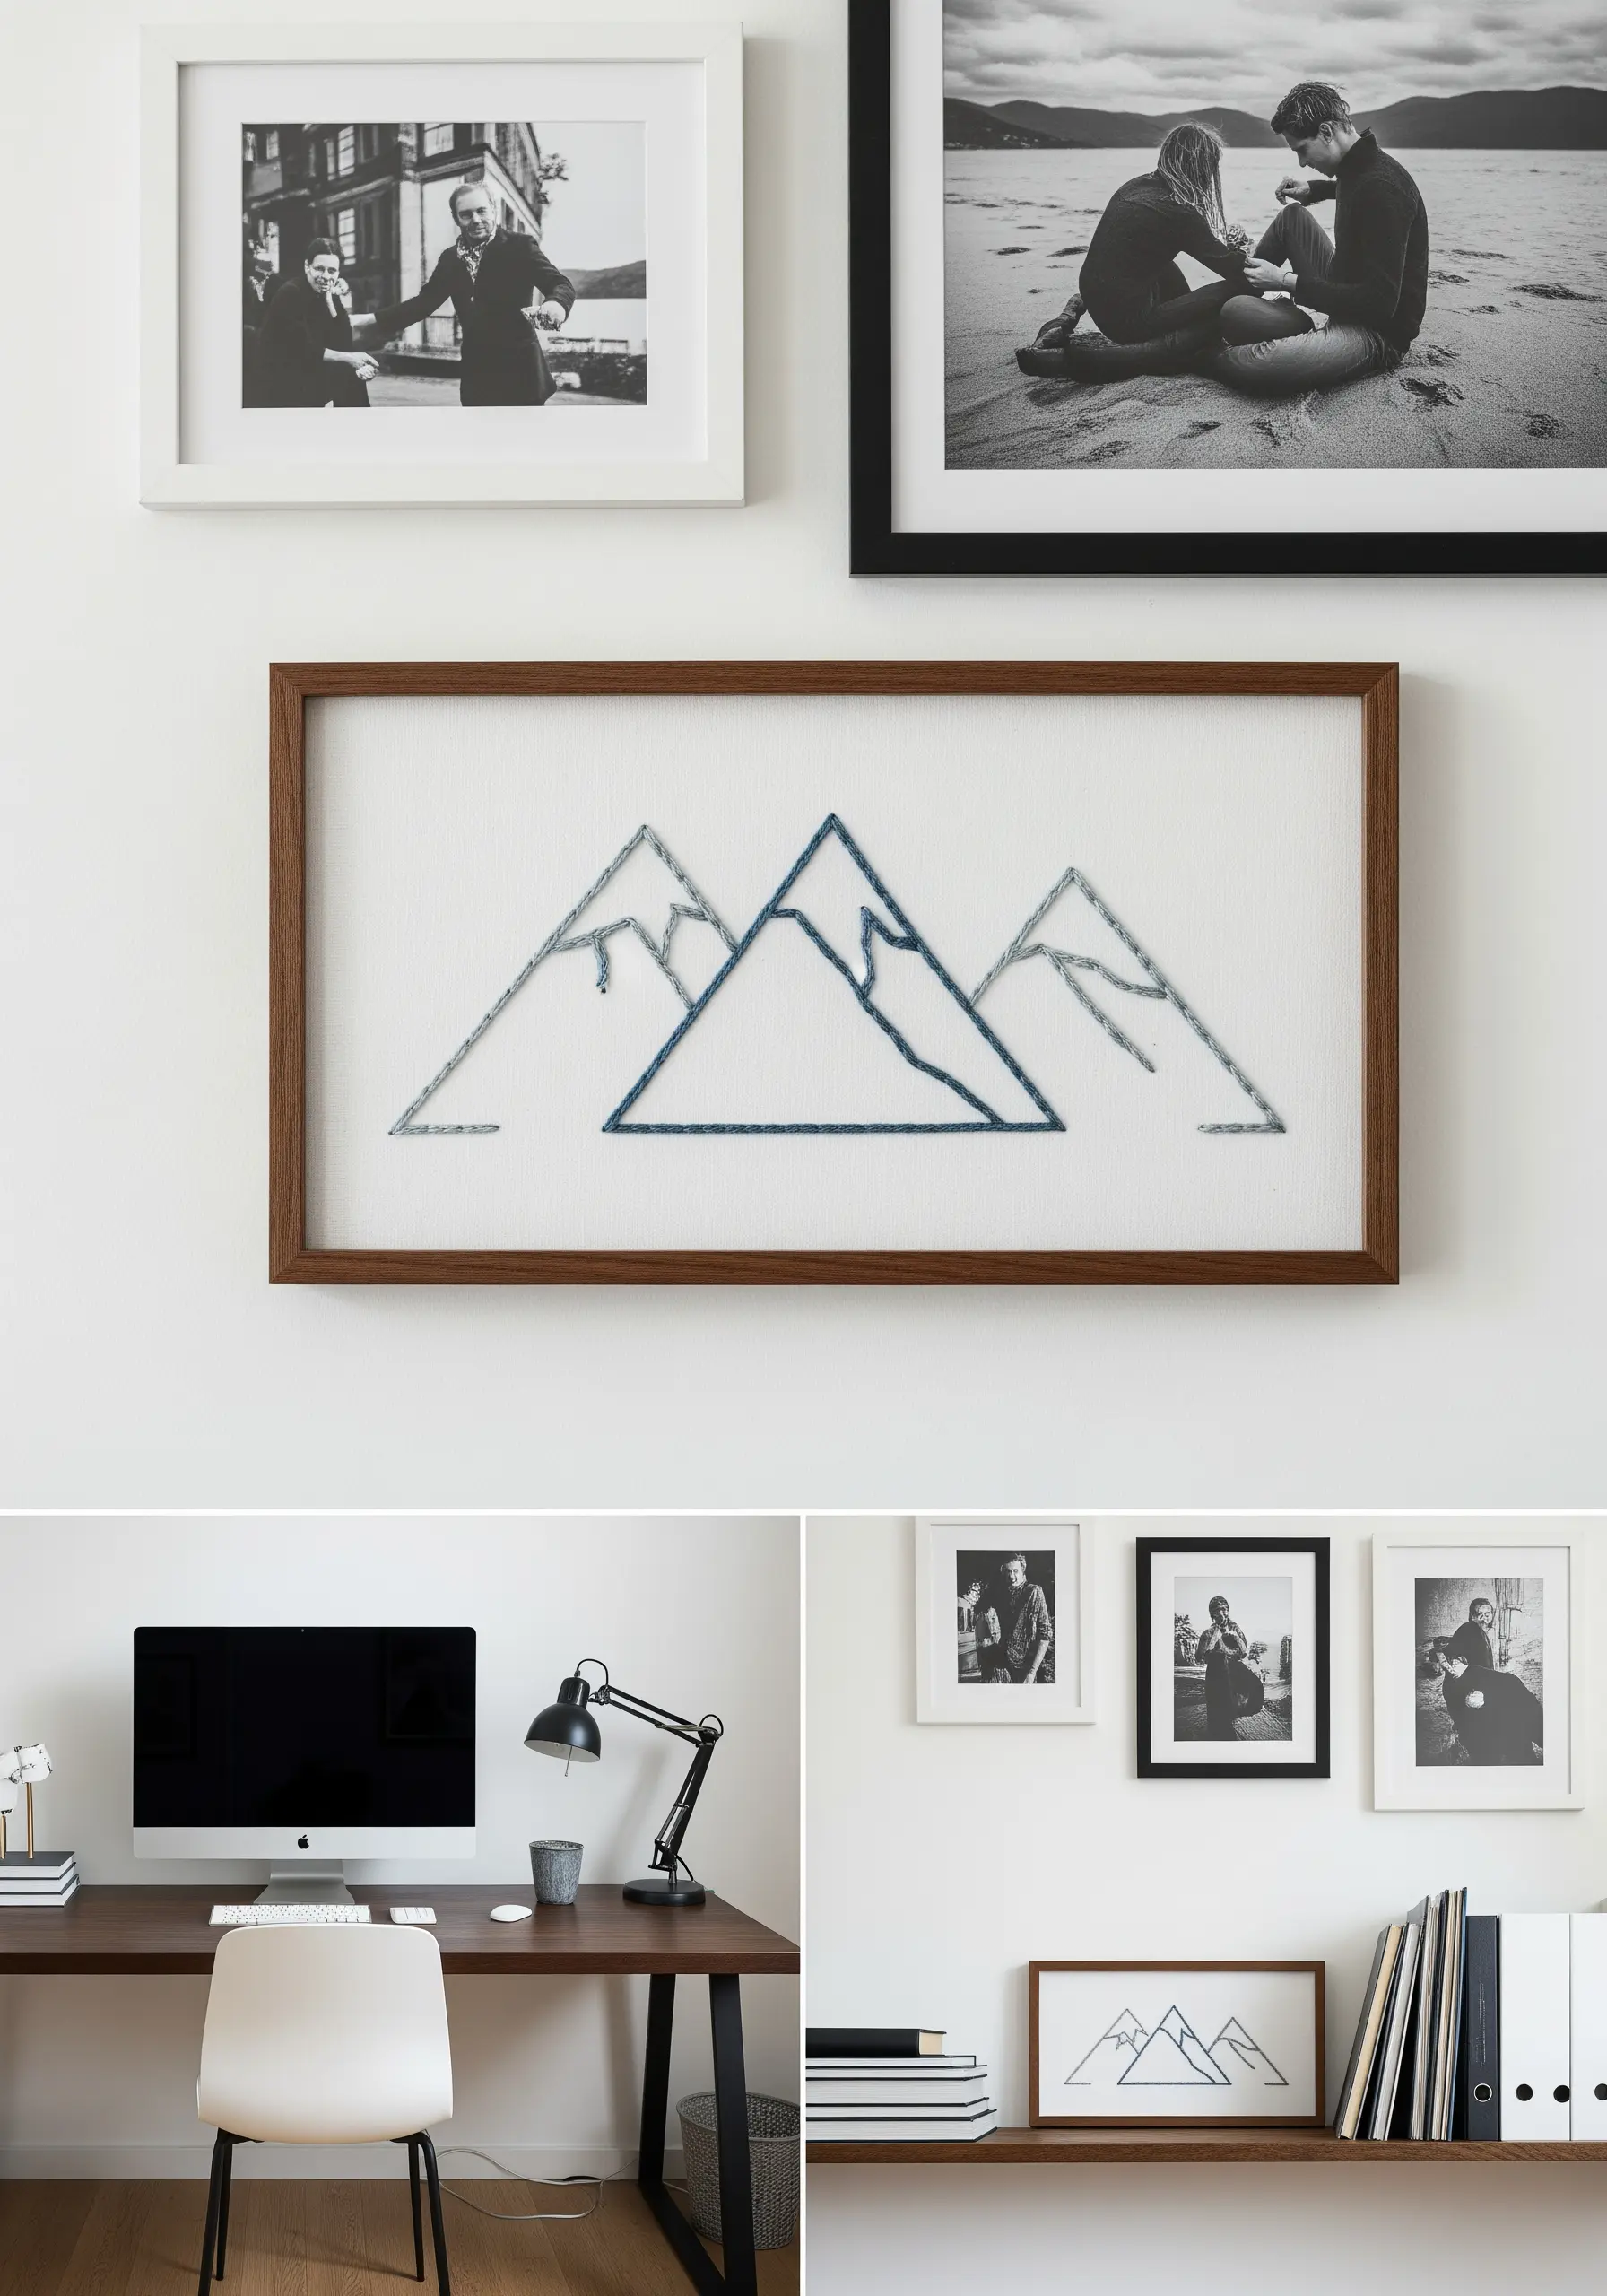
Create the illusion of a landscape with minimal effort by layering simple outlines.
Use a darker, thicker thread (4-5 strands) for the mountain in the foreground to make it feel closer.
For the background mountains, switch to a lighter color and use fewer strands (2-3). This subtle shift in thread weight and color causes the background to recede visually.
This technique transforms a flat design into a dynamic mountain landscape, and mounting it in a rectangular frame elevates it to modern wall art.
5. Build Luminous Texture with Overlapping Stitches
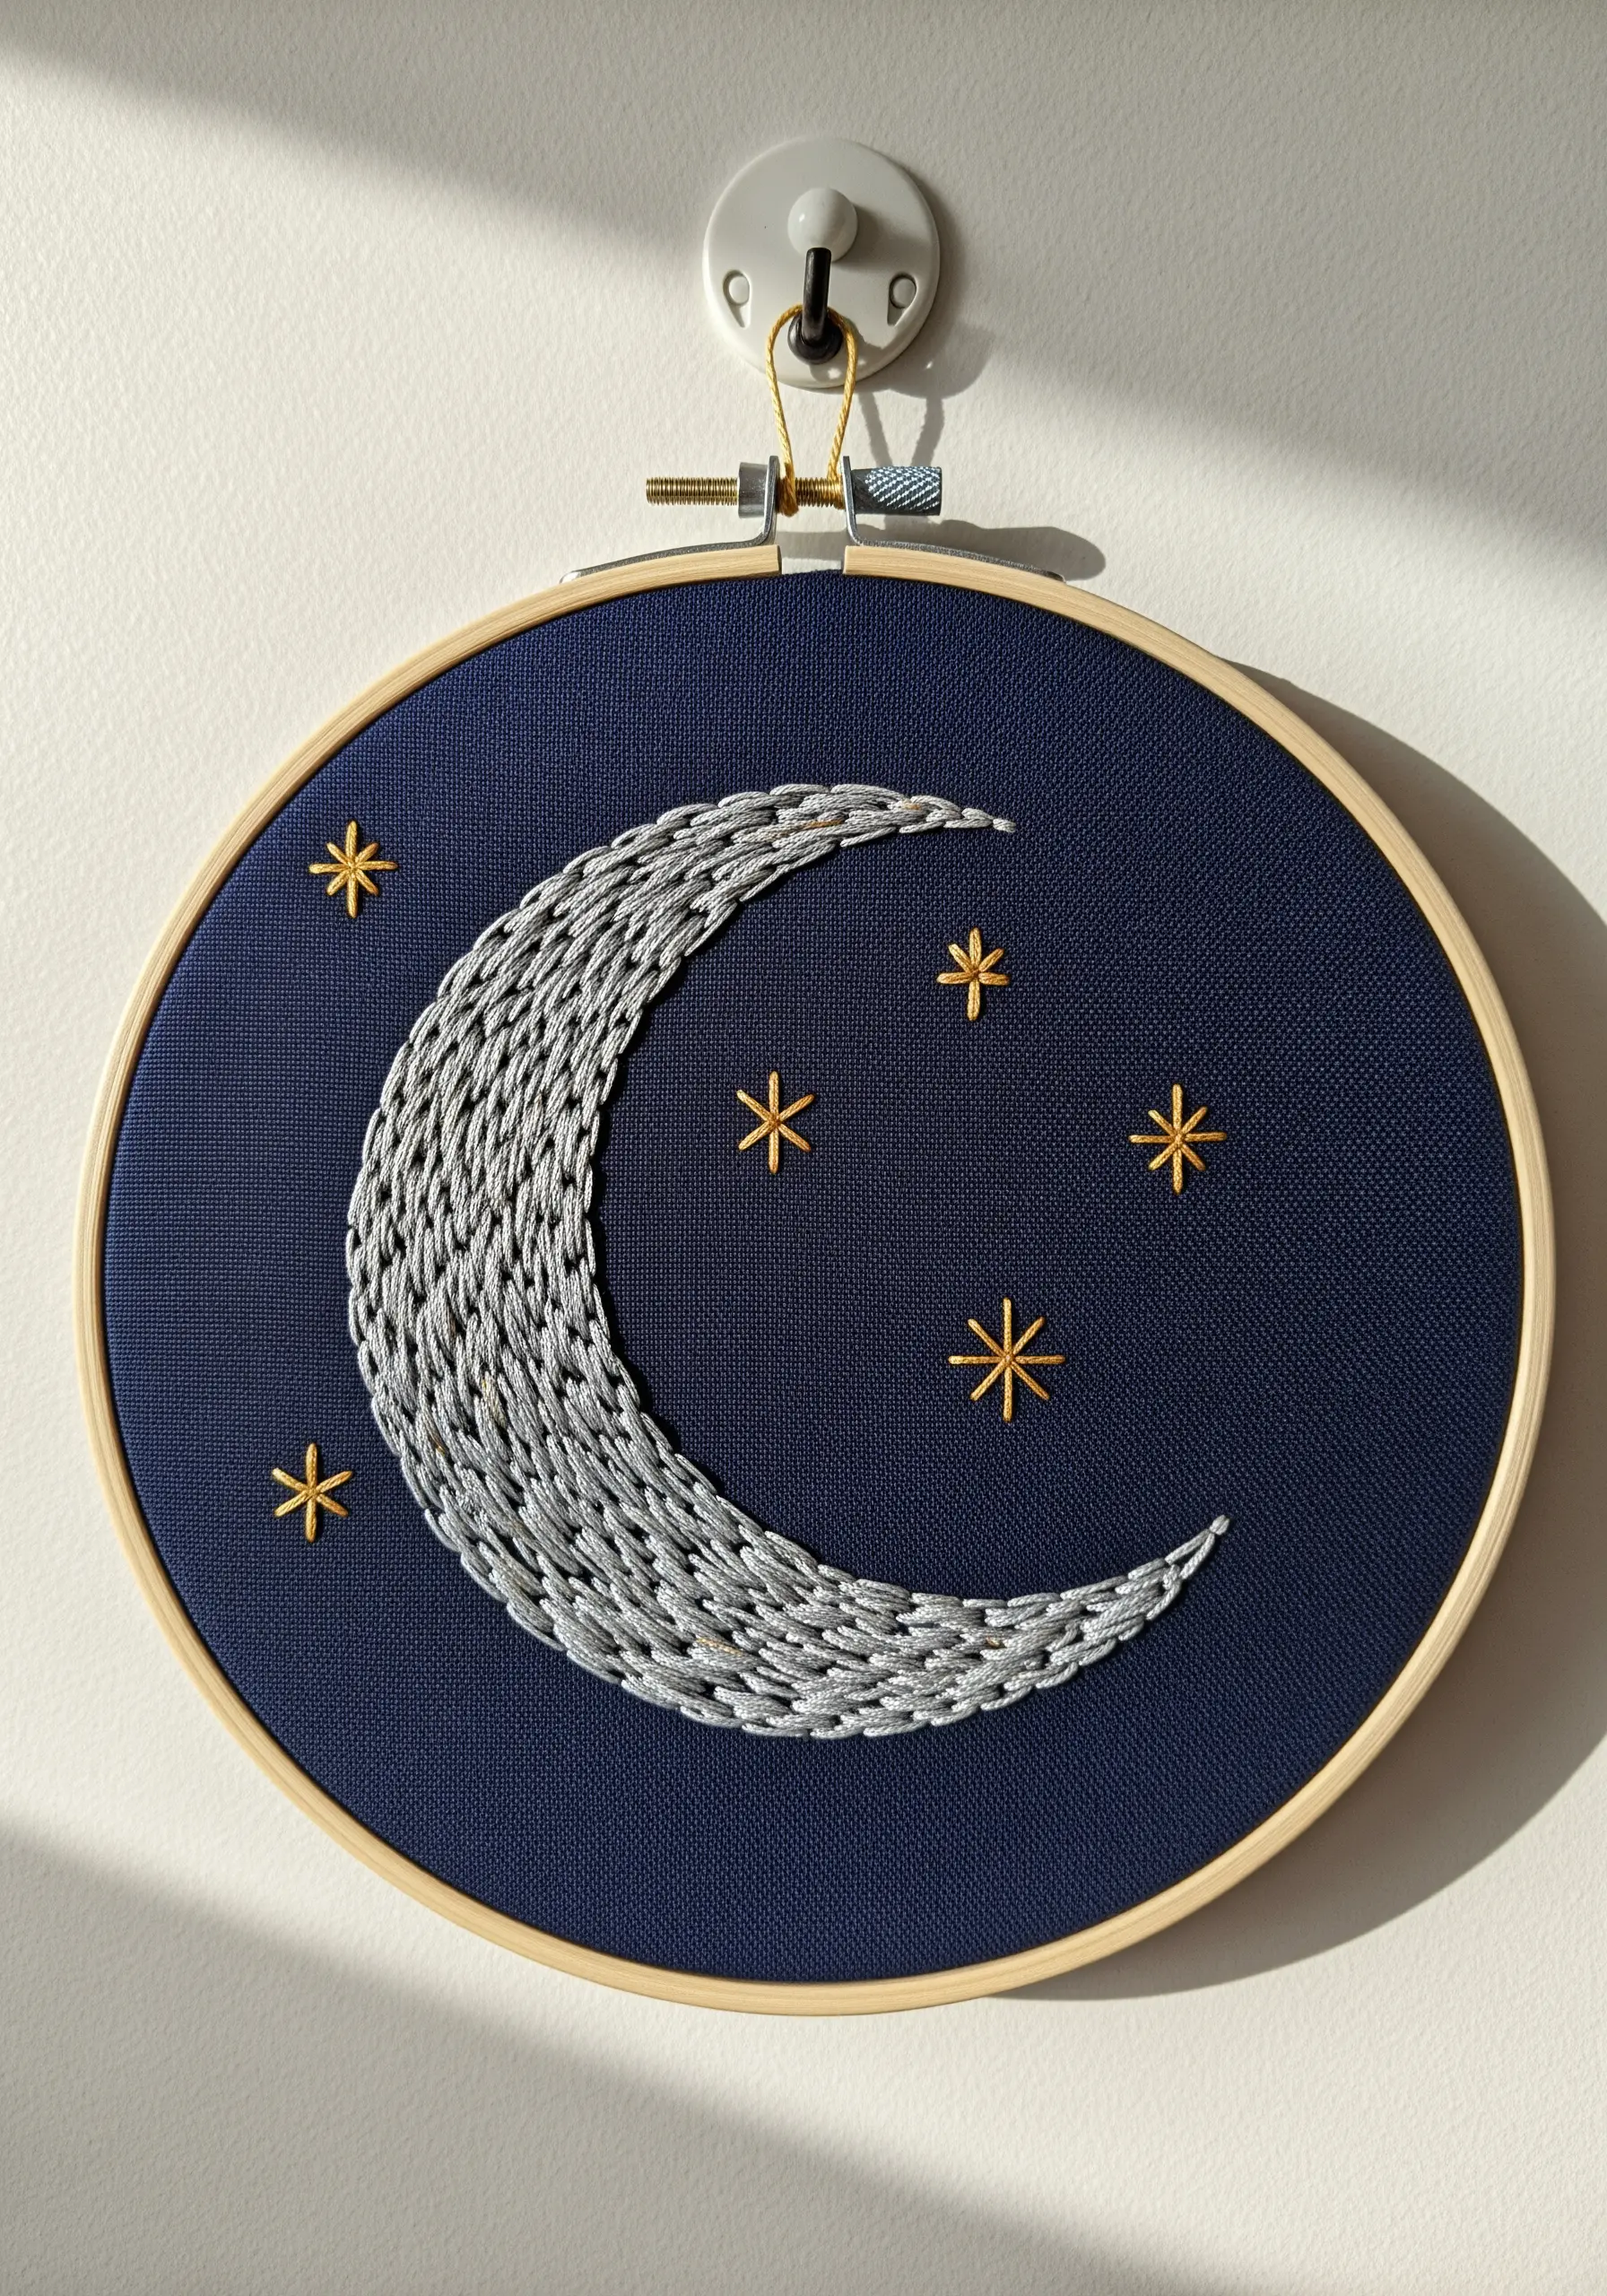
To give your crescent moon a shimmering, textured surface, fill the shape with slightly overlapping straight stitches, angled in the same direction.
Instead of standard cotton, choose a metallic or silvery-gray satin floss. These threads have a natural sheen that catches the light, enhancing the celestial feel.
Stitching on a dark navy or black fabric provides the perfect high-contrast background, making your metallic threads appear even more luminous.
Add a few simple star stitches with gold thread to complete your celestial micro-embroidery scene.
6. Combine Stitches for Realistic Floral Dimension

Bring simple florals to life by assigning a different stitch to each part of the plant for textural variety.
Use French knots for the lavender buds. Clustered together, they create a wonderfully bumpy, realistic texture that mimics a flower head.
For the stems, a simple stem stitch provides a smooth, rope-like line that contrasts perfectly with the knots.
This combination of stitches is one of the most effective delicate lavender stitch ideas for adding dimension to your work without needing complex techniques.
7. Fill Shapes Flawlessly with Satin Stitch

For clean, modern color-blocking, satin stitch is your best tool. The goal is to create a smooth, seamless field of color.
To prevent your edges from looking uneven, first outline each shape with a tiny split stitch. This creates a slightly raised border that your satin stitches can tuck up against, resulting in a perfectly crisp edge.
Keep your stitches parallel and close together, but not overlapping, to avoid bulk. The smooth finish makes these abstract embroidery patterns look incredibly polished.
8. Mix Textures to Define a Single Motif
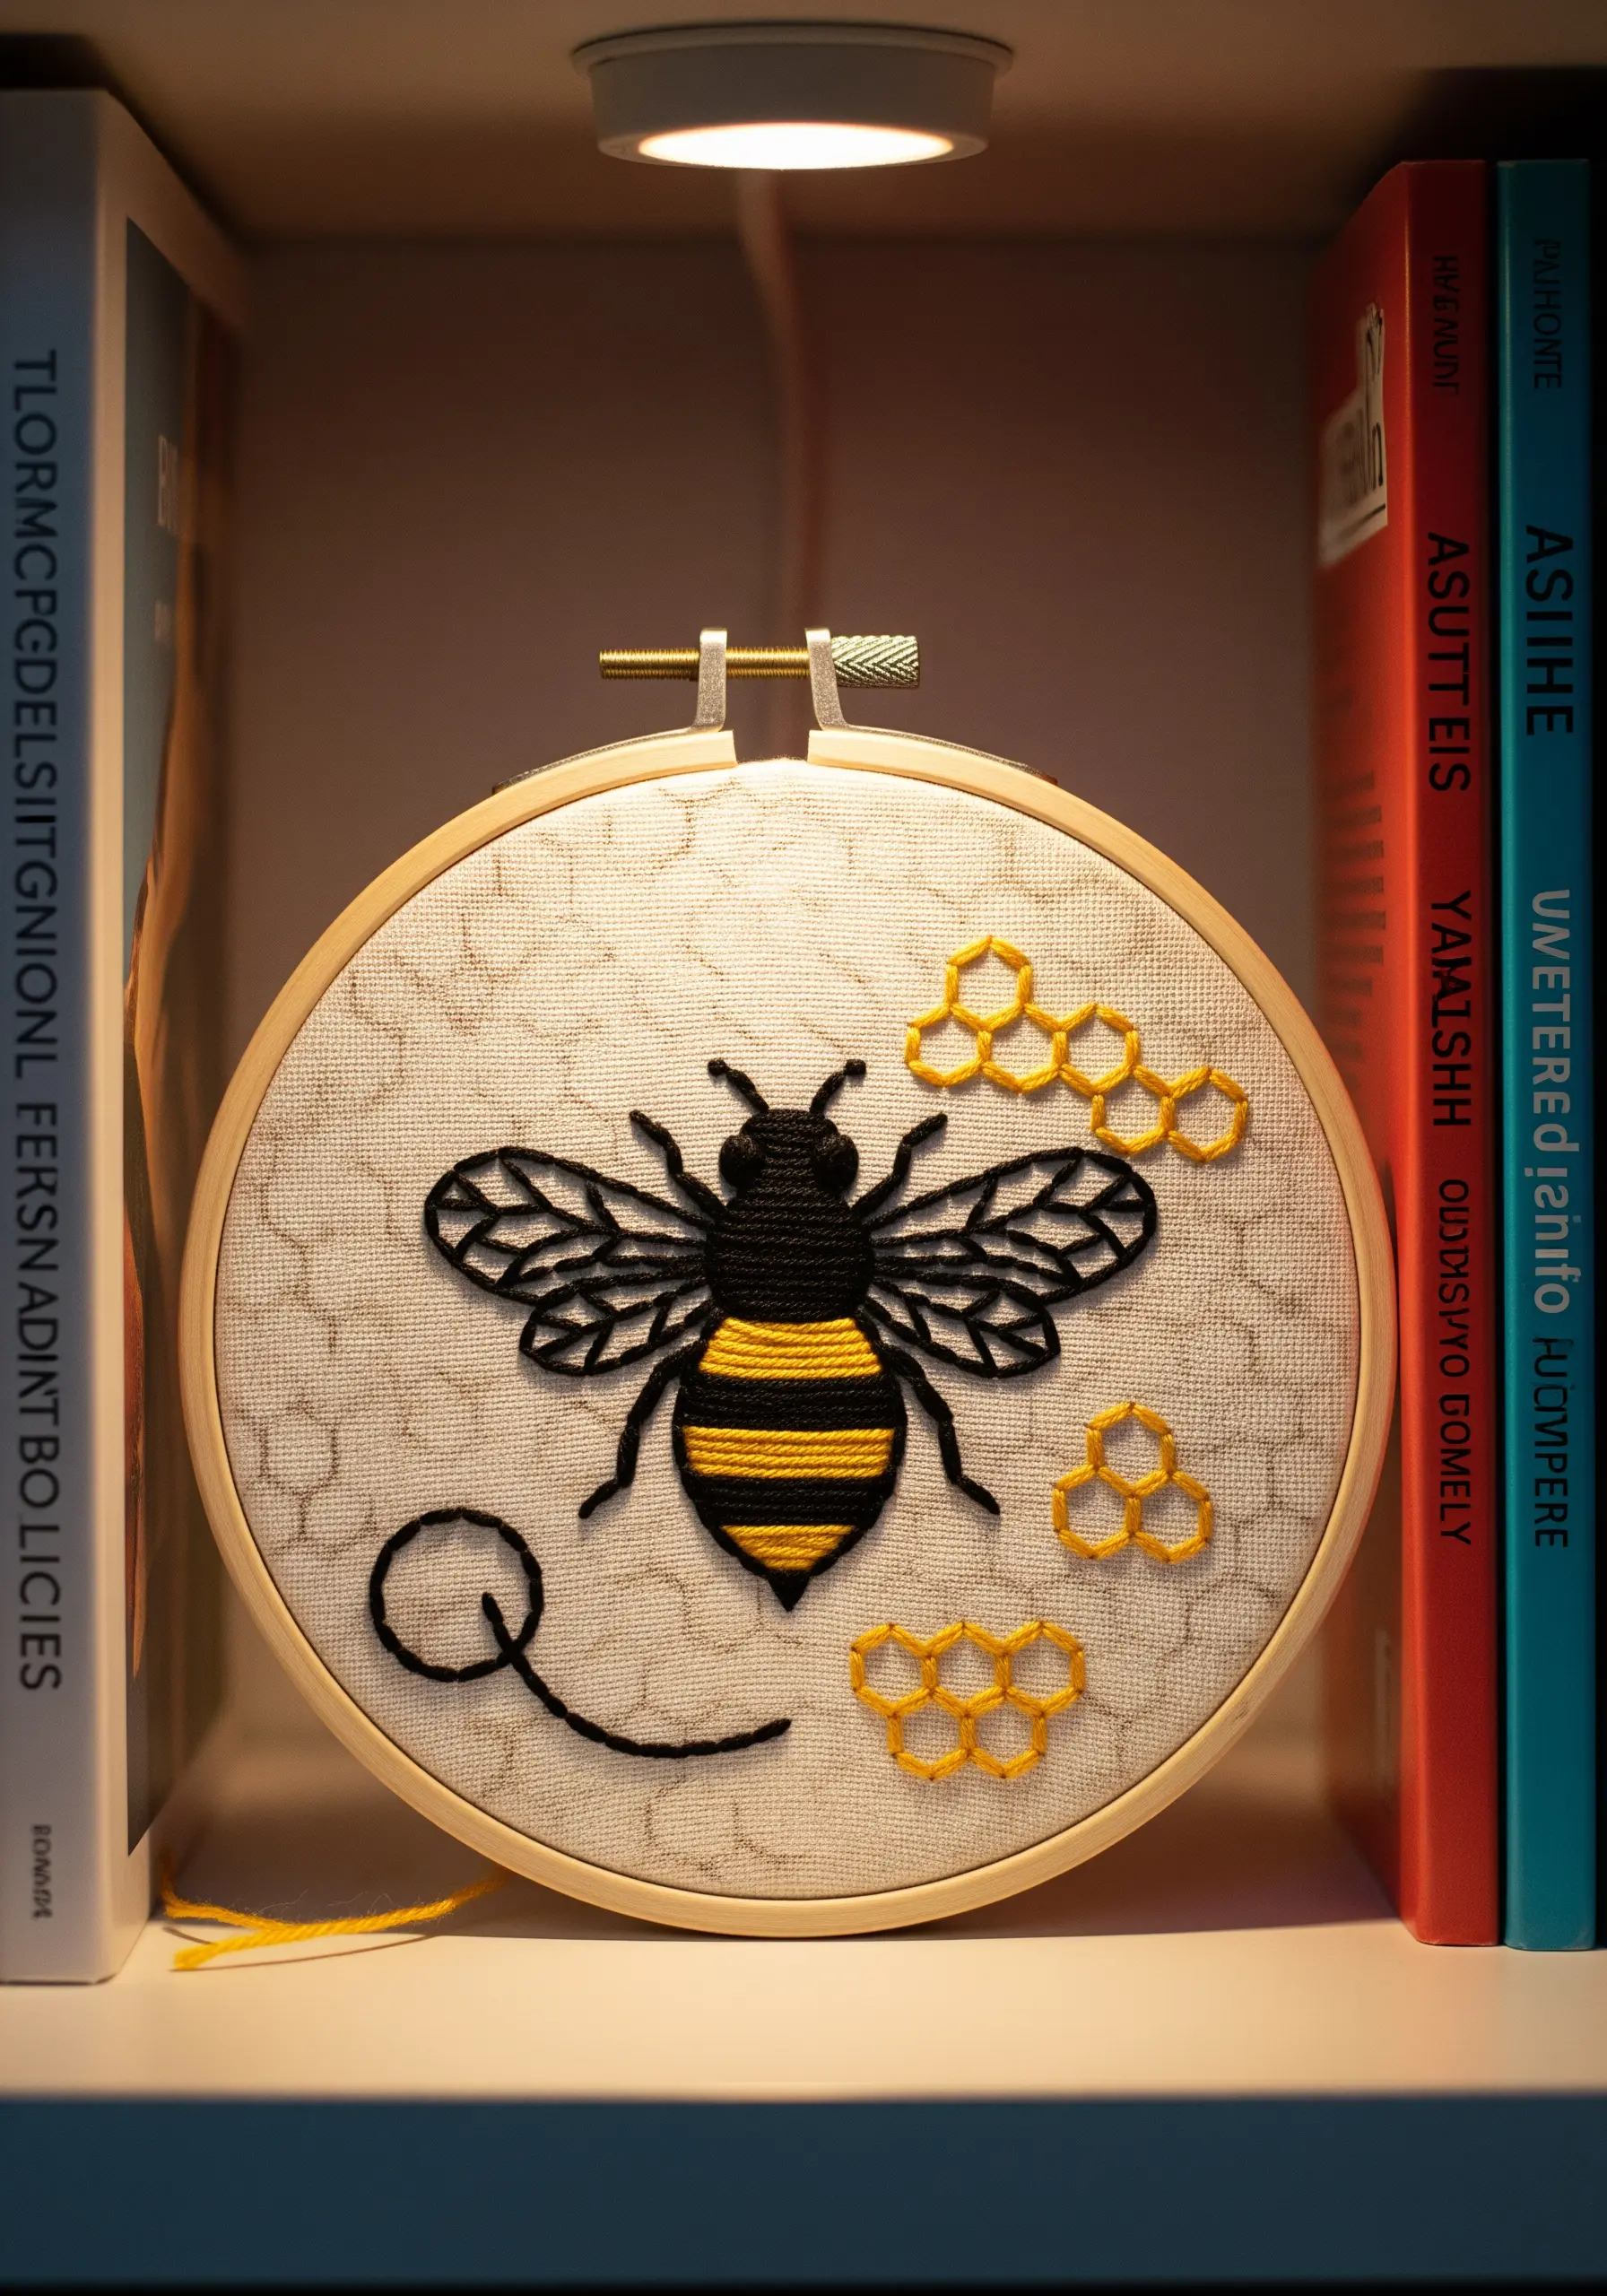
Elevate a simple insect motif by using different stitches and textures for each part of its body.
Use a dense, horizontal satin stitch for the bee’s fuzzy body, alternating black and yellow for the stripes.
For the delicate wings, switch to a simple backstitch outline filled with a few straight stitches. This contrast in density makes the wings feel translucent and light.
This thoughtful variation in texture makes the final piece far more engaging and visually interesting.
9. Script Smooth Lettering with Couching
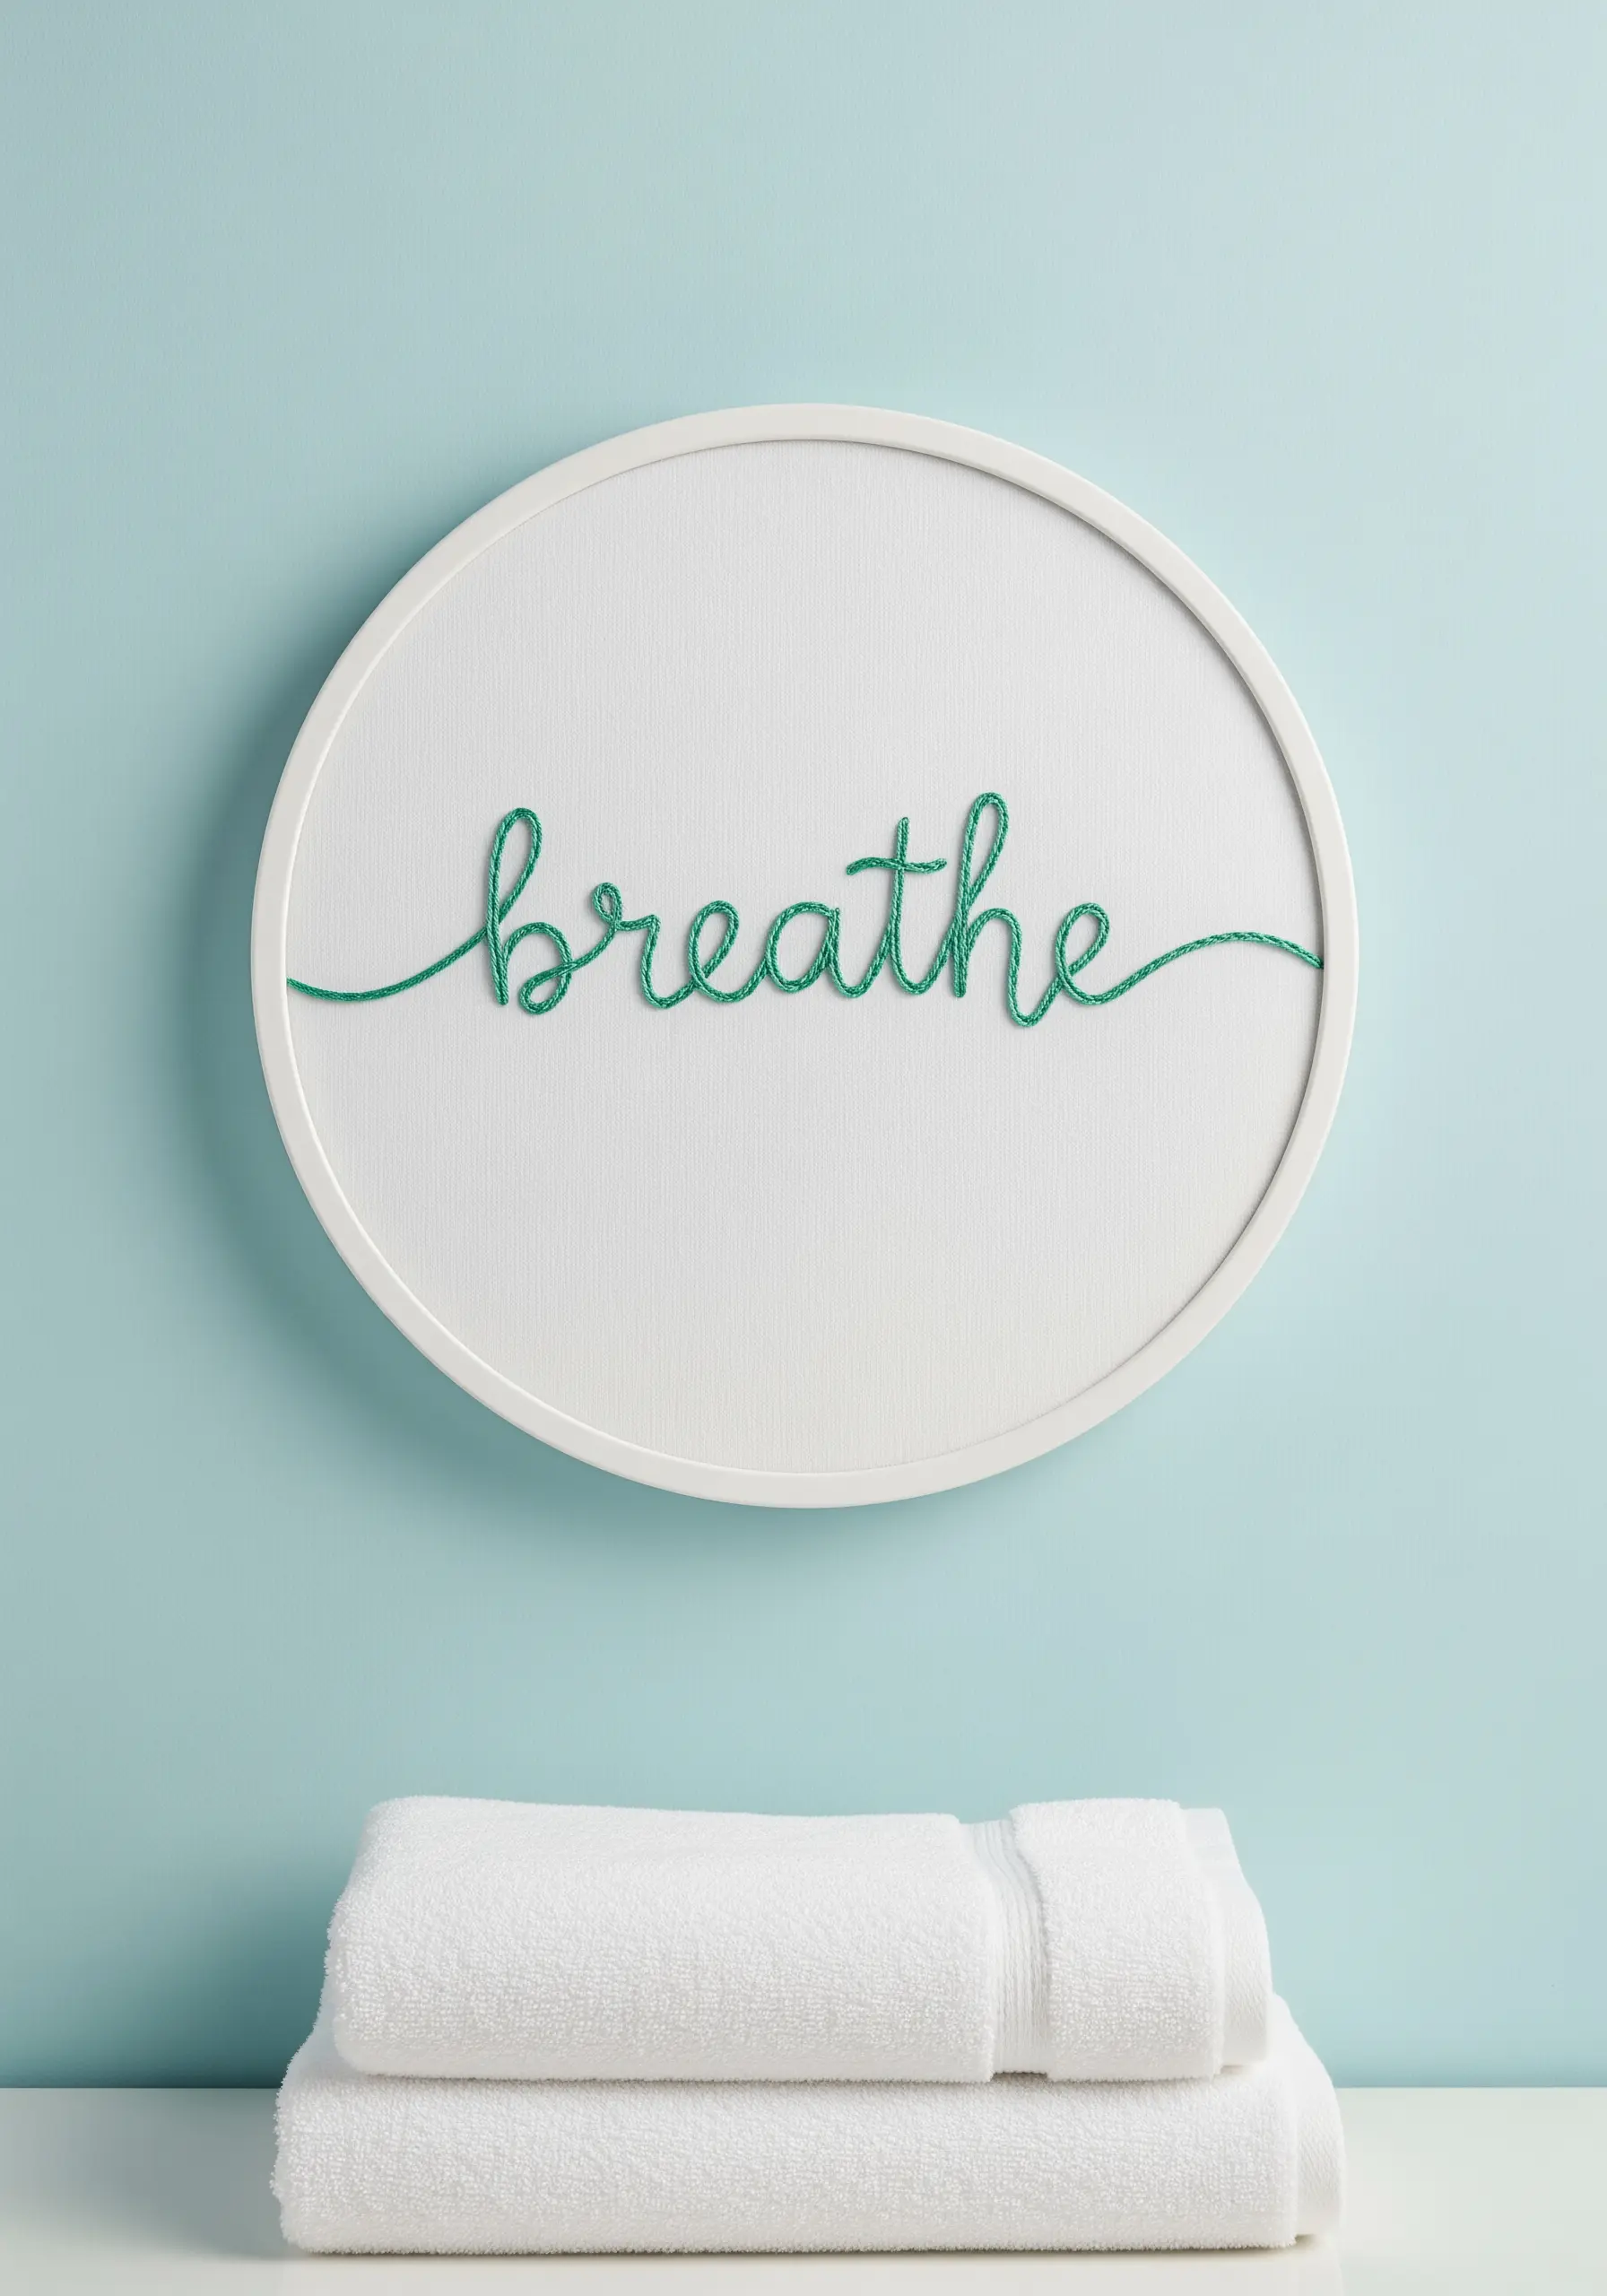
For fluid, cursive lettering that flows like ink, the couching stitch is superior to backstitch.
First, lay down your main thread along the desired script line. You can use a thicker thread or multiple strands for this guide thread.
Then, using a second, thinner thread (one or two strands), make tiny tacking stitches at regular intervals to hold the main thread in place.
This technique allows you to create perfectly smooth curves and swirls that are impossible to achieve with standard outlining stitches, making it perfect for embroidered quote wall hangings.
10. Elevate Your Outlines with a Whipped Backstitch
If your backstitch outlines look a bit gappy or uneven, the whipped backstitch is a simple upgrade for a smoother, more solid line.
First, complete your design using a standard backstitch.
Then, without piercing the fabric, bring up a new thread and ‘whip’ it around each backstitch, always from the same direction (e.g., top to bottom).
This extra step covers the gaps between stitches, creating a raised, cord-like effect that looks incredibly polished, especially for single-color designs.
11. Create a Braided Texture with Chain Stitch
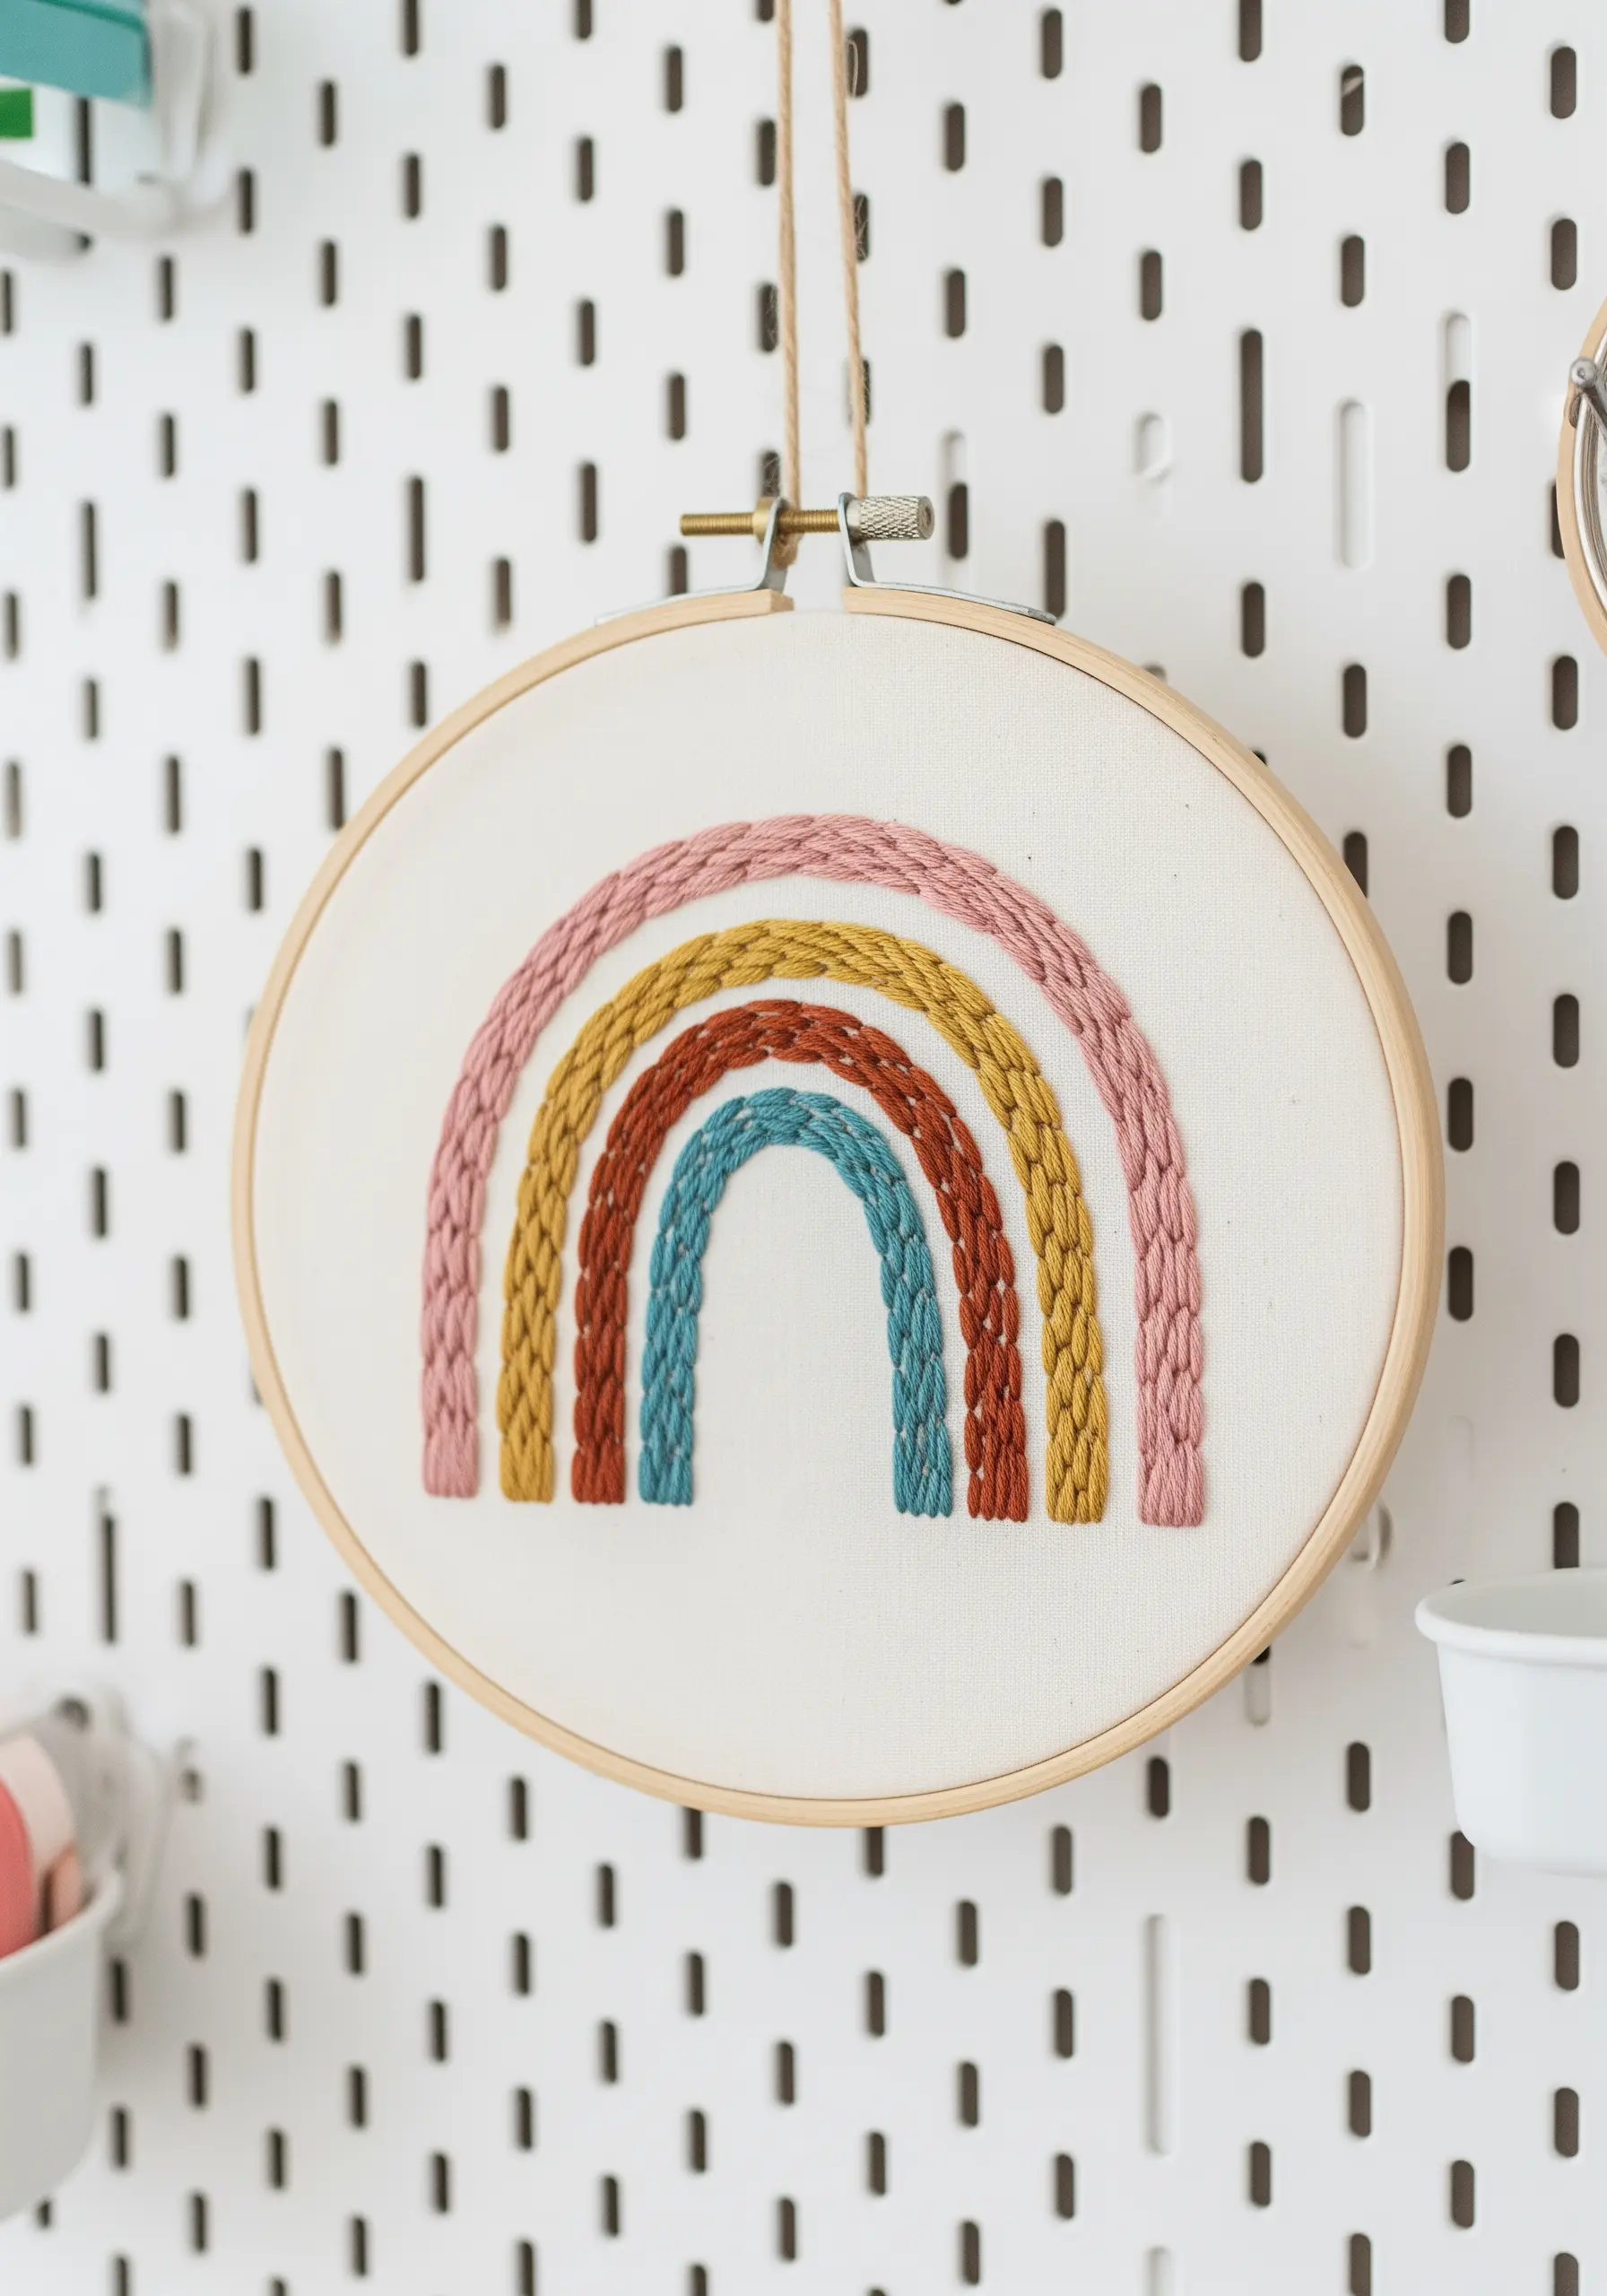
For a bold, tactile line with a beautiful braided texture, use the chain stitch instead of a simple backstitch.
Each stitch forms a loop that the next stitch passes through, creating a continuous, linked chain.
The secret to a neat chain stitch is consistency. Aim to make every loop the same size and tension. If your loops are too loose, the line will look sloppy; too tight, and the fabric will pucker.
This stitch is ideal for filling thick bands of color, like the arches of a rainbow, giving your piece a cozy, handmade feel.
12. Suggest Dimension with Directional Stitches

You can make a flat shape feel three-dimensional simply by changing the direction of your stitches.
Fill the main body of the cactus with a long-and-short stitch, angling your stitches slightly inward toward the center line. This creates a subtle curve that suggests roundness.
For the arms, change the direction of your stitches to follow their upward curve. This small adjustment tricks the eye into seeing depth and form.
Finish with tiny straight stitches for spines and French knots for flowers to complete the illusion.
13. Add Dimension with a Padded Satin Stitch

To make a monogram truly stand out, give it a raised, three-dimensional quality using padded satin stitch.
First, fill the entire letter shape with a foundation of small, simple stitches, like seed stitch or split stitch. This layer of padding is what creates the height.
Then, work your final satin stitch layer directly over the padding. Make your stitches perpendicular to the padding stitches for the smoothest coverage.
This technique transforms a flat letter into a luxurious, tactile element, perfect for minimal monogram styles.
14. Depict Motion with Lines of Chain Stitch
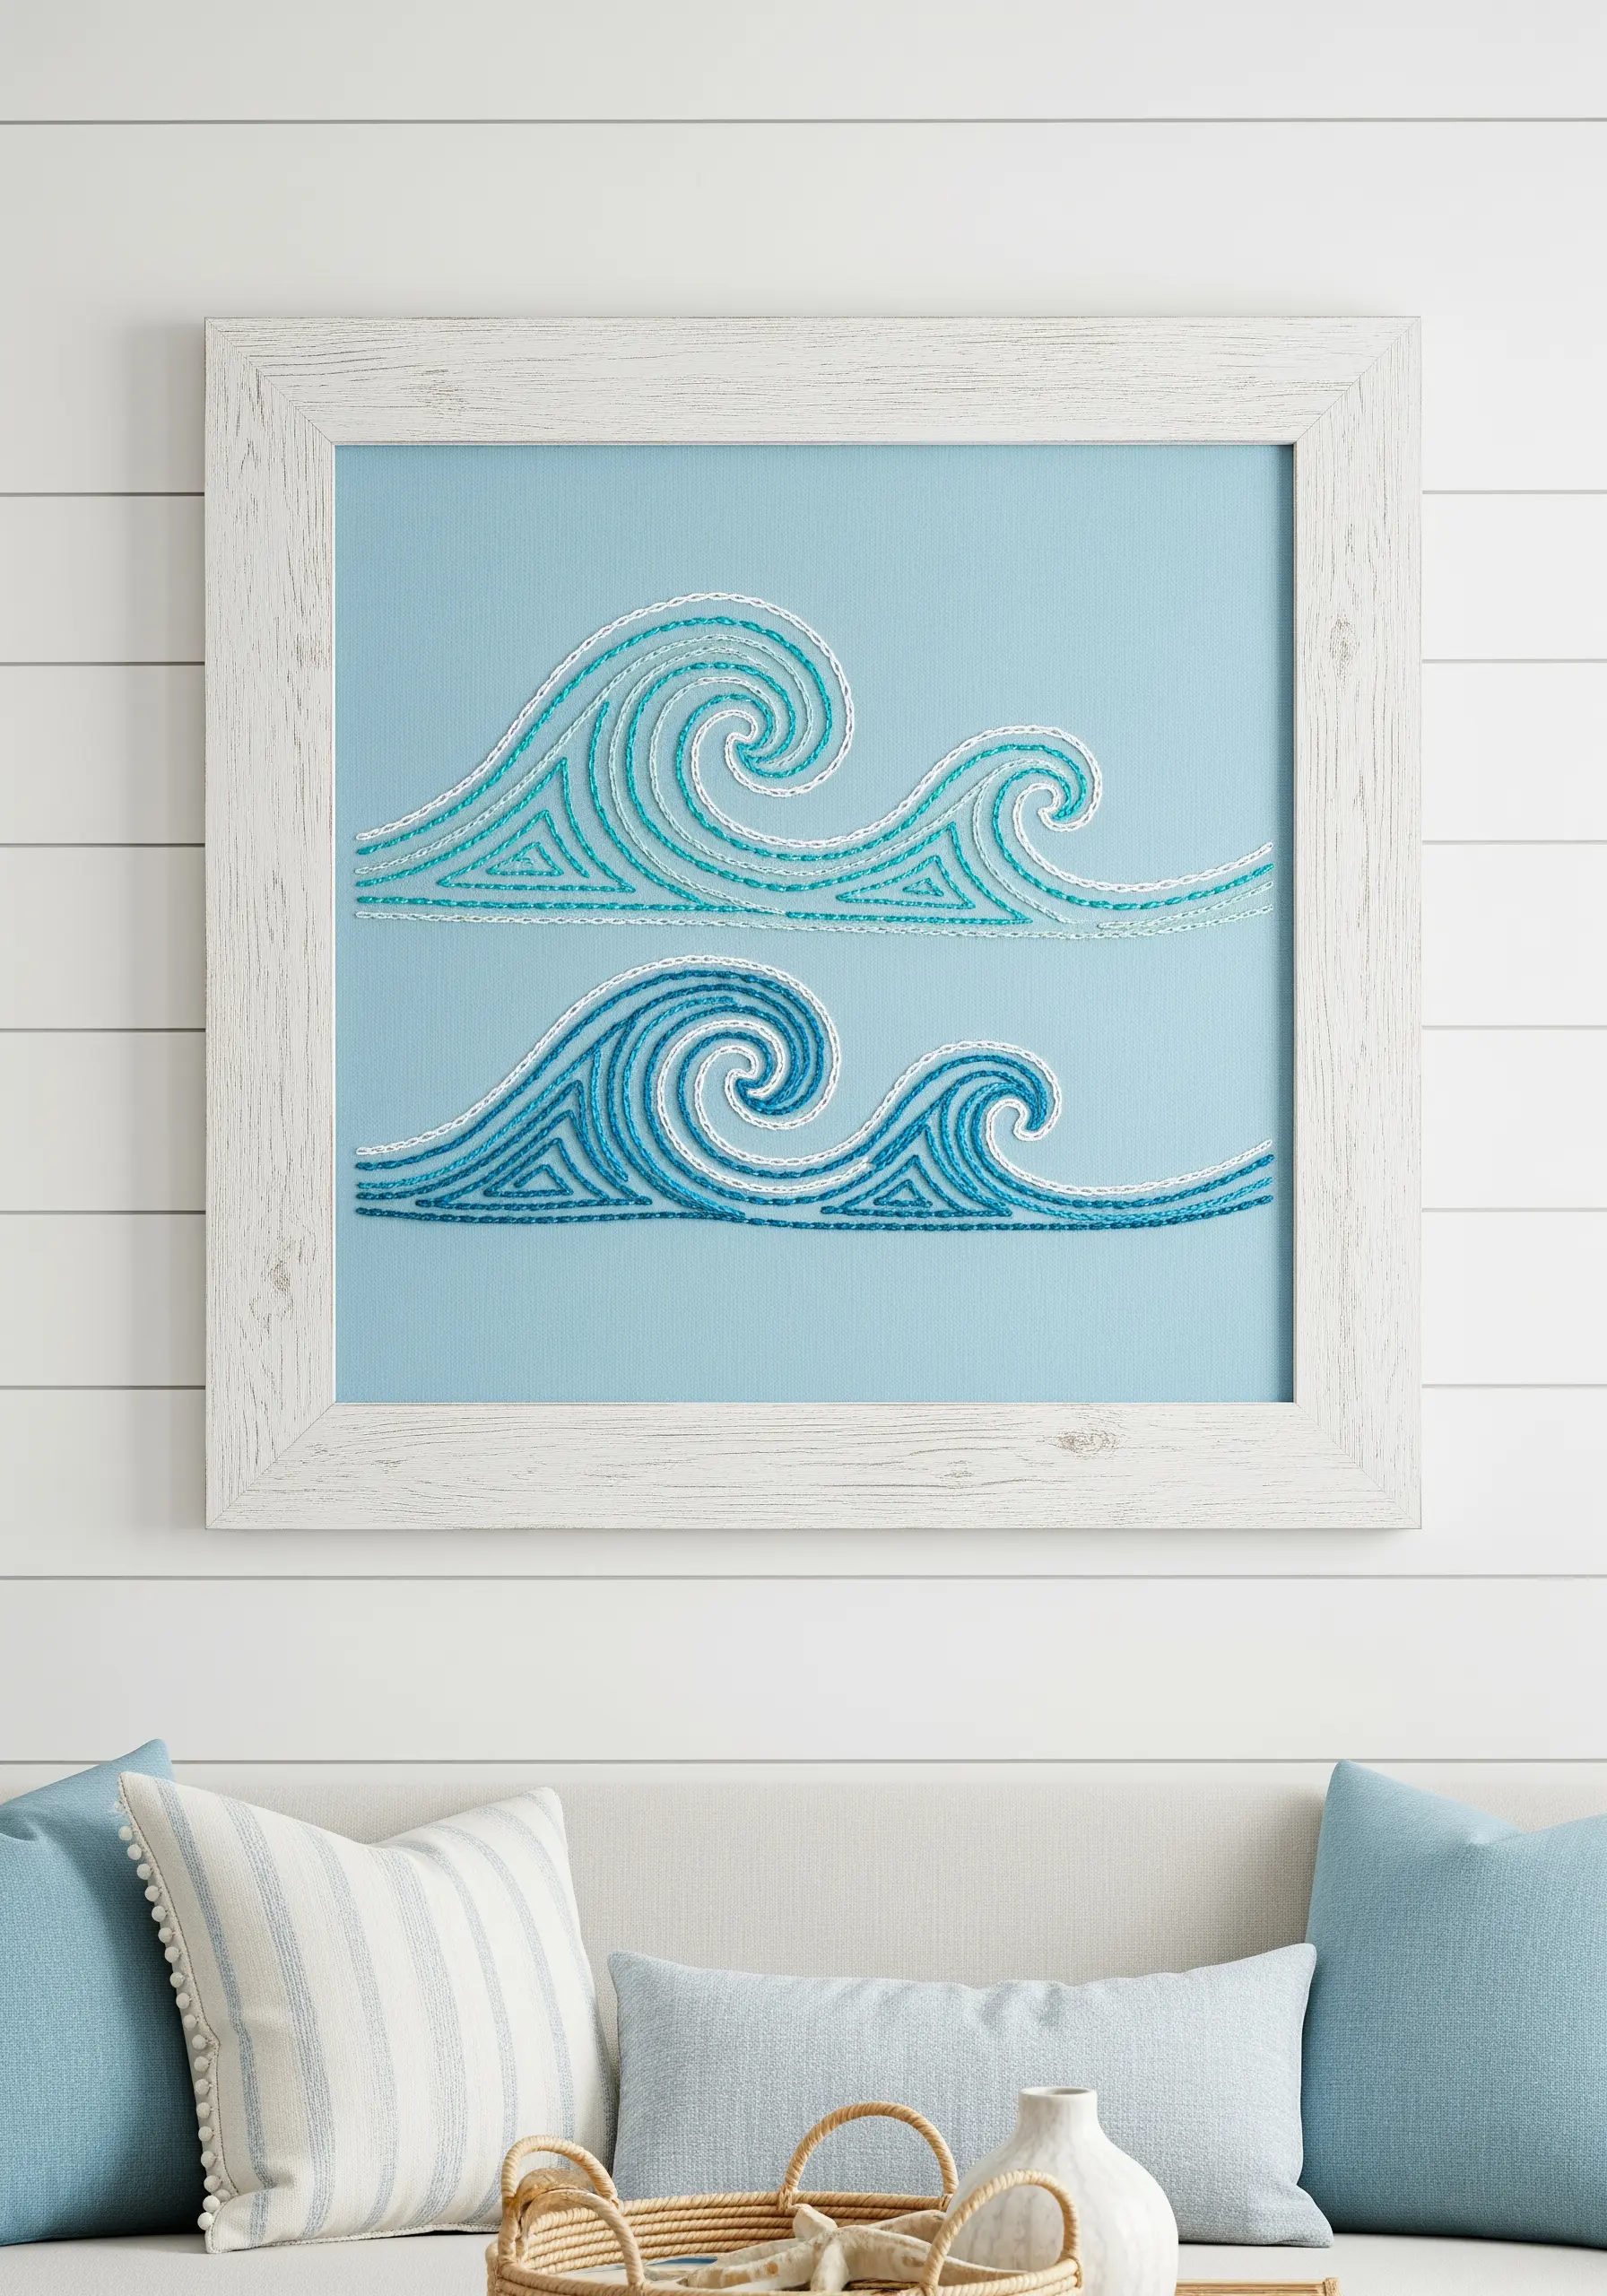
Capture the fluid movement of ocean waves by stitching parallel rows of chain stitch.
Use several shades of the same color family, from dark teal to light seafoam green, to create a sense of depth and highlight.
For extra shimmer, incorporate a single strand of metallic or glitter thread alongside your cotton floss. This subtle addition will catch the light and mimic the sun glistening on water.
The braided texture of the chain stitch is perfect for representing the frothy, dynamic energy of the sea, making for beautiful coastal-vibe embroidery projects.
15. Use Directional Satin Stitch for Realism

To make a simple fruit slice look instantly more realistic, pay close attention to the direction of your satin stitches.
For each segment of the lemon, angle your stitches so they radiate from the center outwards, just as they would in a real piece of fruit.
Use a single strand of a lighter shade to add a few highlight stitches on top, enhancing the juicy texture.
A crisp whipped backstitch for the rind contains the shape and provides a clean, professional finish.
16. Master the Star Stitch for Celestial Details

For perfect, uniform stars in a constellation piece, use the star stitch instead of guessing with random straight stitches.
A star stitch is typically made of eight straight stitches all crossing over a single central point, creating a tiny, multi-faceted starburst.
Use a metallic silver or a bright white thread on dark fabric for maximum contrast and visibility. This makes the design pop and feels more magical.
Connect your stars with a simple, single-strand backstitch to keep the focus on the celestial points themselves.
17. Create Natural Leaf Textures with Fishbone Stitch

The fishbone stitch is the perfect choice for embroidering leaves, as it creates a central vein and angled leaf texture all in one motion.
You begin with a single straight stitch at the leaf’s tip, then alternate angled stitches from left to right, crossing them slightly at the center line.
This stitch naturally forms a beautifully textured, symmetrical leaf shape that looks far more complex than it is to execute.
It’s one of the most effective fern and foliage stitch variations for capturing the organic structure of plants.
18. Refine Your Outlines with Split Stitch
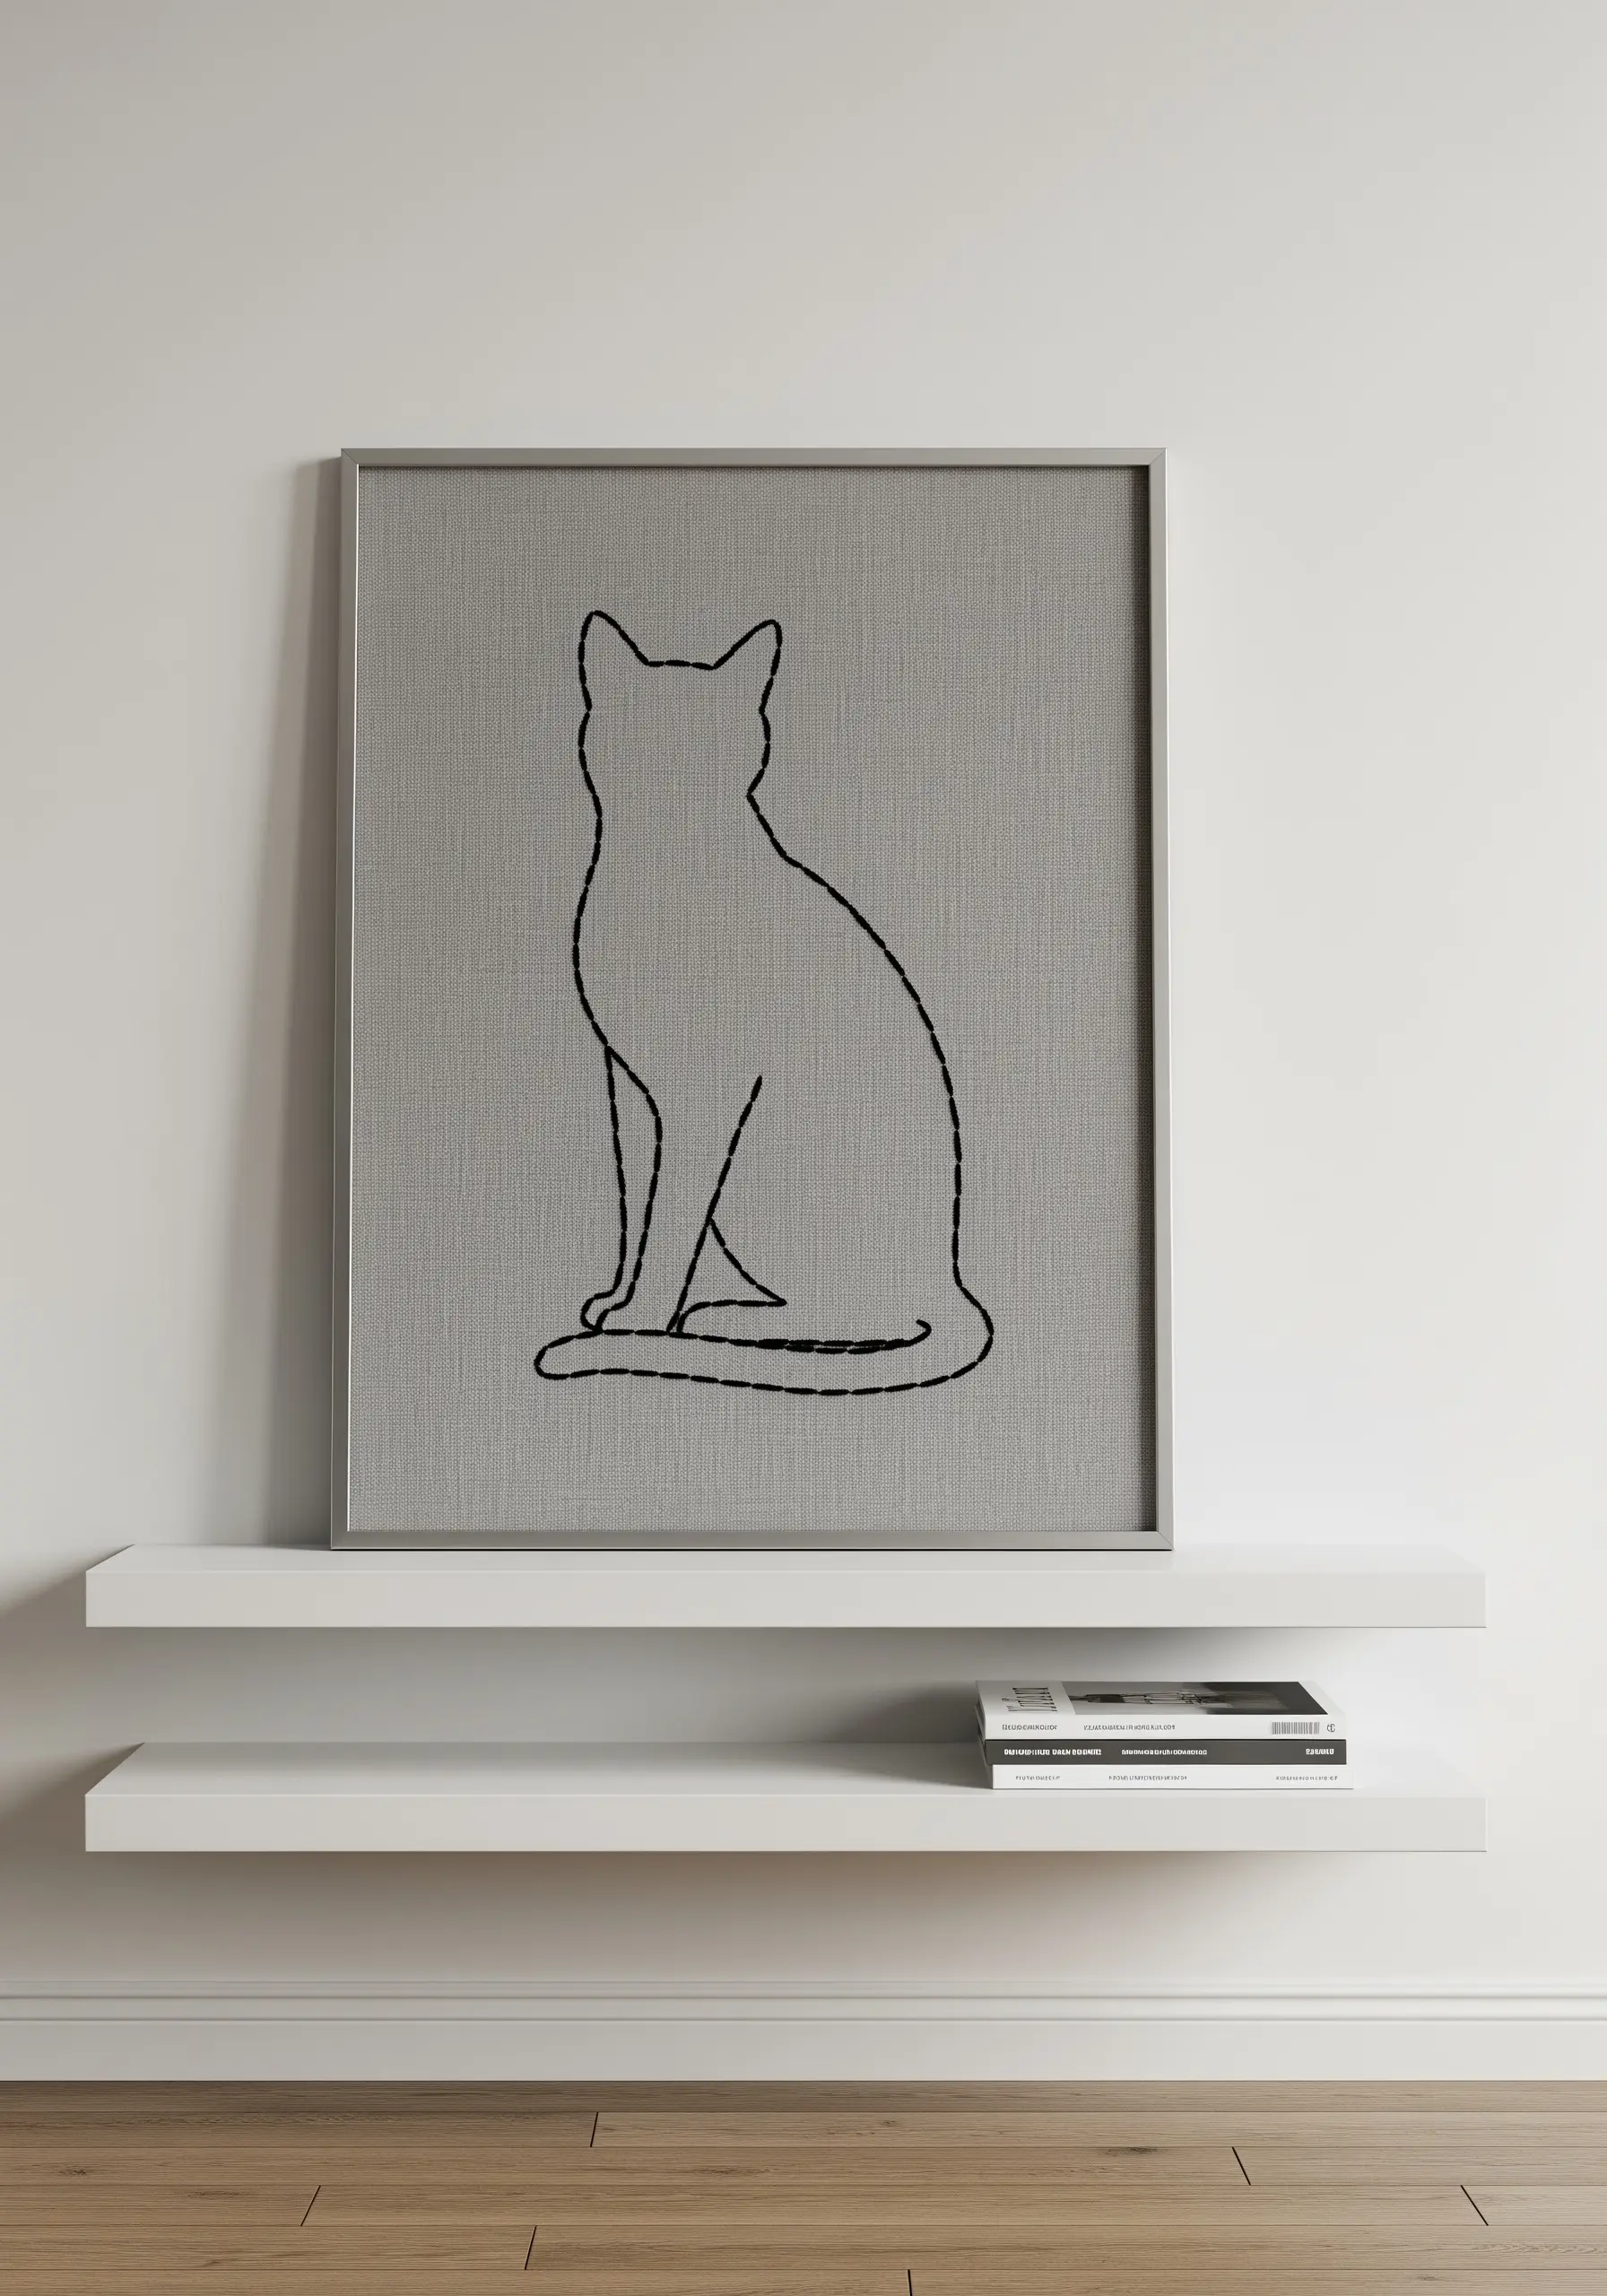
For an outline that looks more like a solid, textured line than a series of dashes, use the split stitch.
You create this stitch by bringing your needle up through the middle of the previous stitch, splitting the threads.
This process creates a tight, almost braided line with more texture and substance than a standard backstitch, making it ideal for elegant silhouettes.
It provides a refined edge for delicate pet line art, giving the final piece a polished, gallery-worthy appearance.
19. Achieve Effortless Color Blending with Variegated Thread
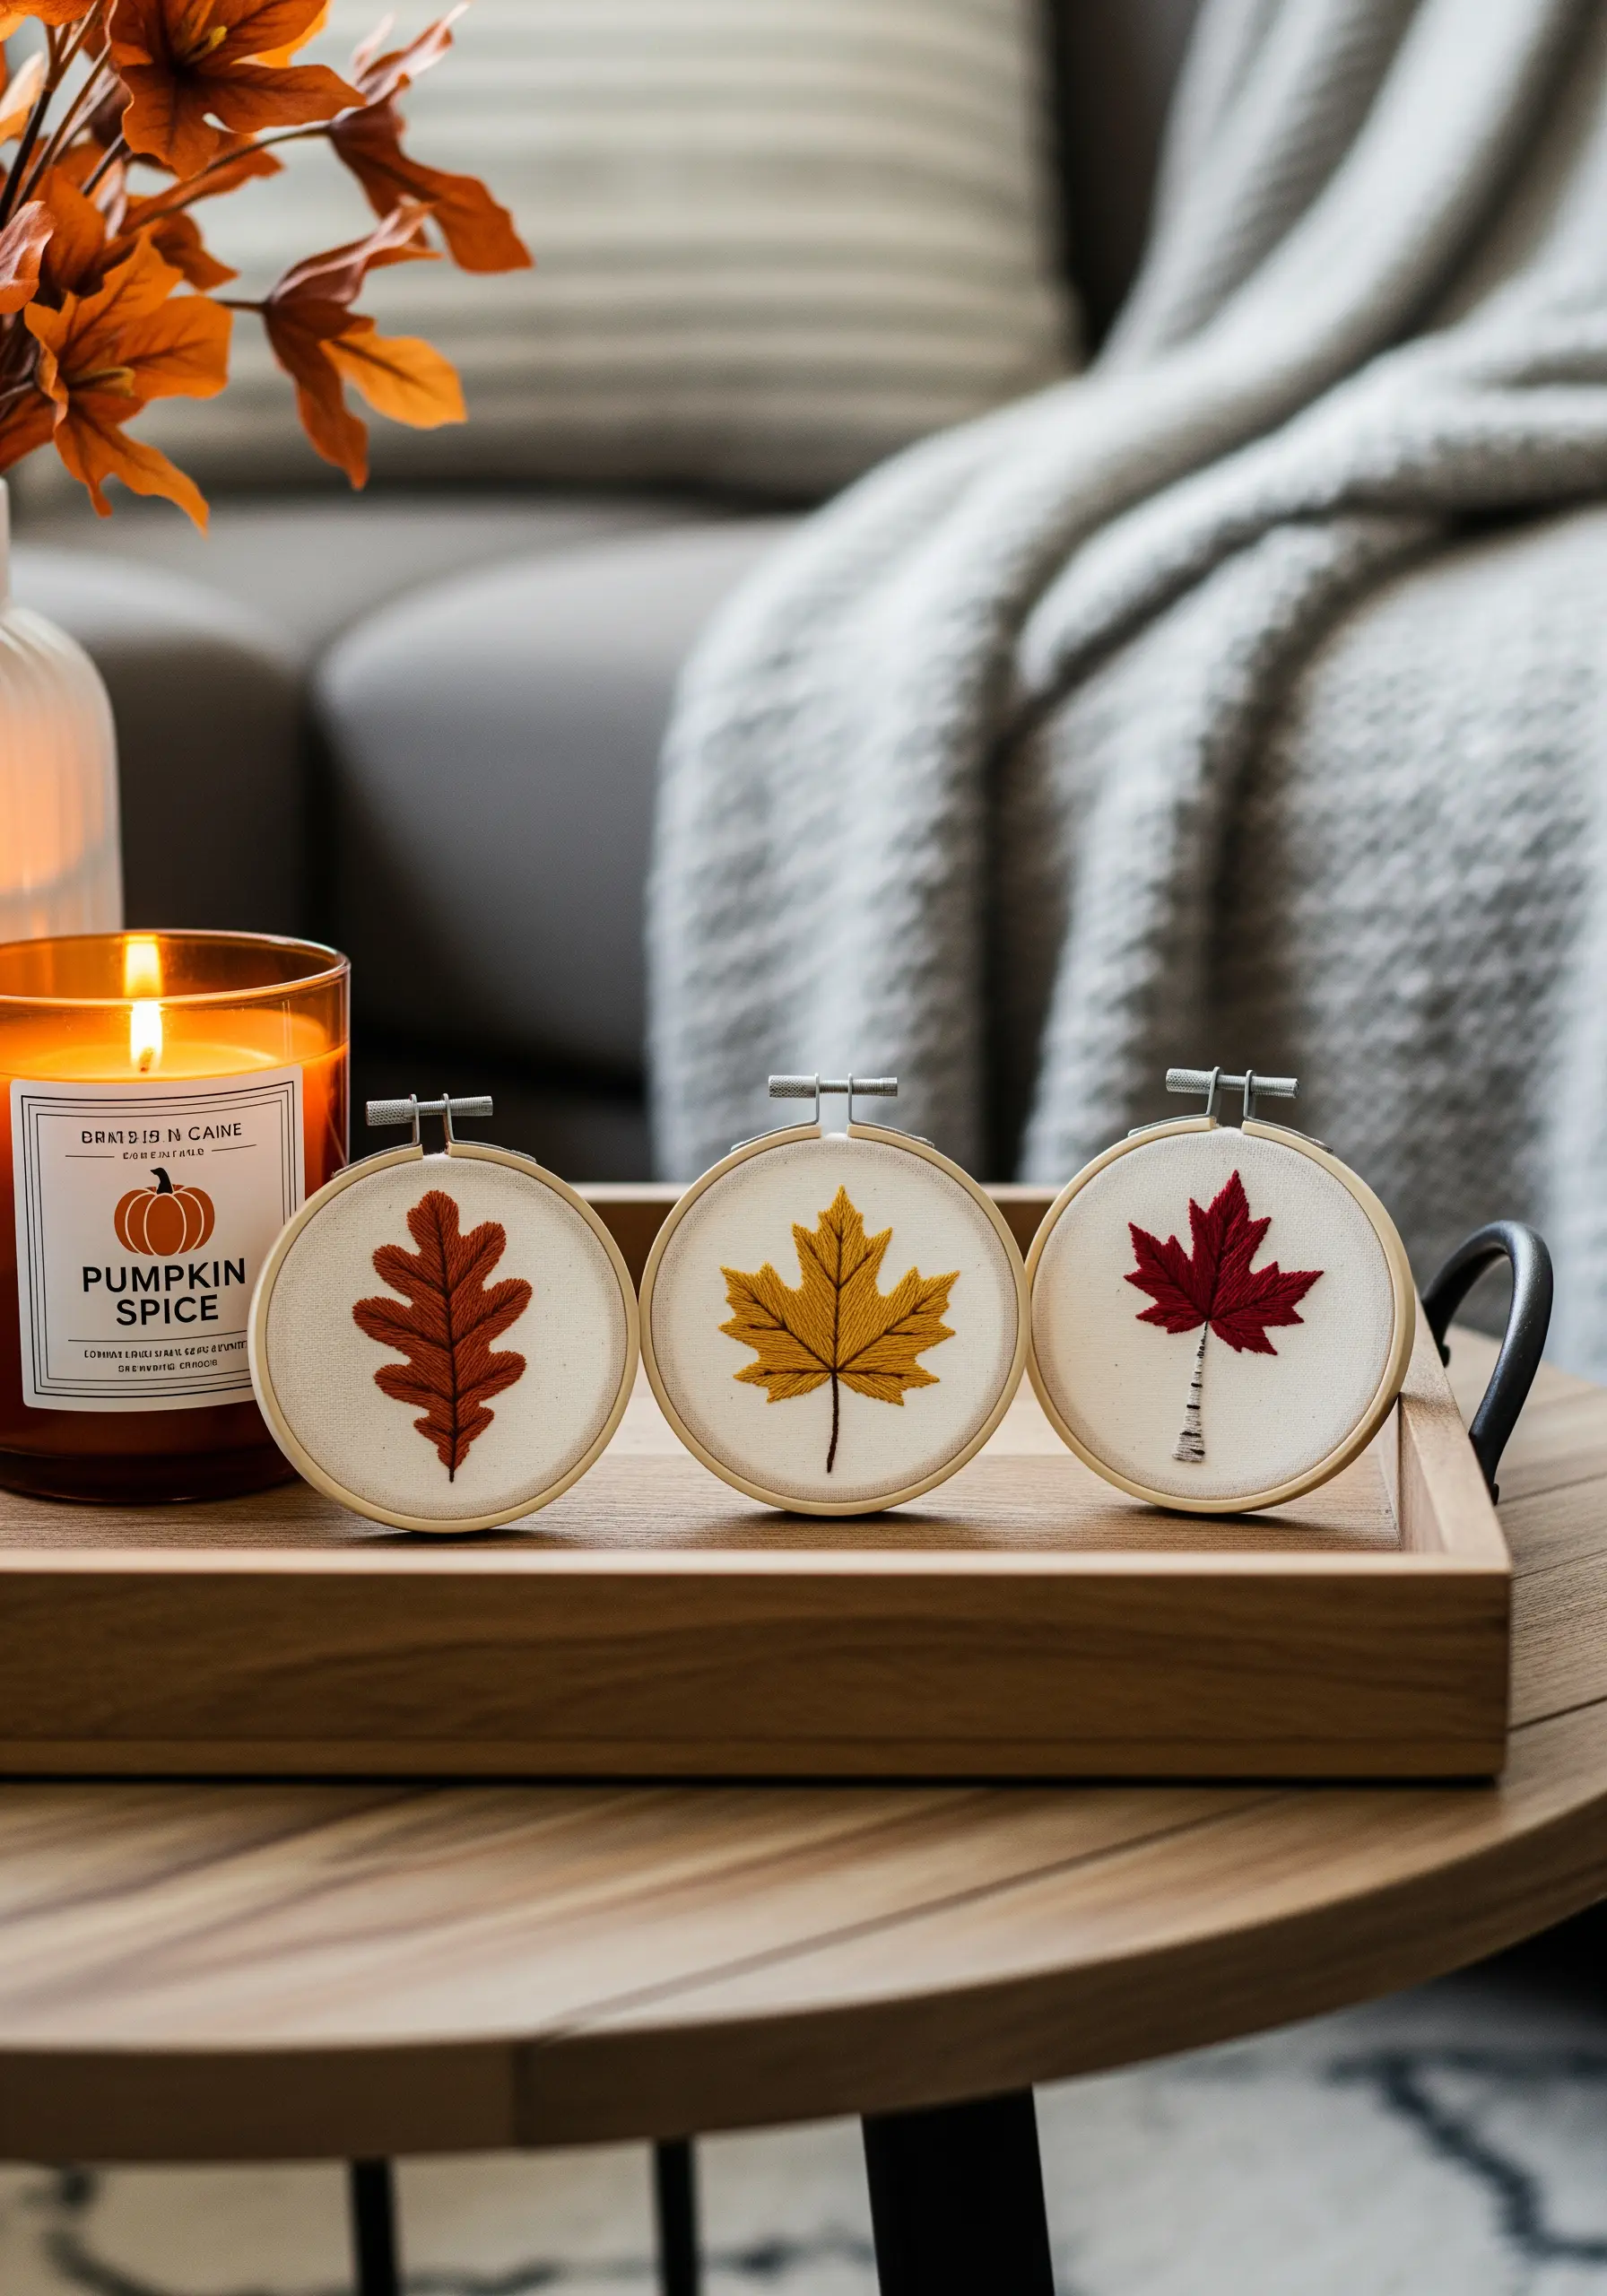
Create beautifully blended, multi-tonal leaves without changing your thread once.
Use a variegated floss, which is a single thread dyed with multiple shades of the same color family (e.g., red, orange, and brown).
As you stitch using fishbone or satin stitch, the colors will change randomly, producing a natural, dappled effect that mimics real autumn foliage.
This is a wonderfully simple way to achieve a complex, painterly look, perfect for nature-inspired embroidery projects.
20. Create a Sense of Delicacy with Sheer Fabric

To capture the airy, floating quality of dandelion seeds, stitch your design on a sheer fabric like organza or tulle.
The transparent background instantly makes the motif feel lighter and more delicate.
Use simple detached chain stitches (lazy daisies) and straight stitches for the seeds. The key is to keep your stitches light and your thread fine (1-2 strands).
When framed in a hoop, the light passing through the sheer fabric brings the entire piece to life.
21. Combine Appliqué and Embroidery for Bold Lettering

For large-scale, impactful text, combine fabric appliqué with embroidery for a clean, graphic result.
First, cut your letters from a contrasting fabric (like felt) and secure them to your base fabric with an iron-on adhesive.
Then, conceal the raw edges and secure the appliqué permanently by outlining each letter with a tight, neat satin stitch or blanket stitch.
This mixed-media technique produces incredibly bold, crisp lettering that would be time-consuming to fill entirely with thread.
22. Explore Color Gradients with Cross-Stitch
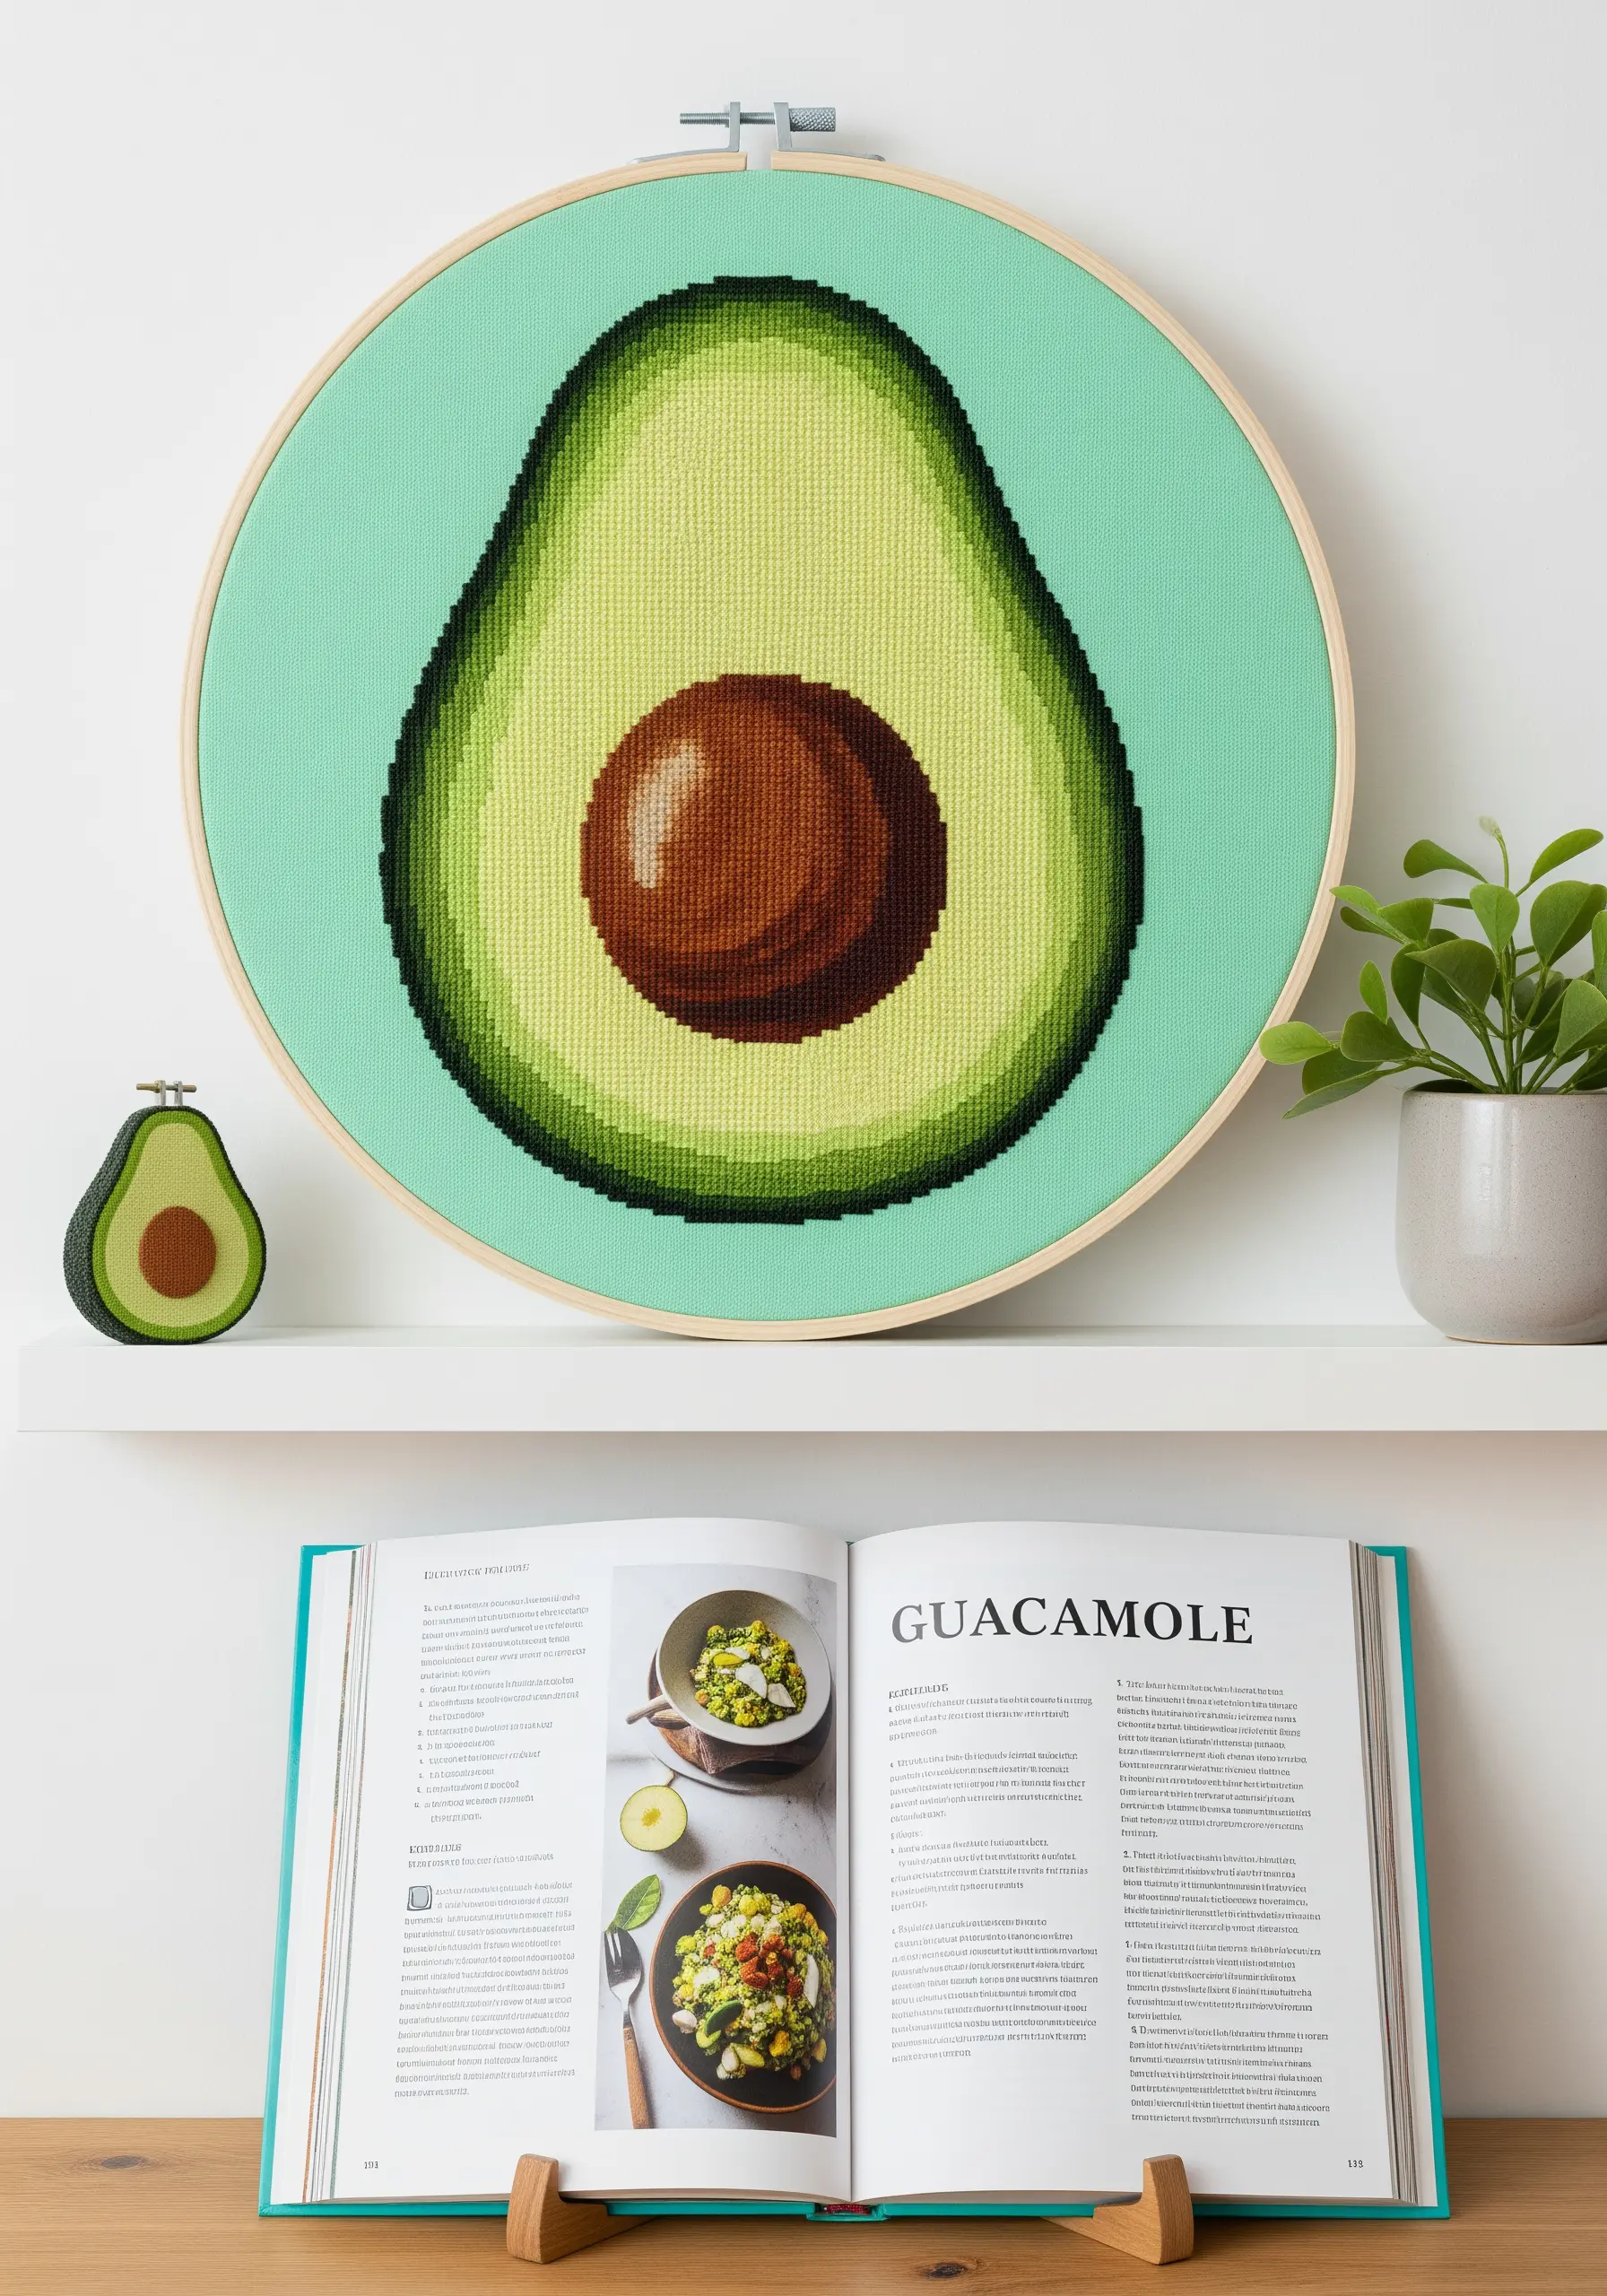
While technically not embroidery, cross-stitch is a fantastic way for beginners to explore color theory and create pixelated gradients.
You work on Aida cloth, a fabric with a built-in grid, making it easy to create uniform ‘X’ shaped stitches.
By following a pattern and using multiple shades of green and brown floss, you can build up a design that looks blended and shaded from a distance.
It’s a methodical, relaxing technique that produces incredibly satisfying and graphic results.
23. Create Contours with Directional Satin Stitch

Make a simple mushroom cap look rounded and three-dimensional by carefully controlling the direction of your satin stitches.
Instead of stitching straight across, angle your stitches to follow the curved shape of the cap, fanning them out from the center.
For the underside, switch to a lighter color and use vertical straight stitches to create a contrasting texture.
This thoughtful use of stitch direction is a fundamental skill in thread painting that adds instant realism to your work.
24. Achieve Fluidity with Single-Line Embroidery
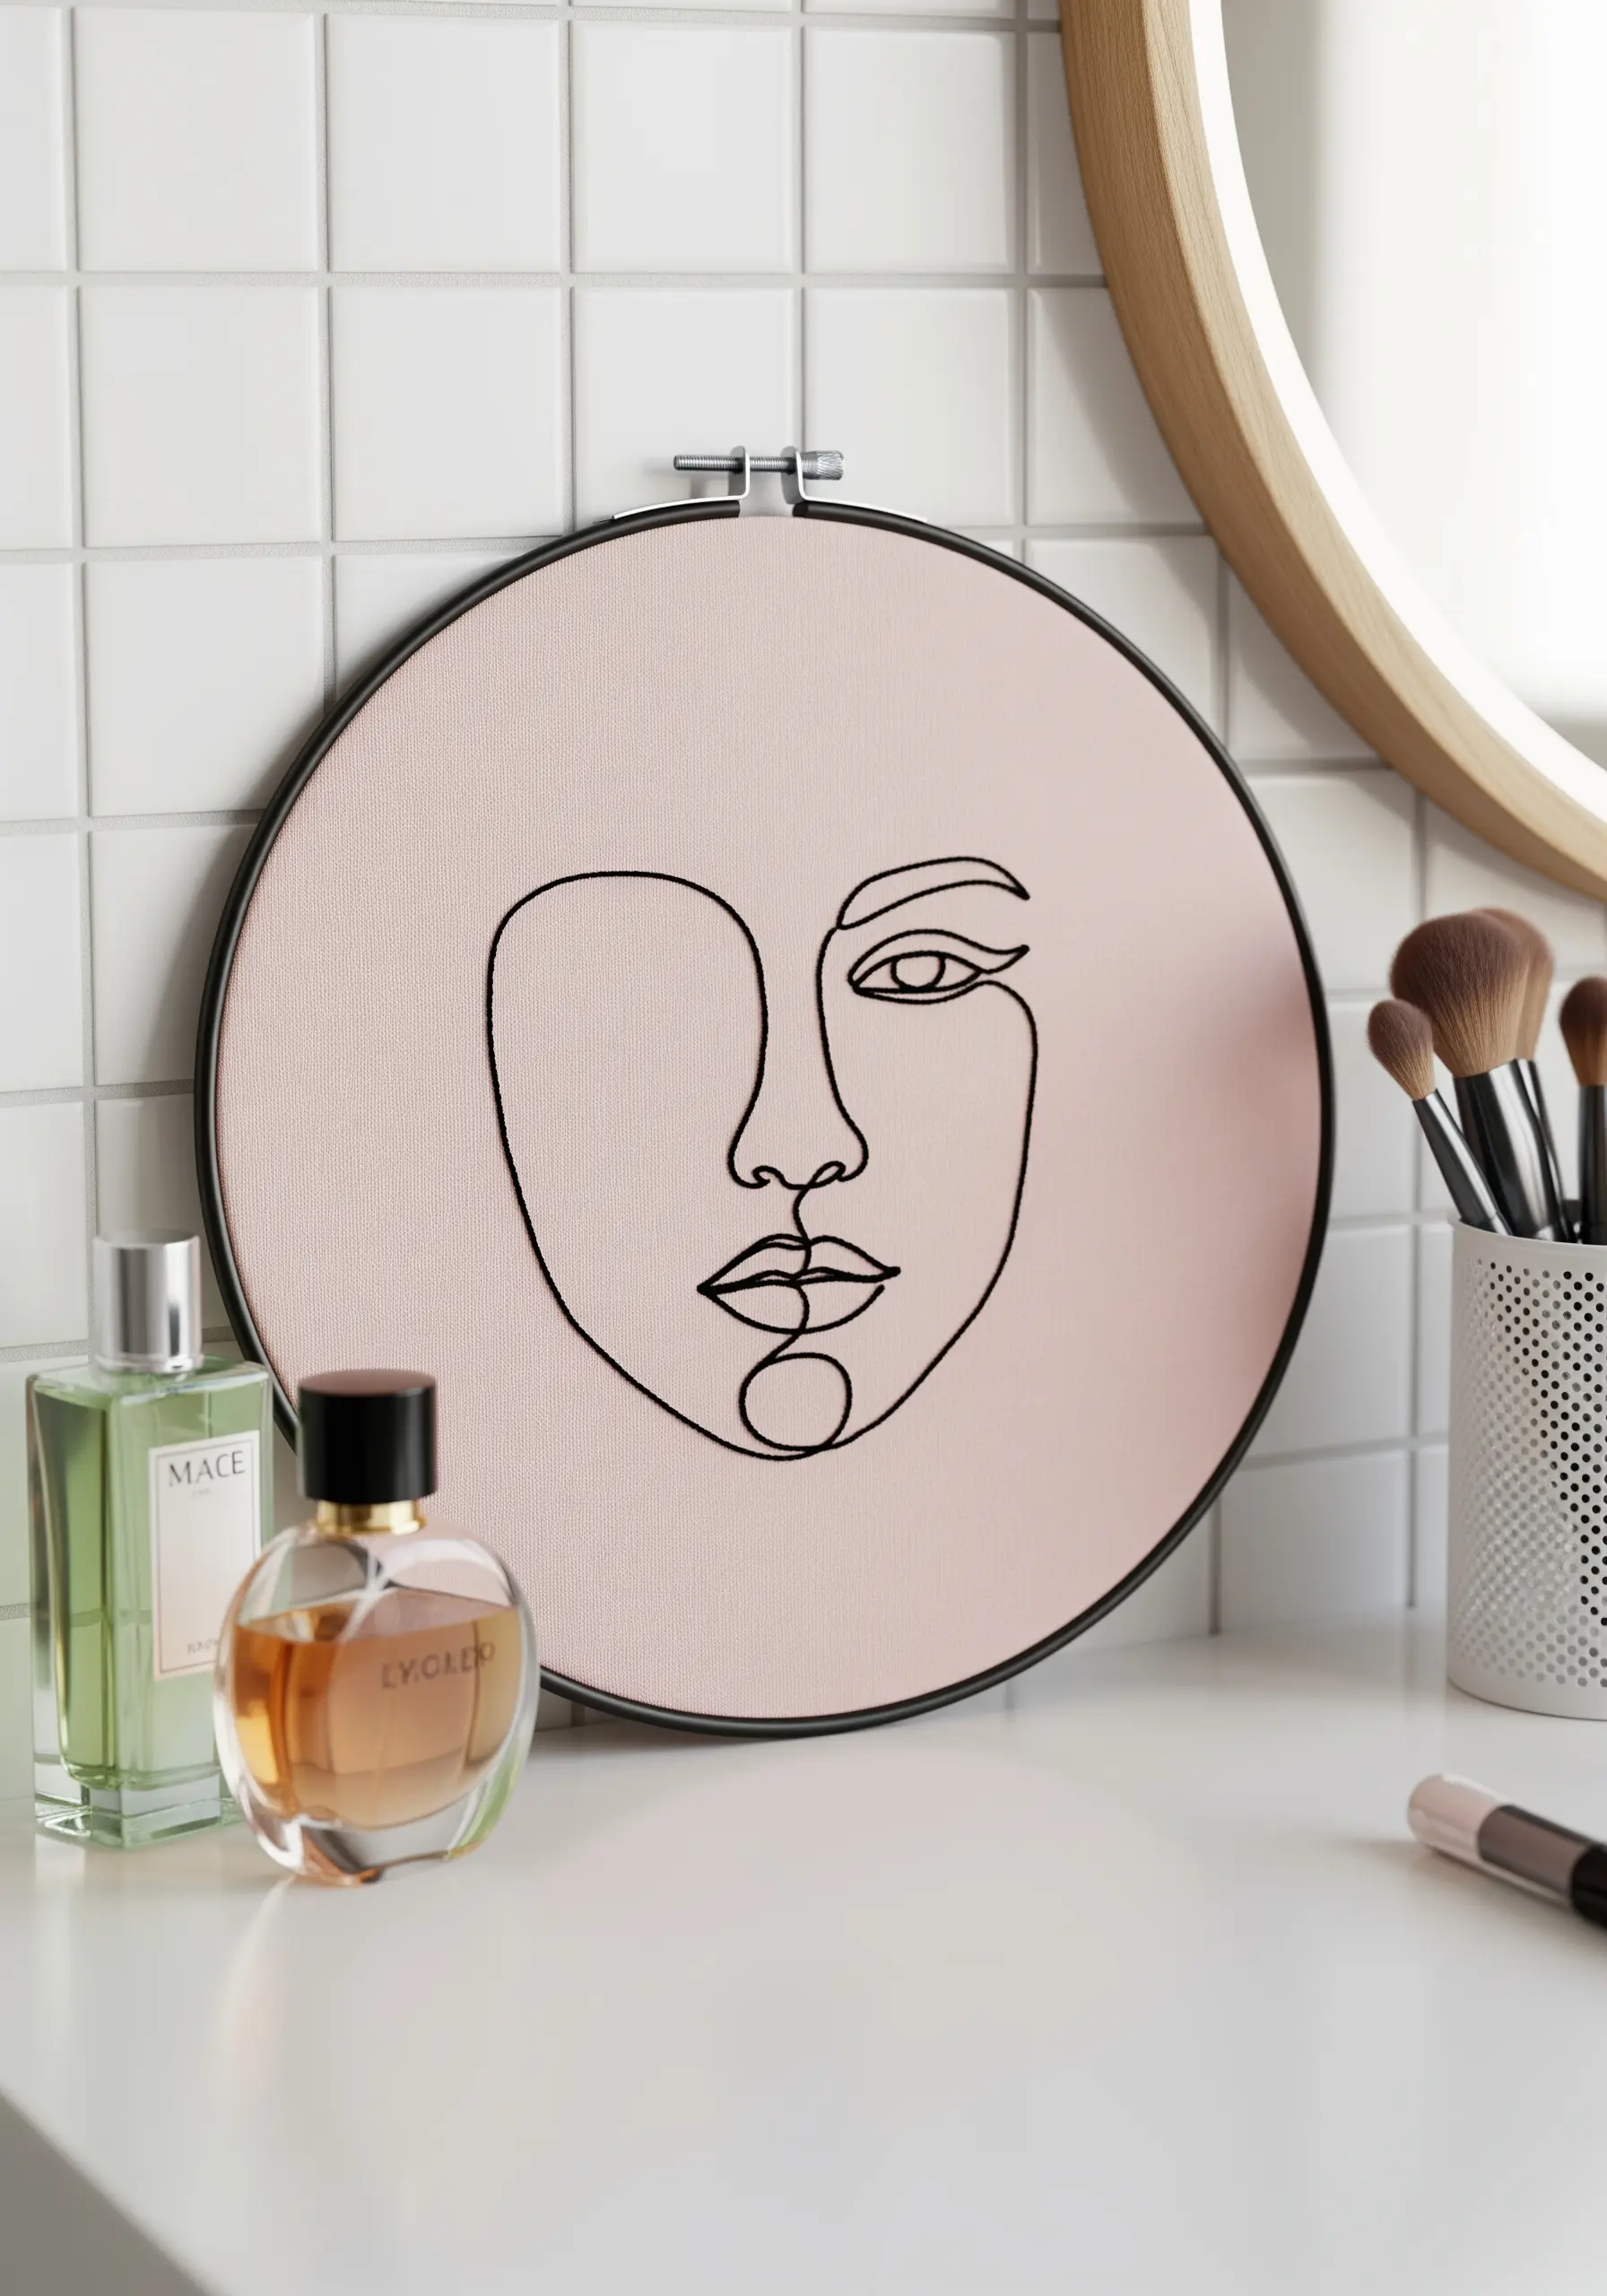
For an elegant, continuous line drawing, the goal is to make it appear as if it were drawn with a single, unbroken stroke.
Use a stem stitch or a whipped backstitch, as these stitches create a smooth, solid line with no visible gaps.
Choose a thread with good contrast against your fabric, like black on pale pink, to emphasize the purity of the line.
This minimalist approach celebrates the simplicity of the form, turning a simple sketch into a piece of abstract line art.
25. Embrace Precision with Geometric Shapes

When embroidering geometric patterns like this honeycomb, precision is everything.
Use a simple backstitch, but concentrate on making every single stitch identical in length. This is what gives the final piece its crisp, clean, and modern aesthetic.
Mark your pattern onto the fabric with a water-soluble pen before you start to ensure every angle is perfect.
Mounting the finished piece in a hexagonal frame complements the motif and elevates it from a simple project to a thoughtful piece of decor.
26. Build Realistic Texture with a Mix of Knots and Stitches

To create a lavender bouquet that looks lush and realistic, you need more than one type of stitch.
Use a combination of French knots and tiny straight stitches for the blossoms. The mix of tight knots and looser straight stitches mimics the varied texture of a real flower head.
Place darker purple knots at the bottom of each cluster and lighter ones at the top to create a subtle highlight.
Binding the stems together with a few simple wrap stitches adds the final touch of realism.


