

You’ve mastered the satin stitch and your French knots are perfect. But you have a feeling there’s something more—a way to make your work not just skillful, but deeply expressive and visually compelling. How do you bridge that gap?
The answer often lies just beyond the thread. By welcoming other materials into your practice—paper, paint, botanicals, even chunky yarn—you unlock a new dimension of texture and storytelling. This isn’t about complicating your process; it’s about expanding your creative language.
These projects are designed to help you do just that. They show you how to layer, combine, and contrast materials in a way that feels intentional and modern. You’ll see how a simple stitch can transform a paper collage, and how a painted background can make your embroidery sing. It’s time to create art that feels as rich and layered as your imagination.
1. Layer Paper and Fabric for Oceanic Depth
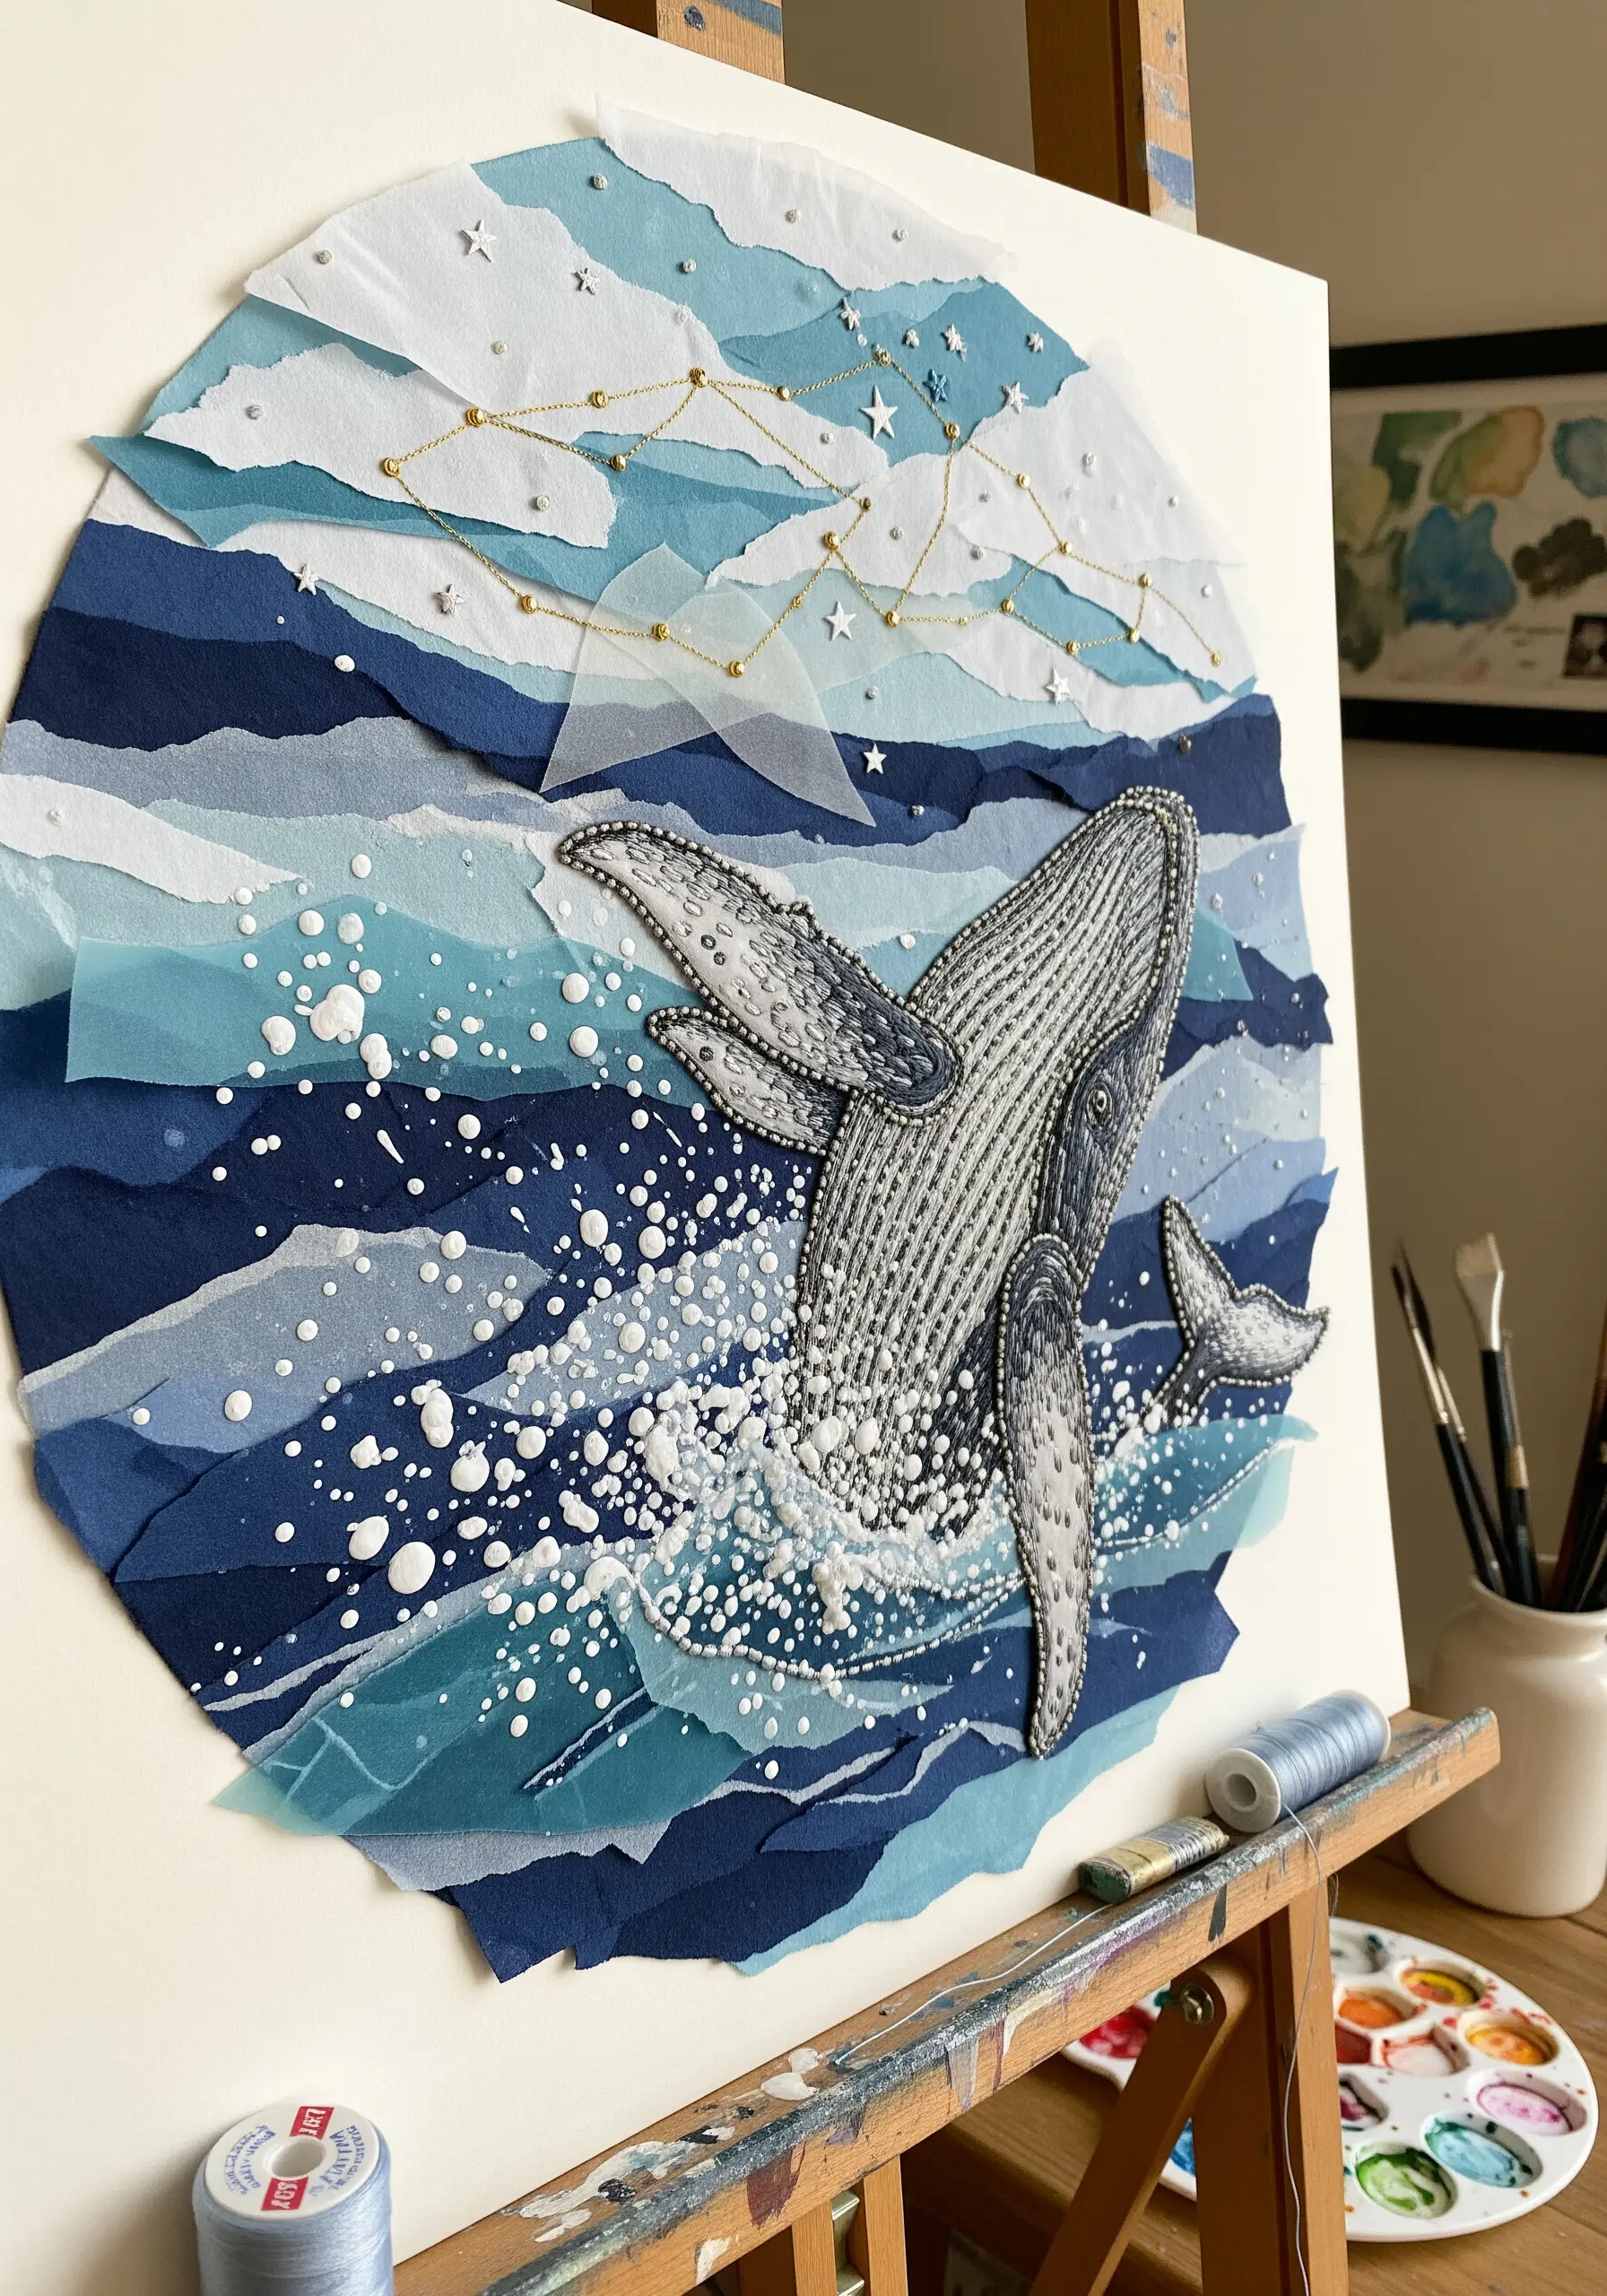
Create a dynamic seascape by layering torn pieces of paper and translucent fabric before you even thread your needle.
Use a mix of textures—handmade paper for the waves, vellum for sea spray, and dark cotton for the deep—to build a tactile background.
Once your collage is set, use dense seed stitches and French knots in white and silver to depict the whale’s textured skin, making it emerge from the background.
Finally, connect delicate gold beads with couched thread to map out constellations, turning the sky into a subtle, elegant focal point.
This method transforms your embroidery from a flat image into a dimensional, narrative scene where thread adds the final layer of exquisite detail.
2. Stitch a Specimen into Your Art Journal
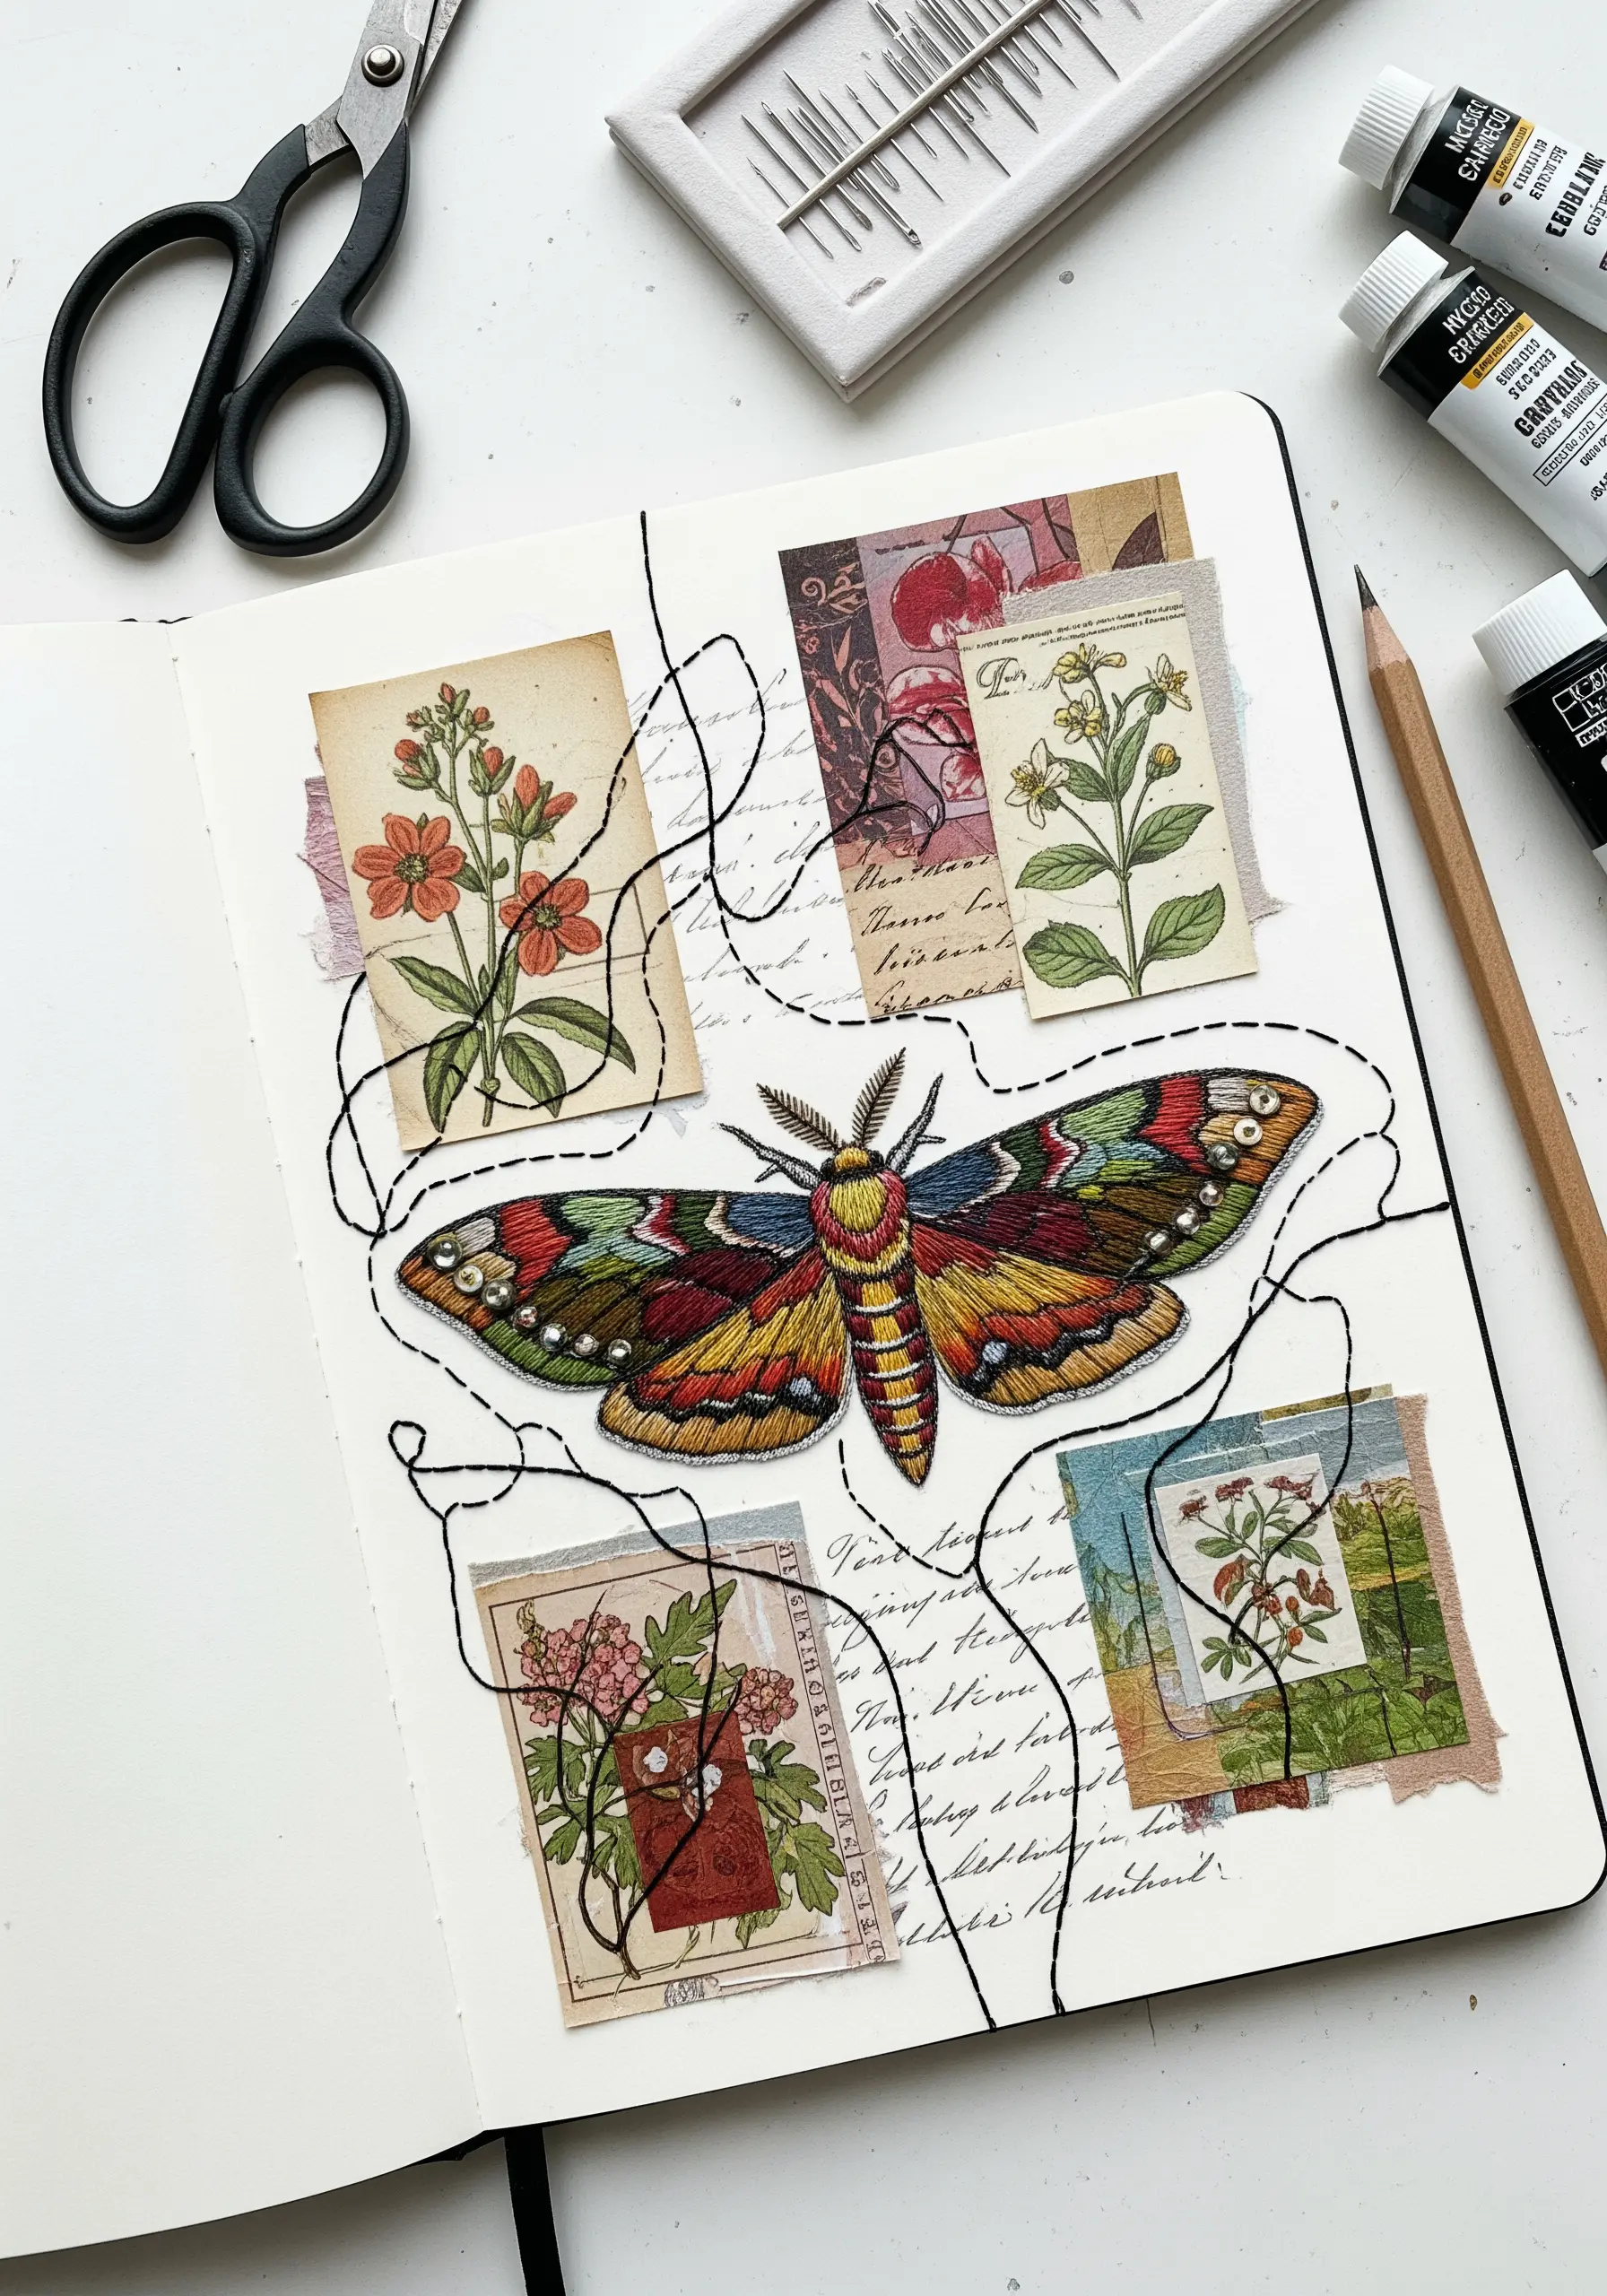
Transform a journal page into a naturalist’s sketchbook by combining paper ephemera with a central embroidered motif.
First, arrange vintage botanical illustrations or scraps of text to create a collage base, securing them with archival glue.
Stitch your main subject—like this vibrant moth—on a separate piece of lightweight fabric, then carefully cut it out, leaving a small border.
Appliqué the embroidered patch onto your journal page, allowing its texture to stand out against the flat paper.
To unify the composition, use a single strand of black thread in a loose, meandering running stitch, visually connecting the different elements as if they’re pinned to a collector’s board.
3. Puncture Paper for Graphic Thread Art
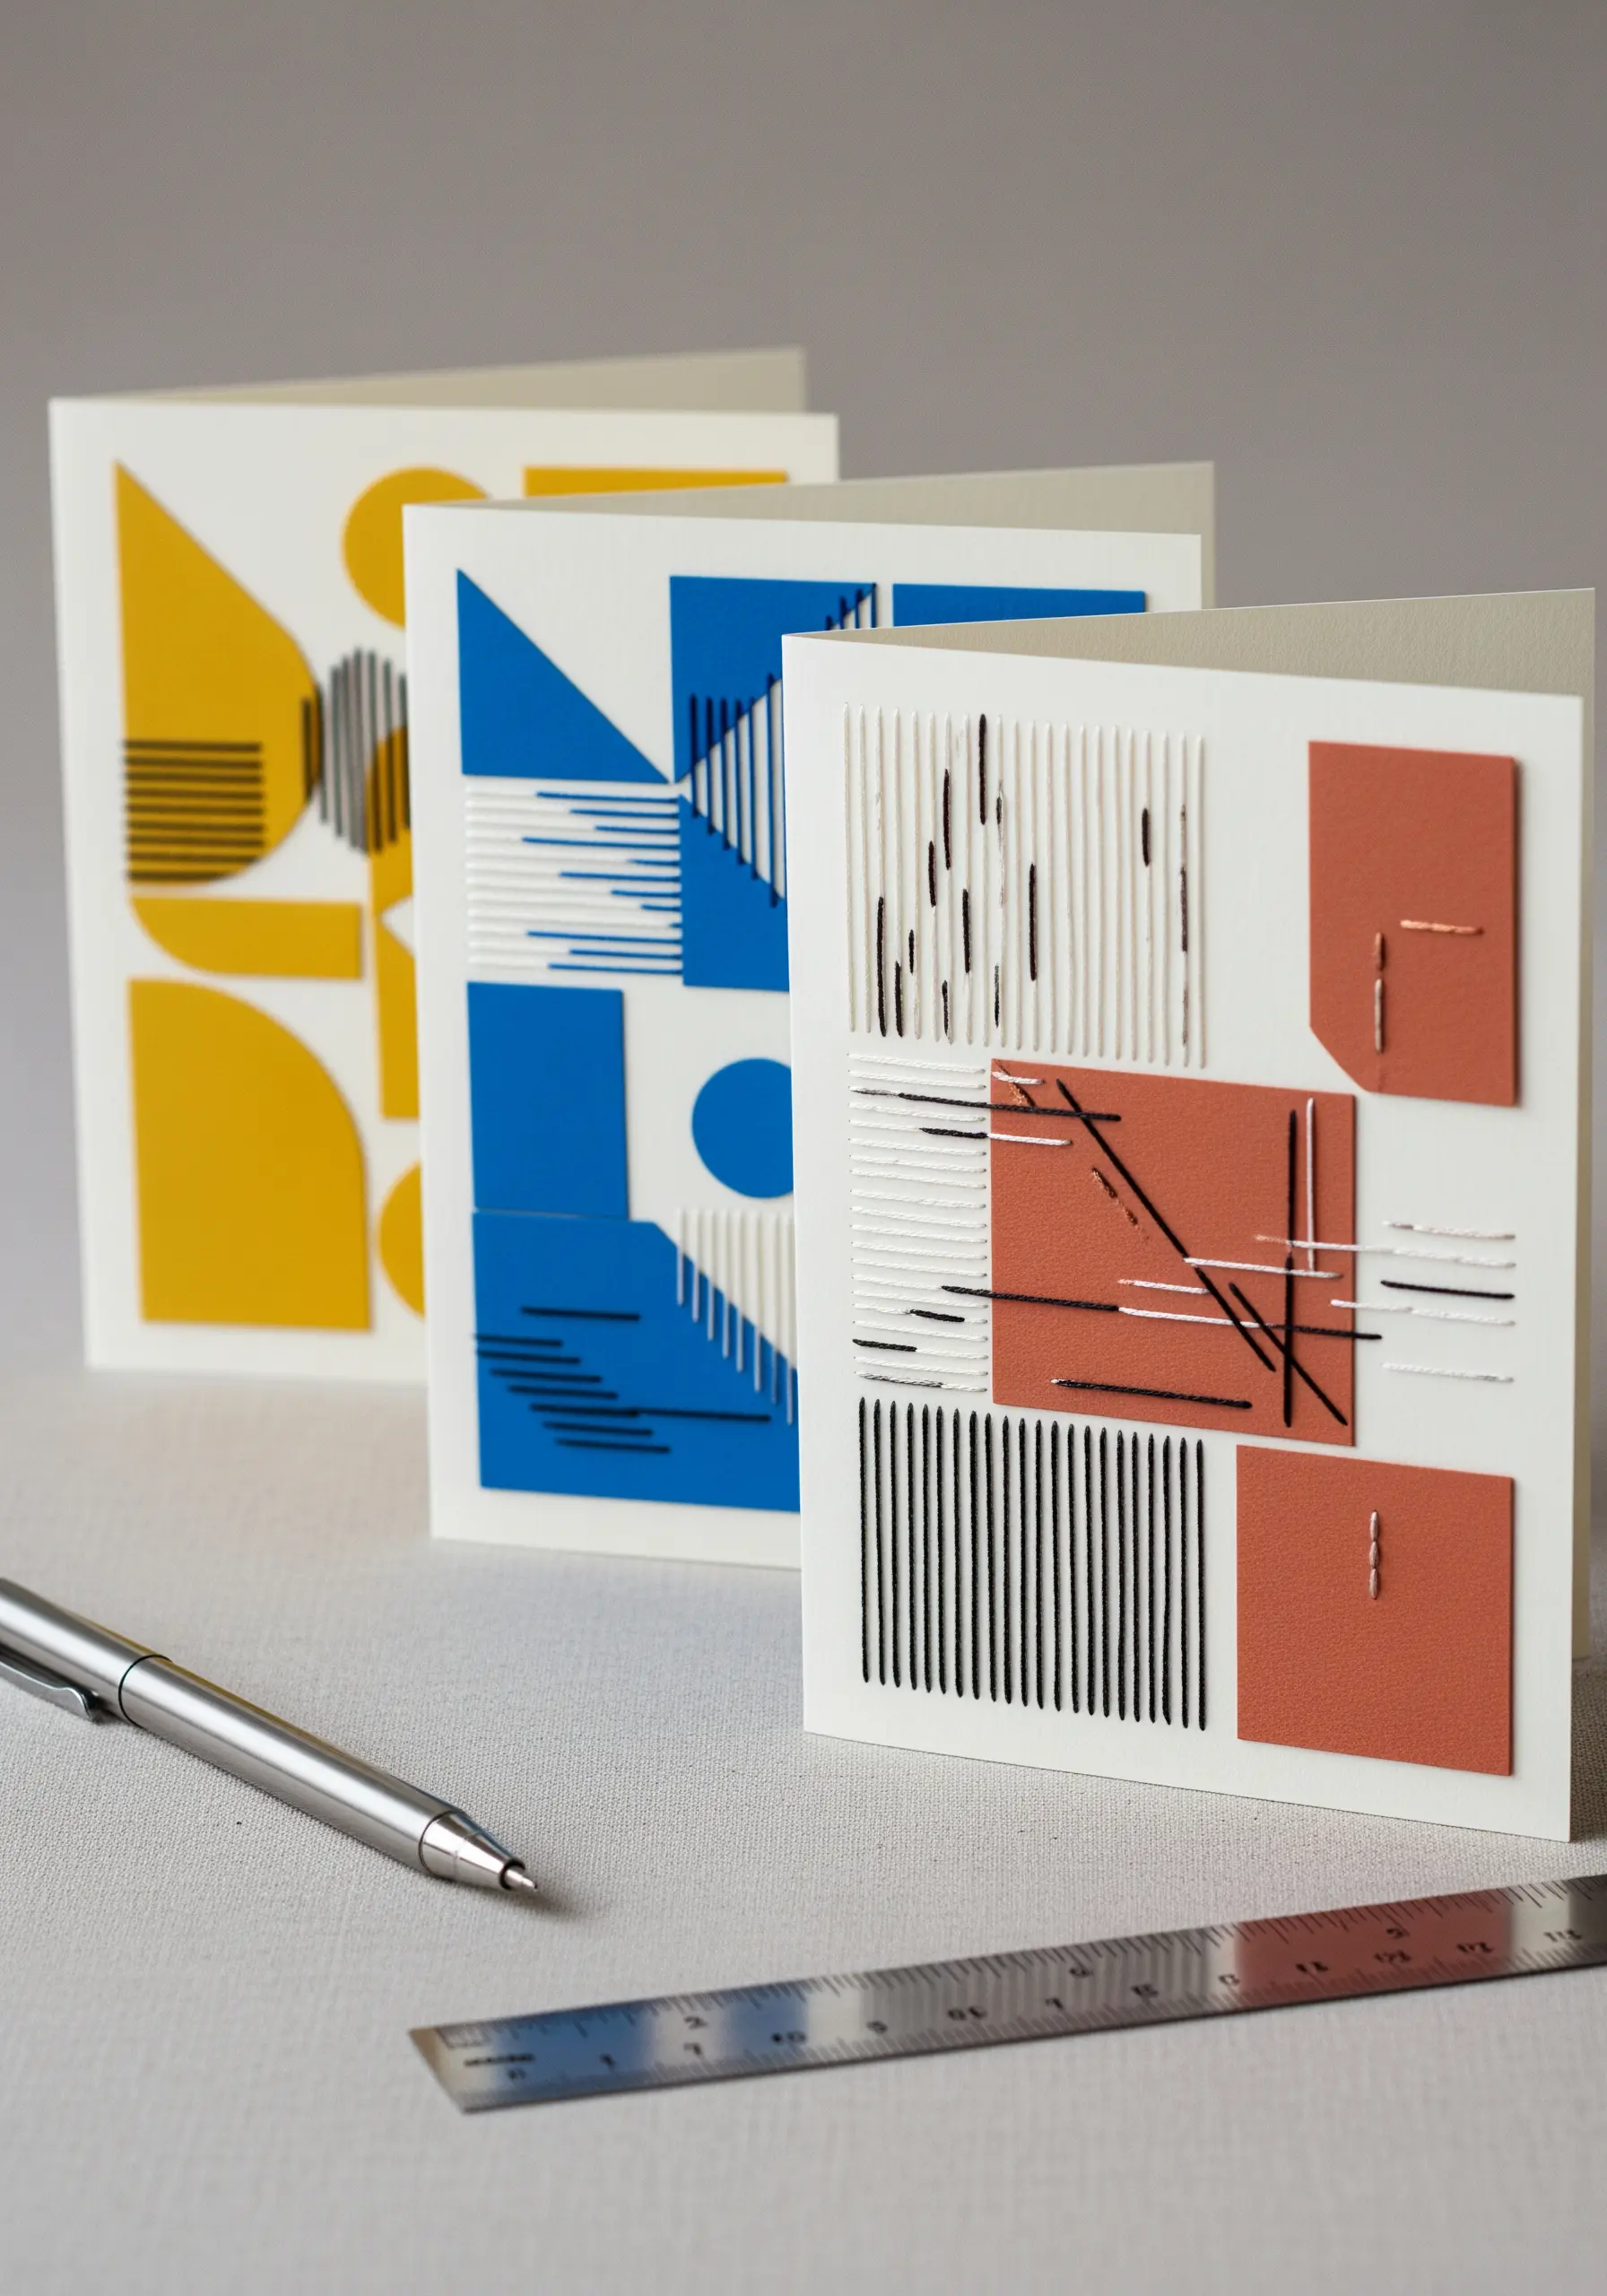
Elevate simple greeting cards or wall art by integrating stitched lines into a graphic design.
Start with high-quality, heavy cardstock (at least 200 gsm) to prevent buckling under thread tension.
Use an awl or a thick needle to pre-punch holes along your design lines before you begin stitching. This ensures clean entry points and prevents the paper from tearing.
Employ simple straight stitches, varying their length and density to create patterns that mimic digital grids or architectural sketches.
This technique works because the sharp, precise nature of the thread offers a tactile contrast to the flat, printed color blocks, adding depth and a handcrafted feel to modern design.
4. Sculpt a Landscape with Textured Stitches

Move beyond flat color and paint a landscape with thread by assigning different stitch families to each natural element.
For the sun, create a dense, raised center using overlapping French knots or turkey work, then radiate outwards with straight stitches in oranges and yellows to convey heat and light.
Use cloud stitches or light seed stitches in grey and white for the sky to give it an airy, soft texture that contrasts with the solid ground.
Fill the fields with tiny, individual French knots and lazy daisy stitches for wildflowers, suggesting abundance without stitching every single petal.
This approach allows you to build a scene rich in dimension, where each texture tells part of the story—from the soft clouds to the radiant sun.
5. Build a Layered Paper and Felt Diorama

Create a three-dimensional scene within a hoop by layering cut paper and felt before adding stitched and beaded details.
Start with a painted background for the sky, perhaps an ombré of dusk blues. Then, build your landscape from the back forward, cutting hills and mountains from felt and trees from cardstock in varying shades of green to create perspective.
Secure each layer with a small amount of fabric glue. The felt adds a soft, light-absorbing texture that makes the sharp paper trees pop.
Your embroidery is the final, delicate touch. Use metallic thread for starbursts and tiny seed beads or French knots for a sparkling, star-filled sky. This technique turns a simple hoop into a captivating, narrative world.
6. Embellish Pressed Botanicals with Stitched Details

Merge the natural world with your craft by stitching directly over and around pressed flowers and leaves.
Carefully arrange your dried botanicals on a piece of fabric or sturdy paper, securing them with a touch of acid-free glue stick.
Use a single strand of thread and a fine needle to add details that enhance, rather than overpower, the delicate specimens. Trace the veins of a leaf with a simple backstitch or outline a petal to restore its shape.
For a focal point, create a central flower from stitched satin-stitch petals and a cluster of French knots, integrating it with the real botanicals.
This method creates a beautiful tension between the preserved organic material and the precision of your handiwork, resulting in a timeless handmade piece that brings natural beauty into every corner.
7. Add Stitched Accents to Papercraft Mobiles
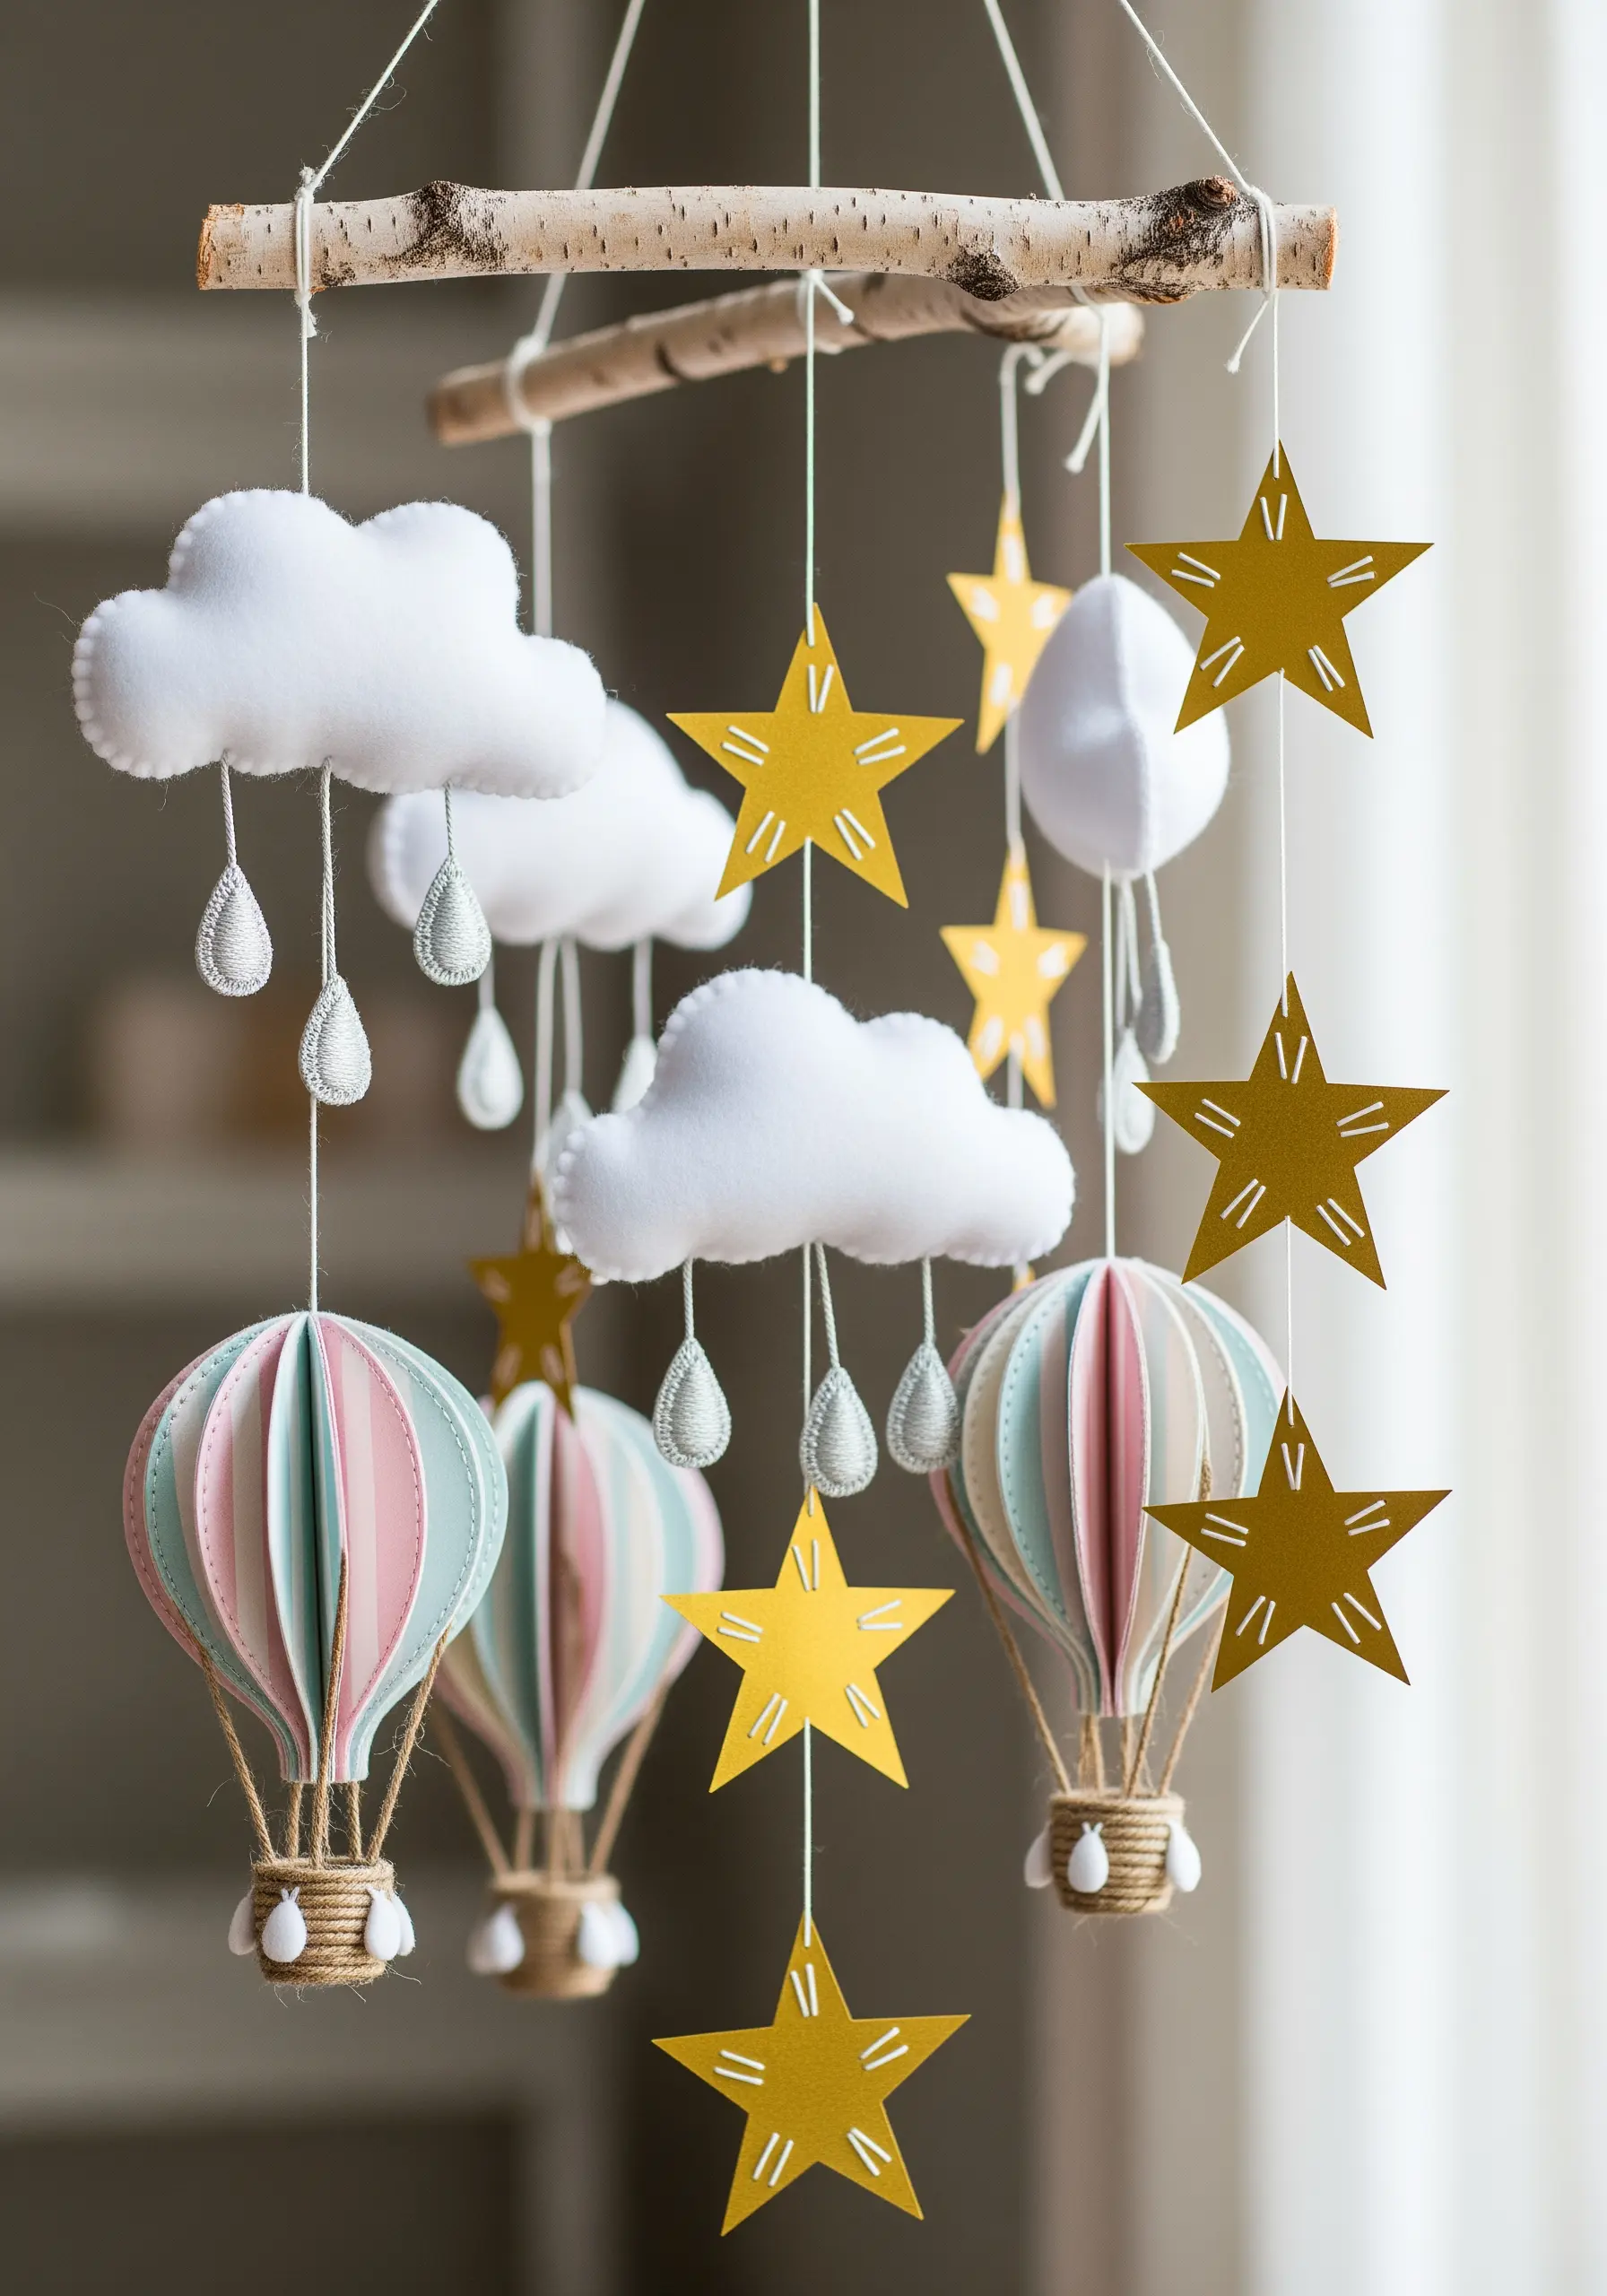
Elevate a nursery mobile from a simple papercraft to a cherished heirloom with subtle, thoughtful embroidery.
After constructing your 3D paper shapes—like these hot air balloons—use a single strand of floss to add small details.
A simple backstitch can outline a seam or add a pattern, while a few straight stitches can suggest texture on the baskets.
Combine paper elements with soft, stuffed felt shapes like clouds. Here, the embroidery serves a dual purpose: a running stitch can close the seam while also adding a decorative border.
These tiny stitched details add a layer of softness and intention, signaling care and handcrafted quality without overwhelming the delicate paper forms.
8. Impose a Geometric Grid Over Abstract Art
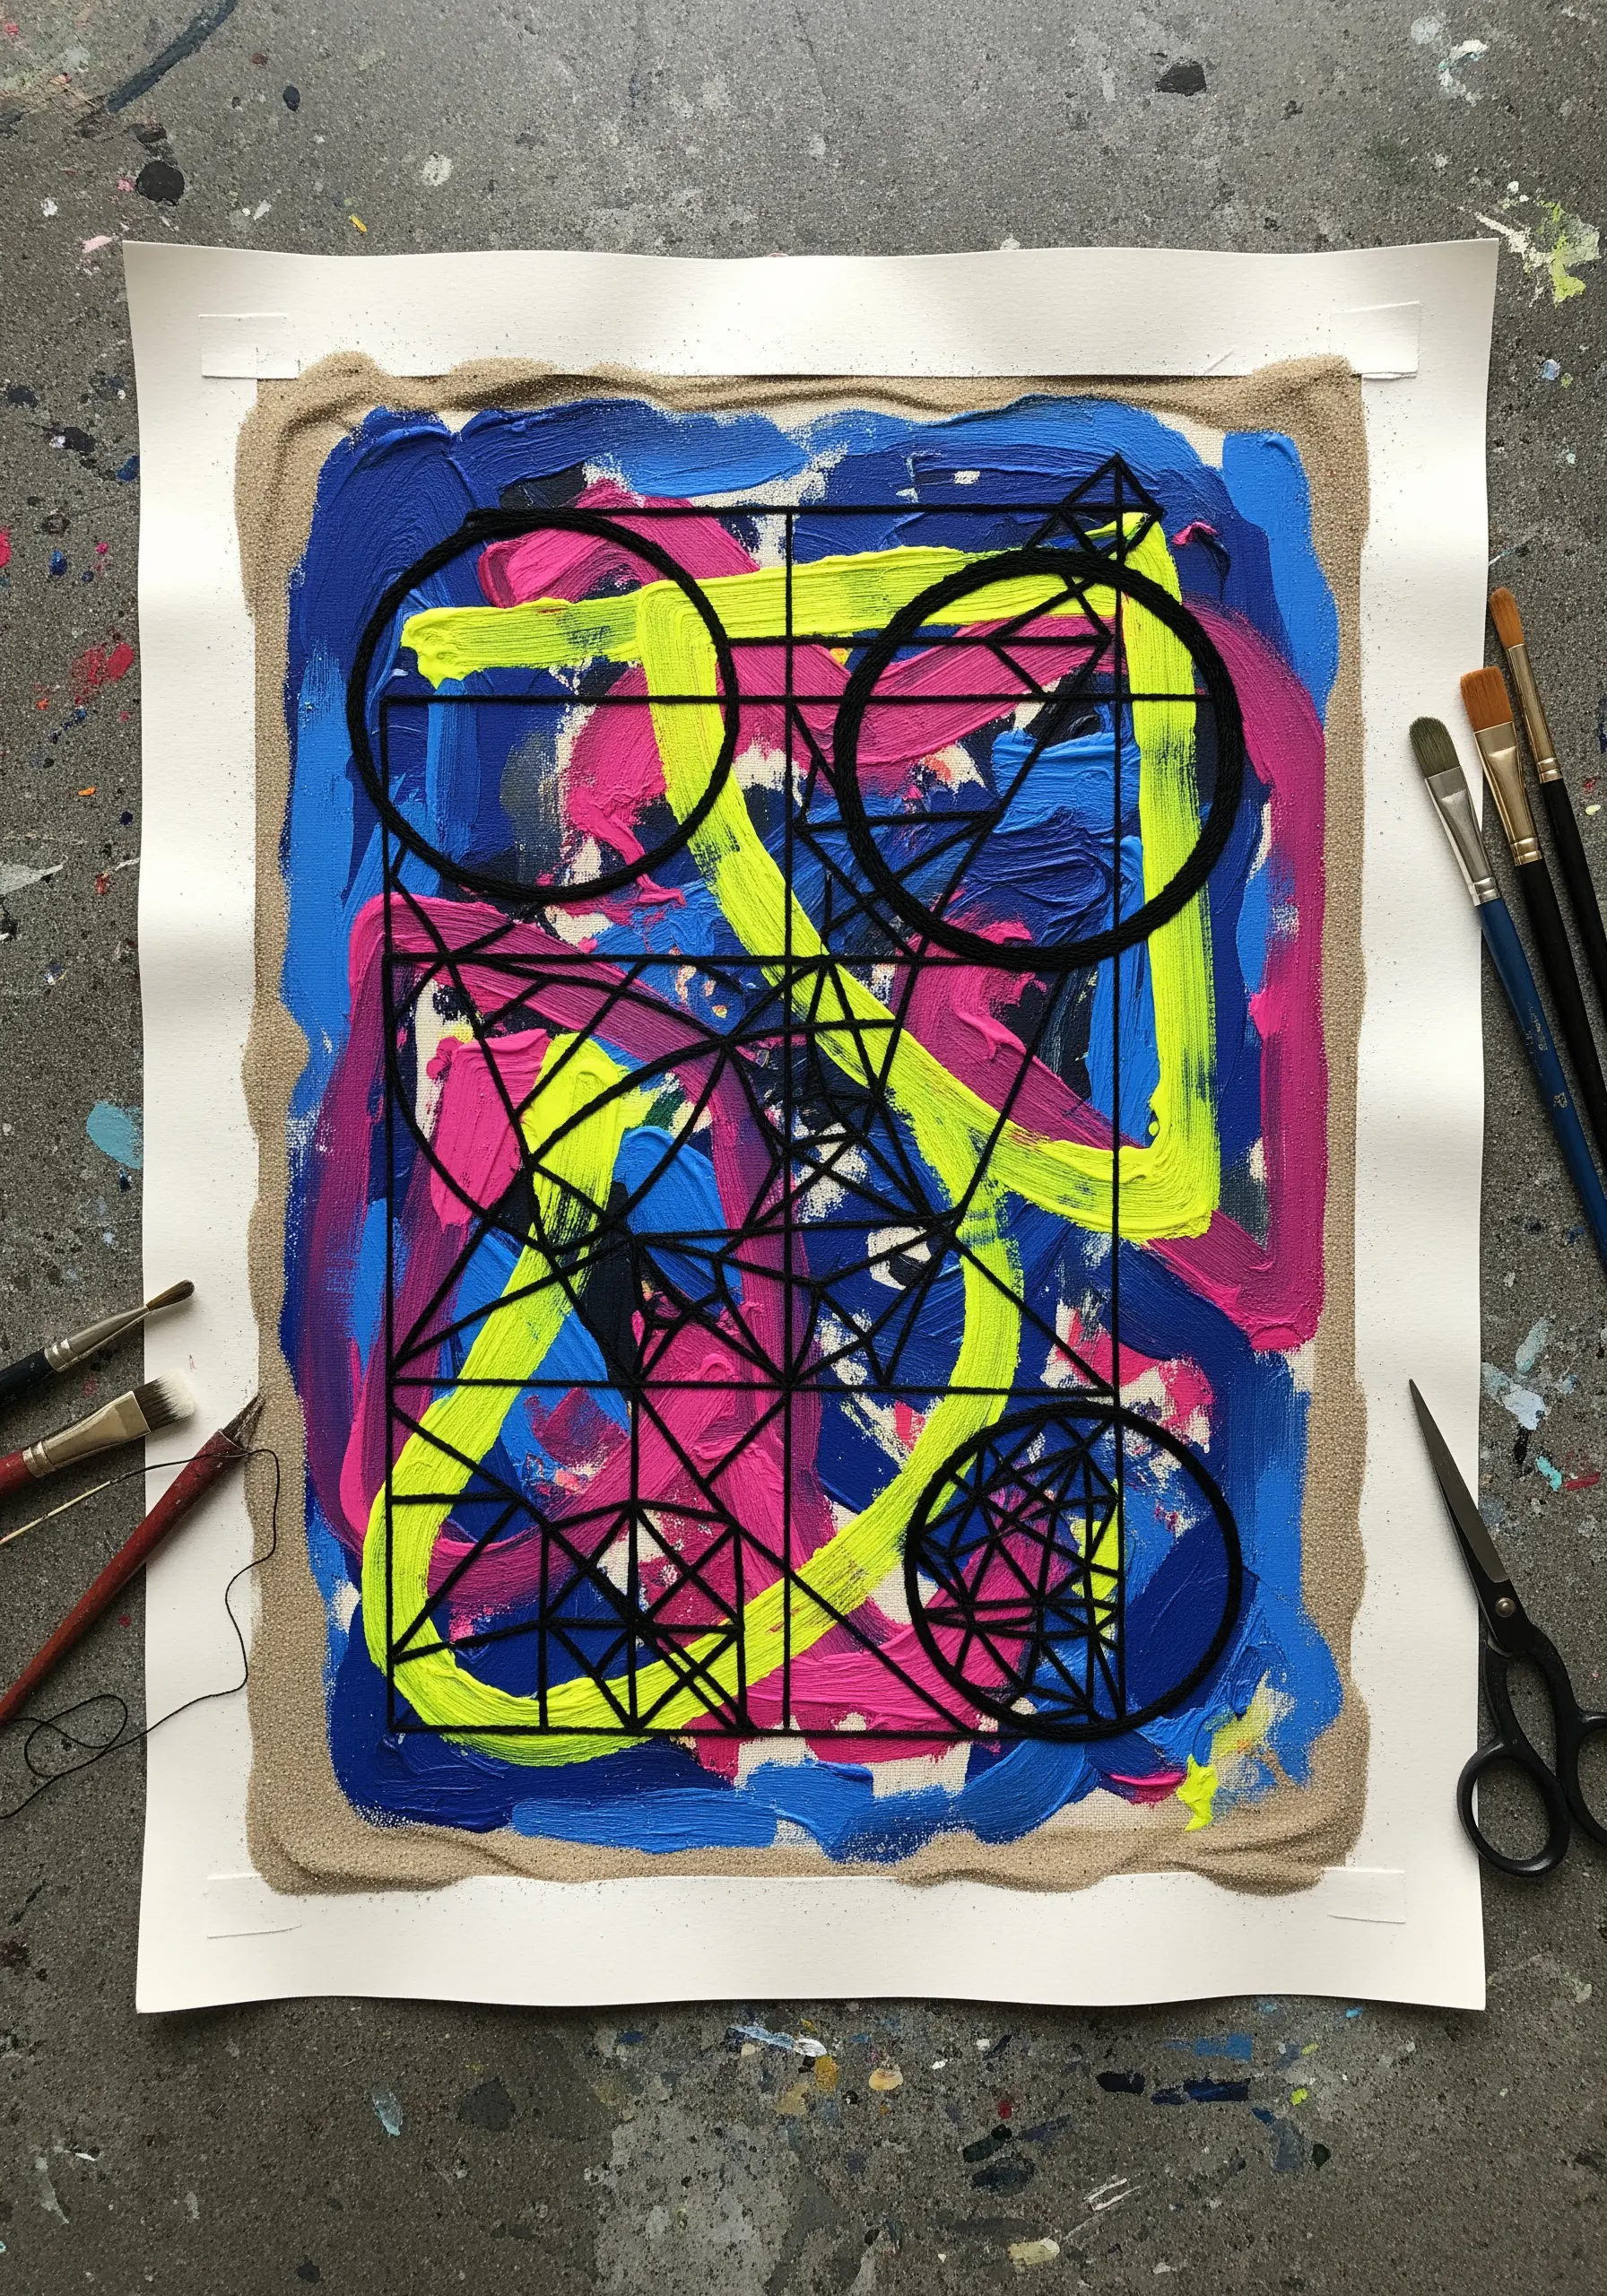
Create a striking piece of contemporary art by contrasting a chaotic, painted background with a disciplined, embroidered foreground.
Start by creating an abstract painting on heavy watercolor paper or canvas, using bold, expressive brushstrokes. Let it dry completely.
Using a ruler and pencil, lightly draw a geometric pattern over the top of your painting.
With a thick, dark thread, stitch the pattern using a backstitch or stem stitch. The clean, rigid lines of the thread will stand in sharp contrast to the fluid paint, creating visual tension and structure.
For an extra textural element, you can even frame the piece with sand or other materials, further blurring the lines between mediums.
9. Illustrate with Thread, Ribbon, and Beads
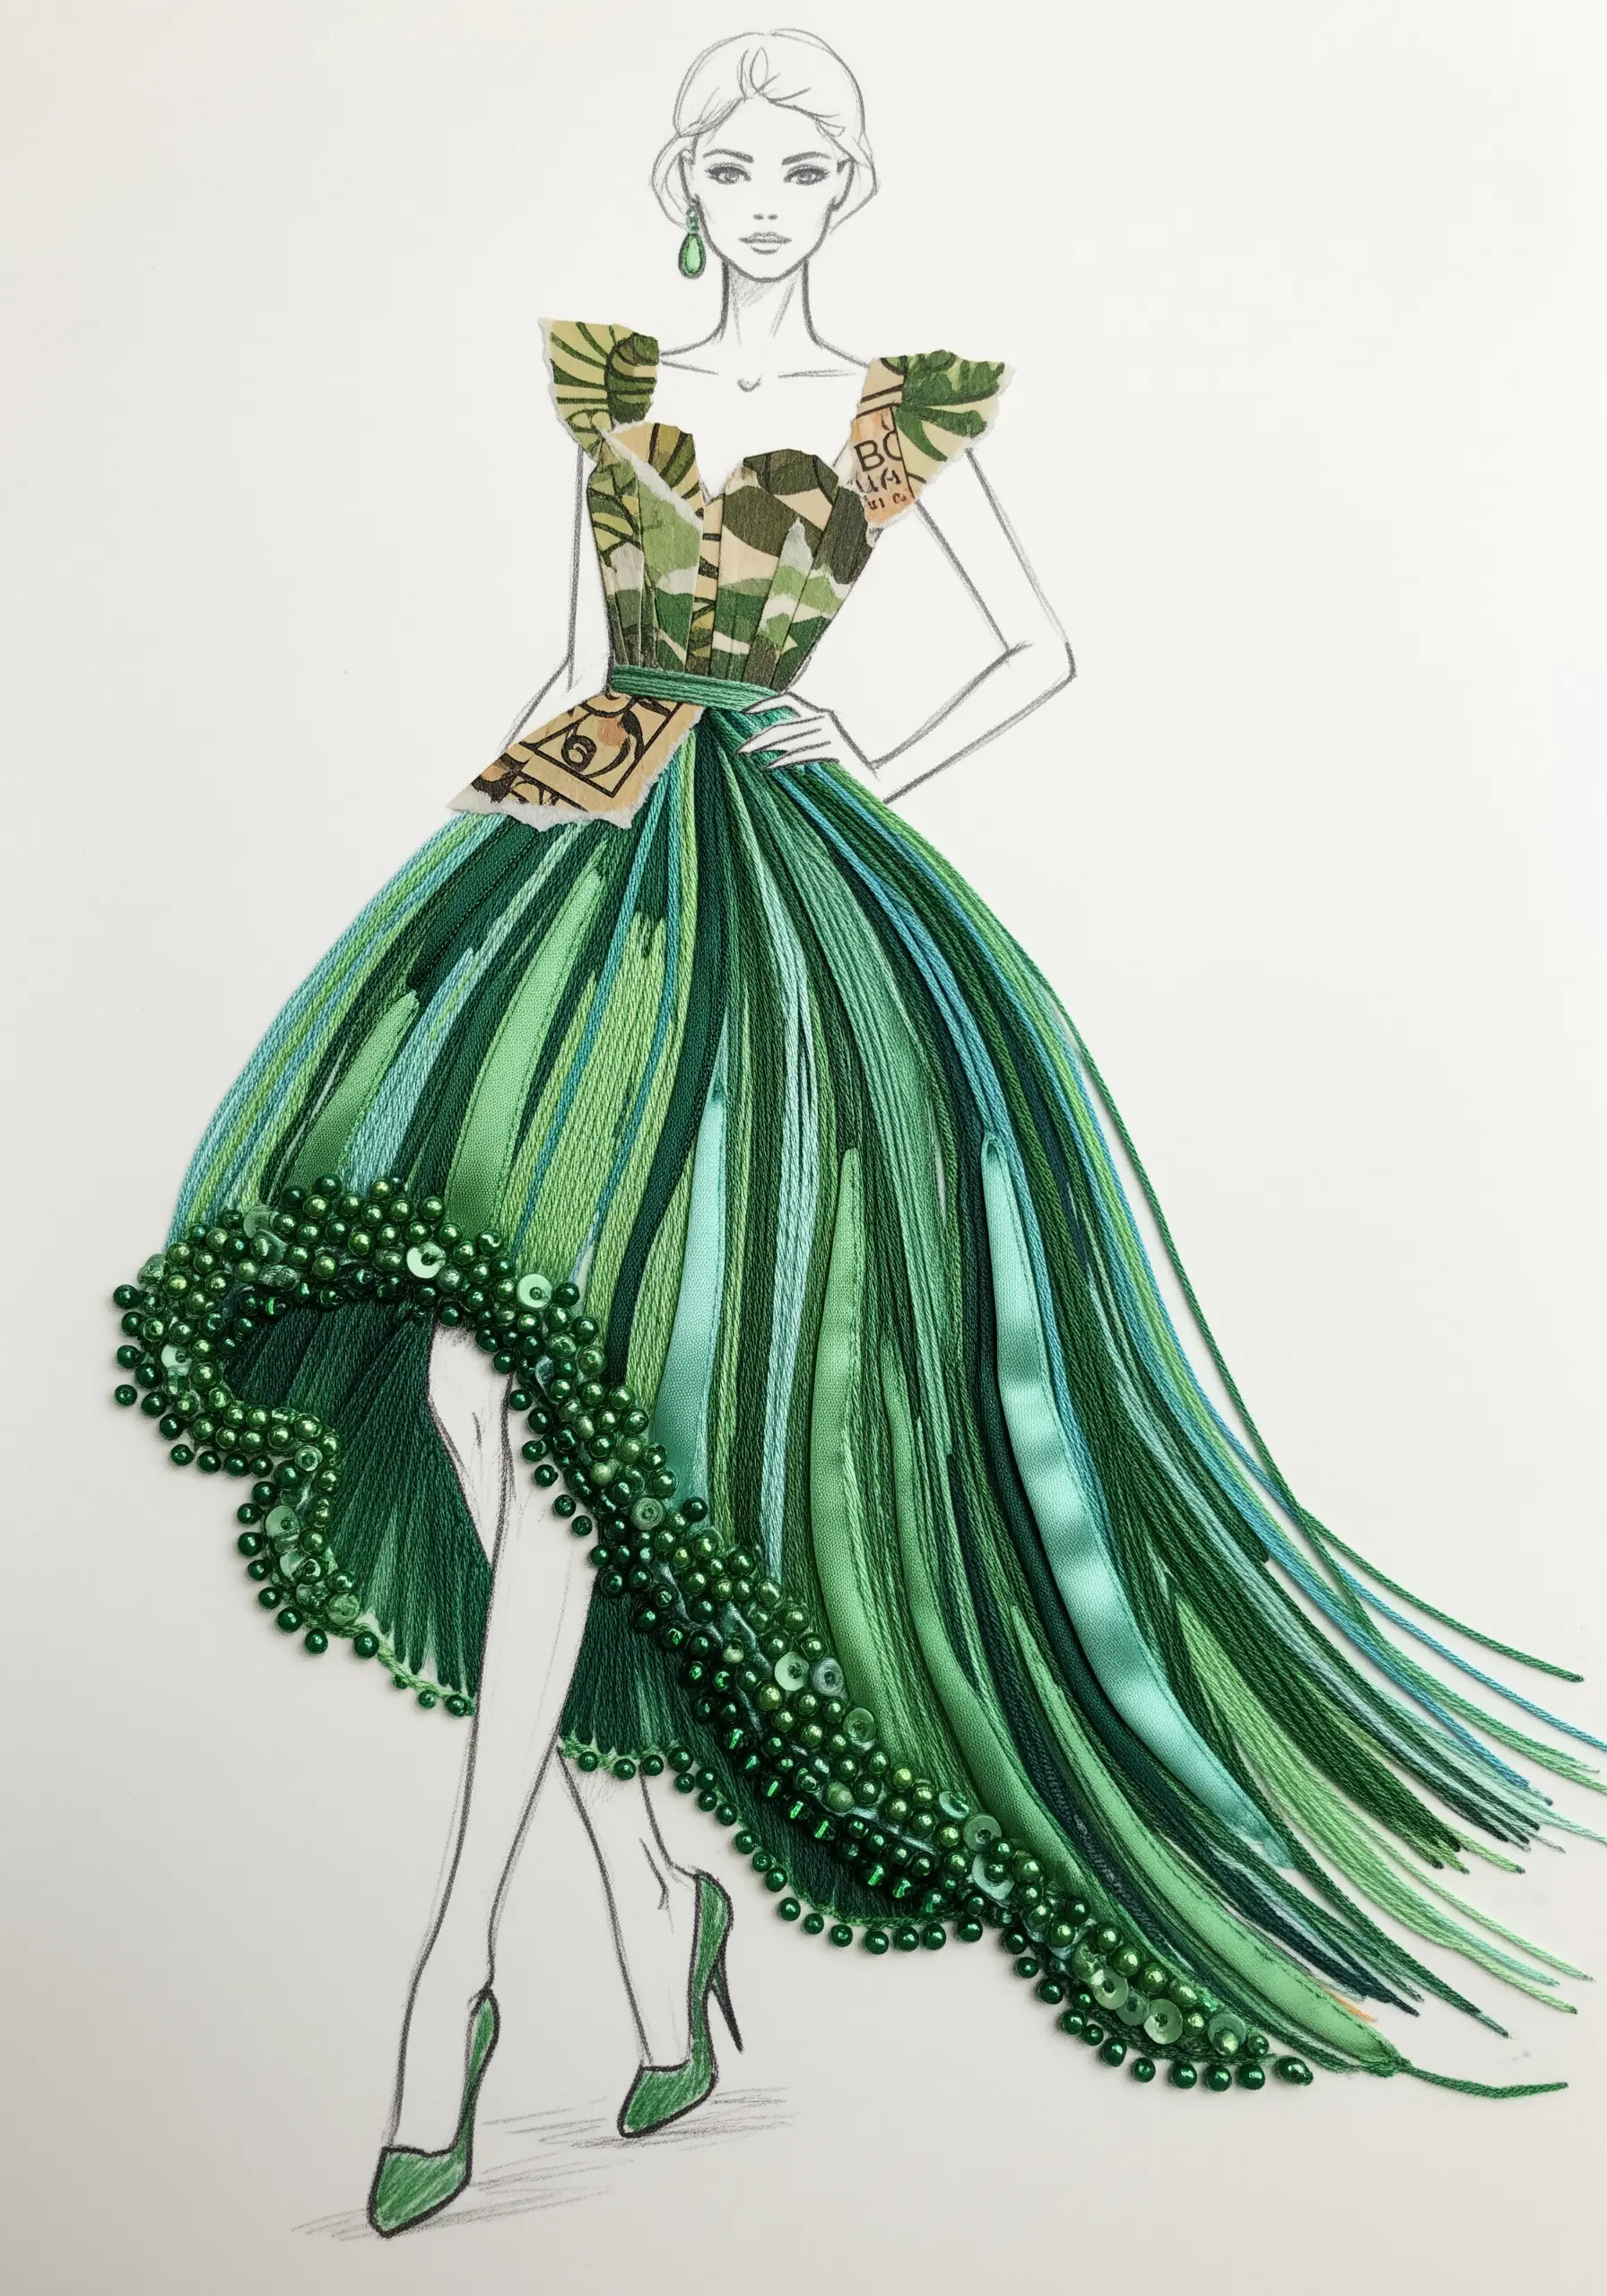
Bring a fashion illustration to life by replacing ink and paint with fibers and embellishments.
Begin with a simple line drawing on heavy paper. Then, instead of coloring in the garment, fill it with texture.
Use a variety of materials for the skirt: satin ribbon for sheen, single strands of embroidery floss for fine detail, and variegated thread for color depth. Secure them at the waist and let them hang loose to create natural movement and volume.
Edge the hemline with a dense border of beads and sequins. This adds weight, catching the light and creating a dramatic, luxurious finish that paper alone could never achieve.
10. Create 3D Appliqué Insect Specimens
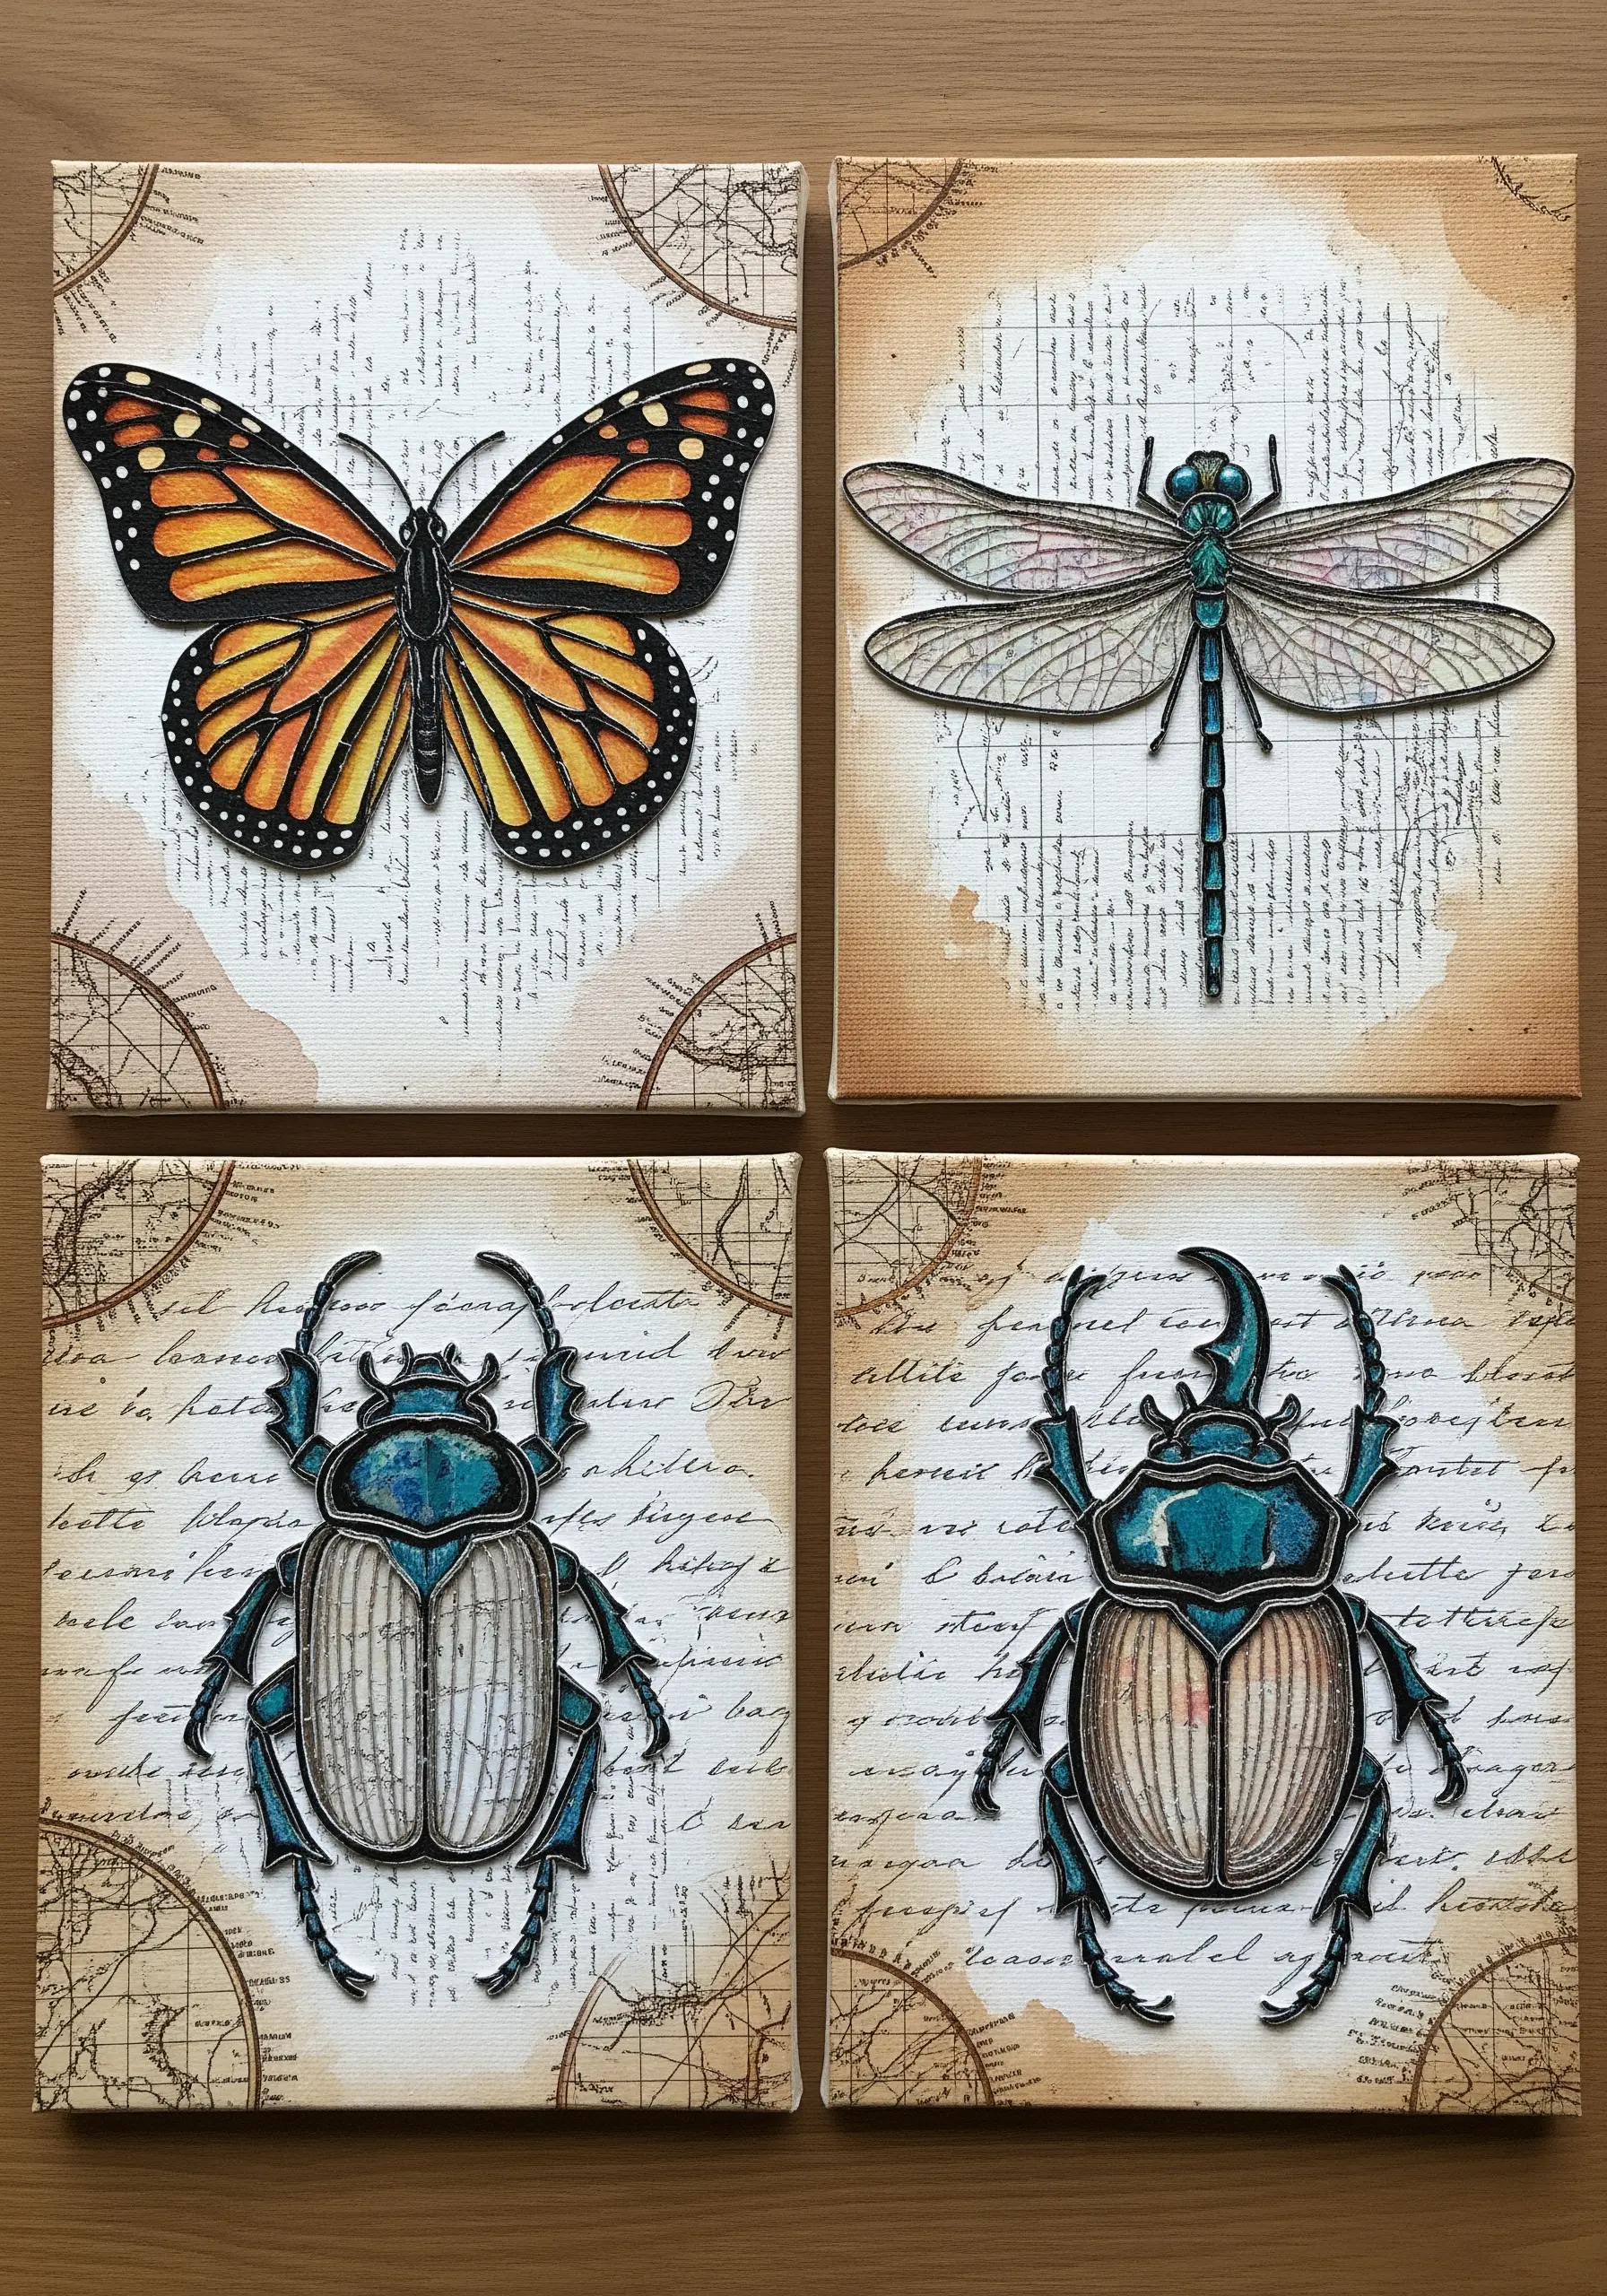
Give your embroidered insects a lifelike, raised appearance by stitching them as separate appliqués.
Complete your insect embroidery on a spare piece of fabric, using long and short stitches to blend colors for a realistic effect.
Once finished, apply a layer of iron-on interfacing to the back for stability. Then, carefully cut out the insect, leaving a very fine edge.
Prepare your background canvas, perhaps with a wash of tea or coffee and vintage-style stamps to create a collector’s aesthetic.
Finally, attach your embroidered insect to the canvas with a few discreet tacking stitches or fabric glue. This separation creates a subtle shadow and a professional, 3D finish.
11. Detail Paper Sculptures with Fine Thread

Add a layer of intricate detail to paper sculptures by incorporating fine embroidery.
For a project like this phoenix, where each feather is cut individually, you can elevate the design by stitching along the edges before assembly.
Use a single strand of metallic or variegated thread and a simple running stitch along the spine or edge of each paper piece.
This subtle detail catches the light and adds a delicate texture that mimics the natural barbs of a feather.
It’s a patient technique that rewards you with a stunning level of realism and depth, transforming cut paper into a work of true artistry.
12. Craft Narrative Bookmarks with Mixed Materials
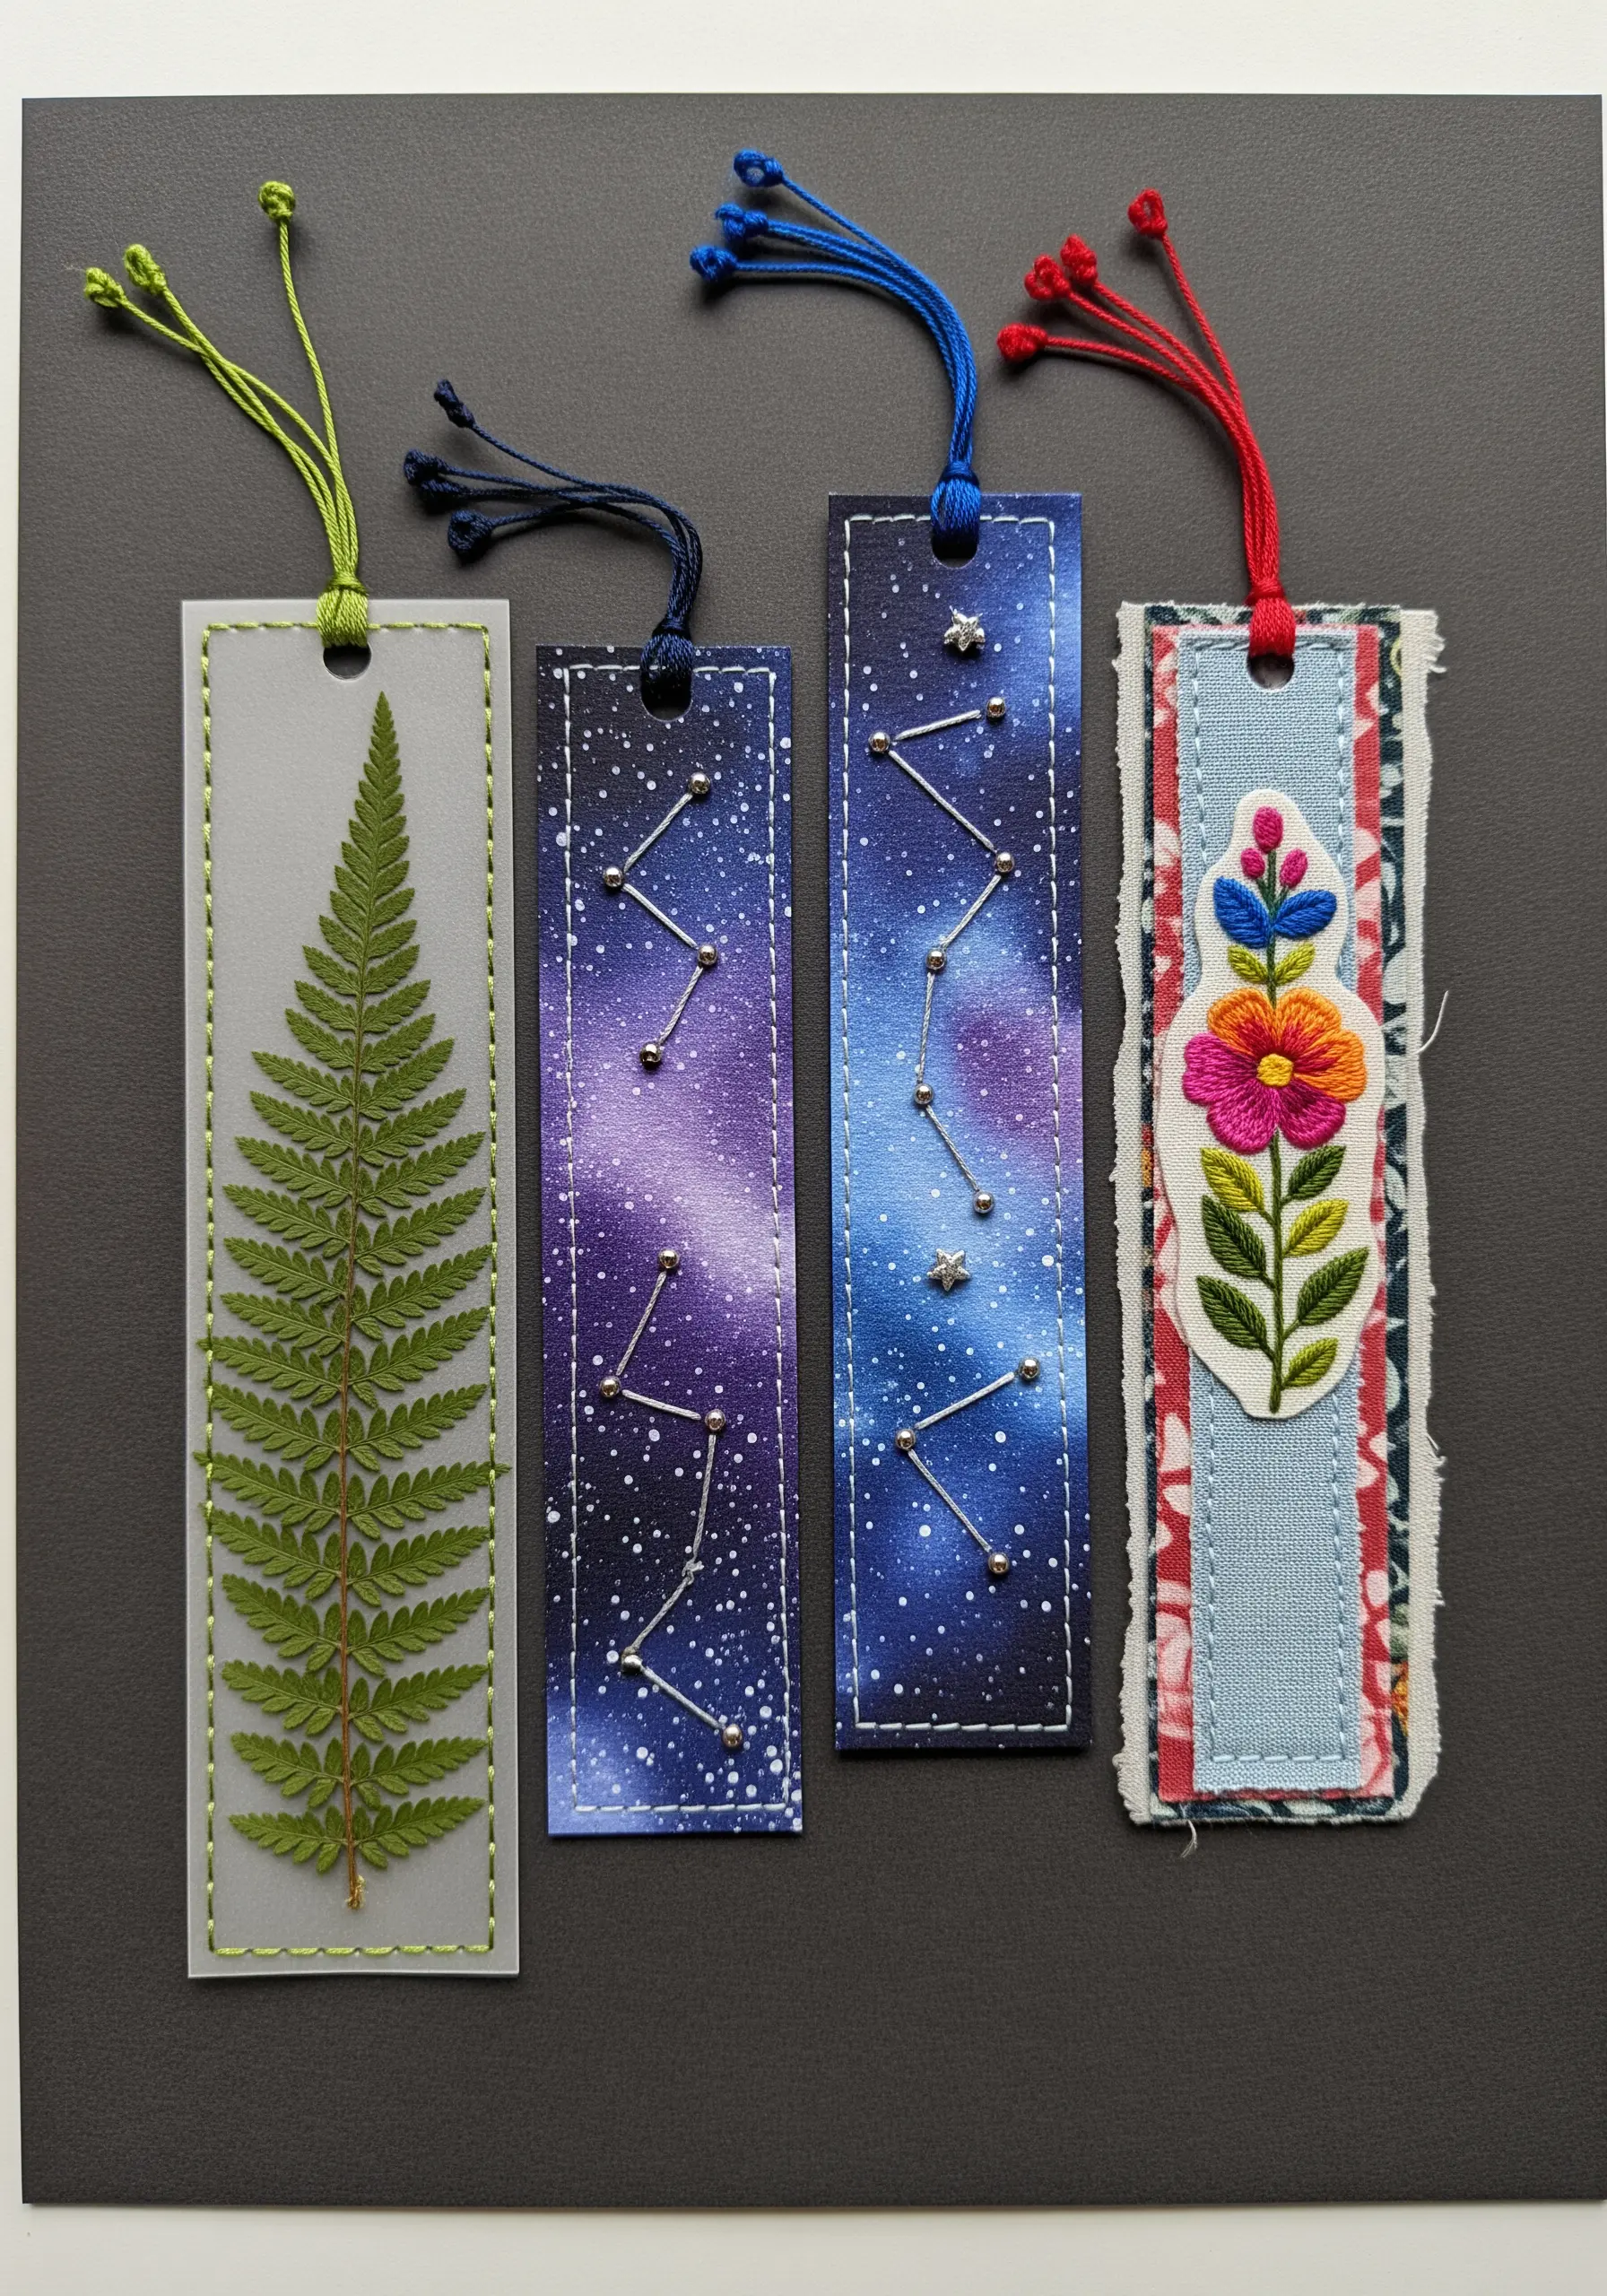
Explore storytelling on a small scale by creating bookmarks that combine diverse textures and techniques.
For a botanical theme, couch a real pressed fern onto translucent vellum with a simple running stitch frame.
To capture a night sky, paint a watercolor galaxy on heavy paper, then use French knots and metallic straight stitches to add stars and constellations.
For a more traditional feel, create a small embroidered floral patch and appliqué it onto a backing made from layered fabric scraps, finished with a raw edge.
Each bookmark becomes a miniature experiment in combining materials, perfect for gifting or personal use.
13. Personalize a Map with Beaded Stitches

Turn a simple map into a personal story by using embroidery and beads to mark significant places.
Choose a map of a meaningful city, region, or country and have it mounted on foam core for stability.
Use different stitches and embellishments to represent different types of memories. A cluster of French knots could mark a favorite park, tiny seed beads could trace a memorable walk, and a small, beaded starburst could pinpoint a home or special location.
This project transforms a static piece of paper into an interactive, tactile record of your life’s geography, making it a deeply personal piece of framed art.
14. Sculpt Hair and Texture with Chunky Yarn

Move beyond fine floss and experiment with thick yarn or wool roving to create bold, high-texture elements in your portraits.
Start with a line drawing on sturdy fabric or thick paper. For the hair, lay down thick yarn or roving in coils and waves to create the desired shape and volume.
Use a couching stitch with a matching or contrasting embroidery floss to tack the thick fibers into place. This gives you complete control over the shape while letting the yarn’s texture dominate.
Weave in thinner, contrasting threads to add highlights, depth, and a touch of unruly realism. This technique is perfect for creating art that invites touch and makes a dramatic statement.
15. Weave an Ethereal Layer into a Paper Diorama

Use embroidery to create the most delicate, almost invisible elements in a 3D paper shadow box.
First, construct your scene by layering cut paper to create a sense of depth—from the foreground trees to the distant sky.
Before sealing your box, stretch a fine, metallic thread between two points in the foreground to create a spiderweb. Use tiny drops of glue or additional stitches to form the radial lines.
In the background, stitch constellations directly onto the painted paper sky using a bright, contrasting thread.
Your thread work represents the elements that are most about light and air, creating a magical contrast with the solid paper forms.
16. Fuse Metallic Paint with Geometric String Art
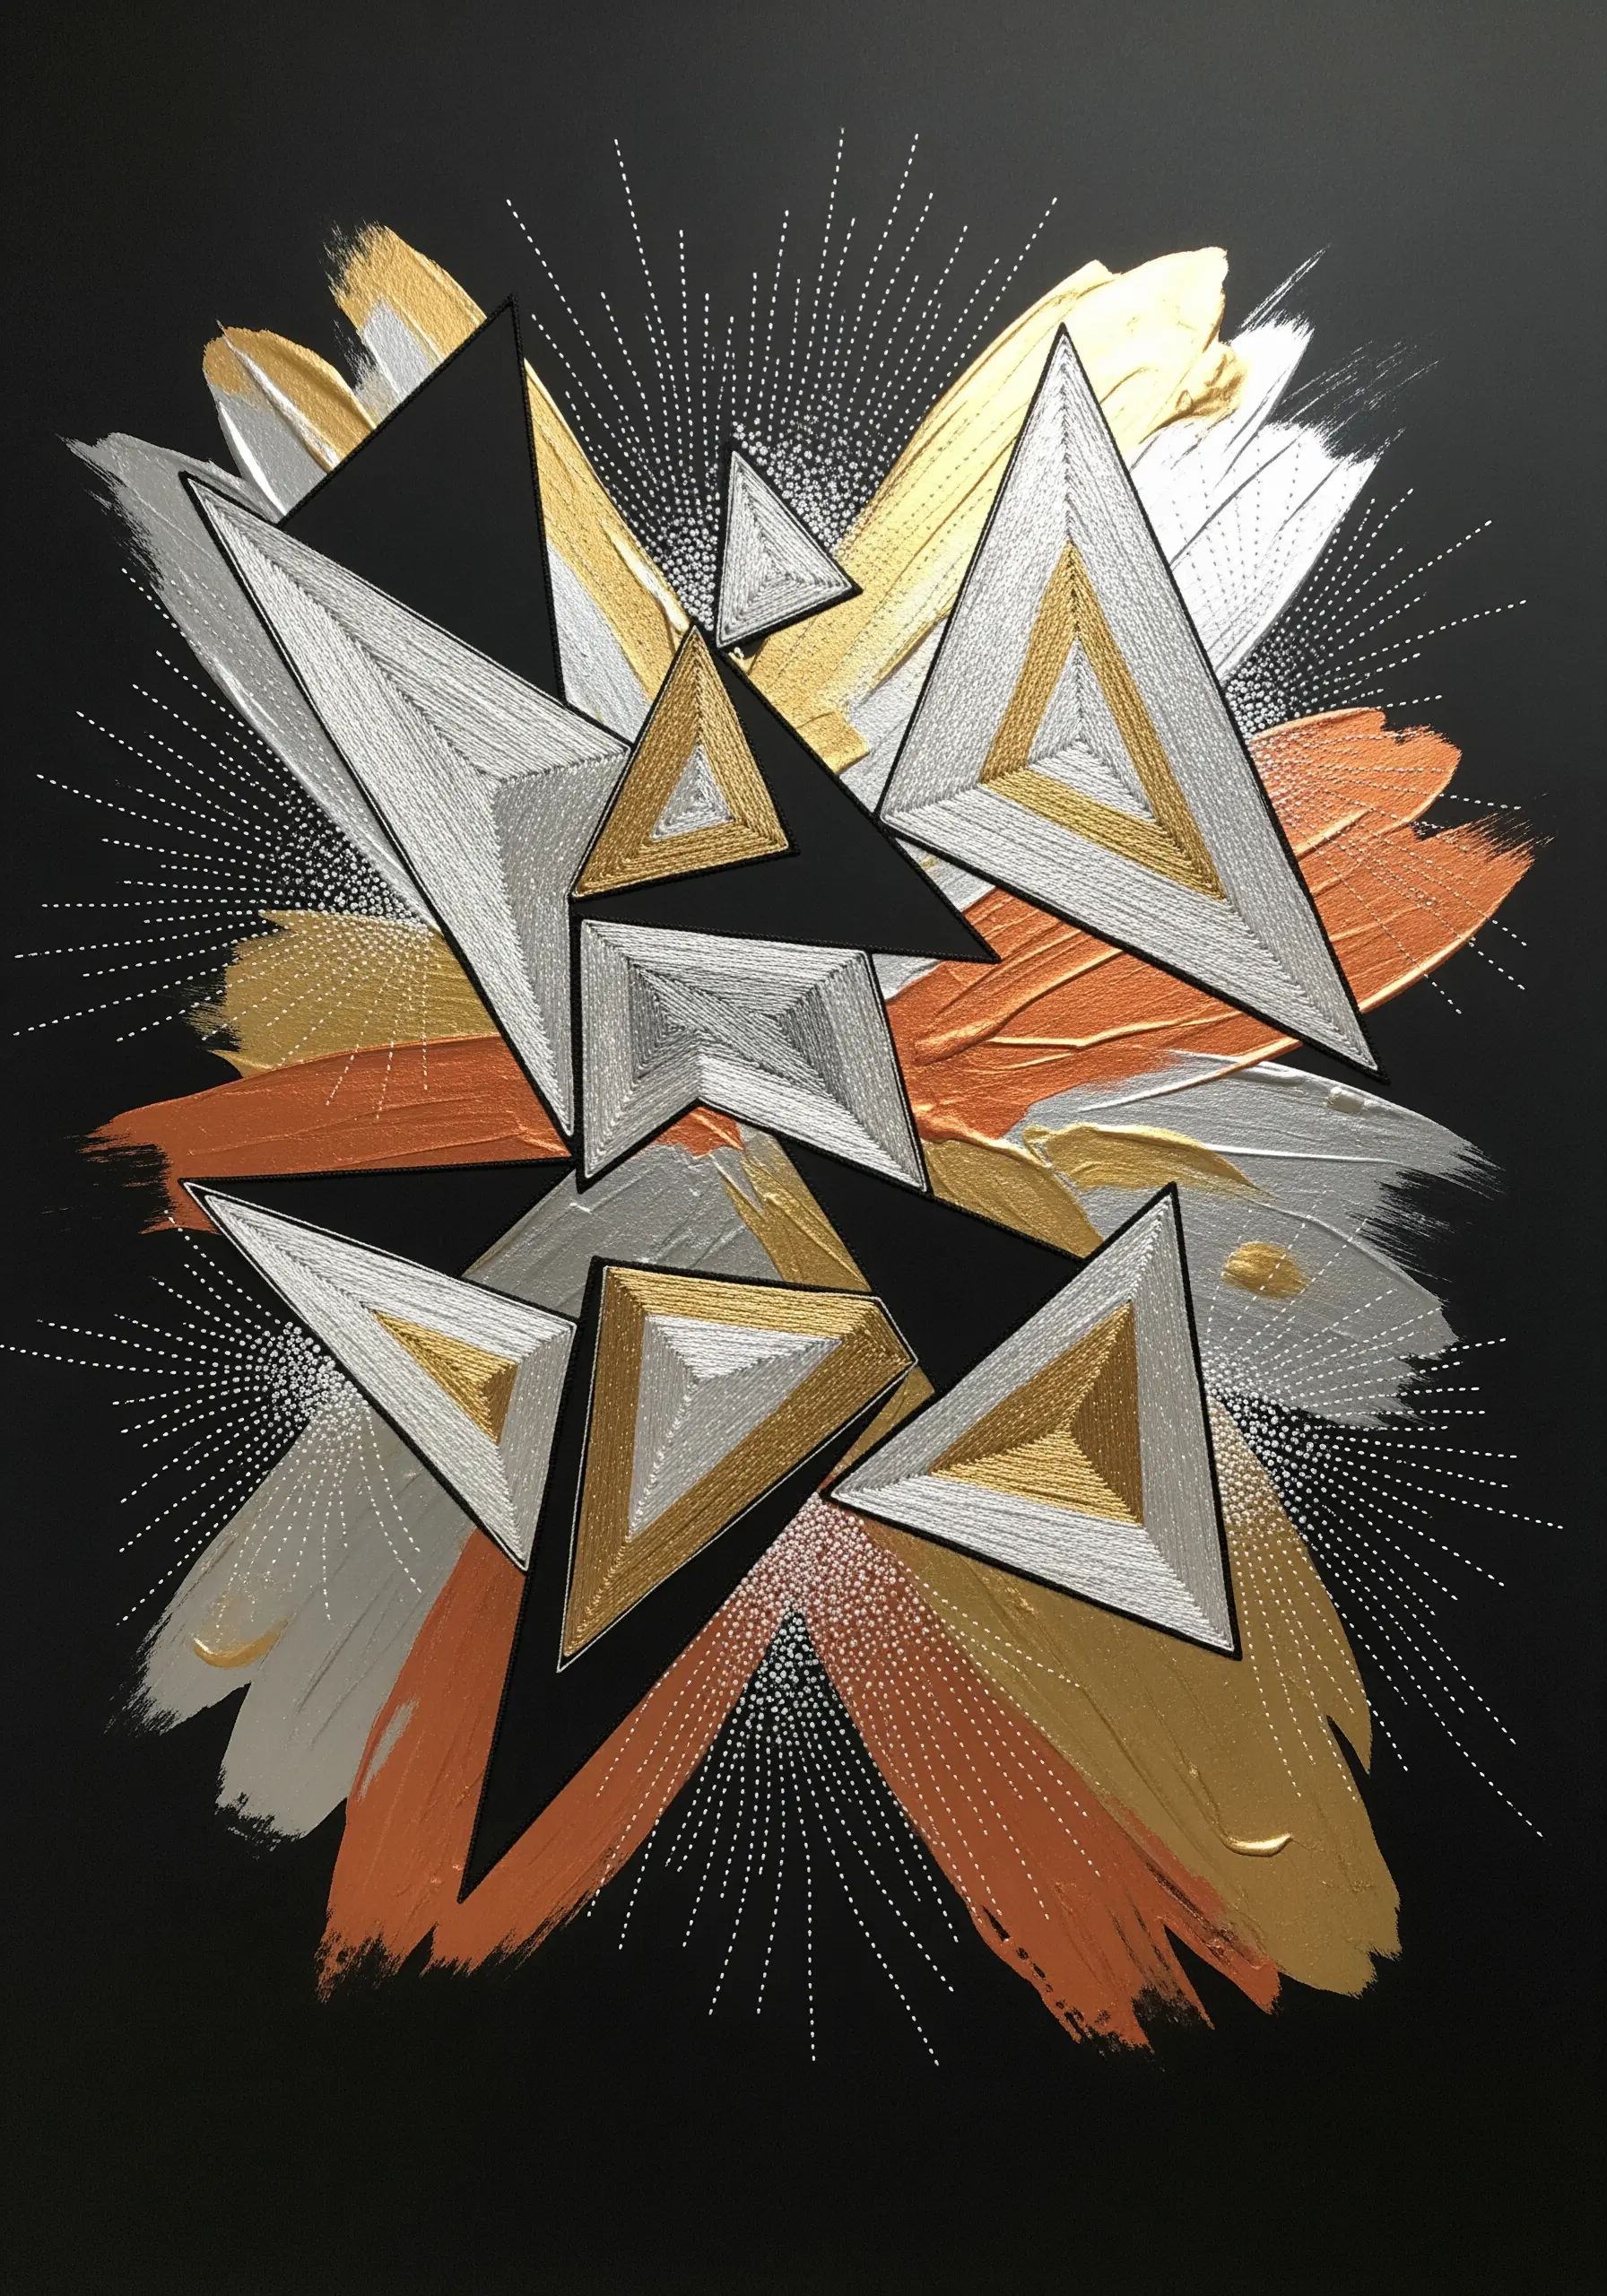
Create a dynamic abstract piece by combining the fluid sheen of metallic paint with the rigid precision of geometric embroidery.
On a black canvas or board, apply thick, expressive strokes of metallic paint (gold, silver, copper) and let them dry completely.
Next, overlay this with paper or cardstock triangles. Stitch these shapes with metallic threads, pulling the thread taut from edge to edge to create a dense, light-catching fill.
Finally, add radiating lines of simple straight stitches coming from the shapes. This creates a ‘burst’ effect, integrating the painted background with the stitched foreground and creating a sense of explosive energy.
17. Frame a Paper Collage with a Blanket Stitch

Turn functional cork coasters into miniature art pieces by combining decoupage with a simple, decorative stitch.
Begin by creating a collage on the cork base using scraps of paper, old stamps, and ephemera. Seal the surface with a layer of Mod Podge or a similar decoupage medium.
Once dry, use an awl to punch evenly spaced holes around the perimeter of the coaster.
Using a colorful, thick embroidery floss or perle cotton, work a blanket stitch around the entire edge. This not only adds a pop of color and a beautiful handmade finish but also helps secure the paper edges and prevent peeling.
It’s a quick, satisfying project that beautifully marries paper art with foundational embroidery.


