
Have you ever finished a piece and felt that something was missing—that a spark of artistry hadn’t quite translated from your mind to the fabric? You are not alone. So many of us master the stitches but struggle to transform them into something that feels like true art.
The secret isn’t about learning dozens of new, complicated techniques. Instead, it’s about making small, intentional shifts in how you use the skills you already have. It’s about choosing the right thread for texture, layering fabrics for depth, or using a stitch not just to fill a space, but to create movement.
Here, you’ll find ideas that bridge the gap between craft and art. Think of your needle less as a tool for making stitches and more as a pen for drawing with thread, a brush for painting with silk, or a chisel for sculpting with fiber. Let’s create not just embroidery, but small, precious objects that hold a story in every fiber.
1. Sculptural Stumpwork with a Luminous Twist
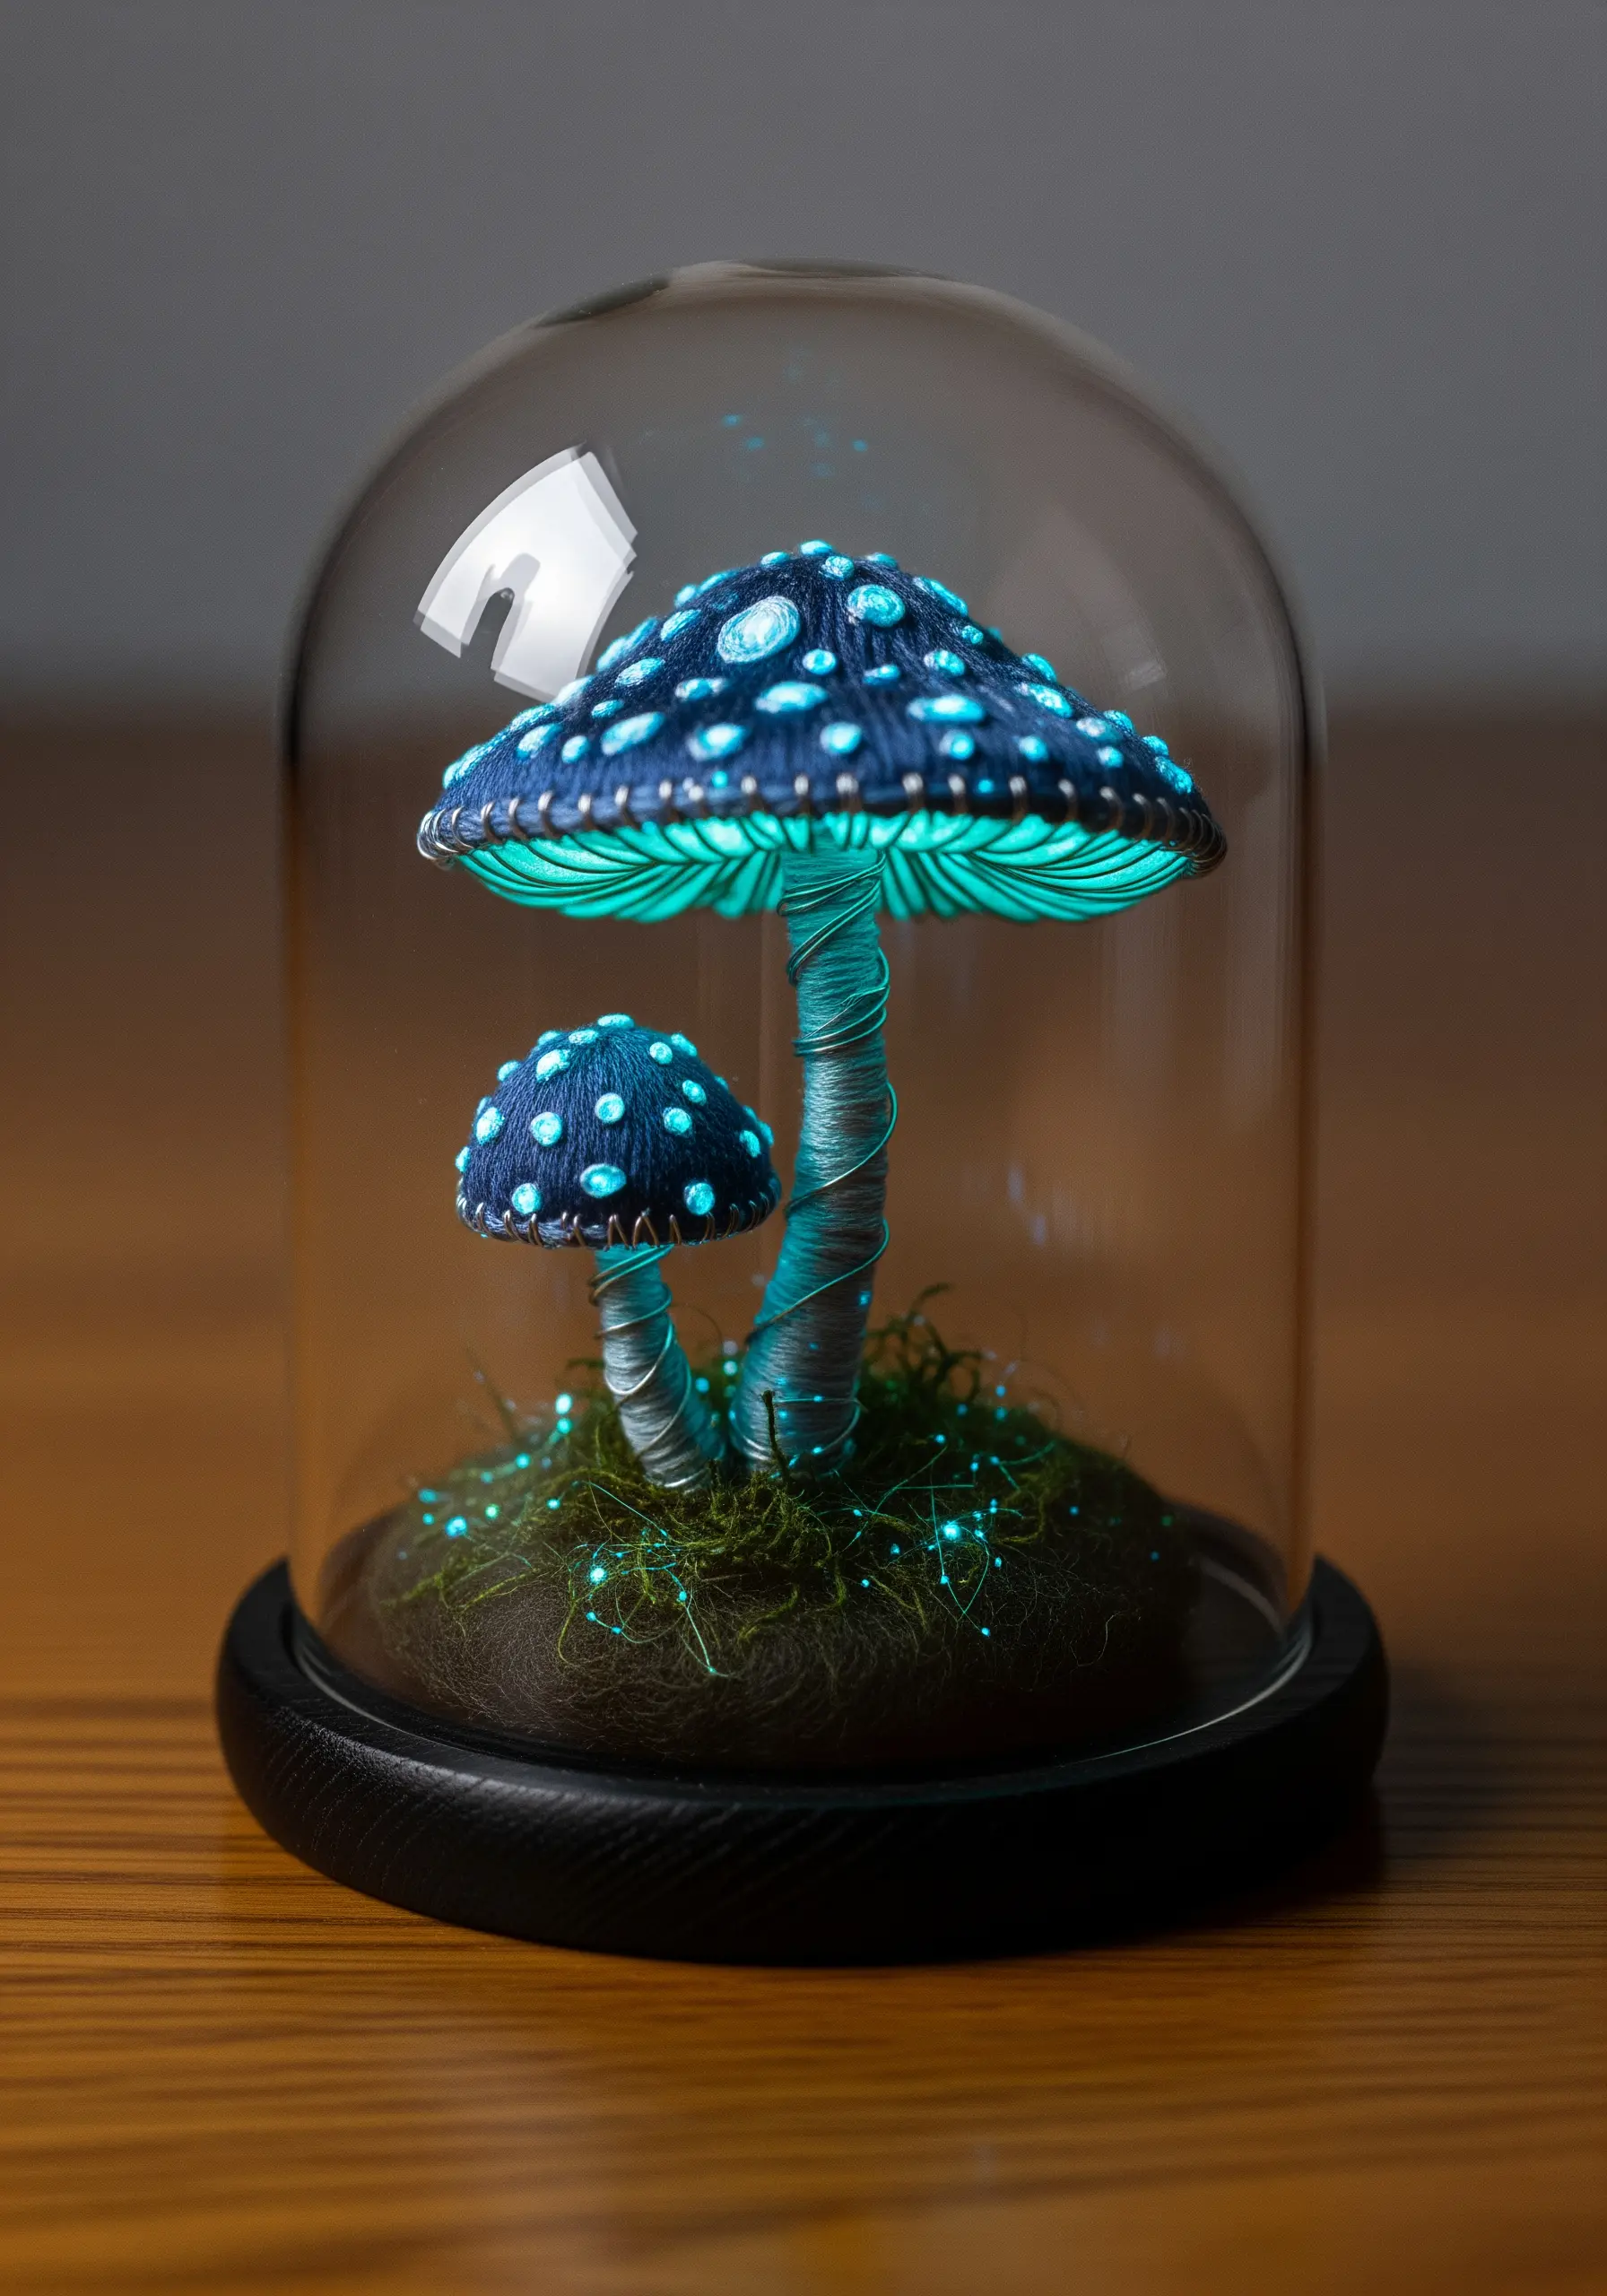
Create three-dimensional forms by moving your embroidery off the fabric and into the third dimension.
Build your mushroom caps using layers of felt as a base, then cover them with dense satin stitch for a smooth, domed effect.
For the stems, wrap thread tightly around a flexible wire armature, allowing you to pose your finished piece dynamically.
Integrate ultra-fine fiber optic strands or glow-in-the-dark thread among your stitches to create a magical, bioluminescent glow that transforms your work in low light.
2. Layered Fabric Collage as a Narrative Base
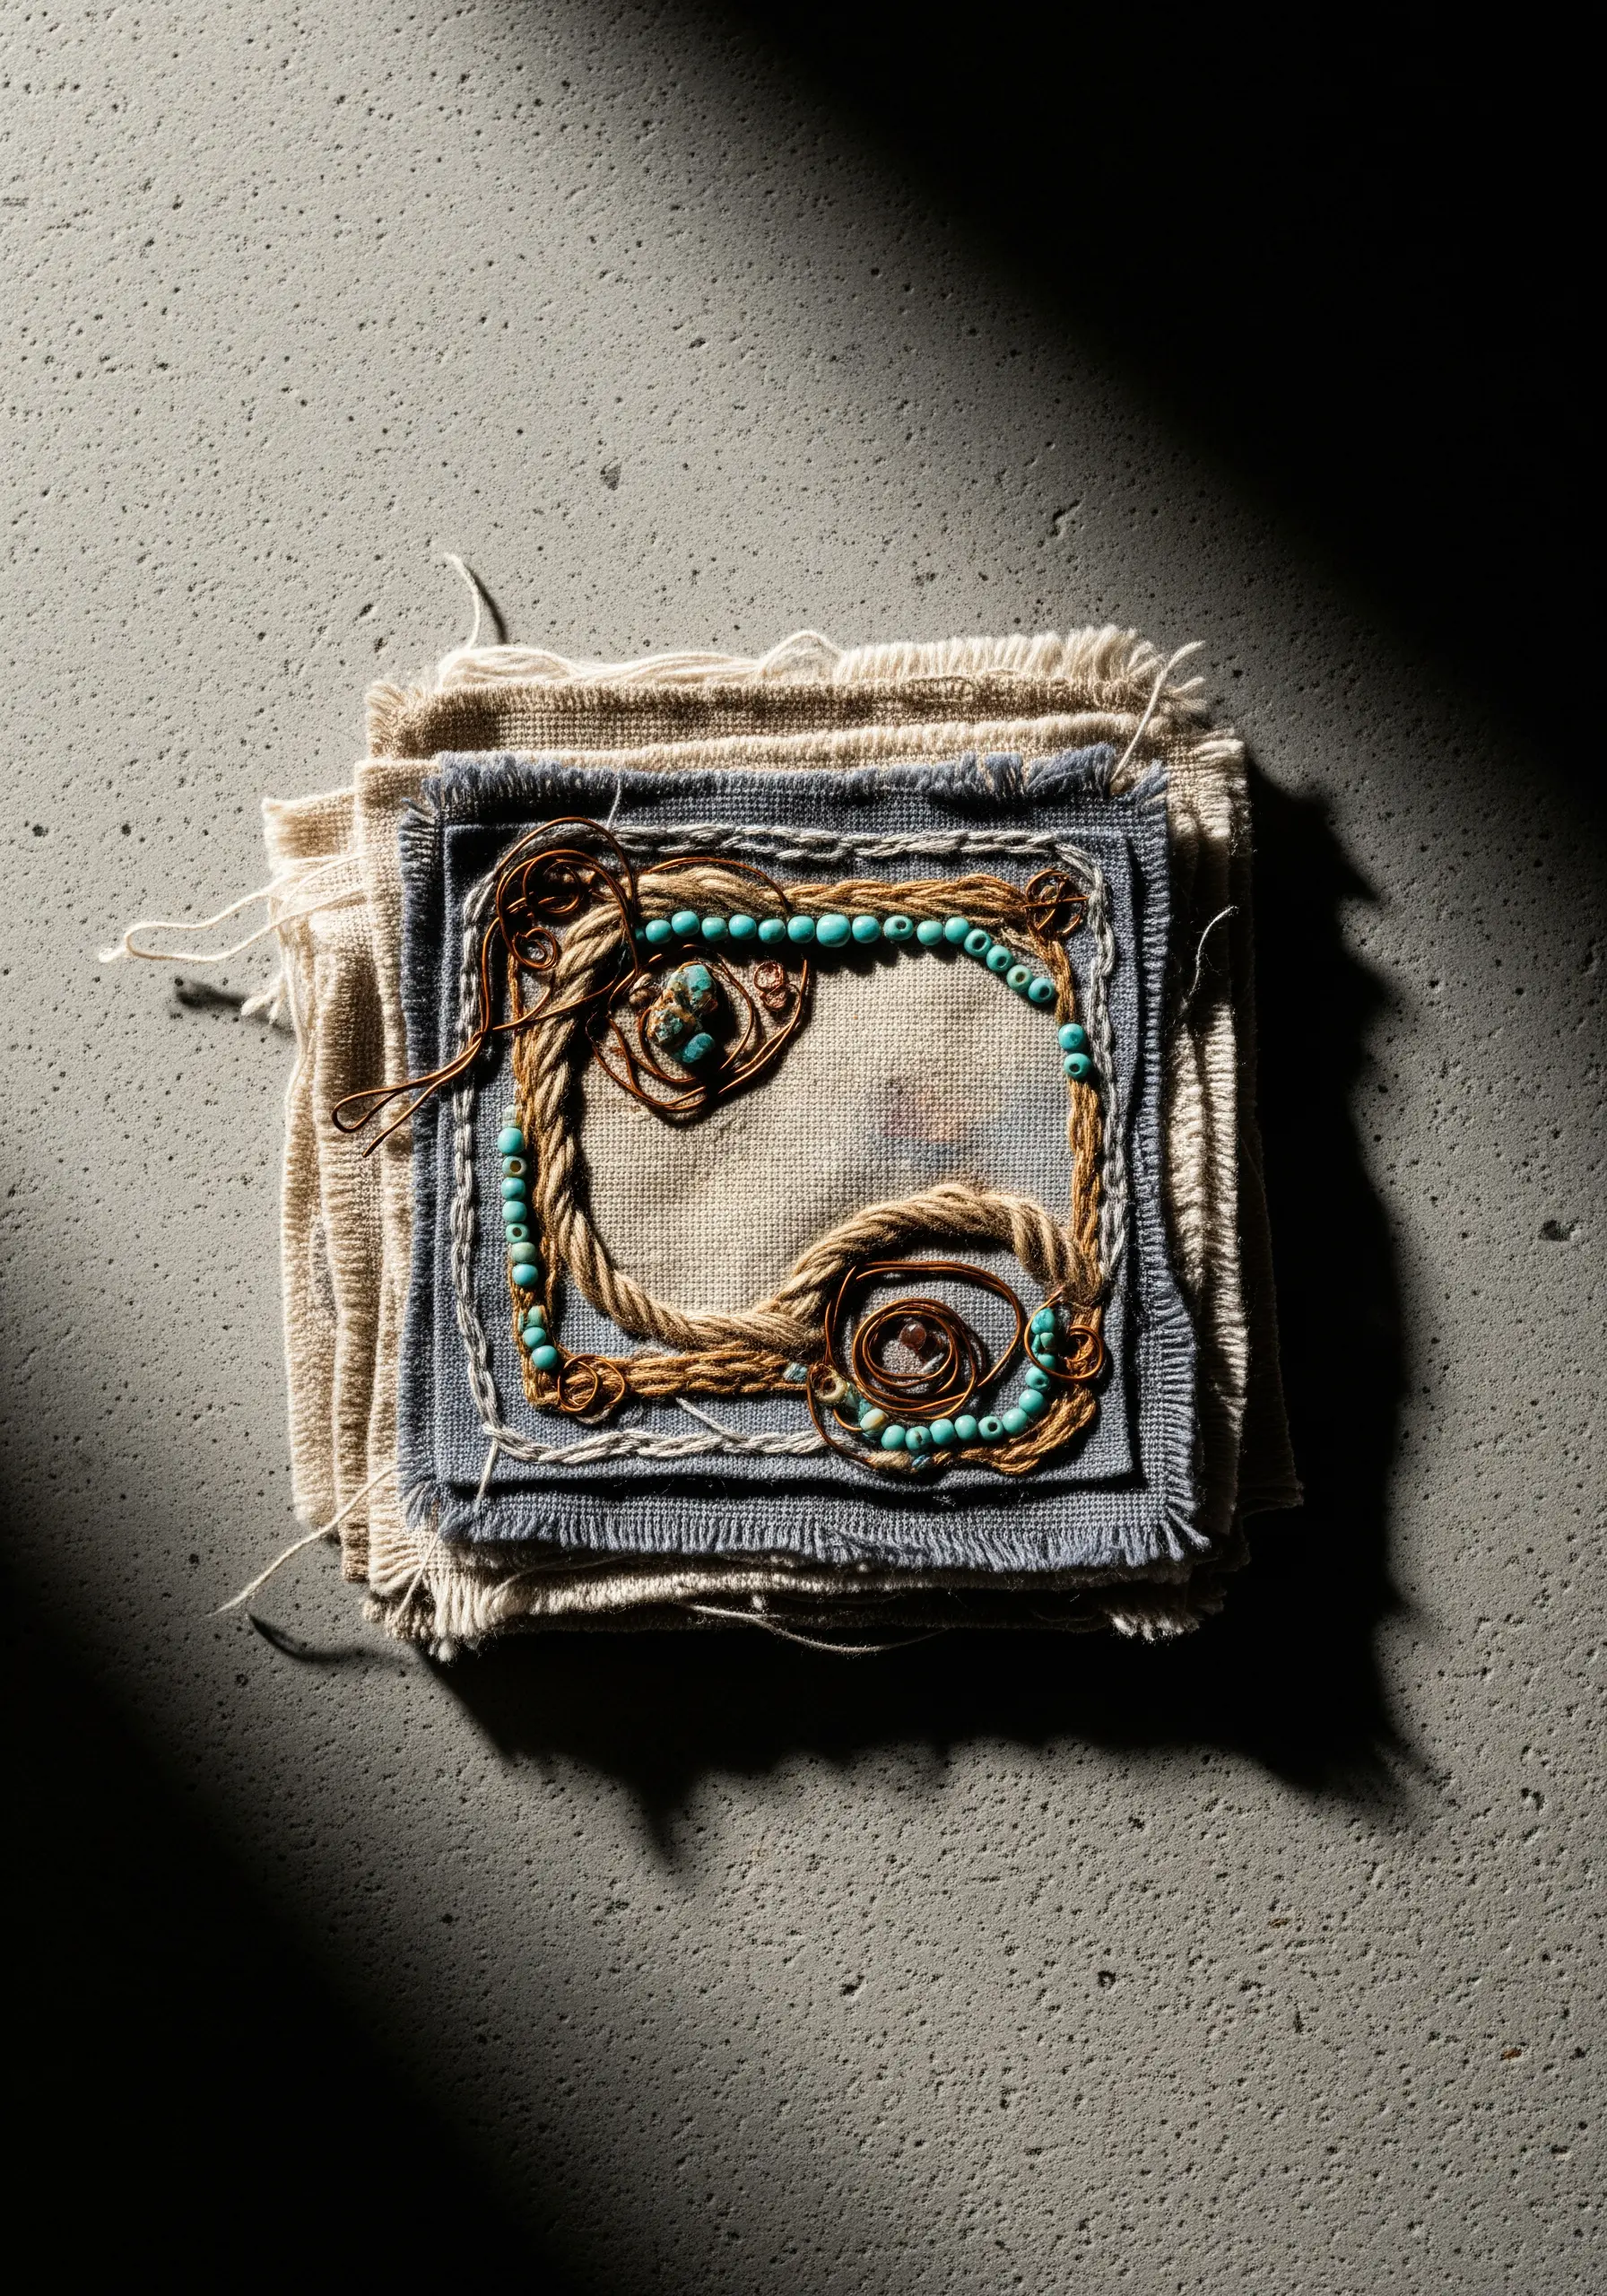
Build depth and history into your work by layering fabrics before you even make a stitch.
Start with a base of raw, unhemmed linen or canvas, then add smaller, frayed-edge scraps on top to create a rustic, artifact-like texture.
When stitching, use a sturdy needle to pierce all layers at once, which quilts them together and prevents shifting.
Frame your central motif with couched twine and semi-precious beads to turn a simple fabric collage into a treasured object.
3. Suspending Stitches: Embroidery in Resin
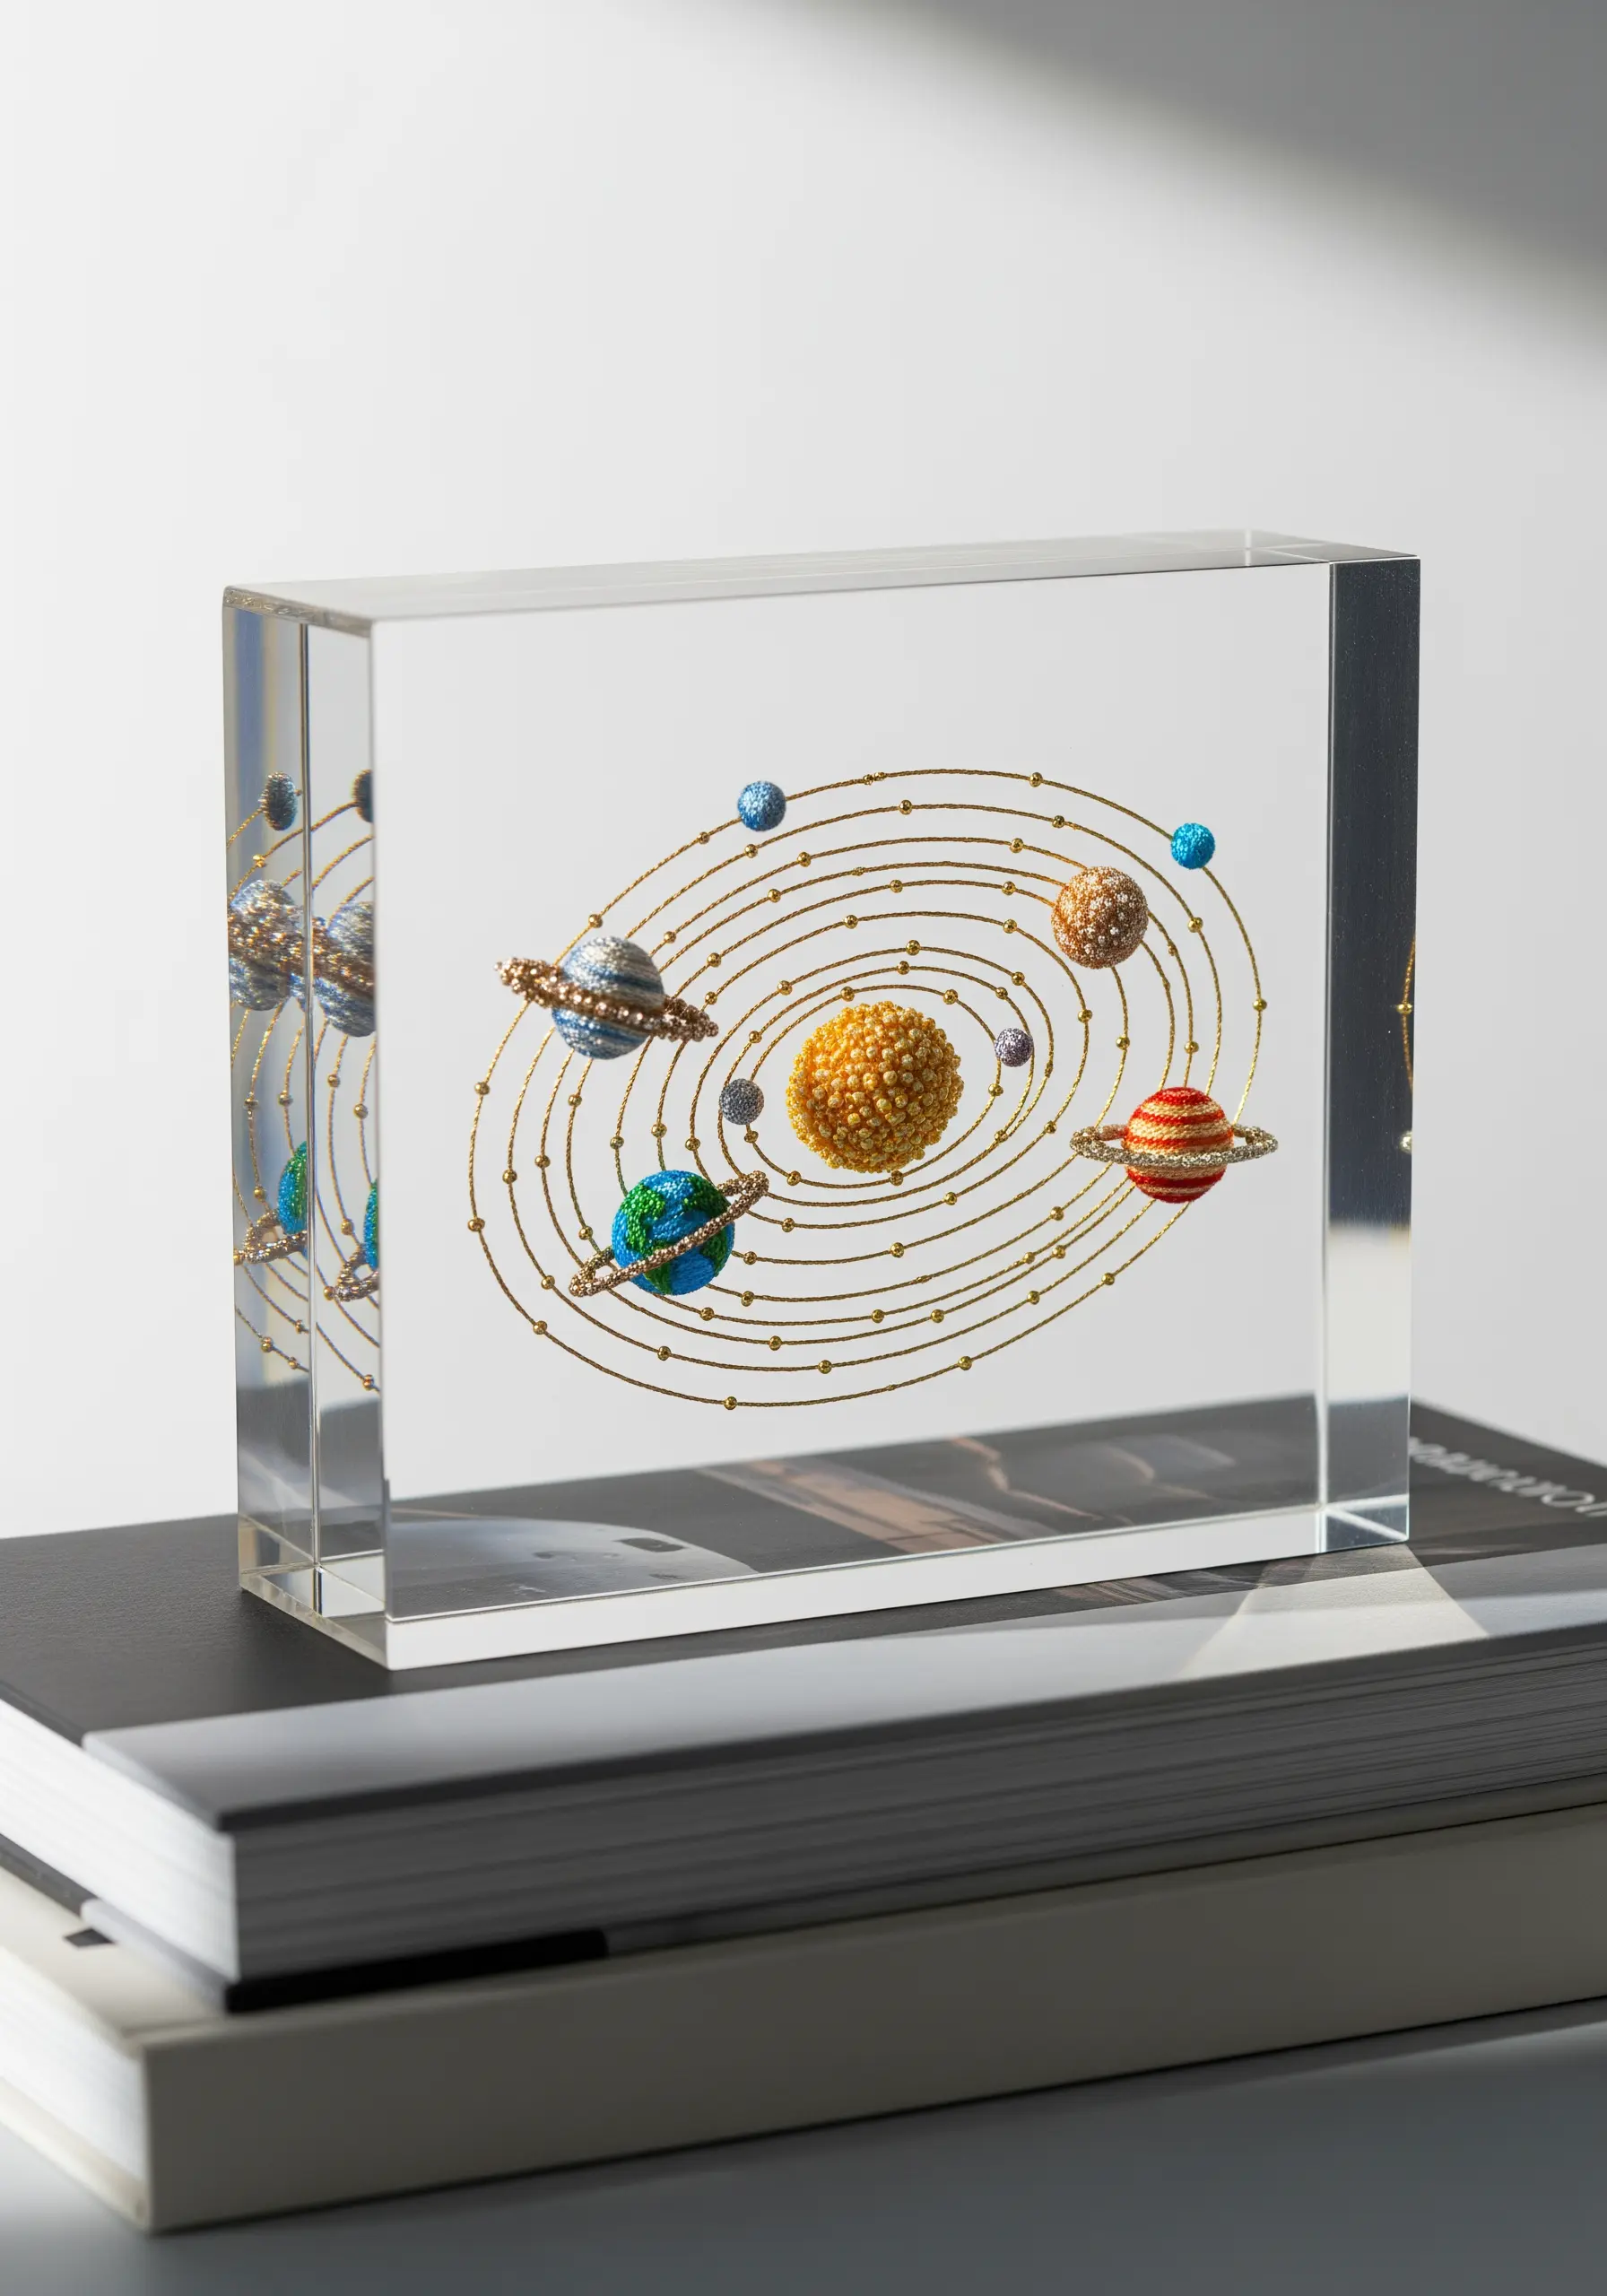
Transform your embroidery into a sculptural object by encasing it in crystal-clear resin.
Stitch your motifs—like these tiny planets made of dense French knots and metallic thread—onto a water-soluble stabilizer.
Once the stabilizer is dissolved, you have delicate, free-standing embroidered objects ready for casting.
Carefully position the elements using tweezers within the resin mold, using fine wire to create orbits, for a piece that seems to float in space.
4. Achieving Realism with Thread Painting
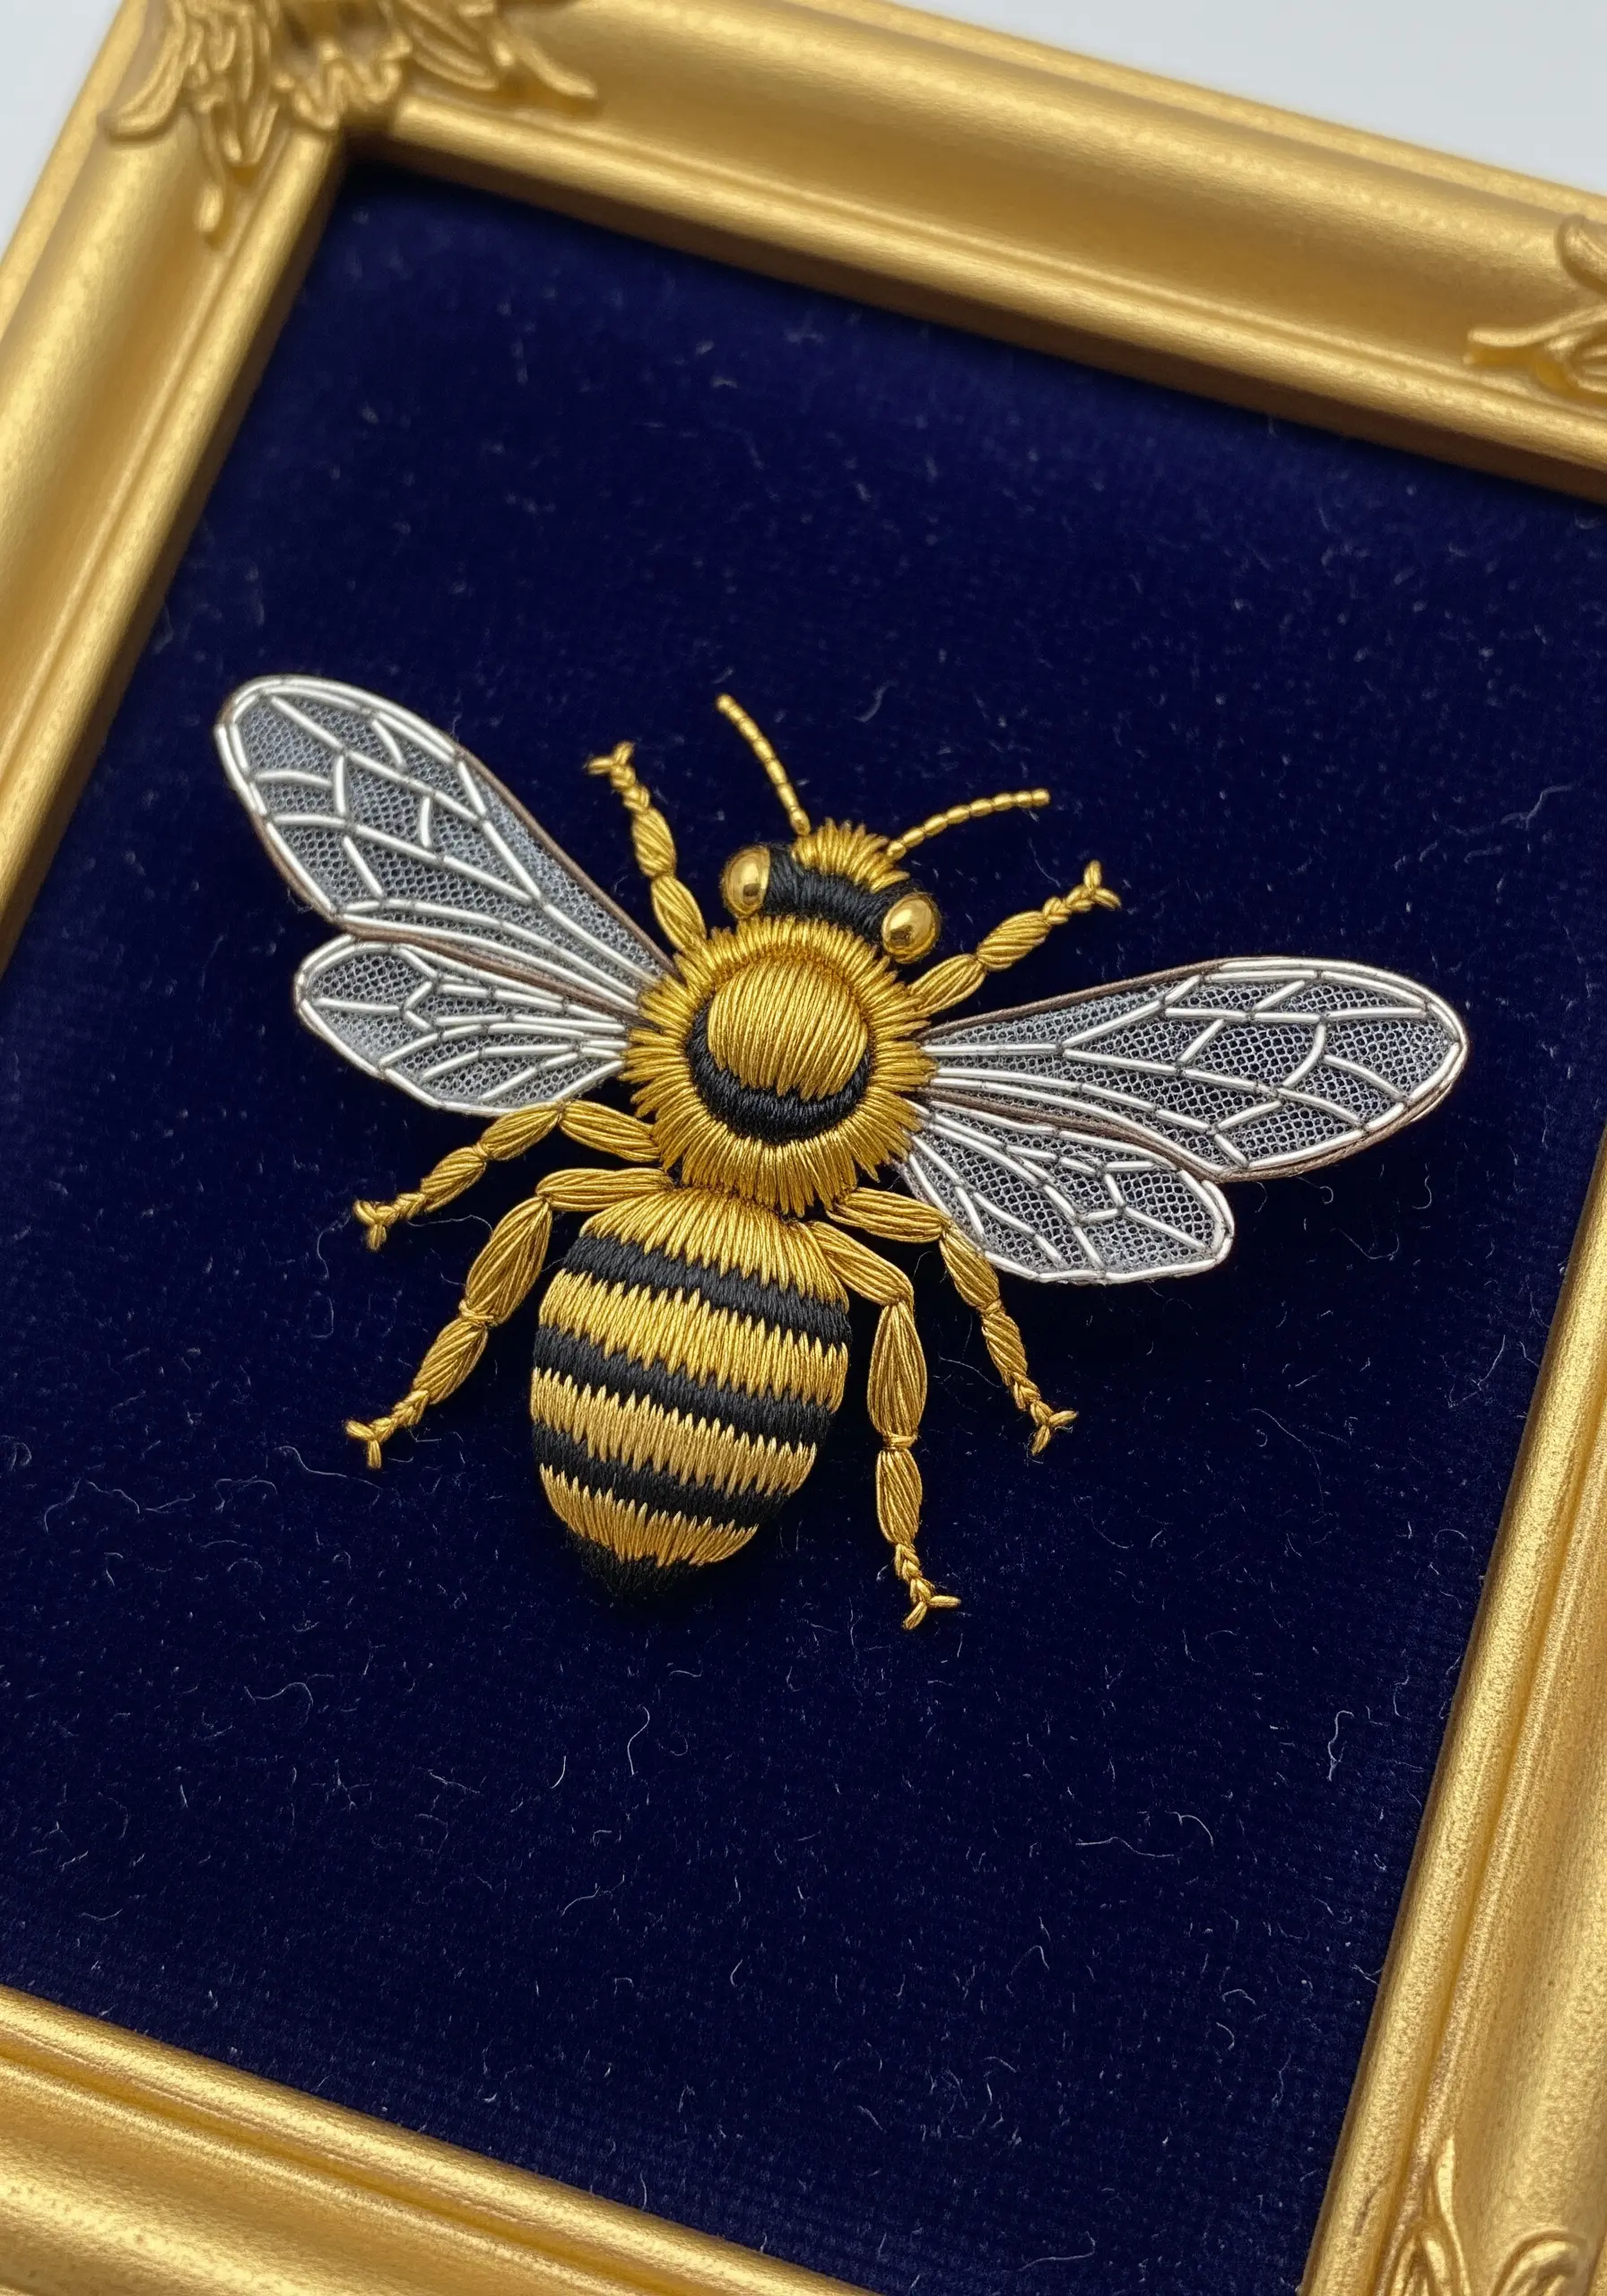
Capture lifelike detail by treating your needle like a paintbrush and your floss like paint.
Use the long-and-short stitch with a single strand of thread to blend colors seamlessly, creating the soft, fuzzy texture on the bee’s thorax.
For the delicate wings, stitch a fine outline on sheer organza fabric, then fill with a sparse brick stitch to suggest transparency and light.
Mount the finished piece on a dark, rich fabric like velvet; the high contrast makes the metallic and silk threads appear more vibrant and luxurious.
5. Weaving Texture into Wall Hangings

Combine weaving and embroidery to create a landscape with incredible depth and tactile appeal.
Use a simple frame loom to weave the background, incorporating chunky wool roving for soft, voluminous clouds and thinner yarns for the sky gradient.
Once it’s off the loom, add fine details directly onto the woven surface.
Embroider delicate sun rays with a single strand of metallic floss or add tiny French knots to suggest distant foliage, adding a layer of refinement to the rustic weave.
6. Textile Kintsugi: Mending with Golden Thread
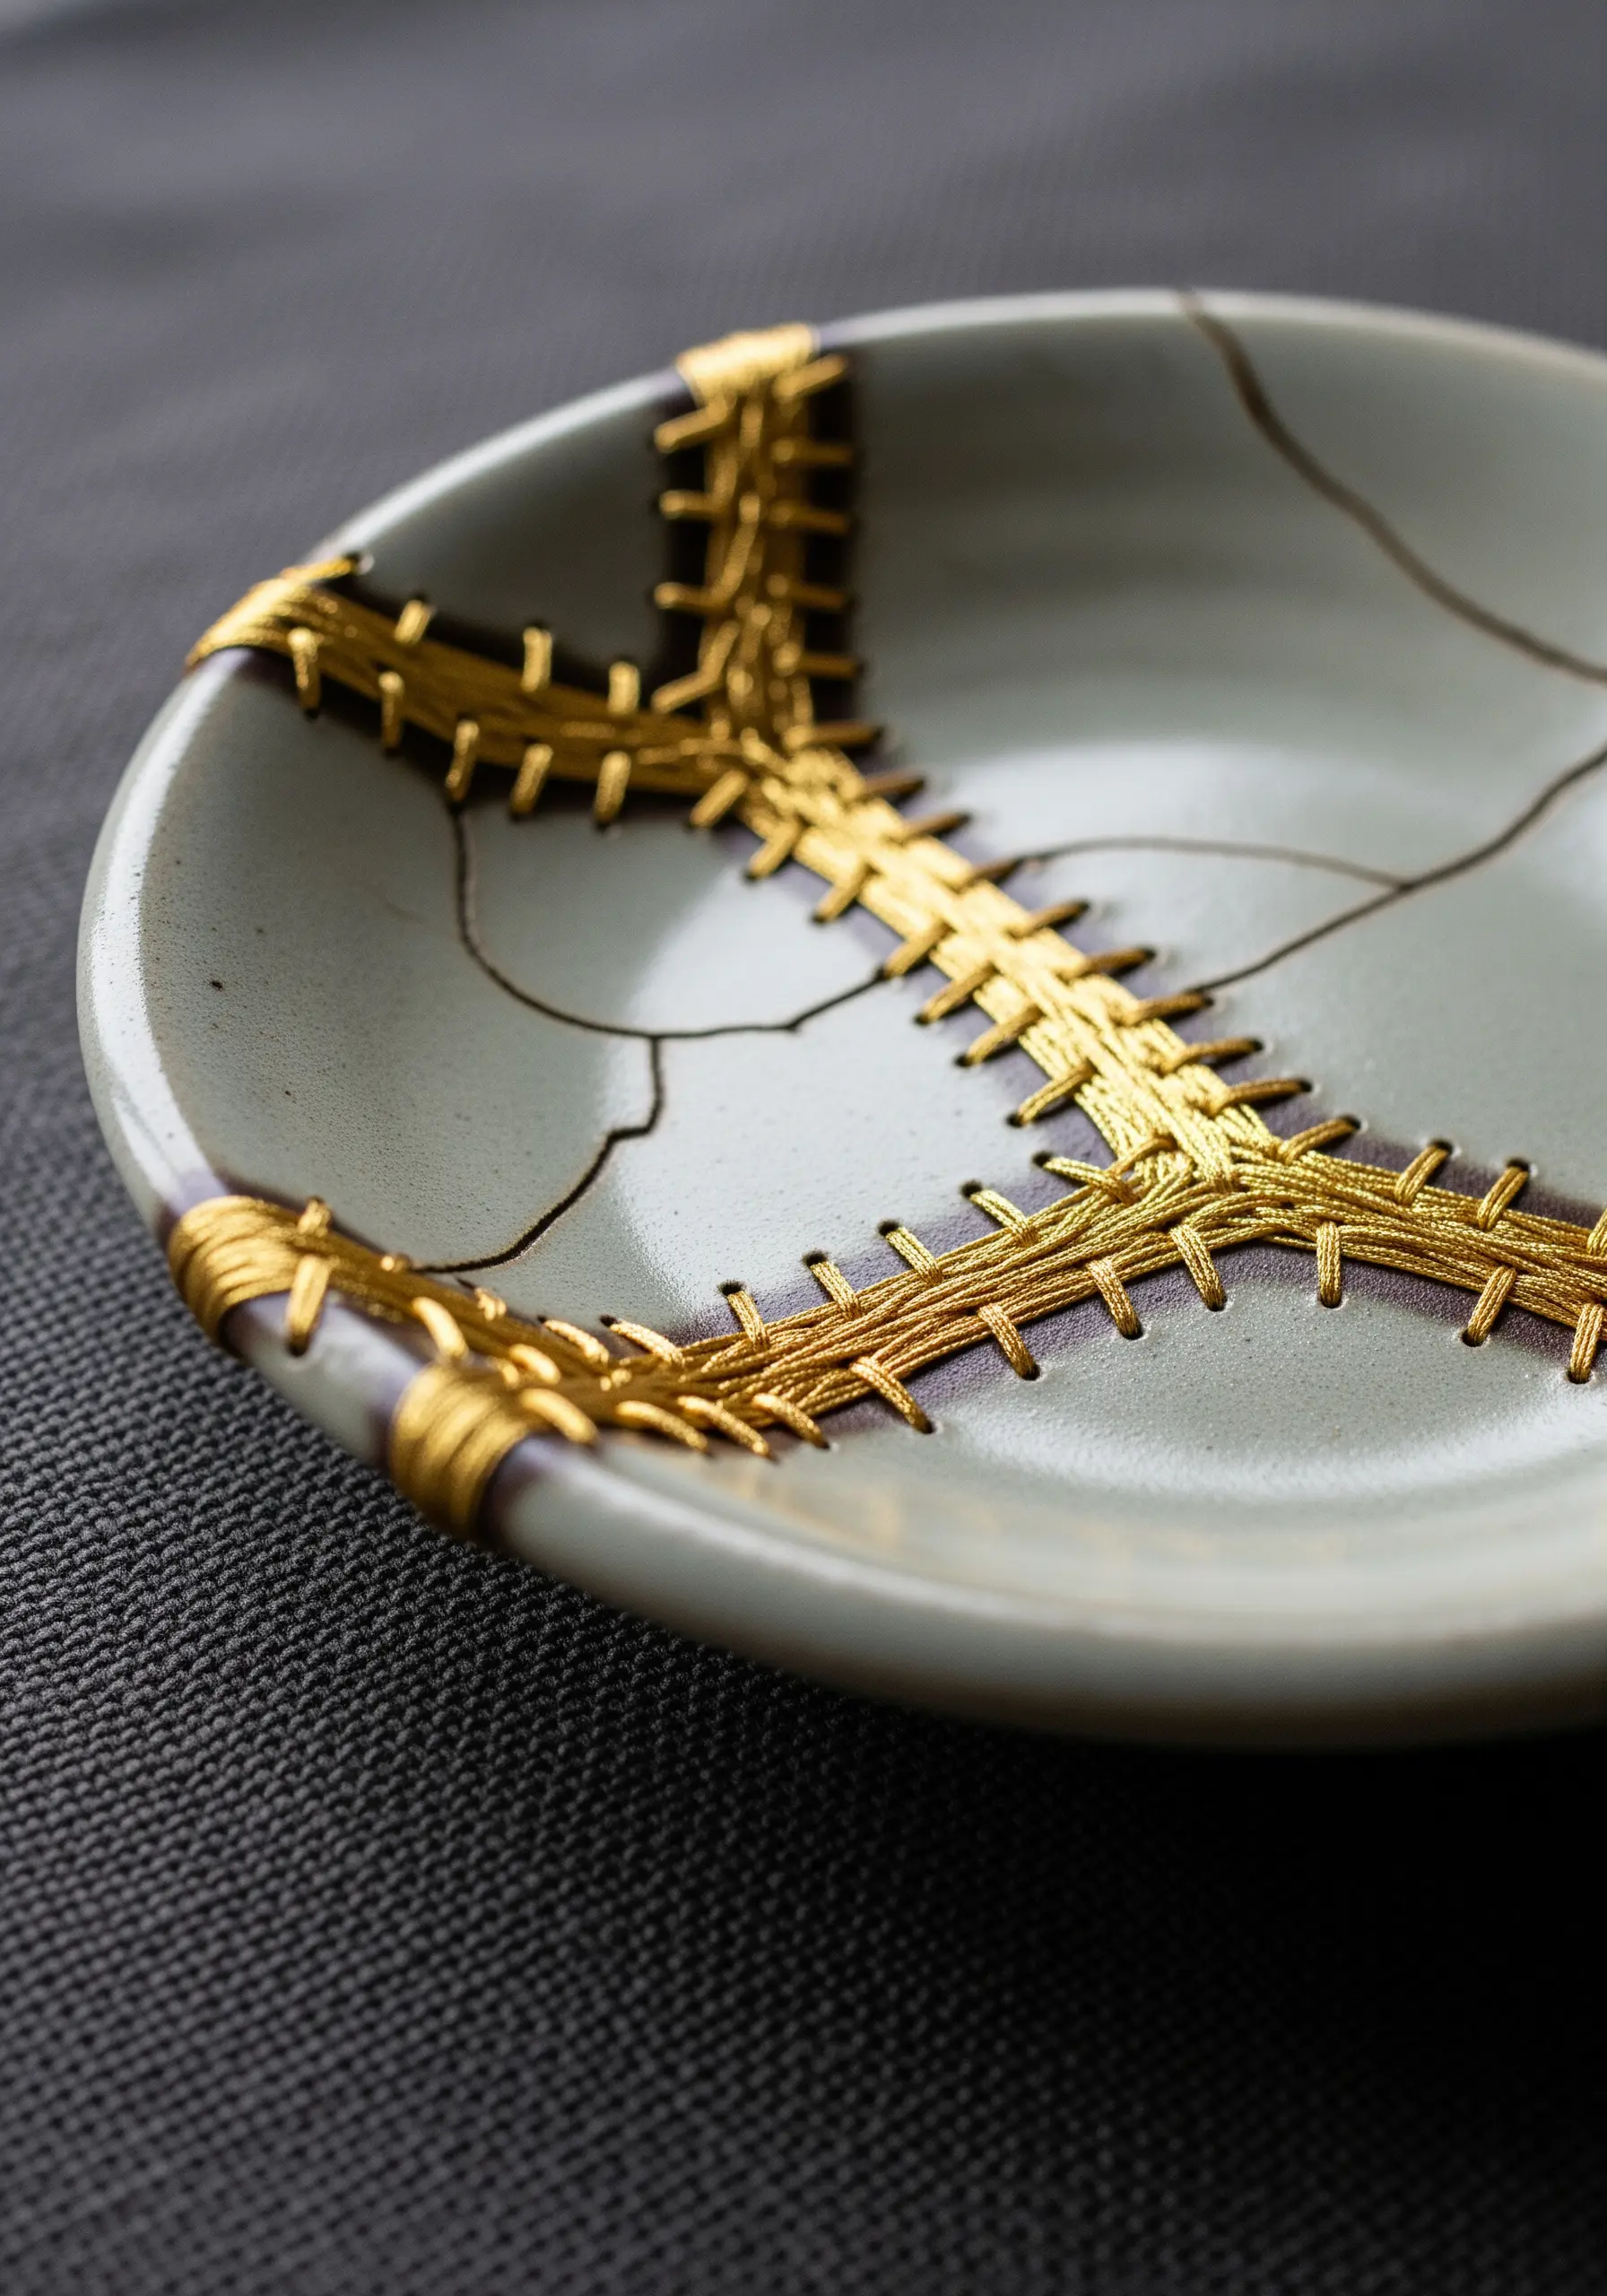
Adopt the Japanese art of kintsugi—repairing broken pottery with gold—and apply it to non-traditional surfaces.
Instead of fabric, you can use this concept to “mend” a cracked ceramic dish, transforming flaws into a beautiful feature.
Drill tiny, careful holes along the cracks, then use a strong metallic thread to lace the pieces together, creating a pattern that highlights the repair.
This technique turns a damaged object into a story of resilience and beauty, making the mending process a visible part of its history.
7. Capturing Motion with Beadwork and Directional Stitching
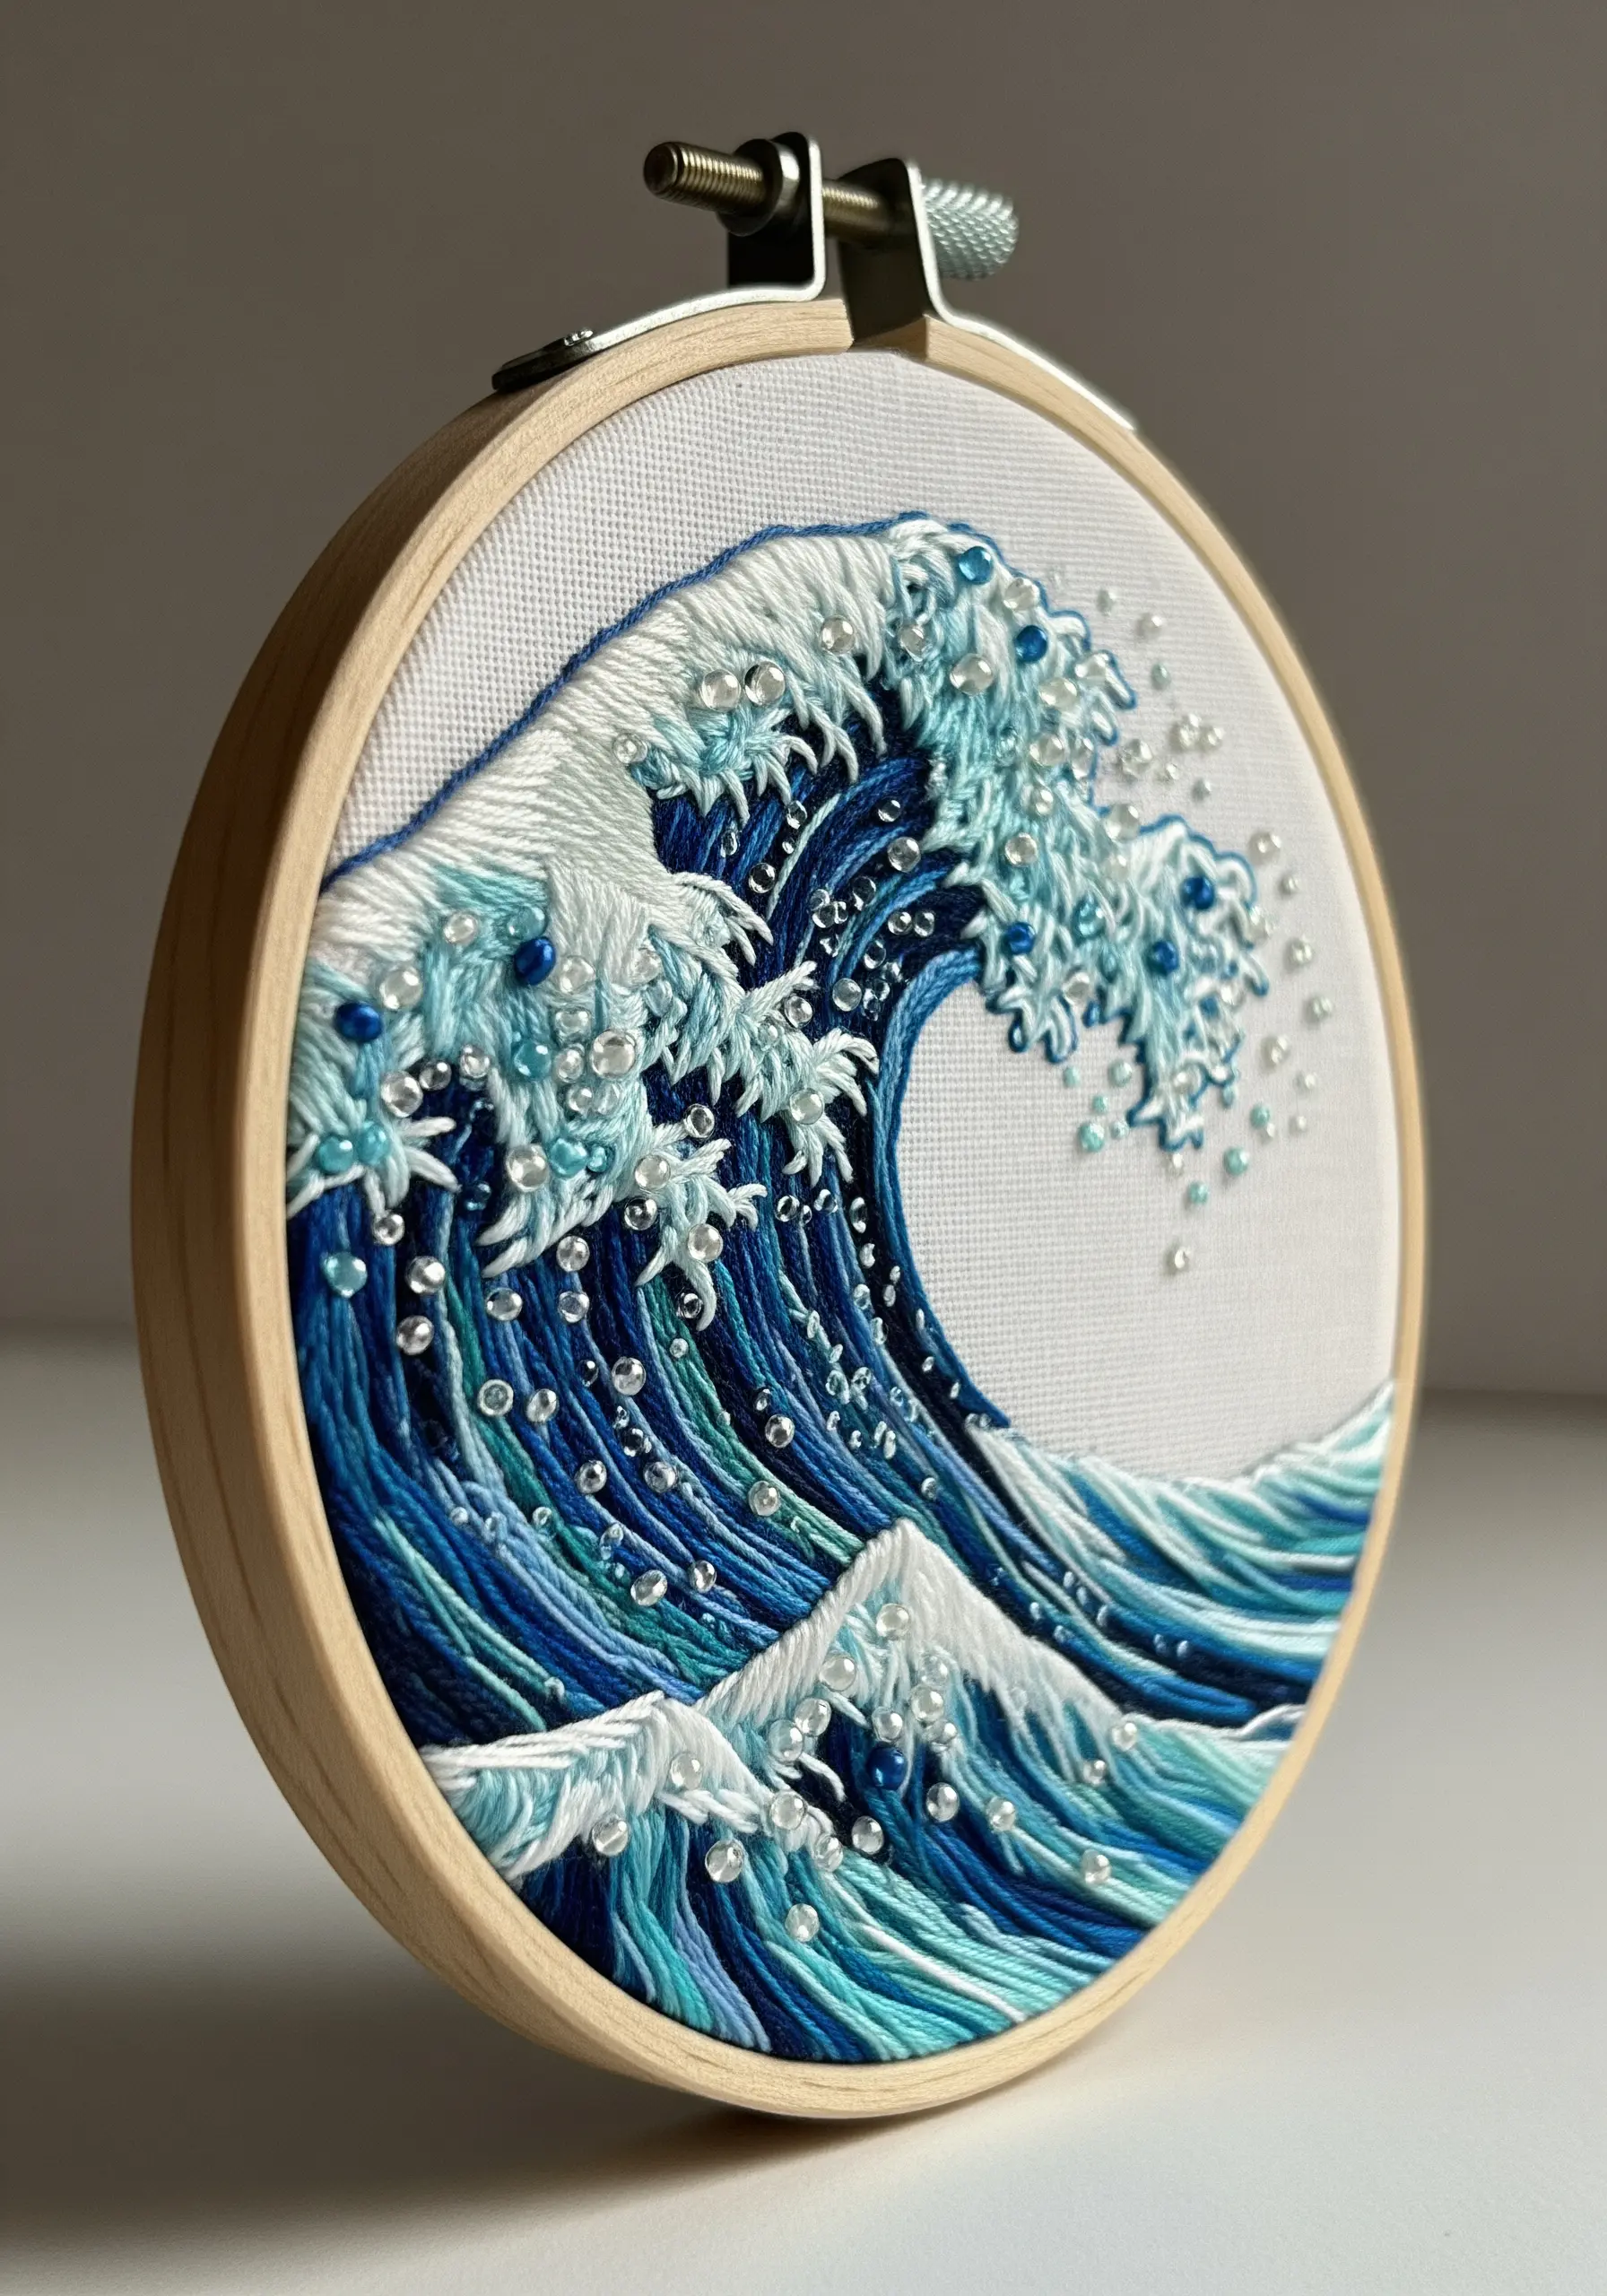
Give your embroidered scenes a sense of dynamic movement by being intentional with stitch direction and embellishments.
For water, ensure your satin stitches follow the curve and flow of the wave, which naturally guides the viewer’s eye and creates an illusion of motion.
Use variegated thread in shades of blue and white to achieve a realistic water gradient without constant color switching.
Scatter translucent seed beads sparingly across the crest of the wave to mimic sea spray; this adds a subtle sparkle and texture that catches the light beautifully.
8. The Power of Precision in Architectural Embroidery
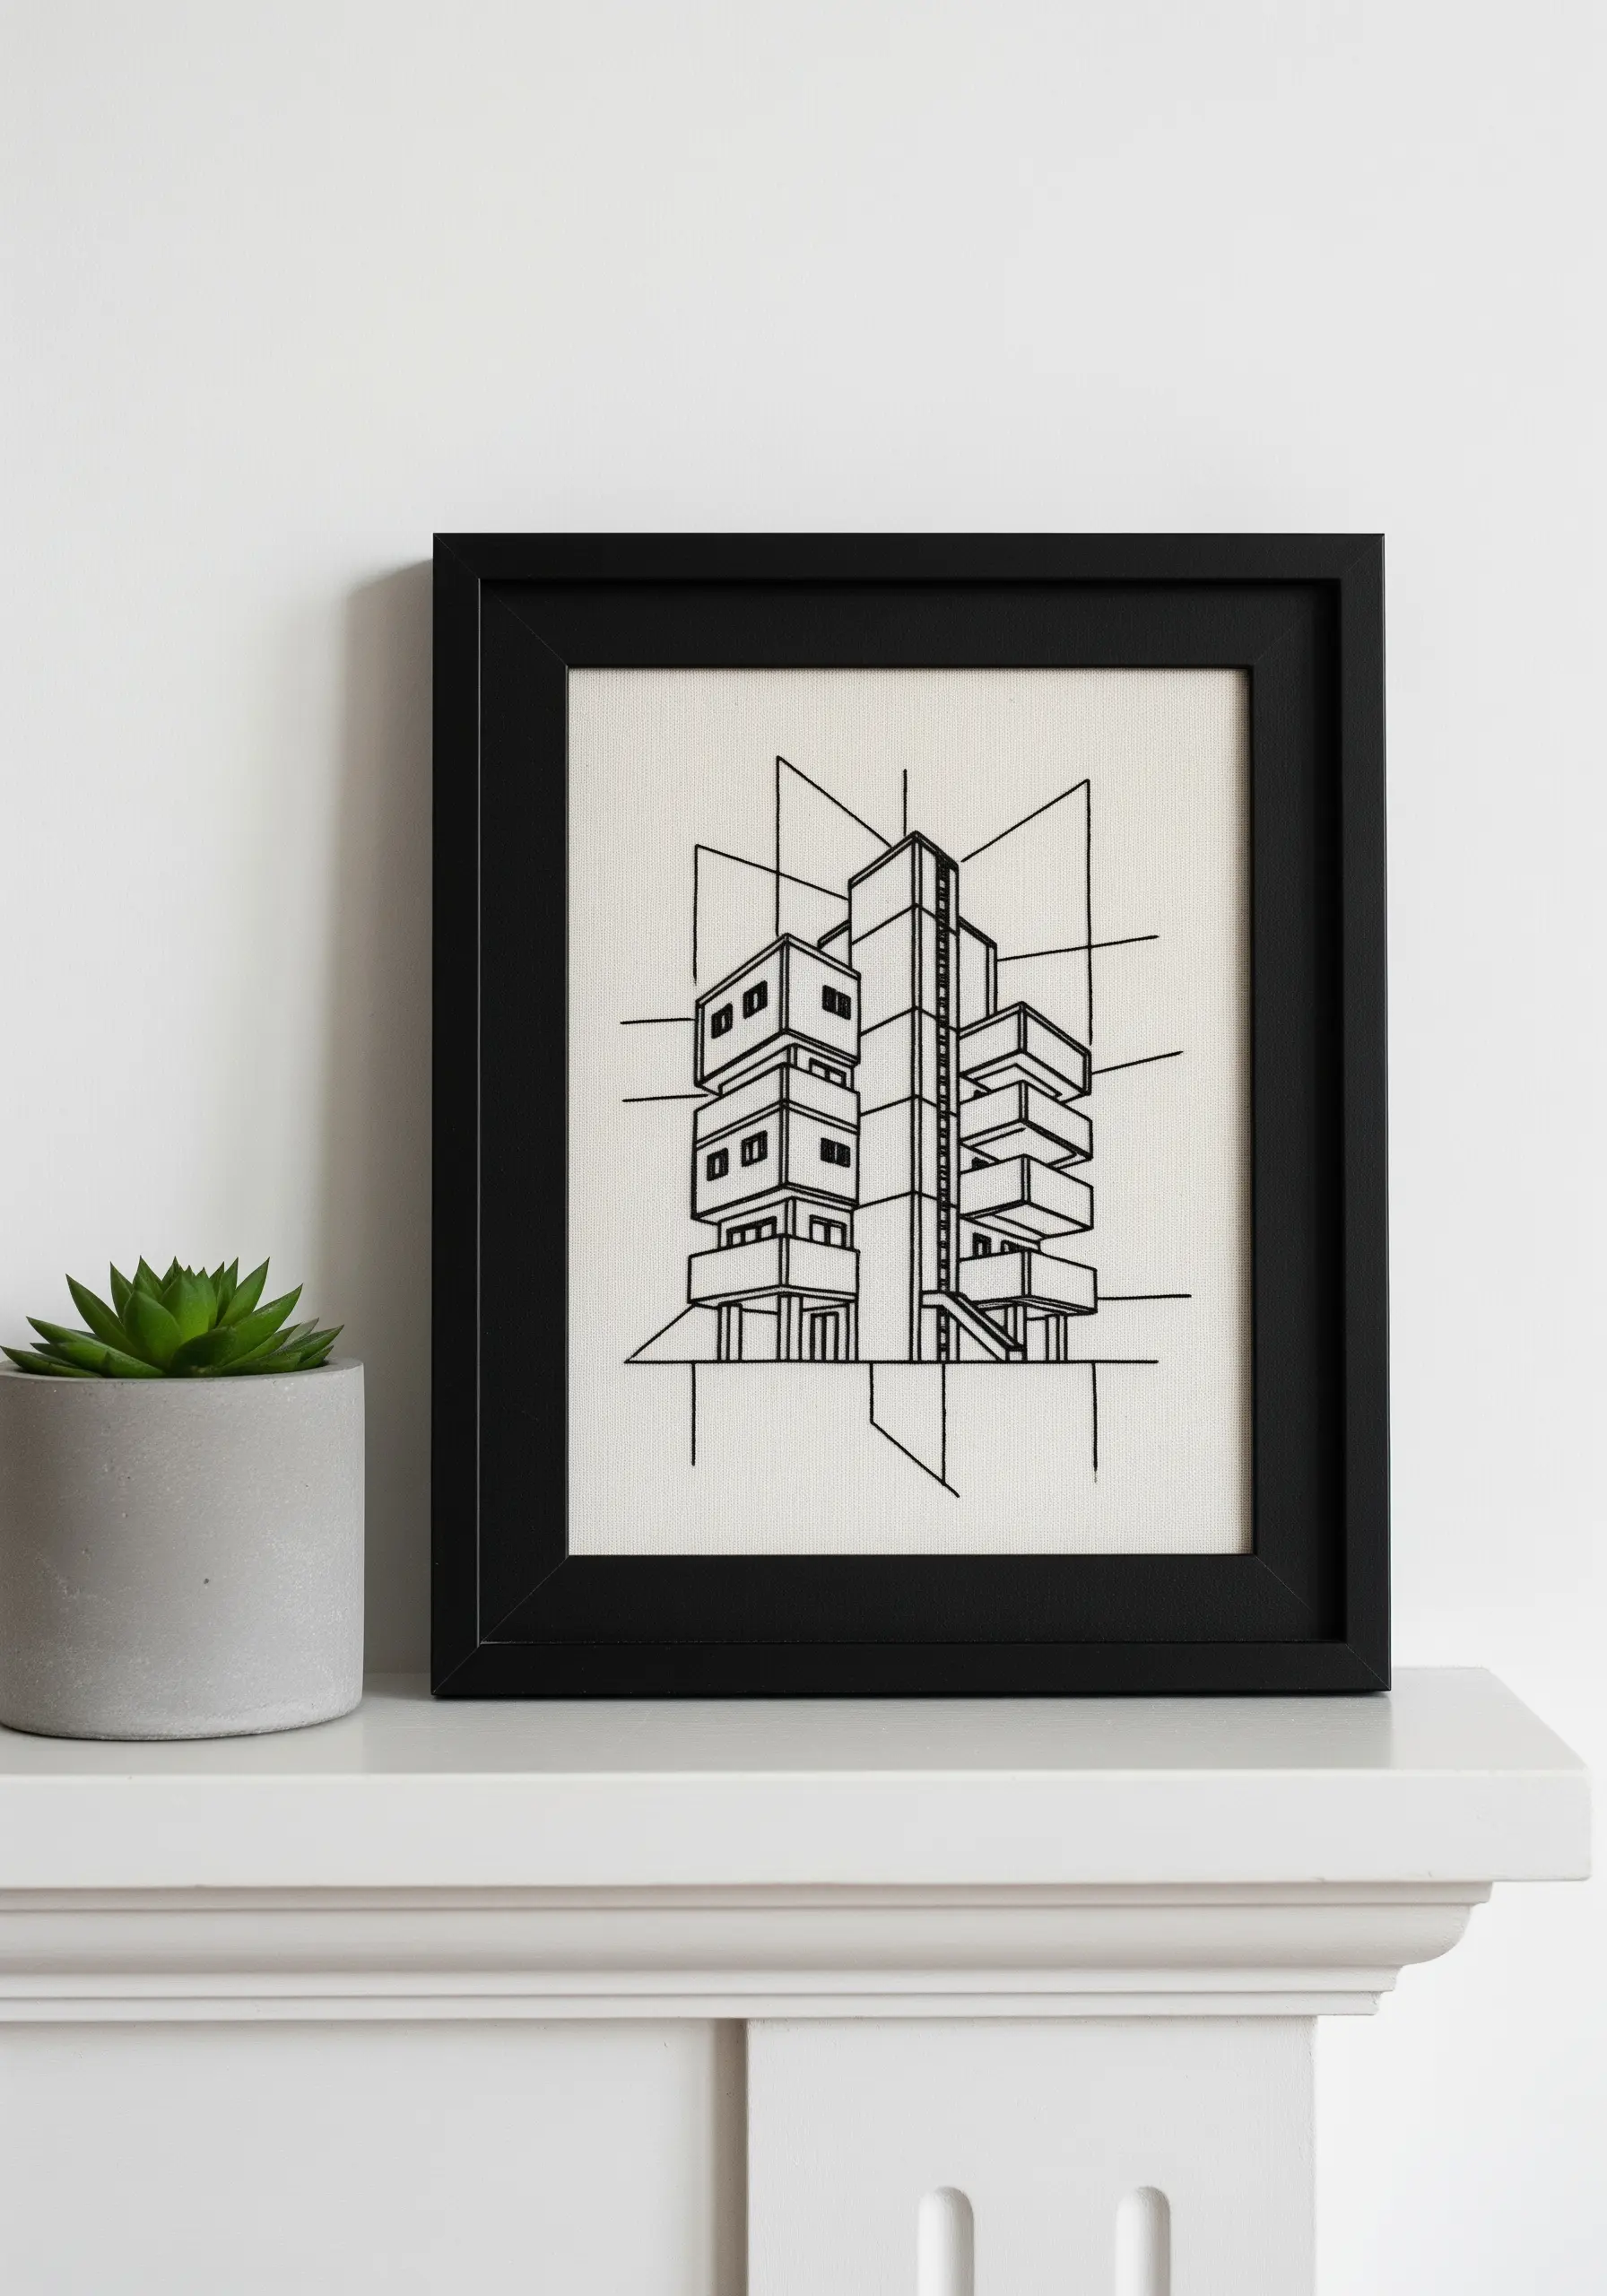
Create striking, modern art by focusing on the clean, graphic quality of architectural lines.
To achieve perfectly crisp and uniform outlines, use a single strand of black floss and a meticulous backstitch.
Transfer your design onto the fabric using a water-soluble stabilizer; it provides a clear guide and washes away completely, leaving no trace.
This minimalist approach emphasizes form and structure, turning a complex building into an elegant piece of minimalist embroidery wall art.
9. Building a Botanical Terrarium with 3D Stitches
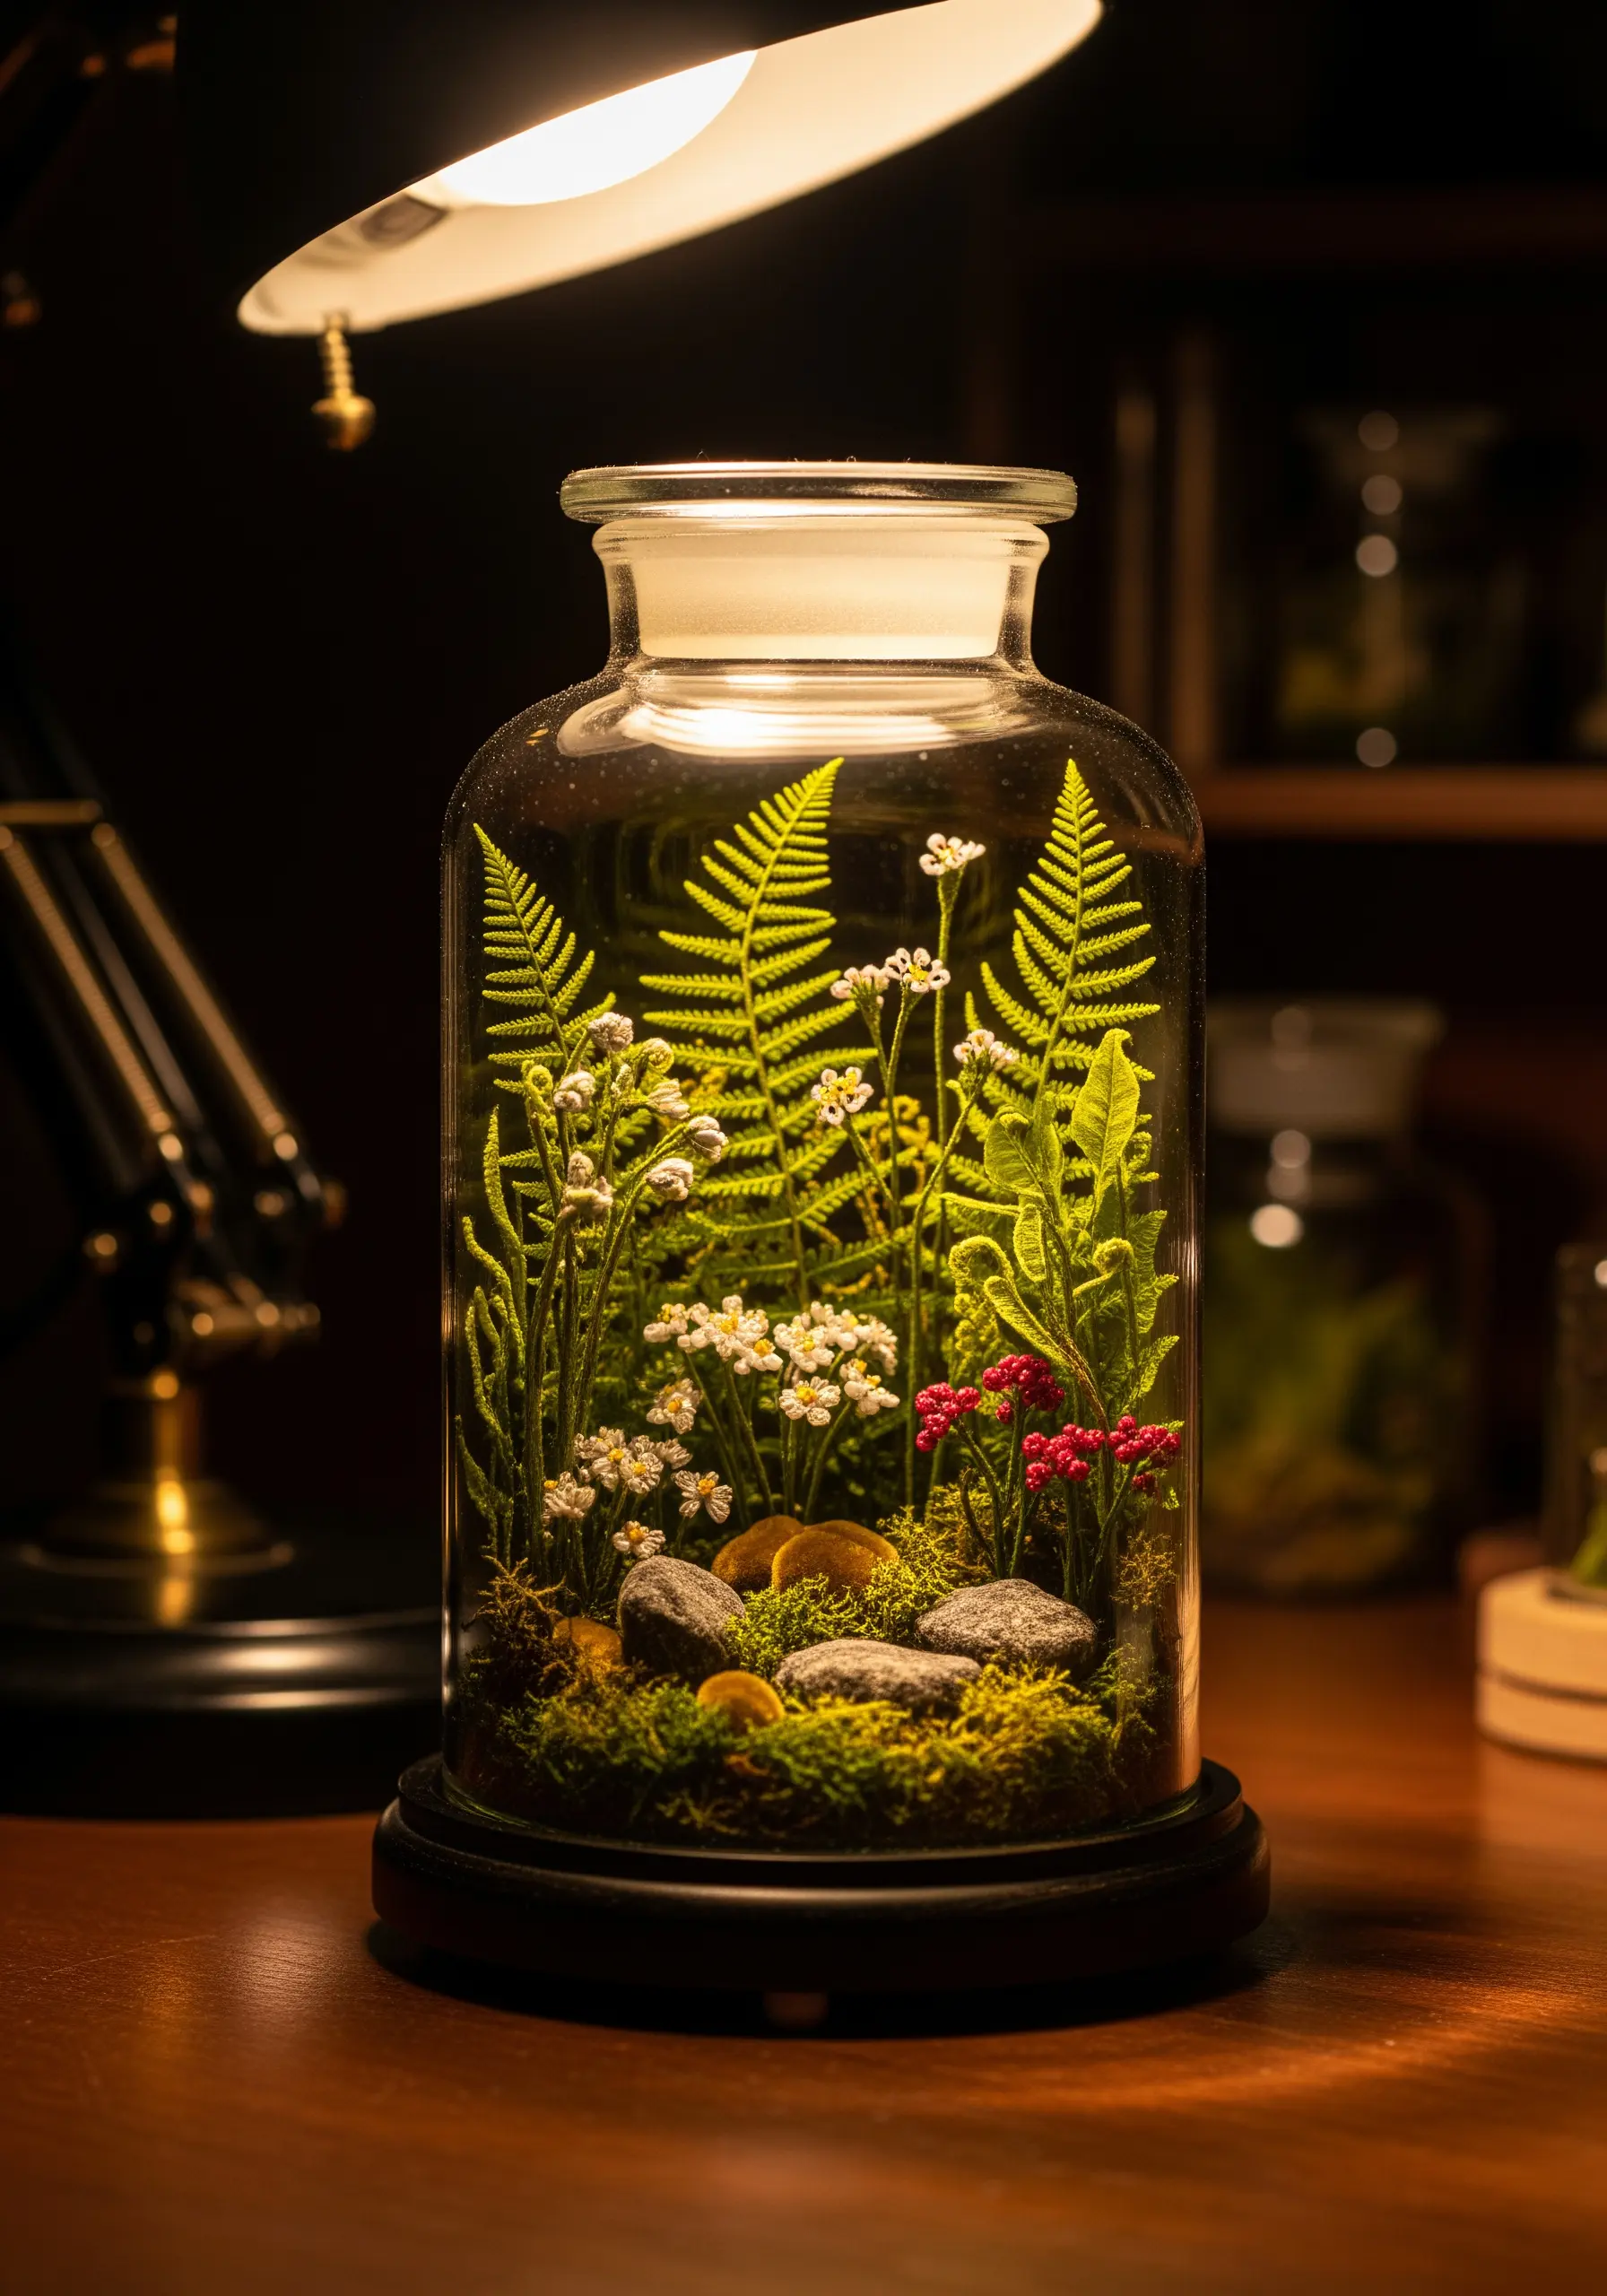
Construct a miniature, everlasting garden by combining various 3D embroidery techniques within a glass jar.
Create delicate leaves and ferns using wired slips—stitch over a wire frame and then cut it out to create posable elements.
Use detached buttonhole stitch and French knots to form tiny, intricate blossoms and flower buds.
Assemble your scene from back to front inside the jar, using a dab of fabric glue to secure the elements to a mossy, faux-earth base.
10. Creating Depth with Suspended Thread Art
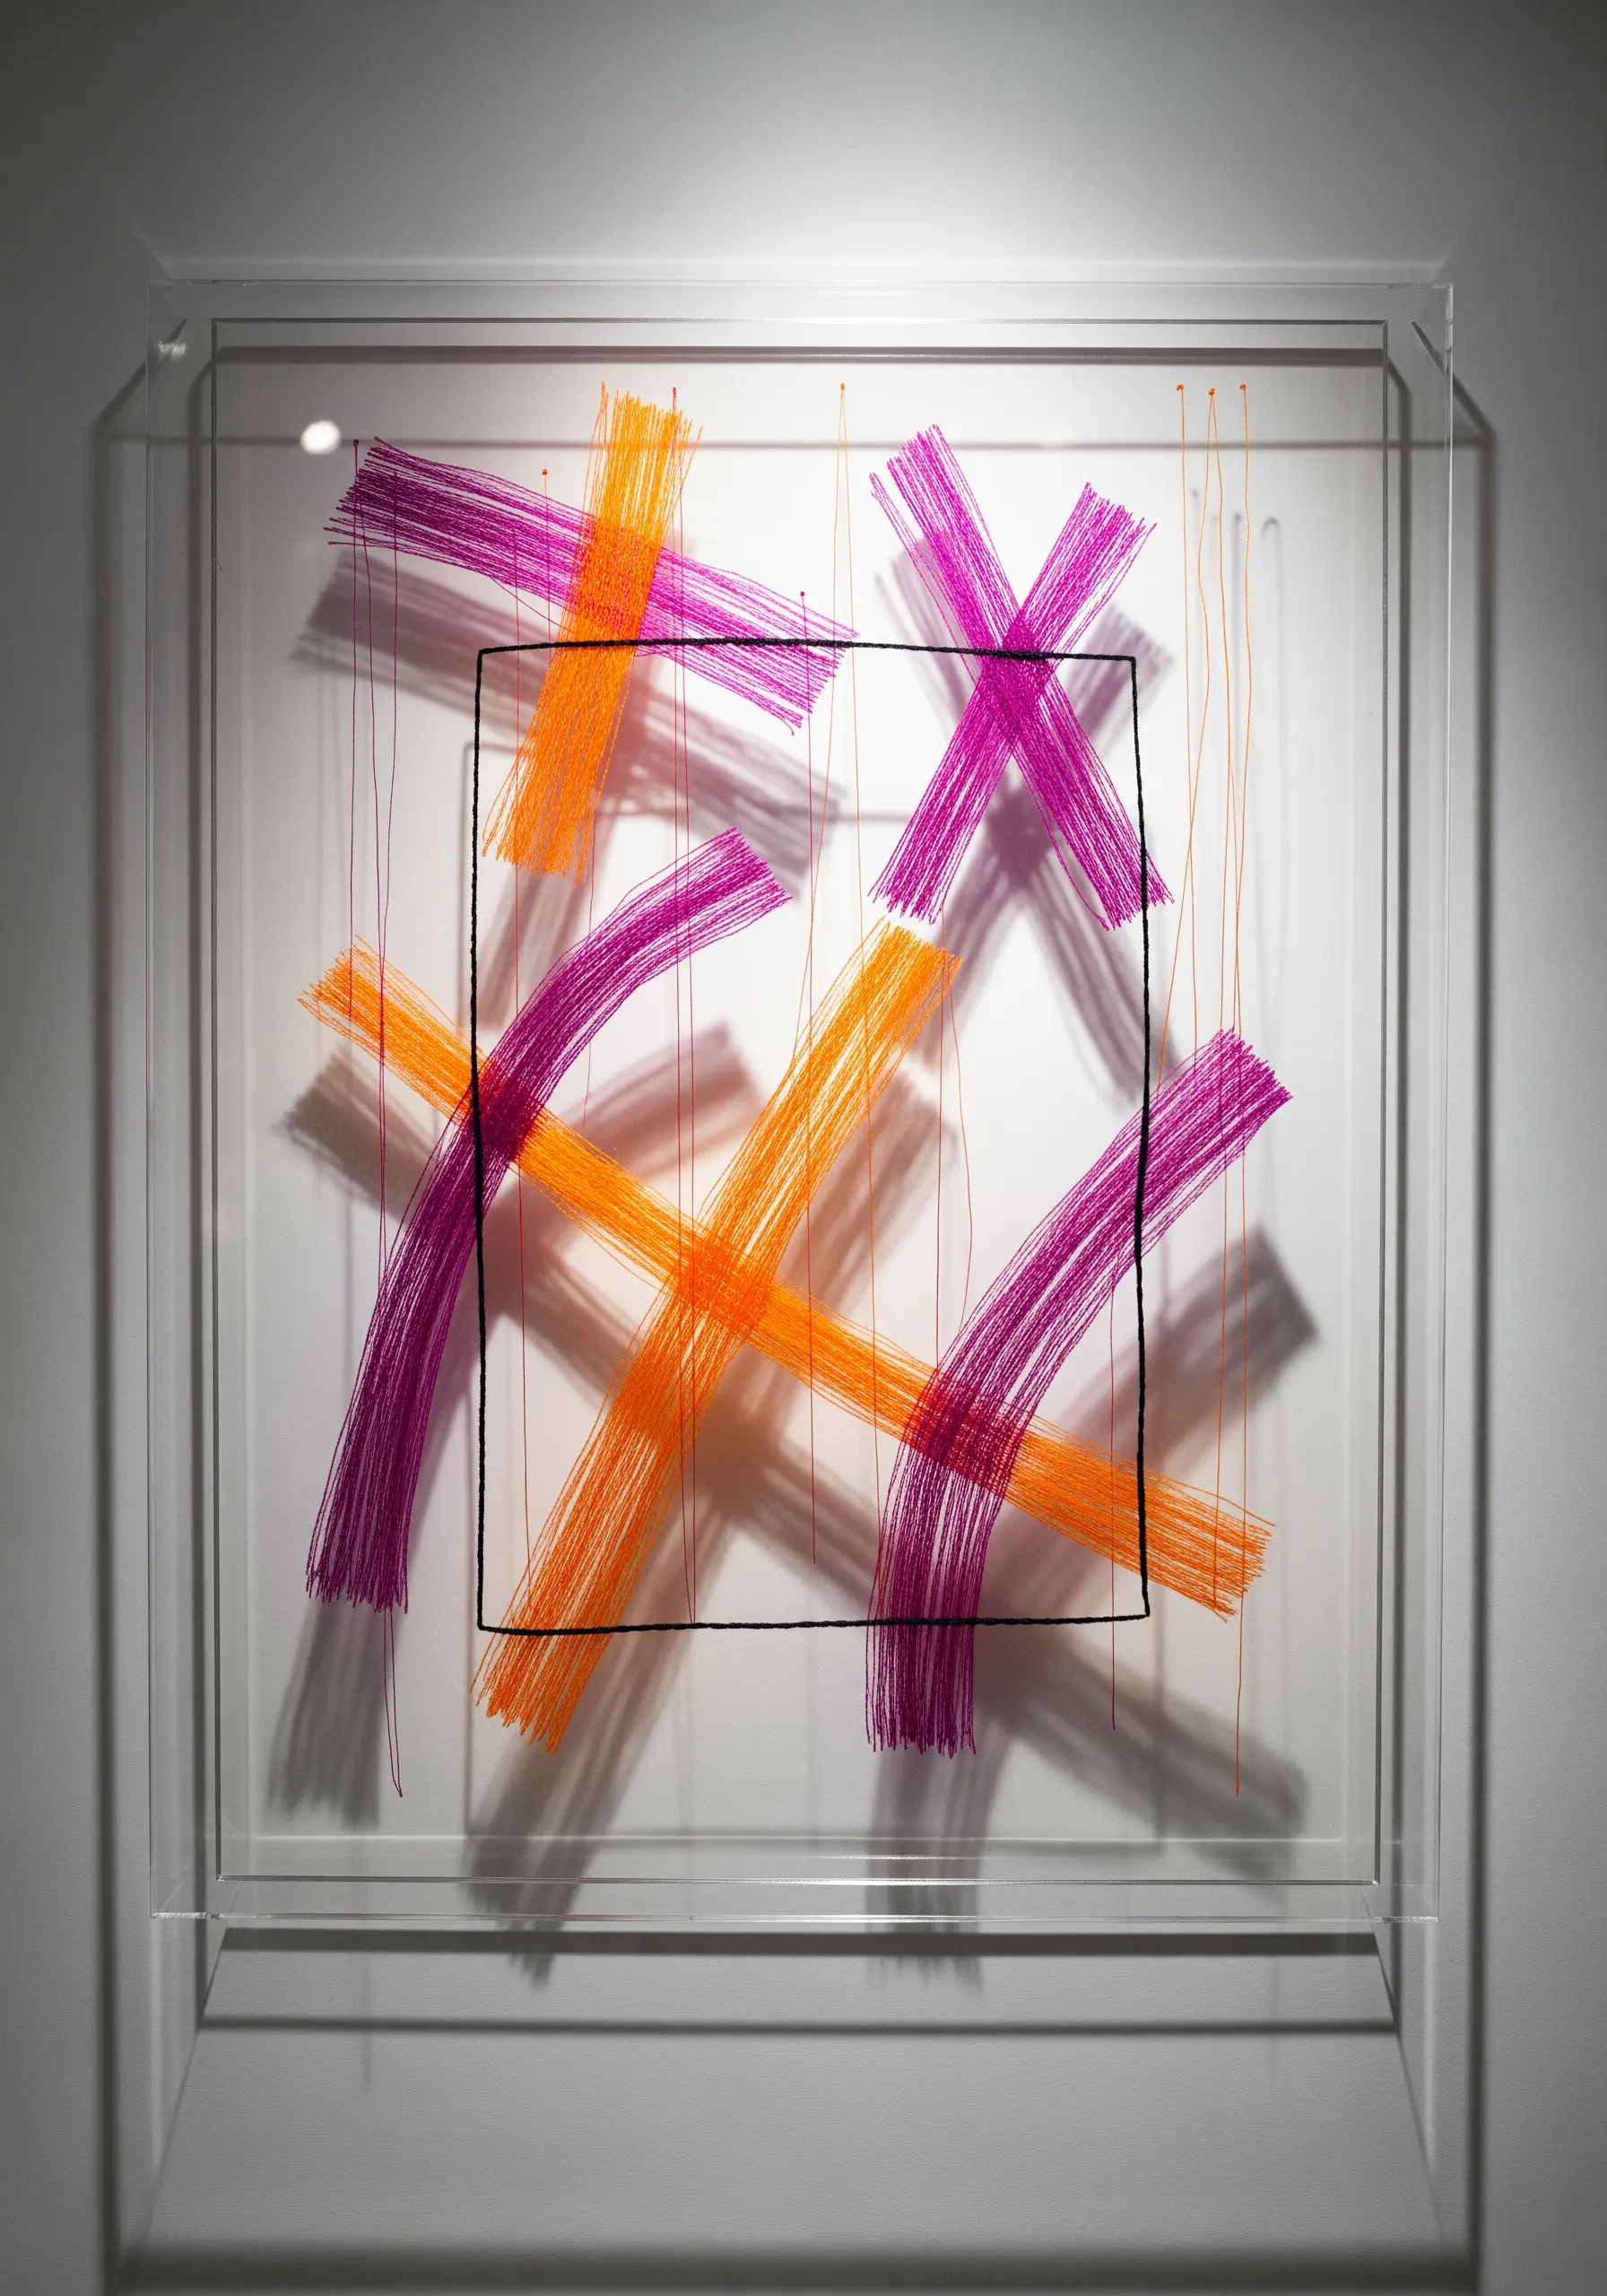
Move beyond a single fabric surface and explore the graphic potential of layered, suspended threads.
This technique involves stretching threads between two transparent planes, like acrylic sheets, inside a shadow box frame.
The space between the layers allows light to pass through, casting shadows that become an integral part of the artwork.
By using modern thread art techniques like this, you create a piece that changes depending on the viewing angle and lighting, offering a dynamic, gallery-style aesthetic.
11. Painterly Portraits with Single-Thread Stitching
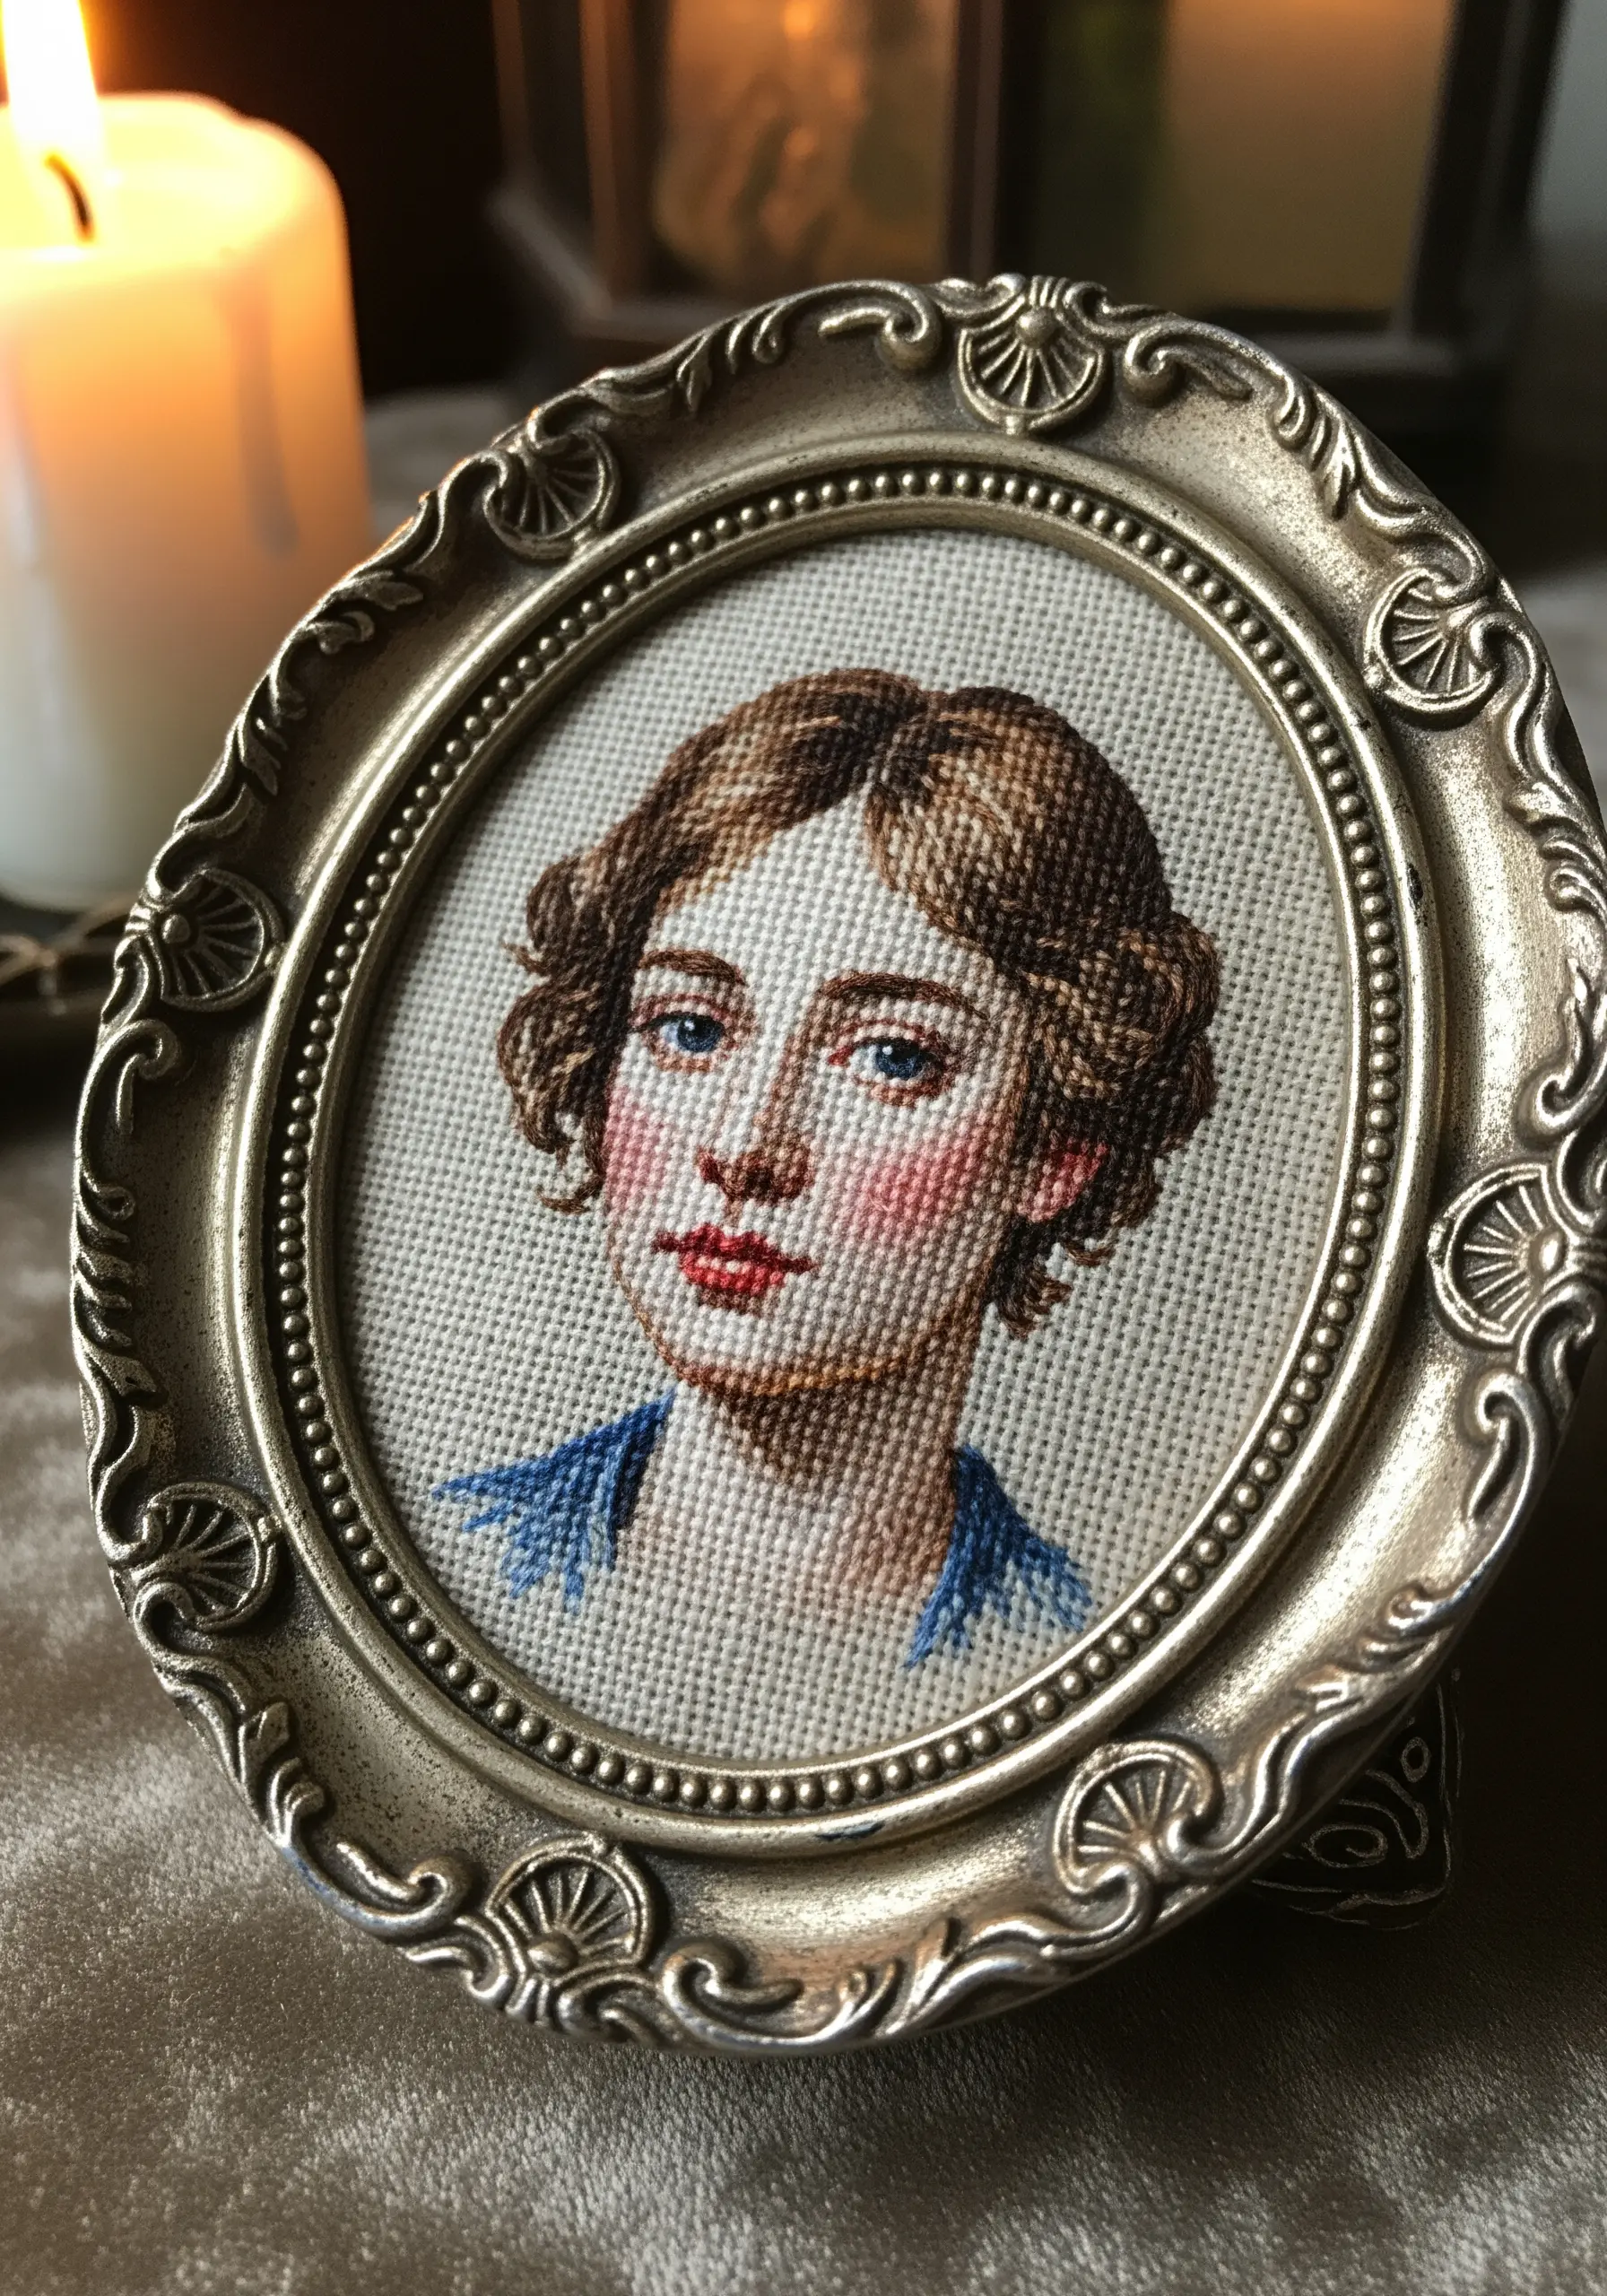
Achieve the subtlety and nuance of a classical painting by working in petit point on a high-count fabric.
Use a single strand of cotton floss for each stitch; this allows for incredibly detailed color blending and soft gradients, especially for skin tones.
Think of each stitch as a pixel. By carefully placing colors side-by-side, you can create shading and highlights that look remarkably lifelike from a distance.
An ornate, vintage-style frame elevates the finished piece from a craft project to a miniature work of art.
12. Embroidering on Unconventional Surfaces
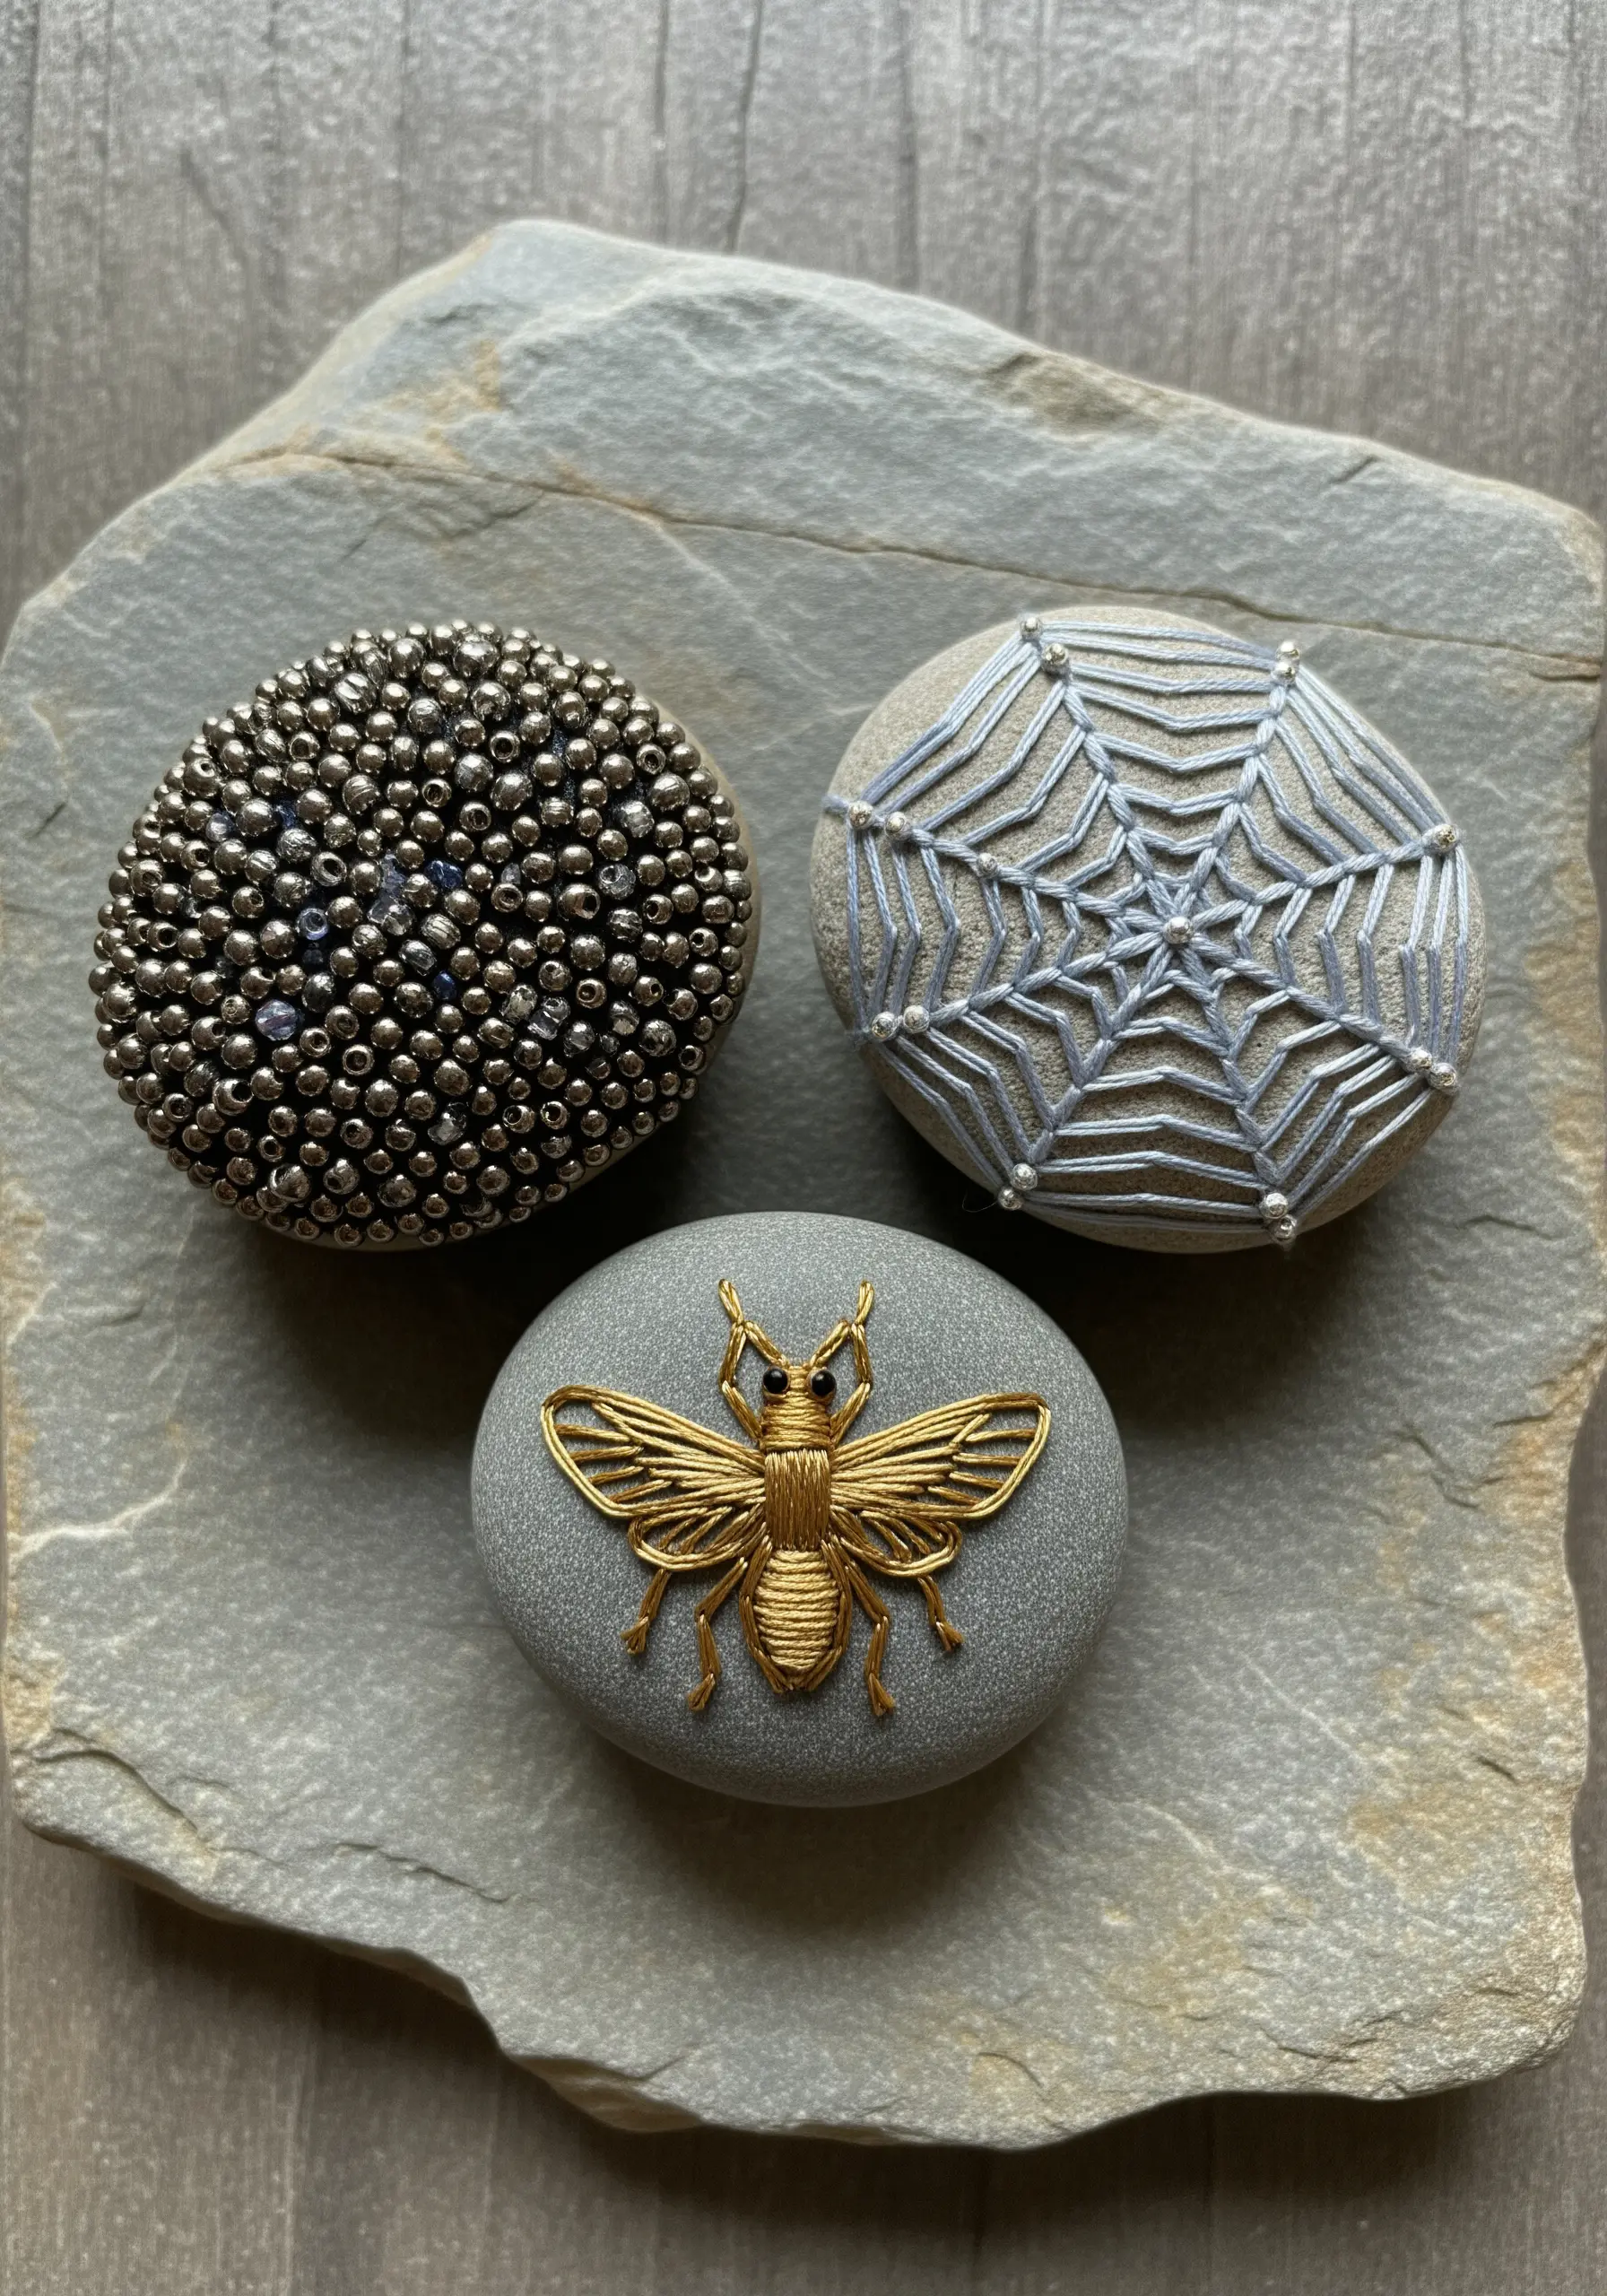
Take your stitching beyond fabric by turning natural objects like stones into miniature art canvases.
To create a stitchable surface, first adhere a piece of felt or non-woven interfacing to the stone with a strong craft glue.
This base allows you to easily pass a needle through, whether you’re creating intricate beaded textures or raised metallic thread designs.
This method transforms found objects into precious, tactile sculptures that connect the softness of thread with the solidity of stone.
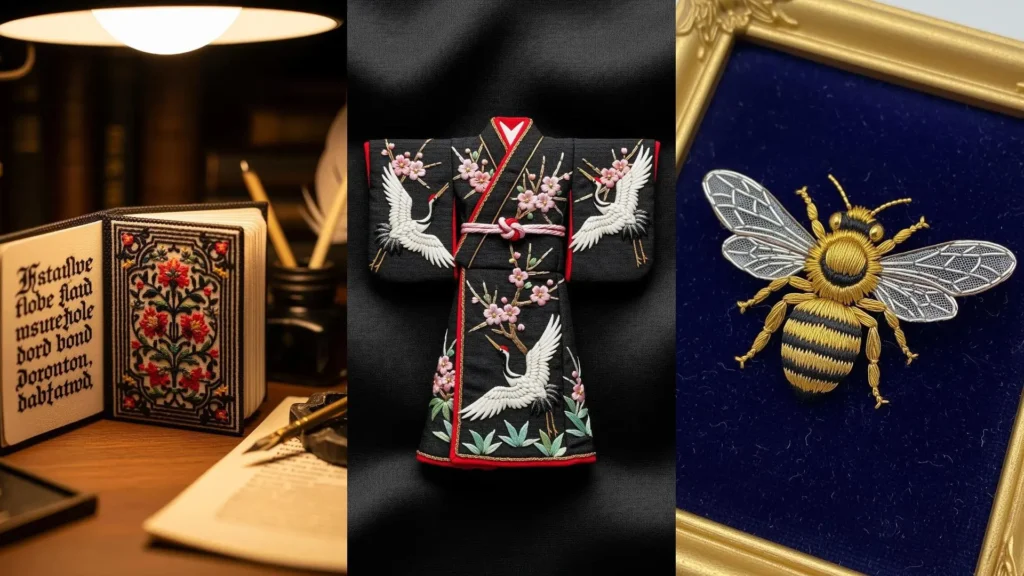
13. Creating an Illuminated Manuscript Effect
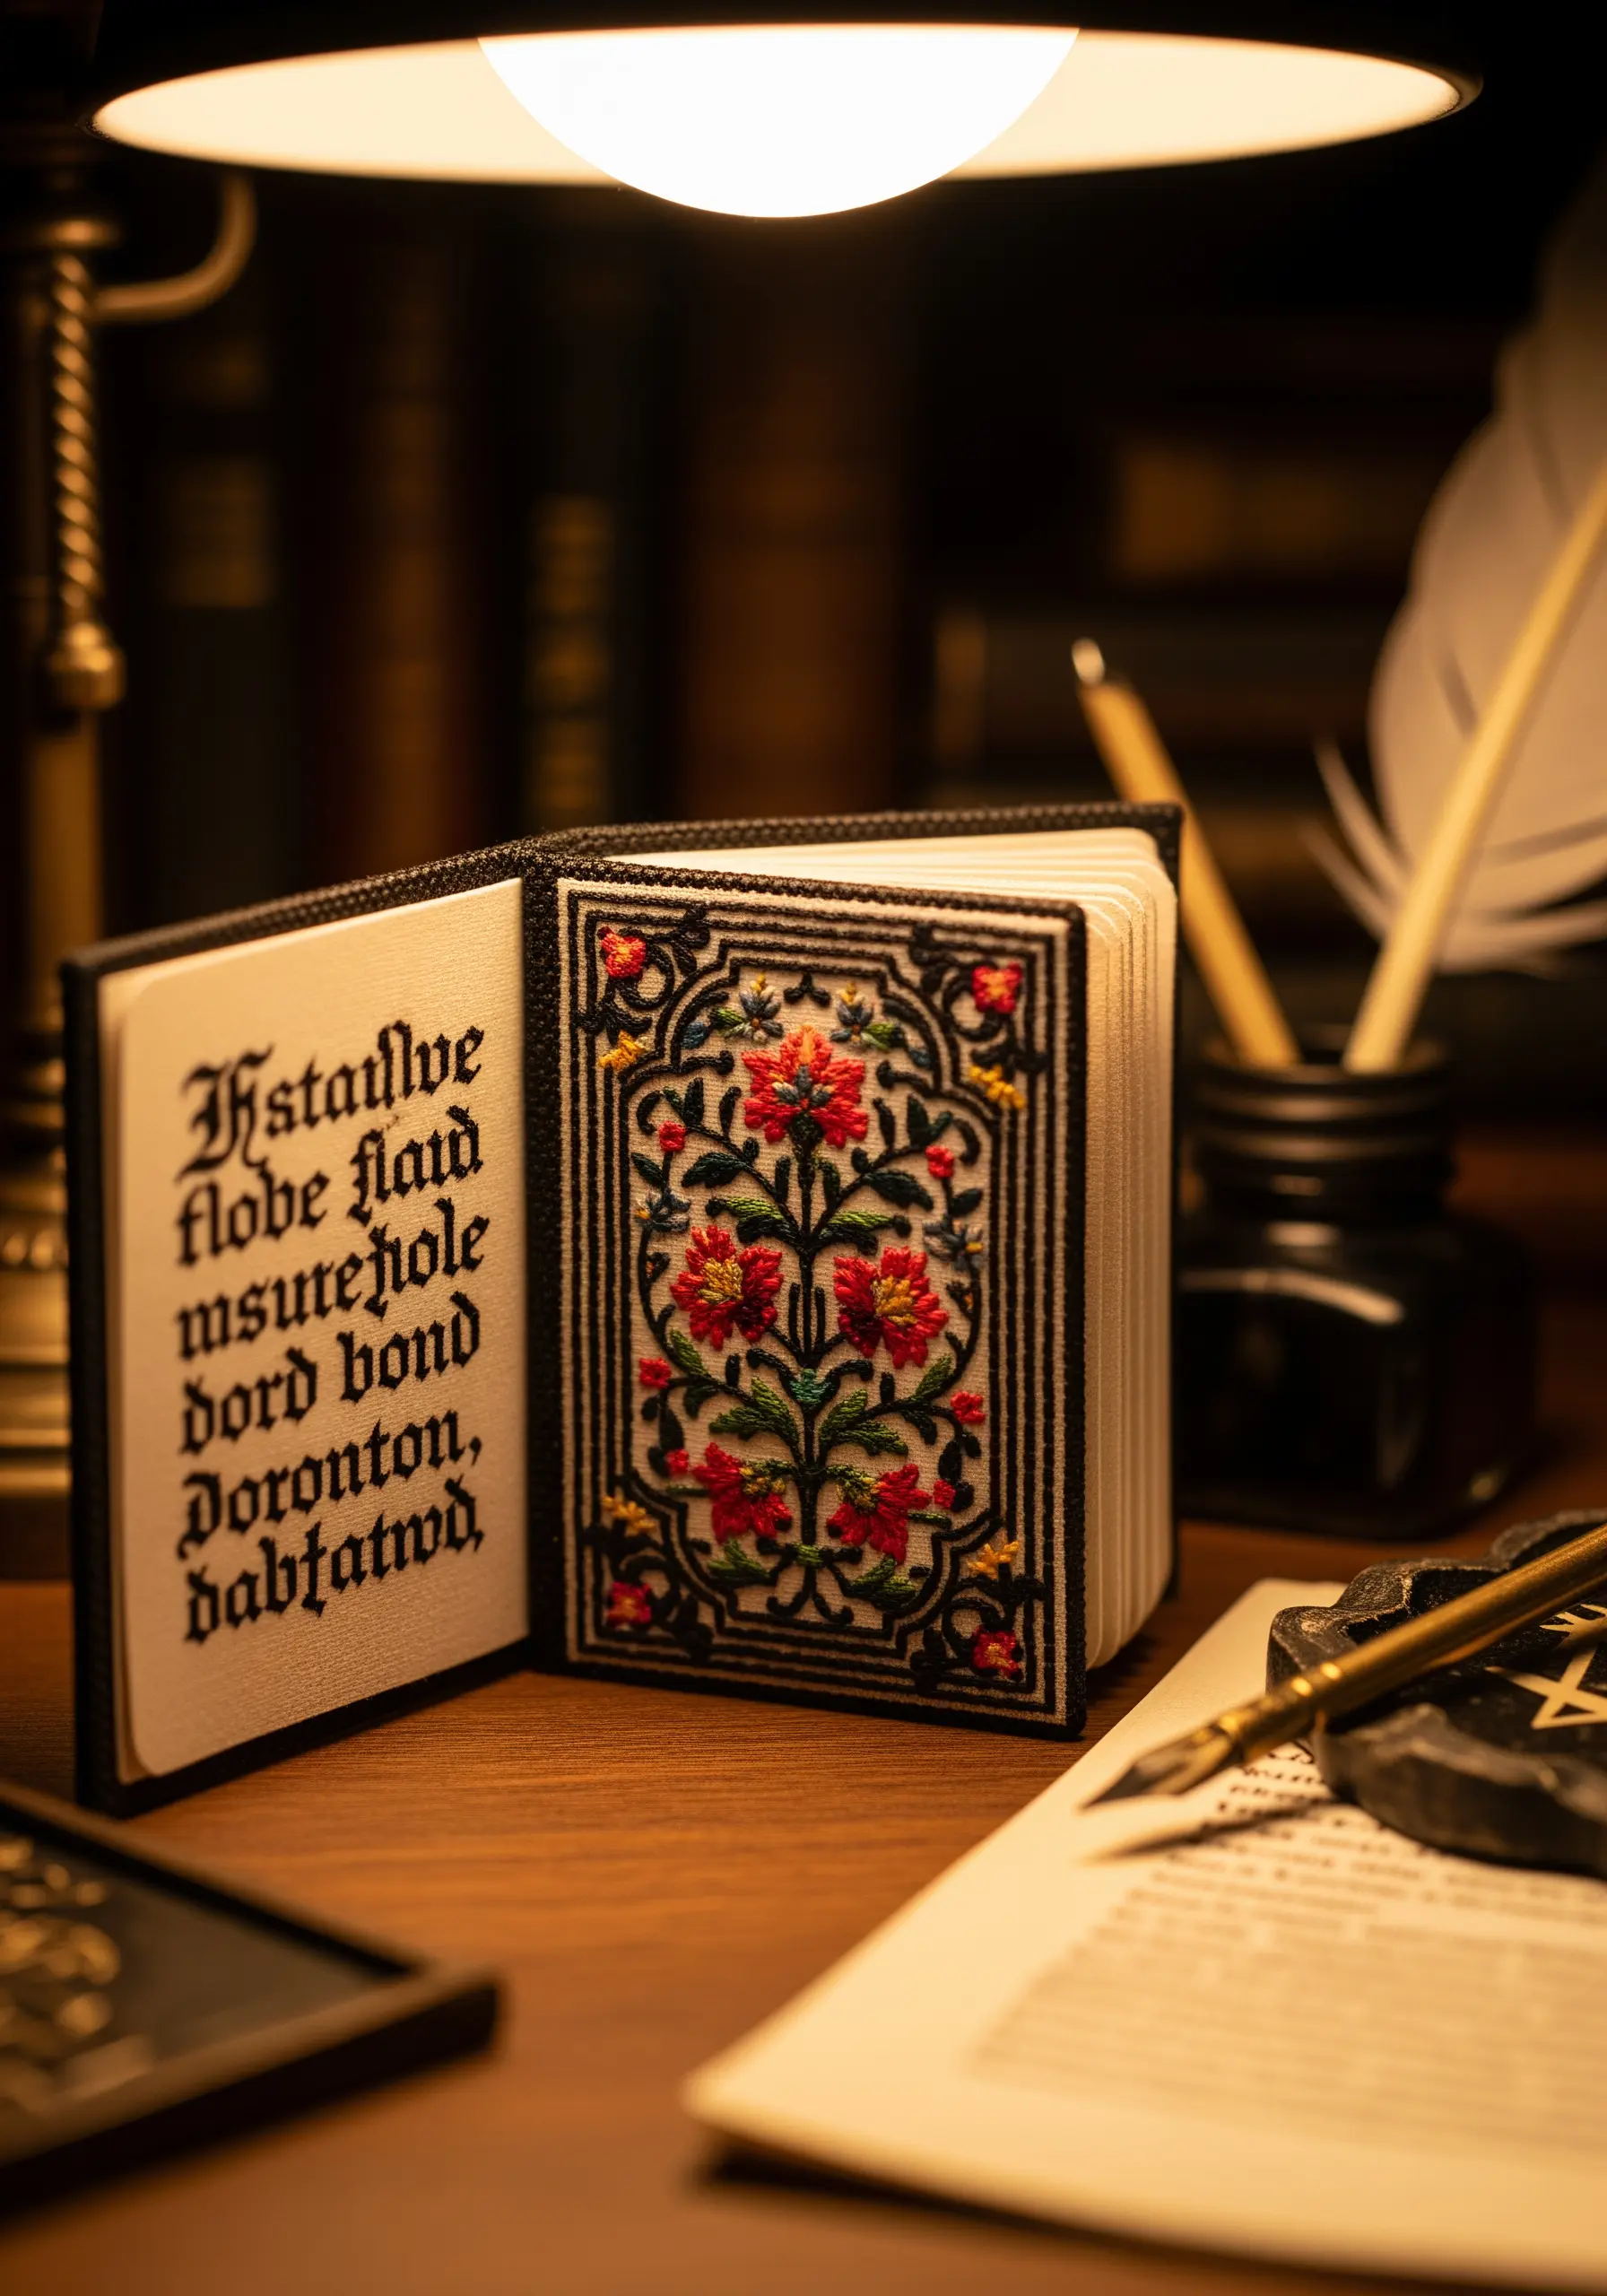
Elevate a simple object, like a notebook cover, with the richness and detail of a medieval manuscript.
Work on a dark, high-count linen to make jewel-toned threads appear exceptionally vibrant.
Use a fine backstitch for the intricate black borders and lettering, which provides a crisp frame for the dense satin stitch florals.
This technique of framing bold color with delicate linework gives your embroidery a timeless, illustrative quality that feels both historic and precious.
14. Sculpting with Thread: The Art of Trapunto
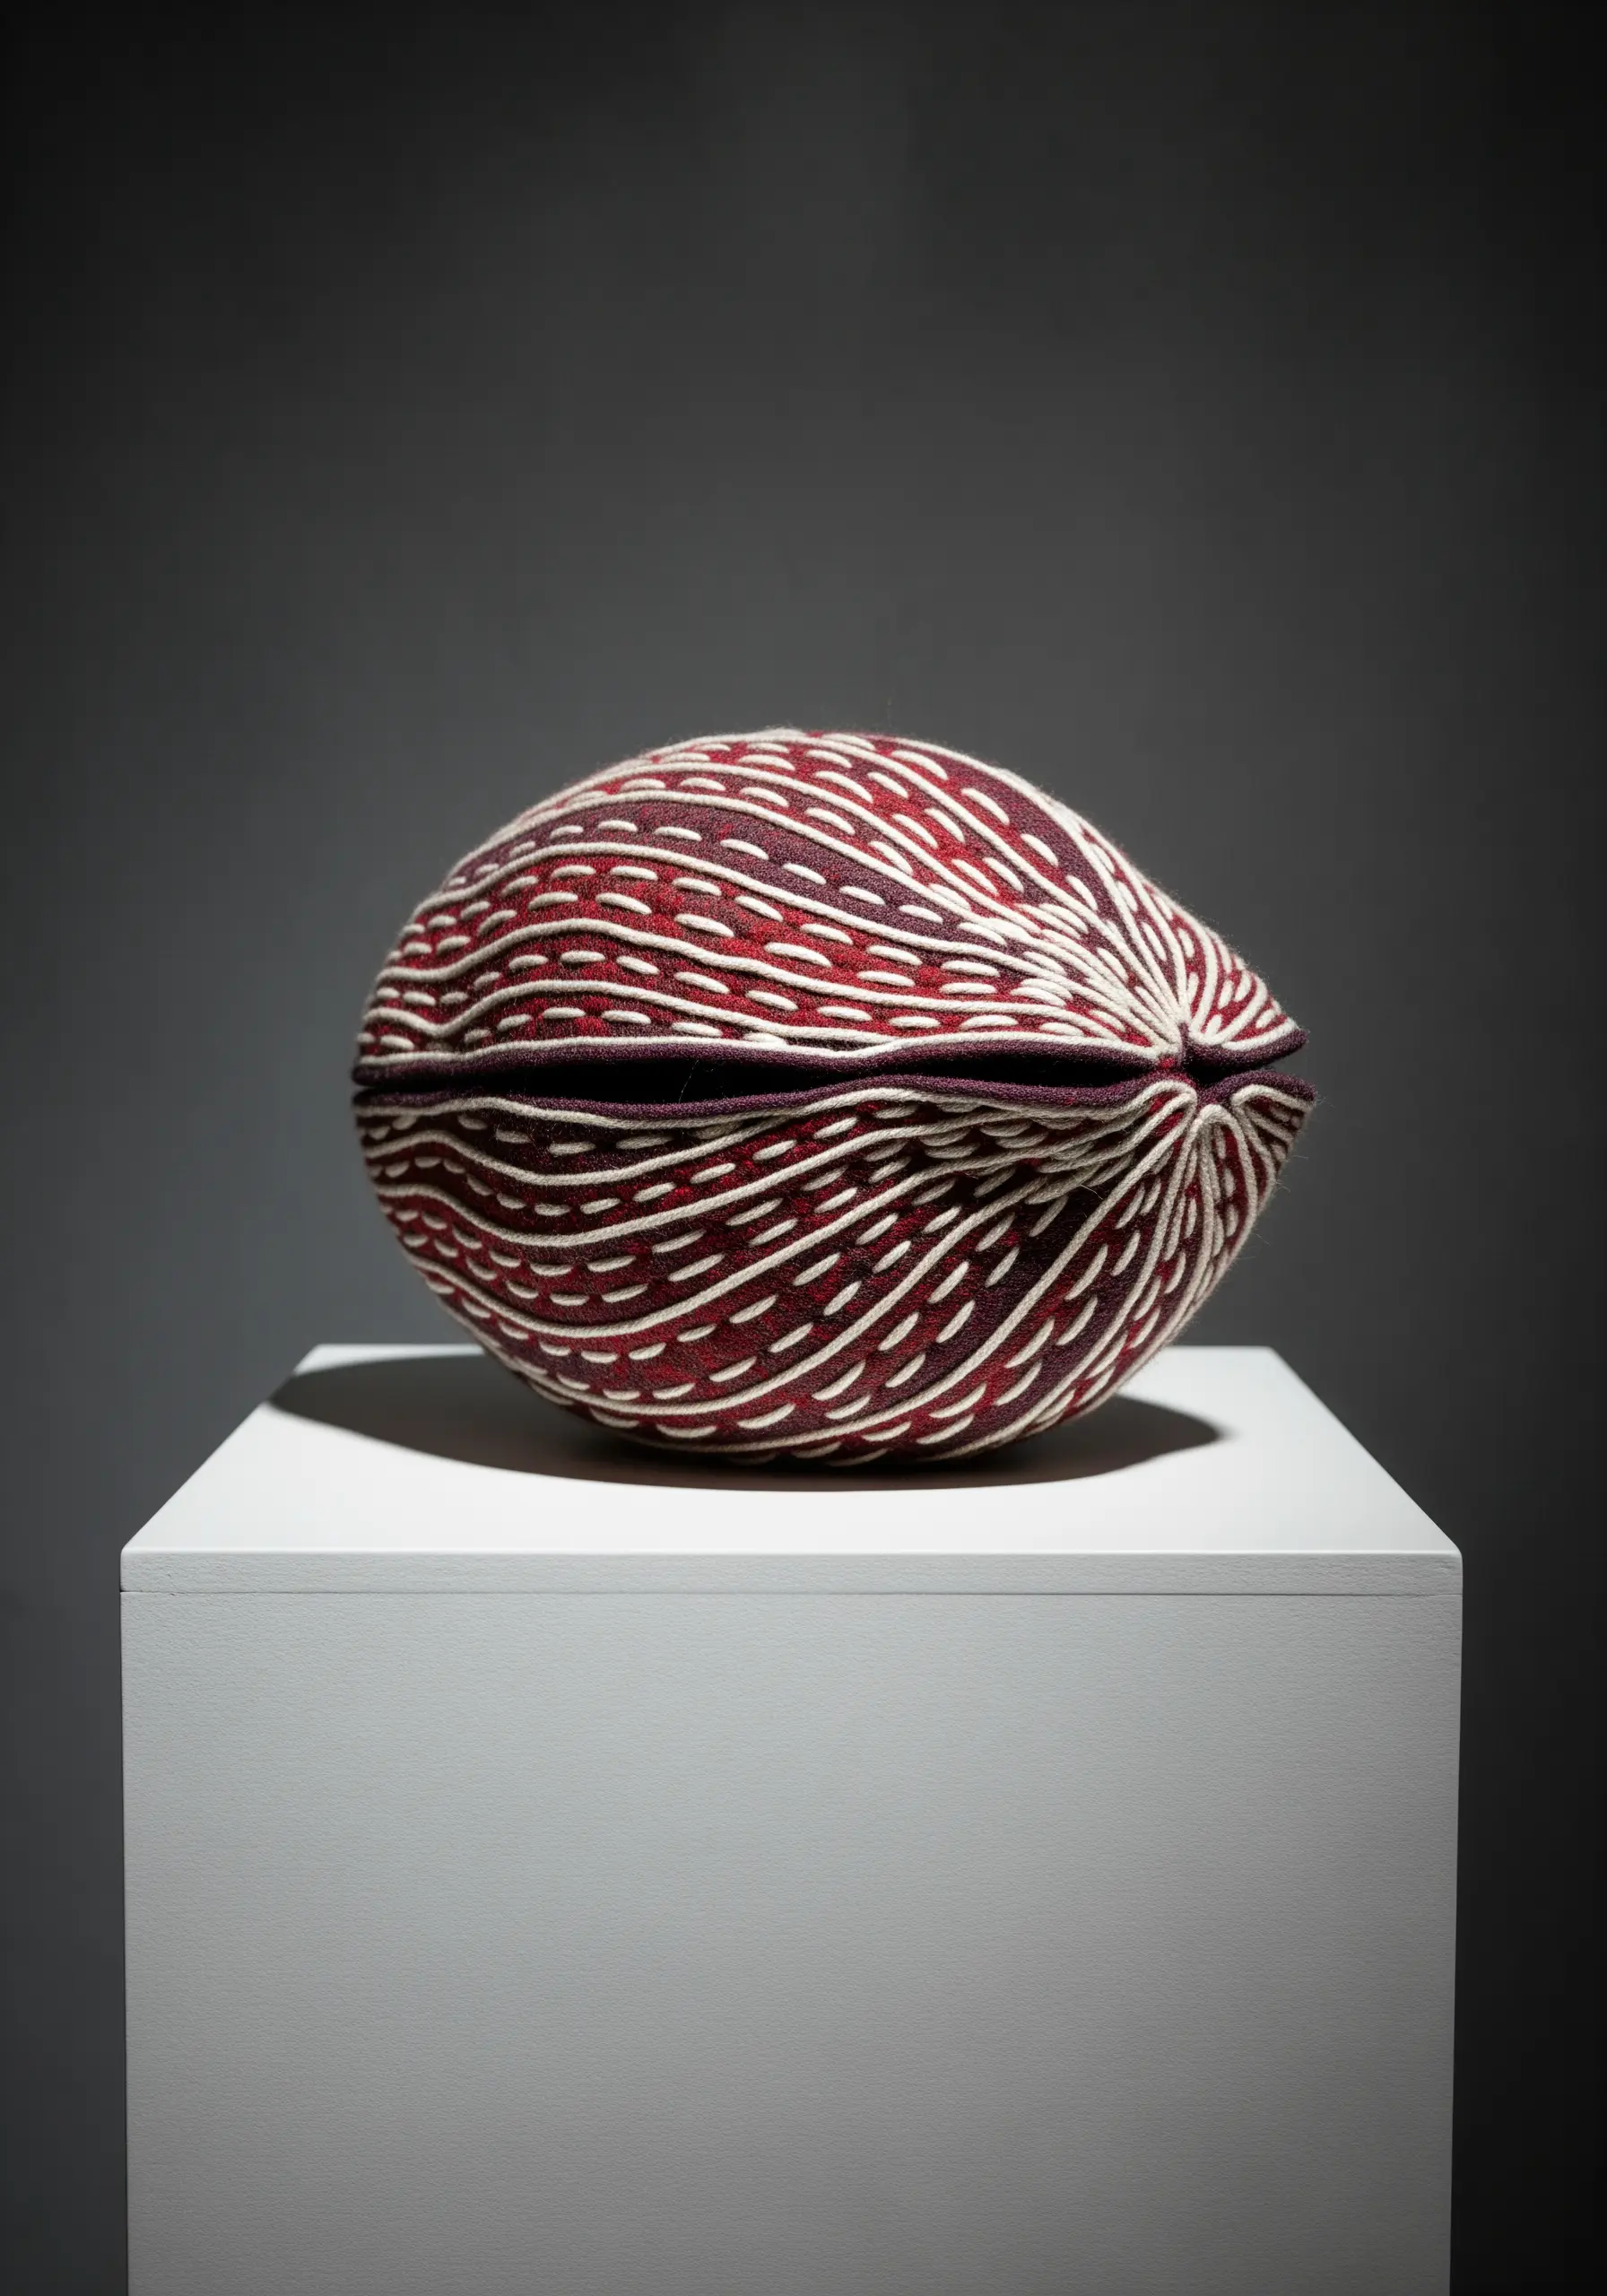
Create volumetric, sculptural forms using dense stitching to shape and define a padded object.
Start by creating a simple fabric pod shape, lightly stuffed with batting.
Then, use a running stitch or backstitch with a thick, contrasting thread to draw patterns across the surface.
As you pull the stitches tight, the fabric puckers and creates deep grooves, resulting in a highly textured, organic form defined entirely by thread.
15. Building Texture with High-Density Beadwork
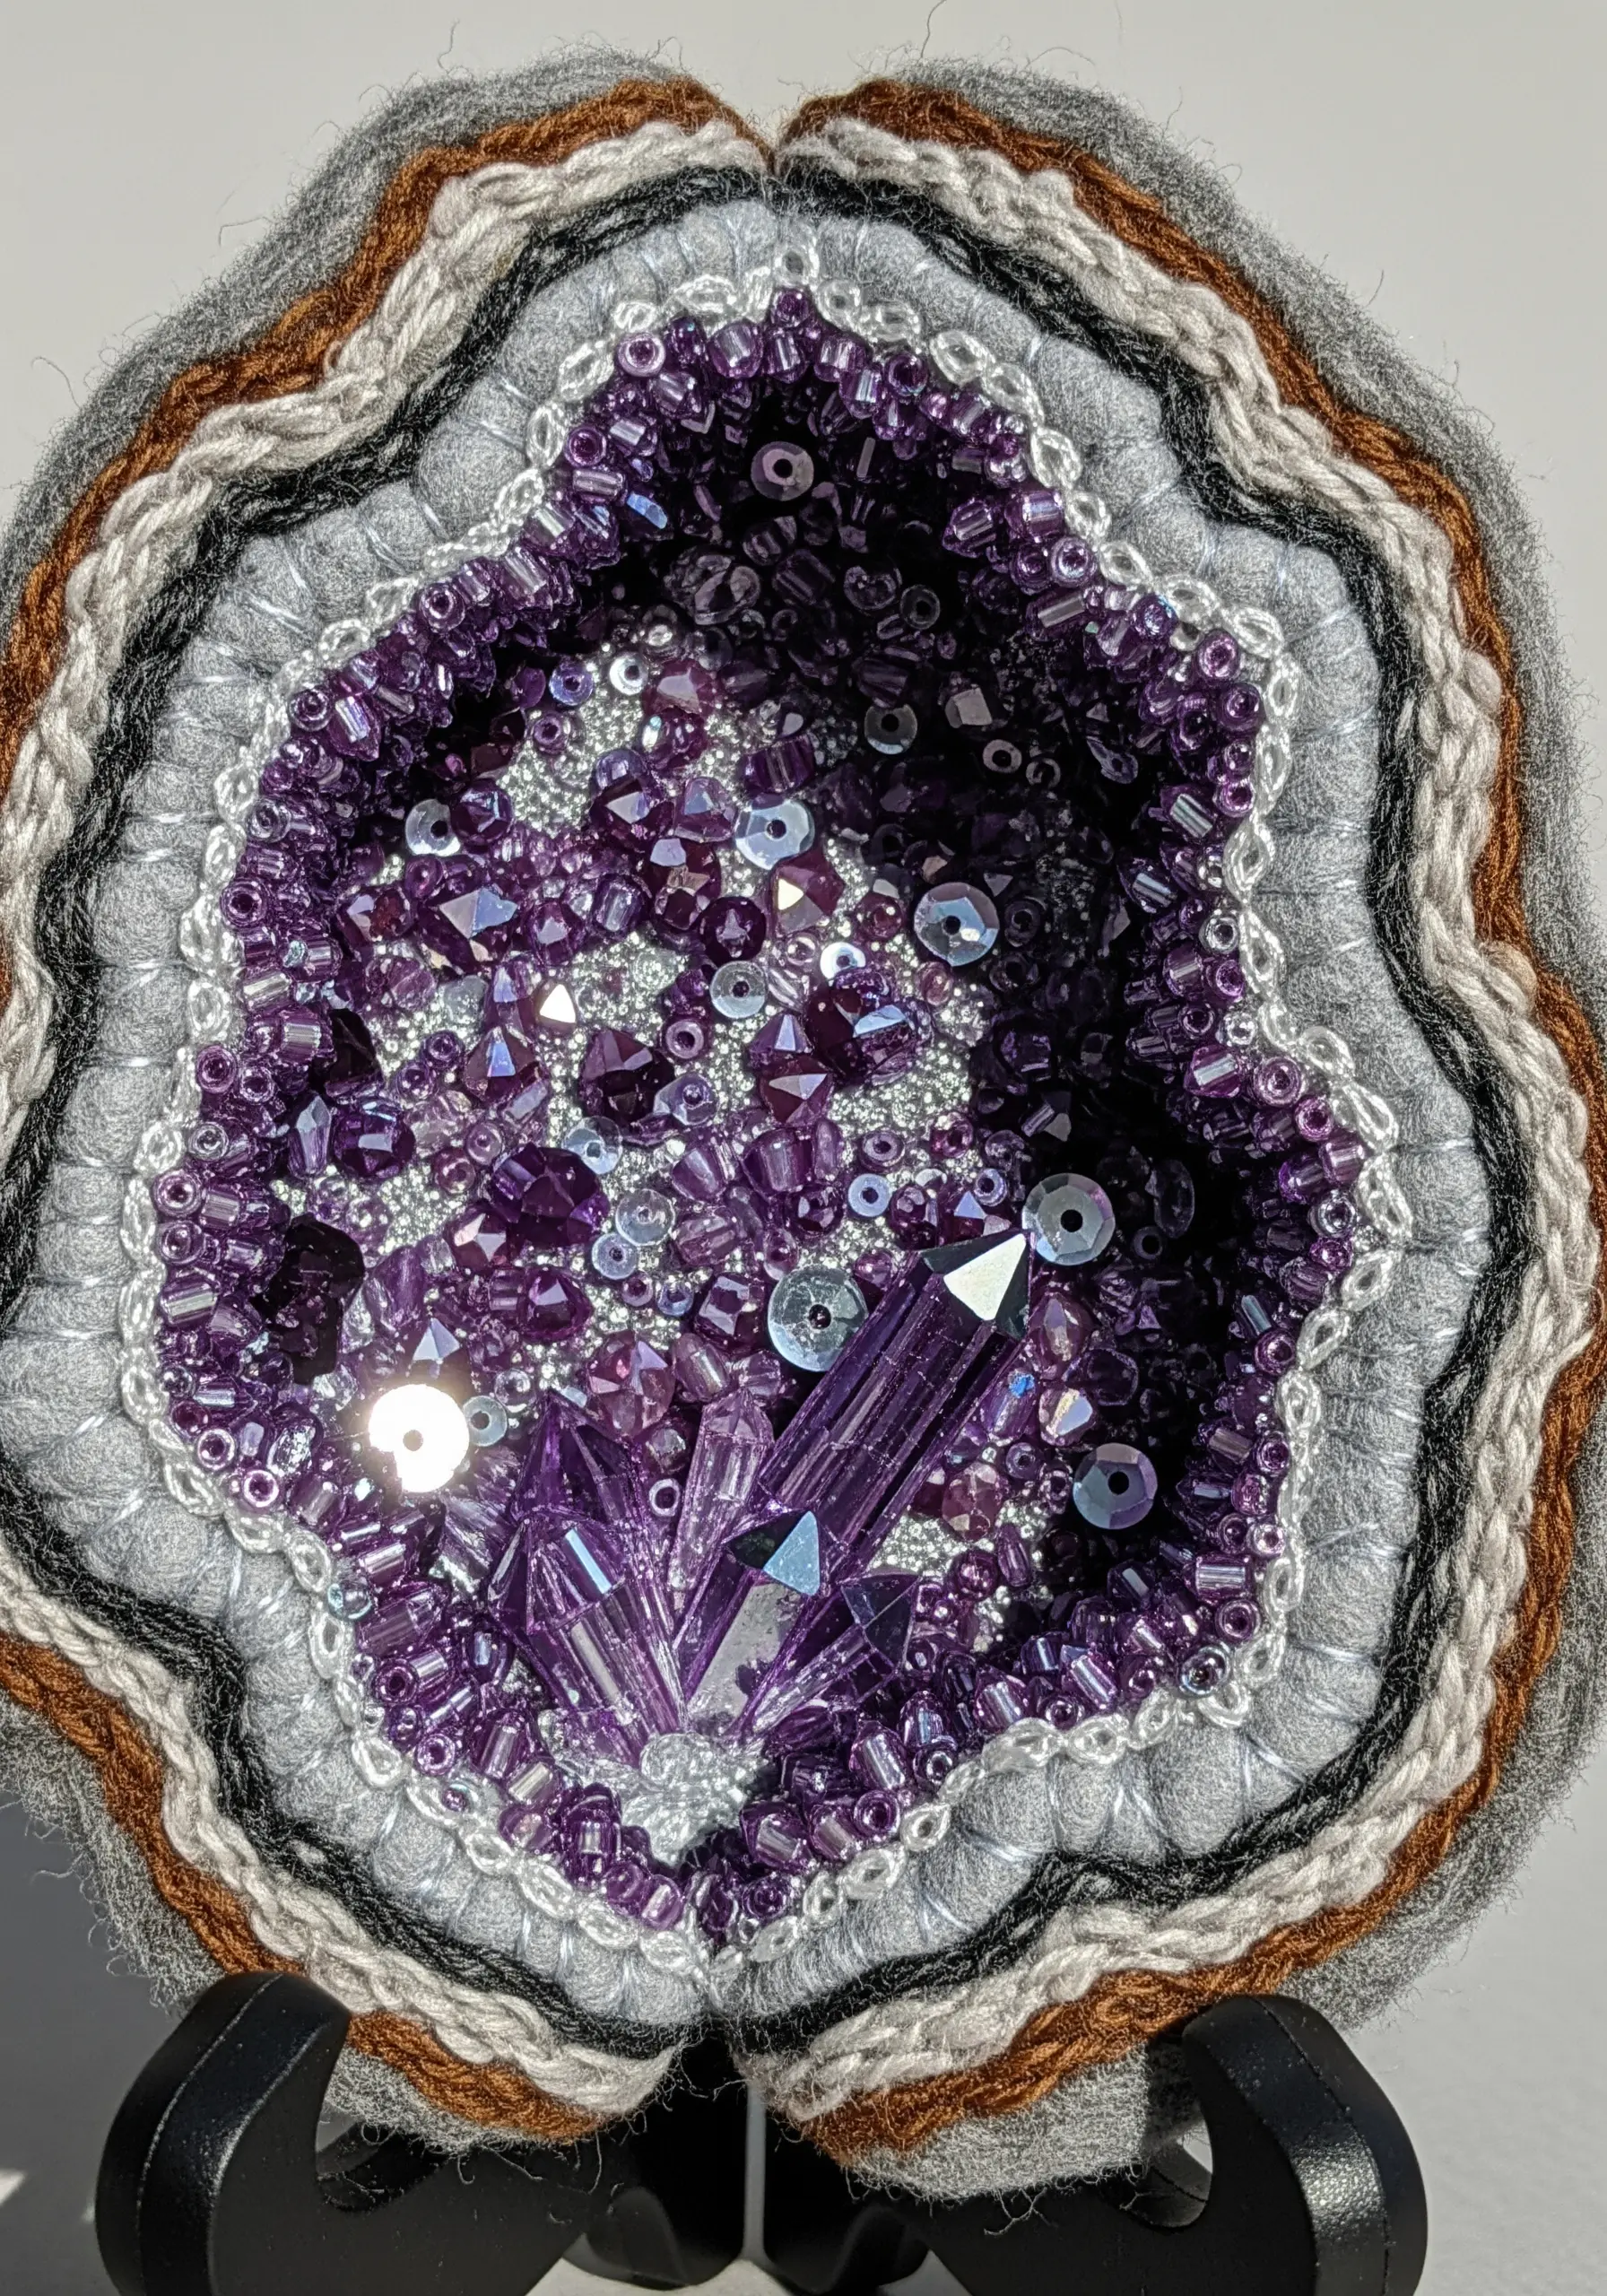
Mimic the crystalline structure of a geode by layering beads, sequins, and felt.
Create your base shape with concentric rings of felt, then couch thick yarn around the edges to define the outer layers.
Fill the center cavity with a dense, chaotic mix of seed beads, crystals, and sequins to replicate the sparkling interior of a real geode.
Varying the size and finish of the beads—from matte to iridescent—adds visual complexity and makes the piece incredibly rich in texture.
16. Data Visualization: Stitching a Soundwave

Translate personal data, like a soundwave from a favorite song or a loved one’s voice, into a starkly modern piece of art.
Use a simple straight stitch on a high-contrast background, like white thread on black canvas, to let the form speak for itself.
To ensure absolute precision, print your soundwave pattern and transfer it directly to the fabric.
This technique transforms an intangible memory into a physical, minimalist object that is both deeply personal and aesthetically striking.
17. Mastering Miniature Scale and Detail
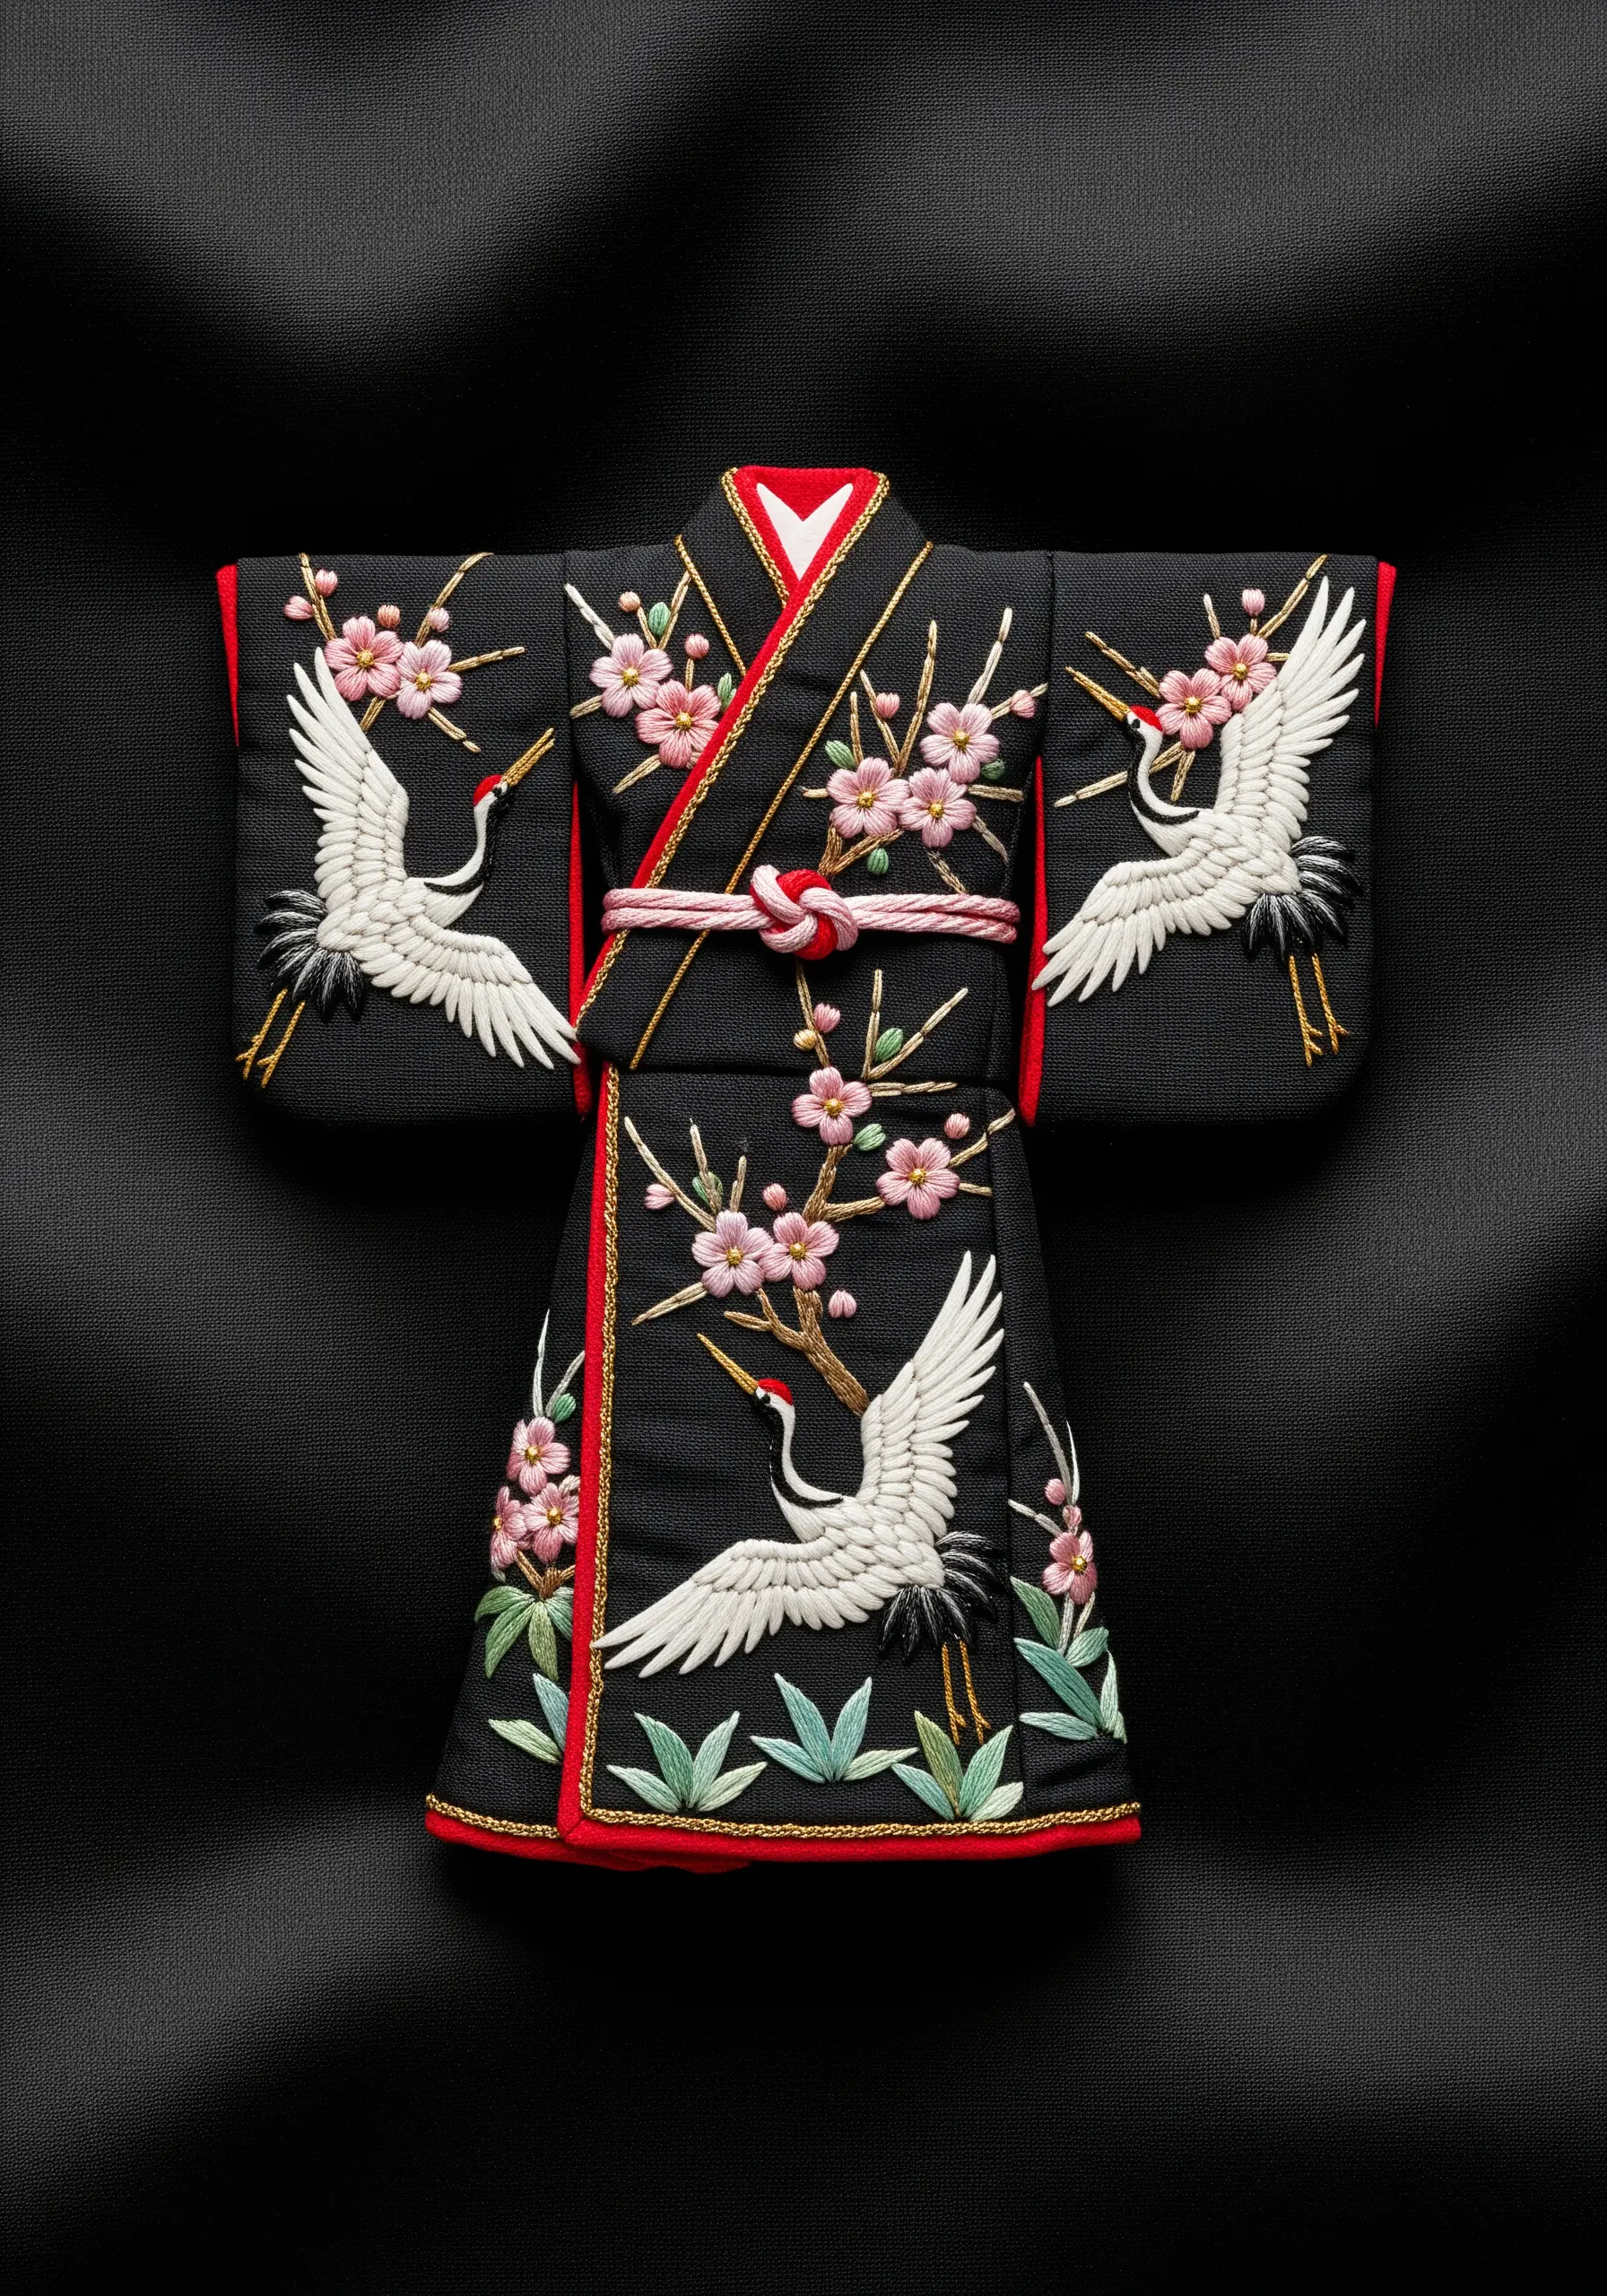
Create exquisite miniature pieces by scaling down your tools and techniques.
For a project this small, use a single strand of fine silk floss and a sharp, small-gauge needle to ensure your stitches remain delicate and precise.
Combine padded satin stitch for the blossoms to give them a subtle lift, and use long-and-short stitch to create the smooth, feathered texture on the cranes’ wings.
The success of miniature embroidery lies in the crispness of each stitch, turning a tiny object into a world of intricate detail.
18. Graphic Storytelling with Felt Appliqué
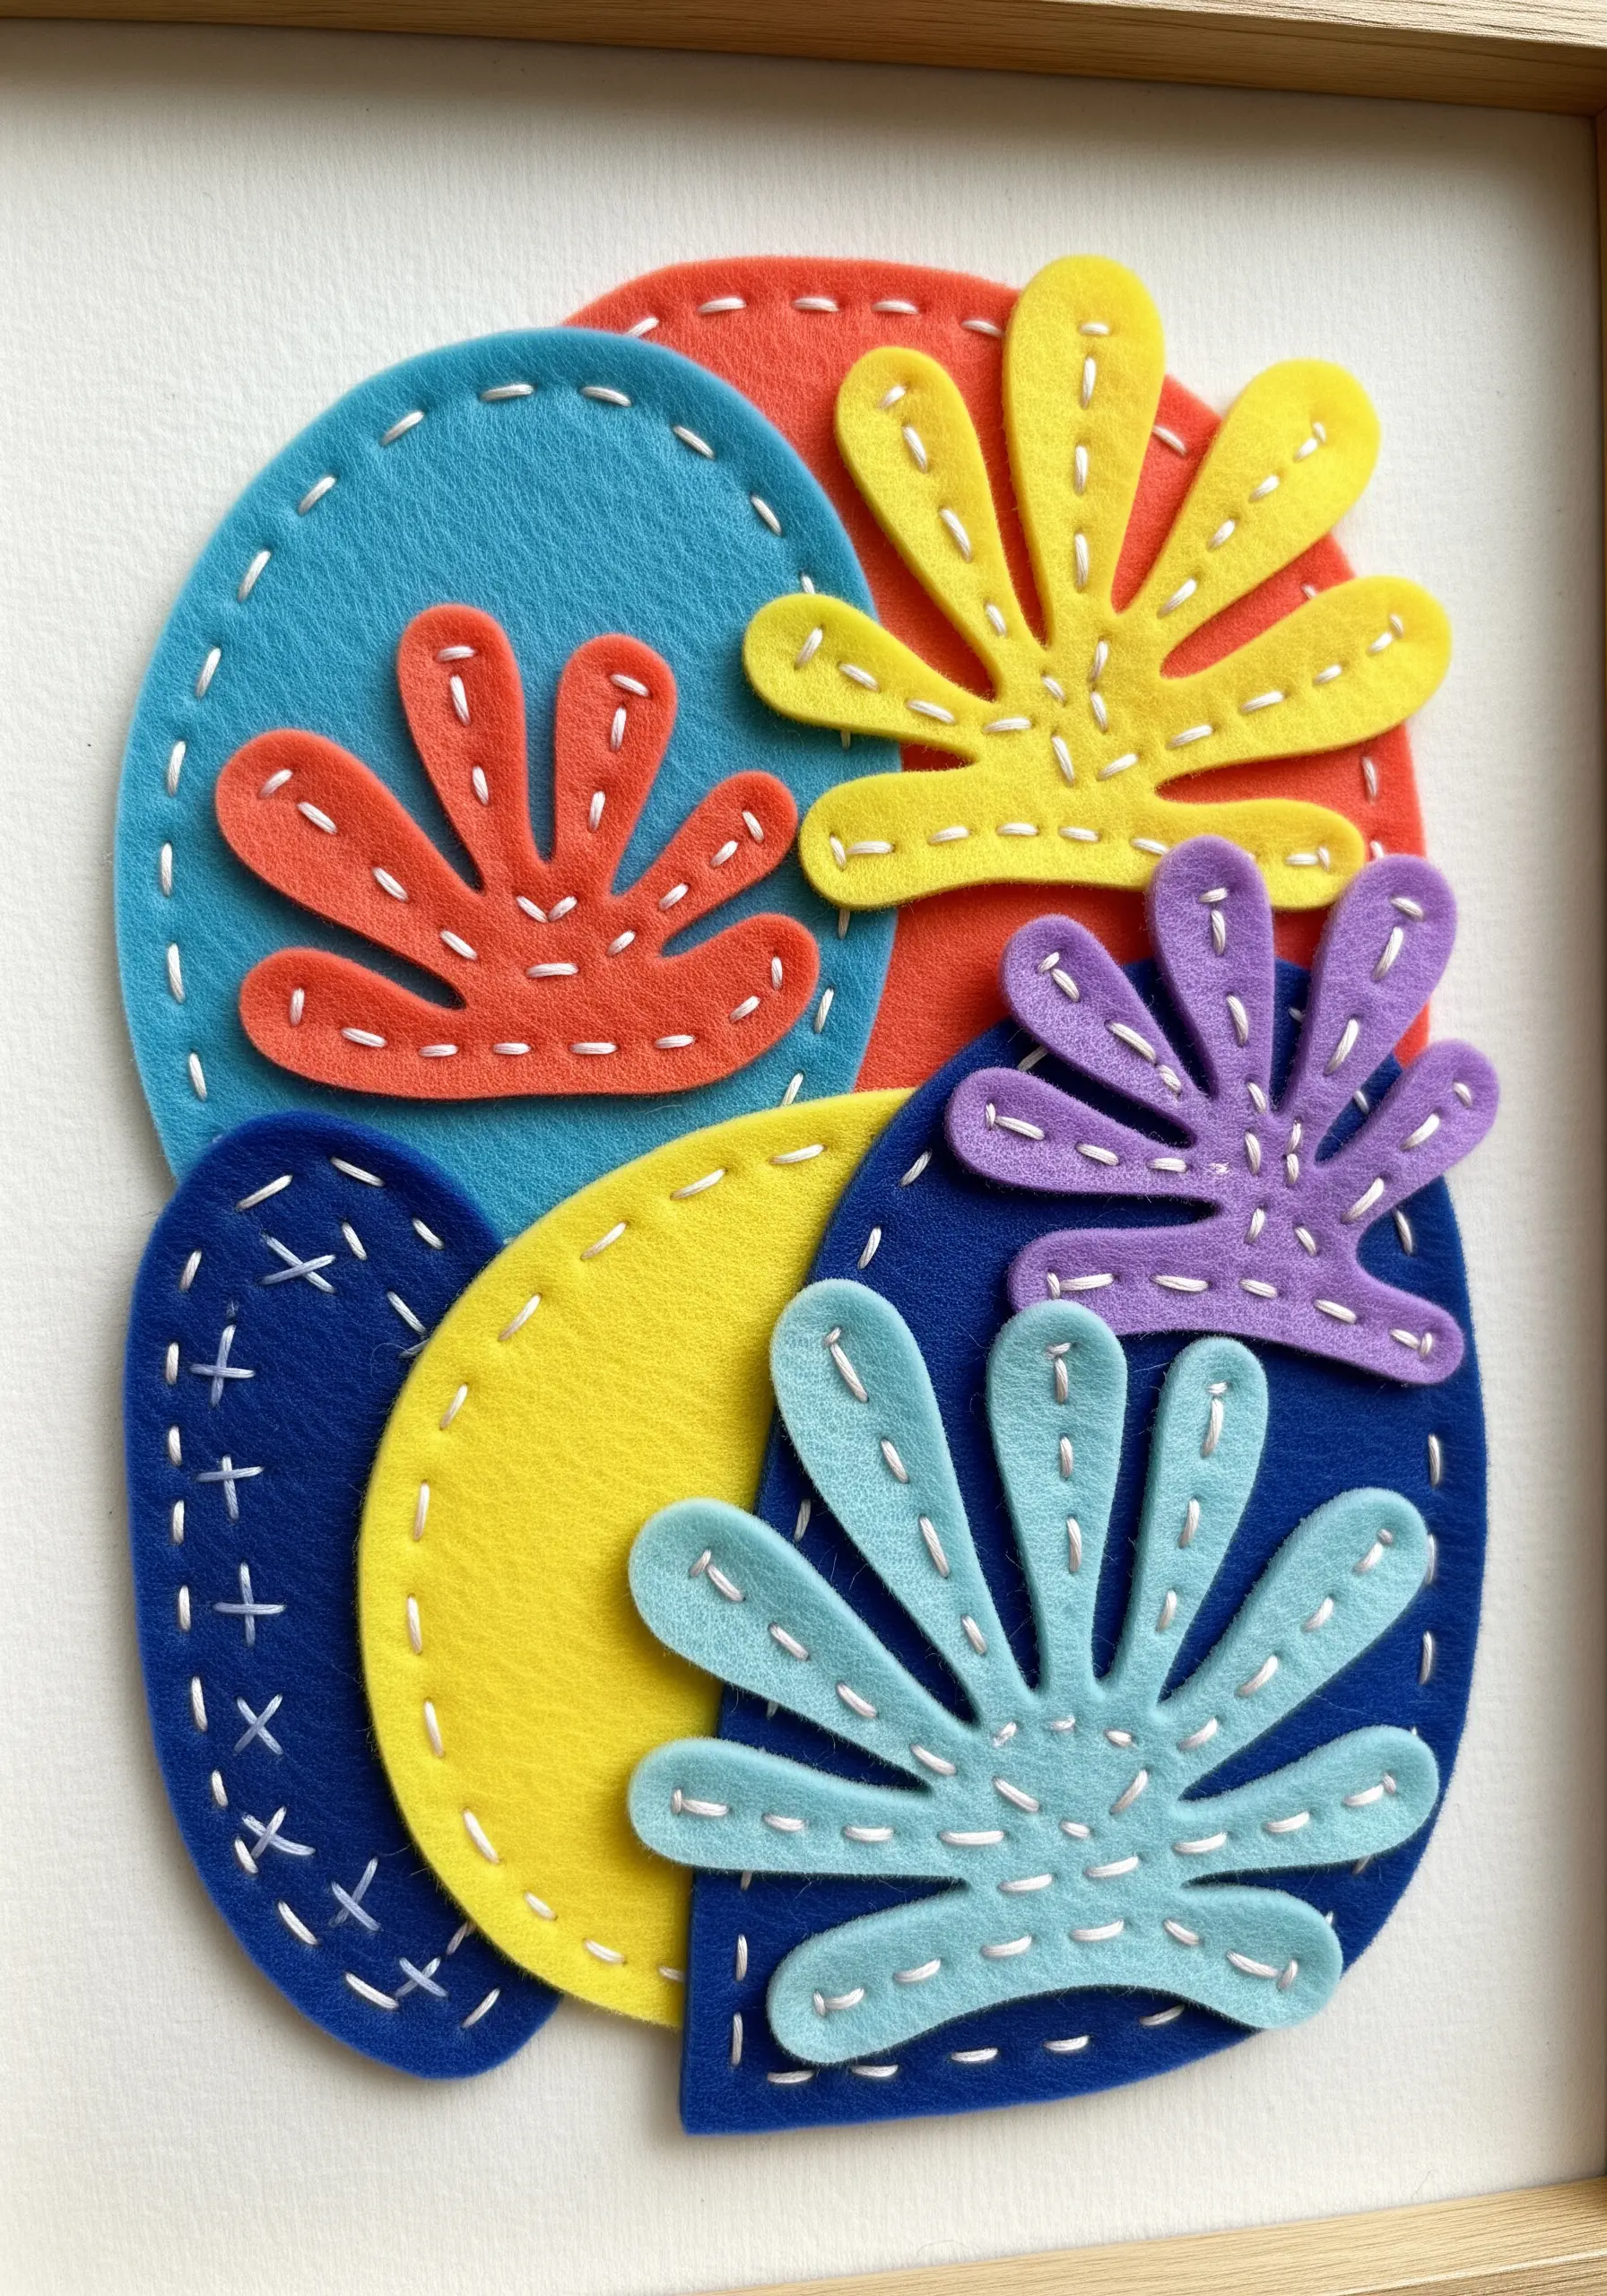
Create bold, playful compositions by cutting shapes from felt and using your stitches as a graphic design element.
Instead of trying to hide your stitches, make them a feature. A contrasting color of thread in a simple running stitch or blanket stitch adds energy and a handcrafted feel.
Layering the felt shapes creates an immediate sense of depth and interaction between the colors.
This technique is a fast and effective way to explore color theory and composition without needing complex embroidery skills.
19. Sculptural Knots as Minimalist Wall Art
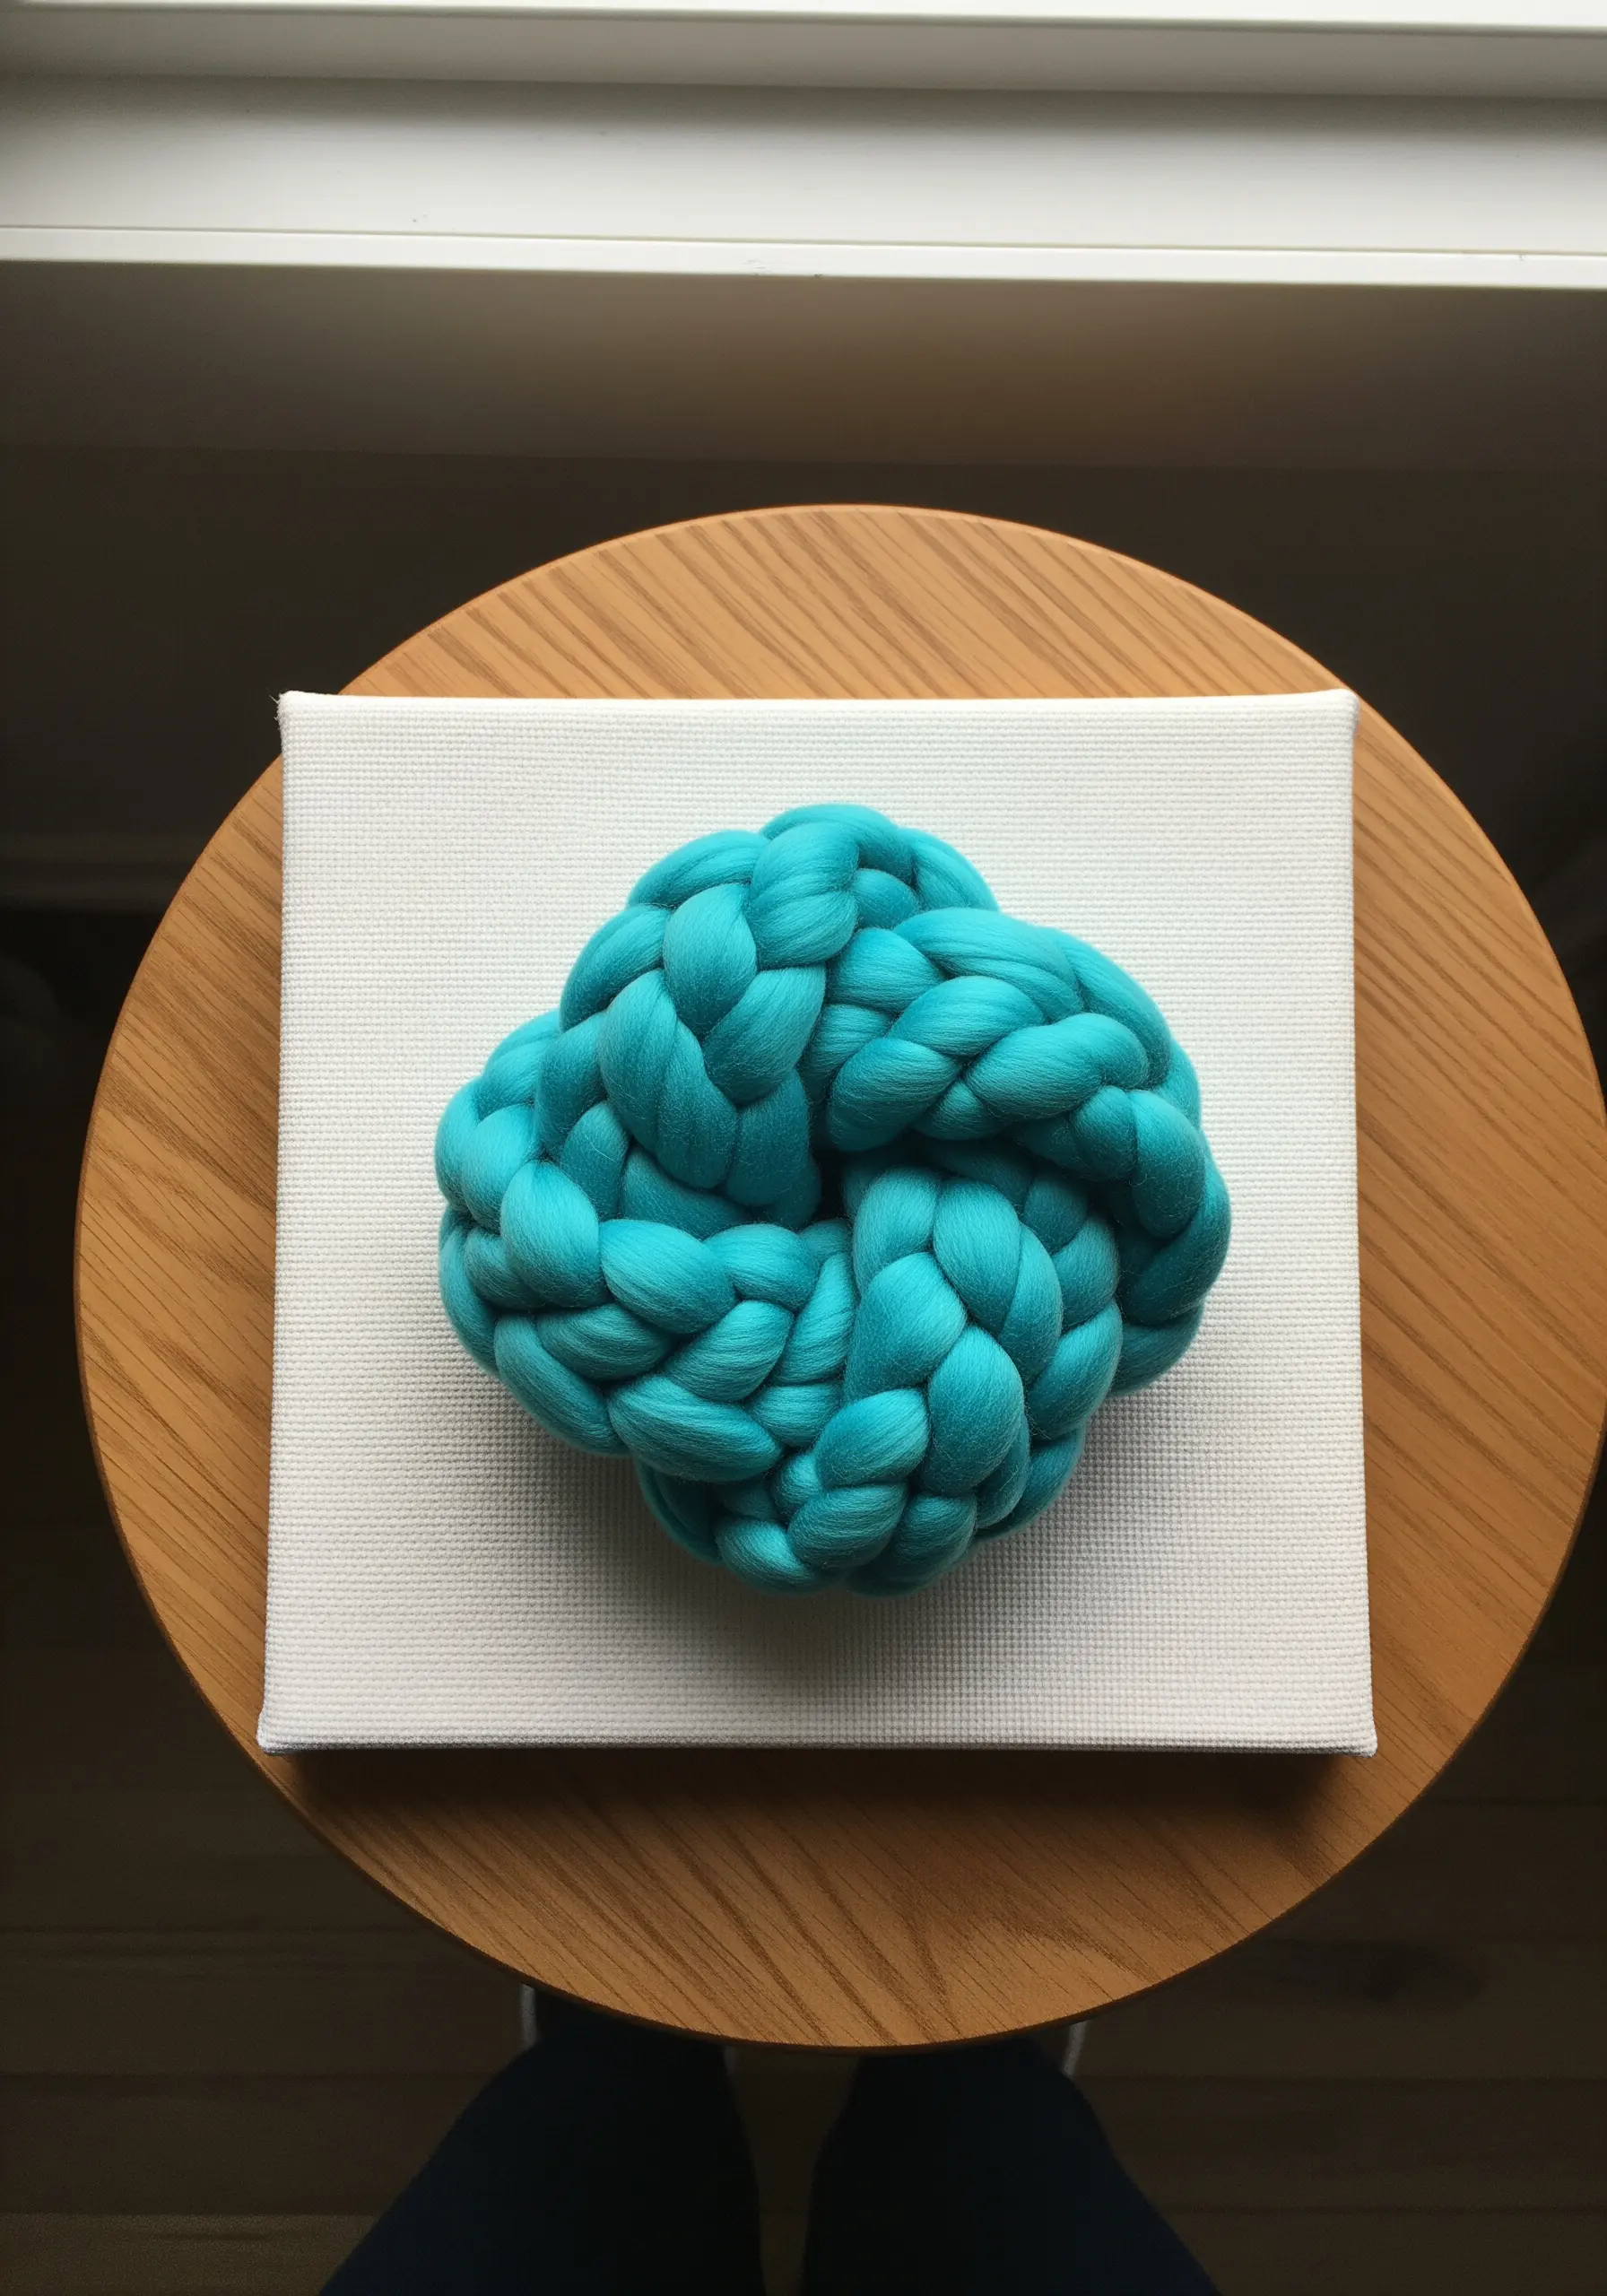
Explore fiber’s sculptural potential by focusing on a single, powerful element: the knot.
Using jumbo yarn, like merino wool or cotton tubing, create an intricate knot like a monkey’s fist or a Celtic knot.
Mount the finished knot securely onto a stretched canvas. The stark contrast between the soft, complex texture of the yarn and the flat, plain canvas creates a striking modern focal point.
This is one of the most impactful mixed-fiber projects you can make for a contemporary space.
20. Celestial Mapping with Beads and Thread
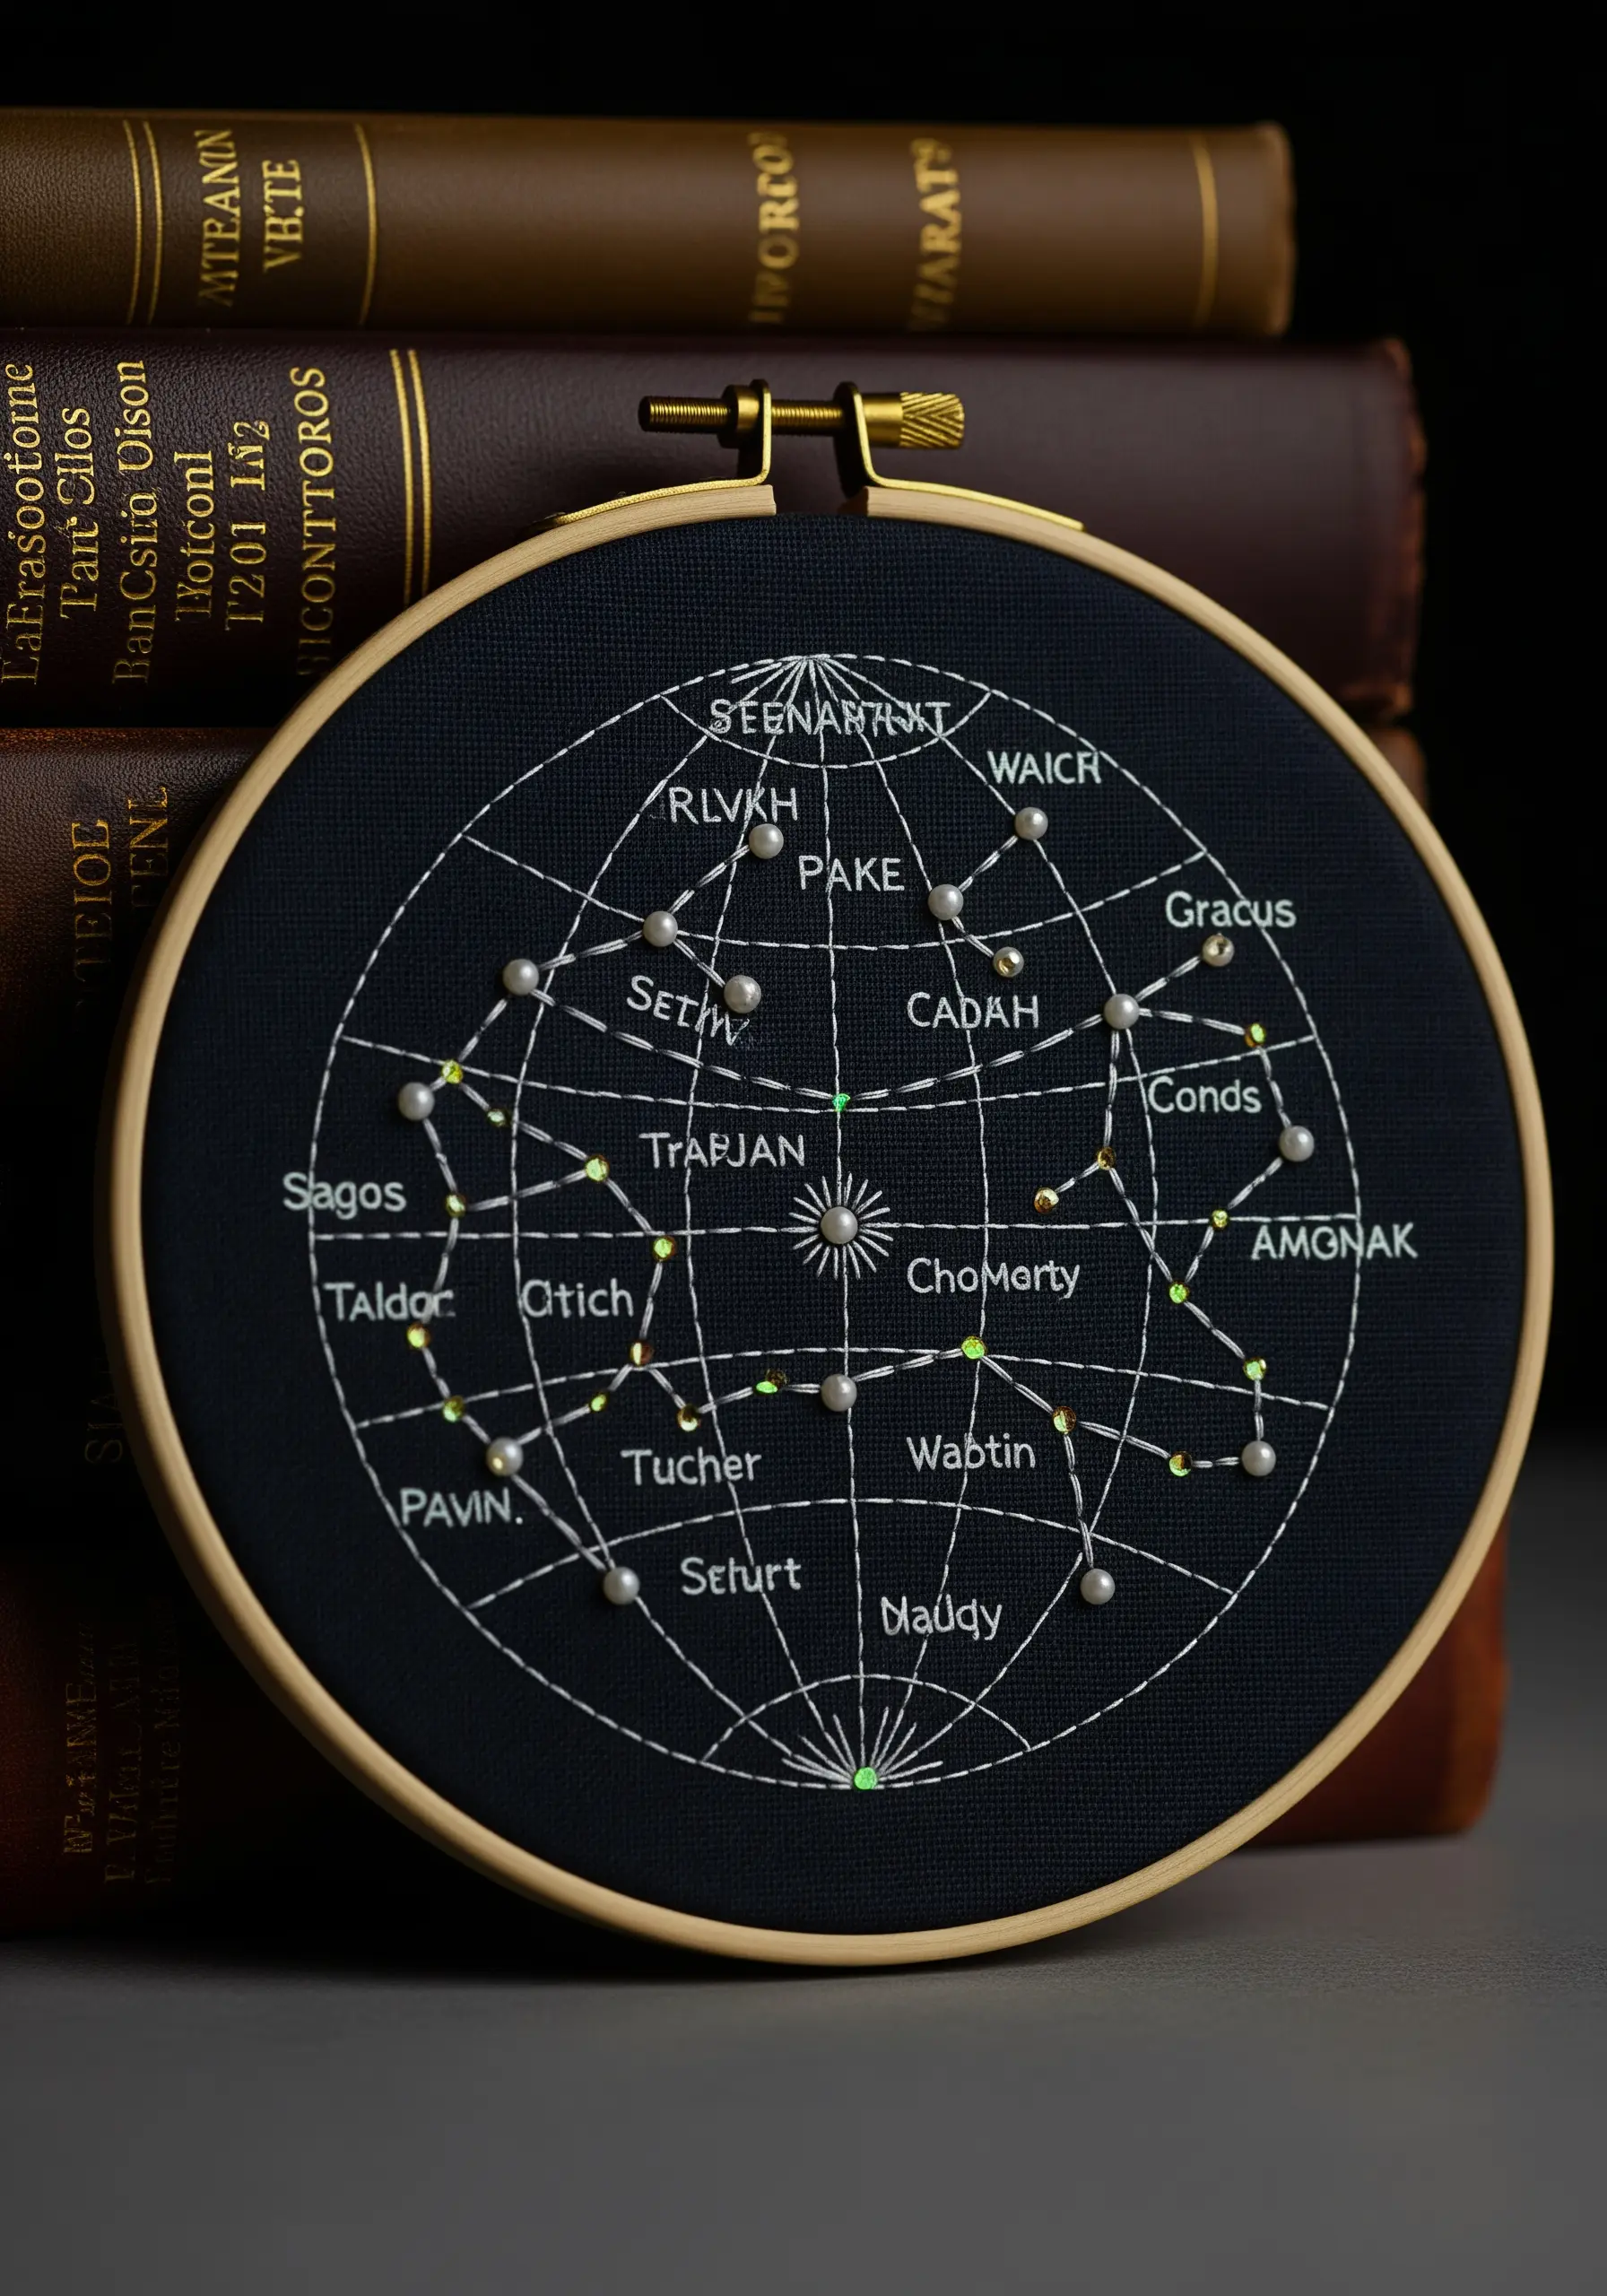
Design a sophisticated celestial map that feels both scientific and magical.
Stitch on a dark, tightly woven fabric like black linen to create a deep space background.
Use a fine, bright white or metallic silver thread for the constellation lines, stitched in a clean backstitch for precision.
Represent stars with tiny pearl beads or silver French knots. This mix of matte thread and lustrous beads adds a subtle textural hierarchy that makes the map feel more dynamic.
21. Applying Bead Weaving to 3D Objects
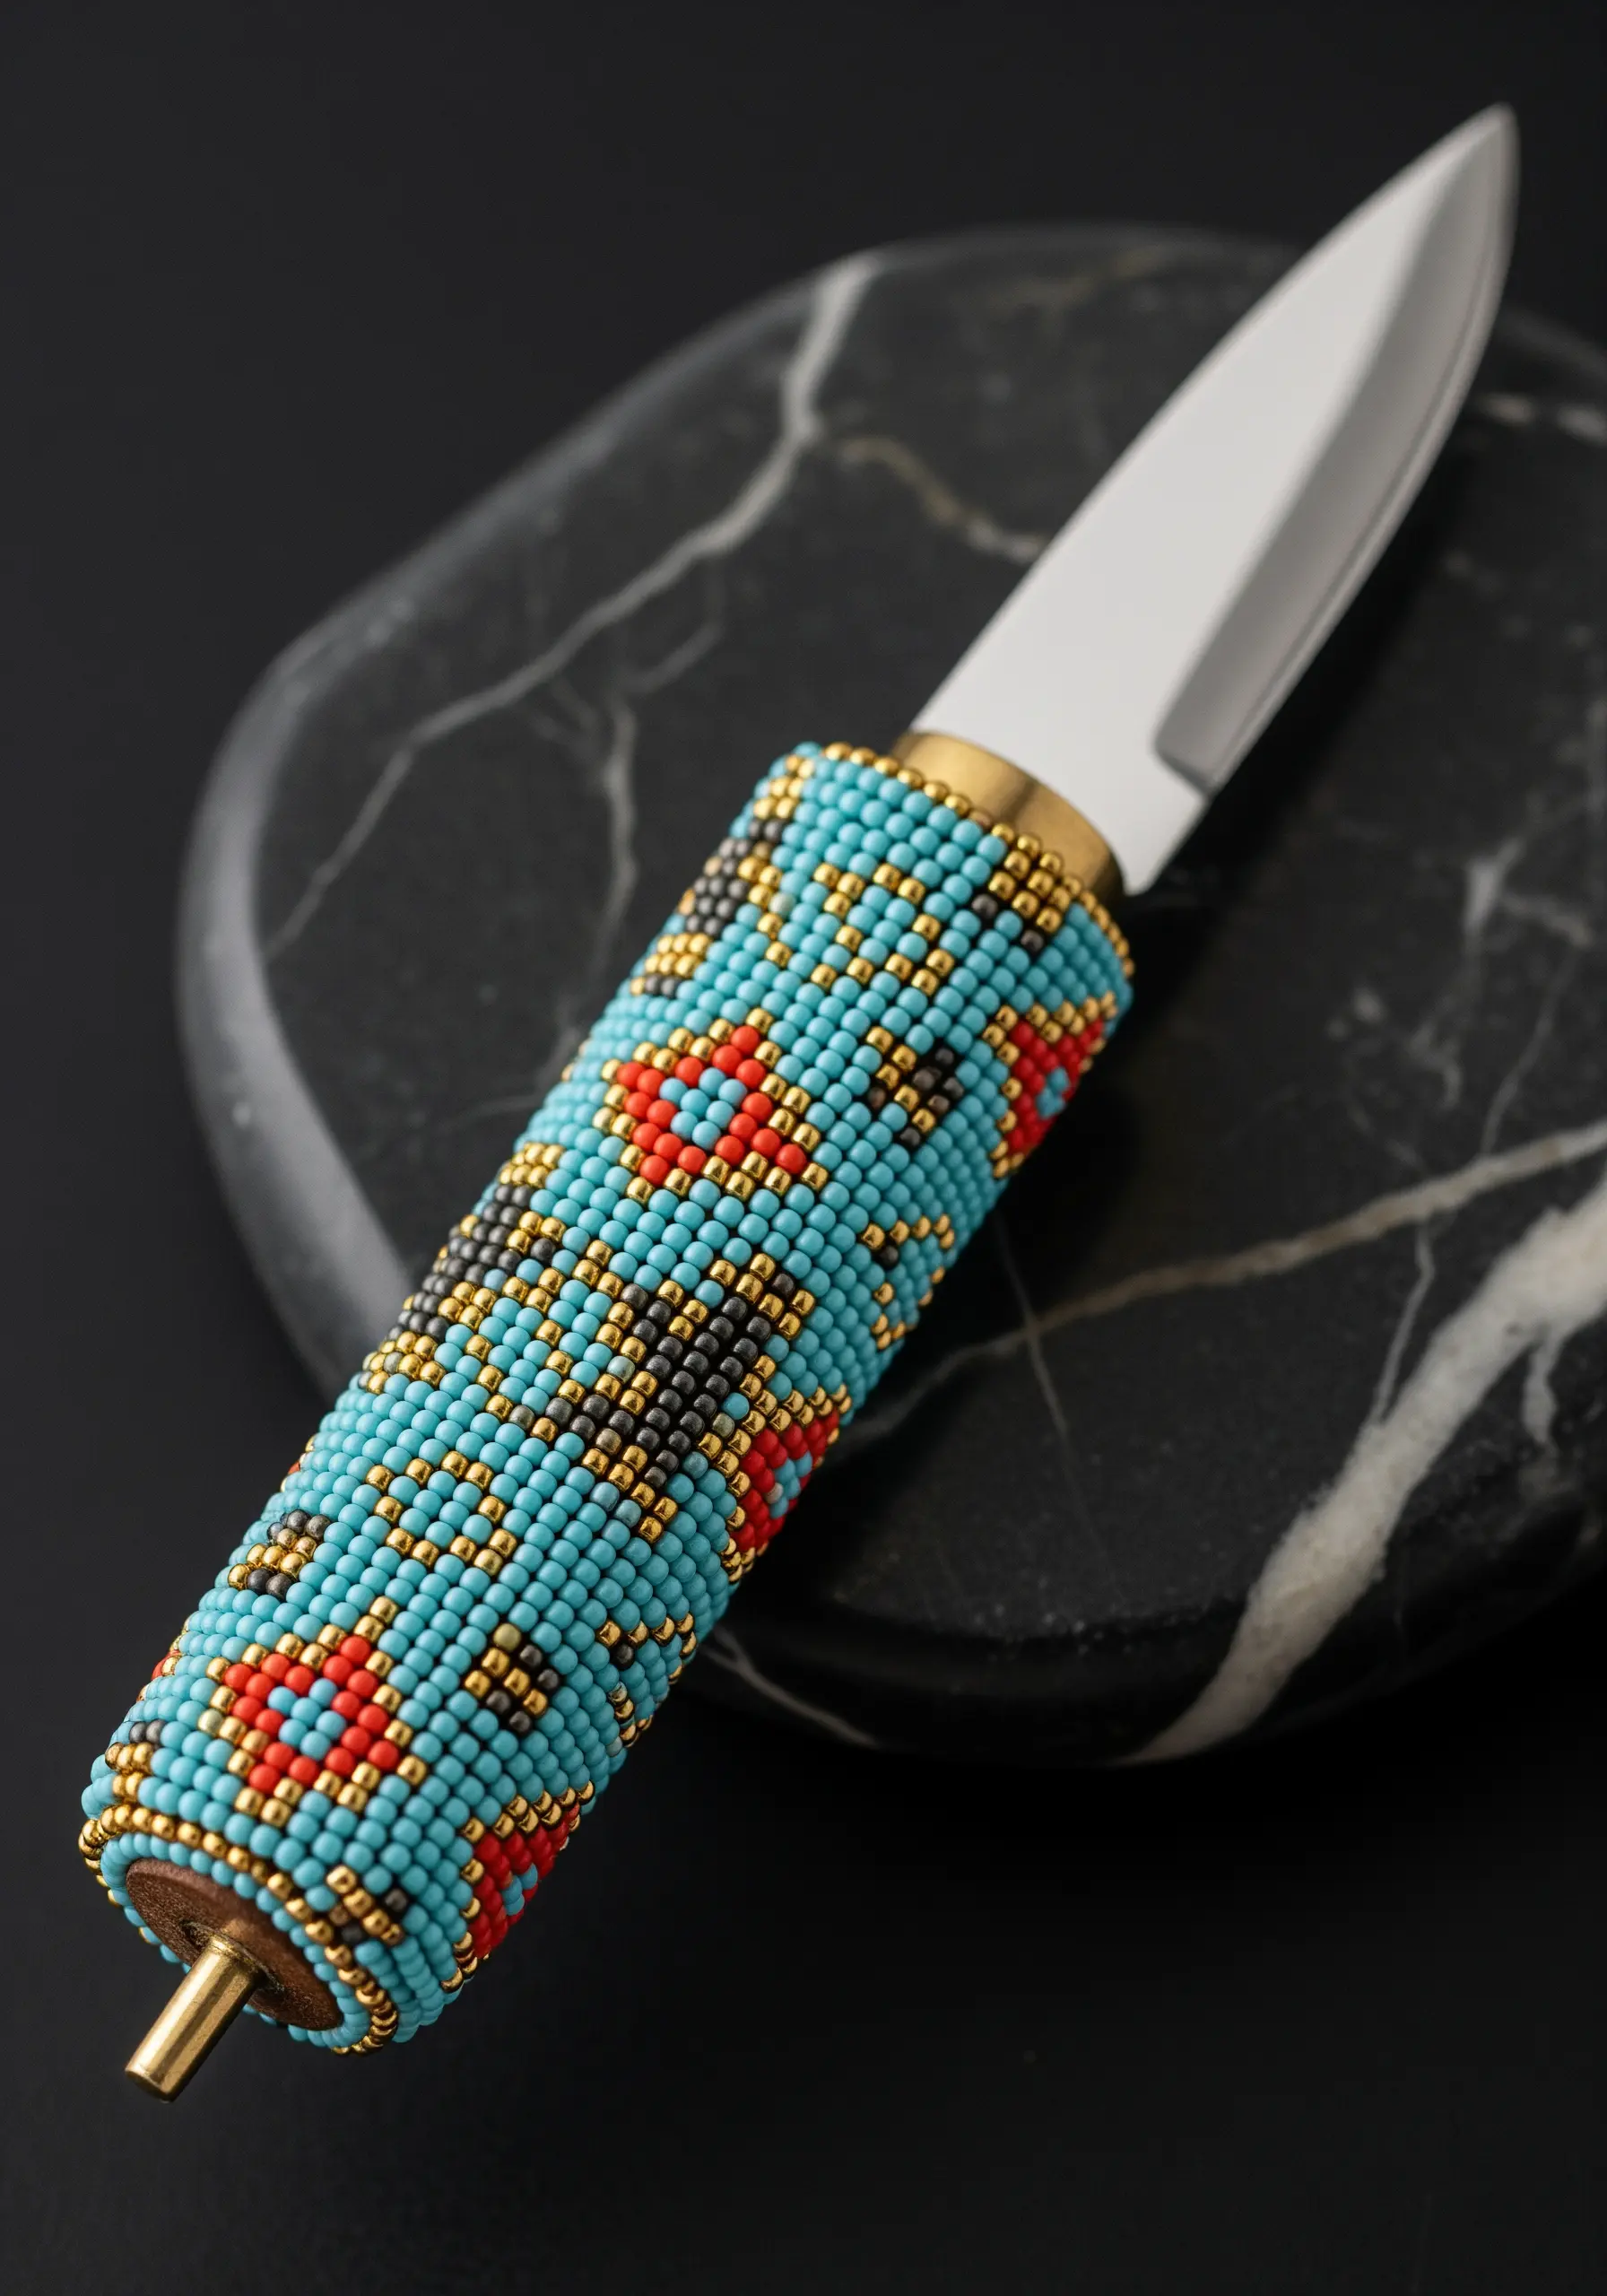
Wrap everyday objects in a skin of intricate beadwork to elevate them into functional art.
Use an off-loom bead weaving stitch, like peyote or brick stitch, to create a flat, patterned strip of beads that is the exact circumference and length of your object’s handle.
Once complete, you can wrap the beaded piece around the handle and seamlessly ‘zip’ the edges together with thread.
This technique requires meticulous planning and consistent tension, but it allows you to add a durable, beautiful, and tactile pattern to any cylindrical form.
22. The Art of the Tiny Cross-Stitch Portrait
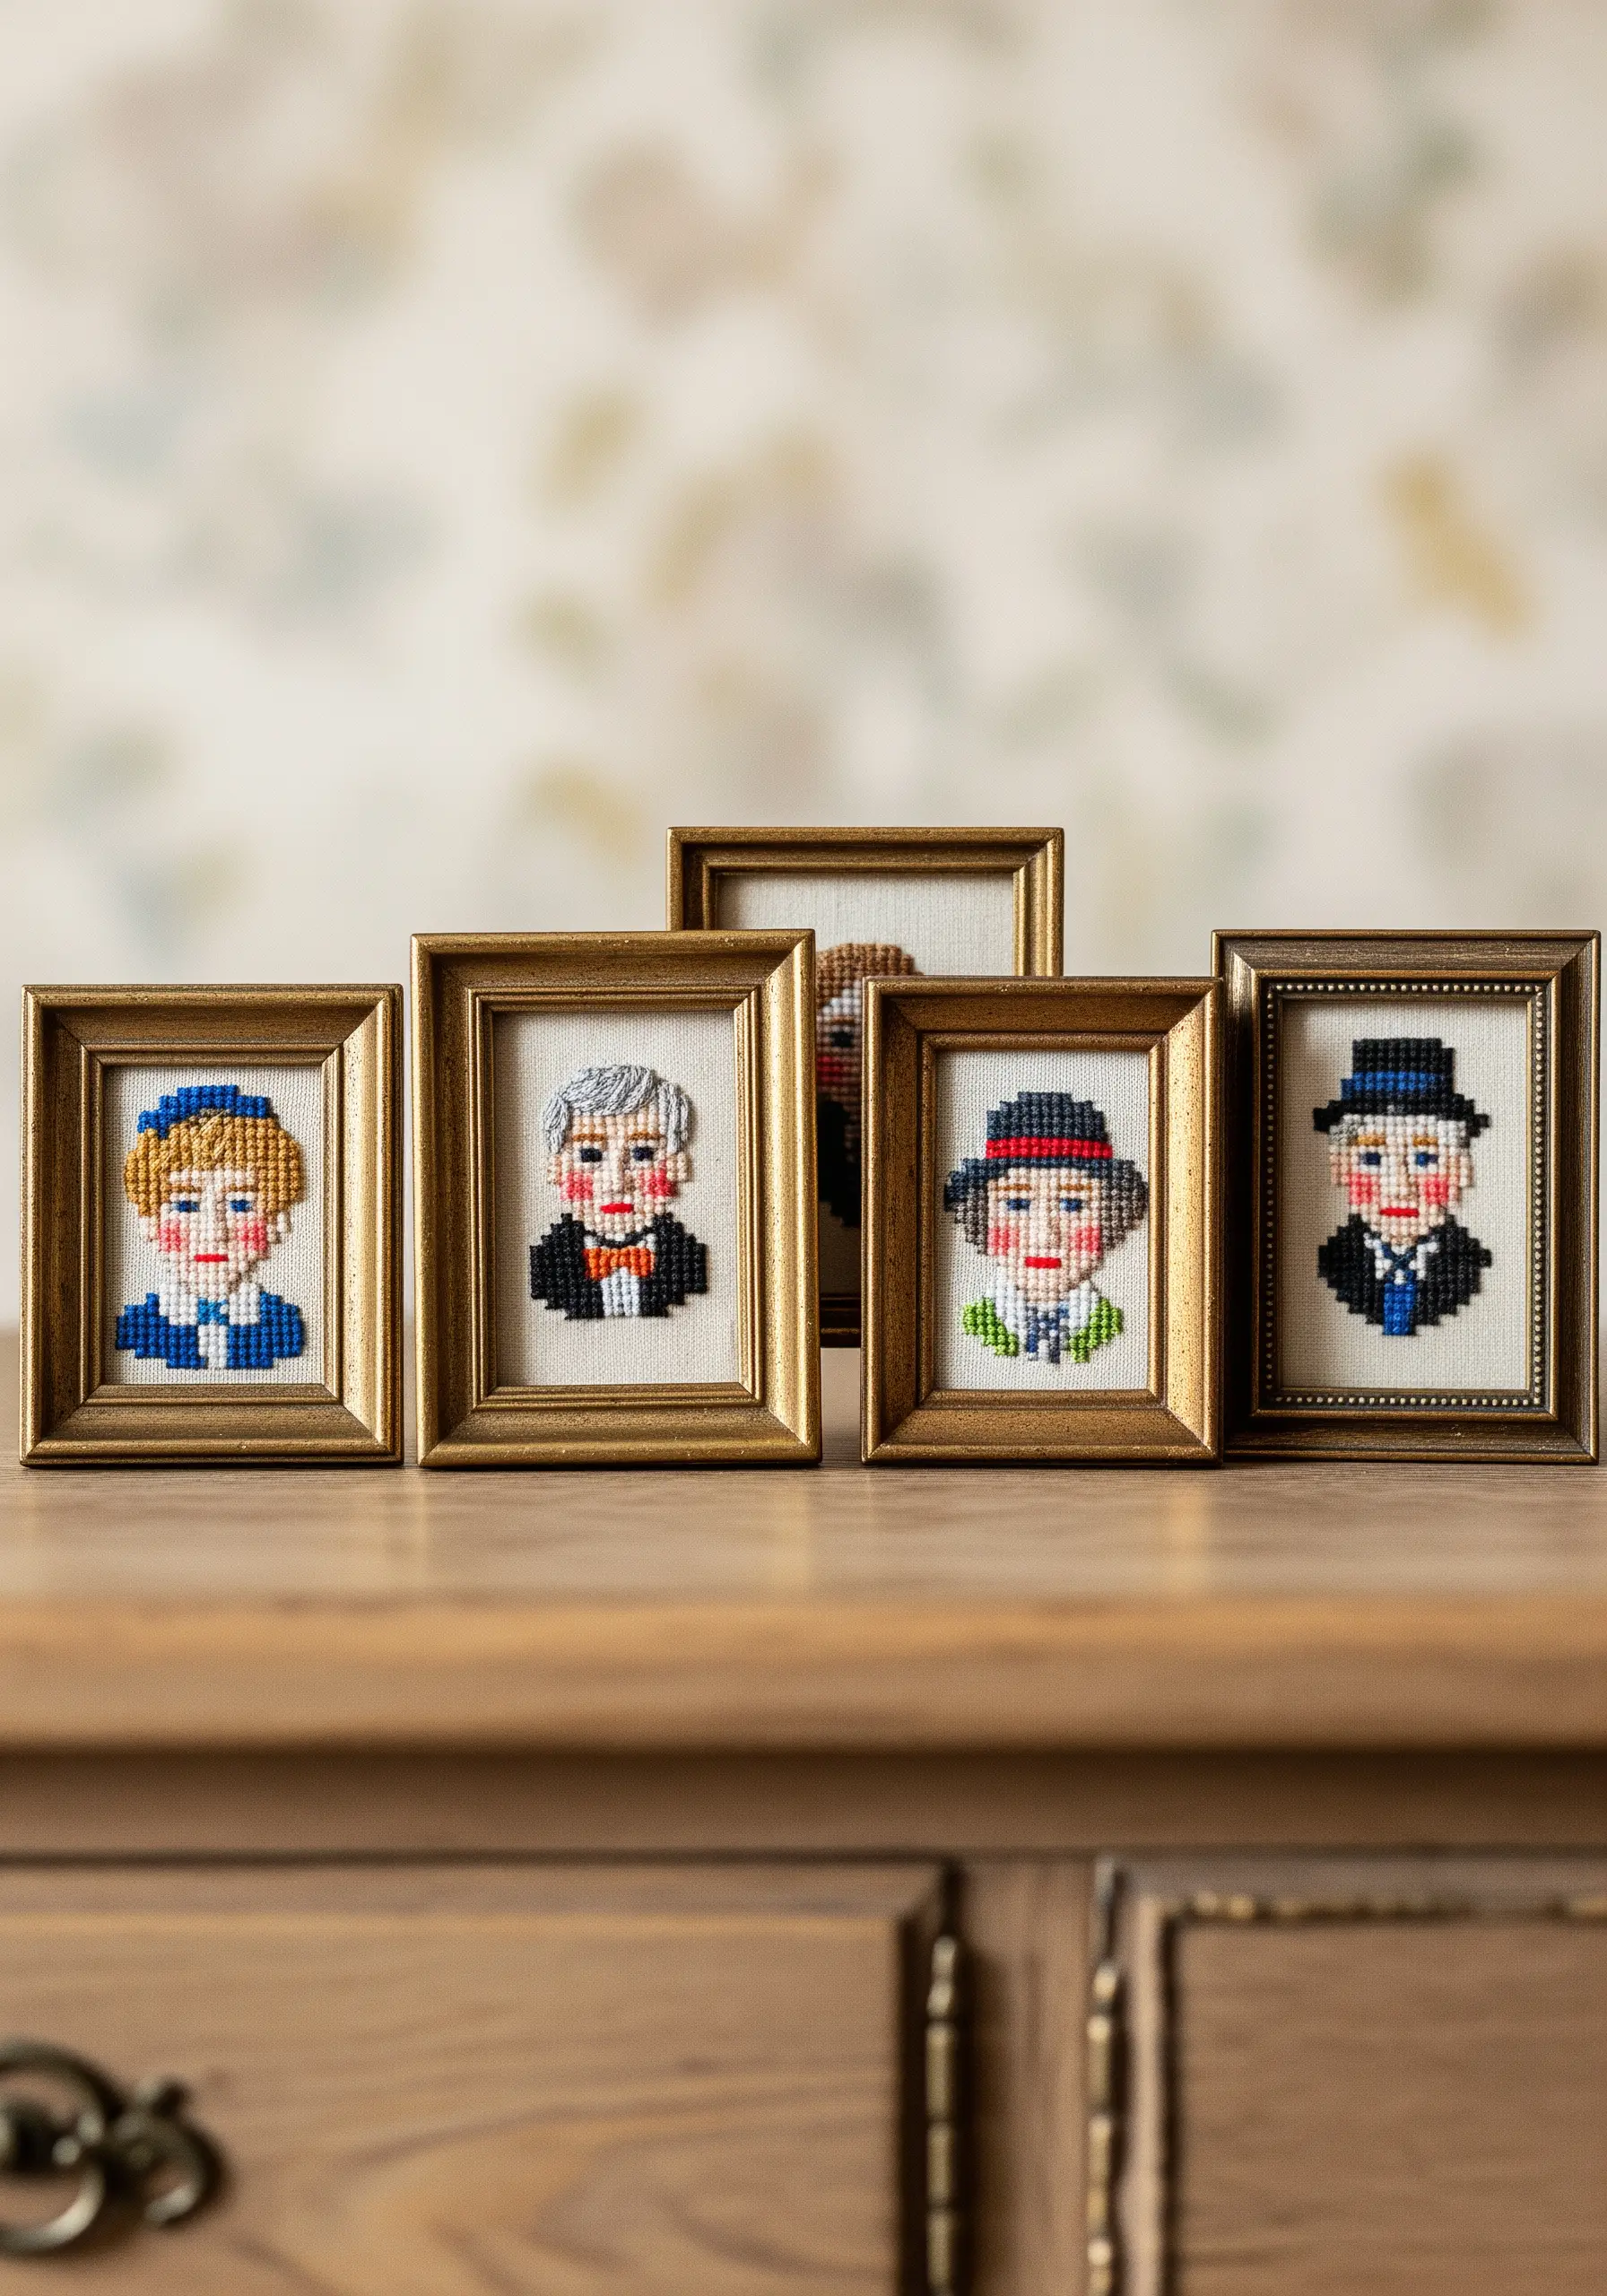
Capture personality and charm on a miniature scale with simplified cross-stitch portraits.
The key to success is not in the number of colors, but in their careful placement. A limited, well-chosen palette can create surprising depth and character.
Work on a high-count Aida or linen fabric, which allows for smaller, more refined stitches that mimic the pixels of a digital image.
Grouping these mini handmade objects together in small, elegant frames creates a delightful and personal gallery.
23. Embellished Entomology: Sequins and Goldwork
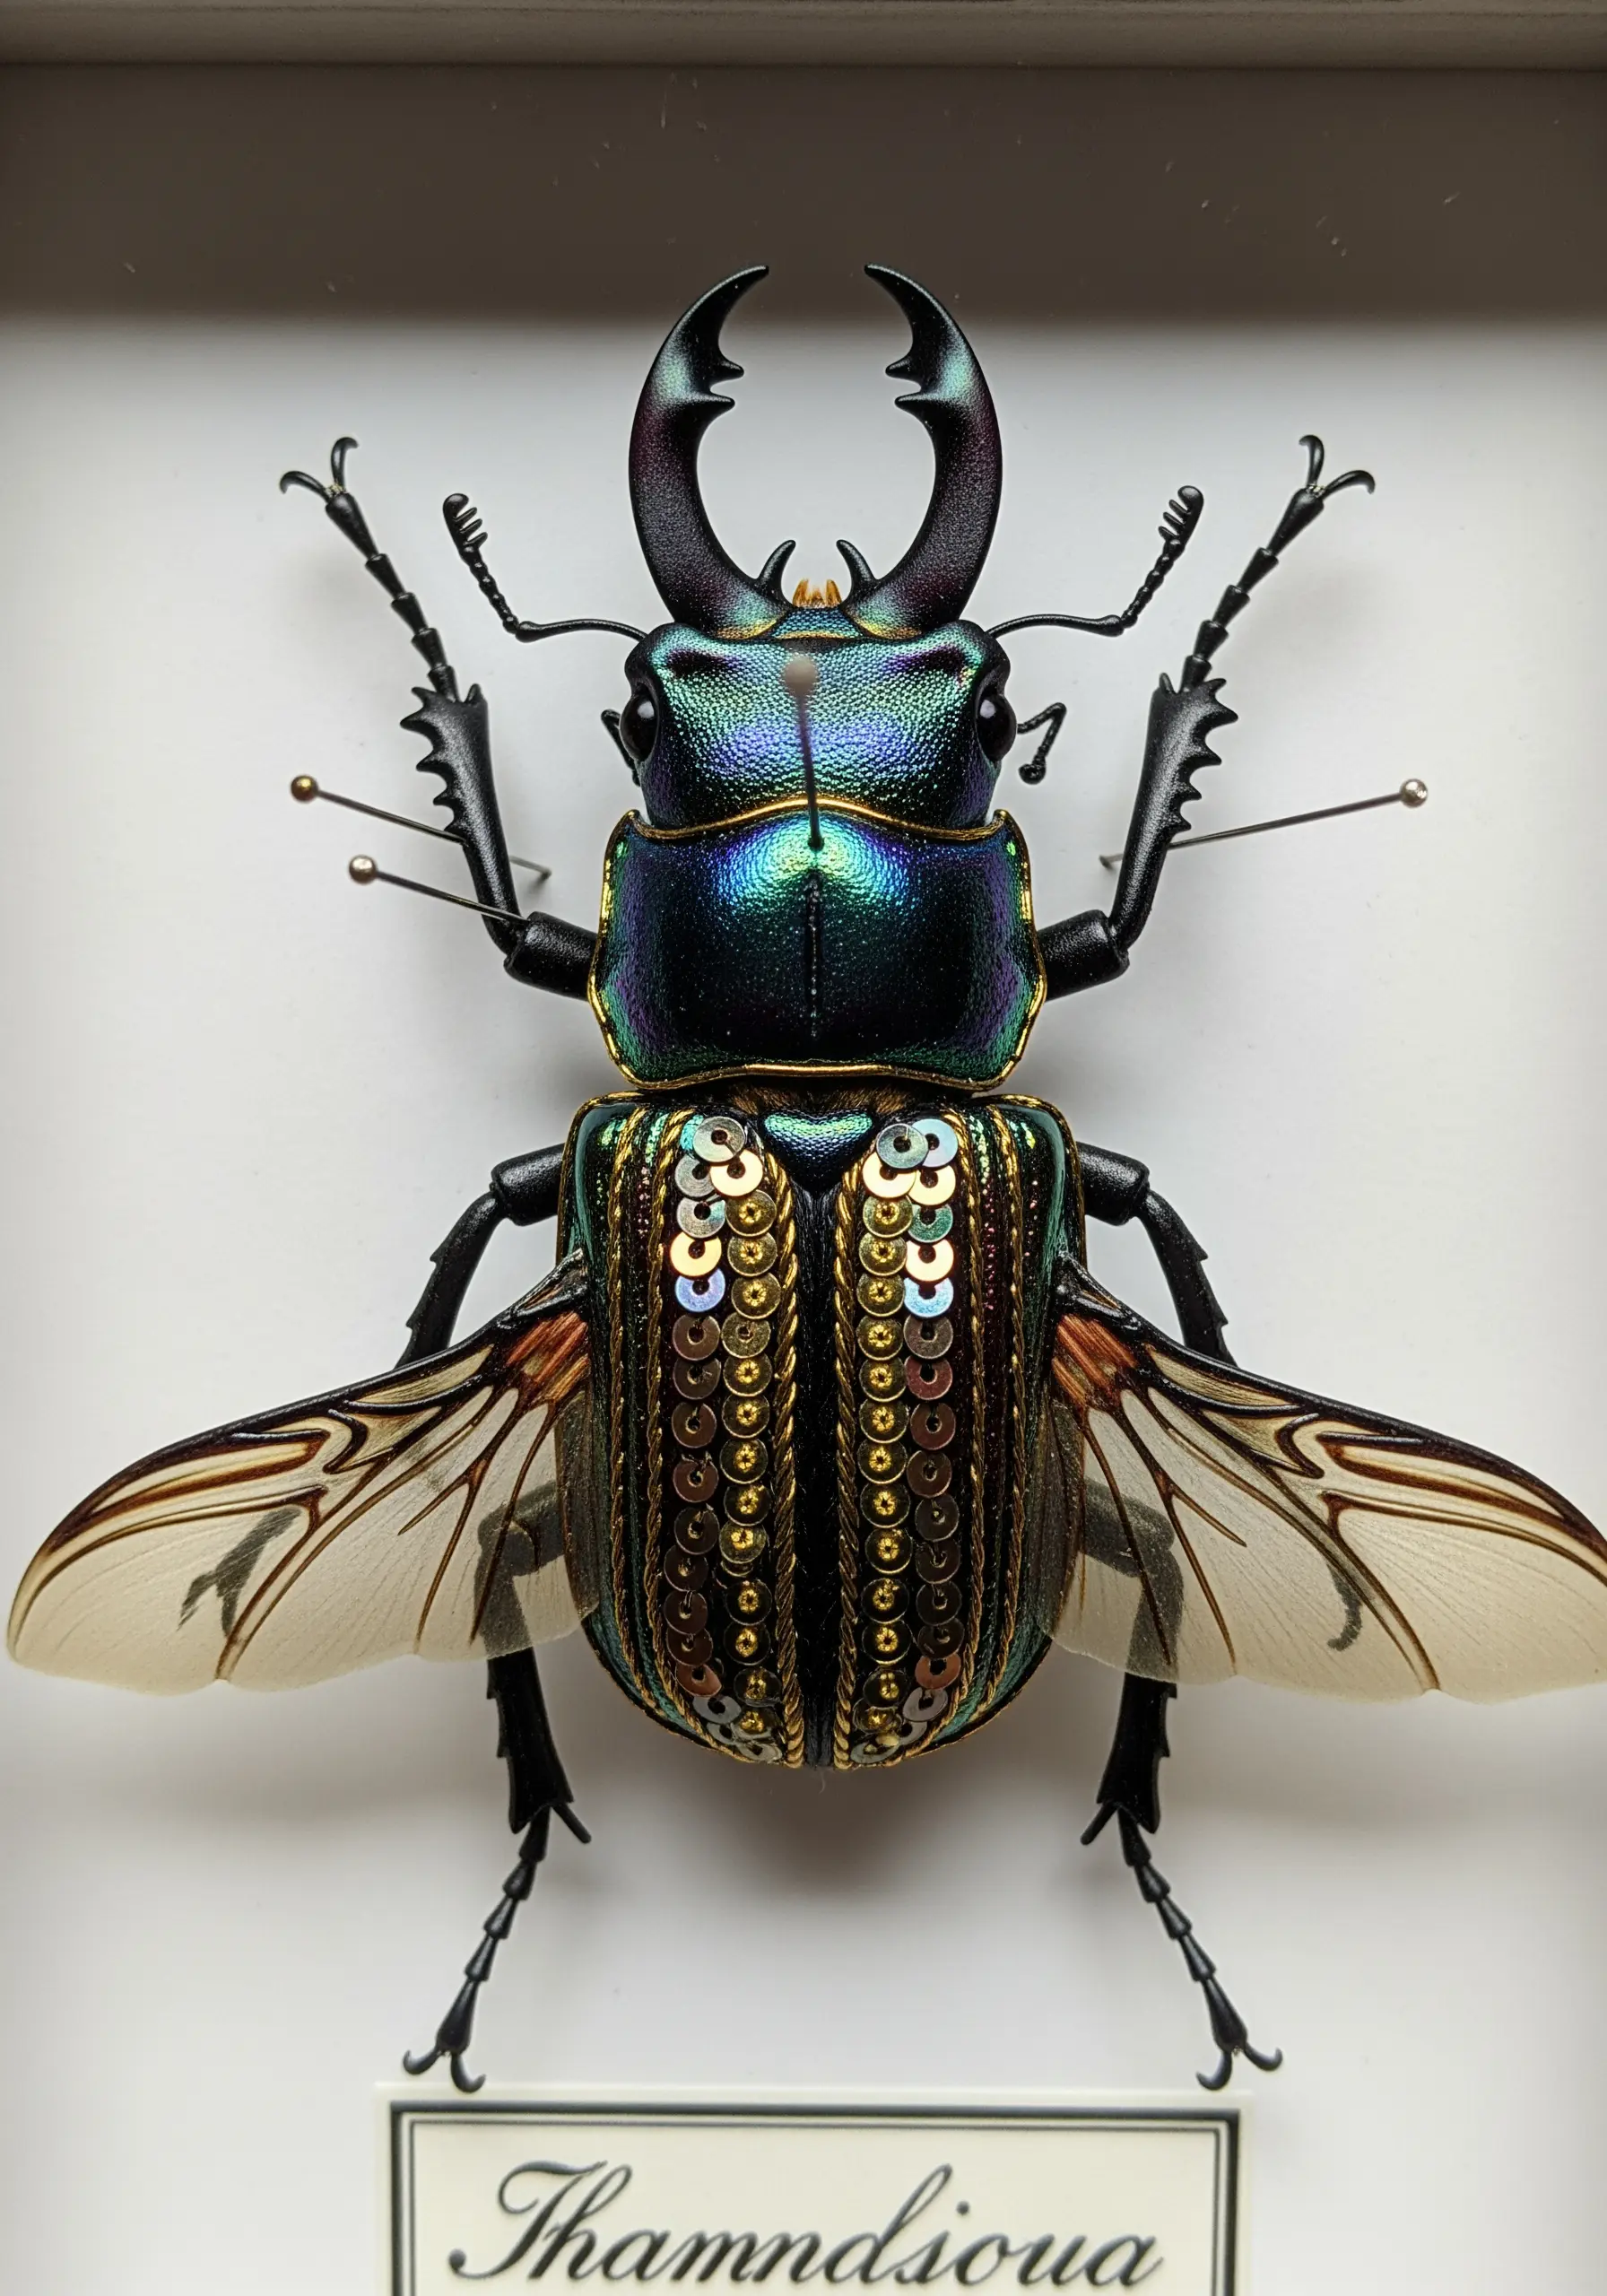
Recreate the iridescent beauty of insects using advanced embellishment techniques.
To mimic a beetle’s shimmering carapace, stitch rows of overlapping sequins down, using a single seed bead to anchor each one.
Use goldwork techniques like couching and purl wire to construct the delicate legs and antennae, giving them a metallic, structural quality.
While this example is on a preserved specimen, you can apply these same techniques to a felt or fabric base to create your own cruelty-free, sparkling insect art.
24. Exploring Texture in a Monochrome Palette
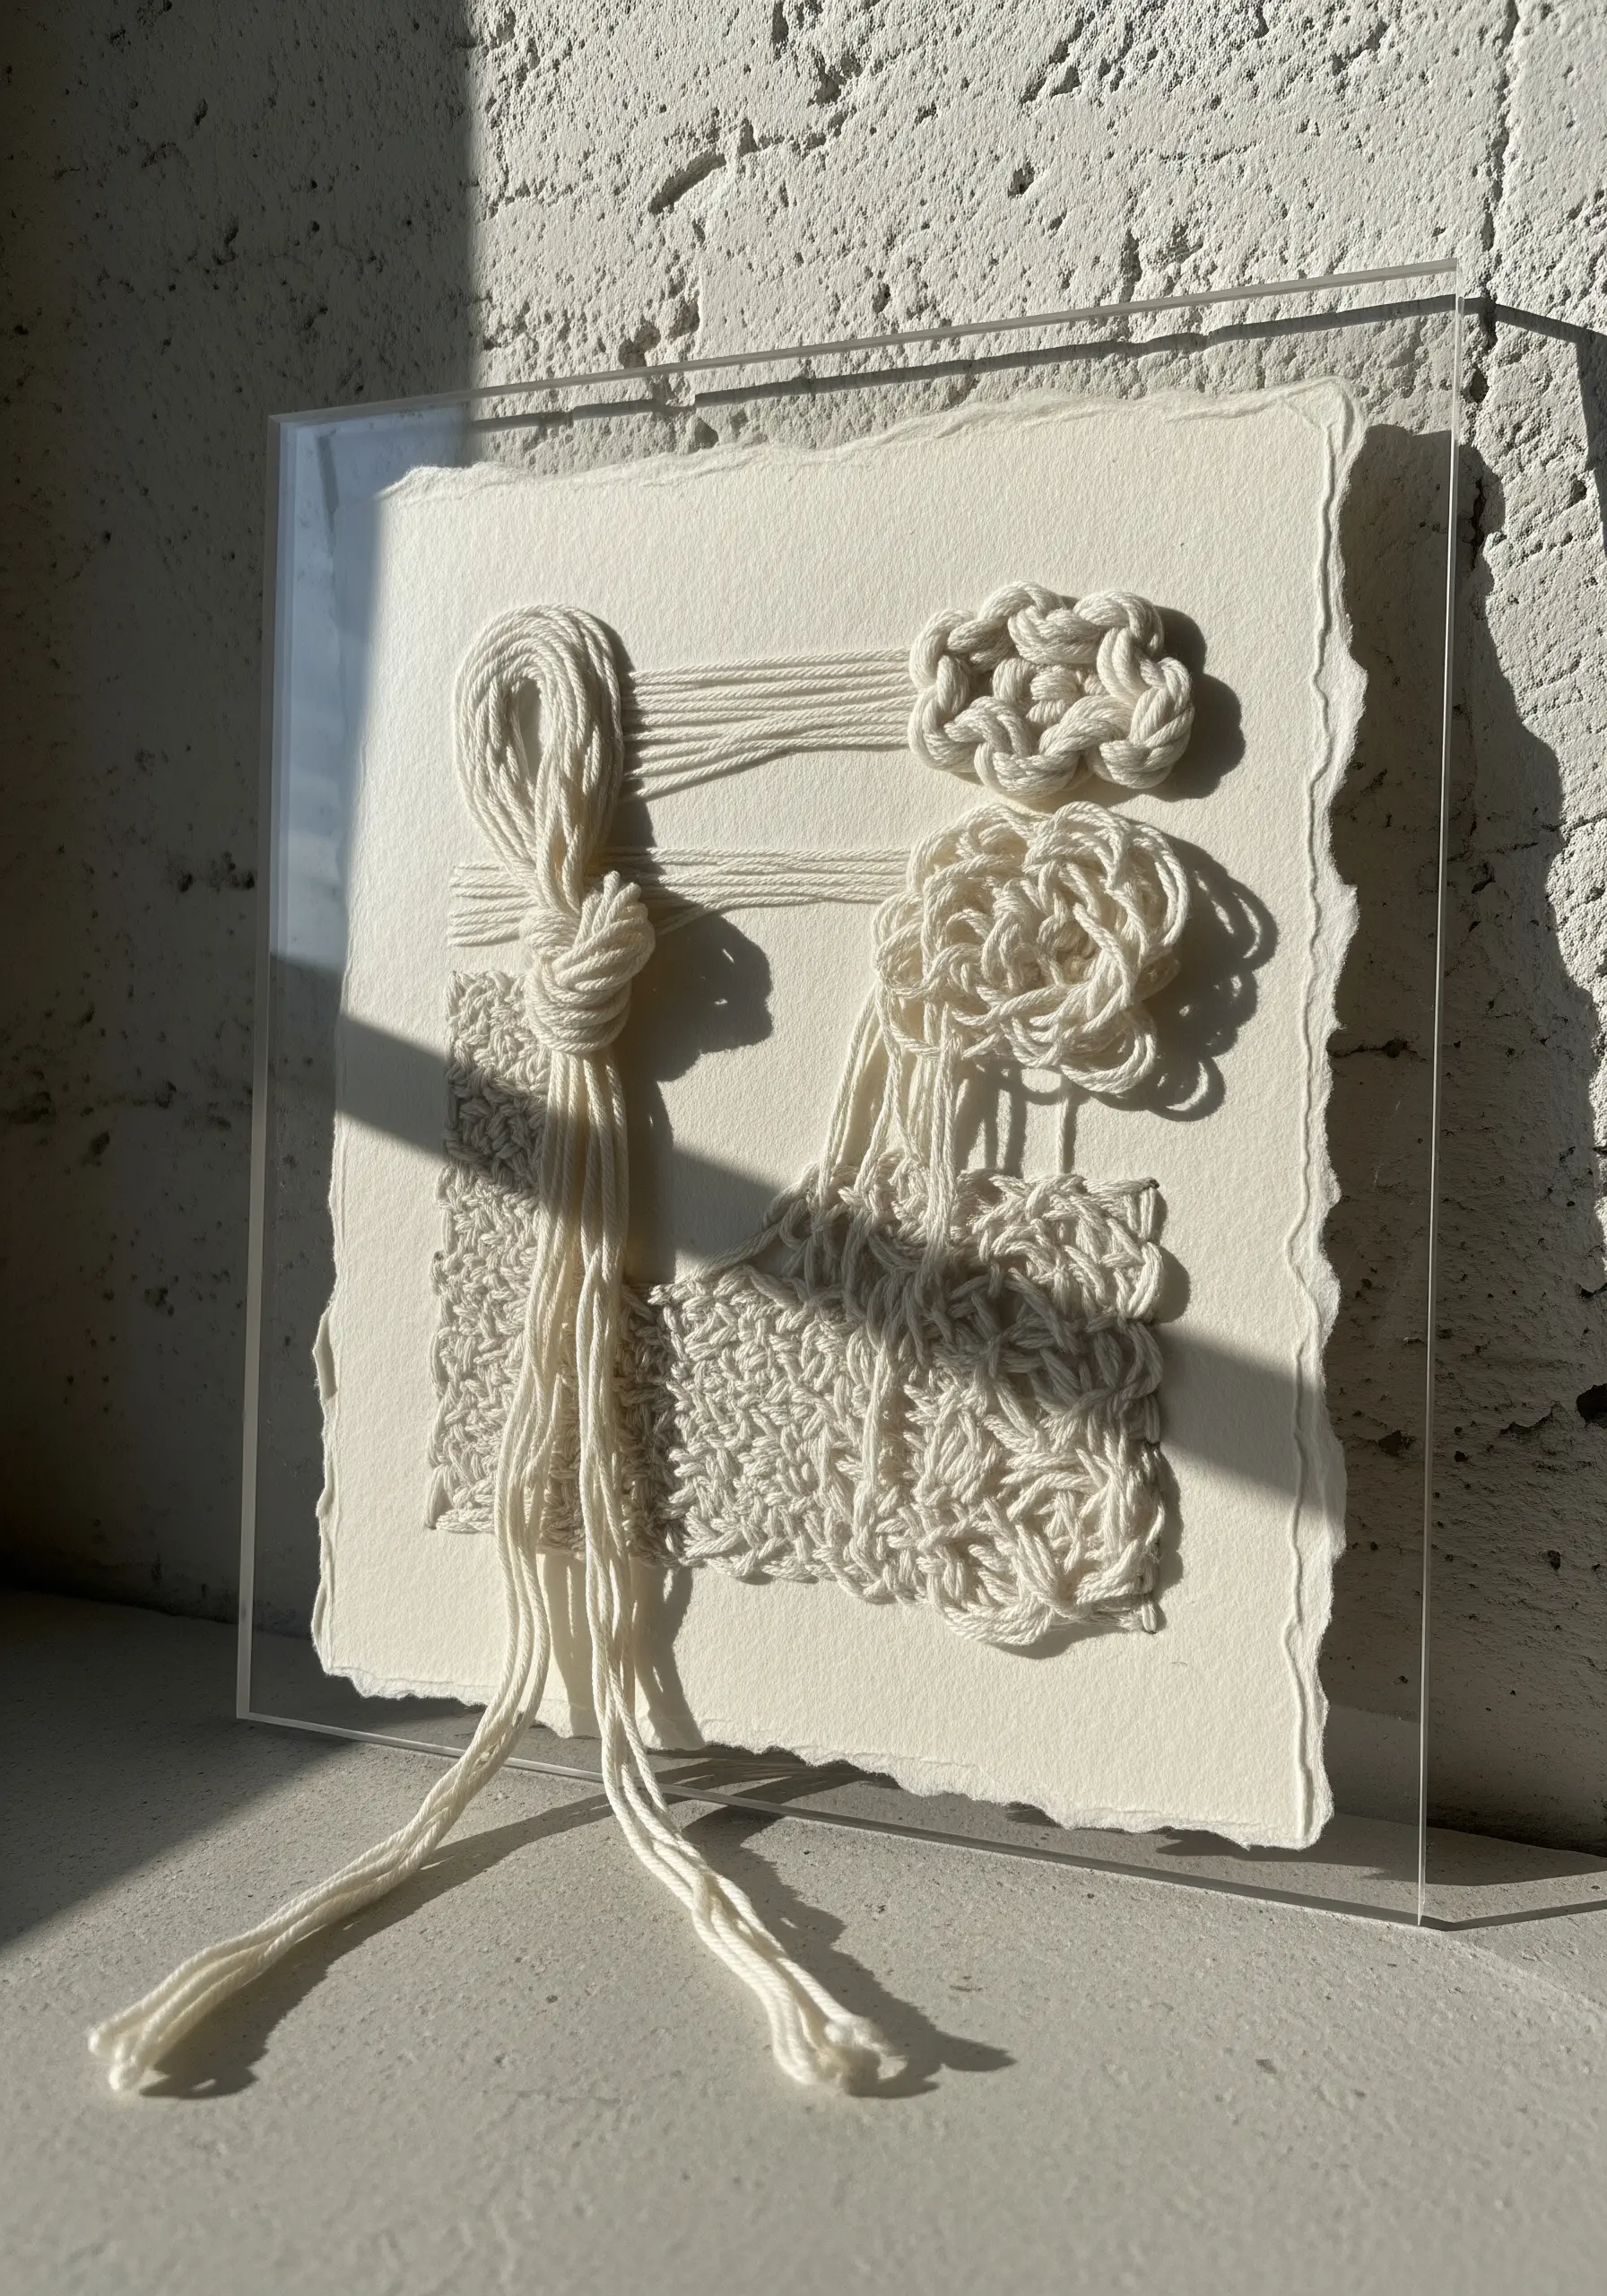
Create a visually compelling piece by focusing entirely on texture, using a single color.
Combine different fiber techniques on one surface—such as weaving, macrame knots, and couching—to build a tactile landscape.
Mount your work on a piece of handmade paper with a deckled edge to add another layer of organic texture.
Working in monochrome forces the viewer to appreciate the subtle interplay of light and shadow across the different surfaces, resulting in a sophisticated and serene artwork.
25. Capturing Autumnal Gradients with Thread Blending
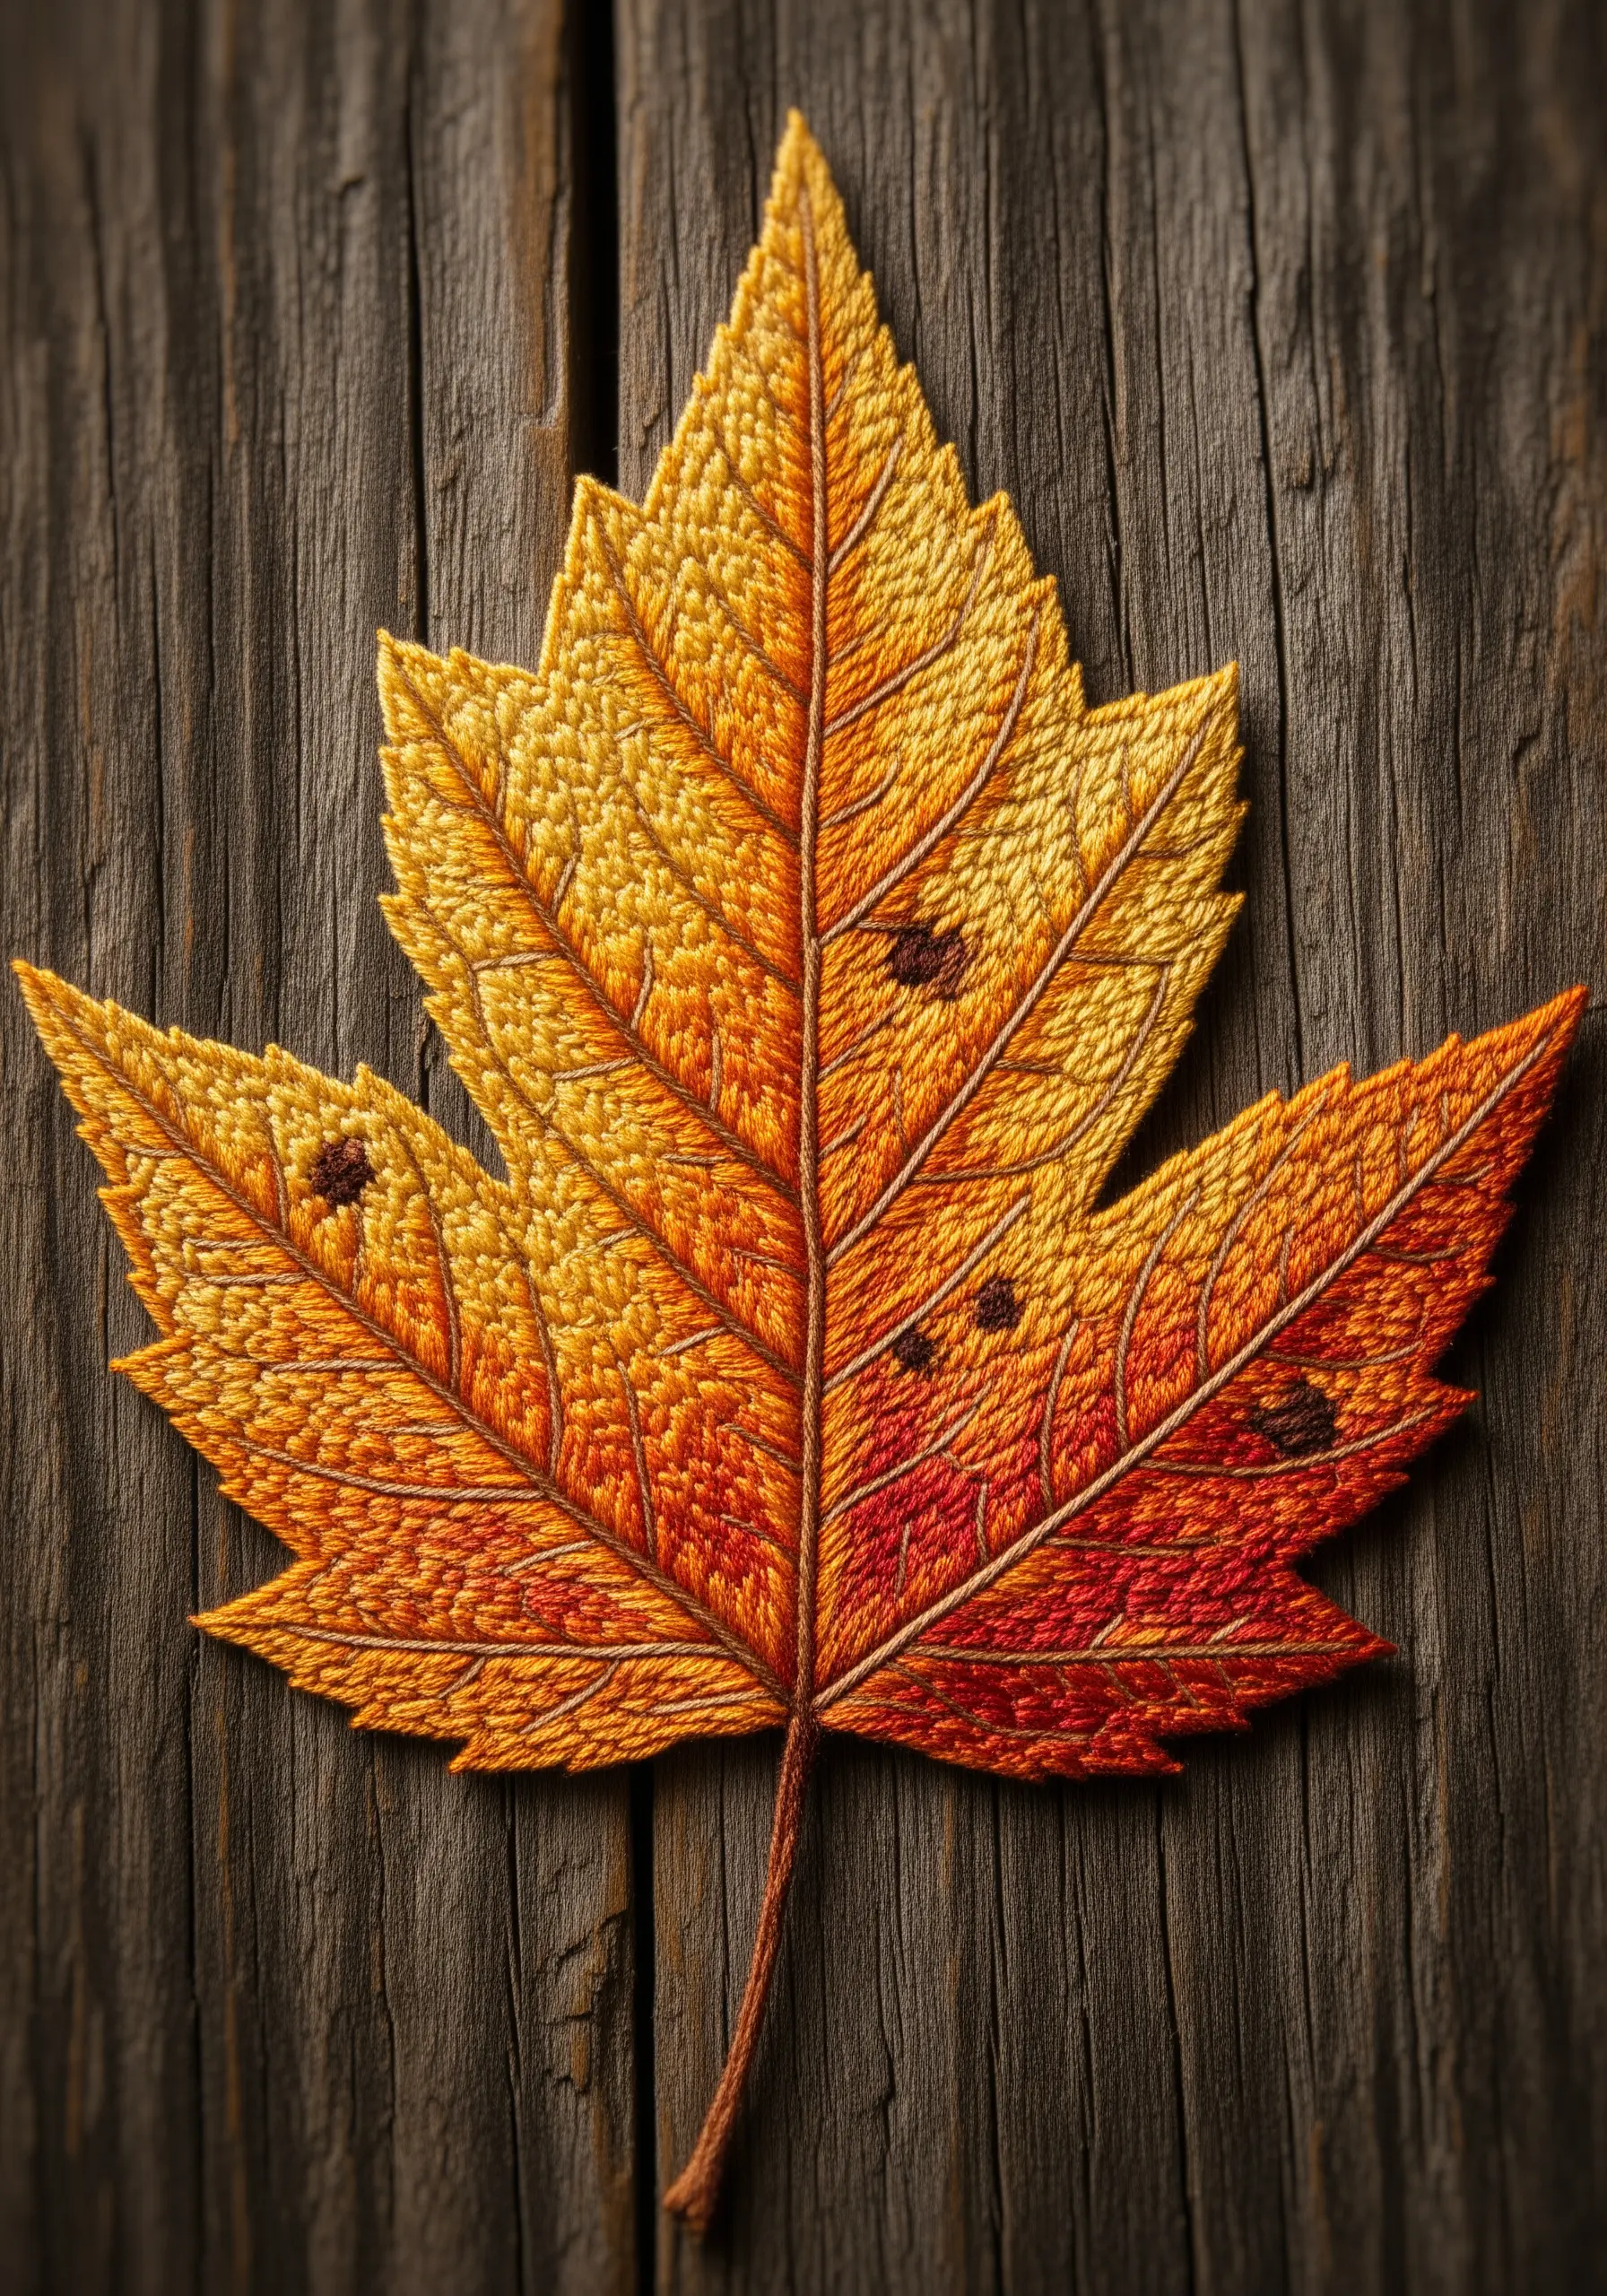
Recreate the subtle color shifts of a changing leaf using meticulous thread blending.
Achieve a smooth, painterly gradient with the long-and-short stitch, working with multiple needles threaded with adjacent colors (e.g., dark orange, light orange, and yellow).
This allows you to make scattered stitches of each color, blending them together organically rather than in hard blocks.
Add the leaf’s veins last, using a single strand of dark brown in a stem stitch over the top of your fill, to give your work realistic structure and depth. It’s one of the most rewarding nature texture embroidery projects you can try.
26. Bold Graphics with Chunky Cord Couching
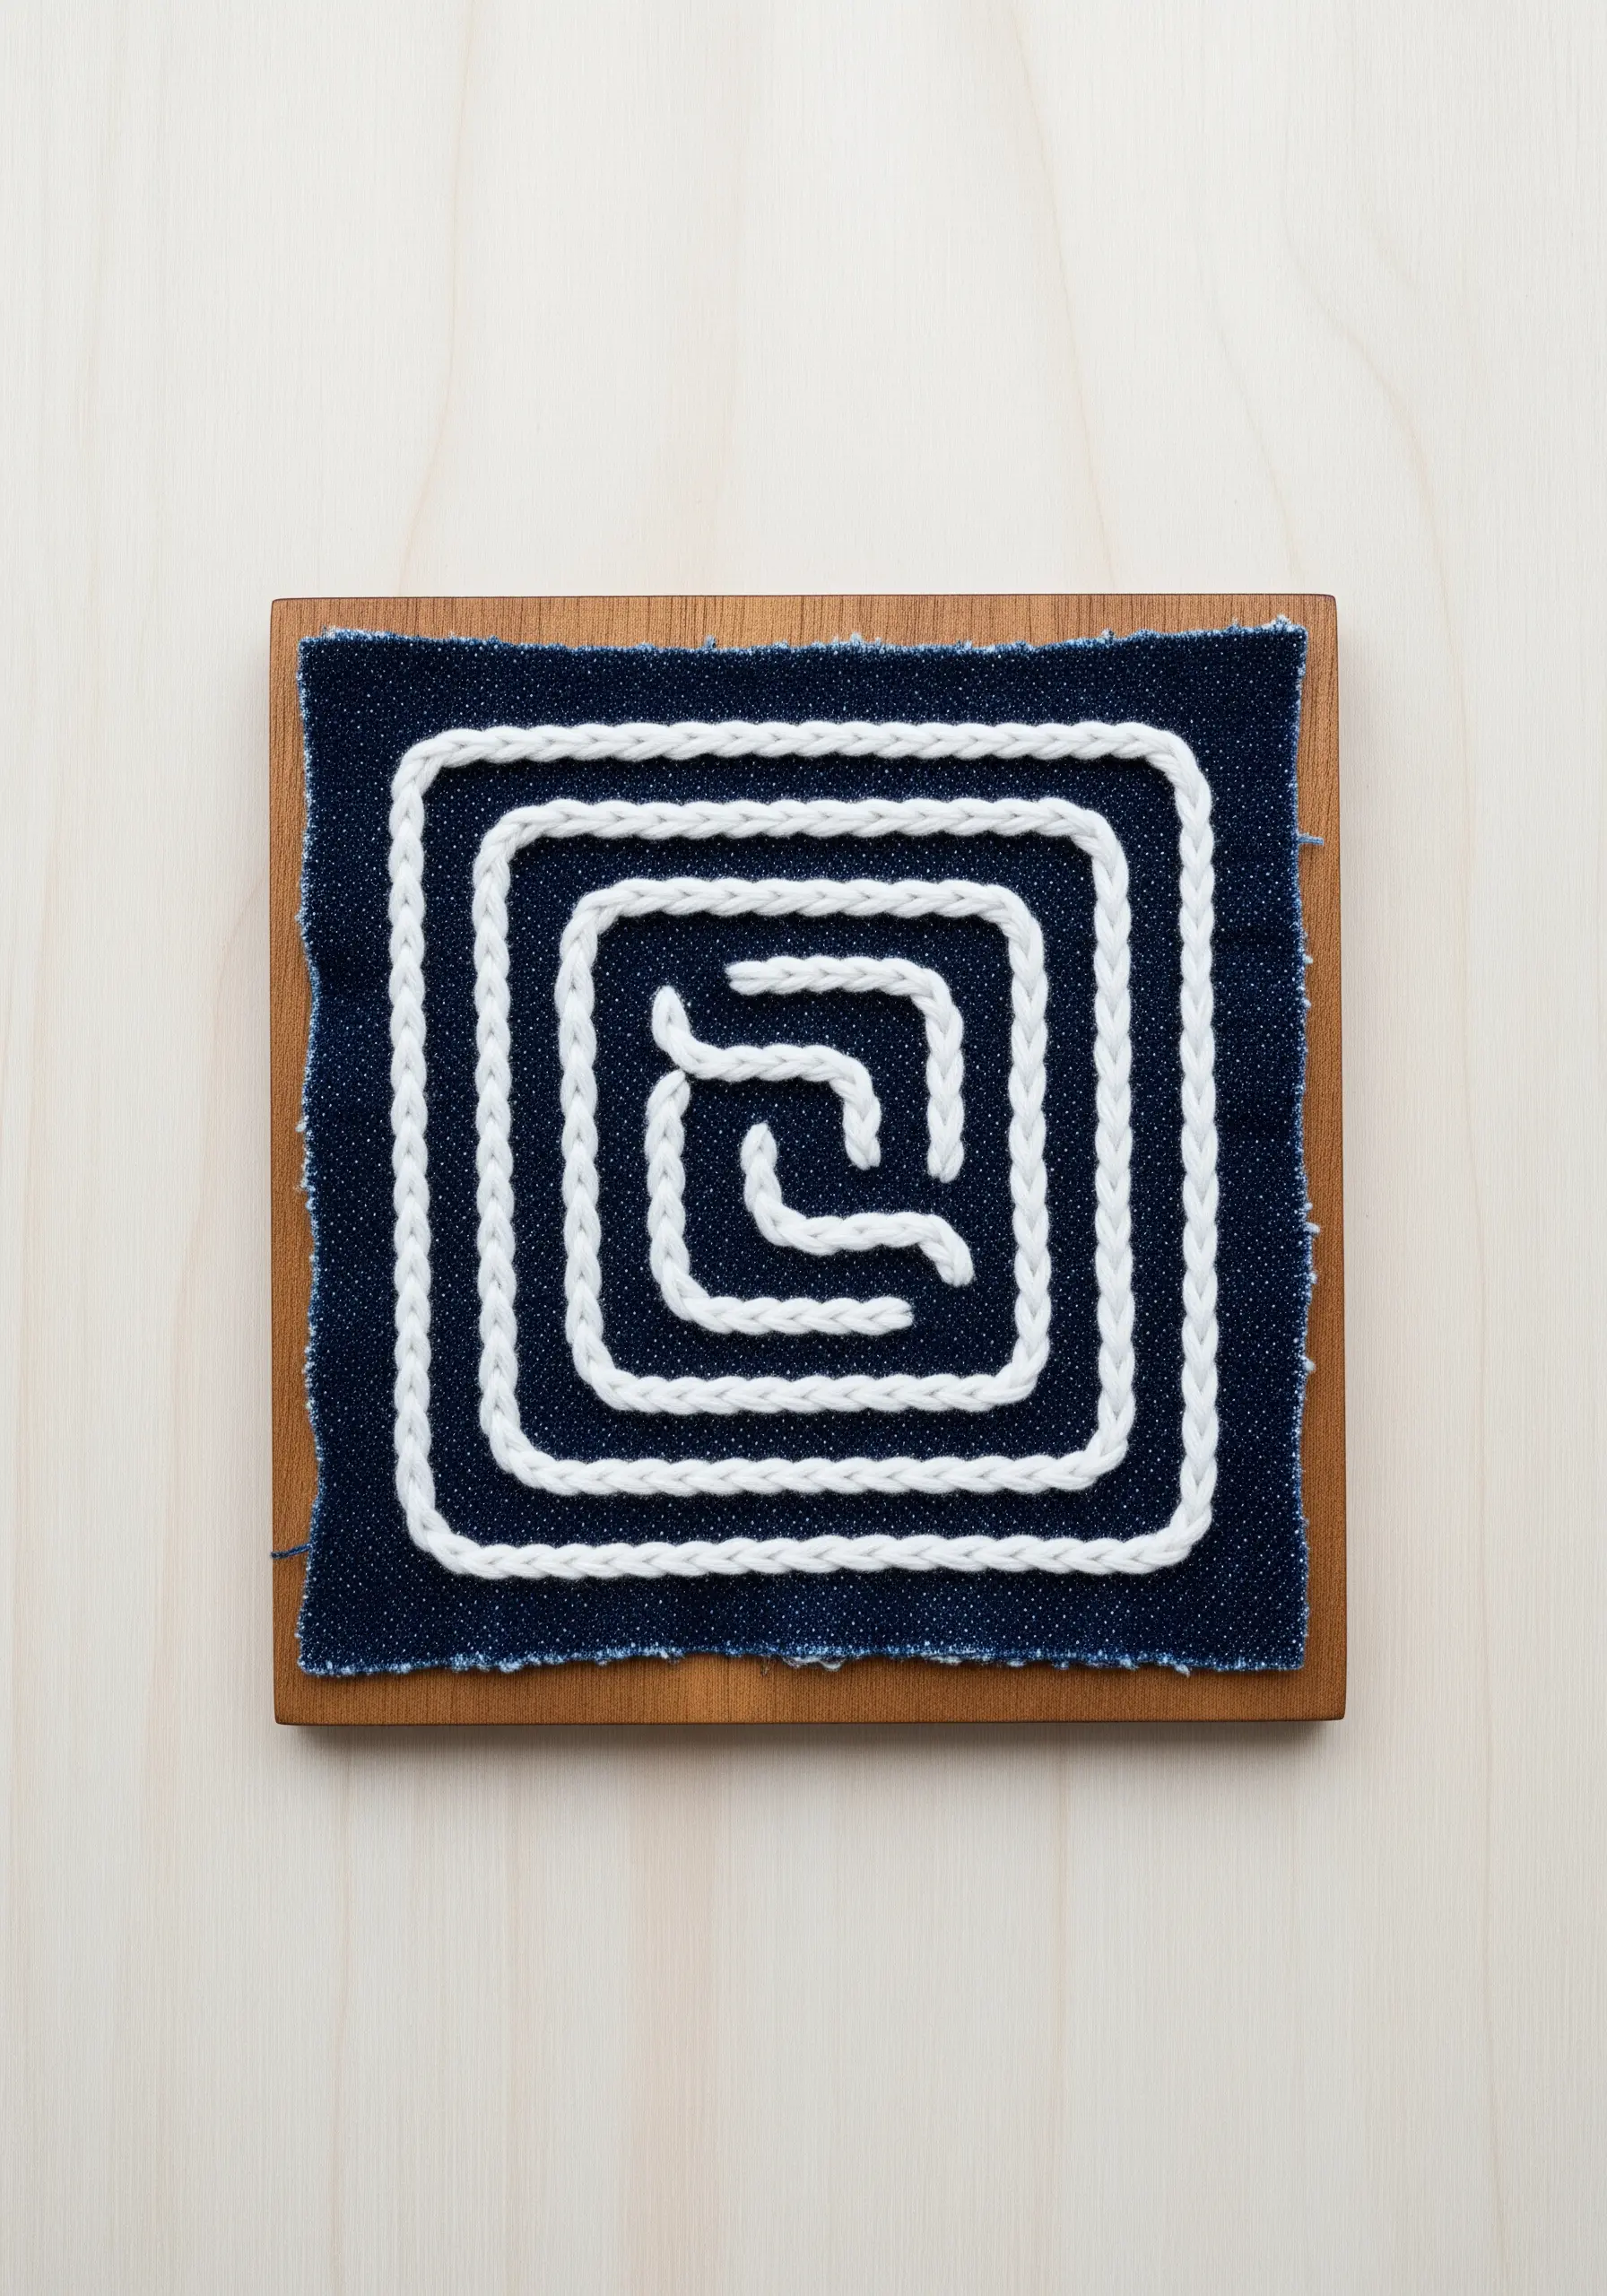
Create powerful, minimalist designs by using a thick cord as your primary drawing tool.
The technique of couching allows you to attach a heavy cord or yarn to a fabric surface by tacking it down with a thinner, discreet thread.
This method is much faster than satin-stitching a thick line and creates a clean, raised, and highly textural effect.
Use a high-contrast combination, like white cord on dark denim, to emphasize the graphic quality of the line.
27. Layering a Scene in a Miniature Frame
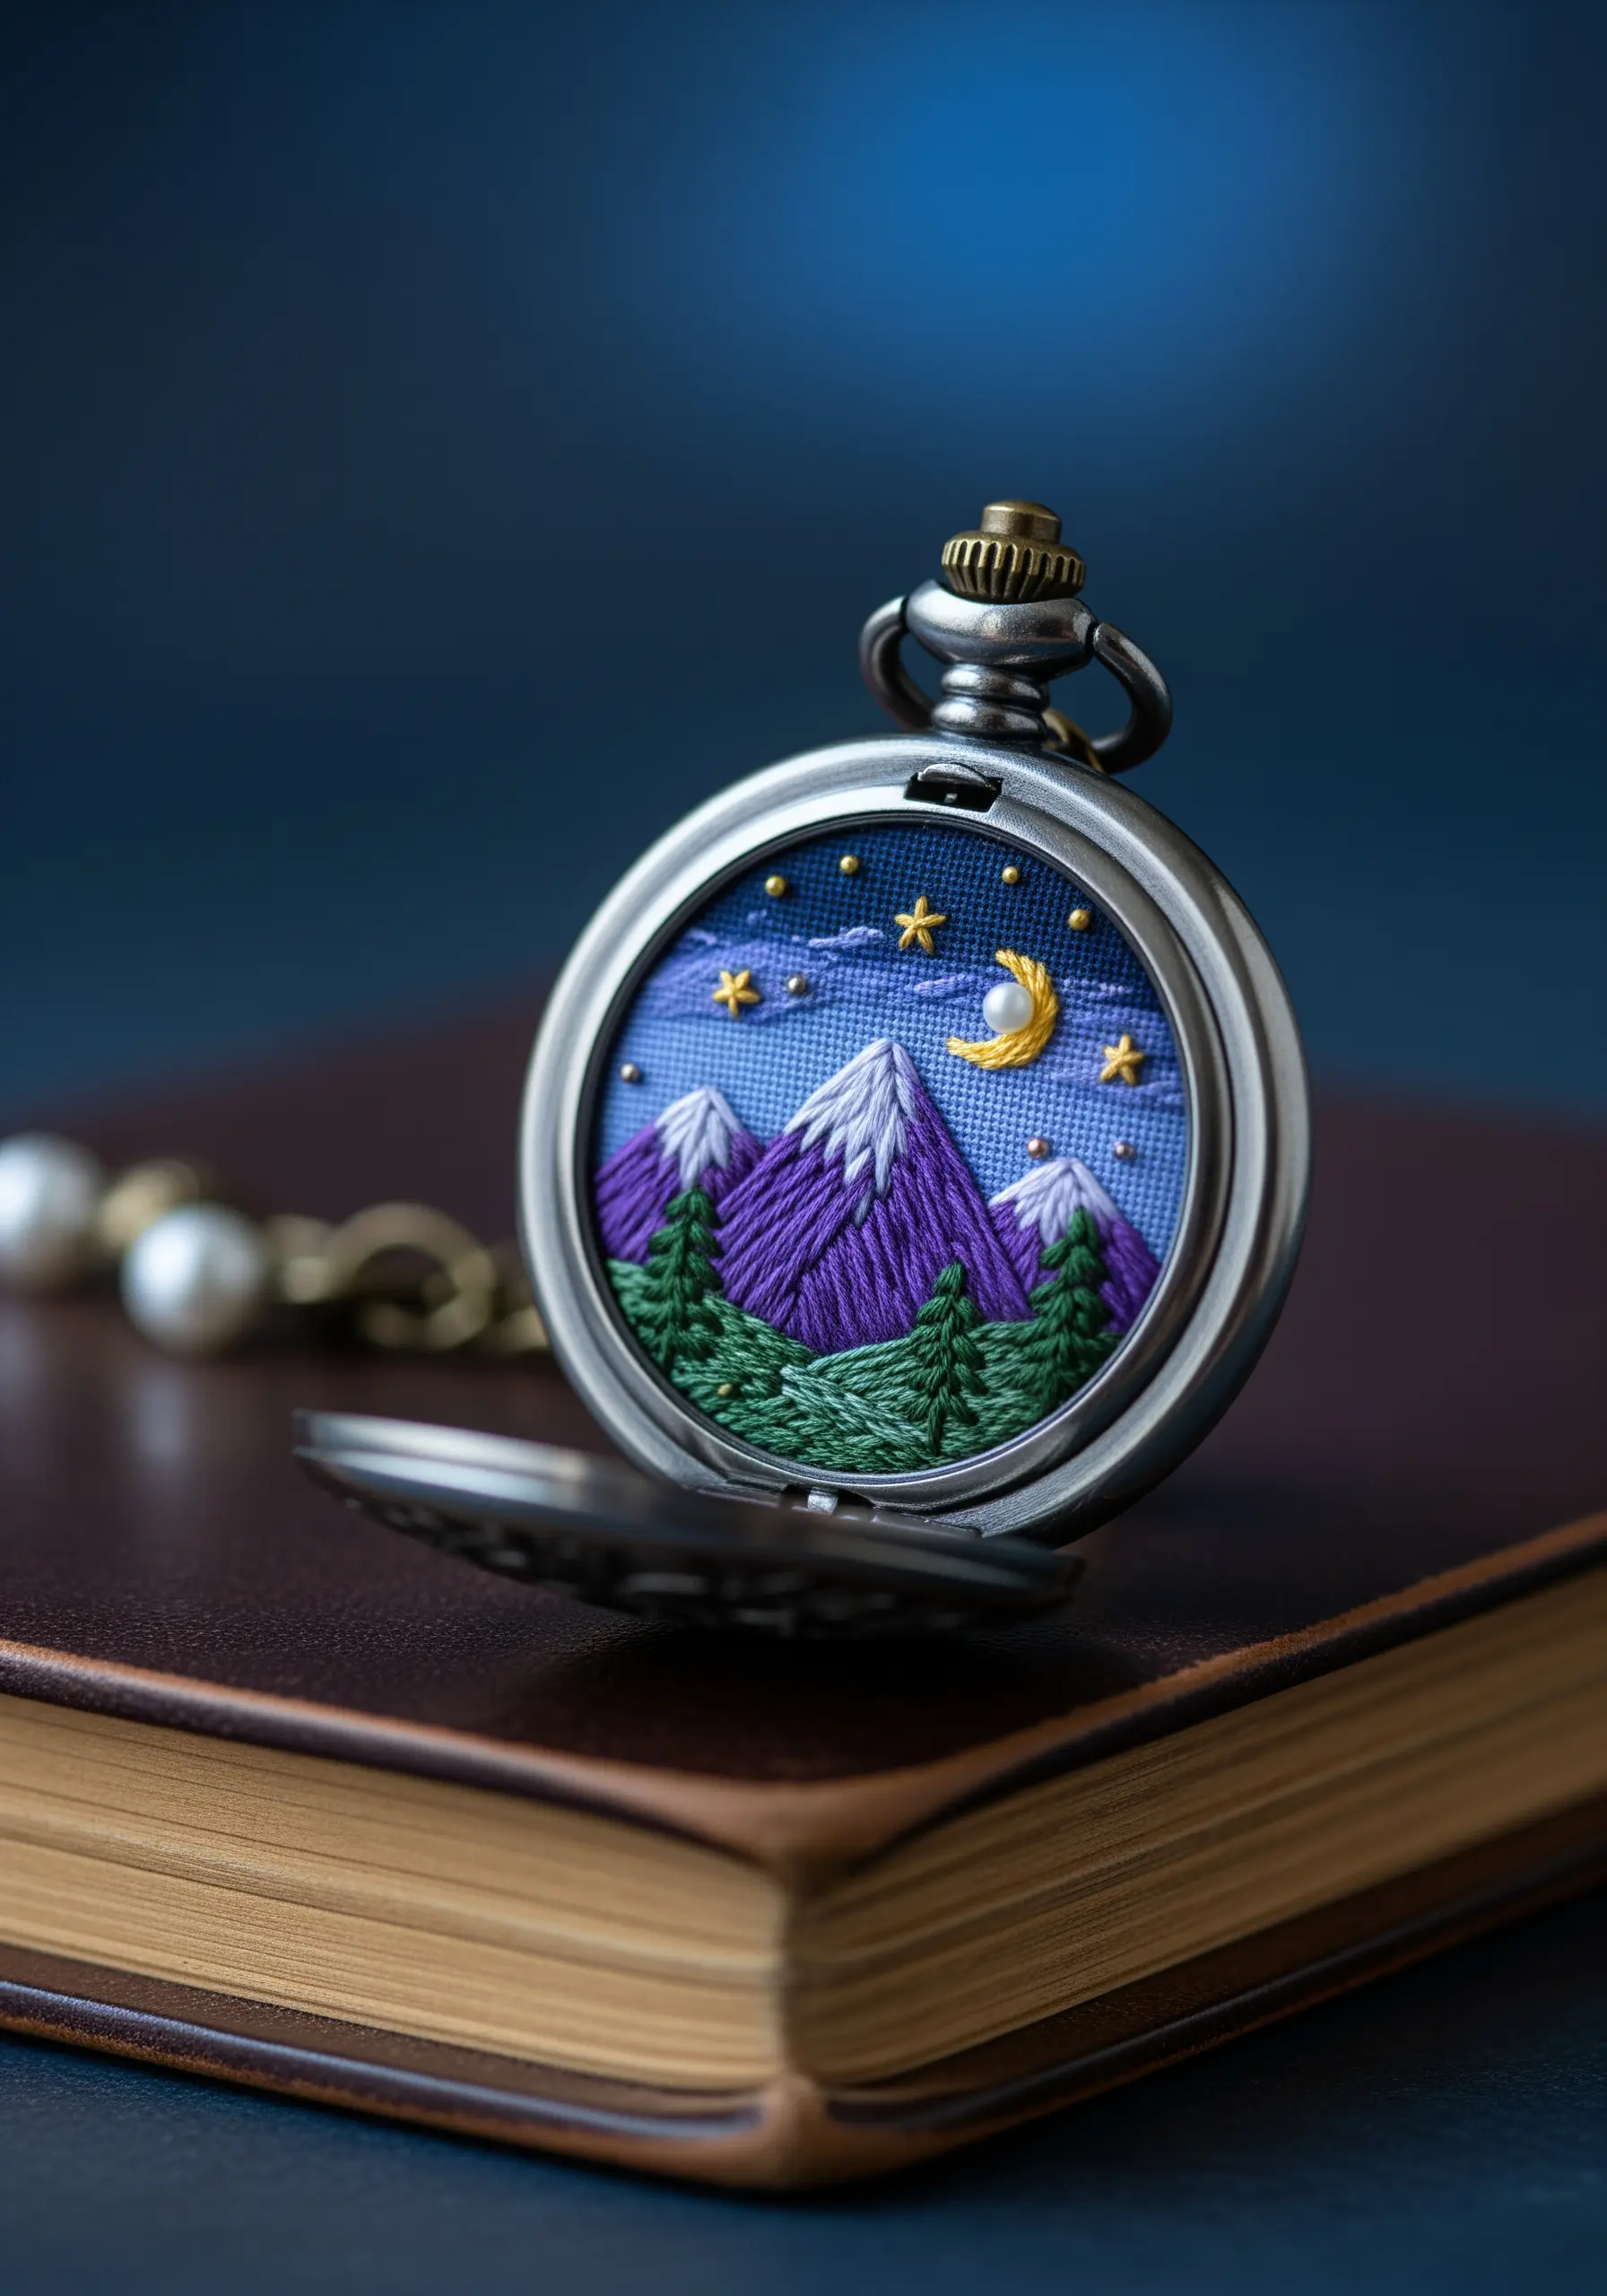
Build a world in miniature by thinking in layers: foreground, mid-ground, and background.
Stitch the farthest elements first, like the sky and stars, directly onto your base fabric.
Next, create the mid-ground mountains using satin stitch, allowing the edges to slightly overlap the sky for a natural look.
Finally, add the foreground trees with French knots or bullion knots, which gives them a three-dimensional texture that makes them pop.
This layering technique creates a convincing sense of depth, even in the smallest of spaces.


