

Sometimes, the key to unlocking your most stunning embroidery isn’t adding more, but taking something away. By limiting yourself to just three colors, you invite a different kind of creativity to the forefront—one based on texture, composition, and the quiet power of each individual stitch.
This focused approach encourages you to see thread and fabric in a new light. Instead of relying on a dozen colors to create interest, you’ll learn to build depth with the direction of a satin stitch, create drama with negative space, and convey emotion through the weight of a single line. It’s a practice in making every element count.
The result is embroidery that feels both modern and timeless, striking yet soft. These designs are more than just patterns; they are exercises in intention, helping you create sophisticated wall décor that feels calm, curated, and uniquely yours.
1. Create Topographic Texture with Directional Fill Stitch
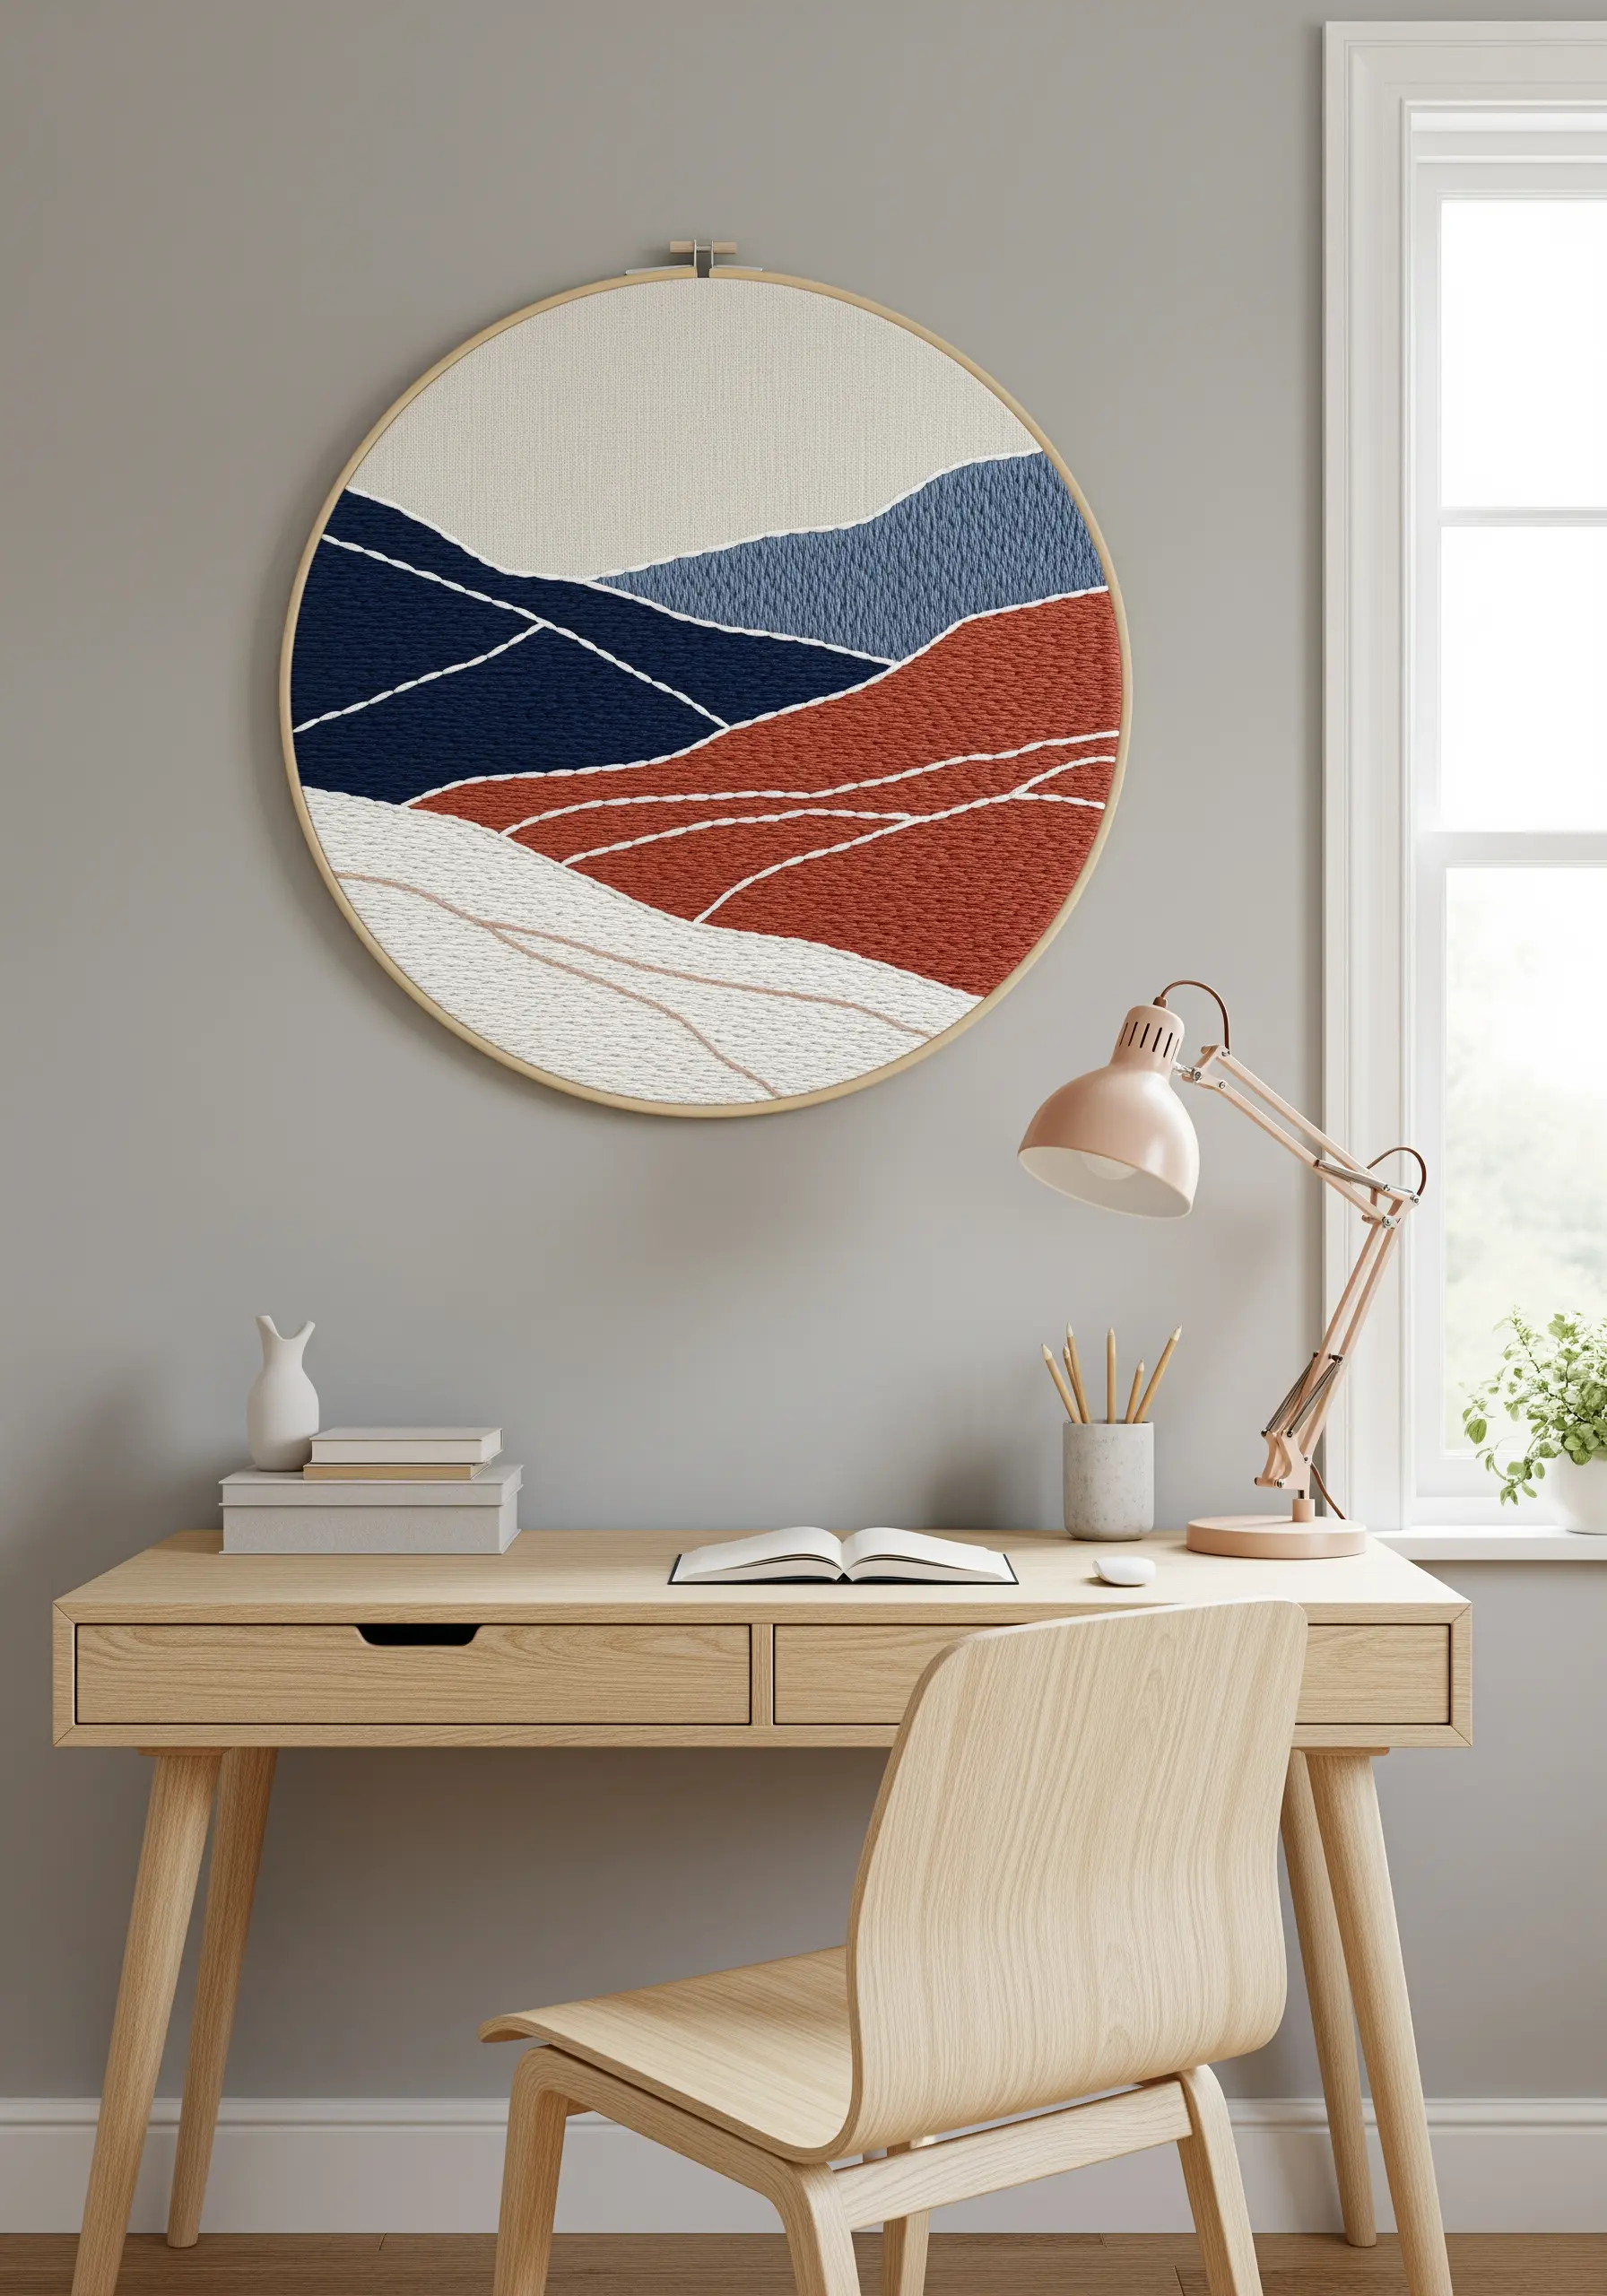
Build a landscape with blocks of dense, directional fill stitch, using one color at a time to create clean, graphic layers.
Use a full six strands of floss to achieve that opaque, fabric-like texture with no background showing through.
Vary the angle of your stitches for each colored section—for example, 45 degrees for one hill, 90 for another—to subtly enhance the sense of depth and dimension.
A single-strand backstitch in a contrasting color, like the white outlines here, defines the edges and unifies the entire composition.
This technique is perfect for oversized hoop wall displays, where the textural details can be appreciated from a distance.
2. Use Seed Stitch Gradients for Luminous Effect
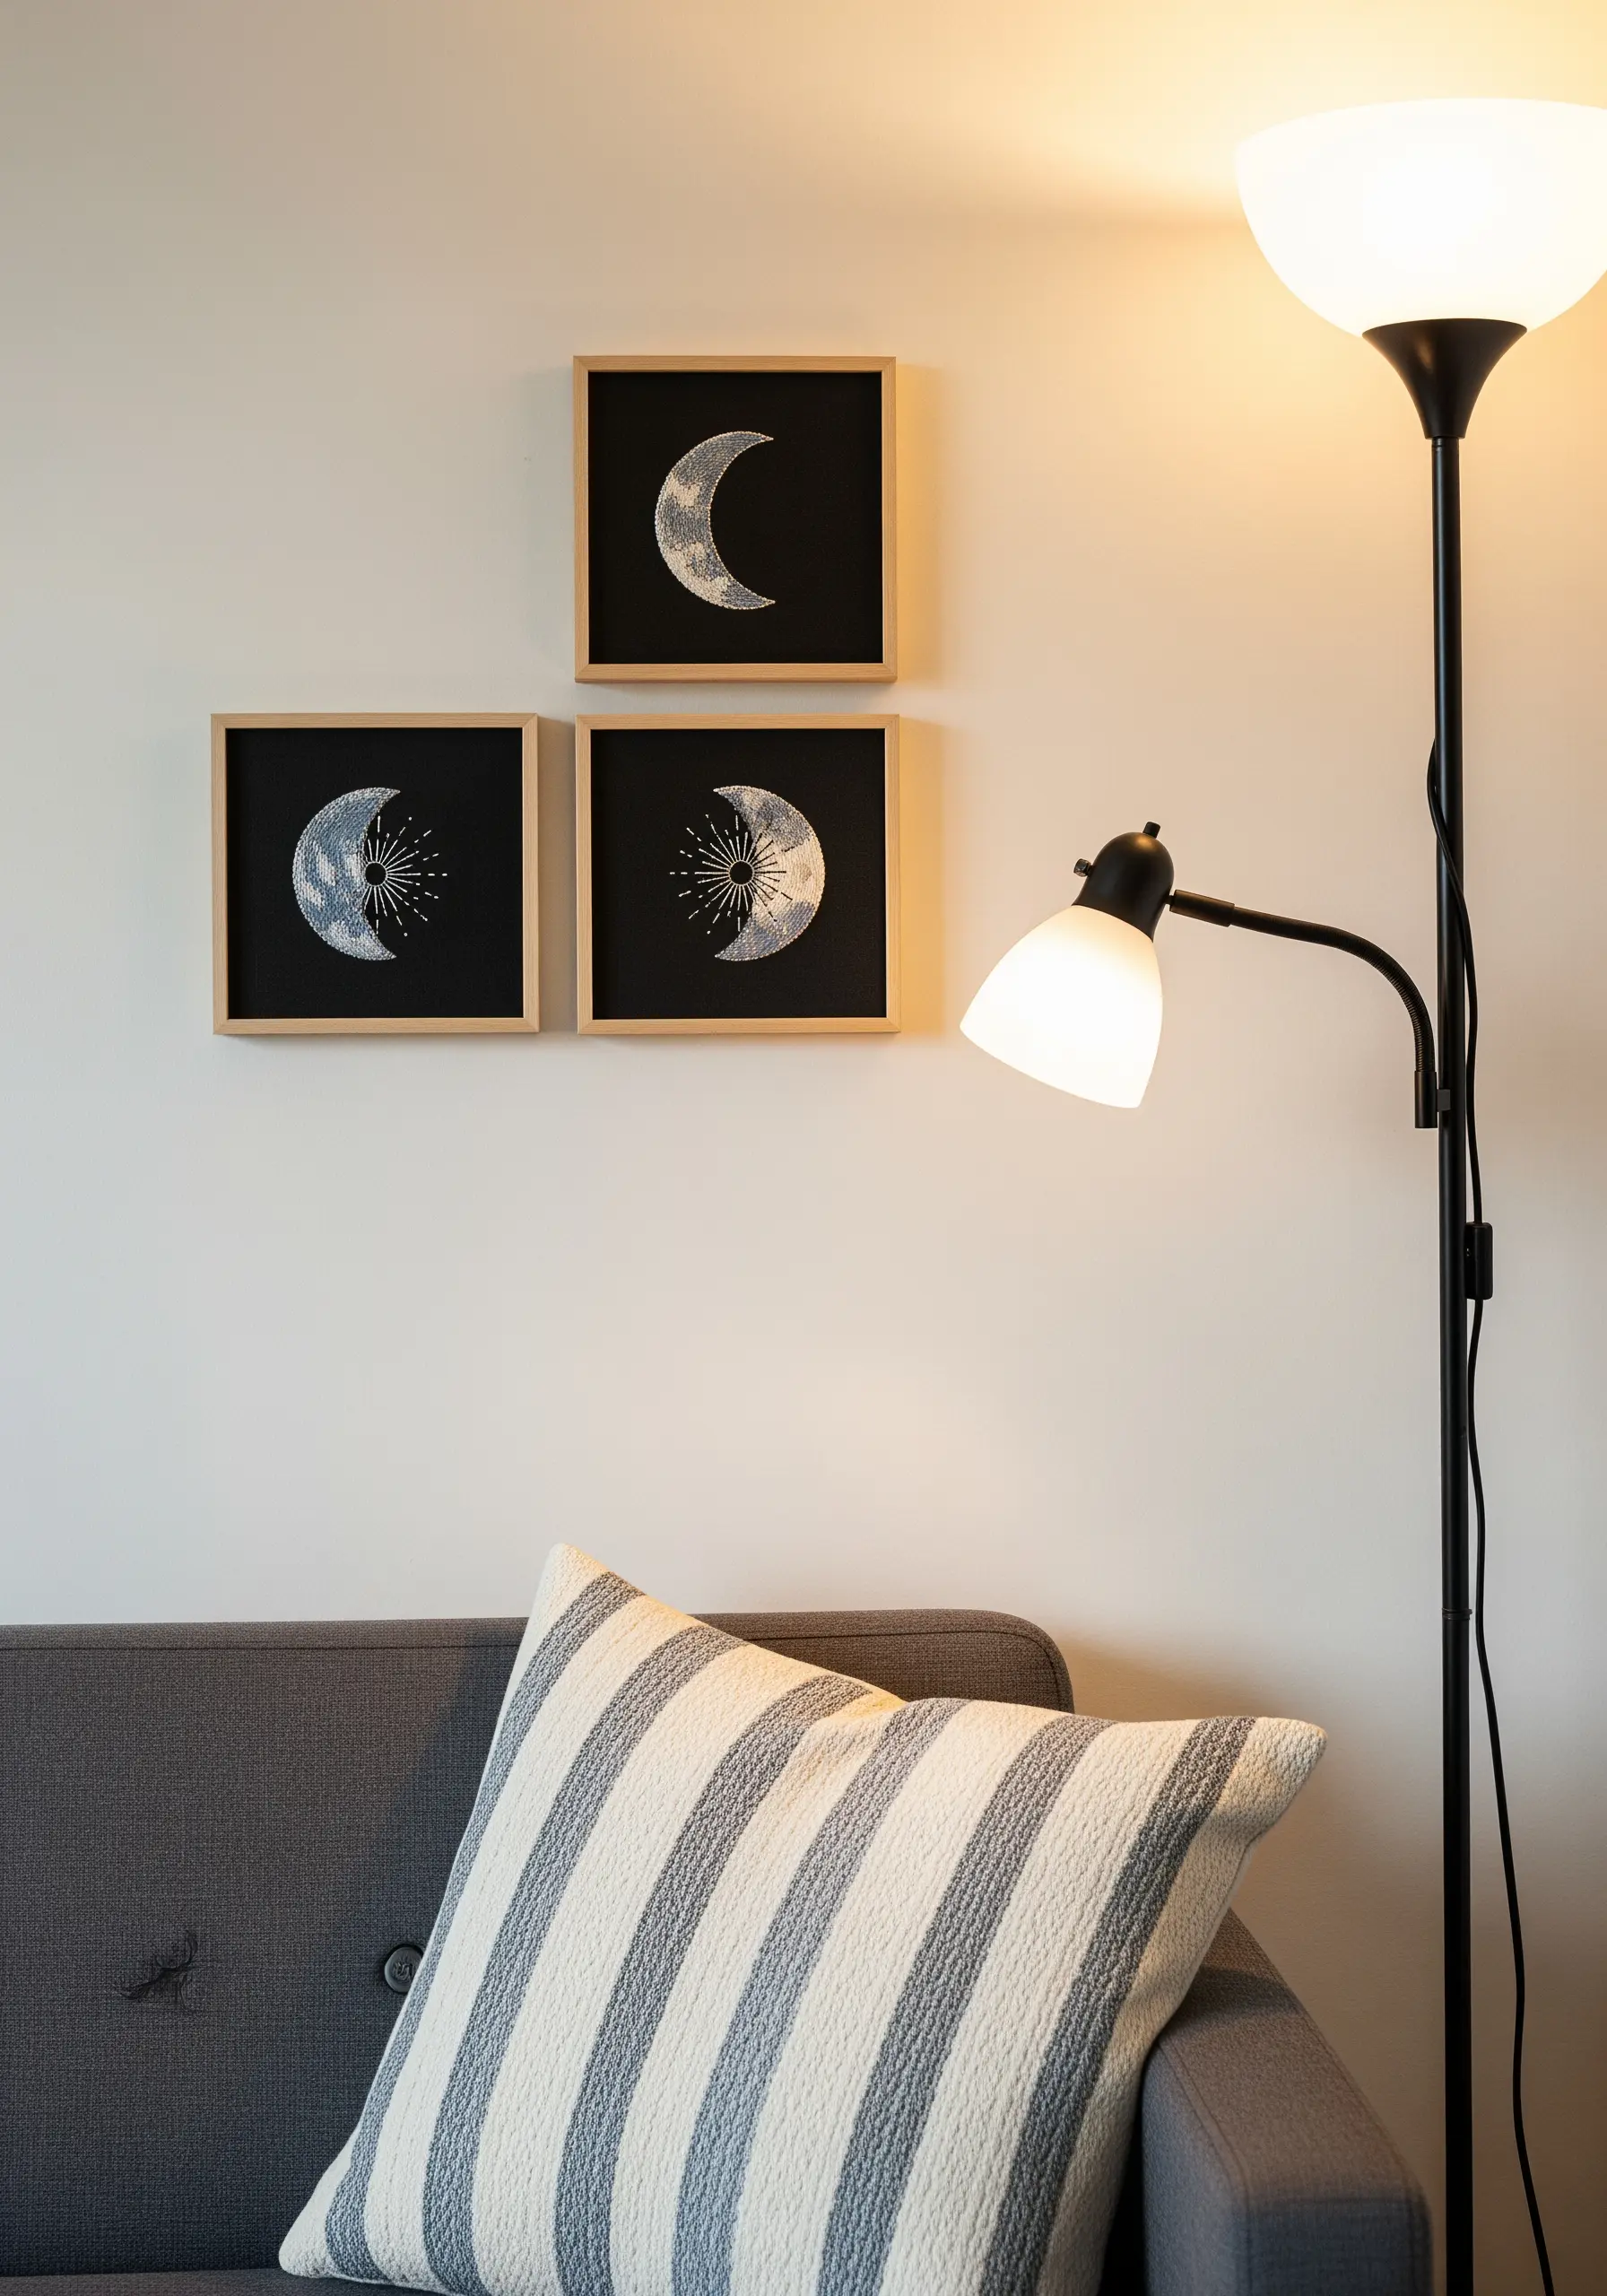
To create a celestial glow on dark fabric, use a scattered seed stitch, placing tiny straight stitches at random angles.
Concentrate your stitches more densely where you want the brightest highlights and feather them out to create soft shadows and gradients.
Combine a matte white or silver thread with a metallic one to add a subtle shimmer that catches the light differently, giving the design a dynamic, magical quality.
This high-contrast approach is one of the most effective stitched details that make plain walls pop elegantly.
3. Achieve Bold Shapes with a Couching Technique
For large-scale, solid color blocks, lay down thick yarn or multiple strands of floss and tack it to the fabric with a thinner, matching thread.
This technique, called couching, allows you to create smooth, curved outlines and dense fills much faster than traditional satin stitch, making it ideal for large fiber art installations.
Work from the outline of each shape inward, spiraling your yarn to create a consistent, satisfying texture that looks woven and cohesive.
The three-color limit forces you to focus on the interplay of shapes, making composition the star of the piece.
4. Define Motifs with a Heavyweight Outline
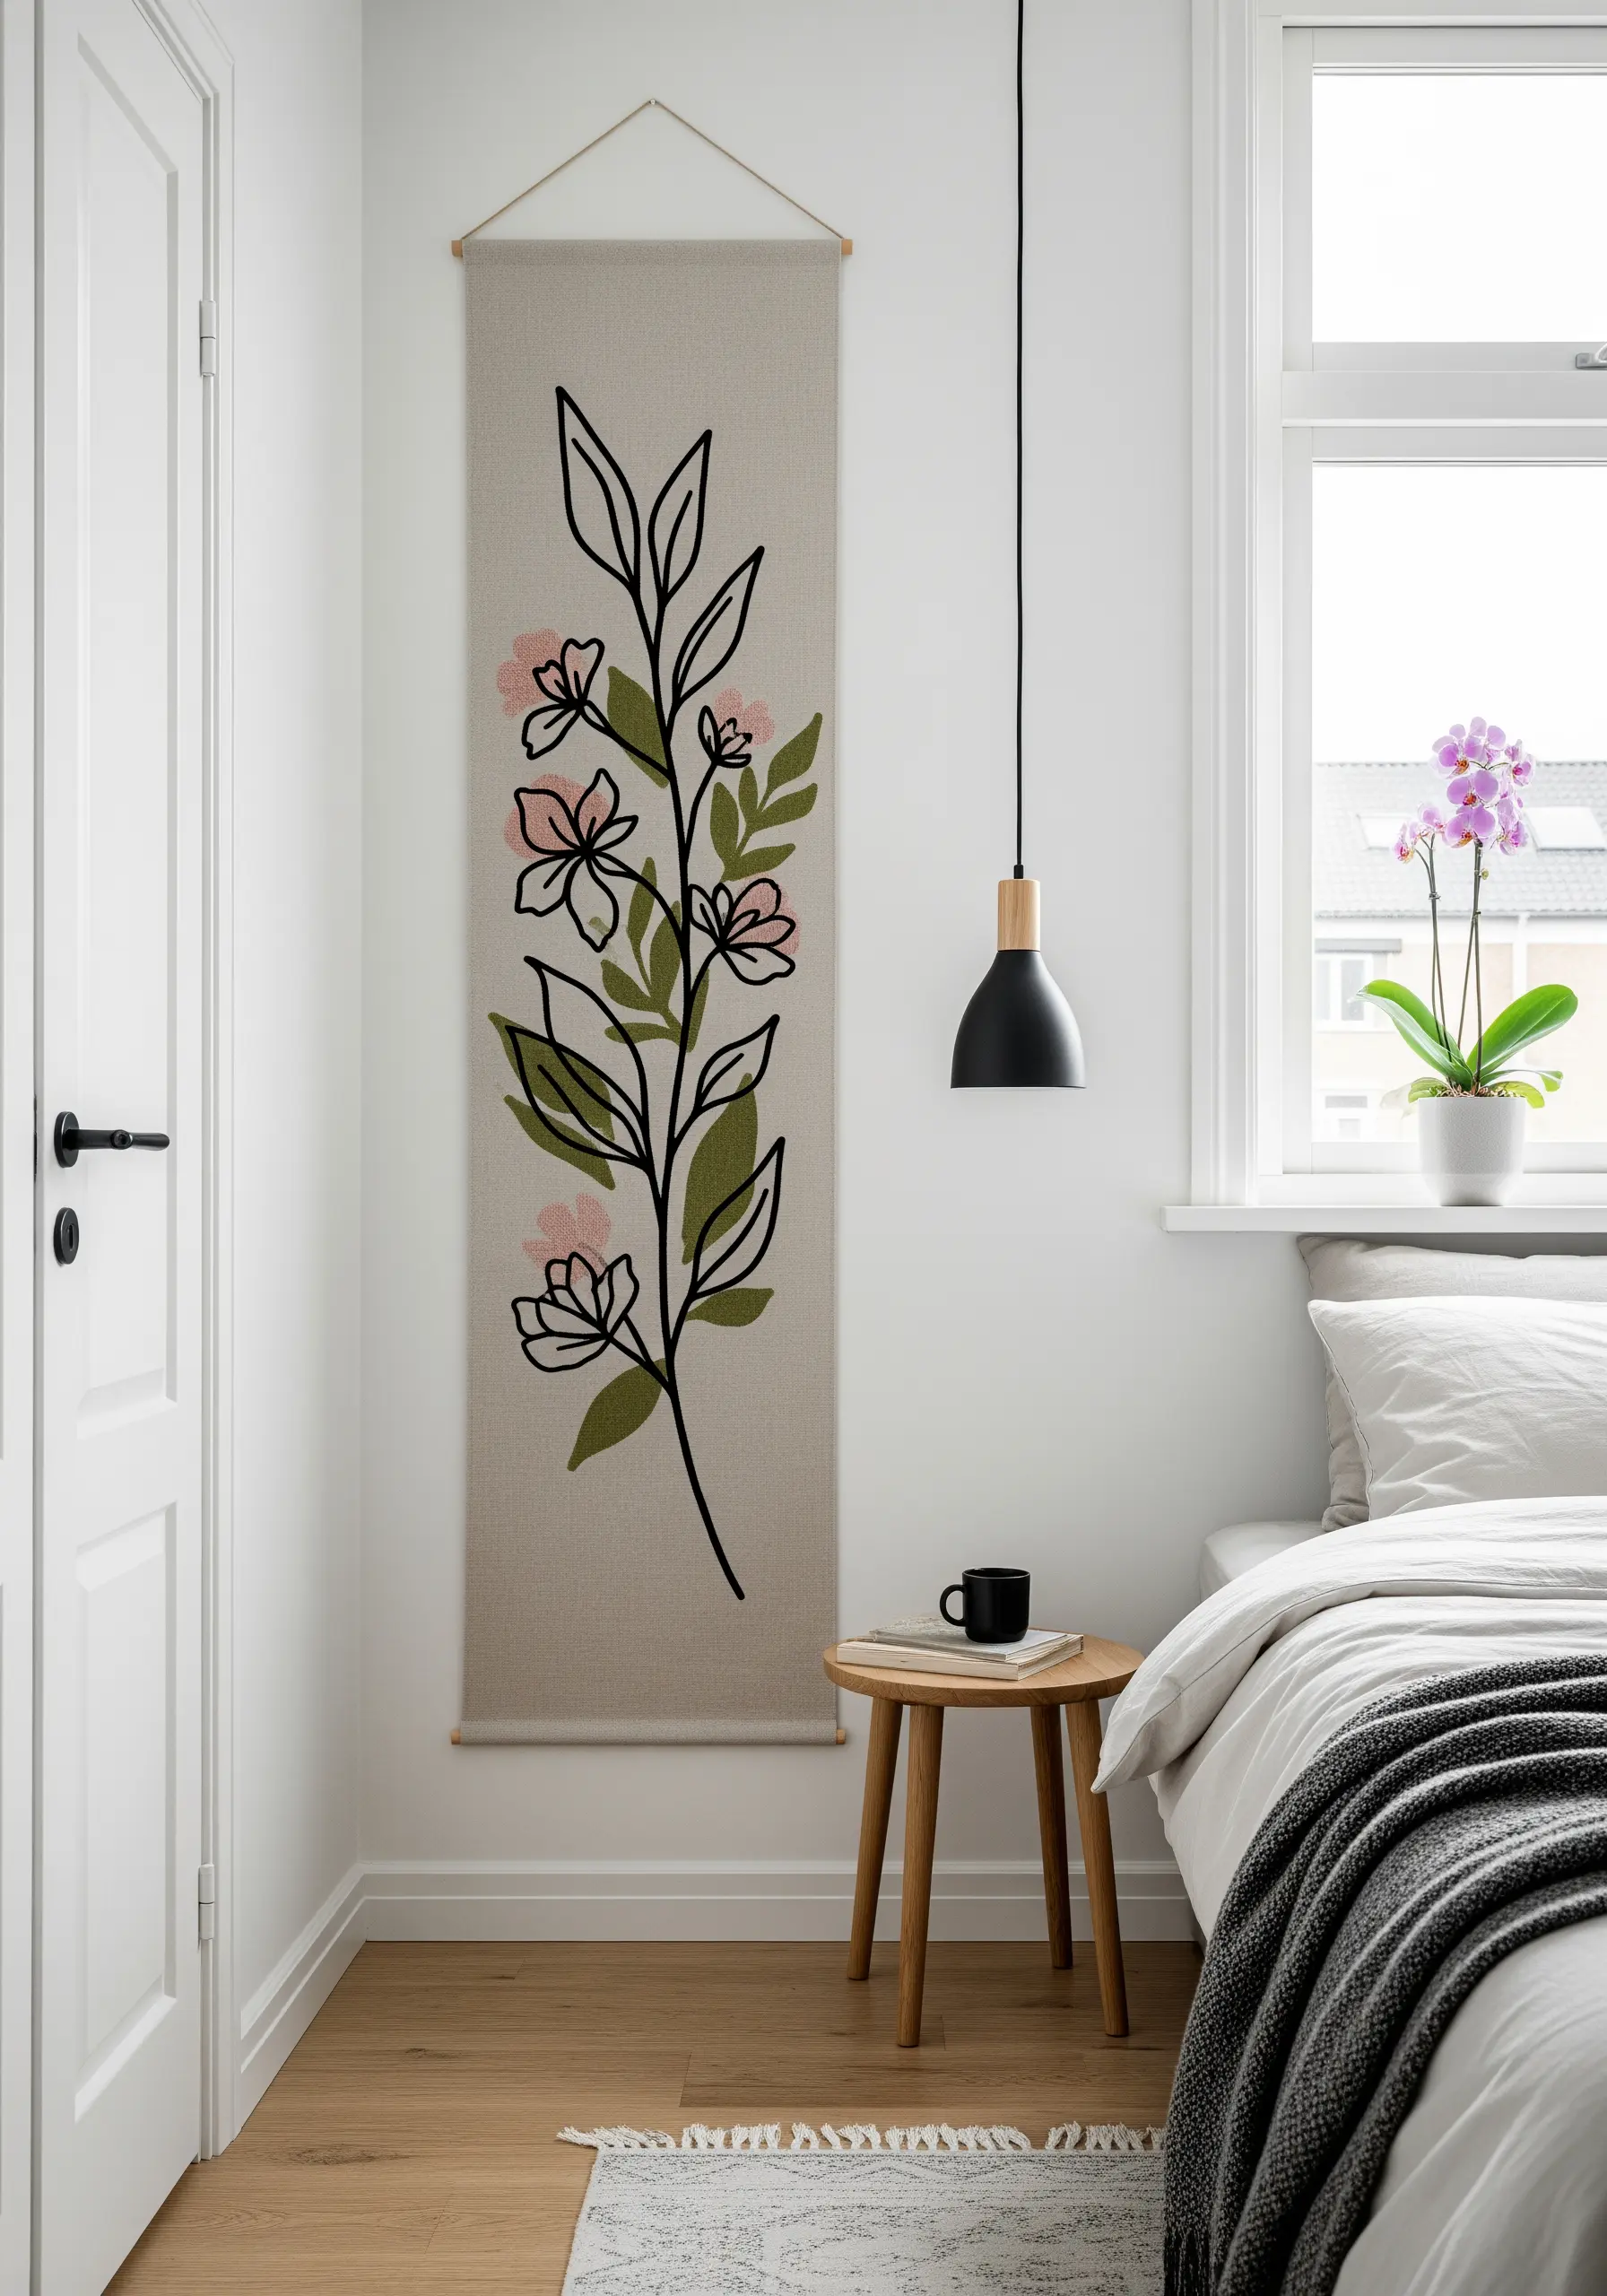
Let your linework do the talking by using a bold stem stitch or chain stitch for outlines, paired with minimal color fills.
Use all six strands of embroidery floss or even a fine perle cotton for the black outlines to give them weight and a graphic, illustrative feel.
Keep the color fills simple and flat—a few strategically placed satin stitches are all you need to add a touch of softness without distracting from the strong lines.
These botanical line art embroidery patterns work especially well on long, narrow wall hangings.
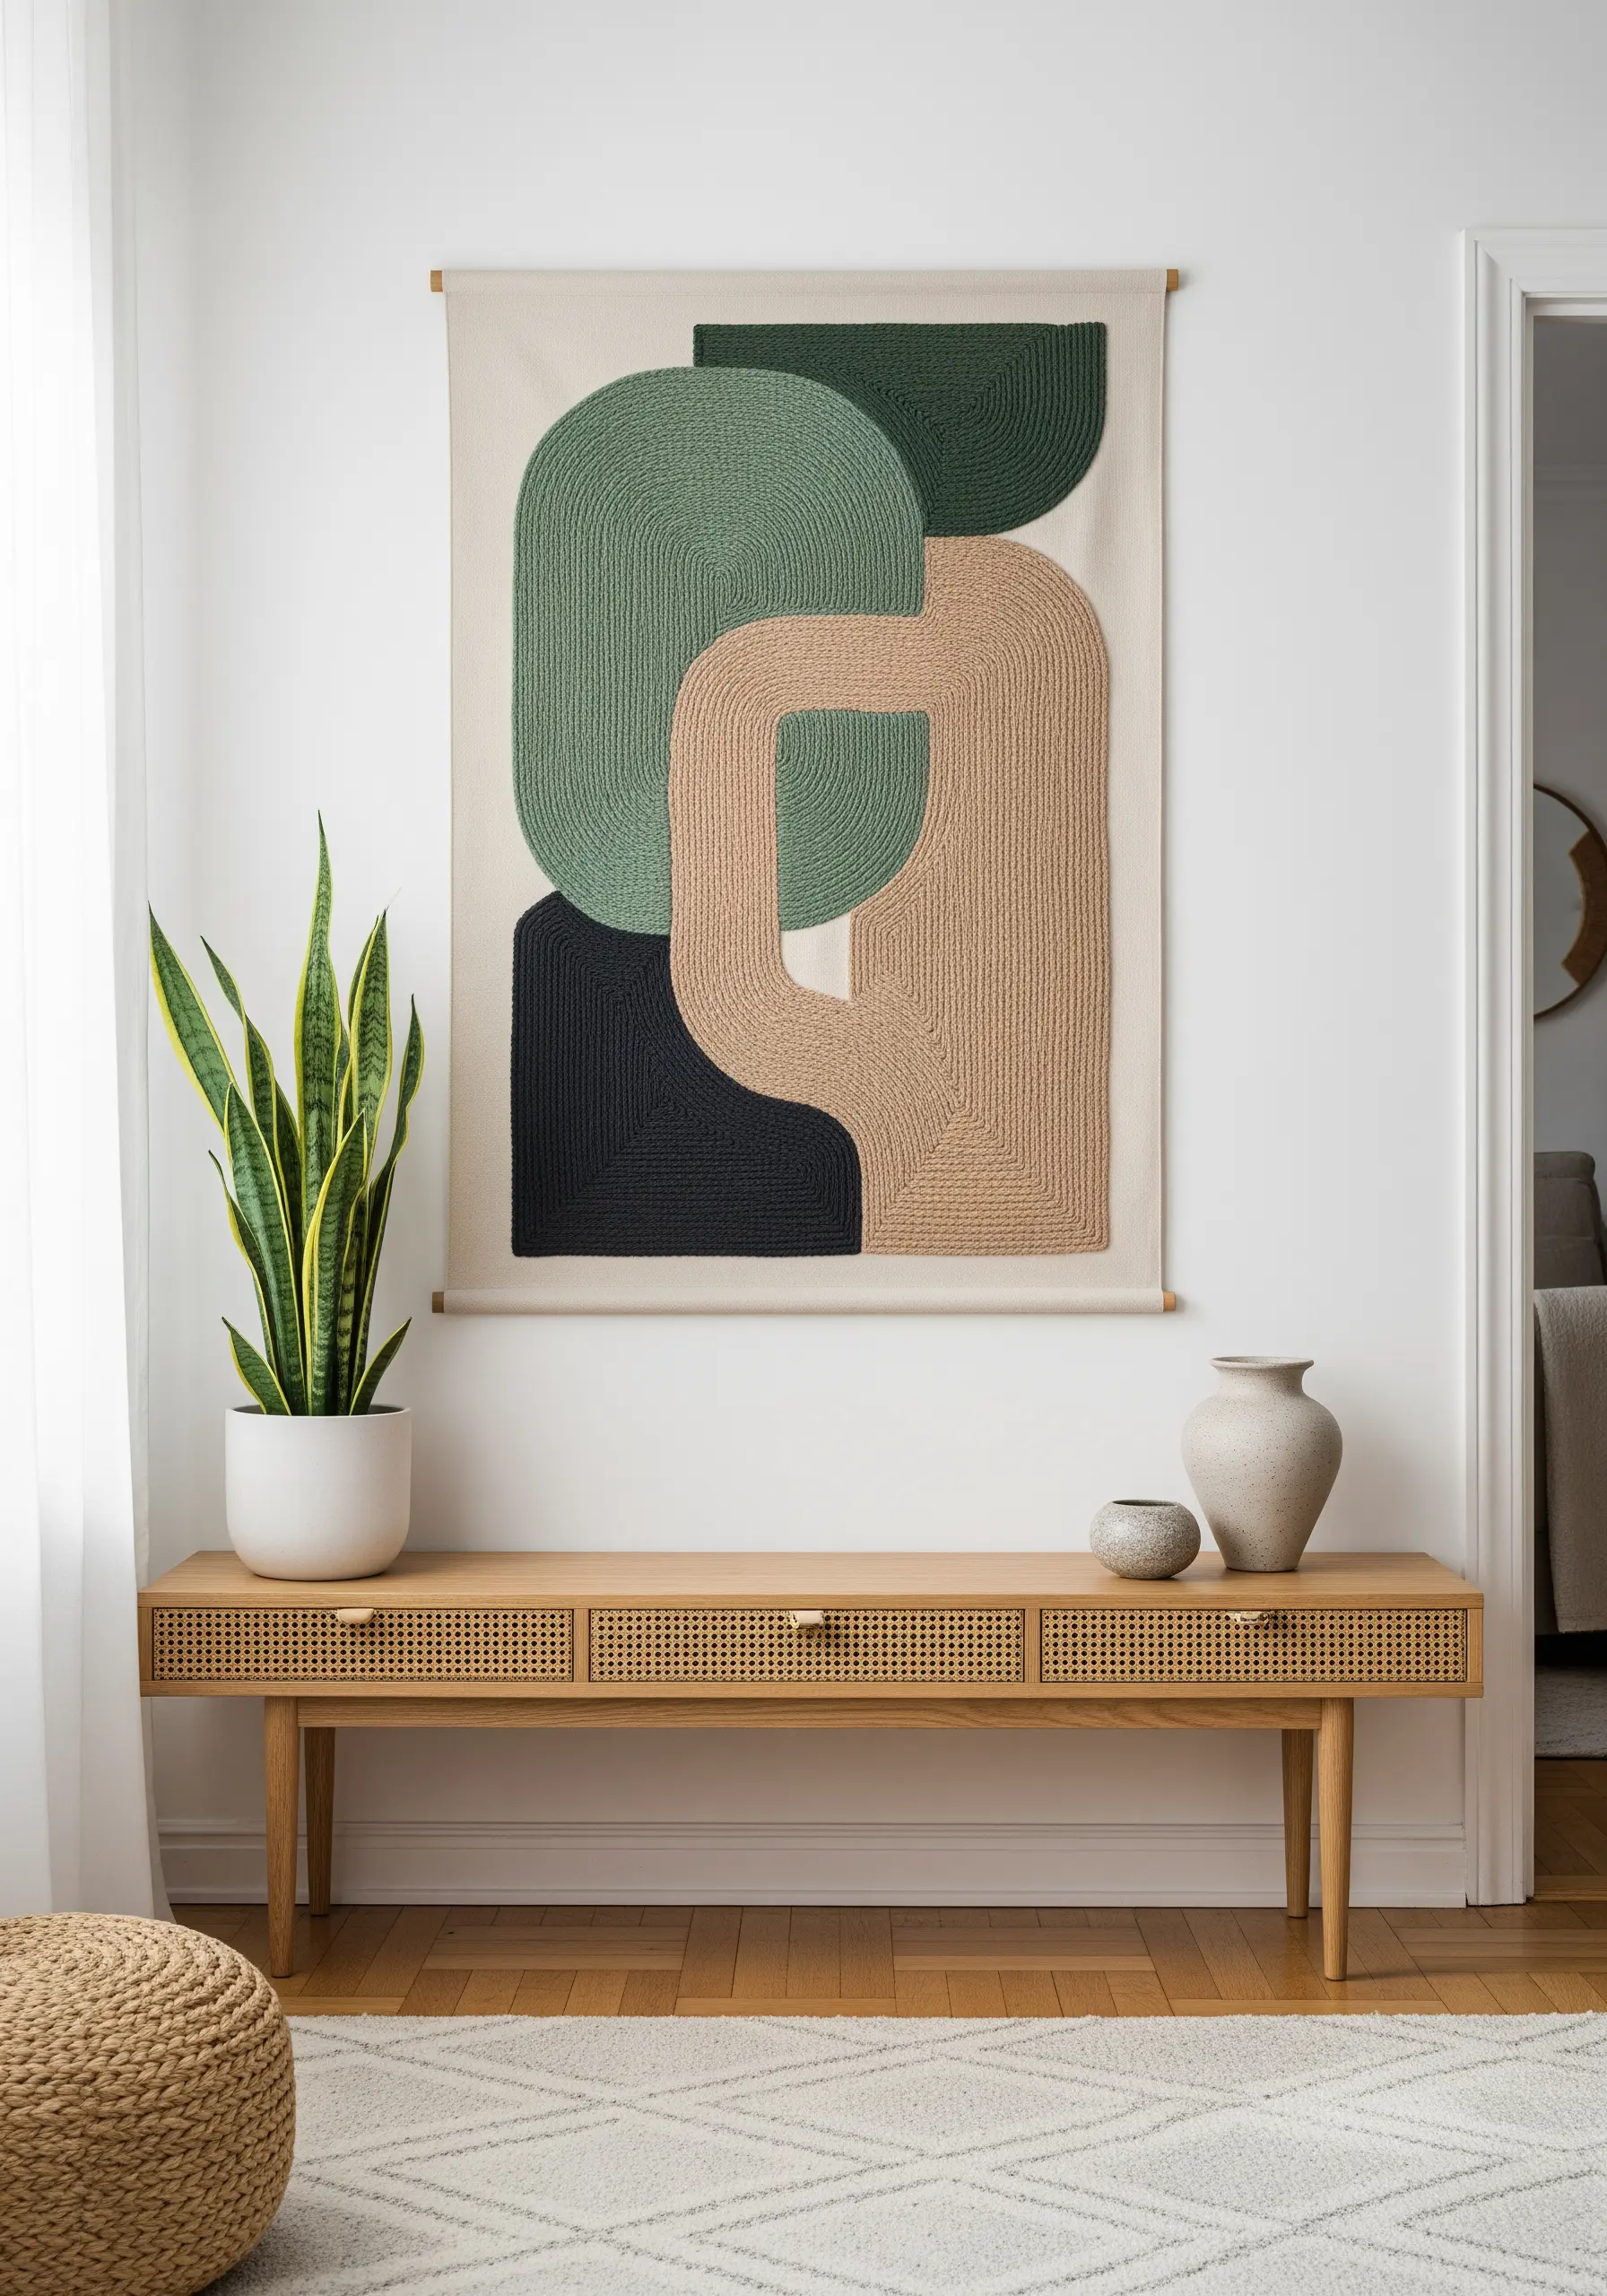
5. Juxtapose Line and Form in Geometric Compositions
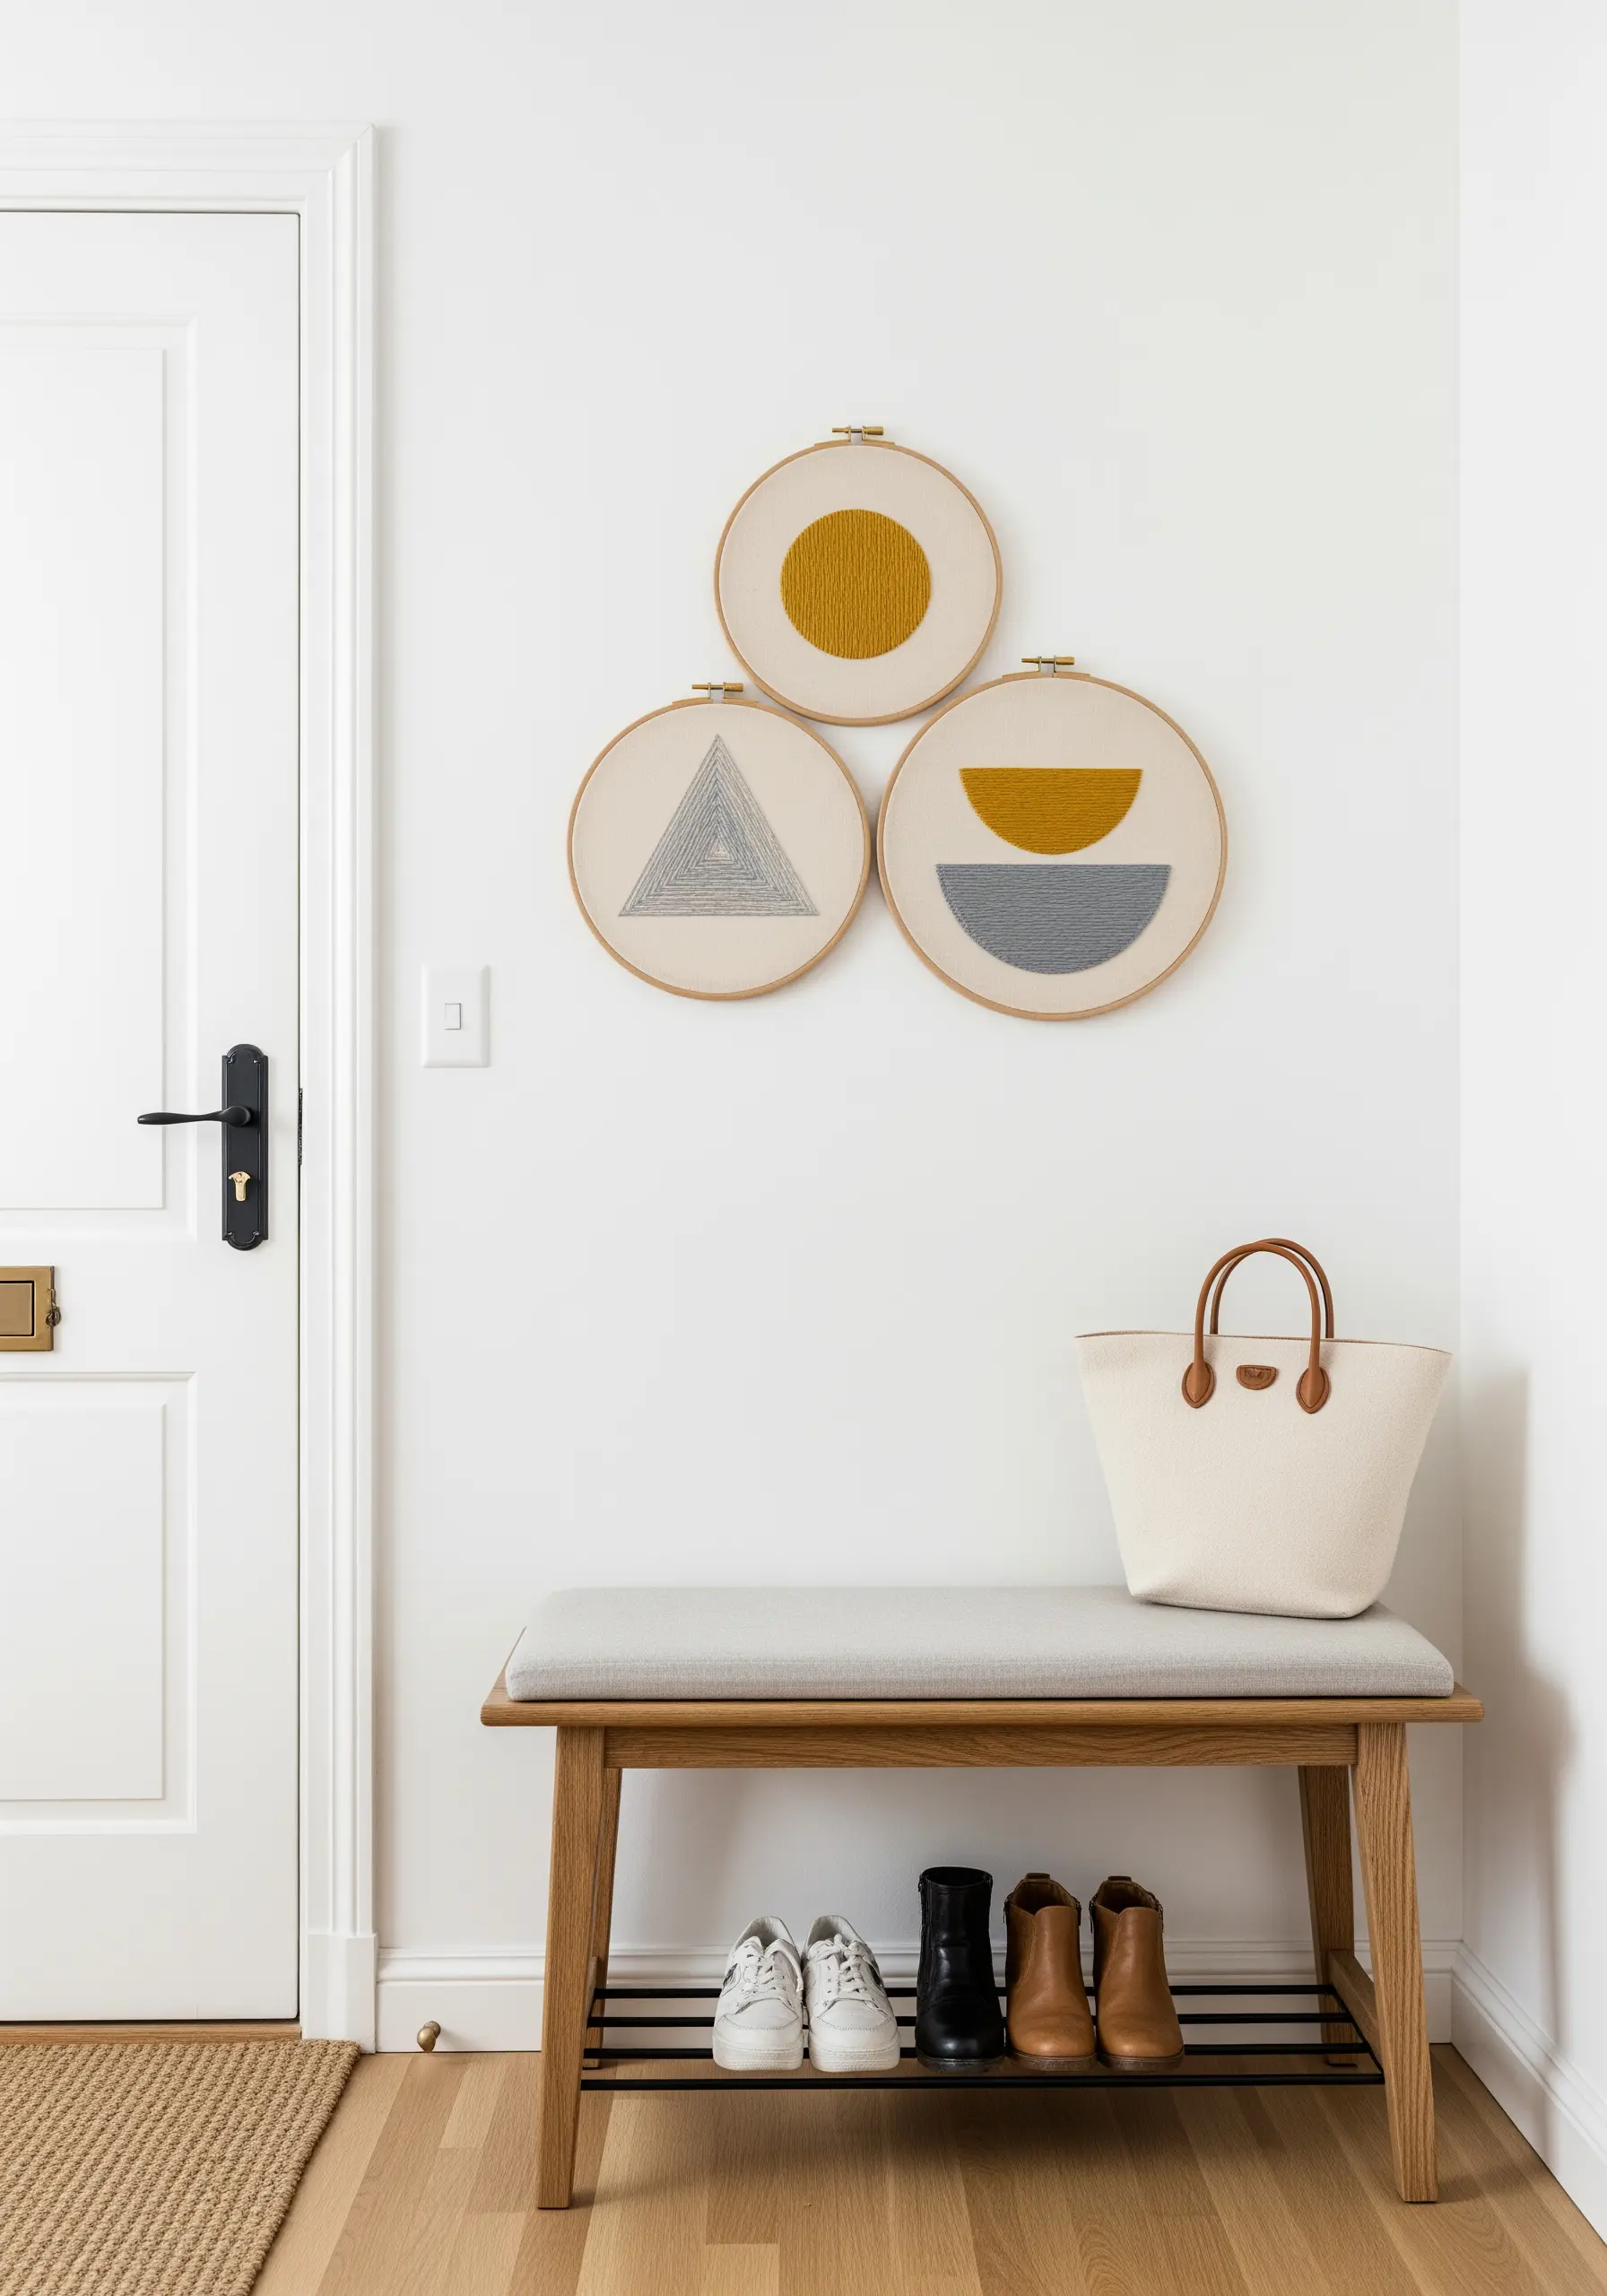
Create visual tension and harmony by pairing solidly filled shapes with delicate line work in a single composition.
Use a dense satin stitch for the solid circles and semi-circles, ensuring your stitches are perfectly parallel for a smooth, polished surface.
For the radiating lines, use a single strand of floss and a simple backstitch to maintain a crisp, airy feel that contrasts with the weight of the filled elements.
Arranging multiple hoops in a cluster turns simple studies into a sophisticated gallery wall.
6. Master Precision with Radiating Straight Stitches
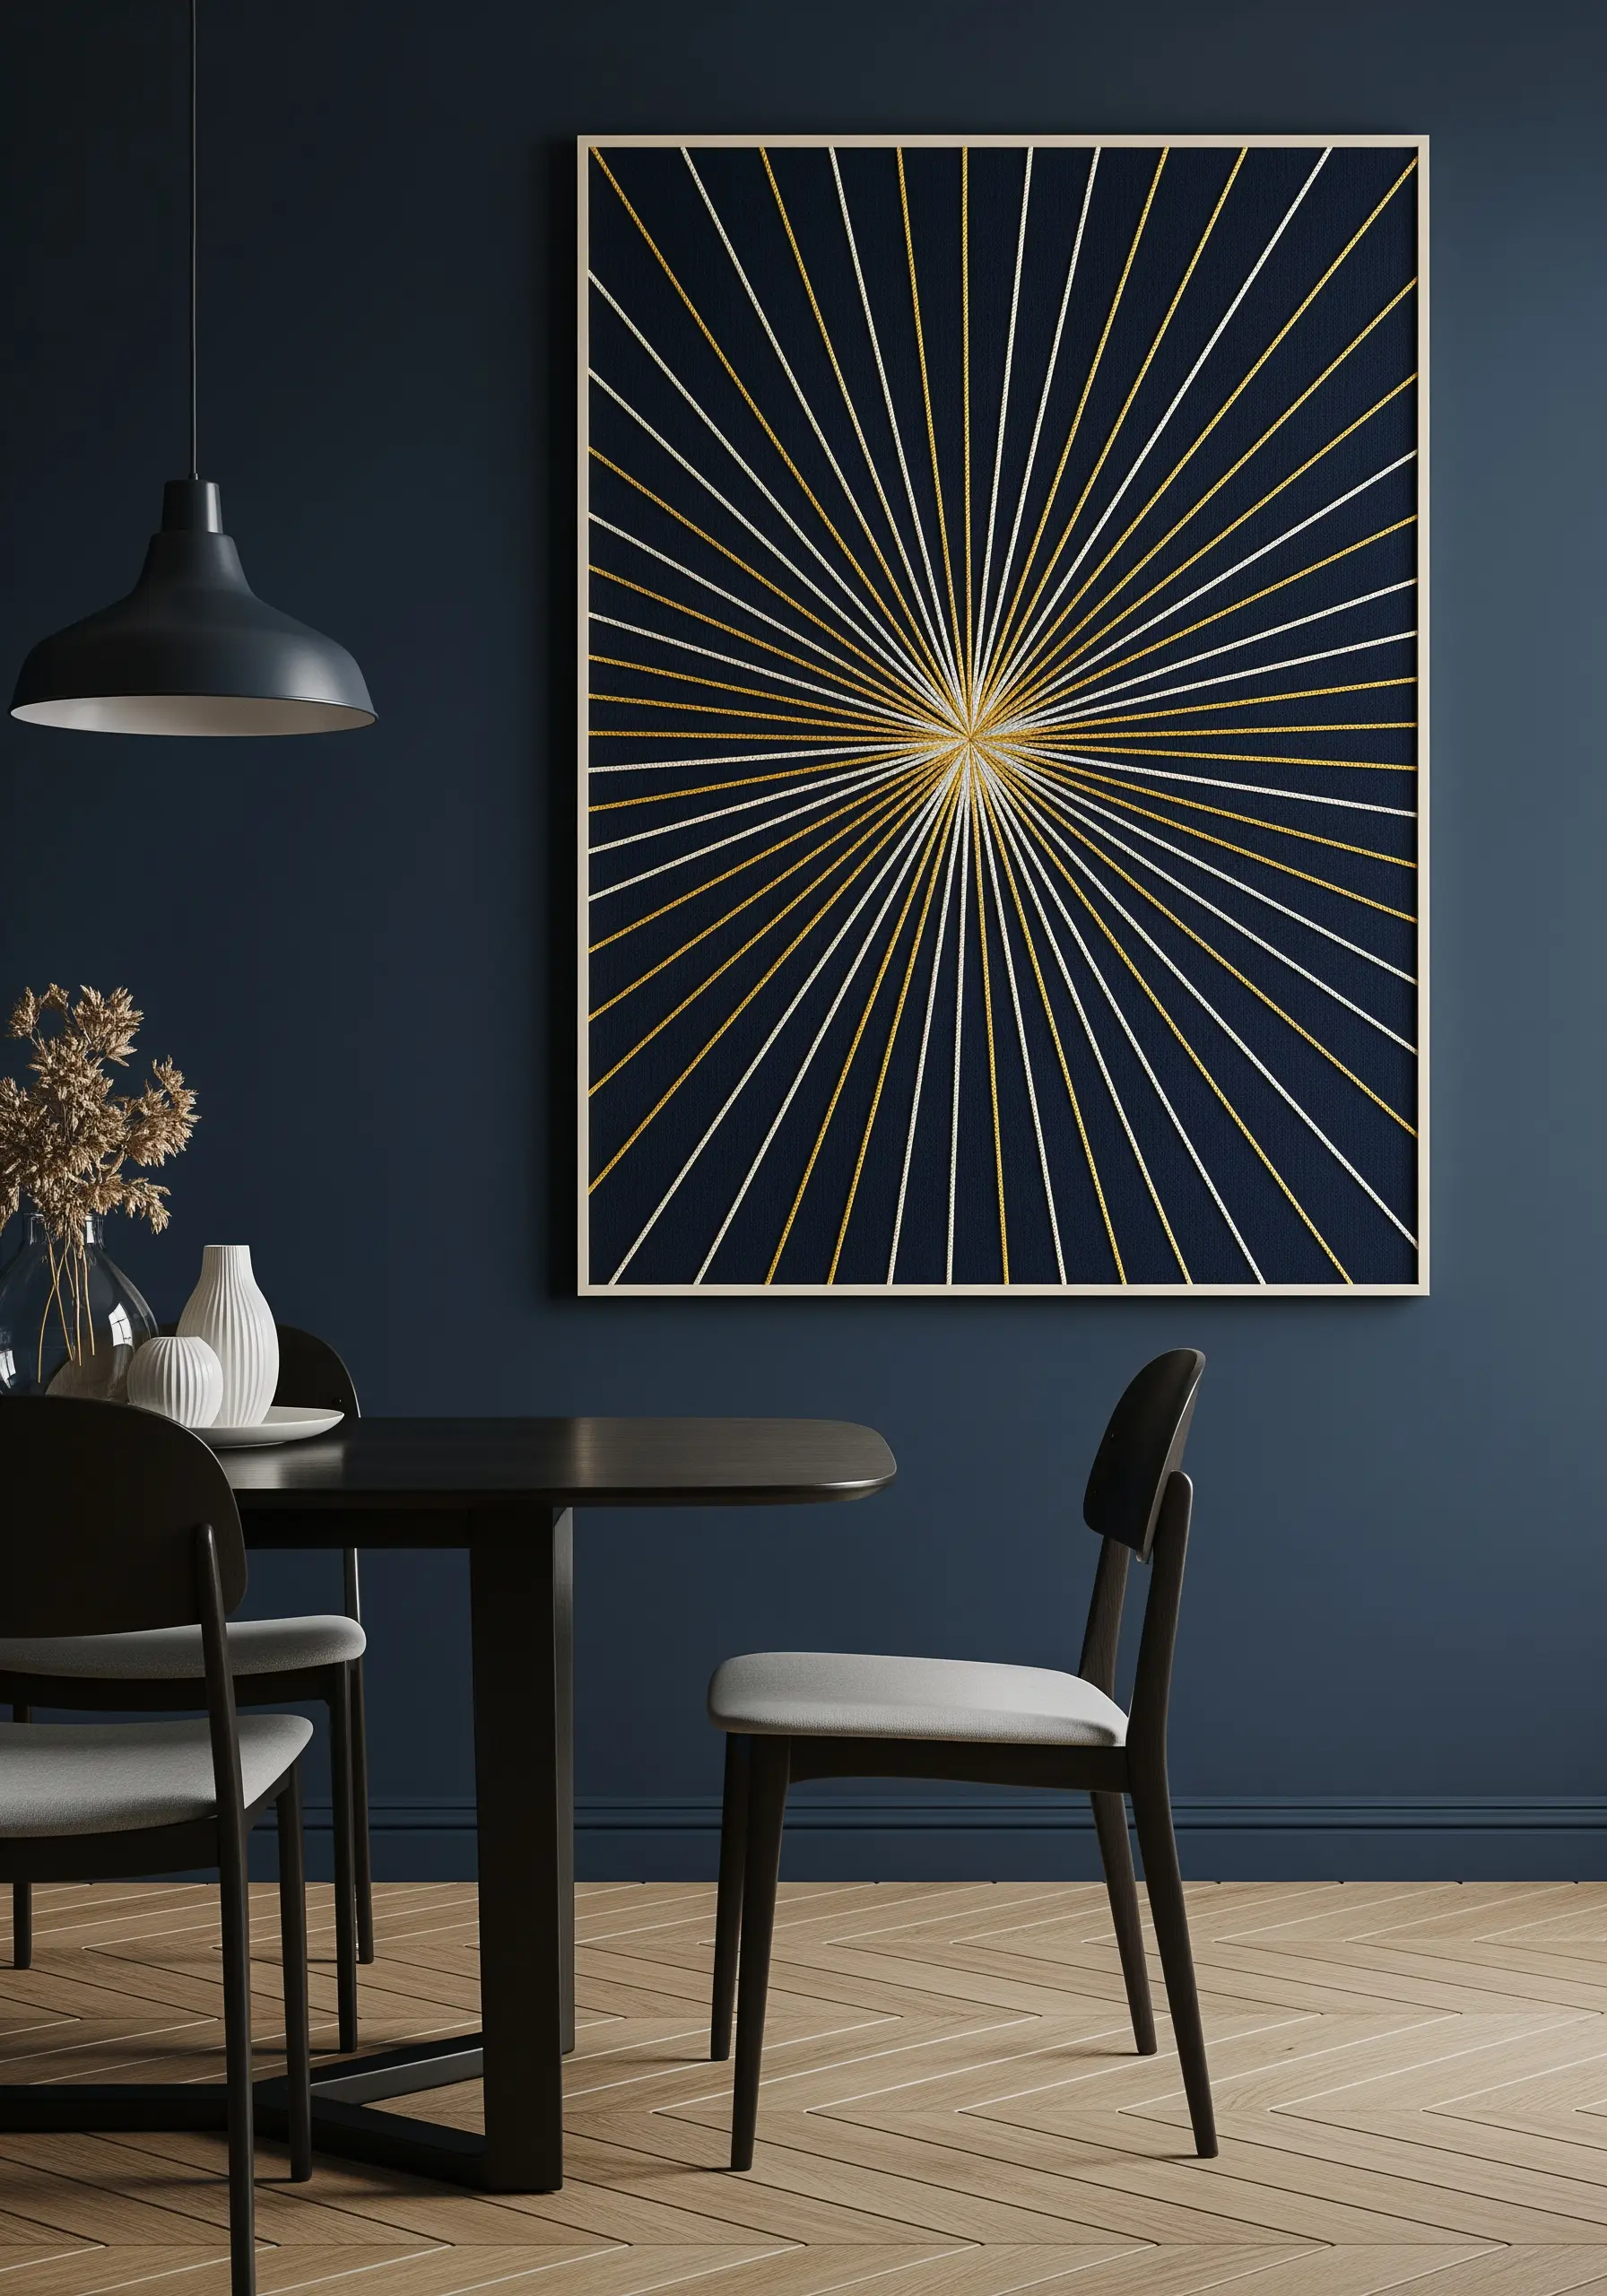
Transform a simple straight stitch into a dramatic statement piece by radiating lines from a central point.
To ensure perfect symmetry, use a water-soluble marker and a protractor to mark your guidelines on the fabric before you begin stitching.
Alternate two colors, like gold and white, to create a subtle vibration and depth that draws the eye inward.
Using a metallic floss for one of the colors adds a touch of luxury and catches the light, making the piece feel dynamic.
7. Convey Movement with Contoured Stitching
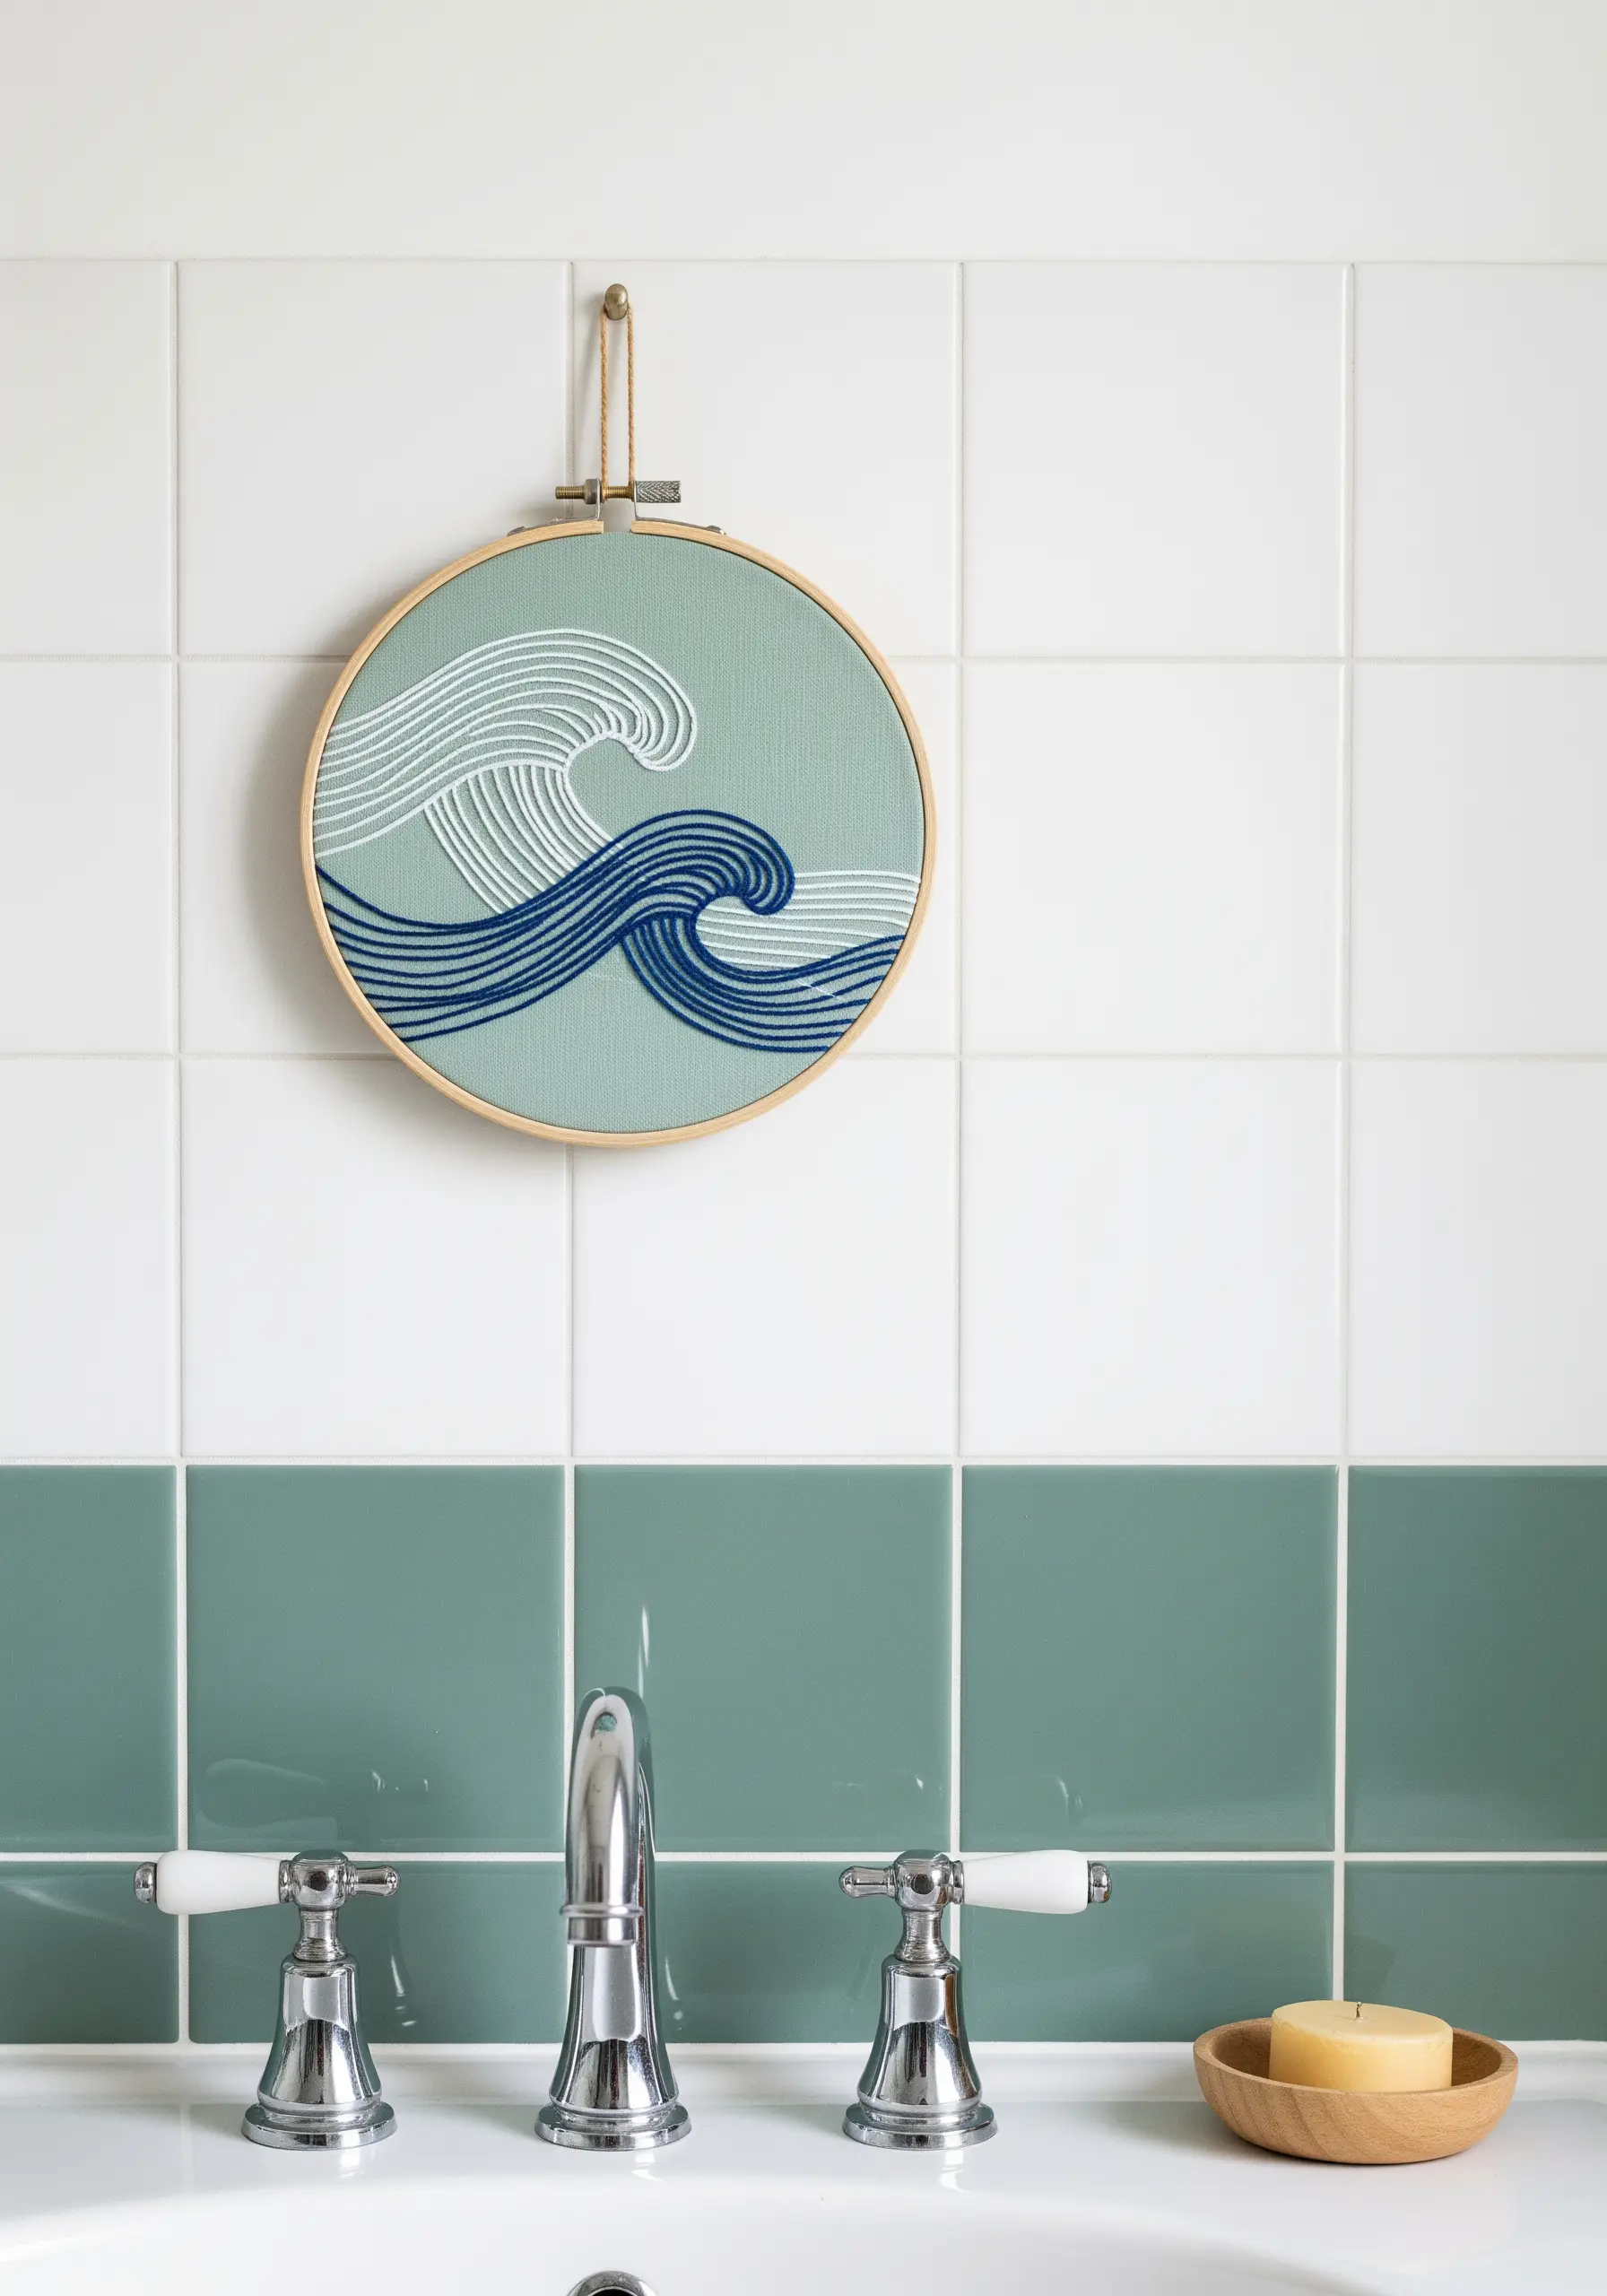
Capture the flow of water by ensuring your stitches follow the natural curves of the waves.
Use a split stitch or stem stitch, which are excellent for creating smooth, continuous lines that can be easily curved and shaped.
Slightly overlap your rows of color—the dark blue, medium blue, and white—to create a seamless blend that mimics the way light hits moving water.
This technique feels both graphic and organic, making it perfect for serene, nature-inspired decor.
8. Simplify Architecture with Graphic Linework

Translate complex subjects like architecture into elegant line art by focusing only on the essential structural lines.
Use a basic backstitch with two or three strands of black floss to keep the lines clean, crisp, and consistent, like an architectural drawing.
Leave the edges of your fabric raw and add a simple stitched border to give the piece an intentional, sketch-like quality.
This minimalist approach turns a detailed building into a piece of modern, graphic art.
9. Split Shapes with Color-Blocking for a Modern Feel
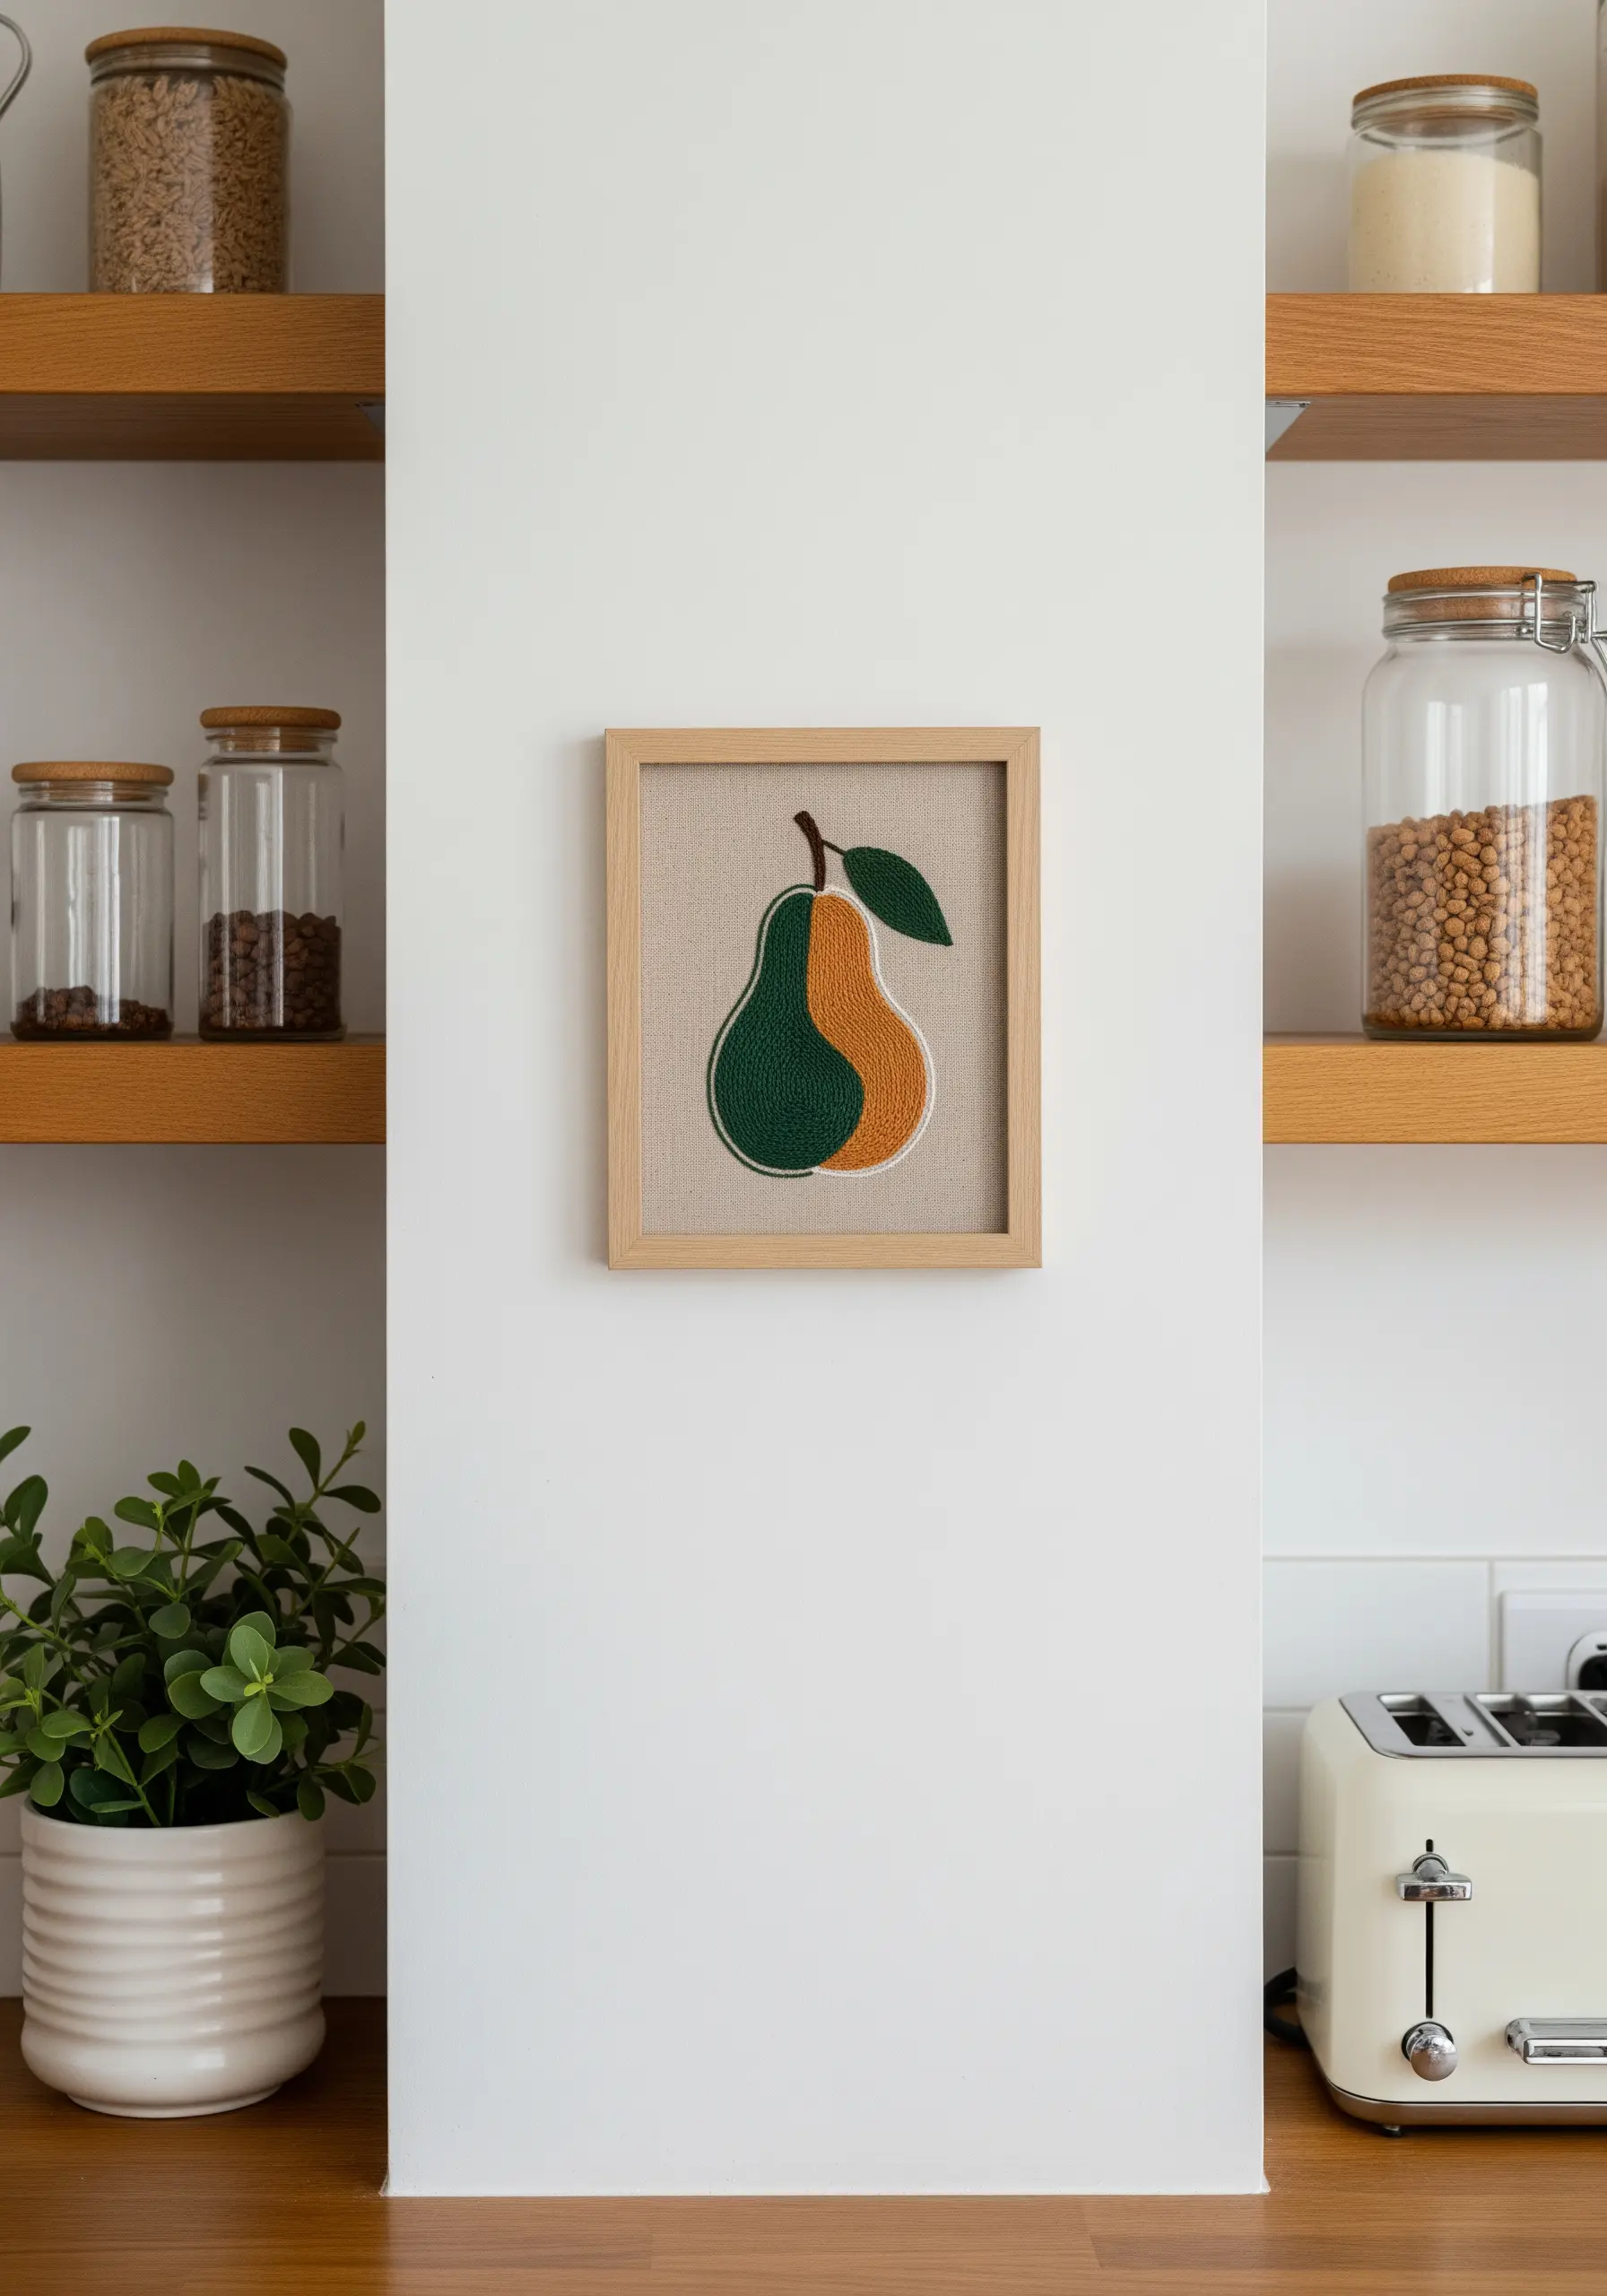
Give a traditional motif a contemporary twist by dividing it down the middle with two distinct, contrasting colors.
Use a dense, textured stitch like the French knot or chain stitch fill to emphasize the solidity of each color block.
Define the entire shape with a clean backstitch outline in a third, neutral color to unify the two halves and make the design pop from the background fabric.
This technique is a simple way to create tiny embroidery designs inspired by everyday life that feel fresh and modern.
10. Imply Form with Minimal, Expressive Outlines
Suggest a complete form using just a few carefully placed lines, letting the viewer’s eye fill in the rest.
Use a whipped backstitch for your main lines—it creates a smooth, uninterrupted quality that feels like a single stroke of a pen.
For shaded or layered areas, switch to a simple backstitch or a single strand of thread to create a lighter, more transparent effect.
Hanging a single, large hoop among framed prints creates a beautiful focal point and adds textural variety to a gallery wall.
11. Weave a Landscape with Long-and-Short Stitch

Create the illusion of a painted or woven landscape using long-and-short stitch to blend colors and create texture.
Work in horizontal rows, varying the length of your stitches and interlocking them with the row below to create a seamless, tapestry-like effect.
Use different shades of a single color, like the purples and grays in these mountains, to build depth and form without overwhelming the design.
Scatter French knots or seed stitches in a light color to add a touch of sparkle, like distant snow or stars.
12. Create Energy with Intersecting Geometric Lines
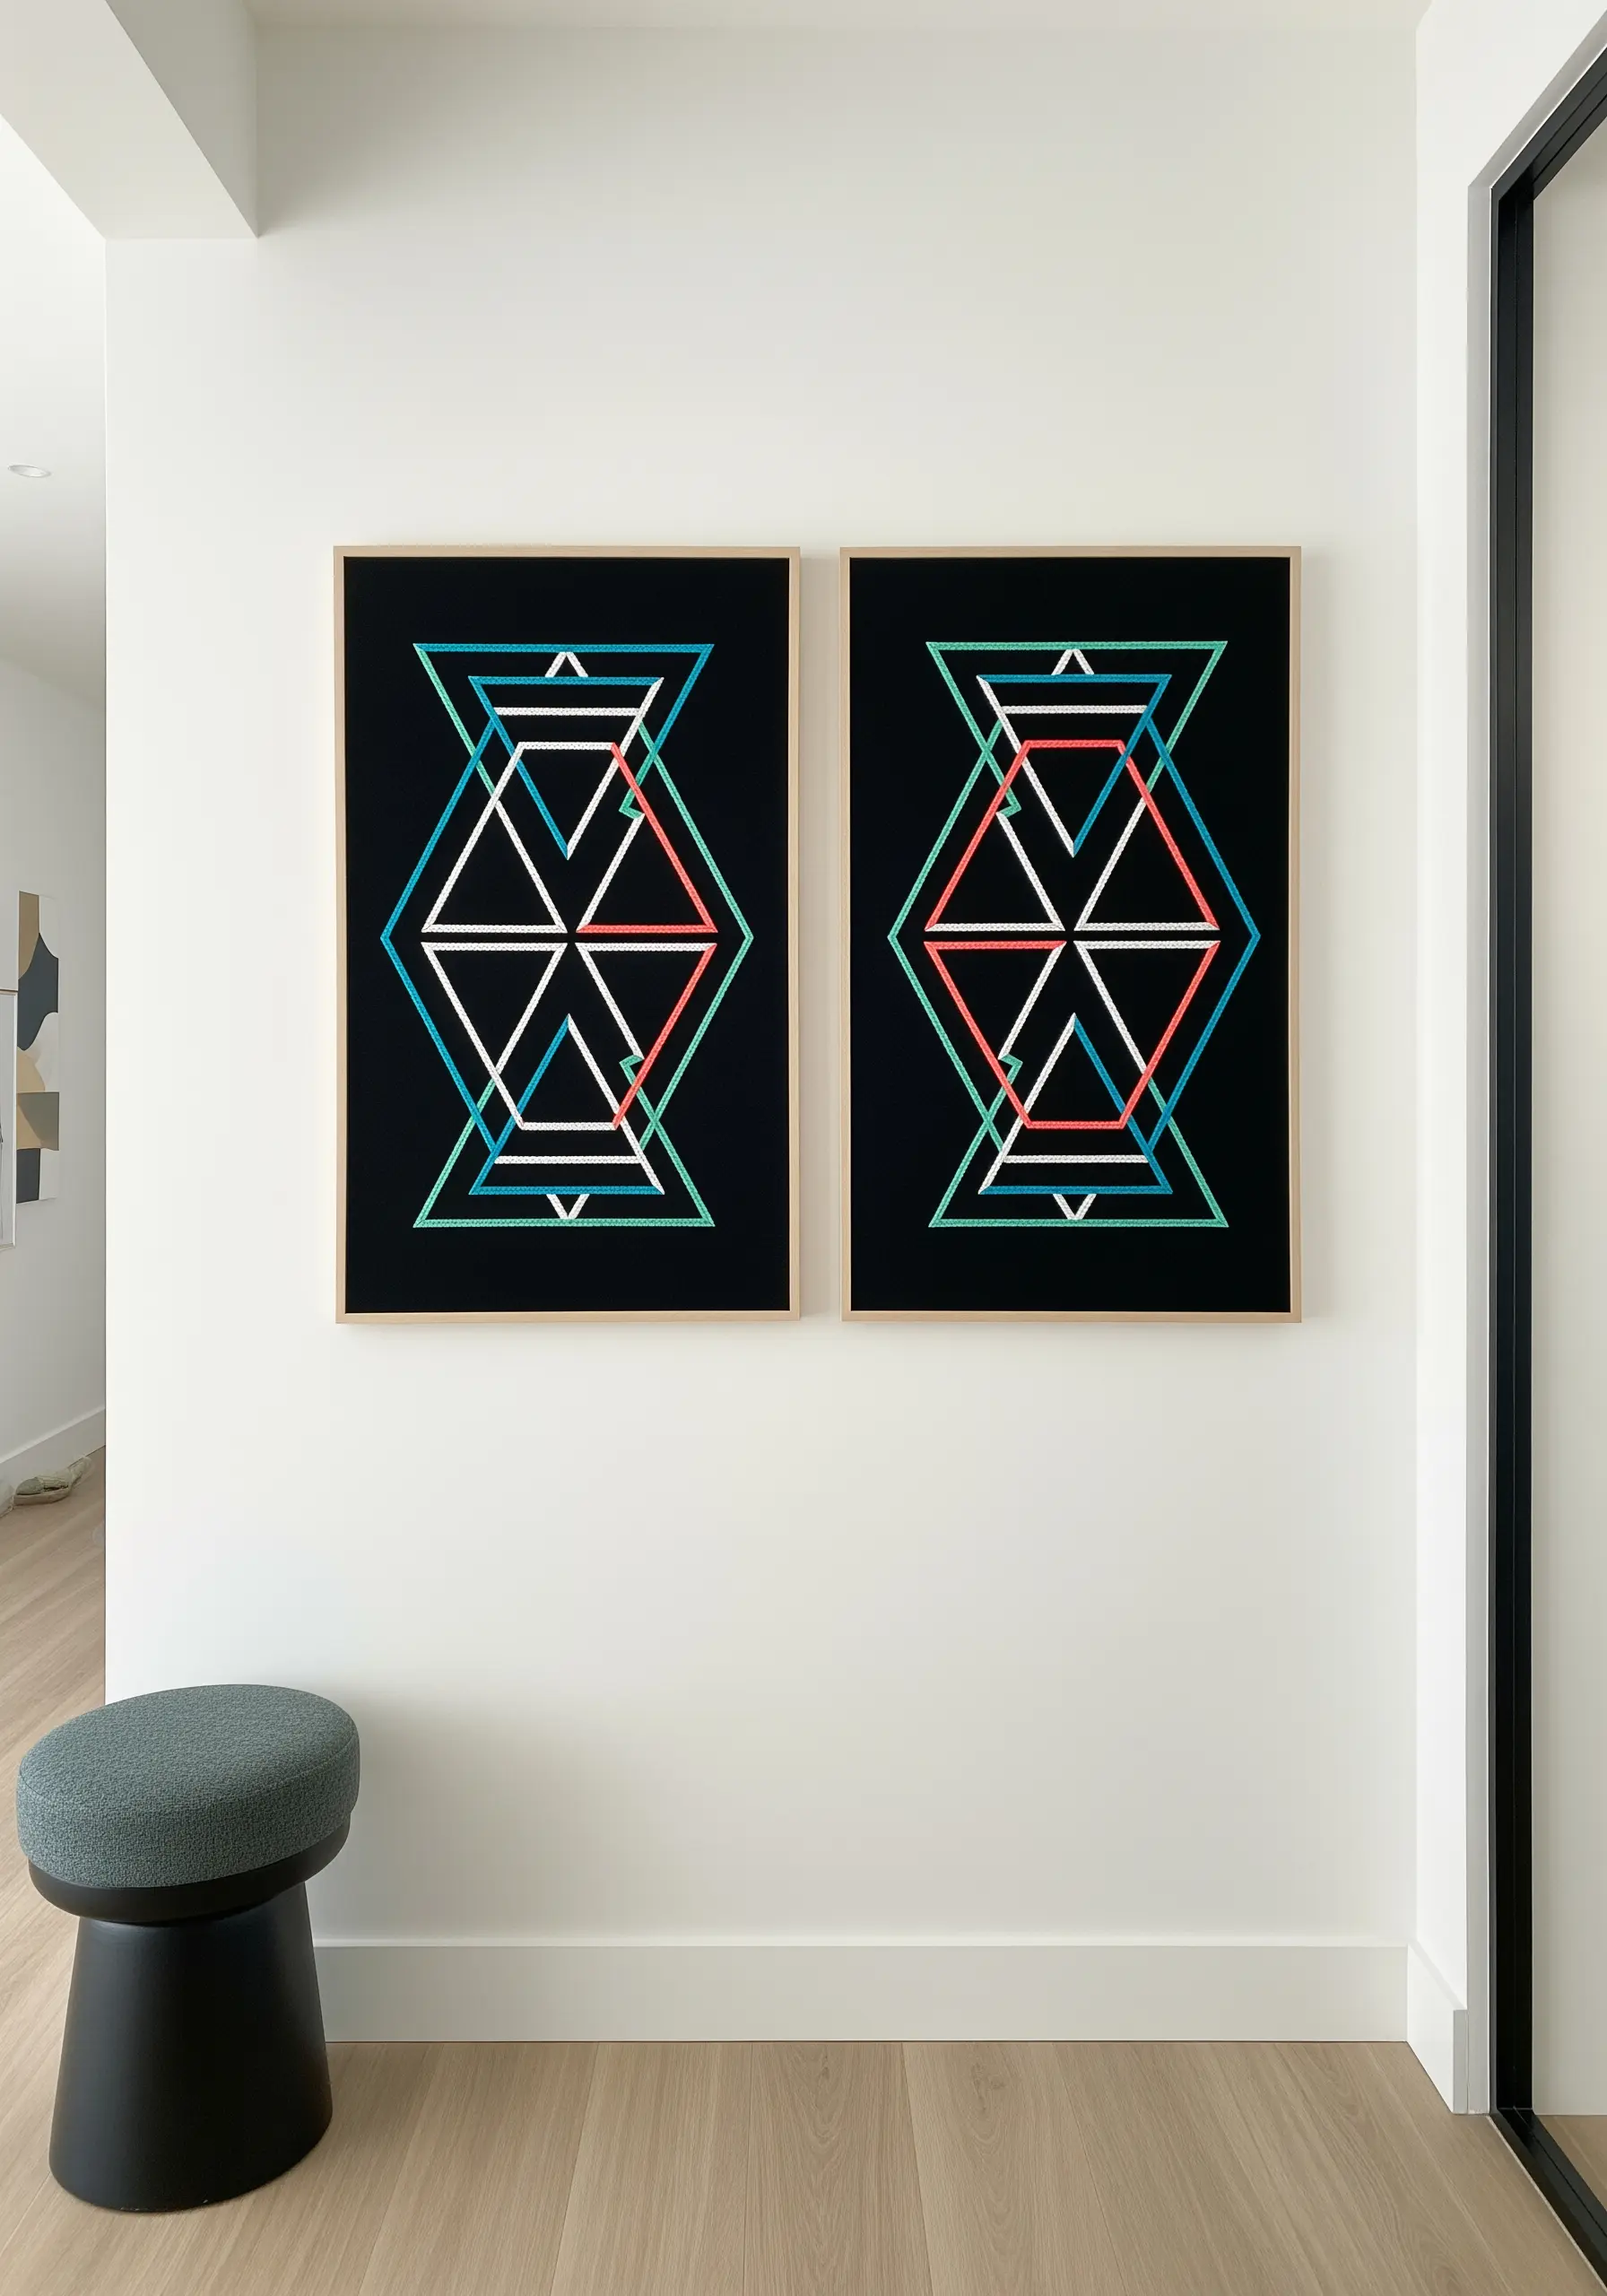
Build a dynamic, layered design by stitching simple geometric shapes that overlap and intersect.
Choose three high-contrast colors on a dark background to make each line and shape clearly visible.
Use a crisp, two-strand backstitch for all your lines to maintain precision and a clean, graphic look.
The key to this design’s success is perfect symmetry, so take the time to draw your pattern onto the fabric accurately before you start stitching.
13. Add Detail with Minimalist Straight Stitches
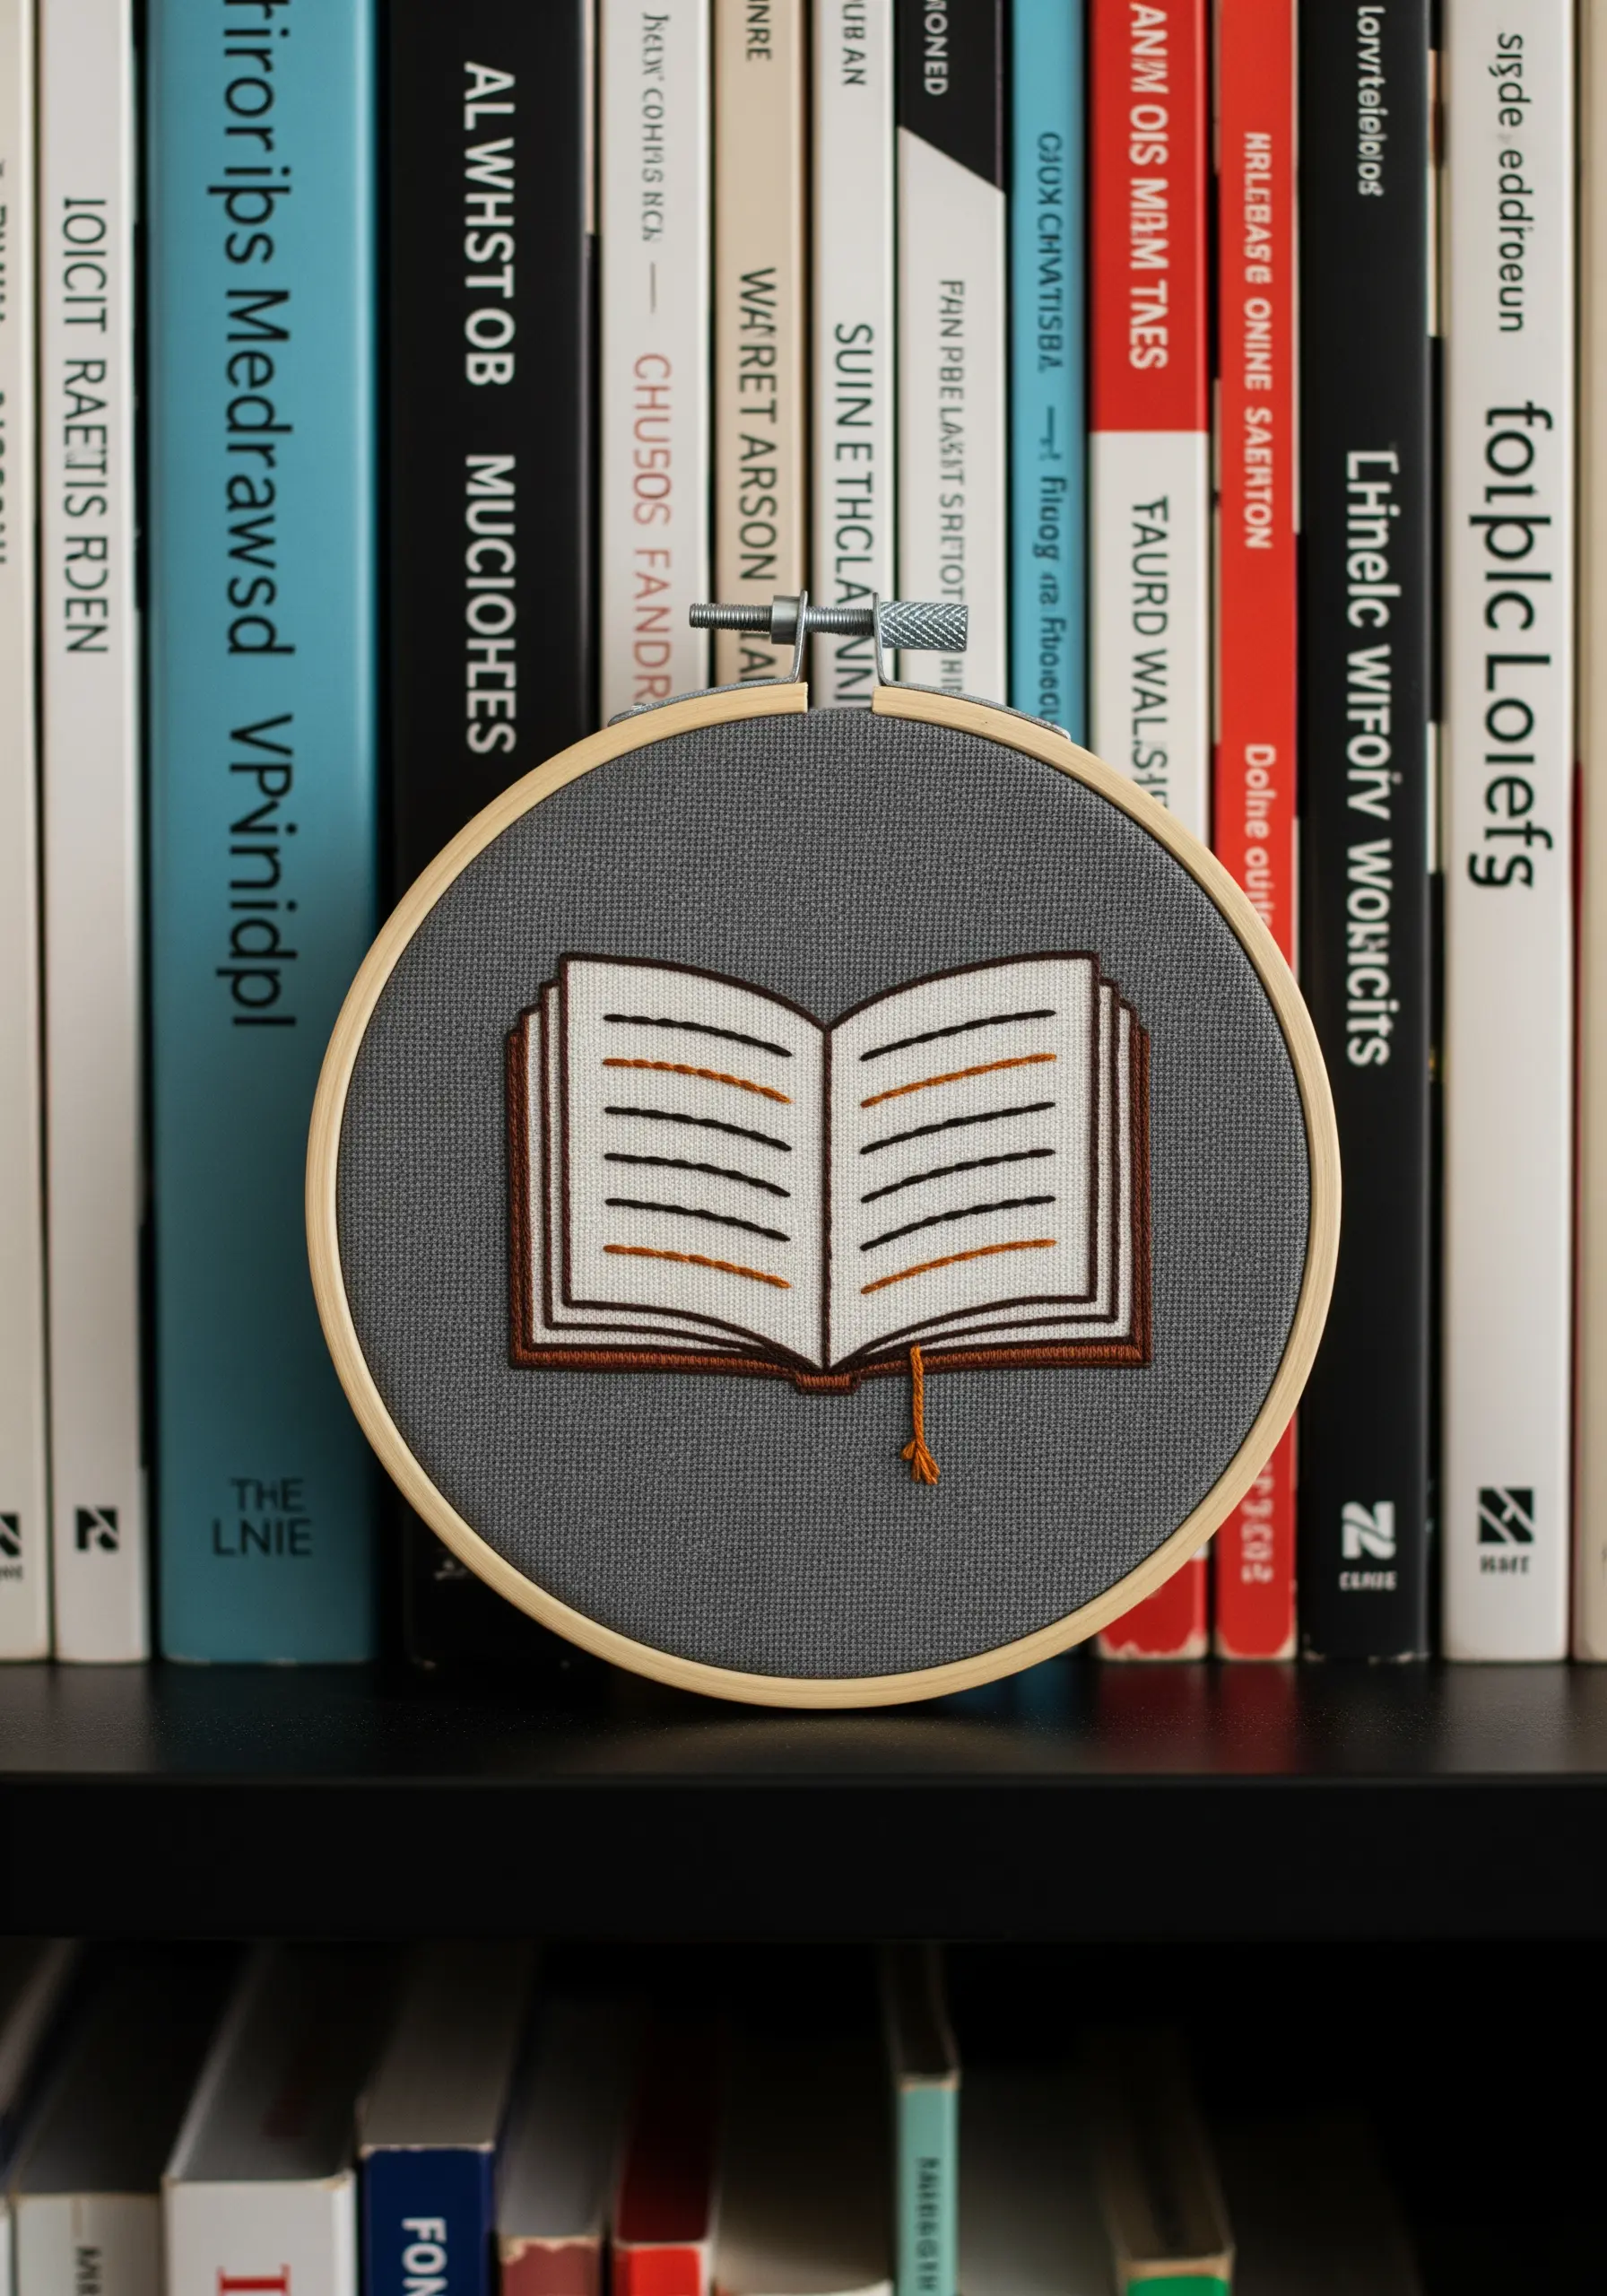
Use simple straight stitches to represent the text lines on book pages, adding detail without clutter.
Vary the length and placement of these stitches slightly to give the impression of real text without being literal.
Outline the book’s shape with a clean, dark satin stitch border to give it weight and definition against the background fabric.
A single, contrasting stitch for a bookmark adds a tiny, thoughtful pop of color that draws the eye.
14. Build Soft Textures with Dense French Knots

For a soft, cloud-like texture, fill shapes with tightly packed French knots or colonial knots.
Use a thicker thread, such as pearl cotton or all six strands of floss, to create plump, substantial knots that quickly fill the space.
Alternate between two closely related colors, like light blue and white, within a single shape to add subtle dimension and visual interest.
This tactile technique is wonderful for animal-themed pillow stitching ideas for nursery and playroom decor, creating a piece that is visually and physically soft.
15. Isolate Color Blocks for a Serene, Graphic Landscape
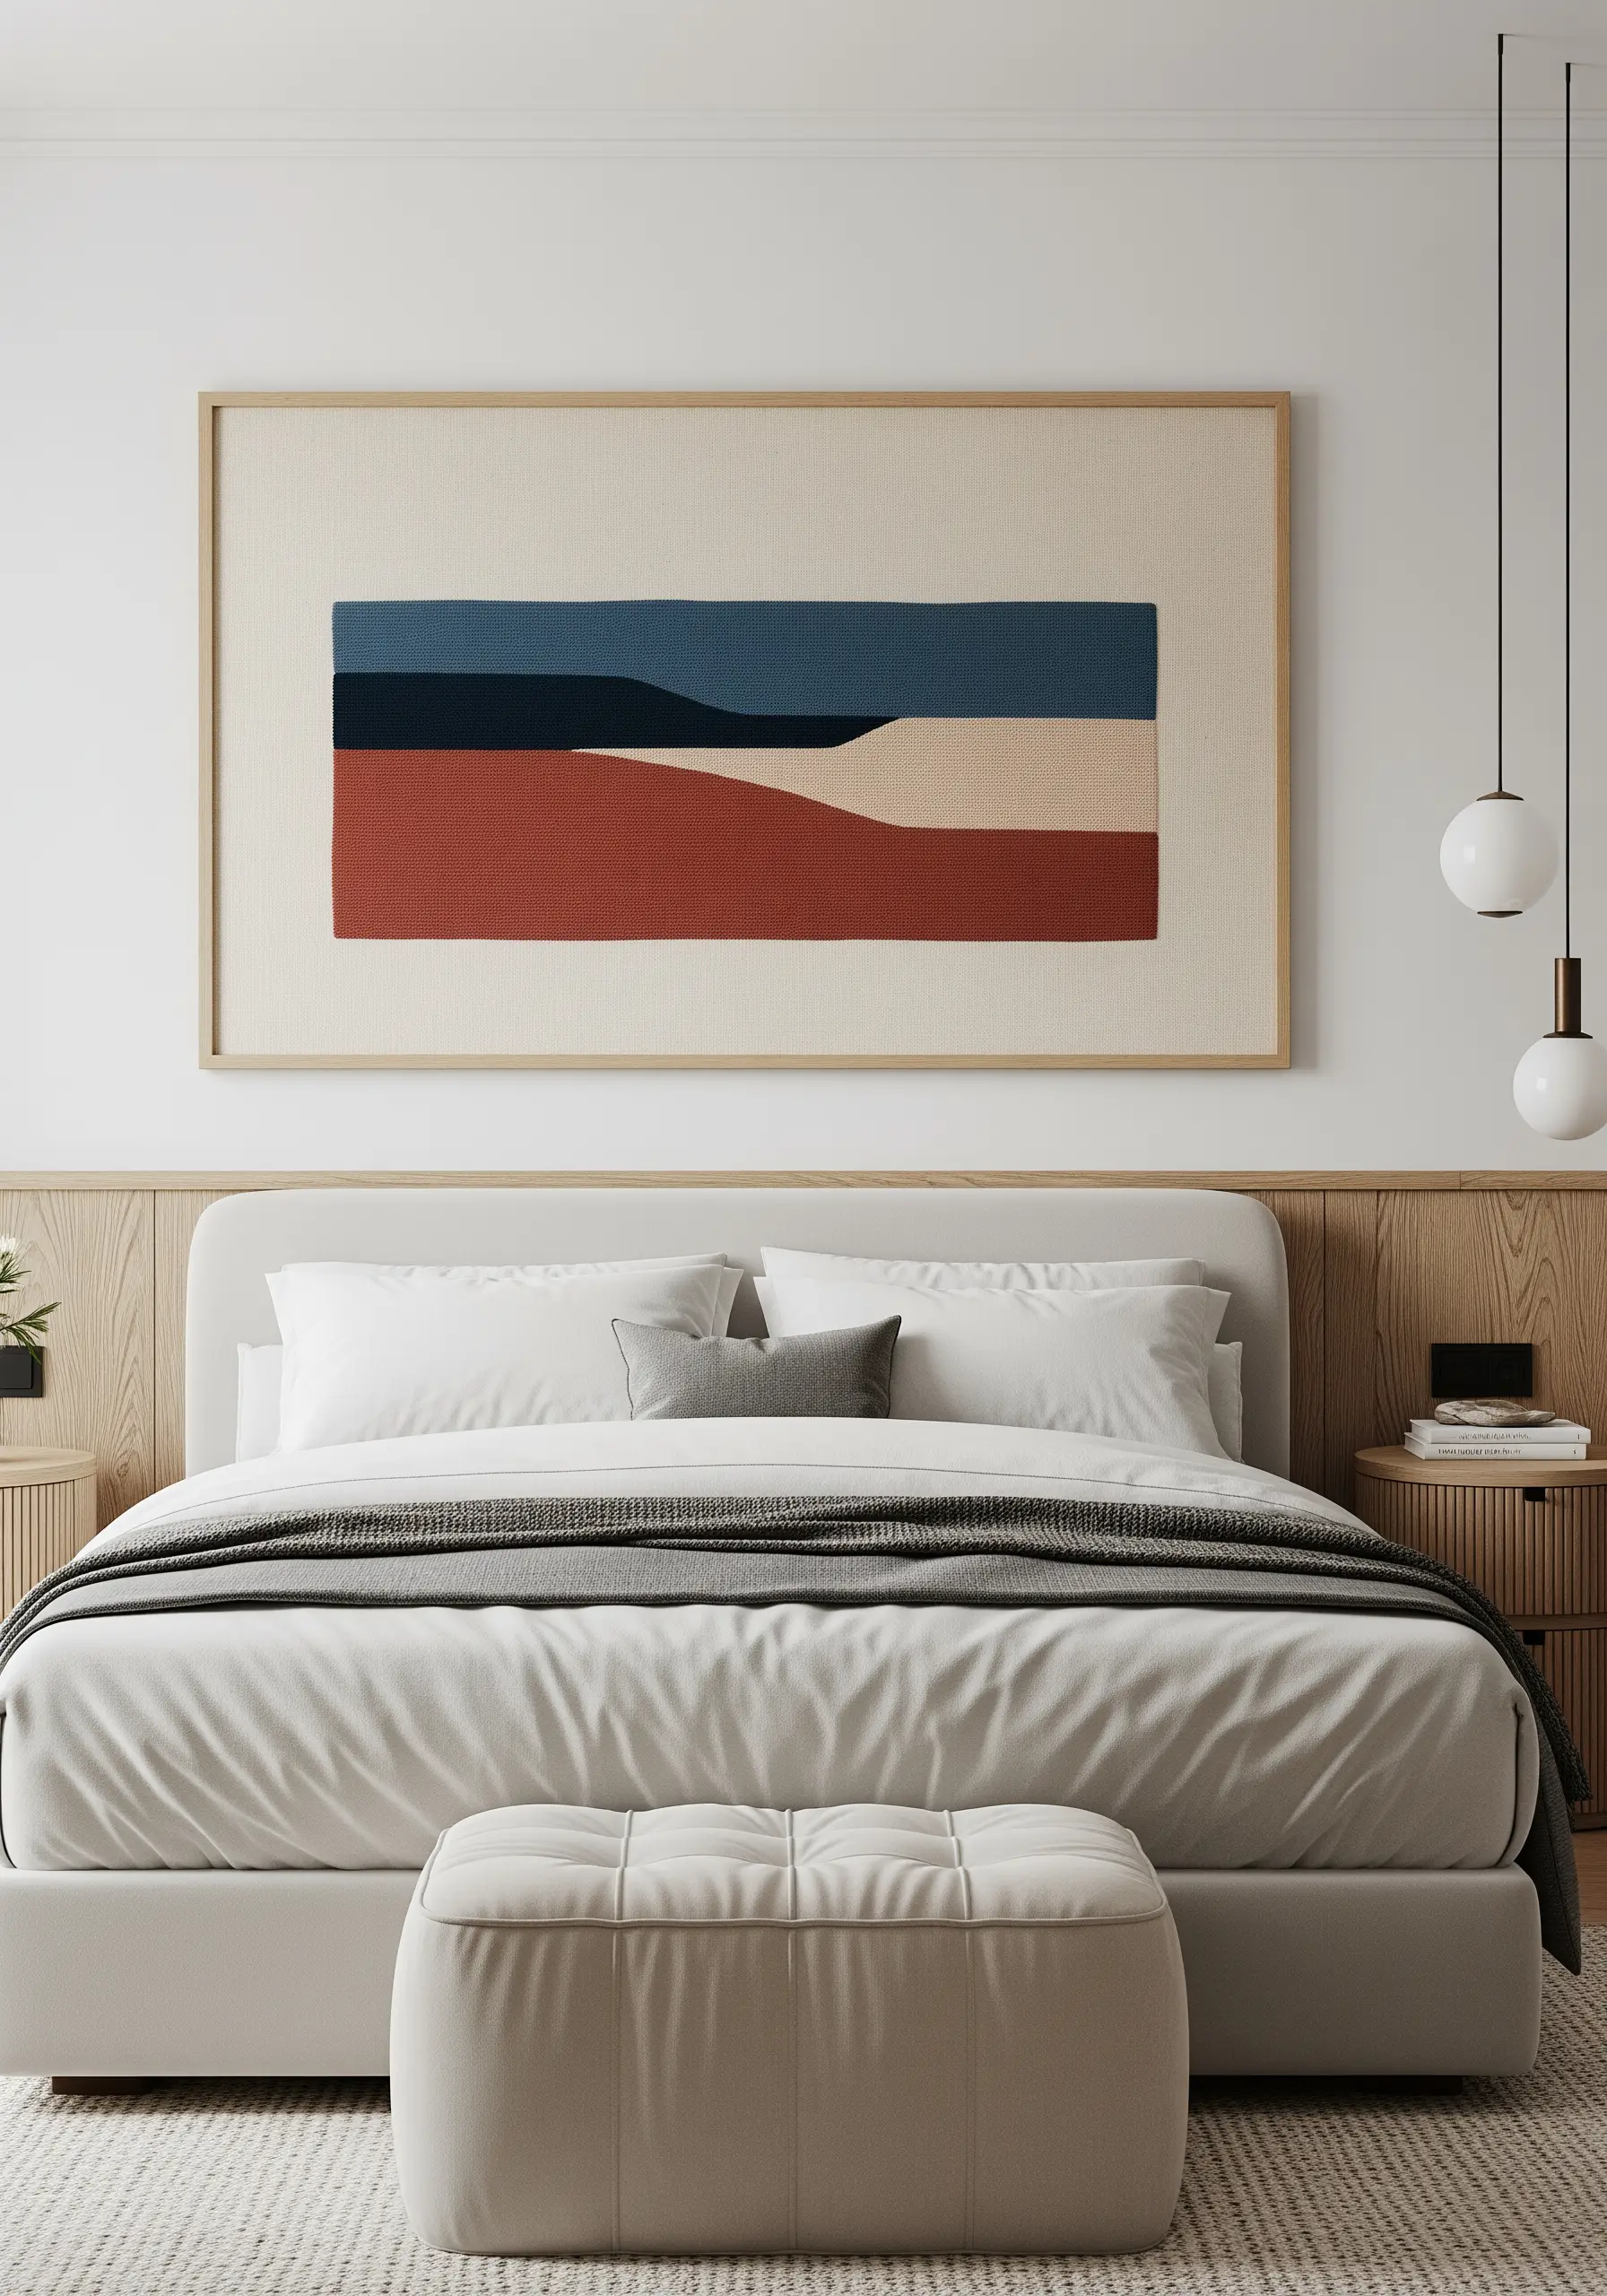
Evoke a minimalist landscape by reducing it to its essential horizontal color fields.
Use a dense, smooth satin stitch, ensuring all stitches within a block are perfectly parallel to each other for a clean, uniform finish.
Choose aida cloth or another evenweave fabric; its grid-like structure will help you keep your stitches straight and even, which is crucial for this style.
The large, uninterrupted blocks of color create a deeply calming and sophisticated effect, perfect for bedroom decor.
16. Make a Statement with a Single Pop of Color
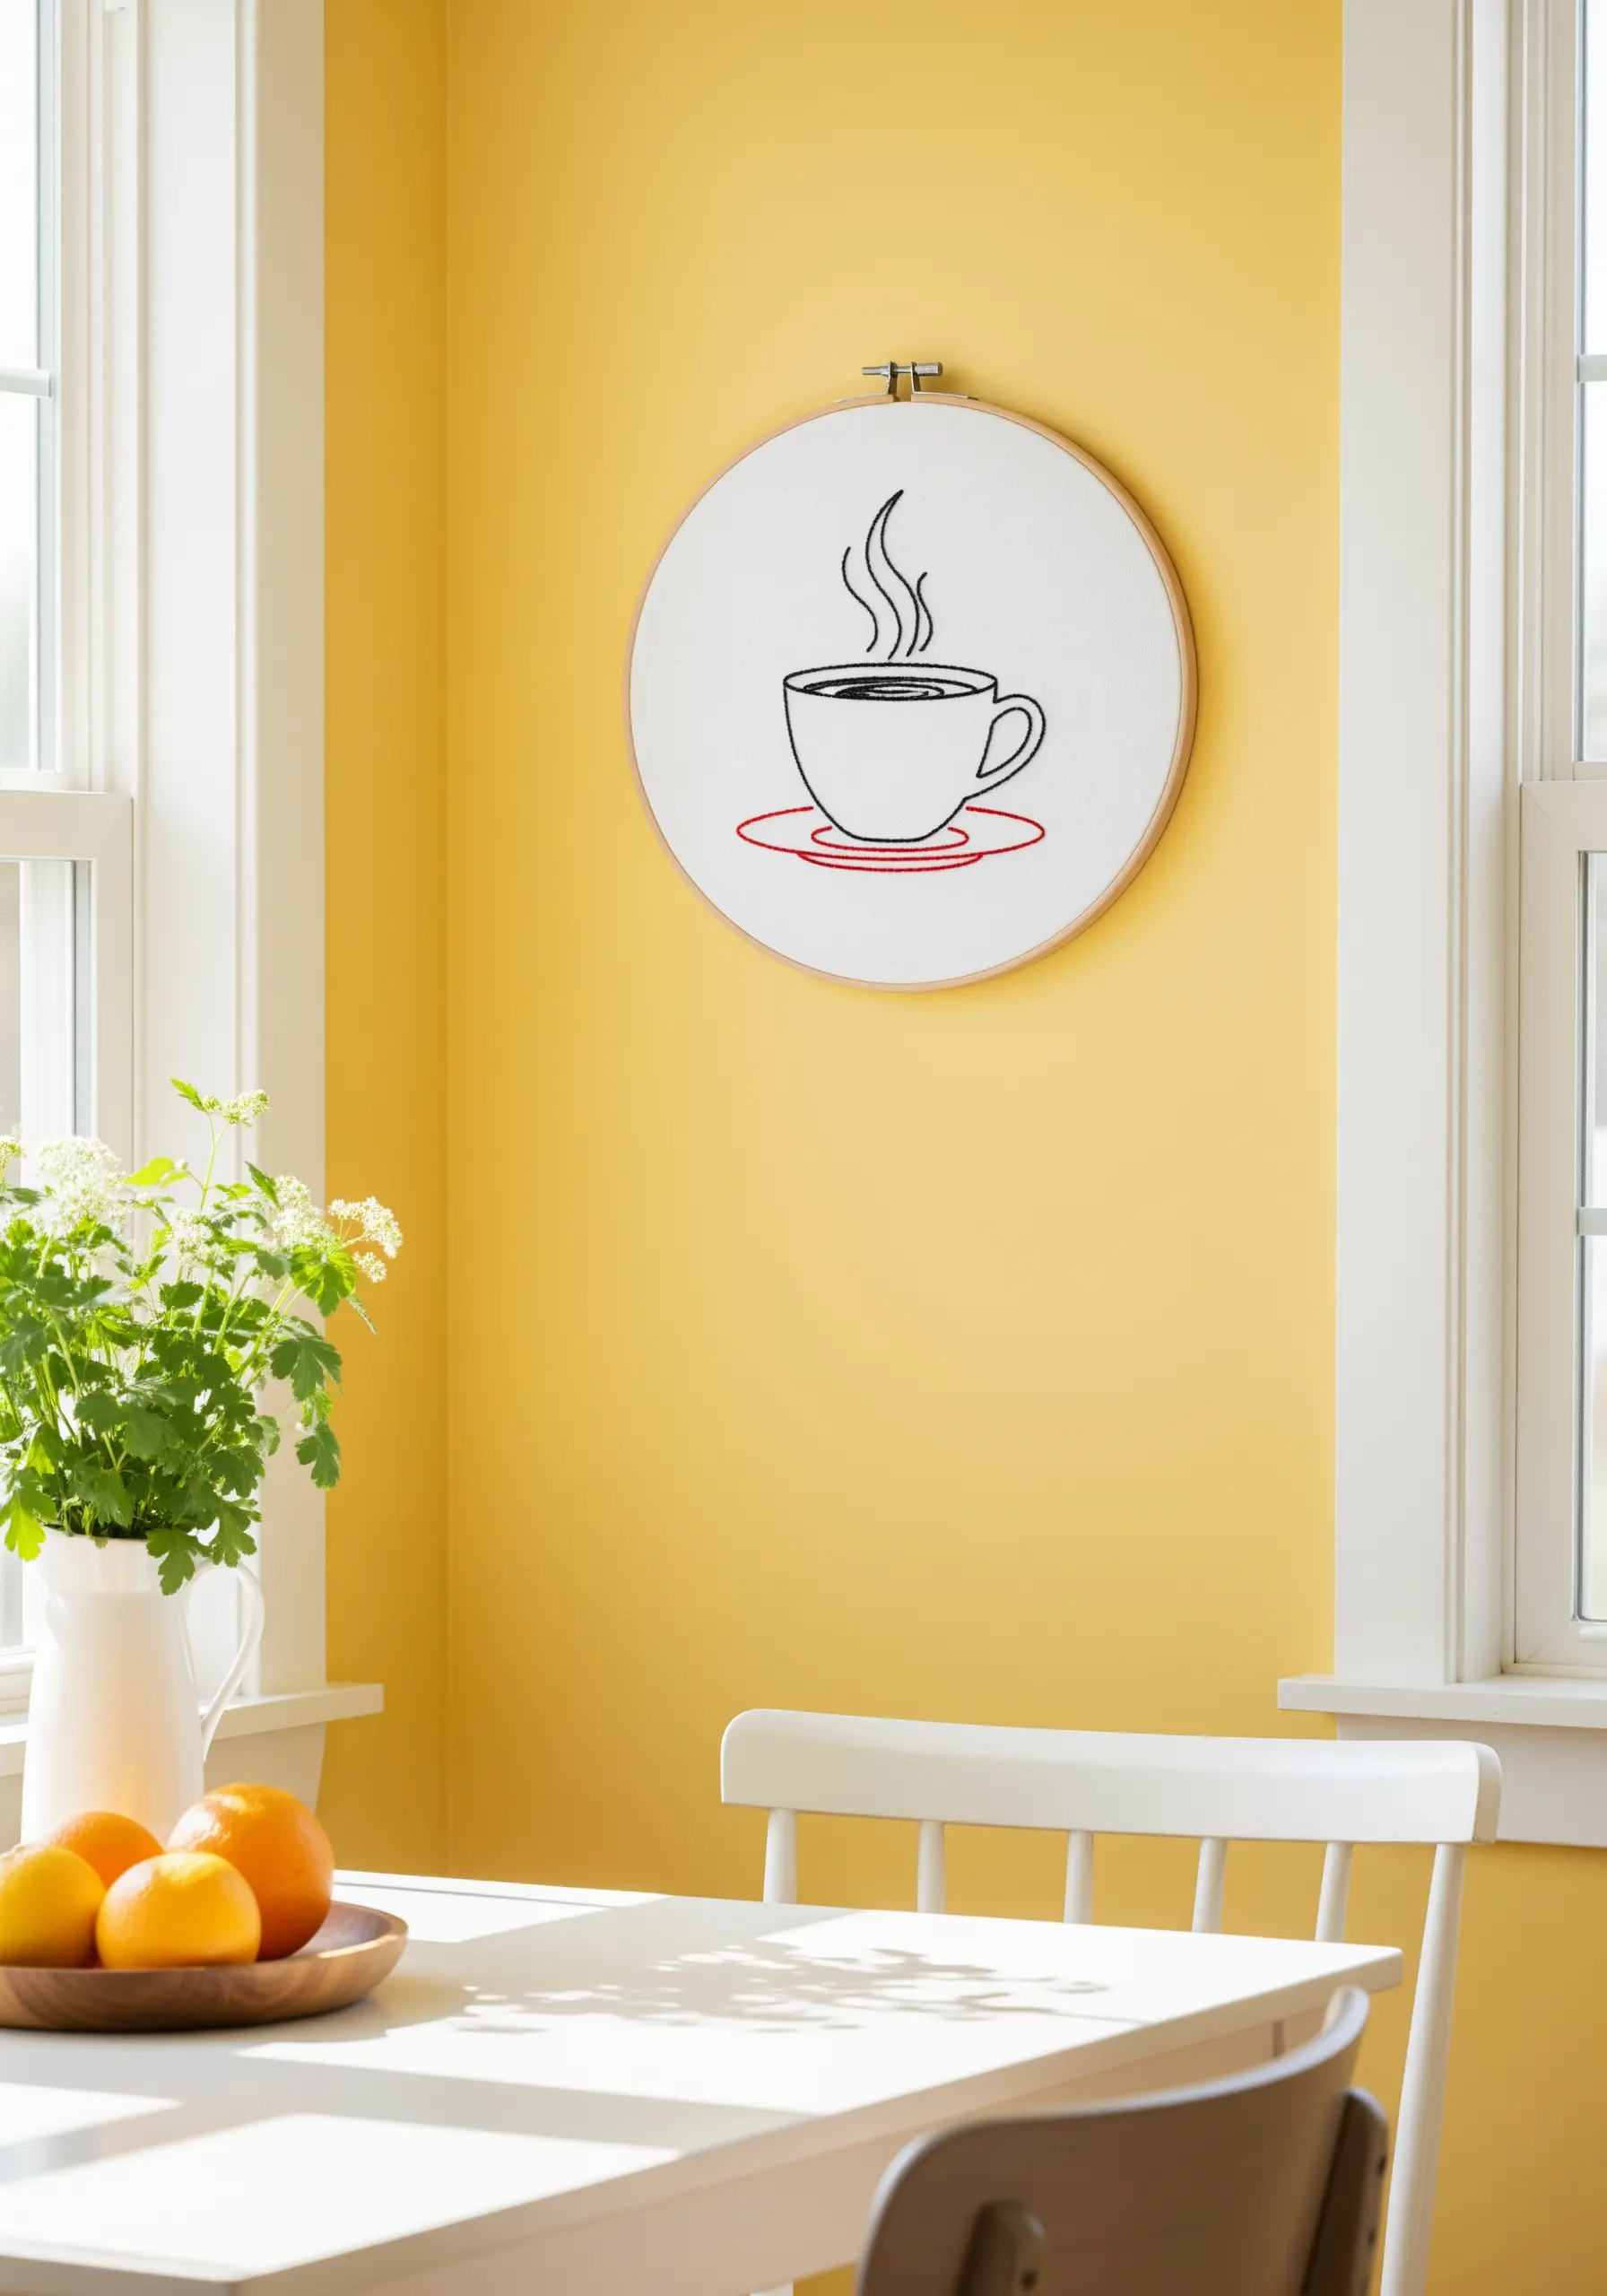
Create a striking focal point by rendering the majority of your design in a neutral color, like black, and highlighting just one element in a bright hue.
Use a simple backstitch for the entire design to maintain a clean, illustrative feel.
The power of this technique lies in its restraint—the single red saucer immediately draws the eye and gives the simple coffee cup a playful, modern energy.
This is one of the most easy small embroidery patterns to try when you want maximum impact with minimal effort.
17. Evoke Motion with Long, Vertical Stitches
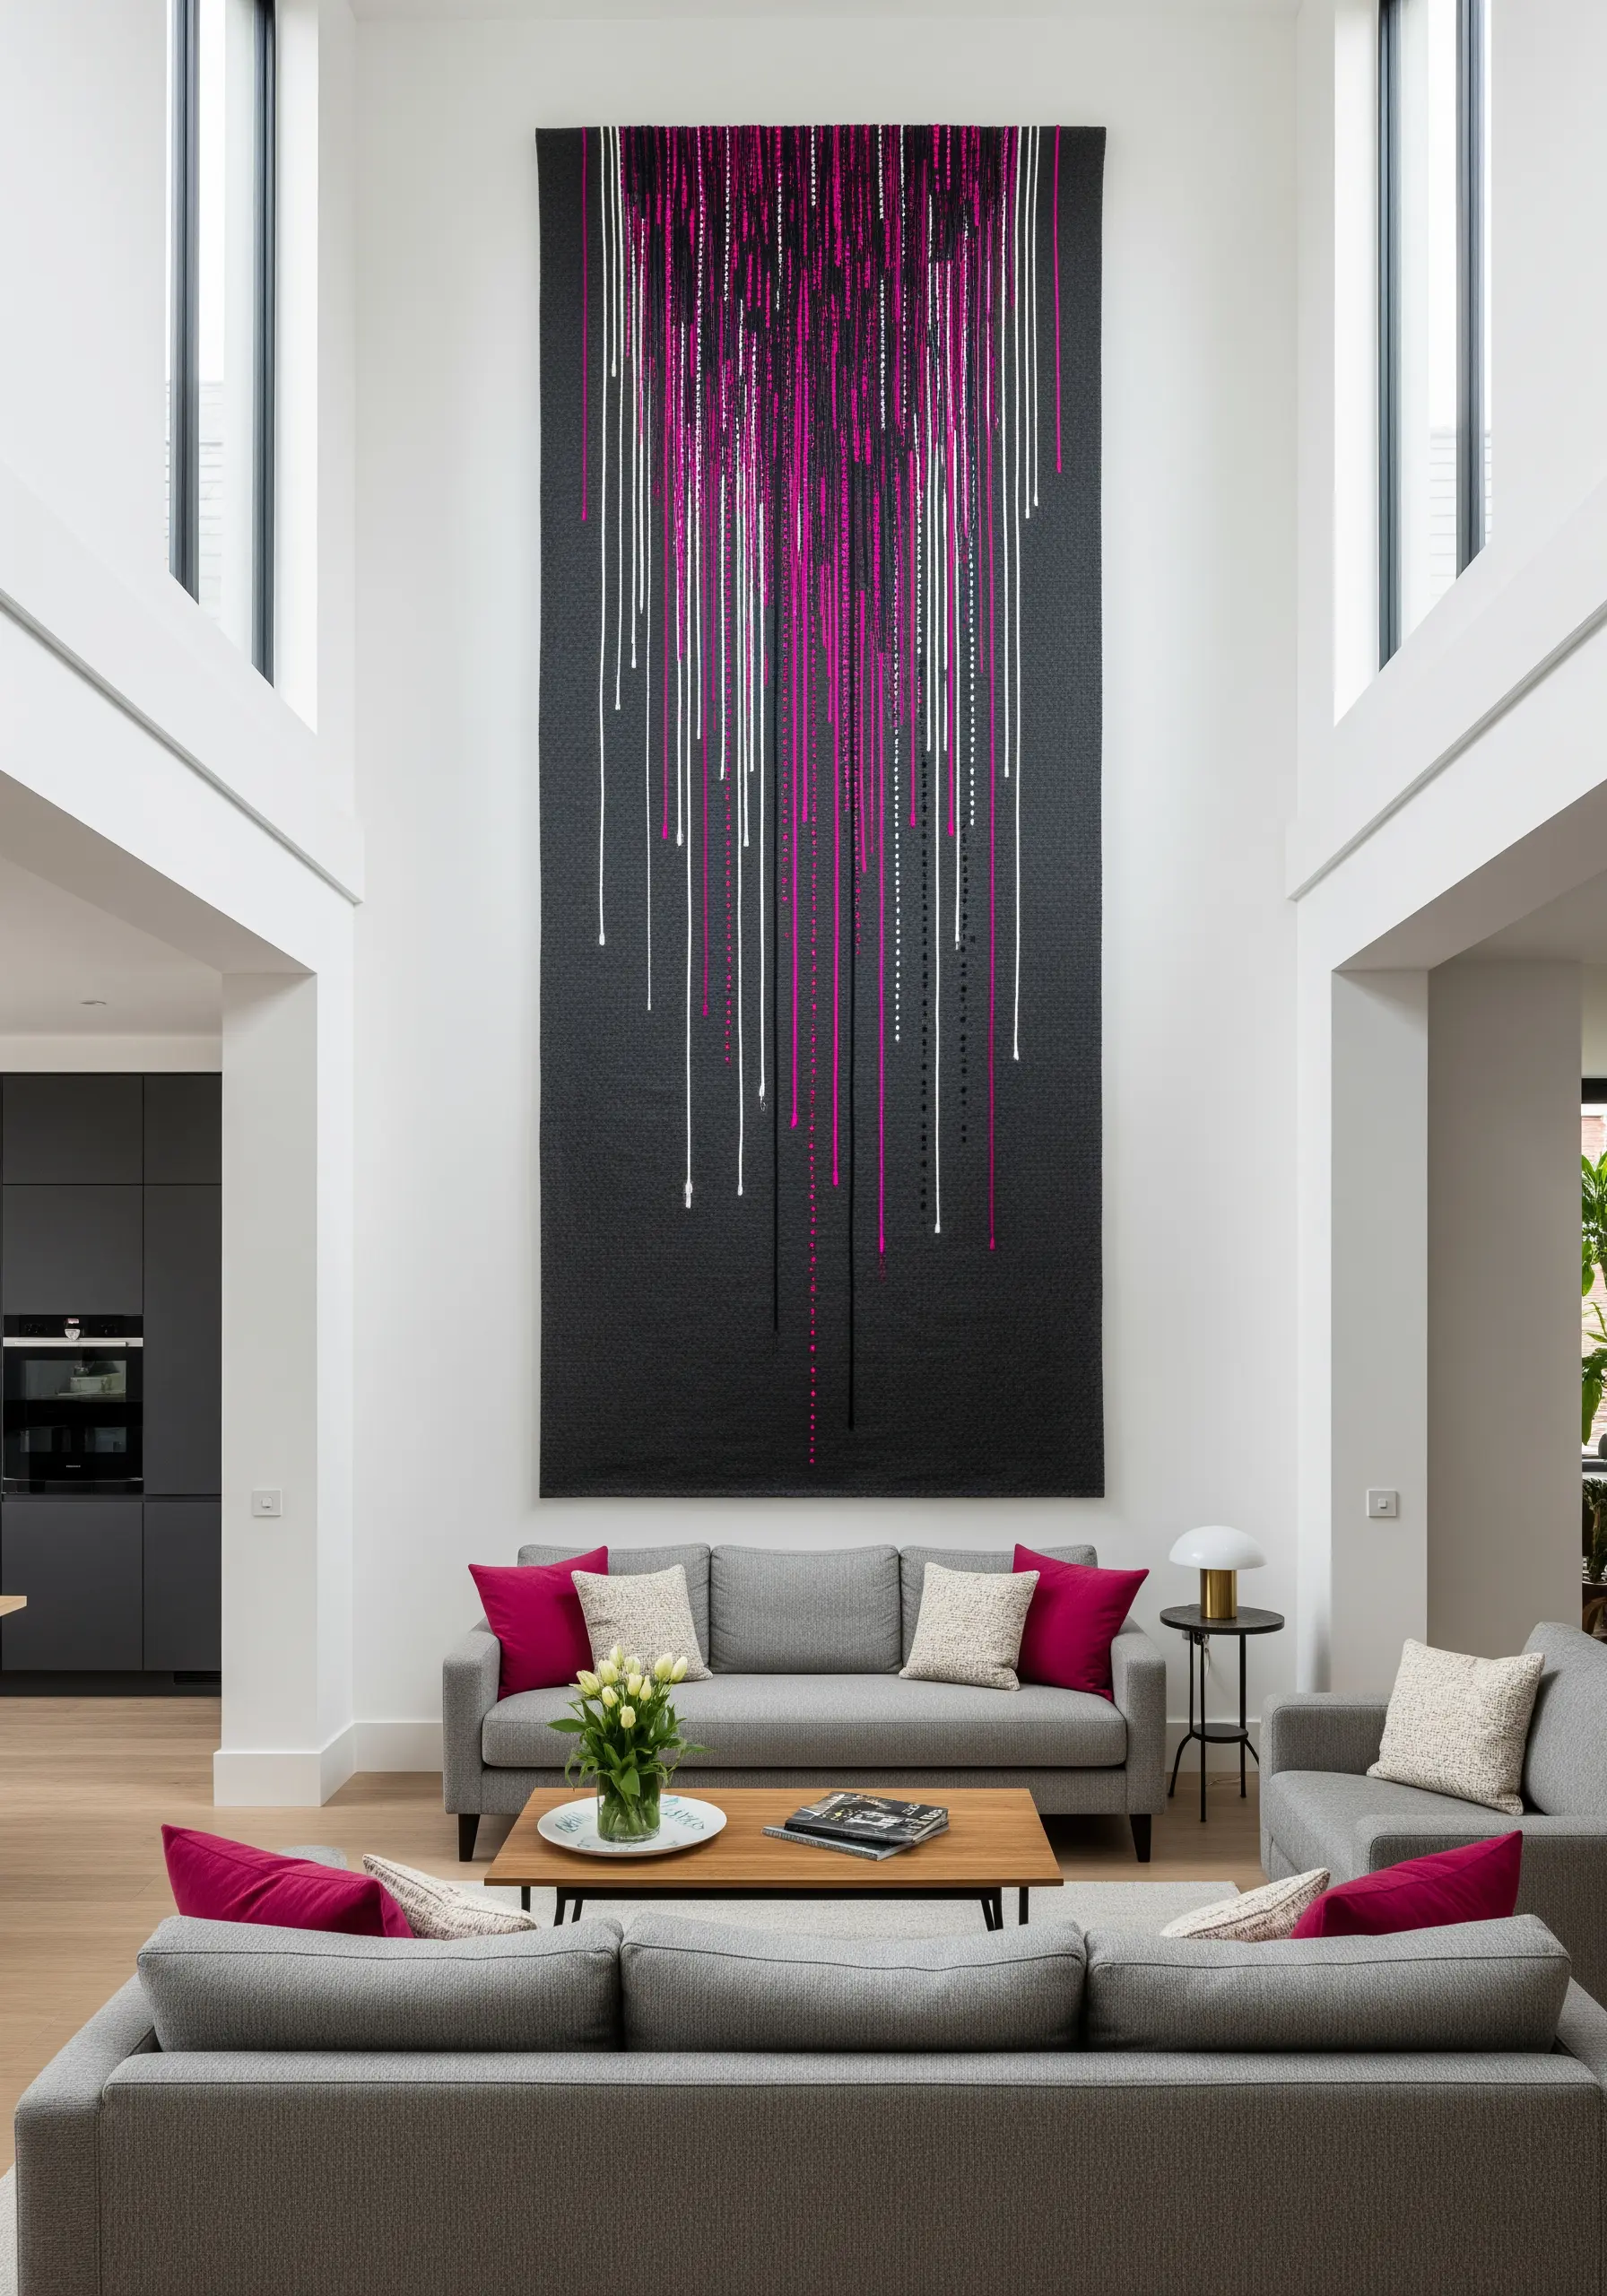
Create a dramatic sense of movement by using long, straight stitches that cascade down the fabric.
Let your threads hang loose at the bottom or use couching to tack them down at varying lengths, enhancing the dripping effect.
Vary the density of the stitches—clustering them tightly at the top and letting them become sparser towards the bottom—to create a natural-looking gradient.
On a large-scale piece, this technique transforms simple stitches into a powerful abstract statement.
18. Embrace Graphic Simplicity with Bold Symbols
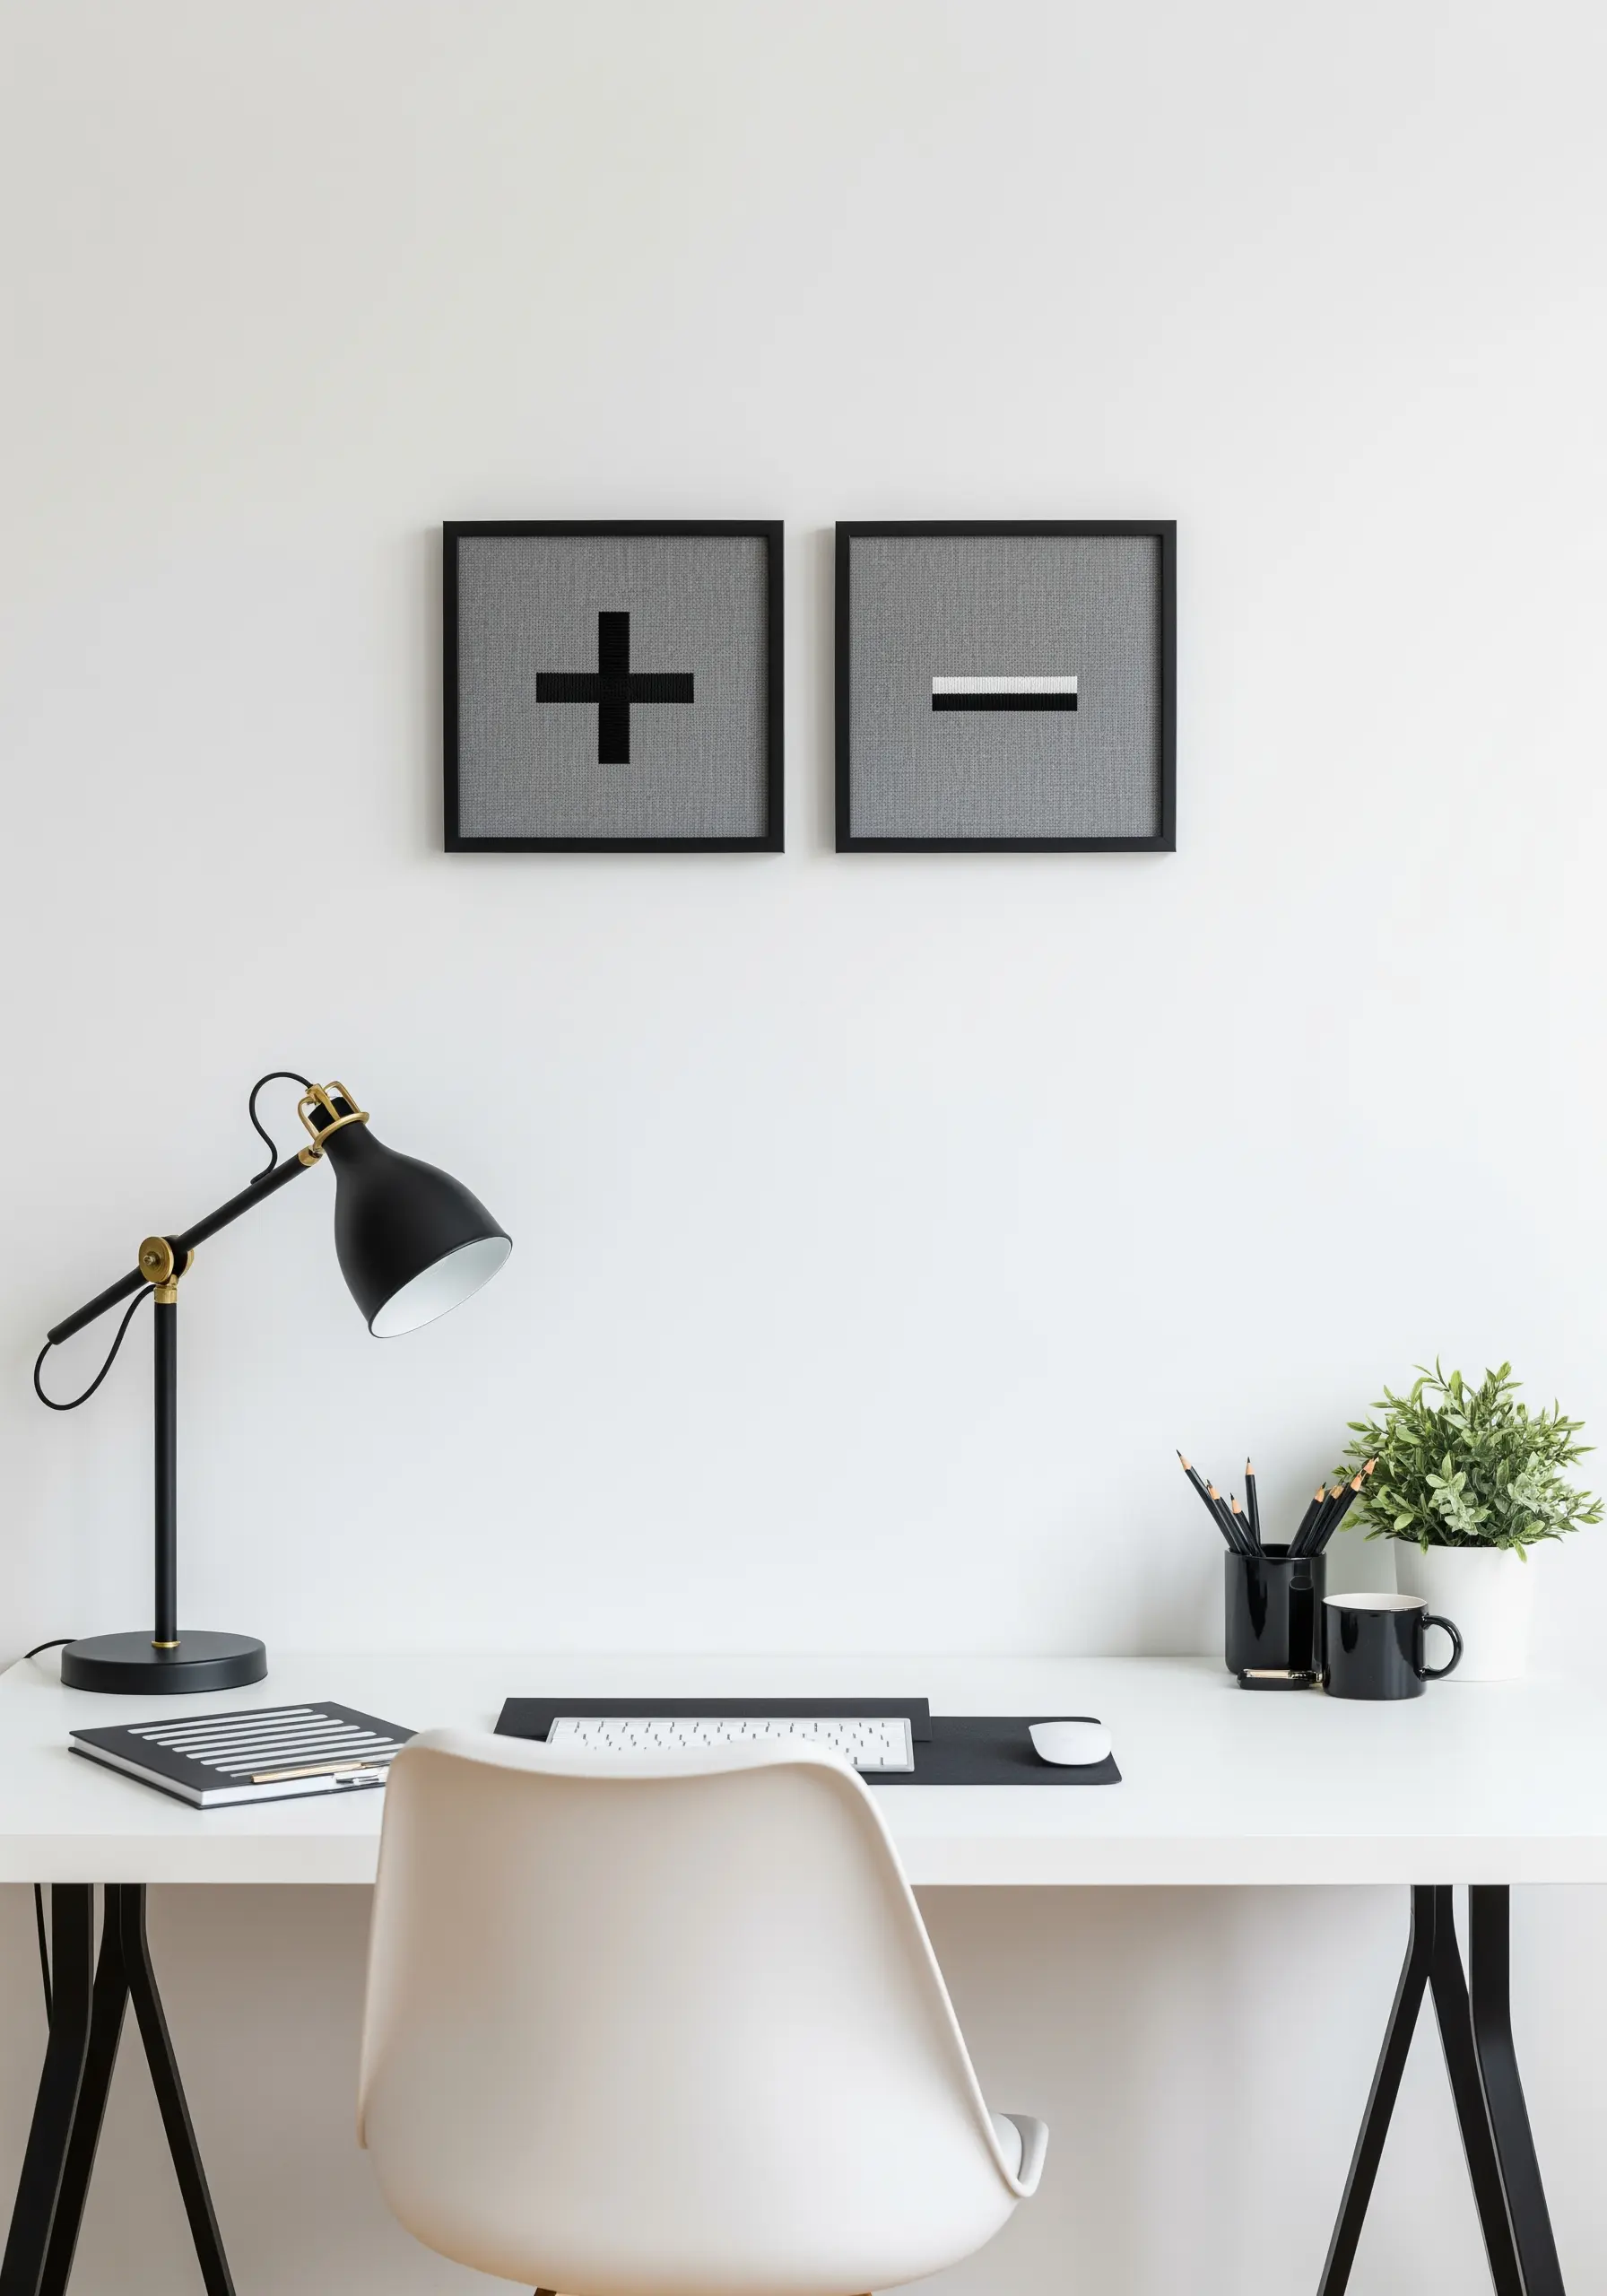
Choose universally understood symbols and render them with thick, clean satin stitches for a bold, graphic statement.
To get those perfectly crisp edges on your plus and minus signs, outline the shape first with a split stitch, then fill it in with satin stitch, tucking your needle just outside the outline.
Using a textured fabric like linen or woven cotton adds a subtle layer of sophistication to the otherwise stark design.
Framing them simply in black creates a cohesive, modern diptych that feels intentional and clean.
19. Design Symmetrical Motifs for a Meditative Feel
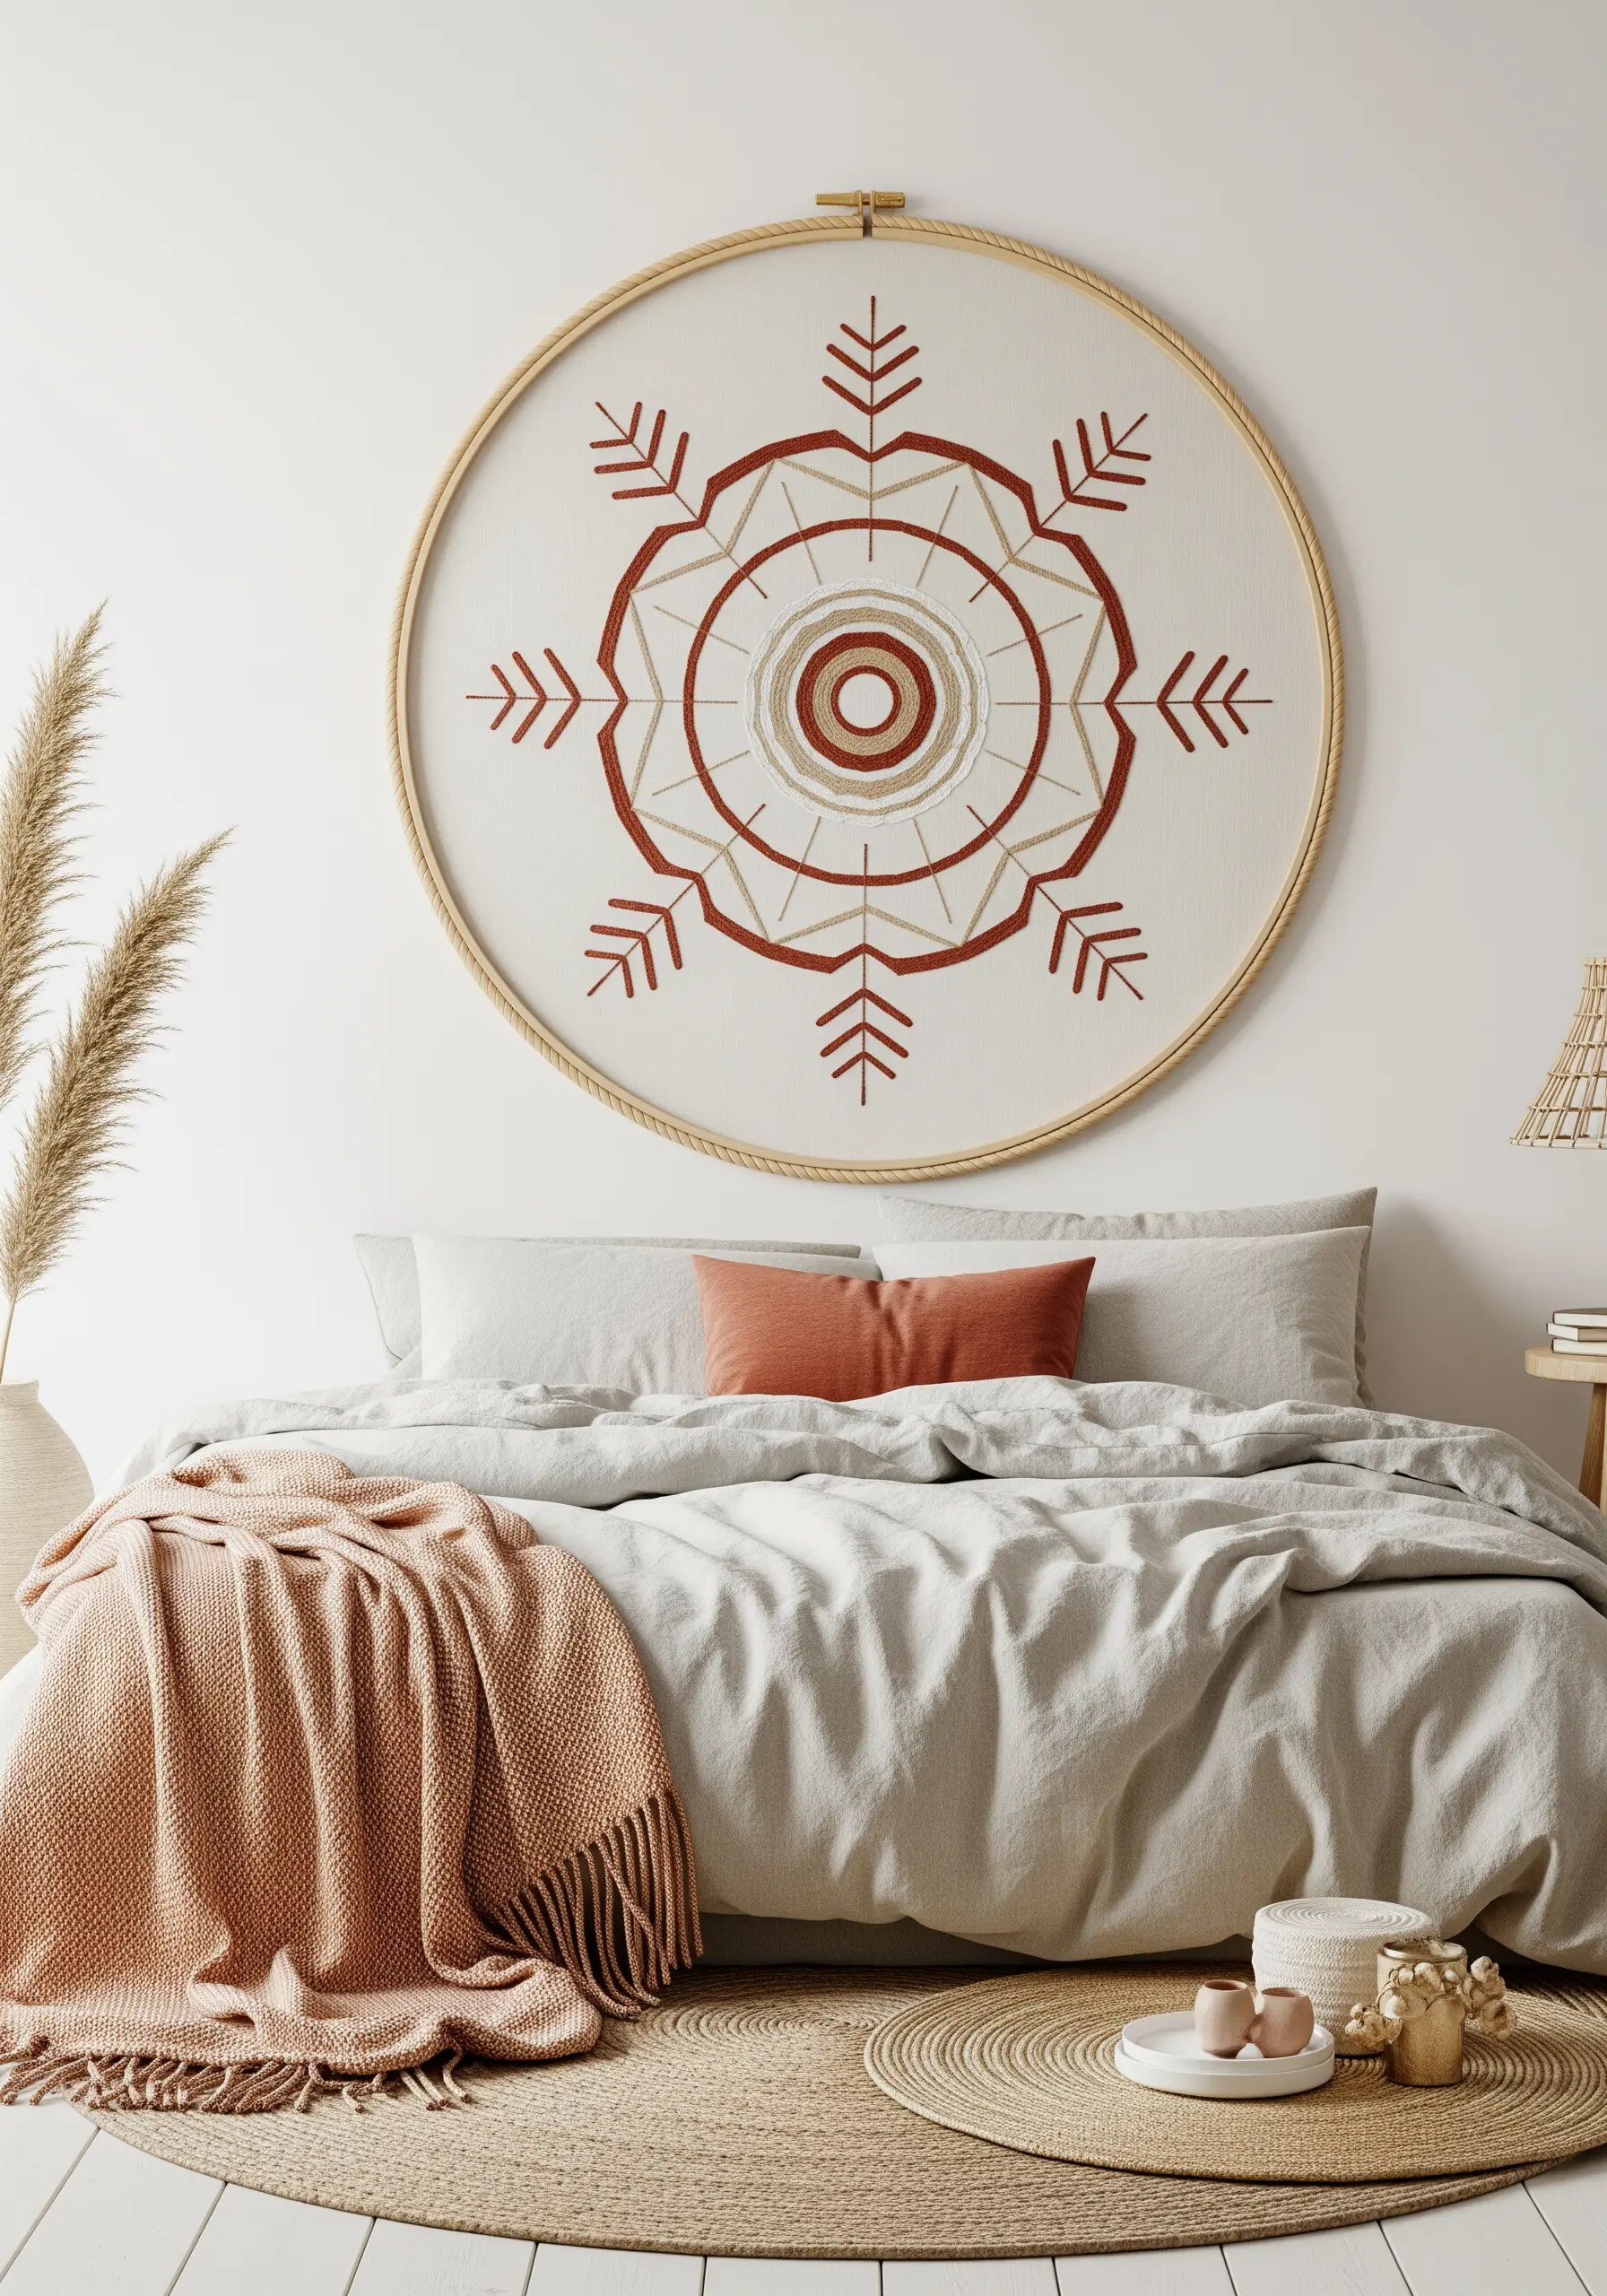
Create a calming, mandala-like design by building a symmetrical pattern around a central point.
Use a combination of simple satin stitch for the filled shapes and backstitch for the delicate lines to create textural variety.
Choose an earthy, warm palette of three colors, such as terracotta, beige, and brown, to enhance the grounded, serene feeling of the piece.
Wrapping the outer hoop with twine or yarn adds a finishing touch, transforming a basic tool into a decorative frame for your boho embroidery patterns.
20. Define Layers with Contrasting Outlines
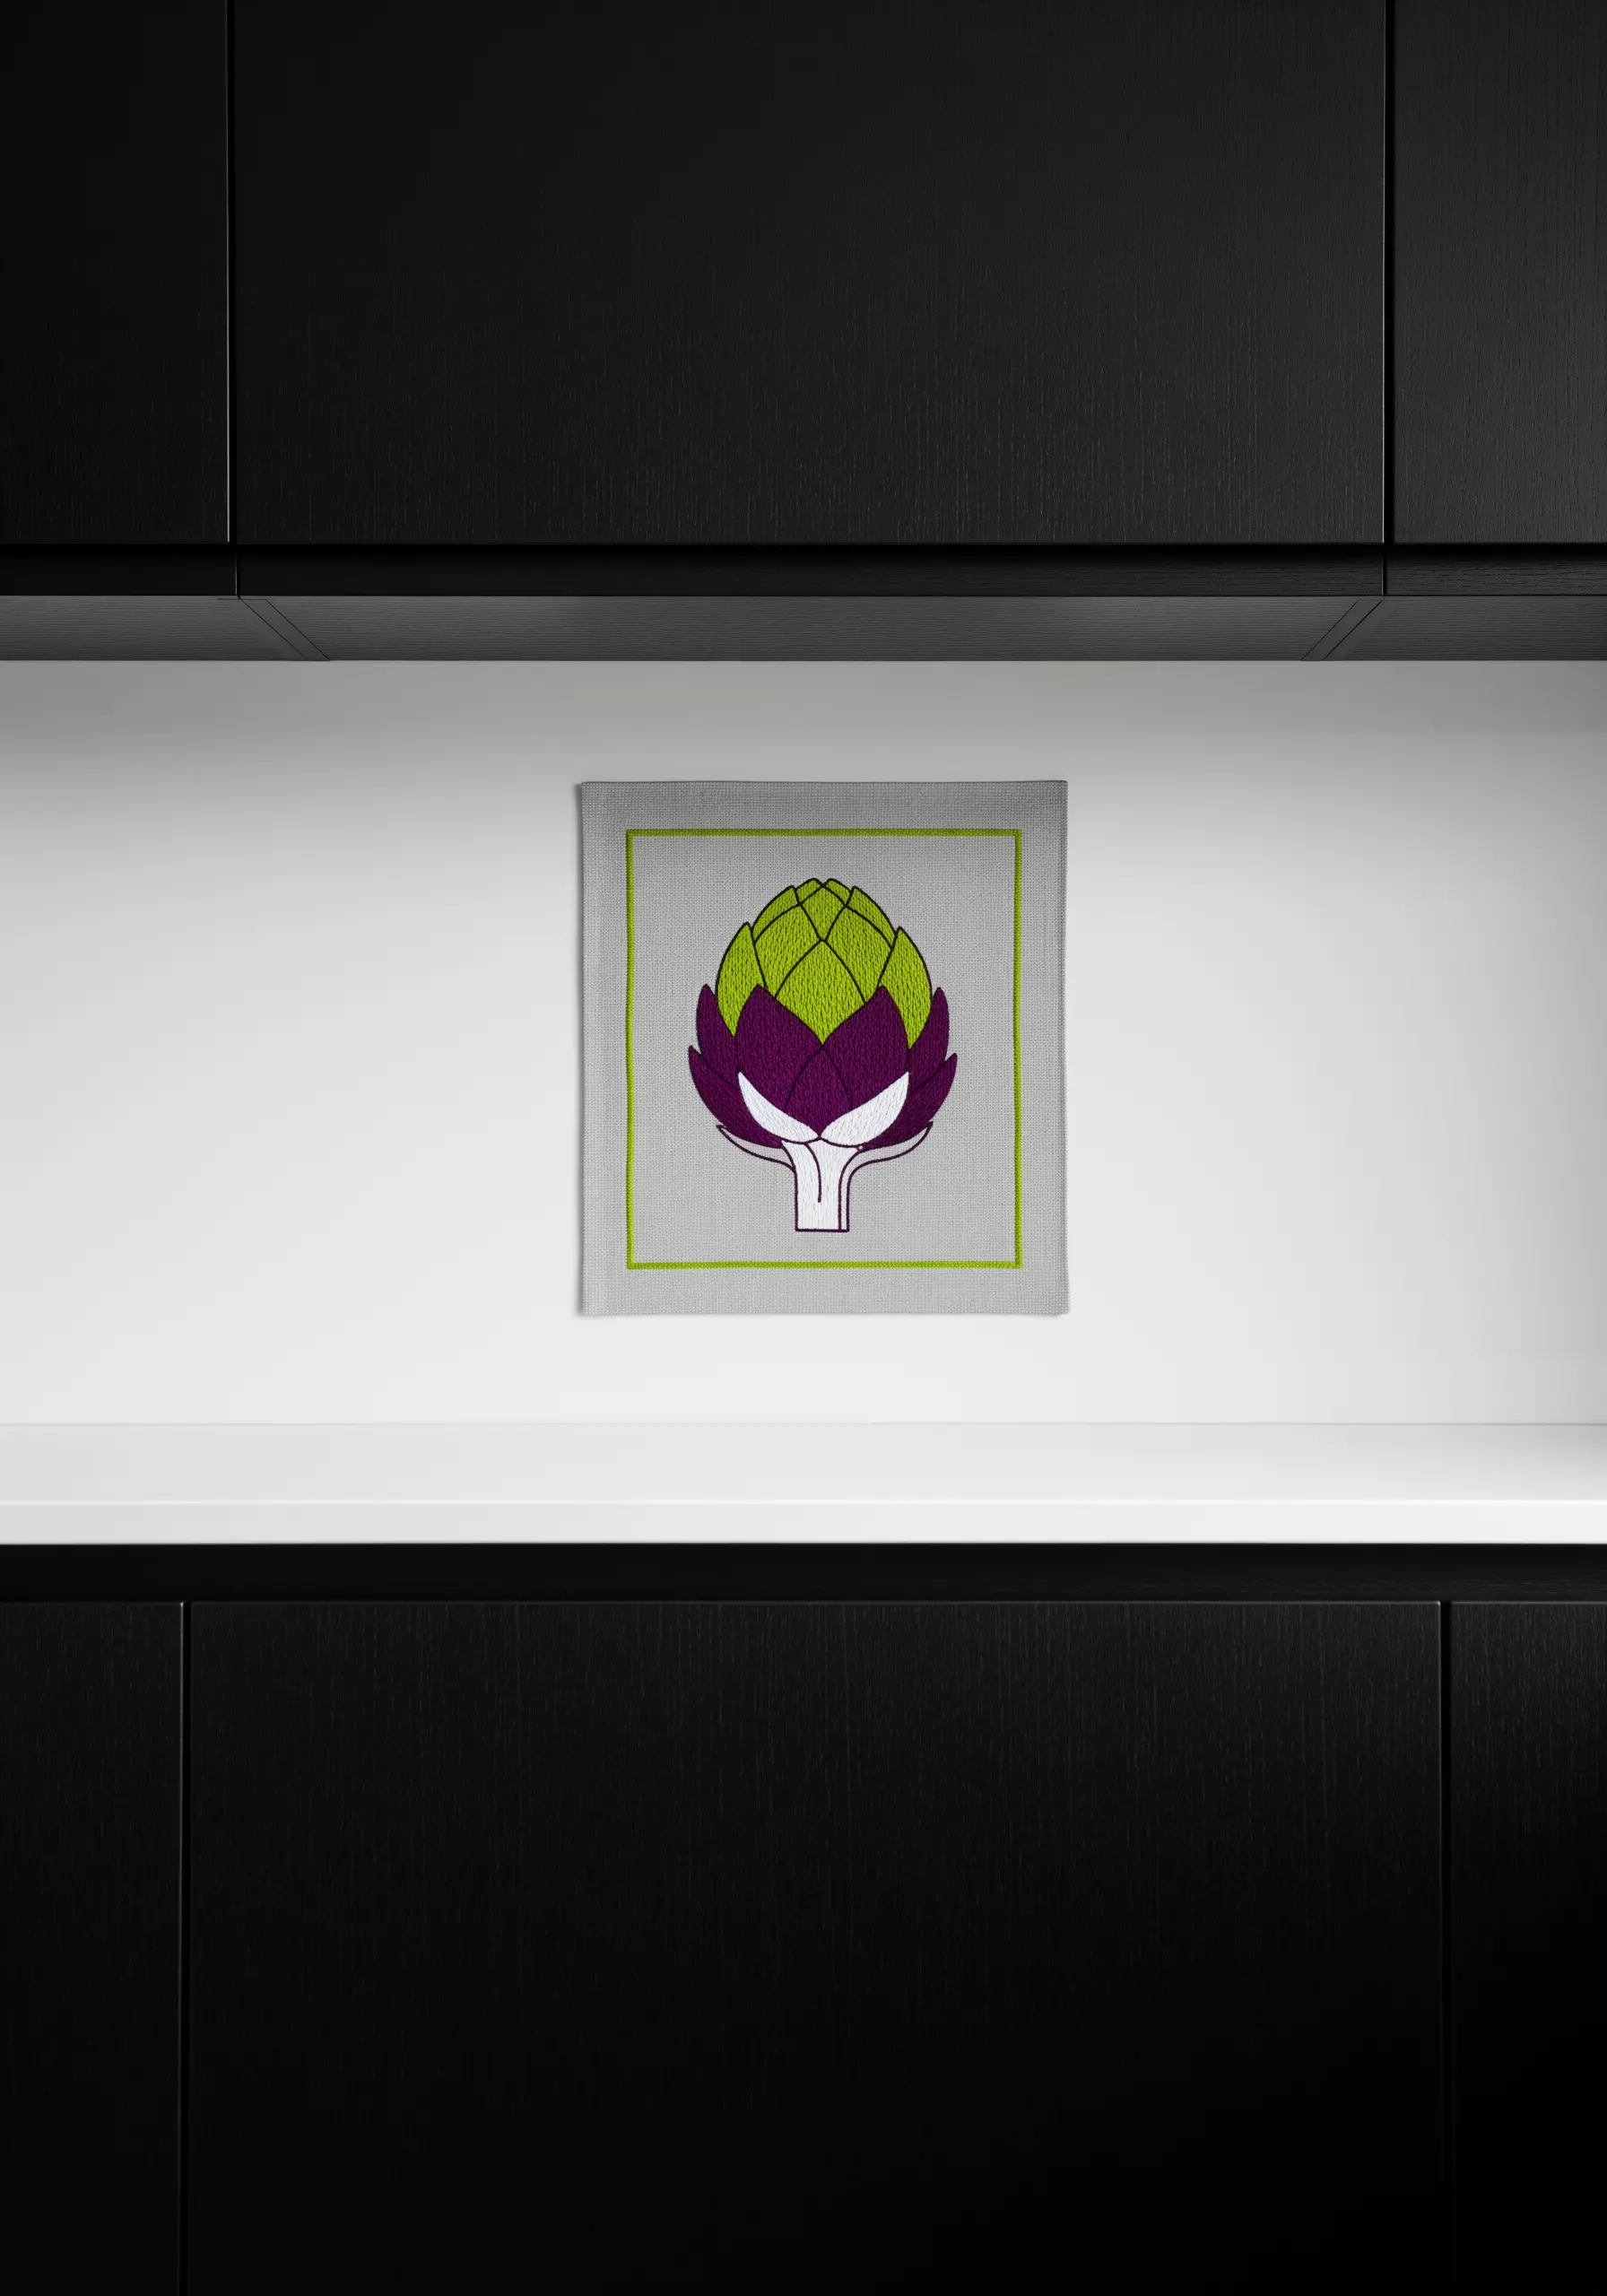
To make layered elements distinct, outline each one with a thin, bright line of backstitch.
The vibrant lime green outline here separates the purple and green sections of the artichoke, making the colors pop and preventing them from visually merging.
Fill each section with a directional satin stitch, angling the stitches to follow the natural curve of the leaves for a more realistic, dimensional look.
This is a great technique for any design where you need to create clear separation between adjacent color blocks.
21. Play with Texture in Monochromatic Stacks
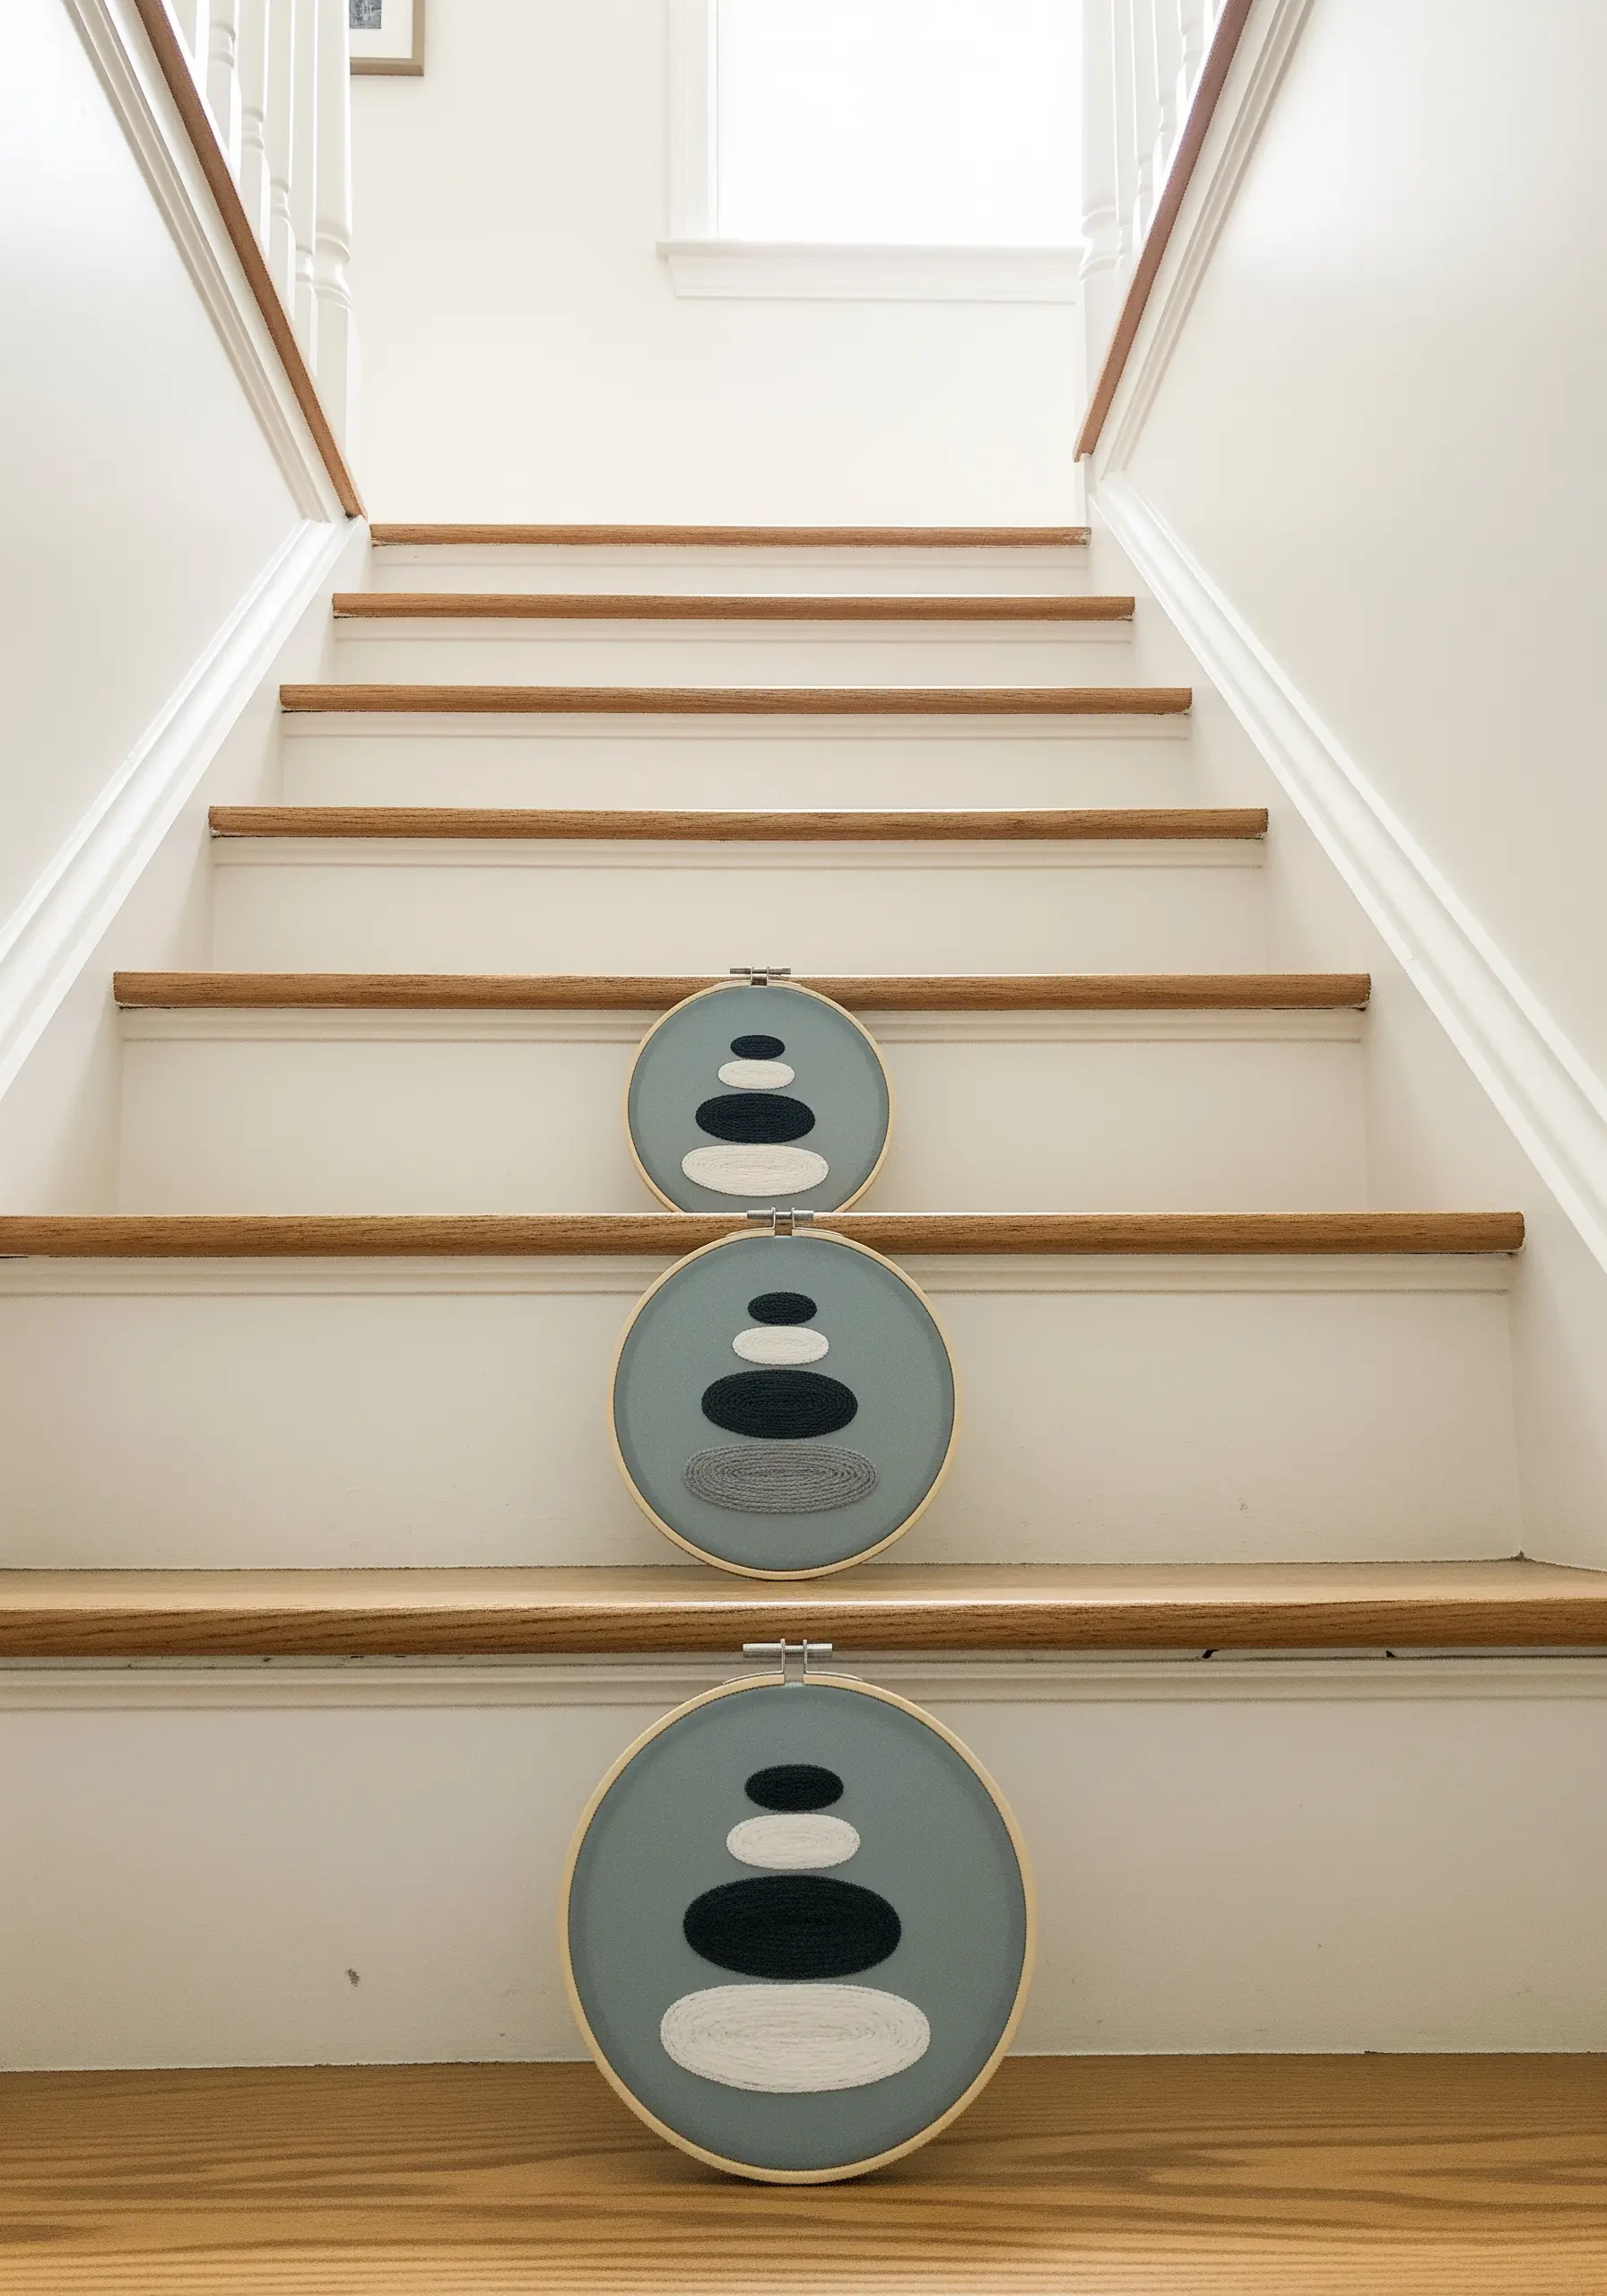
Explore the interplay of texture by assigning a different stitch to each color in a simple, stacked design.
Here, you could use a smooth satin stitch for the solid black and white stones, and a more textured seed stitch or French knots for the gray one.
This approach adds tactile interest and depth to a very simple composition, making it more engaging to look at and to stitch.
Grouping the three hoops together on a staircase creates a sense of rhythm and upward movement.
22. Create an Ombré Effect with Thread Blending
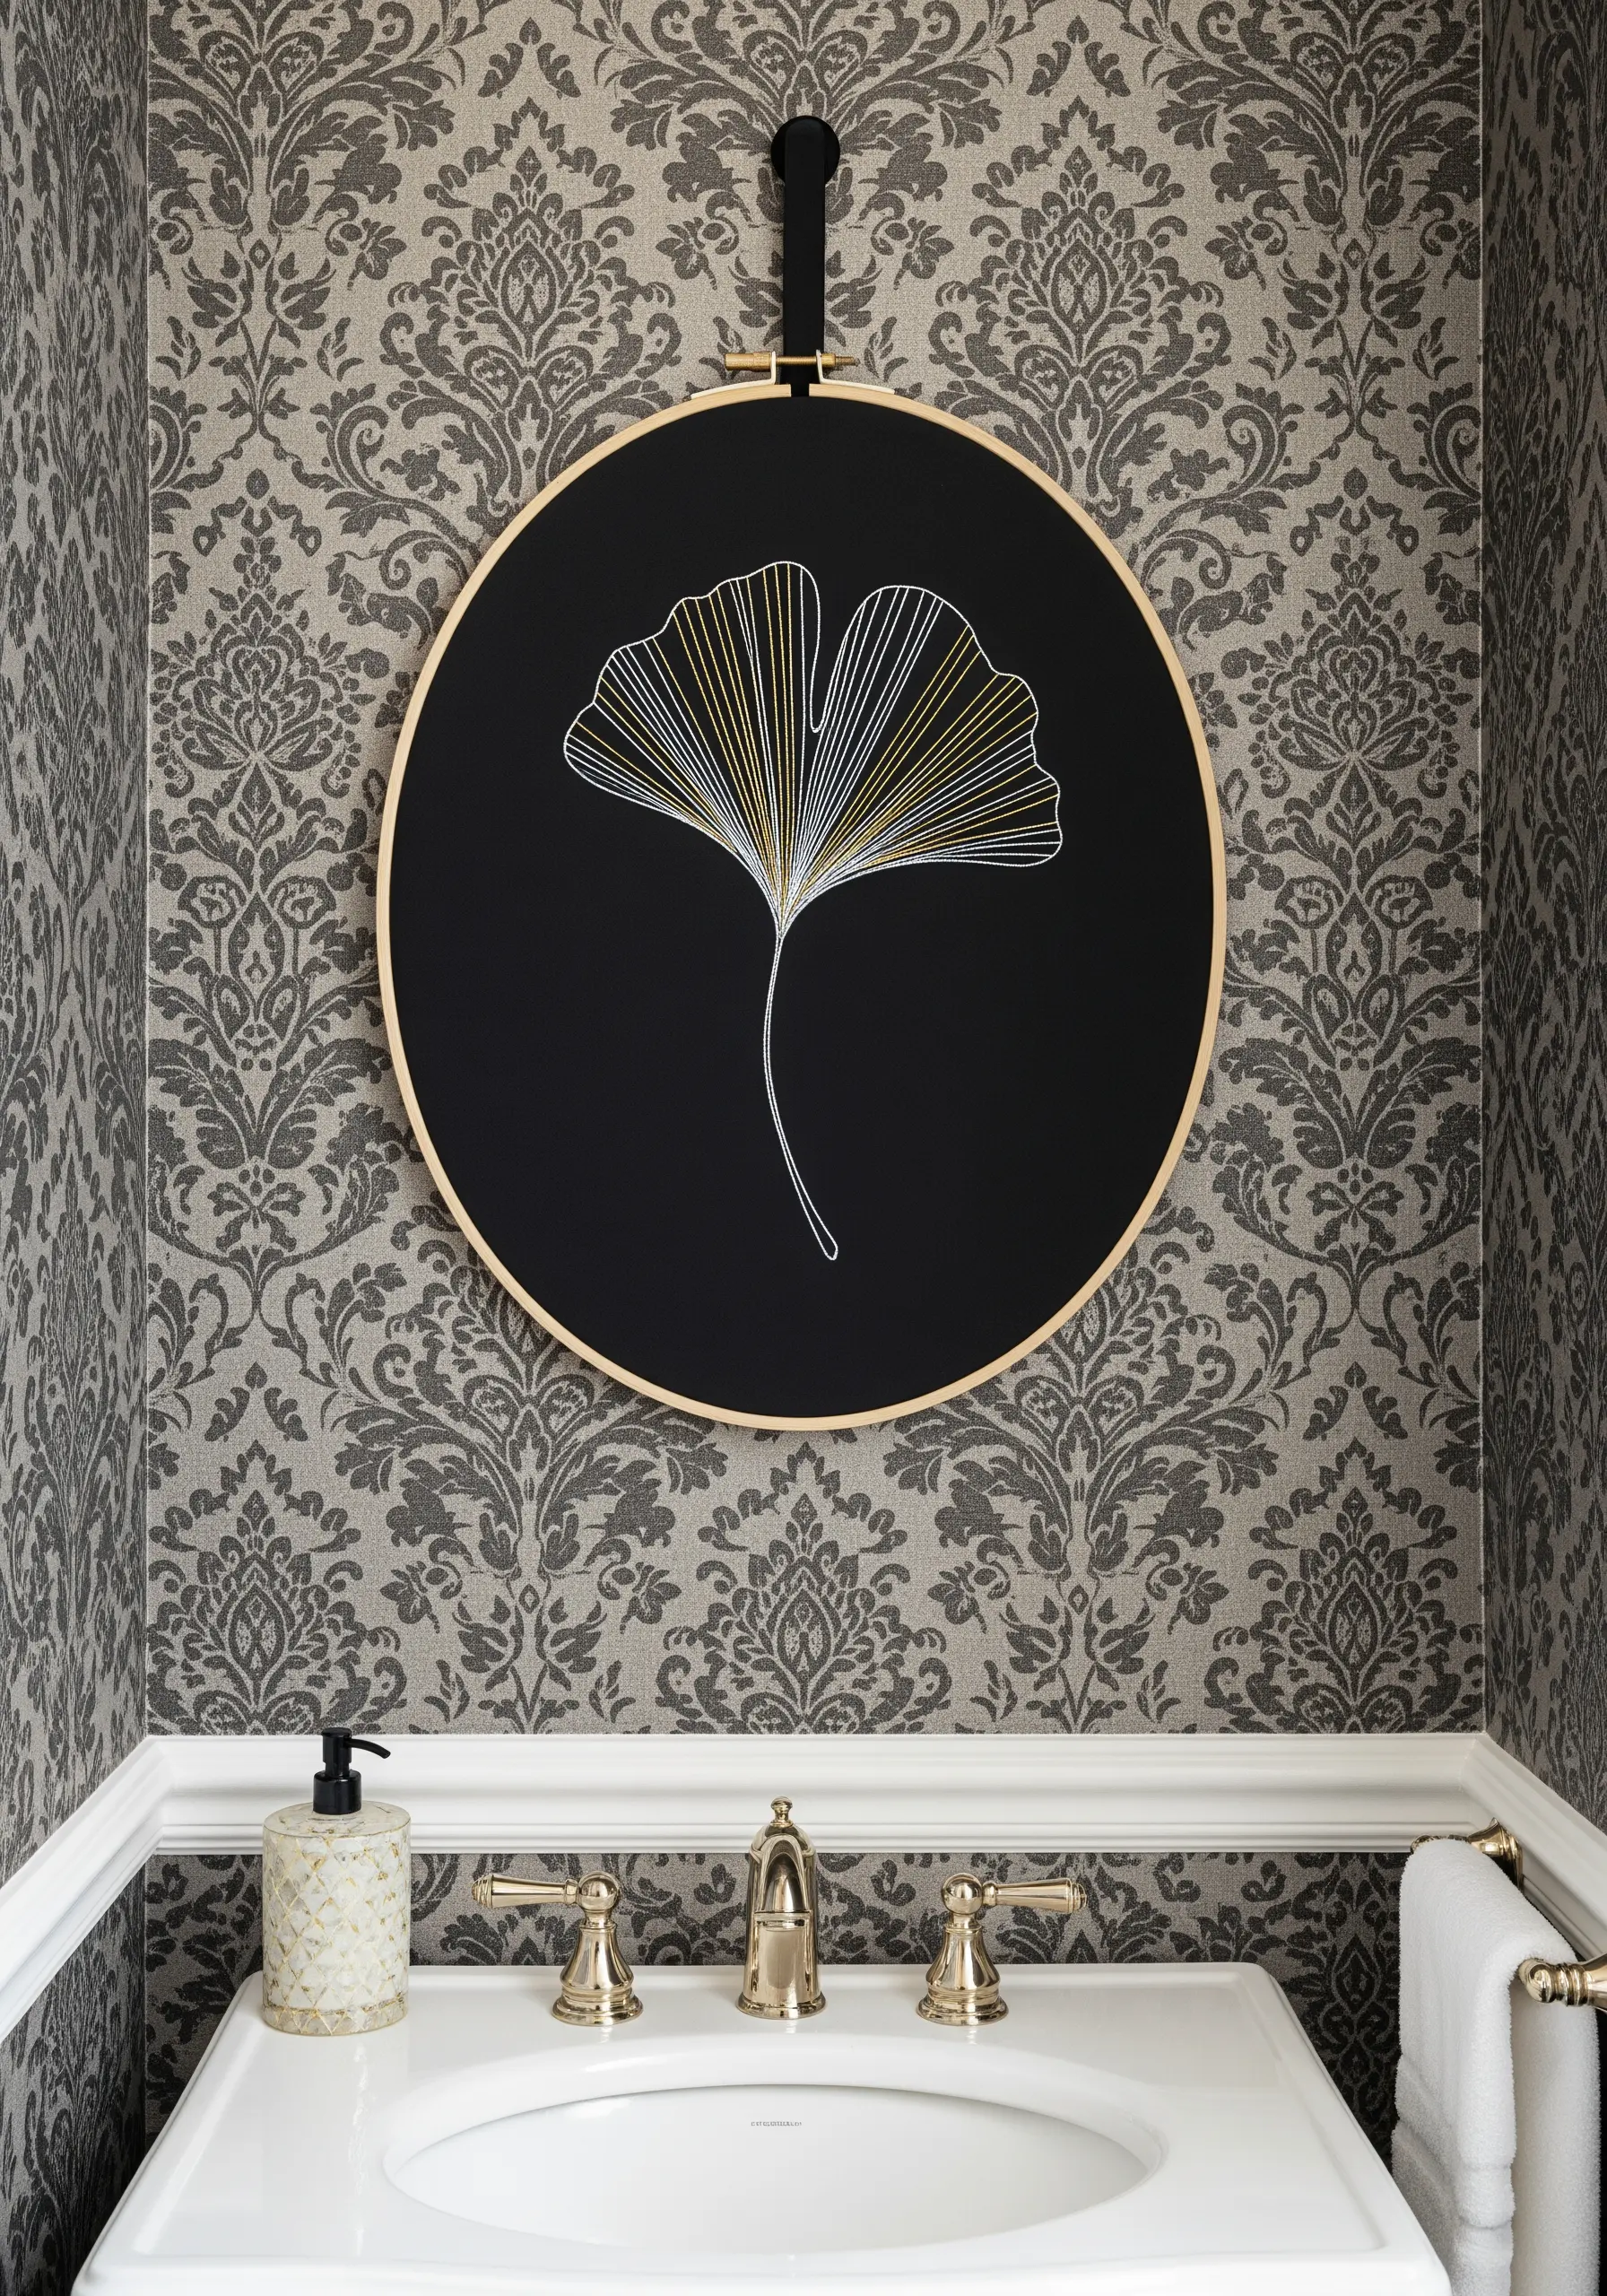
Achieve a smooth color transition in your linework by blending two thread colors in the needle at once.
Start stitching the ginkgo leaf with two strands of white thread, then switch to one strand of white and one of gold, and finish with two strands of gold.
This simple technique creates a beautiful, subtle gradient effect that gives the design a luminous quality.
Using this technique against a stark black background makes the blended colors appear even more radiant.
23. Translate Maps into Minimalist Line Art
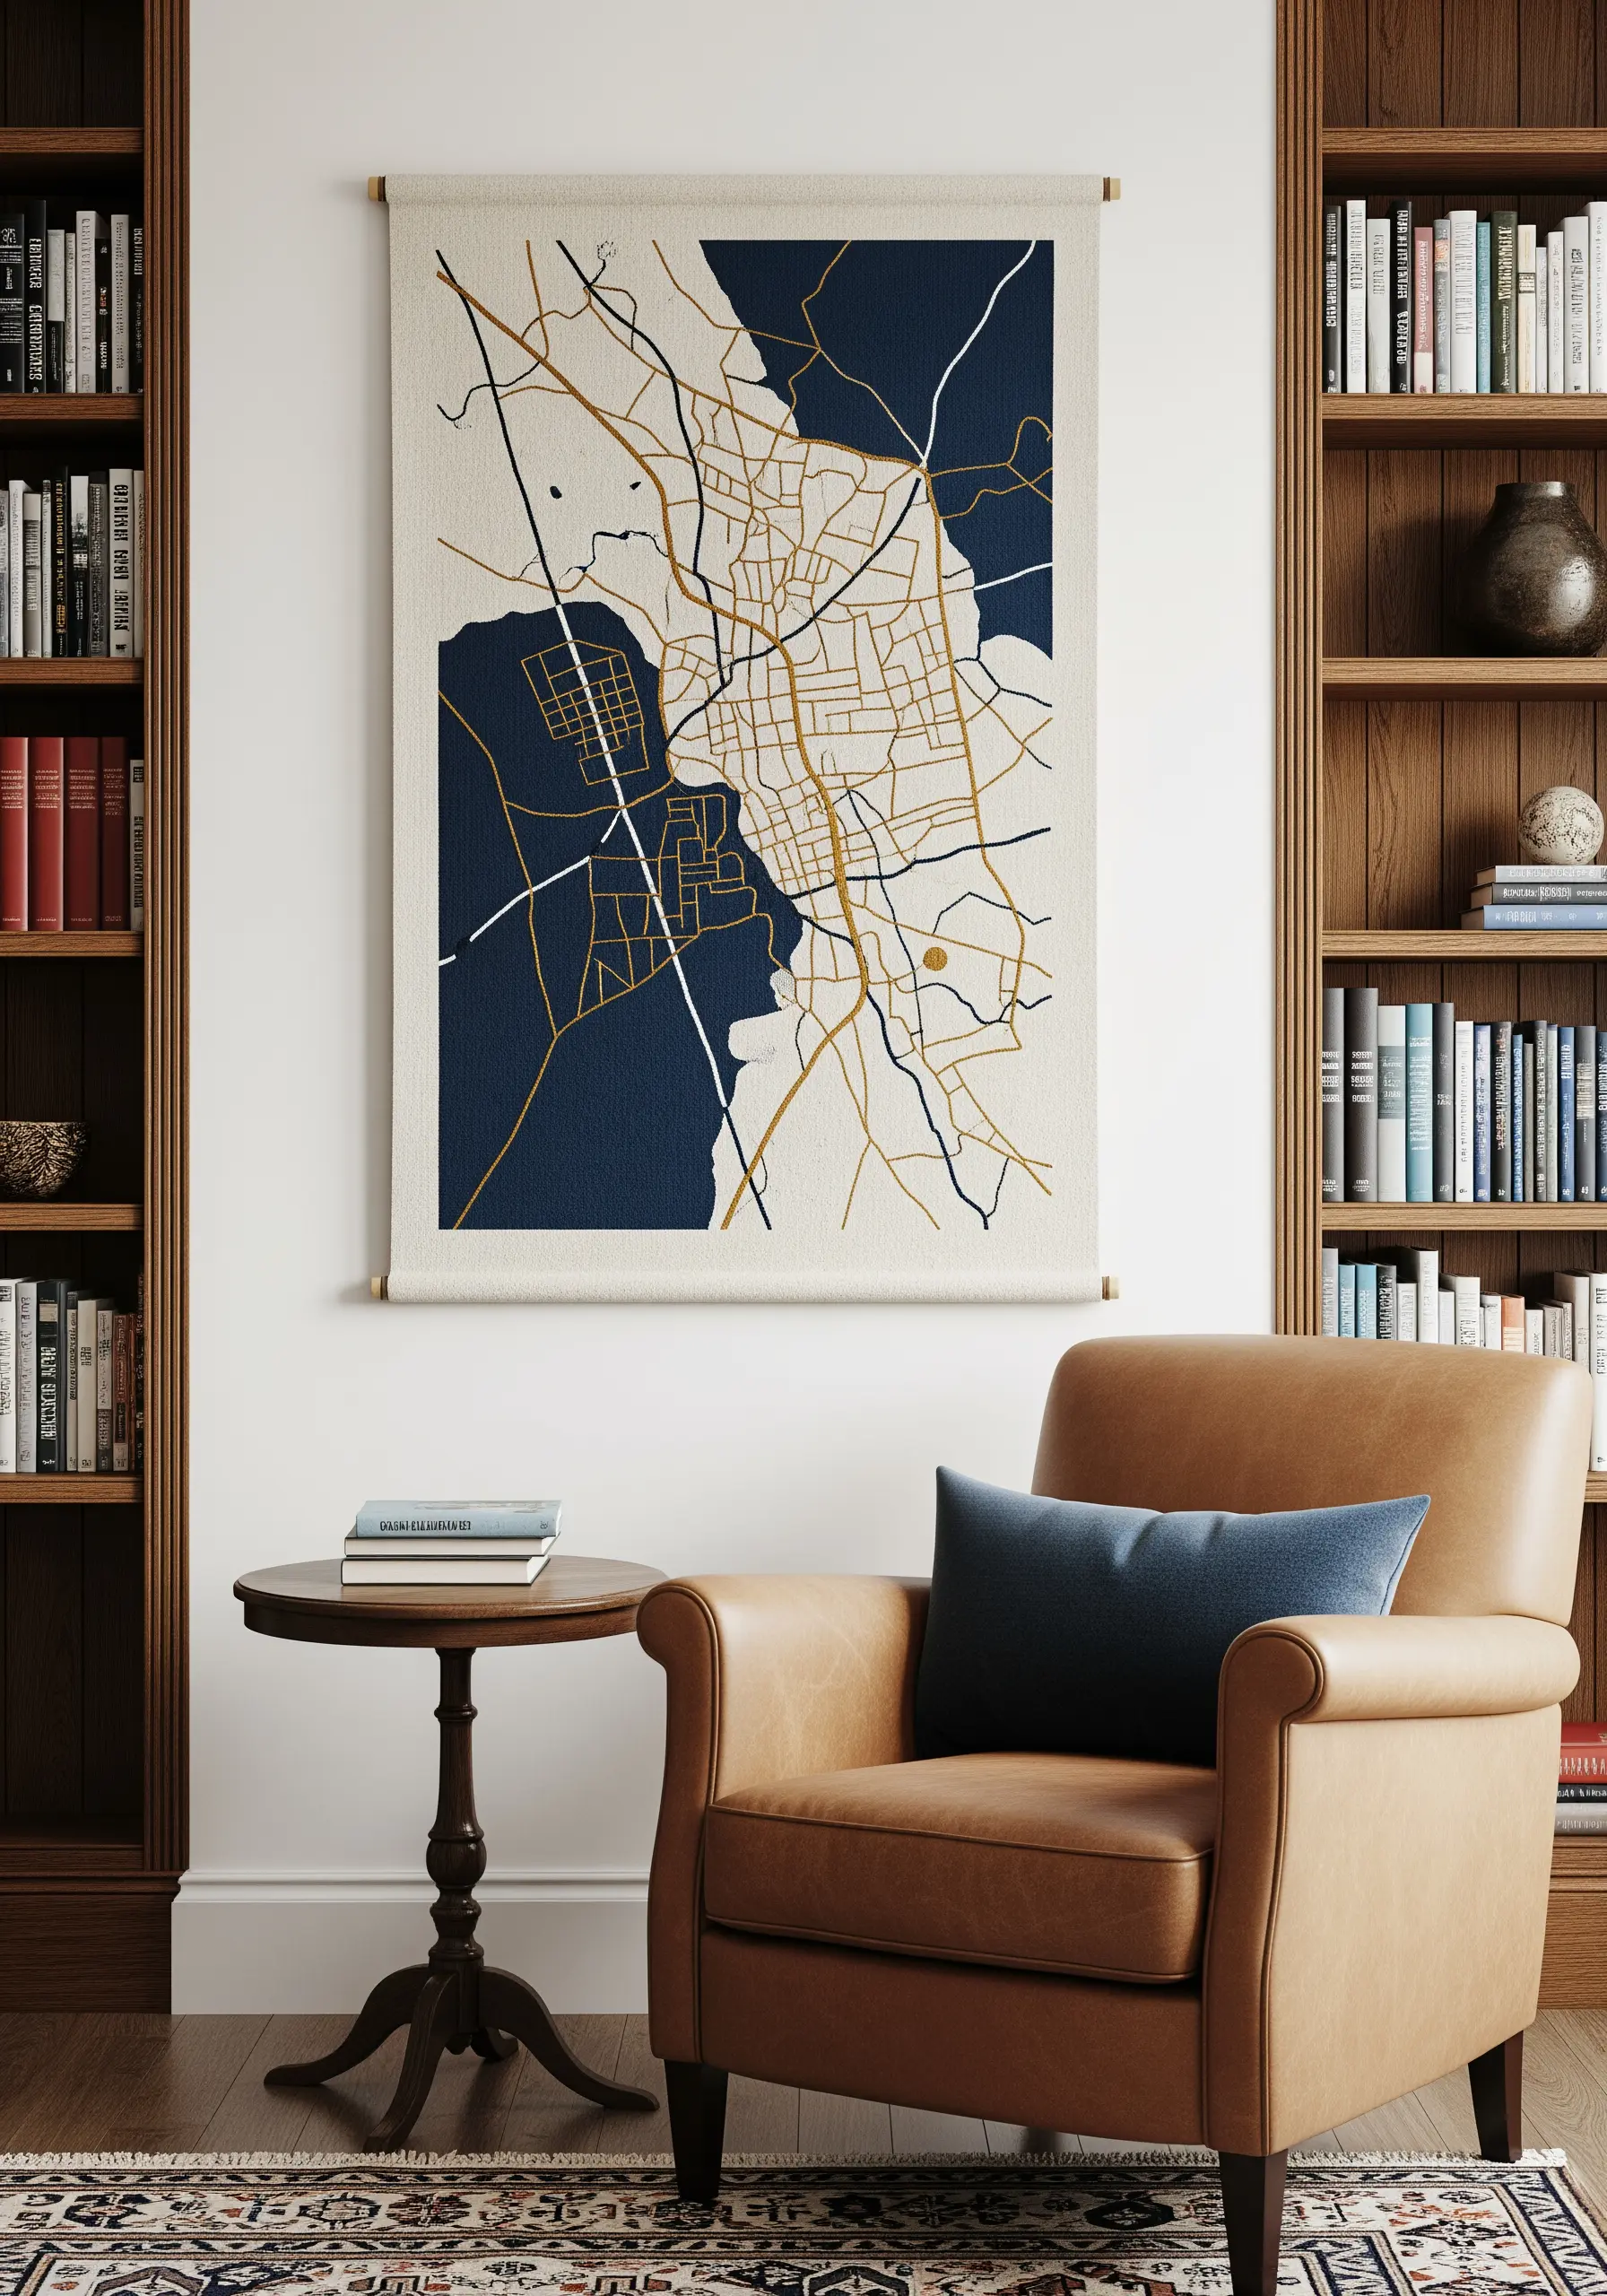
Turn a favorite city map or landscape into a personal piece of art by tracing only the main roads and waterways.
Use a backstitch for the linear roads and a solid satin stitch for larger areas like parks or bodies of water.
Assign a different color to each type of feature—for example, gold for major roads, white for smaller streets, and navy for the background—to create a clear visual hierarchy.
It’s a sophisticated way to create meaningful art that commemorates a special place.
24. Explore Harmony with Vertical Color Blocking

Create a calming, abstract piece by focusing on the relationship between vertical bands of color.
Use a dense vertical satin stitch for the entire piece, which creates a subtle texture and sheen that feels cohesive and woven.
Select an analogous color scheme—colors that sit next to each other on the color wheel, like these pinks and reds—for a harmonious, soothing effect.
A single, dark contrasting stripe adds visual weight and prevents the design from feeling too uniform.
25. Communicate with Graphic Punctuation Marks
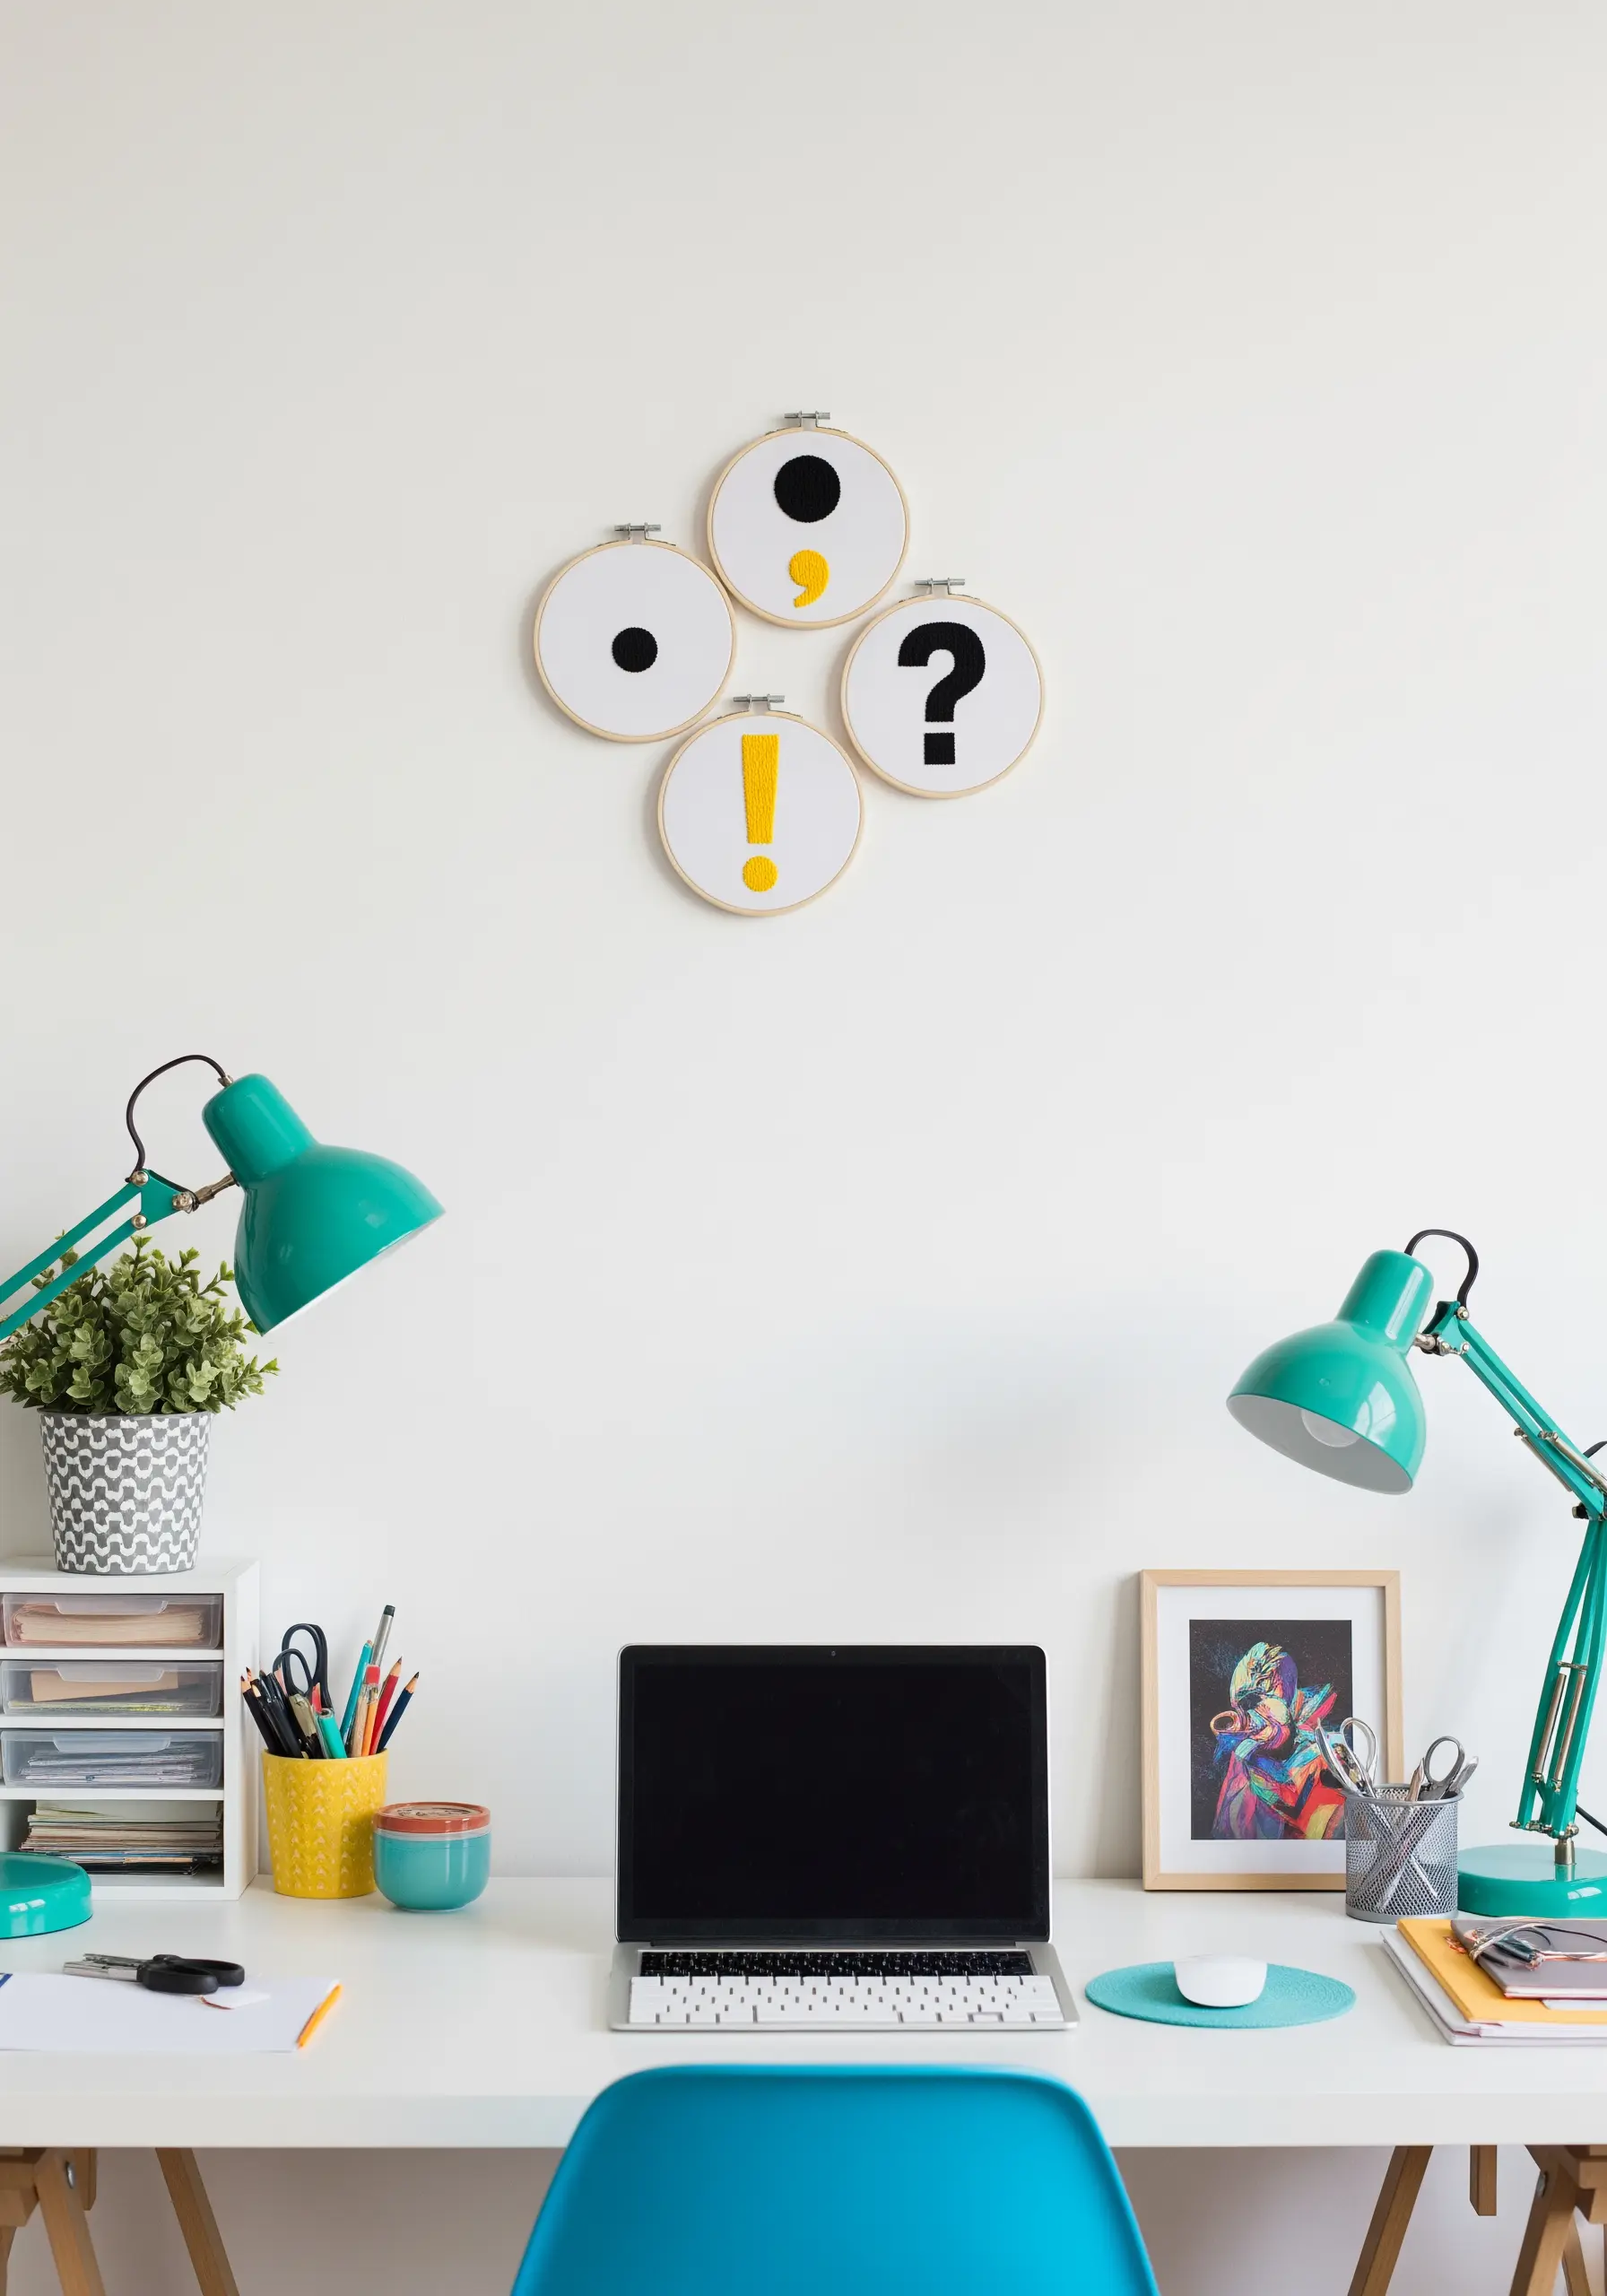
Stitch a series of bold punctuation marks, each in its own small hoop, for a playful and modern wall display.
Use a perfectly smooth satin stitch to fill each shape, outlining it first with a split stitch to ensure crisp, clean edges.
The limited palette of black, white, and a single bright accent color (like yellow) keeps the collection feeling cohesive and graphic.
This is a fantastic way to fill a small wall space with personality and wit.
26. Craft a Single, Flowing Word with Couched Yarn
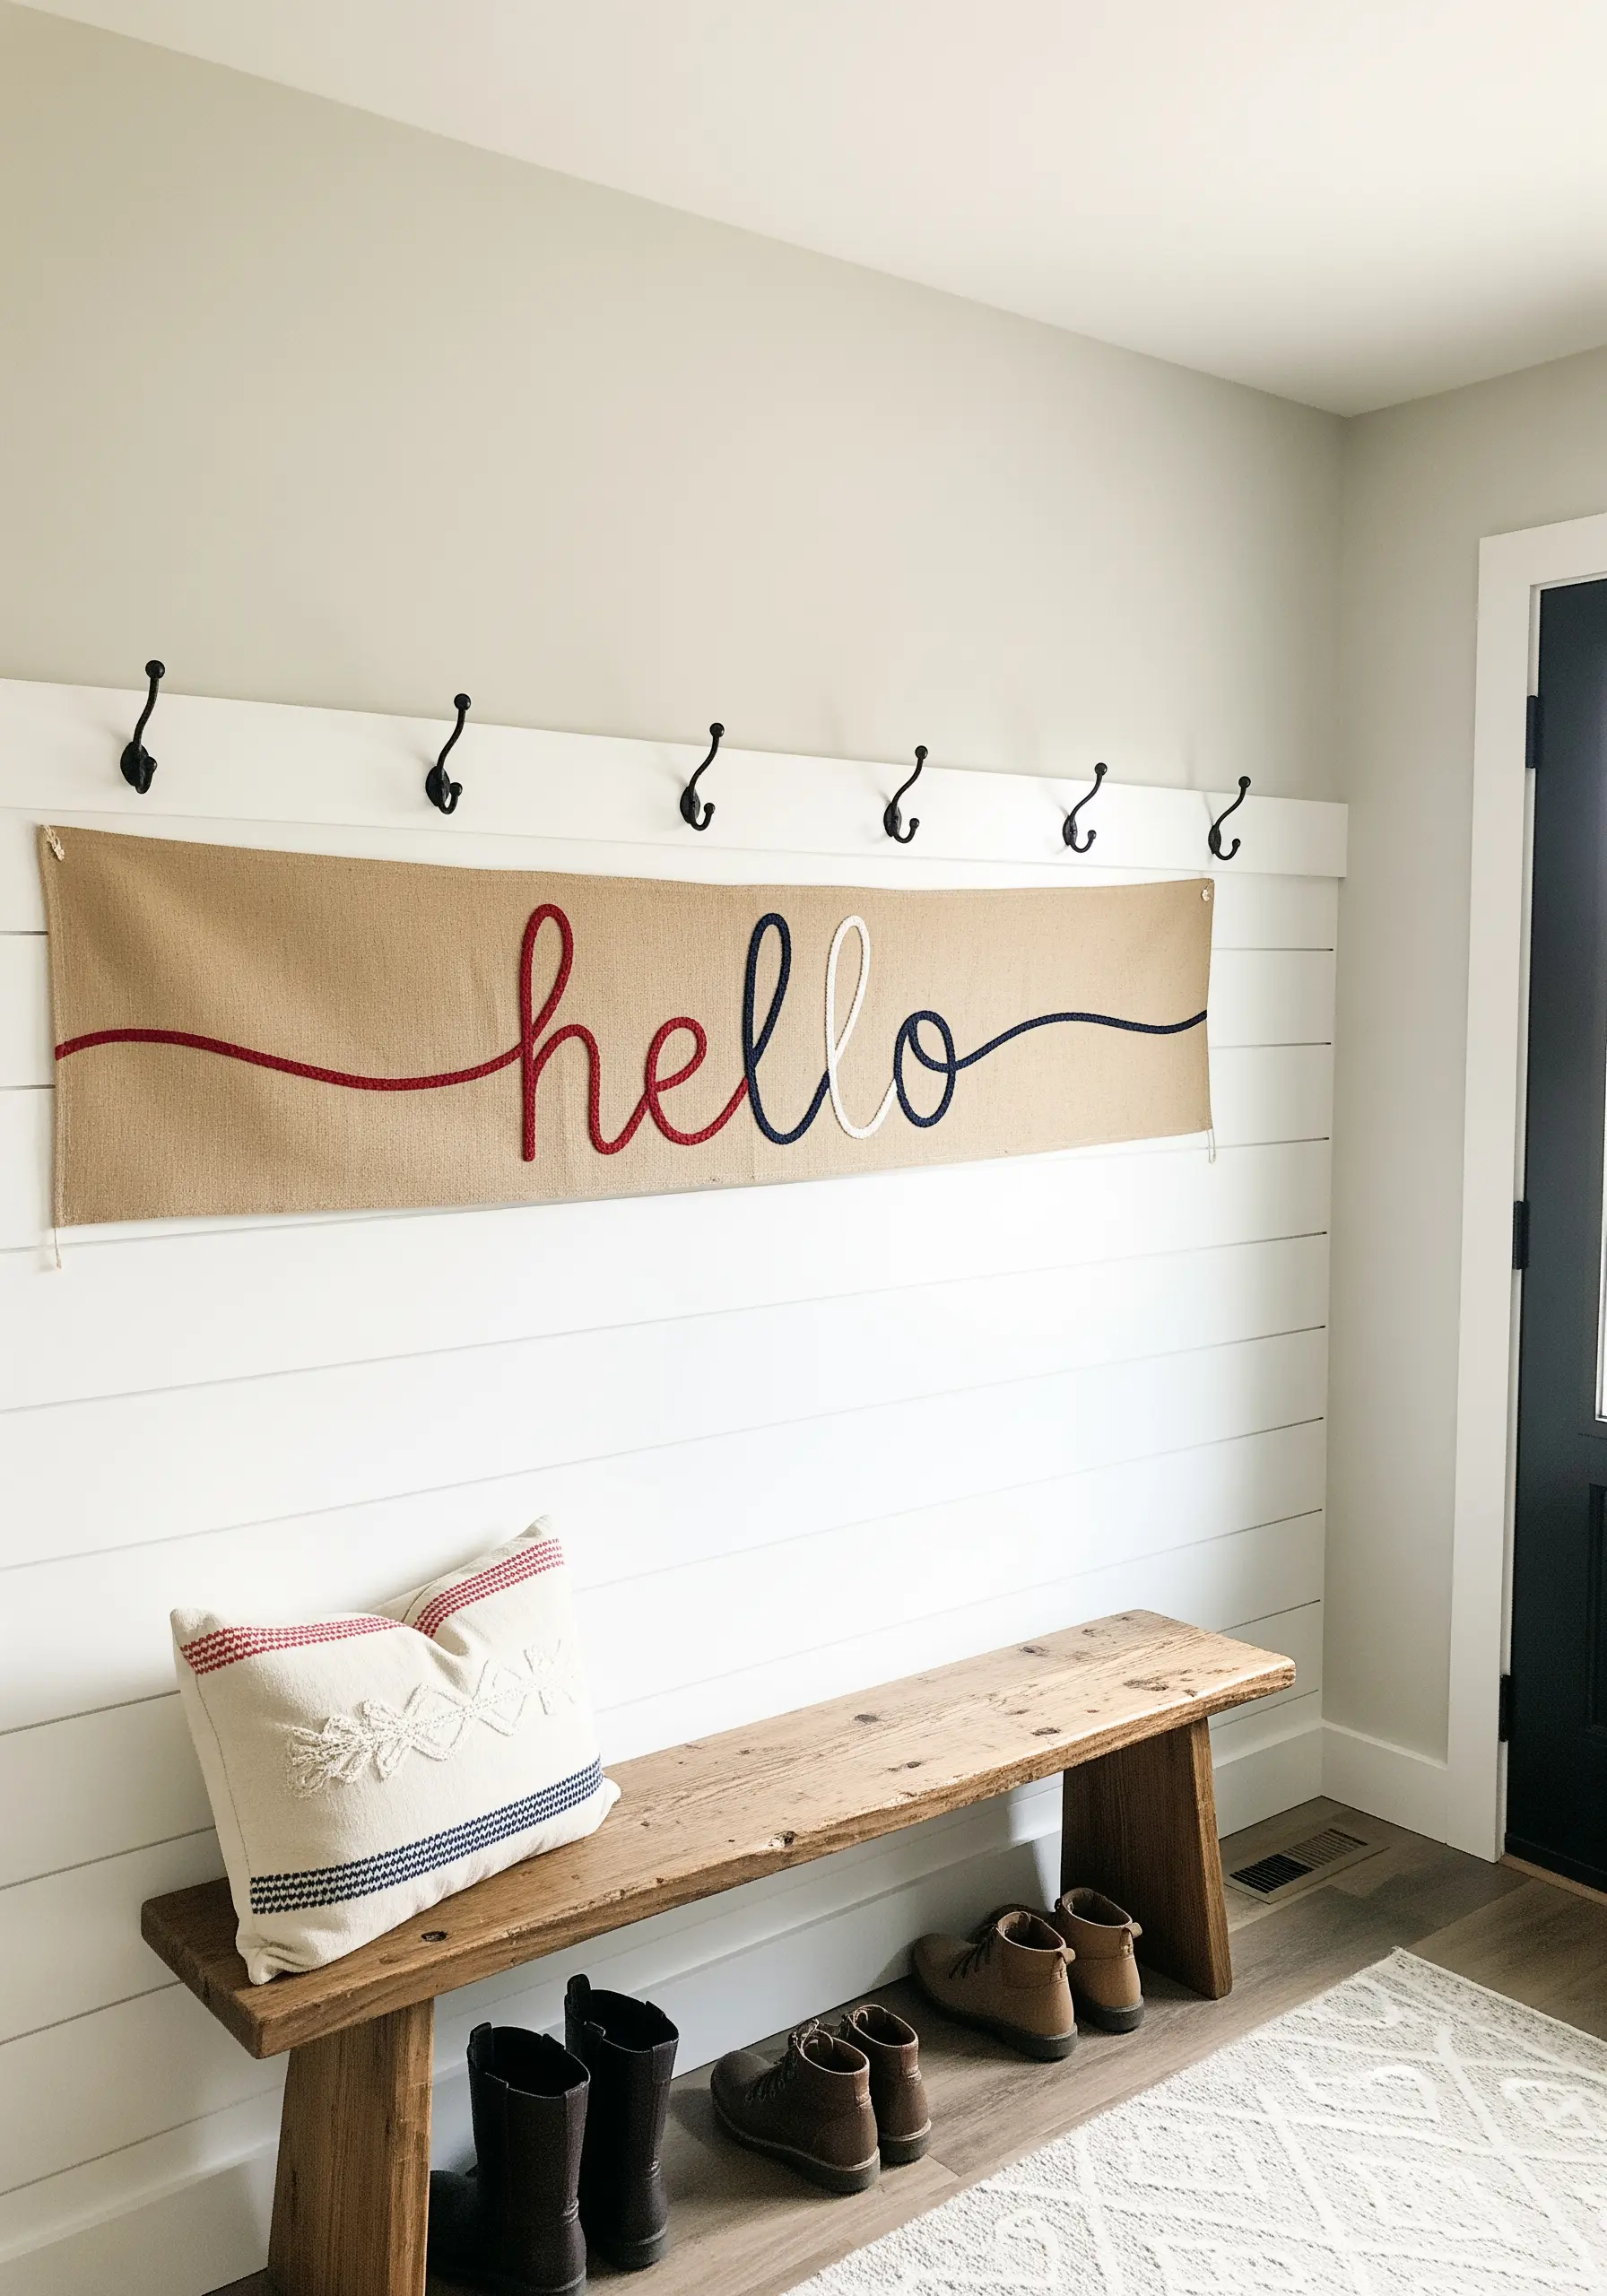
Embroider a word in a single, continuous line by couching thick yarn onto a long fabric banner.
Simply lay the yarn on your fabric in a cursive script and use a regular sewing needle and matching thread to tack it down with tiny, invisible stitches every half-inch.
Alternating the colors of the yarn, as seen in the word “hello,” adds a playful rhythm to the design.
This is a quick, high-impact technique for creating custom banners and welcoming entryway art.
27. Layer Concentric Circles for a Hypnotic Effect
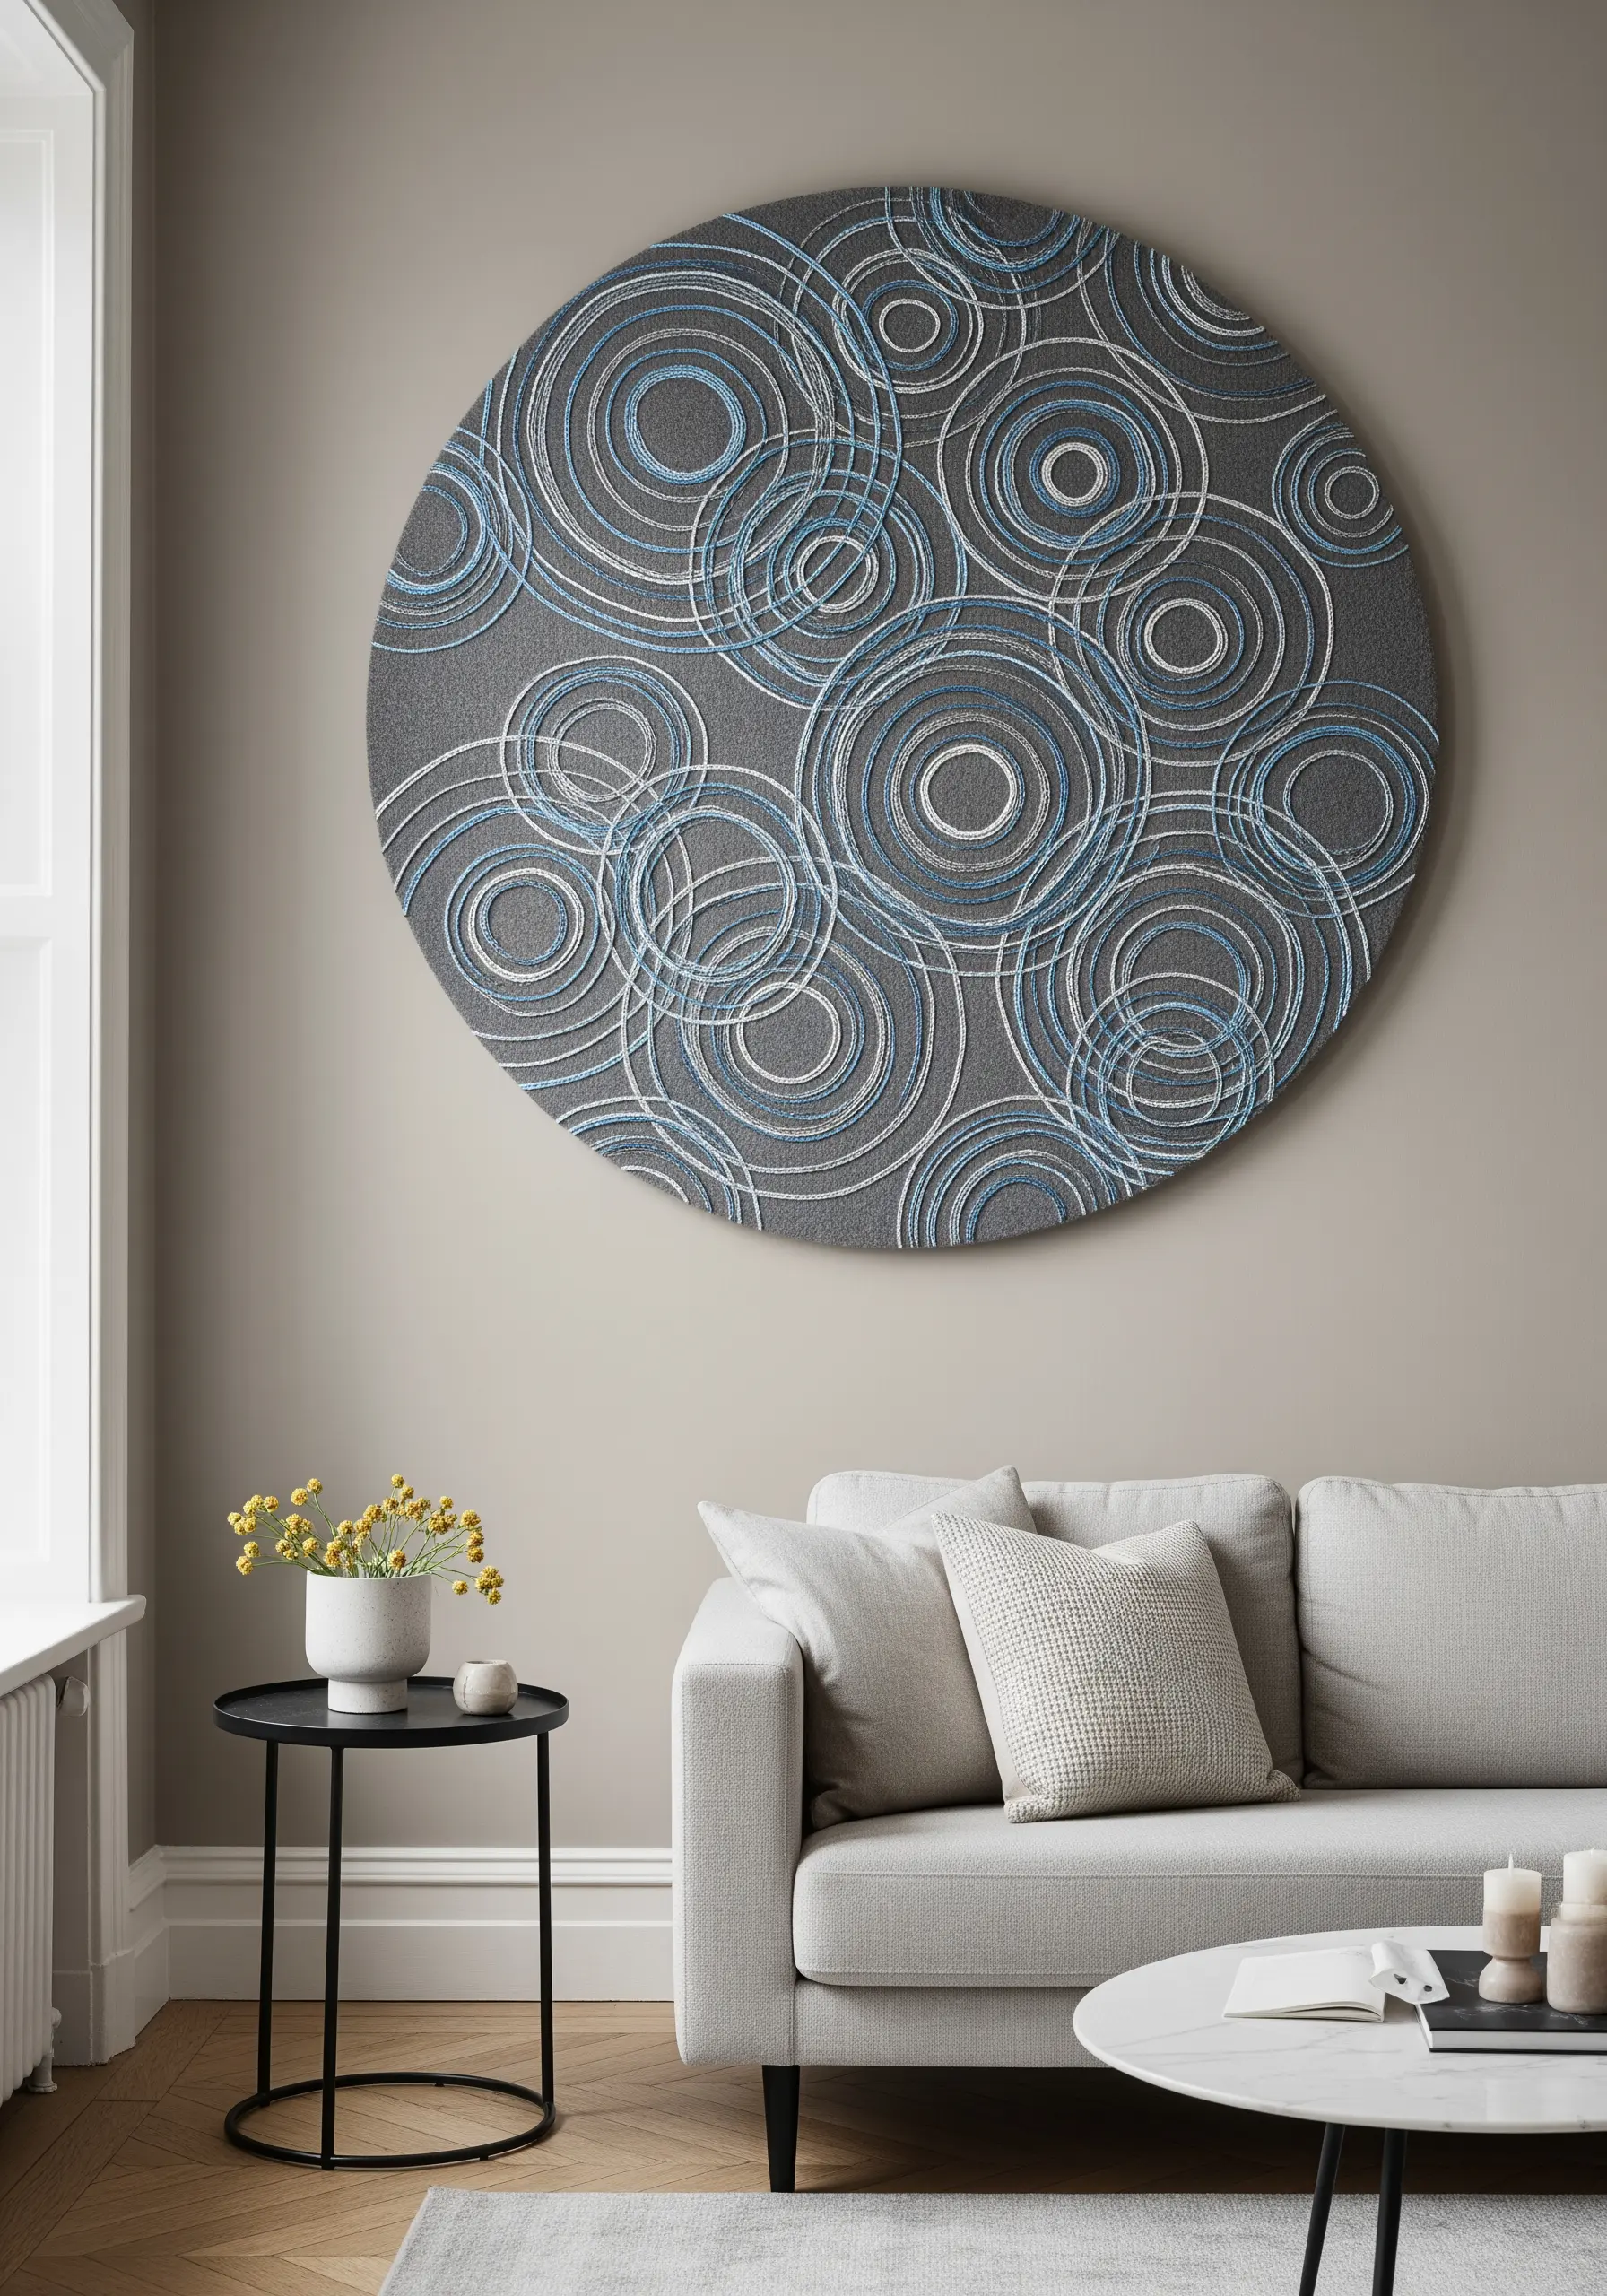
Create a mesmerizing abstract piece by layering dozens of concentric and overlapping circles.
Use a simple backstitch for every circle, but vary the thread colors—alternating between two or three cool tones like blue, white, and gray—to create depth and vibration.
Don’t worry about perfect circles; slight imperfections and overlaps will add to the design’s organic, hand-drawn character.
This project is a meditative exercise in repetition, resulting in a complex and sophisticated piece of art.
28. Map the Stars with Contrasting Stitches
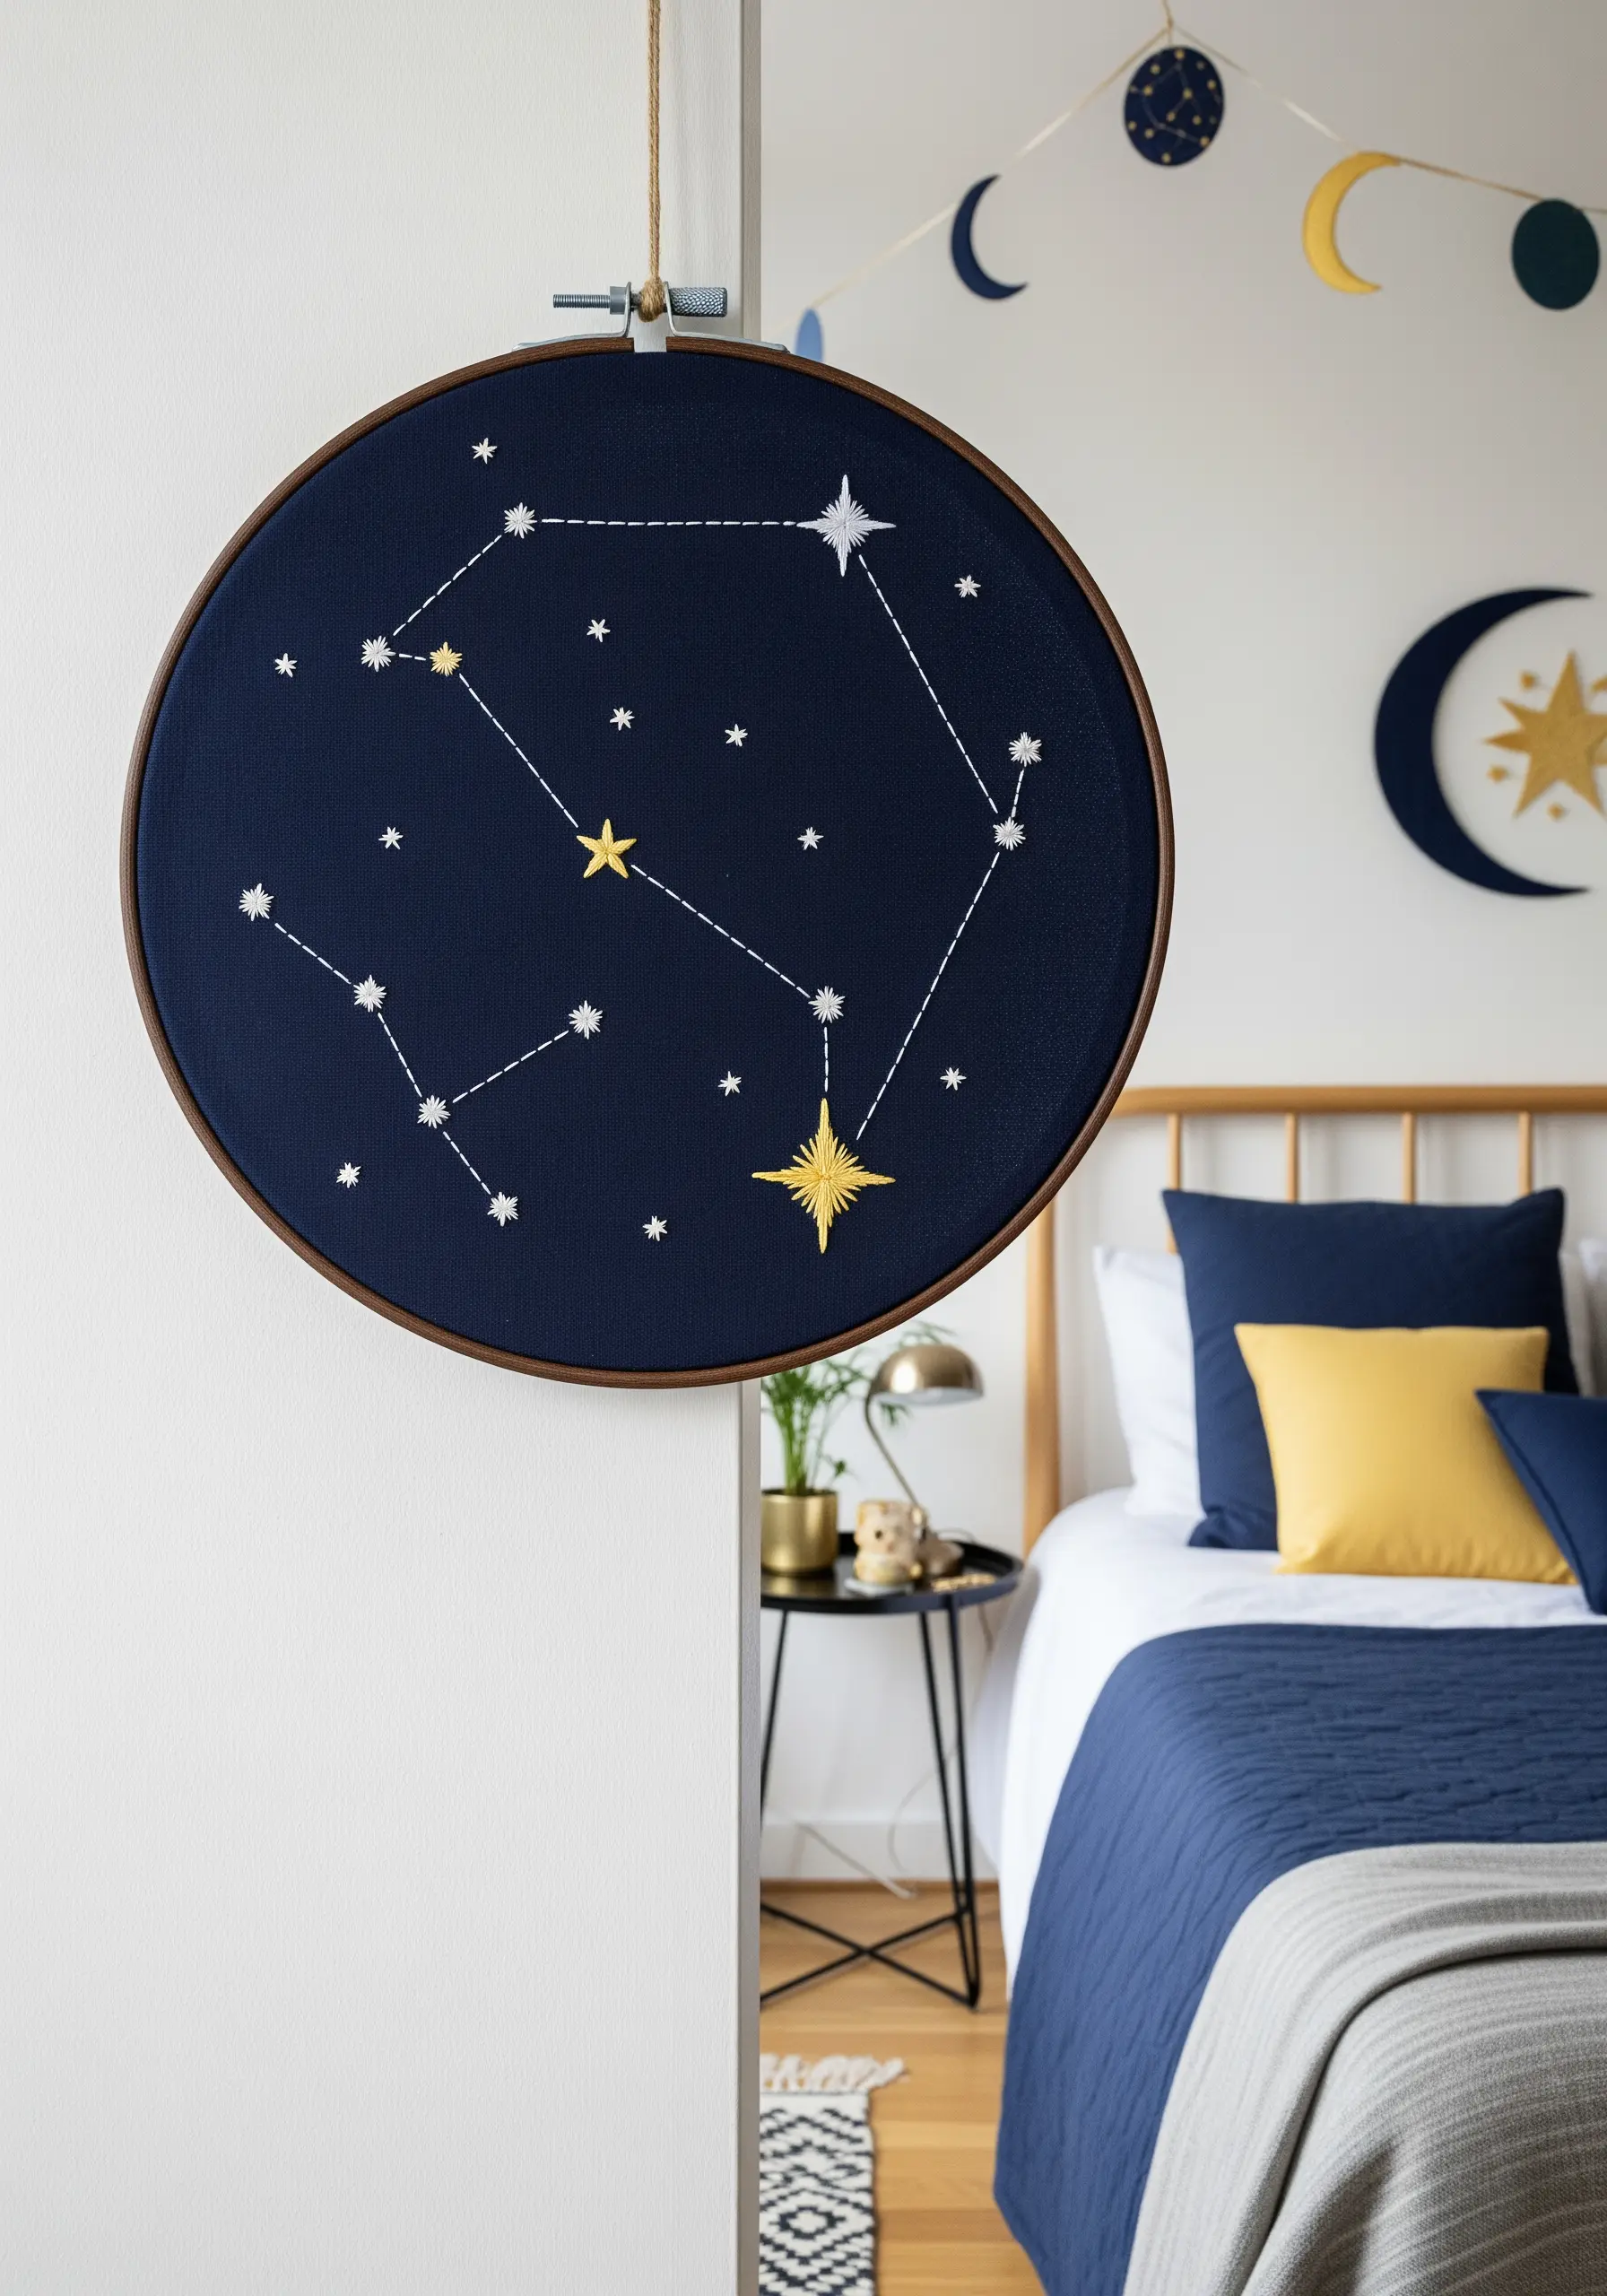
Embroider a constellation using a mix of stitches to differentiate between stars and connecting lines.
Use a simple backstitch for the faint lines connecting the stars to keep them delicate and secondary.
For the stars themselves, use a satin stitch or star stitch, varying their size and using a brighter or metallic thread to make them the focal point.
A deep navy blue linen provides the perfect night-sky backdrop, making your white and gold threads truly shine.


