
Have you ever found yourself hesitating before starting a new embroidery project, worried about committing to a complex design? You’re not alone. The desire for a polished, intentional piece can sometimes feel paralyzing. But what if you could sketch your ideas not with a pencil, but with texture, color, and form?
This collection of mixed-media paper collages offers more than just inspiration—it provides a new way to think about your craft. By exploring how paper can be cut, layered, and sculpted, you can unlock fresh approaches to fabric appliqué, stitch direction, and composition. Think of these techniques as a rehearsal for your thread.
Before you thread your needle, try mapping out a landscape with wrinkled fabric strips, or planning a color gradient with paper squares. Let these tactile experiments build your confidence, refine your vision, and bridge the gap between the art you imagine and the beautiful work you are about to create.
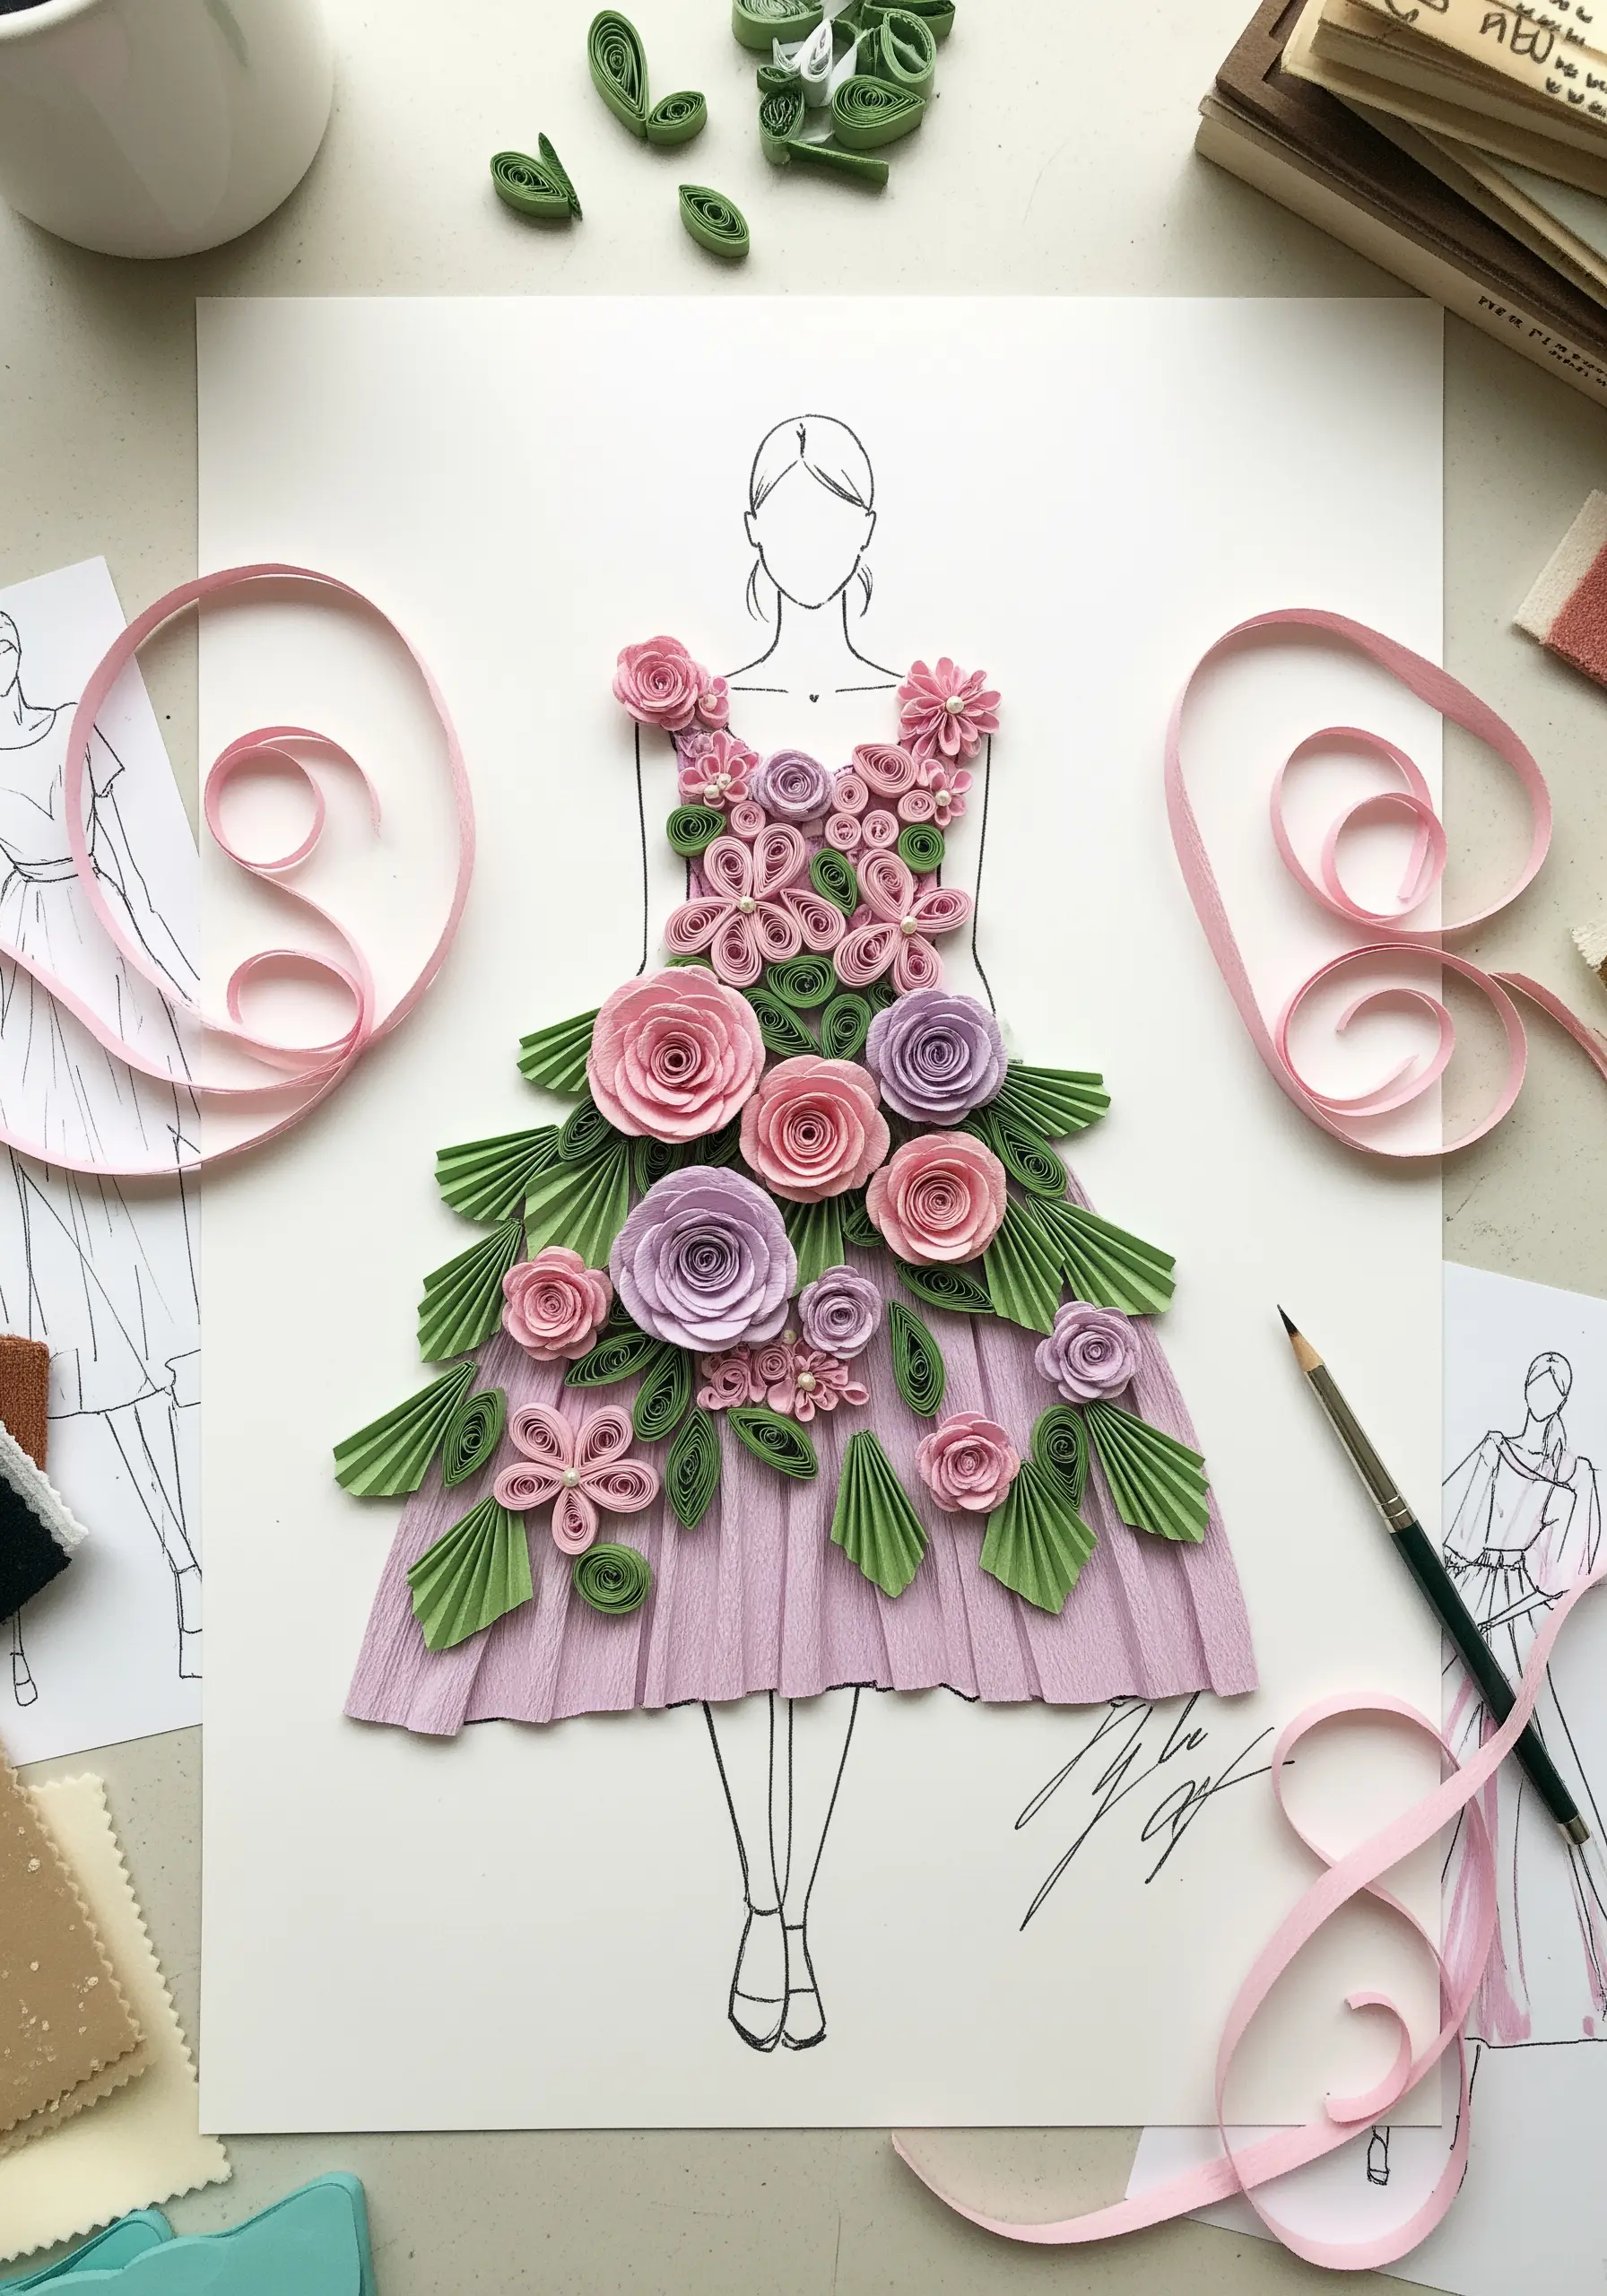
1. Layer Paper Cutouts to Prototype Your Appliqué
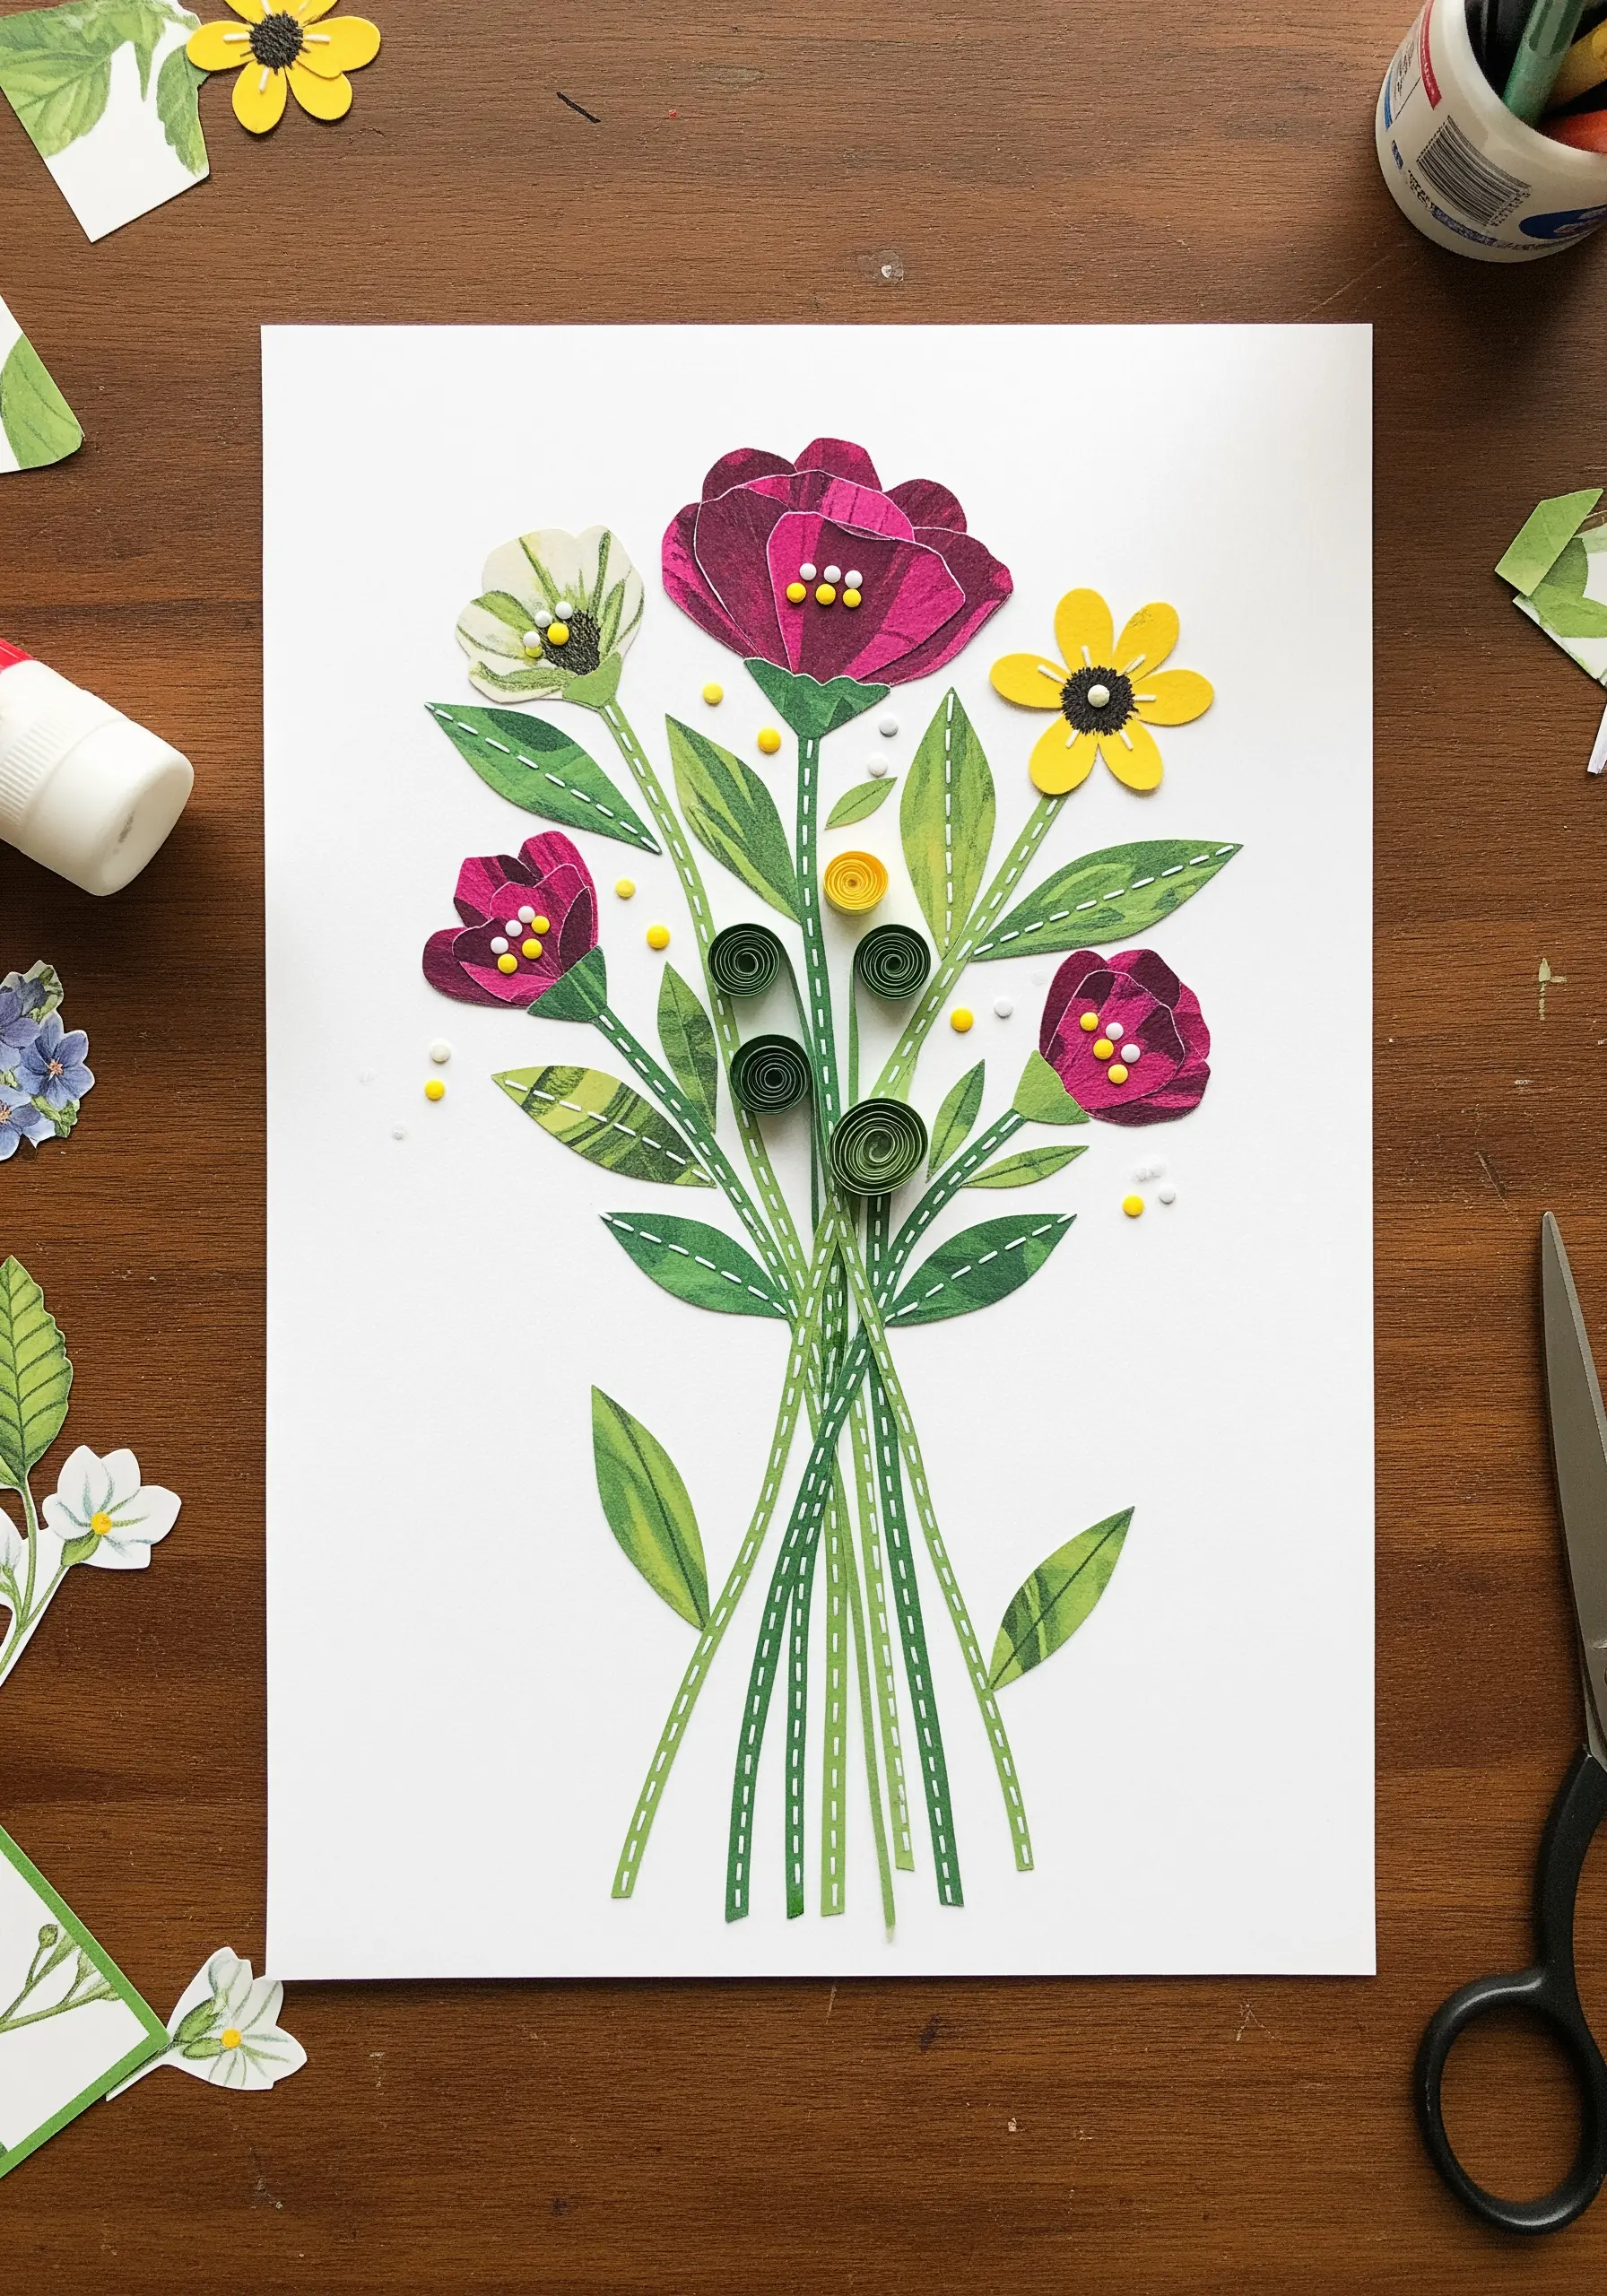
Before you cut into your precious fabric, arrange paper shapes to perfect the composition of your next floral piece.
Use this paper mock-up to map out where your fabric appliqué pieces will go, ensuring balanced color and scale.
For the coiled centers, plan to use French knots or woven wheel stitches to replicate that dense, 3D texture.
The thin, dashed lines on the stems can be translated directly into a simple backstitch or running stitch, creating a delicate, illustrative quality.
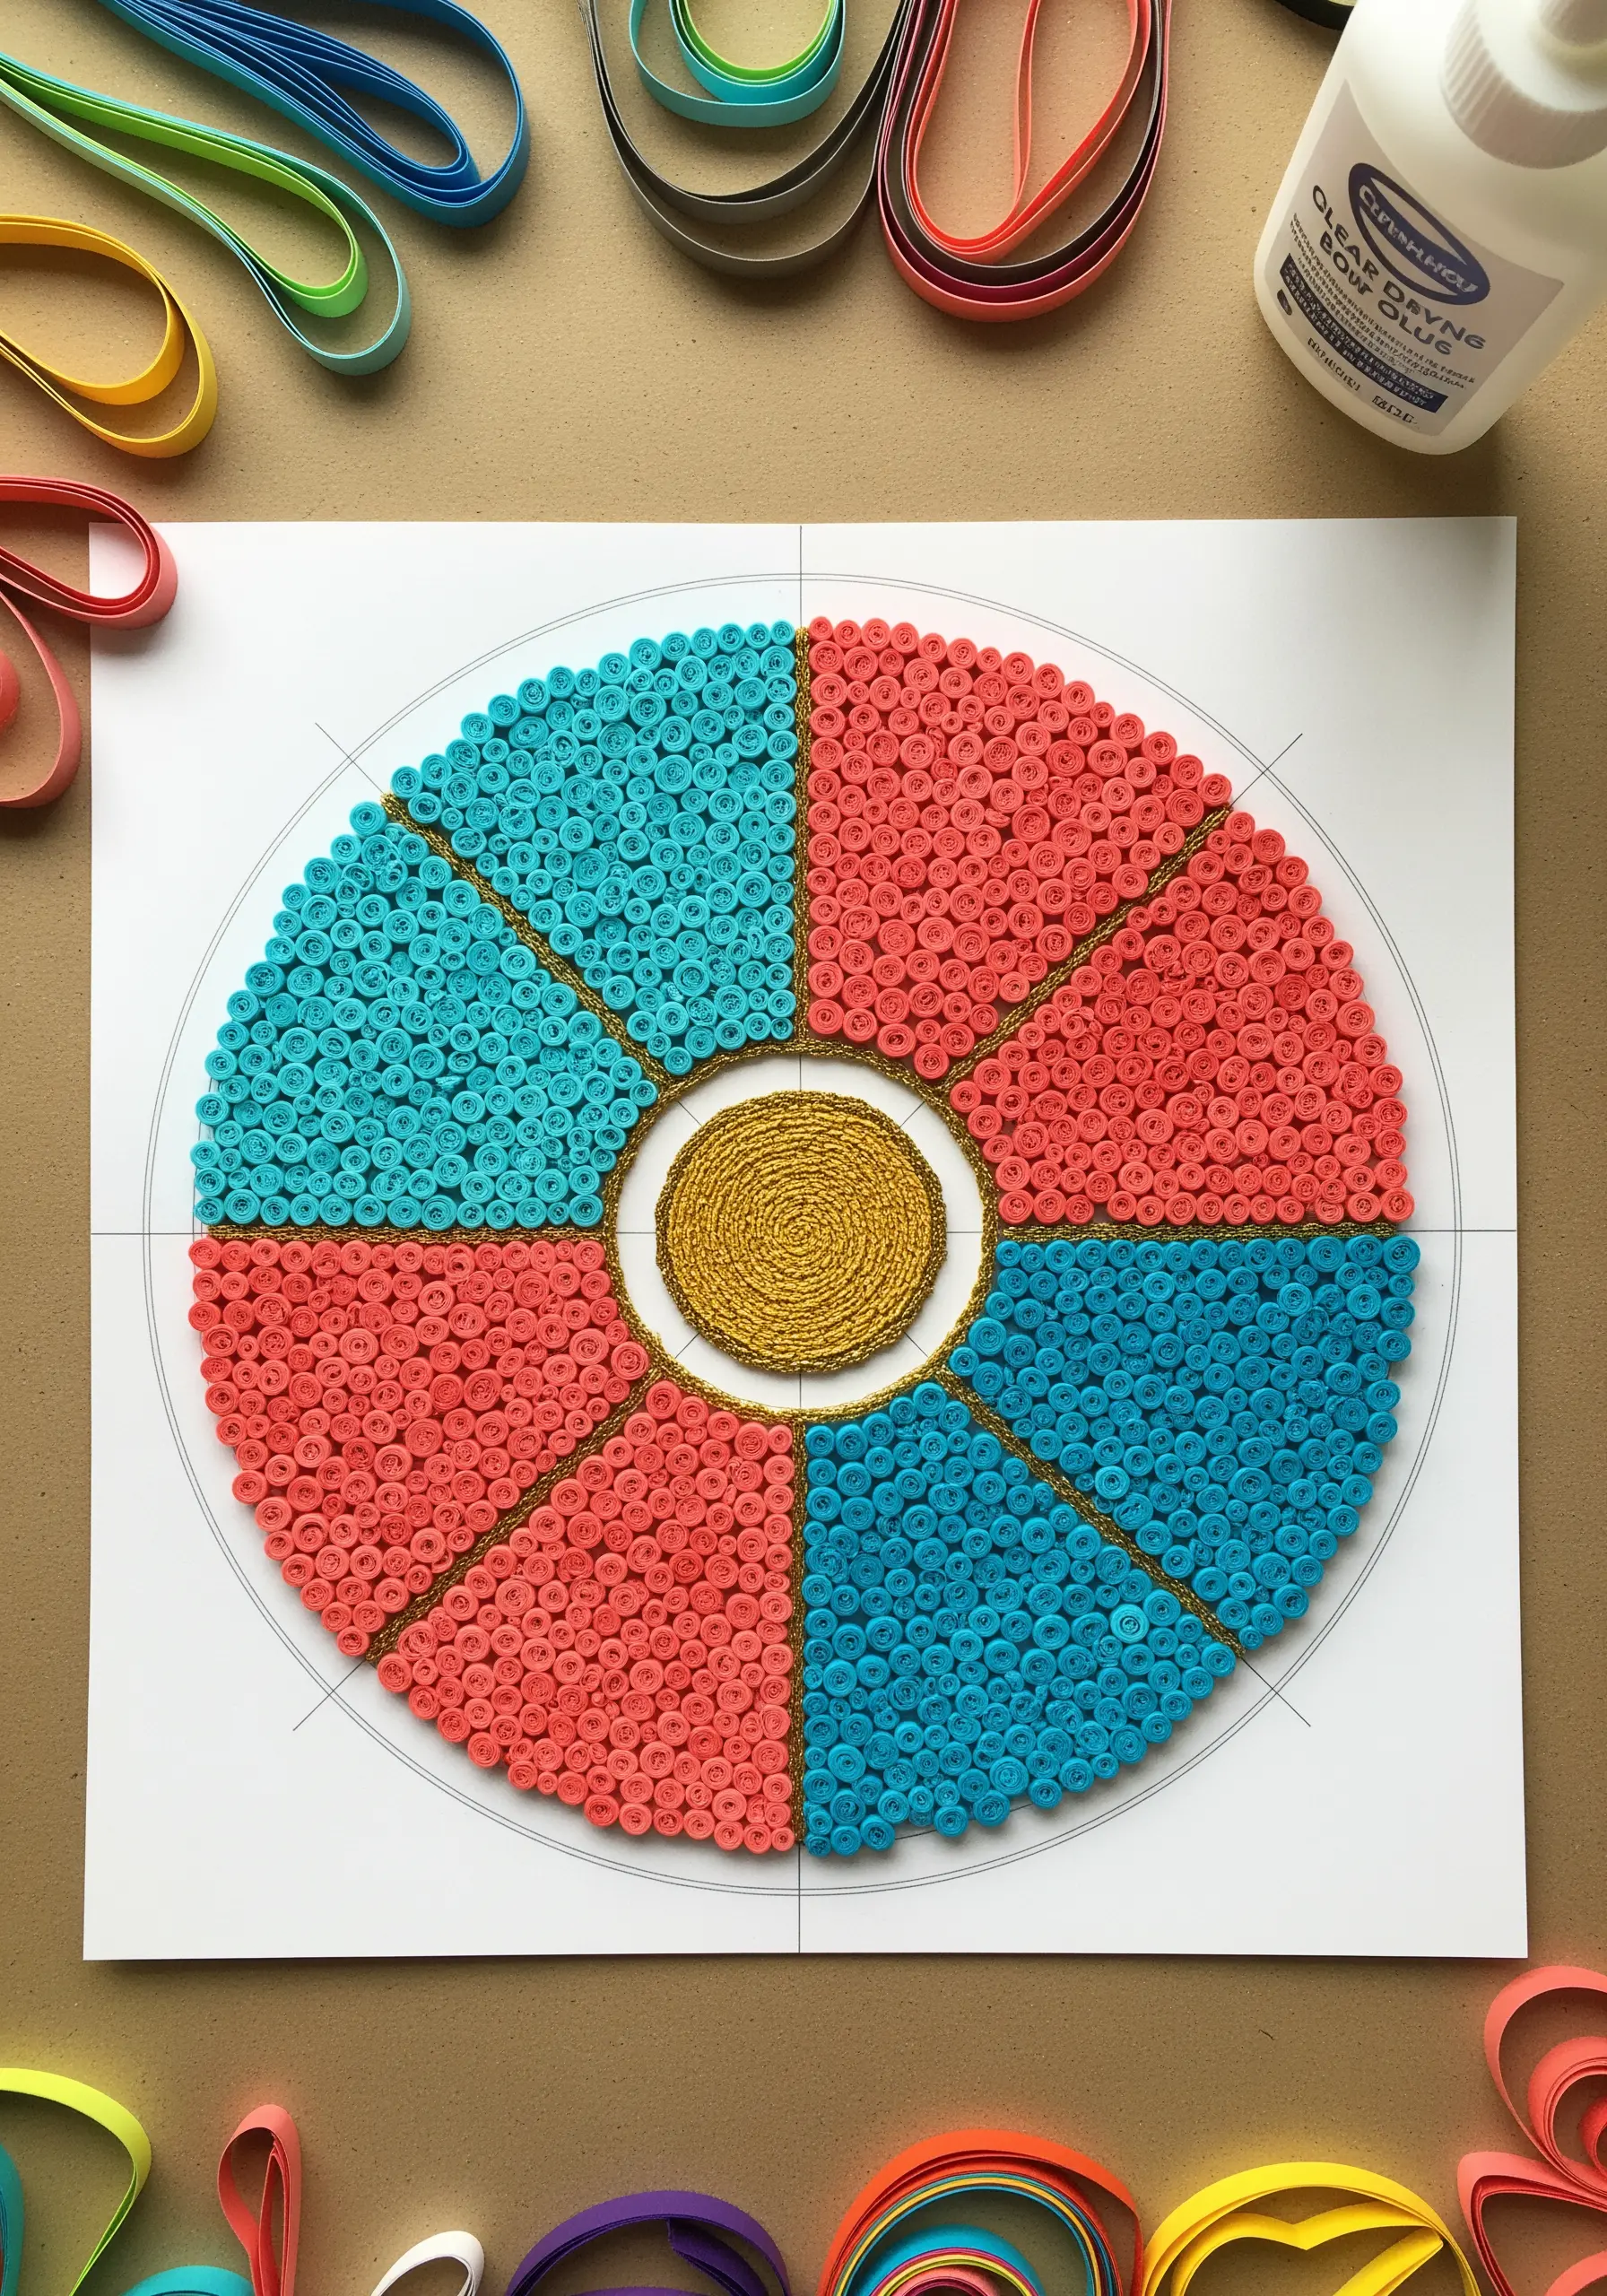
2. Use Paper Strips to Visualize String Art and Couching
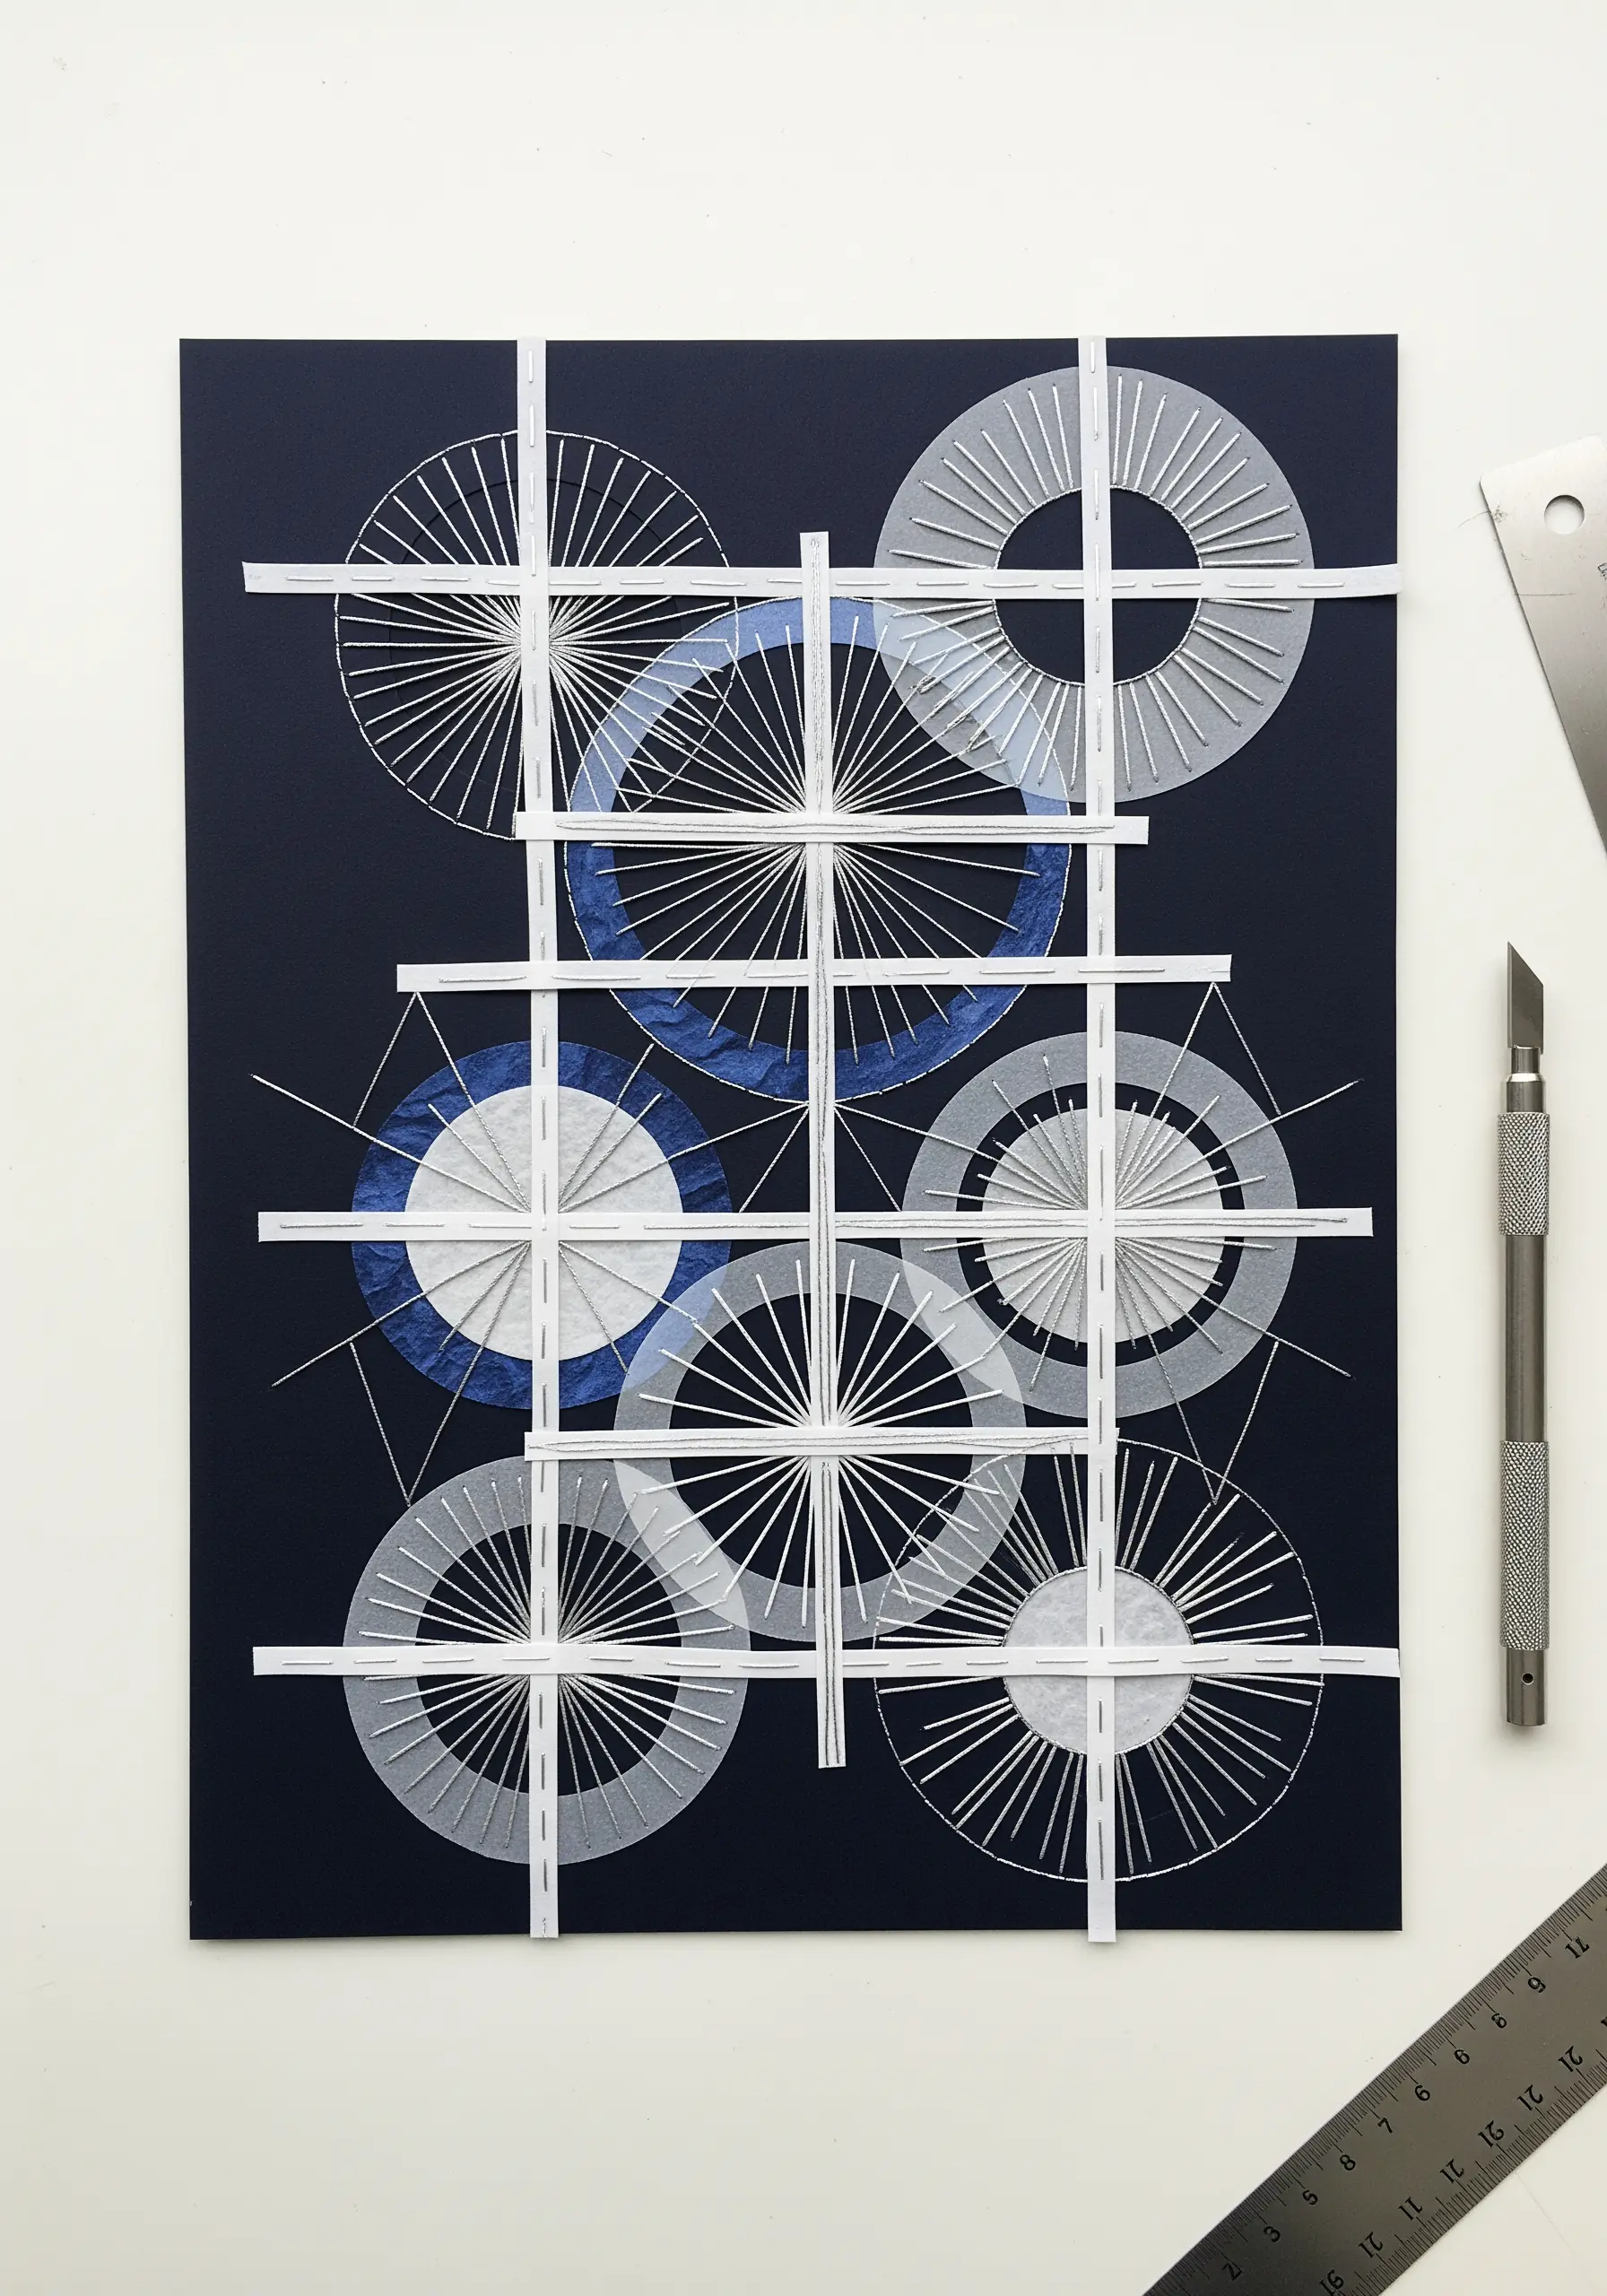
Create a geometric guide with paper strips to visualize how you can use couching techniques to lay down bold, graphic lines in your embroidery.
Place thin strips of translucent paper or vellum where you might use organza appliqué to add subtle layers without heavy stitching.
Translate the radial lines into straight stitches pulled taut across a grid, creating a sense of tension and precision that contrasts beautifully with soft fabrics.
This method allows you to experiment with complex overlapping shapes before committing a single stitch to your fabric base.
3. Mimic Layered Paper ‘Fur’ with Directional Stitches
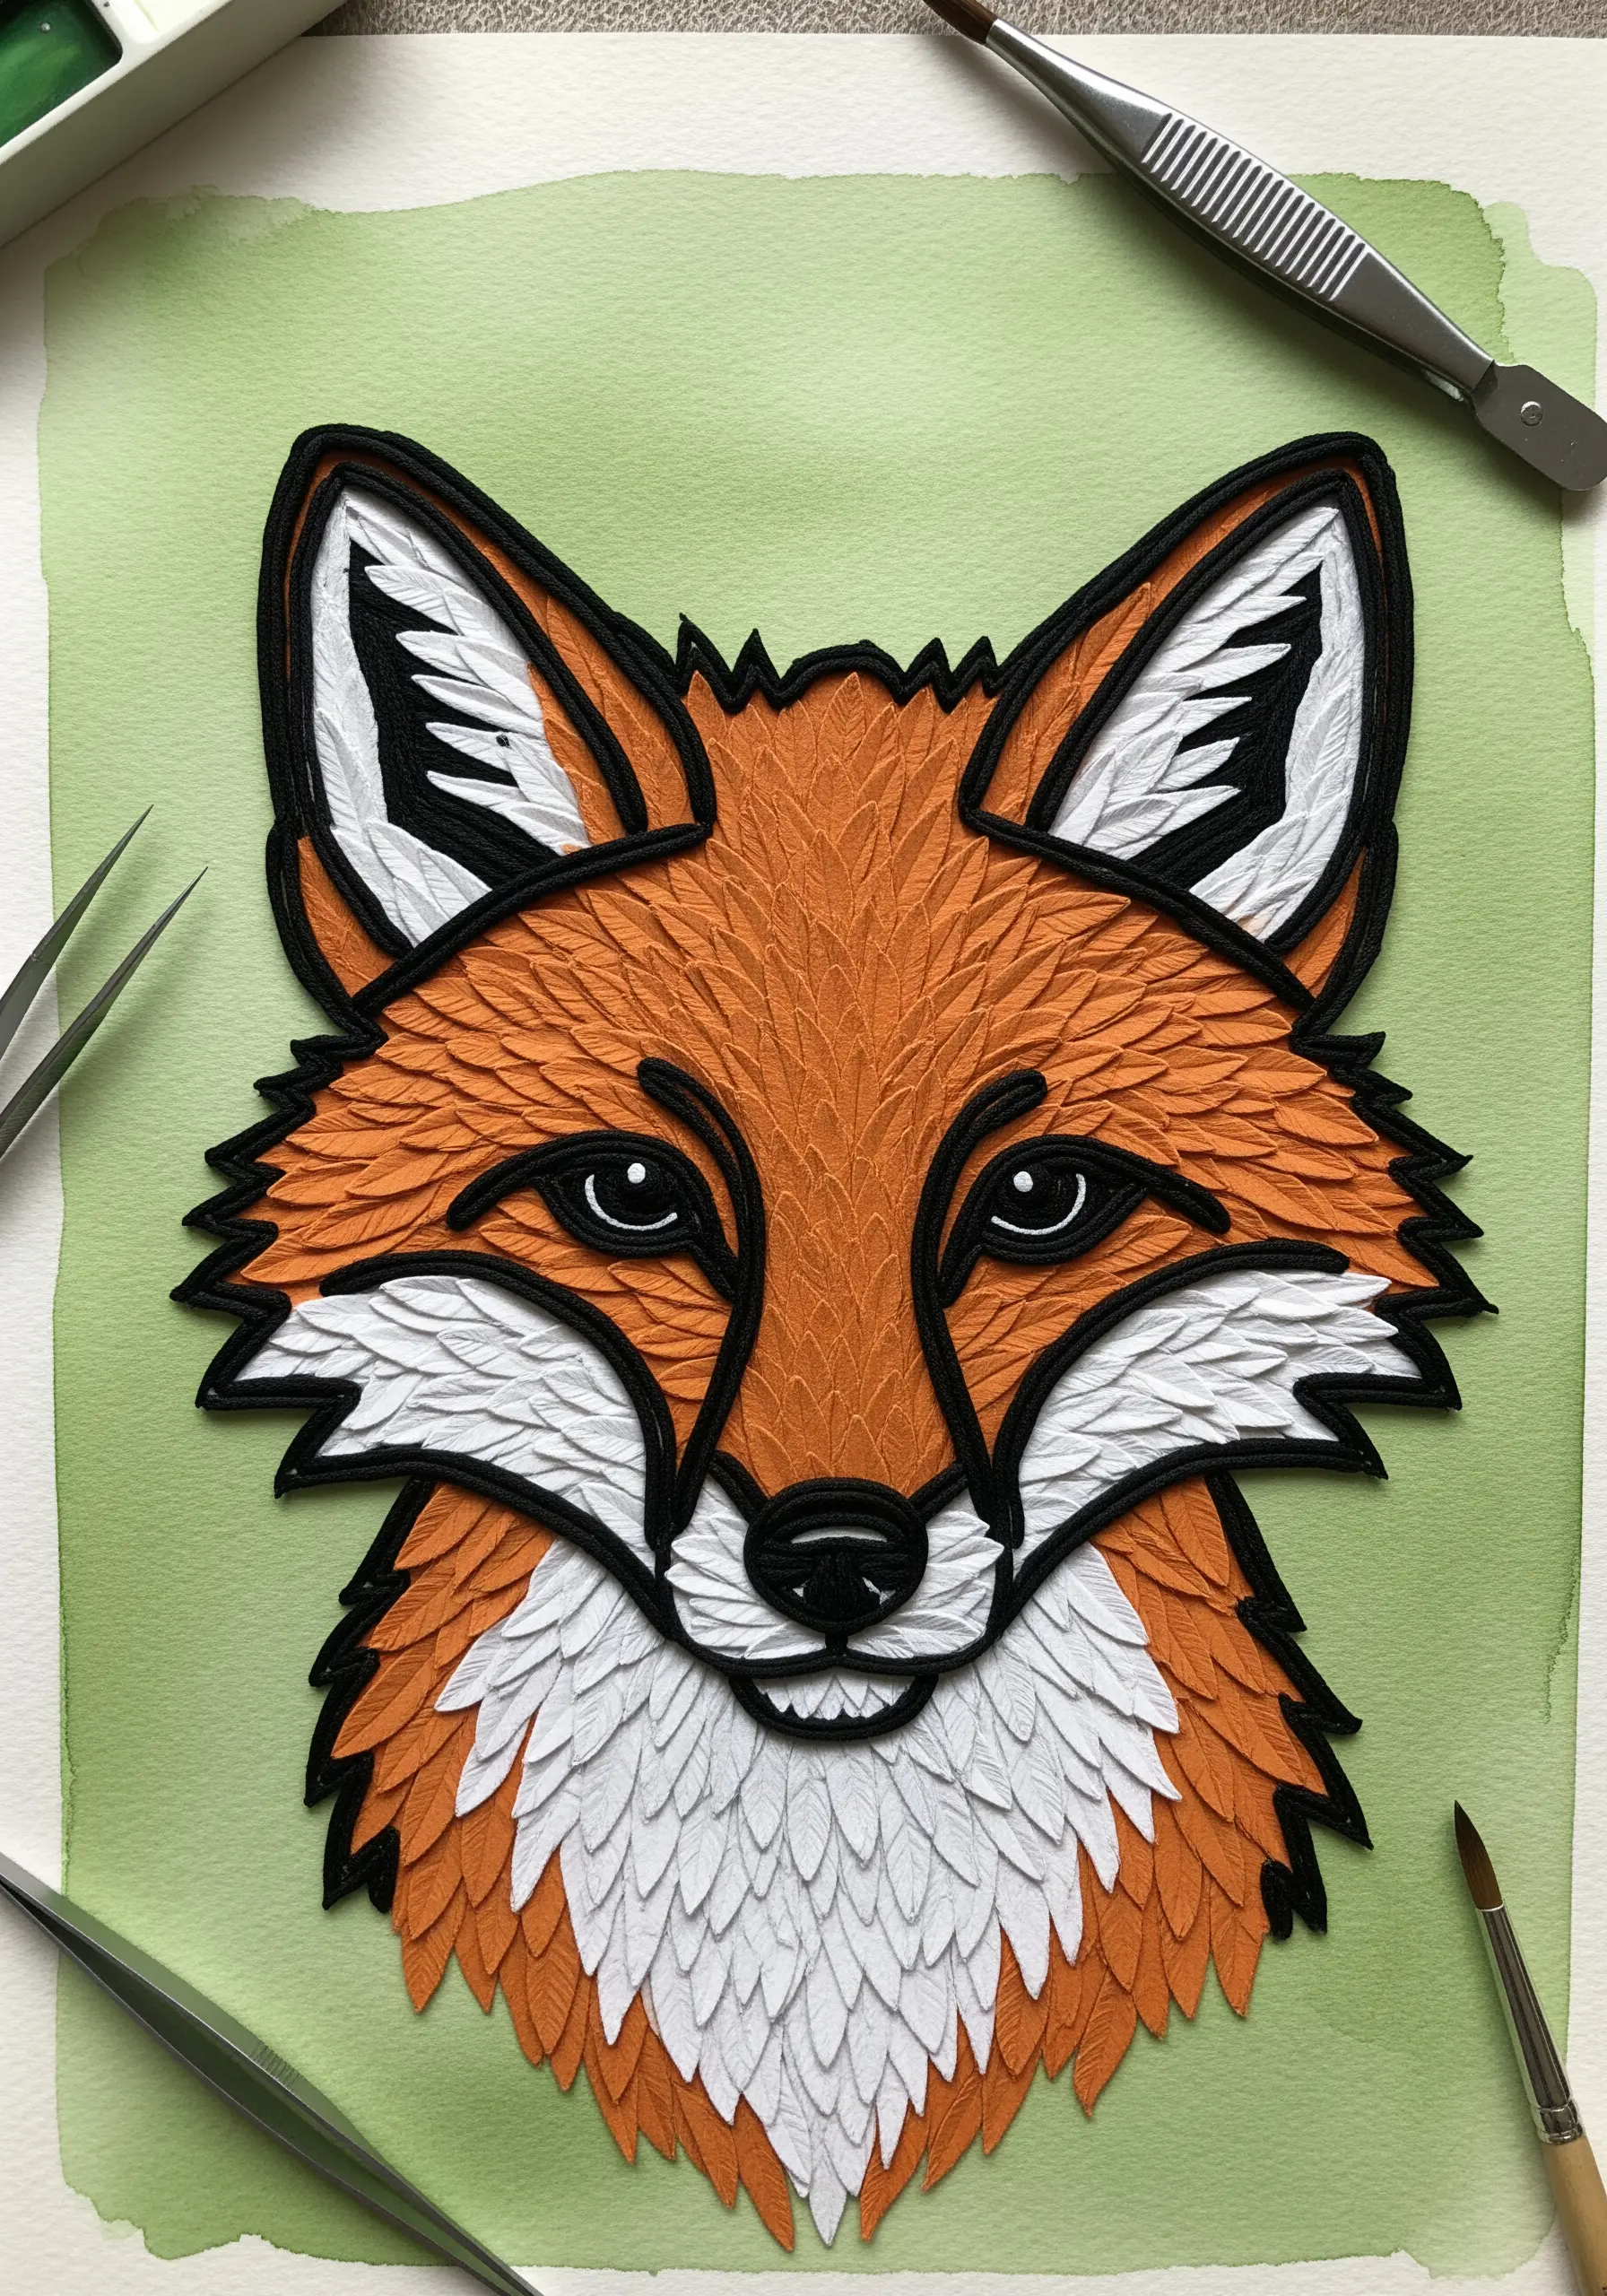
To achieve the texture of layered paper scales, use directional long-and-short stitch to build up layers of color and create the illusion of fur.
Notice how each paper piece is shaped to follow the contours of the face; your stitches should do the same to create realistic form.
For the sharp, clean outline, couch a thick black pearl cotton or use a whipped backstitch to give your work a bold, graphic edge.
This technique of layering stitches, just like layering paper, adds incredible depth and realism to animal portraits.
4. Recreate Celestial Textures with Knots and Appliqué
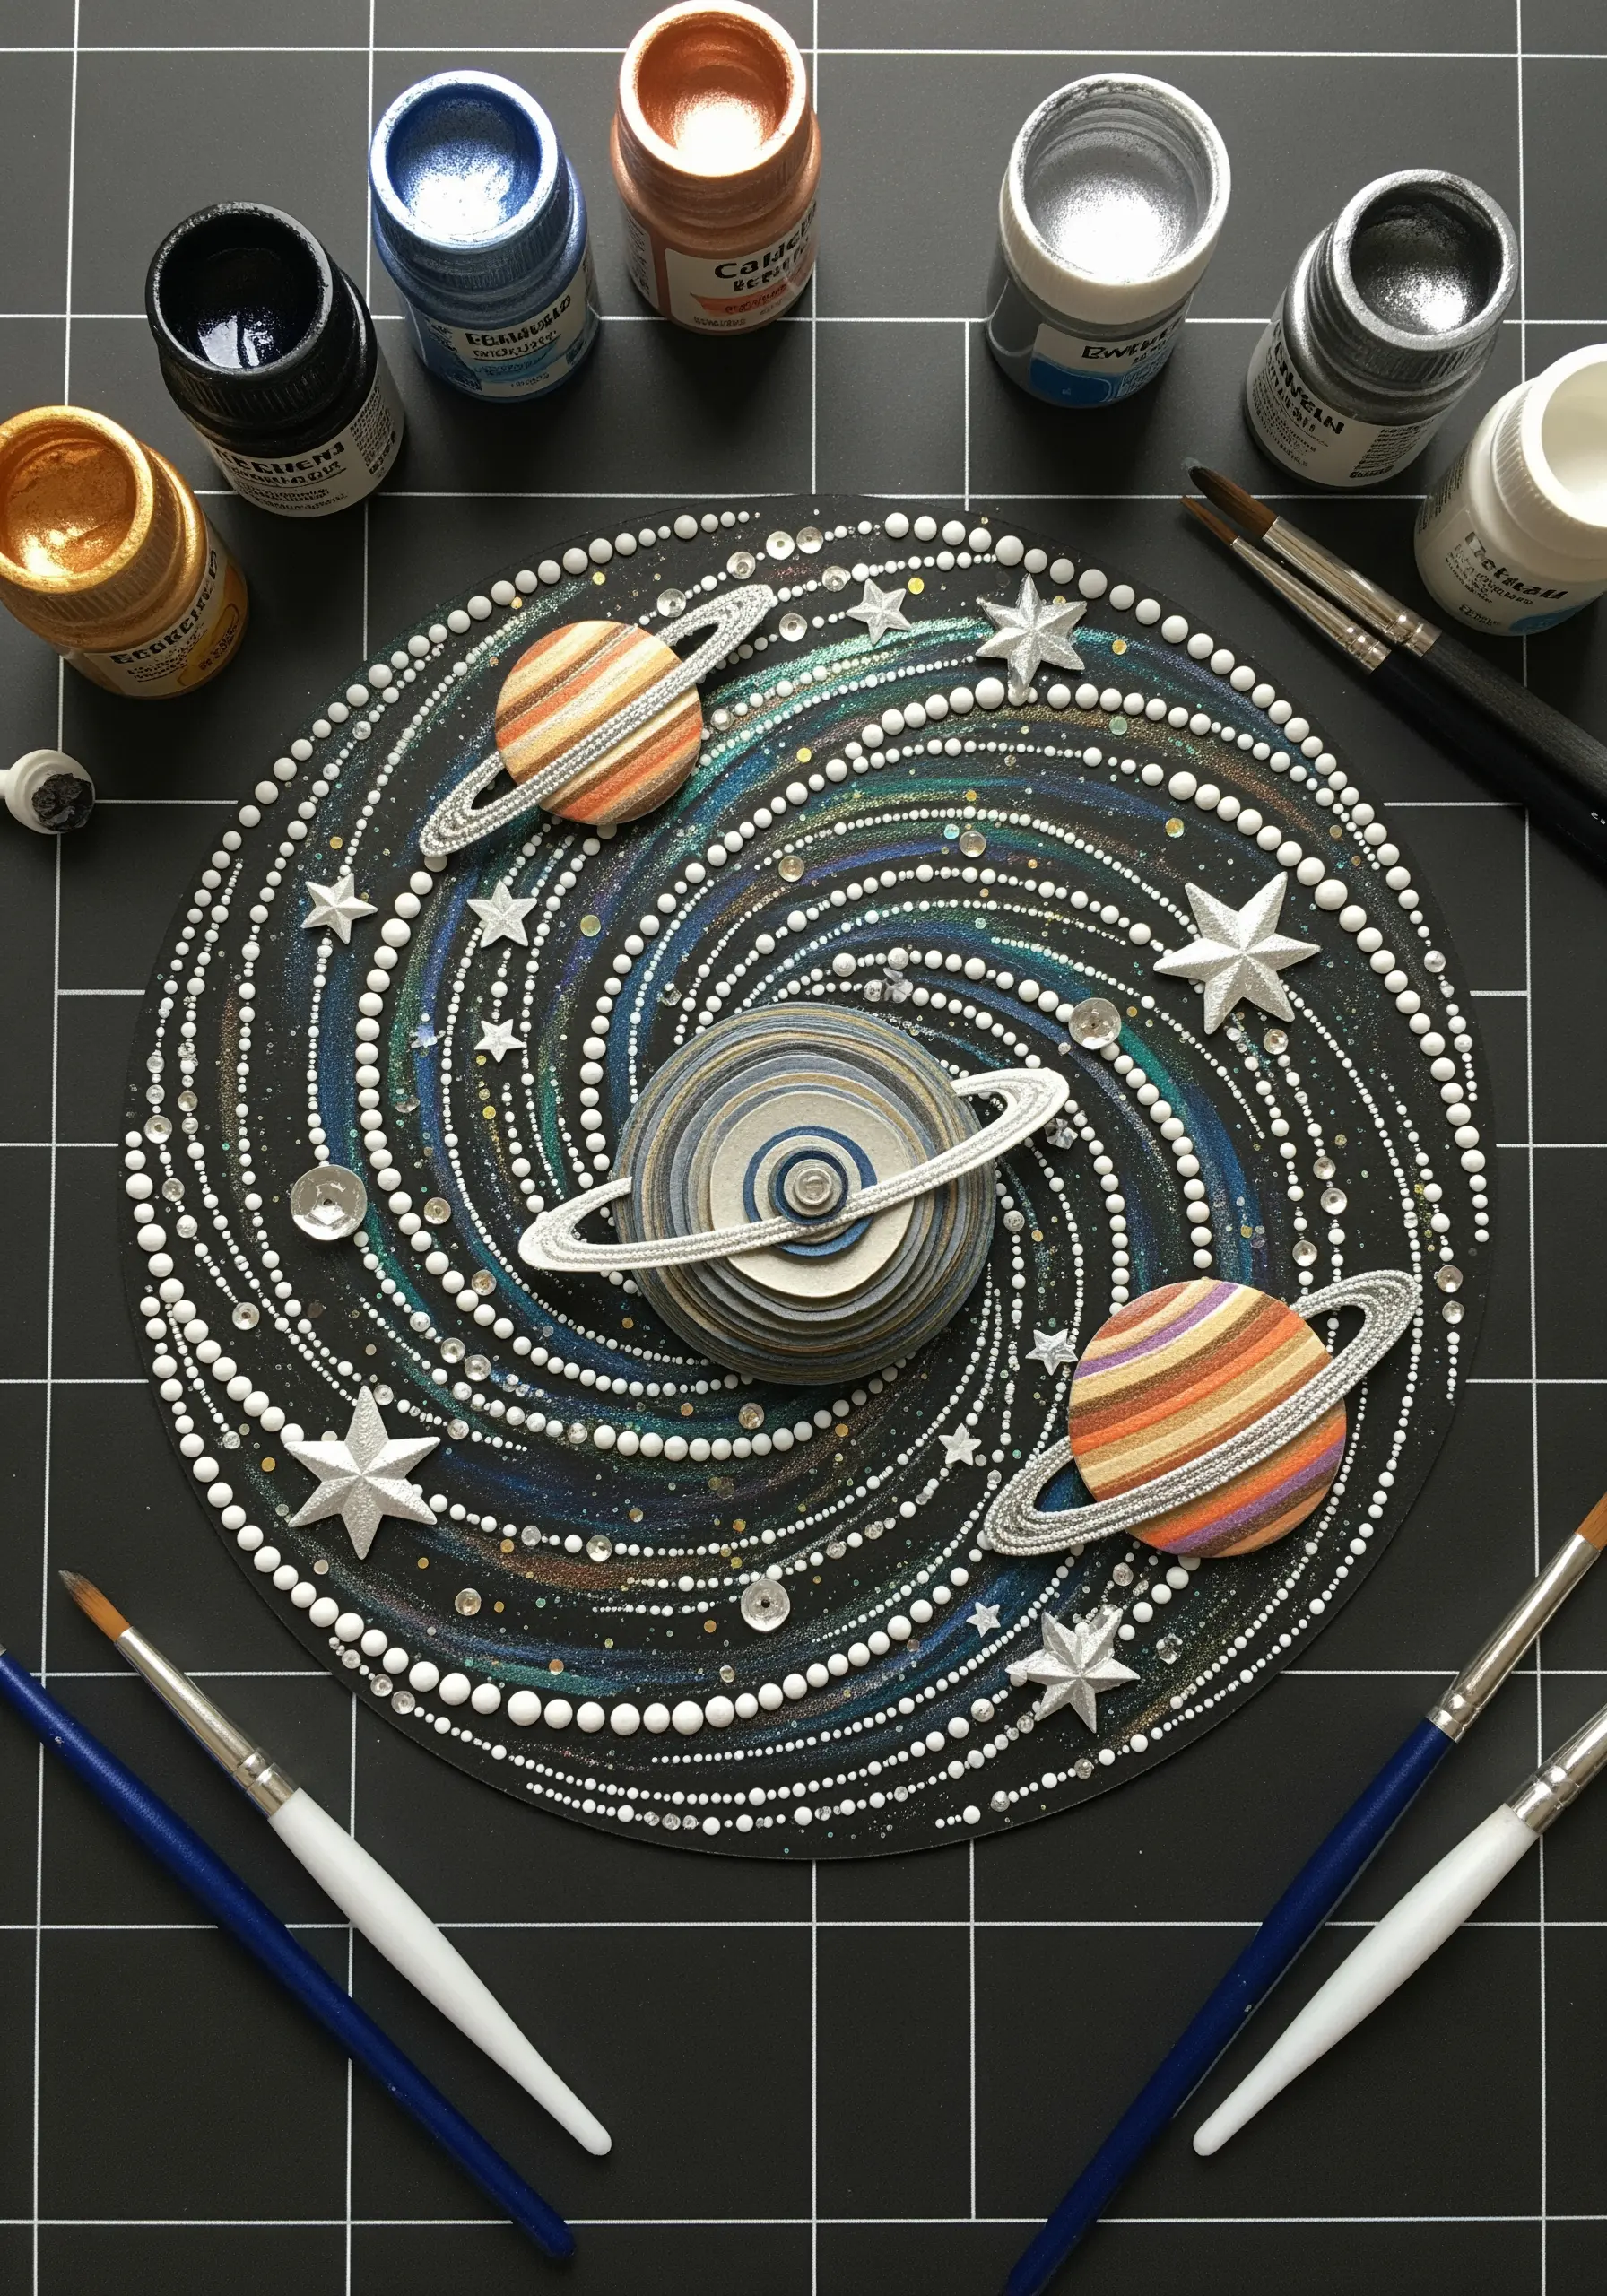
Use this cosmic paper collage as inspiration for a mixed-media embroidery design.
The swirling galaxies of dots can be recreated with hundreds of French knots, colonial knots, and tiny seed beads in varying sizes and iridescent shades.
For the planets, use stacked layers of felt or fabric appliqué to build dimension, then couch metallic thread around them for shimmering rings.
This approach allows you to combine simple stitches into a composition that feels vast, detailed, and full of captivating texture.
5. Build Landscapes with Crinkled Fabric and Couching
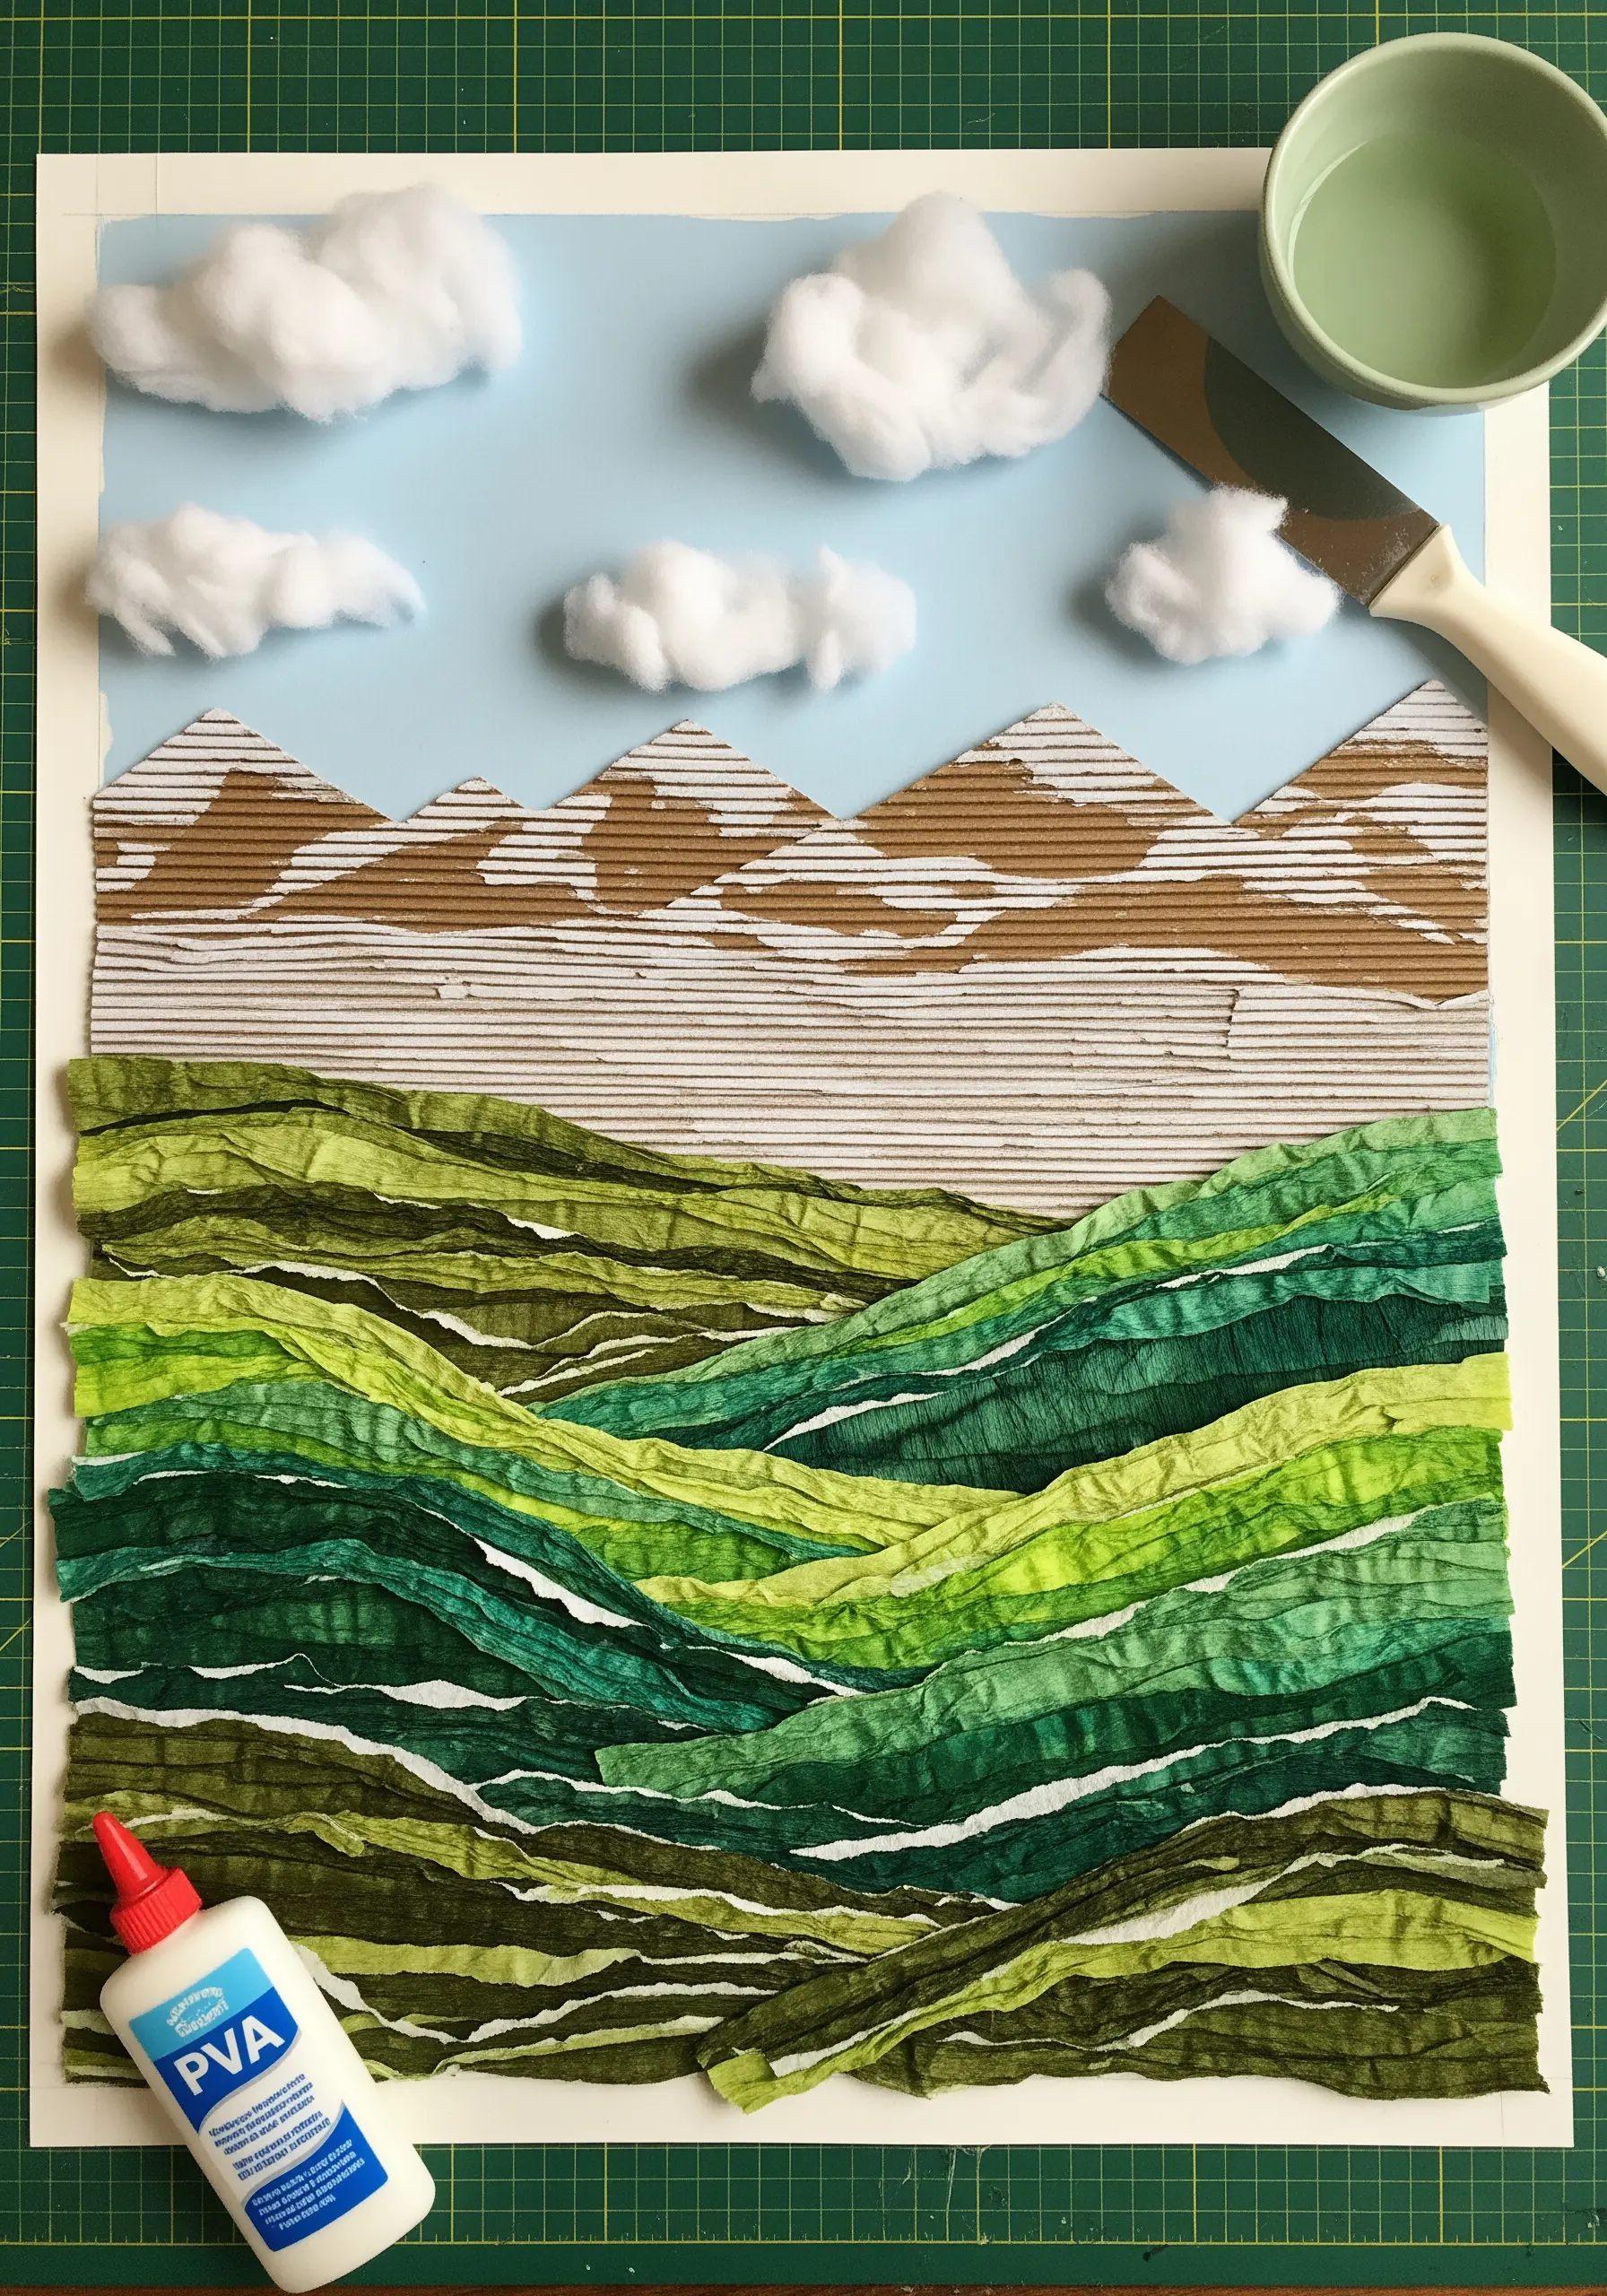
Instead of crinkled paper, use strips of hand-dyed, wrinkled linen or cotton to build a landscape with organic texture.
Appliqué the strips with raw, frayed edges to enhance the rugged feel of rolling hills.
For the mountains, couch thick, chunky yarn over a cardboard base to replicate the corrugated texture and create a strong topographical line.
The fluffy paper clouds are a direct cue to use soft tufts of roving or cotton batting, lightly tacked down for a three-dimensional effect.
6. Translate Paper Quilling into Sculptural Thread Portraits
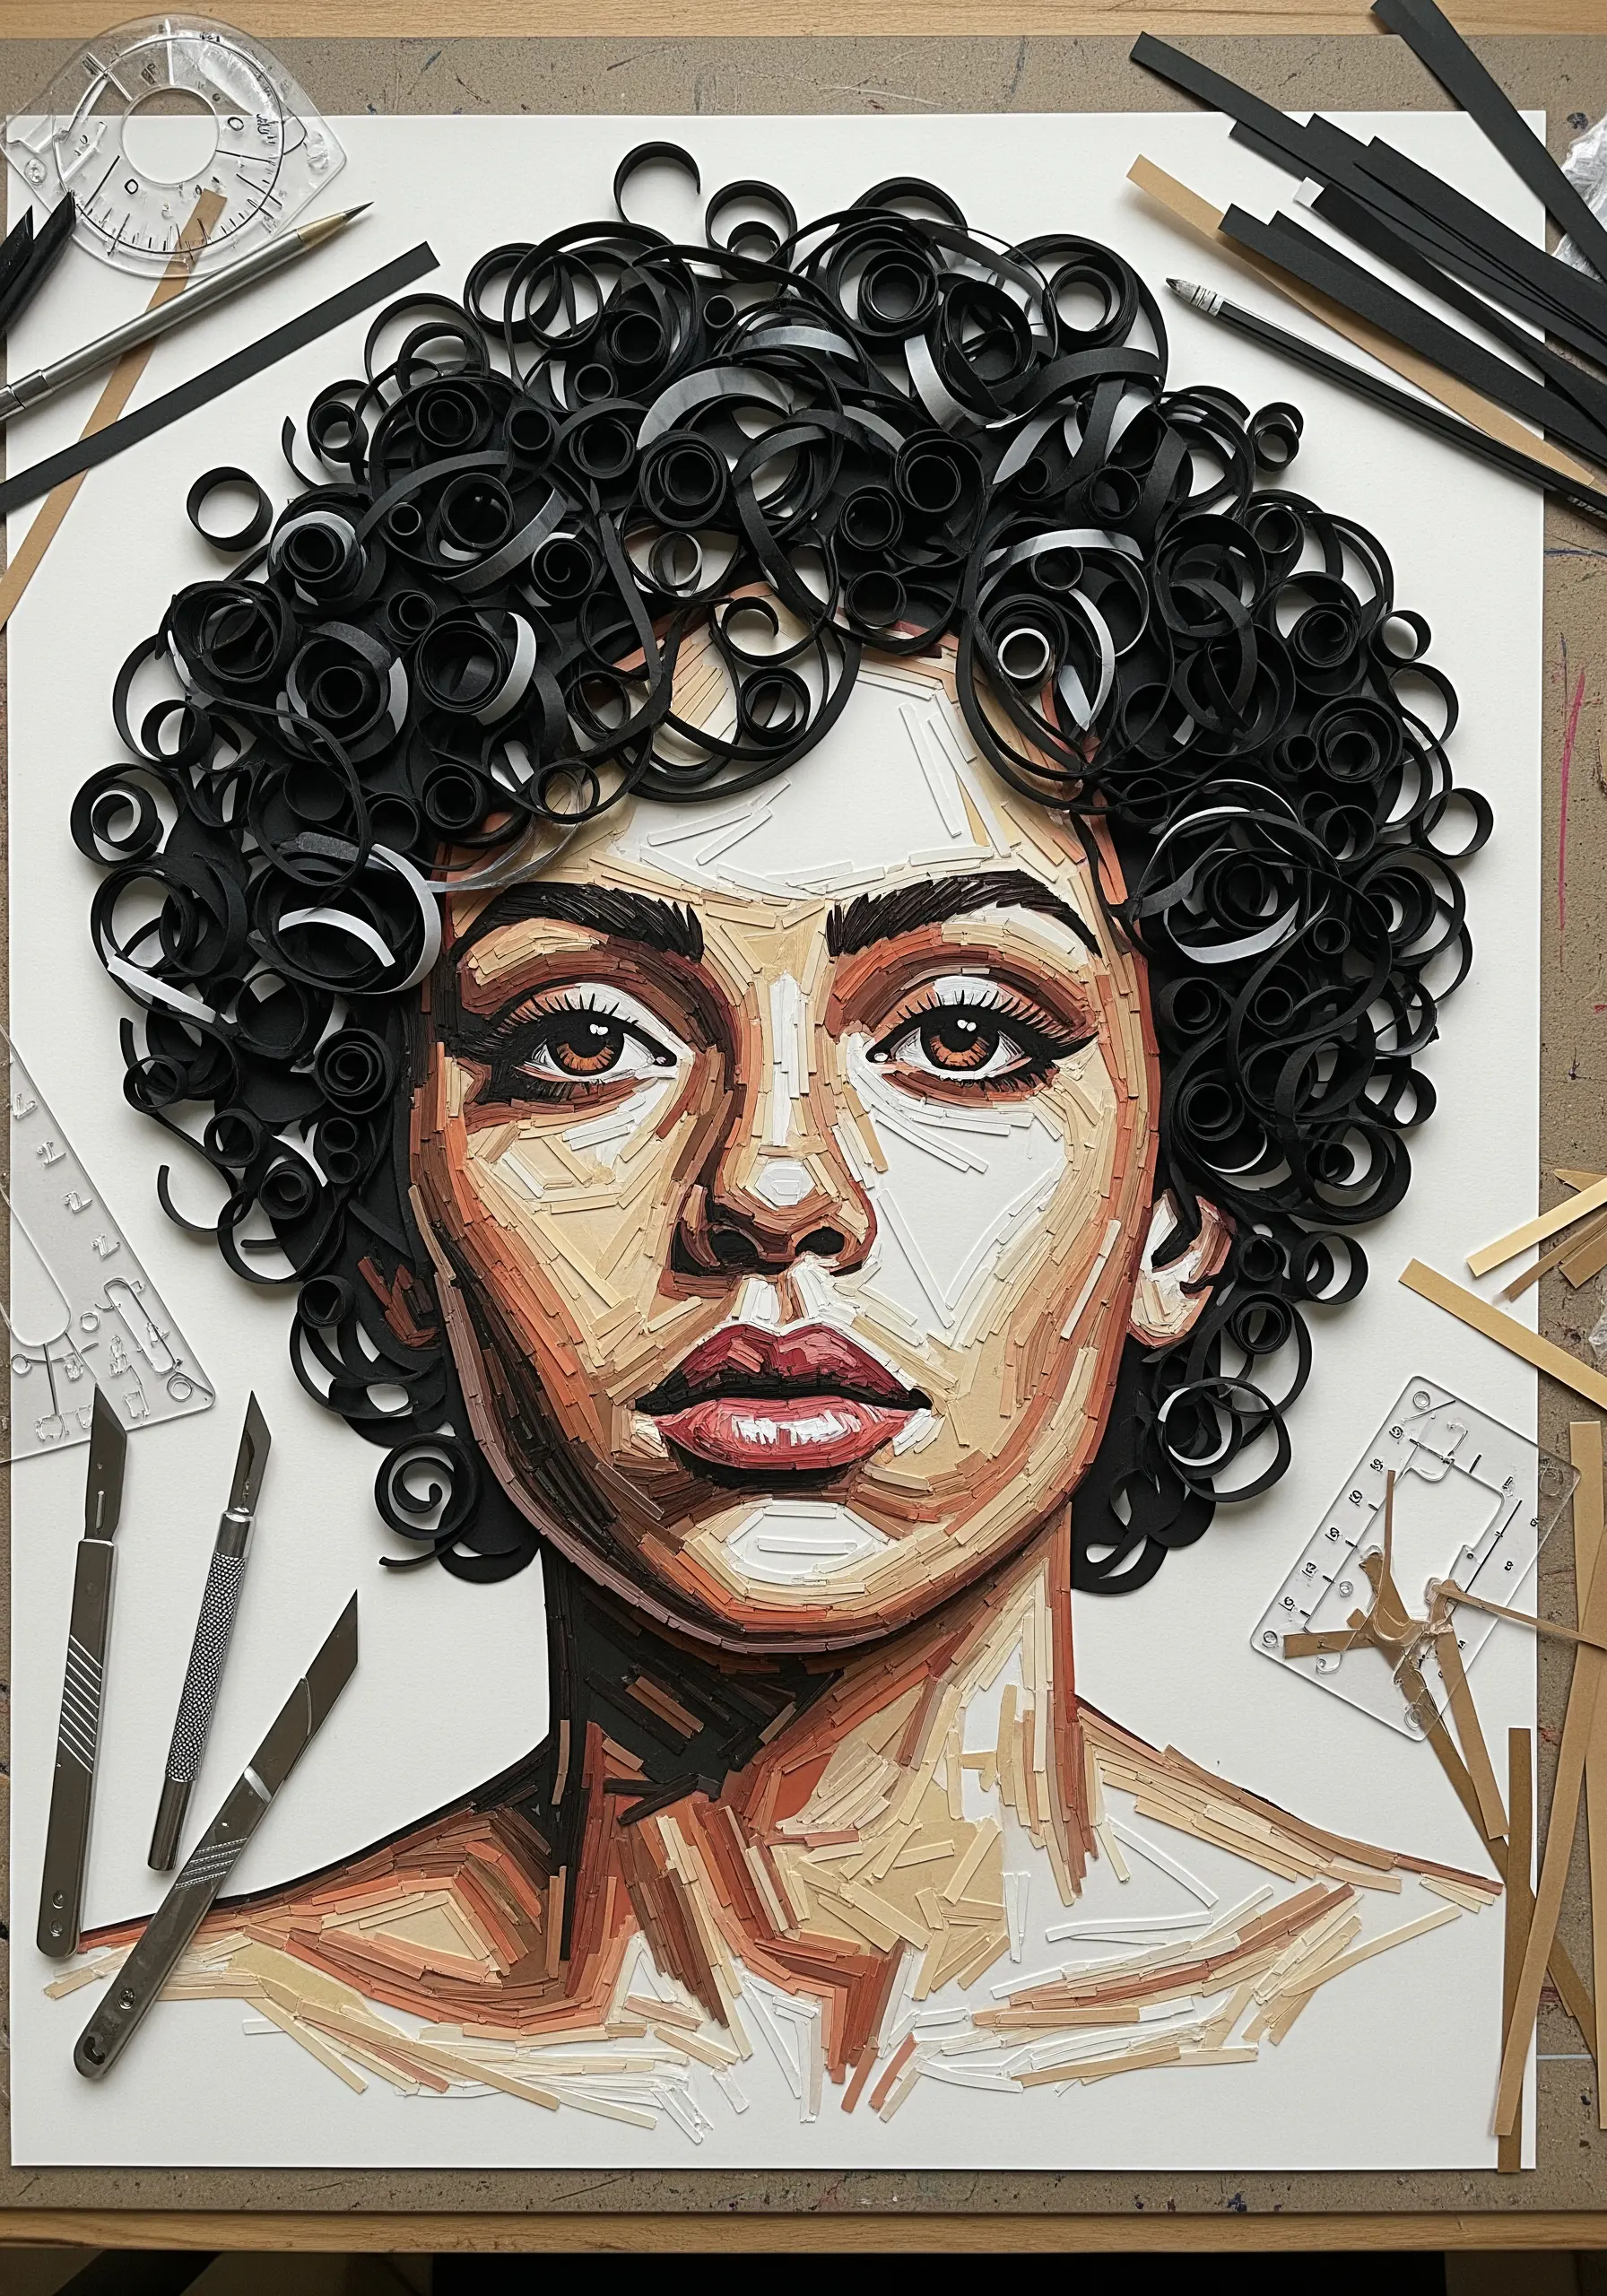
The tightly coiled paper hair is a perfect reference for using Turkey work or Ghiordes knots, which you can trim to create a dense, sculptural hairstyle.
For the skin tones, instead of paper strips, use thread painting with distinct blocks of color to mimic the sharp planes of the face.
This method challenges you to see thread not just as a line, but as a material you can loop, coil, and sculpt to build form, just like paper quilling.
Use a single strand of thread for fine details like eyelashes and brows to contrast with the bold texture of the hair.
7. Use Paper Squares to Plan a Pixelated Cross-Stitch
Before starting a complex color gradient in cross-stitch, map it out using colored paper squares on a grid.
This technique helps you visualize the flow of color and make adjustments without wasting thread or fabric.
Each paper square represents one ‘X’ of your cross-stitch, making it a perfect tool for designing your own pixel art patterns.
It simplifies the process of creating smooth transitions between hues, ensuring your final stitched piece looks polished and intentional.
8. Achieve Gilded Texture with Metallic Couching and Bullion Knots
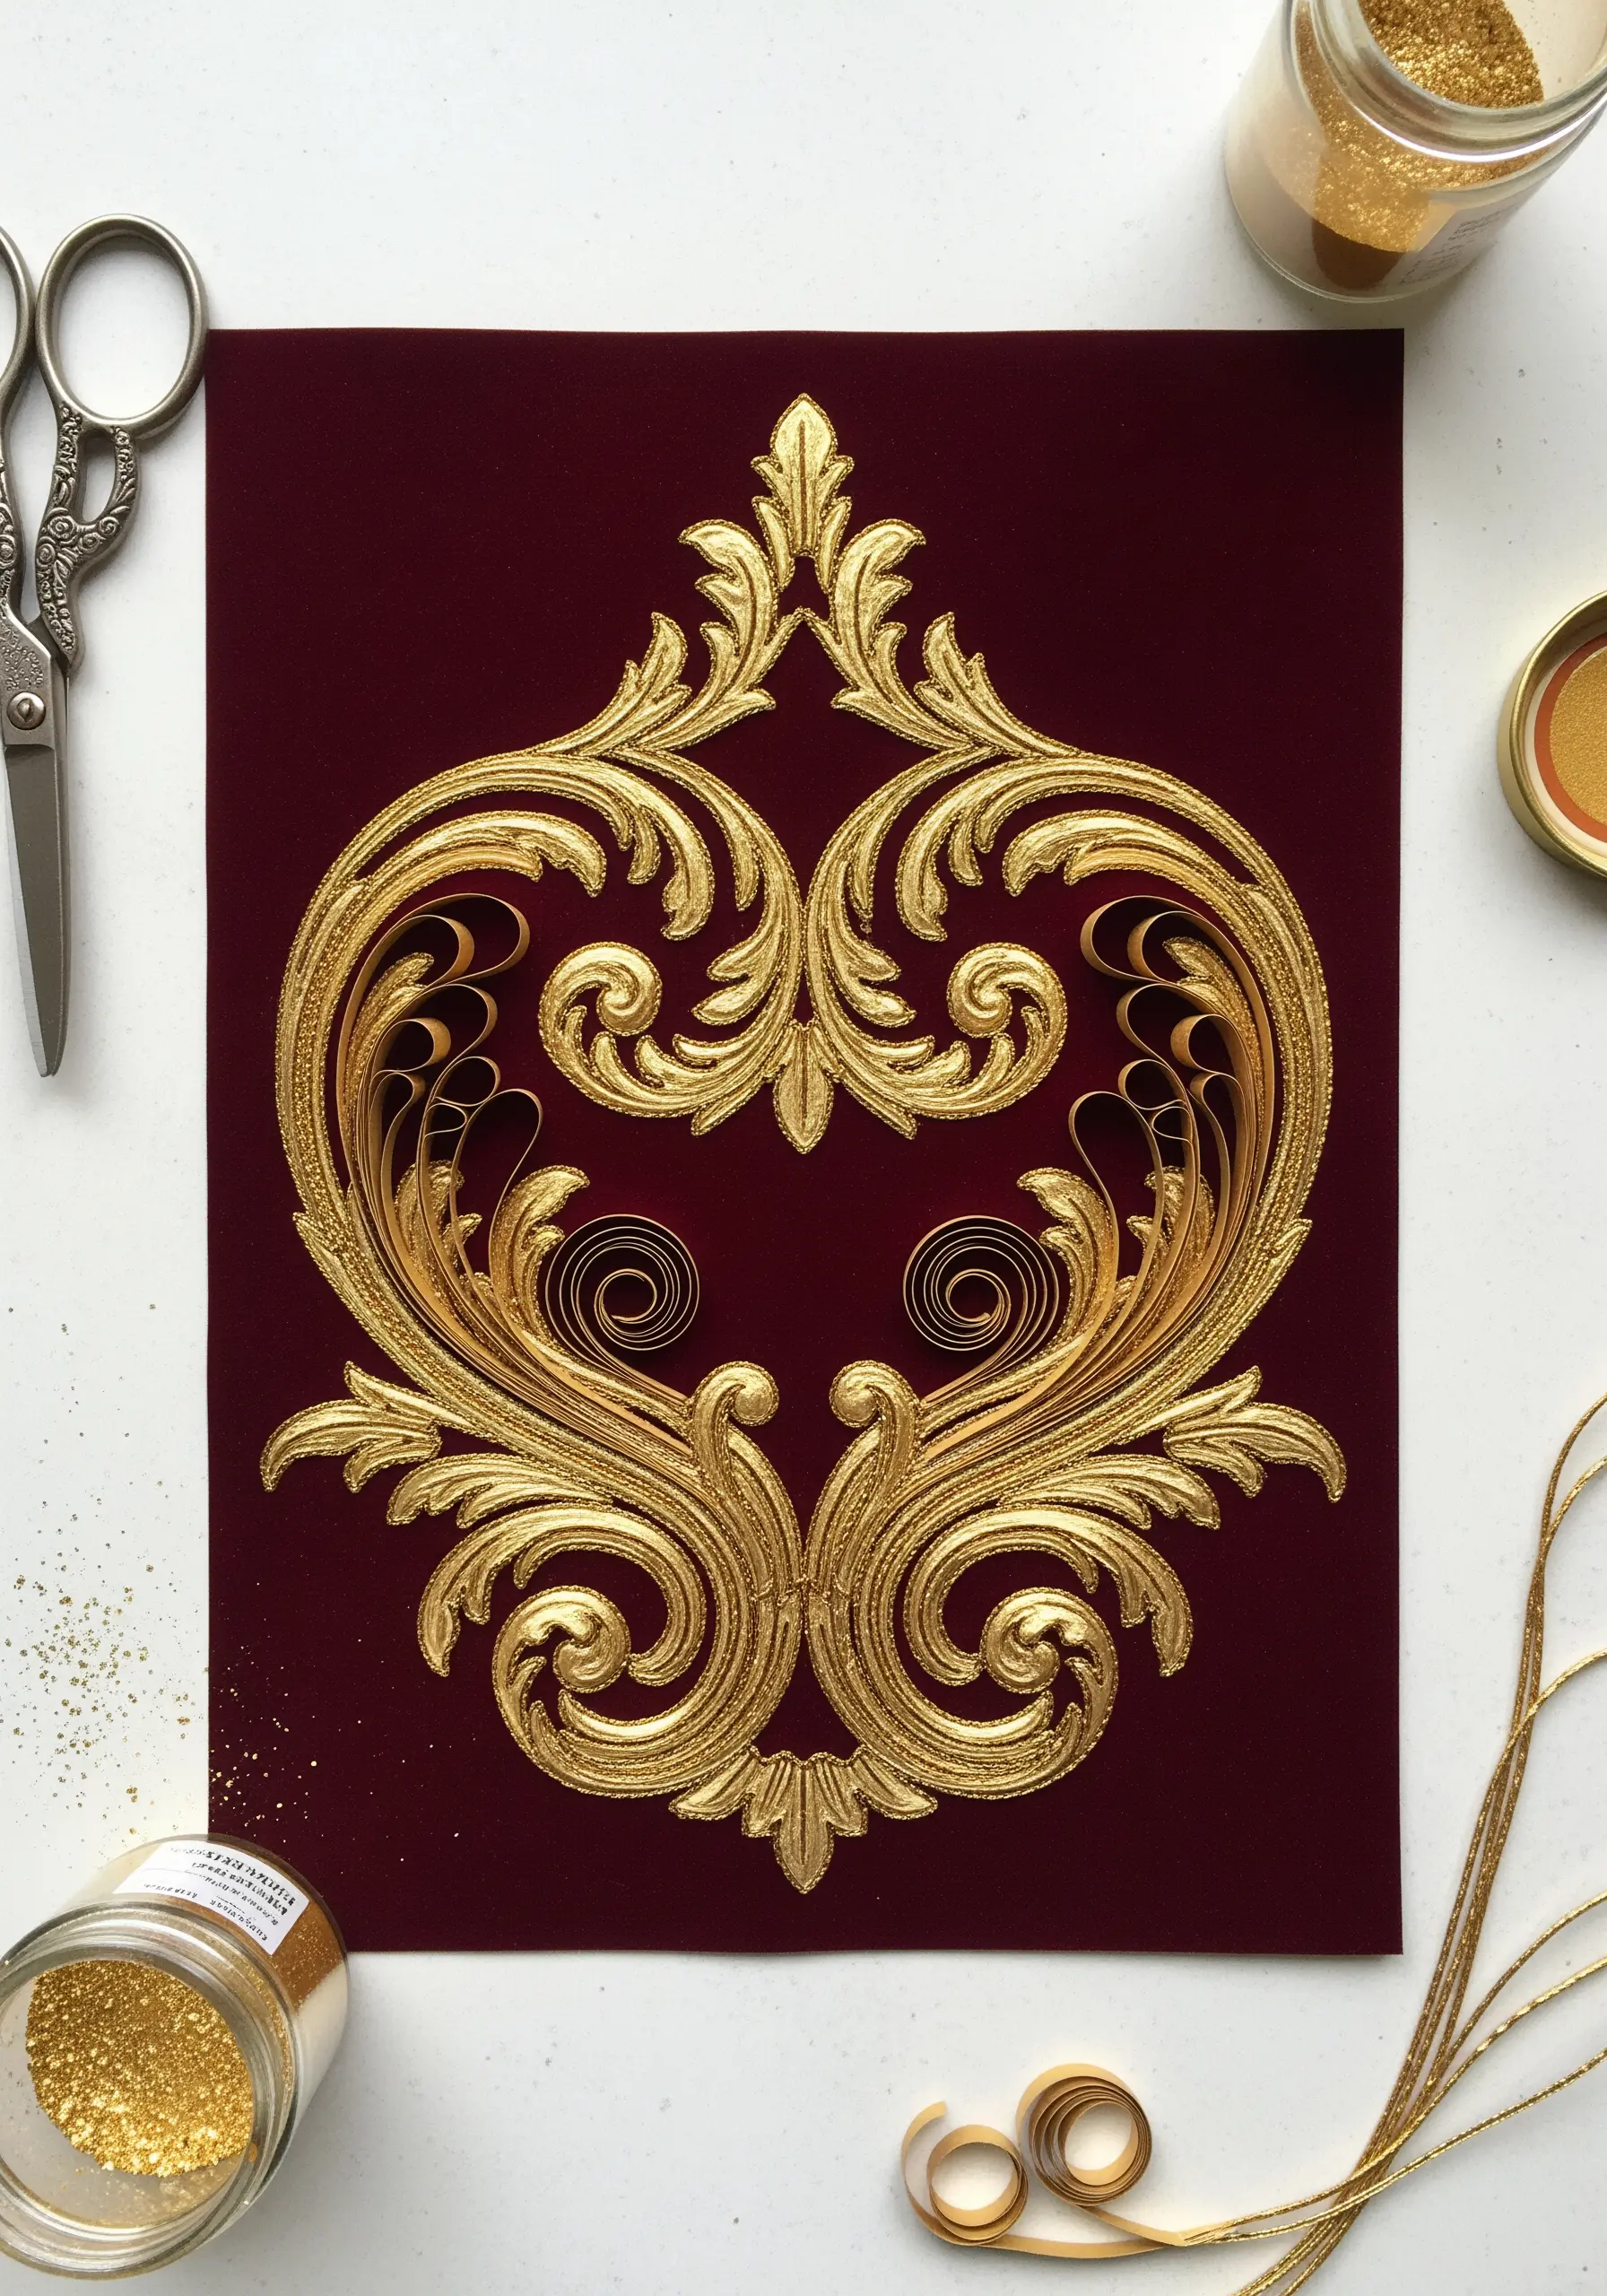
Recreate the elegance of this gilded paper ornament by couching a smooth, metallic passing thread for the main outlines.
For the intricate coiled sections, use bullion knots or cast-on stitches with a fine metallic thread to mimic the look of quilled paper.
Stitching on a dark, rich fabric like velvet or deep burgundy linen will make the metallic threads stand out with regal authority.
This combination of techniques allows you to capture both the smooth lines and the detailed texture of ornate goldwork.
9. Define Botanical Shapes with Graphic Chain Stitching
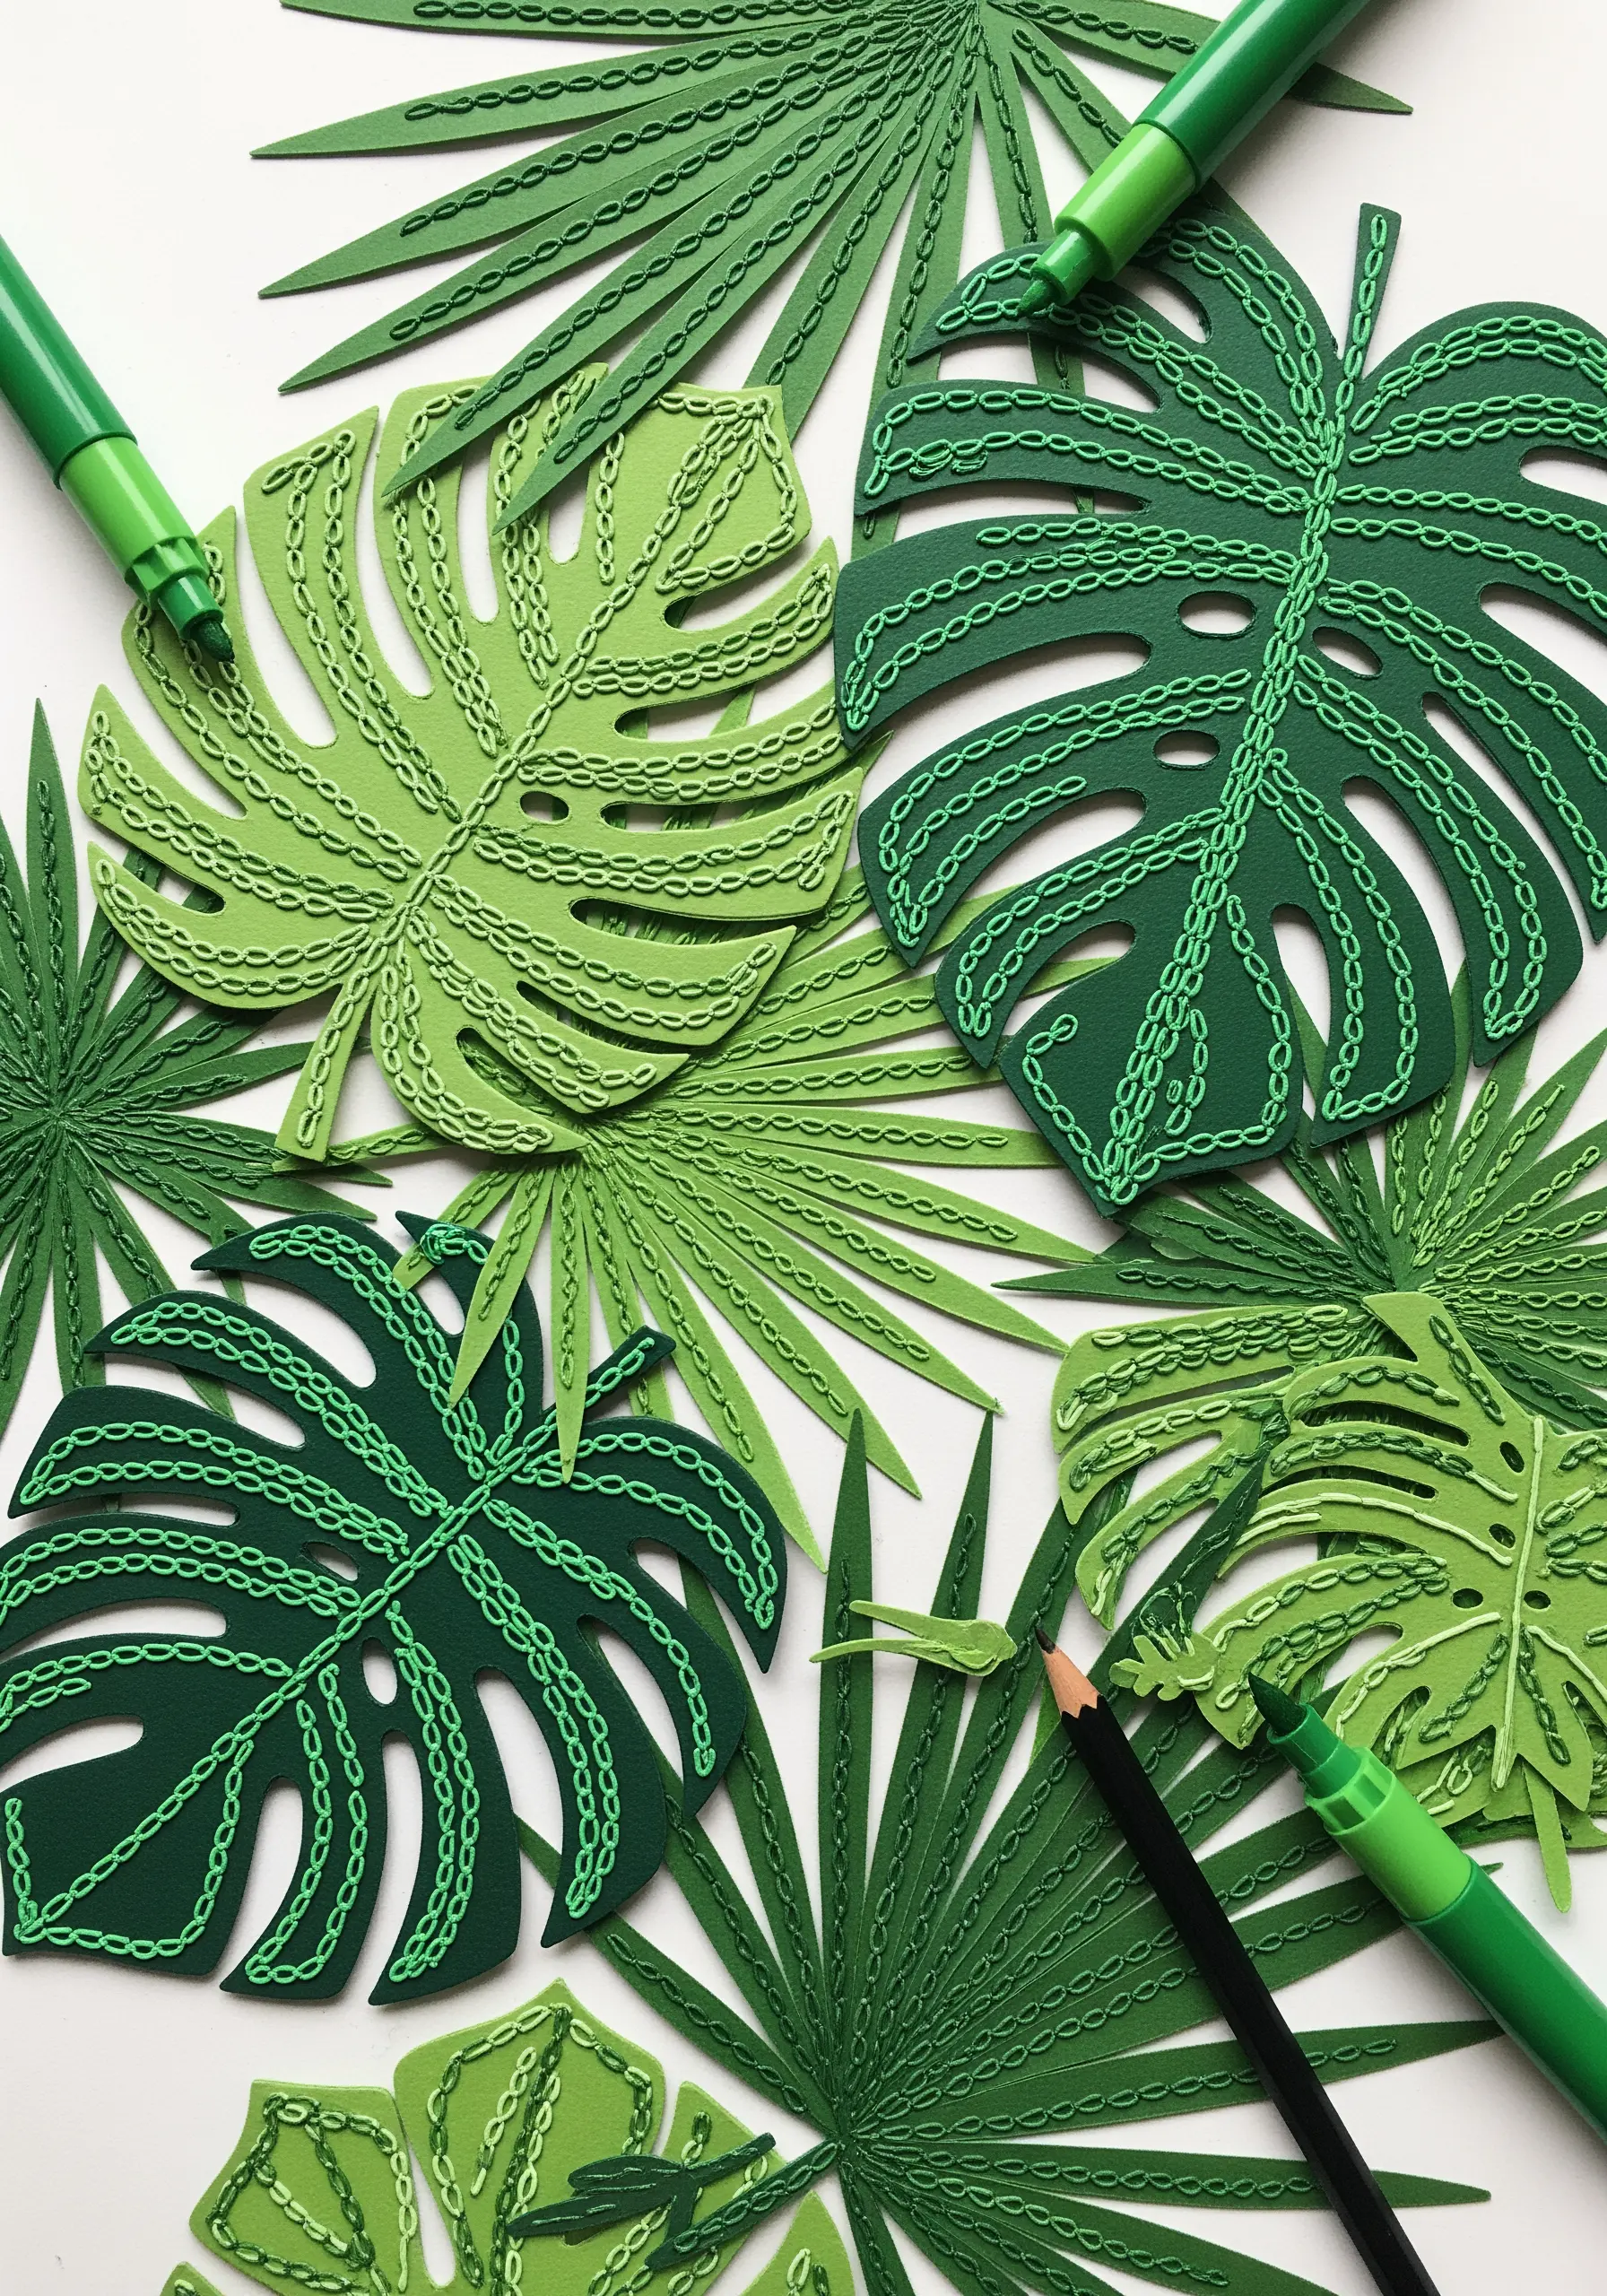
The lines drawn on these paper leaves directly mimic a chain stitch, showing you how to use it for both outlines and textured fills.
Create your own botanical shapes from felt or sturdy cotton and use a contrasting color of thread for the chain stitch to make the details pop.
Vary the size of your chain stitch—larger for bold veins and smaller for delicate edges—to add visual interest.
This technique transforms simple leaf shapes into lush, textured foliage with a clean, modern aesthetic.
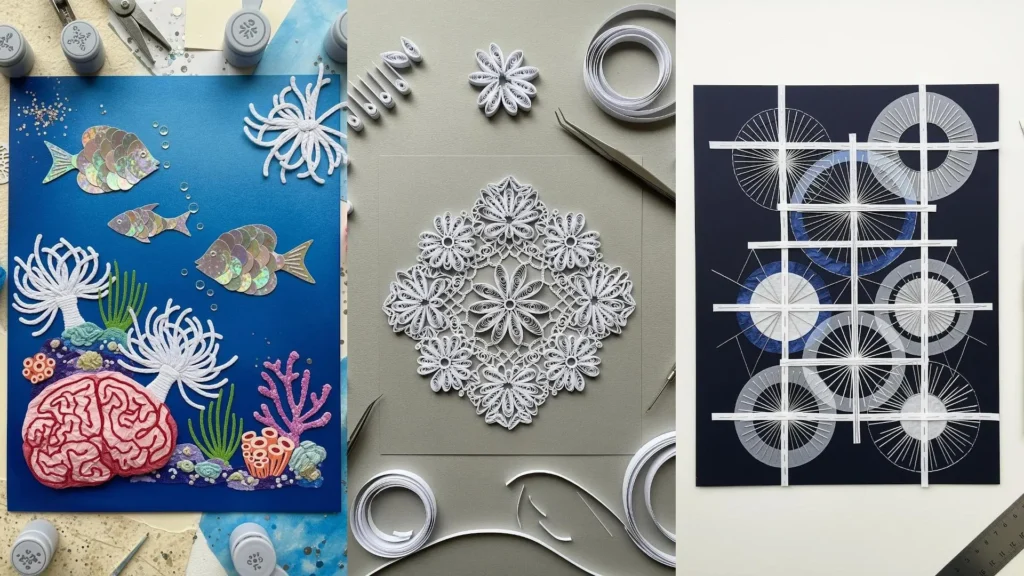
10. Capture Iridescence with Sequins and Specialty Threads
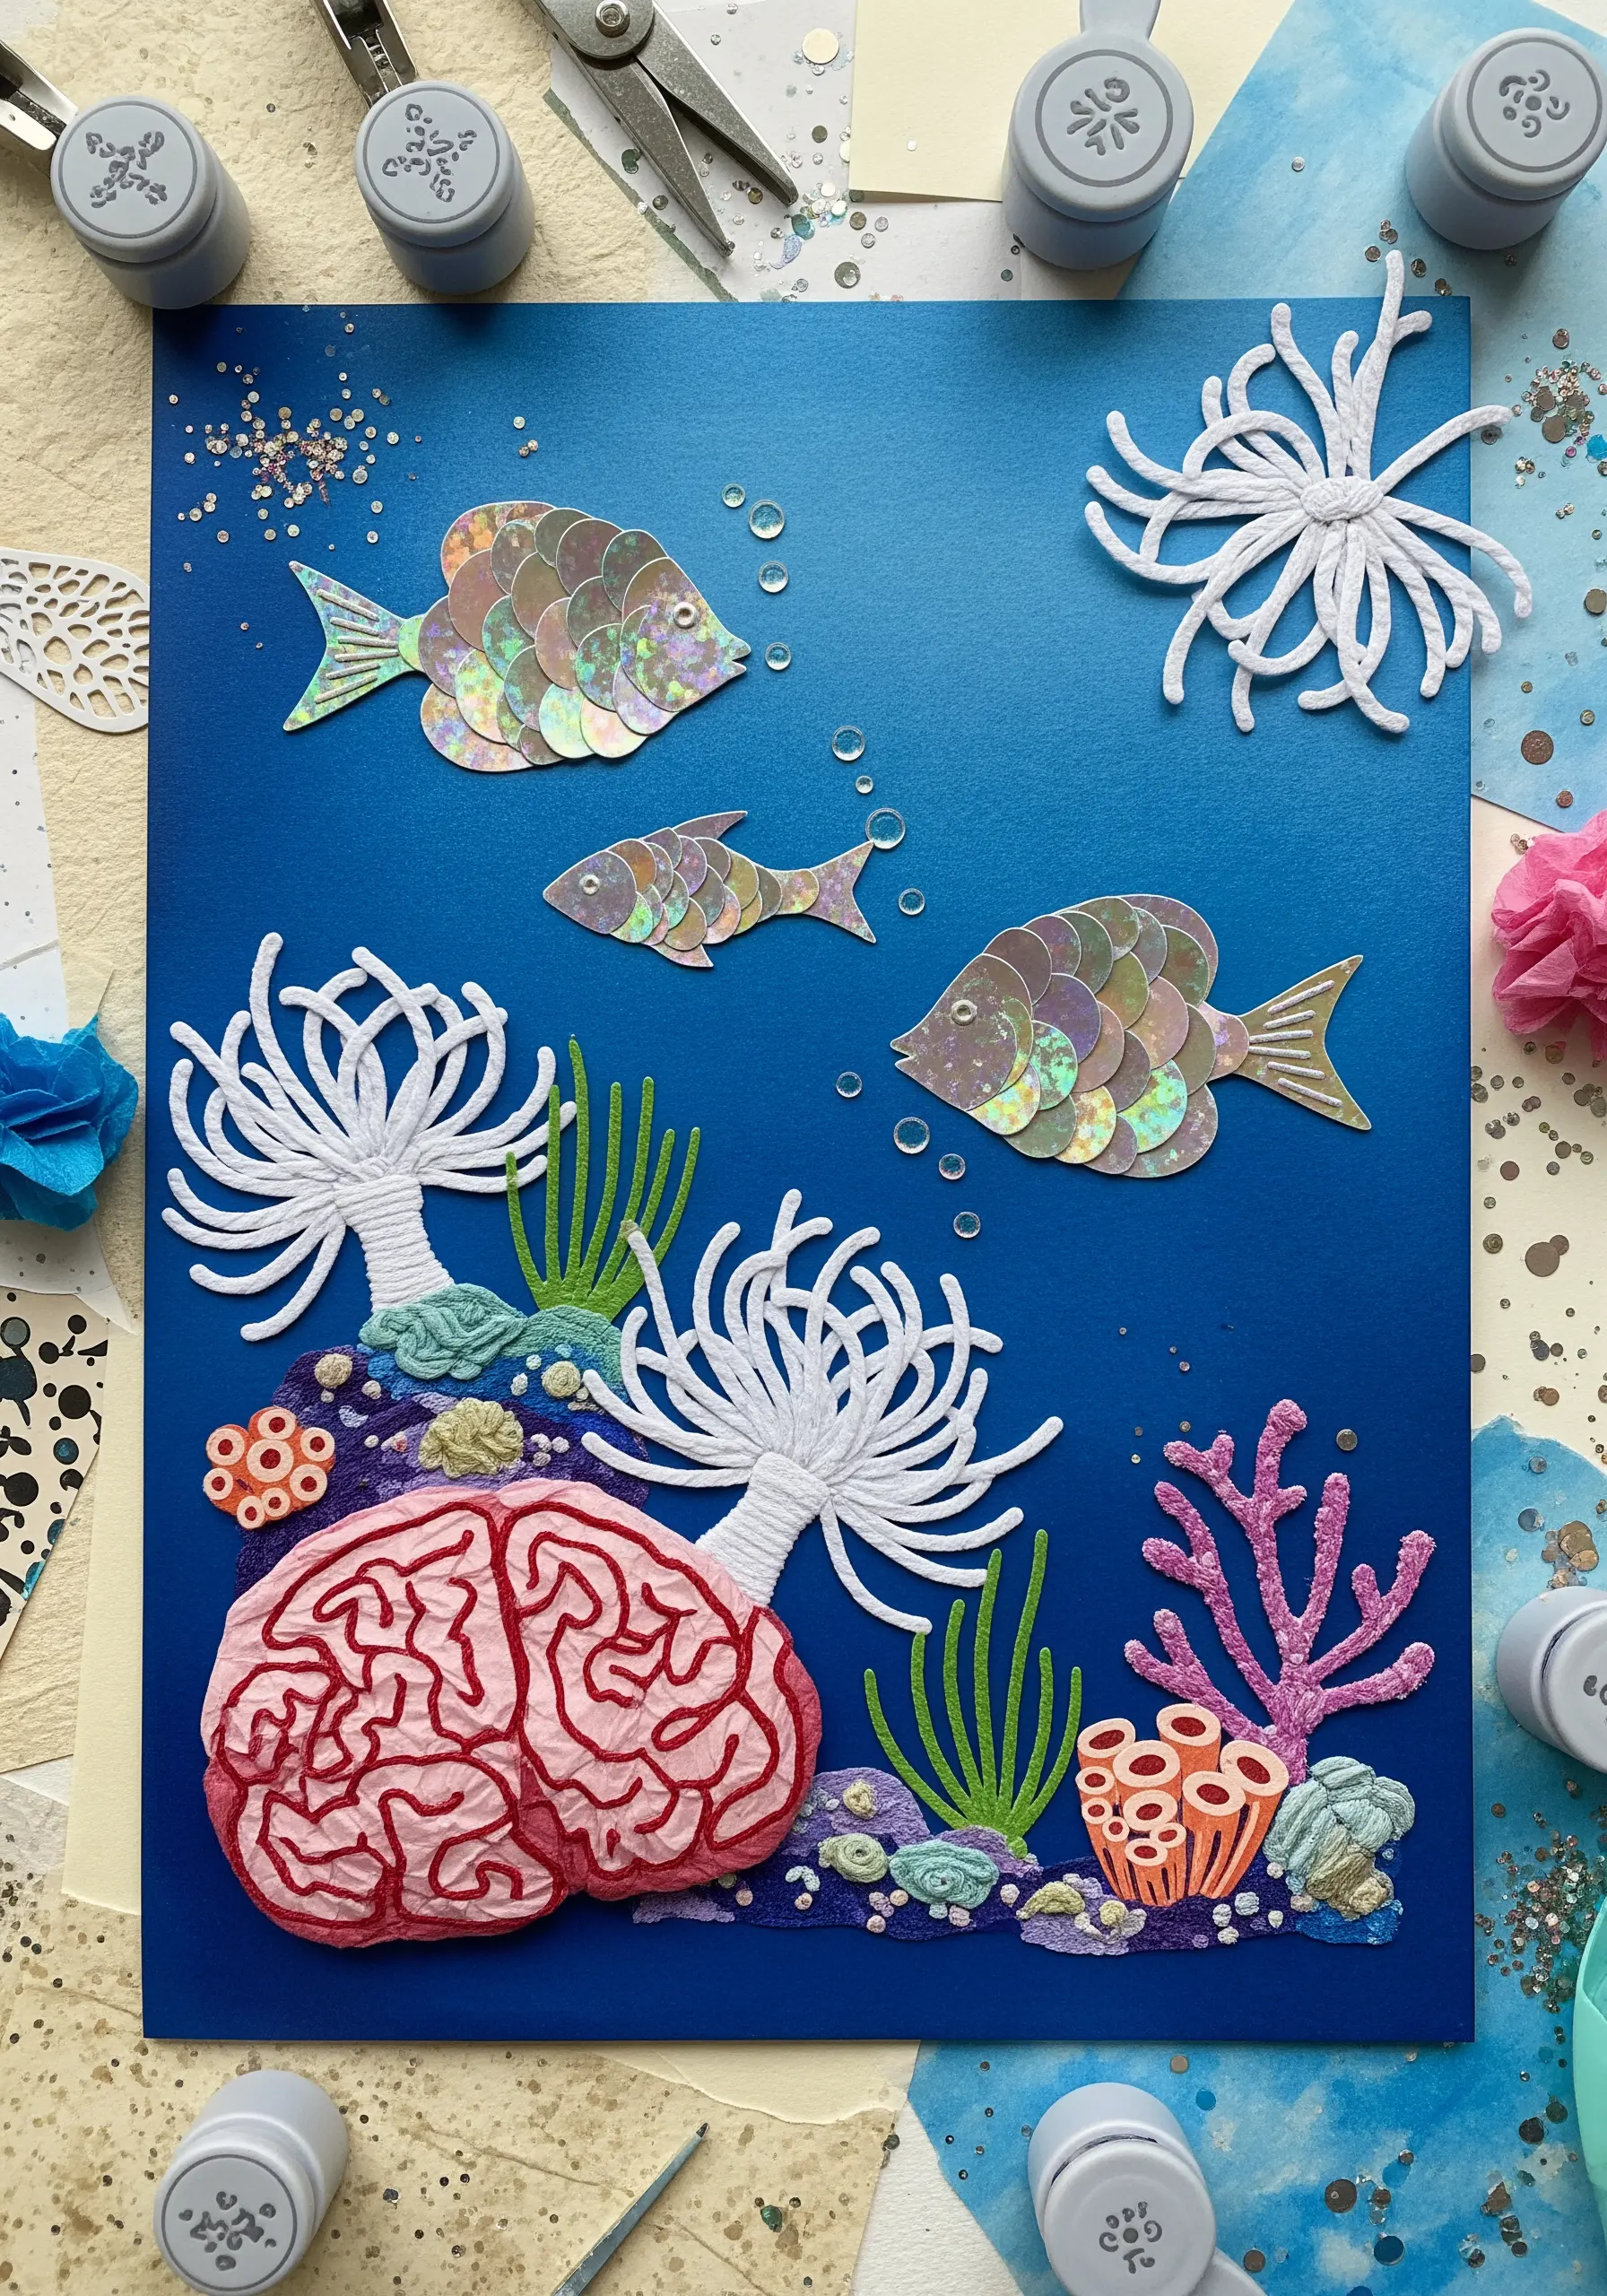
The holographic paper fish are a direct inspiration for using sequins or iridescent floss to create shimmering scales.
Stitch small, overlapping sequins with a single seed bead in the center to mimic the light-catching quality of the paper.
For the brain coral, use a dense grouping of French knots or the Pekinese stitch with a variegated pink thread to create its convoluted texture.
The fine, white anemones can be stitched with detached chain stitches or long straight stitches in a fine white silk thread for a delicate, flowing look.
11. Explore Subtle Texture with Whitework Embroidery
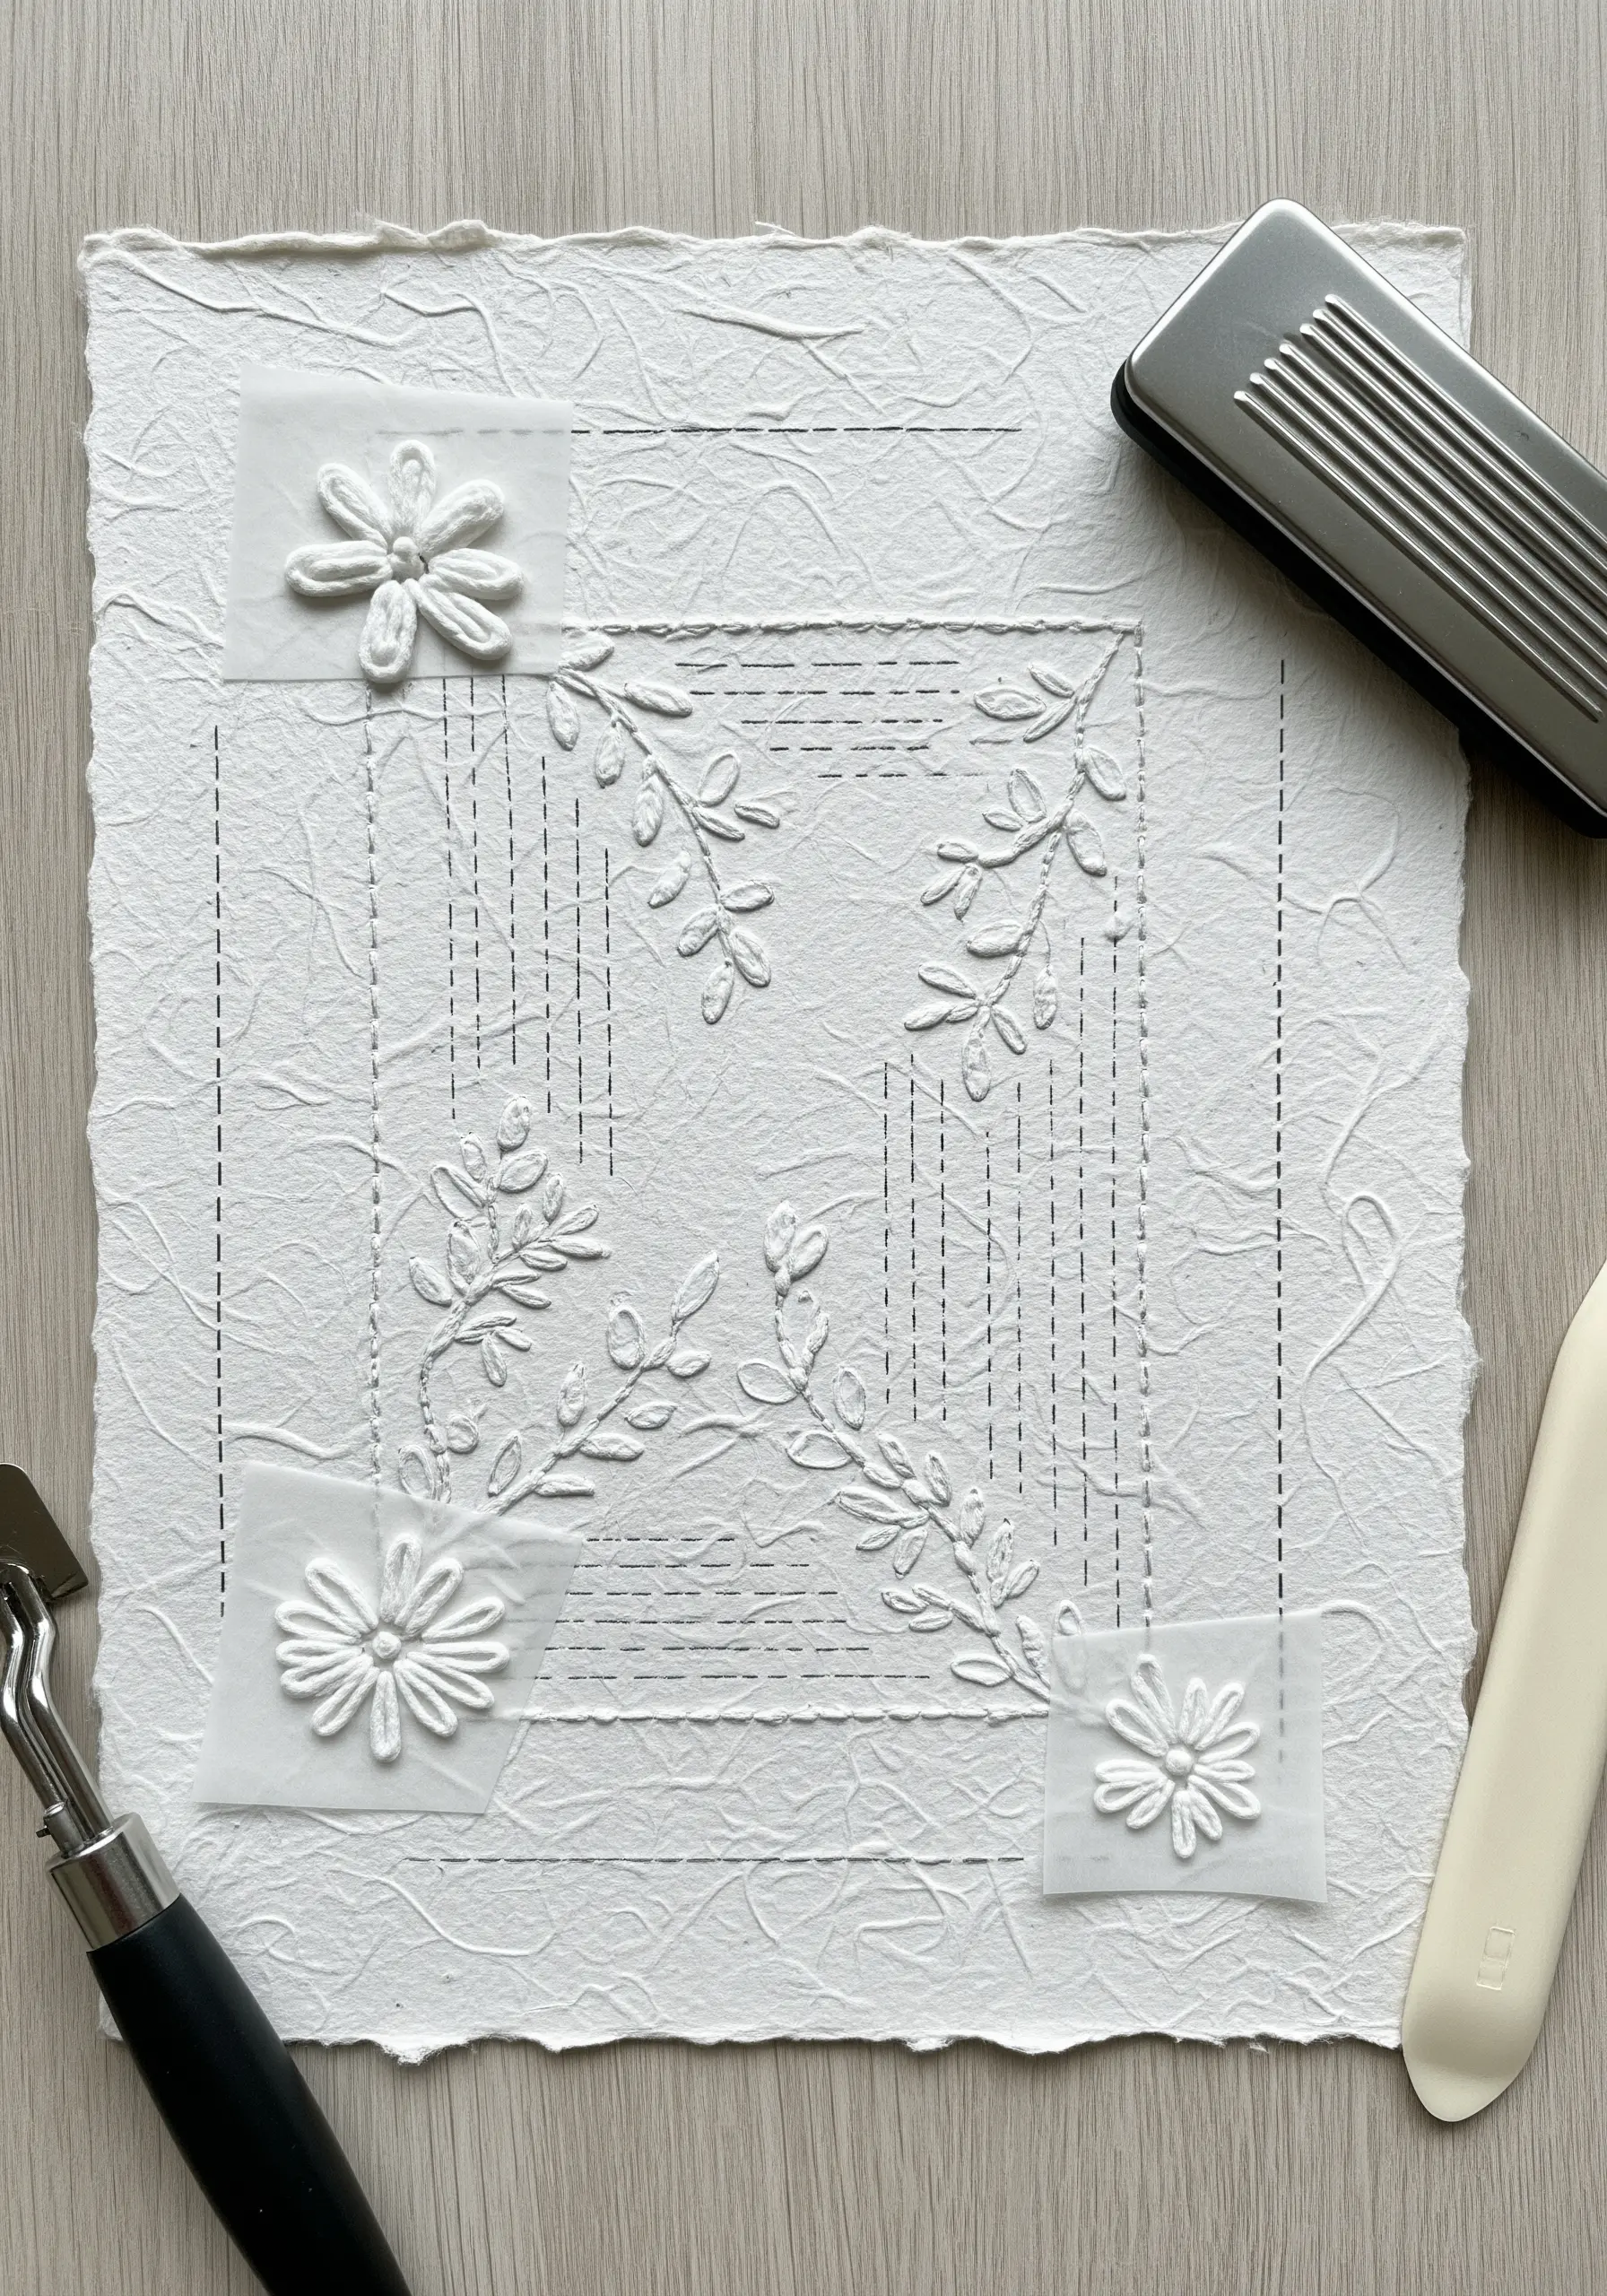
This all-white composition is a beautiful study in texture, which you can translate into whitework embroidery.
Use padded satin stitch to create the raised floral motifs, giving them a soft, bas-relief effect against the background fabric.
The dashed lines can be replicated with a simple running stitch, while the textured paper background inspires the use of dense seed stitching for a subtle, tactile feel.
Working with a single color forces you to focus entirely on how different stitches reflect light and create shadows, resulting in a sophisticated, elegant piece.
12. Stitch on Unconventional Surfaces Like Book Pages
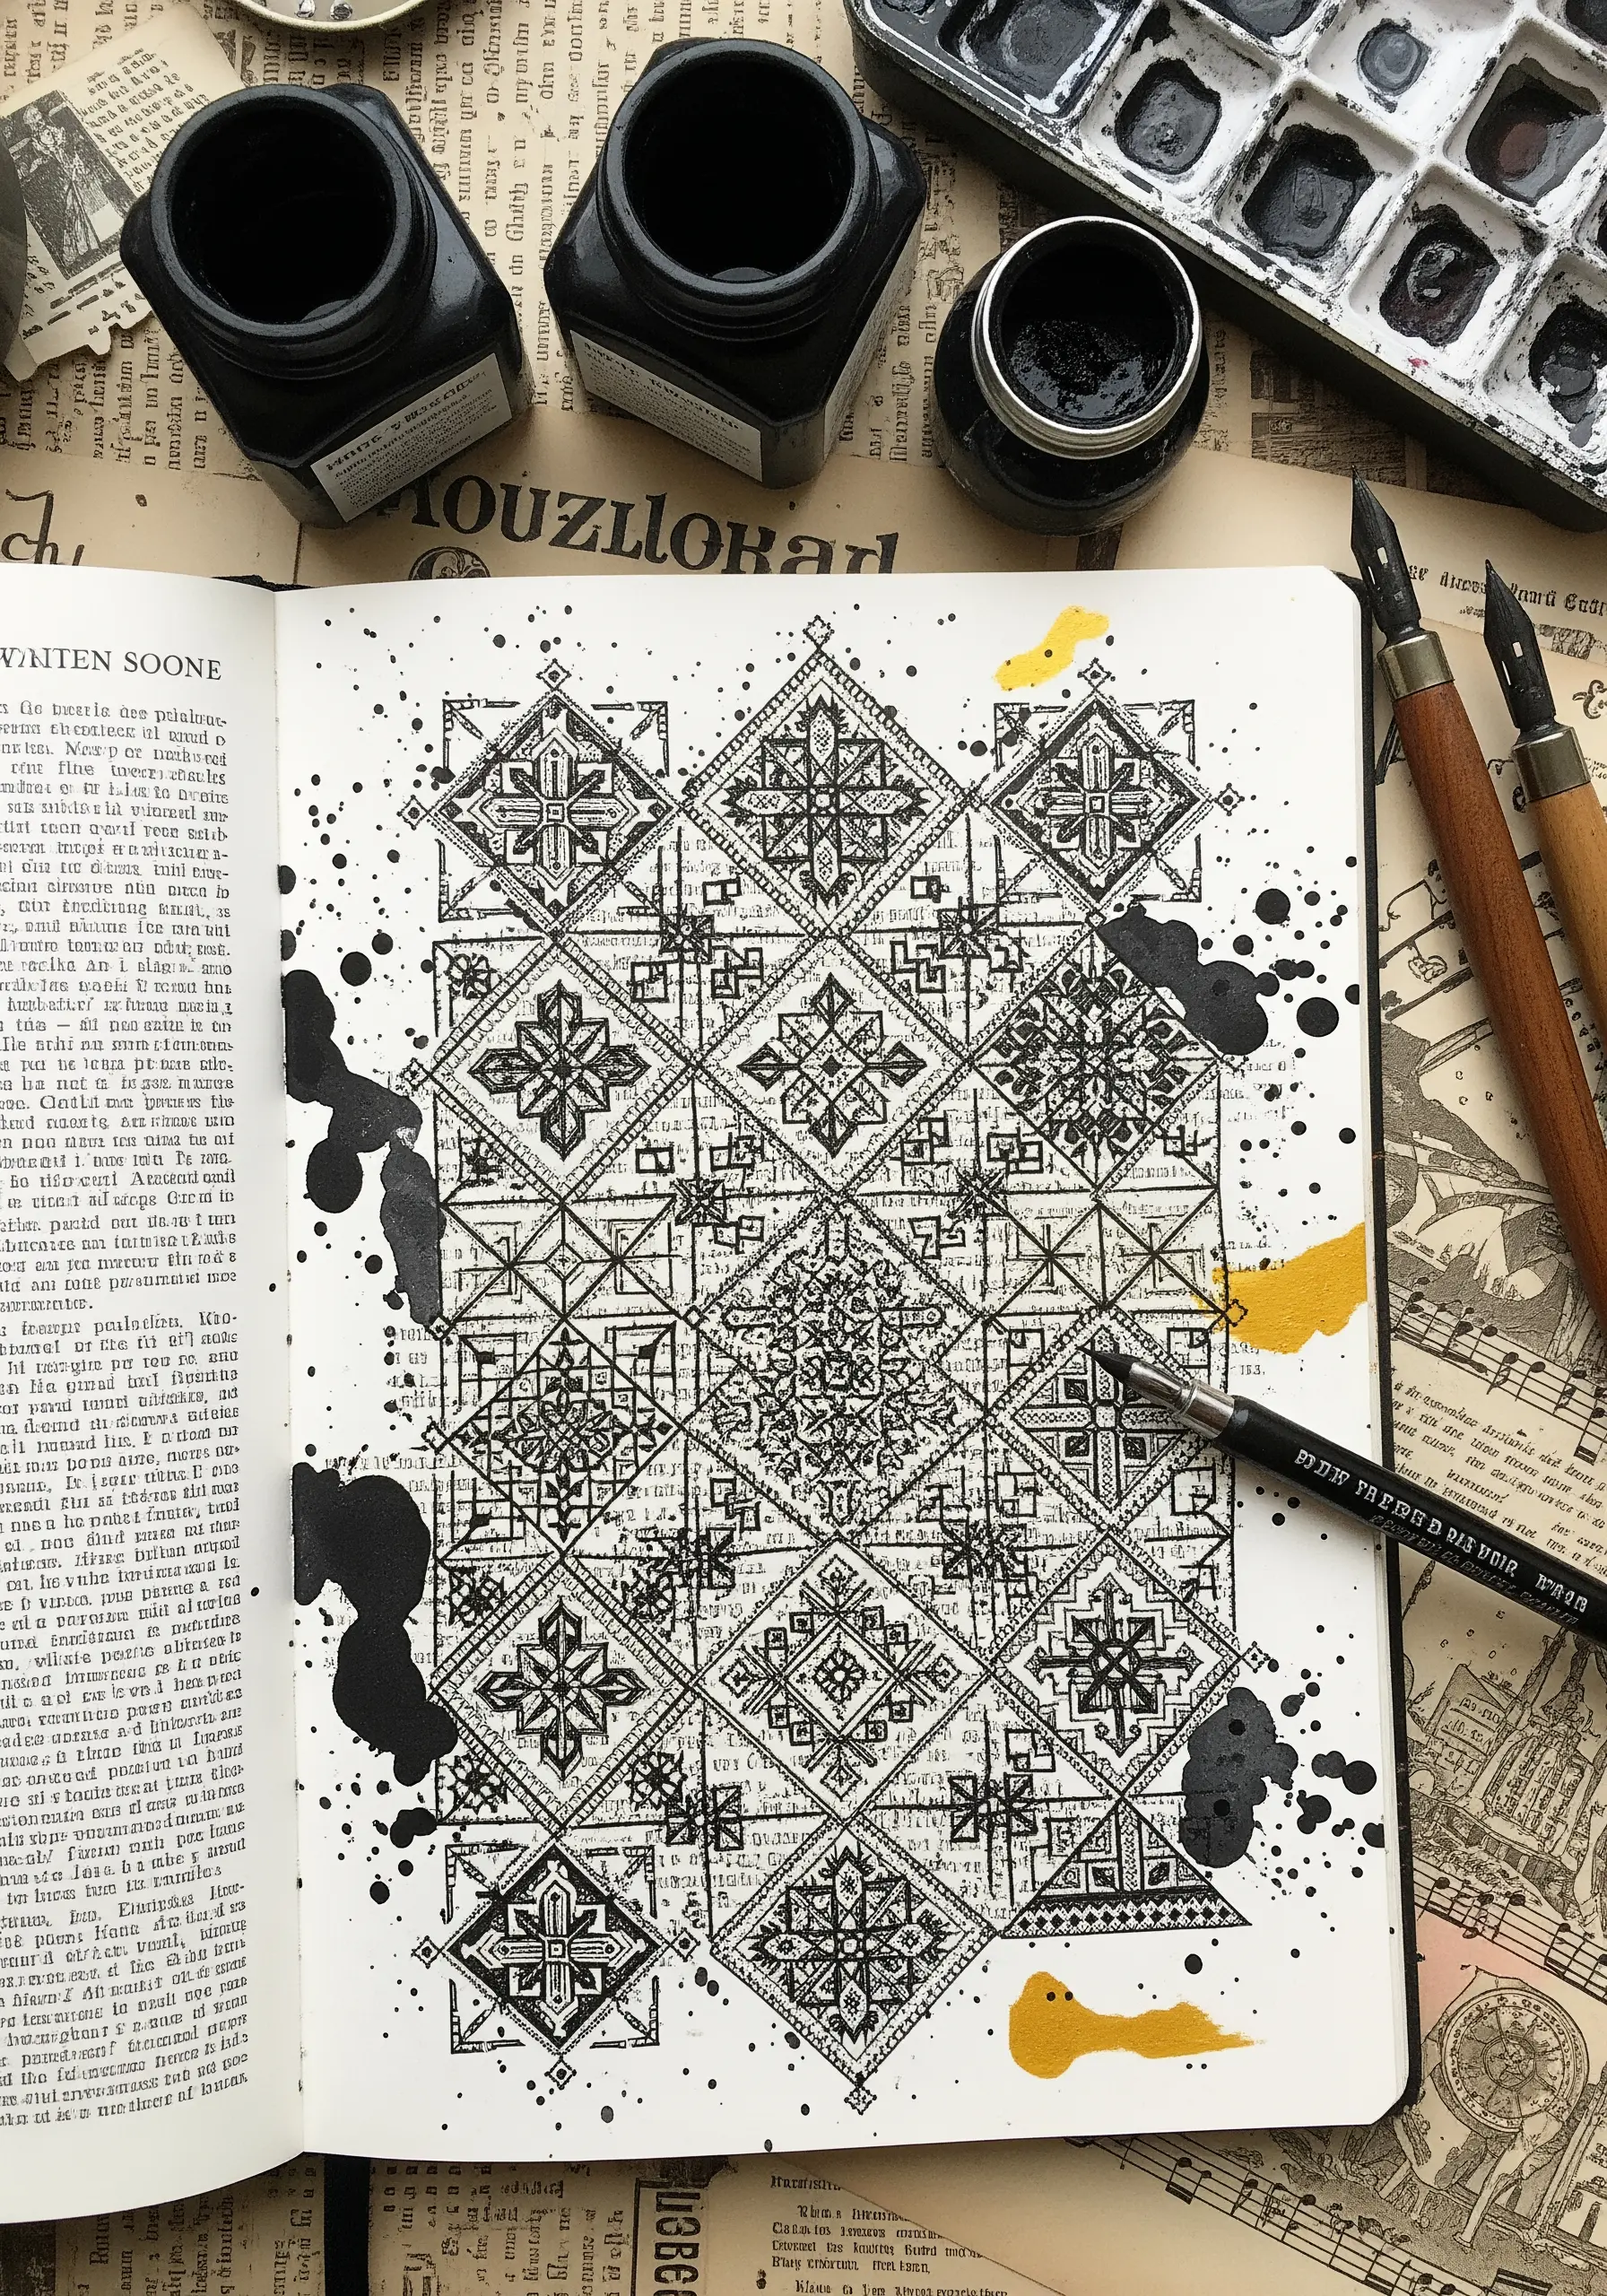
Instead of just drawing on old book pages, use them as your canvas for embroidery.
To prevent tearing, reinforce the back of the page with a lightweight fusible interfacing before you begin stitching.
Use a sharp, fine needle (like a quilting needle) and a simple backstitch with a single strand of thread to create intricate designs without overwhelming the delicate paper.
The ink splatters can be replicated with a few strategically placed French knots or seed beads, adding another layer of mixed-media interest.
13. Use Blanket Stitch to Define Appliqué Shapes
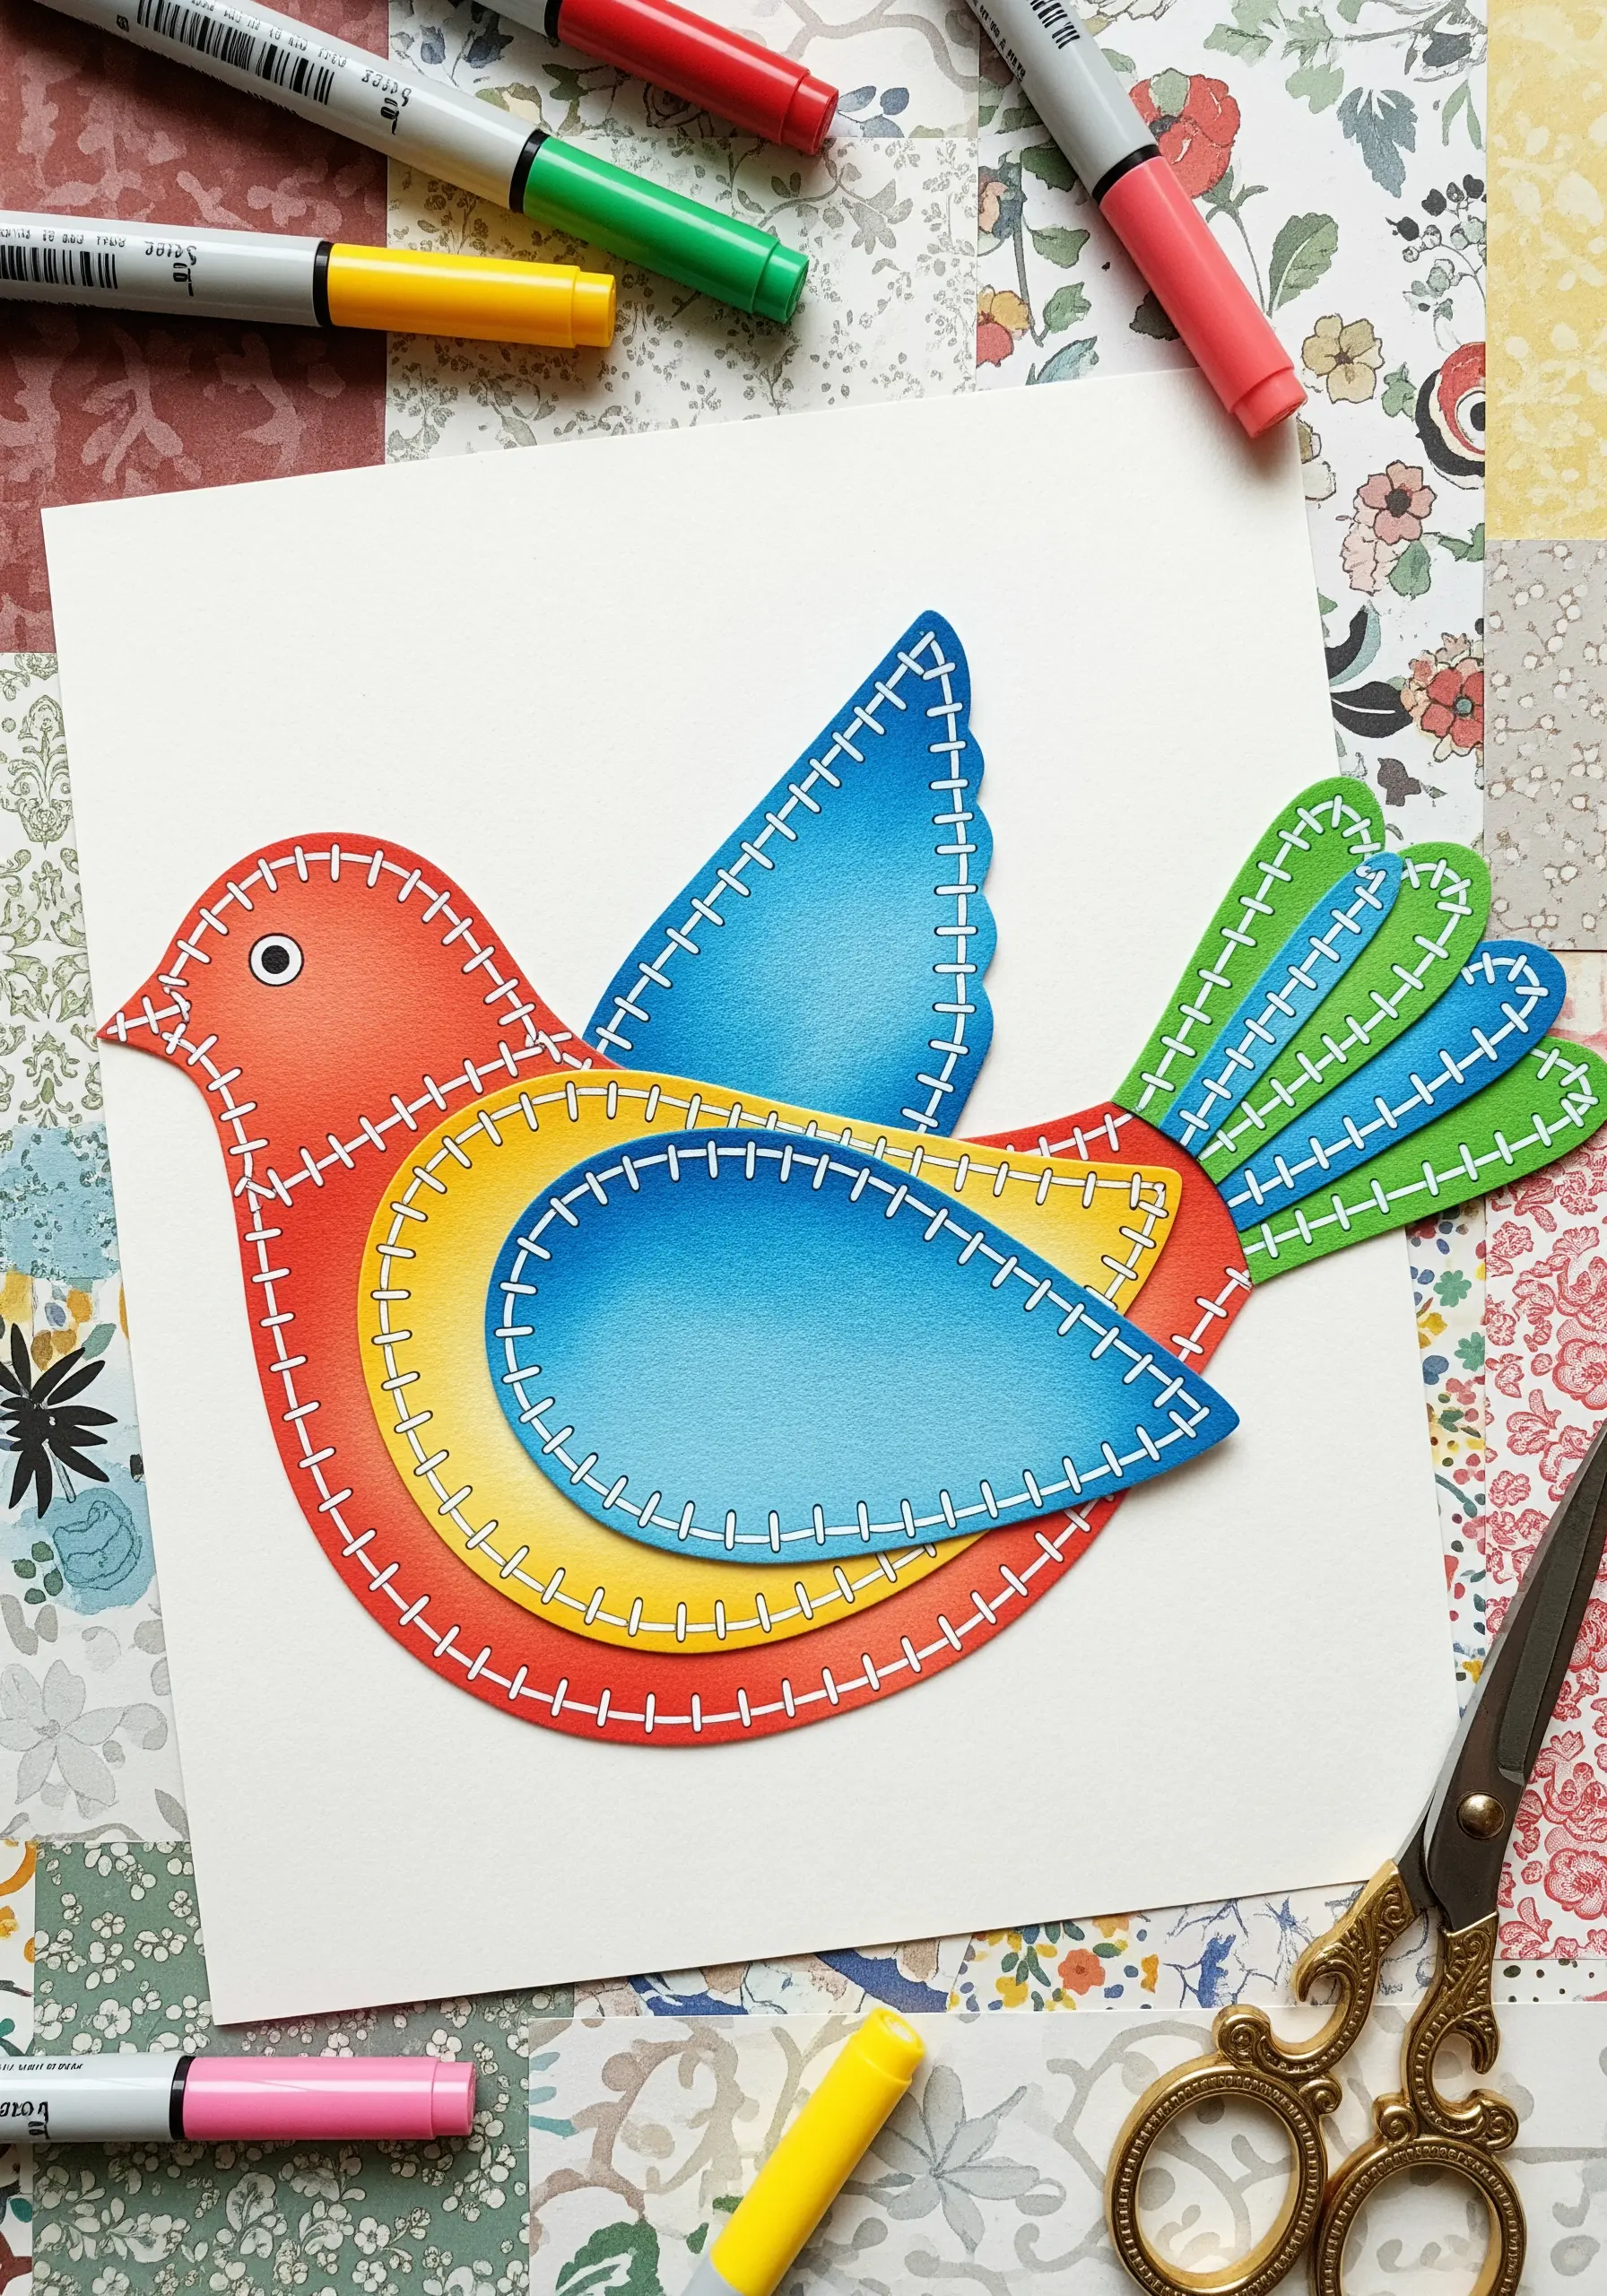
Recreate this layered paper bird using fabric appliqué, cutting each colored section from felt or cotton.
Instead of drawing stitches, use a contrasting white pearl cotton to work a blanket stitch around the edge of each fabric piece.
This not only secures the appliqué but also creates a charming, handcrafted outline that defines each shape beautifully.
Layering the fabric pieces, just like the paper, adds depth and dimension, turning a simple motif into a dynamic composition.
14. Depict Cityscapes with Satin Stitch and French Knots
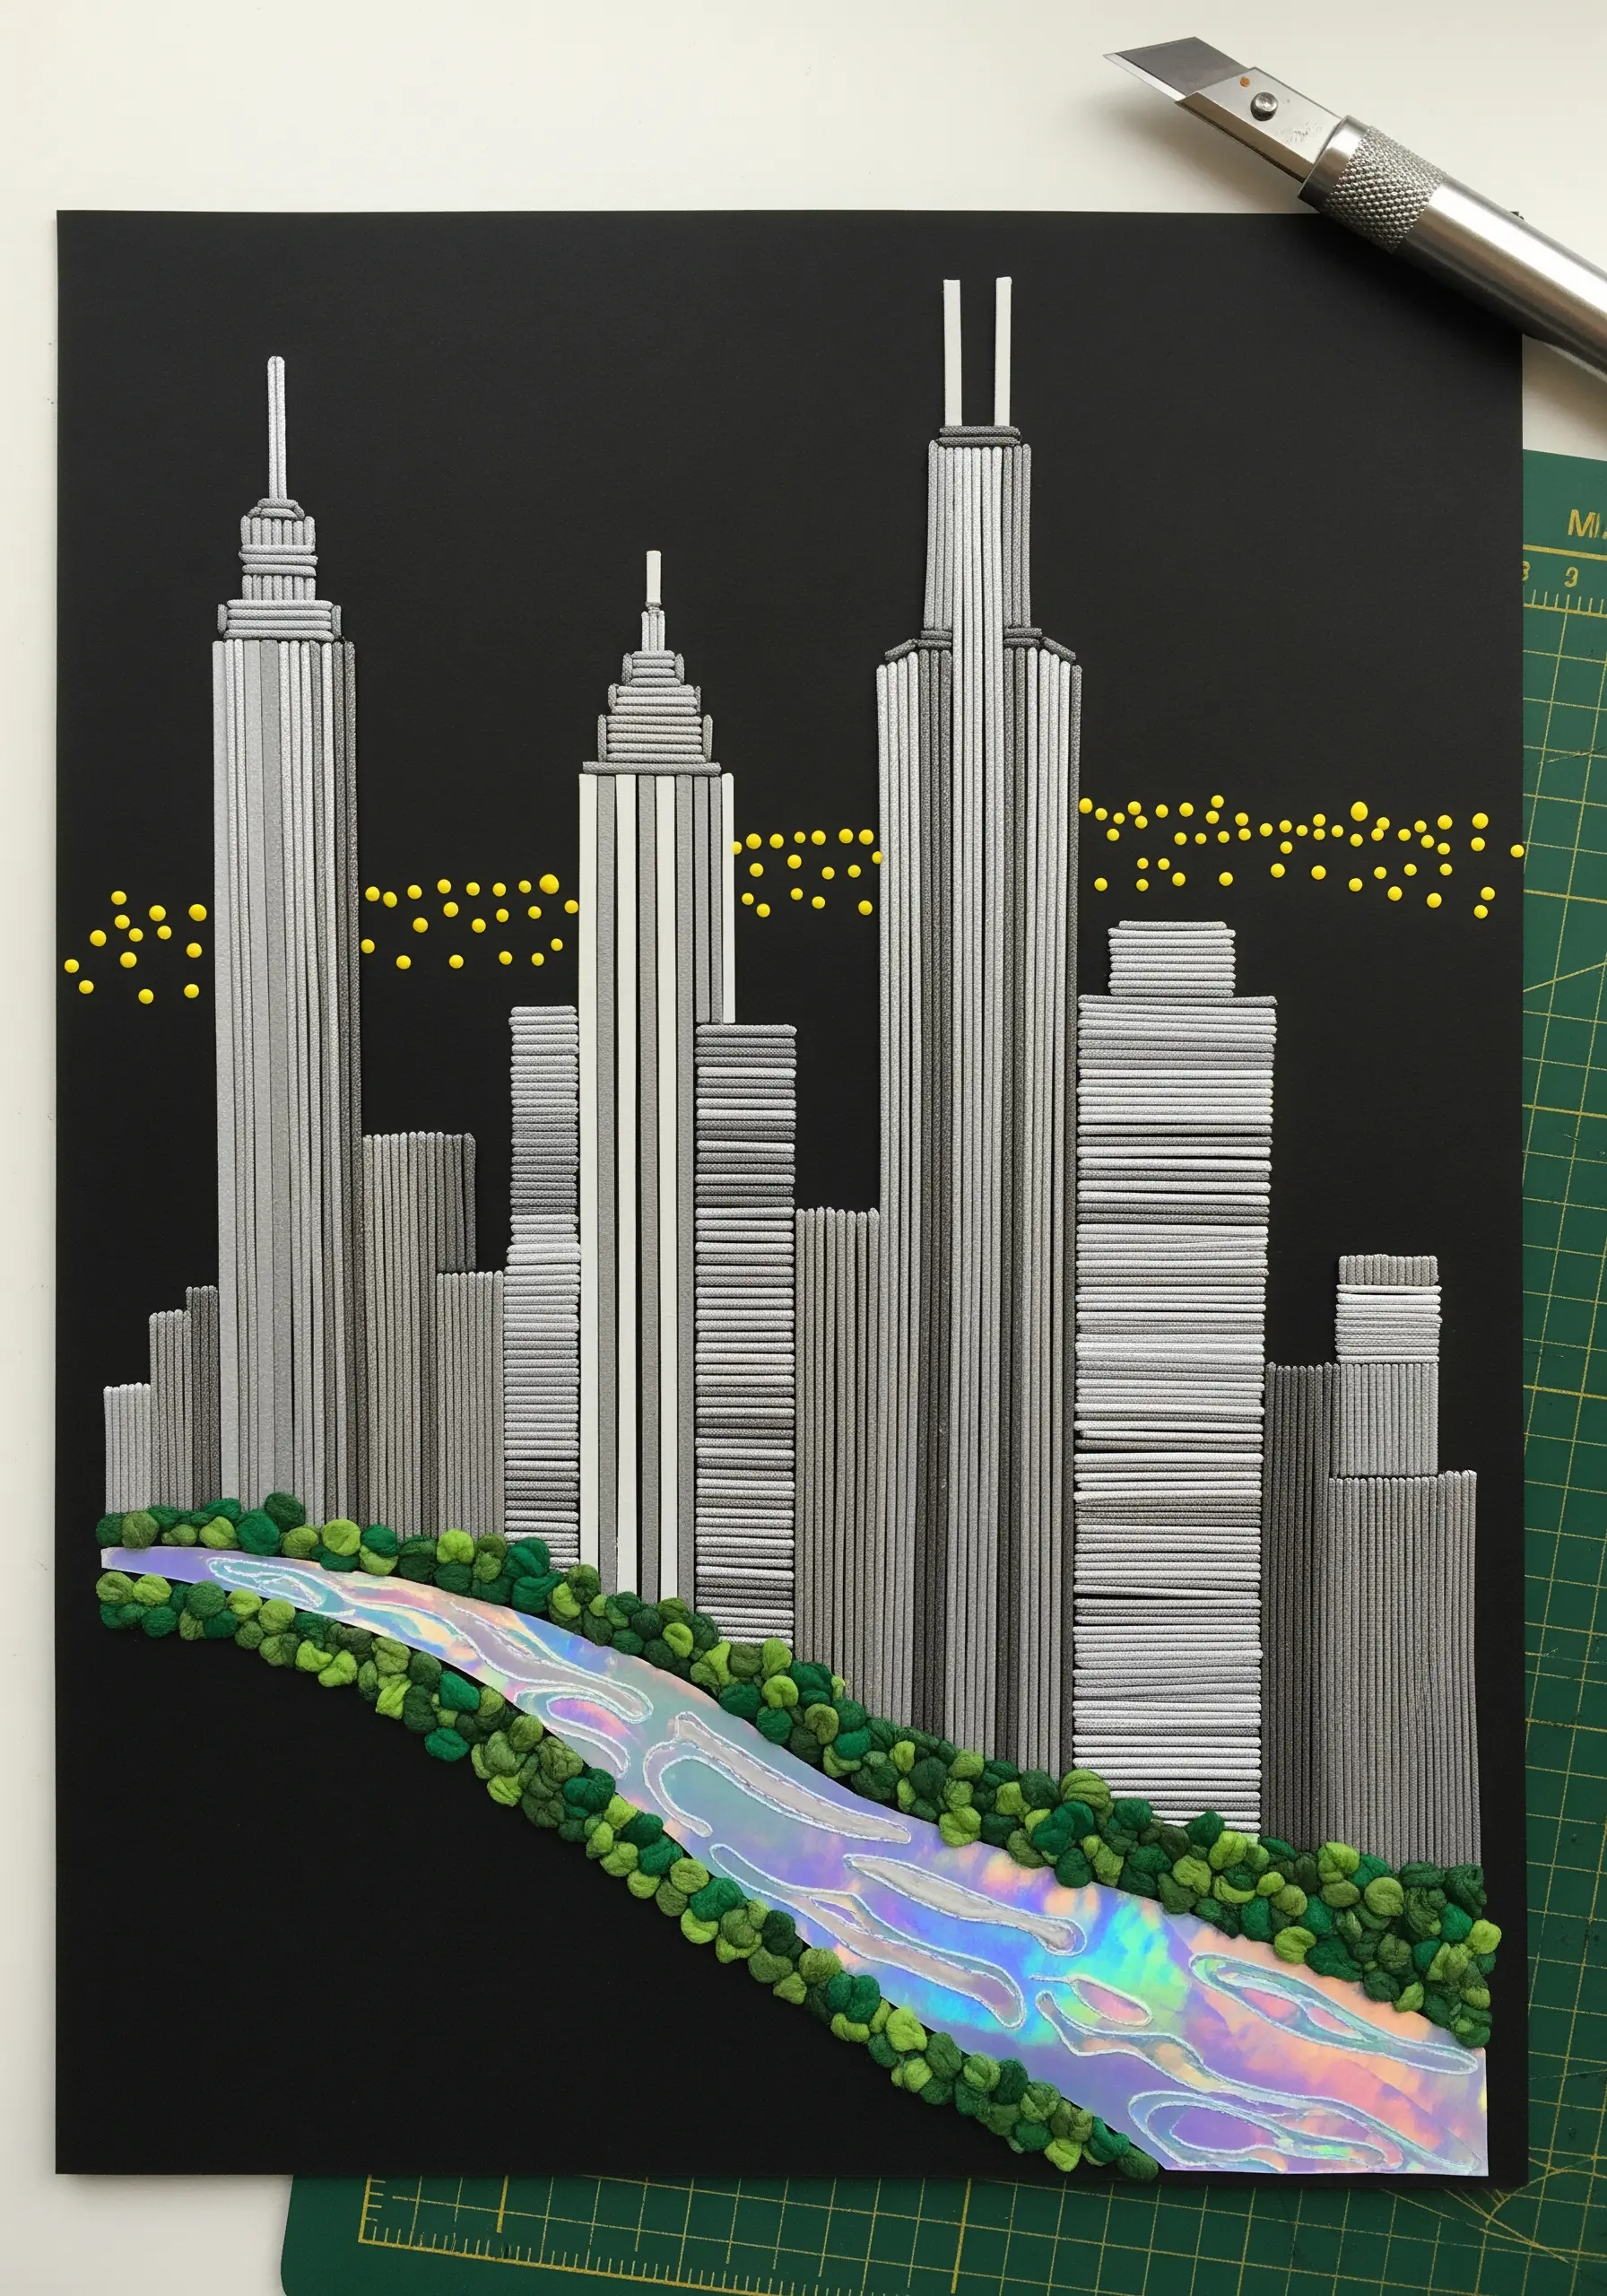
The long, parallel lines of the paper buildings are a perfect guide for using vertical satin stitches to create a sleek, modern cityscape.
Use a silver metallic or a light gray silk thread to capture the reflective quality of glass and steel.
The distant city lights can be stitched as small, scattered French knots using a bright yellow or gold thread.
For the iridescent river, try appliqué with a piece of holographic fabric or use a variegated silk thread to capture its shimmering, flowing movement.
15. Weave Lacy Patterns with Bullion Knots and Woven Wheels
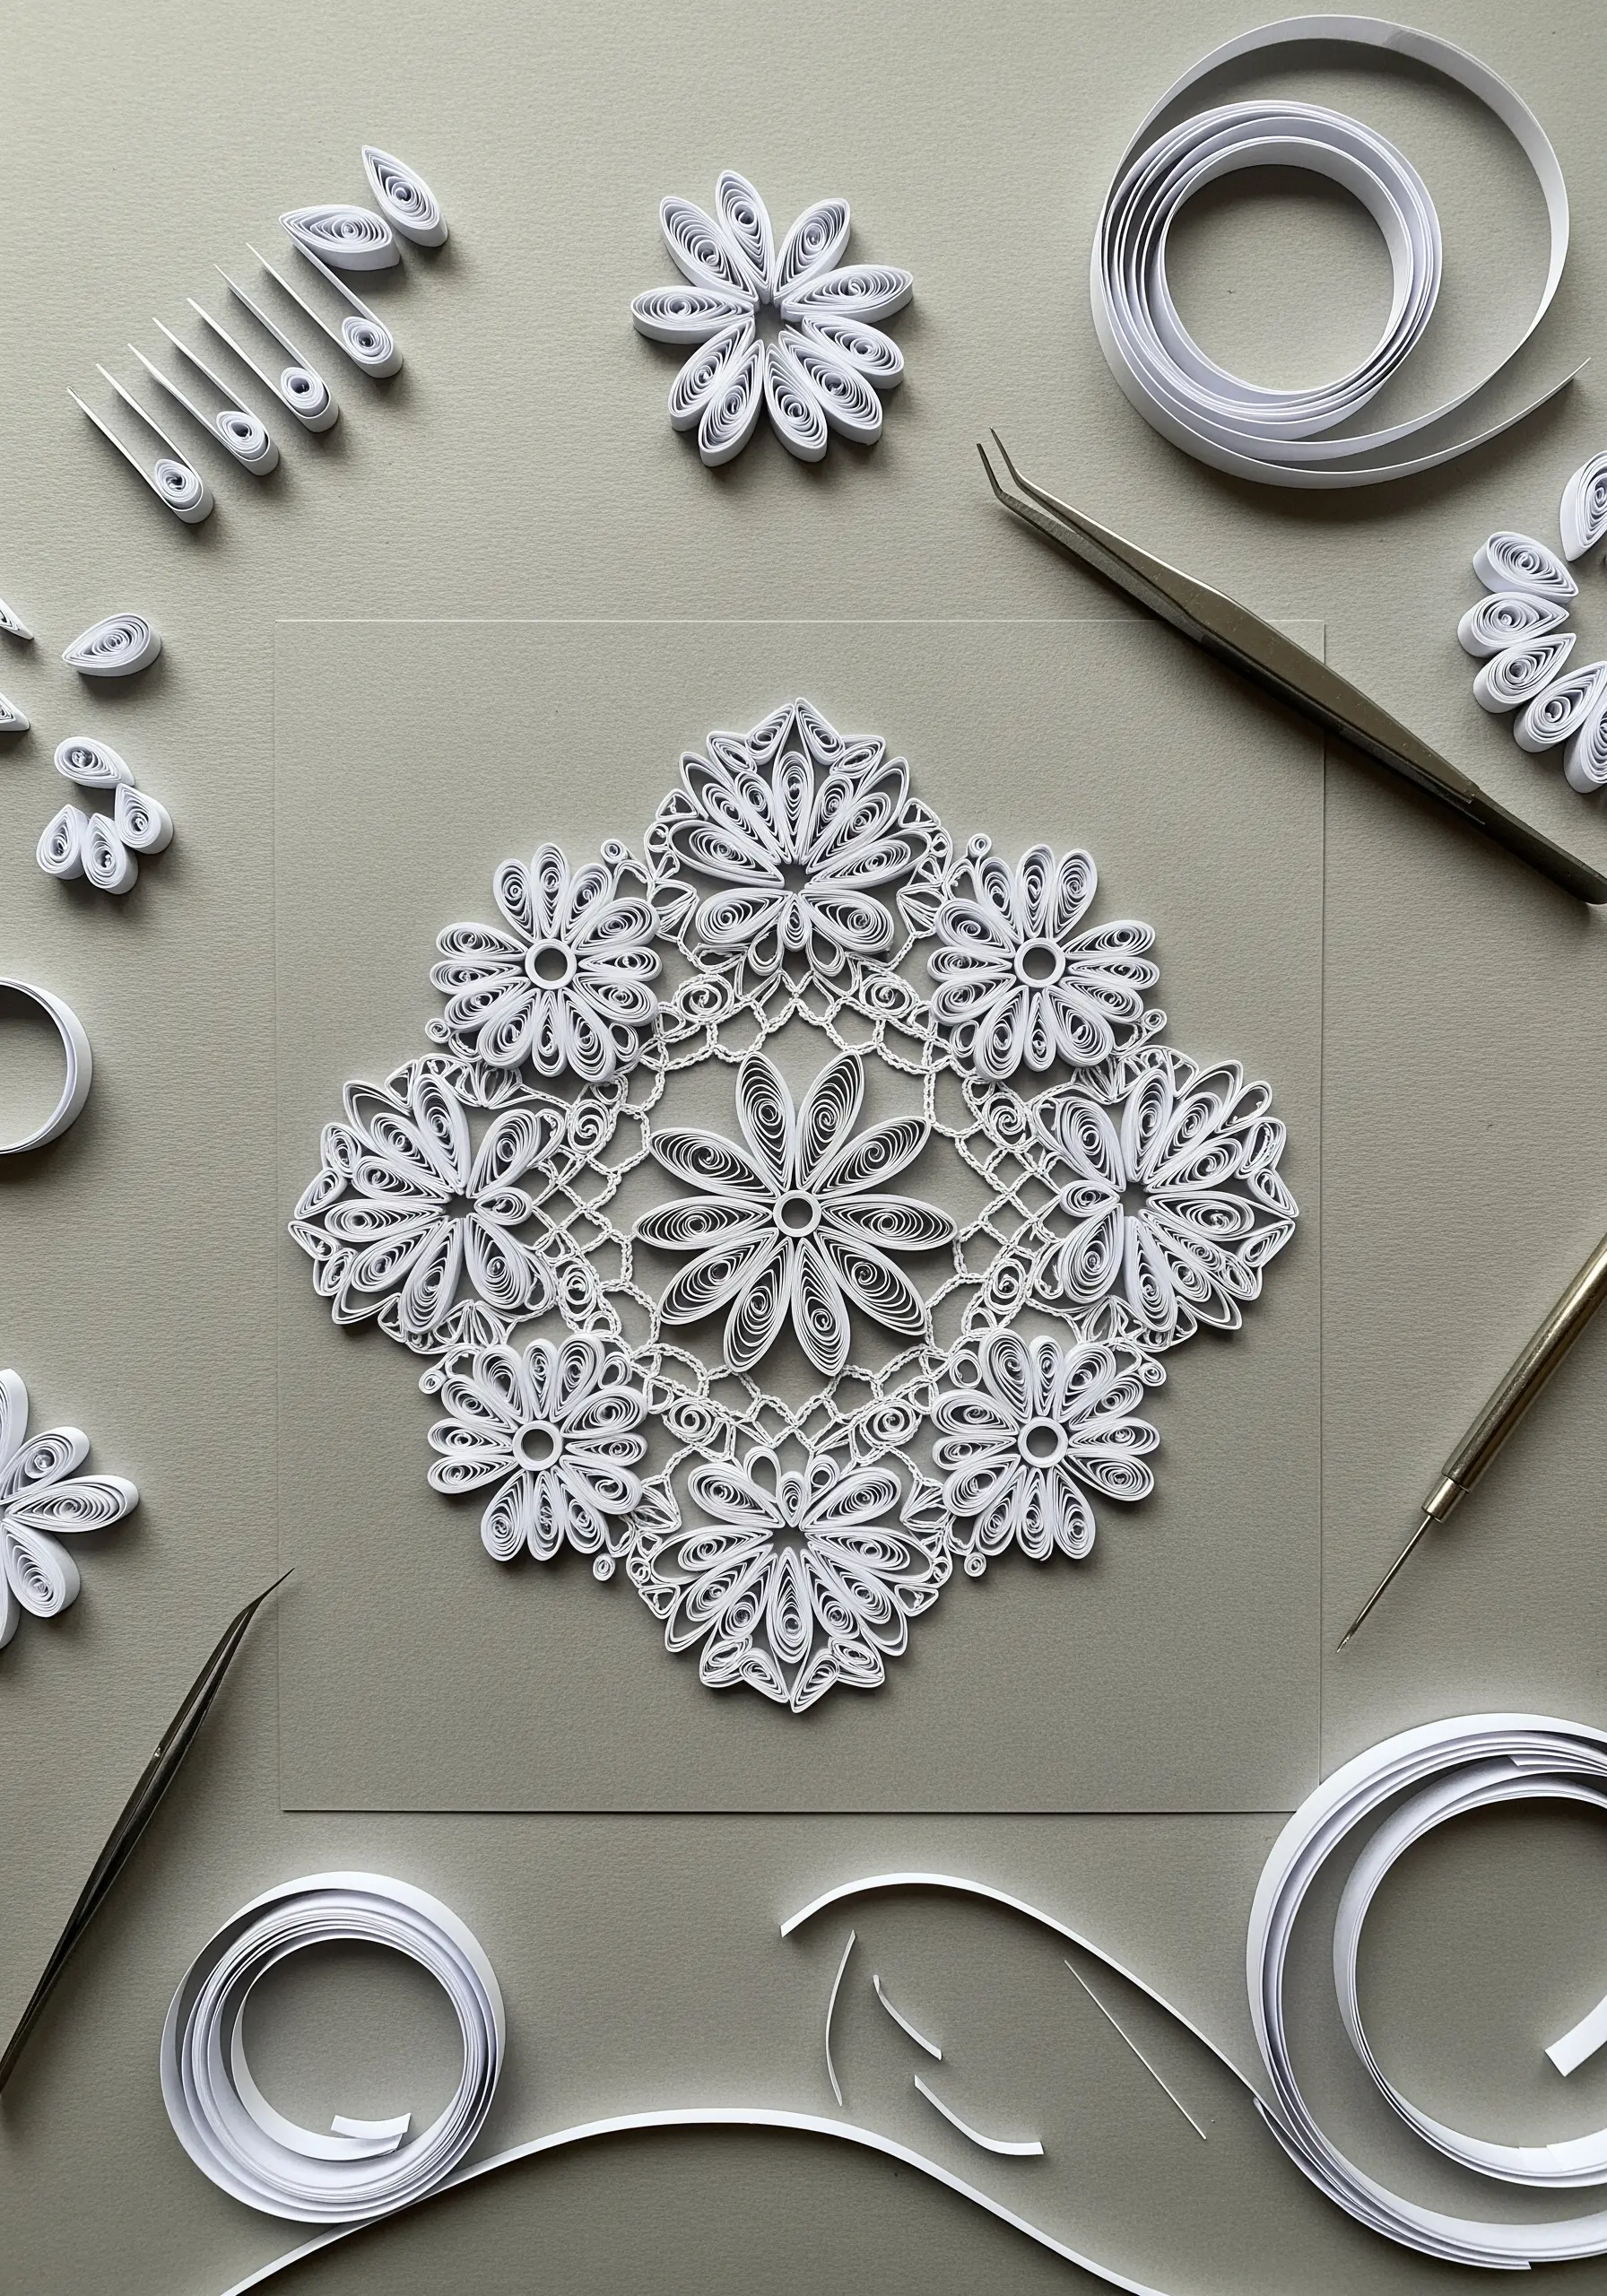
Translate the delicate, airy quality of this paper quilled lace into embroidery by using stitches that create texture and negative space.
Use bullion knots, cast-on stitches, and detached chain stitches to form the petal shapes.
Create the central floral motifs with woven picot stitches or woven wheels for a lacy, three-dimensional effect.
Stitching on a contrasting background, like a gray linen, will highlight the intricate details and make your whitework design truly stand out.
16. Create an Autumnal Wreath with Fabric Appliqué
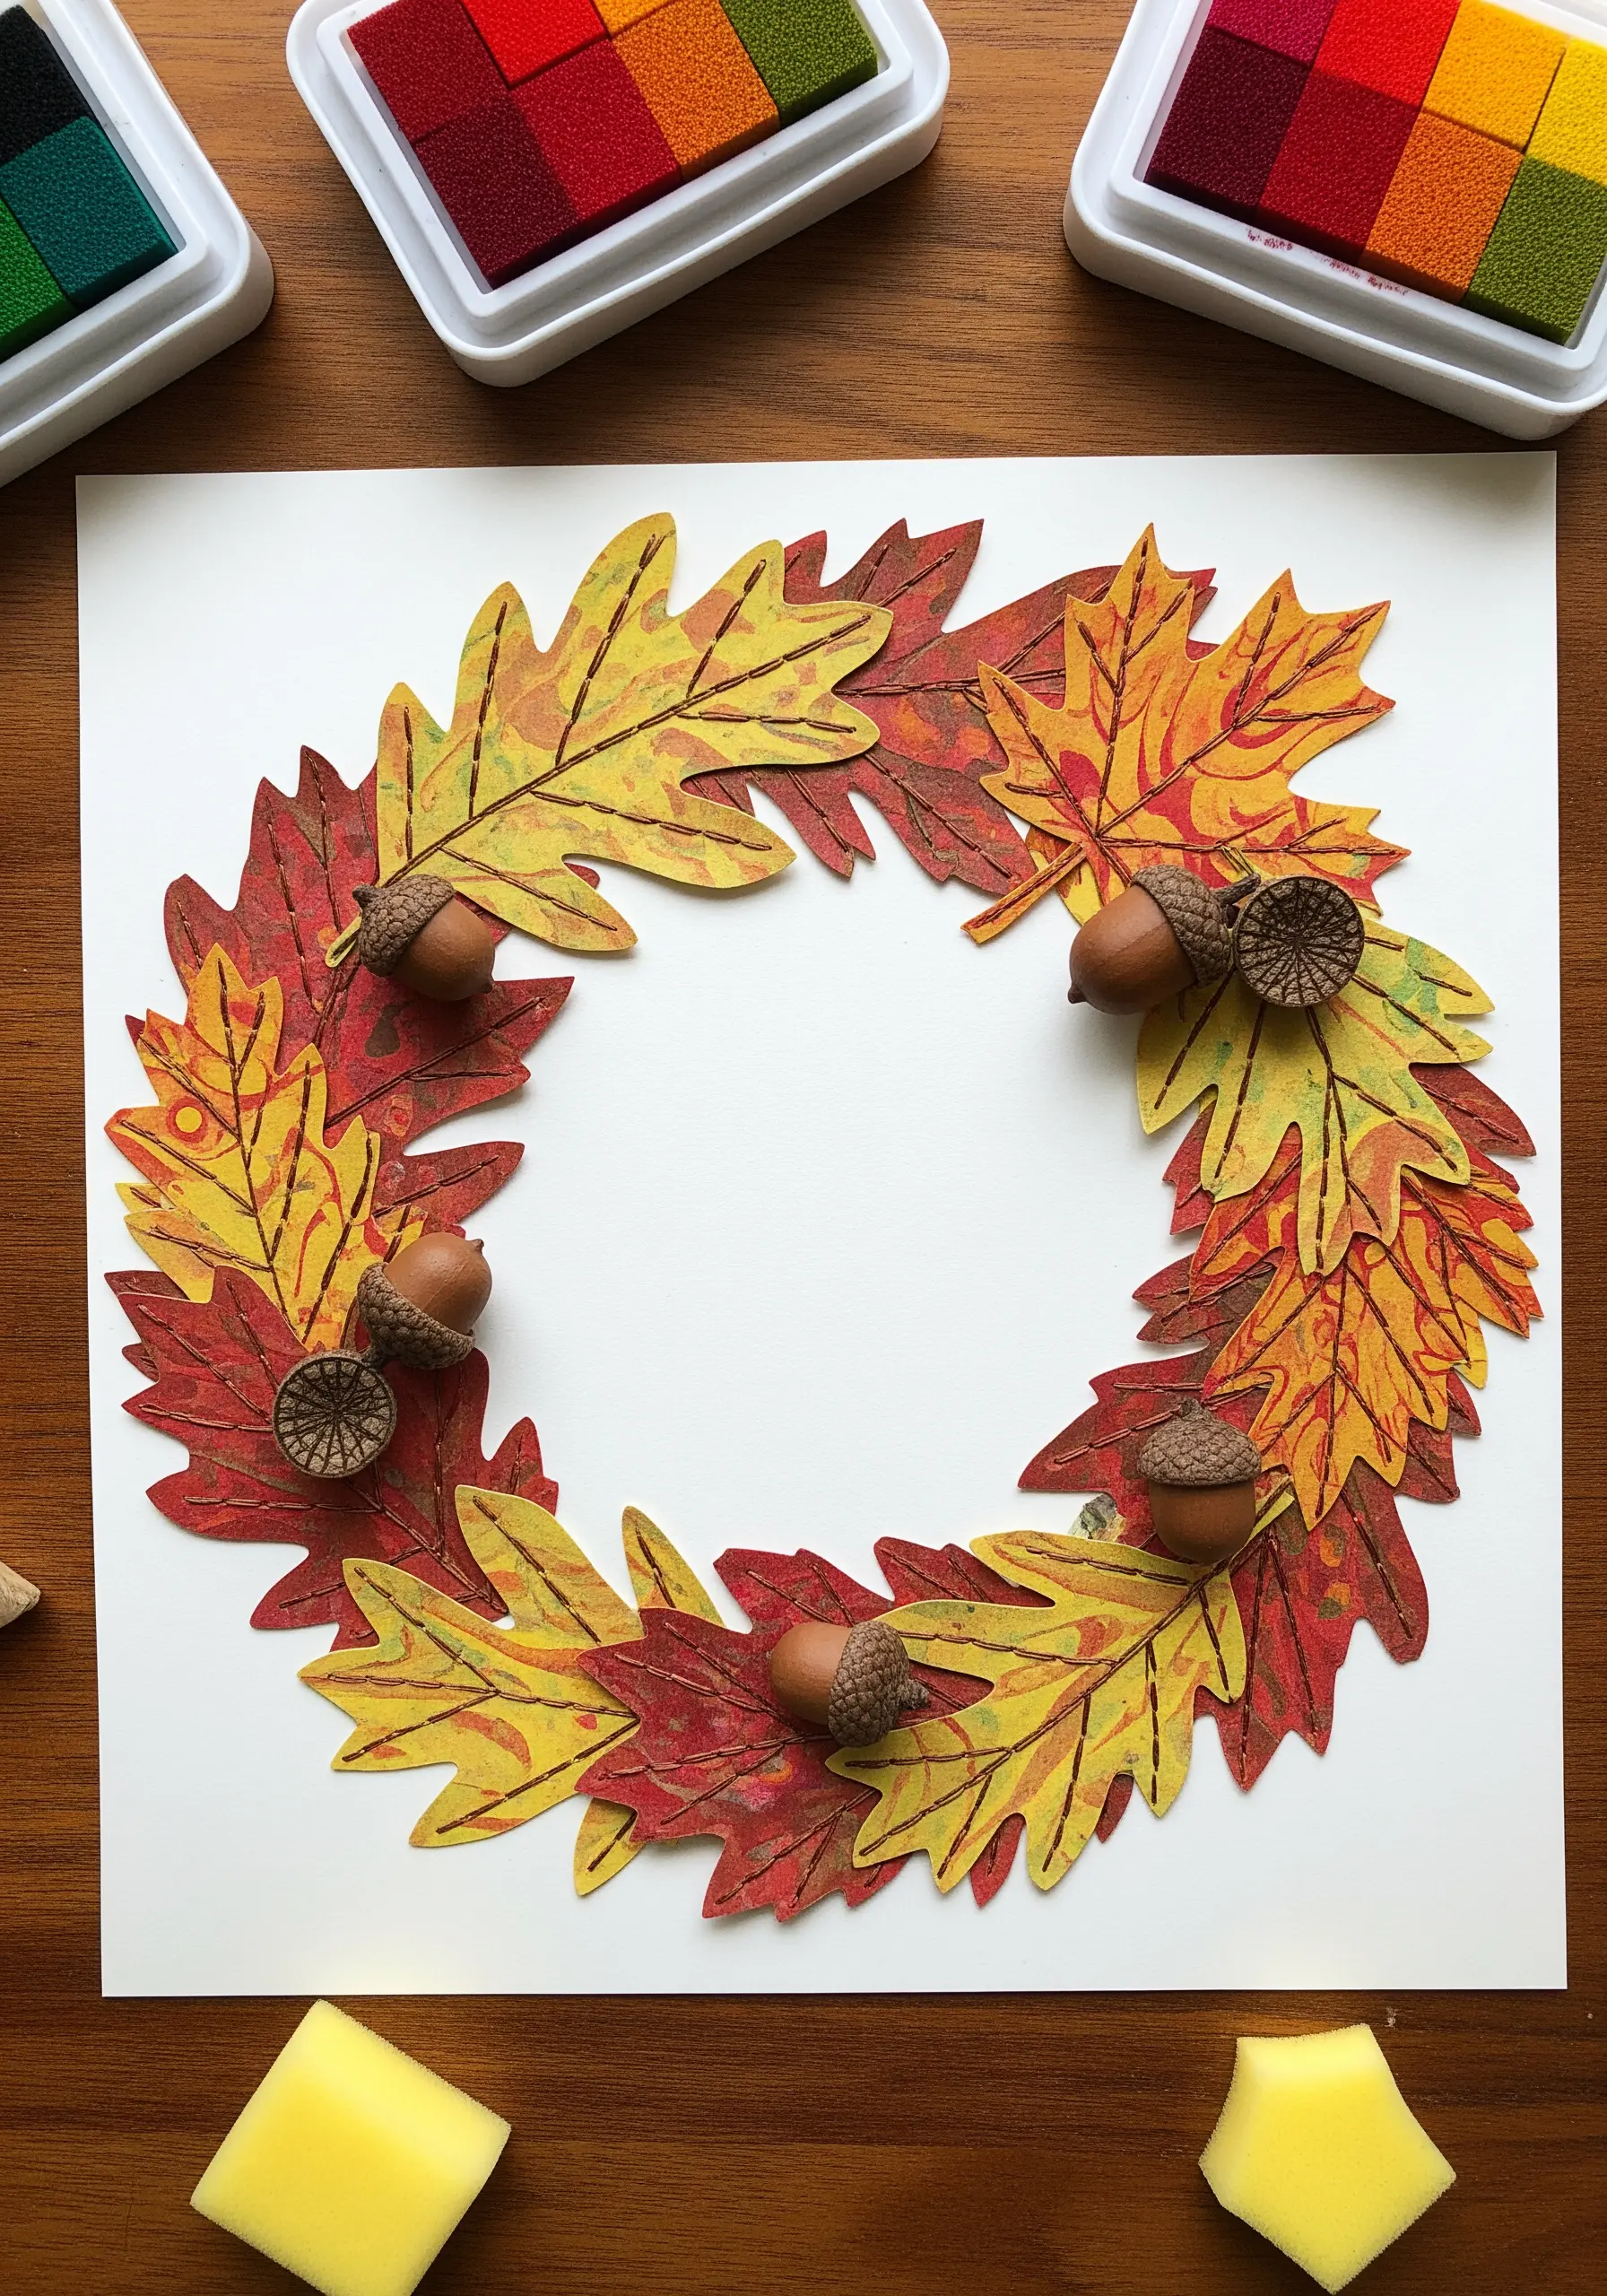
This paper wreath is a wonderful template for a fabric collage embroidery composition.
Cut leaf shapes from autumnal-toned fabrics—cottons with subtle prints or hand-dyed linens work beautifully.
Use a simple backstitch in a dark brown thread to add the delicate veins on each leaf after appliquéing them down.
For the acorns, create small stumpwork forms by wrapping thread around a padded shape to give your wreath a realistic, 3D element.
17. Embellish Illustrations with 3D Floral Stitches
Combine illustration and embroidery by starting with a simple line drawing on fabric, then filling in elements with sculptural stitches.
The pleated paper skirt provides inspiration for using ribbon or folded fabric strips to create a three-dimensional base.
Replicate the rolled paper roses with woven wheel stitches (or rose stitches) in various sizes and shades of pink and lavender.
The green leaves can be made with detached chain (lazy daisy) stitches, tucked in between the woven roses to complete the floral look.
18. Couch Thick Yarn to Create Bold, Tactile Lines
This piece, made with pigment-covered rope, is a direct instruction in the art of couching.
Lay down thick yarn, roving, or even cotton piping cord onto your fabric in your desired shape.
Then, using a thinner, coordinating thread, make small tacking stitches over the yarn to secure it in place.
This technique is perfect for creating bold, textural outlines and fills that add a sculptural quality to your work.
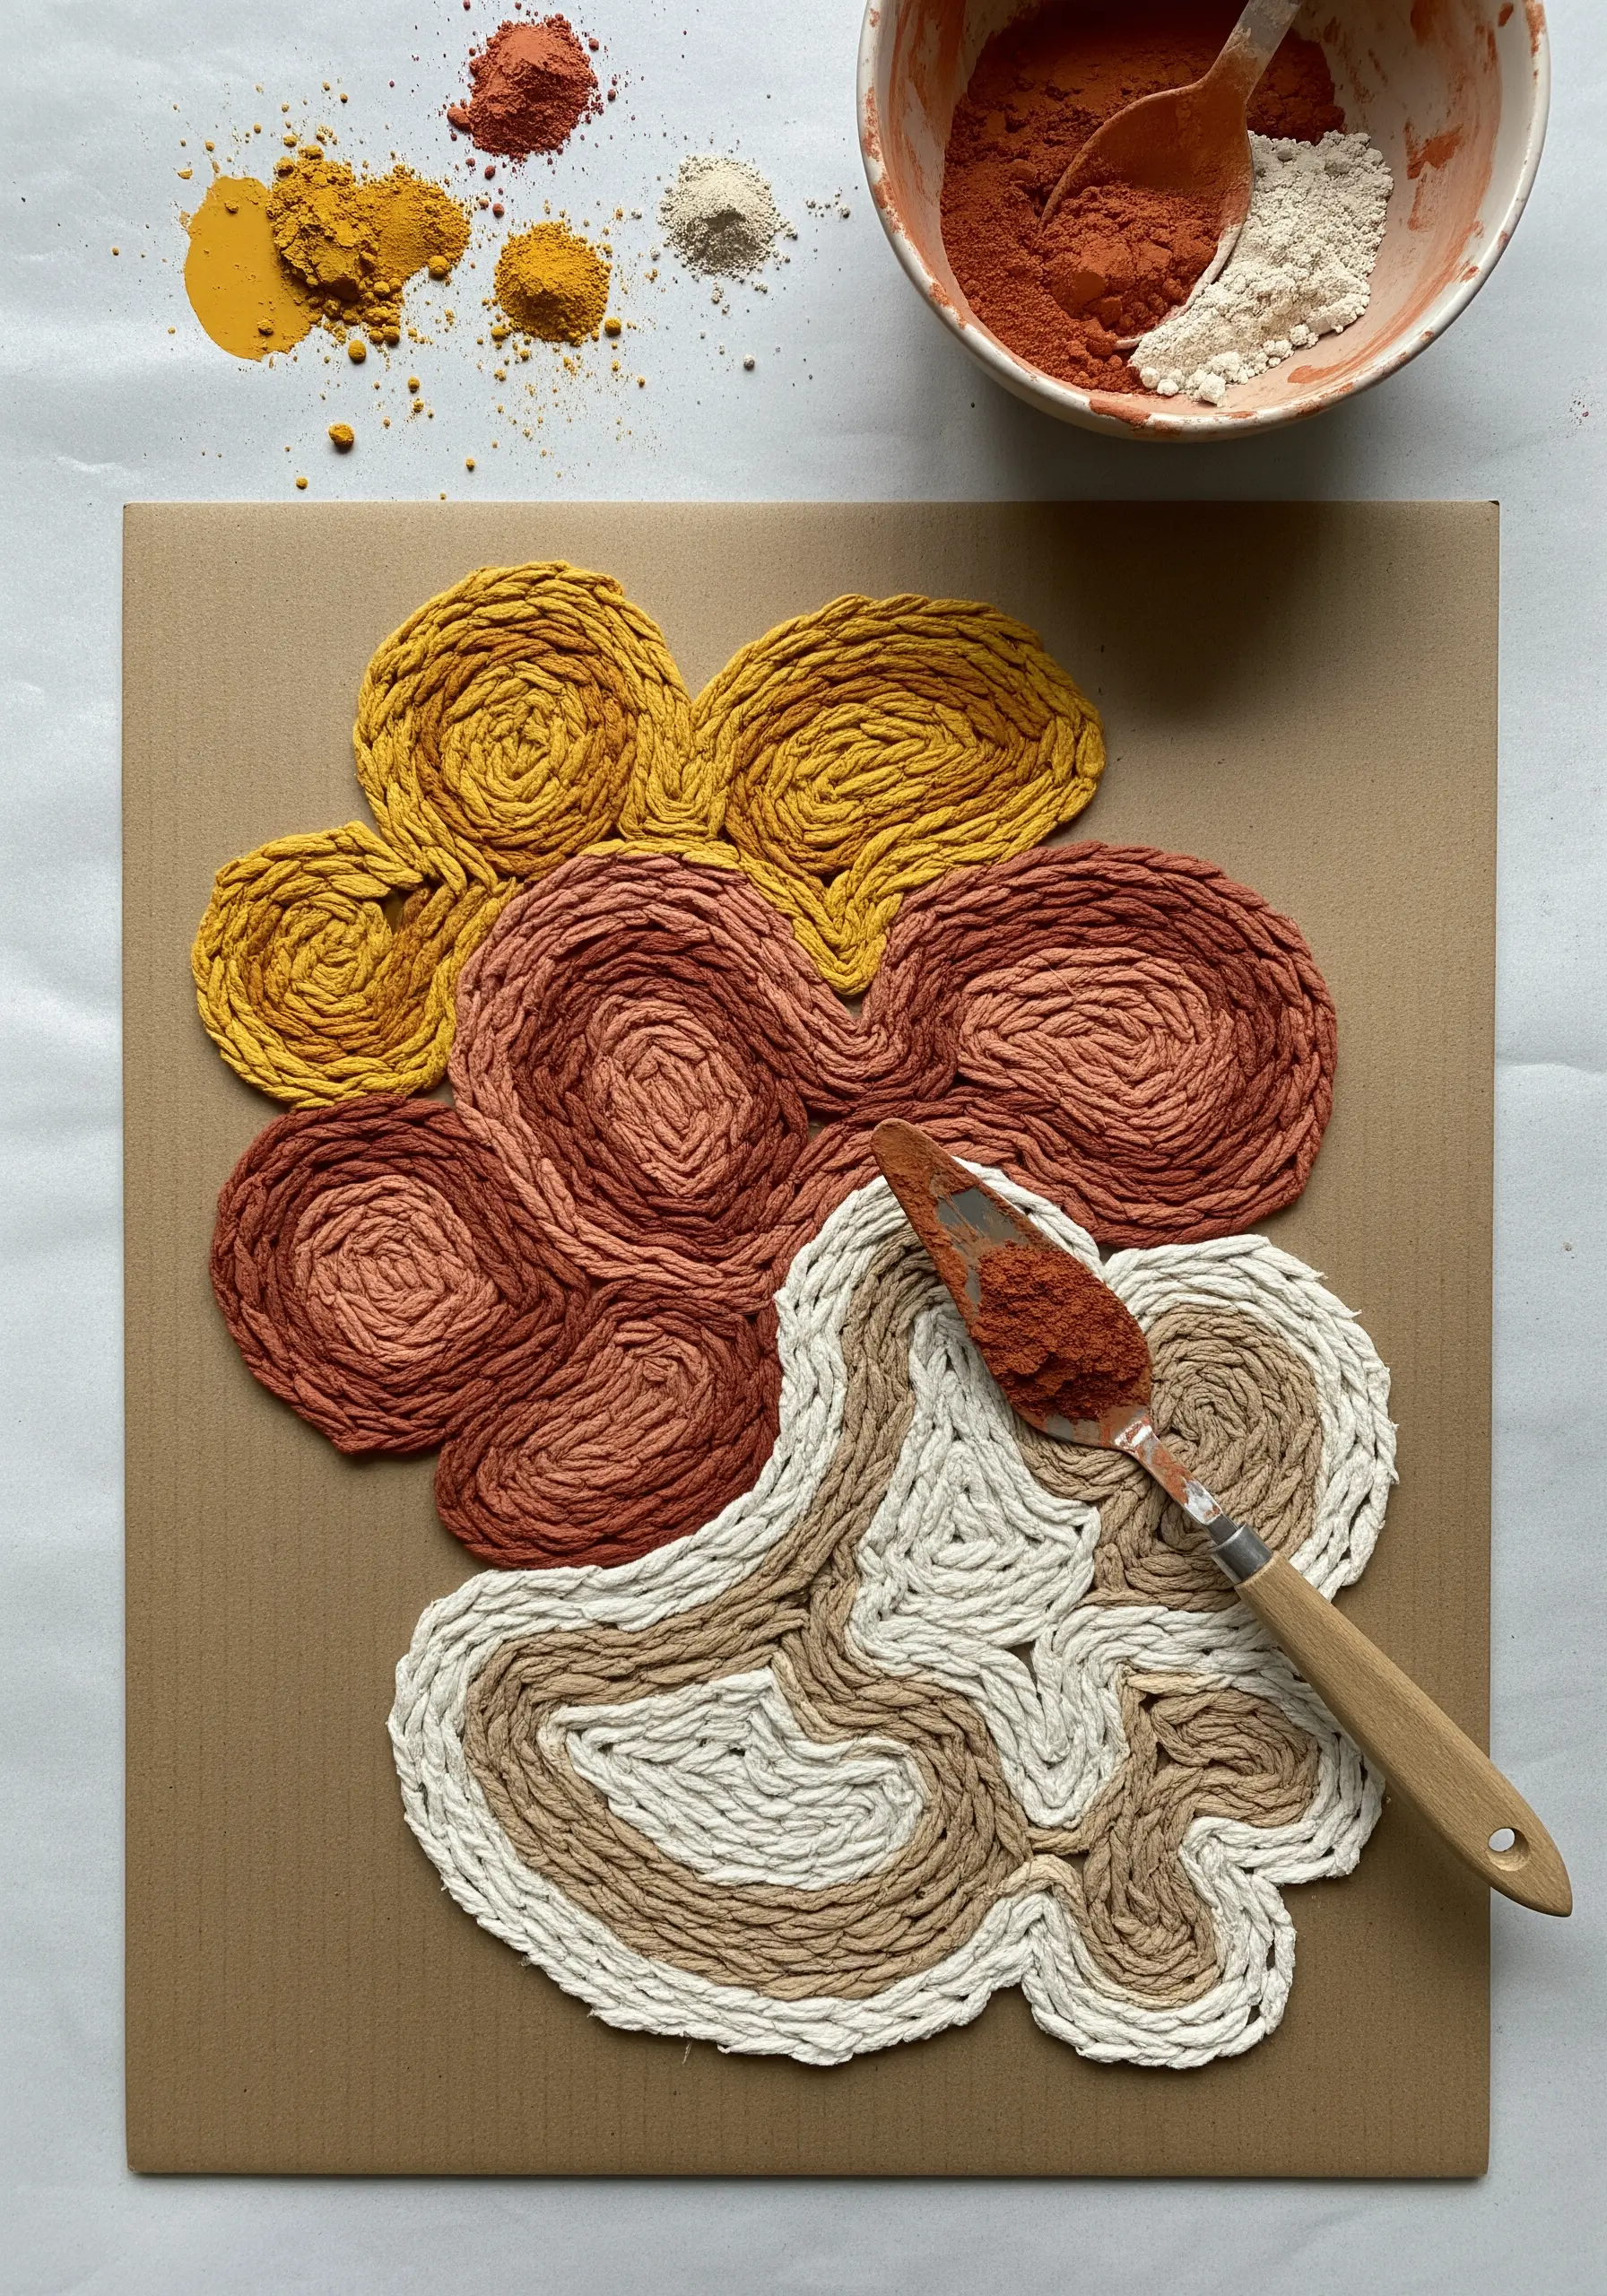
19. Fill Shapes with Dense Clusters of Knots
To achieve the dense, textural fill of these coiled paper circles, pack an area with French knots or bullion knots.
Work the knots closely together, varying the number of wraps to create slight variations in size for a more organic feel.
Use a single color within a section for a bold, color-blocked effect, or a variegated thread for a subtle gradient.
This technique is a wonderful, meditative way to fill large shapes with captivating texture that invites touch.
20. Use Beads and Puffy Paint as Embellishments
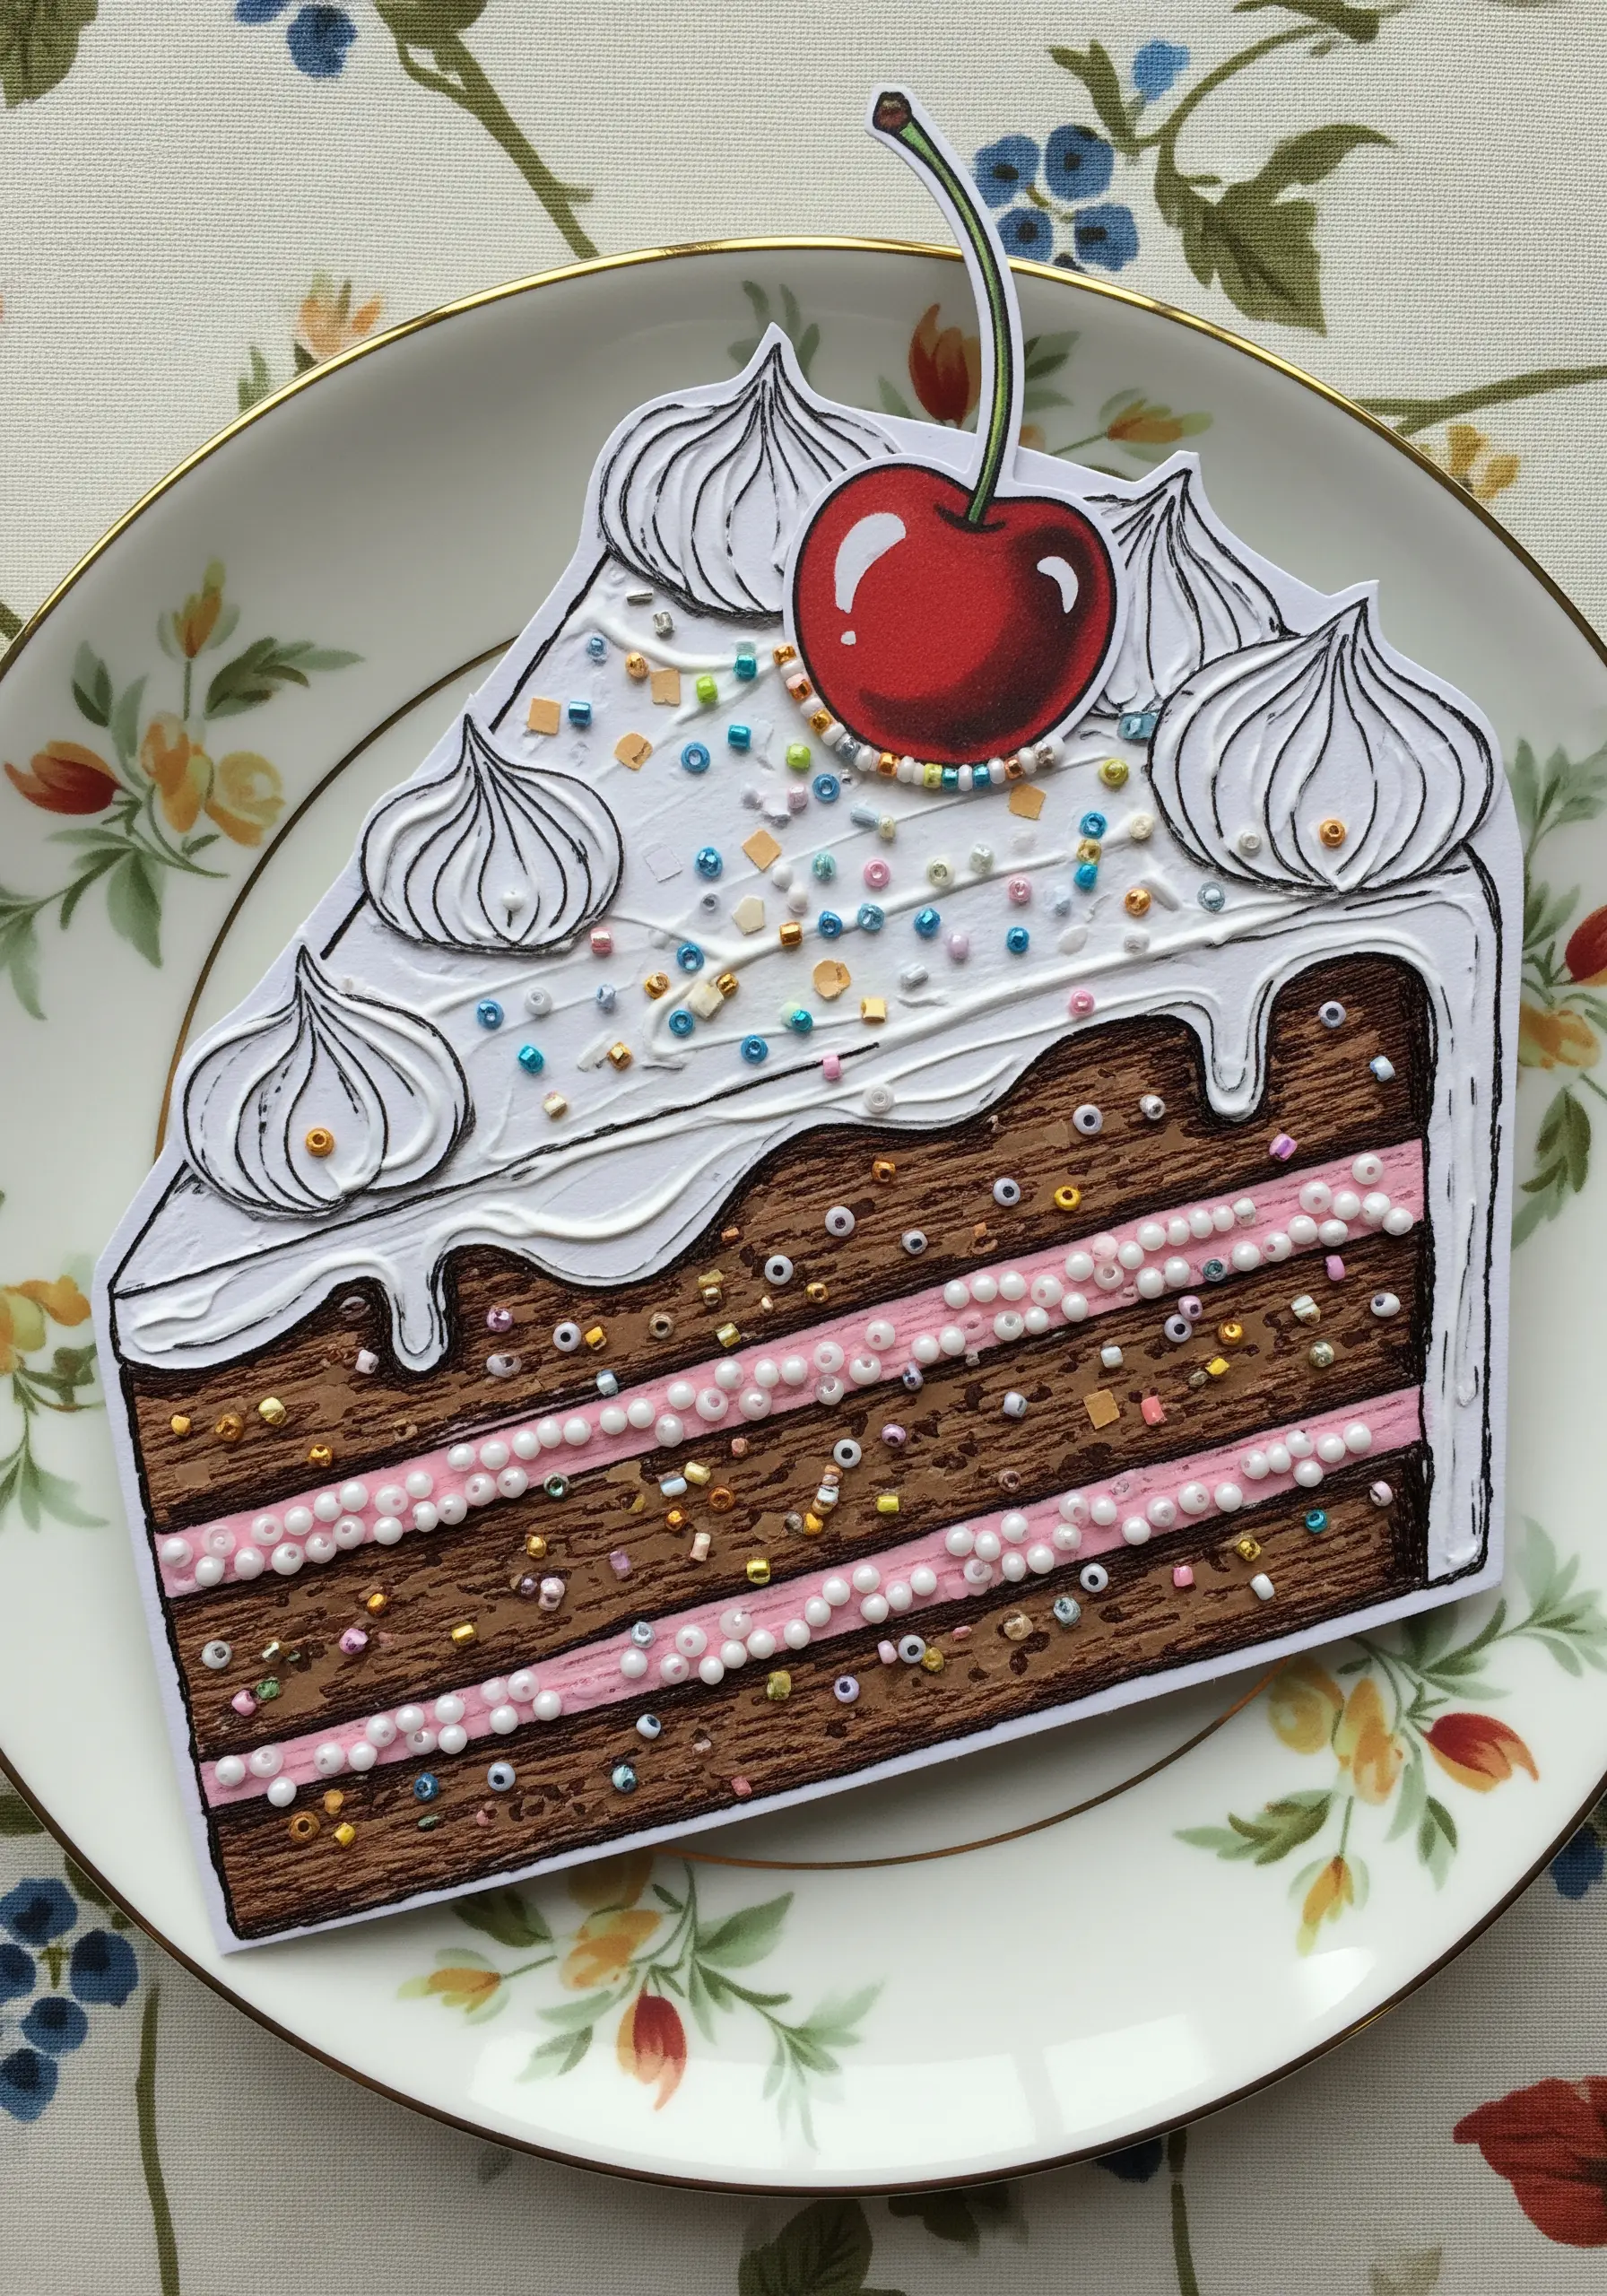
Take inspiration from this paper cake and use mixed-media elements to enhance your embroidery.
The tiny sprinkles are a perfect opportunity to use colorful seed beads or single-wrap French knots for a festive, scattered effect.
For the fluffy icing, try using a white 3D fabric paint (like Puffy Paint) to create raised swirls and drips that add realistic dimension.
This approach pushes the boundaries of traditional embroidery, encouraging you to combine thread with other materials for fun, tactile results.
21. Achieve 3D Lettering with Padded Satin Stitch
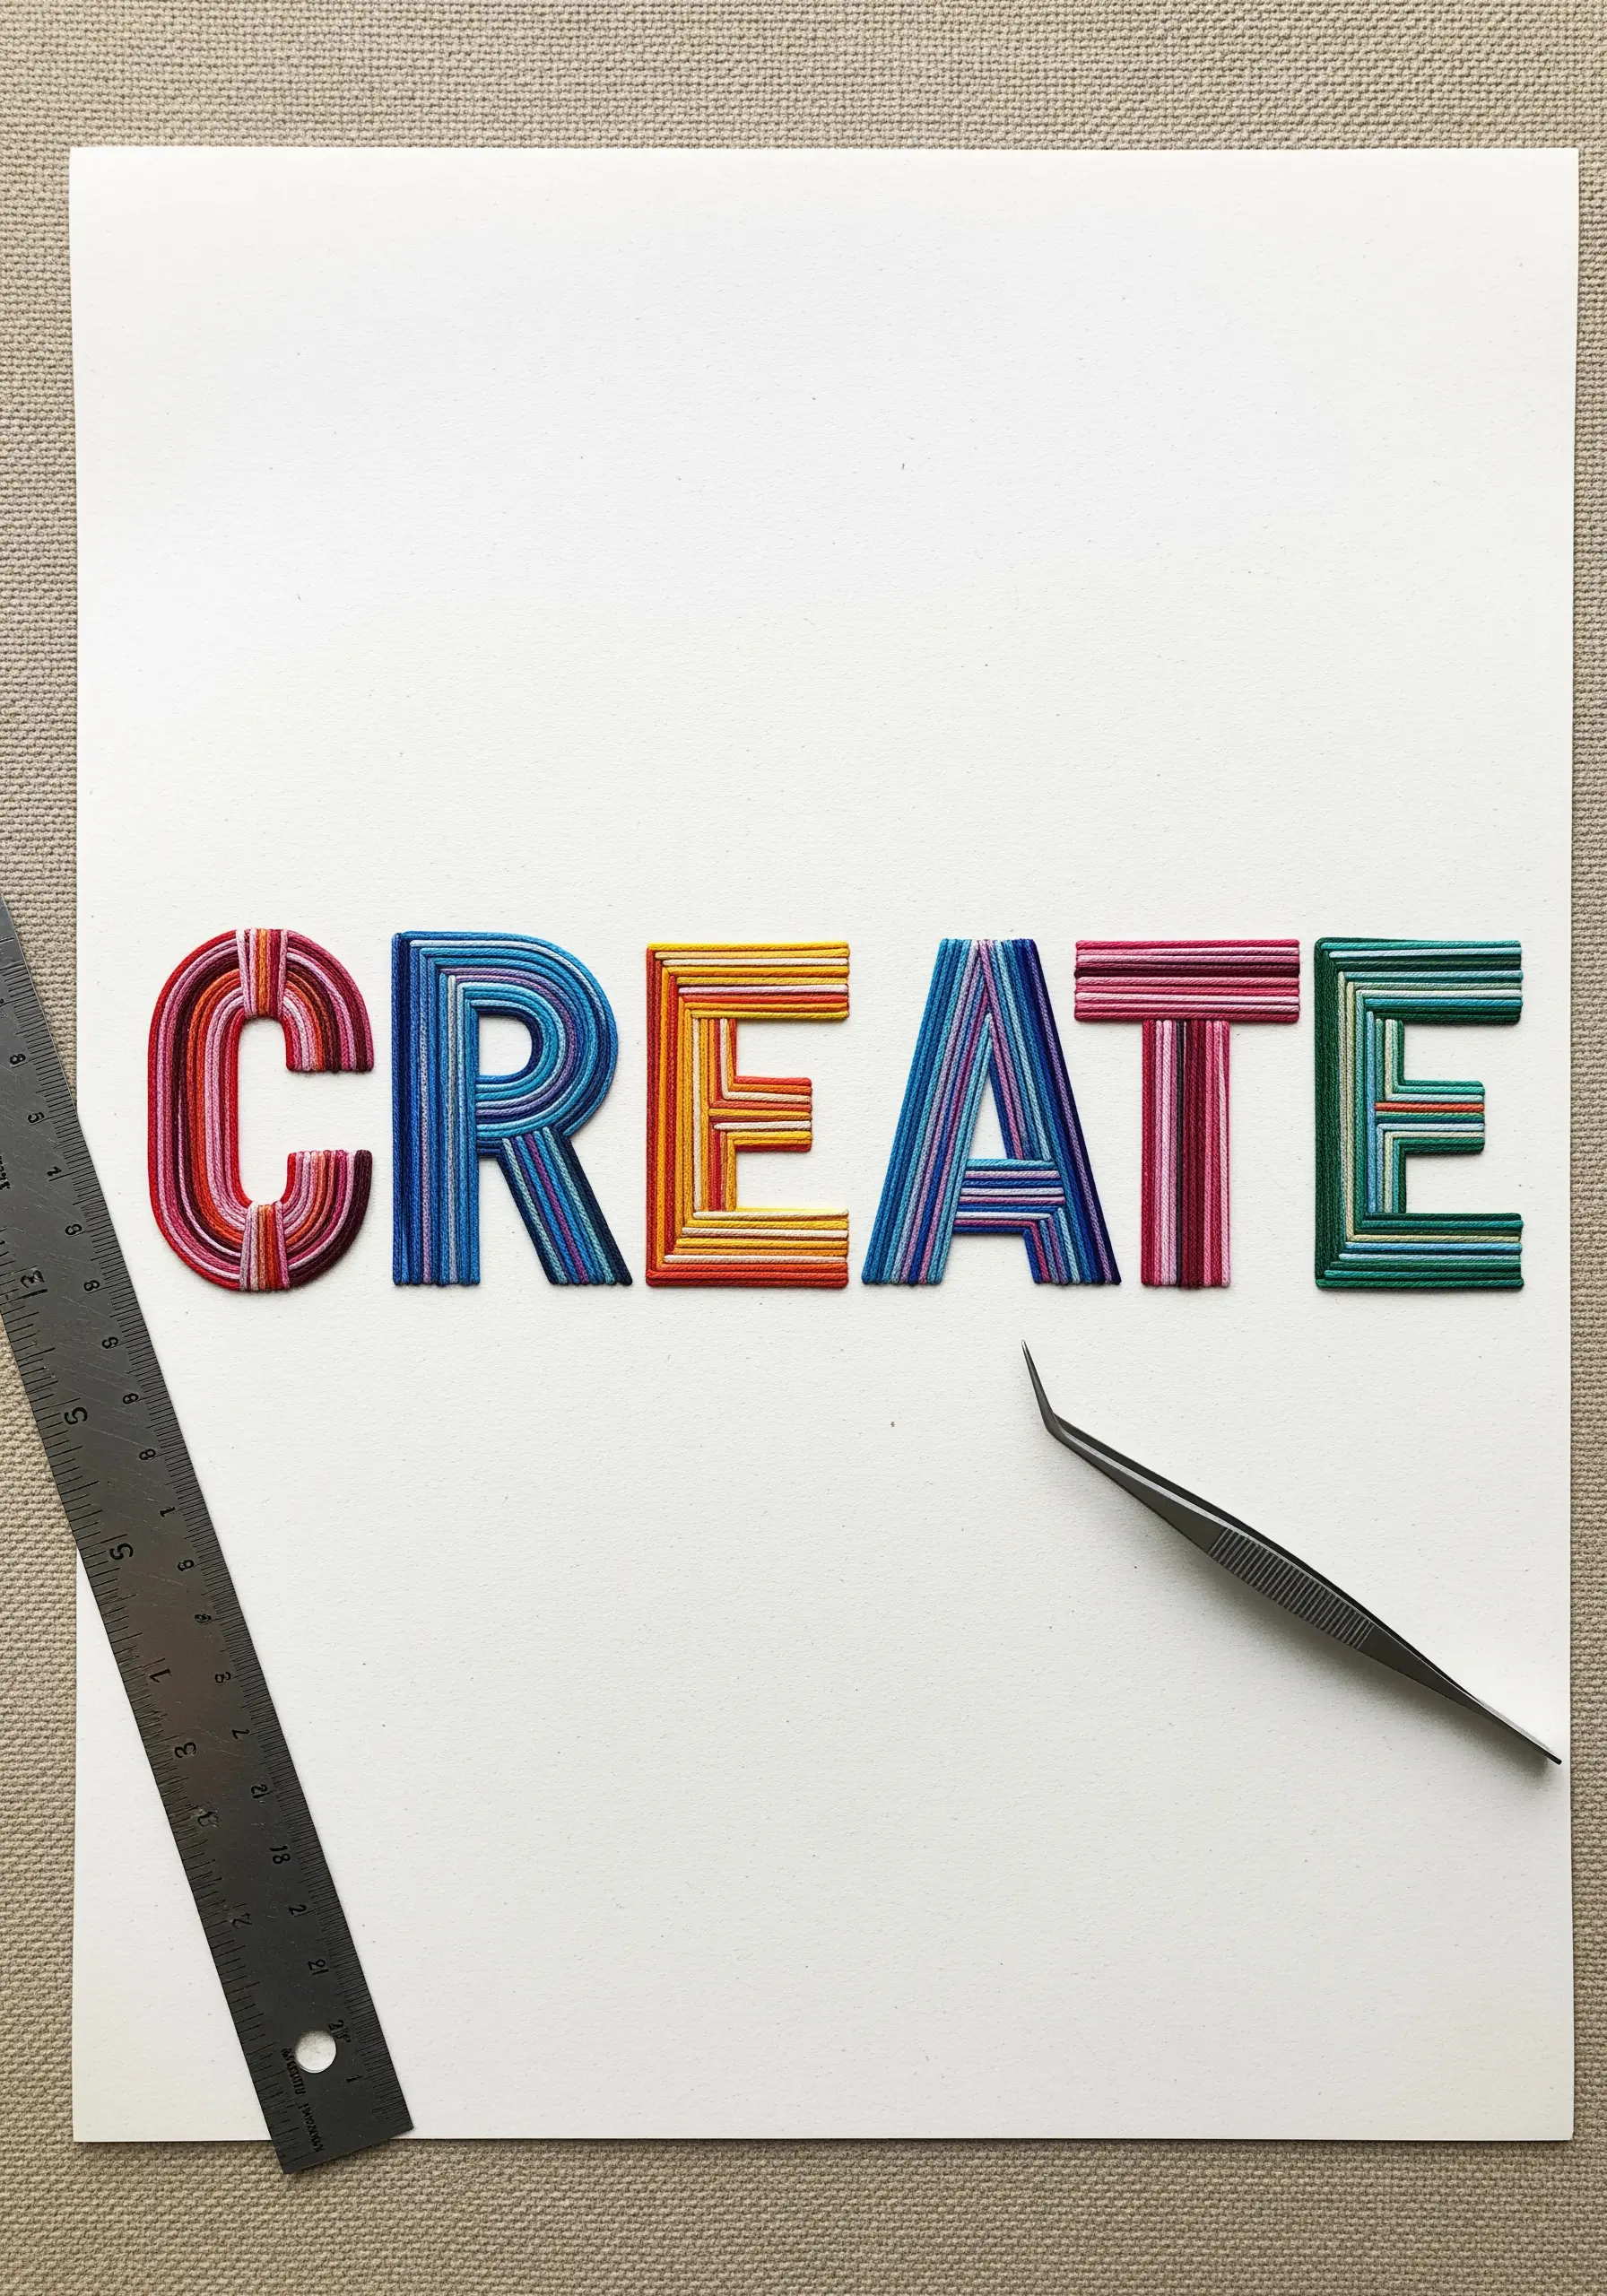
Create bold, dimensional lettering by using a padded satin stitch, a foundational technique in stumpwork.
First, outline your letters with a split stitch. Then, fill the inside of the letters with layers of satin stitch or felt padding.
Finally, cover the entire padded shape with smooth, even vertical or horizontal satin stitches.
This technique makes your lettering pop from the fabric, giving it a weight and presence that a simple outline can’t achieve.
22. Frame Your Work with a Stitched Celtic Knot Border
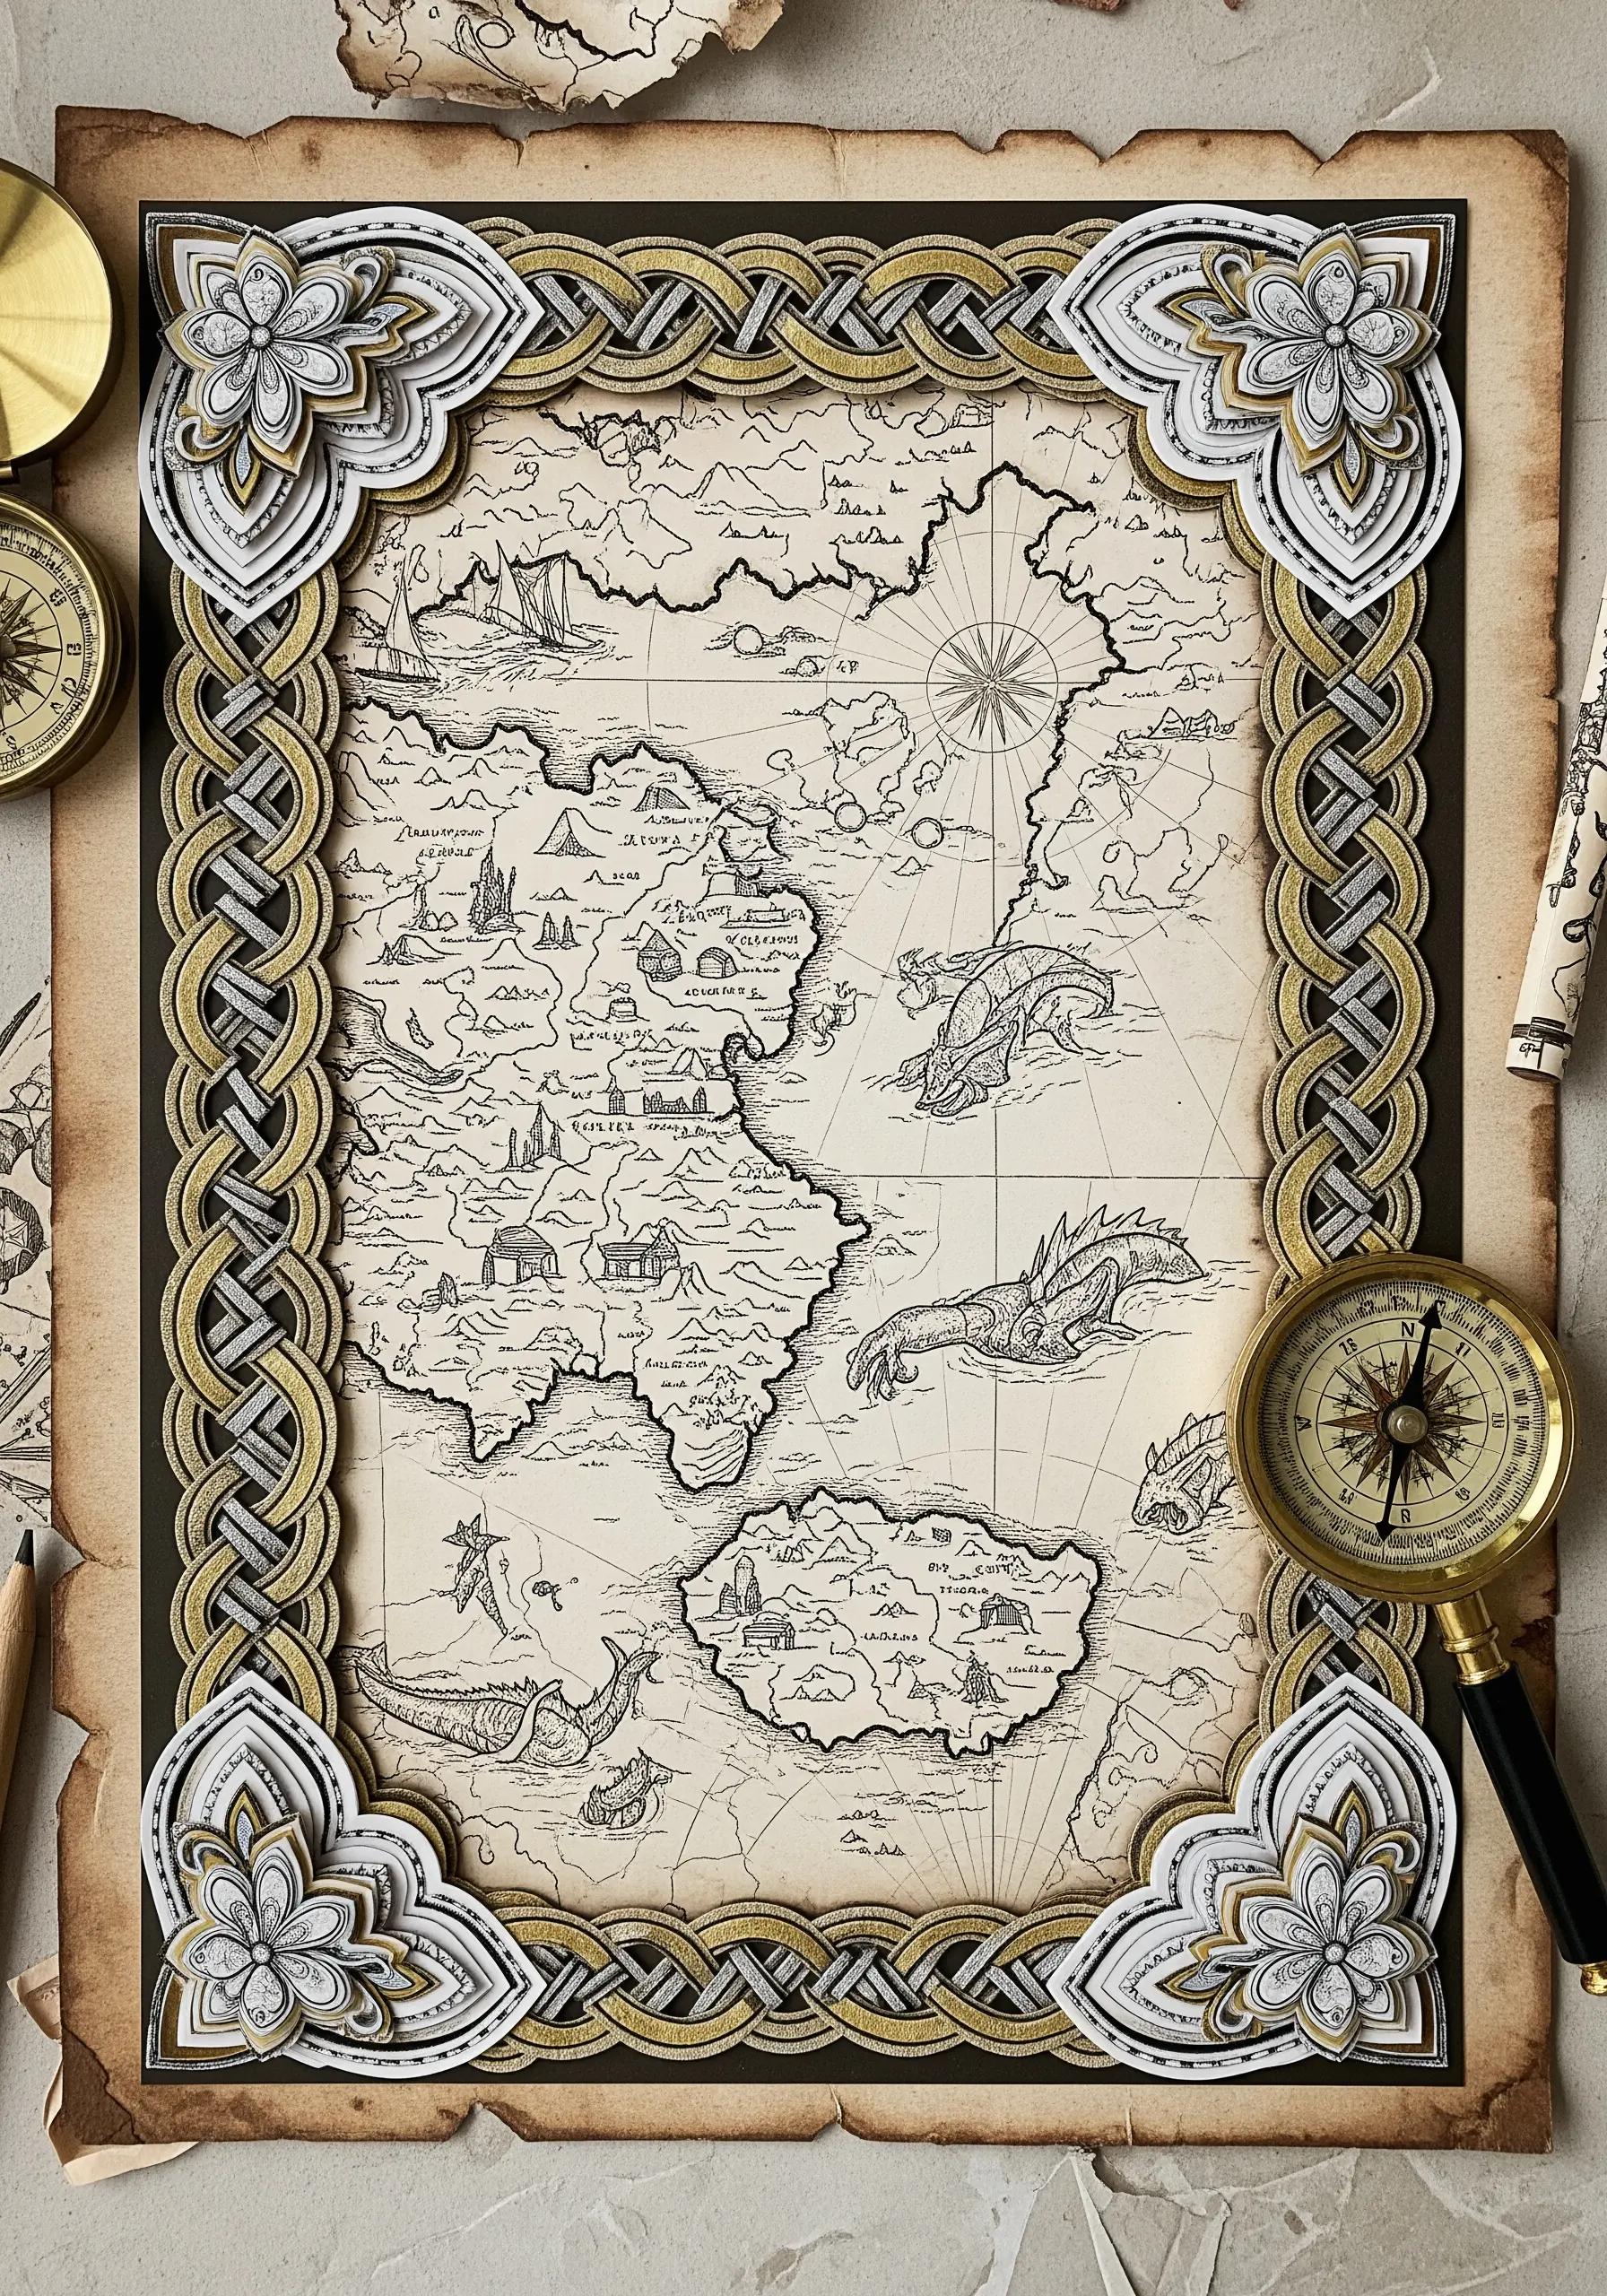
The intricate paper border on this map is a beautiful reference for an embroidered frame.
Create a Celtic knot or braided pattern using a heavy chain stitch or by couching a thick cord onto your fabric.
For a more complex look, weave multiple strands of thread or ribbon together before stitching them down.
Adding such a detailed, substantial border gives your central design importance and creates a truly finished piece of art.
23. Mimic Burnt Edges with Fabric Manipulation
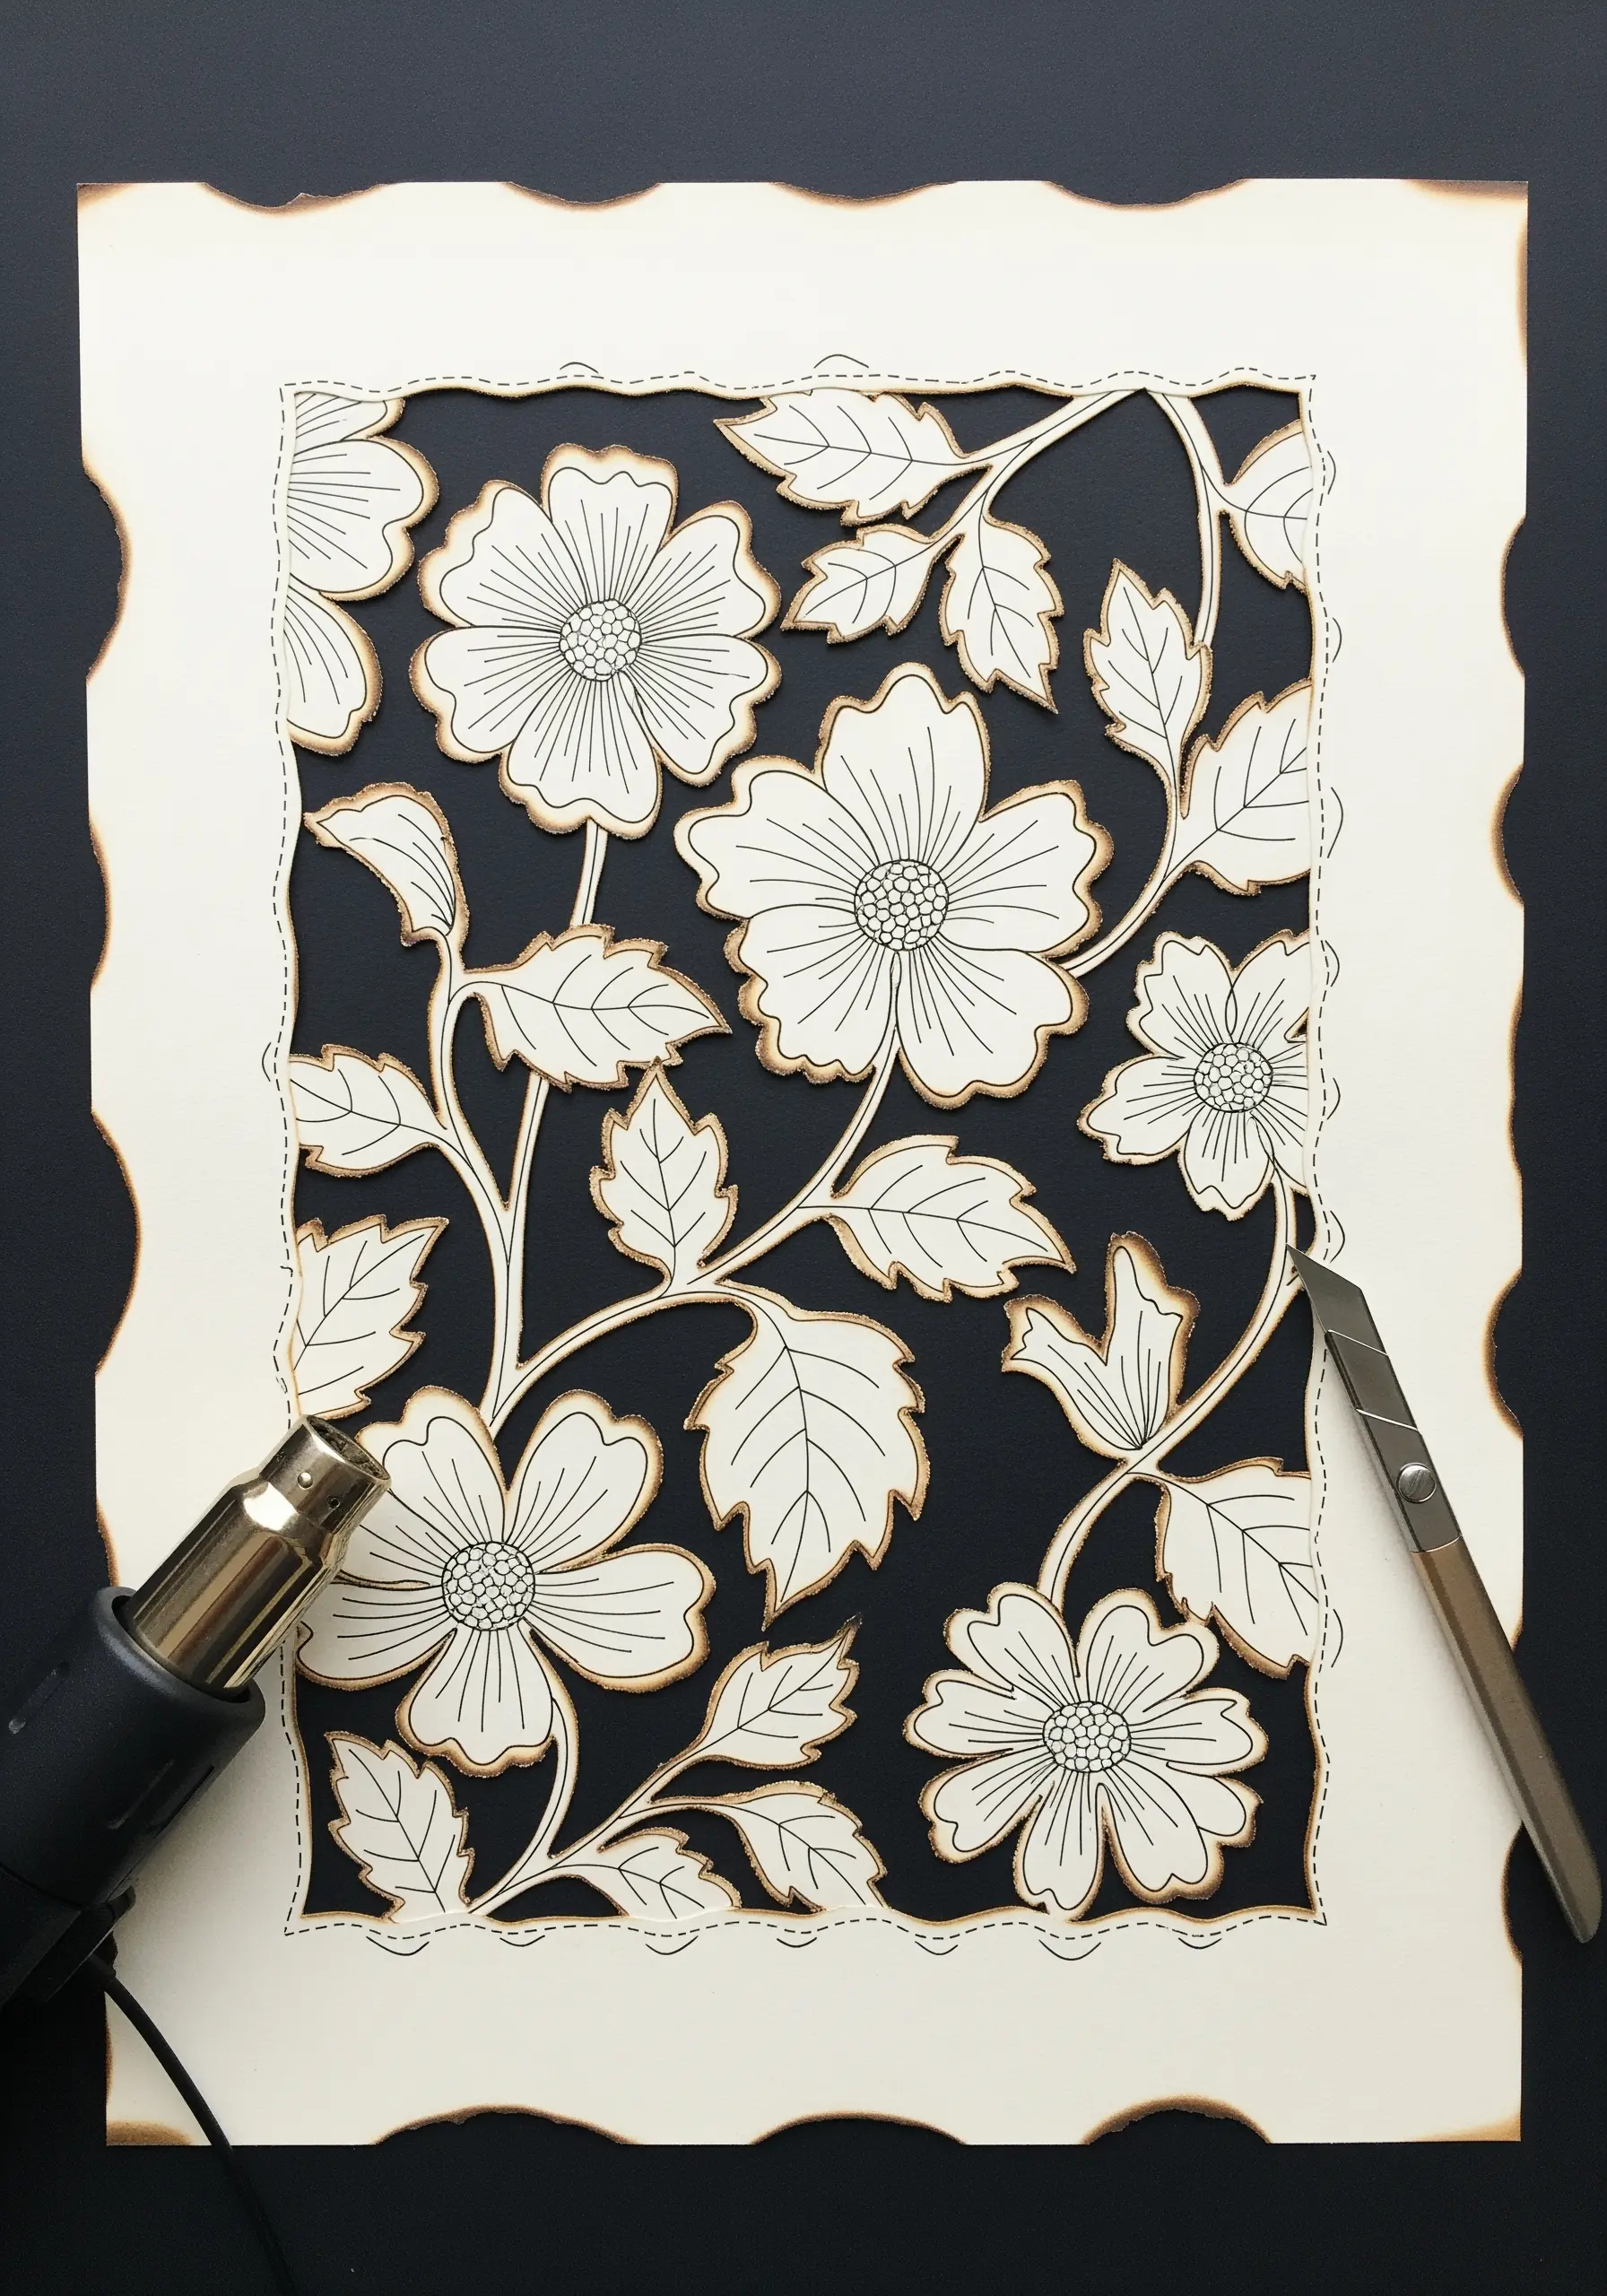
To achieve the delicate, browned edge of burnt paper, carefully singe the edges of a sheer fabric like organza with a heat tool or candle.
Always do this in a well-ventilated area and test on a scrap first. The melted edge will be naturally dark and slightly irregular.
Appliqué these singed organza pieces onto a dark background fabric to create a stunning, high-contrast effect.
Alternatively, you can stitch a dense, uneven blanket stitch along the edge of your fabric using a variegated brown thread to simulate a scorched look.
24. Paint Your Fabric Before Stitching for a Watercolor Effect

Create iridescent, multi-tonal butterfly wings by painting your fabric with watercolors or diluted acrylics first.
Once the paint is dry and heat-set, use a simple backstitch or running stitch with a dark thread to add the delicate veins and outlines.
The paint provides the soft color gradient, while the thread adds crisp definition and texture.
This is one of the most effective paper art techniques to translate into fabric, blending two mediums for a truly artistic result.
25. Fill Silhouettes with Sampler Stitches
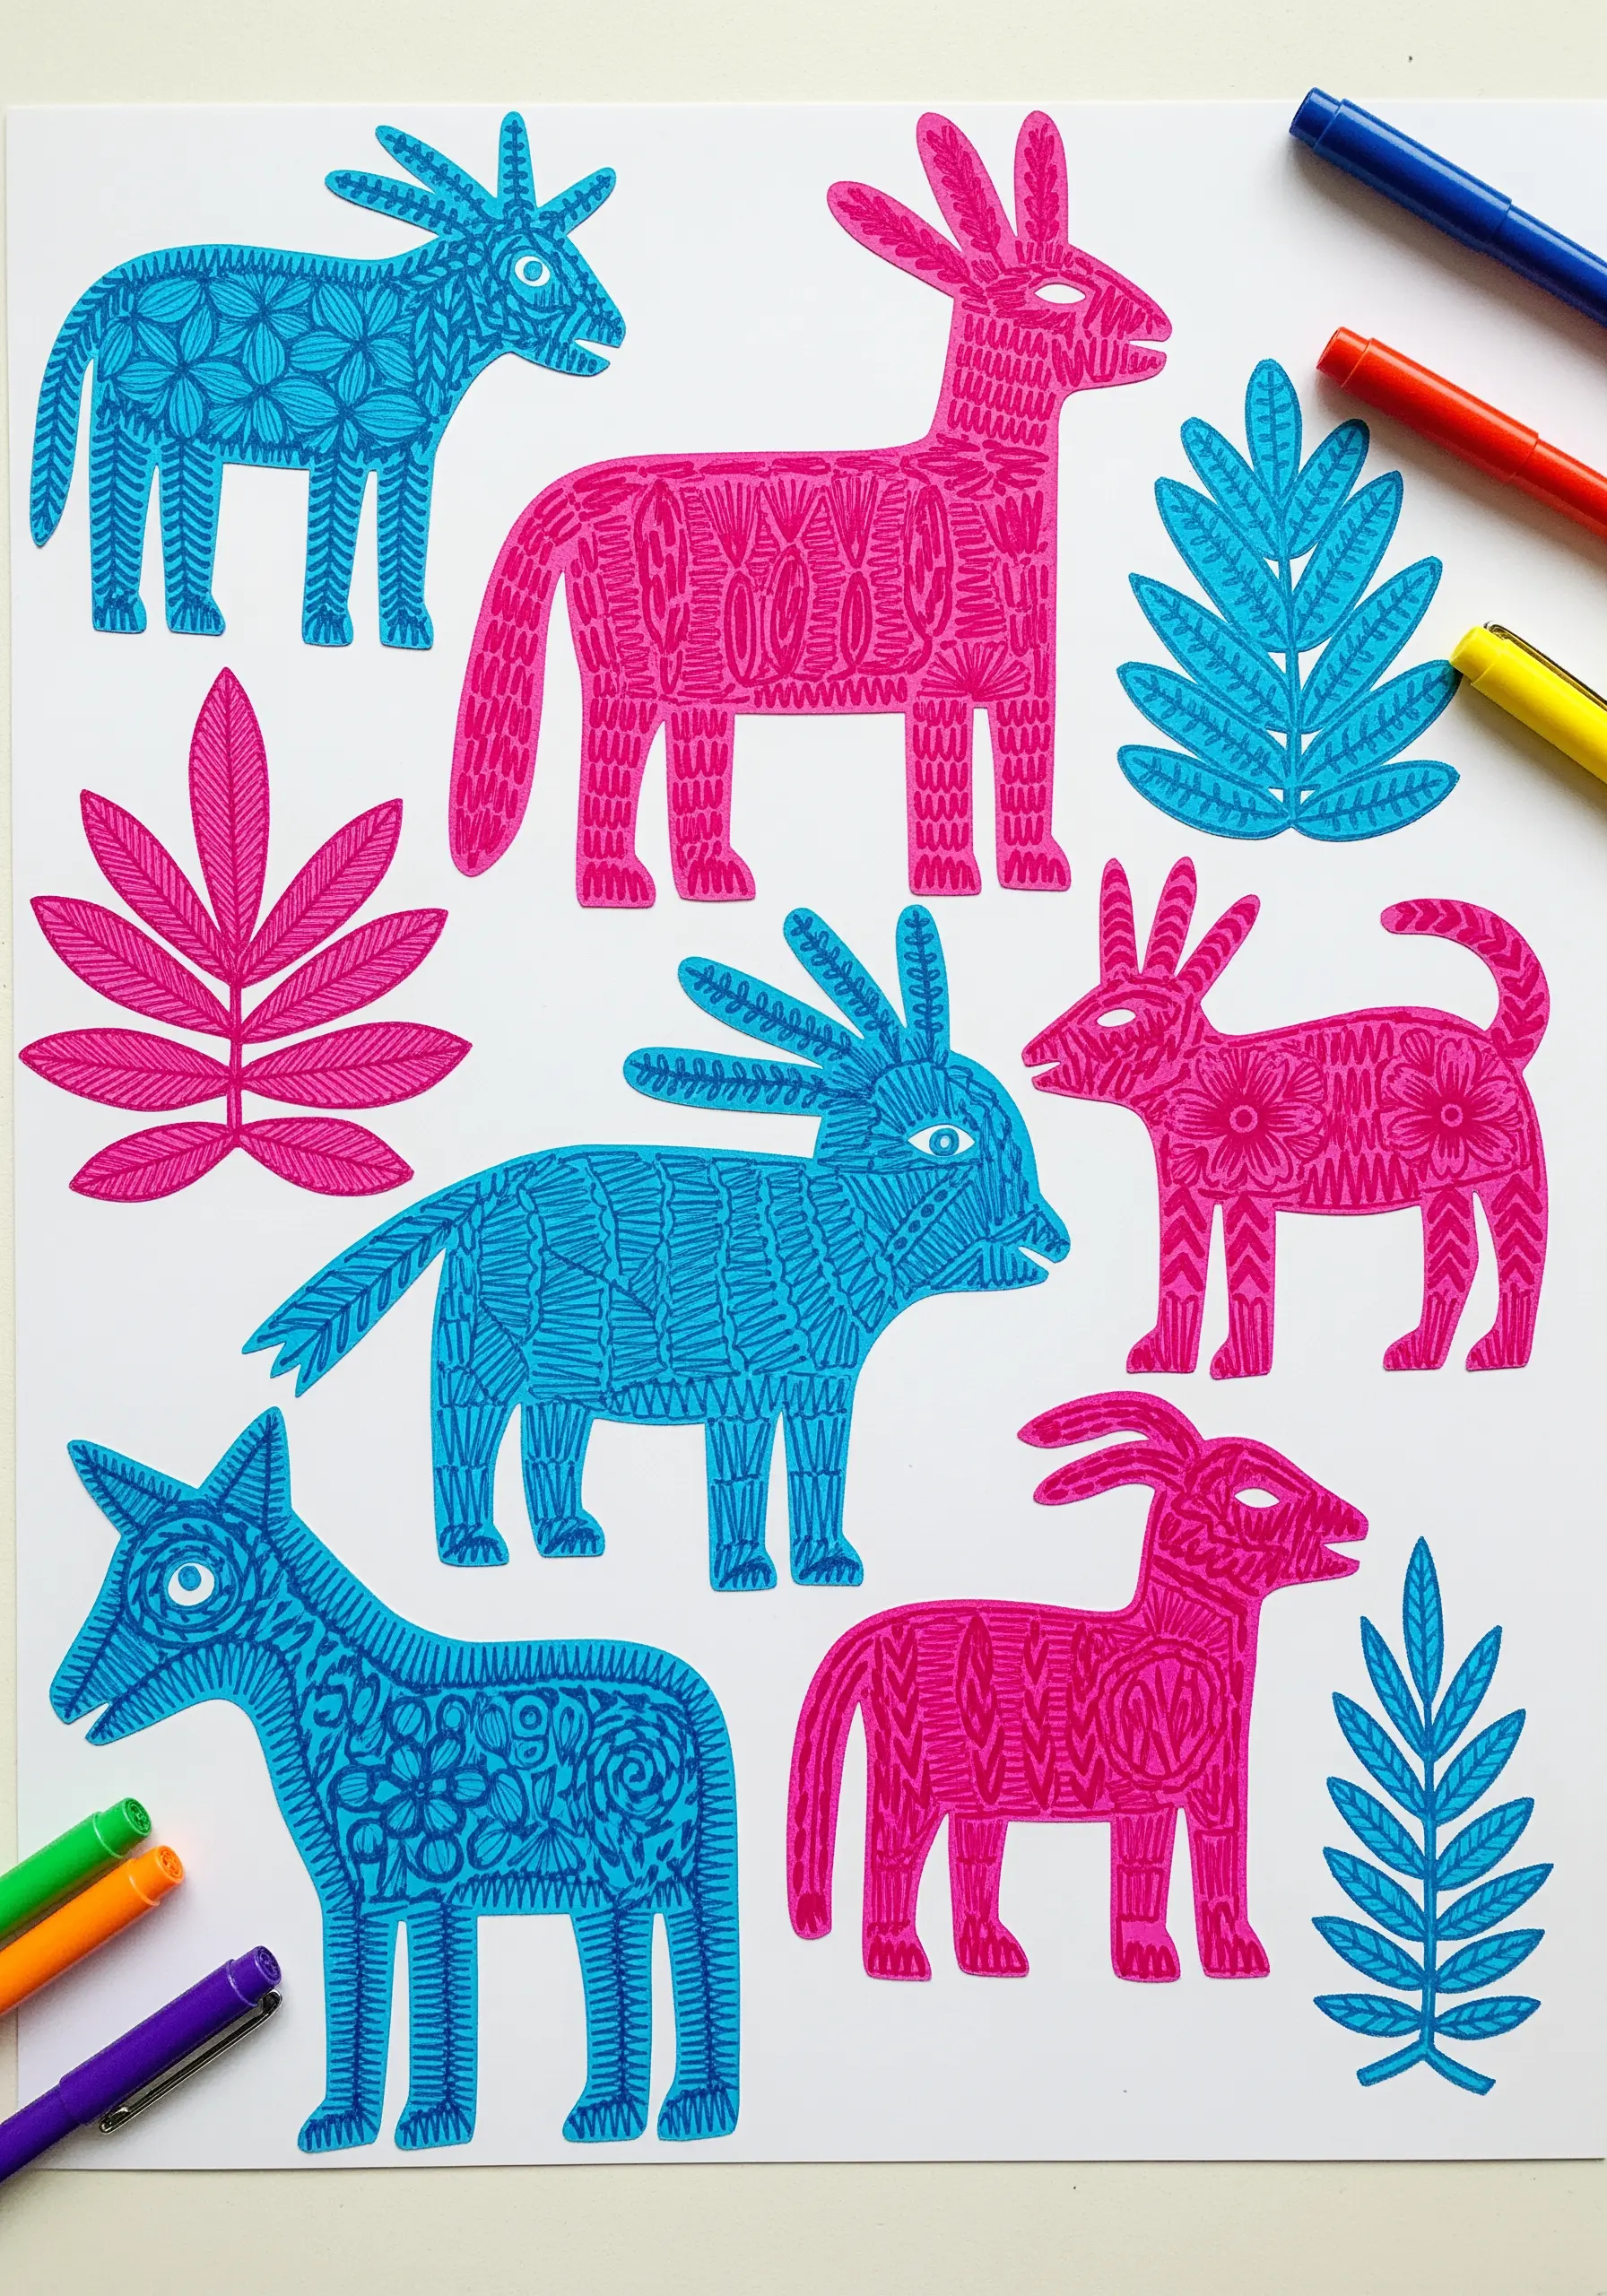
Instead of drawing patterns inside a shape, fill an appliqué silhouette with a variety of textural stitches.
Use this as an opportunity to practice different fill techniques: darning stitch, seed stitch, cross-stitch, or chain stitch can all be used.
This approach turns a simple animal shape into a captivating sampler of your stitching skills.
By keeping the color palette limited, you allow the textures of the different stitches to become the main focus of the piece.
26. Create a 3D Stitch Library as a Reference Tool
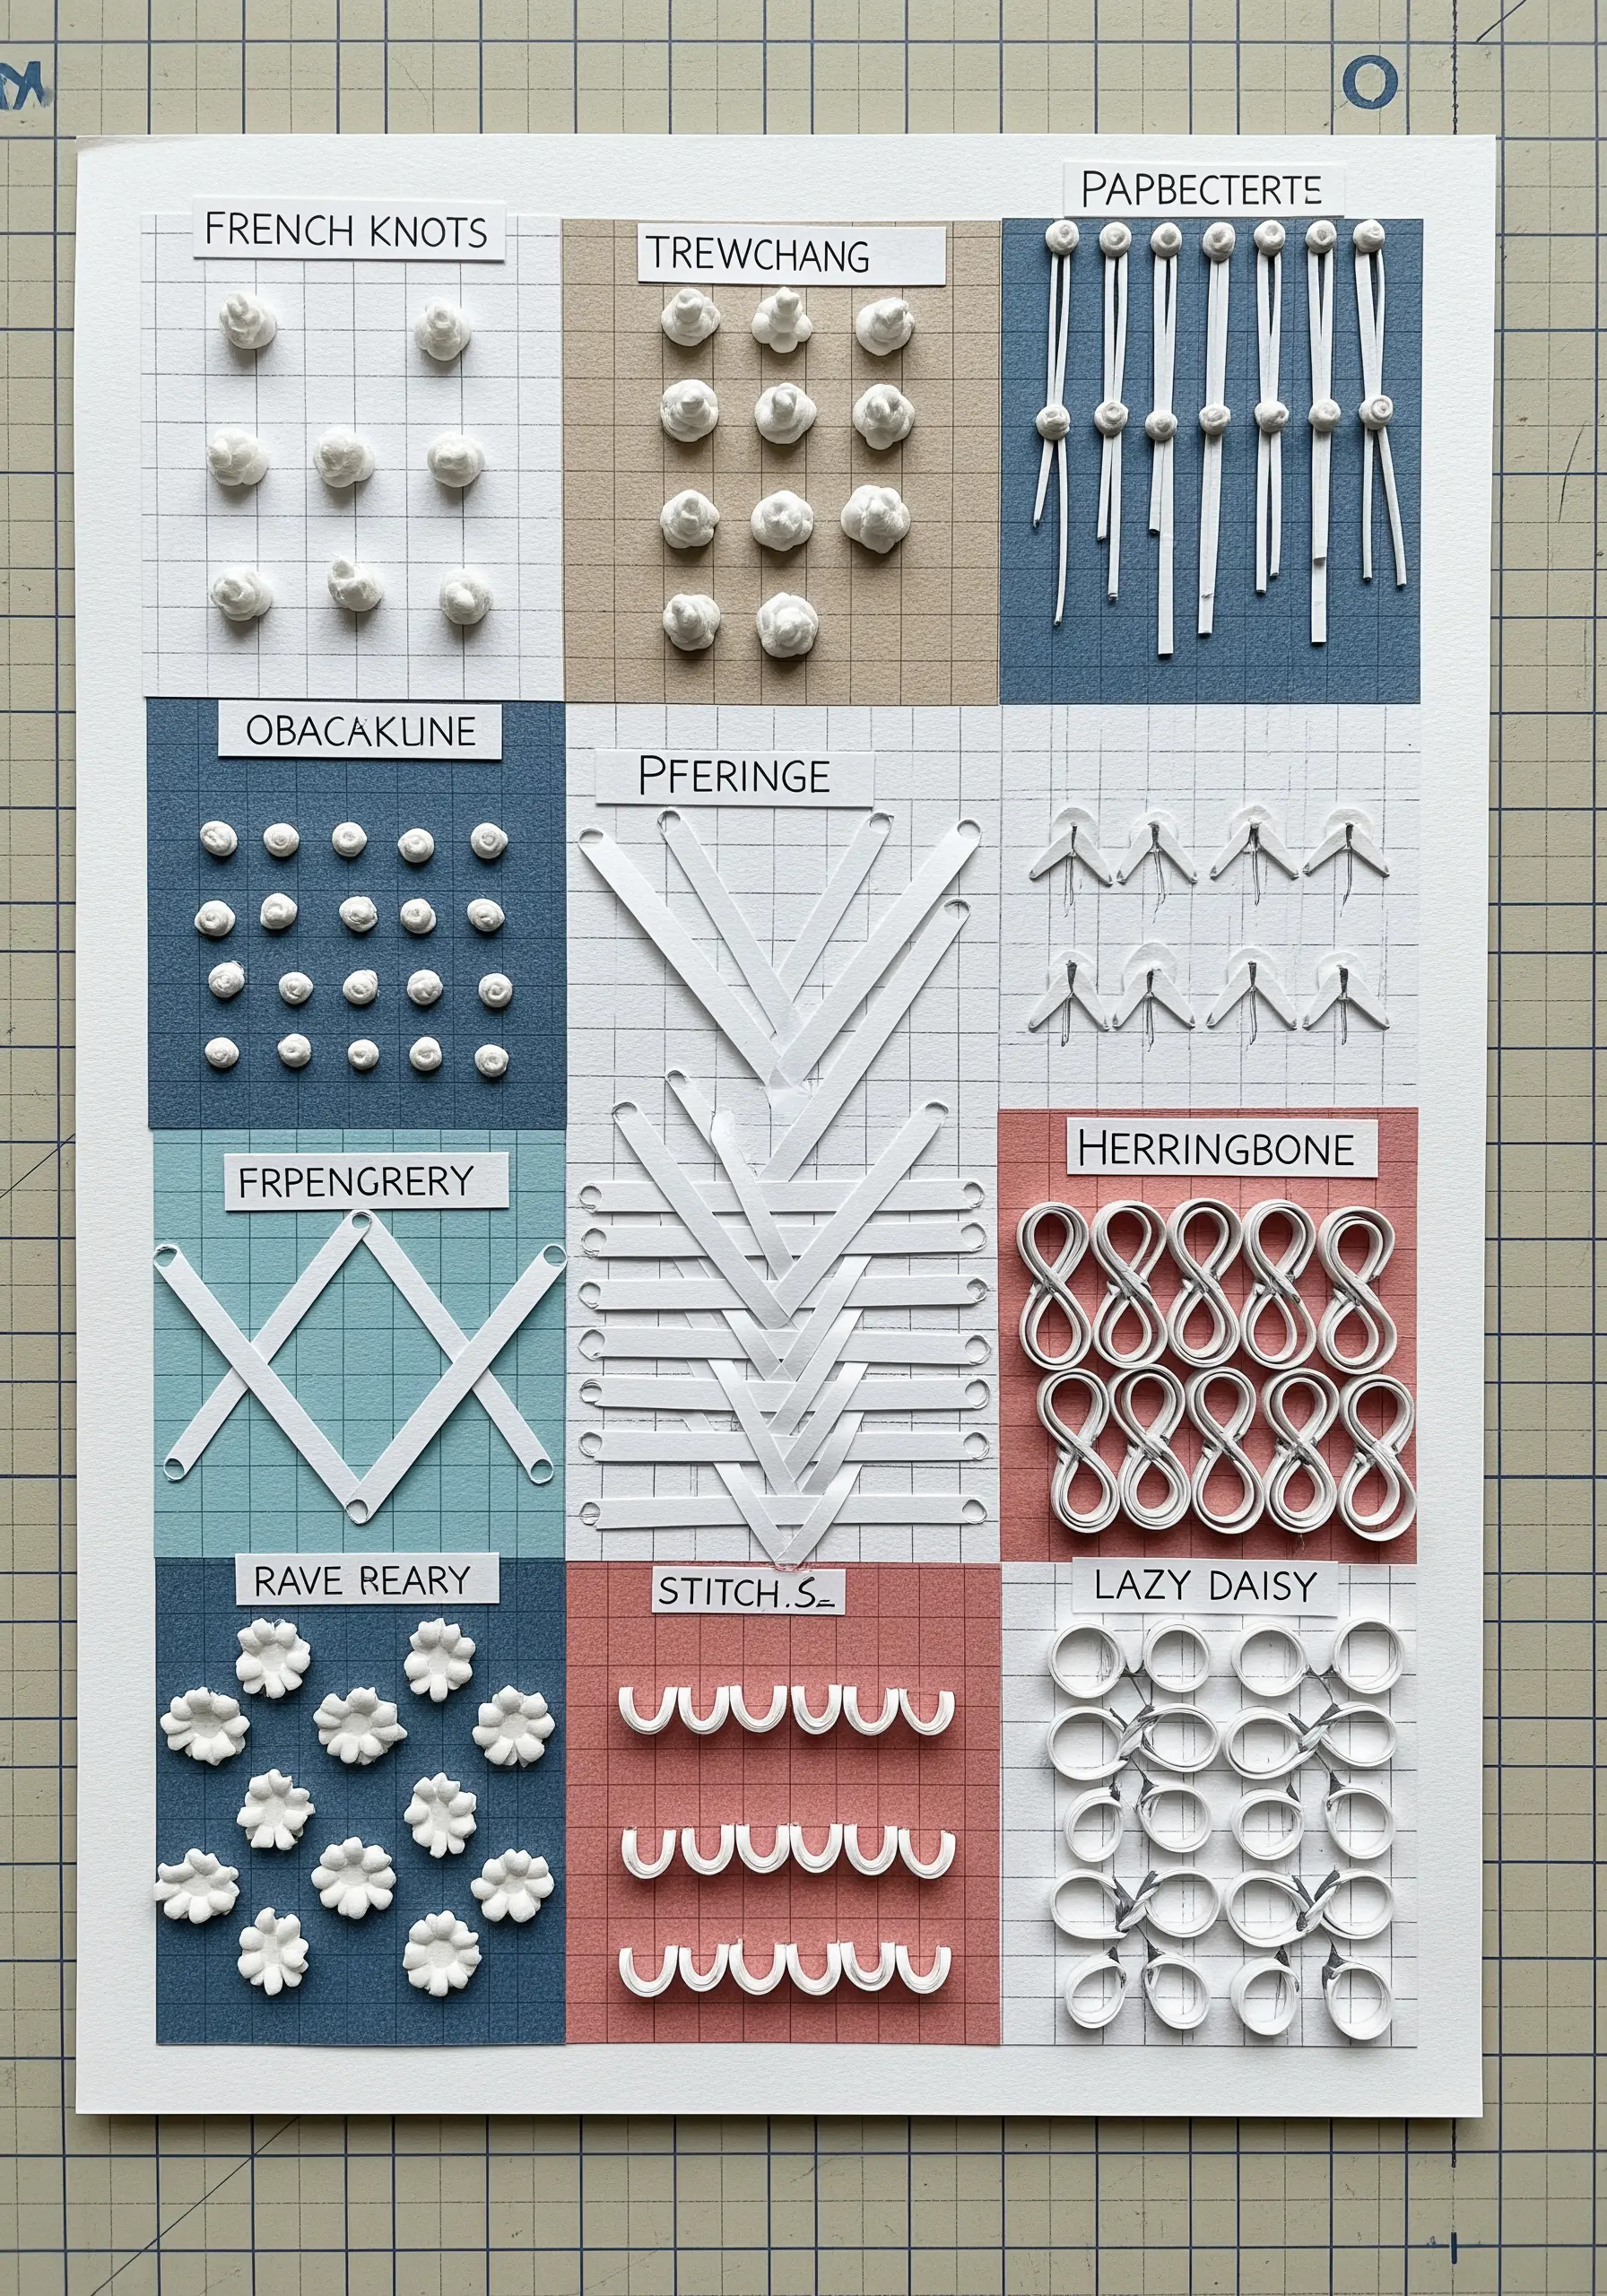
Translate this concept directly onto fabric by creating your own stitch sampler or reference library.
Divide a piece of fabric into a grid and dedicate each square to practicing a different stitch, from French knots to herringbone.
Instead of just stitching flat, experiment with raised and sculptural stitches like Turkey work, bullion knots, and padded satin stitch.
This not only improves your technique but also becomes a beautiful and useful piece of minimalist stitched art to hang in your workspace.
27. Create Abstract Art by Couching Over a Fabric Collage
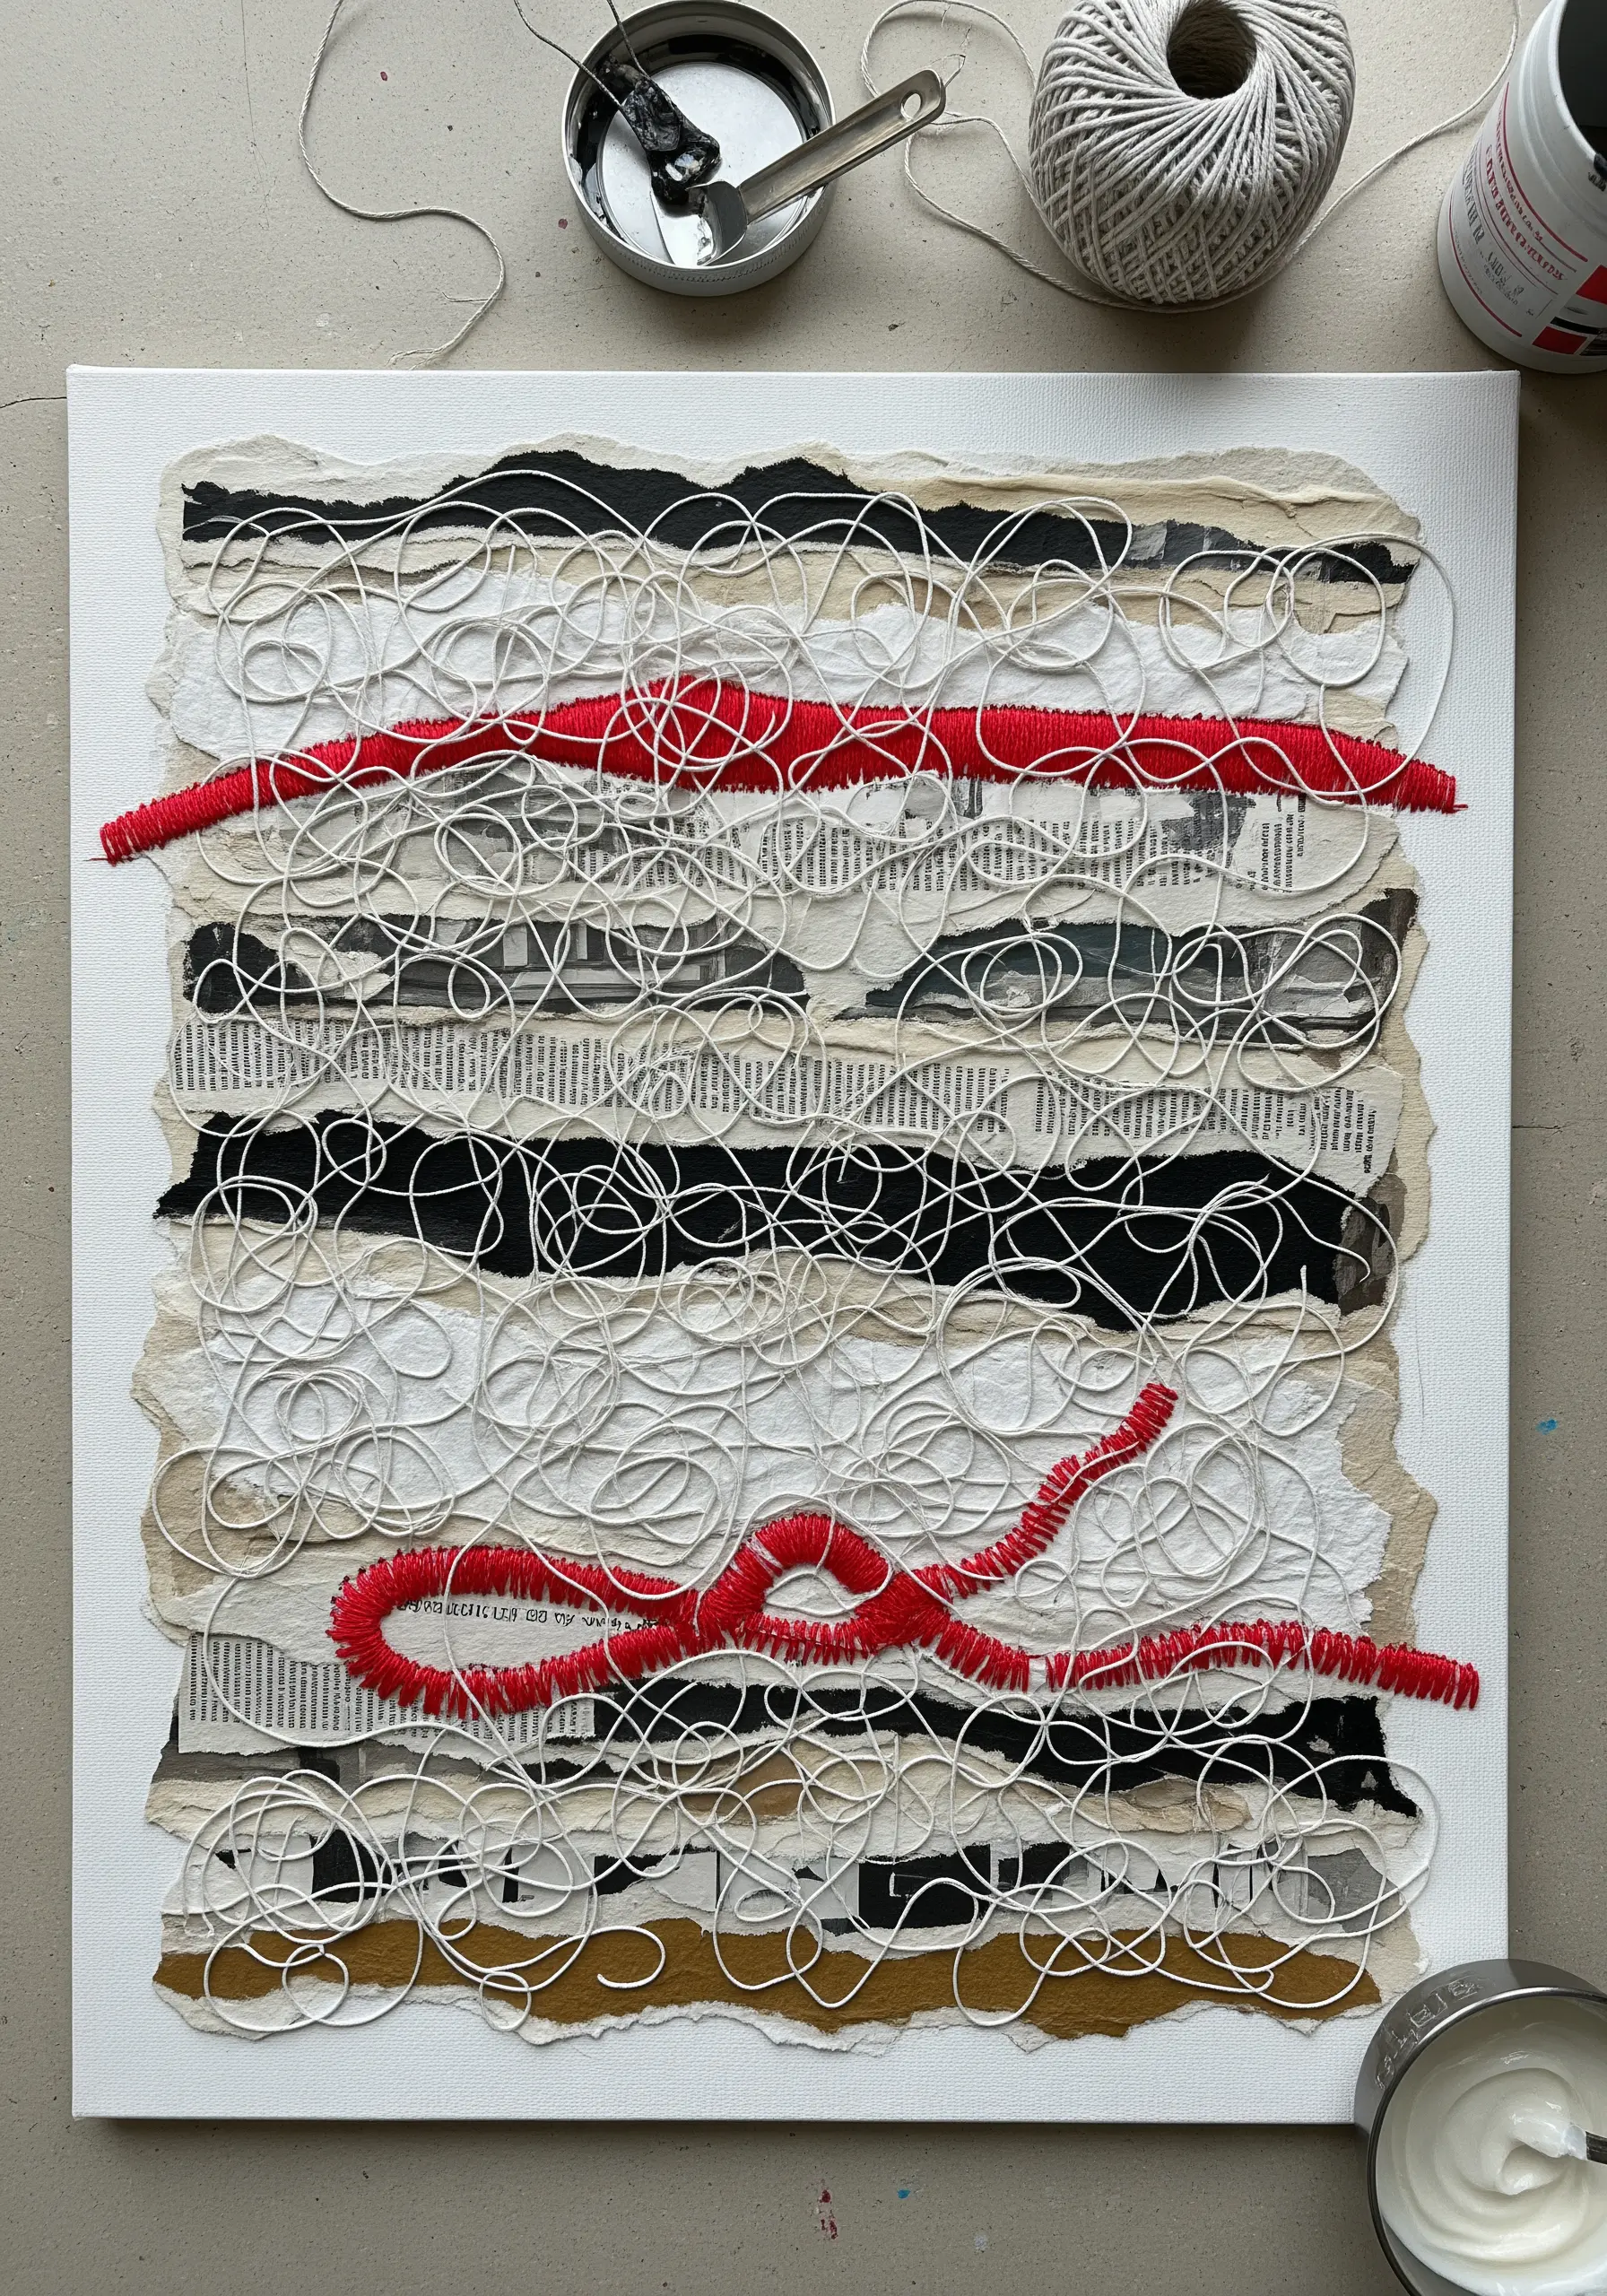
Build a background by layering strips of fabric with raw, torn edges—use cheesecloth, linen, and canvas for a variety of textures.
Once your collage base is secure, couch long pieces of yarn or string in free-form, chaotic loops across the surface.
This method allows you to create dynamic, expressive abstract art without needing to fill the entire canvas with tiny stitches.
Introduce a single pop of color, like the red thread here, to create a focal point and guide the viewer’s eye.
28. Embellish Outlines with Beads and Metallic Threads
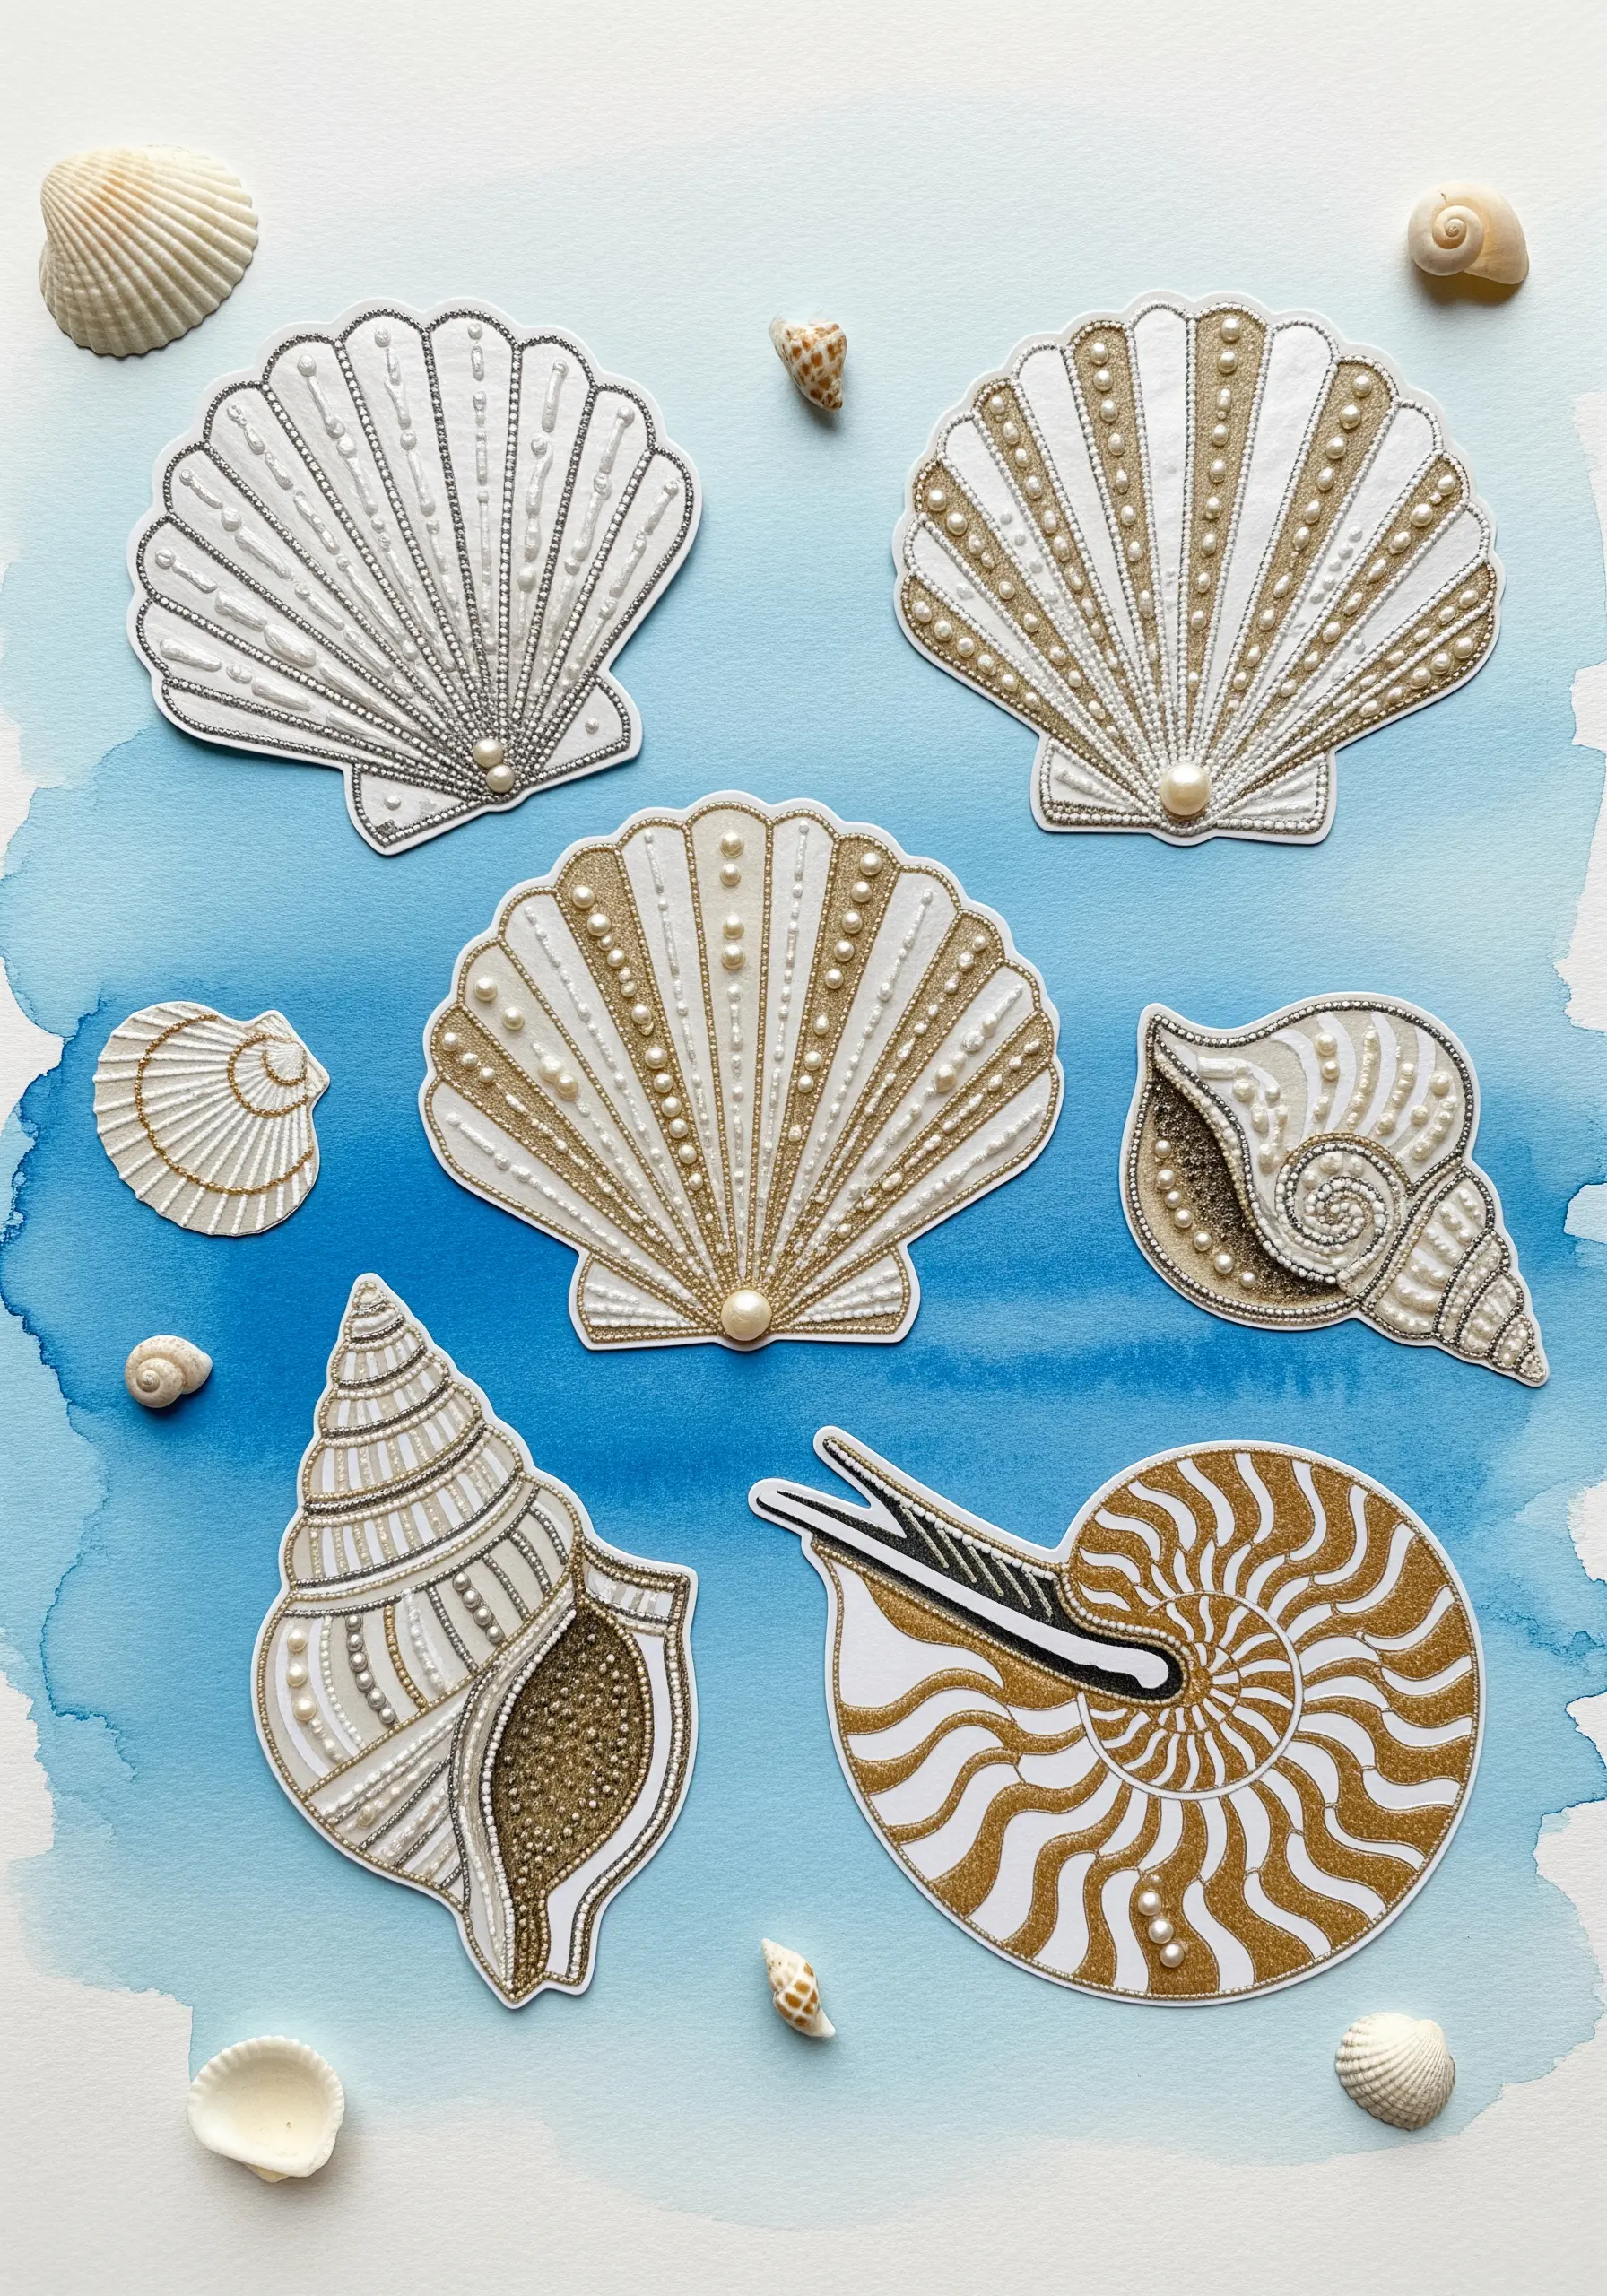
Elevate a simple line drawing by tracing the lines with more than just thread.
Use a couching stitch to lay down a fine metallic cord, or stitch lines of tiny seed beads or bugle beads.
For a pearlescent effect, use small freshwater pearls or pearl-finish beads, tacking each one down individually.
This technique is perfect for adding a touch of luxury and intricate detail to subjects like seashells, feathers, or celestial motifs.
29. Design Cross-Stitch on Paper to Finalize Your Palette
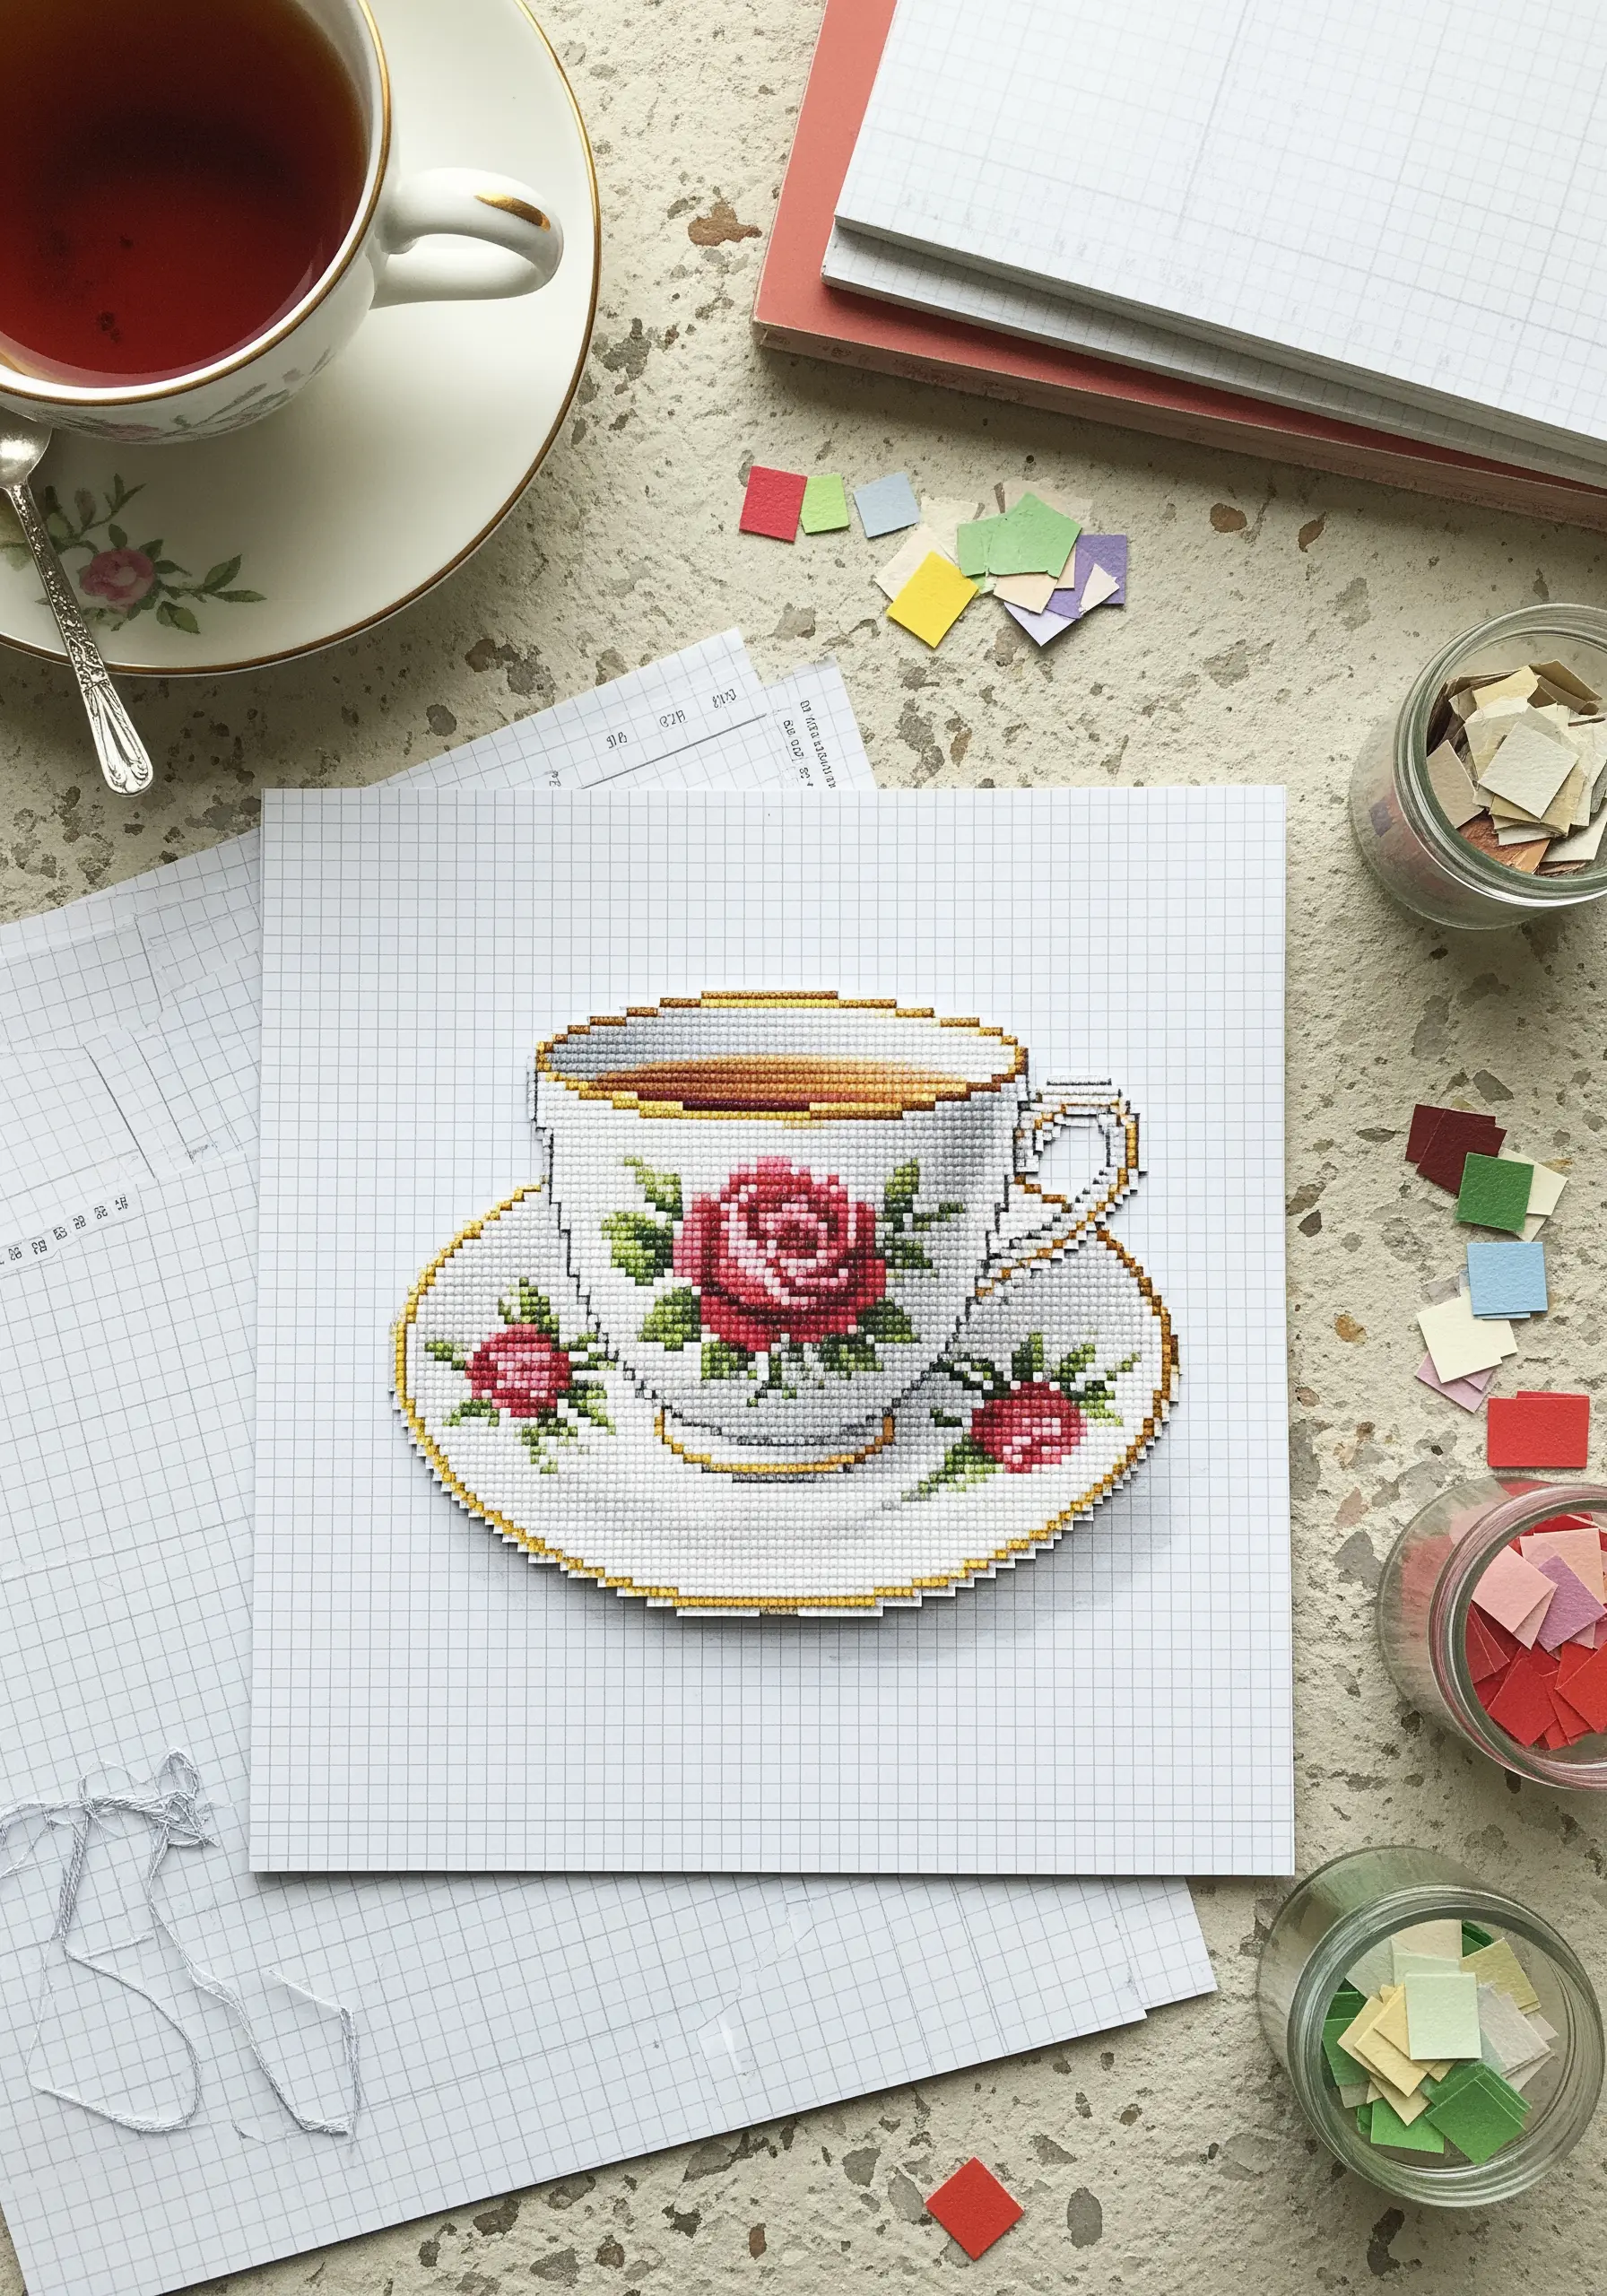
Use the paper collage method as a final check for your cross-stitch color palette before you begin a large project.
Cutting and placing tiny squares of colored paper helps you see how the colors interact in a way that digital programs sometimes can’t capture.
This is especially helpful for intricate designs with subtle shading, like the rose on this teacup.
It’s a low-stakes way to ensure you’re completely happy with your color choices, saving you time and thread in the long run.
30. Experiment with Lacing and Weaving on Your Fabric
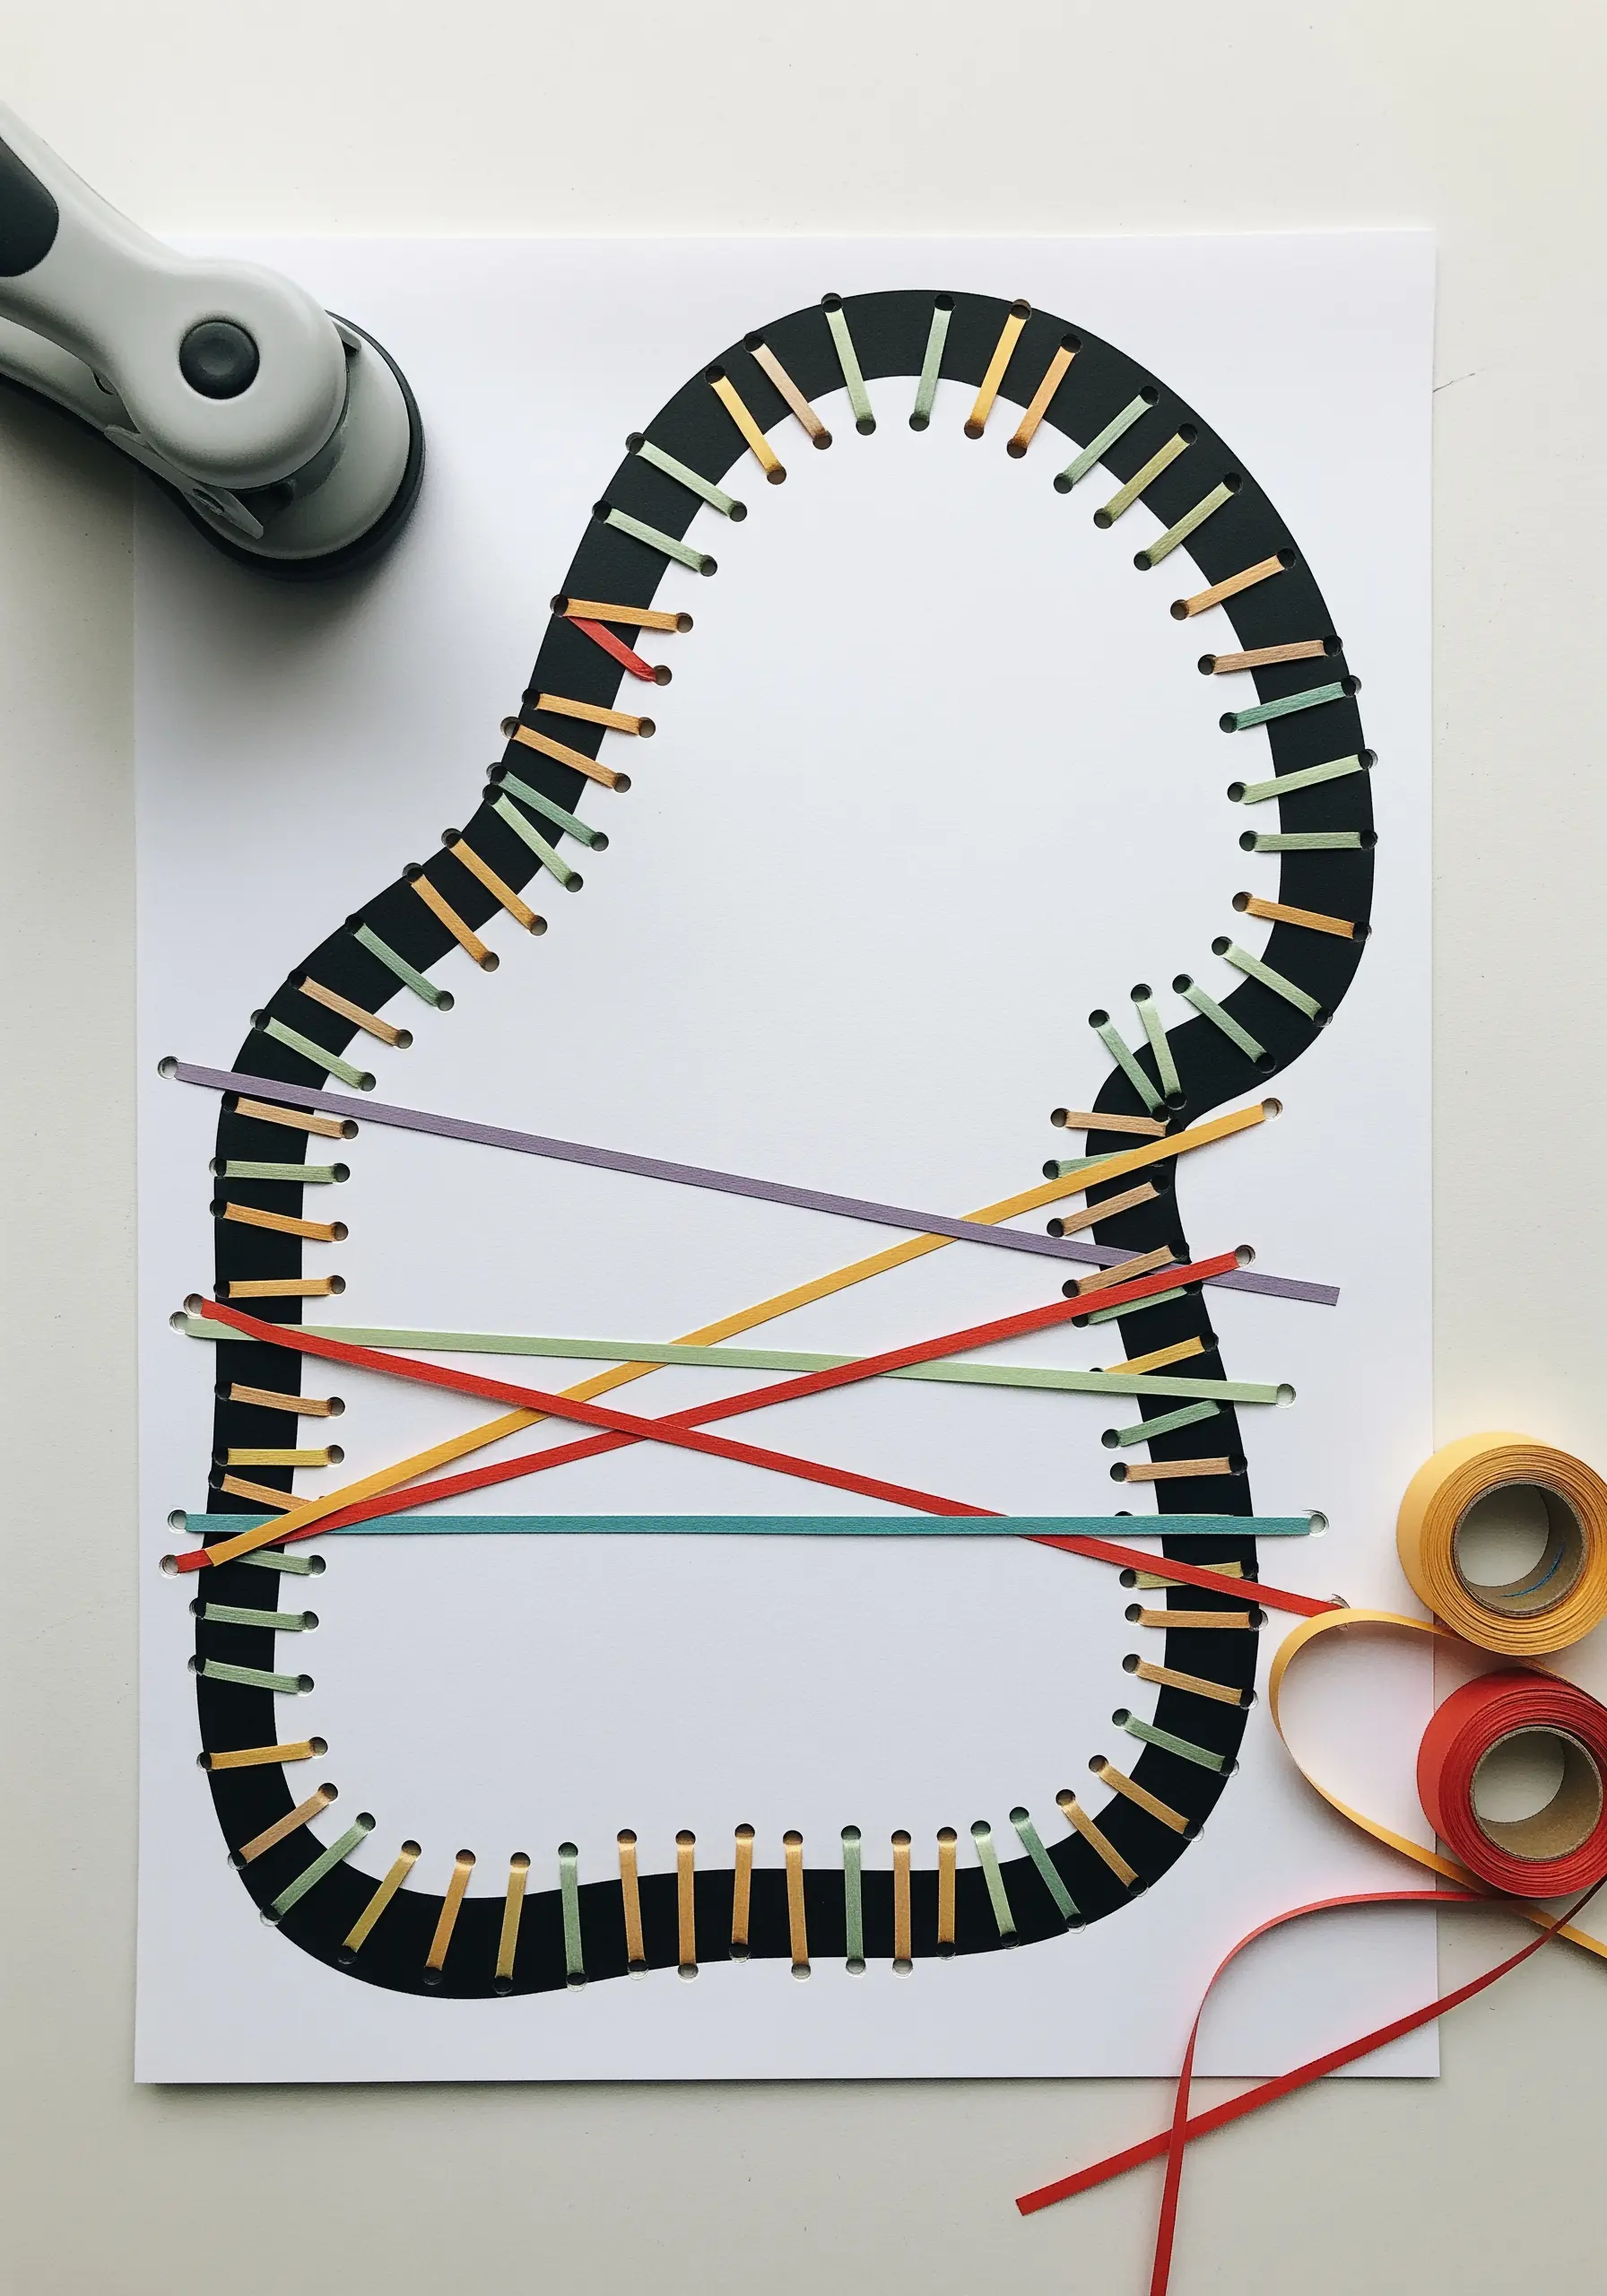
Instead of stitching directly onto fabric, try lacing through it. Punch holes along the edge of an appliqué shape using an awl.
Then, lace ribbon, yarn, or thick floss through the holes to create bold, graphic lines and abstract patterns.
This technique works best with a sturdy base fabric like felt, canvas, or even a sheer fabric fused to a stiff stabilizer.
It’s a playful way to explore tension, color, and negative space, bridging the gap between embroidery and weaving.
31. Master Thread Painting to Capture Iridescent Colors
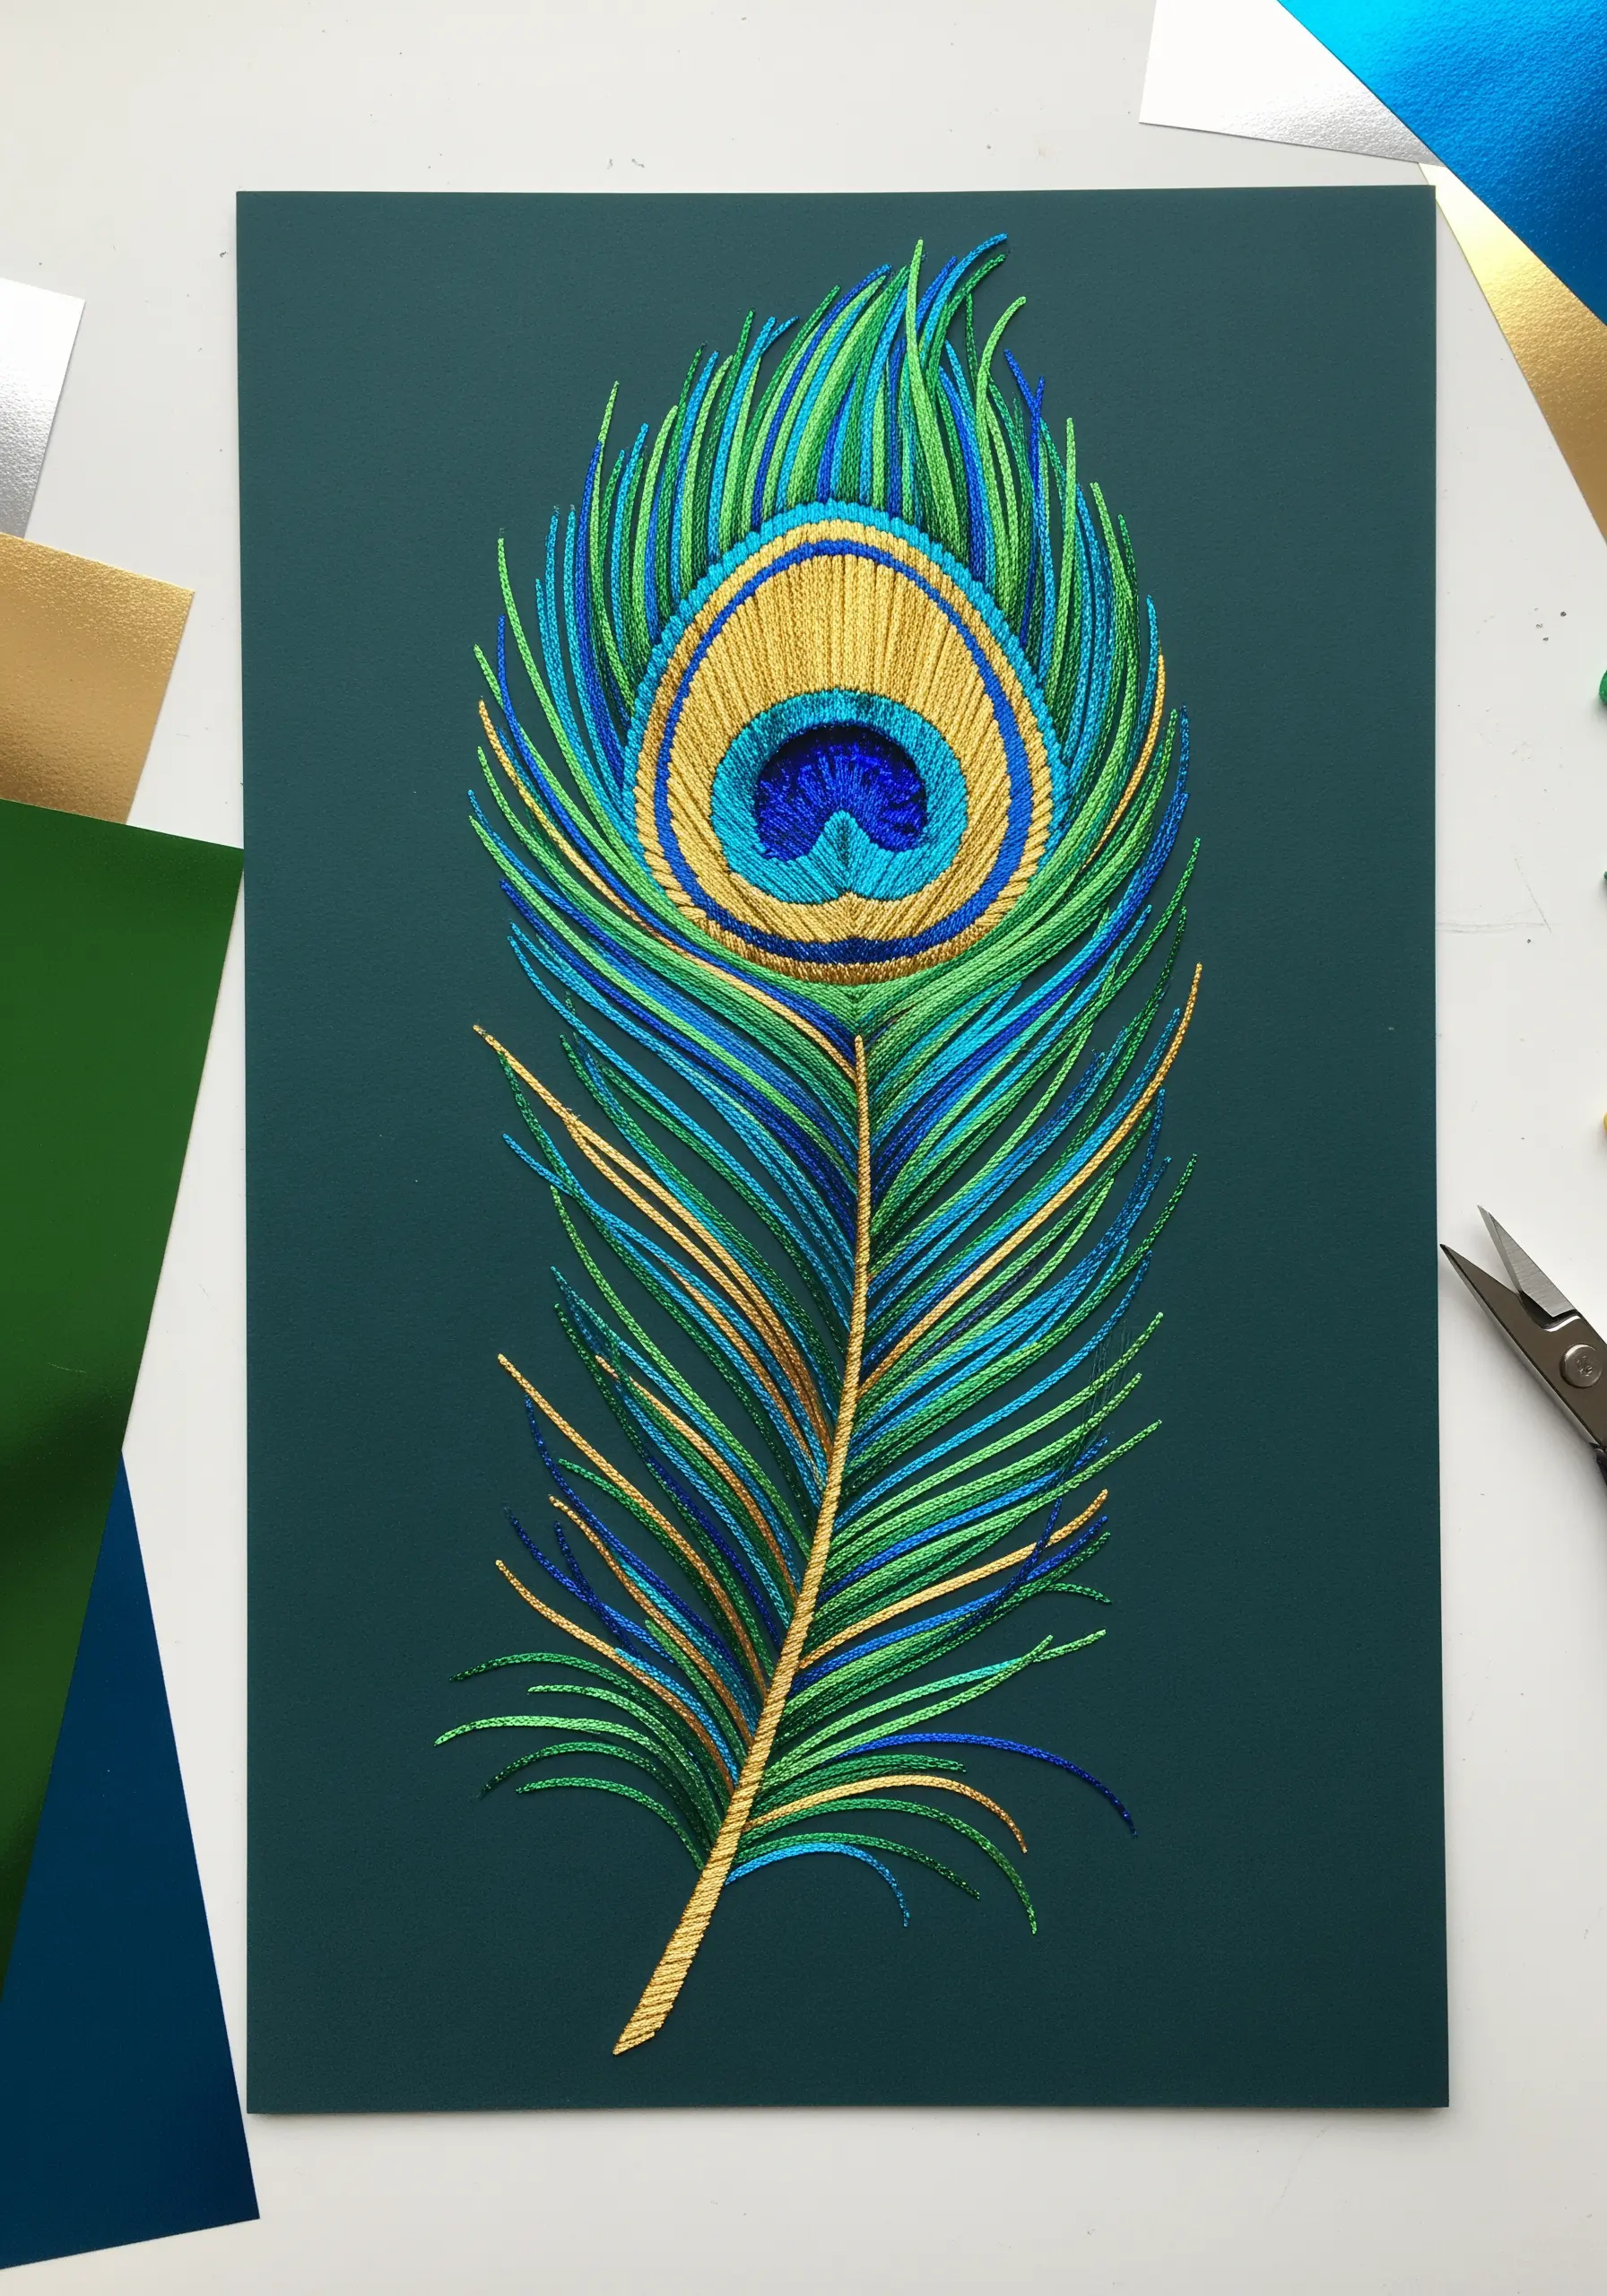
The layered colors of this paper peacock feather are a perfect study for thread painting, or needle painting.
Use long-and-short stitch with single strands of silk or rayon floss to seamlessly blend greens, blues, and golds.
To capture the feather’s iridescent quality, incorporate fine metallic threads alongside the silk floss.
Pay close attention to the direction of your stitches, ensuring they flow outwards from the central quill to create a realistic, shimmering effect.


