
You’ve spent hours perfecting your stitches, choosing just the right colors, and bringing your vision to life with thread. But what happens when the last stitch is made? Often, the most beautiful embroidery is let down by its final presentation. It’s time to think beyond the hoop.
Consider paper not just as a background, but as an active partner to your thread. Imagine your stitches interacting with the crisp edge of a paper cutout, adding textural depth to a watercolor wash, or forming the delicate details on a three-dimensional sculpture. This is where your embroidery evolves from a craft into a cohesive work of art.
These ideas are designed to shift your perspective. They invite you to explore the interplay between the softness of fiber and the structure of paper. You have the skill; now, let’s give your work the innovative, gallery-worthy context it deserves.
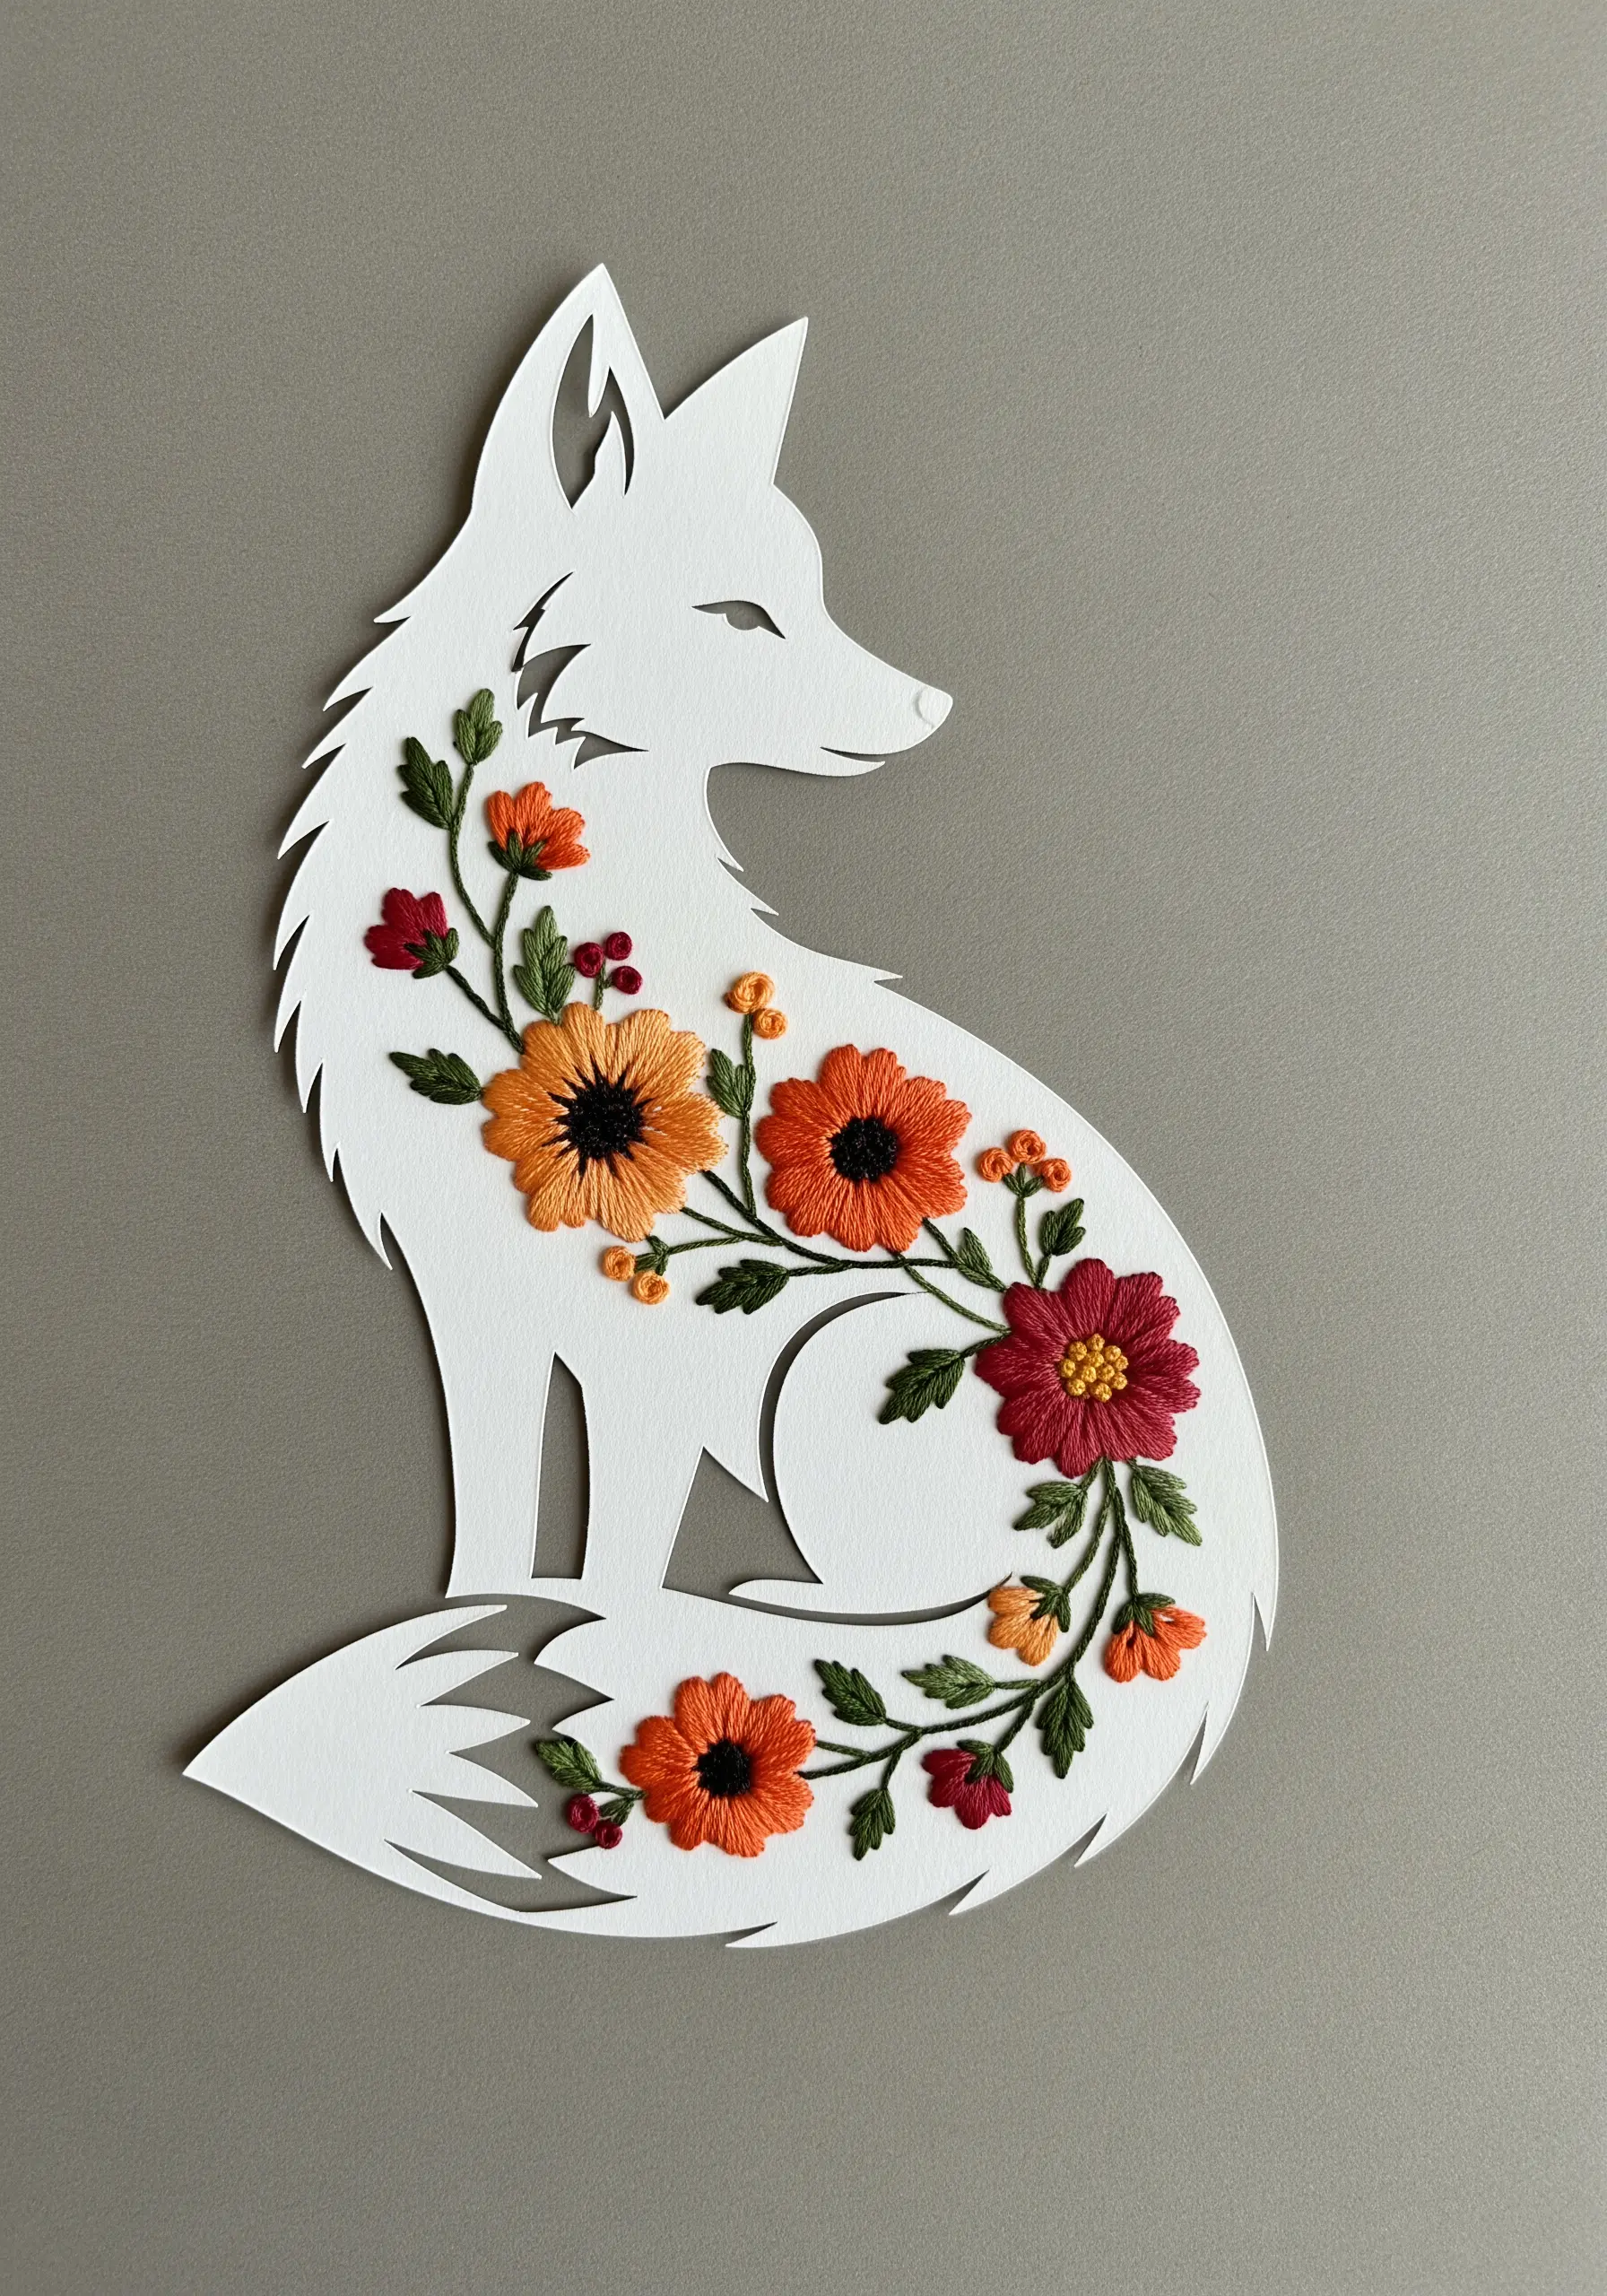
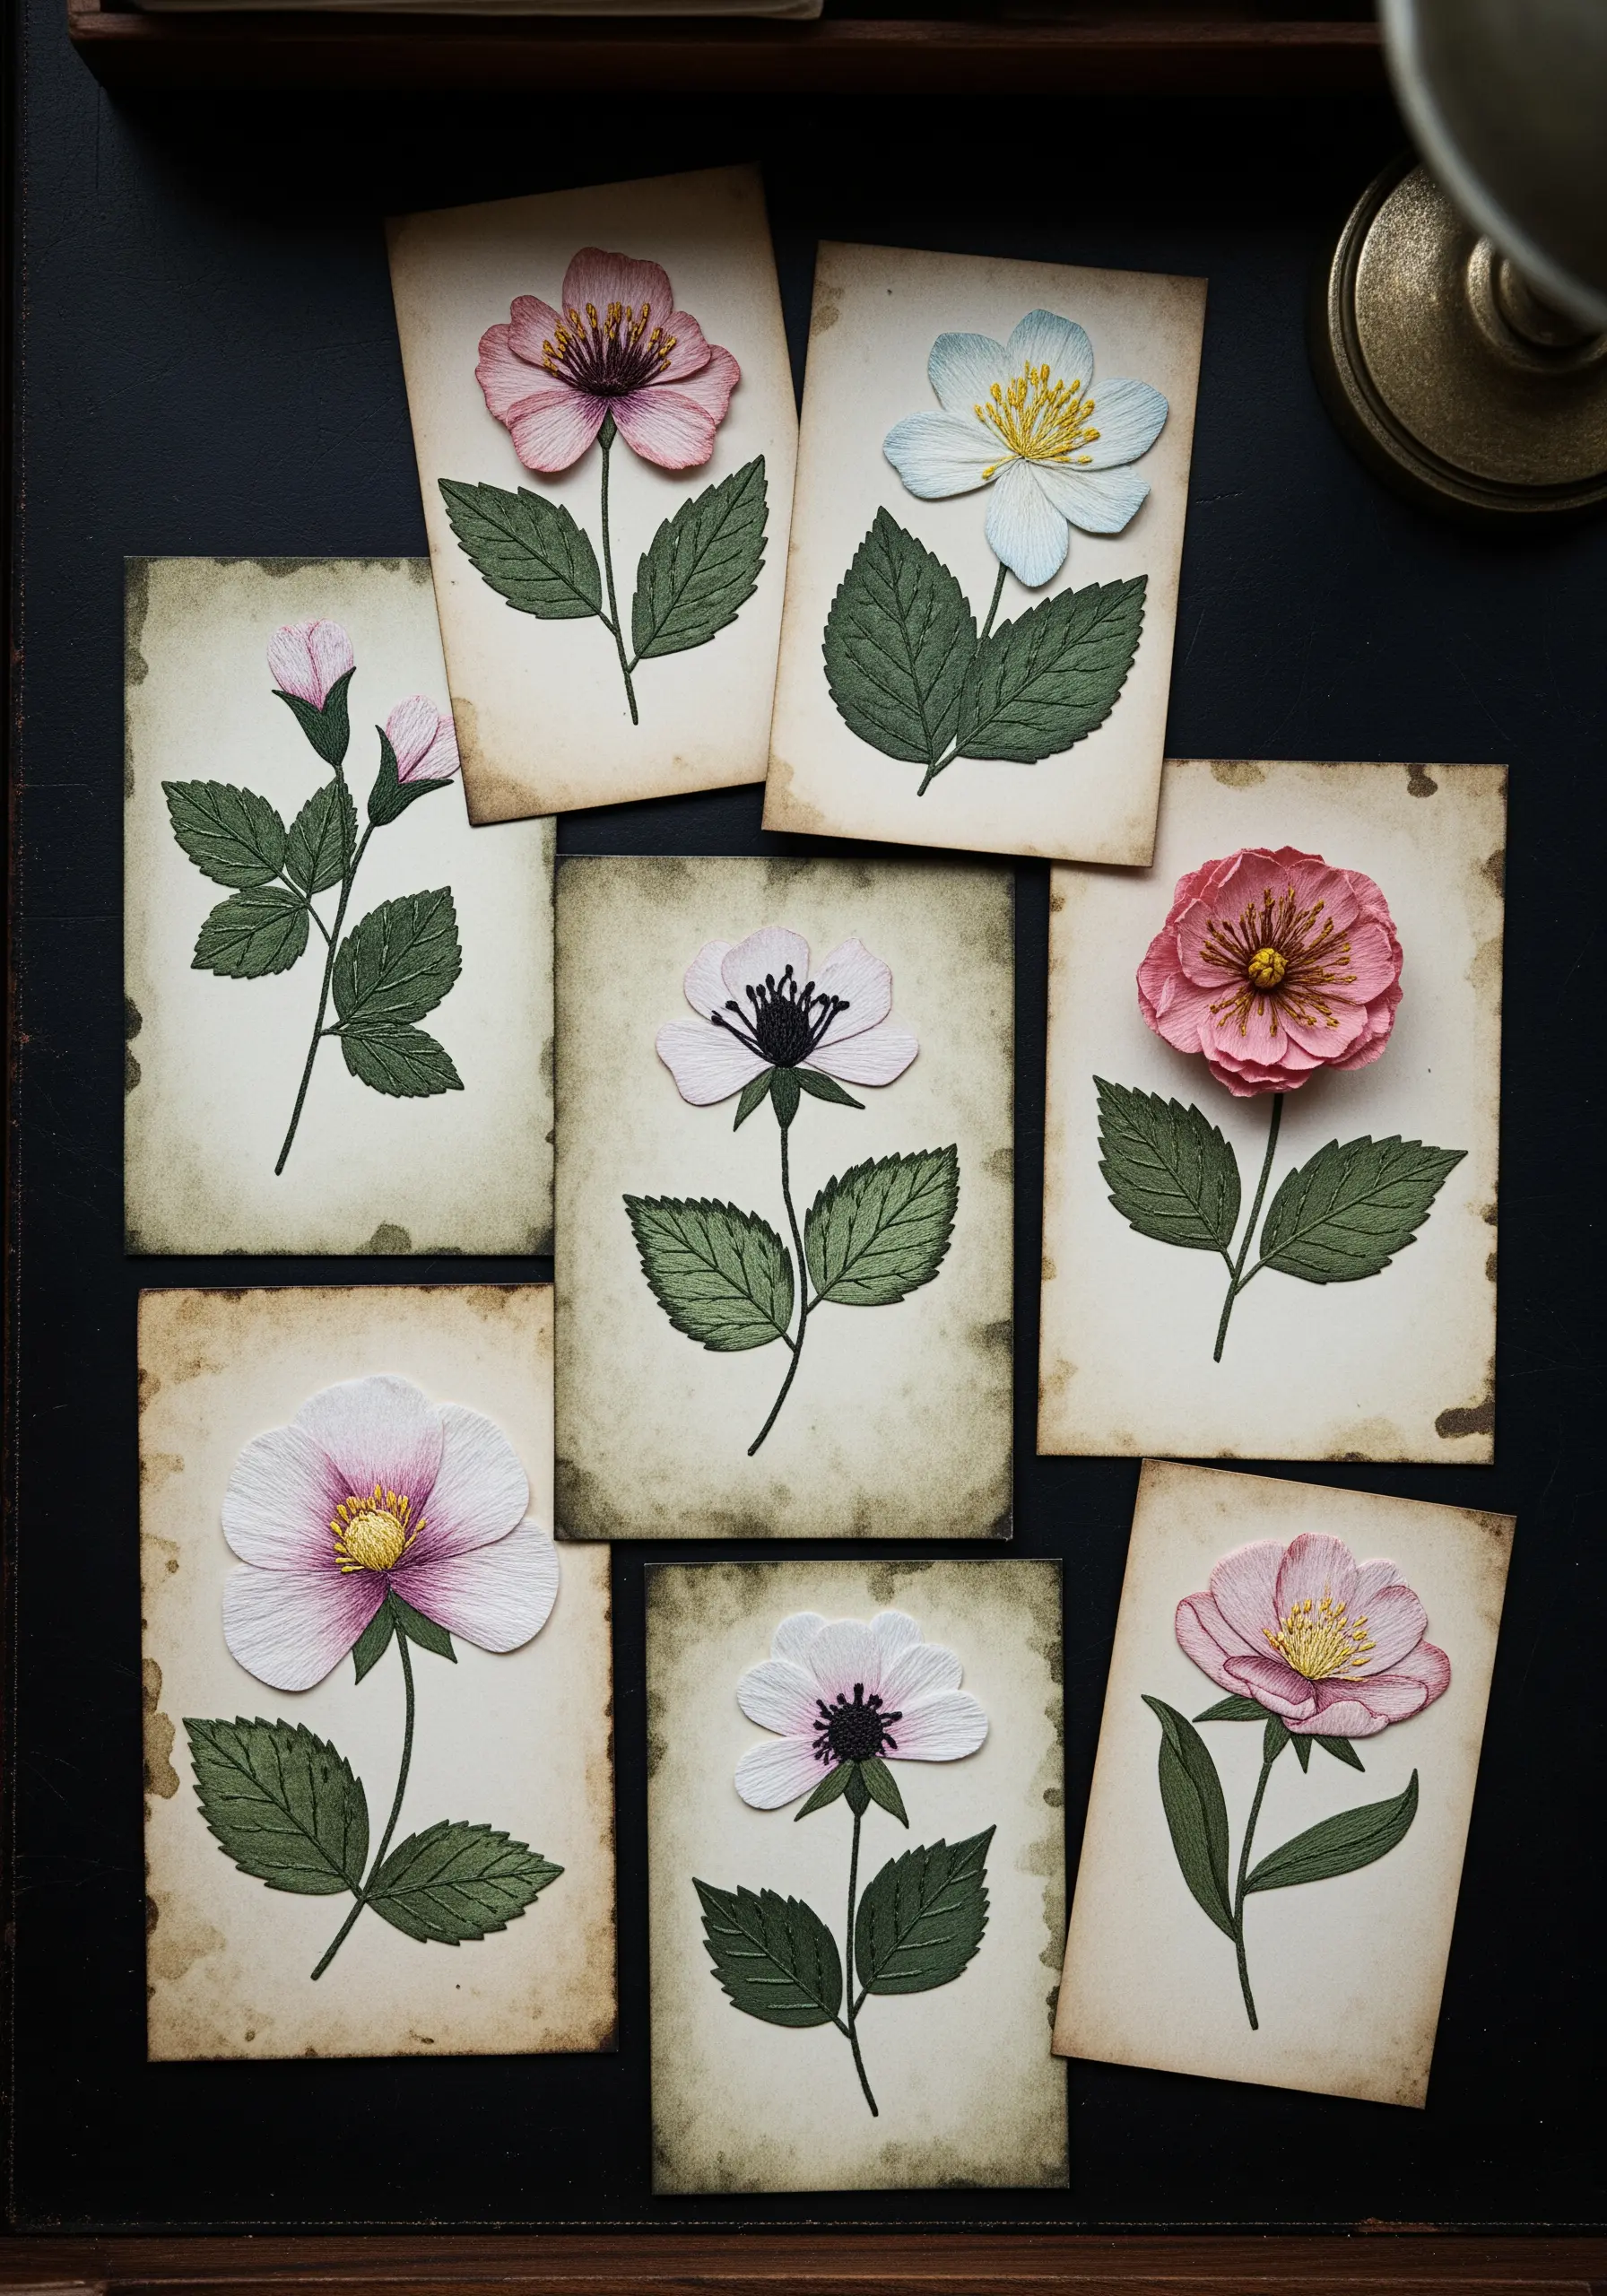
1. Ethereal Botanicals with Translucent Layers
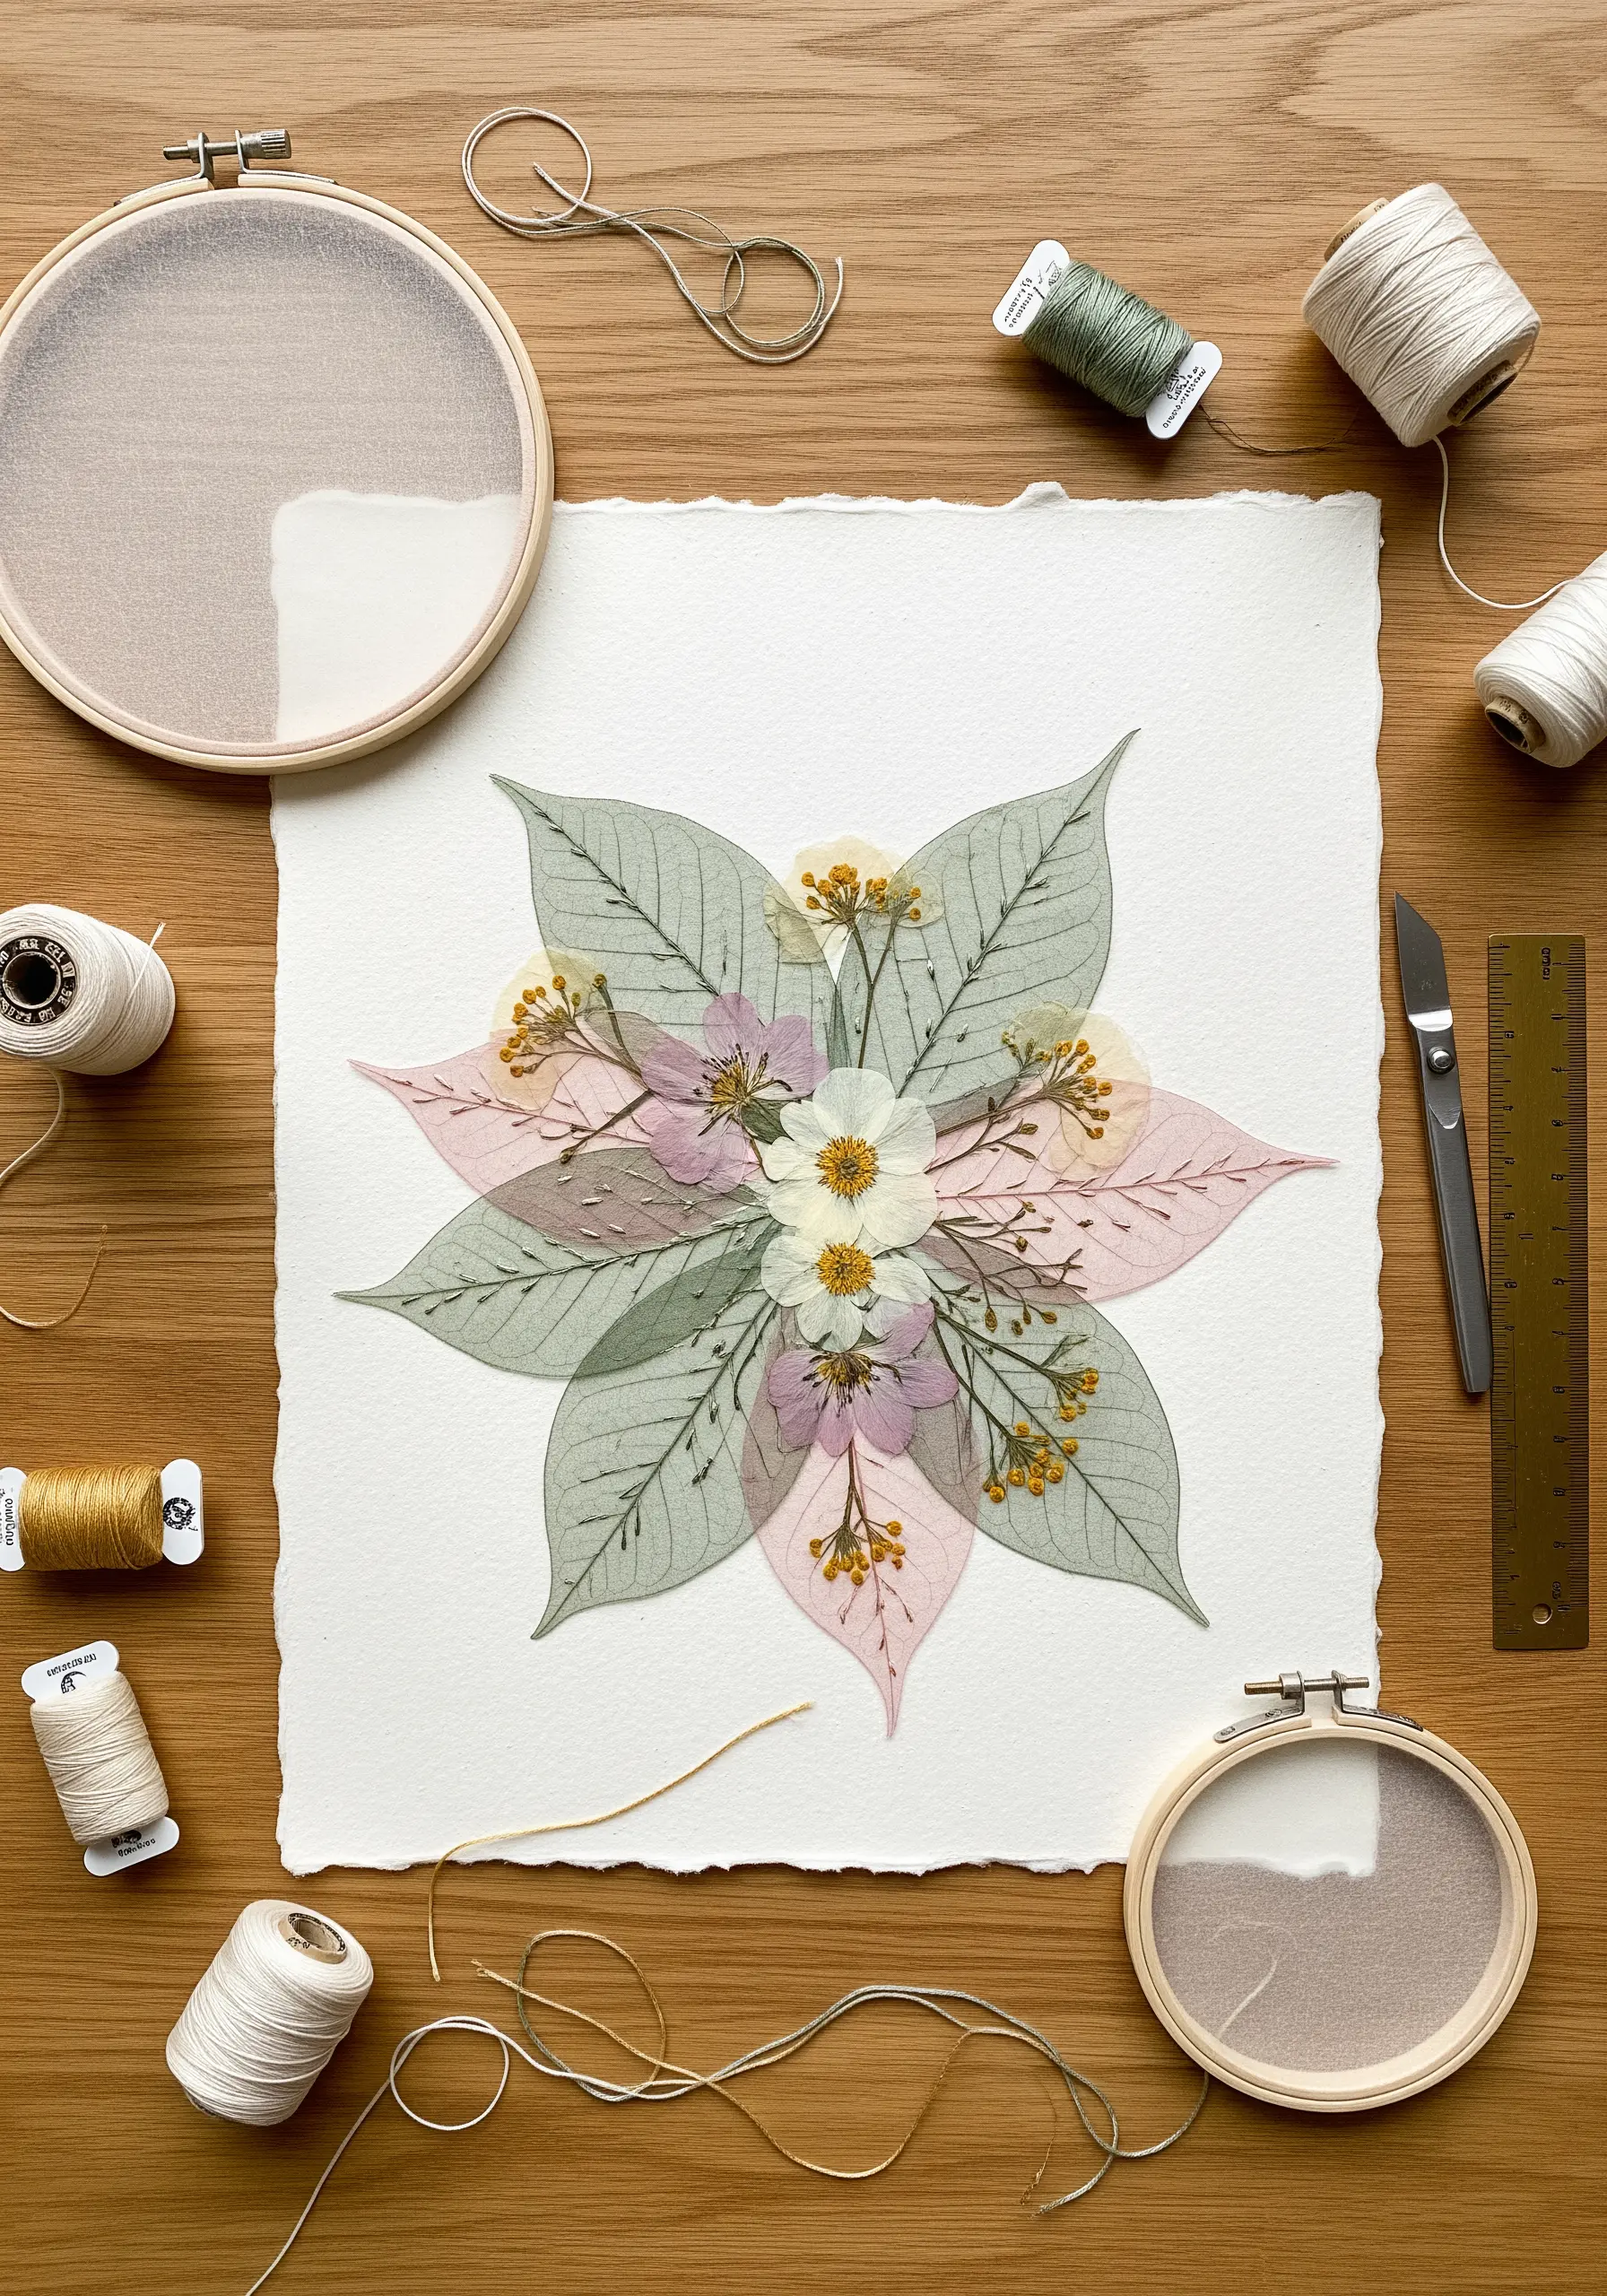
Instead of stitching on fabric, use heavyweight, deckle-edge watercolor paper as your base.
Create your composition by layering translucent vellum or pressed paper leaves, then stitch through them with a single strand of thread to add delicate veining and detail.
This technique turns the paper itself into a frame, blending the textures of fiber and pulp into one cohesive piece.
The result is a light, airy botanical that feels both preserved and alive, perfect for framed embroidery patterns that look like they belong in a gallery.
2. Sculptural Stitching for 3D Paper Forms
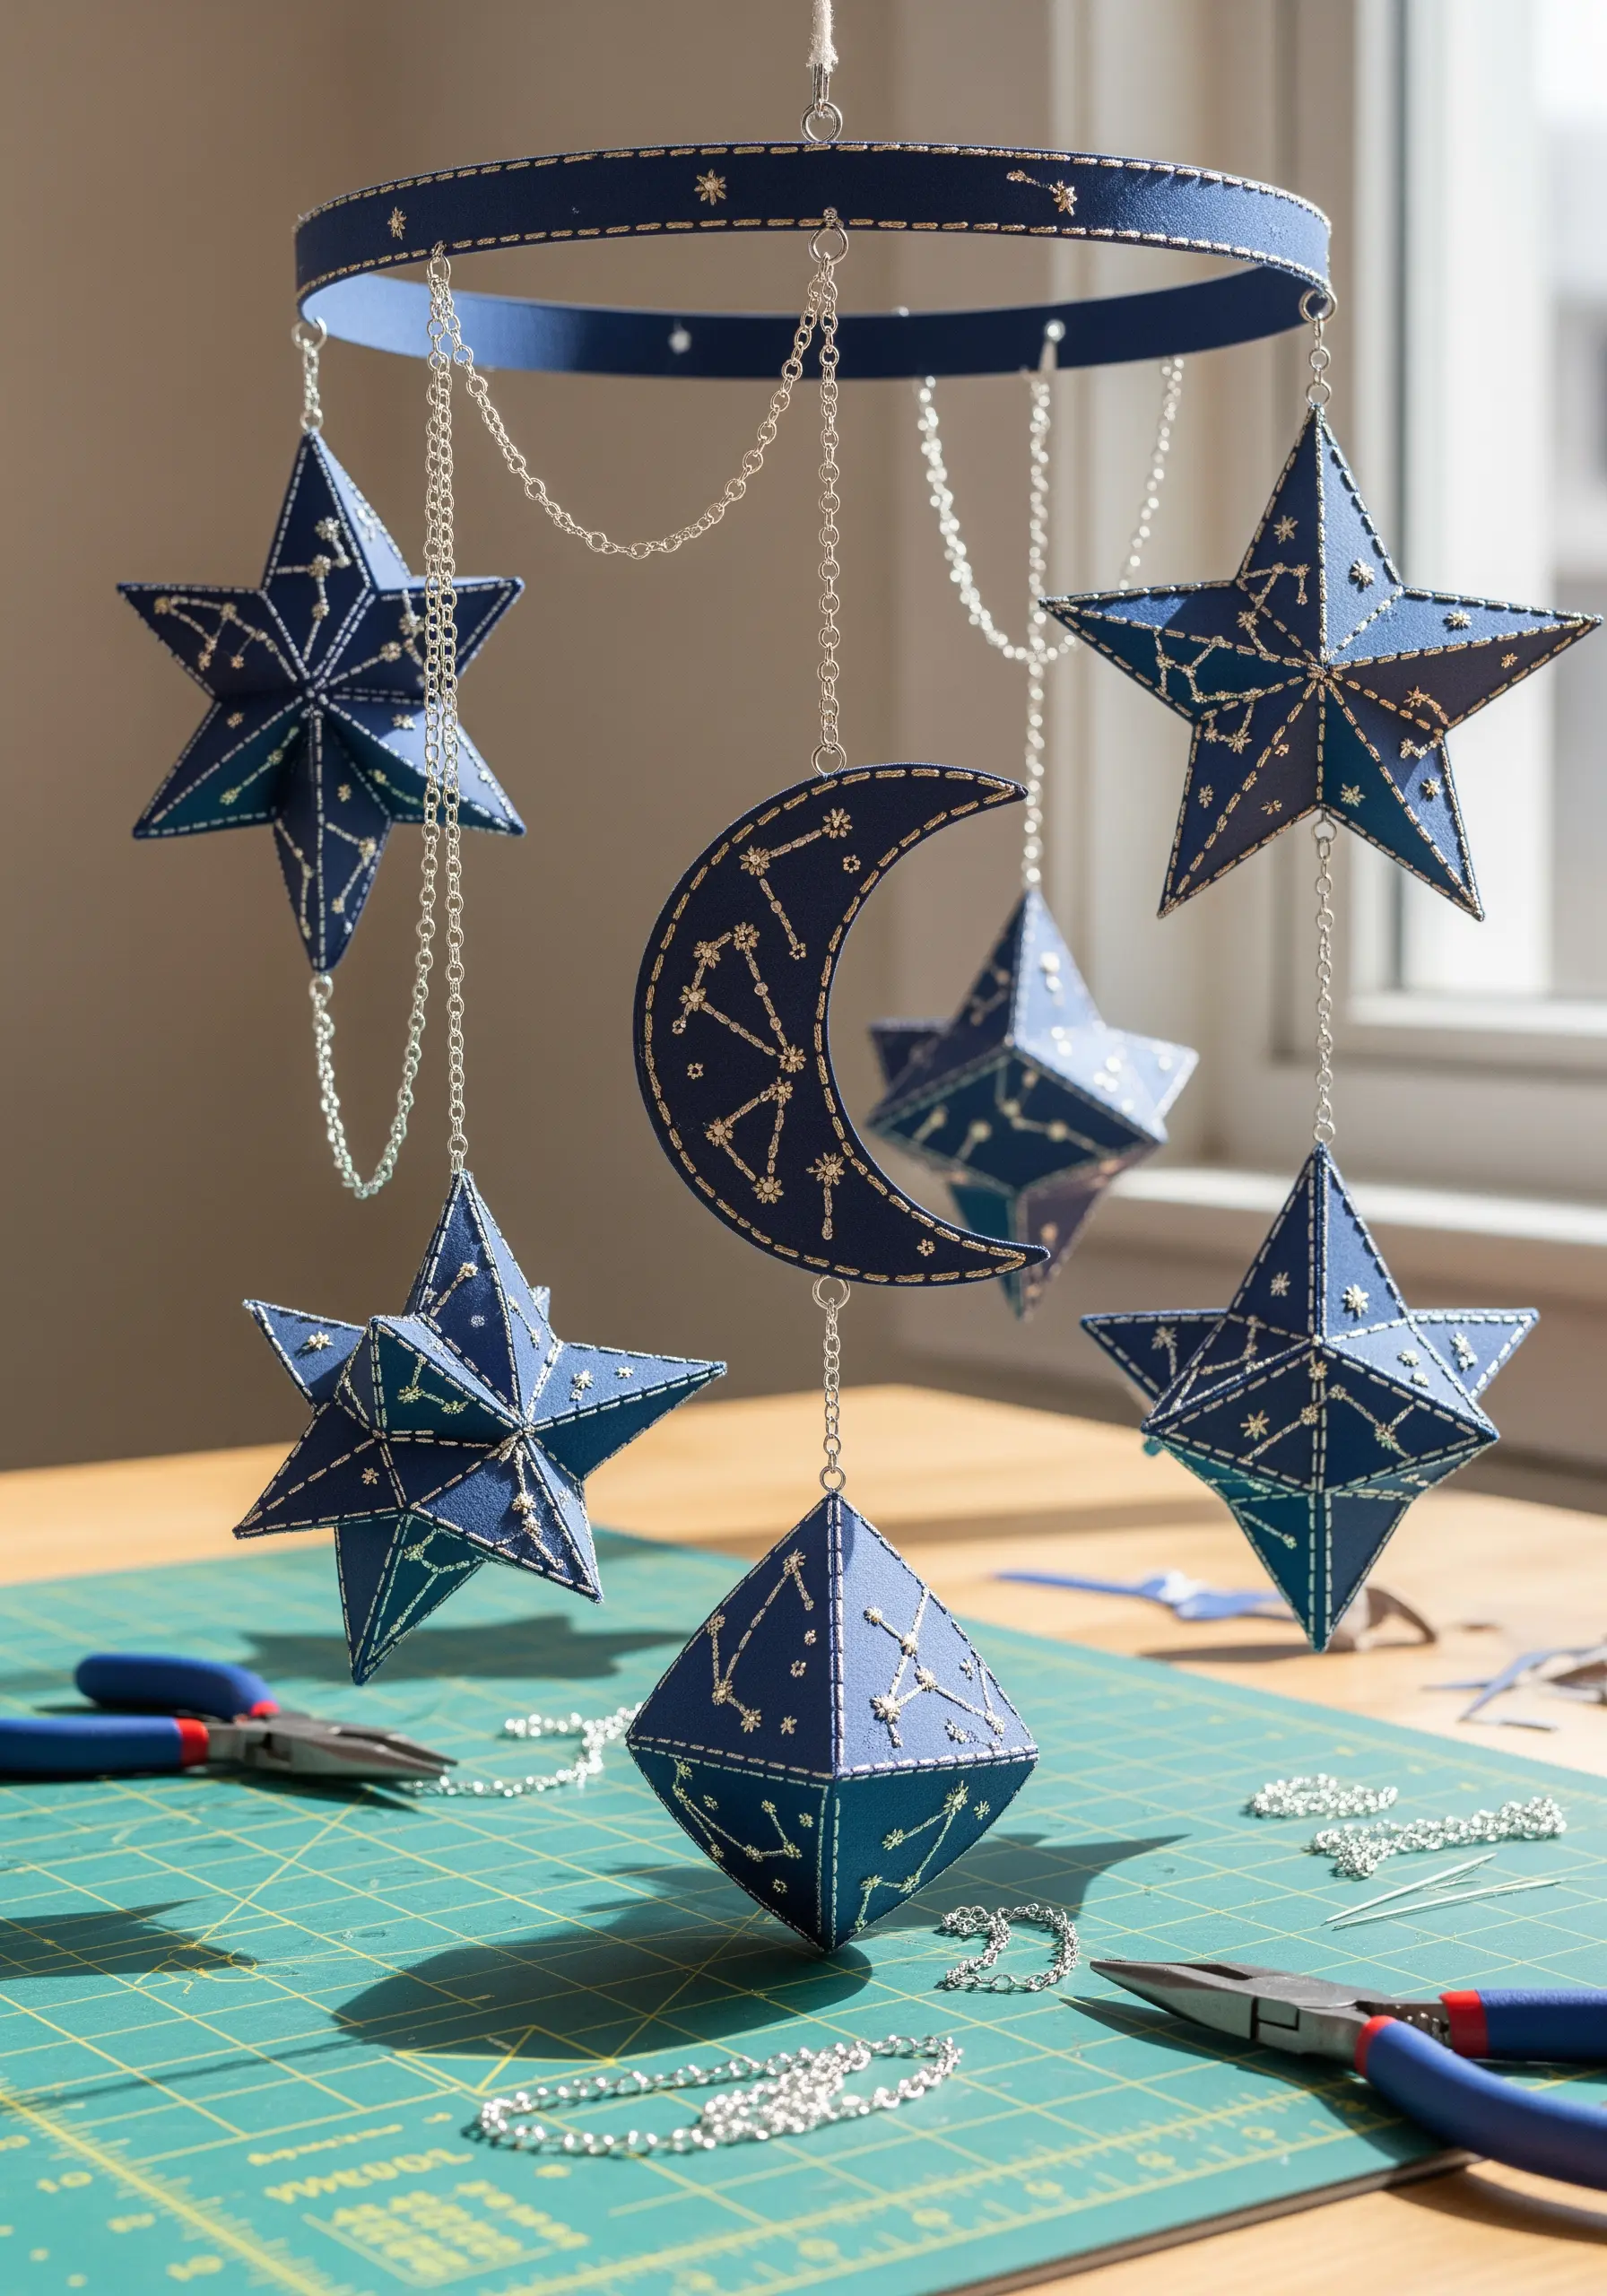
Move your embroidery off the flat plane and into three-dimensional space by working with sturdy cardstock.
Before assembling your shapes, use a fine needle to pre-pierce the holes for your design, such as constellations on stars and moons.
Stitch your patterns with metallic or glow-in-the-dark thread while the paper is still flat to ensure clean, even tension without risking tears.
Once assembled, these objects transform your stitching from a surface decoration into an integral part of a sculptural form.
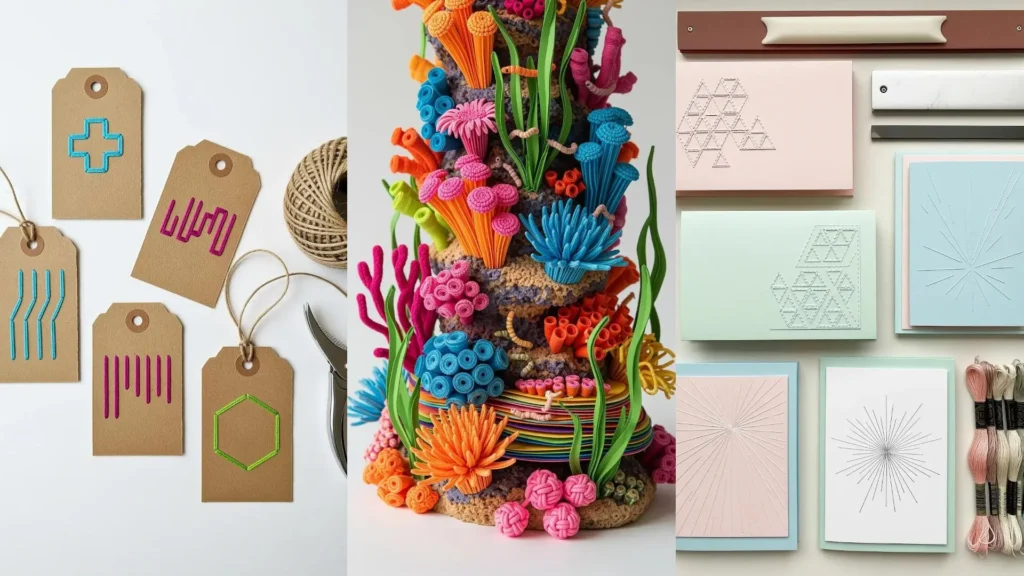
3. Tone-on-Tone Stitches on Embossed Paper
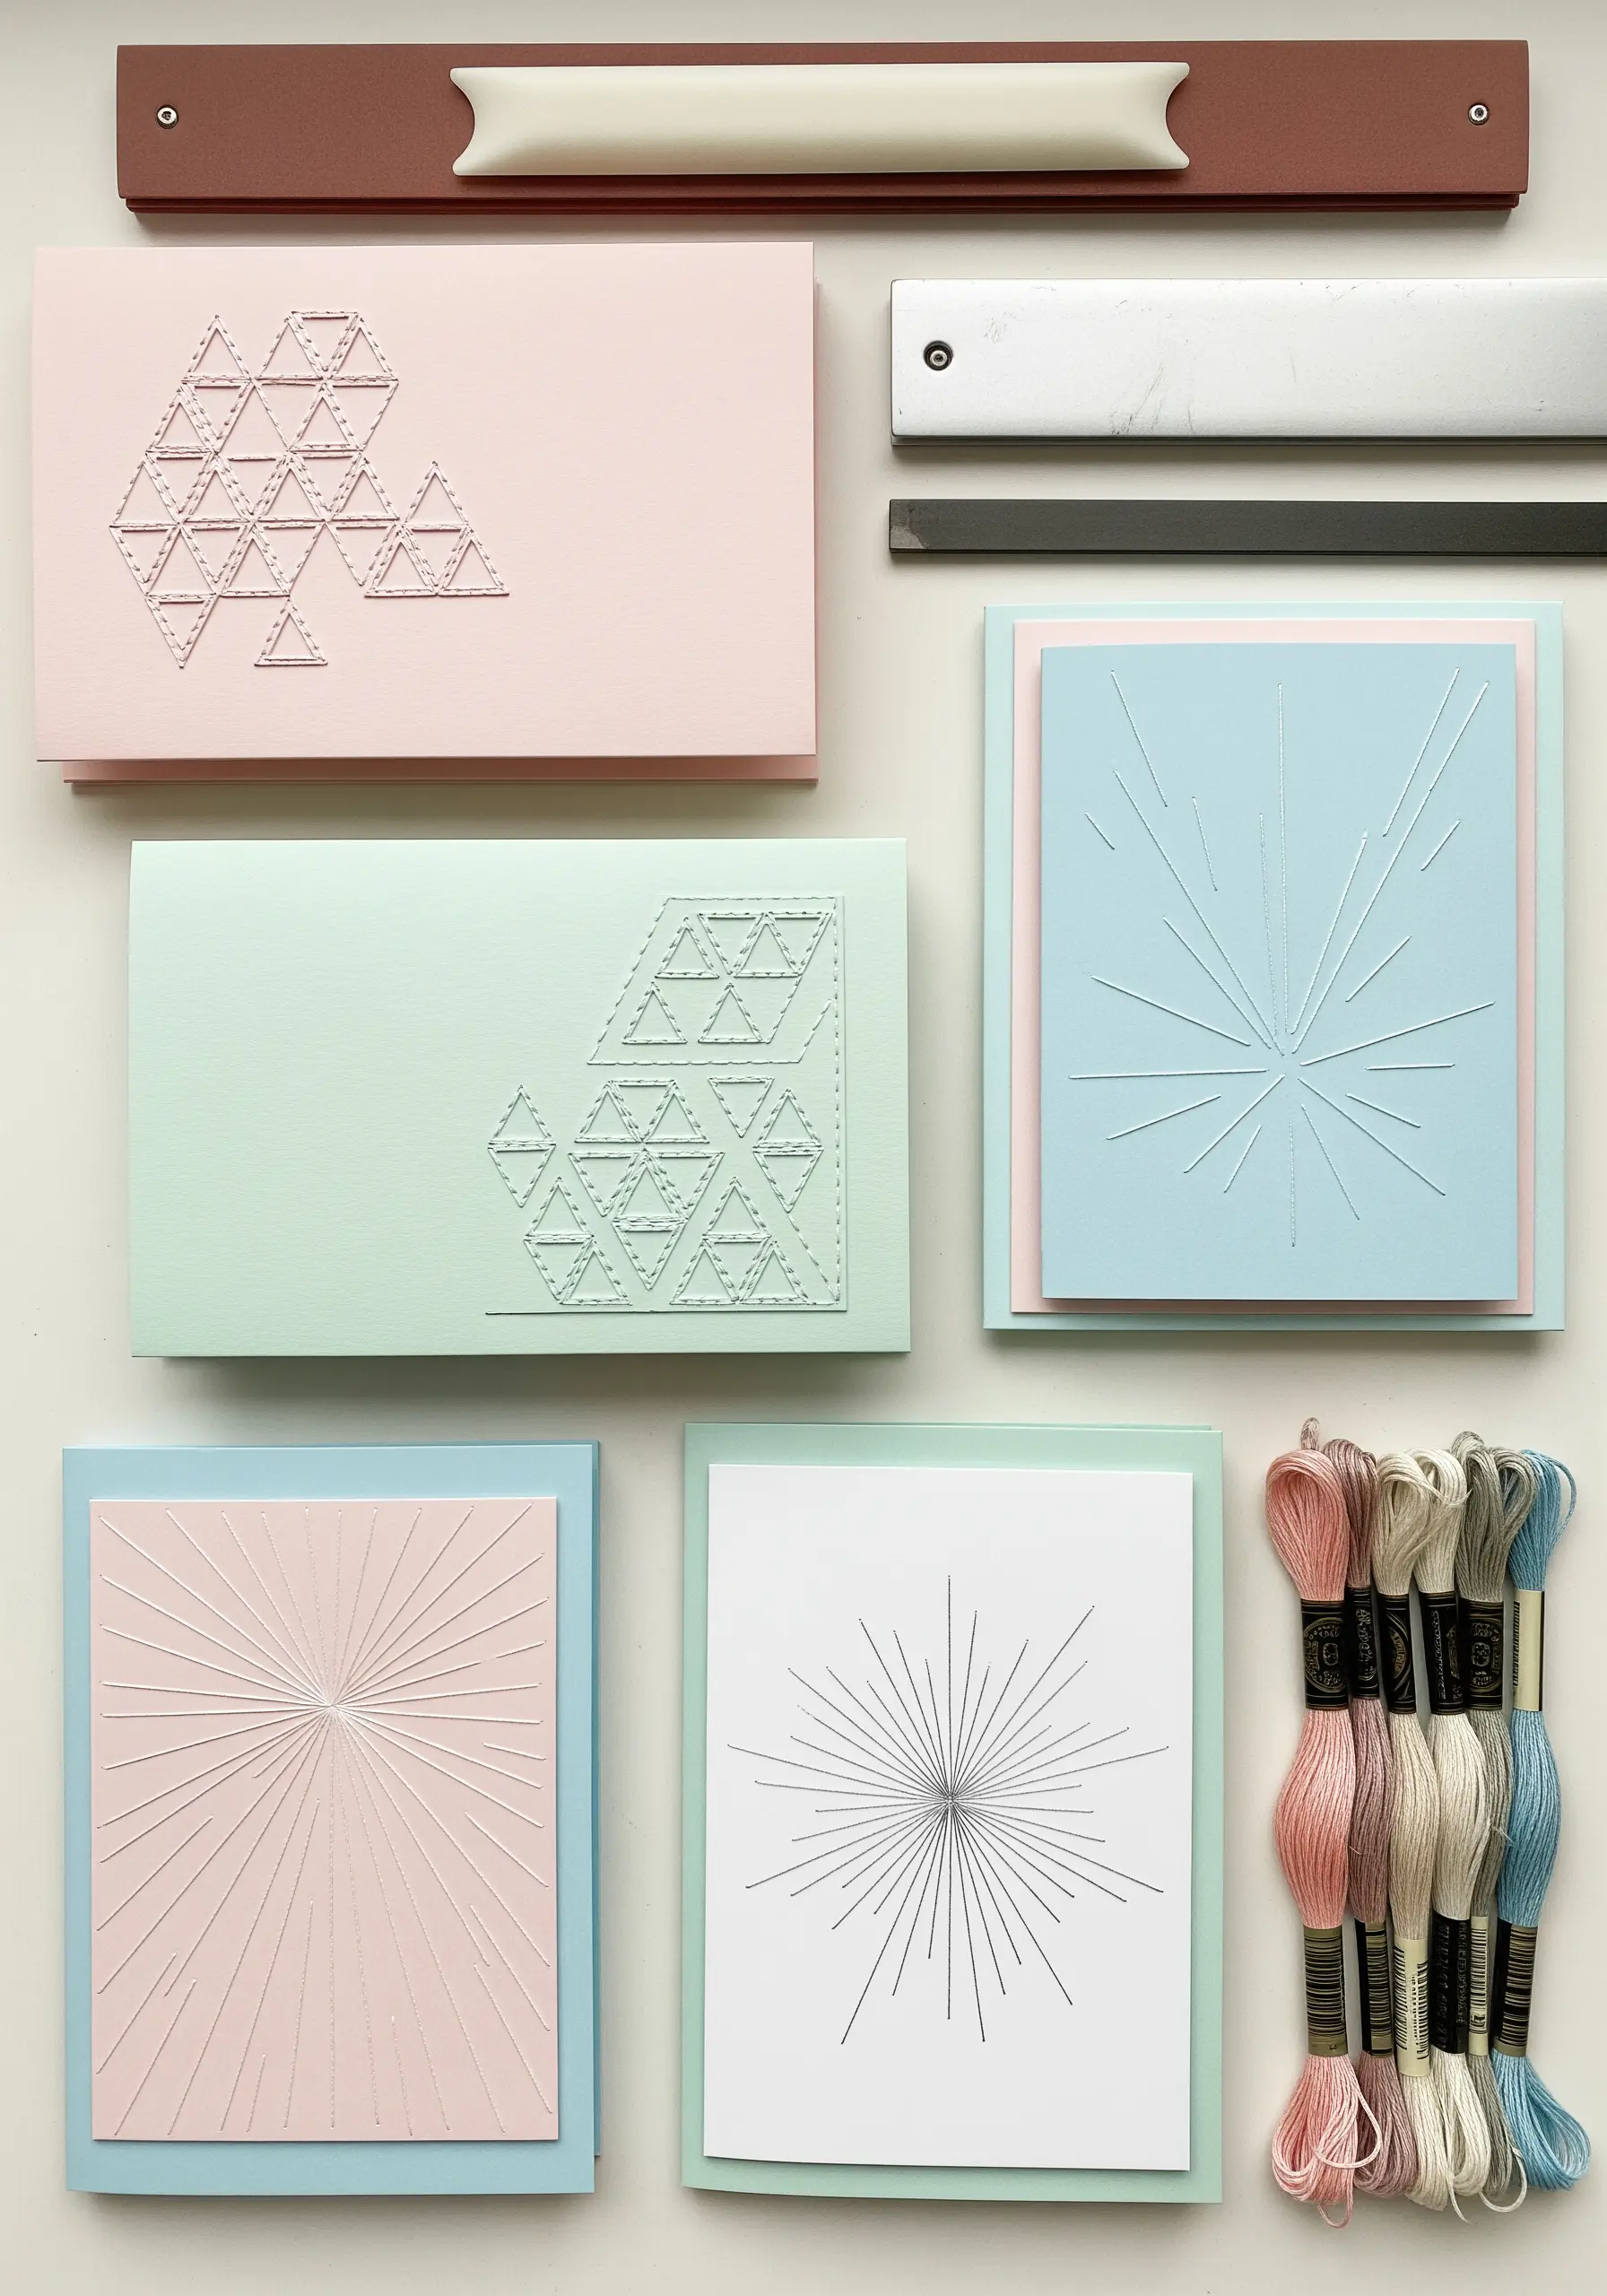
Enhance the subtle beauty of embossed or letterpress paper by adding thread in a perfectly matched hue.
Using a single strand of floss, carefully trace the raised geometric or floral patterns with a simple backstitch.
This method doesn’t introduce new colors or shapes but instead amplifies the existing texture, adding a quiet layer of handcrafted depth.
It’s a sophisticated way to create handmade embroidery gifts that double as mini art pieces with a tactile, elegant finish.
4. Pierced Paper Luminaries with Glowing Stitches
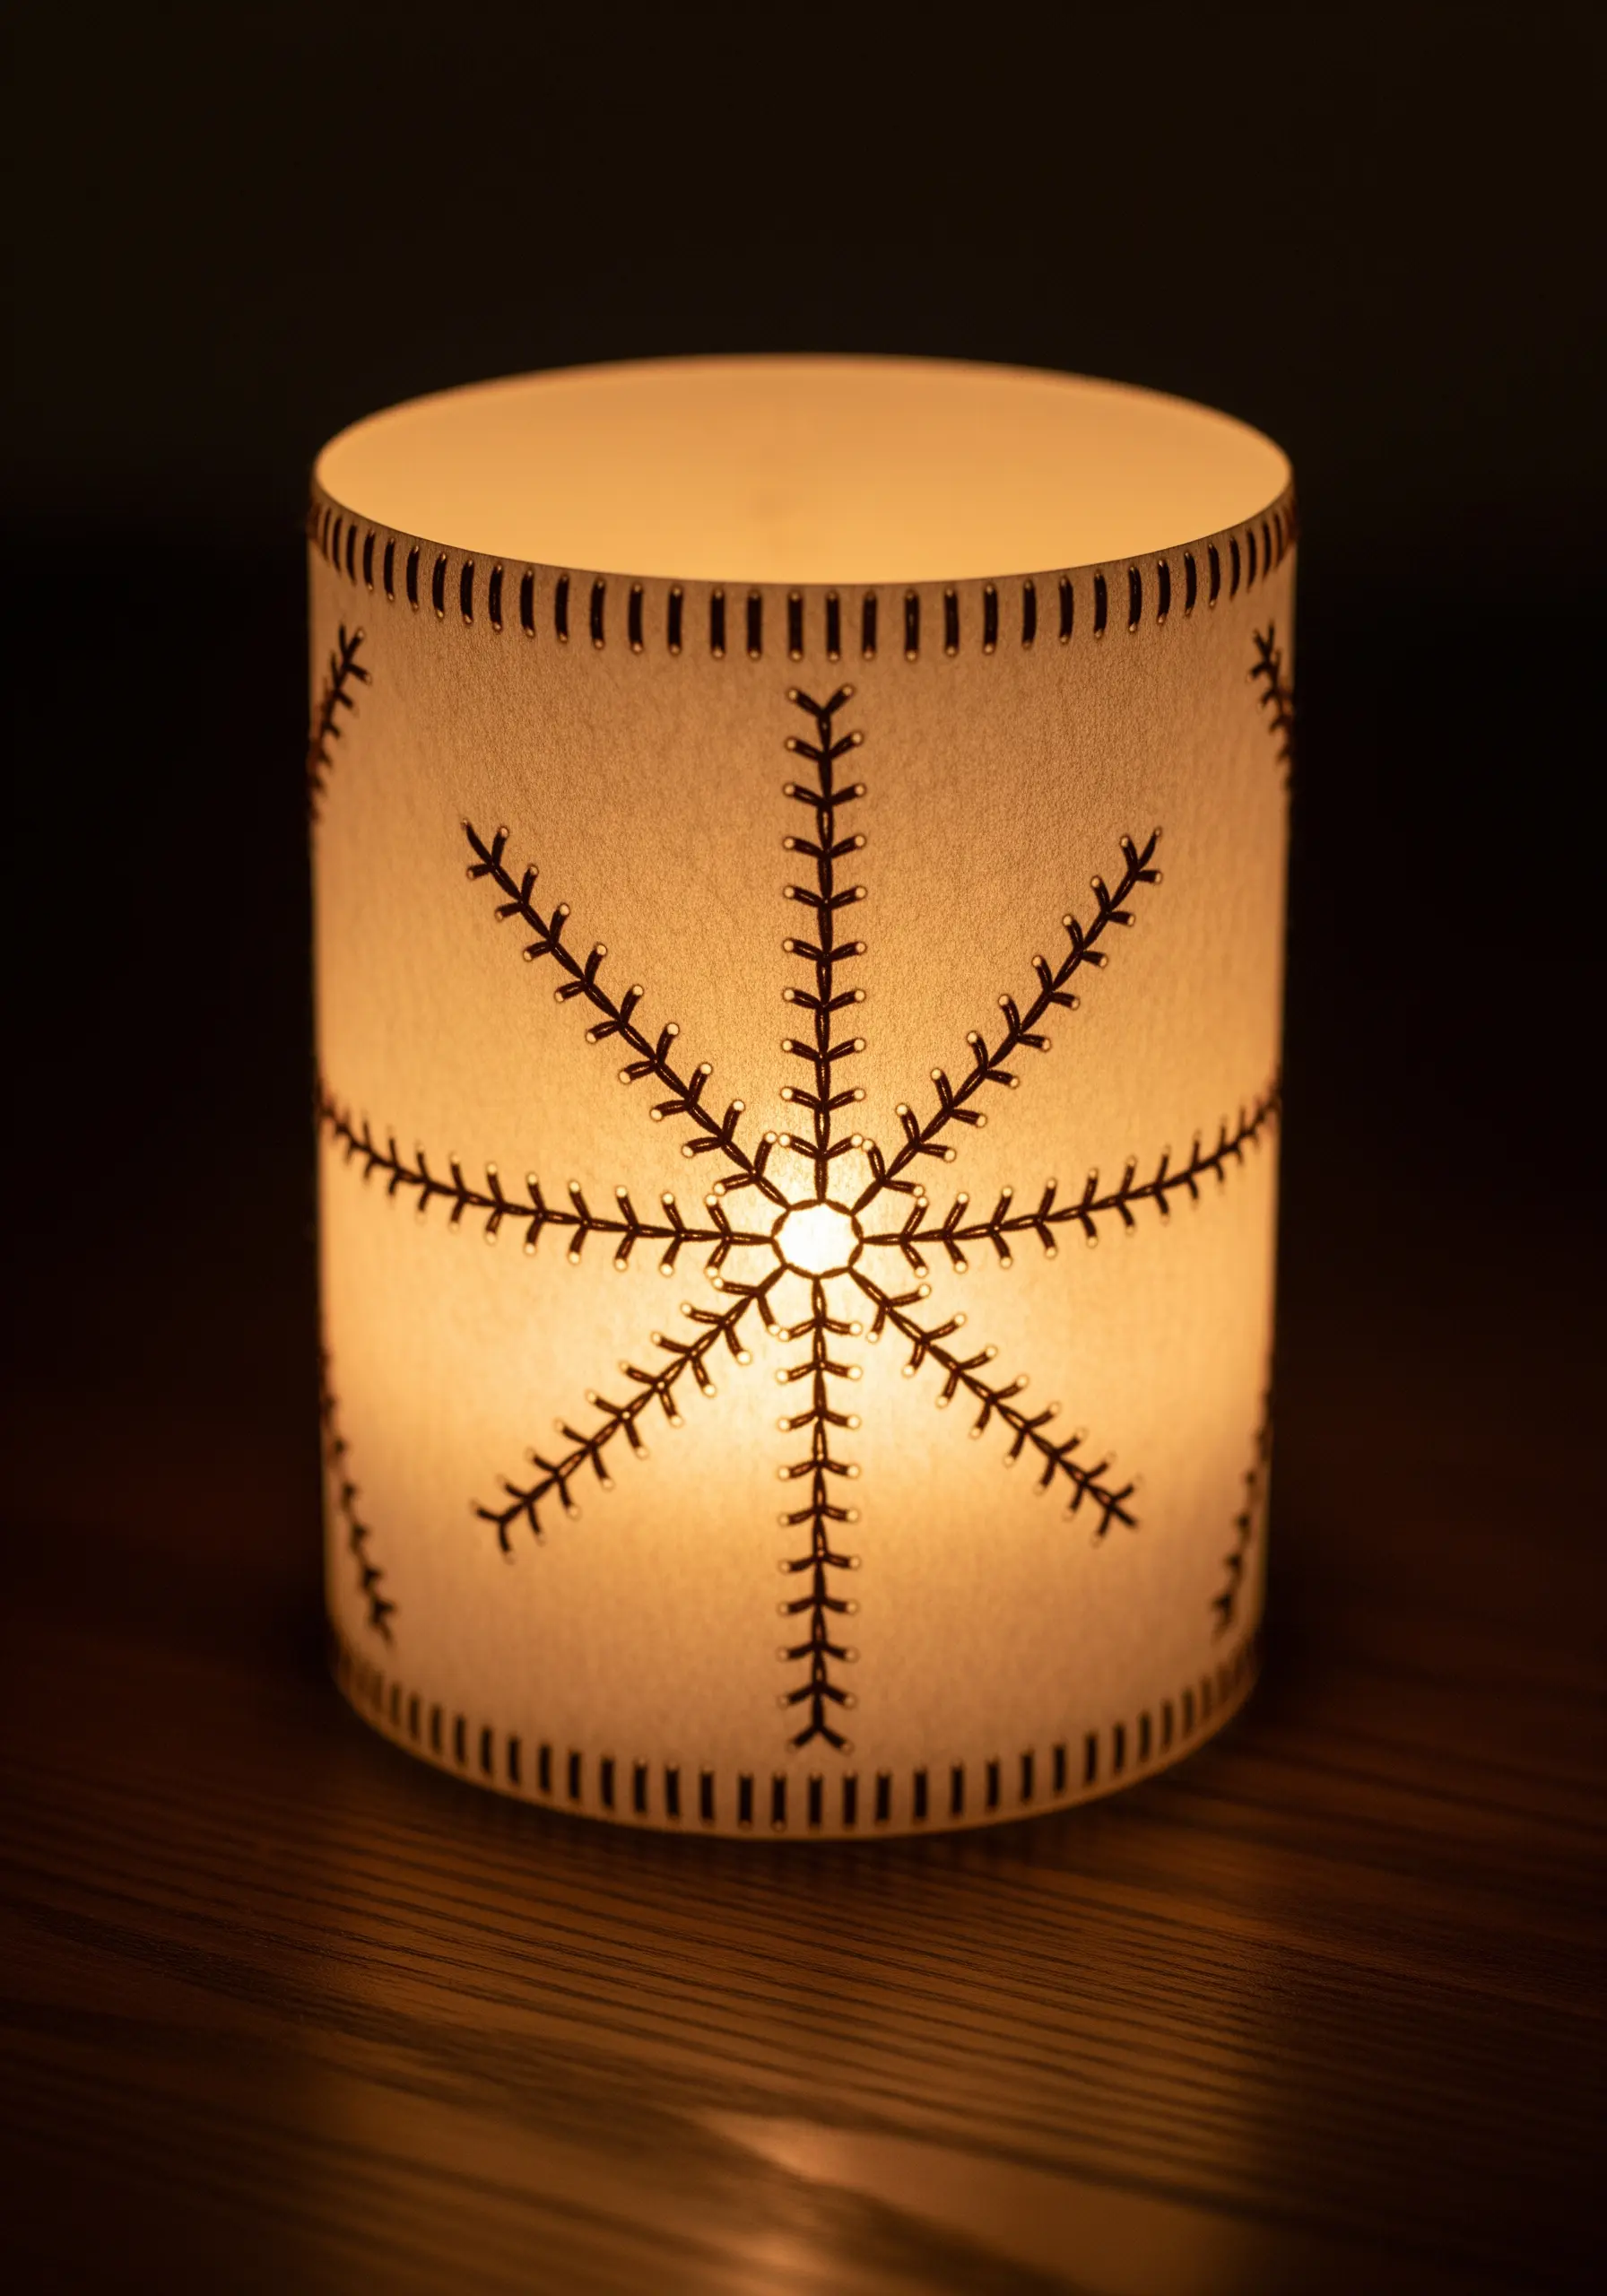
Turn your embroidery into a source of light by stitching on translucent vellum paper.
First, punch out your design—a simple snowflake, starburst, or geometric pattern works best—to guide your stitches and allow light to pass through.
Use a dark, contrasting thread and a bold stitch, like a blanket stitch, to create a strong silhouette.
When you place an LED candle inside the finished paper cylinder, your thread work is transformed into a delicate, glowing illustration.
5. Mixed-Media Journals with Ribbon Embroidery
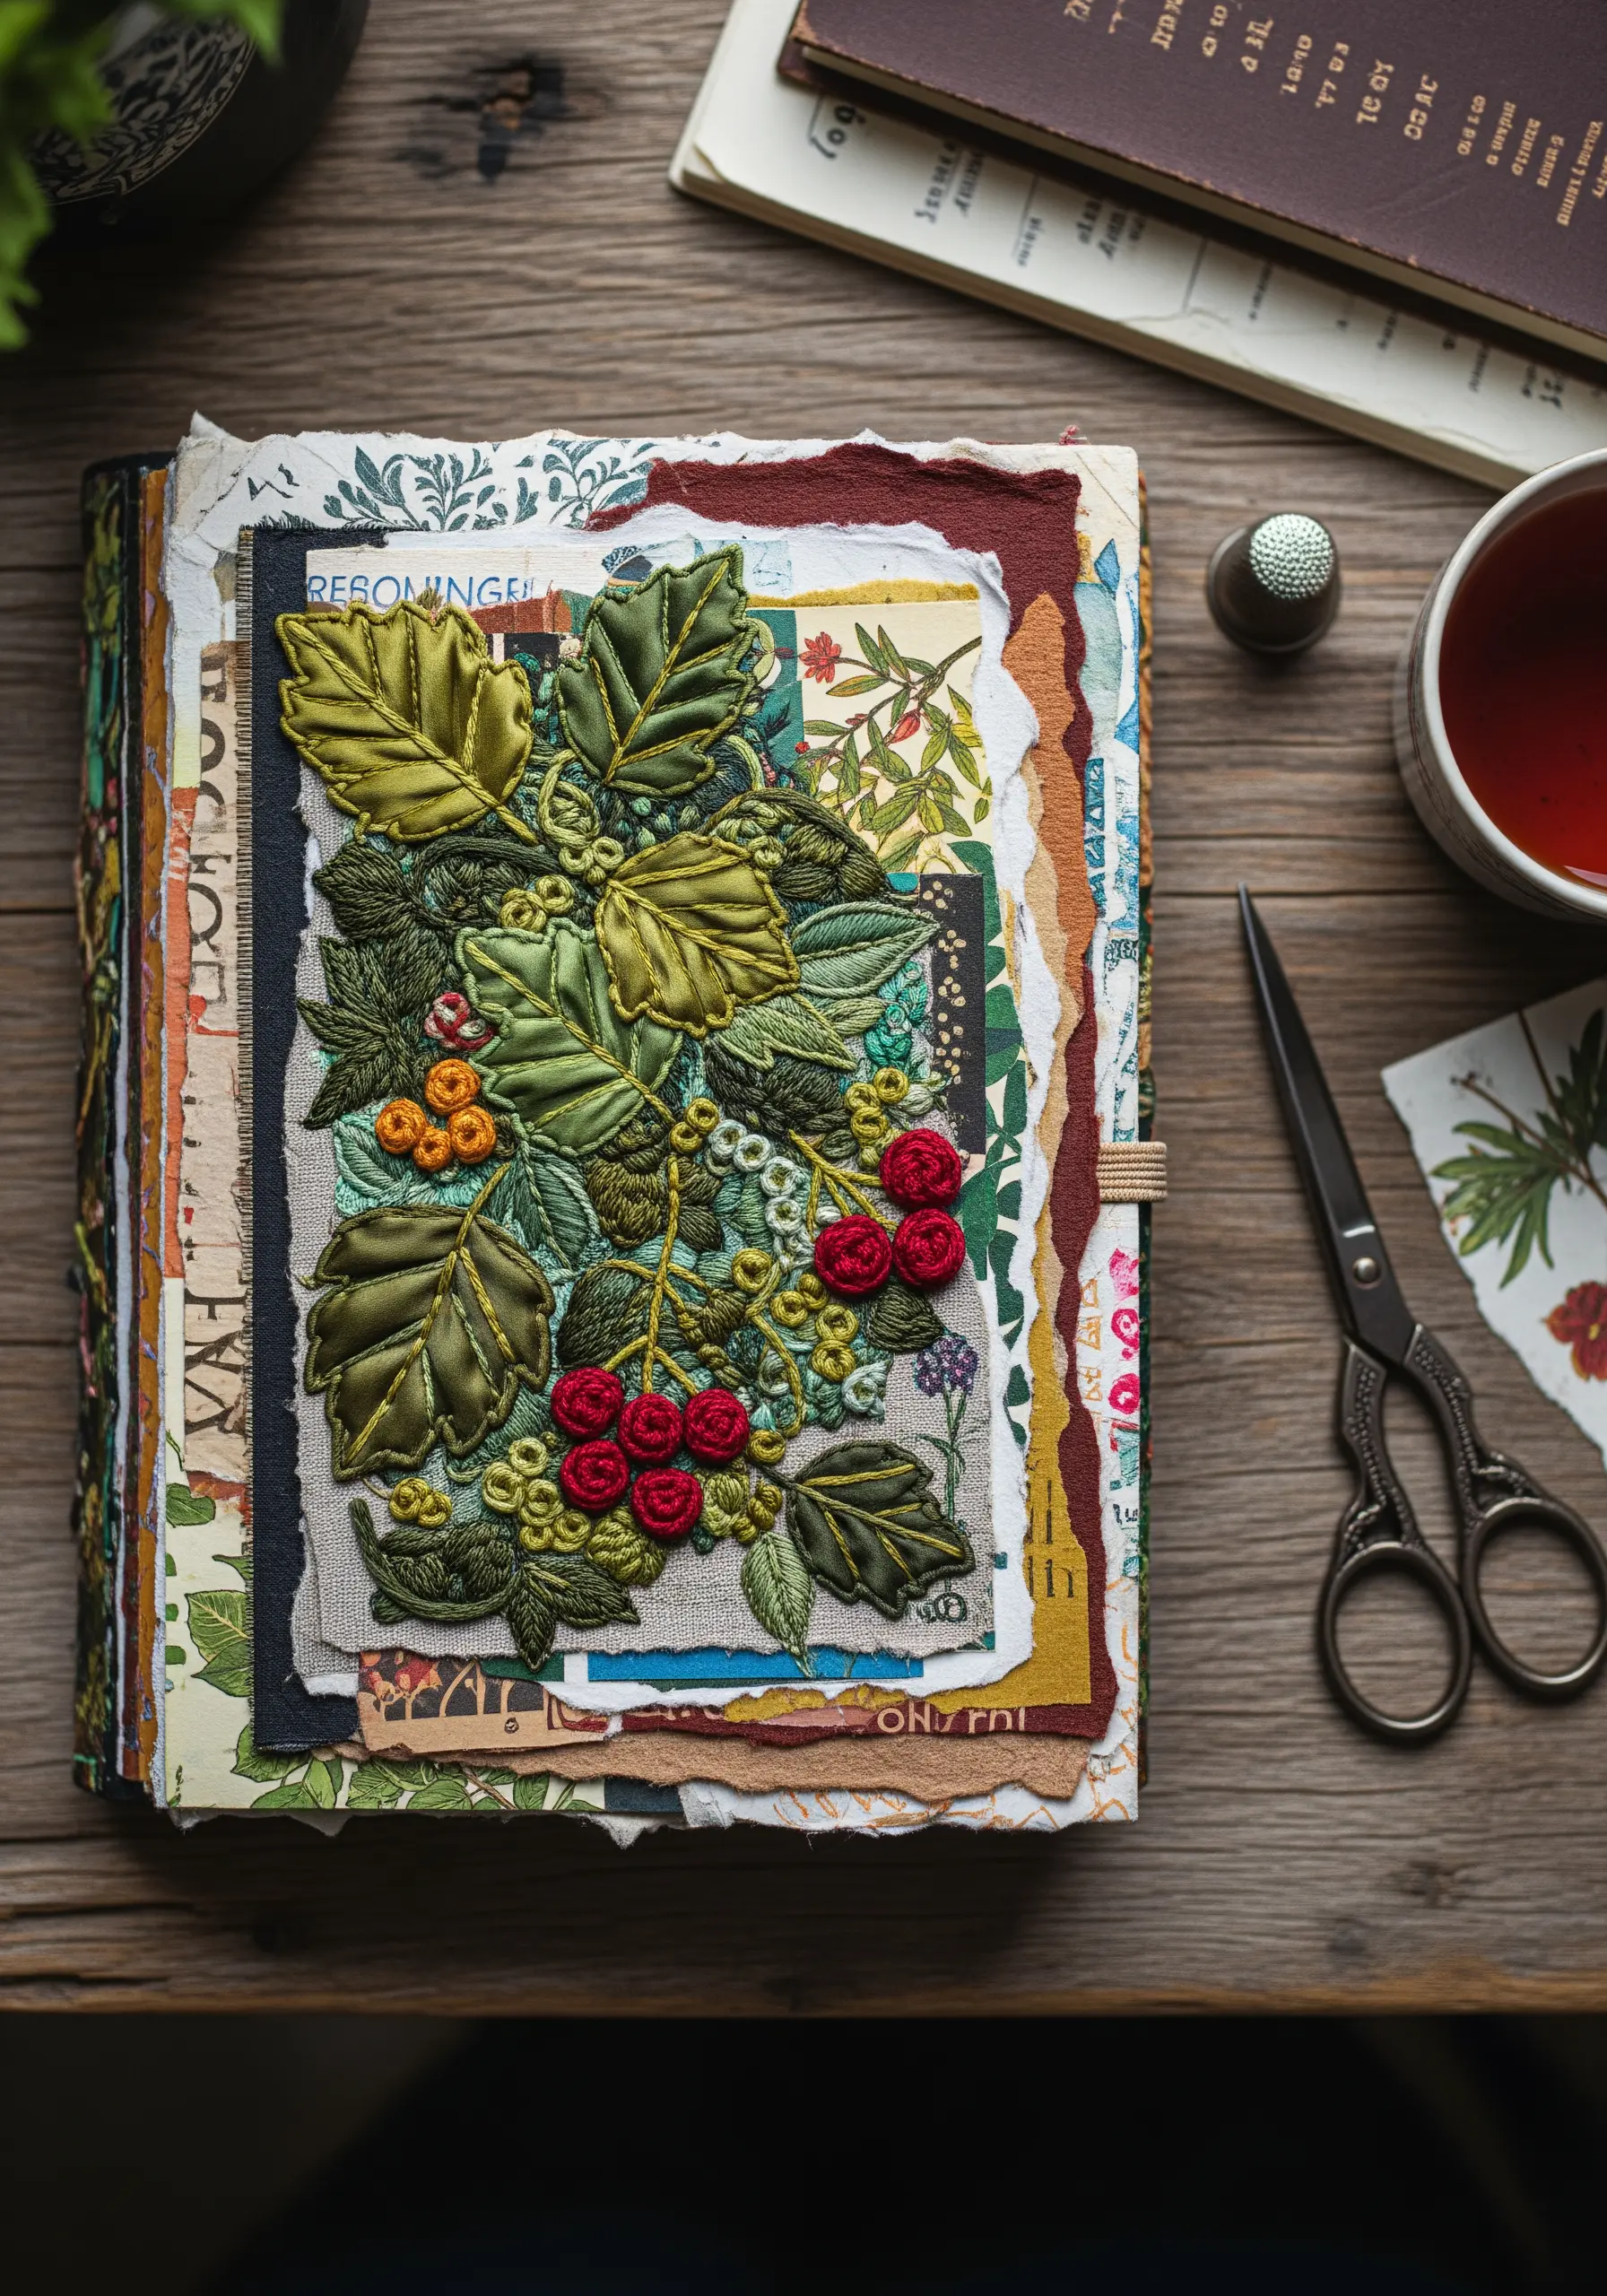
Add a final, powerfully tactile layer to a paper collage by incorporating dimensional ribbon embroidery.
On a journal cover layered with vintage papers and ephemera, use wide silk ribbon to create lush, folded leaves and plump berries with bullion knots.
This technique introduces a sculptural quality that lifts off the page, creating a rich contrast between the flat paper elements and the glossy, three-dimensional stitches, resulting in layered thread-inspired visual effects.
6. Frame Delicate Quilling with Couched Thread
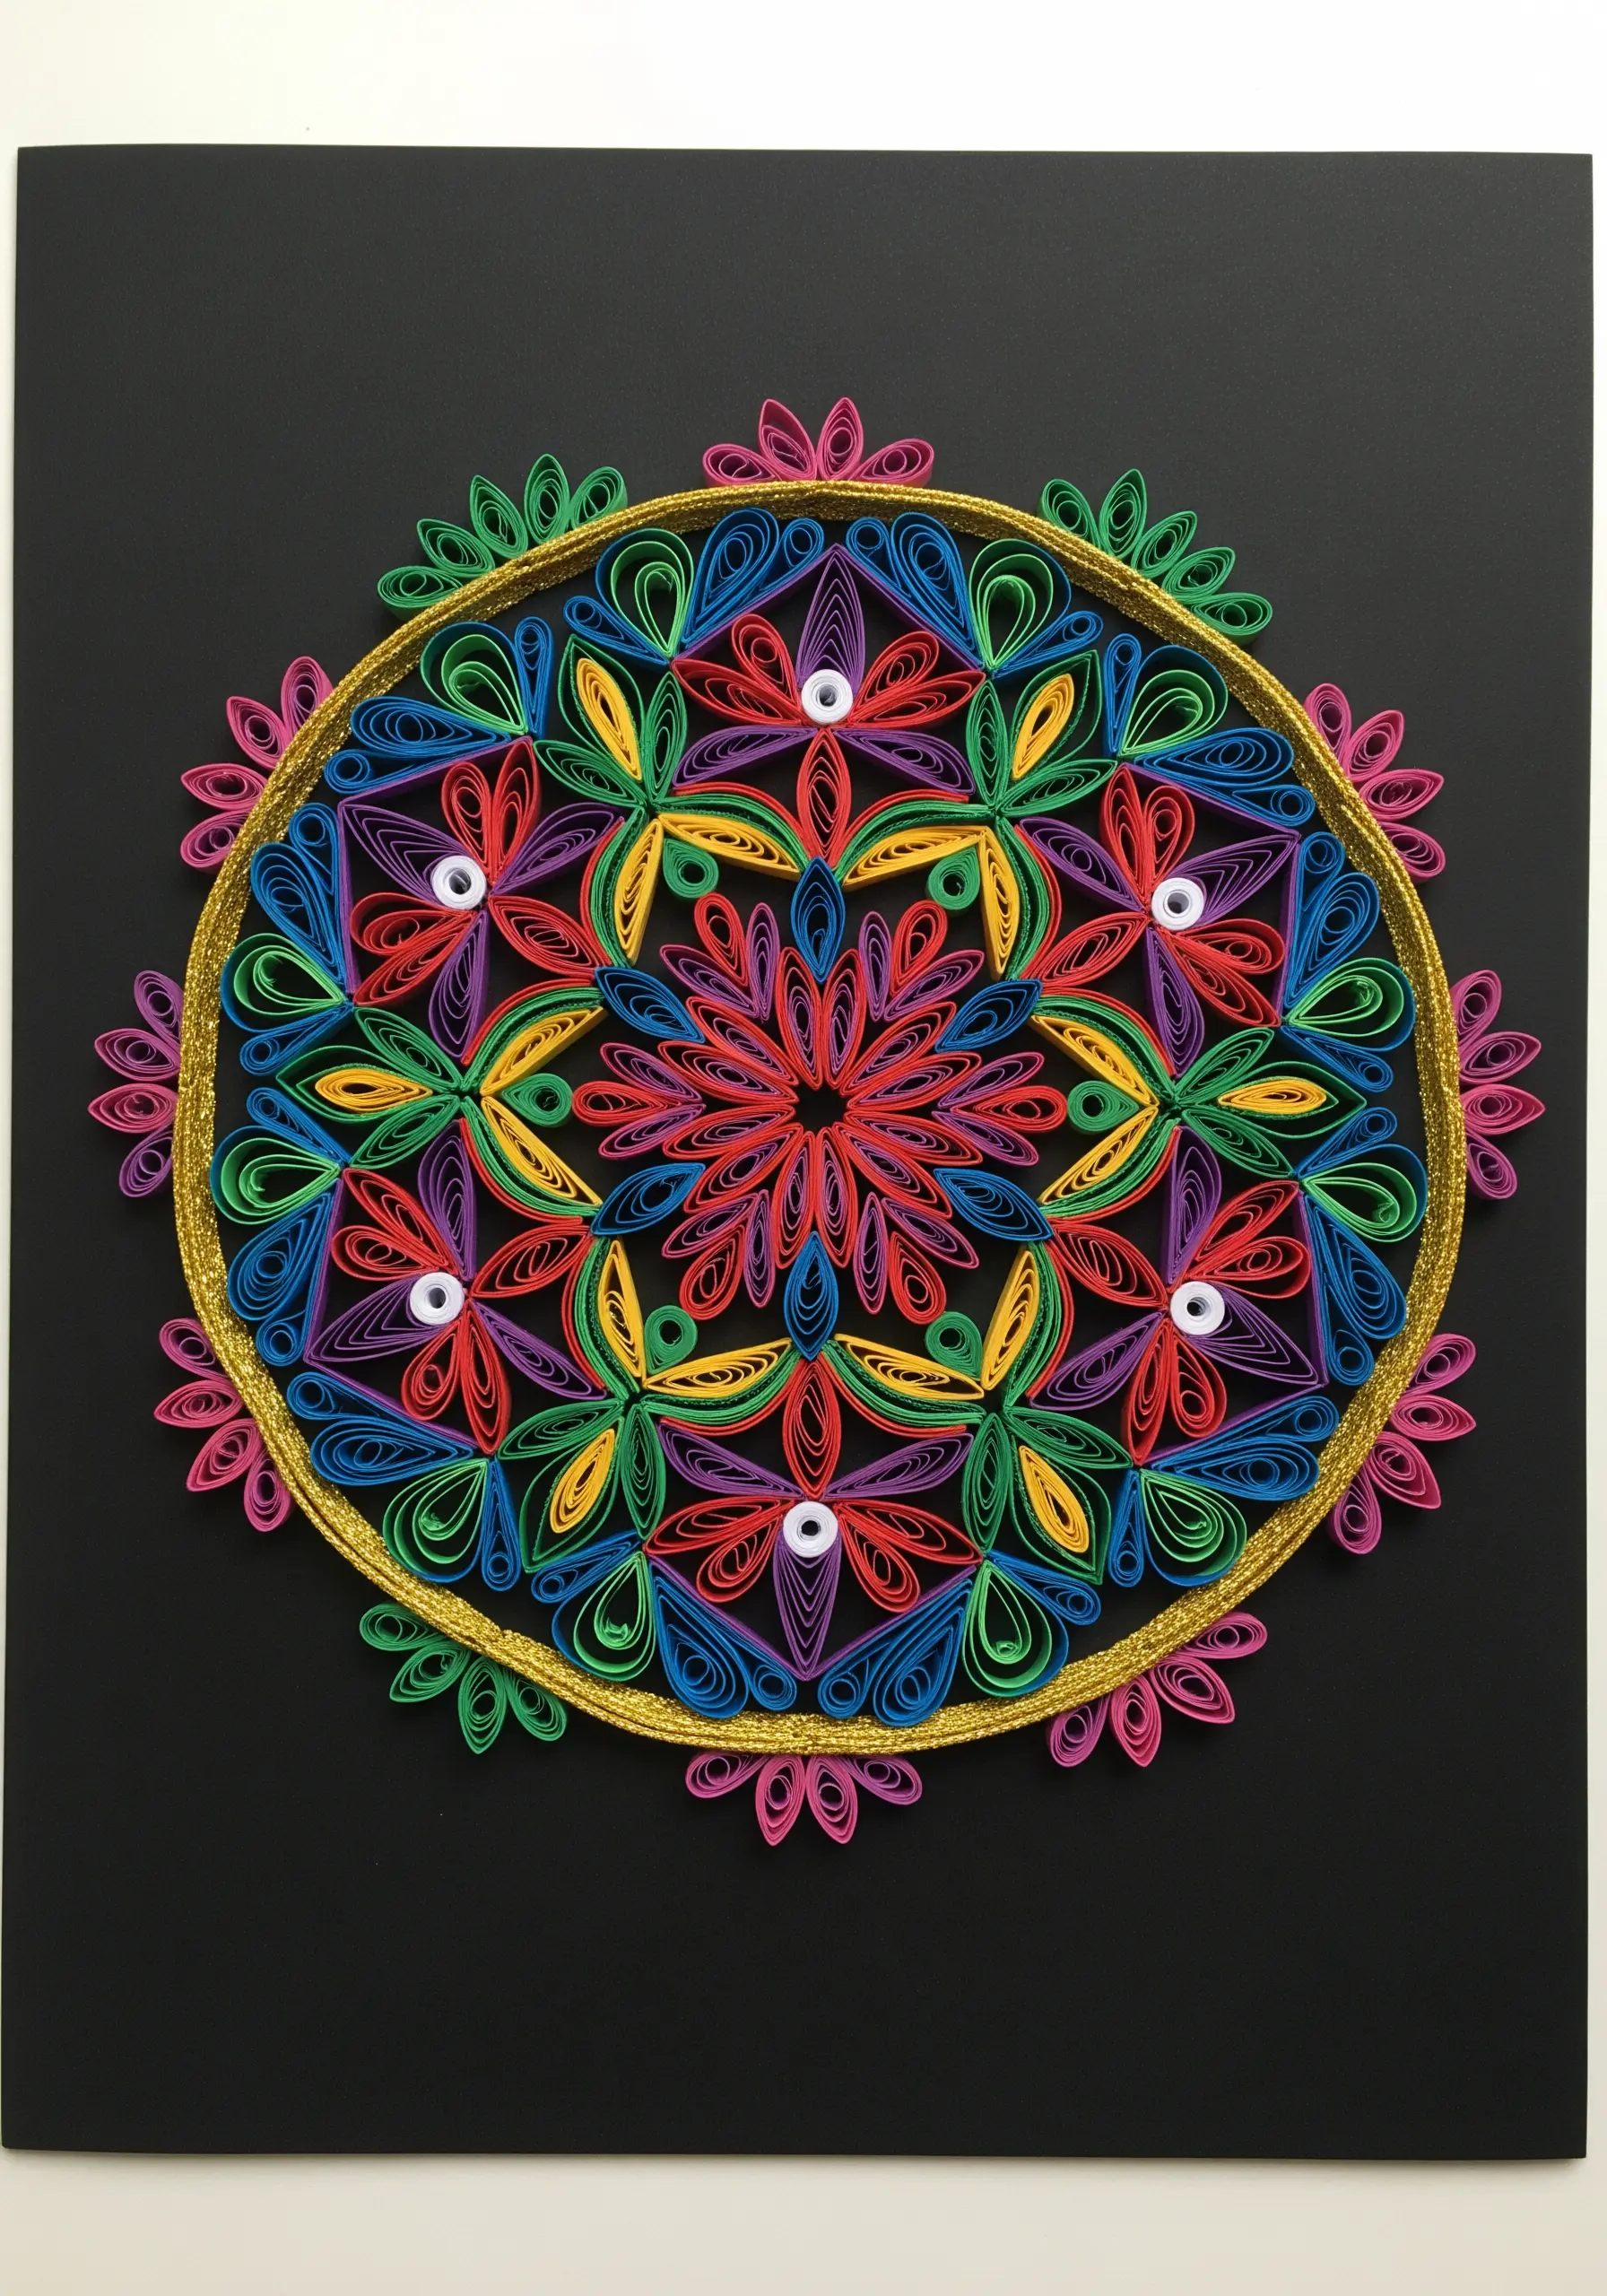
Instead of stitching through fragile paper art, integrate thread as a framing element.
Once your paper quilling design is complete, define its edges by couching a thick metallic cord or a bundle of embroidery floss around the perimeter.
This technique adds a clean, decorative border that contains the intricacy of the quilling while introducing the distinct texture and sheen of thread.
It’s an elegant way to marry two delicate art forms without compromising the structure of either.
7. Add Stitched Accents to Paper Botanicals
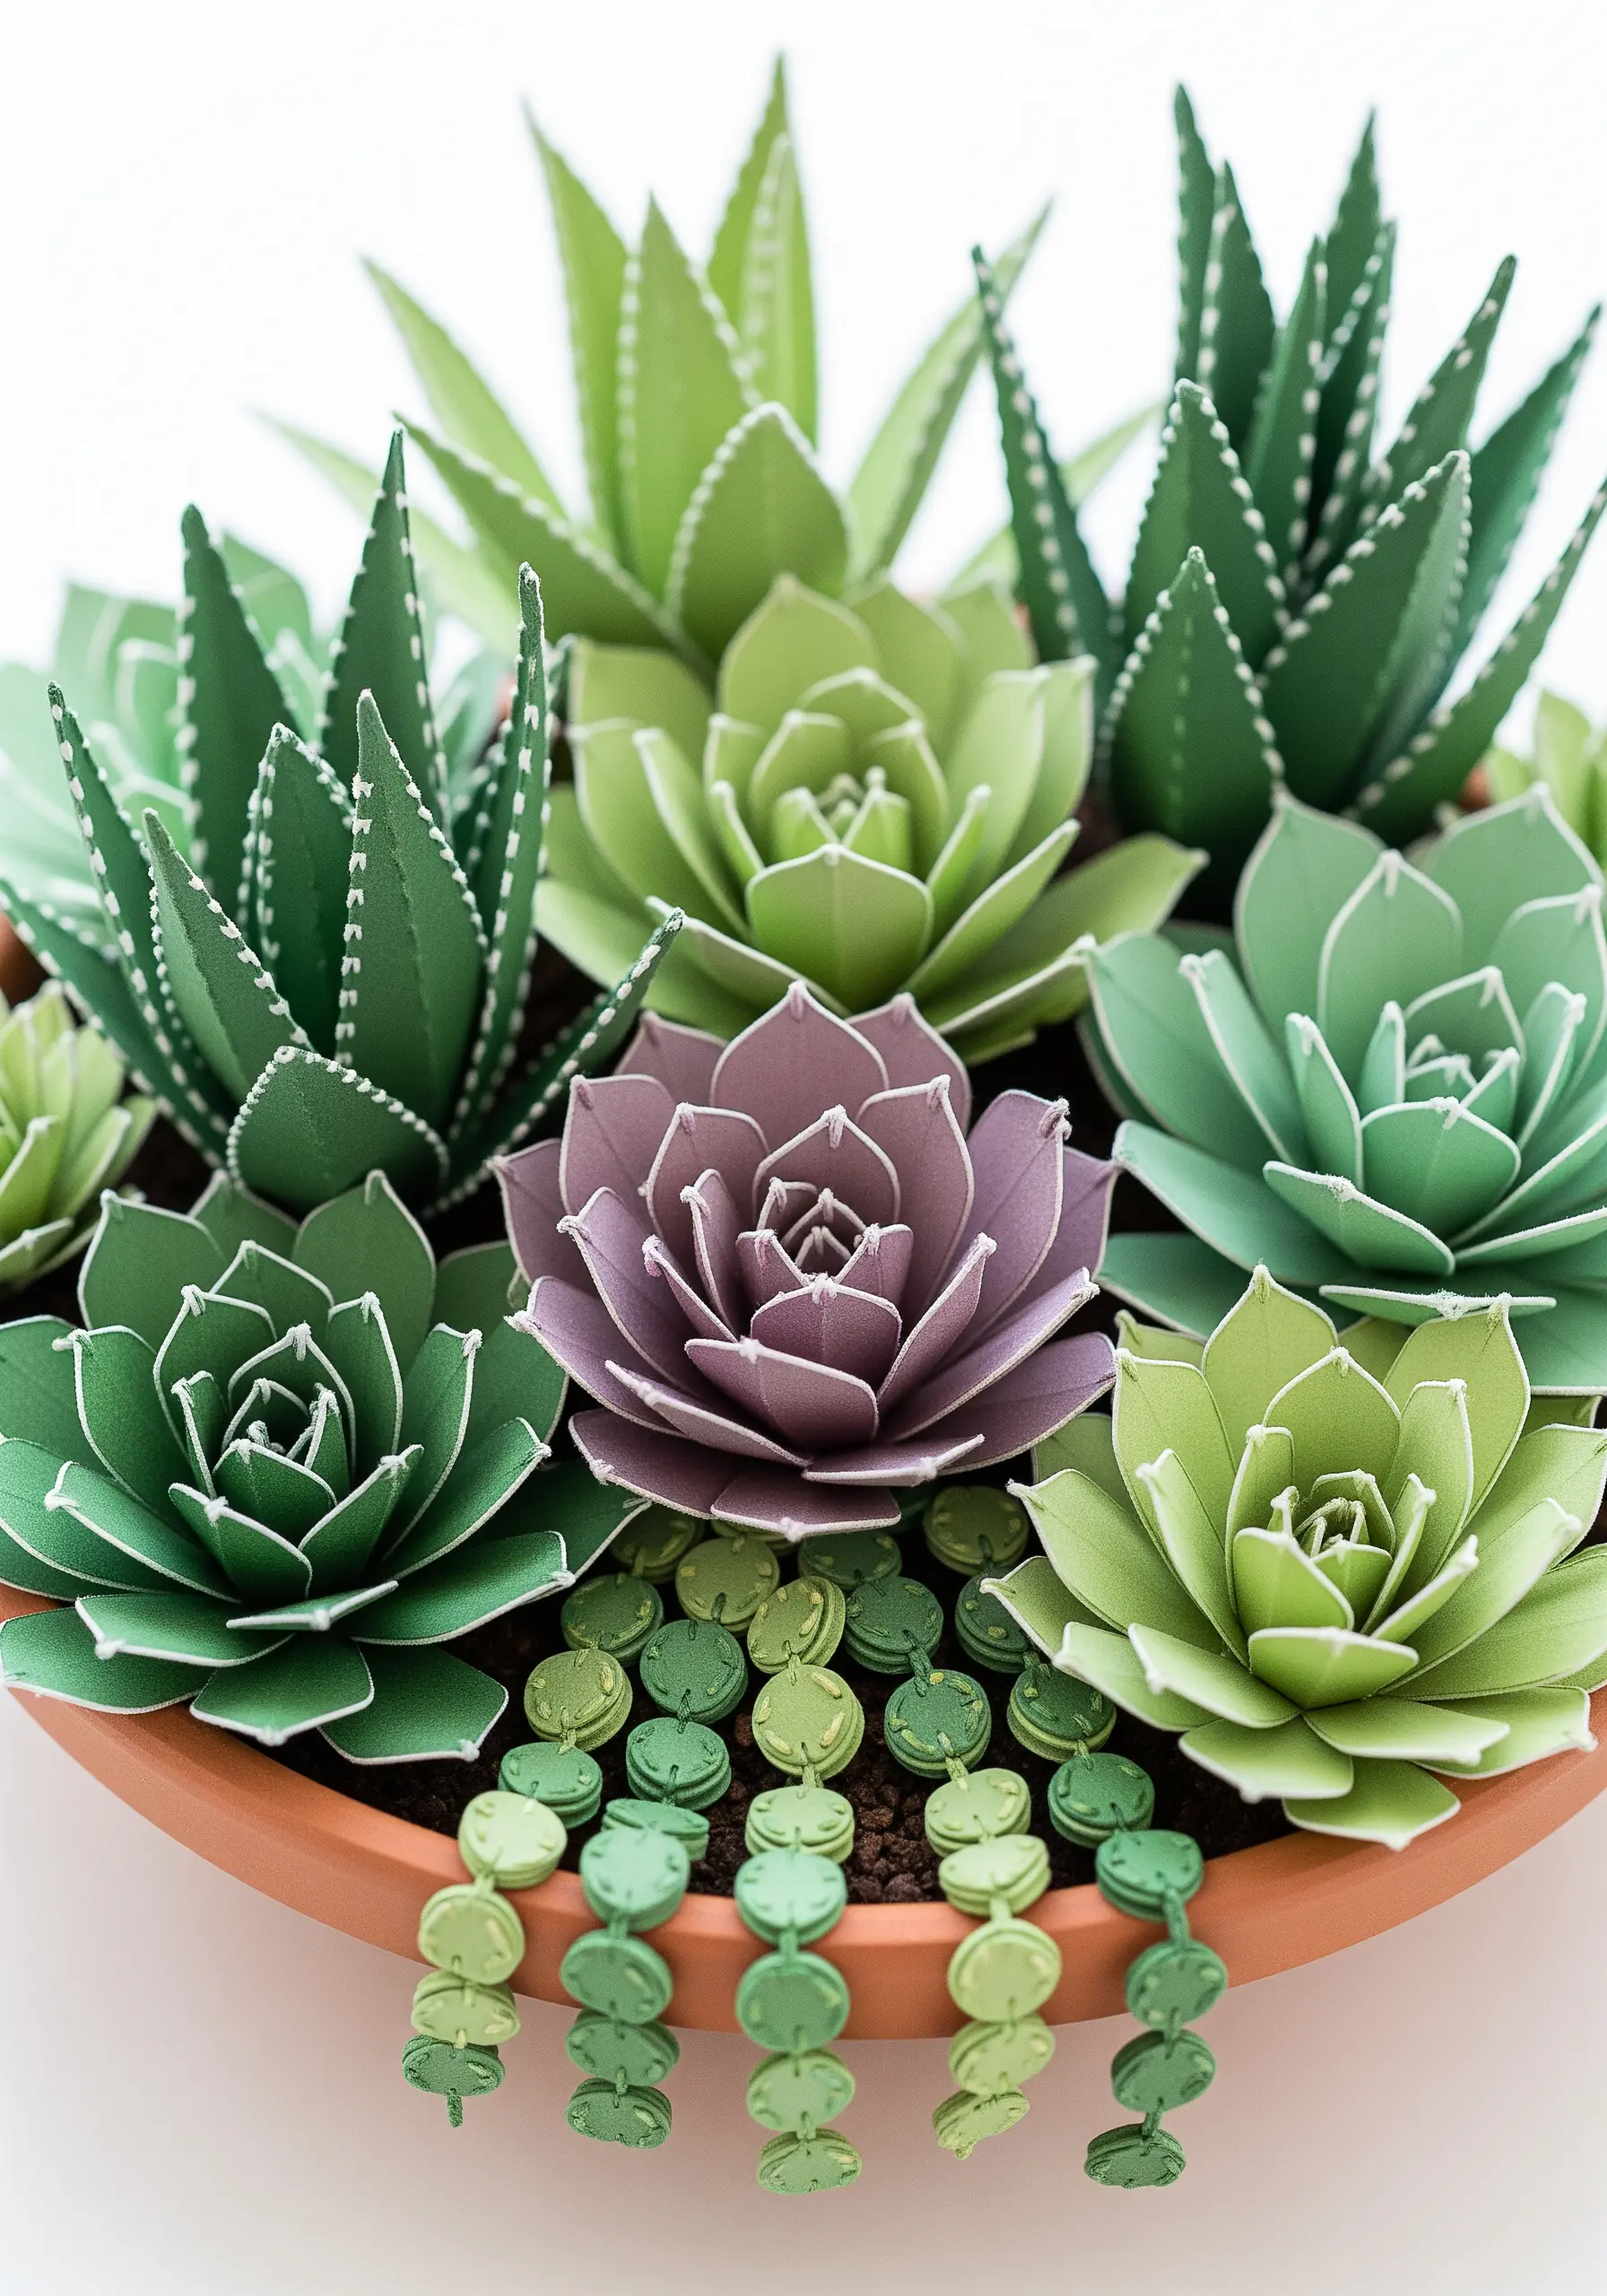
Introduce a soft, organic touch to crisp paper-craft succulents and flowers with minimal, strategic stitching.
Use a single strand of thread to add a cluster of tiny French knots to the heart of an echeveria or a delicate running stitch along the edge of a paper leaf.
These small textile details disrupt the uniformity of the paper, adding a hint of realism and texture that makes the entire piece feel more lifelike.
8. Fill Paper Silhouettes with Negative Space Embroidery
Use a paper cutout not as a background, but as the canvas itself, creating a striking interplay between positive and negative space.
Embroider a dense floral or geometric pattern entirely within the confines of the silhouette—letting the clean, sharp edge of the paper define the overall shape.
The visual power comes from the contrast between the rich, textured stitching and the flat, solid void of the surrounding paper, a key element in abstract thread designs using negative space.
9. Emulate Stitches with Seed Bead Mosaics
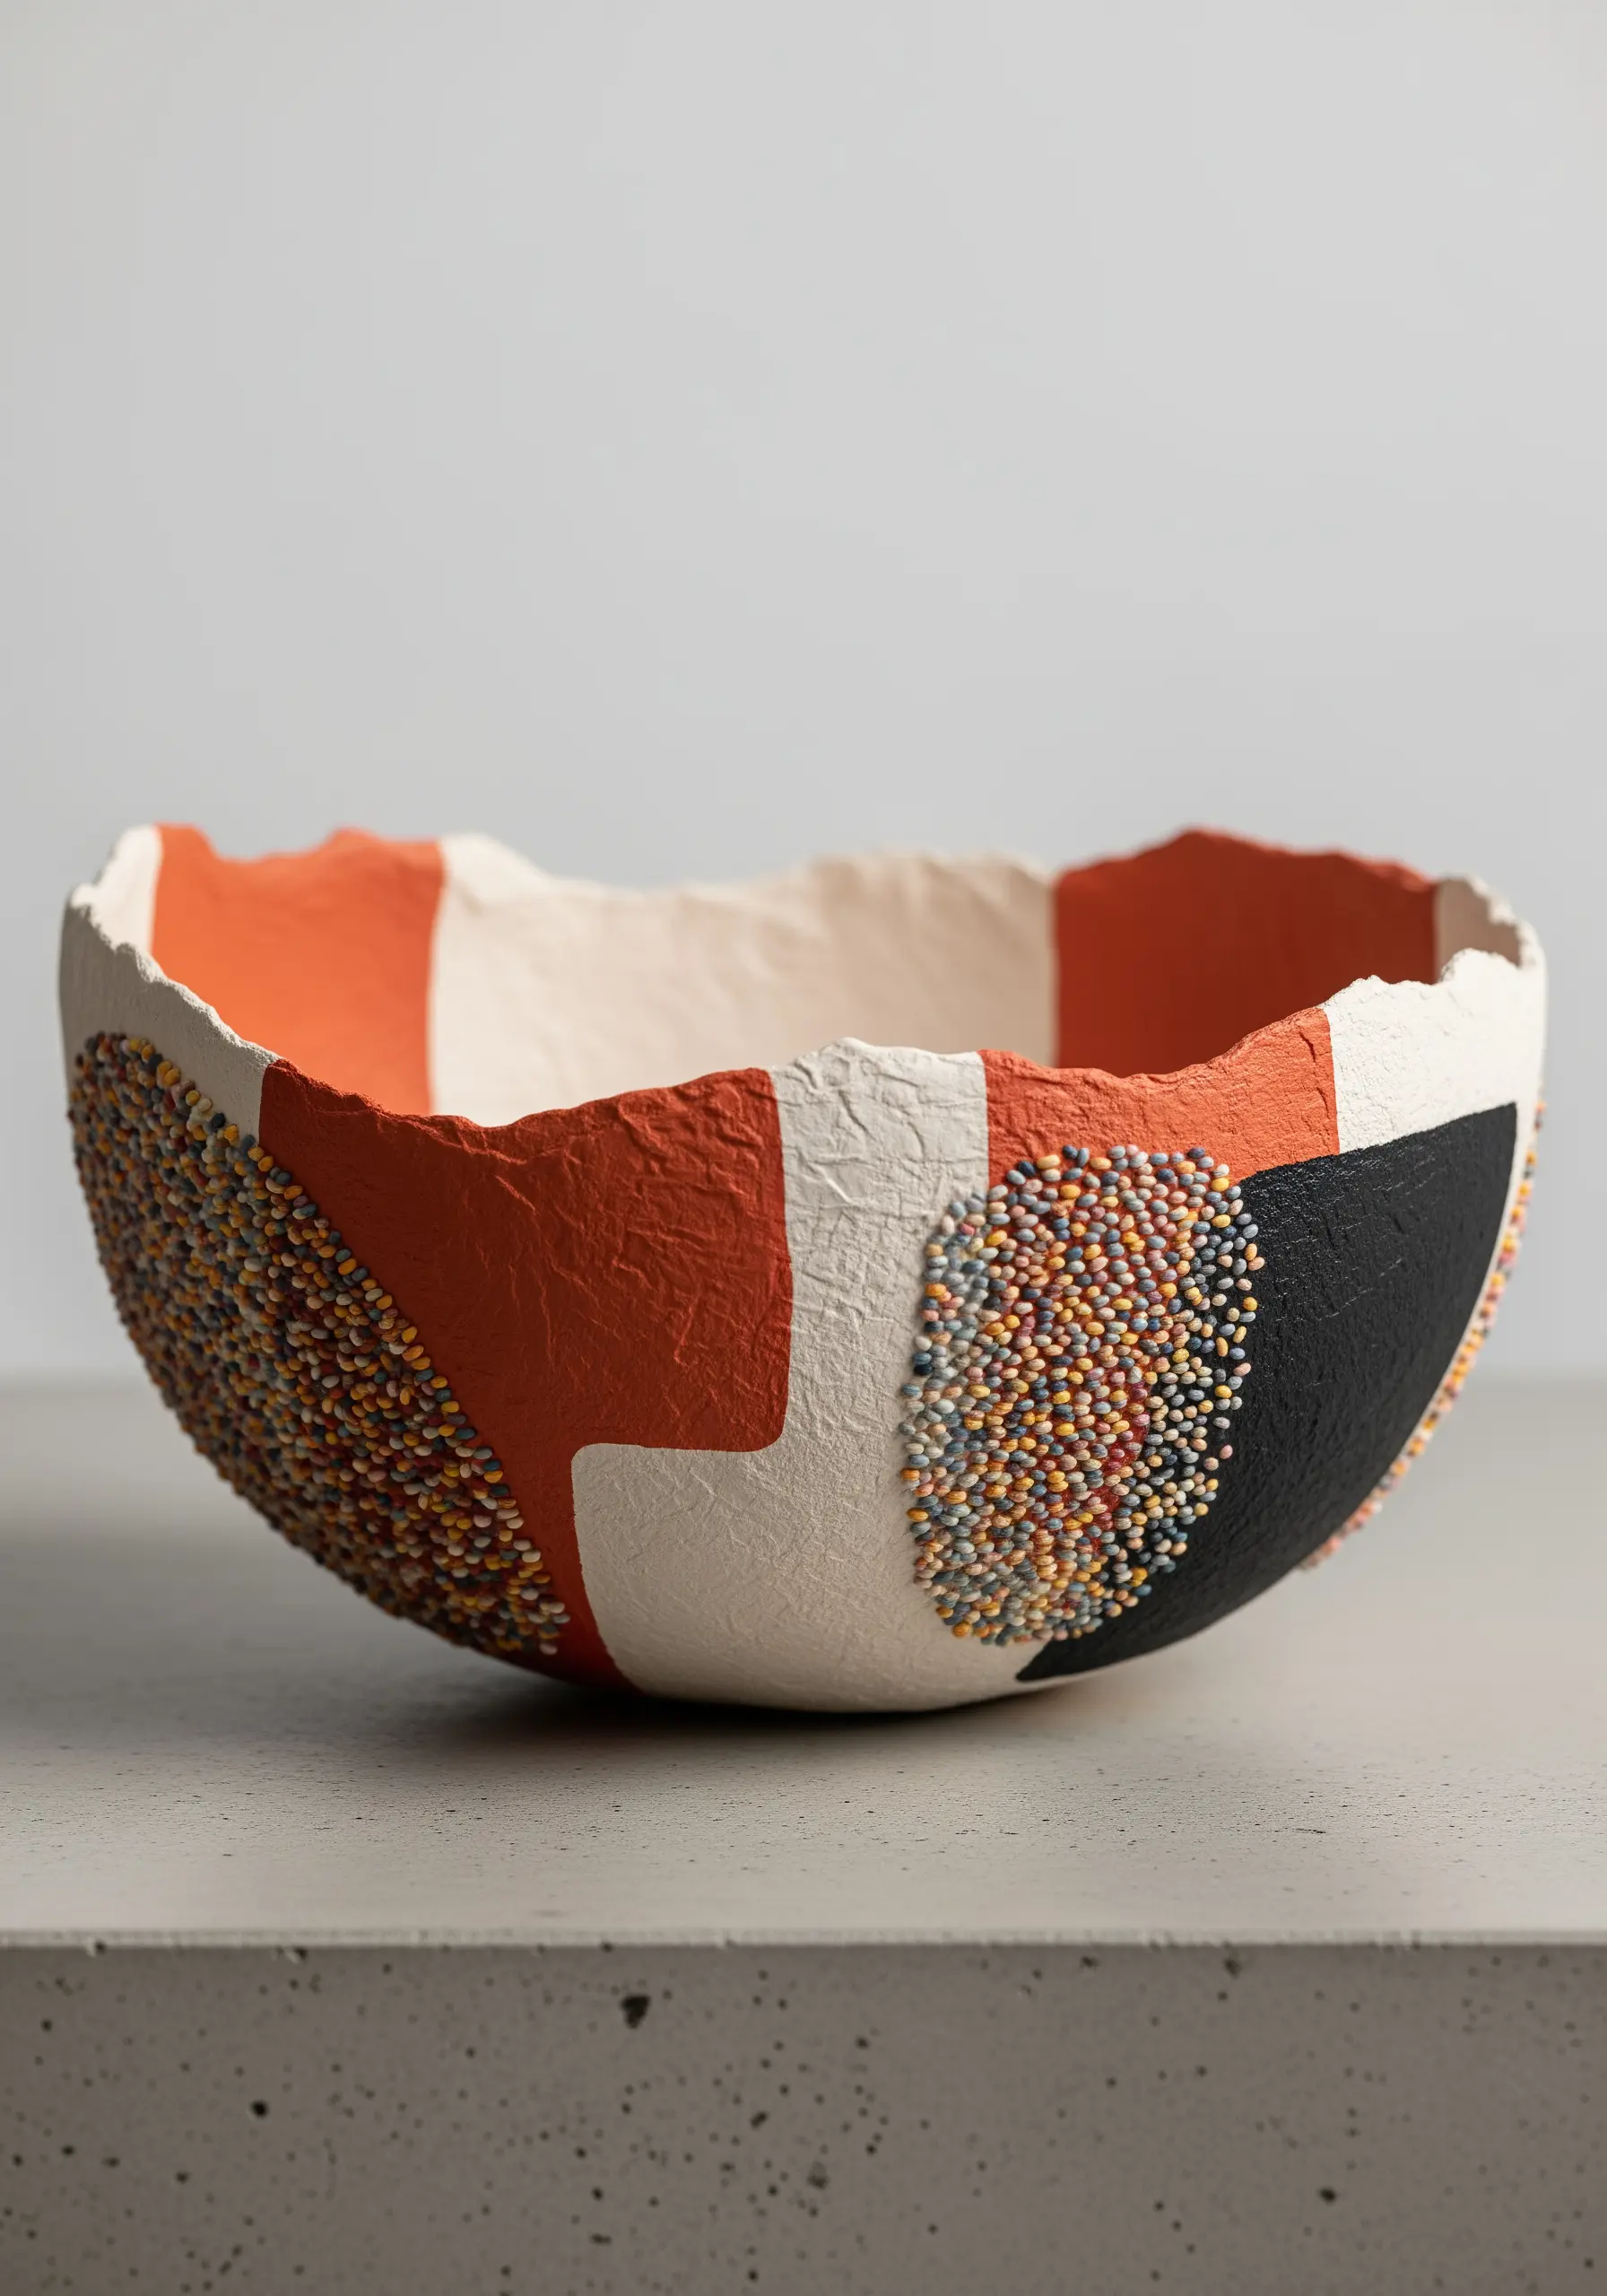
Explore textural effects beyond thread by using beads to mimic the dimensionality of dense embroidery.
On a painted paper-mache bowl, fill designated color-blocked areas with a solid mass of seed beads, adhering them with a strong craft glue.
This technique creates a stunning, pointillist texture that echoes the effect of thousands of French knots, offering a tactile richness and light-catching quality that thread alone cannot replicate.
10. Illuminate Watercolor Washes with Metallic Thread

Create a beautiful contrast by pairing the soft, diffused nature of a watercolor wash with the crisp, reflective line of metallic thread.
Paint a simple gradient on heavy watercolor paper. Once it’s completely dry, stitch a single, elegant motif—like a feather or a constellation—directly onto the painted surface.
The way the metallic floss catches the light against the matte, blended background creates a subtle and sophisticated magic, perfect for DIY cozy embroidery bookmarks.
11. Weave a Thread River Through a Paper Landscape

Bring a sense of movement to a static, layered-paper landscape by introducing woven thread as a central feature.
Instead of drawing or painting a river, couch down multiple strands of variegated blue and silver threads, allowing them to twist and overlap naturally.
This technique adds a rich, textile dimension and a dynamic flow that guides the eye through the composition, creating a powerful focal point among the crisp paper hills.
12. Create Structural Details with Couched Cording

Use embroidery thread not just for decoration, but as a structural element in your 3D paper models.
On a paper hot air balloon, for instance, couch down a thick, twisted cord to form the rigging and basket details instead of simply drawing them on.
This method adds authentic texture and a subtle three-dimensionality, transforming a simple paper craft into a more believable and tactile object.
13. Design Bold Graphics on Kraft Paper Tags
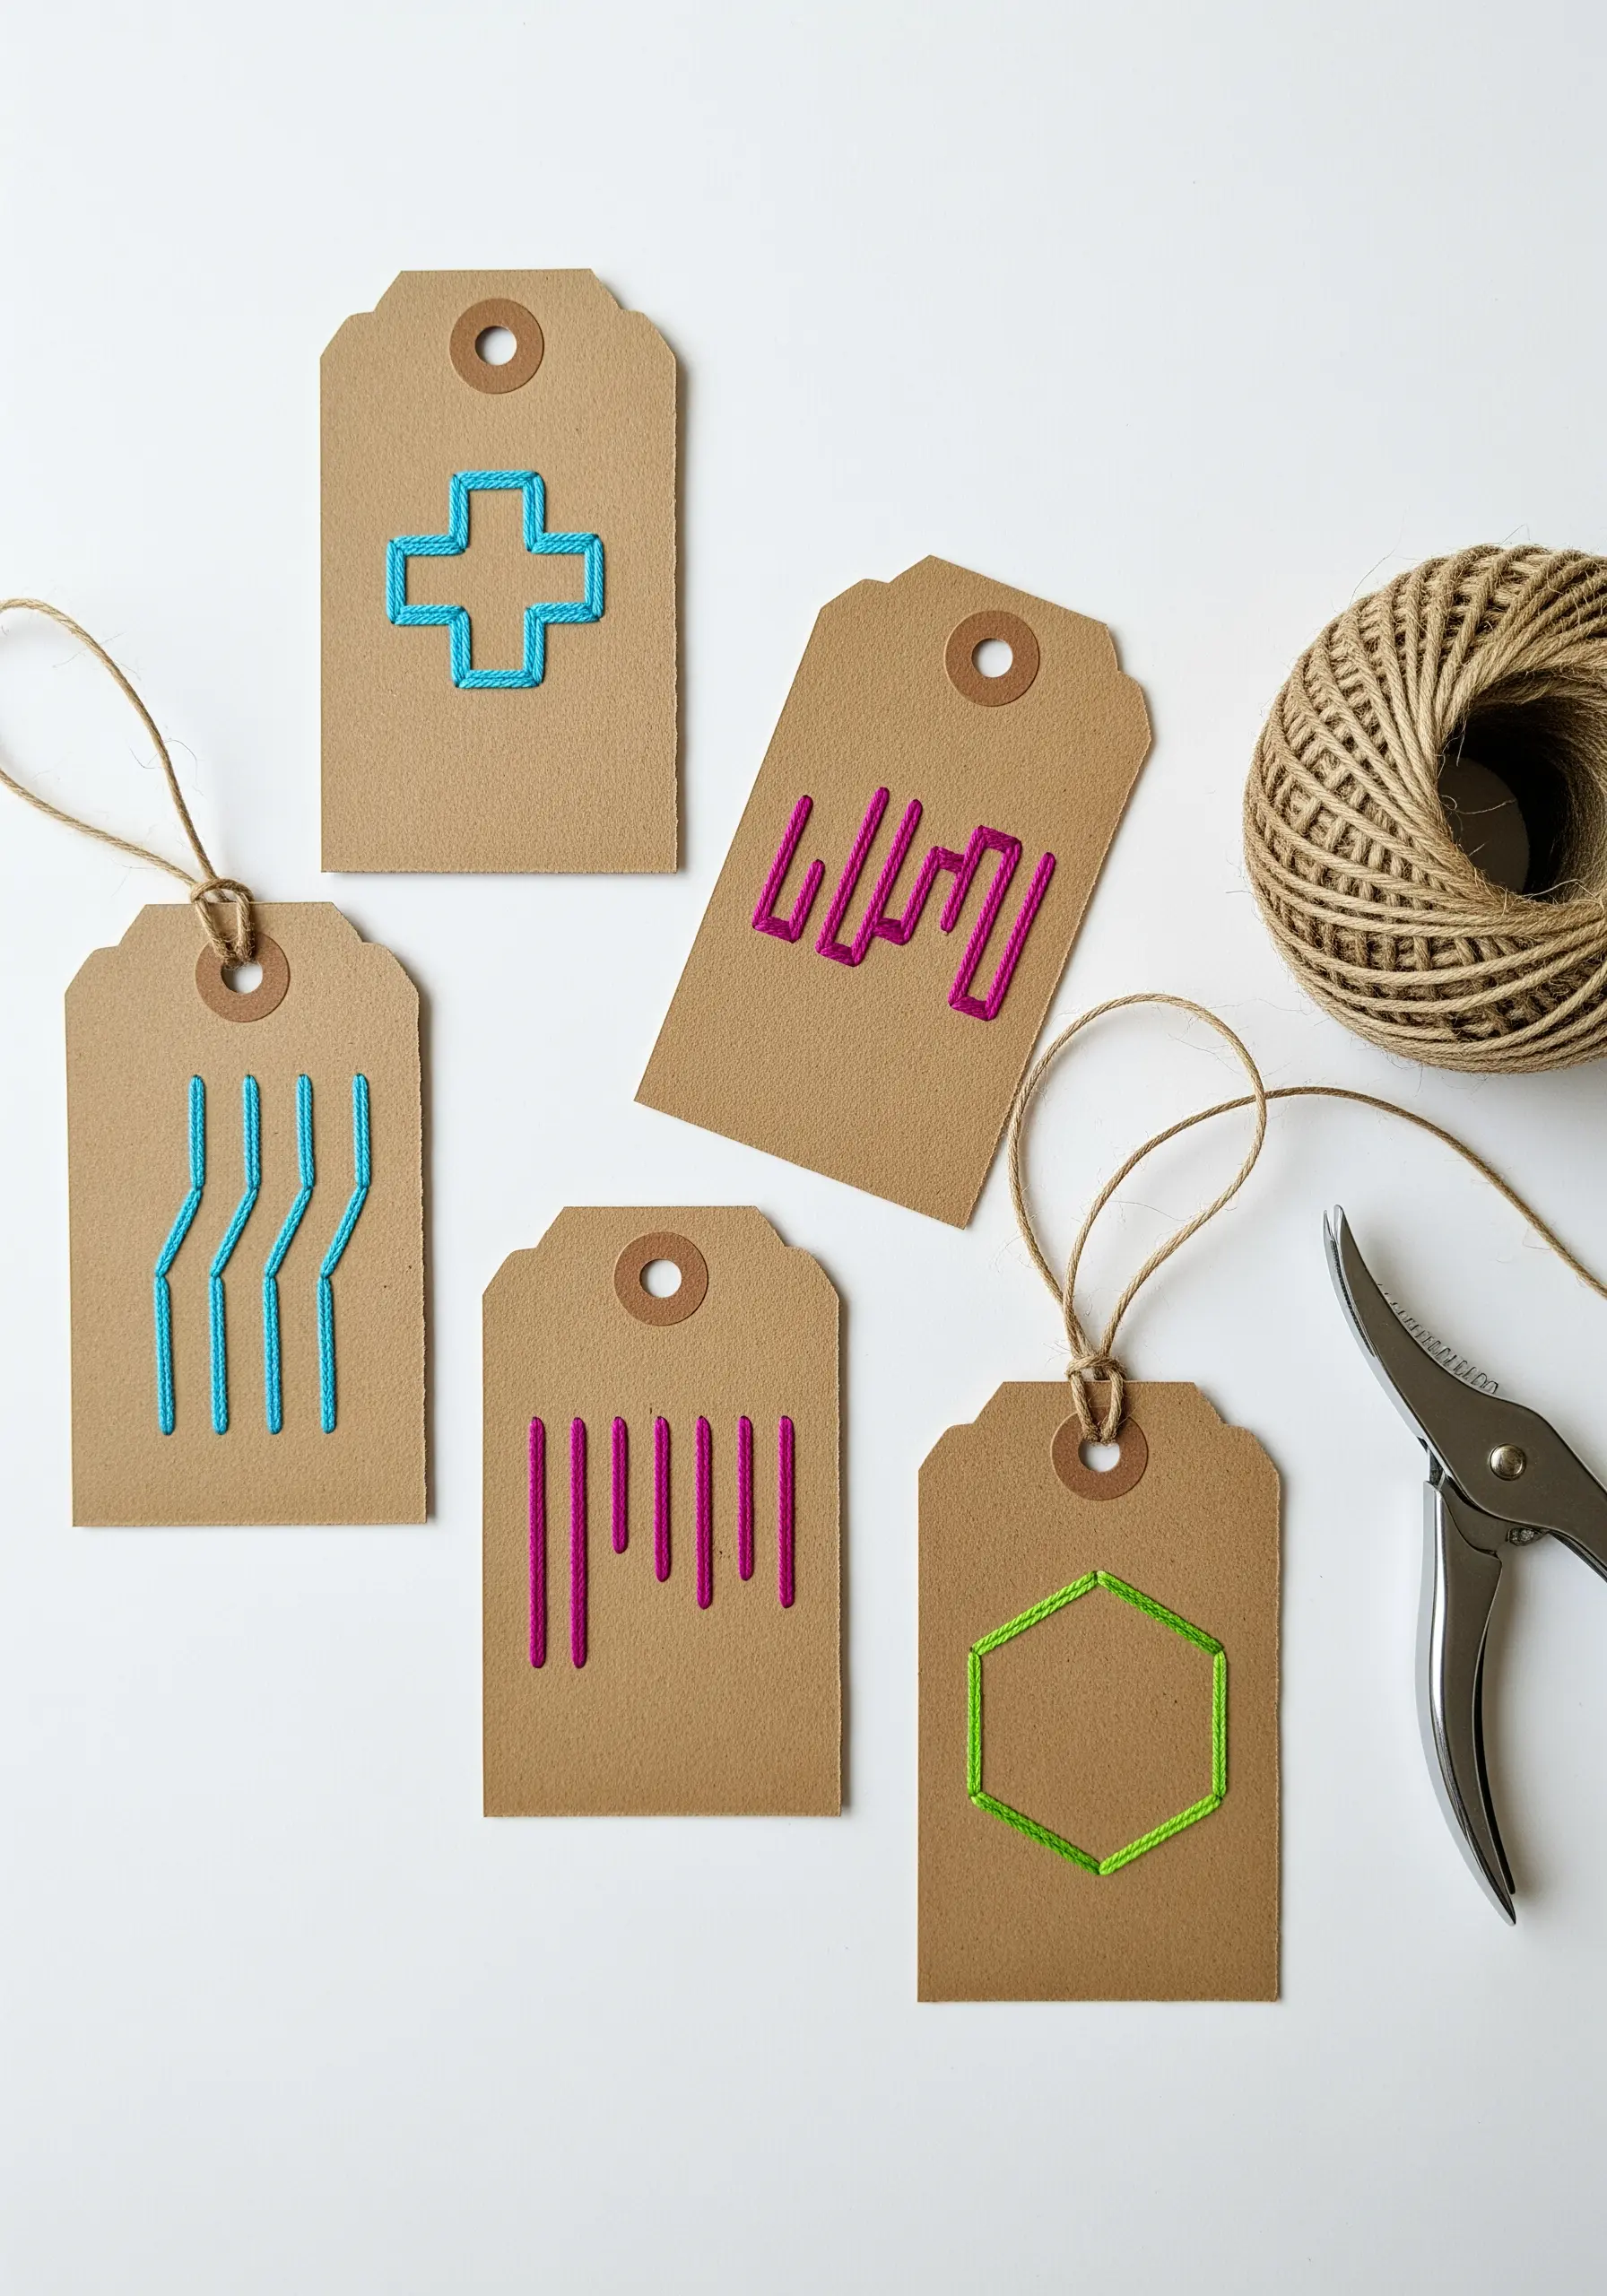
Let your thread make a strong, modern statement by stitching simple graphic icons onto rustic kraft paper.
Use the full six strands of a vibrant, high-contrast floss and work in clean satin stitches or long, decisive straight stitches.
The combination of the unrefined paper texture, bold color, and simple geometry creates a contemporary look that feels both handmade and graphically sharp, making it one of those tiny embroidery ideas that turn blank walls into minimal art or gift tags.
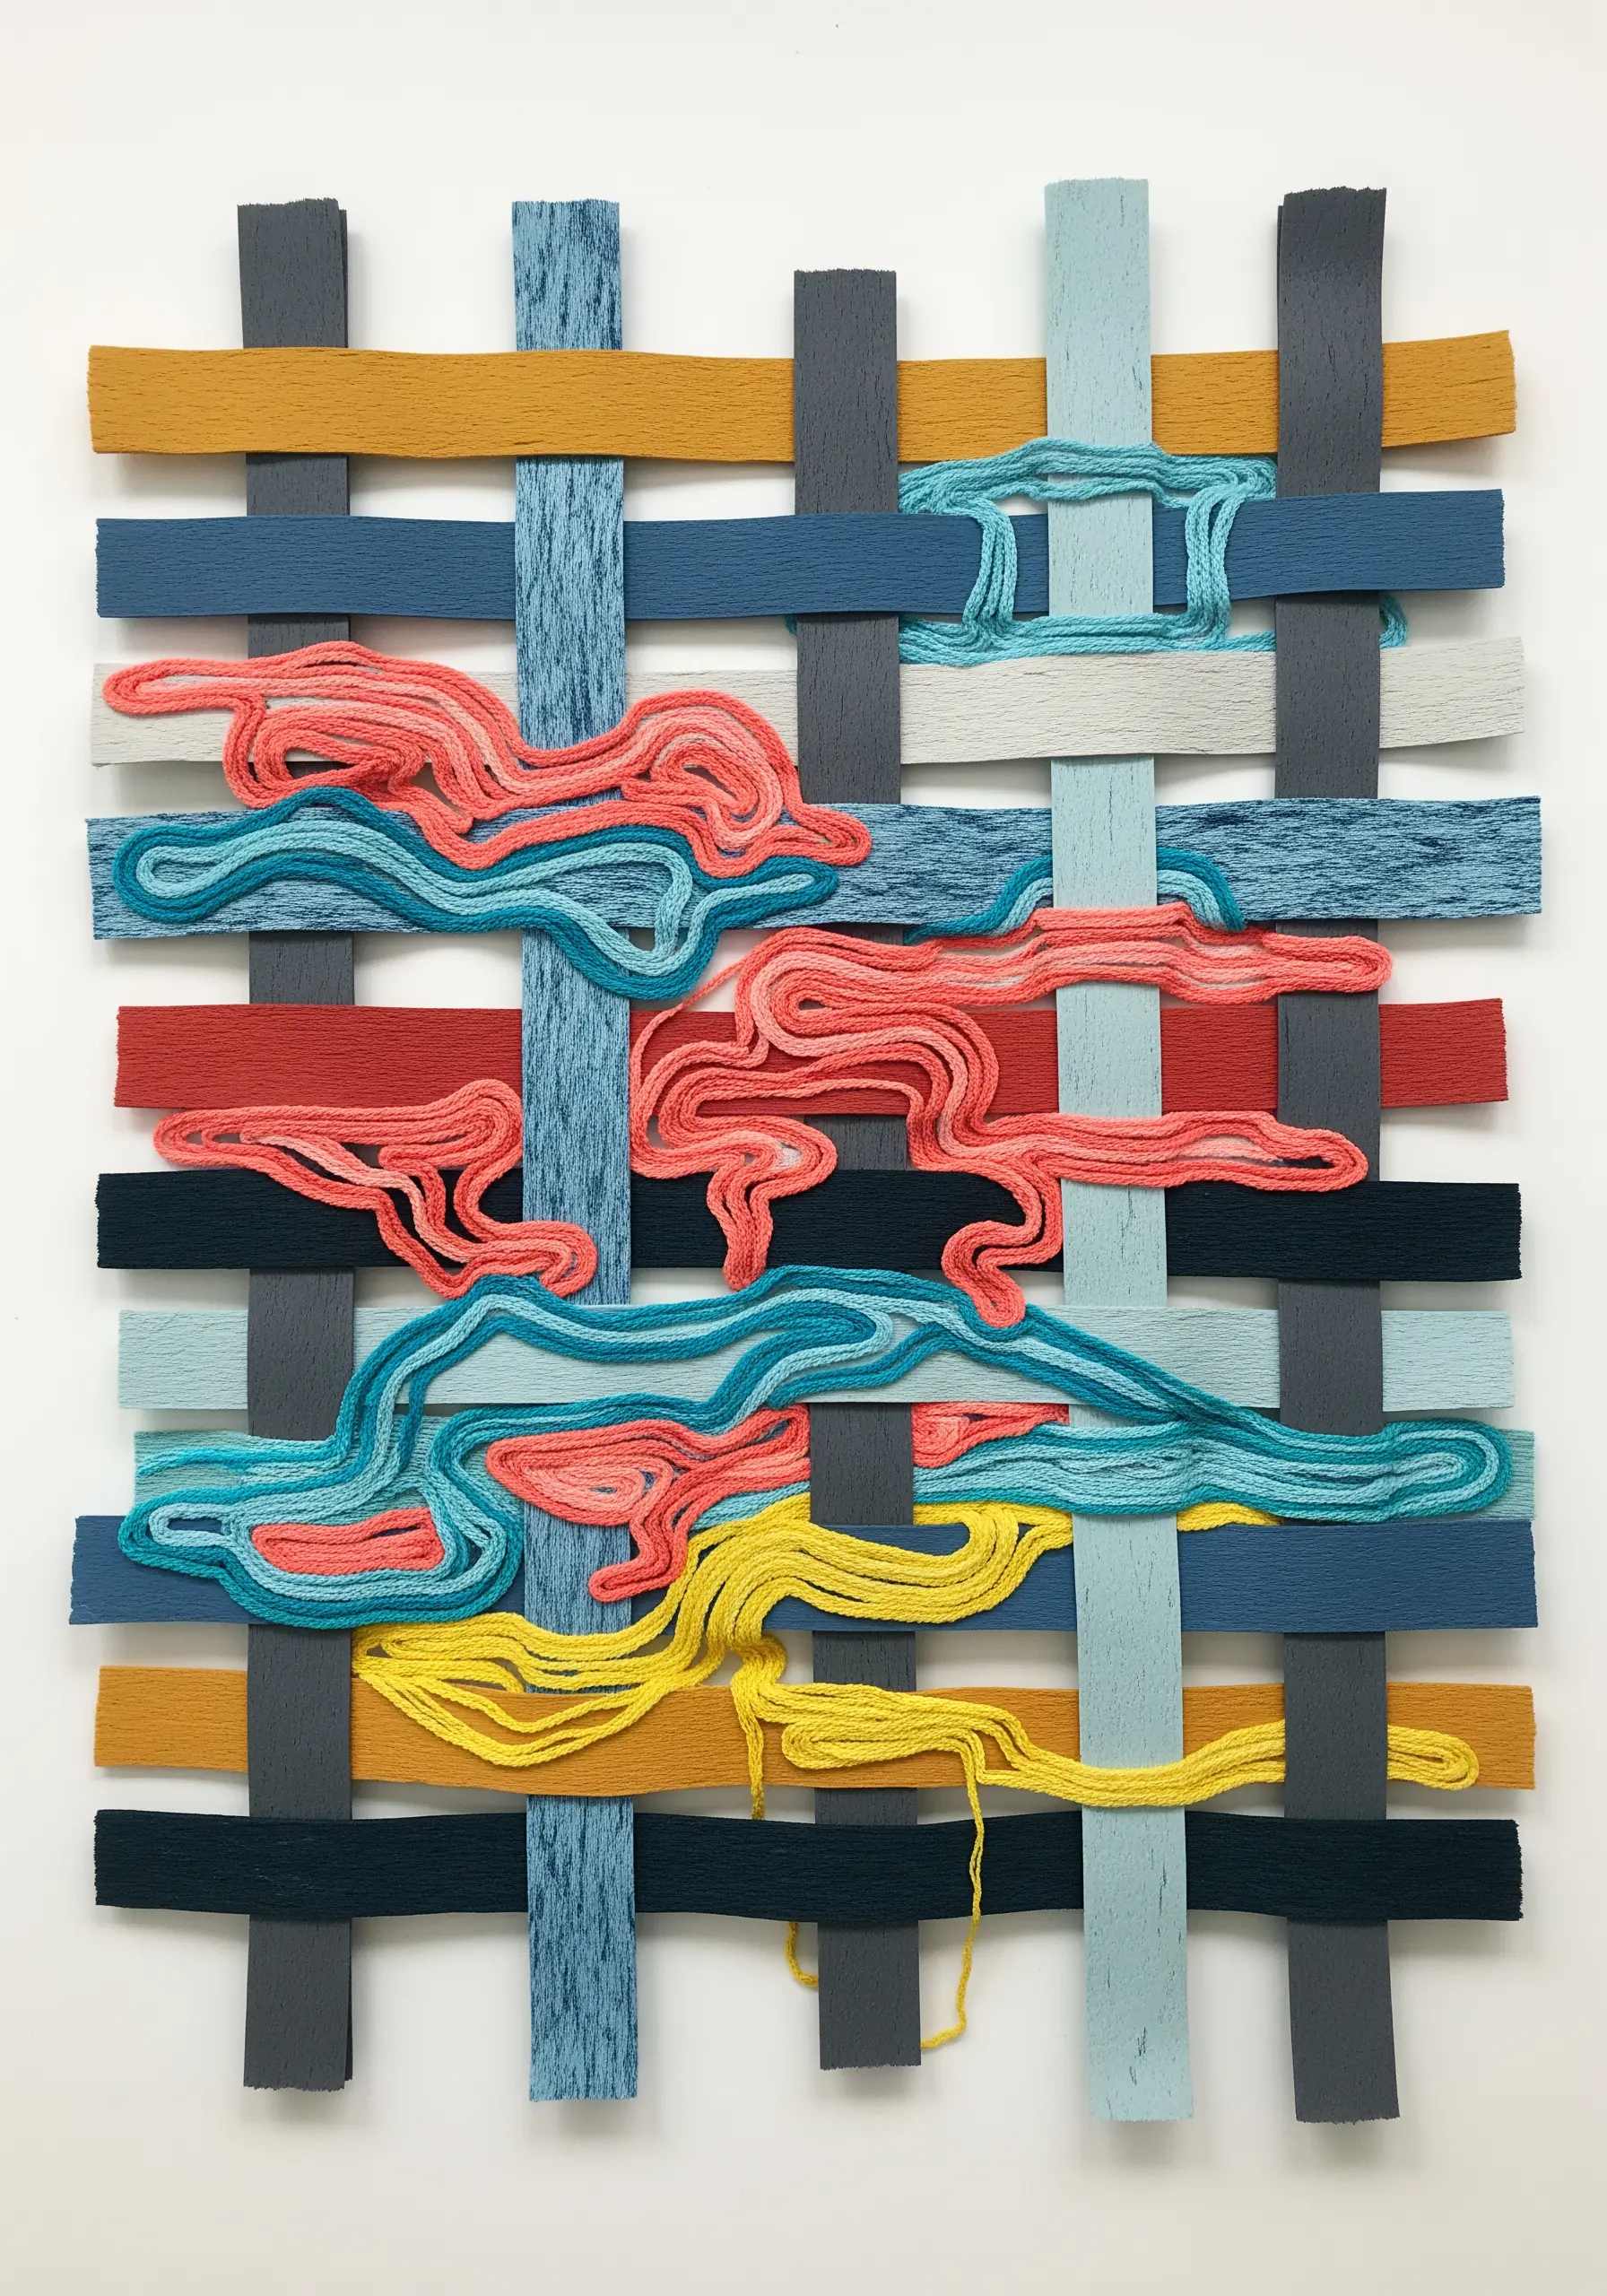
14. Integrate Soft Yarn into Woven Paper
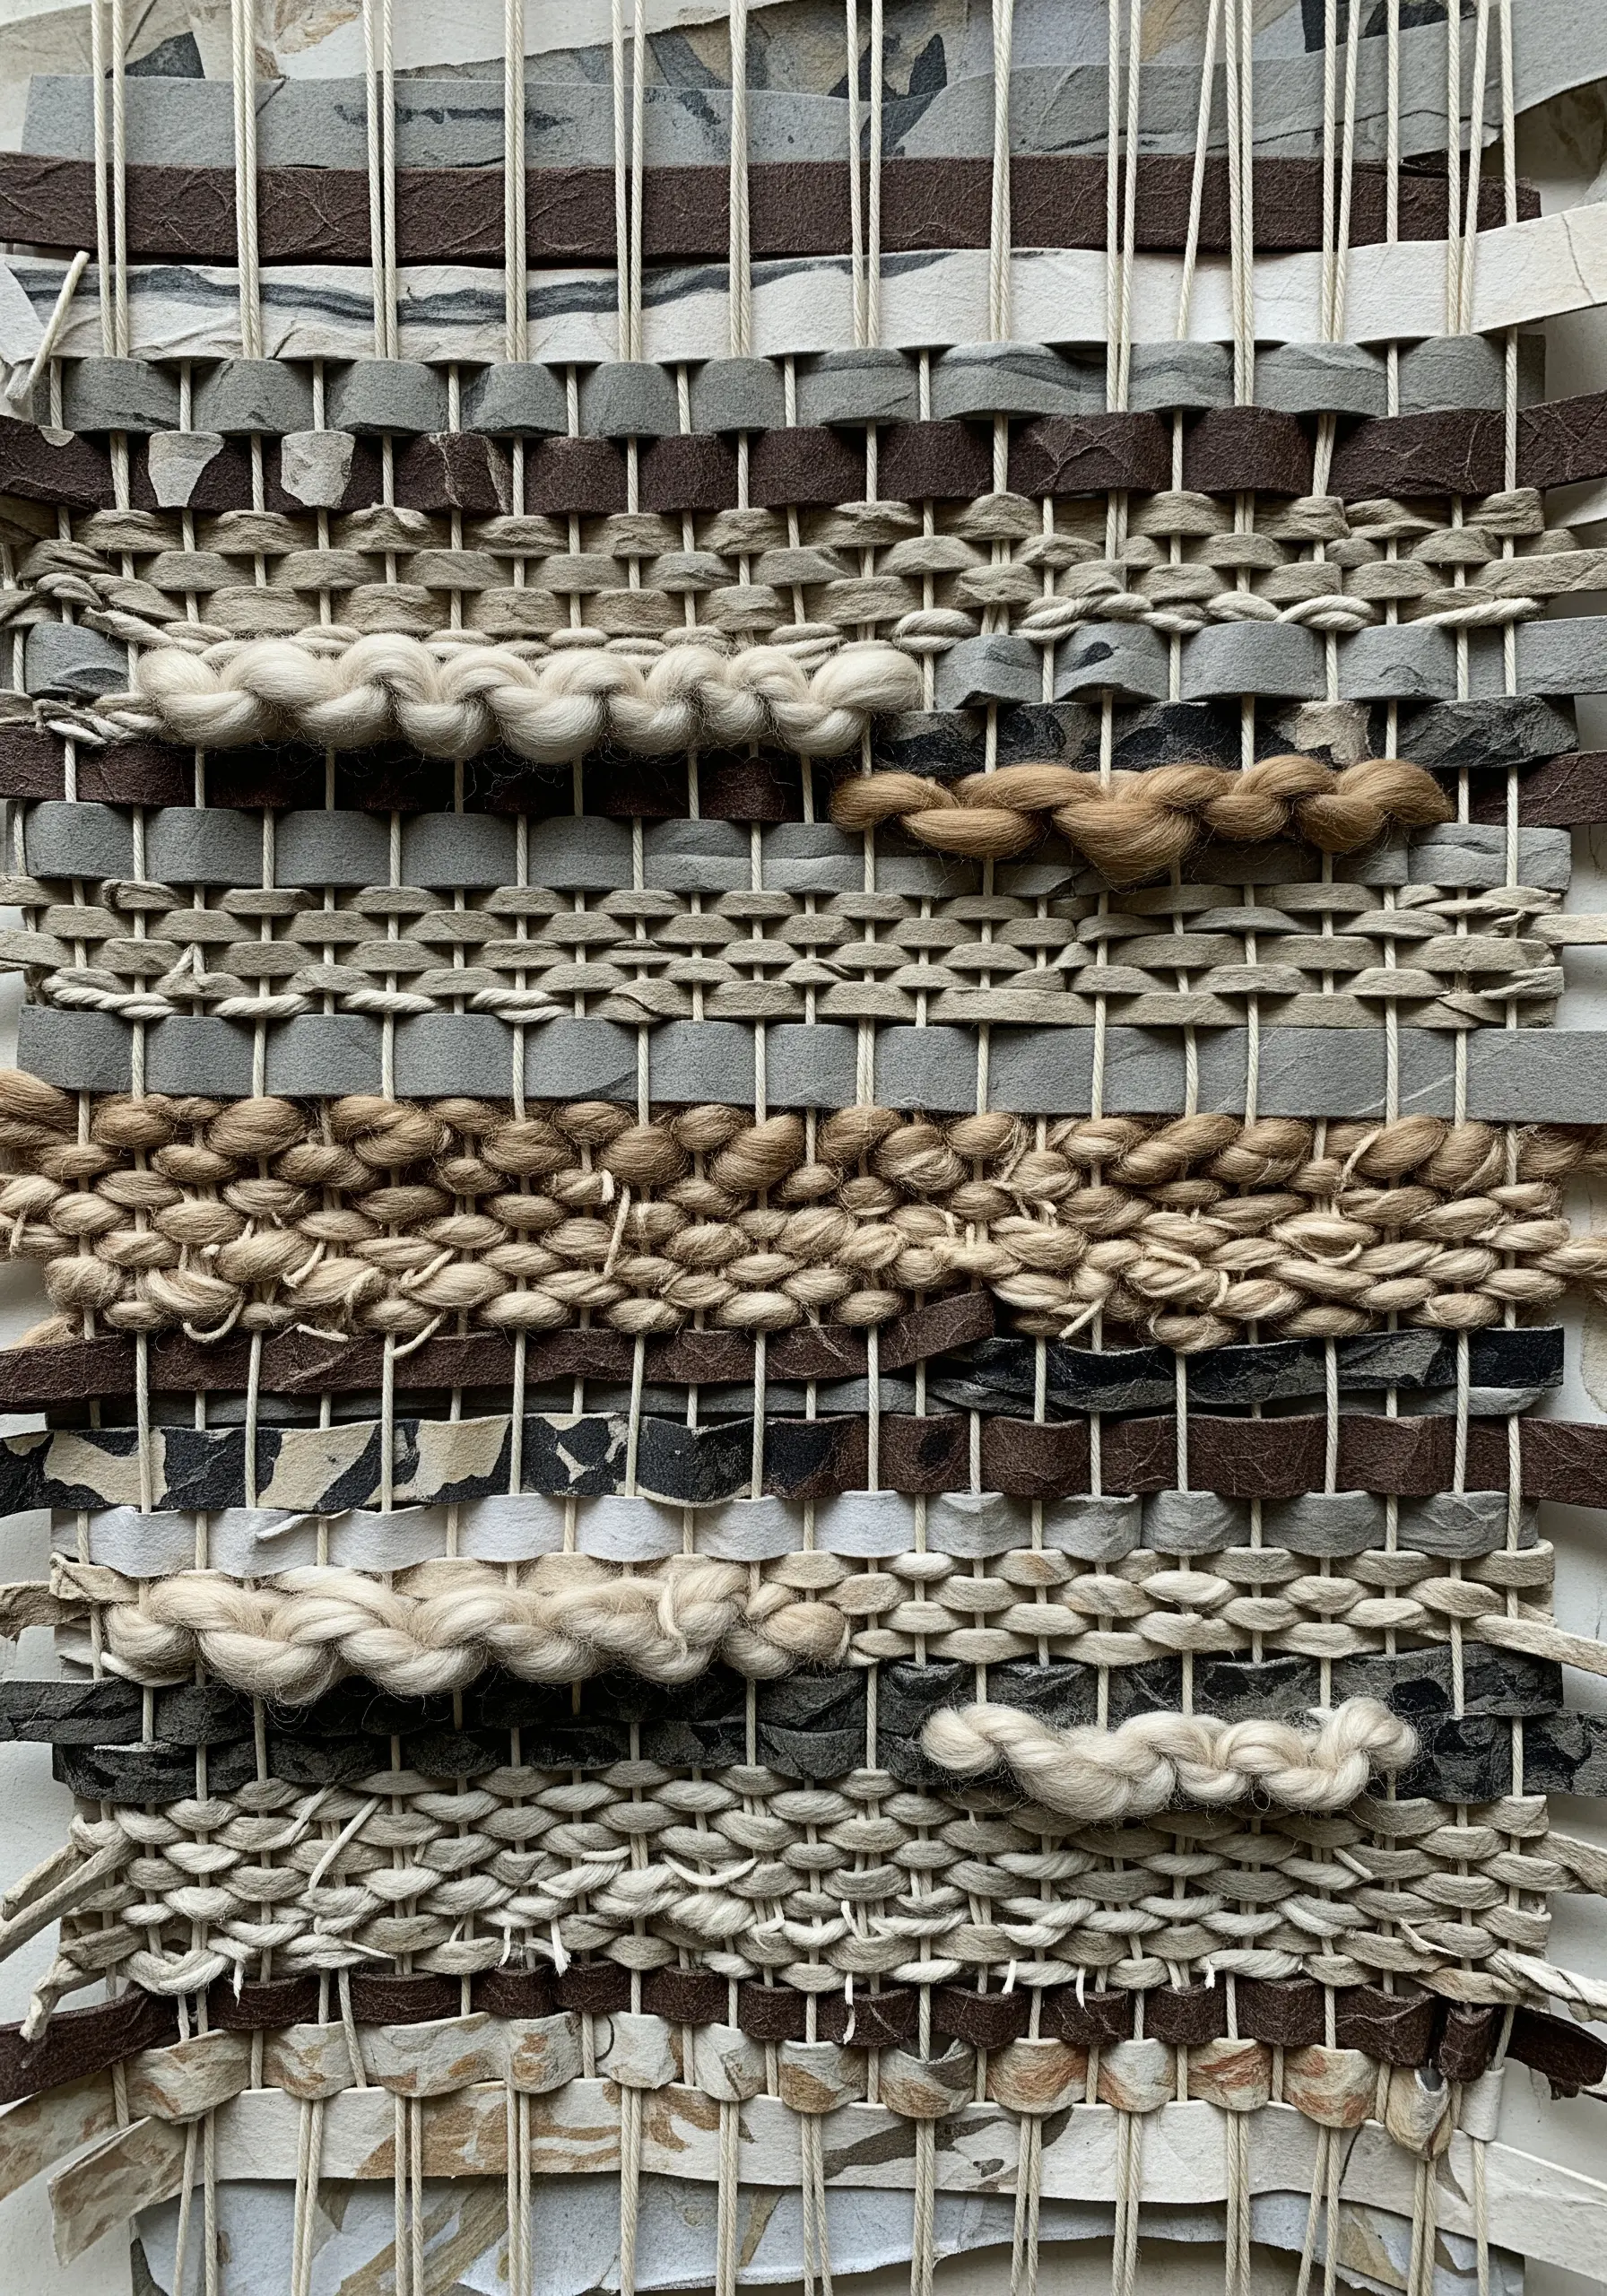
Explore a tapestry of textures by combining the rigidity of paper with the softness of yarn in a single weaving.
Use strips of heavy paper as your warp threads, then weave chunky, textural yarns through them as the weft.
Playing with different yarn weights—from bulky roving to finer plies—creates a dynamic surface that highlights the unique qualities of both materials, making it a perfect handmade art piece that tells a story through texture.
15. Add Stitched Centers to Paper Florals
Elevate your layered paper flowers by giving them a realistic, textural center made from thread.
Instead of using another piece of paper, create a dense cluster of French knots or a small patch of Turkey work right in the middle of the bloom.
This introduces a soft, pollen-like texture that provides a beautiful focal point and adds a surprising touch of realism to the crisp paper petals.
16. Create Motion with Long-Stitch Light Trails

Inject a sense of speed and energy into a static paper collage by using thread to create dynamic lines of movement.
Over a paper cityscape, use single, long stitches of brightly colored floss radiating from a central vanishing point to represent the light trails of traffic.
This technique masterfully uses thread not as a motif, but as a directional tool that draws the eye and creates a powerful illusion of perspective and motion.
17. Stitch on Paper Before You Fold
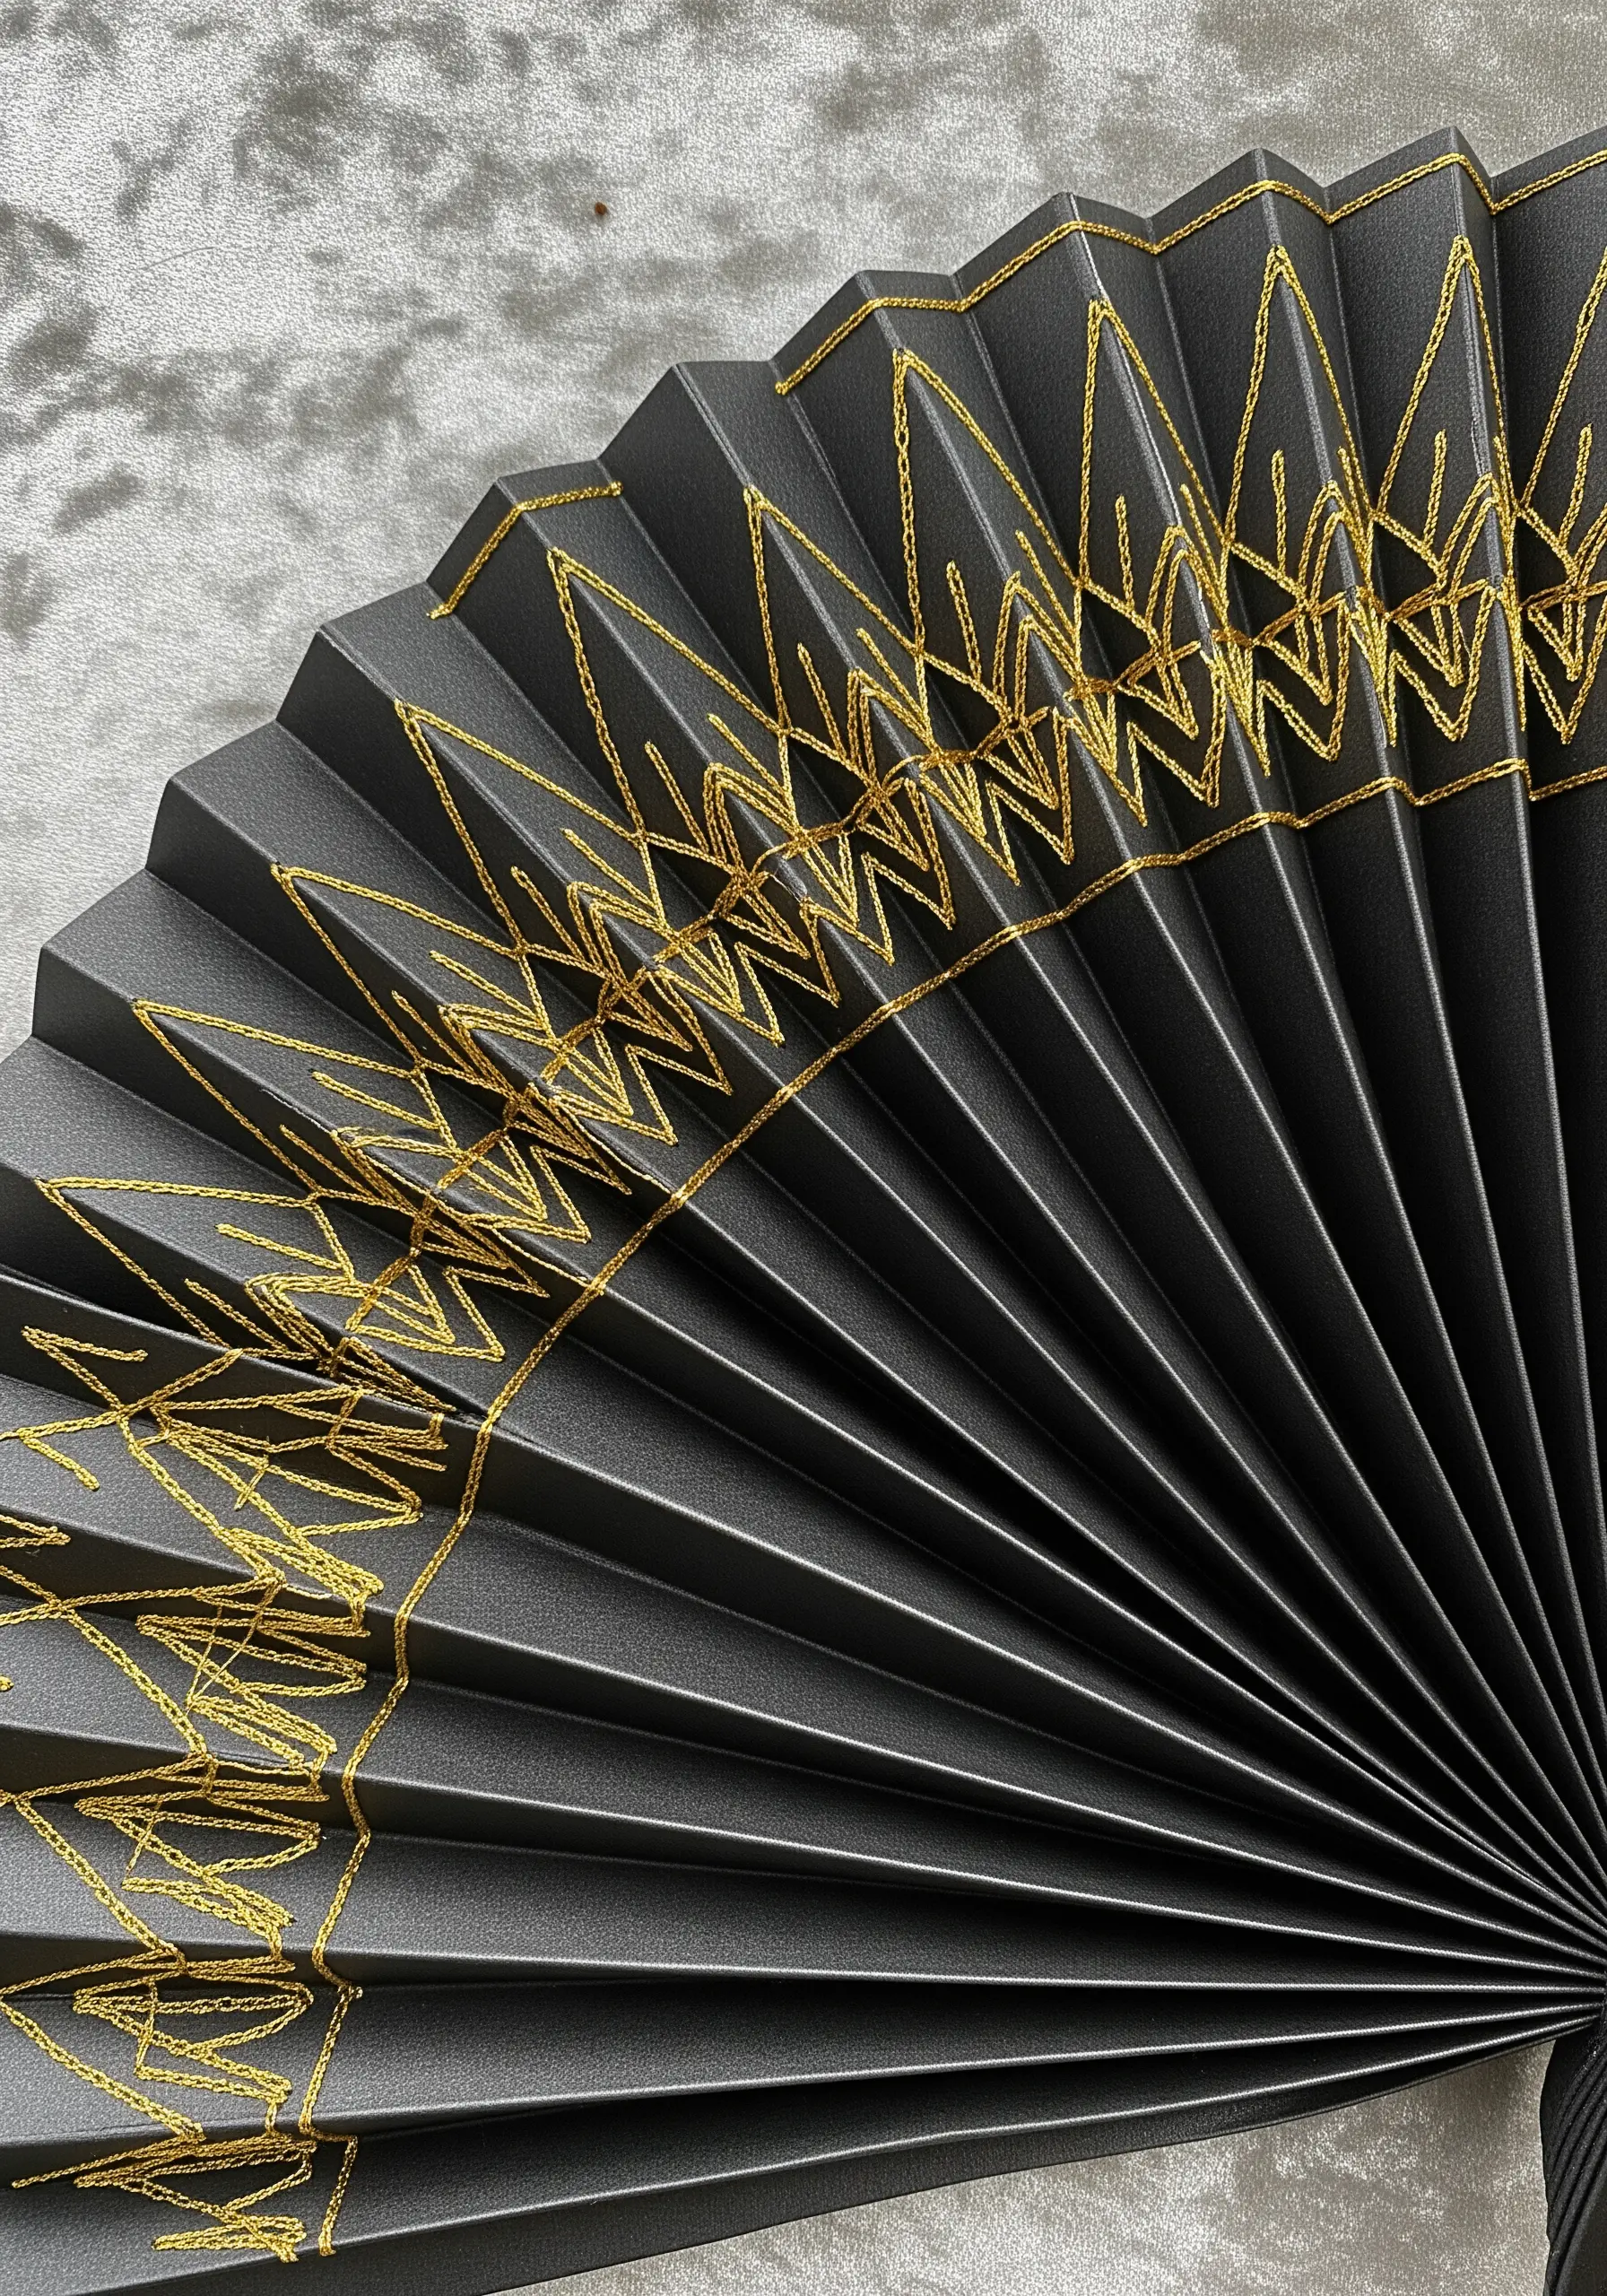
Create an intriguing, fractured pattern by embroidering your design on heavy paper while it is still flat, before folding it into a 3D object like a fan.
Use a simple backstitch and a high-contrast metallic thread to create a sharp, continuous geometric design.
When you make the accordion folds, the pattern will break and repeat in an unexpected way, interacting with the object’s form to create a complex and modern aesthetic.
18. Use Paper Cutouts as a Weaving Loom
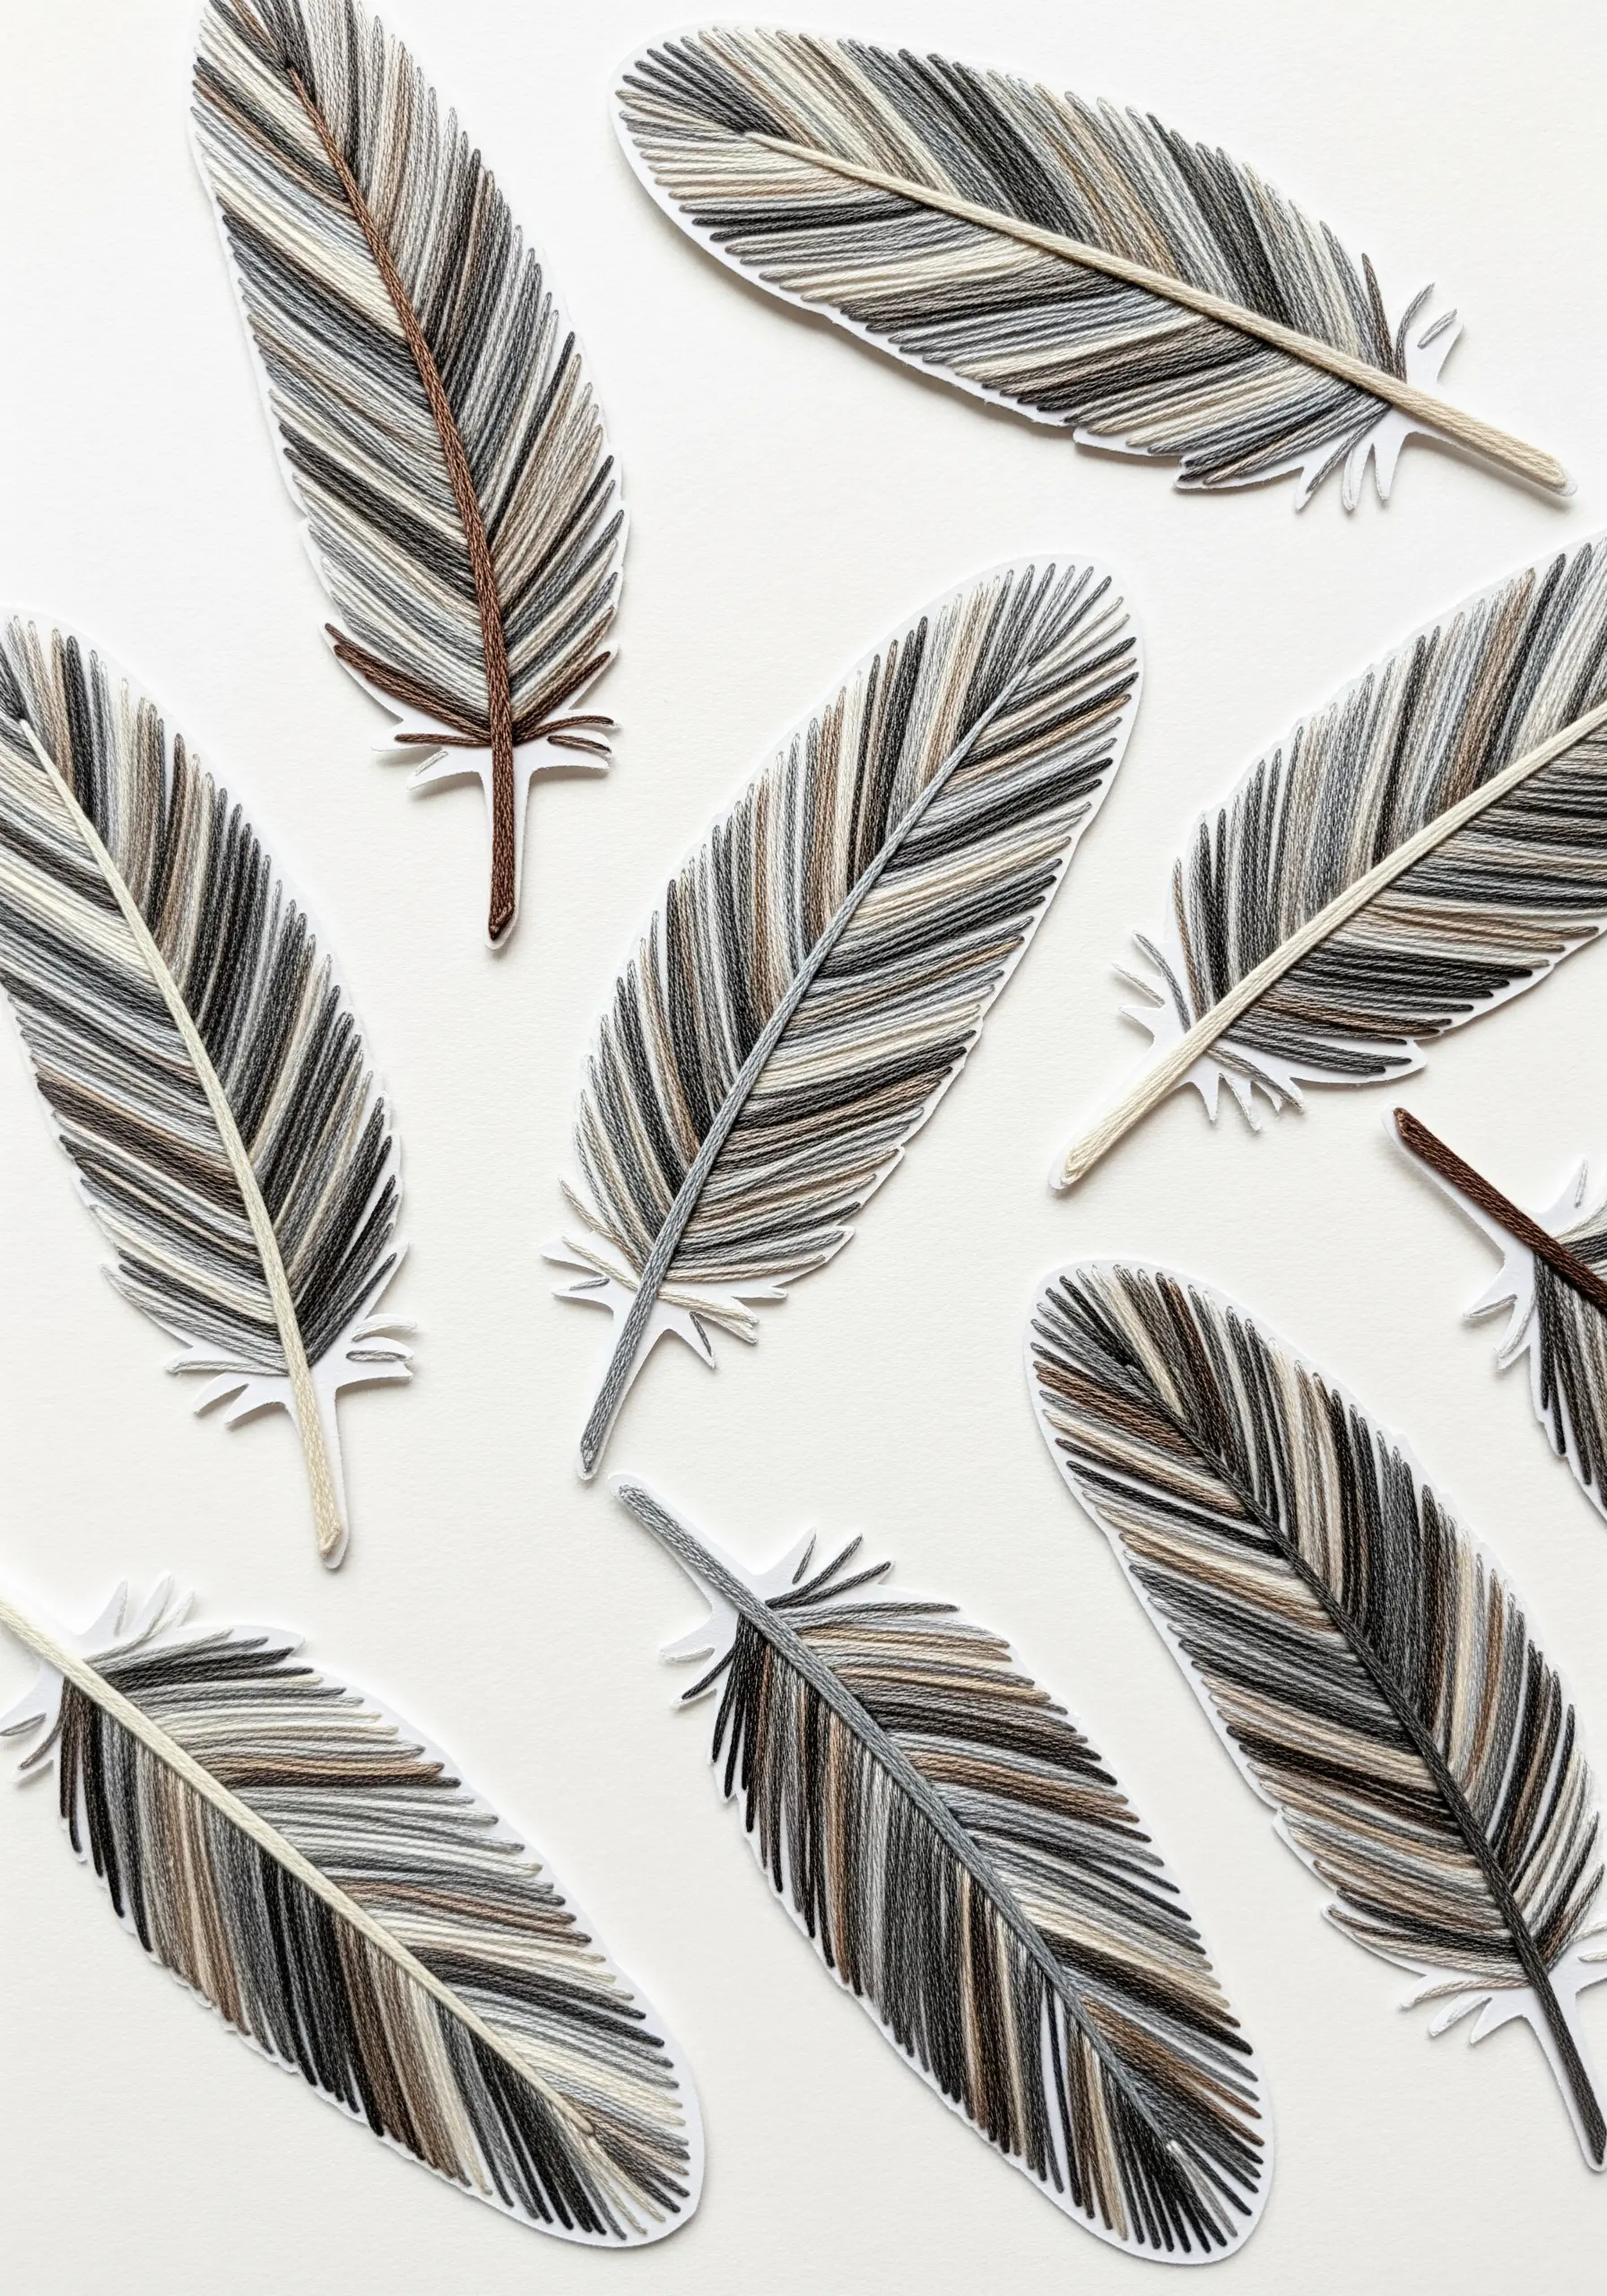
Transform a simple paper cutout into a miniature loom for creating textural, thread-wrapped objects.
On a feather shape, for example, tightly wrap the central quill with a dark thread, then use long straight stitches to radiate from the quill to the outer edge, mimicking the feather’s barbs.
Using a variegated thread here will add natural-looking color shifts, resulting in a beautiful mixed-media piece that showcases both paper and thread.
19. Build Coral Reef Textures with Knots and Quills
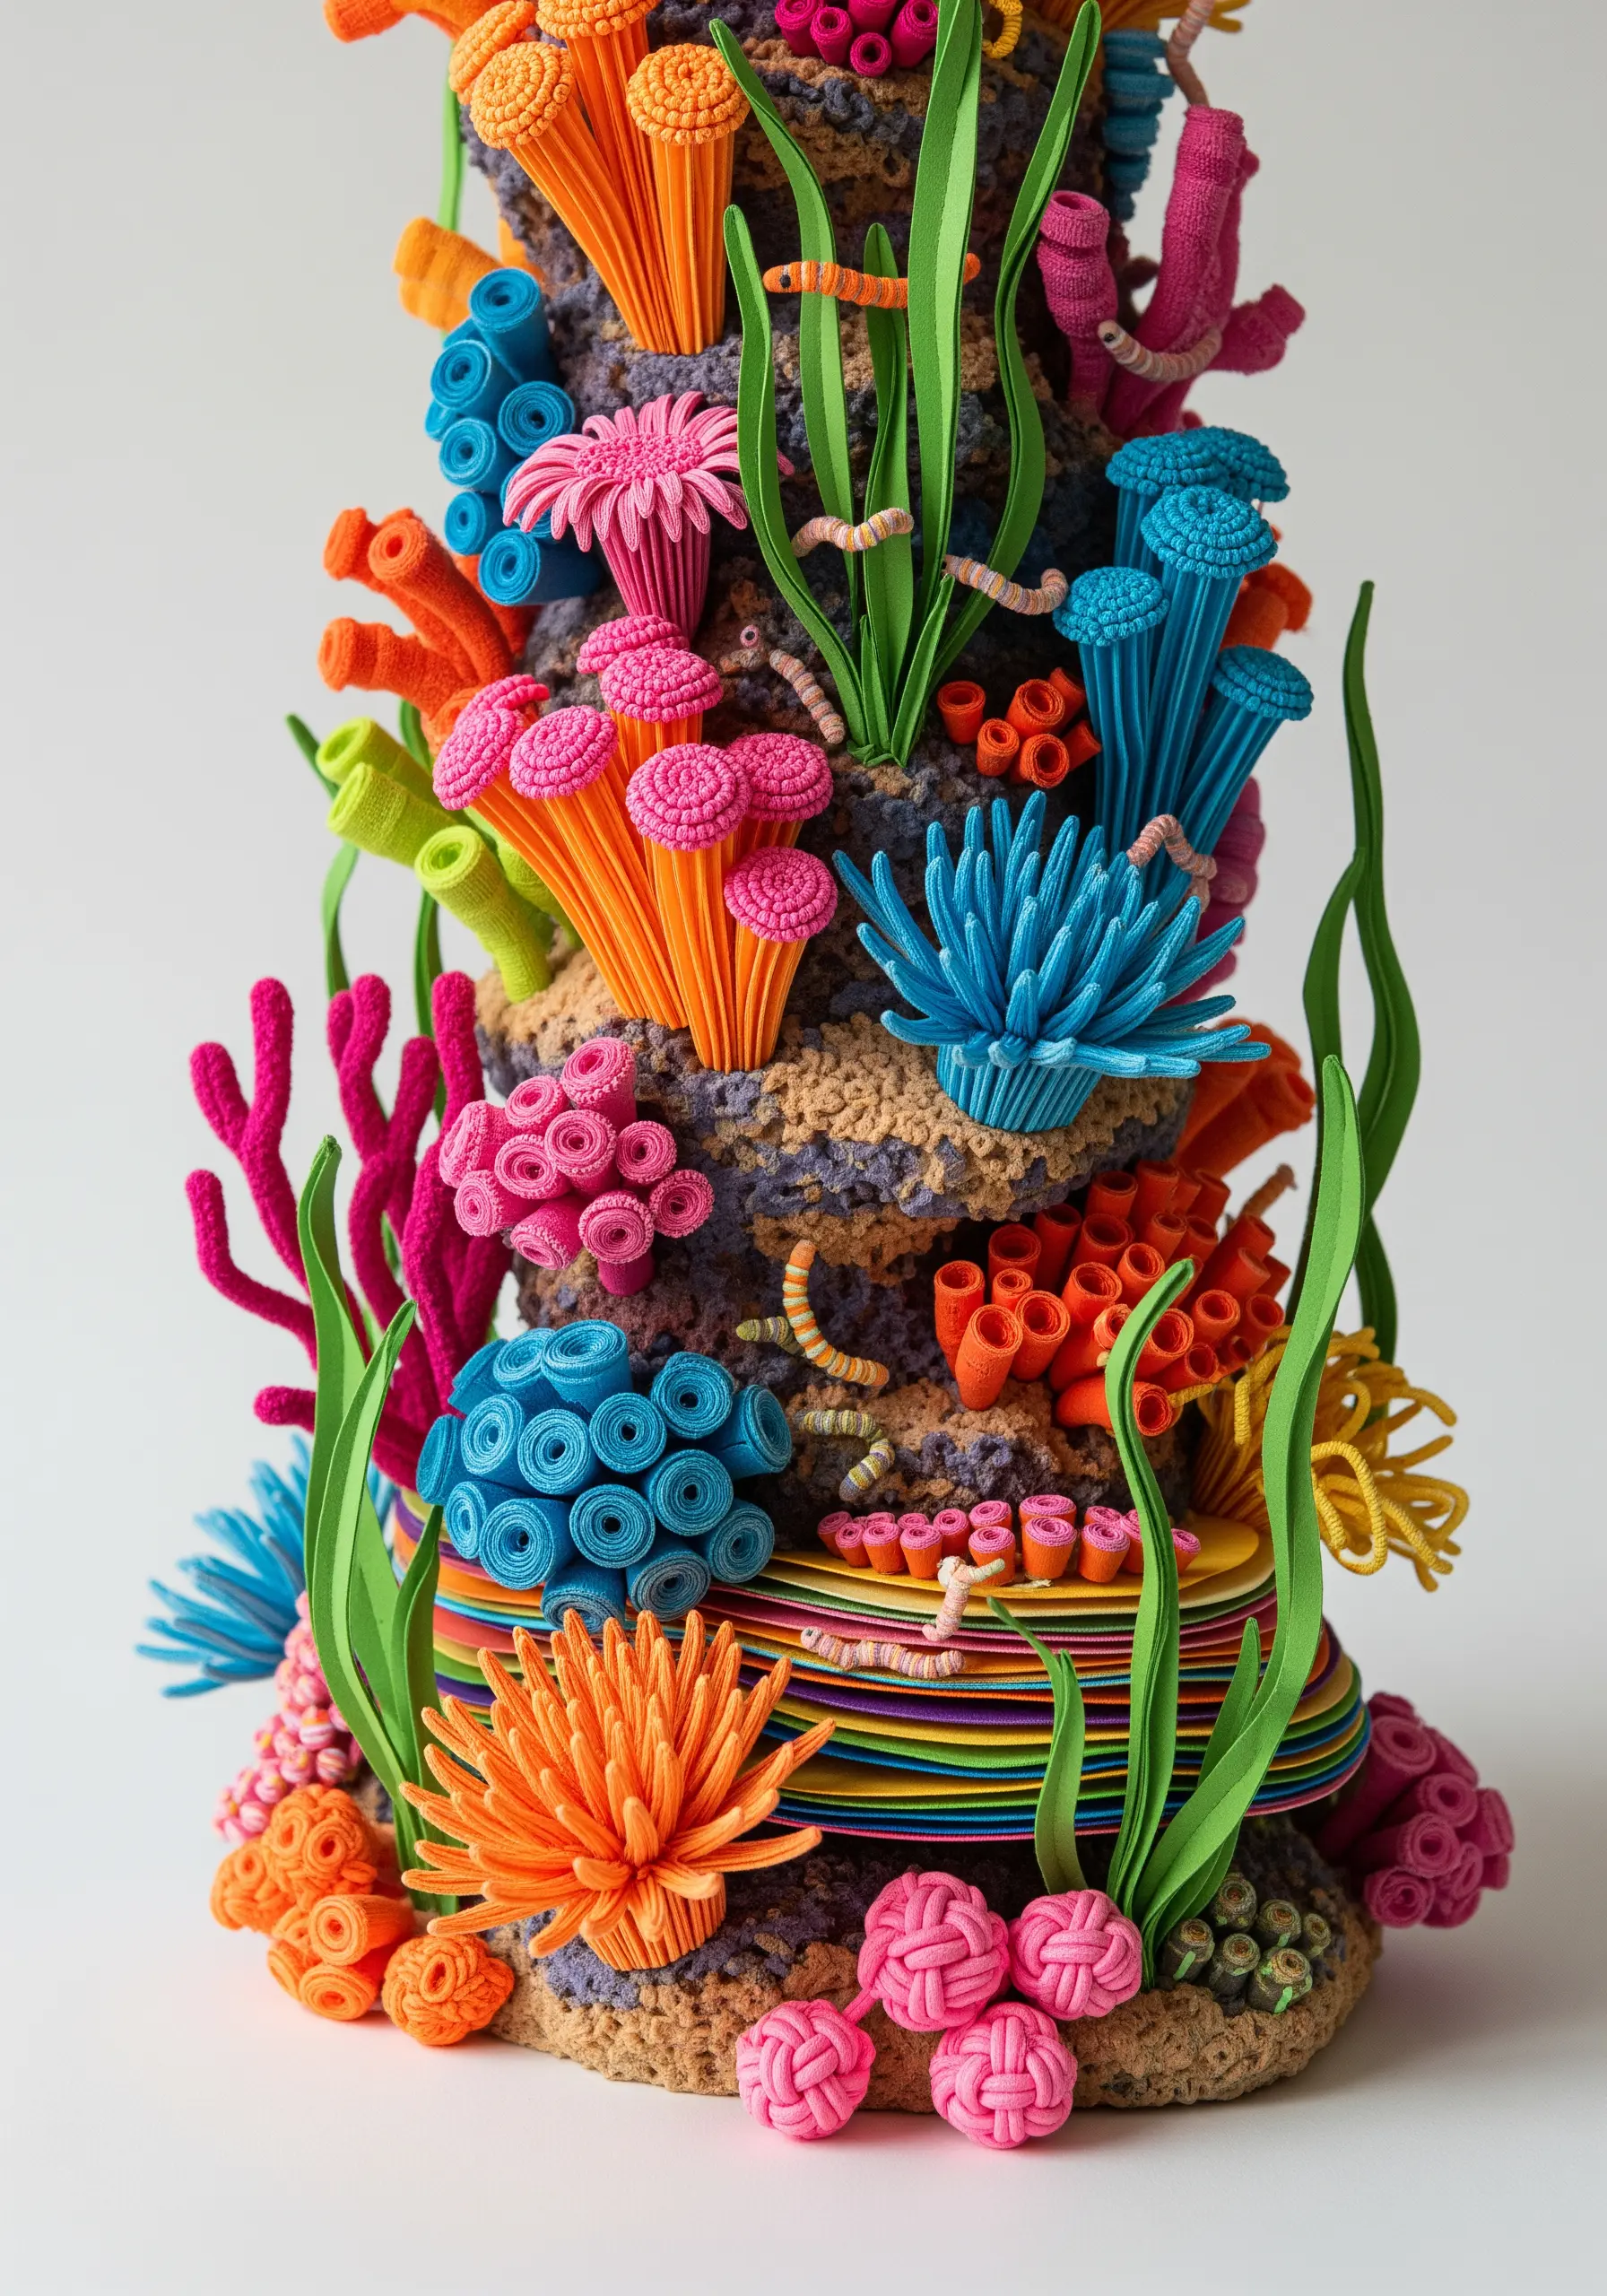
Recreate the complex, organic textures of a coral reef by combining the structural forms of paper quilling with the dimensional dots of embroidery.
Use rolled and coiled paper strips to build the larger coral shapes, then add dense clusters of French knots and bullion knots to simulate the soft polyps and intricate surfaces.
This mixed-media technique allows you to build incredible depth and realism.
20. Embellish an Embossed Photo Mat with Subtle Stitches
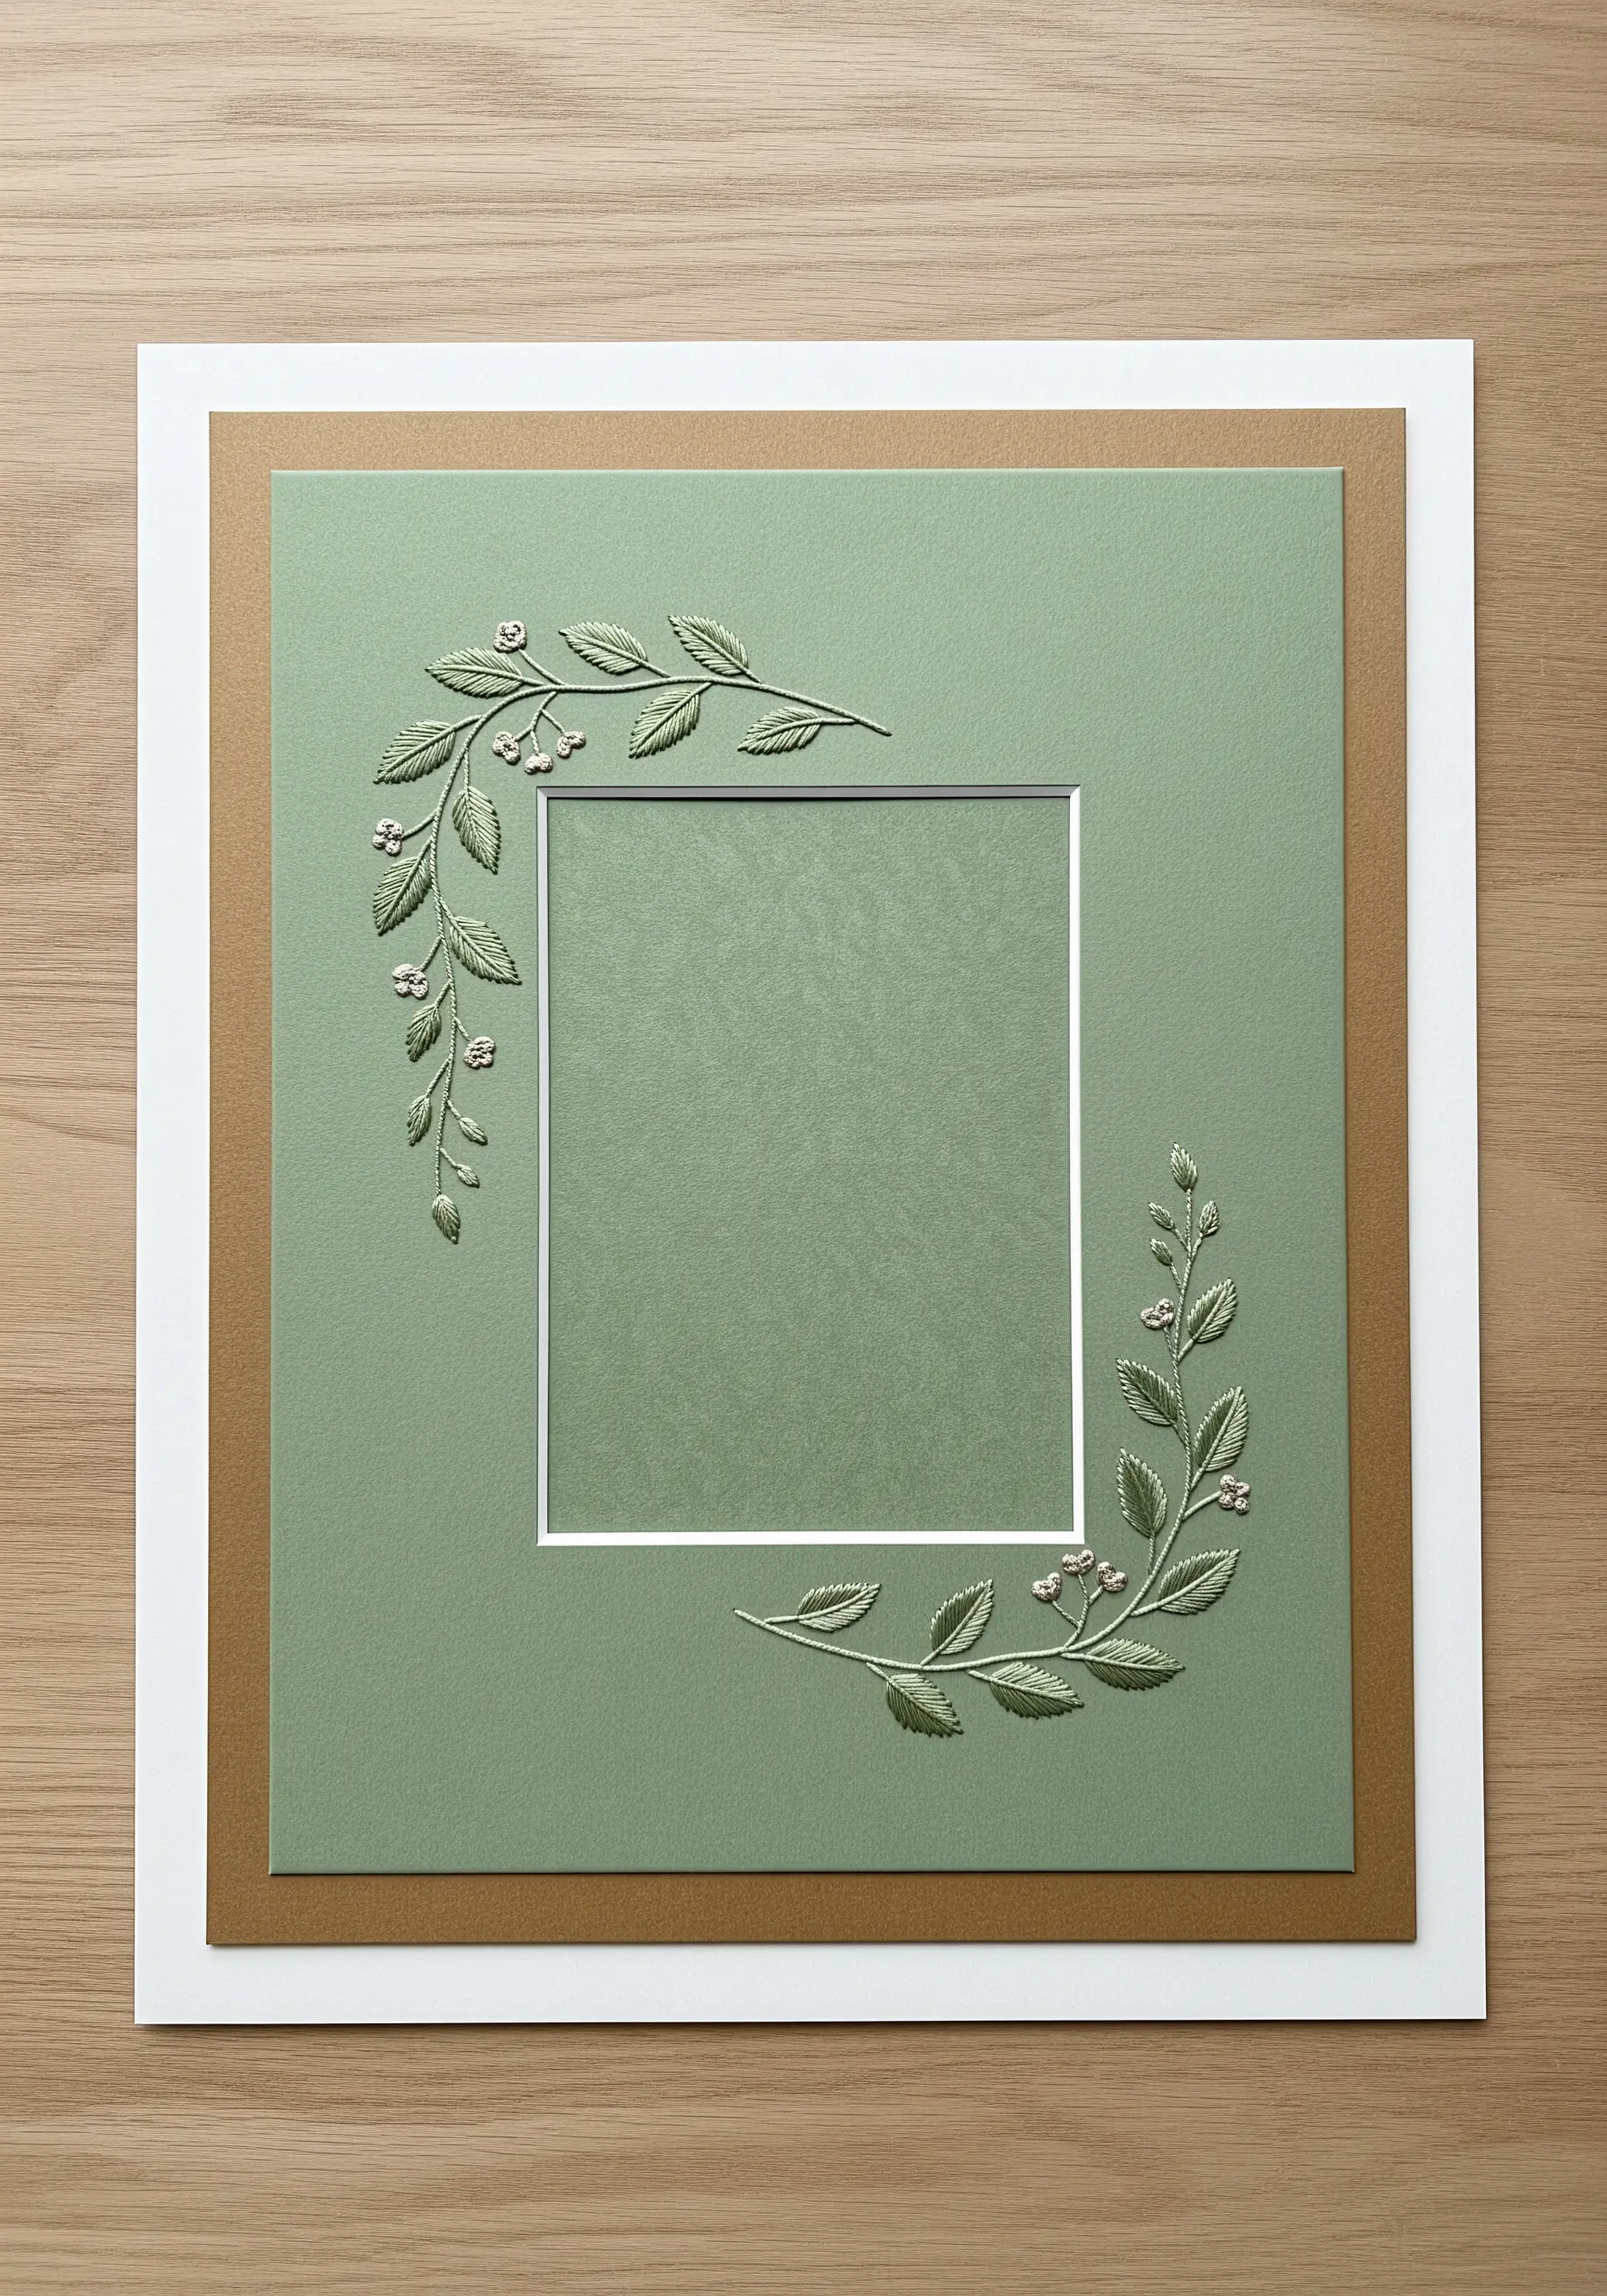
Add a layer of quiet luxury to a store-bought photo mat by accenting its embossed details with delicate embroidery.
Choose a thread color that either matches or subtly complements the paper, and use a single strand to add tiny details—French knot berries on a vine, or single detached chain stitches as tiny leaves.
This restrained approach adds a personal, handcrafted touch that feels exceptionally refined and intentional.
21. Couch Freeform Lines onto a Woven Paper Grid
Use a grid of woven paper strips as a structured, unconventional canvas for fluid, expressive thread work.
Instead of following the grid, lay down bundles of colorful yarn in organic, meandering lines across the surface.
Secure these lines by couching them with a thinner, contrasting thread. The resulting tension between the rigid geometry of the paper grid and the flowing freedom of the yarn creates a compelling piece of abstract art.
22. Create Sculptural Lines with Thread-Wrapped Wire

Elevate minimalist line art by giving it a tangible, three-dimensional form that lifts off the page.
First, bend a thin, pliable wire into your desired continuous-line shape, such as a face or silhouette.
Next, wrap the entire wire form tightly and evenly with embroidery floss. Mount the finished piece onto heavy, textured paper to create a stunning sculptural drawing where the line casts its own subtle shadow.


