
You already know the quiet magic of pulling a threaded needle through fabric. But what if your canvas wasn’t fabric at all? What if it was paper—crisp, smooth, and full of unexpected potential?
Combining paper art with embroidery isn’t about replacing fabric; it’s about expanding your creative language. It allows you to build structure, create sharp silhouettes, and play with light and shadow in ways that textiles alone cannot achieve.
Here, you will discover how to transform paper into a textured base for your stitches, how to use thread to add dimension to paper sculptures, and how to blend these two mediums into art that is modern, tactile, and deeply personal. It’s time to pick up a needle—and a new kind of canvas.
1. Sculptural Quilling Meets Celestial Stitches
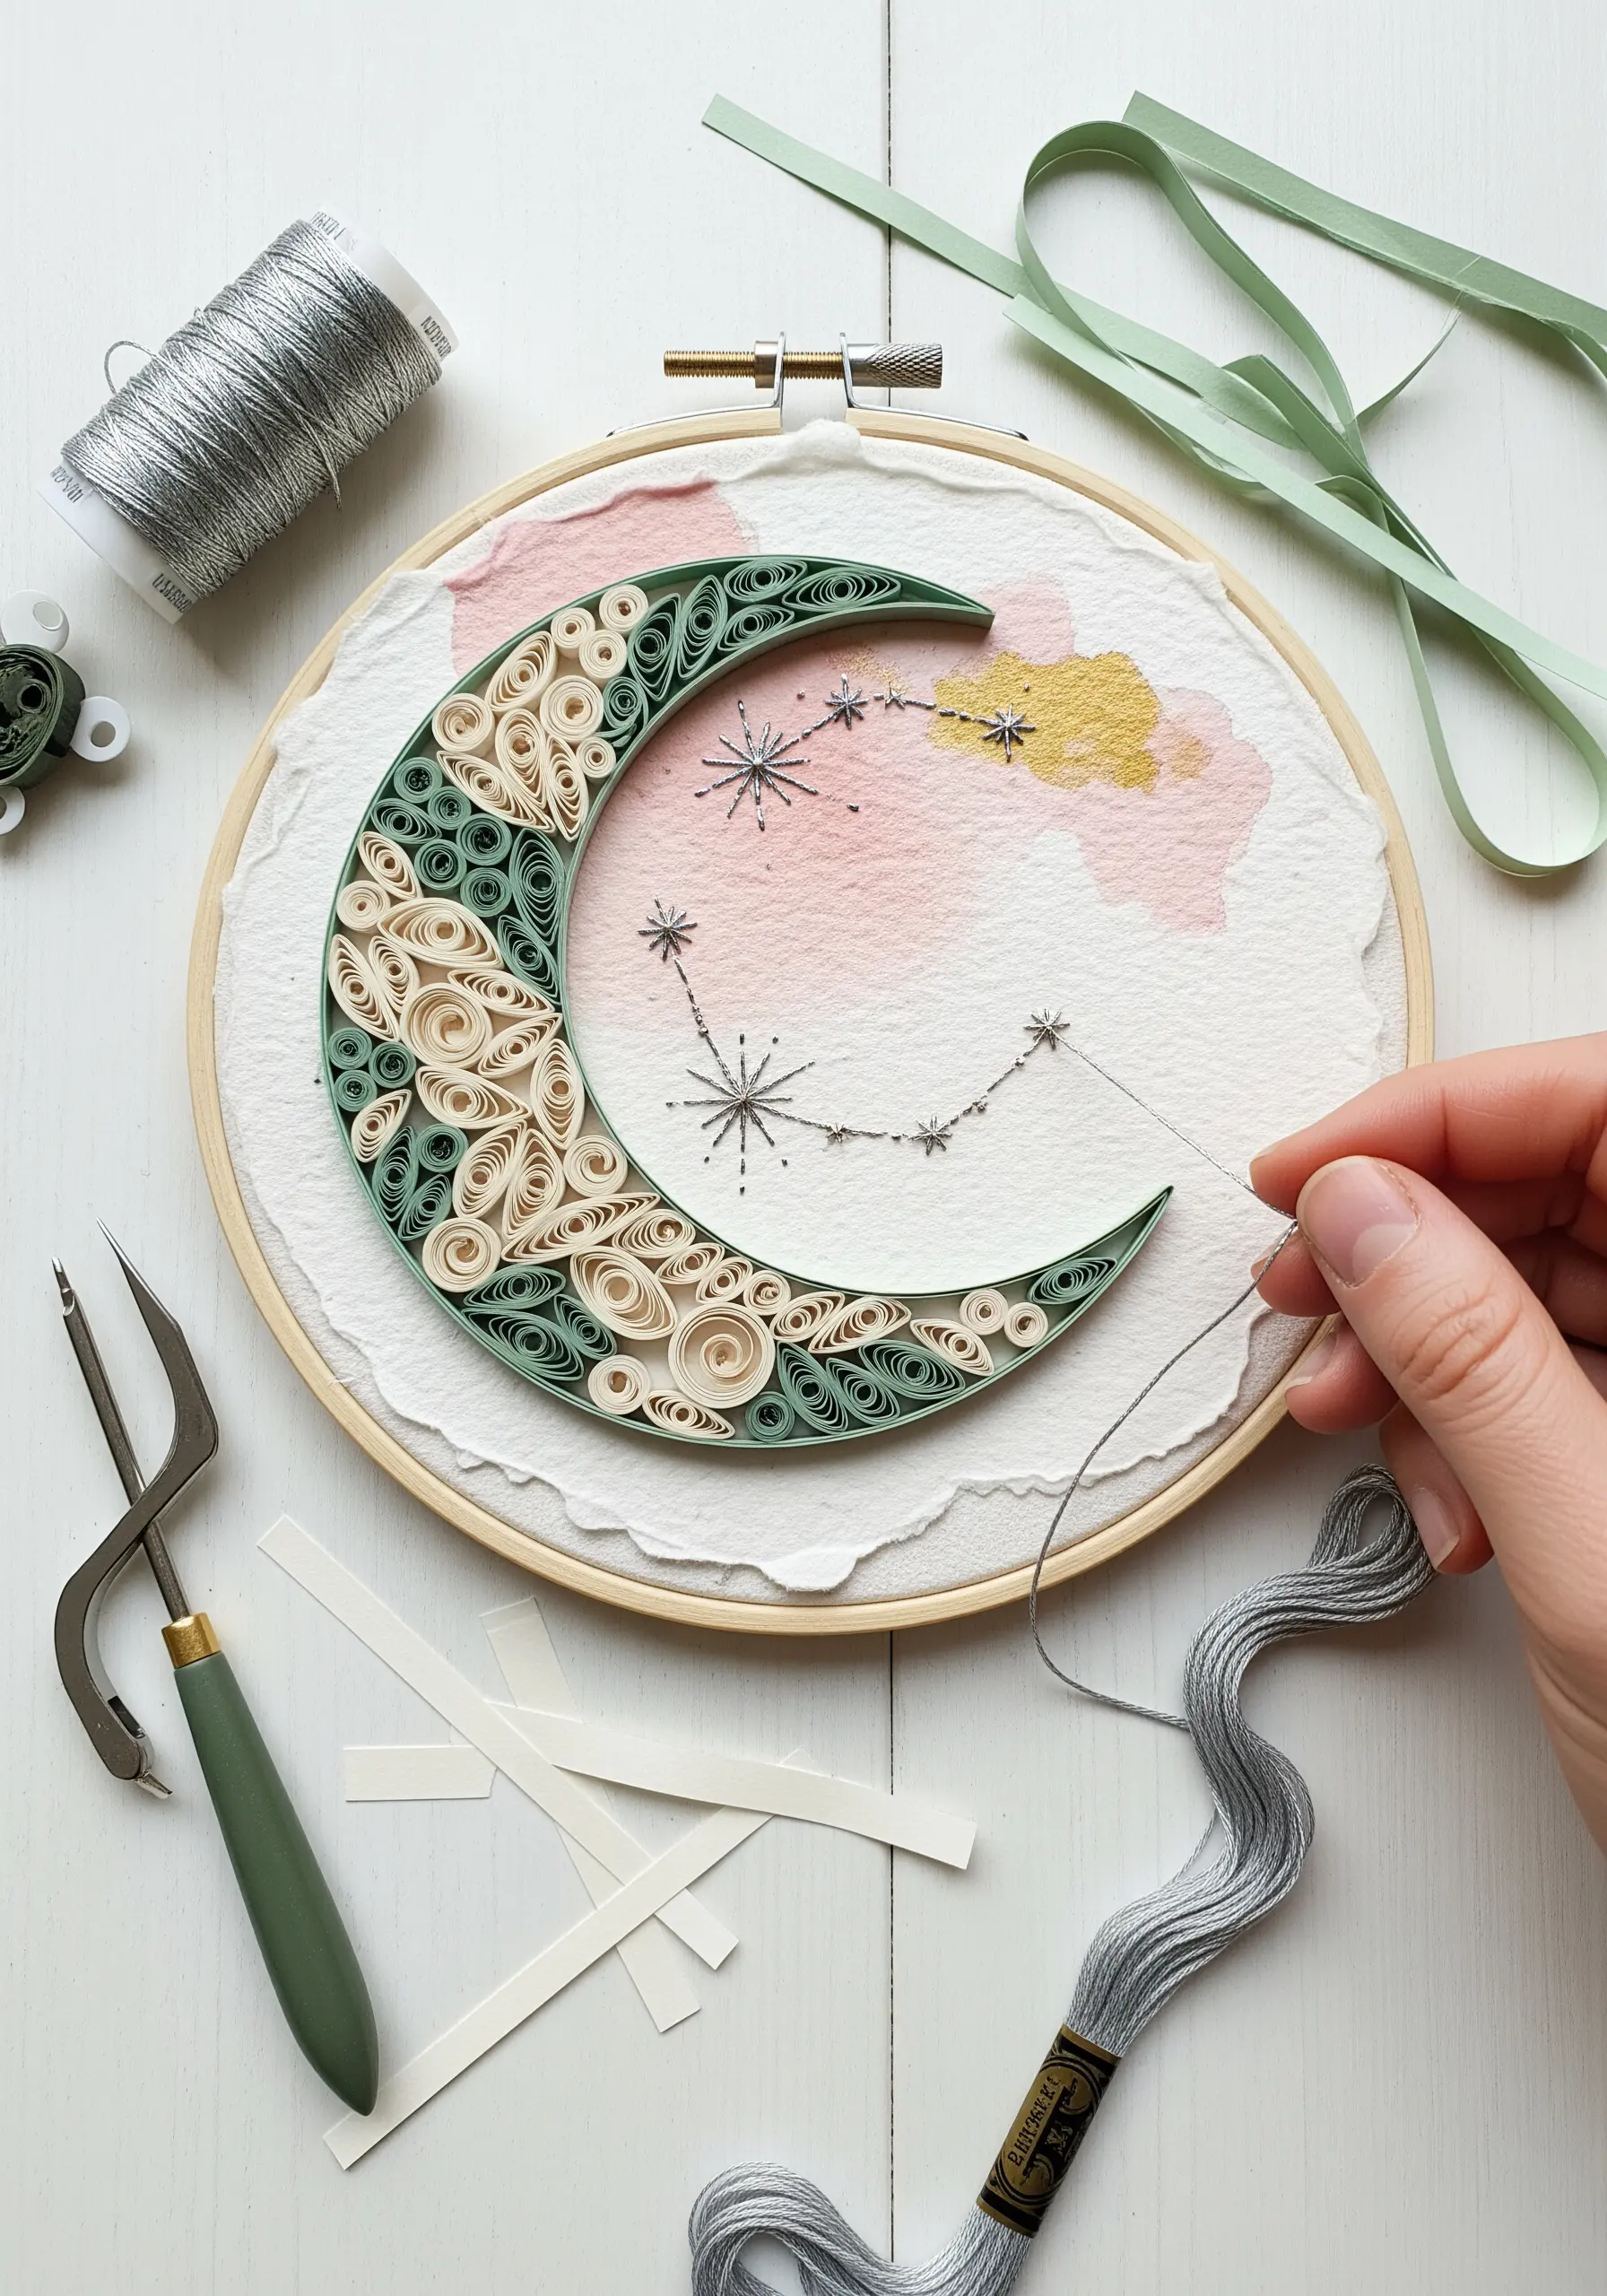
Create a raised, dimensional surface by mounting paper quilling directly onto watercolor paper stretched in a hoop.
This technique allows you to add delicate embroidered details, like these metallic stars, that seem to float above the background.
Use a fine, sharp needle to pierce the paper cleanly, and opt for a single strand of metallic floss for a subtle shimmer that contrasts beautifully with the matte paper.
A light watercolor wash behind the quilling adds softness and depth, preventing the composition from feeling flat.
2. Weave a Paper Canvas for Botanical Outlines
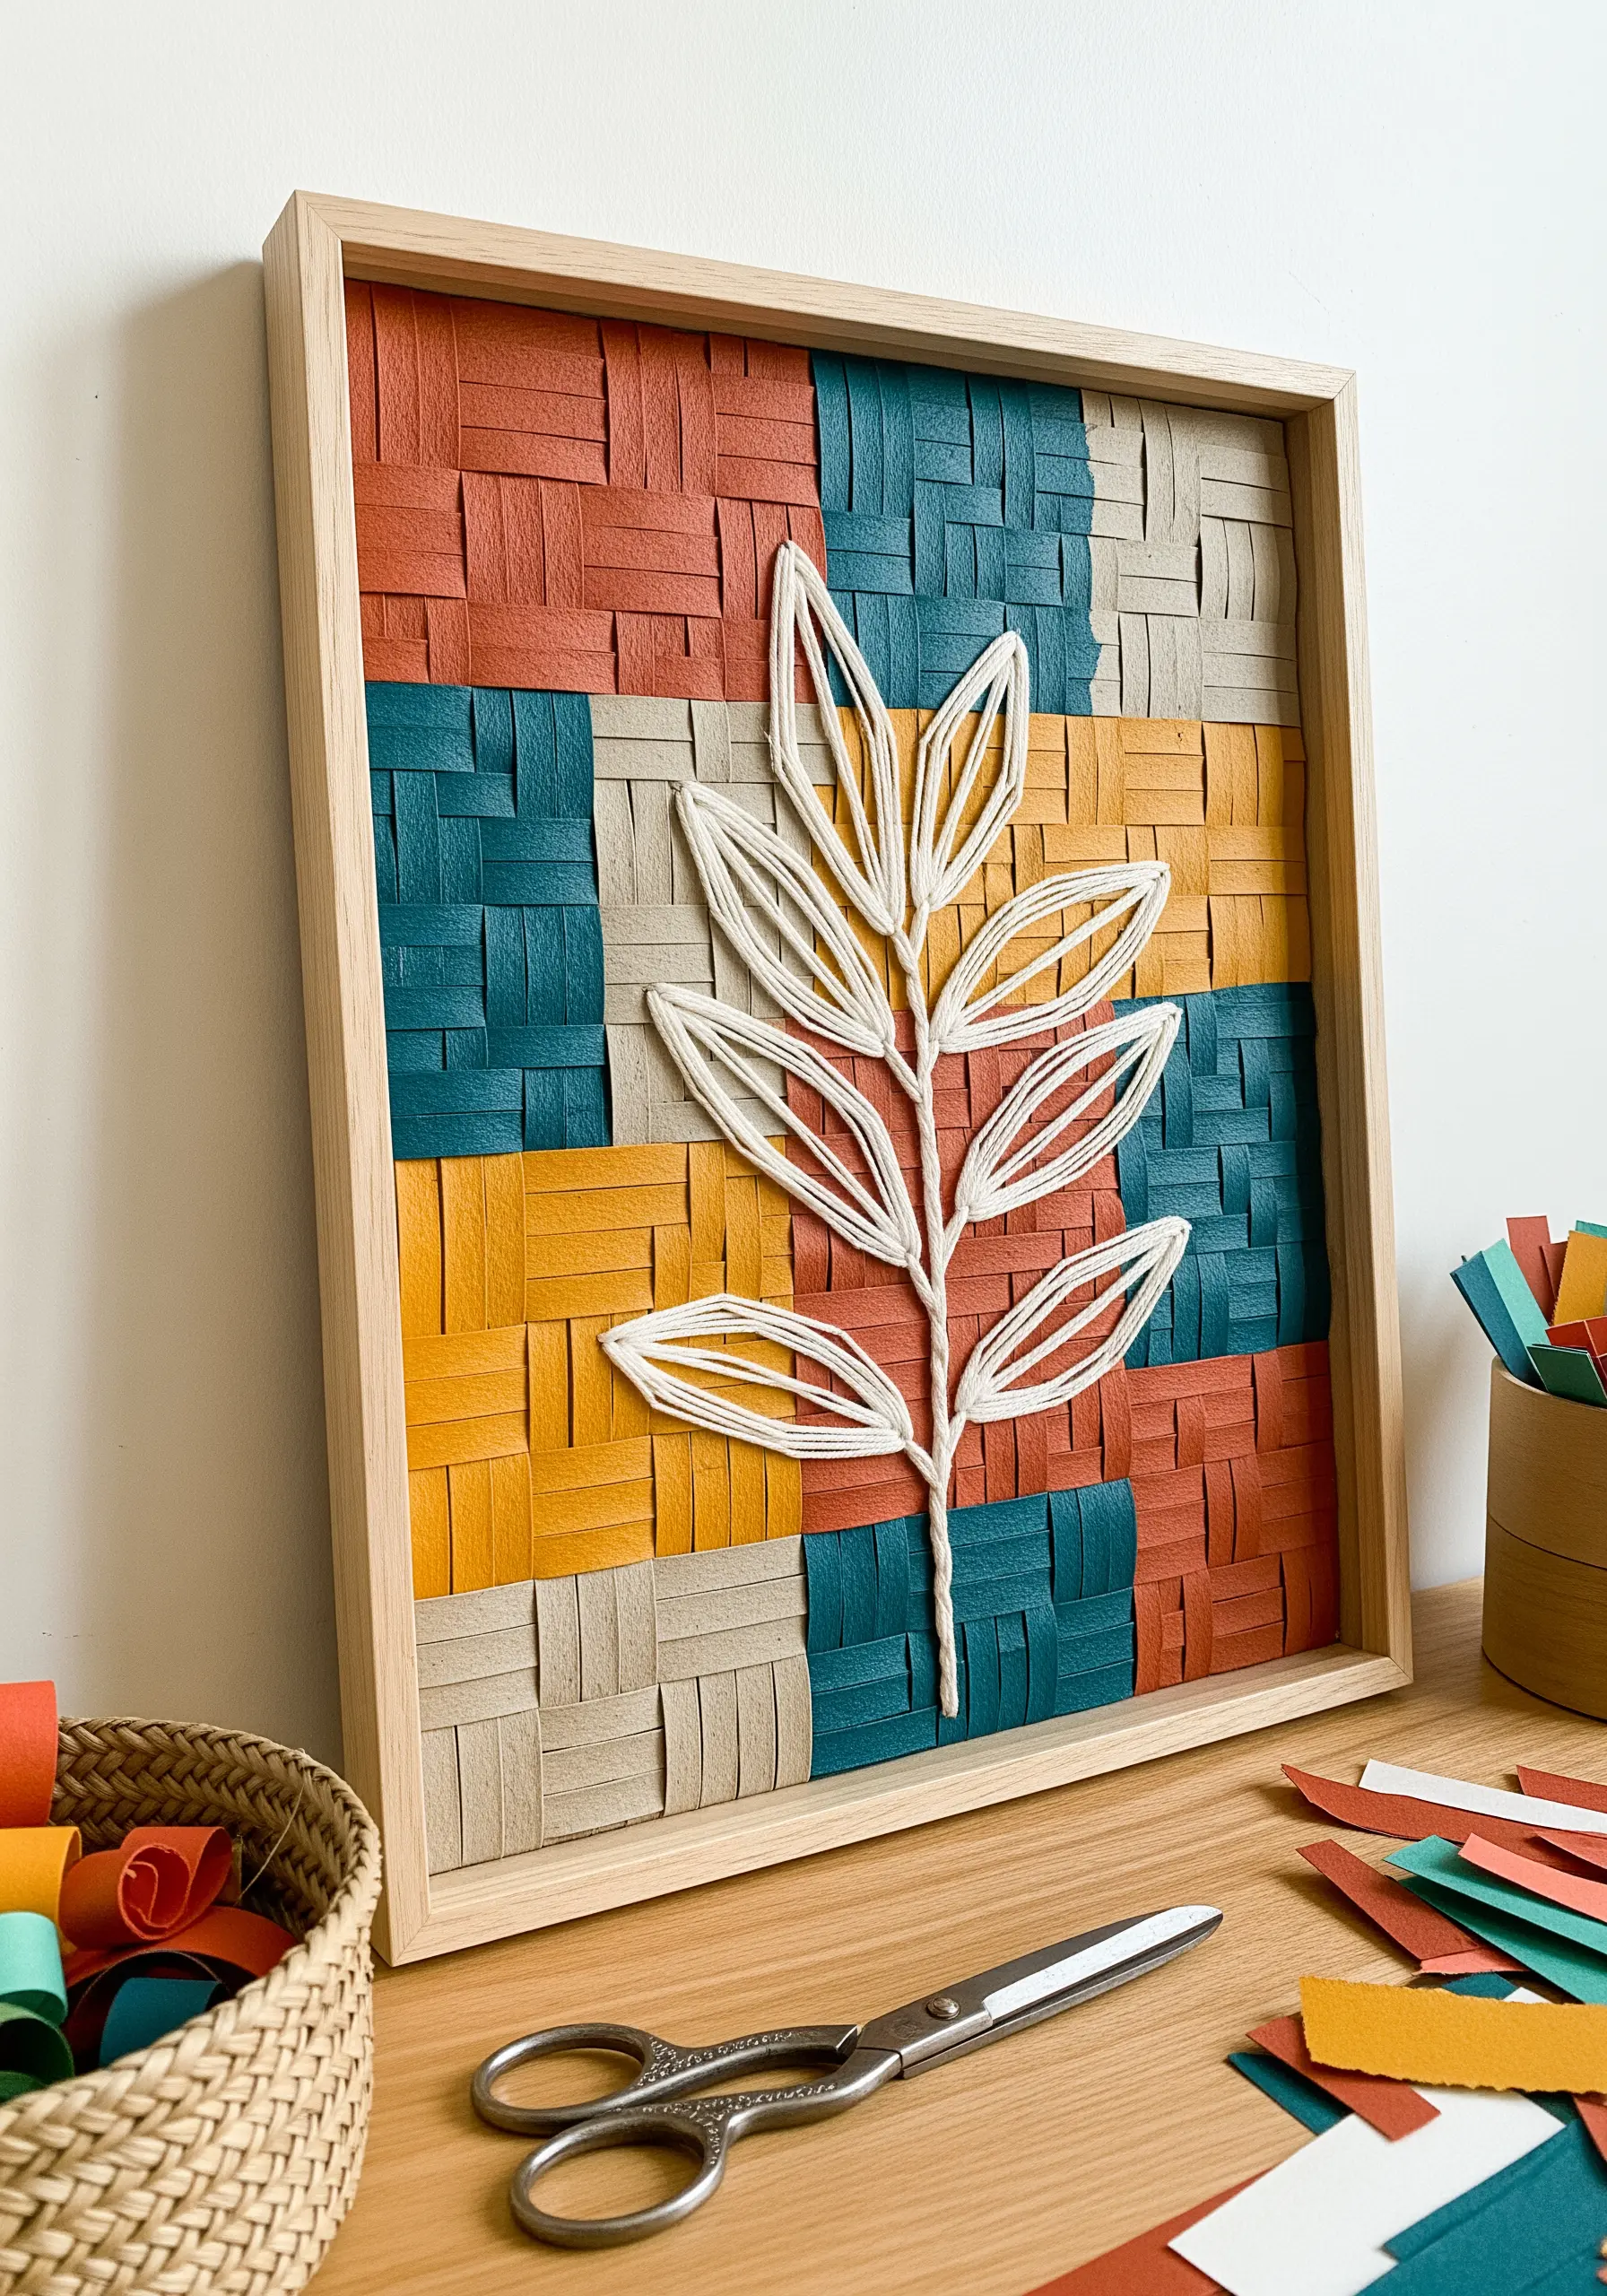
Instead of fabric, weave strips of heavy cardstock to create a graphic, textured background for your stitching.
The interwoven colors provide a dynamic base that makes simple line art pop.
To stitch your motif, use a couching technique—laying down a thick cord or multiple strands of floss and tacking it in place with smaller stitches—to ensure your design stands strong against the busy pattern.
This method avoids piercing the thick paper repeatedly and gives your botanical a clean, raised outline.
3. Add Gilded Accents to Origami Folds
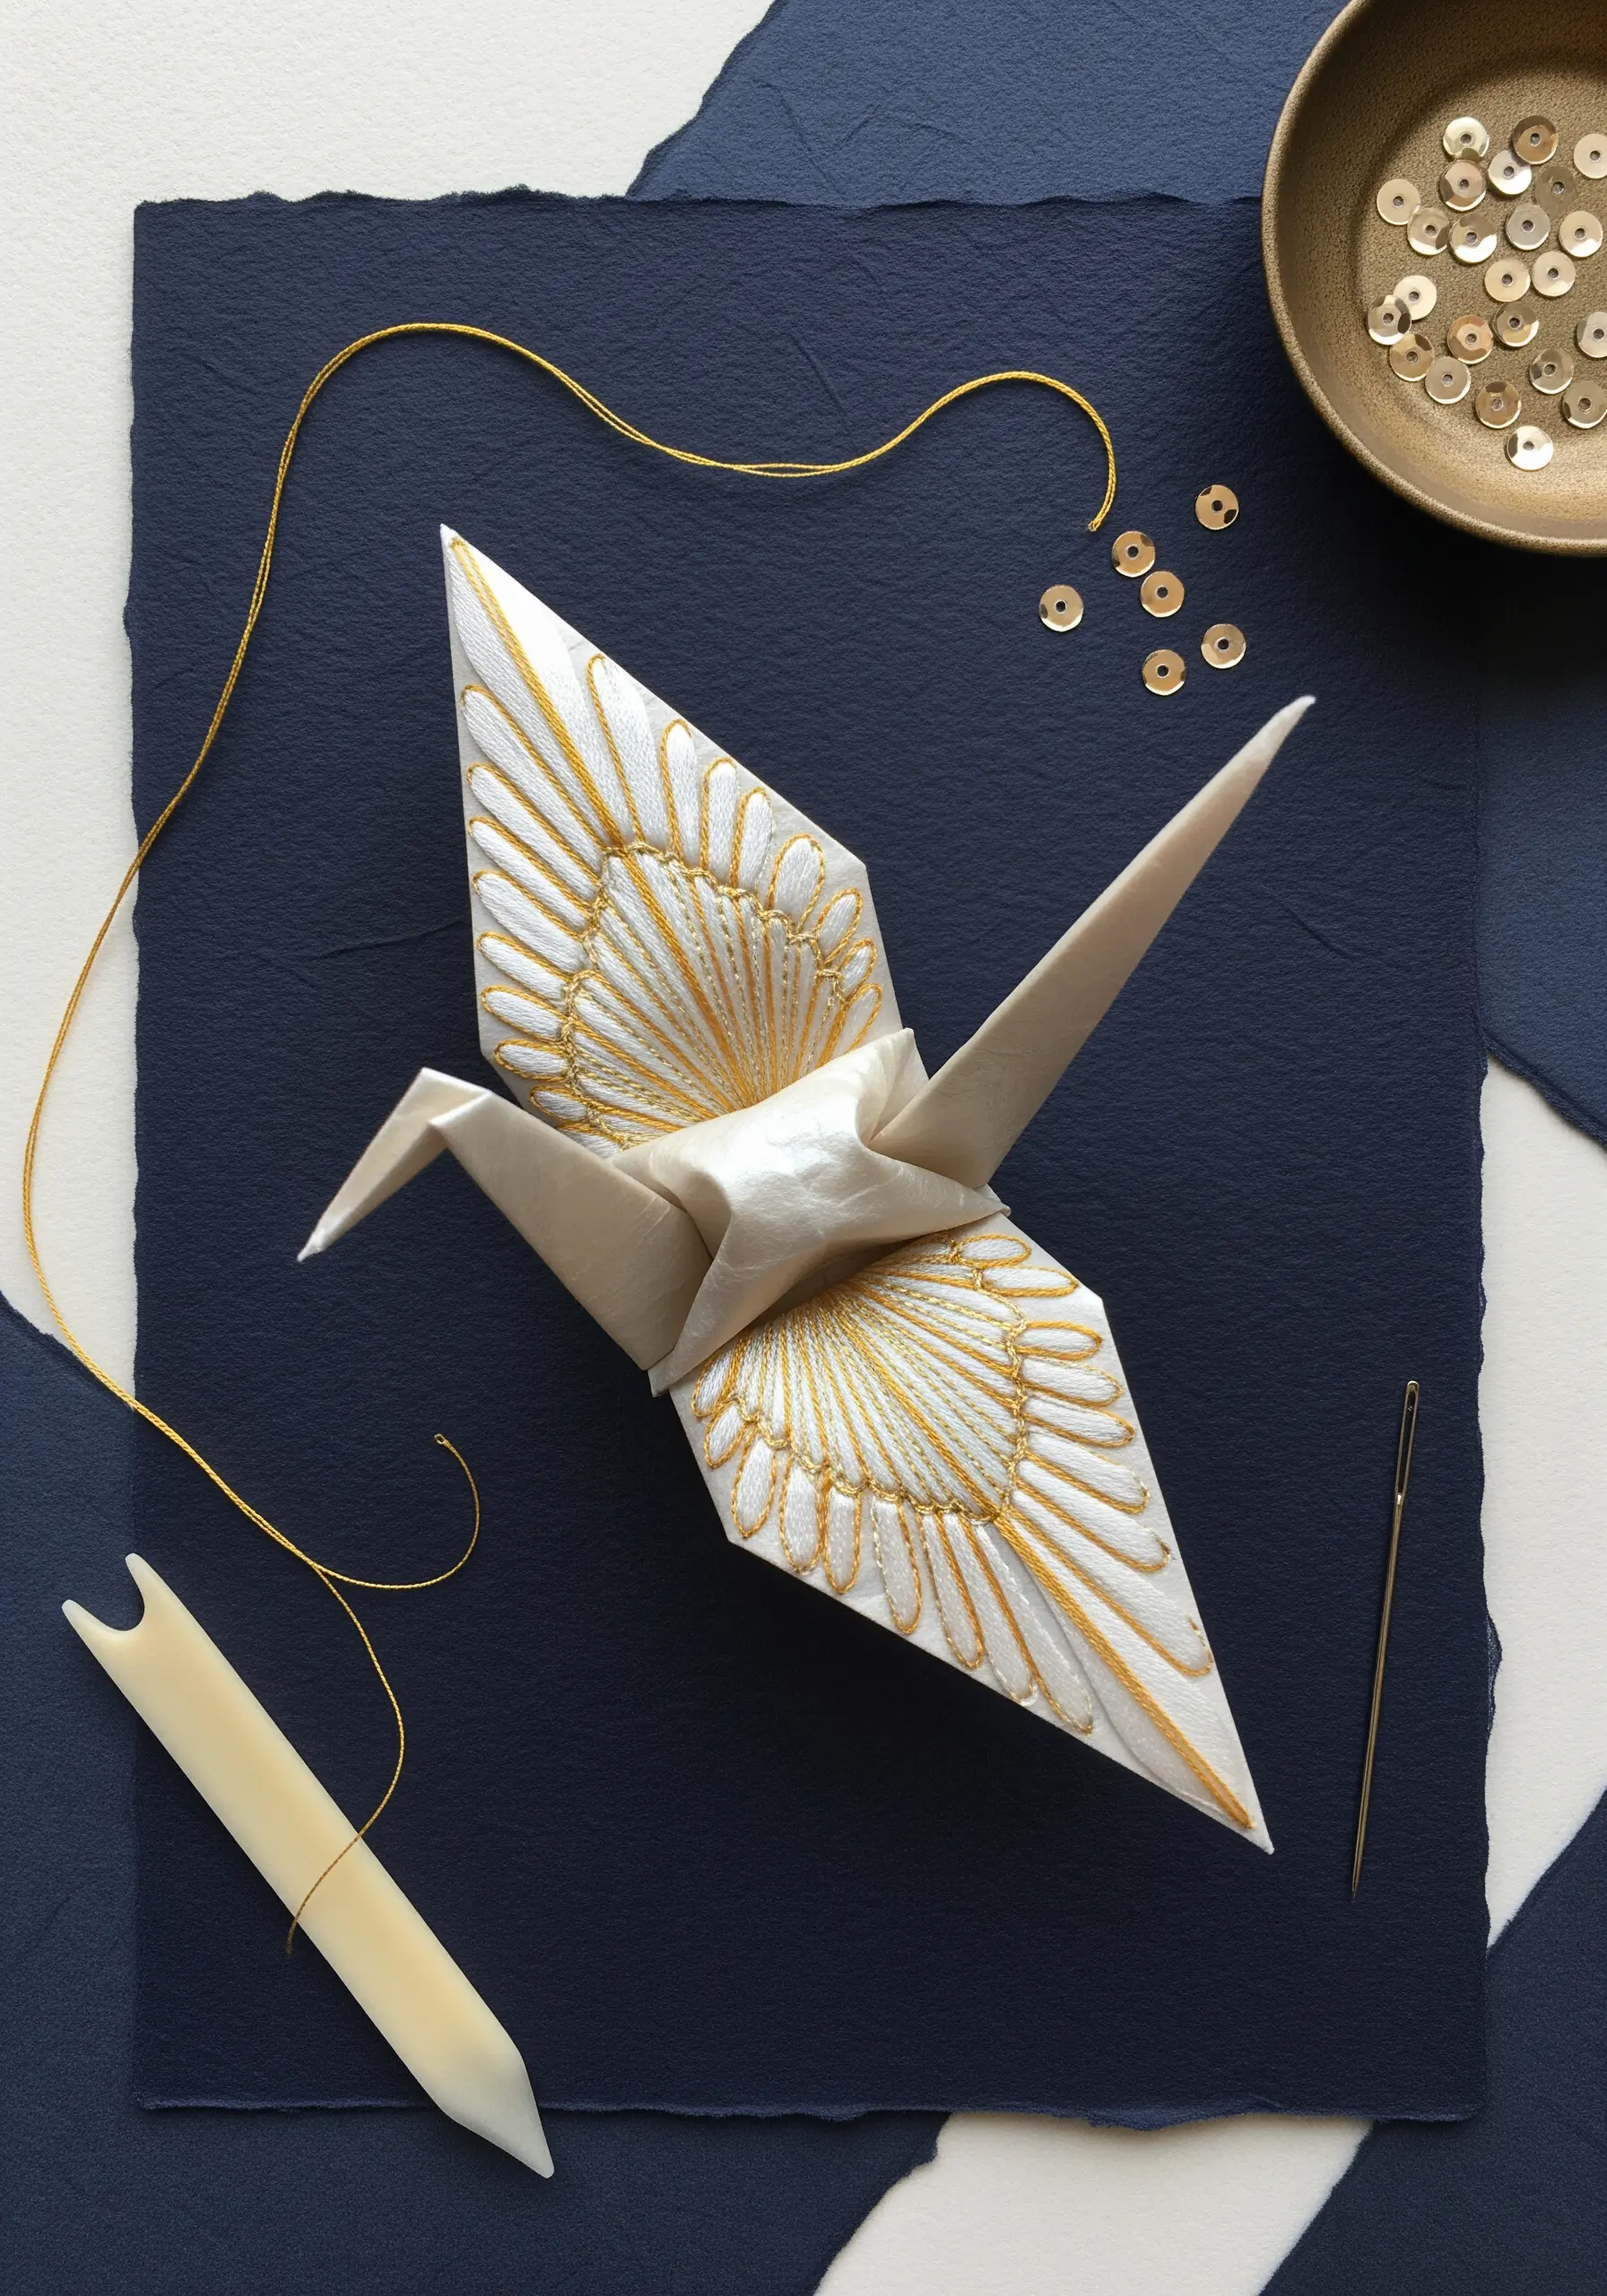
Transform a simple origami figure into a delicate work of art by embroidering directly onto the paper.
Choose a sturdy, high-quality paper that can handle piercing without tearing, like pearlescent or handmade paper.
Use a fine needle and a single strand of gold metallic thread to trace the elegant lines of the folds, adding details like wing feathers with satin stitch.
Pre-punching your stitch holes with the needle before threading can make the process smoother and prevent buckling.
4. Layer Papercut Foliage with Thread Painting
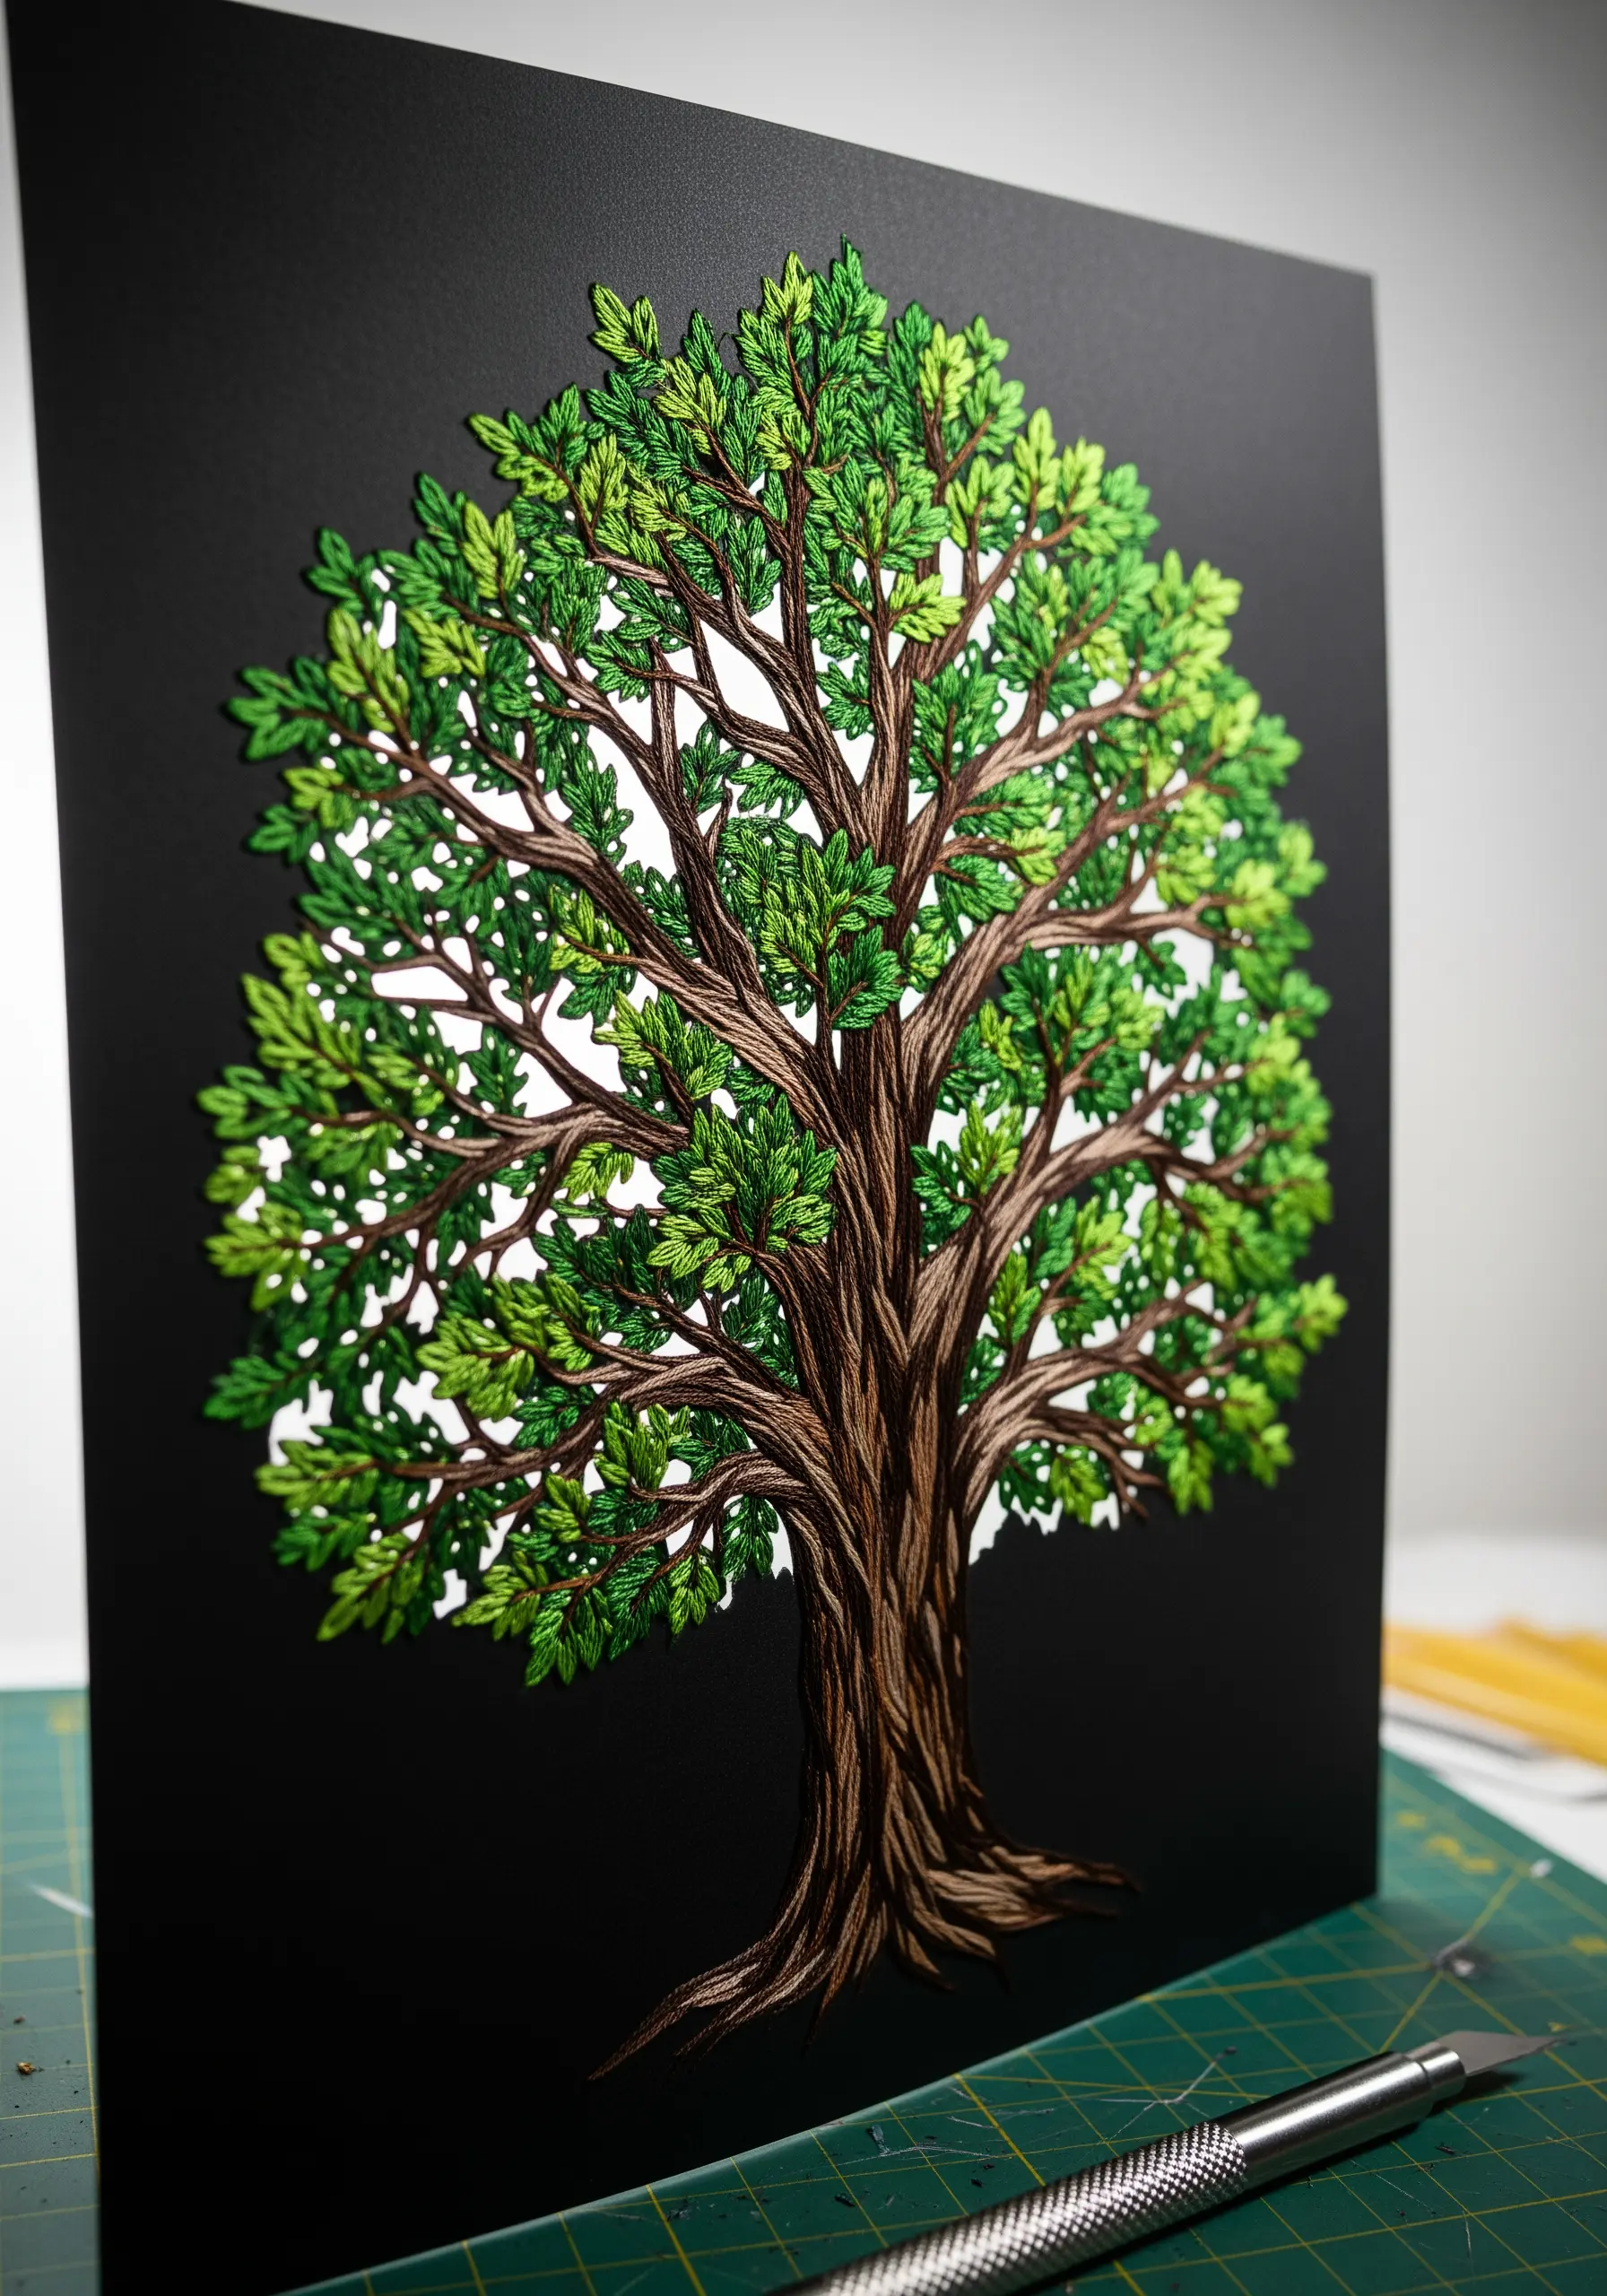
Build extraordinary depth by combining intricate papercutting with detailed thread painting.
Start by cutting out the main trunk and branches from dark paper, then layer progressively smaller, lighter green papercut leaves on top.
Use a single strand of floss in various shades of green to add veins and highlights, stitching directly through the paper layers.
This fusion of techniques creates a hyper-realistic texture that feels both sculptural and painterly.
5. Stitch Definition into Torn-Paper Landscapes

Create a collage landscape using torn watercolor paper to achieve soft, organic mountain ridges and hills.
Once your paper layers are glued down in a hoop, use embroidery to add fine details that paper alone cannot capture.
Employ long satin stitches for sun rays, chunky French knots or couched yarn for clouds, and delicate lazy daisy stitches for wildflowers.
The thread adds a tactile dimension that brings the entire scene to life, turning a flat collage into a dreamy, textured piece.
6. Fill Embossed Designs with Precision Stitching
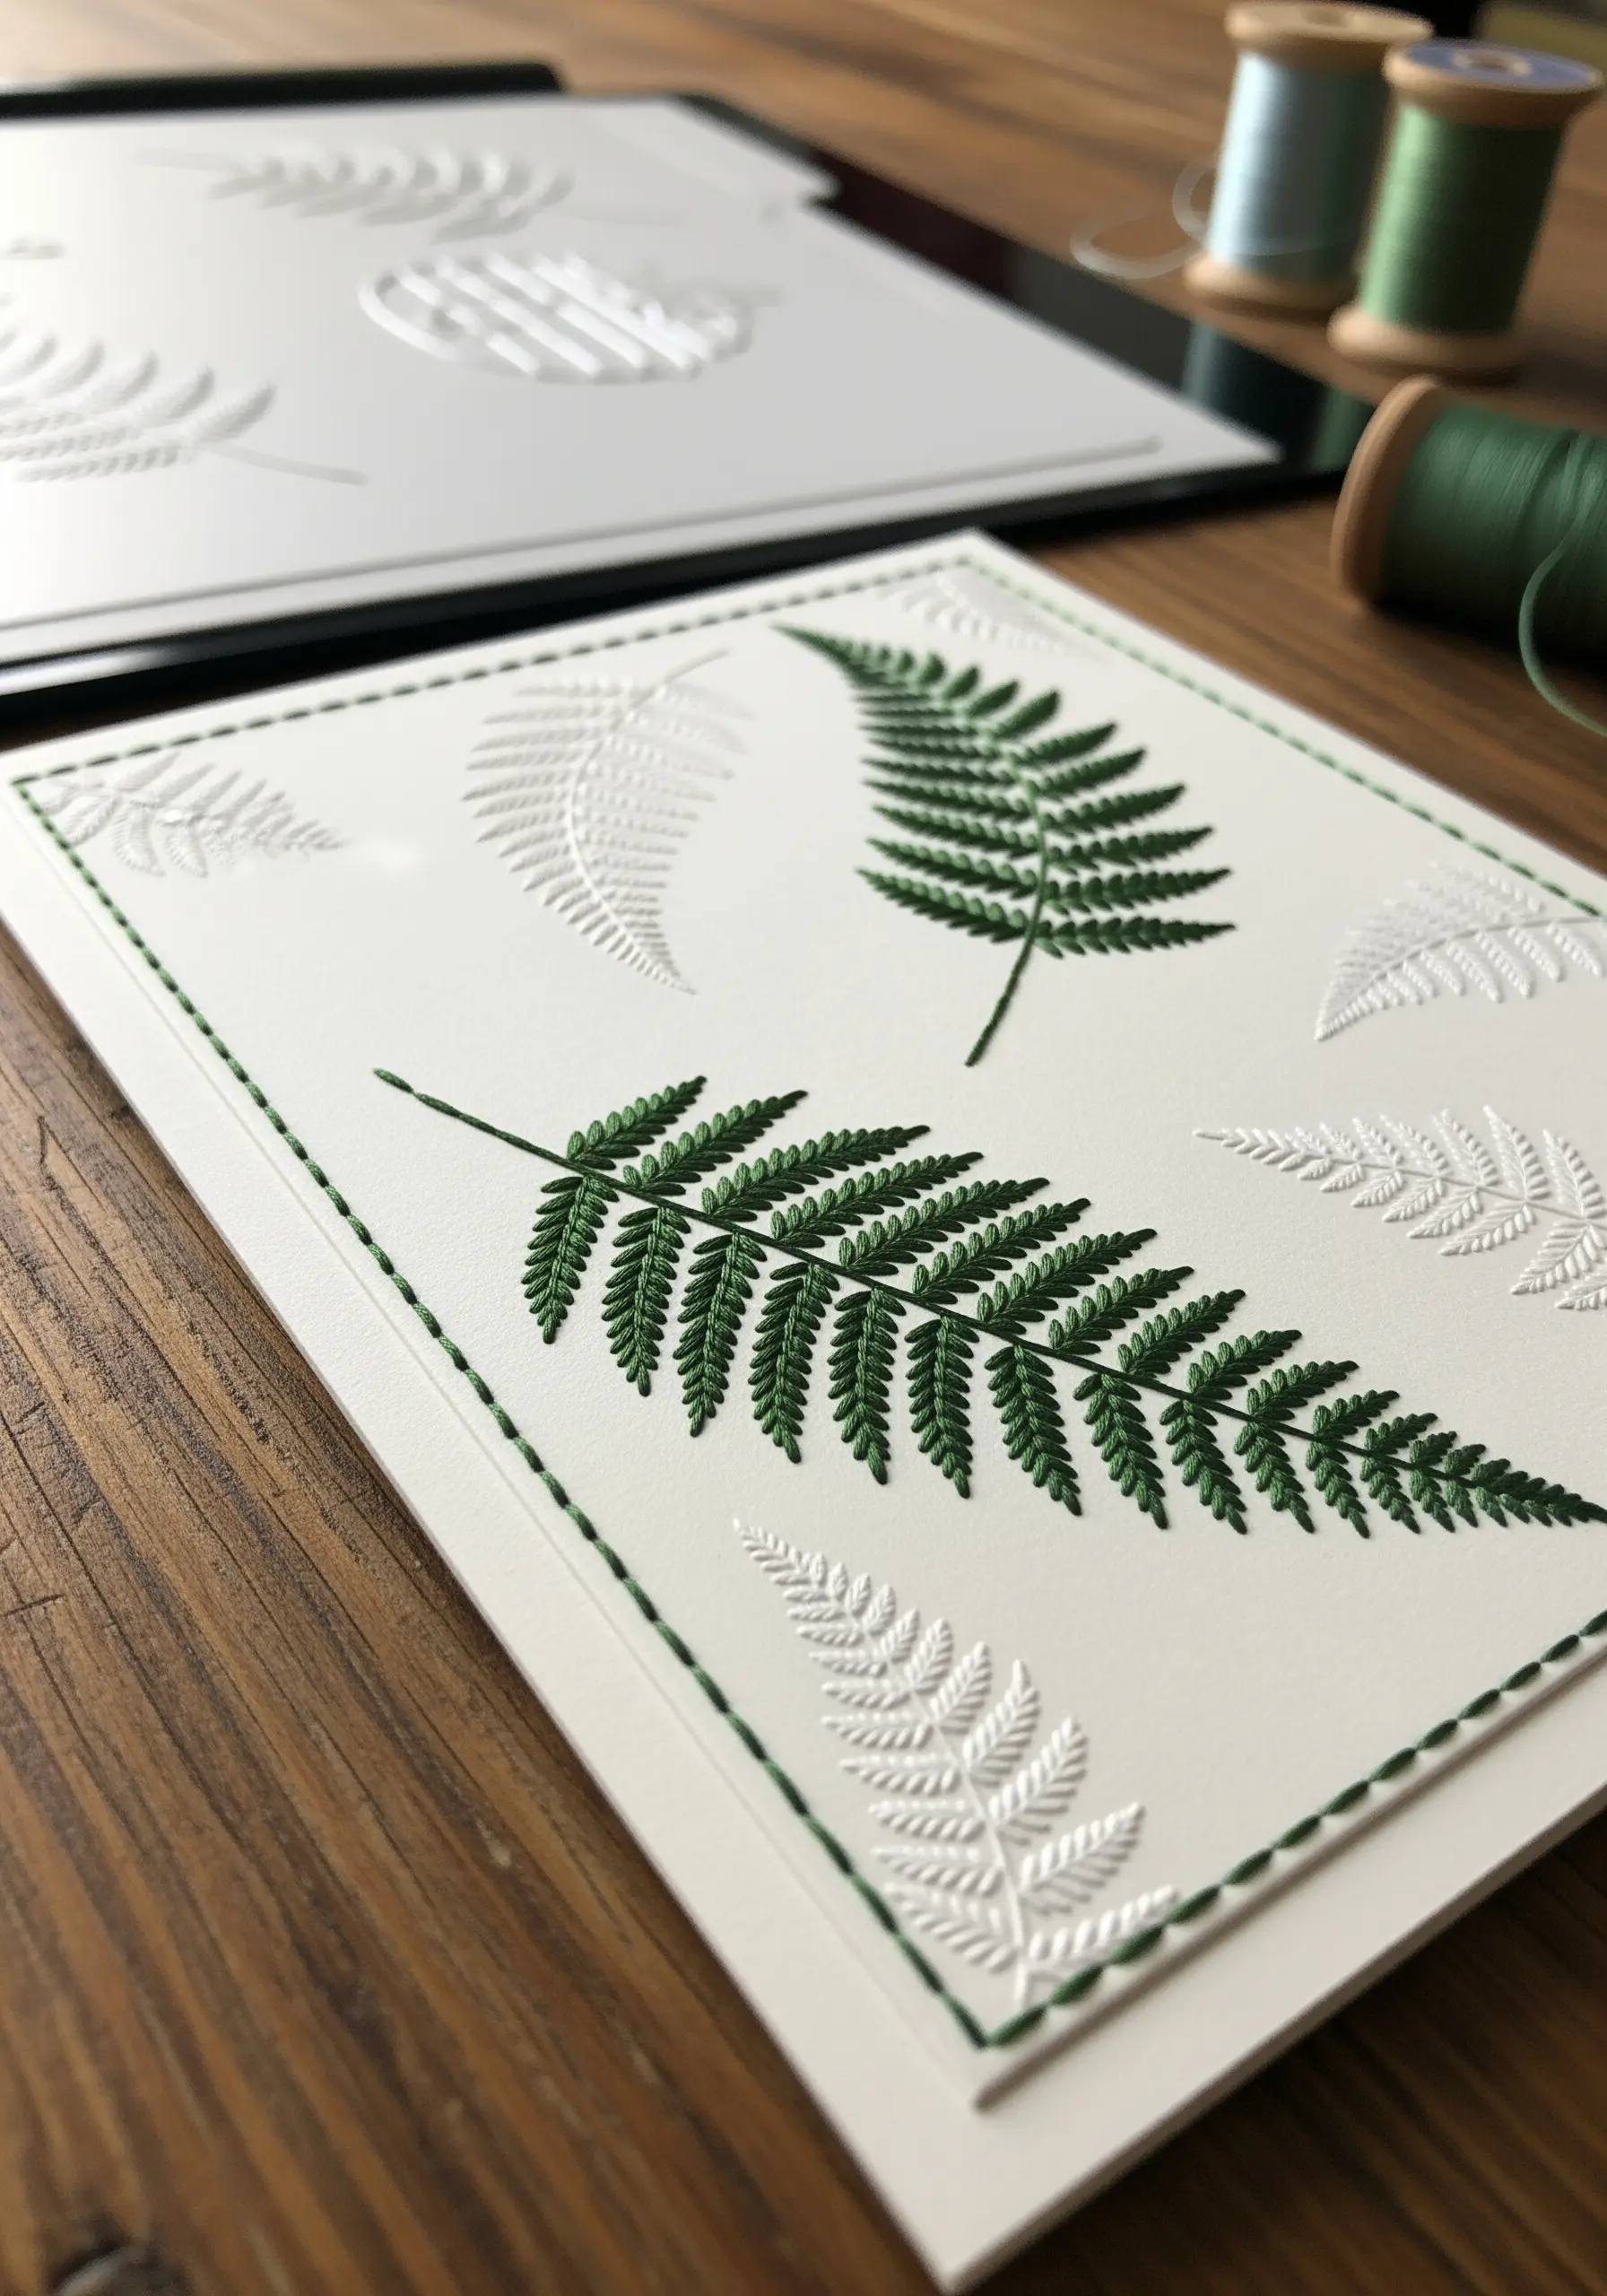
Elevate simple cardstock by stitching into dry-embossed patterns.
Use a stylus or an embossing machine to press a design, like these fern leaves, into the paper, creating a raised guide for your needle.
Carefully fill the debossed areas with a dense, smooth satin stitch. The raised edges of the paper act as a perfect boundary, ensuring your stitches are incredibly neat and defined.
This technique gives your work a clean, letterpress quality with the added warmth of thread.
7. Create Vintage Illustrations with Ink and Thread
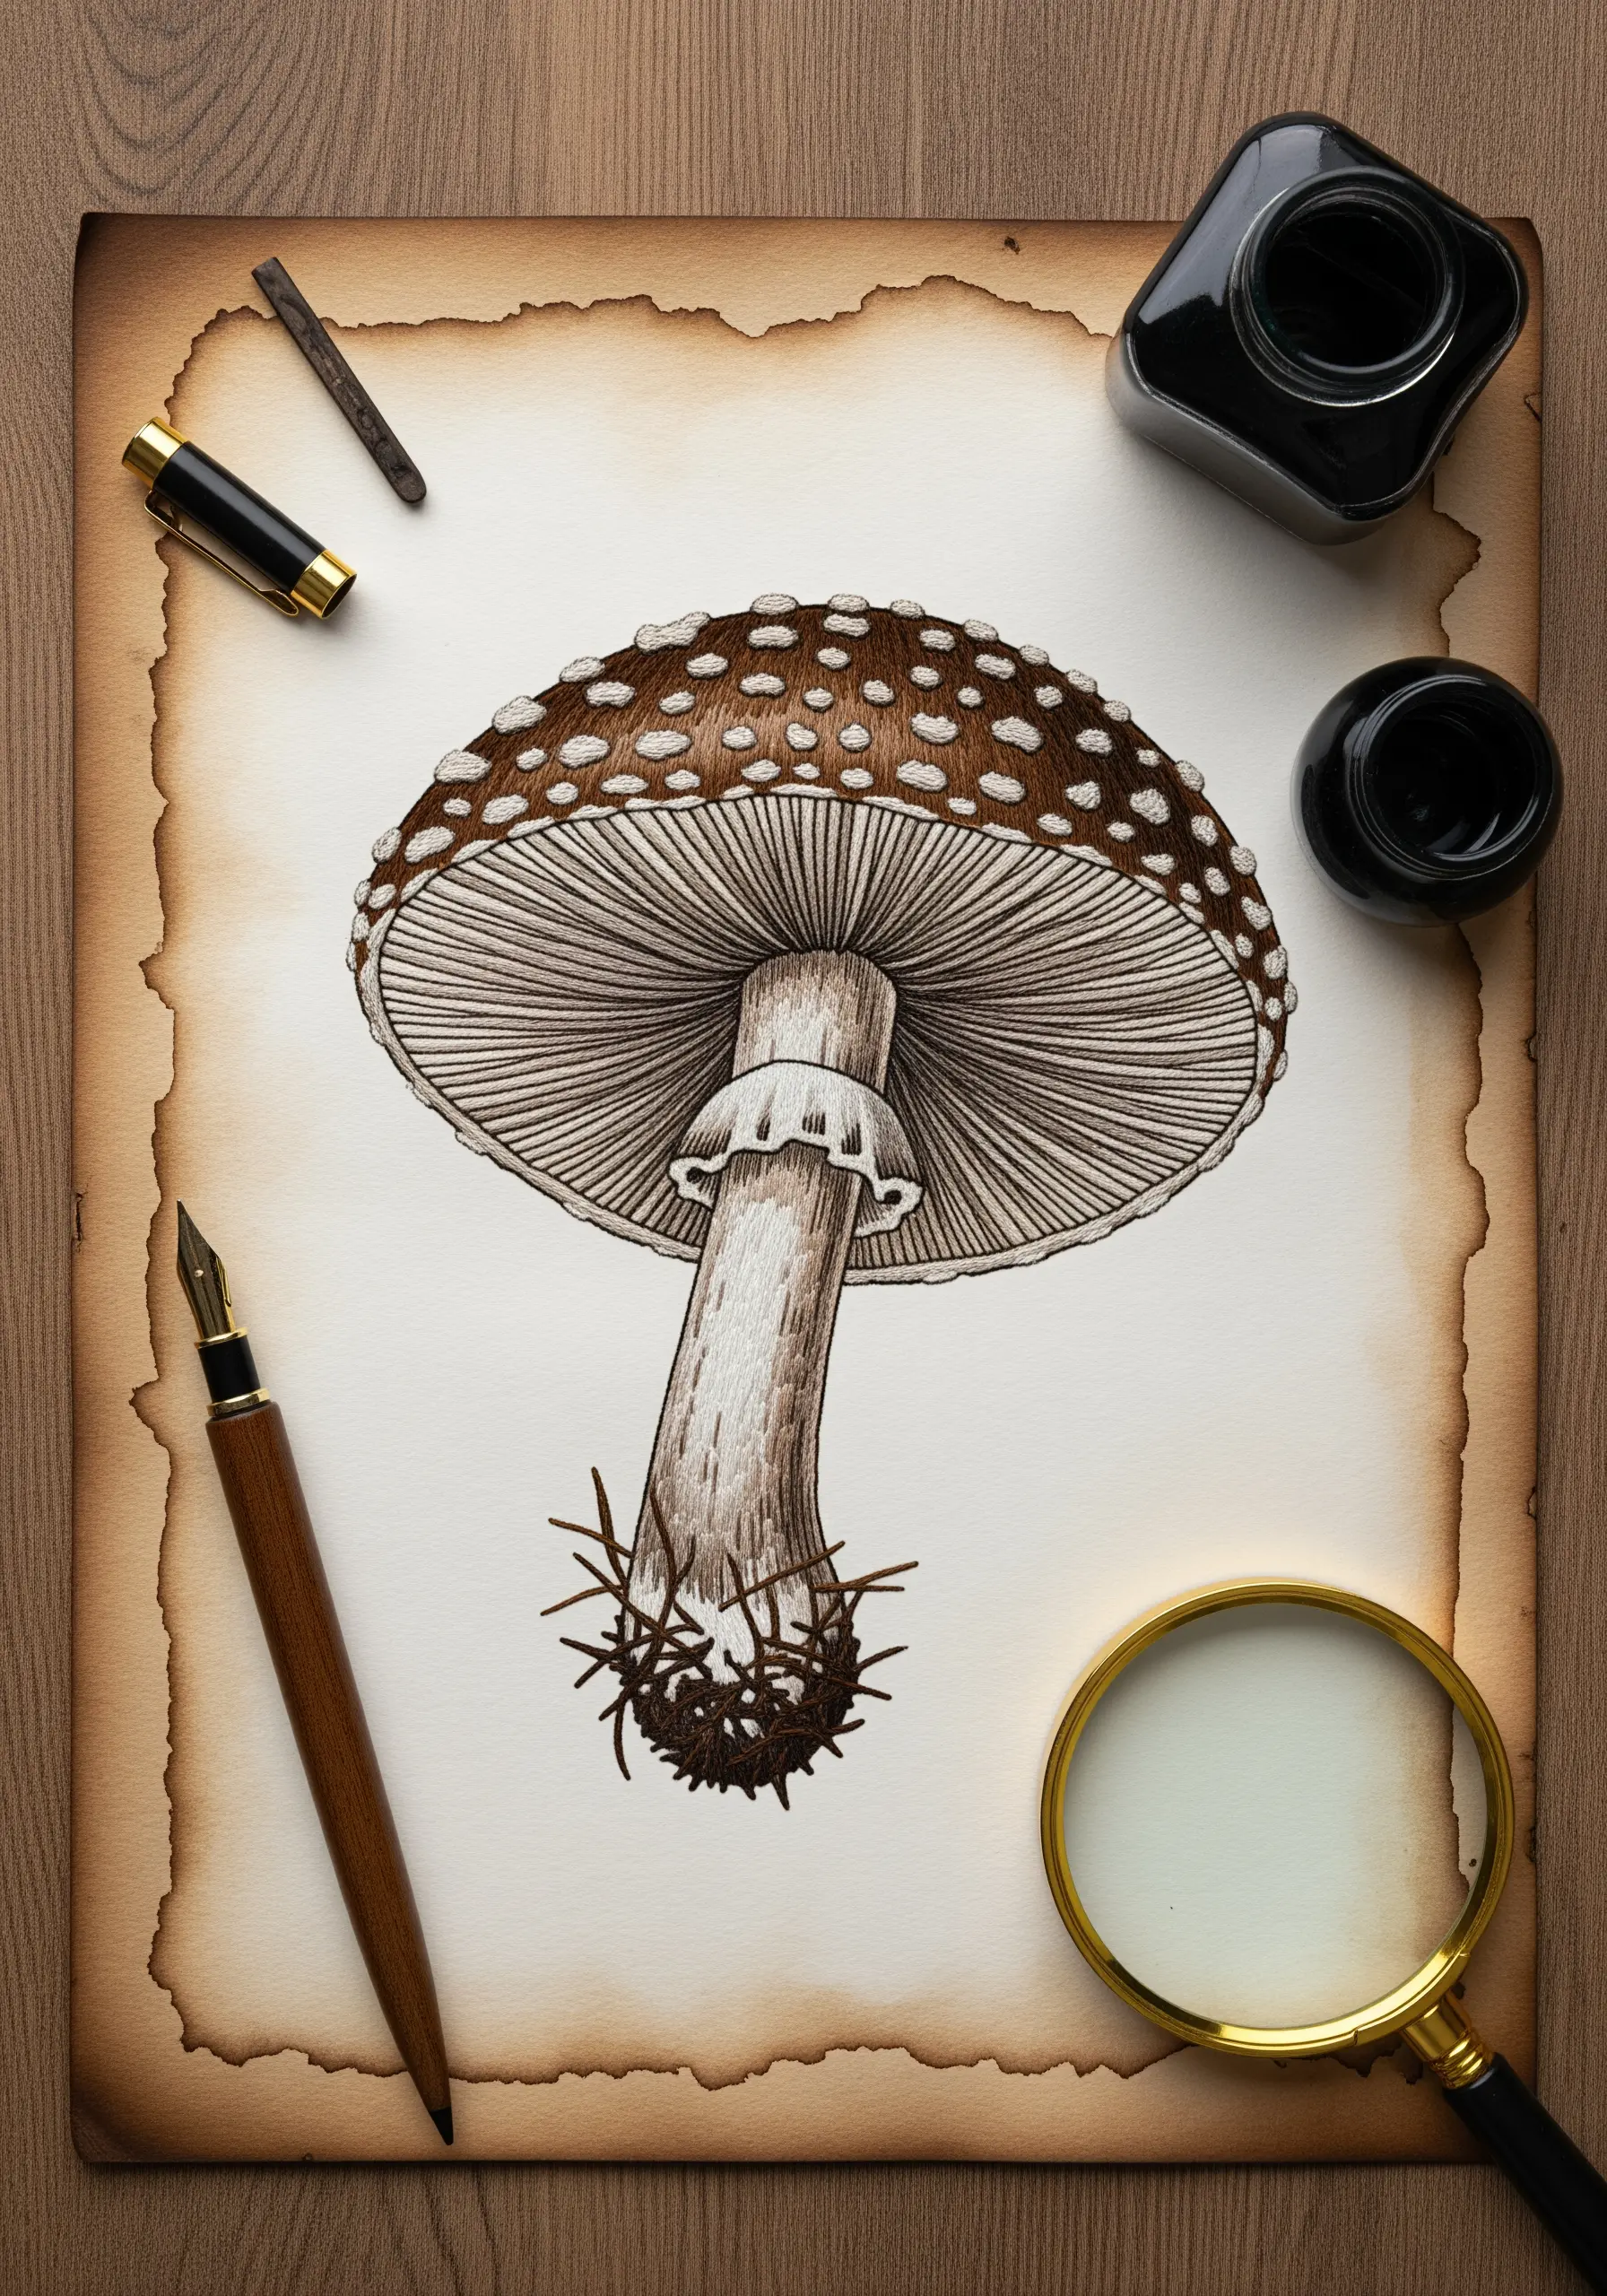
Achieve the look of a vintage botanical sketch by stitching on paper that you’ve antiqued yourself.
Lightly stain the edges of heavy watercolor paper with coffee or tea and let it dry completely.
Draw your design and then use a single strand of dark brown or black thread to stitch it, mimicking the fine lines of an ink pen.
Focus on using backstitch for outlines and tiny seed stitches for shading to enhance the illustrative quality.
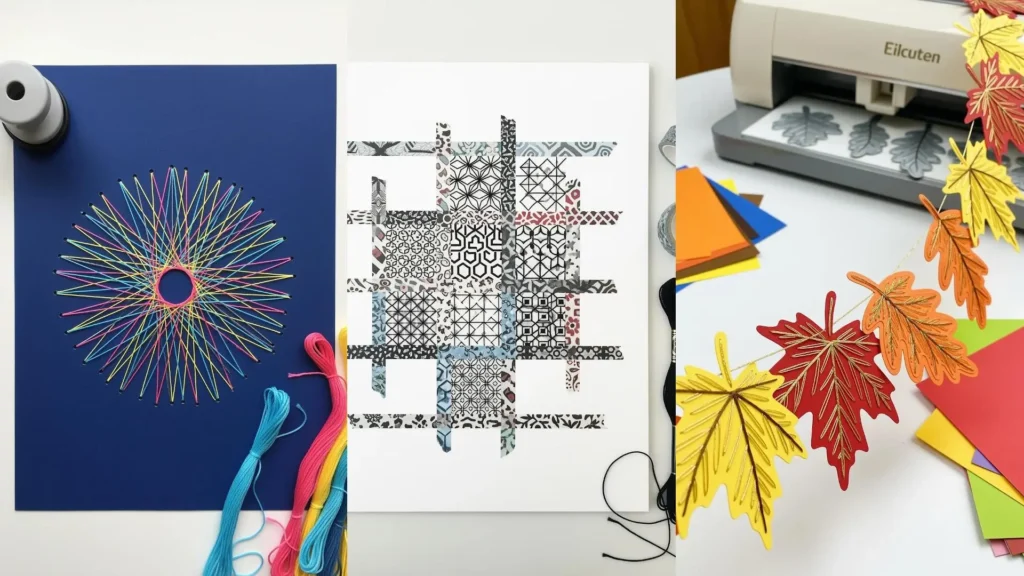
8. Use Cardstock as a Foundation for String Art
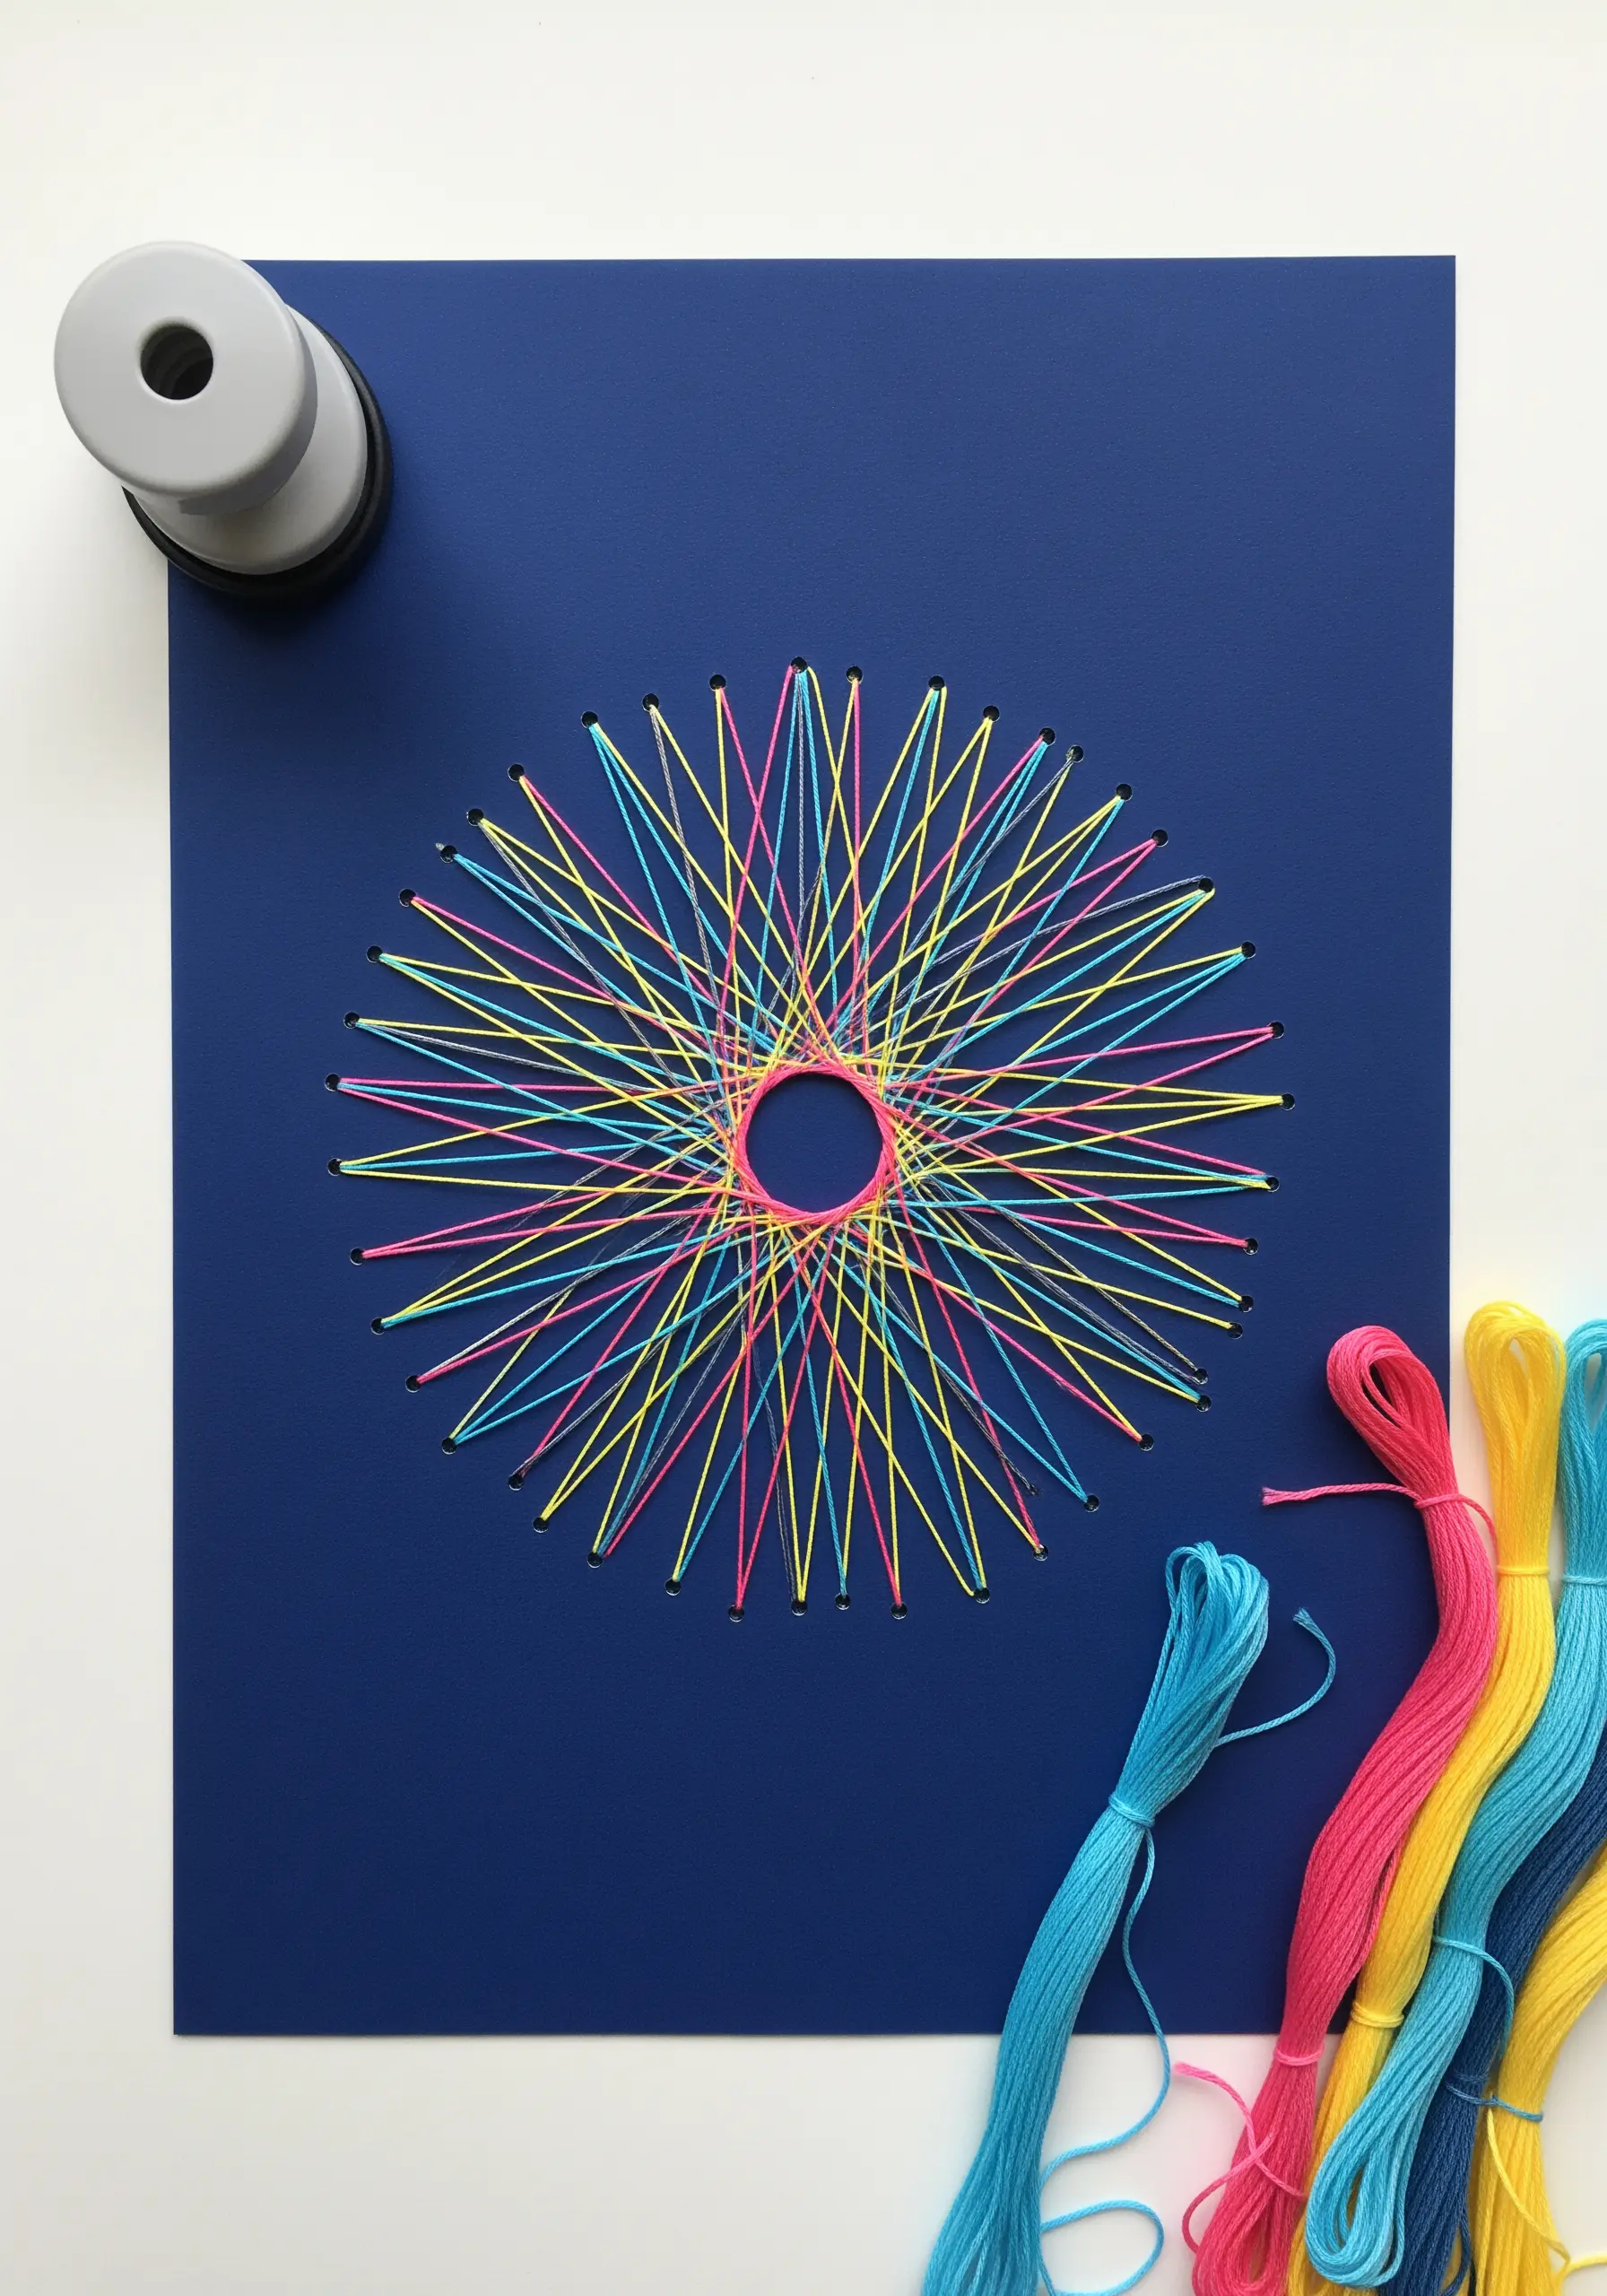
Explore the graphic precision of string art by using heavy cardstock as your canvas.
First, mark out your design and use an awl or a thick needle to punch clean, evenly spaced holes through the paper.
Then, weave embroidery floss between the holes to build up your geometric pattern.
This method offers more control than using nails and wood, allowing for finer details and making it a perfect calming, meditative embroidery project.
9. Stitch Constellations onto an Abstract Canvas
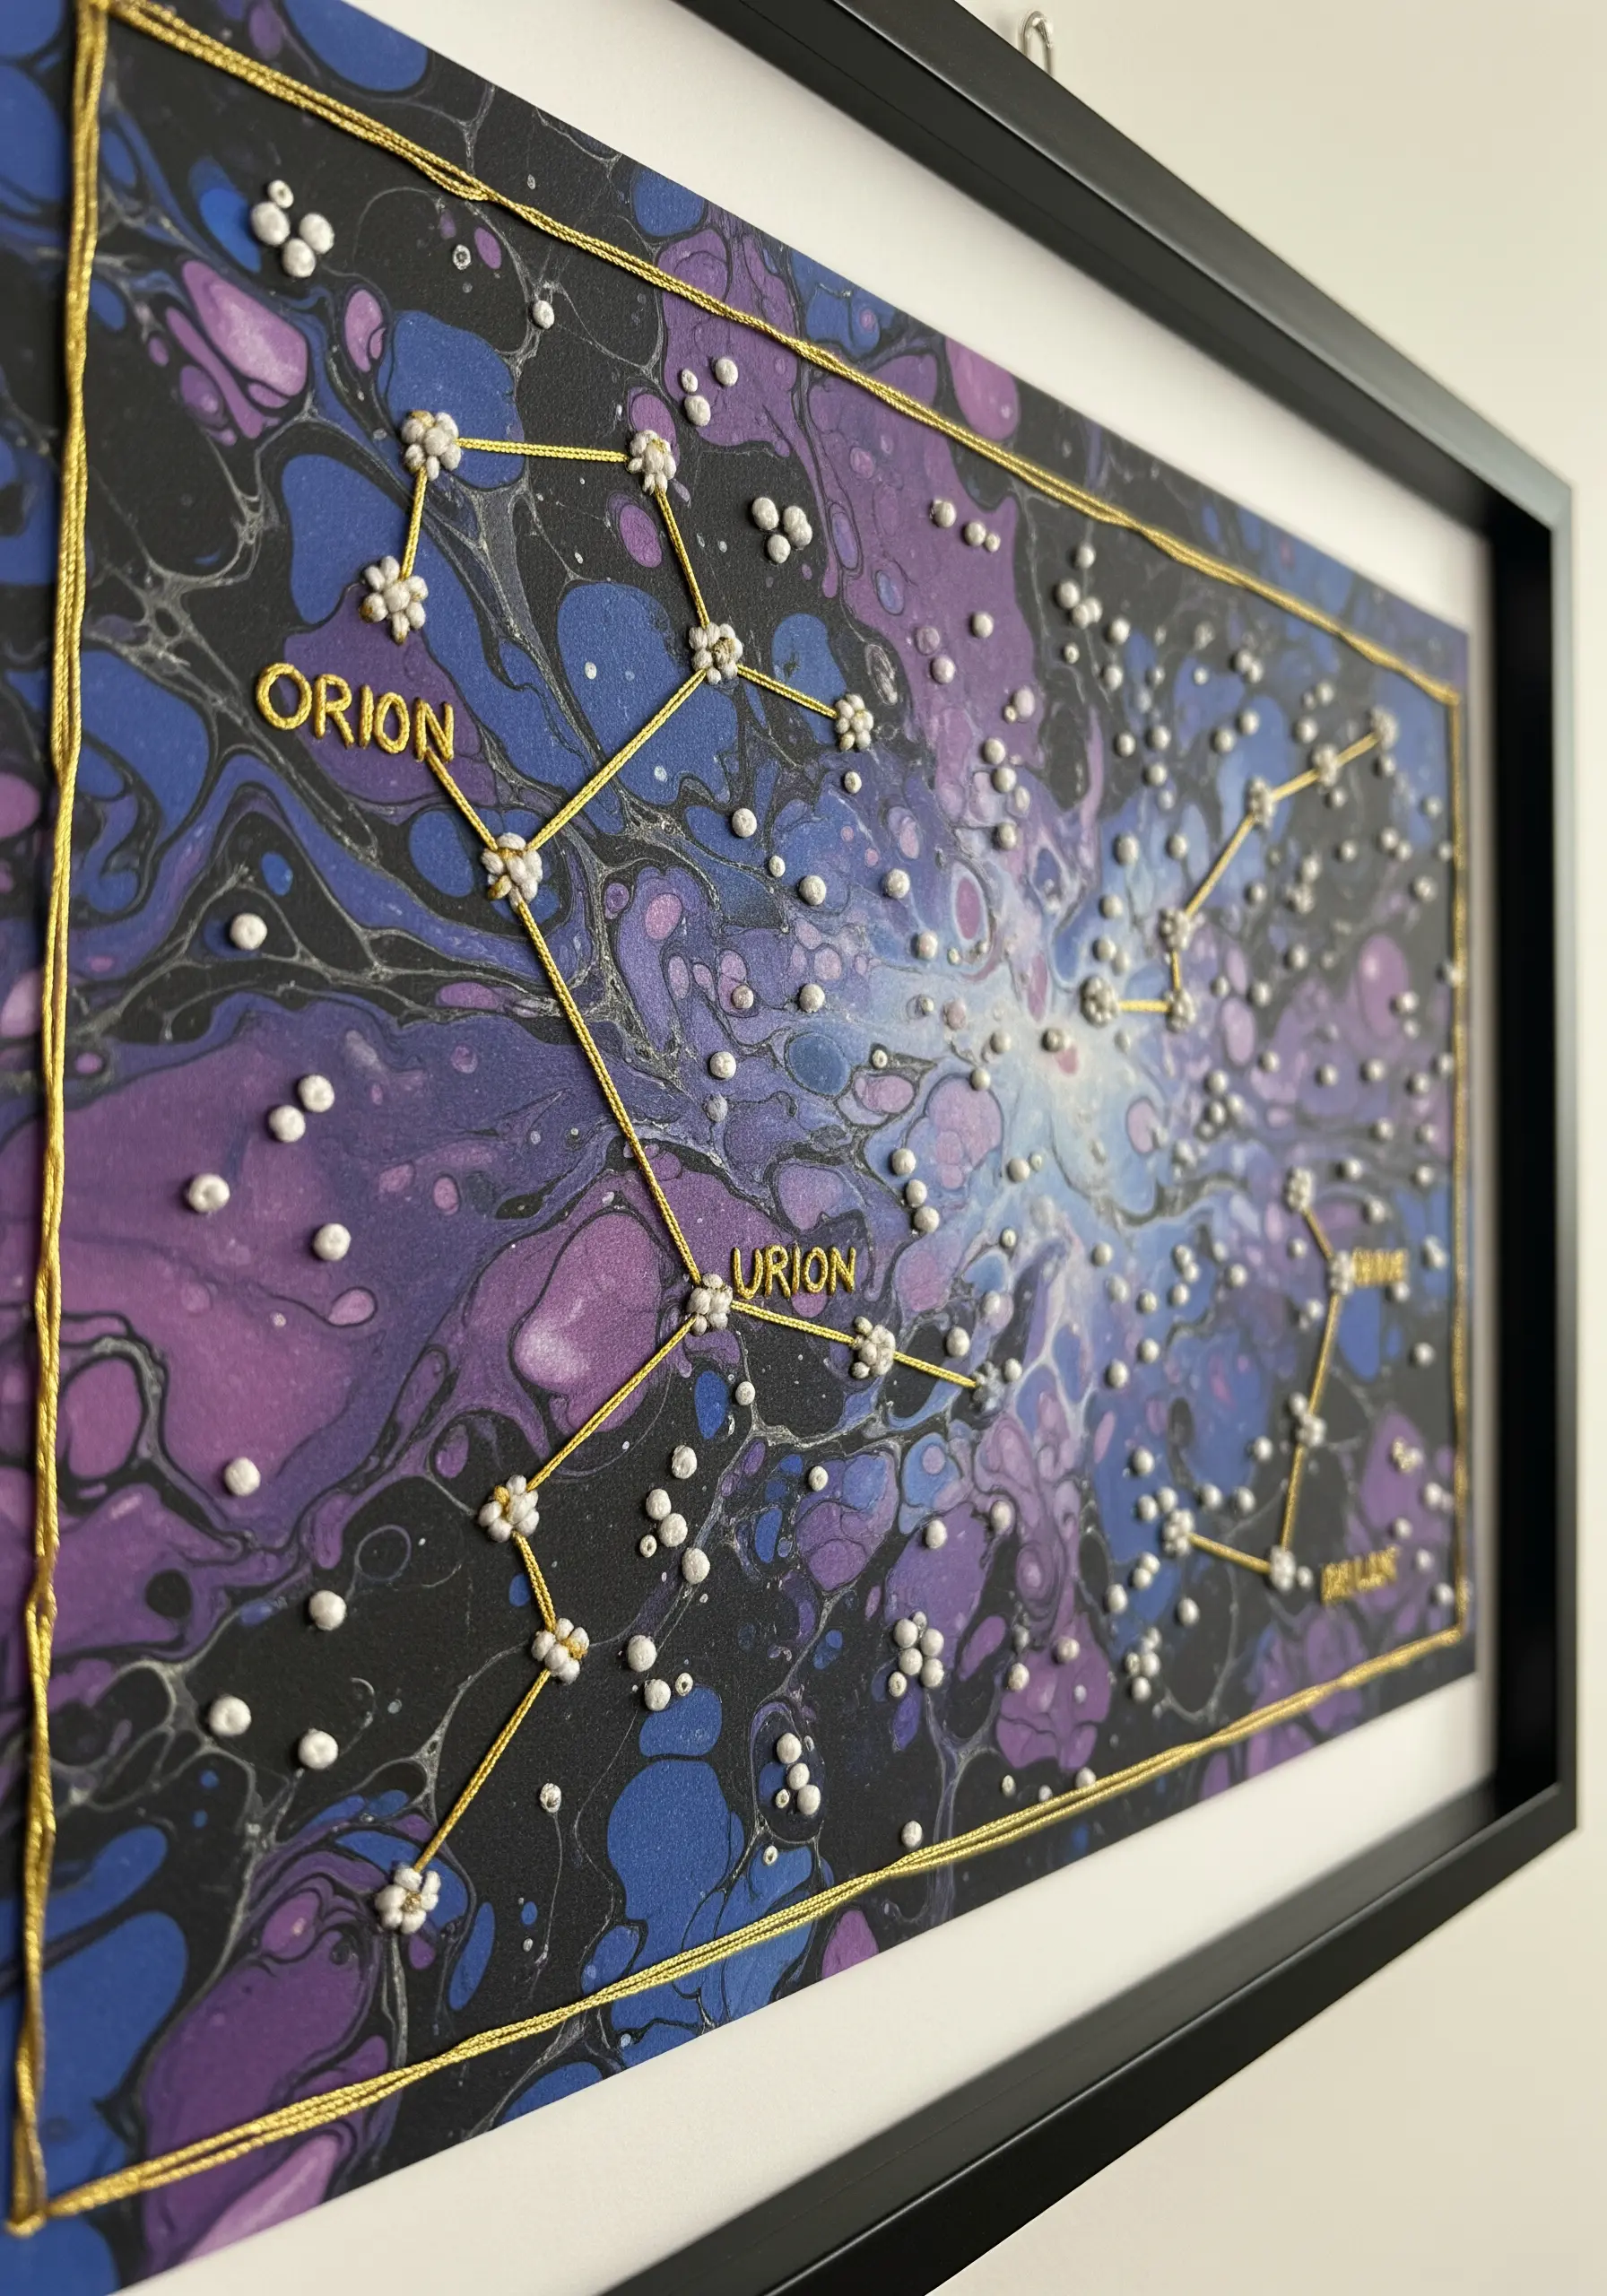
Transform a painted canvas into a celestial map by adding stitched details.
Create a dynamic, galaxy-like background using an acrylic paint-pouring technique on a small canvas panel.
Once it’s completely dry, stitch constellation patterns directly through the canvas using a bright metallic thread that will stand out against the dark colors.
Add tiny French knots or seed beads to represent stars, giving the piece a final, sparkling touch.
10. Craft Embroidered Decoupage Appliqués
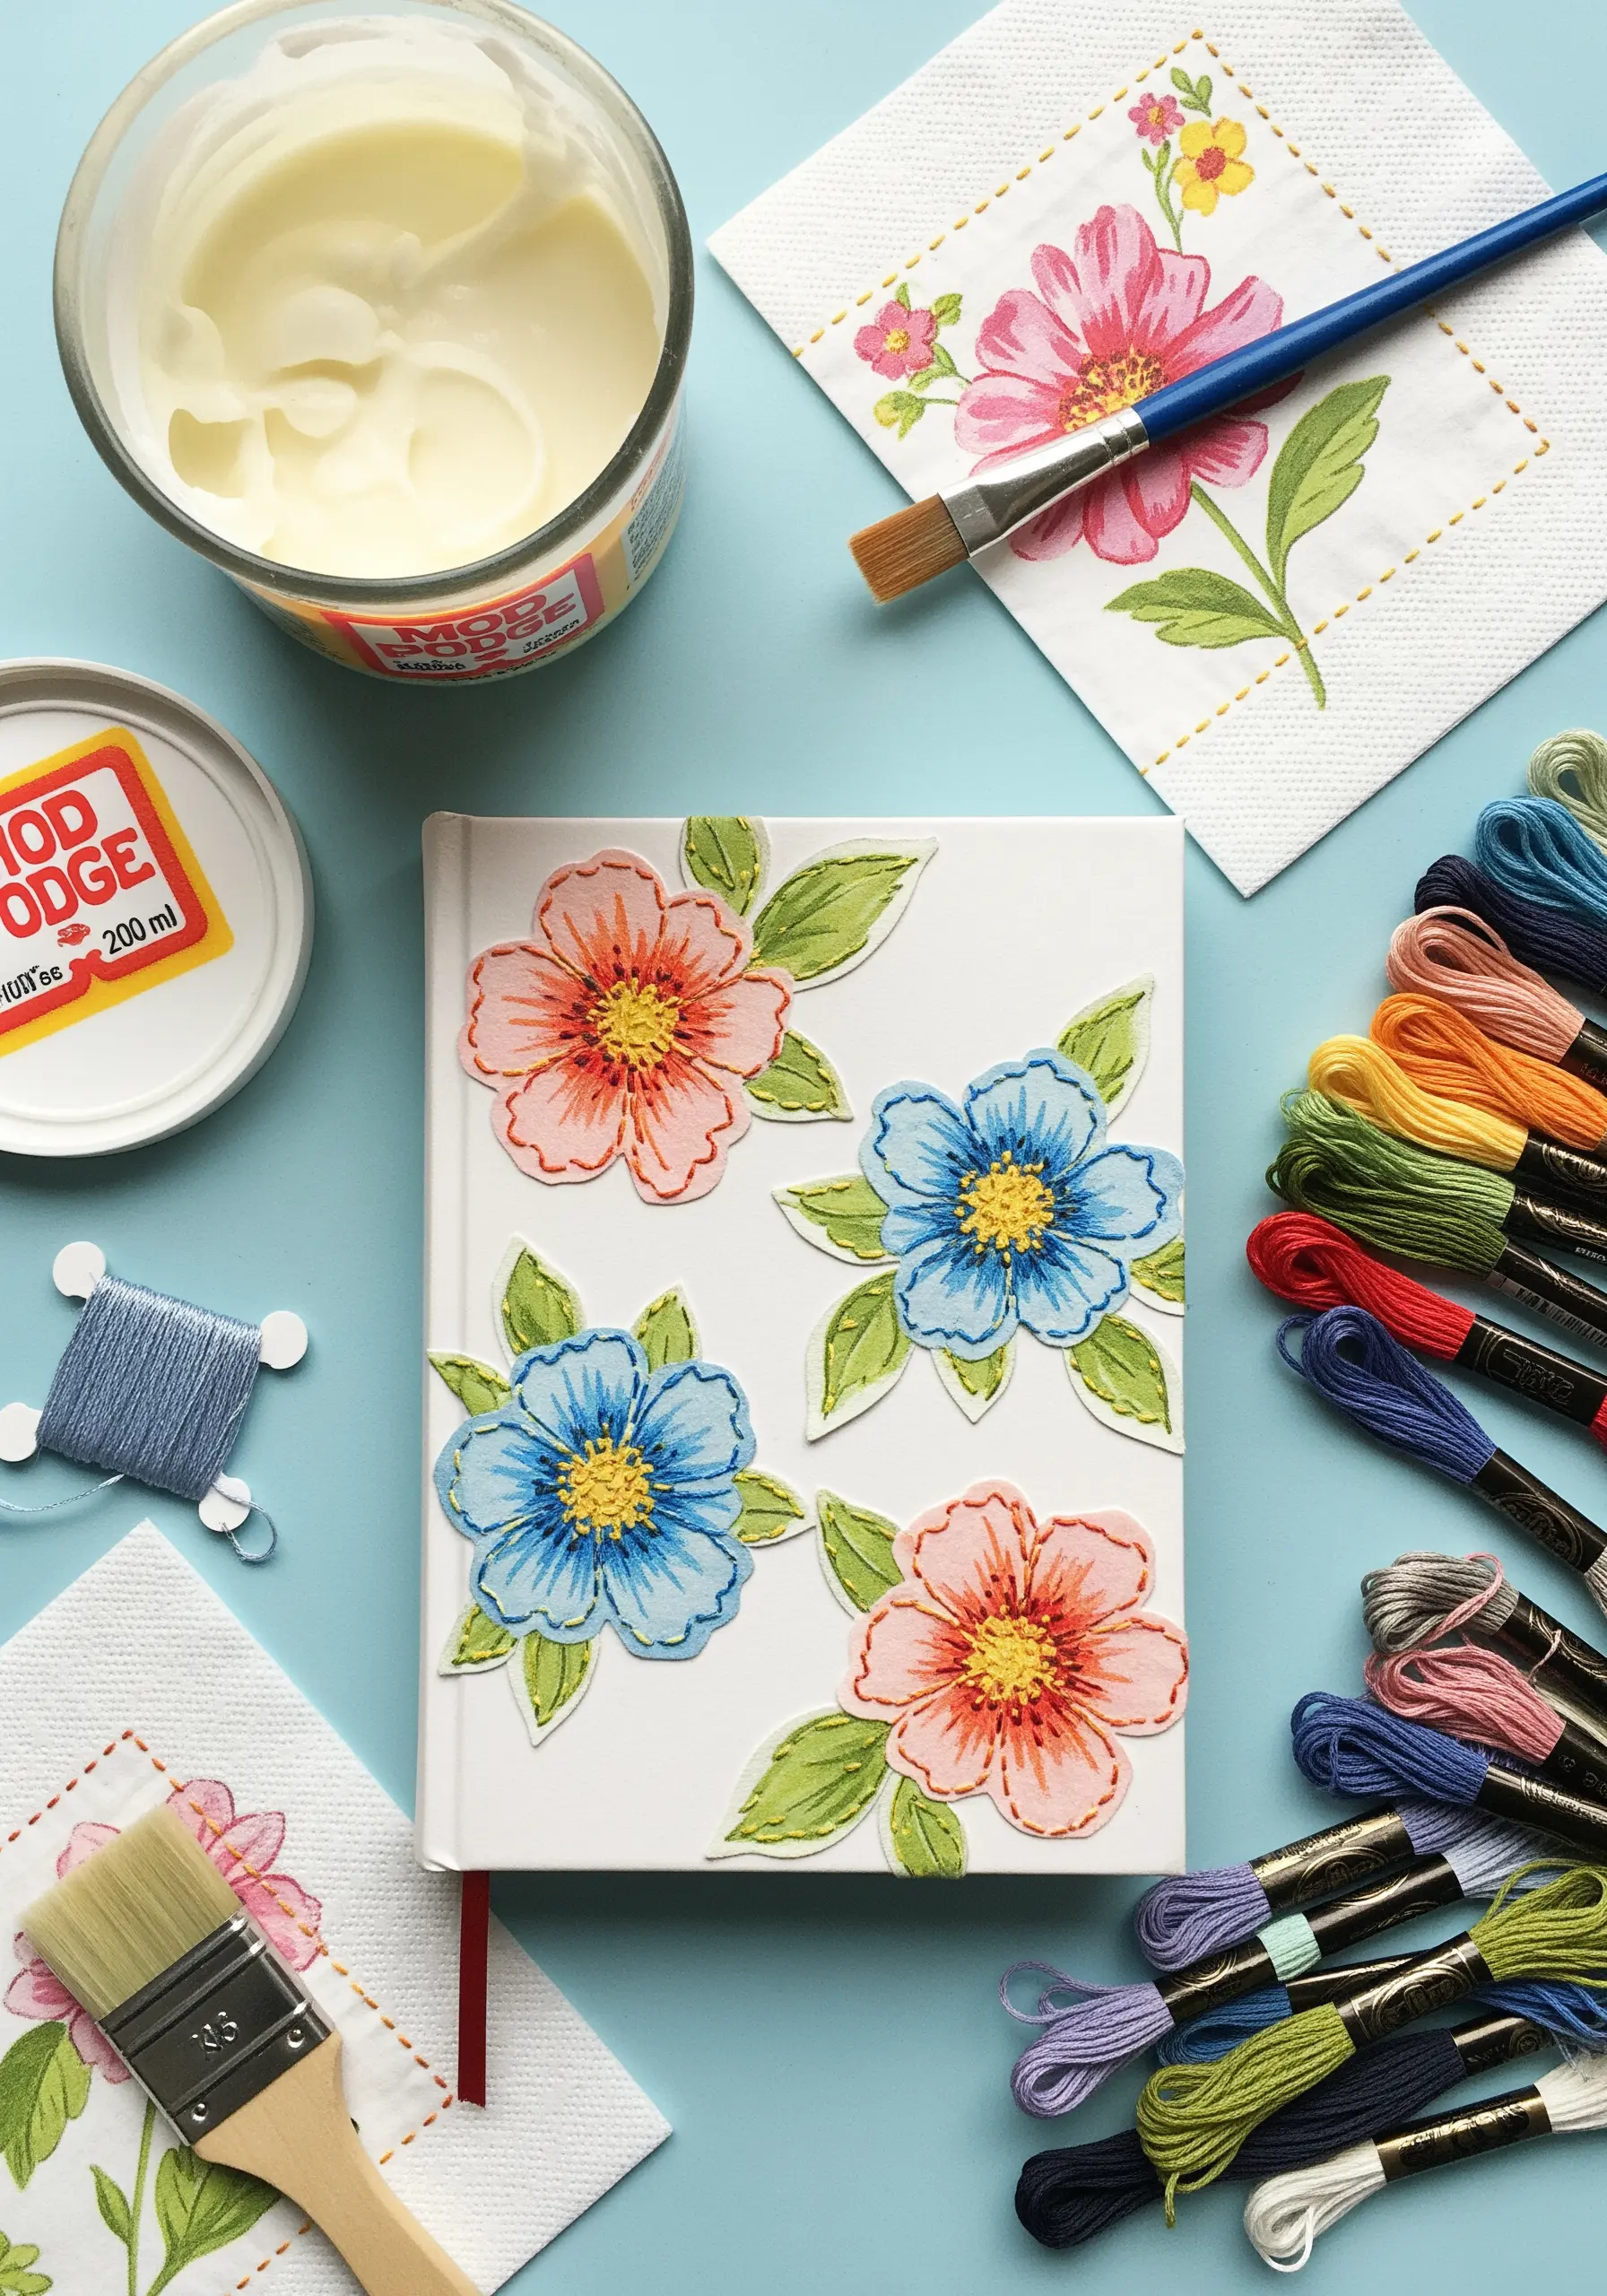
Add a surprising layer of texture to decoupage projects by embroidering your paper elements first.
Select a printed paper napkin and separate its layers, keeping only the top printed one.
Carefully embroider details onto the delicate paper—a few strands of floss for flower centers is enough. Then, cut out the motif and apply it to a surface like a journal using decoupage glue.
The stitched details become a subtle, tactile surprise.
11. Frame Minimalist Stitches with Gilded Edges
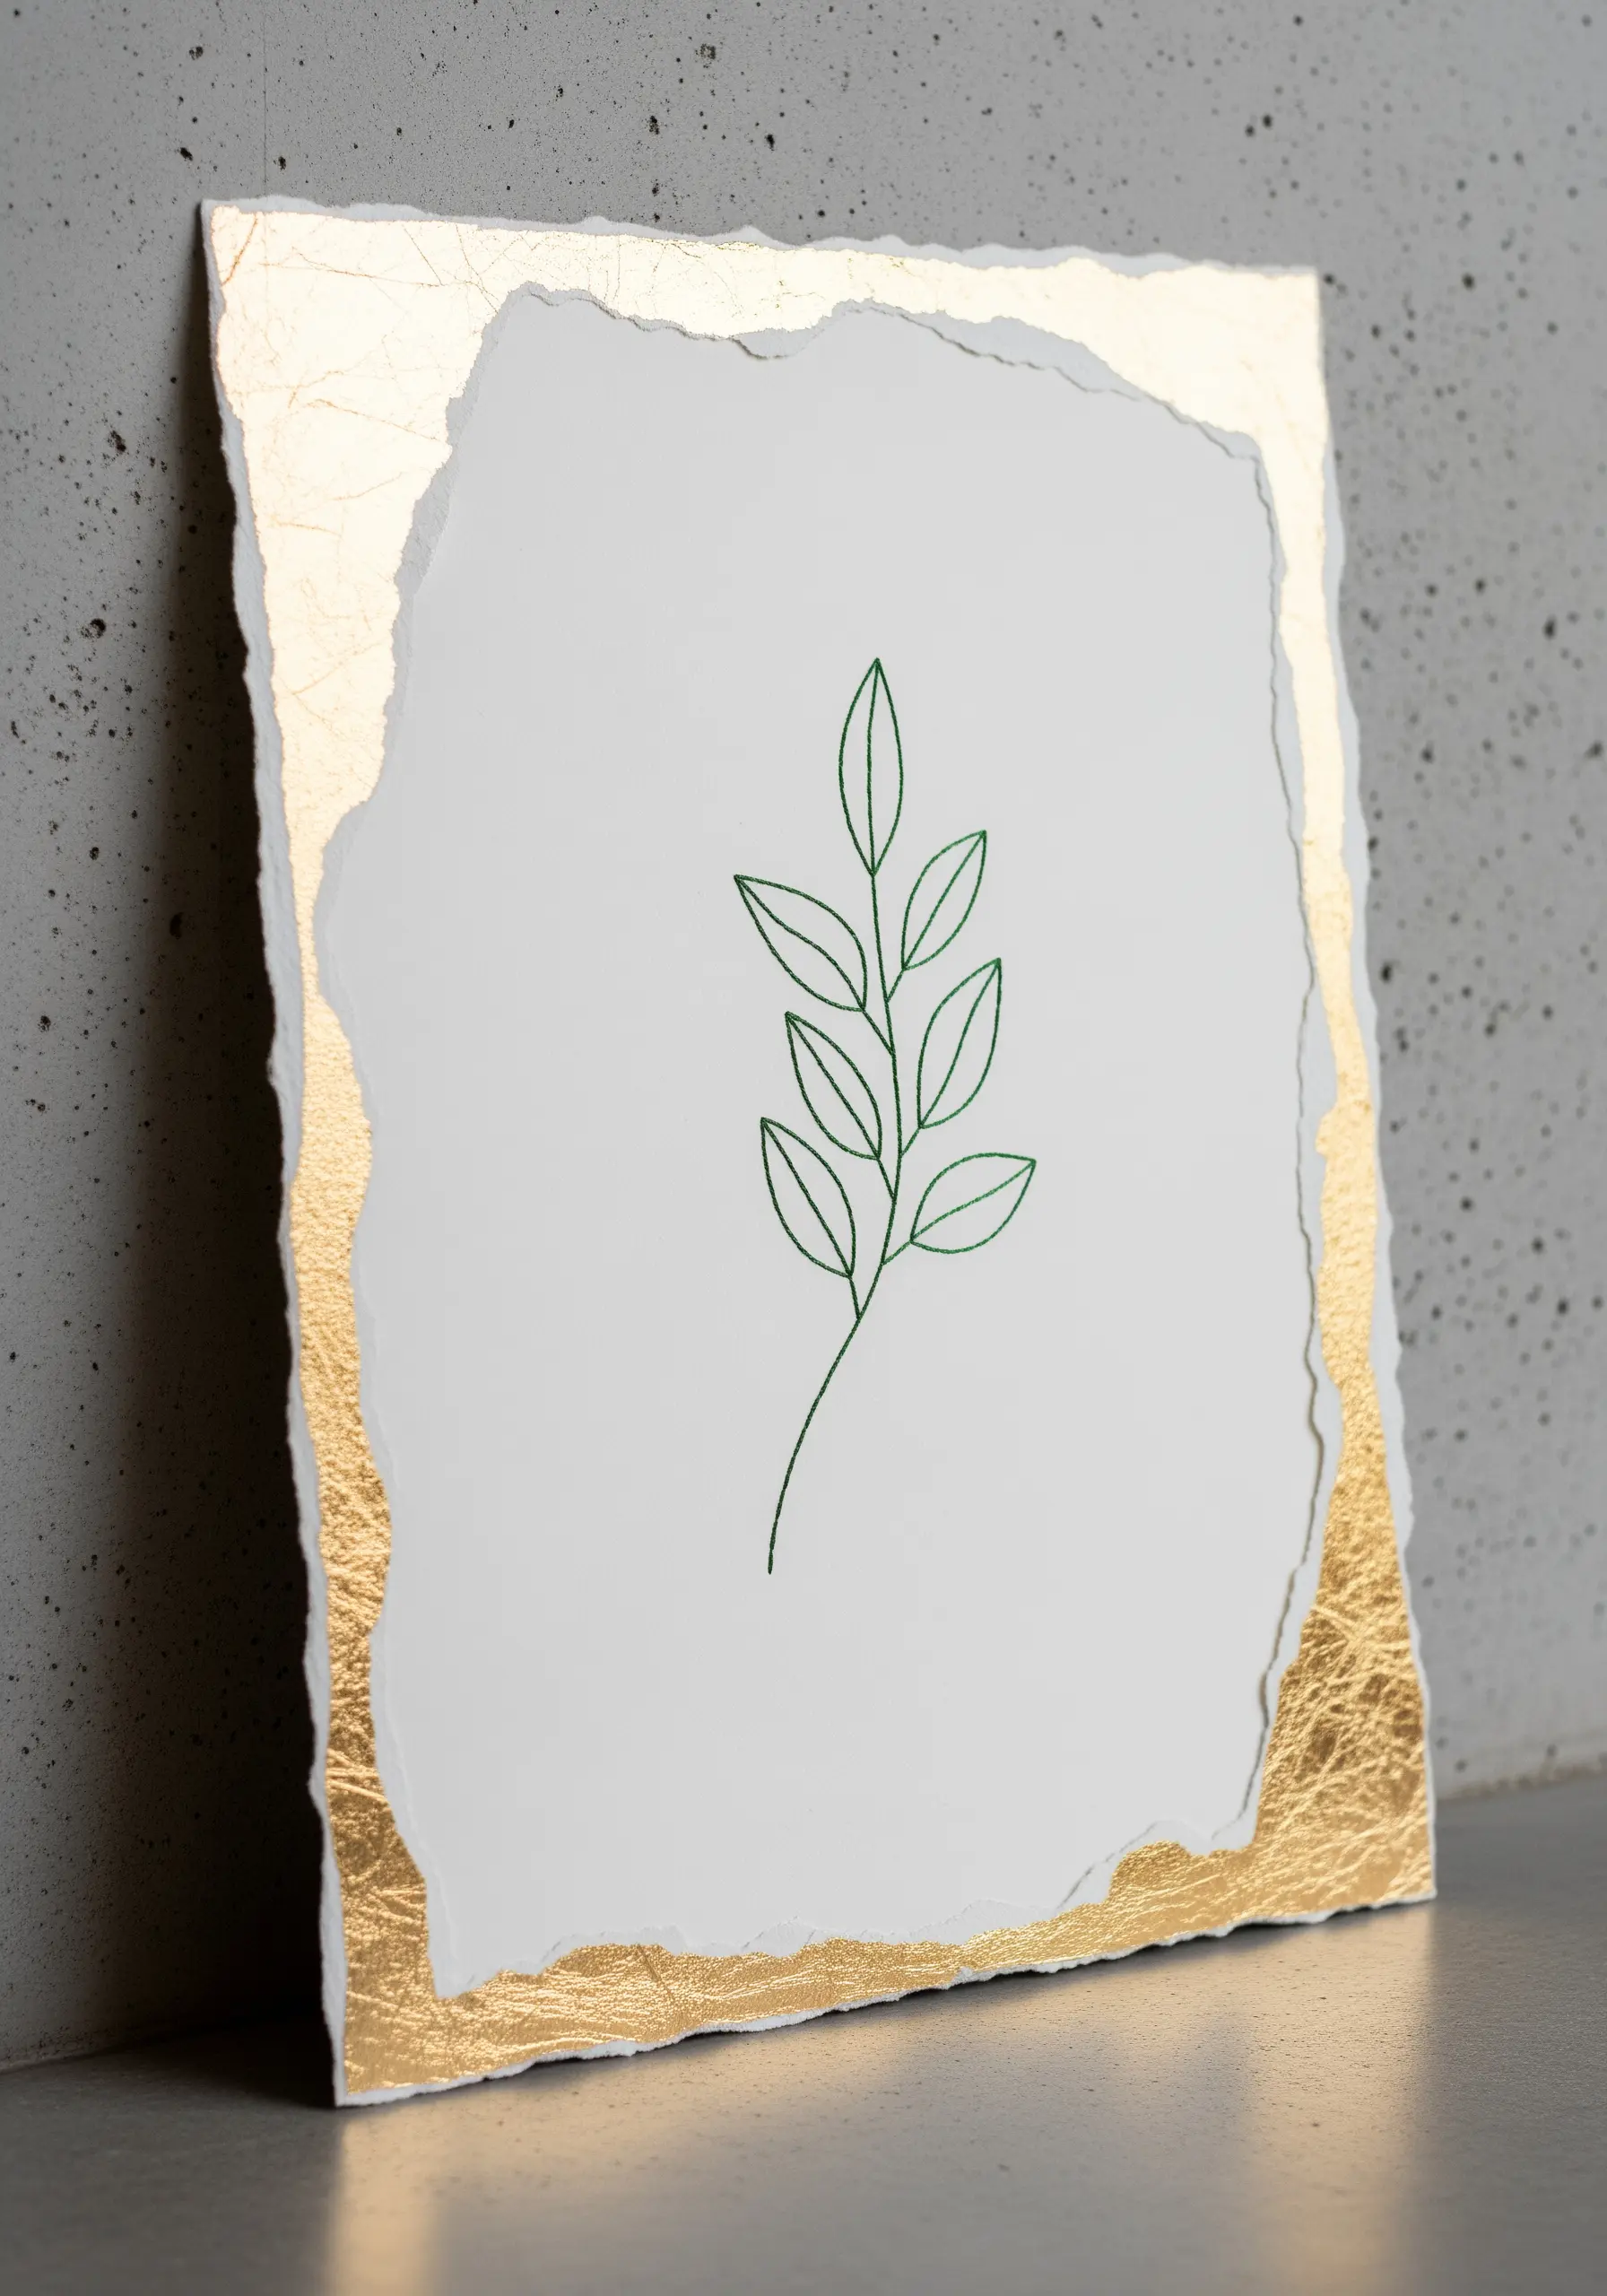
Elevate a simple, single-line embroidery by pairing it with a luxurious finish.
Stitch a delicate botanical motif onto high-quality, deckle-edge watercolor paper.
Then, apply gold leaf around the torn edges of the paper. The technique is simple, but the result is stunningly sophisticated.
The contrast between the humble backstitch and the radiant gold leaf creates a piece of art that feels both organic and precious.
12. Weave Stitches Through a Watercolor Wash
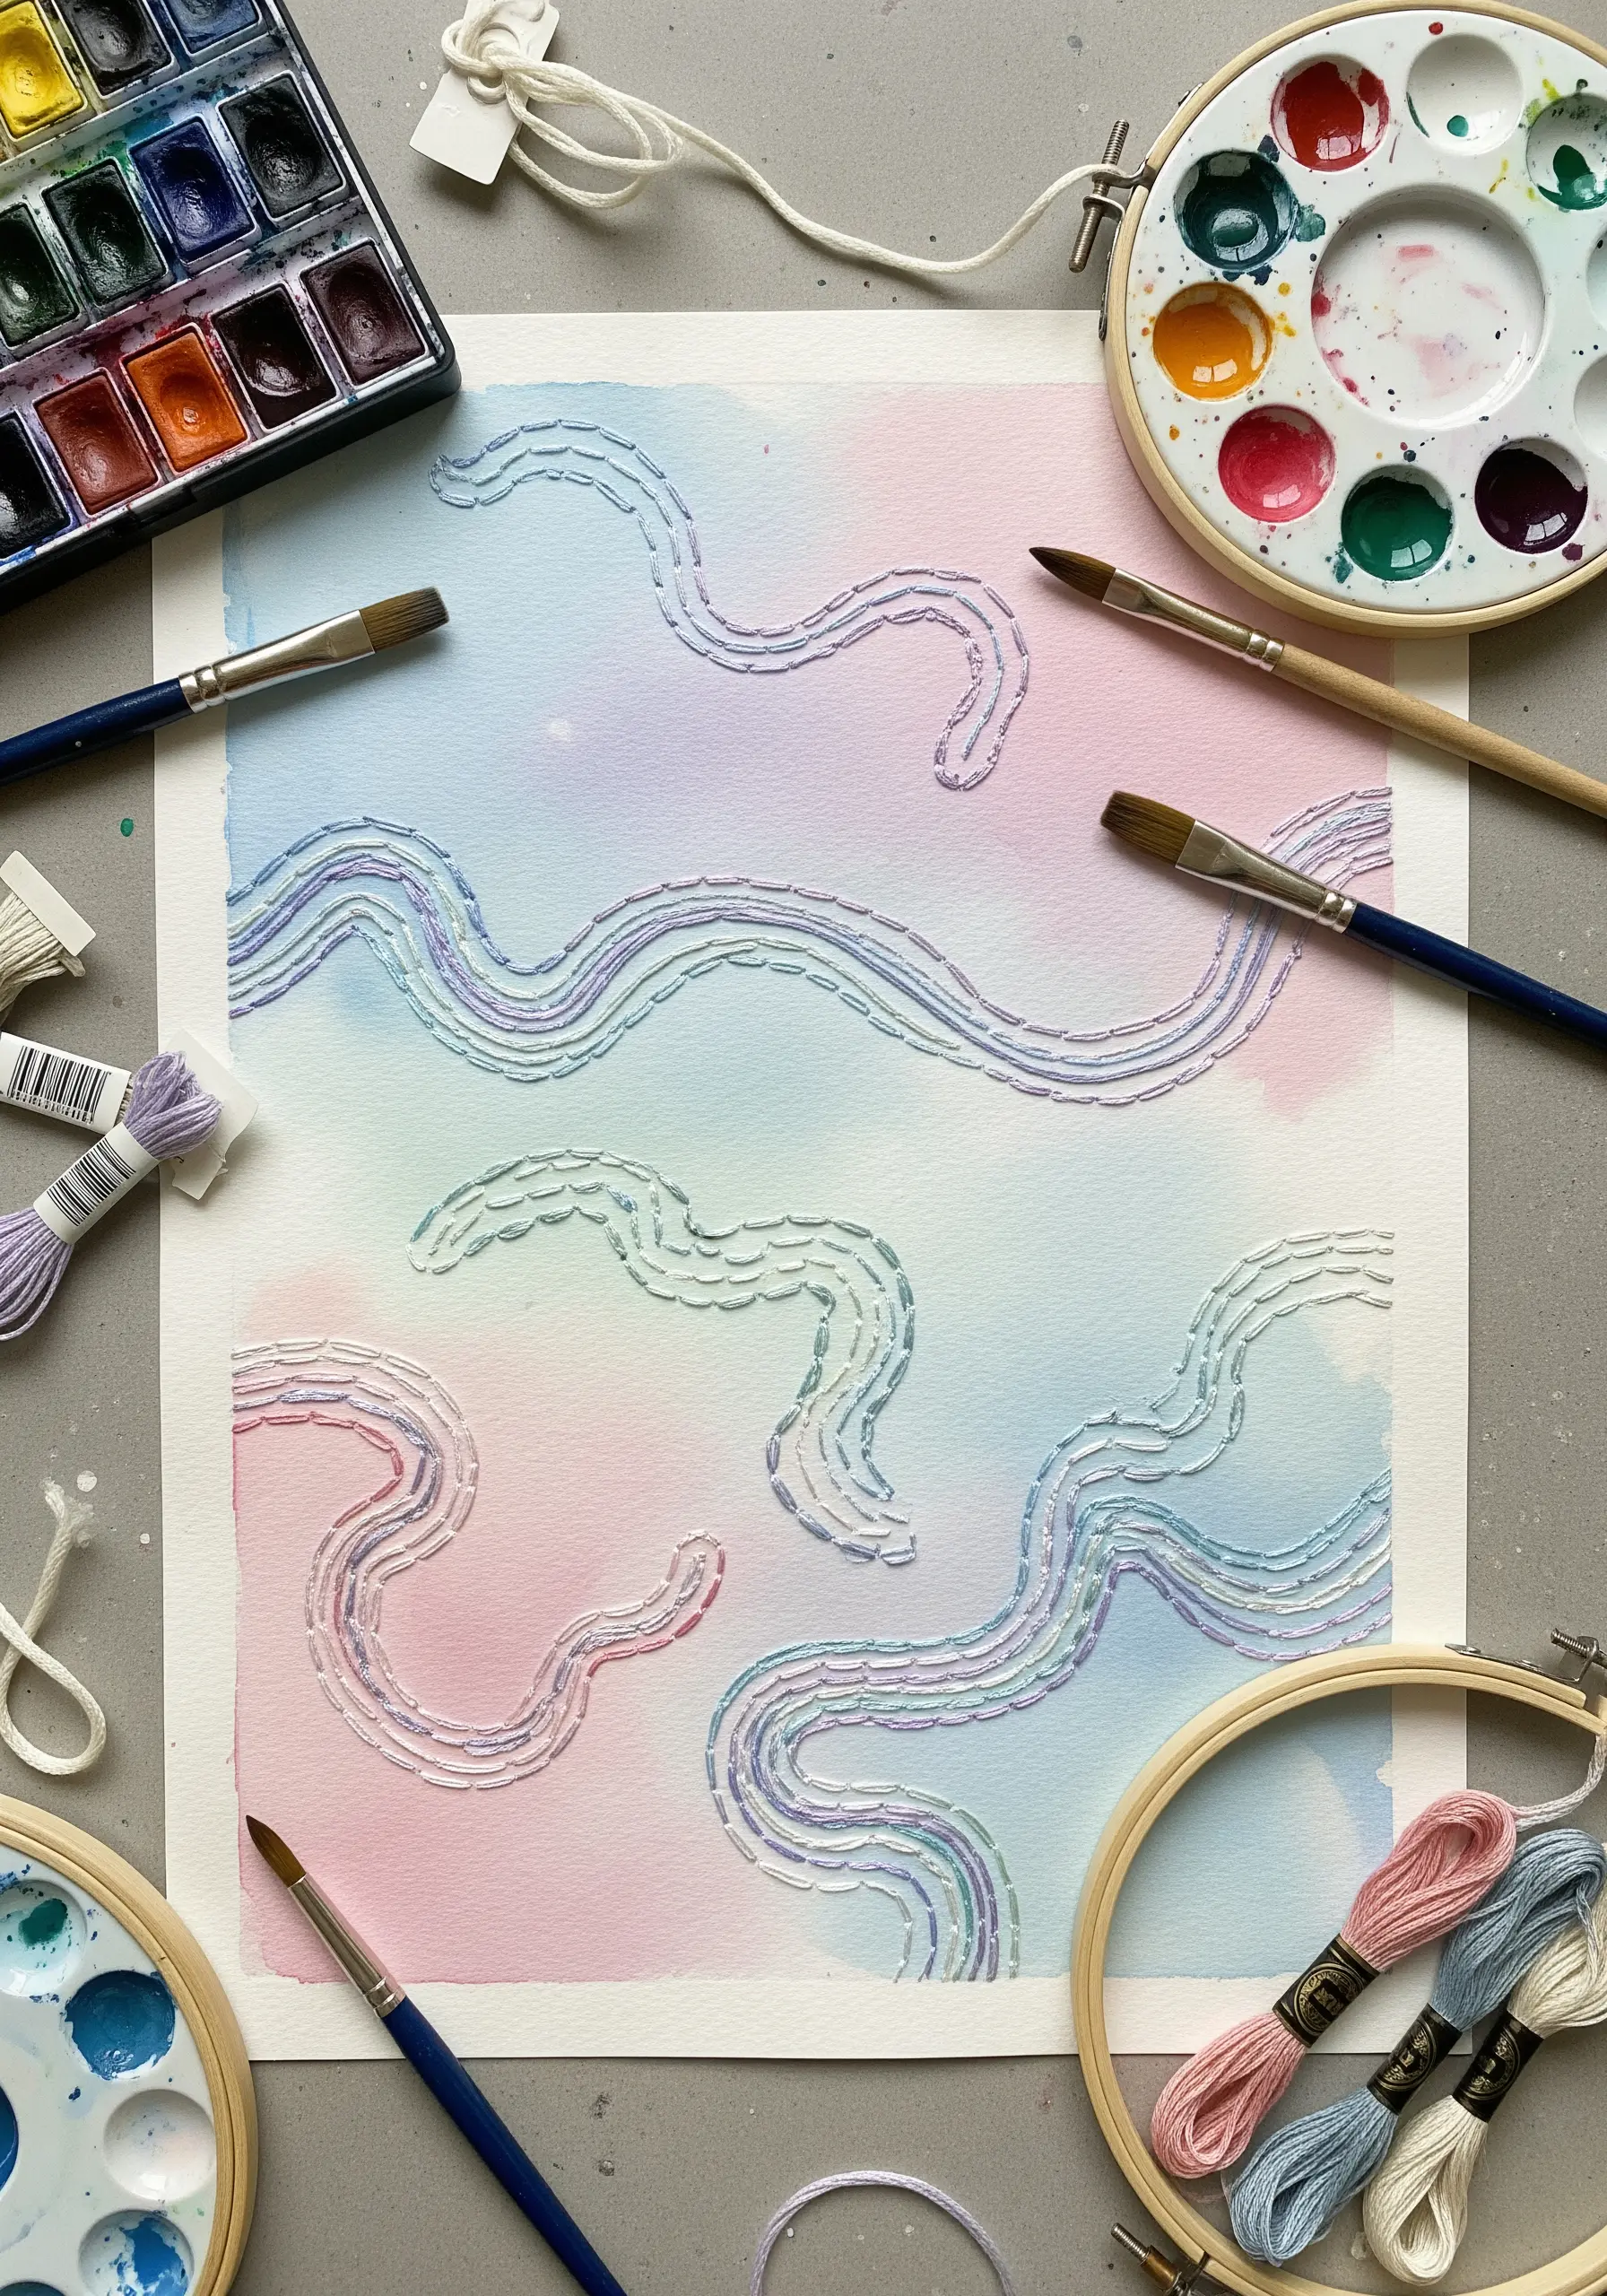
Create a seamless blend of paint and thread by stitching over a soft watercolor background.
On heavy watercolor paper, apply a gentle wash of pastel colors, letting them bleed into one another.
Once the paint is completely dry, use a simple running stitch to create flowing, organic lines across the page.
Choose thread colors that pull from the watercolor palette to create a cohesive design where the stitches appear to emerge directly from the paint.
13. Add Folk Art Stitches to Paper Mache
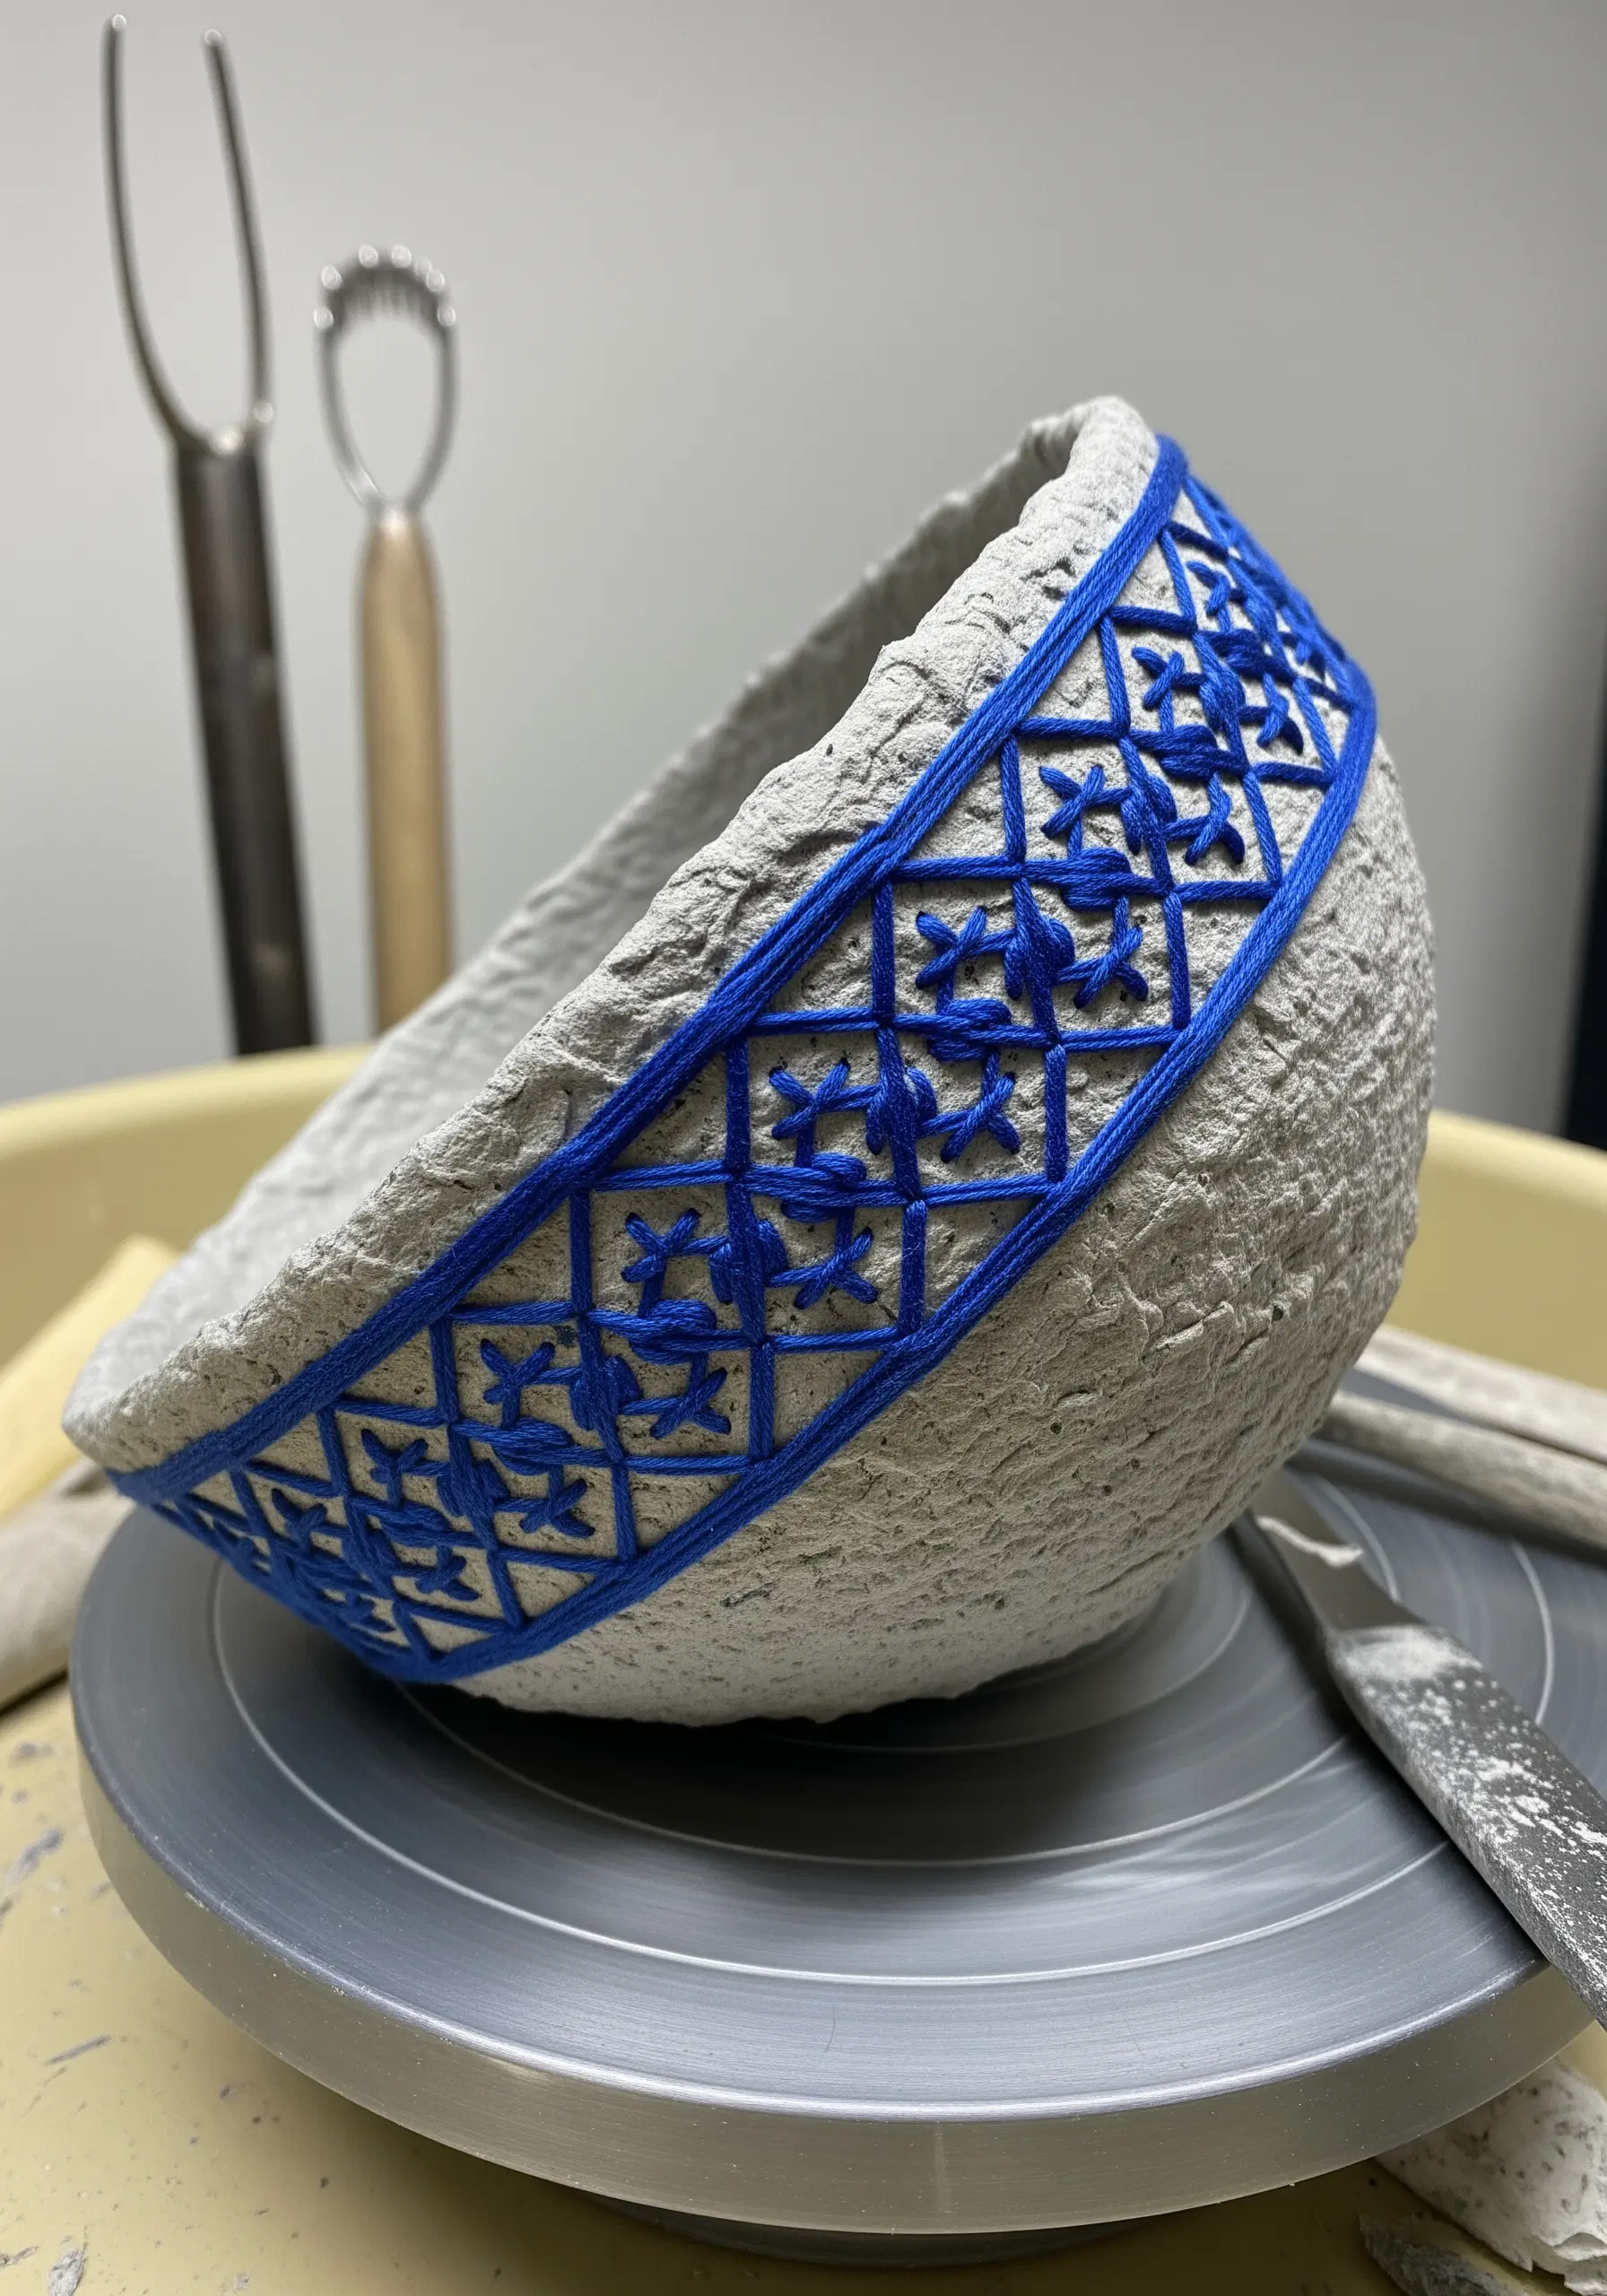
Incorporate traditional embroidery patterns onto unexpected, sculptural surfaces like paper mache.
After you form your bowl or vessel, and while the final layer is still slightly damp, use a sturdy needle to pierce holes for your design.
Once fully dry, use these guide holes to stitch a bold, geometric pattern with a thick cotton floss or yarn.
The rustic texture of the paper mache paired with the clean lines of the stitches creates a beautiful folk-art aesthetic.
14. Use Thread to Bind and Decorate Paper Folds
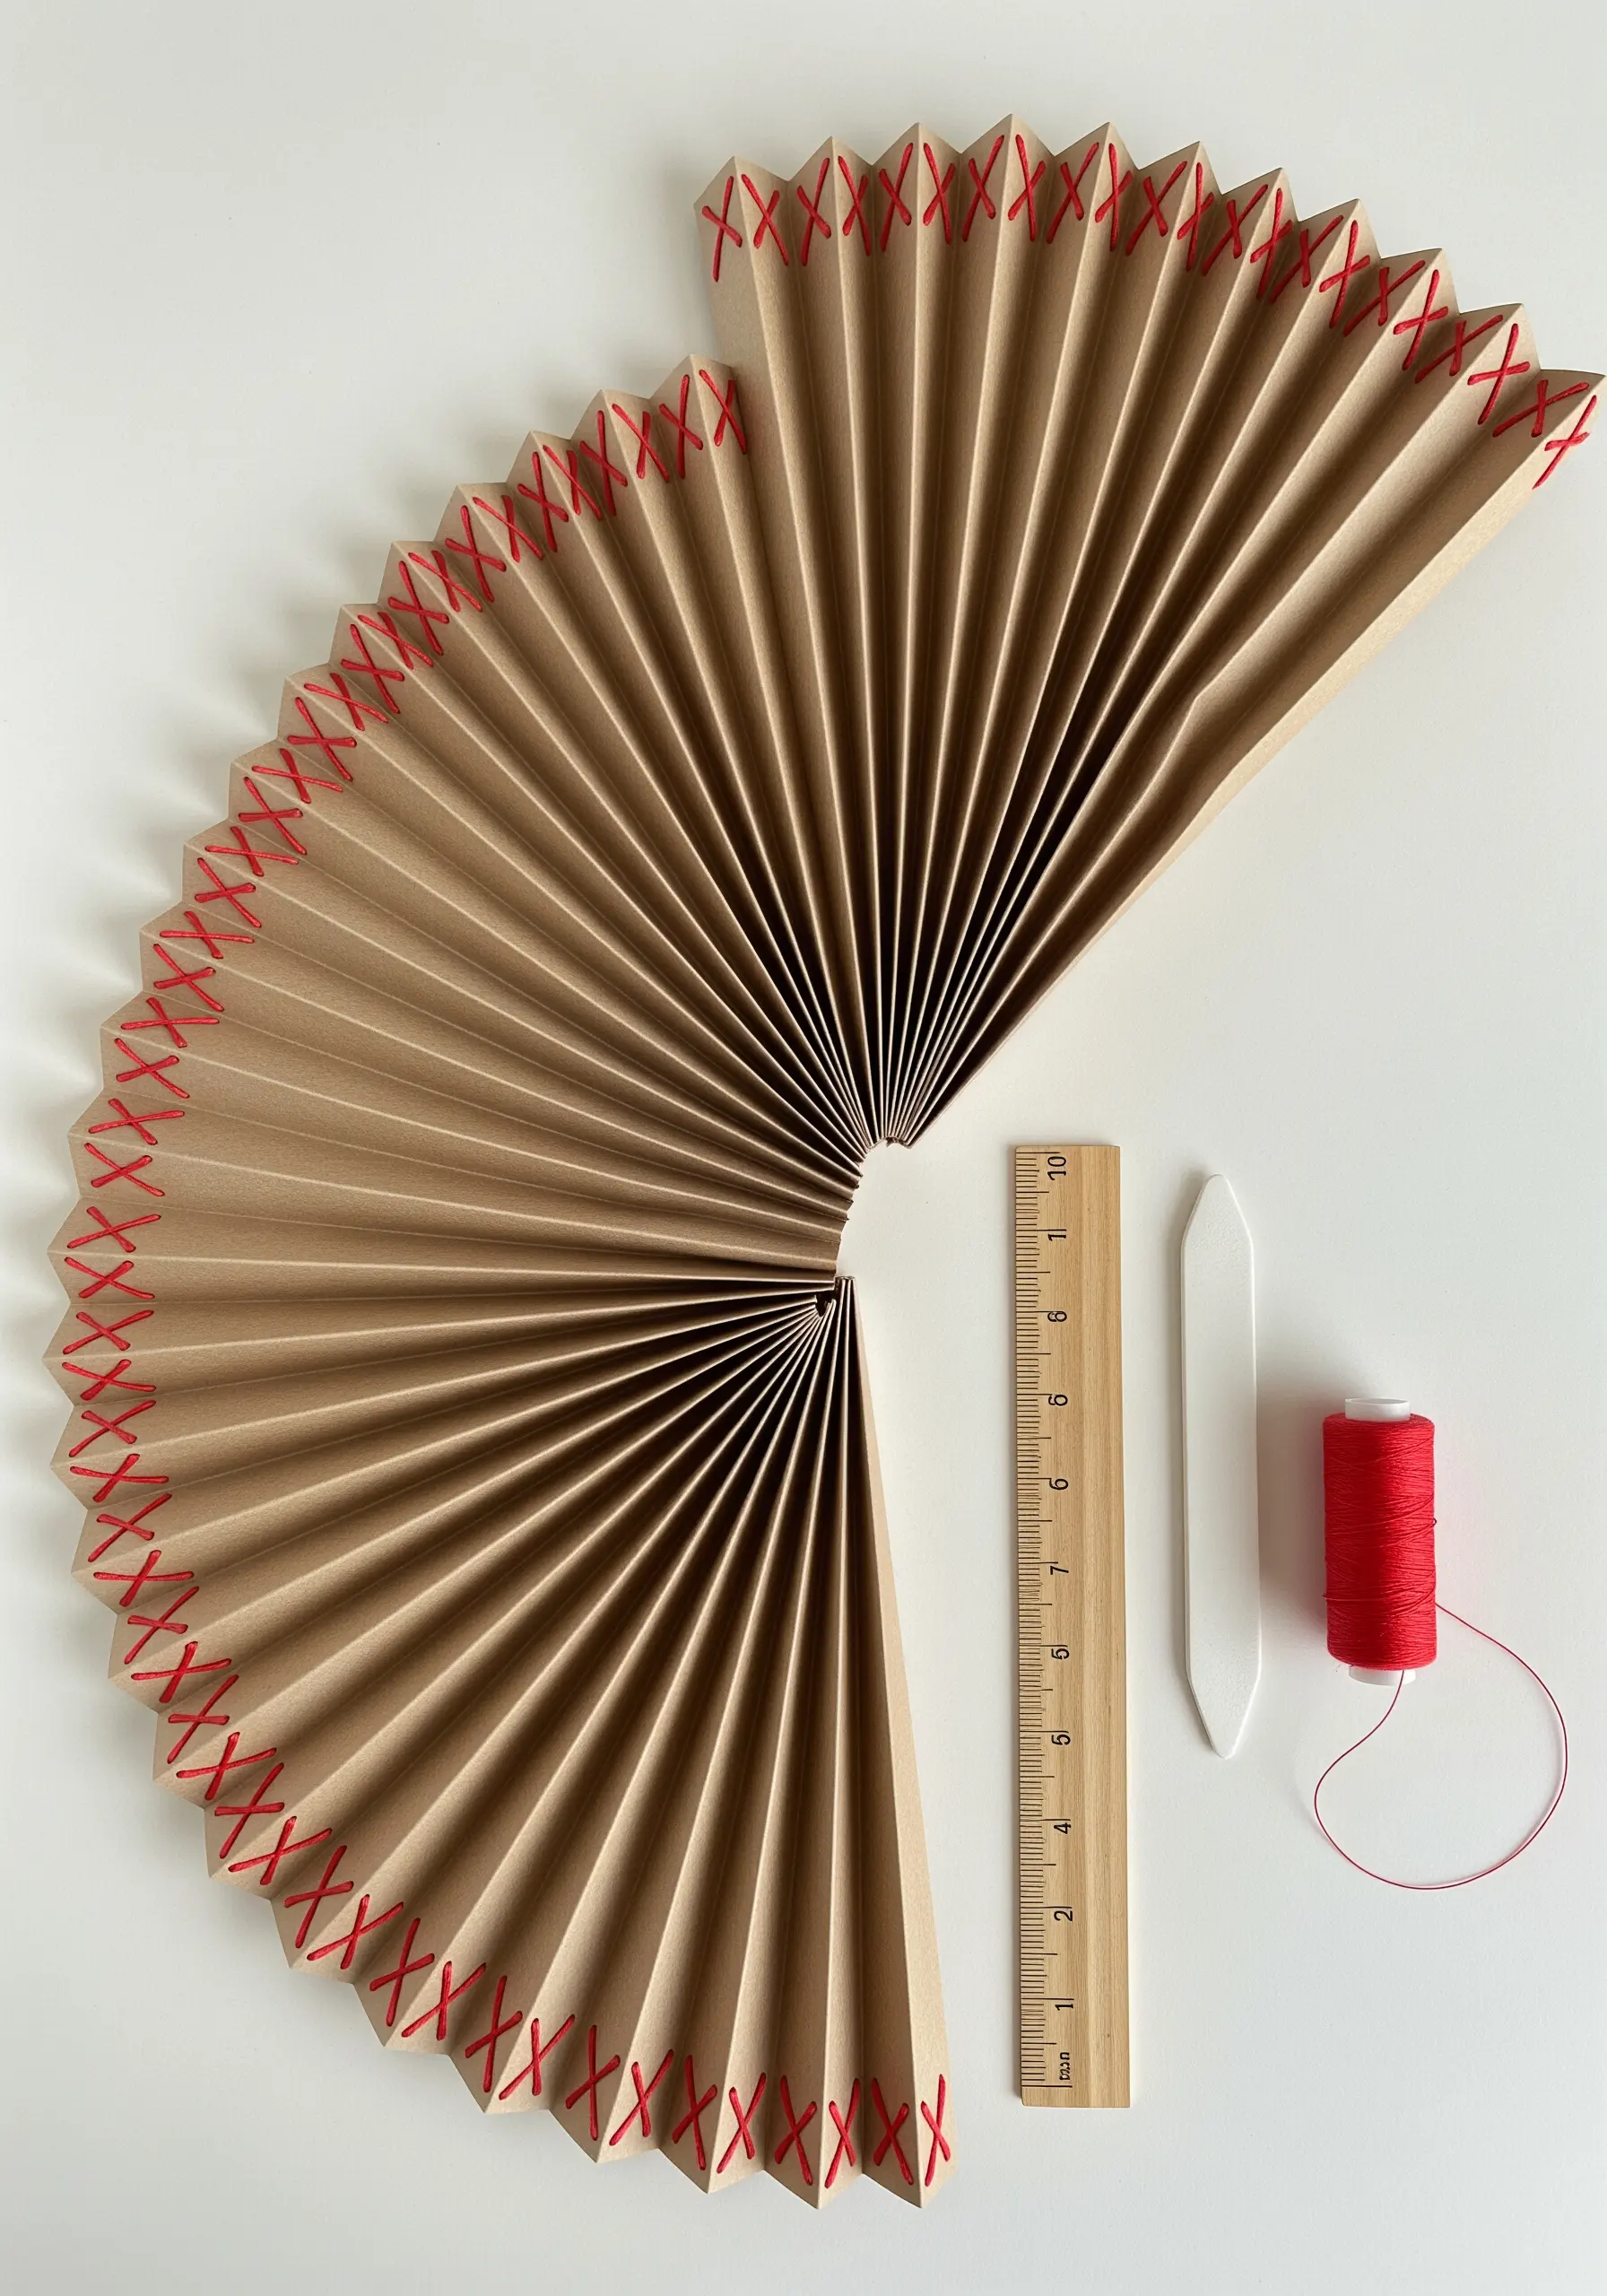
Integrate your stitching into the very structure of your paper art.
After creating an accordion-folded paper fan, use a contrasting thread to add both stability and decoration.
A simple, bold stitch like a cross-stitch or blanket stitch along the top edge not only holds the pleats in place but also adds a graphic, handmade detail.
This is a perfect example of how thread can be functional as well as beautiful.
15. Embellish Pop-Up Cards with Delicate Stitches
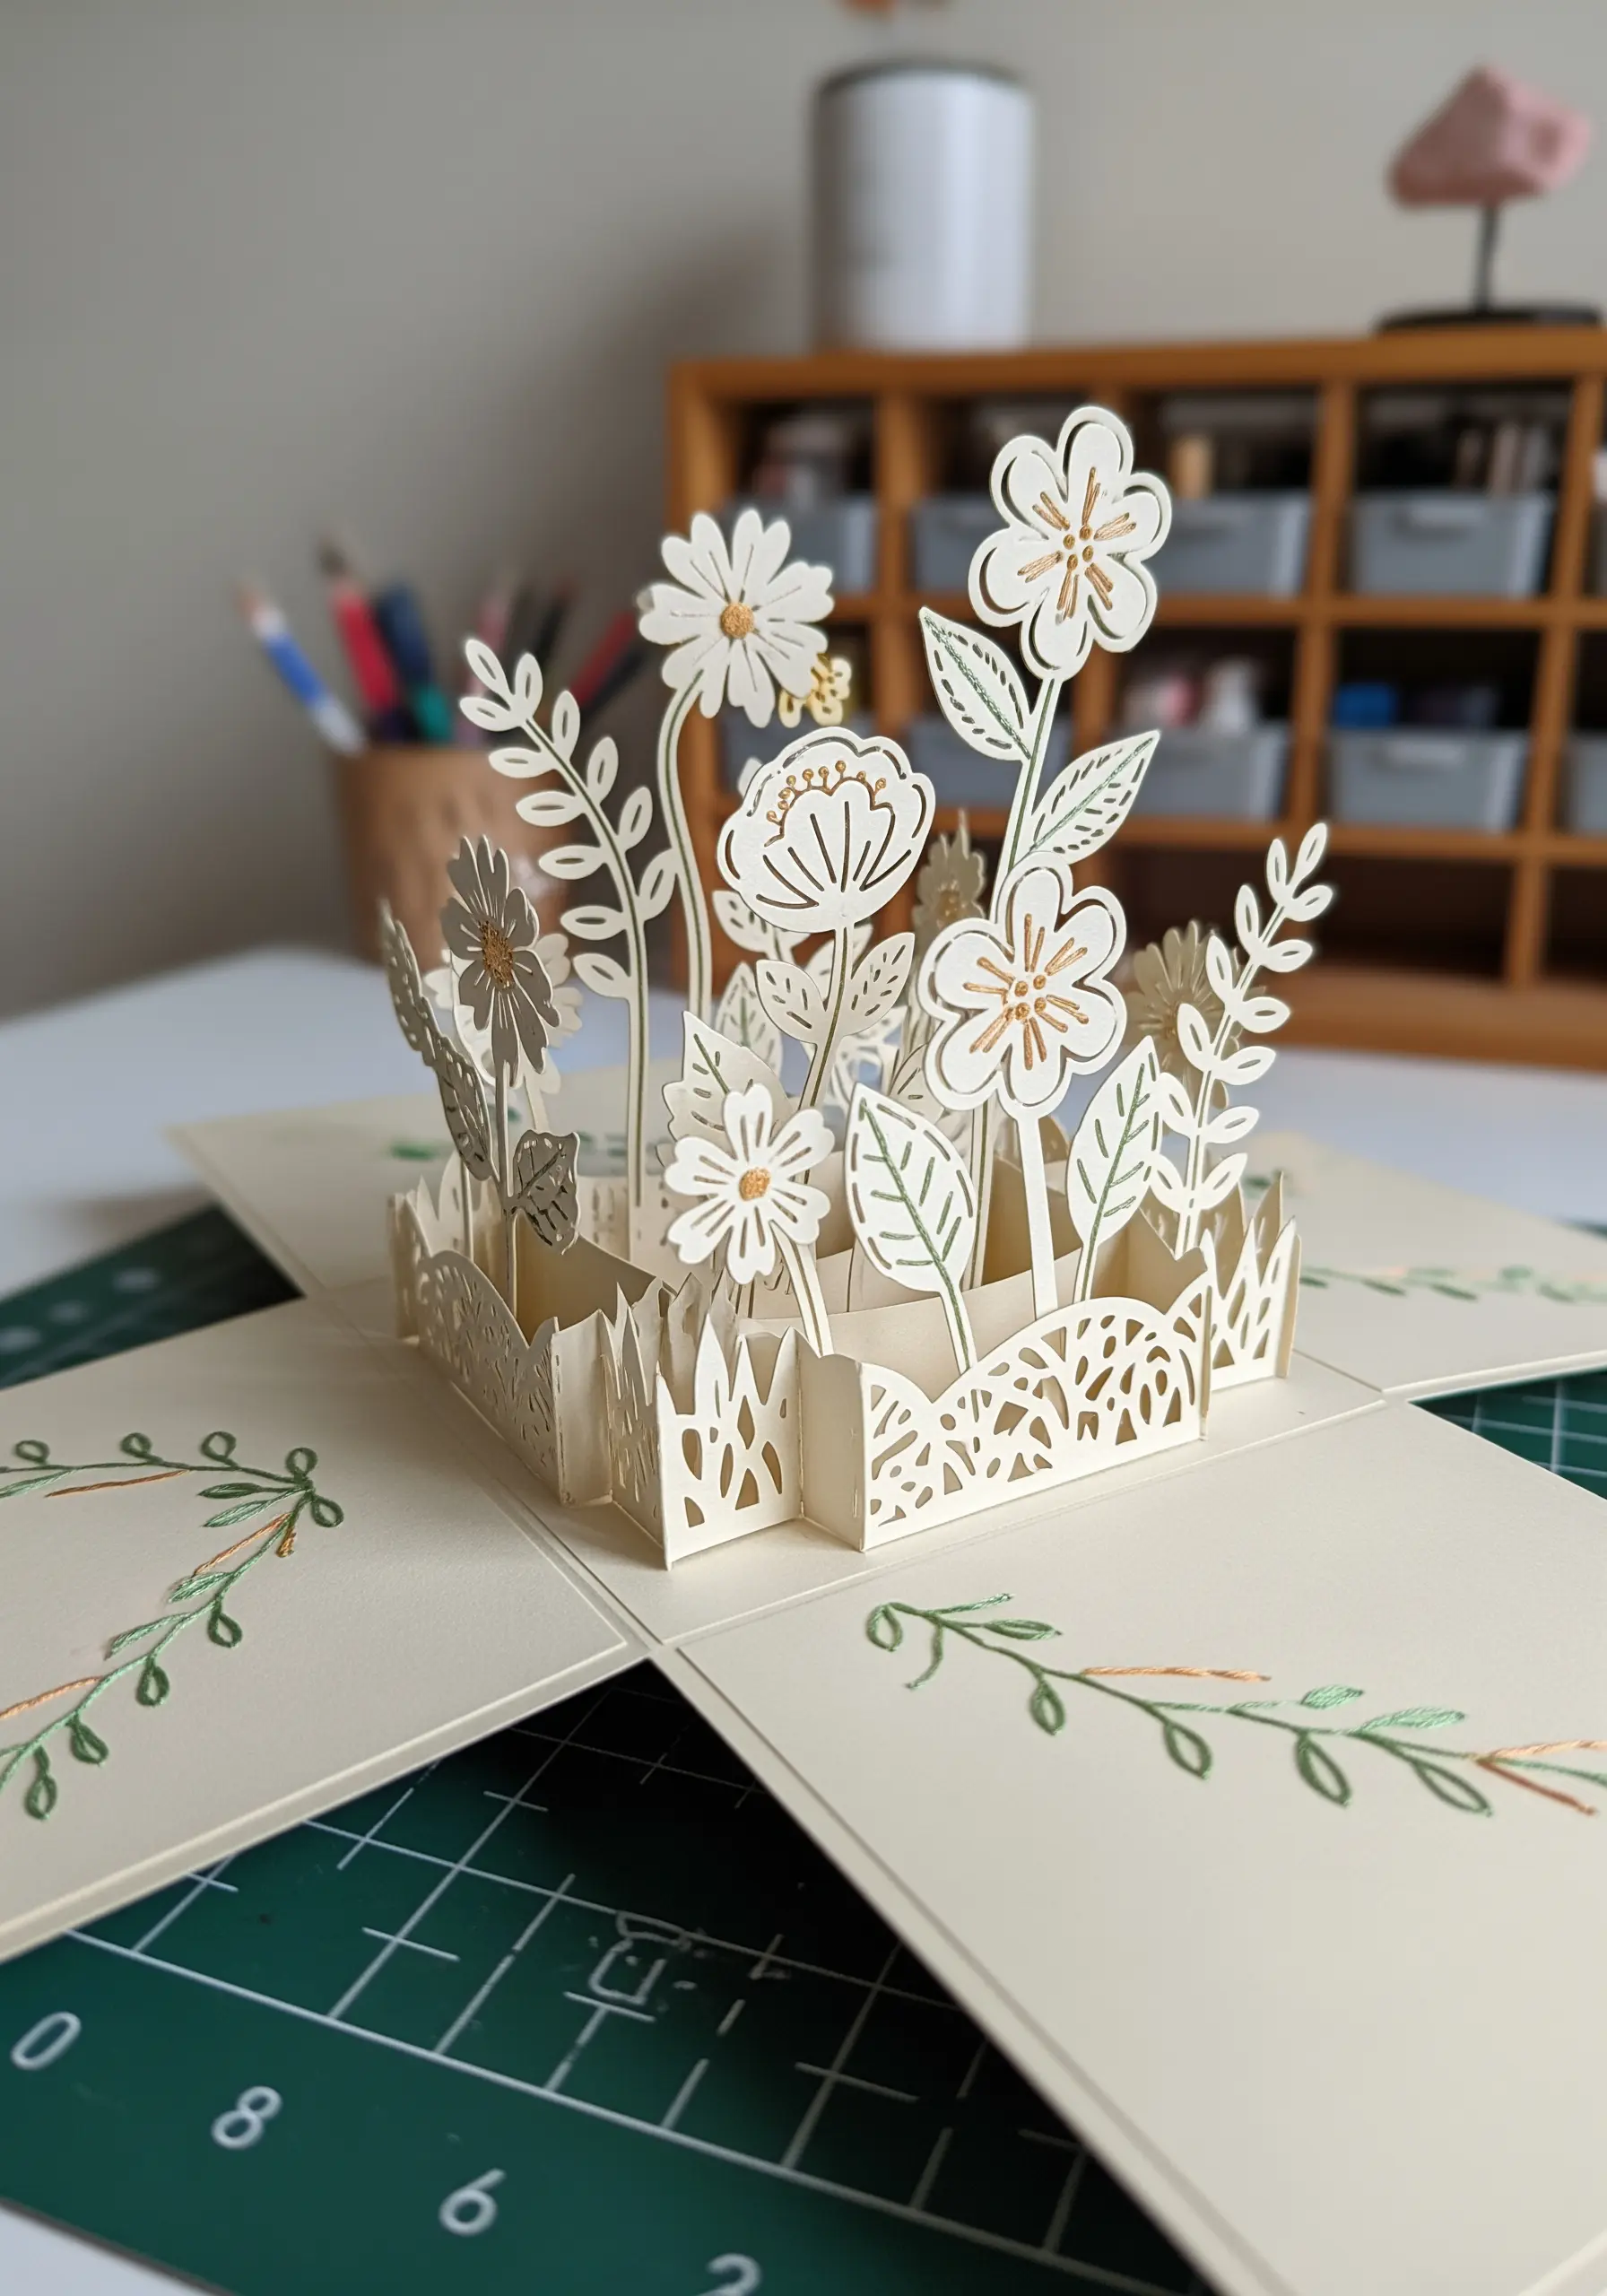
Bring a surprising and personal touch to 3D papercraft by adding tiny embroidered details.
Before you assemble your pop-up card, take a moment to add small embellishments to the flat pieces.
A few French knots can become flower centers, while a simple backstitch can define a leaf’s vein.
These tiny embroidery details add a layer of intricacy and care that makes the final piece truly special.
16. Sculpt Ocean Waves with Layered Paper and Thread
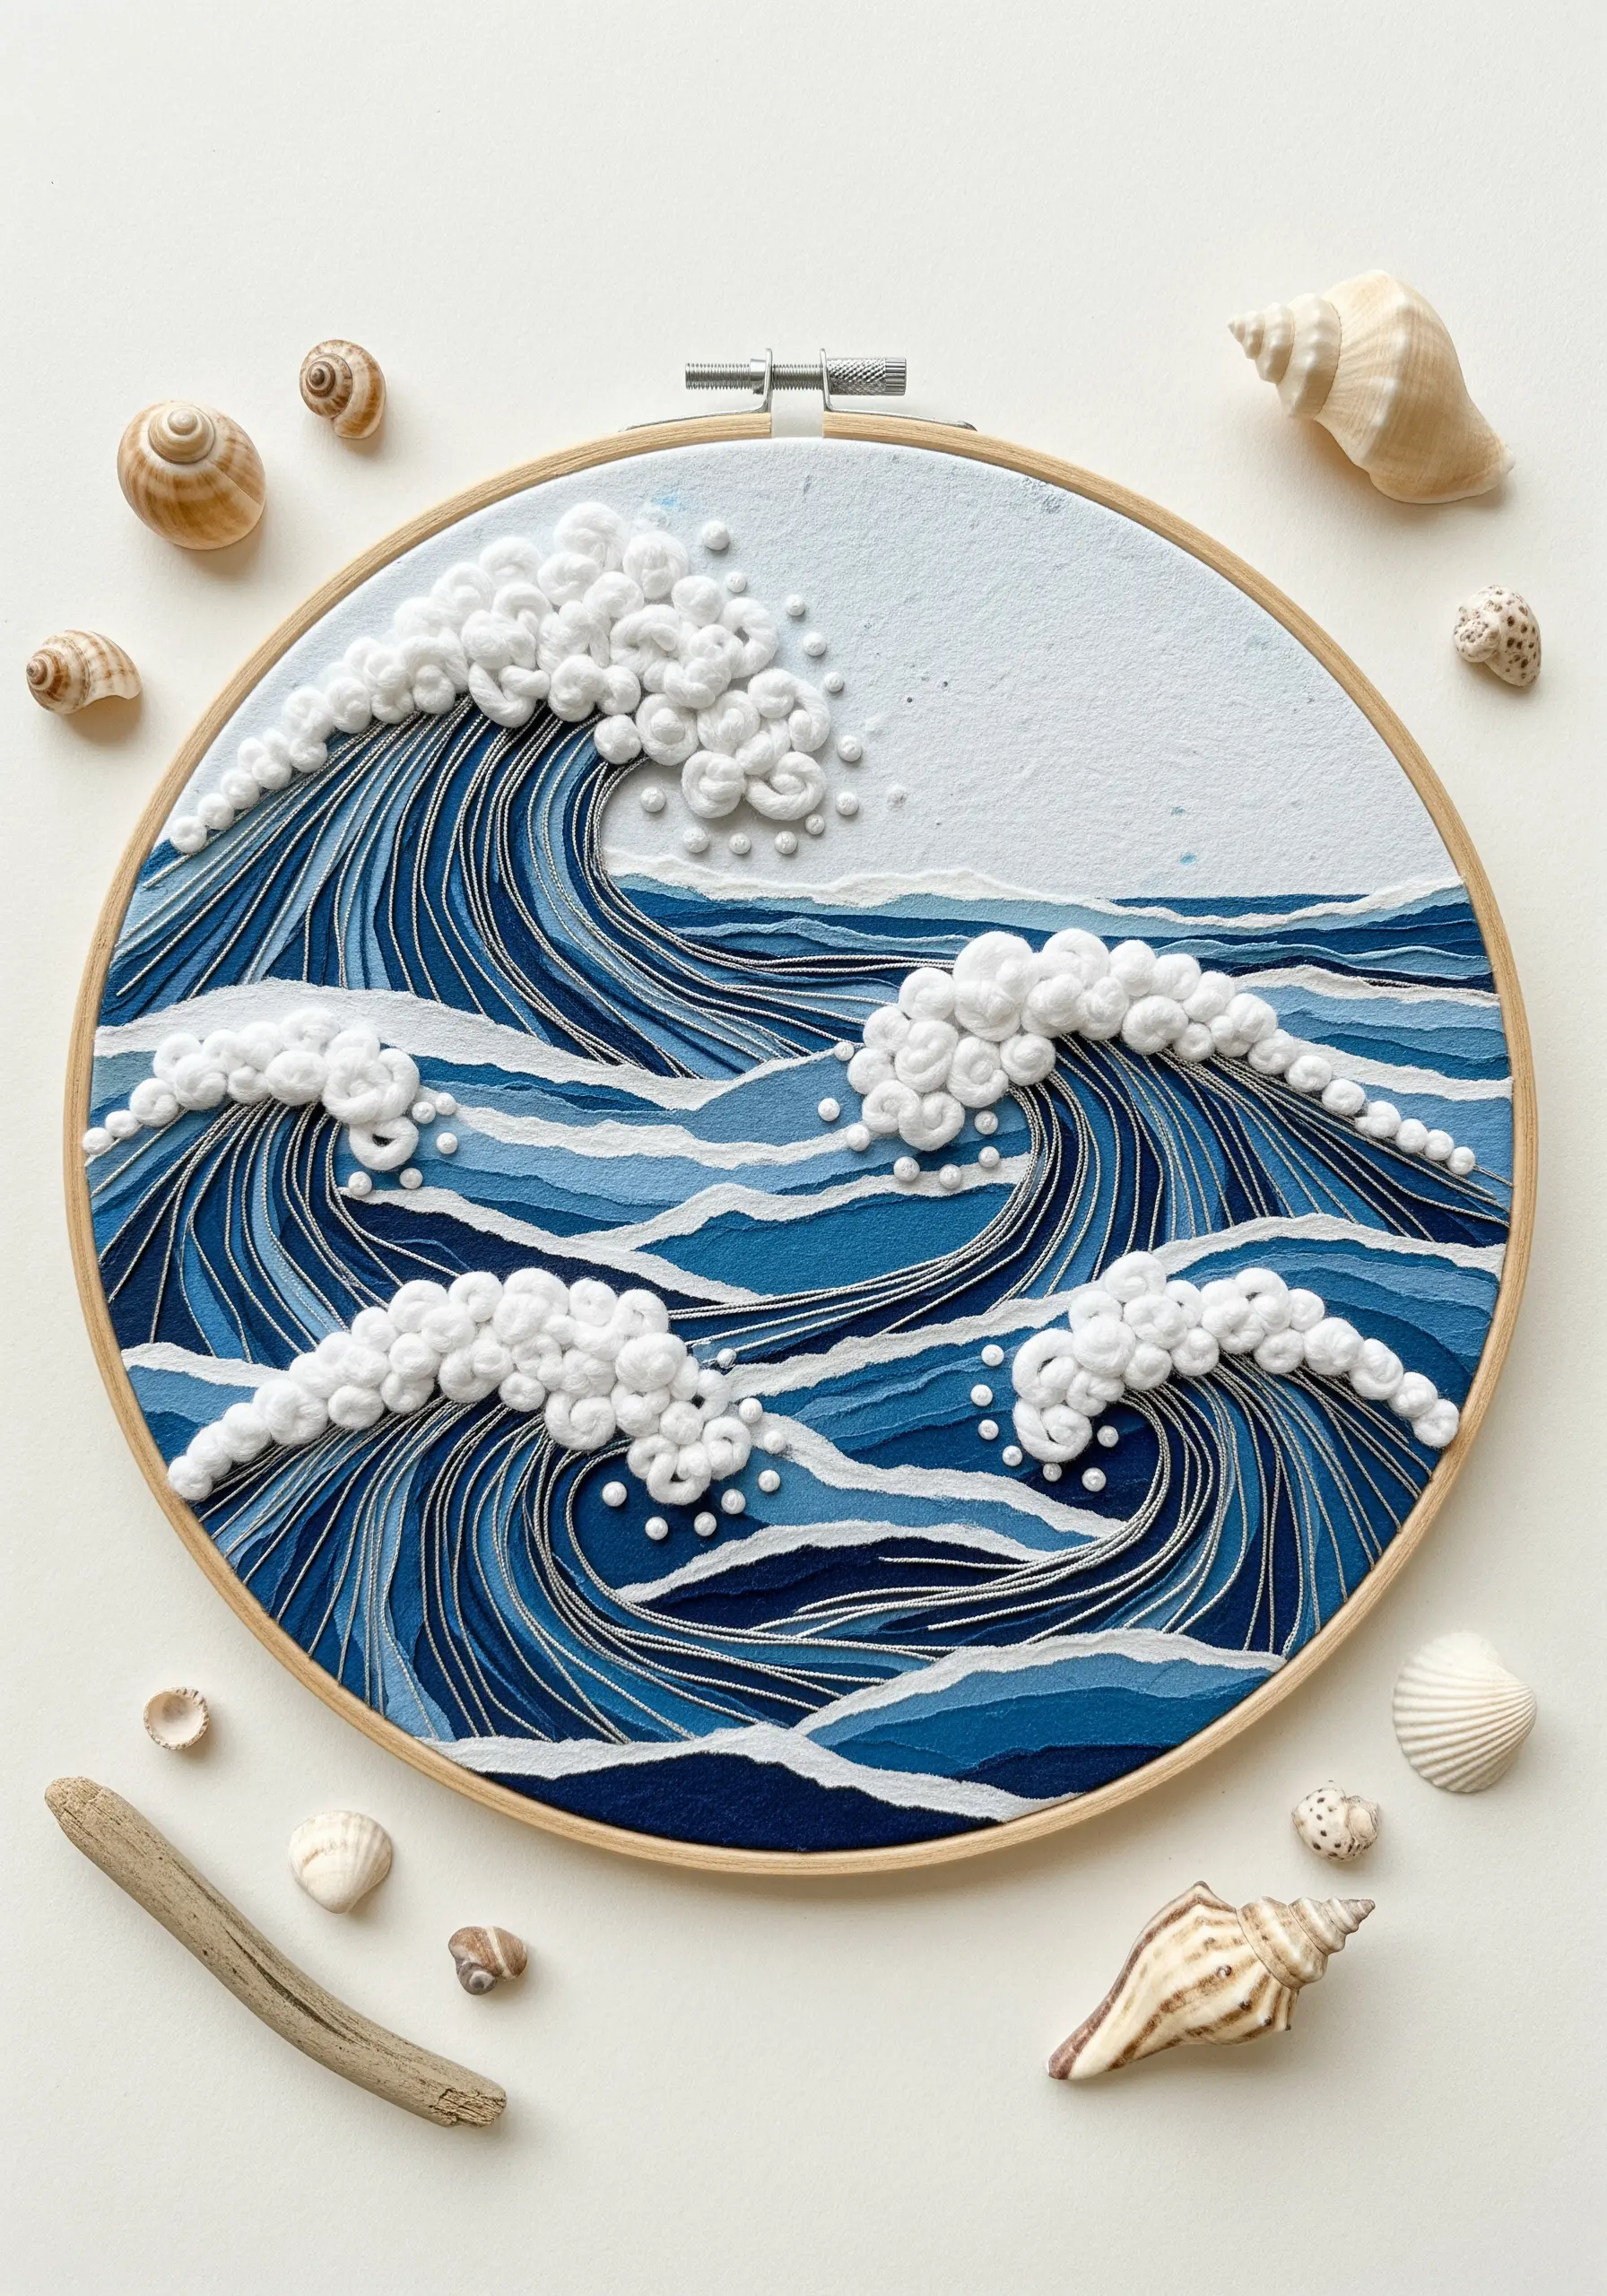
Capture the dynamic movement of the ocean by layering paper and adding stitched contours.
Cut wave-like shapes from various shades of blue cardstock and arrange them in a hoop to create a sense of depth.
Use long, straight stitches in contrasting blues to represent the water’s flow and direction.
Finish with clusters of white French knots for the sea foam, adding a final burst of texture that makes the waves crash right out of the hoop.
17. Apply Embroidered Appliqués to Ceramic Forms
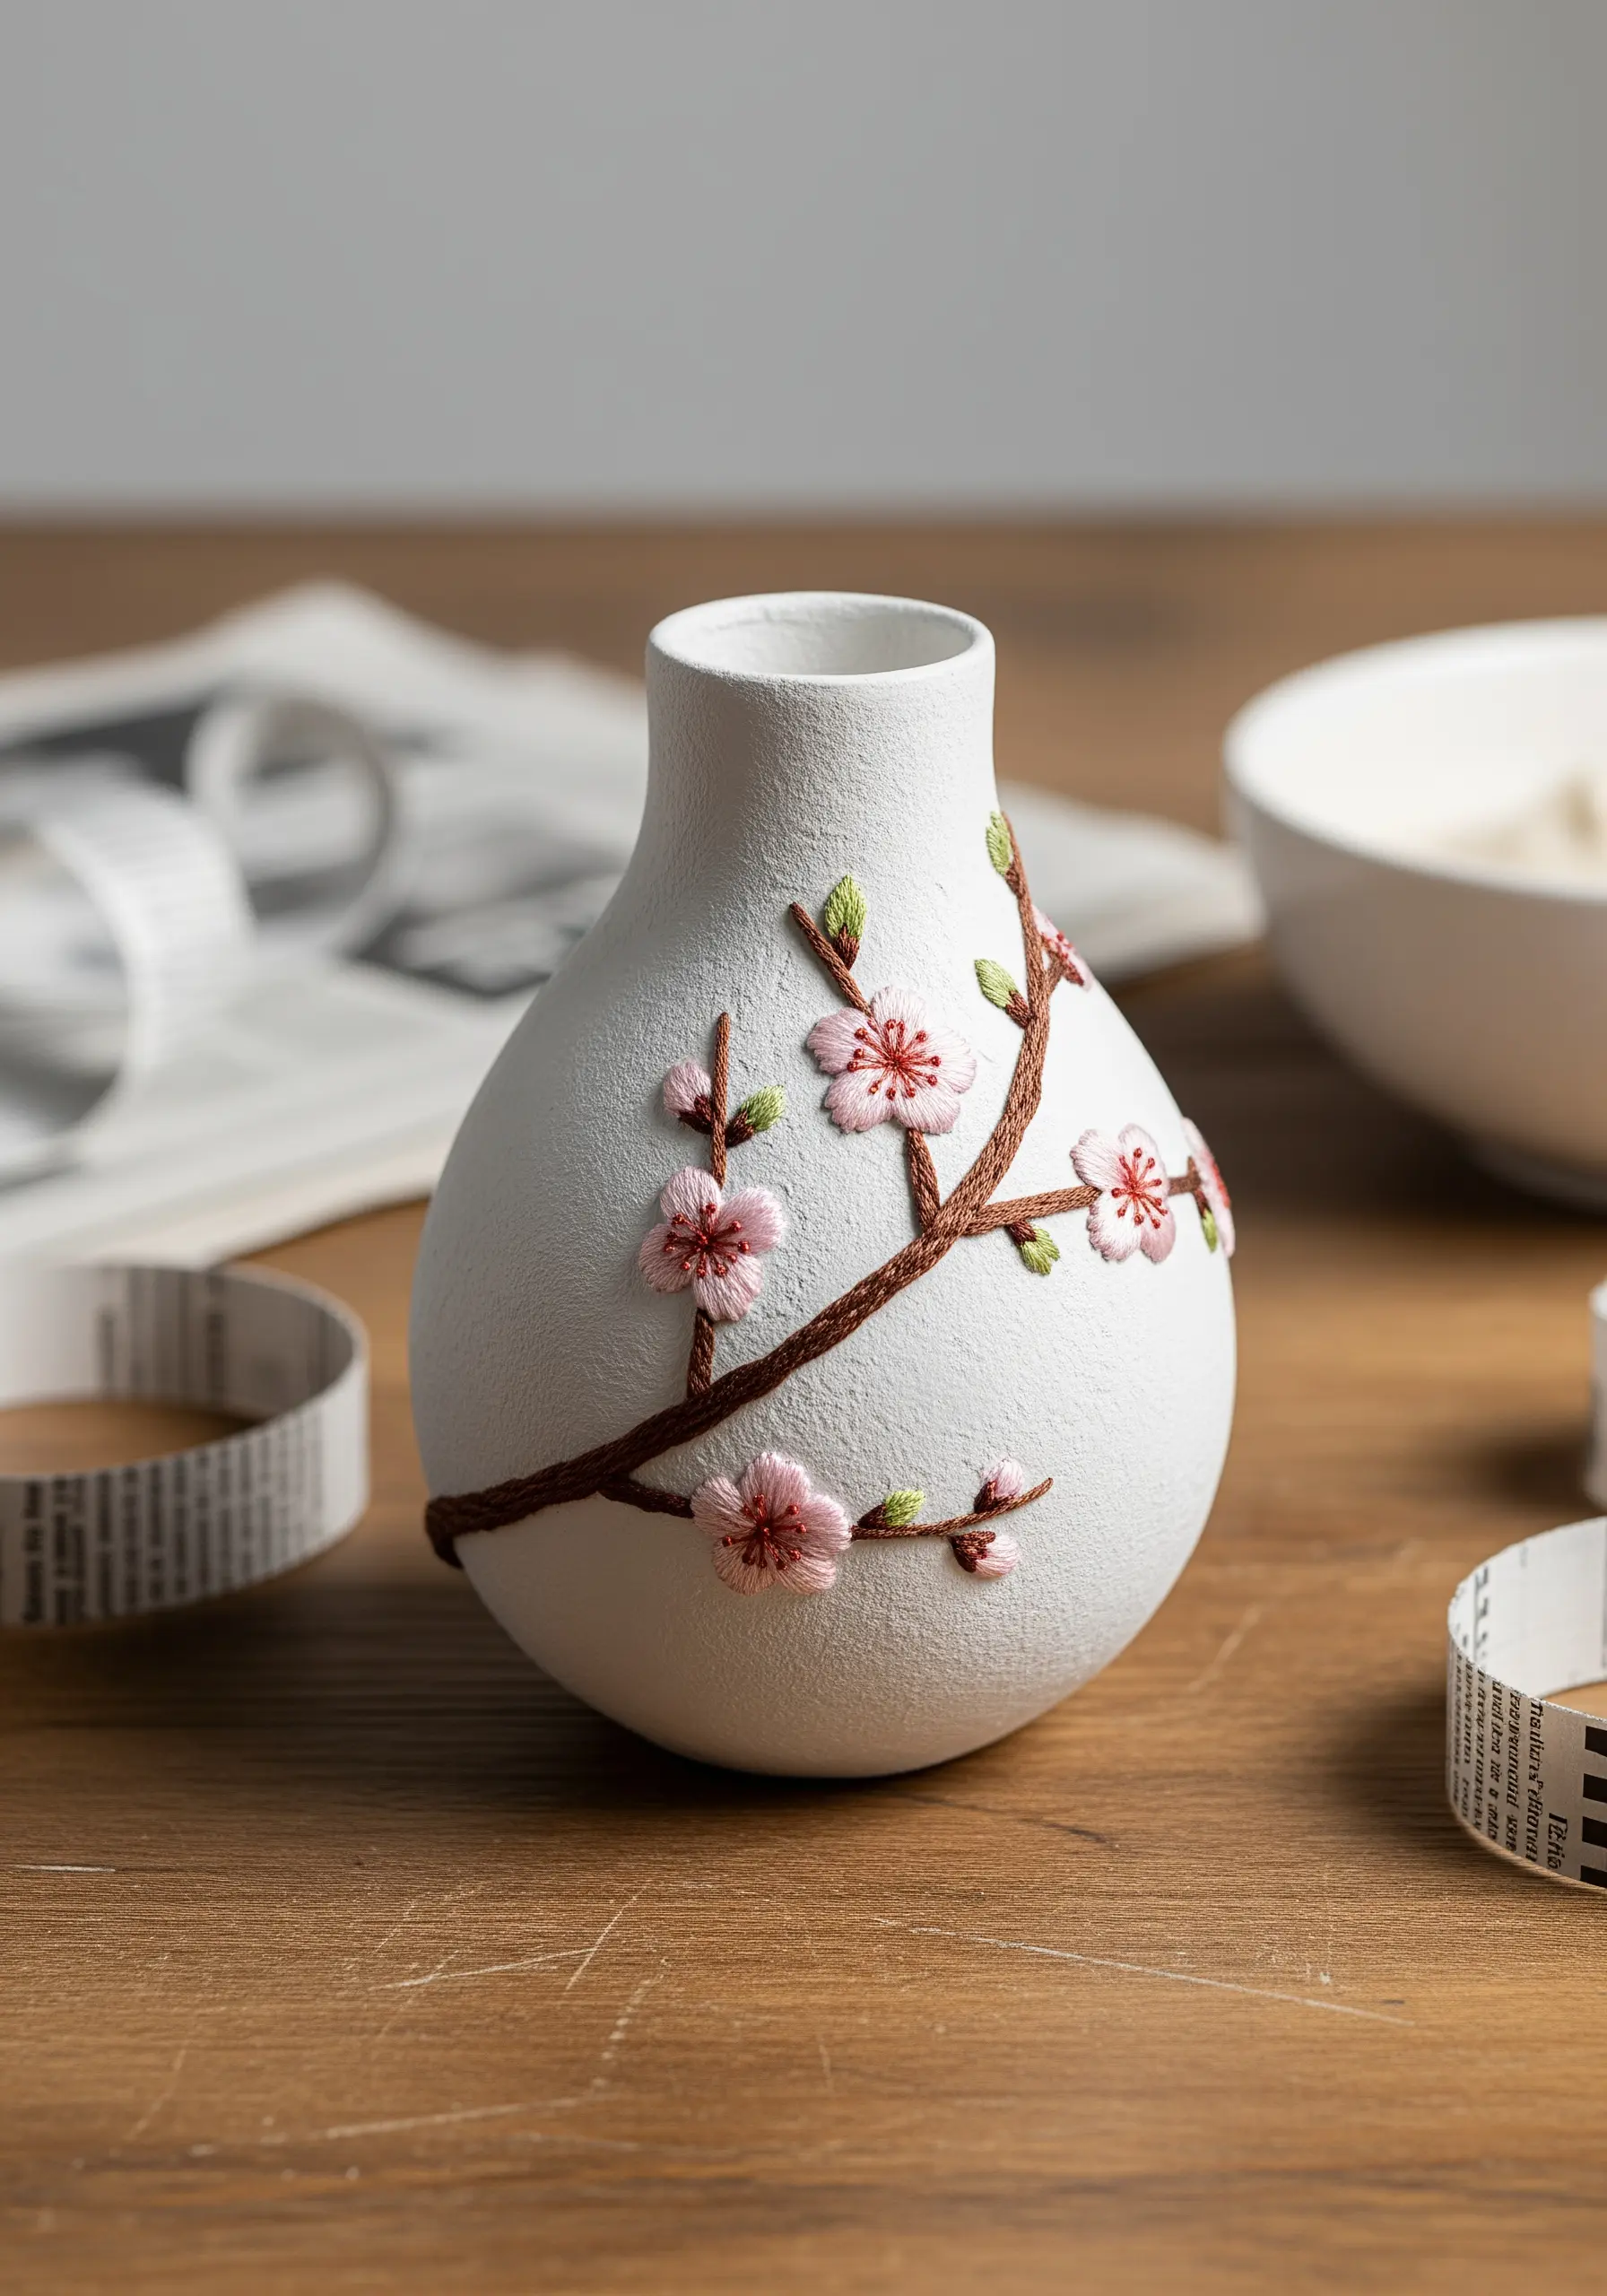
Adorn three-dimensional objects with delicate embroidery by creating a stitched appliqué.
First, complete your embroidery on a piece of sturdy fabric or heavyweight paper. A simple motif like a cherry blossom branch works perfectly.
Carefully trim around the design, leaving a minimal border. Then, use a strong craft adhesive to wrap and apply the stitched piece to a vase or other curved surface.
This allows you to add the softness of thread to hard materials like ceramic or glass.
18. Create Graphic Patterns with Washi Tape and Thread
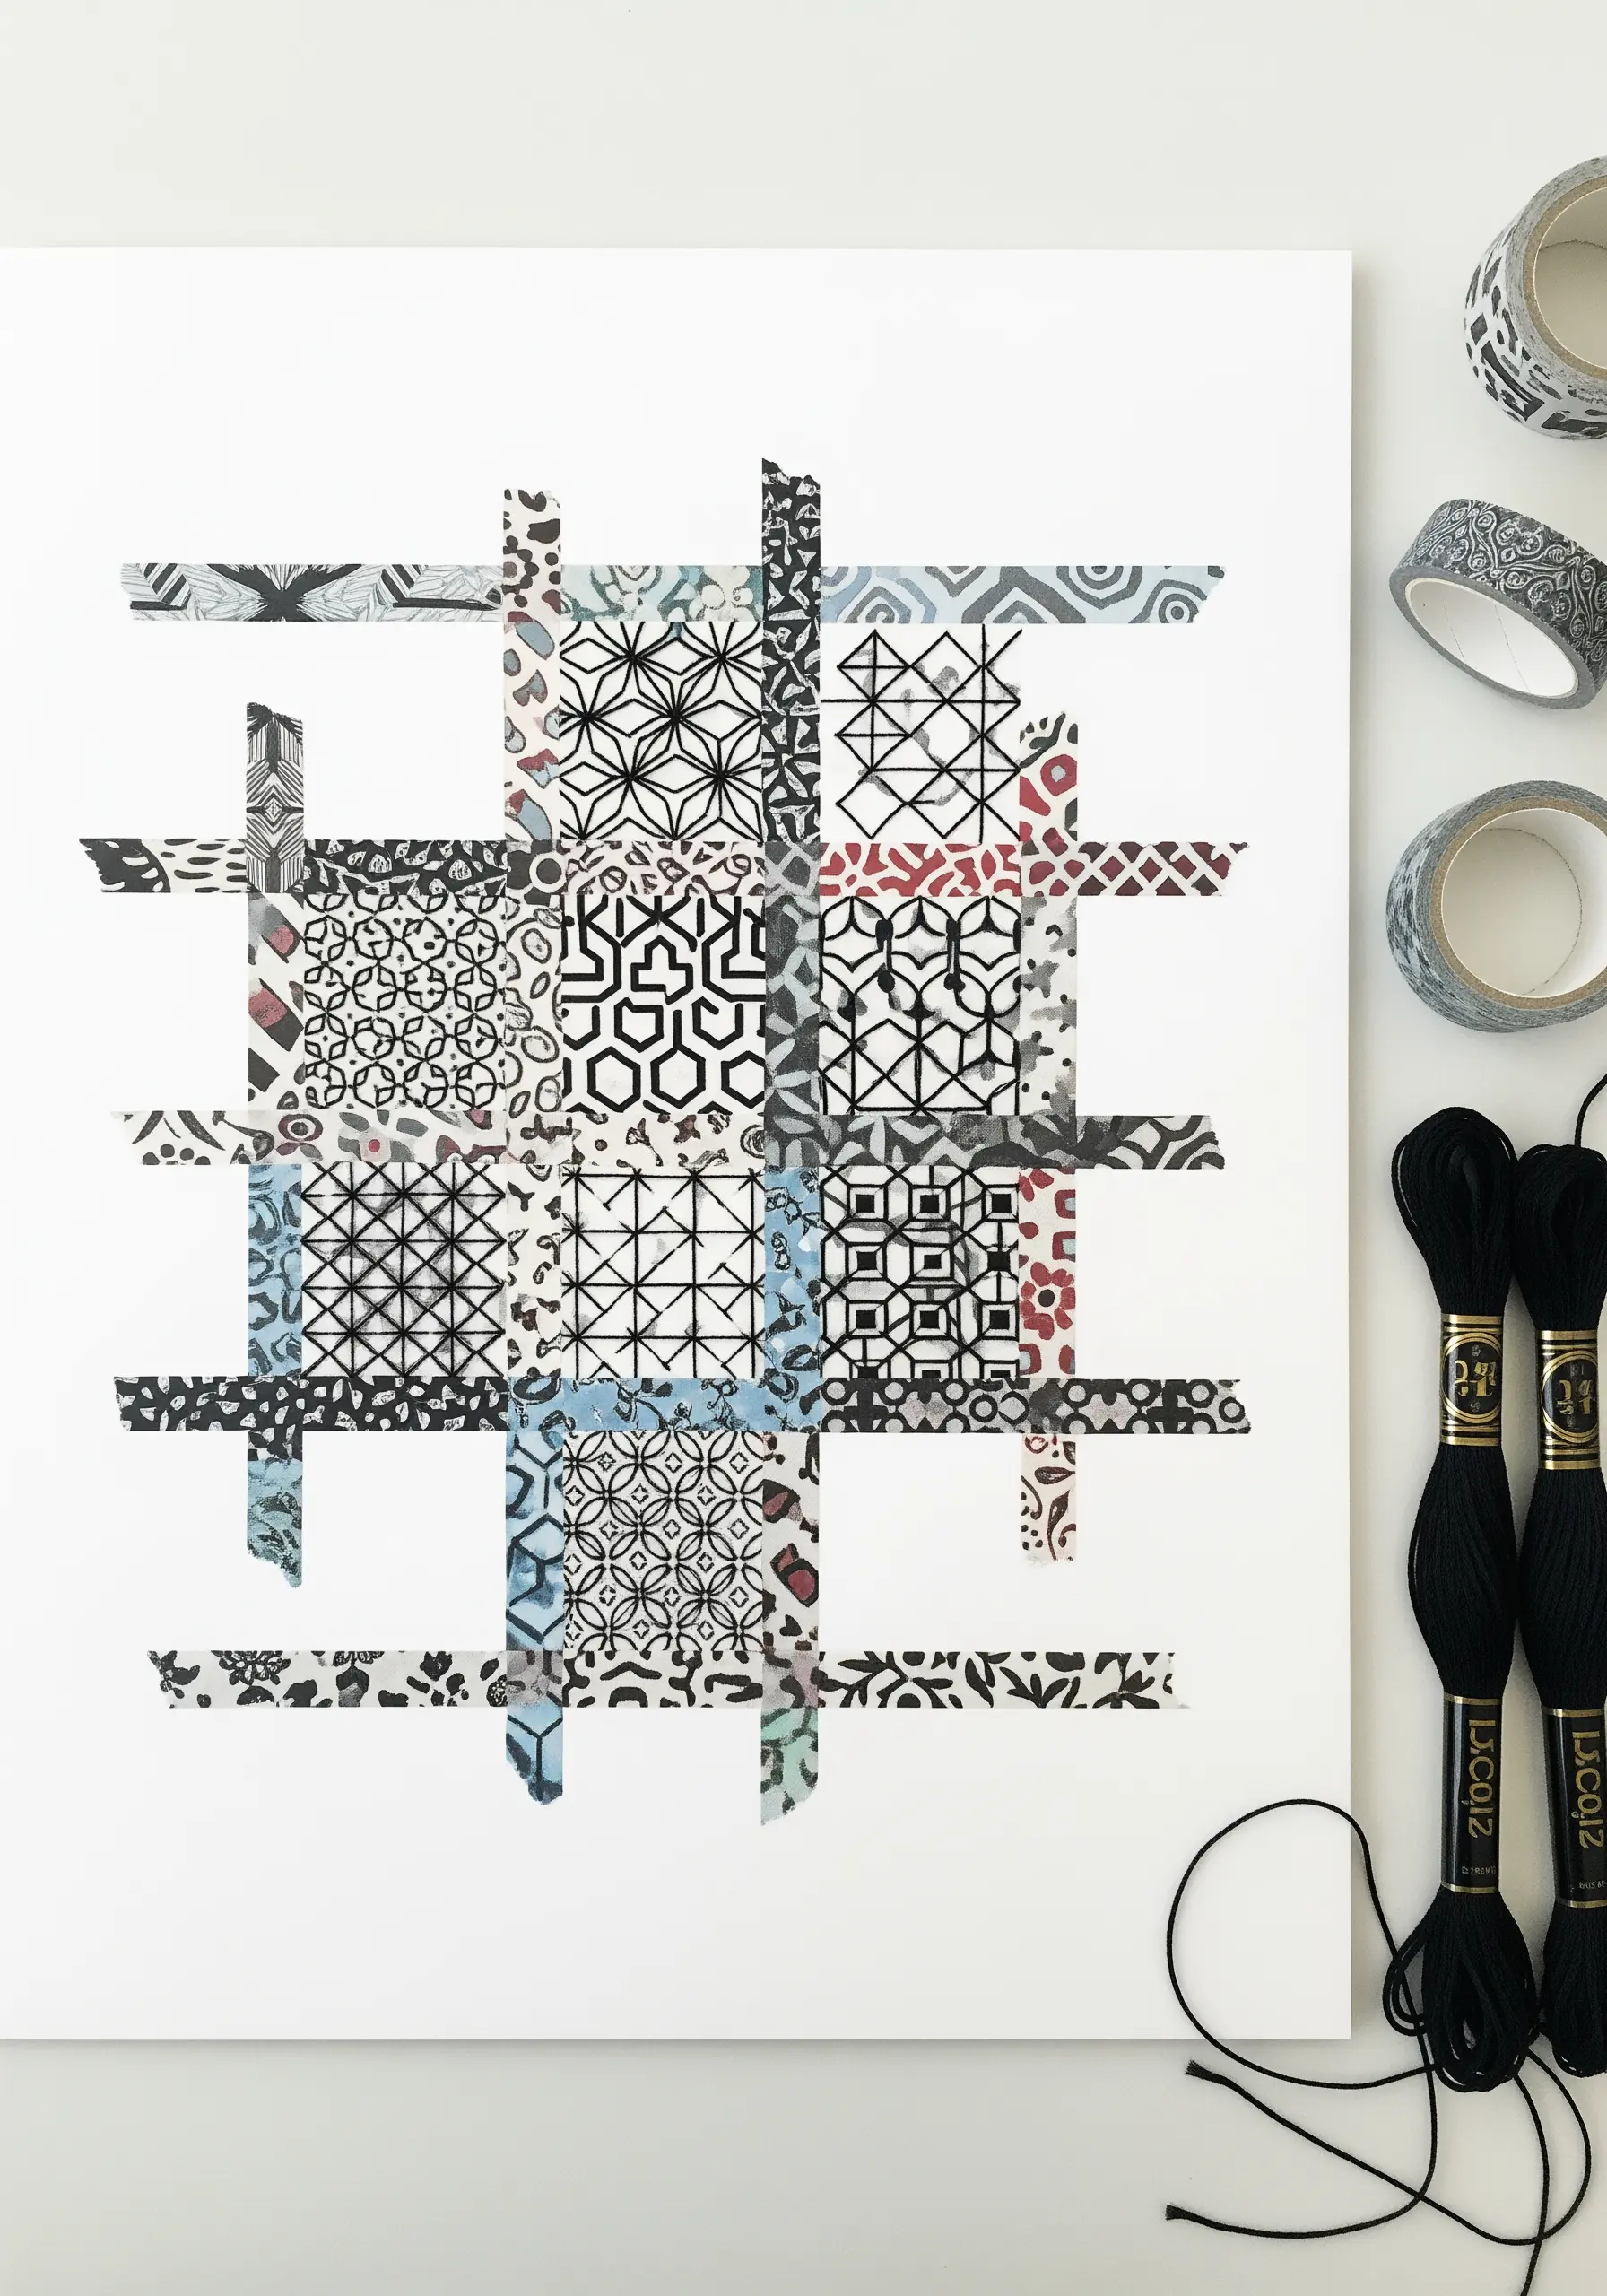
Combine the sharp, clean lines of washi tape with the organic texture of thread.
Create a geometric collage on a piece of white cardstock using patterned washi tapes.
Then, stitch over the composition with a bold, black thread. A simple running stitch or backstitch is all you need to add definition, unify the disparate patterns, and introduce a tactile element.
This is one of the most accessible embroidered mixed-media projects you can try.
19. Embellish Die-Cut Shapes for a Refined Finish
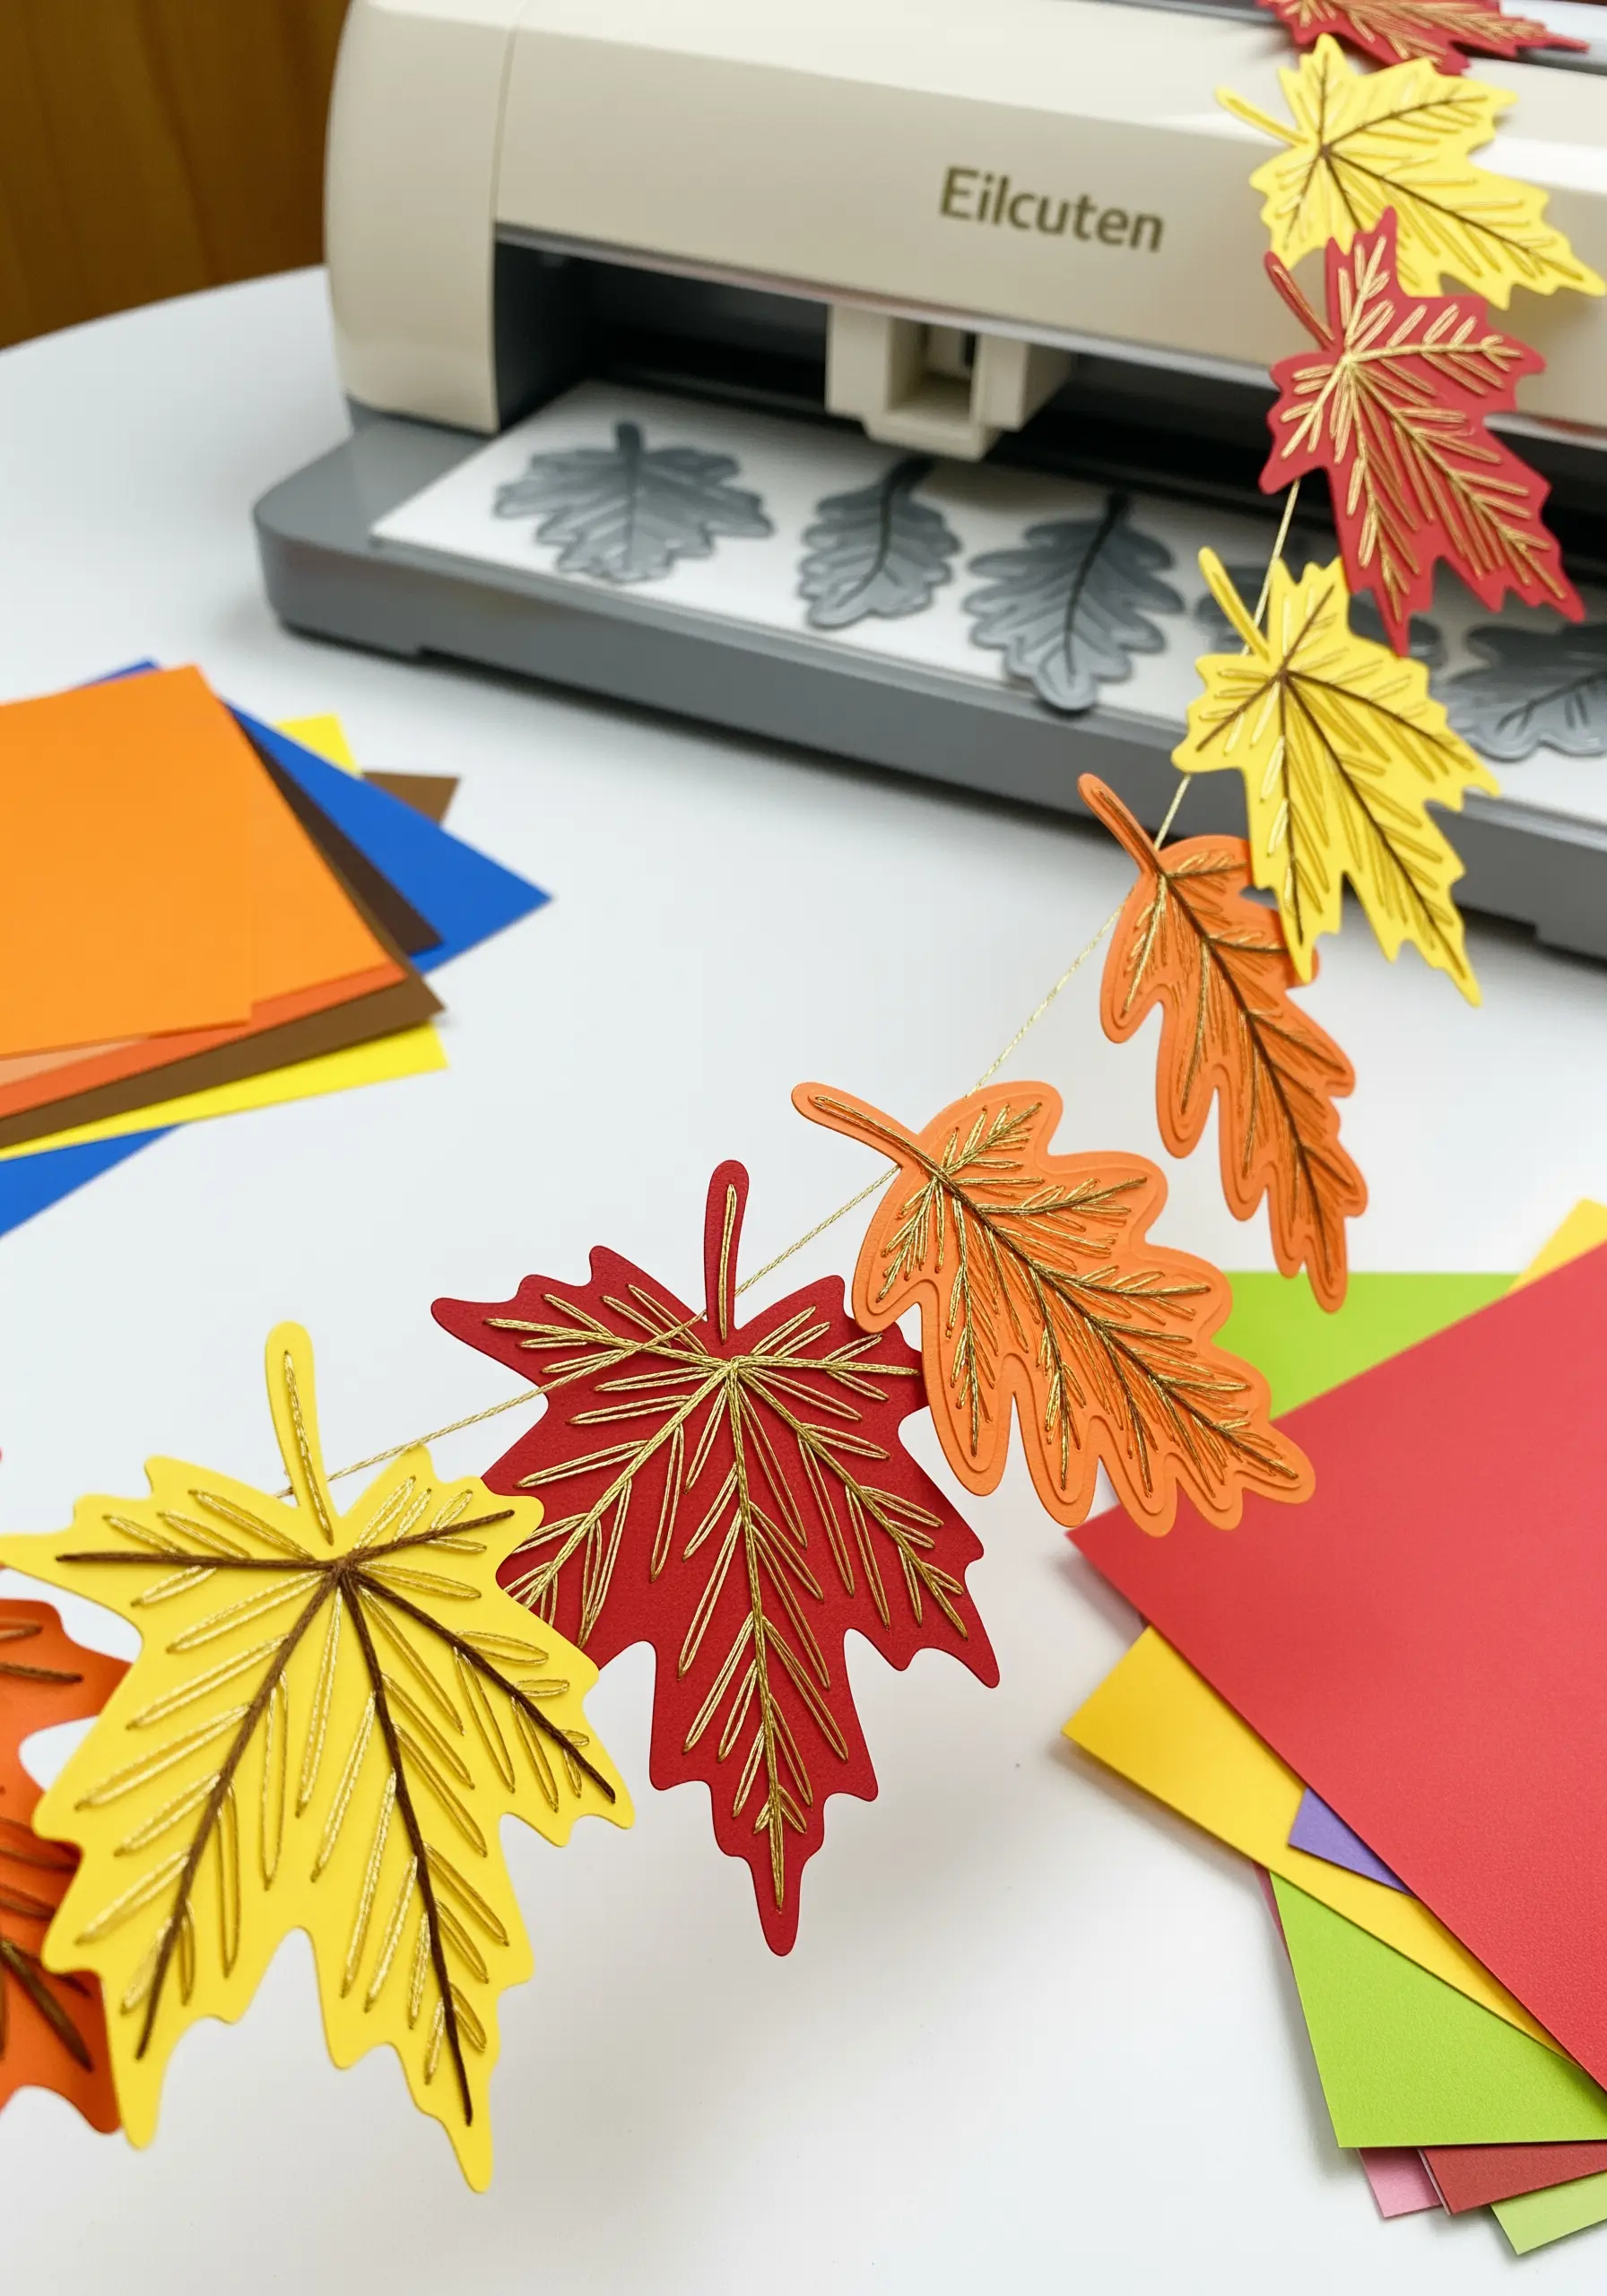
Achieve perfectly uniform shapes for your paper projects by using a die-cutting machine.
Cut autumn leaves from colored cardstock, then give them a touch of elegance with simple embroidery.
A single line of backstitch or chain stitch in a shimmering metallic thread is enough to suggest the veins of the leaves.
This quick embellishment elevates simple paper cutouts into something far more special, perfect for garlands or gift tags.
20. Pre-Embroider Pieces for 3D Paper Models
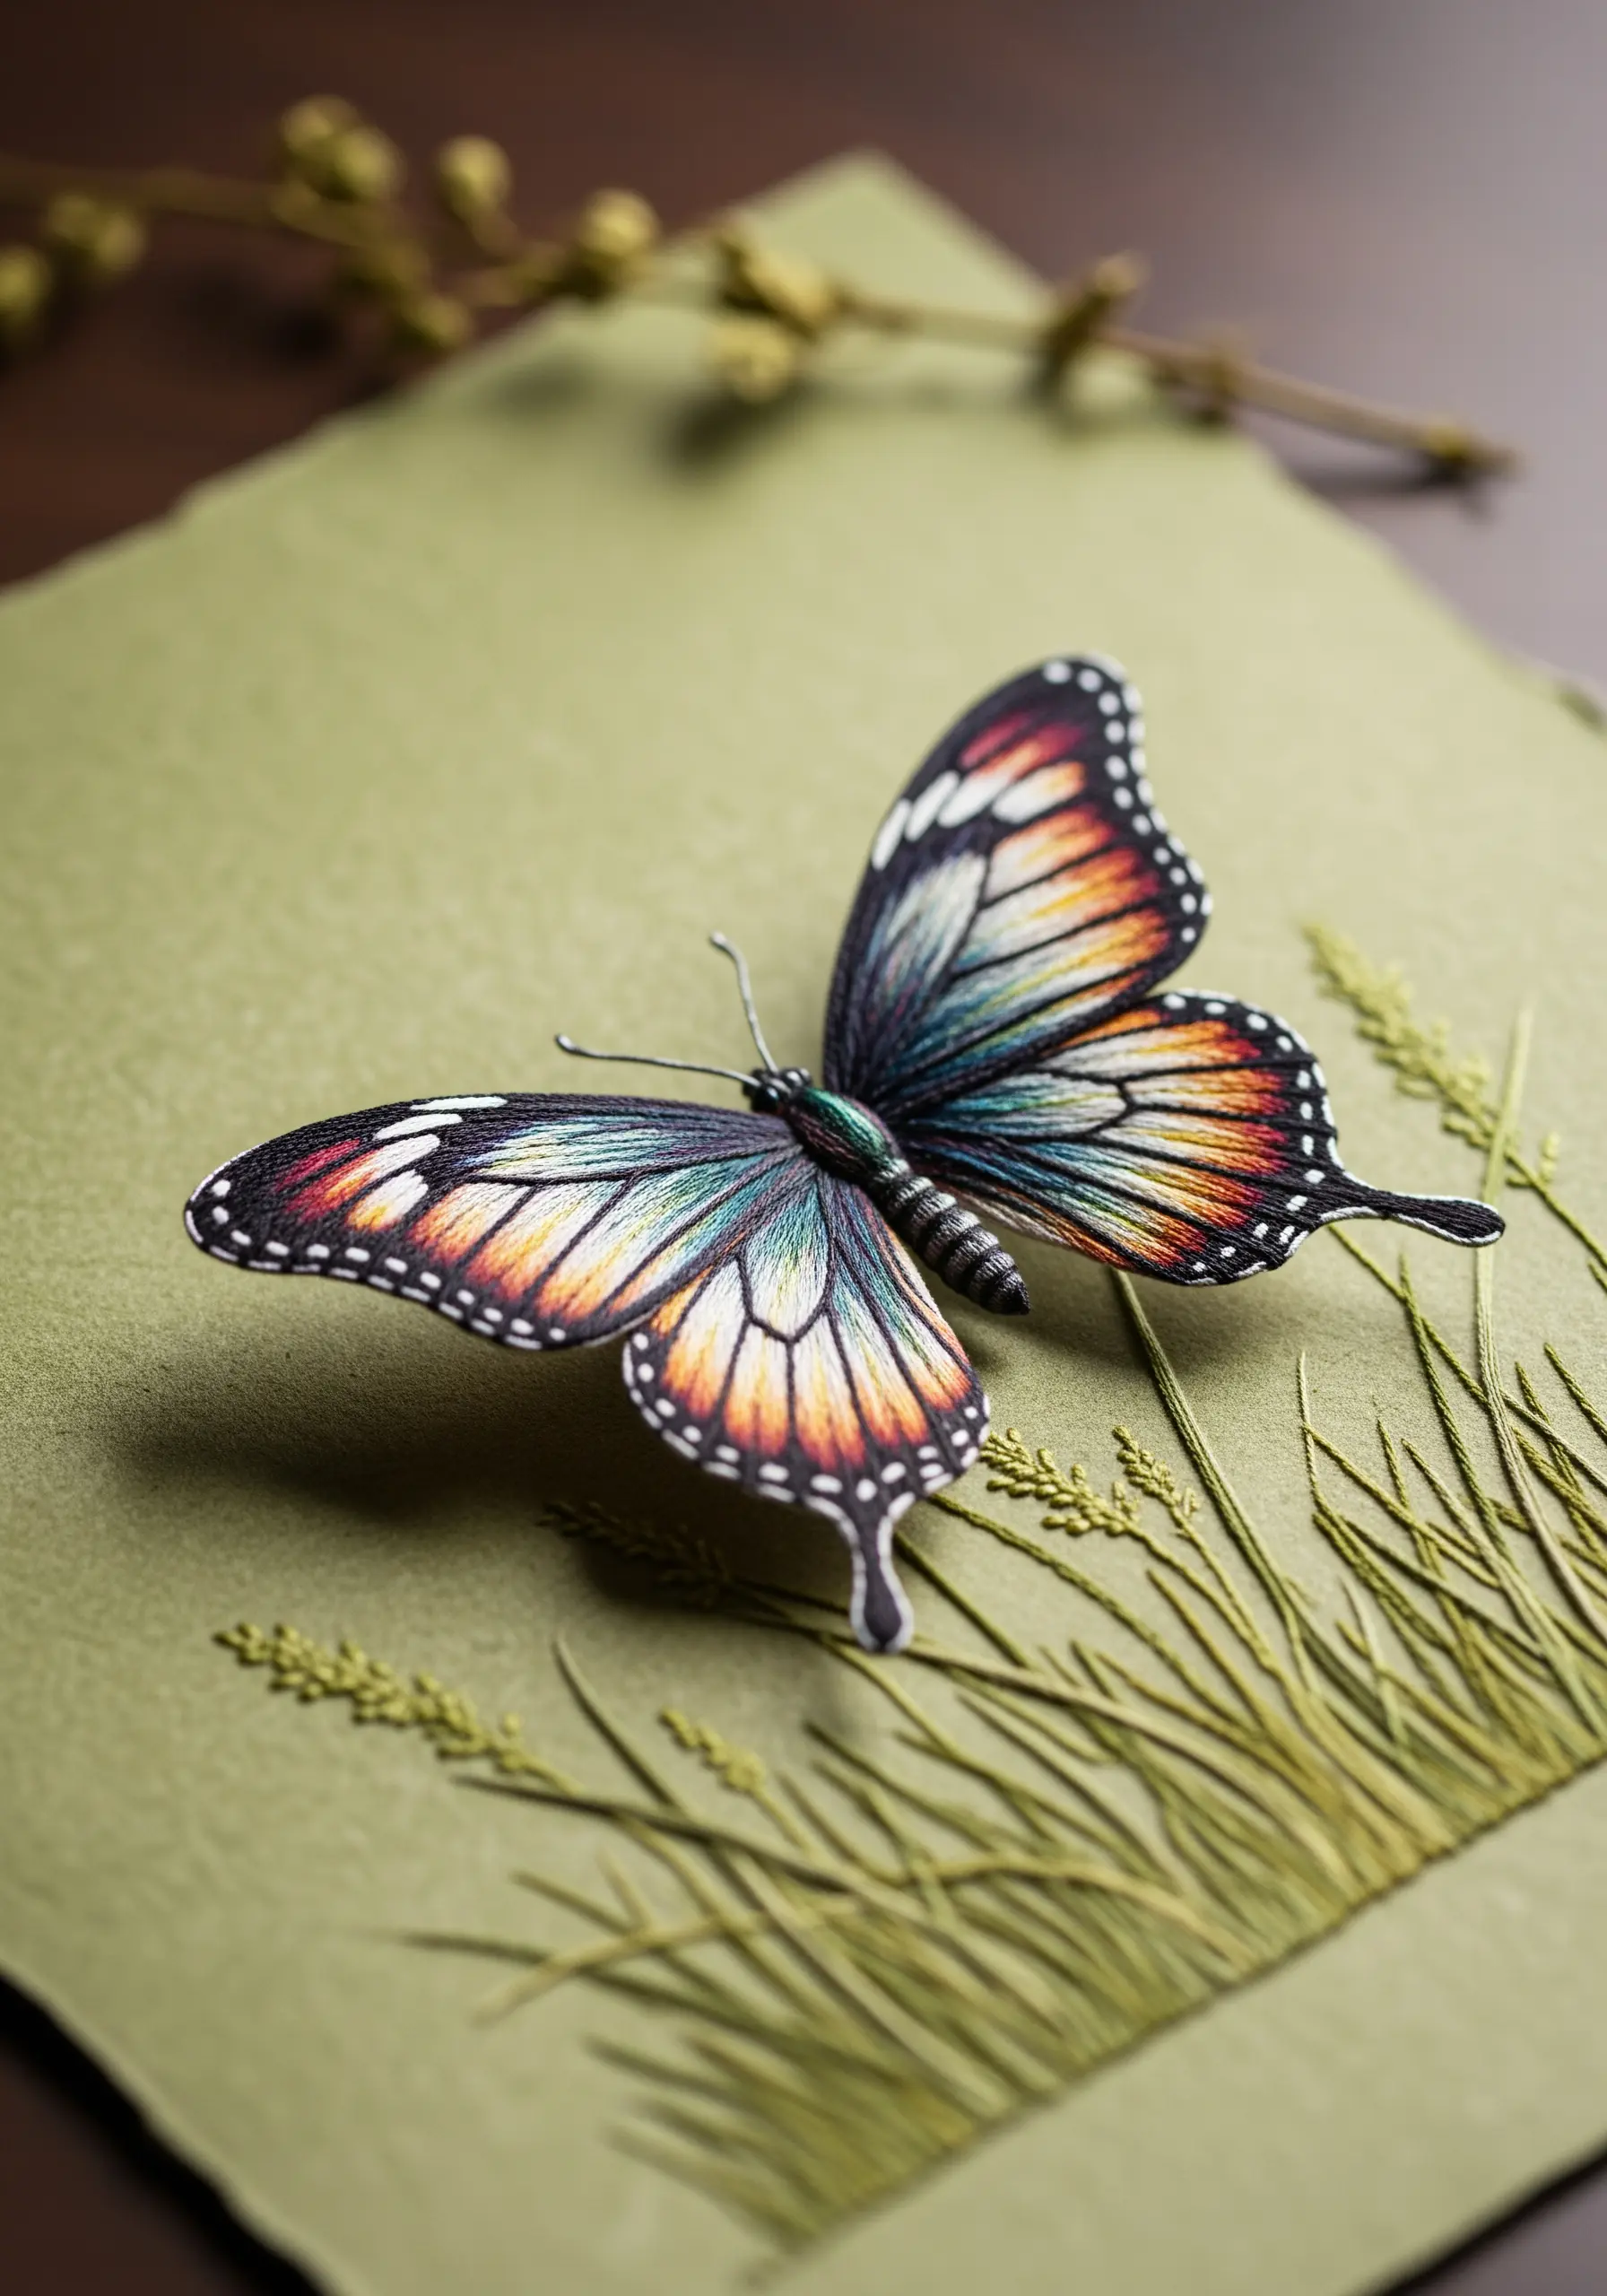
To achieve incredibly detailed embroidery on a 3D paper sculpture, you must stitch the pieces while they are still flat.
Before cutting and assembling your model, use thread painting techniques to add color and shading to elements like these butterfly wings.
Working on the flat paper allows for a level of detail that would be impossible on a finished 3D object.
Once assembled, the stitched details will blend seamlessly into the form, creating a stunningly realistic effect.
21. Combine Paper Weaving with a Stitched Monogram
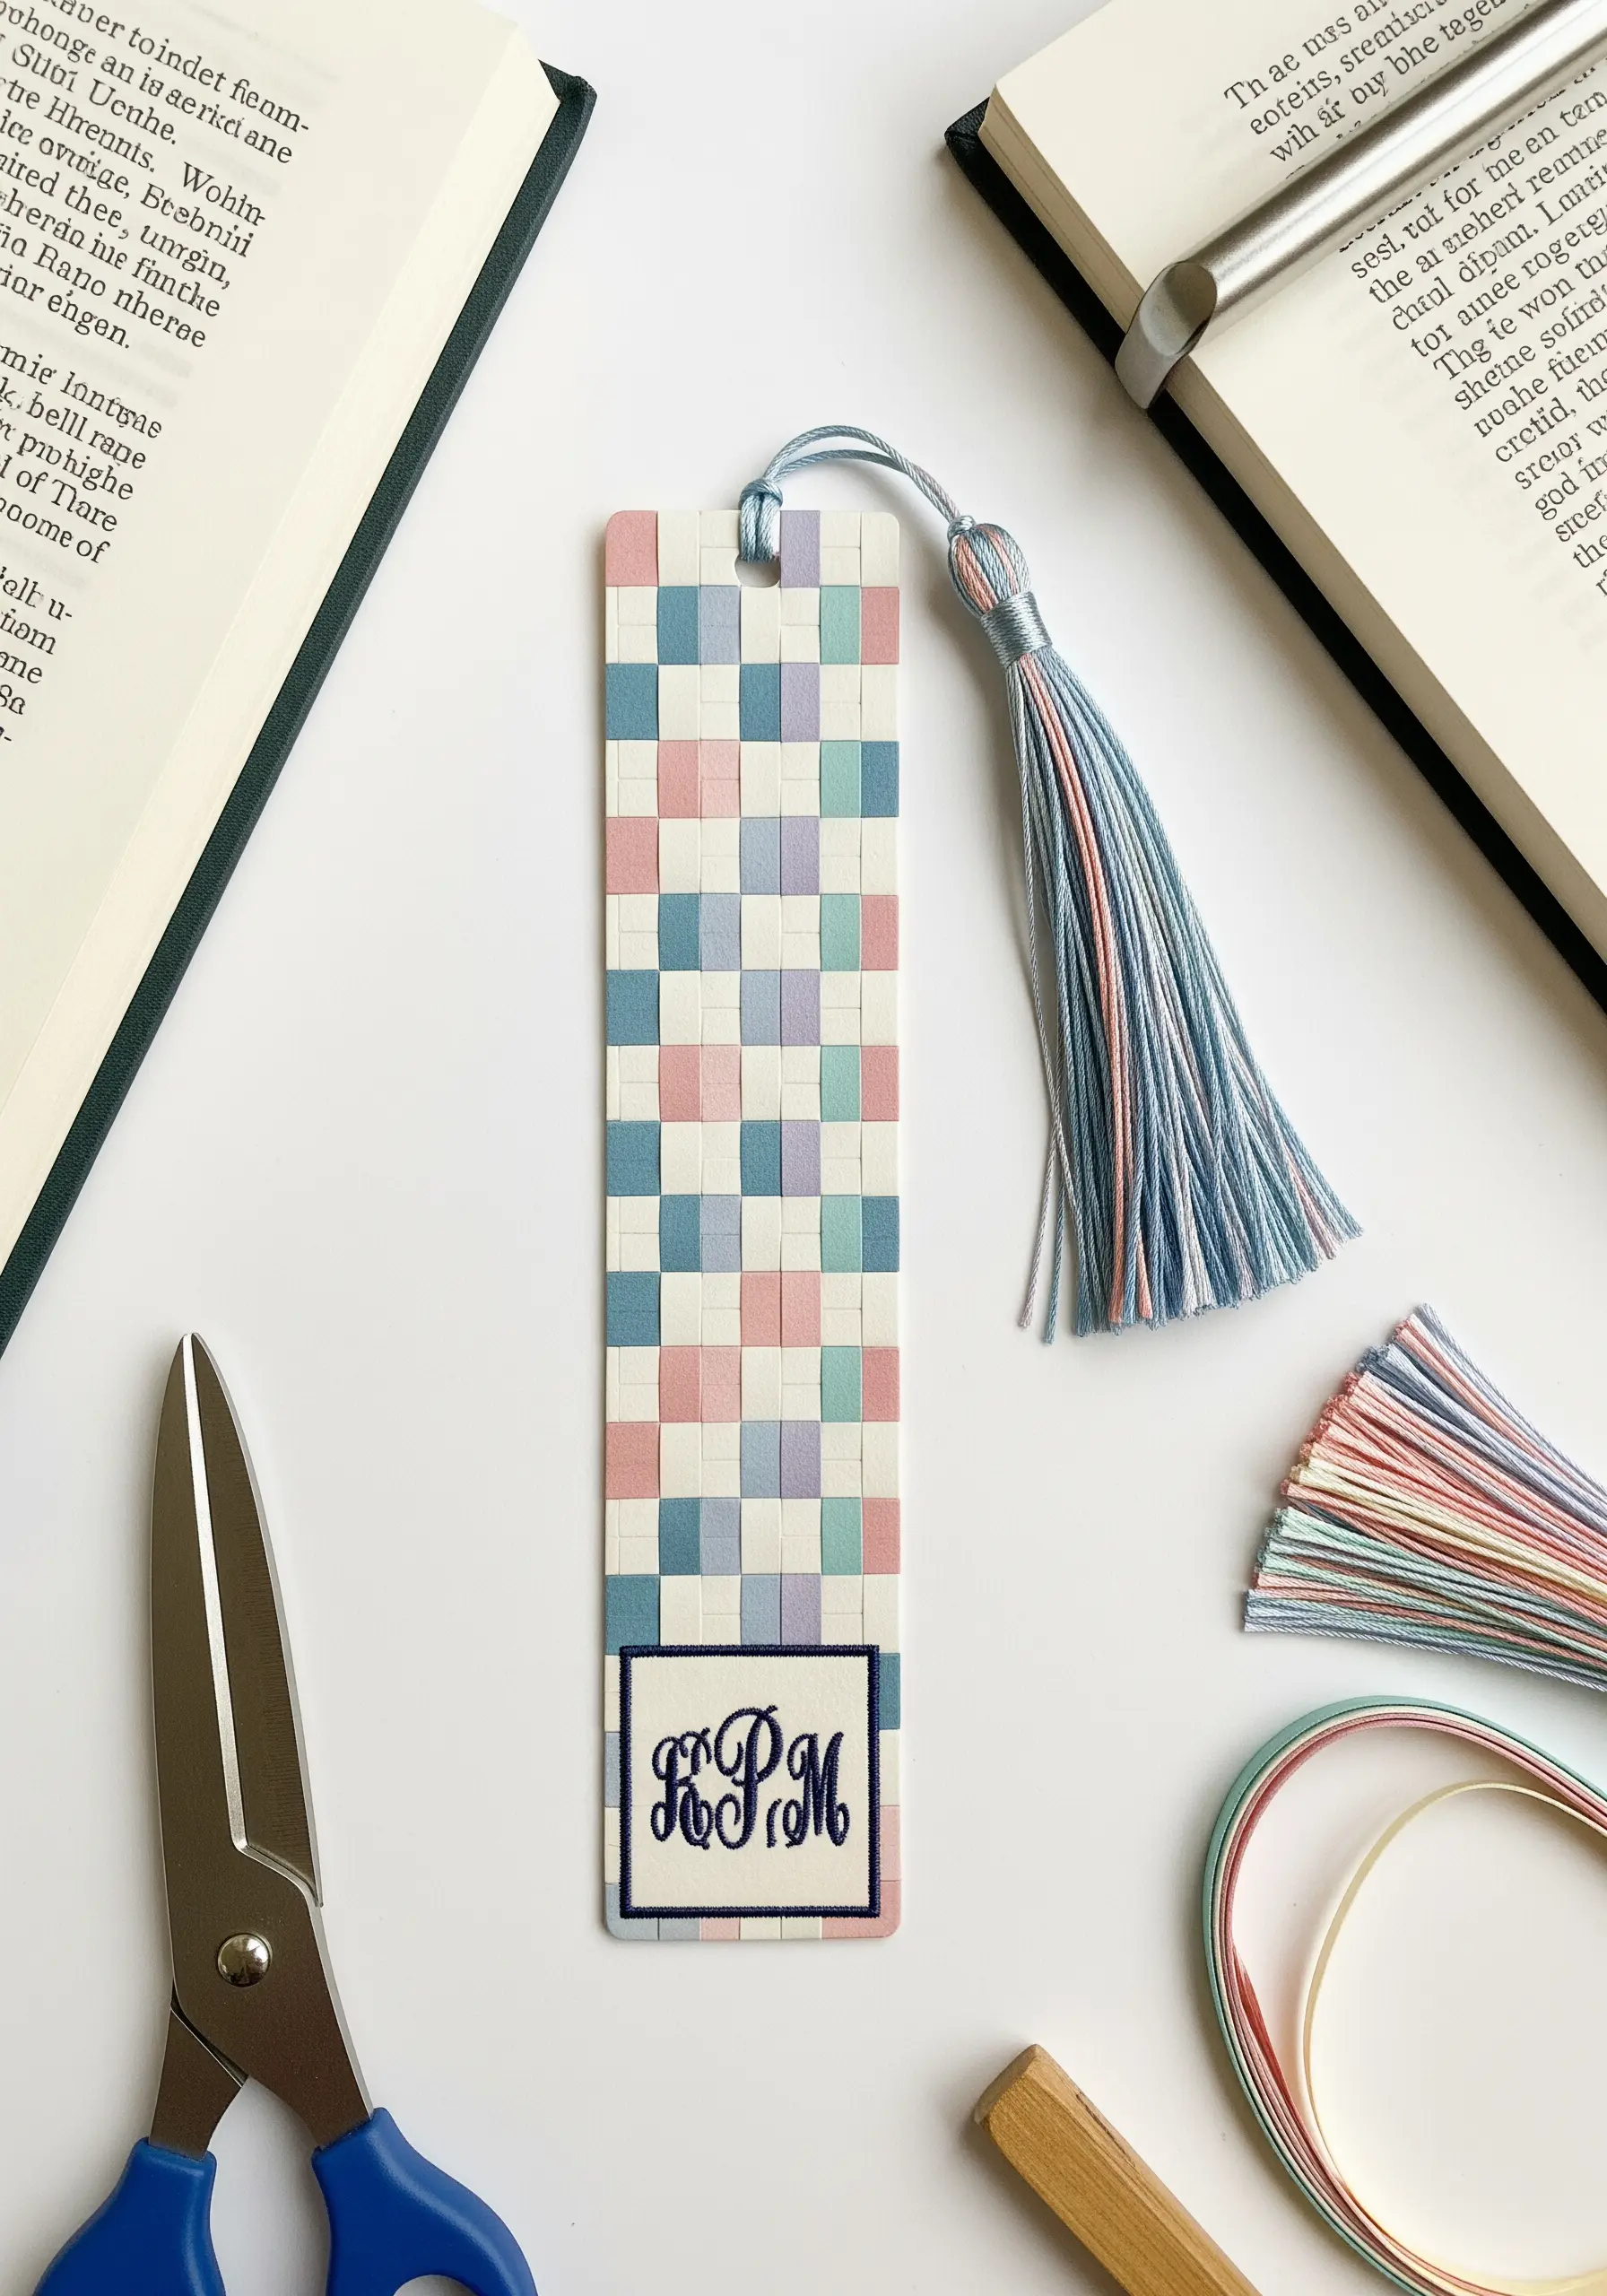
Create a beautiful, personalized bookmark by merging two distinct crafts: paper weaving and embroidery.
Weave thin strips of colored paper for the main body, creating a soft, checkered pattern.
For the finishing touch, embroider a minimal monogram on a small piece of fabric, then mount it at the base of the bookmark.
The combination of smooth paper and textured thread creates a sophisticated, tactile object.
22. Replicate Quilt Blocks with Paper and Thread
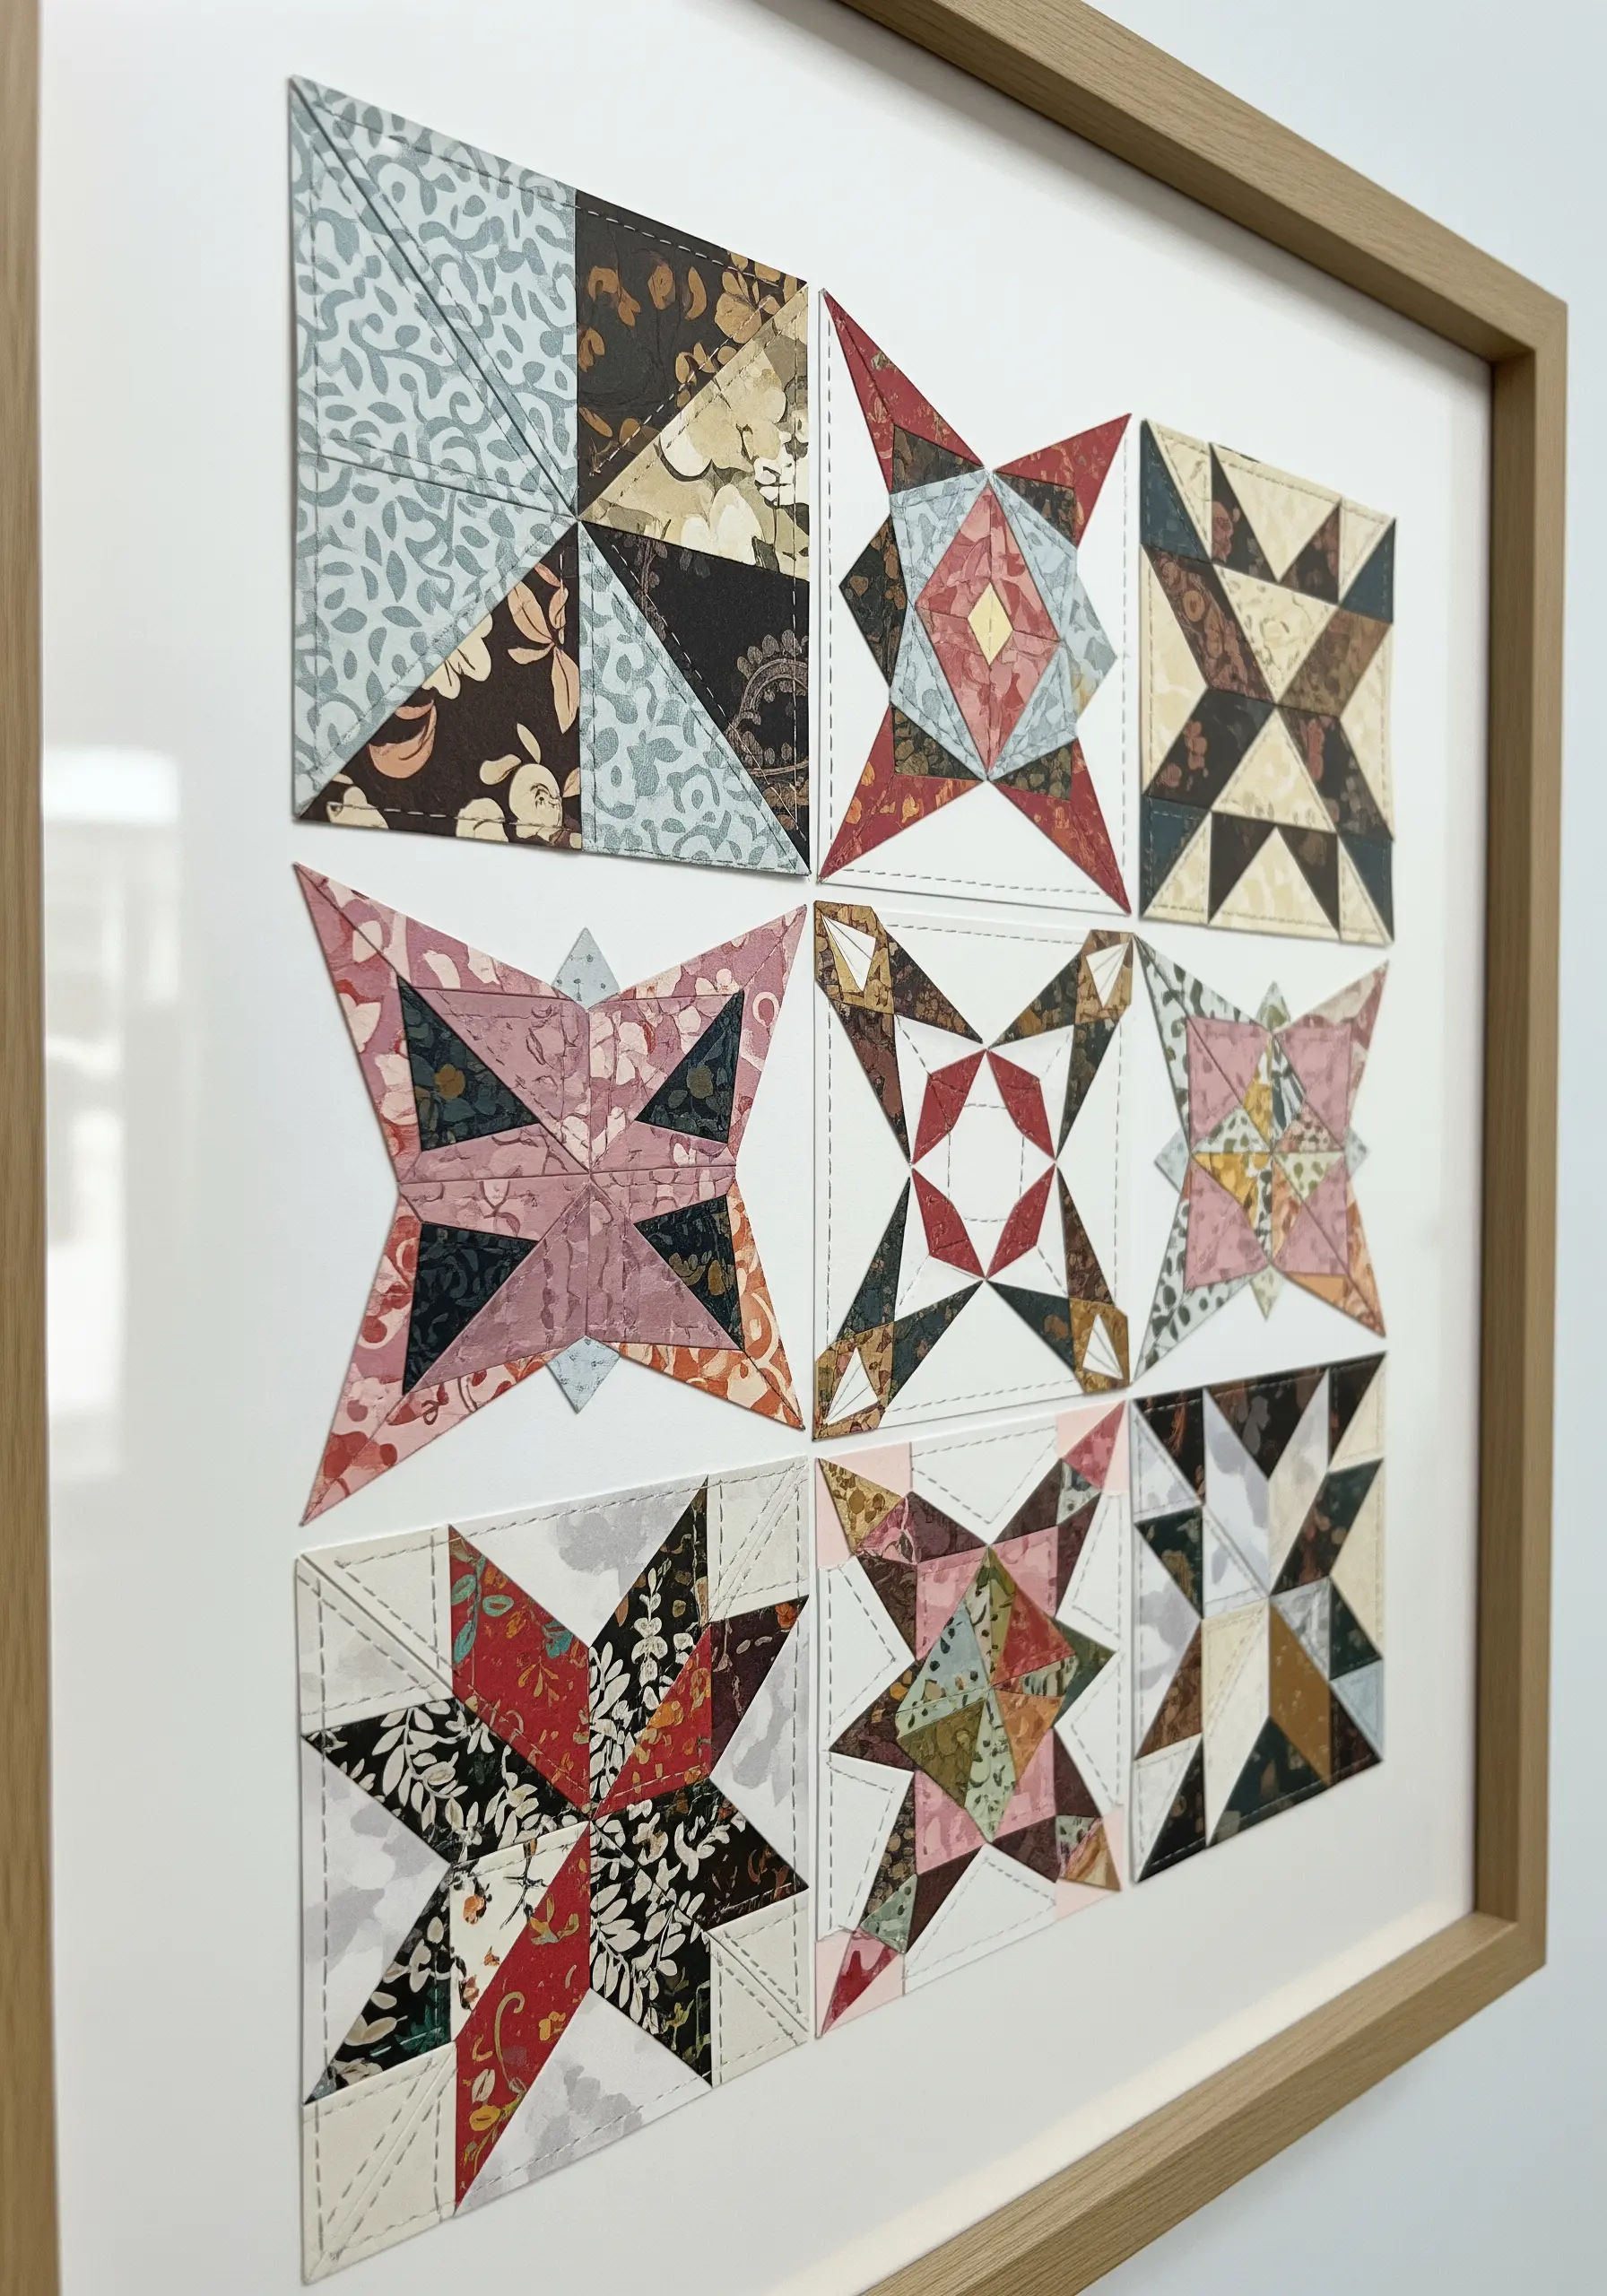
Capture the geometric beauty of traditional quilting using paper instead of fabric.
Cut and arrange patterned scrapbook paper to form classic quilt block designs, gluing them onto a cardstock backing.
Then, use a simple running stitch in a neutral thread along the paper ‘seams’.
This faux-stitching technique adds authentic texture and visual interest, transforming a simple collage into a refined piece of framed art.
23. Embellish Calligraphy with Botanical Stitches
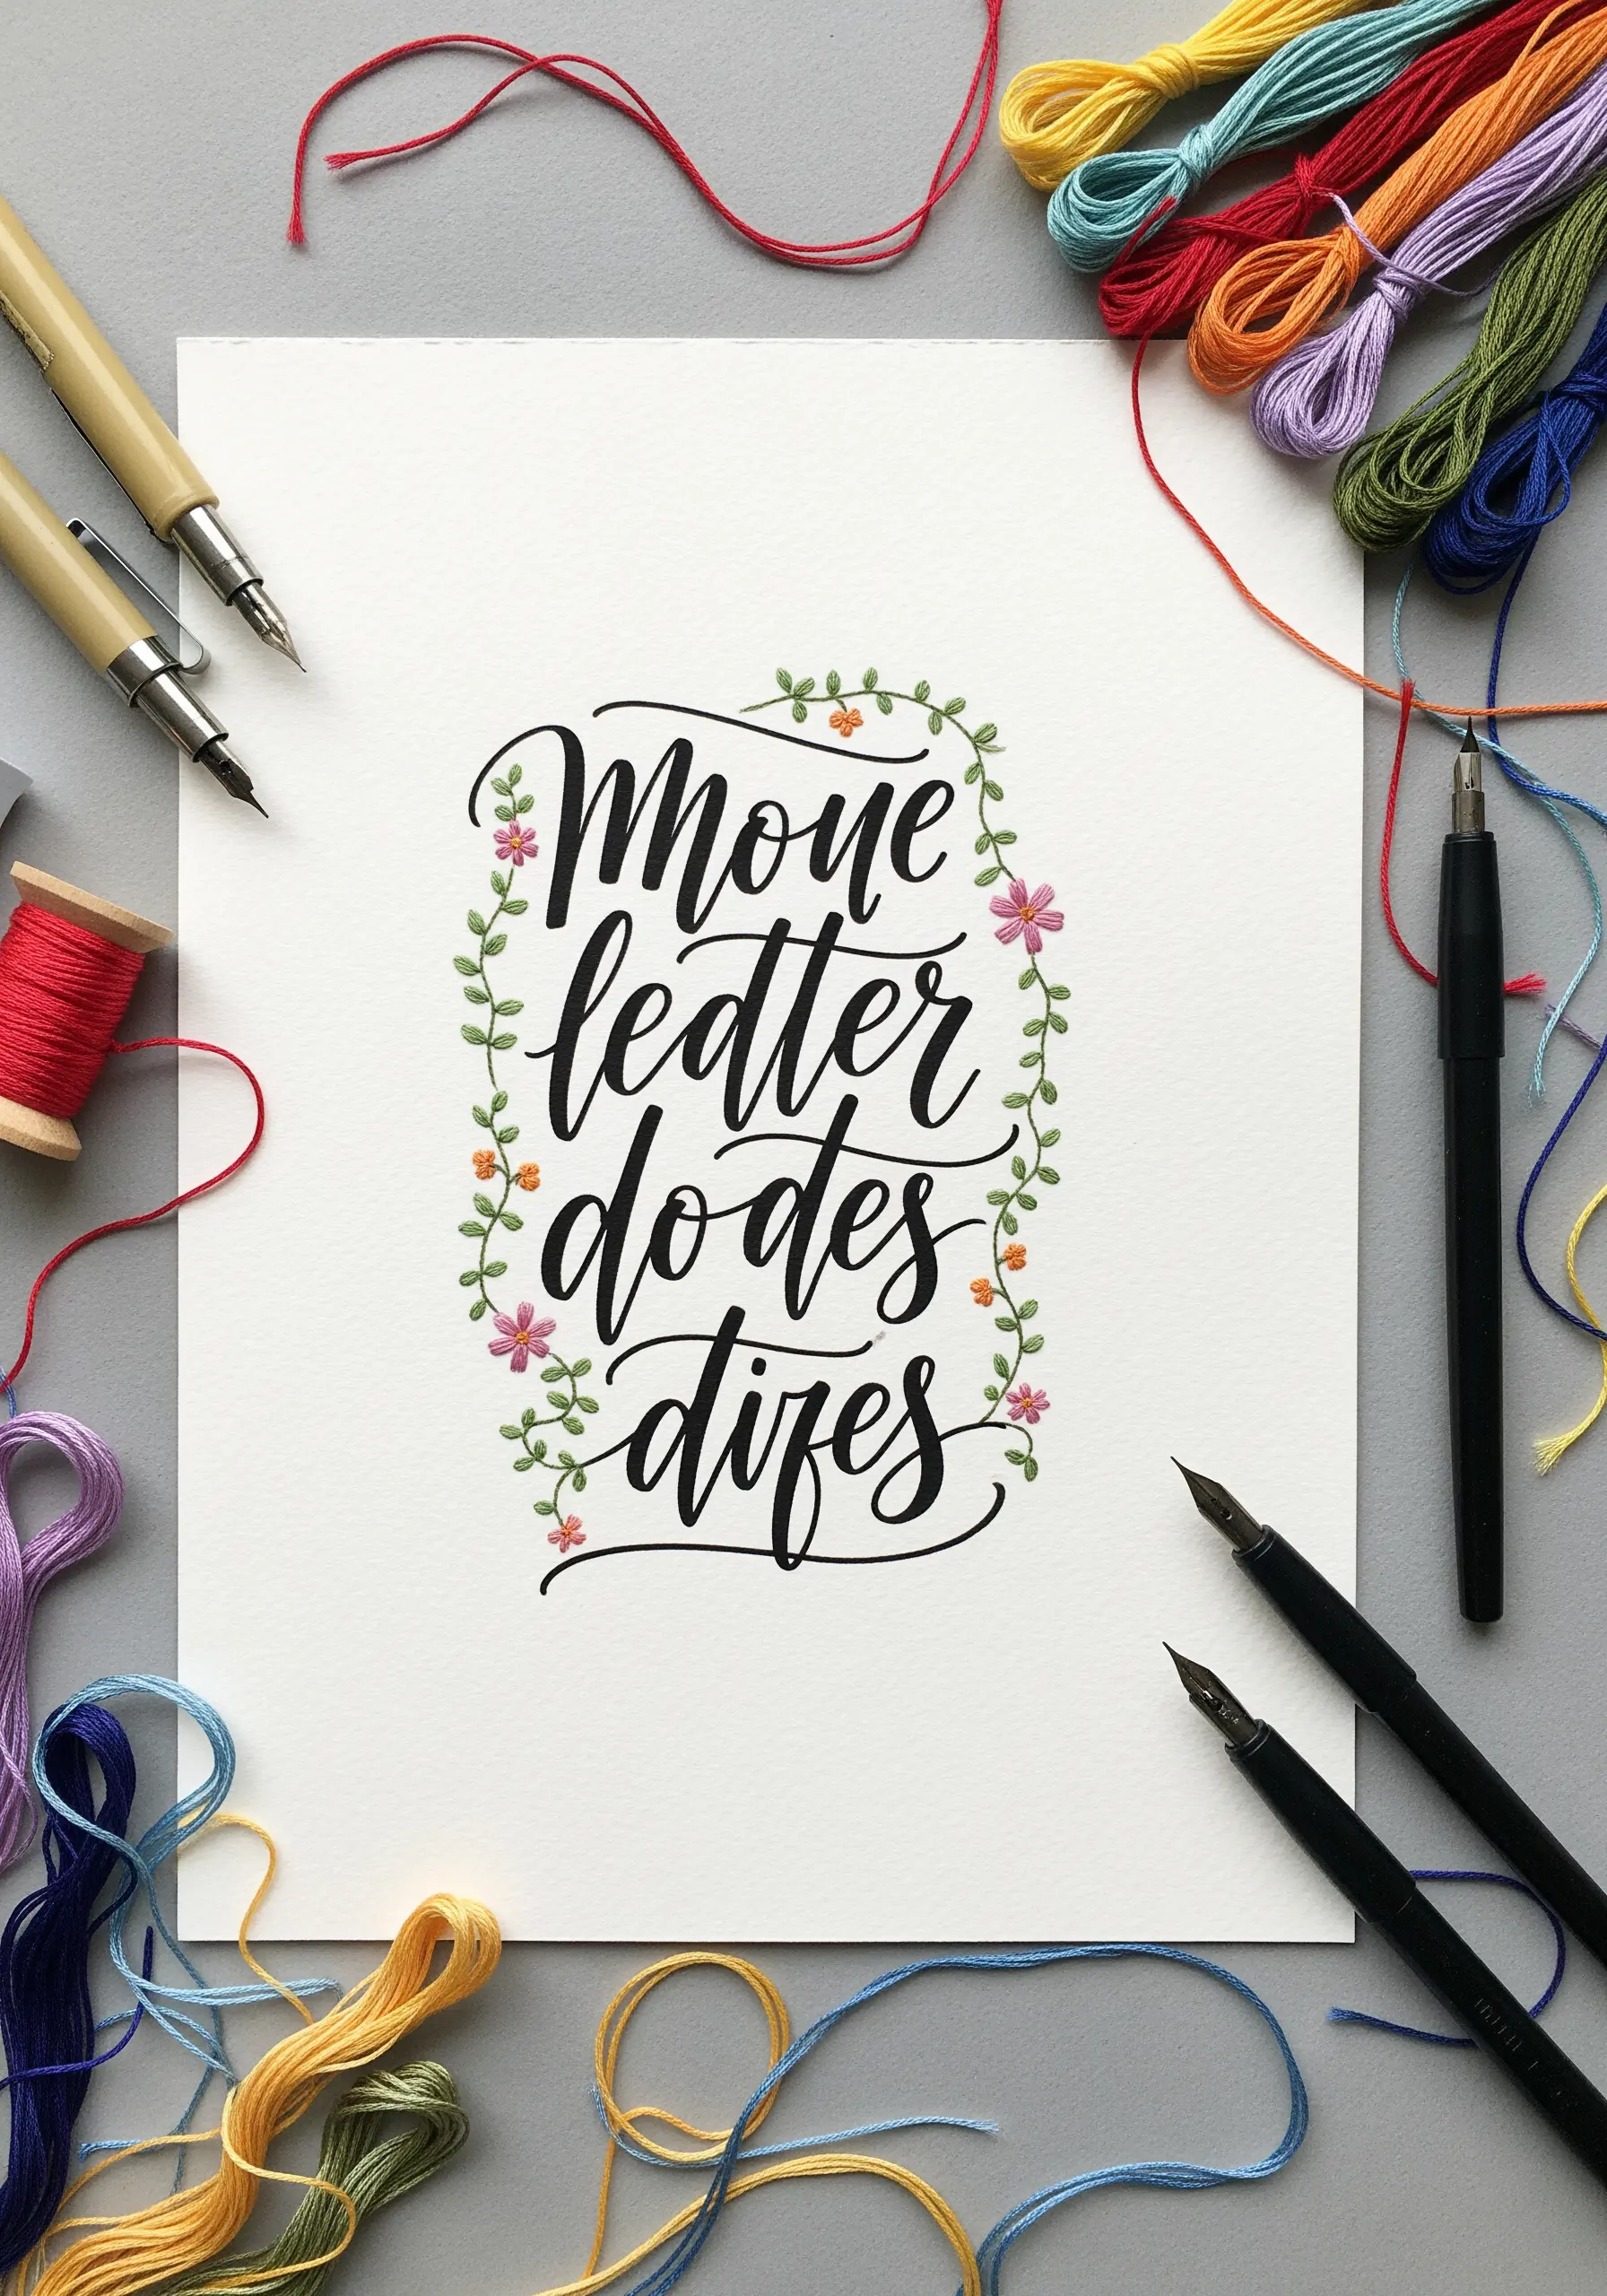
Make your hand-lettering truly unique by intertwining it with delicate embroidered motifs.
After you’ve finished your calligraphy with ink, allow it to dry completely.
Then, use a fine needle and just one or two strands of floss to add tiny floral details.
A few lazy daisy stitches for petals and French knots for centers are all it takes to frame the words in a beautiful, textured garland that elevates the entire piece.
24. Frame Pressed Flowers with Ethereal Stitches
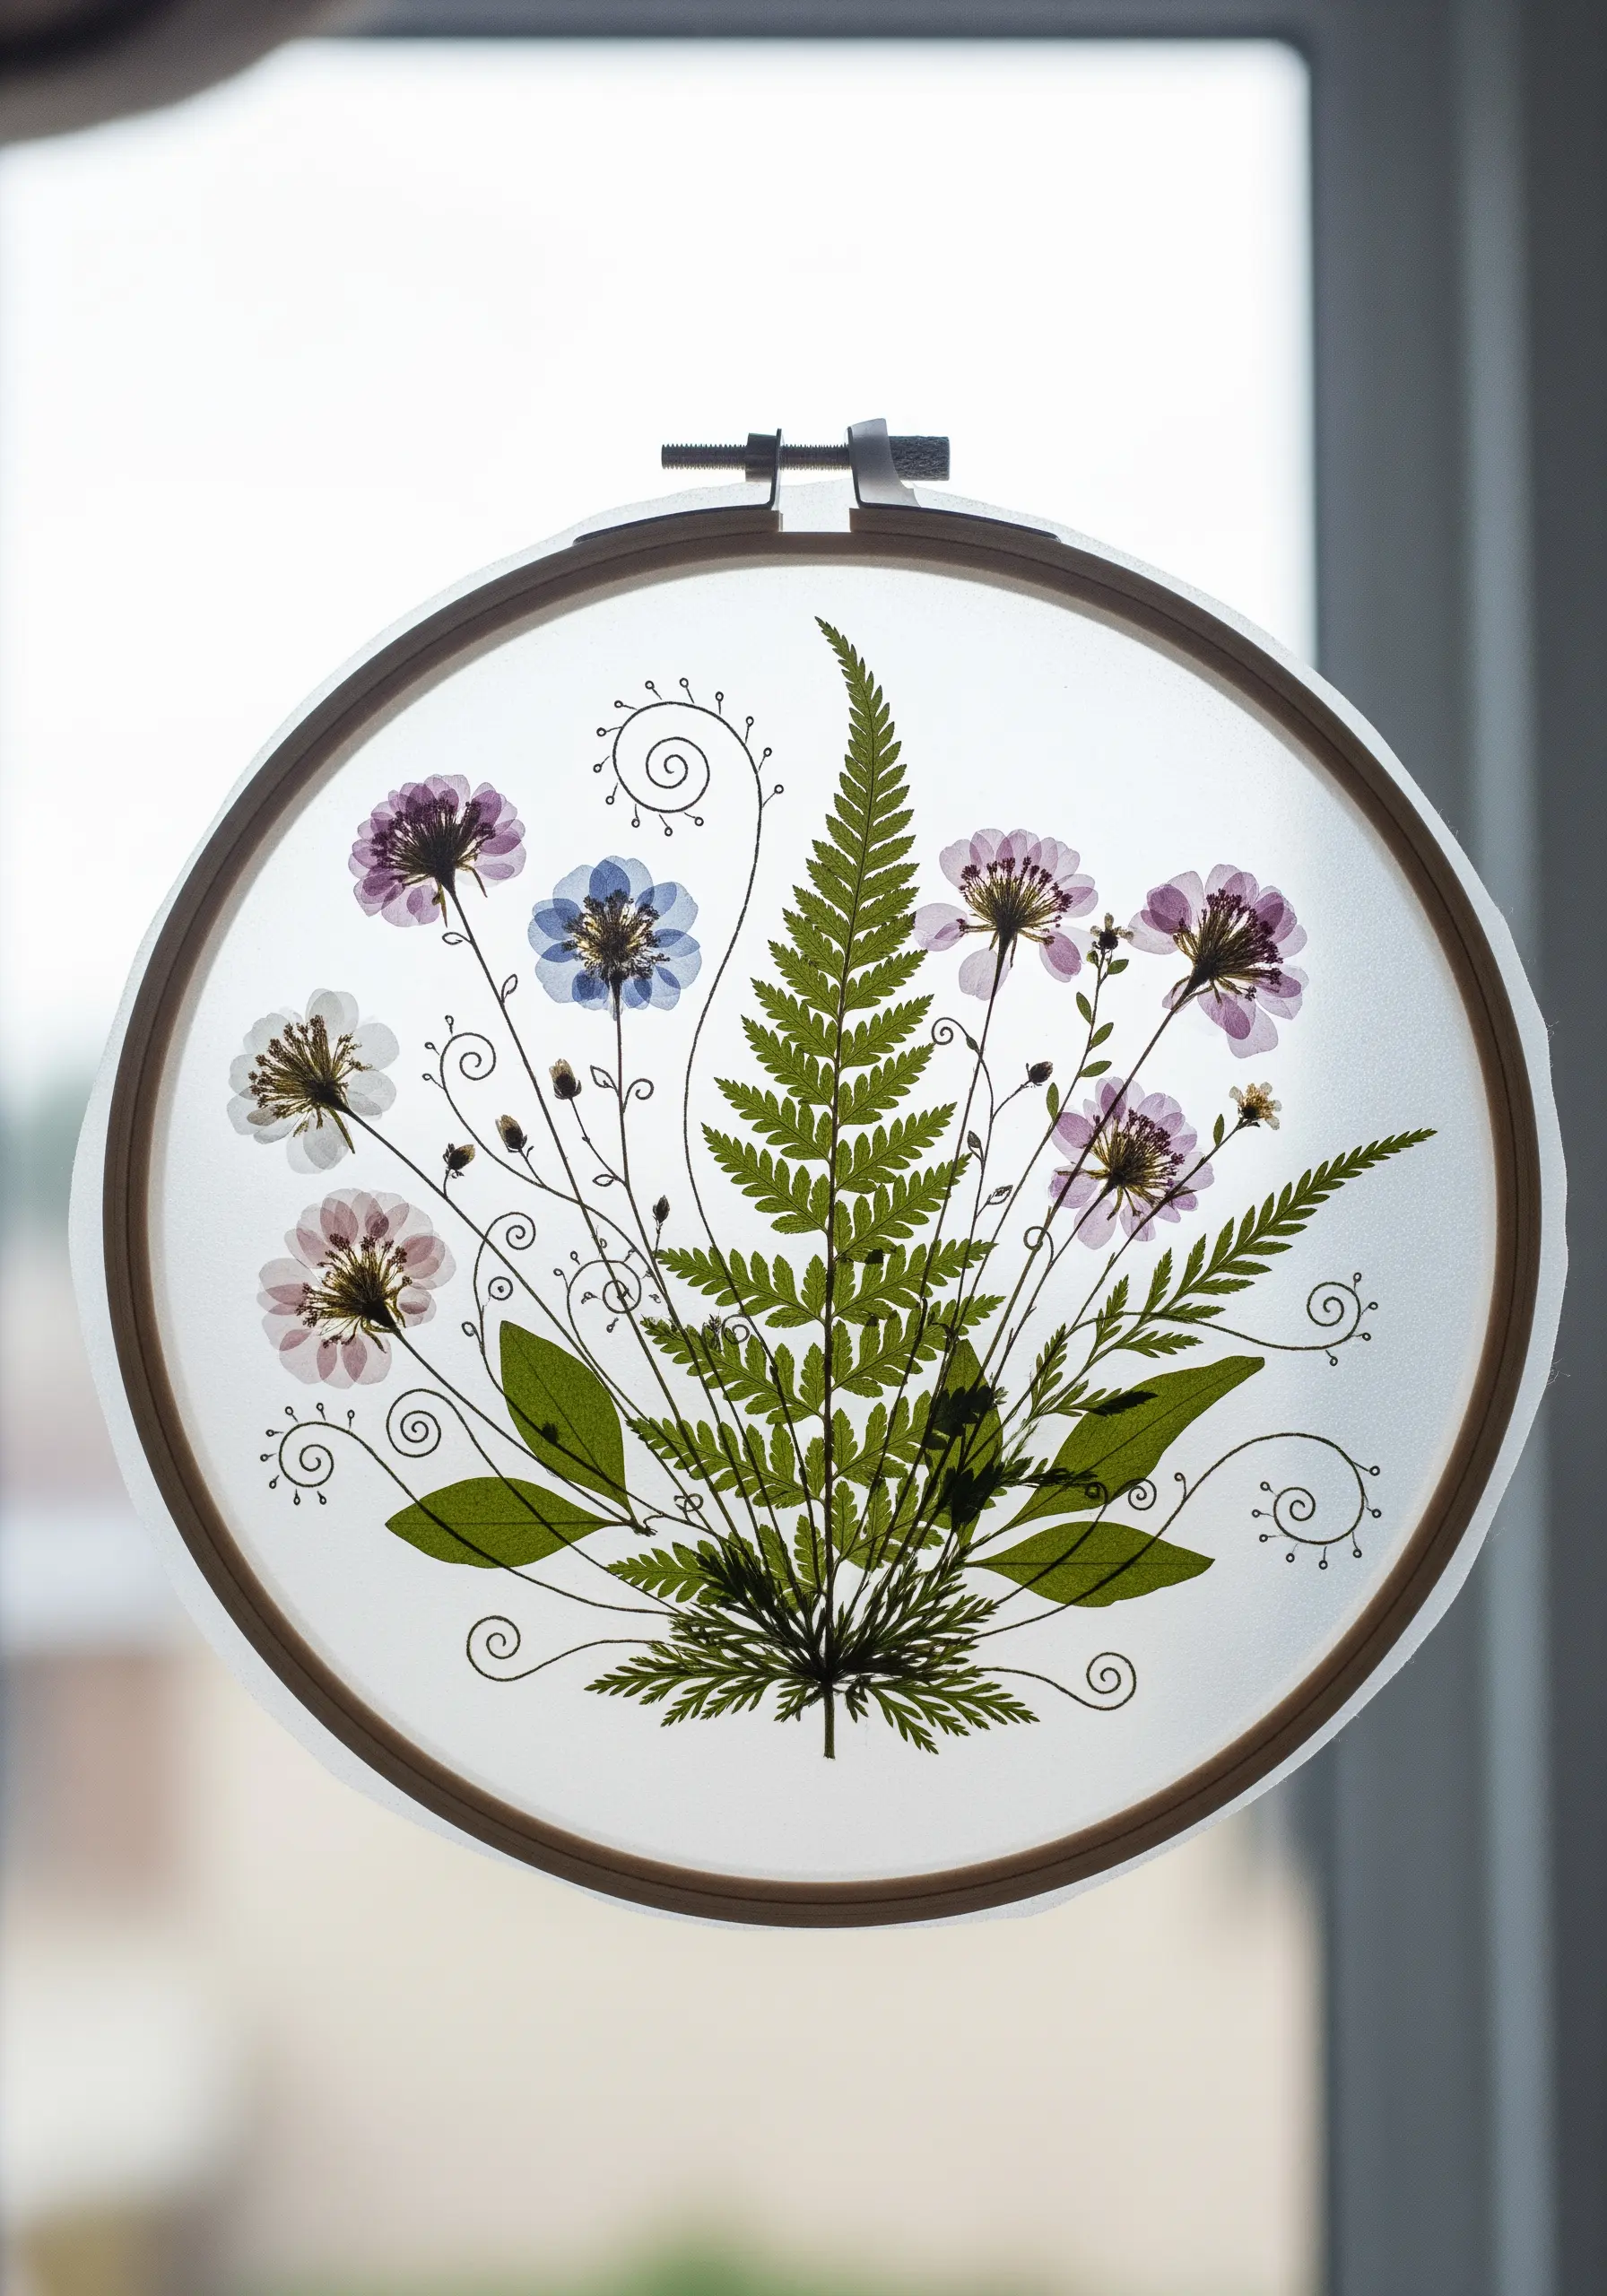
Create a floating botanical display by encasing pressed flowers in sheer fabric and adding embroidered accents.
Carefully arrange your dried flowers and leaves on a layer of tulle or organza stretched in a hoop, then place another layer on top.
Use fine, delicate stitches to secure the layers together and to add decorative elements like swirling tendrils or tiny dots.
The transparent background makes the botanicals and your stitching appear suspended in mid-air, perfect for catching the light.
25. Use Thread to ‘Color In’ Architectural Papercuts
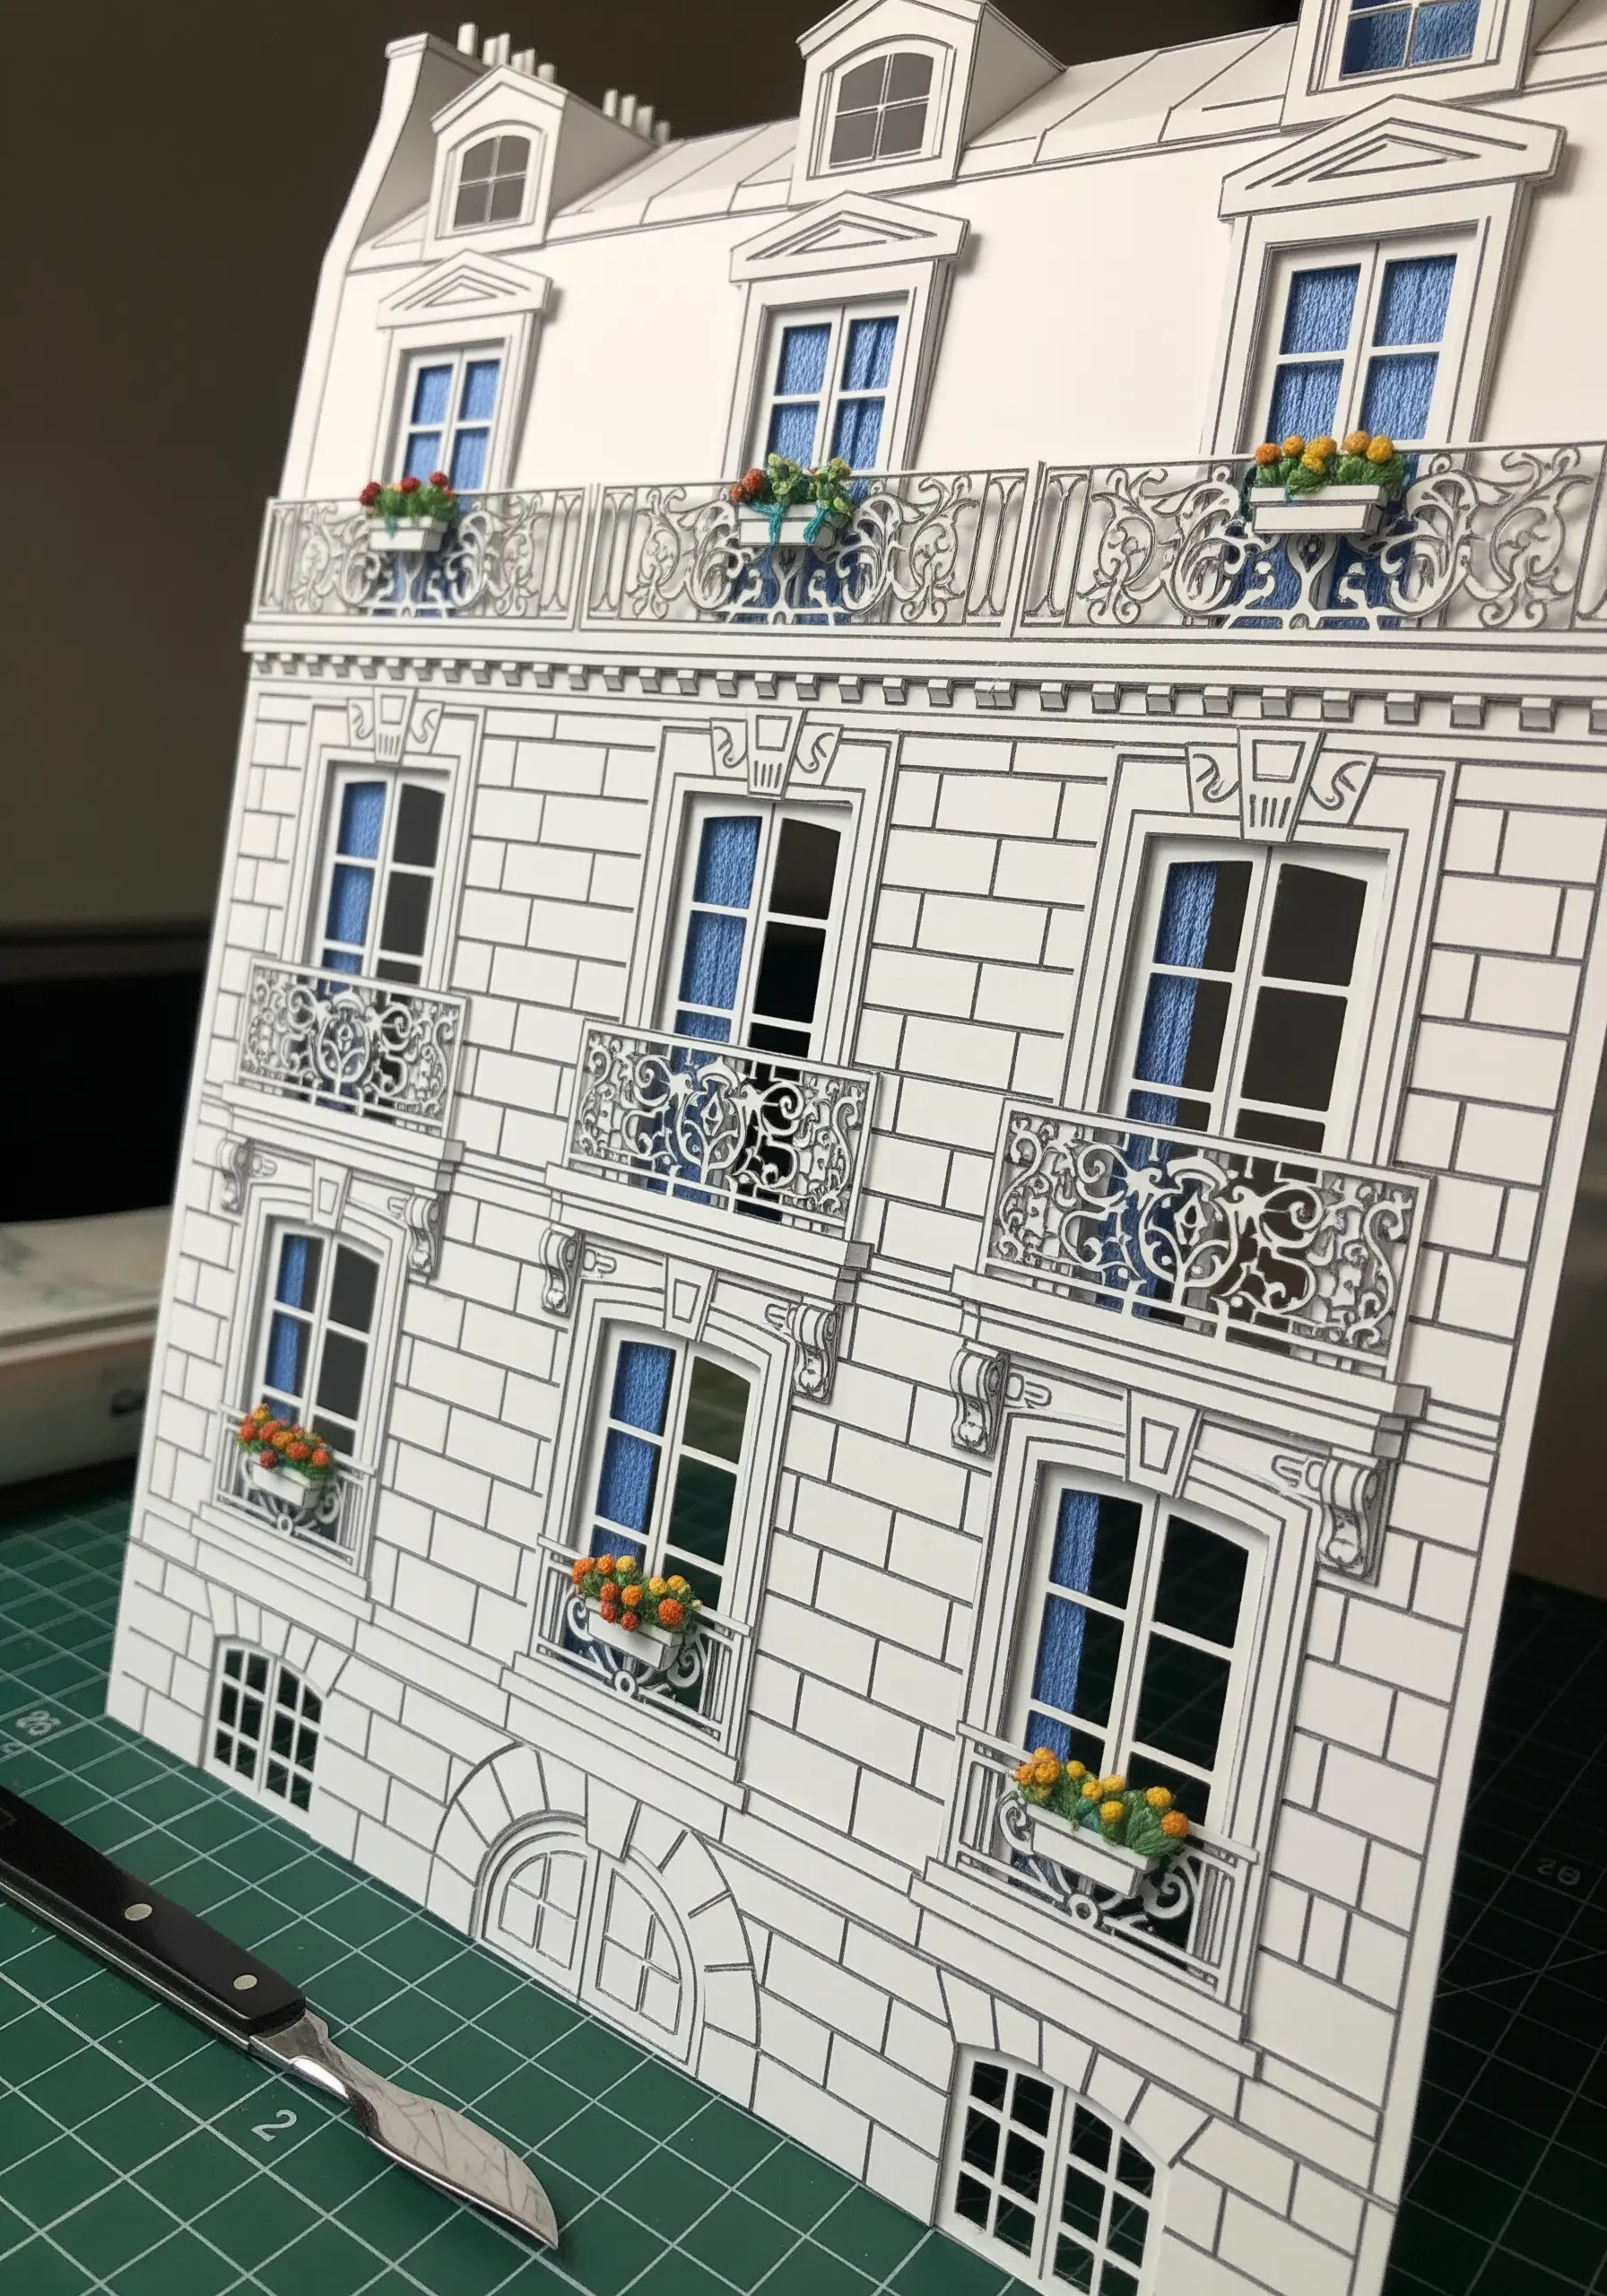
Add a unique layer of color and texture to intricate papercut art by using thread as a backing.
Instead of placing colored paper behind the windows of this architectural piece, stretch a piece of fabric in a contrasting color behind the papercut.
You can even add stitched details to the fabric, like a subtle pattern or a color gradient, that will show through the cutouts.
The soft texture of thread provides a beautiful counterpoint to the sharp, crisp lines of the cut paper.
26. Frame Textured Stitches with a Paper Cutout
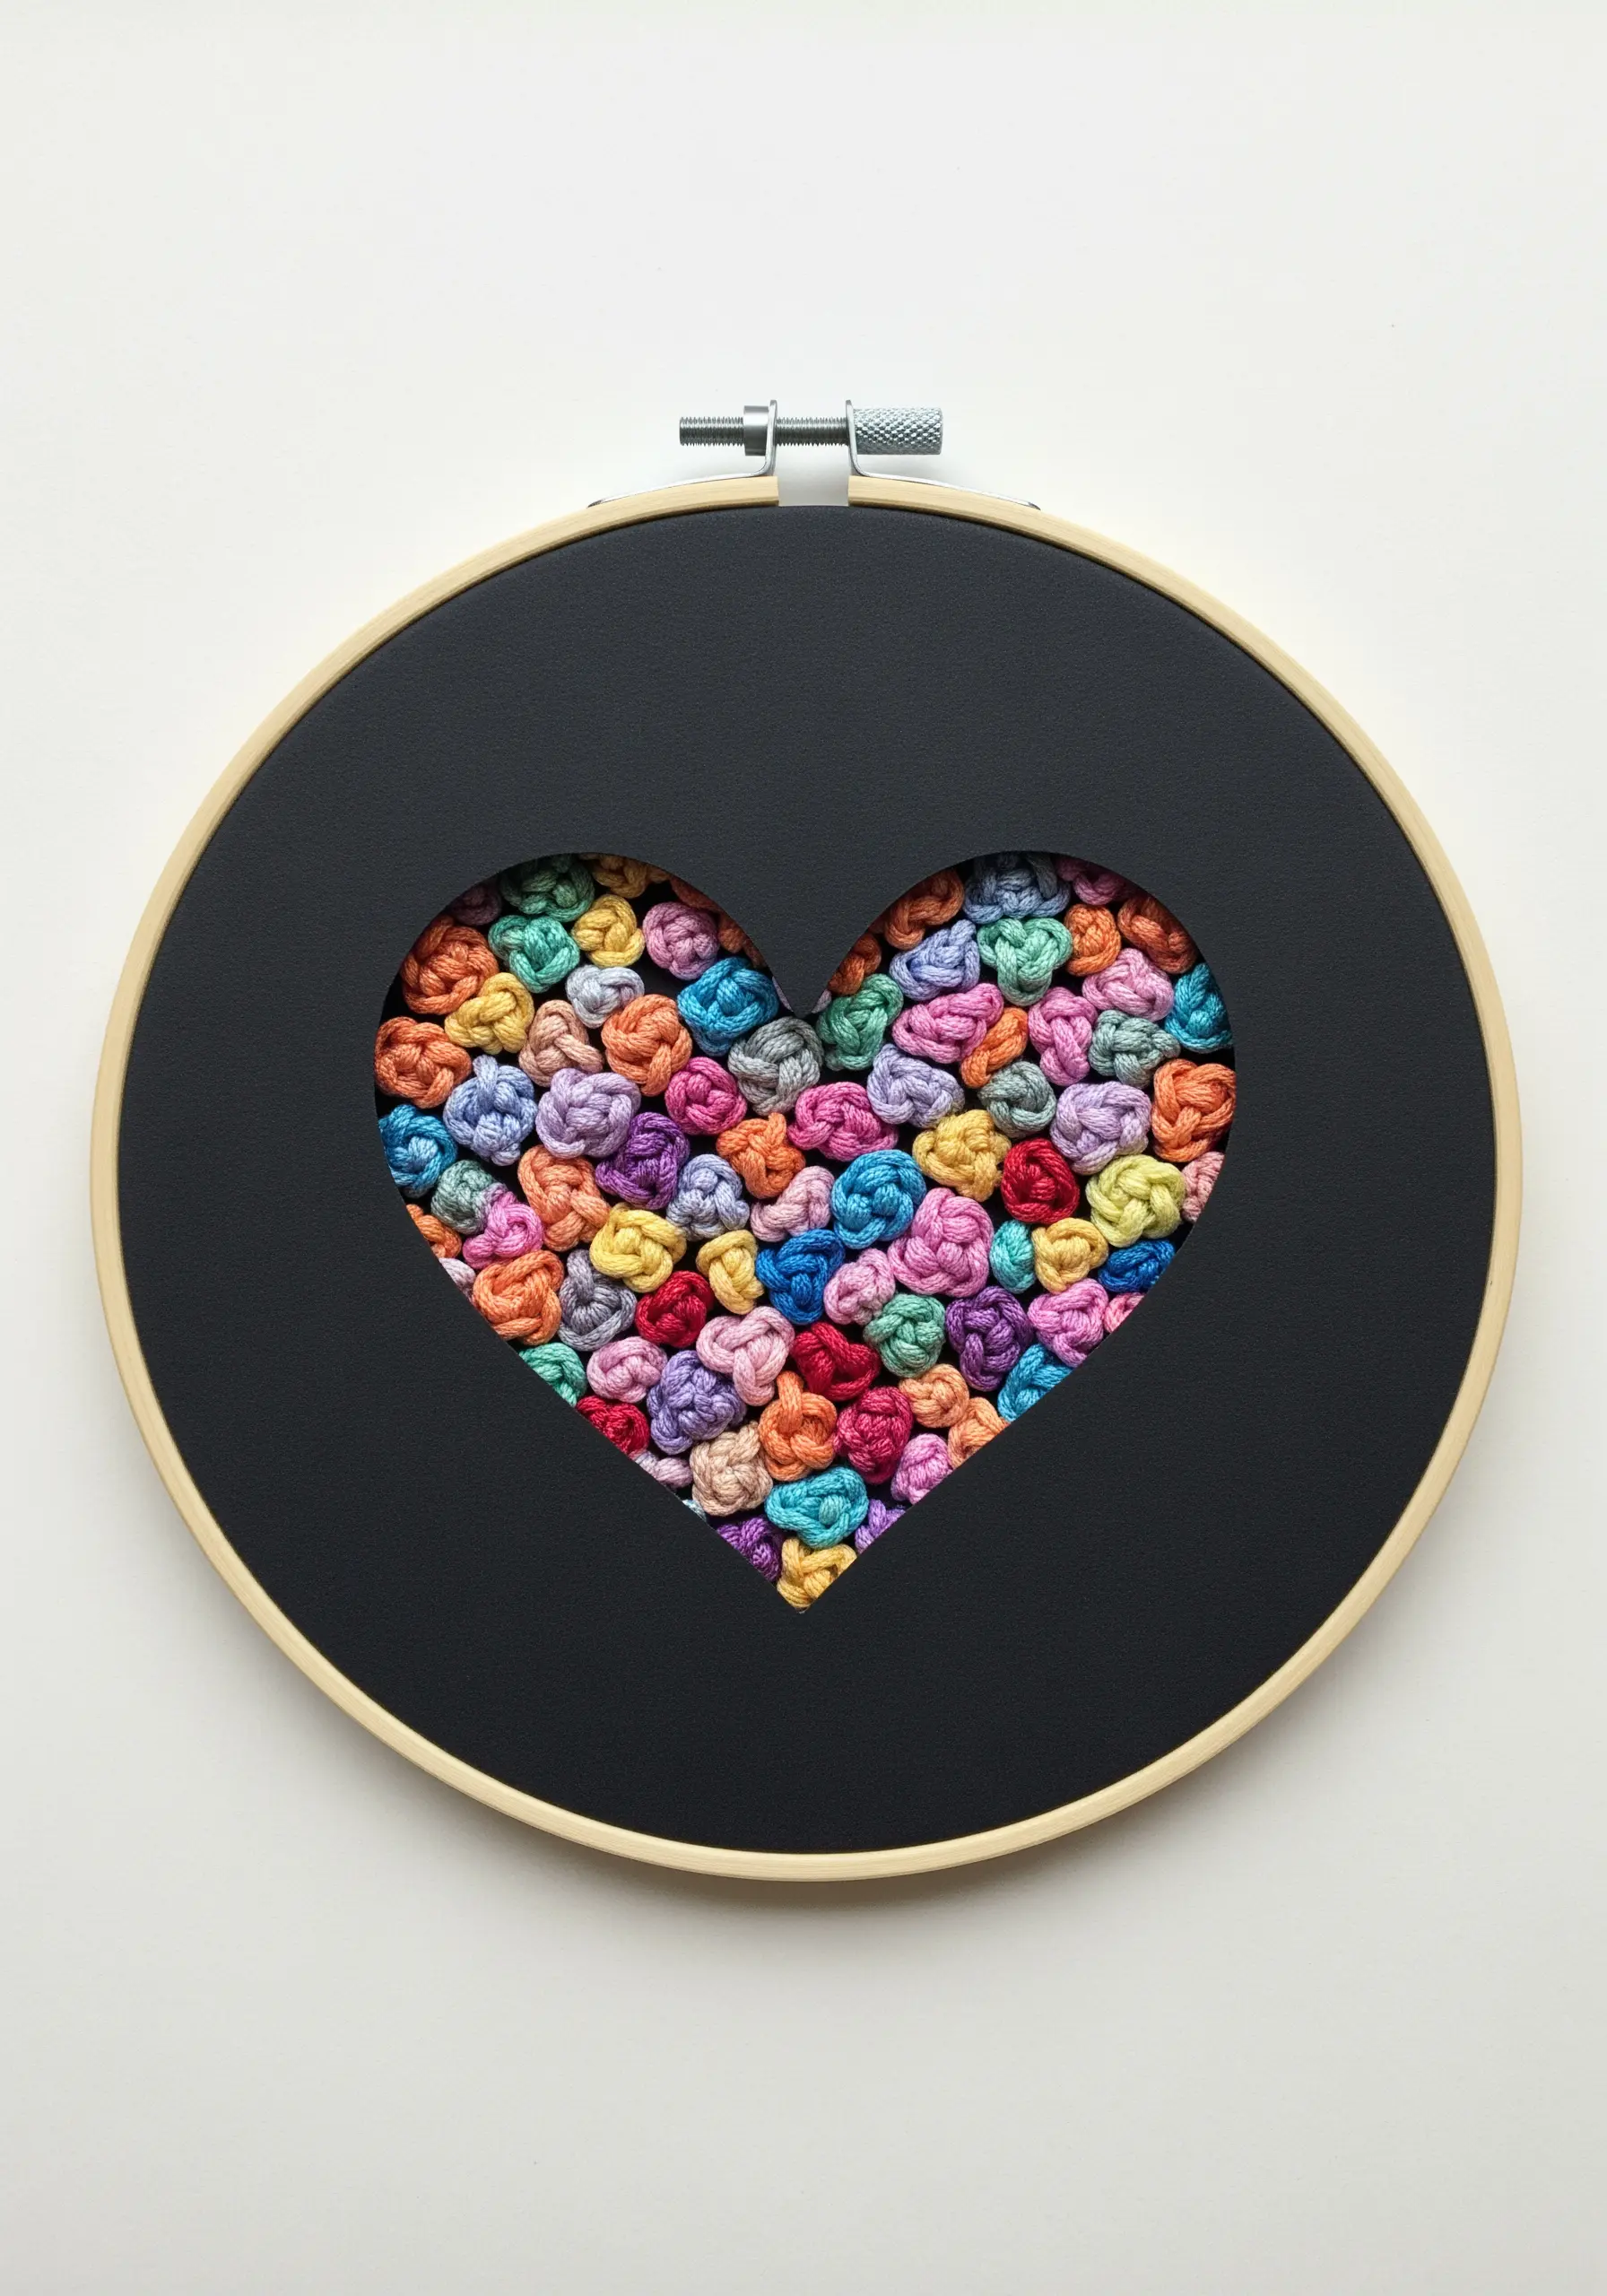
Create a powerful focal point by using paper as a mat to frame your most textured stitches.
Start by filling a piece of fabric with a dense stitch, like French knots or bullion knots, using a vibrant mix of colors.
Then, cut a shape—like this heart—out of a piece of thick, dark cardstock and place it over your embroidery.
The sharp, clean edge of the paper cutout makes the texture and color of the stitches behind it feel even more explosive and contained.
27. Craft Bohemian Jewelry with Paper Beads and Tassels

Combine two simple, mindful crafts to create vibrant, lightweight jewelry.
Roll strips of colorful magazine pages to create unique, eco-friendly paper beads.
Then, make your own fluffy tassels using complementary shades of embroidery floss.
String them together on a simple cord for a statement necklace that is entirely handmade, showcasing the beauty of recycled paper and simple thread.
28. Trace Your Travels on a Paper Map
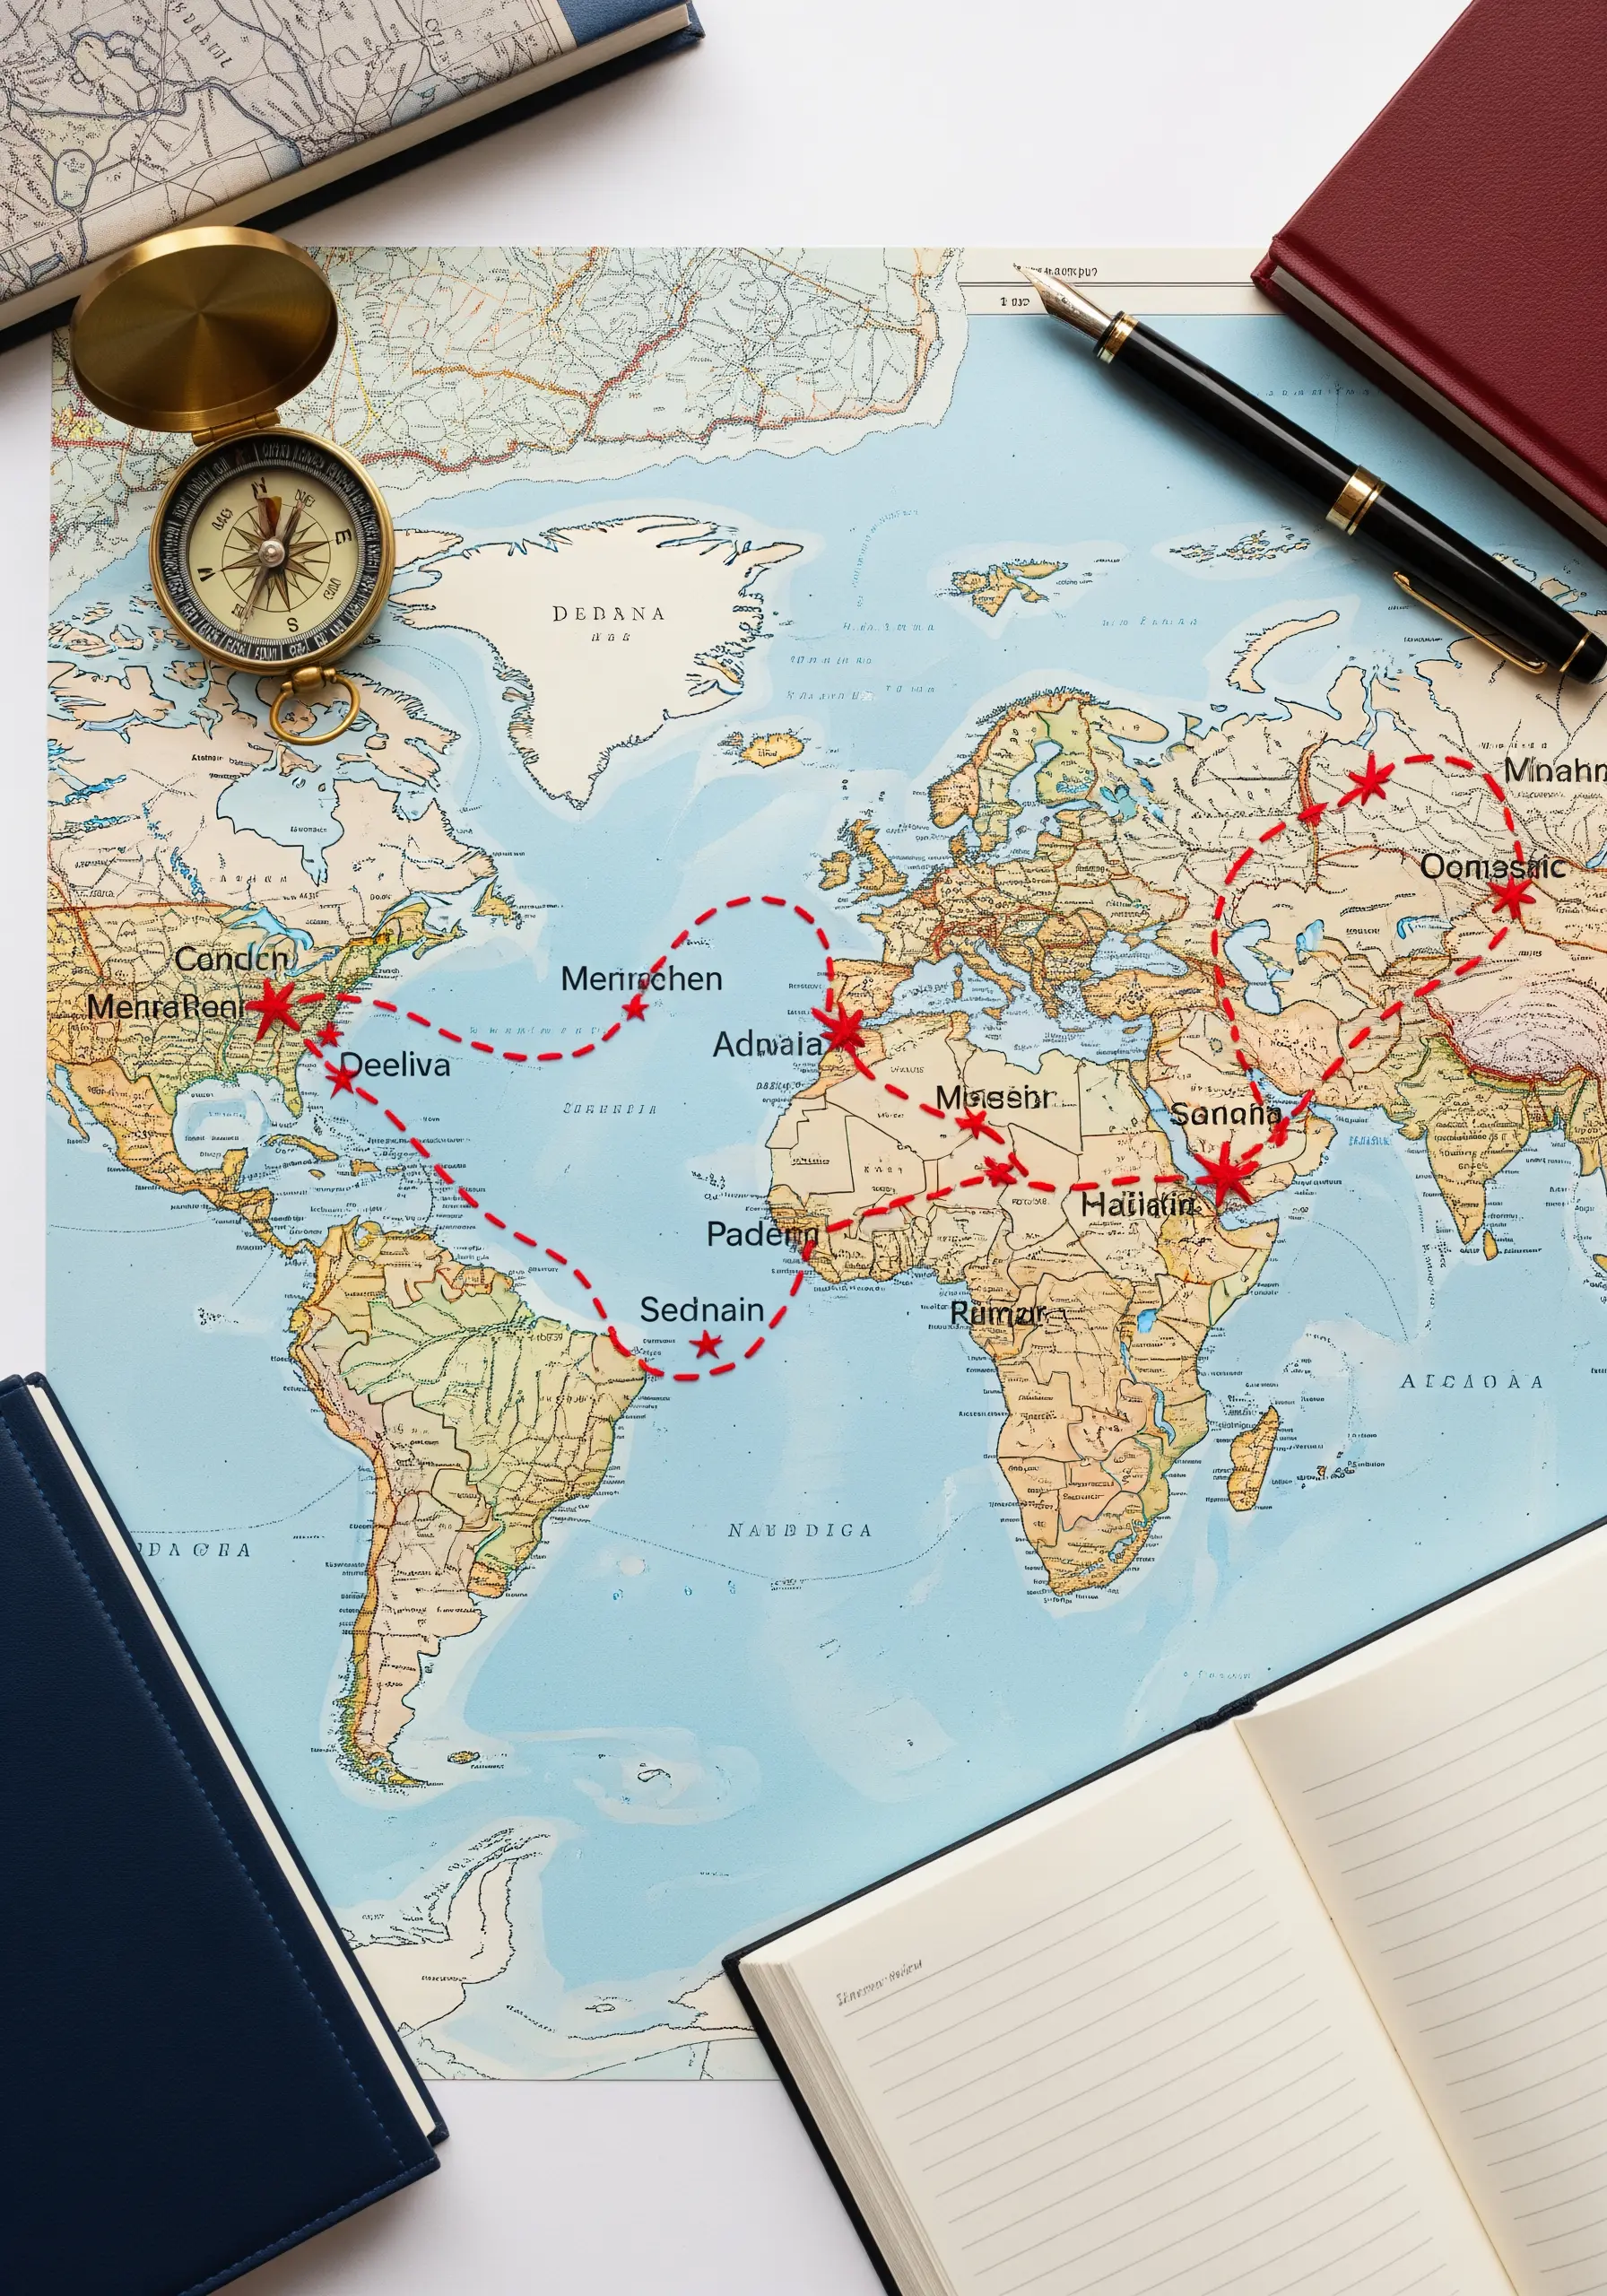
Turn a map into a personal story by documenting your travels with a needle and thread.
Choose a map that has meaning to you and use a simple backstitch to trace a journey you’ve taken.
Use a bright, contrasting thread color, like red, to make your route stand out clearly.
You can mark important destinations with a small star stitch or a French knot. This is a beautiful way to visualize memories and create a unique piece of travel-inspired wall art.
29. Fuse Origami with Goldwork Embroidery
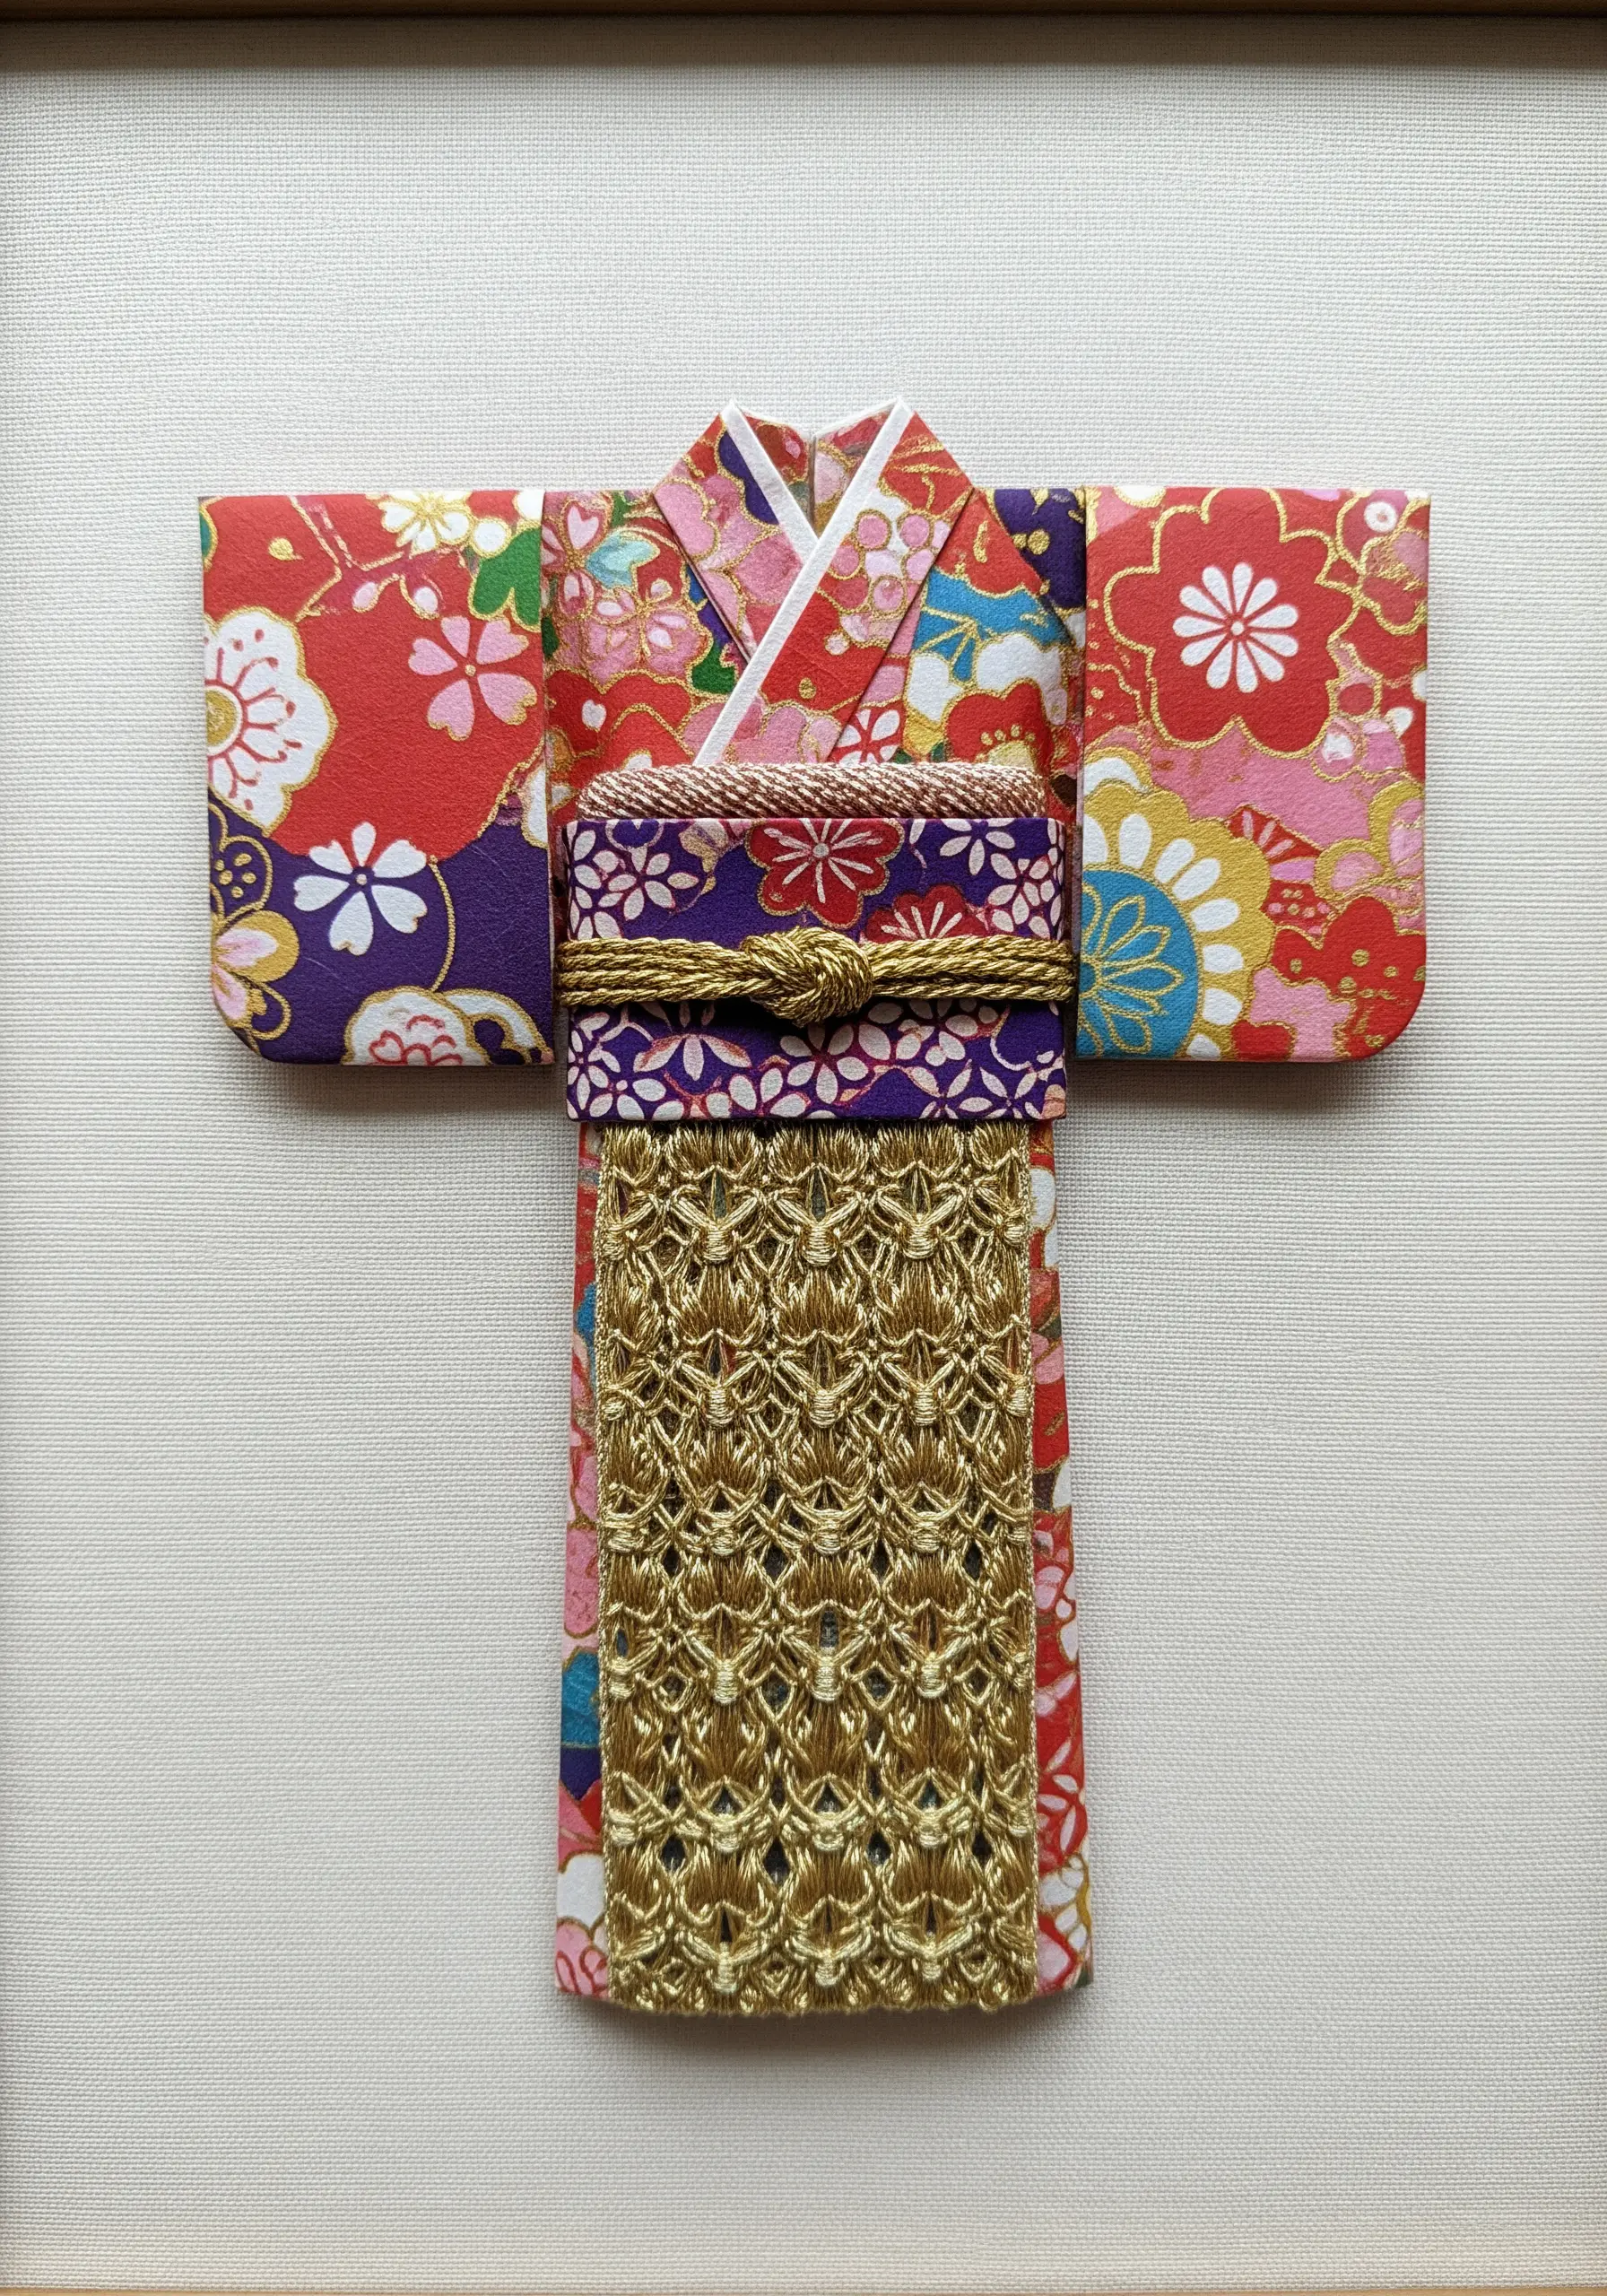
Create a museum-quality piece by pairing the art of paper folding with the luxury of goldwork embroidery.
Construct a miniature kimono from beautiful Chiyogami paper.
Instead of a paper obi (sash), create a separate, small panel of intricate goldwork on fabric. The rich texture and metallic sheen of the thread provide a stunning contrast to the smooth, patterned paper.
This thoughtful combination of materials elevates both crafts into a sophisticated work of art.
30. Add Selective Color to Photos with Thread
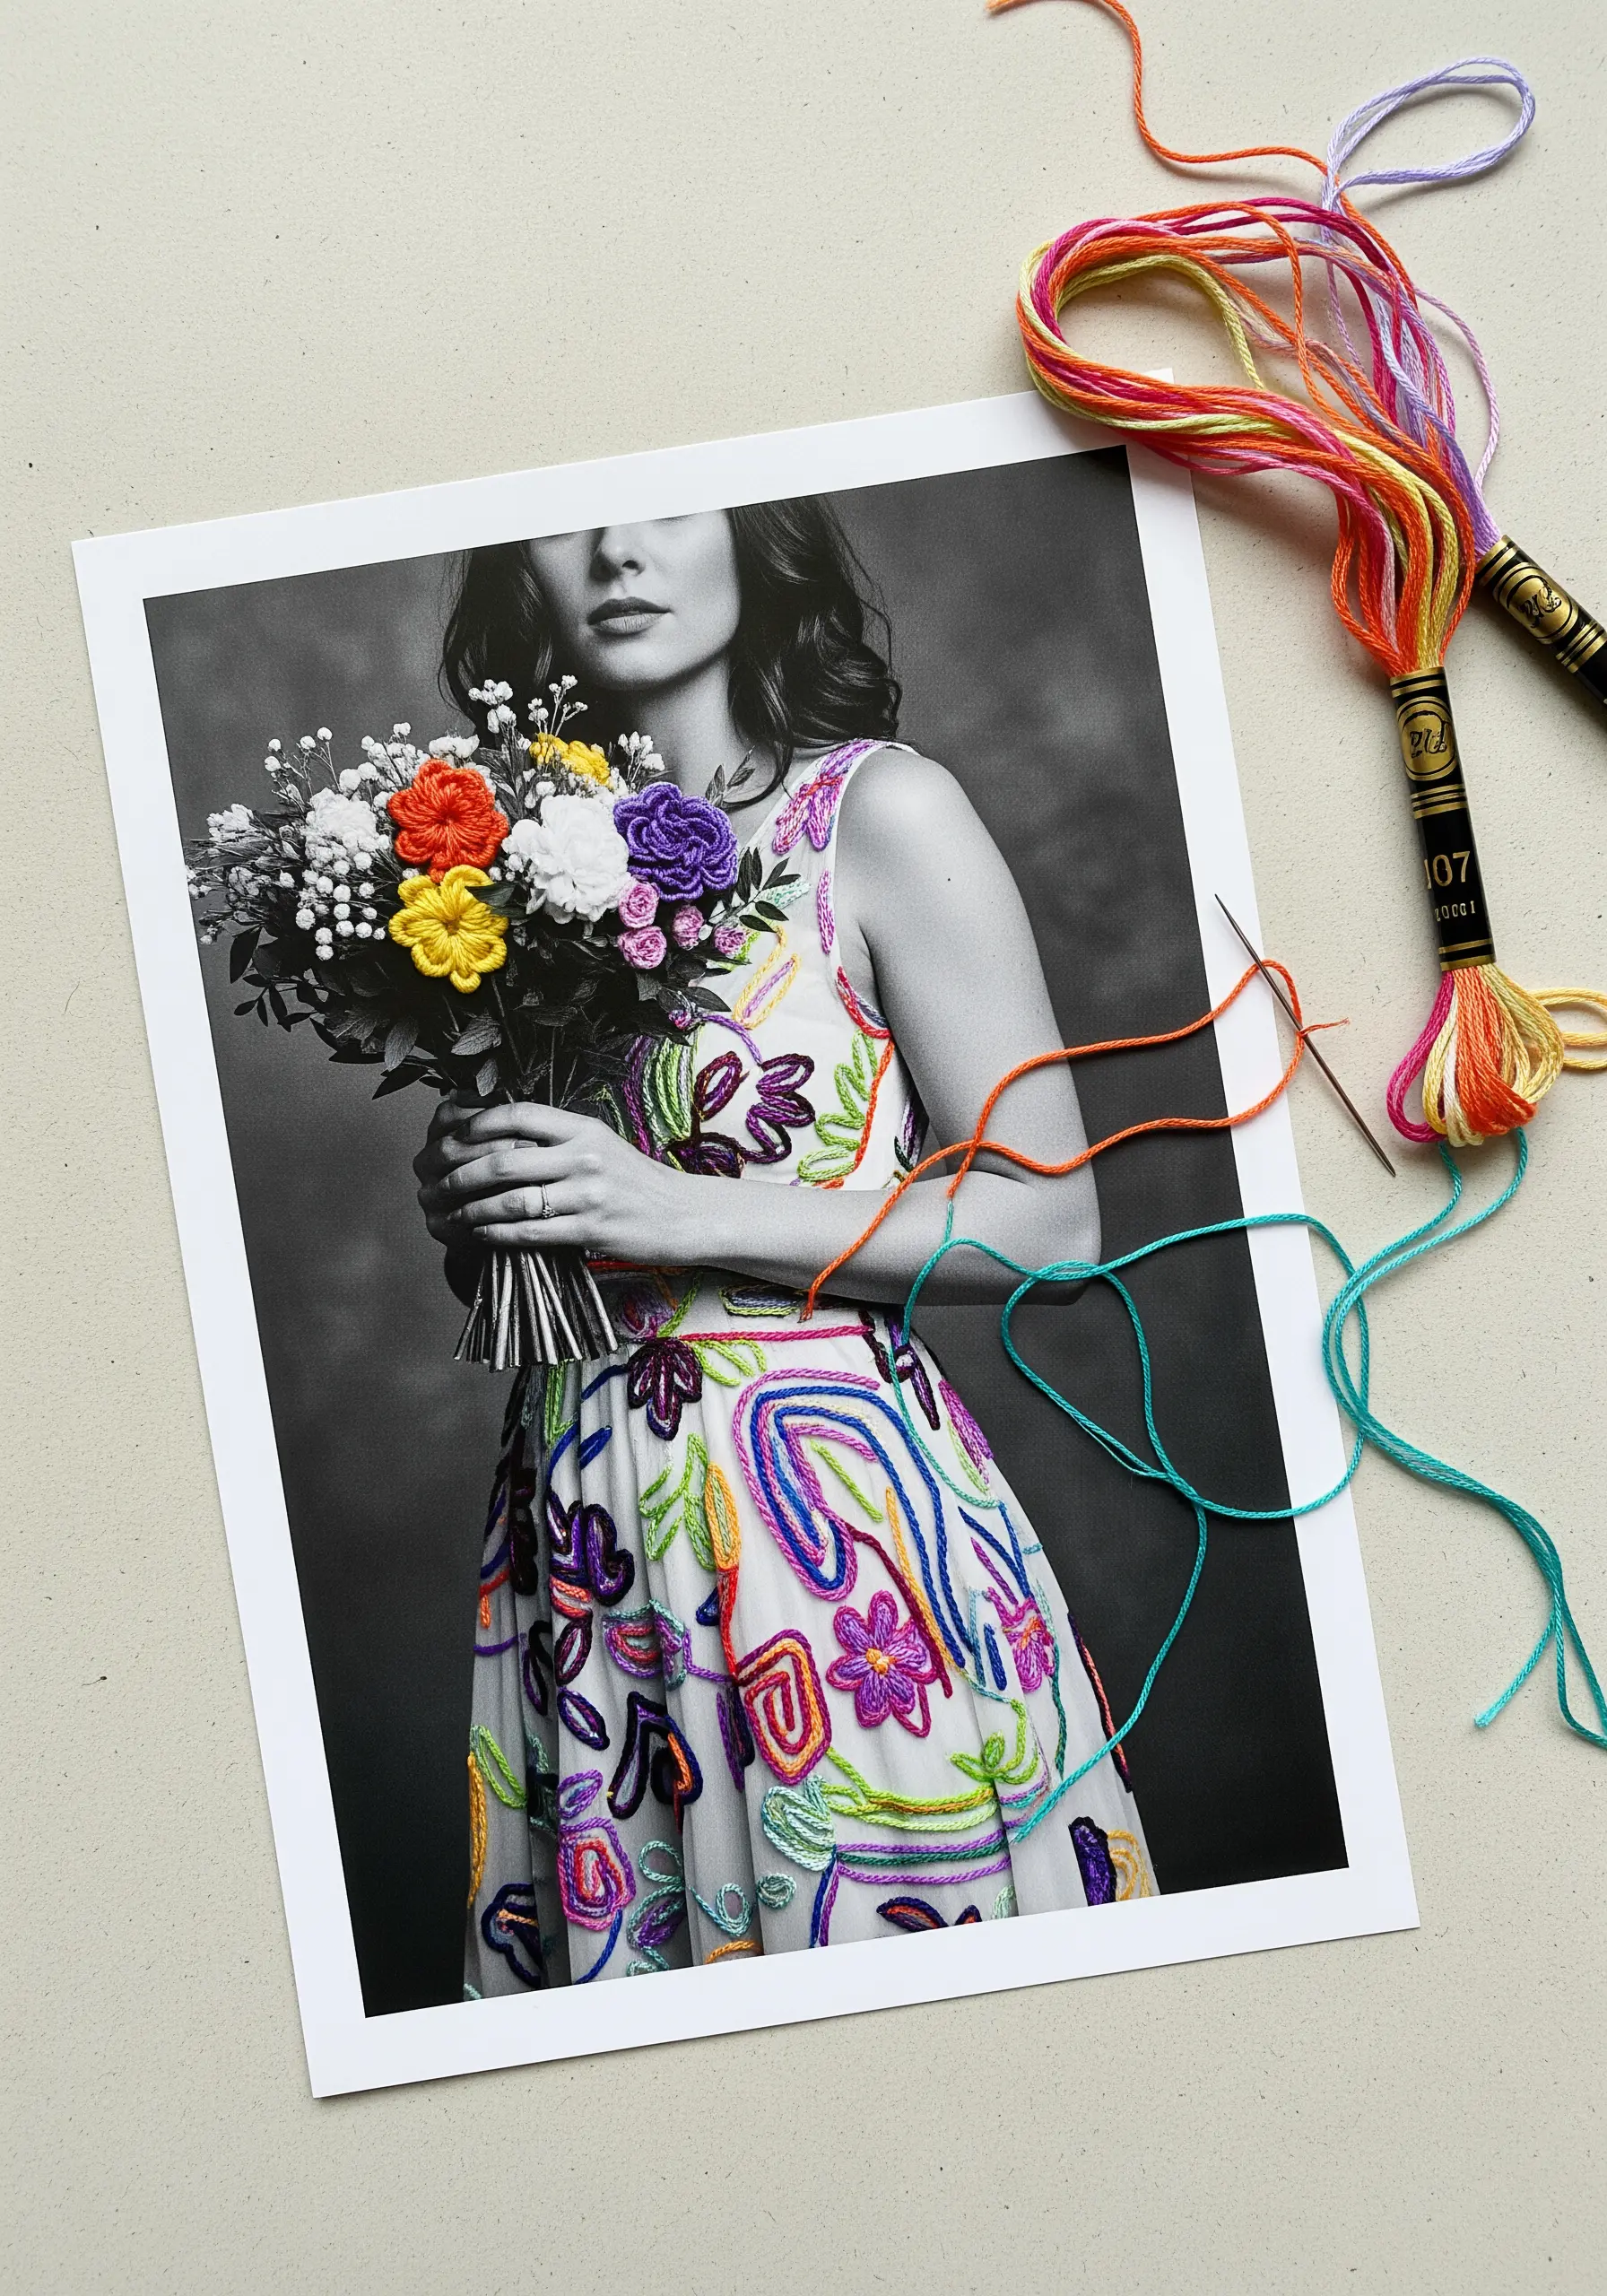
Breathe new life into a photograph by adding selective pops of embroidered color.
Print a favorite black-and-white image onto matte photo paper or a sheet of printable fabric.
Then, use brightly colored thread to “color in” specific elements of the photo. Focus on one area, like a bouquet of flowers or an article of clothing, to create a strong focal point.
The juxtaposition of the flat monochrome image with the vibrant, textured thread is modern and incredibly impactful.
31. Define Geometric Sculptures with Stitched Seams
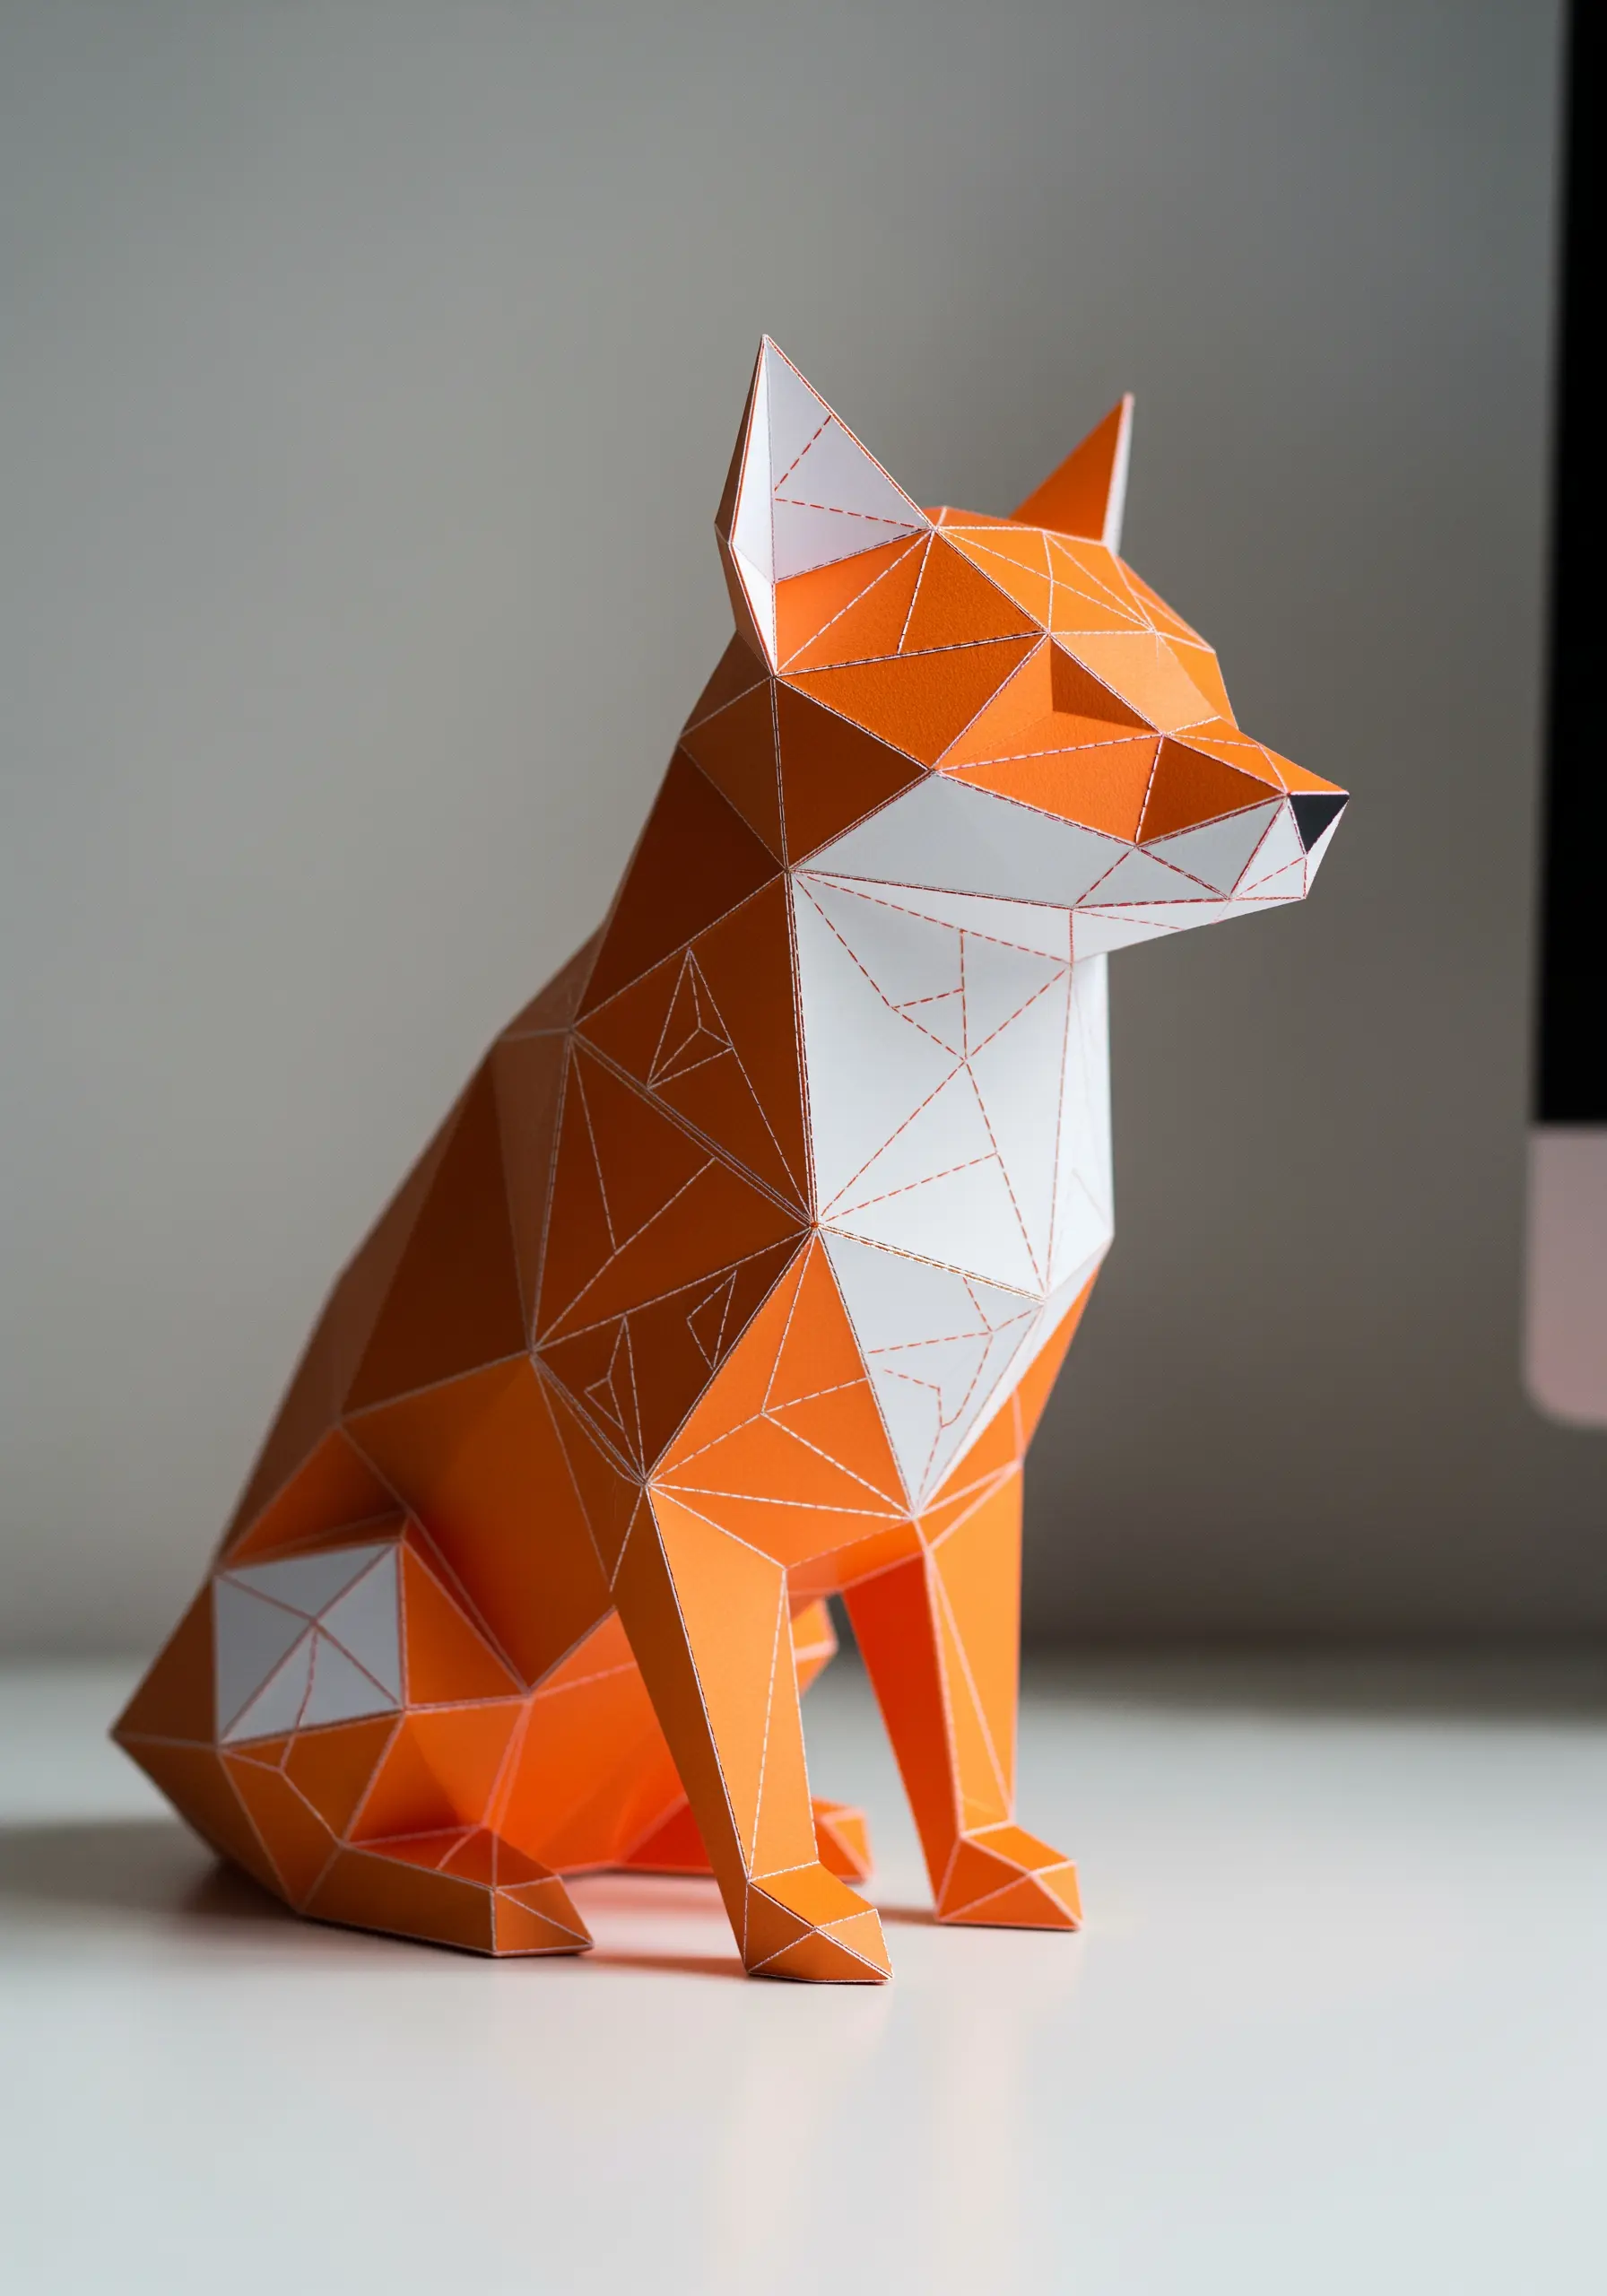
Incorporate thread into the very construction of a low-poly paper sculpture.
Before folding, use a simple running stitch along the fold lines of your paper template.
This technique serves two purposes: it adds a graphic, decorative detail that highlights the geometric forms, and the perforations from the needle can make scoring and folding the thick paper easier.
The thread becomes an integral part of the final object’s design, not just an embellishment.


